You are viewing a plain text version of this content. The canonical link for it is here.
Posted to notifications@apisix.apache.org by yi...@apache.org on 2026/04/22 06:45:49 UTC
(apisix) branch master updated: docs(authz-keycloak): re-port with Admin API, ADC, and Ingress Controller tabs (#13246)
This is an automated email from the ASF dual-hosted git repository.
Yilialinn pushed a commit to branch master
in repository https://gitbox.apache.org/repos/asf/apisix.git
The following commit(s) were added to refs/heads/master by this push:
new 5ca64d18b docs(authz-keycloak): re-port with Admin API, ADC, and Ingress Controller tabs (#13246)
5ca64d18b is described below
commit 5ca64d18b03db3deda73098ca030f6f33d33a678
Author: Yilia Lin <11...@users.noreply.github.com>
AuthorDate: Wed Apr 22 14:45:43 2026 +0800
docs(authz-keycloak): re-port with Admin API, ADC, and Ingress Controller tabs (#13246)
---
docs/en/latest/plugins/authz-keycloak.md | 451 +++++++++++++++++++++------
docs/zh/latest/plugins/authz-keycloak.md | 514 ++++++++++++++++++++++++-------
2 files changed, 758 insertions(+), 207 deletions(-)
diff --git a/docs/en/latest/plugins/authz-keycloak.md b/docs/en/latest/plugins/authz-keycloak.md
index 582522db3..e9da7c41e 100644
--- a/docs/en/latest/plugins/authz-keycloak.md
+++ b/docs/en/latest/plugins/authz-keycloak.md
@@ -6,7 +6,7 @@ keywords:
- Plugin
- Authz Keycloak
- authz-keycloak
-description: This document contains information about the Apache APISIX authz-keycloak Plugin.
+description: The authz-keycloak Plugin supports the integration with Keycloak to authenticate and authorize users.
---
<!--
@@ -28,9 +28,13 @@ description: This document contains information about the Apache APISIX authz-ke
#
-->
+<head>
+ <link rel="canonical" href="https://docs.api7.ai/hub/authz-keycloak" />
+</head>
+
## Description
-The `authz-keycloak` Plugin can be used to add authentication with [Keycloak Identity Server](https://www.keycloak.org/).
+The `authz-keycloak` Plugin supports the integration with [Keycloak](https://www.keycloak.org/) to authenticate and authorize users. See [Keycloak's Authorization Services Guide](https://www.keycloak.org/docs/latest/authorization_services/) for more information about the configuration options available in this Plugin.
:::tip
@@ -42,56 +46,56 @@ Refer to [Authorization Services Guide](https://www.keycloak.org/docs/latest/aut
## Attributes
-| Name | Type | Required | Default | Valid values | Description |
-|----------------------------------------------|---------------|----------|-----------------------------------------------|--------------------------------------------------------------------|-------------------------------------------------------------------------------------------------------------------------------------------------------------------------------------------------------------------------------------------------------|
-| discovery | string | False | | https://host.domain/realms/foo/.well-known/uma2-configuration | URL to [discovery document](https://www.keycloak.org/docs/latest/authorization_services/index.html) of Keycloak Authorization Services. |
-| token_endpoint | string | False | | https://host.domain/realms/foo/protocol/openid-connect/token | An OAuth2-compliant token endpoint that supports the `urn:ietf:params:oauth:grant-type:uma-ticket` grant type. If provided, overrides the value from discovery. |
-| resource_registration_endpoint | string | False | | https://host.domain/realms/foo/authz/protection/resource_set | A UMA-compliant resource registration endpoint. If provided, overrides the value from discovery. |
-| client_id | string | True | | | The identifier of the resource server to which the client is seeking access. |
-| client_secret | string | False | | | The client secret, if required. You can use APISIX secret to store and reference this value. APISIX currently supports storing secrets in two ways. [Environment Variables and HashiCorp Vault](../terminology/secret.md) [...]
-| grant_type | string | False | "urn:ietf:params:oauth:grant-type:uma-ticket" | ["urn:ietf:params:oauth:grant-type:uma-ticket"] | |
-| policy_enforcement_mode | string | False | "ENFORCING" | ["ENFORCING", "PERMISSIVE"] | |
-| permissions | array[string] | False | | | An array of strings, each representing a set of one or more resources and scopes the client is seeking access. |
-| lazy_load_paths | boolean | False | false | | When set to true, dynamically resolves the request URI to resource(s) using the resource registration endpoint instead of the static permission. |
-| http_method_as_scope | boolean | False | false | | When set to true, maps the HTTP request type to scope of the same name and adds to all requested permissions. |
-| timeout | integer | False | 3000 | [1000, ...] | Timeout in ms for the HTTP connection with the Identity Server. |
-| access_token_expires_in | integer | False | 300 | [1, ...] | Expiration time(s) of the access token. |
-| access_token_expires_leeway | integer | False | 0 | [0, ...] | Expiration leeway(s) for access_token renewal. When set, the token will be renewed access_token_expires_leeway seconds before expiration. This avoids errors in cases where the access_token just expires when reaching the OAuth Resource Server. |
-| refresh_token_expires_in | integer | False | 3600 | [1, ...] | The expiration time(s) of the refresh token. |
-| refresh_token_expires_leeway | integer | False | 0 | [0, ...] | Expiration leeway(s) for refresh_token renewal. When set, the token will be renewed refresh_token_expires_leeway seconds before expiration. This avoids errors in cases where the refresh_token just expires when reaching the OAuth Resource Server. |
-| ssl_verify | boolean | False | true | | When set to true, verifies if TLS certificate matches hostname. |
-| cache_ttl_seconds | integer | False | 86400 (equivalent to 24h) | positive integer >= 1 | Maximum time in seconds up to which the Plugin caches discovery documents and tokens used by the Plugin to authenticate to Keycloak. |
-| keepalive | boolean | False | true | | When set to true, enables HTTP keep-alive to keep connections open after use. Set to `true` if you are expecting a lot of requests to Keycloak. |
-| keepalive_timeout | integer | False | 60000 | positive integer >= 1000 | Idle time after which the established HTTP connections will be closed. |
-| keepalive_pool | integer | False | 5 | positive integer >= 1 | Maximum number of connections in the connection pool. |
-| access_denied_redirect_uri | string | False | | [1, 2048] | URI to redirect the user to instead of returning an error message like `"error_description":"not_authorized"`. |
-| password_grant_token_generation_incoming_uri | string | False | | /api/token | Set this to generate token using the password grant type. The Plugin will compare incoming request URI to this value. |
+| Name | Type | Required | Default | Valid values | Description |
+|----------------------------------------------|---------------|----------|-----------------------------------------------|------------------------------------------------------------------------|-------------------------------------------------------------------------------------------------------------------------------------------------------------------------------------------------------------------------------------------------------|
+| discovery | string | False | | https://host.domain/realms/foo/.well-known/uma2-configuration | URL to [discovery document](https://www.keycloak.org/docs/latest/authorization_services/index.html) of Keycloak Authorization Services. |
+| token_endpoint | string | False | | https://host.domain/realms/foo/protocol/openid-connect/token | An OAuth2-compliant token endpoint that supports the `urn:ietf:params:oauth:grant-type:uma-ticket` grant type. If provided, overrides the value from discovery. |
+| resource_registration_endpoint | string | False | | https://host.domain/realms/foo/authz/protection/resource_set | A UMA-compliant resource registration endpoint. If provided, overrides the value from discovery. |
+| client_id | string | True | | | The identifier of the resource server to which the client is seeking access. |
+| client_secret | string | False | | | The client secret, if required. You can use APISIX secret to store and reference this value. APISIX currently supports storing secrets in two ways: [Environment Variables and HashiCorp Vault](../terminology/secret.md). |
+| grant_type | string | False | "urn:ietf:params:oauth:grant-type:uma-ticket" | ["urn:ietf:params:oauth:grant-type:uma-ticket"] | |
+| policy_enforcement_mode | string | False | "ENFORCING" | ["ENFORCING", "PERMISSIVE"] | |
+| permissions | array[string] | False | | | An array of strings, each representing a set of one or more resources and scopes the client is seeking access. |
+| lazy_load_paths | boolean | False | false | | When set to true, dynamically resolves the request URI to resource(s) using the resource registration endpoint instead of the static permission. |
+| http_method_as_scope | boolean | False | false | | When set to true, maps the HTTP request type to scope of the same name and adds to all requested permissions. |
+| timeout | integer | False | 3000 | [1000, ...] | Timeout in ms for the HTTP connection with the Identity Server. |
+| access_token_expires_in | integer | False | 300 | [1, ...] | Expiration time(s) of the access token. |
+| access_token_expires_leeway | integer | False | 0 | [0, ...] | Expiration leeway(s) for access_token renewal. When set, the token will be renewed access_token_expires_leeway seconds before expiration. This avoids errors in cases where the access_token just expires when reaching the OAuth Resource Server. |
+| refresh_token_expires_in | integer | False | 3600 | [1, ...] | The expiration time(s) of the refresh token. |
+| refresh_token_expires_leeway | integer | False | 0 | [0, ...] | Expiration leeway(s) for refresh_token renewal. When set, the token will be renewed refresh_token_expires_leeway seconds before expiration. This avoids errors in cases where the refresh_token just expires when reaching the OAuth Resource Server. |
+| ssl_verify | boolean | False | true | | When set to true, verifies if TLS certificate matches hostname. |
+| cache_ttl_seconds | integer | False | 86400 (equivalent to 24h) | positive integer >= 1 | Maximum time in seconds up to which the Plugin caches discovery documents and tokens used by the Plugin to authenticate to Keycloak. |
+| keepalive | boolean | False | true | | When set to true, enables HTTP keep-alive to keep connections open after use. Set to `true` if you are expecting a lot of requests to Keycloak. |
+| keepalive_timeout | integer | False | 60000 | positive integer >= 1000 | Idle time after which the established HTTP connections will be closed. |
+| keepalive_pool | integer | False | 5 | positive integer >= 1 | Maximum number of connections in the connection pool. |
+| access_denied_redirect_uri | string | False | | [1, 2048] | URI to redirect the user to instead of returning an error message like `"error_description":"not_authorized"`. |
+| password_grant_token_generation_incoming_uri | string | False | | /api/token | Set this to generate token using the password grant type. The Plugin will compare incoming request URI to this value. |
NOTE: `encrypt_fields = {"client_secret"}` is also defined in the schema, which means that the field will be stored encrypted in etcd. See [encrypted storage fields](../plugin-develop.md#encrypted-storage-fields).
-### Discovery and endpoints
+### Discovery and Endpoints
It is recommended to use the `discovery` attribute as the `authz-keycloak` Plugin can discover the Keycloak API endpoints from it.
If set, the `token_endpoint` and `resource_registration_endpoint` will override the values obtained from the discovery document.
-### Client ID and secret
+### Client ID and Secret
The Plugin needs the `client_id` attribute for identification and to specify the context in which to evaluate permissions when interacting with Keycloak.
If the `lazy_load_paths` attribute is set to true, then the Plugin additionally needs to obtain an access token for itself from Keycloak. In such cases, if the client access to Keycloak is confidential, you need to configure the `client_secret` attribute.
-### Policy enforcement mode
+### Policy Enforcement Mode
The `policy_enforcement_mode` attribute specifies how policies are enforced when processing authorization requests sent to the server.
-#### `ENFORCING` mode
+#### `ENFORCING` Mode
Requests are denied by default even when there is no policy associated with a resource.
The `policy_enforcement_mode` is set to `ENFORCING` by default.
-#### `PERMISSIVE` mode
+#### `PERMISSIVE` Mode
Requests are allowed when there is no policy associated with a given resource.
@@ -103,7 +107,7 @@ If the `lazy_load_paths` attribute is set to `false`, the permissions are taken
:::note
-A valid permission can be a single resource or a resource paired with on or more scopes.
+A valid permission can be a single resource or a resource paired with one or more scopes.
:::
@@ -117,15 +121,15 @@ Also make sure that the issued access token contains the `resource_access` claim
:::
-### Automatically mapping HTTP method to scope
+### Automatically Mapping HTTP Method to Scope
The `http_method_as_scope` is often used together with `lazy_load_paths` but can also be used with a static permission list.
If the `http_method_as_scope` attribute is set to `true`, the Plugin maps the request's HTTP method to the scope with the same name. The scope is then added to every permission to check.
-If the `lazy_load_paths` attribute is set to false, the Plugin adds the mapped scope to any of the static permissions configured in the `permissions` attribute—even if they contain on or more scopes already.
+If the `lazy_load_paths` attribute is set to false, the Plugin adds the mapped scope to any of the static permissions configured in the `permissions` attribute—even if they contain one or more scopes already.
-### Generating a token using `password` grant
+### Generating a Token Using `password` Grant
To generate a token using `password` grant, you can set the value of the `password_grant_token_generation_incoming_uri` attribute.
@@ -133,22 +137,14 @@ If the incoming URI matches the configured attribute and the request method is P
You also need to add `application/x-www-form-urlencoded` as `Content-Type` header and `username` and `password` as parameters.
-The example below shows a request if the `password_grant_token_generation_incoming_uri` is `/api/token`:
-
-```shell
-curl --location --request POST 'http://127.0.0.1:9080/api/token' \
---header 'Accept: application/json, text/plain, */*' \
---header 'Content-Type: application/x-www-form-urlencoded' \
---data-urlencode 'username=<User_Name>' \
---data-urlencode 'password=<Password>'
-```
+## Examples
-## Enable Plugin
+The examples below demonstrate how you can configure `authz-keycloak` for different scenarios.
-The example below shows how you can enable the `authz-keycloak` Plugin on a specific Route. `${realm}` represents the realm name in Keycloak.
+To follow along, complete the [preliminary setups](#set-up-keycloak) for Keycloak.
:::note
-You can fetch the `admin_key` from `config.yaml` and save to an environment variable with the following command:
+You can fetch the `admin_key` from `conf/config.yaml` and save to an environment variable with the following command:
```bash
admin_key=$(yq '.deployment.admin.admin_key[0].key' conf/config.yaml | sed 's/"//g')
@@ -156,86 +152,353 @@ admin_key=$(yq '.deployment.admin.admin_key[0].key' conf/config.yaml | sed 's/"/
:::
+### Set Up Keycloak
+
+#### Start Keycloak
+
+Start a Keycloak instance named `apisix-quickstart-keycloak` with the administrator name `quickstart-admin` and password `quickstart-admin-pass` in [development mode](https://www.keycloak.org/server/configuration#_starting_keycloak_in_development_mode) in Docker:
+
```shell
-curl http://127.0.0.1:9180/apisix/admin/routes/5 -H "X-API-KEY: $admin_key" -X PUT -d '
-{
- "uri": "/get",
- "plugins": {
- "authz-keycloak": {
- "token_endpoint": "http://127.0.0.1:8090/realms/${realm}/protocol/openid-connect/token",
- "permissions": ["resource name#scope name"],
- "client_id": "Client ID"
- }
- },
- "upstream": {
- "type": "roundrobin",
- "nodes": {
- "127.0.0.1:8080": 1
- }
- }
-}'
+docker run -d --name "apisix-quickstart-keycloak" \
+ -e 'KEYCLOAK_ADMIN=quickstart-admin' \
+ -e 'KEYCLOAK_ADMIN_PASSWORD=quickstart-admin-pass' \
+ -p 8080:8080 \
+ quay.io/keycloak/keycloak:18.0.2 start-dev
+```
+
+Save the Keycloak IP to an environment variable to be referenced in future configuration:
+
+```shell
+KEYCLOAK_IP=192.168.42.145 # replace with your host IP
```
-## Example usage
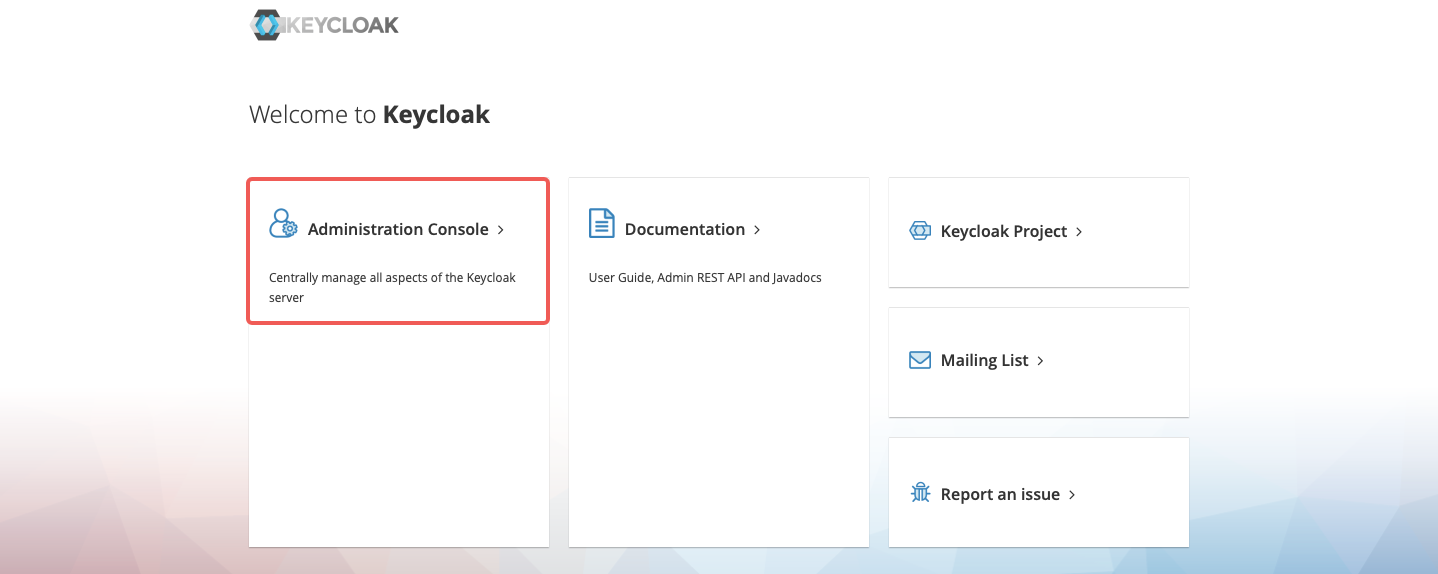
+Navigate to `http://localhost:8080` in browser and click **Administration Console**:
+
+
+
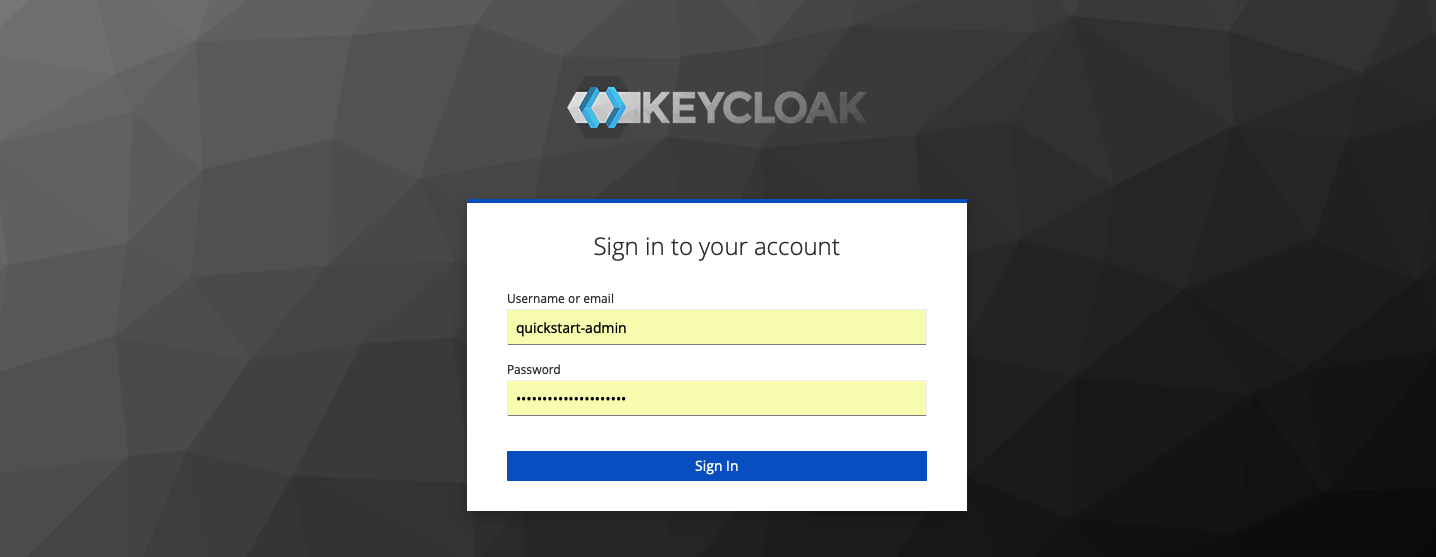
+Enter the administrator's username `quickstart-admin` and password `quickstart-admin-pass` to sign in:
+
+
+
+#### Create a Realm
+
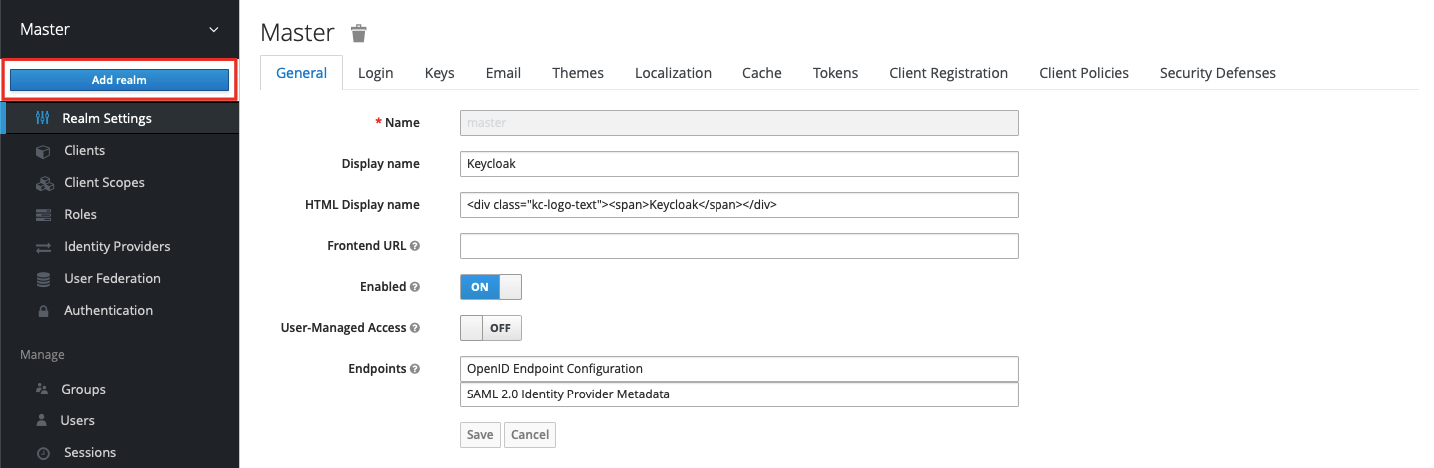
+In the left menu, hover over **Master**, and select **Add realm** in the dropdown:
+
+
+
+Enter the realm name `quickstart-realm` and click **Create** to create it:
+
+
+
+#### Create a Client
+
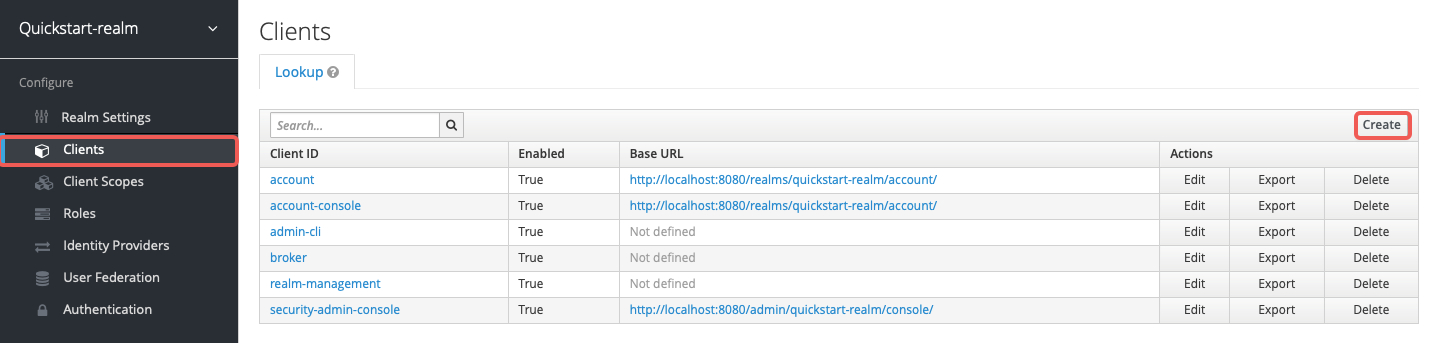
+Click **Clients** > **Create** to open the **Add Client** page:
+
+
+
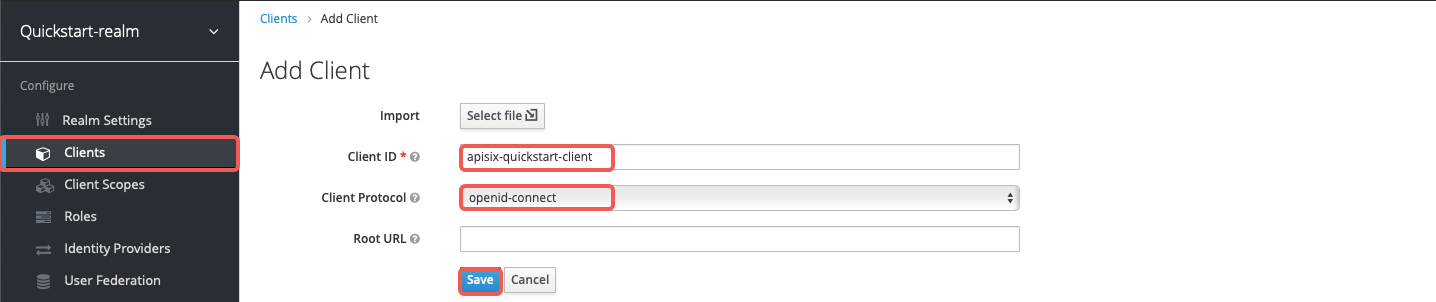
+Enter **Client ID** as `apisix-quickstart-client`, keep the **Client Protocol** as `openid-connect` and **Save**:
+
+
+
+The client `apisix-quickstart-client` is created. After redirecting to the detailed page, select `confidential` as the **Access Type**:
+
+
-Once you have enabled the Plugin on a Route you can use it.
+When the user login is successful during the SSO, Keycloak will carry the state and code to redirect the client to the addresses in **Valid Redirect URIs**. For simplicity of demonstration, enter wildcard `*` to accept any redirect URI:
-First, you have to get the JWT token from Keycloak:
+
+
+Enable authorization for the client, which should also enable service accounts with an assigned role `uma_protection` automatically:
+
+
+
+Select **Save** to apply custom configurations.
+
+#### Save Client ID and Secret
+
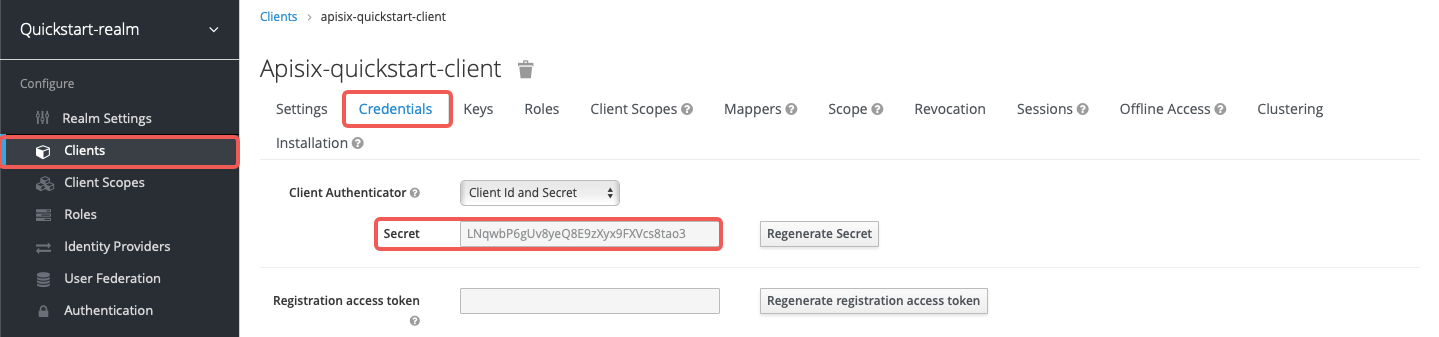
+Click on **Clients** > `apisix-quickstart-client` > **Credentials**, and copy the client secret from **Secret**:
+
+
+
+Save the OIDC client ID and secret to environment variables:
```shell
-curl "http://<YOUR_KEYCLOAK_HOST>/realms/<YOUR_REALM>/protocol/openid-connect/token" \
- -d "client_id=<YOUR_CLIENT_ID>" \
- -d "client_secret=<YOUR_CLIENT_SECRET>" \
- -d "username=<YOUR_USERNAME>" \
- -d "password=<YOUR_PASSWORD>" \
- -d "grant_type=password"
+OIDC_CLIENT_ID=apisix-quickstart-client
+OIDC_CLIENT_SECRET=bSaIN3MV1YynmtXvU8lKkfeY0iwpr9cH # replace with your value
+```
+
+#### Request Access Token
+
+Request an access token from Keycloak:
+
+```shell
+curl -i "http://$KEYCLOAK_IP:8080/realms/quickstart-realm/protocol/openid-connect/token" -X POST \
+ -d 'grant_type=client_credentials' \
+ -d 'client_id='$OIDC_CLIENT_ID'' \
+ -d 'client_secret='$OIDC_CLIENT_SECRET''
```
You should see a response similar to the following:
```text
-{"access_token":"eyJhbGciOiJSUzI1NiIsInR5cCIgOiAiSldUIiwia2lkIiA6ICJoT3ludlBPY2d6Y3VWWnYtTU42bXZKMUczb0dOX2d6MFo3WFl6S2FSa1NBIn0.eyJleHAiOjE3MDMyOTAyNjAsImlhdCI6MTcwMzI4OTk2MCwianRpIjoiMjJhOGFmMzItNDM5Mi00Yzg3LThkM2UtZDkyNDVmZmNiYTNmIiwiaXNzIjoiaHR0cDovLzE5Mi4xNjguMS44Mzo4MDgwL3JlYWxtcy9xdWlja3N0YXJ0LXJlYWxtIiwiYXVkIjoiYWNjb3VudCIsInN1YiI6IjAyZWZlY2VlLTBmYTgtNDg1OS1iYmIwLTgyMGZmZDdjMWRmYSIsInR5cCI6IkJlYXJlciIsImF6cCI6ImFwaXNpeC1xdWlja3N0YXJ0LWNsaWVudCIsInNlc3Npb25fc3RhdGUiOiI1YzIzZjVkZC1 [...]
+{"access_token":"eyJhbGciOiJSUzI1NiIsInR5cCIgOiAiSldUIiwia2lkIiA6ICJoT3ludlBPY2d6Y3VWWnYtTU42bXZKMUczb0dOX2d6MFo3WFl6S2FSa1NBIn0...","expires_in":300,"refresh_expires_in":0,"token_type":"Bearer","not-before-policy":0,"scope":"email profile"}
```
-Now you can make requests with the access token:
+Save the token to an environment variable:
```shell
-curl http://127.0.0.1:9080/get -H 'Authorization: Bearer ${ACCESS_TOKEN}'
+# replace with your access token
+ACCESS_TOKEN=<your_access_token>
```
-To learn more about how you can integrate authorization policies into your API workflows you can checkout the unit test [authz-keycloak.t](https://github.com/apache/apisix/blob/master/t/plugin/authz-keycloak.t).
+### Use Lazy Load Path and Resource Registration Endpoint
-Run the following Docker image and go to `http://localhost:8090` to view the associated policies for the unit tests.
+The examples below demonstrate how you can configure the plugin to dynamically resolve the request URI to resource(s) using the resource registration endpoint instead of the static permissions.
-```bash
-docker run -e KEYCLOAK_USER=admin -e KEYCLOAK_PASSWORD=123456 -p 8090:8080 sshniro/keycloak-apisix
+Create a route with `authz-keycloak-route` as follows:
+
+```shell
+curl "http://127.0.0.1:9180/apisix/admin/routes" -X PUT \
+ -H "X-API-KEY: ${admin_key}" \
+ -d '{
+ "id": "authz-keycloak-route",
+ "uri": "/anything",
+ "plugins": {
+ "authz-keycloak": {
+ "lazy_load_paths": true,
+ "resource_registration_endpoint": "http://'"$KEYCLOAK_IP"':8080/realms/quickstart-realm/authz/protection/resource_set",
+ "discovery": "http://'"$KEYCLOAK_IP"':8080/realms/quickstart-realm/.well-known/uma2-configuration",
+ "client_id": "'"$OIDC_CLIENT_ID"'",
+ "client_secret": "'"$OIDC_CLIENT_SECRET"'"
+ }
+ },
+ "upstream": {
+ "type": "roundrobin",
+ "nodes": {
+ "httpbin.org": 1
+ }
+ }
+ }'
```
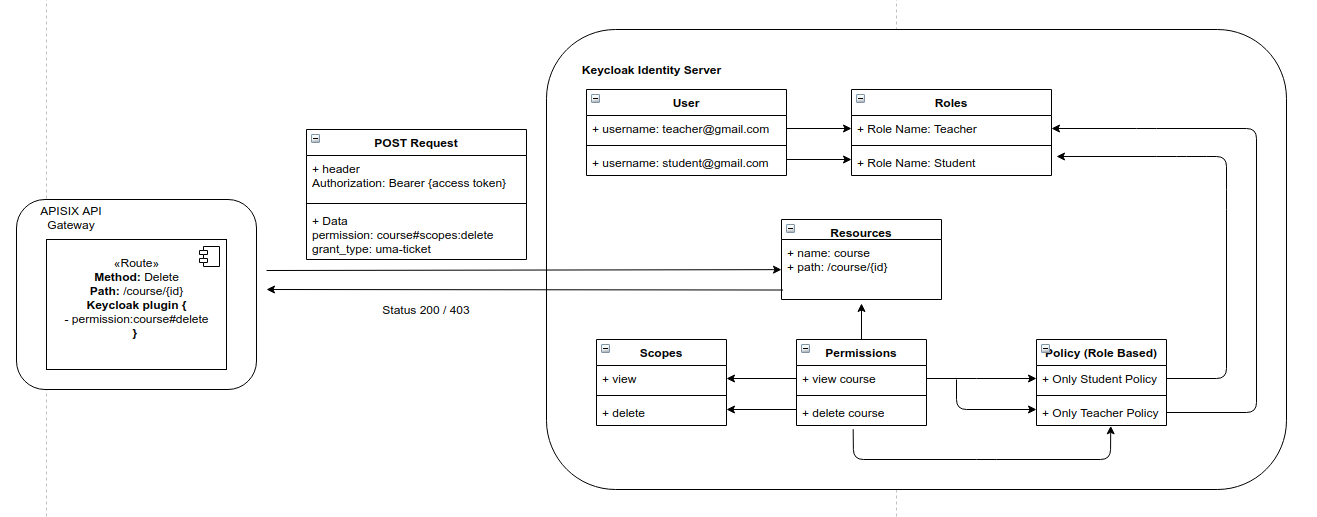
-The image below shows how the policies are configured in the Keycloak server:
+- Set `lazy_load_paths` to `true`.
+- Set `resource_registration_endpoint` to Keycloak's UMA-compliant resource registration endpoint. Required when `lazy_load_paths` is `true` and `discovery` is not provided.
+- Set `discovery` to the discovery document endpoint of Keycloak authorization services.
+- Set `client_id` to client ID created previously.
+- Set `client_secret` to client secret created previously. Required when `lazy_load_paths` is `true`.
+
+Send a request to the route:
+
+```shell
+curl "http://127.0.0.1:9080/anything" -H "Authorization: Bearer $ACCESS_TOKEN"
+```
+
+You should see an `HTTP/1.1 200 OK` response similar to the following:
+
+```json
+{
+ "args": {},
+ "data": "",
+ "files": {},
+ "form": {},
+ "headers": {
+ "Accept": "*/*",
+ "Authorization": "Bearer eyJhbGciOiJSU...",
+ ...
+ },
+ "json": null,
+ "method": "GET",
+ "origin": "127.0.0.1, 108.180.51.111",
+ "url": "http://127.0.0.1/anything"
+}
+```
+
+### Use Static Permissions
+
+The examples below demonstrate how you can configure Keycloak for scope-based permission associated with a client scope policy, and configure the `authz-keycloak` plugin to use static permissions.
+
+#### Create Scope in Keycloak
-
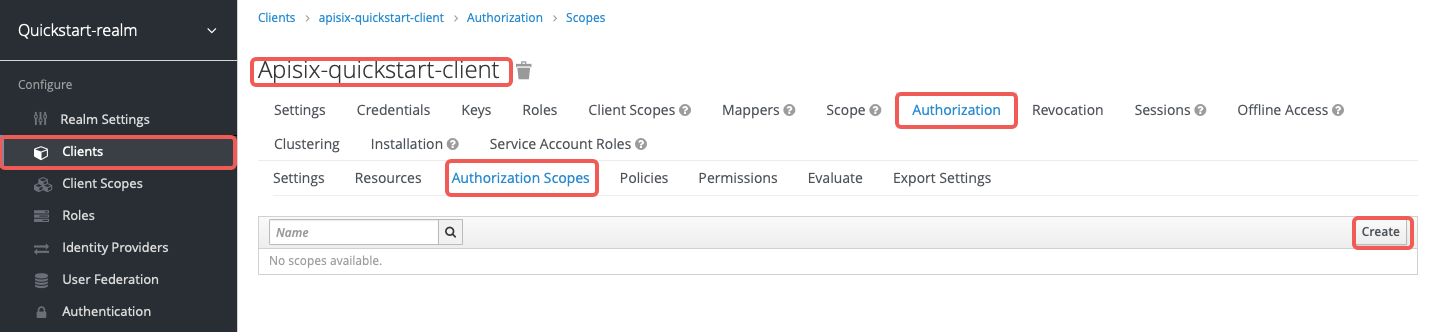
+Go to **Clients** > **`apisix-quickstart-client`** > **Authorization** > **Authorization Scopes**, and click **Create** to open the **Add Scope** page:
-## Delete Plugin
+
-To remove the `authz-keycloak` Plugin, you can delete the corresponding JSON configuration from the Plugin configuration. APISIX will automatically reload and you do not have to restart for this to take effect.
+Enter the scope names as `access` and click **Save**:
+
+
+
+#### Create Resource in Keycloak
+
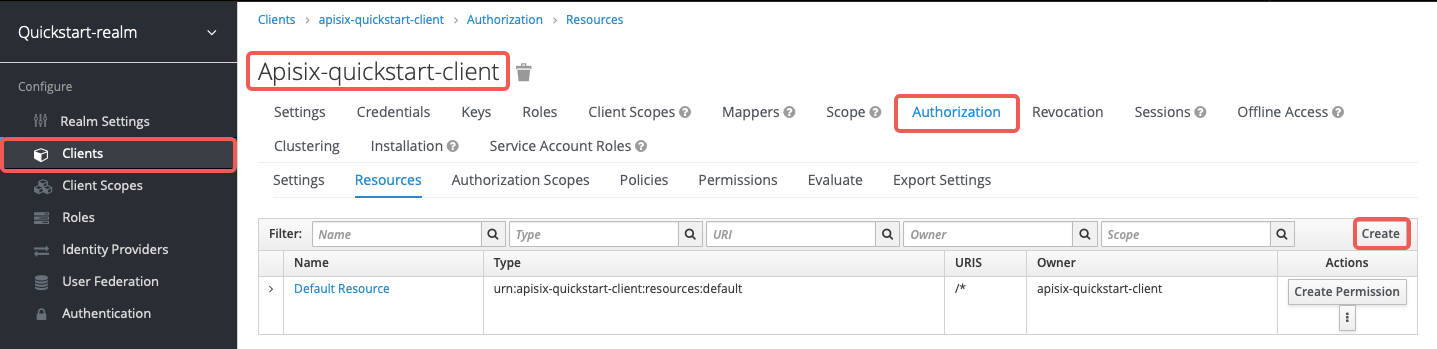
+Go to **Clients** > **`apisix-quickstart-client`** > **Authorization** > **Resources** and click **Create** to open the **Add Resource** page:
+
+
+
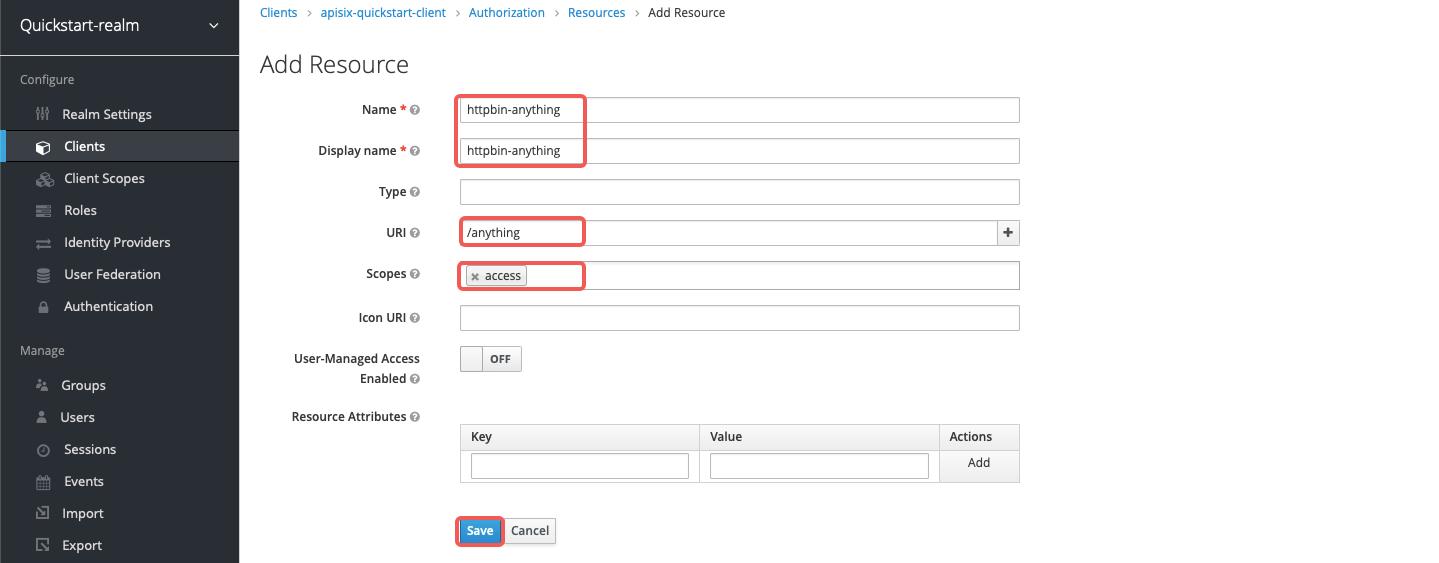
+Enter the resource names `httpbin-anything`, URI `/anything`, scope `access`, and click **Save**:
+
+
+
+#### Create Client Scope in Keycloak
+
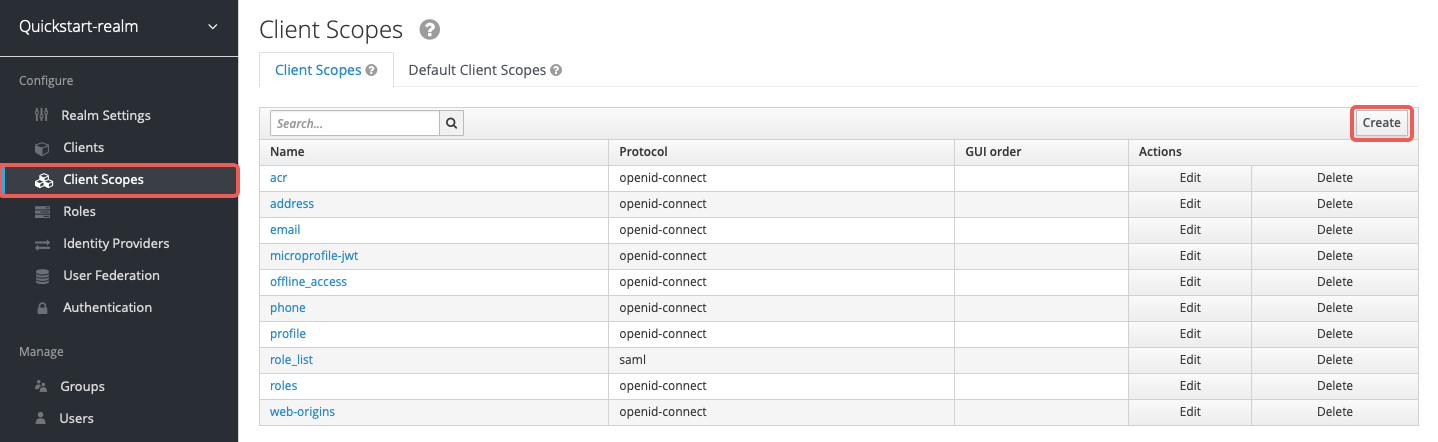
+Go to **Client Scopes** and click **Create** to open the **Add client scope** page:
+
+
+
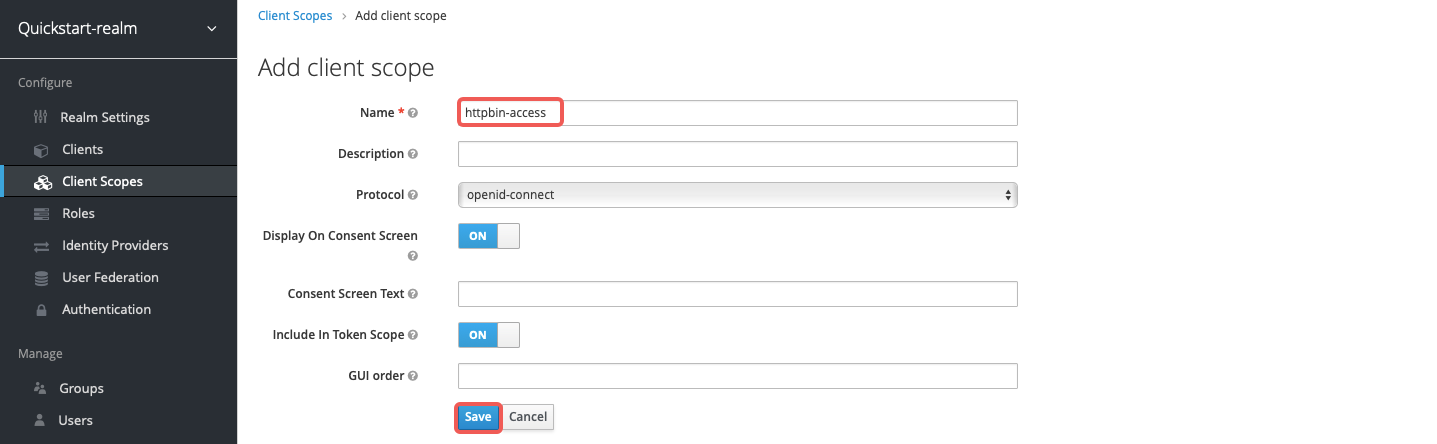
+Enter the scope name `httpbin-access` and click **Save**:
+
+
+
+#### Create Policy in Keycloak
+
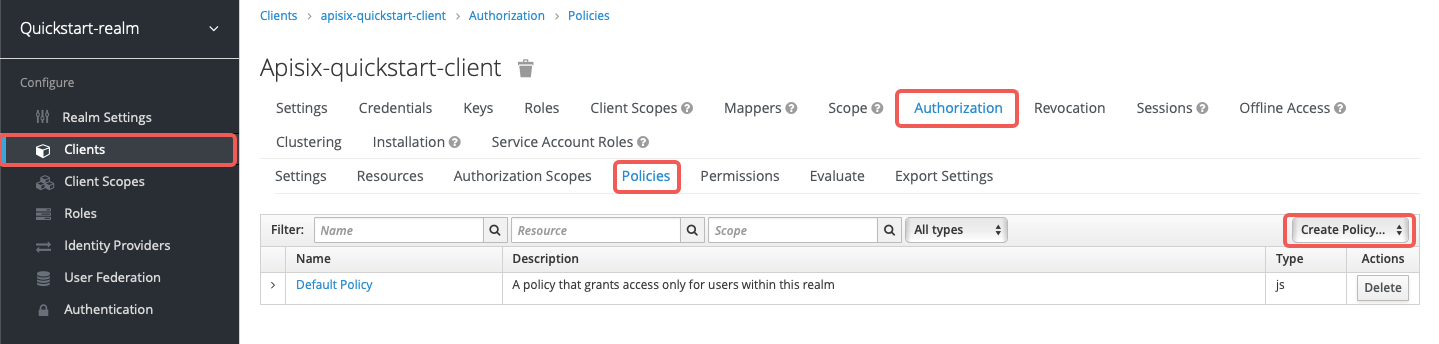
+Go to **Clients** > **`apisix-quickstart-client`** > **Authorization** > **Policies** > **Create Policies** and select **Client Scope** from the dropdown to open the **Add Client Scope Policy** page:
+
+
+
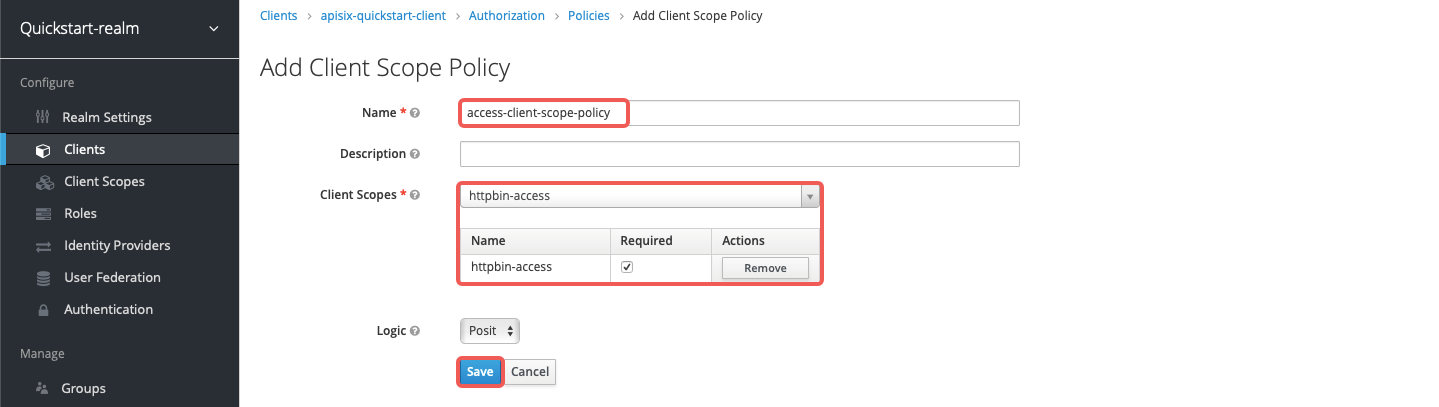
+Enter the policy name `access-client-scope-policy` for client scope `httpbin-access`, check the **Required** box, and click **Save**:
+
+
+
+#### Create Permission in Keycloak
+
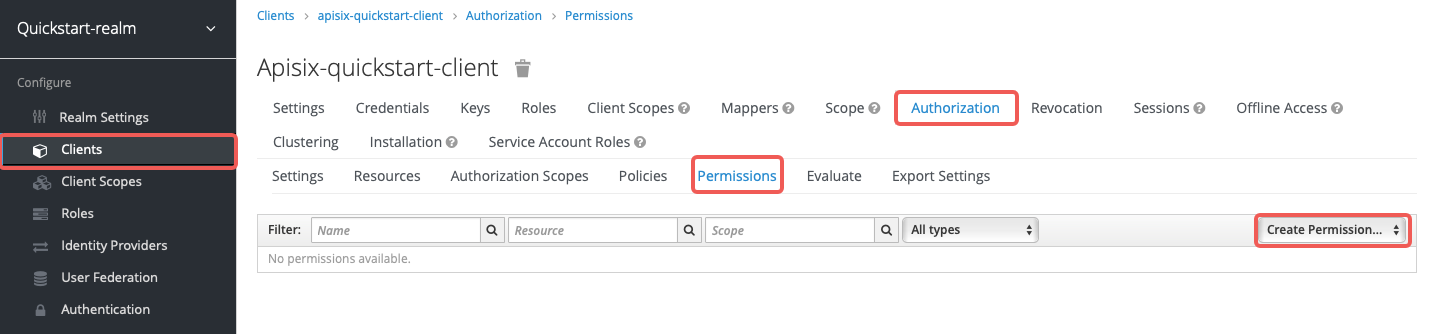
+Go to **Clients** > **`apisix-quickstart-client`** > **Authorization** > **Permissions** > **Create Permissions** and select **Scope-Based** from the dropdown to open the **Add Scope Permission** page:
+
+
+
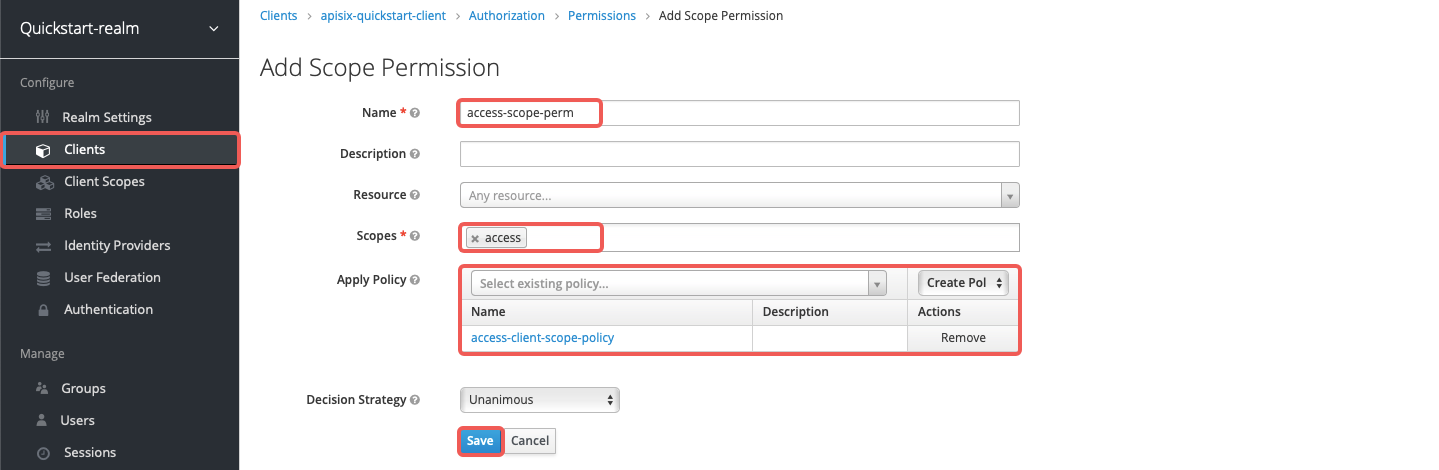
+Enter the permission name `access-scope-perm`, select the `access` scope, apply the policy `access-client-scope-policy`, and click **Save**:
+
+
+
+#### Assign Client Scope
+
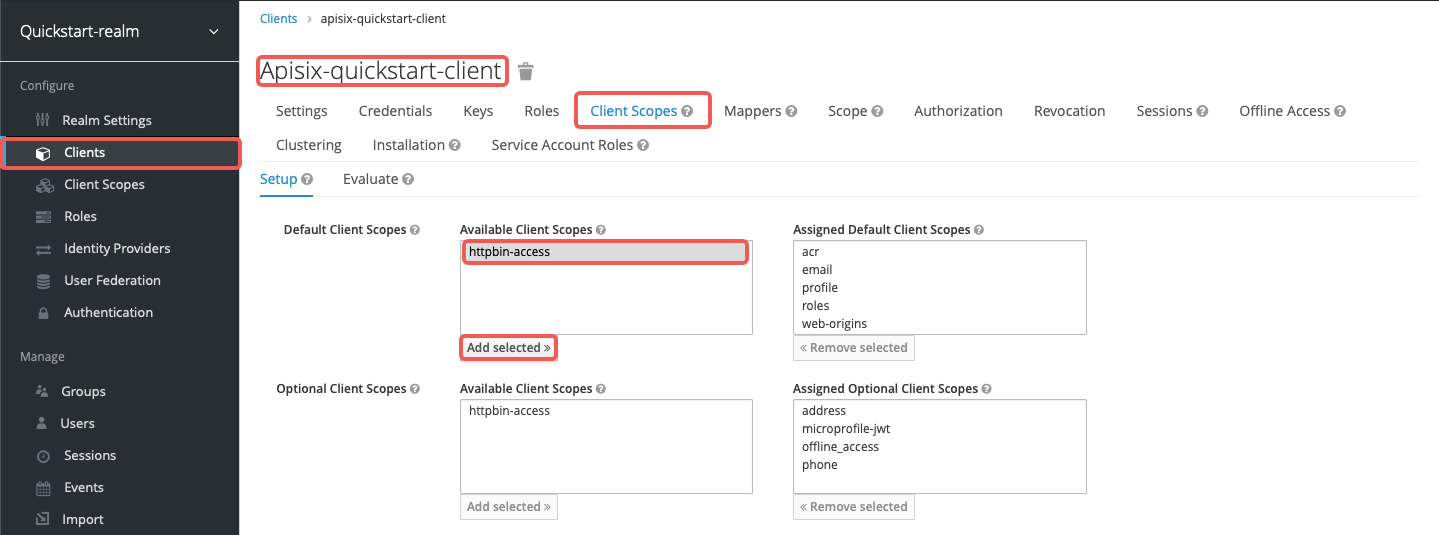
+Go to **Clients** > **`apisix-quickstart-client`** > **Client Scopes** and add `httpbin-access` to the default client scopes:
+
+
+
+#### Configure APISIX
+
+Create a route with `authz-keycloak-route` as follows:
+
+```shell
+curl "http://127.0.0.1:9180/apisix/admin/routes" -X PUT \
+ -H "X-API-KEY: ${admin_key}" \
+ -d '{
+ "id": "authz-keycloak-route",
+ "uri": "/anything",
+ "plugins": {
+ "authz-keycloak": {
+ "lazy_load_paths": false,
+ "discovery": "http://'"$KEYCLOAK_IP"':8080/realms/quickstart-realm/.well-known/uma2-configuration",
+ "permissions": ["httpbin-anything#access"],
+ "client_id": "apisix-quickstart-client"
+ }
+ },
+ "upstream": {
+ "type": "roundrobin",
+ "nodes": {
+ "httpbin.org": 1
+ }
+ }
+ }'
+```
+
+- Set `lazy_load_paths` to `false`.
+- Set `discovery` to the discovery document endpoint of Keycloak authorization services.
+- Set `permissions` to resource `httpbin-anything` and scope `access`.
+
+Send a request to the route:
```shell
-curl http://127.0.0.1:9180/apisix/admin/routes/5 -H "X-API-KEY: $admin_key" -X PUT -d '
+curl "http://127.0.0.1:9080/anything" -H "Authorization: Bearer $ACCESS_TOKEN"
+```
+
+You should see an `HTTP/1.1 200 OK` response similar to the following:
+
+```json
{
- "uri": "/get",
+ "args": {},
+ "data": "",
+ "files": {},
+ "form": {},
+ "headers": {
+ "Accept": "*/*",
+ "Authorization": "Bearer eyJhbGciOiJSU...",
+ ...
+ },
+ "json": null,
+ "method": "GET",
+ "origin": "127.0.0.1, 108.180.51.111",
+ "url": "http://127.0.0.1/anything"
+}
+```
+
+If you remove the client scope `httpbin-access` for `apisix-quickstart-client`, you should receive a `401 Unauthorized` response when requesting the resource.
+
+### Generate Token with Password Grant at Custom Token Endpoint
+
+The examples below demonstrate how you can generate a token using the password grant at a custom endpoint.
+
+#### Create User in Keycloak
+
+To use the password grant, you should first create a user.
+
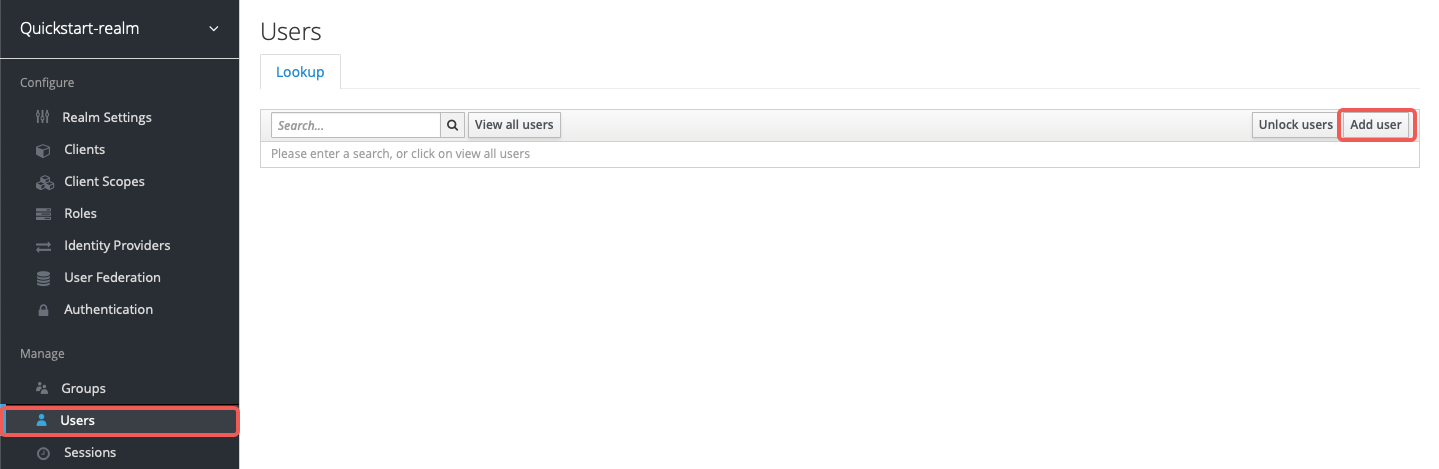
+Go to **Users** > **Add user** and click on **Add user**:
+
+
+
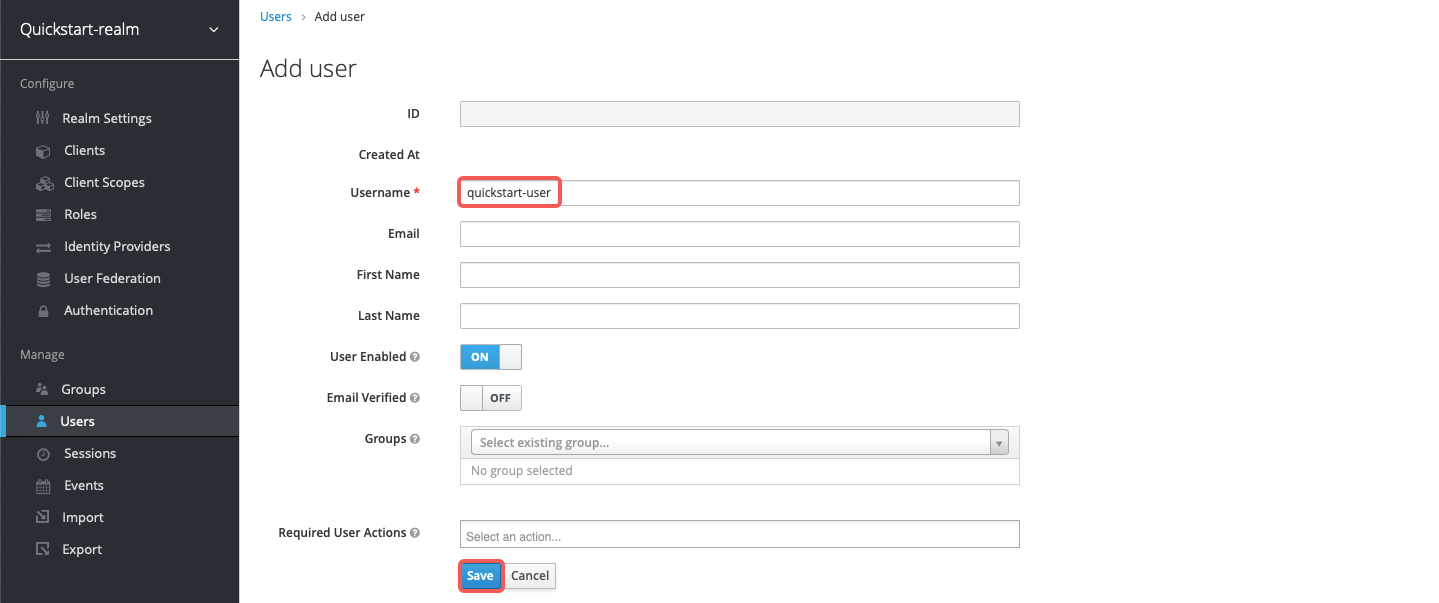
+Enter the **Username** as `quickstart-user` and select **Save**:
+
+
+
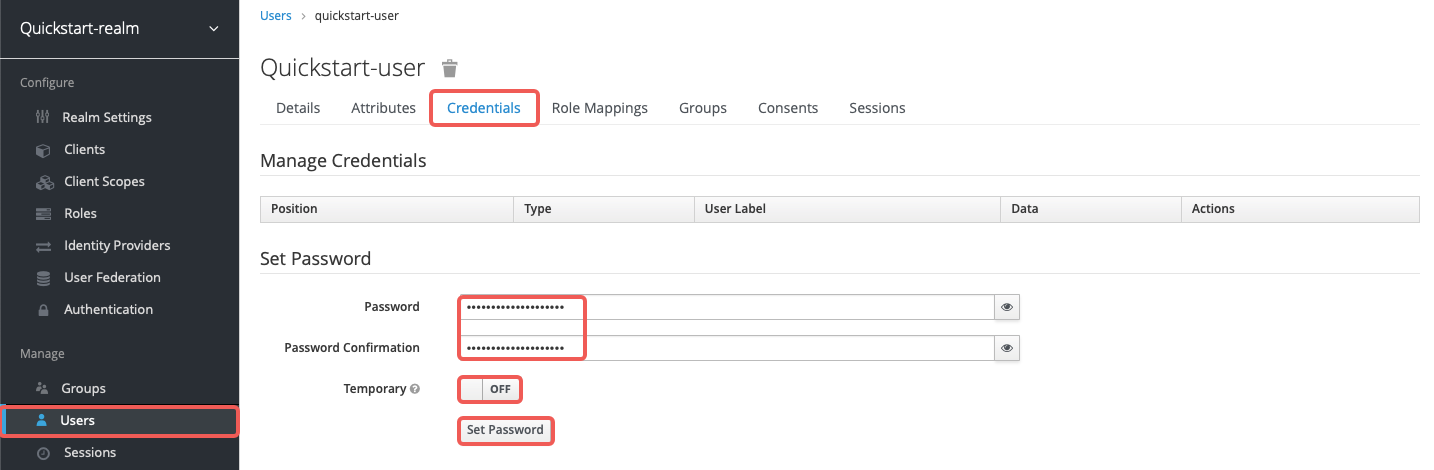
+Click on **Credentials**, then set the **Password** as `quickstart-user-pass`. Switch **Temporary** to `OFF` so that you do not need to change the password the first time you log in:
+
+
+
+#### Configure APISIX
+
+Create a route with `authz-keycloak-route` as follows:
+
+```shell
+curl "http://127.0.0.1:9180/apisix/admin/routes" -X PUT \
+ -H "X-API-KEY: ${admin_key}" \
+ -d '{
+ "id": "authz-keycloak-route",
+ "uri": "/api/*",
"plugins": {
+ "authz-keycloak": {
+ "lazy_load_paths": true,
+ "resource_registration_endpoint": "http://'"$KEYCLOAK_IP"':8080/realms/quickstart-realm/authz/protection/resource_set",
+ "client_id": "'"$OIDC_CLIENT_ID"'",
+ "client_secret": "'"$OIDC_CLIENT_SECRET"'",
+ "token_endpoint": "http://'"$KEYCLOAK_IP"':8080/realms/quickstart-realm/protocol/openid-connect/token",
+ "password_grant_token_generation_incoming_uri": "/api/token"
+ }
},
"upstream": {
- "type": "roundrobin",
- "nodes": {
- "127.0.0.1:8080": 1
- }
+ "type": "roundrobin",
+ "nodes": {
+ "httpbin.org": 1
+ }
}
-}'
+ }'
```
-## Plugin roadmap
+- Set `token_endpoint` to the Keycloak token endpoint. Required when discovery document is not provided.
+- Set `password_grant_token_generation_incoming_uri` to a custom URI path users can obtain tokens from.
+
+Send a request to the configured token endpoint. Note that the request should use the POST method and `application/x-www-form-urlencoded` as the `Content-Type`:
-- Currently, the `authz-keycloak` Plugin requires you to define the resource name and the required scopes to enforce policies for a Route. Keycloak's official adapted (Java, Javascript) provides path matching by querying Keycloak paths dynamically and lazy loading the paths to identity resources. Upcoming releases of the Plugin will support this function.
+```shell
+OIDC_USER=quickstart-user
+OIDC_PASSWORD=quickstart-user-pass
+
+curl "http://127.0.0.1:9080/api/token" -X POST \
+ -H "Content-Type: application/x-www-form-urlencoded" \
+ -H "Accept: application/json" \
+ -d 'username='$OIDC_USER'' \
+ -d 'password='$OIDC_PASSWORD''
+```
-- To support reading scope and configurations from the Keycloak JSON file.
+You should see a JSON response with the access token, similar to the following:
+
+```text
+{"access_token":"eyJhbGciOiJSUzI1NiIsInR5cCIgOiAiSldUIiwia2lkIiA6ICJ6U3FFaXN6VlpuYi1sRWMzZkp0UHNpU1ZZcGs4RGN3dXI1Mkx5V05aQTR3In0...","expires_in":300,"refresh_expires_in":1800,"refresh_token":"eyJhbGciOiJIUzI1NiIsInR5cCIgOiAiSldUIiwia2lkIiA6ICI0YjFiNTQ3Yi0zZmZjLTQ5YzQtYjE2Ni03YjdhNzIxMjk1ODcifQ...","token_type":"Bearer","not-before-policy":0,"session_state":"b16b262e-1056-4515-a455-f25e077ccb76","scope":"profile email"}
+```
diff --git a/docs/zh/latest/plugins/authz-keycloak.md b/docs/zh/latest/plugins/authz-keycloak.md
index 576f29bd3..5f912dbf7 100644
--- a/docs/zh/latest/plugins/authz-keycloak.md
+++ b/docs/zh/latest/plugins/authz-keycloak.md
@@ -6,7 +6,7 @@ keywords:
- Plugin
- Authz Keycloak
- authz-keycloak
-description: 本文介绍了关于 Apache APISIX `authz-keycloak` 插件的基本信息及使用方法。
+description: authz-keycloak 插件与 Keycloak 集成,用于用户认证和授权,增强 API 的安全性和管理能力。
---
<!--
@@ -28,112 +28,123 @@ description: 本文介绍了关于 Apache APISIX `authz-keycloak` 插件的基
#
-->
+<head>
+ <link rel="canonical" href="https://docs.api7.ai/hub/authz-keycloak" />
+</head>
+
## 描述
-`authz-keycloak` 插件可用于通过 [Keycloak Identity Server](https://www.keycloak.org/) 添加身份验证。
+`authz-keycloak` 插件可用于通过 [Keycloak Identity Server](https://www.keycloak.org/) 进行认证。
:::tip
-虽然该插件是为了与 Keycloak 一起使用而开发的,但是它也可以与任何符合 OAuth/OIDC 或 UMA 协议的身份认证软件一起使用。
+虽然本插件是针对 Keycloak 开发的,但也应该适用于任何符合 OAuth/OIDC 和 UMA 规范的身份提供商。
:::
-如果你想了解 Keycloak 的更多信息,请参考 [Authorization Services Guide](https://www.keycloak.org/docs/latest/authorization_services/)。
+有关 Keycloak 的更多信息,请参阅 [Authorization Services Guide](https://www.keycloak.org/docs/latest/authorization_services/)。
## 属性
-| 名称 | 类型 | 必选项 | 默认值 | 有效值 | 描述 |
-|----------------------------------------------|---------------|-------|-----------------------------------------------|--------------------------------------------------------------------|-------------------------------------------------------------------------------------------------------------------------------------------------------------------------------------------------------------------------------------------------------|
-| discovery | string | 否 | | https://host.domain/realms/foo/.well-known/uma2-configuration | Keycloak 授权服务的 [discovery document](https://www.keycloak.org/docs/latest/authorization_services/index.html) 的 URL。 |
-| token_endpoint | string | 否 | | https://host.domain/realms/foo/protocol/openid-connect/token | 接受 OAuth2 兼容 token 的接口,需要支持 `urn:ietf:params:oauth:grant-type:uma-ticket` 授权类型。 |
-| resource_registration_endpoint | string | 否 | | https://host.domain/realms/foo/authz/protection/resource_set | 符合 UMA 的资源注册端点。如果提供,则覆盖发现中的值。 |
-| client_id | string | 是 | | | 客户端正在寻求访问的资源服务器的标识符。 |
-| client_secret | string | 否 | | | 客户端密码(如果需要)。 |
-| grant_type | string | 否 | "urn:ietf:params:oauth:grant-type:uma-ticket" | ["urn:ietf:params:oauth:grant-type:uma-ticket"] | |
-| policy_enforcement_mode | string | 否 | "ENFORCING" | ["ENFORCING", "PERMISSIVE"] | |
-| permissions | array[string] | 否 | | | 描述客户端应用所需访问的资源和权限范围的字符串。格式必须为:`RESOURCE_ID#SCOPE_ID`。 |
-| lazy_load_paths | boolean | 否 | false | [true, false] | 当设置为 true 时,使用资源注册端点而不是静态权限将请求 URI 动态解析为资源。 |
-| http_method_as_scope | boolean | 否 | false | [true, false] | 设置为 true 时,将 HTTP 请求类型映射到同名范围并添加到所有请求的权限。 |
-| timeout | integer | 否 | 3000 | [1000, ...] | 与 Identity Server 的 HTTP 连接超时(毫秒)。 |
-| access_token_expires_in | integer | 否 | 300 | [1, ...] | 访问令牌的有效期。token. |
-| access_token_expires_leeway | integer | 否 | 0 | [0, ...] | access_token 更新的到期余地。设置后,令牌将在到期前几秒更新 access_token_expires_leeway。这避免了 access_token 在到达 OAuth 资源服务器时刚刚过期的情况。 |
-| refresh_token_expires_in | integer | 否 | 3600 | [1, ...] | 刷新令牌的失效时间。 |
-| refresh_token_expires_leeway | integer | 否 | 0 | [0, ...] | refresh_token 更新的到期余地。设置后,令牌将在到期前几秒刷新 refresh_token_expires_leeway。这样可以避免在到达 OAuth 资源服务器时 refresh_token 刚刚过期的错误。 |
-| ssl_verify | boolean | 否 | true | [true, false] | 设置为 `true` 时,验证 TLS 证书是否与主机名匹配。 |
-| cache_ttl_seconds | integer | 否 | 86400 (equivalent to 24h) | positive integer >= 1 | 插件缓存插件用于向 Keycloak 进行身份验证的发现文档和令牌的最长时间(以秒为单位)。 |
-| keepalive | boolean | 否 | true | [true, false] | 当设置为 `true` 时,启用 HTTP keep-alive 保证在使用后仍然保持连接打开。如果您期望对 Keycloak 有很多请求,请设置为 `true`。 |
-| keepalive_timeout | integer | 否 | 60000 | positive integer >= 1000 | 已建立的 HTTP 连接将关闭之前的空闲时间。 |
-| keepalive_pool | integer | 否 | 5 | positive integer >= 1 | 连接池中的最大连接数。 |
-| access_denied_redirect_uri | string | 否 | | [1, 2048] | 需要将用户重定向到的 URI,而不是返回类似 `"error_description":"not_authorized"` 这样的错误消息。 |
-| password_grant_token_generation_incoming_uri | string | 否 | | /api/token | 将此设置为使用密码授予类型生成令牌。该插件会将传入的请求 URI 与此值进行比较。 |
+| 名称 | 类型 | 必填 | 默认值 | 有效值 | 描述 |
+|----------------------------------------------|---------------|------|-----------------------------------------------|------------------------------------------------------------------------|-------------------------------------------------------------------------------------------------------------------------------------------------------------------------------------------------------------------------------------------------------|
+| discovery | string | 否 | | https://host.domain/realms/foo/.well-known/uma2-configuration | Keycloak Authorization Services 的[发现文档](https://www.keycloak.org/docs/latest/authorization_services/index.html) URL。 |
+| token_endpoint | string | 否 | | https://host.domain/realms/foo/protocol/openid-connect/token | 支持 `urn:ietf:params:oauth:grant-type:uma-ticket` 授权类型的符合 OAuth2 规范的令牌端点。若设置,将覆盖从发现文档中获取的值。 |
+| resource_registration_endpoint | string | 否 | | https://host.domain/realms/foo/authz/protection/resource_set | 符合 UMA 规范的资源注册端点。若设置,将覆盖从发现文档中获取的值。 |
+| client_id | string | 是 | | | 客户端尝试访问的资源服务器的标识符。 |
+| client_secret | string | 否 | | | 客户端密钥(如需要)。可以使用 APISIX secret 存储和引用该值,APISIX 目前支持[环境变量和 HashiCorp Vault](../terminology/secret.md) 两种方式。 |
+| grant_type | string | 否 | "urn:ietf:params:oauth:grant-type:uma-ticket" | ["urn:ietf:params:oauth:grant-type:uma-ticket"] | |
+| policy_enforcement_mode | string | 否 | "ENFORCING" | ["ENFORCING", "PERMISSIVE"] | |
+| permissions | array[string] | 否 | | | 字符串数组,每个字符串代表客户端请求访问的一个或多个资源和作用域的集合。 |
+| lazy_load_paths | boolean | 否 | false | | 设置为 `true` 时,使用资源注册端点将请求 URI 动态解析为资源,而非使用静态权限。 |
+| http_method_as_scope | boolean | 否 | false | | 设置为 `true` 时,将 HTTP 请求方法映射为同名作用域,并添加到所有请求的权限中。 |
+| timeout | integer | 否 | 3000 | [1000, ...] | 与 Identity Server 进行 HTTP 连接的超时时间(毫秒)。 |
+| access_token_expires_in | integer | 否 | 300 | [1, ...] | 访问令牌的过期时间(秒)。 |
+| access_token_expires_leeway | integer | 否 | 0 | [0, ...] | 访问令牌续期的宽限时间(秒)。设置后,将在令牌过期前 access_token_expires_leeway 秒进行续期,以避免访问令牌恰好在到达 OAuth 资源服务器时过期的错误。 |
+| refresh_token_expires_in | integer | 否 | 3600 | [1, ...] | 刷新令牌的过期时间(秒)。 |
+| refresh_token_expires_leeway | integer | 否 | 0 | [0, ...] | 刷新令牌续期的宽限时间(秒)。设置后,将在令牌过期前 refresh_token_expires_leeway 秒进行续期,以避免刷新令牌恰好在到达 OAuth 资源服务器时过期的错误。 |
+| ssl_verify | boolean | 否 | true | | 设置为 `true` 时,验证 TLS 证书与主机名是否匹配。 |
+| cache_ttl_seconds | integer | 否 | 86400(相当于 24 小时) | 正整数 >= 1 | 插件缓存发现文档和用于向 Keycloak 认证的令牌的最长时间(秒)。 |
+| keepalive | boolean | 否 | true | | 设置为 `true` 时,启用 HTTP keep-alive,保持连接在使用后不关闭。如果预期有大量请求发往 Keycloak,建议设为 `true`。 |
+| keepalive_timeout | integer | 否 | 60000 | 正整数 >= 1000 | 已建立的 HTTP 连接在空闲多久后关闭。 |
+| keepalive_pool | integer | 否 | 5 | 正整数 >= 1 | 连接池中的最大连接数。 |
+| access_denied_redirect_uri | string | 否 | | [1, 2048] | 用于替代返回 `"error_description":"not_authorized"` 错误信息而重定向用户的 URI。 |
+| password_grant_token_generation_incoming_uri | string | 否 | | /api/token | 设置此项以使用密码授权类型生成令牌。插件会将传入请求的 URI 与此值进行比较。 |
-注意:schema 中还定义了 `encrypt_fields = {"client_secret"}`,这意味着该字段将会被加密存储在 etcd 中。具体参考 [加密存储字段](../plugin-develop.md#加密存储字段)。
+注意:schema 中还定义了 `encrypt_fields = {"client_secret"}`,这意味着该字段将以加密方式存储在 etcd 中。请参阅[加密存储字段](../../../en/latest/plugin-develop.md#encrypted-storage-fields)。
-除上述释义外,还有以下需要注意的点:
+### 发现文档与端点
-- Discovery and endpoints
- - 使用 `discovery` 属性后,`authz-keycloak` 插件就可以从其 URL 中发现 Keycloak API 的端点。该 URL 指向 Keyloak 针对相应领域授权服务的发现文档。
- - 如果发现文档可用,则插件将根据该文档确定令牌端点 URL。如果 URL 存在,则 `token_endpoint` 和 `resource_registration_endpoint` 的值将被其覆盖。
-- Client ID and secret
- - 该插件需配置 `client_id` 属性来标识自身。
- - 如果 `lazy_load_paths` 属性被设置为 `true`,那么该插件还需要从 Keycloak 中获得一个自身访问令牌。在这种情况下,如果客户端对 Keycloak 的访问是加密的,就需要配置 `client_secret` 属性。
-- Policy enforcement mode
- - `policy_enforcement_mode` 属性指定了在处理发送到服务器的授权请求时,该插件如何执行策略。
- - `ENFORCING` mode:即使没有与给定资源关联的策略,请求也会默认被拒绝。`policy_enforcement_mode` 默认设置为 `ENFORCING`。
- - `PERMISSIVE` mode:如果资源没有绑定任何访问策略,也被允许请求。
-- Permissions
- - 在处理传入的请求时,插件可以根据请求的参数确定静态或动态检查 Keycloak 的权限。
- - 如果 `lazy_load_paths` 参数设置为 `false`,则权限来自 `permissions` 属性。`permissions` 中的每个条目都需要按照令牌端点预设的 `permission` 属性进行格式化。详细信息请参考 [Obtaining Permissions](https://www.keycloak.org/docs/latest/authorization_services/index.html#_service_obtaining_permissions).
+建议使用 `discovery` 属性,`authz-keycloak` 插件可从中自动发现 Keycloak API 端点。
- :::note
+若设置 `token_endpoint` 和 `resource_registration_endpoint`,将覆盖从发现文档中获取的值。
- 有效权限可以是单个资源,也可以是与一个或多个范围配对的资源。
+### Client ID 与密钥
- :::
+插件需要 `client_id` 属性进行标识,并在与 Keycloak 交互时指定评估权限的上下文。
- 如果 `lazy_load_paths` 属性设置为 `true`,则请求 URI 将解析为使用资源注册端点在 Keycloak 中配置的一个或多个资源。已经解析的资源被用作于检查的权限。
+若 `lazy_load_paths` 属性设置为 `true`,插件还需要从 Keycloak 为自身获取访问令牌。在此情况下,若客户端对 Keycloak 的访问是保密的,则需要配置 `client_secret` 属性。
- :::note
+### 策略执行模式
- 需要该插件从令牌端点为自己获取单独的访问令牌。因此,请确保在 Keycloak 的客户端设置中设置了 `Service Accounts Enabled` 选项。
+`policy_enforcement_mode` 属性指定在处理发送到服务器的授权请求时如何执行策略。
- 还需要确保颁发的访问令牌包含具有 `uma_protection` 角色的 `resource_access` 声明,以保证插件能够通过 Protection API 查询资源。
+#### `ENFORCING` 模式
- :::
+即使没有与资源关联的策略,请求也会被默认拒绝。
-- 自动将 HTTP method 映射到作用域
+`policy_enforcement_mode` 默认设置为 `ENFORCING`。
- `http_method_as_scope` 通常与 `lazy_load_paths` 一起使用,但也可以与静态权限列表一起使用。
+#### `PERMISSIVE` 模式
- - 如果 `http_method_as_scope` 属性设置为 `true`,插件会将请求的 HTTP 方法映射到同名范围。然后将范围添加到每个要检查的权限。
+当给定资源没有关联策略时,允许请求通过。
- - 如果 `lazy_load_paths` 属性设置为 `false`,则插件会将映射范围添加到 `permissions` 属性中配置的任意一个静态权限——即使它们已经包含一个或多个范围。
+### 权限
-- 使用 `password` 授权生成令牌
+处理传入请求时,插件可以静态或动态地从请求属性中确定要与 Keycloak 核对的权限。
- - 如果要使用 `password` 授权生成令牌,你可以设置 `password_grant_token_generation_incoming_uri` 属性的值。
+若 `lazy_load_paths` 属性设置为 `false`,权限取自 `permissions` 属性。`permissions` 中的每个条目需要按照令牌端点 `permission` 参数的预期格式进行格式化。参阅 [Obtaining Permissions](https://www.keycloak.org/docs/latest/authorization_services/index.html#_service_obtaining_permissions)。
- - 如果传入的 URI 与配置的属性匹配并且请求方法是 POST,则使用 `token_endpoint` 生成一个令牌。
+:::note
- 同时,你还需要添加 `application/x-www-form-urlencoded` 作为 `Content-Type` 标头,`username` 和 `password` 作为参数。
+有效的权限可以是单个资源,也可以是资源与一个或多个作用域的组合。
- 如下示例是当 `password_grant_token_generation_incoming_uri` 设置为 `/api/token` 时的命令:
+:::
- ```shell
- curl --location --request POST 'http://127.0.0.1:9080/api/token' \
- --header 'Accept: application/json, text/plain, */*' \
- --header 'Content-Type: application/x-www-form-urlencoded' \
- --data-urlencode 'username=<User_Name>' \
- --data-urlencode 'password=<Password>'
- ```
+若 `lazy_load_paths` 属性设置为 `true`,将使用资源注册端点将请求 URI 解析为 Keycloak 中配置的一个或多个资源,并将解析出的资源用作待核对的权限。
-## 如何启用
+:::note
-以下示例为你展示了如何在指定 Route 中启用 `authz-keycloak` 插件,其中 `${realm}` 是 Keycloak 中的 `realm` 名称:
+这需要插件通过令牌端点为自身获取单独的访问令牌。请确保在 Keycloak 的客户端设置中启用 `Service Accounts Enabled` 选项。
-:::note
+同时请确保签发的访问令牌包含带有 `uma_protection` 角色的 `resource_access` 声明,以确保插件能够通过 Protection API 查询资源。
+
+:::
+
+### 自动将 HTTP 方法映射到作用域
+
+`http_method_as_scope` 通常与 `lazy_load_paths` 一起使用,但也可以与静态权限列表配合使用。
-您可以这样从 `config.yaml` 中获取 `admin_key` 并存入环境变量:
+若 `http_method_as_scope` 属性设置为 `true`,插件会将请求的 HTTP 方法映射为同名作用域,并将该作用域添加到每个待核对的权限中。
+
+若 `lazy_load_paths` 属性设置为 `false`,插件会将映射的作用域添加到 `permissions` 属性中配置的所有静态权限中——即使这些权限已经包含一个或多个作用域。
+
+### 使用 `password` 授权类型生成令牌
+
+若要使用 `password` 授权类型生成令牌,可以设置 `password_grant_token_generation_incoming_uri` 属性的值。
+
+若传入的 URI 与配置的属性匹配且请求方法为 POST,则使用 `token_endpoint` 生成令牌。
+
+还需要在请求中添加 `application/x-www-form-urlencoded` 作为 `Content-Type` 请求头,并将 `username` 和 `password` 作为参数传入。
+
+## 示例
+
+以下示例演示了如何针对不同场景配置 `authz-keycloak` 插件。
+
+请先完成 Keycloak 的[前置配置](#配置-keycloak)。
+
+:::note
+你可以使用以下命令从 `conf/config.yaml` 获取 `admin_key` 并保存到环境变量:
```bash
admin_key=$(yq '.deployment.admin.admin_key[0].key' conf/config.yaml | sed 's/"//g')
@@ -141,76 +152,353 @@ admin_key=$(yq '.deployment.admin.admin_key[0].key' conf/config.yaml | sed 's/"/
:::
+### 配置 Keycloak
+
+#### 启动 Keycloak
+
+在 Docker 中以[开发模式](https://www.keycloak.org/server/configuration#_starting_keycloak_in_development_mode)启动一个名为 `apisix-quickstart-keycloak` 的 Keycloak 实例,管理员用户名为 `quickstart-admin`,密码为 `quickstart-admin-pass`:
+
```shell
-curl http://127.0.0.1:9180/apisix/admin/routes/1 \
--H "X-API-KEY: $admin_key" -X PUT -d '
-{
- "uri": "/get",
+docker run -d --name "apisix-quickstart-keycloak" \
+ -e 'KEYCLOAK_ADMIN=quickstart-admin' \
+ -e 'KEYCLOAK_ADMIN_PASSWORD=quickstart-admin-pass' \
+ -p 8080:8080 \
+ quay.io/keycloak/keycloak:18.0.2 start-dev
+```
+
+将 Keycloak 的 IP 保存到环境变量,以供后续配置引用:
+
+```shell
+KEYCLOAK_IP=192.168.42.145 # 替换为你的主机 IP
+```
+
+在浏览器中访问 `http://localhost:8080` 并点击 **Administration Console**:
+
+
+
+输入管理员用户名 `quickstart-admin` 和密码 `quickstart-admin-pass` 登录:
+
+
+
+#### 创建 Realm
+
+在左侧菜单中,将鼠标悬停在 **Master** 上,然后在下拉菜单中选择 **Add realm**:
+
+
+
+输入 Realm 名称 `quickstart-realm` 并点击 **Create**:
+
+
+
+#### 创建客户端
+
+点击 **Clients** > **Create** 打开 **Add Client** 页面:
+
+
+
+将 **Client ID** 填写为 `apisix-quickstart-client`,保持 **Client Protocol** 为 `openid-connect`,然后点击 **Save**:
+
+
+
+客户端 `apisix-quickstart-client` 创建成功。跳转到详情页后,将 **Access Type** 选择为 `confidential`:
+
+
+
+SSO 登录成功后,Keycloak 会携带 state 和 code 将客户端重定向到 **Valid Redirect URIs** 中的地址。为简化演示,输入通配符 `*` 接受任意重定向 URI:
+
+
+
+为客户端启用授权,此操作会自动启用服务账号,并分配 `uma_protection` 角色:
+
+
+
+点击 **Save** 应用自定义配置。
+
+#### 保存 Client ID 和密钥
+
+点击 **Clients** > `apisix-quickstart-client` > **Credentials**,从 **Secret** 中复制客户端密钥:
+
+
+
+将 OIDC 客户端 ID 和密钥保存到环境变量:
+
+```shell
+OIDC_CLIENT_ID=apisix-quickstart-client
+OIDC_CLIENT_SECRET=bSaIN3MV1YynmtXvU8lKkfeY0iwpr9cH # 替换为你的实际值
+```
+
+#### 获取访问令牌
+
+从 Keycloak 获取访问令牌:
+
+```shell
+curl -i "http://$KEYCLOAK_IP:8080/realms/quickstart-realm/protocol/openid-connect/token" -X POST \
+ -d 'grant_type=client_credentials' \
+ -d 'client_id='$OIDC_CLIENT_ID'' \
+ -d 'client_secret='$OIDC_CLIENT_SECRET''
+```
+
+你应该会看到类似如下的响应:
+
+```text
+{"access_token":"eyJhbGciOiJSUzI1NiIsInR5cCIgOiAiSldUIiwia2lkIiA6ICJoT3ludlBPY2d6Y3VWWnYtTU42bXZKMUczb0dOX2d6MFo3WFl6S2FSa1NBIn0...","expires_in":300,"refresh_expires_in":0,"token_type":"Bearer","not-before-policy":0,"scope":"email profile"}
+```
+
+将令牌保存到环境变量:
+
+```shell
+# 替换为你的访问令牌
+ACCESS_TOKEN=<your_access_token>
+```
+
+### 使用懒加载路径和资源注册端点
+
+以下示例演示如何配置插件,使用资源注册端点将请求 URI 动态解析为资源,而非使用静态权限。
+
+按如下方式创建路由 `authz-keycloak-route`:
+
+```shell
+curl "http://127.0.0.1:9180/apisix/admin/routes" -X PUT \
+ -H "X-API-KEY: ${admin_key}" \
+ -d '{
+ "id": "authz-keycloak-route",
+ "uri": "/anything",
"plugins": {
- "authz-keycloak": {
- "token_endpoint": "http://127.0.0.1:8090/realms/${realm}/protocol/openid-connect/token",
- "permissions": ["resource name#scope name"],
- "client_id": "Client ID"
- }
+ "authz-keycloak": {
+ "lazy_load_paths": true,
+ "resource_registration_endpoint": "http://'"$KEYCLOAK_IP"':8080/realms/quickstart-realm/authz/protection/resource_set",
+ "discovery": "http://'"$KEYCLOAK_IP"':8080/realms/quickstart-realm/.well-known/uma2-configuration",
+ "client_id": "'"$OIDC_CLIENT_ID"'",
+ "client_secret": "'"$OIDC_CLIENT_SECRET"'"
+ }
},
"upstream": {
- "type": "roundrobin",
- "nodes": {
- "127.0.0.1:8080": 1
- }
+ "type": "roundrobin",
+ "nodes": {
+ "httpbin.org": 1
+ }
}
-}'
+ }'
```
-## 测试插件
+- 将 `lazy_load_paths` 设置为 `true`。
+- 将 `resource_registration_endpoint` 设置为 Keycloak 符合 UMA 规范的资源注册端点。当 `lazy_load_paths` 为 `true` 且未提供 `discovery` 时,此项必填。
+- 将 `discovery` 设置为 Keycloak 授权服务的发现文档端点。
+- 将 `client_id` 设置为之前创建的客户端 ID。
+- 将 `client_secret` 设置为之前创建的客户端密钥。当 `lazy_load_paths` 为 `true` 时,此项必填。
-通过上述命令启用插件后,可以通过以下方法测试插件。
-
-首先需要从 Keycloak 获取 JWT 令牌:
+向路由发送请求:
```shell
-curl "http://<YOUR_KEYCLOAK_HOST>/realms/<YOUR_REALM>/protocol/openid-connect/token" \
- -d "client_id=<YOUR_CLIENT_ID>" \
- -d "client_secret=<YOUR_CLIENT_SECRET>" \
- -d "username=<YOUR_USERNAME>" \
- -d "password=<YOUR_PASSWORD>" \
- -d "grant_type=password"
+curl "http://127.0.0.1:9080/anything" -H "Authorization: Bearer $ACCESS_TOKEN"
```
-你应该收到类似以下的响应:
+你应该会看到类似如下的 `HTTP/1.1 200 OK` 响应:
-```text
-{"access_token":"eyJhbGciOiJSUzI1NiIsInR5cCIgOiAiSldUIiwia2lkIiA6ICJoT3ludlBPY2d6Y3VWWnYtTU42bXZKMUczb0dOX2d6MFo3WFl6S2FSa1NBIn0.eyJleHAiOjE3MDMyOTAyNjAsImlhdCI6MTcwMzI4OTk2MCwianRpIjoiMjJhOGFmMzItNDM5Mi00Yzg3LThkM2UtZDkyNDVmZmNiYTNmIiwiaXNzIjoiaHR0cDovLzE5Mi4xNjguMS44Mzo4MDgwL3JlYWxtcy9xdWlja3N0YXJ0LXJlYWxtIiwiYXVkIjoiYWNjb3VudCIsInN1YiI6IjAyZWZlY2VlLTBmYTgtNDg1OS1iYmIwLTgyMGZmZDdjMWRmYSIsInR5cCI6IkJlYXJlciIsImF6cCI6ImFwaXNpeC1xdWlja3N0YXJ0LWNsaWVudCIsInNlc3Npb25fc3RhdGUiOiI1YzIzZjVkZC1 [...]
+```json
+{
+ "args": {},
+ "data": "",
+ "files": {},
+ "form": {},
+ "headers": {
+ "Accept": "*/*",
+ "Authorization": "Bearer eyJhbGciOiJSU...",
+ ...
+ },
+ "json": null,
+ "method": "GET",
+ "origin": "127.0.0.1, 108.180.51.111",
+ "url": "http://127.0.0.1/anything"
+}
```
-之后就可以使用获得的访问令牌发起请求:
+### 使用静态权限
+
+以下示例演示如何在 Keycloak 中配置与客户端作用域策略关联的基于作用域的权限,并配置 `authz-keycloak` 插件使用静态权限。
+
+#### 在 Keycloak 中创建作用域
+
+前往 **Clients** > **`apisix-quickstart-client`** > **Authorization** > **Authorization Scopes**,点击 **Create** 打开 **Add Scope** 页面:
+
+
+
+输入作用域名称 `access` 并点击 **Save**:
+
+
+
+#### 在 Keycloak 中创建资源
+
+前往 **Clients** > **`apisix-quickstart-client`** > **Authorization** > **Resources**,点击 **Create** 打开 **Add Resource** 页面:
+
+
+
+输入资源名称 `httpbin-anything`、URI `/anything`、作用域 `access`,然后点击 **Save**:
+
+
+
+#### 在 Keycloak 中创建客户端作用域
+
+前往 **Client Scopes**,点击 **Create** 打开 **Add client scope** 页面:
+
+
+
+输入作用域名称 `httpbin-access` 并点击 **Save**:
+
+
+
+#### 在 Keycloak 中创建策略
+
+前往 **Clients** > **`apisix-quickstart-client`** > **Authorization** > **Policies** > **Create Policies**,在下拉菜单中选择 **Client Scope** 打开 **Add Client Scope Policy** 页面:
+
+
+
+为客户端作用域 `httpbin-access` 输入策略名称 `access-client-scope-policy`,勾选 **Required**,然后点击 **Save**:
+
+
+
+#### 在 Keycloak 中创建权限
+
+前往 **Clients** > **`apisix-quickstart-client`** > **Authorization** > **Permissions** > **Create Permissions**,在下拉菜单中选择 **Scope-Based** 打开 **Add Scope Permission** 页面:
+
+
+
+输入权限名称 `access-scope-perm`,选择 `access` 作用域,应用策略 `access-client-scope-policy`,然后点击 **Save**:
+
+
+
+#### 分配客户端作用域
+
+前往 **Clients** > **`apisix-quickstart-client`** > **Client Scopes**,将 `httpbin-access` 添加到默认客户端作用域:
+
+
+
+#### 配置 APISIX
+
+按如下方式创建路由 `authz-keycloak-route`:
```shell
-curl http://127.0.0.1:9080/get -H 'Authorization: Bearer ${ACCESS_TOKEN}'
+curl "http://127.0.0.1:9180/apisix/admin/routes" -X PUT \
+ -H "X-API-KEY: ${admin_key}" \
+ -d '{
+ "id": "authz-keycloak-route",
+ "uri": "/anything",
+ "plugins": {
+ "authz-keycloak": {
+ "lazy_load_paths": false,
+ "discovery": "http://'"$KEYCLOAK_IP"':8080/realms/quickstart-realm/.well-known/uma2-configuration",
+ "permissions": ["httpbin-anything#access"],
+ "client_id": "apisix-quickstart-client"
+ }
+ },
+ "upstream": {
+ "type": "roundrobin",
+ "nodes": {
+ "httpbin.org": 1
+ }
+ }
+ }'
```
-## 删除插件
+- 将 `lazy_load_paths` 设置为 `false`。
+- 将 `discovery` 设置为 Keycloak 授权服务的发现文档端点。
+- 将 `permissions` 设置为资源 `httpbin-anything` 和作用域 `access`。
-当你需要禁用 `authz-keycloak` 插件时,可以通过以下命令删除相应的 JSON 配置,APISIX 将会自动重新加载相关配置,无需重启服务:
+向路由发送请求:
```shell
-curl http://127.0.0.1:9180/apisix/admin/routes/1 \
--H "X-API-KEY: $admin_key" -X PUT -d '
+curl "http://127.0.0.1:9080/anything" -H "Authorization: Bearer $ACCESS_TOKEN"
+```
+
+你应该会看到类似如下的 `HTTP/1.1 200 OK` 响应:
+
+```json
{
- "uri": "/get",
+ "args": {},
+ "data": "",
+ "files": {},
+ "form": {},
+ "headers": {
+ "Accept": "*/*",
+ "Authorization": "Bearer eyJhbGciOiJSU...",
+ ...
+ },
+ "json": null,
+ "method": "GET",
+ "origin": "127.0.0.1, 108.180.51.111",
+ "url": "http://127.0.0.1/anything"
+}
+```
+
+若你移除 `apisix-quickstart-client` 的客户端作用域 `httpbin-access`,访问该资源时将收到 `401 Unauthorized` 响应。
+
+### 在自定义令牌端点使用密码授权类型生成令牌
+
+以下示例演示如何在自定义端点使用密码授权类型生成令牌。
+
+#### 在 Keycloak 中创建用户
+
+若要使用密码授权类型,需要先创建一个用户。
+
+前往 **Users** > **Add user** 并点击 **Add user**:
+
+
+
+将 **Username** 填写为 `quickstart-user` 并点击 **Save**:
+
+
+
+点击 **Credentials**,将 **Password** 设置为 `quickstart-user-pass`。将 **Temporary** 切换为 `OFF`,这样首次登录时无需修改密码:
+
+
+
+#### 配置 APISIX
+
+按如下方式创建路由 `authz-keycloak-route`:
+
+```shell
+curl "http://127.0.0.1:9180/apisix/admin/routes" -X PUT \
+ -H "X-API-KEY: ${admin_key}" \
+ -d '{
+ "id": "authz-keycloak-route",
+ "uri": "/api/*",
"plugins": {
+ "authz-keycloak": {
+ "lazy_load_paths": true,
+ "resource_registration_endpoint": "http://'"$KEYCLOAK_IP"':8080/realms/quickstart-realm/authz/protection/resource_set",
+ "client_id": "'"$OIDC_CLIENT_ID"'",
+ "client_secret": "'"$OIDC_CLIENT_SECRET"'",
+ "token_endpoint": "http://'"$KEYCLOAK_IP"':8080/realms/quickstart-realm/protocol/openid-connect/token",
+ "password_grant_token_generation_incoming_uri": "/api/token"
+ }
},
"upstream": {
- "type": "roundrobin",
- "nodes": {
- "127.0.0.1:8080": 1
- }
+ "type": "roundrobin",
+ "nodes": {
+ "httpbin.org": 1
+ }
}
-}'
+ }'
```
-## 插件 Roadmap
+- 将 `token_endpoint` 设置为 Keycloak 的令牌端点。当未提供发现文档时,此项必填。
+- 将 `password_grant_token_generation_incoming_uri` 设置为用户获取令牌的自定义 URI 路径。
+
+向已配置的令牌端点发送请求。注意请求应使用 POST 方法,并将 `Content-Type` 设置为 `application/x-www-form-urlencoded`:
+
+```shell
+OIDC_USER=quickstart-user
+OIDC_PASSWORD=quickstart-user-pass
+
+curl "http://127.0.0.1:9080/api/token" -X POST \
+ -H "Content-Type: application/x-www-form-urlencoded" \
+ -H "Accept: application/json" \
+ -d 'username='$OIDC_USER'' \
+ -d 'password='$OIDC_PASSWORD''
+```
-- 目前,`authz-keycloak` 插件通过要求定义资源名称和所需的范围,来强制执行路由策略。但 Keycloak 官方适配的其他语言客户端(Java、JavaScript)仍然可以通过动态查询 Keycloak 路径以及延迟加载身份资源的路径来提供路径匹配。在 Apache APISIX 之后发布的插件中即将支持此功能。
+你应该会看到包含访问令牌的 JSON 响应,类似如下:
-- 支持从 Keycloak JSON 文件中读取权限范畴和其他配置项。
+```text
+{"access_token":"eyJhbGciOiJSUzI1NiIsInR5cCIgOiAiSldUIiwia2lkIiA6ICJ6U3FFaXN6VlpuYi1sRWMzZkp0UHNpU1ZZcGs4RGN3dXI1Mkx5V05aQTR3In0...","expires_in":300,"refresh_expires_in":1800,"refresh_token":"eyJhbGciOiJIUzI1NiIsInR5cCIgOiAiSldUIiwia2lkIiA6ICI0YjFiNTQ3Yi0zZmZjLTQ5YzQtYjE2Ni03YjdhNzIxMjk1ODcifQ...","token_type":"Bearer","not-before-policy":0,"session_state":"b16b262e-1056-4515-a455-f25e077ccb76","scope":"profile email"}
+```