You are viewing a plain text version of this content. The canonical link for it is here.
Posted to notifications@apisix.apache.org by bz...@apache.org on 2022/02/16 12:26:44 UTC
[apisix-website] branch master updated: docs: add file-logger plugin blog (#882)
This is an automated email from the ASF dual-hosted git repository.
bzp2010 pushed a commit to branch master
in repository https://gitbox.apache.org/repos/asf/apisix-website.git
The following commit(s) were added to refs/heads/master by this push:
new 0243b19 docs: add file-logger plugin blog (#882)
0243b19 is described below
commit 0243b1932fc3c970d5c9a0bc66cdfb697633a64c
Author: yilinzeng <36...@users.noreply.github.com>
AuthorDate: Wed Feb 16 20:25:11 2022 +0800
docs: add file-logger plugin blog (#882)
---
website/blog/2022/02/16/file-logger.md | 363 +++++++++++++++++++++
.../2022/02/16/file-logger.md | 363 +++++++++++++++++++++
2 files changed, 726 insertions(+)
diff --git a/website/blog/2022/02/16/file-logger.md b/website/blog/2022/02/16/file-logger.md
new file mode 100644
index 0000000..6562c1e
--- /dev/null
+++ b/website/blog/2022/02/16/file-logger.md
@@ -0,0 +1,363 @@
+---
+title: "How did a Beginner Build an Apache APISIX Plugin from 0 to 1"
+authors:
+ - name: "Qi Guo"
+ title: "Author"
+ url: "https://github.com/guoqqqi"
+ image_url: "https://avatars.githubusercontent.com/u/72343596?v=4"
+ - name: "Yilin Zeng"
+ title: "Technical Writer"
+ url: "https://github.com/yzeng25"
+ image_url: "https://avatars.githubusercontent.com/u/36651058?v=4"
+keywords:
+- Apache APISIX
+- Logging
+- Ecosystem
+- Developer
+- Guide
+description: This article documents the process of developing the `file-logger` plugin by a front-end engineer with no back-end experience.
+tags: [Technology,Logging]
+---
+
+> This article documents the process of developing the `file-logger` plugin by a front-end engineer with no back-end experience.
+
+<!--truncate-->
+
+Over the past few months, community users have added many plugins to Apache APISIX, enriching the Apache APISIX ecosystem. From the user's point of view, the emergence of more diverse plugins is certainly a good thing, as they fulfill more of the user's expectations for a gateway that is "one-stop" and "multi-functional" processor on top of perfecting the high performance and low latency of Apache APISIX.
+
+None of the articles on the Apache APISIX blog seem to go into detail about the process of developing plugins. So let's take a look at the process from the perspective of a plugin developer and see how a plugin is born!
+
+This article documents the process of developing the `file-logger` plugin by **a front-end engineer with no back-end experience**. Before digging into the details of the implementation process, we will briefly introduce the functionality of `file-logger`.
+
+## Introduction of file-logger plugin
+
+`file-logger` supports generating custom log formats using Apache APISIX plugin metadata. Users can append request and response data in JSON format to log files via the `file-logger` plugin, or push the log data stream to a specified location.
+
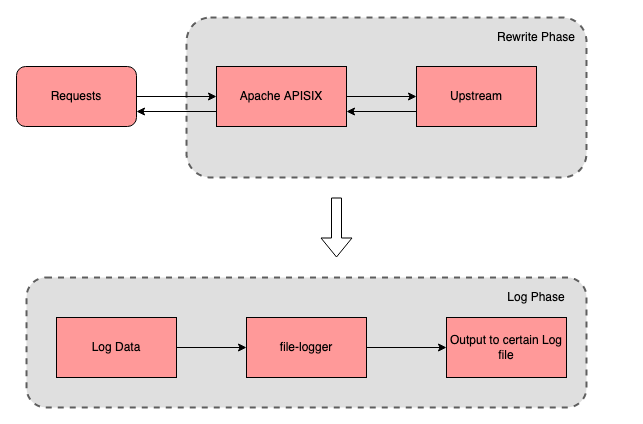
+Imagine this: when monitoring the access log of a route, we not only care about the value of certain request and response data, but also want to write the log data to a specified file. This is where the `file-logger` plugin can be used to help achieve these goals.
+
+
+
+We can use `file-logger` to write log data to a specific log file to simplify the process of monitoring and debugging.
+
+## How to implement a plugin?
+
+After introducing the features of file-logger, you will have a better understanding of this plugin. The following is a detailed explanation of how I, a front-end developer with no server-side experience, develop the plugin for Apache APISIX and add the corresponding tests for it.
+
+### Confirm the name and priority of the plugin
+
+Open the [Apache APISIX Plugin Development Guide](https://apisix.apache.org/docs/apisix/plugin-develop/#name-priority-and-the-others) and in order of priority you need to determine the following two things:
+
+1. Determine the plugin category.
+2. prioritize the plugins and update the `conf/config-default.yaml` file.
+
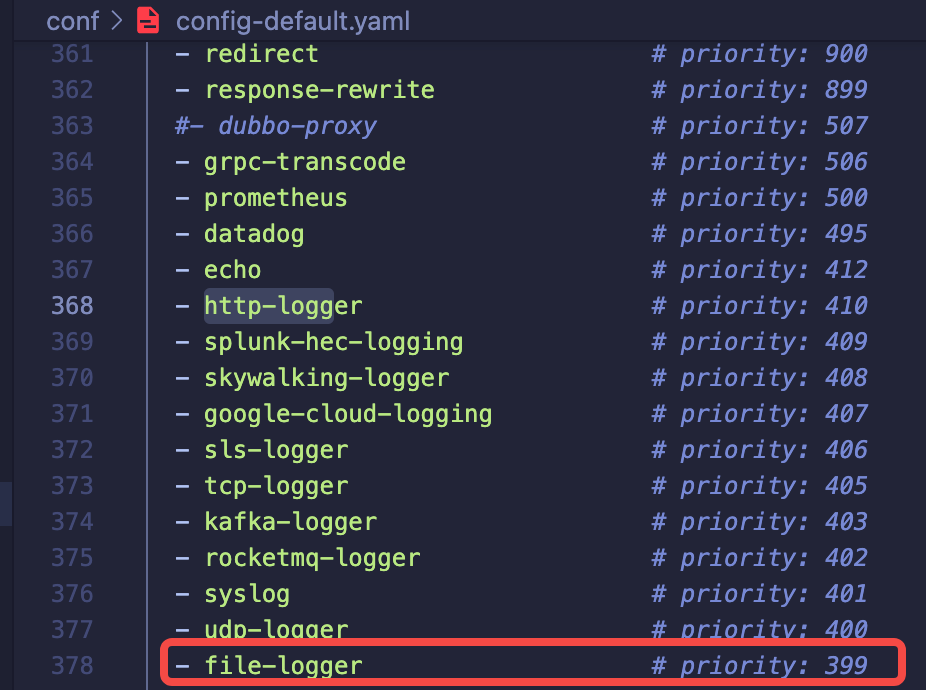
+Since this development of `file-logger` is a logging type plugin, I refer to the name and ordering of the existing logging plugins for Apache APISIX and place `file-logger` here.
+
+
+
+After consulting with other plugin authors and enthusiastic members of the community, the name `file-logger` and priority `399` of the plugin were finally confirmed.
+
+> Note that the priority of the plugin is related to the order of execution; the higher the value of the priority, the more forward the execution. And the ordering of plugin names is not related to the order of execution.
+
+### Create a minimum executable plugin file
+
+After confirming the plugin name and priority, you can create our plugin code file in `apisix/plugins/` directory . There are two points to note here:
+
+- If the plugin code file is created directly in the `apisix/plugins/` directory, there is no need to change the `Makefile` file.
+- If your plugin has its own code directory, you need to update the `Makefile` file, please refer to the [Apache APISIX Plugin Development Guide](https://apisix.apache.org/docs/apisix/plugin-develop/#name-priority-and-the-others) for detailed steps.
+
+1. Here we create the `file-logger.lua` file in the `apisix/plugins/ directory`.
+2. Then we will complete an initialized version based on the `example-plugin`.
+
+```lua
+-- Introduce the module we need in the header
+local core = require("apisix.core")
+local plugin = require("apisix.plugin")
+local ngx = ngx
+
+-- Declare the plugin's name
+local plugin_name = "file-logger"
+
+-- Define the plugin schema format
+local schema = {
+ type = "object",
+ properties = {
+ path = {
+ type = "string"
+ },
+ },
+ required = {"path"}
+}
+
+-- Plugin metadata schema
+local metadata_schema = {
+ type = "object",
+ properties = {
+ log_format = log_util.metadata_schema_log_format
+ }
+}
+
+
+local _M = {
+ version = 0.1,
+ priority = 399,
+ name = plugin_name,
+ schema = schema,
+ metadata_schema = metadata_schema
+}
+
+-- Check if the plugin configuration is correct
+function _M.check_schema(conf, schema_type)
+ if schema_type == core.schema.TYPE_METADATA then
+ return core.schema.check(metadata_schema, conf)
+ end
+ return core.schema.check(schema, conf)
+end
+
+-- Log phase
+function _M.log(conf, ctx)
+ core.log.warn("conf: ", core.json.encode(conf))
+ core.log.warn("ctx: ", core.json.encode(ctx, true))
+end
+
+
+return _M
+```
+
+Once the minimal available plugin file is ready, the plugin's configuration data and request-related data can be output to the `error.log` file via `core.log.warn(core.json.encode(conf))` and `core.log.warn("ctx: ", core.json.encode(ctx, true))`.
+
+### Enable and test the plugin
+
+The following are a couple of steps for testing. In order to test whether the plugin can successfully print the plugin data and request-related data information we configured for it to the error log file, we need to enable the plugin and create a test route.
+
+1. Prepare a test upstream locally (the test upstream used in this article is `127.0.0.1:3030/api/hello`, which I created locally).
+2. Create a route via `curl` command and enable our new plugin.
+
+ ```shell
+ curl http://127.0.0.1:9080/apisix/admin/routes/1 -H 'X-API-KEY: edd1c9f034335f136f87ad84b625c8f1' -X PUT -d '
+ {
+ "plugins": {
+ "file-logger": {
+ "path": "logs/file.log"
+ }
+ },
+ "upstream": {
+ "type": "roundrobin",
+ "nodes": {
+ "127.0.0.1:3030": 1
+ }
+ },
+ "uri": "/api/hello"
+ }'
+ ```
+
+ You will then see a status code `200`, indicating that the route was successfully created.
+3. Run the `curl` command to send a request to the route to test whether the `file-logger` plugin has been started.
+
+ ```shell
+ curl -i http://127.0.0.1:9080/api/hello
+ HTTP/1.1 200 OK
+ ...
+ hello, world
+ ```
+
+4. In the `logs/error.log` file there will be a record:
+
+ 
+
+ As you can see, the `path: logs/file.log` that we configured for the plugin in the conf parameter has been successfully saved. At this point we have successfully created a minimally usable plugin that prints the `conf` and `ctx` parameters in the logging phase.
+
+ After that, we can write the core functionality for the `file-logger.lua` plugin directly in its code file. Here we can directly run the `apisix reload` command to reload the latest plugin code without restarting Apache APISIX.
+
+### Write core function for the file-logger plugin
+
+The main function of the file-logger plugin is to write log data. After asking other people from the community and checking the information, I learned about Lua's IO library, and confirmed that the logic of the plugin's function is roughly the following steps.
+
+1. After each accepted request, output the log data to the `path` configured by the plugin.
+ 1. First, get the value of `path` in `file-logger` through `conf` in the logging phase.
+ 2. Then, the Lua IO library is used to create, open, write, refresh the cache, and close the file.
+2. Handle errors such as open file failure, create file failure, etc.
+
+ ```lua
+ local function write_file_data(conf, log_message)
+ local msg, err = core.json.encode(log_message)
+ if err then
+ return core.log.error("message json serialization failed, error info : ", err)
+ end
+
+ local file, err = io_open(conf.path, 'a+')
+
+ if not file then
+ core.log.error("failed to open file: ", conf.path, ", error info: ", err)
+ else
+ local ok, err = file:write(msg, '\n')
+ if not ok then
+ core.log.error("failed to write file: ", conf.path, ", error info: ", err)
+ else
+ file:flush()
+ end
+ file:close()
+ end
+ end
+ ```
+
+3. Referring to the source code of `http-logger` plugin, I finished the method of passing the log data to the write log data and some judgment and processing of the metadata.
+
+ ```lua
+ function _M.log(conf, ctx)
+ local metadata = plugin.plugin_metadata(plugin_name)
+ local entry
+
+ if metadata and metadata.value.log_format
+ and core.table.nkeys(metadata.value.log_format) > 0
+ then
+ entry = log_util.get_custom_format_log(ctx, metadata.value.log_format)
+ else
+ entry = log_util.get_full_log(ngx, conf)
+ end
+
+ write_file_data(conf, entry)
+ end
+ ```
+
+## Validate and add tests
+
+### Validate the log records
+
+Since the `file-logger` plugin was enabled when the test route was created and the path was configured as `logs/file.log`, we can simply send a request to the test route to verify the results of the log collection at this point.
+
+```shell
+curl -i http://127.0.0.1:9080/api/hello
+```
+
+In the corresponding logs/file.log we can see that each record is saved in JSON format. After formatting one of the data, it looks like this.
+
+```json
+{
+ "server":{
+ "hostname":"....",
+ "version":"2.11.0"
+ },
+ "client_ip":"127.0.0.1",
+ "upstream":"127.0.0.1:3030",
+ "route_id":"1",
+ "start_time":1641285122961,
+ "latency":13.999938964844,
+ "response":{
+ "status":200,
+ "size":252,
+ "headers":{
+ "server":"APISIX\/2.11.0",
+ "content-type":"application\/json; charset=utf-8",
+ "date":"Tue, 04 Jan 2022 08:32:02 GMT",
+ "vary":"Accept-Encoding",
+ "content-length":"19",
+ "connection":"close",
+ "etag":"\"13-5j0ZZR0tI549fSRsYxl8c9vAU78\""
+ }
+ },
+ "service_id":"",
+ "request":{
+ "querystring":{
+
+ },
+ "size":87,
+ "method":"GET",
+ "headers":{
+ "host":"127.0.0.1:9080",
+ "accept":"*\/*",
+ "user-agent":"curl\/7.77.0"
+ },
+ "url":"http:\/\/127.0.0.1:9080\/api\/hello",
+ "uri":"\/api\/hello"
+ }
+}
+```
+
+This concludes the verification of the collection of log records . The verification results indicate that the plugin was successfully launched and returned the appropriate data.
+
+### Add more tests for the plugin
+
+For the `add_block_preprocessor` part of the code, I was confused when I first started writing it because I had no previous experience with Perl. After researching, I realized the correct way to use it: if we don't write `request` assertions and `no_error_log` assertions in the data section, then the default assertion is as follows.
+
+```lua
+--- request
+GET /t
+--- no_error_log
+[error]
+```
+
+After taking some other logging test files into account, I created the file `file-logger.t` in the `t/plugin/` directory.
+
+Each test file is divided by `__DATA__` into a preamble section and a data section. Since there is no clear classification of test-related documents on the official website, you can refer to the related materials at the end of the article for more details. Here is one of the test cases that I have completed after referring to the relevant materials.
+
+```perl
+use t::APISIX 'no_plan';
+
+no_long_string();
+no_root_location();
+
+add_block_preprocessor(sub {
+ my ($block) = @_;
+
+ if (! $block->request) {
+ $block->set_value("request", "GET /t");
+ }
+
+ if (! $block->no_error_log && ! $block->error_log) {
+ $block->set_value("no_error_log", "[error]");
+ }
+});
+
+
+run_tests;
+
+__DATA__
+
+=== TEST 1: sanity
+--- config
+ location /t {
+ content_by_lua_block {
+ local configs = {
+ -- full configuration
+ {
+ path = "file.log"
+ },
+ -- property "path" is required
+ {
+ path = nil
+ }
+ }
+
+ local plugin = require("apisix.plugins.file-logger")
+
+ for i = 1, #configs do
+ ok, err = plugin.check_schema(configs[i])
+ if err then
+ ngx.say(err)
+ else
+ ngx.say("done")
+ end
+ end
+ }
+ }
+--- response_body_like
+done
+property "path" is required
+```
+
+This concludes the plugin addition test session.
+
+## Summary
+
+The above is the whole process of implementing an Apache APISIX plugin from 0 as a newbie in the backend. I did encounter a lot of pitfalls in the process of developing the plugin, but luckily there are many enthusiastic brothers in the Apache APISIX community to help me solve the problems, which made the development and testing of the file-logger plugin relatively smooth throughout. If you are interested in this plugin, or want to see the details of the plugin, you can refer to the [off [...]
+
+Apache APISIX is also currently working on other plugins to support more integration services, so if you're interested, feel free to start a discussion in the [GitHub Discussion](https://github.com/apache/apisix/discussions), or via the [mailing list](https://apisix.apache.org/docs/general/subscribe-guide).
+
+## References
+
+- [Apache APISIX Plugin Development Guide](https://apisix.apache.org/docs/apisix/plugin-develop/)
+- [Lua - File I/O Usage Guide](https://www.tutorialspoint.com/lua/lua_file_io.htm)
+- [How to run Apache APISIX test cases](https://apisix.apache.org/docs/apisix/how-to-build/#step-4-run-test-cases)
+- [How to Write Test Cases](https://apisix.apache.org/docs/apisix/plugin-develop/#write-test-case)
+- [Introduction to the Apache APISIX testing framework](https://apisix.apache.org/docs/apisix/internal/testing-framework/)
+- [Introduction to some APIs related to test-nginx](https://metacpan.org/pod/Test%3A%3ANginx%3A%3ASocket)
diff --git a/website/i18n/zh/docusaurus-plugin-content-blog/2022/02/16/file-logger.md b/website/i18n/zh/docusaurus-plugin-content-blog/2022/02/16/file-logger.md
new file mode 100644
index 0000000..c701576
--- /dev/null
+++ b/website/i18n/zh/docusaurus-plugin-content-blog/2022/02/16/file-logger.md
@@ -0,0 +1,363 @@
+---
+title: "后端新手如何从 0 到 1 打造一款 Apache APISIX 插件"
+authors:
+ - name: "郭奇"
+ title: "Author"
+ url: "https://github.com/guoqqqi"
+ image_url: "https://avatars.githubusercontent.com/u/72343596?v=4"
+ - name: "曾奕霖"
+ title: "Technical Writer"
+ url: "https://github.com/yzeng25"
+ image_url: "https://avatars.githubusercontent.com/u/36651058?v=4"
+keywords:
+- Apache APISIX
+- Logging
+- Ecosystem
+- Developer
+- Guide
+description: 本篇文章记录了一个没有后端经验的前端工程师开发 `file-logger` 插件的过程。
+tags: [Technology,Logging]
+---
+
+> 本篇文章记录了一个没有后端经验的前端工程师开发 `file-logger` 插件的过程。
+
+<!--truncate-->
+
+在过去的几个月,社区用户为 Apache APISIX 添加了许多插件,丰富了 Apache APISIX 的生态。从使用者的角度而言,更多样化的插件出现无疑是一件好事,它们在完善 Apache APISIX 高性能和低延迟的基础之上,满足了使用者对于网关的更多期望,即“一站式”和“多功能”。
+
+社区的贡献者们是如何为 Apache APISIX 开发插件的呢?Apache APISIX 博客上的文章似乎都没有详细讲述过开发插件的流程。那么这次我们换一个视角,从插件开发者的角度出发,一起来看看一款插件诞生的全过程吧!
+
+本篇文章记录了一个**没有后端经验的前端工程师**开发 `file-logger` 插件的过程。在详细说明实现过程之前,先向大家简单介绍下 `file-logger` 的功能。
+
+## 功能介绍
+
+`file-logger` 支持使用 Apache APISIX 插件元数据生成自定义的日志格式,用户可以通过 `file-logger` 插件将 JSON 格式的请求和响应数据附加到日志文件中,也可以将 Log 数据流推送到指定位置。
+
+试想,在监控某一个路由的访问日志时,很多时候我们关注的不仅是某些请求和响应数据的值,还希望将日志数据单独写入到指定的文件中。这时就可以使用 `file-logger` 插件来帮忙实现这些需求。
+
+
+
+具体实现过程中我们可以通过 `file-logger` 将日志数据单独写入指定的日志文件,简化监控和调试的过程。
+
+## 开发实现过程
+
+介绍完 `file-logger` 的功能之后,大家也算对这个插件有了更多的认识。下面为大家详细讲解一下,**没有服务端经验**的我是如何从 0 开始为 Apache APISIX 完成该插件并添加相应测试的。
+
+### 确定插件名称及优先级
+
+打开 [Apache APISIX 插件开发指南](https://apisix.apache.org/zh/docs/apisix/plugin-develop/#%E6%8F%92%E4%BB%B6%E5%91%BD%E5%90%8D%EF%BC%8C%E4%BC%98%E5%85%88%E7%BA%A7%E5%92%8C%E5%85%B6%E4%BB%96),按照先后顺序需要确定以下几项:
+
+1. 确定插件分类。
+2. 确定插件优先级,并更新 `conf/config-default.yaml` 文件。
+
+因为此次开发的 `file-logger` 属于日志类型的插件,所以我参考了 Apache APISIX 已有的日志插件的名称和排序,将 `file-logger` 放到了这里:
+
+
+
+咨询了其他插件的作者和社区的热心成员之后,最终确认了该插件的名称 `file-logger` 和优先级 `399`。
+
+> 需要注意的是,插件的优先级与执行顺序有关,优先级的值越大,执行越靠前。而插件名称的排序与执行顺序无关。
+
+### 创建最小可执行插件文件
+
+确认好插件名称和优先级后,便可在 `apisix/plugins/` 目录下创建我们的插件代码文件,这里有两点需要注意:
+
+- 如果是直接在 `apisix/plugins/` 目录下直接创建插件代码文件,就无需更改 `Makefile` 文件。
+- 如果你的插件有新建自己的代码目录,那么就需要更新 `Makefile 文件`,详细步骤可参考 [Apache APISIX 插件开发指南](https://apisix.apache.org/zh/docs/apisix/plugin-develop/#%E6%8F%92%E4%BB%B6%E5%91%BD%E5%90%8D%EF%BC%8C%E4%BC%98%E5%85%88%E7%BA%A7%E5%92%8C%E5%85%B6%E4%BB%96)。
+
+1. 下面我们在 `apisix/plugins/` 目录下创建 `file-logger.lua` 文件。
+2. 然后根据官方给出的 `example-plugin` 的例子做参考,来完成一个初始化版本。
+
+```lua
+-- 在头部引入我们所需要的模块
+local core = require("apisix.core")
+local plugin = require("apisix.plugin")
+local ngx = ngx
+
+-- 声明插件名称
+local plugin_name = "file-logger"
+
+-- 定义插件 schema 格式
+local schema = {
+ type = "object",
+ properties = {
+ path = {
+ type = "string"
+ },
+ },
+ required = {"path"}
+}
+
+-- 插件元数据 schema
+local metadata_schema = {
+ type = "object",
+ properties = {
+ log_format = log_util.metadata_schema_log_format
+ }
+}
+
+
+local _M = {
+ version = 0.1,
+ priority = 399,
+ name = plugin_name,
+ schema = schema,
+ metadata_schema = metadata_schema
+}
+
+-- 检查插件配置是否正确
+function _M.check_schema(conf, schema_type)
+ if schema_type == core.schema.TYPE_METADATA then
+ return core.schema.check(metadata_schema, conf)
+ end
+ return core.schema.check(schema, conf)
+end
+
+-- 日志阶段
+function _M.log(conf, ctx)
+ core.log.warn("conf: ", core.json.encode(conf))
+ core.log.warn("ctx: ", core.json.encode(ctx, true))
+end
+
+
+return _M
+```
+
+通过 `example-plugin` 的例子完成了一个最小的可用插件文件后,便可通过 `core.log.warn(core.json.encode(conf))` 和 `core.log.warn("ctx: ", core.json.encode(ctx, true))` 将插件的配置数据和请求相关的数据信息输出到 `error.log` 文件中去。
+
+### 启用插件并测试
+
+下面通过创建一条测试路由,来测试插件是否能成功将我们为其配置的插件数据和请求相关的数据信息,打印到错误日志文件中去。
+
+1. 在本地准备一个测试上游(本文中使用的测试上游是我在本地创建的 `127.0.0.1:3030/api/hello`)。
+2. 通过 `curl` 命令创建一条路由并启用我们新增的插件。
+
+ ```shell
+ curl http://127.0.0.1:9080/apisix/admin/routes/1 -H 'X-API-KEY: edd1c9f034335f136f87ad84b625c8f1' -X PUT -d '
+ {
+ "plugins": {
+ "file-logger": {
+ "path": "logs/file.log"
+ }
+ },
+ "upstream": {
+ "type": "roundrobin",
+ "nodes": {
+ "127.0.0.1:3030": 1
+ }
+ },
+ "uri": "/api/hello"
+ }'
+ ```
+
+ 接着就会看到一个 `200` 的状态码,表明已成功创建了路由。
+3. 运行 `curl` 命令向该路由发送请求,测试 `file-logger` 插件是否已经启动。
+
+ ```shell
+ curl -i http://127.0.0.1:9080/api/hello
+ HTTP/1.1 200 OK
+ ...
+ hello, world
+ ```
+
+4. 在 `logs/error.log` 文件中会有一条这样的记录:
+
+ 
+
+ 可以看到, 在 `conf` 参数中我们为插件配置的 `path: logs/file.log` 已经成功地保存了。到此我们已经成功创建了一个最小可用的插件,在日志阶段打印了 `conf` 和 `ctx` 参数的数据。
+
+ 之后,我们可以直接在该 `file-logger.lua` 插件代码文件中,为它编写核心功能。这里我们可以直接运行 `apisix reload` 命令来重新加载最新的插件代码,而无需重启 Apache APISIX。
+
+### 为 file-logger 插件编写核心功能
+
+`file-logger` 插件的主要功能是写日志数据。在经过询问和查阅资料后,我了解到 [Lua 的 IO 库](https://www.tutorialspoint.com/lua/lua_file_io.htm),于是确认了该插件的功能逻辑大致为以下几步:
+
+1. 每次接受请求之后,将日志数据输出到插件配置的 `path` 中去。
+ 1. 首先,在日志阶段通过 `conf` 拿到 `file-logger` 中 `path` 的值。
+ 2. 然后,通过 Lua IO 库来完成文件「创建」、「打开」、「写」、「刷新缓存」、「关闭」的操作。
+2. 处理「文件打开」失败、「文件创建」失败等错误。
+
+ ```lua
+ local function write_file_data(conf, log_message)
+ local msg, err = core.json.encode(log_message)
+ if err then
+ return core.log.error("message json serialization failed, error info : ", err)
+ end
+
+ local file, err = io_open(conf.path, 'a+')
+
+ if not file then
+ core.log.error("failed to open file: ", conf.path, ", error info: ", err)
+ else
+ local ok, err = file:write(msg, '\n')
+ if not ok then
+ core.log.error("failed to write file: ", conf.path, ", error info: ", err)
+ else
+ file:flush()
+ end
+ file:close()
+ end
+ end
+ ```
+
+3. 参考 `http-logger` 插件源码,完成了将日记数据传给写日志数据的方法和 metadata 的一些判断和处理。
+
+ ```lua
+ function _M.log(conf, ctx)
+ local metadata = plugin.plugin_metadata(plugin_name)
+ local entry
+
+ if metadata and metadata.value.log_format
+ and core.table.nkeys(metadata.value.log_format) > 0
+ then
+ entry = log_util.get_custom_format_log(ctx, metadata.value.log_format)
+ else
+ entry = log_util.get_full_log(ngx, conf)
+ end
+
+ write_file_data(conf, entry)
+ end
+ ```
+
+## 验证及添加测试
+
+### 验证收集日志记录
+
+因为在创建测试路由时已经启用了 `file-logger` 插件,并且配置了 `path` 为 `logs/file.log`,所以此时我们只需给测试路由发送请求,以验证日志收集的结果:
+
+```shell
+curl -i http://127.0.0.1:9080/api/hello
+```
+
+在对应的 `logs/file.log` 中我们可以看到每条记录都是以 JSON 的格式保存下来。将其中一条数据格式化之后如下所示:
+
+```json
+{
+ "server":{
+ "hostname":"....",
+ "version":"2.11.0"
+ },
+ "client_ip":"127.0.0.1",
+ "upstream":"127.0.0.1:3030",
+ "route_id":"1",
+ "start_time":1641285122961,
+ "latency":13.999938964844,
+ "response":{
+ "status":200,
+ "size":252,
+ "headers":{
+ "server":"APISIX\/2.11.0",
+ "content-type":"application\/json; charset=utf-8",
+ "date":"Tue, 04 Jan 2022 08:32:02 GMT",
+ "vary":"Accept-Encoding",
+ "content-length":"19",
+ "connection":"close",
+ "etag":"\"13-5j0ZZR0tI549fSRsYxl8c9vAU78\""
+ }
+ },
+ "service_id":"",
+ "request":{
+ "querystring":{
+
+ },
+ "size":87,
+ "method":"GET",
+ "headers":{
+ "host":"127.0.0.1:9080",
+ "accept":"*\/*",
+ "user-agent":"curl\/7.77.0"
+ },
+ "url":"http:\/\/127.0.0.1:9080\/api\/hello",
+ "uri":"\/api\/hello"
+ }
+}
+```
+
+至此验证收集日志记录的环节结束了,验证结果说明插件成功启动并返回了应有的数据。
+
+### 为插件添加测试
+
+对于 `add_block_preprocessor` 部分的代码,由于我没有学过 Perl ,所以在刚开始编写时比较困惑。在询问之后才了解到它的正确使用方式:如果我们在数据部分没有编写相关的 `request` 断言和 `no_error_log` 断言时,那么默认断言如下:
+
+```lua
+--- request
+GET /t
+--- no_error_log
+[error]
+```
+
+综合参考了一些其他的日志测试文件以后,我在 `t/plugin/` 目录下创建 `file-logger.t` 文件。
+
+每一份测试文件都由 `__DATA__` 分为序言部分和数据部分。由于目前官网测试相关文档没有明确归档分类,更多具体内容可参考文末的相关资料。下面我为大家列出参考相关资料后完成的其中一个测试用例:
+
+```perl
+use t::APISIX 'no_plan';
+
+no_long_string();
+no_root_location();
+
+add_block_preprocessor(sub {
+ my ($block) = @_;
+
+ if (! $block->request) {
+ $block->set_value("request", "GET /t");
+ }
+
+ if (! $block->no_error_log && ! $block->error_log) {
+ $block->set_value("no_error_log", "[error]");
+ }
+});
+
+
+run_tests;
+
+__DATA__
+
+=== TEST 1: sanity
+--- config
+ location /t {
+ content_by_lua_block {
+ local configs = {
+ -- full configuration
+ {
+ path = "file.log"
+ },
+ -- property "path" is required
+ {
+ path = nil
+ }
+ }
+
+ local plugin = require("apisix.plugins.file-logger")
+
+ for i = 1, #configs do
+ ok, err = plugin.check_schema(configs[i])
+ if err then
+ ngx.say(err)
+ else
+ ngx.say("done")
+ end
+ end
+ }
+ }
+--- response_body_like
+done
+property "path" is required
+```
+
+至此插件添加测试环节结束。
+
+## 总结
+
+以上就是我作为一个后端新手,从 0 开始实现一款 Apache APISIX 插件的全过程。在开发插件的过程中确实碰到了很多坑,比较幸运的是 Apache APISIX 社区里面有很多热心的大佬帮我解惑,使得 `file-logger` 插件的开发和测试全程都比较顺畅。如果你对这个插件感兴趣,或想要查看插件详情,可以参考 [Apache APISIX 官方文档](https://apisix.apache.org/zh/docs/apisix/next/plugins/file-logger/)。
+
+目前,Apache APISIX 也在开发其他插件以支持集成更多服务,如果您对此感兴趣,欢迎随时在 [GitHub Discussion](https://github.com/apache/apisix/discussions) 中发起讨论,也可通过[邮件列表](https://apisix.apache.org/docs/general/subscribe-guide)进行交流讨论。
+
+## 参考资料
+
+- [Apache APISIX 插件开发指南](https://apisix.apache.org/zh/docs/apisix/plugin-develop/)
+- [Lua - File I/O 使用指南](https://www.tutorialspoint.com/lua/lua_file_io.htm)
+- [如何运行 Apache APISIX 测试案例](https://apisix.apache.org/zh/docs/apisix/how-to-build/#%E6%AD%A5%E9%AA%A44%EF%BC%9A%E8%BF%90%E8%A1%8C%E6%B5%8B%E8%AF%95%E6%A1%88%E4%BE%8B)
+- [如何编写测试用例](https://apisix.apache.org/zh/docs/apisix/plugin-develop/#%E7%BC%96%E5%86%99%E6%B5%8B%E8%AF%95%E7%94%A8%E4%BE%8B)
+- [Apache APISIX 测试框架介绍](https://apisix.apache.org/zh/docs/apisix/internal/testing-framework/)
+- [test-nginx 相关的一些 API 介绍](https://metacpan.org/pod/Test%3A%3ANginx%3A%3ASocket)