You are viewing a plain text version of this content. The canonical link for it is here.
Posted to notifications@apisix.apache.org by li...@apache.org on 2021/09/10 08:21:28 UTC
[apisix-website] branch master updated: docs: add transmitted blog
of APISIX&Nginx (#578)
This is an automated email from the ASF dual-hosted git repository.
liuxiran pushed a commit to branch master
in repository https://gitbox.apache.org/repos/asf/apisix-website.git
The following commit(s) were added to refs/heads/master by this push:
new 13fba79 docs: add transmitted blog of APISIX&Nginx (#578)
13fba79 is described below
commit 13fba79a5a59ea6422fd251bb6234291ef028403
Author: Sylvia <39...@users.noreply.github.com>
AuthorDate: Fri Sep 10 16:21:23 2021 +0800
docs: add transmitted blog of APISIX&Nginx (#578)
---
website/blog/2021-08-10-apisix-nginx.md | 514 ++++++++++++++++++++++++++++++++
1 file changed, 514 insertions(+)
diff --git a/website/blog/2021-08-10-apisix-nginx.md b/website/blog/2021-08-10-apisix-nginx.md
new file mode 100644
index 0000000..2a1aba3
--- /dev/null
+++ b/website/blog/2021-08-10-apisix-nginx.md
@@ -0,0 +1,514 @@
+---
+title: "Apache APISIX 架构分析:如何动态管理 Nginx 集群?"
+keywords:
+- API 网关
+- Apache APISIX
+- Nginx
+- Lua
+- 动态管理
+date: "2021-08-10"
+description: 本文转发自陶辉个人博客,主要介绍了基于APISIX 2.8 版本、OpenResty 1.19.3.2 版本以及 Nginx 1.19.3 版本进行 Apache APISIX 实现 REST API 远程控制 Nginx 集群的原理讲解。
+tags: [technology]
+---
+
+<!--truncate-->
+> 作者陶辉
+
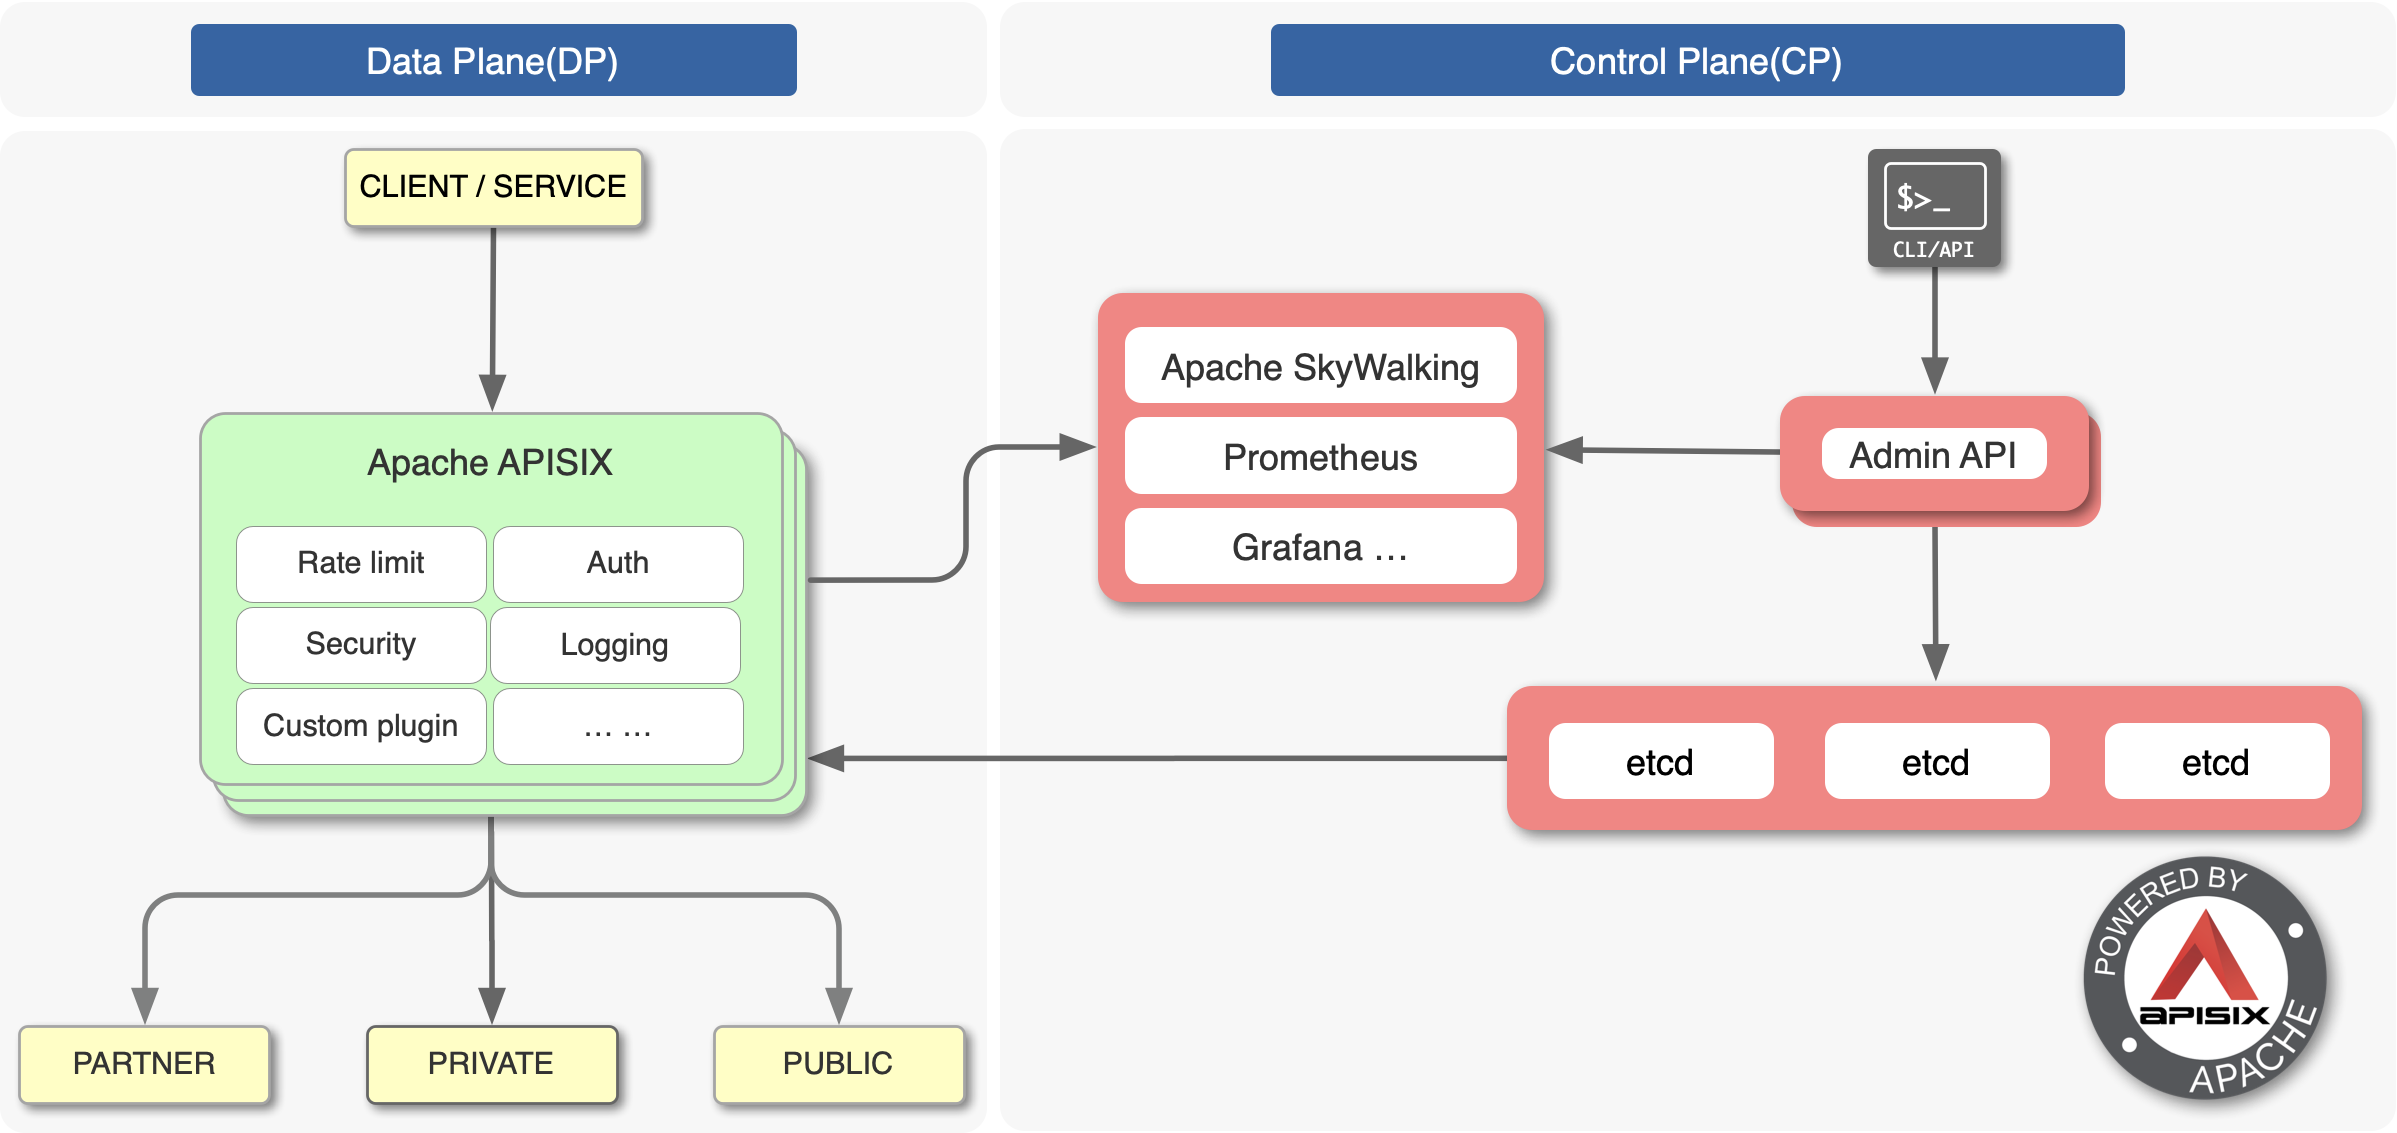
+开源版 Nginx 最为人诟病的就是不具备动态配置、远程 API 及集群管理的能力,而 Apache APISIX 作为 Apache 基金会毕业的开源七层网关,基于 etcd 和 Lua 实现了对 Nginx 集群的动态管理。
+
+
+
+让 Nginx 具备动态、集群管理能力并不容易,因为这将面临以下问题:
+
+* 微服务架构使得上游服务种类多、数量大,这导致路由规则、上游 Server 的变更极为频率。而 Nginx 的路由匹配是基于静态的 Trie 前缀树、哈希表、正则数组实现的,一旦`server_name`、`location` 变动,不执行 reload 就无法实现配置的动态变更
+* Nginx 将自己定位于 ADC 边缘负载均衡,因此它对上游并不支持 HTTP2 协议。这增大了 OpenResty 生态实现 etcd gRPC 接口的难度,因此通过 watch 机制接收配置变更必然效率低下
+* 多进程架构增大了 Worker 进程间的数据同步难度,必须选择 1 个低成本的实现机制,保证每个 Nginx 节点、Worker 进程都持有最新的配置
+
+Apache APISIX 基于 Lua 定时器及 lua-resty-etcd 模块实现了配置的动态管理,本文将基于 APISIX 2.8 版本、OpenResty 1.19.3.2 版本以及 Nginx 1.19.3 版本进行 Apache APISIX 实现 REST API 远程控制 Nginx 集群的原理。
+
+## 基于 etcd watch 机制的配置同步方案
+
+管理集群必须依赖中心化的配置,etcd 就是这样一个数据库。Apache APISIX 没有选择关系型数据库作为配置中心,是因为 etcd 具有以下 2 个优点:
+
+* etcd 采用类 Paxos 的 Raft 协议保障了数据一致性,它是去中心化的分布式数据库,可靠性高于关系数据库
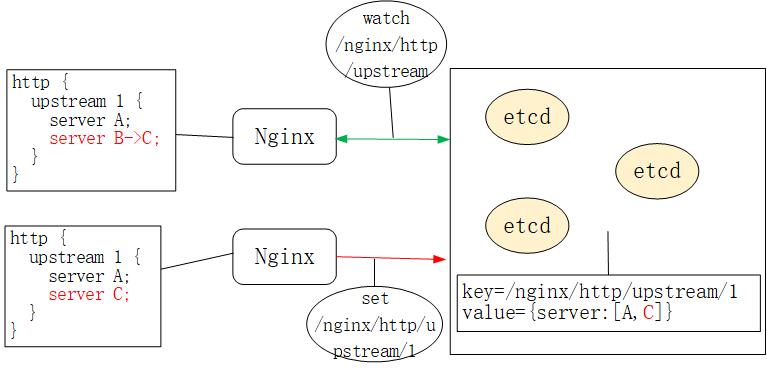
+* etcd 的 watch 机制允许客户端监控某个 key 的变动,即,若类似 /nginx/http/upstream 这种 key 的 value 值发生变动,watch 客户端会立刻收到通知,如下图所示:
+
+
+因此,不同于 Orange 和 Kong,Apache APISIX 采用了 etcd 作为中心化的配置组件。你可以在生产环境的 Apache APISIX 中通过 etcdctl 看到如下类似配置:
+
+```yaml
+# etcdctl get "/apisix/upstreams/1"
+/apisix/upstreams/1
+{"hash_on":"vars","nodes":{"httpbin.org:80":1},"create_time":1627982128,"update_time":1627982128,"scheme":"http","type":"roundrobin","pass_host":"pass","id":"1"}
+```
+
+其中,/apisix 这个前缀可以在 conf/config.yaml 中修改,比如:
+
+```yaml
+etcd:
+ host:
+ - "http://127.0.0.1:2379"
+ prefix: /apisix # apisix configurations prefix
+```
+
+而 upstreams/1 就等价于 nginx.conf 中的 http { upstream 1 {} } 配置。类似关键字还有 /apisix/services/、/apisix/routes/ 等。
+
+那么,Nginx 是怎样通过 watch 机制获取到 etcd 配置数据变化的呢?有没有新启动一个 agent 进程?它通过 HTTP/1.1 还是 gRPC 与 etcd 通讯的?
+
+## ngx.timer.at 定时器
+
+Apache APISIX 并没有启动 Nginx 以外的进程与 etcd 通讯。实际上它是通过 `ngx.timer.at` 这个定时器实现了 watch 机制。为了方便对 OpenResty 不太了解的同学理解,我们先来看看 Nginx 中的定时器是如何实现的,它是 watch 机制实现的基础。
+
+### Nginx 的红黑树定时器
+
+Nginx 采用了 epoll + nonblock socket 这种多路复用机制实现事件处理模型,其中每个 worker 进程会循环处理网络 IO 及定时器事件:
+
+```c
+//参见 Nginx 的 src/os/unix/ngx_process_cycle.c 文件
+static void
+ngx_worker_process_cycle(ngx_cycle_t *cycle, void *data)
+{
+ for ( ;; ) {
+ ngx_process_events_and_timers(cycle);
+ }
+}
+
+// 参见 ngx_proc.c 文件
+void
+ngx_process_events_and_timers(ngx_cycle_t *cycle)
+{
+ timer = ngx_event_find_timer();
+ (void) ngx_process_events(cycle, timer, flags);
+ ngx_event_process_posted(cycle, &ngx_posted_accept_events);
+ ngx_event_expire_timers();
+ ngx_event_process_posted(cycle, &ngx_posted_events);
+}
+```
+
+`ngx_event_expire_timers` 函数会调用所有超时事件的 handler 方法。事实上,定时器是由[红黑树](https://zh.wikipedia.org/zh-hans/%E7%BA%A2%E9%BB%91%E6%A0%91)(一种平衡有序二叉树)实现的,其中 key 是每个事件的绝对过期时间。这样,只要将最小节点与当前时间做比较,就能快速找到过期事件。
+
+### OpenResty 的 Lua 定时器
+
+当然,以上 C 函数开发效率很低。因此,OpenResty 封装了 Lua 接口,通过 [ngx.timer.at](https://github.com/openresty/lua-nginx-module#ngxtimerat) 将 `ngx_timer_add` 这个 C 函数暴露给了 Lua 语言:
+
+```c
+//参见 OpenResty /ngx_lua-0.10.19/src/ngx_http_lua_timer.c 文件
+void
+ngx_http_lua_inject_timer_api(lua_State *L)
+{
+ lua_createtable(L, 0 /* narr */, 4 /* nrec */); /* ngx.timer. */
+
+ lua_pushcfunction(L, ngx_http_lua_ngx_timer_at);
+ lua_setfield(L, -2, "at");
+
+ lua_setfield(L, -2, "timer");
+}
+static int
+ngx_http_lua_ngx_timer_at(lua_State *L)
+{
+ return ngx_http_lua_ngx_timer_helper(L, 0);
+}
+static int
+ngx_http_lua_ngx_timer_helper(lua_State *L, int every)
+{
+ ngx_event_t *ev = NULL;
+ ev->handler = ngx_http_lua_timer_handler;
+ ngx_add_timer(ev, delay);
+}
+```
+
+因此,当我们调用 `ngx.timer.at` Lua 定时器时,就是在 Nginx 的红黑树定时器里加入了 `ngx_http_lua_timer_handler` 回调函数,这个函数不会阻塞 Nginx。
+
+下面我们来看看 Apache APISIX 是怎样使用 `ngx.timer.at` 的。
+
+### Apache APISIX 基于定时器实现的 watch 机制
+
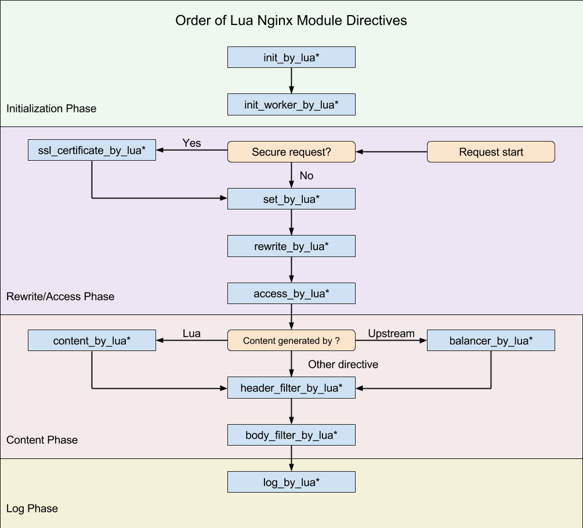
+Nginx 框架为 C 模块开发提供了许多钩子,而 OpenResty 将部分钩子以 Lua 语言形式暴露了出来,如下图所示:
+
+
+
+Apache APISIX 仅使用了其中 8 个钩子(注意,APISIX 没有使用 `set_by_lua` 和 `rewrite_by_lua`,rewrite 阶段的插件其实是 Apache APISIX 自定义的,与 Nginx 无关),包括:
+
+* init_by_lua:Master 进程启动时的初始化
+* init_worker_by_lua:每个 Worker 进程启动时的初始化(包括 privileged agent 进程的初始化,这是实现 Java 等多语言插件远程 RPC 调用的关键)
+* ssl_certificate_by_lua:在处理 TLS 握手时,openssl 提供了一个钩子,OpenResty 通过修改 Nginx 源码以 Lua 方式暴露了该钩子
+* access_by_lua:接收到下游的 HTTP 请求头部后,在此匹配 Host 域名、URI、Method 等路由规则,并选择 Service、Upstream 中的插件及上游 Server
+* balancer_by_lua:在 content 阶段执行的所有反向代理模块,在选择上游 Server 时都会回调 `init_upstream` 钩子函数,OpenResty 将其命名为 `balancer_by_lua`
+* header_filter_by_lua:将 HTTP 响应头部发送给下游前执行的钩子
+* body_filter_by_lua:将 HTTP 响应包体发送给下游前执行的钩子
+* log_by_lua:记录 access 日志时的钩子
+
+准备好上述知识后,我们就可以回答 Apache APISIX 是怎样接收 etcd 数据的更新了。
+
+#### nginx.conf 的生成方式
+
+每个 Nginx Worker 进程都会在 `init_worker_by_lua` 阶段通过 `http_init_worker` 函数启动定时器:
+
+```lua
+init_worker_by_lua_block {
+ apisix.http_init_worker()
+}
+```
+
+你可能很好奇,下载 Apache APISIX 源码后没有看到 nginx.conf,这段配置是哪来的?
+
+这里的 nginx.conf 实际是由 Apache APISIX 的启动命令实时生成的。当你执行 make run 时,它会基于 Lua 模板 apisix/cli/ngx_tpl.lua 文件生成 nginx.conf。请注意,这里的模板规则是 OpenResty 自实现的,语法细节参见 [lua-resty-template](https://github.com/bungle/lua-resty-template)。生成 nginx.conf 的具体代码参见 apisix/cli/ops.lua 文件:
+
+```lua
+local template = require("resty.template")
+local ngx_tpl = require("apisix.cli.ngx_tpl")
+local function init(env)
+ local yaml_conf, err = file.read_yaml_conf(env.apisix_home)
+ local conf_render = template.compile(ngx_tpl)
+ local ngxconf = conf_render(sys_conf)
+
+ local ok, err = util.write_file(env.apisix_home .. "/conf/nginx.conf",
+ ngxconf)
+```
+
+当然,Apache APISIX 允许用户修改 nginx.conf 模板中的部分数据,具体方法是模仿 conf/config-default.yaml 的语法修改 conf/config.yaml 配置。其实现原理参见 `read_yaml_conf` 函数:
+
+```conf
+function _M.read_yaml_conf(apisix_home)
+ local local_conf_path = profile:yaml_path("config-default")
+ local default_conf_yaml, err = util.read_file(local_conf_path)
+
+ local_conf_path = profile:yaml_path("config")
+ local user_conf_yaml, err = util.read_file(local_conf_path)
+ ok, err = merge_conf(default_conf, user_conf)
+end
+```
+
+可见,ngx_tpl.lua 模板中仅部分数据可由 yaml 配置中替换,其中 conf/config-default.yaml 是官方提供的默认配置,而 conf/config.yaml 则是由用户自行覆盖的自定义配置。如果你觉得仅替换模板数据还不够,大可直接修改 ngx_tpl 模板。
+
+#### Apache APISIX 获取 etcd 通知的方式
+
+Apache APISIX 将需要监控的配置以不同的前缀存入了 etcd,目前包括以下 11 种:
+
+* /apisix/consumers/:Apache APISIX 支持以 consumer 抽象上游种类
+* /apisix/global_rules/:全局通用的规则
+* /apisix/plugin_configs/:可以在不同 Router 间复用的 Plugin
+* /apisix/plugin_metadata/:部分插件的元数据
+* /apisix/plugins/:所有 Plugin 插件的列表
+* /apisix/proto/:当透传 gRPC 协议时,部分插件需要转换协议内容,该配置存储 protobuf 消息定义
+* /apisix/routes/:路由信息,是 HTTP请 求匹配的入口,可以直接指定上游 Server,也可以挂载 services 或者 upstream
+* /apisix/services/:可以将相似的 router 中的共性部分抽象为 services,再挂载 plugin
+* /apisix/ssl/:SSL 证书公、私钥及相关匹配规则
+* /apisix/stream_routes/:OSI 四层网关的路由匹配规则
+* /apisix/upstreams/:对一组上游 Server 主机的抽象
+
+这里每类配置对应的处理逻辑都不相同,因此 Apache APISIX 抽象出 apisix/core/config_etcd.lua 文件,专注 etcd 上各类配置的更新维护。在 `http_init_worker` 函数中每类配置都会生成 1 个 config_etcd 对象:
+
+```lua
+function _M.init_worker()
+ local err
+ plugin_configs, err = core.config.new("/plugin_configs", {
+ automatic = true,
+ item_schema = core.schema.plugin_config,
+ checker = plugin_checker,
+ })
+end
+```
+
+而在 `config_etcd` 的 new 函数中,则会循环注册 `_automatic_fetch` 定时器:
+
+```lua
+function _M.new(key, opts)
+ ngx_timer_at(0, _automatic_fetch, obj)
+end
+```
+
+`_automatic_fetch` 函数会反复执行 `sync_data` 函数(包装到 xpcall 之下是为了捕获异常):
+
+```lua
+local function _automatic_fetch(premature, self)
+ local ok, err = xpcall(function()
+ local ok, err = sync_data(self)
+ end, debug.traceback)
+ ngx_timer_at(0, _automatic_fetch, self)
+end
+```
+
+`sync_data` 函数将通过 etcd 的 watch 机制获取更新,它的实现机制我们接下来会详细分析。
+
+所以总结来看,Apache APISIX 在每个 Nginx Worker 进程的启动过程中,通过 `ngx.timer.at` 函数将 `_automatic_fetch` 插入定时器。`_automatic_fetch` 函数执行时会通过 `sync_data` 函数,基于 watch 机制接收 etcd 中的配置变更通知,这样,每个 Nginx 节点、Worker 进程都将保持最新的配置。如此设计还有 1 个明显的优点:etcd 中的配置直接写入 Nginx Worker 进程中,这样处理请求时就能直接使用新配置,无须在进程间同步配置,这要比启动 1 个 agent 进程更简单!
+
+### lua-resty-etcd 库的 HTTP/1.1 协议
+
+`sync_data` 函数到底是怎样获取 etcd 的配置变更消息的呢?先看下 `sync_data` 源码:
+
+```lua
+local etcd = require("resty.etcd")
+etcd_cli, err = etcd.new(etcd_conf)
+
+local function sync_data(self)
+ local dir_res, err = waitdir(self.etcd_cli, self.key, self.prev_index + 1, self.timeout)
+end
+
+local function waitdir(etcd_cli, key, modified_index, timeout)
+ local res_func, func_err, http_cli = etcd_cli:watchdir(key, opts)
+ if http_cli then
+ local res_cancel, err_cancel = etcd_cli:watchcancel(http_cli)
+ end
+end
+```
+
+这里实际与 etcd 通讯的是 [lua-resty-etcd](https://github.com/api7/lua-resty-etcd) 库。它提供的 watchdir 函数用于接收 etcd 发现 key 目录对应 value 变更后发出的通知。
+
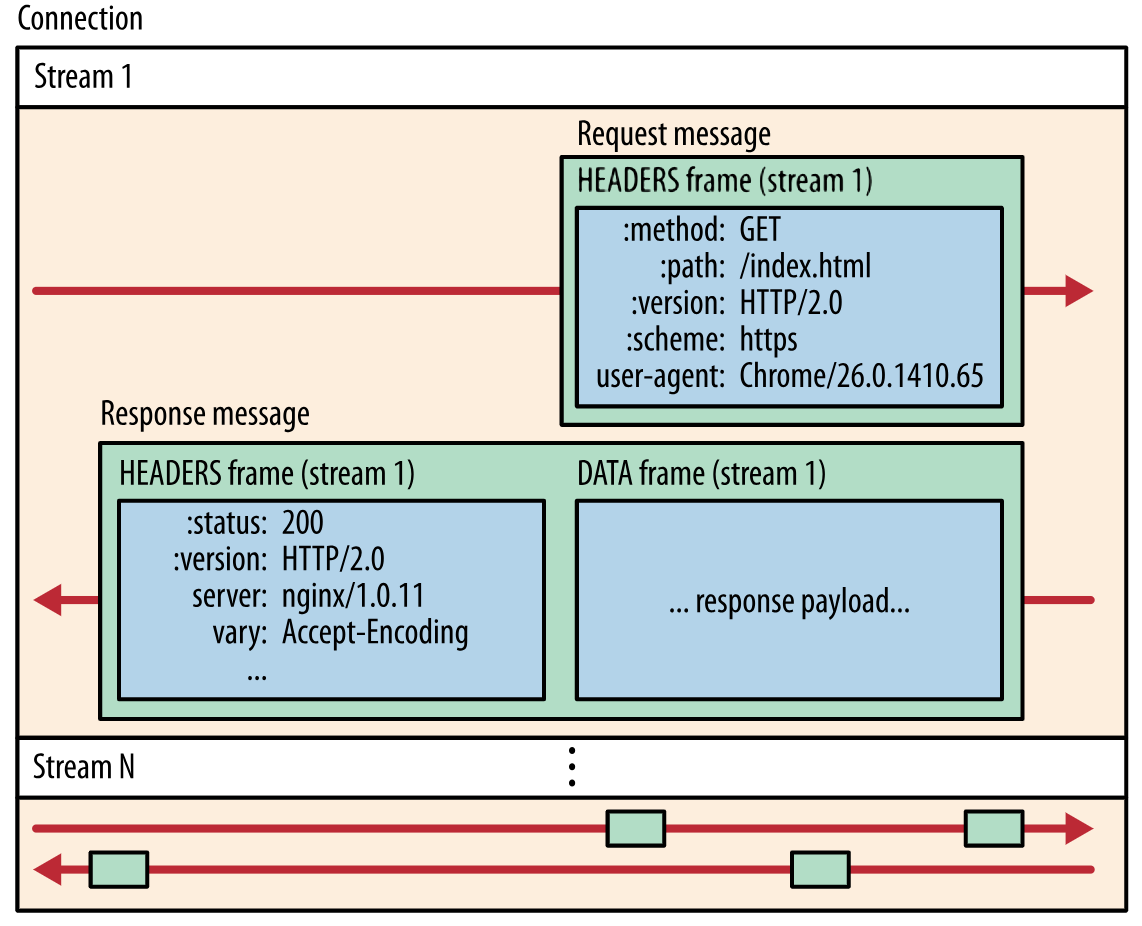
+watchcancel 函数又是做什么的呢?这其实是 OpenResty 生态的缺憾导致的。etcd v3 已经支持高效的 gRPC 协议(底层为 HTTP2 协议)。你可能听说过,HTTP2 不但具备多路复用的能力,还支持服务器直接推送消息,从 HTTP3 协议对照理解 HTTP2 :
+
+
+
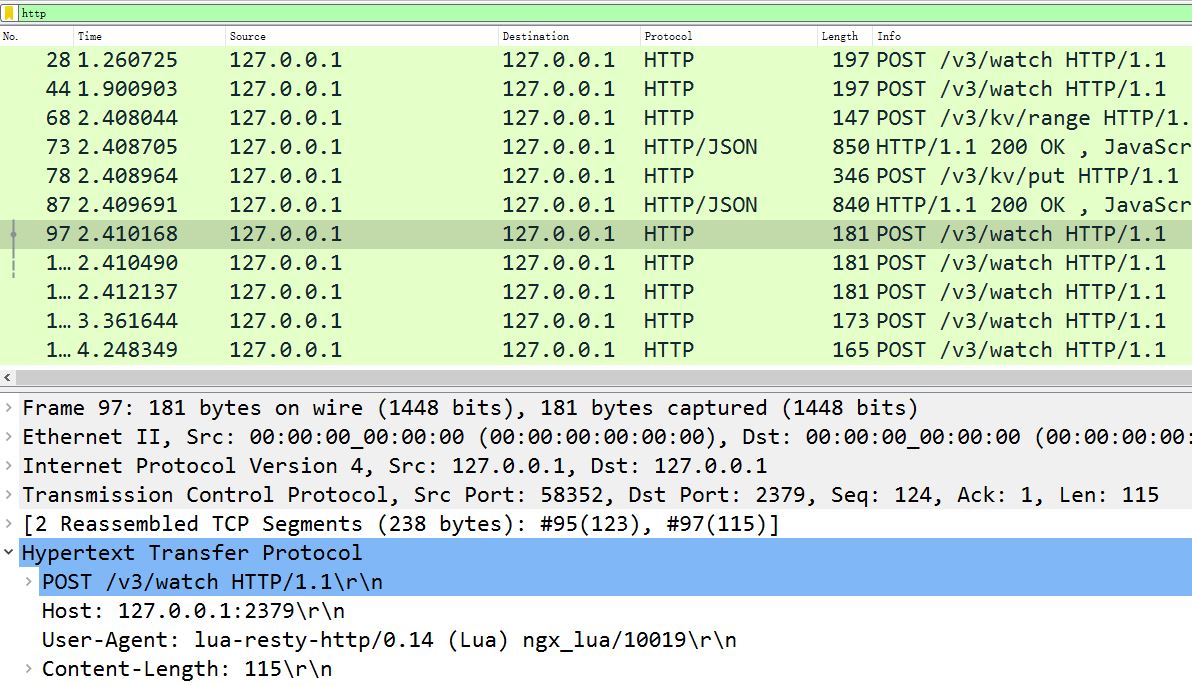
+然而,Lua 生态目前并不支持 HTTP2 协议,所以 lua-resty-etcd 库实际是通过低效的 HTTP/1.1 协议与 etcd 通讯的,因此接收 /watch 通知也是通过带有超时的 /v3/watch 请求完成的。这个现象其实是由 2 个原因造成的:
+
+1. Nginx 将自己定位为边缘负载均衡,因此上游必然是企业内网,时延低、带宽大,所以对上游协议不必支持 HTTP2 协议
+2. 当 Nginx 的 upstream 不能提供 HTTP2 机制给 Lua 时,Lua 只能基于 cosocket 自己实现了。HTTP2 协议非常复杂,目前还没有生产环境可用的 HTTP2 cosocket 库。
+
+使用 HTTP/1.1 的 lua-resty-etcd 库其实很低效,如果你在 APISIX 上抓包,会看到频繁的 POST 报文,其中 URI 为 /v3/watch,而 Body 是 Base64 编码的 watch 目录:
+
+
+
+我们可以验证下 `watchdir` 函数的实现细节:
+
+```lua
+-- lib/resty/etcd/v3.lua 文件
+function _M.watchdir(self, key, opts)
+ return watch(self, key, attr)
+end
+
+local function watch(self, key, attr)
+ callback_fun, err, http_cli = request_chunk(self, 'POST', '/watch',
+ opts, attr.timeout or self.timeout)
+ return callback_fun
+end
+
+local function request_chunk(self, method, path, opts, timeout)
+ http_cli, err = utils.http.new()
+ -- 发起 TCP 连接
+ endpoint, err = http_request_chunk(self, http_cli)
+ -- 发送 HTTP 请求
+ res, err = http_cli:request({
+ method = method,
+ path = endpoint.api_prefix .. path,
+ body = body,
+ query = query,
+ headers = headers,
+ })
+end
+
+local function http_request_chunk(self, http_cli)
+ local endpoint, err = choose_endpoint(self)
+ ok, err = http_cli:connect({
+ scheme = endpoint.scheme,
+ host = endpoint.host,
+ port = endpoint.port,
+ ssl_verify = self.ssl_verify,
+ ssl_cert_path = self.ssl_cert_path,
+ ssl_key_path = self.ssl_key_path,
+ })
+
+ return endpoint, err
+end
+```
+
+可见,Apache APISIX 在每个 worker 进程中,**通过 `ngx.timer.at` 和 lua-resty-etcd 库反复请求 etcd,以此保证每个 Worker 进程中都含有最新的配置。**
+
+## APISIX 配置与插件的远程变更
+
+接下来,我们看看怎样远程修改 etcd 中的配置。
+
+我们当然可以直接通过 gRPC 接口修改 etcd 中相应 key 的内容,再基于上述的 watch 机制使得 Nginx 集群自动更新配置。然而,这样做的风险很大,因为配置请求没有经过校验,进面导致配置数据与 Nginx 集群不匹配。
+
+### 通过 Nginx 的 /apisix/admin/ 接口修改配置
+
+Apache APISIX 提供了这么一种机制:访问任意 1 个 Nginx 节点,通过其 Worker 进程中的 Lua 代码校验请求成功后,再由 /v3/dv/put 接口写入 etcd 中。下面我们来看看 Apache APISIX 是怎么实现的。
+
+首先,make run 生成的 nginx.conf 会自动监听 9080 端口(可通过 config.yaml 中 apisix.node_listen 配置修改),当 `apisix.enable_admin` 设置为 true 时,nginx.conf 就会生成以下配置:
+
+```yaml
+server {
+ listen 9080 default_server reuseport;
+
+ location/apisix/admin {
+ content_by_lua_block {
+ apisix.http_admin()
+ }
+ }
+}
+
+```
+
+这样,Nginx 接收到的 /apisix/admin 请求将被 `http_admin` 函数处理:
+
+```lua
+-- /apisix/init.lua 文件
+function _M.http_admin()
+ local ok = router:dispatch(get_var("uri"), {method = get_method()})
+end
+```
+
+admin 接口能够处理的 API 参见 [GitHub](https://github.com/apache/apisix/blob/release/2.8/docs/zh/latest/admin-api.md) 文档,其中,当 method 方法与 URI 不同时,dispatch 会执行不同的处理函数,其依据如下:
+
+```lua
+-- /apisix/admin/init.lua 文件
+local uri_route = {
+ {
+ paths = [[/apisix/admin/*]],
+ methods = {"GET", "PUT", "POST", "DELETE", "PATCH"},
+ handler = run,
+ },
+ {
+ paths = [[/apisix/admin/stream_routes/*]],
+ methods = {"GET", "PUT", "POST", "DELETE", "PATCH"},
+ handler = run_stream,
+ },
+ {
+ paths = [[/apisix/admin/plugins/list]],
+ methods = {"GET"},
+ handler = get_plugins_list,
+ },
+ {
+ paths = reload_event,
+ methods = {"PUT"},
+ handler = post_reload_plugins,
+ },
+}
+```
+
+比如,当通过 /apisix/admin/upstreams/1 和 PUT 方法创建 1 个 Upstream 上游时:
+
+```shell
+curl "http://127.0.0.1:9080/apisix/admin/upstreams/1" -H "X-API-KEY: edd1c9f034335f136f87ad84b625c8f1" -X PUT -d '
+> {
+> "type": "roundrobin",
+> "nodes": {
+> "httpbin.org:80": 1
+> }
+> }'
+{"action":"set","node":{"key":"\/apisix\/upstreams\/1","value":{"hash_on":"vars","nodes":{"httpbin.org:80":1},"create_time":1627982128,"update_time":1627982128,"scheme":"http","type":"roundrobin","pass_host":"pass","id":"1"}}}
+```
+
+你会在 error.log 中会看到如下日志(想看到这行日志,必须将 config.yaml 中的 nginx_config.error_log_level 设为 INFO):
+
+```yaml
+2021/08/03 17:15:28 [info] 16437#16437: *23572 [lua] init.lua:130: handler(): uri: ["","apisix","admin","upstreams","1"], client: 127.0.0.1, server: _, request: "PUT /apisix/admin/upstreams/1 HTTP/1.1", host: "127.0.0.1:9080"
+```
+
+这行日志实际是由 /apisix/admin/init.lua 中的 `run` 函数打印的,它的执行依据是上面的 uri_route 字典。我们看下 run 函数的内容:
+
+```lua
+-- /apisix/admin/init.lua文件
+local function run()
+ local uri_segs = core.utils.split_uri(ngx.var.uri)
+ core.log.info("uri: ", core.json.delay_encode(uri_segs))
+
+ local seg_res, seg_id = uri_segs[4], uri_segs[5]
+ local seg_sub_path = core.table.concat(uri_segs, "/", 6)
+
+ local resource = resources[seg_res]
+ local code, data = resource[method](seg_id, req_body, seg_sub_path,
+ uri_args)
+end
+```
+
+这里 `resource[method]` 函数又被做了 1 次抽象,它是由 resources 字典决定的:
+
+```lua
+-- /apisix/admin/init.lua文件
+local resources = {
+ routes = require("apisix.admin.routes"),
+ services = require("apisix.admin.services"),
+ upstreams = require("apisix.admin.upstreams"),
+ consumers = require("apisix.admin.consumers"),
+ schema = require("apisix.admin.schema"),
+ ssl = require("apisix.admin.ssl"),
+ plugins = require("apisix.admin.plugins"),
+ proto = require("apisix.admin.proto"),
+ global_rules = require("apisix.admin.global_rules"),
+ stream_routes = require("apisix.admin.stream_routes"),
+ plugin_metadata = require("apisix.admin.plugin_metadata"),
+ plugin_configs = require("apisix.admin.plugin_config"),
+}
+```
+
+因此,上面的 curl 请求将被 /apisix/admin/upstreams.lua 文件的 `put` 函数处理,看下 `put` 函数的实现:
+
+```lua
+-- /apisix/admin/upstreams.lua文件
+function _M.put(id, conf)
+ -- 校验请求数据的合法性
+ local id, err = check_conf(id, conf, true)
+ local key = "/upstreams/" .. id
+ core.log.info("key: ", key)
+ -- 生成etcd中的配置数据
+ local ok, err = utils.inject_conf_with_prev_conf("upstream", key, conf)
+ -- 写入etcd
+ local res, err = core.etcd.set(key, conf)
+end
+
+-- /apisix/core/etcd.lua
+local function set(key, value, ttl)
+ local res, err = etcd_cli:set(prefix .. key, value, {prev_kv = true, lease = data.body.ID})
+end
+```
+
+最终新配置被写入 etcd 中。可见,Nginx 会校验数据再写入 etcd,这样其他 Worker 进程、Nginx 节点都将通过 watch 机制接收到正确的配置。上述流程你可以通过 error.log 中的日志验证:
+
+```yaml
+2021/08/03 17:15:28 [info] 16437#16437: *23572 [lua] upstreams.lua:72: key: /upstreams/1, client: 127.0.0.1, server: _, request: "PUT /apisix/admin/upstreams/1 HTTP/1.1", host: "127.0.0.1:9080"
+```
+
+### 为什么新配置不 reload 就可以生效?
+
+我们再来看 admin 请求执行完 Nginx Worker 进程可以立刻生效的原理。
+
+开源版 Nginx 的请求匹配是基于 3 种不同的容器进行的:
+
+1. 将静态哈希表中的 `server_name` 配置与请求的 `Host` 域名匹配
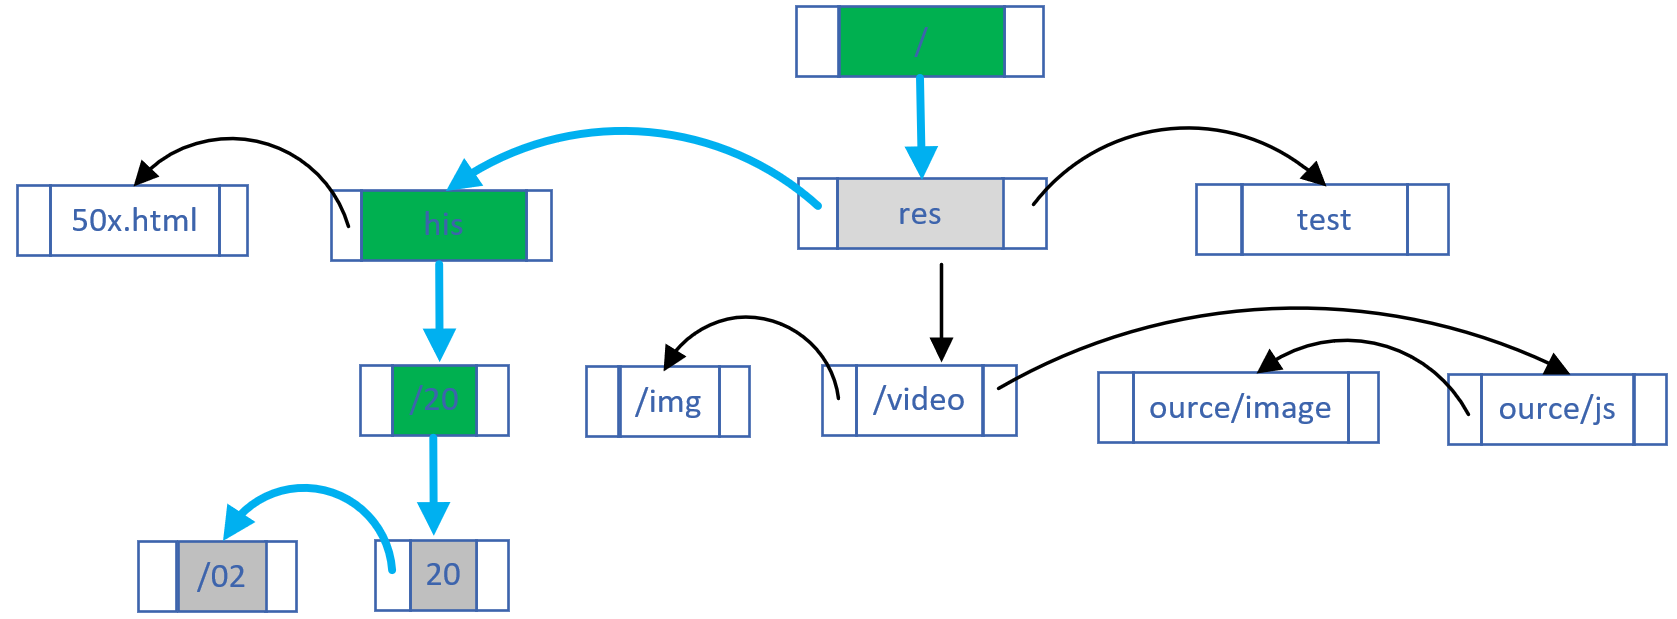
+2. 其次将静态 Trie 前缀树中的 location 配置与请求的 URI 匹配
+
+ 
+
+3. 在上述两个过程中,如果含有正则表达式,则基于数组顺序(在 nginx.conf 中出现的次序)依次匹配。
+
+上述过程虽然执行效率极高,却是写死在 find_config 阶段及 Nginx HTTP 框架中的,一旦变更必须在 nginx -s reload 后才能生效。因此,Apache APISIX 索性完全抛弃了上述流程。
+
+从 nginx.conf 中可以看到,访问任意域名、URI 的请求都会匹配到 `http_access_phase` 这个 lua函数:
+
+```conf
+server {
+ server_name _;
+ location / {
+ access_by_lua_block {
+ apisix.http_access_phase()
+ }
+ proxy_pass $upstream_scheme://apisix_backend$upstream_uri;
+ }
+}
+```
+
+而在 `http_access_phase` 函数中,将会基于 1 个用 C 语言实现的基数前缀树匹配 Method、域名和 URI(仅支持通配符,不支持正则表达式),这个库就是 [lua-resty-radixtree](https://github.com/api7/lua-resty-radixtree)。每当路由规则发生变化,Lua 代码就会重建这棵基数树:
+
+```lua
+function _M.match(api_ctx)
+ if not cached_version or cached_version ~= user_routes.conf_version then
+ uri_router = base_router.create_radixtree_uri_router(user_routes.values,
+ uri_routes, false)
+ cached_version = user_routes.conf_version
+ end
+end
+```
+
+这样,路由变化后就可以不 reload 而使其生效。Plugin 启用、参数及顺序调整的规则与此类似。
+
+最后再提下 Script,它与 Plugin 是互斥的。之前的动态调整改的只是配置,事实上 Lua JIT 的及时编译还提供了另外一个杀手锏 loadstring,它可以将字符串转换为 Lua 代码。因此,在 etcd 中存储 Lua 代码并设置为 Script 后,就可以将其传送到 Nginx 上处理请求了。
+
+## 总结
+
+Nginx 集群的管理必须依赖中心化配置组件,而高可靠又具备 watch 推送机制的 etcd 无疑是最合适的选择!虽然当下 Resty 生态没有 gRPC 客户端,但每个 Worker 进程直接通过 HTTP/1.1 协议同步 etcd 配置仍不失为一个好的方案。
+
+动态修改 Nginx 配置的关键在于2点:Lua 语言的灵活度远高于 nginx.conf 语法,而且 Lua 代码可以通过 loadstring 从外部数据中导入。当然,为了保障路由匹配的执行效率,Apache APISIX 通过 C 语言实现了前缀基数树,基于 Host、Method、URI 进行请求匹配,在保障动态性的基础上提升了性能。
+
+Apache APISIX 拥有许多优秀的设计,本文仅讨论了 Nginx 集群的动态管理。
+
+[点此查看原文链接](https://www.taohui.tech/2021/08/10/%E5%BC%80%E6%BA%90%E7%BD%91%E5%85%B3APISIX%E6%9E%B6%E6%9E%84%E5%88%86%E6%9E%90/#more)