You are viewing a plain text version of this content. The canonical link for it is here.
Posted to commits@weex.apache.org by ha...@apache.org on 2017/10/13 13:04:32 UTC
[37/51] [abbrv] incubator-weex-site git commit: update file structure
and fix responsive styles
http://git-wip-us.apache.org/repos/asf/incubator-weex-site/blob/12e3a8bc/_drafts/v-0.10/references/modules/webview.md
----------------------------------------------------------------------
diff --git a/_drafts/v-0.10/references/modules/webview.md b/_drafts/v-0.10/references/modules/webview.md
new file mode 100644
index 0000000..88c6f17
--- /dev/null
+++ b/_drafts/v-0.10/references/modules/webview.md
@@ -0,0 +1,160 @@
+---
+title: webview
+type: references
+order: 3.9
+version: 0.10
+---
+
+# webview
+
+A series of web operation api like `goBack`, `goForward`, and `reload`. 'webview' module used with the web component.
+
+## API
+
+### goBack(webElement)
+
+Loads the previous location in the history stack.
+
+**Arguments**
+
+* webElement(web): the element of the web component.
+
+#### Example
+
+```
+var webview = require('@weex-module/webview');
+var webElement = this.$el('webview');
+webview.goBack(webElement);
+```
+
+### goForward(webElement)
+
+Loads the next location in the history stack.
+
+**Arguments**
+
+* webElement(web): the element of the web component.
+
+#### Example
+
+```
+var webview = require('@weex-module/webview');
+var webElement = this.$el('webview');
+webview.goForward(webElement);
+```
+
+### reload(webElement)
+
+Reloads the current web page.
+
+**Arguments**
+
+* webElement(web): the element of the web component.
+
+#### Example
+
+```
+var webview = require('@weex-module/webview');
+var webElement = this.$el('webview');
+webview.reload(webElement.ref);
+```
+
+## Example
+
+```html
+<template>
+ <div class="browserStyle">
+ <div style="flex-direction: row">
+ <input id="urlInput" type="url" autofocus="false" placeholder="..." class="textStyle" value="{{input_text}}" oninput="input">
+ </input>
+ </div>
+ <div style="flex-direction: row">
+ <wxc-button value="LoadURL" class="buttonSytle" size="small" onclick="loadURL"></wxc-button>
+ <wxc-button value="Backward" class="buttonSytle" size="small" onclick="backforward"></wxc-button>
+ <wxc-button value="Forward" class="buttonSytle" size="small" onclick="forward"></wxc-button>
+ </div>
+ <div>
+ <web id="webview" src="{{src}}" class="webStyle"></web>
+ </div>
+ </div>
+</template>
+
+<style>
+
+ .browserStyle
+ {
+ width:600;
+ height: 825;
+ background-color:#778899 ;
+ }
+
+ .textStyle
+ {
+ width:600;
+ height: 50;
+ background-color: #D3D3D3;
+ }
+
+ .buttonSytle
+ {
+ width:180;
+ height: 50;
+ font-size: 12;
+ background-color: #D3D3D3;
+ margin:10;
+ padding-left: 5;
+ padding-right: 5;
+ }
+
+ .webStyle
+ {
+ width:600;
+ height: 700;
+ background-color: #8B0000;
+ }
+
+</style>
+
+<script>
+
+ var web_module = require('@weex-module/webview');
+
+ module.exports = {
+ data: {
+ src : "https://h5.m.taobao.com",
+ input_text:"https://www.tmall.com"
+ },
+
+ methods: {
+
+ loadURL: function (e) {
+ var web_element = this.$el('webview');
+ var input = this.$el("urlInput");
+ this.src = this.input_text;
+ web_module.reload(web_element);
+ },
+
+ backforward: function (e) {
+ var web_element = this.$el('webview');
+ web_module.goBack(web_element);
+ this.input_text = web_element.attr.src;
+ },
+
+ forward: function (e) {
+ var web_element = this.$el('webview');
+ web_module.goForward(web_element);
+ this.input_text = web_element.attr.src;
+ },
+ input:function (e) {
+ var input = this.$el("urlInput");
+ this.input_text = input.attr.value;
+ }
+
+ }
+ }
+</script>
+```
+
+[Try it](http://dotwe.org/103d472645206cc1564f49717585abb4)
+
+
http://git-wip-us.apache.org/repos/asf/incubator-weex-site/blob/12e3a8bc/_drafts/v-0.10/references/special-element.md
----------------------------------------------------------------------
diff --git a/_drafts/v-0.10/references/special-element.md b/_drafts/v-0.10/references/special-element.md
new file mode 100644
index 0000000..4a4d57e
--- /dev/null
+++ b/_drafts/v-0.10/references/special-element.md
@@ -0,0 +1,36 @@
+---
+title: Special Element
+type: references
+order: 1.10
+version: 0.10
+---
+
+# Special Element
+
+## Content
+
+The element serves as content distribution outlet in a composed component template. The element itself will be replaced.
+
+alias: 'slot'.
+
+## Example
+
+As shown in the example, 'content' replaced by 'text'.
+
+```html
+<we-element name="item">
+ <template>
+ <div>
+ <content></content>
+ </div>
+ </template>
+</we-element>
+
+<template>
+ <div>
+ <item>
+ <text>Content Text</text>
+ </item>
+ </div>
+</template>
+```
http://git-wip-us.apache.org/repos/asf/incubator-weex-site/blob/12e3a8bc/_drafts/v-0.10/references/specs/index.md
----------------------------------------------------------------------
diff --git a/_drafts/v-0.10/references/specs/index.md b/_drafts/v-0.10/references/specs/index.md
new file mode 100644
index 0000000..d303a16
--- /dev/null
+++ b/_drafts/v-0.10/references/specs/index.md
@@ -0,0 +1,309 @@
+---
+title: JS Bundle format
+type: references
+order: 4
+has_chapter_content: false
+chapter_title: Low-level Specs
+version: 0.10
+---
+
+# JS Bundle format
+
+JS Bundle Version: v0.3.0
+
+## v0.5.0
+
+### Whole Syntax and Structure
+
+A JS Bundle is actually a JavaScript file which follows **ES5** standard. The code is used to define some custom components for the instance and bootstrap the instance with certain name, config and data. Developers could use all kinds of JS code packager like webpack, browserify, requirejs to organize your whole instance code.
+
+### Meta Info
+
+The JS Bundle Must begin with a comment line which is a JSON object like:
+
+```javascript
+// { "framework": "Weex", "version": "0.5.0" }
+```
+
+This JSON object as least contains:
+
+* property `framework` must be `"Weex"`
+* property `version` should be corresponded with the JS Bundle format version
+
+### Global Members
+
+* `__weex_define__(name, options)`
+* `__weex_bootstrap__(name, config, data)`
+* `__weex_document__`
+* `__weex_require__(name)`
+
+#### `__weex_define__(name:string, options: object)`
+
+Define a custom component named `name` for current instance with `options`.
+
+**example:**
+
+```javascript
+__weex_define__('rmb', {
+ template: {
+ type: 'div',
+ style: {flexDirection: 'row'},
+ children: [
+ {type: 'text', attr: {value: '¥'}},
+ {type: 'text', attr: {value: this.value}}
+ ]
+ },
+ data: function () {
+ return {
+ value: '0'
+ }
+ },
+ methods: {...}
+})
+```
+
+The enabled component options contains:
+
+* `template`: just the same as [v0.3.0](#details-of-template-option-definitions)
+* `style`: just the same as [v0.3.0](#details-of-style-option-definitions)
+* `data`: a function which return a plain object to observe by the ViewModel
+* `methods`: a function map to proxy to the ViewModel
+* `computed`: a map of several computed keys for the ViewModel
+* `init`, `created`, `ready`: lifecycle methods
+* `events`: event handlers for the ViewModel
+<!-- * `components`: a map for options of sub components the ViewModel needed (So `__weex_define__(name, options)` equals to run `this.components[name] = options` in each custom components when `init`) -->
+
+The enabled ViewModel APIs contains:
+
+* `$el(id): Element`: find element by id in current ViewModel scope
+* `$vm(id): ViewModel`: find sub ViewModel by id
+* `$getConfig(): object`: get instance config info
+* `$broadcast`/`$emit`/`$dispatch`/`$on`/`$off`: listen and fire component events
+* `$transition` *(experimental)*: animation transition (see more in [animation native module](../animation.html))
+
+#### `__weex_require__(name: string): object`
+
+Get a Weex native module with several native APIs.
+
+**example:**
+
+```javascript
+var modal = __weex_require__('modal')
+modal.toast({
+ message: 'Hey!',
+ duration: 2
+})
+```
+
+polyfill for v0.3.0
+
+```javascript
+function __weex_require__(name) {
+ var result
+ define('__weex_require__', function (r, e, m) {
+ result = r('@weex-module/' + name)
+ })
+ return result
+}
+```
+
+#### `__weex_bootstrap__(nameOrOptions: string|object, config: object?, data: object?): AppInstance | Error`
+
+Start to render by a certain component name or a direct component options as the root element, and some instance `config` and instance `data`. If everything fine, it will returns the root app instance. Otherwise it will return an `Error` instance which describes something wrong.
+
+**example:**
+
+```javascript
+__weex_bootstrap__(
+ 'root',
+ {
+ // format 1:
+ // downgrade: { appVersion: '>= 0.5.0' },
+ // format 2:
+ // downgrade: function (config) { return true }
+ },
+ {
+ // external data
+ // value: '12345'
+ }
+)
+```
+
+The instance `config` now only support `downgrade` property which allows two format:
+
+1. an object like `{ osVersion, appVersion, weexVersion, deviceModel }`
+2. a function like `function (config) { return true }` to return a boolean value. `true` means normal and `false` means downgrade.
+
+The instance `data` will merge to root component data. So the root component is also easy to reuse and the instance data is easy to customize.
+
+#### `__weex_document__`
+
+An virtual-DOM `Document` instance. Also the host of [virtual-DOM APIs](./virtual-dom-apis.html). Every Weex instance has and must have just one `Document` instance.
+
+### Preserved Global Variables
+
+`define`, `bootstrap`, `module`, `exports`, `document`, `require`, `register`, `render`
+
+### A whole example
+
+```javascript
+// { "framework": "Weex", "version": "0.5.0" }
+
+var modal = __weex_require__('modal')
+
+__weex_define__('item', {
+ template: {
+ type: 'div',
+ style: { flexDirection: 'row' },
+ event: {
+ click: function (e) {
+ this.update(e)
+ }
+ },
+ children: [
+ { type: 'image', attr: { src: this.imageUrl }, ...},
+ { type: 'text', attr: { value: this.title }, ...}
+ ]
+ },
+ data: function () {
+ return {
+ imageUrl: '',
+ title: ''
+ }
+ },
+ methods: {
+ update: function (e) {
+ modal.toast({ message: this.title })
+ }
+ }
+})
+
+__weex_define__('app', {
+ template: {
+ type: 'div',
+ children: [
+ {
+ type: 'item',
+ repeat: {
+ expression: function () {
+ return this.list
+ },
+ key: '$index',
+ value: '$value'}
+ },
+ attr: {
+ imageUrl: function () {
+ return this.$value.imageUrl
+ },
+ title: function () {
+ return this.$value.title
+ }
+ }
+ }
+ ]
+ },
+ data: function () {
+ return {
+ list: [
+ { imageUrl: 'xxx', title: '111' },
+ { imageUrl: 'yyy', title: '222' },
+ { imageUrl: 'zzz', title: '333' }
+ ]
+ }
+ }
+})
+
+__weex_bootstrap__('app')
+```
+
+## v0.3.0
+
+### Whole Syntax and Structure
+
+A JS Bundle is actually a JavaScript file which follows **ES5** standard. The code is organized by several modules with AMD-like format:
+
+```javascript
+define('moduleName1', function (require, exports, module) {
+ // content of module1
+})
+
+define('moduleName2', function (require, exports, module) {
+ // content of module2
+})
+
+...
+```
+
+A whole Weex JS Bundle is concatenated by these modules and last a `bootstrap(rootComponentName, optionalConfig, optionalExternalData)` function call.
+
+```javascript
+define('@weex-component/a', function (require, exports, module) {
+ // content of composed component <a>
+})
+
+define('@weex-component/b', function (require, exports, module) {
+ // content of composed component <b>
+})
+
+bootstrap('@weex-component/b')
+```
+
+As the sample above, the component name should be hyphenated (a-z, 0-9, "-"). Other characters are not allowed.
+
+And, the method call `bootstrap()` allows 1~3 parameters: root module name (String), config info (optional JSON) and external data (optional JSON).
+
+### Content of Composed Components
+
+A module of composed component contains 3 parts: whole options definition, additional template option definition and additional style option definition.
+
+- whole options is a piece of JavaScript code to put component options (except `template` option and `style` option) into `module.exports`
+- `template` option is a piece of JSON-like object assigned to `module.exports.template` which describes the display structure of this component
+- `style` option is a piece of JSON object assigned to `module.exports.style` which describes the reusable styles in this component
+
+The `template` option is required and appeared only once, and the `style` option and whole options definition are optional.
+
+These options are defined and transformed by Transformer. Actually you can also ignore all the format limitation and write options to `module.exports` as the same result if you are not going to use Transformer. But that's not recommended.
+
+#### Details of template option definitions
+
+A piece of multi-level embedded JSON-like object which describes the view structure.
+
+Every level JSON-like object has these members below:
+
+* `type`: a required string, component name/type
+* `component`: an optional boolean, whether this component is composed or native
+* `attr`: an optional k-v pairs which contains all attributes of an element, the value could be a string, number, boolean or a function that bind some data value
+* `style`: an optional k-v pairs which contains all styles of an element, just the same format as the `attr`
+* `classList`: an optional array of strings which contains class names for styling.
+* `events`: an optional k-v pairs whose keys are event type and values are corresponding method names
+* `children`: an optional array of child components info
+* `append`: an optional string which determines a compiling workflow strategy: append node-by-node singly or a whole node tree just one time. the default value is `node` and another supported value is `tree`.
+* `shown`: a optional function which returns a boolean value to determine whether this component should be displayed
+* `repeat`: a optional function which returns a list data to displays components with each
+
+**Corresponding Keys to Weex Transformer:**
+
+- tag `name` in Weex file corresponds to `type`
+- attr `if` in Weex file corresponds to `shown`
+- attr `repeat` in Weex file corresponds to `repeat`
+- attr `append` in Weex file corresponds to `append`
+- attr `style` in Weex file with CSS syntax corresponds to `style`
+- attr `class` in Weex file with class names separated by blanks corresponds to `classList`
+- attr `on***` in Weex file with prefix `on` corresponds to a k-v pair in `events`
+- other attributes in Weex file corresponds to `attr`
+- Child nodes in Weex file corresponds to `children`
+
+All tag names, attr names are case-insensitive and transformed to lower-cased. But the attr values are case-sensitive.
+
+#### Details of style option definitions
+
+Just a two-levels JSON object.
+
+* The first levels are class names.
+* The second levels are k-v pairs which describes style names & properties for each class name.
+
+**Corresponding Keys to Weex Transformer:**
+
+* class name corresponds to first level keys
+* prop name corresponds to second level keys
+* prop value corresponds to second level values
http://git-wip-us.apache.org/repos/asf/incubator-weex-site/blob/12e3a8bc/_drafts/v-0.10/references/specs/js-bundle-format.md
----------------------------------------------------------------------
diff --git a/_drafts/v-0.10/references/specs/js-bundle-format.md b/_drafts/v-0.10/references/specs/js-bundle-format.md
new file mode 100644
index 0000000..0b103d9
--- /dev/null
+++ b/_drafts/v-0.10/references/specs/js-bundle-format.md
@@ -0,0 +1,307 @@
+---
+title: JS Bundle format
+type: references
+order: 4.1
+version: 0.10
+---
+
+# JS Bundle format
+
+JS Bundle Version: v0.3.0
+
+## v0.5.0
+
+### Whole Syntax and Structure
+
+A JS Bundle is actually a JavaScript file which follows **ES5** standard. The code is used to define some custom components for the instance and bootstrap the instance with certain name, config and data. Developers could use all kinds of JS code packager like webpack, browserify, requirejs to organize your whole instance code.
+
+### Meta Info
+
+The JS Bundle Must begin with a comment line which is a JSON object like:
+
+```javascript
+// { "framework": "Weex", "version": "0.5.0" }
+```
+
+This JSON object as least contains:
+
+* property `framework` must be `"Weex"`
+* property `version` should be corresponded with the JS Bundle format version
+
+### Global Members
+
+* `__weex_define__(name, options)`
+* `__weex_bootstrap__(name, config, data)`
+* `__weex_document__`
+* `__weex_require__(name)`
+
+#### `__weex_define__(name:string, options: object)`
+
+Define a custom component named `name` for current instance with `options`.
+
+**example:**
+
+```javascript
+__weex_define__('rmb', {
+ template: {
+ type: 'div',
+ style: {flexDirection: 'row'},
+ children: [
+ {type: 'text', attr: {value: '¥'}},
+ {type: 'text', attr: {value: this.value}}
+ ]
+ },
+ data: function () {
+ return {
+ value: '0'
+ }
+ },
+ methods: {...}
+})
+```
+
+The enabled component options contains:
+
+* `template`: just the same as [v0.3.0](#details-of-template-option-definitions)
+* `style`: just the same as [v0.3.0](#details-of-style-option-definitions)
+* `data`: a function which return a plain object to observe by the ViewModel
+* `methods`: a function map to proxy to the ViewModel
+* `computed`: a map of several computed keys for the ViewModel
+* `init`, `created`, `ready`: lifecycle methods
+* `events`: event handlers for the ViewModel
+<!-- * `components`: a map for options of sub components the ViewModel needed (So `__weex_define__(name, options)` equals to run `this.components[name] = options` in each custom components when `init`) -->
+
+The enabled ViewModel APIs contains:
+
+* `$el(id): Element`: find element by id in current ViewModel scope
+* `$vm(id): ViewModel`: find sub ViewModel by id
+* `$getConfig(): object`: get instance config info
+* `$broadcast`/`$emit`/`$dispatch`/`$on`/`$off`: listen and fire component events
+* `$transition` *(experimental)*: animation transition (see more in [animation native module](../animation.html))
+
+#### `__weex_require__(name: string): object`
+
+Get a Weex native module with several native APIs.
+
+**example:**
+
+```javascript
+var modal = __weex_require__('modal')
+modal.toast({
+ message: 'Hey!',
+ duration: 2
+})
+```
+
+polyfill for v0.3.0
+
+```javascript
+function __weex_require__(name) {
+ var result
+ define('__weex_require__', function (r, e, m) {
+ result = r('@weex-module/' + name)
+ })
+ return result
+}
+```
+
+#### `__weex_bootstrap__(nameOrOptions: string|object, config: object?, data: object?): AppInstance | Error`
+
+Start to render by a certain component name or a direct component options as the root element, and some instance `config` and instance `data`. If everything fine, it will returns the root app instance. Otherwise it will return an `Error` instance which describes something wrong.
+
+**example:**
+
+```javascript
+__weex_bootstrap__(
+ 'root',
+ {
+ // format 1:
+ // downgrade: { appVersion: '>= 0.5.0' },
+ // format 2:
+ // downgrade: function (config) { return true }
+ },
+ {
+ // external data
+ // value: '12345'
+ }
+)
+```
+
+The instance `config` now only support `downgrade` property which allows two format:
+
+1. an object like `{ osVersion, appVersion, weexVersion, deviceModel }`
+2. a function like `function (config) { return true }` to return a boolean value. `true` means normal and `false` means downgrade.
+
+The instance `data` will merge to root component data. So the root component is also easy to reuse and the instance data is easy to customize.
+
+#### `__weex_document__`
+
+An virtual-DOM `Document` instance. Also the host of [virtual-DOM APIs](./virtual-dom-apis.html). Every Weex instance has and must have just one `Document` instance.
+
+### Preserved Global Variables
+
+`define`, `bootstrap`, `module`, `exports`, `document`, `require`, `register`, `render`
+
+### A whole example
+
+```javascript
+// { "framework": "Weex", "version": "0.5.0" }
+
+var modal = __weex_require__('modal')
+
+__weex_define__('item', {
+ template: {
+ type: 'div',
+ style: { flexDirection: 'row' },
+ event: {
+ click: function (e) {
+ this.update(e)
+ }
+ },
+ children: [
+ { type: 'image', attr: { src: this.imageUrl }, ...},
+ { type: 'text', attr: { value: this.title }, ...}
+ ]
+ },
+ data: function () {
+ return {
+ imageUrl: '',
+ title: ''
+ }
+ },
+ methods: {
+ update: function (e) {
+ modal.toast({ message: this.title })
+ }
+ }
+})
+
+__weex_define__('app', {
+ template: {
+ type: 'div',
+ children: [
+ {
+ type: 'item',
+ repeat: {
+ expression: function () {
+ return this.list
+ },
+ key: '$index',
+ value: '$value'}
+ },
+ attr: {
+ imageUrl: function () {
+ return this.$value.imageUrl
+ },
+ title: function () {
+ return this.$value.title
+ }
+ }
+ }
+ ]
+ },
+ data: function () {
+ return {
+ list: [
+ { imageUrl: 'xxx', title: '111' },
+ { imageUrl: 'yyy', title: '222' },
+ { imageUrl: 'zzz', title: '333' }
+ ]
+ }
+ }
+})
+
+__weex_bootstrap__('app')
+```
+
+## v0.3.0
+
+### Whole Syntax and Structure
+
+A JS Bundle is actually a JavaScript file which follows **ES5** standard. The code is organized by several modules with AMD-like format:
+
+```javascript
+define('moduleName1', function (require, exports, module) {
+ // content of module1
+})
+
+define('moduleName2', function (require, exports, module) {
+ // content of module2
+})
+
+...
+```
+
+A whole Weex JS Bundle is concatenated by these modules and last a `bootstrap(rootComponentName, optionalConfig, optionalExternalData)` function call.
+
+```javascript
+define('@weex-component/a', function (require, exports, module) {
+ // content of composed component <a>
+})
+
+define('@weex-component/b', function (require, exports, module) {
+ // content of composed component <b>
+})
+
+bootstrap('@weex-component/b')
+```
+
+As the sample above, the component name should be hyphenated (a-z, 0-9, "-"). Other characters are not allowed.
+
+And, the method call `bootstrap()` allows 1~3 parameters: root module name (String), config info (optional JSON) and external data (optional JSON).
+
+### Content of Composed Components
+
+A module of composed component contains 3 parts: whole options definition, additional template option definition and additional style option definition.
+
+- whole options is a piece of JavaScript code to put component options (except `template` option and `style` option) into `module.exports`
+- `template` option is a piece of JSON-like object assigned to `module.exports.template` which describes the display structure of this component
+- `style` option is a piece of JSON object assigned to `module.exports.style` which describes the reusable styles in this component
+
+The `template` option is required and appeared only once, and the `style` option and whole options definition are optional.
+
+These options are defined and transformed by Transformer. Actually you can also ignore all the format limitation and write options to `module.exports` as the same result if you are not going to use Transformer. But that's not recommended.
+
+#### Details of template option definitions
+
+A piece of multi-level embedded JSON-like object which describes the view structure.
+
+Every level JSON-like object has these members below:
+
+* `type`: a required string, component name/type
+* `component`: an optional boolean, whether this component is composed or native
+* `attr`: an optional k-v pairs which contains all attributes of an element, the value could be a string, number, boolean or a function that bind some data value
+* `style`: an optional k-v pairs which contains all styles of an element, just the same format as the `attr`
+* `classList`: an optional array of strings which contains class names for styling.
+* `events`: an optional k-v pairs whose keys are event type and values are corresponding method names
+* `children`: an optional array of child components info
+* `append`: an optional string which determines a compiling workflow strategy: append node-by-node singly or a whole node tree just one time. the default value is `node` and another supported value is `tree`.
+* `shown`: a optional function which returns a boolean value to determine whether this component should be displayed
+* `repeat`: a optional function which returns a list data to displays components with each
+
+**Corresponding Keys to Weex Transformer:**
+
+- tag `name` in Weex file corresponds to `type`
+- attr `if` in Weex file corresponds to `shown`
+- attr `repeat` in Weex file corresponds to `repeat`
+- attr `append` in Weex file corresponds to `append`
+- attr `style` in Weex file with CSS syntax corresponds to `style`
+- attr `class` in Weex file with class names separated by blanks corresponds to `classList`
+- attr `on***` in Weex file with prefix `on` corresponds to a k-v pair in `events`
+- other attributes in Weex file corresponds to `attr`
+- Child nodes in Weex file corresponds to `children`
+
+All tag names, attr names are case-insensitive and transformed to lower-cased. But the attr values are case-sensitive.
+
+#### Details of style option definitions
+
+Just a two-levels JSON object.
+
+* The first levels are class names.
+* The second levels are k-v pairs which describes style names & properties for each class name.
+
+**Corresponding Keys to Weex Transformer:**
+
+* class name corresponds to first level keys
+* prop name corresponds to second level keys
+* prop value corresponds to second level values
http://git-wip-us.apache.org/repos/asf/incubator-weex-site/blob/12e3a8bc/_drafts/v-0.10/references/specs/js-framework-apis.md
----------------------------------------------------------------------
diff --git a/_drafts/v-0.10/references/specs/js-framework-apis.md b/_drafts/v-0.10/references/specs/js-framework-apis.md
new file mode 100644
index 0000000..e1412c6
--- /dev/null
+++ b/_drafts/v-0.10/references/specs/js-framework-apis.md
@@ -0,0 +1,191 @@
+---
+title: JS Framework APIs
+type: references
+order: 4.2
+version: 0.10
+---
+
+# JS Framework APIs
+<span class="weex-version">0.4</span>
+
+## Intro about JS Runtime
+
+These APIs are designed for JS Framework and Native Engine working together.
+
+Considering the limitation of mobile phone resource, *Weex runs only one JS runtime* to handle all Weex instances. So it need a multi-instance management layer in JavaScript. These JS Framework APIs are just designed to do the management job.
+
+* First, each Weex instance have a lifecycle, from `createInstance` to `destroyInstance`. During this period, we can import some extra data by `refreshInstance`.
+* To communicate with Native Engine, we have a couple of APIs: `sendTasks` and `receiveTasks`. They are used to call each other by some commands and messages.
+* And when JS runtime start at the beginning of the app launching, we need something initialized and configured. So we supply some APIs like `registerComponents`, `registerModules`.
+* The last API is just for debugging, we supply an API named `getRoot` to return the whole virtual-DOM data for developers.
+* If any of these API calls failed, an `Error` object should be returned.
+
+## Called by native and supplied from JS Framework
+
+### `createInstance(instanceId, code, options, data)`
+
+Create a Weex instance from Native Engine
+
+* `instanceId`: The unique id for a Weex instance, generated by Native Engine.
+* `code`: The JS bundle code send from Native Engine. It will be executed by `new Function(code)` in JS Framework. The code format depends on [JS Bundle Foramt](./js-bundle-format.html)
+* `options`: *Optional*. An options object. *Currently it supports `debug` flag which enable printing log and `bundleUrl` flag which the url of bundle.*
+* `data`: *Optional*. It's an chance to supply external data instead of the original data in JS bundle.
+
+Example:
+
+```javascript
+createInstance('x', 'define(...); define(...); define(...); bootstrap(...)')
+createInstance('x', '...', { bundleUrl, debug, ... }, { a: 1, b: 2 }})
+```
+
+### `destroyInstance(instanceId)`
+
+Destroy an existed Weex instance by id from Native Engine
+
+### `refreshInstance(instanceId, data)`
+
+Refresh data to an existed Weex instance with certain external data from Native Engine
+
+Example:
+
+```javascript
+refreshInstance('x', {a: 100, b: 200})
+```
+
+### `registerComponents(components)`
+
+Register all native components
+
+* `components`: A array of whose items are component options that are force part to use. *Currently it supports `append` attribute which forces the appending mechanism (`tree` or `node`) when first time rendering.*
+
+Example:
+
+```javascript
+registerComponents([
+ { type: 'container' },
+ { type: 'text' },
+ { type: 'image' },
+ { type: 'slider', append: 'tree' },
+ { type: 'list' },
+ { type: 'cell', append: 'tree' },
+ ...
+])
+```
+
+### `registerModules(modules)`
+
+Register the name, methods and args format of each module
+
+* `modules`: A map that collects all native module definitions. Each module definition is an array which has several API definitions. Each API definition has a `name` string and an `args` array which contains a list of each parameter's type.
+
+**NOTE: the `node` type data will actually return its `ref` property. And the `function` type data will actually return a unique function id referring to it.**
+
+Example:
+
+```javascript
+registerModules({
+ event: [
+ {name: 'openURL', args: ['string']}
+ ],
+ ...
+})
+```
+
+### `receiveTasks(instanceId, tasks)`
+
+Fire events or callbacks to an existed Weex instance from Native Engine
+
+* `tasks[]`: A task list. Each task has a `method="fireEvent|callback"` property and a list of `args`.
+ - In `fireEvent` method, the `args` is `ref` of the target, event `type`, event `data` and `domChanges` description in order. **Note: if some event make virtual-DOM data changed (e.g. value changed in `<input>` or current index changed in `<slider>`), the changing of the target element will be passed as `domChanges`.**
+ - In `callback` method, the `args` is `funcId` of a handler, `data` and `ifKeepAlive` which describes whether this callback handler should be keeping called. (Each callback handler is matched with a `funcId` when the original call happens.)
+
+Example:
+
+```javascript
+receiveTasks('x', [{method: 'fireEvent', args: ['x', '13', 'click', {a: 100, b: 200}]}])
+receiveTasks('x', [{method: 'callback', args: ['x', '7', {a: 100, b: 200}, true]}])
+```
+
+### `getRoot(instanceId)`
+
+Return a JSON object which describes the whole virtual DOM body of an existed Weex instance, which designed for debugging
+
+Example:
+
+```javascript
+getRoot('x')
+// {ref: '_root', type: 'container', attr: {...}, style: {...}, children: [...]}
+```
+
+## Called from JavaScript and implemented with native code
+
+### `sendTasks(instanceId, tasks)`
+
+Make native calls from JS Framework
+
+* `tasks[]`: A task list. Each task has a `module` name, a `method` name, and a `args[]` list.
+
+Example:
+
+```javascript
+sendTasks('x', [
+ {module: 'dom', method: 'addElement', args: ['_root', {ref: '1', type: 'container'}, -1]},
+ {module: 'dom', method: 'addElement', args: ['1', {ref: '2', type: 'text', ...}, -1]},
+ {module: 'dom', method: 'addElement', args: ['1', {ref: '3', type: 'image', ...}, -1]},
+ ...
+])
+```
+
+## Supporting other JS Framework <sup>(experimental)</sup>
+
+### Register a new JS Framework
+
+```javascript
+// lib/frameworks/index.js
+
+import Vue from '...'
+import React from '...'
+import Angular from '...'
+
+export const frameworks = {
+ Vue,
+ React,
+ Angular
+}
+```
+
+### Expose JS Framework APIs
+
+```javascript
+// 3rd-party-framework.js
+
+export function createInstance (id, code, config, data) { ... }
+export function destroyInstance (id) { ... }
+export function refreshInstance (id, data) { ... }
+export function registerComponents (components) { ... }
+export function registerModules (modules) { ... }
+export function recieveTasks (id, tasks) { ... }
+export function getRoot (id) { ... }
+```
+
+The virtual-DOM tasks should follow [virtual-DOM spec](./virtual-dom-apis.html).
+
+### Framework Helper
+
+You can import `lib/runtime/helper.js` to get two important things:
+
+* `Document` class, see [virtual-DOM spec](./virtual-dom-apis.html) for more.
+* `sendTasks` method.
+
+### JS Bundle format
+
+You must ensure the JS Bundle has its first line of code like this:
+
+```javascript
+// { "framework": "Vue" }
+...
+```
+
+to allow JS Runtime to detect which JS Framework it should be opened by.
+
+If no valid annotation found. The JS Bundle will be opened by default JS Framework of Weex.
http://git-wip-us.apache.org/repos/asf/incubator-weex-site/blob/12e3a8bc/_drafts/v-0.10/references/specs/virtual-dom-apis.md
----------------------------------------------------------------------
diff --git a/_drafts/v-0.10/references/specs/virtual-dom-apis.md b/_drafts/v-0.10/references/specs/virtual-dom-apis.md
new file mode 100644
index 0000000..566de1a
--- /dev/null
+++ b/_drafts/v-0.10/references/specs/virtual-dom-apis.md
@@ -0,0 +1,147 @@
+---
+title: Virtual DOM APIs
+type: references
+order: 4.3
+version: 0.10
+---
+
+# Virtual DOM APIs
+<span class="weex-version">0.4</span>
+
+## `Document`
+
+Each instance has a corresponding document with the instance id. A document has many nodes which compose a node tree.
+
+### Constructor
+
+##### `new Document(id: string, url: string?)`
+
+### Members
+
+##### `createElement(tagName: string, props: Object?): Element`
+
+Create a certain type `Element`. And the `props` may contain `attr` object and `style` object. e.g. `createBody('div', {style: {backgroundColor: '#ffffff'}})`
+
+##### `createComment(text: string): Comment`
+
+Create a `Comment` with a certain comment text.
+
+##### `open()`
+
+Set a flag which means init rendering start, so each dom update will be called immediately
+
+##### `close()`
+
+Set a flag which means init rendering finished, so the dom updates later will be batched in each task.
+
+##### `fireEvent(el: Element, type: string, e: Object?, domChanges: Object?)`
+
+Fire an certain type of event on a certain element with an event object. When the event leads to some dom changes, the fourth parameter will describe the change just like `props` parameter in `createElement` method.
+
+#### Read-only & Getters
+
+##### `id: string`
+
+##### `URL: string?`
+
+##### `body: Element`
+
+body element
+
+##### `documentElement: Element`
+
+document element
+
+##### `getRef(ref: string): Node?`
+
+Get node by `ref` from the internal node map
+
+**Note**: the `documentElement` will be generated automatically when a document created, and the `body` should to be created manually and appended to `documentElement` to work. The `type` of a `body` must be one of `div`, `list` or `scroller`.
+
+## `Node`
+
+### Constructor
+
+##### `new Node()`
+
+### Members
+
+##### `destroy()`
+
+#### Read-only & Getters
+
+##### `ref: string`
+
+##### `nextSibling: Node?`
+
+##### `previousSibling: Node?`
+
+##### `parentNode: Node?`
+
+## `Element` extends `Node`
+
+### Constructor
+
+##### `new Element(type: string, props: Object?, ownerDocument: Document)`
+
+Create an element and the `props` may contain `attr` object and `style` object.
+
+### Members
+
+#### DOM Tree
+
+##### `appendChild(node: Node)`
+
+##### `insertBefore(node: Node, before: Node?)`
+
+##### `insertAfter(node: Node, after: Node?)`
+
+##### `removeChild(node: Node, preserved: boolean?)`
+
+Removes a child. The parameter `preserved` means whether destroy the removed node immediately or preserve it.
+
+##### `clear()`
+
+#### DOM props
+
+##### `setAttr(key: string, value: string, silent: boolean?)`
+
+If `silent` is true, it won't cause native calls. Used for handling event with virtual-DOM changes.
+
+##### `setStyle(key: string, value: string, silent: boolean?)`
+
+The `silent` parameter is just same as `setAttr` method.
+
+##### `setClassStyle(classStyle: Object)`
+
+The specificity of class style is lower than normal style. In another way the normal style will override the same name value in class style.
+
+##### `addEvent(type: string, handler: Function)`
+
+##### `removeEvent(type: string)`
+
+##### `fireEvent(type: string, e: any)`
+
+#### Read-only & Getters
+
+##### `toJSON(): Object`
+
+Format of `{ref: string, type: string, attr: Object, style: Object, event: Array(string), children: Array}`
+
+## `Comment` extends `Node`
+
+`Comment` won't be passed to the rendering engine. So it's very useful as a assistant placeholder sometimes.
+
+### Constructor
+
+##### `new Comment(value: string)`
+
+### Members
+
+#### Read-only & Getters
+
+##### `type: string`
+
+Returns `'comment'`
+
+##### `value: string`
http://git-wip-us.apache.org/repos/asf/incubator-weex-site/blob/12e3a8bc/_drafts/v-0.10/references/text-style.md
----------------------------------------------------------------------
diff --git a/_drafts/v-0.10/references/text-style.md b/_drafts/v-0.10/references/text-style.md
new file mode 100644
index 0000000..6b9ee4f
--- /dev/null
+++ b/_drafts/v-0.10/references/text-style.md
@@ -0,0 +1,43 @@
+---
+title: Text Style
+type: references
+version: 0.10
+order: 1.8
+---
+
+# Text Style
+<span class="weex-version">0.5</span>
+
+Text alike components share some common style rules. The text alike components currently includes [`text`](./components/text.html) and [`input`](./components/input.html).
+
+## Properties
+
+- `color`: <colors> this property set the foreground color of an component's text content.
+- `font-size`: <length> this property specifies the size of the font.
+- `font-style`: <enum> `normal` | `italic`. This property lets you select italic or normal faces within a font-family. Default value is `normal`.
+- `font-weight`: <enum> `normal` | `bold`. This property specifies the boldness of the font. Default value is `normal`.
+- `text-decoration`: <enum> `none` | `underline` | `line-through`. This property is used to set the text formatting to underline or line-through. The default value is `none`.
+- `text-align`: <enum> `left` | `center` | `right`. This property describes how inline content like text is aligned in its parent component. The default value is `left`.
+- `font-family`:<string> this property set the font-family of the text. This property **doesn't guarantee** the given font will always be set to the text. If the specified font cannot be found at the device, a typeface fallback will occur and the default typeface will be load. The fallback mechanism may vary in different devices.
+- `text-overflow`:<string> `clip` | `ellipsis`. This property determines how overflowed content that is not displayed is signaled to users. It can be clipped, display an ellipsis.
+
+The property `color` support multiple fomats of values, contains rgb, rgba, #fff, #ffffff, named-color.
+
+Example:
+
+```css
+.my-class { color: red; }
+.my-class { color: #f00; }
+.my-class { color: #ff0000; }
+.my-class { color: rgb(255, 0, 0); }
+.my-class { color: rgba(255, 0, 0, 0.5); }
+```
+
+## Type of Style Value
+
+- length: number followed by length unit `px`, `px` can be omitted.
+- colors: support multiple formats of values, including rgb (`rgb(255, 0, 0)`), rgba (`rgba(255, 0, 0, 0.5)`), hexadecimal (`#ff0000`), short hexadecimal (`#f00`), named color (`red`).
+- enumerated values: a limited number of string values.
+
+**Note:** [The list of color keywords.](./color-names.html)
+
http://git-wip-us.apache.org/repos/asf/incubator-weex-site/blob/12e3a8bc/_drafts/v-0.10/tools/devtools-android.md
----------------------------------------------------------------------
diff --git a/_drafts/v-0.10/tools/devtools-android.md b/_drafts/v-0.10/tools/devtools-android.md
new file mode 100644
index 0000000..9ce8991
--- /dev/null
+++ b/_drafts/v-0.10/tools/devtools-android.md
@@ -0,0 +1,123 @@
+---
+title: Devtools for Android
+type: tools
+order: 2.1
+version: 0.10
+---
+
+# Devtools for Android
+
+[](https://github.com/weexteam/weex_devtools_android/releases) [](https://www.codacy.com/app/weex_devtools/weex_devtools_android?utm_source=github.com&utm_medium=referral&utm_content=weexteam/weex_devtools_android&utm_campaign=Badge_Grade) [](https://codeclimate.com/github/weexteam/weex_devtools_android) [](https://codeclimate.com/github/weexteam/weex_devtools_android) [](https://github.com/weexteam/weex_devtools_android/issues) [  ](https://bintray.com/alibabaweex/maven/weex_inspector/_latestVersion)
+
+Weex devtools is a custom devtools for weex that implements [Chrome Debugging Protocol](https://developer.chrome.com/devtools/docs/debugger-protocol) inspired by [Stetho](https://github.com/facebook/stetho), it is designed to help you quickly inspect your app and debug your JS bundle source in a chrome web page.At present The devtools consist of two part : `Inspector` and `Debugger`. If you want it work well, you must install a `weex-devtool` as debug server.
+
+- **Inspector**
+ Inspector can be used to show your `Element` \ `NetWork` \ `Console log` \ `ScreenCast` \ `BoxModel` \ `Native View` and so on.
+
+- **Debugger**
+ Debugger can be used to debug your bundle js source, you can set `Breakpoint` \ watch `CallStack`.
+
+## Install and launch devtools server
+Open your terminal then type `npm install -g weex-toolkit` and run.Launch it just type and run the command `weex debug`, then a Chrome web page will be opened.
+
+## Use on an android device or emulator
+
+### Taste of first debug with playground
+If you are a green hand to the debug of weex, we recommend you to try your first debug with `playground`, what you need to do is just launch the playground and scan the QR code shown in the debug page which wound opened if the `devtools server` have been launched. after you scan the QR code, the web page will list your connected devices.
+
+ devices")
+
+#### How Debugger Works
+Devtools expands [Chrome Debugging Protocol](https://developer.chrome.com/devtools/docs/debugger-protocol) and the mechanism of communication between client and debug sever is based on [JSON-RPC](https://en.wikipedia.org/wiki/JSON-RPC).
+
+##### Devtools Client
+Devtools Client is integrated in App as aar, it connects to debug server through webscoket protocol with out permission check. I recommend you just packaged it in your debug version consider of the security mechanism.
+
+##### Devtools Debug Server
+Devtools Debug Server is the center node of the communication, it connects to both app and chrome, acts as the turn server of debugging protocol messages and the manager of the js runtime.
+
+##### Chrome FrontEnd
+Chrome's V8 engine acts as the javascript runtime, when debug mode is enabled, all the js code run on it. On the other side we also reuse most of the Chrome's debugging user interface, such as set breakpoint, see call stack and so on.
+
+
+
+### Enable devtools in your own app
+Of course you can reuse the code of playground to build your own app, that is the simplest way to let your app's js code debuggable. On the other hand QR code is not necessary, if your review the source code you can draw a conclusion that QR CODE is just a way to set `devtools server` address. following those steps you can do the same thing.
+
+#### Gradle dependency on inspector.
+There are two choices to set the dependency, the Choice A is recommanded if you have no change to weex_sdk or inspector, while if you use your own custom weex_sdk or inspector Choice B is suitable.
+
+ * *A - aar dependency from jcenter*.
+ ````
+ dependencies {
+ compile 'com.taobao.android:weex_inspector:0.0.8.1'
+ }
+ ````
+I strongly recommend you use the latest version since both weex sdk and devtools are developed iteratively and rapidly. See the release version list [here](https://github.com/weexteam/weex_devtools_android/releases). All the release version will publish to the [jcenter repo](https://bintray.com/alibabaweex/maven/weex_inspector).
+
+ * *B - source code dependency.*
+
+ you need to copy the dir of inspector to the same dir of your app and add `include ":inspector"`in your project's `settings.gradle` file just like playground have done, then add dependency in your app's `build.gralde`.
+ ````
+ dependencies {
+ compile project(':inspector')
+ }
+ ````
+
+##### Version compatibility
+
+| weex sdk | weex inspector | debug server |
+|----------|----------------|--------------|
+|0.8.0.1+ | 0.0.8.1 |0.2.39+ |
+|0.7.0+ | 0.0.7.13 |0.2.38 |
+|0.6.0+ | 0.0.2.2 | |
+
+
+#### Initialize in your XXXApplication file.
+````
+ public class MyApplication extends Application {
+ public void onCreate() {
+ super.onCreate();
+ initDebugEnvironment(true, "xxx.xxx.xxx.xxx"/*"DEBUG_SERVER_HOST"*/);
+ }
+ private void initDebugEnvironment(boolean enable, String host) {
+ WXEnvironment.sRemoteDebugMode = enable;
+ WXEnvironment.sRemoteDebugProxyUrl = "ws://" + host + ":8088/debugProxy/native";
+ }
+}
+````
+
+#### Ship It!
+ 1. You must launch your bundle server firstly. In your weex dir, run command "./start";
+ 2. Launch your remote debug server. Run command `weex debug`, chrome will open a web page show a simply guidance and QR code;
+ 3. Launch your app and make sure debug mode was enabled. You will see a device list in the chrome web page opened by last step, each device item have two button, `Debugger` and `Inspector`;There are two way to enable debug mode:
+ * scaning the QR code and handle the content just like the playground have done.
+ * init it in the XXXApplication by calling `initDebugEnvironment(true, "xxx.xxx.xxx.xxx")`, if you call `initDebugEnvironment(true, "xxx.xxx.xxx.xxx")` after weex sdk inited, you need to call `WXSDKEngine.reload()` to refresh the runtime.
+ 4. Once you click the button `Inspector` chrome will open a page show the inspector view, on the other side, click the button `Debugger` chrome will open a new page to show the debug view;
+
+
+
+
+
+---
+
+#### OPTIONS
+
+##### [**OPTION**] *set your remote bundle server ip.*
+
+ For example, in the playground it is in the `IndexActivity.java`, you need to change the value of `DEFAULT_IP` in IndexActivity.java from `"your_current_IP"` to a server ip like `"30.30.30.150"`:
+````
+ private static final String DEFAULT_IP = "30.30.30.150"; // "your_current_IP";
+````
+
+##### [**OPTION**] *enable network inspection.*
+````
+OkHttpClient client = new OkHttpClient();
+client.networkInterceptors().add(new OkHttpInterceptor());
+````
+
+###### Notice
+ The network inspection only support OKHttpClient right now!!! If you want to use the network inspection to catch your bundle request, you must change your bundle server ip to the real server ip.
+
+#### Known Issues
+ You can report issues and bugs [here](https://github.com/weexteam/weex_devtools_android/issues). We will reply as soon as possible.
http://git-wip-us.apache.org/repos/asf/incubator-weex-site/blob/12e3a8bc/_drafts/v-0.10/tools/devtools-ios.md
----------------------------------------------------------------------
diff --git a/_drafts/v-0.10/tools/devtools-ios.md b/_drafts/v-0.10/tools/devtools-ios.md
new file mode 100644
index 0000000..602f63d
--- /dev/null
+++ b/_drafts/v-0.10/tools/devtools-ios.md
@@ -0,0 +1,76 @@
+---
+title: Devtools for IOS
+type: tools
+order: 2.2
+version: 0.10
+---
+
+# Devtools for IOS
+
+Remote debug for your native iOS app using Chrome Developer Tools
+
+## weex-devtool launch:
+
+0. install and run weex-devtool
+
+ $:npm install -g weex-devtool
+
+ $:weex-devtool
+
+ it will launch chrome browser, showing wss ip address in chrome address bar.
+
+
+## playground install WXDevtool
+
+1. Install dependencies.
+
+ $:pod install
+
+### Usage
+
+1. AppDelegate.m header file
+
+ #import "WXDevTool.h"
+
+2. Initialize inspector when the APP launched
+
+ **Note: The inspector API must be called before weex is initialized**
+
+ + (void)setDebug:(BOOL)isDebug;
+
+ isDebug default is NO, now you open inspect model. opposite is YES, if you set isDebug to YES, then open debug model and inspect model.
+
+ + (void)launchDevToolDebugWithUrl:(NSString *)url;
+ wssip was the wss address showing in the chrome address bar.
+
+ * open debug model and inspector model
+
+ eg:- (BOOL)application:(UIApplication *)application didFinishLaunchingWithOptions:(NSDictionary *)launchOptions
+ {
+ [WXDevTool setDebug:YES];
+ [WXDevTool launchDevToolDebugWithUrl:@"ws://wssip/debugProxy/native"];
+ }
+
+ * open inspect model, remove the @selector(setDebug:) or add [WXDevTool setDebug:NO]
+
+ eg:- (BOOL)application:(UIApplication *)application didFinishLaunchingWithOptions:(NSDictionary *)launchOptions
+ {
+ [WXDevTool launchDevToolDebugWithUrl:@"ws://wssip/debugProxy/native"];
+ }
+
+
+3. Build and running APP, this time chrome will display your device with App name, select inspector to open the inspector tab.
+4. Log print support for different levels of print.
+
+ eg: #import "WXDevTool.h"
+ PDLogE()/PDLogW()
+
+### WXDevtool Dependencies
+
+Your app must be linked against the following frameworks/dylibs
+
+* libicucore.dylib
+* CFNetwork.framework
+* CoreData.framework
+* Security.framework
+* Foundation.framework
http://git-wip-us.apache.org/repos/asf/incubator-weex-site/blob/12e3a8bc/_drafts/v-0.10/tools/devtools.md
----------------------------------------------------------------------
diff --git a/_drafts/v-0.10/tools/devtools.md b/_drafts/v-0.10/tools/devtools.md
new file mode 100644
index 0000000..f883055
--- /dev/null
+++ b/_drafts/v-0.10/tools/devtools.md
@@ -0,0 +1,102 @@
+---
+title: Devtools
+type: tools
+order: 2
+has_chapter_content: true
+version: 0.10
+---
+
+# Devtools
+
+Weex devtools is a custom devtools for weex that implements [Chrome Debugging Protocol](https://developer.chrome.com/devtools/docs/debugger-protocol), it is designed to help you quickly inspect your app and debug your JS bundle source in a chrome web page, both Android and IOS platform are supported.
+
+## Install
+
+```
+ $ npm install -g weex-toolkit
+```
+#### usage
+```
+weex debug [options] [we_file|bundles_dir]
+
+ Options:
+
+ -h, --help output usage information
+ -V, --verbose display logs of debugger server
+ -v, --version display version
+ -p, --port [port] set debugger server port
+ -e, --entry [entry] set the entry bundlejs path when you specific the bundle server root path
+ -m, --mode [mode] set build mode [transformer|loader]
+ -w, --watch watch we file changes auto build them and refresh debugger page![default enabled]
+```
+
+#### start debugger
+```
+$weex debug
+```
+this command will start debug server and launch a chrome opening `DeviceList` page.
+this page will display a qrcode ,you can use `Playground App` scan it for starting debug.
+
+#### start debugger with a we file
+```
+$weex debug your_weex.we
+```
+this command will compile `your_weex.we` to `your_weex.js` and start the debug server as upon command.
+`your_weex.js` will deploy on the server and displayed in `DeviceList` page as another qrcode contain the url of your_weex.js
+
+
+#### start debugger with a directory of we files
+```
+$weex debug your/we/path -e index.we
+```
+this command will build every file in your/we/path and deploy them on the bundle server. your directory will mapping to http://localhost:port/weex/
+use -e to set the entry of these bundles. and the url of "index.we" will display on device list page as another qrcode.
+
+## Features
+
+### Connect devices
+ devices")
+
+### Inspector
+ Inspector can be used to show your `Element` \ `Network` \ `Console log` \ `ScreenCast` \ `BoxModel` \ `Native View` and so on.
+
+
+
+#### Element
+##### native view element
+
+
+##### weex dom element
+
+
+#### Network
+
+##### show the total time and latency
+
+
+##### show the header and response
+
+
+#### Console
+
+
+#### Resource
+
+
+### Debugger
+
+ Debugger can be used to debug your bundle js source, you can set `Breakpoint` \ watch `CallStack`.
+
+
+
+#### Breakpoint and CallStack
+
+
+
+## Integrate devtools
+
+* Android
+ * See the doc [Weex devtools (Android)](/tools/devtools-android.html), it will lead you to config and use it step by step.
+* IOS
+ * See the doc [Weex devtools (IOS)](/tools/devtools-ios.html), it will lead you to config and use it step by step.
+
http://git-wip-us.apache.org/repos/asf/incubator-weex-site/blob/12e3a8bc/_drafts/v-0.10/tools/index.md
----------------------------------------------------------------------
diff --git a/_drafts/v-0.10/tools/index.md b/_drafts/v-0.10/tools/index.md
new file mode 100644
index 0000000..731c2f9
--- /dev/null
+++ b/_drafts/v-0.10/tools/index.md
@@ -0,0 +1,97 @@
+---
+title: CLI
+type: tools
+order: 1
+has_chapter_content: true
+version: 0.10
+---
+
+# Weex-Toolkit
+
+Please access [npmjs.com](https://www.npmjs.com/package/weex-toolkit) for latest version
+
+Weex CLI tool set
+
+## Pre Install
+some dependencies need recent version of npm to install
+
+if your
+```
+$ npm --version
+```
+output less then `2.15.1`, please run below cmd upgrade your npm at first
+```
+sudo npm install -g npm
+```
+
+## Install
+```
+$npm install -g weex-toolkit
+```
+
+## Usage
+
+```
+$weex foo/bar/input_path [options]
+
+$weex create file_name [options]
+
+Options:
+ --qr display QR code for native runtime, **default action**
+ -o,--output transform weex we file to JS Bundle, output path (single JS bundle file or dir)
+ [for create sub cmd] it specified we file output path
+ --watch using with -o , watch input path , auto run transform if change
+ happen
+ -s,--server start a http file server, weex .we file will be transforme to JS
+ bundle on the server , specify local root path using the option
+ --port http listening port number ,default is 8081
+ --wsport websocket listening port number ,default is 8082
+ -f, --force [for create sub cmd] force to replace exsisting file(s)
+ --version show version of weex toolkit
+ --help Show help
+```
+
+## Examples
+
+#### crate a `we file`(weex source file) using standard template
+```
+$weex create hello-world-weex
+```
+a file named 'hello-world-weex.we' we be created in current directory
+
+
+#### transform a `we file` to JS Bundle
+```
+$weex your_best_weex.we -o .
+```
+`your_best_weex.we` will be transform to JS Bundle file `your_best_weex.js` , saved in your current directory
+
+#### transform a `we file` to JS Bundle , watch this file ,auto run transformer if change happen.
+```
+$weex your_best_weex.we -o . --watch
+```
+
+#### transform every we file in a directory
+```
+$weex we/file/storage/path -o outputpath
+```
+every `we file` in `we/file/storage/path` we be transform to JS Bundle , saved in `outputpath` path
+
+#### preview your we file using Weex Playground App
+download & install [weex playground App](http://alibaba.github.io/weex/download.html)
+```
+$weex your_best_weex.we --qr
+```
+a QR code will display in your terminal , using Playground App scan that.
+
+
+#### start http server
+```
+$weex -s .
+```
+a http server will start running , your current directory(.) will be the document root for the server , every weex .we file will be transforme to JS Bundle when access through the server
+
+## Issue & Feedback
+
+[Github Issue List](https://github.com/weexteam/weex-toolkit/issues)
+
http://git-wip-us.apache.org/repos/asf/incubator-weex-site/blob/12e3a8bc/_drafts/v-0.10/tools/playground.md
----------------------------------------------------------------------
diff --git a/_drafts/v-0.10/tools/playground.md b/_drafts/v-0.10/tools/playground.md
new file mode 100644
index 0000000..f315054
--- /dev/null
+++ b/_drafts/v-0.10/tools/playground.md
@@ -0,0 +1,24 @@
+---
+title: Playground
+type: tools
+order: 4
+has_chapter_content: true
+version: 0.10
+---
+
+# Weex Playground App
+
+One of best parts of Weex is Native Runtime . After preview your `we file` render in H5 using weex-toolkit CLI , you can try Native Runtime in a standalone App , this is Weex Playground App . More then that ,Weex playground App preset a lot of Demo & ShowCase ,so you will get to experience performance of Weex native runtime easily.
+
+Android and IOS version of Playground App can be downloaded [here](http://alibaba.github.io/weex/download.html).
+
+## Screenshot
+
+
+
+
+This is main interface of Weex Playground App , you can click the item to see the corresponding demo . click top right corner Icon will active QR scaner that work with Weex [toolkit CLI](../tools/index.html)
+
+please refer to [Weex Tutorial](../guide/index.html)
+
+
http://git-wip-us.apache.org/repos/asf/incubator-weex-site/blob/12e3a8bc/_drafts/v-0.10/tools/transformer.md
----------------------------------------------------------------------
diff --git a/_drafts/v-0.10/tools/transformer.md b/_drafts/v-0.10/tools/transformer.md
new file mode 100644
index 0000000..7df3b60
--- /dev/null
+++ b/_drafts/v-0.10/tools/transformer.md
@@ -0,0 +1,38 @@
+---
+title: Transformer
+type: tools
+order: 3
+has_chapter_content: true
+version: 0.10
+---
+
+# gulp-weex
+
+> gulp plugin for weex transformer
+
+## Usage
+
+```javascript
+var gulp = require('gulp')
+var weex = require('gulp-weex')
+
+gulp.task('default', function () {
+ return gulp.src('src/*.html')
+ .pipe(weex({}))
+ .pipe(gulp.dest('./dest'))
+})
+```
+
+## Options
+
+### oldFormat
+
+whether transform to old format.
+
+default: `false`.
+
+### isEntry
+
+whether is an entry module which has `bootstrap(...)`.
+
+default: `true`.
\ No newline at end of file
http://git-wip-us.apache.org/repos/asf/incubator-weex-site/blob/12e3a8bc/_drafts/v1.0/advanced/create-a-weex-project.md
----------------------------------------------------------------------
diff --git a/_drafts/v1.0/advanced/create-a-weex-project.md b/_drafts/v1.0/advanced/create-a-weex-project.md
new file mode 100644
index 0000000..780341b
--- /dev/null
+++ b/_drafts/v1.0/advanced/create-a-weex-project.md
@@ -0,0 +1,271 @@
+---
+title: 如何创建一个 Weex 项目
+type: advanced
+order: 3
+has_chapter_content: true
+version: 0.10
+---
+
+# 如何创建一个 Weex 项目
+
+对于前端开发者来说开发一个 app 是不容易的,既然 Weex 能以 web 的开发体验构建高性能、可扩展的 native 应用,那我们怎么利用 Weex 简单高效的开发一个 native 应用呢?Weex 替你考虑了这件事。在本章中,我们将学习如何使用 Weexpack 工具快速生成一个全新的 Weex 项目。
+
+根据你的操作系统的不同,步骤也略有差异,如果你从未接触过 native 开发,请慢慢来,遇到问题随时查阅 [FAQ](../faq.md)。
+
+首先,不论任何平台,我们都需要 node.js 和 Weexpack。在本节中,默认你已经安装好了 node.js 和 npm,如有疑问,可参考上一章 [如何在本地开发 Weex 页面](../guide/develop-on-your-local-machine.html)。
+
+Weexpack 是 Weex 新一代的工程开发套件,它允许开发者通过简单的命令,创建 weex 工程项目,将项目运行在不同的开发平台上。未来,我们考虑会将其集成在 weex-toolkits 上,但目前仍需要单独安装。好在安装 Weexpack 非常简单,可以直接使用 npm 安装:
+
+```bash
+npm install weexpack -g
+```
+
+或者用 cnpm:
+
+```bash
+cnpm install weexpack -g
+```
+
+接下来的步骤会有一些复杂和区别,根据开发平台的不同,我们提供了快速导航便于阅读:
+
+- [iOS](#ios)
+- [Android](#android)
+
+## iOS
+
+Mac 是唯一可以开发 iOS 应用的平台,因此创建 iOS 项目只支持 mac。对于 iOS,你需要安装 [Xcode](https://developer.apple.com/xcode/) 和 [CocoaPods](https://guides.cocoapods.org/using/getting-started.html) 。
+
+安装 Xcode 最简单的方法是到 [Mac App Store](https://itunes.apple.com/us/app/xcode/id497799835?mt=12)。Xcode 体积较大,下载请耐心等待。
+
+安装好 Xcode 后,你需要运行 Xcode,使 Xcode 自动安装开发者工具和确认使用协议。
+
+之后你还需要安装 [CocoaPods](https://guides.cocoapods.org/using/getting-started.html) 。CocoaPods 是 Xcode 项目的类库管理工具,可以使用如下命令安装:
+
+```bash
+$ sudo gem install cocoapods
+```
+
+如果执行该命令无反应,很可能是 gem source 问题,你可以切换为淘宝 gem source:
+
+```bash
+$ gem sources --remove https://rubygems.org/
+$ gem sources -a https://ruby.taobao.org/
+$ sudo gem install cocoapods
+```
+
+如有问题,可参考 [CocoaPods 官方文档](https://guides.cocoapods.org/using/getting-started.html)
+
+### 创建项目
+
+然后,就可以使用 weexpack 创建 weex 工程了:
+
+```bash
+$ weexpack init appName
+```
+
+weexpack 会自动新建以 appName 命名的目录,并将项目模板拉取到该目录。
+
+最终形成如下目录结构:
+
+```bash
+-> /appName
+.
+|—— .gitignore
+|—— README.md
+|—— package.json
+|-- android.config.json
+|-- ios.config.json
+|—— webpack.config.js
+|—— /src
+| |—— index.we
+|—— /html5
+| |—— index.html
+|—— /ios
+| |—— /playground
+| |—— /sdk
+| |—— /WXDevtool
+|—— /android
+| |—— /playground
+| |—— /appframework
+```
+
+其中:
+
+- `webpack.config.js` 是 webpack 配置文件,用于生成 `.we` 文件的 JSBunlde
+- `ios.config.json` 是 iOS 项目配置文件
+- `android.config.json` 是 Android 项目配置文件
+- `/src` 目录放置 Weex 页面
+- `/html5` 是 H5 端入口文件
+- `/ios` 放置 iOS 项目
+- `/android` 放置 Android 项目
+
+紧接着,进入目录,并且安装依赖:
+
+```bash
+$ cd appName && npm install
+```
+
+至此,项目模版创建完成,接下来我们可以自定义我们的 APP 信息并打包运行。
+
+### 运行与打包
+
+如果一切正常,你可以使用 weexpack 打包或模拟器运行了:
+
+模拟器运行
+
+```bash
+$ weexpack run ios
+```
+
+构建 ipa 包:
+
+```bash
+$ weexpack build ios
+```
+
+构建包的过程中,将会提示让您输入 CodeSign(证书)、Profile(provisioning profile)、AppId,只有输入真实的这些信息才能成功打包。 其余如AppName,和入口 weex bundle 文件可以编辑项目目录下的 `ios.config.json` 配置。 打完包成功之后,可以在 `/playground/build/ipa_build/` 目录下获取 ipa 文件。
+
+注:证书需要预先安装到 keychain 中,在 keychain 中点击右键获取证书 id(证书名称)、provisioning profile 文件(\*mobileprovision)需要获取 UUID,进入目录可以看到 mobileprovision_UUID.sh 文件,此文件可以获取到 UUID。
+
+mobileprovision_UUID.sh 用法如下:
+
+```bash
+$ ./mobileprovision_UUID.sh *mobileprovision
+```
+
+参数(\*mobileprovision)为 provisioning profile 文件路径
+
+** 注:run 与 build 部分涉及 pod 的依赖安装问题。**
+
+- 首先要安装 cocoapods ,具体安装步骤可查看[这里](https://cocoapods.org/),建议安装 0.39.0 版本。
+- 为了加快 CLI 执行速度,weexpack 创建的工程默认安装了需要的依赖库。但是命令执行依然会更新需要升级的依赖库。
+ - 如果出现这种错误提示 `unable to find a specification for 'WeexSDK'` 这种错误,说明你本地没有更新 cocoapods master 仓库,运行 `pod repo update` ,此时运行 `pod search WeexSDK`:
+
+ 
+
+ 说明 master repo 更新成功。以上是以 `WeexSDK` 为例,其他库类似。
+
+ - 如果出现这种错误 `error: The sandbox is not in sync with the Podfile.lock. Run 'pod install' or update your CocoaPods installation.` 进入 playground 目录(podfile 文件所在目录)按提示执行。
+
+ 更多 pod 使用细节请移步[cocoapods](https://cocoapods.org/)
+
+- mobileprovision,参数(\*mobileprovision)为 provisioning profile 文件路径。
+
+----
+
+## Android
+
+在 Mac 平台开发 Android 首先需要下载 [Android Studio](https://developer.android.com/studio/install.html)(你可能需要翻墙才能访问)。[Android Studio](https://developer.android.com/studio/install.html) 为我们提供了 Android SDK 及 AVD(模拟器)以便我们快速运行 Android 项目。
+
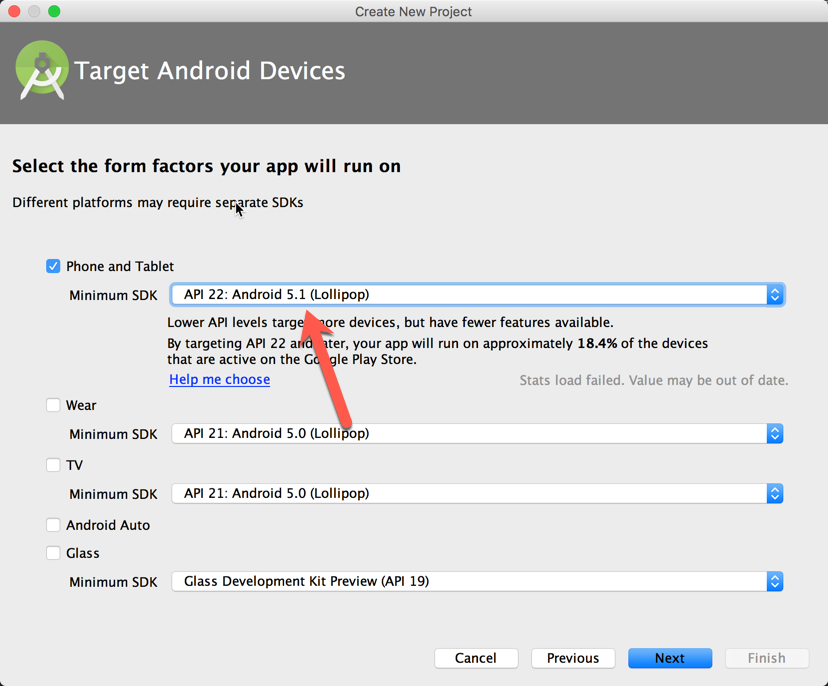
+下载完成后运行 Android Studio,任意新建一个 Android 项目,在第二步中选择 **Android 5.1**,然后点击 next 完成项目创建,如图所示:
+
+
+
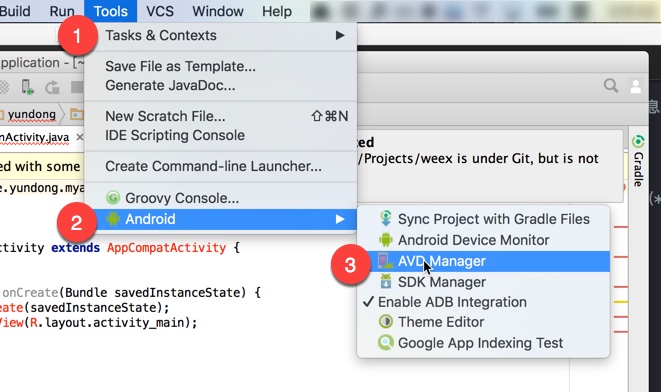
+待 Android Studio 打开后,在顶部菜单栏选择 Tools -> Android -> AVD Manager,安装 Android 模拟器:
+
+
+
+之后,打开模拟器运行 Android。
+
+**注意:**
+
+1. 必须保持模拟器运行。
+2. 保证 Android build-tool 的版本为 23.0。【可以在 Android Studio 的 SDK Manager 里查看是否已安装这个版本,如果没有可选择安装这一版本】。
+
+### 配置环境变量
+
+因为 Android Studio 安装的 SDK 不会自动配置环境变量(你自己安装的 SDK 同样不会)。所以需要您自己手动配置 Android_HOME 环境变量和 PATH
+
+如果是 Android Studio 安装的 SDK 安装路径可已在 SDK manager 里找到(打开 SDK manager 的方式请参照图2)
+
+Windows 下请参照 [window 下如何设置 ANDROID 环境变量](http://jingyan.baidu.com/article/09ea3ede1b4df6c0aede39ab.html)
+
+Linux/Mac 下只需编辑 `.bash_profile` 增加 PATH 即可:
+
+```bash
+vim ~/.bash_profile
+```
+
+然后添加下列代码进去(路径替换为你的真实路径)
+
+```bash
+export ANDROID_HOME=/xxx/Library/Android/sdk
+export PATH=${PATH}:$ANDROID_HOME/tools:$ANDROID_HOME/platform-tools:$ANDROID_HOME/build-tools
+```
+
+然后保存退出(:wq)。再执行下列命令:
+
+```bash
+source ~/.bash_profile
+```
+
+### 创建项目
+
+然后,就可以使用 weexpack 创建 weex 工程了:
+
+```bash
+$ weexpack init appName
+```
+
+weexpack 会自动新建以 appName 命名的目录,并将项目模板拉取到该目录。
+
+最终形成如下目录结构:
+
+```bash
+-> /appName
+.
+|—— .gitignore
+|—— README.md
+|—— package.json
+|-- android.config.json
+|-- ios.config.json
+|—— webpack.config.js
+|—— /src
+| |—— index.we
+|—— /html5
+| |—— index.html
+|—— /ios
+| |—— /playground
+| |—— /sdk
+| |—— /WXDevtool
+|—— /android
+| |—— /playground
+| |—— /appframework
+```
+
+其中:
+
+- `webpack.config.js` 是 webpack 配置文件,用于生成 `.we` 文件的 JSBunlde
+- `ios.config.json` 是 iOS 项目配置文件
+- `android.config.json` 是 Android 项目配置文件
+- `/src` 目录放置 Weex 页面
+- `/html5` 是 H5 端入口文件
+- `/ios` 放置 iOS 项目
+- `/android` 放置 Android 项目
+
+紧接着,进入目录,并且安装依赖:
+
+```bash
+$ cd appName && npm install
+```
+
+至此,项目模版创建完成,接下来我们可以自定义我们的 APP 信息并打包运行。
+
+### 运行与打包
+
+如果一切正常,你可以使用 weexpack 打包或模拟器运行了:
+
+Android 的打包和构建是一体的 :
+
+```bash
+$ weexpack run android
+```
+
+同样的你可以更改项目目录下的android.config.json
+
+- `AppName`: 应用名
+- `AppId`: application_id 包名
+- `SplashText`: 欢迎页上面的文字
+- `WeexBundle`: 指定的 weex bundle 文件(支持文件名和 url 的形式)
+
+ 指定文件名则以本地文件的方式加载 bundle,指定 url 则以远程的方式加载 JSBundle。如果以本地方式指定 bundle `.we` 文件请放到 `src` 目录。
http://git-wip-us.apache.org/repos/asf/incubator-weex-site/blob/12e3a8bc/_drafts/v1.0/advanced/customize-a-native-component.md
----------------------------------------------------------------------
diff --git a/_drafts/v1.0/advanced/customize-a-native-component.md b/_drafts/v1.0/advanced/customize-a-native-component.md
new file mode 100644
index 0000000..404f25c
--- /dev/null
+++ b/_drafts/v1.0/advanced/customize-a-native-component.md
@@ -0,0 +1,168 @@
+---
+title: 自定义 native 组件
+type: advanced
+order: 7
+has_chapter_content: true
+version: 0.10
+---
+
+# 如何自定义 native 组件?
+
+Weex 已经包含了最关键的平台组件,例如 `ScrollView, ListView, Text, Imageview` 等等。当然,这些组件并不能完全满足你的需求。另外,那些在你的工程中常用的大量原生 UI 组件,可能需要被简单地集合到 Weex 中。幸运的是,通过任意已存在的组件来创建你的自定义组件是一件很方便的事。
+
+## Android
+
+### 步骤:
+
+1.自定义组件必须继承自 `WXComponent` 或者 `WXContainer` ;
+2.weex SDK 可以识别 @WXComponentProp (name = value(value 是 attr 或者 dsl style));
+3.方法必须是 `public` 的;
+4.组件类不能是一个内部类;
+5.自定义组件不能被 ProGuard 之类的工具混淆;
+6.组件方法在 UI 线程被调用,因此不要在里面进行耗时的操作;
+7.Weex 的参数类型可以是 int, double, float, String, Map, List 和实现了 WXObject 接口的自定义类;
+
+### 参考以下例子:
+
+``` java
+ `package com.taobao.weex.ui.component;
+// ……
+
+public class MyViewComponent extends WXComponent{
+
+ public MyViewComponent(WXSDKInstance instance, WXDomObject node,
+ WXVContainer parent, String instanceId, boolean lazy) {
+ super(instance, node, parent, instanceId, lazy);
+ }
+
+ @Override
+ protected void initView() {
+ //TODO:your own code ……
+ }
+
+ @Override
+ public WXFrameLayout getView() {
+ //TODO:your own code ………
+ }
+ @WXComponentProp(name=WXDomPropConstant.WX_ATTR_VALUE)
+ public void setMyViewValue(String value) {
+ ((TextView)mHost).setText(value);
+ }
+
+}
+```
+
+必须注册组件:
+
+``` java
+WXSDKEngine.registerComponent("MyView", MyViewComponent.class);
+```
+
+## iOS
+
+虽然 WeexSDK 中有很多的 native 的 Component,但这有可能并不能满足你的需求。在之前你可能已经写了一些很酷炫 native 的组件,想包装一下,导入到 Weex 中,因此我们提供了让开发者实现自己的 native Component。下面将以 WeexSDK 中已经存在的 Component:`image` 为例子,介绍一下如何构建一个 native Component。假设你已经了解 iOS 开发
+
+### 注册 Component
+
+注册一个 component 比较简单,调用 `WXSDKEngine` 中的 `registerComponent:withClass:` 方法,传入组件的标签名称,还有对应的 class 然后你可以创建一个 `WXImageComponent` 表示 `image` 组件的实现。在 `.we` 文件中,只需要写 `<image></image>`
+
+### 添加属性
+
+现在我们要做一些让 image component 更加强大的事情。既然作为一个图片的 component,那它应该要有源,给他加上一个 `src` 的属性,同时给它加上一个 `resize` 的属性(可以配置的有 `contain/cover/stretch`)
+
+```object-c
+@interface WXImageComponent ()
+
+@property (nonatomic, strong) NSString *imageSrc;
+@property (nonatomic, assign) UIViewContentMode resizeMode;
+
+@end
+```
+
+component 中所有的 style,attribute,events 都会被传递到 Component 的初始化方法中,所以,你可以在初始化方法中存储你感兴趣的一些属性值
+
+```object-c
+@implementation WXImageComponent
+
+- (instancetype)initWithRef:(NSString *)ref type:(NSString *)type styles:(NSDictionary *)styles attributes:(NSDictionary *)attributes events:(NSArray *)events weexInstance:(WXSDKInstance *)weexInstance
+{
+ if (self = [super initWithRef:ref type:type styles:styles attributes:attributes events:events weexInstance:weexInstance]) {
+ _imageSrc = [WXConvert NSString:attributes[@"src"]];
+ _resizeMode = [WXConvert UIViewContentMode:attributes[@"resize"]];
+}
+
+ return self;
+}
+
+@end
+```
+
+attribute 中拿到的值的类型都是 `id`,我们可以用转换方法把它转换到任何值。Weex SDK 提供了一些基础的转换方法,可以参考 `WXConvert` 类,或者你可以添加自己的转换函数。
+
+### Hooking 渲染生命周期
+
+native 的 component 是由 Weex 管理的,Weex 创建,布局,渲染,销毁。Weex 的 component 生命周期都是可以 hook 的,你可以在这些生命周期中去做自己的事情。
+
+| 方法 | 描述 |
+| :-: | --- |
+| initWithRef:type:... | 用给定的属性初始化一个component. |
+| layoutDidFinish | 在component完成布局时候会调用. |
+| loadView | 创建component管理的view. |
+| viewWillLoad | 在component的view加载之前会调用. |
+| viewDidLoad | 在component的view加载完之后调用. |
+| viewWillUnload | 在component的view被释放之前调用. |
+| viewDidUnload | 在component的view被释放之后调用. |
+| updateStyles: | 在component的style更新时候调用. |
+| updateAttributes: | 在component的attribute更新时候调用. |
+| addEvent: | 给component添加event的时候调用. |
+| removeEvent: | 在event移除的时候调用. |
+
+在 image component 的例子里面,如果我们需要我们自己的 image view 的话,可以复写 `loadView`这个方法.
+
+```object-c
+- (UIView *)loadView
+{
+return [[WXImageView alloc] init];
+}
+```
+
+现在我们使用 `WXImageView` 渲染 `image` component。
+作为一个 image component,我们需要拿到服务器图片,而且把它设置进 image view 里. 这个操作可以在 `viewDidLoad` 方法中做,这个方法是在 view 已经被创建而且加载了时候 Weex SDK 会调用到,而且 `viewDidLoad` 这个方法是你做额外初始化工作比如改变 content mode(也就是设置resize) 的最好时间.
+
+```object-c
+- (void)viewDidLoad
+{
+ UIImageView *imageView = (UIImageView *)self.view;
+ imageView.contentMode = _resizeMode;
+ imageView.userInteractionEnabled = YES;
+ imageView.clipsToBounds = YES;
+ imageView.exclusiveTouch = YES;
+
+ // Do your image fetching and updating logic
+}
+```
+
+如果可以改变 image 的 src,也可以 hook `updateAttributes:` 方法来做属性更新操作,当 `updateAttributes:` 或者 `updateStyles:` 被调用的时候, component 的 view 已经加载完成
+
+```object-c
+- (void)updateAttributes:(NSDictionary *)attributes
+{
+ if (attributes[@"src"]) {
+ _imageSrc = [WXConvert NSString:attributes[@"src"]];
+ // Do your image updating logic
+ }
+
+ if (attributes[@"resize"]) {
+ _resizeMode = [WXConvert UIViewContentMode:attributes[@"resize"]];
+ self.view.contentMode = _resizeMode;
+ }
+}
+```
+
+或许你需要考虑更多的生命周期方法去 Hook,当布局完成时候,像 `layoutDidFinish`,如果你想了解更多,可以参考一下`WXComponent.h` 声明的方法。
+
+现在你可以用在任何 `.we` 文件里面使用 `<image>`,而且可以加上 image 的属性。
+
+```html
+<image style="your-custom-style" src="image-remote-source" resize="contain/cover/stretch"></image>
+```
http://git-wip-us.apache.org/repos/asf/incubator-weex-site/blob/12e3a8bc/_drafts/v1.0/advanced/cuszomize-native-apis.md
----------------------------------------------------------------------
diff --git a/_drafts/v1.0/advanced/cuszomize-native-apis.md b/_drafts/v1.0/advanced/cuszomize-native-apis.md
new file mode 100644
index 0000000..55e5e4c
--- /dev/null
+++ b/_drafts/v1.0/advanced/cuszomize-native-apis.md
@@ -0,0 +1,85 @@
+---
+title: 自定义 native API
+type: advanced
+order: 8
+has_chapter_content: true
+version: 0.10
+---
+
+# 如何自定义 native API?
+
+Weex 的 SDK 只提供了页面渲染的能力,但是一些其它操作,比如网络请求、图片加载、重定向等功能需要你自己去实现,这个例子讲述了如何用原生代码去扩展 Weex 的功能。
+
+## 关于 URLHelper 的例子
+
+### 新建一个 WXModule
+
+```java
+public class URLHelperModule extends WXModule{
+ private static final String WEEX_CATEGORY="com.taobao.android.intent.category.WEEX";
+ @WXModuleAnno
+ public void openURL(String url){
+ if (TextUtils.isEmpty(url)) {
+ return;
+ }
+ StringBuilder builder=new StringBuilder("http:");
+ builder.append(url);
+ Uri uri = Uri.parse(builder.toString());
+ Intent intent = new Intent(Intent.ACTION_VIEW, uri);
+ intent.addCategory(WEEX_CATEGORY);
+ mWXSDKInstance.getContext().startActivity(intent);
+ }
+}
+```
+
+这里要注意 `@WXModuleAnno` 这个注解,它表示了你把这个方法暴露给 JavaScript。
+
+```java
+public class URLHelperModule extends WXModule{
+
+ @WXModuleAnno
+ public void openURL(String url,String callbackId){
+ //...
+ //callback to javascript
+ Map<String, Object> result = new HashMap<String, Object>();
+ result.put("ts", System.currentTimeMillis());
+ WXBridgeManager.getInstance().callback(mWXSDKInstance.getInstanceId(), callbackId, result);
+ }
+}
+```
+
+### 把module注册到WXSDKEngine:
+
+```java
+try {
+ WXSDKEngine.registerModule("myURL", URLHelperModule.class);
+ //'myURL' is the name you'll use in javascript
+ } catch (WXException e) {
+ WXLogUtils.e(e.getMessage());
+ }
+```
+
+### 在 JavaScript 中使用 `eventModule`:
+
+```javascript
+let URLHelper = require('@weex-module/myURL');//same as you registered
+URLHelper.openURL("http://www.taobao.com",function(ts){
+ console.log("url is open at "+ts);
+});
+```
+
+## 一些注意事项:
+
+1. 定义一个 components 需要继承 `WXModule`
+
+2. 不要忘记添加 `@WXModuleAnno` 注解,不然 Weex 没法识别这个方法
+
+3. 定义的方法必须是 `public 的
+
+4. module 类一定不能是内部类
+
+5. 你定义的 components 不能被混淆,不然会找不到
+
+6. Module 中的方法会在 UI 线程中被调用,所以一定不要做一些耗时操作
+
+7. Moudle 中的方法参数类型可以为 `int`,`double`,`float`,`String`,`Map`,`List`,以及实现 `WXObject` 接口的类。
http://git-wip-us.apache.org/repos/asf/incubator-weex-site/blob/12e3a8bc/_drafts/v1.0/advanced/extend-to-android.md
----------------------------------------------------------------------
diff --git a/_drafts/v1.0/advanced/extend-to-android.md b/_drafts/v1.0/advanced/extend-to-android.md
new file mode 100644
index 0000000..f816ebd
--- /dev/null
+++ b/_drafts/v1.0/advanced/extend-to-android.md
@@ -0,0 +1,170 @@
+---
+title: Android 扩展
+type: advanced
+order: 9
+has_chapter_content: true
+version: 0.10
+---
+
+# Android 扩展
+
+Weex 提供了扩展机制,可以根据自己的业务进行定制自己的功能。
+主要分为两类扩展:
+
+- Module 扩展 非 UI 的特定功能。例如 sendHttp、openURL 等。
+- Component 扩展 实现特别功能的 Native 控件。例如:RichTextview,RefreshListview 等。
+- Adapter 扩展 Weex 对一些基础功能实现了统一的接口,可实现这些接口来定制自己的业务。例如:图片下载等。
+
+## Module 扩展
+
+1. Module 扩展必须继承 WXModule 类。
+2. 扩展方法必须加上 @WXModuleAnno 注解。Weex 会根据注解来判断当前方法是否要运行在 UI 线程,和当前方法是否是扩展方法。
+3. Weex是根据反射来进行调用 Module 扩展方法,所以Module中的扩展方法必须是 public 类型。
+4. 同样因为是通过反射调用,Module 不能被混淆。请在混淆文件中添加代码:`-keep public class * extends com.taobao.weex.common.WXModule{*;}`
+5. Module 扩展的方法可以使用 int, double, float, String, Map, List 类型的参数
+6. 完成 Module 后一定要在初始化时注册 `WXSDKEngine.registerModule("myModule", MyModule.class);` 否则会报类似错误:`ReportException :undefined:9: TypeError: Object #<Object> has no method 'printLog'`
+
+示例如下:
+
+```java
+public class MyModule extends WXModule {
+
+ @WXModuleAnno(runOnUIThread = true)
+ public void printLog(String msg) {
+ Toast.makeText(mWXSDKInstance.getContext(),msg,Toast.LENGTH_SHORT).show();
+ }
+}
+```
+
+JS 调用如下:
+
+```html
+<template>
+ <div>
+ <text onclick="click">点击我测试</text>
+ </div>
+</template>
+
+<script>
+ module.exports = {
+ methods: {
+ click: function() {
+ require('@weex-module/myModule').printLog("我是一个测试!");
+ }
+ }
+ }
+</script>
+```
+
+## Component 扩展
+
+1. Component 扩展类必须集成 WXComponent.
+2. Component 对应的设置属性的方法必须添加注解 @WXComponentProp(name=value(value is attr or style of dsl))
+3. Weex sdk 通过反射调用对应的方法,所以 Component 对应的属性方法必须是 public,并且不能被混淆。请在混淆文件中添加代码 `-keep public class * extends com.taobao.weex.ui.component.WXComponent{*;}`
+4. Component 扩展的方法可以使用 int, double, float, String, Map, List 类型的参数
+5. 完成 Component 后一定要在初始化时注册 `WXSDKEngine.registerComponent("richtext",RichText.class);`
+
+示例如下:
+
+```java
+public class RichText extends WXComponent {
+
+ public RichText(WXSDKInstance instance, WXDomObject dom, WXVContainer parent, boolean isLazy) {
+ super(instance, dom, parent, isLazy);
+ }
+
+ @Override
+ protected void initView() {
+ mHost=new TextView(mContext);
+ ((TextView)mHost).setMovementMethod(LinkMovementMethod.getInstance());
+ }
+
+ @WXComponentProp(name = "tel")
+ public void setTelLink(String tel){
+ SpannableString spannable=new SpannableString(tel);
+ spannable.setSpan(new URLSpan("tel:"+tel),0,tel.length(), Spanned.SPAN_EXCLUSIVE_EXCLUSIVE);
+ ((TextView)mHost).setText(spannable);
+ }
+}
+```
+
+JS 调用如下:
+
+```html
+<template>
+ <div>
+ <richText tel="12305" style="width:200;height:100">12305</text>
+ </div>
+</template>
+```
+## Adapter扩展
+
+图片下载:
+
+需要时集成接口 IWXImgLoaderAdapter,实现 setImage 方法。
+
+示例如下:
+
+```java
+public class ImageAdapter implements IWXImgLoaderAdapter {
+
+ public ImageAdapter() {
+ }
+
+ @Override
+ public void setImage(final String url, final ImageView view,
+ WXImageQuality quality, WXImageStrategy strategy) {
+
+ WXSDKManager.getInstance().postOnUiThread(new Runnable() {
+
+ @Override
+ public void run() {
+ if(view==null||view.getLayoutParams()==null){
+ return;
+ }
+ if (TextUtils.isEmpty(url)) {
+ view.setImageBitmap(null);
+ return;
+ }
+ String temp = url;
+ if (url.startsWith("//")) {
+ temp = "http:" + url;
+ }
+ if (view.getLayoutParams().width <= 0 || view.getLayoutParams().height <= 0) {
+ return;
+ }
+ Picasso.with(WXEnvironment.getApplication())
+ .load(temp)
+ .into(view);
+ }
+ },0);
+ }
+}
+```
+#### 组件方法支持
+从WeexSDK 0.9.5开始,你可以定义组件方法
+
+- 在组件中如下声明一个组件方法
+
+ ```java
+ @JSMethod
+ public void focus(){
+ //method implementation
+ }
+ ```
+- 注册组之后,你可以在weex 文件中调用
+
+ ```html
+ <template>
+ <mycomponent id='mycomponent'></mycomponent>
+ </template>
+ <script>
+ module.exports = {
+ created: function() {
+ this.$el('mycomponent').focus();
+ }
+ }
+ </script>
+ ```
+
+注:工程要添加依赖 `compile 'com.squareup.picasso:picasso:2.5.2'`