You are viewing a plain text version of this content. The canonical link for it is here.
Posted to commits@mxnet.apache.org by th...@apache.org on 2019/06/13 20:47:04 UTC
[incubator-mxnet] branch master updated: Updated Image Augmentation
tutorial to use Gluon Transforms. (#15197)
This is an automated email from the ASF dual-hosted git repository.
thomasdelteil pushed a commit to branch master
in repository https://gitbox.apache.org/repos/asf/incubator-mxnet.git
The following commit(s) were added to refs/heads/master by this push:
new b58cf0a Updated Image Augmentation tutorial to use Gluon Transforms. (#15197)
b58cf0a is described below
commit b58cf0ad55402f577288548403d433e4e4c9687a
Author: Thom Lane <th...@gmail.com>
AuthorDate: Thu Jun 13 13:46:31 2019 -0700
Updated Image Augmentation tutorial to use Gluon Transforms. (#15197)
* Updated Image Augmentation tutorial to use Transforms.
* Updates based on feedback.
---
docs/tutorials/gluon/data_augmentation.md | 219 +++++++++++++++++++++++-------
1 file changed, 169 insertions(+), 50 deletions(-)
diff --git a/docs/tutorials/gluon/data_augmentation.md b/docs/tutorials/gluon/data_augmentation.md
index 356d335..0e320fc 100644
--- a/docs/tutorials/gluon/data_augmentation.md
+++ b/docs/tutorials/gluon/data_augmentation.md
@@ -15,102 +15,221 @@
<!--- specific language governing permissions and limitations -->
<!--- under the License. -->
-# Methods of applying data augmentation (Gluon API)
+# Image Augmentation
-Data Augmentation is a regularization technique that's used to avoid overfitting when training Machine Learning models. Although the technique can be applied in a variety of domains, it's very common in Computer Vision. Adjustments are made to the original images in the training dataset before being used in training. Some example adjustments include translating, cropping, scaling, rotating, changing brightness and contrast. We do this to reduce the dependence of the model on spurious cha [...]
+Augmentation is the process of randomly adjusting the dataset samples used for training. As a result, a greater diversity of samples will be seen by the network and it is therefore less likely to overfit the training dataset. Some of the spurious characteristics of the dataset can be reduced using this technique. One example would be a dataset of images from the same camera having the same color tint: it's unhelpful when you want to apply this model to images from other cameras. You can [...]
+
+Although this technique can be applied in a variety of domains, it's very common in Computer Vision, and we will focus on image augmentations in this tutorial. Some example image augmentations include random crops and flips, and adjustments to the brightness and contrast.
+
+#### What are the prerequisites?
+
+You should be familiar with the concept of a transform and how to apply it to a dataset before reading this tutorial. Check out the [Data Transforms tutorial]() if this is new to you or you need a quick refresher.
+
+#### Where can I find the augmentation transforms?
+
+You can find them in the `mxnet.gluon.data.vision.transforms` module, alongside the deterministic transforms we've seen previously, such as `ToTensor`, `Normalize`, `CenterCrop` and `Resize`. Augmentations involve an element of randomness and all the augmentation transforms are prefixed with `Random`, such as `RandomResizedCrop` and `RandomBrightness`. We'll start by importing MXNet and the `transforms`.
-In this tutorial we demonstrate a method of applying data augmentation with Gluon [`mxnet.gluon.data.Dataset`](https://mxnet.incubator.apache.org/api/python/gluon/data.html#mxnet.gluon.data.Dataset)s, specifically the [`ImageFolderDataset`](https://mxnet.incubator.apache.org/api/python/gluon/data.html#mxnet.gluon.data.vision.datasets.ImageFolderDataset).
```python
-%matplotlib inline
-import mxnet as mx # used version '1.0.0' at time of writing
-import numpy as np
-from matplotlib.pyplot import imshow
-import multiprocessing
-import os
+import matplotlib.pyplot as plt
+import mxnet as mx
+from mxnet.gluon.data.vision import transforms
+```
+
+#### Sample Image
+
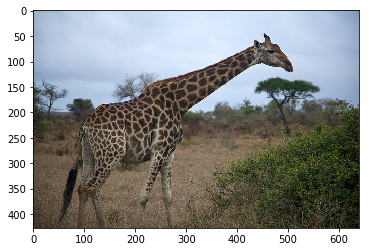
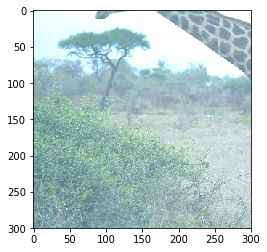
+So that we can see the effects of all the vision augmentations, we'll take a sample image of a giraffe and apply various augmentations to it. We can see what it looks like to begin with.
+
-mx.random.seed(42) # set seed for repeatability
+```python
+image_url = 'https://raw.githubusercontent.com/dmlc/web-data/master/mxnet/doc/tutorials/data_aug/inputs/0.jpg'
+mx.test_utils.download(image_url, "giraffe.jpg")
+example_image = mx.image.imread("giraffe.jpg")
+plt.imshow(example_image.asnumpy())
+```
+
+
+
+
+Since these augmentations are random, we'll apply the same augmentation a few times and plot all of the outputs. We define a few utility functions to help with this.
+
+
+```python
+def show_images(imgs, num_rows, num_cols, scale=2):
+ # show augmented images in a grid layout
+ aspect_ratio = imgs[0].shape[0]/imgs[0].shape[1]
+ figsize = (num_cols * scale, num_rows * scale * aspect_ratio)
+ _, axes = plt.subplots(num_rows, num_cols, figsize=figsize)
+ for i in range(num_rows):
+ for j in range(num_cols):
+ axes[i][j].imshow(imgs[i * num_cols + j].asnumpy())
+ axes[i][j].axes.get_xaxis().set_visible(False)
+ axes[i][j].axes.get_yaxis().set_visible(False)
+ plt.subplots_adjust(hspace=0.1, wspace=0)
+ return axes
+
+def apply(img, aug, num_rows=2, num_cols=4, scale=3):
+ # apply augmentation multiple times to obtain different samples
+ Y = [aug(img) for _ in range(num_rows * num_cols)]
+ show_images(Y, num_rows, num_cols, scale)
```
-We define a utility function below, that will be used for visualising the augmentations in the tutorial.
+# Spatial Augmentation
+
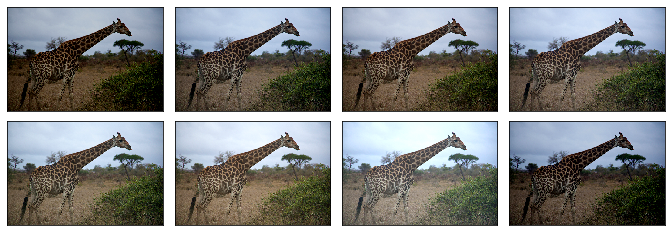
+One form of augmentation affects the spatial position of pixel values. Using combinations of slicing, scaling, translating, rotating and flipping the values of the original image can be shifted to create new images. Some operations (like scaling and rotation) require interpolation as pixels in the new image are combinations of pixels in the original image.
+
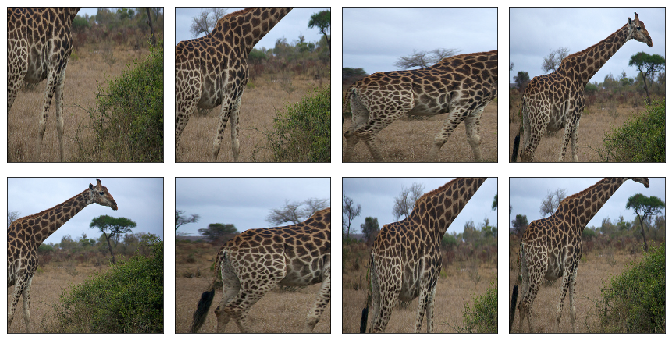
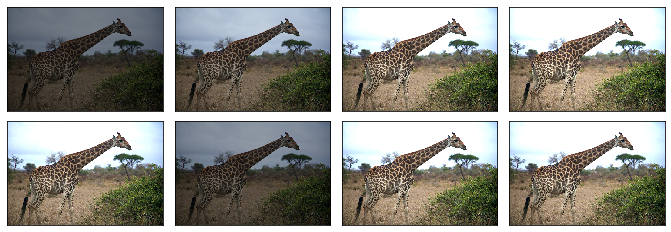
+### `RandomResizedCrop`
+
+Many Computer Visions tasks, such as image classification and object detection, should be robust to changes in the scale and position of objects in the image. You can incorporate this into the network using pooling layers, but an alternative method is to crop random regions of the original image.
+
+As an example, we randomly (using a uniform distribution) crop a region of the image with:
+
+* an area of 10% to 100% of the original area
+* a ratio of width to height between 0.5 and 2
+
+And then we resize this cropped region to 200 by 200 pixels.
```python
-def plot_mx_array(array):
- """
- Array expected to be height x width x 3 (channels), and values are floats between 0 and 255.
- """
- assert array.shape[2] == 3, "RGB Channel should be last"
- imshow((array.clip(0, 255)/255).asnumpy())
+shape_aug = transforms.RandomResizedCrop(size=(200, 200),
+ scale=(0.1, 1),
+ ratio=(0.5, 2))
+apply(example_image, shape_aug)
```
+
+
+
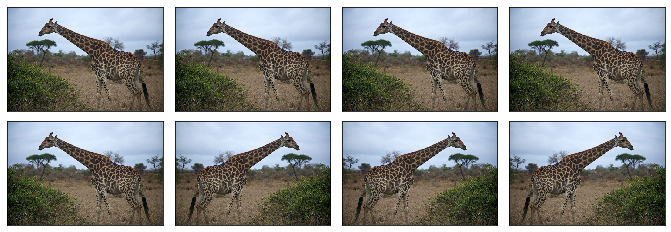
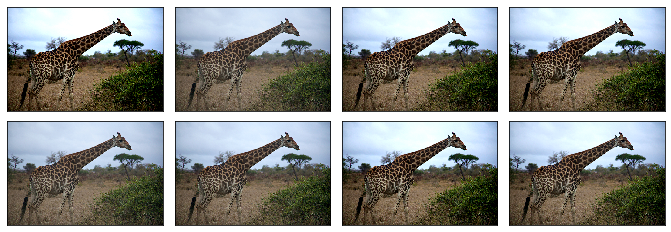
+### `RandomFlipLeftRight`
+
+A simple augmentation technique is flipping. Usually flipping horizontally doesn't change the category of object and results in an image that's still plausible in the real world. Using `RandomFlipLeftRight`, we randomly flip the image horizontally 50% of the time.
+
+
```python
-image_folder = os.path.join('data','images')
-mx.test_utils.download('https://raw.githubusercontent.com/dmlc/web-data/master/mxnet/doc/tutorials/data_aug/inputs/0.jpg', dirname=image_folder)
+apply(example_image, transforms.RandomFlipLeftRight())
```
+
+
+
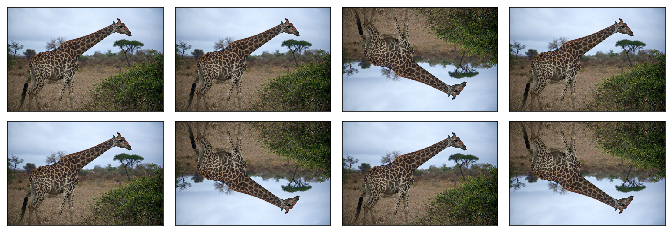
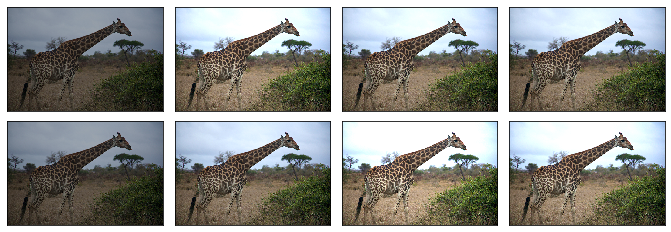
+### `RandomFlipTopBottom`
+
+Although it's not as common as flipping left and right, you can flip the image vertically 50% of the time with `RandomFlipTopBottom`. With our giraffe example, we end up with less plausible samples that horizontal flipping, with the ground above the sky in some cases.
+
+
```python
-example_image = mx.image.imread(os.path.join(image_folder, "0.jpg")).astype("float32")
-plot_mx_array(example_image)
+apply(example_image, transforms.RandomFlipTopBottom())
+```
+
+
+
+
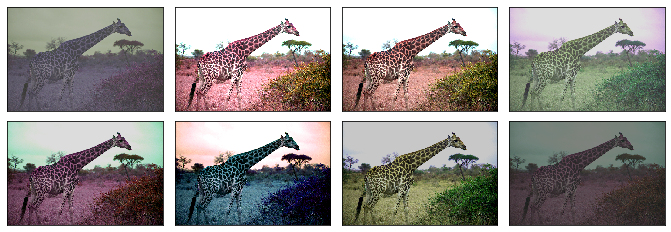
+# Color Augmentation
+
+Usually, exact coloring doesn't play a significant role in the classification or detection of objects, so augmenting the colors of images is a good technique to make the network invariant to color shifts. Color properties that can be changed include brightness, contrast, saturation and hue.
+
+### `RandomBrightness`
+
+Use `RandomBrightness` to add a random brightness jitter to images. Use the `brightness` parameter to control the amount of jitter in brightness, with value from 0 (no change) to 1 (potentially large change). `brightness` doesn't specify whether the brightness of the augmented image will be lighter or darker, just the potential strength of the effect. Specifically the augmentation is given by:
+
+```
+alpha = 1.0 + random.uniform(-brightness, brightness)
+image *= alpha
```
+So by setting this to 0.5 we randomly change the brightness of the image to a value between 50% ($1-0.5$) and 150% ($1+0.5$) of the original image.
-<!--notebook-skip-line-->
+```python
+apply(example_image, transforms.RandomBrightness(0.5))
+```
+
+
-## Quick start with [`ImageFolderDataset`](https://mxnet.incubator.apache.org/api/python/gluon/data.html#mxnet.gluon.data.vision.datasets.ImageFolderDataset)
-Using Gluon, it's simple to add data augmentation to your training pipeline. When creating either [`ImageFolderDataset`](https://mxnet.incubator.apache.org/api/python/gluon/data.html#mxnet.gluon.data.vision.datasets.ImageFolderDataset) or [`ImageRecordDataset`](https://mxnet.incubator.apache.org/api/python/gluon/data.html#mxnet.gluon.data.vision.datasets.ImageRecordDataset), you can pass a `transform` function that will be applied to each image in the dataset, every time it's loaded from [...]
+### `RandomContrast`
-We define `aug_transform` below to perform a selection of augmentation steps and pass it to our dataset. It's worth noting that augmentations should only be applied to the training data (and not the test data), so you don't want to pass this augmentation transform function to the testing dataset.
+Use `RandomContrast` to add a random contrast jitter to an image. Contrast can be thought of as the degree to which light and dark colors in the image differ. Use the `contrast` parameter to control the amount of jitter in contrast, with value from 0 (no change) to 1 (potentially large change). `contrast` doesn't specify whether the contrast of the augmented image will be higher or lower, just the potential strength of the effect. Specifically, the augmentation is given by:
-[`mxnet.image.CreateAugmenter`](https://mxnet.incubator.apache.org/api/python/image/image.html?highlight=createaugmenter#mxnet.image.CreateAugmenter) is a useful function for creating a diverse set of augmentations at once. Despite the singular `CreateAugmenter`, this function actually returns a list of Augmenters. We can then loop through this list and apply each type of augmentation one after another. Although the parameters of `CreateAugmenter` are fixed, the random augmentations (suc [...]
+```
+coef = nd.array([[[0.299, 0.587, 0.114]]])
+alpha = 1.0 + random.uniform(-contrast, contrast)
+gray = image * coef
+gray = (3.0 * (1.0 - alpha) / gray.size) * nd.sum(gray)
+image *= alpha
+image += gray
+```
```python
-def aug_transform(data, label):
- data = data.astype('float32')/255
- augs = mx.image.CreateAugmenter(data_shape=(3, 300, 300),
- rand_crop=0.5, rand_mirror=True, inter_method=10,
- brightness=0.125, contrast=0.125, saturation=0.125,
- pca_noise=0.02)
- for aug in augs:
- data = aug(data)
- return data, label
+apply(example_image, transforms.RandomContrast(0.5))
+```
+
+
+
+
+### `RandomSaturation`
+Use `RandomSaturation` to add a random saturation jitter to an image. Saturation can be thought of as the 'amount' of color in an image. Use the `saturation` parameter to control the amount of jitter in saturation, with value from 0 (no change) to 1 (potentially large change). `saturation` doesn't specify whether the saturation of the augmented image will be higher or lower, just the potential strength of the effect. Specifically the augmentation is using the method detailed [here](https [...]
-training_dataset = mx.gluon.data.vision.ImageFolderDataset('data', transform=aug_transform)
+
+```python
+apply(example_image, transforms.RandomSaturation(0.5))
```
+
+
-We can quickly inspect the augmentations by indexing the dataset (which calls the `__getitem__` method of the dataset). When this method is called (with an index) the correct image is read from disk, and the `transform` is applied. We can see the result of the augmentations when comparing the image below with the original image above.
+### `RandomHue`
+
+Use `RandomHue` to add a random hue jitter to images. Hue can be thought of as the 'shade' of the colors in an image. Use the `hue` parameter to control the amount of jitter in hue, with value from 0 (no change) to 1 (potentially large change). `hue` doesn't specify whether the hue of the augmented image will be shifted one way or the other, just the potential strength of the effect. Specifically the augmentation is using the method detailed [here](https://beesbuzz.biz/code/16-hsv-color- [...]
```python
-sample = training_dataset[0]
-sample_data = sample[0]
-plot_mx_array(sample_data*255)
+apply(example_image, transforms.RandomHue(0.5))
```
+
-<!--notebook-skip-line-->
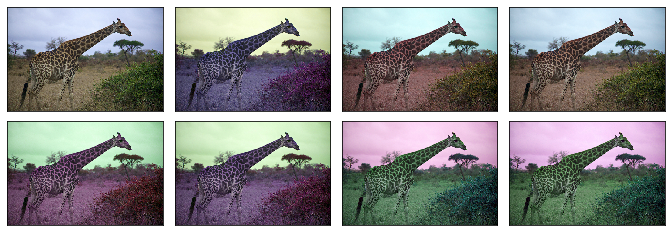
+### `RandomColorJitter`
-In practice you should load images from a dataset with a [`mxnet.gluon.data.DataLoader`](https://mxnet.incubator.apache.org/api/python/gluon/data.html?highlight=dataloader#mxnet.gluon.data.DataLoader) to take advantage of automatic batching and shuffling. Under the hood the `DataLoader` calls `__getitem__`, but you shouldn't need to call directly for anything other than debugging. Some practitioners pre-augment their datasets by applying a fixed number of augmentations to each image and [...]
+`RandomColorJitter` is a convenience transform that can be used to perform multiple color augmentations at once. You can set the `brightness`, `contrast`, `saturation` and `hue` jitters, that function the same as above for their individual transforms.
```python
-batch_size = 1
-training_data_loader = mx.gluon.data.DataLoader(training_dataset, batch_size=1, shuffle=True)
+color_aug = transforms.RandomColorJitter(brightness=0.5,
+ contrast=0.5,
+ saturation=0.5,
+ hue=0.5)
+apply(example_image, color_aug)
+```
+
+
+
+
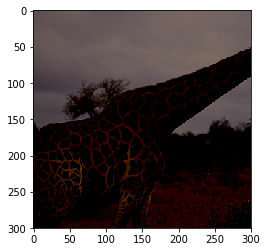
+### `RandomLighting`
+
+Use `RandomLighting` for an AlexNet-style PCA-based noise augmentation.
-for data_batch, label_batch in training_data_loader:
- plot_mx_array(data_batch[0]*255)
- assert data_batch.shape == (1, 300, 300, 3)
- assert label_batch.shape == (1,)
- break
+
+```python
+apply(example_image, transforms.RandomLighting(alpha=1))
```
+
+
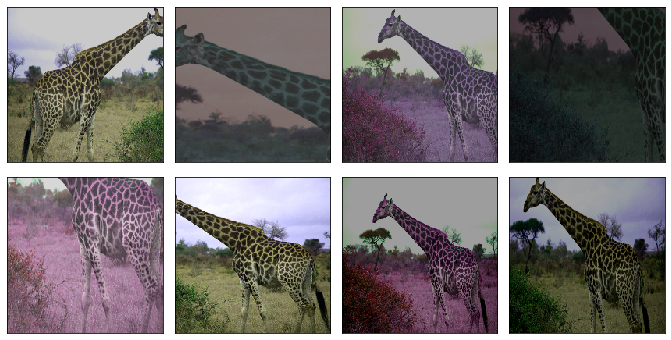
+# Composed Augmentations
+
+In practice, we apply multiple augmentation techniques to an image to increase the variety of images in the dataset. Using the `Compose` transform that was introduced in the [Data Transforms tutorial](), we can apply 3 of the transforms we previously used above.
+
+
+```python
+augs = transforms.Compose([
+ transforms.RandomFlipLeftRight(), color_aug, shape_aug])
+apply(example_image, augs)
+```
-<!--notebook-skip-line-->
+
<!-- INSERT SOURCE DOWNLOAD BUTTONS -->
\ No newline at end of file