You are viewing a plain text version of this content. The canonical link for it is here.
Posted to commits@weex.apache.org by ha...@apache.org on 2017/10/13 13:03:56 UTC
[01/51] [abbrv] incubator-weex-site git commit: rearrangement the
structure of the document
Repository: incubator-weex-site
Updated Branches:
refs/heads/master c8f134e1e -> 12e3a8bcd
http://git-wip-us.apache.org/repos/asf/incubator-weex-site/blob/32a097bf/source/v-0.10/tools/devtools.md
----------------------------------------------------------------------
diff --git a/source/v-0.10/tools/devtools.md b/source/v-0.10/tools/devtools.md
deleted file mode 100644
index f883055..0000000
--- a/source/v-0.10/tools/devtools.md
+++ /dev/null
@@ -1,102 +0,0 @@
----
-title: Devtools
-type: tools
-order: 2
-has_chapter_content: true
-version: 0.10
----
-
-# Devtools
-
-Weex devtools is a custom devtools for weex that implements [Chrome Debugging Protocol](https://developer.chrome.com/devtools/docs/debugger-protocol), it is designed to help you quickly inspect your app and debug your JS bundle source in a chrome web page, both Android and IOS platform are supported.
-
-## Install
-
-```
- $ npm install -g weex-toolkit
-```
-#### usage
-```
-weex debug [options] [we_file|bundles_dir]
-
- Options:
-
- -h, --help output usage information
- -V, --verbose display logs of debugger server
- -v, --version display version
- -p, --port [port] set debugger server port
- -e, --entry [entry] set the entry bundlejs path when you specific the bundle server root path
- -m, --mode [mode] set build mode [transformer|loader]
- -w, --watch watch we file changes auto build them and refresh debugger page![default enabled]
-```
-
-#### start debugger
-```
-$weex debug
-```
-this command will start debug server and launch a chrome opening `DeviceList` page.
-this page will display a qrcode ,you can use `Playground App` scan it for starting debug.
-
-#### start debugger with a we file
-```
-$weex debug your_weex.we
-```
-this command will compile `your_weex.we` to `your_weex.js` and start the debug server as upon command.
-`your_weex.js` will deploy on the server and displayed in `DeviceList` page as another qrcode contain the url of your_weex.js
-
-
-#### start debugger with a directory of we files
-```
-$weex debug your/we/path -e index.we
-```
-this command will build every file in your/we/path and deploy them on the bundle server. your directory will mapping to http://localhost:port/weex/
-use -e to set the entry of these bundles. and the url of "index.we" will display on device list page as another qrcode.
-
-## Features
-
-### Connect devices
- devices")
-
-### Inspector
- Inspector can be used to show your `Element` \ `Network` \ `Console log` \ `ScreenCast` \ `BoxModel` \ `Native View` and so on.
-
-
-
-#### Element
-##### native view element
-
-
-##### weex dom element
-
-
-#### Network
-
-##### show the total time and latency
-
-
-##### show the header and response
-
-
-#### Console
-
-
-#### Resource
-
-
-### Debugger
-
- Debugger can be used to debug your bundle js source, you can set `Breakpoint` \ watch `CallStack`.
-
-
-
-#### Breakpoint and CallStack
-
-
-
-## Integrate devtools
-
-* Android
- * See the doc [Weex devtools (Android)](/tools/devtools-android.html), it will lead you to config and use it step by step.
-* IOS
- * See the doc [Weex devtools (IOS)](/tools/devtools-ios.html), it will lead you to config and use it step by step.
-
http://git-wip-us.apache.org/repos/asf/incubator-weex-site/blob/32a097bf/source/v-0.10/tools/index.md
----------------------------------------------------------------------
diff --git a/source/v-0.10/tools/index.md b/source/v-0.10/tools/index.md
deleted file mode 100644
index 731c2f9..0000000
--- a/source/v-0.10/tools/index.md
+++ /dev/null
@@ -1,97 +0,0 @@
----
-title: CLI
-type: tools
-order: 1
-has_chapter_content: true
-version: 0.10
----
-
-# Weex-Toolkit
-
-Please access [npmjs.com](https://www.npmjs.com/package/weex-toolkit) for latest version
-
-Weex CLI tool set
-
-## Pre Install
-some dependencies need recent version of npm to install
-
-if your
-```
-$ npm --version
-```
-output less then `2.15.1`, please run below cmd upgrade your npm at first
-```
-sudo npm install -g npm
-```
-
-## Install
-```
-$npm install -g weex-toolkit
-```
-
-## Usage
-
-```
-$weex foo/bar/input_path [options]
-
-$weex create file_name [options]
-
-Options:
- --qr display QR code for native runtime, **default action**
- -o,--output transform weex we file to JS Bundle, output path (single JS bundle file or dir)
- [for create sub cmd] it specified we file output path
- --watch using with -o , watch input path , auto run transform if change
- happen
- -s,--server start a http file server, weex .we file will be transforme to JS
- bundle on the server , specify local root path using the option
- --port http listening port number ,default is 8081
- --wsport websocket listening port number ,default is 8082
- -f, --force [for create sub cmd] force to replace exsisting file(s)
- --version show version of weex toolkit
- --help Show help
-```
-
-## Examples
-
-#### crate a `we file`(weex source file) using standard template
-```
-$weex create hello-world-weex
-```
-a file named 'hello-world-weex.we' we be created in current directory
-
-
-#### transform a `we file` to JS Bundle
-```
-$weex your_best_weex.we -o .
-```
-`your_best_weex.we` will be transform to JS Bundle file `your_best_weex.js` , saved in your current directory
-
-#### transform a `we file` to JS Bundle , watch this file ,auto run transformer if change happen.
-```
-$weex your_best_weex.we -o . --watch
-```
-
-#### transform every we file in a directory
-```
-$weex we/file/storage/path -o outputpath
-```
-every `we file` in `we/file/storage/path` we be transform to JS Bundle , saved in `outputpath` path
-
-#### preview your we file using Weex Playground App
-download & install [weex playground App](http://alibaba.github.io/weex/download.html)
-```
-$weex your_best_weex.we --qr
-```
-a QR code will display in your terminal , using Playground App scan that.
-
-
-#### start http server
-```
-$weex -s .
-```
-a http server will start running , your current directory(.) will be the document root for the server , every weex .we file will be transforme to JS Bundle when access through the server
-
-## Issue & Feedback
-
-[Github Issue List](https://github.com/weexteam/weex-toolkit/issues)
-
http://git-wip-us.apache.org/repos/asf/incubator-weex-site/blob/32a097bf/source/v-0.10/tools/playground.md
----------------------------------------------------------------------
diff --git a/source/v-0.10/tools/playground.md b/source/v-0.10/tools/playground.md
deleted file mode 100644
index f315054..0000000
--- a/source/v-0.10/tools/playground.md
+++ /dev/null
@@ -1,24 +0,0 @@
----
-title: Playground
-type: tools
-order: 4
-has_chapter_content: true
-version: 0.10
----
-
-# Weex Playground App
-
-One of best parts of Weex is Native Runtime . After preview your `we file` render in H5 using weex-toolkit CLI , you can try Native Runtime in a standalone App , this is Weex Playground App . More then that ,Weex playground App preset a lot of Demo & ShowCase ,so you will get to experience performance of Weex native runtime easily.
-
-Android and IOS version of Playground App can be downloaded [here](http://alibaba.github.io/weex/download.html).
-
-## Screenshot
-
-
-
-
-This is main interface of Weex Playground App , you can click the item to see the corresponding demo . click top right corner Icon will active QR scaner that work with Weex [toolkit CLI](../tools/index.html)
-
-please refer to [Weex Tutorial](../guide/index.html)
-
-
http://git-wip-us.apache.org/repos/asf/incubator-weex-site/blob/32a097bf/source/v-0.10/tools/transformer.md
----------------------------------------------------------------------
diff --git a/source/v-0.10/tools/transformer.md b/source/v-0.10/tools/transformer.md
deleted file mode 100644
index 7df3b60..0000000
--- a/source/v-0.10/tools/transformer.md
+++ /dev/null
@@ -1,38 +0,0 @@
----
-title: Transformer
-type: tools
-order: 3
-has_chapter_content: true
-version: 0.10
----
-
-# gulp-weex
-
-> gulp plugin for weex transformer
-
-## Usage
-
-```javascript
-var gulp = require('gulp')
-var weex = require('gulp-weex')
-
-gulp.task('default', function () {
- return gulp.src('src/*.html')
- .pipe(weex({}))
- .pipe(gulp.dest('./dest'))
-})
-```
-
-## Options
-
-### oldFormat
-
-whether transform to old format.
-
-default: `false`.
-
-### isEntry
-
-whether is an entry module which has `bootstrap(...)`.
-
-default: `true`.
\ No newline at end of file
http://git-wip-us.apache.org/repos/asf/incubator-weex-site/blob/32a097bf/source/who-is-using-weex.md
----------------------------------------------------------------------
diff --git a/source/who-is-using-weex.md b/source/who-is-using-weex.md
new file mode 100644
index 0000000..3104b9f
--- /dev/null
+++ b/source/who-is-using-weex.md
@@ -0,0 +1,6 @@
+---
+title: Who is Using Weex?
+type: community
+has_chapter_content: false
+version: 2.1
+---
http://git-wip-us.apache.org/repos/asf/incubator-weex-site/blob/32a097bf/source/wiki/color-names.md
----------------------------------------------------------------------
diff --git a/source/wiki/color-names.md b/source/wiki/color-names.md
new file mode 100644
index 0000000..9e246bc
--- /dev/null
+++ b/source/wiki/color-names.md
@@ -0,0 +1,183 @@
+---
+title: Color name
+type: wiki
+group: Style
+order: 3.4
+version: 2.1
+---
+
+# List of the names of colors
+
+### Basic color keywords:
+
+| Color Name | Hex rgb |
+| ---------- | ------- |
+| black | #000000 |
+| silver | #C0C0C0 |
+| gray | #808080 |
+| white | #FFFFFF |
+| maroon | #800000 |
+| red | #FF0000 |
+| purple | #800080 |
+| fuchsia | #FF00FF |
+| green | #008000 |
+| lime | #00FF00 |
+| olive | #808000 |
+| yellow | #FFFF00 |
+| navy | #000080 |
+| blue | #0000FF |
+| teal | #008080 |
+| aqua | #00FFFF |
+
+### Extended color keywords:
+
+| Color Name | Hex rgb |
+| ---------- | ------- |
+| aliceblue | #F0F8FF |
+| antiquewhite | #FAEBD7 |
+| aqua | #00FFFF |
+| aquamarine | #7FFFD4 |
+| azure | #F0FFFF |
+| beige | #F5F5DC |
+| bisque | #FFE4C4 |
+| black | #000000 |
+| blanchedalmond | #FFEBCD |
+| blue | #0000FF |
+| blueviolet | #8A2BE2 |
+| brown | #A52A2A |
+| burlywood | #DEB887 |
+| cadetblue | #5F9EA0 |
+| chartreuse | #7FFF00 |
+| chocolate | #D2691E |
+| coral | #FF7F50 |
+| cornflowerblue | #6495ED |
+| cornsilk | #FFF8DC |
+| crimson | #DC143C |
+| cyan | #00FFFF |
+| darkblue | #00008B |
+| darkcyan | #008B8B |
+| darkgoldenrod | #B8860B |
+| darkgray | #A9A9A9 |
+| darkgreen | #006400 |
+| darkgrey | #A9A9A9 |
+| darkkhaki | #BDB76B |
+| darkmagenta | #8B008B |
+| darkolivegreen | #556B2F |
+| darkorange | #FF8C00 |
+| darkorchid | #9932CC |
+| darkred | #8B0000 |
+| darksalmon | #E9967A |
+| darkseagreen | #8FBC8F |
+| darkslateblue | #483D8B |
+| darkslategray | #2F4F4F |
+| darkslategrey | #2F4F4F |
+| darkturquoise | #00CED1 |
+| darkviolet | #9400D3 |
+| deeppink | #FF1493 |
+| deepskyblue | #00BFFF |
+| dimgray | #696969 |
+| dimgrey | #696969 |
+| dodgerblue | #1E90FF |
+| firebrick | #B22222 |
+| floralwhite | #FFFAF0 |
+| forestgreen | #228B22 |
+| fuchsia | #FF00FF |
+| gainsboro | #DCDCDC |
+| ghostwhite | #F8F8FF |
+| gold | #FFD700 |
+| goldenrod | #DAA520 |
+| gray | #808080 |
+| green | #008000 |
+| greenyellow | #ADFF2F |
+| grey | #808080 |
+| honeydew | #F0FFF0 |
+| hotpink | #FF69B4 |
+| indianred | #CD5C5C |
+| indigo | #4B0082 |
+| ivory | #FFFFF0 |
+| khaki | #F0E68C |
+| lavender | #E6E6FA |
+| lavenderblush | #FFF0F5 |
+| lawngreen | #7CFC00 |
+| lemonchiffon | #FFFACD |
+| lightblue | #ADD8E6 |
+| lightcoral | #F08080 |
+| lightcyan | #E0FFFF |
+| lightgoldenrodyellow | #FAFAD2 |
+| lightgray | #D3D3D3 |
+| lightgreen | #90EE90 |
+| lightgrey | #D3D3D3 |
+| lightpink | #FFB6C1 |
+| lightsalmon | #FFA07A |
+| lightseagreen | #20B2AA |
+| lightskyblue | #87CEFA |
+| lightslategray | #778899 |
+| lightslategrey | #778899 |
+| lightsteelblue | #B0C4DE |
+| lightyellow | #FFFFE0 |
+| lime | #00FF00 |
+| limegreen | #32CD32 |
+| linen | #FAF0E6 |
+| magenta | #FF00FF |
+| maroon | #800000 |
+| mediumaquamarine | #66CDAA |
+| mediumblue | #0000CD |
+| mediumorchid | #BA55D3 |
+| mediumpurple | #9370DB |
+| mediumseagreen | #3CB371 |
+| mediumslateblue | #7B68EE |
+| mediumspringgreen | #00FA9A |
+| mediumturquoise | #48D1CC |
+| mediumvioletred | #C71585 |
+| midnightblue | #191970 |
+| mintcream | #F5FFFA |
+| mistyrose | #FFE4E1 |
+| moccasin | #FFE4B5 |
+| navajowhite | #FFDEAD |
+| navy | #000080 |
+| oldlace | #FDF5E6 |
+| olive | #808000 |
+| olivedrab | #6B8E23 |
+| orange | #FFA500 |
+| orangered | #FF4500 |
+| orchid | #DA70D6 |
+| palegoldenrod | #EEE8AA |
+| palegreen | #98FB98 |
+| paleturquoise | #AFEEEE |
+| palevioletred | #DB7093 |
+| papayawhip | #FFEFD5 |
+| peachpuff | #FFDAB9 |
+| peru | #CD853F |
+| pink | #FFC0CB |
+| plum | #DDA0DD |
+| powderblue | #B0E0E6 |
+| purple | #800080 |
+| red | #FF0000 |
+| rosybrown | #BC8F8F |
+| royalblue | #4169E1 |
+| saddlebrown | #8B4513 |
+| salmon | #FA8072 |
+| sandybrown | #F4A460 |
+| seagreen | #2E8B57 |
+| seashell | #FFF5EE |
+| sienna | #A0522D |
+| silver | #C0C0C0 |
+| skyblue | #87CEEB |
+| slateblue | #6A5ACD |
+| slategray | #708090 |
+| slategrey | #708090 |
+| snow | #FFFAFA |
+| springgreen | #00FF7F |
+| steelblue | #4682B4 |
+| tan | #D2B48C |
+| teal | #008080 |
+| thistle | #D8BFD8 |
+| tomato | #FF6347 |
+| turquoise | #40E0D0 |
+| violet | #EE82EE |
+| wheat | #F5DEB3 |
+| white | #FFFFFF |
+| whitesmoke | #F5F5F5 |
+| yellow | #FFFF00 |
+| yellowgreen | #9ACD32 |
+
http://git-wip-us.apache.org/repos/asf/incubator-weex-site/blob/32a097bf/source/wiki/common-events.md
----------------------------------------------------------------------
diff --git a/source/wiki/common-events.md b/source/wiki/common-events.md
new file mode 100644
index 0000000..f07c7a8
--- /dev/null
+++ b/source/wiki/common-events.md
@@ -0,0 +1,129 @@
+---
+title: Common Events
+type: wiki
+group: Event
+order: 4.1
+version: 2.1
+---
+
+# Common Events
+
+Weex provide the ability to let events trigger action, like starting a JavaScript when a user click on a component. Bellow are the common event attributes that can be added to weex components to define event actions.
+
+## Click event
+
+The onclick attribute fires on a click gesture on the element.
+**Notes: ** The `input` and `switch` component does not currently support the `click` event, please use `change` or `input` event instead.
+
+### event object
+
+- `type` : `click`
+- `target` : The target component where the event is triggered
+- `timestamp` : Timestamp when event is triggered
+
+## Longpress event
+
+If a `longpress` event is bound to a component, the event will be triggered when user long press on it.
+**Notes: ** The `input` and `switch` component does not currently support the `click` event, please use `change` or `input` event instead.
+
+### event object
+
+- `type` : `longpress`
+- `target` : The target component where the event is triggered
+- `timestamp` : Timestamp when event is triggered
+
+## Appear event
+
+If a appear event is bound to a component inside a scrollable container, the event will be triggered when the component comes to be visible.
+
+### event object
+
+- `type` : `appear`
+- `target` : The target component where the event is triggered
+- `timestamp` : Timestamp when event is triggered
+- `direction` : The direction in which the scroller is scrolling. Could be `up` or `down`.
+
+## Disappear event
+
+If a `disappear` event is bound to a component inside a scrollable container, the event will be triggered when the component scrolls out of viewport and disappears from your sight.
+
+### event object
+
+- `type` : `disappear`
+- `target` : The target component where the event is triggered
+- `timestamp` : Timestamp when event is triggered
+- `direction` : The direction in which the scroller is scrolling. Could be `up` or `down`.
+
+## Page event
+
+Weex provides you with simple management of page status, such as `viewappear` and `viewdisappear`.
+The `viewappear` event will be triggered when page is about to show or before any animations are configured for showing. For example, when calling `push` method in `navigator` module, this event will be trigged in new page.
+The `viewdisappear` event will be triggeded when page is about to dismiss.
+Different from `appear` and `disappear` of component, these two events focus on the status of whole page, so **they must be bound to the root component**.
+In addititon, these events also can be bound to body component which is not root actually such as `wxc-navpage`.
+
+### event object
+
+- `type` : `viewappear` or `viewdisappear`
+- `target` : The target component where the event is triggered
+- `timestamp` : Timestamp when event is triggered
+
+
+## Example
+
+```html
+<template>
+ <div>
+ <div class="box" @click="onclick" @longpress="onlongpress" @appear="onappear" @disappear="ondisappear"></div>
+ </div>
+</template>
+
+<script>
+ const modal = weex.requireModule('modal')
+ export default {
+ methods: {
+ onclick (event) {
+ console.log('onclick:', event)
+ modal.toast({
+ message: 'onclick',
+ duration: 0.8
+ })
+ },
+ onlongpress (event) {
+ console.log('onlongpress:', event)
+ modal.toast({
+ message: 'onlongpress',
+ duration: 0.8
+ })
+ },
+ onappear (event) {
+ console.log('onappear:', event)
+ modal.toast({
+ message: 'onappear',
+ duration: 0.8
+ })
+ },
+ ondisappear (event) {
+ console.log('ondisappear:', event)
+ modal.toast({
+ message: 'ondisappear',
+ duration: 0.8
+ })
+ }
+ }
+ }
+</script>
+
+<style scoped>
+ .box {
+ border-width: 2px;
+ border-style: solid;
+ border-color: #BBB;
+ width: 250px;
+ height: 250px;
+ margin-top: 250px;
+ margin-left: 250px;
+ background-color: #EEE;
+ }
+</style>
+```
http://git-wip-us.apache.org/repos/asf/incubator-weex-site/blob/32a097bf/source/wiki/common-styles.md
----------------------------------------------------------------------
diff --git a/source/wiki/common-styles.md b/source/wiki/common-styles.md
new file mode 100644
index 0000000..8344dce
--- /dev/null
+++ b/source/wiki/common-styles.md
@@ -0,0 +1,523 @@
+---
+title: Common Style
+type: wiki
+group: 样式
+order: 3.1
+version: 2.1
+---
+
+# Common Style
+
+All of weex tags share some common style rules
+
+## Box Model
+
+
+
+Weex box model based on the CSS box model, all of weex elements can be considered as boxes. The term "box model" is used when talking about design and layout. The box model is essentially a box that wraps around every HTML element. It consists of margins, borders, paddings, and the actual content.
+
+you can use the definition below in weex box model.
+
+- `width`: `length` type, default value `0`
+- `height`: `length` type, default value `0`
+- `padding`: `length` type, default value `0`, (space around content, between element content and the element border)
+ - `padding-left`: `length` type, default value `0`
+ - `padding-right`: `length` type, default value `0`
+ - `padding-top`: `length` type, default value `0`
+ - `padding-bottom`: `length` type, default value `0`
+- `margin`: `length` type, default value `0`, (space around elements, outside the border)
+ - `margin-left`: `length` type, default value `0`
+ - `margin-right`: `length` type, default value `0`
+ - `margin-top`: `length` type, default value `0`
+ - `margin-bottom`: `length` type, default value `0`
+- `border`
+ - `border-style`: values `solid` | `dashed` | `dotted`, default value `solid`
+ - `border-left-style`: values `solid` | `dashed` | `dotted`, default value `solid`
+ - `border-top-style`: values `solid` | `dashed` | `dotted`, default value `solid`
+ - `border-right-style`: values `solid` | `dashed` | `dotted`, default value `solid`
+ - `border-bottom-style`: values `solid` | `dashed` | `dotted`, default value `solid`
+ - `border-width`: `length` type, non-negative, default value `0`
+ - `border-left-width`: `length` type, non-negative, default value `0`
+ - `border-top-width`: `length` type, non-negative, default value `0`
+ - `border-right-width`: `length` type, non-negative, default value `0`
+ - `border-bottom-width`: `length` type, non-negative, default value `0`
+ - `border-color`: `color` type, default value `#000000`
+ - `border-left-color`: `color` type, default value `#000000`
+ - `border-top-color`: `color` type, default value `#000000`
+ - `border-right-color`: `color` type, default value `#000000`
+ - `border-bottom-color`: `color` type, default value `#000000`
+ - `border-radius`: `length` type, default value `0`, (rounded borders to elements , default value is 0 meaning right angle )
+ - `border-bottom-left-radius`: `length` type, non-negative, default value `0`
+ - `border-bottom-right-radius`: `length` type, non-negative, default value `0`
+ - `border-top-left-radius`: `length` type, non-negative, default value `0`
+ - `border-top-right-radius`: `length` type, non-negative, default value `0`
+
+### Notes
+Weex box model uses `border-box` as the default value of `box-sizing`, meaning the width and height properties includes content, padding and border, but not the margin.
+
+The rule of border-radius for a specific corner such as `border-top-left-radius` is not currently supported for component `<image>`in iOS. This only happens to iOS, it works fine on Android.
+
+Although `overflow:hidden` is default on android, a view **will not** clip its children according to `border-radius` unless all the following condtions met. This only happens on Android, it works fine on iOS.
+* The view type is `div`, `a`, `cell`, `refresh` or `loading`.
+* OS version is Android 4.3 or higher.
+* OS version is **not** Andorid 7.0
+* A view **does not** have `background-image` property nor OS version is Android 5.0 or higher.
+
+### Example
+
+```html
+<template>
+ <div>
+ <image src="..." style="width: 400; height: 200; margin-left: 20;"></image>
+ </div>
+</template>
+```
+
+## Flexbox
+
+Weex box style model based on the CSS flexbox, ensures that elements behave predictably and the page layout can accommodates to different screen sizes and different display devices.
+
+Flexbox consists of flex containers and flex items. If a weex element can containing other elements, it is a flex container.
+
+Notice that the old version of flexbox specification has differences with the new ones, such as whether or not to support wrapping. This is described at w3c's working drafts, and you should notice the differences among them. Also notice that the old version is only supported below the 4.4 version of android.
+
+### Flex container
+
+Flexbox is the default and only style model in Weex, so you don't have to add `display: flex;` in a container.
+
+- `flex-direction`: values `row` | `column`, default value `column`
+
+The flex-direction property specifies the direction of the flexible items inside the flex container. Default value is `column` (top-to-bottom).
+
+- `justify-content`: values `flex-start` | `flex-end` | `center` | `space-between`, default value `flex-start`
+
+The justify-content property horizontally aligns the flexible container's items when the items do not use all available space on the main-axis. Default value is `flex-start` meaning the flex items are positioned at the beginning of the container. `flex-end` means the items are positioned at the end of the container. `center` means the items are positioned at the center of the container. `space-between` means the items are positioned with space between the lines.
+
+
+
+- `align-items`: values `stretch` | `flex-start` | `center` | `flex-end`, default value `stretch`
+
+The align-items property vertically aligns the flexible container's items when the items do not use all available space on the cross-axis. Default value is `stretch` meaning the items are stretched to fit the container. `flex-start` means the items are positioned at the top of the container; `flex-end` means the items are positioned at the bottom of the container; `center` means items are positioned at the center of the container (vertically).
+
+
+
+### Flex item
+
+- `flex`: `number` type, default value `0`
+
+the flex property specifies the length of the flex item, relative to the rest of the flex items inside the same container. If all of the flex items set `flex: 1`, they will have equal width or height on direction of flex container's `flex-direction`. If there are two flex items, with one setting `flex: 1`, and the other setting `flex: 2`, the first one will take 1/3 container space, and the second one will take 2/3 container space. If all of flex items don't set `flex`, they will be aligned depending on the container's `justify-content` property.
+
+
+## Examples
+
+a list of images with equal scales align at the vertical axis:
+
+```html
+<template>
+ <div style="width: 300; height: 100;">
+ <image src="..." style="flex: 1;"></image>
+ <image src="..." style="flex: 1;"></image>
+ <image src="..." style="flex: 1;"></image>
+ </div>
+</template>
+```
+
+a image with fixed width aligns with a stretched text:
+
+```html
+<template>
+ <div style="width: 300; height: 100;">
+ <image src="..." style="width: 100; height: 100;"></image>
+ <text style="flex: 1;">...</text>
+ </div>
+</template>
+```
+
+mixed direction alignment:
+
+```html
+<template>
+ <div style="width: 100;">
+ <image src="..." style="width: 100; height: 100;"></image>
+ <div style="flex-direction: row;">
+ <text style="flex: 2; font-size: 32;">title</text>
+ <text style="flex: 1; font-size: 16;">$100</text>
+ </div>
+ </div>
+</template>
+```
+
+one text align left , the other float right:
+
+
+
+```html
+<template>
+<div style="flex-direction: row; justify-content: space-between;">
+ <text>WEEX</text>
+ <text>2016-05-08</text>
+</div>
+</template>
+```
+
+## Position
+
+we can use properties below to control placement of weex tag
+
+- `position`: values `relative` | `absolute` | `fixed` | `sticky`, default value `relative`
+
+`relative` means the item is positioned relative to its normal position. `absolute` means the item is positioned relative to its container. `fixed` keeps the elements position fixed when the page is scrolling. `sticky` keeps elements positioned inside the viewport as "stuck" at the top or "relative" at its original place depending on whether does it about to scroll out of the view.
+
+- `top`: `number` type, default value `0`, upward offset value
+- `bottom`: `number` type, default value `0`, downward offset value
+- `left`: `number` type, default value `0`, leftward offset value
+- `right`: `number` type, default value `0`, rightward offset value
+
+### Examples
+
+```html
+<template>
+ <div style="flex-direction: column;">
+ <div style="height: 3000;">
+ <image src="..." style="top: 50px; left: 50px;"></image>
+ </div>
+ <div style="height: 3000;">
+ <image src="..." style="position: sticky;"></image>
+ </div>
+ <div style="height: 3000;">
+ <image src="..." style="position: absolute; top: 50px; left: 50px;"></image>
+ </div>
+ </div>
+</template>
+```
+
+## transform
+
+The CSS **transform** property lets you modify the coordinate space of the CSS visual formatting model. Using it, elements can be translated, rotated and scaled.
+
+Currently supported format:
+
+* translate( <number/percentage> [, <number/percentage>]?)
+* translateX( <number/percentage> )
+* translateY( <number/percentage> )
+* scale( <number>)
+* scaleX( <number> )
+* scaleY( <number> )
+* rotate( <angle/degree> )
+* rotateX( <angle/degree> ) <span class="api-version">v0.14+</span>
+* rotateY( <angle/degree> ) <span class="api-version">v0.14+</span>
+* perspective( <number> ), supported for Android 4.1 and above. <span class="api-version">v0.16+</span>
+* transform-origin: number/percentage/keyword(top/left/right/bottom)
+
+### Example
+
+```HTML
+<template>
+ <div class="wrapper">
+ <div class="transform">
+ <text class="title">Transformed element</text>
+ </div>
+ </div>
+</template>
+
+<style>
+ .transform {
+ align-items: center;
+ transform: translate(150px,200px) rotate(20deg);
+ transform-origin: 0 -250px;
+ border-color:red;
+ border-width:2px;
+ }
+ .title {font-size: 48px;}
+</style>
+```
+
+## transition <span class="api-version">v0.16.0+</span>
+
+Now you can use the transition attribute in CSS to enhance the interactivity and visual experience of your application. The transition includes the layout animation, that is, LayoutAnimation, which now changes the layout and uses the fluent animation of the transition. Transition allows the CSS attribute values to transition smoothly over a certain time interval.
+
+### Property
+
+- ``transition-property``:Allows the name of the transitional animation to set the value of the different styles transition effect, the default value is empty, that does not perform any transition, the following table lists all the legitimate parameters of the property:
+
+| Property | Description |
+| --------------- | ---------------------------------------- |
+| width | The transition is performed when the width of the component is involved in the animation |
+| height | The transition is performed when the height of the component is involved in the animation |
+| top | The transition is performed when the top of the component is involved in the animation |
+| bottom | The transition is performed when the bottom of the component is involved in the animation |
+| left | The transition is performed when the left of the component is involved in the animation |
+| right | The transition is performed when the right of the component is involved in the animation |
+| backgroundColor | The transition is performed when the backgroundColor of the component is involved in the animation |
+| opacity | The transition is performed when the opacity of the component is involved in the animation |
+| transform | The transition is performed when the transform of the component is involved in the animation |
+
+- ``transition-duration``:Specifies the duration of the transition transition (in milliseconds). The default value is 0, indicating that there is no animation.
+
+- ``transition-delay``:Specifies the time interval (in milliseconds or seconds) between the request transition transition and the transition transition. The default value is 0, indicating that there is no delay, and the transition transition is performed immediately after the request.
+
+- ``transition-timing-function``:Describes the velocity curve of the transition transition, which is used to make the transition transition smoother. The default is ease. The following table lists all the valid attributes:
+
+| Property | Description |
+| ------------------------------ | ---------------------------------------- |
+| ease | The transition gradually slow down the transition effect |
+| ease-in | The transition starts slowly and then becomes faster for the transition effect |
+| ease-out | The transition starts quickly and then slows the transition effect |
+| ease-in-out | The transition starts slowly, then goes fast and then slowly ends the transition effect |
+| linear | The transition changes at constant speed |
+| cubic-bezier(x1, y1, x2, y2) | Using the custom transition in the third-order Bessel function, the parameter values of the function must be between 0 and 1. For more information on three times Bessel, see [cubic-bezier](http://cubic-bezier.com/) and [Bézier curve](https://en.wikipedia.org/wiki/B%C3%A9zier_curve). |
+
+### Example
+
+```html
+<style scoped>
+ .panel {
+ margin: 10px;
+ top:10px;
+ align-items: center;
+ justify-content: center;
+ border: solid;
+ border-radius: 10px;
+
+ transition-property: width,height,backgroundColor;
+ transition-duration: 0.3s;
+ transition-delay: 0s;
+ transition-timing-function: cubic-bezier(0.25, 0.1, 0.25, 1.0);
+ }
+</style>
+```
+
+
+
+## Pseudo class <span class="api-version">v0.9.5+</span>
+
+Weex support four pseudo-classes: `active`, `focus`, `disabled`, `enabled`
+
+All components support `active`, but only the input component and the textarea component support `focus`, `enabled`, `diabled`.
+
+### Rule
+
+- the high priority override low priority when rules take effect at the same time
+
+ - such as: "input:active:enabled" will override "input:active"
+
+- the interconnection rule as follow
+
+ 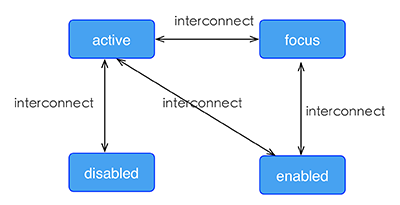
+
+### Example
+
+```html
+<template>
+ <div class="wrapper">
+ <image :src="logoUrl" class="logo"></image>
+ </div>
+</template>
+
+<style scoped>
+ .wrapper {
+ align-items: center;
+ margin-top: 120px;
+ }
+ .title {
+ font-size: 48px;
+ }
+ .logo {
+ width: 360px;
+ height: 82px;
+ background-color: red;
+ }
+ .logo:active {
+ width: 180px;
+ height: 82px;
+ background-color: green;
+ }
+</style>
+
+<script>
+ export default {
+ props: {
+ logoUrl: {
+ default: 'https://alibaba.github.io/weex/img/weex_logo_blue@3x.png'
+ },
+ target: {
+ default: 'World'
+ }
+ },
+ methods: {
+ update (e) {
+ this.target = 'Weex';
+ }
+ }
+ };
+</script>
+```
+
+[Try it](http://dotwe.org/vue/df2c8f254620d6d30d0906ee75fe5b99)
+
+## linear-gradient <span class="api-version">v0.10+</span>
+
+Weex support linear-gradient background, You can see [W3C description of the gradient](https://developer.mozilla.org/en-US/docs/Web/CSS/CSS_Images/Using_CSS_gradients).
+
+### Supported components
+
+All components in Weex support gradients
+
+### Usage
+
+You can use linear gradient by `background-image` property.
+
+```css
+background-image: linear-gradient(to top,#a80077,#66ff00);
+```
+
+`radial-gradient` is not currently supported, do not use it.
+
+Weex currently supports two color gradients. The direction of the gradient is as follows:
+
+* to right
+ From left to right
+* to left
+ From right to left
+* to bottom
+ From top to bottom
+* to top
+ From bottom to top
+* to bottom right
+ From the upper left corner to the lower right corner
+* to top left
+ From the lower right corner to the upper left corner
+
+### Note
+
+- `background-image` and `background-color` are set at the same time, `background-image` precedes `background-color`.
+- Do not use shorthand property such as `background`.
+
+### Example
+
+```html
+<template>
+ <scroller style="background-color: #3a3a3a">
+ <div class="container1" style="background-image:linear-gradient(to right,#a80077,#66ff00);">
+ <text class="direction">to right</text>
+ </div>
+ <div class="container1" style="background-image:linear-gradient(to left,#a80077,#66ff00);">
+ <text class="direction">to left</text>
+ </div>
+ <div class="container1" style="background-image:linear-gradient(to bottom,#a80077,#66ff00);">
+ <text class="direction">to bottom</text>
+ </div>
+ <div class="container1" style="background-image:linear-gradient(to top,#a80077,#66ff00);">
+ <text class="direction">to top</text>
+ </div>
+ <div style="flex-direction: row;align-items: center;justify-content: center">
+ <div class="container2" style="background-image:linear-gradient(to bottom right,#a80077,#66ff00);">
+ <text class="direction">to bottom right</text>
+ </div>
+ <div class="container2" style="background-image:linear-gradient(to top left,#a80077,#66ff00);">
+ <text class="direction">to top left</text>
+ </div>
+ </div>
+ </scroller>
+</template>
+<style>
+ .container1 {
+ margin: 10px;
+ width: 730px;
+ height: 200px;
+ align-items: center;
+ justify-content: center;
+ border: solid;
+ border-radius: 10px;
+ }
+
+ .container2 {
+ margin: 10px;
+ width: 300px;
+ height: 300px;
+ align-items: center;
+ justify-content: center;
+ border: solid;
+ border-radius: 10px;
+ }
+
+ .direction {
+ font-size: 40px;
+ color: white;
+ }
+</style>
+```
+
+## box-shadow <span class="api-version">v0.11+</span>
+
+Weex supports box-shadow in iOS: `inset`,`offset-x`,`offset-y`, `blur-radius`,`color`
+
+
+### Note
+
+- box-shadow takes effect in iOS
+
+### Example
+
+```html
+<template>
+ <div class="wrapper">
+ <div style="width:400px; height:60px;background-color: #FFE4C4; box-shadow:20px 10px rgb(255, 69, 0);">
+ <text class="title" style="text-align: center">Hello {{target}}</text>
+ </div>
+ <div style="margin-top: 80px;width:400px; height:60px;background-color: #FFE4C4; box-shadow: 20px 10px 5px rgba(255, 69, 0, 0.8);">
+ <text class="title" style="text-align: center">Hello {{target}}</text>
+ </div>
+ <div style="margin-top: 80px;width:400px; height:60px;background-color: #FFE4C4; box-shadow:inset 20px 10px 5px rgba(255, 69, 0, 0.8);">
+ <text class="title" style="text-align: center">Hello {{target}}</text>
+ </div>
+ <div style="margin-top: 80px;width:400px; height:60px;background-color: #FFE4C4; box-shadow:inset 20px 10px 5px rgb(255, 69, 0);">
+ <text class="title" style="text-align: center">Hello {{target}}</text>
+ </div>
+ <div style="margin-top: 80px;width:400px; height:60px;background-color: #FFE4C4; box-shadow:20px 10px 5px black;">
+ <text class="title" style="text-align: center">Hello {{target}}</text>
+ </div>
+ <div style="margin-top: 80px;width:400px; height:60px;background-color: #FFE4C4; box-shadow:20px 10px 5px #008B00;">
+ <text class="title" style="text-align: center">Hello {{target}}</text>
+ </div>
+ </div>
+</template>
+
+<style scoped>
+ .wrapper {align-items: center; margin-top: 120px;}
+ .title {font-size: 48px;}
+</style>
+
+<script>
+ module.exports = {
+ data: function () {
+ return {
+ logoUrl: 'https://alibaba.github.io/weex/img/weex_logo_blue@3x.png',
+ target: 'World'
+ };
+ }
+ };
+</script>
+```
+
+
+## Other Common Style
+
+- `opacity`
+- `background-color`
+
+## Type of Style Value
+
+- `length` type
+- `number` type
+- `color` type (*[The list of color keywords.](./color-names.html)*)
+- enumerated type
+
+## Simple Step
+
+These up-to-down steps may help you to plan the whole style of weex pages.
+
+1. overall style: divide the whole page to different parts
+2. flex alignment: align boxes in every part of page
+3. position box: place box, set offset
+4. element specific style: set styles for certain element if needed
http://git-wip-us.apache.org/repos/asf/incubator-weex-site/blob/32a097bf/source/wiki/css-units.md
----------------------------------------------------------------------
diff --git a/source/wiki/css-units.md b/source/wiki/css-units.md
new file mode 100644
index 0000000..cb6d93e
--- /dev/null
+++ b/source/wiki/css-units.md
@@ -0,0 +1,11 @@
+---
+title: CSS unit
+type: wiki
+group: 样式
+order: 3.3
+version: 2.1
+---
+
+# CSS Units
+
+Work in progresss.
http://git-wip-us.apache.org/repos/asf/incubator-weex-site/blob/32a097bf/source/wiki/design-principle.md
----------------------------------------------------------------------
diff --git a/source/wiki/design-principle.md b/source/wiki/design-principle.md
new file mode 100644
index 0000000..e2e9dab
--- /dev/null
+++ b/source/wiki/design-principle.md
@@ -0,0 +1,7 @@
+---
+title: Design Principle
+type: wiki
+group: Design
+order: 1.4
+version: 2.1
+---
http://git-wip-us.apache.org/repos/asf/incubator-weex-site/blob/32a097bf/source/wiki/event-bubble.md
----------------------------------------------------------------------
diff --git a/source/wiki/event-bubble.md b/source/wiki/event-bubble.md
new file mode 100644
index 0000000..b8aefa4
--- /dev/null
+++ b/source/wiki/event-bubble.md
@@ -0,0 +1,147 @@
+---
+title: Event Bubble
+type: wiki
+group: Event
+order: 4.2
+version: 2.1
+---
+
+# Event Bubble <span class="api-version">v0.13+</span>
+
+Weex 2.0 implements the W3C standard event bubbling mechanism.
+
+### Usage
+
+```html
+<template>
+ <div class="root" @click="rootClick" bubble="true">
+ <text style="font-size: 40px;">{{rootText}}</text>
+ <div class="outer" @click="parentClick">
+ <div>
+ <text style="font-size: 40px;">{{parentText}}</text>
+ </div>
+ <text class="inner" @click="click">{{innerText}}</text>
+ </div>
+ </div>
+</template>
+
+<script>
+ module.exports = {
+ data: {
+ innerText: 'click me',
+ parentText: '',
+ rootText: ''
+ },
+ methods: {
+ click: function(e) {
+ this.innerText = 'inner bubble'
+ },
+ parentClick: function(e) {
+ this.parentText = 'parent bubble'
+ },
+ rootClick: function(e) {
+ this.rootText = 'root bubble'
+ }
+ }
+ }
+</script>
+
+<style scoped>
+ .inner {
+ font-size: 40px;
+ text-align: center;
+ background-color: #7a9b1b;
+ padding: 40px;
+ }
+
+ .outer {
+ font-size: 40px;
+ text-align: center;
+ background-color: #9b7a1b;
+ padding: 120px;
+ }
+
+ .root {
+ font-size: 40px;
+ text-align: center;
+ background-color: #7a1b9b;
+ padding: 80px;
+ }
+</style>
+```
+
+[try it](http://dotwe.org/vue/fa2957ce3e9eb47ad9ae1da22d845e95)
+
+Run the above code, open with the client, click on the middle of the elements, you can see the event spread up, followed by the trigger.
+
+### Notice
+
+One thing should be noticed: **For compatibility with previous versions, Weex does not turn on event bubbling by default. You need to add `bubble = "true"` on the root element's properties to turn on the bubbling mechanism. Otherwise, the event will not be propagated upwards, keeping the same effect as the previous version.**
+
+### stopPropagation
+
+In the event handler function, you can use the `e.stopPropagation()` method to prevent the event from escalating. Note that `e.stopPropagation()` differs from `bubble = "true"`, which affects only the current elements and the propagation of parent elements, without affecting the propagation of child elements; the latter is a switching mechanism that is added for compatibility, Will be a global shutdown or open the bubble mechanism, the two can co-exist, as follows:
+
+```html
+<template>
+ <div class="root" @click="rootClick" bubble="true">
+ <text style="font-size: 40px;">{{rootText}}</text>
+ <div class="outer" @click="parentClick">
+ <div>
+ <text style="font-size: 40px;">{{parentText}}</text>
+ </div>
+ <text class="inner" @click="click">{{innerText}}</text>
+ </div>
+ </div>
+</template>
+
+<script>
+ module.exports = {
+ data: {
+ innerText: 'click me',
+ parentText: '',
+ rootText: ''
+ },
+ methods: {
+ click: function(e) {
+ this.innerText = 'inner bubble'
+ },
+ parentClick: function(e) {
+ this.parentText = 'parent bubble'
+ e.stopPropagation()
+ },
+ rootClick: function(e) {
+ this.rootText = 'root bubble'
+ // e.stopPropagation()
+ }
+ }
+ }
+</script>
+
+<style scoped>
+ .inner {
+ font-size: 40px;
+ text-align: center;
+ background-color: #7a9b1b;
+ padding: 40px;
+ }
+
+ .outer {
+ font-size: 40px;
+ text-align: center;
+ background-color: #9b7a1b;
+ padding: 120px;
+ }
+
+ .root {
+ font-size: 40px;
+ text-align: center;
+ background-color: #7a1b9b;
+ padding: 80px;
+ }
+</style>
+```
+
+[try it](http://dotwe.org/vue/2cc80e19c9b2430fb780234628065a69)
+
+Run the above code, open with the client, click on the middle of the element, you can see the event up to the parent element is terminated, no longer continue to spread to the root element.
http://git-wip-us.apache.org/repos/asf/incubator-weex-site/blob/32a097bf/source/wiki/faq.md
----------------------------------------------------------------------
diff --git a/source/wiki/faq.md b/source/wiki/faq.md
new file mode 100644
index 0000000..ba63658
--- /dev/null
+++ b/source/wiki/faq.md
@@ -0,0 +1,210 @@
+---
+title: FAQ
+type: wiki
+group: FAQ
+order: 8
+version: 2.1
+layout: post
+---
+
+# FAQ
+
+## Where are legacy docs?
+
+- [Guide](./v-0.10/guide/index.html)
+- [References](./v-0.10/references/index.html)
+- [Advanced](./v-0.10/advanced/index.html)
+- [Tools](./v-0.10/tools/index.html)
+
+## Command errors in MS Windows
+
+Please install [Git for Windows](https://git-scm.com/download/win) first, see [For Windows](https://github.com/apache/incubator-weex/tree/dev#for-windows) for more information.
+
+
+## Gradle errors in Android Studio
+
+Downloading `license-gradle-plugin.jar` may trigger errors, like `Connection reset` or `peer not authenticated`.
+Maybe a network problem, try a proxy or VPN.
+
+## Use local image
+Weex's native runtime support load image file from device's disk, all you have to do set the file url like `file:///sdcard/image_new0.png`. As to load image file in your project, Weex is not support yet.
+
+## Error(`The header content contains invalid characters`) in windows
+This's is caused by weex-toolkit's dependency 'http-server', whose old version is not working well in chinese windows environment. We have fixed that, you should upgrade weex-toolkit before use that.
+
+## Playground app display nothing (white screen) after scan
+Best way to find out what's happening is read debug log, you can follow [this document](./guide/index.html) to firgure out how to do that.
+
+## About ECMAScript Version
+
+Weex uses JSCore in iOS and uses v8 in Android. So they both support ECMAScript 5 spec. Additionally, we do some polyfills in native environment:
+
+* `Promise` in iOS/Android
+* Timer APIs (`setTimeout` / `clearTimeout` / `setInterval` / `clearInterval`) in iOS/Android
+* `console` in iOS/Android
+
+In Browser we contains a polyfill of `Promise` temporarily. In the future developers can choose whether to import a polyfill by configurations.
+
+You can also write ES6 syntax by `babel` with `webpack`. The loader will convert ES6 syntax into ES5 automatically.
+
+If you want more ES6 polyfills you can import them into the JS Bundle as you like.
+
+## Dependencies in frontend
+
+In Weex you may have some ways to import/require a component or a JS module. Take ES5 syntax for example:
+
+* `require('xxx.js')`: depends on a JS file
+* `require('npm-module-name')`: depends on a NPM module
+* `require('xxx.we')`: include a `we` file to register a Weex custom component
+* `require('@weex-module/xxx')`: depends on a Weex native module. Notice that it is supported only in `*.we` file not `*.js` file. If you want to use Weex native module in a `*.js` file, temporarily you may write like this:
+
+```javascript
+// use this piece of code below to get Weex native module "modal"
+var modal
+__weex_define__('@weex-temp/x', function (__weex_require__) {
+ modal = __weex_require__('@weex-module/modal')
+})
+
+// use APIs in "modal" module
+modal.toast({message: 'hello'})
+```
+
+We will bring a better syntax design in the future.
+
+## iOS text line-height style is abnormal
+
+`line-height` style in text component is different from h5 and Android, text value will be placed at bottom of line box because of iOS native api. We are trying to optimize it.
+
+## Android only support `overflow:hidden`
+The `overflow` style in android is `hidden` and cannot be changed. This is the result of Android View framework. This only happens on Android, iOS will work as expected.
+
+## How to get rid of 750 adaption and calculate width/height in real pixels?
+
+The deviceHeight and deviceWidth got in `this.$getConfig()` is the real device width/height in pixels, not the ones with 750-adapted.
+
+So you can use them to calculate width/height in real pixels.
+
+Suppose you need to display a navigation bar of fixed 88 pixels, the bar's height will be:
+
+```
+var height = 88 * 750 / env.deviceWidth
+```
+
+
+## How to detect an native module/component supported in JavaScript?
+
+### Detect native module
+
+```javascript
+var xxx = require('@weex-module/xxx')
+if (xxx) {
+ // todo: use this module
+}
+else {
+ // todo: handle the exception
+}
+```
+
+### Detect native component
+
+```html
+<template>
+ <component is="{{type}}"></component>
+</template>
+
+<script>
+ var type = 'xxx'
+ var xxx = require('@weex-component/xxx')
+ if (!xxx) {
+ type = 'div' // downgrade to <div>
+ }
+ module.exports = {
+ data: function () {
+ return {
+ type: type
+ }
+ }
+ }
+</script>
+```
+
+## How to transfer data between pages
+
+If you have 2 pages, A and B.
+
+0. A -> B, use [storage module](./references/modules/storage.html) to transfer data
+0. B -> A, use [storage module](./references/modules/storage.html) to transfer data
+
+## How to use `repeat` in Parent-Child components
+
+If you want, You can make a `repeat` operation between Parent-Child components. But you must be strictly in accordance with the document syntax to write code. If there is no child component defined data, or there is no specify `props` that need to be passed down. It will lead to the page does not render properly.
+
+A correct example:
+
+```html
+<element name="child">
+ <template>
+ <div>
+ <text style="font-size:100">{{title}}</text>
+ </div>
+ </template>
+
+ <script>
+ module.exports = {
+ data: {
+ title: null
+ }
+ }
+ </script>
+</element>
+<template>
+ <div>
+ <child repeat="item in lists" title="{{ item.title }}"></child>
+ </div>
+</template>
+<script>
+ module.exports = {
+ data: {
+ lists: [
+ { title: 'A' },
+ { title: 'B' },
+ { title: 'C' }
+ ]
+ },
+ ready: function () {
+ this.lists.splice(0, 1)
+ }
+ }
+</script>
+```
+
+A wrong example:
+
+```html
+<element name="child">
+ <template>
+ <div>
+ <text style="font-size:100">{{title}}</text>
+ </div>
+ </template>
+</element>
+<template>
+ <div>
+ <child repeat="item in lists"></child>
+ </div>
+</template>
+<script>
+ module.exports = {
+ data: {
+ lists: [
+ { title: 'A' },
+ { title: 'B' },
+ { title: 'C' }
+ ]
+ },
+ ready: function () {
+ this.lists.splice(0, 1)
+ }
+ }
+</script>
+```
http://git-wip-us.apache.org/repos/asf/incubator-weex-site/blob/32a097bf/source/wiki/gestures.md
----------------------------------------------------------------------
diff --git a/source/wiki/gestures.md b/source/wiki/gestures.md
new file mode 100644
index 0000000..232d6b1
--- /dev/null
+++ b/source/wiki/gestures.md
@@ -0,0 +1,56 @@
+---
+title: Gesture
+type: wiki
+group: Event
+order: 4.3
+version: 2.1
+---
+
+# Gesture
+
+> Experiment Feature
+
+Weex encapsulates native touch events to provide a gesture system. Using gesture is similar to use event in Weex. Just set `on` attributes on a node to listen to gesture.
+
+## Type
+For now, there are four types of gestures:
+
+* **Touch**. Touch gesture is fired when a touch point is placed, moved or removed from the touch surface. Touch gesture is accuracy as it will report every trivial event. As a result, listening to touch gesture may be slow, a great deal of events needs to be processed even a small move happened. There are three types of Touch gesture:
+ * `touchstart` will be fired when a touch point is placed on the touch surface.
+ * `touchmove` will be fired when a touch point is moved along the touch surface.
+ * `touchend` will be fired when a touch point is removed from the touch surface.
+* **Pan**. Pan gesture also report motion of touch point on the touch surface, which is similar to touch gesture. But Pan gesture is sampled and faster than the touch event. As consequence, it is less accuracy than touch gesture. There are also three types of Pan gesture, and the meaning of these types is very close to types of Touch.
+ * `panstart`
+ * `panmove`
+ * `panend`
+* **Horizontal/Vertical Pan** <span class="api-version">v0.10+</span> . Mainly used for cell swipe gestures before conflict resolving system is completed. start/move/end state of the gesture will be passed by `state` property. **Note**: These gestures are in conflict with click event on Android currently.
+ * `horizontalpan`
+ * `verticalpan`
+* **Swipe**. Swipe is fired when user swipe a touch point on the screen. A serial of motion will only trigger one Swipe gesture.
+* **LongPress**. LongPress is fired when a touch point is held for 500 ms or more.
+
+The Touch gesture and Pan is very close to each other, with following features hold:
+
+* **Touch**. Not sampled, accuracy, but slow.
+* **Pan**. Sampled, fast, less accuracy.
+
+Users may choose their gesture according to their situation.
+
+## Properties
+The following properties can be used in gesture callback:
+
+* `direction`. Only exists for **Swipe** gesture. Indicate the direcion of the swipe, choose from `up`, `left`, `bottom`, `right`.
+* `changedTouches`. An array of motion for every touch pointer that has contribute to the current gesture.
+
+### changedTouches
+
+`changedTouches` is an array, with the following properties in its children:
+
+* `identifier`. A unique identifier for a touch pointer.
+* `pageX`. The X coordinate of the touch pointer relative to the left edge of the document.
+* `pageY`. The Y coordinate of the touch pointer relative to the top of the document.
+* `screenX`. The X coordinate of the touch point relative to the left edge of the screen.
+* `screenY`. The Y coordinate of the touch point relative to the top edge of the screen.
+
+## Constrain
+Currently, Weex Android do not support listening to gesture on `scroller`, `list` and `webview`, as it would lead a large amount of event conflicting.
http://git-wip-us.apache.org/repos/asf/incubator-weex-site/blob/32a097bf/source/wiki/how-it-works.md
----------------------------------------------------------------------
diff --git a/source/wiki/how-it-works.md b/source/wiki/how-it-works.md
new file mode 100644
index 0000000..274e195
--- /dev/null
+++ b/source/wiki/how-it-works.md
@@ -0,0 +1,71 @@
+---
+title: How it works
+type: wiki
+group: Design
+order: 1.1
+version: 2.1
+---
+
+# How it works
+
+## Overall Structure
+
+Weex is a client-side technology on the surface, but in fact it connects the whole way from the local development environment to the cloud deployment and distribution.
+
+Developers can first write an app page just like writing a web page, and then compile the app page into a piece of JavaScript which is called Weex JS bundle.
+
+In the cloud, developers can deploy the generated JS bundle. And then it can be requested or pre-fetched from a mobile app with WeexSDK.
+
+The WeexSDK would prepare a JavaScript engine to run corresponding JS bundle when user opens a Weex page anytime. Usually the JS bundle will make some calls to native-side through Weex JS bridge. They let native-side render the user interface or handle user interactions, storage data, make network communications, call device powers and so on.
+
+Even if a user does not install the App, he can still open a same web page in the browser, using the same source code.
+
+
+
+## Local Development Environment
+
+The design of local development environment of Weex is based on the web development experience. It help web developers writing mobile app UI with their familiar HTML / CSS / JavaScript. At the same time Weex also do the official support to [Vue.js](https://vuejs.org/), a very great front-end framework.
+
+In addition, the management of a Weex project is also very familiar with a web project. First, web developers can use npm packages to manage dependencies. Second, web developers can refer to all best practices from every process of a web project such as scaffolding, development, preview, debugging, test etc.
+
+Also same as the best practice of web development, each Weex page will be built into a JS bundle. In the browser, we put JS bundle into the web page as a `<script>` tag. In the client, we put JS bundle into the local, and execute it in WeexSDK.
+
+**Links**
+
+* [Platform differences between Weex and web](../../references/platform-difference.html)
+* [Differences of using Vue between Weex with web](../../references/vue/difference-with-web.html)
+* [Get Started](../index.html)
+* [Using Devtools](./devtools.html)
+
+## Cloud Deployment & Distribution
+
+Weex JS bundle can be deployed and distributed as a static resource. Almost all current web development system and best practice can be applied to Weex directly such as generating JS bundle through CMS system or deploying JS bundle to static CDN, monitoring JS bundle traffic through server log, caching or pre-fetching JS bundle to reduce networking cost etc.
+
+## Client-side JavaScript Engine
+
+Both iOS and Android client-side of Weex run a JavaScript engine to execute JS bundles and send well defined instructions to the native render layers. We choose JavaScriptCore in iOS and v8 in Android which provide strong performance and stability.
+
+In order to make the mobile resources better utilized, we just run only one instance of JavaScript for all Weex pages. That is, all JS bundles share the same JavaScript instance, but each JS bundle context also isolated well by default in the runtime. We also put Vue 2.0 as a built-in JS Framework, developers do not have to pack it in each JS bundle, which save the size and time of networking.
+
+## Client Rendering Layer
+
+Weex offers both iOS and Android native rendering layers. Each of them are based on the Native DOM model and exposed to JavaScript APIs. At the same time we provide a set of native components and modules to use. Also Weex has high performance especially on first-screen loading time, memory cost and re-reuse of long list, etc.
+
+Although Weex has provided a group of most commonly used components and modules officially. But we definitely know they couldn't satisfy everyone. So we design our native render as extendable as possible. You can extend more components and modules on your own. We can build and share an Weex eco-system together.
+
+**Links**
+
+* [Differences between Weex and web standard](../../references/web-standards.html)
+* [Using Weex in iOS](../../references/ios-apis.html)
+* [Using Weex in Android](../../references/android-apis.html)
+* [Extend to iOS](../../references/advanced/extend-to-ios.html)
+* [Extend to Android](../../references/advanced/extend-to-android.html)
+
+## In the Browser
+
+Besides iOS and Android client, Weex also has a web version based on Vue 2.0. Developers can just use Vue 2.0 to build the same page in browsers.
+
+**Links**
+
+* [Using Weex in HTML5](../../references/html5-apis.html)
+* [Extend to HTML5](../../references/advanced/extend-to-html5.html)
http://git-wip-us.apache.org/repos/asf/incubator-weex-site/blob/32a097bf/source/wiki/index.md
----------------------------------------------------------------------
diff --git a/source/wiki/index.md b/source/wiki/index.md
new file mode 100644
index 0000000..8a36f64
--- /dev/null
+++ b/source/wiki/index.md
@@ -0,0 +1,6 @@
+---
+title: WiKi
+type: wiki
+order: 0
+version: 2.1
+---
http://git-wip-us.apache.org/repos/asf/incubator-weex-site/blob/32a097bf/source/wiki/platfrom-difference.md
----------------------------------------------------------------------
diff --git a/source/wiki/platfrom-difference.md b/source/wiki/platfrom-difference.md
new file mode 100644
index 0000000..3ffc852
--- /dev/null
+++ b/source/wiki/platfrom-difference.md
@@ -0,0 +1,11 @@
+---
+title: Platform Differences with Web
+type: wiki
+group: Design
+order: 1.4
+version: 2.1
+---
+
+# Platform Differences with Web
+
+Work in progresss.
http://git-wip-us.apache.org/repos/asf/incubator-weex-site/blob/32a097bf/source/wiki/text-styles.md
----------------------------------------------------------------------
diff --git a/source/wiki/text-styles.md b/source/wiki/text-styles.md
new file mode 100644
index 0000000..740f5f6
--- /dev/null
+++ b/source/wiki/text-styles.md
@@ -0,0 +1,49 @@
+---
+title: Text Styles
+type: wiki
+group: Style
+order: 3.2
+version: 2.1
+---
+
+Text alike components share some common style rules. The text alike components currently includes [`text`](./components/text.html) and [`input`](./components/input.html).
+
+## Properties
+
+- `color`: <colors> this property set the foreground color of an component's text content.
+- `font-size`: <length> this property specifies the size of the font.
+- `font-style`: <enum> `normal` | `italic`. This property lets you select italic or normal faces within a font-family. Default value is `normal`.
+- `font-weight`<span class="api-version">v0.9+</span>:
+ * values: `normal`, `bold`, `100`, `200`, `300`, `400`, `500`, `600`, `700`, `800`, `900`
+ * normal is equal to 400, bold equel to 700
+ * default value: `normal`
+ * apply to: `<text>`, `<input>`
+ * ios support showing 9 kind of font-weight.
+ * android support showing 2 kind of font-weight:400,700, other value will map to 400 or 700
+ * Some standard values like `lighter`, `bolder`, number unit are not supported.
+ * The effect not apply to all elements, just `<text>` and `<input>`. In another way, it's not inherited.
+- `text-decoration`: <enum> `none` | `underline` | `line-through`. This property is used to set the text formatting to underline or line-through. The default value is `none`.
+- `text-align`: <enum> `left` | `center` | `right`. This property describes how inline content like text is aligned in its parent component. The default value is `left`.
+- `font-family`:<string> this property set the font-family of the text. This property **doesn't guarantee** the given font will always be set to the text. If the specified font cannot be found at the device, a typeface fallback will occur and the default typeface will be load. The fallback mechanism may vary in different devices.
+- `text-overflow`:<string> `clip` | `ellipsis`. This property determines how overflowed content that is not displayed is signaled to users. It can be clipped, display an ellipsis.
+
+The property `color` support multiple fomats of values, contains rgb, rgba, #fff, #ffffff, named-color.
+
+Example:
+
+```css
+.my-class { color: red; }
+.my-class { color: #f00; }
+.my-class { color: #ff0000; }
+.my-class { color: rgb(255, 0, 0); }
+.my-class { color: rgba(255, 0, 0, 0.5); }
+```
+
+## Type of Style Value
+
+- length: number followed by length unit `px`, `px` can be omitted.
+- colors: support multiple formats of values, including rgb (`rgb(255, 0, 0)`), rgba (`rgba(255, 0, 0, 0.5)`), hexadecimal (`#ff0000`), short hexadecimal (`#f00`), named color (`red`).
+- enumerated values: a limited number of string values.
+
+**Note:** [The list of color keywords.](./color-names.html)
+
http://git-wip-us.apache.org/repos/asf/incubator-weex-site/blob/32a097bf/themes/weex/languages/cn.yml
----------------------------------------------------------------------
diff --git a/themes/weex/languages/cn.yml b/themes/weex/languages/cn.yml
index 3796d04..25195c9 100644
--- a/themes/weex/languages/cn.yml
+++ b/themes/weex/languages/cn.yml
@@ -3,16 +3,16 @@ index:
get_started: 上手教程
edge:
title: 优势
- edge1:
+ edge1:
title: 轻量
content: 体积小、语法简单、易于掌握
- edge2:
+ edge2:
title: 可扩展
content: 可以横向扩展和定制原生组件和功能
- edge3:
+ edge3:
title: 高性能
content: 对加载时间和资源占用深度优化,给你更好的体验
- feature:
+ feature:
title: 帮助你构建原生应用
content: 与 Web App、HTML5 App 或 hybrid App 不同,您可以使用 Weex 构建一个真正的原生应用。更贴心的是你的代码只需使用 HTML、CSS、JavaScript 可以构建原生应用,上手非常简单。但实际上,应用的底层是 Objective-C 或 Java, 同时,Weex 提供很多 native 组件或模块供开发人员使用。
cross_platform:
@@ -24,7 +24,7 @@ index:
schematic:
title: 工作原理
content: Weex 是一个动态化的高扩展跨平台解决方案。 在 Weex 代码中,您可以使用 <template>,<style> 和 <script> 标签编写页面或组件,然后将它们转换为 JS bundle 以进行部署。当服务器返回给客户端 JS bundle 时,JS bundle 会被客户端的 JavaScript 引擎处理,并管理渲染 native 视图,调用原生 API 和用户交互。
- users:
+ users:
title: 谁在使用 Weex
tmall:
title: 天猫
@@ -55,11 +55,11 @@ index:
content: 淘票票专业版是一款为电影人提供有价值数据的产品。通过和阿里海量用户数据相结合,为电影人提供了秒级实时票房、排片、影院经营、上映日历和用户画像等数据服务。
fliggy:
title: 飞猪
- content: 飞猪是阿里巴巴集团旗下旅行品牌,旨在为用户提供便捷、更高性价比的出行服务。
+ content: 飞猪是阿里巴巴集团旗下旅行品牌,旨在为用户提供便捷、更高性价比的出行服务。
juhuasuan:
title: 聚划算
content: 聚划算是阿里巴巴集团旗下平台,供淘宝、天猫商家从8亿商品中精挑细选优质商品,自主开展网络精选特卖活动,以更高的服务标准为你提供高性价比的商品。
- qianniu:
+ qianniu:
title: 千牛
content: 阿里巴巴官方出品的卖家移动工作台,服务淘宝、天猫、1688、线下门店等众多商家用户,商家管店必备。
feedback:
@@ -68,18 +68,20 @@ index:
name: 陈天予
title: 众安保险技术总监
content: “ Weex 不仅应用灵活、性能强大,而且能让前端开发者最大程度复用现有技术积累,帮助我们用最少成本设计全新的跨平台架构体系,并尽快进入实施阶段。”
- user2:
+ user2:
name: 林建锋
title: 饿了么大前端部负责人
content: “ Weex 提供了媲美 HTML5 开发效率和 Native 的性能,对于类似我们这种迭代速度要求比较高的团队,几乎是目前最好的方案。”
- user3:
+ user3:
name: 黄泰成
title: 天猫技术专家
content: “ Weex 作为轻量渲染引擎又提供了很方便的插件机制,让各个端可以把自己的能力发挥出来,充分发挥在天猫的业务上,并良好的支持双11。”
-menu:
+menu:
guide: 教程
references: 手册
+ wiki: WiKi
+ community: 社区
doc: 文档
faq: FAQ
note: 说明
@@ -94,6 +96,9 @@ menu:
advanced: 高阶知识
github: GitHub
legacy: 旧语法文档
+ examples: 实例
+ contribute: 如何参与贡献
+ usingWeex: 谁在使用 Weex
playground:
content: Weex Native 运行时实例 & Weex 文件预览工具。
categories: Categories
http://git-wip-us.apache.org/repos/asf/incubator-weex-site/blob/32a097bf/themes/weex/languages/en.yml
----------------------------------------------------------------------
diff --git a/themes/weex/languages/en.yml b/themes/weex/languages/en.yml
index f0e5270..90c6e9c 100644
--- a/themes/weex/languages/en.yml
+++ b/themes/weex/languages/en.yml
@@ -55,11 +55,11 @@ index:
content: Tao Tickets Pro is an intelligent data application which offers film industry practitioners with valuable data and information. Base on the huge data from Alibaba group, it provides services of realtime box office statistic and prediction,film schedule , cinema management information and user profile etc.
fliggy:
title: Fliggy
- content: Fliggy is Alibaba Group's travel brand, designed to provide users with convenient, more cost-effective travel services.
+ content: Fliggy is Alibaba Group's travel brand, designed to provide users with convenient, more cost-effective travel services.
juhuasuan:
title: Juhuasuan
content: Juhuasuan is Alibaba Group's platform for Taobao, Lynx business from 800 million commodities in the carefully selected high-quality goods, independent network to carry out activities to sell, with higher service standards to provide you with cost-effective goods.
- qianniu:
+ qianniu:
title: Qianniu
content: Alibaba produced for the seller stop working units, for the seller the integration of the shop management tools, business information and news, business partnerships, in order to enhance the operational efficiency of the sellers, in order to promote cooperation between the two win, so that the seller can...
feedback:
@@ -80,6 +80,8 @@ index:
menu:
guide: Guide
references: References
+ wiki: WiKi
+ community: Community
doc: Docs
faq: FAQ
note: Note
@@ -94,6 +96,9 @@ menu:
advanced: Advanced
github: GitHub
legacy: Old Syntax Doc
+ examples: Examples
+ contribute: How to Contribute
+ usingWeex: Who is using Weex?
playground:
content: Weex Native Runtime showcase & Weex we file preview.
categories: Categories
http://git-wip-us.apache.org/repos/asf/incubator-weex-site/blob/32a097bf/themes/weex/layout/_partial/header.ejs
----------------------------------------------------------------------
diff --git a/themes/weex/layout/_partial/header.ejs b/themes/weex/layout/_partial/header.ejs
index 922dfc1..1698db4 100644
--- a/themes/weex/layout/_partial/header.ejs
+++ b/themes/weex/layout/_partial/header.ejs
@@ -11,43 +11,26 @@
<li class="<%= page.path.match(/\/?references\/?/i) ? 'current': '' %>">
<a href="<%= url_for_lang('references') %>"><%= _p('menu.references') %></a>
</li>
- <li>
- <a href="<%= url_for_lang('guide/contributing.html') %>"><%= _p('menu.invovled') %></a>
+ <li class="<%= page.path.match(/\/?wiki\/?/i) ? 'current': '' %>">
+ <a href="<%= url_for_lang('wiki') %>"><%= _p('menu.wiki') %></a>
</li>
- <li class="dropdown">
- <a href="javascript:;"><%= _p('menu.tools') %></a>
- <ul class="dropdown-menu subnav">
- <li>
- <a href="<%= url_for_lang('playground.html') %>">Playground</a>
- </li>
- <li>
- <a href="<%= url_for_lang('guide/tools/toolkit.html') %>">Weex-toolkit</a>
- </li>
- <li>
- <a href="http://dotwe.org" target="_blank">Code Snippets</a>
- </li>
- <li>
- <a href="https://market.dotwe.org" target="_blank">Market</a>
- </li>
- <li>
- <a href="<%= url_for_lang('guide/tools/plugin.html') %>">Weex Language Plugin</a>
- </li>
- </ul>
+ <li class="<%= page.path.match(/\/?tools\/?/i) ? 'current': '' %>">
+ <a href="<%= url_for_lang('tools') %>"><%= _p('menu.tools') %></a>
</li>
<li class="dropdown">
- <a href="javascript:;"><%= _p('menu.note') %></a>
+ <a href="javascript:;"><%= _p('menu.community') %></a>
<ul class="dropdown-menu subnav">
<li>
- <a href="<%= url_for_lang('faq.html') %>"><%= _p('menu.faq') %></a>
+ <a href="<%= url_for_lang('resources.html') %>"><%= _p('menu.resources') %></a>
+ </li>
+ <li>
+ <a href="<%= url_for_lang('contributing.html') %>"><%= _p('menu.contribute') %></a>
</li>
<li>
- <a href="<%= url_for_lang('releasenote.html') %>"><%= _p('menu.releasenote') %></a>
+ <a href="<%= url_for_lang('who-is-using-weex.html') %>"><%= _p('menu.usingWeex') %></a>
</li>
</ul>
</li>
- <li class="<%= page.path.match(/\/?blog\/?/i) ? 'current': '' %>">
- <a href="/blog"><%= _p('menu.blog') %></a>
- </li>
</ul>
<ul class="tools">
<li>
http://git-wip-us.apache.org/repos/asf/incubator-weex-site/blob/32a097bf/themes/weex/layout/_partial/post/summary.ejs
----------------------------------------------------------------------
diff --git a/themes/weex/layout/_partial/post/summary.ejs b/themes/weex/layout/_partial/post/summary.ejs
index 670762c..a9853c6 100644
--- a/themes/weex/layout/_partial/post/summary.ejs
+++ b/themes/weex/layout/_partial/post/summary.ejs
@@ -16,10 +16,12 @@
<% pages.forEach(function (item, index) { %>
<li>
- <h3 class="chapter-title"><a href="<%= url_for(item[0].path) %>" class="sidebar-link <%- is_current(item[0].path, 'strict') ? 'current' : '' %> <%- item[0].is_new ? 'new' : '' %>"><%- item[0].title %></a></h3>
- <% if (item.length > 1) { %>
+ <h3 class="chapter-title">
+ <span class="sidebar-link"><%- item[0].group %></span>
+ </h3>
+ <% if (item.length > 0) { %>
<ul class="chapter">
- <% for (var i = 1; i < item.length; i++) { %>
+ <% for (var i = 0; i < item.length; i++) { %>
<li>
<a href="<%= url_for(item[i].path) %>" class="sidebar-link <%- is_current(item[i].path, 'strict') ? 'current' : '' %> <%- item[i].is_new ? 'new' : '' %>"><%= item[i].title %></a>
</li>
[33/51] [abbrv] incubator-weex-site git commit: update file structure
and fix responsive styles
Posted by ha...@apache.org.
http://git-wip-us.apache.org/repos/asf/incubator-weex-site/blob/12e3a8bc/_drafts/v1.0/references/components/refresh.md
----------------------------------------------------------------------
diff --git a/_drafts/v1.0/references/components/refresh.md b/_drafts/v1.0/references/components/refresh.md
new file mode 100644
index 0000000..868dad7
--- /dev/null
+++ b/_drafts/v1.0/references/components/refresh.md
@@ -0,0 +1,204 @@
+---
+title: <refresh>
+type: references
+order: 2.7
+version: 0.10
+---
+
+# <refresh>
+
+<span class="weex-version">v0.6.1+</span>
+
+`<refresh>` 为 `<scroller>` 和 `<list>` 提供下拉加载功能。用法与特性与 `<loading>` 类似,`<scroller>` 和 `<list>` 的子组件,且只能在被 `<scroller>` 和 `<list>` 包含时才能被正确的渲染。
+
+一个简单例子:
+
+```html
+<template>
+ <list>
+ <header>
+ <div class="center">
+ <text style="text-align:center">I am the header</text>
+ </div>
+ </header>
+ <refresh onpullingdown='onpullingdown' onrefresh="onrefresh" display="{{refreshDisplay}}" style="width:750;flex-direction: row;justify-content: center;">
+ <loading-indicator style="height:160;width:160;color:#3192e1"></loading-indicator>
+ </refresh>
+ <cell class="row" repeat="i in staffs" index="{{$index}}">
+ <div class="item">
+ <text>{{i.name}}</text>
+ </div>
+ </cell>
+ </list>
+</template>
+
+<style>
+ .row {
+ width: 750;
+ }
+ .item {
+ justify-content: center;
+ border-bottom-width: 2;
+ border-bottom-color: #c0c0c0;
+ height: 100;
+ padding:20;
+ }
+ .center {
+ border-bottom-width: 2;
+ border-bottom-color: #cccccc;
+ height: 100;
+ padding:20;
+ background-color:#FFFFFF;
+ justify-content: center;
+ }
+</style>
+
+<script>
+ module.exports = {
+ data: {
+ staffs:[],
+ refreshDisplay: 'show',
+ loadingDisplay: 'show',
+ loadingText: 'pull up to load more',
+ refreshText: 'pull down to refresh'
+ },
+ created:function() {
+ this.refreshDisplay='show'
+ this.staffs=[{name:'inns'},{name:'connon'},{name:'baos'},{name:'anna'},{name:'dolley'},{name:'lucy'},{name:'john'}, {name:'lily'},{name:'locke'},{name:'jack'},{name:'danny'},{name:'rose'},{name:'harris'},{name:'lotus'},{name:'louis'}];
+ },
+ methods:{
+ onrefresh:function(e){
+ this.refreshDisplay='show';
+ this.staffs=[{name:'anna'},{name:'baos'},{name:'connon'},{name:'inns'}];
+ this.refreshDisplay='hide'
+ },
+ onpullingdown:function(e){
+ console.log('onpullingdown triggered.');
+ console.log('dy:'+e.dy);
+ console.log('headerHeight:'+e.headerHeight);
+ console.log('maxHeight:'+e.maxHeight);
+ }
+ }
+ }
+</script>
+```
+
+[体验一下](http://dotwe.org/64cb982f67186c76f9f27fe3000a2fe8)
+
+## 子组件
+
+- [`<text>`](./text.html)
+- [`<image>`](./image.html)
+- `<loading-indicator>`: `<refresh>` 和 `<loading>` 组件的子组件,拥有默认的动画效果的实现。
+
+## 特性
+
+- `display {string}`:可选值为 `show` 或者 `hide`,仅隐藏 `<indicator>`,`<loading>` 其他子组件依然可见,`<loading>` 事件仍会被触发。
+
+## 样式
+
+支持所有通用样式。
+
+- 盒模型
+- `flexbox` 布局
+- `position`
+- `opacity`
+- `background-color`
+
+查看 [组件通用样式](../common-style.html)
+
+## 事件
+
+- `refresh`: 当 `<scroller>`/`<list>` 被下拉时触发。
+- `pullingdown`:仅在 Android 支持。当 `<scroller>`/`<list>` 被下拉时触发,可以从事件的参数对象中获取 dy,headerHeight,maxHeight
+
+## 约束
+
+- `<refresh>` 不支持 `remove`,v0.9 版本会修复。
+- `display` 值为 `show` 或 `hide`。仅隐藏 `<indicator>`,`<refresh>` 其他子组件依然可见,`refresh` 事件仍会被触发。
+
+ 如果需要 `<refresh>` hide 时隐藏文案并不再触发事件,有两种解决方法:
+
+ 1. 修改提示文案,并在 `refresh` 事件中添加判断逻辑;
+ 2. v0.9+ 可通过 `remove` 解决。
+
+- 只能通过 `display` 特性进行展示和隐藏,且必须成对出现,即设置 `display="show"`,必须有对应的 `display="hide"`。
+
+## 示例
+
+```html
+<template>
+ <scroller onloadmore="onloadmore" loadmoreoffset="1000">
+ <refresh onrefresh="onrefresh" display="{{refreshDisplay}}">
+ <text id="refreshText">{{refreshText}}</text>
+ </refresh>
+ <div repeat="v in items">
+ <text style="font-size: 40; color: #000000">{{v.item}}</text>
+ </div>
+ <loading onloading="onloading" display="{{loadingDisplay}}">
+ <text id="loadingText">{{loadingText}}</text>
+ </loading>
+ </scroller>
+</template>
+
+<script>
+ module.exports = {
+ data: {
+ refreshDisplay: 'show',
+ loadingDisplay: 'show',
+ loadingText: 'pull up to load more',
+ refreshText: 'pull down to refresh',
+ items: []
+ },
+ created: function () {
+ for (var i = 0; i < 30; i++) {
+ this.items.push({
+ 'item': 'test data' + i
+ });
+ }
+ },
+ methods: {
+ onrefresh: function () {
+ var vm = this;
+ vm.refreshDisplay = 'show'
+ if (vm.items.length > 50) {
+ vm.refreshText = "no more data!"
+ vm.refreshDisplay = 'hide'
+ return;
+ }
+ var len = vm.items.length;
+ for (var i = len; i < (len + 20); i++) {
+ vm.items.unshift({
+ 'item': 'test data ' + i
+ });
+ }
+ vm.refreshDisplay = 'hide'
+ },
+ onloading: function () {
+ var vm = this;
+ vm.loadingDisplay = 'show'
+ if (vm.items.length > 30) {
+ vm.loadingText = "no more data!"
+ vm.loadingDisplay = 'hide'
+ return;
+ }
+
+ var len = vm.items.length;
+ for (var i = len; i < (len + 20); i++) {
+ vm.items.push({
+ 'item': 'test data ' + i
+ });
+ }
+ vm.loadingDisplay = 'hide'
+ },
+ onloadmore: function () {
+ console.log("into--[onloadmore]")
+ }
+ }
+ }
+</script>
+```
+
+[体验一下](http://dotwe.org/80c027d6bfb337195c25cc0ba9317ea5)
+
+更多示例可查看 [`<list>`](./list.html)
http://git-wip-us.apache.org/repos/asf/incubator-weex-site/blob/12e3a8bc/_drafts/v1.0/references/components/scroller.md
----------------------------------------------------------------------
diff --git a/_drafts/v1.0/references/components/scroller.md b/_drafts/v1.0/references/components/scroller.md
new file mode 100644
index 0000000..0fac77c
--- /dev/null
+++ b/_drafts/v1.0/references/components/scroller.md
@@ -0,0 +1,324 @@
+---
+title: <scroller>
+type: references
+order: 2.8
+version: 0.10
+---
+
+# <scroller>
+
+<span class="weex-version">v0.6.1+</span>
+
+`<scroller>` 是一个竖直的,可以容纳多个排成一列的子组件的滚动器。如果子组件的总高度高于其本身,那么所有的子组件都可滚动。
+
+**注意:** `<scroller>` 可以当作根元素或者嵌套元素使用。此组件的滚动方向是垂直方向的形式。
+
+一个简单例子:
+
+```html
+<template>
+ <scroller onloadmore="onloadmore" loadmoreoffset="100">
+ <div repeat="v in items">
+ <text style="font-size: 40; color: #000000">{{v.item}}</text>
+ </div>
+ </scroller>
+</template>
+<script>
+ module.exports = {
+ data: {
+ items: [],
+ triggered: false
+ },
+ created: function () {
+ for (var i = 0; i < 50; i++) {
+ this.items.push({
+ 'item': 'test data' + i
+ });
+ }
+ },
+ methods: {
+ onloadmore: function () {
+ if (!this.triggered) {
+ for (var i = 100; i >= 50; i--) {
+ this.items.push({
+ 'item': 'onloadmore triggered' + i
+ });
+ }
+ }
+ this.triggered = true;
+ }
+ }
+ }
+</script>
+```
+
+[体验一下](http://dotwe.org/6910f0b87aeabe3f2a0d62c0d658dbd2)
+
+## 子组件
+
+支持任意类型的 Weex 组件作为其子组件。 其中,还支持以下两个特殊组件作为子组件:
+
+- `<refresh>`
+
+ 用于给列表添加下拉刷新的功能。
+
+ 使用文档请查看 [`<refresh>`](./refresh.html)
+
+- `<loading>`
+
+ `<loading>` 用法与特性和 `<refresh>` 类似,用于给列表添加上拉加载更多的功能。
+
+ 使用文档请查看 [`<loading>`](./loading.html)
+
+## 特性
+
+- `show-scrollbar {boolean}`:可选值为 `true`/ `false`,默认值为 `true`。控制是否出现滚动条。
+- `scroll-direction {string}`:可选为 `horizontal` 或者 `vertical`,默认值为 `vertical` 。定义滚动的方向。
+- `loadmoreoffset {number}`:默认值为 0,触发 `loadmore` 事件所需要的垂直偏移距离(设备屏幕底部与页面底部之间的距离)。当页面的滚动条滚动到足够接近页面底部时将会触发 `loadmore` 这个事件。
+
+ 
+
+- `loadmoreretry {number}`:默认值为 0,当 `loadmore` 失败时是否重置 `loadmore` 相关的 UI,值不一样就会重置。
+
+## 样式
+
+- 通用样式:支持所有通用样式
+
+ - 盒模型
+ - `flexbox` 布局
+ - `position`
+ - `opacity`
+ - `background-color`
+
+ 查看 [组件通用样式](../common-style.html)
+
+## 事件
+
+- `loadmore` <sup class="wx-v">v0.5+</sup>:如果滚动到底部将会立即触发这个事件,你可以在这个事件的处理函数中加载下一页的列表项。
+- 通用事件
+
+ 支持所有通用事件:
+
+ - `click`
+ - `longpress`
+ - `appear`
+ - `disappear`
+
+ 查看 [通用事件](../common-event.html)
+
+## 扩展
+
+### scrollToElement(node, options)
+
+滚动到列表某个指定项是常见需求,`<list>` 拓展了该功能支持滚动到指定 `<cell>`。通过 `dom` module 访问,更多信息可参考 [dom module](../modules/dom.html) 。
+
+#### 参数
+
+- `node {node}`:指定目标节点。
+- `options {Object}`:
+ - `offset {number}`:一个到其可见位置的偏移距离,默认是0
+
+#### 示例
+
+```html
+<template>
+ <scroller>
+ <div class="row" repeat="item in rows" id="item-{{$index}}">
+ <text class="item-title">row {{item.id}}</text>
+ </div>
+ <div onclick="go" style="width: 750;height: 50; position: fixed; left: 0; right: 0; bottom: 0; background-color: #eeeeee;">
+ <text style="text-align: center;">
+ Go to 50th line.
+ </text>
+ </div>
+ </scroller>
+</template>
+
+<script>
+var dom = require('@weex-module/dom')
+
+module.exports = {
+ data: {
+ rows: []
+ },
+ created: function () {
+ for (var i = 0; i < 100; i++) {
+ this.rows.push({
+ id: i
+ })
+ }
+ },
+ methods: {
+ go: function () {
+ var el = this.$el('item-49')
+
+ dom.scrollToElement(el, {
+ offset: 0
+ })
+ }
+ }
+}
+</script>
+```
+
+[体验一下](http://dotwe.org/483e5c878c52c0891e6e35e478f19854)
+
+## 约束
+
+**不允许**相同方向的 `<list>` 或者 `<scroller>` 互相嵌套,换句话说就是嵌套的 `<list>`/`<scroller>` 必须是不同的方向。
+
+举个例子,**不允许**一个垂直方向的 `<list>` 嵌套的一个垂直方向的 `<scroller>` 中,但是一个垂直方向的 `<list>` 是可以嵌套的一个水平方向的 `<list>` 或者 `<scroller>` 中的。
+
+## 示例
+
+
+
+```html
+<style>
+.item {
+ padding: 20;
+ height: 220;
+ border-bottom-width: 1;
+ border-bottom-style: solid;
+ border-bottom-color: #efefef;
+}
+.item-content {
+ flex-direction: row;
+ width: 710;
+ background-color: #ffffff;
+}
+.item-imgbox {
+ height: 180;
+ width: 180;
+ margin-right: 20;
+}
+.item-img {
+ width: 180;
+ height: 180;
+}
+.item-info {
+ height: 180;
+ width: 510;
+ justify-content: center;
+ position: relative;
+}
+.item-info-detail {
+ position: relative;
+ color: #A2A2A2;
+}
+.desc {
+ lines: 4;
+ text-overflow: ellipsis;
+ font-size: 26;
+ line-height: 30;
+ color: #A2A2A2;
+}
+.title {
+ lines: 1;
+ text-overflow: ellipsis;
+ font-size: 32;
+ color: #2D2D2D;
+ line-height: 40;
+}
+.detail-info {
+ margin-top: 15;
+}
+.up {
+ width: 70;
+ height: 70;
+ position: fixed;
+ right: 20;
+ bottom: 20;
+}
+.img {
+ width: 70;
+ height: 70;
+}
+</style>
+
+<template>
+ <div>
+ <scroller>
+ <div class="item" repeat="item in items" id="item-{{$index}}">
+ <div class="item-content">
+ <div class="item-imgbox">
+ <img class="item-img" src="{{item.img}}" alt="" />
+ </div>
+ <div class="item-info">
+ <div class="item-info-detail">
+ <text class="title">{{item.title}}</text>
+ <div class="detail-info">
+ <text class="desc">{{item.desc}}</text>
+ </div>
+ </div>
+ </div>
+ </div>
+ </div>
+ </scroller>
+ <div class="up" onclick="goToTop">
+ <img class="img" src="https://img.alicdn.com/tps/TB1ZVOEOpXXXXcQaXXXXXXXXXXX-200-200.png"></img>
+ </div>
+ </div>
+</template>
+
+<script>
+ var dom = require('@weex-module/dom') || {}
+
+ module.exports = {
+ data: {
+ items: [{
+ img: 'https://img.alicdn.com/tps/TB1z.55OFXXXXcLXXXXXXXXXXXX-560-560.jpg',
+ title: 'Who is Alan Mathison Turing?Who is Alan Mathison Turing?',
+ desc: 'Alan Mathison Turing ( 23 June 1912 – 7 June 1954) was an English computer scientist, mathematician, logician, cryptanalyst and theoretical biologist. He was highly influential in the development of theoretical computer science, providing a formalisation of the concepts of algorithm and computation with the Turing machine, which can be considered a model of a general purpose computer.Turing is widely considered to be the father of theoretical computer science and artificial intelligence.'
+ },{
+ img: 'https://img.alicdn.com/tps/TB1z.55OFXXXXcLXXXXXXXXXXXX-560-560.jpg',
+ title: 'Who is Alan Mathison Turing?',
+ desc: 'Alan Mathison Turing ( 23 June 1912 – 7 June 1954) was an English computer scientist, mathematician, logician, cryptanalyst and theoretical biologist. He was highly influential in the development of theoretical computer science, providing a formalisation of the concepts of algorithm and computation with the Turing machine, which can be considered a model of a general purpose computer.Turing is widely considered to be the father of theoretical computer science and artificial intelligence.'
+ }]
+ },
+ created: function () {
+ },
+ methods: {
+ goToTop: function (e) {
+ dom.scrollToElement(this.$el('item-0'), {
+ offset: 0
+ })
+ }
+ }
+ }
+</script>
+```
+
+[体验一下](http://dotwe.org/799f54b32f5227f9c34cfbb5e6946ba7)
\ No newline at end of file
http://git-wip-us.apache.org/repos/asf/incubator-weex-site/blob/12e3a8bc/_drafts/v1.0/references/components/slider.md
----------------------------------------------------------------------
diff --git a/_drafts/v1.0/references/components/slider.md b/_drafts/v1.0/references/components/slider.md
new file mode 100644
index 0000000..b12a8aa
--- /dev/null
+++ b/_drafts/v1.0/references/components/slider.md
@@ -0,0 +1,121 @@
+---
+title: <slider>
+type: references
+order: 2.9
+version: 0.10
+---
+
+# <slider>
+
+`<slider>` 组件用于在一个页面中展示多个图片,在前端,这种效果被称为 `轮播图`。
+
+## 子组件
+
+支持任意类型的 Weex 组件作为其子组件。 其中,还支持以下组件作为子组件展示特殊效果:
+
+ - `<indicator>`:用于显示轮播图指示器效果,必须充当 [`<slider>`](./slider.html) 组件的子组件使用。
+
+## 特性
+
+- `auto-play {boolean}`:可选值为 `true`/`false`,默认的是 `false`。
+
+ 该值决定是否自动播放轮播。重置 `loadmore` 相关的 UI,值不一样就会重置。
+
+- `interval {number}`:值为毫秒数,此值设定 slider 切换时间间隔。当 `auto-play` 值为 `true` 时生效。
+
+## 样式
+
+- 通用样式:支持所有通用样式
+
+ - 盒模型
+ - `flexbox` 布局
+ - `position`
+ - `opacity`
+ - `background-color`
+
+ 查看 [组件通用样式](../common-style.html)
+
+## 事件
+
+- `change`: 当轮播索引改变时,触发该事件。
+
+ 事件中 event 对象属性:
+ - `index`:展示的图片索引
+
+- 通用事件
+
+ 支持所有通用事件:
+
+ - `click`
+ - `longpress`
+ - `appear`
+ - `disappear`
+
+ 查看 [通用事件](../common-event.html)
+
+## 示例
+
+```html
+<template>
+ <div>
+ <slider class="slider" interval="3000" auto-play="true">
+ <div class="slider-pages" repeat="item in itemList">
+ <image class="img" src="{{item.pictureUrl}}"></image>
+ <text class="title">{{item.title}}</text>
+ </div>
+ <indicator class="indicator"></indicator>
+ </slider>
+ </div>
+</template>
+
+<style>
+ .img {
+ width: 714;
+ height: 150;
+ }
+ .title {
+ position: absolute;
+ top: 20;
+ left: 20;
+ color: #ff0000;
+ font-size: 48;
+ font-weight: bold;
+ background-color: #eeeeee;
+ }
+ .slider {
+ flex-direction: row;
+ margin: 18;
+ width: 714;
+ height: 230;
+ }
+ .slider-pages {
+ flex-direction: row;
+ width: 714;
+ height: 200;
+ }
+ .indicator {
+ width:714;
+ height:200;
+ position:absolute;
+ top:1;
+ left:1;
+ item-color: red;
+ item-selectedColor: blue;
+ item-size: 20;
+ }
+</style>
+
+<script>
+ module.exports = {
+ data: {
+ itemList: [
+ {itemId: '520421163634', title: 'item1', pictureUrl: 'https://gd2.alicdn.com/bao/uploaded/i2/T14H1LFwBcXXXXXXXX_!!0-item_pic.jpg'},
+ {itemId: '522076777462', title: 'item2', pictureUrl: 'https://gd1.alicdn.com/bao/uploaded/i1/TB1PXJCJFXXXXciXFXXXXXXXXXX_!!0-item_pic.jpg'},
+ {itemId: '522076777462', title: 'iten3', pictureUrl: 'https://gd3.alicdn.com/bao/uploaded/i3/TB1x6hYLXXXXXazXVXXXXXXXXXX_!!0-item_pic.jpg'}
+ ]
+ }
+ }
+</script>
+```
+
+[体验一下](http://dotwe.org/37784d97811f4c91594a9ad6f118c0f7)
http://git-wip-us.apache.org/repos/asf/incubator-weex-site/blob/12e3a8bc/_drafts/v1.0/references/components/switch.md
----------------------------------------------------------------------
diff --git a/_drafts/v1.0/references/components/switch.md b/_drafts/v1.0/references/components/switch.md
new file mode 100644
index 0000000..8a3d614
--- /dev/null
+++ b/_drafts/v1.0/references/components/switch.md
@@ -0,0 +1,98 @@
+---
+title: <switch>
+type: references
+order: 2.11
+version: 0.10
+---
+
+# <switch>
+
+<span class="weex-version">v0.6.1+</span>
+
+`<switch>` 是 Weex 的内置组件,用来创建与 iOS 一致样式的按钮。例如,在 iPhone 中的设置应用中的飞行模式按钮就是一个 switch 按钮。
+
+## 子组件
+
+`<switch>` 组件**不支持**任何子组件。
+
+## 特性
+
+- `checked {boolean}`:默认值为 `false`,表明按钮是否开启 is on or not.
+- `disabled {boolean}`:默认值为 `false`,表明是否激活按钮
+
+## 样式
+
+值得注意的是,在这个组件上,有些样式组件属性**不能使用**,它们是:
+
+- `width`
+- `height`
+- `min-width`
+- `min-height`
+- `margin`
+- `padding`
+- `border`
+
+**注意:**
+
+由于设计宽度为 750px,宽度和高度相关的属性不能配置,组件的尺寸限定在 100x60。
+
+- 通用样式
+
+ - `flexbox` 布局
+ - `position`
+ - `opacity`
+ - `background-color`
+
+ 查看 [组件通用样式](../common-style.html)
+
+## 事件
+
+- `change`:改变开关状态时触发该事件。
+
+ 事件中 event 对象属性:
+
+ - `value`: 组件布尔值真或假。
+ - `timestamp`: 事件的时间戳。
+
+- 通用事件
+
+ 支持所有通用事件:
+
+ - `click`
+ - `longpress`
+ - `appear`
+ - `disappear`
+
+ 查看 [通用事件](../common-event.html)
+
+## 示例
+
+```html
+<template>
+ <div>
+ <text>muted:</text>
+ <switch checked="true" onclick='onclick' onchange='onchange' ondisappear='ondisappear' onappear='onappear'></switch>
+ </div>
+</template>
+
+<script>
+ module.exports ={
+ methods:{
+ onclick:function(e){
+ console.log('onclick:' + e.timestamp);
+ },
+ onchange:function(e){
+ console.log('onchage, value:' + e.value);
+ },
+ ondisappear:function(e){
+ console.log('ondisappear, value:' + e.value);
+ },
+ onappear:function(e){
+ console.log('onappear, value:' + e.value);
+ },
+ }
+ }
+</script>
+```
+
+[体验一下](http://dotwe.org/5f8b9d9c0e429e61f4a004dc8ee637e1)
\ No newline at end of file
http://git-wip-us.apache.org/repos/asf/incubator-weex-site/blob/12e3a8bc/_drafts/v1.0/references/components/text.md
----------------------------------------------------------------------
diff --git a/_drafts/v1.0/references/components/text.md b/_drafts/v1.0/references/components/text.md
new file mode 100644
index 0000000..edd6a05
--- /dev/null
+++ b/_drafts/v1.0/references/components/text.md
@@ -0,0 +1,116 @@
+---
+title: <text>
+type: references
+order: 2.12
+version: 0.10
+---
+
+# <text>
+
+`<text>` 是 Weex 内置的组件,用来将文本按照指定的样式渲染出来。`<text>` 只能包含文本值,你可以使用 `{% raw %}{{}}{% endraw %}` 标记插入变量值作为文本内容。
+
+## 子组件
+
+此组件不支持子组件。
+
+## 特性
+
+- `value {string}`: 组件的值,与 `<text>` 标签中的文本内容相同。
+
+## 样式
+
+- `lines {number}`: 指定文本行数。默认值是 `0` 代表不限制行数。
+- text styles: 查看 [文本样式](../text-style.html)
+
+ - 支持 `color` 样式.
+ - 支持 `font-size` 样式. iOS默认值:`32`,Android:不同设备不同,H5 默认值:`32`.
+ - 支持 `font-style` 样式.
+ - 支持 `font-weight` 样式.
+ - 支持 `text-align` 样式.
+ - 支持 `text-decoration` 样式.
+ - 支持 `text-overflow` 样式.
+ - 支持 `line-height`样式<sup class="wx-v">0.6.1+</sup> 。`line-height` 在 iOS 中与 H5 和 Android 中不同, 文本值将放置在框的底部。
+ - 不支持 `flex-direction`, `justify-content`, `align-items` 这些为子节点设置的属性,并且`<text>`没有子节点。
+
+- 通用样式:支持所有通用样式
+
+ - 盒模型
+ - `flexbox` 布局
+ - `position`
+ - `opacity`
+ - `background-color`
+
+ 查看 [组件通用样式](../common-style.html)
+
+## 事件
+
+- 通用事件
+ 支持所有通用事件:
+
+ - `click`
+ - `longpress`
+ - `appear`
+ - `disappear`
+
+ 查看 [通用事件](../common-event.html)
+
+## 约束
+
+1. `<text>` 里直接写文本头尾空白会被过滤,如果需要保留头尾空白,暂时只能通过数据绑定写头尾空格。
+
+```html
+<template>
+ <div>
+ <text> 测试1,直接放置头尾用空白的文本 </text>
+ <text>{{msg}}</text>
+ </div>
+</template>
+<script>
+module.exports = {
+ data: {
+ msg: ' 测试2,使用数据绑定 '
+ }
+}
+</script>
+```
+
+[体验一下](http://dotwe.org/473d451e48ba322b606c4ba2577fd96a)
+
+## 示例
+
+```html
+<template>
+ <div>
+ <text>this is text content</text>
+ <text value="this is text value"></text>
+ <text id="textid" onclick={{showtext}}>this is gettext content</text>
+ <text value="{{text}}"></text>
+ <text style="lines: 3;">Alan Mathison Turing ( 23 June 1912 – 7 June 1954) was an English computer scientist, mathematician, logician, cryptanalyst and theoretical biologist. He was highly influential in the development of theoretical computer science, providing a formalisation of the concepts of algorithm and computation with the Turing machine, which can be considered a model of a general purpose computer.Turing is widely considered to be the father of theoretical computer science and artificial intelligence.</text>
+</div>
+</template>
+
+<style>
+ .text {
+ font-size: 24;
+ text-decoration: underline;
+ }
+</style>
+
+<script>
+ module.exports = {
+ data: {
+ price1: '99.99',
+ price2: '88.88',
+ text:''
+ },
+ methods: {
+ showtext: function(event) {
+ var textComponent = this.$el("textid");
+ this.text = textComponent.attr.value;
+ }
+ }
+ };
+</script>
+```
+
+[体验一下](http://dotwe.org/b2796940d6b9766000778c61446fcd26)
http://git-wip-us.apache.org/repos/asf/incubator-weex-site/blob/12e3a8bc/_drafts/v1.0/references/components/textarea.md
----------------------------------------------------------------------
diff --git a/_drafts/v1.0/references/components/textarea.md b/_drafts/v1.0/references/components/textarea.md
new file mode 100644
index 0000000..9470173
--- /dev/null
+++ b/_drafts/v1.0/references/components/textarea.md
@@ -0,0 +1,115 @@
+---
+title: <textarea>
+type: references
+order: 2.13
+version: 0.10
+---
+
+# <textarea>
+
+<span class="weex-version">v0.8+</span>
+
+`textarea` 是 Weex 内置的一个组件,用于用户交互,接受用户输入数据。 可以认为是允许多行的 `<input>`
+
+**Notes:** `<textarea>`支持 `<input>` 支持的所有的事件。
+
+## 子组件
+
+`textarea` 组件不支持子组件。
+
+## 特性
+
+- `value {string}`:组件的接收到的输入字符。
+- `placeholder {string}`:提示用户可以输入什么。 提示文本不能有回车或换行。
+- `disabled {boolean}`:表示是否支持输入。通常 `click` 事件在 `disabled` 控件上是失效的。
+- `autofocus {boolean}`:表示是否在页面加载时控件自动获得输入焦点。
+- `rows {number}`:接收 number 类型的数据,指定组件的高度,默认值是 2
+
+## 样式
+
+- text styles
+ - 支持 `color`
+ - 支持 `font-size`
+ - 支持 `font-style`
+ - 支持 `font-weight`
+ - 支持 `text-align`
+
+ 查看 [文本样式](../text-style.html)
+
+- 通用样式:支持所有通用样式
+
+ - 盒模型
+ - `flexbox` 布局
+ - `position`
+ - `opacity`
+ - `background-color`
+
+ 查看 [组件通用样式](../common-style.html)
+
+## 事件
+
+- `input`: 输入字符的值更改。
+
+ 事件中 event 对象属性:
+
+ - `value`: 触发事件的组件;
+ - `timestamp`: 事件发生时的时间戳。
+
+- `change`: 当用户输入完成时触发。通常在 `blur` 事件之后。
+
+ 事件中 event 对象属性:
+
+ - `value`: 触发事件的组件;
+
+ - `timestamp`: 事件发生时的时间戳。
+
+- `focus`: 组件获得输入焦点。
+
+ 事件中 event 对象属性:
+
+ - `timestamp`: 事件发生时的时间戳。
+
+- `blur`: 组件失去输入焦点。
+
+ 事件中 event 对象属性:
+
+ - `timestamp`: 事件发生时的时间戳。
+
+- 通用事件
+
+ **注意:**
+ 不支持 `click` 事件。 请监听 `input` 或 `change` 事件代替。
+
+ 支持以下通用事件:
+
+ - `longpress`
+ - `appear`
+ - `disappear`
+
+ 查看 [通用事件](../common-event.html)
+
+## 示例
+
+```html
+<template>
+ <div>
+ <textarea
+ class="textarea"
+ autofocus="true"
+ placeholder="..."
+ value="我是一个多行版本的input组件">
+ </textarea>
+ </div>
+</template>
+<style>
+ .textarea {
+ margin: 20;
+ border-width: 2;
+ border-style: solid;
+ border-color: #efefef;
+ border-radius: 5;
+ }
+</style>
+```
+
+[体验一下](http://dotwe.org/31d67beda847cd5b5cf7b78ff21895ba)
http://git-wip-us.apache.org/repos/asf/incubator-weex-site/blob/12e3a8bc/_drafts/v1.0/references/components/video.md
----------------------------------------------------------------------
diff --git a/_drafts/v1.0/references/components/video.md b/_drafts/v1.0/references/components/video.md
new file mode 100644
index 0000000..ac17c8b
--- /dev/null
+++ b/_drafts/v1.0/references/components/video.md
@@ -0,0 +1,82 @@
+---
+title: <video>
+type: references
+order: 2.14
+version: 0.10
+---
+
+# <video>
+
+<span class="weex-version">v0.6.1+</span>
+
+`<video>` 组件可以让我们在 Weex 页面中嵌入视频内容。
+
+## 子组件
+
+- `<text>` 是唯一合法的子组件。
+
+### 特性
+
+- `src {string}`:内嵌的视频指向的URL
+- `play-status {string}`:可选值为 `play` | `pause`,用来控制视频的播放状态,`play` 或者 `pause`,默认值是 `pause`。
+- `auto-play {boolean}`:可选值为 `true` | `false`,当页面加载初始化完成后,用来控制视频是否立即播放,默认值是 `false`。
+
+## 样式
+
+- 通用样式:支持所有通用样式
+
+ - 盒模型
+ - `flexbox` 布局
+ - `position`
+ - `opacity`
+ - `background-color`
+
+ 查看 [组件通用样式](../common-style.html)
+
+## 事件
+
+- `start`:当 playback 的状态是 Playing 时触发
+- `pause`:当 playback 的状态是 Paused 时触发
+- `finish`:当 playback 的状态是 Finished 时触发
+- `fail`:当 playback 状态是 Failed 时触发
+
+## 示例
+
+```html
+<template>
+ <div>
+ <text>Big Eater!</text>
+ <video class="video" onstart="onstart" onpause="onpause" onfinish="onfinish" onfail="onfail"
+ auto-play="false" play-status="pause" src="{{src}}" style="width:750;height:500;"></video>
+ <text>state: {{msg}}</text>
+ </div>
+</template>
+
+<style>
+</style>
+
+<script>
+ module.exports ={
+ data: {
+ msg: '',
+ src:'http://flv2.bn.netease.com/videolib3/1611/01/XGqSL5981/SD/XGqSL5981-mobile.mp4'
+ },
+ methods:{
+ onstart:function(e){
+ this.msg = 'onstart'
+ },
+ onpause:function(e){
+ this.msg = 'onpause'
+ },
+ onfinish:function(e){
+ this.msg = 'onfinish'
+ },
+ onfail:function(e){
+ this.msg = 'onfinish'
+ },
+ }
+ }
+</script>
+```
+
+[体验一下](http://dotwe.org/d83a00bbd180bd5dc4e7f9381d39b4dd)
http://git-wip-us.apache.org/repos/asf/incubator-weex-site/blob/12e3a8bc/_drafts/v1.0/references/components/web.md
----------------------------------------------------------------------
diff --git a/_drafts/v1.0/references/components/web.md b/_drafts/v1.0/references/components/web.md
new file mode 100644
index 0000000..073fb4b
--- /dev/null
+++ b/_drafts/v1.0/references/components/web.md
@@ -0,0 +1,143 @@
+---
+title: <web>
+type: references
+order: 2.15
+version: 0.10
+---
+
+# <web>
+
+<span class="weex-version">v0.5+</span>
+
+使用 `<web>` 组件在 Weex 页面中嵌入一张网页内容。`src` 属性用来指定资源地址。你也可以使用 `webview module` 来控制 `web` 的行为,比如前进、后退和重载。可以在这里查看 [`webview` module](../modules/webview.html)。
+
+## 子组件
+
+不支持子组件。
+
+## 特性
+
+- `src {string}`:此特性指定嵌入的 web 页面 url。
+
+## 样式
+
+- 通用样式:不支持部分盒模型样式,支持列表如下:
+
+ - `width`
+
+ 组件的宽度,默认值是0。这个样式定义必须指定数值。
+
+ - `height`
+
+ 组件的高度,默认值是0。这个样式定义必须指定数值。
+
+ - `flexbox` 布局
+ - `position`
+ - `opacity`
+ - `background-color`
+
+ 查看 [组件通用样式](../common-style.html)
+
+## 事件
+
+- `pagestart`: `<web>` 组件开始加载时发送此事件消息。
+- `pagefinish`: `<web>` 组件完成加载时发送此事件消息。
+- `error`: �如果 `<web>` 组件加载出现错误,会发送此事件消息。
+
+- 通用事件
+
+ 支持以下通用事件:
+ - `appear`
+ - `disappear`
+
+ 查看 [通用事件](../common-event.html)
+
+**注意:**
+
+不支持 `click` 事件。
+
+## 示例
+
+我们用一个简易浏览器示例,来展示如何使用 `<web>` 组件和 `webview` module。 查看 [webview module](../modules/webview.html)。
+
+```html
+<template>
+ <div class="browserStyle">
+ <div style="flex-direction: row">
+ <input id="urlInput" type="url" autofocus="false" placeholder="input url" onchange="change" oninput="input" class="textStyle" value="https://www.baidu.com">
+ </input>
+ </div>
+ <div style="flex-direction: row">
+ <text class="buttonSytle" onclick="loadURL">LoadURL</text>
+ <text class="buttonSytle" onclick="backforward">Backward</text>
+ <text class="buttonSytle" onclick="forward">Forward</text>
+ </div>
+ <div>
+ <web id="webview" src="{{src}}" class="webStyle"></web>
+ </div>
+ </div>
+</template>
+
+<style>
+ .browserStyle {
+ position: absolute;
+ top: 0;
+ right: 0;
+ bottom: 0;
+ left: 0;
+ background-color:#778899 ;
+ }
+
+ .textStyle {
+ width: 750;
+ height: 50;
+ background-color: #D3D3D3;
+ font-size: 30;
+ }
+
+ .buttonSytle {
+ width:200;
+ height: 50;
+ background-color: #D3D3D3;
+ margin:10;
+ padding-left: 5;
+ padding-right: 5;
+ font-size: 30;
+ }
+
+ .webStyle {
+ width: 750;
+ height: 800;
+ background-color: #8B0000;
+ }
+</style>
+
+<script>
+ var web_module = require('@weex-module/webview')
+
+ module.exports = {
+ data: {
+ src : "https://h5.m.taobao.com",
+ },
+
+ methods: {
+ loadURL: function (e) {
+ var input = this.$el("urlInput");
+ this.src = input.attr.value;
+ },
+
+ backforward: function (e) {
+ var web_element = this.$el('webview');
+ web_module.goBack(web_element);
+ },
+
+ forward: function (e) {
+ var web_element = this.$el('webview');
+ web_module.goForward(web_element);
+ }
+ }
+ }
+</script>
+```
+
+[体验一下](http://dotwe.org/84741a6befeb0f1e5ce11b47ecf1123f)
http://git-wip-us.apache.org/repos/asf/incubator-weex-site/blob/12e3a8bc/_drafts/v1.0/references/gesture.md
----------------------------------------------------------------------
diff --git a/_drafts/v1.0/references/gesture.md b/_drafts/v1.0/references/gesture.md
new file mode 100644
index 0000000..4377af9
--- /dev/null
+++ b/_drafts/v1.0/references/gesture.md
@@ -0,0 +1,79 @@
+---
+title: 手势
+type: references
+order: 1.4
+version: 0.10
+---
+
+# 手势
+
+*注:该功能属于实验性功能*
+
+Weex 封装了原生的触摸事件以提供手势系统。使用手势类似于在 Weex 中使用事件,只需在节点上设置 `on` 特性来监听手势即可。
+
+## 手势类型
+
+目前,仅支持以下四种手势类型:
+
+- **Touch**:当触摸到一个点,移动或从触摸面移开时触发 `touch` 手势。触摸手势很精准,它会返回所有详细的事件信息。所以,监听 `touch` 手势可能很慢,即使只移动一丁点也需要处理大量事件。有三种类型的 `touch` 手势:
+
+ - `touchstart` 将在触摸到触摸面上时触发。
+ - `touchmove` 将在触摸点在触摸面移动时被触发。
+ - `touchend` 将在从触摸面离开时被触发。
+
+- **Pan**:`pan` 手势也会返回触摸点在触摸面的移动信息,有点类似于 `touch` 手势。但是 `pan` 手势只会采样收集部分事件信息因此比 `touch` 事件要快得多,当然精准性差于 `touch`。`pan` 也有三中类型的手势,这些手势的意义与 `touch` 完全一样:
+
+ - `panstart`
+ - `panmove`
+ - `panend`
+
+- **Swipe**:`swipe` 将会在用户在屏幕上滑动时触发,一次连续的滑动只会触发一次 `swiper` 手势。
+- **LongPress**:`LongPress` 将会在触摸点连续保持 500 ms以上时触发。
+
+`touch` 和 `pan` 非常接近,它们的特点可以总结成这样:
+
+- **Touch**:完整信息,精准、很慢
+- **Pan**:抽样信息,很快,不够精准
+
+开发者可以根据自己的情况选择合适的手势。
+
+## 属性
+
+以下属性可以在手势的回调中使用:
+
+- `direction`:仅在 `swipe` 手势中存在,返回滑动方向,返回值可能为 `up`, `left`, `bottom`, `right`。
+- `changedTouches`:一个数组,包含了当前手势的触摸点的运动轨迹
+
+### changedTouches
+
+`changedTouches` 是一个数组,其子元素中包含以下属性:
+
+- `identifier`:触摸点的唯一标识符。
+- `pageX`:触摸点相对于文档左侧边缘的 X 轴坐标。
+- `pageY`:触摸点相对于文档顶部边缘的 Y 轴坐标。
+- `screenX`:触摸点相对于屏幕左侧边缘的 X 轴坐标。
+- `screenY`:触摸点相对于屏幕顶部边缘的 Y 轴坐标。
+
+## 约束
+
+目前,由于会触发大量事件冲突,Weex Android 还不支持在滚动类型的元素上监听手势,例如 `scroller`, `list` 和 `webview` 这三个组件。
+
+## 示例
+
+```html
+<template>
+ <div ontouchstart="handleTouchstart"></div>
+</template>
+
+<script>
+module.exports = {
+ methods: {
+ handleTouchstart: function(eventProperties) {
+ // handling with the Event Properties
+ }
+ }
+}
+</script>
+```
+
+如上面代码所示,一个 `touchstart` 事件会在触摸点与触摸面接触的时候触发。
http://git-wip-us.apache.org/repos/asf/incubator-weex-site/blob/12e3a8bc/_drafts/v1.0/references/images/Artboard.jpg
----------------------------------------------------------------------
diff --git a/_drafts/v1.0/references/images/Artboard.jpg b/_drafts/v1.0/references/images/Artboard.jpg
new file mode 100644
index 0000000..2f6bb95
Binary files /dev/null and b/_drafts/v1.0/references/images/Artboard.jpg differ
http://git-wip-us.apache.org/repos/asf/incubator-weex-site/blob/12e3a8bc/_drafts/v1.0/references/images/coding_weex_1.jpg
----------------------------------------------------------------------
diff --git a/_drafts/v1.0/references/images/coding_weex_1.jpg b/_drafts/v1.0/references/images/coding_weex_1.jpg
new file mode 100644
index 0000000..8080578
Binary files /dev/null and b/_drafts/v1.0/references/images/coding_weex_1.jpg differ
http://git-wip-us.apache.org/repos/asf/incubator-weex-site/blob/12e3a8bc/_drafts/v1.0/references/images/css-boxmodel.png
----------------------------------------------------------------------
diff --git a/_drafts/v1.0/references/images/css-boxmodel.png b/_drafts/v1.0/references/images/css-boxmodel.png
new file mode 100644
index 0000000..a2063e2
Binary files /dev/null and b/_drafts/v1.0/references/images/css-boxmodel.png differ
http://git-wip-us.apache.org/repos/asf/incubator-weex-site/blob/12e3a8bc/_drafts/v1.0/references/images/css-flexbox-align.jpg
----------------------------------------------------------------------
diff --git a/_drafts/v1.0/references/images/css-flexbox-align.jpg b/_drafts/v1.0/references/images/css-flexbox-align.jpg
new file mode 100644
index 0000000..8a7f731
Binary files /dev/null and b/_drafts/v1.0/references/images/css-flexbox-align.jpg differ
http://git-wip-us.apache.org/repos/asf/incubator-weex-site/blob/12e3a8bc/_drafts/v1.0/references/images/css-flexbox-justify.svg
----------------------------------------------------------------------
diff --git a/_drafts/v1.0/references/images/css-flexbox-justify.svg b/_drafts/v1.0/references/images/css-flexbox-justify.svg
new file mode 100644
index 0000000..33e742b
--- /dev/null
+++ b/_drafts/v1.0/references/images/css-flexbox-justify.svg
@@ -0,0 +1,59 @@
+<svg xmlns="http://www.w3.org/2000/svg" width='504' height='270' viewBox="0 0 504 270">
+ <defs>
+ <pattern id='checker' width='20' height='20' patternUnits='userSpaceOnUse'>
+ <rect x='0' y='0' width='10' height='10' fill='#eee' />
+ <rect x='10' y='10' width='10' height='10' fill='#eee' />
+ <rect x='0' y='10' width='10' height='10' fill='#ccc' />
+ <rect x='10' y='0' width='10' height='10' fill='#ccc' />
+ </pattern>
+ </defs>
+ <style>
+ text { font-family: sans-serif; font-weight: bold; font-size: 30px; text-anchor: middle; }
+ rect { stroke-width: 2px; stroke: #888; }
+ g > rect:nth-child(1) { fill: #888 }
+ g > rect:nth-child(2) { fill: #fcc; }
+ g > rect:nth-child(3) { fill: #cfc; }
+ g > rect:nth-child(4) { fill: #ccf; }
+ g > rect:nth-child(5) { fill: transparent; }
+ </style>
+ <g transform="translate(2,2)">
+ <rect x='0' y='0' width='500' height='50' />
+ <rect x='0' y='0' width='100' height='50' />
+ <rect x='100' y='0' width='80' height='50' />
+ <rect x='180' y='0' width='200' height='50' />
+ <rect x='0' y='0' width='500' height='50' />
+ <text x='250' y='38'>flex-start</text>
+ </g>
+ <g transform="translate(2,56)">
+ <rect x='0' y='0' width='500' height='50' />
+ <rect x='120' y='0' width='100' height='50' />
+ <rect x='220' y='0' width='80' height='50' />
+ <rect x='300' y='0' width='200' height='50' />
+ <rect x='0' y='0' width='500' height='50' />
+ <text x='250' y='38'>flex-end</text>
+ </g>
+ <g transform="translate(2,110)">
+ <rect x='0' y='0' width='500' height='50' />
+ <rect x='60' y='0' width='100' height='50' />
+ <rect x='160' y='0' width='80' height='50' />
+ <rect x='240' y='0' width='200' height='50' />
+ <rect x='0' y='0' width='500' height='50' />
+ <text x='250' y='38'>center</text>
+ </g>
+ <g transform="translate(2,164)">
+ <rect x='0' y='0' width='500' height='50' />
+ <rect x='0' y='0' width='100' height='50' />
+ <rect x='160' y='0' width='80' height='50' />
+ <rect x='300' y='0' width='200' height='50' />
+ <rect x='0' y='0' width='500' height='50' />
+ <text x='250' y='38'>space-between</text>
+ </g>
+ <g transform="translate(2,218)">
+ <rect x='0' y='0' width='500' height='50' />
+ <rect x='20' y='0' width='100' height='50' />
+ <rect x='160' y='0' width='80' height='50' />
+ <rect x='280' y='0' width='200' height='50' />
+ <rect x='0' y='0' width='500' height='50' />
+ <text x='250' y='38'>space-around</text>
+ </g>
+</svg>
\ No newline at end of file
http://git-wip-us.apache.org/repos/asf/incubator-weex-site/blob/12e3a8bc/_drafts/v1.0/references/images/div_1.jpg
----------------------------------------------------------------------
diff --git a/_drafts/v1.0/references/images/div_1.jpg b/_drafts/v1.0/references/images/div_1.jpg
new file mode 100644
index 0000000..3c89773
Binary files /dev/null and b/_drafts/v1.0/references/images/div_1.jpg differ
http://git-wip-us.apache.org/repos/asf/incubator-weex-site/blob/12e3a8bc/_drafts/v1.0/references/images/div_2.jpg
----------------------------------------------------------------------
diff --git a/_drafts/v1.0/references/images/div_2.jpg b/_drafts/v1.0/references/images/div_2.jpg
new file mode 100644
index 0000000..67395bb
Binary files /dev/null and b/_drafts/v1.0/references/images/div_2.jpg differ
http://git-wip-us.apache.org/repos/asf/incubator-weex-site/blob/12e3a8bc/_drafts/v1.0/references/images/div_3.jpg
----------------------------------------------------------------------
diff --git a/_drafts/v1.0/references/images/div_3.jpg b/_drafts/v1.0/references/images/div_3.jpg
new file mode 100644
index 0000000..b10f69e
Binary files /dev/null and b/_drafts/v1.0/references/images/div_3.jpg differ
http://git-wip-us.apache.org/repos/asf/incubator-weex-site/blob/12e3a8bc/_drafts/v1.0/references/images/div_4.jpg
----------------------------------------------------------------------
diff --git a/_drafts/v1.0/references/images/div_4.jpg b/_drafts/v1.0/references/images/div_4.jpg
new file mode 100644
index 0000000..acc2518
Binary files /dev/null and b/_drafts/v1.0/references/images/div_4.jpg differ
http://git-wip-us.apache.org/repos/asf/incubator-weex-site/blob/12e3a8bc/_drafts/v1.0/references/images/image_1.jpg
----------------------------------------------------------------------
diff --git a/_drafts/v1.0/references/images/image_1.jpg b/_drafts/v1.0/references/images/image_1.jpg
new file mode 100644
index 0000000..b87de15
Binary files /dev/null and b/_drafts/v1.0/references/images/image_1.jpg differ
http://git-wip-us.apache.org/repos/asf/incubator-weex-site/blob/12e3a8bc/_drafts/v1.0/references/images/image_2.jpg
----------------------------------------------------------------------
diff --git a/_drafts/v1.0/references/images/image_2.jpg b/_drafts/v1.0/references/images/image_2.jpg
new file mode 100644
index 0000000..598a242
Binary files /dev/null and b/_drafts/v1.0/references/images/image_2.jpg differ
http://git-wip-us.apache.org/repos/asf/incubator-weex-site/blob/12e3a8bc/_drafts/v1.0/references/images/list_2.jpg
----------------------------------------------------------------------
diff --git a/_drafts/v1.0/references/images/list_2.jpg b/_drafts/v1.0/references/images/list_2.jpg
new file mode 100644
index 0000000..8c2cc55
Binary files /dev/null and b/_drafts/v1.0/references/images/list_2.jpg differ
http://git-wip-us.apache.org/repos/asf/incubator-weex-site/blob/12e3a8bc/_drafts/v1.0/references/images/list_3.jpg
----------------------------------------------------------------------
diff --git a/_drafts/v1.0/references/images/list_3.jpg b/_drafts/v1.0/references/images/list_3.jpg
new file mode 100644
index 0000000..f2968c7
Binary files /dev/null and b/_drafts/v1.0/references/images/list_3.jpg differ
http://git-wip-us.apache.org/repos/asf/incubator-weex-site/blob/12e3a8bc/_drafts/v1.0/references/images/list_4.jpg
----------------------------------------------------------------------
diff --git a/_drafts/v1.0/references/images/list_4.jpg b/_drafts/v1.0/references/images/list_4.jpg
new file mode 100644
index 0000000..0123171
Binary files /dev/null and b/_drafts/v1.0/references/images/list_4.jpg differ
http://git-wip-us.apache.org/repos/asf/incubator-weex-site/blob/12e3a8bc/_drafts/v1.0/references/images/nav.jpg
----------------------------------------------------------------------
diff --git a/_drafts/v1.0/references/images/nav.jpg b/_drafts/v1.0/references/images/nav.jpg
new file mode 100644
index 0000000..8c6ed03
Binary files /dev/null and b/_drafts/v1.0/references/images/nav.jpg differ
http://git-wip-us.apache.org/repos/asf/incubator-weex-site/blob/12e3a8bc/_drafts/v1.0/references/images/scroller_1.jpg
----------------------------------------------------------------------
diff --git a/_drafts/v1.0/references/images/scroller_1.jpg b/_drafts/v1.0/references/images/scroller_1.jpg
new file mode 100644
index 0000000..3e995cb
Binary files /dev/null and b/_drafts/v1.0/references/images/scroller_1.jpg differ
http://git-wip-us.apache.org/repos/asf/incubator-weex-site/blob/12e3a8bc/_drafts/v1.0/references/images/style_1.jpg
----------------------------------------------------------------------
diff --git a/_drafts/v1.0/references/images/style_1.jpg b/_drafts/v1.0/references/images/style_1.jpg
new file mode 100644
index 0000000..2482710
Binary files /dev/null and b/_drafts/v1.0/references/images/style_1.jpg differ
http://git-wip-us.apache.org/repos/asf/incubator-weex-site/blob/12e3a8bc/_drafts/v1.0/references/images/style_2.jpg
----------------------------------------------------------------------
diff --git a/_drafts/v1.0/references/images/style_2.jpg b/_drafts/v1.0/references/images/style_2.jpg
new file mode 100644
index 0000000..6b6f2e1
Binary files /dev/null and b/_drafts/v1.0/references/images/style_2.jpg differ
http://git-wip-us.apache.org/repos/asf/incubator-weex-site/blob/12e3a8bc/_drafts/v1.0/references/index.md
----------------------------------------------------------------------
diff --git a/_drafts/v1.0/references/index.md b/_drafts/v1.0/references/index.md
new file mode 100644
index 0000000..644c16f
--- /dev/null
+++ b/_drafts/v1.0/references/index.md
@@ -0,0 +1,46 @@
+---
+title: Bootstrap
+type: references
+order: 1
+has_chapter_content: false
+chapter_title: 通用选项
+version: 0.10
+---
+
+# Bootstrap
+
+除了其默认的意义,`<script>`标签支持在页面的顶级组件中通过 `type` 属性定义两种配置。
+- `type="data"`: 配置初始化数据,这里定义的数据会覆盖定义在`<script>`中的数据;
+- `type="config"`: 定义配置项。
+
+``` html
+<script type="data">
+ /* (可选) 定义初始化数据 */
+</script>
+
+<script type="config">
+ /* (可选) 定义配置项 */
+</script>
+
+```
+## 定义初始化数据
+
+有时,很难在默认的`<script>`标签中维护巨大的数据结构。所以 Weex 允许我们通过 `<script type="data">` 标签定义初始化数据。在这里定义的数据将完全取代默认的 `<script>` 标签中定义的数据。
+
+例如:
+
+```html
+<script type="data">
+ module.exports = {
+ title: 'Alibaba',
+ date: new Date().toLocaleString()
+ }
+</script>
+```
+## 配置项
+
+Weex 也允许我们通过 `<script type="config">` 定义一些配置项,目前,仅只支持配置 `downgrade`。
+- `downgrade.osVersion`
+- `downgrade.appVersion`
+- `downgrade.weexVersion`
+- `downgrade.deviceModel`
http://git-wip-us.apache.org/repos/asf/incubator-weex-site/blob/12e3a8bc/_drafts/v1.0/references/modules/animation.md
----------------------------------------------------------------------
diff --git a/_drafts/v1.0/references/modules/animation.md b/_drafts/v1.0/references/modules/animation.md
new file mode 100644
index 0000000..821bfac
--- /dev/null
+++ b/_drafts/v1.0/references/modules/animation.md
@@ -0,0 +1,90 @@
+---
+title: animation
+type: references
+order: 4.1
+version: 0.10
+---
+
+# `animation` 动画
+
+流畅且有意义的动画是一个十分有效的提升移动应用用户体验的手段,`animation` 模块被用于在组件上执行动画。动画可以对组件执行一系列简单的变换 (位置、大小、旋转角度、背景颜色和不透明度)。举个例子,如果有一个 `<image>` 组件,通过动画你可以对其进行移动、旋转、拉伸或收缩等动作。
+
+## 示例
+
+```html
+<template>
+ <div>
+ <div id="test" class="test" onclick="run"></div>
+ </div>
+</template>
+<style>
+ .test { background-color: #6666ff; width: 200; height: 200; }
+</style>
+<script>
+ var animation = require('@weex-module/animation')
+ module.exports = {
+ methods: {
+ run: function () {
+ var testEl = this.$el('test')
+ animation.transition(testEl, {
+ styles: {
+ backgroundColor: '#FF0000',
+ transform: 'translate(100px, 100px)'
+ },
+ duration: 0, //ms
+ timingFunction: 'ease',
+ 'transform-origin': 'center center',
+ delay: 0 //ms
+ }, function () {
+ console.log('animation finished.')
+ })
+ }
+ }
+ }
+</script>
+```
+
+[体验一下](http://dotwe.org/2ae04d3a7017a2ec748cf40905fcd98c)
+
+## API
+
+### `transition(el, options, callback)`
+
+[example](http://dotwe.org/a034a49b5863da099843eb9a0eea9f93)
+
+#### 参数
+
+* `el {Element}`:将要执行动画的元素,通常可以通过调用 [`this.$el(id)`](../api.html) 来获取元素的引用。
+* `options {Object}`:描述动画过程的对象。
+ * `options.duration {number}`:指定动画的持续时间 (单位是毫秒),默认值是 `0`,表示没有动画效果。
+ * `options.delay {number}`:指定请求动画操作到执行动画之间的时间间隔 (单位是毫秒),默认值是 `0`,表示没有延迟,在请求后立即执行动画。
+ * `options.timingFunction {string}`:描述动画执行的速度曲线,用于使动画变化更为平滑。默认值是 `linear`,表示动画从开始到结束都拥有同样的速度。下表列出了所有合法的属性:
+
+| 属性名 | 描述 | 示例 |
+| ---- | ---- | ---- |
+| `linear` | 动画从头到尾的速度是相同的 | [example](http://dotwe.org/70e0c243ffde30abd8fd353f8c6d1d9a) |
+| `ease-in` | 动画速度由慢到快 | [example](http://dotwe.org/23b104f833039f263957481f2e2c40c9) |
+| `ease-out` | 动画速度由快到慢 | [example](http://dotwe.org/04dab95e073a2c3a808e6b01fc20e996) |
+| `ease-in-out` | 动画先加速到达中间点后减速到达终点 | [example](http://dotwe.org/fc37ec17d215e786ce336a00457489e3) |
+| `cubic-bezier(x1, y1, x2, y2)` | 在三次贝塞尔函数中定义变化过程,函数的参数值必须处于 0 到 1 之间。更多关于三次贝塞尔的信息请参阅 [cubic-bezier](http://cubic-bezier.com/) 和 [Bézier curve](https://en.wikipedia.org/wiki/B%C3%A9zier_curve). | [example](http://weex.alibaba-inc.com/playground/95d8f15d0014c31d3a1d15728313f2a5) |
+
+* `options.styles {Object}`:设置不同样式过渡效果的键值对,下表列出了所有合法的参数:
+
+| 参数名 | 描述 | 值类型 | 默认值 | 示例 |
+| ---- | ---- | ---- | ---- |---- |
+| width | 动画执行后应用到组件上的宽度值 | length | 无 | [example](http://dotwe.org/b599d273f996cfdcbeca7bd5c828ca90) |
+| height | 动画执行后应用到组件上的高度值 | length | 无 | [example](http://dotwe.org/d0b1ccadf386ba00960d0c8340c682e5) |
+| backgroundColor | 动画执行后应用到组件上的背景颜色 | string | none | [example](http://dotwe.org/f4616ee18f6042b63a8fdcd2816b1712) |
+| opacity | 动画执行后应用到组件上的不透明度值 | 介于 0 到 1 间的数值 | `1` | [example](http://dotwe.org/f94394173301db83ae6e66d1330a0d0b) |
+| transformOrigin | 定义变化过程的中心点. 参数 `x-aris` 可能的值为 `left`、`center`、`right`、长度值或百分比值, 参数 `y-axis` 可能的值为 `top`、`center`、`bottom`、长度值或百分比值 | `x-axis y-axis` | `center center` | [example](http://dotwe.org/de43f5a47de230dd531797458bf7fd3c) |
+| transform | 定义应用在元素上的变换类型,支持下表列出的属性 | object | 无 | [example](http://dotwe.org/6766dab0589f7831d4bb6030f4226996) |
+
+`transform`属性的合法值:
+
+| 名称 | 描述 | 值类型 | 默认值 | 示例 |
+| ---- | ---- | ---- | ---- | ---- |
+| `translate`/`translateX`/`translateY` | 指定元素将已被移动到的新位置 | 像素值或百分比 | 无 | [example](http://dotwe.org/6638e66e296723bbef3e59c83b2b5003) |
+| `rotate` | 指定元素将被旋转的角度,单位是度 | number | 无 | [example](http://dotwe.org/ba9e9920594d9388744b2bd0d1b7695d) |
+| `scale`/`scaleX`/`scaleY` | 按比例放大或缩小元素 | number | 无 | [example](http://dotwe.org/14b42dde6583ab222bd2b7ed08f241c8) |
+
+* `callback {Function}`:动画执行完毕之后的回调
http://git-wip-us.apache.org/repos/asf/incubator-weex-site/blob/12e3a8bc/_drafts/v1.0/references/modules/clipboard.md
----------------------------------------------------------------------
diff --git a/_drafts/v1.0/references/modules/clipboard.md b/_drafts/v1.0/references/modules/clipboard.md
new file mode 100644
index 0000000..f4525f2
--- /dev/null
+++ b/_drafts/v1.0/references/modules/clipboard.md
@@ -0,0 +1,112 @@
+---
+title: clipboard
+type: references
+order: 4.2
+version: 0.10
+---
+
+# `clipboard` 剪切板
+<span class="weex-version">v0.8+</span>
+
+我们可以通过 `clipboard` 模块的 `getString()`、`setString()` 接口从系统的粘贴板获取内容或者设置内容。
+
+以前当我们收到一条短信验证码信息时,除了人肉拷贝,我们无法获取拷贝短信的内容。这是非常苦恼的。但是现在我们可以通过简单的调用 `clipboard.getString()` 接口来获取短信内容了。
+
+## 示例
+
+```html
+<template>
+ <div>
+ <div class="div">
+ <text class="text" onclick="onItemClick">hello {{message}}</text>
+ </div>
+ <div class="div">
+ <text class="text" onclick="setContent">click me to set: {{tobecopied}}</text>
+ </div>
+ </div>
+</template>
+
+<script>
+ var clipboard = require('@weex-module/clipboard');
+ module.exports ={
+ data:{
+ tobecopied:'yay!',
+ message:"nothing."
+ },
+ methods:{
+ setContent:function(e){
+ clipboard.setString(this.tobecopied);
+ },
+ onItemClick:function(e){
+ this.message='clicked! ';
+ clipboard.getString(function(ret) {
+ this.message = 'text from clipboard:'+ ret;
+ }.bind(this));
+ }
+ }
+ }
+</script>
+
+<style>
+ .div {
+ flex-direction: row;
+ justify-content: space-between;
+ align-items: center;
+ width: 750;
+ height: 90;
+ padding-left:30;
+ padding-right:30;
+
+ border-bottom-width: 1;
+ border-style: solid;
+ border-color: #dddddd;
+ }
+ .text {
+ width: 750;
+ height: 90;
+ }
+</style>
+```
+
+[体验一下](http://dotwe.org/b6a9d613462d85dce56f81085b094dfa)
+
+**注意**
+
+* 仅支持文本拷贝
+* 出于安全考虑和平台限制,只支持 Android 和 iOS,不支持 html5。
+
+## API
+
+### `getString(callback)`
+
+从系统粘贴板读取内容。
+
+#### 参数
+
+* `callback {function (ret)}`:执行完读取操作后的回调函数。`ret {Object}` 为 `callback` 函数的参数,有两个属性:
+ - `ret.data`:获取到的文本内容;
+ - `ret.result`:返回状态,可能为 `success` 或 `fail`。
+
+#### 示例
+
+```javascript
+var clipboard = require('@weex-module/clipboard');
+clipboard.getString(function(ret) {
+ console.log("text from clipboard: " + ret.data);
+});
+```
+
+### `setString(text)`
+
+将一段文本复制到剪切板,相当于手动复制文本。
+
+#### 参数
+
+* `text {string}`:要复制到剪切板的字符串。
+
+#### 示例
+
+```javascript
+var clipboard = require('@weex-module/clipboard');
+clipboard.setString("SomeStringHere");
+```
http://git-wip-us.apache.org/repos/asf/incubator-weex-site/blob/12e3a8bc/_drafts/v1.0/references/modules/dom.md
----------------------------------------------------------------------
diff --git a/_drafts/v1.0/references/modules/dom.md b/_drafts/v1.0/references/modules/dom.md
new file mode 100644
index 0000000..270ec2b
--- /dev/null
+++ b/_drafts/v1.0/references/modules/dom.md
@@ -0,0 +1,79 @@
+---
+title: dom
+type: references
+order: 4.3
+version: 0.10
+---
+
+# dom
+
+包含如下可以更新 dom 树的 dom API。
+
+这部分API是通过把 virtual-dom 的消息发送到 native 渲染器来做到的。
+
+开发者在日常开发中,唯一可在 `.we` 文件中使用的是 `scrollToElement`。
+~~你也可以调用 `$scrollTo` 方法来使用它~~
+
+这个页面提及的其他的 API,只在 `callNative` 进程中的 native 渲染器用。
+(关于 `callNative` 进程的进一步介绍,可以在 [How it works](../../advanced/how-it-works.html)中的 JS Framework 部分看到 )
+
+## API
+### scrollToElement(node, options)
+
+让页面滚动到那个对应的节点,这个API只能在 `<scroller>` 和 `<list>` 组件中用。
+
+~~这个API也能通过调用VM的方法 `$scrollTo` 来使用(已弃用)~~
+
+要在你的 `.we` 文件中使用这个 API,可以使用 `require('@weex-module/dom').scrollToElement`。
+
+#### 参数
+- `node {Node}`:你要滚动到的那个节点
+- `options {Object}`:如下选项
+ - `offset {number}`:一个到其可见位置的偏移距离,默认是 `0`
+
+#### 示例
+
+```html
+<template>
+ <scroller>
+ <div class="row" repeat="item in rows" id="item-{{$index}}">
+ <text class="item-title">row {{item.id}}</text>
+ </div>
+ <div onclick="go" style="width: 750;height: 50; position: fixed; left: 0; right: 0; bottom: 0; background-color: #eeeeee;">
+ <text style="text-align: center;">
+ Go to 50th line.
+ </text>
+ </div>
+ </scroller>
+</template>
+
+<script>
+var dom = require('@weex-module/dom')
+
+module.exports = {
+ data: {
+ rows: []
+ },
+ created: function () {
+ for (var i = 0; i < 100; i++) {
+ this.rows.push({
+ id: i
+ })
+ }
+ },
+ methods: {
+ go: function () {
+ var el = this.$el('item-49')
+
+ dom.scrollToElement(el, {
+ offset: 0
+ })
+ }
+ }
+}
+</script>
+```
+
+## 其他
+
+dom 还有一些底层接口用于创建 Weex 实例时调用,比如 `createBody`、`updateAttrs` 等,但并未开放供外部使用。
http://git-wip-us.apache.org/repos/asf/incubator-weex-site/blob/12e3a8bc/_drafts/v1.0/references/modules/globalevent.md
----------------------------------------------------------------------
diff --git a/_drafts/v1.0/references/modules/globalevent.md b/_drafts/v1.0/references/modules/globalevent.md
new file mode 100644
index 0000000..9a04dc0
--- /dev/null
+++ b/_drafts/v1.0/references/modules/globalevent.md
@@ -0,0 +1,87 @@
+---
+title: globalEvent
+type: references
+order: 4.9
+version: 0.10
+---
+
+# 全局事件
+<span class="weex-version">0.8 (开发中)</span>
+
+`globalEvent` 用于监听持久性事件,例如定位信息,陀螺仪等的变化。全局事件是需要额外 APIs 处理的次要 API。你能通过 `addEventListener` 注册事件监听,当你不再需要的时候,也可以通过 `removeEventListener` 取消事件监听。
+
+*提醒*
+
+- 这是一个实例级别的事件,而非应用级别。
+
+## 如何让你的模块支持全局事件
+
+API 开发完成后,当需要发送事件时,需要通过以下方法:
+
+```javascript
+/**
+ *
+ * @param eventName eventName
+ * @param params event params
+ */
+instance.fireGlobalEventCallback(eventName,params);
+```
+
+如何在 weex-html5 组件或模块中分发全局事件?只需在文档元素上分派事件:
+
+```javascript
+var evt = new Event('some-type')
+evt.data = { foo: 'bar' }
+document.dispatchEvent(evt)
+```
+
+**示例**
+
+### Android
+
+```java
+Map<String,Object> params=new HashMap<>();
+params.put("key","value");
+mWXSDKInstance.fireGlobalEventCallback("geolocation",params);
+```
+
+### iOS
+
+```object-c
+[weexInstance fireGlobalEvent:@"geolocation" params:@{@"key":@"value"}];
+```
+
+## API
+
+### `addEventListener(String eventName, String callback)`
+
+注册全局事件。
+
+#### 参数
+
+- `eventName {string}`:需要监听的事件名称。
+- `callback {Function}`:触发事件后的回调函数。
+
+#### 示例
+
+```javascript
+var globalEvent = require('@weex-module/globalEvent');
+globalEvent.addEventListener("geolocation", function (e) {
+ console.log("get geolocation")
+});
+```
+
+### `removeEventListener(String eventName)`
+
+取消事件监听。
+
+#### 参数
+
+- `eventName {string}`:需要取消的事件名称。
+
+#### 示例
+
+```javascript
+var globalEvent = require('@weex-module/globalEvent');
+globalEvent.removeEventListener("geolocation");
+```
http://git-wip-us.apache.org/repos/asf/incubator-weex-site/blob/12e3a8bc/_drafts/v1.0/references/modules/index.md
----------------------------------------------------------------------
diff --git a/_drafts/v1.0/references/modules/index.md b/_drafts/v1.0/references/modules/index.md
new file mode 100644
index 0000000..c76e401
--- /dev/null
+++ b/_drafts/v1.0/references/modules/index.md
@@ -0,0 +1,20 @@
+---
+title: 内建模块
+type: references
+order: 4
+has_chapter_content: true
+version: 0.10
+---
+
+# 内建模块
+
+## 如何使用
+
+你可以简单的通过类似 `require('@weex-module/name')` 这样的语法获取一个模块的 API,比如:
+
+```javascript
+var dom = require('@weex-module/dom')
+dom.scrollToElement(this.$el('someIdForElement'), {
+ offset: 0
+})
+```
http://git-wip-us.apache.org/repos/asf/incubator-weex-site/blob/12e3a8bc/_drafts/v1.0/references/modules/modal.md
----------------------------------------------------------------------
diff --git a/_drafts/v1.0/references/modules/modal.md b/_drafts/v1.0/references/modules/modal.md
new file mode 100644
index 0000000..3e652a8
--- /dev/null
+++ b/_drafts/v1.0/references/modules/modal.md
@@ -0,0 +1,196 @@
+---
+title: modal
+type: references
+order: 4.4
+version: 0.10
+---
+
+# `modal` 模态
+
+`modal` 模块提供了以下展示消息框的 API:`toast`、`alert`、`confirm` 和 `prompt`。
+
+## API
+
+### `toast(options)`
+
+`toast()` 会在一个小浮层里展示关于某个操作的简单反馈。例如,在邮件发送前离开邮编编辑界面,可以触发一个“草稿已保存”的 toast,告知用户以后可以继续编辑。toast 会在显示一段时间之后自动消失。
+
+#### 参数
+
+- `options {Object}`:相关选项
+ - `message {string}`:展示的内容
+ - `duration {number}`:展示的持续时间(以秒为单位)
+
+#### 示例
+
+```html
+<template>
+ <div style="height: 200px; width: 400px; background-color: #00bfff;
+ justify-content: center; align-items: center" onclick="{{perform}}">
+ <text style="font-size: 60px; color: #ffffff">Toast</text>
+ </div>
+</template>
+
+<script>
+ module.exports = {
+ methods: {
+ perform: function () {
+ var modal = require('@weex-module/modal');
+ modal.toast({
+ 'message': 'I am a toast',
+ 'duration': 3
+ });
+ }
+ }
+ }
+</script>
+```
+
+[体验一下](http://dotwe.org/a1b8699c49d1cbb3d0de66c1c5175387)
+
+### `alert(options, callback)`
+
+警告框经常用于确保用户可以得到某些信息。当警告框出现后,用户需要点击确定按钮才能继续进行操作。
+
+#### 参数
+
+- `options {Object}`:alert选项
+ - `message {string}`:警告框内显示的文字信息
+ - `okTitle {string}`:确定按钮上显示的文字信息,默认是“OK”
+ - `callback {Function}`:用户操作完成后的回调
+
+#### 示例
+
+```html
+<template>
+ <div>
+ <div style="height: 200px; width: 400px; background-color: #00bfff;
+ justify-content: center; align-items: center" onclick="{{perform}}">
+ <text style="font-size: 60px; color: #ffffff">Alert</text>
+ </div>
+ <text>{{params}}</text>
+ </div>
+</template>
+
+<script>
+ module.exports = {
+ data: {
+ params: ''
+ },
+ methods: {
+ perform: function () {
+ var modal = require('@weex-module/modal');
+ var self = this;
+ modal.alert({
+ 'message': 'I am alert message',
+ 'okTitle': 'YES'
+ }, function (result) {
+ self.params = String(result)
+ });
+ }
+ }
+ }
+</script>
+```
+
+[体验一下](http://dotwe.org/18e2a4bdff4d2f7db865c11eadfcd13e)
+
+### `confirm(options, callback)`
+
+确认框用于使用户可以验证或者接受某些信息。当确认框出现后,用户需要点击确定或者取消按钮才能继续进行操作。
+
+#### 参数
+
+- `options {object}`:confirm 选项
+ - `message {string}`:确认框内显示的文字信息
+ - `okTitle {string}`:确认按钮上显示的文字信息,默认是 `OK`
+ - `cancelTitle {string}`:取消按钮上显示的文字信息,默认是 `Cancel`
+- `callback {function (result)}`:用户操作完成后的回调,回调函数的参数 `result` 是确定按钮上的文字信息字符串
+
+#### 示例
+
+```html
+<template>
+ <div>
+ <div style="height: 200px; width: 400px; background-color: #00bfff;
+ justify-content: center; align-items: center" onclick="{{perform}}">
+ <text style="font-size: 60px; color: #ffffff">Confirm</text>
+ </div>
+ <text>{{params}}</text>
+ </div>
+</template>
+
+<script>
+ module.exports = {
+ data: {
+ params: ''
+ },
+ methods: {
+ perform: function () {
+ var modal = require('@weex-module/modal');
+ var self = this;
+ modal.confirm({
+ 'message': 'I have read and accept the terms.',
+ 'okTitle': 'YES',
+ 'cancelTitle': 'NO'
+ }, function (e) {
+ self.params = String(e)
+ });
+ }
+ }
+ }
+</script>
+```
+
+[体验一下](http://dotwe.org/3534b9d5eac99045015d97b20af22c27)
+
+### `prompt(options, callback)`
+
+提示框经常用于提示用户在进入页面前输入某个值。当提示框出现后,用户需要输入某个值,然后点击确认或取消按钮才能继续操作。
+
+#### 参数
+
+- `options {object}`:prompt 选项
+ - `message {string}`:提示框内要显示的文字信息
+ - `okTitle {string}`:确认按钮上显示的文字信息,默认是 `OK`
+ - `cancelTitle {string}`:取消按钮上显示的文字信息,默认是 `Cancel`
+- `callback {function (ret)}`:用户操作完成后的回调,回调函数的参数 `ret` 格式形如 `{ result: 'OK', data: 'hello world' }`,如下
+ - `result {string}`:用户按下的按钮上的文字信息
+ - `data {string}`:用户输入的文字信息
+
+### 示例
+
+```html
+<template>
+ <div>
+ <div style="height: 200px; width: 400px; background-color: #00bfff;
+ justify-content: center; align-items: center" onclick="{{perform}}">
+ <text style="font-size: 60px; color: #ffffff">Prompt</text>
+ </div>
+ <text>{{params}}</text>
+ </div>
+</template>
+
+<script>
+ module.exports = {
+ data: {
+ params: ''
+ },
+ methods: {
+ perform: function () {
+ var modal = require('@weex-module/modal');
+ var self = this;
+ modal.prompt({
+ 'message': 'I am a prompt',
+ 'okTitle': 'YES',
+ 'cancelTitle': 'NO'
+ }, function (e) {
+ self.params = JSON.stringify(e)
+ });
+ }
+ }
+ }
+</script>
+```
+
+[体验一下](http://dotwe.org/9f089100f5808dbc55ef4872a2c0c77b)
http://git-wip-us.apache.org/repos/asf/incubator-weex-site/blob/12e3a8bc/_drafts/v1.0/references/modules/navigator.md
----------------------------------------------------------------------
diff --git a/_drafts/v1.0/references/modules/navigator.md b/_drafts/v1.0/references/modules/navigator.md
new file mode 100644
index 0000000..fdd4e76
--- /dev/null
+++ b/_drafts/v1.0/references/modules/navigator.md
@@ -0,0 +1,110 @@
+---
+title: navigator
+type: references
+order: 4.5
+version: 0.10
+---
+
+# `navigator` 导航控制
+<span class="weex-version">v0.6.1+</span>
+
+众所周知,在浏览器里,我们可以通过前进或者回退按钮来切换页面,iOS/Android 的 `navigator` 模块就是用来实现类似的效果的。除了前进、回退功能,该模块还允许我们指定在切换页面的时候是否应用动画效果。
+
+## 示例
+
+```html
+<template>
+ <div class="div">
+ <text class="text" onclick="onItemClick">click me! {{message}}</text>
+ </div>
+</template>
+
+<script>
+ var navigator = require('@weex-module/navigator')
+ var nextUrl = 'http://dotwe.org/raw/dist/6cd1703a45d7b2752cf05303069ce881.js'
+ module.exports ={
+ data:{
+ message:''
+ },
+ methods:{
+ onItemClick:function(e){
+ var params = {'url':nextUrl,'animated':'true'}
+ navigator.push(params, function(e) {
+ console.log('i am the callback.')
+ });
+ }
+ }
+ }
+</script>
+<style>
+ .div {
+ flex-direction: row;
+ justify-content: space-between;
+ align-items: center;
+ width: 750;
+ height: 90;
+ padding-left:30;
+ padding-right:30;
+
+ border-bottom-width: 1;
+ border-style: solid;
+ border-color: #dddddd;
+ }
+ .text{
+ width: 750;
+ height: 90;
+ }
+</style>
+```
+
+[体验一下](http://dotwe.org/dba03a1660e6242778fd19d3d8f5944b)
+
+## API
+
+### `push(options, callback)`
+
+把一个weex页面URL压入导航堆栈中,可指定在页面跳转时是否需要动画,以及操作完成后需要执行的回调函数
+
+#### 参数
+
+* `options {Object}`:选项参数
+ * `url {stirng}`:要压入的 Weex 页面的 URL
+ * `animated {string}`:`"true"` 示意为页面压入时需要动画效果,`"false"` 则不需要,默认值为 `"true"`
+* `callback {Function}`:执行完该操作后的回调函数
+
+#### 示例
+
+```javascript
+var navigator = require('@weex-module/navigator')
+var params = {
+ url: 'navigator-demo.js',
+ animated: 'true'
+}
+navigator.push(params, function () {
+ // callback
+})
+```
+
+### `pop(options, callback)`
+
+把一个 Weex 页面 URL 弹出导航堆栈中,可指定在页面弹出时是否需要动画,以及操作完成后需要执行的回调函数。
+
+#### 参数
+
+* `options {object}`:选项参数对象
+ * `animated {string}`:`"true"` 示意为弹出页面时需要动画效果,`"false"` 则不需要,默认值为 `"true"`
+* `callback {function}`:执行完该操作后的回调函数
+
+#### 示例
+
+```javascript
+var navigator = require('@weex-module/navigator')
+var params = {
+ animated: 'true'
+}
+navigator.pop(params, function () {
+ // callback
+})
+```
+
+*注意事项:`animated` 二级参数目前仅支持字符串的 `"true"` 和 `"false"`,传入布尔值类型会导致程序崩溃,未来版本会修复这个问题*
http://git-wip-us.apache.org/repos/asf/incubator-weex-site/blob/12e3a8bc/_drafts/v1.0/references/modules/storage.md
----------------------------------------------------------------------
diff --git a/_drafts/v1.0/references/modules/storage.md b/_drafts/v1.0/references/modules/storage.md
new file mode 100644
index 0000000..c18b9ae
--- /dev/null
+++ b/_drafts/v1.0/references/modules/storage.md
@@ -0,0 +1,224 @@
+---
+title: storage
+type: references
+order: 4.6
+version: 0.10
+---
+
+# `storage` 本地存储
+<span class="weex-version">v0.7+</span>
+
+**备注**:0.7及以上版本可用
+
+`storage` 是一个在前端比较常用的模块,可以对本地数据进行存储、修改、删除,并且该数据是永久保存的,除非手动清除或者代码清除。但是,`storage` 模块有一个限制就是浏览器端(H5)只能存储小于5M的数据,因为在 H5/Web 端的实现是采用 `HTML5 LocalStorage API`。而 Android 和 iOS 这块是没什么限制的。
+ storage 常用在一些被用户经常查询,但是又不频繁更新的数据,比如搜索历史、用户的订单列表等。搜索历史一般情况都是作为本地数据存储的,因此使用 storage 比较合适。而用户订单列表是需要本地存储和服务端器检索配合的场景。当一个用户下单后,会经常查阅个人的订单列表。但是,订单的列表数据不是频繁更新的,往往只有在收到货品时,才更新“已签收”,其余平时的状态是“已发货”。因此,可以使用 storage 存储订单列表,可以减少服务器的压力,例如减少 SQL 查询或者缓存的压力。当用户查看订单详情的时候,再更新数据状态。
+
+这里,我们简单模拟“搜索”记录的场景。在搜索的时候写入,然后读取出来展示成列表。
+
+```html
+<template>
+ <div style="background-color:#F6F6F6;">
+ <div class="search_view">
+ <input class="search" placeholder="Please input" onchange="change"/>
+ <text class="btn" onclick="search">Search</text>
+ </div>
+ <text class="item">History</text>
+ <list>
+ <cell repeat="(i, v) in items">
+ <text class="item">{{v}}</text>
+ </cell>
+ </list>
+ </div>
+</template>
+
+<style>
+ .search_view{
+ height:70;
+ margin-top:20;
+ margin-left:10;
+ margin-right:10;
+ flex-direction:row;
+ }
+ .search{
+ height:70;
+ border-width:1;
+ border-color:#dddddd;
+ padding-left:10;
+ font-size:28;
+ flex:1;
+ }
+ .btn{
+ width:80;
+ text-align:center;
+ justify-content:center;
+ font-size:28;
+ background-color:#1A89EA;
+ color:#ffffff;
+ }
+ .item{
+ text-align:center;
+ font-size:25;
+ height:50;
+ margin-top:10;
+ color:#5E5E5E;
+ border-bottom-width:1;
+ border-bottom-color:#dddddd;
+ justify-content:center;
+ }
+</style>
+
+<script>
+ var storage = require('@weex-module/storage');
+ module.exports = {
+ data: {
+ items: [],
+ keywords:''
+ },
+ created: function(){
+ var that = this;
+ storage.getAllKeys(function(e) {
+ if(e.result == 'success' && e.data.length){
+ e.data.forEach(function(item){
+ if(item.indexOf('search_') > -1){
+ that.items.push(item.split('search_')[1]);
+ }
+ });
+ }
+ });
+ },
+ methods:{
+ search: function(){
+ var that = this;
+ if(!this.keywords) return;
+ storage.setItem('search_' + this.keywords, this.keywords, function(e) {
+ that.items.push(that.keywords);
+ });
+ },
+ change: function(e){
+ if(!e.value) return;
+ this.keywords = e.value;
+ }
+ }
+ };
+</script>
+```
+
+[体验一下](http://dotwe.org/b0f9a8f5df916c91bfb39e54e03a9ba8)
+
+这里,逐一解释下上面的代码。`input` 组件监听了 `change` 事件,可以保存用户输入的搜索关键字。如果用户点击了搜索按钮,则将关键字存储到 storage。这里,使用了 `search_` 作为 storage key 的前缀。因此,我们在页面加载时,在 `created` 生命周期中可以先使用 `storage.getAllKeys` 获取所有的 `key`。如果 `key` 包含了 `search_ `,则说明是搜索记录。因此,将该记录压入数组 items 中,于是界面就会展示出搜索记录的列表。
+
+## API
+
+`storage` 提供了一系列的 API 供我们调用。我们只需要引入该模块,然后调用对应的 API 即可。
+
+### `setItem(key, value, callback)`
+
+该方法可以通过键值对的形式将数据存储到本地。同时可以通过该方法,更新已有的数据。
+
+#### 参数
+
+* `key {string}`:要存储的键,不允许是 `""` 或 `null`
+* `value {string}`:要存储的值,不允许是 `""` 或 `null`
+* `callback {function (e)}`:执行操作成功后的回调
+ * `e.result`:表示设置是否成功,如果成功返回 `"success"`
+ * `e.data`:`undefined` 表示设置成功,`invalid_param` 表示 key/value 为 `""` 或者 `null`
+
+#### 示例
+
+```javascript
+var storage = require('@weex-module/storage')
+storage.setItem('bar', 'bar-value', function (e) {
+ e.result
+ e.data
+})
+```
+
+这里,对返回值做一个简单的介绍:
+
+`e` 包含两个属性:`e.result` 和 `e.data`。如果 `e.result` 返回值是 “success”,则说明成功。`e.data` 返回 `undefined` 表示设置成功,返回 `invalid_param` 表示` key/value` 为 "" 或者 null。因此,你可以判断两个返回判断是否插入成功。
+
+### `getItem(key, callback)`
+
+传入键名返回对应的键值
+
+#### 参数
+
+* `key {string}`:要获取的值的名称,不允许是 `""` 或 `null`
+* `callback {function (e)}`:执行操作成功后的回调
+ * `e.result`:表示设置是否成功,如果成功返回 `"success"`
+ * `e.data`:获取对应的键值字符串,如果没有找到则返回 `undefined`
+
+#### 示例
+
+```javascript
+var storage = require('@weex-module/storage')
+storage.getItem('foo', function (e) {
+ e.data
+});
+```
+
+### `removeItem(key, callback)`
+
+传入一个键名将会删除本地存储中对应的键值
+
+#### 参数
+
+* `key {string}`:要删除的值的名称,不允许是 `""` 或 `null`
+* `callback {function (e)}`:执行操作成功后的回调.
+ * `e.result`:表示删除是否成功,如果成功返回 `"success"`
+ * `e.data`:`undefined` 表示删除成功
+
+#### 示例
+
+```javascript
+var storage = require('@weex-module/storage')
+storage.removeItem('foo', function (e) {
+ e.result
+ e.data
+})
+```
+
+### `length(callback)`
+
+返回本地存储的数据中所有存储项数量的整数
+
+#### 参数
+
+* `callback {function (e)}`:执行操作成功后的回调
+ * `e.result`:表示设置是否成功,如果成功返回 `"success"`
+ * `e.data`:当前已存储项的数量
+
+#### 示例
+
+````javascript
+var storage = require('@weex-module/storage')
+storage.length(function (e) {
+ e.result
+ e.data
+})
+````
+
+### `getAllKeys(callback)`
+
+返回一个包含全部已存储项键名的数组
+
+#### 参数
+
+* `callback {function (e)}`:执行操作成功后的回调。
+ * `e.result`:表示设置是否成功,如果成功返回 `"success"`
+ * `e.data`:所有键名组成的数组
+
+#### 示例
+
+````javascript
+var storage = require('@weex-module/storage')
+storage.getAllKeys(function (e) {
+ e.result
+ e.data
+})
+````
+
+## 其它参考
+
+* [W3school: html5 localStorage](http://www.w3school.com.cn/html5/html_5_webstorage.asp)
+* [storage 模块完整的 Demo](https://github.com/apache/incubator-weex/blob/dev/examples/module/storage-demo.we)
[10/51] [abbrv] incubator-weex-site git commit: rearrangement the
structure of the document
Posted by ha...@apache.org.
http://git-wip-us.apache.org/repos/asf/incubator-weex-site/blob/32a097bf/source/cn/v-0.10/references/modules/storage.md
----------------------------------------------------------------------
diff --git a/source/cn/v-0.10/references/modules/storage.md b/source/cn/v-0.10/references/modules/storage.md
deleted file mode 100644
index c18b9ae..0000000
--- a/source/cn/v-0.10/references/modules/storage.md
+++ /dev/null
@@ -1,224 +0,0 @@
----
-title: storage
-type: references
-order: 4.6
-version: 0.10
----
-
-# `storage` 本地存储
-<span class="weex-version">v0.7+</span>
-
-**备注**:0.7及以上版本可用
-
-`storage` 是一个在前端比较常用的模块,可以对本地数据进行存储、修改、删除,并且该数据是永久保存的,除非手动清除或者代码清除。但是,`storage` 模块有一个限制就是浏览器端(H5)只能存储小于5M的数据,因为在 H5/Web 端的实现是采用 `HTML5 LocalStorage API`。而 Android 和 iOS 这块是没什么限制的。
- storage 常用在一些被用户经常查询,但是又不频繁更新的数据,比如搜索历史、用户的订单列表等。搜索历史一般情况都是作为本地数据存储的,因此使用 storage 比较合适。而用户订单列表是需要本地存储和服务端器检索配合的场景。当一个用户下单后,会经常查阅个人的订单列表。但是,订单的列表数据不是频繁更新的,往往只有在收到货品时,才更新“已签收”,其余平时的状态是“已发货”。因此,可以使用 storage 存储订单列表,可以减少服务器的压力,例如减少 SQL 查询或者缓存的压力。当用户查看订单详情的时候,再更新数据状态。
-
-这里,我们简单模拟“搜索”记录的场景。在搜索的时候写入,然后读取出来展示成列表。
-
-```html
-<template>
- <div style="background-color:#F6F6F6;">
- <div class="search_view">
- <input class="search" placeholder="Please input" onchange="change"/>
- <text class="btn" onclick="search">Search</text>
- </div>
- <text class="item">History</text>
- <list>
- <cell repeat="(i, v) in items">
- <text class="item">{{v}}</text>
- </cell>
- </list>
- </div>
-</template>
-
-<style>
- .search_view{
- height:70;
- margin-top:20;
- margin-left:10;
- margin-right:10;
- flex-direction:row;
- }
- .search{
- height:70;
- border-width:1;
- border-color:#dddddd;
- padding-left:10;
- font-size:28;
- flex:1;
- }
- .btn{
- width:80;
- text-align:center;
- justify-content:center;
- font-size:28;
- background-color:#1A89EA;
- color:#ffffff;
- }
- .item{
- text-align:center;
- font-size:25;
- height:50;
- margin-top:10;
- color:#5E5E5E;
- border-bottom-width:1;
- border-bottom-color:#dddddd;
- justify-content:center;
- }
-</style>
-
-<script>
- var storage = require('@weex-module/storage');
- module.exports = {
- data: {
- items: [],
- keywords:''
- },
- created: function(){
- var that = this;
- storage.getAllKeys(function(e) {
- if(e.result == 'success' && e.data.length){
- e.data.forEach(function(item){
- if(item.indexOf('search_') > -1){
- that.items.push(item.split('search_')[1]);
- }
- });
- }
- });
- },
- methods:{
- search: function(){
- var that = this;
- if(!this.keywords) return;
- storage.setItem('search_' + this.keywords, this.keywords, function(e) {
- that.items.push(that.keywords);
- });
- },
- change: function(e){
- if(!e.value) return;
- this.keywords = e.value;
- }
- }
- };
-</script>
-```
-
-[体验一下](http://dotwe.org/b0f9a8f5df916c91bfb39e54e03a9ba8)
-
-这里,逐一解释下上面的代码。`input` 组件监听了 `change` 事件,可以保存用户输入的搜索关键字。如果用户点击了搜索按钮,则将关键字存储到 storage。这里,使用了 `search_` 作为 storage key 的前缀。因此,我们在页面加载时,在 `created` 生命周期中可以先使用 `storage.getAllKeys` 获取所有的 `key`。如果 `key` 包含了 `search_ `,则说明是搜索记录。因此,将该记录压入数组 items 中,于是界面就会展示出搜索记录的列表。
-
-## API
-
-`storage` 提供了一系列的 API 供我们调用。我们只需要引入该模块,然后调用对应的 API 即可。
-
-### `setItem(key, value, callback)`
-
-该方法可以通过键值对的形式将数据存储到本地。同时可以通过该方法,更新已有的数据。
-
-#### 参数
-
-* `key {string}`:要存储的键,不允许是 `""` 或 `null`
-* `value {string}`:要存储的值,不允许是 `""` 或 `null`
-* `callback {function (e)}`:执行操作成功后的回调
- * `e.result`:表示设置是否成功,如果成功返回 `"success"`
- * `e.data`:`undefined` 表示设置成功,`invalid_param` 表示 key/value 为 `""` 或者 `null`
-
-#### 示例
-
-```javascript
-var storage = require('@weex-module/storage')
-storage.setItem('bar', 'bar-value', function (e) {
- e.result
- e.data
-})
-```
-
-这里,对返回值做一个简单的介绍:
-
-`e` 包含两个属性:`e.result` 和 `e.data`。如果 `e.result` 返回值是 “success”,则说明成功。`e.data` 返回 `undefined` 表示设置成功,返回 `invalid_param` 表示` key/value` 为 "" 或者 null。因此,你可以判断两个返回判断是否插入成功。
-
-### `getItem(key, callback)`
-
-传入键名返回对应的键值
-
-#### 参数
-
-* `key {string}`:要获取的值的名称,不允许是 `""` 或 `null`
-* `callback {function (e)}`:执行操作成功后的回调
- * `e.result`:表示设置是否成功,如果成功返回 `"success"`
- * `e.data`:获取对应的键值字符串,如果没有找到则返回 `undefined`
-
-#### 示例
-
-```javascript
-var storage = require('@weex-module/storage')
-storage.getItem('foo', function (e) {
- e.data
-});
-```
-
-### `removeItem(key, callback)`
-
-传入一个键名将会删除本地存储中对应的键值
-
-#### 参数
-
-* `key {string}`:要删除的值的名称,不允许是 `""` 或 `null`
-* `callback {function (e)}`:执行操作成功后的回调.
- * `e.result`:表示删除是否成功,如果成功返回 `"success"`
- * `e.data`:`undefined` 表示删除成功
-
-#### 示例
-
-```javascript
-var storage = require('@weex-module/storage')
-storage.removeItem('foo', function (e) {
- e.result
- e.data
-})
-```
-
-### `length(callback)`
-
-返回本地存储的数据中所有存储项数量的整数
-
-#### 参数
-
-* `callback {function (e)}`:执行操作成功后的回调
- * `e.result`:表示设置是否成功,如果成功返回 `"success"`
- * `e.data`:当前已存储项的数量
-
-#### 示例
-
-````javascript
-var storage = require('@weex-module/storage')
-storage.length(function (e) {
- e.result
- e.data
-})
-````
-
-### `getAllKeys(callback)`
-
-返回一个包含全部已存储项键名的数组
-
-#### 参数
-
-* `callback {function (e)}`:执行操作成功后的回调。
- * `e.result`:表示设置是否成功,如果成功返回 `"success"`
- * `e.data`:所有键名组成的数组
-
-#### 示例
-
-````javascript
-var storage = require('@weex-module/storage')
-storage.getAllKeys(function (e) {
- e.result
- e.data
-})
-````
-
-## 其它参考
-
-* [W3school: html5 localStorage](http://www.w3school.com.cn/html5/html_5_webstorage.asp)
-* [storage 模块完整的 Demo](https://github.com/apache/incubator-weex/blob/dev/examples/module/storage-demo.we)
http://git-wip-us.apache.org/repos/asf/incubator-weex-site/blob/32a097bf/source/cn/v-0.10/references/modules/stream.md
----------------------------------------------------------------------
diff --git a/source/cn/v-0.10/references/modules/stream.md b/source/cn/v-0.10/references/modules/stream.md
deleted file mode 100644
index 6c1b893..0000000
--- a/source/cn/v-0.10/references/modules/stream.md
+++ /dev/null
@@ -1,220 +0,0 @@
----
-title: stream
-type: references
-order: 4.7
-version: 0.10
----
-
-# stream
-
-## 概述
-
-以下为 stream 相关的 API,用于实现网络请求。
-
-## API
-### `fetch(options, callback[,progressCallback])`
-
-发起网络请求
-
-#### 参数
-
-- `options {Object}`:请求的一些选项
- - `method {string}`:HTTP 方法 `GET` 或是 `POST`
- - `url {string}`:请求的 URL
- - `headers {Object}`:HTTP 请求头
- - `type {string}`:请求类型, `json`,`text` 或是 `jsonp` {在原生实现中其实与 json 相同)
- - `body {string}`:HTTP 请求体。
-
- **注意:**
-
- - `body` 参数仅支持 `string` 类型的参数,请勿直接传递 `JSON`,必须先将其转为字符串。
- - `GET` 请求不支持 `body` 方式传递参数,请使用 url 传参。
-
-- `callback {Function}`:响应结果回调,回调函数将收到如下的 `response` 对象:
- - `status {number}`:返回的状态码
- - `ok {boolean}`:如果状态码在 200~299 之间就为真。
- - `statusText {string}`:状态描述文本
- - `data {Object | string}`: 返回的数据,如果请求类型是 `json` 和 `jsonp`,则它就是一个 object ,如果不是,则它就是一个 string。
- - `headers {Object}`:响应头
-- `progressCallback {Function}`:关于请求状态的回调。 这个回调函数将在请求完成后就被调用:
- - `readyState {number}`:当前状态
- state:'1': 请求连接中
- opened:'2': 返回响应头中
- received:'3': 正在加载返回数据
- - `status {number}`:响应状态码.
- - `length {number}`:已经接受到的数据长度. 你可以从响应头中获取总长度
- - `statusText {string}`:状态文本
- - `headers {Object}`:响应头
-
-#### 示例
-
-```html
-<template>
- <div class="wrapper">
- <list class="list">
- <header class="header">
- <text class="title">Search Results</text>
- </header>
- <refresh style="width: 750; padding: 30;" onrefresh="refreshData" display="{{refreshDisplay}}">
- <text class="text"> ↓ Pull to refresh </text>
- <loading-indicator class="indicator"></loading-indicator>
- </refresh>
- <cell class="row" repeat="item in items" id="item-{{$index}}">
- <div>
- <text class="item">Repo name: {{item.full_name}}</text>
- </div>
- <div>
- <text class="item">Repo star: {{item.stargazers_count}}</text>
- </div>
- </cell>
- <loading onloading="loadingData" style="width: 750; padding: 30;" display="{{loadingDisplay}}">
- <text class="text">{{loadingText}}</text>
- </loading>
- </list>
- <div class="up" onclick="goToTop">
- <img class="img" src="https://img.alicdn.com/tps/TB1ZVOEOpXXXXcQaXXXXXXXXXXX-200-200.png"></img>
- </div>
- </div>
-</template>
-
-<style>
-.wrapper {
- position: absolute;
- top: 0;
- right: 0;
- bottom: 0;
- left: 0;
-}
-.list{
- background-color: #ffffff;
- flex: 1;
-}
-.header {
- height: 80;
- align-items: center;
- justify-content: center;
- background-color: #efefef;
- border-bottom-color: #eeeeee;
- border-bottom-width: 2;
- border-bottom-style: solid;
-}
-.title {
- text-align: center;
-}
-.text {
- text-align: center;
-}
-.row {
- padding: 20;
- border-bottom-color: #eeeeee;
- border-bottom-width: 2;
- border-bottom-style: solid;
-}
-.up {
- width: 70;
- height: 70;
- position: fixed;
- right: 20;
- bottom: 20;
-}
-.img {
- width: 70;
- height: 70;
-}
-</style>
-
-<script>
-var dom = require('@weex-module/dom') || {}
-var stream = require('@weex-module/stream') || {}
-var modal = require('@weex-module/modal') || {}
-
-var SEARCH_URL = 'https://api.github.com/search/repositories?q=language:javascript&sort=stars&order=desc'
-
-module.exports = {
- data: {
- isLoaded: true,
- page: 1,
- loadingDisplay: 'hide',
- refreshDisplay: 'hide',
- loadingText: 'Loading...',
- items:[]
- },
- created: function () {
- var url = SEARCH_URL + '&page=' + this.page
-
- this.renderData(url)
-
- this.page++
- },
- methods: {
- renderData: function (url) {
- var self = this
-
- stream.fetch({
- method: 'GET',
- url: url,
- type:'json'
- }, function(res) {
- self.refreshDisplay = 'hide'
- self.loadingDisplay = 'hide'
-
- try {
- var results = res.data.items || []
-
- if (Array.isArray(results)) {
- for(var i = 0; i < results.length; i++) {
- self.items.push(results[i])
- }
- }
-
- self.isLoaded = true
- } catch(e) {}
- },function(res){
-
- })
- },
- loadingData: function (e) {
- var url = SEARCH_URL + '&page=' + this.page
- var self = this
-
- if (self.isLoaded === false) return
-
- self.loadingDisplay = 'show'
-
- if (self.page <=10 ) {
- self.renderData(url)
- self.page++
- } else {
- self.loadingDisplay = 'hide'
- self.loadingText = 'NO MORE!'
- }
- },
- goToTop: function (e) {
- dom.scrollToElement(this.$el('item-0'), {
- offset: -100
- })
- },
- refreshData: function (e) {
- var url = SEARCH_URL + '&page=1'
-
- if (this.isLoaded === false) return
-
- this.refreshDisplay = 'show'
-
- modal.toast({
- 'message': 'Refreshing...',
- 'duration': 1
- })
-
- this.items = []
- this.page = 1
- this.renderData(url)
-
- this.refreshDisplay = 'hide'
- }
- }
-}
-</script>
-```
-
-[体验一下](http://dotwe.org/ed524ade679b0fa96e980600c53ea5ce)
\ No newline at end of file
http://git-wip-us.apache.org/repos/asf/incubator-weex-site/blob/32a097bf/source/cn/v-0.10/references/modules/webview.md
----------------------------------------------------------------------
diff --git a/source/cn/v-0.10/references/modules/webview.md b/source/cn/v-0.10/references/modules/webview.md
deleted file mode 100644
index b6f3cbe..0000000
--- a/source/cn/v-0.10/references/modules/webview.md
+++ /dev/null
@@ -1,66 +0,0 @@
----
-title: webview
-type: references
-order: 4.8
-version: 0.10
----
-
-# `webview`
-
-一系列的 `<web>` 组件操作接口。 比如 `goBack`、`goForward`、和 `reload`。`webview` module 与 `<web>` 组件共用。
-
-## 示例
-
-查看 [简单浏览器](../components/web.html) ,一个结合 `<web>` 组件和 `webview` module 的示例。
-
-## API
-
-### `goBack(webElement)`
-
-加载历史记录里的前一个资源地址。
-
-#### 参数
-
-* `webElement {Element}`:`<web>` 组件对象。
-
-#### 示例
-
-```javascript
-var webview = require('@weex-module/webview')
-var webElement = this.$el('webview')
-webview.goBack(webElement)
-```
-
-### `goForward(webElement)`
-
-加载历史记录里的下一个资源地址。
-
-#### 参数
-
-* `webElement {Element}`:`<web>` 组件对象。
-
-#### 示例
-
-```javascript
-var webview = require('@weex-module/webview')
-var webElement = this.$el('webview')
-webview.goForward(webElement)
-```
-
-### `reload(webElement)`
-
-刷新当前页面。
-
-#### 参数
-
-* `webElement {Element}`:`<web>` 组件对象。
-
-#### 示例
-
-```javascript
-var webview = require('@weex-module/webview')
-var webElement = this.$el('webview')
-webview.reload(webElement.ref)
-```
-
-*注意事项:未来 `<web>` 组件的 `Element` 对象将会支持直接这些方法,届时 `webview` module 将不再需要*
http://git-wip-us.apache.org/repos/asf/incubator-weex-site/blob/32a097bf/source/cn/v-0.10/references/replace.md
----------------------------------------------------------------------
diff --git a/source/cn/v-0.10/references/replace.md b/source/cn/v-0.10/references/replace.md
deleted file mode 100644
index 5ace251..0000000
--- a/source/cn/v-0.10/references/replace.md
+++ /dev/null
@@ -1,57 +0,0 @@
-# Replace option
-
-The `replace` option is boolean type. It determined whether this composed component will be replaced with the `<template>` content or just as a normal `<div>` element which include the `<template>` content.
-
-For example:
-
-```
-<element name="foo">
- <template>
- <text>Foo</text>
- </template>
- <script>
- module.exports = {
- replace: false // by default
- }
- </script>
-</element>
-
-<template>
- <foo></foo>
-</template>
-```
-
-will rendered as:
-
-```
-<div>
- <text>Foo</text>
-</div>
-```
-
-but:
-
-```
-<element name="foo">
- <template>
- <text>Foo</text>
- </template>
- <script>
- module.exports = {
- replace: true
- }
- </script>
-</element>
-
-<template>
- <foo></foo>
-</template>
-```
-
-will rendered as:
-
-```
-<text>Foo</text>
-```
-
-So you can choose a way you need or like to manage your virtual DOM structure.
http://git-wip-us.apache.org/repos/asf/incubator-weex-site/blob/32a097bf/source/cn/v-0.10/references/special-element.md
----------------------------------------------------------------------
diff --git a/source/cn/v-0.10/references/special-element.md b/source/cn/v-0.10/references/special-element.md
deleted file mode 100644
index e01a2c7..0000000
--- a/source/cn/v-0.10/references/special-element.md
+++ /dev/null
@@ -1,38 +0,0 @@
----
-title: 特殊元素
-type: references
-order: 1.11
-version: 0.10
----
-
-# 特殊元素
-
-## `<content>`
-
-`<content>` 在编写组件模板时作为作为内容节点元素存在,使用时将被真正的元素替换。
-
-替代写法: `<slot>`。
-
-## 示例
-
-如示例中写法,`<content>` 节点被 `<text>` 替代。
-
-```html
-<element name="item">
- <template>
- <div>
- <content></content>
- </div>
- </template>
-</element>
-
-<template>
- <div>
- <item>
- <text>Content Text</text>
- </item>
- </div>
-</template>
-```
-
-[体验一下](http://dotwe.org/bf4354a0e6dbe67470ad1a988cdd565e)
http://git-wip-us.apache.org/repos/asf/incubator-weex-site/blob/32a097bf/source/cn/v-0.10/references/specs/index.md
----------------------------------------------------------------------
diff --git a/source/cn/v-0.10/references/specs/index.md b/source/cn/v-0.10/references/specs/index.md
deleted file mode 100644
index 164e61b..0000000
--- a/source/cn/v-0.10/references/specs/index.md
+++ /dev/null
@@ -1,309 +0,0 @@
----
-title: JS Bundle format (英)
-type: references
-order: 5
-has_chapter_content: false
-chapter_title: 底层规范
-version: 0.10
----
-
-# JS Bundle format
-
-JS Bundle Version: v0.3.0
-
-## v0.5.0
-
-### Whole Syntax and Structure
-
-A JS Bundle is actually a JavaScript file which follows **ES5** standard. The code is used to define some custom components for the instance and bootstrap the instance with certain name, config and data. Developers could use all kinds of JS code packager like webpack, browserify, requirejs to organize your whole instance code.
-
-### Meta Info
-
-The JS Bundle Must begin with a comment line which is a JSON object like:
-
-```javascript
-// { "framework": "Weex", "version": "0.5.0" }
-```
-
-This JSON object as least contains:
-
-* property `framework` must be `"Weex"`
-* property `version` should be corresponded with the JS Bundle format version
-
-### Global Members
-
-* `__weex_define__(name, options)`
-* `__weex_bootstrap__(name, config, data)`
-* `__weex_document__`
-* `__weex_require__(name)`
-
-#### `__weex_define__(name:string, options: object)`
-
-Define a custom component named `name` for current instance with `options`.
-
-**example:**
-
-```javascript
-__weex_define__('rmb', {
- template: {
- type: 'div',
- style: {flexDirection: 'row'},
- children: [
- {type: 'text', attr: {value: '¥'}},
- {type: 'text', attr: {value: this.value}}
- ]
- },
- data: function () {
- return {
- value: '0'
- }
- },
- methods: {...}
-})
-```
-
-The enabled component options contains:
-
-* `template`: just the same as [v0.3.0](#details-of-template-option-definitions)
-* `style`: just the same as [v0.3.0](#details-of-style-option-definitions)
-* `data`: a function which return a plain object to observe by the ViewModel
-* `methods`: a function map to proxy to the ViewModel
-* `computed`: a map of several computed keys for the ViewModel
-* `init`, `created`, `ready`: lifecycle methods
-* `events`: event handlers for the ViewModel
-<!-- * `components`: a map for options of sub components the ViewModel needed (So `__weex_define__(name, options)` equals to run `this.components[name] = options` in each custom components when `init`) -->
-
-The enabled ViewModel APIs contains:
-
-* `$el(id): Element`: find element by id in current ViewModel scope
-* `$vm(id): ViewModel`: find sub ViewModel by id
-* `$getConfig(): object`: get instance config info
-* `$broadcast`/`$emit`/`$dispatch`/`$on`/`$off`: listen and fire component events
-* `$transition` *(experimental)*: animation transition (see more in [animation native module](../animation.html))
-
-#### `__weex_require__(name: string): object`
-
-Get a Weex native module with several native APIs.
-
-**example:**
-
-```javascript
-var modal = __weex_require__('modal')
-modal.toast({
- message: 'Hey!',
- duration: 2
-})
-```
-
-polyfill for v0.3.0
-
-```javascript
-function __weex_require__(name) {
- var result
- define('__weex_require__', function (r, e, m) {
- result = r('@weex-module/' + name)
- })
- return result
-}
-```
-
-#### `__weex_bootstrap__(nameOrOptions: string|object, config: object?, data: object?): AppInstance | Error`
-
-Start to render by a certain component name or a direct component options as the root element, and some instance `config` and instance `data`. If everything fine, it will returns the root app instance. Otherwise it will return an `Error` instance which describes something wrong.
-
-**example:**
-
-```javascript
-__weex_bootstrap__(
- 'root',
- {
- // format 1:
- // downgrade: { appVersion: '>= 0.5.0' },
- // format 2:
- // downgrade: function (config) { return true }
- },
- {
- // external data
- // value: '12345'
- }
-)
-```
-
-The instance `config` now only support `downgrade` property which allows two format:
-
-1. an object like `{ osVersion, appVersion, weexVersion, deviceModel }`
-2. a function like `function (config) { return true }` to return a boolean value. `true` means normal and `false` means downgrade.
-
-The instance `data` will merge to root component data. So the root component is also easy to reuse and the instance data is easy to customize.
-
-#### `__weex_document__`
-
-An virtual-DOM `Document` instance. Also the host of [virtual-DOM APIs](./virtual-dom-apis.html). Every Weex instance has and must have just one `Document` instance.
-
-### Preserved Global Variables
-
-`define`, `bootstrap`, `module`, `exports`, `document`, `require`, `register`, `render`
-
-### A whole example
-
-```javascript
-// { "framework": "Weex", "version": "0.5.0" }
-
-var modal = __weex_require__('modal')
-
-__weex_define__('item', {
- template: {
- type: 'div',
- style: { flexDirection: 'row' },
- event: {
- click: function (e) {
- this.update(e)
- }
- },
- children: [
- { type: 'image', attr: { src: this.imageUrl }, ...},
- { type: 'text', attr: { value: this.title }, ...}
- ]
- },
- data: function () {
- return {
- imageUrl: '',
- title: ''
- }
- },
- methods: {
- update: function (e) {
- modal.toast({ message: this.title })
- }
- }
-})
-
-__weex_define__('app', {
- template: {
- type: 'div',
- children: [
- {
- type: 'item',
- repeat: {
- expression: function () {
- return this.list
- },
- key: '$index',
- value: '$value'}
- },
- attr: {
- imageUrl: function () {
- return this.$value.imageUrl
- },
- title: function () {
- return this.$value.title
- }
- }
- }
- ]
- },
- data: function () {
- return {
- list: [
- { imageUrl: 'xxx', title: '111' },
- { imageUrl: 'yyy', title: '222' },
- { imageUrl: 'zzz', title: '333' }
- ]
- }
- }
-})
-
-__weex_bootstrap__('app')
-```
-
-## v0.3.0
-
-### Whole Syntax and Structure
-
-A JS Bundle is actually a JavaScript file which follows **ES5** standard. The code is organized by several modules with AMD-like format:
-
-```javascript
-define('moduleName1', function (require, exports, module) {
- // content of module1
-})
-
-define('moduleName2', function (require, exports, module) {
- // content of module2
-})
-
-...
-```
-
-A whole Weex JS Bundle is concatenated by these modules and last a `bootstrap(rootComponentName, optionalConfig, optionalExternalData)` function call.
-
-```javascript
-define('@weex-component/a', function (require, exports, module) {
- // content of composed component <a>
-})
-
-define('@weex-component/b', function (require, exports, module) {
- // content of composed component <b>
-})
-
-bootstrap('@weex-component/b')
-```
-
-As the sample above, the component name should be hyphenated (a-z, 0-9, "-"). Other characters are not allowed.
-
-And, the method call `bootstrap()` allows 1~3 parameters: root module name (String), config info (optional JSON) and external data (optional JSON).
-
-### Content of Composed Components
-
-A module of composed component contains 3 parts: whole options definition, additional template option definition and additional style option definition.
-
-- whole options is a piece of JavaScript code to put component options (except `template` option and `style` option) into `module.exports`
-- `template` option is a piece of JSON-like object assigned to `module.exports.template` which describes the display structure of this component
-- `style` option is a piece of JSON object assigned to `module.exports.style` which describes the reusable styles in this component
-
-The `template` option is required and appeared only once, and the `style` option and whole options definition are optional.
-
-These options are defined and transformed by Transformer. Actually you can also ignore all the format limitation and write options to `module.exports` as the same result if you are not going to use Transformer. But that's not recommended.
-
-#### Details of template option definitions
-
-A piece of multi-level embedded JSON-like object which describes the view structure.
-
-Every level JSON-like object has these members below:
-
-* `type`: a required string, component name/type
-* `component`: an optional boolean, whether this component is composed or native
-* `attr`: an optional k-v pairs which contains all attributes of an element, the value could be a string, number, boolean or a function that bind some data value
-* `style`: an optional k-v pairs which contains all styles of an element, just the same format as the `attr`
-* `classList`: an optional array of strings which contains class names for styling.
-* `events`: an optional k-v pairs whose keys are event type and values are corresponding method names
-* `children`: an optional array of child components info
-* `append`: an optional string which determines a compiling workflow strategy: append node-by-node singly or a whole node tree just one time. the default value is `node` and another supported value is `tree`.
-* `shown`: a optional function which returns a boolean value to determine whether this component should be displayed
-* `repeat`: a optional function which returns a list data to displays components with each
-
-**Corresponding Keys to Weex Transformer:**
-
-- tag `name` in Weex file corresponds to `type`
-- attr `if` in Weex file corresponds to `shown`
-- attr `repeat` in Weex file corresponds to `repeat`
-- attr `append` in Weex file corresponds to `append`
-- attr `style` in Weex file with CSS syntax corresponds to `style`
-- attr `class` in Weex file with class names separated by blanks corresponds to `classList`
-- attr `on***` in Weex file with prefix `on` corresponds to a k-v pair in `events`
-- other attributes in Weex file corresponds to `attr`
-- Child nodes in Weex file corresponds to `children`
-
-All tag names, attr names are case-insensitive and transformed to lower-cased. But the attr values are case-sensitive.
-
-#### Details of style option definitions
-
-Just a two-levels JSON object.
-
-* The first levels are class names.
-* The second levels are k-v pairs which describes style names & properties for each class name.
-
-**Corresponding Keys to Weex Transformer:**
-
-* class name corresponds to first level keys
-* prop name corresponds to second level keys
-* prop value corresponds to second level values
http://git-wip-us.apache.org/repos/asf/incubator-weex-site/blob/32a097bf/source/cn/v-0.10/references/specs/js-framework-apis.md
----------------------------------------------------------------------
diff --git a/source/cn/v-0.10/references/specs/js-framework-apis.md b/source/cn/v-0.10/references/specs/js-framework-apis.md
deleted file mode 100644
index d24dd3b..0000000
--- a/source/cn/v-0.10/references/specs/js-framework-apis.md
+++ /dev/null
@@ -1,190 +0,0 @@
----
-title: JS Framework APIs (英)
-type: references
-order: 5.2
-version: 0.10
----
-
-# JS Framework APIs
-
-## Intro about JS Runtime
-
-These APIs are designed for JS Framework and Native Engine working together.
-
-Considering the limitation of mobile phone resource, *Weex runs only one JS runtime* to handle all Weex instances. So it need a multi-instance management layer in JavaScript. These JS Framework APIs are just designed to do the management job.
-
-* First, each Weex instance have a lifecycle, from `createInstance` to `destroyInstance`. During this period, we can import some extra data by `refreshInstance`.
-* To communicate with Native Engine, we have a couple of APIs: `sendTasks` and `receiveTasks`. They are used to call each other by some commands and messages.
-* And when JS runtime start at the beginning of the app launching, we need something initialized and configured. So we supply some APIs like `registerComponents`, `registerModules`.
-* The last API is just for debugging, we supply an API named `getRoot` to return the whole virtual-DOM data for developers.
-* If any of these API calls failed, an `Error` object should be returned.
-
-## Called by native and supplied from JS Framework
-
-### `createInstance(instanceId, code, options, data)`
-
-Create a Weex instance from Native Engine
-
-* `instanceId`: The unique id for a Weex instance, generated by Native Engine.
-* `code`: The JS bundle code send from Native Engine. It will be executed by `new Function(code)` in JS Framework. The code format depends on [JS Bundle Foramt](./js-bundle-format.html)
-* `options`: *Optional*. An options object. *Currently it supports `debug` flag which enable printing log and `bundleUrl` flag which the url of bundle.*
-* `data`: *Optional*. It's an chance to supply external data instead of the original data in JS bundle.
-
-Example:
-
-```javascript
-createInstance('x', 'define(...); define(...); define(...); bootstrap(...)')
-createInstance('x', '...', { bundleUrl, debug, ... }, { a: 1, b: 2 }})
-```
-
-### `destroyInstance(instanceId)`
-
-Destroy an existed Weex instance by id from Native Engine
-
-### `refreshInstance(instanceId, data)`
-
-Refresh data to an existed Weex instance with certain external data from Native Engine
-
-Example:
-
-```javascript
-refreshInstance('x', {a: 100, b: 200})
-```
-
-### `registerComponents(components)`
-
-Register all native components
-
-* `components`: A array of whose items are component options that are force part to use. *Currently it supports `append` attribute which forces the appending mechanism (`tree` or `node`) when first time rendering.*
-
-Example:
-
-```javascript
-registerComponents([
- { type: 'container' },
- { type: 'text' },
- { type: 'image' },
- { type: 'slider', append: 'tree' },
- { type: 'list' },
- { type: 'cell', append: 'tree' },
- ...
-])
-```
-
-### `registerModules(modules)`
-
-Register the name, methods and args format of each module
-
-* `modules`: A map that collects all native module definitions. Each module definition is an array which has several API definitions. Each API definition has a `name` string and an `args` array which contains a list of each parameter's type.
-
-**NOTE: the `node` type data will actually return its `ref` property. And the `function` type data will actually return a unique function id referring to it.**
-
-Example:
-
-```javascript
-registerModules({
- event: [
- {name: 'openURL', args: ['string']}
- ],
- ...
-})
-```
-
-### `receiveTasks(instanceId, tasks)`
-
-Fire events or callbacks to an existed Weex instance from Native Engine
-
-* `tasks[]`: A task list. Each task has a `method="fireEvent|callback"` property and a list of `args`.
- - In `fireEvent` method, the `args` is `ref` of the target, event `type`, event `data` and `domChanges` description in order. **Note: if some event make virtual-DOM data changed (e.g. value changed in `<input>` or current index changed in `<slider>`), the changing of the target element will be passed as `domChanges`.**
- - In `callback` method, the `args` is `funcId` of a handler, `data` and `ifKeepAlive` which describes whether this callback handler should be keeping called. (Each callback handler is matched with a `funcId` when the original call happens.)
-
-Example:
-
-```javascript
-receiveTasks('x', [{method: 'fireEvent', args: ['x', '13', 'click', {a: 100, b: 200}]}])
-receiveTasks('x', [{method: 'callback', args: ['x', '7', {a: 100, b: 200}, true]}])
-```
-
-### `getRoot(instanceId)`
-
-Return a JSON object which describes the whole virtual DOM body of an existed Weex instance, which designed for debugging
-
-Example:
-
-```javascript
-getRoot('x')
-// {ref: '_root', type: 'container', attr: {...}, style: {...}, children: [...]}
-```
-
-## Called from JavaScript and implemented with native code
-
-### `sendTasks(instanceId, tasks)`
-
-Make native calls from JS Framework
-
-* `tasks[]`: A task list. Each task has a `module` name, a `method` name, and a `args[]` list.
-
-Example:
-
-```javascript
-sendTasks('x', [
- {module: 'dom', method: 'addElement', args: ['_root', {ref: '1', type: 'container'}, -1]},
- {module: 'dom', method: 'addElement', args: ['1', {ref: '2', type: 'text', ...}, -1]},
- {module: 'dom', method: 'addElement', args: ['1', {ref: '3', type: 'image', ...}, -1]},
- ...
-])
-```
-
-## Supporting other JS Framework <sup>(experimental)</sup>
-
-### Register a new JS Framework
-
-```javascript
-// lib/frameworks/index.js
-
-import Vue from '...'
-import React from '...'
-import Angular from '...'
-
-export const frameworks = {
- Vue,
- React,
- Angular
-}
-```
-
-### Expose JS Framework APIs
-
-```javascript
-// 3rd-party-framework.js
-
-export function createInstance (id, code, config, data) { ... }
-export function destroyInstance (id) { ... }
-export function refreshInstance (id, data) { ... }
-export function registerComponents (components) { ... }
-export function registerModules (modules) { ... }
-export function recieveTasks (id, tasks) { ... }
-export function getRoot (id) { ... }
-```
-
-The virtual-DOM tasks should follow [virtual-DOM spec](./virtual-dom-apis.html).
-
-### Framework Helper
-
-You can import `lib/runtime/helper.js` to get two important things:
-
-* `Document` class, see [virtual-DOM spec](./virtual-dom-apis.html) for more.
-* `sendTasks` method.
-
-### JS Bundle format
-
-You must ensure the JS Bundle has its first line of code like this:
-
-```javascript
-// { "framework": "Vue" }
-...
-```
-
-to allow JS Runtime to detect which JS Framework it should be opened by.
-
-If no valid annotation found. The JS Bundle will be opened by default JS Framework of Weex.
http://git-wip-us.apache.org/repos/asf/incubator-weex-site/blob/32a097bf/source/cn/v-0.10/references/specs/virtual-dom-apis.md
----------------------------------------------------------------------
diff --git a/source/cn/v-0.10/references/specs/virtual-dom-apis.md b/source/cn/v-0.10/references/specs/virtual-dom-apis.md
deleted file mode 100644
index 9291497..0000000
--- a/source/cn/v-0.10/references/specs/virtual-dom-apis.md
+++ /dev/null
@@ -1,148 +0,0 @@
----
-title: Virtual DOM APIs
-type: references
-order: 5.3
-version: 0.10
----
-
-# Virtual DOM APIs
-
-## `Document`
-
-每个实例有一个与实例 id 对应的 document。Document 具有组成一个节点树的多个节点。
-
-### 构造函数
-
-##### `new Document(id: string, url: string?)`
-
-### 成员
-
-##### `createElement(tagName: string, props: Object?): Element`
-
-创建一个特定类型 `Element` 对象。`props` 对象可能包含一个 `attr` 对象和一个 `style` 对象。例如 `createBody('div', {style: {backgroundColor: '#ffffff'}})`
-
-##### `createComment(text: string): Comment`
-
-创建一个具有一些注释文本的 `Comment` 对象。
-
-##### `open()`
-
-初始化渲染开始时设置一个标志,表示初始化渲染开始,每个 DOM 更新将被立即调用。
-
-##### `close()`
-
-初始化渲染完成时设置一个标志,标识初始化渲染完成,DOM 更新以后将在每个任务中批处理。
-
-##### `fireEvent(el: Element, type: string, e: Object?, domChanges: Object?)`
-
-在某个元素上触发一个带有特定类型的事件,这个事件带有一个事件对象。当事件导致一些 DOM 的变化,第四个参数将像 `createElement` 方法里的 `props` 参数一样描述这些 DOM 变化。
-
-#### 只读属性 & Getters
-
-##### `id: string`
-
-##### `URL: string?`
-
-##### `body: Element`
-
-body 元素
-
-##### `documentElement: Element`
-
-document 元素
-
-##### `getRef(ref: string): Node?`
-
-通过内部 node map 的 `ref` 获取节点。
-
-**注意:**
-
-在一个 document 被创建时会自动生成一个 `documentElement` ,并且 `body` 应该手动创建并添加到 `documentElement` 才能工作。`body` 的 `type` 必须是一个 `div`,`list` 或 `scroller`。
-
-## `Node`
-
-### 构造函数
-
-##### `new Node()`
-
-### 成员
-
-##### `destroy()`
-
-#### 只读属性 & Getters
-
-##### `ref: string`
-
-##### `nextSibling: Node?`
-
-##### `previousSibling: Node?`
-
-##### `parentNode: Node?`
-
-## `Element` extends `Node`
-
-### 构造函数
-
-##### `new Element(type: string, props: Object?, ownerDocument: Document)`
-
-创建一个元素,并且 `props` 对象可能包含一个 `attr` 对象和一个 `style` 对象。
-
-### 成员
-
-#### DOM 树
-
-##### `appendChild(node: Node)`
-
-##### `insertBefore(node: Node, before: Node?)`
-
-##### `insertAfter(node: Node, after: Node?)`
-
-##### `removeChild(node: Node, preserved: boolean?)`
-
-移除一个子节点。`preserved` 参数表示是否立即销毁删除该节点或保存它。
-
-##### `clear()`
-
-#### DOM props
-
-##### `setAttr(key: string, value: string, silent: boolean?)`
-
-如果 `silent` 为 `true`,也不会调用 native。用于有 virtual-DOM 变化的事件处理。
-
-##### `setStyle(key: string, value: string, silent: boolean?)`
-
-`silent` 参数作用与 `setAttr` 中的一样。
-
-##### `setClassStyle(classStyle: Object)`
-
-class 样式的 CSS 优先级低于内联样式,当两种样式风格出现时,内联样式的值会覆盖 class 样式的值。
-
-##### `addEvent(type: string, handler: Function)`
-
-##### `removeEvent(type: string)`
-
-##### `fireEvent(type: string, e: any)`
-
-#### 只读属性 & Getters
-
-##### `toJSON(): Object`
-
-格式化 `{ref: string, type: string, attr: Object, style: Object, event: Array(string), children: Array}`
-
-## `Comment` extends `Node`
-
-`Comment` 将不被传给渲染引擎。因此,可作为占位符使用。
-
-### 构造函数
-
-##### `new Comment(value: string)`
-
-### 成员
-
-#### 只读属性 & Getters
-
-##### `type: string`
-
-返回 `'comment'`
-
-##### `value: string`
http://git-wip-us.apache.org/repos/asf/incubator-weex-site/blob/32a097bf/source/cn/v-0.10/references/text-style.md
----------------------------------------------------------------------
diff --git a/source/cn/v-0.10/references/text-style.md b/source/cn/v-0.10/references/text-style.md
deleted file mode 100644
index 85f67c8..0000000
--- a/source/cn/v-0.10/references/text-style.md
+++ /dev/null
@@ -1,40 +0,0 @@
----
-title: 文本样式
-type: references
-order: 1.7
-version: 0.10
----
-
-# 文本样式
-
-<span class="weex-version">v0.5+</span>
-
-文本类组件共享一些通用样式, 这类组件目前包括 [`<text>`](./components/text.html) 和 [`<input>`](./components/input.html)。
-
-## 属性
-
-- `color {color}`:文字颜色。
-
- 可选值为色值,支持 RGB( `rgb(255, 0, 0)` );RGBA( `rgba(255, 0, 0, 0.5)` );十六进制( `#ff0000` );精简写法的十六进制( `#f00` );色值关键字(`red`)。
-
-- `lines {number}`: 指定文本行数。仅在 `<text>` 组件中支持。默认值是 `0` 代表不限制行数。
-
-- `font-size {number}`:文字大小。
-
-- `font-style {string}`:字体类别。可选值 `normal` | `italic`,默认为 `normal`。
-
-- `font-weight {string}`:字体粗细程度。可选值 `normal` | `bold`,默认为 `normal`。
-
-- `text-decoration {string}`:字体装饰,可选值 `none` | `underline` | `line-through`,默认值为 `none`。
-
-- `text-align {string}`:对齐方式。可选值 `left` | `center` | `right`,默认值为 `left`。目前暂不支持 `justify`, `justify-all`。
-
-- `font-family {string}`:设置字体。
-
- 这个设置 **不保证** 在不同平台,设备间的一致性。如所选设置在平台上不可用,将会降级到平台默认字体。
-
-- `text-overflow {string}`:设置内容超长时的省略样式。可选值 `clip` | `ellipsis`
-
-## 其它参考
-
-- [颜色关键字列表](./references/color-names.html)。
http://git-wip-us.apache.org/repos/asf/incubator-weex-site/blob/32a097bf/source/cn/v-0.10/references/units.md
----------------------------------------------------------------------
diff --git a/source/cn/v-0.10/references/units.md b/source/cn/v-0.10/references/units.md
deleted file mode 100644
index 2ff3482..0000000
--- a/source/cn/v-0.10/references/units.md
+++ /dev/null
@@ -1,66 +0,0 @@
----
-title: CSS 单位
-type: references
-order: 1.9
-version: 0.10
----
-
-# CSS 单位
-
-## CSS `color` 单位
-
-支持以下写法:
-
-```css
-.classA {
- /* 3-chars hex */
- color: #0f0;
- /* 6-chars hex */
- color: #00ff00;
- /* rgba */
- color: rgb(255, 0, 0);
- /* rgba */
- color: rgba(255, 0, 0, 0.5);
- /* transparent */
- color: transparent;
- /* Basic color keywords */
- color: orange;
- /* Extended color keywords */
- color: darkgray;
-}
-```
-
-### 注意
-
-* 不支持 `hsl()`, `hsla()`, `currentColor`, 8个字符的十六进制颜色。
-
-* `rgb(a,b,c)` 或 `rgba(a,b,c,d)` 的性能比其他颜色格式差很多,请选择合适的颜色格式。
-
-颜色名称可查看 [颜色名称列表](./color-names.md).
-
-## CSS `length` 单位
-
-在 Weex 中,我们只支持 `px` 长度单位。并且它将在 JavaScript 运行时和本机渲染器中解析为数字类型。所以你也可以省略 `px` 单位后缀,直接写数字。
-
-下面这些不同的写法,解析的结果完全相同。
-
-```css
-.classA { font-size: 48; line-height: 64; }
-.classB { font-size: 48px; line-height: 64px; }
-```
-
-不支持类似 `em`,`rem`,`pt` 这样的 CSS 标准中的其他长度单位。
-
-## CSS `number` 单位
-
-仅仅一个数字。用于 [`opacity`](./common-style.md#其他基本样式),[`lines`](./text-style.md)等。
-
-有时值必须是整数,例如:`lines`。
-
-**注意:**也可以将所有的 `px` `length` 值简化为一个数字。
-
-## CSS `percentage` 单位 (暂不支持)
-
-表示百分比值,如“50%”,“66.7%”等。
-
-它是 CSS 标准的一部分,但 Weex 暂不支持。
http://git-wip-us.apache.org/repos/asf/incubator-weex-site/blob/32a097bf/source/cn/v-0.10/references/wxc/index.md
----------------------------------------------------------------------
diff --git a/source/cn/v-0.10/references/wxc/index.md b/source/cn/v-0.10/references/wxc/index.md
deleted file mode 100644
index 5969ce2..0000000
--- a/source/cn/v-0.10/references/wxc/index.md
+++ /dev/null
@@ -1,44 +0,0 @@
----
-title: 官方扩展组件
-type: references
-order: 3
-has_chapter_content: true
-version: 0.10
----
-
-# 官方扩展组件
-
-Weex 官方扩展组件指的是以 `wxc-` 开头的组件,这些组件不属于内建组件的一部分,而是 Weex 团队基于内建组件扩展的一些常用组件。这些组件依赖 `weex-components`,需要安装依赖后才可使用。
-
-使用方式如下:
-
-1. 安装依赖
-
- 需要在工程目录下执行以下命令:
-
- ```bash
- npm install weex-components
- ```
-
-2. 使用
-
- 需要在 `<script>` 中引入依赖。
-
- ```html
- <template>
- <div style="flex-direction: column;">
- <wxc-tabbar tab-items = {{tabItems}}></wxc-tabbar>
- </div>
- </template>
-
- <script>
- require('weex-components');
-
- module.exports = {
- data: {},
- methods: {
- // more
- }
- }
- </script>
- ```
\ No newline at end of file
http://git-wip-us.apache.org/repos/asf/incubator-weex-site/blob/32a097bf/source/cn/v-0.10/references/wxc/wxc-navpage.md
----------------------------------------------------------------------
diff --git a/source/cn/v-0.10/references/wxc/wxc-navpage.md b/source/cn/v-0.10/references/wxc/wxc-navpage.md
deleted file mode 100644
index 6b15175..0000000
--- a/source/cn/v-0.10/references/wxc/wxc-navpage.md
+++ /dev/null
@@ -1,192 +0,0 @@
----
-title: <wxc-navpage>
-type: references
-order: 3.1
-version: 0.10
----
-
-# <wxc-navpage> <sup>(v0.5+)</sup>
-
-`<wxc-navpage>` 组件是一个包含 navbar 的容器组件,可以根据业务场景定制 navbar 组件。同时,可以使用 `navigator` 模块控制页面的跳转,具体参考 [`navigator module`](../modules/navigator.html)。一般情况,都是配合 navbar 组件使用。如果不了解 navigator 相关知识,建议先了解下 iOS 或者 Android 的相关组件。在 H5 上,其实是相当于导航栏。
-
-用法:在 `script` 标签中通过一个 `require` 语句引入,即:`require('weex-components');`
-
-**示例**
-
-```html
-<template>
- <div style="flex-direction: column;">
- <wxc-navpage tab-items = {{tabItems}}></wxc-navpage>
- </div>
-</template>
-
-<script>
- require('weex-components');
- // more
-</script>
-```
-
-在 `require('weex-components');` 之前 ,需要在工程目录下执行以下命令:
-
-```bash
-npm install weex-components
-```
-
-## 子组件
-
-`<wxc-navpage>` 组件支持任意 Weex 组件。
-
-## 特性
-
-`<wxc-navpage>` 组件的特性其实是对 navbar 进行功能设置,如下图所示,是 navbar 的一个简单示意。
-
-
-
-- `height {number}`:navbar 的高度,默认是 88。
-
-- `background-color {color}`:navbar 的背景颜色,默认是白色。
-
-- `title {string}`:navbar 的标题。
-
-- `title-color {color}`:navbar 标题的颜色,默认黑色。
-
-- `left-item-title {string}`:navbar 左侧按钮的标题。
-
-- `left-item-color {color}`:navbar 左侧按钮标题颜色,默认黑色。
-
-- `right-item-title {string}`:navbar 右侧按钮标题。
-
-- `right-item-color {color}`:navbar 右侧按钮标题颜色,默认黑色。
-
-- `left-item-src {string}`:navbar 左侧按钮的图标。
-
-- `right-item-src {string}`:navbar 右侧按钮的图标。
-
-### 样式
-
-- 通用样式:支持所有通用样式
-
- - 盒模型
- - `flexbox` 布局
- - `position`
- - `opacity`
- - `background-color`
-
- 查看 [组件通用样式](../common-style.html)
-
-## 事件
-
-`<wxc-navpage>` 组件支持左右两项点击事件。
-
-- `naviBar.leftItem.click`: 当 navbar 的左侧按钮被点击时触发事件,需要在 `created` 时期注册事件。
-- `naviBar.rightItem.click`: 当 navbar 的右侧按钮被点击时触发事件,需要在 `created` 时期注册事件。
-
-**示例:**
-
-```html
-<template>
- <wxc-navpage height={{...}} background-color="..." title="..." title-color="..." left-item-title="..." left-item-color="..." right-item-src="...">
- <content> ...</content>
- </wxc-navpage>
-</template>
-<script>
- require('weex-components');
- module.exports = {
- created: function() {
- this.$on('naviBar.rightItem.click',function(e){
- //handle your click event here.
- });
-
- this.$on('naviBar.leftItem.click',function(e){
- //handle your click event here.
- });
- }
- }
-</script>
-```
-
-- 通用事件
-
- 支持所有通用事件:
-
- - `click`
- - `longpress`
- - `appear`
- - `disappear`
-
- 查看 [通用事件](../common-event.html)
-
-## 示例
-
-**注意:**
-
-[dotwe](http://dotwe.org) 平台暂不支持 `wxc-xxx` 类型的组件。
-
-```html
-<template>
- <wxc-navpage data-role="none" height={{navBarHeight}} background-color="#ff5898" title={{title}} title-color="white" left-item-title="More" left-item-color="white" right-item-src="http://gtms02.alicdn.com/tps/i2/TB1ED7iMpXXXXXEXXXXWA_BHXXX-48-48.png">
- <wxc-panel title="push a new page">
- <wxc-button type="primary" size="small" value="push" onclick="push"></wxc-button>
- </wxc-panel>
- <wxc-panel title="pop to the last page">
- <wxc-button type="success" size="small" value="pop" onclick="pop"></wxc-button>
- </wxc-panel>
- </wxc-navpage>
-</template>
-
-<script>
- require('weex-components');
- module.exports = {
- data: {
- navBarHeight: 88,
- title: 'Navigator',
- dir: 'examples',
- baseURL: '',
- },
- created: function() {
- this.$getConfig(function (config) {
- var env = config.env;
- if(env.platform == 'iOS'){
- var scale = env.scale;
- var deviceWidth = env.deviceWidth / scale;
- this.navBarHeight = 64.0 * 750.0 / deviceWidth;
- }
- }.bind(this));
-
- this.$on('naviBar.rightItem.click',function(e){
- duration = 2;
- this.$call('modal', 'toast', {
- 'message': 'naviBar.rightItem.click',
- 'duration': duration
- });
- });
-
- this.$on('naviBar.leftItem.click',function(e){
- duration = 2;
- this.$call('modal', 'toast', {
- 'message': 'naviBar.leftItem.click',
- 'duration': duration
- });
- });
- },
- methods: {
- push: function() {
- var vm = this;
- var params = {
- 'url': 'http://dotwe.org/raw/dist/33dfcbe81979c60ba5de72c235d7d0f8.js',
- 'animated' : 'true',
- }
- vm.$call('navigator','push',params, function () {});
- },
-
- pop: function() {
- var vm = this;
- var params = {
- 'animated' : 'true',
- }
- vm.$call('navigator','pop',params, function () {});
- }
- }
- }
-</script>
-```
http://git-wip-us.apache.org/repos/asf/incubator-weex-site/blob/32a097bf/source/cn/v-0.10/references/wxc/wxc-tabbar.md
----------------------------------------------------------------------
diff --git a/source/cn/v-0.10/references/wxc/wxc-tabbar.md b/source/cn/v-0.10/references/wxc/wxc-tabbar.md
deleted file mode 100644
index 492c1cd..0000000
--- a/source/cn/v-0.10/references/wxc/wxc-tabbar.md
+++ /dev/null
@@ -1,176 +0,0 @@
----
-title: <wxc-tabbar>
-type: references
-order: 3.2
-version: 0.10
----
-
-# <wxc-tabbar>
-
-`<wxc-tabbar>` 是一个名为 `weex-components` 依赖库的自定义组件。`<wxc-tabbar>` 能在窗口的底部显示 tab 页面,我们可以在不同的 tab 页面之间切换。
-
-用法:在 `script` 标签中通过一个 `require` 语句引入,即:`require('weex-components');`
-
-**示例**
-
-```html
-<template>
- <div style="flex-direction: column;">
- <wxc-tabbar tab-items = {{tabItems}}></wxc-tabbar>
- </div>
-</template>
-
-<script>
- require('weex-components');
-
- module.exports = {
- data: {},
- methods: {
- // more
- }
- }
-</script>
-```
-
-在 `require('weex-components');` 之前 ,需要在工程目录下执行以下命令:
-
-```bash
-npm install weex-components
-```
-
-## 子组件
-
-该组件不支持子组件。
-
-## 特性
-
-- `selected-index {number}`:设置默认选中的 tab 索引,默认值为 0(第一个 tab)。
-- `selected-color {color}`:设置当标题被选中时标题的颜色,默认为红色。
-- `unselected-color {color}`:设置当标题不被选中时标题的颜色,默认为黑色。
-- `tab-items {Array[Object]}`:该属性接受一个 `tabitems` 对象数组, 分别对应到对应的 tab 页面,tab 页面的顺序跟对象数组的位置对应。
- 我们可以通过设置每一项的属性来配置 tabbar 的外观:
-
- - `index {integer}`:必填属性,指明了 tabitem 的次序。
- - `title {string}`:设置 tabitem 的标题,非必填,当标题为空时,标题将不会被显示
- - `titleColor {color}`:设置 tabitem 的标题颜色,默认是黑色
- - `image {string}`:当 tab 页面不被选中时显示的 icon,当不提供时,什么也不显示。
- - `selectedImage {string}`:设置 tab 页面被选中时显示的图片,不提供图片时,什么也不显示。
- - `src {string}`:设置 tab 对应的 Weex 页面的 url,为 http 开头。
- - `visibility {string}`:值为 `visible` | `hidden`,该属性指明了 tab 页面的显示状态,默认值是 visible
-
-## 样式
-
-- 通用样式:支持所有通用样式
-
- - 盒模型
- - `flexbox` 布局
- - `position`
- - `opacity`
- - `background-color`
-
- 查看 [组件通用样式](../common-style.html)
-
-## 事件
-
-- `tabBar.onClick`:当 tab 页面被选中时触发,需要在 `ready` 或者 `create` 生命周期中注册,如:
-
- **示例**
-
- ```html
- <template>
- <div style="flex-direction: column;">
- <wxc-tabbar tab-items="{{tabItems}}"></wxc-tabbar>
- </div>
- </template>
-
- <script>
- require('weex-components');
- module.exports = {
- data: {
- // ...
- },
- created: function() {
- var vm = this;
- vm.$on('tabBar.onClick',function(e){
- var detail= e.detail;
- console.log('tabBar.onClick ' + detail.index);
- });
- },
- methods: {
- }
- }
- </script>
- ```
-
-- 通用事件
- 支持所有通用事件:
-
- - `click`
- - `longpress`
- - `appear`
- - `disappear`
-
- 查看 [通用事件](../common-event.html)
-
-## 示例
-
-**注意:**
-
-[dotwe](http://dotwe.org) 平台暂不支持 `wxc-xxx` 类型的组件。
-
-```html
-<template>
- <div>
- <wxc-tabbar tab-items="{{tabItems}}"></wxc-tabbar>
- </div>
-</template>
-
-<script>
- require('weex-components');
- module.exports = {
- data: {
- dir: 'examples',
- tabItems: [
- {
- index: 0,
- title: 'tab1',
- titleColor: '#000000',
- icon: '',
- image: 'http://gtms01.alicdn.com/tps/i1/TB1qw.hMpXXXXagXXXX9t7RGVXX-46-46.png',
- selectedImage: 'http://gtms04.alicdn.com/tps/i4/TB16jjPMpXXXXazXVXX9t7RGVXX-46-46.png',
- src: 'http://dotwe.org/raw/dist/ba202bcd277285c7f3cf79f9b1055dce.js?itemId=tab1',
- visibility: 'visible',
- },
- {
- index: 1,
- title: 'tab2',
- titleColor: '#000000',
- icon: '',
- image: 'http://gtms03.alicdn.com/tps/i3/TB1LEn9MpXXXXaUXpXX9t7RGVXX-46-46.png',
- selectedImage: 'http://gtms02.alicdn.com/tps/i2/TB1qysbMpXXXXcnXXXX9t7RGVXX-46-46.png',
- src: 'http://dotwe.org/raw/dist/7e24b83c5868dbd4462e30549999245d.js?itemId=tab2',
- visibility: 'hidden',
- },
- {
- index: 2,
- title: 'tab3',
- titleColor: '#000000',
- icon: '',
- image: 'http://gtms01.alicdn.com/tps/i1/TB1B0v5MpXXXXcvXpXX9t7RGVXX-46-46.png',
- selectedImage: 'http://gtms04.alicdn.com/tps/i4/TB1NxY5MpXXXXcrXpXX9t7RGVXX-46-46.png',
- src: 'http://dotwe.org/raw/dist/8a8b49b67084423e097a6b7f549f1453.js?itemId=tab3',
- visibility: 'hidden',
- }
- ],
- },
- created: function() {
- var vm = this;
- vm.$on('tabBar.onClick',function(e){
- var detail= e.detail;
- console.log('tabBar.onClick ' + detail.index);
- });
- },
- methods: {}
- }
-</script>
-```
http://git-wip-us.apache.org/repos/asf/incubator-weex-site/blob/32a097bf/source/cn/v-0.10/tools/devtools-android.md
----------------------------------------------------------------------
diff --git a/source/cn/v-0.10/tools/devtools-android.md b/source/cn/v-0.10/tools/devtools-android.md
deleted file mode 100644
index 9ce8991..0000000
--- a/source/cn/v-0.10/tools/devtools-android.md
+++ /dev/null
@@ -1,123 +0,0 @@
----
-title: Devtools for Android
-type: tools
-order: 2.1
-version: 0.10
----
-
-# Devtools for Android
-
-[](https://github.com/weexteam/weex_devtools_android/releases) [](https://www.codacy.com/app/weex_devtools/weex_devtools_android?utm_source=github.com&utm_medium=referral&utm_content=weexteam/weex_devtools_android&utm_campaign=Badge_Grade) [](https://codeclimate.com/github/weexteam/weex_devtools_android) [](https://codeclimate.com/github/weexteam/weex_devtools_android) [](https://github.com/weexteam/weex_devtools_android/issues) [  ](https://bintray.com/alibabaweex/maven/weex_inspector/_latestVersion)
-
-Weex devtools is a custom devtools for weex that implements [Chrome Debugging Protocol](https://developer.chrome.com/devtools/docs/debugger-protocol) inspired by [Stetho](https://github.com/facebook/stetho), it is designed to help you quickly inspect your app and debug your JS bundle source in a chrome web page.At present The devtools consist of two part : `Inspector` and `Debugger`. If you want it work well, you must install a `weex-devtool` as debug server.
-
-- **Inspector**
- Inspector can be used to show your `Element` \ `NetWork` \ `Console log` \ `ScreenCast` \ `BoxModel` \ `Native View` and so on.
-
-- **Debugger**
- Debugger can be used to debug your bundle js source, you can set `Breakpoint` \ watch `CallStack`.
-
-## Install and launch devtools server
-Open your terminal then type `npm install -g weex-toolkit` and run.Launch it just type and run the command `weex debug`, then a Chrome web page will be opened.
-
-## Use on an android device or emulator
-
-### Taste of first debug with playground
-If you are a green hand to the debug of weex, we recommend you to try your first debug with `playground`, what you need to do is just launch the playground and scan the QR code shown in the debug page which wound opened if the `devtools server` have been launched. after you scan the QR code, the web page will list your connected devices.
-
- devices")
-
-#### How Debugger Works
-Devtools expands [Chrome Debugging Protocol](https://developer.chrome.com/devtools/docs/debugger-protocol) and the mechanism of communication between client and debug sever is based on [JSON-RPC](https://en.wikipedia.org/wiki/JSON-RPC).
-
-##### Devtools Client
-Devtools Client is integrated in App as aar, it connects to debug server through webscoket protocol with out permission check. I recommend you just packaged it in your debug version consider of the security mechanism.
-
-##### Devtools Debug Server
-Devtools Debug Server is the center node of the communication, it connects to both app and chrome, acts as the turn server of debugging protocol messages and the manager of the js runtime.
-
-##### Chrome FrontEnd
-Chrome's V8 engine acts as the javascript runtime, when debug mode is enabled, all the js code run on it. On the other side we also reuse most of the Chrome's debugging user interface, such as set breakpoint, see call stack and so on.
-
-
-
-### Enable devtools in your own app
-Of course you can reuse the code of playground to build your own app, that is the simplest way to let your app's js code debuggable. On the other hand QR code is not necessary, if your review the source code you can draw a conclusion that QR CODE is just a way to set `devtools server` address. following those steps you can do the same thing.
-
-#### Gradle dependency on inspector.
-There are two choices to set the dependency, the Choice A is recommanded if you have no change to weex_sdk or inspector, while if you use your own custom weex_sdk or inspector Choice B is suitable.
-
- * *A - aar dependency from jcenter*.
- ````
- dependencies {
- compile 'com.taobao.android:weex_inspector:0.0.8.1'
- }
- ````
-I strongly recommend you use the latest version since both weex sdk and devtools are developed iteratively and rapidly. See the release version list [here](https://github.com/weexteam/weex_devtools_android/releases). All the release version will publish to the [jcenter repo](https://bintray.com/alibabaweex/maven/weex_inspector).
-
- * *B - source code dependency.*
-
- you need to copy the dir of inspector to the same dir of your app and add `include ":inspector"`in your project's `settings.gradle` file just like playground have done, then add dependency in your app's `build.gralde`.
- ````
- dependencies {
- compile project(':inspector')
- }
- ````
-
-##### Version compatibility
-
-| weex sdk | weex inspector | debug server |
-|----------|----------------|--------------|
-|0.8.0.1+ | 0.0.8.1 |0.2.39+ |
-|0.7.0+ | 0.0.7.13 |0.2.38 |
-|0.6.0+ | 0.0.2.2 | |
-
-
-#### Initialize in your XXXApplication file.
-````
- public class MyApplication extends Application {
- public void onCreate() {
- super.onCreate();
- initDebugEnvironment(true, "xxx.xxx.xxx.xxx"/*"DEBUG_SERVER_HOST"*/);
- }
- private void initDebugEnvironment(boolean enable, String host) {
- WXEnvironment.sRemoteDebugMode = enable;
- WXEnvironment.sRemoteDebugProxyUrl = "ws://" + host + ":8088/debugProxy/native";
- }
-}
-````
-
-#### Ship It!
- 1. You must launch your bundle server firstly. In your weex dir, run command "./start";
- 2. Launch your remote debug server. Run command `weex debug`, chrome will open a web page show a simply guidance and QR code;
- 3. Launch your app and make sure debug mode was enabled. You will see a device list in the chrome web page opened by last step, each device item have two button, `Debugger` and `Inspector`;There are two way to enable debug mode:
- * scaning the QR code and handle the content just like the playground have done.
- * init it in the XXXApplication by calling `initDebugEnvironment(true, "xxx.xxx.xxx.xxx")`, if you call `initDebugEnvironment(true, "xxx.xxx.xxx.xxx")` after weex sdk inited, you need to call `WXSDKEngine.reload()` to refresh the runtime.
- 4. Once you click the button `Inspector` chrome will open a page show the inspector view, on the other side, click the button `Debugger` chrome will open a new page to show the debug view;
-
-
-
-
-
----
-
-#### OPTIONS
-
-##### [**OPTION**] *set your remote bundle server ip.*
-
- For example, in the playground it is in the `IndexActivity.java`, you need to change the value of `DEFAULT_IP` in IndexActivity.java from `"your_current_IP"` to a server ip like `"30.30.30.150"`:
-````
- private static final String DEFAULT_IP = "30.30.30.150"; // "your_current_IP";
-````
-
-##### [**OPTION**] *enable network inspection.*
-````
-OkHttpClient client = new OkHttpClient();
-client.networkInterceptors().add(new OkHttpInterceptor());
-````
-
-###### Notice
- The network inspection only support OKHttpClient right now!!! If you want to use the network inspection to catch your bundle request, you must change your bundle server ip to the real server ip.
-
-#### Known Issues
- You can report issues and bugs [here](https://github.com/weexteam/weex_devtools_android/issues). We will reply as soon as possible.
http://git-wip-us.apache.org/repos/asf/incubator-weex-site/blob/32a097bf/source/cn/v-0.10/tools/devtools-ios.md
----------------------------------------------------------------------
diff --git a/source/cn/v-0.10/tools/devtools-ios.md b/source/cn/v-0.10/tools/devtools-ios.md
deleted file mode 100644
index 801b80d..0000000
--- a/source/cn/v-0.10/tools/devtools-ios.md
+++ /dev/null
@@ -1,65 +0,0 @@
----
-title: Devtools for iOS
-type: tools
-order: 2.2
-version: 0.10
----
-
-# Devtools for iOS
-
-通过Chrome开发者工具远程调试你的原生iOS app
-## 启动weex-devtool:
-1. 安装和运行 weex-devtool
-
- ```
- $:npm install -g weex-devtool
-
- $:weex-devtool
- ```
-
- 它会启动chrome浏览器,展示wss ip 地址在chrome地址栏。
-## playground 安装 WXDevtool
-1. 安装依赖.
-
- $:pod install
-### 使用
-1. AppDelegate.m 头文件
-
- ```
- #import "WXDevTool.h"
- ```
-2. 在App启动的时候初始化 inspector
-
- **注意: The inspector API 必须在weex初始化之前调用**
- - (void)setDebug:(BOOL)isDebug;
-
- isDebug默认是NO,那么你打开的是inspect模式。假如设置isDebug为YES,那么打开debug模式和inspect模式。
- - (void)launchDevToolDebugWithUrl:(NSString *)url;
-
- wssip 是 展示在 chrome 地址栏的wss 地址.
- - 打开 debug 模式 和 inspector 模式
-
- eg:- (BOOL)application:(UIApplication *)application didFinishLaunchingWithOptions:(NSDictionary *)launchOptions
- {
- [WXDevTool setDebug:YES];
- [WXDevTool launchDevToolDebugWithUrl:@"ws://wssip/debugProxy/native"];
- }
- - 打开 inspect 模式, 移除 @selector(setDebug:) 或者 增加 [WXDevTool setDebug:NO]
-
- eg:- (BOOL)application:(UIApplication *)application didFinishLaunchingWithOptions:(NSDictionary *)launchOptions
- {
- [WXDevTool launchDevToolDebugWithUrl:@"ws://wssip/debugProxy/native"];
- }
-3. 编译和运行APP,chrome会显示你的设备,选择inspector。
-4. 支持不同级别的Log打印。
-
- eg: #import "WXDevTool.h"
- PDLogE()/PDLogW()
-### WXDevtool依赖
-
-你的app必须链接下面的frameworks/dylibs
-- libicucore.dylib
-- CFNetwork.framework
-- CoreData.framework
-- Security.framework
-- Foundation.framework
http://git-wip-us.apache.org/repos/asf/incubator-weex-site/blob/32a097bf/source/cn/v-0.10/tools/devtools.md
----------------------------------------------------------------------
diff --git a/source/cn/v-0.10/tools/devtools.md b/source/cn/v-0.10/tools/devtools.md
deleted file mode 100644
index ab7ddb3..0000000
--- a/source/cn/v-0.10/tools/devtools.md
+++ /dev/null
@@ -1,99 +0,0 @@
----
-title: Devtools
-type: tools
-order: 2
-has_chapter_content: true
-version: 0.10
----
-
-# Devtools
-
-**weex devtools**是专门为weex定制的一款实现了[**Chrome Debugging Protocol**](https://developer.chrome.com/devtools/docs/debugger-protocol)的inspect/debug工具,能够帮助你快速查看app运行状态和调试weex中的Javascript代码,当前支持**IOS**和**Android**两个平台。
-## 安装
-
-```
-$ npm install -g weex-toolkit
-```
-## 用法
-
- weex debug [options] [we_file|bundles_dir]
-
- 选项:
-
-```
--h, --help 显示帮助
--V, --verbose 显示debug服务器运行时的各种log
--v, --version 显示版本
--p, --port [port] 设置debug服务器端口号 默认为8088
--e, --entry [entry] debug一个目录时,这个参数指定整个目录的入口bundle文件,这个bundle文件的地址会显示在debug主页上(作为二维码)
--m, --mode [mode] 设置构建we文件的方式,transformer 最基础的风格适合单文件,loader:wepack风格 适合模块化的多文件.默认为transformer
-```
-#### 开启调试
-
-```
-$weex debug
-```
-
-单纯启动一个调试服务器,并同时唤起chrome浏览器打开`调试主页`.
-这个`调试主页`上会有一个二维码,使用Playground App扫这个二维码可以开启Playground调试.
-开启调试后,设备列表中会出现您的设备,根据提示进行后续的调试操作
-#### 调试 we文件
-
-```
-$weex debug your_weex.we
-```
-
-这个命令会将your_weex.we编译成bundlejs文件 部署到debug服务器
-并启动debug服务器如上述命令那样.打开的`调试主页`会多显示一个二维码,使用playground app
-扫这个码可以加载your_weex.we.(注意要先扫描开启调试的那个码)
-这个命令会自动检测your_weex.we文件变动,如果发现内容被修改则立即重新编译部署,并刷新debugger页面
-.
-#### 调试整个bundle/we文件夹
-
-```
-$weex debug your/we/path -e index.we
-```
-
-这个命令会编译你指定目录下的所有的we文件,并把编译好的bundlejs部署到debug服务器,他们的地址会映射到 http://lcoalhost:8088/weex/ 下
-比如 your/we/path/`index.we` 可以通过http://lcoalhost:8088/weex/index.js访问
-your/we/path/`demo/test.we` 可以通过http://lcoalhost:8088/weex/demo/index.js
-
--e参数可以指定一个入口的we文件,这个文件的地址会显示在`调试主页`上(作为二维码)
-## 特性
-### 连接设备
-
-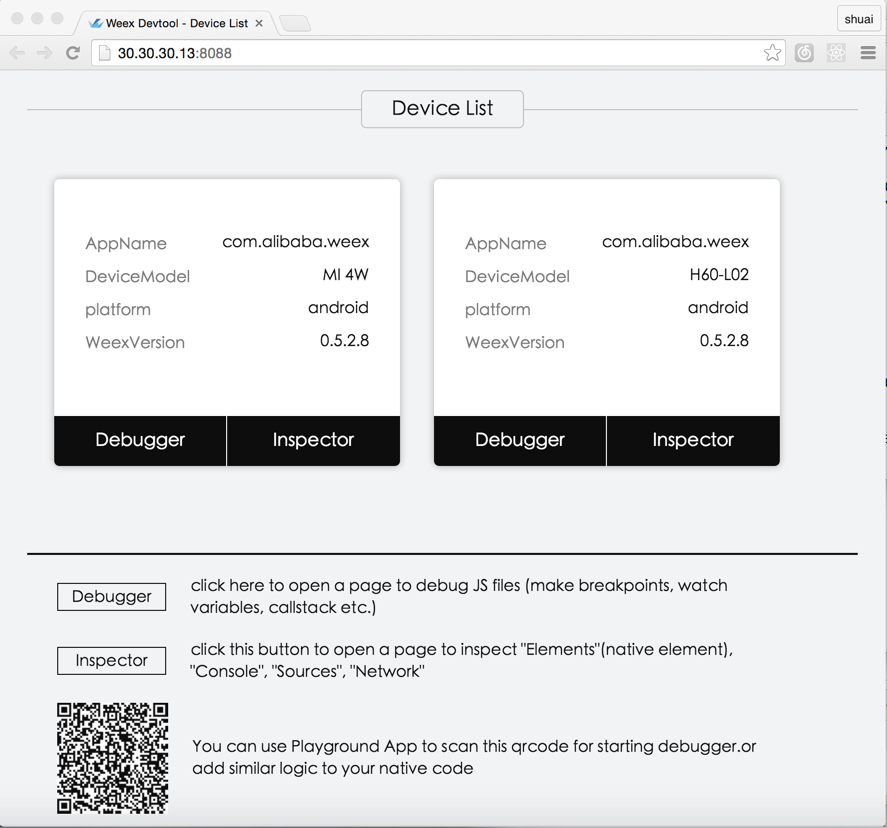
-### Inspector
-
- Inspector 能够用来查看 `Element` \ `NetWork` \ `Console log` \ `ScreenCast` \ `BoxModel` \ `Native View` 等。
-
-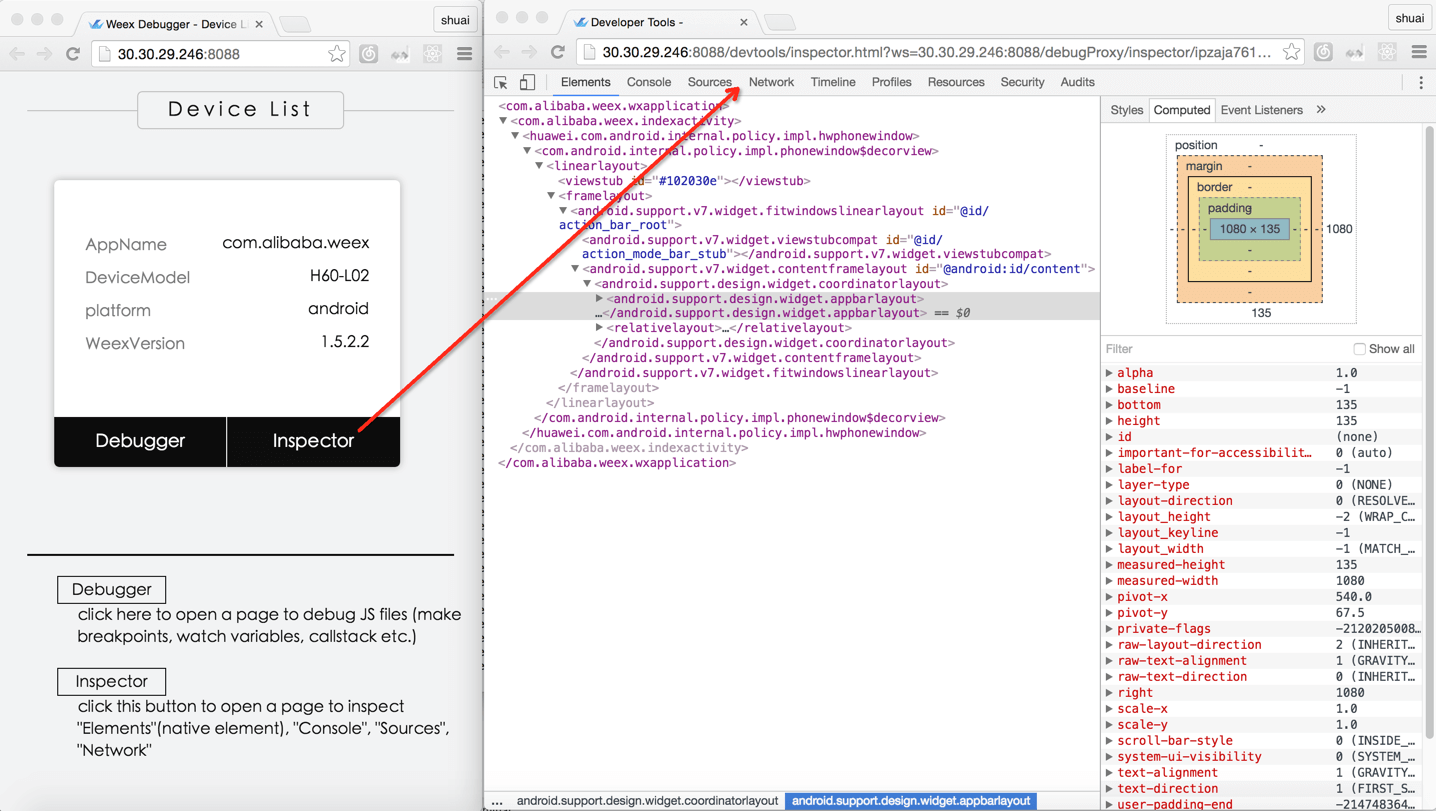
-#### Element
-
-
-#### NetWork
-##### 查看网络请求的总耗时和延时
-
-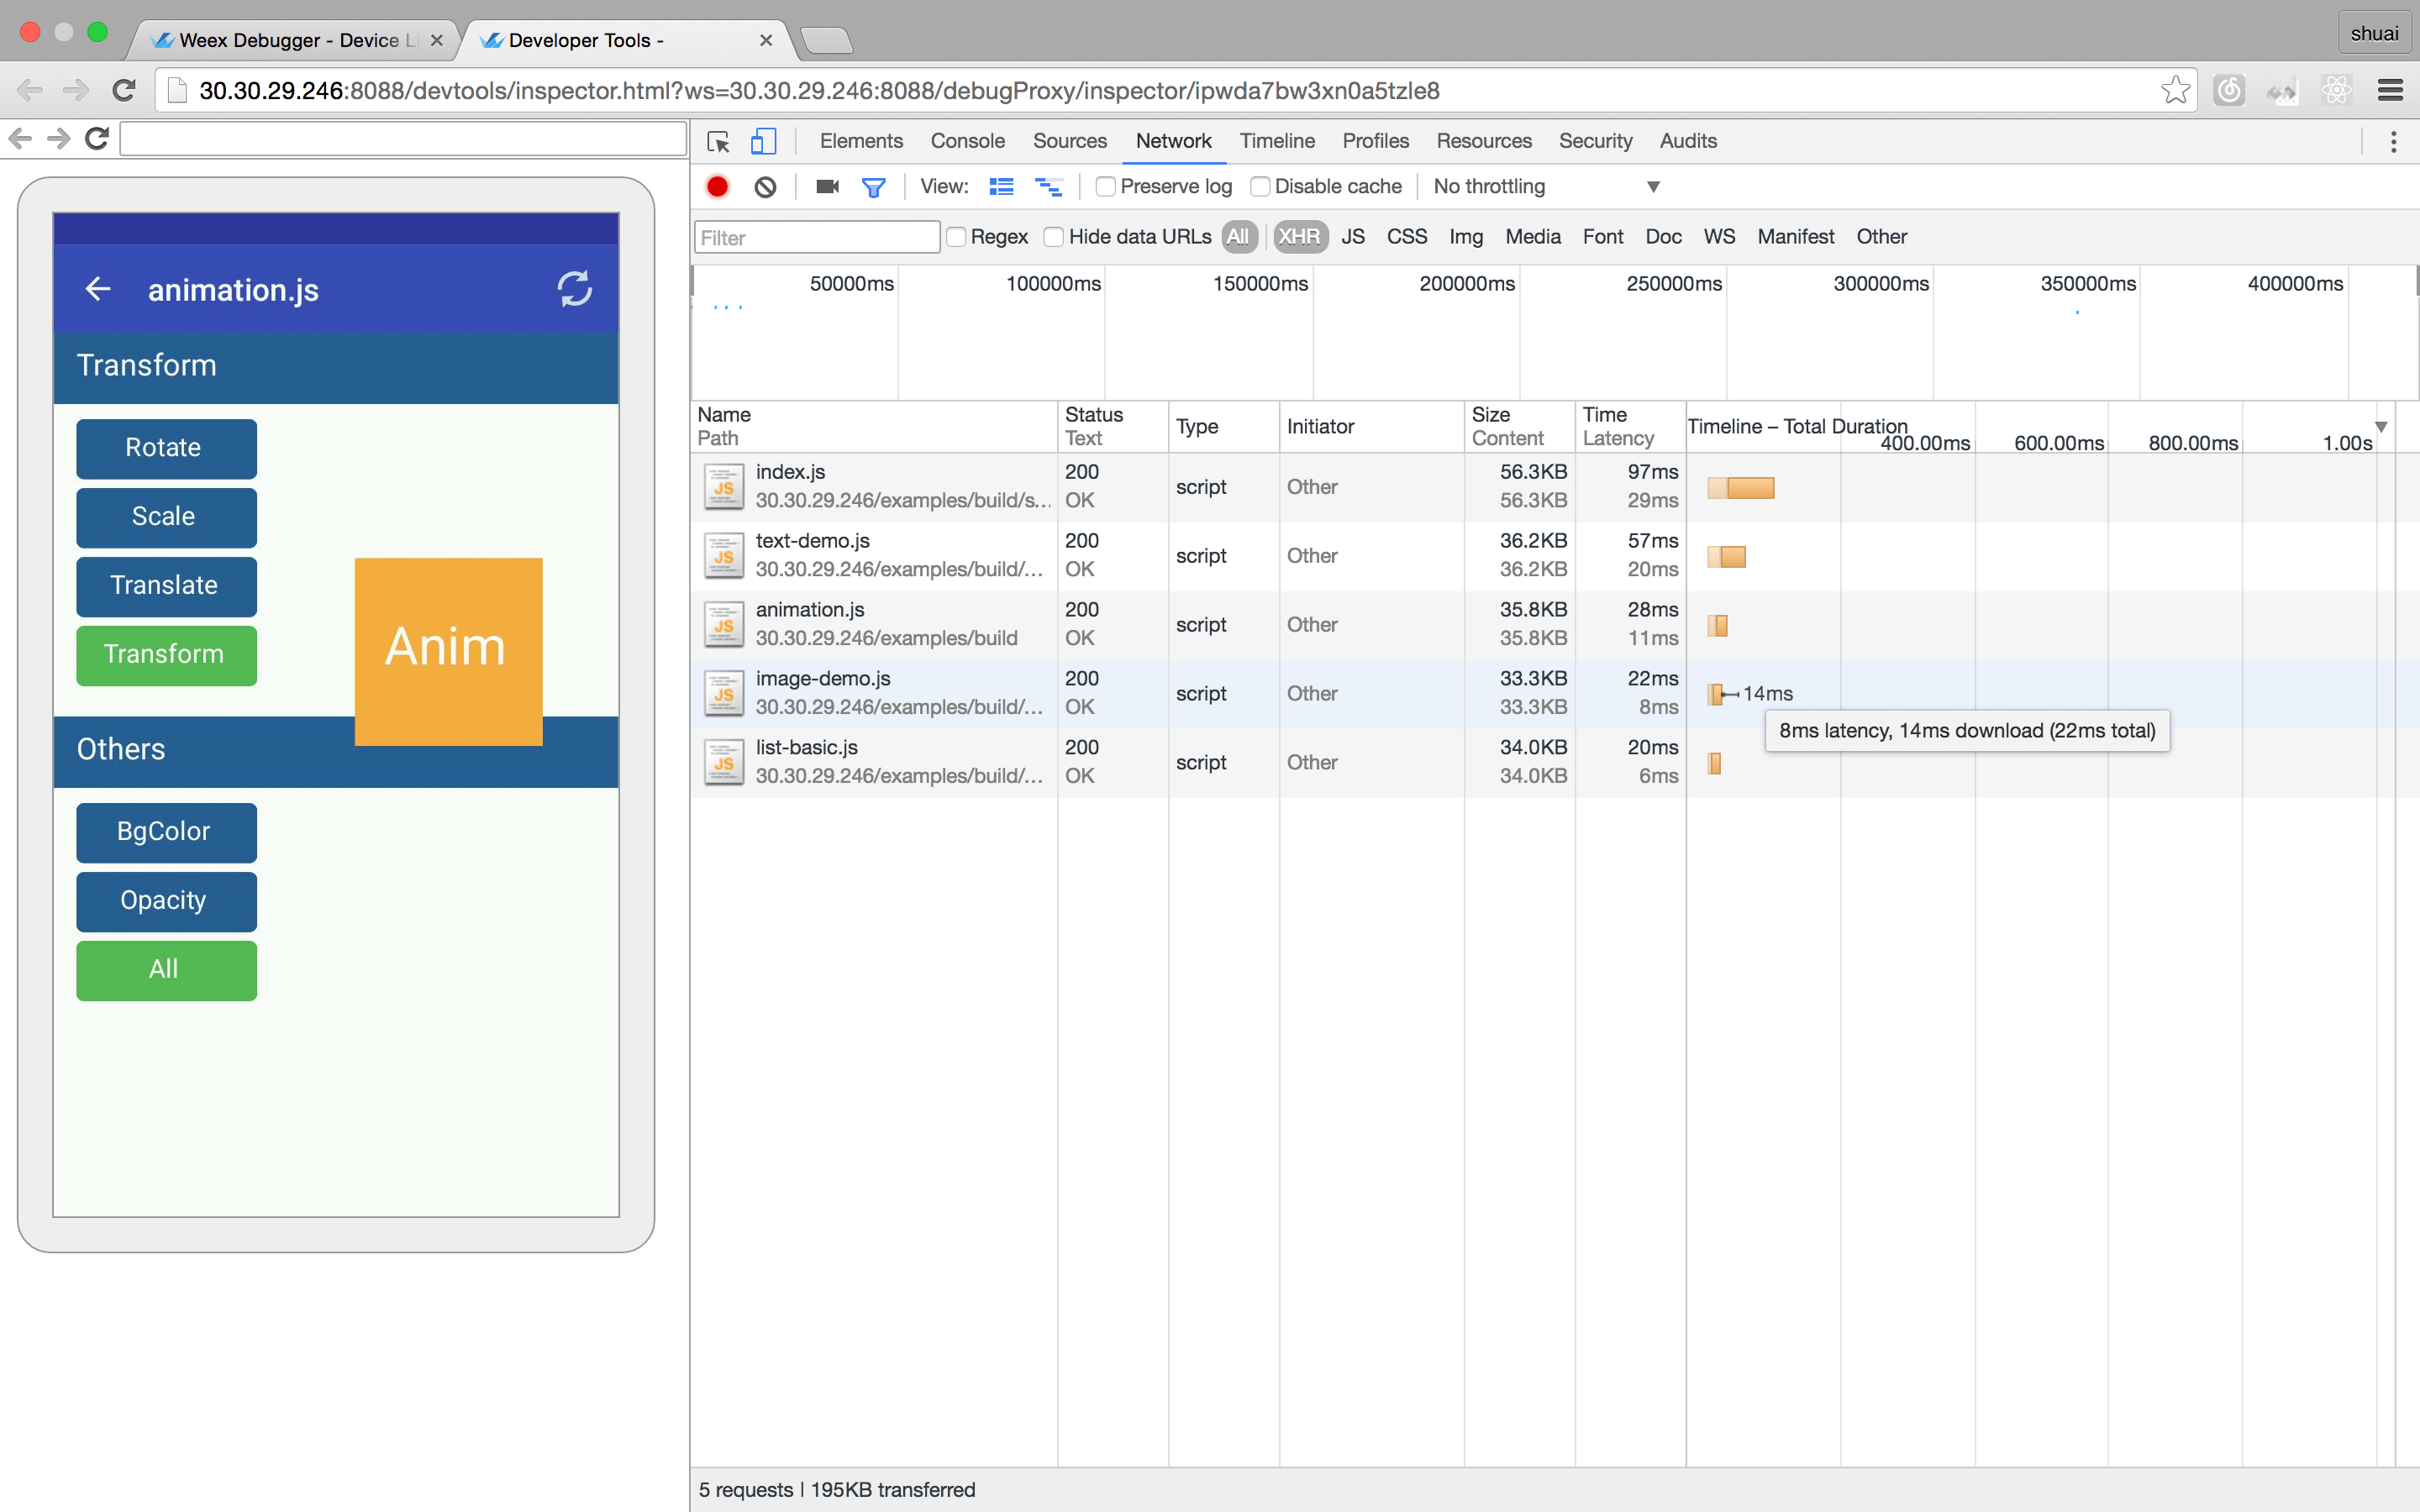
-##### 查看网络请求的header和response
-
-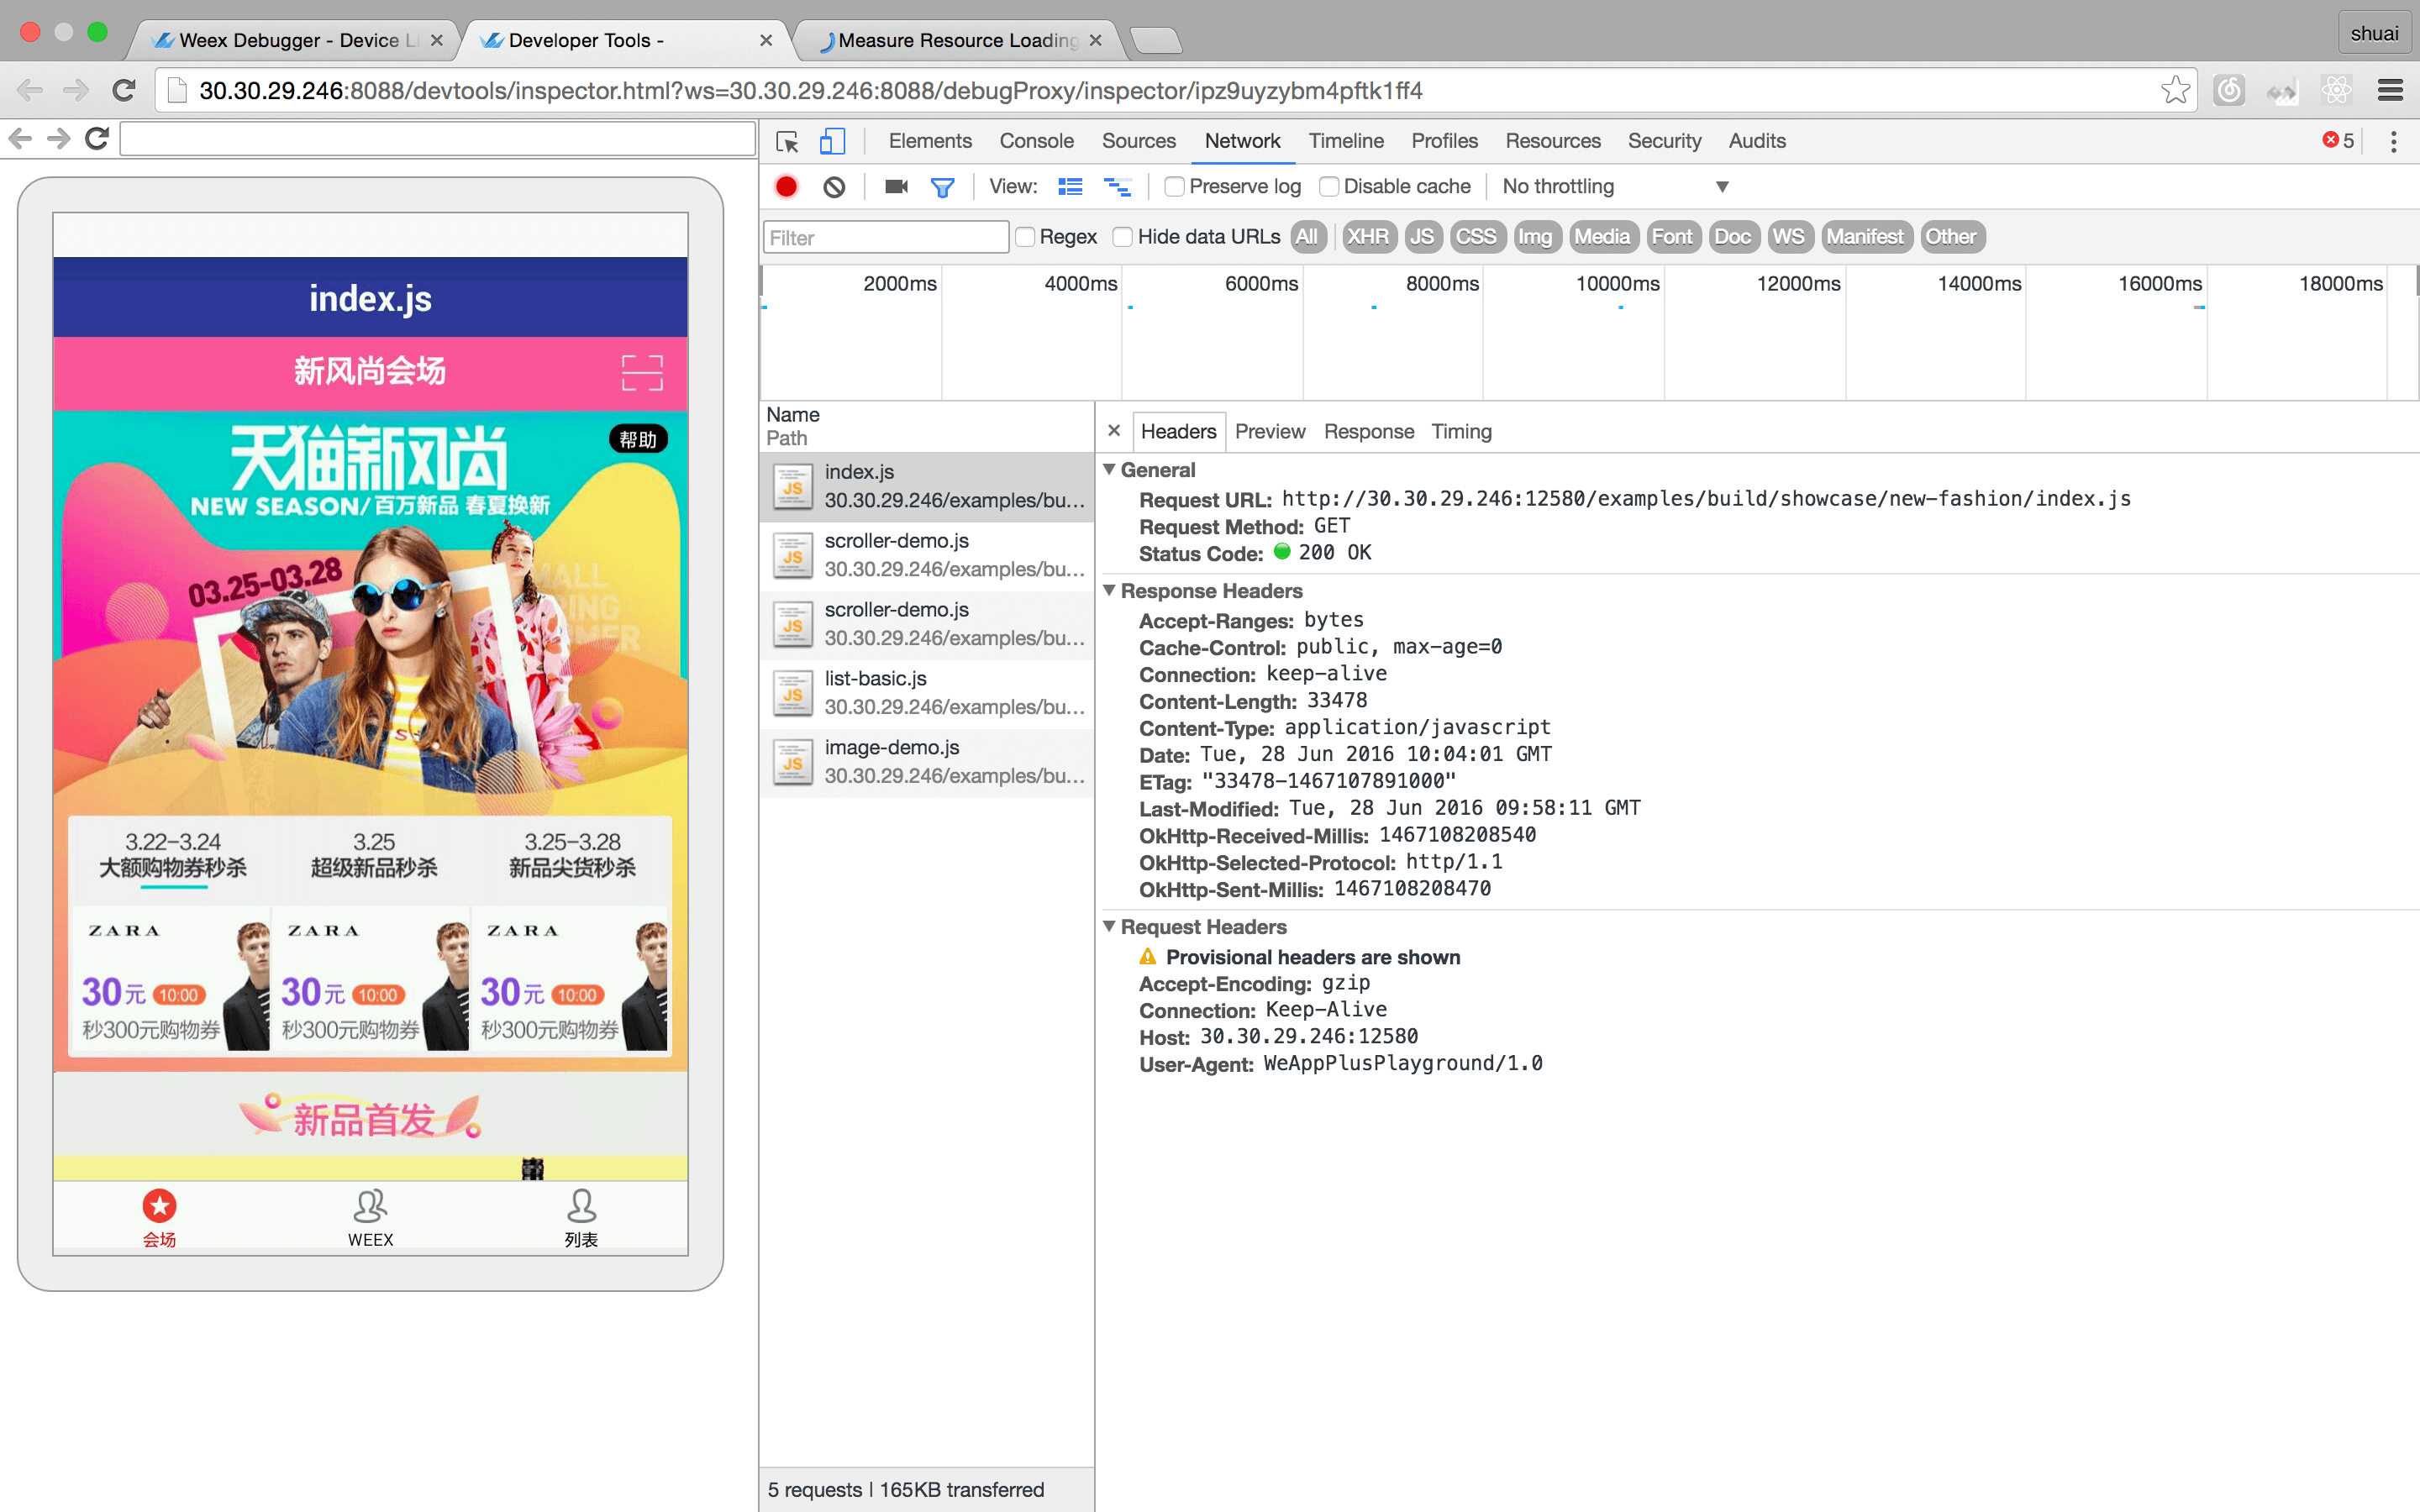
-#### 控制台
-
-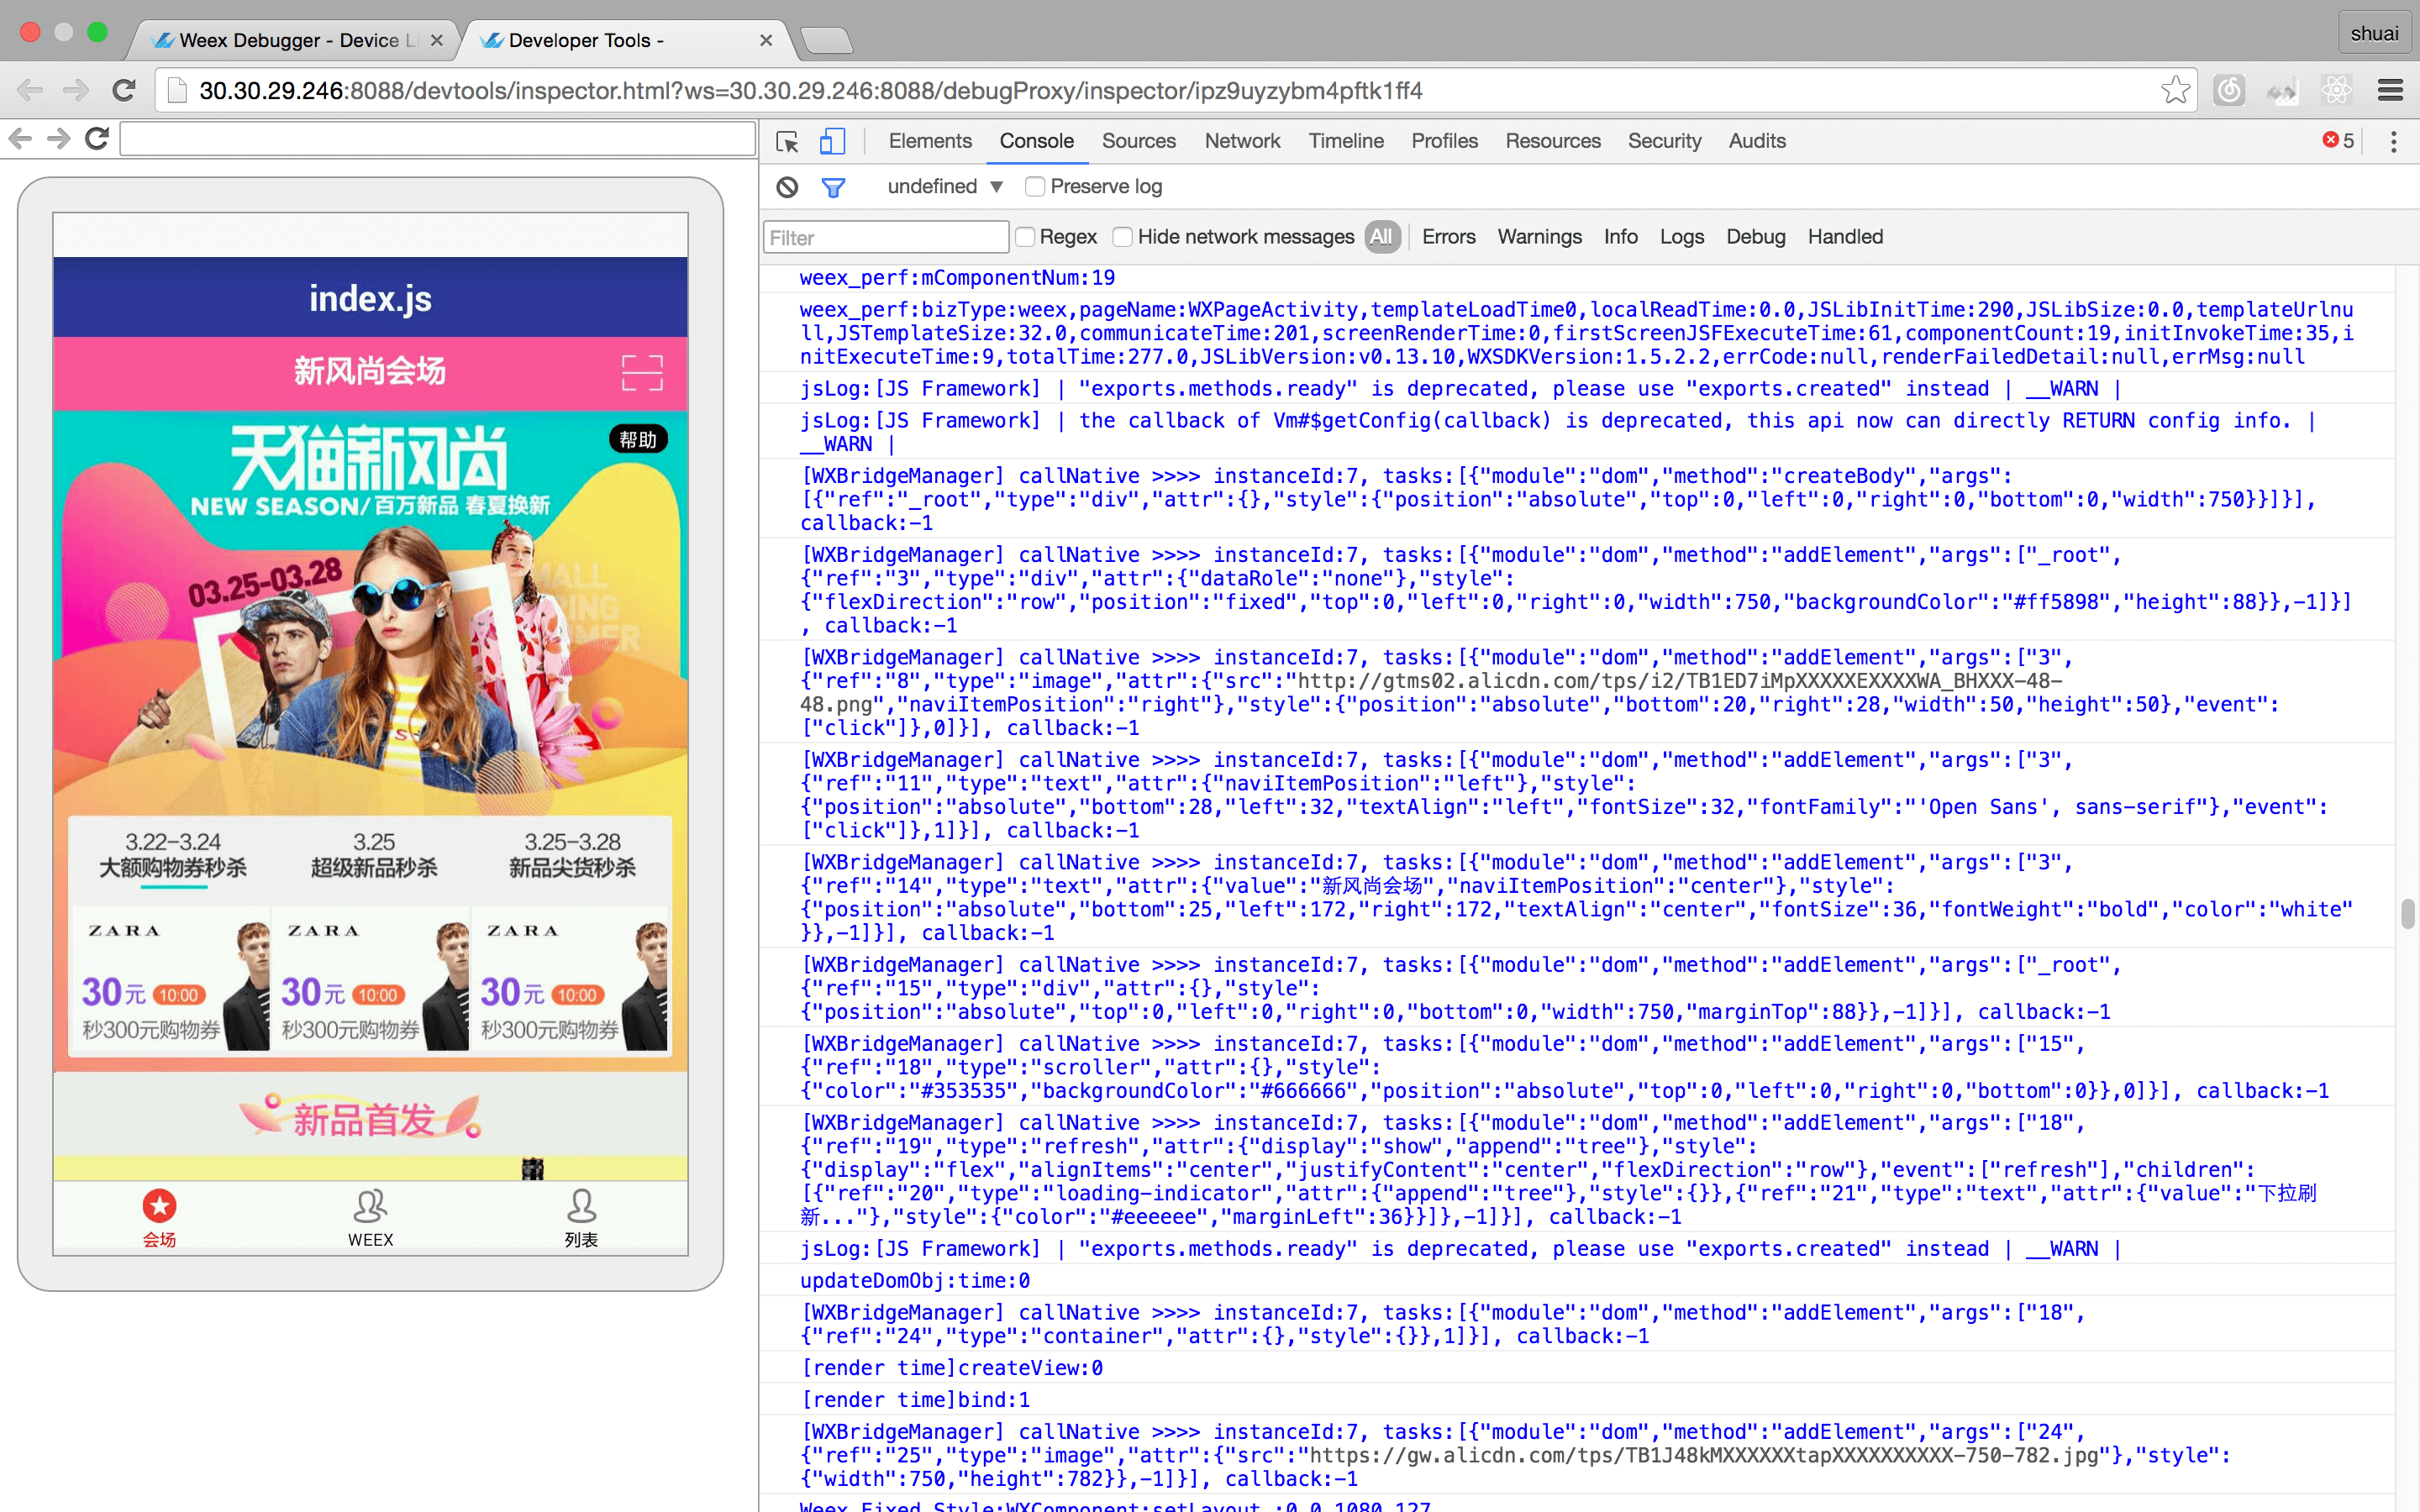
-#### 资源
-
-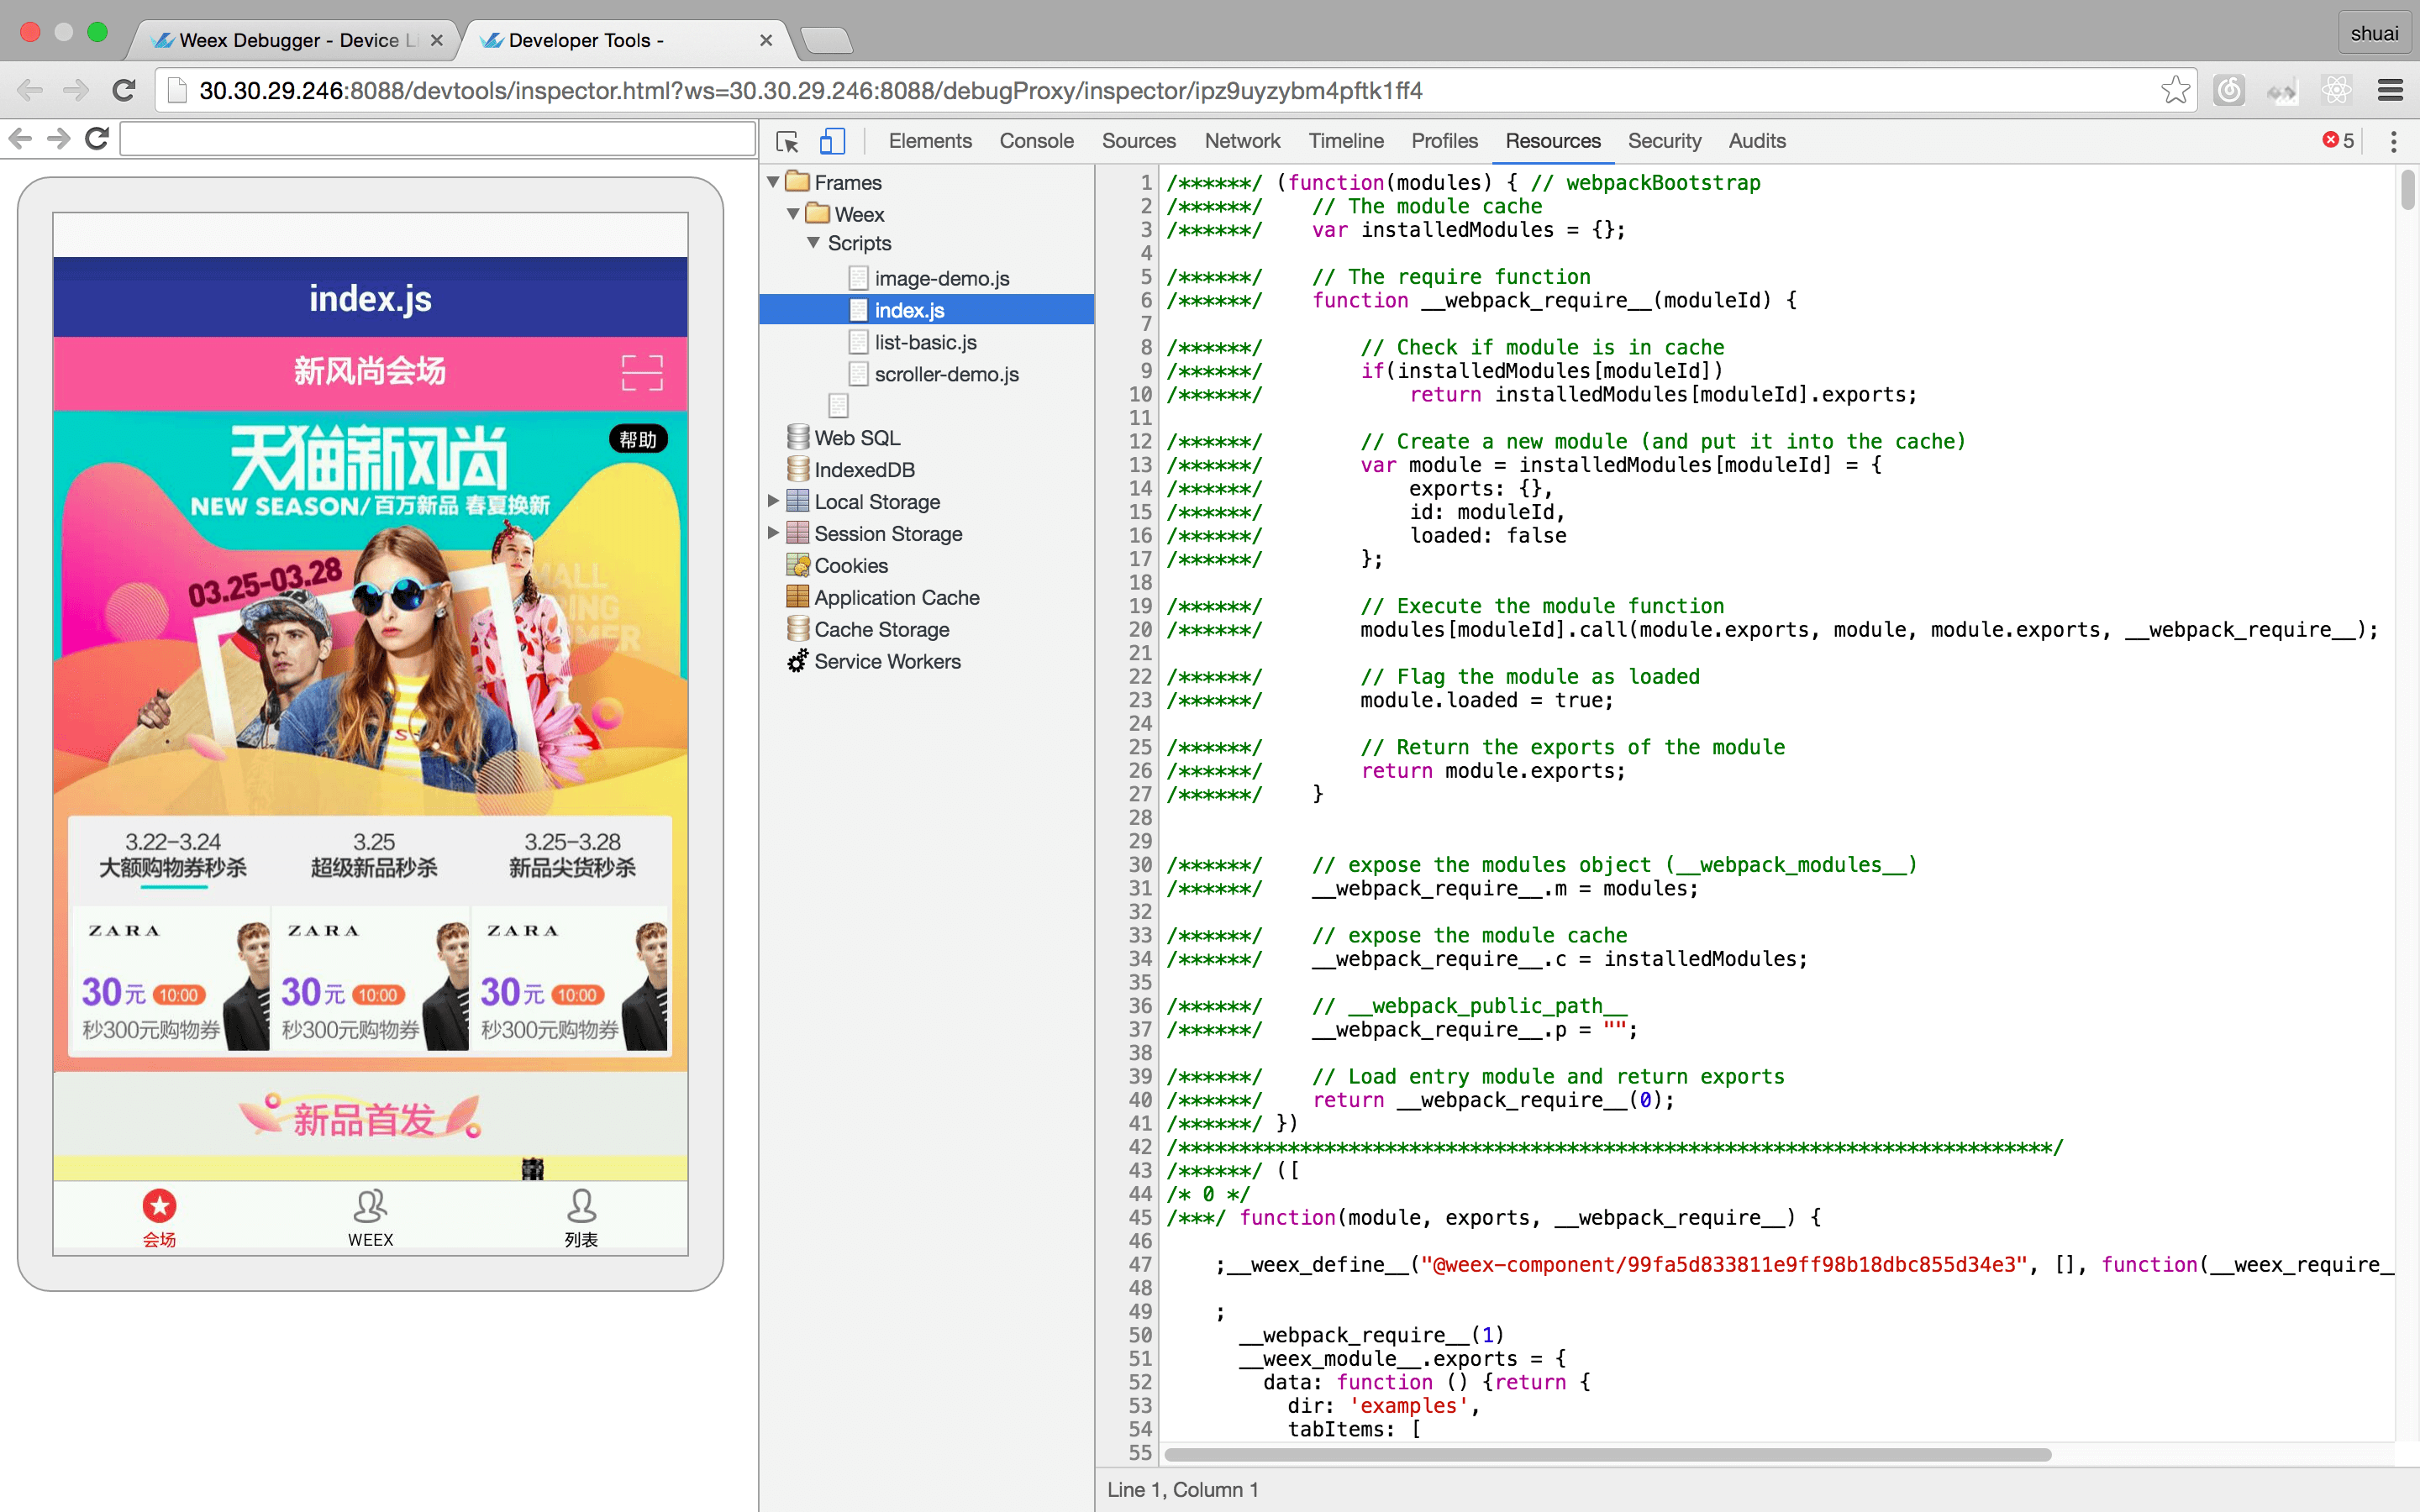
-### Debugger
-
- 调试器用来调试weex中的js代码,能够设置断点、查看调用栈。
-
-
-##### Breakpoint and CallStack
-
-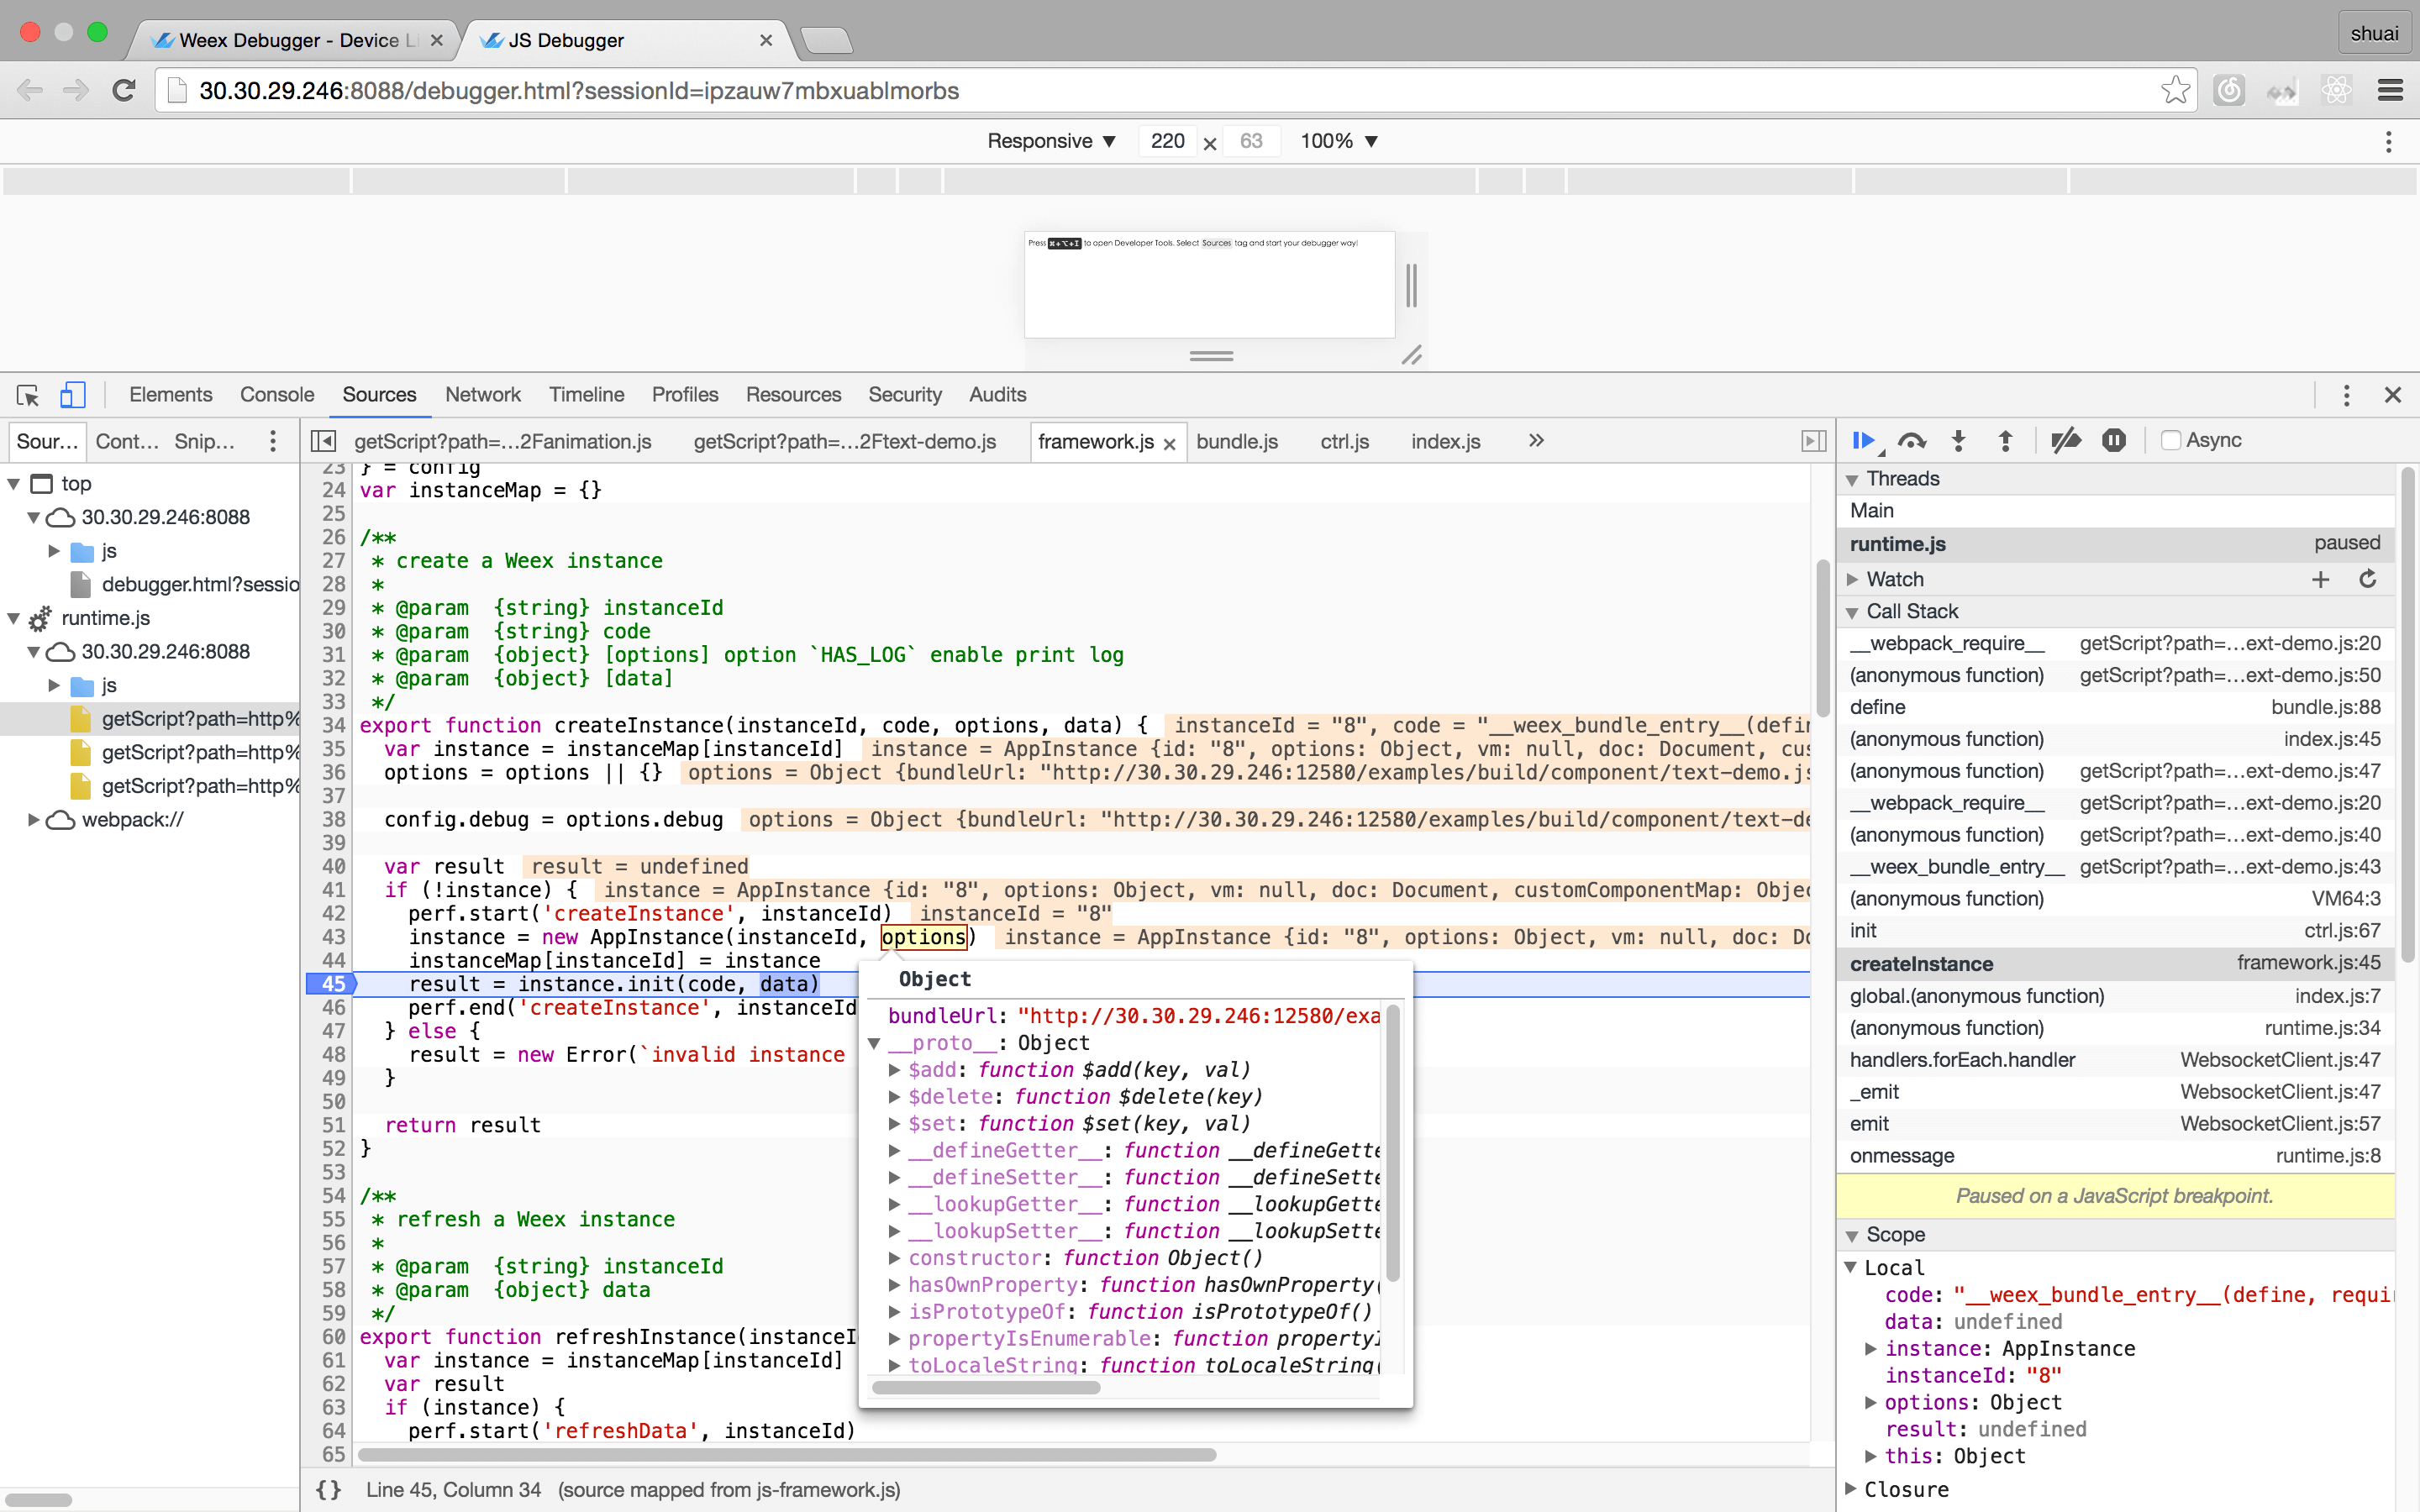
-#### 集成devtools
-- Android
- - 请参考文档 [Weex devtools (Android)](../advanced/integrate-devtools-to-android.html), 其中有详细说明。
-- IOS
- - 请参考文档 [Weex devtools (IOS)](../advanced/integrate-devtools-to-ios.html), 其中有详细说明。
http://git-wip-us.apache.org/repos/asf/incubator-weex-site/blob/32a097bf/source/cn/v-0.10/tools/index.md
----------------------------------------------------------------------
diff --git a/source/cn/v-0.10/tools/index.md b/source/cn/v-0.10/tools/index.md
deleted file mode 100644
index 06c424a..0000000
--- a/source/cn/v-0.10/tools/index.md
+++ /dev/null
@@ -1,96 +0,0 @@
----
-title: CLI (英)
-type: tools
-order: 1
-has_chapter_content: true
-version: 0.10
----
-
-# CLI
-
-Please access [npmjs.com](https://www.npmjs.com/package/weex-toolkit) for latest version
-
-Weex CLI tool set
-
-## Pre Install
-some dependencies need recent version of npm to install
-
-if your
-```
-$ npm --version
-```
-output less than `2.15.1`, please run below cmd to upgrade your npm at first
-```
-sudo npm install -g npm
-```
-
-## Install
-```
-$npm install -g weex-toolkit
-```
-
-## Usage
-
-```
-$weex foo/bar/input_path [options]
-
-$weex create file_name [options]
-
-Options:
- --qr display QR code for native runtime, **default action**
- -o,--output transform weex we file to JS Bundle, output path (single JS bundle file or dir)
- [for create sub cmd] it specified we file output path
- --watch using with -o, watch input path, auto run transform if change
- happen
- -s,--server start a http file server, weex .we file will be transformed to JS
- bundle on the server, specify local root path using the option
- --port http listening port number, default is 8081
- --wsport websocket listening port number, default is 8082
- -f, --force [for create sub cmd] force to replace exsisting file(s)
- --version show version of weex toolkit
- --help Show help
-```
-
-## Examples
-
-#### create a `we file`(weex source file) using standard template
-```
-$weex create hello-world-weex
-```
-a file named 'hello-world-weex.we' will be created in current directory
-
-
-#### transform a `we file` to JS Bundle
-```
-$weex your_best_weex.we -o .
-```
-`your_best_weex.we` will be transformed to JS Bundle file `your_best_weex.js` and saved in your current directory
-
-#### transform a `we file` to JS Bundle, watch this file,auto run transformer if any change happens.
-```
-$weex your_best_weex.we -o . --watch
-```
-
-#### transform every we file in a directory
-```
-$weex we/file/storage/path -o outputpath
-```
-every `we file` in `we/file/storage/path` will be transformed to JS Bundle and saved in `outputpath` path
-
-#### preview your we file using Weex Playground App
-download & install [weex playground App](http://alibaba.github.io/weex/download.html)
-```
-$weex your_best_weex.we --qr
-```
-a QR code will display in your terminal, using Playground App scan that.
-
-
-#### start http server
-```
-$weex -s .
-```
-a http server will start running, your current directory(.) will be the document root for the server, every weex.we file will be transformed to JS Bundle when accessed through the server
-
-## Issue & Feedback
-
-[Github Issue List](https://github.com/weexteam/weex-toolkit/issues)
http://git-wip-us.apache.org/repos/asf/incubator-weex-site/blob/32a097bf/source/cn/v-0.10/tools/playground.md
----------------------------------------------------------------------
diff --git a/source/cn/v-0.10/tools/playground.md b/source/cn/v-0.10/tools/playground.md
deleted file mode 100644
index dc7bbec..0000000
--- a/source/cn/v-0.10/tools/playground.md
+++ /dev/null
@@ -1,22 +0,0 @@
----
-title: Playground
-type: tools
-order: 4
-has_chapter_content: true
-version: 0.10
----
-
-Weex Playground App
-===================
-
-Weex 的最棒的一个部分是 Native Runtime。你的 `.we` 文件可以使用 weex-toolkit CLI 在浏览器中预览 Web 效果,也可以通过 Weex Playground App 这样一个单独的应用来预览原生效果。不仅如此,Weex playground App 还内置了大量的 Demo 和展示案例,这样你就可以更加容易地体验到 Weex 在 Native 层面的效果了。
-
-Playground App 的下载地址在 [这里](http://alibaba.github.io/weex/download.html)。
-
-截图:
-
-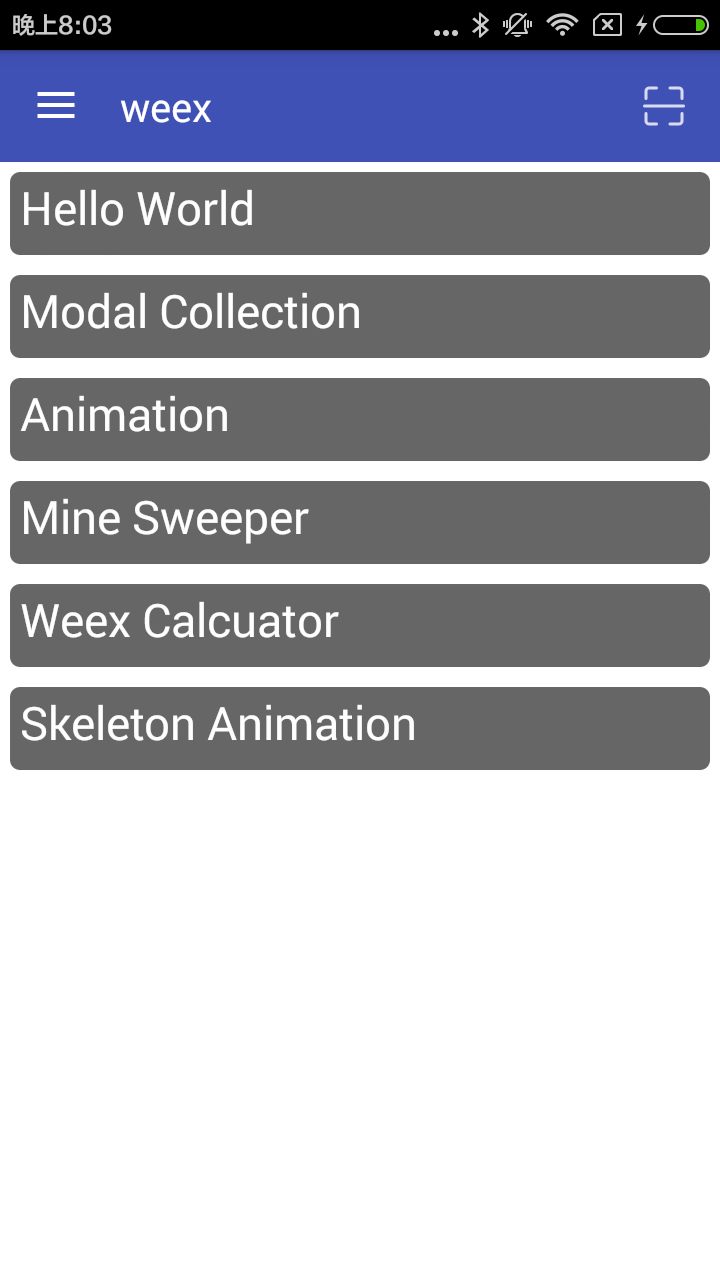
-
-上图就是 Weex Playground App 的主界面,点击列表中的每一项即可进入某个 Demo 或者展示案例。用 Weex toolkit CLI 生成二维码,用 Weex Playground App 扫描二维码(点击右上角图标即可开始扫描)可以预览你的文件。
-
-请参阅 [起步教程](/get-started.md)。
http://git-wip-us.apache.org/repos/asf/incubator-weex-site/blob/32a097bf/source/cn/v-0.10/tools/transformer.md
----------------------------------------------------------------------
diff --git a/source/cn/v-0.10/tools/transformer.md b/source/cn/v-0.10/tools/transformer.md
deleted file mode 100644
index 47a7b4c..0000000
--- a/source/cn/v-0.10/tools/transformer.md
+++ /dev/null
@@ -1,38 +0,0 @@
----
-title: Transormer (英)
-type: tools
-order: 3
-has_chapter_content: true
-version: 0.10
----
-
-# gulp-weex
-
-> gulp plugin for weex transformer
-
-## Usage
-
-```javascript
-var gulp = require('gulp')
-var weex = require('gulp-weex')
-
-gulp.task('default', function () {
- return gulp.src('src/*.html')
- .pipe(weex({}))
- .pipe(gulp.dest('./dest'))
-})
-```
-
-## Options
-
-### oldFormat
-
-whether transform to old format.
-
-default: `false`.
-
-### isEntry
-
-whether is an entry module which has `bootstrap(...)`.
-
-default: `true`.
\ No newline at end of file
http://git-wip-us.apache.org/repos/asf/incubator-weex-site/blob/32a097bf/source/cn/who-is-using-weex.md
----------------------------------------------------------------------
diff --git a/source/cn/who-is-using-weex.md b/source/cn/who-is-using-weex.md
new file mode 100644
index 0000000..a466dcd
--- /dev/null
+++ b/source/cn/who-is-using-weex.md
@@ -0,0 +1,6 @@
+---
+title: 谁在使用 Weex?
+type: community
+has_chapter_content: false
+version: 2.1
+---
http://git-wip-us.apache.org/repos/asf/incubator-weex-site/blob/32a097bf/source/cn/wiki/color-names.md
----------------------------------------------------------------------
diff --git a/source/cn/wiki/color-names.md b/source/cn/wiki/color-names.md
new file mode 100644
index 0000000..5298e5d
--- /dev/null
+++ b/source/cn/wiki/color-names.md
@@ -0,0 +1,181 @@
+---
+title: 颜色名称列表
+type: wiki
+group: 样式
+order: 3.4
+version: 2.1
+---
+
+# Weex 支持的所有颜色名称
+
+### 基础颜色关键词:
+
+| 颜色名 | 十六进制RGB值 |
+| --- | --- |
+| black(黑) | #000000 |
+| silver(银) | #C0C0C0 |
+| gray(灰) | #808080 |
+| white(白) | #FFFFFF |
+| maroon(褐紫红) | #800000 |
+| red(红) | #FF0000 |
+| purple(紫) | #800080 |
+| fuchsia(晚樱) | #FF00FF |
+| green(绿) | #008000 |
+| lime(石灰) | #00FF00 |
+| olive(橄榄) | #808000 |
+| yellow(黄) | #FFFF00 |
+| navy(海军蓝) | #000080 |
+| blue(蓝) | #0000FF |
+| teal(水鸭) | #008080 |
+| aqua(水蓝) | #00FFFF |
+### 扩展颜色关键词:
+
+| 颜色名 | 十六进制RGB值 |
+| --- | --- |
+| aliceblue | #F0F8FF |
+| antiquewhite | #FAEBD7 |
+| aqua | #00FFFF |
+| aquamarine | #7FFFD4 |
+| azure | #F0FFFF |
+| beige | #F5F5DC |
+| bisque | #FFE4C4 |
+| black | #000000 |
+| blanchedalmond | #FFEBCD |
+| blue | #0000FF |
+| blueviolet | #8A2BE2 |
+| brown | #A52A2A |
+| burlywood | #DEB887 |
+| cadetblue | #5F9EA0 |
+| chartreuse | #7FFF00 |
+| chocolate | #D2691E |
+| coral | #FF7F50 |
+| cornflowerblue | #6495ED |
+| cornsilk | #FFF8DC |
+| crimson | #DC143C |
+| cyan | #00FFFF |
+| darkblue | #00008B |
+| darkcyan | #008B8B |
+| darkgoldenrod | #B8860B |
+| darkgray | #A9A9A9 |
+| darkgreen | #006400 |
+| darkgrey | #A9A9A9 |
+| darkkhaki | #BDB76B |
+| darkmagenta | #8B008B |
+| darkolivegreen | #556B2F |
+| darkorange | #FF8C00 |
+| darkorchid | #9932CC |
+| darkred | #8B0000 |
+| darksalmon | #E9967A |
+| darkseagreen | #8FBC8F |
+| darkslateblue | #483D8B |
+| darkslategray | #2F4F4F |
+| darkslategrey | #2F4F4F |
+| darkturquoise | #00CED1 |
+| darkviolet | #9400D3 |
+| deeppink | #FF1493 |
+| deepskyblue | #00BFFF |
+| dimgray | #696969 |
+| dimgrey | #696969 |
+| dodgerblue | #1E90FF |
+| firebrick | #B22222 |
+| floralwhite | #FFFAF0 |
+| forestgreen | #228B22 |
+| fuchsia | #FF00FF |
+| gainsboro | #DCDCDC |
+| ghostwhite | #F8F8FF |
+| gold | #FFD700 |
+| goldenrod | #DAA520 |
+| gray | #808080 |
+| green | #008000 |
+| greenyellow | #ADFF2F |
+| grey | #808080 |
+| honeydew | #F0FFF0 |
+| hotpink | #FF69B4 |
+| indianred | #CD5C5C |
+| indigo | #4B0082 |
+| ivory | #FFFFF0 |
+| khaki | #F0E68C |
+| lavender | #E6E6FA |
+| lavenderblush | #FFF0F5 |
+| lawngreen | #7CFC00 |
+| lemonchiffon | #FFFACD |
+| lightblue | #ADD8E6 |
+| lightcoral | #F08080 |
+| lightcyan | #E0FFFF |
+| lightgoldenrodyellow | #FAFAD2 |
+| lightgray | #D3D3D3 |
+| lightgreen | #90EE90 |
+| lightgrey | #D3D3D3 |
+| lightpink | #FFB6C1 |
+| lightsalmon | #FFA07A |
+| lightseagreen | #20B2AA |
+| lightskyblue | #87CEFA |
+| lightslategray | #778899 |
+| lightslategrey | #778899 |
+| lightsteelblue | #B0C4DE |
+| lightyellow | #FFFFE0 |
+| lime | #00FF00 |
+| limegreen | #32CD32 |
+| linen | #FAF0E6 |
+| magenta | #FF00FF |
+| maroon | #800000 |
+| mediumaquamarine | #66CDAA |
+| mediumblue | #0000CD |
+| mediumorchid | #BA55D3 |
+| mediumpurple | #9370DB |
+| mediumseagreen | #3CB371 |
+| mediumslateblue | #7B68EE |
+| mediumspringgreen | #00FA9A |
+| mediumturquoise | #48D1CC |
+| mediumvioletred | #C71585 |
+| midnightblue | #191970 |
+| mintcream | #F5FFFA |
+| mistyrose | #FFE4E1 |
+| moccasin | #FFE4B5 |
+| navajowhite | #FFDEAD |
+| navy | #000080 |
+| oldlace | #FDF5E6 |
+| olive | #808000 |
+| olivedrab | #6B8E23 |
+| orange | #FFA500 |
+| orangered | #FF4500 |
+| orchid | #DA70D6 |
+| palegoldenrod | #EEE8AA |
+| palegreen | #98FB98 |
+| paleturquoise | #AFEEEE |
+| palevioletred | #DB7093 |
+| papayawhip | #FFEFD5 |
+| peachpuff | #FFDAB9 |
+| peru | #CD853F |
+| pink | #FFC0CB |
+| plum | #DDA0DD |
+| powderblue | #B0E0E6 |
+| purple | #800080 |
+| red | #FF0000 |
+| rosybrown | #BC8F8F |
+| royalblue | #4169E1 |
+| saddlebrown | #8B4513 |
+| salmon | #FA8072 |
+| sandybrown | #F4A460 |
+| seagreen | #2E8B57 |
+| seashell | #FFF5EE |
+| sienna | #A0522D |
+| silver | #C0C0C0 |
+| skyblue | #87CEEB |
+| slateblue | #6A5ACD |
+| slategray | #708090 |
+| slategrey | #708090 |
+| snow | #FFFAFA |
+| springgreen | #00FF7F |
+| steelblue | #4682B4 |
+| tan | #D2B48C |
+| teal | #008080 |
+| thistle | #D8BFD8 |
+| tomato | #FF6347 |
+| turquoise | #40E0D0 |
+| violet | #EE82EE |
+| wheat | #F5DEB3 |
+| white | #FFFFFF |
+| whitesmoke | #F5F5F5 |
+| yellow | #FFFF00 |
+| yellowgreen | #9ACD32 |
http://git-wip-us.apache.org/repos/asf/incubator-weex-site/blob/32a097bf/source/cn/wiki/common-events.md
----------------------------------------------------------------------
diff --git a/source/cn/wiki/common-events.md b/source/cn/wiki/common-events.md
new file mode 100644
index 0000000..33841f1
--- /dev/null
+++ b/source/cn/wiki/common-events.md
@@ -0,0 +1,139 @@
+---
+title: 通用事件
+type: wiki
+group: 事件
+order: 4.1
+version: 2.1
+has_chapter_content: true
+---
+
+# 通用事件
+
+Weex 提供了通过事件触发动作的能力,例如在用户点击组件时执行 JavaScript。下面列出了可被添加到 Weex 组件上以定义事件动作的属性:
+
+## `click`
+
+当组件上发生点击手势时被触发。
+
+**注意:**
+
+`<input>` 和 `<switch>` 组件目前不支持 `click` 事件,请使用 `change` 或 `input` 事件来代替。
+
+### 事件对象
+
+- `type`: `click`
+- `target`: 触发点击事件的目标组件
+- `timestamp`: 触发点击事件时的时间戳
+
+
+## `longpress`
+
+如果一个组件被绑定了 `longpress` 事件,那么当用户长按这个组件时,该事件将会被触发。
+
+**注意:**
+
+`<input>` 和 `<switch>` 组件目前不支持 `click` 事件,请使用 `change` 或 `input` 事件来代替。
+
+### 事件对象
+- `type` : `longpress`
+- `target` : 触发长按事件的目标组件
+- `timestamp` : 长按事件触发时的时间戳
+
+## Appear 事件
+
+如果一个位于某个可滚动区域内的组件被绑定了 `appear` 事件,那么当这个组件的状态变为在屏幕上可见时,该事件将被触发。
+
+### 事件对象
+
+- `type` : `appear`
+- `target` : 触发 Appear 事件的组件对象
+- `timestamp` : 事件被触发时的时间戳
+- `direction` : 触发事件时屏幕的滚动方向,`up` 或 `down`
+
+## Disappear 事件
+
+如果一个位于某个可滚动区域内的组件被绑定了 `disappear` 事件,那么当这个组件被滑出屏幕变为不可见状态时,该事件将被触发。
+
+### 事件对象
+
+- `type` : `disappear`
+- `target` : 触发 Disappear 事件的组件对象
+- `timestamp` : 事件被触发时的时间戳
+- `direction` : 触发事件时屏幕的滚动方向,`up` 或 `down`
+
+## Page 事件
+
+*注意:仅支持 iOS 和 Android,H5 暂不支持。*
+
+Weex 通过 `viewappear` 和 `viewdisappear` 事件提供了简单的页面状态管理能力。
+
+`viewappear` 事件会在页面就要显示或配置的任何页面动画被执行前触发,例如,当调用 `navigator` 模块的 `push` 方法时,该事件将会在打开新页面时被触发。`viewdisappear` 事件会在页面就要关闭时被触发。
+
+与组件的 `appear` 和 `disappear` 事件不同的是,`viewappear` 和 `viewdisappear` 事件关注的是整个页面的状态,所以**它们必须绑定到页面的根元素上**。
+
+特殊情况下,这两个事件也能被绑定到非根元素的body组件上,例如`wxc-navpage`组件。
+
+### 事件对象
+
+- `type` : `viewappear` 或 `viewdisappear`
+- `target` : 触发事件的组件对象
+- `timestamp` : 事件被触发时的时间戳
+
+## 示例
+
+```html
+<template>
+ <div>
+ <div class="box" @click="onclick" @longpress="onlongpress" @appear="onappear" @disappear="ondisappear"></div>
+ </div>
+</template>
+
+<script>
+ const modal = weex.requireModule('modal')
+ export default {
+ methods: {
+ onclick (event) {
+ console.log('onclick:', event)
+ modal.toast({
+ message: 'onclick',
+ duration: 0.8
+ })
+ },
+ onlongpress (event) {
+ console.log('onlongpress:', event)
+ modal.toast({
+ message: 'onlongpress',
+ duration: 0.8
+ })
+ },
+ onappear (event) {
+ console.log('onappear:', event)
+ modal.toast({
+ message: 'onappear',
+ duration: 0.8
+ })
+ },
+ ondisappear (event) {
+ console.log('ondisappear:', event)
+ modal.toast({
+ message: 'ondisappear',
+ duration: 0.8
+ })
+ }
+ }
+ }
+</script>
+
+<style scoped>
+ .box {
+ border-width: 2px;
+ border-style: solid;
+ border-color: #BBB;
+ width: 250px;
+ height: 250px;
+ margin-top: 250px;
+ margin-left: 250px;
+ background-color: #EEE;
+ }
+</style>
+```
[24/51] [abbrv] incubator-weex-site git commit: rearrangement the
structure of the document
Posted by ha...@apache.org.
http://git-wip-us.apache.org/repos/asf/incubator-weex-site/blob/32a097bf/_draft/v1.0/advanced/extend-to-html5.md
----------------------------------------------------------------------
diff --git a/_draft/v1.0/advanced/extend-to-html5.md b/_draft/v1.0/advanced/extend-to-html5.md
new file mode 100644
index 0000000..ff99629
--- /dev/null
+++ b/_draft/v1.0/advanced/extend-to-html5.md
@@ -0,0 +1,253 @@
+---
+title: weex-html5 扩展
+type: advanced
+order: 11
+has_chapter_content: true
+version: 0.10
+---
+
+# 扩展 weex-html5
+
+### 简介
+
+Weex 是一个高可扩展性的跨平台动态化开发方案,你可以在现有组件基础上定制自己需要的三端组件。你可以为 Weex API 模块添加新的方法,或者创建新的 API 模块和新的加载器。按照以下几个步骤扩展你的组件,API 或者加载器。
+
+首先要明确的是,组件和 API 模块是基于 Weex 的扩展,但是独立于 Weex,组件的定义本身是不需要依赖于 Weex 的,这样有助于组件的分散化管理,去除中心化依赖。
+
+其次,当你扩展一个组件,你需要同时扩展三端的组件(android, ios 和 web 端),毕竟 Weex 是一个重视三端一致体验的跨平台移动框架。你可以一个端一个端的扩展,也可以召唤其他端上的开发者来共同完成你在其他端上的组件(你总是可以在社区找到对某个功能有共同需求的开发者)。这里有一些在 [android 端](./extend-to-android.md)和 [ios 端](./extend-to-ios.md)做扩展的文档可以参考。
+
+你应该将你的扩展发布到 Weex 开发者可以方便找到和使用的渠道,比如 `npm`。我们推荐你将你开发的组件发布到 `npm` 供其他 Weex 开发者使用。
+
+最重要的是,你的组件的命名需要遵守 Weex 组件命名规范:以 `weex-` 开头作为组件的前缀,并且以 `-<platform>` 做为结尾后缀,除非你发布的包是三端的实现都包含在内的。这里有个 [`<weex-hello-web`>](https://github.com/MrRaindrop/weex-hello-web) 的例子作为参考,这里注册了一个简单的自定义的组件。
+
+### 创建新组件
+
+步骤:
+1. 在你的组件实现中必须继承 `Weex.Component` 这个类, 并选择性的重写其中的一些方法。
+2. 你的组件的 exports 需要暴露一个 `init` 方法,并在其中使用 `Weex.registerComponent` 注册你的组件。
+
+**这里用一个例子展示如何扩展一个新的组件**
+
+看这个组件扩展的代码( web 端上的组件):
+
+``` javascript
+const attr = {
+ // ...
+}
+const style = {
+ // ...
+}
+const event = {
+ // ...
+}
+// 每个扩展组件都需要实现一个init方法,Weex会通过这方法进行安装和注册.
+function init (Weex) {
+ const Component = Weex.Component
+ const extend = Weex.utils.extend
+
+ // 组件的构造函数
+ function Hello (data) {
+ Component.call(this, data)
+ }
+
+ // prototype继承
+ Hello.prototype = Object.create(Component.prototype)
+ extend(Hello.prototype, proto)
+
+ // 配置属性、样式以及事件
+ extend(Hello.prototype, { attr })
+ extend(Hello.prototype, {
+ style: extend(Object.create(Component.prototype.style), style)
+ })
+ extend(Hello.prototype, { event })
+
+ Weex.registerComponent('weex-hello', Hello)
+}
+
+// 暴露init方法接口.
+export default { init }
+```
+
+上述代码摘引自 [weex-hello-web/src/index.js](https://github.com/MrRaindrop/weex-hello-web/blob/master/src/index.js#L46-L65)
+
+这个demo重写了基类 `Component`中的`create`方法。你也可以选择重写`Component`中的一些其他方法来定制组件的行为。典型的方法包括:
+- `create`: 创建组件的节点,在方法体中return这个节点.
+- `createChildren` 创建子节点.
+- `insertBefore` 在某个子节点之前插入一个新的子节点.
+- `appendChild` 在子节点列表的最后加上一个节点.
+- `removeChild` 移除一个子节点.
+
+**进阶**:更多关于组件定制和扩展的细节和代码展示,可以参考 [weex 主仓库的代码](https://github.com/apache/incubator-weex/tree/dev/html5),这里的组件基本上都是通过上述方式进行定义的。
+
+重要的一点,注册组件的关键方法是 `Weex.registerComponent`,如示例里的 `weex-hello` 组件的注册:
+
+``` javascript
+Weex.registerComponent('weex-hello', Hello)
+```
+
+上述代码引自 [weex-hello-web/src/index.js](https://github.com/MrRaindrop/weex-hello-web/blob/master/src/index.js#L62)
+
+在某个需要使用该组件的weex项目中使用 `Weex.install` 方法安装该组件:
+
+``` javascript
+// import the original weex-html5.
+import weex from 'weex-html5'
+import hello from 'weex-hello-web'
+// install the component.
+weex.install(hello)
+```
+
+上述代码引自 [weex_extend_demo/src/main.js](https://github.com/MrRaindrop/weex_extend_demo/blob/master/src/main.js#L1-L5)
+
+在你的 `.we` 文件中直接使用这个组件:
+
+``` html
+<template>
+ <div>
+ <weex-hello class="hello" style="txt-color:#fff;bg-color:green"
+ value="WEEX" onclick="handleClick">
+ </weex-hello>
+ </div>
+</template>
+```
+
+上述代码引自[weex_extend_demo/demo/index.we](https://github.com/MrRaindrop/weex_extend_demo/blob/master/demo/index.we#L10-L15)
+### 扩展API
+
+你可以扩展新的 API 模块,或者为某个已有的模块添加新的 API. 比如,你可以添加一个 API 模块叫做 `user`,在里面添加一些用户登录登出处理的 API,比如 `login`, `logout` 等等。你可以通过 `require('@weex-module/moduleName)[methodName](arg1, arg2, ...)` ([Module APIs](../references/api.md)) 的方式调用你的 API.
+
+步骤:
+1. 实现你的 API module.
+2. 在你的 API 安装模块里暴露一个 `init` 方法,并在这个方法里面使用 `Weex.registerAPIModules` 注册你的 API module.
+
+**这里用一个例子展示如何扩展一个新的 API 模块**
+
+创建一个文件 `user.js`,在其中定义登录登出 `login/logout` 方法.
+
+``` javascript
+const user = {
+ // 定义用户登录方法.
+ login (callbackId) {
+ login.then(res => {
+ this.sender.performCallback(callbackId, res)
+ }).catch(err => {
+ this.sender.performCallback(callbackId, err)
+ })
+ },
+
+ // 定义用户登出方法.
+ logout (callbackId) {
+ logout.then(res => {
+ this.sender.performCallback(callbackId, res)
+ }).catch(err => {
+ this.sender.performCallback(callbackId, err)
+ })
+ }
+}
+
+// 定义user模块的元 (meta) 信息.
+const meta = {
+ user: [{
+ name: 'login',
+ args: ['function']
+ }, {
+ name: 'logout',
+ args: ['function']
+ }]
+}
+
+export default {
+ init (Weex) {
+ // 注册这个模块,最后一个参数是模块的元信息.
+ Weex.registerApiModule('user', user, meta)
+ }
+}
+```
+
+这个简单的 user helper 模块就实现好了,可以发布到 npm 上,我们可以给这个模块取个名字,比如说 `weex-user-helper`。
+
+在你的新的 Weex 项目里安装这个模块:
+
+``` javascript
+import Weex from 'weex-html5'
+import user from 'weex-user-helper'
+
+Weex.install(user)
+```
+
+安装了这个模块,你就可以在 DSL 代码里引用这个模块干点事情了:
+
+``` html
+<template>
+ <div>
+ <div class="btn" onclick="handleClick">
+ <text>LOGIN</text>
+ </div>
+ </div>
+</template>
+
+<script>
+ var userHelper = require('@weex-module/user')
+ module.exports = {
+ methods: {
+ handleClick: function () {
+ userHelper.login(function () {
+ // ... do sth. in callback.
+ })
+ }
+ }
+ }
+</script>
+```
+
+### 定制加载器loader
+
+**Loader仅用于weex-html5 (web端)加载dsl打包出来的bundle代码,native平台有其他的加载机制**
+
+已有的加载器包括 `xhr`, `jsonp` 和 `source`. 你可以使用 `weex.registerLoader` 注册一个新的加载器。例如,你有一个获取 Weex bundle 的服务 `myServe.getWeexBundle` , 通过这个服务可以加载 weex bundle,为此你可以定义一个加载器:
+
+``` javascript
+function loadByMyServe(pageId, callback) {
+ myServe.getWeexBundle(pageId).then(function (bundle) {
+ callback(bundle)
+ }).catch(function(err) {
+ callback(err)
+ })
+}
+
+// 暴露init方法用于Weex安装此加载器.
+export default {
+ init (Weex) {
+ Weex.registerLoader('myserve', loadByMyServe)
+ }
+}
+```
+
+在你的 weex-html5 项目的启动文件里安装并使用这个加载器:
+
+``` javascript
+import Weex from 'weex-html5'
+
+// 或者import from './myserve.js',不管是import一个npm模块还是import一个文件.
+import loader from 'myLoader'
+
+Weex.install(loader)
+
+// 在init方法里使用这个加载器加载bundle文件.
+(function () {
+ function getUrlParam (key) {
+ const reg = new RegExp('[?|&]' + key + '=([^&]+)')
+ const match = location.search.match(reg)
+ return match && match[1]
+ }
+ const page = getUrlParam('page') || 'examples/build/index.js'
+ Weex.init({
+ appId: location.href,
+ loader: 'myserve', // 使用刚才定义的loader类型
+ source: page,
+ rootId: 'weex'
+ })
+})();
+```
+
+以上是 Weex 带来的扩展性里比较主要的一部分,更多实现细节可以在 [weex 项目代码库](https://github.com/alibaba/weex)以及 weex 的开源社区里找到。
http://git-wip-us.apache.org/repos/asf/incubator-weex-site/blob/32a097bf/_draft/v1.0/advanced/extend-to-ios.md
----------------------------------------------------------------------
diff --git a/_draft/v1.0/advanced/extend-to-ios.md b/_draft/v1.0/advanced/extend-to-ios.md
new file mode 100644
index 0000000..b163d62
--- /dev/null
+++ b/_draft/v1.0/advanced/extend-to-ios.md
@@ -0,0 +1,279 @@
+---
+title: iOS 扩展
+type: advanced
+order: 10
+has_chapter_content: true
+version: 0.10
+---
+
+## iOS 扩展
+
+### Module 扩展
+
+[swift](https://github.com/weexteam/article/issues/55) 扩展 module
+
+Weex SDK 只提供渲染,而不是其他的能力,如果你需要 像网络,图片,URL跳转这些特性,需要自己动手实现他们
+例如,如果你想实现一个url地址跳转函数,你可以按照如下步骤实现一个 Module
+1. **自定义module的步骤**
+ 1. 自定义的module类 必须实现 `WXModuleProtocol`
+ 2. 必须添加宏`WX_EXPORT_METHOD`, 它可以被weex识别,它的参数是 JavaScript调用 module指定方法的参数
+ 3. 添加`@synthesized weexInstance`,每个moudle对象被绑定到一个指定的实例上
+ 4. Module 方法会在UI线程中被调用,所以不要做太多耗时的任务在这里,如果要在其他线程执行整个module 方法,需要实现`WXModuleProtocol`中`- (NSThread *)targetExecuteThread`的方法,这样,分发到这个module的任务会在指定的线程中运行
+ 5. Weex 的参数可以是 String 或者Map
+ 6. Module 支持返回值给 JavaScript中的回调,回调的类型是`WXModuleCallback`,回调的参数可以是String或者Map
+
+ ```object-c
+ @implementation WXEventModule
+ @synthesize weexInstance;
+ WX_EXPORT_METHOD(@selector(openURL:callback))
+ - (void)openURL:(NSString *)url callback:(WXModuleCallback)callback
+ {
+ NSString *newURL = url;
+ if ([url hasPrefix:@"//"]) {
+ newURL = [NSString stringWithFormat:@"http:%@", url];
+ } else if (![url hasPrefix:@"http"]) {
+ newURL = [NSURL URLWithString:url relativeToURL:weexInstance.scriptURL].absoluteString;
+ }
+
+ UIViewController *controller = [[WXDemoViewController alloc] init];
+ ((WXDemoViewController *)controller).url = [NSURL URLWithString:newURL];
+
+ [[weexInstance.viewController navigationController] pushViewController:controller animated:YES];
+ callback(@{@"result":@"success"});
+ }
+
+ @end
+ ```
+2. **Register the module**
+ 通过调用 WXSDKEngine 中的 `registerModule:withClass`方法来注册自己的module
+
+ ```object-c
+ WXSDKEngine.h
+ /**
+ * @abstract Registers a module for a given name
+ * @param name The module name to register
+ * @param clazz The module class to register
+ **/
+ + (void)registerModule:(NSString *)name withClass:(Class)clazz;
+ [WXSDKEngine registerModule:@"event" withClass:[WXEventModule class]];
+ ```
+3. **使用自己的module**
+ 这里的 require 里面的event 就是在 上一步调用`registerModule:` 注册module 时候的name
+
+ ```javascript
+ var eventModule = require('@weex-module/event');
+ eventModule.openURL('url',function(ret) {
+ nativeLog(ret);
+ });
+ ```
+
+ Weex SDK没有 图片下载,navigation 操作的能力,请大家自己实现这些 protocol
+
+### handler 扩展
+ **WXImgLoaderProtocol**
+
+ weexSDK 没有提供图片下载的能力,需要实现 WXImgLoaderProtocol,参考下面的例子
+
+ ```object-c
+ WXImageLoaderProtocol.h
+ @protocol WXImgLoaderProtocol <WXModuleProtocol>
+ /**
+ * @abstract Creates a image download handler with a given URL
+ * @param imageUrl The URL of the image to download
+ * @param imageFrame The frame of the image you want to set
+ * @param options : The options to be used for this download
+ * @param completedBlock : A block called once the download is completed.
+ image : the image which has been download to local.
+ error : the error which has happened in download.
+ finished : a Boolean value indicating whether download action has finished.
+ */
+ -(id<WXImageOperationProtocol>)downloadImageWithURL:(NSString *)url imageFrame:(CGRect)imageFrame userInfo:(NSDictionary *)options completed:(void(^)(UIImage *image, NSError *error, BOOL finished))completedBlock;
+ @end
+ ```
+
+ 实现上述协议
+
+ ```object-c
+ @implementation WXImgLoaderDefaultImpl
+ #pragma mark -
+ #pragma mark WXImgLoaderProtocol
+
+ - (id<WXImageOperationProtocol>)downloadImageWithURL:(NSString *)url imageFrame:(CGRect)imageFrame userInfo:(NSDictionary *)userInfo completed:(void(^)(UIImage *image, NSError *error, BOOL finished))completedBlock
+ {
+ if ([url hasPrefix:@"//"]) {
+ url = [@"http:" stringByAppendingString:url];
+ }
+ return (id<WXImageOperationProtocol>)[[SDWebImageManager sharedManager] downloadImageWithURL:[NSURL URLWithString:url] options:0 progress:^(NSInteger receivedSize, NSInteger expectedSize) {
+ } completed:^(UIImage *image, NSError *error, SDImageCacheType cacheType, BOOL finished, NSURL *imageURL) {
+ if (completedBlock) {
+ completedBlock(image, error, finished);
+ }
+ }];
+ }
+ @end
+ ```
+
+5. **handler注册**
+
+ 你可以通过WXSDKEngine 中的 `registerHandler:withProtocol`注册handler
+
+ ```object-c
+ WXSDKEngine.h
+ /**
+ * @abstract Registers a handler for a given handler instance and specific protocol
+ * @param handler The handler instance to register
+ * @param protocol The protocol to confirm
+ */
+ + (void)registerHandler:(id)handler withProtocol:(Protocol *)protocol;
+
+ [WXSDKEngine registerHandler:[WXImgLoaderDefaultImpl new] withProtocol:@protocol(WXImgLoaderProtocol)]
+ ```
+
+#### Component 扩展
+ 虽然WeexSDK中有提供内置的一些Component,但这有可能并不能满足你的需求。在之前你可能已经写了一些很酷炫native的组件,想包装一下,导入到Weex中,因此我们提供了让开发者实现自己的native Component
+ 下面将以WeexSDK 中已经存在的 Component:`image`为例子,介绍一下如何构建一个native Component.
+ 假设你已经了解IOS开发
+ 1. 注册 Component
+ 注册一个component比较简单,调用 `WXSDKEngine` 中的 `registerComponent:withClass:`方法,传入组件的标签名称,还有对应的class
+ 然后你可以创建一个 `WXImageComponent` 表示`image`组件的实现 在.we 文件中,只需要写
+ <image></image>
+ 2. 添加属性
+ 现在我们要做一些让image component更加强大的事情。既然作为一个图片的component,那它应该要有源,给他加上一个 `src`的属性,同时给它加上一个`resize`的属性(可以配置的有`contain/cover/stretch`)
+
+ ```
+ @interface WXImageComponent ()
+
+ @property (nonatomic, strong) NSString *imageSrc;
+ @property (nonatomic, assign) UIViewContentMode resizeMode;
+
+ @end
+ ```
+ component中所有的style,attribute,events都会被传递到 Component的初始化方法中,所以,你可以在初始化方法中存储你感兴趣的一些属性值
+
+ ```
+ @implementation WXImageComponent
+
+ - (instancetype)initWithRef:(NSString *)ref type:(NSString *)type styles:(NSDictionary *)styles attributes:(NSDictionary *)attributes events:(NSArray *)events weexInstance:(WXSDKInstance *)weexInstance
+ {
+ if (self = [super initWithRef:ref type:type styles:styles attributes:attributes events:events weexInstance:weexInstance]) {
+ _imageSrc = [WXConvert NSString:attributes[@"src"]];
+ _resizeMode = [WXConvert UIViewContentMode:attributes[@"resize"]];
+ }
+
+ return self;
+ }
+
+ @end
+ ```
+
+ attribute中拿到的值的类型都是`id`,我们可以用转换方法把它转换到任何值。Weex SDK提供了一些基础的转换方法,可以参考 `WXConvert`类,或者你可以添加自己的转换函数
+
+ 1. Hooking 渲染生命周期
+ native 的component 是由Weex管理的,weex 创建,布局,渲染,销毁。weex的component生命周期都是可以hook的,你可以在这些生命周期中去做自己的事情
+
+ | 方法 | 描述 |
+ | :-: | --- |
+ | initWithRef:type:... | 用给定的属性初始化一个component. |
+ | layoutDidFinish | 在component完成布局时候会调用. |
+ | loadView | 创建component管理的view. |
+ | viewWillLoad | 在component的view加载之前会调用. |
+ | viewDidLoad | 在component的view加载完之后调用. |
+ | viewWillUnload | 在component的view被释放之前调用. |
+ | viewDidUnload | 在component的view被释放之后调用. |
+ | updateStyles: | 在component的style更新时候调用. |
+ | updateAttributes: | 在component的attribute更新时候调用. |
+ | addEvent: | 给component添加event的时候调用. |
+ | removeEvent: | 在event移除的时候调用. |
+
+ 在image component的例子里面,如果我们需要我们自己的image view 的话,可以复写 `loadView`这个方法.
+
+ ```
+ - (UIView *)loadView
+ {
+ return [[WXImageView alloc] init];
+ }
+ ```
+
+ 现在我们使用 `WXImageView` 渲染 `image` component。
+ 1. 作为一个image component,我们需要拿到服务器图片,而且把它设置进image view 里. 这个操作可以在 `viewDidLoad` 方法中做,这个方法是在view已经被创建而且加载了时候weex SDK会调用到,而且`viewDidLoad`这个方法是你做额外初始化工作比如改变content mode(也就是设置resize) 的最好时间.
+
+ ```
+ - (void)viewDidLoad
+ {
+ UIImageView *imageView = (UIImageView *)self.view;
+ imageView.contentMode = _resizeMode;
+ imageView.userInteractionEnabled = YES;
+ imageView.clipsToBounds = YES;
+ imageView.exclusiveTouch = YES;
+
+ // Do your image fetching and updating logic
+ }
+ ```
+
+ 1. 如果可以改变image的src,也可以hook `updateAttributes:`方法来做属性更新操作,当`updateAttributes:`或者 `updateStyles:`被调用的时候, component的view 已经加载完成
+
+ ```
+ - (void)updateAttributes:(NSDictionary *)attributes
+ {
+ if (attributes[@"src"]) {
+ _imageSrc = [WXConvert NSString:attributes[@"src"]];
+ // Do your image updating logic
+ }
+
+ if (attributes[@"resize"]) {
+ _resizeMode = [WXConvert UIViewContentMode:attributes[@"resize"]];
+ self.view.contentMode = _resizeMode;
+ }
+ }
+ ```
+
+ 或许你需要考虑更多的生命周期方法去Hook,当布局完成时候,像`layoutDidFinish`,如果你想了解更多,可以参考一下`WXComponent.h` 声明的方法
+ 现在你可以用在任何 .we文件里面使用 `<image>`,而且可以加上 image的属性
+
+ ```
+ <image style="your-custom-style" src="image-remote-source" resize="contain/cover/stretch"></image>
+ ```
+##### component 方法
+WeexSDK 0.9.5 之后支持了在js中直接调用component的方法,这里提供一个例子,
+
+- 自定义一个WXMyCompoenent 的组件
+
+ ```
+ @implementation WXMyComponent
+ WX_EXPORT_METHOD(@selector(focus)) // 暴露该方法给js
+ - (instancetype)initWithRef:(NSString *)ref type:(NSString *)type styles:(NSDictionary *)styles attributes:(NSDictionary *)attributes events:(NSArray *)events weexInstance:(WXSDKInstance *)weexInstance
+ {
+ if (self = [super initWithRef:ref type:type styles:styles attributes:attributes events:events weexInstance:weexInstance]) {
+ // handle your attributes
+ // handle your styles
+ }
+
+ return self;
+ }
+
+ - (void)focus
+ {
+ NSLog(@"you got it");
+ }
+ @end
+ ```
+
+- 注册组件 `[WXSDKEngine registerComponent:@"mycomponent" withClass:[WXMyComponent class]] `
+- 在weex 文件中调用
+
+ ```html
+ <template>
+ <mycomponent id='mycomponent'></mycomponent>
+ </template>
+ <script>
+ module.exports = {
+ created: function() {
+ this.$el('mycomponent').focus();
+ }
+ }
+ </script>
+ ```
+
+
+
+
\ No newline at end of file
http://git-wip-us.apache.org/repos/asf/incubator-weex-site/blob/32a097bf/_draft/v1.0/advanced/how-data-binding-works.md
----------------------------------------------------------------------
diff --git a/_draft/v1.0/advanced/how-data-binding-works.md b/_draft/v1.0/advanced/how-data-binding-works.md
new file mode 100644
index 0000000..a905422
--- /dev/null
+++ b/_draft/v1.0/advanced/how-data-binding-works.md
@@ -0,0 +1,39 @@
+---
+title: 数据绑定原理
+type: advanced
+order: 2
+has_chapter_content: true
+version: 0.10
+---
+
+# 数据绑定实现原理
+
+Weex 的 JS Framework 是一个 MVVM,即 Model-View-ViewModel 框架。他会自动监听数据的变化,并通过 `{% raw %}{{字段名}}{% endraw %}` 的语法把数据和视图中所展示的内容自动绑定起来。当数据被改写的时候,视图会自动根据数据的变化而发生相应的变化。
+
+比如下面这个例子,`<text>` 的内容被绑定在了 `notes` 数据字段上:
+
+```html
+<template>
+ <div>
+ <text>{{notes}}</text>
+ </div>
+<template>
+
+<script>
+ module.exports = {
+ data: {
+ notes: 'Hello'
+ }
+ }
+</script>
+```
+
+Weex 的 JS Framework 会首先对 `data` 里的数据进行监听,这样未来的数据变化都能够被监听到。然后我们会编译整个 `<template>` 标签里的内容。当我们找到 `<text>` 标签里的 `{% raw %}{{notes}}{% endraw %}` 时,JS Framework 会跟踪 `data.notes` 的变化并在其发生变化时触发一个句柄,将 `<text>` 的内容设置为 `data.notes` 最新的值。这样的话开发者就不必手动关心数据和视图之间的数据同步问题了。
+
+在这个基础上我们还设计了一些特殊的语法:
+
+- `<foo if="...">` 代表一个条件监听,当其值为 `true` 时,`<foo>` 元素将会被创建和载入,反之则不会被创建或被移除掉。
+- `<foo repeat="...">` 代表一个列表监听,第一次加载的时候 `<foo>` 元素会被按照数组里的数据逐条 clone 并赋值。而当有列表项增加、移动或移除时,视图层也会自动触发相应的改变,并且智能优化至最小变更策略
+- `<foo if="..." repeat="...">` 两个特殊语法共用时,将会优先展开 `repeat` 然后逐条判断 `if`。
+
+相比于一些 virtual-DOM 的 diff 计算机制,我们会直接对数据进行 diff,而且只会 diff 由于用户操作或数据操作发生改变的那部分数据和视图,这是一种更小范围的计算方式。尤其在追求轻量快速的移动端界面上,这种更新机制更加显得具有优势。
http://git-wip-us.apache.org/repos/asf/incubator-weex-site/blob/32a097bf/_draft/v1.0/advanced/images/how-arch.png
----------------------------------------------------------------------
diff --git a/_draft/v1.0/advanced/images/how-arch.png b/_draft/v1.0/advanced/images/how-arch.png
new file mode 100644
index 0000000..a13df7a
Binary files /dev/null and b/_draft/v1.0/advanced/images/how-arch.png differ
http://git-wip-us.apache.org/repos/asf/incubator-weex-site/blob/32a097bf/_draft/v1.0/advanced/images/how-render.png
----------------------------------------------------------------------
diff --git a/_draft/v1.0/advanced/images/how-render.png b/_draft/v1.0/advanced/images/how-render.png
new file mode 100644
index 0000000..db9b0f4
Binary files /dev/null and b/_draft/v1.0/advanced/images/how-render.png differ
http://git-wip-us.apache.org/repos/asf/incubator-weex-site/blob/32a097bf/_draft/v1.0/advanced/index.md
----------------------------------------------------------------------
diff --git a/_draft/v1.0/advanced/index.md b/_draft/v1.0/advanced/index.md
new file mode 100644
index 0000000..8fea01e
--- /dev/null
+++ b/_draft/v1.0/advanced/index.md
@@ -0,0 +1,146 @@
+---
+title: Weex 工作原理
+type: advanced
+order: 1
+has_chapter_content: true
+version: 0.10
+---
+
+# Weex 工作原理概述
+
+## 总览
+
+Weex是跨平台,可扩展的动态化技术. 你能通过在Weex源码中写`<template>`, `<style>` 和 `<script>`标签,然后把这些标签转换为JS Bundle用于部署, 在服务端以这些JS Bundle响应请求. 当客户端接收到JS Bundle时,它能用被客户端中的JS引擎用于管理Native渲染;API调用和用户交互.
+
+### 工作流
+
+```
+Weex we 文件 --------------前端(we源码)
+↓ (转换) ------------------前端(构建过程)
+JS Bundle -----------------前端(JS Bundle代码)
+↓ (部署) ------------------服务器
+在服务器上的JS bundle ----服务器
+↓ (编译) ------------------ 客户端(JS引擎)
+虚拟 DOM 树 --------------- 客户端(Weex JS Framework)
+↓ (渲染) ------------------ 客户端(渲染引擎)
+Native视图 --------------- 客户端(渲染引擎)
+```
+
+在上面的工作流中,我们提到:
+
+- Transformer(转换器): 一个Node JS工具, 转换Weex源码为JS Bundle
+- Weex JS Framework(JS框架): 运行于客户端的的JS框架,管理着Weex实例的运行。Weex实例由JS Bundle创建并构建起虚拟DOM树. 另外,它发送/接受 Native 渲染层产生的系统调用,从而间接的响应用户交互。
+- Native引擎: 在不同的端上,有着不同的实现: iOS/Android/HTML5. 他们有着共同的组件设计, 模块API 和渲染效果. 所以他们能配合同样的 JS Framework 和 JS Bundle工作。
+
+## 转换器
+
+转换器转换Weex源码为JS Bundle. 整体工作可以分为三个部分:
+
+- 转换 `<template>` 为类JSON的树状数据结构, 转换数据绑定为返回数据的函数原型.例如. For example: `<foo a="{% raw %}{{x}}{% endraw %}" b="1" />` 将转换为 `{type: "foo", attr: {a: function () {return this.x}, b: 1}}`.
+- 转换 `<style>` 为类JSON的树状数据结构. 例如: `.classname {name: value;}` 将转换为 `{classname: {name: value}}`.
+- 把上面两部分的内容和 `<script>` 中的内容结合. 上面的三个部分将结合成一个JavaScript AMD 模块.
+
+一个完整的例子:
+
+```html
+<template>
+ <foo a="{{x}}" b="1" class="bar"></foo>
+</template>
+<style>
+ .bar {width: 200; height: 200}
+</style>
+<script>
+ module.exports = {
+ data: function () {
+ return {x: 100}
+ }
+ }
+</script>
+```
+
+将转换为:
+
+```javascript
+define('@weex-component/main', function () {
+ module.exports = {
+ data: function () {
+ return {x: 100}
+ }
+ }
+ module.template = {
+ type: "foo",
+ attr: {
+ a: function () {return this.x},
+ b: 1,
+ classname: ['bar']
+ }
+ }
+ module.style = {
+ bar: {width: 200, height: 200}
+ }
+})
+bootstrap('@weex-component/main')
+```
+
+除此之外,转换器还会做一些额外的事情: 合并Bundle ,添加引导函数,配置外部数据等等,更详细的,请参阅[Synatax](../references/specs/js-bundle-format.html)章节.
+
+## 注意
+
+当前大部分Weex工具最终输出的JS Bundle格式都经过了[Webpack](https://webpack.github.io/)的二次处理,所以你实际使用工具输出的JS Bundle会和上面的有所区别.
+## JS Framework
+
+JS Framework 在初始化阶段被原生 JavaScript 引擎运行. 它提供被每个JS Bundle调用的 `define()` 和 `bootstrap()` 函数. 一旦JS Bundle从服务器下载后,这些函数就会执行. `define()` 函数以注册模块;`bootstrap()`会编译主要的模块为虚拟DOM,并发送渲染指令给Native .
+
+JS 和 Native 的沟通主要通过两个关键方法进行:
+
+- `callNative` 是一个由native代码实现的函数, 它被JS代码调用并向native发送指令,例如 `rendering`, `networking`, `authorizing`和其他客户端侧的 `toast` 等API.
+- `callJS` 是一个由JS实现的函数, 它用于Native向JS发送指令. 目前这些指令由用户交互和Native的回调函数组成.
+## Native 渲染引擎
+
+Native 渲染引擎提供客户端组件和模块.
+
+**Component(组件)** 在屏幕内可见,有特定行为. 能被配置不同的属性和样式,能响应用户交互. 常见的组件有: `<div>`, `<text>`, `<image>`.
+
+**Module(模块)** 是一组能被JS Framework调用的API. 其中的一些能以异步的方式调用JS Framework, 例如: 发送HTTP请求.
+
+在Weex实例运行期间,Native渲染引擎将接收各种各样不同模块的API调用。这些调用创建或更新组件外观,运行如`toast`的Native API.当用户交互或模块回调时,`callJS()`会由JS Framework调用. 这样的循环往复将从Weex实例初始化到销毁一直持续. 如下面的架构图所示, HTML5渲染引擎提供和Native渲染引擎几乎一致的功能。
+
+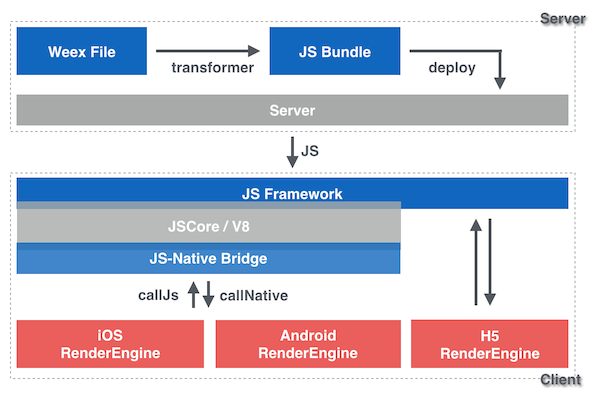
+
+Weex架构图
+
+### 从Javascript中调用Native
+
+```
+[JS Framework]
+↓ callNative
+模块 APIs
+ 渲染 -> 模块显示
+ 其他功能
+[Native 渲染引擎]
+```
+### 从Native中调用Javascript
+
+```
+[Native 渲染引擎]
+模块 APIs 回调
+用户交互
+↓ callJS
+[JS Framework]
+```
+### 渲染流程
+
+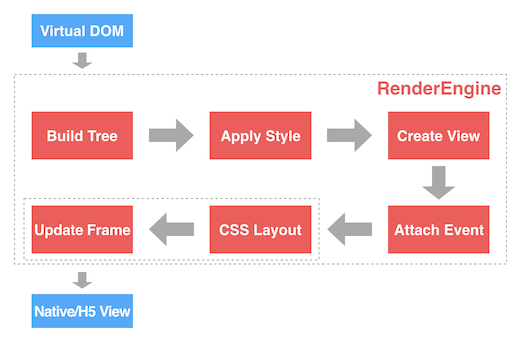
+
+Weex 渲染流程
+
+1. 虚拟DOM.
+2. **构造树结构**. 分析虚拟DOM JSON数据以构造渲染树(RT).
+3. **添加样式**. 为渲染树的各个节点添加样式.
+4. **创建视图**. 为渲染树各个节点创建Native视图.
+5. **绑定事件**. 为Native视图绑定事件.
+6. **CSS布局**. 使用 [css-layout](https://github.com/facebook/css-layout) 来计算各个视图的布局.
+7. **更新视窗(Frame)**. 采用上一步的计算结果来更新视窗中各个视图的最终布局位置.
+8. 最终页面呈现.
+
+在Weex HTML5环境下 `CSS 布局` and `更新视窗` 由浏览器引擎(例如webkit)实现.
http://git-wip-us.apache.org/repos/asf/incubator-weex-site/blob/32a097bf/_draft/v1.0/advanced/integrate-devtools-to-android.md
----------------------------------------------------------------------
diff --git a/_draft/v1.0/advanced/integrate-devtools-to-android.md b/_draft/v1.0/advanced/integrate-devtools-to-android.md
new file mode 100644
index 0000000..5bffd05
--- /dev/null
+++ b/_draft/v1.0/advanced/integrate-devtools-to-android.md
@@ -0,0 +1,272 @@
+---
+title: 集成 Devtools 到 Android
+type: advanced
+order: 12
+has_chapter_content: true
+version: 0.10
+---
+
+# 集成 Devtools 到 Android
+
+Weex Devtools 能够方便调试 Weex 页面,但此功能离不开 Native 的支持。如何让你的 App 也集成 Devtools,在本章将会详细说明 Android 端如何接入 Weex Devtools。
+
+## Android 应用接入
+
+### 添加依赖
+
+可以通过 Gradle 或者 Maven 添加对 devtools aar 的依赖,也可以直接对源码依赖。强烈建议使用最新版本,因为 Weex SDK 和 devtools 都在快速的迭代开发中,新版本会有更多惊喜,同时也修复老版本中一些问题。最新的 release 版本可在[这里](https://github.com/weexteam/weex_devtools_android/releases)查看。所有的 release 版本都会发布到 [jcenter repo](https://bintray.com/alibabaweex/maven/weex_inspector)。
+
+- *Gradle 依赖*
+
+ ```gradle
+ dependencies {
+ compile 'com.taobao.android:weex_inspector:0.8.0.0'
+ }
+ ```
+
+- *Maven依赖*
+
+ ```xml
+ <dependency>
+ <groupId>com.taobao.android</groupId>
+ <artifactId>weex_inspector</artifactId>
+ <version>0.8.0.0</version>
+ <type>pom</type>
+ </dependency>
+ ```
+
+- *源码依赖*
+
+ 需要复制 [inspector](https://github.com/weexteam/weex_devtools_android/tree/master/inspector) 目录到你的 App 的同级目录,然后在工程的 `settings.gradle` 文件下添加 `include ":inspector"`,此过程可以参考 playground 源码的工程配置及其配置,然后在 App 的 `build.gralde` 中添加依赖。
+
+ ```gradle
+ dependencies {
+ compile project(':inspector')
+ }
+ ```
+
+ 另外 weex_inspector 中有一部分包是以 provided 的方式引入,接入方需要自行解决依赖和版本冲突。
+
+ - **provided方式引用的包**
+
+ ```gradle
+ dependencies {
+ provided 'com.google.code.findbugs:jsr305:2.0.1'
+ provided 'com.android.support:appcompat-v7:23.1.1'
+ provided 'com.taobao.android:weex_sdk:0.8.0'
+ provided 'com.alibaba:fastjson:1.1.45+'
+ ...
+ }
+ ```
+
+ - **反射引用的包(0.8.0.0以上版本)**
+
+ ```gradle
+ dependencies {
+ compile 'com.squareup.okhttp:okhttp:2.3.0'
+ compile 'com.squareup.okhttp:okhttp-ws:2.3.0'
+ ...
+ }
+ ```
+
+ 或者
+
+ ```gradle
+ dependencies {
+ compile 'com.squareup.okhttp:okhttp:3.4.1'
+ compile 'com.squareup.okhttp:okhttp-ws:3.4.1'
+ ...
+ }
+ ```
+
+#### 版本兼容
+
+| weex sdk | weex inspector | Debugger Server |
+|----------|----------------|-----------------|
+| 0.8.0.1+ | 0.0.8.1+ | 0.2.39+ |
+| 0.7.0+ | 0.0.7.13 | 0.2.38 |
+| 0.6.0+ | 0.0.2.2 | - |
+
+
+### 添加 Debug 模式开关
+
+控制调试模式的打开和关闭的关键点可以概括为三条规则。
+
+**规则一:通过 `sRemoteDebugMode` 和 `sRemoteDebugProxyUrl` 和来设置开关和 Debugger Server 地址。**
+
+Weex SDK 的 `WXEnvironment` 类里有一对静态变量标记了 Weex 当前的调试模式是否开启分别是:
+
+```java
+public static boolean sRemoteDebugMode; // 是否开启 debug 模式,默认关闭
+public static String sRemoteDebugProxyUrl; // DebugServer的websocket地址
+```
+
+无论在 App 中无论以何种方式设置 Debug 模式,都必须在恰当的时机调用类似如下的方法来设置 `WXEnvironment.sRemoteDebugMode` 和 `WXEnvironment.sRemoteDebugProxyUrl`。
+
+```java
+private void initDebugEnvironment(boolean enable, String host) {
+ WXEnvironment.sRemoteDebugMode = enable;
+ WXEnvironment.sRemoteDebugProxyUrl = "ws://" + host + ":8088/debugProxy/native";
+}
+```
+
+**规则二:修改 `sRemoteDebugMode` 后一定要调用``WXSDKEngine.reload()`。**
+
+一般來說,在修改了 `WXEnvironment.sRemoteDebugMode` 以后调用了 `WXSDKEngine.reload()` 方法才能够使 Debug模式生效。`WXSDKEngine.reload()` 用来重置 Weex 的运行环境上下文,在切换调试模式时需要调用此方法来创建新的 Weex 运行时和 DebugBridge 并将所有的 JS 调用桥接到调试服务器执行。在 reload 过程中会调用 launchInspector,这就是 SDK 控制 Debug 模式最核心一个方法,其传入参数即为 `sRemoteDebugMode`,若为 `true` 则该方法中尝试以反射的方式获取 DebugBridge 用来在远端执行 JS,否则在本地运行。
+
+```java
+private void launchInspector(boolean remoteDebug) {
+ if (WXEnvironment.isApkDebugable()) {
+ try {
+ if (mWxDebugProxy != null) {
+ mWxDebugProxy.stop();
+ }
+ HackedClass<Object> debugProxyClass = WXHack.into("com.taobao.weex.devtools.debug.DebugServerProxy");
+ mWxDebugProxy = (IWXDebugProxy) debugProxyClass.constructor(Context.class, WXBridgeManager.class)
+ .getInstance(WXEnvironment.getApplication(), WXBridgeManager.this);
+ if (mWxDebugProxy != null) {
+ mWxDebugProxy.start();
+ if (remoteDebug) {
+ mWXBridge = mWxDebugProxy.getWXBridge();
+ } else {
+ if (mWXBridge != null && !(mWXBridge instanceof WXBridge)) {
+ mWXBridge = null;
+ }
+ }
+ }
+ } catch (HackAssertionException e) {
+ WXLogUtils.e("launchInspector HackAssertionException ", e);
+ }
+ }
+}
+```
+
+只要遵循上面的原理,开启 Debug 模式的方式和时机可由接入方灵活实现。从 launchInspector 可以看到,SDK 对 devtools 的 aar 包并无强依赖,我们的 App 只需要在 Debug 包中打包该 aar 即可,这样多少可以缓解包大小问题和安全问题。
+
+**例外:** _若修改 `WXEnvironment.sRemoteDebugMode` 的时机在 `WXBridgeManager` 初始化和 restart 和之前则 `WXSDKEngine.reload()` 可忽略._
+
+**规则三:通过响应 `ACTION_DEBUG_INSTANCE_REFRESH` 广播及时刷新。**
+
+广播 `ACTION_DEBUG_INSTANCE_REFRESH` 在调试模式切换和 Chrome 调试页面刷新时发出,主要用来通知当前的 Weex容器以 Debug 模式重新加载当前页。在 playground 中的处理过程如下:
+
+```java
+public class RefreshBroadcastReceiver extends BroadcastReceiver {
+ @Override
+ public void onReceive(Context context, Intent intent) {
+ if (IWXDebugProxy.ACTION_DEBUG_INSTANCE_REFRESH.equals(intent.getAction())) {
+ if (mUri != null) {
+ if (TextUtils.equals(mUri.getScheme(), "http") || TextUtils.equals(mUri.getScheme(), "https")) {
+ loadWXfromService(mUri.toString());
+ } else {
+ loadWXfromLocal(true);
+ }
+ }
+ }
+ }
+}
+```
+
+如果接入方的容器未对该广播做处理,那么将不支持刷新和调试过程中编辑代码时的 watch 功能。
+
+## 接入示例
+
+最简单方式就是复用 Playground 的相关代码,比如扫码和刷新等模块,但是扫码不是必须的,它只是与 App 通信的一种形式,二维码里的包含DebugServer IP 及 bundle 地址等信息,用于建立 App 和 Debugger Server 之间的连接及动态加载 bundle。在 Playground 中给出了两种开启 debug 模式的范例。
+
+* 范例1:通过在 `XXXApplication` 中设置开关打开调试模式
+
+```java
+public class MyApplication extends Application {
+ public void onCreate() {
+ super.onCreate();
+ initDebugEnvironment(true, "xxx.xxx.xxx.xxx"/*"DEBUG_SERVER_HOST"*/);
+ }
+}
+```
+
+这种方式最直接,在代码中直接 hardcode 了开启调试模式,如果在 SDK 初始化之前调用甚至连 `WXSDKEngine.reload()` 都不需要调用,接入方如果需要更灵活的策略可以将 `initDebugEnvironment(boolean enable, String host)` 和 `WXSDKEngine.reload()` 组合在一起在合适的位置和时机调用即可。
+
+* 范例2:通过扫码打开调试模式
+
+Playground 中较多的使用扫码的方式传递信息,不仅用这种方式控制 Debug 模式的开关,而且还通过它来传入 bundle 的 url 直接调试。应当说在开发中这种方式是比较高效的,省去了修改 SDK 代码重复编译和安装 App 的麻烦,缺点就是调试工具这种方式接入需要 App 具有扫码和处理特定规则二维码的能力。除了 Playground 中的方式,接入方亦可根据业务场景对 Debugger 和接入方式进行二次开发。
+
+Playground 集成的具体代码可参考如下两个文件:
+
+* 开关控制,主要参考对二维码的处理部分,详见 [`WXApplication.java`](https://github.com/weexteam/weex_devtools_android/blob/master/playground/app/src/main/java/com/alibaba/weex/WXApplication.java)
+
+* 刷新控制 ,主要参考是对容器 `ACTION_DEBUG_INSTANCE_REFRESH`的处理,详见 [`WXPageActivity.java`](https://github.com/weexteam/weex_devtools_android/blob/master/playground/app/src/main/java/com/alibaba/weex/WXPageActivity.java)
+
+## 牛刀小试
+
+### 前置工作
+
+如果未安装 Debugger Server,在命令行执行 `npm install -g weex-toolkit` 既可以安装调试服务器,运行命令 `weex debug` 就会启动 DebugServer 并打开一个调试页面(详情请查看 [本地开发](/develop-on-your-local-machine.md))。页面下方会展示一个二维码,这个二维码用于向 App 传递 Server 端的地址建立连接。
+
+
+
+### 开始调试
+
+如果你的 App 客户端完成了以上步骤那么恭喜你已经接入完毕,可以愉快的调试 Weex bundle 了,调试体验和网页调试一致!建议新手首先用官方的 Playground 体验一下调试流程。只需要启动 App 扫描 Chrome 调试页面下方的第一个二维码即可建立与 Debugger Server 的通信,Chorome 的调试页面将会列出连接成功的设备信息。
+
+
+
+#### 主要步骤如下
+
+1. 如果你要加载服务器上 bundle,第一步就是要让你的 bundle sever 跑起来. 在 Playground 中特别简单,只需要你到 Weex 源码目录下,运行 `./start` 即可。
+2. 命令行运行 `weex debug` 启动 Debugger Server,Chrome 将会打开一个网页,在网页下方有一个二维码和简单的介绍。
+3. 启动 App 并确认打开调试模式。你将在上一步中打开的网页中看到一个设备列表,每个设备项都有两个按钮,分别是 `Debugger` 和 `Inspector`。
+4. 点击 `Inspector` Chrome 将创建 Inspector 网页;点击 `Debugger` Chrome 将创建 Debugger 网页;二者是相互独立的功能,不相互依赖。
+
+---
+
+## 背景知识
+
+### Devtools 组件介绍
+Devtools 扩展了 [Chrome Debugging Protocol](https://developer.chrome.com/devtools/docs/debugger-protocol),在客户端和调试服务器之间的采用 [JSON-RPC](https://en.wikipedia.org/wiki/JSON-RPC) 作为通信机制,本质上调试过程是两个进程间协同,相互交换控制权及运行结果的过程。更多细节还请阅读 [Weex Devtools Debugger 的技术选型实录](http://www.atatech.org/articles/59284)这篇文章。
+
+* **客户端**
+
+ Devtools 客户端作为 aar 被集成 App 中,它通过 webscoket 连接到调试服务器,此处并未做安全检查。出于安全机制及包大小考虑,强烈建议接入方只在 debug 版本中打包此 aar。
+
+* **服务器**
+
+ Devtools 服务器端是信息交换的中枢,既连接客户端,又连接 Chrome,大多数情况下扮演一个消息转发服务器和 Runtime Manager 的角色。
+
+* **Web端**
+
+ Chrome 的 V8 引擎扮演着 Bundle javascript runtime 的角色。开启 debug 模式后,所有的 bundle js 代码都在该引擎上运行。另一方面我们也复用了 Chrome 前端的调试界面,例如设置断点,查看调用栈等,调试页关闭则 runtime 将会被清理。
+
+调试的大致过程请参考如下时序图。
+
+
+
+## FAQ
+
+在各业务接入过程中,陆续发现一些问题,对高频次的问题解答如下,开发中以 weex debug -V 的方式启动 Debugger Server 可以看到 server 端的 log 信息,对照上文中的时序图对于定位问题还是非常有帮助,建议调试中默认开启 server 端 log。
+
+1. **扫码 App 在 DebugServerProxy 中抛出 class not found**
+
+ 已知的原因如下:
+
+ * weex_inspector 以 provided 方式引用的包是否引入成功,如 fastjson 等。
+ * weex_inspector 以 compile 方式引用的包是否引入成功,某些 app 重新引入 `com.squareup.okhttp:okhttp:2.3.0` 和 `com.squareup.okhttp:okhttp-ws:2.3.0` 则不再报错。
+ * 混淆规则影响反射。
+
+2. **playground 扫码调试 crash**
+
+ 已知的原因如下:
+
+ * 系统为 android 6+,崩溃信息提示进程需要 `android.permission.READ_PHONE_STATE` 权限,代码中未做权限检查,在 0.0.2.7 版本以后已修复,不再需要此权限。
+
+3. **扫码后设备列表页并没有出现我的设备信息**
+
+ 已知的原因如下:
+
+ * Debugger Server 和手机在不同网段,被防火墙隔离。
+ * 手机连接了 PC 端的代理,当前尚不支持。
+ * 多进程连接服务器端的同一端口,比如在 Application 的 `onCreate` 中初始化 sdk,若多个进程连接服务器端的同一端口则报错,在 0.0.2.3 版本以后已支持多进程无此问题。
+
+4. **调试过程中频繁刷新连接失败,Server 端提示重新启动 App,非必现**
+
+ 已知的原因如下:
+
+ * 多线程操作网络连接引起,在频繁的即断即连时容易触发。在 0.0.7.1 版本已修复。
http://git-wip-us.apache.org/repos/asf/incubator-weex-site/blob/32a097bf/_draft/v1.0/advanced/integrate-devtools-to-ios.md
----------------------------------------------------------------------
diff --git a/_draft/v1.0/advanced/integrate-devtools-to-ios.md b/_draft/v1.0/advanced/integrate-devtools-to-ios.md
new file mode 100644
index 0000000..18e0050
--- /dev/null
+++ b/_draft/v1.0/advanced/integrate-devtools-to-ios.md
@@ -0,0 +1,230 @@
+---
+title: 集成 Devtools 到 iOS
+type: advanced
+order: 13
+has_chapter_content: true
+version: 0.10
+---
+
+# 集成 Devtools 到 iOS
+
+Weex Devtools 能够方便调试 Weex 页面,但此功能离不开 Native 的支持。如何让你的 App 也集成 Devtools,在本章将会详细说明 iOS 端如何接入 Weex Devtools。
+
+## iOS 应用接入
+
+### 添加依赖
+
+#### 方法一:cocoapods 依赖
+
+在工程目录的 podfile 添加如下代码
+
+```
+source https://github.com/CocoaPods/Specs.git,
+pod 'WXDevtool', '0.7.0', :configurations => ['Debug'],
+```
+
+目前有如下几个版本:
+
+0.7.0, 0.6.1, 0.1.1, 0.1.0 [master repo]
+
+---
+
+可以通过更新本地 podspec repo,pod search 来查询最新版本,在 podfile 文件添加依赖。
+
+
+*** 推荐在DEBUG模式下依赖。 ***
+
+#### 方法二:github 源码依赖
+
+
+1. [拉取](https://github.com/weexteam/weex-devtool-iOS)最新的WXDevtool代码。
+
+2. 按照如下图示:直接拖动source目录源文件到目标工程中
+
+ 
+
+3. 按照红框中配置勾选
+
+ 
+
+
+ 在相对较大的互联网App研发中, framework 静态库被广泛应用,所以推荐使用方法一接入。
+
+### 集成功能
+
+如果按照方法一接入:podfile 的方式,添加头文件包含:
+
+```
+#import <TBWXDevtool/WXDevtool.h>
+```
+
+如果按照方法二接入:源码依赖的方式,添加头文件包含:
+
+```
+#import "WXDevtool.h"
+```
+
+查看 WXDevtool 头文件如下:
+
+```object-c
+#import <Foundation/Foundation.h>
+
+@interface WXDevTool : NSObject
+/**
+* set debug status
+* @param isDebug : YES:open debug model and inspect model;
+* default is NO,if isDebug is NO, open inspect only;
+* */
++ (void)setDebug:(BOOL)isDebug;
+
+
+/**
+* get debug status
+* */
++ (BOOL)isDebug;
+
+
+/**
+* launch weex debug
+* @param url : ws://ip:port/debugProxy/native, ip and port is your devtool server address
+* eg:@"ws://30.30.29.242:8088/debugProxy/native"
+* */
++ (void)launchDevToolDebugWithUrl:(NSString *)url;
+
+@end
+```
+
+`setDebug`:参数为 `YES` 时,直接开启 debug 模式,反之关闭,使用场景如下所述
+
+在你自己的程序中添加如下代码:
+
+```object-c
+[WXDevTool launchDevToolDebugWithUrl:@"ws://30.30.31.7:8088/debugProxy/native"];
+```
+
+其中的 ws 地址正是 Weex debug 控制台中出现的地址,直接 copy 到 `launchDevToolDebugWithUrl` 接口中。
+
+如果程序一启动就开启 Weex 调试,**需要在 WeexSDK 引擎初始化之前**添加代码:
+
+```object-c
+[WXDevTool setDebug:YES];
+[WXDevTool launchDevToolDebugWithUrl:@"ws://30.30.31.7:8088/debugProxy/native"];
+```
+
+#### 附加页面刷新功能
+
+- 为什么需要页面刷新功能?
+
+ 如下图所示,当点击 debug 按钮时,js 的运行环境会从手机端(JavaScriptCore)切换到 Chrome(V8),这时需要重新初始化 Weex 环境,重新渲染页面。页面渲染是需要接入方在自己的页面添加。
+
+ 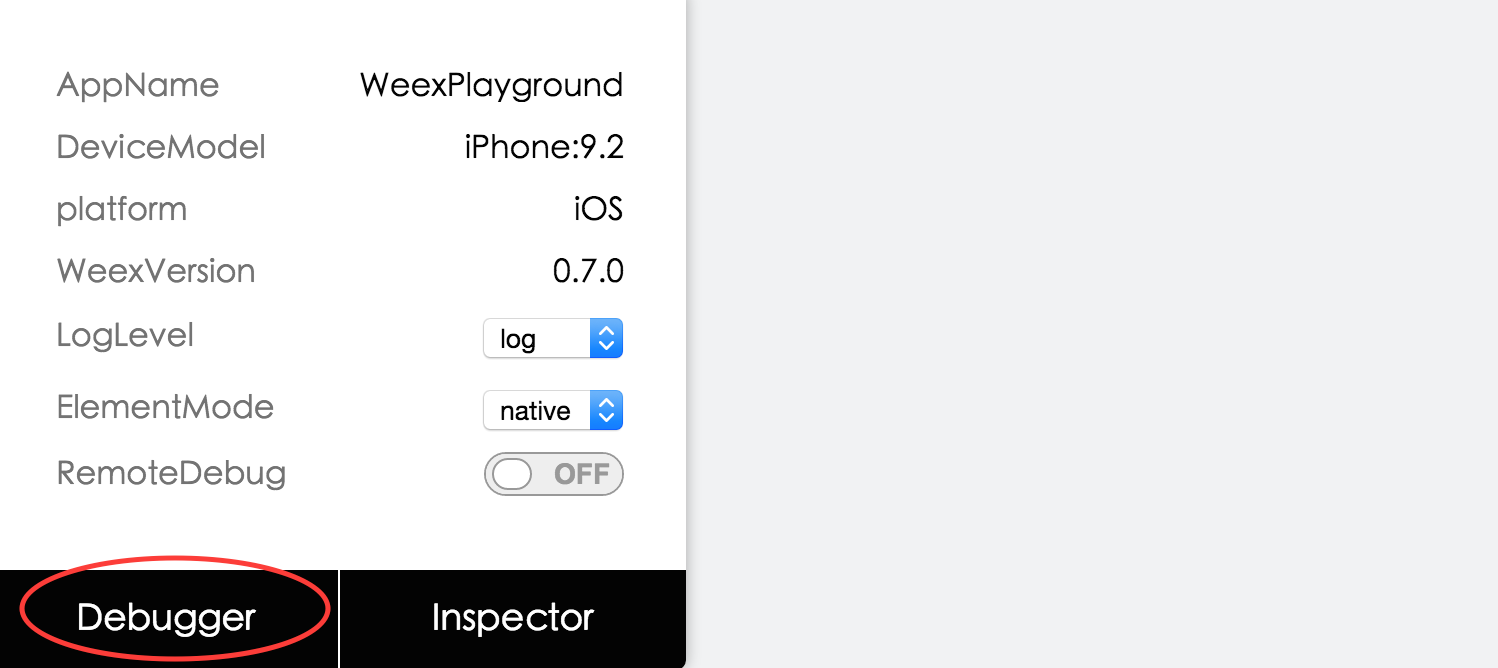
+
+- 什么场景下需要添加页面刷新功能?
+
+ - 点击 debug 按钮调试
+ - 切换 RemoteDebug 开关
+ - 刷新 Chrome 页面(command+R)
+
+- 如何添加刷新
+
+ 在 Weex 页面初始化或 `viewDidLoad` 方法时添加注册通知,举例如下:
+
+ ```object-c
+ [[NSNotificationCenter defaultCenter] addObserver:self selector:notificationRefreshInstance: name:@"RefreshInstance" object:nil];
+ ```
+
+ 最后**千万记得**在 `dealloc` 方法中取消通知,如下所示
+
+ ```
+ - (void)dealloc
+ {
+ [[NSNotificationCenter defaultCenter] removeObserver:self];
+ }
+ ```
+
+ 页面刷新实现,先销毁当前 instance,然后重新创建 instance,举例如下:
+
+ ```
+ - (void)render
+ {
+ CGFloat width = self.view.frame.size.width;
+ [_instance destroyInstance];
+ _instance = [[WXSDKInstance alloc] init];
+ _instance.viewController = self;
+ _instance.frame = CGRectMake(self.view.frame.size.width-width, 0, width, _weexHeight);
+
+ __weak typeof(self) weakSelf = self;
+ _instance.onCreate = ^(UIView *view) {
+ [weakSelf.weexView removeFromSuperview];
+ weakSelf.weexView = view;
+ [weakSelf.view addSubview:weakSelf.weexView];
+ UIAccessibilityPostNotification(UIAccessibilityScreenChangedNotification, weakSelf.weexView);
+ };
+ _instance.onFailed = ^(NSError *error) {
+
+ };
+
+ _instance.renderFinish = ^(UIView *view) {
+ [weakSelf updateInstanceState:WeexInstanceAppear];
+ };
+
+ _instance.updateFinish = ^(UIView *view) {
+ };
+ if (!self.url) {
+ return;
+ }
+ NSURL *URL = [self testURL: [self.url absoluteString]];
+ NSString *randomURL = [NSString stringWithFormat:@"%@?random=%d",URL.absoluteString,arc4random()];
+ [_instance renderWithURL:[NSURL URLWithString:randomURL] options:@{@"bundleUrl":URL.absoluteString} data:nil];
+ }
+ ```
+
+具体实现可参考 [playground](https://github.com/weexteam/weex-devtool-iOS/blob/master/Devtools/playground/WeexDemo/WXDemoViewController.m) `WXDemoViewController.m` 文件
+
+*说明:目前版本需要注册的通知名称为固定的 “RefreshInstance”,下个版本会添加用户自定义 name 。*
+
+## 使用
+
+如果未安装 Debugger Server,在命令行执行 `npm install -g weex-toolkit` 既可以安装调试服务器,运行命令 `weex debug` 就会启动 DebugServer 并打开一个调试页面(详情请查看 [本地开发](../guide/develop-on-your-local-machine.html))。页面下方会展示一个二维码,这个二维码用于向 App 传递 Server 端的地址建立连接。
+
+
+1. 日志级别控制
+
+ 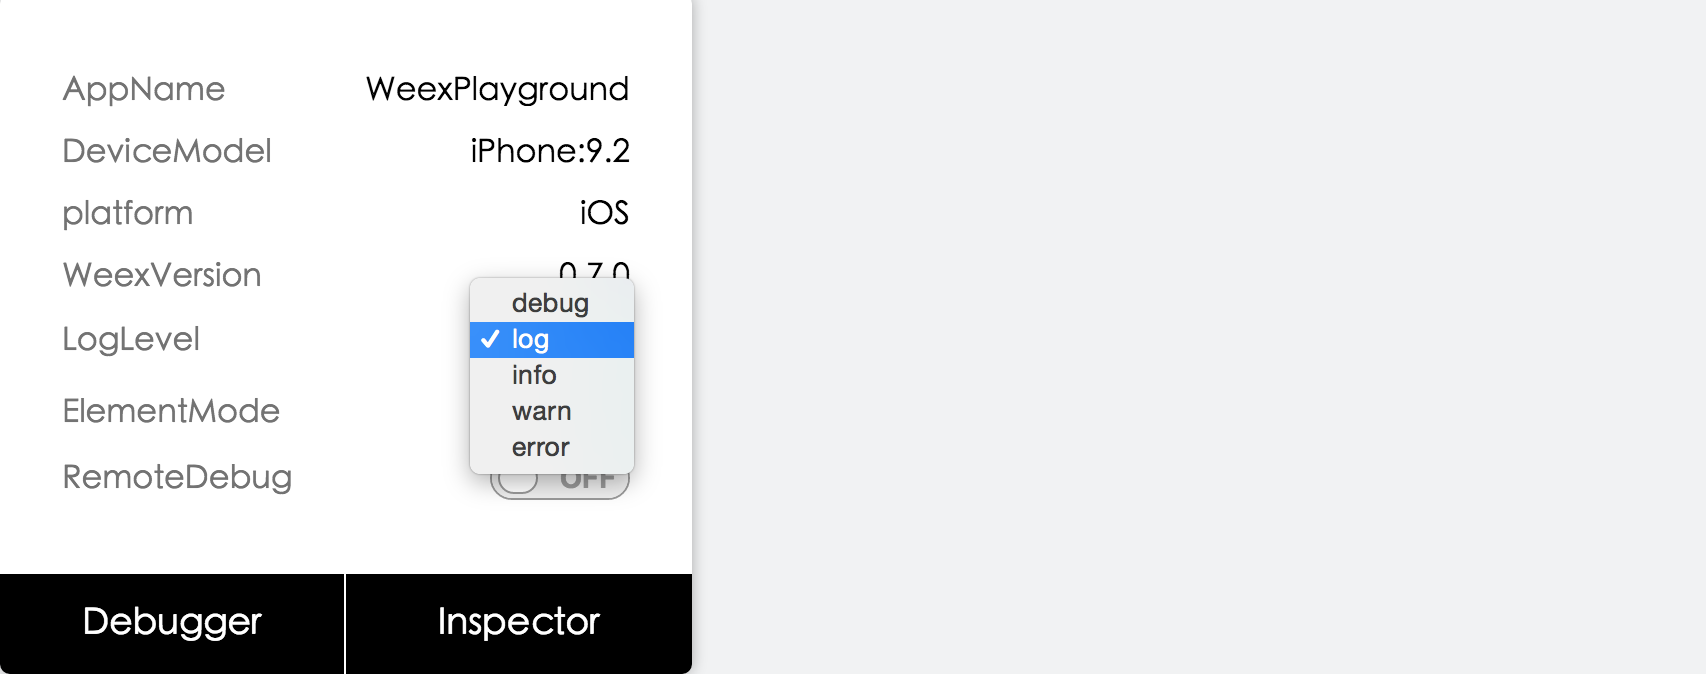
+ 日志级别可以控制native端关于weex的日志。
+
+ 日记级别描述如下:
+
+ ```
+ Off = 0,
+ Error = Error
+ Warning = Error | Warning,
+ Info = Warning | Info,
+ Log = Log | Info,
+ Debug = Log | Debug,
+ All = NSUIntegerMax
+ ```
+
+ 解释:off 关闭日志,Warning 包含 Error、Warning,Info 包含 Warning、Info,Log 包含 Info、Log,Debug 包含 Log、Debug,All 包含所有。
+
+2. Vdom/Native tree选择
+
+ 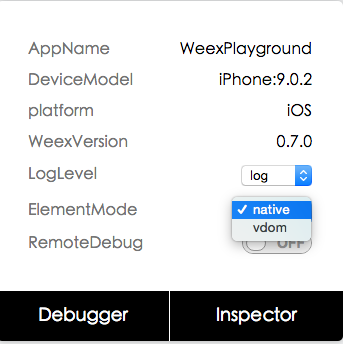
+
+ *图一*
+
+ 
+
+ *图二*
+
+ 点击图一所示native选项会打开图二,方便查看native tree以及view property
+
+ 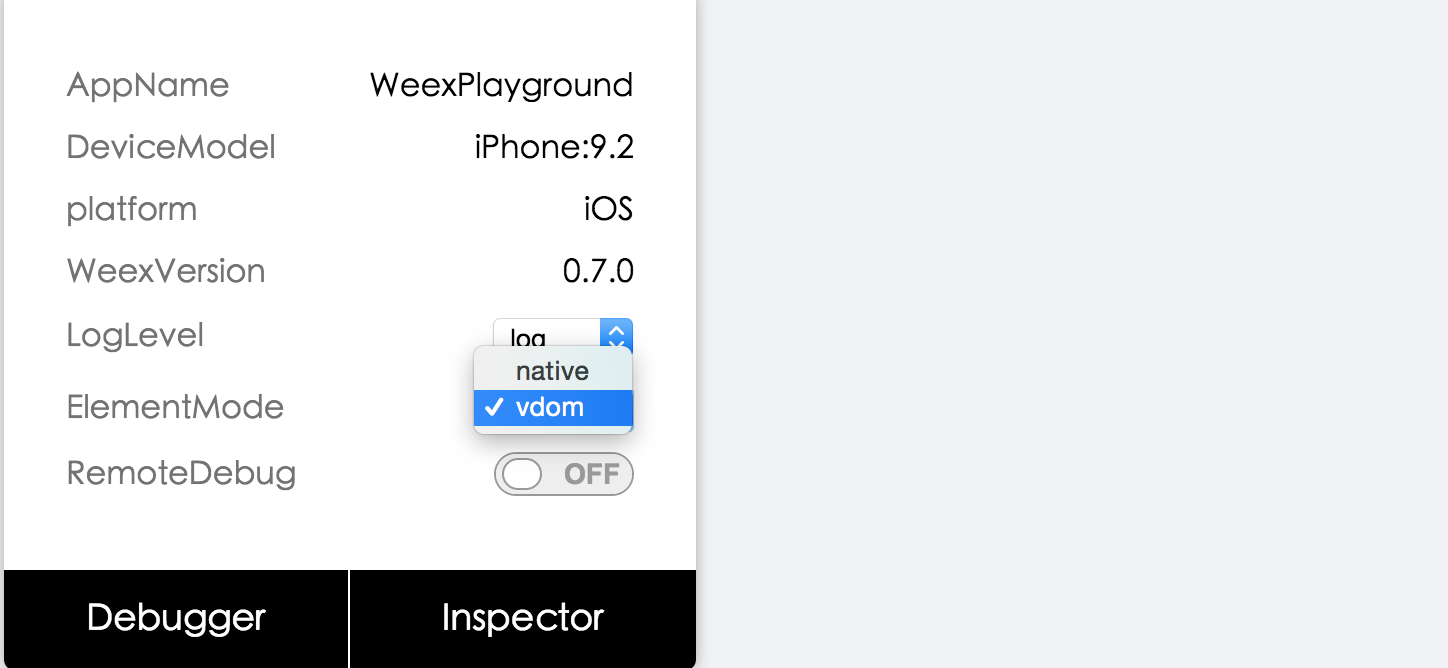
+
+ *图三*
+
+ 
+
+ *图四*
+
+ 点击图三所示 vdom 选项会打开图四,方便查看 vdom tree 以及 component property。
http://git-wip-us.apache.org/repos/asf/incubator-weex-site/blob/32a097bf/_draft/v1.0/advanced/integrate-to-android.md
----------------------------------------------------------------------
diff --git a/_draft/v1.0/advanced/integrate-to-android.md b/_draft/v1.0/advanced/integrate-to-android.md
new file mode 100644
index 0000000..b5bbf8c
--- /dev/null
+++ b/_draft/v1.0/advanced/integrate-to-android.md
@@ -0,0 +1,201 @@
+---
+title: 集成到 Android
+type: advanced
+order: 4
+has_chapter_content: true
+version: 0.10
+---
+
+# WEEX SDK 集成到 Android 工程
+
+注:以下文档都是假设您已经具备一定的Android开发经验。
+### Android 集成有两种方式
+
+1. 源码依赖:能够快速使用WEEX最新功能,可以根据自己项目的特性进行相关改进。
+2. SDK依赖:WEEX 会在jcenter 定期发布稳定版本。[jcenter](https://bintray.com/alibabaweex/maven/weex_sdk/view)
+ 注:国内可能需要翻墙
+
+## 前期准备
+
+- 已经安装了[JDK](http://www.oracle.com/technetwork/java/javase/downloads/jdk8-downloads-2133151.html) version>=1.7 并配置了环境变量
+- 已经安装[Android SDK](https://developer.android.com/studio/index.html) 并配置环境变量。
+- Android SDK version 23 (compileSdkVersion in [`build.gradle`](https://github.com/apache/incubator-weex/blob/master/android/sdk/build.gradle))
+- SDK build tools version 23.0.1 (buildToolsVersion in [`build.gradle`](https://github.com/apache/incubator-weex/blob/master/android/sdk/build.gradle))
+- Android Support Repository >= 17 (for Android Support Library)
+
+## 快速接入
+
+如果你是尝鲜或者对稳定性要求比较高可以使用依赖SDK的方式。
+步骤如下:
+1. 创建Android工程,没有什么要特别说明的,按照你的习惯来。
+2. 修改build.gradle 加入如下基础依赖
+
+ ```gradle
+ compile 'com.android.support:recyclerview-v7:23.1.1'
+ compile 'com.android.support:support-v4:23.1.1'
+ compile 'com.android.support:appcompat-v7:23.1.1'
+ compile 'com.alibaba:fastjson:1.1.46.android'
+ compile 'com.taobao.android:weex_sdk:0.5.1@aar'
+ ```
+
+ 注:版本可以高不可以低。
+### 代码实现
+
+注:附录中有完整代码地址
+- 实现图片下载接口,初始化时设置。
+
+```java
+package com.weex.sample;
+
+import android.widget.ImageView;
+
+import com.taobao.weex.adapter.IWXImgLoaderAdapter;
+import com.taobao.weex.common.WXImageStrategy;
+import com.taobao.weex.dom.WXImageQuality;
+
+/**
+ * Created by lixinke on 16/6/1.
+ */
+public class ImageAdapter implements IWXImgLoaderAdapter {
+
+
+ @Override
+ public void setImage(String url, ImageView view, WXImageQuality quality, WXImageStrategy strategy) {
+ //实现你自己的图片下载,否则图片无法显示。
+ }
+}
+```
+- 初始化
+
+```java
+package com.weex.sample;
+
+import android.app.Application;
+
+import com.taobao.weex.InitConfig;
+import com.taobao.weex.WXSDKEngine;
+
+/**
+ * 注意要在Manifest中设置android:name=".WXApplication"
+ * 要实现ImageAdapter 否则图片不能下载
+ * gradle 中一定要添加一些依赖,否则初始化会失败。
+ * compile 'com.android.support:recyclerview-v7:23.1.1'
+ * compile 'com.android.support:support-v4:23.1.1'
+ * compile 'com.android.support:appcompat-v7:23.1.1'
+ * compile 'com.alibaba:fastjson:1.1.45'
+ */
+public class WXApplication extends Application {
+
+ @Override
+ public void onCreate() {
+ super.onCreate();
+ InitConfig config=new InitConfig.Builder().setImgAdapter(new ImageAdapter()).build();
+ WXSDKEngine.initialize(this,config);
+ }
+}
+
+```
+- 开始渲染
+
+```java
+package com.weex.sample;
+
+import android.os.Bundle;
+import android.support.v7.app.AppCompatActivity;
+import android.view.View;
+
+import com.taobao.weex.IWXRenderListener;
+import com.taobao.weex.WXSDKInstance;
+import com.taobao.weex.common.WXRenderStrategy;
+import com.taobao.weex.utils.WXFileUtils;
+
+public class MainActivity extends AppCompatActivity implements IWXRenderListener {
+
+ WXSDKInstance mWXSDKInstance;
+
+ @Override
+ protected void onCreate(Bundle savedInstanceState) {
+ super.onCreate(savedInstanceState);
+ setContentView(R.layout.activity_main);
+
+ mWXSDKInstance = new WXSDKInstance(this);
+ mWXSDKInstance.registerRenderListener(this);
+ /**
+ * WXSample 可以替换成自定义的字符串,针对埋点有效。
+ * template 是.we transform 后的 js文件。
+ * option 可以为空,或者通过option传入 js需要的参数。例如bundle js的地址等。
+ * jsonInitData 可以为空。
+ * width 为-1 默认全屏,可以自己定制。
+ * height =-1 默认全屏,可以自己定制。
+ */
+ mWXSDKInstance.render("WXSample", WXFileUtils.loadFileContent("hello.js", this), null, null, -1, -1, WXRenderStrategy.APPEND_ASYNC);
+ }
+
+ @Override
+ public void onViewCreated(WXSDKInstance instance, View view) {
+ setContentView(view);
+ }
+
+ @Override
+ public void onRenderSuccess(WXSDKInstance instance, int width, int height) {
+
+ }
+
+ @Override
+ public void onRefreshSuccess(WXSDKInstance instance, int width, int height) {
+
+ }
+
+ @Override
+ public void onException(WXSDKInstance instance, String errCode, String msg) {
+
+ }
+
+
+ @Override
+ protected void onResume() {
+ super.onResume();
+ if(mWXSDKInstance!=null){
+ mWXSDKInstance.onActivityResume();
+ }
+ }
+
+ @Override
+ protected void onPause() {
+ super.onPause();
+ if(mWXSDKInstance!=null){
+ mWXSDKInstance.onActivityPause();
+ }
+ }
+
+ @Override
+ protected void onStop() {
+ super.onStop();
+ if(mWXSDKInstance!=null){
+ mWXSDKInstance.onActivityStop();
+ }
+ }
+
+ @Override
+ protected void onDestroy() {
+ super.onDestroy();
+ if(mWXSDKInstance!=null){
+ mWXSDKInstance.onActivityDestroy();
+ }
+ }
+}
+```
+
+## 源码依赖(IDE Android Studio)
+
+1. 下载源码 `git clone https://github.com/alibaba/weex`
+2. 创建 Android 工程。
+3. 通过以下路径引入 SDK Module
+ File->New-Import Module-> 选择 WEEX SDK Module(weex/android/sdk) -> Finish
+4. app 的 build.gradle 中添加如下依赖:`compile project(':weex_sdk')`
+5. 其他设置请参考上面快速接入
+
+### 附录
+
+WXSample地址
+`https://github.com/xkli/WXSample.git`
http://git-wip-us.apache.org/repos/asf/incubator-weex-site/blob/32a097bf/_draft/v1.0/advanced/integrate-to-html5.md
----------------------------------------------------------------------
diff --git a/_draft/v1.0/advanced/integrate-to-html5.md b/_draft/v1.0/advanced/integrate-to-html5.md
new file mode 100644
index 0000000..30ee3fd
--- /dev/null
+++ b/_draft/v1.0/advanced/integrate-to-html5.md
@@ -0,0 +1,69 @@
+---
+title: 集成到 web
+type: advanced
+order: 6
+has_chapter_content: true
+version: 0.10
+---
+
+## 项目中引入 html5 版 Weex
+
+### 简介
+
+Weex 是一个跨平台可扩展的动态化移动框架,能够真正帮助开发者实现'一次开发,到处运行'。由 Weex 提供的相关工具进行打包好的 bundle 文件可以运行在 android, ios 以及 web(这里我们也称之为html5)平台的渲染器上。Weex HTML5 是一个专用于在移动端 webview 以及各种现代浏览器上渲染 weex 文件的渲染器。
+### 获取 Weex HTML5
+
+使用 npm 安装最新版本的 Weex HTML5,并在你的项目中 require 进来。
+#### 从 npm 安装
+
+请确保通过 `npm install` 或者 `npm update` 获取 Weex HTML5 的最新版本 npm 包。更多关于 npm 的信息情查阅 [npm 官方网站](https://docs.npmjs.com/)。
+
+```bash
+npm install weex-html5
+```
+
+通过 require 引入 weex-html5:
+
+```bash
+var weex = require('weex-html5')
+```
+
+**注意:** 介于 Weex 目前仍处于开源内测阶段,还没有完全开放源代码,因此 `weex-jsframework` 可能还没有在 npm 上发布。当前版本的 `weex-html5` 包含了 `weex-jsframework`,你只需要 require `weex-html5` 即可暂时在 web 平台上运行 weex 代码。建议关注 Weex 的后续版本发布并做必要的引用方式调整。
+### 初始化 Weex
+
+你可以通过 Weex 暴露的 API `init` 来初始化一个 Weex 实例。这个方法需要传递一些配置信息已确定一些环境变量等信息,这些配置信息介绍如下:
+- `appId`: Weex 实例的 id,可以是任意字符串或者数字,并注意不要重复.
+- `source`: 请求的 Weex bundle 文件地址,或者 Weex bundle 文件代码本身,取决于下面的 loader 配置.
+- `loader`: 加载器类型,用于加载 weex bundle,值可以是 'xhr', 'jsonp' 或者 'source'.
+ - `xhr`: 通过 XMLHttpRequest 加载 source(即 weex bundle 的 url 地址).
+ - `jsonp`: 通过 JSONP 加载 weex bundle.
+ - `source`: 直接接受 weex bundle 的代码作为参数.
+- `rootId`: root 容器的 id,默认容器 id 是 'weex'.
+
+以下是一个 Weex 初始化的示例:
+
+``` javascript
+function weexInit() {
+ function getUrlParam (key) {
+ var reg = new RegExp('[?|&]' + key + '=([^&]+)')
+ var match = location.search.match(reg)
+ return match && match[1]
+ }
+
+ var loader = getUrlParam('loader') || 'xhr'
+ var page = getUrlParam('page')
+
+ // 需要指定一个jsonp回调函数名称,如果没有则用默认值'weexJsonpCallback'
+ var JSONP_CALLBACK_NAME = 'weexJsonpCallback'
+
+ window.weex.init({
+ jsonpCallback: JSONP_CALLBACK_NAME,
+ appId: location.href,
+ source: page,
+ loader: loader,
+ rootId: 'weex'
+ })
+}
+
+weexInit()
+```
http://git-wip-us.apache.org/repos/asf/incubator-weex-site/blob/32a097bf/_draft/v1.0/advanced/integrate-to-ios.md
----------------------------------------------------------------------
diff --git a/_draft/v1.0/advanced/integrate-to-ios.md b/_draft/v1.0/advanced/integrate-to-ios.md
new file mode 100644
index 0000000..54a5ca7
--- /dev/null
+++ b/_draft/v1.0/advanced/integrate-to-ios.md
@@ -0,0 +1,110 @@
+---
+title: 集成到 iOS
+type: advanced
+order: 5
+has_chapter_content: true
+version: 0.10
+---
+
+# Weex SDK 集成到 iOS
+
+### cocoaPods 引入 Weex iOS SDK到工程
+
+可以通过源码编译出 Weex SDK,可以在新的 feature 或者 bugfix 分支,尝试最新的 feature
+#### cocoaPods集成
+
+ 假设你已经完成了安装[iOS 开发环境](https://developer.apple.com/library/ios/documentation/IDEs/Conceptual/AppStoreDistributionTutorial/Setup/Setup.html) 和 [CocoaPods](https://guides.cocoapods.org/using/getting-started.html)
+
+1. 从 github 上 clone 一份代码
+
+ ```
+ git clone https://github.com/alibaba/weex.git
+ ```
+
+2. 把 WeexSDK 导入到你已有的项目,如果没有,可以[参考](https://developer.apple.com/library/ios/documentation/IDEs/Conceptual/AppStoreDistributionTutorial/Setup/Setup.html)新建项目
+ 拷贝 `ios/sdk` 下面目录到你的项目目录,在添加依赖之前,确保项目目录有 `Podfile`,如果没有,创建一个,用文本编辑器打开,添加如下依赖
+
+ 如果使用正式版本如 0.6.1 的,就不需要做 拷贝 `ios/sdk` 这个操作,直接引用 cocoaPods 的 master repo 上就可以,这个需要在 Podfile 最前面添加
+
+ ```
+ source 'https://github.com/CocoaPods/Specs.git'
+ ```
+
+ ```object-c
+ target 'YourTarget' do
+ platform :ios, '7.0'
+ pod 'WeexSDK', :path=>'./sdk/' # pod 'WeexSDK', '0.6.1'
+ end
+ ```
+
+ 在命令行(terminal)中,切换到当前目录,运行 `pod install`, 过一会,项目的 .workspace 结尾的文件就被创建出来,到这步,依赖已经添加完了
+
+3. 初始化 Weex 环境
+ 在 AppDelegate.m 文件中做初始化操作,一般会在 `didFinishLaunchingWithOptions` 方法中如下添加
+
+ ```object-c
+ //business configuration
+ [WXAppConfiguration setAppGroup:@"AliApp"];
+ [WXAppConfiguration setAppName:@"WeexDemo"];
+ [WXAppConfiguration setAppVersion:@"1.0.0"];
+
+ //init sdk enviroment
+ [WXSDKEngine initSDKEnviroment];
+
+ //register custom module and component,optional
+ [WXSDKEngine registerComponent:@"MyView" withClass:[MyViewComponent class]];
+ [WXSDKEngine registerModule:@"event" withClass:[WXEventModule class]];
+
+ //register the implementation of protocol, optional
+ [WXSDKEngine registerHandler:[WXNavigationDefaultImpl new] withProtocol:@protocol(WXNavigationProtocol)];
+
+ //set the log level
+ [WXLog setLogLevel: WXLogLevelAll];
+ ```
+
+4. 渲染 weex Instance
+ Weex 支持整体页面渲染和部分渲染两种模式,你需要做的事情是用指定的 URL 渲染 weex 的 view,然后添加到它的父容器上,父容器一般都是 viewController
+
+ ```object-c
+ #import <WeexSDK/WXSDKInstance.h>
+ - (void)viewDidLoad
+ {
+ [super viewDidLoad];
+
+ _instance = [[WXSDKInstance alloc] init];
+ _instance.viewController = self;
+ _instance.frame = self.view.frame;
+
+ __weak typeof(self) weakSelf = self;
+ _instance.onCreate = ^(UIView *view) {
+ [weakSelf.weexView removeFromSuperview];
+ [weakSelf.view addSubview:weakSelf.weexView];
+ };
+
+ _instance.onFailed = ^(NSError *error) {
+ //process failure
+ };
+
+ _instance.renderFinish = ^ (UIView *view) {
+ //process renderFinish
+ };
+ [_instance renderWithURL:self.url options:@{@"bundleUrl":[self.url absoluteString]} data:nil];
+ }
+ ```
+
+ WXSDKInstance 是很重要的一个类,提供了基础的方法和一些回调,如`renderWithURL`,`onCreate`,`onFailed`等,可以参见 `WXSDKInstance.h`的 声明
+
+5. 销毁 Weex Instance
+
+ 在 viewController 的 dealloc 阶段 销毁掉 weex instance, 释放内存,避免造成内存泄露
+
+ ```object-c
+ - (void)dealloc
+ {
+ [_instance destroyInstance];
+ }
+ ```
+
+### 导入 Weex SDK framework到工程
+
+ 参考[此处](https://open.taobao.com/doc2/detail?spm=a219a.7629140.0.0.tFddsV&&docType=1&articleId=104829)直接导入weexSDK
http://git-wip-us.apache.org/repos/asf/incubator-weex-site/blob/32a097bf/_draft/v1.0/blog/index.md
----------------------------------------------------------------------
diff --git a/_draft/v1.0/blog/index.md b/_draft/v1.0/blog/index.md
new file mode 100644
index 0000000..ef7b31d
--- /dev/null
+++ b/_draft/v1.0/blog/index.md
@@ -0,0 +1,4 @@
+type: blog
+index: true
+layout: blog
+---
\ No newline at end of file
http://git-wip-us.apache.org/repos/asf/incubator-weex-site/blob/32a097bf/_draft/v1.0/guide/develop-on-your-local-machine.md
----------------------------------------------------------------------
diff --git a/_draft/v1.0/guide/develop-on-your-local-machine.md b/_draft/v1.0/guide/develop-on-your-local-machine.md
new file mode 100644
index 0000000..276a9f9
--- /dev/null
+++ b/_draft/v1.0/guide/develop-on-your-local-machine.md
@@ -0,0 +1,175 @@
+---
+title: 如何在本地开发 Weex 页面
+type: guide
+order: 2
+has_chapter_content: true
+version: 0.10
+---
+
+# 如何在本地开发 Weex 页面
+
+使用 [dotWe](http://dotwe.org) 对 Weex 尝鲜是一个不错的选择,但如果你想更专业的开发 Weex, [dotWe](http://dotwe.org) 就不怎么够用了。本章会教你如何搭建本地开发环境进行 Weex 开发。
+
+## 第一步:安装依赖
+
+首先,你需要 Node.js 和 weex-toolkit。
+
+安装 Node.js 方式多种多样,最简单的方式是在 [Node.js 官网](https://nodejs.org/en/) 下载可执行程序直接安装即可。
+
+对于 Mac,可以使用 [Homebrew](http://brew.sh/) 进行安装:
+
+```bash
+brew install node
+```
+
+> 更多安装方式可参考 [Node.js 官方信息](https://nodejs.org/en/download/)
+
+安装完成后,可以使用以下命令检测是否安装成功:
+
+```bash
+$ node -v
+v6.3.1
+$ npm -v
+3.10.3
+```
+
+通常,安装了 Node.js 环境,npm 包管理工具也随之安装了。因此,直接使用 npm 来安装 weex-toolkit。
+
+> npm 是一个 JavaScript 包管理工具,它可以让开发者轻松共享和重用代码。Weex 很多依赖来自社区,同样,Weex 也将很多工具发布到社区方便开发者使用。
+
+```bash
+$ npm install -g weex-toolkit
+```
+
+国内开发者可以考虑使用淘宝的 npm 镜像 —— [cnpm](https://npm.taobao.org/) 安装 weex-toolkit
+
+```bash
+$ npm install -g cnpm
+$ cnpm install -g weex-toolkit
+```
+
+*提示:*
+
+如果提示权限错误(*permission error*),使用 `sudo` 关键字进行安装
+
+```bash
+$ sudo cnpm install -g weex-toolkit
+```
+
+安装结束后你可以直接使用 `weex` 命令验证是否安装成功,它会显示 `weex` 命令行工具各参数:
+
+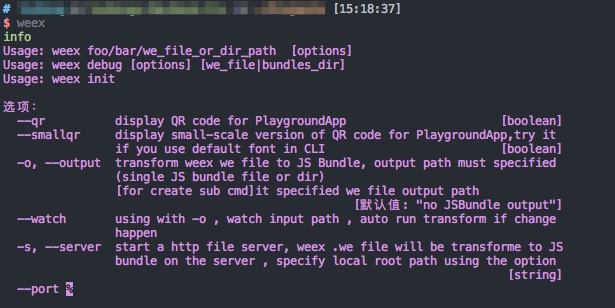
+
+## 第2步:创建文件
+
+现在可以开始编写代码了。首先,我们创建一个 `.we` 文件(Weex 程序的文件后缀(扩展名)是 `.we`)。
+
+打开空白的 `hello.we` 文件,输入三个标签,内容为:
+
+```html
+<template>
+</template>
+
+<style>
+</style>
+
+<script>
+</script>
+```
+
+我们在 [Get started](./index.md) 里已经介绍过 Weex 基本的代码结构:`<template>`、`<style>`、`<script>` 分别对应于 Web 中的 HTML,CSS(`<style>` 标签),JavaScript(`<script>` 标签)。
+
+其实,上面的代码就是最简单的 Weex 程序。但是 `.we` 文件是不能直接运行的,这时候需要使用刚才安装好的 weex-toolkit。weex-toolkit 会编译 `.we` 文件,并且创建静态服务器。
+
+这里,使用 `weex hello.we` 命令编译该程序。
+
+```bash
+$ weex hello.we
+```
+
+这时,命令行会做几件事:
+
+- 编译 `.we` 文件;
+- 启动热加载服务;
+- 启动静态服务器;
+- 拉起浏览器,访问 `http://127.0.0.1:8081/weex_tmp/h5_render/?hot-reload_controller&page=hello.js&loader=xhr`
+
+这时候,已经可以在浏览器预览 Weex 页面了。不过此时页面是空白的,因为 `.we` 文件中没有任何实质的内容。
+
+## 第3步:添加内容
+
+修改 `weex.we` 文件,向 `<template>` 标签中添加内容。具体代码如下:
+
+```html
+<template>
+ <div>
+ <text>Hello world</text>
+ </div>
+</template>
+
+<style></style>
+
+<script></script>
+```
+
+保存代码后,浏览器会自动刷新页面,这时会看到浏览器显示了 “Hello world”。
+
+## 第4步:添加样式
+
+现在,对已有的文本内容进行样式修饰。这里将文本颜色设置为红色,字体大小为 50 像素。具体代码如下:
+
+```html
+<template>
+ <div>
+ <text class="text" style="color: #FF0000;">Hello world</text>
+ </div>
+</template>
+
+<style>
+ .text{
+ font-size: 50;
+ }
+</style>
+
+<script></script>
+```
+
+这时候,浏览器已经重新载入了页面。其实,是weex-toolkit开启了热加载。可以看到红色的 “Hello world”。
+
+**注意:**
+Weex 支持通过 `style` 标签来设定样式,也支持内联样式风格。 对于数值,无需添加任何单位(包括 px、em、rem 等),这是建议的写法。如需了解有哪些通用的样式,可以参考 [通用样式](../references/common-style.md)。
+
+## 第5步:预览
+
+已经在浏览器中看到了刚才的代码效果,为了验证三端是否一致,我们还需 [Playground App](https://alibaba.github.io/weex/download.html) 验证。
+
+这里,我们需要为 `weex hello.we` 增加 `--qr` 参数,表示生成二维码。
+
+```bash
+$ weex hello.we --qr
+```
+
+然后,使用 [Playground](https://alibaba.github.io/weex/download.html) 扫码即可。
+
+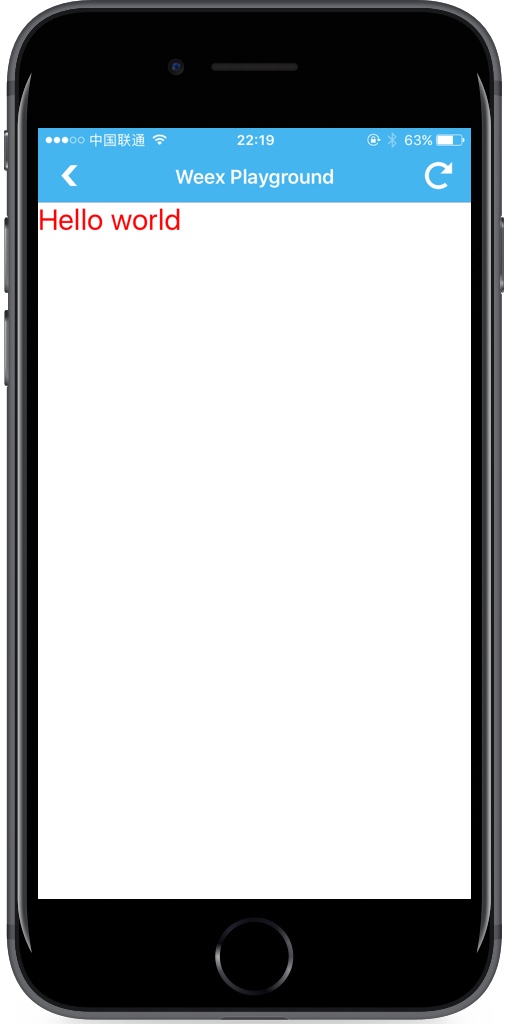
+
+## 第6步:调试
+
+weex-toolkit 已经集成了 Debugger,只需要使用如下命令即可开启 Debugger 开关调试 `hello.we`:
+
+```bash
+$ weex debug hello.we
+```
+
+我们输入以上命令开启,会自动打开浏览器,页面上有两个二维码,第一个是 Debugger Server,第二个是 `.we` 文件的地址。我们在 Playground 中先扫第一个,此时浏览器会进入一个新的页面,请你选择你需要的调试模式:
+
+- Debugger:将会打开 js debugger 页面,您可以通过 debugger 页面调试 js(诸如打断点 查看js log 和查看调用堆栈等信息);
+- Inspector:将会打开 inspector 页面,您可以通过这个页面查看 Weex 页面的 element 属性结构,包含高亮元素,展示样式表,以及显示 native 的 log。同时可以打开一个远程的手机镜像,便于查看界面。另外调试方块中的 ElementMode 可以用来选择 element 树显示原始的 native 组件树还是显示面向前端同学的 DSL (HTML)组件树。
+
+选择一种模式后会新开窗口进入调试页面,这时我们再扫第二个二维码即可进入我们想要调试的页面进行调试了。
+
+## 接下来做什么?
+
+到目前为止,你已经可以在 [dotWe](http://dotwe.org) 或者本地开发 Weex 页面。接下来你可以去学习 Weex [语法](./syntax/main.md) 和 [开发手册](../references/main.md) 了解 Weex 更多特性。这些语法和特性,你完全可以用 [Playground](https://alibaba.github.io/weex/download.html) 运行起来。
+
+如果你已经熟悉 Weex 开发,你应该考虑如何让你的 App 也支持 Weex 页面,或者,怎样用 Weex 开发一个全新的 App 呢?带着这些问题,你可以阅读 [开发进阶](./how-to/main.md)。
http://git-wip-us.apache.org/repos/asf/incubator-weex-site/blob/32a097bf/_draft/v1.0/guide/how-to/debug-with-html5.md
----------------------------------------------------------------------
diff --git a/_draft/v1.0/guide/how-to/debug-with-html5.md b/_draft/v1.0/guide/how-to/debug-with-html5.md
new file mode 100644
index 0000000..c4ba245
--- /dev/null
+++ b/_draft/v1.0/guide/how-to/debug-with-html5.md
@@ -0,0 +1,47 @@
+---
+title: 在浏览器中调试
+type: guide
+order: 4.2
+version: 0.10
+---
+
+# 如何在浏览器中调试?
+
+由于 weex-html5 可以在现代移动浏览器上运行,因此自然支持在浏览器的开发工具中调试 weex-html5 代码。下面将介绍如何使用浏览器的 devTools 调试和分析 weex-html5 程序。以chrome的调试工具为例:
+
+
+
+## Elements
+
+使用 Elements 面板来检查 weex-html5 页面的布局和设计,并操纵 DOM 和 CSS 来自由地做一些开发实验。
+
+## Console
+
+您可以使用 `console.log` 在控制台上记录信息。
+
+## 断点
+
+您可以设置断点来调试代码,断点是调试代码的最有效的方法之一。断点使您能够暂停脚本执行,然后查看该时刻的调用堆栈变量值。
+
+手动断点是您在特定代码行上设置的各个断点。您可以通过 Chrome DevTools GUI 或在代码中插入 debugger 关键字来设置这些断点。
+
+## 找出 bug 的精确位置
+
+一般来说,有三个可能发生错误的地方:渲染器(weex-html5),js 框架(weex-js框架)和变压器(gulp-weex)。
+
+这里有一些方便以找出错误建议,以便你可以快速识别哪个是哪个地方的错误:
+
+* 请检查控制台是否有错误。在调试模式如果有一个错误出现,将会在 console 中打印有关于它的信息。
+* 在 bridge/receiver.js,查看是否调用了 `callNative` 函数。
+* 是否被认为是 API 的方法被执行。
+* 是否调用用于事件触发或执行回调的 `callJS` 方法。
+
+## 其他
+
+更多关于如何调试 H5 页面的信息请查看 [chrome's devTools docs](https://developers.google.com/web/tools/chrome-devtools/?hl=en)
+
+
+
+
+
+
http://git-wip-us.apache.org/repos/asf/incubator-weex-site/blob/32a097bf/_draft/v1.0/guide/how-to/index.md
----------------------------------------------------------------------
diff --git a/_draft/v1.0/guide/how-to/index.md b/_draft/v1.0/guide/how-to/index.md
new file mode 100644
index 0000000..c20ecb0
--- /dev/null
+++ b/_draft/v1.0/guide/how-to/index.md
@@ -0,0 +1,185 @@
+---
+title: 使用 Devtools 调试 Weex 页面
+type: guide
+order: 4
+has_chapter_content: false
+chapter_title: 最佳实践
+version: 0.10
+---
+
+# 如何使用 Devtools 调试 Weex 页面
+
+Weex Devtools 是为 Weex 开发者服务的一款调试工具,能够审查 Weex app 运行时属性,可对 `.we` 代码及 JavaScript 代码断点调试,支持 iOS 和 Android 两个平台。
+
+Weex Devtools 基于 Chrome devtools 实现了 [Chrome Debugging Protocol](https://developer.chrome.com/devtools/docs/debugger-protocol),能够使用 Chrome devtools 调试 Weex 项目,其主要功能分为两大部分—— Debugger 和 Inspector。
+
+## Devtools 主要功能一览
+
+### 连接设备
+devtools 可以动态检测客户端的连接绑定请求,同时连接/调试多个 device(或者模拟器)是很容易的事情,连接到 Devtools 的客户端显示在 “Device List” 界面。如下图所示。
+
+
+
+点击对应设备的 Debugger 按钮即开始调试流程,并弹出JS断点调试的页面;随后点击 Inspector 按钮可弹出调试 DOM 的页面。
+
+### Debugger
+
+这个是用来调试 Weex 的 JSBundle 代码的页面,“Sources” tab 能够显示所有 JS 源码,包括 Weex JSFramework 和 JSBundle 代码。可以设置断点、查看调用栈,与 Chrome 浏览器调试类似。“Console” 控制台显示前端的 Log 信息,并能根据级别(info/warn/error等)和关键字过滤。
+
+
+
+### 断点调试
+
+
+
+### Inspector
+
+Inspector 功能丰富,能够用来查看 `Element` \ `Network` \ `Console log` \ `Screencast` \ `BoxModel` \ `Native View` 等。
+
+
+
+### Device Screencast & View Inspect
+
+如下图所示,通过 Inspector 页面的两个开关,点击右侧 Icon 可以打开设备投屏,然后点击左侧 Icon 再在投屏上点选元素则可以自动在 DOM tree 中定位并审查该元素。
+
+
+
+### Elements
+
+这里展示的是在 Android/iOS 上的 native DOM 树,及其 style 属性和 layout 图。鼠标在 DOM 树移动时,在 device(或模拟器)上对应节点会高亮显示,有助于 native 开发者定位和发现节点。
+
+**注意:**
+screencast 只是对屏幕图像拷贝,在远程调试时能看到远程设备界面,数据网络下 screencast 也将有较大流量花销,如果设备就在手头儿则建议关掉。
+
+Elements 审查有两种模式分别是:native 和 vdom。其中,native 模式下展示的是 Weex 所映射的 native view 的结构,它更接近实现本质;vdom 模式则对应 `.we` 文件中定义的 dom 结构,主要用来审查 `.we` 文件编译为 JSBundle 之后对应的 dom tree 的逻辑构成。
+
+#### native view element
+
+
+
+#### weex dom element
+
+
+
+### Network
+
+这里展示的是 JSBundle 资源加载网络访问的性能。所以如果 JSBundle 资源在设备本地,Network 是没有数据的。
+
+#### 查看网络请求的总耗时和延时
+
+
+
+#### 查看网络请求的header和response
+
+
+
+### 控制台
+
+这里显示的是 Android/iOS 上的 native log,并不是 JS log(JS log 显示在 Debugger 页面)。同样 native log 也有对应级别--warn/error 等和关键字过滤,native 开发查询很方便。
+
+
+
+### 资源(Android Only)
+
+远端访问的资源文件会显示在这里,这里不是查看源码的最佳方式。在 Debugger 页面,“Sources” 里已经有源码并可以断点调试。如果你的应用里有 SQLITE 数据库文件,在这里无需 root 便可以查看和更新,对于 mock 数据来说比较便利。
+
+
+
+### 远程控制 (Android Only)
+
+Android 版本支持在 screencast 上进行远程控制,能够通过鼠标模拟在手机的输入事件,方便手机不在本地的用户进行远程调试。
+
+## 如何安装和启动devtools
+
+无论是跑在 iOS 或者 Android 端,[weex-devtool](https://github.com/weexteam/weex-devtool) 都是必需的,用来启动服务器和 Chrome 页面。
+
+### 安装
+
+如果你已经在前面的教程中安装过 weex-toolkit,就无需再次安装了。
+
+```bash
+$ npm install -g weex-toolkit
+```
+
+#### 用法
+
+ weex debug [options] [we_file|bundles_dir]
+
+ 选项:
+
+ -h, --help 显示帮助
+ -V, --verbose 显示debug服务器运行时的各种log
+ -v, --version 显示版本
+ -p, --port [port] 设置debug服务器端口号 默认为8088
+ -e, --entry [entry] debug一个目录时,这个参数指定整个目录的入口bundle文件,这个bundle文件的地址会显示在debug主页上(作为二维码)
+ -m, --mode [mode] 设置构建we文件的方式,transformer 最基础的风格适合单文件,loader:wepack风格 适合模块化的多文件.默认为transformer
+
+
+## 如何在设备或者模拟器上调试
+
+### weex调试初体验之playground
+
+如果你是一名 Weex 调试的新手,那么推荐你先下载 [Playground](http://alibaba.github.io/weex/download.html) 体验一下 Devtools 调试 JSBundle 的基础流程.
+
+- 前提:
+ - 安装 `weex-toolkit`,内含调试命令 `weex debug`
+ - android/iOS 设备与 PC 在同一局域网,若位于不同网段请确保防火墙可访问性
+
+- Inspector 功能演示
+
+<embed src="//cloud.video.taobao.com/play/u/1955166971/p/2/e/1/t/1/45803002.swf" quality="high" width="100%" height="500px" align="middle" allowScriptAccess="never" allowFullScreen="true" type="application/x-shockwave-flash"></embed>
+
+- Debugger功能演示
+
+<embed src="//cloud.video.taobao.com/play/u/1955166971/p/2/e/1/t/1/45803641.swf" quality="high" width="100%" height="500px" align="middle" allowScriptAccess="never" allowFullScreen="true" type="application/x-shockwave-flash"></embed>
+
+- 调试步骤:
+ - **启动 debug server**
+
+ 执行命令 `weex debug` 将启动 debug server。如果启动成功将会在 Chrome 打开一个 welcome 页面,在网页下方有一个二维码。
+
+ - **启动 Playground 并扫码**
+
+ 点击启首页左上角的扫码按钮扫码上一步中网页下方的二维码。此时 welcome 页面将会出现你的设备信息。Playground 进入 loading 页面,等待你的下一步操作。
+
+ - **点击网页上的 Debugger 按钮**
+
+ app 结束 loading 进入 debugging 状态。同时 Chrome 将会打开 Debugger 页面。按照页面提示打开该页的 JavaScript 控制台并进入 source tab。
+
+ - **设置断点刷新当前页**
+
+ 点击 Playground 首页 list 中的任意项将打开一个 Weex 页面,此时在 Sources 里会出现相应的 JSBundle 文件,设置断点并刷新 Playground 即可调试。
+
+ - **点击网页上的 Inspector 按钮**
+
+ Chrome 会打开 inspector页面,可以查看Element, Console, Network状态。
+
+### Weex调试初体验之应用
+
+如果是接入 Weex 的应用想调试自己的 Weex 代码,有以下几个方式:
+
+1. 借助 Playground 扫码调试
+ - 先确定 Playground 已经是可调试状态
+ - 使用命令行工具打开调试功能 `weex debug`,用 Playground 扫浏览器打开的页面中的二维码
+ - 用 Playground 扫描 JSBundle 二维码
+ - 手机上即显示 Weex 页面的结果。相应在 “Debugger” 和 “Inspector” 页面调试。
+
+2. 为应用接入 Devtools 接口
+
+ - [Android sdk接入指南](https://github.com/weexteam/weex_devtools_android/blob/master/README-zh.html)
+ - [iOS sdk接入指南](https://github.com/weexteam/weex-devtool-iOS/blob/master/README-zh.html)
+
+有任何问题或者建议,请提交[这里](https://github.com/weexteam/weex-devtool/issues),会很快得到解答。
+
+## 更详细的视频讲解
+
+- 第一集 devtools简介
+http://cloud.video.taobao.com/play/u/1955166971/p/1/e/1/t/1/45796387.swf
+- 第二集 inspector功能演示
+http://cloud.video.taobao.com/play/u/1955166971/p/1/e/1/t/1/45803002.swf
+- 第三集 debugger功能演示
+http://cloud.video.taobao.com/play/u/1955166971/p/1/e/1/t/1/45803641.swf
+- 第四集 native 与 weex 联调
+http://cloud.video.taobao.com/play/u/1955166971/p/1/e/1/t/1/45804472.swf
+- 第五集 第三方App接入指南
+http://cloud.video.taobao.com/play/u/1955166971/p/1/e/1/t/1/45805276.swf
\ No newline at end of file
http://git-wip-us.apache.org/repos/asf/incubator-weex-site/blob/32a097bf/_draft/v1.0/guide/how-to/require-3rd-party-libs.md
----------------------------------------------------------------------
diff --git a/_draft/v1.0/guide/how-to/require-3rd-party-libs.md b/_draft/v1.0/guide/how-to/require-3rd-party-libs.md
new file mode 100644
index 0000000..7d3748e
--- /dev/null
+++ b/_draft/v1.0/guide/how-to/require-3rd-party-libs.md
@@ -0,0 +1,57 @@
+---
+title: 如何引入第三方库
+type: guide
+order: 4.3
+version: 0.10
+---
+
+# 如何引入第三方库
+<span class="weex-version">0.4</span>
+
+在 [Get started](../index.html) 中,我们学习了知道可以在 `<script>` 标签中编写 JavaScript 代码。但是在项目中常用的功能或模块,例如解析url参数,将属性从一些对象扩展到另一个对象等等,在每个组件中复制和粘贴这些代码是一个糟糕的做法,因此迫切需要通过 `require` 的方式对可复用的代码进行管理。Weex 为开发人员提供了 CommonJS 风格的 require 语法。
+
+我们以 `extend` 作为例子。
+
+## 引入本地 JS Modules
+
+下面是 `extend` 最简单的实现,并将其放在 `./common/utils.js` 路径中。
+
+```javascript
+function extend(dest, src) {
+ for (var key in src) {
+ dest[key] = src[key]
+ }
+}
+exports.extend = extend
+```
+
+在 `.we` 文件中,`extend` 可以与`require`一起使用:
+
+```html
+<script>
+ var utils = require('./common/utils')
+ var obj1 = {a: 1}
+ var obj2 = {b: 2}
+ utils.extend(obj1, obj2) // obj1 => {a: 1, b: 2}
+</script>
+```
+
+## 引入已经安装的 Node.js Modules
+
+[underscore](http://underscorejs.org) 是一个 JavaScript 库,它提供了一整套函数式编程的实用功能,而不扩展任何 JavaScript 内置对象。它提供了一个更具稳健性的 [`extend`](http://underscorejs.org/#extend)。
+
+我们可以使用 underscore 的 `extend`,而不是我们自己实现的版本。首先,在项目中安装 underscore,然后我们便可以将 underscore `reuqire` 进来并使用它。
+
+```bash
+npm install underscore
+```
+
+```html
+<script>
+ var _ = require('underscore')
+ var obj1 = {a: 1}
+ var obj2 = {b: 2}
+ var obj3 = {c: 3}
+ var ret = _.extend(obj1, obj2, obj3) // ret => {a: 1, b: 2, c: 3}
+</script>
+```
[29/51] [abbrv] incubator-weex-site git commit: rearrangement the
structure of the document
Posted by ha...@apache.org.
rearrangement the structure of the document
Project: http://git-wip-us.apache.org/repos/asf/incubator-weex-site/repo
Commit: http://git-wip-us.apache.org/repos/asf/incubator-weex-site/commit/32a097bf
Tree: http://git-wip-us.apache.org/repos/asf/incubator-weex-site/tree/32a097bf
Diff: http://git-wip-us.apache.org/repos/asf/incubator-weex-site/diff/32a097bf
Branch: refs/heads/master
Commit: 32a097bff84a5295f32128cd476907fc9faa26ab
Parents: 185e603
Author: Hanks <zh...@gmail.com>
Authored: Thu Oct 12 21:22:15 2017 +0800
Committer: Hanks <zh...@gmail.com>
Committed: Thu Oct 12 21:22:15 2017 +0800
----------------------------------------------------------------------
_draft/difference-with-web.en.md | 149 +++++
_draft/difference-with-web.md | 138 ++++
_draft/native-dom-api.md | 212 +++++++
_draft/timer.cn.md | 49 ++
_draft/timer.md | 60 ++
_draft/v-0.10/advanced/extend-to-android.md | 189 ++++++
_draft/v-0.10/advanced/extend-to-html5.md | 258 ++++++++
_draft/v-0.10/advanced/extend-to-ios.md | 311 +++++++++
.../v-0.10/advanced/how-data-binding-works.md | 39 ++
_draft/v-0.10/advanced/images/how-arch.png | Bin 0 -> 62303 bytes
_draft/v-0.10/advanced/images/how-render.png | Bin 0 -> 42957 bytes
_draft/v-0.10/advanced/index.md | 148 +++++
_draft/v-0.10/advanced/integrate-to-android.md | 204 ++++++
_draft/v-0.10/advanced/integrate-to-html5.md | 77 +++
_draft/v-0.10/advanced/integrate-to-ios.md | 118 ++++
_draft/v-0.10/guide/.gitkeep | 0
.../how-to/customize-a-native-component.md | 58 ++
.../guide/how-to/cuszomize-native-apis.md | 80 +++
_draft/v-0.10/guide/how-to/debug-with-html5.md | 47 ++
_draft/v-0.10/guide/how-to/index.md | 40 ++
.../guide/how-to/preview-in-playground-app.md | 20 +
.../guide/how-to/require-3rd-party-libs.md | 56 ++
.../how-to/transform-code-into-js-bundle.md | 110 ++++
_draft/v-0.10/guide/images/tut-cli-qrcode.png | Bin 0 -> 45480 bytes
_draft/v-0.10/guide/images/tut-first.png | Bin 0 -> 51434 bytes
_draft/v-0.10/guide/images/tut-second.png | Bin 0 -> 78519 bytes
_draft/v-0.10/guide/images/tut1.jpg | Bin 0 -> 47442 bytes
_draft/v-0.10/guide/images/tut2.jpg | Bin 0 -> 52428 bytes
_draft/v-0.10/guide/images/tut3.png | Bin 0 -> 52198 bytes
_draft/v-0.10/guide/images/tut4.gif | Bin 0 -> 218245 bytes
_draft/v-0.10/guide/index.md | 211 +++++++
_draft/v-0.10/guide/syntax/comm.md | 228 +++++++
.../v-0.10/guide/syntax/composed-component.md | 114 ++++
_draft/v-0.10/guide/syntax/config-n-data.md | 61 ++
_draft/v-0.10/guide/syntax/data-binding.md | 248 ++++++++
_draft/v-0.10/guide/syntax/display-logic.md | 173 +++++
_draft/v-0.10/guide/syntax/events.md | 59 ++
_draft/v-0.10/guide/syntax/id.md | 65 ++
_draft/v-0.10/guide/syntax/index.md | 122 ++++
_draft/v-0.10/guide/syntax/render-logic.md | 35 ++
_draft/v-0.10/guide/syntax/style-n-class.md | 118 ++++
_draft/v-0.10/references/api.md | 84 +++
_draft/v-0.10/references/bubble.md | 150 +++++
_draft/v-0.10/references/cheatsheet.md | 102 +++
_draft/v-0.10/references/color-names.md | 182 ++++++
_draft/v-0.10/references/common-attrs.md | 78 +++
_draft/v-0.10/references/common-event.md | 120 ++++
_draft/v-0.10/references/common-style.md | 208 ++++++
_draft/v-0.10/references/component-defs.md | 131 ++++
_draft/v-0.10/references/components/a.md | 50 ++
_draft/v-0.10/references/components/cell.md | 42 ++
_draft/v-0.10/references/components/div.md | 48 ++
_draft/v-0.10/references/components/image.md | 55 ++
_draft/v-0.10/references/components/index.md | 24 +
.../v-0.10/references/components/indicator.md | 98 +++
_draft/v-0.10/references/components/input.md | 124 ++++
_draft/v-0.10/references/components/list.md | 292 +++++++++
.../references/components/refresh-loading.md | 297 +++++++++
_draft/v-0.10/references/components/scroller.md | 136 ++++
_draft/v-0.10/references/components/slider.md | 107 ++++
_draft/v-0.10/references/components/switch.md | 81 +++
_draft/v-0.10/references/components/text.md | 94 +++
_draft/v-0.10/references/components/textarea.md | 81 +++
_draft/v-0.10/references/components/video.md | 75 +++
_draft/v-0.10/references/components/web.md | 152 +++++
.../v-0.10/references/components/wxc-navpage.md | 74 +++
.../v-0.10/references/components/wxc-tabbar.md | 94 +++
_draft/v-0.10/references/gesture.md | 74 +++
.../v-0.10/references/images/css-boxmodel.png | Bin 0 -> 12581 bytes
.../references/images/css-flexbox-align.jpg | Bin 0 -> 35005 bytes
.../references/images/css-flexbox-justify.svg | 59 ++
.../references/images/css-flexbox-sample.png | Bin 0 -> 3210 bytes
_draft/v-0.10/references/images/nav.png | Bin 0 -> 83497 bytes
_draft/v-0.10/references/index.md | 49 ++
_draft/v-0.10/references/modules/animation.md | 63 ++
_draft/v-0.10/references/modules/clipboard.md | 53 ++
_draft/v-0.10/references/modules/dom.md | 114 ++++
_draft/v-0.10/references/modules/globalevent.md | 89 +++
_draft/v-0.10/references/modules/index.md | 28 +
_draft/v-0.10/references/modules/modal.md | 192 ++++++
_draft/v-0.10/references/modules/navigator.md | 198 ++++++
_draft/v-0.10/references/modules/storage.md | 111 ++++
_draft/v-0.10/references/modules/stream.md | 86 +++
_draft/v-0.10/references/modules/timer.md | 60 ++
_draft/v-0.10/references/modules/webview.md | 160 +++++
_draft/v-0.10/references/special-element.md | 36 ++
_draft/v-0.10/references/specs/index.md | 309 +++++++++
.../v-0.10/references/specs/js-bundle-format.md | 307 +++++++++
.../references/specs/js-framework-apis.md | 191 ++++++
.../v-0.10/references/specs/virtual-dom-apis.md | 147 +++++
_draft/v-0.10/references/text-style.md | 43 ++
_draft/v-0.10/tools/devtools-android.md | 123 ++++
_draft/v-0.10/tools/devtools-ios.md | 76 +++
_draft/v-0.10/tools/devtools.md | 102 +++
_draft/v-0.10/tools/index.md | 97 +++
_draft/v-0.10/tools/playground.md | 24 +
_draft/v-0.10/tools/transformer.md | 38 ++
_draft/v1.0/advanced/create-a-weex-project.md | 271 ++++++++
.../advanced/customize-a-native-component.md | 168 +++++
_draft/v1.0/advanced/cuszomize-native-apis.md | 85 +++
_draft/v1.0/advanced/extend-to-android.md | 170 +++++
_draft/v1.0/advanced/extend-to-html5.md | 253 ++++++++
_draft/v1.0/advanced/extend-to-ios.md | 279 ++++++++
_draft/v1.0/advanced/how-data-binding-works.md | 39 ++
_draft/v1.0/advanced/images/how-arch.png | Bin 0 -> 62303 bytes
_draft/v1.0/advanced/images/how-render.png | Bin 0 -> 42957 bytes
_draft/v1.0/advanced/index.md | 146 +++++
.../advanced/integrate-devtools-to-android.md | 272 ++++++++
.../v1.0/advanced/integrate-devtools-to-ios.md | 230 +++++++
_draft/v1.0/advanced/integrate-to-android.md | 201 ++++++
_draft/v1.0/advanced/integrate-to-html5.md | 69 ++
_draft/v1.0/advanced/integrate-to-ios.md | 110 ++++
_draft/v1.0/blog/index.md | 4 +
.../v1.0/guide/develop-on-your-local-machine.md | 175 ++++++
_draft/v1.0/guide/how-to/debug-with-html5.md | 47 ++
_draft/v1.0/guide/how-to/index.md | 185 ++++++
.../v1.0/guide/how-to/require-3rd-party-libs.md | 57 ++
.../how-to/transform-code-into-js-bundle.md | 112 ++++
_draft/v1.0/guide/index.md | 60 ++
_draft/v1.0/guide/syntax/comm.md | 134 ++++
_draft/v1.0/guide/syntax/composed-component.md | 158 +++++
_draft/v1.0/guide/syntax/config-n-data.md | 72 +++
_draft/v1.0/guide/syntax/data-binding.md | 332 ++++++++++
_draft/v1.0/guide/syntax/display-logic.md | 252 ++++++++
_draft/v1.0/guide/syntax/events.md | 103 +++
_draft/v1.0/guide/syntax/id.md | 124 ++++
_draft/v1.0/guide/syntax/index.md | 134 ++++
_draft/v1.0/guide/syntax/render-logic.md | 44 ++
_draft/v1.0/guide/syntax/style-n-class.md | 117 ++++
_draft/v1.0/index.md | 5 +
_draft/v1.0/migration/difference.md | 249 ++++++++
_draft/v1.0/migration/index.md | 11 +
_draft/v1.0/migration/migration-from-weex.md | 116 ++++
_draft/v1.0/references/api.md | 67 ++
_draft/v1.0/references/bubble.md | 150 +++++
_draft/v1.0/references/cheatsheet.md | 114 ++++
_draft/v1.0/references/color-names.md | 180 ++++++
_draft/v1.0/references/common-attrs.md | 166 +++++
_draft/v1.0/references/common-event.md | 492 +++++++++++++++
_draft/v1.0/references/common-style.md | 322 ++++++++++
_draft/v1.0/references/component-defs.md | 126 ++++
_draft/v1.0/references/components/a.md | 273 ++++++++
_draft/v1.0/references/components/cell.md | 191 ++++++
_draft/v1.0/references/components/div.md | 245 ++++++++
_draft/v1.0/references/components/image.md | 161 +++++
_draft/v1.0/references/components/index.md | 24 +
_draft/v1.0/references/components/indicator.md | 124 ++++
_draft/v1.0/references/components/input.md | 309 +++++++++
_draft/v1.0/references/components/list.md | 375 +++++++++++
_draft/v1.0/references/components/loading.md | 118 ++++
_draft/v1.0/references/components/refresh.md | 204 ++++++
_draft/v1.0/references/components/scroller.md | 324 ++++++++++
_draft/v1.0/references/components/slider.md | 121 ++++
_draft/v1.0/references/components/switch.md | 98 +++
_draft/v1.0/references/components/text.md | 116 ++++
_draft/v1.0/references/components/textarea.md | 115 ++++
_draft/v1.0/references/components/video.md | 82 +++
_draft/v1.0/references/components/web.md | 143 +++++
_draft/v1.0/references/gesture.md | 79 +++
_draft/v1.0/references/images/Artboard.jpg | Bin 0 -> 36223 bytes
_draft/v1.0/references/images/coding_weex_1.jpg | Bin 0 -> 56225 bytes
_draft/v1.0/references/images/css-boxmodel.png | Bin 0 -> 12581 bytes
.../references/images/css-flexbox-align.jpg | Bin 0 -> 35005 bytes
.../references/images/css-flexbox-justify.svg | 59 ++
_draft/v1.0/references/images/div_1.jpg | Bin 0 -> 59561 bytes
_draft/v1.0/references/images/div_2.jpg | Bin 0 -> 62574 bytes
_draft/v1.0/references/images/div_3.jpg | Bin 0 -> 82345 bytes
_draft/v1.0/references/images/div_4.jpg | Bin 0 -> 200642 bytes
_draft/v1.0/references/images/image_1.jpg | Bin 0 -> 163705 bytes
_draft/v1.0/references/images/image_2.jpg | Bin 0 -> 255560 bytes
_draft/v1.0/references/images/list_2.jpg | Bin 0 -> 56635 bytes
_draft/v1.0/references/images/list_3.jpg | Bin 0 -> 128082 bytes
_draft/v1.0/references/images/list_4.jpg | Bin 0 -> 339799 bytes
_draft/v1.0/references/images/nav.jpg | Bin 0 -> 124441 bytes
_draft/v1.0/references/images/scroller_1.jpg | Bin 0 -> 344783 bytes
_draft/v1.0/references/images/style_1.jpg | Bin 0 -> 59366 bytes
_draft/v1.0/references/images/style_2.jpg | Bin 0 -> 59696 bytes
_draft/v1.0/references/index.md | 46 ++
_draft/v1.0/references/modules/animation.md | 90 +++
_draft/v1.0/references/modules/clipboard.md | 112 ++++
_draft/v1.0/references/modules/dom.md | 79 +++
_draft/v1.0/references/modules/globalevent.md | 87 +++
_draft/v1.0/references/modules/index.md | 20 +
_draft/v1.0/references/modules/modal.md | 196 ++++++
_draft/v1.0/references/modules/navigator.md | 110 ++++
_draft/v1.0/references/modules/storage.md | 224 +++++++
_draft/v1.0/references/modules/stream.md | 220 +++++++
_draft/v1.0/references/modules/webview.md | 66 ++
_draft/v1.0/references/replace.md | 57 ++
_draft/v1.0/references/special-element.md | 38 ++
_draft/v1.0/references/specs/index.md | 309 +++++++++
.../v1.0/references/specs/js-framework-apis.md | 190 ++++++
.../v1.0/references/specs/virtual-dom-apis.md | 148 +++++
_draft/v1.0/references/text-style.md | 40 ++
_draft/v1.0/references/units.md | 66 ++
_draft/v1.0/references/wxc/index.md | 44 ++
_draft/v1.0/references/wxc/wxc-navpage.md | 192 ++++++
_draft/v1.0/references/wxc/wxc-tabbar.md | 176 ++++++
_draft/v1.0/tools/devtools-android.md | 123 ++++
_draft/v1.0/tools/devtools-ios.md | 65 ++
_draft/v1.0/tools/devtools.md | 99 +++
_draft/v1.0/tools/index.md | 96 +++
_draft/v1.0/tools/playground.md | 22 +
_draft/v1.0/tools/transformer.md | 38 ++
_draft/web-dev-experience.en.md | 36 ++
_draft/web-dev-experience.md | 38 ++
_draft/web-standards.en.md | 584 +++++++++++++++++
_draft/web-standards.md | 585 +++++++++++++++++
_draft/weex-dom-api.md | 224 +++++++
_draft/write-once.en.md | 23 +
_draft/write-once.md | 25 +
source/blog/index.md | 4 -
source/cn/blog.md | 4 +
source/cn/contributing.md | 106 ++++
source/cn/download.ejs | 3 -
source/cn/faq.md | 223 -------
source/cn/guide/advanced/app-architecture.md | 62 ++
source/cn/guide/advanced/downgrade.md | 12 +
source/cn/guide/advanced/page-architecture.md | 49 ++
source/cn/guide/advanced/path.md | 44 ++
.../guide/advanced/use-vuex-and-vue-router.md | 88 +++
source/cn/guide/contributing.md | 107 ----
source/cn/guide/extend-android.md | 219 +++++++
source/cn/guide/extend-ios.md | 326 ++++++++++
source/cn/guide/extend-js-framework.md | 173 +++++
source/cn/guide/extend-web-render.md | 104 +++
source/cn/guide/front-end-frameworks.md | 12 +
source/cn/guide/index.md | 5 +-
source/cn/guide/integrate-devtool-to-android.md | 354 +++++++++++
source/cn/guide/integrate-devtool-to-ios.md | 230 +++++++
source/cn/guide/integrate-to-your-app.md | 41 +-
source/cn/guide/intro/app-architecture.md | 61 --
source/cn/guide/intro/how-it-works.md | 62 --
source/cn/guide/intro/index.md | 15 -
source/cn/guide/intro/page-architecture.md | 48 --
source/cn/guide/intro/using-vue.md | 62 --
source/cn/guide/intro/web-dev-experience.md | 38 --
source/cn/guide/intro/write-once.md | 25 -
source/cn/guide/set-up-env.md | 7 +-
source/cn/guide/tools/index.md | 11 -
source/cn/guide/tools/plugin.md | 77 ---
source/cn/guide/tools/toolkit.md | 231 -------
source/cn/guide/using-rax.md | 7 +
source/cn/guide/using-vue.md | 63 ++
source/cn/index.md | 2 +-
source/cn/playground.ejs | 3 -
source/cn/references/advanced/extend-jsfm.md | 172 -----
.../cn/references/advanced/extend-to-android.md | 218 -------
.../cn/references/advanced/extend-to-html5.md | 103 ---
source/cn/references/advanced/extend-to-ios.md | 325 ----------
source/cn/references/advanced/index.md | 15 -
.../advanced/integrate-devtool-to-android.md | 353 -----------
.../advanced/integrate-devtool-to-ios.md | 229 -------
source/cn/references/android-apis.md | 11 +-
source/cn/references/bubble.md | 146 -----
source/cn/references/color-names.md | 180 ------
source/cn/references/common-event.md | 138 ----
source/cn/references/common-style.md | 627 ------------------
source/cn/references/components/a.md | 3 +-
source/cn/references/components/cell.md | 3 +-
source/cn/references/components/div.md | 3 +-
source/cn/references/components/image.md | 11 +-
source/cn/references/components/index.md | 24 -
source/cn/references/components/indicator.md | 3 +-
source/cn/references/components/input.md | 3 +-
source/cn/references/components/list.md | 5 +-
source/cn/references/components/loading.md | 5 +-
source/cn/references/components/refresh.md | 3 +-
source/cn/references/components/scroller.md | 5 +-
source/cn/references/components/slider.md | 7 +-
source/cn/references/components/switch.md | 3 +-
source/cn/references/components/text.md | 5 +-
source/cn/references/components/textarea.md | 3 +-
source/cn/references/components/video.md | 3 +-
source/cn/references/components/waterfall.md | 5 +-
source/cn/references/components/web.md | 3 +-
source/cn/references/downgrade.md | 11 -
source/cn/references/gesture.md | 60 --
source/cn/references/html5-apis.md | 10 -
source/cn/references/index.md | 18 +-
source/cn/references/ios-apis.md | 18 +-
source/cn/references/js-framework-apis.md | 67 ++
source/cn/references/js-service.md | 119 ++++
source/cn/references/js-service/index.md | 118 ----
source/cn/references/jsfm-apis.md | 66 --
source/cn/references/migration/difference.md | 249 --------
source/cn/references/migration/index.md | 11 -
.../references/migration/migration-from-weex.md | 116 ----
source/cn/references/modules/animation.md | 3 +-
source/cn/references/modules/clipboard.md | 3 +-
source/cn/references/modules/dom.md | 21 +-
source/cn/references/modules/globalevent.md | 7 +-
source/cn/references/modules/index.md | 21 -
source/cn/references/modules/meta.md | 7 +-
source/cn/references/modules/modal.md | 3 +-
source/cn/references/modules/navigator.md | 3 +-
source/cn/references/modules/picker.md | 3 +-
source/cn/references/modules/storage.md | 3 +-
source/cn/references/modules/stream.md | 3 +-
source/cn/references/modules/timer.md | 47 --
source/cn/references/modules/websocket.md | 7 +-
source/cn/references/modules/webview.md | 3 +-
source/cn/references/native-dom-api.md | 223 -------
source/cn/references/path.md | 43 --
source/cn/references/platform-difference.md | 70 ---
source/cn/references/text-style.md | 46 --
source/cn/references/unit.md | 64 --
source/cn/references/vue/difference-of-vuex.md | 87 ---
source/cn/references/vue/difference-with-web.md | 137 ----
source/cn/references/vue/index.md | 12 -
source/cn/references/web-standards.md | 584 -----------------
source/cn/references/weex-variable.md | 3 +-
source/cn/resources.md | 6 +
source/cn/tools/download.ejs | 3 +
source/cn/tools/helpers.md | 77 +++
source/cn/tools/index.md | 13 +
source/cn/tools/market.md | 6 +
source/cn/tools/playground.ejs | 3 +
source/cn/tools/toolkit.md | 231 +++++++
.../cn/v-0.10/advanced/create-a-weex-project.md | 271 --------
.../advanced/customize-a-native-component.md | 168 -----
.../cn/v-0.10/advanced/cuszomize-native-apis.md | 85 ---
source/cn/v-0.10/advanced/extend-to-android.md | 170 -----
source/cn/v-0.10/advanced/extend-to-html5.md | 253 --------
source/cn/v-0.10/advanced/extend-to-ios.md | 279 --------
.../v-0.10/advanced/how-data-binding-works.md | 39 --
source/cn/v-0.10/advanced/images/how-arch.png | Bin 62303 -> 0 bytes
source/cn/v-0.10/advanced/images/how-render.png | Bin 42957 -> 0 bytes
source/cn/v-0.10/advanced/index.md | 146 -----
.../advanced/integrate-devtools-to-android.md | 272 --------
.../advanced/integrate-devtools-to-ios.md | 230 -------
.../cn/v-0.10/advanced/integrate-to-android.md | 201 ------
source/cn/v-0.10/advanced/integrate-to-html5.md | 69 --
source/cn/v-0.10/advanced/integrate-to-ios.md | 110 ----
source/cn/v-0.10/blog/index.md | 4 -
.../guide/develop-on-your-local-machine.md | 175 ------
.../cn/v-0.10/guide/how-to/debug-with-html5.md | 47 --
source/cn/v-0.10/guide/how-to/index.md | 185 ------
.../guide/how-to/require-3rd-party-libs.md | 57 --
.../how-to/transform-code-into-js-bundle.md | 112 ----
source/cn/v-0.10/guide/index.md | 60 --
source/cn/v-0.10/guide/syntax/comm.md | 134 ----
.../v-0.10/guide/syntax/composed-component.md | 158 -----
source/cn/v-0.10/guide/syntax/config-n-data.md | 72 ---
source/cn/v-0.10/guide/syntax/data-binding.md | 332 ----------
source/cn/v-0.10/guide/syntax/display-logic.md | 252 --------
source/cn/v-0.10/guide/syntax/events.md | 103 ---
source/cn/v-0.10/guide/syntax/id.md | 124 ----
source/cn/v-0.10/guide/syntax/index.md | 134 ----
source/cn/v-0.10/guide/syntax/render-logic.md | 44 --
source/cn/v-0.10/guide/syntax/style-n-class.md | 117 ----
source/cn/v-0.10/index.md | 5 -
source/cn/v-0.10/references/api.md | 67 --
source/cn/v-0.10/references/bubble.md | 150 -----
source/cn/v-0.10/references/cheatsheet.md | 114 ----
source/cn/v-0.10/references/color-names.md | 180 ------
source/cn/v-0.10/references/common-attrs.md | 166 -----
source/cn/v-0.10/references/common-event.md | 492 ---------------
source/cn/v-0.10/references/common-style.md | 322 ----------
source/cn/v-0.10/references/component-defs.md | 126 ----
source/cn/v-0.10/references/components/a.md | 273 --------
source/cn/v-0.10/references/components/cell.md | 191 ------
source/cn/v-0.10/references/components/div.md | 245 --------
source/cn/v-0.10/references/components/image.md | 161 -----
source/cn/v-0.10/references/components/index.md | 24 -
.../v-0.10/references/components/indicator.md | 124 ----
source/cn/v-0.10/references/components/input.md | 309 ---------
source/cn/v-0.10/references/components/list.md | 375 -----------
.../cn/v-0.10/references/components/loading.md | 118 ----
.../cn/v-0.10/references/components/refresh.md | 204 ------
.../cn/v-0.10/references/components/scroller.md | 324 ----------
.../cn/v-0.10/references/components/slider.md | 121 ----
.../cn/v-0.10/references/components/switch.md | 98 ---
source/cn/v-0.10/references/components/text.md | 116 ----
.../cn/v-0.10/references/components/textarea.md | 115 ----
source/cn/v-0.10/references/components/video.md | 82 ---
source/cn/v-0.10/references/components/web.md | 143 -----
source/cn/v-0.10/references/gesture.md | 79 ---
source/cn/v-0.10/references/images/Artboard.jpg | Bin 36223 -> 0 bytes
.../v-0.10/references/images/coding_weex_1.jpg | Bin 56225 -> 0 bytes
.../v-0.10/references/images/css-boxmodel.png | Bin 12581 -> 0 bytes
.../references/images/css-flexbox-align.jpg | Bin 35005 -> 0 bytes
.../references/images/css-flexbox-justify.svg | 59 --
source/cn/v-0.10/references/images/div_1.jpg | Bin 59561 -> 0 bytes
source/cn/v-0.10/references/images/div_2.jpg | Bin 62574 -> 0 bytes
source/cn/v-0.10/references/images/div_3.jpg | Bin 82345 -> 0 bytes
source/cn/v-0.10/references/images/div_4.jpg | Bin 200642 -> 0 bytes
source/cn/v-0.10/references/images/image_1.jpg | Bin 163705 -> 0 bytes
source/cn/v-0.10/references/images/image_2.jpg | Bin 255560 -> 0 bytes
source/cn/v-0.10/references/images/list_2.jpg | Bin 56635 -> 0 bytes
source/cn/v-0.10/references/images/list_3.jpg | Bin 128082 -> 0 bytes
source/cn/v-0.10/references/images/list_4.jpg | Bin 339799 -> 0 bytes
source/cn/v-0.10/references/images/nav.jpg | Bin 124441 -> 0 bytes
.../cn/v-0.10/references/images/scroller_1.jpg | Bin 344783 -> 0 bytes
source/cn/v-0.10/references/images/style_1.jpg | Bin 59366 -> 0 bytes
source/cn/v-0.10/references/images/style_2.jpg | Bin 59696 -> 0 bytes
source/cn/v-0.10/references/index.md | 46 --
.../cn/v-0.10/references/modules/animation.md | 90 ---
.../cn/v-0.10/references/modules/clipboard.md | 112 ----
source/cn/v-0.10/references/modules/dom.md | 79 ---
.../cn/v-0.10/references/modules/globalevent.md | 87 ---
source/cn/v-0.10/references/modules/index.md | 20 -
source/cn/v-0.10/references/modules/modal.md | 196 ------
.../cn/v-0.10/references/modules/navigator.md | 110 ----
source/cn/v-0.10/references/modules/storage.md | 224 -------
source/cn/v-0.10/references/modules/stream.md | 220 -------
source/cn/v-0.10/references/modules/webview.md | 66 --
source/cn/v-0.10/references/replace.md | 57 --
source/cn/v-0.10/references/special-element.md | 38 --
source/cn/v-0.10/references/specs/index.md | 309 ---------
.../references/specs/js-framework-apis.md | 190 ------
.../v-0.10/references/specs/virtual-dom-apis.md | 148 -----
source/cn/v-0.10/references/text-style.md | 40 --
source/cn/v-0.10/references/units.md | 66 --
source/cn/v-0.10/references/wxc/index.md | 44 --
source/cn/v-0.10/references/wxc/wxc-navpage.md | 192 ------
source/cn/v-0.10/references/wxc/wxc-tabbar.md | 176 ------
source/cn/v-0.10/tools/devtools-android.md | 123 ----
source/cn/v-0.10/tools/devtools-ios.md | 65 --
source/cn/v-0.10/tools/devtools.md | 99 ---
source/cn/v-0.10/tools/index.md | 96 ---
source/cn/v-0.10/tools/playground.md | 22 -
source/cn/v-0.10/tools/transformer.md | 38 --
source/cn/who-is-using-weex.md | 6 +
source/cn/wiki/color-names.md | 181 ++++++
source/cn/wiki/common-events.md | 139 ++++
source/cn/wiki/common-styles.md | 628 +++++++++++++++++++
source/cn/wiki/css-units.md | 65 ++
source/cn/wiki/design-principle.md | 8 +
source/cn/wiki/event-bubble.md | 147 +++++
source/cn/wiki/faq.md | 226 +++++++
source/cn/wiki/gestures.md | 61 ++
source/cn/wiki/how-it-works.md | 63 ++
source/cn/wiki/index.md | 6 +
source/cn/wiki/platform-difference.md | 71 +++
source/cn/wiki/text-styles.md | 47 ++
source/contributing.md | 105 ++++
source/faq.md | 207 ------
source/guide/advanced/app-architecture.md | 62 ++
source/guide/advanced/downgrade.md | 12 +
source/guide/advanced/page-architecture.md | 49 ++
source/guide/advanced/path.md | 38 ++
.../guide/advanced/use-vuex-and-vue-router.md | 90 +++
source/guide/contributing.md | 106 ----
source/guide/extend-android.md | 218 +++++++
source/guide/extend-ios.md | 340 ++++++++++
source/guide/extend-js-framework.md | 168 +++++
source/guide/extend-web-render.md | 96 +++
source/guide/front-end-frameworks.md | 12 +
source/guide/index.md | 9 +-
source/guide/integrate-devtool-to-android.md | 147 +++++
source/guide/integrate-devtool-to-ios.md | 193 ++++++
source/guide/integrate-to-your-app.md | 99 ++-
source/guide/intro/app-architecture.md | 61 --
source/guide/intro/how-it-works.md | 72 ---
source/guide/intro/index.md | 17 -
source/guide/intro/page-architecture.md | 48 --
source/guide/intro/using-vue.md | 58 --
source/guide/intro/web-dev-experience.md | 36 --
source/guide/intro/write-once.md | 23 -
source/guide/set-up-env.md | 10 +-
source/guide/tools/index.md | 11 -
source/guide/tools/plugin.md | 68 --
source/guide/tools/toolkit.md | 197 ------
source/guide/using-rax.md | 7 +
source/guide/using-vue.md | 59 ++
source/references/advanced/extend-jsfm.md | 167 -----
source/references/advanced/extend-to-android.md | 219 -------
source/references/advanced/extend-to-html5.md | 96 ---
source/references/advanced/extend-to-ios.md | 341 ----------
source/references/advanced/index.md | 15 -
.../advanced/integrate-devtool-to-android.md | 146 -----
.../advanced/integrate-devtool-to-ios.md | 192 ------
source/references/android-apis.md | 9 +-
source/references/bubble.md | 146 -----
source/references/color-names.md | 182 ------
source/references/common-event.md | 129 ----
source/references/common-style.md | 522 ---------------
source/references/components/a.md | 3 +-
source/references/components/cell.md | 3 +-
source/references/components/div.md | 3 +-
source/references/components/image.md | 13 +-
source/references/components/index.md | 24 -
source/references/components/indicator.md | 5 +-
source/references/components/input.md | 3 +-
source/references/components/list.md | 5 +-
source/references/components/refresh.md | 7 +-
source/references/components/scroller.md | 9 +-
source/references/components/slider.md | 5 +-
source/references/components/switch.md | 7 +-
source/references/components/text.md | 9 +-
source/references/components/textarea.md | 5 +-
source/references/components/video.md | 5 +-
source/references/components/waterfall.md | 5 +-
source/references/components/web.md | 5 +-
source/references/downgrade.md | 11 -
source/references/gesture.md | 56 --
source/references/html5-apis.md | 10 -
source/references/index.md | 5 +-
source/references/ios-apis.md | 11 +-
source/references/js-service.md | 115 ++++
source/references/js-service/index.md | 114 ----
source/references/js_framework-apis.md | 67 ++
source/references/jsfm-apis.md | 66 --
source/references/migration/difference.md | 10 -
source/references/migration/index.md | 11 -
.../references/migration/migration-from-weex.md | 10 -
source/references/modules/animation.md | 17 +-
source/references/modules/clipboard.md | 5 +-
source/references/modules/dom.md | 21 +-
source/references/modules/globalevent.md | 15 +-
source/references/modules/index.md | 20 -
source/references/modules/meta.md | 7 +-
source/references/modules/modal.md | 55 +-
source/references/modules/navigator.md | 7 +-
source/references/modules/picker.md | 5 +-
source/references/modules/storage.md | 15 +-
source/references/modules/stream.md | 5 +-
source/references/modules/timer.md | 58 --
source/references/modules/websocket.md | 3 +-
source/references/modules/webview.md | 5 +-
source/references/native-dom-api.md | 212 -------
source/references/path.md | 37 --
source/references/platfrom-difference.md | 11 -
source/references/text-style.md | 50 --
source/references/unit.md | 11 -
source/references/vue/difference-of-vuex.md | 89 ---
source/references/vue/difference-with-web.md | 149 -----
source/references/vue/index.md | 11 -
source/references/web-standards.md | 584 -----------------
source/references/weex-variable.md | 15 +-
source/resources.md | 6 +
source/tools/download.ejs | 3 +
source/tools/helders.md | 68 ++
source/tools/index.md | 13 +
source/tools/market.md | 6 +
source/tools/playground.ejs | 3 +
source/tools/toolkit.md | 197 ++++++
source/v-0.10/advanced/extend-to-android.md | 189 ------
source/v-0.10/advanced/extend-to-html5.md | 258 --------
source/v-0.10/advanced/extend-to-ios.md | 311 ---------
.../v-0.10/advanced/how-data-binding-works.md | 39 --
source/v-0.10/advanced/images/how-arch.png | Bin 62303 -> 0 bytes
source/v-0.10/advanced/images/how-render.png | Bin 42957 -> 0 bytes
source/v-0.10/advanced/index.md | 148 -----
source/v-0.10/advanced/integrate-to-android.md | 204 ------
source/v-0.10/advanced/integrate-to-html5.md | 77 ---
source/v-0.10/advanced/integrate-to-ios.md | 118 ----
source/v-0.10/guide/.gitkeep | 0
.../how-to/customize-a-native-component.md | 58 --
.../guide/how-to/cuszomize-native-apis.md | 80 ---
source/v-0.10/guide/how-to/debug-with-html5.md | 47 --
source/v-0.10/guide/how-to/index.md | 40 --
.../guide/how-to/preview-in-playground-app.md | 20 -
.../guide/how-to/require-3rd-party-libs.md | 56 --
.../how-to/transform-code-into-js-bundle.md | 110 ----
source/v-0.10/guide/images/tut-cli-qrcode.png | Bin 45480 -> 0 bytes
source/v-0.10/guide/images/tut-first.png | Bin 51434 -> 0 bytes
source/v-0.10/guide/images/tut-second.png | Bin 78519 -> 0 bytes
source/v-0.10/guide/images/tut1.jpg | Bin 47442 -> 0 bytes
source/v-0.10/guide/images/tut2.jpg | Bin 52428 -> 0 bytes
source/v-0.10/guide/images/tut3.png | Bin 52198 -> 0 bytes
source/v-0.10/guide/images/tut4.gif | Bin 218245 -> 0 bytes
source/v-0.10/guide/index.md | 211 -------
source/v-0.10/guide/syntax/comm.md | 228 -------
.../v-0.10/guide/syntax/composed-component.md | 114 ----
source/v-0.10/guide/syntax/config-n-data.md | 61 --
source/v-0.10/guide/syntax/data-binding.md | 248 --------
source/v-0.10/guide/syntax/display-logic.md | 173 -----
source/v-0.10/guide/syntax/events.md | 59 --
source/v-0.10/guide/syntax/id.md | 65 --
source/v-0.10/guide/syntax/index.md | 122 ----
source/v-0.10/guide/syntax/render-logic.md | 35 --
source/v-0.10/guide/syntax/style-n-class.md | 118 ----
source/v-0.10/references/api.md | 84 ---
source/v-0.10/references/bubble.md | 150 -----
source/v-0.10/references/cheatsheet.md | 102 ---
source/v-0.10/references/color-names.md | 182 ------
source/v-0.10/references/common-attrs.md | 78 ---
source/v-0.10/references/common-event.md | 120 ----
source/v-0.10/references/common-style.md | 208 ------
source/v-0.10/references/component-defs.md | 131 ----
source/v-0.10/references/components/a.md | 50 --
source/v-0.10/references/components/cell.md | 42 --
source/v-0.10/references/components/div.md | 48 --
source/v-0.10/references/components/image.md | 55 --
source/v-0.10/references/components/index.md | 24 -
.../v-0.10/references/components/indicator.md | 98 ---
source/v-0.10/references/components/input.md | 124 ----
source/v-0.10/references/components/list.md | 292 ---------
.../references/components/refresh-loading.md | 297 ---------
source/v-0.10/references/components/scroller.md | 136 ----
source/v-0.10/references/components/slider.md | 107 ----
source/v-0.10/references/components/switch.md | 81 ---
source/v-0.10/references/components/text.md | 94 ---
source/v-0.10/references/components/textarea.md | 81 ---
source/v-0.10/references/components/video.md | 75 ---
source/v-0.10/references/components/web.md | 152 -----
.../v-0.10/references/components/wxc-navpage.md | 74 ---
.../v-0.10/references/components/wxc-tabbar.md | 94 ---
source/v-0.10/references/gesture.md | 74 ---
.../v-0.10/references/images/css-boxmodel.png | Bin 12581 -> 0 bytes
.../references/images/css-flexbox-align.jpg | Bin 35005 -> 0 bytes
.../references/images/css-flexbox-justify.svg | 59 --
.../references/images/css-flexbox-sample.png | Bin 3210 -> 0 bytes
source/v-0.10/references/images/nav.png | Bin 83497 -> 0 bytes
source/v-0.10/references/index.md | 49 --
source/v-0.10/references/modules/animation.md | 63 --
source/v-0.10/references/modules/clipboard.md | 53 --
source/v-0.10/references/modules/dom.md | 114 ----
source/v-0.10/references/modules/globalevent.md | 89 ---
source/v-0.10/references/modules/index.md | 28 -
source/v-0.10/references/modules/modal.md | 192 ------
source/v-0.10/references/modules/navigator.md | 198 ------
source/v-0.10/references/modules/storage.md | 111 ----
source/v-0.10/references/modules/stream.md | 86 ---
source/v-0.10/references/modules/timer.md | 60 --
source/v-0.10/references/modules/webview.md | 160 -----
source/v-0.10/references/special-element.md | 36 --
source/v-0.10/references/specs/index.md | 309 ---------
.../v-0.10/references/specs/js-bundle-format.md | 307 ---------
.../references/specs/js-framework-apis.md | 191 ------
.../v-0.10/references/specs/virtual-dom-apis.md | 147 -----
source/v-0.10/references/text-style.md | 43 --
source/v-0.10/tools/devtools-android.md | 123 ----
source/v-0.10/tools/devtools-ios.md | 76 ---
source/v-0.10/tools/devtools.md | 102 ---
source/v-0.10/tools/index.md | 97 ---
source/v-0.10/tools/playground.md | 24 -
source/v-0.10/tools/transformer.md | 38 --
source/who-is-using-weex.md | 6 +
source/wiki/color-names.md | 183 ++++++
source/wiki/common-events.md | 129 ++++
source/wiki/common-styles.md | 523 +++++++++++++++
source/wiki/css-units.md | 11 +
source/wiki/design-principle.md | 7 +
source/wiki/event-bubble.md | 147 +++++
source/wiki/faq.md | 210 +++++++
source/wiki/gestures.md | 56 ++
source/wiki/how-it-works.md | 71 +++
source/wiki/index.md | 6 +
source/wiki/platfrom-difference.md | 11 +
source/wiki/text-styles.md | 49 ++
themes/weex/languages/cn.yml | 25 +-
themes/weex/languages/en.yml | 9 +-
themes/weex/layout/_partial/header.ejs | 37 +-
themes/weex/layout/_partial/post/summary.ejs | 8 +-
647 files changed, 31535 insertions(+), 31556 deletions(-)
----------------------------------------------------------------------
http://git-wip-us.apache.org/repos/asf/incubator-weex-site/blob/32a097bf/_draft/difference-with-web.en.md
----------------------------------------------------------------------
diff --git a/_draft/difference-with-web.en.md b/_draft/difference-with-web.en.md
new file mode 100644
index 0000000..2af11f9
--- /dev/null
+++ b/_draft/difference-with-web.en.md
@@ -0,0 +1,149 @@
+---
+title: Difference with Web
+type: references
+order: 10.1
+version: 2.1
+---
+
+# Differences between using Vue in Web and Weex
+
+## Platform Differences
+
+Vue.js was designed for the Web platform at the begining. Although it can be based on Weex to develop native applications, there are still many differences between web and native. See [Platform Differences Between Weex and Web](../ platform-difference.html) for more details.
+
+Due to those differences, Weex doesn't support those features in Vue.js (mostly are DOM-related):
+
++ Event bubbling and capturing are not supported. Event modifiers, such as `.prevent`,` .capture`, `.stop`,` .self` are meaningless in the native environment.
++ The keyboard event modifiers, like `.{KeyCode | keyAlias}` is also meaningless. (see [docs in Vue.js](https://vuejs.org/v2/guide/events.html#Key-Modifiers))
++ No need to call `vm.$mount` manually, the entry component will mount to the root view of the native container by default.
++ `v-html` and` v-text` directives are not supported.
+
+## Functional differences
+
+### Vue 2.0 Runtime-only build
+
+Vue 2.0 provides two available builds, the standalone build and the runtime-only build. see the [official document](https://vuejs.org/v2/guide/installation.html#Standalone-vs-Runtime-only-Build) for more information.
+
+Weex only required the runtime-only build of Vue 2.0 for better performance and less code size.
+
+The specific differences are:
+
++ The `template` attribute is not supported when defining a component.
++ Does not support using `x-templates`.
++ Does not support using `Vue.compile`.
+
+### Isolate the context of multiple pages
+
+Weex use the "multiple-pages" concept in native, different js bundle will be run in different native views, there context is isolated. Even the `Vue` variable is not the same instance between js bundles. (However, all the js bundle will share the same Weex runtime.)
+
+Based on this feature, the global configurations in `Vue` will only take effect on the current page:
+
++ `Vue.config`
++ `Vue.component`
++ `Vue.directive`
++ `Vue.filter`
++ `Vue.mixin`
++ `Vue.use`
+
+> Note: Those methods are still work, but its effect will be limited to the current page.
+
+## Restrictions in style
+
+CSS is very flexible, has a lot of properties, support a variety of layout modes. This is the advantage of CSS, but also a bottleneck in browser performance optimization.
+
+The style in Weex is parsed by the native renderer, and for the sake of performance and complexity, Weex makes some trade-offs about CSS features to make it better suited to *"best practices"*.
+
+### Single class selector
+
+Weex only supports to use single class name in `<style>`, does not support *type selectors*, *ID selectors*, *attribute selectors*, *adjacent sibling selectors* and the *combinators*.
+
+```CSS
+/* Support single class name selector */
+.one-class {
+ font-size: 36px;
+}
+
+/* Does not support to use combinators between selector */
+.parent > .child {
+ padding-top: 10px;
+}
+.foo + .bar {
+ margin-left: 20px;
+}
+
+/* Does not support attribute selectors. The `v-cloak` directive is not supported */
+[V-cloak] {
+ color: #FF6600;
+}
+```
+
+The restriction is only for the style definition, does not affect the use of class names. You can still use multiple class names on a single tag, such as:
+
+```Html
+<template>
+ <div class="one two three"><div>
+</template>
+```
+
+### Scoped by default
+
+In Weex, For single file components, the styles written in the `<style>` can only be used in the current component.
+
+In order to maintain consistency with Native, it is recommended that you write the style in the `.vue` file with the` scoped` attribute, that is, `<style scoped>`.
+
+### Supported CSS attributes
+
+Weex supports a subset of CSS, and will continue to expand.
+
+Weex supports *box-model* and *flexbox*, as well as other common styles. See [Weex Common Style](../ common-style.html) and [Supported Web Standards](http://weex.apache.org/references/web-standards.html) for more information.
+
+In addition, you should also pay attention to the following points:
+
++ No need to write style prefix.
++ Weex doesn't support `display: none;` and therefore doesn't support the `v-show` directive.
++ In order to optimize the efficiency of CSS parser, Weex doesn't support shorthand attributes, involving the following attributes:
+ + `flex`
+ + `border`, `border-(top|bottom|left|right)`
+ + `margin`
+ + `padding`
+ + `font`
+ + `background`
+
+## Differences in development
+
+Because of the platform difference, you have to compile your source file in two different ways:
+
++ For the web, you can compile source files in any official way, such as Webpack + vue-loader or Browserify + vueify. and require the [weex-vue-render](https://www.npmjs.com/package/weex-vue-render), which is a group of Weex build-in components.
++ For Android and iOS, we've provided [weex-loader](https://github.com/weexteam/weex-loader) to compile the `.vue` files. That is, use Webpack + weex-loader to generate the js bundle that is available for the native.
+
+### Use weex-loader
+
+[weex-loader](https://github.com/weexteam/weex-loader) is a loader for Webpack, see the [official document](http://webpack.github.io/docs/using-loaders.html) to learn how to use it.
+
+One more thing should be reminded is that if the *entry file* of your webpack config is a `.vue` file, you also need to pass an additional ` entry` parameter, usually set to `true`.
+
+```Js
+module.exports = {
+ // Add the entry parameter for the .vue file
+ entry: './path/to/App.vue?entry=true',
+
+ // other configurations ...
+
+ module: {
+ loaders: [{
+
+ // matches the .vue file path that contains the entry parameter
+ test: /\.vue(\?^^]+)?$/,
+ loaders: ['weex-loader']
+ }]
+ },
+}
+```
+
+**You don't need to write those additional parameters if you are using `.js` file as entry file.** We recommend using javascript files as the entry file of webpack config.
+
+### Setup native development environments
+
+Since your are using Weex to develop native apps, setup native development environments, both Android and iOS, would be very useful.
+
+See [Integrating Weex to the existing application](../../guide/integrate-to-your-app.html) for more information.
http://git-wip-us.apache.org/repos/asf/incubator-weex-site/blob/32a097bf/_draft/difference-with-web.md
----------------------------------------------------------------------
diff --git a/_draft/difference-with-web.md b/_draft/difference-with-web.md
new file mode 100644
index 0000000..d075312
--- /dev/null
+++ b/_draft/difference-with-web.md
@@ -0,0 +1,138 @@
+---
+title: Vue.js 在 Weex 中的差异
+type: guide
+group: 高阶特性
+order: 8.3
+version: 2.1
+---
+
+
+# Vue.js 在 Weex 和 Web 中的差异
+
+## 平台差异
+
+Vue.js 最初是为 Web 平台设计的,虽然可以基于 Weex 开发原生应用,但是 Web 开发和原生开发毕竟不同,在功能和开发体验上都有一些差异,这些差异从本质上讲是原生开发平台和 Web 平台之间的差异,可以通过[《Weex 和 Web 平台的差异》](../platform-difference.html)了解更多细节和原因。
+
+由于运行平台存在差异,Weex 不支持 Vue.js 中与 DOM 相关的功能:
+
++ 不支持事件冒泡和捕获机制,`.prevent` 、`.capture` 、`.stop` 、`.self` 等事件修饰符在原生环境中无意义。
++ 键盘事件的 `.{keyCode | keyAlias}` 修饰符在原生环境中无意义。(参考 [Vue 相关文档](https://cn.vuejs.org/v2/guide/events.html#按键修饰符))
++ 无需自行调用 `vm.$mount`,默认会将入口组件挂载到原生应用的视图中。
++ 不支持 `v-html` 和 `v-text` 指令。
+
+## 功能差异
+
+### 仅引入了 Vue Runtime
+
+Vue 除了提供默认的完整包以外,还提供一个更小巧的 `vue.runtime.js`,在这个文件中移除了模板编译的相关操作,Weex 中也仅引入 Vue Runtime 的功能,这样做除了可以减少代码体积以外,还能减少运行期编译模板的负担,提升性能。
+
+具体的差异有:
+
++ 定义组件时不支持使用 `template` 属性。
++ 不支持使用 `x-templates`。
++ 不支持使用 `Vue.compile`。
+
+### 隔离多页面的作用域
+
+Weex 在原生端使用的是“多页”的实现,不同的 js bundle 将会在不同的原生页面中执行;也就是说,不同的 js bundle 之间将不同共享 js 变量。即使是 `Vue` 这个变量,在不同页面中也对应了不同的引用。
+
+基于这个特性,Vue 中全局功能将只在当前页面内生效:
+
++ `Vue.config`
++ `Vue.component`
++ `Vue.directive`
++ `Vue.filter`
++ `Vue.mixin`
++ `Vue.use`
+
+> 注:以上接口的功能并未受影响,只是其生效范围将会限制在同一页面内。
+
+## 样式差异
+
+Web 中的 CSS 非常的灵活,积累了特别多的属性,支持多种布局方法;这是其优势,也是浏览器性能优化的一个瓶颈。
+
+Weex 中的样式是由原生渲染器解析的,出于性能和功能复杂度的考虑,Weex 对 CSS 的特性做了一些取舍,使其更符合最佳实践。
+
+### 单类名选择器和作用域
+
+Weex 中只支持单个类名选择器,不支持关系选择器,也不支持属性选择器。
+
+```css
+/* 支持单个类名选择器 */
+.one-class {
+ font-size: 36px;
+}
+
+/* 不支持关系选择器 */
+.parent > .child {
+ padding-top: 10px;
+}
+
+/* 不支持属性选择器,不支持 `v-cloak` 指令 */
+[v-cloak] {
+ color: #FF6600;
+}
+```
+
+这个只是对样式定义的限制,不影响样式类名的使用,在标签中可以添加多个样式类名,如:
+
+```html
+<template>
+ <div class="one two three"><div>
+</template>
+```
+
+### 组件级别的作用域
+
+在 Weex 中,写在组件 `<style>` 里的样式只能用在当前组件中,默认是 `scoped` 作用域。为了保持和 Native 的一致性,建议在 `.vue` 文件中写样式时,加上 `scoped` 属性,即: `<style scoped>`。
+
+### 支持的样式属性
+
+Weex 支持的样式特性是 CSS 的子集,并且会不断扩充;在实现过程中我们参考了 [CSS 属性在浏览器中的使用频率](https://gist.github.com/Jinjiang/ea6b403036b7287cf8b8508729b77ac0#css-properties),优先实现其中频率最高的一些属性。
+
+Weex 支持了基本的盒模型和 flexbox 布局,以及其他常用样式,详情可参考[Weex 通用样式文档](../common-style.html)。
+
+在编写样式时,还应该注意一下几点:
+
++ 不需要写样式前缀。
++ Weex 不支持 `display: none;`,因此也不支持 `v-show` 指令。
++ 为了优化样式解析的效率,样式属性暂不支持简写,涉及一下属性:
+ + `border` 、`border-(top|bottom|left|right)`
+ + `margin`
+ + `padding`
+ + `flex`
+
+## 编译环境的差异
+
+在 Weex 中使用 Vue.js ,你所需要关注的运行平台除了 Web 之外还有 Android 和 iOS ,在开发和编译环境上还有一些不同点。针对 Web 和原生平台,将 Vue 项目源文件编译成目标文件,有两种不同的方式:
+
++ 针对 Web 平台,和普通 Vue 2.X 项目一样,可以使用任意官方推荐的方式编译源文件,如 Webpack + vue-loader 或者 Browserify + vueify 。
++ 针对 Android 和 iOS 平台,我们提供了 [weex-loader](https://github.com/weexteam/weex-loader) 工具支持编译 `.vue` 格式的单文件组件;也就是说,目前只能使用 Webpack + weex-loader 来生成原生端可用的 js bundle。
+
+### 使用 weex-loader
+
+weex-loader 是 Webpack 的一个加载器,使用方法参考其[官方文档](http://webpack.github.io/docs/using-loaders.html)。需要提醒的是,如果 Webpack 配置的入口文件是个 `.vue` 格式的文件的话,还需要额外传递 `entry` 参数,通常设置为 `true`,表示将当前组件作为入口组件。为了能正常匹配 `.vue` 文件,Webpack 配置文件中 weex-loader 的匹配规则也需要有所调整。
+
+```js
+module.exports = {
+ // 针对 .vue 文件要添加 entry 参数
+ entry: './path/to/App.vue?entry=true',
+
+ // 其他配置项 ...
+
+ module: {
+ loaders: [{
+
+ // 匹配包含了 entry 参数的 .vue 文件路径
+ test: /\.vue(\?[^?]+)?$/,
+ loaders: ['weex-loader']
+ }]
+ },
+}
+```
+
+如果使用 `.js` 文件作为 Webpack 配置的入口文件,则不需要额外配置这些参数,我们推荐使用 Javascript 文件作为编译的入口文件。
+
+### 搭建原生开发环境
+
+Weex 项目生成的是原生应用,学习一些开发原生应用的基础知识,会对你开发 Weex 项目很有帮助。参考[《集成 Weex 到已有应用》](../../guide/integrate-to-your-app.html)了解更多信息。
http://git-wip-us.apache.org/repos/asf/incubator-weex-site/blob/32a097bf/_draft/native-dom-api.md
----------------------------------------------------------------------
diff --git a/_draft/native-dom-api.md b/_draft/native-dom-api.md
new file mode 100644
index 0000000..37729a2
--- /dev/null
+++ b/_draft/native-dom-api.md
@@ -0,0 +1,212 @@
+---
+title: Native DOM APIs
+type: references
+order: 6
+version: 2.1
+has_chapter_content: true
+---
+
+# Native DOM APIs
+
+Weex in the JS engine, for each page provides a set of Native DOM APIs. This interface is very close to the HTML DOM APIs. Using this interface we can control native rendering logic via JavaScript. And Weex upper layer of Vue 2.0 is based on this interface to adapt.
+
+In most cases, the JS framework will encapsulate native DOM APIs. That way, the developer does not need to work directly on the Native DOM.
+
++ `Document` class: full page document.
++ `Node` class: the base class of nodes.
++ `Element` class: element node, inherited from Node, single view unit.
++ `Comment` class: comment node, inherited from Node, no practical meaning, usually used as placeholders.
+
+Each Weex page has a `weex.document` object, which is an instance of the Document class and is the starting point for all the following interface calls.
+
+Let's take a look at their usage in detail:
+
+## `Document` class
+Each `Document` instance will automatically have a `documentElement` property when it is created. This attribute represents the document node. The document node can have a body, which is the main node of the document.
+
+Note: The document node body only accepts `<div>`, `<list>`, or `<scroller>` three types of element nodes.
+
+### Constructor
+`new Document(id: string, url: string?)`
+
+### Member method
+`createElement(tagName: string, props: Object?): Element`
+
++ Creates an `Element` instance of a specific type `tagName`, which is an element node. Props can contain attr objects and style objects. Such as `createBody ('div', {style: {backgroundColor: '#ffffff'}})`.
+
+`createComment(text: string): Comment`
+
++ Create an instance of ·`Comment`, which is a comment node and set a text description.
+
+`createBody(tagName: string, props: Object?): Element`
+
++ Create a document body node and automatically mount it under `documentElement`.
+
+`fireEvent(el: Element, type: string, e: Object?, domChanges: Object?)`
+Triggers a particular type of event. When the event modifies the DOM's properties or styles during the generation process, the fourth argument is used to describe the changes, and the parameter format is the same as the format of the `createElement` method above.
+
+`destroy()`
+
++ Destroy the current document. Once the document is destroyed, it will no longer work.
+
+### Read-only member variables
+`id: string`
+
++ Each `Document` instance has a unique id. This is also the only id that each Weex page has.
+
+`URL: string?`
+
++ If the current Weex page has a JS bundle URL, the URL will be returned here.
+
+`body: Element`
+
++ The main body of the document, the concept similar to the HTML DOM document.body.
+
+`documentElement: Element`
+
++ Document node, the concept similar to the HTML DOM document.documentElement.
++ The relationship between body and documentElement is: documentElement is the parent of the body.
+
+`getRef(id): Node`
+
++ Get the node based on the node id.
+
+## `Node` Class
+### Constructor
+`new Node()`
+
+### Member method
+`destroy()`
+
+### Read-only member variables or methods
+`ref: string`
+
++ Each `Node` instance has its own unique ref value in the entire `Document instance.
+
+`nextSibling: Node?`
+
+`previousSibling: Node?`
+
+`parentNode: Node?`
+
++ The three interfaces are consistent with the definition of HTML DOM.
+
+`children: Node[]`
+
++ The node has an array of all child nodes.
+
+`pureChildren: Node[]`
+
+The node has an array of all the child elements. The difference between it and `children` is that `pureChildren` contains only the `Element` instance and not the `Comment` instance.
+
+
+## `Element` class, inherited from `Node`
+### Constructor
+`new Element(type: string, props: Object?)`
+
++ Creates an element node of a particular type `type`, and the `props` parameter can contain an `attr` object or a `style` object.
+
+### DOM tree operation
+`appendChild(node: Node)`
+`insertBefore(node: Node, before: Node?)`
+
++ The two interfaces are similar to HTML DOM.
+
+`insertAfter(node: Node, after: Node?)`
+
++ Insert a new node before a child node.
+
+`removeChild(node: Node, preserved: boolean?)`
+
++ Delete the child node node. Parameters `preserved` whether it is immediately removed from memory or temporarily retained.
+
+`clear()`
+
++ Clear all child nodes.
+
+### The DOM property itself operates
+
+`setAttr(key: string, value: string, silent: boolean?)`
+
+`setStyle(key: string, value: string, silent: boolean?)`
+
++ In the above two interfaces, when `silent` is true, the node only updates itself, does not pass the command to the client render layer. This parameter is used to handle user events that have changed the node-related properties at the time of occurrence, and will not send commands repeatedly to the client after the Native DOM has changed.
+
+`addEvent(type: string, handler: Function)`
+
+`removeEvent(type: string)`
+
+`fireEvent(type: string, e: any)`
+
++ Bind events, unbind events, trigger events.
+
+#### Component method for a specific component type
+
+Special: Different component types can have their own unique methods, such as `<web>` components support `refresh` method. You can see the description of each component. In this case, we will generate a specific component type of class, such as `WebElement`, which inherited from `Element`.
+
+Such as:
+
+>`WebElement` inherited from `Element`
+>Indicates that a webview is embedded in the Wex page
+
+>`Refresh ()`: Refreshes the current webview
+
+
+### Read-only member variables or methods
+
+`ref`, `nextSibling`, `previousSibling`, `parentNode`
+
++ Inherited from `Node`.
+
+`nodeType: number`
+
++ The number is always 1.
+
+
+`type: string`
+
++ Consistent with the `type` in the constructor.
+
+`attr: Object`
+
++ The key pair of all the characteristics of the current node. It is recommended to use the `setAttr ()` method to modify, rather than directly modify the object here.
+
+`style: Object`
+
++ The value of all the keys of the current node. It is recommended to modify the `setStyle ()` method, rather than directly modify the object here.
+
+`event: Object`
+
++ All events of the current node are bound. Each event type corresponds to an event handler method. It is recommended to use the `addEvent () / removeEvent ()` method to modify, rather than directly modify the object here.
+
+`toJSON(): Object`
+
++ Returns a JSON object that describes the element's node, such as: `{ref: string, type: string, attr: Object, style: Object, event: Array (string), children: Array}`.
+
+
+## `Comment` class, inherited from `Node`
+
+### Constructor
+`new Comment(value: string)`
+
+### Read-only member variables or methods
+
+`ref`, `nextSibling`, `previousSibling`, `parentNode`
+
++ Inherited from `Node`.
+
+`nodeType: number`
+
++ The number is always 8.
+
+`type: string`
+
++ The type is always `'comment'`
+
+`value: string`
+
++ Consistent with the value in the constructor.
+
+`toJSON(): Object`
+
++ Returns a JSON object describing the annotation node. For example: `<! - value ->`.
http://git-wip-us.apache.org/repos/asf/incubator-weex-site/blob/32a097bf/_draft/timer.cn.md
----------------------------------------------------------------------
diff --git a/_draft/timer.cn.md b/_draft/timer.cn.md
new file mode 100644
index 0000000..c93f937
--- /dev/null
+++ b/_draft/timer.cn.md
@@ -0,0 +1,49 @@
+---
+title: Timer
+type: references
+group: 内置模块
+order: 9.03
+version: 0.10
+---
+
+# Timer
+Weex Timer可以用来延时启动一个一次性任务或者重复任务。Timer���会尽最大努力提供精确的延时,但是延时可能并不精确,延时时间�很可能会超过用户期望的时间。实际上,timer�仅仅是为了支持�HTML5中的�polyfill,*不建议*开发者��直接�使用timer.
+
+## API
+Timer中延时的单位是毫秒,且延时时间应该为一个非负的**int**值(int值�最大为0x7FFFFF).如果延时时间为零,会将该任务�马上插入任务队列的尾部。对于其他非法值,timer的行为未定义。
+
+### setTimeout(fn, timeout)
+`setTimeout()`��会等待指定的时间,然后执行给出的函数。
+* 可以使用 `clearTimeout()`�去�阻止`setTimeout()`���运行如果此时对应的`setTimeout()`��还没有运行的话。
+* 如果需要重复�执行任务,使用`setInterval()`.
+
+#### Arguments
+* `fn` (function): 待执行的函数.
+* `timeout` (number): 执行函数前的等待时间,单位为毫秒。
+
+#### Return value
+一个Number对象, 表示这个�任务的id。把id传入clearTimeout(fnId)中可以用来取消任务。
+
+### setInterval(fn, interval)
+`setInterval()`每隔指定的时间间隔后,会执行对应的�函数。`setInterval()`不会�停止,除非`clearInterval()`被调用。`setInterval()`的返回值可以用来作为`setInterval()`的参数。
+
+#### Arguments
+* `fn` (function): 待执行的函数。
+* `interval` (number): �这次执行函数与下一次�函数之间的时间间隔,单位为�毫秒。
+
+#### Return value
+一个Number对象,代表任务序列的id。可以把这个值传入`clearInterval`中来终止重复任务的执行。
+
+### clearTimeout(fnId)
+`clearTimeout()`可以�用来提前终止`setTimeout()`�启动的任务。仅当`setTimeout()`�对应的任务没有被执行时,`clearTimeout()`才可以用来�终止该任务,否则`clearTimeout()`没有任何效果�。
+
+#### Arguments
+* `fnId` (number): `setTimeout()`��的返回值.
+
+### clearInterval(fnId)
+ `clearInterval()`�可以用来终止 `setInterval()`启动的�任务序列。
+
+#### Arguments
+* `fnId` (number): `setInterval()`的返回值
+
+[Try it](http://dotwe.org/vue/ad564965f1eac5a4bc86946ecff70a0c)
http://git-wip-us.apache.org/repos/asf/incubator-weex-site/blob/32a097bf/_draft/timer.md
----------------------------------------------------------------------
diff --git a/_draft/timer.md b/_draft/timer.md
new file mode 100644
index 0000000..da518fd
--- /dev/null
+++ b/_draft/timer.md
@@ -0,0 +1,60 @@
+---
+title: Timer
+type: references
+group: Build-in Modules
+order: 9.03
+version: 0.10
+---
+
+# Timer
+
+Weex encapsulates a series of APIs in order to start/stop a one-time task or a repeated task at a fixed delay. Please note that this module don't provide an accuracy delay. It provides best-effort delivery, but the actual delay may still exceed the delay user wants if the corresponding thread is busy.
+Actually, this module is made for the polyfill of HTML5 timer APIs, developers **should not** use this module directly unless they know exactly what they are doing.
+
+## API
+
+All timeout or interval in this module are measured in milliseconds. Also, timeout and interval should be a non-negative **integer**(the max of integer is 0x7FFFFFFF). The behavior of invalid value for timeout or interval is undefined.
+
+### setTimeout(fn, timeout)
+
+The `setTimeout()` method calls a function after a specified number of milliseconds. Use the `clearTimeout()` method to prevent the function from running. The function is only executed once. If you need to repeat execution, use the `setInterval()` method.
+
+#### Arguments
+
+- `fn` (function): The function that will be executed
+- `timeout` (number): The number of milliseconds to wait before executing the function
+
+#### Return value
+
+A Number, representing the fnId value of the timer that is set. Use this value with the `clearTimeout()` method to cancel the timer.
+
+### setInterval(fn, interval)
+
+The `setInterval()` method calls a function at specified intervals (in milliseconds), and it will continue calling the function until `clearInterval()` is called. The fnId value returned by `setInterval()` is used as the parameter for the `clearInterval()` method.
+
+#### Arguments
+
+- `fn` (function): The function that will be executed
+- `interval` (number): The intervals (in milliseconds) on how often to execute the function
+
+#### Return value
+
+A Number, representing the fnId value of the timer that is set. Use this value with the `clearInterval()` method to cancel the timer
+
+### clearTimeout(fnId)
+
+The `clearTimeout()` method clears a timer set with the `setTimeout()` method. The fnId value returned by `setTimeout()` is used as the parameter for the `clearTimeout()` method. If the function has not already been executed, you will be able to stop the execution by calling the `clearTimeout()` method, otherwise, this method has no influence on the task.
+
+#### Arguments
+
+- `fnId` (number): The fnId value of the timer returned by the `setTimeout()` method
+
+### clearInterval(fnId)
+
+The `clearInterval()` method clears a timer set with the `setInterval()` method. The fnId value returned by `setInterval()` is used as the parameter for the `clearInterval()` method.
+
+#### Arguments
+
+- `fnId` (number): The fnId of the timer returned by the `setInterval()` method
+
+[Try it](http://dotwe.org/vue/ad564965f1eac5a4bc86946ecff70a0c)
http://git-wip-us.apache.org/repos/asf/incubator-weex-site/blob/32a097bf/_draft/v-0.10/advanced/extend-to-android.md
----------------------------------------------------------------------
diff --git a/_draft/v-0.10/advanced/extend-to-android.md b/_draft/v-0.10/advanced/extend-to-android.md
new file mode 100644
index 0000000..97bb49e
--- /dev/null
+++ b/_draft/v-0.10/advanced/extend-to-android.md
@@ -0,0 +1,189 @@
+---
+title: Extend to Android
+type: advanced
+order: 6
+has_chapter_content: true
+version: 0.10
+---
+
+# Extend to Android
+
+### Module extend
+weex sdk support Module extend,
+Weex SDK provides only rendering capabilities, rather than have other capabilities, such as network, picture, and URL redirection. If you want the these features, you need to implement it.
+
+For example: If you want to implement an address jumping function, you can achieve a Module Follow the steps below.
+
+#### Step to customize a module
+
+1. Customize module must extend WXModule
+2. @WXModuleAnno annotation must be added, as it is the only the way to recognized by Weex
+3. The access levels of mehtod must be **public**
+4. The module class also can not be an inner class
+5. Customize can not be obfuscated by tools like ProGuard
+6. Module methods will be invoked in UI thread, do not put time consuming operation there
+7. Weex params can be int, double, float, String, Map, List
+
+Refer to the following example:
+
+```java
+public class WXEventModule extends WXModule{
+
+ private static final String WEEX_CATEGORY="com.taobao.android.intent.category.WEEX";
+
+ @JSMethod
+ public void openURL(String url){
+ //implement your module logic here
+ }
+}
+
+```
+
+#### Register the moulde
+
+```java
+ WXSDKEngine.registerModule("event", WXEventModule.class);
+```
+
+### Use this module in weex DSL
+Now `event` moudle is avaiable in weex, use the module like this:
+
+```javascript
+var event = require('@weex-module/event');
+event.openURL("http://www.github.com");
+```
+
+### Javascript callback
+
+If the module need implement a callback to javascript, you just add `JSCallback` argument to the method you want expose to javascript:
+
+```java
+ @JSMethod
+ public void openURL(String url,JSCallback callback){
+ //implement your module logic here
+ Map<String,Object> resp = new HashMap();
+ resp.put("result","ok");
+ callback.invoke(resp);
+ }
+```
+
+At the javascript side, call the module with javascript function to receive callback data:
+
+```javascript
+event.openURL("http://www.github.com",function(resp){ console.log(resp.result); });
+```
+
+### Component extend
+
+There are label, image, div, scroll, ect. components in weex, you can also customize your own components.
+
+#### Step to customize a component
+
+1. Customize components must extend WXComponent or WXContainer
+2. @WXComponentProp(name=value(value is attr or style of dsl)) for it be recognized by weex SDK.
+3. The access levels of mehtod must be **public**
+4. The component class can not be an inner class
+5. Customize can not be obfuscated by tools like ProGuard
+6. Component methods will be invoked in UI thread, do not put time consuming operation there.
+7. Weex params can be int, double, float, String, Map, List, Array
+
+
+Refer to the following example
+
+```java
+public class MyViewComponent extends WXComponent{
+ public MyViewComponent(WXSDKInstance instance, WXDomObject dom,
+ WXVContainer parent, String instanceId, boolean isLazy)
+ {
+ public MyViewComponent(WXSDKInstance instance, WXDomObject dom,
+ WXVContainer parent, String instanceId, boolean isLazy) {
+ super(instance, dom, parent, instanceId, isLazy);
+ }
+
+ @Override
+ protected void initView() {
+ mHost = new TextView(mContext);
+ }
+ @WXComponentProp(name=WXDomPropConstant.WX_ATTR_VALUE)
+ public void setMyViewValue(String value) {
+ ((TextView)mHost).setText(value);
+ }
+}
+```
+
+#### Register the Component
+
+
+```java
+WXSDKEngine.registerComponent("MyView", MyViewComponent.class);
+```
+
+### Adapter extend
+
+#### ImagedownloadAdapter
+
+Weex SDK has no image download capability, you need to implement `IWXImgLoaderAdapter`. Refer to the following examples.
+
+```java
+public class ImageAdapter implements IWXImgLoaderAdapter {
+
+ private Activity mContext;
+
+ public ImageAdapter(Activity activity) {
+ mContext = activity;
+ }
+
+ @Override
+ public void setImage(final String url, final ImageView view,
+ WXImageQuality quality, WXImageStrategy strategy) {
+ mContext.runOnUiThread(new Runnable() {
+
+ @Override
+ public void run() {
+ if (TextUtils.isEmpty(url)) {
+ view.setImageBitmap(null);
+ return;
+ }
+ String temp = url;
+ if (url.startsWith("//")){
+ temp = "http:" + url;
+ }
+ if (view.getLayoutParams().width<=0 || view.getLayoutParams().height<=0) {
+ return;
+ }
+ Picasso.with(WXEnvironment.getApplication())
+ .load(temp)
+ .resize(view.getLayoutParams().width,
+ view.getLayoutParams().height).into(view);
+ }
+ });
+ }
+}
+```
+
+#### Component Method
+from WeexSDK `0.9.5`, you can define your component method
+
+for example, define a method in component:
+
+```java
+@JSMethod
+public void focus(){
+//method implementation
+}
+```
+
+after your registration for your own custom component, now you can call it in your js file.
+
+```html
+<template>
+ <mycomponent id='mycomponent'></mycomponent>
+</template>
+<script>
+ module.exports = {
+ created: function() {
+ this.$el('mycomponent').focus();
+ }
+ }
+</script>
+```
http://git-wip-us.apache.org/repos/asf/incubator-weex-site/blob/32a097bf/_draft/v-0.10/advanced/extend-to-html5.md
----------------------------------------------------------------------
diff --git a/_draft/v-0.10/advanced/extend-to-html5.md b/_draft/v-0.10/advanced/extend-to-html5.md
new file mode 100644
index 0000000..6201fc7
--- /dev/null
+++ b/_draft/v-0.10/advanced/extend-to-html5.md
@@ -0,0 +1,258 @@
+---
+title: Extend to web
+type: advanced
+order: 8
+has_chapter_content: true
+version: 0.10
+---
+
+# Extend Weex HTML5
+
+### Intro
+
+Weex is a extendable cross-platform solution for dynamic programming and publishing projects. You can build your own components on web platform or native platform by extending the components system. Also you can extend weex by adding new methods for one module, new moudles or new bundle loaders. Follow the steps bellow you can dive into the journy of creating multiple builtin components, APIs and loaders.
+
+First of all, components, APIs and loaders are extensions to weex, so you can create your extensions without requiring the weex package, that means your extensions can be totally standalone.
+
+Second, you should always implement a extension for all the three platforms (android, ios and web), except that you only use it on one specific platform. After all weex is a cross platform framework and the equality of user expierence in all platforms is very important. Although you can create components separately on one platform by another, or welcome other developers on other platforms to join your work (You can always find coders who want the same feature with you in the commity). Here are docs about how to create native extensions on [ios](./extend-to-ios.html) and [android](./extend-to-android.html).
+
+You should publish your extensions somewhere weex developers can easily find, somewhere popular, independent and easy to search and use, such as, npm. Npm is what we strongly recommended.
+
+The most important thing is, you'd better name your extension appropriately: it should begin with a `weex-` if it is a weex extension, and it should end up with a `-<platform>` as a platform mark. If your package is wrapped up with all the three platforms you can ignore it through. Here is a demonstrating component [`<weex-hello-web>`](https://github.com/MrRaindrop/weex-hello-web) to show how to define your own component.
+
+### Create a new component
+
+Steps:
+
+1. Extend `Weex.Component`, override methods of component class.
+2. Use `Weex.registerComponent` to register your customized component in the `init` method of the installation module.
+3. export the `init` method for the installation (Every weex-html5 extension has to have a `init` method in the export object, which is for another weex project to install.)
+
+Here's a example to create a weex component for web platform (weex-html5):
+
+```javascript
+const attr = {
+ // ...
+}
+const style = {
+ // ...
+}
+const event = {
+ // ...
+}
+// every extension file should have a init method.
+function init (Weex) {
+ const Component = Weex.Component
+ const extend = Weex.utils.extend
+
+ // the component's constructor
+ function Hello (data) {
+ Component.call(this, data)
+ }
+
+ // extend the prototype
+ Hello.prototype = Object.create(Component.prototype)
+ extend(Hello.prototype, proto)
+
+ // config the attributes, styles and events.
+ extend(Hello.prototype, { attr })
+ extend(Hello.prototype, {
+ style: extend(Object.create(Component.prototype.style), style)
+ })
+ extend(Hello.prototype, { event })
+
+ Weex.registerComponent('weex-hello', Hello)
+}
+
+// export the init method.
+export default { init }
+```
+
+The code above is extracted from [weex-hello-web/src/index.js](https://github.com/MrRaindrop/weex-hello-web/blob/master/src/index.js#L46-L65).
+
+This demo has overrided the `create` method of the base class `Component`. You can also override other methods to customize your component's behavior. The typical methods of class `Component` you may override are:
+
+* `create`: to create the node of the component, and return it.
+* `createChildren` to create the children's nodes.
+* `insertBefore` to insert a child before another child.
+* `appendChild` to append a child in the children list.
+* `removeChild` to remove a child in the children list.
+
+**Advanced**: Need more code demonstrations about overriding the component's methods ? Just take a look at the [weex repo's code](https://github.com/apache/incubator-weex/tree/dev/html5/). Basically the most of the built-in components are defined this way.
+
+Important! To register your component in the `init` method, use `Weex.registerComponent`. Here's the demo code:
+
+```javascript
+Weex.registerComponent('weex-hello', Hello)
+```
+
+The code above is from [weex-hello-web/src/index.js](https://github.com/MrRaindrop/weex-hello-web/blob/master/src/index.js#L62)
+
+Install the component using `Weex.install`.
+
+```javascript
+// import the original weex-html5.
+import weex from 'weex-html5'
+import hello from 'weex-hello-web'
+// install the component.
+weex.install(hello)
+```
+
+The code above is from [weex_extend_demo/src/main.js](https://github.com/MrRaindrop/weex_extend_demo/blob/master/src/main.js#L1-L5)
+
+use the component in your `.we` file:
+
+```html
+<template>
+ <div>
+ <weex-hello class="hello" style="txt-color:#fff;bg-color:green"
+ value="WEEX" onclick="handleClick">
+ </weex-hello>
+ </div>
+</template>
+```
+
+The code above is from [weex_extend_demo/demo/index.we](https://github.com/MrRaindrop/weex_extend_demo/blob/master/demo/index.we#L10-L15)
+
+### Add a new API
+
+You can add new API modules, or just add a new API for any existing API modules. For example, you can add a new module `user` with APIs like 'login', 'logout' etc. The developer can invoke the API by using `require('@weex-module/moduleName)[methodName](arg1, arg2, ...)` ([Module APIs](../references/api.html)).
+
+Steps:
+
+1. Implement your API modules.
+2. Use `Weex.registerAPIModules` to register your API modules in the init method of your installation module.
+
+**Here is a example for register a new API module**
+
+First create a file named `user.js` for a new module, then define `login/logout` methods.
+
+```javascript
+const user = {
+ // for user to login.
+ login (callbackId) {
+ login.then(res => {
+ this.sender.performCallback(callbackId, res)
+ }).catch(err => {
+ this.sender.performCallback(callbackId, err)
+ })
+ },
+
+ // for user to logout.
+ logout (callbackId) {
+ logout.then(res => {
+ this.sender.performCallback(callbackId, res)
+ }).catch(err => {
+ this.sender.performCallback(callbackId, err)
+ })
+ }
+}
+
+// add meta info to user module.
+const meta = {
+ user: [{
+ name: 'login',
+ args: ['function']
+ }, {
+ name: 'logout',
+ args: ['function']
+ }]
+}
+
+export default {
+ init (Weex) {
+ // Register your new module. The last parameter is your
+ // new API module's meta info.
+ Weex.registerApiModule('user', user, meta)
+ }
+}
+```
+
+After above coding work, you can publish this user helper API to npm now, for example, with the name of `weex-user-helper`.
+
+Install the component using `Weex.install` in your new weex project.
+
+```javascript
+import Weex from 'weex-html5'
+import user from 'weex-user-helper'
+
+Weex.install(user)
+```
+
+Use the user helper API in your dsl code (xxx.we):
+
+```html
+<template>
+ <div>
+ <div class="btn" onclick="handleClick">
+ <text>LOGIN</text>
+ </div>
+ </div>
+</template>
+
+<script>
+ var userHelper = require('@weex-module/user')
+ module.exports = {
+ methods: {
+ handleClick: function () {
+ userHelper.login(function () {
+ // ... do sth. in callback.
+ })
+ }
+ }
+ }
+</script>
+```
+
+### Add a new loader
+
+**Loader is only a type of extension for weex-html5 (web platform), native platform is not needing this.**
+
+Weex's builtin loaders to load a weex bundle are `xhr`, `jsonp` and `source`. The default loader is `xhr`. You can register your own loader by using `weex.registerLoader`. For example, you got a service method named `myServe.getWeexBundle`, which can load a weex bundle file through some magical tunnel:
+
+```javascript
+function loadByMyServe(pageId, callback) {
+ myServe.getWeexBundle(pageId).then(function (bundle) {
+ callback(bundle)
+ }).catch(function(err) {
+ callback(err)
+ })
+}
+
+// export the init method to enable weex install this loader.
+export default {
+ init (Weex) {
+ Weex.registerLoader('myserve', loadByMyServe)
+ }
+}
+```
+
+install and use your loader in your project's entry file:
+
+```javascript
+import Weex from 'weex-html5'
+
+// or import from './myserve.js', no matter where you can import your loader file.
+import loader from 'myLoader'
+
+Weex.install(loader)
+
+// use your loader in the init function:
+(function () {
+ function getUrlParam (key) {
+ const reg = new RegExp('[?|&]' + key + '=([^&]+)')
+ const match = location.search.match(reg)
+ return match && match[1]
+ }
+ const page = getUrlParam('page') || 'examples/build/index.js'
+ Weex.init({
+ appId: location.href,
+ loader: 'myserve', // use the loader type you defined.
+ source: page,
+ rootId: 'weex'
+ })
+})();
+```
+
+That's the major extension feature weex brought to you. The deep details can be found in the [weex's repo](https://github.com/alibaba/weex) and the weex's community.
+
[16/51] [abbrv] incubator-weex-site git commit: rearrangement the
structure of the document
Posted by ha...@apache.org.
http://git-wip-us.apache.org/repos/asf/incubator-weex-site/blob/32a097bf/source/cn/references/common-event.md
----------------------------------------------------------------------
diff --git a/source/cn/references/common-event.md b/source/cn/references/common-event.md
deleted file mode 100644
index fe0805f..0000000
--- a/source/cn/references/common-event.md
+++ /dev/null
@@ -1,138 +0,0 @@
----
-title: 通用事件
-type: references
-order: 5
-version: 2.1
-has_chapter_content: true
----
-
-# 通用事件
-
-Weex 提供了通过事件触发动作的能力,例如在用户点击组件时执行 JavaScript。下面列出了可被添加到 Weex 组件上以定义事件动作的属性:
-
-## `click`
-
-当组件上发生点击手势时被触发。
-
-**注意:**
-
-`<input>` 和 `<switch>` 组件目前不支持 `click` 事件,请使用 `change` 或 `input` 事件来代替。
-
-### 事件对象
-
-- `type`: `click`
-- `target`: 触发点击事件的目标组件
-- `timestamp`: 触发点击事件时的时间戳
-
-
-## `longpress`
-
-如果一个组件被绑定了 `longpress` 事件,那么当用户长按这个组件时,该事件将会被触发。
-
-**注意:**
-
-`<input>` 和 `<switch>` 组件目前不支持 `click` 事件,请使用 `change` 或 `input` 事件来代替。
-
-### 事件对象
-- `type` : `longpress`
-- `target` : 触发长按事件的目标组件
-- `timestamp` : 长按事件触发时的时间戳
-
-## Appear 事件
-
-如果一个位于某个可滚动区域内的组件被绑定了 `appear` 事件,那么当这个组件的状态变为在屏幕上可见时,该事件将被触发。
-
-### 事件对象
-
-- `type` : `appear`
-- `target` : 触发 Appear 事件的组件对象
-- `timestamp` : 事件被触发时的时间戳
-- `direction` : 触发事件时屏幕的滚动方向,`up` 或 `down`
-
-## Disappear 事件
-
-如果一个位于某个可滚动区域内的组件被绑定了 `disappear` 事件,那么当这个组件被滑出屏幕变为不可见状态时,该事件将被触发。
-
-### 事件对象
-
-- `type` : `disappear`
-- `target` : 触发 Disappear 事件的组件对象
-- `timestamp` : 事件被触发时的时间戳
-- `direction` : 触发事件时屏幕的滚动方向,`up` 或 `down`
-
-## Page 事件
-
-*注意:仅支持 iOS 和 Android,H5 暂不支持。*
-
-Weex 通过 `viewappear` 和 `viewdisappear` 事件提供了简单的页面状态管理能力。
-
-`viewappear` 事件会在页面就要显示或配置的任何页面动画被执行前触发,例如,当调用 `navigator` 模块的 `push` 方法时,该事件将会在打开新页面时被触发。`viewdisappear` 事件会在页面就要关闭时被触发。
-
-与组件的 `appear` 和 `disappear` 事件不同的是,`viewappear` 和 `viewdisappear` 事件关注的是整个页面的状态,所以**它们必须绑定到页面的根元素上**。
-
-特殊情况下,这两个事件也能被绑定到非根元素的body组件上,例如`wxc-navpage`组件。
-
-### 事件对象
-
-- `type` : `viewappear` 或 `viewdisappear`
-- `target` : 触发事件的组件对象
-- `timestamp` : 事件被触发时的时间戳
-
-## 示例
-
-```html
-<template>
- <div>
- <div class="box" @click="onclick" @longpress="onlongpress" @appear="onappear" @disappear="ondisappear"></div>
- </div>
-</template>
-
-<script>
- const modal = weex.requireModule('modal')
- export default {
- methods: {
- onclick (event) {
- console.log('onclick:', event)
- modal.toast({
- message: 'onclick',
- duration: 0.8
- })
- },
- onlongpress (event) {
- console.log('onlongpress:', event)
- modal.toast({
- message: 'onlongpress',
- duration: 0.8
- })
- },
- onappear (event) {
- console.log('onappear:', event)
- modal.toast({
- message: 'onappear',
- duration: 0.8
- })
- },
- ondisappear (event) {
- console.log('ondisappear:', event)
- modal.toast({
- message: 'ondisappear',
- duration: 0.8
- })
- }
- }
- }
-</script>
-
-<style scoped>
- .box {
- border-width: 2px;
- border-style: solid;
- border-color: #BBB;
- width: 250px;
- height: 250px;
- margin-top: 250px;
- margin-left: 250px;
- background-color: #EEE;
- }
-</style>
-```
http://git-wip-us.apache.org/repos/asf/incubator-weex-site/blob/32a097bf/source/cn/references/common-style.md
----------------------------------------------------------------------
diff --git a/source/cn/references/common-style.md b/source/cn/references/common-style.md
deleted file mode 100644
index 937e8de..0000000
--- a/source/cn/references/common-style.md
+++ /dev/null
@@ -1,627 +0,0 @@
----
-title: 通用样式
-type: references
-order: 1.4
-version: 2.1
----
-
-# 通用样式
-
-所有 Weex 组件都支持以下通用样式规则。
-
-## 盒模型
-
-
-
-Weex 盒模型基于 [CSS 盒模型](https://www.w3.org/TR/css3-box/),每个 Weex 元素都可视作一个盒子。我们一般在讨论设计或布局时,会提到「盒模型」这个概念。
-
-盒模型描述了一个元素所占用的空间。每一个盒子有四条边界:外边距边界 margin edge, 边框边界 border edge, 内边距边界 padding edge 与内容边界 content edge。这四层边界,形成一层层的盒子包裹起来,这就是盒模型大体上的含义。
-
-**注意:**
-Weex 对于长度值目前只支持*像素*值,不支持相对单位(`em`、`rem`)。
-
-- `width {length}`:,默认值 0
-- `height {length}`:,默认值 0
-- `padding {length}`:内边距,内容和边框之间的距离。默认值 0
-
- 可有如下写法:
-
- - `padding-left {length}`:,默认值 0
- - `padding-right {length}`:,默认值 0
- - `padding-top {length}`:,默认值 0
- - `padding-bottom {length}`:,默认值 0
-- `margin`:
-
- 外边距,元素和元素之间的空白距离。值类型为 length,默认值 0
-
- 可有如下写法:
-
- - `margin-left {length}`:,默认值 0
- - `margin-right {length}`:,默认值 0
- - `margin-top {length}`:,默认值 0
- - `margin-bottom {length}`:,默认值 0
-- border:
-
- 设定边框,`border` 目前不支持类似这样 `border: 1 solid #ff0000;` 的组合写法。
-
- 可有如下写法:
-
- - `border-style`:
-
- 设定边框样式,值类型为 string,可选值为 `solid` | `dashed` | `dotted`,默认值 `solid`
-
- 可有如下写法:
-
- - `border-left-style {string}`:可选值为 `solid` | `dashed` | `dotted`,默认值 `solid`
- - `border-top-style {string}`:可选值为 `solid` | `dashed` | `dotted`,默认值 `solid`
- - `border-right-style {string}`:可选值为 `solid` | `dashed` | `dotted`,默认值 `solid`
- - `border-bottom-style {string}`:可选值为 `solid` | `dashed` | `dotted`,默认值 `solid`
-
- - `border-width {length}`:
-
- 设定边框宽度,非负值, 默认值 0
-
- 可有如下写法:
-
- - `border-left-width {length}`:,非负值, 默认值 0
- - `border-top-width {length}`:,非负值, 默认值 0
- - `border-right-width {length}`:,非负值, 默认值 0
- - `border-bottom-width {length}`:,非负值, 默认值 0
-
- - `border-color {color}`:
-
- 设定边框颜色,默认值 `#000000`
-
- 可有如下写法:
-
- - `border-left-color {color}`:,默认值 `#000000`
- - `border-top-color {color}`:,默认值 `#000000`
- - `border-right-color {color}`:,默认值 `#000000`
- - `border-bottom-color {color}`:,默认值 `#000000`
- - `border-radius {length}`:
-
- 设定圆角,默认值 0
-
- 可有如下写法:
-
- - `border-bottom-left-radius {length}`:,非负值, 默认值 0
- - `border-bottom-right-radius {length}`:,非负值, 默认值 0
- - `border-top-left-radius {length}`:,非负值, 默认值 0
- - `border-top-right-radius {length}`:,非负值, 默认值 0
-
-
-### 注意:
-
-Weex 盒模型的 `box-sizing` 默认为 `border-box`,即盒子的宽高包含内容、内边距和边框的宽度,不包含外边距的宽度。
-
-目前在 `<image>` 组件上尚无法只定义一个或几个角的 `border-radius`。比如你无法在这两个组件上使用 `border-top-left-radius`。该约束只对 iOS 生效,Android 并不受此限制。
-
-尽管 `overflow:hidden` 在 Android 上是默认行为,但只有下列条件都满足时,一个父 view 才会去 clip 它的子 view。这个限制只对 Android 生效,iOS 不受影响。
-* 父view是`div`, `a`, `cell`, `refresh` 或 `loading`。
-* 系统版本是 Android 4.3 或更高。
-* 系统版本不是 Andorid 7.0。
-* 父 view 没有 `background-image` 属性或系统版本是 Android 5.0 或更高。
-
-### 示例:
-
-```html
-<template>
- <div>
- <image style="width: 400px; height: 200px; margin-left: 20px;" src="https://g.alicdn.com/mtb/lab-zikuan/0.0.18/weex/weex_logo_blue@3x.png"></image>
- </div>
-</template>
-```
-
-## Flexbox
-
-Weex 布局模型基于 CSS [`Flexbox`](http://www.w3.org/TR/css3-flexbox/),以便所有页面元素的排版能够一致可预测,同时页面布局能适应各种设备或者屏幕尺寸。
-
-Flexbox 包含 flex 容器和 flex 成员项。如果一个 Weex 元素可以容纳其他元素,那么它就成为 flex 容器。需要注意的是,flexbox 的老版规范相较新版有些出入,比如是否能支持 wrapping。这些都描述在 W3C 的工作草案中了,你需要注意下新老版本之间的不同。另外,老版本只在安卓 4.4 版以下得到支持。
-
-### Flex 容器
-
-在 Weex 中,Flexbox 是默认且唯一的布局模型,所以你不需要手动为元素添加 `display: flex;` 属性。
-
-- `flex-direction`:
-
- 定义了 flex 容器中 flex 成员项的排列方向。可选值为 `row` | `column`,默认值为 `column`
-
- - `column`:从上到下排列。
- - `row`:从左到右排列。
-
-- `justify-content`:
-
- 定义了 flex 容器中 flex 成员项在主轴方向上如何排列以处理空白部分。可选值为 `flex-start` | `flex-end` | `center` | `space-between`,默认值为 `flex-start`。
-
- - `flex-start`:是默认值,所有的 flex 成员项都排列在容器的前部;
- - `flex-end`:则意味着成员项排列在容器的后部;
- - `center`:即中间对齐,成员项排列在容器中间、两边留白;
- - `space-between`:表示两端对齐,空白均匀地填充到 flex 成员项之间。
-
- 
-
-- `align-items`:
-
- 定义了 flex 容器中 flex 成员项在纵轴方向上如何排列以处理空白部分。可选值为 `stretch` | `flex-start` | `center` | `flex-end`,默认值为 `stretch`。
-
- - `stretch` 是默认值,即拉伸高度至 flex 容器的大小;
- - `flex-start` 则是上对齐,所有的成员项排列在容器顶部;
- - `flex-end` 是下对齐,所有的成员项排列在容器底部;
- - `center` 是中间对齐,所有成员项都垂直地居中显示。
-
- 
-
-### Flex 成员项
-
-flex 属性定义了 flex 成员项可以占用容器中剩余空间的大小。如果所有的成员项设置相同的值 `flex: 1`,它们将平均分配剩余空间. 如果一个成员项设置的值为 `flex: 2`,其它的成员项设置的值为 `flex: 1`,那么这个成员项所占用的剩余空间是其它成员项的2倍。
-
-- `flex {number}`:值为 number 类型。
-
-### 示例
-
-一个简单的网格布局。
-
-
-
-```html
-<template>
- <div>
- <div v-for="(v, i) in list" class="row">
- <div v-for="(text, k) in v" class="item">
- <div>
- <text>{{text}}</text>
- </div>
- </div>
- </div>
- </div>
-</template>
-<style scoped>
- .item{
- flex:1;
- justify-content: center;
- align-items:center;
- border-width:1;
- }
- .row{
- flex-direction: row;
- height:80px;
- }
-</style>
-<script>
- module.exports = {
- data: function () {
- return {
- list:[
- ['A', 'B', 'C'],
- ['D', 'E', 'F'],
- ['G', 'H', 'I']
- ]
- }
- }
- }
-</script>
-```
-
-一个在相对于屏幕水平居中,全屏居中的 `<div>`。
-
-```html
-<template>
- <div class="wrapper">
- <div class="box">
- </div>
- </div>
-</template>
-
-<style scoped>
- .wrapper {
- position: absolute;
- top: 0;
- right: 0;
- bottom: 0;
- left: 0;
- background-color: #cccccc;
- justify-content: center;
- align-items: center;
- }
- .box {
- width: 200px;
- height: 200px;
- background-color: #fc0000;
- }
-</style>
-```
-
-## 定位
-
-Weex 支持 `position` 定位,用法与 CSS position 类似。为元素设置 `position` 后,可通过 `top`、`right`、`bottom`、`left` 四个属性设置元素坐标。
-
-- `position {string}`:
-
- 设置定位类型。可选值为 `relative` | `absolute` | `fixed` | `sticky`,默认值为 `relative`。
-
- - `relative` 是默认值,指的是相对定位;
- - `absolute` 是绝对定位,以元素的容器作为参考系;
- - `fixed` 保证元素在页面窗口中的对应位置显示;
- - `sticky` 指的是仅当元素滚动到页面之外时,元素会固定在页面窗口的顶部。
-- `top {number}`:距离上方的偏移量,默认为 0。
-- `bottom {number}`:距离下方的偏移量,默认为 0。
-- `left {number}`:距离左方的偏移量,默认为 0。
-- `right {number}`:距离右方的偏移量,默认为 0。
-
-**注意:**
-
-1. Weex 目前不支持 `z-index` 设置元素层级关系,但靠后的元素层级更高,因此,对于层级高的元素,可将其排列在后面。
-2. 如果定位元素超过容器边界,在 Android 下,超出部分将**不可见**,原因在于 Android 端元素 `overflow` 默认值为 `hidden`,但目前 Android 暂不支持设置 `overflow: visible`。
-
-### 示例
-
-
-
-```html
-<template scoped>
- <div class="wrapper">
- <div class="box box1">
- </div>
- <div class="box box2">
- </div>
- <div class="box box3">
- </div>
- </div>
-</template>
-
-<style>
- .wrapper {
- position: absolute;
- top: 0;
- right: 0;
- bottom: 0;
- left: 0;
- background-color: #cccccc;
- }
- .box {
- width: 400px;
- height: 400px;
- position: absolute;
- }
- .box1 {
- top: 0;
- left: 0;
- background-color: #ff0000;
- }
- .box2 {
- top: 150px;
- left: 150px;
- background-color: #0055dd;
- }
- .box3 {
- top: 300px;
- left: 300px;
- background-color: #00ff49;
- }
-</style>
-```
-
-## transform
-
-transform 属性向元素应用 2D 转换。该属性允许我们对元素进行旋转、缩放、移动或倾斜。
-
-目前支持的 transform 声明格式:
-
-- translate( <number/percentage> [, <number/percentage>]?)
-- translateX( <number/percentage> )
-- translateY( <number/percentage> )
-- scale( <number>)
-- scaleX( <number> )
-- scaleY( <number> )
-- rotate( <angle/degree> )
-- rotateX( <angle/degree> ) <span class="api-version">v0.14+</span>
-- rotateY( <angle/degree> ) <span class="api-version">v0.14+</span>
-- perspective( <number> ) Android 4.1及以上版本支持 <span class="api-version">v0.16+</span>
-- transform-origin: number/percentage/keyword(top/left/right/bottom)
-
-### 示例
-
-```HTML
-<template>
- <div class="wrapper">
- <div class="transform">
- <text class="title">Transformed element</text>
- </div>
- </div>
-</template>
-
-<style>
- .transform {
- align-items: center;
- transform: translate(150px,200px) rotate(20deg);
- transform-origin: 0 -250px;
- border-color:red;
- border-width:2px;
- }
- .title {font-size: 48px;}
-</style>
-```
-
-
-
-## transition <span class="api-version">v0.16.0+</span>
-
-现在您可以在CSS中使用transition属性来提升您应用的交互性与视觉感受,transition中包括布局动画,即LayoutAnimation,现在布局产生变化的同时也能使用transition带来的流畅动画。transition允许CSS的属性值在一定的时间区间内平滑地过渡。
-
-### 参数
-
-- ``transition-property``:允许过渡动画的属性名,设置不同样式transition效果的键值对,默认值为空,表示不执行任何transition,下表列出了所有合法的参数属性:
-
-| 参数名 | 描述 |
-| --------------- | ------------------------------ |
-| width | transition过渡执行的时候是否组件的宽度参与动画 |
-| height | transition过渡执行的时候是否组件的高度参与动画 |
-| top | transition过渡执行的时候是否组件的顶部距离参与动画 |
-| bottom | transition过渡执行的时候是否组件的底部距离参与动画 |
-| left | transition过渡执行的时候是否组件的左侧距离参与动画 |
-| right | transition过渡执行的时候是否组件的右侧距离参与动画 |
-| backgroundColor | transition过渡执行的时候是否组件的背景颜色参与动画 |
-| opacity | transition过渡执行的时候是否组件的不透明度参与动画 |
-| transform | transition过渡执行的时候是否组件的变换类型参与动画 |
-
-- ``transition-duration``:指定transition过渡的持续时间 (单位是毫秒),默认值是 `0`,表示没有动画效果。
-
-- ``transition-delay``:指定请求transition过渡操作到执行transition过渡之间的时间间隔 (单位是毫秒或者秒),默认值是 `0`,表示没有延迟,在请求后立即执行transition过渡。
-
-- ``transition-timing-function``:描述transition过渡执行的速度曲线,用于使transition过渡更为平滑。默认值是 `ease`。下表列出了所有合法的属性:
-
-| 属性名 | 描述 |
-| ------------------------------ | ---------------------------------------- |
-| ease | transition过渡逐渐变慢的过渡效果 |
-| ease-in | transition过渡慢速开始,然后变快的过渡效果 |
-| ease-out | transition过渡快速开始,然后变慢的过渡效果 |
-| ease-in-out | transition过渡慢速开始,然后变快,然后慢速结束的过渡效果 |
-| linear | transition过渡以匀速变化 |
-| cubic-bezier(x1, y1, x2, y2) | 使用三阶贝塞尔函数中自定义transition变化过程,函数的参数值必须处于 0 到 1 之间。更多关于三次贝塞尔的信息请参阅 [cubic-bezier](http://cubic-bezier.com/) 和 [Bézier curve](https://en.wikipedia.org/wiki/B%C3%A9zier_curve). |
-
-### 示例
-
-```html
-<style scoped>
- .panel {
- margin: 10px;
- top:10px;
- align-items: center;
- justify-content: center;
- border: solid;
- border-radius: 10px;
-
- transition-property: width,height,backgroundColor;
- transition-duration: 0.3s;
- transition-delay: 0s;
- transition-timing-function: cubic-bezier(0.25, 0.1, 0.25, 1.0);
- }
-</style>
-```
-
-## 伪类 <span class="api-version">v0.9.5+</span>
-
-Weex 支持四种伪类:`active`, `focus`, `disabled`, `enabled`
-
-所有组件都支持 `active`, 但只有 `input` 组件和 `textarea` 组件支持 `focus`, `enabled`, `disabled`。
-
-### 规则
-
-- 同时生效的时候,优先级高覆盖优先级低
-
- - 例如:`input:active:enabled` 和 `input:active` 同时生效,前者覆盖后者
-
-- 互联规则如下所示
-
- 
-
-### 示例
-
-```html
-<template>
- <div class="wrapper">
- <image :src="logoUrl" class="logo"></image>
- </div>
-</template>
-
-<style scoped>
- .wrapper {
- align-items: center;
- margin-top: 120px;
- }
- .title {
- font-size: 48px;
- }
- .logo {
- width: 360px;
- height: 82px;
- background-color: red;
- }
- .logo:active {
- width: 180px;
- height: 82px;
- background-color: green;
- }
-</style>
-
-<script>
- export default {
- props: {
- logoUrl: {
- default: 'https://alibaba.github.io/weex/img/weex_logo_blue@3x.png'
- },
- target: {
- default: 'World'
- }
- },
- methods: {
- update (e) {
- this.target = 'Weex';
- }
- }
- };
-</script>
-```
-
-[试一下](http://dotwe.org/vue/df2c8f254620d6d30d0906ee75fe5b99)
-
-## 线性渐变 <span class="api-version">v0.10+</span>
-
-Weex 支持线性渐变背景,具体介绍可参考 [W3C description of the gradient](https://developer.mozilla.org/en-US/docs/Web/CSS/CSS_Images/Using_CSS_gradients)。
-
-所有组件均支持线性渐变。
-
-### 使用
-
- 你可以通过 `background-image` 属性创建线性渐变。
-
-```css
-background-image: linear-gradient(to top,#a80077,#66ff00);
-```
-
-目前暂不支持 `radial-gradient`(径向渐变)。
-
-Weex 目前只支持两种颜色的渐变,渐变方向如下:
-
-* to right
- 从左向右渐变
-* to left
- 从右向左渐变
-* to bottom
- 从上到下渐变
-* to top
- 从下到上渐变
-* to bottom right
- 从左上角到右下角
-* to top left
- 从右下角到左上角
-
-### Note
-
-- `background-image` 优先级高于 `background-color`,这意味着同时设置 `background-image` 和 `background-color`,`background-color` 被覆盖。
-- 不要使用 `background` 简写.
-
-### 示例
-
-```html
-<template>
- <scroller style="background-color: #3a3a3a">
- <div class="container1" style="background-image:linear-gradient(to right,#a80077,#66ff00);">
- <text class="direction">to right</text>
- </div>
- <div class="container1" style="background-image:linear-gradient(to left,#a80077,#66ff00);">
- <text class="direction">to left</text>
- </div>
- <div class="container1" style="background-image:linear-gradient(to bottom,#a80077,#66ff00);">
- <text class="direction">to bottom</text>
- </div>
- <div class="container1" style="background-image:linear-gradient(to top,#a80077,#66ff00);">
- <text class="direction">to top</text>
- </div>
- <div style="flex-direction: row;align-items: center;justify-content: center">
- <div class="container2" style="background-image:linear-gradient(to bottom right,#a80077,#66ff00);">
- <text class="direction">to bottom right</text>
- </div>
- <div class="container2" style="background-image:linear-gradient(to top left,#a80077,#66ff00);">
- <text class="direction">to top left</text>
- </div>
- </div>
- </scroller>
-</template>
-<style>
- .container1 {
- margin: 10px;
- width: 730px;
- height: 200px;
- align-items: center;
- justify-content: center;
- border: solid;
- border-radius: 10px;
- }
-
- .container2 {
- margin: 10px;
- width: 300px;
- height: 300px;
- align-items: center;
- justify-content: center;
- border: solid;
- border-radius: 10px;
- }
-
- .direction {
- font-size: 40px;
- color: white;
- }
-</style>
-```
-
-## 阴影(box-shadow) <span class="api-version">v0.11+</span>
-
-Weex 支持阴影属性:`active`, `focus`, `disabled`, `enabled` `inset(可选)`,`offset-x`,`offset-y`, `blur-radius`,`color`
-
-
-### 注意
-
-- box-shadow仅仅支持iOS
-
-### 示例
-
-```html
-<template>
- <div class="wrapper">
- <div style="width:400px; height:60px;background-color: #FFE4C4; box-shadow:20px 10px rgb(255, 69, 0);">
- <text class="title" style="text-align: center">Hello {{target}}</text>
- </div>
- <div style="margin-top: 80px;width:400px; height:60px;background-color: #FFE4C4; box-shadow: 20px 10px 5px rgba(255, 69, 0, 0.8);">
- <text class="title" style="text-align: center">Hello {{target}}</text>
- </div>
- <div style="margin-top: 80px;width:400px; height:60px;background-color: #FFE4C4; box-shadow:inset 20px 10px 5px rgba(255, 69, 0, 0.8);">
- <text class="title" style="text-align: center">Hello {{target}}</text>
- </div>
- <div style="margin-top: 80px;width:400px; height:60px;background-color: #FFE4C4; box-shadow:inset 20px 10px 5px rgb(255, 69, 0);">
- <text class="title" style="text-align: center">Hello {{target}}</text>
- </div>
- <div style="margin-top: 80px;width:400px; height:60px;background-color: #FFE4C4; box-shadow:20px 10px 5px black;">
- <text class="title" style="text-align: center">Hello {{target}}</text>
- </div>
- <div style="margin-top: 80px;width:400px; height:60px;background-color: #FFE4C4; box-shadow:20px 10px 5px #008B00;">
- <text class="title" style="text-align: center">Hello {{target}}</text>
- </div>
- </div>
-</template>
-
-<style scoped>
- .wrapper {align-items: center; margin-top: 120px;}
- .title {font-size: 48px;}
-</style>
-
-<script>
- module.exports = {
- data: function () {
- return {
- logoUrl: 'https://alibaba.github.io/weex/img/weex_logo_blue@3x.png',
- target: 'World'
- };
- }
- };
-</script>
-```
-
-## 其他基本样式
-
-- `opacity {number}`:取值范围为 [0, 1] 区间。默认值是 1,即完全不透明;0 是完全透明;0.5 是 50% 的透明度。
-- `background-color {color}`:设定元素的背景色,可选值为色值,支持RGB( `rgb(255, 0, 0)` );RGBA( `rgba(255, 0, 0, 0.5)` );十六进制( `#ff0000` );精简写法的十六进制( `#f00` );色值关键字(`red`),默认值是 `transparent` 。
-
-**注意:** [色值的关键字列表](./color-names.html)。
-
-## 上手样式
-
-如果对于样式写法需要更多上手参考,可参考每个组件的文档中,都有常见的例子可供参考。
-
-你可以按照以下步骤来规划 Weex 页面的样式。
-
-1. 全局样式规划:将整个页面分割成合适的模块。
-2. flex 布局:排列和对齐页面模块。
-3. 定位盒子:定位并设置偏移量。
-4. 细节样式处理:增加特定的具体样式。
http://git-wip-us.apache.org/repos/asf/incubator-weex-site/blob/32a097bf/source/cn/references/components/a.md
----------------------------------------------------------------------
diff --git a/source/cn/references/components/a.md b/source/cn/references/components/a.md
index 5e54b0c..2b61fc1 100644
--- a/source/cn/references/components/a.md
+++ b/source/cn/references/components/a.md
@@ -1,7 +1,8 @@
---
title: <a>
type: references
-order: 2.1
+group: 内置组件
+order: 8.04
version: 2.1
---
http://git-wip-us.apache.org/repos/asf/incubator-weex-site/blob/32a097bf/source/cn/references/components/cell.md
----------------------------------------------------------------------
diff --git a/source/cn/references/components/cell.md b/source/cn/references/components/cell.md
index 09f402f..6c0ee52 100644
--- a/source/cn/references/components/cell.md
+++ b/source/cn/references/components/cell.md
@@ -1,7 +1,8 @@
---
title: <cell>
type: references
-order: 2.6
+group: 内置组件
+order: 8.07
version: 2.1
---
http://git-wip-us.apache.org/repos/asf/incubator-weex-site/blob/32a097bf/source/cn/references/components/div.md
----------------------------------------------------------------------
diff --git a/source/cn/references/components/div.md b/source/cn/references/components/div.md
index 90d8711..9fafd76 100644
--- a/source/cn/references/components/div.md
+++ b/source/cn/references/components/div.md
@@ -1,7 +1,8 @@
---
title: <div>
type: references
-order: 2.3
+group: 内置组件
+order: 8.01
version: 2.1
---
http://git-wip-us.apache.org/repos/asf/incubator-weex-site/blob/32a097bf/source/cn/references/components/image.md
----------------------------------------------------------------------
diff --git a/source/cn/references/components/image.md b/source/cn/references/components/image.md
index c096a48..a276a75 100644
--- a/source/cn/references/components/image.md
+++ b/source/cn/references/components/image.md
@@ -1,7 +1,8 @@
---
title: <image>
type: references
-order: 2.4
+group: 内置组件
+order: 8.02
version: 2.1
---
@@ -101,15 +102,15 @@ version: 2.1
## 组件方法
<sup class="api-version">v0.16.0+</sup>
-
+
- save:保存当前图片到本地
- - 参数
+ - 参数
回调函数作为方法入参,接收保存结果.
```
var image = this.$refs.imageRef; // image 是之前已经定义过的ref
image.save(function(result) {
console.log(JSON.stringify(result))
- });
+ });
```
- 异步返回的数据描述
```
@@ -120,7 +121,7 @@ version: 2.1
```
- 说明
对于 iOS 系统需要添加 `NSPhotoLibraryAddUsageDescription`相册访问权限, iOS 11 需要再添加一个`NSPhotoLibraryAddUsageDescription`权限, [查看更多iOS系统权限](https://developer.apple.com/library/content/documentation/General/Reference/InfoPlistKeyReference/Articles/CocoaKeys.html)
-
+
[试一试](http://dotwe.org/vue/fadcd44a7031943ff0feaaf1895df414)
## 约束
http://git-wip-us.apache.org/repos/asf/incubator-weex-site/blob/32a097bf/source/cn/references/components/index.md
----------------------------------------------------------------------
diff --git a/source/cn/references/components/index.md b/source/cn/references/components/index.md
deleted file mode 100644
index 9a02e72..0000000
--- a/source/cn/references/components/index.md
+++ /dev/null
@@ -1,24 +0,0 @@
----
-title: 内建组件
-type: references
-order: 2
-version: 2.1
----
-
-# 内建组件
-
-- [<a>](./a.html)
-- [<indicator>](./indicator.html)
-- [<switch>](./switch.html)
-- [<text>](./text.html)
-- [<textarea>](./textarea.html)
-- [<video>](./video.html)
-- [<web>](./web.html)
-- [<div>](./div.html)
-- [<image>](./image.html)
-- [<input>](./input.html)
-- [<list>](./list.html)
-- [<cell>](./cell.html)
-- [<refresh> & <loading>](./refresh.html)
-- [<scroller>](./scroller.html)
-- [<slider>](./slider.html)
\ No newline at end of file
http://git-wip-us.apache.org/repos/asf/incubator-weex-site/blob/32a097bf/source/cn/references/components/indicator.md
----------------------------------------------------------------------
diff --git a/source/cn/references/components/indicator.md b/source/cn/references/components/indicator.md
index aa1cab4..7da0fa7 100644
--- a/source/cn/references/components/indicator.md
+++ b/source/cn/references/components/indicator.md
@@ -1,7 +1,8 @@
---
title: <indicator>
type: references
-order: 2.11
+group: 内置组件
+order: 8.14
version: 2.1
---
http://git-wip-us.apache.org/repos/asf/incubator-weex-site/blob/32a097bf/source/cn/references/components/input.md
----------------------------------------------------------------------
diff --git a/source/cn/references/components/input.md b/source/cn/references/components/input.md
index 3cf83fd..654a27d 100644
--- a/source/cn/references/components/input.md
+++ b/source/cn/references/components/input.md
@@ -1,7 +1,8 @@
---
title: <input>
type: references
-order: 2.5
+group: 内置组件
+order: 8.10
version: 2.1
---
http://git-wip-us.apache.org/repos/asf/incubator-weex-site/blob/32a097bf/source/cn/references/components/list.md
----------------------------------------------------------------------
diff --git a/source/cn/references/components/list.md b/source/cn/references/components/list.md
index 8e1e63c..51df6b0 100644
--- a/source/cn/references/components/list.md
+++ b/source/cn/references/components/list.md
@@ -1,7 +1,8 @@
---
title: <list>
type: references
-order: 2.5
+group: 内置组件
+order: 8.06
version: 2.1
---
@@ -62,7 +63,7 @@ version: 2.1
## 事件
- `loadmore` <sup class="wx-v">0.5+</sup>:如果列表滚动到底部将会立即触发这个事件,你可以在这个事件的处理函数中加载下一页的列表项。
-- `scroll` <sup class="wx-v">0.11+</sup>: 列表发生滚动时将会触发该事件,事件的默认抽样率为10px,即列表每滚动10px触发一次,可通过属性`offset-accuracy`设置抽样率。
+- `scroll` <sup class="wx-v">0.11+</sup>: 列表发生滚动时将会触发该事件,事件的默认抽样率为10px,即列表每滚动10px触发一次,可通过属性`offset-accuracy`设置抽样率。
事件中 event 对象属性:
- `contentSize {Object}`:列表的内容尺寸
http://git-wip-us.apache.org/repos/asf/incubator-weex-site/blob/32a097bf/source/cn/references/components/loading.md
----------------------------------------------------------------------
diff --git a/source/cn/references/components/loading.md b/source/cn/references/components/loading.md
index cd630c3..08db367 100644
--- a/source/cn/references/components/loading.md
+++ b/source/cn/references/components/loading.md
@@ -1,7 +1,8 @@
---
title: <loading>
type: references
-order: 2.7
+group: 内置组件
+order: 8.08
version: 2.1
---
@@ -124,4 +125,4 @@ version: 2.1
</style>
```
-[Try it](http://dotwe.org/vue/d5c1b2336a703a6e6e47c303af41ffcd)
\ No newline at end of file
+[Try it](http://dotwe.org/vue/d5c1b2336a703a6e6e47c303af41ffcd)
http://git-wip-us.apache.org/repos/asf/incubator-weex-site/blob/32a097bf/source/cn/references/components/refresh.md
----------------------------------------------------------------------
diff --git a/source/cn/references/components/refresh.md b/source/cn/references/components/refresh.md
index 24a5823..c2a335b 100644
--- a/source/cn/references/components/refresh.md
+++ b/source/cn/references/components/refresh.md
@@ -1,7 +1,8 @@
---
title: <refresh>
type: references
-order: 2.8
+group: 内置组件
+order: 8.09
version: 2.1
---
http://git-wip-us.apache.org/repos/asf/incubator-weex-site/blob/32a097bf/source/cn/references/components/scroller.md
----------------------------------------------------------------------
diff --git a/source/cn/references/components/scroller.md b/source/cn/references/components/scroller.md
index acac227..504d9c4 100644
--- a/source/cn/references/components/scroller.md
+++ b/source/cn/references/components/scroller.md
@@ -1,7 +1,8 @@
---
title: <scroller>
type: references
-order: 2.9
+group: 内置组件
+order: 8.05
version: 2.1
---
@@ -62,7 +63,7 @@ version: 2.1
## 事件
- `loadmore` <sup class="wx-v">v0.5+</sup>:如果滚动到底部将会立即触发这个事件,你可以在这个事件的处理函数中加载下一页的列表项。
-- `scroll` <sup class="wx-v">0.11+</sup>: 列表发生滚动时将会触发该事件,事件的默认抽样率为10px,即列表每滚动10px触发一次,可通过属性`offset-accuracy`设置抽样率。 参见 [scroll event demo](http://dotwe.org/vue/9ef0e52bacaa20182a693f2187d851aa)。
+- `scroll` <sup class="wx-v">0.11+</sup>: 列表发生滚动时将会触发该事件,事件的默认抽样率为10px,即列表每滚动10px触发一次,可通过属性`offset-accuracy`设置抽样率。 参见 [scroll event demo](http://dotwe.org/vue/9ef0e52bacaa20182a693f2187d851aa)。
事件中 event 对象属性:
- `contentSize {Object}`:列表的内容尺寸
http://git-wip-us.apache.org/repos/asf/incubator-weex-site/blob/32a097bf/source/cn/references/components/slider.md
----------------------------------------------------------------------
diff --git a/source/cn/references/components/slider.md b/source/cn/references/components/slider.md
index 0a23c2e..bb2098d 100644
--- a/source/cn/references/components/slider.md
+++ b/source/cn/references/components/slider.md
@@ -1,7 +1,8 @@
---
title: <slider>
type: references
-order: 2.11
+group: 内置组件
+order: 8.13
version: 2.1
---
@@ -43,9 +44,9 @@ version: 2.1
事件中 event 对象属性:
- `index`:展示的图片索引
- - `scroll` <sup class="wx-v">0.11+</sup>: 列表发生滚动时将会触发该事件,事件的默认抽样率为10px,即列表每滚动10px触发一次,可通过属性`offset-accuracy`设置抽样率。
+ - `scroll` <sup class="wx-v">0.11+</sup>: 列表发生滚动时将会触发该事件,事件的默认抽样率为10px,即列表每滚动10px触发一次,可通过属性`offset-accuracy`设置抽样率。
[体验一下](http://dotwe.org/vue/832e8f50cc325975b9d3aba93a9f6c39)
- 事件中 event 对象属性:
+ 事件中 event 对象属性:
- `offsetXRatio {number}`:表示当前页面的偏移比例,取值范围为[-1, 1],负值表示向左侧滚动,正值向右。例如,`-0.2`表示当前item有20%的区域被滚动到slider左侧边界以外,`0.3`表示当前item有30%的区域被滚动到slider右侧边界以外。
http://git-wip-us.apache.org/repos/asf/incubator-weex-site/blob/32a097bf/source/cn/references/components/switch.md
----------------------------------------------------------------------
diff --git a/source/cn/references/components/switch.md b/source/cn/references/components/switch.md
index 42b24d9..0863a81 100644
--- a/source/cn/references/components/switch.md
+++ b/source/cn/references/components/switch.md
@@ -1,7 +1,8 @@
---
title: <switch>
type: references
-order: 2.12
+group: 内置组件
+order: 8.12
version: 2.1
---
http://git-wip-us.apache.org/repos/asf/incubator-weex-site/blob/32a097bf/source/cn/references/components/text.md
----------------------------------------------------------------------
diff --git a/source/cn/references/components/text.md b/source/cn/references/components/text.md
index b91f6f9..e264f92 100644
--- a/source/cn/references/components/text.md
+++ b/source/cn/references/components/text.md
@@ -1,7 +1,8 @@
---
title: <text>
type: references
-order: 2.13
+group: 内置组件
+order: 8.02
version: 2.1
---
@@ -58,7 +59,7 @@ version: 2.1
1. `<text>` 里直接写文本头尾空白会被过滤,如果需要保留头尾空白,暂时只能通过数据绑定写头尾空格。
-## iconfont
+## iconfont
`支持版本:v0.12.0`
http://git-wip-us.apache.org/repos/asf/incubator-weex-site/blob/32a097bf/source/cn/references/components/textarea.md
----------------------------------------------------------------------
diff --git a/source/cn/references/components/textarea.md b/source/cn/references/components/textarea.md
index a5ec4d4..ca1eb6d 100644
--- a/source/cn/references/components/textarea.md
+++ b/source/cn/references/components/textarea.md
@@ -1,7 +1,8 @@
---
title: <textarea>
type: references
-order: 2.14
+group: 内置组件
+order: 8.11
version: 2.1
---
http://git-wip-us.apache.org/repos/asf/incubator-weex-site/blob/32a097bf/source/cn/references/components/video.md
----------------------------------------------------------------------
diff --git a/source/cn/references/components/video.md b/source/cn/references/components/video.md
index eee6eb9..d0a7b30 100644
--- a/source/cn/references/components/video.md
+++ b/source/cn/references/components/video.md
@@ -1,7 +1,8 @@
---
title: <video>
type: references
-order: 2.15
+group: 内置组件
+order: 8.15
version: 2.1
---
http://git-wip-us.apache.org/repos/asf/incubator-weex-site/blob/32a097bf/source/cn/references/components/waterfall.md
----------------------------------------------------------------------
diff --git a/source/cn/references/components/waterfall.md b/source/cn/references/components/waterfall.md
index 169ec89..643efb5 100644
--- a/source/cn/references/components/waterfall.md
+++ b/source/cn/references/components/waterfall.md
@@ -1,7 +1,8 @@
---
title: <waterfall>
type: references
-order: 2.5
+group: 内置组件
+order: 8.17
version: 2.1
---
@@ -61,4 +62,4 @@ version: 2.1
### 示例
-参见 [playground waterfall example](http://dotwe.org/vue/7a9195643e9e8da352b0d879cdbe68c0)
\ No newline at end of file
+参见 [playground waterfall example](http://dotwe.org/vue/7a9195643e9e8da352b0d879cdbe68c0)
http://git-wip-us.apache.org/repos/asf/incubator-weex-site/blob/32a097bf/source/cn/references/components/web.md
----------------------------------------------------------------------
diff --git a/source/cn/references/components/web.md b/source/cn/references/components/web.md
index 42f0681..ed60bd1 100644
--- a/source/cn/references/components/web.md
+++ b/source/cn/references/components/web.md
@@ -1,7 +1,8 @@
---
title: <web>
type: references
-order: 2.16
+group: 内置组件
+order: 8.16
version: 2.1
---
http://git-wip-us.apache.org/repos/asf/incubator-weex-site/blob/32a097bf/source/cn/references/downgrade.md
----------------------------------------------------------------------
diff --git a/source/cn/references/downgrade.md b/source/cn/references/downgrade.md
deleted file mode 100644
index 1393c2b..0000000
--- a/source/cn/references/downgrade.md
+++ /dev/null
@@ -1,11 +0,0 @@
----
-title: 降级方案
-type: references
-order: 1.3
-version: 2.1
----
-
-# 降级方案
-
-Weex 2.0 降级方案改成模块的形式支持,具体请参考[downgrade](https://www.npmjs.com/package/@weex-project/downgrade)
-
http://git-wip-us.apache.org/repos/asf/incubator-weex-site/blob/32a097bf/source/cn/references/gesture.md
----------------------------------------------------------------------
diff --git a/source/cn/references/gesture.md b/source/cn/references/gesture.md
deleted file mode 100644
index be81e45..0000000
--- a/source/cn/references/gesture.md
+++ /dev/null
@@ -1,60 +0,0 @@
----
-title: 手势
-type: references
-order: 1.7
-version: 2.1
----
-
-# 手势
-
-*注:该功能属于实验性功能*
-
-Weex 封装了原生的触摸事件以提供手势系统。使用手势类似于在 Weex 中使用事件,只需在节点上设置 `on` 特性来监听手势即可。
-
-## 手势类型
-
-目前,仅支持以下四种手势类型:
-
-- **Touch**:当触摸到一个点,移动或从触摸面移开时触发 `touch` 手势。触摸手势很精准,它会返回所有详细的事件信息。所以,监听 `touch` 手势可能很慢,即使只移动一丁点也需要处理大量事件。有三种类型的 `touch` 手势:
-
- - `touchstart` 将在触摸到触摸面上时触发。
- - `touchmove` 将在触摸点在触摸面移动时被触发。
- - `touchend` 将在从触摸面离开时被触发。
-
-- **Pan**:`pan` 手势也会返回触摸点在触摸面的移动信息,有点类似于 `touch` 手势。但是 `pan` 手势只会采样收集部分事件信息因此比 `touch` 事件要快得多,当然精准性差于 `touch`。`pan` 也有三中类型的手势,这些手势的意义与 `touch` 完全一样:
-
- - `panstart`
- - `panmove`
- - `panend`
- - `horizontalpan` <span class="api-version">v0.10+</span>:手势的 `start/move/end` 状态保存在 `state` 特性中。目前该手势在 Android 下会与 click 事件冲突。
- - `verticalpan` <span class="api-version">v0.10+</span>:势的 `start/move/end` 状态保存在 `state` 特性中。目前该手势在 Android 下会与 click 事件冲突。
-- **Swipe**:`swipe` 将会在用户在屏幕上滑动时触发,一次连续的滑动只会触发一次 `swiper` 手势。
-- **LongPress**:`LongPress` 将会在触摸点连续保持 500 ms以上时触发。
-
-`touch` 和 `pan` 非常接近,它们的特点可以总结成这样:
-
-- **Touch**:完整信息,精准、很慢
-- **Pan**:抽样信息,很快,不够精准
-
-开发者可以根据自己的情况选择合适的手势。
-
-## 属性
-
-以下属性可以在手势的回调中使用:
-
-- `direction`:仅在 `swipe` 手势中存在,返回滑动方向,返回值可能为 `up`, `left`, `bottom`, `right`。
-- `changedTouches`:一个数组,包含了当前手势的触摸点的运动轨迹
-
-### changedTouches
-
-`changedTouches` 是一个数组,其子元素中包含以下属性:
-
-- `identifier`:触摸点的唯一标识符。
-- `pageX`:触摸点相对于文档左侧边缘的 X 轴坐标。
-- `pageY`:触摸点相对于文档顶部边缘的 Y 轴坐标。
-- `screenX`:触摸点相对于屏幕左侧边缘的 X 轴坐标。
-- `screenY`:触摸点相对于屏幕顶部边缘的 Y 轴坐标。
-
-## 约束
-
-目前,由于会触发大量事件冲突,Weex Android 还不支持在滚动类型的元素上监听手势,例如 `scroller`, `list` 和 `webview` 这三个组件。
http://git-wip-us.apache.org/repos/asf/incubator-weex-site/blob/32a097bf/source/cn/references/html5-apis.md
----------------------------------------------------------------------
diff --git a/source/cn/references/html5-apis.md b/source/cn/references/html5-apis.md
deleted file mode 100644
index a8c802a..0000000
--- a/source/cn/references/html5-apis.md
+++ /dev/null
@@ -1,10 +0,0 @@
----
-title: HTML5 APIs
-type: references
-order: 1.3
-version: 2.1
----
-
-# HTML5 APIs
-
-Weex HTML5 APIs 与 [Vue APIs](https://vuejs.org/v2/api/) 保持一致,请直接参考 [Vue APIs](https://vuejs.org/v2/api/)。
\ No newline at end of file
http://git-wip-us.apache.org/repos/asf/incubator-weex-site/blob/32a097bf/source/cn/references/index.md
----------------------------------------------------------------------
diff --git a/source/cn/references/index.md b/source/cn/references/index.md
index 9988c3c..f2217ed 100644
--- a/source/cn/references/index.md
+++ b/source/cn/references/index.md
@@ -1,19 +1,7 @@
---
-title: 通用特性
+title: References
type: references
-order: 1
+order: 0
version: 2.1
+has_chapter_content: true
---
-
-# 通用特性
-
-- [iOS APIs](./ios-apis.html)
-- [Android APIs](./android-apis.html)
-- [HTML5 APIs](./html5-apis.html)
-- [通用样式](./common-style.html)
-- [文本样式](./text-style.html)
-- [颜色名称](./color-names.html)
-- [手势](./gesture.html)
-- [路径](./path.html)
-- [事件冒泡](./bubble.html)
-- [降级方案](./downgrade.html)
\ No newline at end of file
http://git-wip-us.apache.org/repos/asf/incubator-weex-site/blob/32a097bf/source/cn/references/ios-apis.md
----------------------------------------------------------------------
diff --git a/source/cn/references/ios-apis.md b/source/cn/references/ios-apis.md
index 0668923..5002c14 100644
--- a/source/cn/references/ios-apis.md
+++ b/source/cn/references/ios-apis.md
@@ -1,7 +1,8 @@
---
title: iOS APIs
type: references
-order: 1.1
+group: API
+order: 2.3
version: 2.1
---
@@ -14,7 +15,7 @@ version: 2.1
- 重置 JSFramework
## Handler (对应于 Android 的 Adapter) 介绍
-
+
- `WXImgLoaderDefaultImpl` 图片下载 handler。Weex 会把需要设置图片的 View 和 URL 透露出来,Native 端需要实现这个接口进行图片下载。WeexSDK kernel 本身没有提供图片下载的默认实现。
接口定义如下:
@@ -36,7 +37,7 @@ version: 2.1
* finished : a Boolean value indicating whether download action has finished.
*/
- (id<WXImageOperationProtocol>)downloadImageWithURL:(NSString *)url imageFrame:(CGRect)imageFrame userInfo:(NSDictionary *)options completed:(void(^)(UIImage *image, NSError *error, BOOL finished))completedBlock;
- @end
+ @end
```
## Native 和 JS 通信
@@ -44,10 +45,10 @@ version: 2.1
- 自定义通知事件
用于 native 自定义部分和 js 进行实践通知,比如传递下拉事件到 js,这个是在 component 基类的方法,可以直接使用
-
+
```
/**
- * @abstract Fire an event to the component and tell Javascript which value has been changed.
+ * @abstract Fire an event to the component and tell Javascript which value has been changed.
* @param eventName 事件名称,可以在weex文件某个标签组件监听,命名规范为 onXXX
* @param params 数据
* @param domChanges 发生改变的数据
@@ -60,9 +61,9 @@ version: 2.1
多用于 Module 回调结果给 js,回调类型分为下面两种:
1. `WXModuleCallback` 为了性能考虑,该回调只能回调通知js一次,之后会被释放,多用于一次结果
-
+
2. `WXModuleKeepAliveCallback` 该回调可以设置是否为多次回调类型,多次回调的场景如持续监听位置的变化,并返回给 js。
-
+
```
@implementation WXEchoModule
@synthesize weexInstance; // 让该module 获得当前instance
@@ -78,7 +79,7 @@ version: 2.1
WeexSDK 在 `WXSDKInstance` 类中提供了方法 `setFrame(CGRect)` 来改变容器的大小。
如:在导航栏从有到无过程,需要 weexView 的变化, 可以在此时 native 调用该方法设置
-
+
## 降级使用
@@ -88,4 +89,3 @@ Weex 处于发展阶段会增加一些新的特性和功能,但是这些新的
Native 端可以通过接口 WXSDKInstance 中的 onFailed 回调进行处理,如果是主动降级则返回的错误 domain 为 `TemplateErrorType`,Native 端可以跳转到对应的 H5 页面,或者用其他的方式提示用户当前环境不支持 Weex。
-
\ No newline at end of file
http://git-wip-us.apache.org/repos/asf/incubator-weex-site/blob/32a097bf/source/cn/references/js-framework-apis.md
----------------------------------------------------------------------
diff --git a/source/cn/references/js-framework-apis.md b/source/cn/references/js-framework-apis.md
new file mode 100644
index 0000000..2aafd5e
--- /dev/null
+++ b/source/cn/references/js-framework-apis.md
@@ -0,0 +1,67 @@
+---
+title: JS Framework APIs
+type: references
+group: API
+order: 2.4
+version: 2.1
+---
+
+# JS Framework APIs
+
+## BroadcastChannel <span class="api-version">v0.9+</span>
+
+`BroadcastChannel` API 是 Weex 实例间通信的解决方案。
+
+### 参考
+
++ [BroadcastChannel specification](https://html.spec.whatwg.org/multipage/comms.html#broadcasting-to-other-browsing-contexts).
++ [MessageEvent specification](https://html.spec.whatwg.org/multipage/comms.html#messageevent)
+
+### API
+
++ `postMessage(message)`: 通过消息通道发送特定消息给其他 BroadcastChannel 对象。
++ `close`: 关闭 BroadcastChannel 对象,以便垃圾回收。
++ `onmessage`: Event 处理函数, 当 BroadcastChannel 对象接收到消息时触发。
+
+### 使用
+
+```javascript
+const Stack = new BroadcastChannel('Avengers')
+Stack.onmessage = function (event) {
+ console.log(event.data) // in this case, it's "Hulk Smash !!!"
+}
+
+// in another instance
+const Hulk = new BroadcastChannel('Avengers')
+Hulk.postMessage("Hulk Smash !!!")
+```
+
+运行以上代码,Stack 可以从 Hulk 接收消息。
+
+### 注意
+
+需要注意的是: ** `message` 如果是一个对象,该对象不会深拷贝。**
+
+参考以下例子
+
+```javascript
+const a = new BroadcastChannel('app')
+const b = new BroadcastChannel('app')
+
+const message = {
+ lists: ['A', 'B']
+}
+
+a.onmessage = function (event) {
+
+ // in this case, event.data is a reference of message
+ console.assert(event.data === message)
+
+}
+
+b.postMessage(message)
+```
+
+在这个例子中,`event.data` 全等于 `message`。
+
+与深拷贝相比,这种方式能够提高效率并减少内存消耗。但是,不建议开发者在使用时缓存或修改事件对象 (所有类型的事件处理程序都应该有此限制)。
http://git-wip-us.apache.org/repos/asf/incubator-weex-site/blob/32a097bf/source/cn/references/js-service.md
----------------------------------------------------------------------
diff --git a/source/cn/references/js-service.md b/source/cn/references/js-service.md
new file mode 100644
index 0000000..a59c407
--- /dev/null
+++ b/source/cn/references/js-service.md
@@ -0,0 +1,119 @@
+---
+title: JS Service
+type: references
+group: API
+order: 2.6
+version: 2.1
+---
+
+
+# JS Service
+
+<span class="weex-version">v0.9.5+</span>
+
+JS service 和 Weex 实例在 JS runtime 中并行运行。Weex 实例的生命周期可调用 JS service 生命周期。目前提供创建、刷新、销毁生命周期。
+
+**重要提醒: JS Service 非常强大但也很危险,请小心使用!**
+
+
+## 注册 JS Service
+
+### iOS
+
+```objective-c
+[WeexSDKEngine registerService:@"SERVICE_NAME" withScript: @"SERVICE_JS_CODE" withOptions: @{}];
+```
+
+### Android
+
+```java
+HashMap<String, String> options = new HashMap<>()
+options.put("k1", "v1")
+String SERVICE_NAME = "SERVICE_NAME"
+String SERVICE_JS_CODE = "SERVICE_JS_CODE"
+boolean result = WXSDKEngine.registerService(SERVICE_NAME, SERVICE_JS_CODE, options)
+```
+
+### Web
+```html
+<!-- 必须在 JSFM 之后加载 -->
+<script src="SERVICE_JS_CODE_URL"></script>
+```
+
+
+
+## 编写一个 JS service
+
+```javascript
+// options: native inject options
+// options.serviceName is native options name
+service.register(options.serviceName, {
+ /**
+ * JS Service lifecycle. JS Service `create` will before then each instance lifecycle `create`. The return param `instance` is Weex protected param. This object will return to instance global. Other params will in the `services` at instance.
+ *
+ * @param {String} id instance id
+ * @param {Object} env device environment
+ * @return {Object}
+ */
+ create: function(id, env, config) {
+ return {
+ instance: {
+ InstanceService: function(weex) {
+ var modal = weex.requireModule('modal')
+ return {
+ toast: function(title) {
+ modal.toast({ message: title })
+ }
+ }
+ }
+ },
+ NormalService: function(weex) {
+ var modal = weex.requireModule('modal')
+ return {
+ toast: function(title) {
+ modal.toast({ message: title })
+ }
+ }
+ }
+ }
+ },
+
+ /**
+ * JS Service lifecycle. JS Service `refresh` will before then each instance lifecycle `refresh`. If you want to reset variable or something on instance refresh.
+ *
+ * @param {String} id instance id
+ * @param {Object} env device environment
+ */
+ refresh: function(id, env, config){
+
+ },
+
+ /**
+ * JS Service lifecycle. JS Service `destroy` will before then each instance lifecycle `destroy`. You can deleted variable here. If you doesn't detete variable define in JS Service. The variable will always in the js runtime. It's would be memory leak risk.
+ *
+ * @param {String} id instance id
+ * @param {Object} env device environment
+ * @return {Object}
+ */
+ destroy: function(id, env) {
+
+ }
+})
+```
+
+## Using JS Service (vuejs)
+
+```html
+<script>
+var _InstanceService = new InstanceService(weex)
+var _NormalService = new service.normalService(weex)
+
+module.exports = {
+ created: fucntion() {
+ // called modal module to toast something
+ _InstanceService.toast('Instance JS Service')
+ _NormalService.toast('Normal JS Service')
+ }
+}
+</script>
+```
http://git-wip-us.apache.org/repos/asf/incubator-weex-site/blob/32a097bf/source/cn/references/js-service/index.md
----------------------------------------------------------------------
diff --git a/source/cn/references/js-service/index.md b/source/cn/references/js-service/index.md
deleted file mode 100644
index d4004d5..0000000
--- a/source/cn/references/js-service/index.md
+++ /dev/null
@@ -1,118 +0,0 @@
----
-title: JS Service
-type: references
-order: 9
-version: 2.1
----
-
-
-# JS Service
-
-<span class="weex-version">v0.9.5+</span>
-
-JS service 和 Weex 实例在 JS runtime 中并行运行。Weex 实例的生命周期可调用 JS service 生命周期。目前提供创建、刷新、销毁生命周期。
-
-**重要提醒: JS Service 非常强大但也很危险,请小心使用!**
-
-
-## 注册 JS Service
-
-### iOS
-
-```objective-c
-[WeexSDKEngine registerService:@"SERVICE_NAME" withScript: @"SERVICE_JS_CODE" withOptions: @{}];
-```
-
-### Android
-
-```java
-HashMap<String, String> options = new HashMap<>()
-options.put("k1", "v1")
-String SERVICE_NAME = "SERVICE_NAME"
-String SERVICE_JS_CODE = "SERVICE_JS_CODE"
-boolean result = WXSDKEngine.registerService(SERVICE_NAME, SERVICE_JS_CODE, options)
-```
-
-### Web
-```html
-<!-- 必须在 JSFM 之后加载 -->
-<script src="SERVICE_JS_CODE_URL"></script>
-```
-
-
-
-## 编写一个 JS service
-
-```javascript
-// options: native inject options
-// options.serviceName is native options name
-service.register(options.serviceName, {
- /**
- * JS Service lifecycle. JS Service `create` will before then each instance lifecycle `create`. The return param `instance` is Weex protected param. This object will return to instance global. Other params will in the `services` at instance.
- *
- * @param {String} id instance id
- * @param {Object} env device environment
- * @return {Object}
- */
- create: function(id, env, config) {
- return {
- instance: {
- InstanceService: function(weex) {
- var modal = weex.requireModule('modal')
- return {
- toast: function(title) {
- modal.toast({ message: title })
- }
- }
- }
- },
- NormalService: function(weex) {
- var modal = weex.requireModule('modal')
- return {
- toast: function(title) {
- modal.toast({ message: title })
- }
- }
- }
- }
- },
-
- /**
- * JS Service lifecycle. JS Service `refresh` will before then each instance lifecycle `refresh`. If you want to reset variable or something on instance refresh.
- *
- * @param {String} id instance id
- * @param {Object} env device environment
- */
- refresh: function(id, env, config){
-
- },
-
- /**
- * JS Service lifecycle. JS Service `destroy` will before then each instance lifecycle `destroy`. You can deleted variable here. If you doesn't detete variable define in JS Service. The variable will always in the js runtime. It's would be memory leak risk.
- *
- * @param {String} id instance id
- * @param {Object} env device environment
- * @return {Object}
- */
- destroy: function(id, env) {
-
- }
-})
-```
-
-## Using JS Service (vuejs)
-
-```html
-<script>
-var _InstanceService = new InstanceService(weex)
-var _NormalService = new service.normalService(weex)
-
-module.exports = {
- created: fucntion() {
- // called modal module to toast something
- _InstanceService.toast('Instance JS Service')
- _NormalService.toast('Normal JS Service')
- }
-}
-</script>
-```
http://git-wip-us.apache.org/repos/asf/incubator-weex-site/blob/32a097bf/source/cn/references/jsfm-apis.md
----------------------------------------------------------------------
diff --git a/source/cn/references/jsfm-apis.md b/source/cn/references/jsfm-apis.md
deleted file mode 100644
index ffe6029..0000000
--- a/source/cn/references/jsfm-apis.md
+++ /dev/null
@@ -1,66 +0,0 @@
----
-title: JS Framework APIs
-type: references
-order: 1.3
-version: 2.1
----
-
-# JS Framework APIs
-
-## BroadcastChannel <span class="api-version">v0.9+</span>
-
-`BroadcastChannel` API 是 Weex 实例间通信的解决方案。
-
-### 参考
-
-+ [BroadcastChannel specification](https://html.spec.whatwg.org/multipage/comms.html#broadcasting-to-other-browsing-contexts).
-+ [MessageEvent specification](https://html.spec.whatwg.org/multipage/comms.html#messageevent)
-
-### API
-
-+ `postMessage(message)`: 通过消息通道发送特定消息给其他 BroadcastChannel 对象。
-+ `close`: 关闭 BroadcastChannel 对象,以便垃圾回收。
-+ `onmessage`: Event 处理函数, 当 BroadcastChannel 对象接收到消息时触发。
-
-### 使用
-
-```javascript
-const Stack = new BroadcastChannel('Avengers')
-Stack.onmessage = function (event) {
- console.log(event.data) // in this case, it's "Hulk Smash !!!"
-}
-
-// in another instance
-const Hulk = new BroadcastChannel('Avengers')
-Hulk.postMessage("Hulk Smash !!!")
-```
-
-运行以上代码,Stack 可以从 Hulk 接收消息。
-
-### 注意
-
-需要注意的是: ** `message` 如果是一个对象,该对象不会深拷贝。**
-
-参考以下例子
-
-```javascript
-const a = new BroadcastChannel('app')
-const b = new BroadcastChannel('app')
-
-const message = {
- lists: ['A', 'B']
-}
-
-a.onmessage = function (event) {
-
- // in this case, event.data is a reference of message
- console.assert(event.data === message)
-
-}
-
-b.postMessage(message)
-```
-
-在这个例子中,`event.data` 全等于 `message`。
-
-与深拷贝相比,这种方式能够提高效率并减少内存消耗。但是,不建议开发者在使用时缓存或修改事件对象 (所有类型的事件处理程序都应该有此限制)。
\ No newline at end of file
http://git-wip-us.apache.org/repos/asf/incubator-weex-site/blob/32a097bf/source/cn/references/migration/difference.md
----------------------------------------------------------------------
diff --git a/source/cn/references/migration/difference.md b/source/cn/references/migration/difference.md
deleted file mode 100644
index b11c6c2..0000000
--- a/source/cn/references/migration/difference.md
+++ /dev/null
@@ -1,249 +0,0 @@
----
-title: Weex 和 Vue 2.x 的语法差异
-type: references
-order: 12.2
-version: 2.1
----
-
-# Weex 和 Vue 2.x 的语法差异
-
-## Overview
-
-
-| | Weex | Vue |
-| ---- | ---- | --- |
-| 生命周期 | `ready: function() {}` | `mounted: function() {}` |
-| 条件指令 | `if="{% raw %}{{!foo}}{% endraw %}"` | `v-if="!foo"` |
-| 循环指令 | `repeat="{% raw %}{{item in list}}{% endraw %}"` | `v-for="item in list"` |
-| 样式类名 | `class="btn btn-{% raw %}{{type}}{% endraw %}"` | `:class="['btn', 'btn-' + type]"` |
-| 内联样式 | `style="color:{% raw %}{{textColor}}{% endraw %}"` | `:style="{ color: textColor }"` |
-| 事件绑定 | `onclick="handler"` | `@click="handler"` |
-| 原生事件 | `onclick="xxx"` | `@click.native="xxx"` |
-| 数据绑定 | `src="{% raw %}{{rightItemSrc}}{% endraw %}"` | `:src="rightItemSrc"` |
-| 内容/槽 | `<content></content>` | `<slot></slot>` |
-| 数据初始化 | `data: { value: 'x' }` | `data: function() { return { value: 'x' } }` |
-| 标签 ID | `id="xxx"` | `ref="xxx"` |
-| 获取节点 | `this.$el('xxx')` | `this.$refs.xxx` |
-
-
-## Reference
-
-See the source code of `weex-vue-migration` for more details:
-
-+ [template-rewriter](https://github.com/songsiqi/weex-vue-migration/blob/master/src/template-rewriter/rewriter.js)
-+ [script-rewriter](https://github.com/songsiqi/weex-vue-migration/blob/master/src/script-rewriter/rewriter.js)
-
-## LifeCycle Hooks 生命周期钩子
-| weex | vue | Description |
-| --------- | ------------- | ------------------------- |
-| init | beforeCreate | 组件实例刚刚被创建,组件属性如data计算之前 |
-| created | created | 组件实例创建完成,属性已绑定,但DOM还未生成 |
-| | beforeMount | 模板编译/挂载之前 |
-| ready | mounted | 模板编译/挂载之后 |
-| | beforeUpdate | 组件更新之前 |
-| | updated | 组件更新之后 |
-| | activated | for`keep-alive`, 组件被激活时调用 |
-| | deactivated | for`keep-alive`, 组件被移除时调用 |
-| | beforeDestroy | 组件被销毁前调用 |
-| destroyed | destroyed | 组件被销毁后调用 |
-
-# Data Binding 数据绑定
-
-在weex中,使用{% raw %}{{…}}{% endraw %}在`<template>`中绑定在`<script>`里定义的数据;在vue中,需要在要绑定的属性前加 `:` 。如以下示例。
-
-* 类名
-
- - weex
-
- ```html
- <div class="btn btn-{{type}}"></div>
- ```
-
- - vue
-
- ```html
- <div :class="['btn', 'btn-' + type]"></div>
- ```
-
-* 样式绑定
-
- * weex
-
- ```html
- <div style="color:{{textColor}}"></div>
- ```
-
- * vue
-
- ```html
- <div :style="{color: textColor}"></div>
- ```
-
-# if指令
-
-* weex
-
- ```html
- <image src="..." if="{{shown}}"></image>
- ```
-
- or
-
- ```html
- <image src="..." if="shown"></image>
- ```
-
-* vue
-
- ```html
- <image src="..." v-if="shown"></image>
- ```
-
-# 循环指令
-
-* weex: repeat
- - `$index`为索引
-
- ```html
- <div repeat="{{list}}">
- <text>No. {{$index + 1}}</text>
- <div>
- ```
-
- or
-
- ```html
- <div repeat="{{v in list}}">
- <text>No. {{$index + 1}}, {{v.nickname}}</text>
- </div>
- ```
-
- - 对象参数的顺序
-
- ```html
- <div repeat="{{(key, value) in list}}">
- <text>No. {{key + 1}}, {{value.nickname}}</text>
- </div>
- ```
-
- - `track-by`
-
- ```html
- <div repeat="{{item in items}}" track-by="item.id" class="{{gender}}"></div>
- ```
-
-* vue: v-for
-
- - 移除`$index`索引
-
- - 对象参数的改变:改为(value, key), 与通用的对象迭代器保持一致
-
- ```html
- <div repeat="{{(value, key) in list}}">
- <text>No. {{key + 1}}, {{value.nickname}}</text>
- </div>
- ```
-
- - `track-by` 替换为`v-bind`
-
- ```html
- <div v-for="item in items" v-bind:key="item.id">
- ```
-
-# 初始化数据
-
-* weex
-
- ```javascript
- data: { value: 'x' }
- ```
-
-* vue
-
- ```javascript
- props: { value: { default: 'x' } }
- ```
-
- 动态数据
-
- ```javascript
- data: function () { return { value: 'x' } }
- ```
-
-
-# 围绕DOM的实例方法
-
-* 获取节点
-
- - weex: `this.$el('xxx')`
-
- ```html
- <template>
- <container>
- <text id="top">Top</text>
- </container>
- </template>
- <script>
- module.exports = {
- methods: {
- toTop: function () {
- var top = this.$el('top')
- }
- }
- }
- </script>
- ```
-
- - vue
-
- ```javascript
- this.$refs.xxx
- ```
-
-
-
-# 事件
-* 事件绑定
- - weex
-
- ```html
- <div onclick="handler"></div>
- ```
-
- - vue
-
- ```html
- <div @click="handler"></div>
- ```
-
-* 事件触发
- - weex: dispatch和broadcast
-
- ```javascript
- this.$dispatch()
- ```
-
- ```javascript
- this.$broadcast()
- ```
-
- - vue: emit
-
- ```javascript
- this.$emit()
- ```
-
- > 注:Weex 的 `$dispatch` 与组件无关,在任意组件中都可以通过 `$on` 捕获到,Vue 的`$emit` 用于触发组件(标签)的自定义事件。
-
-* 原生事件
- - weex
-
- ```javascript
- onclick="xxx"
- ```
-
- - vue
-
- ```javascript
- @click.native="xxx"
- ```
http://git-wip-us.apache.org/repos/asf/incubator-weex-site/blob/32a097bf/source/cn/references/migration/index.md
----------------------------------------------------------------------
diff --git a/source/cn/references/migration/index.md b/source/cn/references/migration/index.md
deleted file mode 100644
index 1238936..0000000
--- a/source/cn/references/migration/index.md
+++ /dev/null
@@ -1,11 +0,0 @@
----
-title: 迁移
-type: references
-order: 12
-version: 2.1
----
-
-# 迁移
-
-- [如何将原有 Weex 项目改造成 Vue 版本](./migration-from-weex.html)
-- [Weex 和 Vue 2.x 的语法差异](./difference.html)
\ No newline at end of file
http://git-wip-us.apache.org/repos/asf/incubator-weex-site/blob/32a097bf/source/cn/references/migration/migration-from-weex.md
----------------------------------------------------------------------
diff --git a/source/cn/references/migration/migration-from-weex.md b/source/cn/references/migration/migration-from-weex.md
deleted file mode 100644
index 34c3c6d..0000000
--- a/source/cn/references/migration/migration-from-weex.md
+++ /dev/null
@@ -1,116 +0,0 @@
----
-title: 如何将原有 Weex 项目改造成 Vue 版本
-type: references
-order: 12.1
-version: 2.1
----
-
-# 如何将原有 Weex 项目改造成 Vue 版本
-
-Weex 本身有一套语法规则,和 Vue 本身很相似,现在 Weex 与 Vue 有了官方合作,支持将 Vue 2.x 作为内置的前端框架,我们也推荐大家使用 Vue 2.x 的语法开发原生应用。对于现存旧版的 `.we` 文件,建议大家将其改造成 Vue 版本。
-
-## 要解决的问题
-
-> 将内核切换成 Vue 之后,原先基于 Weex 语法开发的项目将如何过渡到 Vue ?
-
-首先需要明确一点:Weex 原有的前端框架也会继续存在于 WeexSDK 中,依然支持 `.we` 文件格式的写法。
-
-此外,由于 `.we` 和 `.vue` 文件的格式本身就比较接近,所以迁移成本比较小,建议大家将现有 `.we` 格式的文件都转换成 `.vue` 格式。我们也推出了相应的工具和方法辅助迁移,在内部也有大量的成功实践,下边将重点介绍一下将 `.we` 文件转成 `.vue` 文件的方法。
-
-## 第一步,借助工具实现语法转换
-
-首先介绍一个工具: **[weex-vue-migration](https://github.com/songsiqi/weex-vue-migration)** ,它可以自动将 `.we` 文件转为 `.vue` 文件,绝大多数的模板语法都能自动转换,语法差异如下:
-
-| | Weex | Vue |
-| ---- | ---- | --- |
-| 生命周期 | `ready: function() {}` | `mounted: function() {}` |
-| 条件指令 | `if="{% raw %}{{!foo}}{% endraw %}"` | `v-if="!foo"` |
-| 循环指令 | `repeat="{% raw %}{{item in list}}{% endraw %}"` | `v-for="item in list"` |
-| 样式类名 | `class="btn btn-{% raw %}{{type}}{% endraw %}"` | `:class="['btn', 'btn-' + type]"` |
-| 内联样式 | `style="color:{% raw %}{{textColor}}{% endraw %}"` | `:style="{ color: textColor }"` |
-| 事件绑定 | `onclick="handler"` | `@click="handler"` |
-| 原生事件 | `onclick="xxx"` | `@click.native="xxx"` |
-| 数据绑定 | `src="{% raw %}{{rightItemSrc}}{% endraw %}"` | `:src="rightItemSrc"` |
-| 内容/槽 | `<content></content>` | `<slot></slot>` |
-| 数据初始化 | `data: { value: 'x' }` | `data: function() { return { value: 'x' } }` |
-| 标签 ID | `id="xxx"` | `ref="xxx"` |
-| 获取节点 | `this.$el('xxx')` | `this.$refs.xxx` |
-
-想要了解更多语法差异的细节,可以参考这篇文章:[《Weex 和 Vue 2.x 的语法差异》](./difference.html) 。
-
-### 使用方法
-
-首先安装工具:
-
-```bash
-npm install weex-vue-migration -g
-```
-
-转换文件:
-
-```bash
-weex-vue-migrate demo.we
-```
-
-转换成功后,将会在当前目录下生成 `demo.vue` 文件,控制台将会有如下输出:
-
-```
-[Success]: Migrate demo.we => demo.vue in 33ms
-Migration finished in 0.035s
-```
-
-除了逐个转换 `.we` 文件以外,`weex-vue-migration` 还支持批量转换整个目录,参考其[说明文档](https://github.com/songsiqi/weex-vue-migration/blob/master/README.md)可以了解更详细的使用方法。
-
-### 注意事项
-
-转换工具将不再支持 Weex 中废弃的语法,如果代码中有如下写法,建议先手动修改再做转换。
-
-0. 忽略 `require('@weex-components')` 语句,可以通过 npm 包的方式引入外部组件。
-0. 无法转换 `repeat="list"` 写法,仅支持 `repeat="item in list"` 格式。
-0. 不支持转换 `<script type="config"></script>`,目前 Vue 中不支持原有的降级配置。
-
-## 第二步,手动调整代码细节
-
-模板和样式的转换都可以借助工具轻易转换过来,`<script>` 中基本的语法也可以转换;但是由于 javascript 的写法比较灵活,仅仅使用工具做转换,并不一定能完美过渡。工具只能处理语法但是理解不了代码中的逻辑,在 Weex 和 Vue 的框架特性存在一些差异,有些差异还是需要手动修改才可以生效。
-
-> 提示:在代码中使用的“黑科技”越多,项目就越难以转换。
-
-### 样式单位
-
-在 `.we` 文件写样式时,开发者通常都不写长度单位,默认会被视为 `px`。在新的 Vue 版本的 Web 渲染器中,`<style>` 中的样式将会直接转化成 CSS class,如果不写单位、浏览器将无法正确识别,会导致在 Web 端无法正常渲染。Native 环境中不受影响。
-
-尽管不影响 Native 页面的渲染,也建议给样式长度加上单位 `px`。
-
-### 旧框架中的内置属性
-
-+ `vm._app`
- + `vm._app.differ`
- + `vm._app.doc`
- + `vm._app.updateActions()`
-
-### 事件派发机制
-
-+ `$dispatch` 、`$broadcast` 、`$call` 方法已经废弃。
-+ `$emit` 行为不一致。
-
-可以使用 Vuex 管理数据状态。
-
-### 直接操作 Virtual-DOM
-
-Weex 和 Vue 中的 Virtual-DOM 格式并不相同,如果你使用了 `this.$el('id')` 获取了某个组件的 element 之后,又修改了其中的某些属性或者调用了某些方法,这些操作在 Vue 中很难找到直接的对应写法。
-
-从另一个角度讲,我们也非常不建议在 Weex 或 Vue 项目中直接操作 Virtual-DOM,这些写法都应该修改。
-
-## 调整开发环境和工具
-
-在文件转换完成后,还需要重新调整一下开发环境。
-
-### 文件的编译
-
-`weex-loader` 同时支持编译 `.we` 和 `.vue` 文件,如果你使用的是 `webpack` 来配置编译环境,将不需要做任何改变就能直接编译 `.vue` 文件。
-
-需要注意的是,Vue 本身就是一个独立的前端框架,使用 Vue 编写的项目在 Web 上完全可以不依赖 Weex 容器运行。在这种情况下,需要配置基于 `vue-loader` 的编译脚本生成适用于 Web 平台 js 文件;然后引入 Vue 格式的 Weex 组件库就可以在 Web 中。
-
-### 辅助工具
-
-Weex 提供了 [weex-toolkit](https://github.com/weexteam/weex-toolkit) 的脚手架工具来辅助开发和调试、[weex-pack](https://github.com/weexteam/weex-pack) 实现打包原生应用;同样在 Vue 中也有 [vue-cli](https://github.com/vuejs/vue-cli) 脚手架工具。Weex 和 Vue 的工具互相做了适配,建议在创建项目和开发 Vue 项目的时候使用 `vue-cli` ,在调试时使用 `weex-toolkit`,在打包原生应用时使用 `weex-pack` 。
http://git-wip-us.apache.org/repos/asf/incubator-weex-site/blob/32a097bf/source/cn/references/modules/animation.md
----------------------------------------------------------------------
diff --git a/source/cn/references/modules/animation.md b/source/cn/references/modules/animation.md
index c4381f1..4e6fe93 100644
--- a/source/cn/references/modules/animation.md
+++ b/source/cn/references/modules/animation.md
@@ -1,7 +1,8 @@
---
title: animation
type: references
-order: 3.1
+group: 内置模块
+order: 9.04
version: 2.1
---
http://git-wip-us.apache.org/repos/asf/incubator-weex-site/blob/32a097bf/source/cn/references/modules/clipboard.md
----------------------------------------------------------------------
diff --git a/source/cn/references/modules/clipboard.md b/source/cn/references/modules/clipboard.md
index 300340c..3e2955e 100644
--- a/source/cn/references/modules/clipboard.md
+++ b/source/cn/references/modules/clipboard.md
@@ -1,7 +1,8 @@
---
title: clipboard
type: references
-order: 3.2
+group: 内置模块
+order: 9.08
version: 2.1
---
http://git-wip-us.apache.org/repos/asf/incubator-weex-site/blob/32a097bf/source/cn/references/modules/dom.md
----------------------------------------------------------------------
diff --git a/source/cn/references/modules/dom.md b/source/cn/references/modules/dom.md
index a177929..e3e6ba1 100644
--- a/source/cn/references/modules/dom.md
+++ b/source/cn/references/modules/dom.md
@@ -1,7 +1,8 @@
---
title: dom
type: references
-order: 3.3
+group: 内置模块
+order: 9.01
version: 2.1
---
@@ -154,15 +155,15 @@ version: 2.1
<text class="info">Left: {{size.left}}</text>
<text class="info">Right: {{size.right}}</text>
</div>
-
+
<text class="info btn" @click='click()'>{{this.tip}}</text>
-
+
</div>
-</template>
+</template>
<script>
const dom = weex.requireModule('dom')
-
+
function round(size) {
var roundSize = {
'width': Math.round(size.width),
@@ -196,7 +197,7 @@ version: 2.1
this.size = round.call(this,option.size);
})
},
-
+
methods:{
click:function() {
if (this.ref === 'viewport') {
@@ -206,14 +207,14 @@ version: 2.1
this.ref = 'viewport'
this.tip = "get box rect"
}
-
+
const result = dom.getComponentRect(this.ref, option => {
console.log('getComponentRect:', option)
this.size = round.call(this,option.size);
})
}
}
-
+
}
</script>
@@ -227,13 +228,13 @@ version: 2.1
margin-left:170px;
padding-left:35px;
border-color: rgb(162, 217, 192);
-
+
}
.btn:active {
background-color: #8fbc8f;
border-color: gray;
}
-
+
.box {
align-items:center;
margin-left: 150px;
http://git-wip-us.apache.org/repos/asf/incubator-weex-site/blob/32a097bf/source/cn/references/modules/globalevent.md
----------------------------------------------------------------------
diff --git a/source/cn/references/modules/globalevent.md b/source/cn/references/modules/globalevent.md
index e92a114..200f063 100644
--- a/source/cn/references/modules/globalevent.md
+++ b/source/cn/references/modules/globalevent.md
@@ -1,7 +1,8 @@
---
title: globalEvent
type: references
-order: 3.9
+group: 内置模块
+order: 9.13
version: 2.1
---
@@ -21,7 +22,7 @@ API 开发完成后,当需要发送事件时,需要通过以下方法:
```javascript
/**
- *
+ *
* @param eventName eventName
* @param params event params
*/
@@ -48,7 +49,7 @@ mWXSDKInstance.fireGlobalEventCallback("geolocation",params);
### iOS
-```object-c
+```object-c
[weexInstance fireGlobalEvent:@"geolocation" params:@{@"key":@"value"}];
```
http://git-wip-us.apache.org/repos/asf/incubator-weex-site/blob/32a097bf/source/cn/references/modules/index.md
----------------------------------------------------------------------
diff --git a/source/cn/references/modules/index.md b/source/cn/references/modules/index.md
deleted file mode 100644
index 543b9d2..0000000
--- a/source/cn/references/modules/index.md
+++ /dev/null
@@ -1,21 +0,0 @@
----
-title: 内建模块
-type: references
-order: 3
-has_chapter_content: true
-version: 2.1
----
-
-# 内建模块
-
-- [animation](./animation.html)
-- [WebSocket](./websocket.html)
-- [picker](./picker.html)
-- [clipboard](./clipboard.html)
-- [dom](./dom.html)
-- [modal](./modal.html)
-- [navigator](./navigator.html)
-- [storage](./storage.html)
-- [stream](./stream.html)
-- [webview](./webview.html)
-- [globalEvent](./globalevent.html)
http://git-wip-us.apache.org/repos/asf/incubator-weex-site/blob/32a097bf/source/cn/references/modules/meta.md
----------------------------------------------------------------------
diff --git a/source/cn/references/modules/meta.md b/source/cn/references/modules/meta.md
index a7d667e..95c1400 100644
--- a/source/cn/references/modules/meta.md
+++ b/source/cn/references/modules/meta.md
@@ -1,7 +1,8 @@
---
title: meta
type: references
-order: 3.12
+group: 内置模块
+order: 9.06
version: 2.1
---
@@ -41,11 +42,11 @@ import App from './app.vue'
const meta = weex.requireModule('meta')
// 配置 viewport 的宽度为 640px
-meta.setViewport({
+meta.setViewport({
width: 640
})
-App.el = '#root'
+App.el = '#root'
new Vue(App)
```
http://git-wip-us.apache.org/repos/asf/incubator-weex-site/blob/32a097bf/source/cn/references/modules/modal.md
----------------------------------------------------------------------
diff --git a/source/cn/references/modules/modal.md b/source/cn/references/modules/modal.md
index 6c42e50..12084c4 100644
--- a/source/cn/references/modules/modal.md
+++ b/source/cn/references/modules/modal.md
@@ -1,7 +1,8 @@
---
title: modal
type: references
-order: 3.4
+group: 内置模块
+order: 9.02
version: 2.1
---
http://git-wip-us.apache.org/repos/asf/incubator-weex-site/blob/32a097bf/source/cn/references/modules/navigator.md
----------------------------------------------------------------------
diff --git a/source/cn/references/modules/navigator.md b/source/cn/references/modules/navigator.md
index fdfa55d..543d858 100644
--- a/source/cn/references/modules/navigator.md
+++ b/source/cn/references/modules/navigator.md
@@ -1,7 +1,8 @@
---
title: navigator
type: references
-order: 3.5
+group: 内置模块
+order: 9.05
version: 2.1
---
http://git-wip-us.apache.org/repos/asf/incubator-weex-site/blob/32a097bf/source/cn/references/modules/picker.md
----------------------------------------------------------------------
diff --git a/source/cn/references/modules/picker.md b/source/cn/references/modules/picker.md
index d1623b0..ed1cff2 100644
--- a/source/cn/references/modules/picker.md
+++ b/source/cn/references/modules/picker.md
@@ -1,7 +1,8 @@
---
title: picker
type: references
-order: 3.11
+group: 内置模块
+order: 9.10
version: 2.1
---
http://git-wip-us.apache.org/repos/asf/incubator-weex-site/blob/32a097bf/source/cn/references/modules/storage.md
----------------------------------------------------------------------
diff --git a/source/cn/references/modules/storage.md b/source/cn/references/modules/storage.md
index 2a88a3a..181ec3a 100644
--- a/source/cn/references/modules/storage.md
+++ b/source/cn/references/modules/storage.md
@@ -1,7 +1,8 @@
---
title: storage
type: references
-order: 3.6
+group: 内置模块
+order: 9.09
version: 2.1
---
http://git-wip-us.apache.org/repos/asf/incubator-weex-site/blob/32a097bf/source/cn/references/modules/stream.md
----------------------------------------------------------------------
diff --git a/source/cn/references/modules/stream.md b/source/cn/references/modules/stream.md
index 2ec1695..4506cd7 100644
--- a/source/cn/references/modules/stream.md
+++ b/source/cn/references/modules/stream.md
@@ -1,7 +1,8 @@
---
title: stream
type: references
-order: 3.7
+group: 内置模块
+order: 9.07
version: 2.1
---
http://git-wip-us.apache.org/repos/asf/incubator-weex-site/blob/32a097bf/source/cn/references/modules/timer.md
----------------------------------------------------------------------
diff --git a/source/cn/references/modules/timer.md b/source/cn/references/modules/timer.md
deleted file mode 100644
index 3ac0c71..0000000
--- a/source/cn/references/modules/timer.md
+++ /dev/null
@@ -1,47 +0,0 @@
----
-title: Timer
-type: references
-version: 0.10
----
-
-# Timer
-Weex Timer可以用来延时启动一个一次性任务或者重复任务。Timer���会尽最大努力提供精确的延时,但是延时可能并不精确,延时时间�很可能会超过用户期望的时间。实际上,timer�仅仅是为了支持�HTML5中的�polyfill,*不建议*开发者��直接�使用timer.
-
-## API
-Timer中延时的单位是毫秒,且延时时间应该为一个非负的**int**值(int值�最大为0x7FFFFF).如果延时时间为零,会将该任务�马上插入任务队列的尾部。对于其他非法值,timer的行为未定义。
-
-### setTimeout(fn, timeout)
-`setTimeout()`��会等待指定的时间,然后执行给出的函数。
-* 可以使用 `clearTimeout()`�去�阻止`setTimeout()`���运行如果此时对应的`setTimeout()`��还没有运行的话。
-* 如果需要重复�执行任务,使用`setInterval()`.
-
-#### Arguments
-* `fn` (function): 待执行的函数.
-* `timeout` (number): 执行函数前的等待时间,单位为毫秒。
-
-#### Return value
-一个Number对象, 表示这个�任务的id。把id传入clearTimeout(fnId)中可以用来取消任务。
-
-### setInterval(fn, interval)
-`setInterval()`每隔指定的时间间隔后,会执行对应的�函数。`setInterval()`不会�停止,除非`clearInterval()`被调用。`setInterval()`的返回值可以用来作为`setInterval()`的参数。
-
-#### Arguments
-* `fn` (function): 待执行的函数。
-* `interval` (number): �这次执行函数与下一次�函数之间的时间间隔,单位为�毫秒。
-
-#### Return value
-一个Number对象,代表任务序列的id。可以把这个值传入`clearInterval`中来终止重复任务的执行。
-
-### clearTimeout(fnId)
-`clearTimeout()`可以�用来提前终止`setTimeout()`�启动的任务。仅当`setTimeout()`�对应的任务没有被执行时,`clearTimeout()`才可以用来�终止该任务,否则`clearTimeout()`没有任何效果�。
-
-#### Arguments
-* `fnId` (number): `setTimeout()`��的返回值.
-
-### clearInterval(fnId)
- `clearInterval()`�可以用来终止 `setInterval()`启动的�任务序列。
-
-#### Arguments
-* `fnId` (number): `setInterval()`的返回值
-
-[Try it](http://dotwe.org/vue/ad564965f1eac5a4bc86946ecff70a0c)
http://git-wip-us.apache.org/repos/asf/incubator-weex-site/blob/32a097bf/source/cn/references/modules/websocket.md
----------------------------------------------------------------------
diff --git a/source/cn/references/modules/websocket.md b/source/cn/references/modules/websocket.md
index 701af41..f940e0e 100644
--- a/source/cn/references/modules/websocket.md
+++ b/source/cn/references/modules/websocket.md
@@ -1,7 +1,8 @@
---
title: WebSocket
type: references
-order: 3.11
+group: 内置模块
+order: 9.12
version: 2.1
---
@@ -13,7 +14,7 @@ version: 2.1
WebSockets 是一种先进的技术, 这使得在用户的 H5/iOS/Android 和一个服务器之间打开一个的交互式通信会话成为可能, 有了这个 API,你可以向服务器发送消息, 并接收事件驱动的响应, 无需轮询服务器的响应
## **注意:**
-- iOS和h5提供 WebSockets 的 protocol 默认实现,安卓使用需要提供自定义 adapter 实现,source:
+- iOS和h5提供 WebSockets 的 protocol 默认实现,安卓使用需要提供自定义 adapter 实现,source:
- [DefaultWebSocketAdapter.java](https://github.com/apache/incubator-weex/blob/dev/android/commons/src/main/java/com/alibaba/weex/commons/adapter/DefaultWebSocketAdapter.java);
- [DefaultWebSocketAdapterFactory.java](https://github.com/apache/incubator-weex/blob/dev/android/commons/src/main/java/com/alibaba/weex/commons/adapter/DefaultWebSocketAdapterFactory.java);
- 集成例子参考weex [playground](https://github.com/apache/incubator-weex/tree/dev/android/playground)
@@ -216,4 +217,4 @@ WebSockets 是一种先进的技术, 这使得在用户的 H5/iOS/Android 和一
</script>
```
-[Have a try](http://dotwe.org/vue/6d8bdfe66f24fda1a2dc6158b0182573)
\ No newline at end of file
+[Have a try](http://dotwe.org/vue/6d8bdfe66f24fda1a2dc6158b0182573)
http://git-wip-us.apache.org/repos/asf/incubator-weex-site/blob/32a097bf/source/cn/references/modules/webview.md
----------------------------------------------------------------------
diff --git a/source/cn/references/modules/webview.md b/source/cn/references/modules/webview.md
index 7cfe32a..8483c63 100644
--- a/source/cn/references/modules/webview.md
+++ b/source/cn/references/modules/webview.md
@@ -1,7 +1,8 @@
---
title: webview
type: references
-order: 3.8
+group: 内置模块
+order: 9.11
version: 2.1
---
[11/51] [abbrv] incubator-weex-site git commit: rearrangement the
structure of the document
Posted by ha...@apache.org.
http://git-wip-us.apache.org/repos/asf/incubator-weex-site/blob/32a097bf/source/cn/v-0.10/references/components/loading.md
----------------------------------------------------------------------
diff --git a/source/cn/v-0.10/references/components/loading.md b/source/cn/v-0.10/references/components/loading.md
deleted file mode 100644
index f6d68fa..0000000
--- a/source/cn/v-0.10/references/components/loading.md
+++ /dev/null
@@ -1,118 +0,0 @@
----
-title: <loading>
-type: references
-order: 2.6
-version: 0.10
----
-
-# <loading>
-
-<span class="weex-version">v0.6.1+</span>
-
-`<loading>` 为 `<scroller>` 和 `<list>` 提供上拉加载功能。用法与特性与 `<refresh>` 类似, 是 `<scroller>` 和 `<list>` 的子组件,且只能在被 `<scroller>` 和 `<list>` 包含时才能被正确的渲染。
-
-## 子组件
-
-- [`<text>`](./text.html)
-- [`<image>`](./image.html)
-- `<loading-indicator>`: `<refresh>` 和 `<loading>` 组件的子组件,拥有默认的动画效果的实现。
-
-## 特性
-
-- `display {string}`:可选值为 `show` 或者 `hide`,仅隐藏 `<indicator>`,`<loading>` 其他子组件依然可见,`loading` 事件仍会被触发。
-
-## 样式
-
-支持所有通用样式。
-
-- 盒模型
-- `flexbox` 布局
-- `position`
-- `opacity`
-- `background-color`
-
-查看 [组件通用样式](../common-style.html)
-
-## 事件
-
-- `loading`:加载时被触发。
-
-## 约束
-
-- `<loading>` 不支持 `remove`,v0.9 版本会修复。
-- `display` 值为 `show` 或 `hide`。仅隐藏 `<indicator>`,`<loading>` 其他子组件依然可见,`loading` 事件仍会被触发。
-
- 如果需要 `<loading>` hide 时隐藏文案并不再触发事件,有两种解决方法:
-
- 1. 修改提示文案,并在 `loading` 事件中添加判断逻辑;
- 2. v0.9+ 可通过 `remove` 解决。
-
-- 只能通过 `display` 特性进行展示和隐藏,且必须成对出现,即设置 `display="show"`,必须有对应的 `display="hide"`。
-
-## 示例
-
-```html
-<template>
- <list>
- <header>
- <div class="center">
- <text style="text-align:center">I am the header</text>
- </div>
- </header>
- <loading onloading="onloading" display="{{loadingDisplay}}" style="width:750;flex-direction: row;justify-content: center;">
- <loading-indicator style="height:160;width:160;color:#3192e1"></loading-indicator>
- </loading>
- <cell class="row" repeat="i in staffs" index="{{$index}}">
- <div class="item">
- <text>{{i.name}}</text>
- </div>
- </cell>
- </list>
-</template>
-
-<style>
- .row {
- width: 750;
- }
- .item {
- justify-content: center;
- border-bottom-width: 2;
- border-bottom-color: #c0c0c0;
- height: 100;
- padding:20;
- }
- .center {
- border-bottom-width: 2;
- border-bottom-color: #cccccc;
- height: 100;
- padding:20;
- background-color:#FFFFFF;
- justify-content: center;
- }
-</style>
-
-<script>
- module.exports = {
- data: {
- staffs:[],
- loadingDisplay: 'show',
- loadingText: 'pull up to load more',
- refreshText: 'pull down to refresh'
- },
- created:function() {
- this.refreshDisplay='show'
- this.staffs=[{name:'inns'},{name:'connon'},{name:'baos'},{name:'anna'},{name:'dolley'},{name:'lucy'},{name:'john'}, {name:'lily'},{name:'locke'},{name:'jack'},{name:'danny'},{name:'rose'},{name:'harris'},{name:'lotus'},{name:'louis'}];
- },
- methods:{
- onloading:function(e){
- console.log('onloading...');
- this.staffs.push({name:'onloading'})
- }
- }
- }
-</script>
-```
-
-[体验一下](http://dotwe.org/6adf7add849f3c9fcdbc776a6c471f02)
-
-更多示例可查看 [`<list>`](./list.html)
http://git-wip-us.apache.org/repos/asf/incubator-weex-site/blob/32a097bf/source/cn/v-0.10/references/components/refresh.md
----------------------------------------------------------------------
diff --git a/source/cn/v-0.10/references/components/refresh.md b/source/cn/v-0.10/references/components/refresh.md
deleted file mode 100644
index 868dad7..0000000
--- a/source/cn/v-0.10/references/components/refresh.md
+++ /dev/null
@@ -1,204 +0,0 @@
----
-title: <refresh>
-type: references
-order: 2.7
-version: 0.10
----
-
-# <refresh>
-
-<span class="weex-version">v0.6.1+</span>
-
-`<refresh>` 为 `<scroller>` 和 `<list>` 提供下拉加载功能。用法与特性与 `<loading>` 类似,`<scroller>` 和 `<list>` 的子组件,且只能在被 `<scroller>` 和 `<list>` 包含时才能被正确的渲染。
-
-一个简单例子:
-
-```html
-<template>
- <list>
- <header>
- <div class="center">
- <text style="text-align:center">I am the header</text>
- </div>
- </header>
- <refresh onpullingdown='onpullingdown' onrefresh="onrefresh" display="{{refreshDisplay}}" style="width:750;flex-direction: row;justify-content: center;">
- <loading-indicator style="height:160;width:160;color:#3192e1"></loading-indicator>
- </refresh>
- <cell class="row" repeat="i in staffs" index="{{$index}}">
- <div class="item">
- <text>{{i.name}}</text>
- </div>
- </cell>
- </list>
-</template>
-
-<style>
- .row {
- width: 750;
- }
- .item {
- justify-content: center;
- border-bottom-width: 2;
- border-bottom-color: #c0c0c0;
- height: 100;
- padding:20;
- }
- .center {
- border-bottom-width: 2;
- border-bottom-color: #cccccc;
- height: 100;
- padding:20;
- background-color:#FFFFFF;
- justify-content: center;
- }
-</style>
-
-<script>
- module.exports = {
- data: {
- staffs:[],
- refreshDisplay: 'show',
- loadingDisplay: 'show',
- loadingText: 'pull up to load more',
- refreshText: 'pull down to refresh'
- },
- created:function() {
- this.refreshDisplay='show'
- this.staffs=[{name:'inns'},{name:'connon'},{name:'baos'},{name:'anna'},{name:'dolley'},{name:'lucy'},{name:'john'}, {name:'lily'},{name:'locke'},{name:'jack'},{name:'danny'},{name:'rose'},{name:'harris'},{name:'lotus'},{name:'louis'}];
- },
- methods:{
- onrefresh:function(e){
- this.refreshDisplay='show';
- this.staffs=[{name:'anna'},{name:'baos'},{name:'connon'},{name:'inns'}];
- this.refreshDisplay='hide'
- },
- onpullingdown:function(e){
- console.log('onpullingdown triggered.');
- console.log('dy:'+e.dy);
- console.log('headerHeight:'+e.headerHeight);
- console.log('maxHeight:'+e.maxHeight);
- }
- }
- }
-</script>
-```
-
-[体验一下](http://dotwe.org/64cb982f67186c76f9f27fe3000a2fe8)
-
-## 子组件
-
-- [`<text>`](./text.html)
-- [`<image>`](./image.html)
-- `<loading-indicator>`: `<refresh>` 和 `<loading>` 组件的子组件,拥有默认的动画效果的实现。
-
-## 特性
-
-- `display {string}`:可选值为 `show` 或者 `hide`,仅隐藏 `<indicator>`,`<loading>` 其他子组件依然可见,`<loading>` 事件仍会被触发。
-
-## 样式
-
-支持所有通用样式。
-
-- 盒模型
-- `flexbox` 布局
-- `position`
-- `opacity`
-- `background-color`
-
-查看 [组件通用样式](../common-style.html)
-
-## 事件
-
-- `refresh`: 当 `<scroller>`/`<list>` 被下拉时触发。
-- `pullingdown`:仅在 Android 支持。当 `<scroller>`/`<list>` 被下拉时触发,可以从事件的参数对象中获取 dy,headerHeight,maxHeight
-
-## 约束
-
-- `<refresh>` 不支持 `remove`,v0.9 版本会修复。
-- `display` 值为 `show` 或 `hide`。仅隐藏 `<indicator>`,`<refresh>` 其他子组件依然可见,`refresh` 事件仍会被触发。
-
- 如果需要 `<refresh>` hide 时隐藏文案并不再触发事件,有两种解决方法:
-
- 1. 修改提示文案,并在 `refresh` 事件中添加判断逻辑;
- 2. v0.9+ 可通过 `remove` 解决。
-
-- 只能通过 `display` 特性进行展示和隐藏,且必须成对出现,即设置 `display="show"`,必须有对应的 `display="hide"`。
-
-## 示例
-
-```html
-<template>
- <scroller onloadmore="onloadmore" loadmoreoffset="1000">
- <refresh onrefresh="onrefresh" display="{{refreshDisplay}}">
- <text id="refreshText">{{refreshText}}</text>
- </refresh>
- <div repeat="v in items">
- <text style="font-size: 40; color: #000000">{{v.item}}</text>
- </div>
- <loading onloading="onloading" display="{{loadingDisplay}}">
- <text id="loadingText">{{loadingText}}</text>
- </loading>
- </scroller>
-</template>
-
-<script>
- module.exports = {
- data: {
- refreshDisplay: 'show',
- loadingDisplay: 'show',
- loadingText: 'pull up to load more',
- refreshText: 'pull down to refresh',
- items: []
- },
- created: function () {
- for (var i = 0; i < 30; i++) {
- this.items.push({
- 'item': 'test data' + i
- });
- }
- },
- methods: {
- onrefresh: function () {
- var vm = this;
- vm.refreshDisplay = 'show'
- if (vm.items.length > 50) {
- vm.refreshText = "no more data!"
- vm.refreshDisplay = 'hide'
- return;
- }
- var len = vm.items.length;
- for (var i = len; i < (len + 20); i++) {
- vm.items.unshift({
- 'item': 'test data ' + i
- });
- }
- vm.refreshDisplay = 'hide'
- },
- onloading: function () {
- var vm = this;
- vm.loadingDisplay = 'show'
- if (vm.items.length > 30) {
- vm.loadingText = "no more data!"
- vm.loadingDisplay = 'hide'
- return;
- }
-
- var len = vm.items.length;
- for (var i = len; i < (len + 20); i++) {
- vm.items.push({
- 'item': 'test data ' + i
- });
- }
- vm.loadingDisplay = 'hide'
- },
- onloadmore: function () {
- console.log("into--[onloadmore]")
- }
- }
- }
-</script>
-```
-
-[体验一下](http://dotwe.org/80c027d6bfb337195c25cc0ba9317ea5)
-
-更多示例可查看 [`<list>`](./list.html)
http://git-wip-us.apache.org/repos/asf/incubator-weex-site/blob/32a097bf/source/cn/v-0.10/references/components/scroller.md
----------------------------------------------------------------------
diff --git a/source/cn/v-0.10/references/components/scroller.md b/source/cn/v-0.10/references/components/scroller.md
deleted file mode 100644
index 0fac77c..0000000
--- a/source/cn/v-0.10/references/components/scroller.md
+++ /dev/null
@@ -1,324 +0,0 @@
----
-title: <scroller>
-type: references
-order: 2.8
-version: 0.10
----
-
-# <scroller>
-
-<span class="weex-version">v0.6.1+</span>
-
-`<scroller>` 是一个竖直的,可以容纳多个排成一列的子组件的滚动器。如果子组件的总高度高于其本身,那么所有的子组件都可滚动。
-
-**注意:** `<scroller>` 可以当作根元素或者嵌套元素使用。此组件的滚动方向是垂直方向的形式。
-
-一个简单例子:
-
-```html
-<template>
- <scroller onloadmore="onloadmore" loadmoreoffset="100">
- <div repeat="v in items">
- <text style="font-size: 40; color: #000000">{{v.item}}</text>
- </div>
- </scroller>
-</template>
-<script>
- module.exports = {
- data: {
- items: [],
- triggered: false
- },
- created: function () {
- for (var i = 0; i < 50; i++) {
- this.items.push({
- 'item': 'test data' + i
- });
- }
- },
- methods: {
- onloadmore: function () {
- if (!this.triggered) {
- for (var i = 100; i >= 50; i--) {
- this.items.push({
- 'item': 'onloadmore triggered' + i
- });
- }
- }
- this.triggered = true;
- }
- }
- }
-</script>
-```
-
-[体验一下](http://dotwe.org/6910f0b87aeabe3f2a0d62c0d658dbd2)
-
-## 子组件
-
-支持任意类型的 Weex 组件作为其子组件。 其中,还支持以下两个特殊组件作为子组件:
-
-- `<refresh>`
-
- 用于给列表添加下拉刷新的功能。
-
- 使用文档请查看 [`<refresh>`](./refresh.html)
-
-- `<loading>`
-
- `<loading>` 用法与特性和 `<refresh>` 类似,用于给列表添加上拉加载更多的功能。
-
- 使用文档请查看 [`<loading>`](./loading.html)
-
-## 特性
-
-- `show-scrollbar {boolean}`:可选值为 `true`/ `false`,默认值为 `true`。控制是否出现滚动条。
-- `scroll-direction {string}`:可选为 `horizontal` 或者 `vertical`,默认值为 `vertical` 。定义滚动的方向。
-- `loadmoreoffset {number}`:默认值为 0,触发 `loadmore` 事件所需要的垂直偏移距离(设备屏幕底部与页面底部之间的距离)。当页面的滚动条滚动到足够接近页面底部时将会触发 `loadmore` 这个事件。
-
- 
-
-- `loadmoreretry {number}`:默认值为 0,当 `loadmore` 失败时是否重置 `loadmore` 相关的 UI,值不一样就会重置。
-
-## 样式
-
-- 通用样式:支持所有通用样式
-
- - 盒模型
- - `flexbox` 布局
- - `position`
- - `opacity`
- - `background-color`
-
- 查看 [组件通用样式](../common-style.html)
-
-## 事件
-
-- `loadmore` <sup class="wx-v">v0.5+</sup>:如果滚动到底部将会立即触发这个事件,你可以在这个事件的处理函数中加载下一页的列表项。
-- 通用事件
-
- 支持所有通用事件:
-
- - `click`
- - `longpress`
- - `appear`
- - `disappear`
-
- 查看 [通用事件](../common-event.html)
-
-## 扩展
-
-### scrollToElement(node, options)
-
-滚动到列表某个指定项是常见需求,`<list>` 拓展了该功能支持滚动到指定 `<cell>`。通过 `dom` module 访问,更多信息可参考 [dom module](../modules/dom.html) 。
-
-#### 参数
-
-- `node {node}`:指定目标节点。
-- `options {Object}`:
- - `offset {number}`:一个到其可见位置的偏移距离,默认是0
-
-#### 示例
-
-```html
-<template>
- <scroller>
- <div class="row" repeat="item in rows" id="item-{{$index}}">
- <text class="item-title">row {{item.id}}</text>
- </div>
- <div onclick="go" style="width: 750;height: 50; position: fixed; left: 0; right: 0; bottom: 0; background-color: #eeeeee;">
- <text style="text-align: center;">
- Go to 50th line.
- </text>
- </div>
- </scroller>
-</template>
-
-<script>
-var dom = require('@weex-module/dom')
-
-module.exports = {
- data: {
- rows: []
- },
- created: function () {
- for (var i = 0; i < 100; i++) {
- this.rows.push({
- id: i
- })
- }
- },
- methods: {
- go: function () {
- var el = this.$el('item-49')
-
- dom.scrollToElement(el, {
- offset: 0
- })
- }
- }
-}
-</script>
-```
-
-[体验一下](http://dotwe.org/483e5c878c52c0891e6e35e478f19854)
-
-## 约束
-
-**不允许**相同方向的 `<list>` 或者 `<scroller>` 互相嵌套,换句话说就是嵌套的 `<list>`/`<scroller>` 必须是不同的方向。
-
-举个例子,**不允许**一个垂直方向的 `<list>` 嵌套的一个垂直方向的 `<scroller>` 中,但是一个垂直方向的 `<list>` 是可以嵌套的一个水平方向的 `<list>` 或者 `<scroller>` 中的。
-
-## 示例
-
-
-
-```html
-<style>
-.item {
- padding: 20;
- height: 220;
- border-bottom-width: 1;
- border-bottom-style: solid;
- border-bottom-color: #efefef;
-}
-.item-content {
- flex-direction: row;
- width: 710;
- background-color: #ffffff;
-}
-.item-imgbox {
- height: 180;
- width: 180;
- margin-right: 20;
-}
-.item-img {
- width: 180;
- height: 180;
-}
-.item-info {
- height: 180;
- width: 510;
- justify-content: center;
- position: relative;
-}
-.item-info-detail {
- position: relative;
- color: #A2A2A2;
-}
-.desc {
- lines: 4;
- text-overflow: ellipsis;
- font-size: 26;
- line-height: 30;
- color: #A2A2A2;
-}
-.title {
- lines: 1;
- text-overflow: ellipsis;
- font-size: 32;
- color: #2D2D2D;
- line-height: 40;
-}
-.detail-info {
- margin-top: 15;
-}
-.up {
- width: 70;
- height: 70;
- position: fixed;
- right: 20;
- bottom: 20;
-}
-.img {
- width: 70;
- height: 70;
-}
-</style>
-
-<template>
- <div>
- <scroller>
- <div class="item" repeat="item in items" id="item-{{$index}}">
- <div class="item-content">
- <div class="item-imgbox">
- <img class="item-img" src="{{item.img}}" alt="" />
- </div>
- <div class="item-info">
- <div class="item-info-detail">
- <text class="title">{{item.title}}</text>
- <div class="detail-info">
- <text class="desc">{{item.desc}}</text>
- </div>
- </div>
- </div>
- </div>
- </div>
- </scroller>
- <div class="up" onclick="goToTop">
- <img class="img" src="https://img.alicdn.com/tps/TB1ZVOEOpXXXXcQaXXXXXXXXXXX-200-200.png"></img>
- </div>
- </div>
-</template>
-
-<script>
- var dom = require('@weex-module/dom') || {}
-
- module.exports = {
- data: {
- items: [{
- img: 'https://img.alicdn.com/tps/TB1z.55OFXXXXcLXXXXXXXXXXXX-560-560.jpg',
- title: 'Who is Alan Mathison Turing?Who is Alan Mathison Turing?',
- desc: 'Alan Mathison Turing ( 23 June 1912 – 7 June 1954) was an English computer scientist, mathematician, logician, cryptanalyst and theoretical biologist. He was highly influential in the development of theoretical computer science, providing a formalisation of the concepts of algorithm and computation with the Turing machine, which can be considered a model of a general purpose computer.Turing is widely considered to be the father of theoretical computer science and artificial intelligence.'
- },{
- img: 'https://img.alicdn.com/tps/TB1z.55OFXXXXcLXXXXXXXXXXXX-560-560.jpg',
- title: 'Who is Alan Mathison Turing?',
- desc: 'Alan Mathison Turing ( 23 June 1912 – 7 June 1954) was an English computer scientist, mathematician, logician, cryptanalyst and theoretical biologist. He was highly influential in the development of theoretical computer science, providing a formalisation of the concepts of algorithm and computation with the Turing machine, which can be considered a model of a general purpose computer.Turing is widely considered to be the father of theoretical computer science and artificial intelligence.'
- }]
- },
- created: function () {
- },
- methods: {
- goToTop: function (e) {
- dom.scrollToElement(this.$el('item-0'), {
- offset: 0
- })
- }
- }
- }
-</script>
-```
-
-[体验一下](http://dotwe.org/799f54b32f5227f9c34cfbb5e6946ba7)
\ No newline at end of file
http://git-wip-us.apache.org/repos/asf/incubator-weex-site/blob/32a097bf/source/cn/v-0.10/references/components/slider.md
----------------------------------------------------------------------
diff --git a/source/cn/v-0.10/references/components/slider.md b/source/cn/v-0.10/references/components/slider.md
deleted file mode 100644
index b12a8aa..0000000
--- a/source/cn/v-0.10/references/components/slider.md
+++ /dev/null
@@ -1,121 +0,0 @@
----
-title: <slider>
-type: references
-order: 2.9
-version: 0.10
----
-
-# <slider>
-
-`<slider>` 组件用于在一个页面中展示多个图片,在前端,这种效果被称为 `轮播图`。
-
-## 子组件
-
-支持任意类型的 Weex 组件作为其子组件。 其中,还支持以下组件作为子组件展示特殊效果:
-
- - `<indicator>`:用于显示轮播图指示器效果,必须充当 [`<slider>`](./slider.html) 组件的子组件使用。
-
-## 特性
-
-- `auto-play {boolean}`:可选值为 `true`/`false`,默认的是 `false`。
-
- 该值决定是否自动播放轮播。重置 `loadmore` 相关的 UI,值不一样就会重置。
-
-- `interval {number}`:值为毫秒数,此值设定 slider 切换时间间隔。当 `auto-play` 值为 `true` 时生效。
-
-## 样式
-
-- 通用样式:支持所有通用样式
-
- - 盒模型
- - `flexbox` 布局
- - `position`
- - `opacity`
- - `background-color`
-
- 查看 [组件通用样式](../common-style.html)
-
-## 事件
-
-- `change`: 当轮播索引改变时,触发该事件。
-
- 事件中 event 对象属性:
- - `index`:展示的图片索引
-
-- 通用事件
-
- 支持所有通用事件:
-
- - `click`
- - `longpress`
- - `appear`
- - `disappear`
-
- 查看 [通用事件](../common-event.html)
-
-## 示例
-
-```html
-<template>
- <div>
- <slider class="slider" interval="3000" auto-play="true">
- <div class="slider-pages" repeat="item in itemList">
- <image class="img" src="{{item.pictureUrl}}"></image>
- <text class="title">{{item.title}}</text>
- </div>
- <indicator class="indicator"></indicator>
- </slider>
- </div>
-</template>
-
-<style>
- .img {
- width: 714;
- height: 150;
- }
- .title {
- position: absolute;
- top: 20;
- left: 20;
- color: #ff0000;
- font-size: 48;
- font-weight: bold;
- background-color: #eeeeee;
- }
- .slider {
- flex-direction: row;
- margin: 18;
- width: 714;
- height: 230;
- }
- .slider-pages {
- flex-direction: row;
- width: 714;
- height: 200;
- }
- .indicator {
- width:714;
- height:200;
- position:absolute;
- top:1;
- left:1;
- item-color: red;
- item-selectedColor: blue;
- item-size: 20;
- }
-</style>
-
-<script>
- module.exports = {
- data: {
- itemList: [
- {itemId: '520421163634', title: 'item1', pictureUrl: 'https://gd2.alicdn.com/bao/uploaded/i2/T14H1LFwBcXXXXXXXX_!!0-item_pic.jpg'},
- {itemId: '522076777462', title: 'item2', pictureUrl: 'https://gd1.alicdn.com/bao/uploaded/i1/TB1PXJCJFXXXXciXFXXXXXXXXXX_!!0-item_pic.jpg'},
- {itemId: '522076777462', title: 'iten3', pictureUrl: 'https://gd3.alicdn.com/bao/uploaded/i3/TB1x6hYLXXXXXazXVXXXXXXXXXX_!!0-item_pic.jpg'}
- ]
- }
- }
-</script>
-```
-
-[体验一下](http://dotwe.org/37784d97811f4c91594a9ad6f118c0f7)
http://git-wip-us.apache.org/repos/asf/incubator-weex-site/blob/32a097bf/source/cn/v-0.10/references/components/switch.md
----------------------------------------------------------------------
diff --git a/source/cn/v-0.10/references/components/switch.md b/source/cn/v-0.10/references/components/switch.md
deleted file mode 100644
index 8a3d614..0000000
--- a/source/cn/v-0.10/references/components/switch.md
+++ /dev/null
@@ -1,98 +0,0 @@
----
-title: <switch>
-type: references
-order: 2.11
-version: 0.10
----
-
-# <switch>
-
-<span class="weex-version">v0.6.1+</span>
-
-`<switch>` 是 Weex 的内置组件,用来创建与 iOS 一致样式的按钮。例如,在 iPhone 中的设置应用中的飞行模式按钮就是一个 switch 按钮。
-
-## 子组件
-
-`<switch>` 组件**不支持**任何子组件。
-
-## 特性
-
-- `checked {boolean}`:默认值为 `false`,表明按钮是否开启 is on or not.
-- `disabled {boolean}`:默认值为 `false`,表明是否激活按钮
-
-## 样式
-
-值得注意的是,在这个组件上,有些样式组件属性**不能使用**,它们是:
-
-- `width`
-- `height`
-- `min-width`
-- `min-height`
-- `margin`
-- `padding`
-- `border`
-
-**注意:**
-
-由于设计宽度为 750px,宽度和高度相关的属性不能配置,组件的尺寸限定在 100x60。
-
-- 通用样式
-
- - `flexbox` 布局
- - `position`
- - `opacity`
- - `background-color`
-
- 查看 [组件通用样式](../common-style.html)
-
-## 事件
-
-- `change`:改变开关状态时触发该事件。
-
- 事件中 event 对象属性:
-
- - `value`: 组件布尔值真或假。
- - `timestamp`: 事件的时间戳。
-
-- 通用事件
-
- 支持所有通用事件:
-
- - `click`
- - `longpress`
- - `appear`
- - `disappear`
-
- 查看 [通用事件](../common-event.html)
-
-## 示例
-
-```html
-<template>
- <div>
- <text>muted:</text>
- <switch checked="true" onclick='onclick' onchange='onchange' ondisappear='ondisappear' onappear='onappear'></switch>
- </div>
-</template>
-
-<script>
- module.exports ={
- methods:{
- onclick:function(e){
- console.log('onclick:' + e.timestamp);
- },
- onchange:function(e){
- console.log('onchage, value:' + e.value);
- },
- ondisappear:function(e){
- console.log('ondisappear, value:' + e.value);
- },
- onappear:function(e){
- console.log('onappear, value:' + e.value);
- },
- }
- }
-</script>
-```
-
-[体验一下](http://dotwe.org/5f8b9d9c0e429e61f4a004dc8ee637e1)
\ No newline at end of file
http://git-wip-us.apache.org/repos/asf/incubator-weex-site/blob/32a097bf/source/cn/v-0.10/references/components/text.md
----------------------------------------------------------------------
diff --git a/source/cn/v-0.10/references/components/text.md b/source/cn/v-0.10/references/components/text.md
deleted file mode 100644
index edd6a05..0000000
--- a/source/cn/v-0.10/references/components/text.md
+++ /dev/null
@@ -1,116 +0,0 @@
----
-title: <text>
-type: references
-order: 2.12
-version: 0.10
----
-
-# <text>
-
-`<text>` 是 Weex 内置的组件,用来将文本按照指定的样式渲染出来。`<text>` 只能包含文本值,你可以使用 `{% raw %}{{}}{% endraw %}` 标记插入变量值作为文本内容。
-
-## 子组件
-
-此组件不支持子组件。
-
-## 特性
-
-- `value {string}`: 组件的值,与 `<text>` 标签中的文本内容相同。
-
-## 样式
-
-- `lines {number}`: 指定文本行数。默认值是 `0` 代表不限制行数。
-- text styles: 查看 [文本样式](../text-style.html)
-
- - 支持 `color` 样式.
- - 支持 `font-size` 样式. iOS默认值:`32`,Android:不同设备不同,H5 默认值:`32`.
- - 支持 `font-style` 样式.
- - 支持 `font-weight` 样式.
- - 支持 `text-align` 样式.
- - 支持 `text-decoration` 样式.
- - 支持 `text-overflow` 样式.
- - 支持 `line-height`样式<sup class="wx-v">0.6.1+</sup> 。`line-height` 在 iOS 中与 H5 和 Android 中不同, 文本值将放置在框的底部。
- - 不支持 `flex-direction`, `justify-content`, `align-items` 这些为子节点设置的属性,并且`<text>`没有子节点。
-
-- 通用样式:支持所有通用样式
-
- - 盒模型
- - `flexbox` 布局
- - `position`
- - `opacity`
- - `background-color`
-
- 查看 [组件通用样式](../common-style.html)
-
-## 事件
-
-- 通用事件
- 支持所有通用事件:
-
- - `click`
- - `longpress`
- - `appear`
- - `disappear`
-
- 查看 [通用事件](../common-event.html)
-
-## 约束
-
-1. `<text>` 里直接写文本头尾空白会被过滤,如果需要保留头尾空白,暂时只能通过数据绑定写头尾空格。
-
-```html
-<template>
- <div>
- <text> 测试1,直接放置头尾用空白的文本 </text>
- <text>{{msg}}</text>
- </div>
-</template>
-<script>
-module.exports = {
- data: {
- msg: ' 测试2,使用数据绑定 '
- }
-}
-</script>
-```
-
-[体验一下](http://dotwe.org/473d451e48ba322b606c4ba2577fd96a)
-
-## 示例
-
-```html
-<template>
- <div>
- <text>this is text content</text>
- <text value="this is text value"></text>
- <text id="textid" onclick={{showtext}}>this is gettext content</text>
- <text value="{{text}}"></text>
- <text style="lines: 3;">Alan Mathison Turing ( 23 June 1912 – 7 June 1954) was an English computer scientist, mathematician, logician, cryptanalyst and theoretical biologist. He was highly influential in the development of theoretical computer science, providing a formalisation of the concepts of algorithm and computation with the Turing machine, which can be considered a model of a general purpose computer.Turing is widely considered to be the father of theoretical computer science and artificial intelligence.</text>
-</div>
-</template>
-
-<style>
- .text {
- font-size: 24;
- text-decoration: underline;
- }
-</style>
-
-<script>
- module.exports = {
- data: {
- price1: '99.99',
- price2: '88.88',
- text:''
- },
- methods: {
- showtext: function(event) {
- var textComponent = this.$el("textid");
- this.text = textComponent.attr.value;
- }
- }
- };
-</script>
-```
-
-[体验一下](http://dotwe.org/b2796940d6b9766000778c61446fcd26)
http://git-wip-us.apache.org/repos/asf/incubator-weex-site/blob/32a097bf/source/cn/v-0.10/references/components/textarea.md
----------------------------------------------------------------------
diff --git a/source/cn/v-0.10/references/components/textarea.md b/source/cn/v-0.10/references/components/textarea.md
deleted file mode 100644
index 9470173..0000000
--- a/source/cn/v-0.10/references/components/textarea.md
+++ /dev/null
@@ -1,115 +0,0 @@
----
-title: <textarea>
-type: references
-order: 2.13
-version: 0.10
----
-
-# <textarea>
-
-<span class="weex-version">v0.8+</span>
-
-`textarea` 是 Weex 内置的一个组件,用于用户交互,接受用户输入数据。 可以认为是允许多行的 `<input>`
-
-**Notes:** `<textarea>`支持 `<input>` 支持的所有的事件。
-
-## 子组件
-
-`textarea` 组件不支持子组件。
-
-## 特性
-
-- `value {string}`:组件的接收到的输入字符。
-- `placeholder {string}`:提示用户可以输入什么。 提示文本不能有回车或换行。
-- `disabled {boolean}`:表示是否支持输入。通常 `click` 事件在 `disabled` 控件上是失效的。
-- `autofocus {boolean}`:表示是否在页面加载时控件自动获得输入焦点。
-- `rows {number}`:接收 number 类型的数据,指定组件的高度,默认值是 2
-
-## 样式
-
-- text styles
- - 支持 `color`
- - 支持 `font-size`
- - 支持 `font-style`
- - 支持 `font-weight`
- - 支持 `text-align`
-
- 查看 [文本样式](../text-style.html)
-
-- 通用样式:支持所有通用样式
-
- - 盒模型
- - `flexbox` 布局
- - `position`
- - `opacity`
- - `background-color`
-
- 查看 [组件通用样式](../common-style.html)
-
-## 事件
-
-- `input`: 输入字符的值更改。
-
- 事件中 event 对象属性:
-
- - `value`: 触发事件的组件;
- - `timestamp`: 事件发生时的时间戳。
-
-- `change`: 当用户输入完成时触发。通常在 `blur` 事件之后。
-
- 事件中 event 对象属性:
-
- - `value`: 触发事件的组件;
-
- - `timestamp`: 事件发生时的时间戳。
-
-- `focus`: 组件获得输入焦点。
-
- 事件中 event 对象属性:
-
- - `timestamp`: 事件发生时的时间戳。
-
-- `blur`: 组件失去输入焦点。
-
- 事件中 event 对象属性:
-
- - `timestamp`: 事件发生时的时间戳。
-
-- 通用事件
-
- **注意:**
- 不支持 `click` 事件。 请监听 `input` 或 `change` 事件代替。
-
- 支持以下通用事件:
-
- - `longpress`
- - `appear`
- - `disappear`
-
- 查看 [通用事件](../common-event.html)
-
-## 示例
-
-```html
-<template>
- <div>
- <textarea
- class="textarea"
- autofocus="true"
- placeholder="..."
- value="我是一个多行版本的input组件">
- </textarea>
- </div>
-</template>
-<style>
- .textarea {
- margin: 20;
- border-width: 2;
- border-style: solid;
- border-color: #efefef;
- border-radius: 5;
- }
-</style>
-```
-
-[体验一下](http://dotwe.org/31d67beda847cd5b5cf7b78ff21895ba)
http://git-wip-us.apache.org/repos/asf/incubator-weex-site/blob/32a097bf/source/cn/v-0.10/references/components/video.md
----------------------------------------------------------------------
diff --git a/source/cn/v-0.10/references/components/video.md b/source/cn/v-0.10/references/components/video.md
deleted file mode 100644
index ac17c8b..0000000
--- a/source/cn/v-0.10/references/components/video.md
+++ /dev/null
@@ -1,82 +0,0 @@
----
-title: <video>
-type: references
-order: 2.14
-version: 0.10
----
-
-# <video>
-
-<span class="weex-version">v0.6.1+</span>
-
-`<video>` 组件可以让我们在 Weex 页面中嵌入视频内容。
-
-## 子组件
-
-- `<text>` 是唯一合法的子组件。
-
-### 特性
-
-- `src {string}`:内嵌的视频指向的URL
-- `play-status {string}`:可选值为 `play` | `pause`,用来控制视频的播放状态,`play` 或者 `pause`,默认值是 `pause`。
-- `auto-play {boolean}`:可选值为 `true` | `false`,当页面加载初始化完成后,用来控制视频是否立即播放,默认值是 `false`。
-
-## 样式
-
-- 通用样式:支持所有通用样式
-
- - 盒模型
- - `flexbox` 布局
- - `position`
- - `opacity`
- - `background-color`
-
- 查看 [组件通用样式](../common-style.html)
-
-## 事件
-
-- `start`:当 playback 的状态是 Playing 时触发
-- `pause`:当 playback 的状态是 Paused 时触发
-- `finish`:当 playback 的状态是 Finished 时触发
-- `fail`:当 playback 状态是 Failed 时触发
-
-## 示例
-
-```html
-<template>
- <div>
- <text>Big Eater!</text>
- <video class="video" onstart="onstart" onpause="onpause" onfinish="onfinish" onfail="onfail"
- auto-play="false" play-status="pause" src="{{src}}" style="width:750;height:500;"></video>
- <text>state: {{msg}}</text>
- </div>
-</template>
-
-<style>
-</style>
-
-<script>
- module.exports ={
- data: {
- msg: '',
- src:'http://flv2.bn.netease.com/videolib3/1611/01/XGqSL5981/SD/XGqSL5981-mobile.mp4'
- },
- methods:{
- onstart:function(e){
- this.msg = 'onstart'
- },
- onpause:function(e){
- this.msg = 'onpause'
- },
- onfinish:function(e){
- this.msg = 'onfinish'
- },
- onfail:function(e){
- this.msg = 'onfinish'
- },
- }
- }
-</script>
-```
-
-[体验一下](http://dotwe.org/d83a00bbd180bd5dc4e7f9381d39b4dd)
http://git-wip-us.apache.org/repos/asf/incubator-weex-site/blob/32a097bf/source/cn/v-0.10/references/components/web.md
----------------------------------------------------------------------
diff --git a/source/cn/v-0.10/references/components/web.md b/source/cn/v-0.10/references/components/web.md
deleted file mode 100644
index 073fb4b..0000000
--- a/source/cn/v-0.10/references/components/web.md
+++ /dev/null
@@ -1,143 +0,0 @@
----
-title: <web>
-type: references
-order: 2.15
-version: 0.10
----
-
-# <web>
-
-<span class="weex-version">v0.5+</span>
-
-使用 `<web>` 组件在 Weex 页面中嵌入一张网页内容。`src` 属性用来指定资源地址。你也可以使用 `webview module` 来控制 `web` 的行为,比如前进、后退和重载。可以在这里查看 [`webview` module](../modules/webview.html)。
-
-## 子组件
-
-不支持子组件。
-
-## 特性
-
-- `src {string}`:此特性指定嵌入的 web 页面 url。
-
-## 样式
-
-- 通用样式:不支持部分盒模型样式,支持列表如下:
-
- - `width`
-
- 组件的宽度,默认值是0。这个样式定义必须指定数值。
-
- - `height`
-
- 组件的高度,默认值是0。这个样式定义必须指定数值。
-
- - `flexbox` 布局
- - `position`
- - `opacity`
- - `background-color`
-
- 查看 [组件通用样式](../common-style.html)
-
-## 事件
-
-- `pagestart`: `<web>` 组件开始加载时发送此事件消息。
-- `pagefinish`: `<web>` 组件完成加载时发送此事件消息。
-- `error`: �如果 `<web>` 组件加载出现错误,会发送此事件消息。
-
-- 通用事件
-
- 支持以下通用事件:
- - `appear`
- - `disappear`
-
- 查看 [通用事件](../common-event.html)
-
-**注意:**
-
-不支持 `click` 事件。
-
-## 示例
-
-我们用一个简易浏览器示例,来展示如何使用 `<web>` 组件和 `webview` module。 查看 [webview module](../modules/webview.html)。
-
-```html
-<template>
- <div class="browserStyle">
- <div style="flex-direction: row">
- <input id="urlInput" type="url" autofocus="false" placeholder="input url" onchange="change" oninput="input" class="textStyle" value="https://www.baidu.com">
- </input>
- </div>
- <div style="flex-direction: row">
- <text class="buttonSytle" onclick="loadURL">LoadURL</text>
- <text class="buttonSytle" onclick="backforward">Backward</text>
- <text class="buttonSytle" onclick="forward">Forward</text>
- </div>
- <div>
- <web id="webview" src="{{src}}" class="webStyle"></web>
- </div>
- </div>
-</template>
-
-<style>
- .browserStyle {
- position: absolute;
- top: 0;
- right: 0;
- bottom: 0;
- left: 0;
- background-color:#778899 ;
- }
-
- .textStyle {
- width: 750;
- height: 50;
- background-color: #D3D3D3;
- font-size: 30;
- }
-
- .buttonSytle {
- width:200;
- height: 50;
- background-color: #D3D3D3;
- margin:10;
- padding-left: 5;
- padding-right: 5;
- font-size: 30;
- }
-
- .webStyle {
- width: 750;
- height: 800;
- background-color: #8B0000;
- }
-</style>
-
-<script>
- var web_module = require('@weex-module/webview')
-
- module.exports = {
- data: {
- src : "https://h5.m.taobao.com",
- },
-
- methods: {
- loadURL: function (e) {
- var input = this.$el("urlInput");
- this.src = input.attr.value;
- },
-
- backforward: function (e) {
- var web_element = this.$el('webview');
- web_module.goBack(web_element);
- },
-
- forward: function (e) {
- var web_element = this.$el('webview');
- web_module.goForward(web_element);
- }
- }
- }
-</script>
-```
-
-[体验一下](http://dotwe.org/84741a6befeb0f1e5ce11b47ecf1123f)
http://git-wip-us.apache.org/repos/asf/incubator-weex-site/blob/32a097bf/source/cn/v-0.10/references/gesture.md
----------------------------------------------------------------------
diff --git a/source/cn/v-0.10/references/gesture.md b/source/cn/v-0.10/references/gesture.md
deleted file mode 100644
index 4377af9..0000000
--- a/source/cn/v-0.10/references/gesture.md
+++ /dev/null
@@ -1,79 +0,0 @@
----
-title: 手势
-type: references
-order: 1.4
-version: 0.10
----
-
-# 手势
-
-*注:该功能属于实验性功能*
-
-Weex 封装了原生的触摸事件以提供手势系统。使用手势类似于在 Weex 中使用事件,只需在节点上设置 `on` 特性来监听手势即可。
-
-## 手势类型
-
-目前,仅支持以下四种手势类型:
-
-- **Touch**:当触摸到一个点,移动或从触摸面移开时触发 `touch` 手势。触摸手势很精准,它会返回所有详细的事件信息。所以,监听 `touch` 手势可能很慢,即使只移动一丁点也需要处理大量事件。有三种类型的 `touch` 手势:
-
- - `touchstart` 将在触摸到触摸面上时触发。
- - `touchmove` 将在触摸点在触摸面移动时被触发。
- - `touchend` 将在从触摸面离开时被触发。
-
-- **Pan**:`pan` 手势也会返回触摸点在触摸面的移动信息,有点类似于 `touch` 手势。但是 `pan` 手势只会采样收集部分事件信息因此比 `touch` 事件要快得多,当然精准性差于 `touch`。`pan` 也有三中类型的手势,这些手势的意义与 `touch` 完全一样:
-
- - `panstart`
- - `panmove`
- - `panend`
-
-- **Swipe**:`swipe` 将会在用户在屏幕上滑动时触发,一次连续的滑动只会触发一次 `swiper` 手势。
-- **LongPress**:`LongPress` 将会在触摸点连续保持 500 ms以上时触发。
-
-`touch` 和 `pan` 非常接近,它们的特点可以总结成这样:
-
-- **Touch**:完整信息,精准、很慢
-- **Pan**:抽样信息,很快,不够精准
-
-开发者可以根据自己的情况选择合适的手势。
-
-## 属性
-
-以下属性可以在手势的回调中使用:
-
-- `direction`:仅在 `swipe` 手势中存在,返回滑动方向,返回值可能为 `up`, `left`, `bottom`, `right`。
-- `changedTouches`:一个数组,包含了当前手势的触摸点的运动轨迹
-
-### changedTouches
-
-`changedTouches` 是一个数组,其子元素中包含以下属性:
-
-- `identifier`:触摸点的唯一标识符。
-- `pageX`:触摸点相对于文档左侧边缘的 X 轴坐标。
-- `pageY`:触摸点相对于文档顶部边缘的 Y 轴坐标。
-- `screenX`:触摸点相对于屏幕左侧边缘的 X 轴坐标。
-- `screenY`:触摸点相对于屏幕顶部边缘的 Y 轴坐标。
-
-## 约束
-
-目前,由于会触发大量事件冲突,Weex Android 还不支持在滚动类型的元素上监听手势,例如 `scroller`, `list` 和 `webview` 这三个组件。
-
-## 示例
-
-```html
-<template>
- <div ontouchstart="handleTouchstart"></div>
-</template>
-
-<script>
-module.exports = {
- methods: {
- handleTouchstart: function(eventProperties) {
- // handling with the Event Properties
- }
- }
-}
-</script>
-```
-
-如上面代码所示,一个 `touchstart` 事件会在触摸点与触摸面接触的时候触发。
http://git-wip-us.apache.org/repos/asf/incubator-weex-site/blob/32a097bf/source/cn/v-0.10/references/images/Artboard.jpg
----------------------------------------------------------------------
diff --git a/source/cn/v-0.10/references/images/Artboard.jpg b/source/cn/v-0.10/references/images/Artboard.jpg
deleted file mode 100644
index 2f6bb95..0000000
Binary files a/source/cn/v-0.10/references/images/Artboard.jpg and /dev/null differ
http://git-wip-us.apache.org/repos/asf/incubator-weex-site/blob/32a097bf/source/cn/v-0.10/references/images/coding_weex_1.jpg
----------------------------------------------------------------------
diff --git a/source/cn/v-0.10/references/images/coding_weex_1.jpg b/source/cn/v-0.10/references/images/coding_weex_1.jpg
deleted file mode 100644
index 8080578..0000000
Binary files a/source/cn/v-0.10/references/images/coding_weex_1.jpg and /dev/null differ
http://git-wip-us.apache.org/repos/asf/incubator-weex-site/blob/32a097bf/source/cn/v-0.10/references/images/css-boxmodel.png
----------------------------------------------------------------------
diff --git a/source/cn/v-0.10/references/images/css-boxmodel.png b/source/cn/v-0.10/references/images/css-boxmodel.png
deleted file mode 100644
index a2063e2..0000000
Binary files a/source/cn/v-0.10/references/images/css-boxmodel.png and /dev/null differ
http://git-wip-us.apache.org/repos/asf/incubator-weex-site/blob/32a097bf/source/cn/v-0.10/references/images/css-flexbox-align.jpg
----------------------------------------------------------------------
diff --git a/source/cn/v-0.10/references/images/css-flexbox-align.jpg b/source/cn/v-0.10/references/images/css-flexbox-align.jpg
deleted file mode 100644
index 8a7f731..0000000
Binary files a/source/cn/v-0.10/references/images/css-flexbox-align.jpg and /dev/null differ
http://git-wip-us.apache.org/repos/asf/incubator-weex-site/blob/32a097bf/source/cn/v-0.10/references/images/css-flexbox-justify.svg
----------------------------------------------------------------------
diff --git a/source/cn/v-0.10/references/images/css-flexbox-justify.svg b/source/cn/v-0.10/references/images/css-flexbox-justify.svg
deleted file mode 100644
index 33e742b..0000000
--- a/source/cn/v-0.10/references/images/css-flexbox-justify.svg
+++ /dev/null
@@ -1,59 +0,0 @@
-<svg xmlns="http://www.w3.org/2000/svg" width='504' height='270' viewBox="0 0 504 270">
- <defs>
- <pattern id='checker' width='20' height='20' patternUnits='userSpaceOnUse'>
- <rect x='0' y='0' width='10' height='10' fill='#eee' />
- <rect x='10' y='10' width='10' height='10' fill='#eee' />
- <rect x='0' y='10' width='10' height='10' fill='#ccc' />
- <rect x='10' y='0' width='10' height='10' fill='#ccc' />
- </pattern>
- </defs>
- <style>
- text { font-family: sans-serif; font-weight: bold; font-size: 30px; text-anchor: middle; }
- rect { stroke-width: 2px; stroke: #888; }
- g > rect:nth-child(1) { fill: #888 }
- g > rect:nth-child(2) { fill: #fcc; }
- g > rect:nth-child(3) { fill: #cfc; }
- g > rect:nth-child(4) { fill: #ccf; }
- g > rect:nth-child(5) { fill: transparent; }
- </style>
- <g transform="translate(2,2)">
- <rect x='0' y='0' width='500' height='50' />
- <rect x='0' y='0' width='100' height='50' />
- <rect x='100' y='0' width='80' height='50' />
- <rect x='180' y='0' width='200' height='50' />
- <rect x='0' y='0' width='500' height='50' />
- <text x='250' y='38'>flex-start</text>
- </g>
- <g transform="translate(2,56)">
- <rect x='0' y='0' width='500' height='50' />
- <rect x='120' y='0' width='100' height='50' />
- <rect x='220' y='0' width='80' height='50' />
- <rect x='300' y='0' width='200' height='50' />
- <rect x='0' y='0' width='500' height='50' />
- <text x='250' y='38'>flex-end</text>
- </g>
- <g transform="translate(2,110)">
- <rect x='0' y='0' width='500' height='50' />
- <rect x='60' y='0' width='100' height='50' />
- <rect x='160' y='0' width='80' height='50' />
- <rect x='240' y='0' width='200' height='50' />
- <rect x='0' y='0' width='500' height='50' />
- <text x='250' y='38'>center</text>
- </g>
- <g transform="translate(2,164)">
- <rect x='0' y='0' width='500' height='50' />
- <rect x='0' y='0' width='100' height='50' />
- <rect x='160' y='0' width='80' height='50' />
- <rect x='300' y='0' width='200' height='50' />
- <rect x='0' y='0' width='500' height='50' />
- <text x='250' y='38'>space-between</text>
- </g>
- <g transform="translate(2,218)">
- <rect x='0' y='0' width='500' height='50' />
- <rect x='20' y='0' width='100' height='50' />
- <rect x='160' y='0' width='80' height='50' />
- <rect x='280' y='0' width='200' height='50' />
- <rect x='0' y='0' width='500' height='50' />
- <text x='250' y='38'>space-around</text>
- </g>
-</svg>
\ No newline at end of file
http://git-wip-us.apache.org/repos/asf/incubator-weex-site/blob/32a097bf/source/cn/v-0.10/references/images/div_1.jpg
----------------------------------------------------------------------
diff --git a/source/cn/v-0.10/references/images/div_1.jpg b/source/cn/v-0.10/references/images/div_1.jpg
deleted file mode 100644
index 3c89773..0000000
Binary files a/source/cn/v-0.10/references/images/div_1.jpg and /dev/null differ
http://git-wip-us.apache.org/repos/asf/incubator-weex-site/blob/32a097bf/source/cn/v-0.10/references/images/div_2.jpg
----------------------------------------------------------------------
diff --git a/source/cn/v-0.10/references/images/div_2.jpg b/source/cn/v-0.10/references/images/div_2.jpg
deleted file mode 100644
index 67395bb..0000000
Binary files a/source/cn/v-0.10/references/images/div_2.jpg and /dev/null differ
http://git-wip-us.apache.org/repos/asf/incubator-weex-site/blob/32a097bf/source/cn/v-0.10/references/images/div_3.jpg
----------------------------------------------------------------------
diff --git a/source/cn/v-0.10/references/images/div_3.jpg b/source/cn/v-0.10/references/images/div_3.jpg
deleted file mode 100644
index b10f69e..0000000
Binary files a/source/cn/v-0.10/references/images/div_3.jpg and /dev/null differ
http://git-wip-us.apache.org/repos/asf/incubator-weex-site/blob/32a097bf/source/cn/v-0.10/references/images/div_4.jpg
----------------------------------------------------------------------
diff --git a/source/cn/v-0.10/references/images/div_4.jpg b/source/cn/v-0.10/references/images/div_4.jpg
deleted file mode 100644
index acc2518..0000000
Binary files a/source/cn/v-0.10/references/images/div_4.jpg and /dev/null differ
http://git-wip-us.apache.org/repos/asf/incubator-weex-site/blob/32a097bf/source/cn/v-0.10/references/images/image_1.jpg
----------------------------------------------------------------------
diff --git a/source/cn/v-0.10/references/images/image_1.jpg b/source/cn/v-0.10/references/images/image_1.jpg
deleted file mode 100644
index b87de15..0000000
Binary files a/source/cn/v-0.10/references/images/image_1.jpg and /dev/null differ
http://git-wip-us.apache.org/repos/asf/incubator-weex-site/blob/32a097bf/source/cn/v-0.10/references/images/image_2.jpg
----------------------------------------------------------------------
diff --git a/source/cn/v-0.10/references/images/image_2.jpg b/source/cn/v-0.10/references/images/image_2.jpg
deleted file mode 100644
index 598a242..0000000
Binary files a/source/cn/v-0.10/references/images/image_2.jpg and /dev/null differ
http://git-wip-us.apache.org/repos/asf/incubator-weex-site/blob/32a097bf/source/cn/v-0.10/references/images/list_2.jpg
----------------------------------------------------------------------
diff --git a/source/cn/v-0.10/references/images/list_2.jpg b/source/cn/v-0.10/references/images/list_2.jpg
deleted file mode 100644
index 8c2cc55..0000000
Binary files a/source/cn/v-0.10/references/images/list_2.jpg and /dev/null differ
http://git-wip-us.apache.org/repos/asf/incubator-weex-site/blob/32a097bf/source/cn/v-0.10/references/images/list_3.jpg
----------------------------------------------------------------------
diff --git a/source/cn/v-0.10/references/images/list_3.jpg b/source/cn/v-0.10/references/images/list_3.jpg
deleted file mode 100644
index f2968c7..0000000
Binary files a/source/cn/v-0.10/references/images/list_3.jpg and /dev/null differ
http://git-wip-us.apache.org/repos/asf/incubator-weex-site/blob/32a097bf/source/cn/v-0.10/references/images/list_4.jpg
----------------------------------------------------------------------
diff --git a/source/cn/v-0.10/references/images/list_4.jpg b/source/cn/v-0.10/references/images/list_4.jpg
deleted file mode 100644
index 0123171..0000000
Binary files a/source/cn/v-0.10/references/images/list_4.jpg and /dev/null differ
http://git-wip-us.apache.org/repos/asf/incubator-weex-site/blob/32a097bf/source/cn/v-0.10/references/images/nav.jpg
----------------------------------------------------------------------
diff --git a/source/cn/v-0.10/references/images/nav.jpg b/source/cn/v-0.10/references/images/nav.jpg
deleted file mode 100644
index 8c6ed03..0000000
Binary files a/source/cn/v-0.10/references/images/nav.jpg and /dev/null differ
http://git-wip-us.apache.org/repos/asf/incubator-weex-site/blob/32a097bf/source/cn/v-0.10/references/images/scroller_1.jpg
----------------------------------------------------------------------
diff --git a/source/cn/v-0.10/references/images/scroller_1.jpg b/source/cn/v-0.10/references/images/scroller_1.jpg
deleted file mode 100644
index 3e995cb..0000000
Binary files a/source/cn/v-0.10/references/images/scroller_1.jpg and /dev/null differ
http://git-wip-us.apache.org/repos/asf/incubator-weex-site/blob/32a097bf/source/cn/v-0.10/references/images/style_1.jpg
----------------------------------------------------------------------
diff --git a/source/cn/v-0.10/references/images/style_1.jpg b/source/cn/v-0.10/references/images/style_1.jpg
deleted file mode 100644
index 2482710..0000000
Binary files a/source/cn/v-0.10/references/images/style_1.jpg and /dev/null differ
http://git-wip-us.apache.org/repos/asf/incubator-weex-site/blob/32a097bf/source/cn/v-0.10/references/images/style_2.jpg
----------------------------------------------------------------------
diff --git a/source/cn/v-0.10/references/images/style_2.jpg b/source/cn/v-0.10/references/images/style_2.jpg
deleted file mode 100644
index 6b6f2e1..0000000
Binary files a/source/cn/v-0.10/references/images/style_2.jpg and /dev/null differ
http://git-wip-us.apache.org/repos/asf/incubator-weex-site/blob/32a097bf/source/cn/v-0.10/references/index.md
----------------------------------------------------------------------
diff --git a/source/cn/v-0.10/references/index.md b/source/cn/v-0.10/references/index.md
deleted file mode 100644
index 644c16f..0000000
--- a/source/cn/v-0.10/references/index.md
+++ /dev/null
@@ -1,46 +0,0 @@
----
-title: Bootstrap
-type: references
-order: 1
-has_chapter_content: false
-chapter_title: 通用选项
-version: 0.10
----
-
-# Bootstrap
-
-除了其默认的意义,`<script>`标签支持在页面的顶级组件中通过 `type` 属性定义两种配置。
-- `type="data"`: 配置初始化数据,这里定义的数据会覆盖定义在`<script>`中的数据;
-- `type="config"`: 定义配置项。
-
-``` html
-<script type="data">
- /* (可选) 定义初始化数据 */
-</script>
-
-<script type="config">
- /* (可选) 定义配置项 */
-</script>
-
-```
-## 定义初始化数据
-
-有时,很难在默认的`<script>`标签中维护巨大的数据结构。所以 Weex 允许我们通过 `<script type="data">` 标签定义初始化数据。在这里定义的数据将完全取代默认的 `<script>` 标签中定义的数据。
-
-例如:
-
-```html
-<script type="data">
- module.exports = {
- title: 'Alibaba',
- date: new Date().toLocaleString()
- }
-</script>
-```
-## 配置项
-
-Weex 也允许我们通过 `<script type="config">` 定义一些配置项,目前,仅只支持配置 `downgrade`。
-- `downgrade.osVersion`
-- `downgrade.appVersion`
-- `downgrade.weexVersion`
-- `downgrade.deviceModel`
http://git-wip-us.apache.org/repos/asf/incubator-weex-site/blob/32a097bf/source/cn/v-0.10/references/modules/animation.md
----------------------------------------------------------------------
diff --git a/source/cn/v-0.10/references/modules/animation.md b/source/cn/v-0.10/references/modules/animation.md
deleted file mode 100644
index 821bfac..0000000
--- a/source/cn/v-0.10/references/modules/animation.md
+++ /dev/null
@@ -1,90 +0,0 @@
----
-title: animation
-type: references
-order: 4.1
-version: 0.10
----
-
-# `animation` 动画
-
-流畅且有意义的动画是一个十分有效的提升移动应用用户体验的手段,`animation` 模块被用于在组件上执行动画。动画可以对组件执行一系列简单的变换 (位置、大小、旋转角度、背景颜色和不透明度)。举个例子,如果有一个 `<image>` 组件,通过动画你可以对其进行移动、旋转、拉伸或收缩等动作。
-
-## 示例
-
-```html
-<template>
- <div>
- <div id="test" class="test" onclick="run"></div>
- </div>
-</template>
-<style>
- .test { background-color: #6666ff; width: 200; height: 200; }
-</style>
-<script>
- var animation = require('@weex-module/animation')
- module.exports = {
- methods: {
- run: function () {
- var testEl = this.$el('test')
- animation.transition(testEl, {
- styles: {
- backgroundColor: '#FF0000',
- transform: 'translate(100px, 100px)'
- },
- duration: 0, //ms
- timingFunction: 'ease',
- 'transform-origin': 'center center',
- delay: 0 //ms
- }, function () {
- console.log('animation finished.')
- })
- }
- }
- }
-</script>
-```
-
-[体验一下](http://dotwe.org/2ae04d3a7017a2ec748cf40905fcd98c)
-
-## API
-
-### `transition(el, options, callback)`
-
-[example](http://dotwe.org/a034a49b5863da099843eb9a0eea9f93)
-
-#### 参数
-
-* `el {Element}`:将要执行动画的元素,通常可以通过调用 [`this.$el(id)`](../api.html) 来获取元素的引用。
-* `options {Object}`:描述动画过程的对象。
- * `options.duration {number}`:指定动画的持续时间 (单位是毫秒),默认值是 `0`,表示没有动画效果。
- * `options.delay {number}`:指定请求动画操作到执行动画之间的时间间隔 (单位是毫秒),默认值是 `0`,表示没有延迟,在请求后立即执行动画。
- * `options.timingFunction {string}`:描述动画执行的速度曲线,用于使动画变化更为平滑。默认值是 `linear`,表示动画从开始到结束都拥有同样的速度。下表列出了所有合法的属性:
-
-| 属性名 | 描述 | 示例 |
-| ---- | ---- | ---- |
-| `linear` | 动画从头到尾的速度是相同的 | [example](http://dotwe.org/70e0c243ffde30abd8fd353f8c6d1d9a) |
-| `ease-in` | 动画速度由慢到快 | [example](http://dotwe.org/23b104f833039f263957481f2e2c40c9) |
-| `ease-out` | 动画速度由快到慢 | [example](http://dotwe.org/04dab95e073a2c3a808e6b01fc20e996) |
-| `ease-in-out` | 动画先加速到达中间点后减速到达终点 | [example](http://dotwe.org/fc37ec17d215e786ce336a00457489e3) |
-| `cubic-bezier(x1, y1, x2, y2)` | 在三次贝塞尔函数中定义变化过程,函数的参数值必须处于 0 到 1 之间。更多关于三次贝塞尔的信息请参阅 [cubic-bezier](http://cubic-bezier.com/) 和 [Bézier curve](https://en.wikipedia.org/wiki/B%C3%A9zier_curve). | [example](http://weex.alibaba-inc.com/playground/95d8f15d0014c31d3a1d15728313f2a5) |
-
-* `options.styles {Object}`:设置不同样式过渡效果的键值对,下表列出了所有合法的参数:
-
-| 参数名 | 描述 | 值类型 | 默认值 | 示例 |
-| ---- | ---- | ---- | ---- |---- |
-| width | 动画执行后应用到组件上的宽度值 | length | 无 | [example](http://dotwe.org/b599d273f996cfdcbeca7bd5c828ca90) |
-| height | 动画执行后应用到组件上的高度值 | length | 无 | [example](http://dotwe.org/d0b1ccadf386ba00960d0c8340c682e5) |
-| backgroundColor | 动画执行后应用到组件上的背景颜色 | string | none | [example](http://dotwe.org/f4616ee18f6042b63a8fdcd2816b1712) |
-| opacity | 动画执行后应用到组件上的不透明度值 | 介于 0 到 1 间的数值 | `1` | [example](http://dotwe.org/f94394173301db83ae6e66d1330a0d0b) |
-| transformOrigin | 定义变化过程的中心点. 参数 `x-aris` 可能的值为 `left`、`center`、`right`、长度值或百分比值, 参数 `y-axis` 可能的值为 `top`、`center`、`bottom`、长度值或百分比值 | `x-axis y-axis` | `center center` | [example](http://dotwe.org/de43f5a47de230dd531797458bf7fd3c) |
-| transform | 定义应用在元素上的变换类型,支持下表列出的属性 | object | 无 | [example](http://dotwe.org/6766dab0589f7831d4bb6030f4226996) |
-
-`transform`属性的合法值:
-
-| 名称 | 描述 | 值类型 | 默认值 | 示例 |
-| ---- | ---- | ---- | ---- | ---- |
-| `translate`/`translateX`/`translateY` | 指定元素将已被移动到的新位置 | 像素值或百分比 | 无 | [example](http://dotwe.org/6638e66e296723bbef3e59c83b2b5003) |
-| `rotate` | 指定元素将被旋转的角度,单位是度 | number | 无 | [example](http://dotwe.org/ba9e9920594d9388744b2bd0d1b7695d) |
-| `scale`/`scaleX`/`scaleY` | 按比例放大或缩小元素 | number | 无 | [example](http://dotwe.org/14b42dde6583ab222bd2b7ed08f241c8) |
-
-* `callback {Function}`:动画执行完毕之后的回调
http://git-wip-us.apache.org/repos/asf/incubator-weex-site/blob/32a097bf/source/cn/v-0.10/references/modules/clipboard.md
----------------------------------------------------------------------
diff --git a/source/cn/v-0.10/references/modules/clipboard.md b/source/cn/v-0.10/references/modules/clipboard.md
deleted file mode 100644
index f4525f2..0000000
--- a/source/cn/v-0.10/references/modules/clipboard.md
+++ /dev/null
@@ -1,112 +0,0 @@
----
-title: clipboard
-type: references
-order: 4.2
-version: 0.10
----
-
-# `clipboard` 剪切板
-<span class="weex-version">v0.8+</span>
-
-我们可以通过 `clipboard` 模块的 `getString()`、`setString()` 接口从系统的粘贴板获取内容或者设置内容。
-
-以前当我们收到一条短信验证码信息时,除了人肉拷贝,我们无法获取拷贝短信的内容。这是非常苦恼的。但是现在我们可以通过简单的调用 `clipboard.getString()` 接口来获取短信内容了。
-
-## 示例
-
-```html
-<template>
- <div>
- <div class="div">
- <text class="text" onclick="onItemClick">hello {{message}}</text>
- </div>
- <div class="div">
- <text class="text" onclick="setContent">click me to set: {{tobecopied}}</text>
- </div>
- </div>
-</template>
-
-<script>
- var clipboard = require('@weex-module/clipboard');
- module.exports ={
- data:{
- tobecopied:'yay!',
- message:"nothing."
- },
- methods:{
- setContent:function(e){
- clipboard.setString(this.tobecopied);
- },
- onItemClick:function(e){
- this.message='clicked! ';
- clipboard.getString(function(ret) {
- this.message = 'text from clipboard:'+ ret;
- }.bind(this));
- }
- }
- }
-</script>
-
-<style>
- .div {
- flex-direction: row;
- justify-content: space-between;
- align-items: center;
- width: 750;
- height: 90;
- padding-left:30;
- padding-right:30;
-
- border-bottom-width: 1;
- border-style: solid;
- border-color: #dddddd;
- }
- .text {
- width: 750;
- height: 90;
- }
-</style>
-```
-
-[体验一下](http://dotwe.org/b6a9d613462d85dce56f81085b094dfa)
-
-**注意**
-
-* 仅支持文本拷贝
-* 出于安全考虑和平台限制,只支持 Android 和 iOS,不支持 html5。
-
-## API
-
-### `getString(callback)`
-
-从系统粘贴板读取内容。
-
-#### 参数
-
-* `callback {function (ret)}`:执行完读取操作后的回调函数。`ret {Object}` 为 `callback` 函数的参数,有两个属性:
- - `ret.data`:获取到的文本内容;
- - `ret.result`:返回状态,可能为 `success` 或 `fail`。
-
-#### 示例
-
-```javascript
-var clipboard = require('@weex-module/clipboard');
-clipboard.getString(function(ret) {
- console.log("text from clipboard: " + ret.data);
-});
-```
-
-### `setString(text)`
-
-将一段文本复制到剪切板,相当于手动复制文本。
-
-#### 参数
-
-* `text {string}`:要复制到剪切板的字符串。
-
-#### 示例
-
-```javascript
-var clipboard = require('@weex-module/clipboard');
-clipboard.setString("SomeStringHere");
-```
http://git-wip-us.apache.org/repos/asf/incubator-weex-site/blob/32a097bf/source/cn/v-0.10/references/modules/dom.md
----------------------------------------------------------------------
diff --git a/source/cn/v-0.10/references/modules/dom.md b/source/cn/v-0.10/references/modules/dom.md
deleted file mode 100644
index 270ec2b..0000000
--- a/source/cn/v-0.10/references/modules/dom.md
+++ /dev/null
@@ -1,79 +0,0 @@
----
-title: dom
-type: references
-order: 4.3
-version: 0.10
----
-
-# dom
-
-包含如下可以更新 dom 树的 dom API。
-
-这部分API是通过把 virtual-dom 的消息发送到 native 渲染器来做到的。
-
-开发者在日常开发中,唯一可在 `.we` 文件中使用的是 `scrollToElement`。
-~~你也可以调用 `$scrollTo` 方法来使用它~~
-
-这个页面提及的其他的 API,只在 `callNative` 进程中的 native 渲染器用。
-(关于 `callNative` 进程的进一步介绍,可以在 [How it works](../../advanced/how-it-works.html)中的 JS Framework 部分看到 )
-
-## API
-### scrollToElement(node, options)
-
-让页面滚动到那个对应的节点,这个API只能在 `<scroller>` 和 `<list>` 组件中用。
-
-~~这个API也能通过调用VM的方法 `$scrollTo` 来使用(已弃用)~~
-
-要在你的 `.we` 文件中使用这个 API,可以使用 `require('@weex-module/dom').scrollToElement`。
-
-#### 参数
-- `node {Node}`:你要滚动到的那个节点
-- `options {Object}`:如下选项
- - `offset {number}`:一个到其可见位置的偏移距离,默认是 `0`
-
-#### 示例
-
-```html
-<template>
- <scroller>
- <div class="row" repeat="item in rows" id="item-{{$index}}">
- <text class="item-title">row {{item.id}}</text>
- </div>
- <div onclick="go" style="width: 750;height: 50; position: fixed; left: 0; right: 0; bottom: 0; background-color: #eeeeee;">
- <text style="text-align: center;">
- Go to 50th line.
- </text>
- </div>
- </scroller>
-</template>
-
-<script>
-var dom = require('@weex-module/dom')
-
-module.exports = {
- data: {
- rows: []
- },
- created: function () {
- for (var i = 0; i < 100; i++) {
- this.rows.push({
- id: i
- })
- }
- },
- methods: {
- go: function () {
- var el = this.$el('item-49')
-
- dom.scrollToElement(el, {
- offset: 0
- })
- }
- }
-}
-</script>
-```
-
-## 其他
-
-dom 还有一些底层接口用于创建 Weex 实例时调用,比如 `createBody`、`updateAttrs` 等,但并未开放供外部使用。
http://git-wip-us.apache.org/repos/asf/incubator-weex-site/blob/32a097bf/source/cn/v-0.10/references/modules/globalevent.md
----------------------------------------------------------------------
diff --git a/source/cn/v-0.10/references/modules/globalevent.md b/source/cn/v-0.10/references/modules/globalevent.md
deleted file mode 100644
index 9a04dc0..0000000
--- a/source/cn/v-0.10/references/modules/globalevent.md
+++ /dev/null
@@ -1,87 +0,0 @@
----
-title: globalEvent
-type: references
-order: 4.9
-version: 0.10
----
-
-# 全局事件
-<span class="weex-version">0.8 (开发中)</span>
-
-`globalEvent` 用于监听持久性事件,例如定位信息,陀螺仪等的变化。全局事件是需要额外 APIs 处理的次要 API。你能通过 `addEventListener` 注册事件监听,当你不再需要的时候,也可以通过 `removeEventListener` 取消事件监听。
-
-*提醒*
-
-- 这是一个实例级别的事件,而非应用级别。
-
-## 如何让你的模块支持全局事件
-
-API 开发完成后,当需要发送事件时,需要通过以下方法:
-
-```javascript
-/**
- *
- * @param eventName eventName
- * @param params event params
- */
-instance.fireGlobalEventCallback(eventName,params);
-```
-
-如何在 weex-html5 组件或模块中分发全局事件?只需在文档元素上分派事件:
-
-```javascript
-var evt = new Event('some-type')
-evt.data = { foo: 'bar' }
-document.dispatchEvent(evt)
-```
-
-**示例**
-
-### Android
-
-```java
-Map<String,Object> params=new HashMap<>();
-params.put("key","value");
-mWXSDKInstance.fireGlobalEventCallback("geolocation",params);
-```
-
-### iOS
-
-```object-c
-[weexInstance fireGlobalEvent:@"geolocation" params:@{@"key":@"value"}];
-```
-
-## API
-
-### `addEventListener(String eventName, String callback)`
-
-注册全局事件。
-
-#### 参数
-
-- `eventName {string}`:需要监听的事件名称。
-- `callback {Function}`:触发事件后的回调函数。
-
-#### 示例
-
-```javascript
-var globalEvent = require('@weex-module/globalEvent');
-globalEvent.addEventListener("geolocation", function (e) {
- console.log("get geolocation")
-});
-```
-
-### `removeEventListener(String eventName)`
-
-取消事件监听。
-
-#### 参数
-
-- `eventName {string}`:需要取消的事件名称。
-
-#### 示例
-
-```javascript
-var globalEvent = require('@weex-module/globalEvent');
-globalEvent.removeEventListener("geolocation");
-```
http://git-wip-us.apache.org/repos/asf/incubator-weex-site/blob/32a097bf/source/cn/v-0.10/references/modules/index.md
----------------------------------------------------------------------
diff --git a/source/cn/v-0.10/references/modules/index.md b/source/cn/v-0.10/references/modules/index.md
deleted file mode 100644
index c76e401..0000000
--- a/source/cn/v-0.10/references/modules/index.md
+++ /dev/null
@@ -1,20 +0,0 @@
----
-title: 内建模块
-type: references
-order: 4
-has_chapter_content: true
-version: 0.10
----
-
-# 内建模块
-
-## 如何使用
-
-你可以简单的通过类似 `require('@weex-module/name')` 这样的语法获取一个模块的 API,比如:
-
-```javascript
-var dom = require('@weex-module/dom')
-dom.scrollToElement(this.$el('someIdForElement'), {
- offset: 0
-})
-```
http://git-wip-us.apache.org/repos/asf/incubator-weex-site/blob/32a097bf/source/cn/v-0.10/references/modules/modal.md
----------------------------------------------------------------------
diff --git a/source/cn/v-0.10/references/modules/modal.md b/source/cn/v-0.10/references/modules/modal.md
deleted file mode 100644
index 3e652a8..0000000
--- a/source/cn/v-0.10/references/modules/modal.md
+++ /dev/null
@@ -1,196 +0,0 @@
----
-title: modal
-type: references
-order: 4.4
-version: 0.10
----
-
-# `modal` 模态
-
-`modal` 模块提供了以下展示消息框的 API:`toast`、`alert`、`confirm` 和 `prompt`。
-
-## API
-
-### `toast(options)`
-
-`toast()` 会在一个小浮层里展示关于某个操作的简单反馈。例如,在邮件发送前离开邮编编辑界面,可以触发一个“草稿已保存”的 toast,告知用户以后可以继续编辑。toast 会在显示一段时间之后自动消失。
-
-#### 参数
-
-- `options {Object}`:相关选项
- - `message {string}`:展示的内容
- - `duration {number}`:展示的持续时间(以秒为单位)
-
-#### 示例
-
-```html
-<template>
- <div style="height: 200px; width: 400px; background-color: #00bfff;
- justify-content: center; align-items: center" onclick="{{perform}}">
- <text style="font-size: 60px; color: #ffffff">Toast</text>
- </div>
-</template>
-
-<script>
- module.exports = {
- methods: {
- perform: function () {
- var modal = require('@weex-module/modal');
- modal.toast({
- 'message': 'I am a toast',
- 'duration': 3
- });
- }
- }
- }
-</script>
-```
-
-[体验一下](http://dotwe.org/a1b8699c49d1cbb3d0de66c1c5175387)
-
-### `alert(options, callback)`
-
-警告框经常用于确保用户可以得到某些信息。当警告框出现后,用户需要点击确定按钮才能继续进行操作。
-
-#### 参数
-
-- `options {Object}`:alert选项
- - `message {string}`:警告框内显示的文字信息
- - `okTitle {string}`:确定按钮上显示的文字信息,默认是“OK”
- - `callback {Function}`:用户操作完成后的回调
-
-#### 示例
-
-```html
-<template>
- <div>
- <div style="height: 200px; width: 400px; background-color: #00bfff;
- justify-content: center; align-items: center" onclick="{{perform}}">
- <text style="font-size: 60px; color: #ffffff">Alert</text>
- </div>
- <text>{{params}}</text>
- </div>
-</template>
-
-<script>
- module.exports = {
- data: {
- params: ''
- },
- methods: {
- perform: function () {
- var modal = require('@weex-module/modal');
- var self = this;
- modal.alert({
- 'message': 'I am alert message',
- 'okTitle': 'YES'
- }, function (result) {
- self.params = String(result)
- });
- }
- }
- }
-</script>
-```
-
-[体验一下](http://dotwe.org/18e2a4bdff4d2f7db865c11eadfcd13e)
-
-### `confirm(options, callback)`
-
-确认框用于使用户可以验证或者接受某些信息。当确认框出现后,用户需要点击确定或者取消按钮才能继续进行操作。
-
-#### 参数
-
-- `options {object}`:confirm 选项
- - `message {string}`:确认框内显示的文字信息
- - `okTitle {string}`:确认按钮上显示的文字信息,默认是 `OK`
- - `cancelTitle {string}`:取消按钮上显示的文字信息,默认是 `Cancel`
-- `callback {function (result)}`:用户操作完成后的回调,回调函数的参数 `result` 是确定按钮上的文字信息字符串
-
-#### 示例
-
-```html
-<template>
- <div>
- <div style="height: 200px; width: 400px; background-color: #00bfff;
- justify-content: center; align-items: center" onclick="{{perform}}">
- <text style="font-size: 60px; color: #ffffff">Confirm</text>
- </div>
- <text>{{params}}</text>
- </div>
-</template>
-
-<script>
- module.exports = {
- data: {
- params: ''
- },
- methods: {
- perform: function () {
- var modal = require('@weex-module/modal');
- var self = this;
- modal.confirm({
- 'message': 'I have read and accept the terms.',
- 'okTitle': 'YES',
- 'cancelTitle': 'NO'
- }, function (e) {
- self.params = String(e)
- });
- }
- }
- }
-</script>
-```
-
-[体验一下](http://dotwe.org/3534b9d5eac99045015d97b20af22c27)
-
-### `prompt(options, callback)`
-
-提示框经常用于提示用户在进入页面前输入某个值。当提示框出现后,用户需要输入某个值,然后点击确认或取消按钮才能继续操作。
-
-#### 参数
-
-- `options {object}`:prompt 选项
- - `message {string}`:提示框内要显示的文字信息
- - `okTitle {string}`:确认按钮上显示的文字信息,默认是 `OK`
- - `cancelTitle {string}`:取消按钮上显示的文字信息,默认是 `Cancel`
-- `callback {function (ret)}`:用户操作完成后的回调,回调函数的参数 `ret` 格式形如 `{ result: 'OK', data: 'hello world' }`,如下
- - `result {string}`:用户按下的按钮上的文字信息
- - `data {string}`:用户输入的文字信息
-
-### 示例
-
-```html
-<template>
- <div>
- <div style="height: 200px; width: 400px; background-color: #00bfff;
- justify-content: center; align-items: center" onclick="{{perform}}">
- <text style="font-size: 60px; color: #ffffff">Prompt</text>
- </div>
- <text>{{params}}</text>
- </div>
-</template>
-
-<script>
- module.exports = {
- data: {
- params: ''
- },
- methods: {
- perform: function () {
- var modal = require('@weex-module/modal');
- var self = this;
- modal.prompt({
- 'message': 'I am a prompt',
- 'okTitle': 'YES',
- 'cancelTitle': 'NO'
- }, function (e) {
- self.params = JSON.stringify(e)
- });
- }
- }
- }
-</script>
-```
-
-[体验一下](http://dotwe.org/9f089100f5808dbc55ef4872a2c0c77b)
http://git-wip-us.apache.org/repos/asf/incubator-weex-site/blob/32a097bf/source/cn/v-0.10/references/modules/navigator.md
----------------------------------------------------------------------
diff --git a/source/cn/v-0.10/references/modules/navigator.md b/source/cn/v-0.10/references/modules/navigator.md
deleted file mode 100644
index fdd4e76..0000000
--- a/source/cn/v-0.10/references/modules/navigator.md
+++ /dev/null
@@ -1,110 +0,0 @@
----
-title: navigator
-type: references
-order: 4.5
-version: 0.10
----
-
-# `navigator` 导航控制
-<span class="weex-version">v0.6.1+</span>
-
-众所周知,在浏览器里,我们可以通过前进或者回退按钮来切换页面,iOS/Android 的 `navigator` 模块就是用来实现类似的效果的。除了前进、回退功能,该模块还允许我们指定在切换页面的时候是否应用动画效果。
-
-## 示例
-
-```html
-<template>
- <div class="div">
- <text class="text" onclick="onItemClick">click me! {{message}}</text>
- </div>
-</template>
-
-<script>
- var navigator = require('@weex-module/navigator')
- var nextUrl = 'http://dotwe.org/raw/dist/6cd1703a45d7b2752cf05303069ce881.js'
- module.exports ={
- data:{
- message:''
- },
- methods:{
- onItemClick:function(e){
- var params = {'url':nextUrl,'animated':'true'}
- navigator.push(params, function(e) {
- console.log('i am the callback.')
- });
- }
- }
- }
-</script>
-<style>
- .div {
- flex-direction: row;
- justify-content: space-between;
- align-items: center;
- width: 750;
- height: 90;
- padding-left:30;
- padding-right:30;
-
- border-bottom-width: 1;
- border-style: solid;
- border-color: #dddddd;
- }
- .text{
- width: 750;
- height: 90;
- }
-</style>
-```
-
-[体验一下](http://dotwe.org/dba03a1660e6242778fd19d3d8f5944b)
-
-## API
-
-### `push(options, callback)`
-
-把一个weex页面URL压入导航堆栈中,可指定在页面跳转时是否需要动画,以及操作完成后需要执行的回调函数
-
-#### 参数
-
-* `options {Object}`:选项参数
- * `url {stirng}`:要压入的 Weex 页面的 URL
- * `animated {string}`:`"true"` 示意为页面压入时需要动画效果,`"false"` 则不需要,默认值为 `"true"`
-* `callback {Function}`:执行完该操作后的回调函数
-
-#### 示例
-
-```javascript
-var navigator = require('@weex-module/navigator')
-var params = {
- url: 'navigator-demo.js',
- animated: 'true'
-}
-navigator.push(params, function () {
- // callback
-})
-```
-
-### `pop(options, callback)`
-
-把一个 Weex 页面 URL 弹出导航堆栈中,可指定在页面弹出时是否需要动画,以及操作完成后需要执行的回调函数。
-
-#### 参数
-
-* `options {object}`:选项参数对象
- * `animated {string}`:`"true"` 示意为弹出页面时需要动画效果,`"false"` 则不需要,默认值为 `"true"`
-* `callback {function}`:执行完该操作后的回调函数
-
-#### 示例
-
-```javascript
-var navigator = require('@weex-module/navigator')
-var params = {
- animated: 'true'
-}
-navigator.pop(params, function () {
- // callback
-})
-```
-
-*注意事项:`animated` 二级参数目前仅支持字符串的 `"true"` 和 `"false"`,传入布尔值类型会导致程序崩溃,未来版本会修复这个问题*
[41/51] [abbrv] incubator-weex-site git commit: update file structure
and fix responsive styles
Posted by ha...@apache.org.
http://git-wip-us.apache.org/repos/asf/incubator-weex-site/blob/12e3a8bc/_draft/web-standards.en.md
----------------------------------------------------------------------
diff --git a/_draft/web-standards.en.md b/_draft/web-standards.en.md
deleted file mode 100644
index 906ff76..0000000
--- a/_draft/web-standards.en.md
+++ /dev/null
@@ -1,584 +0,0 @@
----
-title: Web standards
-type: references
-order: 8
-version: 2.1
-has_chapter_content: true
----
-
-# Web standards
-
-## HTML
-
-refs: https://www.advancedwebranking.com/html/ 2016-12-11
-
-### Overview
-
-| percentage | name | supported |
-| ---- | ---- | ---- |
-| 98.1% | `<head>` | - |
-| 97.9% | `<body>` | - |
-| 97.9% | `<html>` | - |
-| 97% | `<title>` | - |
-| 93.9% | `<meta>` | - |
-| 89.9% | `<div>` | ✓ |
-| 89.6% | `<a>` | ✓ |
-| 88.5% | `<script>` | ✓ |
-| 86.5% | `<link>` | - |
-| 86.3% | `<img>` | ✓ |
-| 81.5% | `<p>` | - (can be customized) |
-| 75.6% | `<span>` | - (can be customized) |
-| 73.8% | `<li>` | - (can be customized) |
-| 73.7% | `<ul>` | - (can be customized) |
-| 70.3% | `<br>` | ✕ |
-| 60.4% | `<style>` | ✓ |
-| 55.8% | `<h1>` | - (can be customized) |
-| 52.7% | `<h2>` | - (can be customized) |
-| 48.4% | `<input>` | ✓ |
-| 46.9% | `<form>` | ✕ |
-| 44.3% | `<strong>` | - (can be customized) |
-| 43.1% | `<h3>` | - (can be customized) |
-| 30.9% | `<table>` | ✕ |
-| 30.3% | `<tr>` | ✕ |
-| 30.2% | `<td>` | ✕ |
-
-### Forms
-
-| percentage | name | supported |
-| ---- | ---- | ---- |
-| 49.5% | `<option>` | ✕ |
-| 30.2% | `<input>` | ✓ |
-| 16.6% | > `[type="hidden"]` | - |
-| 8% | > `[type="text"]` | ✓ |
-| 4.2% | > `[type="submit"]` | - |
-| 2% | > `[type="checkbox"]` | - (`<switch>`) |
-| 1.2% | > `[type="email"]` | ✓ |
-| 1.1% | > `[type="radio"]` | ✕ |
-| 0.9% | > `[type="image"]` | - |
-| 0.8% | > `[type="button"]` | - |
-| 0.6% | > `[type="search"]` | ✕ |
-| 0.6% | > `[type="password"]` | ✓ |
-| 0.1% | > `[type="tel"]` | ✓ |
-| 0.1% | > `[type="number"]` | ✓ |
-| 0% | > `[type="reset"]` | - |
-| 0% | > `[type="file"]` | ✕ |
-| 0% | > `[type="date"]` | ✓ |
-| 0% | > `[type="url"]` | ✓ |
-| 0% | > `[type="range"]` | ✕ |
-| 0% | > `[type="color"]` | ✕ |
-| 0% | > `[type="time"]` | ✓ |
-| 0% | > `[type="datetime-local"]` | ✕ |
-| 7.2% | `<label>` | - |
-| 6.1% | `<form>` | - |
-| 3.7% | `<button>` | - (can be customized) |
-| 2.6% | > `[type="button"]` | - |
-| 1.3% | > `[type="submit"]` | - |
-| 0% | > `[type="reset"]` | - |
-| 1.9% | `<select>` | ✕ |
-| 0.7% | `<textarea>` | ✓ |
-| 0.5% | `<fieldset>` | - |
-| 0.1% | `<optgroup>` | ✕ |
-| 0.1% | `<legend>` | - |
-| 0% | `<progress>` | ✕ |
-| 0% | `<datalist>` | - |
-| 0% | `<output>` | - |
-| 0% | `<meter>` | - |
-
-## CSS Properties
-
-refs: https://www.chromestatus.com/metrics/feature/popularity 2016-12-11
-
-| percentage | name | supported |
-| ---- | ---- | ---- |
-| 90.5115% | display | ✕ `flex` only |
-| 89.8243% | margin | ✓ (not support combo) |
-| 88.7012% | width | ✓ |
-| 88.6468% | overflow | ✓ iOS only, `hidden` only for Android |
-| 88.6432% | background-color | ✓ |
-| 88.0803% | height | ✓ |
-| 87.7648% | font-size | ✓ |
-| 87.3837% | padding | ✓ |
-| 87.2721% | color | ✓ |
-| 86.9788% | text-align | ✓ |
-| 86.6841% | position | ✓ `relative` by default, `static` not supported |
-| 86.6039% | font-family | ✓ |
-| 86.5943% | font-weight | ✓ |
-| 85.0072% | opacity | ✓ |
-| 80.6911% | max-width | ✕ |
-| 79.4476% | box-sizing | ✕ `border-box` only |
-| 75.7623% | max-height | ✕ |
-| 74.9939% | webkit-user-select | ✕ |
-| 57.0292% | align-items | ✓ |
-| 56.8182% | justify-content | ✓ `space-around` not supported well in browser |
-| 50.5941% | flex-direction | ✓ |
-| 48.5052% | border | ✓ |
-| 47.5161% | top | ✓ |
-| 46.9136% | background | ✕ |
-| 46.1552% | cursor | ✕ |
-| 46.1443% | margin-left | ✓ |
-| 46.0956% | left | ✓ |
-| 46.0848% | text-decoration | ✓ |
-| 45.9575% | float | ✕ |
-| 45.8391% | border-bottom | ✓ |
-| 45.7639% | padding-left | ✓ |
-| 45.7128% | margin-top | ✓ |
-| 45.7013% | line-height | ✓ |
-| 45.5836% | background-image | ✕ |
-| 45.0837% | z-index | ✕ |
-| 45.0649% | right | ✓ |
-| 45.0516% | margin-bottom | ✓ |
-| 45.0459% | white-space | ✕ |
-| 44.8710% | margin-right | ✓ |
-| 44.8476% | vertical-align | ✕ |
-| 44.6306% | padding-top | ✓ |
-| 44.1466% | border-radius | ✓ |
-| 44.0136% | border-top | ✓ |
-| 43.9815% | padding-bottom | ✓ |
-| 43.9392% | padding-right | ✓ |
-| 43.8539% | visibility | ✕ |
-| 43.4306% | background-position | ✕ |
-| 43.4098% | background-repeat | ✕ |
-| 43.0391% | clear | ✕ |
-| 42.9100% | bottom | ✓ |
-| 42.2092% | content | ✕ |
-| 42.0690% | box-shadow | ✕ |
-| 41.9004% | border-color | ✓ |
-| 41.7341% | outline | ✕ |
-| 41.4297% | border-right | ✓ |
-| 41.2605% | border-left | ✓ |
-| 41.1127% | min-height | ✕ |
-| 41.0736% | font-style | ✓ |
-| 41.0523% | min-width | ✕ |
-| 40.4298% | list-style | ✕ |
-| 39.7341% | font | ✕ |
-| 38.8999% | background-size | ✕ |
-| 38.7811% | border-width | ✓ |
-| 38.7718% | border-collapse | ✕ |
-| 37.8110% | border-style | ✓ |
-| 37.4962% | text-overflow | ✓ must work with `lines` |
-| 37.3471% | text-transform | ✕ |
-| 37.2154% | transition | ✕ |
-| 36.5155% | overflow-y | ✕ |
-| 36.3025% | transform | ✕ |
-| 36.2488% | text-indent | ✕ |
-| 35.5075% | text-shadow | ✕ |
-| 34.7607% | webkit-appearance | ✕ |
-| 34.1925% | list-style-type | ✕ |
-| 34.0238% | border-spacing | ✕ |
-| 33.6664% | word-wrap | ✕ |
-| 31.9961% | overflow-x | ✕ |
-| 31.9922% | zoom | ✕ |
-| 31.2495% | border-bottom-left-radius | ✕ |
-| 31.1306% | pointer-events | ✕ |
-| 31.1229% | border-top-left-radius | ✕ |
-| 30.2131% | border-bottom-color | ✓ |
-| 29.9608% | border-top-color | ✓ |
-| 29.4297% | border-bottom-right-radius | ✕ |
-| 29.2668% | border-top-right-radius | ✕ |
-| 28.6489% | letter-spacing | ✕ |
-| 27.8327% | animation | ✕ |
-| 26.6738% | border-right-width | ✓ |
-| 26.0169% | src | ✕ |
-| 25.2661% | clip | ✕ |
-| 25.2512% | webkit-font-smoothing | ✕ |
-| 25.1971% | border-bottom-width | ✓ |
-| 25.0246% | border-right-color | ✓ |
-| 24.7790% | direction | ✕ |
-| 24.4094% | webkit-tap-highlight-color | ✕ |
-| 23.9751% | border-left-color | ✓ |
-| 23.9321% | border-top-width | ✓ |
-| 23.7902% | fill | ✕ |
-| 23.2617% | border-left-width | ✓ |
-| 22.7278% | table-layout | ✕ |
-| 21.5766% | word-break | ✕ |
-| 20.4319% | background-clip | ✕ |
-| 19.3198% | transform-origin | ✕ |
-| 18.9233% | filter | ✕ |
-| 17.7879% | resize | ✕ |
-| 16.2501% | flex | ✕ |
-| 15.1656% | font-variant | ✕ |
-| 14.9181% | text-rendering | ✕ |
-| 14.7125% | webkit-filter | ✕ |
-| 14.5263% | transition-duration | ✕ |
-| 14.3966% | transition-property | ✕ |
-| 14.2124% | webkit-box-orient | ✕ |
-| 13.5432% | outline-offset | ✕ |
-| 12.9300% | transition-timing-function | ✕ |
-| 12.2788% | unicode-range | ✕ |
-| 12.0880% | word-spacing | ✕ |
-| 11.9124% | quotes | ✕ |
-| 11.6800% | border-bottom-style | ✓ |
-| 11.4263% | webkit-background-clip | ✕ |
-| 11.0070% | flex-grow | ✕ |
-| 10.5925% | backface-visibility | ✕ |
-| 10.4417% | animation-name | ✕ |
-| 10.4302% | stroke | ✕ |
-| 10.4144% | animation-duration | ✕ |
-| 10.2804% | touch-action | ✕ |
-| 9.9663% | list-style-position | ✕ |
-| 9.8662% | order | ✕ |
-| 9.7770% | outline-width | ✕ |
-| 9.7504% | transition-delay | ✕ |
-| 9.4689% | border-top-style | ✓ |
-| 9.3474% | webkit-box-pack | ✕ |
-| 9.3078% | webkit-box-align | ✕ |
-| 9.2375% | page-break-inside | ✕ |
-| 9.1898% | webkit-line-clamp | ✕ |
-| 8.9350% | list-style-image | ✕ |
-| 8.8339% | page-break-after | ✕ |
-| 8.5735% | speak | ✕ |
-| 8.4754% | unicode-bidi | ✕ |
-| 8.4307% | animation-timing-function | ✕ |
-| 8.1464% | webkit-box-flex | ✕ |
-| 8.0048% | orphans | ✕ |
-| 7.9947% | widows | ✕ |
-| 7.6671% | flex-wrap | ✓ not supported well in browser |
-| 7.5756% | animation-fill-mode | ✕ |
-| 7.4163% | animation-delay | ✕ |
-| 7.3284% | border-left-style | ✓ |
-| 7.1586% | outline-color | ✕ |
-| 6.9102% | flex-shrink | ✕ |
-| 6.7754% | perspective | ✕ |
-| 6.7748% | border-right-style | ✓ |
-| 6.4619% | outline-style | ✕ |
-| 6.0382% | animation-iteration-count | ✕ |
-| 5.9838% | background-origin | ✕ |
-| 5.9714% | fill-opacity | ✕ |
-| 5.9357% | will-change | ✕ |
-| 5.3740% | stroke-width | ✕ |
-| 5.3172% | transform-style | ✕ |
-| 5.2608% | overflow-wrap | ✕ |
-| 5.1730% | background-attachment | ✕ |
-| 4.9039% | counter-increment | ✕ |
-| 4.5950% | counter-reset | ✕ |
-| 4.5031% | align-self | ✕ |
-| 4.4109% | webkit-box-ordinal-group | ✕ |
-| 4.4046% | webkit-animation-direction | ✕ |
-| 3.7598% | background-position-x | ✕ |
-| 3.6867% | border-image | ✕ |
-| 3.6601% | background-position-y | ✕ |
-| 3.5749% | webkit-user-drag | ✕ |
-| 3.3376% | flex-basis | ✕ |
-| 3.1840% | align-content | ✕ |
-| 3.1832% | flex-flow | ✕ |
-| 3.1774% | image-rendering | ✕ |
-| 3.0879% | webkit-margin-start | ✕ |
-| 2.9551% | font-stretch | ✕ |
-| 2.8934% | empty-cells | ✕ |
-| 2.7619% | webkit-margin-after | ✕ |
-| 2.7220% | perspective-origin | ✕ |
-| 2.6125% | webkit-margin-end | ✕ |
-| 2.6089% | column-count | ✕ |
-| 2.5880% | webkit-text-fill-color | ✕ |
-| 2.5466% | webkit-box-direction | ✕ |
-| 2.4618% | font-feature-settings | ✕ |
-| 2.3959% | webkit-mask-image | ✕ |
-| 2.3431% | webkit-padding-end | ✕ |
-| 2.2555% | stroke-dasharray | ✕ |
-| 2.1788% | user-select | ✕ |
-| 2.1679% | object-fit | ✕ |
-| 2.0643% | column-gap | ✕ |
-| 2.0459% | text-size-adjust | ✕ |
-| 2.0253% | caption-side | ✕ |
-| 1.9695% | stroke-dashoffset | ✕ |
-| 1.7923% | stroke-linecap | ✕ |
-| 1.7861% | animation-direction | ✕ |
-| 1.7559% | webkit-font-feature-settings | ✕ |
-| 1.7404% | stroke-opacity | ✕ |
-| 1.5926% | stroke-miterlimit | ✕ |
-| 1.5786% | fill-rule | ✕ |
-| 1.4859% | webkit-user-modify | ✕ |
-| 1.3439% | webkit-border-image | ✕ |
-| 1.3091% | animation-play-state | ✕ |
-| 1.2676% | contain | ✕ |
-| 1.2029% | webkit-padding-start | ✕ |
-| 1.1840% | webkit-margin-before | ✕ |
-| 1.1269% | page-break-before | ✕ |
-| 1.1222% | webkit-margin-top-collapse | ✕ |
-| 1.0418% | columns | ✕ |
-| 1.0354% | webkit-mask-size | ✕ |
-| 0.9650% | border-image-slice | ✕ |
-| 0.9425% | stop-color | ✕ |
-| 0.9408% | webkit-mask-repeat | ✕ |
-| 0.9125% | webkit-box-lines | ✕ |
-| 0.8804% | webkit-column-break-inside | ✕ |
-| 0.8752% | size | ✕ |
-| 0.8334% | font-kerning | ✕ |
-| 0.8034% | stroke-linejoin | ✕ |
-| 0.7869% | tab-size | ✕ |
-| 0.7689% | break-inside | ✕ |
-| 0.7589% | webkit-text-stroke-width | ✕ |
-| 0.7353% | column-width | ✕ |
-| 0.6924% | webkit-mask-position | ✕ |
-| 0.6869% | border-image-width | ✕ |
-| 0.6323% | border-image-repeat | ✕ |
-| 0.5994% | border-image-outset | ✕ |
-| 0.5885% | all | ✕ |
-| 0.5859% | webkit-text-stroke-color | ✕ |
-| 0.5435% | webkit-print-color-adjust | ✕ |
-| 0.5420% | webkit-text-stroke | ✕ |
-| 0.5195% | writing-mode | ✕ |
-| 0.4741% | clip-rule | ✕ |
-| 0.4685% | webkit-clip-path | ✕ |
-| 0.4578% | text-anchor | ✕ |
-| 0.4535% | shape-rendering | ✕ |
-| 0.4526% | webkit-column-break-before | ✕ |
-| 0.4494% | clip-path | ✕ |
-| 0.4452% | webkit-mask | ✕ |
-| 0.4393% | mix-blend-mode | ✕ |
-| 0.4166% | text-align-last | ✕ |
-| 0.4033% | column-rule | ✕ |
-| 0.3990% | webkit-mask-box-image | ✕ |
-| 0.3989% | font-variant-ligatures | ✕ |
-| 0.3881% | column-fill | ✕ |
-| 0.3865% | webkit-line-break | ✕ |
-| 0.3857% | border-image-source | ✕ |
-| 0.3528% | stop-opacity | ✕ |
-| 0.3075% | webkit-perspective-origin-y | ✕ |
-| 0.3054% | webkit-perspective-origin-x | ✕ |
-| 0.2994% | webkit-writing-mode | ✕ |
-| 0.2717% | dominant-baseline | ✕ |
-| 0.2634% | column-rule-color | ✕ |
-| 0.2586% | webkit-box-decoration-break | ✕ |
-| 0.2467% | webkit-text-security | ✕ |
-| 0.2374% | webkit-background-origin | ✕ |
-| 0.2146% | font-variant-caps | ✕ |
-| 0.2005% | column-rule-style | ✕ |
-| 0.1976% | shape-outside | ✕ |
-| 0.1971% | webkit-padding-before | ✕ |
-| 0.1896% | break-after | ✕ |
-| 0.1782% | webkit-padding-after | ✕ |
-| 0.1774% | text-orientation | ✕ |
-| 0.1747% | webkit-text-orientation | ✕ |
-| 0.1655% | mask | ✕ |
-| 0.1626% | alignment-baseline | ✕ |
-| 0.1572% | page | ✕ |
-| 0.1530% | webkit-column-break-after | ✕ |
-| 0.1521% | webkit-box-reflect | ✕ |
-| 0.1504% | webkit-text-emphasis-color | ✕ |
-| 0.1499% | object-position | ✕ |
-| 0.1470% | break-before | ✕ |
-| 0.1455% | webkit-margin-collapse | ✕ |
-| 0.1452% | baseline-shift | ✕ |
-| 0.1451% | hyphens | ✕ |
-| 0.1309% | rx | ✕ |
-| 0.1304% | ry | ✕ |
-| 0.1256% | background-blend-mode | ✕ |
-| 0.1136% | font-variant-numeric | ✕ |
-| 0.1135% | background-repeat-x | ✕ |
-| 0.1123% | background-repeat-y | ✕ |
-| 0.1086% | webkit-text-emphasis | ✕ |
-| 0.1058% | webkit-rtl-ordering | ✕ |
-| 0.1040% | column-rule-width | ✕ |
-| 0.1036% | isolation | ✕ |
-| 0.1002% | webkit-highlight | ✕ |
-| 0.0843% | webkit-transform-origin-y | ✕ |
-| 0.0786% | webkit-transform-origin-x | ✕ |
-| 0.0770% | webkit-app-region | ✕ |
-| 0.0685% | column-span | ✕ |
-| 0.0653% | r | ✕ |
-| 0.0611% | y | ✕ |
-| 0.0602% | x | ✕ |
-| 0.0555% | webkit-border-vertical-spacing | ✕ |
-| 0.0545% | webkit-border-horizontal-spacing | ✕ |
-| 0.0542% | webkit-border-start-width | ✕ |
-| 0.0450% | webkit-border-start-color | ✕ |
-| 0.0424% | webkit-border-after-width | ✕ |
-| 0.0424% | webkit-border-before-width | ✕ |
-| 0.0423% | webkit-border-end-width | ✕ |
-| 0.0351% | marker | ✕ |
-| 0.0349% | webkit-border-end-color | ✕ |
-| 0.0347% | webkit-border-after-color | ✕ |
-| 0.0347% | webkit-border-before-color | ✕ |
-| 0.0342% | mask-type | ✕ |
-| 0.0328% | color-interpolation-filters | ✕ |
-| 0.0325% | webkit-border-end | ✕ |
-| 0.0319% | vector-effect | ✕ |
-| 0.0307% | color-rendering | ✕ |
-
-## CSS Units and Values
-
-refs: https://drafts.csswg.org/css-values/ 2016-12-11
-
-### Textual
-
-* pre-defined keywords
- * CSS-wide keywords
- * `initial`
- * `inherit`
- * `unset`
-* `<custom-ident>`: author-defined identifiers ✓
-* `<string>`: quoted strings (`"xxx"`)
-* `<url>`: resourec locators (`url()`)
-
-### Numeric
-
-* `<integer>` ✓
-* `<number>` ✓
-* `<percentage>`
-
-### Length `<length>`
-
-* relative
- * font-relative
- * `em`
- * `ex`
- * `ch`
- * `ic`
- * `rem` ✓🔧
- * viewport-percentage
- * `vw` ✓🔧
- * `vh` ✓🔧
- * `vi`
- * `vb`
- * `vmin` ✓🔧
- * `vmax` ✓🔧
-* absolute
- * `cm` ✓🔧
- * `mm` ✓🔧
- * `Q` ✓🔧
- * `in` ✓🔧
- * `pc` ✓🔧
- * `pt` ✓🔧
- * `px` autofixed to number
-
-### Quantities
-
-* `<angle>`
- * `deg`
- * `grad`
- * `rad`
- * `turn`
-* `<time>`
- * `s`
- * `ms`
-* `<frequency>`
- * `Hz`
- * `kHz`
-* `<resolution>`
- * `dpi`
- * `dpcm`
- * `dppx`
-
-### Elsewhere
-
-* `<color>` ✓
-* `<image>`
-* `<position>`
-
-### Functional
-
-* `calc()`
-* `toggle()`
-* `attr()`
-
-## JS APIs
-
-refs: https://www.w3.org/standards/techs/js 2016-12-11
-
-### Completed Work
-
-#### Standards
-
-| last update | spec | supported |
-| ---- | ---- | ---- |
-| 2016-11-17 | Media Source Extensions™ | - (media related) |
-| 2016-11-08 | Geolocation API Specification 2nd Edition | ✕ developing |
-| 2016-10-27 | Pointer Lock | - |
-| 2016-10-18 | Vibration API (Second Edition) | ✕ |
-| 2016-04-19 | Web Storage (Second Edition) | ✓ async `storage` module |
-| 2015-10-22 | Web Notifications | ✕ |
-| 2015-05-19 | HTML5 Web Messaging | ✕ `BroadcastChannel` developing |
-| 2015-02-24 | Pointer Events | - |
-| 2015-02-10 | Vibration API | ✕ |
-| 2015-02-03 | Server-Sent Events | ✕ |
-| 2015-01-08 | Indexed Database API | ✕ |
-| 2014-03-13 | Metadata API for Media Resources 1.0 | - (media related) |
-| 2014-02-11 | Progress Events | ✕ |
-| 2014-01-16 | JSON-LD 1.0 Processing Algorithms and API | - |
-| 2013-12-12 | Performance Timeline | - (perf related) |
-| 2013-12-12 | User Timing | - (perf related) |
-| 2013-10-31 | Widget Interface | - |
-| 2013-10-29 | Page Visibility (Second Edition) | ✕ `onviewappear`/`onviewdisappear` |
-| 2013-10-10 | Touch Events | ✕ |
-| 2013-02-21 | Selectors API Level 1 | - |
-| 2012-12-17 | Navigation Timing | - (perf related) |
-| 2012-12-17 | High Resolution Time | - (perf related) |
-| 2008-12-22 | Element Traversal Specification | - |
-
-### Drafts
-
-#### Proposed Recommendations
-
-| last update | spec | supported |
-| ---- | ---- | ---- |
-| 2016-09-15 | WebIDL Level 1 | - |
-
-#### Candidate Recommendations
-
-| last update | spec | supported |
-| ---- | ---- | ---- |
-| 2016-12-08 | Performance Timeline Level 2 | - (perf related) |
-| 2016-11-22 | Page Visibility Level 2 | ✕ `onviewappear`/`onviewdisappear` |
-| 2016-11-01 | High Resolution Time Level 2 | - (perf related) |
-| 2016-08-18 | DeviceOrientation Event Specification | ✕ |
-| 2016-07-21 | Resource Timing Level 1 | - (perf related) |
-| 2016-07-14 | Presentation API | - |
-| 2016-07-07 | Battery Status API | ✕ |
-| 2016-07-05 | Encrypted Media Extensions | - |
-| 2016-05-19 | Media Capture and Streams | - (media related) |
-| 2014-12-11 | Web Cryptography API | - |
-| 2014-09-09 | HTML Media Capture | - (media related) |
-| 2012-09-20 | The WebSocket API | ✕ |
-
-#### Last Call Drafts
-
-| last update | spec | supported |
-| ---- | ---- | ---- |
-| 2011-12-01 | Geolocation API Specification Level 2 | ✕ |
-
-#### Other Working Drafts
-
-| last update | spec | supported |
-| ---- | ---- | ---- |
-| 2016-12-09 | MediaStream Image Capture | - (media related) |
-| 2016-12-06 | MediaStream Recording | - (media related) |
-| 2016-12-06 | Selection API | ✕ |
-| 2016-12-05 | Input Events | ✕ |
-| 2016-12-02 | Gamepad | - |
-| 2016-11-29 | WebDriver | - |
-| 2016-11-24 | WebRTC 1.0: Real-time Communication Between Browsers | ✕ |
-| 2016-11-22 | Pointer Lock 2.0 | - |
-| 2016-11-07 | Remote Playback API | - (media related) |
-| 2016-11-03 | Resource Timing Level 2 | - (perf related) |
-| 2016-11-02 | Audio Output Devices API | - (media related) |
-| 2016-11-01 | Indexed Database API 2.0 | ✕ |
-| 2016-11-01 | User Timing Level 2 | - (perf related) |
-| 2016-10-31 | The Screen Orientation API | ✕ |
-| 2016-10-31 | High Resolution Time Level 3 | - (perf related) |
-| 2016-10-24 | UI Events KeyboardEvent code Values | - |
-| 2016-10-24 | UI Events KeyboardEvent key Values | - |
-| 2016-10-11 | Service Workers 1 | ✕ |
-| 2016-09-21 | Identifiers for WebRTC's Statistics API | - |
-| 2016-09-13 | Accelerometer Sensor | ✕ |
-| 2016-09-13 | Gyroscope Sensor | ✕ |
-| 2016-09-13 | Magnetometer Sensor | ✕ |
-| 2016-08-30 | Ambient Light Sensor | ✕ |
-| 2016-08-30 | Media Capture from DOM Elements | - (media related) |
-| 2016-08-30 | Generic Sensor API | ✕ |
-| 2016-08-03 | Wake Lock API | ✕ |
-| 2016-07-19 | Proximity Sensor | ✕ |
-| 2016-07-19 | Pointer Events - Level 2 | - |
-| 2016-07-14 | Screen Capture | ✕ |
-| 2016-07-12 | Media Capture Depth Stream Extensions | - (media related) |
-| 2016-05-17 | Cooperative Scheduling of Background Tasks | ✕ |
-| 2016-04-22 | Navigation Timing Level 2 | - (perf related) |
-| 2016-04-03 | Clipboard API and events | ✕ `clipboard` module |
-| 2015-12-15 | Push API | ✕ |
-| 2015-12-08 | Web Audio API | - (media related) |
-| 2015-10-15 | FindText API | - |
-| 2015-09-24 | Web Workers | ✕ |
-| 2015-04-21 | File API | ✕ |
-| 2014-02-20 | Network Service Discovery | ✕ |
-| 2012-03-06 | MediaStream Capture Scenarios | - (media related) |
-| 2011-12-15 | Audio Processing API | - (media related) |
\ No newline at end of file
http://git-wip-us.apache.org/repos/asf/incubator-weex-site/blob/12e3a8bc/_draft/web-standards.md
----------------------------------------------------------------------
diff --git a/_draft/web-standards.md b/_draft/web-standards.md
deleted file mode 100644
index 3125796..0000000
--- a/_draft/web-standards.md
+++ /dev/null
@@ -1,585 +0,0 @@
----
-title: Web 标准
-type: references
-group: API
-order: 2.7
-version: 2.1
-has_chapter_content: true
----
-
-# Weex 中的 Web 标准
-
-## HTML
-
-refs: https://www.advancedwebranking.com/html/ 2016-12-11
-
-### Overview
-
-| percentage | name | supported |
-| ---- | ---- | ---- |
-| 98.1% | `<head>` | - |
-| 97.9% | `<body>` | - |
-| 97.9% | `<html>` | - |
-| 97% | `<title>` | - |
-| 93.9% | `<meta>` | - |
-| 89.9% | `<div>` | ✓ |
-| 89.6% | `<a>` | ✓ |
-| 88.5% | `<script>` | ✓ |
-| 86.5% | `<link>` | - |
-| 86.3% | `<img>` | ✓ |
-| 81.5% | `<p>` | - (can be customized) |
-| 75.6% | `<span>` | - (can be customized) |
-| 73.8% | `<li>` | - (can be customized) |
-| 73.7% | `<ul>` | - (can be customized) |
-| 70.3% | `<br>` | ✕ |
-| 60.4% | `<style>` | ✓ |
-| 55.8% | `<h1>` | - (can be customized) |
-| 52.7% | `<h2>` | - (can be customized) |
-| 48.4% | `<input>` | ✓ |
-| 46.9% | `<form>` | ✕ |
-| 44.3% | `<strong>` | - (can be customized) |
-| 43.1% | `<h3>` | - (can be customized) |
-| 30.9% | `<table>` | ✕ |
-| 30.3% | `<tr>` | ✕ |
-| 30.2% | `<td>` | ✕ |
-
-### Forms
-
-| percentage | name | supported |
-| ---- | ---- | ---- |
-| 49.5% | `<option>` | ✕ |
-| 30.2% | `<input>` | ✓ |
-| 16.6% | > `[type="hidden"]` | - |
-| 8% | > `[type="text"]` | ✓ |
-| 4.2% | > `[type="submit"]` | - |
-| 2% | > `[type="checkbox"]` | - (`<switch>`) |
-| 1.2% | > `[type="email"]` | ✓ |
-| 1.1% | > `[type="radio"]` | ✕ |
-| 0.9% | > `[type="image"]` | - |
-| 0.8% | > `[type="button"]` | - |
-| 0.6% | > `[type="search"]` | ✕ |
-| 0.6% | > `[type="password"]` | ✓ |
-| 0.1% | > `[type="tel"]` | ✓ |
-| 0.1% | > `[type="number"]` | ✓ |
-| 0% | > `[type="reset"]` | - |
-| 0% | > `[type="file"]` | ✕ |
-| 0% | > `[type="date"]` | ✓ |
-| 0% | > `[type="url"]` | ✓ |
-| 0% | > `[type="range"]` | ✕ |
-| 0% | > `[type="color"]` | ✕ |
-| 0% | > `[type="time"]` | ✓ |
-| 0% | > `[type="datetime-local"]` | ✕ |
-| 7.2% | `<label>` | - |
-| 6.1% | `<form>` | - |
-| 3.7% | `<button>` | - (can be customized) |
-| 2.6% | > `[type="button"]` | - |
-| 1.3% | > `[type="submit"]` | - |
-| 0% | > `[type="reset"]` | - |
-| 1.9% | `<select>` | ✕ |
-| 0.7% | `<textarea>` | ✓ |
-| 0.5% | `<fieldset>` | - |
-| 0.1% | `<optgroup>` | ✕ |
-| 0.1% | `<legend>` | - |
-| 0% | `<progress>` | ✕ |
-| 0% | `<datalist>` | - |
-| 0% | `<output>` | - |
-| 0% | `<meter>` | - |
-
-## CSS Properties
-
-refs: https://www.chromestatus.com/metrics/feature/popularity 2016-12-11
-
-| percentage | name | supported |
-| ---- | ---- | ---- |
-| 90.5115% | display | ✕ `flex` only |
-| 89.8243% | margin | ✓ (not support combo) |
-| 88.7012% | width | ✓ |
-| 88.6468% | overflow | ✓ iOS only, `hidden` only for Android |
-| 88.6432% | background-color | ✓ |
-| 88.0803% | height | ✓ |
-| 87.7648% | font-size | ✓ |
-| 87.3837% | padding | ✓ |
-| 87.2721% | color | ✓ |
-| 86.9788% | text-align | ✓ |
-| 86.6841% | position | ✓ `relative` by default, `static` not supported |
-| 86.6039% | font-family | ✓ |
-| 86.5943% | font-weight | ✓ |
-| 85.0072% | opacity | ✓ |
-| 80.6911% | max-width | ✕ |
-| 79.4476% | box-sizing | ✕ `border-box` only |
-| 75.7623% | max-height | ✕ |
-| 74.9939% | webkit-user-select | ✕ |
-| 57.0292% | align-items | ✓ |
-| 56.8182% | justify-content | ✓ `space-around` not supported well in browser |
-| 50.5941% | flex-direction | ✓ |
-| 48.5052% | border | ✓ |
-| 47.5161% | top | ✓ |
-| 46.9136% | background | ✕ |
-| 46.1552% | cursor | ✕ |
-| 46.1443% | margin-left | ✓ |
-| 46.0956% | left | ✓ |
-| 46.0848% | text-decoration | ✓ |
-| 45.9575% | float | ✕ |
-| 45.8391% | border-bottom | ✓ |
-| 45.7639% | padding-left | ✓ |
-| 45.7128% | margin-top | ✓ |
-| 45.7013% | line-height | ✓ |
-| 45.5836% | background-image | ✕ |
-| 45.0837% | z-index | ✕ |
-| 45.0649% | right | ✓ |
-| 45.0516% | margin-bottom | ✓ |
-| 45.0459% | white-space | ✕ |
-| 44.8710% | margin-right | ✓ |
-| 44.8476% | vertical-align | ✕ |
-| 44.6306% | padding-top | ✓ |
-| 44.1466% | border-radius | ✓ |
-| 44.0136% | border-top | ✓ |
-| 43.9815% | padding-bottom | ✓ |
-| 43.9392% | padding-right | ✓ |
-| 43.8539% | visibility | ✕ |
-| 43.4306% | background-position | ✕ |
-| 43.4098% | background-repeat | ✕ |
-| 43.0391% | clear | ✕ |
-| 42.9100% | bottom | ✓ |
-| 42.2092% | content | ✕ |
-| 42.0690% | box-shadow | ✕ |
-| 41.9004% | border-color | ✓ |
-| 41.7341% | outline | ✕ |
-| 41.4297% | border-right | ✓ |
-| 41.2605% | border-left | ✓ |
-| 41.1127% | min-height | ✕ |
-| 41.0736% | font-style | ✓ |
-| 41.0523% | min-width | ✕ |
-| 40.4298% | list-style | ✕ |
-| 39.7341% | font | ✕ |
-| 38.8999% | background-size | ✕ |
-| 38.7811% | border-width | ✓ |
-| 38.7718% | border-collapse | ✕ |
-| 37.8110% | border-style | ✓ |
-| 37.4962% | text-overflow | ✓ must work with `lines` |
-| 37.3471% | text-transform | ✕ |
-| 37.2154% | transition | ✕ |
-| 36.5155% | overflow-y | ✕ |
-| 36.3025% | transform | ✕ |
-| 36.2488% | text-indent | ✕ |
-| 35.5075% | text-shadow | ✕ |
-| 34.7607% | webkit-appearance | ✕ |
-| 34.1925% | list-style-type | ✕ |
-| 34.0238% | border-spacing | ✕ |
-| 33.6664% | word-wrap | ✕ |
-| 31.9961% | overflow-x | ✕ |
-| 31.9922% | zoom | ✕ |
-| 31.2495% | border-bottom-left-radius | ✕ |
-| 31.1306% | pointer-events | ✕ |
-| 31.1229% | border-top-left-radius | ✕ |
-| 30.2131% | border-bottom-color | ✓ |
-| 29.9608% | border-top-color | ✓ |
-| 29.4297% | border-bottom-right-radius | ✕ |
-| 29.2668% | border-top-right-radius | ✕ |
-| 28.6489% | letter-spacing | ✕ |
-| 27.8327% | animation | ✕ |
-| 26.6738% | border-right-width | ✓ |
-| 26.0169% | src | ✕ |
-| 25.2661% | clip | ✕ |
-| 25.2512% | webkit-font-smoothing | ✕ |
-| 25.1971% | border-bottom-width | ✓ |
-| 25.0246% | border-right-color | ✓ |
-| 24.7790% | direction | ✕ |
-| 24.4094% | webkit-tap-highlight-color | ✕ |
-| 23.9751% | border-left-color | ✓ |
-| 23.9321% | border-top-width | ✓ |
-| 23.7902% | fill | ✕ |
-| 23.2617% | border-left-width | ✓ |
-| 22.7278% | table-layout | ✕ |
-| 21.5766% | word-break | ✕ |
-| 20.4319% | background-clip | ✕ |
-| 19.3198% | transform-origin | ✕ |
-| 18.9233% | filter | ✕ |
-| 17.7879% | resize | ✕ |
-| 16.2501% | flex | ✕ |
-| 15.1656% | font-variant | ✕ |
-| 14.9181% | text-rendering | ✕ |
-| 14.7125% | webkit-filter | ✕ |
-| 14.5263% | transition-duration | ✕ |
-| 14.3966% | transition-property | ✕ |
-| 14.2124% | webkit-box-orient | ✕ |
-| 13.5432% | outline-offset | ✕ |
-| 12.9300% | transition-timing-function | ✕ |
-| 12.2788% | unicode-range | ✕ |
-| 12.0880% | word-spacing | ✕ |
-| 11.9124% | quotes | ✕ |
-| 11.6800% | border-bottom-style | ✓ |
-| 11.4263% | webkit-background-clip | ✕ |
-| 11.0070% | flex-grow | ✕ |
-| 10.5925% | backface-visibility | ✕ |
-| 10.4417% | animation-name | ✕ |
-| 10.4302% | stroke | ✕ |
-| 10.4144% | animation-duration | ✕ |
-| 10.2804% | touch-action | ✕ |
-| 9.9663% | list-style-position | ✕ |
-| 9.8662% | order | ✕ |
-| 9.7770% | outline-width | ✕ |
-| 9.7504% | transition-delay | ✕ |
-| 9.4689% | border-top-style | ✓ |
-| 9.3474% | webkit-box-pack | ✕ |
-| 9.3078% | webkit-box-align | ✕ |
-| 9.2375% | page-break-inside | ✕ |
-| 9.1898% | webkit-line-clamp | ✕ |
-| 8.9350% | list-style-image | ✕ |
-| 8.8339% | page-break-after | ✕ |
-| 8.5735% | speak | ✕ |
-| 8.4754% | unicode-bidi | ✕ |
-| 8.4307% | animation-timing-function | ✕ |
-| 8.1464% | webkit-box-flex | ✕ |
-| 8.0048% | orphans | ✕ |
-| 7.9947% | widows | ✕ |
-| 7.6671% | flex-wrap | ✓ not supported well in browser |
-| 7.5756% | animation-fill-mode | ✕ |
-| 7.4163% | animation-delay | ✕ |
-| 7.3284% | border-left-style | ✓ |
-| 7.1586% | outline-color | ✕ |
-| 6.9102% | flex-shrink | ✕ |
-| 6.7754% | perspective | ✕ |
-| 6.7748% | border-right-style | ✓ |
-| 6.4619% | outline-style | ✕ |
-| 6.0382% | animation-iteration-count | ✕ |
-| 5.9838% | background-origin | ✕ |
-| 5.9714% | fill-opacity | ✕ |
-| 5.9357% | will-change | ✕ |
-| 5.3740% | stroke-width | ✕ |
-| 5.3172% | transform-style | ✕ |
-| 5.2608% | overflow-wrap | ✕ |
-| 5.1730% | background-attachment | ✕ |
-| 4.9039% | counter-increment | ✕ |
-| 4.5950% | counter-reset | ✕ |
-| 4.5031% | align-self | ✕ |
-| 4.4109% | webkit-box-ordinal-group | ✕ |
-| 4.4046% | webkit-animation-direction | ✕ |
-| 3.7598% | background-position-x | ✕ |
-| 3.6867% | border-image | ✕ |
-| 3.6601% | background-position-y | ✕ |
-| 3.5749% | webkit-user-drag | ✕ |
-| 3.3376% | flex-basis | ✕ |
-| 3.1840% | align-content | ✕ |
-| 3.1832% | flex-flow | ✕ |
-| 3.1774% | image-rendering | ✕ |
-| 3.0879% | webkit-margin-start | ✕ |
-| 2.9551% | font-stretch | ✕ |
-| 2.8934% | empty-cells | ✕ |
-| 2.7619% | webkit-margin-after | ✕ |
-| 2.7220% | perspective-origin | ✕ |
-| 2.6125% | webkit-margin-end | ✕ |
-| 2.6089% | column-count | ✕ |
-| 2.5880% | webkit-text-fill-color | ✕ |
-| 2.5466% | webkit-box-direction | ✕ |
-| 2.4618% | font-feature-settings | ✕ |
-| 2.3959% | webkit-mask-image | ✕ |
-| 2.3431% | webkit-padding-end | ✕ |
-| 2.2555% | stroke-dasharray | ✕ |
-| 2.1788% | user-select | ✕ |
-| 2.1679% | object-fit | ✕ |
-| 2.0643% | column-gap | ✕ |
-| 2.0459% | text-size-adjust | ✕ |
-| 2.0253% | caption-side | ✕ |
-| 1.9695% | stroke-dashoffset | ✕ |
-| 1.7923% | stroke-linecap | ✕ |
-| 1.7861% | animation-direction | ✕ |
-| 1.7559% | webkit-font-feature-settings | ✕ |
-| 1.7404% | stroke-opacity | ✕ |
-| 1.5926% | stroke-miterlimit | ✕ |
-| 1.5786% | fill-rule | ✕ |
-| 1.4859% | webkit-user-modify | ✕ |
-| 1.3439% | webkit-border-image | ✕ |
-| 1.3091% | animation-play-state | ✕ |
-| 1.2676% | contain | ✕ |
-| 1.2029% | webkit-padding-start | ✕ |
-| 1.1840% | webkit-margin-before | ✕ |
-| 1.1269% | page-break-before | ✕ |
-| 1.1222% | webkit-margin-top-collapse | ✕ |
-| 1.0418% | columns | ✕ |
-| 1.0354% | webkit-mask-size | ✕ |
-| 0.9650% | border-image-slice | ✕ |
-| 0.9425% | stop-color | ✕ |
-| 0.9408% | webkit-mask-repeat | ✕ |
-| 0.9125% | webkit-box-lines | ✕ |
-| 0.8804% | webkit-column-break-inside | ✕ |
-| 0.8752% | size | ✕ |
-| 0.8334% | font-kerning | ✕ |
-| 0.8034% | stroke-linejoin | ✕ |
-| 0.7869% | tab-size | ✕ |
-| 0.7689% | break-inside | ✕ |
-| 0.7589% | webkit-text-stroke-width | ✕ |
-| 0.7353% | column-width | ✕ |
-| 0.6924% | webkit-mask-position | ✕ |
-| 0.6869% | border-image-width | ✕ |
-| 0.6323% | border-image-repeat | ✕ |
-| 0.5994% | border-image-outset | ✕ |
-| 0.5885% | all | ✕ |
-| 0.5859% | webkit-text-stroke-color | ✕ |
-| 0.5435% | webkit-print-color-adjust | ✕ |
-| 0.5420% | webkit-text-stroke | ✕ |
-| 0.5195% | writing-mode | ✕ |
-| 0.4741% | clip-rule | ✕ |
-| 0.4685% | webkit-clip-path | ✕ |
-| 0.4578% | text-anchor | ✕ |
-| 0.4535% | shape-rendering | ✕ |
-| 0.4526% | webkit-column-break-before | ✕ |
-| 0.4494% | clip-path | ✕ |
-| 0.4452% | webkit-mask | ✕ |
-| 0.4393% | mix-blend-mode | ✕ |
-| 0.4166% | text-align-last | ✕ |
-| 0.4033% | column-rule | ✕ |
-| 0.3990% | webkit-mask-box-image | ✕ |
-| 0.3989% | font-variant-ligatures | ✕ |
-| 0.3881% | column-fill | ✕ |
-| 0.3865% | webkit-line-break | ✕ |
-| 0.3857% | border-image-source | ✕ |
-| 0.3528% | stop-opacity | ✕ |
-| 0.3075% | webkit-perspective-origin-y | ✕ |
-| 0.3054% | webkit-perspective-origin-x | ✕ |
-| 0.2994% | webkit-writing-mode | ✕ |
-| 0.2717% | dominant-baseline | ✕ |
-| 0.2634% | column-rule-color | ✕ |
-| 0.2586% | webkit-box-decoration-break | ✕ |
-| 0.2467% | webkit-text-security | ✕ |
-| 0.2374% | webkit-background-origin | ✕ |
-| 0.2146% | font-variant-caps | ✕ |
-| 0.2005% | column-rule-style | ✕ |
-| 0.1976% | shape-outside | ✕ |
-| 0.1971% | webkit-padding-before | ✕ |
-| 0.1896% | break-after | ✕ |
-| 0.1782% | webkit-padding-after | ✕ |
-| 0.1774% | text-orientation | ✕ |
-| 0.1747% | webkit-text-orientation | ✕ |
-| 0.1655% | mask | ✕ |
-| 0.1626% | alignment-baseline | ✕ |
-| 0.1572% | page | ✕ |
-| 0.1530% | webkit-column-break-after | ✕ |
-| 0.1521% | webkit-box-reflect | ✕ |
-| 0.1504% | webkit-text-emphasis-color | ✕ |
-| 0.1499% | object-position | ✕ |
-| 0.1470% | break-before | ✕ |
-| 0.1455% | webkit-margin-collapse | ✕ |
-| 0.1452% | baseline-shift | ✕ |
-| 0.1451% | hyphens | ✕ |
-| 0.1309% | rx | ✕ |
-| 0.1304% | ry | ✕ |
-| 0.1256% | background-blend-mode | ✕ |
-| 0.1136% | font-variant-numeric | ✕ |
-| 0.1135% | background-repeat-x | ✕ |
-| 0.1123% | background-repeat-y | ✕ |
-| 0.1086% | webkit-text-emphasis | ✕ |
-| 0.1058% | webkit-rtl-ordering | ✕ |
-| 0.1040% | column-rule-width | ✕ |
-| 0.1036% | isolation | ✕ |
-| 0.1002% | webkit-highlight | ✕ |
-| 0.0843% | webkit-transform-origin-y | ✕ |
-| 0.0786% | webkit-transform-origin-x | ✕ |
-| 0.0770% | webkit-app-region | ✕ |
-| 0.0685% | column-span | ✕ |
-| 0.0653% | r | ✕ |
-| 0.0611% | y | ✕ |
-| 0.0602% | x | ✕ |
-| 0.0555% | webkit-border-vertical-spacing | ✕ |
-| 0.0545% | webkit-border-horizontal-spacing | ✕ |
-| 0.0542% | webkit-border-start-width | ✕ |
-| 0.0450% | webkit-border-start-color | ✕ |
-| 0.0424% | webkit-border-after-width | ✕ |
-| 0.0424% | webkit-border-before-width | ✕ |
-| 0.0423% | webkit-border-end-width | ✕ |
-| 0.0351% | marker | ✕ |
-| 0.0349% | webkit-border-end-color | ✕ |
-| 0.0347% | webkit-border-after-color | ✕ |
-| 0.0347% | webkit-border-before-color | ✕ |
-| 0.0342% | mask-type | ✕ |
-| 0.0328% | color-interpolation-filters | ✕ |
-| 0.0325% | webkit-border-end | ✕ |
-| 0.0319% | vector-effect | ✕ |
-| 0.0307% | color-rendering | ✕ |
-
-## CSS Units and Values
-
-refs: https://drafts.csswg.org/css-values/ 2016-12-11
-
-### Textual
-
-* pre-defined keywords
- * CSS-wide keywords
- * `initial`
- * `inherit`
- * `unset`
-* `<custom-ident>`: author-defined identifiers ✓
-* `<string>`: quoted strings (`"xxx"`)
-* `<url>`: resourec locators (`url()`)
-
-### Numeric
-
-* `<integer>` ✓
-* `<number>` ✓
-* `<percentage>`
-
-### Length `<length>`
-
-* relative
- * font-relative
- * `em`
- * `ex`
- * `ch`
- * `ic`
- * `rem` ✓🔧
- * viewport-percentage
- * `vw` ✓🔧
- * `vh` ✓🔧
- * `vi`
- * `vb`
- * `vmin` ✓🔧
- * `vmax` ✓🔧
-* absolute
- * `cm` ✓🔧
- * `mm` ✓🔧
- * `Q` ✓🔧
- * `in` ✓🔧
- * `pc` ✓🔧
- * `pt` ✓🔧
- * `px` autofixed to number
-
-### Quantities
-
-* `<angle>`
- * `deg`
- * `grad`
- * `rad`
- * `turn`
-* `<time>`
- * `s`
- * `ms`
-* `<frequency>`
- * `Hz`
- * `kHz`
-* `<resolution>`
- * `dpi`
- * `dpcm`
- * `dppx`
-
-### Elsewhere
-
-* `<color>` ✓
-* `<image>`
-* `<position>`
-
-### Functional
-
-* `calc()`
-* `toggle()`
-* `attr()`
-
-## JS APIs
-
-refs: https://www.w3.org/standards/techs/js 2016-12-11
-
-### Completed Work
-
-#### Standards
-
-| last update | spec | supported |
-| ---- | ---- | ---- |
-| 2016-11-17 | Media Source Extensions™ | - (media related) |
-| 2016-11-08 | Geolocation API Specification 2nd Edition | ✕ developing |
-| 2016-10-27 | Pointer Lock | - |
-| 2016-10-18 | Vibration API (Second Edition) | ✕ |
-| 2016-04-19 | Web Storage (Second Edition) | ✓ async `storage` module |
-| 2015-10-22 | Web Notifications | ✕ |
-| 2015-05-19 | HTML5 Web Messaging | ✕ `BroadcastChannel` developing |
-| 2015-02-24 | Pointer Events | - |
-| 2015-02-10 | Vibration API | ✕ |
-| 2015-02-03 | Server-Sent Events | ✕ |
-| 2015-01-08 | Indexed Database API | ✕ |
-| 2014-03-13 | Metadata API for Media Resources 1.0 | - (media related) |
-| 2014-02-11 | Progress Events | ✕ |
-| 2014-01-16 | JSON-LD 1.0 Processing Algorithms and API | - |
-| 2013-12-12 | Performance Timeline | - (perf related) |
-| 2013-12-12 | User Timing | - (perf related) |
-| 2013-10-31 | Widget Interface | - |
-| 2013-10-29 | Page Visibility (Second Edition) | ✕ `onviewappear`/`onviewdisappear` |
-| 2013-10-10 | Touch Events | ✕ |
-| 2013-02-21 | Selectors API Level 1 | - |
-| 2012-12-17 | Navigation Timing | - (perf related) |
-| 2012-12-17 | High Resolution Time | - (perf related) |
-| 2008-12-22 | Element Traversal Specification | - |
-
-### Drafts
-
-#### Proposed Recommendations
-
-| last update | spec | supported |
-| ---- | ---- | ---- |
-| 2016-09-15 | WebIDL Level 1 | - |
-
-#### Candidate Recommendations
-
-| last update | spec | supported |
-| ---- | ---- | ---- |
-| 2016-12-08 | Performance Timeline Level 2 | - (perf related) |
-| 2016-11-22 | Page Visibility Level 2 | ✕ `onviewappear`/`onviewdisappear` |
-| 2016-11-01 | High Resolution Time Level 2 | - (perf related) |
-| 2016-08-18 | DeviceOrientation Event Specification | ✕ |
-| 2016-07-21 | Resource Timing Level 1 | - (perf related) |
-| 2016-07-14 | Presentation API | - |
-| 2016-07-07 | Battery Status API | ✕ |
-| 2016-07-05 | Encrypted Media Extensions | - |
-| 2016-05-19 | Media Capture and Streams | - (media related) |
-| 2014-12-11 | Web Cryptography API | - |
-| 2014-09-09 | HTML Media Capture | - (media related) |
-| 2012-09-20 | The WebSocket API | ✕ |
-
-#### Last Call Drafts
-
-| last update | spec | supported |
-| ---- | ---- | ---- |
-| 2011-12-01 | Geolocation API Specification Level 2 | ✕ |
-
-#### Other Working Drafts
-
-| last update | spec | supported |
-| ---- | ---- | ---- |
-| 2016-12-09 | MediaStream Image Capture | - (media related) |
-| 2016-12-06 | MediaStream Recording | - (media related) |
-| 2016-12-06 | Selection API | ✕ |
-| 2016-12-05 | Input Events | ✕ |
-| 2016-12-02 | Gamepad | - |
-| 2016-11-29 | WebDriver | - |
-| 2016-11-24 | WebRTC 1.0: Real-time Communication Between Browsers | ✕ |
-| 2016-11-22 | Pointer Lock 2.0 | - |
-| 2016-11-07 | Remote Playback API | - (media related) |
-| 2016-11-03 | Resource Timing Level 2 | - (perf related) |
-| 2016-11-02 | Audio Output Devices API | - (media related) |
-| 2016-11-01 | Indexed Database API 2.0 | ✕ |
-| 2016-11-01 | User Timing Level 2 | - (perf related) |
-| 2016-10-31 | The Screen Orientation API | ✕ |
-| 2016-10-31 | High Resolution Time Level 3 | - (perf related) |
-| 2016-10-24 | UI Events KeyboardEvent code Values | - |
-| 2016-10-24 | UI Events KeyboardEvent key Values | - |
-| 2016-10-11 | Service Workers 1 | ✕ |
-| 2016-09-21 | Identifiers for WebRTC's Statistics API | - |
-| 2016-09-13 | Accelerometer Sensor | ✕ |
-| 2016-09-13 | Gyroscope Sensor | ✕ |
-| 2016-09-13 | Magnetometer Sensor | ✕ |
-| 2016-08-30 | Ambient Light Sensor | ✕ |
-| 2016-08-30 | Media Capture from DOM Elements | - (media related) |
-| 2016-08-30 | Generic Sensor API | ✕ |
-| 2016-08-03 | Wake Lock API | ✕ |
-| 2016-07-19 | Proximity Sensor | ✕ |
-| 2016-07-19 | Pointer Events - Level 2 | - |
-| 2016-07-14 | Screen Capture | ✕ |
-| 2016-07-12 | Media Capture Depth Stream Extensions | - (media related) |
-| 2016-05-17 | Cooperative Scheduling of Background Tasks | ✕ |
-| 2016-04-22 | Navigation Timing Level 2 | - (perf related) |
-| 2016-04-03 | Clipboard API and events | ✕ `clipboard` module |
-| 2015-12-15 | Push API | ✕ |
-| 2015-12-08 | Web Audio API | - (media related) |
-| 2015-10-15 | FindText API | - |
-| 2015-09-24 | Web Workers | ✕ |
-| 2015-04-21 | File API | ✕ |
-| 2014-02-20 | Network Service Discovery | ✕ |
-| 2012-03-06 | MediaStream Capture Scenarios | - (media related) |
-| 2011-12-15 | Audio Processing API | - (media related) |
http://git-wip-us.apache.org/repos/asf/incubator-weex-site/blob/12e3a8bc/_draft/weex-dom-api.md
----------------------------------------------------------------------
diff --git a/_draft/weex-dom-api.md b/_draft/weex-dom-api.md
deleted file mode 100644
index f18efa0..0000000
--- a/_draft/weex-dom-api.md
+++ /dev/null
@@ -1,224 +0,0 @@
----
-title: Native DOM APIs
-type: references
-group: API
-order: 2.8
-version: 2.1
-has_chapter_content: true
----
-
-# Native DOM APIs
-
-Weex 在 JS 引擎中,为每个页面都提供了一套 Native DOM APIs,这套接口和 HTML DOM APIs 非常接近,利用这套接口我们可以通过 JavaScript 控制 native 的渲染逻辑。而且 Weex 上层的 Vue 2.0 也是基于这套接口进行适配的。
-
-*绝大多数情况下 JS 框架会把 Native DOM APIs 都封装好,开发者不需要直接对 Native DOM 进行操作。*
-
-* `Document` 类,整个页面文档。
-* `Node` 类,结点的基础类。
-* `Element` 类,元素结点,继承自 `Node`,单个视图单元。
-* `Comment` 类,注释结点,继承自 `Node`,无实际意义,通常用作占位符。
-
-**每个 Weex 页面都有一个 `weex.document` 对象,该对象就是一个 `Document` 类的实例,也是下面所有接口调用的起点。**
-
-接下来详细介绍它们的用法:
-
-## `Document` 类
-
-每个 `Document` 实例在创建的时候都会自动拥有一个 `documentElement` 属性,表示文档结点。该文档结点可以拥有一个 `body`,即文档的主体结点。
-
-**注意事项**: 文档的主体结点只接受 `<div>`、`<list>` 或 `<scroller>` 三种类型的元素结点。
-
-### 构造函数
-
-**`new Document(id: string, url: string?)`**
-
-### 成员方法
-
-**`createElement(tagName: string, props: Object?): Element`**
-
-* 创建一个特定类型 `tagName` 的 `Element` 实例,即一个元素结点。`props` 可以包含 `attr` 对象和 `style` 对象。比如 `createBody('div', {style: {backgroundColor: '#ffffff'}})`。
-
-**`createComment(text: string): Comment`**
-
-* 创建一个 `Comment` 的实例,即一个注释结点,并设置一段文本描述。
-
-**`createBody(tagName: string, props: Object?): Element`**
-
-* 创建文档主体结点,并自动挂载到 `documentElement` 下。
-
-**`fireEvent(el: Element, type: string, e: Object?, domChanges: Object?)`**
-
-* 触发一个特定类型的事件,并附带一个事件对象 `e`。当该事件在产生过程中修改了 DOM 的特性或样式,则第四个参数用来描述这些改变,参数格式和上面 `createElement` 方法的格式相同。
-
-**`destroy()`**
-
-* 销毁当前文档。一旦销毁之后文档将不会再工作。
-
-### 只读成员变量
-
-**`id: string`**
-
-* 每个 `Document` 实例都有一个唯一的 `id`。这同时也是每个 Weex 页面唯一拥有的 `id`。
-
-**`URL: string?`**
-
-* 如果当前 Weex 页面有 JS bundle URL 的话,这里则会返回 这个 URL。
-
-**`body: Element`**
-
-* 文档的主体结点,概念类似 HTML DOM 里的 `document.body`。
-
-**`documentElement: Element`**
-
-* 文档的对应结点,概念类似 HTML DOM 里的 `document.documentElement`。
-* `body` 和 `documentElement` 的关系是:`documentElement` 是 `body` 的父结点。
-
-**`getRef(id): Node`**
-
-* 根据结点 id 获取结点。
-
-## `Node` 类
-
-### 构造函数
-
-**`new Node()`**
-
-### 成员
-
-**`destroy()`**
-
-### 只读成员变量或方法
-
-**`ref: string`**
-
-* 每个 `Node` 实例都有各自的在整个 `Document` 实例中唯一的 `ref` 值。
-
-**`nextSibling: Node?`**
-
-**`previousSibling: Node?`**
-
-**`parentNode: Node?`**
-
-* 上述三个接口和 HTML DOM 的定义吻合。
-
-**`children: Node[]`**
-
-* 该结点拥有的所有子结点的数组。
-
-**`pureChildren: Node[]`**
-
-* 该结点拥有的所有子元素的数组。和 `children` 的区别是,`pureChildren` 只包含了 `Element` 实例而不包含 `Comment` 实例。
-
-## `Element` 类 <small>继承自 `Node`</small>
-
-### 构造函数
-
-**`new Element(type: string, props: Object?)`**
-
-* 创建一个特定类型 `type` 的元素结点,参数 `props` 可以包含 `attr` 对象或 `style` 对象。
-
-### DOM 树操作
-
-**`appendChild(node: Node)`**
-
-**`insertBefore(node: Node, before: Node?)`**
-
-* 上述两个接口类似 HTML DOM。
-
-**`insertAfter(node: Node, after: Node?)`**
-
-* 在一个子结点之前插入新结点 after。
-
-**`removeChild(node: Node, preserved: boolean?)`**
-
-* 删除子结点 `node`,参数 `preserved` 表示立刻从内存中删除还是暂时保留。
-
-**`clear()`**
-
-* 清除所有的子结点。
-
-### DOM 属性本身操作
-
-**`setAttr(key: string, value: string, silent: boolean?)`**
-
-**`setStyle(key: string, value: string, silent: boolean?)`**
-
-* 上述两个接口中,当 `silent` 为真的时候,结点仅更新自己,不会传递命令给客户端渲染层。该参数用来处理用户事件在发生时已经改变结点相关属性的情况下,不会在 Native DOM 也改变之后重复发送命令给客户端。
-
-**`addEvent(type: string, handler: Function)`**
-
-**`removeEvent(type: string)`**
-
-**`fireEvent(type: string, e: any)`**
-
-* 绑定事件、解绑定事件、触发事件。
-
-#### 特定组件类型的组件方法
-
-特殊的:不同组件类型可以拥有自己特有的方法,比如 `<web>` 组件支持 `refresh` 方法,详见各组件的描述,在此情况下,我们会产生特定组件类型的 class,比如 `WebElement`,它继承自 `Element`。
-
-如:
-
-> #### `WebElement` <small>继承自 `Element`</small>
->
-> 表示在 Weex 页面中嵌入一个 webview
->
-> **`refresh()`**: 刷新当前 webview
-
-### 只读成员变量或方法
-
-**`ref`, `nextSibling`, `previousSibling`, `parentNode`**
-
-* 继承自 `Node`。
-
-**`nodeType: number`**
-
-* 永远是数字 `1`。
-
-**`type: string`**
-
-* 和构造函数里的 `type` 一致。
-
-**`attr: Object`**
-
-* 当前结点的所有特性的键值对。推荐通过 `setAttr()` 方法进行修改,而不要直接修改这里的对象。
-
-**`style: Object`**
-
-* 当前结点的所有样式的键值对。推荐通过 `setStyle()` 方法进行修改,而不要直接修改这里的对象。
-
-**`event: Object`**
-
-* 当前结点的所有事件绑定。每个事件类型对应一个事件句柄方法。推荐通过 `addEvent()` / `removeEvent()` 方法进行修改,而不要直接修改这里的对象。
-
-**`toJSON(): Object`**
-
-* 返回描述该元素结点的一段 JSON 对象,形如:`{ref: string, type: string, attr: Object, style: Object, event: Array(string), children: Array}`。
-
-## `Comment` 类 <small>继承自 `Node`</small>
-
-### 构造函数
-
-**`new Comment(value: string)`**
-
-### 只读成员变量或方法
-
-**`ref`, `nextSibling`, `previousSibling`, `parentNode`**
-
-* 继承自 `Node`。
-
-**`nodeType: number`**
-
-* 永远是数字 `8`。
-
-**`type: string`**
-
-* 永远是字符串 `'comment'`
-
-**`value: string`**
-
-* 和构造函数里的 `value` 一致。
-
-**`toJSON(): Object`**
-
-* 返回描述该注释结点的一段 JSON 对象,形如:`<!-- value -->`。
http://git-wip-us.apache.org/repos/asf/incubator-weex-site/blob/12e3a8bc/_draft/write-once.en.md
----------------------------------------------------------------------
diff --git a/_draft/write-once.en.md b/_draft/write-once.en.md
deleted file mode 100644
index 673b302..0000000
--- a/_draft/write-once.en.md
+++ /dev/null
@@ -1,23 +0,0 @@
----
-title: Write once, Run Everywhere
-type: guide
-order: 4.4
-version: 2.1
----
-
-# Write Once, Run Everywhere
-
-Weex is a "Write Once, Run Everywhere" solution.
-
-* First, Weex is based on web dev experience, which includes syntax and project management.
-* Second, all components & modules in Weex are discussed by iOS, Android, web developers together to ensure it's common enough to satisfy every platforms.
-* You only need write the same Weex code for each platforms.
-
-We think about it in these aspects below:
-
-1. Today for almost all mobile apps, one app solves the same problem in different platforms. Weex hope to supply a lightweight way to describe your business logic which works well in all platforms you need.
-2. For the differences of all mobile platforms, we are willing to fill the gap in 3 points:
- 1. Design the same APIs for all platforms to ensure different platforms have the same business logic description.
- 2. Implement the APIs with different style or behaviors to ensure the implementation and user experience matches different platforms.
- 3. Platforms obviously differ among each other. We also have some environment variables to help developers in certain situations.
-3. We trust (web) standard is the best for all features in all platforms.
http://git-wip-us.apache.org/repos/asf/incubator-weex-site/blob/12e3a8bc/_draft/write-once.md
----------------------------------------------------------------------
diff --git a/_draft/write-once.md b/_draft/write-once.md
deleted file mode 100644
index 6c0c62d..0000000
--- a/_draft/write-once.md
+++ /dev/null
@@ -1,25 +0,0 @@
----
-title: 一次撰写,多端运行
-type: wiki
-order: 1.4
-version: 2.1
----
-
-# 一次撰写,多端运行
-
-Weex 提供了多端一致的技术方案。
-
-* 首先 web 开发体验在各端当中是相同的。包括语法设计和工程链路。
-* 其次,Weex 的组件、模块设计都是 iOS、Android、Web 的开发者共同讨论出来的,有一定的通用性和普遍性。
-* Weex 开发同一份代码,可以在不同的端上分别执行,避免了多端的重复研发成本。
-
-我们这样设计基于以下几点设想:
-
-1. 今天绝大多数的移动应用,虽然要同时出现在不同的移动操作系统平台上,但是要解决的问题和用户的需求是相同或非常接近的。Weex 希望提供的是一个快速直接统一描述业务的通用方式,为业务和产品需求直接服务。
-2. 针对各大操作系统平台差异的现状,我们倾向于通过以下两方面来解决这一问题
- 1. 把不同端的样式和行为设计并描述成为相同的 API,这样上层的业务逻辑是同一份,但是在不同端上可以做到不一样的展现效果。
- 2. 通过横向扩展的方式在不同的端上扩展不一样的功能、特性或表现形式。
- 3. 各端不一致的业务描述也是难免的,我们通过提供更多更丰富的环境变量来帮助开发者在同一套代码里高效适配不同的设备场景。
-3. 我们相信标准和规范的力量
-
-部分功能特性由于 native 特性的关系,会略有不同,我们会在相应的组件、模块、API 文档中做相应的描述和提示。
http://git-wip-us.apache.org/repos/asf/incubator-weex-site/blob/12e3a8bc/_drafts/difference-with-web.en.md
----------------------------------------------------------------------
diff --git a/_drafts/difference-with-web.en.md b/_drafts/difference-with-web.en.md
new file mode 100644
index 0000000..2af11f9
--- /dev/null
+++ b/_drafts/difference-with-web.en.md
@@ -0,0 +1,149 @@
+---
+title: Difference with Web
+type: references
+order: 10.1
+version: 2.1
+---
+
+# Differences between using Vue in Web and Weex
+
+## Platform Differences
+
+Vue.js was designed for the Web platform at the begining. Although it can be based on Weex to develop native applications, there are still many differences between web and native. See [Platform Differences Between Weex and Web](../ platform-difference.html) for more details.
+
+Due to those differences, Weex doesn't support those features in Vue.js (mostly are DOM-related):
+
++ Event bubbling and capturing are not supported. Event modifiers, such as `.prevent`,` .capture`, `.stop`,` .self` are meaningless in the native environment.
++ The keyboard event modifiers, like `.{KeyCode | keyAlias}` is also meaningless. (see [docs in Vue.js](https://vuejs.org/v2/guide/events.html#Key-Modifiers))
++ No need to call `vm.$mount` manually, the entry component will mount to the root view of the native container by default.
++ `v-html` and` v-text` directives are not supported.
+
+## Functional differences
+
+### Vue 2.0 Runtime-only build
+
+Vue 2.0 provides two available builds, the standalone build and the runtime-only build. see the [official document](https://vuejs.org/v2/guide/installation.html#Standalone-vs-Runtime-only-Build) for more information.
+
+Weex only required the runtime-only build of Vue 2.0 for better performance and less code size.
+
+The specific differences are:
+
++ The `template` attribute is not supported when defining a component.
++ Does not support using `x-templates`.
++ Does not support using `Vue.compile`.
+
+### Isolate the context of multiple pages
+
+Weex use the "multiple-pages" concept in native, different js bundle will be run in different native views, there context is isolated. Even the `Vue` variable is not the same instance between js bundles. (However, all the js bundle will share the same Weex runtime.)
+
+Based on this feature, the global configurations in `Vue` will only take effect on the current page:
+
++ `Vue.config`
++ `Vue.component`
++ `Vue.directive`
++ `Vue.filter`
++ `Vue.mixin`
++ `Vue.use`
+
+> Note: Those methods are still work, but its effect will be limited to the current page.
+
+## Restrictions in style
+
+CSS is very flexible, has a lot of properties, support a variety of layout modes. This is the advantage of CSS, but also a bottleneck in browser performance optimization.
+
+The style in Weex is parsed by the native renderer, and for the sake of performance and complexity, Weex makes some trade-offs about CSS features to make it better suited to *"best practices"*.
+
+### Single class selector
+
+Weex only supports to use single class name in `<style>`, does not support *type selectors*, *ID selectors*, *attribute selectors*, *adjacent sibling selectors* and the *combinators*.
+
+```CSS
+/* Support single class name selector */
+.one-class {
+ font-size: 36px;
+}
+
+/* Does not support to use combinators between selector */
+.parent > .child {
+ padding-top: 10px;
+}
+.foo + .bar {
+ margin-left: 20px;
+}
+
+/* Does not support attribute selectors. The `v-cloak` directive is not supported */
+[V-cloak] {
+ color: #FF6600;
+}
+```
+
+The restriction is only for the style definition, does not affect the use of class names. You can still use multiple class names on a single tag, such as:
+
+```Html
+<template>
+ <div class="one two three"><div>
+</template>
+```
+
+### Scoped by default
+
+In Weex, For single file components, the styles written in the `<style>` can only be used in the current component.
+
+In order to maintain consistency with Native, it is recommended that you write the style in the `.vue` file with the` scoped` attribute, that is, `<style scoped>`.
+
+### Supported CSS attributes
+
+Weex supports a subset of CSS, and will continue to expand.
+
+Weex supports *box-model* and *flexbox*, as well as other common styles. See [Weex Common Style](../ common-style.html) and [Supported Web Standards](http://weex.apache.org/references/web-standards.html) for more information.
+
+In addition, you should also pay attention to the following points:
+
++ No need to write style prefix.
++ Weex doesn't support `display: none;` and therefore doesn't support the `v-show` directive.
++ In order to optimize the efficiency of CSS parser, Weex doesn't support shorthand attributes, involving the following attributes:
+ + `flex`
+ + `border`, `border-(top|bottom|left|right)`
+ + `margin`
+ + `padding`
+ + `font`
+ + `background`
+
+## Differences in development
+
+Because of the platform difference, you have to compile your source file in two different ways:
+
++ For the web, you can compile source files in any official way, such as Webpack + vue-loader or Browserify + vueify. and require the [weex-vue-render](https://www.npmjs.com/package/weex-vue-render), which is a group of Weex build-in components.
++ For Android and iOS, we've provided [weex-loader](https://github.com/weexteam/weex-loader) to compile the `.vue` files. That is, use Webpack + weex-loader to generate the js bundle that is available for the native.
+
+### Use weex-loader
+
+[weex-loader](https://github.com/weexteam/weex-loader) is a loader for Webpack, see the [official document](http://webpack.github.io/docs/using-loaders.html) to learn how to use it.
+
+One more thing should be reminded is that if the *entry file* of your webpack config is a `.vue` file, you also need to pass an additional ` entry` parameter, usually set to `true`.
+
+```Js
+module.exports = {
+ // Add the entry parameter for the .vue file
+ entry: './path/to/App.vue?entry=true',
+
+ // other configurations ...
+
+ module: {
+ loaders: [{
+
+ // matches the .vue file path that contains the entry parameter
+ test: /\.vue(\?^^]+)?$/,
+ loaders: ['weex-loader']
+ }]
+ },
+}
+```
+
+**You don't need to write those additional parameters if you are using `.js` file as entry file.** We recommend using javascript files as the entry file of webpack config.
+
+### Setup native development environments
+
+Since your are using Weex to develop native apps, setup native development environments, both Android and iOS, would be very useful.
+
+See [Integrating Weex to the existing application](../../guide/integrate-to-your-app.html) for more information.
http://git-wip-us.apache.org/repos/asf/incubator-weex-site/blob/12e3a8bc/_drafts/difference-with-web.md
----------------------------------------------------------------------
diff --git a/_drafts/difference-with-web.md b/_drafts/difference-with-web.md
new file mode 100644
index 0000000..d075312
--- /dev/null
+++ b/_drafts/difference-with-web.md
@@ -0,0 +1,138 @@
+---
+title: Vue.js 在 Weex 中的差异
+type: guide
+group: 高阶特性
+order: 8.3
+version: 2.1
+---
+
+
+# Vue.js 在 Weex 和 Web 中的差异
+
+## 平台差异
+
+Vue.js 最初是为 Web 平台设计的,虽然可以基于 Weex 开发原生应用,但是 Web 开发和原生开发毕竟不同,在功能和开发体验上都有一些差异,这些差异从本质上讲是原生开发平台和 Web 平台之间的差异,可以通过[《Weex 和 Web 平台的差异》](../platform-difference.html)了解更多细节和原因。
+
+由于运行平台存在差异,Weex 不支持 Vue.js 中与 DOM 相关的功能:
+
++ 不支持事件冒泡和捕获机制,`.prevent` 、`.capture` 、`.stop` 、`.self` 等事件修饰符在原生环境中无意义。
++ 键盘事件的 `.{keyCode | keyAlias}` 修饰符在原生环境中无意义。(参考 [Vue 相关文档](https://cn.vuejs.org/v2/guide/events.html#按键修饰符))
++ 无需自行调用 `vm.$mount`,默认会将入口组件挂载到原生应用的视图中。
++ 不支持 `v-html` 和 `v-text` 指令。
+
+## 功能差异
+
+### 仅引入了 Vue Runtime
+
+Vue 除了提供默认的完整包以外,还提供一个更小巧的 `vue.runtime.js`,在这个文件中移除了模板编译的相关操作,Weex 中也仅引入 Vue Runtime 的功能,这样做除了可以减少代码体积以外,还能减少运行期编译模板的负担,提升性能。
+
+具体的差异有:
+
++ 定义组件时不支持使用 `template` 属性。
++ 不支持使用 `x-templates`。
++ 不支持使用 `Vue.compile`。
+
+### 隔离多页面的作用域
+
+Weex 在原生端使用的是“多页”的实现,不同的 js bundle 将会在不同的原生页面中执行;也就是说,不同的 js bundle 之间将不同共享 js 变量。即使是 `Vue` 这个变量,在不同页面中也对应了不同的引用。
+
+基于这个特性,Vue 中全局功能将只在当前页面内生效:
+
++ `Vue.config`
++ `Vue.component`
++ `Vue.directive`
++ `Vue.filter`
++ `Vue.mixin`
++ `Vue.use`
+
+> 注:以上接口的功能并未受影响,只是其生效范围将会限制在同一页面内。
+
+## 样式差异
+
+Web 中的 CSS 非常的灵活,积累了特别多的属性,支持多种布局方法;这是其优势,也是浏览器性能优化的一个瓶颈。
+
+Weex 中的样式是由原生渲染器解析的,出于性能和功能复杂度的考虑,Weex 对 CSS 的特性做了一些取舍,使其更符合最佳实践。
+
+### 单类名选择器和作用域
+
+Weex 中只支持单个类名选择器,不支持关系选择器,也不支持属性选择器。
+
+```css
+/* 支持单个类名选择器 */
+.one-class {
+ font-size: 36px;
+}
+
+/* 不支持关系选择器 */
+.parent > .child {
+ padding-top: 10px;
+}
+
+/* 不支持属性选择器,不支持 `v-cloak` 指令 */
+[v-cloak] {
+ color: #FF6600;
+}
+```
+
+这个只是对样式定义的限制,不影响样式类名的使用,在标签中可以添加多个样式类名,如:
+
+```html
+<template>
+ <div class="one two three"><div>
+</template>
+```
+
+### 组件级别的作用域
+
+在 Weex 中,写在组件 `<style>` 里的样式只能用在当前组件中,默认是 `scoped` 作用域。为了保持和 Native 的一致性,建议在 `.vue` 文件中写样式时,加上 `scoped` 属性,即: `<style scoped>`。
+
+### 支持的样式属性
+
+Weex 支持的样式特性是 CSS 的子集,并且会不断扩充;在实现过程中我们参考了 [CSS 属性在浏览器中的使用频率](https://gist.github.com/Jinjiang/ea6b403036b7287cf8b8508729b77ac0#css-properties),优先实现其中频率最高的一些属性。
+
+Weex 支持了基本的盒模型和 flexbox 布局,以及其他常用样式,详情可参考[Weex 通用样式文档](../common-style.html)。
+
+在编写样式时,还应该注意一下几点:
+
++ 不需要写样式前缀。
++ Weex 不支持 `display: none;`,因此也不支持 `v-show` 指令。
++ 为了优化样式解析的效率,样式属性暂不支持简写,涉及一下属性:
+ + `border` 、`border-(top|bottom|left|right)`
+ + `margin`
+ + `padding`
+ + `flex`
+
+## 编译环境的差异
+
+在 Weex 中使用 Vue.js ,你所需要关注的运行平台除了 Web 之外还有 Android 和 iOS ,在开发和编译环境上还有一些不同点。针对 Web 和原生平台,将 Vue 项目源文件编译成目标文件,有两种不同的方式:
+
++ 针对 Web 平台,和普通 Vue 2.X 项目一样,可以使用任意官方推荐的方式编译源文件,如 Webpack + vue-loader 或者 Browserify + vueify 。
++ 针对 Android 和 iOS 平台,我们提供了 [weex-loader](https://github.com/weexteam/weex-loader) 工具支持编译 `.vue` 格式的单文件组件;也就是说,目前只能使用 Webpack + weex-loader 来生成原生端可用的 js bundle。
+
+### 使用 weex-loader
+
+weex-loader 是 Webpack 的一个加载器,使用方法参考其[官方文档](http://webpack.github.io/docs/using-loaders.html)。需要提醒的是,如果 Webpack 配置的入口文件是个 `.vue` 格式的文件的话,还需要额外传递 `entry` 参数,通常设置为 `true`,表示将当前组件作为入口组件。为了能正常匹配 `.vue` 文件,Webpack 配置文件中 weex-loader 的匹配规则也需要有所调整。
+
+```js
+module.exports = {
+ // 针对 .vue 文件要添加 entry 参数
+ entry: './path/to/App.vue?entry=true',
+
+ // 其他配置项 ...
+
+ module: {
+ loaders: [{
+
+ // 匹配包含了 entry 参数的 .vue 文件路径
+ test: /\.vue(\?[^?]+)?$/,
+ loaders: ['weex-loader']
+ }]
+ },
+}
+```
+
+如果使用 `.js` 文件作为 Webpack 配置的入口文件,则不需要额外配置这些参数,我们推荐使用 Javascript 文件作为编译的入口文件。
+
+### 搭建原生开发环境
+
+Weex 项目生成的是原生应用,学习一些开发原生应用的基础知识,会对你开发 Weex 项目很有帮助。参考[《集成 Weex 到已有应用》](../../guide/integrate-to-your-app.html)了解更多信息。
http://git-wip-us.apache.org/repos/asf/incubator-weex-site/blob/12e3a8bc/_drafts/native-dom-api.md
----------------------------------------------------------------------
diff --git a/_drafts/native-dom-api.md b/_drafts/native-dom-api.md
new file mode 100644
index 0000000..37729a2
--- /dev/null
+++ b/_drafts/native-dom-api.md
@@ -0,0 +1,212 @@
+---
+title: Native DOM APIs
+type: references
+order: 6
+version: 2.1
+has_chapter_content: true
+---
+
+# Native DOM APIs
+
+Weex in the JS engine, for each page provides a set of Native DOM APIs. This interface is very close to the HTML DOM APIs. Using this interface we can control native rendering logic via JavaScript. And Weex upper layer of Vue 2.0 is based on this interface to adapt.
+
+In most cases, the JS framework will encapsulate native DOM APIs. That way, the developer does not need to work directly on the Native DOM.
+
++ `Document` class: full page document.
++ `Node` class: the base class of nodes.
++ `Element` class: element node, inherited from Node, single view unit.
++ `Comment` class: comment node, inherited from Node, no practical meaning, usually used as placeholders.
+
+Each Weex page has a `weex.document` object, which is an instance of the Document class and is the starting point for all the following interface calls.
+
+Let's take a look at their usage in detail:
+
+## `Document` class
+Each `Document` instance will automatically have a `documentElement` property when it is created. This attribute represents the document node. The document node can have a body, which is the main node of the document.
+
+Note: The document node body only accepts `<div>`, `<list>`, or `<scroller>` three types of element nodes.
+
+### Constructor
+`new Document(id: string, url: string?)`
+
+### Member method
+`createElement(tagName: string, props: Object?): Element`
+
++ Creates an `Element` instance of a specific type `tagName`, which is an element node. Props can contain attr objects and style objects. Such as `createBody ('div', {style: {backgroundColor: '#ffffff'}})`.
+
+`createComment(text: string): Comment`
+
++ Create an instance of ·`Comment`, which is a comment node and set a text description.
+
+`createBody(tagName: string, props: Object?): Element`
+
++ Create a document body node and automatically mount it under `documentElement`.
+
+`fireEvent(el: Element, type: string, e: Object?, domChanges: Object?)`
+Triggers a particular type of event. When the event modifies the DOM's properties or styles during the generation process, the fourth argument is used to describe the changes, and the parameter format is the same as the format of the `createElement` method above.
+
+`destroy()`
+
++ Destroy the current document. Once the document is destroyed, it will no longer work.
+
+### Read-only member variables
+`id: string`
+
++ Each `Document` instance has a unique id. This is also the only id that each Weex page has.
+
+`URL: string?`
+
++ If the current Weex page has a JS bundle URL, the URL will be returned here.
+
+`body: Element`
+
++ The main body of the document, the concept similar to the HTML DOM document.body.
+
+`documentElement: Element`
+
++ Document node, the concept similar to the HTML DOM document.documentElement.
++ The relationship between body and documentElement is: documentElement is the parent of the body.
+
+`getRef(id): Node`
+
++ Get the node based on the node id.
+
+## `Node` Class
+### Constructor
+`new Node()`
+
+### Member method
+`destroy()`
+
+### Read-only member variables or methods
+`ref: string`
+
++ Each `Node` instance has its own unique ref value in the entire `Document instance.
+
+`nextSibling: Node?`
+
+`previousSibling: Node?`
+
+`parentNode: Node?`
+
++ The three interfaces are consistent with the definition of HTML DOM.
+
+`children: Node[]`
+
++ The node has an array of all child nodes.
+
+`pureChildren: Node[]`
+
+The node has an array of all the child elements. The difference between it and `children` is that `pureChildren` contains only the `Element` instance and not the `Comment` instance.
+
+
+## `Element` class, inherited from `Node`
+### Constructor
+`new Element(type: string, props: Object?)`
+
++ Creates an element node of a particular type `type`, and the `props` parameter can contain an `attr` object or a `style` object.
+
+### DOM tree operation
+`appendChild(node: Node)`
+`insertBefore(node: Node, before: Node?)`
+
++ The two interfaces are similar to HTML DOM.
+
+`insertAfter(node: Node, after: Node?)`
+
++ Insert a new node before a child node.
+
+`removeChild(node: Node, preserved: boolean?)`
+
++ Delete the child node node. Parameters `preserved` whether it is immediately removed from memory or temporarily retained.
+
+`clear()`
+
++ Clear all child nodes.
+
+### The DOM property itself operates
+
+`setAttr(key: string, value: string, silent: boolean?)`
+
+`setStyle(key: string, value: string, silent: boolean?)`
+
++ In the above two interfaces, when `silent` is true, the node only updates itself, does not pass the command to the client render layer. This parameter is used to handle user events that have changed the node-related properties at the time of occurrence, and will not send commands repeatedly to the client after the Native DOM has changed.
+
+`addEvent(type: string, handler: Function)`
+
+`removeEvent(type: string)`
+
+`fireEvent(type: string, e: any)`
+
++ Bind events, unbind events, trigger events.
+
+#### Component method for a specific component type
+
+Special: Different component types can have their own unique methods, such as `<web>` components support `refresh` method. You can see the description of each component. In this case, we will generate a specific component type of class, such as `WebElement`, which inherited from `Element`.
+
+Such as:
+
+>`WebElement` inherited from `Element`
+>Indicates that a webview is embedded in the Wex page
+
+>`Refresh ()`: Refreshes the current webview
+
+
+### Read-only member variables or methods
+
+`ref`, `nextSibling`, `previousSibling`, `parentNode`
+
++ Inherited from `Node`.
+
+`nodeType: number`
+
++ The number is always 1.
+
+
+`type: string`
+
++ Consistent with the `type` in the constructor.
+
+`attr: Object`
+
++ The key pair of all the characteristics of the current node. It is recommended to use the `setAttr ()` method to modify, rather than directly modify the object here.
+
+`style: Object`
+
++ The value of all the keys of the current node. It is recommended to modify the `setStyle ()` method, rather than directly modify the object here.
+
+`event: Object`
+
++ All events of the current node are bound. Each event type corresponds to an event handler method. It is recommended to use the `addEvent () / removeEvent ()` method to modify, rather than directly modify the object here.
+
+`toJSON(): Object`
+
++ Returns a JSON object that describes the element's node, such as: `{ref: string, type: string, attr: Object, style: Object, event: Array (string), children: Array}`.
+
+
+## `Comment` class, inherited from `Node`
+
+### Constructor
+`new Comment(value: string)`
+
+### Read-only member variables or methods
+
+`ref`, `nextSibling`, `previousSibling`, `parentNode`
+
++ Inherited from `Node`.
+
+`nodeType: number`
+
++ The number is always 8.
+
+`type: string`
+
++ The type is always `'comment'`
+
+`value: string`
+
++ Consistent with the value in the constructor.
+
+`toJSON(): Object`
+
++ Returns a JSON object describing the annotation node. For example: `<! - value ->`.
http://git-wip-us.apache.org/repos/asf/incubator-weex-site/blob/12e3a8bc/_drafts/timer.cn.md
----------------------------------------------------------------------
diff --git a/_drafts/timer.cn.md b/_drafts/timer.cn.md
new file mode 100644
index 0000000..c93f937
--- /dev/null
+++ b/_drafts/timer.cn.md
@@ -0,0 +1,49 @@
+---
+title: Timer
+type: references
+group: 内置模块
+order: 9.03
+version: 0.10
+---
+
+# Timer
+Weex Timer可以用来延时启动一个一次性任务或者重复任务。Timer���会尽最大努力提供精确的延时,但是延时可能并不精确,延时时间�很可能会超过用户期望的时间。实际上,timer�仅仅是为了支持�HTML5中的�polyfill,*不建议*开发者��直接�使用timer.
+
+## API
+Timer中延时的单位是毫秒,且延时时间应该为一个非负的**int**值(int值�最大为0x7FFFFF).如果延时时间为零,会将该任务�马上插入任务队列的尾部。对于其他非法值,timer的行为未定义。
+
+### setTimeout(fn, timeout)
+`setTimeout()`��会等待指定的时间,然后执行给出的函数。
+* 可以使用 `clearTimeout()`�去�阻止`setTimeout()`���运行如果此时对应的`setTimeout()`��还没有运行的话。
+* 如果需要重复�执行任务,使用`setInterval()`.
+
+#### Arguments
+* `fn` (function): 待执行的函数.
+* `timeout` (number): 执行函数前的等待时间,单位为毫秒。
+
+#### Return value
+一个Number对象, 表示这个�任务的id。把id传入clearTimeout(fnId)中可以用来取消任务。
+
+### setInterval(fn, interval)
+`setInterval()`每隔指定的时间间隔后,会执行对应的�函数。`setInterval()`不会�停止,除非`clearInterval()`被调用。`setInterval()`的返回值可以用来作为`setInterval()`的参数。
+
+#### Arguments
+* `fn` (function): 待执行的函数。
+* `interval` (number): �这次执行函数与下一次�函数之间的时间间隔,单位为�毫秒。
+
+#### Return value
+一个Number对象,代表任务序列的id。可以把这个值传入`clearInterval`中来终止重复任务的执行。
+
+### clearTimeout(fnId)
+`clearTimeout()`可以�用来提前终止`setTimeout()`�启动的任务。仅当`setTimeout()`�对应的任务没有被执行时,`clearTimeout()`才可以用来�终止该任务,否则`clearTimeout()`没有任何效果�。
+
+#### Arguments
+* `fnId` (number): `setTimeout()`��的返回值.
+
+### clearInterval(fnId)
+ `clearInterval()`�可以用来终止 `setInterval()`启动的�任务序列。
+
+#### Arguments
+* `fnId` (number): `setInterval()`的返回值
+
+[Try it](http://dotwe.org/vue/ad564965f1eac5a4bc86946ecff70a0c)
http://git-wip-us.apache.org/repos/asf/incubator-weex-site/blob/12e3a8bc/_drafts/timer.md
----------------------------------------------------------------------
diff --git a/_drafts/timer.md b/_drafts/timer.md
new file mode 100644
index 0000000..da518fd
--- /dev/null
+++ b/_drafts/timer.md
@@ -0,0 +1,60 @@
+---
+title: Timer
+type: references
+group: Build-in Modules
+order: 9.03
+version: 0.10
+---
+
+# Timer
+
+Weex encapsulates a series of APIs in order to start/stop a one-time task or a repeated task at a fixed delay. Please note that this module don't provide an accuracy delay. It provides best-effort delivery, but the actual delay may still exceed the delay user wants if the corresponding thread is busy.
+Actually, this module is made for the polyfill of HTML5 timer APIs, developers **should not** use this module directly unless they know exactly what they are doing.
+
+## API
+
+All timeout or interval in this module are measured in milliseconds. Also, timeout and interval should be a non-negative **integer**(the max of integer is 0x7FFFFFFF). The behavior of invalid value for timeout or interval is undefined.
+
+### setTimeout(fn, timeout)
+
+The `setTimeout()` method calls a function after a specified number of milliseconds. Use the `clearTimeout()` method to prevent the function from running. The function is only executed once. If you need to repeat execution, use the `setInterval()` method.
+
+#### Arguments
+
+- `fn` (function): The function that will be executed
+- `timeout` (number): The number of milliseconds to wait before executing the function
+
+#### Return value
+
+A Number, representing the fnId value of the timer that is set. Use this value with the `clearTimeout()` method to cancel the timer.
+
+### setInterval(fn, interval)
+
+The `setInterval()` method calls a function at specified intervals (in milliseconds), and it will continue calling the function until `clearInterval()` is called. The fnId value returned by `setInterval()` is used as the parameter for the `clearInterval()` method.
+
+#### Arguments
+
+- `fn` (function): The function that will be executed
+- `interval` (number): The intervals (in milliseconds) on how often to execute the function
+
+#### Return value
+
+A Number, representing the fnId value of the timer that is set. Use this value with the `clearInterval()` method to cancel the timer
+
+### clearTimeout(fnId)
+
+The `clearTimeout()` method clears a timer set with the `setTimeout()` method. The fnId value returned by `setTimeout()` is used as the parameter for the `clearTimeout()` method. If the function has not already been executed, you will be able to stop the execution by calling the `clearTimeout()` method, otherwise, this method has no influence on the task.
+
+#### Arguments
+
+- `fnId` (number): The fnId value of the timer returned by the `setTimeout()` method
+
+### clearInterval(fnId)
+
+The `clearInterval()` method clears a timer set with the `setInterval()` method. The fnId value returned by `setInterval()` is used as the parameter for the `clearInterval()` method.
+
+#### Arguments
+
+- `fnId` (number): The fnId of the timer returned by the `setInterval()` method
+
+[Try it](http://dotwe.org/vue/ad564965f1eac5a4bc86946ecff70a0c)
http://git-wip-us.apache.org/repos/asf/incubator-weex-site/blob/12e3a8bc/_drafts/v-0.10/advanced/extend-to-android.md
----------------------------------------------------------------------
diff --git a/_drafts/v-0.10/advanced/extend-to-android.md b/_drafts/v-0.10/advanced/extend-to-android.md
new file mode 100644
index 0000000..97bb49e
--- /dev/null
+++ b/_drafts/v-0.10/advanced/extend-to-android.md
@@ -0,0 +1,189 @@
+---
+title: Extend to Android
+type: advanced
+order: 6
+has_chapter_content: true
+version: 0.10
+---
+
+# Extend to Android
+
+### Module extend
+weex sdk support Module extend,
+Weex SDK provides only rendering capabilities, rather than have other capabilities, such as network, picture, and URL redirection. If you want the these features, you need to implement it.
+
+For example: If you want to implement an address jumping function, you can achieve a Module Follow the steps below.
+
+#### Step to customize a module
+
+1. Customize module must extend WXModule
+2. @WXModuleAnno annotation must be added, as it is the only the way to recognized by Weex
+3. The access levels of mehtod must be **public**
+4. The module class also can not be an inner class
+5. Customize can not be obfuscated by tools like ProGuard
+6. Module methods will be invoked in UI thread, do not put time consuming operation there
+7. Weex params can be int, double, float, String, Map, List
+
+Refer to the following example:
+
+```java
+public class WXEventModule extends WXModule{
+
+ private static final String WEEX_CATEGORY="com.taobao.android.intent.category.WEEX";
+
+ @JSMethod
+ public void openURL(String url){
+ //implement your module logic here
+ }
+}
+
+```
+
+#### Register the moulde
+
+```java
+ WXSDKEngine.registerModule("event", WXEventModule.class);
+```
+
+### Use this module in weex DSL
+Now `event` moudle is avaiable in weex, use the module like this:
+
+```javascript
+var event = require('@weex-module/event');
+event.openURL("http://www.github.com");
+```
+
+### Javascript callback
+
+If the module need implement a callback to javascript, you just add `JSCallback` argument to the method you want expose to javascript:
+
+```java
+ @JSMethod
+ public void openURL(String url,JSCallback callback){
+ //implement your module logic here
+ Map<String,Object> resp = new HashMap();
+ resp.put("result","ok");
+ callback.invoke(resp);
+ }
+```
+
+At the javascript side, call the module with javascript function to receive callback data:
+
+```javascript
+event.openURL("http://www.github.com",function(resp){ console.log(resp.result); });
+```
+
+### Component extend
+
+There are label, image, div, scroll, ect. components in weex, you can also customize your own components.
+
+#### Step to customize a component
+
+1. Customize components must extend WXComponent or WXContainer
+2. @WXComponentProp(name=value(value is attr or style of dsl)) for it be recognized by weex SDK.
+3. The access levels of mehtod must be **public**
+4. The component class can not be an inner class
+5. Customize can not be obfuscated by tools like ProGuard
+6. Component methods will be invoked in UI thread, do not put time consuming operation there.
+7. Weex params can be int, double, float, String, Map, List, Array
+
+
+Refer to the following example
+
+```java
+public class MyViewComponent extends WXComponent{
+ public MyViewComponent(WXSDKInstance instance, WXDomObject dom,
+ WXVContainer parent, String instanceId, boolean isLazy)
+ {
+ public MyViewComponent(WXSDKInstance instance, WXDomObject dom,
+ WXVContainer parent, String instanceId, boolean isLazy) {
+ super(instance, dom, parent, instanceId, isLazy);
+ }
+
+ @Override
+ protected void initView() {
+ mHost = new TextView(mContext);
+ }
+ @WXComponentProp(name=WXDomPropConstant.WX_ATTR_VALUE)
+ public void setMyViewValue(String value) {
+ ((TextView)mHost).setText(value);
+ }
+}
+```
+
+#### Register the Component
+
+
+```java
+WXSDKEngine.registerComponent("MyView", MyViewComponent.class);
+```
+
+### Adapter extend
+
+#### ImagedownloadAdapter
+
+Weex SDK has no image download capability, you need to implement `IWXImgLoaderAdapter`. Refer to the following examples.
+
+```java
+public class ImageAdapter implements IWXImgLoaderAdapter {
+
+ private Activity mContext;
+
+ public ImageAdapter(Activity activity) {
+ mContext = activity;
+ }
+
+ @Override
+ public void setImage(final String url, final ImageView view,
+ WXImageQuality quality, WXImageStrategy strategy) {
+ mContext.runOnUiThread(new Runnable() {
+
+ @Override
+ public void run() {
+ if (TextUtils.isEmpty(url)) {
+ view.setImageBitmap(null);
+ return;
+ }
+ String temp = url;
+ if (url.startsWith("//")){
+ temp = "http:" + url;
+ }
+ if (view.getLayoutParams().width<=0 || view.getLayoutParams().height<=0) {
+ return;
+ }
+ Picasso.with(WXEnvironment.getApplication())
+ .load(temp)
+ .resize(view.getLayoutParams().width,
+ view.getLayoutParams().height).into(view);
+ }
+ });
+ }
+}
+```
+
+#### Component Method
+from WeexSDK `0.9.5`, you can define your component method
+
+for example, define a method in component:
+
+```java
+@JSMethod
+public void focus(){
+//method implementation
+}
+```
+
+after your registration for your own custom component, now you can call it in your js file.
+
+```html
+<template>
+ <mycomponent id='mycomponent'></mycomponent>
+</template>
+<script>
+ module.exports = {
+ created: function() {
+ this.$el('mycomponent').focus();
+ }
+ }
+</script>
+```
[21/51] [abbrv] incubator-weex-site git commit: rearrangement the
structure of the document
Posted by ha...@apache.org.
http://git-wip-us.apache.org/repos/asf/incubator-weex-site/blob/32a097bf/_draft/v1.0/references/components/refresh.md
----------------------------------------------------------------------
diff --git a/_draft/v1.0/references/components/refresh.md b/_draft/v1.0/references/components/refresh.md
new file mode 100644
index 0000000..868dad7
--- /dev/null
+++ b/_draft/v1.0/references/components/refresh.md
@@ -0,0 +1,204 @@
+---
+title: <refresh>
+type: references
+order: 2.7
+version: 0.10
+---
+
+# <refresh>
+
+<span class="weex-version">v0.6.1+</span>
+
+`<refresh>` 为 `<scroller>` 和 `<list>` 提供下拉加载功能。用法与特性与 `<loading>` 类似,`<scroller>` 和 `<list>` 的子组件,且只能在被 `<scroller>` 和 `<list>` 包含时才能被正确的渲染。
+
+一个简单例子:
+
+```html
+<template>
+ <list>
+ <header>
+ <div class="center">
+ <text style="text-align:center">I am the header</text>
+ </div>
+ </header>
+ <refresh onpullingdown='onpullingdown' onrefresh="onrefresh" display="{{refreshDisplay}}" style="width:750;flex-direction: row;justify-content: center;">
+ <loading-indicator style="height:160;width:160;color:#3192e1"></loading-indicator>
+ </refresh>
+ <cell class="row" repeat="i in staffs" index="{{$index}}">
+ <div class="item">
+ <text>{{i.name}}</text>
+ </div>
+ </cell>
+ </list>
+</template>
+
+<style>
+ .row {
+ width: 750;
+ }
+ .item {
+ justify-content: center;
+ border-bottom-width: 2;
+ border-bottom-color: #c0c0c0;
+ height: 100;
+ padding:20;
+ }
+ .center {
+ border-bottom-width: 2;
+ border-bottom-color: #cccccc;
+ height: 100;
+ padding:20;
+ background-color:#FFFFFF;
+ justify-content: center;
+ }
+</style>
+
+<script>
+ module.exports = {
+ data: {
+ staffs:[],
+ refreshDisplay: 'show',
+ loadingDisplay: 'show',
+ loadingText: 'pull up to load more',
+ refreshText: 'pull down to refresh'
+ },
+ created:function() {
+ this.refreshDisplay='show'
+ this.staffs=[{name:'inns'},{name:'connon'},{name:'baos'},{name:'anna'},{name:'dolley'},{name:'lucy'},{name:'john'}, {name:'lily'},{name:'locke'},{name:'jack'},{name:'danny'},{name:'rose'},{name:'harris'},{name:'lotus'},{name:'louis'}];
+ },
+ methods:{
+ onrefresh:function(e){
+ this.refreshDisplay='show';
+ this.staffs=[{name:'anna'},{name:'baos'},{name:'connon'},{name:'inns'}];
+ this.refreshDisplay='hide'
+ },
+ onpullingdown:function(e){
+ console.log('onpullingdown triggered.');
+ console.log('dy:'+e.dy);
+ console.log('headerHeight:'+e.headerHeight);
+ console.log('maxHeight:'+e.maxHeight);
+ }
+ }
+ }
+</script>
+```
+
+[体验一下](http://dotwe.org/64cb982f67186c76f9f27fe3000a2fe8)
+
+## 子组件
+
+- [`<text>`](./text.html)
+- [`<image>`](./image.html)
+- `<loading-indicator>`: `<refresh>` 和 `<loading>` 组件的子组件,拥有默认的动画效果的实现。
+
+## 特性
+
+- `display {string}`:可选值为 `show` 或者 `hide`,仅隐藏 `<indicator>`,`<loading>` 其他子组件依然可见,`<loading>` 事件仍会被触发。
+
+## 样式
+
+支持所有通用样式。
+
+- 盒模型
+- `flexbox` 布局
+- `position`
+- `opacity`
+- `background-color`
+
+查看 [组件通用样式](../common-style.html)
+
+## 事件
+
+- `refresh`: 当 `<scroller>`/`<list>` 被下拉时触发。
+- `pullingdown`:仅在 Android 支持。当 `<scroller>`/`<list>` 被下拉时触发,可以从事件的参数对象中获取 dy,headerHeight,maxHeight
+
+## 约束
+
+- `<refresh>` 不支持 `remove`,v0.9 版本会修复。
+- `display` 值为 `show` 或 `hide`。仅隐藏 `<indicator>`,`<refresh>` 其他子组件依然可见,`refresh` 事件仍会被触发。
+
+ 如果需要 `<refresh>` hide 时隐藏文案并不再触发事件,有两种解决方法:
+
+ 1. 修改提示文案,并在 `refresh` 事件中添加判断逻辑;
+ 2. v0.9+ 可通过 `remove` 解决。
+
+- 只能通过 `display` 特性进行展示和隐藏,且必须成对出现,即设置 `display="show"`,必须有对应的 `display="hide"`。
+
+## 示例
+
+```html
+<template>
+ <scroller onloadmore="onloadmore" loadmoreoffset="1000">
+ <refresh onrefresh="onrefresh" display="{{refreshDisplay}}">
+ <text id="refreshText">{{refreshText}}</text>
+ </refresh>
+ <div repeat="v in items">
+ <text style="font-size: 40; color: #000000">{{v.item}}</text>
+ </div>
+ <loading onloading="onloading" display="{{loadingDisplay}}">
+ <text id="loadingText">{{loadingText}}</text>
+ </loading>
+ </scroller>
+</template>
+
+<script>
+ module.exports = {
+ data: {
+ refreshDisplay: 'show',
+ loadingDisplay: 'show',
+ loadingText: 'pull up to load more',
+ refreshText: 'pull down to refresh',
+ items: []
+ },
+ created: function () {
+ for (var i = 0; i < 30; i++) {
+ this.items.push({
+ 'item': 'test data' + i
+ });
+ }
+ },
+ methods: {
+ onrefresh: function () {
+ var vm = this;
+ vm.refreshDisplay = 'show'
+ if (vm.items.length > 50) {
+ vm.refreshText = "no more data!"
+ vm.refreshDisplay = 'hide'
+ return;
+ }
+ var len = vm.items.length;
+ for (var i = len; i < (len + 20); i++) {
+ vm.items.unshift({
+ 'item': 'test data ' + i
+ });
+ }
+ vm.refreshDisplay = 'hide'
+ },
+ onloading: function () {
+ var vm = this;
+ vm.loadingDisplay = 'show'
+ if (vm.items.length > 30) {
+ vm.loadingText = "no more data!"
+ vm.loadingDisplay = 'hide'
+ return;
+ }
+
+ var len = vm.items.length;
+ for (var i = len; i < (len + 20); i++) {
+ vm.items.push({
+ 'item': 'test data ' + i
+ });
+ }
+ vm.loadingDisplay = 'hide'
+ },
+ onloadmore: function () {
+ console.log("into--[onloadmore]")
+ }
+ }
+ }
+</script>
+```
+
+[体验一下](http://dotwe.org/80c027d6bfb337195c25cc0ba9317ea5)
+
+更多示例可查看 [`<list>`](./list.html)
http://git-wip-us.apache.org/repos/asf/incubator-weex-site/blob/32a097bf/_draft/v1.0/references/components/scroller.md
----------------------------------------------------------------------
diff --git a/_draft/v1.0/references/components/scroller.md b/_draft/v1.0/references/components/scroller.md
new file mode 100644
index 0000000..0fac77c
--- /dev/null
+++ b/_draft/v1.0/references/components/scroller.md
@@ -0,0 +1,324 @@
+---
+title: <scroller>
+type: references
+order: 2.8
+version: 0.10
+---
+
+# <scroller>
+
+<span class="weex-version">v0.6.1+</span>
+
+`<scroller>` 是一个竖直的,可以容纳多个排成一列的子组件的滚动器。如果子组件的总高度高于其本身,那么所有的子组件都可滚动。
+
+**注意:** `<scroller>` 可以当作根元素或者嵌套元素使用。此组件的滚动方向是垂直方向的形式。
+
+一个简单例子:
+
+```html
+<template>
+ <scroller onloadmore="onloadmore" loadmoreoffset="100">
+ <div repeat="v in items">
+ <text style="font-size: 40; color: #000000">{{v.item}}</text>
+ </div>
+ </scroller>
+</template>
+<script>
+ module.exports = {
+ data: {
+ items: [],
+ triggered: false
+ },
+ created: function () {
+ for (var i = 0; i < 50; i++) {
+ this.items.push({
+ 'item': 'test data' + i
+ });
+ }
+ },
+ methods: {
+ onloadmore: function () {
+ if (!this.triggered) {
+ for (var i = 100; i >= 50; i--) {
+ this.items.push({
+ 'item': 'onloadmore triggered' + i
+ });
+ }
+ }
+ this.triggered = true;
+ }
+ }
+ }
+</script>
+```
+
+[体验一下](http://dotwe.org/6910f0b87aeabe3f2a0d62c0d658dbd2)
+
+## 子组件
+
+支持任意类型的 Weex 组件作为其子组件。 其中,还支持以下两个特殊组件作为子组件:
+
+- `<refresh>`
+
+ 用于给列表添加下拉刷新的功能。
+
+ 使用文档请查看 [`<refresh>`](./refresh.html)
+
+- `<loading>`
+
+ `<loading>` 用法与特性和 `<refresh>` 类似,用于给列表添加上拉加载更多的功能。
+
+ 使用文档请查看 [`<loading>`](./loading.html)
+
+## 特性
+
+- `show-scrollbar {boolean}`:可选值为 `true`/ `false`,默认值为 `true`。控制是否出现滚动条。
+- `scroll-direction {string}`:可选为 `horizontal` 或者 `vertical`,默认值为 `vertical` 。定义滚动的方向。
+- `loadmoreoffset {number}`:默认值为 0,触发 `loadmore` 事件所需要的垂直偏移距离(设备屏幕底部与页面底部之间的距离)。当页面的滚动条滚动到足够接近页面底部时将会触发 `loadmore` 这个事件。
+
+ 
+
+- `loadmoreretry {number}`:默认值为 0,当 `loadmore` 失败时是否重置 `loadmore` 相关的 UI,值不一样就会重置。
+
+## 样式
+
+- 通用样式:支持所有通用样式
+
+ - 盒模型
+ - `flexbox` 布局
+ - `position`
+ - `opacity`
+ - `background-color`
+
+ 查看 [组件通用样式](../common-style.html)
+
+## 事件
+
+- `loadmore` <sup class="wx-v">v0.5+</sup>:如果滚动到底部将会立即触发这个事件,你可以在这个事件的处理函数中加载下一页的列表项。
+- 通用事件
+
+ 支持所有通用事件:
+
+ - `click`
+ - `longpress`
+ - `appear`
+ - `disappear`
+
+ 查看 [通用事件](../common-event.html)
+
+## 扩展
+
+### scrollToElement(node, options)
+
+滚动到列表某个指定项是常见需求,`<list>` 拓展了该功能支持滚动到指定 `<cell>`。通过 `dom` module 访问,更多信息可参考 [dom module](../modules/dom.html) 。
+
+#### 参数
+
+- `node {node}`:指定目标节点。
+- `options {Object}`:
+ - `offset {number}`:一个到其可见位置的偏移距离,默认是0
+
+#### 示例
+
+```html
+<template>
+ <scroller>
+ <div class="row" repeat="item in rows" id="item-{{$index}}">
+ <text class="item-title">row {{item.id}}</text>
+ </div>
+ <div onclick="go" style="width: 750;height: 50; position: fixed; left: 0; right: 0; bottom: 0; background-color: #eeeeee;">
+ <text style="text-align: center;">
+ Go to 50th line.
+ </text>
+ </div>
+ </scroller>
+</template>
+
+<script>
+var dom = require('@weex-module/dom')
+
+module.exports = {
+ data: {
+ rows: []
+ },
+ created: function () {
+ for (var i = 0; i < 100; i++) {
+ this.rows.push({
+ id: i
+ })
+ }
+ },
+ methods: {
+ go: function () {
+ var el = this.$el('item-49')
+
+ dom.scrollToElement(el, {
+ offset: 0
+ })
+ }
+ }
+}
+</script>
+```
+
+[体验一下](http://dotwe.org/483e5c878c52c0891e6e35e478f19854)
+
+## 约束
+
+**不允许**相同方向的 `<list>` 或者 `<scroller>` 互相嵌套,换句话说就是嵌套的 `<list>`/`<scroller>` 必须是不同的方向。
+
+举个例子,**不允许**一个垂直方向的 `<list>` 嵌套的一个垂直方向的 `<scroller>` 中,但是一个垂直方向的 `<list>` 是可以嵌套的一个水平方向的 `<list>` 或者 `<scroller>` 中的。
+
+## 示例
+
+
+
+```html
+<style>
+.item {
+ padding: 20;
+ height: 220;
+ border-bottom-width: 1;
+ border-bottom-style: solid;
+ border-bottom-color: #efefef;
+}
+.item-content {
+ flex-direction: row;
+ width: 710;
+ background-color: #ffffff;
+}
+.item-imgbox {
+ height: 180;
+ width: 180;
+ margin-right: 20;
+}
+.item-img {
+ width: 180;
+ height: 180;
+}
+.item-info {
+ height: 180;
+ width: 510;
+ justify-content: center;
+ position: relative;
+}
+.item-info-detail {
+ position: relative;
+ color: #A2A2A2;
+}
+.desc {
+ lines: 4;
+ text-overflow: ellipsis;
+ font-size: 26;
+ line-height: 30;
+ color: #A2A2A2;
+}
+.title {
+ lines: 1;
+ text-overflow: ellipsis;
+ font-size: 32;
+ color: #2D2D2D;
+ line-height: 40;
+}
+.detail-info {
+ margin-top: 15;
+}
+.up {
+ width: 70;
+ height: 70;
+ position: fixed;
+ right: 20;
+ bottom: 20;
+}
+.img {
+ width: 70;
+ height: 70;
+}
+</style>
+
+<template>
+ <div>
+ <scroller>
+ <div class="item" repeat="item in items" id="item-{{$index}}">
+ <div class="item-content">
+ <div class="item-imgbox">
+ <img class="item-img" src="{{item.img}}" alt="" />
+ </div>
+ <div class="item-info">
+ <div class="item-info-detail">
+ <text class="title">{{item.title}}</text>
+ <div class="detail-info">
+ <text class="desc">{{item.desc}}</text>
+ </div>
+ </div>
+ </div>
+ </div>
+ </div>
+ </scroller>
+ <div class="up" onclick="goToTop">
+ <img class="img" src="https://img.alicdn.com/tps/TB1ZVOEOpXXXXcQaXXXXXXXXXXX-200-200.png"></img>
+ </div>
+ </div>
+</template>
+
+<script>
+ var dom = require('@weex-module/dom') || {}
+
+ module.exports = {
+ data: {
+ items: [{
+ img: 'https://img.alicdn.com/tps/TB1z.55OFXXXXcLXXXXXXXXXXXX-560-560.jpg',
+ title: 'Who is Alan Mathison Turing?Who is Alan Mathison Turing?',
+ desc: 'Alan Mathison Turing ( 23 June 1912 – 7 June 1954) was an English computer scientist, mathematician, logician, cryptanalyst and theoretical biologist. He was highly influential in the development of theoretical computer science, providing a formalisation of the concepts of algorithm and computation with the Turing machine, which can be considered a model of a general purpose computer.Turing is widely considered to be the father of theoretical computer science and artificial intelligence.'
+ },{
+ img: 'https://img.alicdn.com/tps/TB1z.55OFXXXXcLXXXXXXXXXXXX-560-560.jpg',
+ title: 'Who is Alan Mathison Turing?',
+ desc: 'Alan Mathison Turing ( 23 June 1912 – 7 June 1954) was an English computer scientist, mathematician, logician, cryptanalyst and theoretical biologist. He was highly influential in the development of theoretical computer science, providing a formalisation of the concepts of algorithm and computation with the Turing machine, which can be considered a model of a general purpose computer.Turing is widely considered to be the father of theoretical computer science and artificial intelligence.'
+ },{
+ img: 'https://img.alicdn.com/tps/TB1z.55OFXXXXcLXXXXXXXXXXXX-560-560.jpg',
+ title: 'Who is Alan Mathison Turing?',
+ desc: 'Alan Mathison Turing ( 23 June 1912 – 7 June 1954) was an English computer scientist, mathematician, logician, cryptanalyst and theoretical biologist. He was highly influential in the development of theoretical computer science, providing a formalisation of the concepts of algorithm and computation with the Turing machine, which can be considered a model of a general purpose computer.Turing is widely considered to be the father of theoretical computer science and artificial intelligence.'
+ },{
+ img: 'https://img.alicdn.com/tps/TB1z.55OFXXXXcLXXXXXXXXXXXX-560-560.jpg',
+ title: 'Who is Alan Mathison Turing?',
+ desc: 'Alan Mathison Turing ( 23 June 1912 – 7 June 1954) was an English computer scientist, mathematician, logician, cryptanalyst and theoretical biologist. He was highly influential in the development of theoretical computer science, providing a formalisation of the concepts of algorithm and computation with the Turing machine, which can be considered a model of a general purpose computer.Turing is widely considered to be the father of theoretical computer science and artificial intelligence.'
+ },{
+ img: 'https://img.alicdn.com/tps/TB1z.55OFXXXXcLXXXXXXXXXXXX-560-560.jpg',
+ title: 'Who is Alan Mathison Turing?',
+ desc: 'Alan Mathison Turing ( 23 June 1912 – 7 June 1954) was an English computer scientist, mathematician, logician, cryptanalyst and theoretical biologist. He was highly influential in the development of theoretical computer science, providing a formalisation of the concepts of algorithm and computation with the Turing machine, which can be considered a model of a general purpose computer.Turing is widely considered to be the father of theoretical computer science and artificial intelligence.'
+ },{
+ img: 'https://img.alicdn.com/tps/TB1z.55OFXXXXcLXXXXXXXXXXXX-560-560.jpg',
+ title: 'Who is Alan Mathison Turing?',
+ desc: 'Alan Mathison Turing ( 23 June 1912 – 7 June 1954) was an English computer scientist, mathematician, logician, cryptanalyst and theoretical biologist. He was highly influential in the development of theoretical computer science, providing a formalisation of the concepts of algorithm and computation with the Turing machine, which can be considered a model of a general purpose computer.Turing is widely considered to be the father of theoretical computer science and artificial intelligence.'
+ },{
+ img: 'https://img.alicdn.com/tps/TB1z.55OFXXXXcLXXXXXXXXXXXX-560-560.jpg',
+ title: 'Who is Alan Mathison Turing?',
+ desc: 'Alan Mathison Turing ( 23 June 1912 – 7 June 1954) was an English computer scientist, mathematician, logician, cryptanalyst and theoretical biologist. He was highly influential in the development of theoretical computer science, providing a formalisation of the concepts of algorithm and computation with the Turing machine, which can be considered a model of a general purpose computer.Turing is widely considered to be the father of theoretical computer science and artificial intelligence.'
+ },{
+ img: 'https://img.alicdn.com/tps/TB1z.55OFXXXXcLXXXXXXXXXXXX-560-560.jpg',
+ title: 'Who is Alan Mathison Turing?',
+ desc: 'Alan Mathison Turing ( 23 June 1912 – 7 June 1954) was an English computer scientist, mathematician, logician, cryptanalyst and theoretical biologist. He was highly influential in the development of theoretical computer science, providing a formalisation of the concepts of algorithm and computation with the Turing machine, which can be considered a model of a general purpose computer.Turing is widely considered to be the father of theoretical computer science and artificial intelligence.'
+ },{
+ img: 'https://img.alicdn.com/tps/TB1z.55OFXXXXcLXXXXXXXXXXXX-560-560.jpg',
+ title: 'Who is Alan Mathison Turing?',
+ desc: 'Alan Mathison Turing ( 23 June 1912 – 7 June 1954) was an English computer scientist, mathematician, logician, cryptanalyst and theoretical biologist. He was highly influential in the development of theoretical computer science, providing a formalisation of the concepts of algorithm and computation with the Turing machine, which can be considered a model of a general purpose computer.Turing is widely considered to be the father of theoretical computer science and artificial intelligence.'
+ },{
+ img: 'https://img.alicdn.com/tps/TB1z.55OFXXXXcLXXXXXXXXXXXX-560-560.jpg',
+ title: 'Who is Alan Mathison Turing?',
+ desc: 'Alan Mathison Turing ( 23 June 1912 – 7 June 1954) was an English computer scientist, mathematician, logician, cryptanalyst and theoretical biologist. He was highly influential in the development of theoretical computer science, providing a formalisation of the concepts of algorithm and computation with the Turing machine, which can be considered a model of a general purpose computer.Turing is widely considered to be the father of theoretical computer science and artificial intelligence.'
+ }]
+ },
+ created: function () {
+ },
+ methods: {
+ goToTop: function (e) {
+ dom.scrollToElement(this.$el('item-0'), {
+ offset: 0
+ })
+ }
+ }
+ }
+</script>
+```
+
+[体验一下](http://dotwe.org/799f54b32f5227f9c34cfbb5e6946ba7)
\ No newline at end of file
http://git-wip-us.apache.org/repos/asf/incubator-weex-site/blob/32a097bf/_draft/v1.0/references/components/slider.md
----------------------------------------------------------------------
diff --git a/_draft/v1.0/references/components/slider.md b/_draft/v1.0/references/components/slider.md
new file mode 100644
index 0000000..b12a8aa
--- /dev/null
+++ b/_draft/v1.0/references/components/slider.md
@@ -0,0 +1,121 @@
+---
+title: <slider>
+type: references
+order: 2.9
+version: 0.10
+---
+
+# <slider>
+
+`<slider>` 组件用于在一个页面中展示多个图片,在前端,这种效果被称为 `轮播图`。
+
+## 子组件
+
+支持任意类型的 Weex 组件作为其子组件。 其中,还支持以下组件作为子组件展示特殊效果:
+
+ - `<indicator>`:用于显示轮播图指示器效果,必须充当 [`<slider>`](./slider.html) 组件的子组件使用。
+
+## 特性
+
+- `auto-play {boolean}`:可选值为 `true`/`false`,默认的是 `false`。
+
+ 该值决定是否自动播放轮播。重置 `loadmore` 相关的 UI,值不一样就会重置。
+
+- `interval {number}`:值为毫秒数,此值设定 slider 切换时间间隔。当 `auto-play` 值为 `true` 时生效。
+
+## 样式
+
+- 通用样式:支持所有通用样式
+
+ - 盒模型
+ - `flexbox` 布局
+ - `position`
+ - `opacity`
+ - `background-color`
+
+ 查看 [组件通用样式](../common-style.html)
+
+## 事件
+
+- `change`: 当轮播索引改变时,触发该事件。
+
+ 事件中 event 对象属性:
+ - `index`:展示的图片索引
+
+- 通用事件
+
+ 支持所有通用事件:
+
+ - `click`
+ - `longpress`
+ - `appear`
+ - `disappear`
+
+ 查看 [通用事件](../common-event.html)
+
+## 示例
+
+```html
+<template>
+ <div>
+ <slider class="slider" interval="3000" auto-play="true">
+ <div class="slider-pages" repeat="item in itemList">
+ <image class="img" src="{{item.pictureUrl}}"></image>
+ <text class="title">{{item.title}}</text>
+ </div>
+ <indicator class="indicator"></indicator>
+ </slider>
+ </div>
+</template>
+
+<style>
+ .img {
+ width: 714;
+ height: 150;
+ }
+ .title {
+ position: absolute;
+ top: 20;
+ left: 20;
+ color: #ff0000;
+ font-size: 48;
+ font-weight: bold;
+ background-color: #eeeeee;
+ }
+ .slider {
+ flex-direction: row;
+ margin: 18;
+ width: 714;
+ height: 230;
+ }
+ .slider-pages {
+ flex-direction: row;
+ width: 714;
+ height: 200;
+ }
+ .indicator {
+ width:714;
+ height:200;
+ position:absolute;
+ top:1;
+ left:1;
+ item-color: red;
+ item-selectedColor: blue;
+ item-size: 20;
+ }
+</style>
+
+<script>
+ module.exports = {
+ data: {
+ itemList: [
+ {itemId: '520421163634', title: 'item1', pictureUrl: 'https://gd2.alicdn.com/bao/uploaded/i2/T14H1LFwBcXXXXXXXX_!!0-item_pic.jpg'},
+ {itemId: '522076777462', title: 'item2', pictureUrl: 'https://gd1.alicdn.com/bao/uploaded/i1/TB1PXJCJFXXXXciXFXXXXXXXXXX_!!0-item_pic.jpg'},
+ {itemId: '522076777462', title: 'iten3', pictureUrl: 'https://gd3.alicdn.com/bao/uploaded/i3/TB1x6hYLXXXXXazXVXXXXXXXXXX_!!0-item_pic.jpg'}
+ ]
+ }
+ }
+</script>
+```
+
+[体验一下](http://dotwe.org/37784d97811f4c91594a9ad6f118c0f7)
http://git-wip-us.apache.org/repos/asf/incubator-weex-site/blob/32a097bf/_draft/v1.0/references/components/switch.md
----------------------------------------------------------------------
diff --git a/_draft/v1.0/references/components/switch.md b/_draft/v1.0/references/components/switch.md
new file mode 100644
index 0000000..8a3d614
--- /dev/null
+++ b/_draft/v1.0/references/components/switch.md
@@ -0,0 +1,98 @@
+---
+title: <switch>
+type: references
+order: 2.11
+version: 0.10
+---
+
+# <switch>
+
+<span class="weex-version">v0.6.1+</span>
+
+`<switch>` 是 Weex 的内置组件,用来创建与 iOS 一致样式的按钮。例如,在 iPhone 中的设置应用中的飞行模式按钮就是一个 switch 按钮。
+
+## 子组件
+
+`<switch>` 组件**不支持**任何子组件。
+
+## 特性
+
+- `checked {boolean}`:默认值为 `false`,表明按钮是否开启 is on or not.
+- `disabled {boolean}`:默认值为 `false`,表明是否激活按钮
+
+## 样式
+
+值得注意的是,在这个组件上,有些样式组件属性**不能使用**,它们是:
+
+- `width`
+- `height`
+- `min-width`
+- `min-height`
+- `margin`
+- `padding`
+- `border`
+
+**注意:**
+
+由于设计宽度为 750px,宽度和高度相关的属性不能配置,组件的尺寸限定在 100x60。
+
+- 通用样式
+
+ - `flexbox` 布局
+ - `position`
+ - `opacity`
+ - `background-color`
+
+ 查看 [组件通用样式](../common-style.html)
+
+## 事件
+
+- `change`:改变开关状态时触发该事件。
+
+ 事件中 event 对象属性:
+
+ - `value`: 组件布尔值真或假。
+ - `timestamp`: 事件的时间戳。
+
+- 通用事件
+
+ 支持所有通用事件:
+
+ - `click`
+ - `longpress`
+ - `appear`
+ - `disappear`
+
+ 查看 [通用事件](../common-event.html)
+
+## 示例
+
+```html
+<template>
+ <div>
+ <text>muted:</text>
+ <switch checked="true" onclick='onclick' onchange='onchange' ondisappear='ondisappear' onappear='onappear'></switch>
+ </div>
+</template>
+
+<script>
+ module.exports ={
+ methods:{
+ onclick:function(e){
+ console.log('onclick:' + e.timestamp);
+ },
+ onchange:function(e){
+ console.log('onchage, value:' + e.value);
+ },
+ ondisappear:function(e){
+ console.log('ondisappear, value:' + e.value);
+ },
+ onappear:function(e){
+ console.log('onappear, value:' + e.value);
+ },
+ }
+ }
+</script>
+```
+
+[体验一下](http://dotwe.org/5f8b9d9c0e429e61f4a004dc8ee637e1)
\ No newline at end of file
http://git-wip-us.apache.org/repos/asf/incubator-weex-site/blob/32a097bf/_draft/v1.0/references/components/text.md
----------------------------------------------------------------------
diff --git a/_draft/v1.0/references/components/text.md b/_draft/v1.0/references/components/text.md
new file mode 100644
index 0000000..edd6a05
--- /dev/null
+++ b/_draft/v1.0/references/components/text.md
@@ -0,0 +1,116 @@
+---
+title: <text>
+type: references
+order: 2.12
+version: 0.10
+---
+
+# <text>
+
+`<text>` 是 Weex 内置的组件,用来将文本按照指定的样式渲染出来。`<text>` 只能包含文本值,你可以使用 `{% raw %}{{}}{% endraw %}` 标记插入变量值作为文本内容。
+
+## 子组件
+
+此组件不支持子组件。
+
+## 特性
+
+- `value {string}`: 组件的值,与 `<text>` 标签中的文本内容相同。
+
+## 样式
+
+- `lines {number}`: 指定文本行数。默认值是 `0` 代表不限制行数。
+- text styles: 查看 [文本样式](../text-style.html)
+
+ - 支持 `color` 样式.
+ - 支持 `font-size` 样式. iOS默认值:`32`,Android:不同设备不同,H5 默认值:`32`.
+ - 支持 `font-style` 样式.
+ - 支持 `font-weight` 样式.
+ - 支持 `text-align` 样式.
+ - 支持 `text-decoration` 样式.
+ - 支持 `text-overflow` 样式.
+ - 支持 `line-height`样式<sup class="wx-v">0.6.1+</sup> 。`line-height` 在 iOS 中与 H5 和 Android 中不同, 文本值将放置在框的底部。
+ - 不支持 `flex-direction`, `justify-content`, `align-items` 这些为子节点设置的属性,并且`<text>`没有子节点。
+
+- 通用样式:支持所有通用样式
+
+ - 盒模型
+ - `flexbox` 布局
+ - `position`
+ - `opacity`
+ - `background-color`
+
+ 查看 [组件通用样式](../common-style.html)
+
+## 事件
+
+- 通用事件
+ 支持所有通用事件:
+
+ - `click`
+ - `longpress`
+ - `appear`
+ - `disappear`
+
+ 查看 [通用事件](../common-event.html)
+
+## 约束
+
+1. `<text>` 里直接写文本头尾空白会被过滤,如果需要保留头尾空白,暂时只能通过数据绑定写头尾空格。
+
+```html
+<template>
+ <div>
+ <text> 测试1,直接放置头尾用空白的文本 </text>
+ <text>{{msg}}</text>
+ </div>
+</template>
+<script>
+module.exports = {
+ data: {
+ msg: ' 测试2,使用数据绑定 '
+ }
+}
+</script>
+```
+
+[体验一下](http://dotwe.org/473d451e48ba322b606c4ba2577fd96a)
+
+## 示例
+
+```html
+<template>
+ <div>
+ <text>this is text content</text>
+ <text value="this is text value"></text>
+ <text id="textid" onclick={{showtext}}>this is gettext content</text>
+ <text value="{{text}}"></text>
+ <text style="lines: 3;">Alan Mathison Turing ( 23 June 1912 – 7 June 1954) was an English computer scientist, mathematician, logician, cryptanalyst and theoretical biologist. He was highly influential in the development of theoretical computer science, providing a formalisation of the concepts of algorithm and computation with the Turing machine, which can be considered a model of a general purpose computer.Turing is widely considered to be the father of theoretical computer science and artificial intelligence.</text>
+</div>
+</template>
+
+<style>
+ .text {
+ font-size: 24;
+ text-decoration: underline;
+ }
+</style>
+
+<script>
+ module.exports = {
+ data: {
+ price1: '99.99',
+ price2: '88.88',
+ text:''
+ },
+ methods: {
+ showtext: function(event) {
+ var textComponent = this.$el("textid");
+ this.text = textComponent.attr.value;
+ }
+ }
+ };
+</script>
+```
+
+[体验一下](http://dotwe.org/b2796940d6b9766000778c61446fcd26)
http://git-wip-us.apache.org/repos/asf/incubator-weex-site/blob/32a097bf/_draft/v1.0/references/components/textarea.md
----------------------------------------------------------------------
diff --git a/_draft/v1.0/references/components/textarea.md b/_draft/v1.0/references/components/textarea.md
new file mode 100644
index 0000000..9470173
--- /dev/null
+++ b/_draft/v1.0/references/components/textarea.md
@@ -0,0 +1,115 @@
+---
+title: <textarea>
+type: references
+order: 2.13
+version: 0.10
+---
+
+# <textarea>
+
+<span class="weex-version">v0.8+</span>
+
+`textarea` 是 Weex 内置的一个组件,用于用户交互,接受用户输入数据。 可以认为是允许多行的 `<input>`
+
+**Notes:** `<textarea>`支持 `<input>` 支持的所有的事件。
+
+## 子组件
+
+`textarea` 组件不支持子组件。
+
+## 特性
+
+- `value {string}`:组件的接收到的输入字符。
+- `placeholder {string}`:提示用户可以输入什么。 提示文本不能有回车或换行。
+- `disabled {boolean}`:表示是否支持输入。通常 `click` 事件在 `disabled` 控件上是失效的。
+- `autofocus {boolean}`:表示是否在页面加载时控件自动获得输入焦点。
+- `rows {number}`:接收 number 类型的数据,指定组件的高度,默认值是 2
+
+## 样式
+
+- text styles
+ - 支持 `color`
+ - 支持 `font-size`
+ - 支持 `font-style`
+ - 支持 `font-weight`
+ - 支持 `text-align`
+
+ 查看 [文本样式](../text-style.html)
+
+- 通用样式:支持所有通用样式
+
+ - 盒模型
+ - `flexbox` 布局
+ - `position`
+ - `opacity`
+ - `background-color`
+
+ 查看 [组件通用样式](../common-style.html)
+
+## 事件
+
+- `input`: 输入字符的值更改。
+
+ 事件中 event 对象属性:
+
+ - `value`: 触发事件的组件;
+ - `timestamp`: 事件发生时的时间戳。
+
+- `change`: 当用户输入完成时触发。通常在 `blur` 事件之后。
+
+ 事件中 event 对象属性:
+
+ - `value`: 触发事件的组件;
+
+ - `timestamp`: 事件发生时的时间戳。
+
+- `focus`: 组件获得输入焦点。
+
+ 事件中 event 对象属性:
+
+ - `timestamp`: 事件发生时的时间戳。
+
+- `blur`: 组件失去输入焦点。
+
+ 事件中 event 对象属性:
+
+ - `timestamp`: 事件发生时的时间戳。
+
+- 通用事件
+
+ **注意:**
+ 不支持 `click` 事件。 请监听 `input` 或 `change` 事件代替。
+
+ 支持以下通用事件:
+
+ - `longpress`
+ - `appear`
+ - `disappear`
+
+ 查看 [通用事件](../common-event.html)
+
+## 示例
+
+```html
+<template>
+ <div>
+ <textarea
+ class="textarea"
+ autofocus="true"
+ placeholder="..."
+ value="我是一个多行版本的input组件">
+ </textarea>
+ </div>
+</template>
+<style>
+ .textarea {
+ margin: 20;
+ border-width: 2;
+ border-style: solid;
+ border-color: #efefef;
+ border-radius: 5;
+ }
+</style>
+```
+
+[体验一下](http://dotwe.org/31d67beda847cd5b5cf7b78ff21895ba)
http://git-wip-us.apache.org/repos/asf/incubator-weex-site/blob/32a097bf/_draft/v1.0/references/components/video.md
----------------------------------------------------------------------
diff --git a/_draft/v1.0/references/components/video.md b/_draft/v1.0/references/components/video.md
new file mode 100644
index 0000000..ac17c8b
--- /dev/null
+++ b/_draft/v1.0/references/components/video.md
@@ -0,0 +1,82 @@
+---
+title: <video>
+type: references
+order: 2.14
+version: 0.10
+---
+
+# <video>
+
+<span class="weex-version">v0.6.1+</span>
+
+`<video>` 组件可以让我们在 Weex 页面中嵌入视频内容。
+
+## 子组件
+
+- `<text>` 是唯一合法的子组件。
+
+### 特性
+
+- `src {string}`:内嵌的视频指向的URL
+- `play-status {string}`:可选值为 `play` | `pause`,用来控制视频的播放状态,`play` 或者 `pause`,默认值是 `pause`。
+- `auto-play {boolean}`:可选值为 `true` | `false`,当页面加载初始化完成后,用来控制视频是否立即播放,默认值是 `false`。
+
+## 样式
+
+- 通用样式:支持所有通用样式
+
+ - 盒模型
+ - `flexbox` 布局
+ - `position`
+ - `opacity`
+ - `background-color`
+
+ 查看 [组件通用样式](../common-style.html)
+
+## 事件
+
+- `start`:当 playback 的状态是 Playing 时触发
+- `pause`:当 playback 的状态是 Paused 时触发
+- `finish`:当 playback 的状态是 Finished 时触发
+- `fail`:当 playback 状态是 Failed 时触发
+
+## 示例
+
+```html
+<template>
+ <div>
+ <text>Big Eater!</text>
+ <video class="video" onstart="onstart" onpause="onpause" onfinish="onfinish" onfail="onfail"
+ auto-play="false" play-status="pause" src="{{src}}" style="width:750;height:500;"></video>
+ <text>state: {{msg}}</text>
+ </div>
+</template>
+
+<style>
+</style>
+
+<script>
+ module.exports ={
+ data: {
+ msg: '',
+ src:'http://flv2.bn.netease.com/videolib3/1611/01/XGqSL5981/SD/XGqSL5981-mobile.mp4'
+ },
+ methods:{
+ onstart:function(e){
+ this.msg = 'onstart'
+ },
+ onpause:function(e){
+ this.msg = 'onpause'
+ },
+ onfinish:function(e){
+ this.msg = 'onfinish'
+ },
+ onfail:function(e){
+ this.msg = 'onfinish'
+ },
+ }
+ }
+</script>
+```
+
+[体验一下](http://dotwe.org/d83a00bbd180bd5dc4e7f9381d39b4dd)
http://git-wip-us.apache.org/repos/asf/incubator-weex-site/blob/32a097bf/_draft/v1.0/references/components/web.md
----------------------------------------------------------------------
diff --git a/_draft/v1.0/references/components/web.md b/_draft/v1.0/references/components/web.md
new file mode 100644
index 0000000..073fb4b
--- /dev/null
+++ b/_draft/v1.0/references/components/web.md
@@ -0,0 +1,143 @@
+---
+title: <web>
+type: references
+order: 2.15
+version: 0.10
+---
+
+# <web>
+
+<span class="weex-version">v0.5+</span>
+
+使用 `<web>` 组件在 Weex 页面中嵌入一张网页内容。`src` 属性用来指定资源地址。你也可以使用 `webview module` 来控制 `web` 的行为,比如前进、后退和重载。可以在这里查看 [`webview` module](../modules/webview.html)。
+
+## 子组件
+
+不支持子组件。
+
+## 特性
+
+- `src {string}`:此特性指定嵌入的 web 页面 url。
+
+## 样式
+
+- 通用样式:不支持部分盒模型样式,支持列表如下:
+
+ - `width`
+
+ 组件的宽度,默认值是0。这个样式定义必须指定数值。
+
+ - `height`
+
+ 组件的高度,默认值是0。这个样式定义必须指定数值。
+
+ - `flexbox` 布局
+ - `position`
+ - `opacity`
+ - `background-color`
+
+ 查看 [组件通用样式](../common-style.html)
+
+## 事件
+
+- `pagestart`: `<web>` 组件开始加载时发送此事件消息。
+- `pagefinish`: `<web>` 组件完成加载时发送此事件消息。
+- `error`: �如果 `<web>` 组件加载出现错误,会发送此事件消息。
+
+- 通用事件
+
+ 支持以下通用事件:
+ - `appear`
+ - `disappear`
+
+ 查看 [通用事件](../common-event.html)
+
+**注意:**
+
+不支持 `click` 事件。
+
+## 示例
+
+我们用一个简易浏览器示例,来展示如何使用 `<web>` 组件和 `webview` module。 查看 [webview module](../modules/webview.html)。
+
+```html
+<template>
+ <div class="browserStyle">
+ <div style="flex-direction: row">
+ <input id="urlInput" type="url" autofocus="false" placeholder="input url" onchange="change" oninput="input" class="textStyle" value="https://www.baidu.com">
+ </input>
+ </div>
+ <div style="flex-direction: row">
+ <text class="buttonSytle" onclick="loadURL">LoadURL</text>
+ <text class="buttonSytle" onclick="backforward">Backward</text>
+ <text class="buttonSytle" onclick="forward">Forward</text>
+ </div>
+ <div>
+ <web id="webview" src="{{src}}" class="webStyle"></web>
+ </div>
+ </div>
+</template>
+
+<style>
+ .browserStyle {
+ position: absolute;
+ top: 0;
+ right: 0;
+ bottom: 0;
+ left: 0;
+ background-color:#778899 ;
+ }
+
+ .textStyle {
+ width: 750;
+ height: 50;
+ background-color: #D3D3D3;
+ font-size: 30;
+ }
+
+ .buttonSytle {
+ width:200;
+ height: 50;
+ background-color: #D3D3D3;
+ margin:10;
+ padding-left: 5;
+ padding-right: 5;
+ font-size: 30;
+ }
+
+ .webStyle {
+ width: 750;
+ height: 800;
+ background-color: #8B0000;
+ }
+</style>
+
+<script>
+ var web_module = require('@weex-module/webview')
+
+ module.exports = {
+ data: {
+ src : "https://h5.m.taobao.com",
+ },
+
+ methods: {
+ loadURL: function (e) {
+ var input = this.$el("urlInput");
+ this.src = input.attr.value;
+ },
+
+ backforward: function (e) {
+ var web_element = this.$el('webview');
+ web_module.goBack(web_element);
+ },
+
+ forward: function (e) {
+ var web_element = this.$el('webview');
+ web_module.goForward(web_element);
+ }
+ }
+ }
+</script>
+```
+
+[体验一下](http://dotwe.org/84741a6befeb0f1e5ce11b47ecf1123f)
http://git-wip-us.apache.org/repos/asf/incubator-weex-site/blob/32a097bf/_draft/v1.0/references/gesture.md
----------------------------------------------------------------------
diff --git a/_draft/v1.0/references/gesture.md b/_draft/v1.0/references/gesture.md
new file mode 100644
index 0000000..4377af9
--- /dev/null
+++ b/_draft/v1.0/references/gesture.md
@@ -0,0 +1,79 @@
+---
+title: 手势
+type: references
+order: 1.4
+version: 0.10
+---
+
+# 手势
+
+*注:该功能属于实验性功能*
+
+Weex 封装了原生的触摸事件以提供手势系统。使用手势类似于在 Weex 中使用事件,只需在节点上设置 `on` 特性来监听手势即可。
+
+## 手势类型
+
+目前,仅支持以下四种手势类型:
+
+- **Touch**:当触摸到一个点,移动或从触摸面移开时触发 `touch` 手势。触摸手势很精准,它会返回所有详细的事件信息。所以,监听 `touch` 手势可能很慢,即使只移动一丁点也需要处理大量事件。有三种类型的 `touch` 手势:
+
+ - `touchstart` 将在触摸到触摸面上时触发。
+ - `touchmove` 将在触摸点在触摸面移动时被触发。
+ - `touchend` 将在从触摸面离开时被触发。
+
+- **Pan**:`pan` 手势也会返回触摸点在触摸面的移动信息,有点类似于 `touch` 手势。但是 `pan` 手势只会采样收集部分事件信息因此比 `touch` 事件要快得多,当然精准性差于 `touch`。`pan` 也有三中类型的手势,这些手势的意义与 `touch` 完全一样:
+
+ - `panstart`
+ - `panmove`
+ - `panend`
+
+- **Swipe**:`swipe` 将会在用户在屏幕上滑动时触发,一次连续的滑动只会触发一次 `swiper` 手势。
+- **LongPress**:`LongPress` 将会在触摸点连续保持 500 ms以上时触发。
+
+`touch` 和 `pan` 非常接近,它们的特点可以总结成这样:
+
+- **Touch**:完整信息,精准、很慢
+- **Pan**:抽样信息,很快,不够精准
+
+开发者可以根据自己的情况选择合适的手势。
+
+## 属性
+
+以下属性可以在手势的回调中使用:
+
+- `direction`:仅在 `swipe` 手势中存在,返回滑动方向,返回值可能为 `up`, `left`, `bottom`, `right`。
+- `changedTouches`:一个数组,包含了当前手势的触摸点的运动轨迹
+
+### changedTouches
+
+`changedTouches` 是一个数组,其子元素中包含以下属性:
+
+- `identifier`:触摸点的唯一标识符。
+- `pageX`:触摸点相对于文档左侧边缘的 X 轴坐标。
+- `pageY`:触摸点相对于文档顶部边缘的 Y 轴坐标。
+- `screenX`:触摸点相对于屏幕左侧边缘的 X 轴坐标。
+- `screenY`:触摸点相对于屏幕顶部边缘的 Y 轴坐标。
+
+## 约束
+
+目前,由于会触发大量事件冲突,Weex Android 还不支持在滚动类型的元素上监听手势,例如 `scroller`, `list` 和 `webview` 这三个组件。
+
+## 示例
+
+```html
+<template>
+ <div ontouchstart="handleTouchstart"></div>
+</template>
+
+<script>
+module.exports = {
+ methods: {
+ handleTouchstart: function(eventProperties) {
+ // handling with the Event Properties
+ }
+ }
+}
+</script>
+```
+
+如上面代码所示,一个 `touchstart` 事件会在触摸点与触摸面接触的时候触发。
http://git-wip-us.apache.org/repos/asf/incubator-weex-site/blob/32a097bf/_draft/v1.0/references/images/Artboard.jpg
----------------------------------------------------------------------
diff --git a/_draft/v1.0/references/images/Artboard.jpg b/_draft/v1.0/references/images/Artboard.jpg
new file mode 100644
index 0000000..2f6bb95
Binary files /dev/null and b/_draft/v1.0/references/images/Artboard.jpg differ
http://git-wip-us.apache.org/repos/asf/incubator-weex-site/blob/32a097bf/_draft/v1.0/references/images/coding_weex_1.jpg
----------------------------------------------------------------------
diff --git a/_draft/v1.0/references/images/coding_weex_1.jpg b/_draft/v1.0/references/images/coding_weex_1.jpg
new file mode 100644
index 0000000..8080578
Binary files /dev/null and b/_draft/v1.0/references/images/coding_weex_1.jpg differ
http://git-wip-us.apache.org/repos/asf/incubator-weex-site/blob/32a097bf/_draft/v1.0/references/images/css-boxmodel.png
----------------------------------------------------------------------
diff --git a/_draft/v1.0/references/images/css-boxmodel.png b/_draft/v1.0/references/images/css-boxmodel.png
new file mode 100644
index 0000000..a2063e2
Binary files /dev/null and b/_draft/v1.0/references/images/css-boxmodel.png differ
http://git-wip-us.apache.org/repos/asf/incubator-weex-site/blob/32a097bf/_draft/v1.0/references/images/css-flexbox-align.jpg
----------------------------------------------------------------------
diff --git a/_draft/v1.0/references/images/css-flexbox-align.jpg b/_draft/v1.0/references/images/css-flexbox-align.jpg
new file mode 100644
index 0000000..8a7f731
Binary files /dev/null and b/_draft/v1.0/references/images/css-flexbox-align.jpg differ
http://git-wip-us.apache.org/repos/asf/incubator-weex-site/blob/32a097bf/_draft/v1.0/references/images/css-flexbox-justify.svg
----------------------------------------------------------------------
diff --git a/_draft/v1.0/references/images/css-flexbox-justify.svg b/_draft/v1.0/references/images/css-flexbox-justify.svg
new file mode 100644
index 0000000..33e742b
--- /dev/null
+++ b/_draft/v1.0/references/images/css-flexbox-justify.svg
@@ -0,0 +1,59 @@
+<svg xmlns="http://www.w3.org/2000/svg" width='504' height='270' viewBox="0 0 504 270">
+ <defs>
+ <pattern id='checker' width='20' height='20' patternUnits='userSpaceOnUse'>
+ <rect x='0' y='0' width='10' height='10' fill='#eee' />
+ <rect x='10' y='10' width='10' height='10' fill='#eee' />
+ <rect x='0' y='10' width='10' height='10' fill='#ccc' />
+ <rect x='10' y='0' width='10' height='10' fill='#ccc' />
+ </pattern>
+ </defs>
+ <style>
+ text { font-family: sans-serif; font-weight: bold; font-size: 30px; text-anchor: middle; }
+ rect { stroke-width: 2px; stroke: #888; }
+ g > rect:nth-child(1) { fill: #888 }
+ g > rect:nth-child(2) { fill: #fcc; }
+ g > rect:nth-child(3) { fill: #cfc; }
+ g > rect:nth-child(4) { fill: #ccf; }
+ g > rect:nth-child(5) { fill: transparent; }
+ </style>
+ <g transform="translate(2,2)">
+ <rect x='0' y='0' width='500' height='50' />
+ <rect x='0' y='0' width='100' height='50' />
+ <rect x='100' y='0' width='80' height='50' />
+ <rect x='180' y='0' width='200' height='50' />
+ <rect x='0' y='0' width='500' height='50' />
+ <text x='250' y='38'>flex-start</text>
+ </g>
+ <g transform="translate(2,56)">
+ <rect x='0' y='0' width='500' height='50' />
+ <rect x='120' y='0' width='100' height='50' />
+ <rect x='220' y='0' width='80' height='50' />
+ <rect x='300' y='0' width='200' height='50' />
+ <rect x='0' y='0' width='500' height='50' />
+ <text x='250' y='38'>flex-end</text>
+ </g>
+ <g transform="translate(2,110)">
+ <rect x='0' y='0' width='500' height='50' />
+ <rect x='60' y='0' width='100' height='50' />
+ <rect x='160' y='0' width='80' height='50' />
+ <rect x='240' y='0' width='200' height='50' />
+ <rect x='0' y='0' width='500' height='50' />
+ <text x='250' y='38'>center</text>
+ </g>
+ <g transform="translate(2,164)">
+ <rect x='0' y='0' width='500' height='50' />
+ <rect x='0' y='0' width='100' height='50' />
+ <rect x='160' y='0' width='80' height='50' />
+ <rect x='300' y='0' width='200' height='50' />
+ <rect x='0' y='0' width='500' height='50' />
+ <text x='250' y='38'>space-between</text>
+ </g>
+ <g transform="translate(2,218)">
+ <rect x='0' y='0' width='500' height='50' />
+ <rect x='20' y='0' width='100' height='50' />
+ <rect x='160' y='0' width='80' height='50' />
+ <rect x='280' y='0' width='200' height='50' />
+ <rect x='0' y='0' width='500' height='50' />
+ <text x='250' y='38'>space-around</text>
+ </g>
+</svg>
\ No newline at end of file
http://git-wip-us.apache.org/repos/asf/incubator-weex-site/blob/32a097bf/_draft/v1.0/references/images/div_1.jpg
----------------------------------------------------------------------
diff --git a/_draft/v1.0/references/images/div_1.jpg b/_draft/v1.0/references/images/div_1.jpg
new file mode 100644
index 0000000..3c89773
Binary files /dev/null and b/_draft/v1.0/references/images/div_1.jpg differ
http://git-wip-us.apache.org/repos/asf/incubator-weex-site/blob/32a097bf/_draft/v1.0/references/images/div_2.jpg
----------------------------------------------------------------------
diff --git a/_draft/v1.0/references/images/div_2.jpg b/_draft/v1.0/references/images/div_2.jpg
new file mode 100644
index 0000000..67395bb
Binary files /dev/null and b/_draft/v1.0/references/images/div_2.jpg differ
http://git-wip-us.apache.org/repos/asf/incubator-weex-site/blob/32a097bf/_draft/v1.0/references/images/div_3.jpg
----------------------------------------------------------------------
diff --git a/_draft/v1.0/references/images/div_3.jpg b/_draft/v1.0/references/images/div_3.jpg
new file mode 100644
index 0000000..b10f69e
Binary files /dev/null and b/_draft/v1.0/references/images/div_3.jpg differ
http://git-wip-us.apache.org/repos/asf/incubator-weex-site/blob/32a097bf/_draft/v1.0/references/images/div_4.jpg
----------------------------------------------------------------------
diff --git a/_draft/v1.0/references/images/div_4.jpg b/_draft/v1.0/references/images/div_4.jpg
new file mode 100644
index 0000000..acc2518
Binary files /dev/null and b/_draft/v1.0/references/images/div_4.jpg differ
http://git-wip-us.apache.org/repos/asf/incubator-weex-site/blob/32a097bf/_draft/v1.0/references/images/image_1.jpg
----------------------------------------------------------------------
diff --git a/_draft/v1.0/references/images/image_1.jpg b/_draft/v1.0/references/images/image_1.jpg
new file mode 100644
index 0000000..b87de15
Binary files /dev/null and b/_draft/v1.0/references/images/image_1.jpg differ
http://git-wip-us.apache.org/repos/asf/incubator-weex-site/blob/32a097bf/_draft/v1.0/references/images/image_2.jpg
----------------------------------------------------------------------
diff --git a/_draft/v1.0/references/images/image_2.jpg b/_draft/v1.0/references/images/image_2.jpg
new file mode 100644
index 0000000..598a242
Binary files /dev/null and b/_draft/v1.0/references/images/image_2.jpg differ
http://git-wip-us.apache.org/repos/asf/incubator-weex-site/blob/32a097bf/_draft/v1.0/references/images/list_2.jpg
----------------------------------------------------------------------
diff --git a/_draft/v1.0/references/images/list_2.jpg b/_draft/v1.0/references/images/list_2.jpg
new file mode 100644
index 0000000..8c2cc55
Binary files /dev/null and b/_draft/v1.0/references/images/list_2.jpg differ
http://git-wip-us.apache.org/repos/asf/incubator-weex-site/blob/32a097bf/_draft/v1.0/references/images/list_3.jpg
----------------------------------------------------------------------
diff --git a/_draft/v1.0/references/images/list_3.jpg b/_draft/v1.0/references/images/list_3.jpg
new file mode 100644
index 0000000..f2968c7
Binary files /dev/null and b/_draft/v1.0/references/images/list_3.jpg differ
http://git-wip-us.apache.org/repos/asf/incubator-weex-site/blob/32a097bf/_draft/v1.0/references/images/list_4.jpg
----------------------------------------------------------------------
diff --git a/_draft/v1.0/references/images/list_4.jpg b/_draft/v1.0/references/images/list_4.jpg
new file mode 100644
index 0000000..0123171
Binary files /dev/null and b/_draft/v1.0/references/images/list_4.jpg differ
http://git-wip-us.apache.org/repos/asf/incubator-weex-site/blob/32a097bf/_draft/v1.0/references/images/nav.jpg
----------------------------------------------------------------------
diff --git a/_draft/v1.0/references/images/nav.jpg b/_draft/v1.0/references/images/nav.jpg
new file mode 100644
index 0000000..8c6ed03
Binary files /dev/null and b/_draft/v1.0/references/images/nav.jpg differ
http://git-wip-us.apache.org/repos/asf/incubator-weex-site/blob/32a097bf/_draft/v1.0/references/images/scroller_1.jpg
----------------------------------------------------------------------
diff --git a/_draft/v1.0/references/images/scroller_1.jpg b/_draft/v1.0/references/images/scroller_1.jpg
new file mode 100644
index 0000000..3e995cb
Binary files /dev/null and b/_draft/v1.0/references/images/scroller_1.jpg differ
http://git-wip-us.apache.org/repos/asf/incubator-weex-site/blob/32a097bf/_draft/v1.0/references/images/style_1.jpg
----------------------------------------------------------------------
diff --git a/_draft/v1.0/references/images/style_1.jpg b/_draft/v1.0/references/images/style_1.jpg
new file mode 100644
index 0000000..2482710
Binary files /dev/null and b/_draft/v1.0/references/images/style_1.jpg differ
http://git-wip-us.apache.org/repos/asf/incubator-weex-site/blob/32a097bf/_draft/v1.0/references/images/style_2.jpg
----------------------------------------------------------------------
diff --git a/_draft/v1.0/references/images/style_2.jpg b/_draft/v1.0/references/images/style_2.jpg
new file mode 100644
index 0000000..6b6f2e1
Binary files /dev/null and b/_draft/v1.0/references/images/style_2.jpg differ
http://git-wip-us.apache.org/repos/asf/incubator-weex-site/blob/32a097bf/_draft/v1.0/references/index.md
----------------------------------------------------------------------
diff --git a/_draft/v1.0/references/index.md b/_draft/v1.0/references/index.md
new file mode 100644
index 0000000..644c16f
--- /dev/null
+++ b/_draft/v1.0/references/index.md
@@ -0,0 +1,46 @@
+---
+title: Bootstrap
+type: references
+order: 1
+has_chapter_content: false
+chapter_title: 通用选项
+version: 0.10
+---
+
+# Bootstrap
+
+除了其默认的意义,`<script>`标签支持在页面的顶级组件中通过 `type` 属性定义两种配置。
+- `type="data"`: 配置初始化数据,这里定义的数据会覆盖定义在`<script>`中的数据;
+- `type="config"`: 定义配置项。
+
+``` html
+<script type="data">
+ /* (可选) 定义初始化数据 */
+</script>
+
+<script type="config">
+ /* (可选) 定义配置项 */
+</script>
+
+```
+## 定义初始化数据
+
+有时,很难在默认的`<script>`标签中维护巨大的数据结构。所以 Weex 允许我们通过 `<script type="data">` 标签定义初始化数据。在这里定义的数据将完全取代默认的 `<script>` 标签中定义的数据。
+
+例如:
+
+```html
+<script type="data">
+ module.exports = {
+ title: 'Alibaba',
+ date: new Date().toLocaleString()
+ }
+</script>
+```
+## 配置项
+
+Weex 也允许我们通过 `<script type="config">` 定义一些配置项,目前,仅只支持配置 `downgrade`。
+- `downgrade.osVersion`
+- `downgrade.appVersion`
+- `downgrade.weexVersion`
+- `downgrade.deviceModel`
http://git-wip-us.apache.org/repos/asf/incubator-weex-site/blob/32a097bf/_draft/v1.0/references/modules/animation.md
----------------------------------------------------------------------
diff --git a/_draft/v1.0/references/modules/animation.md b/_draft/v1.0/references/modules/animation.md
new file mode 100644
index 0000000..821bfac
--- /dev/null
+++ b/_draft/v1.0/references/modules/animation.md
@@ -0,0 +1,90 @@
+---
+title: animation
+type: references
+order: 4.1
+version: 0.10
+---
+
+# `animation` 动画
+
+流畅且有意义的动画是一个十分有效的提升移动应用用户体验的手段,`animation` 模块被用于在组件上执行动画。动画可以对组件执行一系列简单的变换 (位置、大小、旋转角度、背景颜色和不透明度)。举个例子,如果有一个 `<image>` 组件,通过动画你可以对其进行移动、旋转、拉伸或收缩等动作。
+
+## 示例
+
+```html
+<template>
+ <div>
+ <div id="test" class="test" onclick="run"></div>
+ </div>
+</template>
+<style>
+ .test { background-color: #6666ff; width: 200; height: 200; }
+</style>
+<script>
+ var animation = require('@weex-module/animation')
+ module.exports = {
+ methods: {
+ run: function () {
+ var testEl = this.$el('test')
+ animation.transition(testEl, {
+ styles: {
+ backgroundColor: '#FF0000',
+ transform: 'translate(100px, 100px)'
+ },
+ duration: 0, //ms
+ timingFunction: 'ease',
+ 'transform-origin': 'center center',
+ delay: 0 //ms
+ }, function () {
+ console.log('animation finished.')
+ })
+ }
+ }
+ }
+</script>
+```
+
+[体验一下](http://dotwe.org/2ae04d3a7017a2ec748cf40905fcd98c)
+
+## API
+
+### `transition(el, options, callback)`
+
+[example](http://dotwe.org/a034a49b5863da099843eb9a0eea9f93)
+
+#### 参数
+
+* `el {Element}`:将要执行动画的元素,通常可以通过调用 [`this.$el(id)`](../api.html) 来获取元素的引用。
+* `options {Object}`:描述动画过程的对象。
+ * `options.duration {number}`:指定动画的持续时间 (单位是毫秒),默认值是 `0`,表示没有动画效果。
+ * `options.delay {number}`:指定请求动画操作到执行动画之间的时间间隔 (单位是毫秒),默认值是 `0`,表示没有延迟,在请求后立即执行动画。
+ * `options.timingFunction {string}`:描述动画执行的速度曲线,用于使动画变化更为平滑。默认值是 `linear`,表示动画从开始到结束都拥有同样的速度。下表列出了所有合法的属性:
+
+| 属性名 | 描述 | 示例 |
+| ---- | ---- | ---- |
+| `linear` | 动画从头到尾的速度是相同的 | [example](http://dotwe.org/70e0c243ffde30abd8fd353f8c6d1d9a) |
+| `ease-in` | 动画速度由慢到快 | [example](http://dotwe.org/23b104f833039f263957481f2e2c40c9) |
+| `ease-out` | 动画速度由快到慢 | [example](http://dotwe.org/04dab95e073a2c3a808e6b01fc20e996) |
+| `ease-in-out` | 动画先加速到达中间点后减速到达终点 | [example](http://dotwe.org/fc37ec17d215e786ce336a00457489e3) |
+| `cubic-bezier(x1, y1, x2, y2)` | 在三次贝塞尔函数中定义变化过程,函数的参数值必须处于 0 到 1 之间。更多关于三次贝塞尔的信息请参阅 [cubic-bezier](http://cubic-bezier.com/) 和 [Bézier curve](https://en.wikipedia.org/wiki/B%C3%A9zier_curve). | [example](http://weex.alibaba-inc.com/playground/95d8f15d0014c31d3a1d15728313f2a5) |
+
+* `options.styles {Object}`:设置不同样式过渡效果的键值对,下表列出了所有合法的参数:
+
+| 参数名 | 描述 | 值类型 | 默认值 | 示例 |
+| ---- | ---- | ---- | ---- |---- |
+| width | 动画执行后应用到组件上的宽度值 | length | 无 | [example](http://dotwe.org/b599d273f996cfdcbeca7bd5c828ca90) |
+| height | 动画执行后应用到组件上的高度值 | length | 无 | [example](http://dotwe.org/d0b1ccadf386ba00960d0c8340c682e5) |
+| backgroundColor | 动画执行后应用到组件上的背景颜色 | string | none | [example](http://dotwe.org/f4616ee18f6042b63a8fdcd2816b1712) |
+| opacity | 动画执行后应用到组件上的不透明度值 | 介于 0 到 1 间的数值 | `1` | [example](http://dotwe.org/f94394173301db83ae6e66d1330a0d0b) |
+| transformOrigin | 定义变化过程的中心点. 参数 `x-aris` 可能的值为 `left`、`center`、`right`、长度值或百分比值, 参数 `y-axis` 可能的值为 `top`、`center`、`bottom`、长度值或百分比值 | `x-axis y-axis` | `center center` | [example](http://dotwe.org/de43f5a47de230dd531797458bf7fd3c) |
+| transform | 定义应用在元素上的变换类型,支持下表列出的属性 | object | 无 | [example](http://dotwe.org/6766dab0589f7831d4bb6030f4226996) |
+
+`transform`属性的合法值:
+
+| 名称 | 描述 | 值类型 | 默认值 | 示例 |
+| ---- | ---- | ---- | ---- | ---- |
+| `translate`/`translateX`/`translateY` | 指定元素将已被移动到的新位置 | 像素值或百分比 | 无 | [example](http://dotwe.org/6638e66e296723bbef3e59c83b2b5003) |
+| `rotate` | 指定元素将被旋转的角度,单位是度 | number | 无 | [example](http://dotwe.org/ba9e9920594d9388744b2bd0d1b7695d) |
+| `scale`/`scaleX`/`scaleY` | 按比例放大或缩小元素 | number | 无 | [example](http://dotwe.org/14b42dde6583ab222bd2b7ed08f241c8) |
+
+* `callback {Function}`:动画执行完毕之后的回调
http://git-wip-us.apache.org/repos/asf/incubator-weex-site/blob/32a097bf/_draft/v1.0/references/modules/clipboard.md
----------------------------------------------------------------------
diff --git a/_draft/v1.0/references/modules/clipboard.md b/_draft/v1.0/references/modules/clipboard.md
new file mode 100644
index 0000000..f4525f2
--- /dev/null
+++ b/_draft/v1.0/references/modules/clipboard.md
@@ -0,0 +1,112 @@
+---
+title: clipboard
+type: references
+order: 4.2
+version: 0.10
+---
+
+# `clipboard` 剪切板
+<span class="weex-version">v0.8+</span>
+
+我们可以通过 `clipboard` 模块的 `getString()`、`setString()` 接口从系统的粘贴板获取内容或者设置内容。
+
+以前当我们收到一条短信验证码信息时,除了人肉拷贝,我们无法获取拷贝短信的内容。这是非常苦恼的。但是现在我们可以通过简单的调用 `clipboard.getString()` 接口来获取短信内容了。
+
+## 示例
+
+```html
+<template>
+ <div>
+ <div class="div">
+ <text class="text" onclick="onItemClick">hello {{message}}</text>
+ </div>
+ <div class="div">
+ <text class="text" onclick="setContent">click me to set: {{tobecopied}}</text>
+ </div>
+ </div>
+</template>
+
+<script>
+ var clipboard = require('@weex-module/clipboard');
+ module.exports ={
+ data:{
+ tobecopied:'yay!',
+ message:"nothing."
+ },
+ methods:{
+ setContent:function(e){
+ clipboard.setString(this.tobecopied);
+ },
+ onItemClick:function(e){
+ this.message='clicked! ';
+ clipboard.getString(function(ret) {
+ this.message = 'text from clipboard:'+ ret;
+ }.bind(this));
+ }
+ }
+ }
+</script>
+
+<style>
+ .div {
+ flex-direction: row;
+ justify-content: space-between;
+ align-items: center;
+ width: 750;
+ height: 90;
+ padding-left:30;
+ padding-right:30;
+
+ border-bottom-width: 1;
+ border-style: solid;
+ border-color: #dddddd;
+ }
+ .text {
+ width: 750;
+ height: 90;
+ }
+</style>
+```
+
+[体验一下](http://dotwe.org/b6a9d613462d85dce56f81085b094dfa)
+
+**注意**
+
+* 仅支持文本拷贝
+* 出于安全考虑和平台限制,只支持 Android 和 iOS,不支持 html5。
+
+## API
+
+### `getString(callback)`
+
+从系统粘贴板读取内容。
+
+#### 参数
+
+* `callback {function (ret)}`:执行完读取操作后的回调函数。`ret {Object}` 为 `callback` 函数的参数,有两个属性:
+ - `ret.data`:获取到的文本内容;
+ - `ret.result`:返回状态,可能为 `success` 或 `fail`。
+
+#### 示例
+
+```javascript
+var clipboard = require('@weex-module/clipboard');
+clipboard.getString(function(ret) {
+ console.log("text from clipboard: " + ret.data);
+});
+```
+
+### `setString(text)`
+
+将一段文本复制到剪切板,相当于手动复制文本。
+
+#### 参数
+
+* `text {string}`:要复制到剪切板的字符串。
+
+#### 示例
+
+```javascript
+var clipboard = require('@weex-module/clipboard');
+clipboard.setString("SomeStringHere");
+```
http://git-wip-us.apache.org/repos/asf/incubator-weex-site/blob/32a097bf/_draft/v1.0/references/modules/dom.md
----------------------------------------------------------------------
diff --git a/_draft/v1.0/references/modules/dom.md b/_draft/v1.0/references/modules/dom.md
new file mode 100644
index 0000000..270ec2b
--- /dev/null
+++ b/_draft/v1.0/references/modules/dom.md
@@ -0,0 +1,79 @@
+---
+title: dom
+type: references
+order: 4.3
+version: 0.10
+---
+
+# dom
+
+包含如下可以更新 dom 树的 dom API。
+
+这部分API是通过把 virtual-dom 的消息发送到 native 渲染器来做到的。
+
+开发者在日常开发中,唯一可在 `.we` 文件中使用的是 `scrollToElement`。
+~~你也可以调用 `$scrollTo` 方法来使用它~~
+
+这个页面提及的其他的 API,只在 `callNative` 进程中的 native 渲染器用。
+(关于 `callNative` 进程的进一步介绍,可以在 [How it works](../../advanced/how-it-works.html)中的 JS Framework 部分看到 )
+
+## API
+### scrollToElement(node, options)
+
+让页面滚动到那个对应的节点,这个API只能在 `<scroller>` 和 `<list>` 组件中用。
+
+~~这个API也能通过调用VM的方法 `$scrollTo` 来使用(已弃用)~~
+
+要在你的 `.we` 文件中使用这个 API,可以使用 `require('@weex-module/dom').scrollToElement`。
+
+#### 参数
+- `node {Node}`:你要滚动到的那个节点
+- `options {Object}`:如下选项
+ - `offset {number}`:一个到其可见位置的偏移距离,默认是 `0`
+
+#### 示例
+
+```html
+<template>
+ <scroller>
+ <div class="row" repeat="item in rows" id="item-{{$index}}">
+ <text class="item-title">row {{item.id}}</text>
+ </div>
+ <div onclick="go" style="width: 750;height: 50; position: fixed; left: 0; right: 0; bottom: 0; background-color: #eeeeee;">
+ <text style="text-align: center;">
+ Go to 50th line.
+ </text>
+ </div>
+ </scroller>
+</template>
+
+<script>
+var dom = require('@weex-module/dom')
+
+module.exports = {
+ data: {
+ rows: []
+ },
+ created: function () {
+ for (var i = 0; i < 100; i++) {
+ this.rows.push({
+ id: i
+ })
+ }
+ },
+ methods: {
+ go: function () {
+ var el = this.$el('item-49')
+
+ dom.scrollToElement(el, {
+ offset: 0
+ })
+ }
+ }
+}
+</script>
+```
+
+## 其他
+
+dom 还有一些底层接口用于创建 Weex 实例时调用,比如 `createBody`、`updateAttrs` 等,但并未开放供外部使用。
http://git-wip-us.apache.org/repos/asf/incubator-weex-site/blob/32a097bf/_draft/v1.0/references/modules/globalevent.md
----------------------------------------------------------------------
diff --git a/_draft/v1.0/references/modules/globalevent.md b/_draft/v1.0/references/modules/globalevent.md
new file mode 100644
index 0000000..9a04dc0
--- /dev/null
+++ b/_draft/v1.0/references/modules/globalevent.md
@@ -0,0 +1,87 @@
+---
+title: globalEvent
+type: references
+order: 4.9
+version: 0.10
+---
+
+# 全局事件
+<span class="weex-version">0.8 (开发中)</span>
+
+`globalEvent` 用于监听持久性事件,例如定位信息,陀螺仪等的变化。全局事件是需要额外 APIs 处理的次要 API。你能通过 `addEventListener` 注册事件监听,当你不再需要的时候,也可以通过 `removeEventListener` 取消事件监听。
+
+*提醒*
+
+- 这是一个实例级别的事件,而非应用级别。
+
+## 如何让你的模块支持全局事件
+
+API 开发完成后,当需要发送事件时,需要通过以下方法:
+
+```javascript
+/**
+ *
+ * @param eventName eventName
+ * @param params event params
+ */
+instance.fireGlobalEventCallback(eventName,params);
+```
+
+如何在 weex-html5 组件或模块中分发全局事件?只需在文档元素上分派事件:
+
+```javascript
+var evt = new Event('some-type')
+evt.data = { foo: 'bar' }
+document.dispatchEvent(evt)
+```
+
+**示例**
+
+### Android
+
+```java
+Map<String,Object> params=new HashMap<>();
+params.put("key","value");
+mWXSDKInstance.fireGlobalEventCallback("geolocation",params);
+```
+
+### iOS
+
+```object-c
+[weexInstance fireGlobalEvent:@"geolocation" params:@{@"key":@"value"}];
+```
+
+## API
+
+### `addEventListener(String eventName, String callback)`
+
+注册全局事件。
+
+#### 参数
+
+- `eventName {string}`:需要监听的事件名称。
+- `callback {Function}`:触发事件后的回调函数。
+
+#### 示例
+
+```javascript
+var globalEvent = require('@weex-module/globalEvent');
+globalEvent.addEventListener("geolocation", function (e) {
+ console.log("get geolocation")
+});
+```
+
+### `removeEventListener(String eventName)`
+
+取消事件监听。
+
+#### 参数
+
+- `eventName {string}`:需要取消的事件名称。
+
+#### 示例
+
+```javascript
+var globalEvent = require('@weex-module/globalEvent');
+globalEvent.removeEventListener("geolocation");
+```
http://git-wip-us.apache.org/repos/asf/incubator-weex-site/blob/32a097bf/_draft/v1.0/references/modules/index.md
----------------------------------------------------------------------
diff --git a/_draft/v1.0/references/modules/index.md b/_draft/v1.0/references/modules/index.md
new file mode 100644
index 0000000..c76e401
--- /dev/null
+++ b/_draft/v1.0/references/modules/index.md
@@ -0,0 +1,20 @@
+---
+title: 内建模块
+type: references
+order: 4
+has_chapter_content: true
+version: 0.10
+---
+
+# 内建模块
+
+## 如何使用
+
+你可以简单的通过类似 `require('@weex-module/name')` 这样的语法获取一个模块的 API,比如:
+
+```javascript
+var dom = require('@weex-module/dom')
+dom.scrollToElement(this.$el('someIdForElement'), {
+ offset: 0
+})
+```
http://git-wip-us.apache.org/repos/asf/incubator-weex-site/blob/32a097bf/_draft/v1.0/references/modules/modal.md
----------------------------------------------------------------------
diff --git a/_draft/v1.0/references/modules/modal.md b/_draft/v1.0/references/modules/modal.md
new file mode 100644
index 0000000..3e652a8
--- /dev/null
+++ b/_draft/v1.0/references/modules/modal.md
@@ -0,0 +1,196 @@
+---
+title: modal
+type: references
+order: 4.4
+version: 0.10
+---
+
+# `modal` 模态
+
+`modal` 模块提供了以下展示消息框的 API:`toast`、`alert`、`confirm` 和 `prompt`。
+
+## API
+
+### `toast(options)`
+
+`toast()` 会在一个小浮层里展示关于某个操作的简单反馈。例如,在邮件发送前离开邮编编辑界面,可以触发一个“草稿已保存”的 toast,告知用户以后可以继续编辑。toast 会在显示一段时间之后自动消失。
+
+#### 参数
+
+- `options {Object}`:相关选项
+ - `message {string}`:展示的内容
+ - `duration {number}`:展示的持续时间(以秒为单位)
+
+#### 示例
+
+```html
+<template>
+ <div style="height: 200px; width: 400px; background-color: #00bfff;
+ justify-content: center; align-items: center" onclick="{{perform}}">
+ <text style="font-size: 60px; color: #ffffff">Toast</text>
+ </div>
+</template>
+
+<script>
+ module.exports = {
+ methods: {
+ perform: function () {
+ var modal = require('@weex-module/modal');
+ modal.toast({
+ 'message': 'I am a toast',
+ 'duration': 3
+ });
+ }
+ }
+ }
+</script>
+```
+
+[体验一下](http://dotwe.org/a1b8699c49d1cbb3d0de66c1c5175387)
+
+### `alert(options, callback)`
+
+警告框经常用于确保用户可以得到某些信息。当警告框出现后,用户需要点击确定按钮才能继续进行操作。
+
+#### 参数
+
+- `options {Object}`:alert选项
+ - `message {string}`:警告框内显示的文字信息
+ - `okTitle {string}`:确定按钮上显示的文字信息,默认是“OK”
+ - `callback {Function}`:用户操作完成后的回调
+
+#### 示例
+
+```html
+<template>
+ <div>
+ <div style="height: 200px; width: 400px; background-color: #00bfff;
+ justify-content: center; align-items: center" onclick="{{perform}}">
+ <text style="font-size: 60px; color: #ffffff">Alert</text>
+ </div>
+ <text>{{params}}</text>
+ </div>
+</template>
+
+<script>
+ module.exports = {
+ data: {
+ params: ''
+ },
+ methods: {
+ perform: function () {
+ var modal = require('@weex-module/modal');
+ var self = this;
+ modal.alert({
+ 'message': 'I am alert message',
+ 'okTitle': 'YES'
+ }, function (result) {
+ self.params = String(result)
+ });
+ }
+ }
+ }
+</script>
+```
+
+[体验一下](http://dotwe.org/18e2a4bdff4d2f7db865c11eadfcd13e)
+
+### `confirm(options, callback)`
+
+确认框用于使用户可以验证或者接受某些信息。当确认框出现后,用户需要点击确定或者取消按钮才能继续进行操作。
+
+#### 参数
+
+- `options {object}`:confirm 选项
+ - `message {string}`:确认框内显示的文字信息
+ - `okTitle {string}`:确认按钮上显示的文字信息,默认是 `OK`
+ - `cancelTitle {string}`:取消按钮上显示的文字信息,默认是 `Cancel`
+- `callback {function (result)}`:用户操作完成后的回调,回调函数的参数 `result` 是确定按钮上的文字信息字符串
+
+#### 示例
+
+```html
+<template>
+ <div>
+ <div style="height: 200px; width: 400px; background-color: #00bfff;
+ justify-content: center; align-items: center" onclick="{{perform}}">
+ <text style="font-size: 60px; color: #ffffff">Confirm</text>
+ </div>
+ <text>{{params}}</text>
+ </div>
+</template>
+
+<script>
+ module.exports = {
+ data: {
+ params: ''
+ },
+ methods: {
+ perform: function () {
+ var modal = require('@weex-module/modal');
+ var self = this;
+ modal.confirm({
+ 'message': 'I have read and accept the terms.',
+ 'okTitle': 'YES',
+ 'cancelTitle': 'NO'
+ }, function (e) {
+ self.params = String(e)
+ });
+ }
+ }
+ }
+</script>
+```
+
+[体验一下](http://dotwe.org/3534b9d5eac99045015d97b20af22c27)
+
+### `prompt(options, callback)`
+
+提示框经常用于提示用户在进入页面前输入某个值。当提示框出现后,用户需要输入某个值,然后点击确认或取消按钮才能继续操作。
+
+#### 参数
+
+- `options {object}`:prompt 选项
+ - `message {string}`:提示框内要显示的文字信息
+ - `okTitle {string}`:确认按钮上显示的文字信息,默认是 `OK`
+ - `cancelTitle {string}`:取消按钮上显示的文字信息,默认是 `Cancel`
+- `callback {function (ret)}`:用户操作完成后的回调,回调函数的参数 `ret` 格式形如 `{ result: 'OK', data: 'hello world' }`,如下
+ - `result {string}`:用户按下的按钮上的文字信息
+ - `data {string}`:用户输入的文字信息
+
+### 示例
+
+```html
+<template>
+ <div>
+ <div style="height: 200px; width: 400px; background-color: #00bfff;
+ justify-content: center; align-items: center" onclick="{{perform}}">
+ <text style="font-size: 60px; color: #ffffff">Prompt</text>
+ </div>
+ <text>{{params}}</text>
+ </div>
+</template>
+
+<script>
+ module.exports = {
+ data: {
+ params: ''
+ },
+ methods: {
+ perform: function () {
+ var modal = require('@weex-module/modal');
+ var self = this;
+ modal.prompt({
+ 'message': 'I am a prompt',
+ 'okTitle': 'YES',
+ 'cancelTitle': 'NO'
+ }, function (e) {
+ self.params = JSON.stringify(e)
+ });
+ }
+ }
+ }
+</script>
+```
+
+[体验一下](http://dotwe.org/9f089100f5808dbc55ef4872a2c0c77b)
http://git-wip-us.apache.org/repos/asf/incubator-weex-site/blob/32a097bf/_draft/v1.0/references/modules/navigator.md
----------------------------------------------------------------------
diff --git a/_draft/v1.0/references/modules/navigator.md b/_draft/v1.0/references/modules/navigator.md
new file mode 100644
index 0000000..fdd4e76
--- /dev/null
+++ b/_draft/v1.0/references/modules/navigator.md
@@ -0,0 +1,110 @@
+---
+title: navigator
+type: references
+order: 4.5
+version: 0.10
+---
+
+# `navigator` 导航控制
+<span class="weex-version">v0.6.1+</span>
+
+众所周知,在浏览器里,我们可以通过前进或者回退按钮来切换页面,iOS/Android 的 `navigator` 模块就是用来实现类似的效果的。除了前进、回退功能,该模块还允许我们指定在切换页面的时候是否应用动画效果。
+
+## 示例
+
+```html
+<template>
+ <div class="div">
+ <text class="text" onclick="onItemClick">click me! {{message}}</text>
+ </div>
+</template>
+
+<script>
+ var navigator = require('@weex-module/navigator')
+ var nextUrl = 'http://dotwe.org/raw/dist/6cd1703a45d7b2752cf05303069ce881.js'
+ module.exports ={
+ data:{
+ message:''
+ },
+ methods:{
+ onItemClick:function(e){
+ var params = {'url':nextUrl,'animated':'true'}
+ navigator.push(params, function(e) {
+ console.log('i am the callback.')
+ });
+ }
+ }
+ }
+</script>
+<style>
+ .div {
+ flex-direction: row;
+ justify-content: space-between;
+ align-items: center;
+ width: 750;
+ height: 90;
+ padding-left:30;
+ padding-right:30;
+
+ border-bottom-width: 1;
+ border-style: solid;
+ border-color: #dddddd;
+ }
+ .text{
+ width: 750;
+ height: 90;
+ }
+</style>
+```
+
+[体验一下](http://dotwe.org/dba03a1660e6242778fd19d3d8f5944b)
+
+## API
+
+### `push(options, callback)`
+
+把一个weex页面URL压入导航堆栈中,可指定在页面跳转时是否需要动画,以及操作完成后需要执行的回调函数
+
+#### 参数
+
+* `options {Object}`:选项参数
+ * `url {stirng}`:要压入的 Weex 页面的 URL
+ * `animated {string}`:`"true"` 示意为页面压入时需要动画效果,`"false"` 则不需要,默认值为 `"true"`
+* `callback {Function}`:执行完该操作后的回调函数
+
+#### 示例
+
+```javascript
+var navigator = require('@weex-module/navigator')
+var params = {
+ url: 'navigator-demo.js',
+ animated: 'true'
+}
+navigator.push(params, function () {
+ // callback
+})
+```
+
+### `pop(options, callback)`
+
+把一个 Weex 页面 URL 弹出导航堆栈中,可指定在页面弹出时是否需要动画,以及操作完成后需要执行的回调函数。
+
+#### 参数
+
+* `options {object}`:选项参数对象
+ * `animated {string}`:`"true"` 示意为弹出页面时需要动画效果,`"false"` 则不需要,默认值为 `"true"`
+* `callback {function}`:执行完该操作后的回调函数
+
+#### 示例
+
+```javascript
+var navigator = require('@weex-module/navigator')
+var params = {
+ animated: 'true'
+}
+navigator.pop(params, function () {
+ // callback
+})
+```
+
+*注意事项:`animated` 二级参数目前仅支持字符串的 `"true"` 和 `"false"`,传入布尔值类型会导致程序崩溃,未来版本会修复这个问题*
http://git-wip-us.apache.org/repos/asf/incubator-weex-site/blob/32a097bf/_draft/v1.0/references/modules/storage.md
----------------------------------------------------------------------
diff --git a/_draft/v1.0/references/modules/storage.md b/_draft/v1.0/references/modules/storage.md
new file mode 100644
index 0000000..c18b9ae
--- /dev/null
+++ b/_draft/v1.0/references/modules/storage.md
@@ -0,0 +1,224 @@
+---
+title: storage
+type: references
+order: 4.6
+version: 0.10
+---
+
+# `storage` 本地存储
+<span class="weex-version">v0.7+</span>
+
+**备注**:0.7及以上版本可用
+
+`storage` 是一个在前端比较常用的模块,可以对本地数据进行存储、修改、删除,并且该数据是永久保存的,除非手动清除或者代码清除。但是,`storage` 模块有一个限制就是浏览器端(H5)只能存储小于5M的数据,因为在 H5/Web 端的实现是采用 `HTML5 LocalStorage API`。而 Android 和 iOS 这块是没什么限制的。
+ storage 常用在一些被用户经常查询,但是又不频繁更新的数据,比如搜索历史、用户的订单列表等。搜索历史一般情况都是作为本地数据存储的,因此使用 storage 比较合适。而用户订单列表是需要本地存储和服务端器检索配合的场景。当一个用户下单后,会经常查阅个人的订单列表。但是,订单的列表数据不是频繁更新的,往往只有在收到货品时,才更新“已签收”,其余平时的状态是“已发货”。因此,可以使用 storage 存储订单列表,可以减少服务器的压力,例如减少 SQL 查询或者缓存的压力。当用户查看订单详情的时候,再更新数据状态。
+
+这里,我们简单模拟“搜索”记录的场景。在搜索的时候写入,然后读取出来展示成列表。
+
+```html
+<template>
+ <div style="background-color:#F6F6F6;">
+ <div class="search_view">
+ <input class="search" placeholder="Please input" onchange="change"/>
+ <text class="btn" onclick="search">Search</text>
+ </div>
+ <text class="item">History</text>
+ <list>
+ <cell repeat="(i, v) in items">
+ <text class="item">{{v}}</text>
+ </cell>
+ </list>
+ </div>
+</template>
+
+<style>
+ .search_view{
+ height:70;
+ margin-top:20;
+ margin-left:10;
+ margin-right:10;
+ flex-direction:row;
+ }
+ .search{
+ height:70;
+ border-width:1;
+ border-color:#dddddd;
+ padding-left:10;
+ font-size:28;
+ flex:1;
+ }
+ .btn{
+ width:80;
+ text-align:center;
+ justify-content:center;
+ font-size:28;
+ background-color:#1A89EA;
+ color:#ffffff;
+ }
+ .item{
+ text-align:center;
+ font-size:25;
+ height:50;
+ margin-top:10;
+ color:#5E5E5E;
+ border-bottom-width:1;
+ border-bottom-color:#dddddd;
+ justify-content:center;
+ }
+</style>
+
+<script>
+ var storage = require('@weex-module/storage');
+ module.exports = {
+ data: {
+ items: [],
+ keywords:''
+ },
+ created: function(){
+ var that = this;
+ storage.getAllKeys(function(e) {
+ if(e.result == 'success' && e.data.length){
+ e.data.forEach(function(item){
+ if(item.indexOf('search_') > -1){
+ that.items.push(item.split('search_')[1]);
+ }
+ });
+ }
+ });
+ },
+ methods:{
+ search: function(){
+ var that = this;
+ if(!this.keywords) return;
+ storage.setItem('search_' + this.keywords, this.keywords, function(e) {
+ that.items.push(that.keywords);
+ });
+ },
+ change: function(e){
+ if(!e.value) return;
+ this.keywords = e.value;
+ }
+ }
+ };
+</script>
+```
+
+[体验一下](http://dotwe.org/b0f9a8f5df916c91bfb39e54e03a9ba8)
+
+这里,逐一解释下上面的代码。`input` 组件监听了 `change` 事件,可以保存用户输入的搜索关键字。如果用户点击了搜索按钮,则将关键字存储到 storage。这里,使用了 `search_` 作为 storage key 的前缀。因此,我们在页面加载时,在 `created` 生命周期中可以先使用 `storage.getAllKeys` 获取所有的 `key`。如果 `key` 包含了 `search_ `,则说明是搜索记录。因此,将该记录压入数组 items 中,于是界面就会展示出搜索记录的列表。
+
+## API
+
+`storage` 提供了一系列的 API 供我们调用。我们只需要引入该模块,然后调用对应的 API 即可。
+
+### `setItem(key, value, callback)`
+
+该方法可以通过键值对的形式将数据存储到本地。同时可以通过该方法,更新已有的数据。
+
+#### 参数
+
+* `key {string}`:要存储的键,不允许是 `""` 或 `null`
+* `value {string}`:要存储的值,不允许是 `""` 或 `null`
+* `callback {function (e)}`:执行操作成功后的回调
+ * `e.result`:表示设置是否成功,如果成功返回 `"success"`
+ * `e.data`:`undefined` 表示设置成功,`invalid_param` 表示 key/value 为 `""` 或者 `null`
+
+#### 示例
+
+```javascript
+var storage = require('@weex-module/storage')
+storage.setItem('bar', 'bar-value', function (e) {
+ e.result
+ e.data
+})
+```
+
+这里,对返回值做一个简单的介绍:
+
+`e` 包含两个属性:`e.result` 和 `e.data`。如果 `e.result` 返回值是 “success”,则说明成功。`e.data` 返回 `undefined` 表示设置成功,返回 `invalid_param` 表示` key/value` 为 "" 或者 null。因此,你可以判断两个返回判断是否插入成功。
+
+### `getItem(key, callback)`
+
+传入键名返回对应的键值
+
+#### 参数
+
+* `key {string}`:要获取的值的名称,不允许是 `""` 或 `null`
+* `callback {function (e)}`:执行操作成功后的回调
+ * `e.result`:表示设置是否成功,如果成功返回 `"success"`
+ * `e.data`:获取对应的键值字符串,如果没有找到则返回 `undefined`
+
+#### 示例
+
+```javascript
+var storage = require('@weex-module/storage')
+storage.getItem('foo', function (e) {
+ e.data
+});
+```
+
+### `removeItem(key, callback)`
+
+传入一个键名将会删除本地存储中对应的键值
+
+#### 参数
+
+* `key {string}`:要删除的值的名称,不允许是 `""` 或 `null`
+* `callback {function (e)}`:执行操作成功后的回调.
+ * `e.result`:表示删除是否成功,如果成功返回 `"success"`
+ * `e.data`:`undefined` 表示删除成功
+
+#### 示例
+
+```javascript
+var storage = require('@weex-module/storage')
+storage.removeItem('foo', function (e) {
+ e.result
+ e.data
+})
+```
+
+### `length(callback)`
+
+返回本地存储的数据中所有存储项数量的整数
+
+#### 参数
+
+* `callback {function (e)}`:执行操作成功后的回调
+ * `e.result`:表示设置是否成功,如果成功返回 `"success"`
+ * `e.data`:当前已存储项的数量
+
+#### 示例
+
+````javascript
+var storage = require('@weex-module/storage')
+storage.length(function (e) {
+ e.result
+ e.data
+})
+````
+
+### `getAllKeys(callback)`
+
+返回一个包含全部已存储项键名的数组
+
+#### 参数
+
+* `callback {function (e)}`:执行操作成功后的回调。
+ * `e.result`:表示设置是否成功,如果成功返回 `"success"`
+ * `e.data`:所有键名组成的数组
+
+#### 示例
+
+````javascript
+var storage = require('@weex-module/storage')
+storage.getAllKeys(function (e) {
+ e.result
+ e.data
+})
+````
+
+## 其它参考
+
+* [W3school: html5 localStorage](http://www.w3school.com.cn/html5/html_5_webstorage.asp)
+* [storage 模块完整的 Demo](https://github.com/apache/incubator-weex/blob/dev/examples/module/storage-demo.we)
[09/51] [abbrv] incubator-weex-site git commit: rearrangement the
structure of the document
Posted by ha...@apache.org.
http://git-wip-us.apache.org/repos/asf/incubator-weex-site/blob/32a097bf/source/cn/wiki/common-styles.md
----------------------------------------------------------------------
diff --git a/source/cn/wiki/common-styles.md b/source/cn/wiki/common-styles.md
new file mode 100644
index 0000000..002a20c
--- /dev/null
+++ b/source/cn/wiki/common-styles.md
@@ -0,0 +1,628 @@
+---
+title: 通用样式
+type: wiki
+group: 样式
+order: 3.1
+version: 2.1
+---
+
+# 通用样式
+
+所有 Weex 组件都支持以下通用样式规则。
+
+## 盒模型
+
+
+
+Weex 盒模型基于 [CSS 盒模型](https://www.w3.org/TR/css3-box/),每个 Weex 元素都可视作一个盒子。我们一般在讨论设计或布局时,会提到「盒模型」这个概念。
+
+盒模型描述了一个元素所占用的空间。每一个盒子有四条边界:外边距边界 margin edge, 边框边界 border edge, 内边距边界 padding edge 与内容边界 content edge。这四层边界,形成一层层的盒子包裹起来,这就是盒模型大体上的含义。
+
+**注意:**
+Weex 对于长度值目前只支持*像素*值,不支持相对单位(`em`、`rem`)。
+
+- `width {length}`:,默认值 0
+- `height {length}`:,默认值 0
+- `padding {length}`:内边距,内容和边框之间的距离。默认值 0
+
+ 可有如下写法:
+
+ - `padding-left {length}`:,默认值 0
+ - `padding-right {length}`:,默认值 0
+ - `padding-top {length}`:,默认值 0
+ - `padding-bottom {length}`:,默认值 0
+- `margin`:
+
+ 外边距,元素和元素之间的空白距离。值类型为 length,默认值 0
+
+ 可有如下写法:
+
+ - `margin-left {length}`:,默认值 0
+ - `margin-right {length}`:,默认值 0
+ - `margin-top {length}`:,默认值 0
+ - `margin-bottom {length}`:,默认值 0
+- border:
+
+ 设定边框,`border` 目前不支持类似这样 `border: 1 solid #ff0000;` 的组合写法。
+
+ 可有如下写法:
+
+ - `border-style`:
+
+ 设定边框样式,值类型为 string,可选值为 `solid` | `dashed` | `dotted`,默认值 `solid`
+
+ 可有如下写法:
+
+ - `border-left-style {string}`:可选值为 `solid` | `dashed` | `dotted`,默认值 `solid`
+ - `border-top-style {string}`:可选值为 `solid` | `dashed` | `dotted`,默认值 `solid`
+ - `border-right-style {string}`:可选值为 `solid` | `dashed` | `dotted`,默认值 `solid`
+ - `border-bottom-style {string}`:可选值为 `solid` | `dashed` | `dotted`,默认值 `solid`
+
+ - `border-width {length}`:
+
+ 设定边框宽度,非负值, 默认值 0
+
+ 可有如下写法:
+
+ - `border-left-width {length}`:,非负值, 默认值 0
+ - `border-top-width {length}`:,非负值, 默认值 0
+ - `border-right-width {length}`:,非负值, 默认值 0
+ - `border-bottom-width {length}`:,非负值, 默认值 0
+
+ - `border-color {color}`:
+
+ 设定边框颜色,默认值 `#000000`
+
+ 可有如下写法:
+
+ - `border-left-color {color}`:,默认值 `#000000`
+ - `border-top-color {color}`:,默认值 `#000000`
+ - `border-right-color {color}`:,默认值 `#000000`
+ - `border-bottom-color {color}`:,默认值 `#000000`
+ - `border-radius {length}`:
+
+ 设定圆角,默认值 0
+
+ 可有如下写法:
+
+ - `border-bottom-left-radius {length}`:,非负值, 默认值 0
+ - `border-bottom-right-radius {length}`:,非负值, 默认值 0
+ - `border-top-left-radius {length}`:,非负值, 默认值 0
+ - `border-top-right-radius {length}`:,非负值, 默认值 0
+
+
+### 注意:
+
+Weex 盒模型的 `box-sizing` 默认为 `border-box`,即盒子的宽高包含内容、内边距和边框的宽度,不包含外边距的宽度。
+
+目前在 `<image>` 组件上尚无法只定义一个或几个角的 `border-radius`。比如你无法在这两个组件上使用 `border-top-left-radius`。该约束只对 iOS 生效,Android 并不受此限制。
+
+尽管 `overflow:hidden` 在 Android 上是默认行为,但只有下列条件都满足时,一个父 view 才会去 clip 它的子 view。这个限制只对 Android 生效,iOS 不受影响。
+* 父view是`div`, `a`, `cell`, `refresh` 或 `loading`。
+* 系统版本是 Android 4.3 或更高。
+* 系统版本不是 Andorid 7.0。
+* 父 view 没有 `background-image` 属性或系统版本是 Android 5.0 或更高。
+
+### 示例:
+
+```html
+<template>
+ <div>
+ <image style="width: 400px; height: 200px; margin-left: 20px;" src="https://g.alicdn.com/mtb/lab-zikuan/0.0.18/weex/weex_logo_blue@3x.png"></image>
+ </div>
+</template>
+```
+
+## Flexbox
+
+Weex 布局模型基于 CSS [`Flexbox`](http://www.w3.org/TR/css3-flexbox/),以便所有页面元素的排版能够一致可预测,同时页面布局能适应各种设备或者屏幕尺寸。
+
+Flexbox 包含 flex 容器和 flex 成员项。如果一个 Weex 元素可以容纳其他元素,那么它就成为 flex 容器。需要注意的是,flexbox 的老版规范相较新版有些出入,比如是否能支持 wrapping。这些都描述在 W3C 的工作草案中了,你需要注意下新老版本之间的不同。另外,老版本只在安卓 4.4 版以下得到支持。
+
+### Flex 容器
+
+在 Weex 中,Flexbox 是默认且唯一的布局模型,所以你不需要手动为元素添加 `display: flex;` 属性。
+
+- `flex-direction`:
+
+ 定义了 flex 容器中 flex 成员项的排列方向。可选值为 `row` | `column`,默认值为 `column`
+
+ - `column`:从上到下排列。
+ - `row`:从左到右排列。
+
+- `justify-content`:
+
+ 定义了 flex 容器中 flex 成员项在主轴方向上如何排列以处理空白部分。可选值为 `flex-start` | `flex-end` | `center` | `space-between`,默认值为 `flex-start`。
+
+ - `flex-start`:是默认值,所有的 flex 成员项都排列在容器的前部;
+ - `flex-end`:则意味着成员项排列在容器的后部;
+ - `center`:即中间对齐,成员项排列在容器中间、两边留白;
+ - `space-between`:表示两端对齐,空白均匀地填充到 flex 成员项之间。
+
+ 
+
+- `align-items`:
+
+ 定义了 flex 容器中 flex 成员项在纵轴方向上如何排列以处理空白部分。可选值为 `stretch` | `flex-start` | `center` | `flex-end`,默认值为 `stretch`。
+
+ - `stretch` 是默认值,即拉伸高度至 flex 容器的大小;
+ - `flex-start` 则是上对齐,所有的成员项排列在容器顶部;
+ - `flex-end` 是下对齐,所有的成员项排列在容器底部;
+ - `center` 是中间对齐,所有成员项都垂直地居中显示。
+
+ 
+
+### Flex 成员项
+
+flex 属性定义了 flex 成员项可以占用容器中剩余空间的大小。如果所有的成员项设置相同的值 `flex: 1`,它们将平均分配剩余空间. 如果一个成员项设置的值为 `flex: 2`,其它的成员项设置的值为 `flex: 1`,那么这个成员项所占用的剩余空间是其它成员项的2倍。
+
+- `flex {number}`:值为 number 类型。
+
+### 示例
+
+一个简单的网格布局。
+
+
+
+```html
+<template>
+ <div>
+ <div v-for="(v, i) in list" class="row">
+ <div v-for="(text, k) in v" class="item">
+ <div>
+ <text>{{text}}</text>
+ </div>
+ </div>
+ </div>
+ </div>
+</template>
+<style scoped>
+ .item{
+ flex:1;
+ justify-content: center;
+ align-items:center;
+ border-width:1;
+ }
+ .row{
+ flex-direction: row;
+ height:80px;
+ }
+</style>
+<script>
+ module.exports = {
+ data: function () {
+ return {
+ list:[
+ ['A', 'B', 'C'],
+ ['D', 'E', 'F'],
+ ['G', 'H', 'I']
+ ]
+ }
+ }
+ }
+</script>
+```
+
+一个在相对于屏幕水平居中,全屏居中的 `<div>`。
+
+```html
+<template>
+ <div class="wrapper">
+ <div class="box">
+ </div>
+ </div>
+</template>
+
+<style scoped>
+ .wrapper {
+ position: absolute;
+ top: 0;
+ right: 0;
+ bottom: 0;
+ left: 0;
+ background-color: #cccccc;
+ justify-content: center;
+ align-items: center;
+ }
+ .box {
+ width: 200px;
+ height: 200px;
+ background-color: #fc0000;
+ }
+</style>
+```
+
+## 定位
+
+Weex 支持 `position` 定位,用法与 CSS position 类似。为元素设置 `position` 后,可通过 `top`、`right`、`bottom`、`left` 四个属性设置元素坐标。
+
+- `position {string}`:
+
+ 设置定位类型。可选值为 `relative` | `absolute` | `fixed` | `sticky`,默认值为 `relative`。
+
+ - `relative` 是默认值,指的是相对定位;
+ - `absolute` 是绝对定位,以元素的容器作为参考系;
+ - `fixed` 保证元素在页面窗口中的对应位置显示;
+ - `sticky` 指的是仅当元素滚动到页面之外时,元素会固定在页面窗口的顶部。
+- `top {number}`:距离上方的偏移量,默认为 0。
+- `bottom {number}`:距离下方的偏移量,默认为 0。
+- `left {number}`:距离左方的偏移量,默认为 0。
+- `right {number}`:距离右方的偏移量,默认为 0。
+
+**注意:**
+
+1. Weex 目前不支持 `z-index` 设置元素层级关系,但靠后的元素层级更高,因此,对于层级高的元素,可将其排列在后面。
+2. 如果定位元素超过容器边界,在 Android 下,超出部分将**不可见**,原因在于 Android 端元素 `overflow` 默认值为 `hidden`,但目前 Android 暂不支持设置 `overflow: visible`。
+
+### 示例
+
+
+
+```html
+<template scoped>
+ <div class="wrapper">
+ <div class="box box1">
+ </div>
+ <div class="box box2">
+ </div>
+ <div class="box box3">
+ </div>
+ </div>
+</template>
+
+<style>
+ .wrapper {
+ position: absolute;
+ top: 0;
+ right: 0;
+ bottom: 0;
+ left: 0;
+ background-color: #cccccc;
+ }
+ .box {
+ width: 400px;
+ height: 400px;
+ position: absolute;
+ }
+ .box1 {
+ top: 0;
+ left: 0;
+ background-color: #ff0000;
+ }
+ .box2 {
+ top: 150px;
+ left: 150px;
+ background-color: #0055dd;
+ }
+ .box3 {
+ top: 300px;
+ left: 300px;
+ background-color: #00ff49;
+ }
+</style>
+```
+
+## transform
+
+transform 属性向元素应用 2D 转换。该属性允许我们对元素进行旋转、缩放、移动或倾斜。
+
+目前支持的 transform 声明格式:
+
+- translate( <number/percentage> [, <number/percentage>]?)
+- translateX( <number/percentage> )
+- translateY( <number/percentage> )
+- scale( <number>)
+- scaleX( <number> )
+- scaleY( <number> )
+- rotate( <angle/degree> )
+- rotateX( <angle/degree> ) <span class="api-version">v0.14+</span>
+- rotateY( <angle/degree> ) <span class="api-version">v0.14+</span>
+- perspective( <number> ) Android 4.1及以上版本支持 <span class="api-version">v0.16+</span>
+- transform-origin: number/percentage/keyword(top/left/right/bottom)
+
+### 示例
+
+```HTML
+<template>
+ <div class="wrapper">
+ <div class="transform">
+ <text class="title">Transformed element</text>
+ </div>
+ </div>
+</template>
+
+<style>
+ .transform {
+ align-items: center;
+ transform: translate(150px,200px) rotate(20deg);
+ transform-origin: 0 -250px;
+ border-color:red;
+ border-width:2px;
+ }
+ .title {font-size: 48px;}
+</style>
+```
+
+
+
+## transition <span class="api-version">v0.16.0+</span>
+
+现在您可以在CSS中使用transition属性来提升您应用的交互性与视觉感受,transition中包括布局动画,即LayoutAnimation,现在布局产生变化的同时也能使用transition带来的流畅动画。transition允许CSS的属性值在一定的时间区间内平滑地过渡。
+
+### 参数
+
+- ``transition-property``:允许过渡动画的属性名,设置不同样式transition效果的键值对,默认值为空,表示不执行任何transition,下表列出了所有合法的参数属性:
+
+| 参数名 | 描述 |
+| --------------- | ------------------------------ |
+| width | transition过渡执行的时候是否组件的宽度参与动画 |
+| height | transition过渡执行的时候是否组件的高度参与动画 |
+| top | transition过渡执行的时候是否组件的顶部距离参与动画 |
+| bottom | transition过渡执行的时候是否组件的底部距离参与动画 |
+| left | transition过渡执行的时候是否组件的左侧距离参与动画 |
+| right | transition过渡执行的时候是否组件的右侧距离参与动画 |
+| backgroundColor | transition过渡执行的时候是否组件的背景颜色参与动画 |
+| opacity | transition过渡执行的时候是否组件的不透明度参与动画 |
+| transform | transition过渡执行的时候是否组件的变换类型参与动画 |
+
+- ``transition-duration``:指定transition过渡的持续时间 (单位是毫秒),默认值是 `0`,表示没有动画效果。
+
+- ``transition-delay``:指定请求transition过渡操作到执行transition过渡之间的时间间隔 (单位是毫秒或者秒),默认值是 `0`,表示没有延迟,在请求后立即执行transition过渡。
+
+- ``transition-timing-function``:描述transition过渡执行的速度曲线,用于使transition过渡更为平滑。默认值是 `ease`。下表列出了所有合法的属性:
+
+| 属性名 | 描述 |
+| ------------------------------ | ---------------------------------------- |
+| ease | transition过渡逐渐变慢的过渡效果 |
+| ease-in | transition过渡慢速开始,然后变快的过渡效果 |
+| ease-out | transition过渡快速开始,然后变慢的过渡效果 |
+| ease-in-out | transition过渡慢速开始,然后变快,然后慢速结束的过渡效果 |
+| linear | transition过渡以匀速变化 |
+| cubic-bezier(x1, y1, x2, y2) | 使用三阶贝塞尔函数中自定义transition变化过程,函数的参数值必须处于 0 到 1 之间。更多关于三次贝塞尔的信息请参阅 [cubic-bezier](http://cubic-bezier.com/) 和 [Bézier curve](https://en.wikipedia.org/wiki/B%C3%A9zier_curve). |
+
+### 示例
+
+```html
+<style scoped>
+ .panel {
+ margin: 10px;
+ top:10px;
+ align-items: center;
+ justify-content: center;
+ border: solid;
+ border-radius: 10px;
+
+ transition-property: width,height,backgroundColor;
+ transition-duration: 0.3s;
+ transition-delay: 0s;
+ transition-timing-function: cubic-bezier(0.25, 0.1, 0.25, 1.0);
+ }
+</style>
+```
+
+## 伪类 <span class="api-version">v0.9.5+</span>
+
+Weex 支持四种伪类:`active`, `focus`, `disabled`, `enabled`
+
+所有组件都支持 `active`, 但只有 `input` 组件和 `textarea` 组件支持 `focus`, `enabled`, `disabled`。
+
+### 规则
+
+- 同时生效的时候,优先级高覆盖优先级低
+
+ - 例如:`input:active:enabled` 和 `input:active` 同时生效,前者覆盖后者
+
+- 互联规则如下所示
+
+ 
+
+### 示例
+
+```html
+<template>
+ <div class="wrapper">
+ <image :src="logoUrl" class="logo"></image>
+ </div>
+</template>
+
+<style scoped>
+ .wrapper {
+ align-items: center;
+ margin-top: 120px;
+ }
+ .title {
+ font-size: 48px;
+ }
+ .logo {
+ width: 360px;
+ height: 82px;
+ background-color: red;
+ }
+ .logo:active {
+ width: 180px;
+ height: 82px;
+ background-color: green;
+ }
+</style>
+
+<script>
+ export default {
+ props: {
+ logoUrl: {
+ default: 'https://alibaba.github.io/weex/img/weex_logo_blue@3x.png'
+ },
+ target: {
+ default: 'World'
+ }
+ },
+ methods: {
+ update (e) {
+ this.target = 'Weex';
+ }
+ }
+ };
+</script>
+```
+
+[试一下](http://dotwe.org/vue/df2c8f254620d6d30d0906ee75fe5b99)
+
+## 线性渐变 <span class="api-version">v0.10+</span>
+
+Weex 支持线性渐变背景,具体介绍可参考 [W3C description of the gradient](https://developer.mozilla.org/en-US/docs/Web/CSS/CSS_Images/Using_CSS_gradients)。
+
+所有组件均支持线性渐变。
+
+### 使用
+
+ 你可以通过 `background-image` 属性创建线性渐变。
+
+```css
+background-image: linear-gradient(to top,#a80077,#66ff00);
+```
+
+目前暂不支持 `radial-gradient`(径向渐变)。
+
+Weex 目前只支持两种颜色的渐变,渐变方向如下:
+
+* to right
+ 从左向右渐变
+* to left
+ 从右向左渐变
+* to bottom
+ 从上到下渐变
+* to top
+ 从下到上渐变
+* to bottom right
+ 从左上角到右下角
+* to top left
+ 从右下角到左上角
+
+### Note
+
+- `background-image` 优先级高于 `background-color`,这意味着同时设置 `background-image` 和 `background-color`,`background-color` 被覆盖。
+- 不要使用 `background` 简写.
+
+### 示例
+
+```html
+<template>
+ <scroller style="background-color: #3a3a3a">
+ <div class="container1" style="background-image:linear-gradient(to right,#a80077,#66ff00);">
+ <text class="direction">to right</text>
+ </div>
+ <div class="container1" style="background-image:linear-gradient(to left,#a80077,#66ff00);">
+ <text class="direction">to left</text>
+ </div>
+ <div class="container1" style="background-image:linear-gradient(to bottom,#a80077,#66ff00);">
+ <text class="direction">to bottom</text>
+ </div>
+ <div class="container1" style="background-image:linear-gradient(to top,#a80077,#66ff00);">
+ <text class="direction">to top</text>
+ </div>
+ <div style="flex-direction: row;align-items: center;justify-content: center">
+ <div class="container2" style="background-image:linear-gradient(to bottom right,#a80077,#66ff00);">
+ <text class="direction">to bottom right</text>
+ </div>
+ <div class="container2" style="background-image:linear-gradient(to top left,#a80077,#66ff00);">
+ <text class="direction">to top left</text>
+ </div>
+ </div>
+ </scroller>
+</template>
+<style>
+ .container1 {
+ margin: 10px;
+ width: 730px;
+ height: 200px;
+ align-items: center;
+ justify-content: center;
+ border: solid;
+ border-radius: 10px;
+ }
+
+ .container2 {
+ margin: 10px;
+ width: 300px;
+ height: 300px;
+ align-items: center;
+ justify-content: center;
+ border: solid;
+ border-radius: 10px;
+ }
+
+ .direction {
+ font-size: 40px;
+ color: white;
+ }
+</style>
+```
+
+## 阴影(box-shadow) <span class="api-version">v0.11+</span>
+
+Weex 支持阴影属性:`active`, `focus`, `disabled`, `enabled` `inset(可选)`,`offset-x`,`offset-y`, `blur-radius`,`color`
+
+
+### 注意
+
+- box-shadow仅仅支持iOS
+
+### 示例
+
+```html
+<template>
+ <div class="wrapper">
+ <div style="width:400px; height:60px;background-color: #FFE4C4; box-shadow:20px 10px rgb(255, 69, 0);">
+ <text class="title" style="text-align: center">Hello {{target}}</text>
+ </div>
+ <div style="margin-top: 80px;width:400px; height:60px;background-color: #FFE4C4; box-shadow: 20px 10px 5px rgba(255, 69, 0, 0.8);">
+ <text class="title" style="text-align: center">Hello {{target}}</text>
+ </div>
+ <div style="margin-top: 80px;width:400px; height:60px;background-color: #FFE4C4; box-shadow:inset 20px 10px 5px rgba(255, 69, 0, 0.8);">
+ <text class="title" style="text-align: center">Hello {{target}}</text>
+ </div>
+ <div style="margin-top: 80px;width:400px; height:60px;background-color: #FFE4C4; box-shadow:inset 20px 10px 5px rgb(255, 69, 0);">
+ <text class="title" style="text-align: center">Hello {{target}}</text>
+ </div>
+ <div style="margin-top: 80px;width:400px; height:60px;background-color: #FFE4C4; box-shadow:20px 10px 5px black;">
+ <text class="title" style="text-align: center">Hello {{target}}</text>
+ </div>
+ <div style="margin-top: 80px;width:400px; height:60px;background-color: #FFE4C4; box-shadow:20px 10px 5px #008B00;">
+ <text class="title" style="text-align: center">Hello {{target}}</text>
+ </div>
+ </div>
+</template>
+
+<style scoped>
+ .wrapper {align-items: center; margin-top: 120px;}
+ .title {font-size: 48px;}
+</style>
+
+<script>
+ module.exports = {
+ data: function () {
+ return {
+ logoUrl: 'https://alibaba.github.io/weex/img/weex_logo_blue@3x.png',
+ target: 'World'
+ };
+ }
+ };
+</script>
+```
+
+## 其他基本样式
+
+- `opacity {number}`:取值范围为 [0, 1] 区间。默认值是 1,即完全不透明;0 是完全透明;0.5 是 50% 的透明度。
+- `background-color {color}`:设定元素的背景色,可选值为色值,支持RGB( `rgb(255, 0, 0)` );RGBA( `rgba(255, 0, 0, 0.5)` );十六进制( `#ff0000` );精简写法的十六进制( `#f00` );色值关键字(`red`),默认值是 `transparent` 。
+
+**注意:** [色值的关键字列表](./color-names.html)。
+
+## 上手样式
+
+如果对于样式写法需要更多上手参考,可参考每个组件的文档中,都有常见的例子可供参考。
+
+你可以按照以下步骤来规划 Weex 页面的样式。
+
+1. 全局样式规划:将整个页面分割成合适的模块。
+2. flex 布局:排列和对齐页面模块。
+3. 定位盒子:定位并设置偏移量。
+4. 细节样式处理:增加特定的具体样式。
http://git-wip-us.apache.org/repos/asf/incubator-weex-site/blob/32a097bf/source/cn/wiki/css-units.md
----------------------------------------------------------------------
diff --git a/source/cn/wiki/css-units.md b/source/cn/wiki/css-units.md
new file mode 100644
index 0000000..c76aa8b
--- /dev/null
+++ b/source/cn/wiki/css-units.md
@@ -0,0 +1,65 @@
+---
+title: CSS 单位
+type: wiki
+group: 样式
+order: 3.3
+version: 2.1
+has_chapter_content: true
+---
+
+# CSS 单位
+
+## CSS `color` 单位
+
+支持以下写法:
+
+```css
+.classA {
+ /* 3-chars hex */
+ color: #0f0;
+ /* 6-chars hex */
+ color: #00ff00;
+ /* rgba */
+ color: rgb(255, 0, 0);
+ /* rgba */
+ color: rgba(255, 0, 0, 0.5);
+ /* transparent */
+ color: transparent;
+ /* Basic color keywords */
+ color: orange;
+ /* Extended color keywords */
+ color: darkgray;
+}
+```
+
+### 注意
+
+* 不支持 `hsl()`, `hsla()`, `currentColor`, 8个字符的十六进制颜色。
+
+* `rgb(a,b,c)` 或 `rgba(a,b,c,d)` 的性能比其他颜色格式差很多,请选择合适的颜色格式。
+
+颜色名称可查看 [颜色名称列表](./color-names.html).
+
+## CSS `length` 单位
+
+在 Weex 中,我们只支持 `px` 长度单位。并且它将在 JavaScript 运行时和本机渲染器中解析为数字类型。
+
+下面这些不同的写法,解析的结果完全相同。
+
+```css
+.classA { font-size: 48px; line-height: 64px; }
+```
+
+不支持类似 `em`,`rem`,`pt` 这样的 CSS 标准中的其他长度单位。
+
+## CSS `number` 单位
+
+仅仅一个数字。用于 [`opacity`](./common-style.html),[`lines`](./text-style.html)等。
+
+有时值必须是整数,例如:`lines`。
+
+## CSS `percentage` 单位 (暂不支持)
+
+表示百分比值,如“50%”,“66.7%”等。
+
+它是 CSS 标准的一部分,但 Weex 暂不支持。
http://git-wip-us.apache.org/repos/asf/incubator-weex-site/blob/32a097bf/source/cn/wiki/design-principle.md
----------------------------------------------------------------------
diff --git a/source/cn/wiki/design-principle.md b/source/cn/wiki/design-principle.md
new file mode 100644
index 0000000..c72ba3a
--- /dev/null
+++ b/source/cn/wiki/design-principle.md
@@ -0,0 +1,8 @@
+---
+title: 设计理念
+type: wiki
+group: Design
+order: 1.4
+has_chapter_content: false
+version: 2.1
+---
http://git-wip-us.apache.org/repos/asf/incubator-weex-site/blob/32a097bf/source/cn/wiki/event-bubble.md
----------------------------------------------------------------------
diff --git a/source/cn/wiki/event-bubble.md b/source/cn/wiki/event-bubble.md
new file mode 100644
index 0000000..b6bd083
--- /dev/null
+++ b/source/cn/wiki/event-bubble.md
@@ -0,0 +1,147 @@
+---
+title: 事件冒泡
+type: wiki
+group: 事件
+order: 4.2
+version: 2.1
+---
+
+# 事件冒泡 <span class="api-version">v0.13+</span>
+
+Weex 2.0 实现了 W3C 标准的事件冒泡机制。
+
+### 使用
+
+```html
+<template>
+ <div class="root" @click="rootClick" bubble="true">
+ <text style="font-size: 40px;">{{rootText}}</text>
+ <div class="outer" @click="parentClick">
+ <div>
+ <text style="font-size: 40px;">{{parentText}}</text>
+ </div>
+ <text class="inner" @click="click">{{innerText}}</text>
+ </div>
+ </div>
+</template>
+
+<script>
+ module.exports = {
+ data: {
+ innerText: 'click me',
+ parentText: '',
+ rootText: ''
+ },
+ methods: {
+ click: function(e) {
+ this.innerText = 'inner bubble'
+ },
+ parentClick: function(e) {
+ this.parentText = 'parent bubble'
+ },
+ rootClick: function(e) {
+ this.rootText = 'root bubble'
+ }
+ }
+ }
+</script>
+
+<style scoped>
+ .inner {
+ font-size: 40px;
+ text-align: center;
+ background-color: #7a9b1b;
+ padding: 40px;
+ }
+
+ .outer {
+ font-size: 40px;
+ text-align: center;
+ background-color: #9b7a1b;
+ padding: 120px;
+ }
+
+ .root {
+ font-size: 40px;
+ text-align: center;
+ background-color: #7a1b9b;
+ padding: 80px;
+ }
+</style>
+```
+
+[try it](http://dotwe.org/vue/fa2957ce3e9eb47ad9ae1da22d845e95)
+
+运行以上代码,用客户端打开,点击中间的元素,可以看到事件向上传播,依次触发。
+
+### 注意
+
+需要注意的是: ** 为了兼容之前的版本,Weex 默认不会开启事件冒泡机制。需要在根元素的属性上,添加 `bubble="true"` 来开启冒泡机制。否则,将不会向上传播事件,保持与之前版本的效果相同。 **
+
+### stopPropagation
+
+在事件处理函数中,可以使用 `e.stopPropagation()` 方法,来阻止本次事件向上的传递过程。注意,`e.stopPropagation()` 与 `bubble="true"` 不同,前者只会影响当前元素以及父元素的传播,不会影响子元素的传播;后者是为了版本兼容而增加的开关机制,会全局关闭或者开启冒泡机制,两者可以共同存在使用,如下:
+
+```html
+<template>
+ <div class="root" @click="rootClick" bubble="true">
+ <text style="font-size: 40px;">{{rootText}}</text>
+ <div class="outer" @click="parentClick">
+ <div>
+ <text style="font-size: 40px;">{{parentText}}</text>
+ </div>
+ <text class="inner" @click="click">{{innerText}}</text>
+ </div>
+ </div>
+</template>
+
+<script>
+ module.exports = {
+ data: {
+ innerText: 'click me',
+ parentText: '',
+ rootText: ''
+ },
+ methods: {
+ click: function(e) {
+ this.innerText = 'inner bubble'
+ },
+ parentClick: function(e) {
+ this.parentText = 'parent bubble'
+ e.stopPropagation()
+ },
+ rootClick: function(e) {
+ this.rootText = 'root bubble'
+ // e.stopPropagation()
+ }
+ }
+ }
+</script>
+
+<style scoped>
+ .inner {
+ font-size: 40px;
+ text-align: center;
+ background-color: #7a9b1b;
+ padding: 40px;
+ }
+
+ .outer {
+ font-size: 40px;
+ text-align: center;
+ background-color: #9b7a1b;
+ padding: 120px;
+ }
+
+ .root {
+ font-size: 40px;
+ text-align: center;
+ background-color: #7a1b9b;
+ padding: 80px;
+ }
+</style>
+```
+
+[try it](http://dotwe.org/vue/2cc80e19c9b2430fb780234628065a69)
+
+运行以上代码,用客户端打开,点击中间的元素,可以看到事件向上传播到父元素被终止,不再继续往根元素传播。
http://git-wip-us.apache.org/repos/asf/incubator-weex-site/blob/32a097bf/source/cn/wiki/faq.md
----------------------------------------------------------------------
diff --git a/source/cn/wiki/faq.md b/source/cn/wiki/faq.md
new file mode 100644
index 0000000..12c64d4
--- /dev/null
+++ b/source/cn/wiki/faq.md
@@ -0,0 +1,226 @@
+---
+title: 常见问题
+type: wiki
+group: FAQ
+order: 8
+version: 2.1
+layout: post
+---
+
+# 常见问题解答
+
+## 如何查阅旧文档?
+
+你可以通过文档左侧目录最后一项 “旧文档” 进入对于的历史文档页面。也可以直接访问以下链接访问:
+
+- [Guide](./v-0.10/guide/index.html)
+- [手册](./v-0.10/references/index.html)
+- [高阶知识](./v-0.10/advanced/index.html)
+- [工具](./v-0.10/tools/index.html)
+
+## Windows 指令错误
+
+请先安装 [Git for Windows](https://git-scm.com/download/win),在 [For Windows](https://github.com/apache/incubator-weex/tree/dev#for-windows) 中查看更多信息。
+
+
+## Android Studio 中 Gradle 错误
+
+下载 `license-gradle-plugin.jar` 可能引发一些错误,比如 `链接被重置(Connection reset)` 和 `证书无效(peer not authenticated)` 。这可能是由于网络问题导致的,请尝试使用代理或VPN。
+
+## 使用本地图片
+
+Weex 的原生运行机制支持从设备中加载图片,你只需要设置文件 url,例如 `file:///sdcard/image_new0.png` 这样的格式。但是 Weex 暂时还不支持加载你工程中的图片文件。
+
+## Windows 错误 `The header content contains invalid characters ` (头中包含非法字符)
+
+这是由于 weex-toolkit 的依赖 http-server 导致的,http-server 的老版本在中文 windows 中的支持不是很好。我们已经修复了这个问题,请在使用前升级 weex-toolkit 版本。
+
+## Playground 应用在扫面后什么都没有显示(白屏)
+
+最好的方法是查看 debug 日志来查找原因,你可以按照 [这篇文档](./guide/how-to/debug-with-devtools.html) 中的说明来查明导致这一问题的原因。
+
+## 关于 ECMAScript 版本问题
+
+Weex 在 iOS 中使用 JSCore ,在 Android 中使用 v8,因此他们都支持 ECMAScript 5。另外,我们还在原生环境中加了一些 polyfills:
+
+- `Promise` in iOS/Android
+- `Timer APIs` (setTimeout/clearTimeout/setInterval/clearInterval`) in iOS/Android
+- `console` in iOS/Android
+
+在浏览器中我们暂时是包含了一个 `Promise` 的 polyfill。
+
+在未来,开发者可以选择是否通过 configurations 来导入一个 polyfill。
+
+你也可以通过带有 `webpack` 的 `babel` 来写 ES6,这个加载器能够自动将 ES6 转换为 ES5。
+
+如果你还想要更多的 ES6 polyfills,你可以把他们引入到 JS Bundle 中。
+
+## 前端依赖
+
+在 Weex 中你有很多方法来 import/require 一个组件或者一个 JS 模块。以 ES5 为例:
+
+- `require('xxx.js')` : 依赖一个 JS 文件
+- `require('npm-module-name')` : 依赖一个 NPM 模块
+- `require('xxx.we')` : 包含一个 `.we` 文件来注册一个 Weex 自定义组件
+- `require('@weex-module/xxx')` : 依赖一个 Weex 原生模块。注意这只支持 `*.we` 文件而不支持 `*.js` 文件。如果你想要在一个 `*.js` 文件中使用 Weex 原生模块,暂时你可以这样写:
+
+```js
+// use this piece of code below to get Weex native module "modal"
+var modal
+__weex_define__('@weex-temp/x', function (__weex_require__) {
+ modal = __weex_require__('@weex-module/modal')
+})
+
+// use APIs in "modal" module
+modal.toast({message: 'hello'})
+```
+
+以后我们会给大家带来一个更好的设计。
+
+## iOS 文本 `line-height` 样式不正常
+
+`line-height` 样式在 `<text>` 组件中的表现与 H5 和 Android 不同,文本不会在行内居中,而是贴近行底部,因为这里使用的 iOS 原生 API。我们正在努力优化,与其他两端保持一致。
+
+## Android 只支持 `overflow:hidden`
+
+`overflow` 样式在 Android 默认为 `hidden` 并且无法修改,原因是 Android View framework 限制。这个问题只出现在 Android 端,iOS 端和 H5 正常。
+
+## 如何取消 750 像素自适应并以宽高比计算真实像素?
+
+`this.$getConfig()` 方法会返回一个对象,这个对象的 `deviceHeight` 和 `deviceWidth` 属性即实际设备宽度/高度(以像素为单位),而不是以 750 适配的。
+
+因此,您可以使用它们来计算实际像素的宽度/高度。
+
+假设您需要显示固定为 88 px 的导航栏,该导航栏的高度将是:
+
+``` javascript
+var height = 88 * 750 / env.deviceWidth
+```
+
+## 如何在 JavaScript 中检测是否支持某个原生的 module/component
+
+### 检测原生 module
+
+```javascript
+var xxx = require('@weex-module/xxx')
+if (xxx) {
+ // todo: use this module
+}
+else {
+ // todo: handle the exception
+}
+```
+
+### 检测原生 component
+
+```html
+<template>
+ <component is="{{type}}"></component>
+</template>
+
+<script>
+ var type = 'xxx'
+ var xxx = require('@weex-component/xxx')
+ if (!xxx) {
+ type = 'div' // downgrade to <div>
+ }
+ module.exports = {
+ data: function () {
+ return {
+ type: type
+ }
+ }
+ }
+</script>
+```
+
+## 如何在 pages 之间传递数据
+
+如果你有两个页面,A 页面和 B 页面
+
+1. A -> B,使用 [getConfig api](/references/api.md#getconfig) or [storage module](/modules/storage.md) 传递数据;
+2. B -> A,使用 [storage module](/modules/storage.md) 传递数据。
+
+
+## 父子组件之间进行 repeat 操作
+
+如果你有需求,在父子组件之间进行 repeat 操作,需要注意,必须严格按照官网文档的语法来书写代码。如果缺少子组件定义 data 数据,或者是没有指定需要向下传递的 props,都会导致页面不正常渲染。
+
+错误示例:
+
+```html
+<element name="child">
+ <template>
+ <div>
+ <text style="font-size:100">{{title}}</text>
+ </div>
+ </template>
+</element>
+
+<template>
+ <div>
+ <child repeat="item in lists"></child>
+ </div>
+</template>
+<script>
+ module.exports = {
+ data: {
+ lists: [
+ { title: 'A' },
+ { title: 'B' },
+ { title: 'C' }
+ ]
+ },
+ ready: function () {
+ this.lists.splice(0, 1)
+ }
+ }
+</script>
+```
+
+以上示例的理想执行情况,应该是页面上第一个元素 A 被删除,剩下 B、C 两个元素。
+但是,由于错误的写法,导致列表执行 splice 操作之后,出现错误的更新情况:页面最后一个元素 C 被删除。
+
+正确的写法如下:
+
+```html
+<element name="child">
+ <template>
+ <div>
+ <text style="font-size:100">{{title}}</text>
+ </div>
+ </template>
+
+ <script>
+ module.exports = {
+ data: {
+ title: null
+ }
+ }
+ </script>
+</element>
+
+<template>
+ <div>
+ <child repeat="item in lists" title="{{ item.title }}"></child>
+ </div>
+</template>
+<script>
+ module.exports = {
+ data: {
+ lists: [
+ { title: 'A' },
+ { title: 'B' },
+ { title: 'C' }
+ ]
+ },
+ ready: function () {
+ this.lists.splice(0, 1)
+ }
+ }
+</script>
+```
+
+在线示例请见:
+
+* [错误示例](http://dotwe.org/de97cf2c1b7ec09a53728edc9c27ad2a)
http://git-wip-us.apache.org/repos/asf/incubator-weex-site/blob/32a097bf/source/cn/wiki/gestures.md
----------------------------------------------------------------------
diff --git a/source/cn/wiki/gestures.md b/source/cn/wiki/gestures.md
new file mode 100644
index 0000000..dd75b31
--- /dev/null
+++ b/source/cn/wiki/gestures.md
@@ -0,0 +1,61 @@
+---
+title: 手势
+type: wiki
+group: 事件
+order: 4.3
+version: 2.1
+---
+
+# 手势
+
+*注:该功能属于实验性功能*
+
+Weex 封装了原生的触摸事件以提供手势系统。使用手势类似于在 Weex 中使用事件,只需在节点上设置 `on` 特性来监听手势即可。
+
+## 手势类型
+
+目前,仅支持以下四种手势类型:
+
+- **Touch**:当触摸到一个点,移动或从触摸面移开时触发 `touch` 手势。触摸手势很精准,它会返回所有详细的事件信息。所以,监听 `touch` 手势可能很慢,即使只移动一丁点也需要处理大量事件。有三种类型的 `touch` 手势:
+
+ - `touchstart` 将在触摸到触摸面上时触发。
+ - `touchmove` 将在触摸点在触摸面移动时被触发。
+ - `touchend` 将在从触摸面离开时被触发。
+
+- **Pan**:`pan` 手势也会返回触摸点在触摸面的移动信息,有点类似于 `touch` 手势。但是 `pan` 手势只会采样收集部分事件信息因此比 `touch` 事件要快得多,当然精准性差于 `touch`。`pan` 也有三中类型的手势,这些手势的意义与 `touch` 完全一样:
+
+ - `panstart`
+ - `panmove`
+ - `panend`
+ - `horizontalpan` <span class="api-version">v0.10+</span>:手势的 `start/move/end` 状态保存在 `state` 特性中。目前该手势在 Android 下会与 click 事件冲突。
+ - `verticalpan` <span class="api-version">v0.10+</span>:势的 `start/move/end` 状态保存在 `state` 特性中。目前该手势在 Android 下会与 click 事件冲突。
+- **Swipe**:`swipe` 将会在用户在屏幕上滑动时触发,一次连续的滑动只会触发一次 `swiper` 手势。
+- **LongPress**:`LongPress` 将会在触摸点连续保持 500 ms以上时触发。
+
+`touch` 和 `pan` 非常接近,它们的特点可以总结成这样:
+
+- **Touch**:完整信息,精准、很慢
+- **Pan**:抽样信息,很快,不够精准
+
+开发者可以根据自己的情况选择合适的手势。
+
+## 属性
+
+以下属性可以在手势的回调中使用:
+
+- `direction`:仅在 `swipe` 手势中存在,返回滑动方向,返回值可能为 `up`, `left`, `bottom`, `right`。
+- `changedTouches`:一个数组,包含了当前手势的触摸点的运动轨迹
+
+### changedTouches
+
+`changedTouches` 是一个数组,其子元素中包含以下属性:
+
+- `identifier`:触摸点的唯一标识符。
+- `pageX`:触摸点相对于文档左侧边缘的 X 轴坐标。
+- `pageY`:触摸点相对于文档顶部边缘的 Y 轴坐标。
+- `screenX`:触摸点相对于屏幕左侧边缘的 X 轴坐标。
+- `screenY`:触摸点相对于屏幕顶部边缘的 Y 轴坐标。
+
+## 约束
+
+目前,由于会触发大量事件冲突,Weex Android 还不支持在滚动类型的元素上监听手势,例如 `scroller`, `list` 和 `webview` 这三个组件。
http://git-wip-us.apache.org/repos/asf/incubator-weex-site/blob/32a097bf/source/cn/wiki/how-it-works.md
----------------------------------------------------------------------
diff --git a/source/cn/wiki/how-it-works.md b/source/cn/wiki/how-it-works.md
new file mode 100644
index 0000000..e21fa47
--- /dev/null
+++ b/source/cn/wiki/how-it-works.md
@@ -0,0 +1,63 @@
+---
+title: 工作原理
+type: wiki
+group: Design
+order: 1.1
+has_chapter_content: false
+chapter_title: 优势介绍
+version: 2.1
+---
+
+# 工作原理
+
+## 整体架构
+
+Weex 表面上是一个客户端技术,但实际上它串联起了从本地开发环境到云端部署和分发的整个链路。开发者首先可以在本地像撰写 web 页面一样撰写一个 app 的页面,然后编译成一段 JavaScript 代码,形成 Weex 的一个 JS bundle;在云端,开发者可以把生成的 JS bundle 部署上去,然后通过网络请求或预下发的方式传递到用户的移动应用客户端;在移动应用客户端里,WeexSDK 会准备好一个 JavaScript 引擎,并且在用户打开一个 Weex 页面时执行相应的 JS bundle,并在执行过程中产生各种命令发送到 native 端进行的界面渲染或数据存储、网络通信、调用设备功能、用户交互响应等移动应用的场景实践;同时,如果用户没有安装移动应用,他仍然可以在浏览器里打开一个相同的 web 页面,这个页面是使用相同的页面源代码,通过浏览器里的 JavaScript 引擎运行起来的。
+
+
+
+## 本地开发环境
+
+Weex 的本地开发环境基于 web 开发体验而设计,web 开发者可以通过自己熟悉的 HTML/CSS/JavaScript 技术和语法实现移动应用的界面。同时 Weex 也对 [Vue.js](https://vuejs.org/) 这一非常优秀的前端框架做了官方的支持。
+
+除此之外,Weex 的工程设计也是 web 开发者非常熟悉的,首先 web 开发者可以使用自己熟悉的 npm 进行依赖管理;其次 web 开发者在通过项目脚手架初始化工程、开发、调试、质量控制等各个环节,都可以参考 web 开发已有的最佳实践。
+
+和如今 web 开发的最佳实践一样,Weex 会把一个页面的源代码全部编译打包成一个 JS bundle,在浏览器中,我们需要把这个 JS bundle 作为一段 `<script>` 载入网页,在客户端里,我们把这段 JS bundle 载入本地,并通过 WeexSDK 直接执行。
+
+**相关阅读**
+
+* [Weex 和 web 平台的差异](../../references/platform-difference.html)
+* [Vue 2.x 在 Weex 和 web 中的差异](../../references/vue/difference-with-web.html)
+* [快速上手](../index.html)
+* [使用 Devtools](./devtools.html)
+
+## 云端部署和分发
+
+Weex 的 JS bundle 可以作为 web 开发中的一段静态资源进行部署和下发。几乎可以复用 HTML5 所有的工程体系和最佳实践。比如在本地开发环境通过部署工具将 JS bundle 部署到 CDN、通过 CMS 或搭建平台把业务数据和模块化的前端组件自动化拼接生成 JS bundle、通过服务端 JS bundle 的流量和日志统计页面的访问情况、通过 AppCache 或类似的方式对 JS bundle 在客户端进行缓存或预加载以降低网络通信的成本等。
+
+## 客户端 JavaScript 引擎
+
+Weex 的 iOS 和 Android 客户端中都会运行一个 JavaScript 引擎,来执行 JS bundle,同时向各端的渲染层发送规范化的指令,调度客户端的渲染和其它各种能力。我们在 iOS 下选择了 JavaScriptCore 内核,而在 Android 下选择了 UC 提供的 v8 内核。无论是从性能还是稳定性方面都提供了强有力的保障。
+
+为了让整个移动应用的资源利用得更好,我们在客户端提供的 JavaScript 引擎是单例的,即所有 JS bundle 公用一个 JavaScript 内核实例,同时对每个 JS bundle 在运行时进行了上下文的隔离,使得每个 JS bundle 都能够高效安全的工作。我们还把 Vue 2.0 这样的 JS Framework 做了预置,开发者不必把 JS Framework 打包在每个 JS bundle 里,从而大大减少了 JS bundle 的体积,也就进一步保障了页面打开的速度。
+
+## 客户端渲染层
+
+Weex 目前提供了 iOS 和 Android 两个客户端的 native 渲染层。每个端都基于 DOM 模型设计并实现了标准的界面渲染接口供 JavaScript 引擎调用。并且结合 web 标准和 native 的特点和优势实现了一套统一的组件和模块。Weex 在性能方面的表现也是非常优异的,尤其是界面首屏加载时间、native 下长列表的资源开销和复用情况、CPU、内存、帧率 等关键指标。当然,尽管 Weex 官方已经提供了一组开发者最常用的组件和模块,但面对丰富多样的移动应用研发需求,团队也难免会力不从心,为此我们提供了灵活自由的横向扩展能力,开发者可以根据自身的情况定制属于自己的客户端组件和模块,进一步丰富 Weex 在客户端上的能力。
+
+**相关链接**
+
+* [Weex 的组件和模块跟 web 标准的区别](../../references/web-standards.html)
+* [如何使用 iOS](../../references/ios-apis.html)
+* [如何使用 Android](../../references/android-apis.html)
+* [如何扩展 iOS](../../references/advanced/extend-to-ios.html)
+* [如何扩展 Android](../../references/advanced/extend-to-android.html)
+
+## 浏览器渲染
+
+Weex 除了提供 iOS 和 Android 的客户端渲染层之外,还基于 Vue 2.0 对官方的所有组件和模块进行了封装,开发者可以基于 Vue 2.0 用同一套源代码构建出在浏览器中相同效果的页面。并且同样可以横向扩展。
+
+**相关链接**
+
+* [如何使用 HTML5](../../references/html5-apis.html)
+* [如何扩展 HTML5](../../references/advanced/extend-to-html5.html)
http://git-wip-us.apache.org/repos/asf/incubator-weex-site/blob/32a097bf/source/cn/wiki/index.md
----------------------------------------------------------------------
diff --git a/source/cn/wiki/index.md b/source/cn/wiki/index.md
new file mode 100644
index 0000000..8a36f64
--- /dev/null
+++ b/source/cn/wiki/index.md
@@ -0,0 +1,6 @@
+---
+title: WiKi
+type: wiki
+order: 0
+version: 2.1
+---
http://git-wip-us.apache.org/repos/asf/incubator-weex-site/blob/32a097bf/source/cn/wiki/platform-difference.md
----------------------------------------------------------------------
diff --git a/source/cn/wiki/platform-difference.md b/source/cn/wiki/platform-difference.md
new file mode 100644
index 0000000..7c8fad4
--- /dev/null
+++ b/source/cn/wiki/platform-difference.md
@@ -0,0 +1,71 @@
+---
+title: 与 Web 平台的差异
+type: wiki
+group: Design
+order: 1.5
+version: 2.1
+has_chapter_content: true
+---
+
+# Weex 和 Web 平台的差异
+
+Weex 是一个跨平台解决方案,Web 平台只是其一种运行环境,除此之外还可以在 Android 和 iOS 客户端中运行。原生开发平台和 Web 平台之间的差异,在功能和开发体验上都有一些差异。
+
+## Weex 环境中没有 DOM
+
+DOM(Document Object Model),即文档对象模型,是 HTML 和 XML 文档的编程接口,是 Web 中的概念。Weex 的运行环境以原生应用为主,在 Android 和 iOS 环境中渲染出来的是原生的组件,不是 DOM Element。
+
+### 不支持 DOM 操作
+
+既然原生环境中不支持 Web API,没有 `Element` 、`Event` 、`File` 等对象,详细列表可以参考 [Web APIs on MDN](https://developer.mozilla.org/en-US/docs/Web/API)。不支持选中元素,如 `document.getElementById` 、 `document.querySelector` 等;当然也不支持基于 DOM API 的程序库(如 jQuery)。
+
+### 有限的事件类型
+
+Weex 支持在标签上绑定事件,和在浏览器中的写法一样,但是 Weex 中的事件是由原生组件捕获并触发的,行为和浏览器中有所不同,事件中的属性也和 Web 中有差异。
+
++ 并不支持 Web 中所有的事件类型,详情请参考[《通用事件》](./common-event.html)。
++ 不区分事件的捕获阶段和冒泡阶段,相当于 DOM 0 级事件。
+
+## Weex 环境中没有 BOM
+
+BOM(Browser Object Model),即浏览器对象模型,是浏览器环境为 javascript 提供的接口。Weex 在原生端没有并不基于浏览器运行,不支持浏览器提供的 BOM 接口。
+
+### 没有 `window` 、`screen` 对象
+
+Weex 中并未提供浏览器中的 `window` 和 `screen` 对象,不支持使用全局变量。如果是想要获取设备的屏幕或环境信息,可以使用 `WXEnvironment` 变量。
+
++ `WXEnvironment`
+ + `weexVersion`: WeexSDK 的版本。
+ + `appName`: 应用的名称。
+ + `appVersion`: 应用的版本。
+ + `platform`: 运行平台,可能的值是 `Web` 、`Android` 、`iOS` 之一。
+ + `osName`: 系统的名称。
+ + `osVersion`: 系统版本。
+ + `deviceWidth`: 设备宽度。
+ + `deviceHeight`: 设备高度。
+
+### 没有 `document` 对象
+
+在浏览器中 `document` 表示了当前活动的文档模型,在 Android 和 iOS 环境中并没有这个对象,也不支持与其相关的 DOM 操作。
+
+### 没有 `history` 、`location` 、`navigator` 对象
+
++ `history` 保存了当前页面的历史记录,并且提供了前进后退操作。
++ `location` 记录了当前页面 URL 相关的信息。
++ `navigator` 记录了当前浏览器中的信息。
+
+这些接口与浏览器自身的实现有关,可以控制页面的前进后退并且获取状态信息。虽然在 Android 和 iOS 中也有“历史”和“导航”的概念,但是它是用于多个管理视图之间的跳转的。换句话说,在浏览器中执行“前进”、“后退”仍然会处于同一个页签中,在原生应用中“前进”、“后退”则会真实的跳转到其他页面。
+
+此外 Weex 也提供了 `navigator` 模块来操作页面的跳转,使用方法参考[《navigator 导航控制》](./modules/navigator.html)。
+
+## 能够调用移动设备原生 API
+
+在 Weex 中能够调用移动设备原生 API,使用方法是通过注册、调用模块来实现。其中有一些模块是 Weex 内置的,如 clipboard 、 navigator 、storage 等。
+
++ [《clipboard 剪切板》](./modules/clipboard.html)
++ [《navigator 导航控制》](./modules/navigator.html)
++ [《storage 本地存储 》](./modules/storage.html)
+
+为了保持框架的通用性,Weex 内置的原生模块有限,不过 Weex 提供了横向扩展的能力,可以扩展原生模块,具体的扩展方法请参考[《iOS 扩展》](./advanced/index.html) 和[《Android 扩展》](./advanced/extend-to-android.html)。
+
+> 有些接口在浏览器环境中也存在,不过在使用时应该注意浏览器的兼容性;如剪贴板功能,出于安全性考虑,绝大多数浏览器都限制其使用。
http://git-wip-us.apache.org/repos/asf/incubator-weex-site/blob/32a097bf/source/cn/wiki/text-styles.md
----------------------------------------------------------------------
diff --git a/source/cn/wiki/text-styles.md b/source/cn/wiki/text-styles.md
new file mode 100644
index 0000000..b2c6865
--- /dev/null
+++ b/source/cn/wiki/text-styles.md
@@ -0,0 +1,47 @@
+---
+title: 文本样式
+type: wiki
+group: 样式
+order: 3.2
+version: 2.1
+---
+
+# 文本样式
+
+<span class="weex-version">v0.5+</span>
+
+文本类组件共享一些通用样式, 这类组件目前包括 [`<text>`](./components/text.html) 和 [`<input>`](./components/input.html)。
+
+## 属性
+
+- `color {color}`:文字颜色。
+
+ 可选值为色值,支持 RGB( `rgb(255, 0, 0)` );RGBA( `rgba(255, 0, 0, 0.5)` );十六进制( `#ff0000` );精简写法的十六进制( `#f00` );色值关键字(`red`)。
+
+- `lines {number}`: 指定文本行数。仅在 `<text>` 组件中支持。默认值是 `0` 代表不限制行数。
+
+- `font-size {number}`:文字大小。
+
+- `font-style {string}`:字体类别。可选值 `normal` | `italic`,默认为 `normal`。
+
+- `font-weight {string}`<span class="api-version">v0.9+</span>:字体粗细程度
+
+ * 可选值: `normal`, `bold`, `100`, `200`, `300`, `400`, `500`, `600`, `700`, `800`, `900`
+ * normal 等同于 400, bold 等同于 700;
+ * 默认值: `normal`;
+ * iOS 支持 9 种 font-weight值;Android 仅支持 400 和 700, 其他值会设为 400 或 700
+ * 类似 `lighter`, `bolder` 这样的值暂时不支持
+
+- `text-decoration {string}`:字体装饰,可选值 `none` | `underline` | `line-through`,默认值为 `none`。
+
+- `text-align {string}`:对齐方式。可选值 `left` | `center` | `right`,默认值为 `left`。目前暂不支持 `justify`, `justify-all`。
+
+- `font-family {string}`:设置字体。
+
+ 这个设置 **不保证** 在不同平台,设备间的一致性。如所选设置在平台上不可用,将会降级到平台默认字体。
+
+- `text-overflow {string}`:设置内容超长时的省略样式。可选值 `clip` | `ellipsis`
+
+## 其它参考
+
+- [颜色关键字列表](./color-names.html)。
http://git-wip-us.apache.org/repos/asf/incubator-weex-site/blob/32a097bf/source/contributing.md
----------------------------------------------------------------------
diff --git a/source/contributing.md b/source/contributing.md
new file mode 100644
index 0000000..e231c11
--- /dev/null
+++ b/source/contributing.md
@@ -0,0 +1,105 @@
+---
+title: How to Contribute
+type: community
+has_chapter_content: false
+version: 2.1
+---
+
+# How to Contribute
+
+Welcome to create [pull requests](https://github.com/apache/incubator-weex/compare) or join in our [mailing list](http://mail-archives.apache.org/mod_mbox/incubator-weex-dev/) for bugfix, doc, example, suggestion and anything.
+
+## Join in Weex Mailing List
+
+In Weex community all discussion will happen on mailing list.
+
+Just send an email to `dev-subscribe@weex.incubator.apache.org` and follow the instructions to subscribe Weex dev mailing list. And then you will receive all discussions and community messages by your personal email. In the same time you can freely send your own emails to join in us.
+
+At the same time you can see the archives of all the mails through the web: [http://mail-archives.apache.org/mod_mbox/incubator-weex-dev/](http://mail-archives.apache.org/mod_mbox/incubator-weex-dev/)
+
+*If you won't follow the mailing list any more. There is another way to unsubscribe it: send an email to `dev-unsubscribe@weex.incubator.apache.org` and follow the instructions.*
+
+Besides Weex dev mailing list, we also have some other mailing lists for you. You can check them out here: http://mail-archives.apache.org/mod_mbox/#weex.incubator
+
+## Branch Management
+
+```
+release
+ ↑
+release-{version}
+ ↑
+master <--- PR(feature/hotfix/typo)
+```
+
+0. `master` branch
+ 0. `master` is the stable developing branch.
+ 0. ***It's RECOMMENDED to commit hotfix (like typo) or feature PR to `master `***.
+0. `release-{version}` branch
+ 0. `release-{version}` is used for every version which we consider for stable publish.
+ 0. e.g. `release-0.16`
+0. `release` branch
+ 0. `release` is the latest release branch,we will make tag and publish version on this branch.
+
+### Branch Name For PR
+
+```
+{module}-{action}-{shortName}
+```
+
+* `{module}`, see [commit log module](#commit-log)
+* `{action}`
+ * `feature`: checkout from `{module}` and merge to `{module}` later. If `{module}` not exists, merge to `dev`
+ * `bugfix`: like `feature`, for bugfix only
+ * `hotfix`: checkout from `master` or release `tag`, merge to `master` and `{module}` later. If `{module}` not exists, merge to `dev`
+
+for example:
+
+* `android-bugfix-memory`
+* `jsfm-feature-communication`
+* `android-hotfix-compute-layout`
+
+## Commit Log
+
+```
+{action} [{module}] {description}
+```
+
+* `{action}`
+ * `+` add
+ * `*` update or bugfix
+ * `-` remove
+* `{module}`
+ * Including: android, ios, jsfm, html5, component, doc, website, example, test, all
+* `{description}`
+ * Just make it as clear and simple as possible.
+
+for example:
+
+* `+ [android] close #123, add refreshing for WebView`
+* `* [doc] fix #123, update video auto-play property`
+* `- [example] remove abc`
+
+## Pull Request
+
+You can [create pull requests](https://github.com/apache/incubator-weex/compare) in GitHub.
+
+1. First we suggest you have some discussion with the community (commonly in our mailing list) before you code.
+2. Fork repo from [https://github.com/apache/incubator-weex/](https://github.com/apache/incubator-weex/)
+3. Finish the job you want to do.
+4. Create a pull request.
+
+## Code Style Guide
+
+### Objective-C
+
+* Tabs for indentation(not spaces)
+* `*` operator goes with the variable name (e.g. Type *variable;)
+* Function definitions: place each brace on its own line.
+* Other braces: place the open brace on the line preceding the code block; place the close brace on its own line.
+* Use `#pragma marks` to categorize methods into functional groupings and protocol implementations
+* Follow other guidelines on [GitHub Objective-C Style Guide](https://github.com/github/objective-c-style-guide)
+
+### Java & Android
+
+* Use [Google Java Style](https://google.github.io/styleguide/javaguide.html) as basic guidelines of java code.
+* Follow [AOSP Code Style](https://source.android.com/source/code-style.html) for rest of android related code style.
http://git-wip-us.apache.org/repos/asf/incubator-weex-site/blob/32a097bf/source/faq.md
----------------------------------------------------------------------
diff --git a/source/faq.md b/source/faq.md
deleted file mode 100644
index afff270..0000000
--- a/source/faq.md
+++ /dev/null
@@ -1,207 +0,0 @@
----
-title: FAQ
-type: faq
-layout: post
----
-
-# FAQ
-
-## Where are legacy docs?
-
-- [Guide](./v-0.10/guide/index.html)
-- [References](./v-0.10/references/index.html)
-- [Advanced](./v-0.10/advanced/index.html)
-- [Tools](./v-0.10/tools/index.html)
-
-## Command errors in MS Windows
-
-Please install [Git for Windows](https://git-scm.com/download/win) first, see [For Windows](https://github.com/apache/incubator-weex/tree/dev#for-windows) for more information.
-
-
-## Gradle errors in Android Studio
-
-Downloading `license-gradle-plugin.jar` may trigger errors, like `Connection reset` or `peer not authenticated`.
-Maybe a network problem, try a proxy or VPN.
-
-## Use local image
-Weex's native runtime support load image file from device's disk, all you have to do set the file url like `file:///sdcard/image_new0.png`. As to load image file in your project, Weex is not support yet.
-
-## Error(`The header content contains invalid characters`) in windows
-This's is caused by weex-toolkit's dependency 'http-server', whose old version is not working well in chinese windows environment. We have fixed that, you should upgrade weex-toolkit before use that.
-
-## Playground app display nothing (white screen) after scan
-Best way to find out what's happening is read debug log, you can follow [this document](./guide/index.html) to firgure out how to do that.
-
-## About ECMAScript Version
-
-Weex uses JSCore in iOS and uses v8 in Android. So they both support ECMAScript 5 spec. Additionally, we do some polyfills in native environment:
-
-* `Promise` in iOS/Android
-* Timer APIs (`setTimeout` / `clearTimeout` / `setInterval` / `clearInterval`) in iOS/Android
-* `console` in iOS/Android
-
-In Browser we contains a polyfill of `Promise` temporarily. In the future developers can choose whether to import a polyfill by configurations.
-
-You can also write ES6 syntax by `babel` with `webpack`. The loader will convert ES6 syntax into ES5 automatically.
-
-If you want more ES6 polyfills you can import them into the JS Bundle as you like.
-
-## Dependencies in frontend
-
-In Weex you may have some ways to import/require a component or a JS module. Take ES5 syntax for example:
-
-* `require('xxx.js')`: depends on a JS file
-* `require('npm-module-name')`: depends on a NPM module
-* `require('xxx.we')`: include a `we` file to register a Weex custom component
-* `require('@weex-module/xxx')`: depends on a Weex native module. Notice that it is supported only in `*.we` file not `*.js` file. If you want to use Weex native module in a `*.js` file, temporarily you may write like this:
-
-```javascript
-// use this piece of code below to get Weex native module "modal"
-var modal
-__weex_define__('@weex-temp/x', function (__weex_require__) {
- modal = __weex_require__('@weex-module/modal')
-})
-
-// use APIs in "modal" module
-modal.toast({message: 'hello'})
-```
-
-We will bring a better syntax design in the future.
-
-## iOS text line-height style is abnormal
-
-`line-height` style in text component is different from h5 and Android, text value will be placed at bottom of line box because of iOS native api. We are trying to optimize it.
-
-## Android only support `overflow:hidden`
-The `overflow` style in android is `hidden` and cannot be changed. This is the result of Android View framework. This only happens on Android, iOS will work as expected.
-
-## How to get rid of 750 adaption and calculate width/height in real pixels?
-
-The deviceHeight and deviceWidth got in `this.$getConfig()` is the real device width/height in pixels, not the ones with 750-adapted.
-
-So you can use them to calculate width/height in real pixels.
-
-Suppose you need to display a navigation bar of fixed 88 pixels, the bar's height will be:
-
-```
-var height = 88 * 750 / env.deviceWidth
-```
-
-
-## How to detect an native module/component supported in JavaScript?
-
-### Detect native module
-
-```javascript
-var xxx = require('@weex-module/xxx')
-if (xxx) {
- // todo: use this module
-}
-else {
- // todo: handle the exception
-}
-```
-
-### Detect native component
-
-```html
-<template>
- <component is="{{type}}"></component>
-</template>
-
-<script>
- var type = 'xxx'
- var xxx = require('@weex-component/xxx')
- if (!xxx) {
- type = 'div' // downgrade to <div>
- }
- module.exports = {
- data: function () {
- return {
- type: type
- }
- }
- }
-</script>
-```
-
-## How to transfer data between pages
-
-If you have 2 pages, A and B.
-
-0. A -> B, use [storage module](./references/modules/storage.html) to transfer data
-0. B -> A, use [storage module](./references/modules/storage.html) to transfer data
-
-## How to use `repeat` in Parent-Child components
-
-If you want, You can make a `repeat` operation between Parent-Child components. But you must be strictly in accordance with the document syntax to write code. If there is no child component defined data, or there is no specify `props` that need to be passed down. It will lead to the page does not render properly.
-
-A correct example:
-
-```html
-<element name="child">
- <template>
- <div>
- <text style="font-size:100">{{title}}</text>
- </div>
- </template>
-
- <script>
- module.exports = {
- data: {
- title: null
- }
- }
- </script>
-</element>
-<template>
- <div>
- <child repeat="item in lists" title="{{ item.title }}"></child>
- </div>
-</template>
-<script>
- module.exports = {
- data: {
- lists: [
- { title: 'A' },
- { title: 'B' },
- { title: 'C' }
- ]
- },
- ready: function () {
- this.lists.splice(0, 1)
- }
- }
-</script>
-```
-
-A wrong example:
-
-```html
-<element name="child">
- <template>
- <div>
- <text style="font-size:100">{{title}}</text>
- </div>
- </template>
-</element>
-<template>
- <div>
- <child repeat="item in lists"></child>
- </div>
-</template>
-<script>
- module.exports = {
- data: {
- lists: [
- { title: 'A' },
- { title: 'B' },
- { title: 'C' }
- ]
- },
- ready: function () {
- this.lists.splice(0, 1)
- }
- }
-</script>
-```
http://git-wip-us.apache.org/repos/asf/incubator-weex-site/blob/32a097bf/source/guide/advanced/app-architecture.md
----------------------------------------------------------------------
diff --git a/source/guide/advanced/app-architecture.md b/source/guide/advanced/app-architecture.md
new file mode 100644
index 0000000..dc0f80f
--- /dev/null
+++ b/source/guide/advanced/app-architecture.md
@@ -0,0 +1,62 @@
+---
+title: Mobile App Architecture
+type: guide
+group: Advanced Guide
+order: 8.5
+version: 2.1
+---
+
+# Mobile App Architecture
+
+## Today's Mobile App
+
+Let's talk about what we think a mobile app should be.
+
+### Mobile App Needs Parallel Development
+
+Nowadays, all mobile app teams requires the ability to develop in parallel. When a mobile app keeps growing, supporting large-scale parallel development must become a very important key thing. Otherwise it's really easy to become a bottleneck.
+
+### Mobile App Needs to be Dynamic
+
+Today the development of mobile apps is very heavy. And it's really slow in iteration, release, distribution and online bugfix. The size of the package of an app is growing fast too. All of this is not suitable for this mobile internet age. Mobile app needs to be dynaimic which is out of the cumbersome process of version deployment and distribution.
+
+### Mobile App Needs Open Interconnection
+
+Today in your phone, things are hard to connect and share between different apps. They needs some container with common standard and specs to be shared with each other.
+
+## Our Thinking of Mobile App
+
+We think a dynamic, parallel development supported, standardized mobile app should be like this:
+
+```
+|------|------|------|------| |-----|
+| page | page | page | page | | api |
+|------|------|------|------| | api |
+| page | page | page | page | | api |
+|------|------|------|------| | api |
+| page | page | page | page | | api |
+|---------------------------| | api |
+| router | | api |
+|---------------------------| |-----|
+```
+
+* Pages: A whole mobile app should be divided into several mobile pages. Each mobile page has its own "URL".
+* Router: All the mobile pages above will be connected with router. And navigators or tab bars are just doing this job.
+* Features: All kinds of APIs or services provided from the device. Every mobile page could use these features as they like.
+
+So before you build your mobile app, make sure how many mobile pages your mobile app has and what are they. How do they connect each other. Give each mobile page a URL. And sort out all the APIs and services your mobile app needs.
+
+Then create the pages and develop, debug and deploy them using Weex.
+
+**Links**
+
+* [Mobile page architecture](./page-architecture.html)
+
+If you have built a complete mobile app already and just want to using Weex to rebuild part of these pages, that's absolutely no problem. Because Weex is just a SDK to build mobile pages which can coexist very well with other native views or hybrid pages.
+
+If the feature of WeexSDK is limited to your mobile app. You can extend your own components and modules. It requires some native development knowledge. But with our efforts on delivering more and more features, we believe this part of job will be getting smaller and smaller.
+
+**Links**
+
+* [Extend to iOS](../../references/advanced/extend-to-ios.html)
+* [Extend to Android](../../references/advanced/extend-to-android.html)
http://git-wip-us.apache.org/repos/asf/incubator-weex-site/blob/32a097bf/source/guide/advanced/downgrade.md
----------------------------------------------------------------------
diff --git a/source/guide/advanced/downgrade.md b/source/guide/advanced/downgrade.md
new file mode 100644
index 0000000..753fcff
--- /dev/null
+++ b/source/guide/advanced/downgrade.md
@@ -0,0 +1,12 @@
+---
+title: Downgrade
+type: guide
+group: Advanced Guide
+order: 8.2
+version: 2.1
+---
+
+# downgrade
+
+Weex 2.0 downgrade change to module,please refer to [downgrade](https://www.npmjs.com/package/@weex-project/downgrade)
+
http://git-wip-us.apache.org/repos/asf/incubator-weex-site/blob/32a097bf/source/guide/advanced/page-architecture.md
----------------------------------------------------------------------
diff --git a/source/guide/advanced/page-architecture.md b/source/guide/advanced/page-architecture.md
new file mode 100644
index 0000000..8117536
--- /dev/null
+++ b/source/guide/advanced/page-architecture.md
@@ -0,0 +1,49 @@
+---
+title: Weex Page Architecture
+type: guide
+group: Advanced Guide
+order: 8.6
+version: 2.1
+---
+
+# Weex Page Architecture
+
+A Weex page is a independent mobile page which includes UI, interaction logic, device power, lifecycle management etc.
+
+## UI
+
+### Native DOM Model
+
+Weex page has its HTML-like DOM model to manage UI. It will be decomposed into a DOM tree which consists of some DOM nodes.
+
+**Links**
+
+* [Weex Native DOM APIs](../../references/native-dom-api.html)
+
+### Components
+
+Weex supports many kinds of components. Some of them are content components such as text, image and videos. Some of them are container components such as div, list, scroller. Also there are some special components like slider, input, textarea, and switch.
+
+**Links**
+
+* [All components Weex supports](../../references/components/index.html)
+
+### Layout System
+
+Weex use some CSS properties to layout every nodes in the DOM tree together. It includes:
+
+* Box model: Describe the `width`, `height`, `padding`, `margin` and `border` of a component node.
+* Flexbox: Describe the relations between different nodes with CSS Flexbox Spec.
+* Supportting `absolute`, `relative`, `fixed` and `sticky` value of CSS `position` property.
+
+### Features
+
+Weex supports lots of device features through modules such as storage, navigation, modals etc. Each of them exposes some JS APIs.
+
+**Links**
+
+* [All modules Weex supports](../../references/modules/index.html)
+
+### Lifecycle
+
+Every Weex page has its lifecycle which is defined and implemented in WeexSDK. All Weex pages will go through the whole process, from being created and last to being destroyed.
http://git-wip-us.apache.org/repos/asf/incubator-weex-site/blob/32a097bf/source/guide/advanced/path.md
----------------------------------------------------------------------
diff --git a/source/guide/advanced/path.md b/source/guide/advanced/path.md
new file mode 100644
index 0000000..898881f
--- /dev/null
+++ b/source/guide/advanced/path.md
@@ -0,0 +1,38 @@
+---
+title: Asset Path
+type: guide
+group: Advanced Guide
+order: 8.1
+version: 2.1
+has_chapter_content: true
+---
+
+# Path
+
+<span class="weex-version">0.9</span>
+
+This article will cover uri (url) usage in Weex. Including using image/typeface resources, deal with relative uri and how to access local and packaged asset files.
+
+## Schemes
+
+* Local
+Weex SDK provide `local` scheme to access resources packaged with application, and of cource, it's not working in the HTML5 runtime.
+Currently, developers can use this scheme with `image` and text's font file location.
+ * In iOS, it's always locate file in 'bundle resources'. For example, a `image` component with `local:///app_icon` will load image file named 'app_icon' in bundle resouce, and font file work in the same way.
+ * In Android, image component will load from 'drawable' resource folder like 'res/drawable-xxx'. But load font file is different, android framework can not load font file from 'res', so SDK will load it from `asserts` folder.
+
+* HTTP/HTTPS
+It's working in the same way as in web, Weex support these at very beginning.
+
+* File
+Use `file` scheme to access local disk file. This scheme has its limitations: You would not hard coded a file url in source page. Because not matter it's running in different platform(iOS, Android) or not, the content will be totally different in another device, which is depend to the specific device.
+So one possible case is getting the file url in runtime dynamically, which you can use it to diaplay a local disk image, or maybe upload it later.
+
+## Relative URI
+
+[Like we do in HTML](https://www.w3.org/TR/html4/types.html#type-uri), weex process 'relative URI' in the same way. The relative URI, which start with `/`,`.`,`..`,`//`, will resolve by the bunle url.
+Means URL start with `/` will resolve to the root folder as bundle js file, `.` and `..` will resolve to current and parent folder, and `//` will resolve to same scheme bundle js have.
+
+## URI Adapter
+
+All the above is the default implementation, developers can extend or override these their own by providing a 'URI Adapter'. Same as the other adapters, Custom adapter should be set before Weex SDK is initializing.
http://git-wip-us.apache.org/repos/asf/incubator-weex-site/blob/32a097bf/source/guide/advanced/use-vuex-and-vue-router.md
----------------------------------------------------------------------
diff --git a/source/guide/advanced/use-vuex-and-vue-router.md b/source/guide/advanced/use-vuex-and-vue-router.md
new file mode 100644
index 0000000..037f1bb
--- /dev/null
+++ b/source/guide/advanced/use-vuex-and-vue-router.md
@@ -0,0 +1,90 @@
+---
+title: Use Vuex and vue-router
+type: guide
+group: Advanced Guide
+order: 8.4
+version: 2.1
+---
+
+# Using Vuex and vue-router
+
+Vue.js also has many peripheral technology products such as [Vuex](https://github.com/vuejs/vuex) and [vue-router](https://github.com/vuejs/vue-router), etc. Those libraries can also works well in Weex.
+
+> We developed a complete project based on Weex and Vue.js which named [weex-hackernews](https://github.com/weepteam/web-ehackernews). We used Vuex and vue-loader in it, and it works well on both iOS, Android and web.
+
+## Using Vuex
+
+> [Official Vuex documents](https://vuex.vuejs.org/en/)
+
+
+
+Vuex is a state management pattern + library for Vue.js applications. it's also a library implementation tailored specifically for Vue.js to take advantage of its granular reactivity system for efficient updates. It serves as a centralized store for all the components in an application, with rules ensuring that the state can only be mutated in a predictable fashion.
+
+As a kind of state management library, Vuex is platform-independent, It also can be used in Weex. Read its [official documents](https://vuex.vuejs.org/en/) for more details.
+
+It also integrates with Vue's official [devtools extension](https://github.com/vuejs/vue-devtools) to provide advanced features on web platform, such as zero-config time-travel debugging and state snapshot export / import. (web platform only)
+
+## Using vue-router
+
+> [Official vue-router documents](https://router.vuejs.org/en/)
+
+Creating a Single-page Application with Vue.js + vue-router is dead simple. With Vue.js, you are already composing our application with components. When adding vue-router to the mix, all you need to do is map your components to the routes and let vue-router know where to render them.
+
+However, there are many difference between web and Android or iOS, some features of vue-router are limited in Weex.
+
+### Router mode
+
+vue-router provides three routing modes:
+
++ `hash`: uses the URL hash for routing. Works in all Vue-supported browsers, including those that do not support HTML5 History API. (**default**)
++ `history`: requires HTML5 History API and server config. See [HTML5 History Mode](https://router.vuejs.org/en/essentials/history-mode.html).
++ `abstract`: works in all JavaScript environments, e.g. server-side with Node.js.
+
+You can pass the `mode` parameter when creating a router:
+
+```js
+new Router({
+ mode: 'abstract',
+ // ...
+})
+```
+
+Obviously "hash" mode and "history" mode are only available on the web, and have no effect in Weex. That is, you have to use "abstract" mode in Android and iOS. However, **vue-router will automatically be forced into "abstract" mode if no browser API is present.** so, just don't set the `mode` option, or set it to "abstract".
+
+### Programmatic navigation
+
+vue-router use `<router-link>` to create a navigation link, but in which some of the features based on the DOM events, it doesn't work well in the native environment. In Weex, you must use the [Programmatic Navigation](https://router.vuejs.org/en/essentials/navigation.html) to manage the router.
+
+Here is an basic example using `<router-link>`:
+
+```html
+<!-- Can only be used on the web, it takes no effects on Android or iOS! -->
+<template>
+ <div>
+ <router-link to="profile">
+ <text>Profile</text>
+ </router-link>
+ </div>
+</template>
+```
+
+For native platforms, you have to use the `router.push`:
+
+```html
+<template>
+ <div>
+ <text @click="jump">Profile</text>
+ </div>
+</template>
+
+<script>
+ import router from './path/to/router'
+ export default {
+ methods: {
+ jump () {
+ router.push('profile')
+ }
+ }
+ }
+</script>
+```
http://git-wip-us.apache.org/repos/asf/incubator-weex-site/blob/32a097bf/source/guide/contributing.md
----------------------------------------------------------------------
diff --git a/source/guide/contributing.md b/source/guide/contributing.md
deleted file mode 100644
index 0d4ba82..0000000
--- a/source/guide/contributing.md
+++ /dev/null
@@ -1,106 +0,0 @@
----
-title: How to Contribute
-type: guide
-order: 6
-has_chapter_content: true
-version: 2.1
----
-
-# How to Contribute
-
-Welcome to create [pull requests](https://github.com/apache/incubator-weex/compare) or join in our [mailing list](http://mail-archives.apache.org/mod_mbox/incubator-weex-dev/) for bugfix, doc, example, suggestion and anything.
-
-## Join in Weex Mailing List
-
-In Weex community all discussion will happen on mailing list.
-
-Just send an email to `dev-subscribe@weex.incubator.apache.org` and follow the instructions to subscribe Weex dev mailing list. And then you will receive all discussions and community messages by your personal email. In the same time you can freely send your own emails to join in us.
-
-At the same time you can see the archives of all the mails through the web: [http://mail-archives.apache.org/mod_mbox/incubator-weex-dev/](http://mail-archives.apache.org/mod_mbox/incubator-weex-dev/)
-
-*If you won't follow the mailing list any more. There is another way to unsubscribe it: send an email to `dev-unsubscribe@weex.incubator.apache.org` and follow the instructions.*
-
-Besides Weex dev mailing list, we also have some other mailing lists for you. You can check them out here: http://mail-archives.apache.org/mod_mbox/#weex.incubator
-
-## Branch Management
-
-```
-release
- ↑
-release-{version}
- ↑
-master <--- PR(feature/hotfix/typo)
-```
-
-0. `master` branch
- 0. `master` is the stable developing branch.
- 0. ***It's RECOMMENDED to commit hotfix (like typo) or feature PR to `master `***.
-0. `release-{version}` branch
- 0. `release-{version}` is used for every version which we consider for stable publish.
- 0. e.g. `release-0.16`
-0. `release` branch
- 0. `release` is the latest release branch,we will make tag and publish version on this branch.
-
-### Branch Name For PR
-
-```
-{module}-{action}-{shortName}
-```
-
-* `{module}`, see [commit log module](#commit-log)
-* `{action}`
- * `feature`: checkout from `{module}` and merge to `{module}` later. If `{module}` not exists, merge to `dev`
- * `bugfix`: like `feature`, for bugfix only
- * `hotfix`: checkout from `master` or release `tag`, merge to `master` and `{module}` later. If `{module}` not exists, merge to `dev`
-
-for example:
-
-* `android-bugfix-memory`
-* `jsfm-feature-communication`
-* `android-hotfix-compute-layout`
-
-## Commit Log
-
-```
-{action} [{module}] {description}
-```
-
-* `{action}`
- * `+` add
- * `*` update or bugfix
- * `-` remove
-* `{module}`
- * Including: android, ios, jsfm, html5, component, doc, website, example, test, all
-* `{description}`
- * Just make it as clear and simple as possible.
-
-for example:
-
-* `+ [android] close #123, add refreshing for WebView`
-* `* [doc] fix #123, update video auto-play property`
-* `- [example] remove abc`
-
-## Pull Request
-
-You can [create pull requests](https://github.com/apache/incubator-weex/compare) in GitHub.
-
-1. First we suggest you have some discussion with the community (commonly in our mailing list) before you code.
-2. Fork repo from [https://github.com/apache/incubator-weex/](https://github.com/apache/incubator-weex/)
-3. Finish the job you want to do.
-4. Create a pull request.
-
-## Code Style Guide
-
-### Objective-C
-
-* Tabs for indentation(not spaces)
-* `*` operator goes with the variable name (e.g. Type *variable;)
-* Function definitions: place each brace on its own line.
-* Other braces: place the open brace on the line preceding the code block; place the close brace on its own line.
-* Use `#pragma marks` to categorize methods into functional groupings and protocol implementations
-* Follow other guidelines on [GitHub Objective-C Style Guide](https://github.com/github/objective-c-style-guide)
-
-### Java & Android
-
-* Use [Google Java Style](https://google.github.io/styleguide/javaguide.html) as basic guidelines of java code.
-* Follow [AOSP Code Style](https://source.android.com/source/code-style.html) for rest of android related code style.
http://git-wip-us.apache.org/repos/asf/incubator-weex-site/blob/32a097bf/source/guide/extend-android.md
----------------------------------------------------------------------
diff --git a/source/guide/extend-android.md b/source/guide/extend-android.md
new file mode 100644
index 0000000..52c8849
--- /dev/null
+++ b/source/guide/extend-android.md
@@ -0,0 +1,218 @@
+---
+title: Extend Android
+type: guide
+group: Extend
+order: 6.2
+version: 2.1
+---
+
+## Module extend
+
+weex sdk support Module extend, Weex SDK provides only rendering capabilities, rather than have other capabilities, such as network, picture, and URL redirection. If you want the these features, you need to implement it.
+
+For example: If you want to implement an address jumping function, you can achieve a Module Follow the steps below.
+
+### Step to customize a module
+
+- Customize module must extend WXModule
+- @WXModuleAnno annotation must be added, as it is the only the way to recognized by Weex
+- The access levels of mehtod must be **public**
+- The module class also can not be an inner class
+- Customize can not be obfuscated by tools like ProGuard
+- Module methods will be invoked in UI thread, do not put time consuming operation there
+- Weex params can be int, double, float, String, Map, List
+
+Refer to the following example:
+
+```java
+public class WXEventModule extends WXModule{
+
+ private static final String WEEX_CATEGORY="com.taobao.android.intent.category.WEEX";
+
+ @WXModuleAnno
+ public void openURL(String url){
+ //implement your module logic here
+ }
+}
+```
+
+#### Support synchronous/asynchronous callback
+
+You can add `@JSMethod (uiThread = false or true)` annotation to choose the callback mode of moudle. See the follow example.
+
+```java
+ // as sync-callback mode
+@JSMethod (uiThread = false)
+public void testSyncCall(){
+ WXLogUtils.d("WXComponentSyncTest : Thread.currentThread().getName());
+}
+
+// as async-callback mode
+@JSMethod (uiThread = true)
+public void testAsyncCall(){
+ WXLogUtils.e("WXComponentASynTest : Thread.currentThread().getName() );
+}
+```
+
+### Register the moulde
+
+```java
+WXSDKEngine.registerModule("event", WXEventModule.class);
+```
+
+### Use this module in weex DSL
+Now `event` moudle is avaiable in weex, use the module like this:
+
+```javascript
+var event = weex.requireModule('event');
+event.openURL("http://www.github.com");
+```
+
+### Javascript callback
+
+If the module need implement a callback to javascript, you just add `JSCallback` argument to the method you want expose to javascript:
+
+```java
+@WXModuleAnno
+public void openURL(String url,JSCallback callback){
+ //implement your module logic here
+ Map<String,Object> resp = new HashMap();
+ resp.put("result","ok");
+ callback.invoke(resp);
+}
+```
+
+At the javascript side, call the module with javascript function to receive callback data:
+
+```javascript
+event.openURL("http://www.github.com",function(resp){ console.log(resp.result); });
+```
+
+### Component extend
+
+There are label, image, div, scroll, ect. components in weex, you can also customize your own components.
+
+#### Step to customize a component
+
+1. Customize components must extend WXComponent or WXContainer
+2. @WXComponentProp(name=value(value is attr or style of dsl)) for it be recognized by weex SDK.
+3. The access levels of mehtod must be **public**
+4. The component class can not be an inner class
+5. Customize can not be obfuscated by tools like ProGuard
+6. Component methods will be invoked in UI thread, do not put time consuming operation there.
+7. Weex params can be int, double, float, String, Map, List, Array
+
+
+Refer to the following example
+
+```java
+public class MyViewComponent extends WXComponent{
+ public MyViewComponent(WXSDKInstance instance, WXDomObject dom,
+ WXVContainer parent, String instanceId, boolean isLazy)
+ {
+ public MyViewComponent(WXSDKInstance instance, WXDomObject dom,
+ WXVContainer parent, String instanceId, boolean isLazy) {
+ super(instance, dom, parent, instanceId, isLazy);
+ }
+
+ @Override
+ protected void initView() {
+ mHost = new TextView(mContext);
+ }
+ @WXComponentProp(name=WXDomPropConstant.WX_ATTR_VALUE)
+ public void setMyViewValue(String value) {
+ ((TextView)mHost).setText(value);
+ }
+}
+```
+
+#### Register the Component
+
+
+```java
+WXSDKEngine.registerComponent("MyView", MyViewComponent.class);
+```
+
+### Adapter extend
+
+#### ImagedownloadAdapter
+
+Weex SDK has no image download capability, you need to implement `IWXImgLoaderAdapter`. Refer to the following examples.
+
+```java
+public class ImageAdapter implements IWXImgLoaderAdapter {
+
+ private Activity mContext;
+
+ public ImageAdapter(Activity activity) {
+ mContext = activity;
+ }
+
+ @Override
+ public void setImage(final String url, final ImageView view,
+ WXImageQuality quality, WXImageStrategy strategy) {
+ mContext.runOnUiThread(new Runnable() {
+
+ @Override
+ public void run() {
+ if (TextUtils.isEmpty(url)) {
+ view.setImageBitmap(null);
+ return;
+ }
+ String temp = url;
+ if (url.startsWith("//")){
+ temp = "http:" + url;
+ }
+ if (view.getLayoutParams().width<=0 || view.getLayoutParams().height<=0) {
+ return;
+ }
+ Picasso.with(WXEnvironment.getApplication())
+ .load(temp)
+ .resize(view.getLayoutParams().width,
+ view.getLayoutParams().height).into(view);
+ }
+ });
+ }
+}
+```
+
+#### Component Method
+ from WeexSDK `0.9.5`, you can define your component method
+
+ for example, define a method in component:
+
+ ```java
+ @JSMethod
+ public void focus(){
+ //method implementation
+ }
+ ```
+
+ after your registration for your own custom component, now you can call it in your js file.
+
+ ```html
+<template>
+ <mycomponent id='mycomponent'></mycomponent>
+</template>
+<script>
+ module.exports = {
+ created: function() {
+ this.$el('mycomponent').focus();
+ }
+ }
+</script>
+```
+
+#### Proguard Rules
+
+If you want to using proguard to protect your source code, please add the following rules to your profile:
+
+```java
+-keep class com.taobao.weex.WXDebugTool{*;}
+-keep class com.taobao.weex.devtools.common.LogUtil{*;}
+-keep public class * extends com.taobao.weex.ui.component.WXComponent{*;}
+-keep public class * extends com.taobao.weex.common.WXModule{*;}
+-keepclassmembers class ** {
+ @com.taobao.weex.ui.component.WXComponentProp public *;
+}
+```
[26/51] [abbrv] incubator-weex-site git commit: rearrangement the
structure of the document
Posted by ha...@apache.org.
http://git-wip-us.apache.org/repos/asf/incubator-weex-site/blob/32a097bf/_draft/v-0.10/references/components/scroller.md
----------------------------------------------------------------------
diff --git a/_draft/v-0.10/references/components/scroller.md b/_draft/v-0.10/references/components/scroller.md
new file mode 100644
index 0000000..3197ab8
--- /dev/null
+++ b/_draft/v-0.10/references/components/scroller.md
@@ -0,0 +1,136 @@
+---
+title: <scroller>
+type: references
+order: 2.8
+version: 0.10
+---
+
+# <scroller>
+<span class="weex-version">v0.6.1+</span>
+
+A scroller is a component in vertical direction which can have multiple child components in one column. If total height of its child components exceed the height of the scroller, the whole child components will be scrollable.
+
+Notes: A <scroller> can be used as a root element or a embed element. The scroll direction of this component is column, and it can't be changed.
+
+
+**example**
+
+```html
+<template>
+ <scroller onloadmore="onloadmore" loadmoreoffset="100">
+ <div repeat="{{v in items}}">
+ <text style="font-size: 40; color: #000000">{{v.item}}</text>
+ </div>
+ </scroller>
+</template>
+<script>
+ module.exports = {
+ data: {
+ items: [],
+ triggered:false
+ },
+ created: function () {
+ for (var i = 0; i < 50; i++) {
+ this.items.push({'item': 'test data' + i});
+ }
+ },
+ methods: {
+ onloadmore:function(){
+ if(!this.triggered){
+ for (var i = 100; i >= 50; i--) {
+ this.items.push({'item':'onloadmore triggered' + i});
+ }
+ }
+ this.triggered=true;
+ }
+ }
+ }
+</script>
+```
+
+[try it](http://dotwe.org/acf155122b9457211165680b01fae1c2)
+
+## Child Components
+
+Scroller supports all kinds of components, such as div, text, etc.
+And there are two special components that can only be used inside scroller component.
+
+* refresh 0.6.1 used inside list to add pull-down-to-refresh functionality.
+* loading 0.6.1 used inside list to add pull-up-to-load-more functionality.
+
+
+## Attributes
+
+* show-scrollbar: true/false whether show the scroll bar or not, default value is true
+* scroll-direction: <string> define scroll direction of component, horizontal or vertical
+* loadmoreoffset : <number> default value is 0. The loadmore event will be triggered when the list is loadmoreoffset left to reach the bottom of the list view. e.g. a list has total content length of 1000, and the loadmoreoffset is set to 400, the loadmore event will be triggered when 600 has beed scrolled and there is less than 400 left.
+* loadmoreretry : <number> default value 0,whether to reset loadmore related UI when loadmore failed, will be deprecated in further release.
+
+**example**
+
+```html
+<template>
+ <scroller onloadmore="onloadmore" loadmoreoffset="100">
+ <div repeat="{{v in items}}">
+ <text style="font-size: 40; color: #000000">{{v.item}}</text>
+ </div>
+ </scroller>
+</template>
+<script>
+module.exports = {
+ data: {
+ items: [],
+ triggered:false
+ },
+ created: function () {
+ for (var i = 0; i < 50; i++) {
+ this.items.push({'item': 'test data' + i});
+ }
+ },
+ methods: {
+ onloadmore:function(){
+ if(!this.triggered){
+ for (var i = 100; i >= 50; i--) {
+ this.items.push({'item':'onloadmore triggered' + i});
+ }
+ }
+ this.triggered=true;
+ }
+ }
+}
+</script>
+```
+
+[try it](http://dotwe.org/acf155122b9457211165680b01fae1c2)
+
+
+Please checkout [Scroller Component Attributes]() to have a look at the inherited attributes from direct parent.
+
+Other attributes please check out the [common attributes](../common-attrs.html).
+
+## Styles
+
+common styles: check out [common styles for components](../common-style.html)
+
+* support flexbox related styles
+* support box model related styles
+* support position related styles
+* support opacity, background-color etc.
+
+
+## Events
+
+onloadmore used with loadmoreoffset attribute. if the view has less than loadmoreoffset to scroll down, the onloadmore event will be triggered.
+
+common events: check out the [common events](../common-event.html)
+
+* support onclick event. Check out [common events](../common-event.html)
+* support onappear / ondisappear event. Check out [common events](../common-event.html)
+
+
+
+## Restrictions
+
+Nested lists or scrollers within the same direction are not supported. In other words. nested lists/scroller must have different directions.
+For example, a vertical list nested in a vertical list or scroller is not allowed. However, a vertical list nested in a horizontal list or scroller is legal.
+
http://git-wip-us.apache.org/repos/asf/incubator-weex-site/blob/32a097bf/_draft/v-0.10/references/components/slider.md
----------------------------------------------------------------------
diff --git a/_draft/v-0.10/references/components/slider.md b/_draft/v-0.10/references/components/slider.md
new file mode 100644
index 0000000..b1a537f
--- /dev/null
+++ b/_draft/v-0.10/references/components/slider.md
@@ -0,0 +1,107 @@
+---
+title: <slider>
+type: references
+order: 2.9
+version: 0.10
+---
+
+# <slider>
+
+## Summary
+
+A slide's player to show slides (mostly as pictures) one page by another. The default interval between two slides is 3 seconds.
+
+## Child Components
+
+It supports all kinds of weex components as its slides, especially the `indicator` component which can be used only as a child component of `slider`.
+
+## Attributes
+
+- `auto-play`: <boolean> `true` | `false`. This value determines whether the slides plays automatically after the page rendering finished. The default value is `false`.
+- `interval`: <number> millisecond. This value determines time interval for each page displayed in slider.
+- `index`: <number> . This value determines the index of current shown slide. The default value is `0`.
+
+Other attributes please check out the [common attributes](../references/common-attrs.html).
+
+## Styles
+
+**common styles**: check out [common styles for components](../references/common-style.html)
+
+- support flexbox related styles
+- support box model related styles
+- support ``position`` related styles
+- support ``opacity``, ``background-color`` etc.
+
+## Events
+
+- `change`: triggerd when the slide's index is changed. The event object contains the attribute of `index`, which is the index number of the currently shown slide.
+
+**common events**: check out the [common events](../references/common-event.html)
+
+- support `click` event. Check out [common events](../references/common-event.html)
+- support `appear` / `disappear` event. Check out [common events](../references/common-event.html)
+
+### Example
+
+```html
+<template>
+ <div>
+ <slider class="slider" interval="3000" auto-play="true">
+ <div class="slider-pages" repeat="item in itemList">
+ <image class="img" src="{{item.pictureUrl}}"></image>
+ <text class="title">{{item.title}}</text>
+ </div>
+ <indicator class="indicator"></indicator>
+ </slider>
+ </div>
+</template>
+
+<style>
+ .img {
+ width: 714;
+ height: 150;
+ }
+ .title {
+ position: absolute;
+ top: 20;
+ left: 20;
+ color: #ff0000;
+ font-size: 48;
+ font-weight: bold;
+ background-color: #eeeeee;
+ }
+ .slider {
+ flex-direction: row;
+ margin: 18;
+ width: 714;
+ height: 230;
+ }
+ .slider-pages {
+ flex-direction: row;
+ width: 714;
+ height: 200;
+ }
+ .indicator {
+ width:714;
+ height:200;
+ position:absolute;
+ top:1;
+ left:1;
+ item-color: red;
+ item-selectedColor: blue;
+ item-size: 20;
+ }
+</style>
+
+<script>
+ module.exports = {
+ data: {
+ itemList: [
+ {itemId: '520421163634', title: 'item1', pictureUrl: 'https://gd2.alicdn.com/bao/uploaded/i2/T14H1LFwBcXXXXXXXX_!!0-item_pic.jpg'},
+ {itemId: '522076777462', title: 'item2', pictureUrl: 'https://gd1.alicdn.com/bao/uploaded/i1/TB1PXJCJFXXXXciXFXXXXXXXXXX_!!0-item_pic.jpg'},
+ {itemId: '522076777462', title: 'iten3', pictureUrl: 'https://gd3.alicdn.com/bao/uploaded/i3/TB1x6hYLXXXXXazXVXXXXXXXXXX_!!0-item_pic.jpg'}
+ ]
+ }
+ }
+</script>
+```
http://git-wip-us.apache.org/repos/asf/incubator-weex-site/blob/32a097bf/_draft/v-0.10/references/components/switch.md
----------------------------------------------------------------------
diff --git a/_draft/v-0.10/references/components/switch.md b/_draft/v-0.10/references/components/switch.md
new file mode 100644
index 0000000..441da7b
--- /dev/null
+++ b/_draft/v-0.10/references/components/switch.md
@@ -0,0 +1,81 @@
+---
+title: <switch>
+type: references
+order: 2.11
+version: 0.10
+---
+
+# <switch>
+
+<span class="weex-version">v0.6.1+</span>
+
+The weex builtin component switch is used to create and manage an IOS styled On/Off buttons, for example, the Airplane mode button in the Settings app is a switch button.
+
+**example**
+
+```html
+<template>
+ <div>
+ <text>muted:</text>
+ <switch checked="true" onclick='onclick' onchange='onchange' ondisappear='ondisappear' onappear='onappear'></switch>
+</div>
+</template>
+
+<script>
+ module.exports ={
+ methods:{
+ onclick:function(e){
+ console.log('onclick:' + e.timestamp);
+ },
+ onchange:function(e){
+ console.log('onchage, value:' + e.value);
+ },
+ ondisappear:function(e){
+ console.log('ondisappear, value:' + e.value);
+ },
+ onappear:function(e){
+ console.log('onappear, value:' + e.value);
+ },
+ }
+ }
+</script>
+```
+
+[try it](http://dotwe.org/7306d24f4f677b6d9935dbd00e3aa981)
+
+## Child Components
+
+There are no child components for the switch component.
+
+## Attributes
+
+* checked <boolean> true|false, default value is false, indicating whether the button is on or not.
+* disabled <boolean> true|false, default value is false, indicating whether the button is enable or not.
+
+Other attributes please check out the [common attributes](../common-attrs.html).
+
+## Styles
+Notes: There are several style properties that you mustn't use on this component. And here are all the invalid properties:
+
+* width
+* height
+* min-width
+* min-height
+* margin and margin-xxs
+* padding and padding-xxs
+* border and border-xxs
+
+Notes: Specially the width and height related properties is not configurable and the size of this component is fixed to 100x60 (for the design width 750px).
+
+common styles: check out [common styles for components](../common-style.html)
+
+## Events
+
+* onappear / ondisappear event. check out [common events](../common-event.html)
+* onclick: check out [common events](../common-event.html)
+* onchange: check out [common events](../common-event.html)
+
+## Parameters of events' object for onchange event:
+
+* value: the value of the component who dispatched this event, which is the boolean value true or false.
+* timestamp: the time stamp of the event.
http://git-wip-us.apache.org/repos/asf/incubator-weex-site/blob/32a097bf/_draft/v-0.10/references/components/text.md
----------------------------------------------------------------------
diff --git a/_draft/v-0.10/references/components/text.md b/_draft/v-0.10/references/components/text.md
new file mode 100644
index 0000000..308fd4a
--- /dev/null
+++ b/_draft/v-0.10/references/components/text.md
@@ -0,0 +1,94 @@
+---
+title: <text>
+type: references
+order: 2.12
+version: 0.10
+---
+
+# <text>
+
+The weex builtin component 'text' is used to render text with specified style rule. <text> tag can contain text value only. You can use variable interpolation in the text content with the mark `{% raw %}{{}}{% endraw %}`.
+
+## Child Components
+
+This component supports no child components.
+
+## Attributes
+
+* value(string): text value of this component. This is equal to the content of 'text'.
+
+### example
+
+```
+var textComponent = this.$el("textid");
+this.text = textComponent.attr.value;
+```
+
+## Styles
+
+* lines: specify the text lines. Default value is `0` for unlimited.
+* text styles: check out [text styles](../text-style.html)
+
+ * support 'color' style.
+ * support 'font-size' style. iOS: default vlaue `32`. Android: platform specify. HTML5: default value `32`.
+ * support 'font-style' style.
+ * support 'font-weight' style.
+ * support 'text-align' style.
+ * support 'text-decoration' style.
+ * support 'text-overflow' style.
+ * support 'line-height'(available from v0.6.1) style. line-height in iOS is different from h5 and Android, text value will be placed at bottom of line box.
+ * not support 'flex-direction, 'justify-content', 'align-items' which is active for child nodes, and text has no child nodes.
+
+### common styles
+check out [common styles for components](../common-style.html)
+
+* support flexbox related styles.
+* support box model related styles.
+* support 'position' related styles.
+* support 'opacity', 'background-color' etc.
+
+## Events
+
+### common events
+check out [common events](../common-event.html)
+
+* support 'click' event.
+* support 'appear' / 'disappear' event.
+
+## Example
+
+```html
+<template>
+ <div>
+ <text>this is text content</text>
+ <text value="this is text value"></text>
+ <text style="text">{{price1}}</text>
+ <text id="textid" onclick={{showtext}}>this is gettext content</text>
+ <text value="{{text}}"></text>
+ </div>
+</template>
+
+<style>
+ .text {
+ font-size: 24;
+ text-decoration: underline;
+ }
+</style>
+
+<script>
+ module.exports = {
+ data: {
+ price1: '99.99',
+ price2: '88.88',
+ text:''
+ },
+ methods: {
+ showtext: function(event) {
+ var textComponent = this.$el("textid");
+ this.text = textComponent.attr.value;
+ }
+ }
+ };
+</script>
+```
+[Try it](http://dotwe.org/48f4d7c50245145c72c33161e2bb4325)
http://git-wip-us.apache.org/repos/asf/incubator-weex-site/blob/32a097bf/_draft/v-0.10/references/components/textarea.md
----------------------------------------------------------------------
diff --git a/_draft/v-0.10/references/components/textarea.md b/_draft/v-0.10/references/components/textarea.md
new file mode 100644
index 0000000..2645385
--- /dev/null
+++ b/_draft/v-0.10/references/components/textarea.md
@@ -0,0 +1,81 @@
+---
+title: <textarea>
+type: references
+order: 2.13
+version: 0.10
+---
+
+# <textarea>
+<span class="weex-version">v0.8+</span>
+
+
+### Summary
+
+The weex builtin component `textarea` is used to create interactive controls to accept data from users. It can be a multi-line [input](./input.html).
+
+**Notes:** `<textarea>` support all event which `<input>` had.
+
+### Child Components
+
+This component supports no child components.
+
+### attributes
+
+- `value`: <string> the value of the control.
+- `placeholder`: <string> a hint to the user of which can be entered to the control. The placeholder text must have no carriage returns or line-feeds.
+- `disabled`: <boolean> a boolean attribute indicates that the form control is not available for interaction. In particular, the click event will not be dispatched on disabled controls.
+- `autofocus`: <boolean> a boolean attribute lets you specify that a form control should have input focus when the page loads.
+- `rows:`<number> a number which can specify the height of textarea, default is `2`.
+
+Other attributes please check out the [common attributes](../common-attrs.html).
+
+### Styles
+
+**text styles**: checkout [text styles](../text-style.html)
+
+- support `color` style.
+- support `font-size` style.
+- support `font-style` style.
+- support `font-weight` style.
+- support `text-align` style.
+
+
+**common styles**: check out [common styles for components](../common-style.html)
+
+- support flexbox related styles.
+- support box model related styles.
+- support ``position`` related styles.
+- support ``opacity``, ``background-color`` etc.
+
+### Events
+
+- `input`: the value of an element changes.
+- `change`: the change event is fired when a change to the component's value is commited by the user. It always come after a ``blur`` event.
+- `focus`: a component has received focus.
+- `blur`: a component has lost focus.
+
+**common events**: check out the [common events](../common-event.html)
+
+- support `appear` / `disappear` event. Check out [common events](../common-event.html).
+
+**Notes:** `<textarea>` does not support the common-event `click`. Please listen to the `input` or `change` event instead.
+
+### Parameters of events' object
+
+- for ``input`` and ``change`` events:
+ - `value`: the value of the component who dispatched this event.
+ - `timestamp`: the time stamp of the event.
+- for ``focus`` and ``blur`` events:
+ - `timestamp`: the time stamp of the event.
+
+### Example
+
+```html
+<div>
+ <textarea
+ autofocus="true"
+ placeholder="..."
+ value="I am a multiple input">
+ </textarea>
+</div>
+```
http://git-wip-us.apache.org/repos/asf/incubator-weex-site/blob/32a097bf/_draft/v-0.10/references/components/video.md
----------------------------------------------------------------------
diff --git a/_draft/v-0.10/references/components/video.md b/_draft/v-0.10/references/components/video.md
new file mode 100644
index 0000000..fa4384e
--- /dev/null
+++ b/_draft/v-0.10/references/components/video.md
@@ -0,0 +1,75 @@
+---
+title: <video>
+type: references
+order: 2.14
+version: 0.10
+---
+
+# <video>
+<span class="weex-version">v0.6.1+</span>
+
+The video component can be used to embed video content in a weex page.
+
+**example**
+
+```html
+<template>
+ <div>
+ <text>Big Eater!</text>
+ <video onstart='onstart' onpause='onpause' onfinish='onfinish' onfail='onfail'
+ auto-play="false" play-status="pause" src="{{src}}" style="width:750;height:500;"></video>
+</div>
+
+ </div>
+</template>
+
+<script>
+ module.exports ={
+ data: {
+ src:'http://flv2.bn.netease.com/videolib3/1611/01/XGqSL5981/SD/XGqSL5981-mobile.mp4'
+ },
+ methods:{
+ onstart:function(e){
+ console.log('onstart');
+ console.log(e);
+ },
+ onpause:function(e){
+ console.log('onpause');
+ },
+ onfinish:function(e){
+ console.log('onfinish');
+ },
+ onfail:function(e){
+ console.log('onfail');
+ },
+ }
+ }
+</script>
+```
+
+[try it](http://dotwe.org/97938570cddf76c792a1a5f9542253b1)
+
+## Child Components
+* text is the only valid type of child component.
+
+## Attributes
+
+* src: <string> The URL of the video to embed.
+* play-status: <boolean> play | pause. Use it to control video's play/pause status. Default value is pause.
+* auto-play: <boolean> true | false. Use it to control whether it is playing when the page initialization finished. Defalut value is false.
+
+Other attributes please check out the [common attributes](../common-attrs.html).
+
+## Styles
+common styles: check out [common styles for components](../common-style.html)
+
+* support flexbox related styles
+* support box model related styles
+* support position related styles
+* support opacity, background-color etc.
+
+## Events
+* onstart: triggered when playback state is Playing.
+* onpause: triggered when playback state is Paused.
+* onfinish: triggered when playback state is Finished.
+* onfail: triggered when playback state is Failed.
http://git-wip-us.apache.org/repos/asf/incubator-weex-site/blob/32a097bf/_draft/v-0.10/references/components/web.md
----------------------------------------------------------------------
diff --git a/_draft/v-0.10/references/components/web.md b/_draft/v-0.10/references/components/web.md
new file mode 100644
index 0000000..89d47c7
--- /dev/null
+++ b/_draft/v-0.10/references/components/web.md
@@ -0,0 +1,152 @@
+---
+title: <web>
+type: references
+order: 2.15
+version: 0.10
+---
+
+# <web>
+<span class="weex-version">v0.5+</span>
+
+Use web component to display any web content in the weex page. The `src`attribute is used to specify a special source. You also can use `webview` module to control some web operation such as goBack,goForward and reload. see [webview module](https://alibaba.github.io/weex/doc/modules/webview.html).For example,You can use web component and webview module to assemble a browser.
+
+## Child Components
+
+This component supports no child components.
+
+## Attributes
+
+**src**(string): this attribute specifies the page source to load.
+
+Other attributes please check out the [common attributes](../common-attrs.html).
+
+## Styles
+
+**width**(float): the width of the component, default value is 0. This style must be specified.
+
+**height**(float): the height of the component, default value is 0. This style must be specifed.
+
+
+### common styles
+
+check out the [common styles](../common-attrs.html).
+
+support flexbox related styles
+support box model related styles
+support `position` related styles
+
+## Events
+
+**pagestart**: sent after the web component starts loading a page.
+**pagefinish**: sent after the web component finishes loading a page.
+**error**: sent if the web component failed to load a page.
+
+### common events
+
+support `appear` / `disappear` event.
+
+Check out [common events](../common-event.html)
+
+### Notes
+not support `click` event.
+
+## Example
+
+We use a simple Browser Demo to show how to use web component and webview module. Check out [webview module](../modules/webview.html).
+
+
+```html
+<template>
+ <div class="browserStyle">
+ <div style="flex-direction: row">
+ <input id="urlInput" type="url" autofocus="false" placeholder="..." class="textStyle" value="{{input_text}}" oninput="input">
+ </input>
+ </div>
+ <div style="flex-direction: row">
+ <wxc-button value="LoadURL" class="buttonSytle" size="small" onclick="loadURL"></wxc-button>
+ <wxc-button value="Backward" class="buttonSytle" size="small" onclick="backforward"></wxc-button>
+ <wxc-button value="Forward" class="buttonSytle" size="small" onclick="forward"></wxc-button>
+ </div>
+ <div>
+ <web id="webview" src="{{src}}" class="webStyle"></web>
+ </div>
+ </div>
+</template>
+
+<style>
+
+ .browserStyle
+ {
+ width:600;
+ height: 825;
+ background-color:#778899 ;
+ }
+
+ .textStyle
+ {
+ width:600;
+ height: 50;
+ background-color: #D3D3D3;
+ }
+
+ .buttonSytle
+ {
+ width:180;
+ height: 50;
+ font-size: 12;
+ background-color: #D3D3D3;
+ margin:10;
+ padding-left: 5;
+ padding-right: 5;
+ }
+
+ .webStyle
+ {
+ width:600;
+ height: 700;
+ background-color: #8B0000;
+ }
+
+</style>
+
+<script>
+
+ var web_module = require('@weex-module/webview');
+
+ module.exports = {
+ data: {
+ src : "https://h5.m.taobao.com",
+ input_text:"https://www.tmall.com"
+ },
+
+ methods: {
+
+ loadURL: function (e) {
+ var web_element = this.$el('webview');
+ var input = this.$el("urlInput");
+ this.src = this.input_text;
+ web_module.reload(web_element);
+ },
+
+ backforward: function (e) {
+ var web_element = this.$el('webview');
+ web_module.goBack(web_element);
+ this.input_text = web_element.attr.src;
+ },
+
+ forward: function (e) {
+ var web_element = this.$el('webview');
+ web_module.goForward(web_element);
+ this.input_text = web_element.attr.src;
+ },
+ input:function (e) {
+ var input = this.$el("urlInput");
+ this.input_text = input.attr.value;
+ }
+
+ }
+ }
+</script>
+```
+
+[Try it](http://dotwe.org/103d472645206cc1564f49717585abb4)
http://git-wip-us.apache.org/repos/asf/incubator-weex-site/blob/32a097bf/_draft/v-0.10/references/components/wxc-navpage.md
----------------------------------------------------------------------
diff --git a/_draft/v-0.10/references/components/wxc-navpage.md b/_draft/v-0.10/references/components/wxc-navpage.md
new file mode 100644
index 0000000..0ae7eba
--- /dev/null
+++ b/_draft/v-0.10/references/components/wxc-navpage.md
@@ -0,0 +1,74 @@
+---
+title: <wxc-navpage>
+type: references
+order: 2.16
+version: 0.10
+---
+
+# <wxc-navpage>
+
+### Summary
+
+The "wxc-navpage" tag implements a specialized component that contains a navbar at the top of the window and an embed content page. You can customize the navbar as you like. In addition, you can use `navigator` module to control the page jump, see [navigator module](../modules/navigator.html).
+
+### Child Components
+
+This type of component supports all kinds of weex component as its child components.
+
+### Attributes
+
+- `height`: <length> The height of the navbar. Default value is 88.
+- `background-color`: <color>The backgroudColor of the navbar. Default value is `white`.
+- `title`: <string> The title of the navbar.
+- `title-color`: <color>The color of the navbar title. Default value is `black`.
+- `left-item-title`: <string> The title of the leftItem.
+- `left-item-color`: <color> The color of the leftItem title. Default value is `black`.
+- `right-item-title`: <string> The title of the rightItem.
+- `right-item-color`: <color> The color of the rightItem title. Default value is `black`.
+- `left-item-src`: <string> The imageURL of the leftItem you want to set.
+- `right-item-src`: <string> The imageURL of the rightItem you want to set.
+
+Other attributes please check out the [common attributes](../references/common-attrs.html).
+
+### Styles
+
+**common styles**: check out the [common styles](../references/common-attrs.html)
+
+- support flexbox related styles
+- support box model related styles
+- support ``position`` related styles
+- support ``opacity``, ``background-color`` etc.
+
+### Events
+
+- `naviBar.leftItem.click`: triggered when the leftItem of navbar is clicked. You need to register the observer in ready or create block.
+- `naviBar.rightItem.click`: triggered when the rightItem of navbar is clicked. You need to register the observer in ready or create block.
+
+**common events**: check out the [common events](../references/common-event.html)
+
+- support `click` event. Check out [common events](../references/common-event.html)
+- support `appear` / `disappear` event. Check out [common events](../references/common-event.html)
+
+### Example
+
+```html
+<template>
+ <wxc-navpage height={{...}} background-color="..." title="..." title-color="..." left-item-title="..." left-item-color="..." right-item-src="...">
+ <content> ...</content>
+ </wxc-navpage>
+</template>
+<script>
+ require('weex-components');
+ module.exports = {
+ created: function() {
+ this.$on('naviBar.rightItem.click',function(e){
+ //handle your click event here.
+ });
+
+ this.$on('naviBar.leftItem.click',function(e){
+ //handle your click event here.
+ });
+ }
+ }
+</script>
+```
http://git-wip-us.apache.org/repos/asf/incubator-weex-site/blob/32a097bf/_draft/v-0.10/references/components/wxc-tabbar.md
----------------------------------------------------------------------
diff --git a/_draft/v-0.10/references/components/wxc-tabbar.md b/_draft/v-0.10/references/components/wxc-tabbar.md
new file mode 100644
index 0000000..944b06d
--- /dev/null
+++ b/_draft/v-0.10/references/components/wxc-tabbar.md
@@ -0,0 +1,94 @@
+---
+title: <wxc-tabbar>
+type: references
+order: 2.17
+version: 0.10
+---
+
+# <wxc-tabbar>
+
+The `wxc-tabbar` is a custom component, which belongs to the `weex-components` node package, implements a specialized component that corresponds to the radio-style selection. It displays tabs at the bottom of the window for switching between different tab pages.
+
+Usage: You can use this component by a `require` statement, `require('weex-components');`, in the script tag. e.g.
+
+```html
+<template>
+ <div style="flex-direction: column;">
+ <wxc-tabbar tab-items = {{tabItems}}></wxc-tabbar>
+ </div>
+</template>
+
+<script>
+ require('weex-components');
+ // Other javascript statements.
+</script>
+```
+
+Before requiring `weex-components'`, you need to specify `weex-components` dependency in your project's package.json file. e.g.
+
+```json
+"dependencies": {
+ "weex-components": "^0.2.0"
+}
+```
+
+## Child Components
+
+`wxc-tabbar` has no child components.
+
+
+## Attributes
+
+* `selected-index` : <number> default value is 0
+* `selected-color`: <color> The color of the title when it is selected. Default is red color.
+* `unselected-color`: <color> The color of the title when it is unselected. Default is black color.
+* `tab-items` This attribute accepts an array of `tabitem` objects, each of which corresponds to the tab pages. And the order of the items equals to the order of the tab pages onscreen. You can configure the appearance of tabbar by setting the tabitem object's properties. Each tabitem properties are listed as below:
+ * `index`: <integer> This attribute is required, and it specifies the order of the item.
+ * `title`: <string> The item’s title. and it is optional. The tile will not be displayed if empty or not provided.
+ * `titleColor`: <color>The item’s titleColor. Default is black color.
+ * `image`: <string>The icon displayed when the tabitem is unselected. The image will not be displayed if empty or not provided.
+ * `selectedImage` : <string>The icon displayed when the tabitem is selected. The icon will not be displayed if empty or not provided.
+ * `src` : <string> The weex page for the tab page.
+ * `visibility`: <string>visible | hidden. This attribute specifies display status of the tab page. Default value is visible.
+
+Other attributes please check out the [common attributes](../common-attrs.html).
+
+## Styles
+common styles: check out [common styles](../common-style.html) for components
+
+* support flexbox related styles
+* support box model related styles
+* support position related styles
+* support opacity, background-color etc.
+
+## Events
+* `tabBar.onClick`: triggered when the tabitem is selected. You need to register the observer in ready or create block.
+e.g.
+
+
+```html
+<template>
+ <div style="flex-direction: column;">
+ <wxc-tabbar tab-items = {{tabItems}}></wxc-tabbar>
+ </div>
+</template>
+
+<script>
+ require('weex-components');
+ module.exports = {
+ data: {
+ },
+ methods: {
+ ready: function (e) {
+ var vm = this;
+ vm.$on('tabBar.onClick',function(e){
+ var index = e.detail.index;
+ });
+ },
+ }
+ }
+</script>
+```
+
+## Example
+You should checkout the playground's `tabbar` example.
http://git-wip-us.apache.org/repos/asf/incubator-weex-site/blob/32a097bf/_draft/v-0.10/references/gesture.md
----------------------------------------------------------------------
diff --git a/_draft/v-0.10/references/gesture.md b/_draft/v-0.10/references/gesture.md
new file mode 100644
index 0000000..fc41fd4
--- /dev/null
+++ b/_draft/v-0.10/references/gesture.md
@@ -0,0 +1,74 @@
+---
+title: Gesture
+type: references
+order: 1.4
+version: 0.10
+---
+
+# Gesture
+
+> Experiment Feature
+
+Weex encapsulates native touch events to provide a gesture system. Using gesture is similar to use event in Weex. Just set `on` attributes on a node to listen to gesture.
+
+## Type
+For now, there are four types of gestures:
+
+* **Touch**. Touch gesture is fired when a touch point is placed, moved or removed from the touch surface. Touch gesture is accuracy as it will report every trivial event. As a result, listening to touch gesture may be slow, a great deal of events needs to be processed even a small move happened. There are three types of Touch gesture:
+ * `touchstart` will be fired when a touch point is placed on the touch surface.
+ * `touchmove` will be fired when a touch point is moved along the touch surface.
+ * `touchend` will be fired when a touch point is removed from the touch surface.
+* **Pan**. Pan gesture also report motion of touch point on the touch surface, which is similar to touch gesture. But Pan gesture is sampled and faster than the touch event. As consequence, it is less accuracy than touch gesture. There are also three types of Pan gesture, and the meaning of these types is very close to types of Touch.
+ * `panstart`
+ * `panmove`
+ * `panend`
+* **Swipe**. Swipe is fired when user swipe a touch point on the screen. A serial of motion will only trigger one Swipe gesture.
+* **LongPress**. Swipe is fired when a touch point is held for 500 ms or more.
+
+The Touch gesture and Pan is very close to each other, with following features hold:
+
+* **Touch**. Not sampled, accuracy, but slow.
+* **Pan**. Sampled, fast, less accuracy.
+
+Users may choose their gesture according to their situation.
+
+## Properties
+The following properties can be used in gesture callback:
+
+* `direction`. Only exists for **Swipe** gesture. Indicate the direcion of the swipe, choose from `up`, `left`, `bottom`, `right`.
+* `changedTouches`. An array of motion for every touch pointer that has contribute to the current gesture.
+
+### changedTouches
+
+`changedTouches` is an array, with the following properties in its children:
+
+* `identifier`. A unique identifier for a touch pointer.
+* `pageX`. The X coordinate of the touch pointer relative to the left edge of the document.
+* `pageY`. The Y coordinate of the touch pointer relative to the top of the document.
+* `screenX`. The X coordinate of the touch point relative to the left edge of the screen.
+* `screenY`. The Y coordinate of the touch point relative to the top edge of the screen.
+
+## Constrain
+Currently, Weex Android do not support listening to gesture on `scroller`, `list` and `webview`, as it would lead a large amount of event conflicting.
+
+## How to use
+
+Example:
+
+```html
+<template>
+ <div ontouchstart="handleTouchstart"></div>
+</template>
+
+<script>
+module.exports = {
+ methods: {
+ handleTouchstart: function(eventProperties) {
+ // handling with the Event Properties
+ }
+ }
+}
+</script>
+```
+
+With the code above, a `touchstart` event will be fired when a touch point is placed on the touch surface.
http://git-wip-us.apache.org/repos/asf/incubator-weex-site/blob/32a097bf/_draft/v-0.10/references/images/css-boxmodel.png
----------------------------------------------------------------------
diff --git a/_draft/v-0.10/references/images/css-boxmodel.png b/_draft/v-0.10/references/images/css-boxmodel.png
new file mode 100644
index 0000000..a2063e2
Binary files /dev/null and b/_draft/v-0.10/references/images/css-boxmodel.png differ
http://git-wip-us.apache.org/repos/asf/incubator-weex-site/blob/32a097bf/_draft/v-0.10/references/images/css-flexbox-align.jpg
----------------------------------------------------------------------
diff --git a/_draft/v-0.10/references/images/css-flexbox-align.jpg b/_draft/v-0.10/references/images/css-flexbox-align.jpg
new file mode 100644
index 0000000..8a7f731
Binary files /dev/null and b/_draft/v-0.10/references/images/css-flexbox-align.jpg differ
http://git-wip-us.apache.org/repos/asf/incubator-weex-site/blob/32a097bf/_draft/v-0.10/references/images/css-flexbox-justify.svg
----------------------------------------------------------------------
diff --git a/_draft/v-0.10/references/images/css-flexbox-justify.svg b/_draft/v-0.10/references/images/css-flexbox-justify.svg
new file mode 100644
index 0000000..33e742b
--- /dev/null
+++ b/_draft/v-0.10/references/images/css-flexbox-justify.svg
@@ -0,0 +1,59 @@
+<svg xmlns="http://www.w3.org/2000/svg" width='504' height='270' viewBox="0 0 504 270">
+ <defs>
+ <pattern id='checker' width='20' height='20' patternUnits='userSpaceOnUse'>
+ <rect x='0' y='0' width='10' height='10' fill='#eee' />
+ <rect x='10' y='10' width='10' height='10' fill='#eee' />
+ <rect x='0' y='10' width='10' height='10' fill='#ccc' />
+ <rect x='10' y='0' width='10' height='10' fill='#ccc' />
+ </pattern>
+ </defs>
+ <style>
+ text { font-family: sans-serif; font-weight: bold; font-size: 30px; text-anchor: middle; }
+ rect { stroke-width: 2px; stroke: #888; }
+ g > rect:nth-child(1) { fill: #888 }
+ g > rect:nth-child(2) { fill: #fcc; }
+ g > rect:nth-child(3) { fill: #cfc; }
+ g > rect:nth-child(4) { fill: #ccf; }
+ g > rect:nth-child(5) { fill: transparent; }
+ </style>
+ <g transform="translate(2,2)">
+ <rect x='0' y='0' width='500' height='50' />
+ <rect x='0' y='0' width='100' height='50' />
+ <rect x='100' y='0' width='80' height='50' />
+ <rect x='180' y='0' width='200' height='50' />
+ <rect x='0' y='0' width='500' height='50' />
+ <text x='250' y='38'>flex-start</text>
+ </g>
+ <g transform="translate(2,56)">
+ <rect x='0' y='0' width='500' height='50' />
+ <rect x='120' y='0' width='100' height='50' />
+ <rect x='220' y='0' width='80' height='50' />
+ <rect x='300' y='0' width='200' height='50' />
+ <rect x='0' y='0' width='500' height='50' />
+ <text x='250' y='38'>flex-end</text>
+ </g>
+ <g transform="translate(2,110)">
+ <rect x='0' y='0' width='500' height='50' />
+ <rect x='60' y='0' width='100' height='50' />
+ <rect x='160' y='0' width='80' height='50' />
+ <rect x='240' y='0' width='200' height='50' />
+ <rect x='0' y='0' width='500' height='50' />
+ <text x='250' y='38'>center</text>
+ </g>
+ <g transform="translate(2,164)">
+ <rect x='0' y='0' width='500' height='50' />
+ <rect x='0' y='0' width='100' height='50' />
+ <rect x='160' y='0' width='80' height='50' />
+ <rect x='300' y='0' width='200' height='50' />
+ <rect x='0' y='0' width='500' height='50' />
+ <text x='250' y='38'>space-between</text>
+ </g>
+ <g transform="translate(2,218)">
+ <rect x='0' y='0' width='500' height='50' />
+ <rect x='20' y='0' width='100' height='50' />
+ <rect x='160' y='0' width='80' height='50' />
+ <rect x='280' y='0' width='200' height='50' />
+ <rect x='0' y='0' width='500' height='50' />
+ <text x='250' y='38'>space-around</text>
+ </g>
+</svg>
\ No newline at end of file
http://git-wip-us.apache.org/repos/asf/incubator-weex-site/blob/32a097bf/_draft/v-0.10/references/images/css-flexbox-sample.png
----------------------------------------------------------------------
diff --git a/_draft/v-0.10/references/images/css-flexbox-sample.png b/_draft/v-0.10/references/images/css-flexbox-sample.png
new file mode 100644
index 0000000..0f1236d
Binary files /dev/null and b/_draft/v-0.10/references/images/css-flexbox-sample.png differ
http://git-wip-us.apache.org/repos/asf/incubator-weex-site/blob/32a097bf/_draft/v-0.10/references/images/nav.png
----------------------------------------------------------------------
diff --git a/_draft/v-0.10/references/images/nav.png b/_draft/v-0.10/references/images/nav.png
new file mode 100644
index 0000000..7081ca7
Binary files /dev/null and b/_draft/v-0.10/references/images/nav.png differ
http://git-wip-us.apache.org/repos/asf/incubator-weex-site/blob/32a097bf/_draft/v-0.10/references/index.md
----------------------------------------------------------------------
diff --git a/_draft/v-0.10/references/index.md b/_draft/v-0.10/references/index.md
new file mode 100644
index 0000000..d59d654
--- /dev/null
+++ b/_draft/v-0.10/references/index.md
@@ -0,0 +1,49 @@
+---
+title: Bootstrap
+type: references
+order: 1
+has_chapter_content: false
+chapter_title: Common Options
+version: 0.10
+---
+
+# Bootstrap
+
+Besides its default meaning, `<script>` tag supports two more configuration with its `type` property *in the top level component of a page*.
+
+* `type="data"`: For initial data configuration, the data defined here will overwrite the data definition in the `<script>`.
+* `type="config"`: For configuration definition.
+
+```html
+<script type="data">
+ /* (optional) the definition of initial data */
+</script>
+
+<script type="config">
+ /* (optional) the definition of configuration */
+</script>
+```
+
+## Initial data definition
+
+Sometimes, it is hard to maintain huge data structure in the default `<script>` tag. So Weex allows us to have a `<script type="data">` tag to define initial data. The data defined in here will totally replace the data defined in the default `<script>` tag.
+
+here is an example:
+
+```html
+<script type="data">
+{
+ title: 'Alibaba',
+ date: new Date().toLocaleString()
+}
+</script>
+```
+
+## script configuration
+
+Weex also allows us to do some configuration with a `<script type="config">`, So far, we only support the `downgrade` configs.
+
+- `downgrade.osVersion`
+- `downgrade.appVersion`
+- `downgrade.weexVersion`
+- `downgrade.deviceModel`
http://git-wip-us.apache.org/repos/asf/incubator-weex-site/blob/32a097bf/_draft/v-0.10/references/modules/animation.md
----------------------------------------------------------------------
diff --git a/_draft/v-0.10/references/modules/animation.md b/_draft/v-0.10/references/modules/animation.md
new file mode 100644
index 0000000..4b46564
--- /dev/null
+++ b/_draft/v-0.10/references/modules/animation.md
@@ -0,0 +1,63 @@
+---
+title: animation
+type: references
+order: 3.1
+version: 0.10
+---
+
+# animation
+
+Smooth and meaningful animation is very effective for enhancing the user experience of mobile application, you can use the `animation` module to perform animation on components. A animation can perform a series of simple transformations (position, size, rotation, background color, and opacity) on the component. So, if you have a `image` component, you can move, rotate, grow, or shrink it.
+
+## API
+### transition(node, options, callback)
+
+[example](http://dotwe.org/5be74019d5e510fa95c5dedec24f7ce5)
+
+#### Arguments
+##### node
+
+**type:** node
+
+**position:** An element that will be animated, normally you can get this by calling `this.$el(id)`.
+
+##### options
+
+**type:** object
+
+**position:** Transition options.
+- `duration` (number): Specifies the number of milliseconds of animation execution, the default value is `0`, means that no animation will occur.
+- `delay` (number): Specifies the amount of milliseconds to wait between a change being requested to a property that is to be transitioned and the start of the transition effect. The default value is `0`.
+- `timingFunction` (string): Used to describe how the intermediate values of the styles being affected by a transition effect are calculated, default value is `linear`, the allowed attributes are listed in the following table:
+
+|name|description|example|
+|:--|:--|:--|
+|`linear`|Specifies a transition effect with the same speed from start to end|[example](http://dotwe.org/d71491ded2bede32df3e8b44b53d5e4f)|
+|`ease-in`|Specifies a transition effect with a slow start|[example](http://dotwe.org/23b104f833039f263957481f2e2c40c9)|
+|`ease-out`|Specifies a transition effect with a slow end|[example](http://dotwe.org/04dab95e073a2c3a808e6b01fc20e996)|
+|`ease-in-out`|Specifies a transition effect with a slow start and end|[example](http://dotwe.org/fc37ec17d215e786ce336a00457489e3)|
+|`cubic-bezier(x1, y1, x2, y2)`|Define your own values in the cubic-bezier function. Possible values are parameter values from 0 to 1. More information about cubic-bezier please visit [cubic-bezier](http://cubic-bezier.com/) and [Bézier curve](https://en.wikipedia.org/wiki/B%C3%A9zier_curve).|[example](http://dotwe.org/95d8f15d0014c31d3a1d15728313f2a5)|
+
+- `styles` (object): Specify the names and values of styles to which a transition effect should be applied. The allowed attributes are listed in the following table:
+
+| name | description | value type | default value |example|
+| :--- | :--- | :--- | :--- |:---|
+|width|The width applied to the component after the animation finished.|length|none|[example](http://dotwe.org/b599d273f996cfdcbeca7bd5c828ca90)|
+|height|The height applied to the component after the animation finished.|length|none|[example](http://dotwe.org/d0b1ccadf386ba00960d0c8340c682e5)|
+|backgroundColor|The background color applied to the component after the animation finished.|string|none|[example](http://dotwe.org/f4616ee18f6042b63a8fdcd2816b1712)|
+|opacity|The opacity applied to the component after the animation finished.|number between 0 to 1|`1`|[example](http://dotwe.org/f94394173301db83ae6e66d1330a0d0b)|
+|transformOrigin|The povit of transition. The possible values for `x-aris` are `left`/`center`/`right`/length or percent, and possible values of `y-axis` are `top`/`center`/`bottom`/ length or percent|`x-axis y-axis`|`center center`|[example](http://dotwe.org/de43f5a47de230dd531797458bf7fd3c)|
+|transform|Transform function to be applied to the element. The properties in the following table are supported|object|none|[example](http://dotwe.org/cfc0388441f5a53a73335885006c13e7)|
+
+properties of `transform`:
+
+| name | description | value type | default value |example|
+| :--- | :--- | :--- | :--- |:---|
+|translate/translateX/translateY|Specifies the location of which the element will be translated.|pixel or percent|none|[example](http://dotwe.org/6638e66e296723bbef3e59c83b2b5003)|
+|rotate|Specifies the angle of which the element will be rotated, the unit is degree.|number|none|[example](http://dotwe.org/ba9e9920594d9388744b2bd0d1b7695d)|
+|scale/scaleX/scaleY|Stretch or shrink the element.|number|none|[example](http://dotwe.org/14b42dde6583ab222bd2b7ed08f241c8)|
+
+#### callback
+**type:** function
+
+**position:** Callback which is called after the completion of transition.
\ No newline at end of file
http://git-wip-us.apache.org/repos/asf/incubator-weex-site/blob/32a097bf/_draft/v-0.10/references/modules/clipboard.md
----------------------------------------------------------------------
diff --git a/_draft/v-0.10/references/modules/clipboard.md b/_draft/v-0.10/references/modules/clipboard.md
new file mode 100644
index 0000000..d0f45e7
--- /dev/null
+++ b/_draft/v-0.10/references/modules/clipboard.md
@@ -0,0 +1,53 @@
+---
+title: clipboard
+type: references
+order: 3.2
+version: 0.10
+---
+
+# clipboard
+<span class="weex-version">v0.8+ (developing)</span>
+
+clipboard allows you to `getString()` or `setString()` from the system clipboard.
+
+Not long ago, We're still suffering from such a situation that we got a verification code sent by SMS, and we had no way to get the code from the SMS text but to typed it by our hands. How frustrated it is! But now you can enable your app to get the code from the system clipboard by calling `clipboard.getString()` .
+
+## Caution
+
+* only support text.
+* only works on Android and iOS. NOT works for html5, for web security reason.
+
+## API
+
+### getString(callback)
+
+reads from clipboard.
+
+##### Arguments
+
+`callback(function)`: the callback function after executing this action. `data` is the return value.
+
+Example
+
+```js
+var clipboard = require('@weex-module/clipboard');
+clipboard.getString(function(ret) {
+ // callback. 'ret' is an object that contains 'result' and 'data'.
+ // use 'ret.data' to fetch the value.
+ console.log("read from clipboard is " + ret.data);
+});
+
+```
+### setString(text)
+
+sets the text to clipboard, having the same effect as copying manually.
+
+##### Arguments
+
+`text(string)`: the text copied to clipboard.
+Example
+
+```js
+var clipboard = require('@weex-module/clipboard');
+clipboard.setString("SomeStringHere");
+```
http://git-wip-us.apache.org/repos/asf/incubator-weex-site/blob/32a097bf/_draft/v-0.10/references/modules/dom.md
----------------------------------------------------------------------
diff --git a/_draft/v-0.10/references/modules/dom.md b/_draft/v-0.10/references/modules/dom.md
new file mode 100644
index 0000000..948abf0
--- /dev/null
+++ b/_draft/v-0.10/references/modules/dom.md
@@ -0,0 +1,114 @@
+---
+title: dom
+type: references
+order: 3.3
+version: 0.10
+---
+
+# dom
+
+## Summary
+
+A series of dom apis that sending virtual-dom's messages to the native renderer to update the dom tree. The only API for developers to use in a `.we` file is `scrollToElement` <del>which you can use by calling the `$scrollTo` method</del>. Other APIs mentioned on this page should only be used through the native renderer in the `callNative` process.
+
+## API
+
+### scrollToElement(node, options)
+
+Scroll the page to the specified node. This API should only be used on the element in the `scroller` or `list` component.
+
+<del>This API can be used by calling the VM's method `$scrollTo` **(deprecated)**.</del> You can use `require('@weex-module/dom').scrollToElement` to call this API in your `.we` file.
+
+#### Arguments
+
+* `node`*(Node)*: an element that scrolled into the view.
+* `options`*(object)*: some options.
+ * `offset`*(number)*: An offset to the visible position, default is `0`.
+
+#### Example
+
+```javascript
+var dom = require('@weex-module/dom');
+dom.scrollToElement(this.$el('someId'), {offset: 10});
+```
+
+### createBody(element)
+
+Create the body for the whole dom tree. Element type should only be the ones that can be used as roots (`div`, `scroller` and `list`).
+
+#### Arguments
+
+* `element`*(object)*: a object that specified the body node info like ref, type, children, etc.
+
+### addElement(parentNode, element, index)
+
+Add a element into the dom tree.
+
+#### Arguments
+
+* `parentNode`*(Node)*: specify the element's parent node.
+* `element`*(object)*: a object that specified the config info for the node to be added.
+* `index`*(number)*: insert the element to the specified position.
+
+### removeElement(node)
+
+Remove a node in the dom tree.
+
+#### Arguments
+
+* `node`*(Node)*: the node to be removed.
+
+### moveElement(node, parentNode, index)
+
+Move a exsited node into another parent (or the same parent) before the specified position.
+
+#### Arguments
+
+* `node`*(Node)*: the node to be moved.
+* `parentNode`*(Node)*: the parent node to move into.
+* `index`*(number)*:: according to the specified position index, will the node be inserted into.
+
+### addEvent(node, type)
+
+Inform the renderer that there are listeners for a specified event type.
+
+#### Arguments
+
+* `node`*(Node)*: the node to be listened on.
+* `type`*(string)*: which type of events the node should be listened for.
+
+### removeEvent(node, type)
+
+Remove event listeners on the specified node for the specified event type.
+
+#### Arguments
+
+* `node`*(Node)*: on which node should the listeners to be removed
+* `type`*(string)*: specify the event type.
+
+### updateAttrs(node, attr)
+
+Update attrbutes of the specified node.
+
+#### Arguments
+
+* `node`*(Node)*: the node to be updated.
+* `attr`*(object)*: the attributes object with the attribute items to be updated.
+
+### updateStyle(node, style)
+
+Update styles of the specified node.
+
+#### Arguments
+
+* `node`*(Node)*: the node to be updated.
+* `style`*(object)*: the style object with the style rules to be updated.
+
+### createFinish()
+
+Notify native renders that the series of messages for updating the native dom tree have reached a end.
+
+### refreshFinish()
+
+Notify native renders that the series of messages for refreshing a native dom tree have reached a end.
+
http://git-wip-us.apache.org/repos/asf/incubator-weex-site/blob/32a097bf/_draft/v-0.10/references/modules/globalevent.md
----------------------------------------------------------------------
diff --git a/_draft/v-0.10/references/modules/globalevent.md b/_draft/v-0.10/references/modules/globalevent.md
new file mode 100644
index 0000000..0db8c48
--- /dev/null
+++ b/_draft/v-0.10/references/modules/globalevent.md
@@ -0,0 +1,89 @@
+---
+title: globalEvent
+type: references
+order: 3.10
+version: 0.10
+---
+
+# globalEvent
+<span class="weex-version">v0.8+ (developing)</span>
+
+## Summary
+
+`globalEvent` are used to listen for persistent events, such as changes in positioning information, gyroscopes, and so on. A global event is a secondary API that requires additional APIs to work with.
+
+You can register events via `addEventListener`, which can be removed by `removeEventListener` when you do not need to listen for `globalEvent`.
+
+*AUCTION*
+- Only instance level is not application level .
+
+## How to make your Module support global events
+API development is complete, when the event needs to be sent, the need through the following methods:
+
+```javascript
+/**
+ *
+ * @param eventName eventName
+ * @param params event params
+ */
+instance.fireGlobalEventCallback(eventName,params);
+```
+
+How to dispatch a global event in a weex-html5 component or module ? Just dispatch the event on the document element:
+
+```javascript
+var evt = new Event('some-type')
+evt.data = { foo: 'bar' }
+document.dispatchEvent(evt)
+```
+
+### Example
+
+#### Android
+
+```java
+Map<String,Object> params=new HashMap<>();
+params.put("key","value");
+mWXSDKInstance.fireGlobalEventCallback("geolocation",params);
+```
+#### iOS
+
+```Objective-C
+[weexInstance fireGlobalEvent:@"geolocation" params:@{@"key":@"value"}];
+```
+
+## API
+
+### addEventListener(String eventName, String callback)
+
+register global event.
+
+#### Arguments
+
+* `eventName`*(string)*: The name of the event you want to listen to.
+* `callback`*(function)*: the callback function after executing this action.
+
+#### Example
+
+```javascript
+var globalEvent = require('@weex-module/globalEvent');
+globalEvent.addEventListener("geolocation", function (e) {
+ console.log("get geolocation")
+ });
+```
+
+### removeEventListener(String eventName)
+
+remove global event
+
+#### Arguments
+
+* `eventName`*(string)*: You no longer need to listen for event names.
+
+#### Example
+
+```javascript
+var globalEvent = require('@weex-module/globalEvent');
+globalEvent.removeEventListener("geolocation");
+```
+
http://git-wip-us.apache.org/repos/asf/incubator-weex-site/blob/32a097bf/_draft/v-0.10/references/modules/index.md
----------------------------------------------------------------------
diff --git a/_draft/v-0.10/references/modules/index.md b/_draft/v-0.10/references/modules/index.md
new file mode 100644
index 0000000..2a094ca
--- /dev/null
+++ b/_draft/v-0.10/references/modules/index.md
@@ -0,0 +1,28 @@
+---
+title: Built-in Modules
+type: references
+order: 3
+has_chapter_content: true
+version: 0.10
+---
+
+# Built-in Modules
+
+## How to use
+
+You can use a simply way like `require('@weex-module/name')` to access the apis of module. e.g.
+
+```html
+<script>
+var dom = require('@weex-module/dom')
+
+module.exports = {
+ data: {},
+ created: function () {
+ dom.scrollToElement(this.$el('someIdForElement'), {
+ offset: 0
+ })
+ }
+}
+</script>
+```
\ No newline at end of file
http://git-wip-us.apache.org/repos/asf/incubator-weex-site/blob/32a097bf/_draft/v-0.10/references/modules/modal.md
----------------------------------------------------------------------
diff --git a/_draft/v-0.10/references/modules/modal.md b/_draft/v-0.10/references/modules/modal.md
new file mode 100644
index 0000000..2ebad15
--- /dev/null
+++ b/_draft/v-0.10/references/modules/modal.md
@@ -0,0 +1,192 @@
+---
+title: modal
+type: references
+order: 3.4
+version: 0.10
+---
+
+# modal
+
+Weex provides a series of message boxes: `toast`, `alert`, `confirm` and `prompt`.
+
+## API
+### toast(options)
+
+A toast provides simple feedback about an operation in a small popup. For example, navigating away from an email before you send it triggers a "Draft saved" toast to let you know that you can continue editing later. Toasts automatically disappear after a timeout.
+
+#### Arguments
+- `options` (object): toast options.
+ - `message` (string): the text message that the toast shows.
+ - `duration` (number): the duration(seconds) that the toast shows.
+
+**Example:**
+
+```html
+<template>
+ <div style="height: 200px; width: 400px; background-color: #00bfff;
+ justify-content: center; align-items: center" onclick="{{perform}}">
+ <text style="font-size: 60px; color: #ffffff">Toast</text>
+ </div>
+</template>
+
+<script>
+ module.exports = {
+ methods: {
+ perform: function () {
+ var modal = require('@weex-module/modal');
+ modal.toast({
+ 'message': 'I am a toast',
+ 'duration': 3
+ });
+ }
+ }
+ }
+</script>
+```
+### alert(options, callback)
+
+An alert box is often used if you want to make sure information comes through to the user.
+When an alert box pops up, the user will have to click "OK" to proceed.
+
+#### Arguments
+
+- `options` (object): alert box options.
+ - `message` (string): the text message that the alert shows.
+ - `okTitle` (string): the text of positive button, default is 'OK'.
+ - `callback` (function): callback when complete.
+ This method has a callback function whose arguments will be:
+- `result` (string): the title text of the confirm button that clicked by user.
+
+**Example:**
+
+```html
+<template>
+ <div>
+ <div style="height: 200px; width: 400px; background-color: #00bfff;
+ justify-content: center; align-items: center" onclick="{{perform}}">
+ <text style="font-size: 60px; color: #ffffff">Alert</text>
+ </div>
+ <text>{{params}}</text>
+ </div>
+</template>
+
+<script>
+ module.exports = {
+ data: {
+ params: ''
+ },
+ methods: {
+ perform: function () {
+ var modal = require('@weex-module/modal');
+ var self = this;
+ modal.alert({
+ 'message': 'I am alert message',
+ 'okTitle' : 'YES'
+ }, function (result) {
+ self.params = String(result)
+ });
+ }
+ }
+ }
+</script>
+```
+
+### confirm(options, callback)
+A confirm box is often used if you want the user to verify or accept something.
+
+When a confirm box pops up, the user will have to click either confirm or cancel button to proceed.
+
+#### Arguments
+- `options` (object): confirm box options.
+ - `message` (string): the message that the confirm shows.
+ - `okTitle` (string): the title of confirm button, default is 'OK'.
+ - `cancelTitle` (string): the title of cancel button, default is 'Cancel'.
+- `callback` (function): callback when complete.
+
+This method has a callback function whose arguments will be:
+- `result`(string): the title text of the button that clicked by user.
+**Example:**
+
+```html
+<template>
+ <div>
+ <div style="height: 200px; width: 400px; background-color: #00bfff;
+ justify-content: center; align-items: center" onclick="{{perform}}">
+ <text style="font-size: 60px; color: #ffffff">Confirm</text>
+ </div>
+ <text>{{params}}</text>
+ </div>
+</template>
+
+<script>
+ module.exports = {
+ data: {
+ params: ''
+ },
+ methods: {
+ perform: function () {
+ var modal = require('@weex-module/modal');
+ var self = this;
+ modal.confirm({
+ 'message': 'I have read and accept the terms.',
+ 'okTitle' : 'YES',
+ 'cancelTitle' : 'NO'
+ }, function (e) {
+ self.params = String(e)
+ });
+ }
+ }
+ }
+</script>
+```
+
+### prompt(options, callback)
+
+A prompt box is often used if you want the user to input a value before entering a page.
+When a prompt box pops up, the user will have to click either confirm or cancel button to proceed after entering an input value.
+
+#### Arguments
+- `options` (object): some options.
+ - `message` (string): the message that the prompt shows.
+ - `okTitle` (string): the title text of confirm button, default is 'OK'.
+ - `cancelTitle` (string): the title text of cancel button, default is 'Cancel'.
+- `callback` (function): callback when complete.
+ This method has a callback function whose arguments will be:
+- `ret` (object): the argument will be a object, which has attributes `result` and `data`, like `{ result: 'OK', data: 'hello world' }`
+ - `result` (string): the title of the button that clicked by user.
+ - `data` (string): the value of the text that entered by user.
+
+**Example:**
+
+```html
+<template>
+ <div>
+ <div style="height: 200px; width: 400px; background-color: #00bfff;
+ justify-content: center; align-items: center" onclick="{{perform}}">
+ <text style="font-size: 60px; color: #ffffff">Prompt</text>
+ </div>
+ <text>{{params}}</text>
+ </div>
+</template>
+
+<script>
+ module.exports = {
+ data: {
+ params: ''
+ },
+ methods: {
+ perform: function () {
+ var modal = require('@weex-module/modal');
+ var self = this;
+ modal.prompt({
+ 'message': 'I am a prompt',
+ 'okTitle' : 'YES',
+ 'cancelTitle' : 'NO'
+ }, function (e) {
+ self.params = JSON.stringify(e)
+ });
+ }
+ }
+ }
+</script>
+```
\ No newline at end of file
http://git-wip-us.apache.org/repos/asf/incubator-weex-site/blob/32a097bf/_draft/v-0.10/references/modules/navigator.md
----------------------------------------------------------------------
diff --git a/_draft/v-0.10/references/modules/navigator.md b/_draft/v-0.10/references/modules/navigator.md
new file mode 100644
index 0000000..fe4442c
--- /dev/null
+++ b/_draft/v-0.10/references/modules/navigator.md
@@ -0,0 +1,198 @@
+---
+title: navigator
+type: references
+order: 3.5
+version: 0.10
+---
+
+# Navigator
+<span class="weex-version">v0.6.1+</span>
+
+As it's known to all that, we can navigate back and forth in the web browser using the navigation bar.
+And The navigator module mimics the same behaviors in the iOS/Android application. Without such an ability, We will have to stay in the same page forever, so it is very important. Besides the navigation, the module can let us to specify whether to apply animation or not during the transition.
+
+**example**
+
+```html
+<template>
+ <div class="div">
+ <text class="text" onclick="onItemClick">click me! {{message}}</text>
+ </div>
+</template>
+
+<script>
+ module.exports ={
+ data:{
+ message:""
+ },
+ methods:{
+ onItemClick:function(e){
+
+ var navigator = require('@weex-module/navigator');
+ var params = {'url':'http://weex.alibaba-inc.com/raw/html5/3d2996653c1d129603f9c935b895e998.js','animated':true};
+ navigator.push(params, function(e) {
+ console.log('i am the callback.')
+ });
+ }
+ }
+ }
+</script>
+<style>
+ .div {
+ flex-direction: row;
+ justify-content: space-between;
+ align-items: center;
+ width: 750;
+ height: 90;
+ padding-left:30;
+ padding-right:30;
+
+ border-bottom-width: 1;
+ border-style: solid;
+ border-color: #dddddd;
+ }
+ .text{
+ width: 750;
+ height: 90;
+ }
+</style>
+```
+
+[try it](http://dotwe.org/004a5e3f26290cf5b9ce03806a574633)
+
+## API
+### push(options, callback)
+
+push a weex page onto the navigator stack, you can specify whether apply animation when pushing. And you can also specify a callback function to be executed after the operation is over.
+
+**parameters**
+
+* options(object): some options.
+ * url(stirng): The URL of the weex page to push.
+ * animated(string): true, if the weex page is push through animation, otherwise, false. Default value is true.
+
+* callback(object): the callback function to be called after executing this action.
+
+```javascript
+var params = {
+ 'url': 'navigator-demo.js',
+ 'animated' : 'true',
+}
+var navigator = require('@weex-module/navigator');
+navigator.push(params, function(e) {
+ //callback
+});
+```
+
+### pop(options, callback)
+pop a weex page onto the navigator stack, you can specify whether apply animation when popping. And you can also specify a callback function to be executed after the operation is over.
+
+**parameters**
+
+* options(object): some options.
+ * animated(string): true if the weex page is pop through animation; otherwise, false. Default value is true.
+* callback(object): the callback function after executing this action.
+
+**example**
+
+```javascript
+var params = {
+ 'animated' : 'true',
+}
+var navigator = require('@weex-module/navigator');
+navigator.pop(params, function(e) {
+ //callback
+});
+```
+
+### close(options, callback)
+close a weex page, you can specify a callback function to be executed after the operation is over.
+
+**parameters**
+
+* options(object): some options.
+ * animated(string): true, should animation be applied when closing. Default value is true.
+* callback(object): the callback function after executing this action.
+
+### setNavBarBackgroundColor(params, callback)
+set color for the navigation bar's background color, you can specify a callback function to be executed after the operation is over.
+
+**parameters**
+
+* params(object): some parameters.
+ * backgroundColor(string): it's a required param, no default value provided.
+* callback(object): the callback function after executing this action.
+
+
+### setNavBarLeftItem(params,callback)
+set left item for the navigation bar, you can specify a callback function to be executed after the operation is over.
+
+**parameters**
+
+* params(object): parameters can not be empty, titleColor depends on title. And If title and icon are provided, only the title and its titleColor will be used. That's to say, icon will only be used when title is not present.
+ * title(string): the title for the bar button.
+ * titleColor (string): the title color.
+ * icon (string): the icon for the bar button, should be an an downloadable image.
+* callback(object): the callback function after executing this action.
+
+### clearNavBarLeftItem(callback)
+clear left item for the navigation bar, you can specify a callback function to be executed after the operation is over.
+
+**parameters**
+
+* callback(object): the callback function after executing this action.
+
+### setNavBarRightItem(params,callback)
+set the right item for the navigation bar, you can specify a callback function to be executed after the operation is over.
+
+**parameters**
+
+* params(object): parameters can not be empty, titleColor depends on title. And If title and icon are provided, only the title and its titleColor will be used. That's to say, icon will be used when title is not present.
+ * title(string): the title for the bar button.
+ * titleColor (string): the title color.
+ * icon (string): the icon for the bar button, should be an an downloadable image.
+* callback(object): the callback function after executing this action.
+
+### clearNavBarRightItem(params, callback)
+clear the right item for the navigation bar, you can specify a callback function to be executed after the operation is over.
+**parameters**
+
+* params(object): optional.
+* callback(object): the callback function after executing this action.
+
+
+### setNavBarMoreItem(params,callback)
+set the more item for the navigation bar, you can specify a callback function to be executed after the operation is over.
+
+**parameters**
+
+Actually, the function does nothing.
+* params(object): optional.
+* callback(object): the callback function after executing this action.
+
+### clearNavBarMoreItem(params, callback)
+clear the more item for the navigation bar, you can specify a callback function to be executed after the operation is over.
+
+**parameters**
+
+Actually, the function does nothing.
+* params(object): optional.
+* callback(object): the callback function after executing this action.
+
+### setNavBarTitle(params,callback)
+set the title for the navigation bar, you can specify a callback function to be executed after the operation is over.
+
+**parameters**
+
+* params(object): parameters can not be empty.
+ * title(string): the title for the bar button.
+* callback(object): the callback function after executing this action.
+
+
+### clearNavBarTitle(params,callback)
+clear the title for the navigation bar, you can specify a callback function to be executed after the operation is over.
+
+**parameters**
+
+* params(object): optional.
+* callback(object): the callback function after executing this action.
http://git-wip-us.apache.org/repos/asf/incubator-weex-site/blob/32a097bf/_draft/v-0.10/references/modules/storage.md
----------------------------------------------------------------------
diff --git a/_draft/v-0.10/references/modules/storage.md b/_draft/v-0.10/references/modules/storage.md
new file mode 100644
index 0000000..9c62109
--- /dev/null
+++ b/_draft/v-0.10/references/modules/storage.md
@@ -0,0 +1,111 @@
+---
+title: storage
+type: references
+order: 3.6
+version: 0.10
+---
+
+# storage
+<span class="weex-version">v0.7+</span>
+
+## Summary
+
+`storage` is a series of apis, allowing you to for example add, modify or delete stored data items.
+
+## API
+
+### setItem(key, value, callback)
+
+When passed a key name and value, will add that key to the storage,
+or update that key's value if it already exists.
+
+#### Arguments
+
+* `key`*(string)*: the name of the key you want to store. "" or null is not allowed.
+* `value`*(string)*: the name of the value you want to store."" or null is not allowed.
+* `callback`*(object)*: the callback function after executing this action.
+
+##### Example
+
+```javascript
+var storage = require('@weex-module/storage');
+storage.setItem('bar', 'bar-value', function(e) {
+ // callback.'e' is an object that contains 'result' and 'data'. e.result indicate whether `setItem` is succeed.
+ // e.data will return 'undefined' if success or 'invalid_param' if your key/value is ""/null.
+});
+```
+
+### getItem(key, callback)
+
+When passed a key name, will return that key's value.
+
+#### Arguments
+
+* `key`*(string)*: the name of the key you want to retrieve the value of."" or null is not allowed.
+* `callback`*(object)*: the callback function after executing this action.
+
+##### Example
+
+```javascript
+var storage = require('@weex-module/storage');
+storage.getItem('foo', function(e) {
+ //callback.'e' is an object that contains 'result' and 'data'.
+ // use 'e.data' to fetch the value of the key,if not found,'undefined' will return.
+});
+```
+
+### removeItem(key, callback)
+
+When passed a key name, will remove that key from the storage.
+
+#### Arguments
+
+* `key`*(string)*: the name of the key you want to remove."" or null is not allowed.
+* `callback`*(object)*: the callback function after executing this action.
+
+##### Example
+
+```javascript
+var storage = require('@weex-module/storage');
+storage.removeItem('foo', function(e) {
+ // callback. 'e' is an object that contains 'result' and 'data'.
+ // e.result will return 'success' or 'failed' according to the executing result.
+ // e.data will always return 'undefined' in this function if success.
+});
+```
+
+### length(callback)
+
+Returns an integer representing the number of data items stored in the Storage object.
+
+#### Arguments
+
+* `callback`*(object)*: the callback function after executing this action.
+
+##### Example
+
+```javascript
+var storage = require('@weex-module/storage');
+storage.length(function(e) {
+ // callback. 'e' is an object that contains 'result' and 'data'.
+ //e.data will return that number.
+});
+```
+
+### getAllKeys(callback)
+
+Returns an array that contains all keys stored in Storage object.
+
+#### Arguments
+
+* `callback`*(object)*: the callback function after executing this action.
+
+##### Example
+
+```javascript
+var storage = require('@weex-module/storage');
+storage.getAllKeys(function(e) {
+ // callback. 'e' is an object that contains 'result' and 'data'.
+ //e.data will return that array of keys.
+});
+```
http://git-wip-us.apache.org/repos/asf/incubator-weex-site/blob/32a097bf/_draft/v-0.10/references/modules/stream.md
----------------------------------------------------------------------
diff --git a/_draft/v-0.10/references/modules/stream.md b/_draft/v-0.10/references/modules/stream.md
new file mode 100644
index 0000000..522e3b0
--- /dev/null
+++ b/_draft/v-0.10/references/modules/stream.md
@@ -0,0 +1,86 @@
+---
+title: stream
+type: references
+order: 3.7
+version: 0.10
+---
+
+# stream
+
+A series of stream api. It provides a network request.
+
+## API
+
+### fetch(options, callback,progressCallback)
+
+Start a network request, use two callbacks to receive server's response data.
+
+**Arguments**
+
+* options(object): the request options, key value style dictionary.
+
+ * method(string): the HTTP method `GET` or `POST`.
+
+ * url(string): the request url.
+
+ * headers(string): the HTTP request headers.
+
+ * type(string): request type, 'json','text' or 'jsonp'(same as 'json' in native implementation)
+
+ * body(string): the HTTP body.
+
+* callback(function): A callback function whose argument is the response object of the request. Callback function will receive a `response` object.
+
+ * status(number): response status code.
+
+ * ok(boolean): true if status code is bewteen 200~299.
+
+ * statusText(string): status text
+
+ * data(string): response data. It's a object if request option is `json`/`jsonp`, or *(string)* in other type value.
+
+ * headers(object): response headers
+
+* progressCallback(function): A progress callback. This callback will be invoked before request finished.
+
+ * readyState(number): Current request state.'1':request connection opened;'2':response headers received.;'3':response data is loading;
+
+ * status(number): response status code.
+
+ * length(number): bytes of data have received. You can read full length of response from 'headers'.
+
+ * statusText(string): status text.
+
+ * headers(object): response headers.
+
+### Example
+
+```html
+<template>
+ <div>
+ <text onclick="startStream">click here to start stream</text>
+ </div>
+</template>
+
+<script>
+ module.exports = {
+ methods: {
+ startStream: function () {
+ var stream_module = require('@weex-module/stream');
+ stream_module.fetch({
+ method: 'GET',
+ url: "http://httpbin.org/get",
+ type:'json'
+ }, function(response) {
+ //finished response
+ console.log("all received:",response);
+ },function(response){
+ //progress response
+ console.log("current bytes received:",response.length);
+ });
+ }
+ }
+ }
+</script>
+```
+[Try it](http://dotwe.org/6e4ede64fdfe070b9696cc4cc3bdd086)
http://git-wip-us.apache.org/repos/asf/incubator-weex-site/blob/32a097bf/_draft/v-0.10/references/modules/timer.md
----------------------------------------------------------------------
diff --git a/_draft/v-0.10/references/modules/timer.md b/_draft/v-0.10/references/modules/timer.md
new file mode 100644
index 0000000..c82109d
--- /dev/null
+++ b/_draft/v-0.10/references/modules/timer.md
@@ -0,0 +1,60 @@
+---
+title: Timer
+type: references
+order: 3.8
+version: 0.10
+---
+
+# Timer
+
+Weex encapsulates a series of APIs in order to start/stop a one-time task or a repeated task at a fixed delay. Please note that this module don't provide an accuracy delay. It provides best-effort delivery, but the actual delay may still exceed the delay user wants if the corresponding thread is busy.
+Actually, this module is made for the polyfill of HTML5 timer APIs, developers **should not** use this module directly unless they know exactly what they are doing.
+
+## API
+
+All timeout or interval in this module are measured in milliseconds.
+Also, timeout and interval should be a non-negative integer(the max of integer is 0x7FFFFFFF). If timeout or interval is negative, then it will be reset to zero, e.g. the task will be put in the task queue immediately.
+
+### setTimeout(fn, timeout)
+
+The `setTimeout()` method calls a function after a specified number of milliseconds. Use the `clearTimeout()` method to prevent the function from running. The function is only executed once. If you need to repeat execution, use the `setInterval()` method.
+
+#### Arguments
+
+- `fn` (function): The function that will be executed
+- `timeout` (number): The number of milliseconds to wait before executing the function
+
+#### Return value
+
+A Number, representing the fnId value of the timer that is set. Use this value with the `clearTimeout()` method to cancel the timer.
+
+### setInterval(fn, interval)
+
+The `setInterval()` method calls a function at specified intervals (in milliseconds), and it will continue calling the function until `clearInterval()` is called. The fnId value returned by `setInterval()` is used as the parameter for the `clearInterval()` method.
+
+#### Arguments
+
+- `fn` (function): The function that will be executed
+- `interval` (number): The intervals (in milliseconds) on how often to execute the function
+
+#### Return value
+
+A Number, representing the fnId value of the timer that is set. Use this value with the `clearInterval()` method to cancel the timer
+
+### clearTimeout(fnId)
+
+The `clearTimeout()` method clears a timer set with the `setTimeout()` method. The fnId value returned by `setTimeout()` is used as the parameter for the `clearTimeout()` method. If the function has not already been executed, you will be able to stop the execution by calling the `clearTimeout()` method, otherwise, this method has no influence on the task.
+
+#### Arguments
+
+- `fnId` (number): The fnId value of the timer returned by the `setTimeout()` method
+
+### clearInterval(fnId)
+
+The `clearInterval()` method clears a timer set with the `setInterval()` method. The fnId value returned by `setInterval()` is used as the parameter for the `clearInterval()` method.
+
+#### Arguments
+
+- `fnId` (number): The fnId of the timer returned by the `setInterval()` method
+
+[Try it](http://dotwe.org/996578e8f29b88d7d4fa01ab031fbbda)
http://git-wip-us.apache.org/repos/asf/incubator-weex-site/blob/32a097bf/_draft/v-0.10/references/modules/webview.md
----------------------------------------------------------------------
diff --git a/_draft/v-0.10/references/modules/webview.md b/_draft/v-0.10/references/modules/webview.md
new file mode 100644
index 0000000..88c6f17
--- /dev/null
+++ b/_draft/v-0.10/references/modules/webview.md
@@ -0,0 +1,160 @@
+---
+title: webview
+type: references
+order: 3.9
+version: 0.10
+---
+
+# webview
+
+A series of web operation api like `goBack`, `goForward`, and `reload`. 'webview' module used with the web component.
+
+## API
+
+### goBack(webElement)
+
+Loads the previous location in the history stack.
+
+**Arguments**
+
+* webElement(web): the element of the web component.
+
+#### Example
+
+```
+var webview = require('@weex-module/webview');
+var webElement = this.$el('webview');
+webview.goBack(webElement);
+```
+
+### goForward(webElement)
+
+Loads the next location in the history stack.
+
+**Arguments**
+
+* webElement(web): the element of the web component.
+
+#### Example
+
+```
+var webview = require('@weex-module/webview');
+var webElement = this.$el('webview');
+webview.goForward(webElement);
+```
+
+### reload(webElement)
+
+Reloads the current web page.
+
+**Arguments**
+
+* webElement(web): the element of the web component.
+
+#### Example
+
+```
+var webview = require('@weex-module/webview');
+var webElement = this.$el('webview');
+webview.reload(webElement.ref);
+```
+
+## Example
+
+```html
+<template>
+ <div class="browserStyle">
+ <div style="flex-direction: row">
+ <input id="urlInput" type="url" autofocus="false" placeholder="..." class="textStyle" value="{{input_text}}" oninput="input">
+ </input>
+ </div>
+ <div style="flex-direction: row">
+ <wxc-button value="LoadURL" class="buttonSytle" size="small" onclick="loadURL"></wxc-button>
+ <wxc-button value="Backward" class="buttonSytle" size="small" onclick="backforward"></wxc-button>
+ <wxc-button value="Forward" class="buttonSytle" size="small" onclick="forward"></wxc-button>
+ </div>
+ <div>
+ <web id="webview" src="{{src}}" class="webStyle"></web>
+ </div>
+ </div>
+</template>
+
+<style>
+
+ .browserStyle
+ {
+ width:600;
+ height: 825;
+ background-color:#778899 ;
+ }
+
+ .textStyle
+ {
+ width:600;
+ height: 50;
+ background-color: #D3D3D3;
+ }
+
+ .buttonSytle
+ {
+ width:180;
+ height: 50;
+ font-size: 12;
+ background-color: #D3D3D3;
+ margin:10;
+ padding-left: 5;
+ padding-right: 5;
+ }
+
+ .webStyle
+ {
+ width:600;
+ height: 700;
+ background-color: #8B0000;
+ }
+
+</style>
+
+<script>
+
+ var web_module = require('@weex-module/webview');
+
+ module.exports = {
+ data: {
+ src : "https://h5.m.taobao.com",
+ input_text:"https://www.tmall.com"
+ },
+
+ methods: {
+
+ loadURL: function (e) {
+ var web_element = this.$el('webview');
+ var input = this.$el("urlInput");
+ this.src = this.input_text;
+ web_module.reload(web_element);
+ },
+
+ backforward: function (e) {
+ var web_element = this.$el('webview');
+ web_module.goBack(web_element);
+ this.input_text = web_element.attr.src;
+ },
+
+ forward: function (e) {
+ var web_element = this.$el('webview');
+ web_module.goForward(web_element);
+ this.input_text = web_element.attr.src;
+ },
+ input:function (e) {
+ var input = this.$el("urlInput");
+ this.input_text = input.attr.value;
+ }
+
+ }
+ }
+</script>
+```
+
+[Try it](http://dotwe.org/103d472645206cc1564f49717585abb4)
+
+
http://git-wip-us.apache.org/repos/asf/incubator-weex-site/blob/32a097bf/_draft/v-0.10/references/special-element.md
----------------------------------------------------------------------
diff --git a/_draft/v-0.10/references/special-element.md b/_draft/v-0.10/references/special-element.md
new file mode 100644
index 0000000..4a4d57e
--- /dev/null
+++ b/_draft/v-0.10/references/special-element.md
@@ -0,0 +1,36 @@
+---
+title: Special Element
+type: references
+order: 1.10
+version: 0.10
+---
+
+# Special Element
+
+## Content
+
+The element serves as content distribution outlet in a composed component template. The element itself will be replaced.
+
+alias: 'slot'.
+
+## Example
+
+As shown in the example, 'content' replaced by 'text'.
+
+```html
+<we-element name="item">
+ <template>
+ <div>
+ <content></content>
+ </div>
+ </template>
+</we-element>
+
+<template>
+ <div>
+ <item>
+ <text>Content Text</text>
+ </item>
+ </div>
+</template>
+```
[12/51] [abbrv] incubator-weex-site git commit: rearrangement the
structure of the document
Posted by ha...@apache.org.
http://git-wip-us.apache.org/repos/asf/incubator-weex-site/blob/32a097bf/source/cn/v-0.10/references/common-attrs.md
----------------------------------------------------------------------
diff --git a/source/cn/v-0.10/references/common-attrs.md b/source/cn/v-0.10/references/common-attrs.md
deleted file mode 100644
index 8ac1c0f..0000000
--- a/source/cn/v-0.10/references/common-attrs.md
+++ /dev/null
@@ -1,166 +0,0 @@
----
-title: 通用特性
-type: references
-order: 1.5
-version: 0.10
----
-
-# 通用特性
-
-特性(attribute)与 HTML 中元素特性类似,提供了与 Weex 元素有关的其他附加信息。所有的元素都可以拥有特性, 特性总是在 Weex 元素的起始标签中定义,并总是以键值对的形式出现,例如:`name="value"`。可以使用 [Mustache](https://mustache.github.io/) 对特性值进行数据绑定。
-
-**Notes!**
-
-Weex 遵循 [HTML attribute](https://en.wikipedia.org/wiki/HTML_attribute) 命名规范, 所以请 **不要在特性中使用驼峰风格(CamelCase)** , 使用`-`连接符的**羊肉串风格(kebab-case)** 才是更好的命名方式。
-
-所有 Weex 元素都拥有以下特性:
-
-## id
-
-为 `<template>` 内定义的元素指定一个唯一的 id,通过 `this.$el(id)` 可以容易地获取一个 Weex 元素的引用。更多信息可参考 [Instance APIs](./api.html)
-
-```html
-<template>
- <div id="wrapper">
- <list class="list">
- <cell class="row" repeat="item in rows" id="item-{{$index}}">
- <text class="item-title">row {{item.id}}</text>
- </cell>
- </list>
- </div>
-</template>
-<style></style>
-
-<script>
-module.exports = {
- data: {
- rows:[
- {id: 1},
- {id: 2},
- {id: 3},
- {id: 4},
- {id: 5}
- ]
- }
-}
-</script>
-```
-
-[体验一下](http://dotwe.org/b5032fa96e3e657711916148b1978ad3)
-
-## style
-
-为元素定义行内样式。
-
-```html
-<div style="width: 200px; height: 200px; color: #ff0000;"></div>
-<div style="padding: {{x}}; margin: 0"></div>
-```
-
-## class
-
-为元素定义一个或多个类名(引用样式表中的类)。
-
-```html
-<div class="button"></div>
-<div class="button {{btnStatus}}"></div>
-```
-
-## repeat
-
-我们可以通过 `repeat` 特性根据一个数组进行渲染,迭代地生成当前标签的内容。`repeat` 特性有着 `item in items` 形式的特殊语法,其中,`items` 是数组数据,`item` 是数组元素迭代的别名。
-
-```html
-<template>
- <div>
- <list class="list">
- <cell class="row" repeat="item in rows" id="item-{{$index}}">
- <text class="item-title">row {{item.id}}</text>
- </cell>
- </list>
- </div>
-</template>
-
-<style></style>
-
-<script>
-module.exports = {
- data: {
- rows:[
- {id: 1},
- {id: 2},
- {id: 3},
- {id: 4},
- {id: 5}
- ]
- }
-}
-</script>
-```
-
-[体验一下](http://dotwe.org/b5032fa96e3e657711916148b1978ad3)
-
-## if
-
-提供一个布尔值来决定是否显示当前标签。当值为 `true` 时,元素显示,为 `false` 时元素隐藏。
-
-```html
-<div if="true"></div>
-<div if="{{opened}}"></div>
-<div if="{{direction === 'row'}}"></div>
-```
-
-## append
-
-append 特性用于控制渲染次序。它的可选值为 `tree` 或 `node`,默认为 `tree`,不支持数据绑定。不同的值会执行不同的渲染过程:
-
-- `append="tree"` 是一次性渲染整个节点树,渲染更高效,但是如果页面太大容易造成较长时间的白屏。
-- `append="node"` 所有节点逐个渲染,整体渲染速度略慢,但是用户体验好一些。
-
-通过 `node` 和 `tree` 可以精细化地控制页面展示的逻辑和颗粒度,一般比较好的实践为首屏以内按 `tree` 解析,首屏以外按 `node` 解析。
-
-```html
-<div append="tree"></div>
-<div append="node"></div>
-```
-
-## 事件处理 (on...)
-
-在 Weex 标签上注册事件处理器。以 `on` 加 事件名为 `key`,事件处理函数为 `value`。
-
-```html
-<template>
- <div class="btn" onClick="alertMsg"><text>Click me</text></div>
-</template>
-
-<style>
-.btn {
- justify-content: center;
- align-items: center;
- width: 200;
- height: 100;
- background-color: #ff0000;
- border-radius: 5;
- color: #ffffff;
-}
-</style>
-
-<script>
-var modal = require('@weex-module/modal')
-
-module.exports = {
- data: {},
- methods: {
- alertMsg: function (e) {
- modal.alert({
- message: 'click',
- okTitle: 'alert'
- }, function() {
- })
- }
- }
-}
-</script>
-```
-
-[体验一下](http://dotwe.org/97de59d24d7667aa91187d59123d24a6)
http://git-wip-us.apache.org/repos/asf/incubator-weex-site/blob/32a097bf/source/cn/v-0.10/references/common-event.md
----------------------------------------------------------------------
diff --git a/source/cn/v-0.10/references/common-event.md b/source/cn/v-0.10/references/common-event.md
deleted file mode 100644
index 2554fe1..0000000
--- a/source/cn/v-0.10/references/common-event.md
+++ /dev/null
@@ -1,492 +0,0 @@
----
-title: 通用事件
-type: references
-order: 1.10
-version: 0.10
----
-
-# 通用事件
-
-Weex 提供了通过事件触发动作的能力,例如在用户点击组件时执行 JavaScript。下面列出了可被添加到 Weex 组件上以定义事件动作的属性:
-
-## `click`
-
-当组件上发生点击手势时被触发。
-
-**注意:**
-
-`<input>` 和 `<switch>` 组件目前不支持 `click` 事件,请使用 `change` 或 `input` 事件来代替。
-
-### 事件对象
-
-- `type`: `click`
-- `target`: 触发点击事件的目标组件
-- `timestamp`: 触发点击事件时的时间戳
-
-### 示例
-
-点击按钮,将弹出弹框,再点击弹框 `×`,关闭弹框。
-
-```html
-<template>
- <div>
- <div>
- <text class="btn" onclick="openDialog">Show Dialog</text>
- </div>
-
- <div id="dialog" class="dialog" if="{{isShowDialog}}">
- <div class="dialog-backdrop"></div>
- <div class="dialog-content">
- <div class="dialog-header">
- <text class="dialog-title">{{dialogTitle}}</text>
- <text class="close" onclick="closeDialog">×</text>
- </div>
- <div class="dialog-body">
- <text>{{dialogBody}}</text>
- </div>
- </div>
- </div>
- </div>
-</template>
-
-<style>
-.dialog-backdrop {
- opacity: .5;
- position: absolute;
- top: 0;
- right: 0;
- bottom: 0;
- left: 0;
- background-color: #000000;
-}
-.dialog {
- position: fixed;
- top: 0;
- right: 0;
- bottom: 0;
- left: 0;
- justify-content: center;
- align-items: center;
-}
-.dialog-content {
- width: 450;
- background-color: #ffffff;
-}
-.dialog-header {
- padding: 20;
- border-bottom-width: 1;
- border-bottom-style: solid;
- border-bottom-color: #efefef;
-}
-.dialog-body {
- padding: 20;
-}
-.close {
- font-size: 50;
- position: absolute;
- right: 10;
- top: 10;
-}
-.btn {
- text-align: center;
- color: #ffffff;
- padding: 12;
- background-color: #3071a9;
- border-color: #285e8e;
- border-radius: 4;
-}
-</style>
-
-<script>
- module.exports = {
- data: {
- isShowDialog: false,
- dialogTitle: 'HELLO',
- dialogBody: 'Weex is best!'
- },
- methods: {
- openDialog: function (e) {
- this.isShowDialog = true
- },
- closeDialog: function (e) {
- this.isShowDialog = false
- }
- }
- }
-</script>
-```
-
-[体验一下](http://dotwe.org/6c1dd48b419e614f92581930f42fd366)
-
-## `longpress`
-
-如果一个组件被绑定了 `longpress` 事件,那么当用户长按这个组件时,该事件将会被触发。
-
-**注意:**
-
-`<input>` 和 `<switch>` 组件目前不支持 `click` 事件,请使用 `change` 或 `input` 事件来代替。
-
-### 事件对象
-- `type` : `longpress`
-- `target` : 触发长按事件的目标组件
-- `timestamp` : 长按事件触发时的时间戳
-
-### 示例
-
-长按按钮,变换背景色。
-
-```html
-<template>
- <div style="width: 400; height: 200; background-color: {{bg}};
- justify-content: center; align-items: center;" onlongpress="{{update}}">
- <text style="font-size: 60">Press me</text>
- </div>
-</template>
-
-<script>
- module.exports = {
- data: {
- bg: '#FF0000'
- },
- methods: {
- update: function () {
- this.bg = this.bg === '#FF0000' ? '#00FF00' : '#FF0000'
- }
- }
- }
-</script>
-```
-
-[体验一下](http://dotwe.org/14a646ea3d7d5e1de5baaca9061a48b3)
-
-## Appear 事件
-
-如果一个位于某个可滚动区域内的组件被绑定了 `appear` 事件,那么当这个组件的状态变为在屏幕上可见时,该事件将被触发。
-
-### 事件对象
-
-- `type` : `appear`
-- `target` : 触发 Appear 事件的组件对象
-- `timestamp` : 事件被触发时的时间戳
-- `direction` : 触发事件时屏幕的滚动方向,`up` 或 `down`
-
-### 示例
-
-当滚到最下方时,最后一个 `item` 出现,将会弹出弹框。
-
-```html
-<template>
- <scroller onviewappear="{{viewappear}}" onviewdisappear="{{viewdisappear}}">
- <div class="item">
- <text>scroll 1</text>
- </div>
- <div class="item">
- <text>scroll 2</text>
- </div>
- <div class="item">
- <text>scroll 3</text>
- </div>
- <div class="item">
- <text>scroll 4</text>
- </div>
- <div class="item">
- <text>scroll 5</text>
- </div>
- <div class="item">
- <text>scroll 6</text>
- </div>
- <div class="item">
- <text>scroll 7</text>
- </div>
- <div class="item">
- <text>scroll 8</text>
- </div>
- <div class="item">
- <text>scroll 9</text>
- </div>
- <div class="item">
- <text>scroll 10</text>
- </div>
- <div class="item" onappear="alertMsg" >
- <text>I will alert a message when I appeared.</text>
- </div>
- </scroller>
-</template>
-
-<style>
- .list {
- height: 850;
- }
-
- .count {
- font-size: 48;
- margin: 10;
- }
-
- .indicator {
- height: 40;
- width: 40;
- color: #45b5f0;
- }
-
- .row {
- width: 750;
- }
-
- .item {
- justify-content: center;
- border-bottom-width: 2;
- border-bottom-color: #c0c0c0;
- height: 200;
- padding: 20;
- }
-</style>
-
-<script>
- var modal = require('@weex-module/modal')
- module.exports = {
- data: {},
- methods: {
- alertMsg: function (e) {
- modal.alert({
- message: 'I am appeared.',
- okTitle: 'Appear'
- }, function() {
- })
- },
- viewappear: function () {
- nativeLog('>>>>>', 'viewappear')
- },
- viewdisappear: function () {
- nativeLog('>>>>>', 'viewdisappear')
- }
- }
- }
-</script>
-```
-
-[体验一下](http://dotwe.org/4d5335f086dfc9964caed5b1fe4b1aa7)
-
-## Disappear 事件
-
-如果一个位于某个可滚动区域内的组件被绑定了 `disappear` 事件,那么当这个组件被滑出屏幕变为不可见状态时,该事件将被触发。
-
-### 事件对象
-
-- `type` : `disappear`
-- `target` : 触发 Disappear 事件的组件对象
-- `timestamp` : 事件被触发时的时间戳
-- `direction` : 触发事件时屏幕的滚动方向,`up` 或 `down`
-
-### 示例
-
-当向下滚动到第一个 `item` 消失后,将会弹出弹框。
-
-```html
-<template>
- <scroller onviewappear="{{viewappear}}" onviewdisappear="{{viewdisappear}}">
- <div class="item" ondisappear="alertMsg" >
- <text>I will alert a message when I disappeared.</text>
- </div>
- <div class="item">
- <text>scroll 1</text>
- </div>
- <div class="item">
- <text>scroll 2</text>
- </div>
- <div class="item">
- <text>scroll 3</text>
- </div>
- <div class="item">
- <text>scroll 4</text>
- </div>
- <div class="item">
- <text>scroll 5</text>
- </div>
- <div class="item">
- <text>scroll 6</text>
- </div>
- <div class="item">
- <text>scroll 7</text>
- </div>
- <div class="item">
- <text>scroll 8</text>
- </div>
- <div class="item">
- <text>scroll 9</text>
- </div>
- <div class="item">
- <text>scroll 10</text>
- </div>
- </scroller>
-</template>
-
-<style>
- .list {
- height: 850;
- }
-
- .count {
- font-size: 48;
- margin: 10;
- }
-
- .indicator {
- height: 40;
- width: 40;
- color: #45b5f0;
- }
-
- .row {
- width: 750;
- }
-
- .item {
- justify-content: center;
- border-bottom-width: 2;
- border-bottom-color: #c0c0c0;
- height: 200;
- padding: 20;
- }
-</style>
-
-<script>
- var modal = require('@weex-module/modal')
- module.exports = {
- data: {},
- methods: {
- alertMsg: function (e) {
- modal.alert({
- message: 'I am disappeared.',
- okTitle: 'Disappear'
- }, function() {
- })
- },
- viewappear: function () {
- nativeLog('>>>>>', 'viewappear')
- },
- viewdisappear: function () {
- nativeLog('>>>>>', 'viewdisappear')
- }
- }
- }
-</script>
-```
-
-[体验一下](http://dotwe.org/eefa176009207a429bbaf475f6ee92d1)
-
-## Page 事件
-
-*注意:仅支持 iOS 和 Android,H5 暂不支持。*
-
-Weex 通过 `viewappear` 和 `viewdisappear` 事件提供了简单的页面状态管理能力。
-
-`viewappear` 事件会在页面就要显示或配置的任何页面动画被执行前触发,例如,当调用 `navigator` 模块的 `push` 方法时,该事件将会在打开新页面时被触发。`viewdisappear` 事件会在页面就要关闭时被触发。
-
-与组件的 `appear` 和 `disappear` 事件不同的是,`viewappear` 和 `viewdisappear` 事件关注的是整个页面的状态,所以**它们必须绑定到页面的根元素上**。
-
-特殊情况下,这两个事件也能被绑定到非根元素的body组件上,例如`wxc-navpage`组件。
-
-### 事件对象
-
-- `type` : `viewappear` 或 `viewdisappear`
-- `target` : 触发事件的组件对象
-- `timestamp` : 事件被触发时的时间戳
-
-### 示例
-
-进出页面时,都会弹框提示。
-
-```html
-<template>
- <scroller onviewappear="{{alertViewappearMsg}}" onviewdisappear="{{alertViewdisappearMsg}}">
- <div class="item">
- <text>scroll 1</text>
- </div>
- <div class="item">
- <text>scroll 2</text>
- </div>
- <div class="item">
- <text>scroll 3</text>
- </div>
- <div class="item">
- <text>scroll 4</text>
- </div>
- <div class="item">
- <text>scroll 5</text>
- </div>
- <div class="item">
- <text>scroll 6</text>
- </div>
- <div class="item">
- <text>scroll 7</text>
- </div>
- <div class="item">
- <text>scroll 8</text>
- </div>
- <div class="item">
- <text>scroll 9</text>
- </div>
- <div class="item">
- <text>scroll 10</text>
- </div>
- <div class="item" onappear="alertMsg" >
- <text>scroll 11</text>
- </div>
- </scroller>
-</template>
-
-<style>
- .list {
- height: 850;
- }
-
- .count {
- font-size: 48;
- margin: 10;
- }
-
- .indicator {
- height: 40;
- width: 40;
- color: #45b5f0;
- }
-
- .row {
- width: 750;
- }
-
- .item {
- justify-content: center;
- border-bottom-width: 2;
- border-bottom-color: #c0c0c0;
- height: 200;
- padding: 20;
- }
-</style>
-
-<script>
- var modal = require('@weex-module/modal')
- module.exports = {
- data: {},
- methods: {
- alertViewappearMsg: function () {
- modal.alert({
- message: 'viewappear.',
- okTitle: 'viewappear'
- }, function() {
- })
- },
- alertViewdisappearMsg: function () {
- modal.alert({
- message: 'viewdisappear.',
- okTitle: 'viewdisappear'
- }, function() {
- })
- }
- }
- }
-</script>
-```
-
-[体验一下](http://dotwe.org/450205a8f8612381422220ce88a562ff)
http://git-wip-us.apache.org/repos/asf/incubator-weex-site/blob/32a097bf/source/cn/v-0.10/references/common-style.md
----------------------------------------------------------------------
diff --git a/source/cn/v-0.10/references/common-style.md b/source/cn/v-0.10/references/common-style.md
deleted file mode 100644
index 8a585f2..0000000
--- a/source/cn/v-0.10/references/common-style.md
+++ /dev/null
@@ -1,322 +0,0 @@
----
-title: 通用样式
-type: references
-order: 1.6
-version: 0.10
----
-
-# 通用样式
-
-所有 Weex 组件都支持以下通用样式规则。
-
-## 盒模型
-
-
-
-Weex 盒模型基于 [CSS 盒模型](https://www.w3.org/TR/css3-box/),每个 Weex 元素都可视作一个盒子。我们一般在讨论设计或布局时,会提到「盒模型」这个概念。
-
-盒模型描述了一个元素所占用的空间。每一个盒子有四条边界:外边距边界 margin edge, 边框边界 border edge, 内边距边界 padding edge 与内容边界 content edge。这四层边界,形成一层层的盒子包裹起来,这就是盒模型大体上的含义。
-
-**注意:**
-Weex 对于长度值目前只支持*像素*值,单位可省略,不支持相对单位(`em`、`rem`)。
-
-- `width {length}`:,默认值 0
-- `height {length}`:,默认值 0
-- `padding {length}`:内边距,内容和边框之间的距离。默认值 0
-
- 可有如下写法:
-
- - `padding-left {length}`:,默认值 0
- - `padding-right {length}`:,默认值 0
- - `padding-top {length}`:,默认值 0
- - `padding-bottom {length}`:,默认值 0
-- `margin`:
-
- 外边距,元素和元素之间的空白距离。值类型为 length,默认值 0
-
- 可有如下写法:
-
- - `margin-left {length}`:,默认值 0
- - `margin-right {length}`:,默认值 0
- - `margin-top {length}`:,默认值 0
- - `margin-bottom {length}`:,默认值 0
-- border:
-
- 设定边框,`border` 目前不支持类似这样 `border: 1 solid #ff0000;` 的组合写法。
-
- 可有如下写法:
-
- - `border-style`:
-
- 设定边框样式,值类型为 string,可选值为 `solid` | `dashed` | `dotted`,默认值 `solid`
-
- 可有如下写法:
-
- - `border-left-style {string}`:可选值为 `solid` | `dashed` | `dotted`,默认值 `solid`
- - `border-top-style {string}`:可选值为 `solid` | `dashed` | `dotted`,默认值 `solid`
- - `border-right-style {string}`:可选值为 `solid` | `dashed` | `dotted`,默认值 `solid`
- - `border-bottom-style {string}`:可选值为 `solid` | `dashed` | `dotted`,默认值 `solid`
-
- - `border-width {length}`:
-
- 设定边框宽度,非负值, 默认值 0
-
- 可有如下写法:
-
- - `border-left-width {length}`:,非负值, 默认值 0
- - `border-top-width {length}`:,非负值, 默认值 0
- - `border-right-width {length}`:,非负值, 默认值 0
- - `border-bottom-width {length}`:,非负值, 默认值 0
-
- - `border-color {color}`:
-
- 设定边框颜色,默认值 `#000000`
-
- 可有如下写法:
-
- - `border-left-color {color}`:,默认值 `#000000`
- - `border-top-color {color}`:,默认值 `#000000`
- - `border-right-color {color}`:,默认值 `#000000`
- - `border-bottom-color {color}`:,默认值 `#000000`
- - `border-radius {length}`:
-
- 设定圆角,默认值 0
-
- 可有如下写法:
-
- - `border-bottom-left-radius {length}`:,非负值, 默认值 0
- - `border-bottom-right-radius {length}`:,非负值, 默认值 0
- - `border-top-left-radius {length}`:,非负值, 默认值 0
- - `border-top-right-radius {length}`:,非负值, 默认值 0
-
-
-注意:目前在 `<image>` 和 `<text>` 组件上尚无法只定义一个或几个角的 `border-radius`。比如你无法在这两个组件上使用 `border-top-left-radius`。
-
-Weex 盒模型的 `box-sizing` 默认为 `border-box`,即盒子的宽高包含内容、内边距和边框的宽度,不包含外边距的宽度。
-
-### 示例:
-
-```html
-<template>
- <div>
- <image style="width: 400; height: 200; margin-left: 20;" src="https://g.alicdn.com/mtb/lab-zikuan/0.0.18/weex/weex_logo_blue@3x.png"></image>
- </div>
-</template>
-```
-
-## Flexbox
-
-Weex 布局模型基于 CSS [`Flexbox`](http://www.w3.org/TR/css3-flexbox/),以便所有页面元素的排版能够一致可预测,同时页面布局能适应各种设备或者屏幕尺寸。
-
-Flexbox 包含 flex 容器和 flex 成员项。如果一个 Weex 元素可以容纳其他元素,那么它就成为 flex 容器。需要注意的是,flexbox 的老版规范相较新版有些出入,比如是否能支持 wrapping。这些都描述在 W3C 的工作草案中了,你需要注意下新老版本之间的不同。另外,老版本只在安卓 4.4 版以下得到支持。
-
-### Flex 容器
-
-在 Weex 中,Flexbox 是默认且唯一的布局模型,所以你不需要手动为元素添加 `display: flex;` 属性。
-
-- `flex-direction`:
-
- 定义了 flex 容器中 flex 成员项的排列方向。可选值为 `row` | `column`,默认值为 `column`
-
- - `column`:从上到下排列。
- - `row`:从左到右排列。
-
-- `justify-content`:
-
- 定义了 flex 容器中 flex 成员项在主轴方向上如何排列以处理空白部分。可选值为 `flex-start` | `flex-end` | `center` | `space-between`,默认值为 `flex-start`。
-
- - `flex-start`:是默认值,所有的 flex 成员项都排列在容器的前部;
- - `flex-end`:则意味着成员项排列在容器的后部;
- - `center`:即中间对齐,成员项排列在容器中间、两边留白;
- - `space-between`:表示两端对齐,空白均匀地填充到 flex 成员项之间。
-
- 
-
-- `align-items`:
-
- 定义了 flex 容器中 flex 成员项在纵轴方向上如何排列以处理空白部分。可选值为 `stretch` | `flex-start` | `center` | `flex-end`,默认值为 `stretch`。
-
- - `stretch` 是默认值,即拉伸高度至 flex 容器的大小;
- - `flex-start` 则是上对齐,所有的成员项排列在容器顶部;
- - `flex-end` 是下对齐,所有的成员项排列在容器底部;
- - `center` 是中间对齐,所有成员项都垂直地居中显示。
-
- 
-
-### Flex 成员项
-
-flex 属性定义了 flex 成员项可以占用容器中剩余空间的大小。如果所有的成员项设置相同的值 `flex: 1`,它们将平均分配剩余空间. 如果一个成员项设置的值为 `flex: 2`,其它的成员项设置的值为 `flex: 1`,那么这个成员项所占用的剩余空间是其它成员项的2倍。
-
-- `flex {number}`:值为 number 类型。
-
-### 示例
-
-一个简单的网格布局。
-
-
-
-```html
-<template>
- <div>
- <div repeat="(i, v) in list" class="row">
- <div repeat="(k, text) in v" class="item">
- <div>
- <text>{{text}}</text>
- </div>
- </div>
- </div>
- </div>
-</template>
-<style>
- .item{
- flex:1;
- justify-content: center;
- align-items:center;
- border-width:1;
- }
- .row{
- flex-direction: row;
- height:80;
- }
-</style>
-<script>
- module.exports = {
- data: function () {
- return {
- list:[
- ['A', 'B', 'C'],
- ['D', 'E', 'F'],
- ['G', 'H', 'I']
- ]
- }
- }
- }
-</script>
-```
-
-[体验一下](http://dotwe.org/ee6a898fcac2242308c24fe5882c52ac)
-
-一个在相对于屏幕水平居中,全屏居中的 `<div>`。
-
-```html
-<template>
- <div class="wrapper">
- <div class="box">
- </div>
- </div>
-</template>
-
-<style>
- .wrapper {
- position: absolute;
- top: 0;
- right: 0;
- bottom: 0;
- left: 0;
- background-color: #cccccc;
- justify-content: center;
- align-items: center;
- }
- .box {
- width: 200;
- height: 200;
- background-color: #fc0000;
- }
-</style>
-```
-
-[体验一下](http://dotwe.org/a76cd89b37c72d308ed576131830e877)
-
-## 定位
-
-Weex 支持 `position` 定位,用法与 CSS position 类似。为元素设置 `position` 后,可通过 `top`、`right`、`bottom`、`left` 四个属性设置元素坐标。
-
-- `position {string}`:
-
- 设置定位类型。可选值为 `relative` | `absolute` | `fixed` | `sticky`,默认值为 `relative`。
-
- - `relative` 是默认值,指的是相对定位;
- - `absolute` 是绝对定位,以元素的容器作为参考系;
- - `fixed` 保证元素在页面窗口中的对应位置显示;
- - `sticky` 指的是仅当元素滚动到页面之外时,元素会固定在页面窗口的顶部。
-- `top {number}`:距离上方的偏移量,默认为 0。
-- `bottom {number}`:距离下方的偏移量,默认为 0。
-- `left {number}`:距离左方的偏移量,默认为 0。
-- `right {number}`:距离右方的偏移量,默认为 0。
-
-**注意:**
-
-1. Weex 目前不支持 `z-index` 设置元素层级关系,但靠后的元素层级更高,因此,对于层级高的元素,可将其排列在后面。
-2. 如果定位元素超过容器边界,在 Android 下,超出部分将**不可见**,原因在于 Android 端元素 `overflow` 默认值为 `hidden`,但目前 Android 暂不支持设置 `overflow: visible`。
-
-### 示例
-
-
-
-```html
-<template>
- <div class="wrapper">
- <div class="box box1">
- </div>
- <div class="box box2">
- </div>
- <div class="box box3">
- </div>
- </div>
-</template>
-
-<style>
- .wrapper {
- position: absolute;
- top: 0;
- right: 0;
- bottom: 0;
- left: 0;
- background-color: #cccccc;
- }
- .box {
- width: 400;
- height: 400;
- position: absolute;
- }
- .box1 {
- top: 0;
- left: 0;
- background-color: #ff0000;
- }
- .box2 {
- top: 150;
- left: 150;
- background-color: #0055dd;
- }
- .box3 {
- top: 300;
- left: 300;
- background-color: #00ff49;
- }
-</style>
-```
-
-[体验一下](http://dotwe.org/b04339de27cfabf0710e045c0079e56a)
-
-## 其他基本样式
-
-- `opacity {number}`:取值范围为 [0, 1] 区间。默认值是 1,即完全不透明;0 是完全透明;0.5 是 50% 的透明度。
-- `background-color {color}`:设定元素的背景色,可选值为色值,支持RGB( `rgb(255, 0, 0)` );RGBA( `rgba(255, 0, 0, 0.5)` );十六进制( `#ff0000` );精简写法的十六进制( `#f00` );色值关键字(`red`),默认值是 `transparent` 。
-
-**注意:** [色值的关键字列表](./color-names.md)。
-
-## 上手样式
-
-如果对于样式写法需要更多上手参考,可参考
-
-- [如何做出高性能长列表]()
-- [如何布局]()
-- 以及每个组件的文档中,都有常见的例子可供参考。
-
-你可以按照以下步骤来规划 Weex 页面的样式。
-
-1. 全局样式规划:将整个页面分割成合适的模块。
-2. flex 布局:排列和对齐页面模块。
-3. 定位盒子:定位并设置偏移量。
-4. 细节样式处理:增加特定的具体样式。
http://git-wip-us.apache.org/repos/asf/incubator-weex-site/blob/32a097bf/source/cn/v-0.10/references/component-defs.md
----------------------------------------------------------------------
diff --git a/source/cn/v-0.10/references/component-defs.md b/source/cn/v-0.10/references/component-defs.md
deleted file mode 100644
index 11e4282..0000000
--- a/source/cn/v-0.10/references/component-defs.md
+++ /dev/null
@@ -1,126 +0,0 @@
----
-title: ViewModel 选项
-type: references
-order: 1.2
-version: 0.10
----
-
-# 组件定义
-
-定义组件是通过一组选项来描述一个组件。这组选项总是被赋值给 `<script>` 标签中的 `module.exports` 。
-
-``` javascript
-module.exports = {
- // a set of options here
-}
-```
-## 数据和方法
-
-``` javascript
-module.exports = {
- data: function () {
- return {x: 1, y: 2}
- },
- methods: {
- doThis: function () {...},
- doThat: function () {...}
- },
- ...
-}
-```
-
-`data` 选项是一个函数,它返回这个视图模型可监听的数据对象。而 `methods` 是一个映射,其中包含所有视图模型的方法。
-
-每个 `data` 或 `method` 属性将被代理到视图模型实例中。所以,你能通过 `this.x` 读写数据,或者通过 `this.doThis()` 调用方法。
-
-一个完整的例子:
-
-```html
-<template>
- <div style="width: {{w}}; height: {{h}}; background-color: red;" onclick="update"></div>
-</template>
-<script>
- module.exports = {
- data: function () {
- return {w: 750, h: 200}
- },
- methods: {
- update: function (e) {
- this.h += 200
- }
- }
- }
-</script>
-```
-## 事件
-
-``` javascript
-module.exports = {
- data: ...,
- methods: {
- foo: function () {
- ...
- this.$emit('customtype1', data)
- }
- },
- events: {
- customtype1: function (e) {
- console.log(e.type, e.detail)
- }
- },
- ...
-}
-```
-
-`events` 选项允许你在视图模型被创建时注册自定义事件。然后,它会监听这些类型的事件,并通过函数类型的值处理它们。
-
-Weex 会把一个事件对象作为第一个参数传递给其绑定的事件,这个事件对象在 `e.detail` 中包含事件数据。
-## 生命周期
-
-``` javascript
-module.exports = {
- data: ...,
- methods: ...,
- init: function () {
- console.log('ViewModel constructor begins')
- },
- created: function () {
- console.log('Data observation finished')
- },
- ready: function () {
- console.log('Virtual DOM finished')
- },
- ...
-}
-```
-
-Weex 视图模型现在支持生命周期内的钩子函数,这些钩子函数能被写为组件选项:
-- `init`: 在视图模型的构造函数开始调用时激活;
-- `created`: 当视图模型监听默认数据,但还未编译模板时激活;
-- `ready`: 当视图模型监听默认数据并且编译模板生成虚拟DOM后被激活。
-
-**注意:当 `methods`、`events` 或生命周期方法作为参数传递给别的函数时,务必确认函数执行时的上下文符合您的预期,例如:**
-
-``` javascript
-module.exports = {
- data: function () {
- return {x: 1, y: 2}
- },
- ready: function () {
- // `undefined`
- // 因为上下文发生了变化
- this.foo(this.bar)
- // `1`
- // 正确绑定上下文之后可以得到预期的值
- this.foo(this.bar.bind(this))
- },
- methods: {
- foo: function (fn) {
- return fn()
- },
- bar: function () {
- return this.x
- }
- }
-}
-```
http://git-wip-us.apache.org/repos/asf/incubator-weex-site/blob/32a097bf/source/cn/v-0.10/references/components/a.md
----------------------------------------------------------------------
diff --git a/source/cn/v-0.10/references/components/a.md b/source/cn/v-0.10/references/components/a.md
deleted file mode 100644
index 75bd831..0000000
--- a/source/cn/v-0.10/references/components/a.md
+++ /dev/null
@@ -1,273 +0,0 @@
----
-title: <a>
-type: references
-order: 2.1
-version: 0.10
----
-
-# <a>
-
-`<a>` 组件定义了指向某个页面的一个超链接. 此组件的作用和用法与HTML5中的 [`<a>`](https://developer.mozilla.org/en-US/docs/Web/HTML/Element/a) 非常类似,区别在于 Weex 的 `<a>` 组件**不能**直接在里面添加文本(字符串),如果要展示文本,应该添加 `<text>` 组件。
-
-一个简单例子:
-
-```HTML
-<template>
- <div class="wrapper">
- <a href="http://dotwe.org/raw/dist/a468998152ee680413588c38bd61c29e.js">
- <text>click</text>
- </a>
- </div>
-</template>
-
-<style>
-.wrapper {
- text-align: center;
-}
-</style>
-```
-
-[体验一下](http://dotwe.org/f63c78213ef26c25357ffa851537fff3)
-
-## 子组件
-
-此组件支持除了自己外的所有 Weex 组件作为子组件。
-
-## 特性
-
-- `href {string}`:定义了超链接的 URL。
-
-## 样式
-
-`<a>` 支持所有通用样式。
-
-- 盒模型
-- `flexbox` 布局
-- `position`
-- `opacity`
-- `background-color`
-
-查看 [组件通用样式](../common-style.html)。
-
-## 事件
-
-`<a>` 支持所有通用事件。
-
-- `click`
- **注意:**我们不能保证 `click` 事件和 `href` 跳转的执行顺序。建议不要使用 `click` 事件来处理 `href` 跳转前的逻辑处理。
-- `longpress`
-- `appear`
-- `disappear`
-
-查看 [通用事件](../common-event.html)。
-
-## 约束
-
-1. **不能**直接在 `<a>` 中添加文本。
- 错误示例,“click” 无法被正常渲染。
-
- ```HTML
- <template>
- <div class="wrapper">
- <a href="http://dotwe.org/raw/dist/a468998152ee680413588c38bd61c29e.js">
- click
- </a>
- </div>
- </template>
-
- <style>
- .wrapper {
- text-align: center;
- }
- </style>
- ```
-
-[体验一下](http://dotwe.org/0a22d65138691a208e3fb1f8f6392b38)
-
-2. 请不要为 `<a>` 添加 `click` 事件。我们不能确保 `click` 事件和 `href` 跳转的执行顺序。
-
-## 示例
-
-```html
-<template>
- <div>
- <list class="list">
- <header class="header">
- <text class="title">Search Results</text>
- </header>
- <refresh style="width: 750; padding: 30;" onrefresh="refreshData" display="{{refreshDisplay}}">
- <text class="text"> ↓ Pull to refresh </text>
- <loading-indicator class="indicator"></loading-indicator>
- </refresh>
- <cell class="row" repeat="item in items" id="item-{{$index}}">
- <div class="lines">
- <text class="item">Repo name: </text><a href="{{item.repo_url}}"><text class="link">{{item.full_name}}</text></a>
- </div>
- <div>
- <text class="item">Repo star: {{item.stargazers_count}}</text>
- </div>
- </cell>
- <loading onloading="loadingData" style="width: 750; padding: 30;" display="{{loadingDisplay}}">
- <text class="text">{{loadingText}}</text>
- </loading>
- </list>
- <div class="up" onclick="goToTop">
- <img class="img" src="https://img.alicdn.com/tps/TB1ZVOEOpXXXXcQaXXXXXXXXXXX-200-200.png"></img>
- </div>
- </div>
-</template>
-
-<style>
-.header {
- padding: 25;
- background-color: #efefef;
- border-bottom-color: #eeeeee;
- border-bottom-width: 2;
- border-bottom-style: solid;
-}
-.title {
- text-align: center;
-}
-.text {
- text-align: center;
-}
-.list {
- background-color: #ffffff;
-}
-.row {
- padding: 20;
- border-bottom-color: #eeeeee;
- border-bottom-width: 2;
- border-bottom-style: solid;
-}
-.up {
- width: 70;
- height: 70;
- position: fixed;
- right: 20;
- bottom: 20;
-}
-.img {
- width: 70;
- height: 70;
-}
-.lines {
- flex-direction: row;
-}
-.link {
- color: #008cff;
- text-decoration: underline;
-}
-</style>
-
-<script>
-var dom = require('@weex-module/dom') || {}
-var stream = require('@weex-module/stream') || {}
-var modal = require('@weex-module/modal') || {}
-
-var SEARCH_URL = 'https://api.github.com/search/repositories?q=language:javascript&sort=stars&order=desc',
- PAGE_URL = 'http://dotwe.org/raw/dist/f1fa0895d0fa0fd80896e02a589443dd.js'
-
-module.exports = {
- data: {
- isLoaded: true,
- page: 1,
- loadingDisplay: 'hide',
- refreshDisplay: 'hide',
- loadingText: 'Loading...',
- items:[]
- },
- created: function () {
- var url = SEARCH_URL + '&page=' + this.page
-
- this.renderData(url)
-
- this.page++
- },
- methods: {
- renderData: function (url) {
- var self = this
-
- stream.fetch({
- method: 'GET',
- url: url,
- type:'json'
- }, function(res) {
- try {
- var results = res.data.items || []
-
- if (Array.isArray(results)) {
- for(var i = 0; i < results.length; i++) {
- var repo_url = results[i].html_url
- if (repo_url) {
- results[i].repo_url = self.processUrl(repo_url)
- }
- self.items.push(results[i])
- }
- }
- } catch(e) {}
- },function(res){
-
- })
- },
- loadingData: function (e) {
- var url = SEARCH_URL + '&page=' + this.page
- var self = this
-
- if (self.isLoaded === false) return
-
- self.loadingDisplay = 'show'
-
- if (self.page <=10 ) {
- self.renderData(url)
- self.page++
- } else {
- self.loadingDisplay = 'hide'
- self.loadingText = 'NO MORE!'
- }
- },
- goToTop: function (e) {
- dom.scrollToElement(this.$el('item-0'), {
- offset: -100
- })
- },
- refreshData: function (e) {
- var url = SEARCH_URL + '&page=1'
-
- if (this.isLoaded === false) return
-
- this.refreshDisplay = 'show'
-
- modal.toast({
- 'message': 'Refreshing...',
- 'duration': 1
- })
-
- this.items = []
- this.page = 1
- this.renderData(url)
-
- this.refreshDisplay = 'hide'
- },
- processUrl: function (url) {
- var platform = this.$getConfig().env.platform.toLowerCase()
-
-
- if (url) {
- // iOS do not need encode
- if (platform === 'ios') {
- return PAGE_URL + '?weburl=' + url
- } else if (platform === 'web') {
- return url
- } else {
- var encodeUrl = encodeURIComponent(url)
- return PAGE_URL + '?weburl=' + encodeUrl
- }
- }
- }
- }
-}
-</script>
-```
-
-[体验一下](http://dotwe.org/3e8369efb20a169077b5331b45927ed8)。
http://git-wip-us.apache.org/repos/asf/incubator-weex-site/blob/32a097bf/source/cn/v-0.10/references/components/cell.md
----------------------------------------------------------------------
diff --git a/source/cn/v-0.10/references/components/cell.md b/source/cn/v-0.10/references/components/cell.md
deleted file mode 100644
index e977037..0000000
--- a/source/cn/v-0.10/references/components/cell.md
+++ /dev/null
@@ -1,191 +0,0 @@
----
-title: <cell>
-type: references
-order: 2.5
-version: 0.10
----
-
-# <cell>
-
-用于定义列表中的子列表项,类似于 HTML 中的 `ul` 之于 `li`。Weex 会对 `<cell>` 进行高效的内存回收以达到更好的性能,该组件必须作为[`<list>`](./list.html) 组件的子组件, 这是为了优化滚动时的性能。
-
-## 子组件
-
-支持所有 Weex 的组件作为它的子组件。
-
-## 样式
-
-**注意:**
-
-你不能给 `<cell>` 设定`flex`值。 `<cell>`的宽度等于父组件 `<list>` 的宽度,并且 `<cell>` 高度自适应。
-
-- 通用样式:支持所有通用样式
-
- - 盒模型
- - `flexbox` 布局
- - `position`
- - `opacity`
- - `background-color`
-
- 查看 [组件通用样式](../common-style.html)
-
-## 事件
-
-- 通用事件
-
- 支持所有通用事件:
-
- - `click`
- - `longpress`
- - `appear`
- - `disappear`
-
- 查看 [通用事件](../common-event.html)
-
-## 示例
-
-
-
-```html
-<template>
- <div>
- <list class="list">
- <header class="header">
- <text class="title">Search Results</text>
- </header>
- <refresh style="width: 750; padding: 30;" onrefresh="refreshData">
- <text class="text"> ↓ Pull to refresh </text>
- <loading-indicator class="indicator"></loading-indicator>
- </refresh>
- <cell class="row" repeat="item in items" id="item-{{$index}}">
- <div>
- <text class="item">Repo name: {{item.full_name}}</text>
- </div>
- <div>
- <text class="item">Repo star: {{item.stargazers_count}}</text>
- </div>
- </cell>
- <loading onloading="loadingData" style="width: 750; padding: 30;" display="{{loadingDisplay}}">
- <text class="text">{{loadingText}}</text>
- </loading>
- </list>
- <div class="up" onclick="goToTop">
- <img class="img" src="https://img.alicdn.com/tps/TB1ZVOEOpXXXXcQaXXXXXXXXXXX-200-200.png"></img>
- </div>
- </div>
-</template>
-
-<style>
-.header {
- padding: 25;
- background-color: #efefef;
- border-bottom-color: #eeeeee;
- border-bottom-width: 2;
- border-bottom-style: solid;
-}
-.title {
- text-align: center;
-}
-.text {
- text-align: center;
-}
-.list {
- background-color: #ffffff;
-}
-.row {
- padding: 20;
- border-bottom-color: #eeeeee;
- border-bottom-width: 2;
- border-bottom-style: solid;
-}
-.up {
- width: 70;
- height: 70;
- position: fixed;
- right: 20;
- bottom: 20;
-}
-.img {
- width: 70;
- height: 70;
-}
-</style>
-
-<script>
-var dom = require('@weex-module/dom') || {}
-var stream = require('@weex-module/stream') || {}
-var modal = require('@weex-module/modal') || {}
-
-var SEARCH_URL = 'https://api.github.com/search/repositories?q=language:javascript&sort=stars&order=desc'
-
-module.exports = {
- data: {
- page: 1,
- loadingDisplay: 'show',
- loadingText: 'Loading...',
- items:[]
- },
- created: function () {
- var url = SEARCH_URL + '&page=' + this.page
-
- this.renderData(url)
-
- this.page++
- },
- methods: {
- renderData: function (url) {
- var self = this
-
- stream.fetch({
- method: 'GET',
- url: url,
- type:'json'
- }, function(res) {
- try {
- var results = res.data.items || []
-
- if (Array.isArray(results)) {
- for(var i = 0; i < results.length; i++) {
- self.items.push(results[i])
- }
- }
- } catch(e) {}
- },function(res){
-
- })
- },
- loadingData: function (e) {
- var url = SEARCH_URL + '&page=' + this.page
- var self = this
-
- if (self.page <=10 ) {
- self.renderData(url)
- self.page++
- } else {
- self.loadingDisplay = 'hide'
- self.loadingText = 'NO MORE!'
- }
- },
- goToTop: function (e) {
- dom.scrollToElement(this.$el('item-0'), {
- offset: -100
- })
- },
- refreshData: function (e) {
- var url = SEARCH_URL + '&page=1'
-
- modal.toast({
- 'message': 'Refreshing...',
- 'duration': 1
- })
-
- this.items = []
- this.page = 1
- this.renderData(url)
- }
- }
-}
-</script>
-```
-
-[体验一下](http://dotwe.org/280fa3dc8e793ea8712451ecdf84fb7b)
\ No newline at end of file
http://git-wip-us.apache.org/repos/asf/incubator-weex-site/blob/32a097bf/source/cn/v-0.10/references/components/div.md
----------------------------------------------------------------------
diff --git a/source/cn/v-0.10/references/components/div.md b/source/cn/v-0.10/references/components/div.md
deleted file mode 100644
index 893f7a1..0000000
--- a/source/cn/v-0.10/references/components/div.md
+++ /dev/null
@@ -1,245 +0,0 @@
----
-title: <div>
-type: references
-order: 2.2
-version: 0.10
----
-
-# <div>
-
-`<div>` 组件是用于包装其它组件的最基本容器。支持所有的通用样式、特性、`flexbox` 布局。其类似于 HTML 的 `<div>` 容器,但**不能**直接在里面添加文本(字符串),如果要展示文本,应该使用 `<text>` 组件。历史版本中,`<div>` 别名是 `<container>`,目前**已经弃用**。
-
-**注意:**
-
-`<div>` 嵌套层级不可过深,否则容易引起性能问题,建议控制在 **10** 层以内。
-
-一个简单例子:
-
-```html
-<template>
- <div>
- <text class="text">Hello World!</text>
- </div>
-</template>
-
-<style>
-.text {
- font-size: 70;
- color: #ff0000
-}
-</style>
-
-<script></script>
-```
-
-[体验一下](http://dotwe.org/a468998152ee680413588c38bd61c29e)
-
-
-
-## 子组件
-
-`<div>` 基本容器组件,因此支持包括 `<div>` 在内的任何组件作为自己的子组件。因此,在写一个组件时,推荐外层使用 `<div>` 作为根容器。
-
-## 样式
-
-`<div>` 支持所有通用样式:
-
-- 盒模型
-- `flexbox` 布局
-- `position`
-- `opacity`
-- `background-color`
-
-查看 [组件通用样式](../common-style.html)
-
-## 事件
-
-`<div>` 支持所有通用事件:
-
-- `click`
-- `longpress`
-- `appear`
-- `disappear`
-
-查看 [通用事件](../common-event.html)
-
-## 约束
-
-1. **不能**直接在 `<div>` 中添加文本。
-
- 错误示例,“Hello World!” 无法被正常渲染。
-
- ```html
- <template>
- <div>Hello World!</div>
- </template>
-
- <style>
- .text {
- font-size: 70;
- color: #ff0000
- }
- </style>
-
- <script></script>
- ```
-
- [体验一下](http://dotwe.org/3ef3ba3f0f162b27e24c525250c46a04)
-
-2. `<div>` 不可滚动,即使显式设置高度也一样。
-
- [错误示例](http://dotwe.org/a2cc491c5b9e6f6eb06795e45e725efd)
-
-## 示例
-
-
-
-```html
-<style>
-.item {
- padding: 20;
- height: 220;
- border-bottom-width: 1;
- border-bottom-style: solid;
- border-bottom-color: #efefef;
-}
-.item-content {
- flex-direction: row;
- width: 710;
- background-color: #ffffff;
-}
-.item-imgbox {
- height: 180;
- width: 180;
- margin-right: 20;
-}
-.item-img {
- width: 180;
- height: 180;
-}
-.item-info {
- height: 180;
- width: 510;
- justify-content: center;
- position: relative;
-}
-.item-info-detail {
- position: relative;
- color: #A2A2A2;
-}
-.desc {
- lines: 4;
- text-overflow: ellipsis;
- font-size: 26;
- line-height: 30;
- color: #A2A2A2;
-}
-.title {
- lines: 1;
- text-overflow: ellipsis;
- font-size: 32;
- color: #2D2D2D;
- line-height: 40;
-}
-.detail-info {
- margin-top: 15;
-}
-.up {
- width: 70;
- height: 70;
- position: fixed;
- right: 20;
- bottom: 20;
-}
-.img {
- width: 70;
- height: 70;
-}
-</style>
-
-<template>
- <div>
- <scroller>
- <div class="item" repeat="item in items" id="item-{{$index}}">
- <div class="item-content">
- <div class="item-imgbox">
- <img class="item-img" src="{{item.img}}" alt="" />
- </div>
- <div class="item-info">
- <div class="item-info-detail">
- <text class="title">{{item.title}}</text>
- <div class="detail-info">
- <text class="desc">{{item.desc}}</text>
- </div>
- </div>
- </div>
- </div>
- </div>
- </scroller>
- <div class="up" onclick="goToTop">
- <img class="img" src="https://img.alicdn.com/tps/TB1ZVOEOpXXXXcQaXXXXXXXXXXX-200-200.png"></img>
- </div>
- </div>
-</template>
-
-<script>
- var dom = require('@weex-module/dom') || {}
-
- module.exports = {
- data: {
- items: [{
- img: 'https://img.alicdn.com/tps/TB1z.55OFXXXXcLXXXXXXXXXXXX-560-560.jpg',
- title: 'Who is Alan Mathison Turing?Who is Alan Mathison Turing?',
- desc: 'Alan Mathison Turing ( 23 June 1912 – 7 June 1954) was an English computer scientist, mathematician, logician, cryptanalyst and theoretical biologist. He was highly influential in the development of theoretical computer science, providing a formalisation of the concepts of algorithm and computation with the Turing machine, which can be considered a model of a general purpose computer.Turing is widely considered to be the father of theoretical computer science and artificial intelligence.'
- },{
- img: 'https://img.alicdn.com/tps/TB1z.55OFXXXXcLXXXXXXXXXXXX-560-560.jpg',
- title: 'Who is Alan Mathison Turing?',
- desc: 'Alan Mathison Turing ( 23 June 1912 – 7 June 1954) was an English computer scientist, mathematician, logician, cryptanalyst and theoretical biologist. He was highly influential in the development of theoretical computer science, providing a formalisation of the concepts of algorithm and computation with the Turing machine, which can be considered a model of a general purpose computer.Turing is widely considered to be the father of theoretical computer science and artificial intelligence.'
- },{
- img: 'https://img.alicdn.com/tps/TB1z.55OFXXXXcLXXXXXXXXXXXX-560-560.jpg',
- title: 'Who is Alan Mathison Turing?',
- desc: 'Alan Mathison Turing ( 23 June 1912 – 7 June 1954) was an English computer scientist, mathematician, logician, cryptanalyst and theoretical biologist. He was highly influential in the development of theoretical computer science, providing a formalisation of the concepts of algorithm and computation with the Turing machine, which can be considered a model of a general purpose computer.Turing is widely considered to be the father of theoretical computer science and artificial intelligence.'
- },{
- img: 'https://img.alicdn.com/tps/TB1z.55OFXXXXcLXXXXXXXXXXXX-560-560.jpg',
- title: 'Who is Alan Mathison Turing?',
- desc: 'Alan Mathison Turing ( 23 June 1912 – 7 June 1954) was an English computer scientist, mathematician, logician, cryptanalyst and theoretical biologist. He was highly influential in the development of theoretical computer science, providing a formalisation of the concepts of algorithm and computation with the Turing machine, which can be considered a model of a general purpose computer.Turing is widely considered to be the father of theoretical computer science and artificial intelligence.'
- },{
- img: 'https://img.alicdn.com/tps/TB1z.55OFXXXXcLXXXXXXXXXXXX-560-560.jpg',
- title: 'Who is Alan Mathison Turing?',
- desc: 'Alan Mathison Turing ( 23 June 1912 – 7 June 1954) was an English computer scientist, mathematician, logician, cryptanalyst and theoretical biologist. He was highly influential in the development of theoretical computer science, providing a formalisation of the concepts of algorithm and computation with the Turing machine, which can be considered a model of a general purpose computer.Turing is widely considered to be the father of theoretical computer science and artificial intelligence.'
- },{
- img: 'https://img.alicdn.com/tps/TB1z.55OFXXXXcLXXXXXXXXXXXX-560-560.jpg',
- title: 'Who is Alan Mathison Turing?',
- desc: 'Alan Mathison Turing ( 23 June 1912 – 7 June 1954) was an English computer scientist, mathematician, logician, cryptanalyst and theoretical biologist. He was highly influential in the development of theoretical computer science, providing a formalisation of the concepts of algorithm and computation with the Turing machine, which can be considered a model of a general purpose computer.Turing is widely considered to be the father of theoretical computer science and artificial intelligence.'
- },{
- img: 'https://img.alicdn.com/tps/TB1z.55OFXXXXcLXXXXXXXXXXXX-560-560.jpg',
- title: 'Who is Alan Mathison Turing?',
- desc: 'Alan Mathison Turing ( 23 June 1912 – 7 June 1954) was an English computer scientist, mathematician, logician, cryptanalyst and theoretical biologist. He was highly influential in the development of theoretical computer science, providing a formalisation of the concepts of algorithm and computation with the Turing machine, which can be considered a model of a general purpose computer.Turing is widely considered to be the father of theoretical computer science and artificial intelligence.'
- },{
- img: 'https://img.alicdn.com/tps/TB1z.55OFXXXXcLXXXXXXXXXXXX-560-560.jpg',
- title: 'Who is Alan Mathison Turing?',
- desc: 'Alan Mathison Turing ( 23 June 1912 – 7 June 1954) was an English computer scientist, mathematician, logician, cryptanalyst and theoretical biologist. He was highly influential in the development of theoretical computer science, providing a formalisation of the concepts of algorithm and computation with the Turing machine, which can be considered a model of a general purpose computer.Turing is widely considered to be the father of theoretical computer science and artificial intelligence.'
- },{
- img: 'https://img.alicdn.com/tps/TB1z.55OFXXXXcLXXXXXXXXXXXX-560-560.jpg',
- title: 'Who is Alan Mathison Turing?',
- desc: 'Alan Mathison Turing ( 23 June 1912 – 7 June 1954) was an English computer scientist, mathematician, logician, cryptanalyst and theoretical biologist. He was highly influential in the development of theoretical computer science, providing a formalisation of the concepts of algorithm and computation with the Turing machine, which can be considered a model of a general purpose computer.Turing is widely considered to be the father of theoretical computer science and artificial intelligence.'
- },{
- img: 'https://img.alicdn.com/tps/TB1z.55OFXXXXcLXXXXXXXXXXXX-560-560.jpg',
- title: 'Who is Alan Mathison Turing?',
- desc: 'Alan Mathison Turing ( 23 June 1912 – 7 June 1954) was an English computer scientist, mathematician, logician, cryptanalyst and theoretical biologist. He was highly influential in the development of theoretical computer science, providing a formalisation of the concepts of algorithm and computation with the Turing machine, which can be considered a model of a general purpose computer.Turing is widely considered to be the father of theoretical computer science and artificial intelligence.'
- }]
- },
- created: function () {
- },
- methods: {
- goToTop: function (e) {
- dom.scrollToElement(this.$el('item-0'), {
- offset: 0
- })
- }
- }
- }
-</script>
-```
-
-[体验一下](http://dotwe.org/799f54b32f5227f9c34cfbb5e6946ba7)
http://git-wip-us.apache.org/repos/asf/incubator-weex-site/blob/32a097bf/source/cn/v-0.10/references/components/image.md
----------------------------------------------------------------------
diff --git a/source/cn/v-0.10/references/components/image.md b/source/cn/v-0.10/references/components/image.md
deleted file mode 100644
index 5a18280..0000000
--- a/source/cn/v-0.10/references/components/image.md
+++ /dev/null
@@ -1,161 +0,0 @@
----
-title: <image>
-type: references
-order: 2.3
-version: 0.10
----
-
-# <image>
-
-`<image>` 组件用于渲染图片,并且它不能包含任何子组件。可以用 `<img>` 作简写。
-
-需要注意的是,需要明确指定 `width` 和 `height`,否则图片无法显示。
-
-简单例子:
-
-```html
-<template>
- <div>
- <img style="width: 560;height: 560;" src="https://img.alicdn.com/tps/TB1z.55OFXXXXcLXXXXXXXXXXXX-560-560.jpg"></img>
- </div>
-</template>
-```
-
-[体验一下](http://dotwe.org/23b6cf951e6059d2cf7b9a74a9915ace)
-
-## 子组件
-
-`<image>` 组件不支持任何子组件,因此不要尝试在 `<image>` 组件中添加任何组件。如果需要实现 `background-image` 的效果,可以使用 `<image>` 组件和 `position` 定位来现实,如下面代码。
-
-```html
-<template>
- <div>
- <img style="width:750; height:750;" src="https://img.alicdn.com/tps/TB1z.55OFXXXXcLXXXXXXXXXXXX-560-560.jpg"></img>
- <div class="title">
- <text style="font-size:50; color: #ff0000">你好,image</text>
- </div>
- </div>
-</template>
-<style>
- .title{
- position:absolute;
- top:50;
- left:10;
- }
-</style>
-```
-
-[体验一下](http://dotwe.org/08dd49aaca8bf289c5fc08f808b9c08c)
-
-## 特性
-
-`<image>` 组件,包含 `src` 和 `resize` 两个重要特性。
-
-- `src {string}`:定义图片链接,目前图片暂不支持本地图片。
-- `resize {string}`:可以控制图片的拉伸状态,值行为和 W3C 标准一致。
-
- 可选值为:
-
- - `stretch`:默认值,指定图片按照容器拉伸,有可能使图片产生形变。
- - `cover`:指定图片可以被调整到容器,以使图片完全覆盖背景区域,图片有可能被剪裁。
- - `contain`:指定可以不用考虑容器的大小,把图像扩展至最大尺寸,以使其宽度和高度完全适应内容区域。
-
- 例子:
-
- 
-
- [体验一下](http://dotwe.org/049213ab3364a86637e211c0329cdc50)
-
-## 样式
-
-- 通用样式:支持所有通用样式
-
- - 盒模型
- - `flexbox` 布局
- - `position`
- - `opacity`
- - `background-color`
-
- 查看 [组件通用样式](../common-style.html)
-
-## 事件
-
-- `load` <sup class="wx-v">v0.8+</sup>:当图片加载完成时触发。目前在 Android、iOS 上支持,H5 暂不支持。
-
-- 通用事件
-
- 支持所有通用事件:
-
- - `click`
- - `longpress`
- - `appear`
- - `disappear`
-
- 查看 [通用事件](../common-event.html)
-
-## 约束
-
-1. 需要指定宽高;
-2. 不支持子组件。
-
-## 示例
-
-我们这里展示了一篇文章,文章标题有一副背景图。
-
-
-
-这个效果实现起来非常容易,我们只需要将标题文案通过 `position: absolute` 进行定位即可。唯一需要注意的一点是,Weex 目前不支持 `z-index`,因此必须把上层元素放在后。
-
-```html
-<style>
- .page-head {
- width:750;
- height:200;
- }
- .title-bg {
- width:750;
- height:200;
- }
- .title-box {
- width: 750;
- height: 200;
- justify-content: center;
- align-items: center;
- position: absolute;
- top: 0;
- right: 0;
- bottom: 0;
- left: 0;
- }
- .title {
- color: #ffffff;
- font-size: 32;
- font-weight: bold;
- }
- .article {
- padding: 20;
- }
- .paragraph{
- margin-bottom: 15;
- }
-</style>
-
-<template>
- <scroller class="wrapper" >
- <div class="page-head" >
- <image class="title-bg" resize="cover" src="https://img.alicdn.com/tps/TB1dX5NOFXXXXc6XFXXXXXXXXXX-750-202.png"></image>
- <div class="title-box">
- <text class="title">Alan Mathison Turing</text>
- </div>
- </image>
- <div class="article">
- <text class="paragraph">Alan Mathison Turing ( 23 June 1912 – 7 June 1954) was an English computer scientist, mathematician, logician, cryptanalyst and theoretical biologist. He was highly influential in the development of theoretical computer science, providing a formalisation of the concepts of algorithm and computation with the Turing machine, which can be considered a model of a general purpose computer.Turing is widely considered to be the father of theoretical computer science and artificial intelligence.</text>
- <text class="paragraph">During the Second World War, Turing worked for the Government Code and Cypher School (GC&CS) at Bletchley Park, Britain's codebreaking centre. For a time he led Hut 8, the section responsible for German naval cryptanalysis. He devised a number of techniques for speeding the breaking of German ciphers, including improvements to the pre-war Polish bombe method, an electromechanical machine that could find settings for the Enigma machine. Turing played a pivotal role in cracking intercepted coded messages that enabled the Allies to defeat the Nazis in many crucial engagements, including the Battle of the Atlantic; it has been estimated that this work shortened the war in Europe by more than two years and saved over fourteen million lives.</text>
- <text class="paragraph">After the war, he worked at the National Physical Laboratory, where he designed the ACE, among the first designs for a stored-program computer. In 1948 Turing joined Max Newman's Computing Machine Laboratory at the Victoria University of Manchester, where he helped develop the Manchester computers and became interested in mathematical biology. He wrote a paper on the chemical basis of morphogenesis, and predicted oscillating chemical reactions such as the Belousov–Zhabotinsky reaction, first observed in the 1960s.</text>
- <text class="paragraph">Turing was prosecuted in 1952 for homosexual acts, when by the Labouchere Amendment, "gross indecency" was still criminal in the UK. He accepted chemical castration treatment, with DES, as an alternative to prison. Turing died in 1954, 16 days before his 42nd birthday, from cyanide poisoning. An inquest determined his death as suicide, but it has been noted that the known evidence is also consistent with accidental poisoning. In 2009, following an Internet campaign, British Prime Minister Gordon Brown made an official public apology on behalf of the British government for "the appalling way he was treated." Queen Elizabeth II granted him a posthumous pardon in 2013.</text>
- </div>
- </scroller>
-</template>
-```
-
-[体验一下](http://dotwe.org/bccf884672f0a76f884298b3754d2079)
\ No newline at end of file
http://git-wip-us.apache.org/repos/asf/incubator-weex-site/blob/32a097bf/source/cn/v-0.10/references/components/index.md
----------------------------------------------------------------------
diff --git a/source/cn/v-0.10/references/components/index.md b/source/cn/v-0.10/references/components/index.md
deleted file mode 100644
index 78ef46b..0000000
--- a/source/cn/v-0.10/references/components/index.md
+++ /dev/null
@@ -1,24 +0,0 @@
----
-title: 内建组件
-type: references
-order: 2
-version: 0.10
----
-
-# 内建组件
-
-- [<a>](./a.html)
-- [<indicator>](./indicator.html)
-- [<switch>](./switch.html)
-- [<text>](./text.html)
-- [<textarea>](./textarea.html)
-- [<video>](./video.html)
-- [<web>](./web.html)
-- [<div>](./div.html)
-- [<image>](./image.html)
-- [<input>](./input.html)
-- [<list>](./list.html)
-- [<cell>](./cell.html)
-- [<refresh> & <loading>](./refresh.html)
-- [<scroller>](./scroller.html)
-- [<slider>](./slider.html)
\ No newline at end of file
http://git-wip-us.apache.org/repos/asf/incubator-weex-site/blob/32a097bf/source/cn/v-0.10/references/components/indicator.md
----------------------------------------------------------------------
diff --git a/source/cn/v-0.10/references/components/indicator.md b/source/cn/v-0.10/references/components/indicator.md
deleted file mode 100644
index b2aa19d..0000000
--- a/source/cn/v-0.10/references/components/indicator.md
+++ /dev/null
@@ -1,124 +0,0 @@
----
-title: <indicator>
-type: references
-order: 2.10
-version: 0.10
----
-
-# <indicator>
-
-`<indicator>` 组件用于显示轮播图指示器效果,必须充当 [`<slider>`](./slider.html) 组件的子组件使用。
-
-## 子组件
-
-`<indicator>` 组件没有任何子组件。
-
-## 样式
-
-`<indicator>` 组件有一些私有样式,如下:
-
-- `item-color {color}`:设置项的颜色,可以是颜色的名称,例如 `red`;也可以是 16 进制的颜色,例如 `#RRGGBB`。
-
-- `item-selected-color {color}`:被选中时的颜色,可以是颜色的名称,`red`;也可以是 16 进制的颜色,例如 `#RRGGBB`。
-
-- `item-size {number}`:元素的个数。
-
-- 通用样式
- - 盒模型
- - `flexbox` 布局
- - `position`
- - `opacity`
- - `background-color`
-
- 查看 [组件通用样式](../common-style.html)
-
-**注意 1:**
-
-这里需要注意一点,`<indicator>` 的 `position` 不仅依赖 `top`、`left`、`bottom` 和 `right` 样式,同时会参考 `width`和 `height` 样式。`<indicator>` 默认的宽高继承于 `<slider>`,如果 `<slider>` 未设置宽高,需要显式的给 `<indicator>` 设置宽高值。
-
-**注意 2:**
-
-`background-color` 不推荐使用,建议使用 `item-color` 和 `item-selected-color` 代替。
-
-
-## 事件
-
-支持所有通用事件。
-
-- `click`
-- `longpress`
-- `appear`
-- `disappear`
-
-查看 [通用事件](../common-event.html)
-
-## 约束
-
-1. 不支持子组件。
-
-## 示例
-
-```html
-<template>
- <div>
- <slider class="slider">
- <div class="slider-pages" repeat="item in itemList">
- <image class="img" src="{{item.pictureUrl}}"></image>
- <text class="title">{{item.title}}</text>
- </div>
- <indicator class="indicator"></indicator>
- </slider>
- </div>
-</template>
-
-<style>
- .img {
- width: 714;
- height: 150;
- }
- .title {
- position: absolute;
- top: 20;
- left: 20;
- color: #ff0000;
- font-size: 48;
- font-weight: bold;
- background-color: #eeeeee;
- }
- .slider {
- flex-direction: row;
- margin: 18;
- width: 714;
- height: 230;
- }
- .slider-pages {
- flex-direction: row;
- width: 714;
- height: 200;
- }
- .indicator {
- width:714;
- height:200;
- position:absolute;
- top:1;
- left:1;
- item-color: red;
- item-selectedColor: blue;
- item-size: 20;
- }
-</style>
-
-<script>
- module.exports = {
- data: {
- itemList: [
- {itemId: '520421163634', title: 'item1', pictureUrl: 'https://gd2.alicdn.com/bao/uploaded/i2/T14H1LFwBcXXXXXXXX_!!0-item_pic.jpg'},
- {itemId: '522076777462', title: 'item2', pictureUrl: 'https://gd1.alicdn.com/bao/uploaded/i1/TB1PXJCJFXXXXciXFXXXXXXXXXX_!!0-item_pic.jpg'},
- {itemId: '522076777462', title: 'iten3', pictureUrl: 'https://gd3.alicdn.com/bao/uploaded/i3/TB1x6hYLXXXXXazXVXXXXXXXXXX_!!0-item_pic.jpg'}
- ]
- }
- }
-</script>
-```
-
-[体验一下](http://dotwe.org/baea3d54c503c6d3d4e4a8f275b9d47f)
\ No newline at end of file
http://git-wip-us.apache.org/repos/asf/incubator-weex-site/blob/32a097bf/source/cn/v-0.10/references/components/input.md
----------------------------------------------------------------------
diff --git a/source/cn/v-0.10/references/components/input.md b/source/cn/v-0.10/references/components/input.md
deleted file mode 100644
index 9a7b8ff..0000000
--- a/source/cn/v-0.10/references/components/input.md
+++ /dev/null
@@ -1,309 +0,0 @@
----
-title: <input>
-type: references
-order: 2.4
-version: 0.10
----
-
-# <input>
-
-Weex 内置的 `<input>` 组件用来创建接收用户输入字符的输入组件。 `<input>` 组件的工作方式因 `type` 属性的值而异,比如 `<text>`, `password`,`url`,`email`,`tel` 等。
-
-**注意:**
-
-此组件不支持 `click` 事件。请监听 `<input>` 或 `change` 来代替 `click` 事件。
-
-## 子组件
-
-不支持子组件。
-
-## 特性
-
-- `type {string}`:控件的类型,默认值是 `<text>`。`type` 值可以是 `text`,`password`,`url`,`email`,`tel` 。每个 `type` 值都符合 W3C 标准。
-- `value {string}`:组件的接收到的输入字符。
-- `placeholder {string}`:提示用户可以输入什么。 提示文本不能有回车或换行。
-- `disabled {boolean}`:布尔类型的数据,表示是否支持输入。通常 `click` 事件在 `disabled` 控件上是失效的。
-- `autofocus {boolean}`:布尔类型的数据,表示是否在页面加载时控件自动获得输入焦点。
-- `maxlength {nubmer}`:<sup class="wx-v">v0.7</sup>一个数值类型的值,表示输入的最大长度。
-
-## 样式
-
-- `placeholder-color {color}`:placeholder 字符颜色。默认值是 `#999999`。
-- text styles
- - 支持 `color`
- - 支持 `font-size`
- - 支持 `font-style`
- - 支持 `font-weight`
- - 支持 `text-align`
-
- 查看 [文本样式](../text-style.html)
-
-- 通用样式:支持所有通用样式
- - 盒模型
- - `flexbox` 布局
- - `position`
- - `opacity`
- - `background-color`
-
- 查看 [组件通用样式](../common-style.html)
-
-## 事件
-
-- `input`: 输入字符的值更改。
-
- 事件中 event 对象属性:
-
- - `value`: 触发事件的组件;
- - `timestamp`: 事件发生时的时间戳,仅支持Android。
-
-- `change`: 当用户输入完成时触发。通常在 `blur` 事件之后。
-
- 事件中 event 对象属性:
-
- - `value`: 触发事件的组件;
-
- - `timestamp`: 事件发生时的时间戳,仅支持Android。
-
-- `focus`: 组件获得输入焦点。
-
- 事件中 event 对象属性:
-
- - `timestamp`: 事件发生时的时间戳,仅支持Android。
-
-- `blur`: 组件失去输入焦点。
-
- 事件中 event 对象属性:
-
- - `timestamp`: 事件发生时的时间戳,仅支持Android。
-
-- 通用事件
-
- **注意:**
- 不支持 `click` 事件。 请监听 `input` 或 `change` 事件代替。
-
- 支持以下通用事件:
-
- - `longpress`
- - `appear`
- - `disappear`
-
- 查看 [通用事件](../common-event.html)
-
-# 约束
-
-目前不支持 `this.$el(id).value = ''` 这种方式改写 input value。只支持在 `<input>` 组件的 `input`、`change` 事件中改写。
-
-## 示例
-
-```html
-<template>
- <div>
- <div>
- <text style="font-size: 40px">oninput: {{txtInput}}</text>
- <text style="font-size: 40px">onchange: {{txtChange}}</text>
- <text style="font-size: 40px">onreturntype: {{txtReturnType}}</text>
- </div>
- <scroller>
- <div>
- <div style="background-color: #286090">
- <text class="title" style="height: 80 ;padding: 20;color: #FFFFFF">input type = text</text>
- </div>
- <input type="text" placeholder="Input Text" class="input" :autofocus=true value="" @change="onchange" @input="oninput" @focus="onfocus" @blur="onblur"/>
- </div>
-
- <div>
- <div style="background-color: #286090">
- <text class="title" style="height: 80 ;padding: 20;color: #FFFFFF">input type = password</text>
- </div>
- <input type="password" placeholder="Input Password" class="input" @change="onchange" @input="oninput"/>
- </div>
-
- <div>
- <div style="background-color: #286090">
- <text class="title" style="height: 80 ;padding: 20;color: #FFFFFF">input type = url</text>
- </div>
- <input type="url" placeholder="Input URL" class="input" @change="onchange" @input="oninput"/>
- </div>
-
- <div>
- <div style="background-color: #286090">
- <text class="title" style="height: 80 ;padding: 20;color: #FFFFFF">input type = email</text>
- </div>
- <input type="email" placeholder="Input Email" class="input" @change="onchange" @input="oninput"/>
- </div>
-
- <div>
- <div style="background-color: #286090">
- <text class="title" style="height: 80 ;padding: 20;color: #FFFFFF">input type = tel</text>
- </div>
- <input type="tel" placeholder="Input Tel" class="input" @change="onchange" @input="oninput"/>
- </div>
-
- <div>
- <div style="background-color: #286090">
- <text class="title" style="height: 80 ;padding: 20;color: #FFFFFF">input type = time</text>
- </div>
- <input type="time" placeholder="Input Time" class="input" @change="onchange" @input="oninput"/>
- </div>
-
- <div>
- <div style="background-color: #286090">
- <text class="title" style="height: 80 ;padding: 20;color: #FFFFFF">input type = date</text>
- </div>
- <input type="date" placeholder="Input Date" class="input" @change="onchange" @input="oninput" max="2017-12-12" min="2015-01-01"/>
- </div>
-
- <div>
- <div style="background-color: #286090">
- <text class="title" style="height: 80 ;padding: 20;color: #FFFFFF">input return-key-type = default</text>
- </div>
- <input type="text" placeholder="please input" return-key-type="default" class="input" @change="onchange" @return = "onreturn" @input="oninput" />
- </div>
-
- <div>
- <div style="background-color: #286090">
- <text class="title" style="height: 80 ;padding: 20;color: #FFFFFF">input return-key-type = go</text>
- </div>
- <input type="text" placeholder="please input" return-key-type="go" class="input" @change="onchange" @return = "onreturn" @input="oninput" />
- </div>
-
- <div>
- <div style="background-color: #286090">
- <text class="title" style="height: 80 ;padding: 20;color: #FFFFFF">input return-key-type = next</text>
- </div>
- <input type="text" placeholder="please input" return-key-type="next" class="input" @change="onchange" @return = "onreturn" @input="oninput" />
- </div>
-
- <div>
- <div style="background-color: #286090">
- <text class="title" style="height: 80 ;padding: 20;color: #FFFFFF">input return-key-type = search</text>
- </div>
- <input type="text" placeholder="please input" return-key-type="search" class="input" @change="onchange" @return = "onreturn" @input="oninput" />
- </div>
-
- <div>
- <div style="background-color: #286090">
- <text class="title" style="height: 80 ;padding: 20;color: #FFFFFF">input return-key-type = send</text>
- </div>
- <input type="text" placeholder="please input" return-key-type="send" class="input" @change="onchange" @return = "onreturn" @input="oninput" />
- </div>
-
- <div>
- <div style="background-color: #286090">
- <text class="title" style="height: 80 ;padding: 20;color: #FFFFFF">input return-key-type = done</text>
- </div>
- <input type="text" placeholder="please input" return-key-type="done" class="input" @change="onchange" @return = "onreturn" @input="oninput" />
- </div>
-
-
- <div>
- <div style="background-color: #286090">
- <text class="title" style="height: 80 ;padding: 20;color: #FFFFFF">function focus() & blur()</text>
- </div>
- <div style="flex-direction: row;margin-bottom: 16px;justify-content: space-between">
- <text class="button" value="Focus" type="primary" @click="focus"></text>
- <text class="button" value="Blur" type="primary" @click="blur"></text>
- </div>
-
- <input type="text" placeholder="Input1" class="input" value="" ref="input1"/>
- </div>
-
-
- <div>
- <div style="background-color: #286090">
- <text class="title" style="height: 80 ;padding: 20;color: #FFFFFF">input selection</text>
- </div>
- <div style="flex-direction: row;margin-bottom: 16px;justify-content: space-between">
- <text class="button" value="setRange" type="primary" @click="setRange"></text>
- </div>
- <input type="text" ref="inputselection" placeholder="please input" value="123456789" class="input" @change="onchange" @return = "onreturn" @input="oninput"/>
- </div>
-
-
-
- </scroller>
- </div>
-</template>
-
-<style scoped>
- .input {
- font-size: 60px;
- height: 80px;
- width: 750px;
- }
- .button {
- font-size: 36;
- width: 200;
- color: #41B883;
- text-align: center;
- padding-top: 10;
- padding-bottom: 10;
- border-width: 2;
- border-style: solid;
- margin-right: 20;
- border-color: rgb(162, 217, 192);
- background-color: rgba(162, 217, 192, 0.2);
- }
-</style>
-
-<script>
- const modal = weex.requireModule('modal')
- module.exports = {
- data: function () {
- return {
- txtInput: '',
- txtChange: '',
- txtReturnType: '',
- txtSelection:'',
- autofocus: false
- };
- },
- methods: {
- ready: function () {
- var self = this;
- setTimeout(function () {
- self.autofocus = true;
- }, 1000);
- },
- onchange: function (event) {
- this.txtChange = event.value;
- console.log('onchange', event.value);
- },
- onreturn: function (event) {
- this.txtReturnType = event.returnKeyType;
- console.log('onreturn', event.type);
- },
- oninput: function (event) {
- this.txtInput = event.value;
- console.log('oninput', event.value);
- },
- focus: function () {
- this.$refs['input1'].focus();
- },
- blur: function () {
- this.$refs['input1'].blur();
- },
- setRange: function() {
- console.log(this.$refs["inputselection"]);
- this.$refs["inputselection"].setSelectionRange(2, 6);
- },
- onfocus () {
- console.log('onfocus:');
- modal.toast({
- message: 'onfocus',
- duration: 0.8
- })
- },
- onblur () {
- console.log('onblur:');
- modal.toast({
- message: 'input blur',
- duration: 0.8
- })
- }
- }
- };
-</script>
-```
-
-[体验一下](http://dotwe.org/vue/dd83d941d2364f2849e45dc3c5d91ab4)
http://git-wip-us.apache.org/repos/asf/incubator-weex-site/blob/32a097bf/source/cn/v-0.10/references/components/list.md
----------------------------------------------------------------------
diff --git a/source/cn/v-0.10/references/components/list.md b/source/cn/v-0.10/references/components/list.md
deleted file mode 100644
index 842201f..0000000
--- a/source/cn/v-0.10/references/components/list.md
+++ /dev/null
@@ -1,375 +0,0 @@
----
-title: <list>
-type: references
-order: 2.4
-version: 0.10
----
-
-# <list>
-
-`<list>` 组件是提供垂直列表功能的核心组件,拥有平滑的滚动和高效的内存管理,非常适合用于长列表的展示。最简单的使用方法是在 `<list>` 标签内使用一组由简单数组 `repeat` 生成的 `<cell>` 标签填充。
-
-一个最简例子:
-
-```html
-<template>
- <list class="list">
- <cell class="row" repeat="item in rows" index="{{$index}}">
- <text class="item-title">row {{item.id}}</text>
- </cell>
- </list>
-</template>
-
-<style></style>
-
-<script>
-module.exports = {
- data: {
- rows:[
- {id: 1},
- {id: 2},
- {id: 3},
- {id: 4},
- {id: 5}
- ]
- }
-}
-</script>
-```
-
-[体验一下](http://dotwe.org/bcaf48a63b49750b828d2d23762d4a15)
-
-
-
-## 子组件
-
-`<list>` 组件支持更多高级功能,由以下子组件提供:
-
-- `<cell>`
-
- 用于定义列表中的子列表项,类似于 HTML 中的 `ul` 之于 `li`。Weex 会对 `<cell>` 进行高效的内存回收以达到更好的性能。
-
- 使用文档请查看 [`<cell>`](./cell.html)。
-
-- `header` <sup class="wx-v">0.6.1+</sup>
-
- 当 `<header>` 到达屏幕顶部时,吸附在屏幕顶部。
-
-- `<refresh>`
-
- 用于给列表添加下拉刷新的功能。
-
- 使用文档请查看 [`<refresh>`](./refresh.html)
-
-- `<loading>`
-
- `<loading>` 用法与特性和 `<refresh>` 类似,用于给列表添加上拉加载更多的功能。
-
- 使用文档请查看 [`<loading>`](./loading.html)
-
-**注意:**
-
-`<list>` 的子组件只能包括以上四种组件或是 `fix` 定位的组件,其他形式的组件将不能被正确的渲染。
-
-一个错误的示范,此例子无法在客户端正常渲染,因为 `<list>` 子组件是 `<div>`:
-
-```html
-<template>
- <list class="list">
- <div class="row" repeat="item in rows" index="{{$index}}">
- <text class="item-title">row {{item.id}}</text>
- </div>
- </list>
-</template>
-
-<style></style>
-
-<script>
-module.exports = {
- data: {
- rows:[
- {id: 1},
- {id: 2},
- {id: 3},
- {id: 4},
- {id: 5}
- ]
- }
-}
-</script>
-```
-
-## 特性
-
-- `loadmoreoffset {number}`:默认值为 0,触发 `loadmore` 事件所需要的垂直偏移距离(设备屏幕底部与 `<list>` 底部之间的距离)。当 `<list>` 的滚动条滚动到足够接近 `<list>` 底部时将会触发 `loadmore` 这个事件。
-
- 
-
-## 样式
-
-- 通用样式:支持所有通用样式
-
- - 盒模型
- - `flexbox` 布局
- - `position`
- - `opacity`
- - `background-color`
-
- 查看 [组件通用样式](../common-style.html)
-
-## 事件
-
-- `loadmore` <sup class="wx-v">0.5+</sup>:如果列表滚动到底部将会立即触发这个事件,你可以在这个事件的处理函数中加载下一页的列表项。
-
- [体验一下](http://dotwe.org/bc445ede8746a31360e3607d210304c5)
-
-- 通用事件
-
- 支持所有通用事件:
-
- - `click`
- - `longpress`
- - `appear`
- - `disappear`
-
- 查看 [通用事件](../common-event.html)
-
-## 扩展
-
-### scrollToElement(node, options)
-
-滚动到列表某个指定项是常见需求,`<list>` 拓展了该功能支持滚动到指定 `<cell>`。通过 `dom` module 访问,更多信息可参考 [dom module](../modules/dom.html) 。
-
-#### 参数
-
-- `node {node}`:指定目标节点。
-- `options {Object}`:
- - `offset {number}`:一个到其可见位置的偏移距离,默认是 0
-
-#### 示例
-
-```html
-<template>
- <list class="list">
- <cell>
- <div onclick="go" style="width: 750;height: 50; position: fixed; left: 0; right: 0; bottom: 0; background-color: #eeeeee;">
- <text style="text-align: center;">
- Go to 50th line.
- </text>
- </div>
- </cell>
- <cell class="row" repeat="item in rows" id="item-{{$index}}">
- <text class="item-title">row {{item.id}}</text>
- </cell>
- </list>
-</template>
-
-<script>
-var dom = require('@weex-module/dom')
-
-module.exports = {
- data: {
- rows: []
- },
- created: function () {
- for (var i = 0; i < 100; i++) {
- this.rows.push({
- id: i
- })
- }
- },
- methods: {
- go: function () {
- var el = this.$el('item-49')
-
- dom.scrollToElement(el, {
- offset: 0
- })
- }
- }
-}
-</script>
-```
-
-[体验一下](http://dotwe.org/65d91cb47d0e348c5750d2248d59b6bd)
-
-## 约束
-
-1. **不允许**相同方向的 `<list>` 或者 `<scroller>` 互相嵌套,换句话说就是嵌套的 `<list>`/`<scroller>` 必须是不同的方向。
-
- 举个例子,**不允许**一个垂直方向的 `<list>` 嵌套的一个垂直方向的 `<scroller>` 中,但是一个垂直方向的 `<list>` 是可以嵌套的一个水平方向的 list 或者 `<scroller>` 中的。
-
-2. `<list>` 为根节点时无需设置高度,但是内嵌 `<list>` 高度**必须可计算**,你可以使用 `flex` 或 `postion` 将 `<list>` 设为一个响应式高度(例如全屏显示), 也可以显式设置 `<list>` 组件的 `height` 样式。
-
-## 示例
-
-```html
-<template>
- <div class="wrapper">
- <list class="list">
- <header class="header">
- <text class="title">Search Results</text>
- </header>
- <refresh style="width: 750; padding: 30;" onrefresh="refreshData" display="{{refreshDisplay}}">
- <text class="text"> ↓ Pull to refresh </text>
- <loading-indicator class="indicator"></loading-indicator>
- </refresh>
- <cell class="row" repeat="item in items" id="item-{{$index}}">
- <div>
- <text class="item">Repo name: {{item.full_name}}</text>
- </div>
- <div>
- <text class="item">Repo star: {{item.stargazers_count}}</text>
- </div>
- </cell>
- <loading onloading="loadingData" style="width: 750; padding: 30;" display="{{loadingDisplay}}">
- <text class="text">{{loadingText}}</text>
- </loading>
- </list>
- <div class="up" onclick="goToTop">
- <img class="img" src="https://img.alicdn.com/tps/TB1ZVOEOpXXXXcQaXXXXXXXXXXX-200-200.png"></img>
- </div>
- </div>
-</template>
-
-<style>
-.wrapper {
- position: absolute;
- top: 0;
- right: 0;
- bottom: 0;
- left: 0;
-}
-.list{
- background-color: #ffffff;
- flex: 1;
-}
-.header {
- height: 80;
- align-items: center;
- justify-content: center;
- background-color: #efefef;
- border-bottom-color: #eeeeee;
- border-bottom-width: 2;
- border-bottom-style: solid;
-}
-.title {
- text-align: center;
-}
-.text {
- text-align: center;
-}
-.row {
- padding: 20;
- border-bottom-color: #eeeeee;
- border-bottom-width: 2;
- border-bottom-style: solid;
-}
-.up {
- width: 70;
- height: 70;
- position: fixed;
- right: 20;
- bottom: 20;
-}
-.img {
- width: 70;
- height: 70;
-}
-</style>
-
-<script>
-var dom = require('@weex-module/dom') || {}
-var stream = require('@weex-module/stream') || {}
-var modal = require('@weex-module/modal') || {}
-
-var SEARCH_URL = 'https://api.github.com/search/repositories?q=language:javascript&sort=stars&order=desc'
-
-module.exports = {
- data: {
- isLoaded: true,
- page: 1,
- loadingDisplay: 'hide',
- refreshDisplay: 'hide',
- loadingText: 'Loading...',
- items:[]
- },
- created: function () {
- var url = SEARCH_URL + '&page=' + this.page
-
- this.renderData(url)
-
- this.page++
- },
- methods: {
- renderData: function (url) {
- var self = this
-
- stream.fetch({
- method: 'GET',
- url: url,
- type:'json'
- }, function(res) {
- self.refreshDisplay = 'hide'
- self.loadingDisplay = 'hide'
-
- try {
- var results = res.data.items || []
-
- if (Array.isArray(results)) {
- for(var i = 0; i < results.length; i++) {
- self.items.push(results[i])
- }
- }
-
- self.isLoaded = true
- } catch(e) {}
- },function(res){
-
- })
- },
- loadingData: function (e) {
- var url = SEARCH_URL + '&page=' + this.page
- var self = this
-
- if (self.isLoaded === false) return
-
- self.loadingDisplay = 'show'
-
- if (self.page <=10 ) {
- self.renderData(url)
- self.page++
- } else {
- self.loadingDisplay = 'hide'
- self.loadingText = 'NO MORE!'
- }
- },
- goToTop: function (e) {
- dom.scrollToElement(this.$el('item-0'), {
- offset: -100
- })
- },
- refreshData: function (e) {
- var url = SEARCH_URL + '&page=1'
-
- if (this.isLoaded === false) return
-
- this.refreshDisplay = 'show'
-
- modal.toast({
- 'message': 'Refreshing...',
- 'duration': 1
- })
-
- this.items = []
- this.page = 1
- this.renderData(url)
-
- this.refreshDisplay = 'hide'
- }
- }
-}
-</script>
-```
-
-[体验一下](http://dotwe.org/ed524ade679b0fa96e980600c53ea5ce)
\ No newline at end of file
[45/51] [abbrv] incubator-weex-site git commit: update file structure
and fix responsive styles
Posted by ha...@apache.org.
http://git-wip-us.apache.org/repos/asf/incubator-weex-site/blob/12e3a8bc/_draft/v1.0/guide/syntax/comm.md
----------------------------------------------------------------------
diff --git a/_draft/v1.0/guide/syntax/comm.md b/_draft/v1.0/guide/syntax/comm.md
deleted file mode 100644
index 7923ef7..0000000
--- a/_draft/v1.0/guide/syntax/comm.md
+++ /dev/null
@@ -1,134 +0,0 @@
----
-title: 组件通信
-type: guide
-order: 3.8
-version: 0.10
----
-
-# 组件间通信
-
-## 自定义事件
-
-Weex 支持自定义事件,这里有两个相关的设计:1,监听自定义事件;2,创建自定义事件。
-
-## 监听自定义事件
-
-每个 Weex 的 ViewModel 都支持 `this.$on(type, handler)` 和 `this.$off(type[, handler])` 的 API。`type` 是监听的自定义事件类型,`handler` 是事件处理函数。
-
-当 `handler` 被触发时,会有一个事件对象 `event` 作为第一个参数被传入,事件对象的数据格式基于[事件机制](./events.html)中提到的事件描述对象。
-
-## 创建自定义事件
-
-每个 Weex 的 ViewModel 都支持 `this.$emit(type, detail)` 的 API,可以在当前 ViewModel 中产生一个自定义事件。`type` 是自定义事件的类型,`detail` 则是一个对该事件细节补充描述的 JSON 对象,会以 `event.detail` 的形式出现在处理此事件的函数中。
-
-## 从子组件向父组件通信
-
-首先父组件要监听特定类型的自定义事件,而子组件可以使用 `this._parent` 找到父组件,然后再调用 `this._parent.$emit(type, detail)` 方法,即可实现自下而上的通信。例如:
-
-```html
-<element name="foo">
- <template>
- <div>
- <image src="{{imageUrl}}" class="thumb" onclick="test"></image>
- <text>{{title}}</text>
- </div>
- </template>
- <style>
- .thumb { width: 200; height: 200; }
- </style>
- <script>
- module.exports = {
- data: {
- title: '',
- imageUrl: ''
- },
- methods: {
- test: function () {
- // Emit notify to parent
- this._parent.$emit('notify', {a: 1})
- }
- }
- }
- </script>
-</element>
-
-<template>
- <div>
- <foo title="Hello" image-url="https://gtms02.alicdn.com/tps/i2/TB1QHKjMXXXXXadXVXX20ySQVXX-512-512.png"></foo>
- <text if="eventType">event: {{eventType}} - {{eventDetail}}</text>
- </div>
-</template>
-
-<script>
- module.exports = {
- data: {
- eventType: '',
- eventDetail: {}
- },
- created: function () {
- this.$on('notify', function(event) {
- // When a notify comes, this handler will be run.
- // `event.detail` will be `{a: 1}`
- this.eventType = event.type
- this.eventDetail = JSON.stringify(event.detail)
- })
- }
- }
-</script>
-```
-
-[体验一下](http://dotwe.org/51e553ef43e5c744d05da1bb811903bf)
-
-## 从父组件向子组件通信
-
-同理,首先子组件要监听特定类型的自定义事件,而父组件可以使用 `this.$vm(id)` 找到父组件,然后再调用 `this.$vm(id).$emit(type, detail)` 方法,即可实现自上而下的通信。例如:
-
-```html
-<element name="foo">
- <template>
- <div>
- <image if="imageUrl" src="{{imageUrl}}" class="thumb"></image>
- <text>Foo</text>
- </div>
- </template>
- <style>
- .thumb { width: 200; height: 200; }
- </style>
- <script>
- module.exports = {
- data: {
- imageUrl: ''
- },
- created: function() {
- this.$on('changeImage', function (e) {
- this.imageUrl = e.detail
- }.bind(this))
- }
- }
- </script>
-</element>
-
-<template>
- <div>
- <foo id="sub"></foo>
- <text onclick="test">click to update foo</text>
- </div>
-</template>
-
-<script>
- module.exports = {
- methods: {
- test: function (e) {
- this.$vm('sub').$emit(
- 'changeImage',
- 'https://gtms02.alicdn.com/tps/i2/TB1QHKjMXXXXXadXVXX20ySQVXX-512-512.png'
- )
- }
- }
- }
-</script>
-```
-
-[体验一下](http://dotwe.org/ea616d180620648e66554d42f57db82b)
-
-下一节:[页面整体配置](./config-n-data.html)
http://git-wip-us.apache.org/repos/asf/incubator-weex-site/blob/12e3a8bc/_draft/v1.0/guide/syntax/composed-component.md
----------------------------------------------------------------------
diff --git a/_draft/v1.0/guide/syntax/composed-component.md b/_draft/v1.0/guide/syntax/composed-component.md
deleted file mode 100644
index 061eaf4..0000000
--- a/_draft/v1.0/guide/syntax/composed-component.md
+++ /dev/null
@@ -1,158 +0,0 @@
----
-title: 组件封装
-type: guide
-order: 3.6
-version: 0.10
----
-
-# 组件封装
-
-经常我们会发现 Weex 的 `<template>` 中有很多可复用的部分,这时候我们可以将其封装成上层的自定义组件并重用。例如我们可以直接创建一个名为 `foo.we` 的文件,`<foo>` 就是自定义组件的组件名称:
-
-```html
-<!-- foo.we -->
-<template>
- <div style="flex-direction: row;">
- <image src="{{image}}"></image>
- <text>{{title}}</text>
- </div>
-</template>
-<script>
- var env = 'foo'
- module.exports = {
- data: {
- title: null,
- image: null
- }
- }
-</script>
-```
-
-`foo.we` 的也包含 `<template>`,`<style>` 和 `<script>`,定义好了后,直接用 `<foo>` 标签即可将其引入到其它组件的 `<template>` 中,并且在 `<foo>` 标签上设置其 `data` 同名的特性会将这个值赋给 `<foo>` 的上下文:
-
-_注意事项:由于 HTML 语法中特性名是不区分大小写的,所以您无法直接用驼峰命名,我们提供了 hyphenated 语法,在解析之后这些名称会自动转换为驼峰命名 (比如在 `<template>` 的组件特性里用 `aaa-bbb-ccc` 表示其 `data` 或上下文里的 `aaaBbbCcc`)。_
-
-```html
-<!-- bar.we -->
-<template>
- <foo title="..." image="..."></foo>
-</template>
-<script>
- var env = 'bar'
-</script>
-```
-
-_注意事项:这里 `bar.we` 和 `foo.we` 必须在同目录下才能自动建立依赖关系。_
-
-_注意事项:`foo.we` 文件的 `<script>` 具有相对独立的作用域,不会和 `bar.we` 中的 `<script>` 产生干扰。同时 `<foo>` 对象具有相对独立的子组件上下文,即 `this`,也包括其定义的完全不同的数据和方法。_
-
-## 组件嵌套
-
-自定义组件也支持嵌套,如下:
-
-```html
-<!-- somepath/foo.we -->
-<template>
- <div style="flex-direction: row;">
- <image src="{{image}}"></image>
- <text>{{title}}</text>
- </div>
-</template>
-<script>
- module.exports = {
- data: {
- // These keys must be declared explicitly here
- // or data-binding will not work from its parent.
- title: null,
- image: null
- }
- }
-</script>
-```
-
-```html
-<!-- samepath/foo.list.we -->
-<template>
- <div>
- <text>{{description}}</text>
- <foo repeat="item in list" title="{{item.text}}" image="{{item.img}}"></foo>
- </div>
-</template>
-<script>
- module.exports = {
- data: {
- description: '',
- // This key must be declared explicitly here
- // or data-binding will not work from its parent.
- list: []
- }
- }
-</script>
-```
-
-```html
-<!-- samepath/main.we -->
-<template>
- <foo-list list="{{list}}"></foo-list>
-</template>
-<script>
- module.exports = {
- data: {
- list: [
- {text: '...', img: '...'},
- {text: '...', img: '...'},
- {text: '...', img: '...'},
- ...
- ]
- }
- }
-</script>
-```
-
-这里的 `main.we` 嵌套了 `<foo-list>`,`<foo-list>` 嵌套了 `<foo>`,同时组件可以正常的配合数据绑定、`repeat` 特性等使用。
-
-## 更多子组件的定义和书写方式
-
-除了在主文件同目录下创建和被封装组件同名的 `we` 文件之外,Weex 还支持另外几种子组件的书写方式:
-
-* 在 `<script>` 中通过 `require` 其它目录的 `we` 文件定义同名组件
-* 在主文件下新增 `<element name="xxx">` 标签,`name` 特性的值为新创建的组件名,其 `<element>` 内部的内容是定义该组件的代码
-
-比如:
-
-```html
-<!-- path-a/main.we -->
-<element name="foo">
- <text>Foo</text>
-</element>
-
-<template>
- <div>
- <foo></foo>
- <bar></bar>
- </div>
-</template>
-
-<script>
- require('path-b/bar.we')
-</script>
-```
-
-```html
-<!-- path-b/bar.we -->
-<template>
- <text>Bar</text>
-</template>
-```
-
-这样的话,`path-a/main.we` 最终展示的结果是“Foo”和“Bar”两段文本。
-
-## 注意事项
-
-- 组件各自的 `<style>` 是相互独立的,不会担心不同组件中相同的 class name 相互干扰。
-- 如果自定义组件在父组件中有 `id` 特性,则可以在父组件上下文中通过 `this.$vm(id)` 接口来访问该自定义组件的上下文,也可以通过 `this.$el(id)` 来找到其背后真实的原生组件。更多详见[获取子组件信息](./id.html)
-- 自定义组件之间通信的问题可以参考[组件间通信](./comm.html)
-- 不论通过父组件把数据传递进来还是在当前组件内部对数据发起修改,只有在组件的 `data` 选项中明确写明的字段才会被正常的监听。
-- 任何组件目前均不支持自闭合标签的写法,请勿使用。
-
-下一节:[获取子组件信息](./id.html)
http://git-wip-us.apache.org/repos/asf/incubator-weex-site/blob/12e3a8bc/_draft/v1.0/guide/syntax/config-n-data.md
----------------------------------------------------------------------
diff --git a/_draft/v1.0/guide/syntax/config-n-data.md b/_draft/v1.0/guide/syntax/config-n-data.md
deleted file mode 100644
index cad39ab..0000000
--- a/_draft/v1.0/guide/syntax/config-n-data.md
+++ /dev/null
@@ -1,72 +0,0 @@
----
-title: 页面配置和页面数据
-type: guide
-order: 3.9
-version: 0.10
----
-
-# 页面配置和页面数据
-
-在 Weex 中,你可以通过一些特殊的 `<script>` 进行页面整体配置。
-
-_注意事项:这些配置会代表页面整体,所以写在自定义子组件中是无效的,只有写在顶级 ViewModel 的 `<sctipt>` 中才会生效。_
-
-先举个例子:
-
-```html
-<!-- definition of sub components -->
-<element name="sub-component-a">...</element>
-<element name="sub-component-b">...</element>
-<element name="sub-component-c">...</element>
-
-<!-- definition of top-level component -->
-<template>...</template>
-<style></style>
-<script>
- module.exports = {
- data: { x: 1, y: 2 }
- }
-</script>
-
-<!-- config and data -->
-<script type="config">
- downgrade: {
- ios: {
- os: '9', // all of 9.x.x
- app: '~5.3.2',
- framework: '^1.3', // all of 1.3.x
- deviceModel: ['AAAA', 'BBBB']
- },
- android: {
- os: '*', // all of version
- app: '^5',
- framework: '',
- deviceModel: ''
- }
- }
-</script>
-<script type="data">
- { y: 200 }
-</script>
-```
-
-## `<script type="config">`
-
-开发者可以在顶级 ViewModel 中加入这样一段 `<script>`,以 JSON 格式描述页面整体的配置信息。
-
-目前支持的配置信息只有 `downgrade`:用来从平台、应用等维度描述页面的降级规则。这样设计对于产品迭代最大的帮助是可以在高版本中使用 Weex,而在低版本中使用之前已有的渲染方式,这部分控制降级的细节需要 native 接入的时候进行相应的识别和具体操作。
-
-未来这里会有更多的配置项出现在这里。
-
-## `<script type="data">`
-
-开发者可以在顶级 ViewModel 中加入这样一段 `<script>`,以 JSON 格式额外配置顶级 ViewModel 的数据,它会覆盖顶级 ViewModel 数据中相应的字段。比如上述例子中,最终的顶级 ViewModel 中的数据为 `{ x: 1, y: 200 }`。
-
-## 总结
-
-至此,Weex 基本的语法已经全部介绍过了。相信您对 Weex 的使用方式和开发方式有了更多的了解。
-
-接下来我们推荐您阅读:
-
-* [最佳实践](../how-to/index.html)
-* [Weex 手册](../../references/index.html)
http://git-wip-us.apache.org/repos/asf/incubator-weex-site/blob/12e3a8bc/_draft/v1.0/guide/syntax/data-binding.md
----------------------------------------------------------------------
diff --git a/_draft/v1.0/guide/syntax/data-binding.md b/_draft/v1.0/guide/syntax/data-binding.md
deleted file mode 100644
index bbefdd1..0000000
--- a/_draft/v1.0/guide/syntax/data-binding.md
+++ /dev/null
@@ -1,332 +0,0 @@
----
-title: 数据绑定
-type: guide
-order: 3.1
-version: 0.10
----
-
-# 数据绑定
-
-Weex使用 _mustache_ 的语法 (`{% raw %}{{...}}{% endraw %}`) 来对 `<template>` 中的模板和 `<script>` 里的数据进行绑定. 一旦数据额模板绑定了, 数据上的修改会实时的在模板内容中生效。
-
-## 数据绑定路径
-
-```html
-<template>
- <div>
- <text style="font-size: {{size}}">{{title}}</text>
- </div>
-</template>
-
-<script>
- module.exports = {
- data: {
- size: 48,
- title: 'Alibaba Weex Team'
- }
- }
-</script>
-```
-
-[体验一下](http://dotwe.org/6d18c0e696d33705083e34ef387ac529)
-
-上面的代码会把 `title` 和 `size` 的数值绑定到模板内容上。
-
-我们也可以通过 `.` 符号来绑定数据结构中的字段。看一下下面的代码片段:
-
-```html
-<template>
- <div>
- <text style="font-size: {{title.size}}">{{title.value}}</text>
- </div>
-</template>
-
-<script>
- module.exports = {
- data: {
- title: {
- size: 48,
- value: 'Alibaba Weex Team'
- }
- }
- }
-</script>
-```
-
-[体验一下](http://dotwe.org/e291bbe2d5c34fe04db92bc827697a4b)
-
-## 数据绑定表达式
-
-进行数据绑定时,Weex 支持一些简单的 JavaScript 表达式,例如:
-
-```html
-<template>
- <div style="flex-direction: row;">
- <text>{{firstName + ' ' + lastName}}</text>
- </div>
-</template>
-
-<script>
- module.exports = {
- data: {
- firstName: 'John',
- lastName: 'Smith'
- }
- }
-</script>
-```
-
-[体验一下](http://dotwe.org/aeef6c2ca9bd9b7c5d039ed84572e1ee)
-
-这些表达式会在当前的上下文中进行运算。
-
-## 计算属性 <sup>v0.5+</sup>
-
-数据绑定表达式已经非常方便了,但如果希望在模板里实现更复杂的逻辑判断,你也可以使用计算属性。例如:
-
-```html
-<template>
- <div style="flex-direction: row;">
- <text>{{fullName}}</text>
- <text onclick="changeName" style="margin-left: 10;">CHANGE NAME</text>
- </div>
-</template>
-
-<script>
- module.exports = {
- data: {
- firstName: 'John',
- lastName: 'Smith'
- },
- computed: {
- fullName: function() {
- return this.firstName + ' ' + this.lastName
- }
- },
- methods: {
- changeName: function() {
- this.firstName = 'Terry'
- }
- }
- }
-</script>
-```
-
-[体验一下](http://dotwe.org/276e7c42a2d480d669868476e62b326e)
-
-同样能够达到相同的效果。这里我们引入了一个叫做 `fullName` 的计算属性,由 `firstName` 和 `lastName` 计算而成,在数据绑定的时候,如果 `firstName` 或 `lastName` 发生改变,`fullName` 都会自动重新计算并触发改变。
-
-另外计算属性还支持另外一种写法,就是同时定义一个计算属性的 getter 和 setter,这样的话当下面例子中的 `fullName` 被赋值时,`data` 里的 `firstName` 和 `lastName` 会被自动改变:
-
-```html
-<template>
- <div style="flex-direction: row;">
- <text>{{fullName}}</text>
- <text onclick="changeName" style="margin-left: 10;">CHANGE NAME</text>
- </div>
-</template>
-
-<script>
- module.exports = {
- data: {
- firstName: 'John',
- lastName: 'Smith'
- },
- computed: {
- fullName: {
- get: function() {
- return this.firstName + ' ' + this.lastName
- },
-
- set: function(v) {
- var s = v.split(' ')
- this.firstName = s[0]
- this.lastName = s[1]
- }
- }
- },
- methods: {
- changeName: function() {
- this.fullName = 'Terry King'
- }
- }
- }
-</script>
-```
-
-[体验一下](http://dotwe.org/9f33809592391c566c886029c509c167)
-
-**注意事项:`data`、`methods`、`computed` 中的字段是不能相互重复的,因为它们都会通过组件实例的 `this` 访问到。**
-
-## 数据绑定在 `<template>` 中的特殊用法
-
-### 样式: `style` 或 `class`
-
-组件的样式能够通过 `style` 特性进行绑定:
-
-```html
-<template>
- <div>
- <text style="font-size: {{size}}; color: {{color}};">Hello World</text>
- </div>
-</template>
-
-<script>
- module.exports = {
- data: {
- size: 32,
- color: '#ff0000'
- }
- }
-</script>
-```
-
-[体验一下](http://dotwe.org/f53674fa7910d266e0a2d8a5c285d2b1)
-
-样式也能够通过 `class` 特性实现样式绑定,多个 class 名通过空格分隔:
-
-```html
-<template>
- <div>
- <text class="{{size}}">Hello</text>
- <text class="title {{status}}">World</text>
- </div>
-</template>
-
-<style>
- .large { font-size: 64; }
- .small { font-size: 32; }
- .title { font-weight: bold; }
- .success { color: #00ff00; }
- .error { color: #ff0000; }
-</style>
-
-<script>
- module.exports = {
- data: {
- size: 'large',
- status: 'success'
- }
- }
-</script>
-```
-
-[体验一下](http://dotwe.org/4260897c1526a685672dca95af271493)
-
-在上面的代码中如果 `{% raw %}{{size}}{% endraw %}` 和 `{% raw %}{{status}}{% endraw %}` 是空值, 就只有 `class="title"` 会被解析。
-
-延伸阅读:[style 和 class](./style-n-class.html)
-
-### 事件绑定:`on...`
-
-以 `on...` 开头的就是用于绑定事件的特性,特性名中 `on` 之后的部分就是事件的类型,特性的值就是处理该事件的函数名。_函数名外不需要添加 mustache 语法中的大括号_。例如:
-
-```html
-<template>
- <div>
- <text onclick="toggle">Toggle: {{result}}</text>
- </div>
-</template>
-
-<script>
- module.exports = {
- data: {
- result: true
- },
- methods: {
- toggle: function () {
- this.result = !this.result
- }
- }
- }
-</script>
-```
-
-[体验一下](http://dotwe.org/2f9f910a60ffc1ed54c797390d6615e1)
-
-除此之外 Weex 还支持更多的事件处理方式。
-
-延伸阅读:[事件处理](./events.html)
-
-### 展示逻辑控制 `if` & `repeat`
-
-`if` 特性能够通过特性值的真假来控制组建是否显示,_且 mustache 大括号可以省略_。例如:
-
-```html
-<template>
- <div style="flex-direction: column;">
- <text onclick="toggle">Toggle</text>
- <image if="{{shown}}" src="{{imageUrl}}" class="logo"></image>
- </div>
-</template>
-
-<style>
- .logo { width: 512; height: 512; }
-</style>
-
-<script>
- module.exports = {
- data: {
- shown: true,
- imageUrl: 'https://gtms02.alicdn.com/tps/i2/TB1QHKjMXXXXXadXVXX20ySQVXX-512-512.png'
- },
- methods: {
- toggle: function () {
- this.shown = !this.shown
- }
- }
- }
-</script>
-```
-
-[体验一下](http://dotwe.org/3ec9347e4810f503b641849d214d8c15)
-
-`repeat` 特性可以根据一组数组数据重复生成相同或相似的顺序排列的界面。例如:
-
-```html
-<template>
- <div>
- <text repeat="(k,v) in list">{{k}} - {{v}}</text>
- </div>
-</template>
-<script>
- module.exports = {
- data: {
- list: ['a', 'b', 'c']
- }
- }
-</script>
-```
-
-[体验一下](http://dotwe.org/db40d2341fdbf16d3d806f502189843d)
-
-延伸阅读:[展示逻辑控制](./display-logic.html)
-
-### 静态模板优化 `static` <sup>v0.9.2+</sup>
-
-`static` 特性可以一次性把数据设置到模板相应的位置上,但是今后不会随着数据的变化而更新。这样可以减少无谓的数据绑定,有效控制和优化长列表、纯静态页面在运行时的开销。不过你也要小心使用不要导致原本需要更新的视图没有触发更新。
-
-```html
-<template>
- <div static>
- <text>{{ word }}</text>
- </div>
-</template>
-
-<script>
- module.exports = {
- ready: function() {
- this.word = 'Data changes' // UI won't be updated
- },
- data: {
- word: 'Hello static'
- }
- }
-</script>
-```
-
-[体验一下](http://dotwe.org/dbadfd66463a2c03e3e06d391b0ad8ec)
-
-如上所示,添加 `static` 关键字,渲染结果会是“Hello static”字样,相当于渲染一个静态的节点,`ready` 函数中对数据 `word` 的改变不会更新到视图。
-
-下一篇:[style 和 class](./style-n-class.html)
http://git-wip-us.apache.org/repos/asf/incubator-weex-site/blob/12e3a8bc/_draft/v1.0/guide/syntax/display-logic.md
----------------------------------------------------------------------
diff --git a/_draft/v1.0/guide/syntax/display-logic.md b/_draft/v1.0/guide/syntax/display-logic.md
deleted file mode 100644
index 9498de2..0000000
--- a/_draft/v1.0/guide/syntax/display-logic.md
+++ /dev/null
@@ -1,252 +0,0 @@
----
-title: 展示逻辑控制
-type: guide
-order: 3.4
-version: 0.10
----
-
-# 展示逻辑控制
-
-Weex 支持通过两种特殊的特性 `if` 和 `repeat` 确定组件的显示逻辑,这会使得整个界面的展示逻辑控制更加简单灵活。
-
-## `if`
-
-通过设置 `if` 特性值,你可以控制当前组件是否显示。如果值为真,则当前组件会被渲染出来,如果值为假则会被移除。例如:
-
-```html
-<template>
- <div>
- <text onclick="toggle">Toggle Image</text>
- <image if="shown" src="{{imageUrl}}" style="width: 512; height: 512;"></image>
- </div>
-</template>
-
-<script>
-module.exports = {
- data: {
- imageUrl: 'https://gtms02.alicdn.com/tps/i2/TB1QHKjMXXXXXadXVXX20ySQVXX-512-512.png',
- shown: true
- },
- methods: {
- toggle: function () {
- this.shown = !this.shown
- }
- }
-}
-</script>
-```
-
-[体验一下](http://dotwe.org/e0999a51fa404f48bbae177f1569cd0e)
-
-_注意事项:`if="condition"` 和 `if="{% raw %}{{condition}}{% endraw %}"` 都是可以的,两者等价使用。_
-
-_注意事项:`if` 不能用在 `<template>` 的根组件上,否则将无法被 Weex 正常的识别和处理。_
-
-### `if` 不会阻断子元素的数据更新
-
-下面这个例子在数据更新后 `item` 或 `item.image` 不存在的情况下会报错:
-
-```html
-<template>
- <div if="{{(item && item.image)}}" style="width: 200; height: 200;">
- <image style="width: 100; height: 100;" src="{{item.image.url}}"></image>
- </div>
-</template>
-```
-
-原因在于 Weex 本身的机制是数据更新在 DOM 更新之前,因此 `if` 数据更新之后,不支持阻断其子元素的数据更新,即 `if` 数据更新为 `false` 之后,内部的子元素仍然会触发自身的数据更新,找不到对应字段,导致报错,可参考这个 [issue](https://github.com/alibaba/weex/issues/1758)。
-
-因此,有两种解决方案:
-
-- 为 `img` 组件的 `src` 也增加容错方案:
-
- ```html
- <div if="{{(item && item.image)}}" style="width: 200; height: 200;">
- <image style="width: 100; height: 100;" src="{{item && item.image && item.image.url}}"></image>
- </div>
- ```
-
-- 如果是在 `repeat` 的列表中,还可以使用 `track-by`强制不复用子元素解决。
-
-## `repeat`
-
-`repeat` 特性用于重复渲染一组相同的组件。它绑定的数据类型必须为数组,数组里的每一项数据可以体现在不同的组件特性、样式、事件绑定等。例如:
-
-``` html
-<template>
- <div>
- <div repeat="person in list" class="{{person.gender}}">
- <text>{{person.nickname}}</text>
- </div>
- </div>
-</template>
-
-<style>
- .male { background-color: #9999ff; }
- .female { background-color: #ff9999; }
-</style>
-
-<script>
-module.exports = {
- data: {
- list: [
- { gender: 'male', nickname: 'Li Lei' },
- { gender: 'female', nickname: 'Han Meimei' },
- { gender: 'male', nickname: 'Jim Green' }
- ]
- }
-}
-</script>
-```
-
-[体验一下](http://dotwe.org/8c87aac2820531090181c32fca41e913)
-
-此外,`repeat` 特性还支持绑定数组中数据项目的索引值。例如:
-
-``` html
-<template>
- <div>
- <div repeat="(index, person) in list" class="{{person.gender}}">
- <text>{{index}} - {{person.nickname}}</text>
- </div>
- </div>
-</template>
-
-<style>
- .male { background-color: #9999ff; }
- .female { background-color: #ff9999; }
-</style>
-
-<script>
-module.exports = {
- data: {
- list: [
- { gender: 'male', nickname: 'Li Lei' },
- { gender: 'female', nickname: 'Han Meimei' },
- { gender: 'male', nickname: 'Jim Green' }
- ]
- }
-}
-</script>
-```
-
-[体验一下](http://dotwe.org/65d348256ab5c54aa996d3ee6b4ea115)
-
-每一个昵称之前都有对应数组项目的索引值。
-
-_注意事项:同样的 `repeat="..."` 和 `repeat="{% raw %}{{...}}{% endraw %}"` 都是可以的,两者等价使用。_
-
-_注意事项:`if` 不能用在 `<template>` 的根组件上,否则将无法被 Weex 正常的识别和处理。_
-
-**注意事项: 当你修改 `repeat` 中的数组时,在写法上会受到一定的限制,具体如下:**
-
-**直接通过“角标”修改数组的某个项目 (如 `this.items[0] = ...`) 是不会触发视图自动更新的。我们在数组的原型上提供了一个额外的方法:`this.items.$set(index, item)` 来完成相同的事情。**
-
-```javascript
-// 和 `this.items[0] = ...` 作用相同,但会自动触发视图更新
-this.items.$set(0, { childMsg: 'Changed!'})
-```
-
-**直接通过修改 `length` 来改变数组长度 (如 `this.items.length = 0`) 也是不会触发视图自动更新的。我们推荐您直接赋值一个新的空数组把旧的替换掉。**
-
-```javascript
-// 和 `this.items.length = 0` 作用相同,但会自动触发视图更新
-this.items = []
-```
-
-### `repeat` 特性中的 `$index` 形参
-
-在 `repeat` 特性值中,如果没有指定索引值的形参,则可以通过绑定形参 `$index` 来展示数组项目的索引值。例如:
-
-``` html
-<template>
- <div>
- <div repeat="person in list" class="{{person.gender}}">
- <text>{{$index}} - {{person.nickname}}</text>
- </div>
- </div>
-</template>
-
-<style>
- .male { background-color: #9999ff; }
- .female { background-color: #ff9999; }
-</style>
-
-<script>
-module.exports = {
- data: {
- list: [
- { gender: 'male', nickname: 'Li Lei' },
- { gender: 'female', nickname: 'Han Meimei' },
- { gender: 'male', nickname: 'Jim Green' }
- ]
- }
-}
-</script>
-```
-
-[体验一下](http://dotwe.org/65d348256ab5c54aa996d3ee6b4ea115)
-
-渲染效果和上一个例子应该是相同的。
-
-### 在 `repeat` 中使用 `track-by` 特性追踪变化
-
-通常情况下,当更新 `repeat` 中绑定的数组时,所有数组项目关联的组件都会被重新渲染。如果其中部分索引值对应的数据未发生变更,那么最好是让这些组件在渲染层保持原样,仅更新数据有变化的节点。Weex 提供了 `track-by` 特性来辅助判断哪些数组项目发生了改变。
-
-首先 `track-by` 特性的值必须是在每一条数组项目中都有且值没有重复的一个字段名,用来区分和追踪每一条数据项增删与否或次序变化与否的关键依据。每当数组发生变化之后,新老数组数据会根据 `track-by` 特性值所代表的字段重新匹配,然后再决定渲染层应该新建或删除一个组件?还是移动一个组件?还是讲组件保持原来的位置。默认的 `track-by` 的值就是数组的索引值。例如:
-
-``` html
-<template>
- <div>
- <div repeat="person in list" class="{{person.gender}}">
- <text>{{$index}} - {{person.id}} - {{person.nickname}}</text>
- </div>
- <text>----</text>
- <div repeat="person in list" class="{{person.gender}}" track-by="id">
- <text>{{$index}} - {{person.id}} - {{person.nickname}}</text>
- </div>
- <text>----</text>
- <!-- something wrong here: duplicated track-by value -->
- <div repeat="person in list" class="{{person.gender}}" track-by="nickname">
- <text>{{$index}} - {{person.id}} - {{person.nickname}}</text>
- </div>
- </div>
-</template>
-
-<style>
- .male { background-color: #9999ff; }
- .female { background-color: #ff9999; }
-</style>
-
-<script>
-module.exports = {
- data: {
- list: [
- { id: 11, gender: 'male', nickname: 'Li Lei' },
- { id: 22, gender: 'female', nickname: 'Han Meimei' },
- { id: 33, gender: 'male', nickname: 'Jim Green' }
- ]
- },
- ready: function () {
- this.list.unshift({ id: 44, gender: 'female', nickname: 'Han Meimei' })
- }
-}
-</script>
-```
-
-[体验一下](http://dotwe.org/c124bfc21e6d92271356acbea232089b)
-
-这种情况下,第一个列表的更新策略是:
-
-1. 把第一个 `<text>` 赋值为 `Han Meimei`
-2. 第二个赋值为 `Li Lei`
-3. 第三个赋值为 `Han Meimei`
-4. 最后新建一个 `<text>` 并赋值为 `Jin Green`
-
-第二个列表的更新策略是:
-
-1. 在最前面新建一个 `<text>` 并赋值为 `Han Meimei`
-
-第三个列表的更新会遇到问题,因为有两个数组项目的 `nickname` 值都是 `Han Meimei` 所以造成意料之外的渲染结果 (只渲染了三个数组项目)。
-
-下一节:[渲染过程控制](./render-logic.html)
http://git-wip-us.apache.org/repos/asf/incubator-weex-site/blob/12e3a8bc/_draft/v1.0/guide/syntax/events.md
----------------------------------------------------------------------
diff --git a/_draft/v1.0/guide/syntax/events.md b/_draft/v1.0/guide/syntax/events.md
deleted file mode 100644
index 4898219..0000000
--- a/_draft/v1.0/guide/syntax/events.md
+++ /dev/null
@@ -1,103 +0,0 @@
----
-title: 事件处理
-type: guide
-order: 3.3
-version: 0.10
----
-
-# 事件处理
-
-Weex 允许对 `<template>` 中的元素绑定事件处理函数。
-
-## 基本语法
-
-以 `on...` 开头的就是用于绑定事件的特性,特性名中 `on` 之后的部分就是事件的类型,特性的值就是处理该事件的函数名。_函数名外不需要添加 mustache 语法中的大括号_。例如:
-
-```html
-<template>
- <div>
- <text onclick="toggle">Toggle: {{result}}</text>
- </div>
-</template>
-
-<script>
- module.exports = {
- data: {
- result: true
- },
- methods: {
- toggle: function () {
- this.result = !this.result
- }
- }
- }
-</script>
-```
-
-[体验一下](http://dotwe.org/2f9f910a60ffc1ed54c797390d6615e1)
-
-## 内联事件处理参数
-
-同时我们也支持在事件绑定的特性值中内联写明被传入的参数。例如:
-
-```html
-<template>
- <div>
- <text onclick="update(1, 2)">Result: {{result}}</text>
- </div>
-</template>
-
-<script>
- module.exports = {
- data: {
- result: '<empty>'
- },
- methods: {
- update: function (x, y) {
- this.result = x + y
- }
- }
- }
-</script>
-```
-
-[体验一下](http://dotwe.org/777056d8985e73567464e2d66cbe73fc)
-
-## 特殊的内联事件处理参数
-
-额外的,在这种内联的事件绑定写法中,你可以使用一个特殊的参数 `$event`,代表事件描述对象,即默认事件处理函数的第一个参数。所以 `<template>` 中的 `onclick="foo"` 和 `onclick="foo($event)"` 是等价的,`$event` 的用法可以更多参考下面的例子
-
-```html
-<template>
- <div>
- <text onclick="update($event, 1, 2)">Result: {{result}}</text>
- </div>
-</template>
-
-<script>
- module.exports = {
- data: {
- result: '<empty>'
- },
- methods: {
- update: function (e, x, y) {
- this.result = e.type + (x + y)
- }
- }
- }
-</script>
-```
-
-[体验一下](http://dotwe.org/5e1e7c22f036725e44c3ff492f173400)
-
-## 事件描述对象
-
-每当一次事件被触发的时候,都会产生一个事件描述对象,该对象会默认作为第一个参数传递给事件处理函数,或以 `$event` 形参的方式出现在内联事件处理函数中。
-
-每个事件描述对象至少包含以下几个特性:
-
-- `type` (`string`): 事件名称, 如: `click`
-- `target` (`Element`): 目标元素
-- `timestamp` (`number`): 事件触发时的时间戳数字
-
-下一节:[展示逻辑控制](./display-logic.html)
http://git-wip-us.apache.org/repos/asf/incubator-weex-site/blob/12e3a8bc/_draft/v1.0/guide/syntax/id.md
----------------------------------------------------------------------
diff --git a/_draft/v1.0/guide/syntax/id.md b/_draft/v1.0/guide/syntax/id.md
deleted file mode 100644
index 0a204ad..0000000
--- a/_draft/v1.0/guide/syntax/id.md
+++ /dev/null
@@ -1,124 +0,0 @@
----
-title: 找节点
-type: guide
-order: 3.7
-version: 0.10
----
-
-# 找节点
-
-在 Weex 中,您可以通过在特定的子组件上设置 `id` 特性,以此在该 `<template>` 内唯一标识这个组件。
-
-## 获取子组件
-
-您可以在父组件上下文中使用 `this.$el(id)` 来找到该组件,以运用 `scrollToElement()` 为例:
-
-```html
-<template>
- <div>
- <text id="goto-top">Top</text>
- <div style="height: 10000; background-color: #999999;"></div>
- <text onclick="back2Top">Back to Top</text>
- </div>
-</template>
-<script>
- var dom = require('@weex-module/dom')
- module.exports = {
- methods: {
- back2Top: function () {
- var el = this.$el('goto-top')
- dom.scrollToElement(el, { offset: 10 })
- }
- }
- }
-</script>
-```
-
-[体验一下](http://dotwe.org/ed07068ef6f038d6c39af6c971ad08a0)
-
-### `id` 和 `repeat` 特性配合使用
-
-`id` 也可以和 `repeat` 语法配合使用,关于 `repeat` 更多详见 [展示逻辑控制](./display-logic.html),但是要确保循环的节点需要用不同的 `id`,比如:
-
-```html
-<template>
- <div>
- <image
- repeat="image in images"
- id="img-{{image.id}}"
- src="{{image.url}}"
- onclick="getImageId"></image>
- </div>
-</template>
-<script>
-module.exports = {
- data: {
- images: [
- {id: 1, url: '...'},
- {id: 2, url: '...'},
- {id: 3, url: '...'},
- ...
- ]
- },
- methods: {
- getImageId: function(e) {
- // get e.target.id
- }
- }
-}
-</script>
-```
-
-### 获取自定义子组件的上下文
-
-另外,我们还可以通过 `this.$vm(id)` 方法可以访问自定义子组件的上下文:
-
-```html
-<element name="foo">
- <template>
- <div style="flex-direction: row;">
- <text>{{title}}</text>
- </div>
- </template>
- <script>
- module.exports = {
- data: {
- title: null
- },
- methods: {
- setTitle: function (text) {
- this.title = text
- }
- }
- }
- </script>
-</element>
-
-<template>
- <div>
- <foo id="sub" title="Hello"></foo>
- <text onclick="update">Click Me to Update</text>
- </div>
-</template>
-<script>
- module.exports = {
- methods: {
- update: function (e) {
- this.$vm('sub').setTitle('Updated')
- }
- }
- }
-</script>
-```
-
-[体验一下](http://dotwe.org/1d332e6c238462e841743035c6bc697e)
-
-实际上,如上述的例子,我们找到子组件上下文之后,直接在这个上下文中调用子组件方法或修改子组件的数据并不是我们认为最好的方式,我们更倾向于通过一套确定的组件间通信机制来完成这一工作。
-
-### 获取父级组件或其上下文
-
-除了可以自上而下寻找组件或其上下文,Weex 也支持自下而上做相同的事情。当前上下文中的 `this._parent` 可以获取其父级上下文。除了父级上下文,对于父级组件本身,相关处理也可以基于先获取父级上下文,然后在父级组件内部完成更多更细致的处理。更多内容可以深入了解组件间通信的部分。
-
-_注意事项:在未来的版本中 `this._parent` 将改为 `this.$parent`。_
-
-下一篇: [组件间通信](./comm.html)
http://git-wip-us.apache.org/repos/asf/incubator-weex-site/blob/12e3a8bc/_draft/v1.0/guide/syntax/index.md
----------------------------------------------------------------------
diff --git a/_draft/v1.0/guide/syntax/index.md b/_draft/v1.0/guide/syntax/index.md
deleted file mode 100644
index df0c33a..0000000
--- a/_draft/v1.0/guide/syntax/index.md
+++ /dev/null
@@ -1,134 +0,0 @@
----
-title: 语法介绍
-type: guide
-order: 3
-has_chapter_content: true
-version: 0.10
----
-
-# 语法综述
-
-Weex 代码由 `<template>`、`<style>`、`<script>` 三个部分构成。
-
-- `<template>`:_必须的_,使用 HTML 语法描述页面结构,内容由多个标签组成,不同的标签代表不同的组件。
-- `<style>`:_可选的_,使用 CSS 语法描述页面的具体展现形式。
-- `<script>`:_可选的_,使用 JavaScript 描述页面中的数据和页面的行为,Weex 中的数据定义也在 `<script>` 中进行。
-
-```html
-<template>
- <!-- (required) the structure of page -->
-</template>
-
-<style>
- /* (optional) stylesheet */
-</style>
-
-<script>
- /* (optional) the definition of data, methods and life-circle */
-</script>
-```
-
-这是一个典型的 M-V-VM 架构:通过 ViewModel 把 Model 和 View 建立更直接有效的关系,ViewModel 的实现以 `<script>` 的内容为主。
-
-## `<template>` 模板
-
-`<template>` 中的标签组织类似如下代码:
-
-``` html
-<template>
- <div>
- <image style="width: 200; height: 200;" src="https://gtms02.alicdn.com/tps/i2/TB1QHKjMXXXXXadXVXX20ySQVXX-512-512.png"></image>
- <text>Alibaba Weex Team</text>
- </div>
-</template>
-```
-
-[体验一下](http://dotwe.org/5256e6e610ded330369f2e8010f7f0e6)
-
-`<div>` 标签是一个根节点,里面包含描述图片的 `<image>` 标签和描述文字的 `<text>` 标签。
-
-和 HTML 类似,不同标签代表的组件有各自的特性 (attribute),部分组件可以拥有自己的子组件。
-
-延伸阅读:[内置组件列表](../../references/components/index.html)
-
-根节点:每个 Weex 页面最顶层的节点,我们称为根节点。下面是目前我们支持的三种根节点:
-
-- `<div>`:普通根节点,有确定的尺寸,不可滚动。
-- `<scroller>`:可滚动根节点,适用于需要全页滚动的场景。
-- `<list>`:列表根节点,适用于其中包含重复的子元素的列表场景。
-
-目前 Weex 仅支持以上三种根节点。
-
-_注意事项:`<template>` 只支持一个根节点,多个根节点将无法被 Weex 正常的识别和处理。_
-
-## `<style>` 样式
-
-我们可以把 Weex 中的样式语法理解为 CSS 的一个子集,两者有一些细微的区别
-
-第一种写法是,你能在标签上,直接通过内联 `style` 特性编写样式. 第二种写法,通过标签中的 `class` 特性与 `<style>` 标签中定义的样式建立对应关系,让 `<style>` 标签中定义的样式作用于特定标签之上。以下是例子:
-
-```html
-<template>
- <div>
- <text style="font-size: 64;">Alibaba</text>
- <text class="large">Weex Team</text>
- </div>
-</template>
-
-<style>
- .large {font-size: 64;}
-</style>
-```
-
-[体验一下](http://dotwe.org/d8af9186bf045df74e7a538d91798db4)
-
-上面的两个 `<text>` 组件都被设置了同样的字体大小,但分别用了两种不同的方式。
-
-延伸阅读:[Weex 通用样式](../references/common-style.html)
-
-**注意**:Weex 遵循 [HTML 特性](https://en.wikipedia.org/wiki/HTML_attribute) 命名规范,所以特性命名时**请不要使用陀峰格式 (CamelCase)**,采用以“-”分割的 **long-name** 形式。
-
-## `<script>` 脚本
-
-`<script>` 描述页面中的数据和页面的行为,代码遵循 JavaScript (ES5) 语法 (目前 iOS 端和浏览器端取决于内置 JavaScript 引擎对 ES 版本的支持情况,安卓端能够完整支持 ES5,但不原生支持 ES6,需要用类似 [babel](http://babeljs.io) 的工具对源代码进行转换)。下面是一个例子:
-
-``` html
-<template>
- <div>
- <text>The time is {{datetime}}</text>
- <text>{{title}}</text>
- <text>{{getTitle()}}</text>
- </div>
-</template>
-
-<script>
- module.exports = {
- data: {
- title: 'Alibaba',
- datetime: null
- },
- methods: {
- getTitle: function () {
- return 'Weex Team'
- }
- },
- created: function() {
- this.datetime = new Date().toLocaleString()
- }
- }
-</script>
-```
-
-[体验一下](http://dotwe.org/8095bed0d9db4299fb39975d4b35b13f)
-
-上面 `<script>` 标签中定义了被赋值给 `module.exports` 的对象,这个对象其实就是一个 ViewModel 选项,让三个 `<text>` 标签显示当前时间、“Alibaba”字样和“Weex Team”字样。
-
-选项中的 `data` 用于存储数据,这些数据可以通过[数据绑定](./data-binding.html)机制和 `<template>` 标签中的内容绑定起来。当这些数据变更时,被绑定的模板内容也会自动更新。这些数据在 `<script>` 中的各个方法中可以通过类似 `this.x` 的方式进行读写操作。
-
-而选项中的 `methods` 里则列出了当前上下文可执行的各种函数,比如 `getTitle()`。
-
-选项中最后的 `created` 是生命周期函数,会在数据初始化之后、界面被绑定数据并渲染之前执行。类似的生命周期函数还有 `init`、`ready` 等,在这个例子中,`datetime` 会在界面渲染之前被更新为当前的时间。
-
-延伸阅读:[ViewModel 选项](../../references/component-defs.html)
-
-接下来,我们来详细介绍[数据绑定](./data-binding.html)的相关知识。
http://git-wip-us.apache.org/repos/asf/incubator-weex-site/blob/12e3a8bc/_draft/v1.0/guide/syntax/render-logic.md
----------------------------------------------------------------------
diff --git a/_draft/v1.0/guide/syntax/render-logic.md b/_draft/v1.0/guide/syntax/render-logic.md
deleted file mode 100644
index f516733..0000000
--- a/_draft/v1.0/guide/syntax/render-logic.md
+++ /dev/null
@@ -1,44 +0,0 @@
----
-title: 渲染过程控制
-type: guide
-order: 3.5
-version: 0.10
----
-
-# 渲染过程控制
-
-## `append`
-
-`append` 特性定义了当前组件的子组件:
-
-1. 以一整棵树的方式一次性添加到视图中 (`append="tree"`),还是
-2. 每个子组件都产生一次单独的添加到视图的指令 (`append="node"`)
-
-``` html
-<template>
- <div>
- <div>
- <text>Hello</text>
- <text>Weex</text>
- </div>
- <div append="node">
- <text>Hello</text>
- <text>Weex</text>
- </div>
- <div append="tree">
- <text>Hello</text>
- <text>Weex</text>
- </div>
- </div>
-</template>
-```
-
-[体验一下](http://dotwe.org/417c75415efce66d8e22bf5942b380ee)
-
-在上面的代码中,第一组和第二组 `<div>` 的渲染过程相同,即先添加空的父级 `<div>`,然后插入第一个 `<text>` Hello,然后插入第二个 `<text>` Weex;第三组 `<div>` 则是连带两个 `<text>` 子组件一齐传给渲染层进行渲染的。
-
-渲染结果显而易见,前两组渲染方式会使首次绘制的响应速度比后者快些,但是总渲染时间可能比第三组 `append="tree"` 更长。开发者可以根据实际界面的情况自行选择合理的渲染过程。
-
-默认情况下,除了 `<cell>` 组件的默认渲染过程是 `tree` 模式,其它组件都默认按照 `node` 模式进行渲染。
-
-下一节:[自定义组件](./composed-component.html)
http://git-wip-us.apache.org/repos/asf/incubator-weex-site/blob/12e3a8bc/_draft/v1.0/guide/syntax/style-n-class.md
----------------------------------------------------------------------
diff --git a/_draft/v1.0/guide/syntax/style-n-class.md b/_draft/v1.0/guide/syntax/style-n-class.md
deleted file mode 100644
index afe2de1..0000000
--- a/_draft/v1.0/guide/syntax/style-n-class.md
+++ /dev/null
@@ -1,117 +0,0 @@
----
-title: CSS 样式和类
-type: guide
-order: 3.2
-version: 0.10
----
-
-# CSS 样式和类
-
-## 基础语法
-
-CSS 样式可以理解为一系列的键值对,其中的每一对描述了一个特定的样式,例如组件的宽或者高。
-
-```css
-.div {
- width: 400;
- height: 50;
-}
-```
-
-键值对的形式是 `prop-name: prop-value;`。键名是 `prop-name`,键值是 `prop-value`。 一般情况下,键名按照连接符的方式进行命名,键和值之间由冒号 `:` 进行分隔,每对键值之间由分号 `;` 进行分隔。
-
-在 Weex 页面上样式有两种形式:
-
-- `<template>` 中的 `style` 特性
-- `<style>` 样式表
-
-### `<template>` 中的 `style` 特性
-
-在 `style` 特性中编写样式,例如:
-
-```html
-<template>
- <div style="width: 400; height: 50;">
- ...
- </div>
-</template>
-```
-
-这段代码的意思是 `<div>` 组件的宽和高分别为 400 像素和 50 像素。
-
-### `<style>` 样式表
-
-例如:
-
-```html
-<style>
- .wrapper { width: 600; }
- .title { width: 400; height: 50; }
- .highlight { color: #ff0000; }
-</style>
-```
-
-样式表包含了多个样式规则,每条规则有一个对应的类,以及由 `{...}` 包括的若干条样式。例如:
-
-```css
-.title { width: 400; height: 50; }
-```
-
-### `class` 特性
-
-`<template>` 标签中的 `class` 特性值用来匹配 `<style>` 样式表中的一个或多个 class 名,多个 class name 之间由空格分隔。例如:
-
-```html
-<template>
- <div class="wrapper">
- <text class="title">...</text>
- <text class="title highlight">...</text>
- </div>
-</template>
-<style>
- .wrapper { width: 600; }
- .title { width: 400; height: 50; }
- .highlight { color: #ff0000; }
-</style>
-```
-
-[体验一下](http://dotwe.org/8487e2a33cd051c9adfa887d0bafbb44)
-
-这段代码的含义是 `<div>` 组件的宽度是 600 像素,两个 `<text>` 组件的尺寸为 400x50,其中第二个文本组件是红色字。
-
-**注意事项**
-
-- 为了简化页面设计和实现,屏幕的宽度统一为 750 像素,不同设备屏幕都会按照比例转化为这一尺寸进行长度计算。
-- 标准 CSS 支持很多样式选择器,但 Weex 目前只支持单个 class name 的选择器。
-- 标准 CSS 支持很多的长度单位,但 Weex 目前只支持像素,并且 `px` 单位可以忽略不写,直接使用对应的数值。更多详情请查看[通用样式](../references/common-style.html)。
-- 子元素的样式不会继承自父元素,这一点与标准 CSS 不同,比如 `color` 和 `font-size` 等样式作用在 `<text>` 上层的 `<div>` 上是无效的。
-- 标准 CSS 包含了非常多的样式属性,但 Weex 只支持了其中的一部分,比如盒模型、flexbox、position 等布局属性,以及 `font-size`、`color` 等其它样式。
-
-## 与数据绑定结合
-
-请查阅[数据绑定](./data-binding.html)中有关 `style` 和 `class` 特性的相关部分。这里简单举个例子:
-
-```html
-<template>
- <div>
- <text style="font-size: {{fontSize}};">Alibaba</text>
- <text class="large {{textClass}}">Weex Team</text>
- </div>
-</template>
-<style>
- .large {font-size: 32;}
- .highlight {color: #ff0000;}
-</style>
-<script>
- module.exports = {
- data: {
- fontSize: 32,
- textClass: 'highlight'
- }
- }
-</script>
-```
-
-[体验一下](http://dotwe.org/440d3318dc7b83e3bb0a110f3b3236ca)
-
-下一篇:[事件处理](./events.html)
http://git-wip-us.apache.org/repos/asf/incubator-weex-site/blob/12e3a8bc/_draft/v1.0/index.md
----------------------------------------------------------------------
diff --git a/_draft/v1.0/index.md b/_draft/v1.0/index.md
deleted file mode 100644
index 9e59b8c..0000000
--- a/_draft/v1.0/index.md
+++ /dev/null
@@ -1,5 +0,0 @@
-layout: index
-type: index
-subtitle: 快速、简洁且高效
-version: 0.10
----
\ No newline at end of file
http://git-wip-us.apache.org/repos/asf/incubator-weex-site/blob/12e3a8bc/_draft/v1.0/migration/difference.md
----------------------------------------------------------------------
diff --git a/_draft/v1.0/migration/difference.md b/_draft/v1.0/migration/difference.md
deleted file mode 100644
index b11c6c2..0000000
--- a/_draft/v1.0/migration/difference.md
+++ /dev/null
@@ -1,249 +0,0 @@
----
-title: Weex 和 Vue 2.x 的语法差异
-type: references
-order: 12.2
-version: 2.1
----
-
-# Weex 和 Vue 2.x 的语法差异
-
-## Overview
-
-
-| | Weex | Vue |
-| ---- | ---- | --- |
-| 生命周期 | `ready: function() {}` | `mounted: function() {}` |
-| 条件指令 | `if="{% raw %}{{!foo}}{% endraw %}"` | `v-if="!foo"` |
-| 循环指令 | `repeat="{% raw %}{{item in list}}{% endraw %}"` | `v-for="item in list"` |
-| 样式类名 | `class="btn btn-{% raw %}{{type}}{% endraw %}"` | `:class="['btn', 'btn-' + type]"` |
-| 内联样式 | `style="color:{% raw %}{{textColor}}{% endraw %}"` | `:style="{ color: textColor }"` |
-| 事件绑定 | `onclick="handler"` | `@click="handler"` |
-| 原生事件 | `onclick="xxx"` | `@click.native="xxx"` |
-| 数据绑定 | `src="{% raw %}{{rightItemSrc}}{% endraw %}"` | `:src="rightItemSrc"` |
-| 内容/槽 | `<content></content>` | `<slot></slot>` |
-| 数据初始化 | `data: { value: 'x' }` | `data: function() { return { value: 'x' } }` |
-| 标签 ID | `id="xxx"` | `ref="xxx"` |
-| 获取节点 | `this.$el('xxx')` | `this.$refs.xxx` |
-
-
-## Reference
-
-See the source code of `weex-vue-migration` for more details:
-
-+ [template-rewriter](https://github.com/songsiqi/weex-vue-migration/blob/master/src/template-rewriter/rewriter.js)
-+ [script-rewriter](https://github.com/songsiqi/weex-vue-migration/blob/master/src/script-rewriter/rewriter.js)
-
-## LifeCycle Hooks 生命周期钩子
-| weex | vue | Description |
-| --------- | ------------- | ------------------------- |
-| init | beforeCreate | 组件实例刚刚被创建,组件属性如data计算之前 |
-| created | created | 组件实例创建完成,属性已绑定,但DOM还未生成 |
-| | beforeMount | 模板编译/挂载之前 |
-| ready | mounted | 模板编译/挂载之后 |
-| | beforeUpdate | 组件更新之前 |
-| | updated | 组件更新之后 |
-| | activated | for`keep-alive`, 组件被激活时调用 |
-| | deactivated | for`keep-alive`, 组件被移除时调用 |
-| | beforeDestroy | 组件被销毁前调用 |
-| destroyed | destroyed | 组件被销毁后调用 |
-
-# Data Binding 数据绑定
-
-在weex中,使用{% raw %}{{…}}{% endraw %}在`<template>`中绑定在`<script>`里定义的数据;在vue中,需要在要绑定的属性前加 `:` 。如以下示例。
-
-* 类名
-
- - weex
-
- ```html
- <div class="btn btn-{{type}}"></div>
- ```
-
- - vue
-
- ```html
- <div :class="['btn', 'btn-' + type]"></div>
- ```
-
-* 样式绑定
-
- * weex
-
- ```html
- <div style="color:{{textColor}}"></div>
- ```
-
- * vue
-
- ```html
- <div :style="{color: textColor}"></div>
- ```
-
-# if指令
-
-* weex
-
- ```html
- <image src="..." if="{{shown}}"></image>
- ```
-
- or
-
- ```html
- <image src="..." if="shown"></image>
- ```
-
-* vue
-
- ```html
- <image src="..." v-if="shown"></image>
- ```
-
-# 循环指令
-
-* weex: repeat
- - `$index`为索引
-
- ```html
- <div repeat="{{list}}">
- <text>No. {{$index + 1}}</text>
- <div>
- ```
-
- or
-
- ```html
- <div repeat="{{v in list}}">
- <text>No. {{$index + 1}}, {{v.nickname}}</text>
- </div>
- ```
-
- - 对象参数的顺序
-
- ```html
- <div repeat="{{(key, value) in list}}">
- <text>No. {{key + 1}}, {{value.nickname}}</text>
- </div>
- ```
-
- - `track-by`
-
- ```html
- <div repeat="{{item in items}}" track-by="item.id" class="{{gender}}"></div>
- ```
-
-* vue: v-for
-
- - 移除`$index`索引
-
- - 对象参数的改变:改为(value, key), 与通用的对象迭代器保持一致
-
- ```html
- <div repeat="{{(value, key) in list}}">
- <text>No. {{key + 1}}, {{value.nickname}}</text>
- </div>
- ```
-
- - `track-by` 替换为`v-bind`
-
- ```html
- <div v-for="item in items" v-bind:key="item.id">
- ```
-
-# 初始化数据
-
-* weex
-
- ```javascript
- data: { value: 'x' }
- ```
-
-* vue
-
- ```javascript
- props: { value: { default: 'x' } }
- ```
-
- 动态数据
-
- ```javascript
- data: function () { return { value: 'x' } }
- ```
-
-
-# 围绕DOM的实例方法
-
-* 获取节点
-
- - weex: `this.$el('xxx')`
-
- ```html
- <template>
- <container>
- <text id="top">Top</text>
- </container>
- </template>
- <script>
- module.exports = {
- methods: {
- toTop: function () {
- var top = this.$el('top')
- }
- }
- }
- </script>
- ```
-
- - vue
-
- ```javascript
- this.$refs.xxx
- ```
-
-
-
-# 事件
-* 事件绑定
- - weex
-
- ```html
- <div onclick="handler"></div>
- ```
-
- - vue
-
- ```html
- <div @click="handler"></div>
- ```
-
-* 事件触发
- - weex: dispatch和broadcast
-
- ```javascript
- this.$dispatch()
- ```
-
- ```javascript
- this.$broadcast()
- ```
-
- - vue: emit
-
- ```javascript
- this.$emit()
- ```
-
- > 注:Weex 的 `$dispatch` 与组件无关,在任意组件中都可以通过 `$on` 捕获到,Vue 的`$emit` 用于触发组件(标签)的自定义事件。
-
-* 原生事件
- - weex
-
- ```javascript
- onclick="xxx"
- ```
-
- - vue
-
- ```javascript
- @click.native="xxx"
- ```
http://git-wip-us.apache.org/repos/asf/incubator-weex-site/blob/12e3a8bc/_draft/v1.0/migration/index.md
----------------------------------------------------------------------
diff --git a/_draft/v1.0/migration/index.md b/_draft/v1.0/migration/index.md
deleted file mode 100644
index 1238936..0000000
--- a/_draft/v1.0/migration/index.md
+++ /dev/null
@@ -1,11 +0,0 @@
----
-title: 迁移
-type: references
-order: 12
-version: 2.1
----
-
-# 迁移
-
-- [如何将原有 Weex 项目改造成 Vue 版本](./migration-from-weex.html)
-- [Weex 和 Vue 2.x 的语法差异](./difference.html)
\ No newline at end of file
http://git-wip-us.apache.org/repos/asf/incubator-weex-site/blob/12e3a8bc/_draft/v1.0/migration/migration-from-weex.md
----------------------------------------------------------------------
diff --git a/_draft/v1.0/migration/migration-from-weex.md b/_draft/v1.0/migration/migration-from-weex.md
deleted file mode 100644
index 34c3c6d..0000000
--- a/_draft/v1.0/migration/migration-from-weex.md
+++ /dev/null
@@ -1,116 +0,0 @@
----
-title: 如何将原有 Weex 项目改造成 Vue 版本
-type: references
-order: 12.1
-version: 2.1
----
-
-# 如何将原有 Weex 项目改造成 Vue 版本
-
-Weex 本身有一套语法规则,和 Vue 本身很相似,现在 Weex 与 Vue 有了官方合作,支持将 Vue 2.x 作为内置的前端框架,我们也推荐大家使用 Vue 2.x 的语法开发原生应用。对于现存旧版的 `.we` 文件,建议大家将其改造成 Vue 版本。
-
-## 要解决的问题
-
-> 将内核切换成 Vue 之后,原先基于 Weex 语法开发的项目将如何过渡到 Vue ?
-
-首先需要明确一点:Weex 原有的前端框架也会继续存在于 WeexSDK 中,依然支持 `.we` 文件格式的写法。
-
-此外,由于 `.we` 和 `.vue` 文件的格式本身就比较接近,所以迁移成本比较小,建议大家将现有 `.we` 格式的文件都转换成 `.vue` 格式。我们也推出了相应的工具和方法辅助迁移,在内部也有大量的成功实践,下边将重点介绍一下将 `.we` 文件转成 `.vue` 文件的方法。
-
-## 第一步,借助工具实现语法转换
-
-首先介绍一个工具: **[weex-vue-migration](https://github.com/songsiqi/weex-vue-migration)** ,它可以自动将 `.we` 文件转为 `.vue` 文件,绝大多数的模板语法都能自动转换,语法差异如下:
-
-| | Weex | Vue |
-| ---- | ---- | --- |
-| 生命周期 | `ready: function() {}` | `mounted: function() {}` |
-| 条件指令 | `if="{% raw %}{{!foo}}{% endraw %}"` | `v-if="!foo"` |
-| 循环指令 | `repeat="{% raw %}{{item in list}}{% endraw %}"` | `v-for="item in list"` |
-| 样式类名 | `class="btn btn-{% raw %}{{type}}{% endraw %}"` | `:class="['btn', 'btn-' + type]"` |
-| 内联样式 | `style="color:{% raw %}{{textColor}}{% endraw %}"` | `:style="{ color: textColor }"` |
-| 事件绑定 | `onclick="handler"` | `@click="handler"` |
-| 原生事件 | `onclick="xxx"` | `@click.native="xxx"` |
-| 数据绑定 | `src="{% raw %}{{rightItemSrc}}{% endraw %}"` | `:src="rightItemSrc"` |
-| 内容/槽 | `<content></content>` | `<slot></slot>` |
-| 数据初始化 | `data: { value: 'x' }` | `data: function() { return { value: 'x' } }` |
-| 标签 ID | `id="xxx"` | `ref="xxx"` |
-| 获取节点 | `this.$el('xxx')` | `this.$refs.xxx` |
-
-想要了解更多语法差异的细节,可以参考这篇文章:[《Weex 和 Vue 2.x 的语法差异》](./difference.html) 。
-
-### 使用方法
-
-首先安装工具:
-
-```bash
-npm install weex-vue-migration -g
-```
-
-转换文件:
-
-```bash
-weex-vue-migrate demo.we
-```
-
-转换成功后,将会在当前目录下生成 `demo.vue` 文件,控制台将会有如下输出:
-
-```
-[Success]: Migrate demo.we => demo.vue in 33ms
-Migration finished in 0.035s
-```
-
-除了逐个转换 `.we` 文件以外,`weex-vue-migration` 还支持批量转换整个目录,参考其[说明文档](https://github.com/songsiqi/weex-vue-migration/blob/master/README.md)可以了解更详细的使用方法。
-
-### 注意事项
-
-转换工具将不再支持 Weex 中废弃的语法,如果代码中有如下写法,建议先手动修改再做转换。
-
-0. 忽略 `require('@weex-components')` 语句,可以通过 npm 包的方式引入外部组件。
-0. 无法转换 `repeat="list"` 写法,仅支持 `repeat="item in list"` 格式。
-0. 不支持转换 `<script type="config"></script>`,目前 Vue 中不支持原有的降级配置。
-
-## 第二步,手动调整代码细节
-
-模板和样式的转换都可以借助工具轻易转换过来,`<script>` 中基本的语法也可以转换;但是由于 javascript 的写法比较灵活,仅仅使用工具做转换,并不一定能完美过渡。工具只能处理语法但是理解不了代码中的逻辑,在 Weex 和 Vue 的框架特性存在一些差异,有些差异还是需要手动修改才可以生效。
-
-> 提示:在代码中使用的“黑科技”越多,项目就越难以转换。
-
-### 样式单位
-
-在 `.we` 文件写样式时,开发者通常都不写长度单位,默认会被视为 `px`。在新的 Vue 版本的 Web 渲染器中,`<style>` 中的样式将会直接转化成 CSS class,如果不写单位、浏览器将无法正确识别,会导致在 Web 端无法正常渲染。Native 环境中不受影响。
-
-尽管不影响 Native 页面的渲染,也建议给样式长度加上单位 `px`。
-
-### 旧框架中的内置属性
-
-+ `vm._app`
- + `vm._app.differ`
- + `vm._app.doc`
- + `vm._app.updateActions()`
-
-### 事件派发机制
-
-+ `$dispatch` 、`$broadcast` 、`$call` 方法已经废弃。
-+ `$emit` 行为不一致。
-
-可以使用 Vuex 管理数据状态。
-
-### 直接操作 Virtual-DOM
-
-Weex 和 Vue 中的 Virtual-DOM 格式并不相同,如果你使用了 `this.$el('id')` 获取了某个组件的 element 之后,又修改了其中的某些属性或者调用了某些方法,这些操作在 Vue 中很难找到直接的对应写法。
-
-从另一个角度讲,我们也非常不建议在 Weex 或 Vue 项目中直接操作 Virtual-DOM,这些写法都应该修改。
-
-## 调整开发环境和工具
-
-在文件转换完成后,还需要重新调整一下开发环境。
-
-### 文件的编译
-
-`weex-loader` 同时支持编译 `.we` 和 `.vue` 文件,如果你使用的是 `webpack` 来配置编译环境,将不需要做任何改变就能直接编译 `.vue` 文件。
-
-需要注意的是,Vue 本身就是一个独立的前端框架,使用 Vue 编写的项目在 Web 上完全可以不依赖 Weex 容器运行。在这种情况下,需要配置基于 `vue-loader` 的编译脚本生成适用于 Web 平台 js 文件;然后引入 Vue 格式的 Weex 组件库就可以在 Web 中。
-
-### 辅助工具
-
-Weex 提供了 [weex-toolkit](https://github.com/weexteam/weex-toolkit) 的脚手架工具来辅助开发和调试、[weex-pack](https://github.com/weexteam/weex-pack) 实现打包原生应用;同样在 Vue 中也有 [vue-cli](https://github.com/vuejs/vue-cli) 脚手架工具。Weex 和 Vue 的工具互相做了适配,建议在创建项目和开发 Vue 项目的时候使用 `vue-cli` ,在调试时使用 `weex-toolkit`,在打包原生应用时使用 `weex-pack` 。
http://git-wip-us.apache.org/repos/asf/incubator-weex-site/blob/12e3a8bc/_draft/v1.0/references/api.md
----------------------------------------------------------------------
diff --git a/_draft/v1.0/references/api.md b/_draft/v1.0/references/api.md
deleted file mode 100644
index e3e5e4b..0000000
--- a/_draft/v1.0/references/api.md
+++ /dev/null
@@ -1,67 +0,0 @@
----
-title: ViewModel APIs
-type: references
-order: 1.3
-version: 0.10
----
-
-# 接口
-
-你可以在组件的方法中通过 `this` (Vm)上下文访问这些 API。
-
-例子:
-
-```html
-<script>
-module.exports = {
- methods: {
- somemethod: function() {
- this.$vm('someId');
- }
- }
-}
-</script>
-```
-
-## $(id)
-
-**不建议使用**,请使用 `$vm` 代替。
-## $el(id)
-
-返回对应 id 的元素对象的引用。
-### Arguments
-- `id` _(string)_: 唯一标识符。
-### Returns
-- _(Element)_: 一个元素对象的引用。
-### Tips
-- id 只能保证是当前(页面)组件中是唯一的,如果你需要寻找父组件或子组件,你可以利用组件间的通信模式实现。
-- 延伸阅读: [id](../guide/syntax/id.md),[Communicate Between Components](../guide/syntax/comm.md)
-## $vm(id)
-
-返回对应 id 的 vm 对象引用。
-### Arguments
-- `id` _(String)_: 唯一标识符。
-### Returns
-- `vm` _(Vm)_: 一个 Vm 对象引用。
-### Tips
-- id 只能保证是当前(页面)组件中是唯一的,如果你需要寻找父组件或子组件,你可以利用组件间的通信模式实现。
-- 延伸阅读: [id](../guide/syntax/id.md),[Communicate Between Components](../guide/syntax/comm.md)
-## $getConfig()
-
-获取当前全局环境变量和配置信息。
-### Returns
-- `config` _(object)_: 配置对象;
-- `bundleUrl` _(string)_: bundle 的 url;
-- `debug` _(boolean)_: 是否是调试模式;
-- `env` _(object)_: 环境对象;
- - `weexVersion` _(string)_: Weex sdk 版本;
- - `appName` _(string)_: 应用名字;
- - `appVersion` _(string)_: 应用版本;
- - `platform` _(string)_: 平台信息,是 `iOS`、`Android` 还是 `Web`;
- - `osVersion` _(string)_: 系统版本;
- - `deviceModel` _(string)_: 设备型号 **(仅原生应用)**;
- - `deviceWidth` _(number)_: 设备宽度,默认为 `750`;
- - `deviceHeight` _(number)_: 设备高度。
-## $call(module, method, ...args)
-
-**不建议使用**,请使用 `require('@weex-module/module')[method](...args)` 代替。查看更多信息:[modules](./modules/main)。
http://git-wip-us.apache.org/repos/asf/incubator-weex-site/blob/12e3a8bc/_draft/v1.0/references/bubble.md
----------------------------------------------------------------------
diff --git a/_draft/v1.0/references/bubble.md b/_draft/v1.0/references/bubble.md
deleted file mode 100644
index 74b7e98..0000000
--- a/_draft/v1.0/references/bubble.md
+++ /dev/null
@@ -1,150 +0,0 @@
----
-title: 事件冒泡
-type: references
-order: 1.3
-version: 0.10
----
-
-# 事件冒泡 <span class="api-version">v0.13+</span>
-
-Weex 1.0 实现了 W3C 标准的事件冒泡机制。
-
-### 使用
-
-```html
-<template>
- <div class="root" onclick="rootClick" bubble="true">
- <div>
- <text style="font-size: 40px;">{{rootText}}</text>
- </div>
- <div class="outer" onclick="parentClick">
- <div>
- <text style="font-size: 40px;">{{parentText}}</text>
- </div>
- <text class="inner" onclick="click">{{innerText}}</text>
- </div>
- </div>
-</template>
-
-<script>
- module.exports = {
- data: {
- innerText: 'click me',
- parentText: '',
- rootText: ''
- },
- methods: {
- click: function(e) {
- this.innerText = 'inner bubble'
- },
- parentClick: function(e) {
- this.parentText = 'parent bubble'
- },
- rootClick: function(e) {
- this.rootText = 'root bubble'
- }
- }
- }
-</script>
-
-<style>
- .inner {
- font-size: 40px;
- text-align: center;
- background-color: #7a9b1b;
- padding: 40px;
- }
-
- .outer {
- font-size: 40px;
- text-align: center;
- background-color: #9b7a1b;
- padding: 120px;
- }
-
- .root {
- font-size: 40px;
- text-align: center;
- background-color: #7a1b9b;
- padding: 80px;
- }
-</style>
-```
-
-[try it](http://dotwe.org/weex/dbfeb926e003986e2eea88c8ccdadb92)
-
-运行以上代码,用客户端打开,点击中间的元素,可以看到事件向上传播,依次触发。
-
-### 注意
-
-需要注意的是: ** 为了兼容之前的版本,Weex 默认不会开启事件冒泡机制。需要在根元素的属性上,添加 `bubble="true"` 来开启冒泡机制。否则,将不会向上传播事件,保持与之前版本的效果相同。 **
-
-### stopPropagation
-
-在事件处理函数中,可以使用 `e.stopPropagation()` 方法,来阻止本次事件向上的传递过程。注意,`e.stopPropagation()` 与 `bubble="true"` 不同,前者只会影响当前元素以及父元素的传播,不会影响子元素的传播;后者是为了版本兼容而增加的开关机制,会全局关闭或者开启冒泡机制,两者可以共同存在使用,如下:
-
-```html
-<template>
- <div class="root" onclick="rootClick" bubble="true">
- <div>
- <text style="font-size: 40px;">{{rootText}}</text>
- </div>
- <div class="outer" onclick="parentClick">
- <div>
- <text style="font-size: 40px;">{{parentText}}</text>
- </div>
- <text class="inner" onclick="click">{{innerText}}</text>
- </div>
- </div>
-</template>
-
-<script>
- module.exports = {
- data: {
- innerText: 'click me',
- parentText: '',
- rootText: ''
- },
- methods: {
- click: function(e) {
- this.innerText = 'inner bubble'
- },
- parentClick: function(e) {
- this.parentText = 'parent bubble'
- e.stopPropagation()
- },
- rootClick: function(e) {
- this.rootText = 'root bubble'
- // e.stopPropagation()
- }
- }
- }
-</script>
-
-<style>
- .inner {
- font-size: 40px;
- text-align: center;
- background-color: #7a9b1b;
- padding: 40px;
- }
-
- .outer {
- font-size: 40px;
- text-align: center;
- background-color: #9b7a1b;
- padding: 120px;
- }
-
- .root {
- font-size: 40px;
- text-align: center;
- background-color: #7a1b9b;
- padding: 80px;
- }
-</style>
-```
-
-[try it](http://dotwe.org/weex/0cab45a7c62e8bebedd2ffd83a8e1256)
-
-运行以上代码,用客户端打开,点击中间的元素,可以看到事件向上传播到父元素被终止,不再继续往根元素传播。
http://git-wip-us.apache.org/repos/asf/incubator-weex-site/blob/12e3a8bc/_draft/v1.0/references/cheatsheet.md
----------------------------------------------------------------------
diff --git a/_draft/v1.0/references/cheatsheet.md b/_draft/v1.0/references/cheatsheet.md
deleted file mode 100644
index 777abf6..0000000
--- a/_draft/v1.0/references/cheatsheet.md
+++ /dev/null
@@ -1,114 +0,0 @@
----
-title: Weex 快查手册
-type: references
-order: 6
-version: 0.10
----
-
-# Weex 备忘录
-
-## Native 组件
-<style>
-code {
- word-break: break-all;
-}
-</style>
-
-| 组件 | 特性 | 样式 | 事件 | 特殊父组件 | 子组件 |
-| ---- | ---- | ---- | ---- | ---- | ---- |
-| `<div>` | - | **box model**<br>**flexbox**<br>`position`<br>`background-color`<br>`opacity` | `click`<br>`appear`<br>`disappear` | - | (any) |
-| `<text>` | `value` | **box model**<br>flex<br>`position`<br>`background-color`<br>`opacity`<br>`color`<br>`font-size`<br>`font-style`<br>`font-weight`<br>`text-decoration`<br>`text-align`<br>`text-overflow`<br>`line-height` | `click`<br>`appear`<br>`disappear` | - | text only |
-| `<image>` | `src` | **box model**<br>**flexbox**<br>`position`<br>`background-color`<br>`opacity`<br>`resize` | `click`<br>`appear`<br>`disappear` | - | (none) |
-| `<scroller>` | `show-scrollbar`<br>`scroll-direction` | **box model**<br>**flexbox**<br>`position`<br>`background-color`<br>`opacity` | `click`<br>`appear`<br>`disappear` | - | (any) |
-| `<list>` | `loadmoreoffset` | **box model**<br>**flexbox**<br>`position`<br>`background-color`<br>`opacity` | `click`<br>`appear`<br>`disappear`<br>`loadmore`<br>`refresh`<br>`loading` | - | `<cell>`<br>`<header>`<br>`<refresh>`<br>`<loading>` |
-| `<cell>` | - | **box model**<br>**flexbox**<br>`position`<br>`background-color`<br>`opacity` | `click`<br>`appear`<br>`disappear` | `<list>` | (any) |
-| `<slider>` | `auto-play` | **box model**<br>**flexbox**<br>`position`<br>`background-color`<br>`opacity` | `click`<br>`appear`<br>`disappear`<br>`change` | - | (any)<br>`<indicator>` |
-| `<indicator>` | - | **box model**<br>**flexbox**<br>`position`<br>`item-color`<br>`item-selected-color`<br>`item-size` | `click`<br>`appear`<br>`disappear` | `<slider>` | (none) |
-| `<wxc-navpage>` | `height`<br>`background-color`<br>`title`<br>`title-color`<br>`left-item-title`<br>`left-item-color`<br>`right-item-title`<br>`right-item-color`<br>`left-item-src`<br>`right-item-src` | **box model**<br>**flexbox**<br>`position`<br>`background-color`<br>`opacity` | `click`<br>`appear`<br>`disappear`<br>`naviBar.leftItem.click`<br>`naviBar.rightItem.click` | - | (any) |
-| `<wxc-tabbar>` | `tab-items` | **box model**<br>**flexbox**<br>`position`<br>`background-color`<br>`opacity` | `tabBar.onClick` | - | (none) |
-| `<embed>` | `src` | **box model**<br>**flexbox**<br>`position`<br>`background-color`<br>`opacity` | `click`<br>`appear`<br>`disappear` | - | (none) |
-| `<web>` | `src` | **box model**<br>**flexbox**<br>`position`<br>`background-color`<br>`opacity` | `click`<br>`appear`<br>`disappear`<br>`pagestart`<br>`pagefinish`<br>`error` | - | (none) |
-| `<video>` | `src`<br>`play-status`<br>`auto-play` | **box model**<br>**flexbox**<br>`position`<br>`background-color`<br>`opacity` | `click`<br>`appear`<br>`disappear`<br>`start`<br>`pause`<br>`finish`<br>`fail` | - | (none) |
-| `<a>` | `href` | **box model**<br>**flexbox**<br>`position`<br>`background-color`<br>`opacity` | `click`<br>`appear`<br>`disappear` | - | (any) |
-| `<input>` | `type`<br>`value`<br>`placeholder`<br>`disabled`<br>`autofocus` | **box model**<br>**flexbox**<br>`position`<br>`background-color`<br>`opacity`<br>`placeholder-color`<br>`color`<br>`font-size`<br>`font-style`<br>`font-weight`<br>`text-align` | `click`<br>`appear`<br>`disappear` | - | (none) |
-| `<switch>` | `checked` | **box model**<br>**flexbox**<br>`position`<br>`background-color`<br>`opacity` | `appear`<br>`disappear`<br>`input`<br>`change`<br>`focus`<br>`blur` | - | (none) |
-
-## Native Modules
-
-| module | apis |
-| ---- | ---- |
-| `@weex-module/dom` | `scrollToElement(node, { offset })` |
-| `@weex-module/modal` | `toast({ message, duration })`<br>`alert({ message, okTitle }, callback)`<br>`confirm({ message, okTitle, cancelTitle }, callback(result))`<br>`prompt({ message, okTitle, cancelTitle }, callback(result, data))` |
-| `@weex-module/stream` | `fetch({ method, url, headers, type, body }, callback({ status, ok, statusText, data, headers }), progressCallback({ readyState, status, length, statusText, headers}))` |
-| `@weex-module/webview` | `goBack(ref)`<br>`goForward(ref)`<br>`reload(ref)` |
-| `@weex-module/navigator` | `push({ url, animated }, callback)`<br>`pop({ animated }, callback)` |
-| `@weex-module/animation` | `transition(node, { styles, duration, timingFunction, delay, transform-origin }, callback)` |
-
-## 特殊的模版语法
-
-* `<foo x="abc">`
-* `{% raw %}<foo x="{{expr}}">{% endraw %}`
-* `<foo style="name1: value1; name2: value2">`
-* `{% raw %}<foo style="name1: value1; name2: {{expr}}; name3: ...">{% endraw %}`
-* `<foo class="a b c">`
-* `{% raw %}<foo class="a {{expr}} c">{% endraw %}`
-* `<foo onclick="methodName">`
-* `<foo id="abc">`
-* `<foo if="expr">`
-* `<foo repeat="item in list">`
-* `<foo repeat="(key,item) in list">`
-* `<component type="foo">`
-* `{% raw %}<component type="{{expr}}">{% endraw %}`
-
-## ViewModel APIs
-
-* `this.$vm(el)`
-* `this.$el(el)`
-* `this.$getConfig()`
-* `this.$emit(type, data)`
-* `this.$dispatch(type, data)`
-* `this.$broadcast(type, data)`
-
-## ViewModel Options
-
-* `data`
-* `methods`
-* `computed`
-* `init`, `created`, `ready`
-* `events`
-
-**示例:**
-
-```javascript
-module.exports = {
-
- data: function () {
- return {
- x: 1,
- y: 2
- }
- }
-
- methods: {
- foo: function () {
- console.log('foo')
- }
- },
-
- computed: {
- z: function () {
- return this.x + this.y
- }
- },
-
- events: {
- custom: function (e) {
- console.log(e)
- }
- },
-
- init: function () {},
- created: function () {},
- ready: function () {}
-}
-```
http://git-wip-us.apache.org/repos/asf/incubator-weex-site/blob/12e3a8bc/_draft/v1.0/references/color-names.md
----------------------------------------------------------------------
diff --git a/_draft/v1.0/references/color-names.md b/_draft/v1.0/references/color-names.md
deleted file mode 100644
index 1b8a968..0000000
--- a/_draft/v1.0/references/color-names.md
+++ /dev/null
@@ -1,180 +0,0 @@
----
-title: 颜色名称列表
-type: references
-order: 1.8
-version: 0.10
----
-
-# Weex 支持的所有颜色名称
-
-### 基础颜色关键词:
-
-| 颜色名 | 十六进制RGB值 |
-| --- | --- |
-| black(黑) | #000000 |
-| silver(银) | #C0C0C0 |
-| gray(灰) | #808080 |
-| white(白) | #FFFFFF |
-| maroon(褐紫红) | #800000 |
-| red(红) | #FF0000 |
-| purple(紫) | #800080 |
-| fuchsia(晚樱) | #FF00FF |
-| green(绿) | #008000 |
-| lime(石灰) | #00FF00 |
-| olive(橄榄) | #808000 |
-| yellow(黄) | #FFFF00 |
-| navy(海军蓝) | #000080 |
-| blue(蓝) | #0000FF |
-| teal(水鸭) | #008080 |
-| aqua(水蓝) | #00FFFF |
-### 扩展颜色关键词:
-
-| 颜色名 | 十六进制RGB值 |
-| --- | --- |
-| aliceblue | #F0F8FF |
-| antiquewhite | #FAEBD7 |
-| aqua | #00FFFF |
-| aquamarine | #7FFFD4 |
-| azure | #F0FFFF |
-| beige | #F5F5DC |
-| bisque | #FFE4C4 |
-| black | #000000 |
-| blanchedalmond | #FFEBCD |
-| blue | #0000FF |
-| blueviolet | #8A2BE2 |
-| brown | #A52A2A |
-| burlywood | #DEB887 |
-| cadetblue | #5F9EA0 |
-| chartreuse | #7FFF00 |
-| chocolate | #D2691E |
-| coral | #FF7F50 |
-| cornflowerblue | #6495ED |
-| cornsilk | #FFF8DC |
-| crimson | #DC143C |
-| cyan | #00FFFF |
-| darkblue | #00008B |
-| darkcyan | #008B8B |
-| darkgoldenrod | #B8860B |
-| darkgray | #A9A9A9 |
-| darkgreen | #006400 |
-| darkgrey | #A9A9A9 |
-| darkkhaki | #BDB76B |
-| darkmagenta | #8B008B |
-| darkolivegreen | #556B2F |
-| darkorange | #FF8C00 |
-| darkorchid | #9932CC |
-| darkred | #8B0000 |
-| darksalmon | #E9967A |
-| darkseagreen | #8FBC8F |
-| darkslateblue | #483D8B |
-| darkslategray | #2F4F4F |
-| darkslategrey | #2F4F4F |
-| darkturquoise | #00CED1 |
-| darkviolet | #9400D3 |
-| deeppink | #FF1493 |
-| deepskyblue | #00BFFF |
-| dimgray | #696969 |
-| dimgrey | #696969 |
-| dodgerblue | #1E90FF |
-| firebrick | #B22222 |
-| floralwhite | #FFFAF0 |
-| forestgreen | #228B22 |
-| fuchsia | #FF00FF |
-| gainsboro | #DCDCDC |
-| ghostwhite | #F8F8FF |
-| gold | #FFD700 |
-| goldenrod | #DAA520 |
-| gray | #808080 |
-| green | #008000 |
-| greenyellow | #ADFF2F |
-| grey | #808080 |
-| honeydew | #F0FFF0 |
-| hotpink | #FF69B4 |
-| indianred | #CD5C5C |
-| indigo | #4B0082 |
-| ivory | #FFFFF0 |
-| khaki | #F0E68C |
-| lavender | #E6E6FA |
-| lavenderblush | #FFF0F5 |
-| lawngreen | #7CFC00 |
-| lemonchiffon | #FFFACD |
-| lightblue | #ADD8E6 |
-| lightcoral | #F08080 |
-| lightcyan | #E0FFFF |
-| lightgoldenrodyellow | #FAFAD2 |
-| lightgray | #D3D3D3 |
-| lightgreen | #90EE90 |
-| lightgrey | #D3D3D3 |
-| lightpink | #FFB6C1 |
-| lightsalmon | #FFA07A |
-| lightseagreen | #20B2AA |
-| lightskyblue | #87CEFA |
-| lightslategray | #778899 |
-| lightslategrey | #778899 |
-| lightsteelblue | #B0C4DE |
-| lightyellow | #FFFFE0 |
-| lime | #00FF00 |
-| limegreen | #32CD32 |
-| linen | #FAF0E6 |
-| magenta | #FF00FF |
-| maroon | #800000 |
-| mediumaquamarine | #66CDAA |
-| mediumblue | #0000CD |
-| mediumorchid | #BA55D3 |
-| mediumpurple | #9370DB |
-| mediumseagreen | #3CB371 |
-| mediumslateblue | #7B68EE |
-| mediumspringgreen | #00FA9A |
-| mediumturquoise | #48D1CC |
-| mediumvioletred | #C71585 |
-| midnightblue | #191970 |
-| mintcream | #F5FFFA |
-| mistyrose | #FFE4E1 |
-| moccasin | #FFE4B5 |
-| navajowhite | #FFDEAD |
-| navy | #000080 |
-| oldlace | #FDF5E6 |
-| olive | #808000 |
-| olivedrab | #6B8E23 |
-| orange | #FFA500 |
-| orangered | #FF4500 |
-| orchid | #DA70D6 |
-| palegoldenrod | #EEE8AA |
-| palegreen | #98FB98 |
-| paleturquoise | #AFEEEE |
-| palevioletred | #DB7093 |
-| papayawhip | #FFEFD5 |
-| peachpuff | #FFDAB9 |
-| peru | #CD853F |
-| pink | #FFC0CB |
-| plum | #DDA0DD |
-| powderblue | #B0E0E6 |
-| purple | #800080 |
-| red | #FF0000 |
-| rosybrown | #BC8F8F |
-| royalblue | #4169E1 |
-| saddlebrown | #8B4513 |
-| salmon | #FA8072 |
-| sandybrown | #F4A460 |
-| seagreen | #2E8B57 |
-| seashell | #FFF5EE |
-| sienna | #A0522D |
-| silver | #C0C0C0 |
-| skyblue | #87CEEB |
-| slateblue | #6A5ACD |
-| slategray | #708090 |
-| slategrey | #708090 |
-| snow | #FFFAFA |
-| springgreen | #00FF7F |
-| steelblue | #4682B4 |
-| tan | #D2B48C |
-| teal | #008080 |
-| thistle | #D8BFD8 |
-| tomato | #FF6347 |
-| turquoise | #40E0D0 |
-| violet | #EE82EE |
-| wheat | #F5DEB3 |
-| white | #FFFFFF |
-| whitesmoke | #F5F5F5 |
-| yellow | #FFFF00 |
-| yellowgreen | #9ACD32 |
http://git-wip-us.apache.org/repos/asf/incubator-weex-site/blob/12e3a8bc/_draft/v1.0/references/common-attrs.md
----------------------------------------------------------------------
diff --git a/_draft/v1.0/references/common-attrs.md b/_draft/v1.0/references/common-attrs.md
deleted file mode 100644
index 8ac1c0f..0000000
--- a/_draft/v1.0/references/common-attrs.md
+++ /dev/null
@@ -1,166 +0,0 @@
----
-title: 通用特性
-type: references
-order: 1.5
-version: 0.10
----
-
-# 通用特性
-
-特性(attribute)与 HTML 中元素特性类似,提供了与 Weex 元素有关的其他附加信息。所有的元素都可以拥有特性, 特性总是在 Weex 元素的起始标签中定义,并总是以键值对的形式出现,例如:`name="value"`。可以使用 [Mustache](https://mustache.github.io/) 对特性值进行数据绑定。
-
-**Notes!**
-
-Weex 遵循 [HTML attribute](https://en.wikipedia.org/wiki/HTML_attribute) 命名规范, 所以请 **不要在特性中使用驼峰风格(CamelCase)** , 使用`-`连接符的**羊肉串风格(kebab-case)** 才是更好的命名方式。
-
-所有 Weex 元素都拥有以下特性:
-
-## id
-
-为 `<template>` 内定义的元素指定一个唯一的 id,通过 `this.$el(id)` 可以容易地获取一个 Weex 元素的引用。更多信息可参考 [Instance APIs](./api.html)
-
-```html
-<template>
- <div id="wrapper">
- <list class="list">
- <cell class="row" repeat="item in rows" id="item-{{$index}}">
- <text class="item-title">row {{item.id}}</text>
- </cell>
- </list>
- </div>
-</template>
-<style></style>
-
-<script>
-module.exports = {
- data: {
- rows:[
- {id: 1},
- {id: 2},
- {id: 3},
- {id: 4},
- {id: 5}
- ]
- }
-}
-</script>
-```
-
-[体验一下](http://dotwe.org/b5032fa96e3e657711916148b1978ad3)
-
-## style
-
-为元素定义行内样式。
-
-```html
-<div style="width: 200px; height: 200px; color: #ff0000;"></div>
-<div style="padding: {{x}}; margin: 0"></div>
-```
-
-## class
-
-为元素定义一个或多个类名(引用样式表中的类)。
-
-```html
-<div class="button"></div>
-<div class="button {{btnStatus}}"></div>
-```
-
-## repeat
-
-我们可以通过 `repeat` 特性根据一个数组进行渲染,迭代地生成当前标签的内容。`repeat` 特性有着 `item in items` 形式的特殊语法,其中,`items` 是数组数据,`item` 是数组元素迭代的别名。
-
-```html
-<template>
- <div>
- <list class="list">
- <cell class="row" repeat="item in rows" id="item-{{$index}}">
- <text class="item-title">row {{item.id}}</text>
- </cell>
- </list>
- </div>
-</template>
-
-<style></style>
-
-<script>
-module.exports = {
- data: {
- rows:[
- {id: 1},
- {id: 2},
- {id: 3},
- {id: 4},
- {id: 5}
- ]
- }
-}
-</script>
-```
-
-[体验一下](http://dotwe.org/b5032fa96e3e657711916148b1978ad3)
-
-## if
-
-提供一个布尔值来决定是否显示当前标签。当值为 `true` 时,元素显示,为 `false` 时元素隐藏。
-
-```html
-<div if="true"></div>
-<div if="{{opened}}"></div>
-<div if="{{direction === 'row'}}"></div>
-```
-
-## append
-
-append 特性用于控制渲染次序。它的可选值为 `tree` 或 `node`,默认为 `tree`,不支持数据绑定。不同的值会执行不同的渲染过程:
-
-- `append="tree"` 是一次性渲染整个节点树,渲染更高效,但是如果页面太大容易造成较长时间的白屏。
-- `append="node"` 所有节点逐个渲染,整体渲染速度略慢,但是用户体验好一些。
-
-通过 `node` 和 `tree` 可以精细化地控制页面展示的逻辑和颗粒度,一般比较好的实践为首屏以内按 `tree` 解析,首屏以外按 `node` 解析。
-
-```html
-<div append="tree"></div>
-<div append="node"></div>
-```
-
-## 事件处理 (on...)
-
-在 Weex 标签上注册事件处理器。以 `on` 加 事件名为 `key`,事件处理函数为 `value`。
-
-```html
-<template>
- <div class="btn" onClick="alertMsg"><text>Click me</text></div>
-</template>
-
-<style>
-.btn {
- justify-content: center;
- align-items: center;
- width: 200;
- height: 100;
- background-color: #ff0000;
- border-radius: 5;
- color: #ffffff;
-}
-</style>
-
-<script>
-var modal = require('@weex-module/modal')
-
-module.exports = {
- data: {},
- methods: {
- alertMsg: function (e) {
- modal.alert({
- message: 'click',
- okTitle: 'alert'
- }, function() {
- })
- }
- }
-}
-</script>
-```
-
-[体验一下](http://dotwe.org/97de59d24d7667aa91187d59123d24a6)
[05/51] [abbrv] incubator-weex-site git commit: rearrangement the
structure of the document
Posted by ha...@apache.org.
http://git-wip-us.apache.org/repos/asf/incubator-weex-site/blob/32a097bf/source/references/web-standards.md
----------------------------------------------------------------------
diff --git a/source/references/web-standards.md b/source/references/web-standards.md
deleted file mode 100644
index 906ff76..0000000
--- a/source/references/web-standards.md
+++ /dev/null
@@ -1,584 +0,0 @@
----
-title: Web standards
-type: references
-order: 8
-version: 2.1
-has_chapter_content: true
----
-
-# Web standards
-
-## HTML
-
-refs: https://www.advancedwebranking.com/html/ 2016-12-11
-
-### Overview
-
-| percentage | name | supported |
-| ---- | ---- | ---- |
-| 98.1% | `<head>` | - |
-| 97.9% | `<body>` | - |
-| 97.9% | `<html>` | - |
-| 97% | `<title>` | - |
-| 93.9% | `<meta>` | - |
-| 89.9% | `<div>` | ✓ |
-| 89.6% | `<a>` | ✓ |
-| 88.5% | `<script>` | ✓ |
-| 86.5% | `<link>` | - |
-| 86.3% | `<img>` | ✓ |
-| 81.5% | `<p>` | - (can be customized) |
-| 75.6% | `<span>` | - (can be customized) |
-| 73.8% | `<li>` | - (can be customized) |
-| 73.7% | `<ul>` | - (can be customized) |
-| 70.3% | `<br>` | ✕ |
-| 60.4% | `<style>` | ✓ |
-| 55.8% | `<h1>` | - (can be customized) |
-| 52.7% | `<h2>` | - (can be customized) |
-| 48.4% | `<input>` | ✓ |
-| 46.9% | `<form>` | ✕ |
-| 44.3% | `<strong>` | - (can be customized) |
-| 43.1% | `<h3>` | - (can be customized) |
-| 30.9% | `<table>` | ✕ |
-| 30.3% | `<tr>` | ✕ |
-| 30.2% | `<td>` | ✕ |
-
-### Forms
-
-| percentage | name | supported |
-| ---- | ---- | ---- |
-| 49.5% | `<option>` | ✕ |
-| 30.2% | `<input>` | ✓ |
-| 16.6% | > `[type="hidden"]` | - |
-| 8% | > `[type="text"]` | ✓ |
-| 4.2% | > `[type="submit"]` | - |
-| 2% | > `[type="checkbox"]` | - (`<switch>`) |
-| 1.2% | > `[type="email"]` | ✓ |
-| 1.1% | > `[type="radio"]` | ✕ |
-| 0.9% | > `[type="image"]` | - |
-| 0.8% | > `[type="button"]` | - |
-| 0.6% | > `[type="search"]` | ✕ |
-| 0.6% | > `[type="password"]` | ✓ |
-| 0.1% | > `[type="tel"]` | ✓ |
-| 0.1% | > `[type="number"]` | ✓ |
-| 0% | > `[type="reset"]` | - |
-| 0% | > `[type="file"]` | ✕ |
-| 0% | > `[type="date"]` | ✓ |
-| 0% | > `[type="url"]` | ✓ |
-| 0% | > `[type="range"]` | ✕ |
-| 0% | > `[type="color"]` | ✕ |
-| 0% | > `[type="time"]` | ✓ |
-| 0% | > `[type="datetime-local"]` | ✕ |
-| 7.2% | `<label>` | - |
-| 6.1% | `<form>` | - |
-| 3.7% | `<button>` | - (can be customized) |
-| 2.6% | > `[type="button"]` | - |
-| 1.3% | > `[type="submit"]` | - |
-| 0% | > `[type="reset"]` | - |
-| 1.9% | `<select>` | ✕ |
-| 0.7% | `<textarea>` | ✓ |
-| 0.5% | `<fieldset>` | - |
-| 0.1% | `<optgroup>` | ✕ |
-| 0.1% | `<legend>` | - |
-| 0% | `<progress>` | ✕ |
-| 0% | `<datalist>` | - |
-| 0% | `<output>` | - |
-| 0% | `<meter>` | - |
-
-## CSS Properties
-
-refs: https://www.chromestatus.com/metrics/feature/popularity 2016-12-11
-
-| percentage | name | supported |
-| ---- | ---- | ---- |
-| 90.5115% | display | ✕ `flex` only |
-| 89.8243% | margin | ✓ (not support combo) |
-| 88.7012% | width | ✓ |
-| 88.6468% | overflow | ✓ iOS only, `hidden` only for Android |
-| 88.6432% | background-color | ✓ |
-| 88.0803% | height | ✓ |
-| 87.7648% | font-size | ✓ |
-| 87.3837% | padding | ✓ |
-| 87.2721% | color | ✓ |
-| 86.9788% | text-align | ✓ |
-| 86.6841% | position | ✓ `relative` by default, `static` not supported |
-| 86.6039% | font-family | ✓ |
-| 86.5943% | font-weight | ✓ |
-| 85.0072% | opacity | ✓ |
-| 80.6911% | max-width | ✕ |
-| 79.4476% | box-sizing | ✕ `border-box` only |
-| 75.7623% | max-height | ✕ |
-| 74.9939% | webkit-user-select | ✕ |
-| 57.0292% | align-items | ✓ |
-| 56.8182% | justify-content | ✓ `space-around` not supported well in browser |
-| 50.5941% | flex-direction | ✓ |
-| 48.5052% | border | ✓ |
-| 47.5161% | top | ✓ |
-| 46.9136% | background | ✕ |
-| 46.1552% | cursor | ✕ |
-| 46.1443% | margin-left | ✓ |
-| 46.0956% | left | ✓ |
-| 46.0848% | text-decoration | ✓ |
-| 45.9575% | float | ✕ |
-| 45.8391% | border-bottom | ✓ |
-| 45.7639% | padding-left | ✓ |
-| 45.7128% | margin-top | ✓ |
-| 45.7013% | line-height | ✓ |
-| 45.5836% | background-image | ✕ |
-| 45.0837% | z-index | ✕ |
-| 45.0649% | right | ✓ |
-| 45.0516% | margin-bottom | ✓ |
-| 45.0459% | white-space | ✕ |
-| 44.8710% | margin-right | ✓ |
-| 44.8476% | vertical-align | ✕ |
-| 44.6306% | padding-top | ✓ |
-| 44.1466% | border-radius | ✓ |
-| 44.0136% | border-top | ✓ |
-| 43.9815% | padding-bottom | ✓ |
-| 43.9392% | padding-right | ✓ |
-| 43.8539% | visibility | ✕ |
-| 43.4306% | background-position | ✕ |
-| 43.4098% | background-repeat | ✕ |
-| 43.0391% | clear | ✕ |
-| 42.9100% | bottom | ✓ |
-| 42.2092% | content | ✕ |
-| 42.0690% | box-shadow | ✕ |
-| 41.9004% | border-color | ✓ |
-| 41.7341% | outline | ✕ |
-| 41.4297% | border-right | ✓ |
-| 41.2605% | border-left | ✓ |
-| 41.1127% | min-height | ✕ |
-| 41.0736% | font-style | ✓ |
-| 41.0523% | min-width | ✕ |
-| 40.4298% | list-style | ✕ |
-| 39.7341% | font | ✕ |
-| 38.8999% | background-size | ✕ |
-| 38.7811% | border-width | ✓ |
-| 38.7718% | border-collapse | ✕ |
-| 37.8110% | border-style | ✓ |
-| 37.4962% | text-overflow | ✓ must work with `lines` |
-| 37.3471% | text-transform | ✕ |
-| 37.2154% | transition | ✕ |
-| 36.5155% | overflow-y | ✕ |
-| 36.3025% | transform | ✕ |
-| 36.2488% | text-indent | ✕ |
-| 35.5075% | text-shadow | ✕ |
-| 34.7607% | webkit-appearance | ✕ |
-| 34.1925% | list-style-type | ✕ |
-| 34.0238% | border-spacing | ✕ |
-| 33.6664% | word-wrap | ✕ |
-| 31.9961% | overflow-x | ✕ |
-| 31.9922% | zoom | ✕ |
-| 31.2495% | border-bottom-left-radius | ✕ |
-| 31.1306% | pointer-events | ✕ |
-| 31.1229% | border-top-left-radius | ✕ |
-| 30.2131% | border-bottom-color | ✓ |
-| 29.9608% | border-top-color | ✓ |
-| 29.4297% | border-bottom-right-radius | ✕ |
-| 29.2668% | border-top-right-radius | ✕ |
-| 28.6489% | letter-spacing | ✕ |
-| 27.8327% | animation | ✕ |
-| 26.6738% | border-right-width | ✓ |
-| 26.0169% | src | ✕ |
-| 25.2661% | clip | ✕ |
-| 25.2512% | webkit-font-smoothing | ✕ |
-| 25.1971% | border-bottom-width | ✓ |
-| 25.0246% | border-right-color | ✓ |
-| 24.7790% | direction | ✕ |
-| 24.4094% | webkit-tap-highlight-color | ✕ |
-| 23.9751% | border-left-color | ✓ |
-| 23.9321% | border-top-width | ✓ |
-| 23.7902% | fill | ✕ |
-| 23.2617% | border-left-width | ✓ |
-| 22.7278% | table-layout | ✕ |
-| 21.5766% | word-break | ✕ |
-| 20.4319% | background-clip | ✕ |
-| 19.3198% | transform-origin | ✕ |
-| 18.9233% | filter | ✕ |
-| 17.7879% | resize | ✕ |
-| 16.2501% | flex | ✕ |
-| 15.1656% | font-variant | ✕ |
-| 14.9181% | text-rendering | ✕ |
-| 14.7125% | webkit-filter | ✕ |
-| 14.5263% | transition-duration | ✕ |
-| 14.3966% | transition-property | ✕ |
-| 14.2124% | webkit-box-orient | ✕ |
-| 13.5432% | outline-offset | ✕ |
-| 12.9300% | transition-timing-function | ✕ |
-| 12.2788% | unicode-range | ✕ |
-| 12.0880% | word-spacing | ✕ |
-| 11.9124% | quotes | ✕ |
-| 11.6800% | border-bottom-style | ✓ |
-| 11.4263% | webkit-background-clip | ✕ |
-| 11.0070% | flex-grow | ✕ |
-| 10.5925% | backface-visibility | ✕ |
-| 10.4417% | animation-name | ✕ |
-| 10.4302% | stroke | ✕ |
-| 10.4144% | animation-duration | ✕ |
-| 10.2804% | touch-action | ✕ |
-| 9.9663% | list-style-position | ✕ |
-| 9.8662% | order | ✕ |
-| 9.7770% | outline-width | ✕ |
-| 9.7504% | transition-delay | ✕ |
-| 9.4689% | border-top-style | ✓ |
-| 9.3474% | webkit-box-pack | ✕ |
-| 9.3078% | webkit-box-align | ✕ |
-| 9.2375% | page-break-inside | ✕ |
-| 9.1898% | webkit-line-clamp | ✕ |
-| 8.9350% | list-style-image | ✕ |
-| 8.8339% | page-break-after | ✕ |
-| 8.5735% | speak | ✕ |
-| 8.4754% | unicode-bidi | ✕ |
-| 8.4307% | animation-timing-function | ✕ |
-| 8.1464% | webkit-box-flex | ✕ |
-| 8.0048% | orphans | ✕ |
-| 7.9947% | widows | ✕ |
-| 7.6671% | flex-wrap | ✓ not supported well in browser |
-| 7.5756% | animation-fill-mode | ✕ |
-| 7.4163% | animation-delay | ✕ |
-| 7.3284% | border-left-style | ✓ |
-| 7.1586% | outline-color | ✕ |
-| 6.9102% | flex-shrink | ✕ |
-| 6.7754% | perspective | ✕ |
-| 6.7748% | border-right-style | ✓ |
-| 6.4619% | outline-style | ✕ |
-| 6.0382% | animation-iteration-count | ✕ |
-| 5.9838% | background-origin | ✕ |
-| 5.9714% | fill-opacity | ✕ |
-| 5.9357% | will-change | ✕ |
-| 5.3740% | stroke-width | ✕ |
-| 5.3172% | transform-style | ✕ |
-| 5.2608% | overflow-wrap | ✕ |
-| 5.1730% | background-attachment | ✕ |
-| 4.9039% | counter-increment | ✕ |
-| 4.5950% | counter-reset | ✕ |
-| 4.5031% | align-self | ✕ |
-| 4.4109% | webkit-box-ordinal-group | ✕ |
-| 4.4046% | webkit-animation-direction | ✕ |
-| 3.7598% | background-position-x | ✕ |
-| 3.6867% | border-image | ✕ |
-| 3.6601% | background-position-y | ✕ |
-| 3.5749% | webkit-user-drag | ✕ |
-| 3.3376% | flex-basis | ✕ |
-| 3.1840% | align-content | ✕ |
-| 3.1832% | flex-flow | ✕ |
-| 3.1774% | image-rendering | ✕ |
-| 3.0879% | webkit-margin-start | ✕ |
-| 2.9551% | font-stretch | ✕ |
-| 2.8934% | empty-cells | ✕ |
-| 2.7619% | webkit-margin-after | ✕ |
-| 2.7220% | perspective-origin | ✕ |
-| 2.6125% | webkit-margin-end | ✕ |
-| 2.6089% | column-count | ✕ |
-| 2.5880% | webkit-text-fill-color | ✕ |
-| 2.5466% | webkit-box-direction | ✕ |
-| 2.4618% | font-feature-settings | ✕ |
-| 2.3959% | webkit-mask-image | ✕ |
-| 2.3431% | webkit-padding-end | ✕ |
-| 2.2555% | stroke-dasharray | ✕ |
-| 2.1788% | user-select | ✕ |
-| 2.1679% | object-fit | ✕ |
-| 2.0643% | column-gap | ✕ |
-| 2.0459% | text-size-adjust | ✕ |
-| 2.0253% | caption-side | ✕ |
-| 1.9695% | stroke-dashoffset | ✕ |
-| 1.7923% | stroke-linecap | ✕ |
-| 1.7861% | animation-direction | ✕ |
-| 1.7559% | webkit-font-feature-settings | ✕ |
-| 1.7404% | stroke-opacity | ✕ |
-| 1.5926% | stroke-miterlimit | ✕ |
-| 1.5786% | fill-rule | ✕ |
-| 1.4859% | webkit-user-modify | ✕ |
-| 1.3439% | webkit-border-image | ✕ |
-| 1.3091% | animation-play-state | ✕ |
-| 1.2676% | contain | ✕ |
-| 1.2029% | webkit-padding-start | ✕ |
-| 1.1840% | webkit-margin-before | ✕ |
-| 1.1269% | page-break-before | ✕ |
-| 1.1222% | webkit-margin-top-collapse | ✕ |
-| 1.0418% | columns | ✕ |
-| 1.0354% | webkit-mask-size | ✕ |
-| 0.9650% | border-image-slice | ✕ |
-| 0.9425% | stop-color | ✕ |
-| 0.9408% | webkit-mask-repeat | ✕ |
-| 0.9125% | webkit-box-lines | ✕ |
-| 0.8804% | webkit-column-break-inside | ✕ |
-| 0.8752% | size | ✕ |
-| 0.8334% | font-kerning | ✕ |
-| 0.8034% | stroke-linejoin | ✕ |
-| 0.7869% | tab-size | ✕ |
-| 0.7689% | break-inside | ✕ |
-| 0.7589% | webkit-text-stroke-width | ✕ |
-| 0.7353% | column-width | ✕ |
-| 0.6924% | webkit-mask-position | ✕ |
-| 0.6869% | border-image-width | ✕ |
-| 0.6323% | border-image-repeat | ✕ |
-| 0.5994% | border-image-outset | ✕ |
-| 0.5885% | all | ✕ |
-| 0.5859% | webkit-text-stroke-color | ✕ |
-| 0.5435% | webkit-print-color-adjust | ✕ |
-| 0.5420% | webkit-text-stroke | ✕ |
-| 0.5195% | writing-mode | ✕ |
-| 0.4741% | clip-rule | ✕ |
-| 0.4685% | webkit-clip-path | ✕ |
-| 0.4578% | text-anchor | ✕ |
-| 0.4535% | shape-rendering | ✕ |
-| 0.4526% | webkit-column-break-before | ✕ |
-| 0.4494% | clip-path | ✕ |
-| 0.4452% | webkit-mask | ✕ |
-| 0.4393% | mix-blend-mode | ✕ |
-| 0.4166% | text-align-last | ✕ |
-| 0.4033% | column-rule | ✕ |
-| 0.3990% | webkit-mask-box-image | ✕ |
-| 0.3989% | font-variant-ligatures | ✕ |
-| 0.3881% | column-fill | ✕ |
-| 0.3865% | webkit-line-break | ✕ |
-| 0.3857% | border-image-source | ✕ |
-| 0.3528% | stop-opacity | ✕ |
-| 0.3075% | webkit-perspective-origin-y | ✕ |
-| 0.3054% | webkit-perspective-origin-x | ✕ |
-| 0.2994% | webkit-writing-mode | ✕ |
-| 0.2717% | dominant-baseline | ✕ |
-| 0.2634% | column-rule-color | ✕ |
-| 0.2586% | webkit-box-decoration-break | ✕ |
-| 0.2467% | webkit-text-security | ✕ |
-| 0.2374% | webkit-background-origin | ✕ |
-| 0.2146% | font-variant-caps | ✕ |
-| 0.2005% | column-rule-style | ✕ |
-| 0.1976% | shape-outside | ✕ |
-| 0.1971% | webkit-padding-before | ✕ |
-| 0.1896% | break-after | ✕ |
-| 0.1782% | webkit-padding-after | ✕ |
-| 0.1774% | text-orientation | ✕ |
-| 0.1747% | webkit-text-orientation | ✕ |
-| 0.1655% | mask | ✕ |
-| 0.1626% | alignment-baseline | ✕ |
-| 0.1572% | page | ✕ |
-| 0.1530% | webkit-column-break-after | ✕ |
-| 0.1521% | webkit-box-reflect | ✕ |
-| 0.1504% | webkit-text-emphasis-color | ✕ |
-| 0.1499% | object-position | ✕ |
-| 0.1470% | break-before | ✕ |
-| 0.1455% | webkit-margin-collapse | ✕ |
-| 0.1452% | baseline-shift | ✕ |
-| 0.1451% | hyphens | ✕ |
-| 0.1309% | rx | ✕ |
-| 0.1304% | ry | ✕ |
-| 0.1256% | background-blend-mode | ✕ |
-| 0.1136% | font-variant-numeric | ✕ |
-| 0.1135% | background-repeat-x | ✕ |
-| 0.1123% | background-repeat-y | ✕ |
-| 0.1086% | webkit-text-emphasis | ✕ |
-| 0.1058% | webkit-rtl-ordering | ✕ |
-| 0.1040% | column-rule-width | ✕ |
-| 0.1036% | isolation | ✕ |
-| 0.1002% | webkit-highlight | ✕ |
-| 0.0843% | webkit-transform-origin-y | ✕ |
-| 0.0786% | webkit-transform-origin-x | ✕ |
-| 0.0770% | webkit-app-region | ✕ |
-| 0.0685% | column-span | ✕ |
-| 0.0653% | r | ✕ |
-| 0.0611% | y | ✕ |
-| 0.0602% | x | ✕ |
-| 0.0555% | webkit-border-vertical-spacing | ✕ |
-| 0.0545% | webkit-border-horizontal-spacing | ✕ |
-| 0.0542% | webkit-border-start-width | ✕ |
-| 0.0450% | webkit-border-start-color | ✕ |
-| 0.0424% | webkit-border-after-width | ✕ |
-| 0.0424% | webkit-border-before-width | ✕ |
-| 0.0423% | webkit-border-end-width | ✕ |
-| 0.0351% | marker | ✕ |
-| 0.0349% | webkit-border-end-color | ✕ |
-| 0.0347% | webkit-border-after-color | ✕ |
-| 0.0347% | webkit-border-before-color | ✕ |
-| 0.0342% | mask-type | ✕ |
-| 0.0328% | color-interpolation-filters | ✕ |
-| 0.0325% | webkit-border-end | ✕ |
-| 0.0319% | vector-effect | ✕ |
-| 0.0307% | color-rendering | ✕ |
-
-## CSS Units and Values
-
-refs: https://drafts.csswg.org/css-values/ 2016-12-11
-
-### Textual
-
-* pre-defined keywords
- * CSS-wide keywords
- * `initial`
- * `inherit`
- * `unset`
-* `<custom-ident>`: author-defined identifiers ✓
-* `<string>`: quoted strings (`"xxx"`)
-* `<url>`: resourec locators (`url()`)
-
-### Numeric
-
-* `<integer>` ✓
-* `<number>` ✓
-* `<percentage>`
-
-### Length `<length>`
-
-* relative
- * font-relative
- * `em`
- * `ex`
- * `ch`
- * `ic`
- * `rem` ✓🔧
- * viewport-percentage
- * `vw` ✓🔧
- * `vh` ✓🔧
- * `vi`
- * `vb`
- * `vmin` ✓🔧
- * `vmax` ✓🔧
-* absolute
- * `cm` ✓🔧
- * `mm` ✓🔧
- * `Q` ✓🔧
- * `in` ✓🔧
- * `pc` ✓🔧
- * `pt` ✓🔧
- * `px` autofixed to number
-
-### Quantities
-
-* `<angle>`
- * `deg`
- * `grad`
- * `rad`
- * `turn`
-* `<time>`
- * `s`
- * `ms`
-* `<frequency>`
- * `Hz`
- * `kHz`
-* `<resolution>`
- * `dpi`
- * `dpcm`
- * `dppx`
-
-### Elsewhere
-
-* `<color>` ✓
-* `<image>`
-* `<position>`
-
-### Functional
-
-* `calc()`
-* `toggle()`
-* `attr()`
-
-## JS APIs
-
-refs: https://www.w3.org/standards/techs/js 2016-12-11
-
-### Completed Work
-
-#### Standards
-
-| last update | spec | supported |
-| ---- | ---- | ---- |
-| 2016-11-17 | Media Source Extensions™ | - (media related) |
-| 2016-11-08 | Geolocation API Specification 2nd Edition | ✕ developing |
-| 2016-10-27 | Pointer Lock | - |
-| 2016-10-18 | Vibration API (Second Edition) | ✕ |
-| 2016-04-19 | Web Storage (Second Edition) | ✓ async `storage` module |
-| 2015-10-22 | Web Notifications | ✕ |
-| 2015-05-19 | HTML5 Web Messaging | ✕ `BroadcastChannel` developing |
-| 2015-02-24 | Pointer Events | - |
-| 2015-02-10 | Vibration API | ✕ |
-| 2015-02-03 | Server-Sent Events | ✕ |
-| 2015-01-08 | Indexed Database API | ✕ |
-| 2014-03-13 | Metadata API for Media Resources 1.0 | - (media related) |
-| 2014-02-11 | Progress Events | ✕ |
-| 2014-01-16 | JSON-LD 1.0 Processing Algorithms and API | - |
-| 2013-12-12 | Performance Timeline | - (perf related) |
-| 2013-12-12 | User Timing | - (perf related) |
-| 2013-10-31 | Widget Interface | - |
-| 2013-10-29 | Page Visibility (Second Edition) | ✕ `onviewappear`/`onviewdisappear` |
-| 2013-10-10 | Touch Events | ✕ |
-| 2013-02-21 | Selectors API Level 1 | - |
-| 2012-12-17 | Navigation Timing | - (perf related) |
-| 2012-12-17 | High Resolution Time | - (perf related) |
-| 2008-12-22 | Element Traversal Specification | - |
-
-### Drafts
-
-#### Proposed Recommendations
-
-| last update | spec | supported |
-| ---- | ---- | ---- |
-| 2016-09-15 | WebIDL Level 1 | - |
-
-#### Candidate Recommendations
-
-| last update | spec | supported |
-| ---- | ---- | ---- |
-| 2016-12-08 | Performance Timeline Level 2 | - (perf related) |
-| 2016-11-22 | Page Visibility Level 2 | ✕ `onviewappear`/`onviewdisappear` |
-| 2016-11-01 | High Resolution Time Level 2 | - (perf related) |
-| 2016-08-18 | DeviceOrientation Event Specification | ✕ |
-| 2016-07-21 | Resource Timing Level 1 | - (perf related) |
-| 2016-07-14 | Presentation API | - |
-| 2016-07-07 | Battery Status API | ✕ |
-| 2016-07-05 | Encrypted Media Extensions | - |
-| 2016-05-19 | Media Capture and Streams | - (media related) |
-| 2014-12-11 | Web Cryptography API | - |
-| 2014-09-09 | HTML Media Capture | - (media related) |
-| 2012-09-20 | The WebSocket API | ✕ |
-
-#### Last Call Drafts
-
-| last update | spec | supported |
-| ---- | ---- | ---- |
-| 2011-12-01 | Geolocation API Specification Level 2 | ✕ |
-
-#### Other Working Drafts
-
-| last update | spec | supported |
-| ---- | ---- | ---- |
-| 2016-12-09 | MediaStream Image Capture | - (media related) |
-| 2016-12-06 | MediaStream Recording | - (media related) |
-| 2016-12-06 | Selection API | ✕ |
-| 2016-12-05 | Input Events | ✕ |
-| 2016-12-02 | Gamepad | - |
-| 2016-11-29 | WebDriver | - |
-| 2016-11-24 | WebRTC 1.0: Real-time Communication Between Browsers | ✕ |
-| 2016-11-22 | Pointer Lock 2.0 | - |
-| 2016-11-07 | Remote Playback API | - (media related) |
-| 2016-11-03 | Resource Timing Level 2 | - (perf related) |
-| 2016-11-02 | Audio Output Devices API | - (media related) |
-| 2016-11-01 | Indexed Database API 2.0 | ✕ |
-| 2016-11-01 | User Timing Level 2 | - (perf related) |
-| 2016-10-31 | The Screen Orientation API | ✕ |
-| 2016-10-31 | High Resolution Time Level 3 | - (perf related) |
-| 2016-10-24 | UI Events KeyboardEvent code Values | - |
-| 2016-10-24 | UI Events KeyboardEvent key Values | - |
-| 2016-10-11 | Service Workers 1 | ✕ |
-| 2016-09-21 | Identifiers for WebRTC's Statistics API | - |
-| 2016-09-13 | Accelerometer Sensor | ✕ |
-| 2016-09-13 | Gyroscope Sensor | ✕ |
-| 2016-09-13 | Magnetometer Sensor | ✕ |
-| 2016-08-30 | Ambient Light Sensor | ✕ |
-| 2016-08-30 | Media Capture from DOM Elements | - (media related) |
-| 2016-08-30 | Generic Sensor API | ✕ |
-| 2016-08-03 | Wake Lock API | ✕ |
-| 2016-07-19 | Proximity Sensor | ✕ |
-| 2016-07-19 | Pointer Events - Level 2 | - |
-| 2016-07-14 | Screen Capture | ✕ |
-| 2016-07-12 | Media Capture Depth Stream Extensions | - (media related) |
-| 2016-05-17 | Cooperative Scheduling of Background Tasks | ✕ |
-| 2016-04-22 | Navigation Timing Level 2 | - (perf related) |
-| 2016-04-03 | Clipboard API and events | ✕ `clipboard` module |
-| 2015-12-15 | Push API | ✕ |
-| 2015-12-08 | Web Audio API | - (media related) |
-| 2015-10-15 | FindText API | - |
-| 2015-09-24 | Web Workers | ✕ |
-| 2015-04-21 | File API | ✕ |
-| 2014-02-20 | Network Service Discovery | ✕ |
-| 2012-03-06 | MediaStream Capture Scenarios | - (media related) |
-| 2011-12-15 | Audio Processing API | - (media related) |
\ No newline at end of file
http://git-wip-us.apache.org/repos/asf/incubator-weex-site/blob/32a097bf/source/references/weex-variable.md
----------------------------------------------------------------------
diff --git a/source/references/weex-variable.md b/source/references/weex-variable.md
index 322d79c..be5ec14 100644
--- a/source/references/weex-variable.md
+++ b/source/references/weex-variable.md
@@ -1,17 +1,18 @@
---
-title: Weex Variable
+title: Weex Variable
type: references
-order: 7
+group: API
+order: 2.5
version: 2.1
---
# Weex instance variable
-Each Weex page has a separate weex variable, which exists in the JS context. They hold a single instance or method of the current Weex page.
+Each Weex page has a separate weex variable, which exists in the JS context. They hold a single instance or method of the current Weex page.
## `weex.config`
-This variable contains all the environment information for the current Weex page, including not only:
+This variable contains all the environment information for the current Weex page, including not only:
+ `BundleUrl`: string: The URL of the JS bundle.
+ `Env: Object`: environment object.
@@ -25,9 +26,9 @@ This variable contains all the environment information for the current Weex page
+ `DeviceWidth: number`: device width
+ `DeviceHeight: number`: device height. In Weex, the default width of viewport is 750px, thus you can obtain the height of screen by `height = 750/deviceWidth*deviceHeight` if the width of viewport remains its default value.
-`weex.requireModule(module: string): Object`
+`weex.requireModule(module: string): Object`
-Get all the methods of a native module, such as:
+Get all the methods of a native module, such as:
```html
<template>
@@ -40,7 +41,7 @@ Get all the methods of a native module, such as:
duration: 3
})
</script>
-```
+```
## `weex.document: Document`
http://git-wip-us.apache.org/repos/asf/incubator-weex-site/blob/32a097bf/source/resources.md
----------------------------------------------------------------------
diff --git a/source/resources.md b/source/resources.md
new file mode 100644
index 0000000..1b0f238
--- /dev/null
+++ b/source/resources.md
@@ -0,0 +1,6 @@
+---
+title: Resources
+type: community
+has_chapter_content: false
+version: 2.1
+---
http://git-wip-us.apache.org/repos/asf/incubator-weex-site/blob/32a097bf/source/tools/download.ejs
----------------------------------------------------------------------
diff --git a/source/tools/download.ejs b/source/tools/download.ejs
new file mode 100644
index 0000000..ef2c86f
--- /dev/null
+++ b/source/tools/download.ejs
@@ -0,0 +1,3 @@
+layout: download
+type: download
+---
\ No newline at end of file
http://git-wip-us.apache.org/repos/asf/incubator-weex-site/blob/32a097bf/source/tools/helders.md
----------------------------------------------------------------------
diff --git a/source/tools/helders.md b/source/tools/helders.md
new file mode 100644
index 0000000..317e4f0
--- /dev/null
+++ b/source/tools/helders.md
@@ -0,0 +1,68 @@
+---
+title: Weex Language Support Plugin
+type: tools
+order: 5.1
+version: 2.1
+---
+
+# Weex Language Support Plugin
+
+[Weex Language Support](https://plugins.jetbrains.com/plugin/9189-weex-language-support) is a official tools to code highlight, automatic completion,lint and other functions in IDEA, WebStorm or the others IDEs.
+
+### Supported IDEs
+You can install and use this plugin on the following IDEs on any operating system:
+**IntelliJ IDEA Ultimate, PhpStorm, WebStorm, PyCharm, RubyMine, AppCode, CLion, Gogland, Rider**
+
+### Install
+Just searching the `Weex Language Support` in plugin repo to install, next you need restart IDE to enable it.
+
+
+### Configurations
+Open `Preferences -> Other Settings -> Weex language support` to configuration plugin
+
+- Target Weex Version: Config the version of Weex that your current project in use, default is `LATEST`, it means always using the latest version
+- Vue Support: Config whether to support Vue, you need to restart IDE after turning on or off the set to take effect
+- Custom Rules: Import the custom Weex DSL rules, The format of the custom rules will be listed later
+- Global Weex Components: Sets the location of the module that is applied in the project, in particular, the `node_modules` directory in current project and npm root will be automatically included, you do not need to add them here
+
+
+### Format of Custom DSL Rules
+Custom rules are included in a json file, the root node of the json file is an array, each element in the array corresponds to a label in the DSL.
+Let's take the example of the `loading>` tag:
+```js
+{
+ "tag": "loading", //tag name, not null
+ "attrs": [ //attributes of tag, can be null
+ {
+ "name": "display", //attribute name, not null
+ "valuePattern": null, //pattern expression to check the attribute value, can be null
+ "valueEnum": [ //attribute value enumeration, can be null
+ "show",
+ "hide"
+ ],
+ "valueType": "var", //type of attribute value, must be var or function
+ "since": 0, //which version the attribute is added to sdk, such as 0.11
+ "weexOnly": false //whether the attribute is available only in 1.0 syntax, default is false
+ }
+ ],
+ "events": [ //events list, can be null
+ {
+ "name": "loading", //event name, not null
+ "since": 0 //which version the event is added to sdk
+ }
+ ],
+ "parents": [ //The tag is allowed to be a child of which tags, null means no restrictions
+ "list",
+ "scroller"
+ ],
+ "childes": [ //which tags are allowed as their own child tags, null means no restrictions
+ "text",
+ "image",
+ "loading-indicator"
+ ],
+ "document": "/references/components/loading.html" //document link
+ }
+```
+
+### Contribution
+Please commiting Issues and Pull Requests into the [weex-language-support](https://github.com/misakuo/weex-language-support) project
http://git-wip-us.apache.org/repos/asf/incubator-weex-site/blob/32a097bf/source/tools/index.md
----------------------------------------------------------------------
diff --git a/source/tools/index.md b/source/tools/index.md
new file mode 100644
index 0000000..a7323f6
--- /dev/null
+++ b/source/tools/index.md
@@ -0,0 +1,13 @@
+---
+title: Develop Tools
+type: tools
+order: 5
+version: 2.1
+---
+
+# 开发工具
+
++ [Playground App](./playground.html)
++ [Online Playground](http://dotwe.org/vue/)
++ [weex-toolkit](./toolkit.html)
++ [Weex Language Support插件](./plugin.html)
http://git-wip-us.apache.org/repos/asf/incubator-weex-site/blob/32a097bf/source/tools/market.md
----------------------------------------------------------------------
diff --git a/source/tools/market.md b/source/tools/market.md
new file mode 100644
index 0000000..5d2c774
--- /dev/null
+++ b/source/tools/market.md
@@ -0,0 +1,6 @@
+---
+title: Weex Market
+type: tools
+order: 5.3
+version: 2.1
+---
http://git-wip-us.apache.org/repos/asf/incubator-weex-site/blob/32a097bf/source/tools/playground.ejs
----------------------------------------------------------------------
diff --git a/source/tools/playground.ejs b/source/tools/playground.ejs
new file mode 100644
index 0000000..0e310d4
--- /dev/null
+++ b/source/tools/playground.ejs
@@ -0,0 +1,3 @@
+layout: playground
+type: playground
+---
http://git-wip-us.apache.org/repos/asf/incubator-weex-site/blob/32a097bf/source/tools/toolkit.md
----------------------------------------------------------------------
diff --git a/source/tools/toolkit.md b/source/tools/toolkit.md
new file mode 100644
index 0000000..5b65155
--- /dev/null
+++ b/source/tools/toolkit.md
@@ -0,0 +1,197 @@
+---
+title: Use weex-toolkit
+type: tools
+order: 5.1
+version: 2.1
+---
+
+# weex-toolkit
+
+[weex-toolkit](https://github.com/weexteam/weex-toolkit) is an official command line tool to help developers to create, debug and build their Weex project.
+
+### Install
+use npm to install weex-toolkit:
+
+``` bash
+$ npm install -g weex-toolkit
+```
+if you make it, you can input "weex" in your command line terminal to test it. The right output:
+
+
+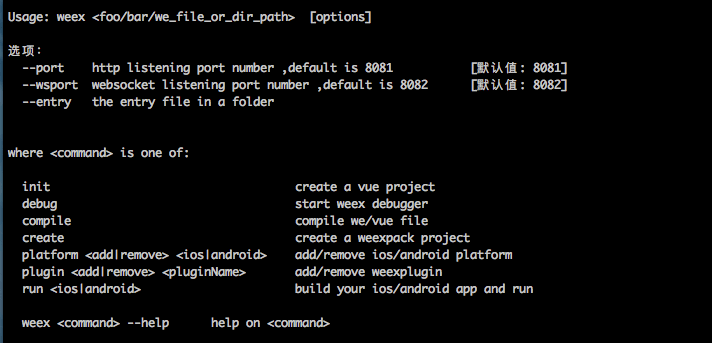
+
+if you have never installed node.js, you should go [node.js.org]( https://nodejs.org/en/) to download and install it.
+* node engine version >= 6. You can try [n](https://github.com/tj/n) to manage your node versions*
+If you meet some errors when installing like `permission error`, please go [weex-toolkit issues](https://github.com/weexteam/weex-toolkit/issues) to find some solution or have a discuss with us.
+
+
+### initialize Weex project
+```bash
+$ weex init awesome-project
+```
+After command running, you can find `awesome-project` directory and there are some Weex templates in it.
+There are some useful npm scripts you will use in the future:
+
+- `build`: build the source code and generate the JS bundle
+- `dev`: run webpack watch configuration
+- `serve`: start a web server
+- `debug`: open the debug mode
+
+Then we run `npm run dev & npm run serve` in root directory to start watch mode and static server.
+
+Finally, we can see the Weex page in `http://localhost:8080/index.html`.
+
+### preview Weex page in time
+
+weex-toolkit supports previewing your Weex file(`.we` or `.vue`) in a watch mode. You only need specify your file path.
+
+``` bash
+$ weex src/foo.vue
+```
+The browser will auto open the location and you could see the layout and effects of your Weex page. If you have a [Playground](https://weex.apache.org/cn/playground.html) app in your mobile devices, you can scan the QR code at the opened page.
+Try the command below, you’ll preview the whole directory files.
+
+``` bash
+$ weex src --entry src/foo.vue
+```
+You need to specify the directory path and the entry file(`--entry`).
+### build Weex project
+Use ` weex compile ` to build your single weex file or the whole project.
+``` bash
+weex compile src/foo.vue dist
+```
+There are two arguments. One is your code source path (a single file or a directory) and another is your destination path you want to build
+
+### debug
+
+weex-toolkit has the ability to extend third party script. And **[Weex devtools](https://github.com/weexteam/weex-devtool)** is a custom devtools for Weex that implements [Chrome Debugging Protocol](https://developer.chrome.com/devtools/docs/debugger-protocol), it is designed to help you quickly inspect your app and debug your JS bundle source in a Chrome web page, both android and iOS platform are supported. So you can use weex-devtools feature by weex-toolkit.
+
+#### usage
+
+``` bash
+weex debug [options] [we_file|bundles_dir]
+
+ Options:
+
+ -h, --help output usage information
+ -V, --verbose display logs of debugger server
+ -v, --version display version
+ -p, --port [port] set debugger server port
+ -e, --entry [entry] set the entry bundlejs path when you specific the bundle server root path
+ -m, --mode [mode] set build mode [transformer|loader]
+ -w, --watch watch we file changes auto build them and refresh debugger page![default enabled]
+```
+#### start debugger
+
+```
+$ weex debug
+```
+
+
+this command will start debug server and launch a chrome opening `DeviceList` page.
+this page will display a qrcode ,you can use `Playground App` scan it for starting debug.
+
+#### debug `.we` | `.vue` file
+
+```
+$ weex debug your_weex.vue
+```
+
+this command will compile `your_weex.we` to `your_weex.js` and start the debug server as upon command.
+`your_weex.js` will deploy on the server and displayed in `DeviceList` page as another qrcode contain the url of your_weex.js.
+
+.
+#### start debugger with a directory of we files
+
+
+```
+$weex debug your/we/path -e index.we
+```
+
+this command will build every file in `your/we/path `and deploy them on the bundle server. your directory will mapping to http://localhost:port/weex/
+use `-e` to set the entry of these bundles. and the url of `index.we` will display on device list page as another qrcode.
+
+
+#### Features
+
+##### Connect devices
+
+
+
+##### Inspector
+
+ Inspector can be used to show your `Element` \ `Network` \ `Console log` \ `ScreenCast` \ `BoxModel` \ `Native View` and so on.
+
+
+##### Element
+
+
+##### NetWork
+##### show the total time and latency
+
+
+##### show the header and response
+
+
+##### Console
+
+
+##### Resource
+
+
+#### Debugger
+
+
+##### Breakpoint and CallStack
+
+
+#### Integrate devtools
+* Android
+ * See the doc [Weex devtools (Android)](../../references/advanced/integrate-devtool-to-android.html), it will lead you to config and use it step by step.
+* IOS
+ * See the doc [Weex devtools (IOS)](../../references/advanced/integrate-devtool-to-ios.html), it will lead you to config and use it step by step.
+
+### weex-toolkit extends weexpack command
+
+[weexpack](https://github.com/weexteam/weex-pack) helps to setup Weex application from scratch quickly. With simple commands, developers could create a Weex project, add different platform template, could install plugins from local, GitHub or Weex market, could pack up his application project and run on mobile. For those who would like to share his own plugins, he could publish them to the Weex market.
+
+Now weex-toolkit can run the same commands of `weexpack` because of the new architecture. If your directory is generated by `weexpack`, you can build your iOS or android app.
+
+### weex platform and run commands
+
+Use `platform add|remove` to add or remove Weex app template and run it in your target devices.
+
+``` bash
+$ weex platform add ios
+```
+If you use these commands firstly, you might see the prompt. Just enter Y.
+
+
+
+Then run platform, you will see an iPhone simulator.
+
+``` bash
+$ weex run ios
+```
+
+
+### weex plugin commands
+
+If you want to use some plugins on the [weex market](https://market.dotwe.org), weex-toolkit is the right choice.
+
+```bash
+$ weex plugin add plugin_name
+```
+You need to specify the plugin name from market like "weex-chart":
+
+``` bash
+$ weex plugin add weex-chart
+```
+
+Remove some plugins(eg: weex-chart):
+
+``` bash
+$ weex plugin remove weex-chart
+```
+
+Learn more about [weexpack](https://github.com/weexteam/weex-pack) .
http://git-wip-us.apache.org/repos/asf/incubator-weex-site/blob/32a097bf/source/v-0.10/advanced/extend-to-android.md
----------------------------------------------------------------------
diff --git a/source/v-0.10/advanced/extend-to-android.md b/source/v-0.10/advanced/extend-to-android.md
deleted file mode 100644
index 97bb49e..0000000
--- a/source/v-0.10/advanced/extend-to-android.md
+++ /dev/null
@@ -1,189 +0,0 @@
----
-title: Extend to Android
-type: advanced
-order: 6
-has_chapter_content: true
-version: 0.10
----
-
-# Extend to Android
-
-### Module extend
-weex sdk support Module extend,
-Weex SDK provides only rendering capabilities, rather than have other capabilities, such as network, picture, and URL redirection. If you want the these features, you need to implement it.
-
-For example: If you want to implement an address jumping function, you can achieve a Module Follow the steps below.
-
-#### Step to customize a module
-
-1. Customize module must extend WXModule
-2. @WXModuleAnno annotation must be added, as it is the only the way to recognized by Weex
-3. The access levels of mehtod must be **public**
-4. The module class also can not be an inner class
-5. Customize can not be obfuscated by tools like ProGuard
-6. Module methods will be invoked in UI thread, do not put time consuming operation there
-7. Weex params can be int, double, float, String, Map, List
-
-Refer to the following example:
-
-```java
-public class WXEventModule extends WXModule{
-
- private static final String WEEX_CATEGORY="com.taobao.android.intent.category.WEEX";
-
- @JSMethod
- public void openURL(String url){
- //implement your module logic here
- }
-}
-
-```
-
-#### Register the moulde
-
-```java
- WXSDKEngine.registerModule("event", WXEventModule.class);
-```
-
-### Use this module in weex DSL
-Now `event` moudle is avaiable in weex, use the module like this:
-
-```javascript
-var event = require('@weex-module/event');
-event.openURL("http://www.github.com");
-```
-
-### Javascript callback
-
-If the module need implement a callback to javascript, you just add `JSCallback` argument to the method you want expose to javascript:
-
-```java
- @JSMethod
- public void openURL(String url,JSCallback callback){
- //implement your module logic here
- Map<String,Object> resp = new HashMap();
- resp.put("result","ok");
- callback.invoke(resp);
- }
-```
-
-At the javascript side, call the module with javascript function to receive callback data:
-
-```javascript
-event.openURL("http://www.github.com",function(resp){ console.log(resp.result); });
-```
-
-### Component extend
-
-There are label, image, div, scroll, ect. components in weex, you can also customize your own components.
-
-#### Step to customize a component
-
-1. Customize components must extend WXComponent or WXContainer
-2. @WXComponentProp(name=value(value is attr or style of dsl)) for it be recognized by weex SDK.
-3. The access levels of mehtod must be **public**
-4. The component class can not be an inner class
-5. Customize can not be obfuscated by tools like ProGuard
-6. Component methods will be invoked in UI thread, do not put time consuming operation there.
-7. Weex params can be int, double, float, String, Map, List, Array
-
-
-Refer to the following example
-
-```java
-public class MyViewComponent extends WXComponent{
- public MyViewComponent(WXSDKInstance instance, WXDomObject dom,
- WXVContainer parent, String instanceId, boolean isLazy)
- {
- public MyViewComponent(WXSDKInstance instance, WXDomObject dom,
- WXVContainer parent, String instanceId, boolean isLazy) {
- super(instance, dom, parent, instanceId, isLazy);
- }
-
- @Override
- protected void initView() {
- mHost = new TextView(mContext);
- }
- @WXComponentProp(name=WXDomPropConstant.WX_ATTR_VALUE)
- public void setMyViewValue(String value) {
- ((TextView)mHost).setText(value);
- }
-}
-```
-
-#### Register the Component
-
-
-```java
-WXSDKEngine.registerComponent("MyView", MyViewComponent.class);
-```
-
-### Adapter extend
-
-#### ImagedownloadAdapter
-
-Weex SDK has no image download capability, you need to implement `IWXImgLoaderAdapter`. Refer to the following examples.
-
-```java
-public class ImageAdapter implements IWXImgLoaderAdapter {
-
- private Activity mContext;
-
- public ImageAdapter(Activity activity) {
- mContext = activity;
- }
-
- @Override
- public void setImage(final String url, final ImageView view,
- WXImageQuality quality, WXImageStrategy strategy) {
- mContext.runOnUiThread(new Runnable() {
-
- @Override
- public void run() {
- if (TextUtils.isEmpty(url)) {
- view.setImageBitmap(null);
- return;
- }
- String temp = url;
- if (url.startsWith("//")){
- temp = "http:" + url;
- }
- if (view.getLayoutParams().width<=0 || view.getLayoutParams().height<=0) {
- return;
- }
- Picasso.with(WXEnvironment.getApplication())
- .load(temp)
- .resize(view.getLayoutParams().width,
- view.getLayoutParams().height).into(view);
- }
- });
- }
-}
-```
-
-#### Component Method
-from WeexSDK `0.9.5`, you can define your component method
-
-for example, define a method in component:
-
-```java
-@JSMethod
-public void focus(){
-//method implementation
-}
-```
-
-after your registration for your own custom component, now you can call it in your js file.
-
-```html
-<template>
- <mycomponent id='mycomponent'></mycomponent>
-</template>
-<script>
- module.exports = {
- created: function() {
- this.$el('mycomponent').focus();
- }
- }
-</script>
-```
http://git-wip-us.apache.org/repos/asf/incubator-weex-site/blob/32a097bf/source/v-0.10/advanced/extend-to-html5.md
----------------------------------------------------------------------
diff --git a/source/v-0.10/advanced/extend-to-html5.md b/source/v-0.10/advanced/extend-to-html5.md
deleted file mode 100644
index 6201fc7..0000000
--- a/source/v-0.10/advanced/extend-to-html5.md
+++ /dev/null
@@ -1,258 +0,0 @@
----
-title: Extend to web
-type: advanced
-order: 8
-has_chapter_content: true
-version: 0.10
----
-
-# Extend Weex HTML5
-
-### Intro
-
-Weex is a extendable cross-platform solution for dynamic programming and publishing projects. You can build your own components on web platform or native platform by extending the components system. Also you can extend weex by adding new methods for one module, new moudles or new bundle loaders. Follow the steps bellow you can dive into the journy of creating multiple builtin components, APIs and loaders.
-
-First of all, components, APIs and loaders are extensions to weex, so you can create your extensions without requiring the weex package, that means your extensions can be totally standalone.
-
-Second, you should always implement a extension for all the three platforms (android, ios and web), except that you only use it on one specific platform. After all weex is a cross platform framework and the equality of user expierence in all platforms is very important. Although you can create components separately on one platform by another, or welcome other developers on other platforms to join your work (You can always find coders who want the same feature with you in the commity). Here are docs about how to create native extensions on [ios](./extend-to-ios.html) and [android](./extend-to-android.html).
-
-You should publish your extensions somewhere weex developers can easily find, somewhere popular, independent and easy to search and use, such as, npm. Npm is what we strongly recommended.
-
-The most important thing is, you'd better name your extension appropriately: it should begin with a `weex-` if it is a weex extension, and it should end up with a `-<platform>` as a platform mark. If your package is wrapped up with all the three platforms you can ignore it through. Here is a demonstrating component [`<weex-hello-web>`](https://github.com/MrRaindrop/weex-hello-web) to show how to define your own component.
-
-### Create a new component
-
-Steps:
-
-1. Extend `Weex.Component`, override methods of component class.
-2. Use `Weex.registerComponent` to register your customized component in the `init` method of the installation module.
-3. export the `init` method for the installation (Every weex-html5 extension has to have a `init` method in the export object, which is for another weex project to install.)
-
-Here's a example to create a weex component for web platform (weex-html5):
-
-```javascript
-const attr = {
- // ...
-}
-const style = {
- // ...
-}
-const event = {
- // ...
-}
-// every extension file should have a init method.
-function init (Weex) {
- const Component = Weex.Component
- const extend = Weex.utils.extend
-
- // the component's constructor
- function Hello (data) {
- Component.call(this, data)
- }
-
- // extend the prototype
- Hello.prototype = Object.create(Component.prototype)
- extend(Hello.prototype, proto)
-
- // config the attributes, styles and events.
- extend(Hello.prototype, { attr })
- extend(Hello.prototype, {
- style: extend(Object.create(Component.prototype.style), style)
- })
- extend(Hello.prototype, { event })
-
- Weex.registerComponent('weex-hello', Hello)
-}
-
-// export the init method.
-export default { init }
-```
-
-The code above is extracted from [weex-hello-web/src/index.js](https://github.com/MrRaindrop/weex-hello-web/blob/master/src/index.js#L46-L65).
-
-This demo has overrided the `create` method of the base class `Component`. You can also override other methods to customize your component's behavior. The typical methods of class `Component` you may override are:
-
-* `create`: to create the node of the component, and return it.
-* `createChildren` to create the children's nodes.
-* `insertBefore` to insert a child before another child.
-* `appendChild` to append a child in the children list.
-* `removeChild` to remove a child in the children list.
-
-**Advanced**: Need more code demonstrations about overriding the component's methods ? Just take a look at the [weex repo's code](https://github.com/apache/incubator-weex/tree/dev/html5/). Basically the most of the built-in components are defined this way.
-
-Important! To register your component in the `init` method, use `Weex.registerComponent`. Here's the demo code:
-
-```javascript
-Weex.registerComponent('weex-hello', Hello)
-```
-
-The code above is from [weex-hello-web/src/index.js](https://github.com/MrRaindrop/weex-hello-web/blob/master/src/index.js#L62)
-
-Install the component using `Weex.install`.
-
-```javascript
-// import the original weex-html5.
-import weex from 'weex-html5'
-import hello from 'weex-hello-web'
-// install the component.
-weex.install(hello)
-```
-
-The code above is from [weex_extend_demo/src/main.js](https://github.com/MrRaindrop/weex_extend_demo/blob/master/src/main.js#L1-L5)
-
-use the component in your `.we` file:
-
-```html
-<template>
- <div>
- <weex-hello class="hello" style="txt-color:#fff;bg-color:green"
- value="WEEX" onclick="handleClick">
- </weex-hello>
- </div>
-</template>
-```
-
-The code above is from [weex_extend_demo/demo/index.we](https://github.com/MrRaindrop/weex_extend_demo/blob/master/demo/index.we#L10-L15)
-
-### Add a new API
-
-You can add new API modules, or just add a new API for any existing API modules. For example, you can add a new module `user` with APIs like 'login', 'logout' etc. The developer can invoke the API by using `require('@weex-module/moduleName)[methodName](arg1, arg2, ...)` ([Module APIs](../references/api.html)).
-
-Steps:
-
-1. Implement your API modules.
-2. Use `Weex.registerAPIModules` to register your API modules in the init method of your installation module.
-
-**Here is a example for register a new API module**
-
-First create a file named `user.js` for a new module, then define `login/logout` methods.
-
-```javascript
-const user = {
- // for user to login.
- login (callbackId) {
- login.then(res => {
- this.sender.performCallback(callbackId, res)
- }).catch(err => {
- this.sender.performCallback(callbackId, err)
- })
- },
-
- // for user to logout.
- logout (callbackId) {
- logout.then(res => {
- this.sender.performCallback(callbackId, res)
- }).catch(err => {
- this.sender.performCallback(callbackId, err)
- })
- }
-}
-
-// add meta info to user module.
-const meta = {
- user: [{
- name: 'login',
- args: ['function']
- }, {
- name: 'logout',
- args: ['function']
- }]
-}
-
-export default {
- init (Weex) {
- // Register your new module. The last parameter is your
- // new API module's meta info.
- Weex.registerApiModule('user', user, meta)
- }
-}
-```
-
-After above coding work, you can publish this user helper API to npm now, for example, with the name of `weex-user-helper`.
-
-Install the component using `Weex.install` in your new weex project.
-
-```javascript
-import Weex from 'weex-html5'
-import user from 'weex-user-helper'
-
-Weex.install(user)
-```
-
-Use the user helper API in your dsl code (xxx.we):
-
-```html
-<template>
- <div>
- <div class="btn" onclick="handleClick">
- <text>LOGIN</text>
- </div>
- </div>
-</template>
-
-<script>
- var userHelper = require('@weex-module/user')
- module.exports = {
- methods: {
- handleClick: function () {
- userHelper.login(function () {
- // ... do sth. in callback.
- })
- }
- }
- }
-</script>
-```
-
-### Add a new loader
-
-**Loader is only a type of extension for weex-html5 (web platform), native platform is not needing this.**
-
-Weex's builtin loaders to load a weex bundle are `xhr`, `jsonp` and `source`. The default loader is `xhr`. You can register your own loader by using `weex.registerLoader`. For example, you got a service method named `myServe.getWeexBundle`, which can load a weex bundle file through some magical tunnel:
-
-```javascript
-function loadByMyServe(pageId, callback) {
- myServe.getWeexBundle(pageId).then(function (bundle) {
- callback(bundle)
- }).catch(function(err) {
- callback(err)
- })
-}
-
-// export the init method to enable weex install this loader.
-export default {
- init (Weex) {
- Weex.registerLoader('myserve', loadByMyServe)
- }
-}
-```
-
-install and use your loader in your project's entry file:
-
-```javascript
-import Weex from 'weex-html5'
-
-// or import from './myserve.js', no matter where you can import your loader file.
-import loader from 'myLoader'
-
-Weex.install(loader)
-
-// use your loader in the init function:
-(function () {
- function getUrlParam (key) {
- const reg = new RegExp('[?|&]' + key + '=([^&]+)')
- const match = location.search.match(reg)
- return match && match[1]
- }
- const page = getUrlParam('page') || 'examples/build/index.js'
- Weex.init({
- appId: location.href,
- loader: 'myserve', // use the loader type you defined.
- source: page,
- rootId: 'weex'
- })
-})();
-```
-
-That's the major extension feature weex brought to you. The deep details can be found in the [weex's repo](https://github.com/alibaba/weex) and the weex's community.
-
http://git-wip-us.apache.org/repos/asf/incubator-weex-site/blob/32a097bf/source/v-0.10/advanced/extend-to-ios.md
----------------------------------------------------------------------
diff --git a/source/v-0.10/advanced/extend-to-ios.md b/source/v-0.10/advanced/extend-to-ios.md
deleted file mode 100644
index bddb96e..0000000
--- a/source/v-0.10/advanced/extend-to-ios.md
+++ /dev/null
@@ -1,311 +0,0 @@
----
-title: Extend to iOS
-type: advanced
-order: 7
-has_chapter_content: true
-version: 0.10
----
-
-# Extend to iOS
-
-### Module extend
-
-Weex SDK provides only rendering capabilities, rather than have other capabilities, such as network, picture, and URL redirection. If you want these features, you need to implement it.
-
-For example: If you want to implement an address jumping function, you can achieve a Module following the steps below.
-
-#### Step to customize a module
-
-1. Module
- customized must implement WXModuleProtocol
-2. A macro named `WX_EXPORT_METHOD` must be added, as it is the only way to be recognized by Weex. It takes arguments that specifies the method in module called by JavaScript code.
-3. The weexInstance should be synthesized. Each module object is bind to a specific instance.
-4. Module methods will be invoked in UI thread, so do not put time consuming operation there. If you want to execute the whole module methods in other thread, please implement the method `- (NSThread *)targetExecuteThread` in protocol. In the way, tasks distributed to this module will be executed in targetExecuteThread.
-5. Weex params can be String or Map.
-6. Module supports to return results to Javascript in callback. This callback is type of `WXModuleCallback`, the params of which can be String or Map.
-
-```objective-c
-@implementation WXEventModule
-@synthesize weexInstance;
- WX_EXPORT_METHOD(@selector(openURL:callback))
-
-- (void)openURL:(NSString *)url callback:(WXModuleCallback)callback
-{
- NSString *newURL = url;
- if ([url hasPrefix:@"//"]) {
- newURL = [NSString stringWithFormat:@"http:%@", url];
- } else if (![url hasPrefix:@"http"]) {
- newURL = [NSURL URLWithString:url relativeToURL:weexInstance.scriptURL].absoluteString;
- }
-
- UIViewController *controller = [[WXDemoViewController alloc] init];
- ((WXDemoViewController *)controller).url = [NSURL URLWithString:newURL];
-
- [[weexInstance.viewController navigationController] pushViewController:controller animated:YES];
- callback(@{@"result":@"success"});
-}
-
-@end
-```
-
-#### Register the module
-
-You can register the customized module by calling the method `registerModule:withClass` in WXSDKEngine.
-
-```objective-c
-WXSDKEngine.h
-/**
-* @abstract Registers a module for a given name
-* @param name The module name to register
-* @param clazz The module class to register
-**/
-+ (void)registerModule:(NSString *)name withClass:(Class)clazz;
-
-[WXSDKEngine registerModule:@"event" withClass:[WXEventModule class]];
-```
-
-### Handler extend
-
-Weex SDK doesn't have capabilitis, such as image download 、navigator operation,please implement these protocols by yourself.
-
-#### WXImgLoaderProtocol
-<font color="gray">
-Weex SDK has no image download capability, you need to implement `WXImgLoaderProtocol`. Refer to the following examples.
-
-```objective-c
-WXImageLoaderProtocol.h
-@protocol WXImgLoaderProtocol <WXModuleProtocol>
-
-/**
- * @abstract Creates a image download handler with a given URL
- * @param imageUrl The URL of the image to download
- * @param imageFrame The frame of the image you want to set
- * @param options : The options to be used for this download
- * @param completedBlock : A block called once the download is completed.
- image : the image which has been download to local.
- error : the error which has happened in download.
- finished : a Boolean value indicating whether download action has finished.
- */
- -(id<WXImageOperationProtocol>)downloadImageWithURL:(NSString *)url imageFrame:(CGRect)imageFrame userInfo:(NSDictionary *)options completed:(void(^)(UIImage *image, NSError *error, BOOL finished))completedBlock;
- @end
-```
-
-Implement above protocol as follows.
-
-
-```objective-c
-@implementation WXImgLoaderDefaultImpl
-#pragma mark -
-#pragma mark WXImgLoaderProtocol
-
-- (id<WXImageOperationProtocol>)downloadImageWithURL:(NSString *)url imageFrame:(CGRect)imageFrame userInfo:(NSDictionary *)userInfo completed:(void(^)(UIImage *image, NSError *error, BOOL finished))completedBlock
-{
- if ([url hasPrefix:@"//"]) {
- url = [@"http:" stringByAppendingString:url];
- }
- return (id<WXImageOperationProtocol>)[[SDWebImageManager sharedManager] downloadImageWithURL:[NSURL URLWithString:url] options:0 progress:^(NSInteger receivedSize, NSInteger expectedSize) {
- } completed:^(UIImage *image, NSError *error, SDImageCacheType cacheType, BOOL finished, NSURL *imageURL) {
- if (completedBlock) {
- completedBlock(image, error, finished);
- }
- }];
-}
-@end
-```
-
-#### Register the handler
-
-You can register the handler which implements the protocol by calling `registerHandler:withProtocol` in WXSDKEngine.
-
-```objective-c
-WXSDKEngine.h
-/**
-* @abstract Registers a handler for a given handler instance and specific protocol
-* @param handler The handler instance to register
-* @param protocol The protocol to confirm
-*/
-+ (void)registerHandler:(id)handler withProtocol:(Protocol *)protocol;
-
-[WXSDKEngine registerHandler:[WXImgLoaderDefaultImpl new] withProtocol:@protocol(WXImgLoaderProtocol)];
-```
-
-## Custom Native Components for iOS
-
-### Component extend
-
-There are a lot of native components ready to be used in the Weex SDK, but users always have their own use cases. You might have written an awesome native UI widget in your previous work and just want to wrap up it and export to Weex. So we provide a way to enable developers to create their own custom fully-native components.
-
-This guide will use the implementation of existing component `image` to show you how to build a native component. It will also assume that you are familiar with iOS programming.
-
-#### Registration
-
-Defining a custom native component is simple. Just call `[WXSDKEngine registerComponent:withClass:]` with the component's tag name as first argument.
-
-```objective-c
-[WXSDKEngine registerComponent:@"image" withClass:[WXImageComponent class]];
-```
-
-Then you can create a `WXImageComponent` class to represent the implementation of image component.
-
-Now you can use `<image>` wherever you want in the template.
-
-```html
-<image></image>
-```
-
-#### Adding Properties
-
-The next thing we can do is to extend some native properties to make the component more powerful. As an image, let's say we should have a `src` attribute as image's remote source and a `resize` attribute as image's resize mode(contain/cover/stretch).
-
-```objective-c
-@interface WXImageComponent ()
-
-@property (nonatomic, strong) NSString *imageSrc;
-@property (nonatomic, assign) UIViewContentMode resizeMode;
-
-@end
-```
-
-All of the styles, attributes and events will be passed to the component's initialization method, so here you can store the properties which you are interested in.
-
-```objective-c
-@implementation WXImageComponent
-
-- (instancetype)initWithRef:(NSString *)ref type:(NSString *)type styles:(NSDictionary *)styles attributes:(NSDictionary *)attributes events:(NSArray *)events weexInstance:(WXSDKInstance *)weexInstance
-{
- if (self = [super initWithRef:ref type:type styles:styles attributes:attributes events:events weexInstance:weexInstance]) {
- _imageSrc = [WXConvert NSString:attributes[@"src"]];
- _resizeMode = [WXConvert UIViewContentMode:attributes[@"resize"]];
- }
-
- return self;
-}
-
-@end
-```
-
-The properties getted in the attributes are of `id` type, so we have to convert them to the type we want using a conversion function. Basic conversion functions can be found in the `WXConvert` file, or you can just add your own conversion function.
-
-
-#### Hooking Render Life Cycle
-
-A Native Component has a life cycle managed by Weex. Weex creates it, layout it, renders it and destroys it.
-
-Weex offers component life cycle hooks that give you visibility into these key moments and the ability to act when they occur.
-
-method| description
-:----:|------
-initWithRef:type:...| Initializes a new component using the specified properties.
-layoutDidFinish | Called when the component has just laid out.
-loadView | Creates the view that the component manages.
-viewWillLoad | Called before the load of component's view .
-viewDidLoad | Called after the component's view is loaded and set.
-viewWillUnload | Called just before releasing the component's view.
-viewDidUnload | Called when the component's view is released.
-updateStyles:| Called when component's style are updated.
-updateAttributes:| Called when component's attributes are updated.
-addEvent:| Called when adding an event to the component.
-removeEvent:| Called when removing an event frome the component.
-
-
-As in the image component example, if we need to use our own image view, we can override the `loadView` method.
-
-
-```objective-c
-- (UIView *)loadView
-{
- return [[WXImageView alloc] init];
-}
-```
-
-Now Weex will use `WXImageView` to render the `image` component.
-
-As an image component, we will need to fetch the remote image and set it to the image view. This can be done in `viewDidLoad` method when the view is created and loaded. `viewDidLoad` is also the best time to perform additional initialization for your view, such as content mode changing.
-
-
-```objective-c
-- (void)viewDidLoad
-{
- UIImageView *imageView = (UIImageView *)self.view;
- imageView.contentMode = _resizeMode;
- imageView.userInteractionEnabled = YES;
- imageView.clipsToBounds = YES;
- imageView.exclusiveTouch = YES;
-
- // Do your image fetching and updating logic
-}
-```
-
-If image's remote source can be changed, you can also hook the `updateAttributes:` method to perform your attributes changing logic. Component's view always has been loaded while `updateAttributes:` or `updateStyles:` is called.
-
-
-```objective-c
-- (void)updateAttributes:(NSDictionary *)attributes
-{
- if (attributes[@"src"]) {
- _imageSrc = [WXConvert NSString:attributes[@"src"]];
- // Do your image updating logic
- }
-
- if (attributes[@"resize"]) {
- _resizeMode = [WXConvert UIViewContentMode:attributes[@"resize"]];
- self.view.contentMode = _resizeMode;
- }
-}
-```
-
-Maybe there is even more life cycle hooks you might need to consider, such as `layoutDidFinish` while layout computing is finished. If you want to go deeper, check out the `WXComponent.h` file in the source code.
-
-Now you can use `<image>` and its attributes wherever you want in the template.
-
-```html
-<image style="your-custom-style" src="image-remote-source" resize="contain/cover/stretch"></image>
-```
-#### Component Method
-from WeexSDK `0.9.5`, you can define your component method by macro `WX_EXPORT_METHOD`
-for example:
-
-```
-@implementation WXMyComponent
- +WX_EXPORT_METHOD(@selector(focus))
- +- (instancetype)initWithRef:(NSString *)ref type:(NSString *)type styles:(NSDictionary *)styles attributes:(NSDictionary *)attributes events:(NSArray *)events weexInstance:(WXSDKInstance *)weexInstance
- {
- if (self = [super initWithRef:ref type:type styles:styles attributes:attributes events:events weexInstance:weexInstance]) {
- // handle your attributes
- // handle your styles
- }
-
- return self;
- }
-
-
- - (void)focus
- {
- NSLog(@"you got it");
- }
-@end
-```
-
-after your registration for your own custom component, now you can call it in your js file.
-
-```html
-<template>
- <mycomponent id='mycomponent'></mycomponent>
-</template>
-<script>
- module.exports = {
- created: function() {
- this.$el('mycomponent').focus();
- }
- }
-</script>
-```
-
-
-
-
-
-
-
-
-
http://git-wip-us.apache.org/repos/asf/incubator-weex-site/blob/32a097bf/source/v-0.10/advanced/how-data-binding-works.md
----------------------------------------------------------------------
diff --git a/source/v-0.10/advanced/how-data-binding-works.md b/source/v-0.10/advanced/how-data-binding-works.md
deleted file mode 100644
index a207997..0000000
--- a/source/v-0.10/advanced/how-data-binding-works.md
+++ /dev/null
@@ -1,39 +0,0 @@
----
-title: How data-binding works
-type: advanced
-order: 2
-has_chapter_content: true
-version: 0.10
----
-
-# How data-binding works
-
-Weex JS Framework is a MVVM framework. It observe data and use `{% raw %}{{bindedKey}}{% endraw %}` syntax to bind in views. When data is changed in anyway, the view will automatically be updated due to data-binding.
-
-For example, The content of a `<text>` component is bound with the key `notes` in data:
-
-```html
-<template>
- <div>
- <text>{{notes}}</text>
- </div>
-<template>
-
-<script>
- module.exports = {
- data: {
- notes: 'Hello'
- }
- }
-</script>
-```
-
-Weex JS Framework first observe the data object to make sure each data change in the future will be observed. And then it will compile the whole `<template>`. When it finds that the content of the `<text>` is bound with `notes`, JS Framework will watch the `data.notes` changes and set a handler which will update the `<text>` content with new `data.notes`. So developer only need to manage the data, the view display could automatically do corresponding changes.
-
-Some special data-binding syntax here:
-
-* `{% raw %}<foo if="{{condition}}">{% endraw %}` will watch the condition value changes. When it changes to `true`, the `<foo>` element will be created and attached, otherwise it will be not created or removed.
-* `{% raw %}<foo repeat="{{list}}">{% endraw %}` will watch the mutations of a list. At the beginning the `<foo>` element will be cloned and attached with each item in list. When some items are added, removed or moved, the `<foo>` element list will be re-generated new content in the right order with minimum alterations.
-* `{% raw %}<foo if="{{condition}}" repeat="{{list}}">{% endraw %}` will process `repeat` first and `if` the second. In another way, it will walk through each item in list, if the item's condition value is true, a `<foo>` element will be cloned and attached with this certain item value.
-
-Compared with virtual DOM diff algorithm, we just "diff" the data and only calculate/update the virtual DOM with minimum alterations for each user interaction or data-change operation. So it's more lightweight and fast especially for small views in mobile devices.
http://git-wip-us.apache.org/repos/asf/incubator-weex-site/blob/32a097bf/source/v-0.10/advanced/images/how-arch.png
----------------------------------------------------------------------
diff --git a/source/v-0.10/advanced/images/how-arch.png b/source/v-0.10/advanced/images/how-arch.png
deleted file mode 100644
index a13df7a..0000000
Binary files a/source/v-0.10/advanced/images/how-arch.png and /dev/null differ
http://git-wip-us.apache.org/repos/asf/incubator-weex-site/blob/32a097bf/source/v-0.10/advanced/images/how-render.png
----------------------------------------------------------------------
diff --git a/source/v-0.10/advanced/images/how-render.png b/source/v-0.10/advanced/images/how-render.png
deleted file mode 100644
index db9b0f4..0000000
Binary files a/source/v-0.10/advanced/images/how-render.png and /dev/null differ
http://git-wip-us.apache.org/repos/asf/incubator-weex-site/blob/32a097bf/source/v-0.10/advanced/index.md
----------------------------------------------------------------------
diff --git a/source/v-0.10/advanced/index.md b/source/v-0.10/advanced/index.md
deleted file mode 100644
index dca072d..0000000
--- a/source/v-0.10/advanced/index.md
+++ /dev/null
@@ -1,148 +0,0 @@
----
-title: How it works
-type: advanced
-order: 1
-has_chapter_content: true
-version: 0.10
----
-
-# How it works
-<span class="weex-version">0.4</span>
-
-## Overview
-
-Weex is a extendable cross-platform solution for dynamic programming and publishing projects. In the source code you can write pages or components with `<template>`, `<style>` and `<script>` tags, and then transform them into bundles for deploying. In server-side we can use these JS bundles for client request. When client get a bundle from server, it will be processed by client-side JavaScript engine and manages the native view rendering, the native API invoking and user interactions.
-
-### Whole Workflow
-
-```
-Weex file --------------frontend(source code)
-↓ (transform) --------- frontend(build tool)
-JS bundle ------------- frontend(bundle code)
-↓ (deploy) ------------ server
-JS bundle in server --- server
-↓ (compile) ----------- client(js-engine)
-Virtual DOM tree ------ client(weex-jsframework)
-↓ (render) ------------ client(render-engine)
-Native view ----------- client(render-engine)
-```
-
-According to the workflow above, you need:
-
-* Transformer: A nodejs tool to transform the source code into the bundle code.
-* JS Framework: A JavaScript framework runing in the client which manage Weex instance. The instance which created from a JS bundle builds virtual DOM tree. Also it sends/receives native calls for native view rendering, native APIs and user interactions.
-* Native Engine: There are many different ports for different platforms: iOS/Android/HTML5. They have the same components design, module APIs design and rendering effect. So they can work with the one and the same JS Framework and JS bundles.
-
-## Transformer
-
-The transformer transforms a source code into a bundle code. The whole work could be divided into three parts:
-
-* Transform `<template>` into a JSON-like tree and transform data-binding attribute into a function prop which return the correct data value. For example: `{% raw %}<foo a="{{x}}" b="1" />{% endraw %}` will be transformed into `{type: "foo", attr: {a: function () {return this.x}, b: 1}}`.
-* Transform `<style>` into a JSON tree. For example: `.classname {name: value;}` will be transformed into `{classname: {name: value}}`.
-* Join the two above with `<script>` content. The three parts will be joined together and wrapped into a JavaScript AMD module.
-
-A whole example (`main.we`):
-
-```html
-<template>
- <foo a="{{x}}" b="1" class="bar"></foo>
-</template>
-<style>
- .bar {width: 200; height: 200}
-</style>
-<script>
- module.exports = {
- data: function () {
- return {x: 100}
- }
- }
-</script>
-```
-
-will transformed into:
-
-```
-define('@weex-component/main', function () {
- module.exports = {
- data: function () {
- return {x: 100}
- }
- }
- module.template = {
- type: "foo",
- attr: {
- a: function () {return this.x},
- b: 1,
- classname: ['bar']
- }
- }
- module.style = {
- bar: {width: 200, height: 200}
- }
-}
-bootstrap('@weex-component/main')
-```
-
-Additionally, the transformer could also do more things: combo the bundles, bootstrap with config and external data. For more information, please see the syntax specs.
-
-## NOTICE
-Most of Weex utility output JS Bundle after [Webpack](https://webpack.github.io/) re-bundle. So the eventual format of Weex JSBundle is webpack packed .
-
-## JS Framework
-
-JS Framework will run in native JavaScript engine at the beginning preparation phase. It has `define()` and `bootstrap()` functions for each the bunlde code. Once a JS bundle requested from server, the code will be executed. `define()` will register all modules first, then `bootstrap()` will start compiling main component into virtual DOM and send rendering calls to native.
-
-There are two key methods for the bridge between JS and native:
-
-* `callNative` sends commands from JavaScript to native. So it's called from JavaScript and implemented with native code. All commands are native APIs organized by modules, for example `rendering`, `networking`, `authorizing`, and other client-side features like `toast` etc.
-* `callJS` sends commands from native to JavaScript. So it's called from native and implemented by JS Framework. All commands are user interactions or native callbacks.
-
-## Native RenderEngine
-
-Native RenderEngine will supplies many native components and modules for call.
-
-**Component** is an element in the screen which have a certain view and behavior. It could be configured with some attributes and style properties, and could response user interactions. There are some common components like `<div>`, `<text>`, `<image>` etc.
-
-**Module** is a set of APIs which could be called from JS Framework. Some of them also have to make async callbacks to JS Framework, for example: send HTTP request.
-
-During a Weex instance works, Native RenderEngine receives all kinds of module API calls from JS Framework. These calls will create or update components for view and use client-side features like `toast`. When a user interaction or module API callback happens, It will call `callJS()` from JS Framework. These jobs could walk through the Weex instance lifecycle till the instance is destroyed. As is shown in the architecture figure, H5 RenderEngine is a special RenderEngine with almost the same functions as native RenderEngines.
-
-
-Weex Architecture
-
-### call native from javascript
-
-```
-[JS Framework]
-↓ callNative
-module APIs
- rendering -> components display
- other features
-[Native RenderEngine]
-```
-
-### call javascript from native
-
-```
-[Native RenderEngine]
-module APIs callbacks
-user interactions
-↓ callJS
-[JS Framework]
-```
-
-### Render Flow
-
-
-Weex Render Flow
-
-0. Input is virtual dom.
-0. **Build Tree**. Parse JSON data (virtual dom) to a Render Tree (RT).
-0. **Apply Style**. Attach css style to RT nodes.
-0. **Create View**. Create native views for each RT node.
-0. **Attach Event**. Attach events for each view.
-0. **CSS Layout**. Use [css-layout](https://github.com/facebook/css-layout) to calculate the layout of each view.
-0. **Update Frame**. Update layout parameters of each view.
-0. Output is Native or H5 Views.
-
-In H5 Render Flow, `CSS Layout` and `Update Frame` are implemented by browser engine like webkit.
http://git-wip-us.apache.org/repos/asf/incubator-weex-site/blob/32a097bf/source/v-0.10/advanced/integrate-to-android.md
----------------------------------------------------------------------
diff --git a/source/v-0.10/advanced/integrate-to-android.md b/source/v-0.10/advanced/integrate-to-android.md
deleted file mode 100644
index e2b2569..0000000
--- a/source/v-0.10/advanced/integrate-to-android.md
+++ /dev/null
@@ -1,204 +0,0 @@
----
-title: Integrate to Android
-type: advanced
-order: 3
-has_chapter_content: true
-version: 0.10
----
-
-# Integrate to Android
-
-When you need to use the new features or to customize specific features, you can rely on the Source SDK for development。
-
-## Prerequisites
-
-Assuming you have the Android SDK installed, run `android` to open the Android SDK Manager.
-
-Make sure you have the following installed:
-
-1. Android SDK version 23 (compileSdkVersion in [`build.gradle`](https://github.com/apache/incubator-weex/blob/master/android/sdk/build.gradle))
-2. SDK build tools version 23.0.2 (buildToolsVersion in [`build.gradle`](https://github.com/apache/incubator-weex/blob/master/android/sdk/build.gradle))
-3. Android Support Repository >= 17 (for Android Support Library)
-4. Android NDK (download & extraction instructions [here](http://developer.android.com/ndk/downloads/index.html))
-
-Point Gradle to your Android SDK: either have `$ANDROID_SDK` and `$ANDROID_NDK ` defined, or create a local.properties file in the root of your weex checkout with the following contents:
-
-```
-sdk.dir=absolute_path_to_android_sdk
-ndk.dir=absolute_path_to_android_ndk
-```
-
-Example:
-
-```
-sdk.dir=/Users/your_name/android-sdk-macosx
-ndk.dir=/Users/your_name/android-ndk-r10e
-```
-
-
-## Building the source
-
-#### 1. Clone source from github
-
-First, you need to git clone `weex` from github:
-
-```shell
-git clone https://github.com/alibaba/weex.git
-```
-##### 2. Build APK
- *** 1) Android studio build APK ***
-
- ```
- Step 1: run android studio
- Step 2: open the file of ~/weex/android/playground/build.gradle
- Step 3: Run the Project and the Apk will auto install in your android device
- ```
- *** 2) Gradle build APK ***
-
- ```
- Step 1: enter the direction of "/weex/android/playground"
- Step 2: run the build command: ./gradlew clean assemble
- Step 3: obtain the payground APK from the direction of weex/android/playground/app/build/outputs/apk/
- Step 3: then adb install -r weex/android/playground/app/build/outputs/apk/playgroud.apk
- ```
-#### 3. Adding the `:weex_sdk_android` project
-
-
-Add the `:weex_sdk_android` project in `android/settings.gradle`:
-
-```gradle
-include ':weex_sdk_android'
-
-project(':weex_sdk_android').projectDir = new File(
- rootProject.projectDir, '../weex_sdk_android')
-```
-
-Modify your `android/app/build.gradle` to use the `:weex_sdk_android` project instead of the pre-compiled library, e.g. - replace `compile 'com.taobao.android:weex_sdk:0.4.1` with `compile project(':weex_sdk_android')`:
-
-```gradle
-dependencies {
- compile fileTree(dir: 'libs', include: ['*.jar'])
- compile 'com.android.support:appcompat-v7:23.0.1'
-
- compile project(':weex_sdk_android')
-
- ...
-}
-```
-
-#### 3. Making 3rd-party modules use your project
-
-If you use 3rd-party weex modules, you need to override their dependencies so that they don't build the pre-compiled library. Otherwise you'll get an error while compiling - `Error: more than one library with package name 'com.taobao.weex'`.
-
-Modify your `android/app/build.gradle` and replace `compile project(':weex-custom-module')` with:
-
-```gradle
-compile(project(':weex-custom-module')) {
- exclude group: 'com.taobao.weex', module: 'weex_sdk_android'
-}
-```
-
-#### 4、How to load local Your Js bundle in the directory of Android assets
-Besides load a Js Bundle online, you also can load the js bundle from the directory of Android assets.
-
-For Example:
-
- ```
- String yourbundleStr = WXFileUtils.loadFileContent("yourBundle.js", context);
- WXSDKInstance.render(TAG, yourbundleStr, options, null, width, Height, WXRenderStrategy.APPEND_ASYNC);
- ```
-
-
-## Building from Android Studio
-
-From the Welcome screen of Android Studio choose "Import project" and select the `playground` folder of your app.
-
-You should be able to use the _Run_ button to run your app on a device.
-
-## Tip
-1. Since the packet size limit is currently only compiled arm , X86 does not support.
-
-2. Gradle build fails in `ndk-build`. See the section about `local.properties` file above.
-
-#Quick access
-
-## Requirements
-
-* an existing, gradle-based Android app
-
-## Prepare your app
-
-In your app's `build.gradle` file add the WEEX dependency:
-
- compile 'com.taobao.android:weex_sdk:0.4.1'
-
-You can find the latest version of the WEEX library on [jcenter](https://bintray.com/search?query=weex_sdk&forceAgnostic=true). Next, make sure you have the Internet permission in your `AndroidManifest.xml`:
-
- <uses-permission android:name="android.permission.INTERNET" />
-
-
-## Add native code
-
-You need to add some native code in order to start the Weex runtime and get it to render something. To do this, we're going to create an `Application` to init weex, then we we're going to create an `Activity` that creates a WeexContainerView, starts a Weex application inside it and sets it as the main content view.
-
-
-```java
-public class WXApplication extends Application {
- @Override
- public void onCreate() {
- super.onCreate();
-
- WXEnvironment.addCustomOptions("appName","TBSample");
- WXSDKEngine.init(this);
- try {
-
- WXSDKEngine.registerComponent("wtRichText", WTRichText.class);
- ......
-
- WXSDKEngine.registerModule("event", WXEventModule.class);
- } catch (WXException e) {
- e.printStackTrace();
- }
- }
-}
-```
-
-Next,
-
-```java
-// Create or find RenderContainer view.
-// Notice: If you create RenderContainer manually, don't forget add it to view tree.
-RenderContainer renderContainer = (RenderContainer)findViewById(R.id.container);
-
-//crate Weex instance
-WXSDKInstance mInstance = new WXSDKInstance(this);
-//set render container
-mInstance.setRenderContainer(renderContainer);
-//set image Adapter
-mInstance.setImgLoaderAdapter(new ImageAdapter(this));
-//register render listener
-mInstance.registerRenderListener(new IWXRenderListener() {
- @Override
- public void onViewCreated(WXSDKInstance instance, View resultView) {
- // Notice: If you don't setRenderContainer before render, you need add the resultView to view tree here.
-
- }
- @Override
- public void onRenderSuccess(WXSDKInstance instance) {
- }
- @Override
- public void onRefreshSuccess(WXSDKInstance instance) {
- }
- @Override
- public void onException(WXSDKInstance instance, String errCode,String msg) {
- }
-});
-//start render weex view
-mInstance.render(pageName,template, null, null, -1, -1, WXRenderStrategy.APPEND_ASYNC);
-```
-
-That's it, your activity is ready to run some JavaScript code.
-
-## Reference Example
-
-[`Weex Examples`](https://github.com/apache/incubator-weex/tree/master/examples)
http://git-wip-us.apache.org/repos/asf/incubator-weex-site/blob/32a097bf/source/v-0.10/advanced/integrate-to-html5.md
----------------------------------------------------------------------
diff --git a/source/v-0.10/advanced/integrate-to-html5.md b/source/v-0.10/advanced/integrate-to-html5.md
deleted file mode 100644
index b71bcd7..0000000
--- a/source/v-0.10/advanced/integrate-to-html5.md
+++ /dev/null
@@ -1,77 +0,0 @@
----
-title: Integrate to web
-type: advanced
-order: 5
-has_chapter_content: true
-version: 0.10
----
-
-# Integrate Weex HTML5 to your project
-
-### Intro
-
-Weex is a extendable cross-platform solution for dynamic programming and publishing projects, which is for developers to write code once and run the code everywhere.
-
-The bundle transformed from the source can currently run on android, ios and web platform. Weex HTML5 is a renderer for weex bundle to run on a webview or a modern browser etc.
-
-### Get Weex HTML5
-
-Use npm to install the latest version of Weex HTML5, require it in your code by CommonJS and use it as a npm package.
-
-#### Install from npm
-
-Make sure you get the latest version by `npm install` or `npm update`. For more information of npm, please visit the [npm official site](https://docs.npmjs.com/).
-
-```
-npm install weex-html5
-```
-
-require weex-html5:
-
-```
-const weex = require('weex-html5')
-```
-
-### Initialize and run
-
-You can initialize weex through the API `init`. This method takes a config object as the first argument to confirm the runtime infomation and environment. Following parameters can be set by this config object:
-
-* `appId`: app instance id, can be either a string or a number
-* `source`: the requested url of weex bundle, or the transformed code it self.
-* `loader`: the loader type to load the weex bundle, which value is 'xhr' or 'jsonp' or 'source'.
- * `xhr`: load the source (weex bundle url) by XHR
- * `jsonp`: load the source bundle by JSONP
- * `source`: the source parameter above should be a weex bundle content (transformed bundle).
-* `rootId`: the id of the root element. Default value is 'weex'.
-
-Here is a example to do the initialzation:
-
-```
-function weexInit() {
- function getUrlParam (key) {
- var reg = new RegExp('[?|&]' + key + '=([^&]+)')
- var match = location.search.match(reg)
- return match && match[1]
- }
-
- var loader = getUrlParam('loader') || 'xhr'
- var page = getUrlParam('page')
-
- // jsonp callback name should be specified or be the default
- // value 'weexJsonpCallback' if the 'jsonp' loader is used.
- var JSONP_CALLBACK_NAME = 'weexJsonpCallback'
-
- window.weex.init({
- jsonpCallback: JSONP_CALLBACK_NAME,
- appId: location.href,
- source: page,
- loader: loader,
- rootId: 'weex'
- })
-}
-
-weexInit()
-```
-
-
-
http://git-wip-us.apache.org/repos/asf/incubator-weex-site/blob/32a097bf/source/v-0.10/advanced/integrate-to-ios.md
----------------------------------------------------------------------
diff --git a/source/v-0.10/advanced/integrate-to-ios.md b/source/v-0.10/advanced/integrate-to-ios.md
deleted file mode 100644
index 69dea6d..0000000
--- a/source/v-0.10/advanced/integrate-to-ios.md
+++ /dev/null
@@ -1,118 +0,0 @@
----
-title: Integrate to iOS
-type: advanced
-order: 4
-has_chapter_content: true
-version: 0.10
----
-
-# import Weex iOS to your project
-
-You will need to build Weex from source if you want to work on a new feature/bug fix, try out the latest features not released yet, or maintain your own fork with patches that cannot be merged to the core.
-
-Assuming you have installed [iOS Develop Environment](https://developer.apple.com/library/ios/documentation/IDEs/Conceptual/AppStoreDistributionTutorial/Setup/Setup.html) and [CocoaPods](https://guides.cocoapods.org/using/getting-started.html).
-
-#### 1. Clone source from github
-
-First, you need to git clone `weex` from github:
-
-```
-git clone https://github.com/alibaba/weex.git
-```
-#### 2. Import WeexSDK to project
-
-Copy the whole folder `/ios/sdk` to your project directory.
-
-Before adding the dependencies, please confirm that the project directory already exists the Podfile. If not, create a new one. Then, edit this file, adding some necessary dependecis for the target.
-
-```
-target 'YourTarget' do
- platform :ios, '7.0'
- pod 'WeexSDK', :path=>'./sdk/'
-end
-```
-You can get your `YourTarget` below
-
-
-
-Run pod install in current directory, for a while, .xcworkspace will be created. At this point, the dependencies have been established.
-
-#### 3. Init Weex Environment
-We are used to doing some initial tasks in appDelegate. Of course, there is no exception. You can do this in `didFinishLaunchingWithOptions` as follows.
-
-```
-//business configuration
-[WXAppConfiguration setAppGroup:@"AliApp"];
-[WXAppConfiguration setAppName:@"WeexDemo"];
-[WXAppConfiguration setAppVersion:@"1.0.0"];
-
-//init sdk enviroment
-[WXSDKEngine initSDKEnviroment];
-
-//register custom module and component,optional
-[WXSDKEngine registerComponent:@"MyView" withClass:[MyViewComponent class]];
-[WXSDKEngine registerModule:@"event" withClass:[WXEventModule class]];
-
-//register the implementation of protocol, optional
-[WXSDKEngine registerHandler:[WXNavigationDefaultImpl new] withProtocol:@protocol(WXNavigationProtocol)];
-
-//set the log level
-[WXLog setLogLevel:WXLogLevelVerbose];
-
-```
-
-#### 4. Render Weex Instance
-Weex supports two different modes, the full page rendering and part of page rendering.
-Something you have to do is to render weex view with specific URL, then add it to the parent container, which may be the viewController.
-
-```
-#import <WeexSDK/WXSDKInstance.h>
-
-- (void)viewDidLoad
-{
- [super viewDidLoad];
-
- _instance = [[WXSDKInstance alloc] init];
- _instance.viewController = self;
- _instance.frame = self.view.frame;
-
- __weak typeof(self) weakSelf = self;
- _instance.onCreate = ^(UIView *view) {
- [weakSelf.weexView removeFromSuperview];
- weakSelf.weexView = view;
- [weakSelf.view addSubview:weakSelf.weexView];
- };
-
- _instance.onFailed = ^(NSError *error) {
- //process failure
- };
-
- _instance.renderFinish = ^ (UIView *view) {
- //process renderFinish
- };
- [_instance renderWithURL:self.url options:@{@"bundleUrl":[self.url absoluteString]} data:nil];
-}
-```
-WXSDKInstance is a very imporent class, which provides you with some basic methods and callbacks, such as renderWithURL、onCreate、onFailed and etc. You can understand their usage by reading WXSDKInstance.h.
-
-
-#### 5. Destroy Weex Instance
-
-Please release weex instance in dealloc stage of viewContoller, or it will lead to memory leak.
-
-```
-- (void)dealloc
-{
- [_instance destroyInstance];
-}
-```
-
-#### 6. Build .IPA for Weex
-
-We can also pack all the JS files into the app's resources. This way you can run your app without development server and submit it to the AppStore.
-
-* [Install weex-toolkit](https://github.com/alibaba/weex_toolchain/tree/master/toolkit) and transform your `.we` file to JS by running `weex index.we -o index.js`, `index.we` is the entry file of your app.
-* Move `index.js` to your app's Xcode project and add the file to your target.
-* Replace `[_instance renderWithURL:'httpURL']` with: `[_instance renderWithURL: [[NSBundle mainBundle] URLForResource:@"index" withExtension:@"js"]]`
-
-* Go to Product -> Archive in Xcode and follow the steps to build your .IPA file and submit it to the AppStore.
http://git-wip-us.apache.org/repos/asf/incubator-weex-site/blob/32a097bf/source/v-0.10/guide/.gitkeep
----------------------------------------------------------------------
diff --git a/source/v-0.10/guide/.gitkeep b/source/v-0.10/guide/.gitkeep
deleted file mode 100644
index e69de29..0000000
[51/51] [abbrv] incubator-weex-site git commit: update file structure
and fix responsive styles
Posted by ha...@apache.org.
update file structure and fix responsive styles
Project: http://git-wip-us.apache.org/repos/asf/incubator-weex-site/repo
Commit: http://git-wip-us.apache.org/repos/asf/incubator-weex-site/commit/12e3a8bc
Tree: http://git-wip-us.apache.org/repos/asf/incubator-weex-site/tree/12e3a8bc
Diff: http://git-wip-us.apache.org/repos/asf/incubator-weex-site/diff/12e3a8bc
Branch: refs/heads/master
Commit: 12e3a8bcd85c23a672ec660c215551b801156fee
Parents: 0e91280
Author: Hanks <zh...@gmail.com>
Authored: Fri Oct 13 20:46:23 2017 +0800
Committer: Hanks <zh...@gmail.com>
Committed: Fri Oct 13 20:46:23 2017 +0800
----------------------------------------------------------------------
_draft/difference-with-web.en.md | 149 -----
_draft/difference-with-web.md | 138 -----
_draft/native-dom-api.md | 212 -------
_draft/timer.cn.md | 49 --
_draft/timer.md | 60 --
_draft/v-0.10/advanced/extend-to-android.md | 189 ------
_draft/v-0.10/advanced/extend-to-html5.md | 258 --------
_draft/v-0.10/advanced/extend-to-ios.md | 311 ----------
.../v-0.10/advanced/how-data-binding-works.md | 39 --
_draft/v-0.10/advanced/images/how-arch.png | Bin 62303 -> 0 bytes
_draft/v-0.10/advanced/images/how-render.png | Bin 42957 -> 0 bytes
_draft/v-0.10/advanced/index.md | 148 -----
_draft/v-0.10/advanced/integrate-to-android.md | 204 -------
_draft/v-0.10/advanced/integrate-to-html5.md | 77 ---
_draft/v-0.10/advanced/integrate-to-ios.md | 118 ----
_draft/v-0.10/guide/.gitkeep | 0
.../how-to/customize-a-native-component.md | 58 --
.../guide/how-to/cuszomize-native-apis.md | 80 ---
_draft/v-0.10/guide/how-to/debug-with-html5.md | 47 --
_draft/v-0.10/guide/how-to/index.md | 40 --
.../guide/how-to/preview-in-playground-app.md | 20 -
.../guide/how-to/require-3rd-party-libs.md | 56 --
.../how-to/transform-code-into-js-bundle.md | 110 ----
_draft/v-0.10/guide/images/tut-cli-qrcode.png | Bin 45480 -> 0 bytes
_draft/v-0.10/guide/images/tut-first.png | Bin 51434 -> 0 bytes
_draft/v-0.10/guide/images/tut-second.png | Bin 78519 -> 0 bytes
_draft/v-0.10/guide/images/tut1.jpg | Bin 47442 -> 0 bytes
_draft/v-0.10/guide/images/tut2.jpg | Bin 52428 -> 0 bytes
_draft/v-0.10/guide/images/tut3.png | Bin 52198 -> 0 bytes
_draft/v-0.10/guide/images/tut4.gif | Bin 218245 -> 0 bytes
_draft/v-0.10/guide/index.md | 211 -------
_draft/v-0.10/guide/syntax/comm.md | 228 --------
.../v-0.10/guide/syntax/composed-component.md | 114 ----
_draft/v-0.10/guide/syntax/config-n-data.md | 61 --
_draft/v-0.10/guide/syntax/data-binding.md | 248 --------
_draft/v-0.10/guide/syntax/display-logic.md | 173 ------
_draft/v-0.10/guide/syntax/events.md | 59 --
_draft/v-0.10/guide/syntax/id.md | 65 ---
_draft/v-0.10/guide/syntax/index.md | 122 ----
_draft/v-0.10/guide/syntax/render-logic.md | 35 --
_draft/v-0.10/guide/syntax/style-n-class.md | 118 ----
_draft/v-0.10/references/api.md | 84 ---
_draft/v-0.10/references/bubble.md | 150 -----
_draft/v-0.10/references/cheatsheet.md | 102 ----
_draft/v-0.10/references/color-names.md | 182 ------
_draft/v-0.10/references/common-attrs.md | 78 ---
_draft/v-0.10/references/common-event.md | 120 ----
_draft/v-0.10/references/common-style.md | 208 -------
_draft/v-0.10/references/component-defs.md | 131 -----
_draft/v-0.10/references/components/a.md | 50 --
_draft/v-0.10/references/components/cell.md | 42 --
_draft/v-0.10/references/components/div.md | 48 --
_draft/v-0.10/references/components/image.md | 55 --
_draft/v-0.10/references/components/index.md | 24 -
.../v-0.10/references/components/indicator.md | 98 ----
_draft/v-0.10/references/components/input.md | 124 ----
_draft/v-0.10/references/components/list.md | 292 ---------
.../references/components/refresh-loading.md | 297 ----------
_draft/v-0.10/references/components/scroller.md | 136 -----
_draft/v-0.10/references/components/slider.md | 107 ----
_draft/v-0.10/references/components/switch.md | 81 ---
_draft/v-0.10/references/components/text.md | 94 ---
_draft/v-0.10/references/components/textarea.md | 81 ---
_draft/v-0.10/references/components/video.md | 75 ---
_draft/v-0.10/references/components/web.md | 152 -----
.../v-0.10/references/components/wxc-navpage.md | 74 ---
.../v-0.10/references/components/wxc-tabbar.md | 94 ---
_draft/v-0.10/references/gesture.md | 74 ---
.../v-0.10/references/images/css-boxmodel.png | Bin 12581 -> 0 bytes
.../references/images/css-flexbox-align.jpg | Bin 35005 -> 0 bytes
.../references/images/css-flexbox-justify.svg | 59 --
.../references/images/css-flexbox-sample.png | Bin 3210 -> 0 bytes
_draft/v-0.10/references/images/nav.png | Bin 83497 -> 0 bytes
_draft/v-0.10/references/index.md | 49 --
_draft/v-0.10/references/modules/animation.md | 63 --
_draft/v-0.10/references/modules/clipboard.md | 53 --
_draft/v-0.10/references/modules/dom.md | 114 ----
_draft/v-0.10/references/modules/globalevent.md | 89 ---
_draft/v-0.10/references/modules/index.md | 28 -
_draft/v-0.10/references/modules/modal.md | 192 ------
_draft/v-0.10/references/modules/navigator.md | 198 -------
_draft/v-0.10/references/modules/storage.md | 111 ----
_draft/v-0.10/references/modules/stream.md | 86 ---
_draft/v-0.10/references/modules/timer.md | 60 --
_draft/v-0.10/references/modules/webview.md | 160 -----
_draft/v-0.10/references/special-element.md | 36 --
_draft/v-0.10/references/specs/index.md | 309 ----------
.../v-0.10/references/specs/js-bundle-format.md | 307 ----------
.../references/specs/js-framework-apis.md | 191 ------
.../v-0.10/references/specs/virtual-dom-apis.md | 147 -----
_draft/v-0.10/references/text-style.md | 43 --
_draft/v-0.10/tools/devtools-android.md | 123 ----
_draft/v-0.10/tools/devtools-ios.md | 76 ---
_draft/v-0.10/tools/devtools.md | 102 ----
_draft/v-0.10/tools/index.md | 97 ---
_draft/v-0.10/tools/playground.md | 24 -
_draft/v-0.10/tools/transformer.md | 38 --
_draft/v1.0/advanced/create-a-weex-project.md | 271 ---------
.../advanced/customize-a-native-component.md | 168 ------
_draft/v1.0/advanced/cuszomize-native-apis.md | 85 ---
_draft/v1.0/advanced/extend-to-android.md | 170 ------
_draft/v1.0/advanced/extend-to-html5.md | 253 --------
_draft/v1.0/advanced/extend-to-ios.md | 279 ---------
_draft/v1.0/advanced/how-data-binding-works.md | 39 --
_draft/v1.0/advanced/images/how-arch.png | Bin 62303 -> 0 bytes
_draft/v1.0/advanced/images/how-render.png | Bin 42957 -> 0 bytes
_draft/v1.0/advanced/index.md | 146 -----
.../advanced/integrate-devtools-to-android.md | 272 ---------
.../v1.0/advanced/integrate-devtools-to-ios.md | 230 --------
_draft/v1.0/advanced/integrate-to-android.md | 201 -------
_draft/v1.0/advanced/integrate-to-html5.md | 69 ---
_draft/v1.0/advanced/integrate-to-ios.md | 110 ----
_draft/v1.0/blog/index.md | 4 -
.../v1.0/guide/develop-on-your-local-machine.md | 175 ------
_draft/v1.0/guide/how-to/debug-with-html5.md | 47 --
_draft/v1.0/guide/how-to/index.md | 185 ------
.../v1.0/guide/how-to/require-3rd-party-libs.md | 57 --
.../how-to/transform-code-into-js-bundle.md | 112 ----
_draft/v1.0/guide/index.md | 60 --
_draft/v1.0/guide/syntax/comm.md | 134 -----
_draft/v1.0/guide/syntax/composed-component.md | 158 -----
_draft/v1.0/guide/syntax/config-n-data.md | 72 ---
_draft/v1.0/guide/syntax/data-binding.md | 332 -----------
_draft/v1.0/guide/syntax/display-logic.md | 252 --------
_draft/v1.0/guide/syntax/events.md | 103 ----
_draft/v1.0/guide/syntax/id.md | 124 ----
_draft/v1.0/guide/syntax/index.md | 134 -----
_draft/v1.0/guide/syntax/render-logic.md | 44 --
_draft/v1.0/guide/syntax/style-n-class.md | 117 ----
_draft/v1.0/index.md | 5 -
_draft/v1.0/migration/difference.md | 249 --------
_draft/v1.0/migration/index.md | 11 -
_draft/v1.0/migration/migration-from-weex.md | 116 ----
_draft/v1.0/references/api.md | 67 ---
_draft/v1.0/references/bubble.md | 150 -----
_draft/v1.0/references/cheatsheet.md | 114 ----
_draft/v1.0/references/color-names.md | 180 ------
_draft/v1.0/references/common-attrs.md | 166 ------
_draft/v1.0/references/common-event.md | 492 ----------------
_draft/v1.0/references/common-style.md | 322 ----------
_draft/v1.0/references/component-defs.md | 126 ----
_draft/v1.0/references/components/a.md | 273 ---------
_draft/v1.0/references/components/cell.md | 191 ------
_draft/v1.0/references/components/div.md | 245 --------
_draft/v1.0/references/components/image.md | 161 -----
_draft/v1.0/references/components/index.md | 24 -
_draft/v1.0/references/components/indicator.md | 124 ----
_draft/v1.0/references/components/input.md | 309 ----------
_draft/v1.0/references/components/list.md | 375 ------------
_draft/v1.0/references/components/loading.md | 118 ----
_draft/v1.0/references/components/refresh.md | 204 -------
_draft/v1.0/references/components/scroller.md | 324 ----------
_draft/v1.0/references/components/slider.md | 121 ----
_draft/v1.0/references/components/switch.md | 98 ----
_draft/v1.0/references/components/text.md | 116 ----
_draft/v1.0/references/components/textarea.md | 115 ----
_draft/v1.0/references/components/video.md | 82 ---
_draft/v1.0/references/components/web.md | 143 -----
_draft/v1.0/references/gesture.md | 79 ---
_draft/v1.0/references/images/Artboard.jpg | Bin 36223 -> 0 bytes
_draft/v1.0/references/images/coding_weex_1.jpg | Bin 56225 -> 0 bytes
_draft/v1.0/references/images/css-boxmodel.png | Bin 12581 -> 0 bytes
.../references/images/css-flexbox-align.jpg | Bin 35005 -> 0 bytes
.../references/images/css-flexbox-justify.svg | 59 --
_draft/v1.0/references/images/div_1.jpg | Bin 59561 -> 0 bytes
_draft/v1.0/references/images/div_2.jpg | Bin 62574 -> 0 bytes
_draft/v1.0/references/images/div_3.jpg | Bin 82345 -> 0 bytes
_draft/v1.0/references/images/div_4.jpg | Bin 200642 -> 0 bytes
_draft/v1.0/references/images/image_1.jpg | Bin 163705 -> 0 bytes
_draft/v1.0/references/images/image_2.jpg | Bin 255560 -> 0 bytes
_draft/v1.0/references/images/list_2.jpg | Bin 56635 -> 0 bytes
_draft/v1.0/references/images/list_3.jpg | Bin 128082 -> 0 bytes
_draft/v1.0/references/images/list_4.jpg | Bin 339799 -> 0 bytes
_draft/v1.0/references/images/nav.jpg | Bin 124441 -> 0 bytes
_draft/v1.0/references/images/scroller_1.jpg | Bin 344783 -> 0 bytes
_draft/v1.0/references/images/style_1.jpg | Bin 59366 -> 0 bytes
_draft/v1.0/references/images/style_2.jpg | Bin 59696 -> 0 bytes
_draft/v1.0/references/index.md | 46 --
_draft/v1.0/references/modules/animation.md | 90 ---
_draft/v1.0/references/modules/clipboard.md | 112 ----
_draft/v1.0/references/modules/dom.md | 79 ---
_draft/v1.0/references/modules/globalevent.md | 87 ---
_draft/v1.0/references/modules/index.md | 20 -
_draft/v1.0/references/modules/modal.md | 196 -------
_draft/v1.0/references/modules/navigator.md | 110 ----
_draft/v1.0/references/modules/storage.md | 224 -------
_draft/v1.0/references/modules/stream.md | 220 -------
_draft/v1.0/references/modules/webview.md | 66 ---
_draft/v1.0/references/replace.md | 57 --
_draft/v1.0/references/special-element.md | 38 --
_draft/v1.0/references/specs/index.md | 309 ----------
.../v1.0/references/specs/js-framework-apis.md | 190 ------
.../v1.0/references/specs/virtual-dom-apis.md | 148 -----
_draft/v1.0/references/text-style.md | 40 --
_draft/v1.0/references/units.md | 66 ---
_draft/v1.0/references/wxc/index.md | 44 --
_draft/v1.0/references/wxc/wxc-navpage.md | 192 ------
_draft/v1.0/references/wxc/wxc-tabbar.md | 176 ------
_draft/v1.0/tools/devtools-android.md | 123 ----
_draft/v1.0/tools/devtools-ios.md | 65 ---
_draft/v1.0/tools/devtools.md | 99 ----
_draft/v1.0/tools/index.md | 96 ---
_draft/v1.0/tools/playground.md | 22 -
_draft/v1.0/tools/transformer.md | 38 --
_draft/web-dev-experience.en.md | 36 --
_draft/web-dev-experience.md | 38 --
_draft/web-standards.en.md | 584 ------------------
_draft/web-standards.md | 585 -------------------
_draft/weex-dom-api.md | 224 -------
_draft/write-once.en.md | 23 -
_draft/write-once.md | 25 -
_drafts/difference-with-web.en.md | 149 +++++
_drafts/difference-with-web.md | 138 +++++
_drafts/native-dom-api.md | 212 +++++++
_drafts/timer.cn.md | 49 ++
_drafts/timer.md | 60 ++
_drafts/v-0.10/advanced/extend-to-android.md | 189 ++++++
_drafts/v-0.10/advanced/extend-to-html5.md | 258 ++++++++
_drafts/v-0.10/advanced/extend-to-ios.md | 311 ++++++++++
.../v-0.10/advanced/how-data-binding-works.md | 39 ++
_drafts/v-0.10/advanced/images/how-arch.png | Bin 0 -> 62303 bytes
_drafts/v-0.10/advanced/images/how-render.png | Bin 0 -> 42957 bytes
_drafts/v-0.10/advanced/index.md | 148 +++++
_drafts/v-0.10/advanced/integrate-to-android.md | 204 +++++++
_drafts/v-0.10/advanced/integrate-to-html5.md | 77 +++
_drafts/v-0.10/advanced/integrate-to-ios.md | 118 ++++
_drafts/v-0.10/guide/.gitkeep | 0
.../how-to/customize-a-native-component.md | 58 ++
.../guide/how-to/cuszomize-native-apis.md | 80 +++
_drafts/v-0.10/guide/how-to/debug-with-html5.md | 47 ++
_drafts/v-0.10/guide/how-to/index.md | 40 ++
.../guide/how-to/preview-in-playground-app.md | 20 +
.../guide/how-to/require-3rd-party-libs.md | 56 ++
.../how-to/transform-code-into-js-bundle.md | 110 ++++
_drafts/v-0.10/guide/images/tut-cli-qrcode.png | Bin 0 -> 45480 bytes
_drafts/v-0.10/guide/images/tut-first.png | Bin 0 -> 51434 bytes
_drafts/v-0.10/guide/images/tut-second.png | Bin 0 -> 78519 bytes
_drafts/v-0.10/guide/images/tut1.jpg | Bin 0 -> 47442 bytes
_drafts/v-0.10/guide/images/tut2.jpg | Bin 0 -> 52428 bytes
_drafts/v-0.10/guide/images/tut3.png | Bin 0 -> 52198 bytes
_drafts/v-0.10/guide/images/tut4.gif | Bin 0 -> 218245 bytes
_drafts/v-0.10/guide/index.md | 211 +++++++
_drafts/v-0.10/guide/syntax/comm.md | 228 ++++++++
.../v-0.10/guide/syntax/composed-component.md | 114 ++++
_drafts/v-0.10/guide/syntax/config-n-data.md | 61 ++
_drafts/v-0.10/guide/syntax/data-binding.md | 248 ++++++++
_drafts/v-0.10/guide/syntax/display-logic.md | 173 ++++++
_drafts/v-0.10/guide/syntax/events.md | 59 ++
_drafts/v-0.10/guide/syntax/id.md | 65 +++
_drafts/v-0.10/guide/syntax/index.md | 122 ++++
_drafts/v-0.10/guide/syntax/render-logic.md | 35 ++
_drafts/v-0.10/guide/syntax/style-n-class.md | 118 ++++
_drafts/v-0.10/references/api.md | 84 +++
_drafts/v-0.10/references/bubble.md | 150 +++++
_drafts/v-0.10/references/cheatsheet.md | 102 ++++
_drafts/v-0.10/references/color-names.md | 182 ++++++
_drafts/v-0.10/references/common-attrs.md | 78 +++
_drafts/v-0.10/references/common-event.md | 120 ++++
_drafts/v-0.10/references/common-style.md | 208 +++++++
_drafts/v-0.10/references/component-defs.md | 131 +++++
_drafts/v-0.10/references/components/a.md | 50 ++
_drafts/v-0.10/references/components/cell.md | 42 ++
_drafts/v-0.10/references/components/div.md | 48 ++
_drafts/v-0.10/references/components/image.md | 55 ++
_drafts/v-0.10/references/components/index.md | 24 +
.../v-0.10/references/components/indicator.md | 98 ++++
_drafts/v-0.10/references/components/input.md | 124 ++++
_drafts/v-0.10/references/components/list.md | 292 +++++++++
.../references/components/refresh-loading.md | 297 ++++++++++
.../v-0.10/references/components/scroller.md | 136 +++++
_drafts/v-0.10/references/components/slider.md | 107 ++++
_drafts/v-0.10/references/components/switch.md | 81 +++
_drafts/v-0.10/references/components/text.md | 94 +++
.../v-0.10/references/components/textarea.md | 81 +++
_drafts/v-0.10/references/components/video.md | 75 +++
_drafts/v-0.10/references/components/web.md | 152 +++++
.../v-0.10/references/components/wxc-navpage.md | 74 +++
.../v-0.10/references/components/wxc-tabbar.md | 94 +++
_drafts/v-0.10/references/gesture.md | 74 +++
.../v-0.10/references/images/css-boxmodel.png | Bin 0 -> 12581 bytes
.../references/images/css-flexbox-align.jpg | Bin 0 -> 35005 bytes
.../references/images/css-flexbox-justify.svg | 59 ++
.../references/images/css-flexbox-sample.png | Bin 0 -> 3210 bytes
_drafts/v-0.10/references/images/nav.png | Bin 0 -> 83497 bytes
_drafts/v-0.10/references/index.md | 49 ++
_drafts/v-0.10/references/modules/animation.md | 63 ++
_drafts/v-0.10/references/modules/clipboard.md | 53 ++
_drafts/v-0.10/references/modules/dom.md | 114 ++++
.../v-0.10/references/modules/globalevent.md | 89 +++
_drafts/v-0.10/references/modules/index.md | 28 +
_drafts/v-0.10/references/modules/modal.md | 192 ++++++
_drafts/v-0.10/references/modules/navigator.md | 198 +++++++
_drafts/v-0.10/references/modules/storage.md | 111 ++++
_drafts/v-0.10/references/modules/stream.md | 86 +++
_drafts/v-0.10/references/modules/timer.md | 60 ++
_drafts/v-0.10/references/modules/webview.md | 160 +++++
_drafts/v-0.10/references/special-element.md | 36 ++
_drafts/v-0.10/references/specs/index.md | 309 ++++++++++
.../v-0.10/references/specs/js-bundle-format.md | 307 ++++++++++
.../references/specs/js-framework-apis.md | 191 ++++++
.../v-0.10/references/specs/virtual-dom-apis.md | 147 +++++
_drafts/v-0.10/references/text-style.md | 43 ++
_drafts/v-0.10/tools/devtools-android.md | 123 ++++
_drafts/v-0.10/tools/devtools-ios.md | 76 +++
_drafts/v-0.10/tools/devtools.md | 102 ++++
_drafts/v-0.10/tools/index.md | 97 +++
_drafts/v-0.10/tools/playground.md | 24 +
_drafts/v-0.10/tools/transformer.md | 38 ++
_drafts/v1.0/advanced/create-a-weex-project.md | 271 +++++++++
.../advanced/customize-a-native-component.md | 168 ++++++
_drafts/v1.0/advanced/cuszomize-native-apis.md | 85 +++
_drafts/v1.0/advanced/extend-to-android.md | 170 ++++++
_drafts/v1.0/advanced/extend-to-html5.md | 253 ++++++++
_drafts/v1.0/advanced/extend-to-ios.md | 279 +++++++++
_drafts/v1.0/advanced/how-data-binding-works.md | 39 ++
_drafts/v1.0/advanced/images/how-arch.png | Bin 0 -> 62303 bytes
_drafts/v1.0/advanced/images/how-render.png | Bin 0 -> 42957 bytes
_drafts/v1.0/advanced/index.md | 146 +++++
.../advanced/integrate-devtools-to-android.md | 272 +++++++++
.../v1.0/advanced/integrate-devtools-to-ios.md | 230 ++++++++
_drafts/v1.0/advanced/integrate-to-android.md | 201 +++++++
_drafts/v1.0/advanced/integrate-to-html5.md | 69 +++
_drafts/v1.0/advanced/integrate-to-ios.md | 110 ++++
_drafts/v1.0/blog/index.md | 4 +
.../v1.0/guide/develop-on-your-local-machine.md | 175 ++++++
_drafts/v1.0/guide/how-to/debug-with-html5.md | 47 ++
_drafts/v1.0/guide/how-to/index.md | 185 ++++++
.../v1.0/guide/how-to/require-3rd-party-libs.md | 57 ++
.../how-to/transform-code-into-js-bundle.md | 112 ++++
_drafts/v1.0/guide/index.md | 60 ++
_drafts/v1.0/guide/syntax/comm.md | 134 +++++
_drafts/v1.0/guide/syntax/composed-component.md | 158 +++++
_drafts/v1.0/guide/syntax/config-n-data.md | 72 +++
_drafts/v1.0/guide/syntax/data-binding.md | 332 +++++++++++
_drafts/v1.0/guide/syntax/display-logic.md | 252 ++++++++
_drafts/v1.0/guide/syntax/events.md | 103 ++++
_drafts/v1.0/guide/syntax/id.md | 124 ++++
_drafts/v1.0/guide/syntax/index.md | 134 +++++
_drafts/v1.0/guide/syntax/render-logic.md | 44 ++
_drafts/v1.0/guide/syntax/style-n-class.md | 117 ++++
_drafts/v1.0/index.md | 5 +
_drafts/v1.0/migration/difference.md | 249 ++++++++
_drafts/v1.0/migration/index.md | 11 +
_drafts/v1.0/migration/migration-from-weex.md | 116 ++++
_drafts/v1.0/references/api.md | 67 +++
_drafts/v1.0/references/bubble.md | 150 +++++
_drafts/v1.0/references/cheatsheet.md | 114 ++++
_drafts/v1.0/references/color-names.md | 180 ++++++
_drafts/v1.0/references/common-attrs.md | 166 ++++++
_drafts/v1.0/references/common-event.md | 492 ++++++++++++++++
_drafts/v1.0/references/common-style.md | 322 ++++++++++
_drafts/v1.0/references/component-defs.md | 126 ++++
_drafts/v1.0/references/components/a.md | 273 +++++++++
_drafts/v1.0/references/components/cell.md | 191 ++++++
_drafts/v1.0/references/components/div.md | 245 ++++++++
_drafts/v1.0/references/components/image.md | 161 +++++
_drafts/v1.0/references/components/index.md | 24 +
_drafts/v1.0/references/components/indicator.md | 124 ++++
_drafts/v1.0/references/components/input.md | 309 ++++++++++
_drafts/v1.0/references/components/list.md | 375 ++++++++++++
_drafts/v1.0/references/components/loading.md | 118 ++++
_drafts/v1.0/references/components/refresh.md | 204 +++++++
_drafts/v1.0/references/components/scroller.md | 324 ++++++++++
_drafts/v1.0/references/components/slider.md | 121 ++++
_drafts/v1.0/references/components/switch.md | 98 ++++
_drafts/v1.0/references/components/text.md | 116 ++++
_drafts/v1.0/references/components/textarea.md | 115 ++++
_drafts/v1.0/references/components/video.md | 82 +++
_drafts/v1.0/references/components/web.md | 143 +++++
_drafts/v1.0/references/gesture.md | 79 +++
_drafts/v1.0/references/images/Artboard.jpg | Bin 0 -> 36223 bytes
.../v1.0/references/images/coding_weex_1.jpg | Bin 0 -> 56225 bytes
_drafts/v1.0/references/images/css-boxmodel.png | Bin 0 -> 12581 bytes
.../references/images/css-flexbox-align.jpg | Bin 0 -> 35005 bytes
.../references/images/css-flexbox-justify.svg | 59 ++
_drafts/v1.0/references/images/div_1.jpg | Bin 0 -> 59561 bytes
_drafts/v1.0/references/images/div_2.jpg | Bin 0 -> 62574 bytes
_drafts/v1.0/references/images/div_3.jpg | Bin 0 -> 82345 bytes
_drafts/v1.0/references/images/div_4.jpg | Bin 0 -> 200642 bytes
_drafts/v1.0/references/images/image_1.jpg | Bin 0 -> 163705 bytes
_drafts/v1.0/references/images/image_2.jpg | Bin 0 -> 255560 bytes
_drafts/v1.0/references/images/list_2.jpg | Bin 0 -> 56635 bytes
_drafts/v1.0/references/images/list_3.jpg | Bin 0 -> 128082 bytes
_drafts/v1.0/references/images/list_4.jpg | Bin 0 -> 339799 bytes
_drafts/v1.0/references/images/nav.jpg | Bin 0 -> 124441 bytes
_drafts/v1.0/references/images/scroller_1.jpg | Bin 0 -> 344783 bytes
_drafts/v1.0/references/images/style_1.jpg | Bin 0 -> 59366 bytes
_drafts/v1.0/references/images/style_2.jpg | Bin 0 -> 59696 bytes
_drafts/v1.0/references/index.md | 46 ++
_drafts/v1.0/references/modules/animation.md | 90 +++
_drafts/v1.0/references/modules/clipboard.md | 112 ++++
_drafts/v1.0/references/modules/dom.md | 79 +++
_drafts/v1.0/references/modules/globalevent.md | 87 +++
_drafts/v1.0/references/modules/index.md | 20 +
_drafts/v1.0/references/modules/modal.md | 196 +++++++
_drafts/v1.0/references/modules/navigator.md | 110 ++++
_drafts/v1.0/references/modules/storage.md | 224 +++++++
_drafts/v1.0/references/modules/stream.md | 220 +++++++
_drafts/v1.0/references/modules/webview.md | 66 +++
_drafts/v1.0/references/replace.md | 57 ++
_drafts/v1.0/references/special-element.md | 38 ++
_drafts/v1.0/references/specs/index.md | 309 ++++++++++
.../v1.0/references/specs/js-framework-apis.md | 190 ++++++
.../v1.0/references/specs/virtual-dom-apis.md | 148 +++++
_drafts/v1.0/references/text-style.md | 40 ++
_drafts/v1.0/references/units.md | 66 +++
_drafts/v1.0/references/wxc/index.md | 44 ++
_drafts/v1.0/references/wxc/wxc-navpage.md | 192 ++++++
_drafts/v1.0/references/wxc/wxc-tabbar.md | 176 ++++++
_drafts/v1.0/tools/devtools-android.md | 123 ++++
_drafts/v1.0/tools/devtools-ios.md | 65 +++
_drafts/v1.0/tools/devtools.md | 99 ++++
_drafts/v1.0/tools/index.md | 96 +++
_drafts/v1.0/tools/playground.md | 22 +
_drafts/v1.0/tools/transformer.md | 38 ++
_drafts/web-dev-experience.en.md | 36 ++
_drafts/web-dev-experience.md | 38 ++
_drafts/web-standards.en.md | 584 ++++++++++++++++++
_drafts/web-standards.md | 585 +++++++++++++++++++
_drafts/weex-dom-api.md | 224 +++++++
_drafts/write-once.en.md | 23 +
_drafts/write-once.md | 25 +
source/cn/development-process.md | 6 +
source/development-process.md | 6 +
source/wiki/common-styles.md | 2 +-
source/wiki/css-units.md | 2 +-
source/wiki/platform-difference.md | 11 +
source/wiki/platfrom-difference.md | 11 -
themes/weex/languages/cn.yml | 1 +
themes/weex/languages/en.yml | 1 +
themes/weex/layout/_partial/article.ejs | 6 +
themes/weex/layout/_partial/footer.ejs | 6 +-
themes/weex/layout/_partial/header.ejs | 3 +
themes/weex/layout/layout.ejs | 7 +-
themes/weex/source/css/common.scss | 2 +-
themes/weex/source/css/media-queries.scss | 44 +-
themes/weex/source/css/partial/article.scss | 42 +-
themes/weex/source/css/partial/footer.scss | 18 +-
themes/weex/source/css/partial/header.scss | 7 +-
themes/weex/source/css/partial/sidebar.scss | 22 +-
themes/weex/source/css/partial/summary.scss | 10 +-
themes/weex/source/css/post.scss | 34 +-
themes/weex/source/css/variable.scss | 4 +-
443 files changed, 23811 insertions(+), 23704 deletions(-)
----------------------------------------------------------------------
http://git-wip-us.apache.org/repos/asf/incubator-weex-site/blob/12e3a8bc/_draft/difference-with-web.en.md
----------------------------------------------------------------------
diff --git a/_draft/difference-with-web.en.md b/_draft/difference-with-web.en.md
deleted file mode 100644
index 2af11f9..0000000
--- a/_draft/difference-with-web.en.md
+++ /dev/null
@@ -1,149 +0,0 @@
----
-title: Difference with Web
-type: references
-order: 10.1
-version: 2.1
----
-
-# Differences between using Vue in Web and Weex
-
-## Platform Differences
-
-Vue.js was designed for the Web platform at the begining. Although it can be based on Weex to develop native applications, there are still many differences between web and native. See [Platform Differences Between Weex and Web](../ platform-difference.html) for more details.
-
-Due to those differences, Weex doesn't support those features in Vue.js (mostly are DOM-related):
-
-+ Event bubbling and capturing are not supported. Event modifiers, such as `.prevent`,` .capture`, `.stop`,` .self` are meaningless in the native environment.
-+ The keyboard event modifiers, like `.{KeyCode | keyAlias}` is also meaningless. (see [docs in Vue.js](https://vuejs.org/v2/guide/events.html#Key-Modifiers))
-+ No need to call `vm.$mount` manually, the entry component will mount to the root view of the native container by default.
-+ `v-html` and` v-text` directives are not supported.
-
-## Functional differences
-
-### Vue 2.0 Runtime-only build
-
-Vue 2.0 provides two available builds, the standalone build and the runtime-only build. see the [official document](https://vuejs.org/v2/guide/installation.html#Standalone-vs-Runtime-only-Build) for more information.
-
-Weex only required the runtime-only build of Vue 2.0 for better performance and less code size.
-
-The specific differences are:
-
-+ The `template` attribute is not supported when defining a component.
-+ Does not support using `x-templates`.
-+ Does not support using `Vue.compile`.
-
-### Isolate the context of multiple pages
-
-Weex use the "multiple-pages" concept in native, different js bundle will be run in different native views, there context is isolated. Even the `Vue` variable is not the same instance between js bundles. (However, all the js bundle will share the same Weex runtime.)
-
-Based on this feature, the global configurations in `Vue` will only take effect on the current page:
-
-+ `Vue.config`
-+ `Vue.component`
-+ `Vue.directive`
-+ `Vue.filter`
-+ `Vue.mixin`
-+ `Vue.use`
-
-> Note: Those methods are still work, but its effect will be limited to the current page.
-
-## Restrictions in style
-
-CSS is very flexible, has a lot of properties, support a variety of layout modes. This is the advantage of CSS, but also a bottleneck in browser performance optimization.
-
-The style in Weex is parsed by the native renderer, and for the sake of performance and complexity, Weex makes some trade-offs about CSS features to make it better suited to *"best practices"*.
-
-### Single class selector
-
-Weex only supports to use single class name in `<style>`, does not support *type selectors*, *ID selectors*, *attribute selectors*, *adjacent sibling selectors* and the *combinators*.
-
-```CSS
-/* Support single class name selector */
-.one-class {
- font-size: 36px;
-}
-
-/* Does not support to use combinators between selector */
-.parent > .child {
- padding-top: 10px;
-}
-.foo + .bar {
- margin-left: 20px;
-}
-
-/* Does not support attribute selectors. The `v-cloak` directive is not supported */
-[V-cloak] {
- color: #FF6600;
-}
-```
-
-The restriction is only for the style definition, does not affect the use of class names. You can still use multiple class names on a single tag, such as:
-
-```Html
-<template>
- <div class="one two three"><div>
-</template>
-```
-
-### Scoped by default
-
-In Weex, For single file components, the styles written in the `<style>` can only be used in the current component.
-
-In order to maintain consistency with Native, it is recommended that you write the style in the `.vue` file with the` scoped` attribute, that is, `<style scoped>`.
-
-### Supported CSS attributes
-
-Weex supports a subset of CSS, and will continue to expand.
-
-Weex supports *box-model* and *flexbox*, as well as other common styles. See [Weex Common Style](../ common-style.html) and [Supported Web Standards](http://weex.apache.org/references/web-standards.html) for more information.
-
-In addition, you should also pay attention to the following points:
-
-+ No need to write style prefix.
-+ Weex doesn't support `display: none;` and therefore doesn't support the `v-show` directive.
-+ In order to optimize the efficiency of CSS parser, Weex doesn't support shorthand attributes, involving the following attributes:
- + `flex`
- + `border`, `border-(top|bottom|left|right)`
- + `margin`
- + `padding`
- + `font`
- + `background`
-
-## Differences in development
-
-Because of the platform difference, you have to compile your source file in two different ways:
-
-+ For the web, you can compile source files in any official way, such as Webpack + vue-loader or Browserify + vueify. and require the [weex-vue-render](https://www.npmjs.com/package/weex-vue-render), which is a group of Weex build-in components.
-+ For Android and iOS, we've provided [weex-loader](https://github.com/weexteam/weex-loader) to compile the `.vue` files. That is, use Webpack + weex-loader to generate the js bundle that is available for the native.
-
-### Use weex-loader
-
-[weex-loader](https://github.com/weexteam/weex-loader) is a loader for Webpack, see the [official document](http://webpack.github.io/docs/using-loaders.html) to learn how to use it.
-
-One more thing should be reminded is that if the *entry file* of your webpack config is a `.vue` file, you also need to pass an additional ` entry` parameter, usually set to `true`.
-
-```Js
-module.exports = {
- // Add the entry parameter for the .vue file
- entry: './path/to/App.vue?entry=true',
-
- // other configurations ...
-
- module: {
- loaders: [{
-
- // matches the .vue file path that contains the entry parameter
- test: /\.vue(\?^^]+)?$/,
- loaders: ['weex-loader']
- }]
- },
-}
-```
-
-**You don't need to write those additional parameters if you are using `.js` file as entry file.** We recommend using javascript files as the entry file of webpack config.
-
-### Setup native development environments
-
-Since your are using Weex to develop native apps, setup native development environments, both Android and iOS, would be very useful.
-
-See [Integrating Weex to the existing application](../../guide/integrate-to-your-app.html) for more information.
http://git-wip-us.apache.org/repos/asf/incubator-weex-site/blob/12e3a8bc/_draft/difference-with-web.md
----------------------------------------------------------------------
diff --git a/_draft/difference-with-web.md b/_draft/difference-with-web.md
deleted file mode 100644
index d075312..0000000
--- a/_draft/difference-with-web.md
+++ /dev/null
@@ -1,138 +0,0 @@
----
-title: Vue.js 在 Weex 中的差异
-type: guide
-group: 高阶特性
-order: 8.3
-version: 2.1
----
-
-
-# Vue.js 在 Weex 和 Web 中的差异
-
-## 平台差异
-
-Vue.js 最初是为 Web 平台设计的,虽然可以基于 Weex 开发原生应用,但是 Web 开发和原生开发毕竟不同,在功能和开发体验上都有一些差异,这些差异从本质上讲是原生开发平台和 Web 平台之间的差异,可以通过[《Weex 和 Web 平台的差异》](../platform-difference.html)了解更多细节和原因。
-
-由于运行平台存在差异,Weex 不支持 Vue.js 中与 DOM 相关的功能:
-
-+ 不支持事件冒泡和捕获机制,`.prevent` 、`.capture` 、`.stop` 、`.self` 等事件修饰符在原生环境中无意义。
-+ 键盘事件的 `.{keyCode | keyAlias}` 修饰符在原生环境中无意义。(参考 [Vue 相关文档](https://cn.vuejs.org/v2/guide/events.html#按键修饰符))
-+ 无需自行调用 `vm.$mount`,默认会将入口组件挂载到原生应用的视图中。
-+ 不支持 `v-html` 和 `v-text` 指令。
-
-## 功能差异
-
-### 仅引入了 Vue Runtime
-
-Vue 除了提供默认的完整包以外,还提供一个更小巧的 `vue.runtime.js`,在这个文件中移除了模板编译的相关操作,Weex 中也仅引入 Vue Runtime 的功能,这样做除了可以减少代码体积以外,还能减少运行期编译模板的负担,提升性能。
-
-具体的差异有:
-
-+ 定义组件时不支持使用 `template` 属性。
-+ 不支持使用 `x-templates`。
-+ 不支持使用 `Vue.compile`。
-
-### 隔离多页面的作用域
-
-Weex 在原生端使用的是“多页”的实现,不同的 js bundle 将会在不同的原生页面中执行;也就是说,不同的 js bundle 之间将不同共享 js 变量。即使是 `Vue` 这个变量,在不同页面中也对应了不同的引用。
-
-基于这个特性,Vue 中全局功能将只在当前页面内生效:
-
-+ `Vue.config`
-+ `Vue.component`
-+ `Vue.directive`
-+ `Vue.filter`
-+ `Vue.mixin`
-+ `Vue.use`
-
-> 注:以上接口的功能并未受影响,只是其生效范围将会限制在同一页面内。
-
-## 样式差异
-
-Web 中的 CSS 非常的灵活,积累了特别多的属性,支持多种布局方法;这是其优势,也是浏览器性能优化的一个瓶颈。
-
-Weex 中的样式是由原生渲染器解析的,出于性能和功能复杂度的考虑,Weex 对 CSS 的特性做了一些取舍,使其更符合最佳实践。
-
-### 单类名选择器和作用域
-
-Weex 中只支持单个类名选择器,不支持关系选择器,也不支持属性选择器。
-
-```css
-/* 支持单个类名选择器 */
-.one-class {
- font-size: 36px;
-}
-
-/* 不支持关系选择器 */
-.parent > .child {
- padding-top: 10px;
-}
-
-/* 不支持属性选择器,不支持 `v-cloak` 指令 */
-[v-cloak] {
- color: #FF6600;
-}
-```
-
-这个只是对样式定义的限制,不影响样式类名的使用,在标签中可以添加多个样式类名,如:
-
-```html
-<template>
- <div class="one two three"><div>
-</template>
-```
-
-### 组件级别的作用域
-
-在 Weex 中,写在组件 `<style>` 里的样式只能用在当前组件中,默认是 `scoped` 作用域。为了保持和 Native 的一致性,建议在 `.vue` 文件中写样式时,加上 `scoped` 属性,即: `<style scoped>`。
-
-### 支持的样式属性
-
-Weex 支持的样式特性是 CSS 的子集,并且会不断扩充;在实现过程中我们参考了 [CSS 属性在浏览器中的使用频率](https://gist.github.com/Jinjiang/ea6b403036b7287cf8b8508729b77ac0#css-properties),优先实现其中频率最高的一些属性。
-
-Weex 支持了基本的盒模型和 flexbox 布局,以及其他常用样式,详情可参考[Weex 通用样式文档](../common-style.html)。
-
-在编写样式时,还应该注意一下几点:
-
-+ 不需要写样式前缀。
-+ Weex 不支持 `display: none;`,因此也不支持 `v-show` 指令。
-+ 为了优化样式解析的效率,样式属性暂不支持简写,涉及一下属性:
- + `border` 、`border-(top|bottom|left|right)`
- + `margin`
- + `padding`
- + `flex`
-
-## 编译环境的差异
-
-在 Weex 中使用 Vue.js ,你所需要关注的运行平台除了 Web 之外还有 Android 和 iOS ,在开发和编译环境上还有一些不同点。针对 Web 和原生平台,将 Vue 项目源文件编译成目标文件,有两种不同的方式:
-
-+ 针对 Web 平台,和普通 Vue 2.X 项目一样,可以使用任意官方推荐的方式编译源文件,如 Webpack + vue-loader 或者 Browserify + vueify 。
-+ 针对 Android 和 iOS 平台,我们提供了 [weex-loader](https://github.com/weexteam/weex-loader) 工具支持编译 `.vue` 格式的单文件组件;也就是说,目前只能使用 Webpack + weex-loader 来生成原生端可用的 js bundle。
-
-### 使用 weex-loader
-
-weex-loader 是 Webpack 的一个加载器,使用方法参考其[官方文档](http://webpack.github.io/docs/using-loaders.html)。需要提醒的是,如果 Webpack 配置的入口文件是个 `.vue` 格式的文件的话,还需要额外传递 `entry` 参数,通常设置为 `true`,表示将当前组件作为入口组件。为了能正常匹配 `.vue` 文件,Webpack 配置文件中 weex-loader 的匹配规则也需要有所调整。
-
-```js
-module.exports = {
- // 针对 .vue 文件要添加 entry 参数
- entry: './path/to/App.vue?entry=true',
-
- // 其他配置项 ...
-
- module: {
- loaders: [{
-
- // 匹配包含了 entry 参数的 .vue 文件路径
- test: /\.vue(\?[^?]+)?$/,
- loaders: ['weex-loader']
- }]
- },
-}
-```
-
-如果使用 `.js` 文件作为 Webpack 配置的入口文件,则不需要额外配置这些参数,我们推荐使用 Javascript 文件作为编译的入口文件。
-
-### 搭建原生开发环境
-
-Weex 项目生成的是原生应用,学习一些开发原生应用的基础知识,会对你开发 Weex 项目很有帮助。参考[《集成 Weex 到已有应用》](../../guide/integrate-to-your-app.html)了解更多信息。
http://git-wip-us.apache.org/repos/asf/incubator-weex-site/blob/12e3a8bc/_draft/native-dom-api.md
----------------------------------------------------------------------
diff --git a/_draft/native-dom-api.md b/_draft/native-dom-api.md
deleted file mode 100644
index 37729a2..0000000
--- a/_draft/native-dom-api.md
+++ /dev/null
@@ -1,212 +0,0 @@
----
-title: Native DOM APIs
-type: references
-order: 6
-version: 2.1
-has_chapter_content: true
----
-
-# Native DOM APIs
-
-Weex in the JS engine, for each page provides a set of Native DOM APIs. This interface is very close to the HTML DOM APIs. Using this interface we can control native rendering logic via JavaScript. And Weex upper layer of Vue 2.0 is based on this interface to adapt.
-
-In most cases, the JS framework will encapsulate native DOM APIs. That way, the developer does not need to work directly on the Native DOM.
-
-+ `Document` class: full page document.
-+ `Node` class: the base class of nodes.
-+ `Element` class: element node, inherited from Node, single view unit.
-+ `Comment` class: comment node, inherited from Node, no practical meaning, usually used as placeholders.
-
-Each Weex page has a `weex.document` object, which is an instance of the Document class and is the starting point for all the following interface calls.
-
-Let's take a look at their usage in detail:
-
-## `Document` class
-Each `Document` instance will automatically have a `documentElement` property when it is created. This attribute represents the document node. The document node can have a body, which is the main node of the document.
-
-Note: The document node body only accepts `<div>`, `<list>`, or `<scroller>` three types of element nodes.
-
-### Constructor
-`new Document(id: string, url: string?)`
-
-### Member method
-`createElement(tagName: string, props: Object?): Element`
-
-+ Creates an `Element` instance of a specific type `tagName`, which is an element node. Props can contain attr objects and style objects. Such as `createBody ('div', {style: {backgroundColor: '#ffffff'}})`.
-
-`createComment(text: string): Comment`
-
-+ Create an instance of ·`Comment`, which is a comment node and set a text description.
-
-`createBody(tagName: string, props: Object?): Element`
-
-+ Create a document body node and automatically mount it under `documentElement`.
-
-`fireEvent(el: Element, type: string, e: Object?, domChanges: Object?)`
-Triggers a particular type of event. When the event modifies the DOM's properties or styles during the generation process, the fourth argument is used to describe the changes, and the parameter format is the same as the format of the `createElement` method above.
-
-`destroy()`
-
-+ Destroy the current document. Once the document is destroyed, it will no longer work.
-
-### Read-only member variables
-`id: string`
-
-+ Each `Document` instance has a unique id. This is also the only id that each Weex page has.
-
-`URL: string?`
-
-+ If the current Weex page has a JS bundle URL, the URL will be returned here.
-
-`body: Element`
-
-+ The main body of the document, the concept similar to the HTML DOM document.body.
-
-`documentElement: Element`
-
-+ Document node, the concept similar to the HTML DOM document.documentElement.
-+ The relationship between body and documentElement is: documentElement is the parent of the body.
-
-`getRef(id): Node`
-
-+ Get the node based on the node id.
-
-## `Node` Class
-### Constructor
-`new Node()`
-
-### Member method
-`destroy()`
-
-### Read-only member variables or methods
-`ref: string`
-
-+ Each `Node` instance has its own unique ref value in the entire `Document instance.
-
-`nextSibling: Node?`
-
-`previousSibling: Node?`
-
-`parentNode: Node?`
-
-+ The three interfaces are consistent with the definition of HTML DOM.
-
-`children: Node[]`
-
-+ The node has an array of all child nodes.
-
-`pureChildren: Node[]`
-
-The node has an array of all the child elements. The difference between it and `children` is that `pureChildren` contains only the `Element` instance and not the `Comment` instance.
-
-
-## `Element` class, inherited from `Node`
-### Constructor
-`new Element(type: string, props: Object?)`
-
-+ Creates an element node of a particular type `type`, and the `props` parameter can contain an `attr` object or a `style` object.
-
-### DOM tree operation
-`appendChild(node: Node)`
-`insertBefore(node: Node, before: Node?)`
-
-+ The two interfaces are similar to HTML DOM.
-
-`insertAfter(node: Node, after: Node?)`
-
-+ Insert a new node before a child node.
-
-`removeChild(node: Node, preserved: boolean?)`
-
-+ Delete the child node node. Parameters `preserved` whether it is immediately removed from memory or temporarily retained.
-
-`clear()`
-
-+ Clear all child nodes.
-
-### The DOM property itself operates
-
-`setAttr(key: string, value: string, silent: boolean?)`
-
-`setStyle(key: string, value: string, silent: boolean?)`
-
-+ In the above two interfaces, when `silent` is true, the node only updates itself, does not pass the command to the client render layer. This parameter is used to handle user events that have changed the node-related properties at the time of occurrence, and will not send commands repeatedly to the client after the Native DOM has changed.
-
-`addEvent(type: string, handler: Function)`
-
-`removeEvent(type: string)`
-
-`fireEvent(type: string, e: any)`
-
-+ Bind events, unbind events, trigger events.
-
-#### Component method for a specific component type
-
-Special: Different component types can have their own unique methods, such as `<web>` components support `refresh` method. You can see the description of each component. In this case, we will generate a specific component type of class, such as `WebElement`, which inherited from `Element`.
-
-Such as:
-
->`WebElement` inherited from `Element`
->Indicates that a webview is embedded in the Wex page
-
->`Refresh ()`: Refreshes the current webview
-
-
-### Read-only member variables or methods
-
-`ref`, `nextSibling`, `previousSibling`, `parentNode`
-
-+ Inherited from `Node`.
-
-`nodeType: number`
-
-+ The number is always 1.
-
-
-`type: string`
-
-+ Consistent with the `type` in the constructor.
-
-`attr: Object`
-
-+ The key pair of all the characteristics of the current node. It is recommended to use the `setAttr ()` method to modify, rather than directly modify the object here.
-
-`style: Object`
-
-+ The value of all the keys of the current node. It is recommended to modify the `setStyle ()` method, rather than directly modify the object here.
-
-`event: Object`
-
-+ All events of the current node are bound. Each event type corresponds to an event handler method. It is recommended to use the `addEvent () / removeEvent ()` method to modify, rather than directly modify the object here.
-
-`toJSON(): Object`
-
-+ Returns a JSON object that describes the element's node, such as: `{ref: string, type: string, attr: Object, style: Object, event: Array (string), children: Array}`.
-
-
-## `Comment` class, inherited from `Node`
-
-### Constructor
-`new Comment(value: string)`
-
-### Read-only member variables or methods
-
-`ref`, `nextSibling`, `previousSibling`, `parentNode`
-
-+ Inherited from `Node`.
-
-`nodeType: number`
-
-+ The number is always 8.
-
-`type: string`
-
-+ The type is always `'comment'`
-
-`value: string`
-
-+ Consistent with the value in the constructor.
-
-`toJSON(): Object`
-
-+ Returns a JSON object describing the annotation node. For example: `<! - value ->`.
http://git-wip-us.apache.org/repos/asf/incubator-weex-site/blob/12e3a8bc/_draft/timer.cn.md
----------------------------------------------------------------------
diff --git a/_draft/timer.cn.md b/_draft/timer.cn.md
deleted file mode 100644
index c93f937..0000000
--- a/_draft/timer.cn.md
+++ /dev/null
@@ -1,49 +0,0 @@
----
-title: Timer
-type: references
-group: 内置模块
-order: 9.03
-version: 0.10
----
-
-# Timer
-Weex Timer可以用来延时启动一个一次性任务或者重复任务。Timer���会尽最大努力提供精确的延时,但是延时可能并不精确,延时时间�很可能会超过用户期望的时间。实际上,timer�仅仅是为了支持�HTML5中的�polyfill,*不建议*开发者��直接�使用timer.
-
-## API
-Timer中延时的单位是毫秒,且延时时间应该为一个非负的**int**值(int值�最大为0x7FFFFF).如果延时时间为零,会将该任务�马上插入任务队列的尾部。对于其他非法值,timer的行为未定义。
-
-### setTimeout(fn, timeout)
-`setTimeout()`��会等待指定的时间,然后执行给出的函数。
-* 可以使用 `clearTimeout()`�去�阻止`setTimeout()`���运行如果此时对应的`setTimeout()`��还没有运行的话。
-* 如果需要重复�执行任务,使用`setInterval()`.
-
-#### Arguments
-* `fn` (function): 待执行的函数.
-* `timeout` (number): 执行函数前的等待时间,单位为毫秒。
-
-#### Return value
-一个Number对象, 表示这个�任务的id。把id传入clearTimeout(fnId)中可以用来取消任务。
-
-### setInterval(fn, interval)
-`setInterval()`每隔指定的时间间隔后,会执行对应的�函数。`setInterval()`不会�停止,除非`clearInterval()`被调用。`setInterval()`的返回值可以用来作为`setInterval()`的参数。
-
-#### Arguments
-* `fn` (function): 待执行的函数。
-* `interval` (number): �这次执行函数与下一次�函数之间的时间间隔,单位为�毫秒。
-
-#### Return value
-一个Number对象,代表任务序列的id。可以把这个值传入`clearInterval`中来终止重复任务的执行。
-
-### clearTimeout(fnId)
-`clearTimeout()`可以�用来提前终止`setTimeout()`�启动的任务。仅当`setTimeout()`�对应的任务没有被执行时,`clearTimeout()`才可以用来�终止该任务,否则`clearTimeout()`没有任何效果�。
-
-#### Arguments
-* `fnId` (number): `setTimeout()`��的返回值.
-
-### clearInterval(fnId)
- `clearInterval()`�可以用来终止 `setInterval()`启动的�任务序列。
-
-#### Arguments
-* `fnId` (number): `setInterval()`的返回值
-
-[Try it](http://dotwe.org/vue/ad564965f1eac5a4bc86946ecff70a0c)
http://git-wip-us.apache.org/repos/asf/incubator-weex-site/blob/12e3a8bc/_draft/timer.md
----------------------------------------------------------------------
diff --git a/_draft/timer.md b/_draft/timer.md
deleted file mode 100644
index da518fd..0000000
--- a/_draft/timer.md
+++ /dev/null
@@ -1,60 +0,0 @@
----
-title: Timer
-type: references
-group: Build-in Modules
-order: 9.03
-version: 0.10
----
-
-# Timer
-
-Weex encapsulates a series of APIs in order to start/stop a one-time task or a repeated task at a fixed delay. Please note that this module don't provide an accuracy delay. It provides best-effort delivery, but the actual delay may still exceed the delay user wants if the corresponding thread is busy.
-Actually, this module is made for the polyfill of HTML5 timer APIs, developers **should not** use this module directly unless they know exactly what they are doing.
-
-## API
-
-All timeout or interval in this module are measured in milliseconds. Also, timeout and interval should be a non-negative **integer**(the max of integer is 0x7FFFFFFF). The behavior of invalid value for timeout or interval is undefined.
-
-### setTimeout(fn, timeout)
-
-The `setTimeout()` method calls a function after a specified number of milliseconds. Use the `clearTimeout()` method to prevent the function from running. The function is only executed once. If you need to repeat execution, use the `setInterval()` method.
-
-#### Arguments
-
-- `fn` (function): The function that will be executed
-- `timeout` (number): The number of milliseconds to wait before executing the function
-
-#### Return value
-
-A Number, representing the fnId value of the timer that is set. Use this value with the `clearTimeout()` method to cancel the timer.
-
-### setInterval(fn, interval)
-
-The `setInterval()` method calls a function at specified intervals (in milliseconds), and it will continue calling the function until `clearInterval()` is called. The fnId value returned by `setInterval()` is used as the parameter for the `clearInterval()` method.
-
-#### Arguments
-
-- `fn` (function): The function that will be executed
-- `interval` (number): The intervals (in milliseconds) on how often to execute the function
-
-#### Return value
-
-A Number, representing the fnId value of the timer that is set. Use this value with the `clearInterval()` method to cancel the timer
-
-### clearTimeout(fnId)
-
-The `clearTimeout()` method clears a timer set with the `setTimeout()` method. The fnId value returned by `setTimeout()` is used as the parameter for the `clearTimeout()` method. If the function has not already been executed, you will be able to stop the execution by calling the `clearTimeout()` method, otherwise, this method has no influence on the task.
-
-#### Arguments
-
-- `fnId` (number): The fnId value of the timer returned by the `setTimeout()` method
-
-### clearInterval(fnId)
-
-The `clearInterval()` method clears a timer set with the `setInterval()` method. The fnId value returned by `setInterval()` is used as the parameter for the `clearInterval()` method.
-
-#### Arguments
-
-- `fnId` (number): The fnId of the timer returned by the `setInterval()` method
-
-[Try it](http://dotwe.org/vue/ad564965f1eac5a4bc86946ecff70a0c)
http://git-wip-us.apache.org/repos/asf/incubator-weex-site/blob/12e3a8bc/_draft/v-0.10/advanced/extend-to-android.md
----------------------------------------------------------------------
diff --git a/_draft/v-0.10/advanced/extend-to-android.md b/_draft/v-0.10/advanced/extend-to-android.md
deleted file mode 100644
index 97bb49e..0000000
--- a/_draft/v-0.10/advanced/extend-to-android.md
+++ /dev/null
@@ -1,189 +0,0 @@
----
-title: Extend to Android
-type: advanced
-order: 6
-has_chapter_content: true
-version: 0.10
----
-
-# Extend to Android
-
-### Module extend
-weex sdk support Module extend,
-Weex SDK provides only rendering capabilities, rather than have other capabilities, such as network, picture, and URL redirection. If you want the these features, you need to implement it.
-
-For example: If you want to implement an address jumping function, you can achieve a Module Follow the steps below.
-
-#### Step to customize a module
-
-1. Customize module must extend WXModule
-2. @WXModuleAnno annotation must be added, as it is the only the way to recognized by Weex
-3. The access levels of mehtod must be **public**
-4. The module class also can not be an inner class
-5. Customize can not be obfuscated by tools like ProGuard
-6. Module methods will be invoked in UI thread, do not put time consuming operation there
-7. Weex params can be int, double, float, String, Map, List
-
-Refer to the following example:
-
-```java
-public class WXEventModule extends WXModule{
-
- private static final String WEEX_CATEGORY="com.taobao.android.intent.category.WEEX";
-
- @JSMethod
- public void openURL(String url){
- //implement your module logic here
- }
-}
-
-```
-
-#### Register the moulde
-
-```java
- WXSDKEngine.registerModule("event", WXEventModule.class);
-```
-
-### Use this module in weex DSL
-Now `event` moudle is avaiable in weex, use the module like this:
-
-```javascript
-var event = require('@weex-module/event');
-event.openURL("http://www.github.com");
-```
-
-### Javascript callback
-
-If the module need implement a callback to javascript, you just add `JSCallback` argument to the method you want expose to javascript:
-
-```java
- @JSMethod
- public void openURL(String url,JSCallback callback){
- //implement your module logic here
- Map<String,Object> resp = new HashMap();
- resp.put("result","ok");
- callback.invoke(resp);
- }
-```
-
-At the javascript side, call the module with javascript function to receive callback data:
-
-```javascript
-event.openURL("http://www.github.com",function(resp){ console.log(resp.result); });
-```
-
-### Component extend
-
-There are label, image, div, scroll, ect. components in weex, you can also customize your own components.
-
-#### Step to customize a component
-
-1. Customize components must extend WXComponent or WXContainer
-2. @WXComponentProp(name=value(value is attr or style of dsl)) for it be recognized by weex SDK.
-3. The access levels of mehtod must be **public**
-4. The component class can not be an inner class
-5. Customize can not be obfuscated by tools like ProGuard
-6. Component methods will be invoked in UI thread, do not put time consuming operation there.
-7. Weex params can be int, double, float, String, Map, List, Array
-
-
-Refer to the following example
-
-```java
-public class MyViewComponent extends WXComponent{
- public MyViewComponent(WXSDKInstance instance, WXDomObject dom,
- WXVContainer parent, String instanceId, boolean isLazy)
- {
- public MyViewComponent(WXSDKInstance instance, WXDomObject dom,
- WXVContainer parent, String instanceId, boolean isLazy) {
- super(instance, dom, parent, instanceId, isLazy);
- }
-
- @Override
- protected void initView() {
- mHost = new TextView(mContext);
- }
- @WXComponentProp(name=WXDomPropConstant.WX_ATTR_VALUE)
- public void setMyViewValue(String value) {
- ((TextView)mHost).setText(value);
- }
-}
-```
-
-#### Register the Component
-
-
-```java
-WXSDKEngine.registerComponent("MyView", MyViewComponent.class);
-```
-
-### Adapter extend
-
-#### ImagedownloadAdapter
-
-Weex SDK has no image download capability, you need to implement `IWXImgLoaderAdapter`. Refer to the following examples.
-
-```java
-public class ImageAdapter implements IWXImgLoaderAdapter {
-
- private Activity mContext;
-
- public ImageAdapter(Activity activity) {
- mContext = activity;
- }
-
- @Override
- public void setImage(final String url, final ImageView view,
- WXImageQuality quality, WXImageStrategy strategy) {
- mContext.runOnUiThread(new Runnable() {
-
- @Override
- public void run() {
- if (TextUtils.isEmpty(url)) {
- view.setImageBitmap(null);
- return;
- }
- String temp = url;
- if (url.startsWith("//")){
- temp = "http:" + url;
- }
- if (view.getLayoutParams().width<=0 || view.getLayoutParams().height<=0) {
- return;
- }
- Picasso.with(WXEnvironment.getApplication())
- .load(temp)
- .resize(view.getLayoutParams().width,
- view.getLayoutParams().height).into(view);
- }
- });
- }
-}
-```
-
-#### Component Method
-from WeexSDK `0.9.5`, you can define your component method
-
-for example, define a method in component:
-
-```java
-@JSMethod
-public void focus(){
-//method implementation
-}
-```
-
-after your registration for your own custom component, now you can call it in your js file.
-
-```html
-<template>
- <mycomponent id='mycomponent'></mycomponent>
-</template>
-<script>
- module.exports = {
- created: function() {
- this.$el('mycomponent').focus();
- }
- }
-</script>
-```
http://git-wip-us.apache.org/repos/asf/incubator-weex-site/blob/12e3a8bc/_draft/v-0.10/advanced/extend-to-html5.md
----------------------------------------------------------------------
diff --git a/_draft/v-0.10/advanced/extend-to-html5.md b/_draft/v-0.10/advanced/extend-to-html5.md
deleted file mode 100644
index 6201fc7..0000000
--- a/_draft/v-0.10/advanced/extend-to-html5.md
+++ /dev/null
@@ -1,258 +0,0 @@
----
-title: Extend to web
-type: advanced
-order: 8
-has_chapter_content: true
-version: 0.10
----
-
-# Extend Weex HTML5
-
-### Intro
-
-Weex is a extendable cross-platform solution for dynamic programming and publishing projects. You can build your own components on web platform or native platform by extending the components system. Also you can extend weex by adding new methods for one module, new moudles or new bundle loaders. Follow the steps bellow you can dive into the journy of creating multiple builtin components, APIs and loaders.
-
-First of all, components, APIs and loaders are extensions to weex, so you can create your extensions without requiring the weex package, that means your extensions can be totally standalone.
-
-Second, you should always implement a extension for all the three platforms (android, ios and web), except that you only use it on one specific platform. After all weex is a cross platform framework and the equality of user expierence in all platforms is very important. Although you can create components separately on one platform by another, or welcome other developers on other platforms to join your work (You can always find coders who want the same feature with you in the commity). Here are docs about how to create native extensions on [ios](./extend-to-ios.html) and [android](./extend-to-android.html).
-
-You should publish your extensions somewhere weex developers can easily find, somewhere popular, independent and easy to search and use, such as, npm. Npm is what we strongly recommended.
-
-The most important thing is, you'd better name your extension appropriately: it should begin with a `weex-` if it is a weex extension, and it should end up with a `-<platform>` as a platform mark. If your package is wrapped up with all the three platforms you can ignore it through. Here is a demonstrating component [`<weex-hello-web>`](https://github.com/MrRaindrop/weex-hello-web) to show how to define your own component.
-
-### Create a new component
-
-Steps:
-
-1. Extend `Weex.Component`, override methods of component class.
-2. Use `Weex.registerComponent` to register your customized component in the `init` method of the installation module.
-3. export the `init` method for the installation (Every weex-html5 extension has to have a `init` method in the export object, which is for another weex project to install.)
-
-Here's a example to create a weex component for web platform (weex-html5):
-
-```javascript
-const attr = {
- // ...
-}
-const style = {
- // ...
-}
-const event = {
- // ...
-}
-// every extension file should have a init method.
-function init (Weex) {
- const Component = Weex.Component
- const extend = Weex.utils.extend
-
- // the component's constructor
- function Hello (data) {
- Component.call(this, data)
- }
-
- // extend the prototype
- Hello.prototype = Object.create(Component.prototype)
- extend(Hello.prototype, proto)
-
- // config the attributes, styles and events.
- extend(Hello.prototype, { attr })
- extend(Hello.prototype, {
- style: extend(Object.create(Component.prototype.style), style)
- })
- extend(Hello.prototype, { event })
-
- Weex.registerComponent('weex-hello', Hello)
-}
-
-// export the init method.
-export default { init }
-```
-
-The code above is extracted from [weex-hello-web/src/index.js](https://github.com/MrRaindrop/weex-hello-web/blob/master/src/index.js#L46-L65).
-
-This demo has overrided the `create` method of the base class `Component`. You can also override other methods to customize your component's behavior. The typical methods of class `Component` you may override are:
-
-* `create`: to create the node of the component, and return it.
-* `createChildren` to create the children's nodes.
-* `insertBefore` to insert a child before another child.
-* `appendChild` to append a child in the children list.
-* `removeChild` to remove a child in the children list.
-
-**Advanced**: Need more code demonstrations about overriding the component's methods ? Just take a look at the [weex repo's code](https://github.com/apache/incubator-weex/tree/dev/html5/). Basically the most of the built-in components are defined this way.
-
-Important! To register your component in the `init` method, use `Weex.registerComponent`. Here's the demo code:
-
-```javascript
-Weex.registerComponent('weex-hello', Hello)
-```
-
-The code above is from [weex-hello-web/src/index.js](https://github.com/MrRaindrop/weex-hello-web/blob/master/src/index.js#L62)
-
-Install the component using `Weex.install`.
-
-```javascript
-// import the original weex-html5.
-import weex from 'weex-html5'
-import hello from 'weex-hello-web'
-// install the component.
-weex.install(hello)
-```
-
-The code above is from [weex_extend_demo/src/main.js](https://github.com/MrRaindrop/weex_extend_demo/blob/master/src/main.js#L1-L5)
-
-use the component in your `.we` file:
-
-```html
-<template>
- <div>
- <weex-hello class="hello" style="txt-color:#fff;bg-color:green"
- value="WEEX" onclick="handleClick">
- </weex-hello>
- </div>
-</template>
-```
-
-The code above is from [weex_extend_demo/demo/index.we](https://github.com/MrRaindrop/weex_extend_demo/blob/master/demo/index.we#L10-L15)
-
-### Add a new API
-
-You can add new API modules, or just add a new API for any existing API modules. For example, you can add a new module `user` with APIs like 'login', 'logout' etc. The developer can invoke the API by using `require('@weex-module/moduleName)[methodName](arg1, arg2, ...)` ([Module APIs](../references/api.html)).
-
-Steps:
-
-1. Implement your API modules.
-2. Use `Weex.registerAPIModules` to register your API modules in the init method of your installation module.
-
-**Here is a example for register a new API module**
-
-First create a file named `user.js` for a new module, then define `login/logout` methods.
-
-```javascript
-const user = {
- // for user to login.
- login (callbackId) {
- login.then(res => {
- this.sender.performCallback(callbackId, res)
- }).catch(err => {
- this.sender.performCallback(callbackId, err)
- })
- },
-
- // for user to logout.
- logout (callbackId) {
- logout.then(res => {
- this.sender.performCallback(callbackId, res)
- }).catch(err => {
- this.sender.performCallback(callbackId, err)
- })
- }
-}
-
-// add meta info to user module.
-const meta = {
- user: [{
- name: 'login',
- args: ['function']
- }, {
- name: 'logout',
- args: ['function']
- }]
-}
-
-export default {
- init (Weex) {
- // Register your new module. The last parameter is your
- // new API module's meta info.
- Weex.registerApiModule('user', user, meta)
- }
-}
-```
-
-After above coding work, you can publish this user helper API to npm now, for example, with the name of `weex-user-helper`.
-
-Install the component using `Weex.install` in your new weex project.
-
-```javascript
-import Weex from 'weex-html5'
-import user from 'weex-user-helper'
-
-Weex.install(user)
-```
-
-Use the user helper API in your dsl code (xxx.we):
-
-```html
-<template>
- <div>
- <div class="btn" onclick="handleClick">
- <text>LOGIN</text>
- </div>
- </div>
-</template>
-
-<script>
- var userHelper = require('@weex-module/user')
- module.exports = {
- methods: {
- handleClick: function () {
- userHelper.login(function () {
- // ... do sth. in callback.
- })
- }
- }
- }
-</script>
-```
-
-### Add a new loader
-
-**Loader is only a type of extension for weex-html5 (web platform), native platform is not needing this.**
-
-Weex's builtin loaders to load a weex bundle are `xhr`, `jsonp` and `source`. The default loader is `xhr`. You can register your own loader by using `weex.registerLoader`. For example, you got a service method named `myServe.getWeexBundle`, which can load a weex bundle file through some magical tunnel:
-
-```javascript
-function loadByMyServe(pageId, callback) {
- myServe.getWeexBundle(pageId).then(function (bundle) {
- callback(bundle)
- }).catch(function(err) {
- callback(err)
- })
-}
-
-// export the init method to enable weex install this loader.
-export default {
- init (Weex) {
- Weex.registerLoader('myserve', loadByMyServe)
- }
-}
-```
-
-install and use your loader in your project's entry file:
-
-```javascript
-import Weex from 'weex-html5'
-
-// or import from './myserve.js', no matter where you can import your loader file.
-import loader from 'myLoader'
-
-Weex.install(loader)
-
-// use your loader in the init function:
-(function () {
- function getUrlParam (key) {
- const reg = new RegExp('[?|&]' + key + '=([^&]+)')
- const match = location.search.match(reg)
- return match && match[1]
- }
- const page = getUrlParam('page') || 'examples/build/index.js'
- Weex.init({
- appId: location.href,
- loader: 'myserve', // use the loader type you defined.
- source: page,
- rootId: 'weex'
- })
-})();
-```
-
-That's the major extension feature weex brought to you. The deep details can be found in the [weex's repo](https://github.com/alibaba/weex) and the weex's community.
-
http://git-wip-us.apache.org/repos/asf/incubator-weex-site/blob/12e3a8bc/_draft/v-0.10/advanced/extend-to-ios.md
----------------------------------------------------------------------
diff --git a/_draft/v-0.10/advanced/extend-to-ios.md b/_draft/v-0.10/advanced/extend-to-ios.md
deleted file mode 100644
index bddb96e..0000000
--- a/_draft/v-0.10/advanced/extend-to-ios.md
+++ /dev/null
@@ -1,311 +0,0 @@
----
-title: Extend to iOS
-type: advanced
-order: 7
-has_chapter_content: true
-version: 0.10
----
-
-# Extend to iOS
-
-### Module extend
-
-Weex SDK provides only rendering capabilities, rather than have other capabilities, such as network, picture, and URL redirection. If you want these features, you need to implement it.
-
-For example: If you want to implement an address jumping function, you can achieve a Module following the steps below.
-
-#### Step to customize a module
-
-1. Module
- customized must implement WXModuleProtocol
-2. A macro named `WX_EXPORT_METHOD` must be added, as it is the only way to be recognized by Weex. It takes arguments that specifies the method in module called by JavaScript code.
-3. The weexInstance should be synthesized. Each module object is bind to a specific instance.
-4. Module methods will be invoked in UI thread, so do not put time consuming operation there. If you want to execute the whole module methods in other thread, please implement the method `- (NSThread *)targetExecuteThread` in protocol. In the way, tasks distributed to this module will be executed in targetExecuteThread.
-5. Weex params can be String or Map.
-6. Module supports to return results to Javascript in callback. This callback is type of `WXModuleCallback`, the params of which can be String or Map.
-
-```objective-c
-@implementation WXEventModule
-@synthesize weexInstance;
- WX_EXPORT_METHOD(@selector(openURL:callback))
-
-- (void)openURL:(NSString *)url callback:(WXModuleCallback)callback
-{
- NSString *newURL = url;
- if ([url hasPrefix:@"//"]) {
- newURL = [NSString stringWithFormat:@"http:%@", url];
- } else if (![url hasPrefix:@"http"]) {
- newURL = [NSURL URLWithString:url relativeToURL:weexInstance.scriptURL].absoluteString;
- }
-
- UIViewController *controller = [[WXDemoViewController alloc] init];
- ((WXDemoViewController *)controller).url = [NSURL URLWithString:newURL];
-
- [[weexInstance.viewController navigationController] pushViewController:controller animated:YES];
- callback(@{@"result":@"success"});
-}
-
-@end
-```
-
-#### Register the module
-
-You can register the customized module by calling the method `registerModule:withClass` in WXSDKEngine.
-
-```objective-c
-WXSDKEngine.h
-/**
-* @abstract Registers a module for a given name
-* @param name The module name to register
-* @param clazz The module class to register
-**/
-+ (void)registerModule:(NSString *)name withClass:(Class)clazz;
-
-[WXSDKEngine registerModule:@"event" withClass:[WXEventModule class]];
-```
-
-### Handler extend
-
-Weex SDK doesn't have capabilitis, such as image download 、navigator operation,please implement these protocols by yourself.
-
-#### WXImgLoaderProtocol
-<font color="gray">
-Weex SDK has no image download capability, you need to implement `WXImgLoaderProtocol`. Refer to the following examples.
-
-```objective-c
-WXImageLoaderProtocol.h
-@protocol WXImgLoaderProtocol <WXModuleProtocol>
-
-/**
- * @abstract Creates a image download handler with a given URL
- * @param imageUrl The URL of the image to download
- * @param imageFrame The frame of the image you want to set
- * @param options : The options to be used for this download
- * @param completedBlock : A block called once the download is completed.
- image : the image which has been download to local.
- error : the error which has happened in download.
- finished : a Boolean value indicating whether download action has finished.
- */
- -(id<WXImageOperationProtocol>)downloadImageWithURL:(NSString *)url imageFrame:(CGRect)imageFrame userInfo:(NSDictionary *)options completed:(void(^)(UIImage *image, NSError *error, BOOL finished))completedBlock;
- @end
-```
-
-Implement above protocol as follows.
-
-
-```objective-c
-@implementation WXImgLoaderDefaultImpl
-#pragma mark -
-#pragma mark WXImgLoaderProtocol
-
-- (id<WXImageOperationProtocol>)downloadImageWithURL:(NSString *)url imageFrame:(CGRect)imageFrame userInfo:(NSDictionary *)userInfo completed:(void(^)(UIImage *image, NSError *error, BOOL finished))completedBlock
-{
- if ([url hasPrefix:@"//"]) {
- url = [@"http:" stringByAppendingString:url];
- }
- return (id<WXImageOperationProtocol>)[[SDWebImageManager sharedManager] downloadImageWithURL:[NSURL URLWithString:url] options:0 progress:^(NSInteger receivedSize, NSInteger expectedSize) {
- } completed:^(UIImage *image, NSError *error, SDImageCacheType cacheType, BOOL finished, NSURL *imageURL) {
- if (completedBlock) {
- completedBlock(image, error, finished);
- }
- }];
-}
-@end
-```
-
-#### Register the handler
-
-You can register the handler which implements the protocol by calling `registerHandler:withProtocol` in WXSDKEngine.
-
-```objective-c
-WXSDKEngine.h
-/**
-* @abstract Registers a handler for a given handler instance and specific protocol
-* @param handler The handler instance to register
-* @param protocol The protocol to confirm
-*/
-+ (void)registerHandler:(id)handler withProtocol:(Protocol *)protocol;
-
-[WXSDKEngine registerHandler:[WXImgLoaderDefaultImpl new] withProtocol:@protocol(WXImgLoaderProtocol)];
-```
-
-## Custom Native Components for iOS
-
-### Component extend
-
-There are a lot of native components ready to be used in the Weex SDK, but users always have their own use cases. You might have written an awesome native UI widget in your previous work and just want to wrap up it and export to Weex. So we provide a way to enable developers to create their own custom fully-native components.
-
-This guide will use the implementation of existing component `image` to show you how to build a native component. It will also assume that you are familiar with iOS programming.
-
-#### Registration
-
-Defining a custom native component is simple. Just call `[WXSDKEngine registerComponent:withClass:]` with the component's tag name as first argument.
-
-```objective-c
-[WXSDKEngine registerComponent:@"image" withClass:[WXImageComponent class]];
-```
-
-Then you can create a `WXImageComponent` class to represent the implementation of image component.
-
-Now you can use `<image>` wherever you want in the template.
-
-```html
-<image></image>
-```
-
-#### Adding Properties
-
-The next thing we can do is to extend some native properties to make the component more powerful. As an image, let's say we should have a `src` attribute as image's remote source and a `resize` attribute as image's resize mode(contain/cover/stretch).
-
-```objective-c
-@interface WXImageComponent ()
-
-@property (nonatomic, strong) NSString *imageSrc;
-@property (nonatomic, assign) UIViewContentMode resizeMode;
-
-@end
-```
-
-All of the styles, attributes and events will be passed to the component's initialization method, so here you can store the properties which you are interested in.
-
-```objective-c
-@implementation WXImageComponent
-
-- (instancetype)initWithRef:(NSString *)ref type:(NSString *)type styles:(NSDictionary *)styles attributes:(NSDictionary *)attributes events:(NSArray *)events weexInstance:(WXSDKInstance *)weexInstance
-{
- if (self = [super initWithRef:ref type:type styles:styles attributes:attributes events:events weexInstance:weexInstance]) {
- _imageSrc = [WXConvert NSString:attributes[@"src"]];
- _resizeMode = [WXConvert UIViewContentMode:attributes[@"resize"]];
- }
-
- return self;
-}
-
-@end
-```
-
-The properties getted in the attributes are of `id` type, so we have to convert them to the type we want using a conversion function. Basic conversion functions can be found in the `WXConvert` file, or you can just add your own conversion function.
-
-
-#### Hooking Render Life Cycle
-
-A Native Component has a life cycle managed by Weex. Weex creates it, layout it, renders it and destroys it.
-
-Weex offers component life cycle hooks that give you visibility into these key moments and the ability to act when they occur.
-
-method| description
-:----:|------
-initWithRef:type:...| Initializes a new component using the specified properties.
-layoutDidFinish | Called when the component has just laid out.
-loadView | Creates the view that the component manages.
-viewWillLoad | Called before the load of component's view .
-viewDidLoad | Called after the component's view is loaded and set.
-viewWillUnload | Called just before releasing the component's view.
-viewDidUnload | Called when the component's view is released.
-updateStyles:| Called when component's style are updated.
-updateAttributes:| Called when component's attributes are updated.
-addEvent:| Called when adding an event to the component.
-removeEvent:| Called when removing an event frome the component.
-
-
-As in the image component example, if we need to use our own image view, we can override the `loadView` method.
-
-
-```objective-c
-- (UIView *)loadView
-{
- return [[WXImageView alloc] init];
-}
-```
-
-Now Weex will use `WXImageView` to render the `image` component.
-
-As an image component, we will need to fetch the remote image and set it to the image view. This can be done in `viewDidLoad` method when the view is created and loaded. `viewDidLoad` is also the best time to perform additional initialization for your view, such as content mode changing.
-
-
-```objective-c
-- (void)viewDidLoad
-{
- UIImageView *imageView = (UIImageView *)self.view;
- imageView.contentMode = _resizeMode;
- imageView.userInteractionEnabled = YES;
- imageView.clipsToBounds = YES;
- imageView.exclusiveTouch = YES;
-
- // Do your image fetching and updating logic
-}
-```
-
-If image's remote source can be changed, you can also hook the `updateAttributes:` method to perform your attributes changing logic. Component's view always has been loaded while `updateAttributes:` or `updateStyles:` is called.
-
-
-```objective-c
-- (void)updateAttributes:(NSDictionary *)attributes
-{
- if (attributes[@"src"]) {
- _imageSrc = [WXConvert NSString:attributes[@"src"]];
- // Do your image updating logic
- }
-
- if (attributes[@"resize"]) {
- _resizeMode = [WXConvert UIViewContentMode:attributes[@"resize"]];
- self.view.contentMode = _resizeMode;
- }
-}
-```
-
-Maybe there is even more life cycle hooks you might need to consider, such as `layoutDidFinish` while layout computing is finished. If you want to go deeper, check out the `WXComponent.h` file in the source code.
-
-Now you can use `<image>` and its attributes wherever you want in the template.
-
-```html
-<image style="your-custom-style" src="image-remote-source" resize="contain/cover/stretch"></image>
-```
-#### Component Method
-from WeexSDK `0.9.5`, you can define your component method by macro `WX_EXPORT_METHOD`
-for example:
-
-```
-@implementation WXMyComponent
- +WX_EXPORT_METHOD(@selector(focus))
- +- (instancetype)initWithRef:(NSString *)ref type:(NSString *)type styles:(NSDictionary *)styles attributes:(NSDictionary *)attributes events:(NSArray *)events weexInstance:(WXSDKInstance *)weexInstance
- {
- if (self = [super initWithRef:ref type:type styles:styles attributes:attributes events:events weexInstance:weexInstance]) {
- // handle your attributes
- // handle your styles
- }
-
- return self;
- }
-
-
- - (void)focus
- {
- NSLog(@"you got it");
- }
-@end
-```
-
-after your registration for your own custom component, now you can call it in your js file.
-
-```html
-<template>
- <mycomponent id='mycomponent'></mycomponent>
-</template>
-<script>
- module.exports = {
- created: function() {
- this.$el('mycomponent').focus();
- }
- }
-</script>
-```
-
-
-
-
-
-
-
-
-
http://git-wip-us.apache.org/repos/asf/incubator-weex-site/blob/12e3a8bc/_draft/v-0.10/advanced/how-data-binding-works.md
----------------------------------------------------------------------
diff --git a/_draft/v-0.10/advanced/how-data-binding-works.md b/_draft/v-0.10/advanced/how-data-binding-works.md
deleted file mode 100644
index a207997..0000000
--- a/_draft/v-0.10/advanced/how-data-binding-works.md
+++ /dev/null
@@ -1,39 +0,0 @@
----
-title: How data-binding works
-type: advanced
-order: 2
-has_chapter_content: true
-version: 0.10
----
-
-# How data-binding works
-
-Weex JS Framework is a MVVM framework. It observe data and use `{% raw %}{{bindedKey}}{% endraw %}` syntax to bind in views. When data is changed in anyway, the view will automatically be updated due to data-binding.
-
-For example, The content of a `<text>` component is bound with the key `notes` in data:
-
-```html
-<template>
- <div>
- <text>{{notes}}</text>
- </div>
-<template>
-
-<script>
- module.exports = {
- data: {
- notes: 'Hello'
- }
- }
-</script>
-```
-
-Weex JS Framework first observe the data object to make sure each data change in the future will be observed. And then it will compile the whole `<template>`. When it finds that the content of the `<text>` is bound with `notes`, JS Framework will watch the `data.notes` changes and set a handler which will update the `<text>` content with new `data.notes`. So developer only need to manage the data, the view display could automatically do corresponding changes.
-
-Some special data-binding syntax here:
-
-* `{% raw %}<foo if="{{condition}}">{% endraw %}` will watch the condition value changes. When it changes to `true`, the `<foo>` element will be created and attached, otherwise it will be not created or removed.
-* `{% raw %}<foo repeat="{{list}}">{% endraw %}` will watch the mutations of a list. At the beginning the `<foo>` element will be cloned and attached with each item in list. When some items are added, removed or moved, the `<foo>` element list will be re-generated new content in the right order with minimum alterations.
-* `{% raw %}<foo if="{{condition}}" repeat="{{list}}">{% endraw %}` will process `repeat` first and `if` the second. In another way, it will walk through each item in list, if the item's condition value is true, a `<foo>` element will be cloned and attached with this certain item value.
-
-Compared with virtual DOM diff algorithm, we just "diff" the data and only calculate/update the virtual DOM with minimum alterations for each user interaction or data-change operation. So it's more lightweight and fast especially for small views in mobile devices.
http://git-wip-us.apache.org/repos/asf/incubator-weex-site/blob/12e3a8bc/_draft/v-0.10/advanced/images/how-arch.png
----------------------------------------------------------------------
diff --git a/_draft/v-0.10/advanced/images/how-arch.png b/_draft/v-0.10/advanced/images/how-arch.png
deleted file mode 100644
index a13df7a..0000000
Binary files a/_draft/v-0.10/advanced/images/how-arch.png and /dev/null differ
http://git-wip-us.apache.org/repos/asf/incubator-weex-site/blob/12e3a8bc/_draft/v-0.10/advanced/images/how-render.png
----------------------------------------------------------------------
diff --git a/_draft/v-0.10/advanced/images/how-render.png b/_draft/v-0.10/advanced/images/how-render.png
deleted file mode 100644
index db9b0f4..0000000
Binary files a/_draft/v-0.10/advanced/images/how-render.png and /dev/null differ
[07/51] [abbrv] incubator-weex-site git commit: rearrangement the
structure of the document
Posted by ha...@apache.org.
http://git-wip-us.apache.org/repos/asf/incubator-weex-site/blob/32a097bf/source/references/advanced/extend-jsfm.md
----------------------------------------------------------------------
diff --git a/source/references/advanced/extend-jsfm.md b/source/references/advanced/extend-jsfm.md
deleted file mode 100644
index fc0fd79..0000000
--- a/source/references/advanced/extend-jsfm.md
+++ /dev/null
@@ -1,167 +0,0 @@
----
-title: Extend JS framework
-type: references
-order: 11.4
-version: 2.1
----
-
-# Extend JS framework
-
-This part of the extension of JS framework is still in the discussion, may be adjusted at any time, please pay attention.
-
-Weex wants to be able to respect as many developer development habits as possible.So, in addition to Weex official support Vue 2.0, the developer can also customize and horizontally extension their own or their favorite JS Framework.The steps to customize the JS Framework are as follows:
-
-+ First you have a complete set of JS Framework.
-+ Learn about Weex's JS engine feature support.
-+ Adapting Weex's native DOM APIs.
-+ Adapting Weex's initialization portal and multi-instance management mechanism.
-+ Add your own JS Framework to the framework configuration of the Weex JS runtime. Then pack it.
-+ Build JS bundles based on the JS Framework. You need to add a specific prefix comment so that the Weex JS runtime can recognize it.
-
-## Weex JS engine features support
-
-+ Under iOS, Weex uses the JavaScriptCore that comes with the system, so the ES support depends on the version of the operating system.
-The current conservative judgments, ES5 features on the market mainstream iOS devices are perfectly supported, but some of the features of ES6 + is not supported.
-
-+ Under Android, Weex uses the v8 kernel provided by UC. For performance and stability considerations, we are not using the latest version of the v8 kernel.The same conservative judgment, the ES5 feature can all support, including strict mode `Object.freeze` and so on.
-
-+ The Weex JS engine does not support HTML DOM APIs and HTML5 JS APIs, including `document`, `set`Timeout`, and so on.
-
-+ We added `Promise`'s polyfill, as well as the `console`'s polyfill.
-
-+ In addition, in order to ensure that the JS engine can manage memory as much as possible, we have a generic global object for the `Object.freeze ()` freeze operation, which includes:
-
- - `Object`
- - `Object.prototype`
- - `Array`
- - `Array.prototype`
- - `String.prototype`
- - `Number.prototype`
- - `Boolean.prototype`
- - `Error.prototype`
- - `Date.prototype`
- - `RegExp.prototype`
-
-## Adapt to Weex's initial entry and multi-instance management mechanism
-
-The JS Framework provided by the developer needs to be packaged as a **CommonJS** package, and the package needs to be extension to the following methods:
-
-### Framework initialization
-
-+ `init(config)`
- - `config`
- - `Document`
- - `Element`
- - `Comment`
- - `TaskSender`
- - `CallbackManager`
-
-This method places the Native DOM class and two auxiliary classes provided by Weex in the `config` parameter and allows the framework itself to be initialized.
-
-Tip: At the same time, the author can pass in a different `config` in the framework of the initialization time. This allows for framework testing or environmental simulation.
-
-#### Introduction to parameter format
-
-+ `TaskSender`: wip…
-+ `CallbackManager`: wip…
-
-### Register available native components and modules
-
-+ `registerComponents(components)`
-+ `registerModules(modules)`
-
-These two methods are called immediately after the frame is initialized. This framework will be able to know which components and modules the current client supports.
-
-#### Introduction to parameter format
-
-+ `components: Array`: Describe the array of components, each of which includes:
- + `type: string`: Component name, for example `div`。
- + `methods: string[]`: Optional, a list of method names supported by this component. These methods can follow the native DOM APIs call.
-+ `modules: Object`: Describe the hash table of a series of modules. Key is the module name, the value is an array. The elements of the array describe a method in the module. The information of the method includes:
- + `name: string`: Method name
- + `args: string[]`: Parameter number and type description
-
-**E.g:**
-
-```javascript
-registerComponents([
- { type: 'web', methods: ['goBack', 'goForward', 'refresh']}
-])
-registerModules({
- event: [
- {name: 'openURL', args: ['string']}
- ]
-})
-```
-
-### Multi - instance lifecycle management
-
-+ `createInstance(instanceId, code, config, data, env)`
-+ `refreshInstance(instanceId, data)`
-+ `destroyInstance(instanceId)`
-
-Each Weex page has two stages: created and destroyed. At the same time in the Weex page running process, native can send messages to the Weex page. Different frameworks can follow their own ideas to achieve the message.
-
-#### Introduction to parameter format
-
-+ `instanceId: string`: The unique id of the Weex page is generated by native.
-+ `code: string`:The Wex page's JS bundle's code is passed through native.
-+ `config: Object?`: The configuration information for the Wex page, such as the bundleUrl representing the bundle address, is generated by the native configuration. It has nothing to do with the contents of the JS bundle itself.
-+ `data: Object?`: Native can import an external data when creating a Weex page. The JS framework can also generate different page content for the same JS bundle with different data.
-+ `env: Object?`:The current environment information about the Weex page, the meaning of each field:
- - `info: Object`: Framework information, see the "JS Bundle format requirements" later.
- - `config: Object`:Equivalent to the third parameter of the method `config`
- - `callbacks: CallbackManager`: only `CallbackManager`instance of Weex page.
- - `created: number`:The number of seconds that the Wex page was created.
- - `framework: string`:The name of the framework used by the Wex page. Equivalent to `info.framework`.
-
-### Native communication
-
-+ `receiveTasks(instanceId, tasks)`
-
-Native can use the `refreshInstance` method to send a message to the JS framework layer. But in many cases will use `receiveTasks` to send user events or methods callback to the JS framework.
-
-For example, if the user clicks on a button, native will send a `fireEvent` type of task to the JS framework, and then the JS framework will handle the corresponding event logic. This part of the working mechanism is related to the design of the `addEvent` in the native DOM interface.
-
-Another example is the user using fetch to send network requests. When the request is done at the native end, it will be sent to the JS framework with a callback type of task. Since native can not pass the function in JavaScript, it actually only sends a callbackId to the JS framework. This part of the working mechanism is related to the design of CallbackManager.
-
-#### Auxiliary method
-
-+ `getRoot(instanceId): JSON`
-
-This method returns the full JSON description of the document body node. Developers can view the full native DOM tree as a result. The format of the specific return value is the same as the return method of the toJSON () method in the native DOM interface. This feature is used extensively as a developer tool extension.
-
-## Configure the JS Framework in WeexSDK
-### Prepare your JS Framework code
-
-```javascript
-// your-own-js-framework.js
-export function init (config) { ... }
-export function registerComponents (components) { ... }
-export function registerModules (modules) { ... }
-export function createInstance (id, code, config, data, env) { ... }
-export function destroyInstance (id) { ... }
-export function refreshInstance (id, data) { ... }
-export function recieveTasks (id, tasks) { ... }
-export function getRoot (id) { ... }
-```
-
-### Register a JS Framework
-
-```javascript
-import * as Vue from '...'
-import * as React from '...'
-import * as Angular from '...'
-export default { Vue, React, Angular };
-```
-And then packaged JS runtime, integrated into WeexSDK.
-
-#### JS Bundle format requirements
-
-**Framework info**
-The note(alias framework info) at the beginning of the JS Bundle file is very important. The format is as follows:
-
-```javascript
-// { "framework": "Vue" }
-```
-So that the Weex JS engine will know that the JS bundle needs to use the Vue framework to resolve.Similarly, Weex supports multiple frameworks.It will be based on js bundle notes to select the corresponding framework resolution.
http://git-wip-us.apache.org/repos/asf/incubator-weex-site/blob/32a097bf/source/references/advanced/extend-to-android.md
----------------------------------------------------------------------
diff --git a/source/references/advanced/extend-to-android.md b/source/references/advanced/extend-to-android.md
deleted file mode 100644
index 2ec4bc5..0000000
--- a/source/references/advanced/extend-to-android.md
+++ /dev/null
@@ -1,219 +0,0 @@
----
-title: Extend to Android
-type: references
-order: 11.2
-version: 2.1
----
-
-# Extend to Android
-
-## Module extend
-
-weex sdk support Module extend, Weex SDK provides only rendering capabilities, rather than have other capabilities, such as network, picture, and URL redirection. If you want the these features, you need to implement it.
-
-For example: If you want to implement an address jumping function, you can achieve a Module Follow the steps below.
-
-### Step to customize a module
-
-- Customize module must extend WXModule
-- @WXModuleAnno annotation must be added, as it is the only the way to recognized by Weex
-- The access levels of mehtod must be **public**
-- The module class also can not be an inner class
-- Customize can not be obfuscated by tools like ProGuard
-- Module methods will be invoked in UI thread, do not put time consuming operation there
-- Weex params can be int, double, float, String, Map, List
-
-Refer to the following example:
-
-```java
-public class WXEventModule extends WXModule{
-
- private static final String WEEX_CATEGORY="com.taobao.android.intent.category.WEEX";
-
- @WXModuleAnno
- public void openURL(String url){
- //implement your module logic here
- }
-}
-```
-
-#### Support synchronous/asynchronous callback
-
-You can add `@JSMethod (uiThread = false or true)` annotation to choose the callback mode of moudle. See the follow example.
-
-```java
- // as sync-callback mode
-@JSMethod (uiThread = false)
-public void testSyncCall(){
- WXLogUtils.d("WXComponentSyncTest : Thread.currentThread().getName());
-}
-
-// as async-callback mode
-@JSMethod (uiThread = true)
-public void testAsyncCall(){
- WXLogUtils.e("WXComponentASynTest : Thread.currentThread().getName() );
-}
-```
-
-### Register the moulde
-
-```java
-WXSDKEngine.registerModule("event", WXEventModule.class);
-```
-
-### Use this module in weex DSL
-Now `event` moudle is avaiable in weex, use the module like this:
-
-```javascript
-var event = weex.requireModule('event');
-event.openURL("http://www.github.com");
-```
-
-### Javascript callback
-
-If the module need implement a callback to javascript, you just add `JSCallback` argument to the method you want expose to javascript:
-
-```java
-@WXModuleAnno
-public void openURL(String url,JSCallback callback){
- //implement your module logic here
- Map<String,Object> resp = new HashMap();
- resp.put("result","ok");
- callback.invoke(resp);
-}
-```
-
-At the javascript side, call the module with javascript function to receive callback data:
-
-```javascript
-event.openURL("http://www.github.com",function(resp){ console.log(resp.result); });
-```
-
-### Component extend
-
-There are label, image, div, scroll, ect. components in weex, you can also customize your own components.
-
-#### Step to customize a component
-
-1. Customize components must extend WXComponent or WXContainer
-2. @WXComponentProp(name=value(value is attr or style of dsl)) for it be recognized by weex SDK.
-3. The access levels of mehtod must be **public**
-4. The component class can not be an inner class
-5. Customize can not be obfuscated by tools like ProGuard
-6. Component methods will be invoked in UI thread, do not put time consuming operation there.
-7. Weex params can be int, double, float, String, Map, List, Array
-
-
-Refer to the following example
-
-```java
-public class MyViewComponent extends WXComponent{
- public MyViewComponent(WXSDKInstance instance, WXDomObject dom,
- WXVContainer parent, String instanceId, boolean isLazy)
- {
- public MyViewComponent(WXSDKInstance instance, WXDomObject dom,
- WXVContainer parent, String instanceId, boolean isLazy) {
- super(instance, dom, parent, instanceId, isLazy);
- }
-
- @Override
- protected void initView() {
- mHost = new TextView(mContext);
- }
- @WXComponentProp(name=WXDomPropConstant.WX_ATTR_VALUE)
- public void setMyViewValue(String value) {
- ((TextView)mHost).setText(value);
- }
-}
-```
-
-#### Register the Component
-
-
-```java
-WXSDKEngine.registerComponent("MyView", MyViewComponent.class);
-```
-
-### Adapter extend
-
-#### ImagedownloadAdapter
-
-Weex SDK has no image download capability, you need to implement `IWXImgLoaderAdapter`. Refer to the following examples.
-
-```java
-public class ImageAdapter implements IWXImgLoaderAdapter {
-
- private Activity mContext;
-
- public ImageAdapter(Activity activity) {
- mContext = activity;
- }
-
- @Override
- public void setImage(final String url, final ImageView view,
- WXImageQuality quality, WXImageStrategy strategy) {
- mContext.runOnUiThread(new Runnable() {
-
- @Override
- public void run() {
- if (TextUtils.isEmpty(url)) {
- view.setImageBitmap(null);
- return;
- }
- String temp = url;
- if (url.startsWith("//")){
- temp = "http:" + url;
- }
- if (view.getLayoutParams().width<=0 || view.getLayoutParams().height<=0) {
- return;
- }
- Picasso.with(WXEnvironment.getApplication())
- .load(temp)
- .resize(view.getLayoutParams().width,
- view.getLayoutParams().height).into(view);
- }
- });
- }
-}
-```
-
-#### Component Method
- from WeexSDK `0.9.5`, you can define your component method
-
- for example, define a method in component:
-
- ```java
- @JSMethod
- public void focus(){
- //method implementation
- }
- ```
-
- after your registration for your own custom component, now you can call it in your js file.
-
- ```html
-<template>
- <mycomponent id='mycomponent'></mycomponent>
-</template>
-<script>
- module.exports = {
- created: function() {
- this.$el('mycomponent').focus();
- }
- }
-</script>
-```
-
-#### Proguard Rules
-
-If you want to using proguard to protect your source code, please add the following rules to your profile:
-
-```java
--keep class com.taobao.weex.WXDebugTool{*;}
--keep class com.taobao.weex.devtools.common.LogUtil{*;}
--keep public class * extends com.taobao.weex.ui.component.WXComponent{*;}
--keep public class * extends com.taobao.weex.common.WXModule{*;}
--keepclassmembers class ** {
- @com.taobao.weex.ui.component.WXComponentProp public *;
-}
-```
http://git-wip-us.apache.org/repos/asf/incubator-weex-site/blob/32a097bf/source/references/advanced/extend-to-html5.md
----------------------------------------------------------------------
diff --git a/source/references/advanced/extend-to-html5.md b/source/references/advanced/extend-to-html5.md
deleted file mode 100644
index cc9acf3..0000000
--- a/source/references/advanced/extend-to-html5.md
+++ /dev/null
@@ -1,96 +0,0 @@
----
-title: Extend to HTML5
-type: references
-order: 11.3
-version: 2.1
----
-
-# Extend to HTML5
-
-Weex itself offers a lot of built-in components and modules, but also has the ability to expand horizontally. It allows developers to expand and customize themselves. But it is important to note that Weex is a cross-platform solution. When extending its built-in components or modules, you need to implement it on the three ends (Android, iOS, Web).
-
-
-After Weex switches the kernel to Vue 2.x, it will be easier to extend the Vue component on the Web side.
-
-## Extend Web components
-
-Vue.js is an independent front-end framework. In the browser, you can not use the Weex container for page rendering. So, the two things are the same: (1) for the Weex platform to expand Vue.js Web components. (2) directly using Vue.js to develop a Web component. The development of components can refer to its documentation: [component](https://vuejs.org/v2/guide/components.html). It is also recommended to use the ```.vue``` file to write components. How to use it: [Single file component](https://vuejs.org/v2/guide/single-file-components.html).
-
-### Example of component extension
-To extend ```<sidebar>``` as an example, you should first write the logic of the component itself:
-
-```html
-<!-- sidebar.vue -->
-<template>
- <div class="sidebar">
- <slot></slot>
- </div>
-</template>
-<style scoped>
- .sidebar {
- /* ... */
- }
-</style>
-<script>
- export default {
- props: [],
- data () {
- return {}
- }
- }
-</script>
-```
-
-And then register the ```<sidebar>``` component globally before using it:
-
-```javascript
-import Vue from 'vue'
-import Sidebar from './path/to/sidebar.vue'
-// register the ```<sidebar>``` component globally
-Vue.component('sidebar', Sidebar)
-```
-
-When you extend the Weex component, if you only use the built-in components provided by Weex and use the styles that Weex supports, it is no different from the normal custom component and does not need to be implemented at the Native side.
-
-If you find a component that does not support labels and styles that are not supported by Weex, you will need to really extend the Weex component. At the same time, you also need to extend in the Android side and the iOS side, or will lead to rendering exception.
-
-## Extend the Web module
-
-In addition to the common components, Weex also provides a common module, you can easily call the native API. In general, the registered Weex module requires three ends to be implemented, otherwise it will affect its normal use.
-
-### Register the module
-If we import the ```weex-vue-render``` library, we can get the weex variable globally. You can register the module using the ```registerModule```method.
-
-#### API format
-+ `registerModule`
-
- 1.```name```: {String} Required, module name.
- 2.```define```: {Object} Required, module definition.
-
-#### The example of register module
-The following code registers a module called guide:
-
-```javascript
-weex.registerModule('guide', {
- greeting () {
- console.log('Hello, nice to meet you. I am your guide.')
- },
- farewell () {
- console.log('Goodbye, I am always at your service.')
- }
-})
-```
-
-### Use the module
-
-Weex provides the require method for getting registered modules. You only need to pass the module name directly:
-
-```javascript
-//import module
-const guide = weex.requireModule('guide')
-// use the methods of module
-guide.greeting()
-guide.farewell()
-```
-
-The above wording is as useful as the native end, except that the methods in the module are provided by Native.
\ No newline at end of file
http://git-wip-us.apache.org/repos/asf/incubator-weex-site/blob/32a097bf/source/references/advanced/extend-to-ios.md
----------------------------------------------------------------------
diff --git a/source/references/advanced/extend-to-ios.md b/source/references/advanced/extend-to-ios.md
deleted file mode 100644
index 02dc037..0000000
--- a/source/references/advanced/extend-to-ios.md
+++ /dev/null
@@ -1,341 +0,0 @@
----
-title: Extend to iOS
-type: references
-order: 11.1
-version: 2.1
----
-
-# Extend to iOS
-
-#### Notice
-
-**All of the exported APIs in Weex are controllable and safe, they can not access private APIs or do any system hacks at runtime, neither can they change the primary purpose of the Application**.
-
-**If you are extending your custom modules/components, be sure NOT to export the ability of Objective-C runtime, be sure NOT to export dynamic and uncontrolled methods such as `dlopen()`, `dlsym()`, `respondsToSelector:`, `performSelector:`, `method_exchangeImplementations()`, be sure NOT to export any private methods. **
-
-### Module extend
-
-Weex SDK provides only rendering capabilities, rather than have other capabilities, such as network, picture, and URL redirection. If you want these features, you need to implement it.
-
-For example: If you want to implement an address jumping function, you can achieve a Module following the steps below.
-
-#### Step to customize a module
-
-1. Module
- customized must implement WXModuleProtocol
-2. A macro named `WX_EXPORT_METHOD` must be added, as it is the only way to export methods to JavaScript.
-3. The weexInstance should be synthesized. Each module object is bind to a specific instance.
-4. Module methods will be invoked in UI thread, so do not put time consuming operation there. If you want to execute the whole module methods in other thread, please implement the method `- (NSThread *)targetExecuteThread` in protocol. In the way, tasks distributed to this module will be executed in targetExecuteThread.
-5. Weex params can be String or Map.
-6. Module supports to return results to Javascript in callback. This callback is type of `WXModuleCallback`, the params of which can be String or Map.
-
-```objective-c
-@implementation WXEventModule
-
-@synthesize weexInstance;
-WX_EXPORT_METHOD(@selector(openURL:callback:))
-
-- (void)openURL:(NSString *)url callback:(WXModuleCallback)callback
-{
- NSString *newURL = url;
- if ([url hasPrefix:@"//"]) {
- newURL = [NSString stringWithFormat:@"http:%@", url];
- } else if (![url hasPrefix:@"http"]) {
- newURL = [NSURL URLWithString:url relativeToURL:weexInstance.scriptURL].absoluteString;
- }
-
- UIViewController *controller = [[WXDemoViewController alloc] init];
- ((WXDemoViewController *)controller).url = [NSURL URLWithString:newURL];
-
- [[weexInstance.viewController navigationController] pushViewController:controller animated:YES];
- callback(@{@"result":@"success"});
-}
-
-@end
-```
-
-#### export synchronous methods <span class="api-version">v0.10+</span>
-
-If you want to export synchronous methods which could make Javascript receive return values from natvie, you can use `WX_EXPORT_METHOD_SYNC` macro.
-
-native code:
-
-```objective-c
-@implementation WXEventModule
-
-WX_EXPORT_METHOD_SYNC(@selector(getString))
-
-- (NSString *)getString
-{
- return @"testString";
-}
-
-@end
-```
-
-js code:
-
-```javascript
-const eventModule = weex.requireModule('event')
-const returnString = syncTest.getString() // return "testString"
-```
-
-You can alse return number/array/dictionary except string.
-
-`notice:` the exported synchronous native method **can only be called on JS thread**. **Do not** do heavy work which will block js execution.
-
-`notice:` Vue 2.0 has not supported this feature yet. It will be supported in version 0.12 at the soonest.
-
-#### Register the module
-
-You can register the customized module by calling the method `registerModule:withClass` in WXSDKEngine.
-
-```objective-c
-WXSDKEngine.h
-/**
-* @abstract Registers a module for a given name
-* @param name The module name to register
-* @param clazz The module class to register
-**/
-+ (void)registerModule:(NSString *)name withClass:(Class)clazz;
-
-[WXSDKEngine registerModule:@"event" withClass:[WXEventModule class]];
-```
-
-### Handler extend
-
-Weex SDK doesn't have capabilitis, such as image download 、navigator operation,please implement these protocols by yourself.
-
-#### WXImgLoaderProtocol
-<font color="gray">
-Weex SDK has no image download capability, you need to implement `WXImgLoaderProtocol`. Refer to the following examples.
-
-```objective-c
-WXImageLoaderProtocol.h
-@protocol WXImgLoaderProtocol <WXModuleProtocol>
-
-/**
- * @abstract Creates a image download handler with a given URL
- * @param imageUrl The URL of the image to download
- * @param imageFrame The frame of the image you want to set
- * @param options : The options to be used for this download
- * @param completedBlock : A block called once the download is completed.
- image : the image which has been download to local.
- error : the error which has happened in download.
- finished : a Boolean value indicating whether download action has finished.
- */
- -(id<WXImageOperationProtocol>)downloadImageWithURL:(NSString *)url imageFrame:(CGRect)imageFrame userInfo:(NSDictionary *)options completed:(void(^)(UIImage *image, NSError *error, BOOL finished))completedBlock;
- @end
-```
-
-Implement above protocol as follows.
-
-
-```objective-c
-@implementation WXImgLoaderDefaultImpl
-#pragma mark -
-#pragma mark WXImgLoaderProtocol
-
-- (id<WXImageOperationProtocol>)downloadImageWithURL:(NSString *)url imageFrame:(CGRect)imageFrame userInfo:(NSDictionary *)userInfo completed:(void(^)(UIImage *image, NSError *error, BOOL finished))completedBlock
-{
- if ([url hasPrefix:@"//"]) {
- url = [@"http:" stringByAppendingString:url];
- }
- return (id<WXImageOperationProtocol>)[[SDWebImageManager sharedManager] downloadImageWithURL:[NSURL URLWithString:url] options:0 progress:^(NSInteger receivedSize, NSInteger expectedSize) {
- } completed:^(UIImage *image, NSError *error, SDImageCacheType cacheType, BOOL finished, NSURL *imageURL) {
- if (completedBlock) {
- completedBlock(image, error, finished);
- }
- }];
-}
-@end
-```
-
-#### Register the handler
-
-You can register the handler which implements the protocol by calling `registerHandler:withProtocol` in WXSDKEngine.
-
-```objective-c
-WXSDKEngine.h
-/**
-* @abstract Registers a handler for a given handler instance and specific protocol
-* @param handler The handler instance to register
-* @param protocol The protocol to confirm
-*/
-+ (void)registerHandler:(id)handler withProtocol:(Protocol *)protocol;
-
-[WXSDKEngine registerHandler:[WXImgLoaderDefaultImpl new] withProtocol:@protocol(WXImgLoaderProtocol)];
-```
-
-## Custom Native Components for iOS
-
-### Component extend
-
-There are a lot of native components ready to be used in the Weex SDK, but users always have their own use cases. You might have written an awesome native UI widget in your previous work and just want to wrap up it and export to Weex. So we provide a way to enable developers to create their own custom fully-native components.
-
-This guide will use the implementation of existing component `image` to show you how to build a native component. It will also assume that you are familiar with iOS programming.
-
-#### Registration
-
-Defining a custom native component is simple. Just call `[WXSDKEngine registerComponent:withClass:]` with the component's tag name as first argument.
-
-```objective-c
-[WXSDKEngine registerComponent:@"image" withClass:[WXImageComponent class]];
-```
-
-Then you can create a `WXImageComponent` class to represent the implementation of image component.
-
-Now you can use `<image>` wherever you want in the template.
-
-```html
-<image></image>
-```
-
-#### Adding Properties
-
-The next thing we can do is to extend some native properties to make the component more powerful. As an image, let's say we should have a `src` attribute as image's remote source and a `resize` attribute as image's resize mode(contain/cover/stretch).
-
-```objective-c
-@interface WXImageComponent ()
-
-@property (nonatomic, strong) NSString *imageSrc;
-@property (nonatomic, assign) UIViewContentMode resizeMode;
-
-@end
-```
-
-All of the styles, attributes and events will be passed to the component's initialization method, so here you can store the properties which you are interested in.
-
-```objective-c
-@implementation WXImageComponent
-
-- (instancetype)initWithRef:(NSString *)ref type:(NSString *)type styles:(NSDictionary *)styles attributes:(NSDictionary *)attributes events:(NSArray *)events weexInstance:(WXSDKInstance *)weexInstance
-{
- if (self = [super initWithRef:ref type:type styles:styles attributes:attributes events:events weexInstance:weexInstance]) {
- _imageSrc = [WXConvert NSString:attributes[@"src"]];
- _resizeMode = [WXConvert UIViewContentMode:attributes[@"resize"]];
- }
-
- return self;
-}
-
-@end
-```
-
-The properties getted in the attributes are of `id` type, so we have to convert them to the type we want using a conversion function. Basic conversion functions can be found in the `WXConvert` file, or you can just add your own conversion function.
-
-
-#### Hooking Render Life Cycle
-
-A Native Component has a life cycle managed by Weex. Weex creates it, layout it, renders it and destroys it.
-
-Weex offers component life cycle hooks that give you visibility into these key moments and the ability to act when they occur.
-
-| method | description |
-| :------------------: | ---------------------------------------- |
-| initWithRef:type:... | Initializes a new component using the specified properties. |
-| layoutDidFinish | Called when the component has just laid out. |
-| loadView | Creates the view that the component manages. |
-| viewWillLoad | Called before the load of component's view . |
-| viewDidLoad | Called after the component's view is loaded and set. |
-| viewWillUnload | Called just before releasing the component's view. |
-| viewDidUnload | Called when the component's view is released. |
-| updateStyles: | Called when component's style are updated. |
-| updateAttributes: | Called when component's attributes are updated. |
-| addEvent: | Called when adding an event to the component. |
-| removeEvent: | Called when removing an event frome the component. |
-
-
-As in the image component example, if we need to use our own image view, we can override the `loadView` method.
-
-
-```objective-c
-- (UIView *)loadView
-{
- return [[WXImageView alloc] init];
-}
-```
-
-Now Weex will use `WXImageView` to render the `image` component.
-
-As an image component, we will need to fetch the remote image and set it to the image view. This can be done in `viewDidLoad` method when the view is created and loaded. `viewDidLoad` is also the best time to perform additional initialization for your view, such as content mode changing.
-
-
-```objective-c
-- (void)viewDidLoad
-{
- UIImageView *imageView = (UIImageView *)self.view;
- imageView.contentMode = _resizeMode;
- imageView.userInteractionEnabled = YES;
- imageView.clipsToBounds = YES;
- imageView.exclusiveTouch = YES;
-
- // Do your image fetching and updating logic
-}
-```
-
-If image's remote source can be changed, you can also hook the `updateAttributes:` method to perform your attributes changing logic. Component's view always has been loaded while `updateAttributes:` or `updateStyles:` is called.
-
-
-```objective-c
-- (void)updateAttributes:(NSDictionary *)attributes
-{
- if (attributes[@"src"]) {
- _imageSrc = [WXConvert NSString:attributes[@"src"]];
- // Do your image updating logic
- }
-
- if (attributes[@"resize"]) {
- _resizeMode = [WXConvert UIViewContentMode:attributes[@"resize"]];
- self.view.contentMode = _resizeMode;
- }
-}
-```
-
-Maybe there is even more life cycle hooks you might need to consider, such as `layoutDidFinish` while layout computing is finished. If you want to go deeper, check out the `WXComponent.h` file in the source code.
-
-Now you can use `<image>` and its attributes wherever you want in the template.
-
-```html
-<image style="your-custom-style" src="image-remote-source" resize="contain/cover/stretch"></image>
-```
-
-#### Component Method
-from WeexSDK `0.9.5`, you can define your component method by macro `WX_EXPORT_METHOD`
-for example:
-
-```
-@implementation WXMyComponent
- +WX_EXPORT_METHOD(@selector(focus))
- +- (instancetype)initWithRef:(NSString *)ref type:(NSString *)type styles:(NSDictionary *)styles attributes:(NSDictionary *)attributes events:(NSArray *)events weexInstance:(WXSDKInstance *)weexInstance
- {
- if (self = [super initWithRef:ref type:type styles:styles attributes:attributes events:events weexInstance:weexInstance]) {
- // handle your attributes
- // handle your styles
- }
-
- return self;
- }
-
-
- - (void)focus
- {
- NSLog(@"you got it");
- }
-@end
-```
-
-after your registration for your own custom component, now you can call it in your js file.
-
-```html
-<template>
- <mycomponent ref='mycomponent'></mycomponent>
-</template>
-<script>
- module.exports = {
- created: function() {
- this.$refs.mycomponent.focus();
- }
- }
-</script>
-```
http://git-wip-us.apache.org/repos/asf/incubator-weex-site/blob/32a097bf/source/references/advanced/index.md
----------------------------------------------------------------------
diff --git a/source/references/advanced/index.md b/source/references/advanced/index.md
deleted file mode 100644
index c5c049d..0000000
--- a/source/references/advanced/index.md
+++ /dev/null
@@ -1,15 +0,0 @@
----
-title: Advanced
-type: references
-order: 11
-version: 2.1
----
-
-# Advanced
-
-- [Extend to iOS](./extend-to-ios.html)
-- [Extend to Android](./extend-to-android.html)
-- [Extend to HTML5](./extend-to-html5.html)
-- [Extend JS framework](./extend-jsfm.html)
-- [Integrate Devtool to Android](./integrate-devtool-to-android.html)
-- [Integrate Devtool to iOS](./integrate-devtool-to-ios.html)
\ No newline at end of file
http://git-wip-us.apache.org/repos/asf/incubator-weex-site/blob/32a097bf/source/references/advanced/integrate-devtool-to-android.md
----------------------------------------------------------------------
diff --git a/source/references/advanced/integrate-devtool-to-android.md b/source/references/advanced/integrate-devtool-to-android.md
deleted file mode 100644
index af5480d..0000000
--- a/source/references/advanced/integrate-devtool-to-android.md
+++ /dev/null
@@ -1,146 +0,0 @@
----
-title: Integrate Devtool to Android
-type: references
-order: 11.5
-version: 2.1
----
-
-# Integrate Devtool to Android
-
-Weex devtools is a custom devtools for weex that implements Chrome Debugging Protocol inspired by Stetho, it is designed to help you quickly inspect your app and debug your JS bundle source in a Chrome web page. To make it work, at first you must integrate devtool to your App. This page will help you integrate devtool to your Android App.
-
-## Integrate to Android
-
-### Installing Dependencies
-
-Weex Devtools depend on `weex_inspector`. I strongly recommend you use the latest version since both Weex SDK and devtools are developed iteratively and rapidly. See the release version list [here](https://github.com/weexteam/weex_devtools_android/releases). All the release version will publish to the [jcenter repo](https://bintray.com/alibabaweex/maven/weex_inspector). There are two choices to install it:
-
-- From Gradle
-
- ```gradle
- dependencies {
- compile 'com.taobao.android:weex_inspector:0.8.0.0'
- }
- ```
-
-- From source code
-
- you need to copy the dir of inspector to the same dir of your app and add `include ":inspector"`in your project's `settings.gradle` file just like playground have done, then add dependency in your app's `build.gralde`.
-
- ```gradle
- dependencies {
- compile project(':inspector')
- }
- ```
-
-#### Version compatibility
-
-| weex sdk | weex inspector | Debugger Server |
-|----------|----------------|-----------------|
-| 0.8.0.1+ | 0.0.8.1+ | 0.2.39+ |
-| 0.7.0+ | 0.0.7.13 | 0.2.38 |
-| 0.6.0+ | 0.0.2.2 | - |
-
-
-### Adding Debug mode switch
-
-The key to control the opening and closing of the debug mode can be summarized as three rules:
-
-**No.1: Set the switch and Debugger Server addresses via `sRemoteDebugMode` and ` sRemoteDebugProxyUrl`.**
-
-`WXEnvironment` class has a pair of static variables mark Weex current debug mode:
-
-```java
-public static boolean sRemoteDebugMode; // default close
-public static String sRemoteDebugProxyUrl; // Debugger Server addresses
-```
-
-You have to set `WXEnvironment.sRemoteDebugMode` and `WXEnvironment.sRemoteDebugProxyUrl` at the right time, for example:
-
-```java
-private void initDebugEnvironment(boolean enable, String host) {
- WXEnvironment.sRemoteDebugMode = enable;
- WXEnvironment.sRemoteDebugProxyUrl = "ws://" + host + ":8088/debugProxy/native";
-}
-```
-
-**No.2: You must call `WXSDKEngine.reload()` method when `sRemoteDebugMode` was changed.**
-
-You can control a state of debug mode via the `WXEnvironment.sRemoteDebugMode`, but you need reset Weex runtime if you changed a state of debug mode.
-
-```java
-private void launchInspector(boolean remoteDebug) {
- if (WXEnvironment.isApkDebugable()) {
- try {
- if (mWxDebugProxy != null) {
- mWxDebugProxy.stop();
- }
- HackedClass<Object> debugProxyClass = WXHack.into("com.taobao.weex.devtools.debug.DebugServerProxy");
- mWxDebugProxy = (IWXDebugProxy) debugProxyClass.constructor(Context.class, WXBridgeManager.class)
- .getInstance(WXEnvironment.getApplication(), WXBridgeManager.this);
- if (mWxDebugProxy != null) {
- mWxDebugProxy.start();
- if (remoteDebug) {
- mWXBridge = mWxDebugProxy.getWXBridge();
- } else {
- if (mWXBridge != null && !(mWXBridge instanceof WXBridge)) {
- mWXBridge = null;
- }
- }
- }
- } catch (HackAssertionException e) {
- WXLogUtils.e("launchInspector HackAssertionException ", e);
- }
- }
-}
-```
-
-In this way, You can control the debug mode flexibly.
-
-**No.3: Auto refresh page via `ACTION_DEBUG_INSTANCE_REFRESH` broadcast**
-
-`ACTION_DEBUG_INSTANCE_REFRESH` can be broadcast messages when the debug mode is switched or Chrome page refresh. You can use this mechanism to inform the current page to refresh in time.
-
-```java
-public class RefreshBroadcastReceiver extends BroadcastReceiver {
- @Override
- public void onReceive(Context context, Intent intent) {
- if (IWXDebugProxy.ACTION_DEBUG_INSTANCE_REFRESH.equals(intent.getAction())) {
- if (mUri != null) {
- if (TextUtils.equals(mUri.getScheme(), "http") || TextUtils.equals(mUri.getScheme(), "https")) {
- loadWXfromService(mUri.toString());
- } else {
- loadWXfromLocal(true);
- }
- }
- }
- }
-}
-```
-
-### Example
-
-The easiest way is reuse the code of playground. On the other hand QR code is not necessary, if you review the source code you can draw a conclusion that QR CODE is just a way to set devtools server address. There are two examples of how to open debug modes in the Playground App:
-
-- Set the debug mode via `XXXApplication`
-
- ```java
- public class MyApplication extends Application {
- public void onCreate() {
- super.onCreate();
- initDebugEnvironment(true, "xxx.xxx.xxx.xxx"/*"DEBUG_SERVER_HOST"*/);
- }
- }
- ```
-
-- Set the debug mode by scan QR code
-
- You review the source code of playground.
-
- - Debug mode switch control: [`WXApplication.java`](https://github.com/weexteam/weex_devtools_android/blob/master/playground/app/src/main/java/com/alibaba/weex/WXApplication.java)
- - Refresh control [`WXPageActivity.java`](https://github.com/weexteam/weex_devtools_android/blob/master/playground/app/src/main/java/com/alibaba/weex/WXPageActivity.java)
-
-
-## Known Issues
-
-You can report issues and bugs [here](https://github.com/weexteam/weex_devtools_android/issues). We will reply as soon as possible.
\ No newline at end of file
http://git-wip-us.apache.org/repos/asf/incubator-weex-site/blob/32a097bf/source/references/advanced/integrate-devtool-to-ios.md
----------------------------------------------------------------------
diff --git a/source/references/advanced/integrate-devtool-to-ios.md b/source/references/advanced/integrate-devtool-to-ios.md
deleted file mode 100644
index 0ae3ef5..0000000
--- a/source/references/advanced/integrate-devtool-to-ios.md
+++ /dev/null
@@ -1,192 +0,0 @@
----
-title: Integrate Devtool to iOS
-type: references
-order: 11.6
-version: 2.1
----
-
-# Integrate Devtool to iOS
-
-Weex devtools is a custom devtools for weex that implements Chrome Debugging Protocol inspired by Stetho, it is designed to help you quickly inspect your app and debug your JS bundle source in a Chrome web page. To make it work, at first you must integrate devtool to your App. This page will help you integrate devtool to your iOS App.
-
-## Integrate to iOS
-
-### Installing Dependencies
-
-There are two choices to install dependencies:
-
-#### No.1 From cocoapods
-
-```
-source https://github.com/CocoaPods/Specs.git,
-pod 'WXDevtool', '0.7.0', :configurations => ['Debug'],
-```
-
-I strongly recommend you use the latest version since both Weex SDK and devtools are developed iteratively and rapidly.
-
-#### No.2 From source code
-
-1. Get source code by [GitHub](https://github.com/weexteam/weex-devtool-iOS).
-
-2. Copy source folder to your project.
-
- 
-
-3. Choose options as the picture shows.
-
- 
-
-### Integrate
-
-#### Step 1. Add header file in `AppDelegate.m`
-
- - From cocoapods:
-
- ```
- #import <TBWXDevtool/WXDevtool.h>
- ``
-
- - From source code
-
- ```
- #import "WXDevtool.h"
- ```
-
-#### Step 2. Initialize inspector when the APP launched
-
-You can see the WXDevtool header file as follows:
-
-```object-c
-#import <Foundation/Foundation.h>
-
-@interface WXDevTool : NSObject
-/**
-* set debug status
-* @param isDebug : YES:open debug model and inspect model;
-* default is NO,if isDebug is NO, open inspect only;
-* */
-+ (void)setDebug:(BOOL)isDebug;
-
-
-/**
-* get debug status
-* */
-+ (BOOL)isDebug;
-
-
-/**
-* launch weex debug
-* @param url : ws://ip:port/debugProxy/native, ip and port is your devtool server address
-* eg:@"ws://30.30.29.242:8088/debugProxy/native"
-* */
-+ (void)launchDevToolDebugWithUrl:(NSString *)url;
-
-@end
-```
-
-**Note: The inspector API must be called before weex is initialized**
-
-- `setDebug`
-
- `setDebug` is used to control the state of debug mode, when its value is `YES`, open the debug mode, otherwise closed.
-
-- `(void)launchDevToolDebugWithUrl:(NSString *)url;`
-
- wssip was the wss address showing in the chrome address bar.
-
-open debug model and inspector model
-
-eg:
-
-```object-c
-- (BOOL)application:(UIApplication *)application didFinishLaunchingWithOptions:(NSDictionary *)launchOptions { [WXDevTool setDebug:YES]; [WXDevTool launchDevToolDebugWithUrl:@"ws://wssip/debugProxy/native"]; }
-```
-
-open inspect model, remove the `@selector
-(setDebug:)` or add `[WXDevTool setDebug:NO]`
-
-eg:
-
-```object-c
-- (BOOL)application:(UIApplication *)application didFinishLaunchingWithOptions:(NSDictionary *)launchOptions { [WXDevTool launchDevToolDebugWithUrl:@"ws://wssip/debugProxy/native"]; }
-```
-
-#### Step 3. Auto refresh
-
-Q: Why do we need auto refresh feature?
-
-A: As shown in future, when you click the debugger button, Javascript runtime environment will change from the phone (JavaScriptCore) to PC (Chrome V8), then Weex need to re-initialize the Weex environment, re-render the page. Page rendering is required for the developer to add on its own page.
-
-
-
-Q: What kind of scene need to add refresh feature?
-
-- Click debugger button
-- Switch remoteDebug
-- Refresh inspect page
-
-Q: How to add auto refresh feature?
-
-Register events when Weex initialization.
-
-```object-c
-[[NSNotificationCenter defaultCenter] addObserver:self selector:notificationRefreshInstance: name:@"RefreshInstance" object:nil];
-```
-
-**Notes: You must cancel this event in the `dealloc` method. For example:**
-
-```
-- (void)dealloc
-{
- [[NSNotificationCenter defaultCenter] removeObserver:self];
-}
-```
-
-For example, First you can destroy the current instance, and then re-create instance:
-
-
-```
-- (void)dealloc
-{
- [[NSNotificationCenter defaultCenter] removeObserver:self];
-}
-```
-
-页面刷新实现,先销毁当前 instance,然后重新创建 instance,举例如下:
-
-```
- - (void)render
- {
- CGFloat width = self.view.frame.size.width;
- [_instance destroyInstance];
- _instance = [[WXSDKInstance alloc] init];
- _instance.viewController = self;
- _instance.frame = CGRectMake(self.view.frame.size.width-width, 0, width, _weexHeight);
-
- __weak typeof(self) weakSelf = self;
- _instance.onCreate = ^(UIView *view) {
- [weakSelf.weexView removeFromSuperview];
- weakSelf.weexView = view;
- [weakSelf.view addSubview:weakSelf.weexView];
- UIAccessibilityPostNotification(UIAccessibilityScreenChangedNotification, weakSelf.weexView);
- };
- _instance.onFailed = ^(NSError *error) {
-
- };
-
- _instance.renderFinish = ^(UIView *view) {
- [weakSelf updateInstanceState:WeexInstanceAppear];
- };
-
- _instance.updateFinish = ^(UIView *view) {
- };
- if (!self.url) {
- return;
- }
- NSURL *URL = [self testURL: [self.url absoluteString]];
- NSString *randomURL = [NSString stringWithFormat:@"%@?random=%d",URL.absoluteString,arc4random()];
- [_instance renderWithURL:[NSURL URLWithString:randomURL] options:@{@"bundleUrl":URL.absoluteString} data:nil];
-}
-```
-
-You can see the details in this case [WXDemoViewController.m](https://github.com/weexteam/weex-devtool-iOS/blob/master/Devtools/playground/WeexDemo/WXDemoViewController.m)
http://git-wip-us.apache.org/repos/asf/incubator-weex-site/blob/32a097bf/source/references/android-apis.md
----------------------------------------------------------------------
diff --git a/source/references/android-apis.md b/source/references/android-apis.md
index 963371c..44d1fe2 100644
--- a/source/references/android-apis.md
+++ b/source/references/android-apis.md
@@ -1,7 +1,8 @@
---
-title: Android APIs
+title: Android APIs
type: references
-order: 1.2
+group: API
+order: 2.2
version: 2.1
---
@@ -151,7 +152,7 @@ public class WXLocation extends WXModule {
callback.invoke(data);
//Continuous connection
callback.invokeAndKeepAlive(data);
-
+
//Invoke method and invokeAndKeepAlive two methods of choice }
}
```
@@ -216,4 +217,4 @@ You can use the `mWXSDKInstance.setSize()` method to change the size of the Weex
Weex in the development stage will add some new features and new methods, but these new features and functions must be upgraded to achieve the SDK, for the application should not be upgraded how to deal with it? You can use the downgrade feature.
-Native can be handled by the `onException` method in interface `IWXRenderListener`, and if it is an active demoulding errCode is a character that is divided by "|". "|" The preceding character is 1 for active demotion, and the Native side can jump to the corresponding H5 page. Or otherwise prompted the user's current environment does not support Weex.
\ No newline at end of file
+Native can be handled by the `onException` method in interface `IWXRenderListener`, and if it is an active demoulding errCode is a character that is divided by "|". "|" The preceding character is 1 for active demotion, and the Native side can jump to the corresponding H5 page. Or otherwise prompted the user's current environment does not support Weex.
http://git-wip-us.apache.org/repos/asf/incubator-weex-site/blob/32a097bf/source/references/bubble.md
----------------------------------------------------------------------
diff --git a/source/references/bubble.md b/source/references/bubble.md
deleted file mode 100644
index 8d2470c..0000000
--- a/source/references/bubble.md
+++ /dev/null
@@ -1,146 +0,0 @@
----
-title: Event Bubble
-type: references
-order: 1.3
-version: 2.1
----
-
-# Event Bubble <span class="api-version">v0.13+</span>
-
-Weex 2.0 implements the W3C standard event bubbling mechanism.
-
-### Usage
-
-```html
-<template>
- <div class="root" @click="rootClick" bubble="true">
- <text style="font-size: 40px;">{{rootText}}</text>
- <div class="outer" @click="parentClick">
- <div>
- <text style="font-size: 40px;">{{parentText}}</text>
- </div>
- <text class="inner" @click="click">{{innerText}}</text>
- </div>
- </div>
-</template>
-
-<script>
- module.exports = {
- data: {
- innerText: 'click me',
- parentText: '',
- rootText: ''
- },
- methods: {
- click: function(e) {
- this.innerText = 'inner bubble'
- },
- parentClick: function(e) {
- this.parentText = 'parent bubble'
- },
- rootClick: function(e) {
- this.rootText = 'root bubble'
- }
- }
- }
-</script>
-
-<style scoped>
- .inner {
- font-size: 40px;
- text-align: center;
- background-color: #7a9b1b;
- padding: 40px;
- }
-
- .outer {
- font-size: 40px;
- text-align: center;
- background-color: #9b7a1b;
- padding: 120px;
- }
-
- .root {
- font-size: 40px;
- text-align: center;
- background-color: #7a1b9b;
- padding: 80px;
- }
-</style>
-```
-
-[try it](http://dotwe.org/vue/fa2957ce3e9eb47ad9ae1da22d845e95)
-
-Run the above code, open with the client, click on the middle of the elements, you can see the event spread up, followed by the trigger.
-
-### Notice
-
-One thing should be noticed: **For compatibility with previous versions, Weex does not turn on event bubbling by default. You need to add `bubble = "true"` on the root element's properties to turn on the bubbling mechanism. Otherwise, the event will not be propagated upwards, keeping the same effect as the previous version.**
-
-### stopPropagation
-
-In the event handler function, you can use the `e.stopPropagation()` method to prevent the event from escalating. Note that `e.stopPropagation()` differs from `bubble = "true"`, which affects only the current elements and the propagation of parent elements, without affecting the propagation of child elements; the latter is a switching mechanism that is added for compatibility, Will be a global shutdown or open the bubble mechanism, the two can co-exist, as follows:
-
-```html
-<template>
- <div class="root" @click="rootClick" bubble="true">
- <text style="font-size: 40px;">{{rootText}}</text>
- <div class="outer" @click="parentClick">
- <div>
- <text style="font-size: 40px;">{{parentText}}</text>
- </div>
- <text class="inner" @click="click">{{innerText}}</text>
- </div>
- </div>
-</template>
-
-<script>
- module.exports = {
- data: {
- innerText: 'click me',
- parentText: '',
- rootText: ''
- },
- methods: {
- click: function(e) {
- this.innerText = 'inner bubble'
- },
- parentClick: function(e) {
- this.parentText = 'parent bubble'
- e.stopPropagation()
- },
- rootClick: function(e) {
- this.rootText = 'root bubble'
- // e.stopPropagation()
- }
- }
- }
-</script>
-
-<style scoped>
- .inner {
- font-size: 40px;
- text-align: center;
- background-color: #7a9b1b;
- padding: 40px;
- }
-
- .outer {
- font-size: 40px;
- text-align: center;
- background-color: #9b7a1b;
- padding: 120px;
- }
-
- .root {
- font-size: 40px;
- text-align: center;
- background-color: #7a1b9b;
- padding: 80px;
- }
-</style>
-```
-
-[try it](http://dotwe.org/vue/2cc80e19c9b2430fb780234628065a69)
-
-Run the above code, open with the client, click on the middle of the element, you can see the event up to the parent element is terminated, no longer continue to spread to the root element.
http://git-wip-us.apache.org/repos/asf/incubator-weex-site/blob/32a097bf/source/references/color-names.md
----------------------------------------------------------------------
diff --git a/source/references/color-names.md b/source/references/color-names.md
deleted file mode 100644
index fa78cda..0000000
--- a/source/references/color-names.md
+++ /dev/null
@@ -1,182 +0,0 @@
----
-title: Color name
-type: references
-order: 1.7
-version: 2.1
----
-
-# List of the names of colors
-
-### Basic color keywords:
-
-| Color Name | Hex rgb |
-| ---------- | ------- |
-| black | #000000 |
-| silver | #C0C0C0 |
-| gray | #808080 |
-| white | #FFFFFF |
-| maroon | #800000 |
-| red | #FF0000 |
-| purple | #800080 |
-| fuchsia | #FF00FF |
-| green | #008000 |
-| lime | #00FF00 |
-| olive | #808000 |
-| yellow | #FFFF00 |
-| navy | #000080 |
-| blue | #0000FF |
-| teal | #008080 |
-| aqua | #00FFFF |
-
-### Extended color keywords:
-
-| Color Name | Hex rgb |
-| ---------- | ------- |
-| aliceblue | #F0F8FF |
-| antiquewhite | #FAEBD7 |
-| aqua | #00FFFF |
-| aquamarine | #7FFFD4 |
-| azure | #F0FFFF |
-| beige | #F5F5DC |
-| bisque | #FFE4C4 |
-| black | #000000 |
-| blanchedalmond | #FFEBCD |
-| blue | #0000FF |
-| blueviolet | #8A2BE2 |
-| brown | #A52A2A |
-| burlywood | #DEB887 |
-| cadetblue | #5F9EA0 |
-| chartreuse | #7FFF00 |
-| chocolate | #D2691E |
-| coral | #FF7F50 |
-| cornflowerblue | #6495ED |
-| cornsilk | #FFF8DC |
-| crimson | #DC143C |
-| cyan | #00FFFF |
-| darkblue | #00008B |
-| darkcyan | #008B8B |
-| darkgoldenrod | #B8860B |
-| darkgray | #A9A9A9 |
-| darkgreen | #006400 |
-| darkgrey | #A9A9A9 |
-| darkkhaki | #BDB76B |
-| darkmagenta | #8B008B |
-| darkolivegreen | #556B2F |
-| darkorange | #FF8C00 |
-| darkorchid | #9932CC |
-| darkred | #8B0000 |
-| darksalmon | #E9967A |
-| darkseagreen | #8FBC8F |
-| darkslateblue | #483D8B |
-| darkslategray | #2F4F4F |
-| darkslategrey | #2F4F4F |
-| darkturquoise | #00CED1 |
-| darkviolet | #9400D3 |
-| deeppink | #FF1493 |
-| deepskyblue | #00BFFF |
-| dimgray | #696969 |
-| dimgrey | #696969 |
-| dodgerblue | #1E90FF |
-| firebrick | #B22222 |
-| floralwhite | #FFFAF0 |
-| forestgreen | #228B22 |
-| fuchsia | #FF00FF |
-| gainsboro | #DCDCDC |
-| ghostwhite | #F8F8FF |
-| gold | #FFD700 |
-| goldenrod | #DAA520 |
-| gray | #808080 |
-| green | #008000 |
-| greenyellow | #ADFF2F |
-| grey | #808080 |
-| honeydew | #F0FFF0 |
-| hotpink | #FF69B4 |
-| indianred | #CD5C5C |
-| indigo | #4B0082 |
-| ivory | #FFFFF0 |
-| khaki | #F0E68C |
-| lavender | #E6E6FA |
-| lavenderblush | #FFF0F5 |
-| lawngreen | #7CFC00 |
-| lemonchiffon | #FFFACD |
-| lightblue | #ADD8E6 |
-| lightcoral | #F08080 |
-| lightcyan | #E0FFFF |
-| lightgoldenrodyellow | #FAFAD2 |
-| lightgray | #D3D3D3 |
-| lightgreen | #90EE90 |
-| lightgrey | #D3D3D3 |
-| lightpink | #FFB6C1 |
-| lightsalmon | #FFA07A |
-| lightseagreen | #20B2AA |
-| lightskyblue | #87CEFA |
-| lightslategray | #778899 |
-| lightslategrey | #778899 |
-| lightsteelblue | #B0C4DE |
-| lightyellow | #FFFFE0 |
-| lime | #00FF00 |
-| limegreen | #32CD32 |
-| linen | #FAF0E6 |
-| magenta | #FF00FF |
-| maroon | #800000 |
-| mediumaquamarine | #66CDAA |
-| mediumblue | #0000CD |
-| mediumorchid | #BA55D3 |
-| mediumpurple | #9370DB |
-| mediumseagreen | #3CB371 |
-| mediumslateblue | #7B68EE |
-| mediumspringgreen | #00FA9A |
-| mediumturquoise | #48D1CC |
-| mediumvioletred | #C71585 |
-| midnightblue | #191970 |
-| mintcream | #F5FFFA |
-| mistyrose | #FFE4E1 |
-| moccasin | #FFE4B5 |
-| navajowhite | #FFDEAD |
-| navy | #000080 |
-| oldlace | #FDF5E6 |
-| olive | #808000 |
-| olivedrab | #6B8E23 |
-| orange | #FFA500 |
-| orangered | #FF4500 |
-| orchid | #DA70D6 |
-| palegoldenrod | #EEE8AA |
-| palegreen | #98FB98 |
-| paleturquoise | #AFEEEE |
-| palevioletred | #DB7093 |
-| papayawhip | #FFEFD5 |
-| peachpuff | #FFDAB9 |
-| peru | #CD853F |
-| pink | #FFC0CB |
-| plum | #DDA0DD |
-| powderblue | #B0E0E6 |
-| purple | #800080 |
-| red | #FF0000 |
-| rosybrown | #BC8F8F |
-| royalblue | #4169E1 |
-| saddlebrown | #8B4513 |
-| salmon | #FA8072 |
-| sandybrown | #F4A460 |
-| seagreen | #2E8B57 |
-| seashell | #FFF5EE |
-| sienna | #A0522D |
-| silver | #C0C0C0 |
-| skyblue | #87CEEB |
-| slateblue | #6A5ACD |
-| slategray | #708090 |
-| slategrey | #708090 |
-| snow | #FFFAFA |
-| springgreen | #00FF7F |
-| steelblue | #4682B4 |
-| tan | #D2B48C |
-| teal | #008080 |
-| thistle | #D8BFD8 |
-| tomato | #FF6347 |
-| turquoise | #40E0D0 |
-| violet | #EE82EE |
-| wheat | #F5DEB3 |
-| white | #FFFFFF |
-| whitesmoke | #F5F5F5 |
-| yellow | #FFFF00 |
-| yellowgreen | #9ACD32 |
-
http://git-wip-us.apache.org/repos/asf/incubator-weex-site/blob/32a097bf/source/references/common-event.md
----------------------------------------------------------------------
diff --git a/source/references/common-event.md b/source/references/common-event.md
deleted file mode 100644
index 6492fe3..0000000
--- a/source/references/common-event.md
+++ /dev/null
@@ -1,129 +0,0 @@
----
-title: Common Events
-type: references
-order: 5
-version: 2.1
-has_chapter_content: true
----
-
-# Common Events
-
-Weex provide the ability to let events trigger action, like starting a JavaScript when a user click on a component. Bellow are the common event attributes that can be added to weex components to define event actions.
-
-## Click event
-
-The onclick attribute fires on a click gesture on the element.
-**Notes: ** The `input` and `switch` component does not currently support the `click` event, please use `change` or `input` event instead.
-
-### event object
-
-- `type` : `click`
-- `target` : The target component where the event is triggered
-- `timestamp` : Timestamp when event is triggered
-
-## Longpress event
-
-If a `longpress` event is bound to a component, the event will be triggered when user long press on it.
-**Notes: ** The `input` and `switch` component does not currently support the `click` event, please use `change` or `input` event instead.
-
-### event object
-
-- `type` : `longpress`
-- `target` : The target component where the event is triggered
-- `timestamp` : Timestamp when event is triggered
-
-## Appear event
-
-If a appear event is bound to a component inside a scrollable container, the event will be triggered when the component comes to be visible.
-
-### event object
-
-- `type` : `appear`
-- `target` : The target component where the event is triggered
-- `timestamp` : Timestamp when event is triggered
-- `direction` : The direction in which the scroller is scrolling. Could be `up` or `down`.
-
-## Disappear event
-
-If a `disappear` event is bound to a component inside a scrollable container, the event will be triggered when the component scrolls out of viewport and disappears from your sight.
-
-### event object
-
-- `type` : `disappear`
-- `target` : The target component where the event is triggered
-- `timestamp` : Timestamp when event is triggered
-- `direction` : The direction in which the scroller is scrolling. Could be `up` or `down`.
-
-## Page event
-
-Weex provides you with simple management of page status, such as `viewappear` and `viewdisappear`.
-The `viewappear` event will be triggered when page is about to show or before any animations are configured for showing. For example, when calling `push` method in `navigator` module, this event will be trigged in new page.
-The `viewdisappear` event will be triggeded when page is about to dismiss.
-Different from `appear` and `disappear` of component, these two events focus on the status of whole page, so **they must be bound to the root component**.
-In addititon, these events also can be bound to body component which is not root actually such as `wxc-navpage`.
-
-### event object
-
-- `type` : `viewappear` or `viewdisappear`
-- `target` : The target component where the event is triggered
-- `timestamp` : Timestamp when event is triggered
-
-
-## Example
-
-```html
-<template>
- <div>
- <div class="box" @click="onclick" @longpress="onlongpress" @appear="onappear" @disappear="ondisappear"></div>
- </div>
-</template>
-
-<script>
- const modal = weex.requireModule('modal')
- export default {
- methods: {
- onclick (event) {
- console.log('onclick:', event)
- modal.toast({
- message: 'onclick',
- duration: 0.8
- })
- },
- onlongpress (event) {
- console.log('onlongpress:', event)
- modal.toast({
- message: 'onlongpress',
- duration: 0.8
- })
- },
- onappear (event) {
- console.log('onappear:', event)
- modal.toast({
- message: 'onappear',
- duration: 0.8
- })
- },
- ondisappear (event) {
- console.log('ondisappear:', event)
- modal.toast({
- message: 'ondisappear',
- duration: 0.8
- })
- }
- }
- }
-</script>
-
-<style scoped>
- .box {
- border-width: 2px;
- border-style: solid;
- border-color: #BBB;
- width: 250px;
- height: 250px;
- margin-top: 250px;
- margin-left: 250px;
- background-color: #EEE;
- }
-</style>
-```
\ No newline at end of file
http://git-wip-us.apache.org/repos/asf/incubator-weex-site/blob/32a097bf/source/references/common-style.md
----------------------------------------------------------------------
diff --git a/source/references/common-style.md b/source/references/common-style.md
deleted file mode 100644
index 359b0e0..0000000
--- a/source/references/common-style.md
+++ /dev/null
@@ -1,522 +0,0 @@
----
-title: Common Style
-type: references
-order: 1.5
-version: 2.1
----
-
-# Common Style
-
-All of weex tags share some common style rules
-
-## Box Model
-
-
-
-Weex box model based on the CSS box model, all of weex elements can be considered as boxes. The term "box model" is used when talking about design and layout. The box model is essentially a box that wraps around every HTML element. It consists of margins, borders, paddings, and the actual content.
-
-you can use the definition below in weex box model.
-
-- `width`: `length` type, default value `0`
-- `height`: `length` type, default value `0`
-- `padding`: `length` type, default value `0`, (space around content, between element content and the element border)
- - `padding-left`: `length` type, default value `0`
- - `padding-right`: `length` type, default value `0`
- - `padding-top`: `length` type, default value `0`
- - `padding-bottom`: `length` type, default value `0`
-- `margin`: `length` type, default value `0`, (space around elements, outside the border)
- - `margin-left`: `length` type, default value `0`
- - `margin-right`: `length` type, default value `0`
- - `margin-top`: `length` type, default value `0`
- - `margin-bottom`: `length` type, default value `0`
-- `border`
- - `border-style`: values `solid` | `dashed` | `dotted`, default value `solid`
- - `border-left-style`: values `solid` | `dashed` | `dotted`, default value `solid`
- - `border-top-style`: values `solid` | `dashed` | `dotted`, default value `solid`
- - `border-right-style`: values `solid` | `dashed` | `dotted`, default value `solid`
- - `border-bottom-style`: values `solid` | `dashed` | `dotted`, default value `solid`
- - `border-width`: `length` type, non-negative, default value `0`
- - `border-left-width`: `length` type, non-negative, default value `0`
- - `border-top-width`: `length` type, non-negative, default value `0`
- - `border-right-width`: `length` type, non-negative, default value `0`
- - `border-bottom-width`: `length` type, non-negative, default value `0`
- - `border-color`: `color` type, default value `#000000`
- - `border-left-color`: `color` type, default value `#000000`
- - `border-top-color`: `color` type, default value `#000000`
- - `border-right-color`: `color` type, default value `#000000`
- - `border-bottom-color`: `color` type, default value `#000000`
- - `border-radius`: `length` type, default value `0`, (rounded borders to elements , default value is 0 meaning right angle )
- - `border-bottom-left-radius`: `length` type, non-negative, default value `0`
- - `border-bottom-right-radius`: `length` type, non-negative, default value `0`
- - `border-top-left-radius`: `length` type, non-negative, default value `0`
- - `border-top-right-radius`: `length` type, non-negative, default value `0`
-
-### Notes
-Weex box model uses `border-box` as the default value of `box-sizing`, meaning the width and height properties includes content, padding and border, but not the margin.
-
-The rule of border-radius for a specific corner such as `border-top-left-radius` is not currently supported for component `<image>`in iOS. This only happens to iOS, it works fine on Android.
-
-Although `overflow:hidden` is default on android, a view **will not** clip its children according to `border-radius` unless all the following condtions met. This only happens on Android, it works fine on iOS.
-* The view type is `div`, `a`, `cell`, `refresh` or `loading`.
-* OS version is Android 4.3 or higher.
-* OS version is **not** Andorid 7.0
-* A view **does not** have `background-image` property nor OS version is Android 5.0 or higher.
-
-### Example
-
-```html
-<template>
- <div>
- <image src="..." style="width: 400; height: 200; margin-left: 20;"></image>
- </div>
-</template>
-```
-
-## Flexbox
-
-Weex box style model based on the CSS flexbox, ensures that elements behave predictably and the page layout can accommodates to different screen sizes and different display devices.
-
-Flexbox consists of flex containers and flex items. If a weex element can containing other elements, it is a flex container.
-
-Notice that the old version of flexbox specification has differences with the new ones, such as whether or not to support wrapping. This is described at w3c's working drafts, and you should notice the differences among them. Also notice that the old version is only supported below the 4.4 version of android.
-
-### Flex container
-
-Flexbox is the default and only style model in Weex, so you don't have to add `display: flex;` in a container.
-
-- `flex-direction`: values `row` | `column`, default value `column`
-
-The flex-direction property specifies the direction of the flexible items inside the flex container. Default value is `column` (top-to-bottom).
-
-- `justify-content`: values `flex-start` | `flex-end` | `center` | `space-between`, default value `flex-start`
-
-The justify-content property horizontally aligns the flexible container's items when the items do not use all available space on the main-axis. Default value is `flex-start` meaning the flex items are positioned at the beginning of the container. `flex-end` means the items are positioned at the end of the container. `center` means the items are positioned at the center of the container. `space-between` means the items are positioned with space between the lines.
-
-
-
-- `align-items`: values `stretch` | `flex-start` | `center` | `flex-end`, default value `stretch`
-
-The align-items property vertically aligns the flexible container's items when the items do not use all available space on the cross-axis. Default value is `stretch` meaning the items are stretched to fit the container. `flex-start` means the items are positioned at the top of the container; `flex-end` means the items are positioned at the bottom of the container; `center` means items are positioned at the center of the container (vertically).
-
-
-
-### Flex item
-
-- `flex`: `number` type, default value `0`
-
-the flex property specifies the length of the flex item, relative to the rest of the flex items inside the same container. If all of the flex items set `flex: 1`, they will have equal width or height on direction of flex container's `flex-direction`. If there are two flex items, with one setting `flex: 1`, and the other setting `flex: 2`, the first one will take 1/3 container space, and the second one will take 2/3 container space. If all of flex items don't set `flex`, they will be aligned depending on the container's `justify-content` property.
-
-
-## Examples
-
-a list of images with equal scales align at the vertical axis:
-
-```html
-<template>
- <div style="width: 300; height: 100;">
- <image src="..." style="flex: 1;"></image>
- <image src="..." style="flex: 1;"></image>
- <image src="..." style="flex: 1;"></image>
- </div>
-</template>
-```
-
-a image with fixed width aligns with a stretched text:
-
-```html
-<template>
- <div style="width: 300; height: 100;">
- <image src="..." style="width: 100; height: 100;"></image>
- <text style="flex: 1;">...</text>
- </div>
-</template>
-```
-
-mixed direction alignment:
-
-```html
-<template>
- <div style="width: 100;">
- <image src="..." style="width: 100; height: 100;"></image>
- <div style="flex-direction: row;">
- <text style="flex: 2; font-size: 32;">title</text>
- <text style="flex: 1; font-size: 16;">$100</text>
- </div>
- </div>
-</template>
-```
-
-one text align left , the other float right:
-
-
-
-```html
-<template>
-<div style="flex-direction: row; justify-content: space-between;">
- <text>WEEX</text>
- <text>2016-05-08</text>
-</div>
-</template>
-```
-
-## Position
-
-we can use properties below to control placement of weex tag
-
-- `position`: values `relative` | `absolute` | `fixed` | `sticky`, default value `relative`
-
-`relative` means the item is positioned relative to its normal position. `absolute` means the item is positioned relative to its container. `fixed` keeps the elements position fixed when the page is scrolling. `sticky` keeps elements positioned inside the viewport as "stuck" at the top or "relative" at its original place depending on whether does it about to scroll out of the view.
-
-- `top`: `number` type, default value `0`, upward offset value
-- `bottom`: `number` type, default value `0`, downward offset value
-- `left`: `number` type, default value `0`, leftward offset value
-- `right`: `number` type, default value `0`, rightward offset value
-
-### Examples
-
-```html
-<template>
- <div style="flex-direction: column;">
- <div style="height: 3000;">
- <image src="..." style="top: 50px; left: 50px;"></image>
- </div>
- <div style="height: 3000;">
- <image src="..." style="position: sticky;"></image>
- </div>
- <div style="height: 3000;">
- <image src="..." style="position: absolute; top: 50px; left: 50px;"></image>
- </div>
- </div>
-</template>
-```
-
-## transform
-
-The CSS **transform** property lets you modify the coordinate space of the CSS visual formatting model. Using it, elements can be translated, rotated and scaled.
-
-Currently supported format:
-
-* translate( <number/percentage> [, <number/percentage>]?)
-* translateX( <number/percentage> )
-* translateY( <number/percentage> )
-* scale( <number>)
-* scaleX( <number> )
-* scaleY( <number> )
-* rotate( <angle/degree> )
-* rotateX( <angle/degree> ) <span class="api-version">v0.14+</span>
-* rotateY( <angle/degree> ) <span class="api-version">v0.14+</span>
-* perspective( <number> ), supported for Android 4.1 and above. <span class="api-version">v0.16+</span>
-* transform-origin: number/percentage/keyword(top/left/right/bottom)
-
-### Example
-
-```HTML
-<template>
- <div class="wrapper">
- <div class="transform">
- <text class="title">Transformed element</text>
- </div>
- </div>
-</template>
-
-<style>
- .transform {
- align-items: center;
- transform: translate(150px,200px) rotate(20deg);
- transform-origin: 0 -250px;
- border-color:red;
- border-width:2px;
- }
- .title {font-size: 48px;}
-</style>
-```
-
-## transition <span class="api-version">v0.16.0+</span>
-
-Now you can use the transition attribute in CSS to enhance the interactivity and visual experience of your application. The transition includes the layout animation, that is, LayoutAnimation, which now changes the layout and uses the fluent animation of the transition. Transition allows the CSS attribute values to transition smoothly over a certain time interval.
-
-### Property
-
-- ``transition-property``:Allows the name of the transitional animation to set the value of the different styles transition effect, the default value is empty, that does not perform any transition, the following table lists all the legitimate parameters of the property:
-
-| Property | Description |
-| --------------- | ---------------------------------------- |
-| width | The transition is performed when the width of the component is involved in the animation |
-| height | The transition is performed when the height of the component is involved in the animation |
-| top | The transition is performed when the top of the component is involved in the animation |
-| bottom | The transition is performed when the bottom of the component is involved in the animation |
-| left | The transition is performed when the left of the component is involved in the animation |
-| right | The transition is performed when the right of the component is involved in the animation |
-| backgroundColor | The transition is performed when the backgroundColor of the component is involved in the animation |
-| opacity | The transition is performed when the opacity of the component is involved in the animation |
-| transform | The transition is performed when the transform of the component is involved in the animation |
-
-- ``transition-duration``:Specifies the duration of the transition transition (in milliseconds). The default value is 0, indicating that there is no animation.
-
-- ``transition-delay``:Specifies the time interval (in milliseconds or seconds) between the request transition transition and the transition transition. The default value is 0, indicating that there is no delay, and the transition transition is performed immediately after the request.
-
-- ``transition-timing-function``:Describes the velocity curve of the transition transition, which is used to make the transition transition smoother. The default is ease. The following table lists all the valid attributes:
-
-| Property | Description |
-| ------------------------------ | ---------------------------------------- |
-| ease | The transition gradually slow down the transition effect |
-| ease-in | The transition starts slowly and then becomes faster for the transition effect |
-| ease-out | The transition starts quickly and then slows the transition effect |
-| ease-in-out | The transition starts slowly, then goes fast and then slowly ends the transition effect |
-| linear | The transition changes at constant speed |
-| cubic-bezier(x1, y1, x2, y2) | Using the custom transition in the third-order Bessel function, the parameter values of the function must be between 0 and 1. For more information on three times Bessel, see [cubic-bezier](http://cubic-bezier.com/) and [Bézier curve](https://en.wikipedia.org/wiki/B%C3%A9zier_curve). |
-
-### Example
-
-```html
-<style scoped>
- .panel {
- margin: 10px;
- top:10px;
- align-items: center;
- justify-content: center;
- border: solid;
- border-radius: 10px;
-
- transition-property: width,height,backgroundColor;
- transition-duration: 0.3s;
- transition-delay: 0s;
- transition-timing-function: cubic-bezier(0.25, 0.1, 0.25, 1.0);
- }
-</style>
-```
-
-
-
-## Pseudo class <span class="api-version">v0.9.5+</span>
-
-Weex support four pseudo-classes: `active`, `focus`, `disabled`, `enabled`
-
-All components support `active`, but only the input component and the textarea component support `focus`, `enabled`, `diabled`.
-
-### Rule
-
-- the high priority override low priority when rules take effect at the same time
-
- - such as: "input:active:enabled" will override "input:active"
-
-- the interconnection rule as follow
-
- 
-
-### Example
-
-```html
-<template>
- <div class="wrapper">
- <image :src="logoUrl" class="logo"></image>
- </div>
-</template>
-
-<style scoped>
- .wrapper {
- align-items: center;
- margin-top: 120px;
- }
- .title {
- font-size: 48px;
- }
- .logo {
- width: 360px;
- height: 82px;
- background-color: red;
- }
- .logo:active {
- width: 180px;
- height: 82px;
- background-color: green;
- }
-</style>
-
-<script>
- export default {
- props: {
- logoUrl: {
- default: 'https://alibaba.github.io/weex/img/weex_logo_blue@3x.png'
- },
- target: {
- default: 'World'
- }
- },
- methods: {
- update (e) {
- this.target = 'Weex';
- }
- }
- };
-</script>
-```
-
-[Try it](http://dotwe.org/vue/df2c8f254620d6d30d0906ee75fe5b99)
-
-## linear-gradient <span class="api-version">v0.10+</span>
-
-Weex support linear-gradient background, You can see [W3C description of the gradient](https://developer.mozilla.org/en-US/docs/Web/CSS/CSS_Images/Using_CSS_gradients).
-
-### Supported components
-
-All components in Weex support gradients
-
-### Usage
-
-You can use linear gradient by `background-image` property.
-
-```css
-background-image: linear-gradient(to top,#a80077,#66ff00);
-```
-
-`radial-gradient` is not currently supported, do not use it.
-
-Weex currently supports two color gradients. The direction of the gradient is as follows:
-
-* to right
- From left to right
-* to left
- From right to left
-* to bottom
- From top to bottom
-* to top
- From bottom to top
-* to bottom right
- From the upper left corner to the lower right corner
-* to top left
- From the lower right corner to the upper left corner
-
-### Note
-
-- `background-image` and `background-color` are set at the same time, `background-image` precedes `background-color`.
-- Do not use shorthand property such as `background`.
-
-### Example
-
-```html
-<template>
- <scroller style="background-color: #3a3a3a">
- <div class="container1" style="background-image:linear-gradient(to right,#a80077,#66ff00);">
- <text class="direction">to right</text>
- </div>
- <div class="container1" style="background-image:linear-gradient(to left,#a80077,#66ff00);">
- <text class="direction">to left</text>
- </div>
- <div class="container1" style="background-image:linear-gradient(to bottom,#a80077,#66ff00);">
- <text class="direction">to bottom</text>
- </div>
- <div class="container1" style="background-image:linear-gradient(to top,#a80077,#66ff00);">
- <text class="direction">to top</text>
- </div>
- <div style="flex-direction: row;align-items: center;justify-content: center">
- <div class="container2" style="background-image:linear-gradient(to bottom right,#a80077,#66ff00);">
- <text class="direction">to bottom right</text>
- </div>
- <div class="container2" style="background-image:linear-gradient(to top left,#a80077,#66ff00);">
- <text class="direction">to top left</text>
- </div>
- </div>
- </scroller>
-</template>
-<style>
- .container1 {
- margin: 10px;
- width: 730px;
- height: 200px;
- align-items: center;
- justify-content: center;
- border: solid;
- border-radius: 10px;
- }
-
- .container2 {
- margin: 10px;
- width: 300px;
- height: 300px;
- align-items: center;
- justify-content: center;
- border: solid;
- border-radius: 10px;
- }
-
- .direction {
- font-size: 40px;
- color: white;
- }
-</style>
-```
-
-## box-shadow <span class="api-version">v0.11+</span>
-
-Weex supports box-shadow in iOS: `inset`,`offset-x`,`offset-y`, `blur-radius`,`color`
-
-
-### Note
-
-- box-shadow takes effect in iOS
-
-### Example
-
-```html
-<template>
- <div class="wrapper">
- <div style="width:400px; height:60px;background-color: #FFE4C4; box-shadow:20px 10px rgb(255, 69, 0);">
- <text class="title" style="text-align: center">Hello {{target}}</text>
- </div>
- <div style="margin-top: 80px;width:400px; height:60px;background-color: #FFE4C4; box-shadow: 20px 10px 5px rgba(255, 69, 0, 0.8);">
- <text class="title" style="text-align: center">Hello {{target}}</text>
- </div>
- <div style="margin-top: 80px;width:400px; height:60px;background-color: #FFE4C4; box-shadow:inset 20px 10px 5px rgba(255, 69, 0, 0.8);">
- <text class="title" style="text-align: center">Hello {{target}}</text>
- </div>
- <div style="margin-top: 80px;width:400px; height:60px;background-color: #FFE4C4; box-shadow:inset 20px 10px 5px rgb(255, 69, 0);">
- <text class="title" style="text-align: center">Hello {{target}}</text>
- </div>
- <div style="margin-top: 80px;width:400px; height:60px;background-color: #FFE4C4; box-shadow:20px 10px 5px black;">
- <text class="title" style="text-align: center">Hello {{target}}</text>
- </div>
- <div style="margin-top: 80px;width:400px; height:60px;background-color: #FFE4C4; box-shadow:20px 10px 5px #008B00;">
- <text class="title" style="text-align: center">Hello {{target}}</text>
- </div>
- </div>
-</template>
-
-<style scoped>
- .wrapper {align-items: center; margin-top: 120px;}
- .title {font-size: 48px;}
-</style>
-
-<script>
- module.exports = {
- data: function () {
- return {
- logoUrl: 'https://alibaba.github.io/weex/img/weex_logo_blue@3x.png',
- target: 'World'
- };
- }
- };
-</script>
-```
-
-
-## Other Common Style
-
-- `opacity`
-- `background-color`
-
-## Type of Style Value
-
-- `length` type
-- `number` type
-- `color` type (*[The list of color keywords.](./color-names.html)*)
-- enumerated type
-
-## Simple Step
-
-These up-to-down steps may help you to plan the whole style of weex pages.
-
-1. overall style: divide the whole page to different parts
-2. flex alignment: align boxes in every part of page
-3. position box: place box, set offset
-4. element specific style: set styles for certain element if needed
http://git-wip-us.apache.org/repos/asf/incubator-weex-site/blob/32a097bf/source/references/components/a.md
----------------------------------------------------------------------
diff --git a/source/references/components/a.md b/source/references/components/a.md
index ae436bb..ac19ccd 100644
--- a/source/references/components/a.md
+++ b/source/references/components/a.md
@@ -1,7 +1,8 @@
---
title: <a>
type: references
-order: 2.1
+group: Build-in Components
+order: 8.04
version: 2.1
---
http://git-wip-us.apache.org/repos/asf/incubator-weex-site/blob/32a097bf/source/references/components/cell.md
----------------------------------------------------------------------
diff --git a/source/references/components/cell.md b/source/references/components/cell.md
index a018c00..6b33fda 100644
--- a/source/references/components/cell.md
+++ b/source/references/components/cell.md
@@ -1,7 +1,8 @@
---
title: <cell>
type: references
-order: 2.6
+group: Build-in Components
+order: 8.07
version: 2.1
---
http://git-wip-us.apache.org/repos/asf/incubator-weex-site/blob/32a097bf/source/references/components/div.md
----------------------------------------------------------------------
diff --git a/source/references/components/div.md b/source/references/components/div.md
index 1bcc162..0191750 100644
--- a/source/references/components/div.md
+++ b/source/references/components/div.md
@@ -1,7 +1,8 @@
---
title: <div>
type: references
-order: 2.2
+group: Build-in Components
+order: 8.01
version: 2.1
---
http://git-wip-us.apache.org/repos/asf/incubator-weex-site/blob/32a097bf/source/references/components/image.md
----------------------------------------------------------------------
diff --git a/source/references/components/image.md b/source/references/components/image.md
index d0f2520..717b161 100644
--- a/source/references/components/image.md
+++ b/source/references/components/image.md
@@ -1,7 +1,8 @@
---
title: <image>
type: references
-order: 2.3
+group: Build-in Components
+order: 8.02
version: 2.1
---
@@ -41,8 +42,8 @@ This component supports no child components.
**common events**: check out the [common events](../common-event.html)
- support `click` event. Check out [common events](../common-event.html)
-- support `appear` / `disappear` event. Check out [common events](../common-event.html)
-- `load`<sup class="api-version">v0.8+</sup> event. The `load` event fires on an image has been loaded. Only Android and iOS are supported currently. [example](http://dotwe.org/vue/e291159ac60b35dcd4994638a78d54ad)
+- support `appear` / `disappear` event. Check out [common events](../common-event.html)
+- `load`<sup class="api-version">v0.8+</sup> event. The `load` event fires on an image has been loaded. Only Android and iOS are supported currently. [example](http://dotwe.org/vue/e291159ac60b35dcd4994638a78d54ad)
- event object
- `success` : `true` if the image was loaded successfully, otherwise `false`
- `size` : the original size of image, contains two parameters: `naturalWidth` representing the original width of image in pixels, `naturalHeight` representing the original height of image in pixels. default value. The default value for both parameters is `0`.
@@ -50,12 +51,12 @@ This component supports no child components.
**component method**
- support save <sup class="api-version">v0.16.0+</sup> image to local device or photo album.
- - you should specify a callback function to receive the saving result.
+ - you should specify a callback function to receive the saving result.
```
var image = this.$refs.imageRef; // image 是之前已经定义过的ref
image.save(function(result) {
console.log(JSON.stringify(result))
- });
+ });
```
and the result can be the following format
```
@@ -123,4 +124,4 @@ This component supports no child components.
</style>
```
-[try it](http://dotwe.org/vue/e2122bc245beafb0348d79bfd1274904)
\ No newline at end of file
+[try it](http://dotwe.org/vue/e2122bc245beafb0348d79bfd1274904)
http://git-wip-us.apache.org/repos/asf/incubator-weex-site/blob/32a097bf/source/references/components/index.md
----------------------------------------------------------------------
diff --git a/source/references/components/index.md b/source/references/components/index.md
deleted file mode 100644
index dd9162e..0000000
--- a/source/references/components/index.md
+++ /dev/null
@@ -1,24 +0,0 @@
----
-title: Build-in Components
-type: references
-order: 2
-version: 2.1
----
-
-# Build-in Components
-
-- [<a>](./a.html)
-- [<indicator>](./indicator.html)
-- [<switch>](./switch.html)
-- [<text>](./text.html)
-- [<textarea>](./textarea.html)
-- [<video>](./video.html)
-- [<web>](./web.html)
-- [<div>](./div.html)
-- [<image>](./image.html)
-- [<input>](./input.html)
-- [<list>](./list.html)
-- [<cell>](./cell.html)
-- [<refresh> & <loading>](./refresh.html)
-- [<scroller>](./scroller.html)
-- [<slider>](./slider.html)
\ No newline at end of file
http://git-wip-us.apache.org/repos/asf/incubator-weex-site/blob/32a097bf/source/references/components/indicator.md
----------------------------------------------------------------------
diff --git a/source/references/components/indicator.md b/source/references/components/indicator.md
index 29f4454..63cf272 100644
--- a/source/references/components/indicator.md
+++ b/source/references/components/indicator.md
@@ -1,7 +1,8 @@
---
title: <indicator>
type: references
-order: 2.10
+group: Build-in Components
+order: 8.14
version: 2.1
---
@@ -118,4 +119,4 @@ There is no specific attribute for this component.
</script>
```
-[try it](http://dotwe.org/vue/d2a654c4b75f1b4d80336c8a5fe133b9)
\ No newline at end of file
+[try it](http://dotwe.org/vue/d2a654c4b75f1b4d80336c8a5fe133b9)
http://git-wip-us.apache.org/repos/asf/incubator-weex-site/blob/32a097bf/source/references/components/input.md
----------------------------------------------------------------------
diff --git a/source/references/components/input.md b/source/references/components/input.md
index fdd4d0a..c3d9967 100644
--- a/source/references/components/input.md
+++ b/source/references/components/input.md
@@ -1,7 +1,8 @@
---
title: <input>
type: references
-order: 2.4
+group: Build-in Components
+order: 8.10
version: 2.1
---
[22/51] [abbrv] incubator-weex-site git commit: rearrangement the
structure of the document
Posted by ha...@apache.org.
http://git-wip-us.apache.org/repos/asf/incubator-weex-site/blob/32a097bf/_draft/v1.0/references/common-attrs.md
----------------------------------------------------------------------
diff --git a/_draft/v1.0/references/common-attrs.md b/_draft/v1.0/references/common-attrs.md
new file mode 100644
index 0000000..8ac1c0f
--- /dev/null
+++ b/_draft/v1.0/references/common-attrs.md
@@ -0,0 +1,166 @@
+---
+title: 通用特性
+type: references
+order: 1.5
+version: 0.10
+---
+
+# 通用特性
+
+特性(attribute)与 HTML 中元素特性类似,提供了与 Weex 元素有关的其他附加信息。所有的元素都可以拥有特性, 特性总是在 Weex 元素的起始标签中定义,并总是以键值对的形式出现,例如:`name="value"`。可以使用 [Mustache](https://mustache.github.io/) 对特性值进行数据绑定。
+
+**Notes!**
+
+Weex 遵循 [HTML attribute](https://en.wikipedia.org/wiki/HTML_attribute) 命名规范, 所以请 **不要在特性中使用驼峰风格(CamelCase)** , 使用`-`连接符的**羊肉串风格(kebab-case)** 才是更好的命名方式。
+
+所有 Weex 元素都拥有以下特性:
+
+## id
+
+为 `<template>` 内定义的元素指定一个唯一的 id,通过 `this.$el(id)` 可以容易地获取一个 Weex 元素的引用。更多信息可参考 [Instance APIs](./api.html)
+
+```html
+<template>
+ <div id="wrapper">
+ <list class="list">
+ <cell class="row" repeat="item in rows" id="item-{{$index}}">
+ <text class="item-title">row {{item.id}}</text>
+ </cell>
+ </list>
+ </div>
+</template>
+<style></style>
+
+<script>
+module.exports = {
+ data: {
+ rows:[
+ {id: 1},
+ {id: 2},
+ {id: 3},
+ {id: 4},
+ {id: 5}
+ ]
+ }
+}
+</script>
+```
+
+[体验一下](http://dotwe.org/b5032fa96e3e657711916148b1978ad3)
+
+## style
+
+为元素定义行内样式。
+
+```html
+<div style="width: 200px; height: 200px; color: #ff0000;"></div>
+<div style="padding: {{x}}; margin: 0"></div>
+```
+
+## class
+
+为元素定义一个或多个类名(引用样式表中的类)。
+
+```html
+<div class="button"></div>
+<div class="button {{btnStatus}}"></div>
+```
+
+## repeat
+
+我们可以通过 `repeat` 特性根据一个数组进行渲染,迭代地生成当前标签的内容。`repeat` 特性有着 `item in items` 形式的特殊语法,其中,`items` 是数组数据,`item` 是数组元素迭代的别名。
+
+```html
+<template>
+ <div>
+ <list class="list">
+ <cell class="row" repeat="item in rows" id="item-{{$index}}">
+ <text class="item-title">row {{item.id}}</text>
+ </cell>
+ </list>
+ </div>
+</template>
+
+<style></style>
+
+<script>
+module.exports = {
+ data: {
+ rows:[
+ {id: 1},
+ {id: 2},
+ {id: 3},
+ {id: 4},
+ {id: 5}
+ ]
+ }
+}
+</script>
+```
+
+[体验一下](http://dotwe.org/b5032fa96e3e657711916148b1978ad3)
+
+## if
+
+提供一个布尔值来决定是否显示当前标签。当值为 `true` 时,元素显示,为 `false` 时元素隐藏。
+
+```html
+<div if="true"></div>
+<div if="{{opened}}"></div>
+<div if="{{direction === 'row'}}"></div>
+```
+
+## append
+
+append 特性用于控制渲染次序。它的可选值为 `tree` 或 `node`,默认为 `tree`,不支持数据绑定。不同的值会执行不同的渲染过程:
+
+- `append="tree"` 是一次性渲染整个节点树,渲染更高效,但是如果页面太大容易造成较长时间的白屏。
+- `append="node"` 所有节点逐个渲染,整体渲染速度略慢,但是用户体验好一些。
+
+通过 `node` 和 `tree` 可以精细化地控制页面展示的逻辑和颗粒度,一般比较好的实践为首屏以内按 `tree` 解析,首屏以外按 `node` 解析。
+
+```html
+<div append="tree"></div>
+<div append="node"></div>
+```
+
+## 事件处理 (on...)
+
+在 Weex 标签上注册事件处理器。以 `on` 加 事件名为 `key`,事件处理函数为 `value`。
+
+```html
+<template>
+ <div class="btn" onClick="alertMsg"><text>Click me</text></div>
+</template>
+
+<style>
+.btn {
+ justify-content: center;
+ align-items: center;
+ width: 200;
+ height: 100;
+ background-color: #ff0000;
+ border-radius: 5;
+ color: #ffffff;
+}
+</style>
+
+<script>
+var modal = require('@weex-module/modal')
+
+module.exports = {
+ data: {},
+ methods: {
+ alertMsg: function (e) {
+ modal.alert({
+ message: 'click',
+ okTitle: 'alert'
+ }, function() {
+ })
+ }
+ }
+}
+</script>
+```
+
+[体验一下](http://dotwe.org/97de59d24d7667aa91187d59123d24a6)
http://git-wip-us.apache.org/repos/asf/incubator-weex-site/blob/32a097bf/_draft/v1.0/references/common-event.md
----------------------------------------------------------------------
diff --git a/_draft/v1.0/references/common-event.md b/_draft/v1.0/references/common-event.md
new file mode 100644
index 0000000..2554fe1
--- /dev/null
+++ b/_draft/v1.0/references/common-event.md
@@ -0,0 +1,492 @@
+---
+title: 通用事件
+type: references
+order: 1.10
+version: 0.10
+---
+
+# 通用事件
+
+Weex 提供了通过事件触发动作的能力,例如在用户点击组件时执行 JavaScript。下面列出了可被添加到 Weex 组件上以定义事件动作的属性:
+
+## `click`
+
+当组件上发生点击手势时被触发。
+
+**注意:**
+
+`<input>` 和 `<switch>` 组件目前不支持 `click` 事件,请使用 `change` 或 `input` 事件来代替。
+
+### 事件对象
+
+- `type`: `click`
+- `target`: 触发点击事件的目标组件
+- `timestamp`: 触发点击事件时的时间戳
+
+### 示例
+
+点击按钮,将弹出弹框,再点击弹框 `×`,关闭弹框。
+
+```html
+<template>
+ <div>
+ <div>
+ <text class="btn" onclick="openDialog">Show Dialog</text>
+ </div>
+
+ <div id="dialog" class="dialog" if="{{isShowDialog}}">
+ <div class="dialog-backdrop"></div>
+ <div class="dialog-content">
+ <div class="dialog-header">
+ <text class="dialog-title">{{dialogTitle}}</text>
+ <text class="close" onclick="closeDialog">×</text>
+ </div>
+ <div class="dialog-body">
+ <text>{{dialogBody}}</text>
+ </div>
+ </div>
+ </div>
+ </div>
+</template>
+
+<style>
+.dialog-backdrop {
+ opacity: .5;
+ position: absolute;
+ top: 0;
+ right: 0;
+ bottom: 0;
+ left: 0;
+ background-color: #000000;
+}
+.dialog {
+ position: fixed;
+ top: 0;
+ right: 0;
+ bottom: 0;
+ left: 0;
+ justify-content: center;
+ align-items: center;
+}
+.dialog-content {
+ width: 450;
+ background-color: #ffffff;
+}
+.dialog-header {
+ padding: 20;
+ border-bottom-width: 1;
+ border-bottom-style: solid;
+ border-bottom-color: #efefef;
+}
+.dialog-body {
+ padding: 20;
+}
+.close {
+ font-size: 50;
+ position: absolute;
+ right: 10;
+ top: 10;
+}
+.btn {
+ text-align: center;
+ color: #ffffff;
+ padding: 12;
+ background-color: #3071a9;
+ border-color: #285e8e;
+ border-radius: 4;
+}
+</style>
+
+<script>
+ module.exports = {
+ data: {
+ isShowDialog: false,
+ dialogTitle: 'HELLO',
+ dialogBody: 'Weex is best!'
+ },
+ methods: {
+ openDialog: function (e) {
+ this.isShowDialog = true
+ },
+ closeDialog: function (e) {
+ this.isShowDialog = false
+ }
+ }
+ }
+</script>
+```
+
+[体验一下](http://dotwe.org/6c1dd48b419e614f92581930f42fd366)
+
+## `longpress`
+
+如果一个组件被绑定了 `longpress` 事件,那么当用户长按这个组件时,该事件将会被触发。
+
+**注意:**
+
+`<input>` 和 `<switch>` 组件目前不支持 `click` 事件,请使用 `change` 或 `input` 事件来代替。
+
+### 事件对象
+- `type` : `longpress`
+- `target` : 触发长按事件的目标组件
+- `timestamp` : 长按事件触发时的时间戳
+
+### 示例
+
+长按按钮,变换背景色。
+
+```html
+<template>
+ <div style="width: 400; height: 200; background-color: {{bg}};
+ justify-content: center; align-items: center;" onlongpress="{{update}}">
+ <text style="font-size: 60">Press me</text>
+ </div>
+</template>
+
+<script>
+ module.exports = {
+ data: {
+ bg: '#FF0000'
+ },
+ methods: {
+ update: function () {
+ this.bg = this.bg === '#FF0000' ? '#00FF00' : '#FF0000'
+ }
+ }
+ }
+</script>
+```
+
+[体验一下](http://dotwe.org/14a646ea3d7d5e1de5baaca9061a48b3)
+
+## Appear 事件
+
+如果一个位于某个可滚动区域内的组件被绑定了 `appear` 事件,那么当这个组件的状态变为在屏幕上可见时,该事件将被触发。
+
+### 事件对象
+
+- `type` : `appear`
+- `target` : 触发 Appear 事件的组件对象
+- `timestamp` : 事件被触发时的时间戳
+- `direction` : 触发事件时屏幕的滚动方向,`up` 或 `down`
+
+### 示例
+
+当滚到最下方时,最后一个 `item` 出现,将会弹出弹框。
+
+```html
+<template>
+ <scroller onviewappear="{{viewappear}}" onviewdisappear="{{viewdisappear}}">
+ <div class="item">
+ <text>scroll 1</text>
+ </div>
+ <div class="item">
+ <text>scroll 2</text>
+ </div>
+ <div class="item">
+ <text>scroll 3</text>
+ </div>
+ <div class="item">
+ <text>scroll 4</text>
+ </div>
+ <div class="item">
+ <text>scroll 5</text>
+ </div>
+ <div class="item">
+ <text>scroll 6</text>
+ </div>
+ <div class="item">
+ <text>scroll 7</text>
+ </div>
+ <div class="item">
+ <text>scroll 8</text>
+ </div>
+ <div class="item">
+ <text>scroll 9</text>
+ </div>
+ <div class="item">
+ <text>scroll 10</text>
+ </div>
+ <div class="item" onappear="alertMsg" >
+ <text>I will alert a message when I appeared.</text>
+ </div>
+ </scroller>
+</template>
+
+<style>
+ .list {
+ height: 850;
+ }
+
+ .count {
+ font-size: 48;
+ margin: 10;
+ }
+
+ .indicator {
+ height: 40;
+ width: 40;
+ color: #45b5f0;
+ }
+
+ .row {
+ width: 750;
+ }
+
+ .item {
+ justify-content: center;
+ border-bottom-width: 2;
+ border-bottom-color: #c0c0c0;
+ height: 200;
+ padding: 20;
+ }
+</style>
+
+<script>
+ var modal = require('@weex-module/modal')
+ module.exports = {
+ data: {},
+ methods: {
+ alertMsg: function (e) {
+ modal.alert({
+ message: 'I am appeared.',
+ okTitle: 'Appear'
+ }, function() {
+ })
+ },
+ viewappear: function () {
+ nativeLog('>>>>>', 'viewappear')
+ },
+ viewdisappear: function () {
+ nativeLog('>>>>>', 'viewdisappear')
+ }
+ }
+ }
+</script>
+```
+
+[体验一下](http://dotwe.org/4d5335f086dfc9964caed5b1fe4b1aa7)
+
+## Disappear 事件
+
+如果一个位于某个可滚动区域内的组件被绑定了 `disappear` 事件,那么当这个组件被滑出屏幕变为不可见状态时,该事件将被触发。
+
+### 事件对象
+
+- `type` : `disappear`
+- `target` : 触发 Disappear 事件的组件对象
+- `timestamp` : 事件被触发时的时间戳
+- `direction` : 触发事件时屏幕的滚动方向,`up` 或 `down`
+
+### 示例
+
+当向下滚动到第一个 `item` 消失后,将会弹出弹框。
+
+```html
+<template>
+ <scroller onviewappear="{{viewappear}}" onviewdisappear="{{viewdisappear}}">
+ <div class="item" ondisappear="alertMsg" >
+ <text>I will alert a message when I disappeared.</text>
+ </div>
+ <div class="item">
+ <text>scroll 1</text>
+ </div>
+ <div class="item">
+ <text>scroll 2</text>
+ </div>
+ <div class="item">
+ <text>scroll 3</text>
+ </div>
+ <div class="item">
+ <text>scroll 4</text>
+ </div>
+ <div class="item">
+ <text>scroll 5</text>
+ </div>
+ <div class="item">
+ <text>scroll 6</text>
+ </div>
+ <div class="item">
+ <text>scroll 7</text>
+ </div>
+ <div class="item">
+ <text>scroll 8</text>
+ </div>
+ <div class="item">
+ <text>scroll 9</text>
+ </div>
+ <div class="item">
+ <text>scroll 10</text>
+ </div>
+ </scroller>
+</template>
+
+<style>
+ .list {
+ height: 850;
+ }
+
+ .count {
+ font-size: 48;
+ margin: 10;
+ }
+
+ .indicator {
+ height: 40;
+ width: 40;
+ color: #45b5f0;
+ }
+
+ .row {
+ width: 750;
+ }
+
+ .item {
+ justify-content: center;
+ border-bottom-width: 2;
+ border-bottom-color: #c0c0c0;
+ height: 200;
+ padding: 20;
+ }
+</style>
+
+<script>
+ var modal = require('@weex-module/modal')
+ module.exports = {
+ data: {},
+ methods: {
+ alertMsg: function (e) {
+ modal.alert({
+ message: 'I am disappeared.',
+ okTitle: 'Disappear'
+ }, function() {
+ })
+ },
+ viewappear: function () {
+ nativeLog('>>>>>', 'viewappear')
+ },
+ viewdisappear: function () {
+ nativeLog('>>>>>', 'viewdisappear')
+ }
+ }
+ }
+</script>
+```
+
+[体验一下](http://dotwe.org/eefa176009207a429bbaf475f6ee92d1)
+
+## Page 事件
+
+*注意:仅支持 iOS 和 Android,H5 暂不支持。*
+
+Weex 通过 `viewappear` 和 `viewdisappear` 事件提供了简单的页面状态管理能力。
+
+`viewappear` 事件会在页面就要显示或配置的任何页面动画被执行前触发,例如,当调用 `navigator` 模块的 `push` 方法时,该事件将会在打开新页面时被触发。`viewdisappear` 事件会在页面就要关闭时被触发。
+
+与组件的 `appear` 和 `disappear` 事件不同的是,`viewappear` 和 `viewdisappear` 事件关注的是整个页面的状态,所以**它们必须绑定到页面的根元素上**。
+
+特殊情况下,这两个事件也能被绑定到非根元素的body组件上,例如`wxc-navpage`组件。
+
+### 事件对象
+
+- `type` : `viewappear` 或 `viewdisappear`
+- `target` : 触发事件的组件对象
+- `timestamp` : 事件被触发时的时间戳
+
+### 示例
+
+进出页面时,都会弹框提示。
+
+```html
+<template>
+ <scroller onviewappear="{{alertViewappearMsg}}" onviewdisappear="{{alertViewdisappearMsg}}">
+ <div class="item">
+ <text>scroll 1</text>
+ </div>
+ <div class="item">
+ <text>scroll 2</text>
+ </div>
+ <div class="item">
+ <text>scroll 3</text>
+ </div>
+ <div class="item">
+ <text>scroll 4</text>
+ </div>
+ <div class="item">
+ <text>scroll 5</text>
+ </div>
+ <div class="item">
+ <text>scroll 6</text>
+ </div>
+ <div class="item">
+ <text>scroll 7</text>
+ </div>
+ <div class="item">
+ <text>scroll 8</text>
+ </div>
+ <div class="item">
+ <text>scroll 9</text>
+ </div>
+ <div class="item">
+ <text>scroll 10</text>
+ </div>
+ <div class="item" onappear="alertMsg" >
+ <text>scroll 11</text>
+ </div>
+ </scroller>
+</template>
+
+<style>
+ .list {
+ height: 850;
+ }
+
+ .count {
+ font-size: 48;
+ margin: 10;
+ }
+
+ .indicator {
+ height: 40;
+ width: 40;
+ color: #45b5f0;
+ }
+
+ .row {
+ width: 750;
+ }
+
+ .item {
+ justify-content: center;
+ border-bottom-width: 2;
+ border-bottom-color: #c0c0c0;
+ height: 200;
+ padding: 20;
+ }
+</style>
+
+<script>
+ var modal = require('@weex-module/modal')
+ module.exports = {
+ data: {},
+ methods: {
+ alertViewappearMsg: function () {
+ modal.alert({
+ message: 'viewappear.',
+ okTitle: 'viewappear'
+ }, function() {
+ })
+ },
+ alertViewdisappearMsg: function () {
+ modal.alert({
+ message: 'viewdisappear.',
+ okTitle: 'viewdisappear'
+ }, function() {
+ })
+ }
+ }
+ }
+</script>
+```
+
+[体验一下](http://dotwe.org/450205a8f8612381422220ce88a562ff)
http://git-wip-us.apache.org/repos/asf/incubator-weex-site/blob/32a097bf/_draft/v1.0/references/common-style.md
----------------------------------------------------------------------
diff --git a/_draft/v1.0/references/common-style.md b/_draft/v1.0/references/common-style.md
new file mode 100644
index 0000000..8a585f2
--- /dev/null
+++ b/_draft/v1.0/references/common-style.md
@@ -0,0 +1,322 @@
+---
+title: 通用样式
+type: references
+order: 1.6
+version: 0.10
+---
+
+# 通用样式
+
+所有 Weex 组件都支持以下通用样式规则。
+
+## 盒模型
+
+
+
+Weex 盒模型基于 [CSS 盒模型](https://www.w3.org/TR/css3-box/),每个 Weex 元素都可视作一个盒子。我们一般在讨论设计或布局时,会提到「盒模型」这个概念。
+
+盒模型描述了一个元素所占用的空间。每一个盒子有四条边界:外边距边界 margin edge, 边框边界 border edge, 内边距边界 padding edge 与内容边界 content edge。这四层边界,形成一层层的盒子包裹起来,这就是盒模型大体上的含义。
+
+**注意:**
+Weex 对于长度值目前只支持*像素*值,单位可省略,不支持相对单位(`em`、`rem`)。
+
+- `width {length}`:,默认值 0
+- `height {length}`:,默认值 0
+- `padding {length}`:内边距,内容和边框之间的距离。默认值 0
+
+ 可有如下写法:
+
+ - `padding-left {length}`:,默认值 0
+ - `padding-right {length}`:,默认值 0
+ - `padding-top {length}`:,默认值 0
+ - `padding-bottom {length}`:,默认值 0
+- `margin`:
+
+ 外边距,元素和元素之间的空白距离。值类型为 length,默认值 0
+
+ 可有如下写法:
+
+ - `margin-left {length}`:,默认值 0
+ - `margin-right {length}`:,默认值 0
+ - `margin-top {length}`:,默认值 0
+ - `margin-bottom {length}`:,默认值 0
+- border:
+
+ 设定边框,`border` 目前不支持类似这样 `border: 1 solid #ff0000;` 的组合写法。
+
+ 可有如下写法:
+
+ - `border-style`:
+
+ 设定边框样式,值类型为 string,可选值为 `solid` | `dashed` | `dotted`,默认值 `solid`
+
+ 可有如下写法:
+
+ - `border-left-style {string}`:可选值为 `solid` | `dashed` | `dotted`,默认值 `solid`
+ - `border-top-style {string}`:可选值为 `solid` | `dashed` | `dotted`,默认值 `solid`
+ - `border-right-style {string}`:可选值为 `solid` | `dashed` | `dotted`,默认值 `solid`
+ - `border-bottom-style {string}`:可选值为 `solid` | `dashed` | `dotted`,默认值 `solid`
+
+ - `border-width {length}`:
+
+ 设定边框宽度,非负值, 默认值 0
+
+ 可有如下写法:
+
+ - `border-left-width {length}`:,非负值, 默认值 0
+ - `border-top-width {length}`:,非负值, 默认值 0
+ - `border-right-width {length}`:,非负值, 默认值 0
+ - `border-bottom-width {length}`:,非负值, 默认值 0
+
+ - `border-color {color}`:
+
+ 设定边框颜色,默认值 `#000000`
+
+ 可有如下写法:
+
+ - `border-left-color {color}`:,默认值 `#000000`
+ - `border-top-color {color}`:,默认值 `#000000`
+ - `border-right-color {color}`:,默认值 `#000000`
+ - `border-bottom-color {color}`:,默认值 `#000000`
+ - `border-radius {length}`:
+
+ 设定圆角,默认值 0
+
+ 可有如下写法:
+
+ - `border-bottom-left-radius {length}`:,非负值, 默认值 0
+ - `border-bottom-right-radius {length}`:,非负值, 默认值 0
+ - `border-top-left-radius {length}`:,非负值, 默认值 0
+ - `border-top-right-radius {length}`:,非负值, 默认值 0
+
+
+注意:目前在 `<image>` 和 `<text>` 组件上尚无法只定义一个或几个角的 `border-radius`。比如你无法在这两个组件上使用 `border-top-left-radius`。
+
+Weex 盒模型的 `box-sizing` 默认为 `border-box`,即盒子的宽高包含内容、内边距和边框的宽度,不包含外边距的宽度。
+
+### 示例:
+
+```html
+<template>
+ <div>
+ <image style="width: 400; height: 200; margin-left: 20;" src="https://g.alicdn.com/mtb/lab-zikuan/0.0.18/weex/weex_logo_blue@3x.png"></image>
+ </div>
+</template>
+```
+
+## Flexbox
+
+Weex 布局模型基于 CSS [`Flexbox`](http://www.w3.org/TR/css3-flexbox/),以便所有页面元素的排版能够一致可预测,同时页面布局能适应各种设备或者屏幕尺寸。
+
+Flexbox 包含 flex 容器和 flex 成员项。如果一个 Weex 元素可以容纳其他元素,那么它就成为 flex 容器。需要注意的是,flexbox 的老版规范相较新版有些出入,比如是否能支持 wrapping。这些都描述在 W3C 的工作草案中了,你需要注意下新老版本之间的不同。另外,老版本只在安卓 4.4 版以下得到支持。
+
+### Flex 容器
+
+在 Weex 中,Flexbox 是默认且唯一的布局模型,所以你不需要手动为元素添加 `display: flex;` 属性。
+
+- `flex-direction`:
+
+ 定义了 flex 容器中 flex 成员项的排列方向。可选值为 `row` | `column`,默认值为 `column`
+
+ - `column`:从上到下排列。
+ - `row`:从左到右排列。
+
+- `justify-content`:
+
+ 定义了 flex 容器中 flex 成员项在主轴方向上如何排列以处理空白部分。可选值为 `flex-start` | `flex-end` | `center` | `space-between`,默认值为 `flex-start`。
+
+ - `flex-start`:是默认值,所有的 flex 成员项都排列在容器的前部;
+ - `flex-end`:则意味着成员项排列在容器的后部;
+ - `center`:即中间对齐,成员项排列在容器中间、两边留白;
+ - `space-between`:表示两端对齐,空白均匀地填充到 flex 成员项之间。
+
+ 
+
+- `align-items`:
+
+ 定义了 flex 容器中 flex 成员项在纵轴方向上如何排列以处理空白部分。可选值为 `stretch` | `flex-start` | `center` | `flex-end`,默认值为 `stretch`。
+
+ - `stretch` 是默认值,即拉伸高度至 flex 容器的大小;
+ - `flex-start` 则是上对齐,所有的成员项排列在容器顶部;
+ - `flex-end` 是下对齐,所有的成员项排列在容器底部;
+ - `center` 是中间对齐,所有成员项都垂直地居中显示。
+
+ 
+
+### Flex 成员项
+
+flex 属性定义了 flex 成员项可以占用容器中剩余空间的大小。如果所有的成员项设置相同的值 `flex: 1`,它们将平均分配剩余空间. 如果一个成员项设置的值为 `flex: 2`,其它的成员项设置的值为 `flex: 1`,那么这个成员项所占用的剩余空间是其它成员项的2倍。
+
+- `flex {number}`:值为 number 类型。
+
+### 示例
+
+一个简单的网格布局。
+
+
+
+```html
+<template>
+ <div>
+ <div repeat="(i, v) in list" class="row">
+ <div repeat="(k, text) in v" class="item">
+ <div>
+ <text>{{text}}</text>
+ </div>
+ </div>
+ </div>
+ </div>
+</template>
+<style>
+ .item{
+ flex:1;
+ justify-content: center;
+ align-items:center;
+ border-width:1;
+ }
+ .row{
+ flex-direction: row;
+ height:80;
+ }
+</style>
+<script>
+ module.exports = {
+ data: function () {
+ return {
+ list:[
+ ['A', 'B', 'C'],
+ ['D', 'E', 'F'],
+ ['G', 'H', 'I']
+ ]
+ }
+ }
+ }
+</script>
+```
+
+[体验一下](http://dotwe.org/ee6a898fcac2242308c24fe5882c52ac)
+
+一个在相对于屏幕水平居中,全屏居中的 `<div>`。
+
+```html
+<template>
+ <div class="wrapper">
+ <div class="box">
+ </div>
+ </div>
+</template>
+
+<style>
+ .wrapper {
+ position: absolute;
+ top: 0;
+ right: 0;
+ bottom: 0;
+ left: 0;
+ background-color: #cccccc;
+ justify-content: center;
+ align-items: center;
+ }
+ .box {
+ width: 200;
+ height: 200;
+ background-color: #fc0000;
+ }
+</style>
+```
+
+[体验一下](http://dotwe.org/a76cd89b37c72d308ed576131830e877)
+
+## 定位
+
+Weex 支持 `position` 定位,用法与 CSS position 类似。为元素设置 `position` 后,可通过 `top`、`right`、`bottom`、`left` 四个属性设置元素坐标。
+
+- `position {string}`:
+
+ 设置定位类型。可选值为 `relative` | `absolute` | `fixed` | `sticky`,默认值为 `relative`。
+
+ - `relative` 是默认值,指的是相对定位;
+ - `absolute` 是绝对定位,以元素的容器作为参考系;
+ - `fixed` 保证元素在页面窗口中的对应位置显示;
+ - `sticky` 指的是仅当元素滚动到页面之外时,元素会固定在页面窗口的顶部。
+- `top {number}`:距离上方的偏移量,默认为 0。
+- `bottom {number}`:距离下方的偏移量,默认为 0。
+- `left {number}`:距离左方的偏移量,默认为 0。
+- `right {number}`:距离右方的偏移量,默认为 0。
+
+**注意:**
+
+1. Weex 目前不支持 `z-index` 设置元素层级关系,但靠后的元素层级更高,因此,对于层级高的元素,可将其排列在后面。
+2. 如果定位元素超过容器边界,在 Android 下,超出部分将**不可见**,原因在于 Android 端元素 `overflow` 默认值为 `hidden`,但目前 Android 暂不支持设置 `overflow: visible`。
+
+### 示例
+
+
+
+```html
+<template>
+ <div class="wrapper">
+ <div class="box box1">
+ </div>
+ <div class="box box2">
+ </div>
+ <div class="box box3">
+ </div>
+ </div>
+</template>
+
+<style>
+ .wrapper {
+ position: absolute;
+ top: 0;
+ right: 0;
+ bottom: 0;
+ left: 0;
+ background-color: #cccccc;
+ }
+ .box {
+ width: 400;
+ height: 400;
+ position: absolute;
+ }
+ .box1 {
+ top: 0;
+ left: 0;
+ background-color: #ff0000;
+ }
+ .box2 {
+ top: 150;
+ left: 150;
+ background-color: #0055dd;
+ }
+ .box3 {
+ top: 300;
+ left: 300;
+ background-color: #00ff49;
+ }
+</style>
+```
+
+[体验一下](http://dotwe.org/b04339de27cfabf0710e045c0079e56a)
+
+## 其他基本样式
+
+- `opacity {number}`:取值范围为 [0, 1] 区间。默认值是 1,即完全不透明;0 是完全透明;0.5 是 50% 的透明度。
+- `background-color {color}`:设定元素的背景色,可选值为色值,支持RGB( `rgb(255, 0, 0)` );RGBA( `rgba(255, 0, 0, 0.5)` );十六进制( `#ff0000` );精简写法的十六进制( `#f00` );色值关键字(`red`),默认值是 `transparent` 。
+
+**注意:** [色值的关键字列表](./color-names.md)。
+
+## 上手样式
+
+如果对于样式写法需要更多上手参考,可参考
+
+- [如何做出高性能长列表]()
+- [如何布局]()
+- 以及每个组件的文档中,都有常见的例子可供参考。
+
+你可以按照以下步骤来规划 Weex 页面的样式。
+
+1. 全局样式规划:将整个页面分割成合适的模块。
+2. flex 布局:排列和对齐页面模块。
+3. 定位盒子:定位并设置偏移量。
+4. 细节样式处理:增加特定的具体样式。
http://git-wip-us.apache.org/repos/asf/incubator-weex-site/blob/32a097bf/_draft/v1.0/references/component-defs.md
----------------------------------------------------------------------
diff --git a/_draft/v1.0/references/component-defs.md b/_draft/v1.0/references/component-defs.md
new file mode 100644
index 0000000..11e4282
--- /dev/null
+++ b/_draft/v1.0/references/component-defs.md
@@ -0,0 +1,126 @@
+---
+title: ViewModel 选项
+type: references
+order: 1.2
+version: 0.10
+---
+
+# 组件定义
+
+定义组件是通过一组选项来描述一个组件。这组选项总是被赋值给 `<script>` 标签中的 `module.exports` 。
+
+``` javascript
+module.exports = {
+ // a set of options here
+}
+```
+## 数据和方法
+
+``` javascript
+module.exports = {
+ data: function () {
+ return {x: 1, y: 2}
+ },
+ methods: {
+ doThis: function () {...},
+ doThat: function () {...}
+ },
+ ...
+}
+```
+
+`data` 选项是一个函数,它返回这个视图模型可监听的数据对象。而 `methods` 是一个映射,其中包含所有视图模型的方法。
+
+每个 `data` 或 `method` 属性将被代理到视图模型实例中。所以,你能通过 `this.x` 读写数据,或者通过 `this.doThis()` 调用方法。
+
+一个完整的例子:
+
+```html
+<template>
+ <div style="width: {{w}}; height: {{h}}; background-color: red;" onclick="update"></div>
+</template>
+<script>
+ module.exports = {
+ data: function () {
+ return {w: 750, h: 200}
+ },
+ methods: {
+ update: function (e) {
+ this.h += 200
+ }
+ }
+ }
+</script>
+```
+## 事件
+
+``` javascript
+module.exports = {
+ data: ...,
+ methods: {
+ foo: function () {
+ ...
+ this.$emit('customtype1', data)
+ }
+ },
+ events: {
+ customtype1: function (e) {
+ console.log(e.type, e.detail)
+ }
+ },
+ ...
+}
+```
+
+`events` 选项允许你在视图模型被创建时注册自定义事件。然后,它会监听这些类型的事件,并通过函数类型的值处理它们。
+
+Weex 会把一个事件对象作为第一个参数传递给其绑定的事件,这个事件对象在 `e.detail` 中包含事件数据。
+## 生命周期
+
+``` javascript
+module.exports = {
+ data: ...,
+ methods: ...,
+ init: function () {
+ console.log('ViewModel constructor begins')
+ },
+ created: function () {
+ console.log('Data observation finished')
+ },
+ ready: function () {
+ console.log('Virtual DOM finished')
+ },
+ ...
+}
+```
+
+Weex 视图模型现在支持生命周期内的钩子函数,这些钩子函数能被写为组件选项:
+- `init`: 在视图模型的构造函数开始调用时激活;
+- `created`: 当视图模型监听默认数据,但还未编译模板时激活;
+- `ready`: 当视图模型监听默认数据并且编译模板生成虚拟DOM后被激活。
+
+**注意:当 `methods`、`events` 或生命周期方法作为参数传递给别的函数时,务必确认函数执行时的上下文符合您的预期,例如:**
+
+``` javascript
+module.exports = {
+ data: function () {
+ return {x: 1, y: 2}
+ },
+ ready: function () {
+ // `undefined`
+ // 因为上下文发生了变化
+ this.foo(this.bar)
+ // `1`
+ // 正确绑定上下文之后可以得到预期的值
+ this.foo(this.bar.bind(this))
+ },
+ methods: {
+ foo: function (fn) {
+ return fn()
+ },
+ bar: function () {
+ return this.x
+ }
+ }
+}
+```
http://git-wip-us.apache.org/repos/asf/incubator-weex-site/blob/32a097bf/_draft/v1.0/references/components/a.md
----------------------------------------------------------------------
diff --git a/_draft/v1.0/references/components/a.md b/_draft/v1.0/references/components/a.md
new file mode 100644
index 0000000..75bd831
--- /dev/null
+++ b/_draft/v1.0/references/components/a.md
@@ -0,0 +1,273 @@
+---
+title: <a>
+type: references
+order: 2.1
+version: 0.10
+---
+
+# <a>
+
+`<a>` 组件定义了指向某个页面的一个超链接. 此组件的作用和用法与HTML5中的 [`<a>`](https://developer.mozilla.org/en-US/docs/Web/HTML/Element/a) 非常类似,区别在于 Weex 的 `<a>` 组件**不能**直接在里面添加文本(字符串),如果要展示文本,应该添加 `<text>` 组件。
+
+一个简单例子:
+
+```HTML
+<template>
+ <div class="wrapper">
+ <a href="http://dotwe.org/raw/dist/a468998152ee680413588c38bd61c29e.js">
+ <text>click</text>
+ </a>
+ </div>
+</template>
+
+<style>
+.wrapper {
+ text-align: center;
+}
+</style>
+```
+
+[体验一下](http://dotwe.org/f63c78213ef26c25357ffa851537fff3)
+
+## 子组件
+
+此组件支持除了自己外的所有 Weex 组件作为子组件。
+
+## 特性
+
+- `href {string}`:定义了超链接的 URL。
+
+## 样式
+
+`<a>` 支持所有通用样式。
+
+- 盒模型
+- `flexbox` 布局
+- `position`
+- `opacity`
+- `background-color`
+
+查看 [组件通用样式](../common-style.html)。
+
+## 事件
+
+`<a>` 支持所有通用事件。
+
+- `click`
+ **注意:**我们不能保证 `click` 事件和 `href` 跳转的执行顺序。建议不要使用 `click` 事件来处理 `href` 跳转前的逻辑处理。
+- `longpress`
+- `appear`
+- `disappear`
+
+查看 [通用事件](../common-event.html)。
+
+## 约束
+
+1. **不能**直接在 `<a>` 中添加文本。
+ 错误示例,“click” 无法被正常渲染。
+
+ ```HTML
+ <template>
+ <div class="wrapper">
+ <a href="http://dotwe.org/raw/dist/a468998152ee680413588c38bd61c29e.js">
+ click
+ </a>
+ </div>
+ </template>
+
+ <style>
+ .wrapper {
+ text-align: center;
+ }
+ </style>
+ ```
+
+[体验一下](http://dotwe.org/0a22d65138691a208e3fb1f8f6392b38)
+
+2. 请不要为 `<a>` 添加 `click` 事件。我们不能确保 `click` 事件和 `href` 跳转的执行顺序。
+
+## 示例
+
+```html
+<template>
+ <div>
+ <list class="list">
+ <header class="header">
+ <text class="title">Search Results</text>
+ </header>
+ <refresh style="width: 750; padding: 30;" onrefresh="refreshData" display="{{refreshDisplay}}">
+ <text class="text"> ↓ Pull to refresh </text>
+ <loading-indicator class="indicator"></loading-indicator>
+ </refresh>
+ <cell class="row" repeat="item in items" id="item-{{$index}}">
+ <div class="lines">
+ <text class="item">Repo name: </text><a href="{{item.repo_url}}"><text class="link">{{item.full_name}}</text></a>
+ </div>
+ <div>
+ <text class="item">Repo star: {{item.stargazers_count}}</text>
+ </div>
+ </cell>
+ <loading onloading="loadingData" style="width: 750; padding: 30;" display="{{loadingDisplay}}">
+ <text class="text">{{loadingText}}</text>
+ </loading>
+ </list>
+ <div class="up" onclick="goToTop">
+ <img class="img" src="https://img.alicdn.com/tps/TB1ZVOEOpXXXXcQaXXXXXXXXXXX-200-200.png"></img>
+ </div>
+ </div>
+</template>
+
+<style>
+.header {
+ padding: 25;
+ background-color: #efefef;
+ border-bottom-color: #eeeeee;
+ border-bottom-width: 2;
+ border-bottom-style: solid;
+}
+.title {
+ text-align: center;
+}
+.text {
+ text-align: center;
+}
+.list {
+ background-color: #ffffff;
+}
+.row {
+ padding: 20;
+ border-bottom-color: #eeeeee;
+ border-bottom-width: 2;
+ border-bottom-style: solid;
+}
+.up {
+ width: 70;
+ height: 70;
+ position: fixed;
+ right: 20;
+ bottom: 20;
+}
+.img {
+ width: 70;
+ height: 70;
+}
+.lines {
+ flex-direction: row;
+}
+.link {
+ color: #008cff;
+ text-decoration: underline;
+}
+</style>
+
+<script>
+var dom = require('@weex-module/dom') || {}
+var stream = require('@weex-module/stream') || {}
+var modal = require('@weex-module/modal') || {}
+
+var SEARCH_URL = 'https://api.github.com/search/repositories?q=language:javascript&sort=stars&order=desc',
+ PAGE_URL = 'http://dotwe.org/raw/dist/f1fa0895d0fa0fd80896e02a589443dd.js'
+
+module.exports = {
+ data: {
+ isLoaded: true,
+ page: 1,
+ loadingDisplay: 'hide',
+ refreshDisplay: 'hide',
+ loadingText: 'Loading...',
+ items:[]
+ },
+ created: function () {
+ var url = SEARCH_URL + '&page=' + this.page
+
+ this.renderData(url)
+
+ this.page++
+ },
+ methods: {
+ renderData: function (url) {
+ var self = this
+
+ stream.fetch({
+ method: 'GET',
+ url: url,
+ type:'json'
+ }, function(res) {
+ try {
+ var results = res.data.items || []
+
+ if (Array.isArray(results)) {
+ for(var i = 0; i < results.length; i++) {
+ var repo_url = results[i].html_url
+ if (repo_url) {
+ results[i].repo_url = self.processUrl(repo_url)
+ }
+ self.items.push(results[i])
+ }
+ }
+ } catch(e) {}
+ },function(res){
+
+ })
+ },
+ loadingData: function (e) {
+ var url = SEARCH_URL + '&page=' + this.page
+ var self = this
+
+ if (self.isLoaded === false) return
+
+ self.loadingDisplay = 'show'
+
+ if (self.page <=10 ) {
+ self.renderData(url)
+ self.page++
+ } else {
+ self.loadingDisplay = 'hide'
+ self.loadingText = 'NO MORE!'
+ }
+ },
+ goToTop: function (e) {
+ dom.scrollToElement(this.$el('item-0'), {
+ offset: -100
+ })
+ },
+ refreshData: function (e) {
+ var url = SEARCH_URL + '&page=1'
+
+ if (this.isLoaded === false) return
+
+ this.refreshDisplay = 'show'
+
+ modal.toast({
+ 'message': 'Refreshing...',
+ 'duration': 1
+ })
+
+ this.items = []
+ this.page = 1
+ this.renderData(url)
+
+ this.refreshDisplay = 'hide'
+ },
+ processUrl: function (url) {
+ var platform = this.$getConfig().env.platform.toLowerCase()
+
+
+ if (url) {
+ // iOS do not need encode
+ if (platform === 'ios') {
+ return PAGE_URL + '?weburl=' + url
+ } else if (platform === 'web') {
+ return url
+ } else {
+ var encodeUrl = encodeURIComponent(url)
+ return PAGE_URL + '?weburl=' + encodeUrl
+ }
+ }
+ }
+ }
+}
+</script>
+```
+
+[体验一下](http://dotwe.org/3e8369efb20a169077b5331b45927ed8)。
http://git-wip-us.apache.org/repos/asf/incubator-weex-site/blob/32a097bf/_draft/v1.0/references/components/cell.md
----------------------------------------------------------------------
diff --git a/_draft/v1.0/references/components/cell.md b/_draft/v1.0/references/components/cell.md
new file mode 100644
index 0000000..e977037
--- /dev/null
+++ b/_draft/v1.0/references/components/cell.md
@@ -0,0 +1,191 @@
+---
+title: <cell>
+type: references
+order: 2.5
+version: 0.10
+---
+
+# <cell>
+
+用于定义列表中的子列表项,类似于 HTML 中的 `ul` 之于 `li`。Weex 会对 `<cell>` 进行高效的内存回收以达到更好的性能,该组件必须作为[`<list>`](./list.html) 组件的子组件, 这是为了优化滚动时的性能。
+
+## 子组件
+
+支持所有 Weex 的组件作为它的子组件。
+
+## 样式
+
+**注意:**
+
+你不能给 `<cell>` 设定`flex`值。 `<cell>`的宽度等于父组件 `<list>` 的宽度,并且 `<cell>` 高度自适应。
+
+- 通用样式:支持所有通用样式
+
+ - 盒模型
+ - `flexbox` 布局
+ - `position`
+ - `opacity`
+ - `background-color`
+
+ 查看 [组件通用样式](../common-style.html)
+
+## 事件
+
+- 通用事件
+
+ 支持所有通用事件:
+
+ - `click`
+ - `longpress`
+ - `appear`
+ - `disappear`
+
+ 查看 [通用事件](../common-event.html)
+
+## 示例
+
+
+
+```html
+<template>
+ <div>
+ <list class="list">
+ <header class="header">
+ <text class="title">Search Results</text>
+ </header>
+ <refresh style="width: 750; padding: 30;" onrefresh="refreshData">
+ <text class="text"> ↓ Pull to refresh </text>
+ <loading-indicator class="indicator"></loading-indicator>
+ </refresh>
+ <cell class="row" repeat="item in items" id="item-{{$index}}">
+ <div>
+ <text class="item">Repo name: {{item.full_name}}</text>
+ </div>
+ <div>
+ <text class="item">Repo star: {{item.stargazers_count}}</text>
+ </div>
+ </cell>
+ <loading onloading="loadingData" style="width: 750; padding: 30;" display="{{loadingDisplay}}">
+ <text class="text">{{loadingText}}</text>
+ </loading>
+ </list>
+ <div class="up" onclick="goToTop">
+ <img class="img" src="https://img.alicdn.com/tps/TB1ZVOEOpXXXXcQaXXXXXXXXXXX-200-200.png"></img>
+ </div>
+ </div>
+</template>
+
+<style>
+.header {
+ padding: 25;
+ background-color: #efefef;
+ border-bottom-color: #eeeeee;
+ border-bottom-width: 2;
+ border-bottom-style: solid;
+}
+.title {
+ text-align: center;
+}
+.text {
+ text-align: center;
+}
+.list {
+ background-color: #ffffff;
+}
+.row {
+ padding: 20;
+ border-bottom-color: #eeeeee;
+ border-bottom-width: 2;
+ border-bottom-style: solid;
+}
+.up {
+ width: 70;
+ height: 70;
+ position: fixed;
+ right: 20;
+ bottom: 20;
+}
+.img {
+ width: 70;
+ height: 70;
+}
+</style>
+
+<script>
+var dom = require('@weex-module/dom') || {}
+var stream = require('@weex-module/stream') || {}
+var modal = require('@weex-module/modal') || {}
+
+var SEARCH_URL = 'https://api.github.com/search/repositories?q=language:javascript&sort=stars&order=desc'
+
+module.exports = {
+ data: {
+ page: 1,
+ loadingDisplay: 'show',
+ loadingText: 'Loading...',
+ items:[]
+ },
+ created: function () {
+ var url = SEARCH_URL + '&page=' + this.page
+
+ this.renderData(url)
+
+ this.page++
+ },
+ methods: {
+ renderData: function (url) {
+ var self = this
+
+ stream.fetch({
+ method: 'GET',
+ url: url,
+ type:'json'
+ }, function(res) {
+ try {
+ var results = res.data.items || []
+
+ if (Array.isArray(results)) {
+ for(var i = 0; i < results.length; i++) {
+ self.items.push(results[i])
+ }
+ }
+ } catch(e) {}
+ },function(res){
+
+ })
+ },
+ loadingData: function (e) {
+ var url = SEARCH_URL + '&page=' + this.page
+ var self = this
+
+ if (self.page <=10 ) {
+ self.renderData(url)
+ self.page++
+ } else {
+ self.loadingDisplay = 'hide'
+ self.loadingText = 'NO MORE!'
+ }
+ },
+ goToTop: function (e) {
+ dom.scrollToElement(this.$el('item-0'), {
+ offset: -100
+ })
+ },
+ refreshData: function (e) {
+ var url = SEARCH_URL + '&page=1'
+
+ modal.toast({
+ 'message': 'Refreshing...',
+ 'duration': 1
+ })
+
+ this.items = []
+ this.page = 1
+ this.renderData(url)
+ }
+ }
+}
+</script>
+```
+
+[体验一下](http://dotwe.org/280fa3dc8e793ea8712451ecdf84fb7b)
\ No newline at end of file
http://git-wip-us.apache.org/repos/asf/incubator-weex-site/blob/32a097bf/_draft/v1.0/references/components/div.md
----------------------------------------------------------------------
diff --git a/_draft/v1.0/references/components/div.md b/_draft/v1.0/references/components/div.md
new file mode 100644
index 0000000..893f7a1
--- /dev/null
+++ b/_draft/v1.0/references/components/div.md
@@ -0,0 +1,245 @@
+---
+title: <div>
+type: references
+order: 2.2
+version: 0.10
+---
+
+# <div>
+
+`<div>` 组件是用于包装其它组件的最基本容器。支持所有的通用样式、特性、`flexbox` 布局。其类似于 HTML 的 `<div>` 容器,但**不能**直接在里面添加文本(字符串),如果要展示文本,应该使用 `<text>` 组件。历史版本中,`<div>` 别名是 `<container>`,目前**已经弃用**。
+
+**注意:**
+
+`<div>` 嵌套层级不可过深,否则容易引起性能问题,建议控制在 **10** 层以内。
+
+一个简单例子:
+
+```html
+<template>
+ <div>
+ <text class="text">Hello World!</text>
+ </div>
+</template>
+
+<style>
+.text {
+ font-size: 70;
+ color: #ff0000
+}
+</style>
+
+<script></script>
+```
+
+[体验一下](http://dotwe.org/a468998152ee680413588c38bd61c29e)
+
+
+
+## 子组件
+
+`<div>` 基本容器组件,因此支持包括 `<div>` 在内的任何组件作为自己的子组件。因此,在写一个组件时,推荐外层使用 `<div>` 作为根容器。
+
+## 样式
+
+`<div>` 支持所有通用样式:
+
+- 盒模型
+- `flexbox` 布局
+- `position`
+- `opacity`
+- `background-color`
+
+查看 [组件通用样式](../common-style.html)
+
+## 事件
+
+`<div>` 支持所有通用事件:
+
+- `click`
+- `longpress`
+- `appear`
+- `disappear`
+
+查看 [通用事件](../common-event.html)
+
+## 约束
+
+1. **不能**直接在 `<div>` 中添加文本。
+
+ 错误示例,“Hello World!” 无法被正常渲染。
+
+ ```html
+ <template>
+ <div>Hello World!</div>
+ </template>
+
+ <style>
+ .text {
+ font-size: 70;
+ color: #ff0000
+ }
+ </style>
+
+ <script></script>
+ ```
+
+ [体验一下](http://dotwe.org/3ef3ba3f0f162b27e24c525250c46a04)
+
+2. `<div>` 不可滚动,即使显式设置高度也一样。
+
+ [错误示例](http://dotwe.org/a2cc491c5b9e6f6eb06795e45e725efd)
+
+## 示例
+
+
+
+```html
+<style>
+.item {
+ padding: 20;
+ height: 220;
+ border-bottom-width: 1;
+ border-bottom-style: solid;
+ border-bottom-color: #efefef;
+}
+.item-content {
+ flex-direction: row;
+ width: 710;
+ background-color: #ffffff;
+}
+.item-imgbox {
+ height: 180;
+ width: 180;
+ margin-right: 20;
+}
+.item-img {
+ width: 180;
+ height: 180;
+}
+.item-info {
+ height: 180;
+ width: 510;
+ justify-content: center;
+ position: relative;
+}
+.item-info-detail {
+ position: relative;
+ color: #A2A2A2;
+}
+.desc {
+ lines: 4;
+ text-overflow: ellipsis;
+ font-size: 26;
+ line-height: 30;
+ color: #A2A2A2;
+}
+.title {
+ lines: 1;
+ text-overflow: ellipsis;
+ font-size: 32;
+ color: #2D2D2D;
+ line-height: 40;
+}
+.detail-info {
+ margin-top: 15;
+}
+.up {
+ width: 70;
+ height: 70;
+ position: fixed;
+ right: 20;
+ bottom: 20;
+}
+.img {
+ width: 70;
+ height: 70;
+}
+</style>
+
+<template>
+ <div>
+ <scroller>
+ <div class="item" repeat="item in items" id="item-{{$index}}">
+ <div class="item-content">
+ <div class="item-imgbox">
+ <img class="item-img" src="{{item.img}}" alt="" />
+ </div>
+ <div class="item-info">
+ <div class="item-info-detail">
+ <text class="title">{{item.title}}</text>
+ <div class="detail-info">
+ <text class="desc">{{item.desc}}</text>
+ </div>
+ </div>
+ </div>
+ </div>
+ </div>
+ </scroller>
+ <div class="up" onclick="goToTop">
+ <img class="img" src="https://img.alicdn.com/tps/TB1ZVOEOpXXXXcQaXXXXXXXXXXX-200-200.png"></img>
+ </div>
+ </div>
+</template>
+
+<script>
+ var dom = require('@weex-module/dom') || {}
+
+ module.exports = {
+ data: {
+ items: [{
+ img: 'https://img.alicdn.com/tps/TB1z.55OFXXXXcLXXXXXXXXXXXX-560-560.jpg',
+ title: 'Who is Alan Mathison Turing?Who is Alan Mathison Turing?',
+ desc: 'Alan Mathison Turing ( 23 June 1912 – 7 June 1954) was an English computer scientist, mathematician, logician, cryptanalyst and theoretical biologist. He was highly influential in the development of theoretical computer science, providing a formalisation of the concepts of algorithm and computation with the Turing machine, which can be considered a model of a general purpose computer.Turing is widely considered to be the father of theoretical computer science and artificial intelligence.'
+ },{
+ img: 'https://img.alicdn.com/tps/TB1z.55OFXXXXcLXXXXXXXXXXXX-560-560.jpg',
+ title: 'Who is Alan Mathison Turing?',
+ desc: 'Alan Mathison Turing ( 23 June 1912 – 7 June 1954) was an English computer scientist, mathematician, logician, cryptanalyst and theoretical biologist. He was highly influential in the development of theoretical computer science, providing a formalisation of the concepts of algorithm and computation with the Turing machine, which can be considered a model of a general purpose computer.Turing is widely considered to be the father of theoretical computer science and artificial intelligence.'
+ },{
+ img: 'https://img.alicdn.com/tps/TB1z.55OFXXXXcLXXXXXXXXXXXX-560-560.jpg',
+ title: 'Who is Alan Mathison Turing?',
+ desc: 'Alan Mathison Turing ( 23 June 1912 – 7 June 1954) was an English computer scientist, mathematician, logician, cryptanalyst and theoretical biologist. He was highly influential in the development of theoretical computer science, providing a formalisation of the concepts of algorithm and computation with the Turing machine, which can be considered a model of a general purpose computer.Turing is widely considered to be the father of theoretical computer science and artificial intelligence.'
+ },{
+ img: 'https://img.alicdn.com/tps/TB1z.55OFXXXXcLXXXXXXXXXXXX-560-560.jpg',
+ title: 'Who is Alan Mathison Turing?',
+ desc: 'Alan Mathison Turing ( 23 June 1912 – 7 June 1954) was an English computer scientist, mathematician, logician, cryptanalyst and theoretical biologist. He was highly influential in the development of theoretical computer science, providing a formalisation of the concepts of algorithm and computation with the Turing machine, which can be considered a model of a general purpose computer.Turing is widely considered to be the father of theoretical computer science and artificial intelligence.'
+ },{
+ img: 'https://img.alicdn.com/tps/TB1z.55OFXXXXcLXXXXXXXXXXXX-560-560.jpg',
+ title: 'Who is Alan Mathison Turing?',
+ desc: 'Alan Mathison Turing ( 23 June 1912 – 7 June 1954) was an English computer scientist, mathematician, logician, cryptanalyst and theoretical biologist. He was highly influential in the development of theoretical computer science, providing a formalisation of the concepts of algorithm and computation with the Turing machine, which can be considered a model of a general purpose computer.Turing is widely considered to be the father of theoretical computer science and artificial intelligence.'
+ },{
+ img: 'https://img.alicdn.com/tps/TB1z.55OFXXXXcLXXXXXXXXXXXX-560-560.jpg',
+ title: 'Who is Alan Mathison Turing?',
+ desc: 'Alan Mathison Turing ( 23 June 1912 – 7 June 1954) was an English computer scientist, mathematician, logician, cryptanalyst and theoretical biologist. He was highly influential in the development of theoretical computer science, providing a formalisation of the concepts of algorithm and computation with the Turing machine, which can be considered a model of a general purpose computer.Turing is widely considered to be the father of theoretical computer science and artificial intelligence.'
+ },{
+ img: 'https://img.alicdn.com/tps/TB1z.55OFXXXXcLXXXXXXXXXXXX-560-560.jpg',
+ title: 'Who is Alan Mathison Turing?',
+ desc: 'Alan Mathison Turing ( 23 June 1912 – 7 June 1954) was an English computer scientist, mathematician, logician, cryptanalyst and theoretical biologist. He was highly influential in the development of theoretical computer science, providing a formalisation of the concepts of algorithm and computation with the Turing machine, which can be considered a model of a general purpose computer.Turing is widely considered to be the father of theoretical computer science and artificial intelligence.'
+ },{
+ img: 'https://img.alicdn.com/tps/TB1z.55OFXXXXcLXXXXXXXXXXXX-560-560.jpg',
+ title: 'Who is Alan Mathison Turing?',
+ desc: 'Alan Mathison Turing ( 23 June 1912 – 7 June 1954) was an English computer scientist, mathematician, logician, cryptanalyst and theoretical biologist. He was highly influential in the development of theoretical computer science, providing a formalisation of the concepts of algorithm and computation with the Turing machine, which can be considered a model of a general purpose computer.Turing is widely considered to be the father of theoretical computer science and artificial intelligence.'
+ },{
+ img: 'https://img.alicdn.com/tps/TB1z.55OFXXXXcLXXXXXXXXXXXX-560-560.jpg',
+ title: 'Who is Alan Mathison Turing?',
+ desc: 'Alan Mathison Turing ( 23 June 1912 – 7 June 1954) was an English computer scientist, mathematician, logician, cryptanalyst and theoretical biologist. He was highly influential in the development of theoretical computer science, providing a formalisation of the concepts of algorithm and computation with the Turing machine, which can be considered a model of a general purpose computer.Turing is widely considered to be the father of theoretical computer science and artificial intelligence.'
+ },{
+ img: 'https://img.alicdn.com/tps/TB1z.55OFXXXXcLXXXXXXXXXXXX-560-560.jpg',
+ title: 'Who is Alan Mathison Turing?',
+ desc: 'Alan Mathison Turing ( 23 June 1912 – 7 June 1954) was an English computer scientist, mathematician, logician, cryptanalyst and theoretical biologist. He was highly influential in the development of theoretical computer science, providing a formalisation of the concepts of algorithm and computation with the Turing machine, which can be considered a model of a general purpose computer.Turing is widely considered to be the father of theoretical computer science and artificial intelligence.'
+ }]
+ },
+ created: function () {
+ },
+ methods: {
+ goToTop: function (e) {
+ dom.scrollToElement(this.$el('item-0'), {
+ offset: 0
+ })
+ }
+ }
+ }
+</script>
+```
+
+[体验一下](http://dotwe.org/799f54b32f5227f9c34cfbb5e6946ba7)
http://git-wip-us.apache.org/repos/asf/incubator-weex-site/blob/32a097bf/_draft/v1.0/references/components/image.md
----------------------------------------------------------------------
diff --git a/_draft/v1.0/references/components/image.md b/_draft/v1.0/references/components/image.md
new file mode 100644
index 0000000..5a18280
--- /dev/null
+++ b/_draft/v1.0/references/components/image.md
@@ -0,0 +1,161 @@
+---
+title: <image>
+type: references
+order: 2.3
+version: 0.10
+---
+
+# <image>
+
+`<image>` 组件用于渲染图片,并且它不能包含任何子组件。可以用 `<img>` 作简写。
+
+需要注意的是,需要明确指定 `width` 和 `height`,否则图片无法显示。
+
+简单例子:
+
+```html
+<template>
+ <div>
+ <img style="width: 560;height: 560;" src="https://img.alicdn.com/tps/TB1z.55OFXXXXcLXXXXXXXXXXXX-560-560.jpg"></img>
+ </div>
+</template>
+```
+
+[体验一下](http://dotwe.org/23b6cf951e6059d2cf7b9a74a9915ace)
+
+## 子组件
+
+`<image>` 组件不支持任何子组件,因此不要尝试在 `<image>` 组件中添加任何组件。如果需要实现 `background-image` 的效果,可以使用 `<image>` 组件和 `position` 定位来现实,如下面代码。
+
+```html
+<template>
+ <div>
+ <img style="width:750; height:750;" src="https://img.alicdn.com/tps/TB1z.55OFXXXXcLXXXXXXXXXXXX-560-560.jpg"></img>
+ <div class="title">
+ <text style="font-size:50; color: #ff0000">你好,image</text>
+ </div>
+ </div>
+</template>
+<style>
+ .title{
+ position:absolute;
+ top:50;
+ left:10;
+ }
+</style>
+```
+
+[体验一下](http://dotwe.org/08dd49aaca8bf289c5fc08f808b9c08c)
+
+## 特性
+
+`<image>` 组件,包含 `src` 和 `resize` 两个重要特性。
+
+- `src {string}`:定义图片链接,目前图片暂不支持本地图片。
+- `resize {string}`:可以控制图片的拉伸状态,值行为和 W3C 标准一致。
+
+ 可选值为:
+
+ - `stretch`:默认值,指定图片按照容器拉伸,有可能使图片产生形变。
+ - `cover`:指定图片可以被调整到容器,以使图片完全覆盖背景区域,图片有可能被剪裁。
+ - `contain`:指定可以不用考虑容器的大小,把图像扩展至最大尺寸,以使其宽度和高度完全适应内容区域。
+
+ 例子:
+
+ 
+
+ [体验一下](http://dotwe.org/049213ab3364a86637e211c0329cdc50)
+
+## 样式
+
+- 通用样式:支持所有通用样式
+
+ - 盒模型
+ - `flexbox` 布局
+ - `position`
+ - `opacity`
+ - `background-color`
+
+ 查看 [组件通用样式](../common-style.html)
+
+## 事件
+
+- `load` <sup class="wx-v">v0.8+</sup>:当图片加载完成时触发。目前在 Android、iOS 上支持,H5 暂不支持。
+
+- 通用事件
+
+ 支持所有通用事件:
+
+ - `click`
+ - `longpress`
+ - `appear`
+ - `disappear`
+
+ 查看 [通用事件](../common-event.html)
+
+## 约束
+
+1. 需要指定宽高;
+2. 不支持子组件。
+
+## 示例
+
+我们这里展示了一篇文章,文章标题有一副背景图。
+
+
+
+这个效果实现起来非常容易,我们只需要将标题文案通过 `position: absolute` 进行定位即可。唯一需要注意的一点是,Weex 目前不支持 `z-index`,因此必须把上层元素放在后。
+
+```html
+<style>
+ .page-head {
+ width:750;
+ height:200;
+ }
+ .title-bg {
+ width:750;
+ height:200;
+ }
+ .title-box {
+ width: 750;
+ height: 200;
+ justify-content: center;
+ align-items: center;
+ position: absolute;
+ top: 0;
+ right: 0;
+ bottom: 0;
+ left: 0;
+ }
+ .title {
+ color: #ffffff;
+ font-size: 32;
+ font-weight: bold;
+ }
+ .article {
+ padding: 20;
+ }
+ .paragraph{
+ margin-bottom: 15;
+ }
+</style>
+
+<template>
+ <scroller class="wrapper" >
+ <div class="page-head" >
+ <image class="title-bg" resize="cover" src="https://img.alicdn.com/tps/TB1dX5NOFXXXXc6XFXXXXXXXXXX-750-202.png"></image>
+ <div class="title-box">
+ <text class="title">Alan Mathison Turing</text>
+ </div>
+ </image>
+ <div class="article">
+ <text class="paragraph">Alan Mathison Turing ( 23 June 1912 – 7 June 1954) was an English computer scientist, mathematician, logician, cryptanalyst and theoretical biologist. He was highly influential in the development of theoretical computer science, providing a formalisation of the concepts of algorithm and computation with the Turing machine, which can be considered a model of a general purpose computer.Turing is widely considered to be the father of theoretical computer science and artificial intelligence.</text>
+ <text class="paragraph">During the Second World War, Turing worked for the Government Code and Cypher School (GC&CS) at Bletchley Park, Britain's codebreaking centre. For a time he led Hut 8, the section responsible for German naval cryptanalysis. He devised a number of techniques for speeding the breaking of German ciphers, including improvements to the pre-war Polish bombe method, an electromechanical machine that could find settings for the Enigma machine. Turing played a pivotal role in cracking intercepted coded messages that enabled the Allies to defeat the Nazis in many crucial engagements, including the Battle of the Atlantic; it has been estimated that this work shortened the war in Europe by more than two years and saved over fourteen million lives.</text>
+ <text class="paragraph">After the war, he worked at the National Physical Laboratory, where he designed the ACE, among the first designs for a stored-program computer. In 1948 Turing joined Max Newman's Computing Machine Laboratory at the Victoria University of Manchester, where he helped develop the Manchester computers and became interested in mathematical biology. He wrote a paper on the chemical basis of morphogenesis, and predicted oscillating chemical reactions such as the Belousov–Zhabotinsky reaction, first observed in the 1960s.</text>
+ <text class="paragraph">Turing was prosecuted in 1952 for homosexual acts, when by the Labouchere Amendment, "gross indecency" was still criminal in the UK. He accepted chemical castration treatment, with DES, as an alternative to prison. Turing died in 1954, 16 days before his 42nd birthday, from cyanide poisoning. An inquest determined his death as suicide, but it has been noted that the known evidence is also consistent with accidental poisoning. In 2009, following an Internet campaign, British Prime Minister Gordon Brown made an official public apology on behalf of the British government for "the appalling way he was treated." Queen Elizabeth II granted him a posthumous pardon in 2013.</text>
+ </div>
+ </scroller>
+</template>
+```
+
+[体验一下](http://dotwe.org/bccf884672f0a76f884298b3754d2079)
\ No newline at end of file
http://git-wip-us.apache.org/repos/asf/incubator-weex-site/blob/32a097bf/_draft/v1.0/references/components/index.md
----------------------------------------------------------------------
diff --git a/_draft/v1.0/references/components/index.md b/_draft/v1.0/references/components/index.md
new file mode 100644
index 0000000..78ef46b
--- /dev/null
+++ b/_draft/v1.0/references/components/index.md
@@ -0,0 +1,24 @@
+---
+title: 内建组件
+type: references
+order: 2
+version: 0.10
+---
+
+# 内建组件
+
+- [<a>](./a.html)
+- [<indicator>](./indicator.html)
+- [<switch>](./switch.html)
+- [<text>](./text.html)
+- [<textarea>](./textarea.html)
+- [<video>](./video.html)
+- [<web>](./web.html)
+- [<div>](./div.html)
+- [<image>](./image.html)
+- [<input>](./input.html)
+- [<list>](./list.html)
+- [<cell>](./cell.html)
+- [<refresh> & <loading>](./refresh.html)
+- [<scroller>](./scroller.html)
+- [<slider>](./slider.html)
\ No newline at end of file
http://git-wip-us.apache.org/repos/asf/incubator-weex-site/blob/32a097bf/_draft/v1.0/references/components/indicator.md
----------------------------------------------------------------------
diff --git a/_draft/v1.0/references/components/indicator.md b/_draft/v1.0/references/components/indicator.md
new file mode 100644
index 0000000..b2aa19d
--- /dev/null
+++ b/_draft/v1.0/references/components/indicator.md
@@ -0,0 +1,124 @@
+---
+title: <indicator>
+type: references
+order: 2.10
+version: 0.10
+---
+
+# <indicator>
+
+`<indicator>` 组件用于显示轮播图指示器效果,必须充当 [`<slider>`](./slider.html) 组件的子组件使用。
+
+## 子组件
+
+`<indicator>` 组件没有任何子组件。
+
+## 样式
+
+`<indicator>` 组件有一些私有样式,如下:
+
+- `item-color {color}`:设置项的颜色,可以是颜色的名称,例如 `red`;也可以是 16 进制的颜色,例如 `#RRGGBB`。
+
+- `item-selected-color {color}`:被选中时的颜色,可以是颜色的名称,`red`;也可以是 16 进制的颜色,例如 `#RRGGBB`。
+
+- `item-size {number}`:元素的个数。
+
+- 通用样式
+ - 盒模型
+ - `flexbox` 布局
+ - `position`
+ - `opacity`
+ - `background-color`
+
+ 查看 [组件通用样式](../common-style.html)
+
+**注意 1:**
+
+这里需要注意一点,`<indicator>` 的 `position` 不仅依赖 `top`、`left`、`bottom` 和 `right` 样式,同时会参考 `width`和 `height` 样式。`<indicator>` 默认的宽高继承于 `<slider>`,如果 `<slider>` 未设置宽高,需要显式的给 `<indicator>` 设置宽高值。
+
+**注意 2:**
+
+`background-color` 不推荐使用,建议使用 `item-color` 和 `item-selected-color` 代替。
+
+
+## 事件
+
+支持所有通用事件。
+
+- `click`
+- `longpress`
+- `appear`
+- `disappear`
+
+查看 [通用事件](../common-event.html)
+
+## 约束
+
+1. 不支持子组件。
+
+## 示例
+
+```html
+<template>
+ <div>
+ <slider class="slider">
+ <div class="slider-pages" repeat="item in itemList">
+ <image class="img" src="{{item.pictureUrl}}"></image>
+ <text class="title">{{item.title}}</text>
+ </div>
+ <indicator class="indicator"></indicator>
+ </slider>
+ </div>
+</template>
+
+<style>
+ .img {
+ width: 714;
+ height: 150;
+ }
+ .title {
+ position: absolute;
+ top: 20;
+ left: 20;
+ color: #ff0000;
+ font-size: 48;
+ font-weight: bold;
+ background-color: #eeeeee;
+ }
+ .slider {
+ flex-direction: row;
+ margin: 18;
+ width: 714;
+ height: 230;
+ }
+ .slider-pages {
+ flex-direction: row;
+ width: 714;
+ height: 200;
+ }
+ .indicator {
+ width:714;
+ height:200;
+ position:absolute;
+ top:1;
+ left:1;
+ item-color: red;
+ item-selectedColor: blue;
+ item-size: 20;
+ }
+</style>
+
+<script>
+ module.exports = {
+ data: {
+ itemList: [
+ {itemId: '520421163634', title: 'item1', pictureUrl: 'https://gd2.alicdn.com/bao/uploaded/i2/T14H1LFwBcXXXXXXXX_!!0-item_pic.jpg'},
+ {itemId: '522076777462', title: 'item2', pictureUrl: 'https://gd1.alicdn.com/bao/uploaded/i1/TB1PXJCJFXXXXciXFXXXXXXXXXX_!!0-item_pic.jpg'},
+ {itemId: '522076777462', title: 'iten3', pictureUrl: 'https://gd3.alicdn.com/bao/uploaded/i3/TB1x6hYLXXXXXazXVXXXXXXXXXX_!!0-item_pic.jpg'}
+ ]
+ }
+ }
+</script>
+```
+
+[体验一下](http://dotwe.org/baea3d54c503c6d3d4e4a8f275b9d47f)
\ No newline at end of file
http://git-wip-us.apache.org/repos/asf/incubator-weex-site/blob/32a097bf/_draft/v1.0/references/components/input.md
----------------------------------------------------------------------
diff --git a/_draft/v1.0/references/components/input.md b/_draft/v1.0/references/components/input.md
new file mode 100644
index 0000000..9a7b8ff
--- /dev/null
+++ b/_draft/v1.0/references/components/input.md
@@ -0,0 +1,309 @@
+---
+title: <input>
+type: references
+order: 2.4
+version: 0.10
+---
+
+# <input>
+
+Weex 内置的 `<input>` 组件用来创建接收用户输入字符的输入组件。 `<input>` 组件的工作方式因 `type` 属性的值而异,比如 `<text>`, `password`,`url`,`email`,`tel` 等。
+
+**注意:**
+
+此组件不支持 `click` 事件。请监听 `<input>` 或 `change` 来代替 `click` 事件。
+
+## 子组件
+
+不支持子组件。
+
+## 特性
+
+- `type {string}`:控件的类型,默认值是 `<text>`。`type` 值可以是 `text`,`password`,`url`,`email`,`tel` 。每个 `type` 值都符合 W3C 标准。
+- `value {string}`:组件的接收到的输入字符。
+- `placeholder {string}`:提示用户可以输入什么。 提示文本不能有回车或换行。
+- `disabled {boolean}`:布尔类型的数据,表示是否支持输入。通常 `click` 事件在 `disabled` 控件上是失效的。
+- `autofocus {boolean}`:布尔类型的数据,表示是否在页面加载时控件自动获得输入焦点。
+- `maxlength {nubmer}`:<sup class="wx-v">v0.7</sup>一个数值类型的值,表示输入的最大长度。
+
+## 样式
+
+- `placeholder-color {color}`:placeholder 字符颜色。默认值是 `#999999`。
+- text styles
+ - 支持 `color`
+ - 支持 `font-size`
+ - 支持 `font-style`
+ - 支持 `font-weight`
+ - 支持 `text-align`
+
+ 查看 [文本样式](../text-style.html)
+
+- 通用样式:支持所有通用样式
+ - 盒模型
+ - `flexbox` 布局
+ - `position`
+ - `opacity`
+ - `background-color`
+
+ 查看 [组件通用样式](../common-style.html)
+
+## 事件
+
+- `input`: 输入字符的值更改。
+
+ 事件中 event 对象属性:
+
+ - `value`: 触发事件的组件;
+ - `timestamp`: 事件发生时的时间戳,仅支持Android。
+
+- `change`: 当用户输入完成时触发。通常在 `blur` 事件之后。
+
+ 事件中 event 对象属性:
+
+ - `value`: 触发事件的组件;
+
+ - `timestamp`: 事件发生时的时间戳,仅支持Android。
+
+- `focus`: 组件获得输入焦点。
+
+ 事件中 event 对象属性:
+
+ - `timestamp`: 事件发生时的时间戳,仅支持Android。
+
+- `blur`: 组件失去输入焦点。
+
+ 事件中 event 对象属性:
+
+ - `timestamp`: 事件发生时的时间戳,仅支持Android。
+
+- 通用事件
+
+ **注意:**
+ 不支持 `click` 事件。 请监听 `input` 或 `change` 事件代替。
+
+ 支持以下通用事件:
+
+ - `longpress`
+ - `appear`
+ - `disappear`
+
+ 查看 [通用事件](../common-event.html)
+
+# 约束
+
+目前不支持 `this.$el(id).value = ''` 这种方式改写 input value。只支持在 `<input>` 组件的 `input`、`change` 事件中改写。
+
+## 示例
+
+```html
+<template>
+ <div>
+ <div>
+ <text style="font-size: 40px">oninput: {{txtInput}}</text>
+ <text style="font-size: 40px">onchange: {{txtChange}}</text>
+ <text style="font-size: 40px">onreturntype: {{txtReturnType}}</text>
+ </div>
+ <scroller>
+ <div>
+ <div style="background-color: #286090">
+ <text class="title" style="height: 80 ;padding: 20;color: #FFFFFF">input type = text</text>
+ </div>
+ <input type="text" placeholder="Input Text" class="input" :autofocus=true value="" @change="onchange" @input="oninput" @focus="onfocus" @blur="onblur"/>
+ </div>
+
+ <div>
+ <div style="background-color: #286090">
+ <text class="title" style="height: 80 ;padding: 20;color: #FFFFFF">input type = password</text>
+ </div>
+ <input type="password" placeholder="Input Password" class="input" @change="onchange" @input="oninput"/>
+ </div>
+
+ <div>
+ <div style="background-color: #286090">
+ <text class="title" style="height: 80 ;padding: 20;color: #FFFFFF">input type = url</text>
+ </div>
+ <input type="url" placeholder="Input URL" class="input" @change="onchange" @input="oninput"/>
+ </div>
+
+ <div>
+ <div style="background-color: #286090">
+ <text class="title" style="height: 80 ;padding: 20;color: #FFFFFF">input type = email</text>
+ </div>
+ <input type="email" placeholder="Input Email" class="input" @change="onchange" @input="oninput"/>
+ </div>
+
+ <div>
+ <div style="background-color: #286090">
+ <text class="title" style="height: 80 ;padding: 20;color: #FFFFFF">input type = tel</text>
+ </div>
+ <input type="tel" placeholder="Input Tel" class="input" @change="onchange" @input="oninput"/>
+ </div>
+
+ <div>
+ <div style="background-color: #286090">
+ <text class="title" style="height: 80 ;padding: 20;color: #FFFFFF">input type = time</text>
+ </div>
+ <input type="time" placeholder="Input Time" class="input" @change="onchange" @input="oninput"/>
+ </div>
+
+ <div>
+ <div style="background-color: #286090">
+ <text class="title" style="height: 80 ;padding: 20;color: #FFFFFF">input type = date</text>
+ </div>
+ <input type="date" placeholder="Input Date" class="input" @change="onchange" @input="oninput" max="2017-12-12" min="2015-01-01"/>
+ </div>
+
+ <div>
+ <div style="background-color: #286090">
+ <text class="title" style="height: 80 ;padding: 20;color: #FFFFFF">input return-key-type = default</text>
+ </div>
+ <input type="text" placeholder="please input" return-key-type="default" class="input" @change="onchange" @return = "onreturn" @input="oninput" />
+ </div>
+
+ <div>
+ <div style="background-color: #286090">
+ <text class="title" style="height: 80 ;padding: 20;color: #FFFFFF">input return-key-type = go</text>
+ </div>
+ <input type="text" placeholder="please input" return-key-type="go" class="input" @change="onchange" @return = "onreturn" @input="oninput" />
+ </div>
+
+ <div>
+ <div style="background-color: #286090">
+ <text class="title" style="height: 80 ;padding: 20;color: #FFFFFF">input return-key-type = next</text>
+ </div>
+ <input type="text" placeholder="please input" return-key-type="next" class="input" @change="onchange" @return = "onreturn" @input="oninput" />
+ </div>
+
+ <div>
+ <div style="background-color: #286090">
+ <text class="title" style="height: 80 ;padding: 20;color: #FFFFFF">input return-key-type = search</text>
+ </div>
+ <input type="text" placeholder="please input" return-key-type="search" class="input" @change="onchange" @return = "onreturn" @input="oninput" />
+ </div>
+
+ <div>
+ <div style="background-color: #286090">
+ <text class="title" style="height: 80 ;padding: 20;color: #FFFFFF">input return-key-type = send</text>
+ </div>
+ <input type="text" placeholder="please input" return-key-type="send" class="input" @change="onchange" @return = "onreturn" @input="oninput" />
+ </div>
+
+ <div>
+ <div style="background-color: #286090">
+ <text class="title" style="height: 80 ;padding: 20;color: #FFFFFF">input return-key-type = done</text>
+ </div>
+ <input type="text" placeholder="please input" return-key-type="done" class="input" @change="onchange" @return = "onreturn" @input="oninput" />
+ </div>
+
+
+ <div>
+ <div style="background-color: #286090">
+ <text class="title" style="height: 80 ;padding: 20;color: #FFFFFF">function focus() & blur()</text>
+ </div>
+ <div style="flex-direction: row;margin-bottom: 16px;justify-content: space-between">
+ <text class="button" value="Focus" type="primary" @click="focus"></text>
+ <text class="button" value="Blur" type="primary" @click="blur"></text>
+ </div>
+
+ <input type="text" placeholder="Input1" class="input" value="" ref="input1"/>
+ </div>
+
+
+ <div>
+ <div style="background-color: #286090">
+ <text class="title" style="height: 80 ;padding: 20;color: #FFFFFF">input selection</text>
+ </div>
+ <div style="flex-direction: row;margin-bottom: 16px;justify-content: space-between">
+ <text class="button" value="setRange" type="primary" @click="setRange"></text>
+ </div>
+ <input type="text" ref="inputselection" placeholder="please input" value="123456789" class="input" @change="onchange" @return = "onreturn" @input="oninput"/>
+ </div>
+
+
+
+ </scroller>
+ </div>
+</template>
+
+<style scoped>
+ .input {
+ font-size: 60px;
+ height: 80px;
+ width: 750px;
+ }
+ .button {
+ font-size: 36;
+ width: 200;
+ color: #41B883;
+ text-align: center;
+ padding-top: 10;
+ padding-bottom: 10;
+ border-width: 2;
+ border-style: solid;
+ margin-right: 20;
+ border-color: rgb(162, 217, 192);
+ background-color: rgba(162, 217, 192, 0.2);
+ }
+</style>
+
+<script>
+ const modal = weex.requireModule('modal')
+ module.exports = {
+ data: function () {
+ return {
+ txtInput: '',
+ txtChange: '',
+ txtReturnType: '',
+ txtSelection:'',
+ autofocus: false
+ };
+ },
+ methods: {
+ ready: function () {
+ var self = this;
+ setTimeout(function () {
+ self.autofocus = true;
+ }, 1000);
+ },
+ onchange: function (event) {
+ this.txtChange = event.value;
+ console.log('onchange', event.value);
+ },
+ onreturn: function (event) {
+ this.txtReturnType = event.returnKeyType;
+ console.log('onreturn', event.type);
+ },
+ oninput: function (event) {
+ this.txtInput = event.value;
+ console.log('oninput', event.value);
+ },
+ focus: function () {
+ this.$refs['input1'].focus();
+ },
+ blur: function () {
+ this.$refs['input1'].blur();
+ },
+ setRange: function() {
+ console.log(this.$refs["inputselection"]);
+ this.$refs["inputselection"].setSelectionRange(2, 6);
+ },
+ onfocus () {
+ console.log('onfocus:');
+ modal.toast({
+ message: 'onfocus',
+ duration: 0.8
+ })
+ },
+ onblur () {
+ console.log('onblur:');
+ modal.toast({
+ message: 'input blur',
+ duration: 0.8
+ })
+ }
+ }
+ };
+</script>
+```
+
+[体验一下](http://dotwe.org/vue/dd83d941d2364f2849e45dc3c5d91ab4)
http://git-wip-us.apache.org/repos/asf/incubator-weex-site/blob/32a097bf/_draft/v1.0/references/components/list.md
----------------------------------------------------------------------
diff --git a/_draft/v1.0/references/components/list.md b/_draft/v1.0/references/components/list.md
new file mode 100644
index 0000000..842201f
--- /dev/null
+++ b/_draft/v1.0/references/components/list.md
@@ -0,0 +1,375 @@
+---
+title: <list>
+type: references
+order: 2.4
+version: 0.10
+---
+
+# <list>
+
+`<list>` 组件是提供垂直列表功能的核心组件,拥有平滑的滚动和高效的内存管理,非常适合用于长列表的展示。最简单的使用方法是在 `<list>` 标签内使用一组由简单数组 `repeat` 生成的 `<cell>` 标签填充。
+
+一个最简例子:
+
+```html
+<template>
+ <list class="list">
+ <cell class="row" repeat="item in rows" index="{{$index}}">
+ <text class="item-title">row {{item.id}}</text>
+ </cell>
+ </list>
+</template>
+
+<style></style>
+
+<script>
+module.exports = {
+ data: {
+ rows:[
+ {id: 1},
+ {id: 2},
+ {id: 3},
+ {id: 4},
+ {id: 5}
+ ]
+ }
+}
+</script>
+```
+
+[体验一下](http://dotwe.org/bcaf48a63b49750b828d2d23762d4a15)
+
+
+
+## 子组件
+
+`<list>` 组件支持更多高级功能,由以下子组件提供:
+
+- `<cell>`
+
+ 用于定义列表中的子列表项,类似于 HTML 中的 `ul` 之于 `li`。Weex 会对 `<cell>` 进行高效的内存回收以达到更好的性能。
+
+ 使用文档请查看 [`<cell>`](./cell.html)。
+
+- `header` <sup class="wx-v">0.6.1+</sup>
+
+ 当 `<header>` 到达屏幕顶部时,吸附在屏幕顶部。
+
+- `<refresh>`
+
+ 用于给列表添加下拉刷新的功能。
+
+ 使用文档请查看 [`<refresh>`](./refresh.html)
+
+- `<loading>`
+
+ `<loading>` 用法与特性和 `<refresh>` 类似,用于给列表添加上拉加载更多的功能。
+
+ 使用文档请查看 [`<loading>`](./loading.html)
+
+**注意:**
+
+`<list>` 的子组件只能包括以上四种组件或是 `fix` 定位的组件,其他形式的组件将不能被正确的渲染。
+
+一个错误的示范,此例子无法在客户端正常渲染,因为 `<list>` 子组件是 `<div>`:
+
+```html
+<template>
+ <list class="list">
+ <div class="row" repeat="item in rows" index="{{$index}}">
+ <text class="item-title">row {{item.id}}</text>
+ </div>
+ </list>
+</template>
+
+<style></style>
+
+<script>
+module.exports = {
+ data: {
+ rows:[
+ {id: 1},
+ {id: 2},
+ {id: 3},
+ {id: 4},
+ {id: 5}
+ ]
+ }
+}
+</script>
+```
+
+## 特性
+
+- `loadmoreoffset {number}`:默认值为 0,触发 `loadmore` 事件所需要的垂直偏移距离(设备屏幕底部与 `<list>` 底部之间的距离)。当 `<list>` 的滚动条滚动到足够接近 `<list>` 底部时将会触发 `loadmore` 这个事件。
+
+ 
+
+## 样式
+
+- 通用样式:支持所有通用样式
+
+ - 盒模型
+ - `flexbox` 布局
+ - `position`
+ - `opacity`
+ - `background-color`
+
+ 查看 [组件通用样式](../common-style.html)
+
+## 事件
+
+- `loadmore` <sup class="wx-v">0.5+</sup>:如果列表滚动到底部将会立即触发这个事件,你可以在这个事件的处理函数中加载下一页的列表项。
+
+ [体验一下](http://dotwe.org/bc445ede8746a31360e3607d210304c5)
+
+- 通用事件
+
+ 支持所有通用事件:
+
+ - `click`
+ - `longpress`
+ - `appear`
+ - `disappear`
+
+ 查看 [通用事件](../common-event.html)
+
+## 扩展
+
+### scrollToElement(node, options)
+
+滚动到列表某个指定项是常见需求,`<list>` 拓展了该功能支持滚动到指定 `<cell>`。通过 `dom` module 访问,更多信息可参考 [dom module](../modules/dom.html) 。
+
+#### 参数
+
+- `node {node}`:指定目标节点。
+- `options {Object}`:
+ - `offset {number}`:一个到其可见位置的偏移距离,默认是 0
+
+#### 示例
+
+```html
+<template>
+ <list class="list">
+ <cell>
+ <div onclick="go" style="width: 750;height: 50; position: fixed; left: 0; right: 0; bottom: 0; background-color: #eeeeee;">
+ <text style="text-align: center;">
+ Go to 50th line.
+ </text>
+ </div>
+ </cell>
+ <cell class="row" repeat="item in rows" id="item-{{$index}}">
+ <text class="item-title">row {{item.id}}</text>
+ </cell>
+ </list>
+</template>
+
+<script>
+var dom = require('@weex-module/dom')
+
+module.exports = {
+ data: {
+ rows: []
+ },
+ created: function () {
+ for (var i = 0; i < 100; i++) {
+ this.rows.push({
+ id: i
+ })
+ }
+ },
+ methods: {
+ go: function () {
+ var el = this.$el('item-49')
+
+ dom.scrollToElement(el, {
+ offset: 0
+ })
+ }
+ }
+}
+</script>
+```
+
+[体验一下](http://dotwe.org/65d91cb47d0e348c5750d2248d59b6bd)
+
+## 约束
+
+1. **不允许**相同方向的 `<list>` 或者 `<scroller>` 互相嵌套,换句话说就是嵌套的 `<list>`/`<scroller>` 必须是不同的方向。
+
+ 举个例子,**不允许**一个垂直方向的 `<list>` 嵌套的一个垂直方向的 `<scroller>` 中,但是一个垂直方向的 `<list>` 是可以嵌套的一个水平方向的 list 或者 `<scroller>` 中的。
+
+2. `<list>` 为根节点时无需设置高度,但是内嵌 `<list>` 高度**必须可计算**,你可以使用 `flex` 或 `postion` 将 `<list>` 设为一个响应式高度(例如全屏显示), 也可以显式设置 `<list>` 组件的 `height` 样式。
+
+## 示例
+
+```html
+<template>
+ <div class="wrapper">
+ <list class="list">
+ <header class="header">
+ <text class="title">Search Results</text>
+ </header>
+ <refresh style="width: 750; padding: 30;" onrefresh="refreshData" display="{{refreshDisplay}}">
+ <text class="text"> ↓ Pull to refresh </text>
+ <loading-indicator class="indicator"></loading-indicator>
+ </refresh>
+ <cell class="row" repeat="item in items" id="item-{{$index}}">
+ <div>
+ <text class="item">Repo name: {{item.full_name}}</text>
+ </div>
+ <div>
+ <text class="item">Repo star: {{item.stargazers_count}}</text>
+ </div>
+ </cell>
+ <loading onloading="loadingData" style="width: 750; padding: 30;" display="{{loadingDisplay}}">
+ <text class="text">{{loadingText}}</text>
+ </loading>
+ </list>
+ <div class="up" onclick="goToTop">
+ <img class="img" src="https://img.alicdn.com/tps/TB1ZVOEOpXXXXcQaXXXXXXXXXXX-200-200.png"></img>
+ </div>
+ </div>
+</template>
+
+<style>
+.wrapper {
+ position: absolute;
+ top: 0;
+ right: 0;
+ bottom: 0;
+ left: 0;
+}
+.list{
+ background-color: #ffffff;
+ flex: 1;
+}
+.header {
+ height: 80;
+ align-items: center;
+ justify-content: center;
+ background-color: #efefef;
+ border-bottom-color: #eeeeee;
+ border-bottom-width: 2;
+ border-bottom-style: solid;
+}
+.title {
+ text-align: center;
+}
+.text {
+ text-align: center;
+}
+.row {
+ padding: 20;
+ border-bottom-color: #eeeeee;
+ border-bottom-width: 2;
+ border-bottom-style: solid;
+}
+.up {
+ width: 70;
+ height: 70;
+ position: fixed;
+ right: 20;
+ bottom: 20;
+}
+.img {
+ width: 70;
+ height: 70;
+}
+</style>
+
+<script>
+var dom = require('@weex-module/dom') || {}
+var stream = require('@weex-module/stream') || {}
+var modal = require('@weex-module/modal') || {}
+
+var SEARCH_URL = 'https://api.github.com/search/repositories?q=language:javascript&sort=stars&order=desc'
+
+module.exports = {
+ data: {
+ isLoaded: true,
+ page: 1,
+ loadingDisplay: 'hide',
+ refreshDisplay: 'hide',
+ loadingText: 'Loading...',
+ items:[]
+ },
+ created: function () {
+ var url = SEARCH_URL + '&page=' + this.page
+
+ this.renderData(url)
+
+ this.page++
+ },
+ methods: {
+ renderData: function (url) {
+ var self = this
+
+ stream.fetch({
+ method: 'GET',
+ url: url,
+ type:'json'
+ }, function(res) {
+ self.refreshDisplay = 'hide'
+ self.loadingDisplay = 'hide'
+
+ try {
+ var results = res.data.items || []
+
+ if (Array.isArray(results)) {
+ for(var i = 0; i < results.length; i++) {
+ self.items.push(results[i])
+ }
+ }
+
+ self.isLoaded = true
+ } catch(e) {}
+ },function(res){
+
+ })
+ },
+ loadingData: function (e) {
+ var url = SEARCH_URL + '&page=' + this.page
+ var self = this
+
+ if (self.isLoaded === false) return
+
+ self.loadingDisplay = 'show'
+
+ if (self.page <=10 ) {
+ self.renderData(url)
+ self.page++
+ } else {
+ self.loadingDisplay = 'hide'
+ self.loadingText = 'NO MORE!'
+ }
+ },
+ goToTop: function (e) {
+ dom.scrollToElement(this.$el('item-0'), {
+ offset: -100
+ })
+ },
+ refreshData: function (e) {
+ var url = SEARCH_URL + '&page=1'
+
+ if (this.isLoaded === false) return
+
+ this.refreshDisplay = 'show'
+
+ modal.toast({
+ 'message': 'Refreshing...',
+ 'duration': 1
+ })
+
+ this.items = []
+ this.page = 1
+ this.renderData(url)
+
+ this.refreshDisplay = 'hide'
+ }
+ }
+}
+</script>
+```
+
+[体验一下](http://dotwe.org/ed524ade679b0fa96e980600c53ea5ce)
\ No newline at end of file
http://git-wip-us.apache.org/repos/asf/incubator-weex-site/blob/32a097bf/_draft/v1.0/references/components/loading.md
----------------------------------------------------------------------
diff --git a/_draft/v1.0/references/components/loading.md b/_draft/v1.0/references/components/loading.md
new file mode 100644
index 0000000..f6d68fa
--- /dev/null
+++ b/_draft/v1.0/references/components/loading.md
@@ -0,0 +1,118 @@
+---
+title: <loading>
+type: references
+order: 2.6
+version: 0.10
+---
+
+# <loading>
+
+<span class="weex-version">v0.6.1+</span>
+
+`<loading>` 为 `<scroller>` 和 `<list>` 提供上拉加载功能。用法与特性与 `<refresh>` 类似, 是 `<scroller>` 和 `<list>` 的子组件,且只能在被 `<scroller>` 和 `<list>` 包含时才能被正确的渲染。
+
+## 子组件
+
+- [`<text>`](./text.html)
+- [`<image>`](./image.html)
+- `<loading-indicator>`: `<refresh>` 和 `<loading>` 组件的子组件,拥有默认的动画效果的实现。
+
+## 特性
+
+- `display {string}`:可选值为 `show` 或者 `hide`,仅隐藏 `<indicator>`,`<loading>` 其他子组件依然可见,`loading` 事件仍会被触发。
+
+## 样式
+
+支持所有通用样式。
+
+- 盒模型
+- `flexbox` 布局
+- `position`
+- `opacity`
+- `background-color`
+
+查看 [组件通用样式](../common-style.html)
+
+## 事件
+
+- `loading`:加载时被触发。
+
+## 约束
+
+- `<loading>` 不支持 `remove`,v0.9 版本会修复。
+- `display` 值为 `show` 或 `hide`。仅隐藏 `<indicator>`,`<loading>` 其他子组件依然可见,`loading` 事件仍会被触发。
+
+ 如果需要 `<loading>` hide 时隐藏文案并不再触发事件,有两种解决方法:
+
+ 1. 修改提示文案,并在 `loading` 事件中添加判断逻辑;
+ 2. v0.9+ 可通过 `remove` 解决。
+
+- 只能通过 `display` 特性进行展示和隐藏,且必须成对出现,即设置 `display="show"`,必须有对应的 `display="hide"`。
+
+## 示例
+
+```html
+<template>
+ <list>
+ <header>
+ <div class="center">
+ <text style="text-align:center">I am the header</text>
+ </div>
+ </header>
+ <loading onloading="onloading" display="{{loadingDisplay}}" style="width:750;flex-direction: row;justify-content: center;">
+ <loading-indicator style="height:160;width:160;color:#3192e1"></loading-indicator>
+ </loading>
+ <cell class="row" repeat="i in staffs" index="{{$index}}">
+ <div class="item">
+ <text>{{i.name}}</text>
+ </div>
+ </cell>
+ </list>
+</template>
+
+<style>
+ .row {
+ width: 750;
+ }
+ .item {
+ justify-content: center;
+ border-bottom-width: 2;
+ border-bottom-color: #c0c0c0;
+ height: 100;
+ padding:20;
+ }
+ .center {
+ border-bottom-width: 2;
+ border-bottom-color: #cccccc;
+ height: 100;
+ padding:20;
+ background-color:#FFFFFF;
+ justify-content: center;
+ }
+</style>
+
+<script>
+ module.exports = {
+ data: {
+ staffs:[],
+ loadingDisplay: 'show',
+ loadingText: 'pull up to load more',
+ refreshText: 'pull down to refresh'
+ },
+ created:function() {
+ this.refreshDisplay='show'
+ this.staffs=[{name:'inns'},{name:'connon'},{name:'baos'},{name:'anna'},{name:'dolley'},{name:'lucy'},{name:'john'}, {name:'lily'},{name:'locke'},{name:'jack'},{name:'danny'},{name:'rose'},{name:'harris'},{name:'lotus'},{name:'louis'}];
+ },
+ methods:{
+ onloading:function(e){
+ console.log('onloading...');
+ this.staffs.push({name:'onloading'})
+ }
+ }
+ }
+</script>
+```
+
+[体验一下](http://dotwe.org/6adf7add849f3c9fcdbc776a6c471f02)
+
+更多示例可查看 [`<list>`](./list.html)
[14/51] [abbrv] incubator-weex-site git commit: rearrangement the
structure of the document
Posted by ha...@apache.org.
http://git-wip-us.apache.org/repos/asf/incubator-weex-site/blob/32a097bf/source/cn/v-0.10/advanced/extend-to-android.md
----------------------------------------------------------------------
diff --git a/source/cn/v-0.10/advanced/extend-to-android.md b/source/cn/v-0.10/advanced/extend-to-android.md
deleted file mode 100644
index f816ebd..0000000
--- a/source/cn/v-0.10/advanced/extend-to-android.md
+++ /dev/null
@@ -1,170 +0,0 @@
----
-title: Android 扩展
-type: advanced
-order: 9
-has_chapter_content: true
-version: 0.10
----
-
-# Android 扩展
-
-Weex 提供了扩展机制,可以根据自己的业务进行定制自己的功能。
-主要分为两类扩展:
-
-- Module 扩展 非 UI 的特定功能。例如 sendHttp、openURL 等。
-- Component 扩展 实现特别功能的 Native 控件。例如:RichTextview,RefreshListview 等。
-- Adapter 扩展 Weex 对一些基础功能实现了统一的接口,可实现这些接口来定制自己的业务。例如:图片下载等。
-
-## Module 扩展
-
-1. Module 扩展必须继承 WXModule 类。
-2. 扩展方法必须加上 @WXModuleAnno 注解。Weex 会根据注解来判断当前方法是否要运行在 UI 线程,和当前方法是否是扩展方法。
-3. Weex是根据反射来进行调用 Module 扩展方法,所以Module中的扩展方法必须是 public 类型。
-4. 同样因为是通过反射调用,Module 不能被混淆。请在混淆文件中添加代码:`-keep public class * extends com.taobao.weex.common.WXModule{*;}`
-5. Module 扩展的方法可以使用 int, double, float, String, Map, List 类型的参数
-6. 完成 Module 后一定要在初始化时注册 `WXSDKEngine.registerModule("myModule", MyModule.class);` 否则会报类似错误:`ReportException :undefined:9: TypeError: Object #<Object> has no method 'printLog'`
-
-示例如下:
-
-```java
-public class MyModule extends WXModule {
-
- @WXModuleAnno(runOnUIThread = true)
- public void printLog(String msg) {
- Toast.makeText(mWXSDKInstance.getContext(),msg,Toast.LENGTH_SHORT).show();
- }
-}
-```
-
-JS 调用如下:
-
-```html
-<template>
- <div>
- <text onclick="click">点击我测试</text>
- </div>
-</template>
-
-<script>
- module.exports = {
- methods: {
- click: function() {
- require('@weex-module/myModule').printLog("我是一个测试!");
- }
- }
- }
-</script>
-```
-
-## Component 扩展
-
-1. Component 扩展类必须集成 WXComponent.
-2. Component 对应的设置属性的方法必须添加注解 @WXComponentProp(name=value(value is attr or style of dsl))
-3. Weex sdk 通过反射调用对应的方法,所以 Component 对应的属性方法必须是 public,并且不能被混淆。请在混淆文件中添加代码 `-keep public class * extends com.taobao.weex.ui.component.WXComponent{*;}`
-4. Component 扩展的方法可以使用 int, double, float, String, Map, List 类型的参数
-5. 完成 Component 后一定要在初始化时注册 `WXSDKEngine.registerComponent("richtext",RichText.class);`
-
-示例如下:
-
-```java
-public class RichText extends WXComponent {
-
- public RichText(WXSDKInstance instance, WXDomObject dom, WXVContainer parent, boolean isLazy) {
- super(instance, dom, parent, isLazy);
- }
-
- @Override
- protected void initView() {
- mHost=new TextView(mContext);
- ((TextView)mHost).setMovementMethod(LinkMovementMethod.getInstance());
- }
-
- @WXComponentProp(name = "tel")
- public void setTelLink(String tel){
- SpannableString spannable=new SpannableString(tel);
- spannable.setSpan(new URLSpan("tel:"+tel),0,tel.length(), Spanned.SPAN_EXCLUSIVE_EXCLUSIVE);
- ((TextView)mHost).setText(spannable);
- }
-}
-```
-
-JS 调用如下:
-
-```html
-<template>
- <div>
- <richText tel="12305" style="width:200;height:100">12305</text>
- </div>
-</template>
-```
-## Adapter扩展
-
-图片下载:
-
-需要时集成接口 IWXImgLoaderAdapter,实现 setImage 方法。
-
-示例如下:
-
-```java
-public class ImageAdapter implements IWXImgLoaderAdapter {
-
- public ImageAdapter() {
- }
-
- @Override
- public void setImage(final String url, final ImageView view,
- WXImageQuality quality, WXImageStrategy strategy) {
-
- WXSDKManager.getInstance().postOnUiThread(new Runnable() {
-
- @Override
- public void run() {
- if(view==null||view.getLayoutParams()==null){
- return;
- }
- if (TextUtils.isEmpty(url)) {
- view.setImageBitmap(null);
- return;
- }
- String temp = url;
- if (url.startsWith("//")) {
- temp = "http:" + url;
- }
- if (view.getLayoutParams().width <= 0 || view.getLayoutParams().height <= 0) {
- return;
- }
- Picasso.with(WXEnvironment.getApplication())
- .load(temp)
- .into(view);
- }
- },0);
- }
-}
-```
-#### 组件方法支持
-从WeexSDK 0.9.5开始,你可以定义组件方法
-
-- 在组件中如下声明一个组件方法
-
- ```java
- @JSMethod
- public void focus(){
- //method implementation
- }
- ```
-- 注册组之后,你可以在weex 文件中调用
-
- ```html
- <template>
- <mycomponent id='mycomponent'></mycomponent>
- </template>
- <script>
- module.exports = {
- created: function() {
- this.$el('mycomponent').focus();
- }
- }
- </script>
- ```
-
-注:工程要添加依赖 `compile 'com.squareup.picasso:picasso:2.5.2'`
http://git-wip-us.apache.org/repos/asf/incubator-weex-site/blob/32a097bf/source/cn/v-0.10/advanced/extend-to-html5.md
----------------------------------------------------------------------
diff --git a/source/cn/v-0.10/advanced/extend-to-html5.md b/source/cn/v-0.10/advanced/extend-to-html5.md
deleted file mode 100644
index ff99629..0000000
--- a/source/cn/v-0.10/advanced/extend-to-html5.md
+++ /dev/null
@@ -1,253 +0,0 @@
----
-title: weex-html5 扩展
-type: advanced
-order: 11
-has_chapter_content: true
-version: 0.10
----
-
-# 扩展 weex-html5
-
-### 简介
-
-Weex 是一个高可扩展性的跨平台动态化开发方案,你可以在现有组件基础上定制自己需要的三端组件。你可以为 Weex API 模块添加新的方法,或者创建新的 API 模块和新的加载器。按照以下几个步骤扩展你的组件,API 或者加载器。
-
-首先要明确的是,组件和 API 模块是基于 Weex 的扩展,但是独立于 Weex,组件的定义本身是不需要依赖于 Weex 的,这样有助于组件的分散化管理,去除中心化依赖。
-
-其次,当你扩展一个组件,你需要同时扩展三端的组件(android, ios 和 web 端),毕竟 Weex 是一个重视三端一致体验的跨平台移动框架。你可以一个端一个端的扩展,也可以召唤其他端上的开发者来共同完成你在其他端上的组件(你总是可以在社区找到对某个功能有共同需求的开发者)。这里有一些在 [android 端](./extend-to-android.md)和 [ios 端](./extend-to-ios.md)做扩展的文档可以参考。
-
-你应该将你的扩展发布到 Weex 开发者可以方便找到和使用的渠道,比如 `npm`。我们推荐你将你开发的组件发布到 `npm` 供其他 Weex 开发者使用。
-
-最重要的是,你的组件的命名需要遵守 Weex 组件命名规范:以 `weex-` 开头作为组件的前缀,并且以 `-<platform>` 做为结尾后缀,除非你发布的包是三端的实现都包含在内的。这里有个 [`<weex-hello-web`>](https://github.com/MrRaindrop/weex-hello-web) 的例子作为参考,这里注册了一个简单的自定义的组件。
-
-### 创建新组件
-
-步骤:
-1. 在你的组件实现中必须继承 `Weex.Component` 这个类, 并选择性的重写其中的一些方法。
-2. 你的组件的 exports 需要暴露一个 `init` 方法,并在其中使用 `Weex.registerComponent` 注册你的组件。
-
-**这里用一个例子展示如何扩展一个新的组件**
-
-看这个组件扩展的代码( web 端上的组件):
-
-``` javascript
-const attr = {
- // ...
-}
-const style = {
- // ...
-}
-const event = {
- // ...
-}
-// 每个扩展组件都需要实现一个init方法,Weex会通过这方法进行安装和注册.
-function init (Weex) {
- const Component = Weex.Component
- const extend = Weex.utils.extend
-
- // 组件的构造函数
- function Hello (data) {
- Component.call(this, data)
- }
-
- // prototype继承
- Hello.prototype = Object.create(Component.prototype)
- extend(Hello.prototype, proto)
-
- // 配置属性、样式以及事件
- extend(Hello.prototype, { attr })
- extend(Hello.prototype, {
- style: extend(Object.create(Component.prototype.style), style)
- })
- extend(Hello.prototype, { event })
-
- Weex.registerComponent('weex-hello', Hello)
-}
-
-// 暴露init方法接口.
-export default { init }
-```
-
-上述代码摘引自 [weex-hello-web/src/index.js](https://github.com/MrRaindrop/weex-hello-web/blob/master/src/index.js#L46-L65)
-
-这个demo重写了基类 `Component`中的`create`方法。你也可以选择重写`Component`中的一些其他方法来定制组件的行为。典型的方法包括:
-- `create`: 创建组件的节点,在方法体中return这个节点.
-- `createChildren` 创建子节点.
-- `insertBefore` 在某个子节点之前插入一个新的子节点.
-- `appendChild` 在子节点列表的最后加上一个节点.
-- `removeChild` 移除一个子节点.
-
-**进阶**:更多关于组件定制和扩展的细节和代码展示,可以参考 [weex 主仓库的代码](https://github.com/apache/incubator-weex/tree/dev/html5),这里的组件基本上都是通过上述方式进行定义的。
-
-重要的一点,注册组件的关键方法是 `Weex.registerComponent`,如示例里的 `weex-hello` 组件的注册:
-
-``` javascript
-Weex.registerComponent('weex-hello', Hello)
-```
-
-上述代码引自 [weex-hello-web/src/index.js](https://github.com/MrRaindrop/weex-hello-web/blob/master/src/index.js#L62)
-
-在某个需要使用该组件的weex项目中使用 `Weex.install` 方法安装该组件:
-
-``` javascript
-// import the original weex-html5.
-import weex from 'weex-html5'
-import hello from 'weex-hello-web'
-// install the component.
-weex.install(hello)
-```
-
-上述代码引自 [weex_extend_demo/src/main.js](https://github.com/MrRaindrop/weex_extend_demo/blob/master/src/main.js#L1-L5)
-
-在你的 `.we` 文件中直接使用这个组件:
-
-``` html
-<template>
- <div>
- <weex-hello class="hello" style="txt-color:#fff;bg-color:green"
- value="WEEX" onclick="handleClick">
- </weex-hello>
- </div>
-</template>
-```
-
-上述代码引自[weex_extend_demo/demo/index.we](https://github.com/MrRaindrop/weex_extend_demo/blob/master/demo/index.we#L10-L15)
-### 扩展API
-
-你可以扩展新的 API 模块,或者为某个已有的模块添加新的 API. 比如,你可以添加一个 API 模块叫做 `user`,在里面添加一些用户登录登出处理的 API,比如 `login`, `logout` 等等。你可以通过 `require('@weex-module/moduleName)[methodName](arg1, arg2, ...)` ([Module APIs](../references/api.md)) 的方式调用你的 API.
-
-步骤:
-1. 实现你的 API module.
-2. 在你的 API 安装模块里暴露一个 `init` 方法,并在这个方法里面使用 `Weex.registerAPIModules` 注册你的 API module.
-
-**这里用一个例子展示如何扩展一个新的 API 模块**
-
-创建一个文件 `user.js`,在其中定义登录登出 `login/logout` 方法.
-
-``` javascript
-const user = {
- // 定义用户登录方法.
- login (callbackId) {
- login.then(res => {
- this.sender.performCallback(callbackId, res)
- }).catch(err => {
- this.sender.performCallback(callbackId, err)
- })
- },
-
- // 定义用户登出方法.
- logout (callbackId) {
- logout.then(res => {
- this.sender.performCallback(callbackId, res)
- }).catch(err => {
- this.sender.performCallback(callbackId, err)
- })
- }
-}
-
-// 定义user模块的元 (meta) 信息.
-const meta = {
- user: [{
- name: 'login',
- args: ['function']
- }, {
- name: 'logout',
- args: ['function']
- }]
-}
-
-export default {
- init (Weex) {
- // 注册这个模块,最后一个参数是模块的元信息.
- Weex.registerApiModule('user', user, meta)
- }
-}
-```
-
-这个简单的 user helper 模块就实现好了,可以发布到 npm 上,我们可以给这个模块取个名字,比如说 `weex-user-helper`。
-
-在你的新的 Weex 项目里安装这个模块:
-
-``` javascript
-import Weex from 'weex-html5'
-import user from 'weex-user-helper'
-
-Weex.install(user)
-```
-
-安装了这个模块,你就可以在 DSL 代码里引用这个模块干点事情了:
-
-``` html
-<template>
- <div>
- <div class="btn" onclick="handleClick">
- <text>LOGIN</text>
- </div>
- </div>
-</template>
-
-<script>
- var userHelper = require('@weex-module/user')
- module.exports = {
- methods: {
- handleClick: function () {
- userHelper.login(function () {
- // ... do sth. in callback.
- })
- }
- }
- }
-</script>
-```
-
-### 定制加载器loader
-
-**Loader仅用于weex-html5 (web端)加载dsl打包出来的bundle代码,native平台有其他的加载机制**
-
-已有的加载器包括 `xhr`, `jsonp` 和 `source`. 你可以使用 `weex.registerLoader` 注册一个新的加载器。例如,你有一个获取 Weex bundle 的服务 `myServe.getWeexBundle` , 通过这个服务可以加载 weex bundle,为此你可以定义一个加载器:
-
-``` javascript
-function loadByMyServe(pageId, callback) {
- myServe.getWeexBundle(pageId).then(function (bundle) {
- callback(bundle)
- }).catch(function(err) {
- callback(err)
- })
-}
-
-// 暴露init方法用于Weex安装此加载器.
-export default {
- init (Weex) {
- Weex.registerLoader('myserve', loadByMyServe)
- }
-}
-```
-
-在你的 weex-html5 项目的启动文件里安装并使用这个加载器:
-
-``` javascript
-import Weex from 'weex-html5'
-
-// 或者import from './myserve.js',不管是import一个npm模块还是import一个文件.
-import loader from 'myLoader'
-
-Weex.install(loader)
-
-// 在init方法里使用这个加载器加载bundle文件.
-(function () {
- function getUrlParam (key) {
- const reg = new RegExp('[?|&]' + key + '=([^&]+)')
- const match = location.search.match(reg)
- return match && match[1]
- }
- const page = getUrlParam('page') || 'examples/build/index.js'
- Weex.init({
- appId: location.href,
- loader: 'myserve', // 使用刚才定义的loader类型
- source: page,
- rootId: 'weex'
- })
-})();
-```
-
-以上是 Weex 带来的扩展性里比较主要的一部分,更多实现细节可以在 [weex 项目代码库](https://github.com/alibaba/weex)以及 weex 的开源社区里找到。
http://git-wip-us.apache.org/repos/asf/incubator-weex-site/blob/32a097bf/source/cn/v-0.10/advanced/extend-to-ios.md
----------------------------------------------------------------------
diff --git a/source/cn/v-0.10/advanced/extend-to-ios.md b/source/cn/v-0.10/advanced/extend-to-ios.md
deleted file mode 100644
index b163d62..0000000
--- a/source/cn/v-0.10/advanced/extend-to-ios.md
+++ /dev/null
@@ -1,279 +0,0 @@
----
-title: iOS 扩展
-type: advanced
-order: 10
-has_chapter_content: true
-version: 0.10
----
-
-## iOS 扩展
-
-### Module 扩展
-
-[swift](https://github.com/weexteam/article/issues/55) 扩展 module
-
-Weex SDK 只提供渲染,而不是其他的能力,如果你需要 像网络,图片,URL跳转这些特性,需要自己动手实现他们
-例如,如果你想实现一个url地址跳转函数,你可以按照如下步骤实现一个 Module
-1. **自定义module的步骤**
- 1. 自定义的module类 必须实现 `WXModuleProtocol`
- 2. 必须添加宏`WX_EXPORT_METHOD`, 它可以被weex识别,它的参数是 JavaScript调用 module指定方法的参数
- 3. 添加`@synthesized weexInstance`,每个moudle对象被绑定到一个指定的实例上
- 4. Module 方法会在UI线程中被调用,所以不要做太多耗时的任务在这里,如果要在其他线程执行整个module 方法,需要实现`WXModuleProtocol`中`- (NSThread *)targetExecuteThread`的方法,这样,分发到这个module的任务会在指定的线程中运行
- 5. Weex 的参数可以是 String 或者Map
- 6. Module 支持返回值给 JavaScript中的回调,回调的类型是`WXModuleCallback`,回调的参数可以是String或者Map
-
- ```object-c
- @implementation WXEventModule
- @synthesize weexInstance;
- WX_EXPORT_METHOD(@selector(openURL:callback))
- - (void)openURL:(NSString *)url callback:(WXModuleCallback)callback
- {
- NSString *newURL = url;
- if ([url hasPrefix:@"//"]) {
- newURL = [NSString stringWithFormat:@"http:%@", url];
- } else if (![url hasPrefix:@"http"]) {
- newURL = [NSURL URLWithString:url relativeToURL:weexInstance.scriptURL].absoluteString;
- }
-
- UIViewController *controller = [[WXDemoViewController alloc] init];
- ((WXDemoViewController *)controller).url = [NSURL URLWithString:newURL];
-
- [[weexInstance.viewController navigationController] pushViewController:controller animated:YES];
- callback(@{@"result":@"success"});
- }
-
- @end
- ```
-2. **Register the module**
- 通过调用 WXSDKEngine 中的 `registerModule:withClass`方法来注册自己的module
-
- ```object-c
- WXSDKEngine.h
- /**
- * @abstract Registers a module for a given name
- * @param name The module name to register
- * @param clazz The module class to register
- **/
- + (void)registerModule:(NSString *)name withClass:(Class)clazz;
- [WXSDKEngine registerModule:@"event" withClass:[WXEventModule class]];
- ```
-3. **使用自己的module**
- 这里的 require 里面的event 就是在 上一步调用`registerModule:` 注册module 时候的name
-
- ```javascript
- var eventModule = require('@weex-module/event');
- eventModule.openURL('url',function(ret) {
- nativeLog(ret);
- });
- ```
-
- Weex SDK没有 图片下载,navigation 操作的能力,请大家自己实现这些 protocol
-
-### handler 扩展
- **WXImgLoaderProtocol**
-
- weexSDK 没有提供图片下载的能力,需要实现 WXImgLoaderProtocol,参考下面的例子
-
- ```object-c
- WXImageLoaderProtocol.h
- @protocol WXImgLoaderProtocol <WXModuleProtocol>
- /**
- * @abstract Creates a image download handler with a given URL
- * @param imageUrl The URL of the image to download
- * @param imageFrame The frame of the image you want to set
- * @param options : The options to be used for this download
- * @param completedBlock : A block called once the download is completed.
- image : the image which has been download to local.
- error : the error which has happened in download.
- finished : a Boolean value indicating whether download action has finished.
- */
- -(id<WXImageOperationProtocol>)downloadImageWithURL:(NSString *)url imageFrame:(CGRect)imageFrame userInfo:(NSDictionary *)options completed:(void(^)(UIImage *image, NSError *error, BOOL finished))completedBlock;
- @end
- ```
-
- 实现上述协议
-
- ```object-c
- @implementation WXImgLoaderDefaultImpl
- #pragma mark -
- #pragma mark WXImgLoaderProtocol
-
- - (id<WXImageOperationProtocol>)downloadImageWithURL:(NSString *)url imageFrame:(CGRect)imageFrame userInfo:(NSDictionary *)userInfo completed:(void(^)(UIImage *image, NSError *error, BOOL finished))completedBlock
- {
- if ([url hasPrefix:@"//"]) {
- url = [@"http:" stringByAppendingString:url];
- }
- return (id<WXImageOperationProtocol>)[[SDWebImageManager sharedManager] downloadImageWithURL:[NSURL URLWithString:url] options:0 progress:^(NSInteger receivedSize, NSInteger expectedSize) {
- } completed:^(UIImage *image, NSError *error, SDImageCacheType cacheType, BOOL finished, NSURL *imageURL) {
- if (completedBlock) {
- completedBlock(image, error, finished);
- }
- }];
- }
- @end
- ```
-
-5. **handler注册**
-
- 你可以通过WXSDKEngine 中的 `registerHandler:withProtocol`注册handler
-
- ```object-c
- WXSDKEngine.h
- /**
- * @abstract Registers a handler for a given handler instance and specific protocol
- * @param handler The handler instance to register
- * @param protocol The protocol to confirm
- */
- + (void)registerHandler:(id)handler withProtocol:(Protocol *)protocol;
-
- [WXSDKEngine registerHandler:[WXImgLoaderDefaultImpl new] withProtocol:@protocol(WXImgLoaderProtocol)]
- ```
-
-#### Component 扩展
- 虽然WeexSDK中有提供内置的一些Component,但这有可能并不能满足你的需求。在之前你可能已经写了一些很酷炫native的组件,想包装一下,导入到Weex中,因此我们提供了让开发者实现自己的native Component
- 下面将以WeexSDK 中已经存在的 Component:`image`为例子,介绍一下如何构建一个native Component.
- 假设你已经了解IOS开发
- 1. 注册 Component
- 注册一个component比较简单,调用 `WXSDKEngine` 中的 `registerComponent:withClass:`方法,传入组件的标签名称,还有对应的class
- 然后你可以创建一个 `WXImageComponent` 表示`image`组件的实现 在.we 文件中,只需要写
- <image></image>
- 2. 添加属性
- 现在我们要做一些让image component更加强大的事情。既然作为一个图片的component,那它应该要有源,给他加上一个 `src`的属性,同时给它加上一个`resize`的属性(可以配置的有`contain/cover/stretch`)
-
- ```
- @interface WXImageComponent ()
-
- @property (nonatomic, strong) NSString *imageSrc;
- @property (nonatomic, assign) UIViewContentMode resizeMode;
-
- @end
- ```
- component中所有的style,attribute,events都会被传递到 Component的初始化方法中,所以,你可以在初始化方法中存储你感兴趣的一些属性值
-
- ```
- @implementation WXImageComponent
-
- - (instancetype)initWithRef:(NSString *)ref type:(NSString *)type styles:(NSDictionary *)styles attributes:(NSDictionary *)attributes events:(NSArray *)events weexInstance:(WXSDKInstance *)weexInstance
- {
- if (self = [super initWithRef:ref type:type styles:styles attributes:attributes events:events weexInstance:weexInstance]) {
- _imageSrc = [WXConvert NSString:attributes[@"src"]];
- _resizeMode = [WXConvert UIViewContentMode:attributes[@"resize"]];
- }
-
- return self;
- }
-
- @end
- ```
-
- attribute中拿到的值的类型都是`id`,我们可以用转换方法把它转换到任何值。Weex SDK提供了一些基础的转换方法,可以参考 `WXConvert`类,或者你可以添加自己的转换函数
-
- 1. Hooking 渲染生命周期
- native 的component 是由Weex管理的,weex 创建,布局,渲染,销毁。weex的component生命周期都是可以hook的,你可以在这些生命周期中去做自己的事情
-
- | 方法 | 描述 |
- | :-: | --- |
- | initWithRef:type:... | 用给定的属性初始化一个component. |
- | layoutDidFinish | 在component完成布局时候会调用. |
- | loadView | 创建component管理的view. |
- | viewWillLoad | 在component的view加载之前会调用. |
- | viewDidLoad | 在component的view加载完之后调用. |
- | viewWillUnload | 在component的view被释放之前调用. |
- | viewDidUnload | 在component的view被释放之后调用. |
- | updateStyles: | 在component的style更新时候调用. |
- | updateAttributes: | 在component的attribute更新时候调用. |
- | addEvent: | 给component添加event的时候调用. |
- | removeEvent: | 在event移除的时候调用. |
-
- 在image component的例子里面,如果我们需要我们自己的image view 的话,可以复写 `loadView`这个方法.
-
- ```
- - (UIView *)loadView
- {
- return [[WXImageView alloc] init];
- }
- ```
-
- 现在我们使用 `WXImageView` 渲染 `image` component。
- 1. 作为一个image component,我们需要拿到服务器图片,而且把它设置进image view 里. 这个操作可以在 `viewDidLoad` 方法中做,这个方法是在view已经被创建而且加载了时候weex SDK会调用到,而且`viewDidLoad`这个方法是你做额外初始化工作比如改变content mode(也就是设置resize) 的最好时间.
-
- ```
- - (void)viewDidLoad
- {
- UIImageView *imageView = (UIImageView *)self.view;
- imageView.contentMode = _resizeMode;
- imageView.userInteractionEnabled = YES;
- imageView.clipsToBounds = YES;
- imageView.exclusiveTouch = YES;
-
- // Do your image fetching and updating logic
- }
- ```
-
- 1. 如果可以改变image的src,也可以hook `updateAttributes:`方法来做属性更新操作,当`updateAttributes:`或者 `updateStyles:`被调用的时候, component的view 已经加载完成
-
- ```
- - (void)updateAttributes:(NSDictionary *)attributes
- {
- if (attributes[@"src"]) {
- _imageSrc = [WXConvert NSString:attributes[@"src"]];
- // Do your image updating logic
- }
-
- if (attributes[@"resize"]) {
- _resizeMode = [WXConvert UIViewContentMode:attributes[@"resize"]];
- self.view.contentMode = _resizeMode;
- }
- }
- ```
-
- 或许你需要考虑更多的生命周期方法去Hook,当布局完成时候,像`layoutDidFinish`,如果你想了解更多,可以参考一下`WXComponent.h` 声明的方法
- 现在你可以用在任何 .we文件里面使用 `<image>`,而且可以加上 image的属性
-
- ```
- <image style="your-custom-style" src="image-remote-source" resize="contain/cover/stretch"></image>
- ```
-##### component 方法
-WeexSDK 0.9.5 之后支持了在js中直接调用component的方法,这里提供一个例子,
-
-- 自定义一个WXMyCompoenent 的组件
-
- ```
- @implementation WXMyComponent
- WX_EXPORT_METHOD(@selector(focus)) // 暴露该方法给js
- - (instancetype)initWithRef:(NSString *)ref type:(NSString *)type styles:(NSDictionary *)styles attributes:(NSDictionary *)attributes events:(NSArray *)events weexInstance:(WXSDKInstance *)weexInstance
- {
- if (self = [super initWithRef:ref type:type styles:styles attributes:attributes events:events weexInstance:weexInstance]) {
- // handle your attributes
- // handle your styles
- }
-
- return self;
- }
-
- - (void)focus
- {
- NSLog(@"you got it");
- }
- @end
- ```
-
-- 注册组件 `[WXSDKEngine registerComponent:@"mycomponent" withClass:[WXMyComponent class]] `
-- 在weex 文件中调用
-
- ```html
- <template>
- <mycomponent id='mycomponent'></mycomponent>
- </template>
- <script>
- module.exports = {
- created: function() {
- this.$el('mycomponent').focus();
- }
- }
- </script>
- ```
-
-
-
-
\ No newline at end of file
http://git-wip-us.apache.org/repos/asf/incubator-weex-site/blob/32a097bf/source/cn/v-0.10/advanced/how-data-binding-works.md
----------------------------------------------------------------------
diff --git a/source/cn/v-0.10/advanced/how-data-binding-works.md b/source/cn/v-0.10/advanced/how-data-binding-works.md
deleted file mode 100644
index a905422..0000000
--- a/source/cn/v-0.10/advanced/how-data-binding-works.md
+++ /dev/null
@@ -1,39 +0,0 @@
----
-title: 数据绑定原理
-type: advanced
-order: 2
-has_chapter_content: true
-version: 0.10
----
-
-# 数据绑定实现原理
-
-Weex 的 JS Framework 是一个 MVVM,即 Model-View-ViewModel 框架。他会自动监听数据的变化,并通过 `{% raw %}{{字段名}}{% endraw %}` 的语法把数据和视图中所展示的内容自动绑定起来。当数据被改写的时候,视图会自动根据数据的变化而发生相应的变化。
-
-比如下面这个例子,`<text>` 的内容被绑定在了 `notes` 数据字段上:
-
-```html
-<template>
- <div>
- <text>{{notes}}</text>
- </div>
-<template>
-
-<script>
- module.exports = {
- data: {
- notes: 'Hello'
- }
- }
-</script>
-```
-
-Weex 的 JS Framework 会首先对 `data` 里的数据进行监听,这样未来的数据变化都能够被监听到。然后我们会编译整个 `<template>` 标签里的内容。当我们找到 `<text>` 标签里的 `{% raw %}{{notes}}{% endraw %}` 时,JS Framework 会跟踪 `data.notes` 的变化并在其发生变化时触发一个句柄,将 `<text>` 的内容设置为 `data.notes` 最新的值。这样的话开发者就不必手动关心数据和视图之间的数据同步问题了。
-
-在这个基础上我们还设计了一些特殊的语法:
-
-- `<foo if="...">` 代表一个条件监听,当其值为 `true` 时,`<foo>` 元素将会被创建和载入,反之则不会被创建或被移除掉。
-- `<foo repeat="...">` 代表一个列表监听,第一次加载的时候 `<foo>` 元素会被按照数组里的数据逐条 clone 并赋值。而当有列表项增加、移动或移除时,视图层也会自动触发相应的改变,并且智能优化至最小变更策略
-- `<foo if="..." repeat="...">` 两个特殊语法共用时,将会优先展开 `repeat` 然后逐条判断 `if`。
-
-相比于一些 virtual-DOM 的 diff 计算机制,我们会直接对数据进行 diff,而且只会 diff 由于用户操作或数据操作发生改变的那部分数据和视图,这是一种更小范围的计算方式。尤其在追求轻量快速的移动端界面上,这种更新机制更加显得具有优势。
http://git-wip-us.apache.org/repos/asf/incubator-weex-site/blob/32a097bf/source/cn/v-0.10/advanced/images/how-arch.png
----------------------------------------------------------------------
diff --git a/source/cn/v-0.10/advanced/images/how-arch.png b/source/cn/v-0.10/advanced/images/how-arch.png
deleted file mode 100644
index a13df7a..0000000
Binary files a/source/cn/v-0.10/advanced/images/how-arch.png and /dev/null differ
http://git-wip-us.apache.org/repos/asf/incubator-weex-site/blob/32a097bf/source/cn/v-0.10/advanced/images/how-render.png
----------------------------------------------------------------------
diff --git a/source/cn/v-0.10/advanced/images/how-render.png b/source/cn/v-0.10/advanced/images/how-render.png
deleted file mode 100644
index db9b0f4..0000000
Binary files a/source/cn/v-0.10/advanced/images/how-render.png and /dev/null differ
http://git-wip-us.apache.org/repos/asf/incubator-weex-site/blob/32a097bf/source/cn/v-0.10/advanced/index.md
----------------------------------------------------------------------
diff --git a/source/cn/v-0.10/advanced/index.md b/source/cn/v-0.10/advanced/index.md
deleted file mode 100644
index 8fea01e..0000000
--- a/source/cn/v-0.10/advanced/index.md
+++ /dev/null
@@ -1,146 +0,0 @@
----
-title: Weex 工作原理
-type: advanced
-order: 1
-has_chapter_content: true
-version: 0.10
----
-
-# Weex 工作原理概述
-
-## 总览
-
-Weex是跨平台,可扩展的动态化技术. 你能通过在Weex源码中写`<template>`, `<style>` 和 `<script>`标签,然后把这些标签转换为JS Bundle用于部署, 在服务端以这些JS Bundle响应请求. 当客户端接收到JS Bundle时,它能用被客户端中的JS引擎用于管理Native渲染;API调用和用户交互.
-
-### 工作流
-
-```
-Weex we 文件 --------------前端(we源码)
-↓ (转换) ------------------前端(构建过程)
-JS Bundle -----------------前端(JS Bundle代码)
-↓ (部署) ------------------服务器
-在服务器上的JS bundle ----服务器
-↓ (编译) ------------------ 客户端(JS引擎)
-虚拟 DOM 树 --------------- 客户端(Weex JS Framework)
-↓ (渲染) ------------------ 客户端(渲染引擎)
-Native视图 --------------- 客户端(渲染引擎)
-```
-
-在上面的工作流中,我们提到:
-
-- Transformer(转换器): 一个Node JS工具, 转换Weex源码为JS Bundle
-- Weex JS Framework(JS框架): 运行于客户端的的JS框架,管理着Weex实例的运行。Weex实例由JS Bundle创建并构建起虚拟DOM树. 另外,它发送/接受 Native 渲染层产生的系统调用,从而间接的响应用户交互。
-- Native引擎: 在不同的端上,有着不同的实现: iOS/Android/HTML5. 他们有着共同的组件设计, 模块API 和渲染效果. 所以他们能配合同样的 JS Framework 和 JS Bundle工作。
-
-## 转换器
-
-转换器转换Weex源码为JS Bundle. 整体工作可以分为三个部分:
-
-- 转换 `<template>` 为类JSON的树状数据结构, 转换数据绑定为返回数据的函数原型.例如. For example: `<foo a="{% raw %}{{x}}{% endraw %}" b="1" />` 将转换为 `{type: "foo", attr: {a: function () {return this.x}, b: 1}}`.
-- 转换 `<style>` 为类JSON的树状数据结构. 例如: `.classname {name: value;}` 将转换为 `{classname: {name: value}}`.
-- 把上面两部分的内容和 `<script>` 中的内容结合. 上面的三个部分将结合成一个JavaScript AMD 模块.
-
-一个完整的例子:
-
-```html
-<template>
- <foo a="{{x}}" b="1" class="bar"></foo>
-</template>
-<style>
- .bar {width: 200; height: 200}
-</style>
-<script>
- module.exports = {
- data: function () {
- return {x: 100}
- }
- }
-</script>
-```
-
-将转换为:
-
-```javascript
-define('@weex-component/main', function () {
- module.exports = {
- data: function () {
- return {x: 100}
- }
- }
- module.template = {
- type: "foo",
- attr: {
- a: function () {return this.x},
- b: 1,
- classname: ['bar']
- }
- }
- module.style = {
- bar: {width: 200, height: 200}
- }
-})
-bootstrap('@weex-component/main')
-```
-
-除此之外,转换器还会做一些额外的事情: 合并Bundle ,添加引导函数,配置外部数据等等,更详细的,请参阅[Synatax](../references/specs/js-bundle-format.html)章节.
-
-## 注意
-
-当前大部分Weex工具最终输出的JS Bundle格式都经过了[Webpack](https://webpack.github.io/)的二次处理,所以你实际使用工具输出的JS Bundle会和上面的有所区别.
-## JS Framework
-
-JS Framework 在初始化阶段被原生 JavaScript 引擎运行. 它提供被每个JS Bundle调用的 `define()` 和 `bootstrap()` 函数. 一旦JS Bundle从服务器下载后,这些函数就会执行. `define()` 函数以注册模块;`bootstrap()`会编译主要的模块为虚拟DOM,并发送渲染指令给Native .
-
-JS 和 Native 的沟通主要通过两个关键方法进行:
-
-- `callNative` 是一个由native代码实现的函数, 它被JS代码调用并向native发送指令,例如 `rendering`, `networking`, `authorizing`和其他客户端侧的 `toast` 等API.
-- `callJS` 是一个由JS实现的函数, 它用于Native向JS发送指令. 目前这些指令由用户交互和Native的回调函数组成.
-## Native 渲染引擎
-
-Native 渲染引擎提供客户端组件和模块.
-
-**Component(组件)** 在屏幕内可见,有特定行为. 能被配置不同的属性和样式,能响应用户交互. 常见的组件有: `<div>`, `<text>`, `<image>`.
-
-**Module(模块)** 是一组能被JS Framework调用的API. 其中的一些能以异步的方式调用JS Framework, 例如: 发送HTTP请求.
-
-在Weex实例运行期间,Native渲染引擎将接收各种各样不同模块的API调用。这些调用创建或更新组件外观,运行如`toast`的Native API.当用户交互或模块回调时,`callJS()`会由JS Framework调用. 这样的循环往复将从Weex实例初始化到销毁一直持续. 如下面的架构图所示, HTML5渲染引擎提供和Native渲染引擎几乎一致的功能。
-
-
-
-Weex架构图
-
-### 从Javascript中调用Native
-
-```
-[JS Framework]
-↓ callNative
-模块 APIs
- 渲染 -> 模块显示
- 其他功能
-[Native 渲染引擎]
-```
-### 从Native中调用Javascript
-
-```
-[Native 渲染引擎]
-模块 APIs 回调
-用户交互
-↓ callJS
-[JS Framework]
-```
-### 渲染流程
-
-
-
-Weex 渲染流程
-
-1. 虚拟DOM.
-2. **构造树结构**. 分析虚拟DOM JSON数据以构造渲染树(RT).
-3. **添加样式**. 为渲染树的各个节点添加样式.
-4. **创建视图**. 为渲染树各个节点创建Native视图.
-5. **绑定事件**. 为Native视图绑定事件.
-6. **CSS布局**. 使用 [css-layout](https://github.com/facebook/css-layout) 来计算各个视图的布局.
-7. **更新视窗(Frame)**. 采用上一步的计算结果来更新视窗中各个视图的最终布局位置.
-8. 最终页面呈现.
-
-在Weex HTML5环境下 `CSS 布局` and `更新视窗` 由浏览器引擎(例如webkit)实现.
http://git-wip-us.apache.org/repos/asf/incubator-weex-site/blob/32a097bf/source/cn/v-0.10/advanced/integrate-devtools-to-android.md
----------------------------------------------------------------------
diff --git a/source/cn/v-0.10/advanced/integrate-devtools-to-android.md b/source/cn/v-0.10/advanced/integrate-devtools-to-android.md
deleted file mode 100644
index 5bffd05..0000000
--- a/source/cn/v-0.10/advanced/integrate-devtools-to-android.md
+++ /dev/null
@@ -1,272 +0,0 @@
----
-title: 集成 Devtools 到 Android
-type: advanced
-order: 12
-has_chapter_content: true
-version: 0.10
----
-
-# 集成 Devtools 到 Android
-
-Weex Devtools 能够方便调试 Weex 页面,但此功能离不开 Native 的支持。如何让你的 App 也集成 Devtools,在本章将会详细说明 Android 端如何接入 Weex Devtools。
-
-## Android 应用接入
-
-### 添加依赖
-
-可以通过 Gradle 或者 Maven 添加对 devtools aar 的依赖,也可以直接对源码依赖。强烈建议使用最新版本,因为 Weex SDK 和 devtools 都在快速的迭代开发中,新版本会有更多惊喜,同时也修复老版本中一些问题。最新的 release 版本可在[这里](https://github.com/weexteam/weex_devtools_android/releases)查看。所有的 release 版本都会发布到 [jcenter repo](https://bintray.com/alibabaweex/maven/weex_inspector)。
-
-- *Gradle 依赖*
-
- ```gradle
- dependencies {
- compile 'com.taobao.android:weex_inspector:0.8.0.0'
- }
- ```
-
-- *Maven依赖*
-
- ```xml
- <dependency>
- <groupId>com.taobao.android</groupId>
- <artifactId>weex_inspector</artifactId>
- <version>0.8.0.0</version>
- <type>pom</type>
- </dependency>
- ```
-
-- *源码依赖*
-
- 需要复制 [inspector](https://github.com/weexteam/weex_devtools_android/tree/master/inspector) 目录到你的 App 的同级目录,然后在工程的 `settings.gradle` 文件下添加 `include ":inspector"`,此过程可以参考 playground 源码的工程配置及其配置,然后在 App 的 `build.gralde` 中添加依赖。
-
- ```gradle
- dependencies {
- compile project(':inspector')
- }
- ```
-
- 另外 weex_inspector 中有一部分包是以 provided 的方式引入,接入方需要自行解决依赖和版本冲突。
-
- - **provided方式引用的包**
-
- ```gradle
- dependencies {
- provided 'com.google.code.findbugs:jsr305:2.0.1'
- provided 'com.android.support:appcompat-v7:23.1.1'
- provided 'com.taobao.android:weex_sdk:0.8.0'
- provided 'com.alibaba:fastjson:1.1.45+'
- ...
- }
- ```
-
- - **反射引用的包(0.8.0.0以上版本)**
-
- ```gradle
- dependencies {
- compile 'com.squareup.okhttp:okhttp:2.3.0'
- compile 'com.squareup.okhttp:okhttp-ws:2.3.0'
- ...
- }
- ```
-
- 或者
-
- ```gradle
- dependencies {
- compile 'com.squareup.okhttp:okhttp:3.4.1'
- compile 'com.squareup.okhttp:okhttp-ws:3.4.1'
- ...
- }
- ```
-
-#### 版本兼容
-
-| weex sdk | weex inspector | Debugger Server |
-|----------|----------------|-----------------|
-| 0.8.0.1+ | 0.0.8.1+ | 0.2.39+ |
-| 0.7.0+ | 0.0.7.13 | 0.2.38 |
-| 0.6.0+ | 0.0.2.2 | - |
-
-
-### 添加 Debug 模式开关
-
-控制调试模式的打开和关闭的关键点可以概括为三条规则。
-
-**规则一:通过 `sRemoteDebugMode` 和 `sRemoteDebugProxyUrl` 和来设置开关和 Debugger Server 地址。**
-
-Weex SDK 的 `WXEnvironment` 类里有一对静态变量标记了 Weex 当前的调试模式是否开启分别是:
-
-```java
-public static boolean sRemoteDebugMode; // 是否开启 debug 模式,默认关闭
-public static String sRemoteDebugProxyUrl; // DebugServer的websocket地址
-```
-
-无论在 App 中无论以何种方式设置 Debug 模式,都必须在恰当的时机调用类似如下的方法来设置 `WXEnvironment.sRemoteDebugMode` 和 `WXEnvironment.sRemoteDebugProxyUrl`。
-
-```java
-private void initDebugEnvironment(boolean enable, String host) {
- WXEnvironment.sRemoteDebugMode = enable;
- WXEnvironment.sRemoteDebugProxyUrl = "ws://" + host + ":8088/debugProxy/native";
-}
-```
-
-**规则二:修改 `sRemoteDebugMode` 后一定要调用``WXSDKEngine.reload()`。**
-
-一般來說,在修改了 `WXEnvironment.sRemoteDebugMode` 以后调用了 `WXSDKEngine.reload()` 方法才能够使 Debug模式生效。`WXSDKEngine.reload()` 用来重置 Weex 的运行环境上下文,在切换调试模式时需要调用此方法来创建新的 Weex 运行时和 DebugBridge 并将所有的 JS 调用桥接到调试服务器执行。在 reload 过程中会调用 launchInspector,这就是 SDK 控制 Debug 模式最核心一个方法,其传入参数即为 `sRemoteDebugMode`,若为 `true` 则该方法中尝试以反射的方式获取 DebugBridge 用来在远端执行 JS,否则在本地运行。
-
-```java
-private void launchInspector(boolean remoteDebug) {
- if (WXEnvironment.isApkDebugable()) {
- try {
- if (mWxDebugProxy != null) {
- mWxDebugProxy.stop();
- }
- HackedClass<Object> debugProxyClass = WXHack.into("com.taobao.weex.devtools.debug.DebugServerProxy");
- mWxDebugProxy = (IWXDebugProxy) debugProxyClass.constructor(Context.class, WXBridgeManager.class)
- .getInstance(WXEnvironment.getApplication(), WXBridgeManager.this);
- if (mWxDebugProxy != null) {
- mWxDebugProxy.start();
- if (remoteDebug) {
- mWXBridge = mWxDebugProxy.getWXBridge();
- } else {
- if (mWXBridge != null && !(mWXBridge instanceof WXBridge)) {
- mWXBridge = null;
- }
- }
- }
- } catch (HackAssertionException e) {
- WXLogUtils.e("launchInspector HackAssertionException ", e);
- }
- }
-}
-```
-
-只要遵循上面的原理,开启 Debug 模式的方式和时机可由接入方灵活实现。从 launchInspector 可以看到,SDK 对 devtools 的 aar 包并无强依赖,我们的 App 只需要在 Debug 包中打包该 aar 即可,这样多少可以缓解包大小问题和安全问题。
-
-**例外:** _若修改 `WXEnvironment.sRemoteDebugMode` 的时机在 `WXBridgeManager` 初始化和 restart 和之前则 `WXSDKEngine.reload()` 可忽略._
-
-**规则三:通过响应 `ACTION_DEBUG_INSTANCE_REFRESH` 广播及时刷新。**
-
-广播 `ACTION_DEBUG_INSTANCE_REFRESH` 在调试模式切换和 Chrome 调试页面刷新时发出,主要用来通知当前的 Weex容器以 Debug 模式重新加载当前页。在 playground 中的处理过程如下:
-
-```java
-public class RefreshBroadcastReceiver extends BroadcastReceiver {
- @Override
- public void onReceive(Context context, Intent intent) {
- if (IWXDebugProxy.ACTION_DEBUG_INSTANCE_REFRESH.equals(intent.getAction())) {
- if (mUri != null) {
- if (TextUtils.equals(mUri.getScheme(), "http") || TextUtils.equals(mUri.getScheme(), "https")) {
- loadWXfromService(mUri.toString());
- } else {
- loadWXfromLocal(true);
- }
- }
- }
- }
-}
-```
-
-如果接入方的容器未对该广播做处理,那么将不支持刷新和调试过程中编辑代码时的 watch 功能。
-
-## 接入示例
-
-最简单方式就是复用 Playground 的相关代码,比如扫码和刷新等模块,但是扫码不是必须的,它只是与 App 通信的一种形式,二维码里的包含DebugServer IP 及 bundle 地址等信息,用于建立 App 和 Debugger Server 之间的连接及动态加载 bundle。在 Playground 中给出了两种开启 debug 模式的范例。
-
-* 范例1:通过在 `XXXApplication` 中设置开关打开调试模式
-
-```java
-public class MyApplication extends Application {
- public void onCreate() {
- super.onCreate();
- initDebugEnvironment(true, "xxx.xxx.xxx.xxx"/*"DEBUG_SERVER_HOST"*/);
- }
-}
-```
-
-这种方式最直接,在代码中直接 hardcode 了开启调试模式,如果在 SDK 初始化之前调用甚至连 `WXSDKEngine.reload()` 都不需要调用,接入方如果需要更灵活的策略可以将 `initDebugEnvironment(boolean enable, String host)` 和 `WXSDKEngine.reload()` 组合在一起在合适的位置和时机调用即可。
-
-* 范例2:通过扫码打开调试模式
-
-Playground 中较多的使用扫码的方式传递信息,不仅用这种方式控制 Debug 模式的开关,而且还通过它来传入 bundle 的 url 直接调试。应当说在开发中这种方式是比较高效的,省去了修改 SDK 代码重复编译和安装 App 的麻烦,缺点就是调试工具这种方式接入需要 App 具有扫码和处理特定规则二维码的能力。除了 Playground 中的方式,接入方亦可根据业务场景对 Debugger 和接入方式进行二次开发。
-
-Playground 集成的具体代码可参考如下两个文件:
-
-* 开关控制,主要参考对二维码的处理部分,详见 [`WXApplication.java`](https://github.com/weexteam/weex_devtools_android/blob/master/playground/app/src/main/java/com/alibaba/weex/WXApplication.java)
-
-* 刷新控制 ,主要参考是对容器 `ACTION_DEBUG_INSTANCE_REFRESH`的处理,详见 [`WXPageActivity.java`](https://github.com/weexteam/weex_devtools_android/blob/master/playground/app/src/main/java/com/alibaba/weex/WXPageActivity.java)
-
-## 牛刀小试
-
-### 前置工作
-
-如果未安装 Debugger Server,在命令行执行 `npm install -g weex-toolkit` 既可以安装调试服务器,运行命令 `weex debug` 就会启动 DebugServer 并打开一个调试页面(详情请查看 [本地开发](/develop-on-your-local-machine.md))。页面下方会展示一个二维码,这个二维码用于向 App 传递 Server 端的地址建立连接。
-
-
-
-### 开始调试
-
-如果你的 App 客户端完成了以上步骤那么恭喜你已经接入完毕,可以愉快的调试 Weex bundle 了,调试体验和网页调试一致!建议新手首先用官方的 Playground 体验一下调试流程。只需要启动 App 扫描 Chrome 调试页面下方的第一个二维码即可建立与 Debugger Server 的通信,Chorome 的调试页面将会列出连接成功的设备信息。
-
-
-
-#### 主要步骤如下
-
-1. 如果你要加载服务器上 bundle,第一步就是要让你的 bundle sever 跑起来. 在 Playground 中特别简单,只需要你到 Weex 源码目录下,运行 `./start` 即可。
-2. 命令行运行 `weex debug` 启动 Debugger Server,Chrome 将会打开一个网页,在网页下方有一个二维码和简单的介绍。
-3. 启动 App 并确认打开调试模式。你将在上一步中打开的网页中看到一个设备列表,每个设备项都有两个按钮,分别是 `Debugger` 和 `Inspector`。
-4. 点击 `Inspector` Chrome 将创建 Inspector 网页;点击 `Debugger` Chrome 将创建 Debugger 网页;二者是相互独立的功能,不相互依赖。
-
----
-
-## 背景知识
-
-### Devtools 组件介绍
-Devtools 扩展了 [Chrome Debugging Protocol](https://developer.chrome.com/devtools/docs/debugger-protocol),在客户端和调试服务器之间的采用 [JSON-RPC](https://en.wikipedia.org/wiki/JSON-RPC) 作为通信机制,本质上调试过程是两个进程间协同,相互交换控制权及运行结果的过程。更多细节还请阅读 [Weex Devtools Debugger 的技术选型实录](http://www.atatech.org/articles/59284)这篇文章。
-
-* **客户端**
-
- Devtools 客户端作为 aar 被集成 App 中,它通过 webscoket 连接到调试服务器,此处并未做安全检查。出于安全机制及包大小考虑,强烈建议接入方只在 debug 版本中打包此 aar。
-
-* **服务器**
-
- Devtools 服务器端是信息交换的中枢,既连接客户端,又连接 Chrome,大多数情况下扮演一个消息转发服务器和 Runtime Manager 的角色。
-
-* **Web端**
-
- Chrome 的 V8 引擎扮演着 Bundle javascript runtime 的角色。开启 debug 模式后,所有的 bundle js 代码都在该引擎上运行。另一方面我们也复用了 Chrome 前端的调试界面,例如设置断点,查看调用栈等,调试页关闭则 runtime 将会被清理。
-
-调试的大致过程请参考如下时序图。
-
-
-
-## FAQ
-
-在各业务接入过程中,陆续发现一些问题,对高频次的问题解答如下,开发中以 weex debug -V 的方式启动 Debugger Server 可以看到 server 端的 log 信息,对照上文中的时序图对于定位问题还是非常有帮助,建议调试中默认开启 server 端 log。
-
-1. **扫码 App 在 DebugServerProxy 中抛出 class not found**
-
- 已知的原因如下:
-
- * weex_inspector 以 provided 方式引用的包是否引入成功,如 fastjson 等。
- * weex_inspector 以 compile 方式引用的包是否引入成功,某些 app 重新引入 `com.squareup.okhttp:okhttp:2.3.0` 和 `com.squareup.okhttp:okhttp-ws:2.3.0` 则不再报错。
- * 混淆规则影响反射。
-
-2. **playground 扫码调试 crash**
-
- 已知的原因如下:
-
- * 系统为 android 6+,崩溃信息提示进程需要 `android.permission.READ_PHONE_STATE` 权限,代码中未做权限检查,在 0.0.2.7 版本以后已修复,不再需要此权限。
-
-3. **扫码后设备列表页并没有出现我的设备信息**
-
- 已知的原因如下:
-
- * Debugger Server 和手机在不同网段,被防火墙隔离。
- * 手机连接了 PC 端的代理,当前尚不支持。
- * 多进程连接服务器端的同一端口,比如在 Application 的 `onCreate` 中初始化 sdk,若多个进程连接服务器端的同一端口则报错,在 0.0.2.3 版本以后已支持多进程无此问题。
-
-4. **调试过程中频繁刷新连接失败,Server 端提示重新启动 App,非必现**
-
- 已知的原因如下:
-
- * 多线程操作网络连接引起,在频繁的即断即连时容易触发。在 0.0.7.1 版本已修复。
http://git-wip-us.apache.org/repos/asf/incubator-weex-site/blob/32a097bf/source/cn/v-0.10/advanced/integrate-devtools-to-ios.md
----------------------------------------------------------------------
diff --git a/source/cn/v-0.10/advanced/integrate-devtools-to-ios.md b/source/cn/v-0.10/advanced/integrate-devtools-to-ios.md
deleted file mode 100644
index 18e0050..0000000
--- a/source/cn/v-0.10/advanced/integrate-devtools-to-ios.md
+++ /dev/null
@@ -1,230 +0,0 @@
----
-title: 集成 Devtools 到 iOS
-type: advanced
-order: 13
-has_chapter_content: true
-version: 0.10
----
-
-# 集成 Devtools 到 iOS
-
-Weex Devtools 能够方便调试 Weex 页面,但此功能离不开 Native 的支持。如何让你的 App 也集成 Devtools,在本章将会详细说明 iOS 端如何接入 Weex Devtools。
-
-## iOS 应用接入
-
-### 添加依赖
-
-#### 方法一:cocoapods 依赖
-
-在工程目录的 podfile 添加如下代码
-
-```
-source https://github.com/CocoaPods/Specs.git,
-pod 'WXDevtool', '0.7.0', :configurations => ['Debug'],
-```
-
-目前有如下几个版本:
-
-0.7.0, 0.6.1, 0.1.1, 0.1.0 [master repo]
-
----
-
-可以通过更新本地 podspec repo,pod search 来查询最新版本,在 podfile 文件添加依赖。
-
-
-*** 推荐在DEBUG模式下依赖。 ***
-
-#### 方法二:github 源码依赖
-
-
-1. [拉取](https://github.com/weexteam/weex-devtool-iOS)最新的WXDevtool代码。
-
-2. 按照如下图示:直接拖动source目录源文件到目标工程中
-
- 
-
-3. 按照红框中配置勾选
-
- 
-
-
- 在相对较大的互联网App研发中, framework 静态库被广泛应用,所以推荐使用方法一接入。
-
-### 集成功能
-
-如果按照方法一接入:podfile 的方式,添加头文件包含:
-
-```
-#import <TBWXDevtool/WXDevtool.h>
-```
-
-如果按照方法二接入:源码依赖的方式,添加头文件包含:
-
-```
-#import "WXDevtool.h"
-```
-
-查看 WXDevtool 头文件如下:
-
-```object-c
-#import <Foundation/Foundation.h>
-
-@interface WXDevTool : NSObject
-/**
-* set debug status
-* @param isDebug : YES:open debug model and inspect model;
-* default is NO,if isDebug is NO, open inspect only;
-* */
-+ (void)setDebug:(BOOL)isDebug;
-
-
-/**
-* get debug status
-* */
-+ (BOOL)isDebug;
-
-
-/**
-* launch weex debug
-* @param url : ws://ip:port/debugProxy/native, ip and port is your devtool server address
-* eg:@"ws://30.30.29.242:8088/debugProxy/native"
-* */
-+ (void)launchDevToolDebugWithUrl:(NSString *)url;
-
-@end
-```
-
-`setDebug`:参数为 `YES` 时,直接开启 debug 模式,反之关闭,使用场景如下所述
-
-在你自己的程序中添加如下代码:
-
-```object-c
-[WXDevTool launchDevToolDebugWithUrl:@"ws://30.30.31.7:8088/debugProxy/native"];
-```
-
-其中的 ws 地址正是 Weex debug 控制台中出现的地址,直接 copy 到 `launchDevToolDebugWithUrl` 接口中。
-
-如果程序一启动就开启 Weex 调试,**需要在 WeexSDK 引擎初始化之前**添加代码:
-
-```object-c
-[WXDevTool setDebug:YES];
-[WXDevTool launchDevToolDebugWithUrl:@"ws://30.30.31.7:8088/debugProxy/native"];
-```
-
-#### 附加页面刷新功能
-
-- 为什么需要页面刷新功能?
-
- 如下图所示,当点击 debug 按钮时,js 的运行环境会从手机端(JavaScriptCore)切换到 Chrome(V8),这时需要重新初始化 Weex 环境,重新渲染页面。页面渲染是需要接入方在自己的页面添加。
-
- 
-
-- 什么场景下需要添加页面刷新功能?
-
- - 点击 debug 按钮调试
- - 切换 RemoteDebug 开关
- - 刷新 Chrome 页面(command+R)
-
-- 如何添加刷新
-
- 在 Weex 页面初始化或 `viewDidLoad` 方法时添加注册通知,举例如下:
-
- ```object-c
- [[NSNotificationCenter defaultCenter] addObserver:self selector:notificationRefreshInstance: name:@"RefreshInstance" object:nil];
- ```
-
- 最后**千万记得**在 `dealloc` 方法中取消通知,如下所示
-
- ```
- - (void)dealloc
- {
- [[NSNotificationCenter defaultCenter] removeObserver:self];
- }
- ```
-
- 页面刷新实现,先销毁当前 instance,然后重新创建 instance,举例如下:
-
- ```
- - (void)render
- {
- CGFloat width = self.view.frame.size.width;
- [_instance destroyInstance];
- _instance = [[WXSDKInstance alloc] init];
- _instance.viewController = self;
- _instance.frame = CGRectMake(self.view.frame.size.width-width, 0, width, _weexHeight);
-
- __weak typeof(self) weakSelf = self;
- _instance.onCreate = ^(UIView *view) {
- [weakSelf.weexView removeFromSuperview];
- weakSelf.weexView = view;
- [weakSelf.view addSubview:weakSelf.weexView];
- UIAccessibilityPostNotification(UIAccessibilityScreenChangedNotification, weakSelf.weexView);
- };
- _instance.onFailed = ^(NSError *error) {
-
- };
-
- _instance.renderFinish = ^(UIView *view) {
- [weakSelf updateInstanceState:WeexInstanceAppear];
- };
-
- _instance.updateFinish = ^(UIView *view) {
- };
- if (!self.url) {
- return;
- }
- NSURL *URL = [self testURL: [self.url absoluteString]];
- NSString *randomURL = [NSString stringWithFormat:@"%@?random=%d",URL.absoluteString,arc4random()];
- [_instance renderWithURL:[NSURL URLWithString:randomURL] options:@{@"bundleUrl":URL.absoluteString} data:nil];
- }
- ```
-
-具体实现可参考 [playground](https://github.com/weexteam/weex-devtool-iOS/blob/master/Devtools/playground/WeexDemo/WXDemoViewController.m) `WXDemoViewController.m` 文件
-
-*说明:目前版本需要注册的通知名称为固定的 “RefreshInstance”,下个版本会添加用户自定义 name 。*
-
-## 使用
-
-如果未安装 Debugger Server,在命令行执行 `npm install -g weex-toolkit` 既可以安装调试服务器,运行命令 `weex debug` 就会启动 DebugServer 并打开一个调试页面(详情请查看 [本地开发](../guide/develop-on-your-local-machine.html))。页面下方会展示一个二维码,这个二维码用于向 App 传递 Server 端的地址建立连接。
-
-
-1. 日志级别控制
-
- 
- 日志级别可以控制native端关于weex的日志。
-
- 日记级别描述如下:
-
- ```
- Off = 0,
- Error = Error
- Warning = Error | Warning,
- Info = Warning | Info,
- Log = Log | Info,
- Debug = Log | Debug,
- All = NSUIntegerMax
- ```
-
- 解释:off 关闭日志,Warning 包含 Error、Warning,Info 包含 Warning、Info,Log 包含 Info、Log,Debug 包含 Log、Debug,All 包含所有。
-
-2. Vdom/Native tree选择
-
- 
-
- *图一*
-
- 
-
- *图二*
-
- 点击图一所示native选项会打开图二,方便查看native tree以及view property
-
- 
-
- *图三*
-
- 
-
- *图四*
-
- 点击图三所示 vdom 选项会打开图四,方便查看 vdom tree 以及 component property。
http://git-wip-us.apache.org/repos/asf/incubator-weex-site/blob/32a097bf/source/cn/v-0.10/advanced/integrate-to-android.md
----------------------------------------------------------------------
diff --git a/source/cn/v-0.10/advanced/integrate-to-android.md b/source/cn/v-0.10/advanced/integrate-to-android.md
deleted file mode 100644
index b5bbf8c..0000000
--- a/source/cn/v-0.10/advanced/integrate-to-android.md
+++ /dev/null
@@ -1,201 +0,0 @@
----
-title: 集成到 Android
-type: advanced
-order: 4
-has_chapter_content: true
-version: 0.10
----
-
-# WEEX SDK 集成到 Android 工程
-
-注:以下文档都是假设您已经具备一定的Android开发经验。
-### Android 集成有两种方式
-
-1. 源码依赖:能够快速使用WEEX最新功能,可以根据自己项目的特性进行相关改进。
-2. SDK依赖:WEEX 会在jcenter 定期发布稳定版本。[jcenter](https://bintray.com/alibabaweex/maven/weex_sdk/view)
- 注:国内可能需要翻墙
-
-## 前期准备
-
-- 已经安装了[JDK](http://www.oracle.com/technetwork/java/javase/downloads/jdk8-downloads-2133151.html) version>=1.7 并配置了环境变量
-- 已经安装[Android SDK](https://developer.android.com/studio/index.html) 并配置环境变量。
-- Android SDK version 23 (compileSdkVersion in [`build.gradle`](https://github.com/apache/incubator-weex/blob/master/android/sdk/build.gradle))
-- SDK build tools version 23.0.1 (buildToolsVersion in [`build.gradle`](https://github.com/apache/incubator-weex/blob/master/android/sdk/build.gradle))
-- Android Support Repository >= 17 (for Android Support Library)
-
-## 快速接入
-
-如果你是尝鲜或者对稳定性要求比较高可以使用依赖SDK的方式。
-步骤如下:
-1. 创建Android工程,没有什么要特别说明的,按照你的习惯来。
-2. 修改build.gradle 加入如下基础依赖
-
- ```gradle
- compile 'com.android.support:recyclerview-v7:23.1.1'
- compile 'com.android.support:support-v4:23.1.1'
- compile 'com.android.support:appcompat-v7:23.1.1'
- compile 'com.alibaba:fastjson:1.1.46.android'
- compile 'com.taobao.android:weex_sdk:0.5.1@aar'
- ```
-
- 注:版本可以高不可以低。
-### 代码实现
-
-注:附录中有完整代码地址
-- 实现图片下载接口,初始化时设置。
-
-```java
-package com.weex.sample;
-
-import android.widget.ImageView;
-
-import com.taobao.weex.adapter.IWXImgLoaderAdapter;
-import com.taobao.weex.common.WXImageStrategy;
-import com.taobao.weex.dom.WXImageQuality;
-
-/**
- * Created by lixinke on 16/6/1.
- */
-public class ImageAdapter implements IWXImgLoaderAdapter {
-
-
- @Override
- public void setImage(String url, ImageView view, WXImageQuality quality, WXImageStrategy strategy) {
- //实现你自己的图片下载,否则图片无法显示。
- }
-}
-```
-- 初始化
-
-```java
-package com.weex.sample;
-
-import android.app.Application;
-
-import com.taobao.weex.InitConfig;
-import com.taobao.weex.WXSDKEngine;
-
-/**
- * 注意要在Manifest中设置android:name=".WXApplication"
- * 要实现ImageAdapter 否则图片不能下载
- * gradle 中一定要添加一些依赖,否则初始化会失败。
- * compile 'com.android.support:recyclerview-v7:23.1.1'
- * compile 'com.android.support:support-v4:23.1.1'
- * compile 'com.android.support:appcompat-v7:23.1.1'
- * compile 'com.alibaba:fastjson:1.1.45'
- */
-public class WXApplication extends Application {
-
- @Override
- public void onCreate() {
- super.onCreate();
- InitConfig config=new InitConfig.Builder().setImgAdapter(new ImageAdapter()).build();
- WXSDKEngine.initialize(this,config);
- }
-}
-
-```
-- 开始渲染
-
-```java
-package com.weex.sample;
-
-import android.os.Bundle;
-import android.support.v7.app.AppCompatActivity;
-import android.view.View;
-
-import com.taobao.weex.IWXRenderListener;
-import com.taobao.weex.WXSDKInstance;
-import com.taobao.weex.common.WXRenderStrategy;
-import com.taobao.weex.utils.WXFileUtils;
-
-public class MainActivity extends AppCompatActivity implements IWXRenderListener {
-
- WXSDKInstance mWXSDKInstance;
-
- @Override
- protected void onCreate(Bundle savedInstanceState) {
- super.onCreate(savedInstanceState);
- setContentView(R.layout.activity_main);
-
- mWXSDKInstance = new WXSDKInstance(this);
- mWXSDKInstance.registerRenderListener(this);
- /**
- * WXSample 可以替换成自定义的字符串,针对埋点有效。
- * template 是.we transform 后的 js文件。
- * option 可以为空,或者通过option传入 js需要的参数。例如bundle js的地址等。
- * jsonInitData 可以为空。
- * width 为-1 默认全屏,可以自己定制。
- * height =-1 默认全屏,可以自己定制。
- */
- mWXSDKInstance.render("WXSample", WXFileUtils.loadFileContent("hello.js", this), null, null, -1, -1, WXRenderStrategy.APPEND_ASYNC);
- }
-
- @Override
- public void onViewCreated(WXSDKInstance instance, View view) {
- setContentView(view);
- }
-
- @Override
- public void onRenderSuccess(WXSDKInstance instance, int width, int height) {
-
- }
-
- @Override
- public void onRefreshSuccess(WXSDKInstance instance, int width, int height) {
-
- }
-
- @Override
- public void onException(WXSDKInstance instance, String errCode, String msg) {
-
- }
-
-
- @Override
- protected void onResume() {
- super.onResume();
- if(mWXSDKInstance!=null){
- mWXSDKInstance.onActivityResume();
- }
- }
-
- @Override
- protected void onPause() {
- super.onPause();
- if(mWXSDKInstance!=null){
- mWXSDKInstance.onActivityPause();
- }
- }
-
- @Override
- protected void onStop() {
- super.onStop();
- if(mWXSDKInstance!=null){
- mWXSDKInstance.onActivityStop();
- }
- }
-
- @Override
- protected void onDestroy() {
- super.onDestroy();
- if(mWXSDKInstance!=null){
- mWXSDKInstance.onActivityDestroy();
- }
- }
-}
-```
-
-## 源码依赖(IDE Android Studio)
-
-1. 下载源码 `git clone https://github.com/alibaba/weex`
-2. 创建 Android 工程。
-3. 通过以下路径引入 SDK Module
- File->New-Import Module-> 选择 WEEX SDK Module(weex/android/sdk) -> Finish
-4. app 的 build.gradle 中添加如下依赖:`compile project(':weex_sdk')`
-5. 其他设置请参考上面快速接入
-
-### 附录
-
-WXSample地址
-`https://github.com/xkli/WXSample.git`
http://git-wip-us.apache.org/repos/asf/incubator-weex-site/blob/32a097bf/source/cn/v-0.10/advanced/integrate-to-html5.md
----------------------------------------------------------------------
diff --git a/source/cn/v-0.10/advanced/integrate-to-html5.md b/source/cn/v-0.10/advanced/integrate-to-html5.md
deleted file mode 100644
index 30ee3fd..0000000
--- a/source/cn/v-0.10/advanced/integrate-to-html5.md
+++ /dev/null
@@ -1,69 +0,0 @@
----
-title: 集成到 web
-type: advanced
-order: 6
-has_chapter_content: true
-version: 0.10
----
-
-## 项目中引入 html5 版 Weex
-
-### 简介
-
-Weex 是一个跨平台可扩展的动态化移动框架,能够真正帮助开发者实现'一次开发,到处运行'。由 Weex 提供的相关工具进行打包好的 bundle 文件可以运行在 android, ios 以及 web(这里我们也称之为html5)平台的渲染器上。Weex HTML5 是一个专用于在移动端 webview 以及各种现代浏览器上渲染 weex 文件的渲染器。
-### 获取 Weex HTML5
-
-使用 npm 安装最新版本的 Weex HTML5,并在你的项目中 require 进来。
-#### 从 npm 安装
-
-请确保通过 `npm install` 或者 `npm update` 获取 Weex HTML5 的最新版本 npm 包。更多关于 npm 的信息情查阅 [npm 官方网站](https://docs.npmjs.com/)。
-
-```bash
-npm install weex-html5
-```
-
-通过 require 引入 weex-html5:
-
-```bash
-var weex = require('weex-html5')
-```
-
-**注意:** 介于 Weex 目前仍处于开源内测阶段,还没有完全开放源代码,因此 `weex-jsframework` 可能还没有在 npm 上发布。当前版本的 `weex-html5` 包含了 `weex-jsframework`,你只需要 require `weex-html5` 即可暂时在 web 平台上运行 weex 代码。建议关注 Weex 的后续版本发布并做必要的引用方式调整。
-### 初始化 Weex
-
-你可以通过 Weex 暴露的 API `init` 来初始化一个 Weex 实例。这个方法需要传递一些配置信息已确定一些环境变量等信息,这些配置信息介绍如下:
-- `appId`: Weex 实例的 id,可以是任意字符串或者数字,并注意不要重复.
-- `source`: 请求的 Weex bundle 文件地址,或者 Weex bundle 文件代码本身,取决于下面的 loader 配置.
-- `loader`: 加载器类型,用于加载 weex bundle,值可以是 'xhr', 'jsonp' 或者 'source'.
- - `xhr`: 通过 XMLHttpRequest 加载 source(即 weex bundle 的 url 地址).
- - `jsonp`: 通过 JSONP 加载 weex bundle.
- - `source`: 直接接受 weex bundle 的代码作为参数.
-- `rootId`: root 容器的 id,默认容器 id 是 'weex'.
-
-以下是一个 Weex 初始化的示例:
-
-``` javascript
-function weexInit() {
- function getUrlParam (key) {
- var reg = new RegExp('[?|&]' + key + '=([^&]+)')
- var match = location.search.match(reg)
- return match && match[1]
- }
-
- var loader = getUrlParam('loader') || 'xhr'
- var page = getUrlParam('page')
-
- // 需要指定一个jsonp回调函数名称,如果没有则用默认值'weexJsonpCallback'
- var JSONP_CALLBACK_NAME = 'weexJsonpCallback'
-
- window.weex.init({
- jsonpCallback: JSONP_CALLBACK_NAME,
- appId: location.href,
- source: page,
- loader: loader,
- rootId: 'weex'
- })
-}
-
-weexInit()
-```
http://git-wip-us.apache.org/repos/asf/incubator-weex-site/blob/32a097bf/source/cn/v-0.10/advanced/integrate-to-ios.md
----------------------------------------------------------------------
diff --git a/source/cn/v-0.10/advanced/integrate-to-ios.md b/source/cn/v-0.10/advanced/integrate-to-ios.md
deleted file mode 100644
index 54a5ca7..0000000
--- a/source/cn/v-0.10/advanced/integrate-to-ios.md
+++ /dev/null
@@ -1,110 +0,0 @@
----
-title: 集成到 iOS
-type: advanced
-order: 5
-has_chapter_content: true
-version: 0.10
----
-
-# Weex SDK 集成到 iOS
-
-### cocoaPods 引入 Weex iOS SDK到工程
-
-可以通过源码编译出 Weex SDK,可以在新的 feature 或者 bugfix 分支,尝试最新的 feature
-#### cocoaPods集成
-
- 假设你已经完成了安装[iOS 开发环境](https://developer.apple.com/library/ios/documentation/IDEs/Conceptual/AppStoreDistributionTutorial/Setup/Setup.html) 和 [CocoaPods](https://guides.cocoapods.org/using/getting-started.html)
-
-1. 从 github 上 clone 一份代码
-
- ```
- git clone https://github.com/alibaba/weex.git
- ```
-
-2. 把 WeexSDK 导入到你已有的项目,如果没有,可以[参考](https://developer.apple.com/library/ios/documentation/IDEs/Conceptual/AppStoreDistributionTutorial/Setup/Setup.html)新建项目
- 拷贝 `ios/sdk` 下面目录到你的项目目录,在添加依赖之前,确保项目目录有 `Podfile`,如果没有,创建一个,用文本编辑器打开,添加如下依赖
-
- 如果使用正式版本如 0.6.1 的,就不需要做 拷贝 `ios/sdk` 这个操作,直接引用 cocoaPods 的 master repo 上就可以,这个需要在 Podfile 最前面添加
-
- ```
- source 'https://github.com/CocoaPods/Specs.git'
- ```
-
- ```object-c
- target 'YourTarget' do
- platform :ios, '7.0'
- pod 'WeexSDK', :path=>'./sdk/' # pod 'WeexSDK', '0.6.1'
- end
- ```
-
- 在命令行(terminal)中,切换到当前目录,运行 `pod install`, 过一会,项目的 .workspace 结尾的文件就被创建出来,到这步,依赖已经添加完了
-
-3. 初始化 Weex 环境
- 在 AppDelegate.m 文件中做初始化操作,一般会在 `didFinishLaunchingWithOptions` 方法中如下添加
-
- ```object-c
- //business configuration
- [WXAppConfiguration setAppGroup:@"AliApp"];
- [WXAppConfiguration setAppName:@"WeexDemo"];
- [WXAppConfiguration setAppVersion:@"1.0.0"];
-
- //init sdk enviroment
- [WXSDKEngine initSDKEnviroment];
-
- //register custom module and component,optional
- [WXSDKEngine registerComponent:@"MyView" withClass:[MyViewComponent class]];
- [WXSDKEngine registerModule:@"event" withClass:[WXEventModule class]];
-
- //register the implementation of protocol, optional
- [WXSDKEngine registerHandler:[WXNavigationDefaultImpl new] withProtocol:@protocol(WXNavigationProtocol)];
-
- //set the log level
- [WXLog setLogLevel: WXLogLevelAll];
- ```
-
-4. 渲染 weex Instance
- Weex 支持整体页面渲染和部分渲染两种模式,你需要做的事情是用指定的 URL 渲染 weex 的 view,然后添加到它的父容器上,父容器一般都是 viewController
-
- ```object-c
- #import <WeexSDK/WXSDKInstance.h>
- - (void)viewDidLoad
- {
- [super viewDidLoad];
-
- _instance = [[WXSDKInstance alloc] init];
- _instance.viewController = self;
- _instance.frame = self.view.frame;
-
- __weak typeof(self) weakSelf = self;
- _instance.onCreate = ^(UIView *view) {
- [weakSelf.weexView removeFromSuperview];
- [weakSelf.view addSubview:weakSelf.weexView];
- };
-
- _instance.onFailed = ^(NSError *error) {
- //process failure
- };
-
- _instance.renderFinish = ^ (UIView *view) {
- //process renderFinish
- };
- [_instance renderWithURL:self.url options:@{@"bundleUrl":[self.url absoluteString]} data:nil];
- }
- ```
-
- WXSDKInstance 是很重要的一个类,提供了基础的方法和一些回调,如`renderWithURL`,`onCreate`,`onFailed`等,可以参见 `WXSDKInstance.h`的 声明
-
-5. 销毁 Weex Instance
-
- 在 viewController 的 dealloc 阶段 销毁掉 weex instance, 释放内存,避免造成内存泄露
-
- ```object-c
- - (void)dealloc
- {
- [_instance destroyInstance];
- }
- ```
-
-### 导入 Weex SDK framework到工程
-
- 参考[此处](https://open.taobao.com/doc2/detail?spm=a219a.7629140.0.0.tFddsV&&docType=1&articleId=104829)直接导入weexSDK
http://git-wip-us.apache.org/repos/asf/incubator-weex-site/blob/32a097bf/source/cn/v-0.10/blog/index.md
----------------------------------------------------------------------
diff --git a/source/cn/v-0.10/blog/index.md b/source/cn/v-0.10/blog/index.md
deleted file mode 100644
index ef7b31d..0000000
--- a/source/cn/v-0.10/blog/index.md
+++ /dev/null
@@ -1,4 +0,0 @@
-type: blog
-index: true
-layout: blog
----
\ No newline at end of file
http://git-wip-us.apache.org/repos/asf/incubator-weex-site/blob/32a097bf/source/cn/v-0.10/guide/develop-on-your-local-machine.md
----------------------------------------------------------------------
diff --git a/source/cn/v-0.10/guide/develop-on-your-local-machine.md b/source/cn/v-0.10/guide/develop-on-your-local-machine.md
deleted file mode 100644
index 276a9f9..0000000
--- a/source/cn/v-0.10/guide/develop-on-your-local-machine.md
+++ /dev/null
@@ -1,175 +0,0 @@
----
-title: 如何在本地开发 Weex 页面
-type: guide
-order: 2
-has_chapter_content: true
-version: 0.10
----
-
-# 如何在本地开发 Weex 页面
-
-使用 [dotWe](http://dotwe.org) 对 Weex 尝鲜是一个不错的选择,但如果你想更专业的开发 Weex, [dotWe](http://dotwe.org) 就不怎么够用了。本章会教你如何搭建本地开发环境进行 Weex 开发。
-
-## 第一步:安装依赖
-
-首先,你需要 Node.js 和 weex-toolkit。
-
-安装 Node.js 方式多种多样,最简单的方式是在 [Node.js 官网](https://nodejs.org/en/) 下载可执行程序直接安装即可。
-
-对于 Mac,可以使用 [Homebrew](http://brew.sh/) 进行安装:
-
-```bash
-brew install node
-```
-
-> 更多安装方式可参考 [Node.js 官方信息](https://nodejs.org/en/download/)
-
-安装完成后,可以使用以下命令检测是否安装成功:
-
-```bash
-$ node -v
-v6.3.1
-$ npm -v
-3.10.3
-```
-
-通常,安装了 Node.js 环境,npm 包管理工具也随之安装了。因此,直接使用 npm 来安装 weex-toolkit。
-
-> npm 是一个 JavaScript 包管理工具,它可以让开发者轻松共享和重用代码。Weex 很多依赖来自社区,同样,Weex 也将很多工具发布到社区方便开发者使用。
-
-```bash
-$ npm install -g weex-toolkit
-```
-
-国内开发者可以考虑使用淘宝的 npm 镜像 —— [cnpm](https://npm.taobao.org/) 安装 weex-toolkit
-
-```bash
-$ npm install -g cnpm
-$ cnpm install -g weex-toolkit
-```
-
-*提示:*
-
-如果提示权限错误(*permission error*),使用 `sudo` 关键字进行安装
-
-```bash
-$ sudo cnpm install -g weex-toolkit
-```
-
-安装结束后你可以直接使用 `weex` 命令验证是否安装成功,它会显示 `weex` 命令行工具各参数:
-
-
-
-## 第2步:创建文件
-
-现在可以开始编写代码了。首先,我们创建一个 `.we` 文件(Weex 程序的文件后缀(扩展名)是 `.we`)。
-
-打开空白的 `hello.we` 文件,输入三个标签,内容为:
-
-```html
-<template>
-</template>
-
-<style>
-</style>
-
-<script>
-</script>
-```
-
-我们在 [Get started](./index.md) 里已经介绍过 Weex 基本的代码结构:`<template>`、`<style>`、`<script>` 分别对应于 Web 中的 HTML,CSS(`<style>` 标签),JavaScript(`<script>` 标签)。
-
-其实,上面的代码就是最简单的 Weex 程序。但是 `.we` 文件是不能直接运行的,这时候需要使用刚才安装好的 weex-toolkit。weex-toolkit 会编译 `.we` 文件,并且创建静态服务器。
-
-这里,使用 `weex hello.we` 命令编译该程序。
-
-```bash
-$ weex hello.we
-```
-
-这时,命令行会做几件事:
-
-- 编译 `.we` 文件;
-- 启动热加载服务;
-- 启动静态服务器;
-- 拉起浏览器,访问 `http://127.0.0.1:8081/weex_tmp/h5_render/?hot-reload_controller&page=hello.js&loader=xhr`
-
-这时候,已经可以在浏览器预览 Weex 页面了。不过此时页面是空白的,因为 `.we` 文件中没有任何实质的内容。
-
-## 第3步:添加内容
-
-修改 `weex.we` 文件,向 `<template>` 标签中添加内容。具体代码如下:
-
-```html
-<template>
- <div>
- <text>Hello world</text>
- </div>
-</template>
-
-<style></style>
-
-<script></script>
-```
-
-保存代码后,浏览器会自动刷新页面,这时会看到浏览器显示了 “Hello world”。
-
-## 第4步:添加样式
-
-现在,对已有的文本内容进行样式修饰。这里将文本颜色设置为红色,字体大小为 50 像素。具体代码如下:
-
-```html
-<template>
- <div>
- <text class="text" style="color: #FF0000;">Hello world</text>
- </div>
-</template>
-
-<style>
- .text{
- font-size: 50;
- }
-</style>
-
-<script></script>
-```
-
-这时候,浏览器已经重新载入了页面。其实,是weex-toolkit开启了热加载。可以看到红色的 “Hello world”。
-
-**注意:**
-Weex 支持通过 `style` 标签来设定样式,也支持内联样式风格。 对于数值,无需添加任何单位(包括 px、em、rem 等),这是建议的写法。如需了解有哪些通用的样式,可以参考 [通用样式](../references/common-style.md)。
-
-## 第5步:预览
-
-已经在浏览器中看到了刚才的代码效果,为了验证三端是否一致,我们还需 [Playground App](https://alibaba.github.io/weex/download.html) 验证。
-
-这里,我们需要为 `weex hello.we` 增加 `--qr` 参数,表示生成二维码。
-
-```bash
-$ weex hello.we --qr
-```
-
-然后,使用 [Playground](https://alibaba.github.io/weex/download.html) 扫码即可。
-
-
-
-## 第6步:调试
-
-weex-toolkit 已经集成了 Debugger,只需要使用如下命令即可开启 Debugger 开关调试 `hello.we`:
-
-```bash
-$ weex debug hello.we
-```
-
-我们输入以上命令开启,会自动打开浏览器,页面上有两个二维码,第一个是 Debugger Server,第二个是 `.we` 文件的地址。我们在 Playground 中先扫第一个,此时浏览器会进入一个新的页面,请你选择你需要的调试模式:
-
-- Debugger:将会打开 js debugger 页面,您可以通过 debugger 页面调试 js(诸如打断点 查看js log 和查看调用堆栈等信息);
-- Inspector:将会打开 inspector 页面,您可以通过这个页面查看 Weex 页面的 element 属性结构,包含高亮元素,展示样式表,以及显示 native 的 log。同时可以打开一个远程的手机镜像,便于查看界面。另外调试方块中的 ElementMode 可以用来选择 element 树显示原始的 native 组件树还是显示面向前端同学的 DSL (HTML)组件树。
-
-选择一种模式后会新开窗口进入调试页面,这时我们再扫第二个二维码即可进入我们想要调试的页面进行调试了。
-
-## 接下来做什么?
-
-到目前为止,你已经可以在 [dotWe](http://dotwe.org) 或者本地开发 Weex 页面。接下来你可以去学习 Weex [语法](./syntax/main.md) 和 [开发手册](../references/main.md) 了解 Weex 更多特性。这些语法和特性,你完全可以用 [Playground](https://alibaba.github.io/weex/download.html) 运行起来。
-
-如果你已经熟悉 Weex 开发,你应该考虑如何让你的 App 也支持 Weex 页面,或者,怎样用 Weex 开发一个全新的 App 呢?带着这些问题,你可以阅读 [开发进阶](./how-to/main.md)。
http://git-wip-us.apache.org/repos/asf/incubator-weex-site/blob/32a097bf/source/cn/v-0.10/guide/how-to/debug-with-html5.md
----------------------------------------------------------------------
diff --git a/source/cn/v-0.10/guide/how-to/debug-with-html5.md b/source/cn/v-0.10/guide/how-to/debug-with-html5.md
deleted file mode 100644
index c4ba245..0000000
--- a/source/cn/v-0.10/guide/how-to/debug-with-html5.md
+++ /dev/null
@@ -1,47 +0,0 @@
----
-title: 在浏览器中调试
-type: guide
-order: 4.2
-version: 0.10
----
-
-# 如何在浏览器中调试?
-
-由于 weex-html5 可以在现代移动浏览器上运行,因此自然支持在浏览器的开发工具中调试 weex-html5 代码。下面将介绍如何使用浏览器的 devTools 调试和分析 weex-html5 程序。以chrome的调试工具为例:
-
-
-
-## Elements
-
-使用 Elements 面板来检查 weex-html5 页面的布局和设计,并操纵 DOM 和 CSS 来自由地做一些开发实验。
-
-## Console
-
-您可以使用 `console.log` 在控制台上记录信息。
-
-## 断点
-
-您可以设置断点来调试代码,断点是调试代码的最有效的方法之一。断点使您能够暂停脚本执行,然后查看该时刻的调用堆栈变量值。
-
-手动断点是您在特定代码行上设置的各个断点。您可以通过 Chrome DevTools GUI 或在代码中插入 debugger 关键字来设置这些断点。
-
-## 找出 bug 的精确位置
-
-一般来说,有三个可能发生错误的地方:渲染器(weex-html5),js 框架(weex-js框架)和变压器(gulp-weex)。
-
-这里有一些方便以找出错误建议,以便你可以快速识别哪个是哪个地方的错误:
-
-* 请检查控制台是否有错误。在调试模式如果有一个错误出现,将会在 console 中打印有关于它的信息。
-* 在 bridge/receiver.js,查看是否调用了 `callNative` 函数。
-* 是否被认为是 API 的方法被执行。
-* 是否调用用于事件触发或执行回调的 `callJS` 方法。
-
-## 其他
-
-更多关于如何调试 H5 页面的信息请查看 [chrome's devTools docs](https://developers.google.com/web/tools/chrome-devtools/?hl=en)
-
-
-
-
-
-
[35/51] [abbrv] incubator-weex-site git commit: update file structure
and fix responsive styles
Posted by ha...@apache.org.
http://git-wip-us.apache.org/repos/asf/incubator-weex-site/blob/12e3a8bc/_drafts/v1.0/guide/how-to/transform-code-into-js-bundle.md
----------------------------------------------------------------------
diff --git a/_drafts/v1.0/guide/how-to/transform-code-into-js-bundle.md b/_drafts/v1.0/guide/how-to/transform-code-into-js-bundle.md
new file mode 100644
index 0000000..69667ae
--- /dev/null
+++ b/_drafts/v1.0/guide/how-to/transform-code-into-js-bundle.md
@@ -0,0 +1,112 @@
+---
+title: 将 `.we` 源代码转换成 JS Bundle
+type: guide
+order: 4.4
+version: 0.10
+---
+
+# 将 `.we` 源代码转换成 JS Bundle
+<span class="weex-version">0.4</span>
+
+在前面的章节中你已经了解到如何编写及组织 Weex 代码,如果你还有疑问,可参考 [语法](../syntax/main.html) 及 [手册](../../references/main.html)。 但是,Weex 语法的代码必须转换为 JSBundle,以便 Weex JSFramework 可以在 iOS,Android 和浏览器端解析和执行。了解更多信息,可参考 [Weex 工作原理](../../advanced/how-it-works.html) 和 [JS Bundle 格式](../../references/specs/js-bundle-format.html)
+
+现在,回到将 `.we` 源代码转换成 JS Bundle 的主题。有几种方法来实现这一目标。
+
+## 使用 weex-toolkit
+
+如果你已经有了 node.js 开发环境,可以直接使用以下命令。关于 node.js 及其他依赖安装可参考[安装依赖](../develop-on-your-local-machine.html#第一步:安装依赖)
+```bash
+$npm install -g weex-toolkit
+```
+
+### 将 `.we` 文件转换为 JS Bundle
+
+```bash
+$ weex your_best_weex.we -o .
+```
+
+`your_best_weex.we` 将会被转换为 `your_best_weex.js` 并保存在当前目录。
+
+### 将 `.we` 文件转换为 JS Bundle 并开启 watch 功能,实时自动转换
+
+```bash
+
+$ weex your_best_weex.we -o . --watch
+```
+
+### 将所有 `.we` 文件转换到一个目录中
+
+```bash
+$ weex we/file/storage/path -o outputpath
+```
+
+ `we/file/storage/path` 目录下的每个 `.we` 文件都会被转换为 JS Bundle 并保存到 `outputpath` 目录。
+
+请访问 [npmjs.com](https://www.npmjs.com/package/weex-toolkit) 了解更多关于 `weex-toolkit`。
+
+## transformer
+
+```bash
+npm install weex-transformer
+```
+
+### CLI Tool
+
+```
+ Usage: transformer [options] <file...>
+
+ Options:
+
+ -h, --help output usage information
+ -V, --version output the version number
+ -l, --oldFormat [value] whether to transform to old format (default: false)
+ -e, --isEntry [value] whether is an entry module which has `bootstrap` (default: true)
+ -o, --output [path] the output file dirname
+```
+
+### API
+
+** transform(name, code, path, elements, config) **
+
+```javascript
+var transformer = require('weex-transformer')
+var output = transformer.transform('foo', '/* code here */', '.', {})
+```
+
+参数:
+
+- `name {string}`:当前 bundle 文件名
+- `code {string}`:源码
+- `path {string}`: *可选*,当在某个路径中查找自定义组件时很有用
+- `elements {Object}`:*可选*,存在的自定义组件映射
+- `config {Object}`:*可选*
+
+ * `oldFormat {boolean}`:是否转换为旧格式 (默认:`false`)
+ * `isEntry {boolean}`:是否是具有 `bootstrap` 的入口模块 (默认:`true`)
+
+返回值:
+- 一个对象:
+ - `result {string}`:所有自定义组件的 `define()` 方法和最终的 `bootstrap()`
+ - `logs {Array}`:相应的警告和错误日志
+
+## gulp weex
+
+```bash
+npm install gulp-weex
+```
+
+```javascript
+var gulp = require('gulp')
+var weex = require('gulp-weex')
+
+gulp.task('default', function () {
+ return gulp.src('src/*.html')
+ .pipe(weex({}))
+ .pipe(gulp.dest('./dest'))
+})
+```
+
+参数:
+
+- `oldFormat {boolean}`:是否转换为旧格式 (默认:`false`)
+- `isEntry {boolean}`:是否是具有 `bootstrap` 的入口模块 (默认:`true`)
http://git-wip-us.apache.org/repos/asf/incubator-weex-site/blob/12e3a8bc/_drafts/v1.0/guide/index.md
----------------------------------------------------------------------
diff --git a/_drafts/v1.0/guide/index.md b/_drafts/v1.0/guide/index.md
new file mode 100644
index 0000000..73d1a98
--- /dev/null
+++ b/_drafts/v1.0/guide/index.md
@@ -0,0 +1,60 @@
+---
+title: 上手教程
+type: guide
+order: 1
+has_chapter_content: true
+version: 0.10
+---
+
+# 起步教程
+
+Weex 是一套简单易用的跨平台开发方案,能以 web 的开发体验构建高性能、可扩展的 native 应用,为了做到这些,Weex 与 Vue 合作,使用 Vue 作为上层框架,并遵循 W3C 标准实现了统一的 JSEngine 和 DOM API,这样一来,你甚至可以使用其他框架驱动 Weex,打造三端一致的 native 应用。
+
+尝试 Weex 最简单的方法是使用 [Playground App](https://alibaba.github.io/weex/download.html) 和在 [dotWe](http://dotwe.org) 编写一个 [Hello World](http://dotwe.org/656345423a7ef46f4b897ff471fd2ab5) 例子。你不需要考虑安装开发环境或编写 native 代码,只需要做下面两件事:
+
+- 为你的手机安装 [Playground App](https://alibaba.github.io/weex/download.html),当然,Weex 是跨平台的框架,你依然可以使用浏览器进行预览,只是这样你就无法感受到 native 优秀的体验了。
+- 在新标签页中打开 [Hello World](http://dotwe.org/656345423a7ef46f4b897ff471fd2ab5) 例子,点击预览,然后用 Playground 扫码即可。
+
+在这个例子中,我们看到了熟悉的 HTML 语义化标签、CSS 样式和 Javascript 代码。这是一个最简单的 Weex 示例,它在页面中渲染了一个 "Hello World"。
+
+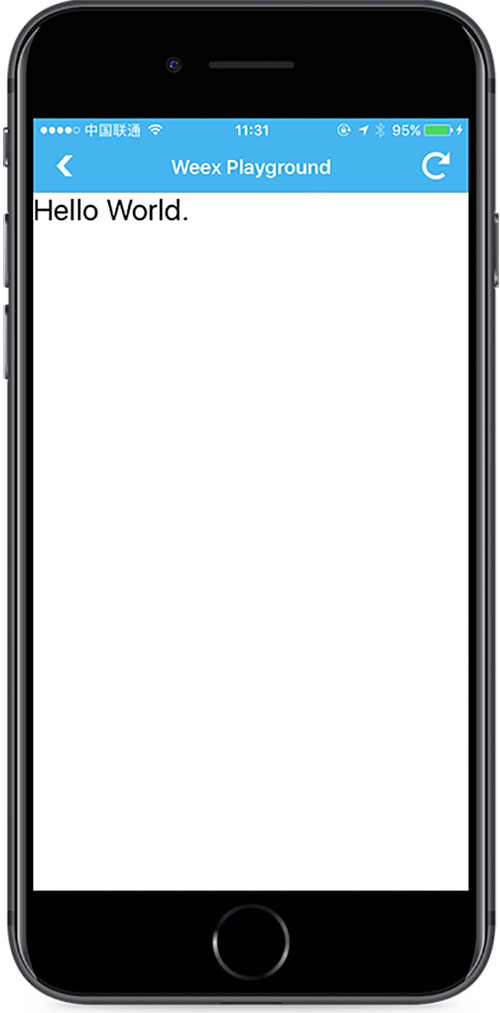
+
+## 发生了什么?
+
+就如示例代码所示:
+
+```html
+<template>
+ <div>
+ <text class="text">{{text}}</text>
+ </div>
+</template>
+
+<style>
+ .text {
+ font-size: 50;
+ }
+</style>
+
+<script>
+ module.exports = {
+ data: {
+ text: 'Hello World.'
+ }
+ }
+</script>
+```
+
+我们暂时不去关心 Weex 的技术细节,仅看大致的代码结构。Weex 代码由三部分构成:`template`、`style`、`script`,这三个概念之于 Weex 就如 HTML,CSS,JavaScript 之于 Web。
+
+模板部分赋予 Weex 以骨架,由标签以及标签包围的内容构成,标签中能添加 `attribute(特性)`,不同的 `attribute` 有不同的含义,例如 class 特性让同样的样式可以作用于多组 Weex 标签, onclick 特性让标签能对用户点击事件作出回应。
+
+样式部分描述 Weex 标签如何显示。和你一样,我们喜欢 CSS,所以 Weex 中的样式尽量和 CSS 标准一致。Weex 支持很多 CSS 中的特性: margin, padding, fixed...... 更好的是, flexbox 布局模型在 Weex 中获得了很好的支持。
+
+脚本部分为 Weex 标签添加数据与逻辑,在这里你能方便的访问本地或远程的数据并动态更新。你还能定义方法并让这些方法响应不同的事件。Weex 脚本的组织方式基本遵循于 CommonJS module 规范。
+
+是不是觉得这些语法有些眼熟?没错,Weex 语法参考了 [Vue](https://github.com/vuejs/vue),如果你熟悉 Vue,你会很快适应 Weex 语法(最新的 Weex framework 将会基于 [Vue 2.0](https://github.com/vuejs/vue) 开发,完全兼容 Vue,可参见我们的 [Roadmap](https://github.com/weexteam/weex-vue-framework/issues/9)),更好的是,我们拥抱规范,尽可能的按照 W3C 标准进行实现,因此,你大可不必担心 Weex 三端差异。
+
+你可以试着修改 [Hello World](http://dotwe.org/656345423a7ef46f4b897ff471fd2ab5) 的代码,再次点击预览即可生成新的二维码进行扫描。
+
+Weex 不止是个 Demo,在接下来的章节中,你还会看到更多 Weex 开发 native 应用并将其集成到你的 App 中的精彩教程。不要忘了随时在 [dotWe](http://dotwe.org) 中编写代码验证并通过 [Playground App](https://alibaba.github.io/weex/download.html) 预览。
http://git-wip-us.apache.org/repos/asf/incubator-weex-site/blob/12e3a8bc/_drafts/v1.0/guide/syntax/comm.md
----------------------------------------------------------------------
diff --git a/_drafts/v1.0/guide/syntax/comm.md b/_drafts/v1.0/guide/syntax/comm.md
new file mode 100644
index 0000000..7923ef7
--- /dev/null
+++ b/_drafts/v1.0/guide/syntax/comm.md
@@ -0,0 +1,134 @@
+---
+title: 组件通信
+type: guide
+order: 3.8
+version: 0.10
+---
+
+# 组件间通信
+
+## 自定义事件
+
+Weex 支持自定义事件,这里有两个相关的设计:1,监听自定义事件;2,创建自定义事件。
+
+## 监听自定义事件
+
+每个 Weex 的 ViewModel 都支持 `this.$on(type, handler)` 和 `this.$off(type[, handler])` 的 API。`type` 是监听的自定义事件类型,`handler` 是事件处理函数。
+
+当 `handler` 被触发时,会有一个事件对象 `event` 作为第一个参数被传入,事件对象的数据格式基于[事件机制](./events.html)中提到的事件描述对象。
+
+## 创建自定义事件
+
+每个 Weex 的 ViewModel 都支持 `this.$emit(type, detail)` 的 API,可以在当前 ViewModel 中产生一个自定义事件。`type` 是自定义事件的类型,`detail` 则是一个对该事件细节补充描述的 JSON 对象,会以 `event.detail` 的形式出现在处理此事件的函数中。
+
+## 从子组件向父组件通信
+
+首先父组件要监听特定类型的自定义事件,而子组件可以使用 `this._parent` 找到父组件,然后再调用 `this._parent.$emit(type, detail)` 方法,即可实现自下而上的通信。例如:
+
+```html
+<element name="foo">
+ <template>
+ <div>
+ <image src="{{imageUrl}}" class="thumb" onclick="test"></image>
+ <text>{{title}}</text>
+ </div>
+ </template>
+ <style>
+ .thumb { width: 200; height: 200; }
+ </style>
+ <script>
+ module.exports = {
+ data: {
+ title: '',
+ imageUrl: ''
+ },
+ methods: {
+ test: function () {
+ // Emit notify to parent
+ this._parent.$emit('notify', {a: 1})
+ }
+ }
+ }
+ </script>
+</element>
+
+<template>
+ <div>
+ <foo title="Hello" image-url="https://gtms02.alicdn.com/tps/i2/TB1QHKjMXXXXXadXVXX20ySQVXX-512-512.png"></foo>
+ <text if="eventType">event: {{eventType}} - {{eventDetail}}</text>
+ </div>
+</template>
+
+<script>
+ module.exports = {
+ data: {
+ eventType: '',
+ eventDetail: {}
+ },
+ created: function () {
+ this.$on('notify', function(event) {
+ // When a notify comes, this handler will be run.
+ // `event.detail` will be `{a: 1}`
+ this.eventType = event.type
+ this.eventDetail = JSON.stringify(event.detail)
+ })
+ }
+ }
+</script>
+```
+
+[体验一下](http://dotwe.org/51e553ef43e5c744d05da1bb811903bf)
+
+## 从父组件向子组件通信
+
+同理,首先子组件要监听特定类型的自定义事件,而父组件可以使用 `this.$vm(id)` 找到父组件,然后再调用 `this.$vm(id).$emit(type, detail)` 方法,即可实现自上而下的通信。例如:
+
+```html
+<element name="foo">
+ <template>
+ <div>
+ <image if="imageUrl" src="{{imageUrl}}" class="thumb"></image>
+ <text>Foo</text>
+ </div>
+ </template>
+ <style>
+ .thumb { width: 200; height: 200; }
+ </style>
+ <script>
+ module.exports = {
+ data: {
+ imageUrl: ''
+ },
+ created: function() {
+ this.$on('changeImage', function (e) {
+ this.imageUrl = e.detail
+ }.bind(this))
+ }
+ }
+ </script>
+</element>
+
+<template>
+ <div>
+ <foo id="sub"></foo>
+ <text onclick="test">click to update foo</text>
+ </div>
+</template>
+
+<script>
+ module.exports = {
+ methods: {
+ test: function (e) {
+ this.$vm('sub').$emit(
+ 'changeImage',
+ 'https://gtms02.alicdn.com/tps/i2/TB1QHKjMXXXXXadXVXX20ySQVXX-512-512.png'
+ )
+ }
+ }
+ }
+</script>
+```
+
+[体验一下](http://dotwe.org/ea616d180620648e66554d42f57db82b)
+
+下一节:[页面整体配置](./config-n-data.html)
http://git-wip-us.apache.org/repos/asf/incubator-weex-site/blob/12e3a8bc/_drafts/v1.0/guide/syntax/composed-component.md
----------------------------------------------------------------------
diff --git a/_drafts/v1.0/guide/syntax/composed-component.md b/_drafts/v1.0/guide/syntax/composed-component.md
new file mode 100644
index 0000000..061eaf4
--- /dev/null
+++ b/_drafts/v1.0/guide/syntax/composed-component.md
@@ -0,0 +1,158 @@
+---
+title: 组件封装
+type: guide
+order: 3.6
+version: 0.10
+---
+
+# 组件封装
+
+经常我们会发现 Weex 的 `<template>` 中有很多可复用的部分,这时候我们可以将其封装成上层的自定义组件并重用。例如我们可以直接创建一个名为 `foo.we` 的文件,`<foo>` 就是自定义组件的组件名称:
+
+```html
+<!-- foo.we -->
+<template>
+ <div style="flex-direction: row;">
+ <image src="{{image}}"></image>
+ <text>{{title}}</text>
+ </div>
+</template>
+<script>
+ var env = 'foo'
+ module.exports = {
+ data: {
+ title: null,
+ image: null
+ }
+ }
+</script>
+```
+
+`foo.we` 的也包含 `<template>`,`<style>` 和 `<script>`,定义好了后,直接用 `<foo>` 标签即可将其引入到其它组件的 `<template>` 中,并且在 `<foo>` 标签上设置其 `data` 同名的特性会将这个值赋给 `<foo>` 的上下文:
+
+_注意事项:由于 HTML 语法中特性名是不区分大小写的,所以您无法直接用驼峰命名,我们提供了 hyphenated 语法,在解析之后这些名称会自动转换为驼峰命名 (比如在 `<template>` 的组件特性里用 `aaa-bbb-ccc` 表示其 `data` 或上下文里的 `aaaBbbCcc`)。_
+
+```html
+<!-- bar.we -->
+<template>
+ <foo title="..." image="..."></foo>
+</template>
+<script>
+ var env = 'bar'
+</script>
+```
+
+_注意事项:这里 `bar.we` 和 `foo.we` 必须在同目录下才能自动建立依赖关系。_
+
+_注意事项:`foo.we` 文件的 `<script>` 具有相对独立的作用域,不会和 `bar.we` 中的 `<script>` 产生干扰。同时 `<foo>` 对象具有相对独立的子组件上下文,即 `this`,也包括其定义的完全不同的数据和方法。_
+
+## 组件嵌套
+
+自定义组件也支持嵌套,如下:
+
+```html
+<!-- somepath/foo.we -->
+<template>
+ <div style="flex-direction: row;">
+ <image src="{{image}}"></image>
+ <text>{{title}}</text>
+ </div>
+</template>
+<script>
+ module.exports = {
+ data: {
+ // These keys must be declared explicitly here
+ // or data-binding will not work from its parent.
+ title: null,
+ image: null
+ }
+ }
+</script>
+```
+
+```html
+<!-- samepath/foo.list.we -->
+<template>
+ <div>
+ <text>{{description}}</text>
+ <foo repeat="item in list" title="{{item.text}}" image="{{item.img}}"></foo>
+ </div>
+</template>
+<script>
+ module.exports = {
+ data: {
+ description: '',
+ // This key must be declared explicitly here
+ // or data-binding will not work from its parent.
+ list: []
+ }
+ }
+</script>
+```
+
+```html
+<!-- samepath/main.we -->
+<template>
+ <foo-list list="{{list}}"></foo-list>
+</template>
+<script>
+ module.exports = {
+ data: {
+ list: [
+ {text: '...', img: '...'},
+ {text: '...', img: '...'},
+ {text: '...', img: '...'},
+ ...
+ ]
+ }
+ }
+</script>
+```
+
+这里的 `main.we` 嵌套了 `<foo-list>`,`<foo-list>` 嵌套了 `<foo>`,同时组件可以正常的配合数据绑定、`repeat` 特性等使用。
+
+## 更多子组件的定义和书写方式
+
+除了在主文件同目录下创建和被封装组件同名的 `we` 文件之外,Weex 还支持另外几种子组件的书写方式:
+
+* 在 `<script>` 中通过 `require` 其它目录的 `we` 文件定义同名组件
+* 在主文件下新增 `<element name="xxx">` 标签,`name` 特性的值为新创建的组件名,其 `<element>` 内部的内容是定义该组件的代码
+
+比如:
+
+```html
+<!-- path-a/main.we -->
+<element name="foo">
+ <text>Foo</text>
+</element>
+
+<template>
+ <div>
+ <foo></foo>
+ <bar></bar>
+ </div>
+</template>
+
+<script>
+ require('path-b/bar.we')
+</script>
+```
+
+```html
+<!-- path-b/bar.we -->
+<template>
+ <text>Bar</text>
+</template>
+```
+
+这样的话,`path-a/main.we` 最终展示的结果是“Foo”和“Bar”两段文本。
+
+## 注意事项
+
+- 组件各自的 `<style>` 是相互独立的,不会担心不同组件中相同的 class name 相互干扰。
+- 如果自定义组件在父组件中有 `id` 特性,则可以在父组件上下文中通过 `this.$vm(id)` 接口来访问该自定义组件的上下文,也可以通过 `this.$el(id)` 来找到其背后真实的原生组件。更多详见[获取子组件信息](./id.html)
+- 自定义组件之间通信的问题可以参考[组件间通信](./comm.html)
+- 不论通过父组件把数据传递进来还是在当前组件内部对数据发起修改,只有在组件的 `data` 选项中明确写明的字段才会被正常的监听。
+- 任何组件目前均不支持自闭合标签的写法,请勿使用。
+
+下一节:[获取子组件信息](./id.html)
http://git-wip-us.apache.org/repos/asf/incubator-weex-site/blob/12e3a8bc/_drafts/v1.0/guide/syntax/config-n-data.md
----------------------------------------------------------------------
diff --git a/_drafts/v1.0/guide/syntax/config-n-data.md b/_drafts/v1.0/guide/syntax/config-n-data.md
new file mode 100644
index 0000000..cad39ab
--- /dev/null
+++ b/_drafts/v1.0/guide/syntax/config-n-data.md
@@ -0,0 +1,72 @@
+---
+title: 页面配置和页面数据
+type: guide
+order: 3.9
+version: 0.10
+---
+
+# 页面配置和页面数据
+
+在 Weex 中,你可以通过一些特殊的 `<script>` 进行页面整体配置。
+
+_注意事项:这些配置会代表页面整体,所以写在自定义子组件中是无效的,只有写在顶级 ViewModel 的 `<sctipt>` 中才会生效。_
+
+先举个例子:
+
+```html
+<!-- definition of sub components -->
+<element name="sub-component-a">...</element>
+<element name="sub-component-b">...</element>
+<element name="sub-component-c">...</element>
+
+<!-- definition of top-level component -->
+<template>...</template>
+<style></style>
+<script>
+ module.exports = {
+ data: { x: 1, y: 2 }
+ }
+</script>
+
+<!-- config and data -->
+<script type="config">
+ downgrade: {
+ ios: {
+ os: '9', // all of 9.x.x
+ app: '~5.3.2',
+ framework: '^1.3', // all of 1.3.x
+ deviceModel: ['AAAA', 'BBBB']
+ },
+ android: {
+ os: '*', // all of version
+ app: '^5',
+ framework: '',
+ deviceModel: ''
+ }
+ }
+</script>
+<script type="data">
+ { y: 200 }
+</script>
+```
+
+## `<script type="config">`
+
+开发者可以在顶级 ViewModel 中加入这样一段 `<script>`,以 JSON 格式描述页面整体的配置信息。
+
+目前支持的配置信息只有 `downgrade`:用来从平台、应用等维度描述页面的降级规则。这样设计对于产品迭代最大的帮助是可以在高版本中使用 Weex,而在低版本中使用之前已有的渲染方式,这部分控制降级的细节需要 native 接入的时候进行相应的识别和具体操作。
+
+未来这里会有更多的配置项出现在这里。
+
+## `<script type="data">`
+
+开发者可以在顶级 ViewModel 中加入这样一段 `<script>`,以 JSON 格式额外配置顶级 ViewModel 的数据,它会覆盖顶级 ViewModel 数据中相应的字段。比如上述例子中,最终的顶级 ViewModel 中的数据为 `{ x: 1, y: 200 }`。
+
+## 总结
+
+至此,Weex 基本的语法已经全部介绍过了。相信您对 Weex 的使用方式和开发方式有了更多的了解。
+
+接下来我们推荐您阅读:
+
+* [最佳实践](../how-to/index.html)
+* [Weex 手册](../../references/index.html)
http://git-wip-us.apache.org/repos/asf/incubator-weex-site/blob/12e3a8bc/_drafts/v1.0/guide/syntax/data-binding.md
----------------------------------------------------------------------
diff --git a/_drafts/v1.0/guide/syntax/data-binding.md b/_drafts/v1.0/guide/syntax/data-binding.md
new file mode 100644
index 0000000..bbefdd1
--- /dev/null
+++ b/_drafts/v1.0/guide/syntax/data-binding.md
@@ -0,0 +1,332 @@
+---
+title: 数据绑定
+type: guide
+order: 3.1
+version: 0.10
+---
+
+# 数据绑定
+
+Weex使用 _mustache_ 的语法 (`{% raw %}{{...}}{% endraw %}`) 来对 `<template>` 中的模板和 `<script>` 里的数据进行绑定. 一旦数据额模板绑定了, 数据上的修改会实时的在模板内容中生效。
+
+## 数据绑定路径
+
+```html
+<template>
+ <div>
+ <text style="font-size: {{size}}">{{title}}</text>
+ </div>
+</template>
+
+<script>
+ module.exports = {
+ data: {
+ size: 48,
+ title: 'Alibaba Weex Team'
+ }
+ }
+</script>
+```
+
+[体验一下](http://dotwe.org/6d18c0e696d33705083e34ef387ac529)
+
+上面的代码会把 `title` 和 `size` 的数值绑定到模板内容上。
+
+我们也可以通过 `.` 符号来绑定数据结构中的字段。看一下下面的代码片段:
+
+```html
+<template>
+ <div>
+ <text style="font-size: {{title.size}}">{{title.value}}</text>
+ </div>
+</template>
+
+<script>
+ module.exports = {
+ data: {
+ title: {
+ size: 48,
+ value: 'Alibaba Weex Team'
+ }
+ }
+ }
+</script>
+```
+
+[体验一下](http://dotwe.org/e291bbe2d5c34fe04db92bc827697a4b)
+
+## 数据绑定表达式
+
+进行数据绑定时,Weex 支持一些简单的 JavaScript 表达式,例如:
+
+```html
+<template>
+ <div style="flex-direction: row;">
+ <text>{{firstName + ' ' + lastName}}</text>
+ </div>
+</template>
+
+<script>
+ module.exports = {
+ data: {
+ firstName: 'John',
+ lastName: 'Smith'
+ }
+ }
+</script>
+```
+
+[体验一下](http://dotwe.org/aeef6c2ca9bd9b7c5d039ed84572e1ee)
+
+这些表达式会在当前的上下文中进行运算。
+
+## 计算属性 <sup>v0.5+</sup>
+
+数据绑定表达式已经非常方便了,但如果希望在模板里实现更复杂的逻辑判断,你也可以使用计算属性。例如:
+
+```html
+<template>
+ <div style="flex-direction: row;">
+ <text>{{fullName}}</text>
+ <text onclick="changeName" style="margin-left: 10;">CHANGE NAME</text>
+ </div>
+</template>
+
+<script>
+ module.exports = {
+ data: {
+ firstName: 'John',
+ lastName: 'Smith'
+ },
+ computed: {
+ fullName: function() {
+ return this.firstName + ' ' + this.lastName
+ }
+ },
+ methods: {
+ changeName: function() {
+ this.firstName = 'Terry'
+ }
+ }
+ }
+</script>
+```
+
+[体验一下](http://dotwe.org/276e7c42a2d480d669868476e62b326e)
+
+同样能够达到相同的效果。这里我们引入了一个叫做 `fullName` 的计算属性,由 `firstName` 和 `lastName` 计算而成,在数据绑定的时候,如果 `firstName` 或 `lastName` 发生改变,`fullName` 都会自动重新计算并触发改变。
+
+另外计算属性还支持另外一种写法,就是同时定义一个计算属性的 getter 和 setter,这样的话当下面例子中的 `fullName` 被赋值时,`data` 里的 `firstName` 和 `lastName` 会被自动改变:
+
+```html
+<template>
+ <div style="flex-direction: row;">
+ <text>{{fullName}}</text>
+ <text onclick="changeName" style="margin-left: 10;">CHANGE NAME</text>
+ </div>
+</template>
+
+<script>
+ module.exports = {
+ data: {
+ firstName: 'John',
+ lastName: 'Smith'
+ },
+ computed: {
+ fullName: {
+ get: function() {
+ return this.firstName + ' ' + this.lastName
+ },
+
+ set: function(v) {
+ var s = v.split(' ')
+ this.firstName = s[0]
+ this.lastName = s[1]
+ }
+ }
+ },
+ methods: {
+ changeName: function() {
+ this.fullName = 'Terry King'
+ }
+ }
+ }
+</script>
+```
+
+[体验一下](http://dotwe.org/9f33809592391c566c886029c509c167)
+
+**注意事项:`data`、`methods`、`computed` 中的字段是不能相互重复的,因为它们都会通过组件实例的 `this` 访问到。**
+
+## 数据绑定在 `<template>` 中的特殊用法
+
+### 样式: `style` 或 `class`
+
+组件的样式能够通过 `style` 特性进行绑定:
+
+```html
+<template>
+ <div>
+ <text style="font-size: {{size}}; color: {{color}};">Hello World</text>
+ </div>
+</template>
+
+<script>
+ module.exports = {
+ data: {
+ size: 32,
+ color: '#ff0000'
+ }
+ }
+</script>
+```
+
+[体验一下](http://dotwe.org/f53674fa7910d266e0a2d8a5c285d2b1)
+
+样式也能够通过 `class` 特性实现样式绑定,多个 class 名通过空格分隔:
+
+```html
+<template>
+ <div>
+ <text class="{{size}}">Hello</text>
+ <text class="title {{status}}">World</text>
+ </div>
+</template>
+
+<style>
+ .large { font-size: 64; }
+ .small { font-size: 32; }
+ .title { font-weight: bold; }
+ .success { color: #00ff00; }
+ .error { color: #ff0000; }
+</style>
+
+<script>
+ module.exports = {
+ data: {
+ size: 'large',
+ status: 'success'
+ }
+ }
+</script>
+```
+
+[体验一下](http://dotwe.org/4260897c1526a685672dca95af271493)
+
+在上面的代码中如果 `{% raw %}{{size}}{% endraw %}` 和 `{% raw %}{{status}}{% endraw %}` 是空值, 就只有 `class="title"` 会被解析。
+
+延伸阅读:[style 和 class](./style-n-class.html)
+
+### 事件绑定:`on...`
+
+以 `on...` 开头的就是用于绑定事件的特性,特性名中 `on` 之后的部分就是事件的类型,特性的值就是处理该事件的函数名。_函数名外不需要添加 mustache 语法中的大括号_。例如:
+
+```html
+<template>
+ <div>
+ <text onclick="toggle">Toggle: {{result}}</text>
+ </div>
+</template>
+
+<script>
+ module.exports = {
+ data: {
+ result: true
+ },
+ methods: {
+ toggle: function () {
+ this.result = !this.result
+ }
+ }
+ }
+</script>
+```
+
+[体验一下](http://dotwe.org/2f9f910a60ffc1ed54c797390d6615e1)
+
+除此之外 Weex 还支持更多的事件处理方式。
+
+延伸阅读:[事件处理](./events.html)
+
+### 展示逻辑控制 `if` & `repeat`
+
+`if` 特性能够通过特性值的真假来控制组建是否显示,_且 mustache 大括号可以省略_。例如:
+
+```html
+<template>
+ <div style="flex-direction: column;">
+ <text onclick="toggle">Toggle</text>
+ <image if="{{shown}}" src="{{imageUrl}}" class="logo"></image>
+ </div>
+</template>
+
+<style>
+ .logo { width: 512; height: 512; }
+</style>
+
+<script>
+ module.exports = {
+ data: {
+ shown: true,
+ imageUrl: 'https://gtms02.alicdn.com/tps/i2/TB1QHKjMXXXXXadXVXX20ySQVXX-512-512.png'
+ },
+ methods: {
+ toggle: function () {
+ this.shown = !this.shown
+ }
+ }
+ }
+</script>
+```
+
+[体验一下](http://dotwe.org/3ec9347e4810f503b641849d214d8c15)
+
+`repeat` 特性可以根据一组数组数据重复生成相同或相似的顺序排列的界面。例如:
+
+```html
+<template>
+ <div>
+ <text repeat="(k,v) in list">{{k}} - {{v}}</text>
+ </div>
+</template>
+<script>
+ module.exports = {
+ data: {
+ list: ['a', 'b', 'c']
+ }
+ }
+</script>
+```
+
+[体验一下](http://dotwe.org/db40d2341fdbf16d3d806f502189843d)
+
+延伸阅读:[展示逻辑控制](./display-logic.html)
+
+### 静态模板优化 `static` <sup>v0.9.2+</sup>
+
+`static` 特性可以一次性把数据设置到模板相应的位置上,但是今后不会随着数据的变化而更新。这样可以减少无谓的数据绑定,有效控制和优化长列表、纯静态页面在运行时的开销。不过你也要小心使用不要导致原本需要更新的视图没有触发更新。
+
+```html
+<template>
+ <div static>
+ <text>{{ word }}</text>
+ </div>
+</template>
+
+<script>
+ module.exports = {
+ ready: function() {
+ this.word = 'Data changes' // UI won't be updated
+ },
+ data: {
+ word: 'Hello static'
+ }
+ }
+</script>
+```
+
+[体验一下](http://dotwe.org/dbadfd66463a2c03e3e06d391b0ad8ec)
+
+如上所示,添加 `static` 关键字,渲染结果会是“Hello static”字样,相当于渲染一个静态的节点,`ready` 函数中对数据 `word` 的改变不会更新到视图。
+
+下一篇:[style 和 class](./style-n-class.html)
http://git-wip-us.apache.org/repos/asf/incubator-weex-site/blob/12e3a8bc/_drafts/v1.0/guide/syntax/display-logic.md
----------------------------------------------------------------------
diff --git a/_drafts/v1.0/guide/syntax/display-logic.md b/_drafts/v1.0/guide/syntax/display-logic.md
new file mode 100644
index 0000000..9498de2
--- /dev/null
+++ b/_drafts/v1.0/guide/syntax/display-logic.md
@@ -0,0 +1,252 @@
+---
+title: 展示逻辑控制
+type: guide
+order: 3.4
+version: 0.10
+---
+
+# 展示逻辑控制
+
+Weex 支持通过两种特殊的特性 `if` 和 `repeat` 确定组件的显示逻辑,这会使得整个界面的展示逻辑控制更加简单灵活。
+
+## `if`
+
+通过设置 `if` 特性值,你可以控制当前组件是否显示。如果值为真,则当前组件会被渲染出来,如果值为假则会被移除。例如:
+
+```html
+<template>
+ <div>
+ <text onclick="toggle">Toggle Image</text>
+ <image if="shown" src="{{imageUrl}}" style="width: 512; height: 512;"></image>
+ </div>
+</template>
+
+<script>
+module.exports = {
+ data: {
+ imageUrl: 'https://gtms02.alicdn.com/tps/i2/TB1QHKjMXXXXXadXVXX20ySQVXX-512-512.png',
+ shown: true
+ },
+ methods: {
+ toggle: function () {
+ this.shown = !this.shown
+ }
+ }
+}
+</script>
+```
+
+[体验一下](http://dotwe.org/e0999a51fa404f48bbae177f1569cd0e)
+
+_注意事项:`if="condition"` 和 `if="{% raw %}{{condition}}{% endraw %}"` 都是可以的,两者等价使用。_
+
+_注意事项:`if` 不能用在 `<template>` 的根组件上,否则将无法被 Weex 正常的识别和处理。_
+
+### `if` 不会阻断子元素的数据更新
+
+下面这个例子在数据更新后 `item` 或 `item.image` 不存在的情况下会报错:
+
+```html
+<template>
+ <div if="{{(item && item.image)}}" style="width: 200; height: 200;">
+ <image style="width: 100; height: 100;" src="{{item.image.url}}"></image>
+ </div>
+</template>
+```
+
+原因在于 Weex 本身的机制是数据更新在 DOM 更新之前,因此 `if` 数据更新之后,不支持阻断其子元素的数据更新,即 `if` 数据更新为 `false` 之后,内部的子元素仍然会触发自身的数据更新,找不到对应字段,导致报错,可参考这个 [issue](https://github.com/alibaba/weex/issues/1758)。
+
+因此,有两种解决方案:
+
+- 为 `img` 组件的 `src` 也增加容错方案:
+
+ ```html
+ <div if="{{(item && item.image)}}" style="width: 200; height: 200;">
+ <image style="width: 100; height: 100;" src="{{item && item.image && item.image.url}}"></image>
+ </div>
+ ```
+
+- 如果是在 `repeat` 的列表中,还可以使用 `track-by`强制不复用子元素解决。
+
+## `repeat`
+
+`repeat` 特性用于重复渲染一组相同的组件。它绑定的数据类型必须为数组,数组里的每一项数据可以体现在不同的组件特性、样式、事件绑定等。例如:
+
+``` html
+<template>
+ <div>
+ <div repeat="person in list" class="{{person.gender}}">
+ <text>{{person.nickname}}</text>
+ </div>
+ </div>
+</template>
+
+<style>
+ .male { background-color: #9999ff; }
+ .female { background-color: #ff9999; }
+</style>
+
+<script>
+module.exports = {
+ data: {
+ list: [
+ { gender: 'male', nickname: 'Li Lei' },
+ { gender: 'female', nickname: 'Han Meimei' },
+ { gender: 'male', nickname: 'Jim Green' }
+ ]
+ }
+}
+</script>
+```
+
+[体验一下](http://dotwe.org/8c87aac2820531090181c32fca41e913)
+
+此外,`repeat` 特性还支持绑定数组中数据项目的索引值。例如:
+
+``` html
+<template>
+ <div>
+ <div repeat="(index, person) in list" class="{{person.gender}}">
+ <text>{{index}} - {{person.nickname}}</text>
+ </div>
+ </div>
+</template>
+
+<style>
+ .male { background-color: #9999ff; }
+ .female { background-color: #ff9999; }
+</style>
+
+<script>
+module.exports = {
+ data: {
+ list: [
+ { gender: 'male', nickname: 'Li Lei' },
+ { gender: 'female', nickname: 'Han Meimei' },
+ { gender: 'male', nickname: 'Jim Green' }
+ ]
+ }
+}
+</script>
+```
+
+[体验一下](http://dotwe.org/65d348256ab5c54aa996d3ee6b4ea115)
+
+每一个昵称之前都有对应数组项目的索引值。
+
+_注意事项:同样的 `repeat="..."` 和 `repeat="{% raw %}{{...}}{% endraw %}"` 都是可以的,两者等价使用。_
+
+_注意事项:`if` 不能用在 `<template>` 的根组件上,否则将无法被 Weex 正常的识别和处理。_
+
+**注意事项: 当你修改 `repeat` 中的数组时,在写法上会受到一定的限制,具体如下:**
+
+**直接通过“角标”修改数组的某个项目 (如 `this.items[0] = ...`) 是不会触发视图自动更新的。我们在数组的原型上提供了一个额外的方法:`this.items.$set(index, item)` 来完成相同的事情。**
+
+```javascript
+// 和 `this.items[0] = ...` 作用相同,但会自动触发视图更新
+this.items.$set(0, { childMsg: 'Changed!'})
+```
+
+**直接通过修改 `length` 来改变数组长度 (如 `this.items.length = 0`) 也是不会触发视图自动更新的。我们推荐您直接赋值一个新的空数组把旧的替换掉。**
+
+```javascript
+// 和 `this.items.length = 0` 作用相同,但会自动触发视图更新
+this.items = []
+```
+
+### `repeat` 特性中的 `$index` 形参
+
+在 `repeat` 特性值中,如果没有指定索引值的形参,则可以通过绑定形参 `$index` 来展示数组项目的索引值。例如:
+
+``` html
+<template>
+ <div>
+ <div repeat="person in list" class="{{person.gender}}">
+ <text>{{$index}} - {{person.nickname}}</text>
+ </div>
+ </div>
+</template>
+
+<style>
+ .male { background-color: #9999ff; }
+ .female { background-color: #ff9999; }
+</style>
+
+<script>
+module.exports = {
+ data: {
+ list: [
+ { gender: 'male', nickname: 'Li Lei' },
+ { gender: 'female', nickname: 'Han Meimei' },
+ { gender: 'male', nickname: 'Jim Green' }
+ ]
+ }
+}
+</script>
+```
+
+[体验一下](http://dotwe.org/65d348256ab5c54aa996d3ee6b4ea115)
+
+渲染效果和上一个例子应该是相同的。
+
+### 在 `repeat` 中使用 `track-by` 特性追踪变化
+
+通常情况下,当更新 `repeat` 中绑定的数组时,所有数组项目关联的组件都会被重新渲染。如果其中部分索引值对应的数据未发生变更,那么最好是让这些组件在渲染层保持原样,仅更新数据有变化的节点。Weex 提供了 `track-by` 特性来辅助判断哪些数组项目发生了改变。
+
+首先 `track-by` 特性的值必须是在每一条数组项目中都有且值没有重复的一个字段名,用来区分和追踪每一条数据项增删与否或次序变化与否的关键依据。每当数组发生变化之后,新老数组数据会根据 `track-by` 特性值所代表的字段重新匹配,然后再决定渲染层应该新建或删除一个组件?还是移动一个组件?还是讲组件保持原来的位置。默认的 `track-by` 的值就是数组的索引值。例如:
+
+``` html
+<template>
+ <div>
+ <div repeat="person in list" class="{{person.gender}}">
+ <text>{{$index}} - {{person.id}} - {{person.nickname}}</text>
+ </div>
+ <text>----</text>
+ <div repeat="person in list" class="{{person.gender}}" track-by="id">
+ <text>{{$index}} - {{person.id}} - {{person.nickname}}</text>
+ </div>
+ <text>----</text>
+ <!-- something wrong here: duplicated track-by value -->
+ <div repeat="person in list" class="{{person.gender}}" track-by="nickname">
+ <text>{{$index}} - {{person.id}} - {{person.nickname}}</text>
+ </div>
+ </div>
+</template>
+
+<style>
+ .male { background-color: #9999ff; }
+ .female { background-color: #ff9999; }
+</style>
+
+<script>
+module.exports = {
+ data: {
+ list: [
+ { id: 11, gender: 'male', nickname: 'Li Lei' },
+ { id: 22, gender: 'female', nickname: 'Han Meimei' },
+ { id: 33, gender: 'male', nickname: 'Jim Green' }
+ ]
+ },
+ ready: function () {
+ this.list.unshift({ id: 44, gender: 'female', nickname: 'Han Meimei' })
+ }
+}
+</script>
+```
+
+[体验一下](http://dotwe.org/c124bfc21e6d92271356acbea232089b)
+
+这种情况下,第一个列表的更新策略是:
+
+1. 把第一个 `<text>` 赋值为 `Han Meimei`
+2. 第二个赋值为 `Li Lei`
+3. 第三个赋值为 `Han Meimei`
+4. 最后新建一个 `<text>` 并赋值为 `Jin Green`
+
+第二个列表的更新策略是:
+
+1. 在最前面新建一个 `<text>` 并赋值为 `Han Meimei`
+
+第三个列表的更新会遇到问题,因为有两个数组项目的 `nickname` 值都是 `Han Meimei` 所以造成意料之外的渲染结果 (只渲染了三个数组项目)。
+
+下一节:[渲染过程控制](./render-logic.html)
http://git-wip-us.apache.org/repos/asf/incubator-weex-site/blob/12e3a8bc/_drafts/v1.0/guide/syntax/events.md
----------------------------------------------------------------------
diff --git a/_drafts/v1.0/guide/syntax/events.md b/_drafts/v1.0/guide/syntax/events.md
new file mode 100644
index 0000000..4898219
--- /dev/null
+++ b/_drafts/v1.0/guide/syntax/events.md
@@ -0,0 +1,103 @@
+---
+title: 事件处理
+type: guide
+order: 3.3
+version: 0.10
+---
+
+# 事件处理
+
+Weex 允许对 `<template>` 中的元素绑定事件处理函数。
+
+## 基本语法
+
+以 `on...` 开头的就是用于绑定事件的特性,特性名中 `on` 之后的部分就是事件的类型,特性的值就是处理该事件的函数名。_函数名外不需要添加 mustache 语法中的大括号_。例如:
+
+```html
+<template>
+ <div>
+ <text onclick="toggle">Toggle: {{result}}</text>
+ </div>
+</template>
+
+<script>
+ module.exports = {
+ data: {
+ result: true
+ },
+ methods: {
+ toggle: function () {
+ this.result = !this.result
+ }
+ }
+ }
+</script>
+```
+
+[体验一下](http://dotwe.org/2f9f910a60ffc1ed54c797390d6615e1)
+
+## 内联事件处理参数
+
+同时我们也支持在事件绑定的特性值中内联写明被传入的参数。例如:
+
+```html
+<template>
+ <div>
+ <text onclick="update(1, 2)">Result: {{result}}</text>
+ </div>
+</template>
+
+<script>
+ module.exports = {
+ data: {
+ result: '<empty>'
+ },
+ methods: {
+ update: function (x, y) {
+ this.result = x + y
+ }
+ }
+ }
+</script>
+```
+
+[体验一下](http://dotwe.org/777056d8985e73567464e2d66cbe73fc)
+
+## 特殊的内联事件处理参数
+
+额外的,在这种内联的事件绑定写法中,你可以使用一个特殊的参数 `$event`,代表事件描述对象,即默认事件处理函数的第一个参数。所以 `<template>` 中的 `onclick="foo"` 和 `onclick="foo($event)"` 是等价的,`$event` 的用法可以更多参考下面的例子
+
+```html
+<template>
+ <div>
+ <text onclick="update($event, 1, 2)">Result: {{result}}</text>
+ </div>
+</template>
+
+<script>
+ module.exports = {
+ data: {
+ result: '<empty>'
+ },
+ methods: {
+ update: function (e, x, y) {
+ this.result = e.type + (x + y)
+ }
+ }
+ }
+</script>
+```
+
+[体验一下](http://dotwe.org/5e1e7c22f036725e44c3ff492f173400)
+
+## 事件描述对象
+
+每当一次事件被触发的时候,都会产生一个事件描述对象,该对象会默认作为第一个参数传递给事件处理函数,或以 `$event` 形参的方式出现在内联事件处理函数中。
+
+每个事件描述对象至少包含以下几个特性:
+
+- `type` (`string`): 事件名称, 如: `click`
+- `target` (`Element`): 目标元素
+- `timestamp` (`number`): 事件触发时的时间戳数字
+
+下一节:[展示逻辑控制](./display-logic.html)
http://git-wip-us.apache.org/repos/asf/incubator-weex-site/blob/12e3a8bc/_drafts/v1.0/guide/syntax/id.md
----------------------------------------------------------------------
diff --git a/_drafts/v1.0/guide/syntax/id.md b/_drafts/v1.0/guide/syntax/id.md
new file mode 100644
index 0000000..0a204ad
--- /dev/null
+++ b/_drafts/v1.0/guide/syntax/id.md
@@ -0,0 +1,124 @@
+---
+title: 找节点
+type: guide
+order: 3.7
+version: 0.10
+---
+
+# 找节点
+
+在 Weex 中,您可以通过在特定的子组件上设置 `id` 特性,以此在该 `<template>` 内唯一标识这个组件。
+
+## 获取子组件
+
+您可以在父组件上下文中使用 `this.$el(id)` 来找到该组件,以运用 `scrollToElement()` 为例:
+
+```html
+<template>
+ <div>
+ <text id="goto-top">Top</text>
+ <div style="height: 10000; background-color: #999999;"></div>
+ <text onclick="back2Top">Back to Top</text>
+ </div>
+</template>
+<script>
+ var dom = require('@weex-module/dom')
+ module.exports = {
+ methods: {
+ back2Top: function () {
+ var el = this.$el('goto-top')
+ dom.scrollToElement(el, { offset: 10 })
+ }
+ }
+ }
+</script>
+```
+
+[体验一下](http://dotwe.org/ed07068ef6f038d6c39af6c971ad08a0)
+
+### `id` 和 `repeat` 特性配合使用
+
+`id` 也可以和 `repeat` 语法配合使用,关于 `repeat` 更多详见 [展示逻辑控制](./display-logic.html),但是要确保循环的节点需要用不同的 `id`,比如:
+
+```html
+<template>
+ <div>
+ <image
+ repeat="image in images"
+ id="img-{{image.id}}"
+ src="{{image.url}}"
+ onclick="getImageId"></image>
+ </div>
+</template>
+<script>
+module.exports = {
+ data: {
+ images: [
+ {id: 1, url: '...'},
+ {id: 2, url: '...'},
+ {id: 3, url: '...'},
+ ...
+ ]
+ },
+ methods: {
+ getImageId: function(e) {
+ // get e.target.id
+ }
+ }
+}
+</script>
+```
+
+### 获取自定义子组件的上下文
+
+另外,我们还可以通过 `this.$vm(id)` 方法可以访问自定义子组件的上下文:
+
+```html
+<element name="foo">
+ <template>
+ <div style="flex-direction: row;">
+ <text>{{title}}</text>
+ </div>
+ </template>
+ <script>
+ module.exports = {
+ data: {
+ title: null
+ },
+ methods: {
+ setTitle: function (text) {
+ this.title = text
+ }
+ }
+ }
+ </script>
+</element>
+
+<template>
+ <div>
+ <foo id="sub" title="Hello"></foo>
+ <text onclick="update">Click Me to Update</text>
+ </div>
+</template>
+<script>
+ module.exports = {
+ methods: {
+ update: function (e) {
+ this.$vm('sub').setTitle('Updated')
+ }
+ }
+ }
+</script>
+```
+
+[体验一下](http://dotwe.org/1d332e6c238462e841743035c6bc697e)
+
+实际上,如上述的例子,我们找到子组件上下文之后,直接在这个上下文中调用子组件方法或修改子组件的数据并不是我们认为最好的方式,我们更倾向于通过一套确定的组件间通信机制来完成这一工作。
+
+### 获取父级组件或其上下文
+
+除了可以自上而下寻找组件或其上下文,Weex 也支持自下而上做相同的事情。当前上下文中的 `this._parent` 可以获取其父级上下文。除了父级上下文,对于父级组件本身,相关处理也可以基于先获取父级上下文,然后在父级组件内部完成更多更细致的处理。更多内容可以深入了解组件间通信的部分。
+
+_注意事项:在未来的版本中 `this._parent` 将改为 `this.$parent`。_
+
+下一篇: [组件间通信](./comm.html)
http://git-wip-us.apache.org/repos/asf/incubator-weex-site/blob/12e3a8bc/_drafts/v1.0/guide/syntax/index.md
----------------------------------------------------------------------
diff --git a/_drafts/v1.0/guide/syntax/index.md b/_drafts/v1.0/guide/syntax/index.md
new file mode 100644
index 0000000..df0c33a
--- /dev/null
+++ b/_drafts/v1.0/guide/syntax/index.md
@@ -0,0 +1,134 @@
+---
+title: 语法介绍
+type: guide
+order: 3
+has_chapter_content: true
+version: 0.10
+---
+
+# 语法综述
+
+Weex 代码由 `<template>`、`<style>`、`<script>` 三个部分构成。
+
+- `<template>`:_必须的_,使用 HTML 语法描述页面结构,内容由多个标签组成,不同的标签代表不同的组件。
+- `<style>`:_可选的_,使用 CSS 语法描述页面的具体展现形式。
+- `<script>`:_可选的_,使用 JavaScript 描述页面中的数据和页面的行为,Weex 中的数据定义也在 `<script>` 中进行。
+
+```html
+<template>
+ <!-- (required) the structure of page -->
+</template>
+
+<style>
+ /* (optional) stylesheet */
+</style>
+
+<script>
+ /* (optional) the definition of data, methods and life-circle */
+</script>
+```
+
+这是一个典型的 M-V-VM 架构:通过 ViewModel 把 Model 和 View 建立更直接有效的关系,ViewModel 的实现以 `<script>` 的内容为主。
+
+## `<template>` 模板
+
+`<template>` 中的标签组织类似如下代码:
+
+``` html
+<template>
+ <div>
+ <image style="width: 200; height: 200;" src="https://gtms02.alicdn.com/tps/i2/TB1QHKjMXXXXXadXVXX20ySQVXX-512-512.png"></image>
+ <text>Alibaba Weex Team</text>
+ </div>
+</template>
+```
+
+[体验一下](http://dotwe.org/5256e6e610ded330369f2e8010f7f0e6)
+
+`<div>` 标签是一个根节点,里面包含描述图片的 `<image>` 标签和描述文字的 `<text>` 标签。
+
+和 HTML 类似,不同标签代表的组件有各自的特性 (attribute),部分组件可以拥有自己的子组件。
+
+延伸阅读:[内置组件列表](../../references/components/index.html)
+
+根节点:每个 Weex 页面最顶层的节点,我们称为根节点。下面是目前我们支持的三种根节点:
+
+- `<div>`:普通根节点,有确定的尺寸,不可滚动。
+- `<scroller>`:可滚动根节点,适用于需要全页滚动的场景。
+- `<list>`:列表根节点,适用于其中包含重复的子元素的列表场景。
+
+目前 Weex 仅支持以上三种根节点。
+
+_注意事项:`<template>` 只支持一个根节点,多个根节点将无法被 Weex 正常的识别和处理。_
+
+## `<style>` 样式
+
+我们可以把 Weex 中的样式语法理解为 CSS 的一个子集,两者有一些细微的区别
+
+第一种写法是,你能在标签上,直接通过内联 `style` 特性编写样式. 第二种写法,通过标签中的 `class` 特性与 `<style>` 标签中定义的样式建立对应关系,让 `<style>` 标签中定义的样式作用于特定标签之上。以下是例子:
+
+```html
+<template>
+ <div>
+ <text style="font-size: 64;">Alibaba</text>
+ <text class="large">Weex Team</text>
+ </div>
+</template>
+
+<style>
+ .large {font-size: 64;}
+</style>
+```
+
+[体验一下](http://dotwe.org/d8af9186bf045df74e7a538d91798db4)
+
+上面的两个 `<text>` 组件都被设置了同样的字体大小,但分别用了两种不同的方式。
+
+延伸阅读:[Weex 通用样式](../references/common-style.html)
+
+**注意**:Weex 遵循 [HTML 特性](https://en.wikipedia.org/wiki/HTML_attribute) 命名规范,所以特性命名时**请不要使用陀峰格式 (CamelCase)**,采用以“-”分割的 **long-name** 形式。
+
+## `<script>` 脚本
+
+`<script>` 描述页面中的数据和页面的行为,代码遵循 JavaScript (ES5) 语法 (目前 iOS 端和浏览器端取决于内置 JavaScript 引擎对 ES 版本的支持情况,安卓端能够完整支持 ES5,但不原生支持 ES6,需要用类似 [babel](http://babeljs.io) 的工具对源代码进行转换)。下面是一个例子:
+
+``` html
+<template>
+ <div>
+ <text>The time is {{datetime}}</text>
+ <text>{{title}}</text>
+ <text>{{getTitle()}}</text>
+ </div>
+</template>
+
+<script>
+ module.exports = {
+ data: {
+ title: 'Alibaba',
+ datetime: null
+ },
+ methods: {
+ getTitle: function () {
+ return 'Weex Team'
+ }
+ },
+ created: function() {
+ this.datetime = new Date().toLocaleString()
+ }
+ }
+</script>
+```
+
+[体验一下](http://dotwe.org/8095bed0d9db4299fb39975d4b35b13f)
+
+上面 `<script>` 标签中定义了被赋值给 `module.exports` 的对象,这个对象其实就是一个 ViewModel 选项,让三个 `<text>` 标签显示当前时间、“Alibaba”字样和“Weex Team”字样。
+
+选项中的 `data` 用于存储数据,这些数据可以通过[数据绑定](./data-binding.html)机制和 `<template>` 标签中的内容绑定起来。当这些数据变更时,被绑定的模板内容也会自动更新。这些数据在 `<script>` 中的各个方法中可以通过类似 `this.x` 的方式进行读写操作。
+
+而选项中的 `methods` 里则列出了当前上下文可执行的各种函数,比如 `getTitle()`。
+
+选项中最后的 `created` 是生命周期函数,会在数据初始化之后、界面被绑定数据并渲染之前执行。类似的生命周期函数还有 `init`、`ready` 等,在这个例子中,`datetime` 会在界面渲染之前被更新为当前的时间。
+
+延伸阅读:[ViewModel 选项](../../references/component-defs.html)
+
+接下来,我们来详细介绍[数据绑定](./data-binding.html)的相关知识。
http://git-wip-us.apache.org/repos/asf/incubator-weex-site/blob/12e3a8bc/_drafts/v1.0/guide/syntax/render-logic.md
----------------------------------------------------------------------
diff --git a/_drafts/v1.0/guide/syntax/render-logic.md b/_drafts/v1.0/guide/syntax/render-logic.md
new file mode 100644
index 0000000..f516733
--- /dev/null
+++ b/_drafts/v1.0/guide/syntax/render-logic.md
@@ -0,0 +1,44 @@
+---
+title: 渲染过程控制
+type: guide
+order: 3.5
+version: 0.10
+---
+
+# 渲染过程控制
+
+## `append`
+
+`append` 特性定义了当前组件的子组件:
+
+1. 以一整棵树的方式一次性添加到视图中 (`append="tree"`),还是
+2. 每个子组件都产生一次单独的添加到视图的指令 (`append="node"`)
+
+``` html
+<template>
+ <div>
+ <div>
+ <text>Hello</text>
+ <text>Weex</text>
+ </div>
+ <div append="node">
+ <text>Hello</text>
+ <text>Weex</text>
+ </div>
+ <div append="tree">
+ <text>Hello</text>
+ <text>Weex</text>
+ </div>
+ </div>
+</template>
+```
+
+[体验一下](http://dotwe.org/417c75415efce66d8e22bf5942b380ee)
+
+在上面的代码中,第一组和第二组 `<div>` 的渲染过程相同,即先添加空的父级 `<div>`,然后插入第一个 `<text>` Hello,然后插入第二个 `<text>` Weex;第三组 `<div>` 则是连带两个 `<text>` 子组件一齐传给渲染层进行渲染的。
+
+渲染结果显而易见,前两组渲染方式会使首次绘制的响应速度比后者快些,但是总渲染时间可能比第三组 `append="tree"` 更长。开发者可以根据实际界面的情况自行选择合理的渲染过程。
+
+默认情况下,除了 `<cell>` 组件的默认渲染过程是 `tree` 模式,其它组件都默认按照 `node` 模式进行渲染。
+
+下一节:[自定义组件](./composed-component.html)
http://git-wip-us.apache.org/repos/asf/incubator-weex-site/blob/12e3a8bc/_drafts/v1.0/guide/syntax/style-n-class.md
----------------------------------------------------------------------
diff --git a/_drafts/v1.0/guide/syntax/style-n-class.md b/_drafts/v1.0/guide/syntax/style-n-class.md
new file mode 100644
index 0000000..afe2de1
--- /dev/null
+++ b/_drafts/v1.0/guide/syntax/style-n-class.md
@@ -0,0 +1,117 @@
+---
+title: CSS 样式和类
+type: guide
+order: 3.2
+version: 0.10
+---
+
+# CSS 样式和类
+
+## 基础语法
+
+CSS 样式可以理解为一系列的键值对,其中的每一对描述了一个特定的样式,例如组件的宽或者高。
+
+```css
+.div {
+ width: 400;
+ height: 50;
+}
+```
+
+键值对的形式是 `prop-name: prop-value;`。键名是 `prop-name`,键值是 `prop-value`。 一般情况下,键名按照连接符的方式进行命名,键和值之间由冒号 `:` 进行分隔,每对键值之间由分号 `;` 进行分隔。
+
+在 Weex 页面上样式有两种形式:
+
+- `<template>` 中的 `style` 特性
+- `<style>` 样式表
+
+### `<template>` 中的 `style` 特性
+
+在 `style` 特性中编写样式,例如:
+
+```html
+<template>
+ <div style="width: 400; height: 50;">
+ ...
+ </div>
+</template>
+```
+
+这段代码的意思是 `<div>` 组件的宽和高分别为 400 像素和 50 像素。
+
+### `<style>` 样式表
+
+例如:
+
+```html
+<style>
+ .wrapper { width: 600; }
+ .title { width: 400; height: 50; }
+ .highlight { color: #ff0000; }
+</style>
+```
+
+样式表包含了多个样式规则,每条规则有一个对应的类,以及由 `{...}` 包括的若干条样式。例如:
+
+```css
+.title { width: 400; height: 50; }
+```
+
+### `class` 特性
+
+`<template>` 标签中的 `class` 特性值用来匹配 `<style>` 样式表中的一个或多个 class 名,多个 class name 之间由空格分隔。例如:
+
+```html
+<template>
+ <div class="wrapper">
+ <text class="title">...</text>
+ <text class="title highlight">...</text>
+ </div>
+</template>
+<style>
+ .wrapper { width: 600; }
+ .title { width: 400; height: 50; }
+ .highlight { color: #ff0000; }
+</style>
+```
+
+[体验一下](http://dotwe.org/8487e2a33cd051c9adfa887d0bafbb44)
+
+这段代码的含义是 `<div>` 组件的宽度是 600 像素,两个 `<text>` 组件的尺寸为 400x50,其中第二个文本组件是红色字。
+
+**注意事项**
+
+- 为了简化页面设计和实现,屏幕的宽度统一为 750 像素,不同设备屏幕都会按照比例转化为这一尺寸进行长度计算。
+- 标准 CSS 支持很多样式选择器,但 Weex 目前只支持单个 class name 的选择器。
+- 标准 CSS 支持很多的长度单位,但 Weex 目前只支持像素,并且 `px` 单位可以忽略不写,直接使用对应的数值。更多详情请查看[通用样式](../references/common-style.html)。
+- 子元素的样式不会继承自父元素,这一点与标准 CSS 不同,比如 `color` 和 `font-size` 等样式作用在 `<text>` 上层的 `<div>` 上是无效的。
+- 标准 CSS 包含了非常多的样式属性,但 Weex 只支持了其中的一部分,比如盒模型、flexbox、position 等布局属性,以及 `font-size`、`color` 等其它样式。
+
+## 与数据绑定结合
+
+请查阅[数据绑定](./data-binding.html)中有关 `style` 和 `class` 特性的相关部分。这里简单举个例子:
+
+```html
+<template>
+ <div>
+ <text style="font-size: {{fontSize}};">Alibaba</text>
+ <text class="large {{textClass}}">Weex Team</text>
+ </div>
+</template>
+<style>
+ .large {font-size: 32;}
+ .highlight {color: #ff0000;}
+</style>
+<script>
+ module.exports = {
+ data: {
+ fontSize: 32,
+ textClass: 'highlight'
+ }
+ }
+</script>
+```
+
+[体验一下](http://dotwe.org/440d3318dc7b83e3bb0a110f3b3236ca)
+
+下一篇:[事件处理](./events.html)
http://git-wip-us.apache.org/repos/asf/incubator-weex-site/blob/12e3a8bc/_drafts/v1.0/index.md
----------------------------------------------------------------------
diff --git a/_drafts/v1.0/index.md b/_drafts/v1.0/index.md
new file mode 100644
index 0000000..9e59b8c
--- /dev/null
+++ b/_drafts/v1.0/index.md
@@ -0,0 +1,5 @@
+layout: index
+type: index
+subtitle: 快速、简洁且高效
+version: 0.10
+---
\ No newline at end of file
http://git-wip-us.apache.org/repos/asf/incubator-weex-site/blob/12e3a8bc/_drafts/v1.0/migration/difference.md
----------------------------------------------------------------------
diff --git a/_drafts/v1.0/migration/difference.md b/_drafts/v1.0/migration/difference.md
new file mode 100644
index 0000000..b11c6c2
--- /dev/null
+++ b/_drafts/v1.0/migration/difference.md
@@ -0,0 +1,249 @@
+---
+title: Weex 和 Vue 2.x 的语法差异
+type: references
+order: 12.2
+version: 2.1
+---
+
+# Weex 和 Vue 2.x 的语法差异
+
+## Overview
+
+
+| | Weex | Vue |
+| ---- | ---- | --- |
+| 生命周期 | `ready: function() {}` | `mounted: function() {}` |
+| 条件指令 | `if="{% raw %}{{!foo}}{% endraw %}"` | `v-if="!foo"` |
+| 循环指令 | `repeat="{% raw %}{{item in list}}{% endraw %}"` | `v-for="item in list"` |
+| 样式类名 | `class="btn btn-{% raw %}{{type}}{% endraw %}"` | `:class="['btn', 'btn-' + type]"` |
+| 内联样式 | `style="color:{% raw %}{{textColor}}{% endraw %}"` | `:style="{ color: textColor }"` |
+| 事件绑定 | `onclick="handler"` | `@click="handler"` |
+| 原生事件 | `onclick="xxx"` | `@click.native="xxx"` |
+| 数据绑定 | `src="{% raw %}{{rightItemSrc}}{% endraw %}"` | `:src="rightItemSrc"` |
+| 内容/槽 | `<content></content>` | `<slot></slot>` |
+| 数据初始化 | `data: { value: 'x' }` | `data: function() { return { value: 'x' } }` |
+| 标签 ID | `id="xxx"` | `ref="xxx"` |
+| 获取节点 | `this.$el('xxx')` | `this.$refs.xxx` |
+
+
+## Reference
+
+See the source code of `weex-vue-migration` for more details:
+
++ [template-rewriter](https://github.com/songsiqi/weex-vue-migration/blob/master/src/template-rewriter/rewriter.js)
++ [script-rewriter](https://github.com/songsiqi/weex-vue-migration/blob/master/src/script-rewriter/rewriter.js)
+
+## LifeCycle Hooks 生命周期钩子
+| weex | vue | Description |
+| --------- | ------------- | ------------------------- |
+| init | beforeCreate | 组件实例刚刚被创建,组件属性如data计算之前 |
+| created | created | 组件实例创建完成,属性已绑定,但DOM还未生成 |
+| | beforeMount | 模板编译/挂载之前 |
+| ready | mounted | 模板编译/挂载之后 |
+| | beforeUpdate | 组件更新之前 |
+| | updated | 组件更新之后 |
+| | activated | for`keep-alive`, 组件被激活时调用 |
+| | deactivated | for`keep-alive`, 组件被移除时调用 |
+| | beforeDestroy | 组件被销毁前调用 |
+| destroyed | destroyed | 组件被销毁后调用 |
+
+# Data Binding 数据绑定
+
+在weex中,使用{% raw %}{{…}}{% endraw %}在`<template>`中绑定在`<script>`里定义的数据;在vue中,需要在要绑定的属性前加 `:` 。如以下示例。
+
+* 类名
+
+ - weex
+
+ ```html
+ <div class="btn btn-{{type}}"></div>
+ ```
+
+ - vue
+
+ ```html
+ <div :class="['btn', 'btn-' + type]"></div>
+ ```
+
+* 样式绑定
+
+ * weex
+
+ ```html
+ <div style="color:{{textColor}}"></div>
+ ```
+
+ * vue
+
+ ```html
+ <div :style="{color: textColor}"></div>
+ ```
+
+# if指令
+
+* weex
+
+ ```html
+ <image src="..." if="{{shown}}"></image>
+ ```
+
+ or
+
+ ```html
+ <image src="..." if="shown"></image>
+ ```
+
+* vue
+
+ ```html
+ <image src="..." v-if="shown"></image>
+ ```
+
+# 循环指令
+
+* weex: repeat
+ - `$index`为索引
+
+ ```html
+ <div repeat="{{list}}">
+ <text>No. {{$index + 1}}</text>
+ <div>
+ ```
+
+ or
+
+ ```html
+ <div repeat="{{v in list}}">
+ <text>No. {{$index + 1}}, {{v.nickname}}</text>
+ </div>
+ ```
+
+ - 对象参数的顺序
+
+ ```html
+ <div repeat="{{(key, value) in list}}">
+ <text>No. {{key + 1}}, {{value.nickname}}</text>
+ </div>
+ ```
+
+ - `track-by`
+
+ ```html
+ <div repeat="{{item in items}}" track-by="item.id" class="{{gender}}"></div>
+ ```
+
+* vue: v-for
+
+ - 移除`$index`索引
+
+ - 对象参数的改变:改为(value, key), 与通用的对象迭代器保持一致
+
+ ```html
+ <div repeat="{{(value, key) in list}}">
+ <text>No. {{key + 1}}, {{value.nickname}}</text>
+ </div>
+ ```
+
+ - `track-by` 替换为`v-bind`
+
+ ```html
+ <div v-for="item in items" v-bind:key="item.id">
+ ```
+
+# 初始化数据
+
+* weex
+
+ ```javascript
+ data: { value: 'x' }
+ ```
+
+* vue
+
+ ```javascript
+ props: { value: { default: 'x' } }
+ ```
+
+ 动态数据
+
+ ```javascript
+ data: function () { return { value: 'x' } }
+ ```
+
+
+# 围绕DOM的实例方法
+
+* 获取节点
+
+ - weex: `this.$el('xxx')`
+
+ ```html
+ <template>
+ <container>
+ <text id="top">Top</text>
+ </container>
+ </template>
+ <script>
+ module.exports = {
+ methods: {
+ toTop: function () {
+ var top = this.$el('top')
+ }
+ }
+ }
+ </script>
+ ```
+
+ - vue
+
+ ```javascript
+ this.$refs.xxx
+ ```
+
+
+
+# 事件
+* 事件绑定
+ - weex
+
+ ```html
+ <div onclick="handler"></div>
+ ```
+
+ - vue
+
+ ```html
+ <div @click="handler"></div>
+ ```
+
+* 事件触发
+ - weex: dispatch和broadcast
+
+ ```javascript
+ this.$dispatch()
+ ```
+
+ ```javascript
+ this.$broadcast()
+ ```
+
+ - vue: emit
+
+ ```javascript
+ this.$emit()
+ ```
+
+ > 注:Weex 的 `$dispatch` 与组件无关,在任意组件中都可以通过 `$on` 捕获到,Vue 的`$emit` 用于触发组件(标签)的自定义事件。
+
+* 原生事件
+ - weex
+
+ ```javascript
+ onclick="xxx"
+ ```
+
+ - vue
+
+ ```javascript
+ @click.native="xxx"
+ ```
http://git-wip-us.apache.org/repos/asf/incubator-weex-site/blob/12e3a8bc/_drafts/v1.0/migration/index.md
----------------------------------------------------------------------
diff --git a/_drafts/v1.0/migration/index.md b/_drafts/v1.0/migration/index.md
new file mode 100644
index 0000000..1238936
--- /dev/null
+++ b/_drafts/v1.0/migration/index.md
@@ -0,0 +1,11 @@
+---
+title: 迁移
+type: references
+order: 12
+version: 2.1
+---
+
+# 迁移
+
+- [如何将原有 Weex 项目改造成 Vue 版本](./migration-from-weex.html)
+- [Weex 和 Vue 2.x 的语法差异](./difference.html)
\ No newline at end of file
http://git-wip-us.apache.org/repos/asf/incubator-weex-site/blob/12e3a8bc/_drafts/v1.0/migration/migration-from-weex.md
----------------------------------------------------------------------
diff --git a/_drafts/v1.0/migration/migration-from-weex.md b/_drafts/v1.0/migration/migration-from-weex.md
new file mode 100644
index 0000000..34c3c6d
--- /dev/null
+++ b/_drafts/v1.0/migration/migration-from-weex.md
@@ -0,0 +1,116 @@
+---
+title: 如何将原有 Weex 项目改造成 Vue 版本
+type: references
+order: 12.1
+version: 2.1
+---
+
+# 如何将原有 Weex 项目改造成 Vue 版本
+
+Weex 本身有一套语法规则,和 Vue 本身很相似,现在 Weex 与 Vue 有了官方合作,支持将 Vue 2.x 作为内置的前端框架,我们也推荐大家使用 Vue 2.x 的语法开发原生应用。对于现存旧版的 `.we` 文件,建议大家将其改造成 Vue 版本。
+
+## 要解决的问题
+
+> 将内核切换成 Vue 之后,原先基于 Weex 语法开发的项目将如何过渡到 Vue ?
+
+首先需要明确一点:Weex 原有的前端框架也会继续存在于 WeexSDK 中,依然支持 `.we` 文件格式的写法。
+
+此外,由于 `.we` 和 `.vue` 文件的格式本身就比较接近,所以迁移成本比较小,建议大家将现有 `.we` 格式的文件都转换成 `.vue` 格式。我们也推出了相应的工具和方法辅助迁移,在内部也有大量的成功实践,下边将重点介绍一下将 `.we` 文件转成 `.vue` 文件的方法。
+
+## 第一步,借助工具实现语法转换
+
+首先介绍一个工具: **[weex-vue-migration](https://github.com/songsiqi/weex-vue-migration)** ,它可以自动将 `.we` 文件转为 `.vue` 文件,绝大多数的模板语法都能自动转换,语法差异如下:
+
+| | Weex | Vue |
+| ---- | ---- | --- |
+| 生命周期 | `ready: function() {}` | `mounted: function() {}` |
+| 条件指令 | `if="{% raw %}{{!foo}}{% endraw %}"` | `v-if="!foo"` |
+| 循环指令 | `repeat="{% raw %}{{item in list}}{% endraw %}"` | `v-for="item in list"` |
+| 样式类名 | `class="btn btn-{% raw %}{{type}}{% endraw %}"` | `:class="['btn', 'btn-' + type]"` |
+| 内联样式 | `style="color:{% raw %}{{textColor}}{% endraw %}"` | `:style="{ color: textColor }"` |
+| 事件绑定 | `onclick="handler"` | `@click="handler"` |
+| 原生事件 | `onclick="xxx"` | `@click.native="xxx"` |
+| 数据绑定 | `src="{% raw %}{{rightItemSrc}}{% endraw %}"` | `:src="rightItemSrc"` |
+| 内容/槽 | `<content></content>` | `<slot></slot>` |
+| 数据初始化 | `data: { value: 'x' }` | `data: function() { return { value: 'x' } }` |
+| 标签 ID | `id="xxx"` | `ref="xxx"` |
+| 获取节点 | `this.$el('xxx')` | `this.$refs.xxx` |
+
+想要了解更多语法差异的细节,可以参考这篇文章:[《Weex 和 Vue 2.x 的语法差异》](./difference.html) 。
+
+### 使用方法
+
+首先安装工具:
+
+```bash
+npm install weex-vue-migration -g
+```
+
+转换文件:
+
+```bash
+weex-vue-migrate demo.we
+```
+
+转换成功后,将会在当前目录下生成 `demo.vue` 文件,控制台将会有如下输出:
+
+```
+[Success]: Migrate demo.we => demo.vue in 33ms
+Migration finished in 0.035s
+```
+
+除了逐个转换 `.we` 文件以外,`weex-vue-migration` 还支持批量转换整个目录,参考其[说明文档](https://github.com/songsiqi/weex-vue-migration/blob/master/README.md)可以了解更详细的使用方法。
+
+### 注意事项
+
+转换工具将不再支持 Weex 中废弃的语法,如果代码中有如下写法,建议先手动修改再做转换。
+
+0. 忽略 `require('@weex-components')` 语句,可以通过 npm 包的方式引入外部组件。
+0. 无法转换 `repeat="list"` 写法,仅支持 `repeat="item in list"` 格式。
+0. 不支持转换 `<script type="config"></script>`,目前 Vue 中不支持原有的降级配置。
+
+## 第二步,手动调整代码细节
+
+模板和样式的转换都可以借助工具轻易转换过来,`<script>` 中基本的语法也可以转换;但是由于 javascript 的写法比较灵活,仅仅使用工具做转换,并不一定能完美过渡。工具只能处理语法但是理解不了代码中的逻辑,在 Weex 和 Vue 的框架特性存在一些差异,有些差异还是需要手动修改才可以生效。
+
+> 提示:在代码中使用的“黑科技”越多,项目就越难以转换。
+
+### 样式单位
+
+在 `.we` 文件写样式时,开发者通常都不写长度单位,默认会被视为 `px`。在新的 Vue 版本的 Web 渲染器中,`<style>` 中的样式将会直接转化成 CSS class,如果不写单位、浏览器将无法正确识别,会导致在 Web 端无法正常渲染。Native 环境中不受影响。
+
+尽管不影响 Native 页面的渲染,也建议给样式长度加上单位 `px`。
+
+### 旧框架中的内置属性
+
++ `vm._app`
+ + `vm._app.differ`
+ + `vm._app.doc`
+ + `vm._app.updateActions()`
+
+### 事件派发机制
+
++ `$dispatch` 、`$broadcast` 、`$call` 方法已经废弃。
++ `$emit` 行为不一致。
+
+可以使用 Vuex 管理数据状态。
+
+### 直接操作 Virtual-DOM
+
+Weex 和 Vue 中的 Virtual-DOM 格式并不相同,如果你使用了 `this.$el('id')` 获取了某个组件的 element 之后,又修改了其中的某些属性或者调用了某些方法,这些操作在 Vue 中很难找到直接的对应写法。
+
+从另一个角度讲,我们也非常不建议在 Weex 或 Vue 项目中直接操作 Virtual-DOM,这些写法都应该修改。
+
+## 调整开发环境和工具
+
+在文件转换完成后,还需要重新调整一下开发环境。
+
+### 文件的编译
+
+`weex-loader` 同时支持编译 `.we` 和 `.vue` 文件,如果你使用的是 `webpack` 来配置编译环境,将不需要做任何改变就能直接编译 `.vue` 文件。
+
+需要注意的是,Vue 本身就是一个独立的前端框架,使用 Vue 编写的项目在 Web 上完全可以不依赖 Weex 容器运行。在这种情况下,需要配置基于 `vue-loader` 的编译脚本生成适用于 Web 平台 js 文件;然后引入 Vue 格式的 Weex 组件库就可以在 Web 中。
+
+### 辅助工具
+
+Weex 提供了 [weex-toolkit](https://github.com/weexteam/weex-toolkit) 的脚手架工具来辅助开发和调试、[weex-pack](https://github.com/weexteam/weex-pack) 实现打包原生应用;同样在 Vue 中也有 [vue-cli](https://github.com/vuejs/vue-cli) 脚手架工具。Weex 和 Vue 的工具互相做了适配,建议在创建项目和开发 Vue 项目的时候使用 `vue-cli` ,在调试时使用 `weex-toolkit`,在打包原生应用时使用 `weex-pack` 。
http://git-wip-us.apache.org/repos/asf/incubator-weex-site/blob/12e3a8bc/_drafts/v1.0/references/api.md
----------------------------------------------------------------------
diff --git a/_drafts/v1.0/references/api.md b/_drafts/v1.0/references/api.md
new file mode 100644
index 0000000..e3e5e4b
--- /dev/null
+++ b/_drafts/v1.0/references/api.md
@@ -0,0 +1,67 @@
+---
+title: ViewModel APIs
+type: references
+order: 1.3
+version: 0.10
+---
+
+# 接口
+
+你可以在组件的方法中通过 `this` (Vm)上下文访问这些 API。
+
+例子:
+
+```html
+<script>
+module.exports = {
+ methods: {
+ somemethod: function() {
+ this.$vm('someId');
+ }
+ }
+}
+</script>
+```
+
+## $(id)
+
+**不建议使用**,请使用 `$vm` 代替。
+## $el(id)
+
+返回对应 id 的元素对象的引用。
+### Arguments
+- `id` _(string)_: 唯一标识符。
+### Returns
+- _(Element)_: 一个元素对象的引用。
+### Tips
+- id 只能保证是当前(页面)组件中是唯一的,如果你需要寻找父组件或子组件,你可以利用组件间的通信模式实现。
+- 延伸阅读: [id](../guide/syntax/id.md),[Communicate Between Components](../guide/syntax/comm.md)
+## $vm(id)
+
+返回对应 id 的 vm 对象引用。
+### Arguments
+- `id` _(String)_: 唯一标识符。
+### Returns
+- `vm` _(Vm)_: 一个 Vm 对象引用。
+### Tips
+- id 只能保证是当前(页面)组件中是唯一的,如果你需要寻找父组件或子组件,你可以利用组件间的通信模式实现。
+- 延伸阅读: [id](../guide/syntax/id.md),[Communicate Between Components](../guide/syntax/comm.md)
+## $getConfig()
+
+获取当前全局环境变量和配置信息。
+### Returns
+- `config` _(object)_: 配置对象;
+- `bundleUrl` _(string)_: bundle 的 url;
+- `debug` _(boolean)_: 是否是调试模式;
+- `env` _(object)_: 环境对象;
+ - `weexVersion` _(string)_: Weex sdk 版本;
+ - `appName` _(string)_: 应用名字;
+ - `appVersion` _(string)_: 应用版本;
+ - `platform` _(string)_: 平台信息,是 `iOS`、`Android` 还是 `Web`;
+ - `osVersion` _(string)_: 系统版本;
+ - `deviceModel` _(string)_: 设备型号 **(仅原生应用)**;
+ - `deviceWidth` _(number)_: 设备宽度,默认为 `750`;
+ - `deviceHeight` _(number)_: 设备高度。
+## $call(module, method, ...args)
+
+**不建议使用**,请使用 `require('@weex-module/module')[method](...args)` 代替。查看更多信息:[modules](./modules/main)。
http://git-wip-us.apache.org/repos/asf/incubator-weex-site/blob/12e3a8bc/_drafts/v1.0/references/bubble.md
----------------------------------------------------------------------
diff --git a/_drafts/v1.0/references/bubble.md b/_drafts/v1.0/references/bubble.md
new file mode 100644
index 0000000..74b7e98
--- /dev/null
+++ b/_drafts/v1.0/references/bubble.md
@@ -0,0 +1,150 @@
+---
+title: 事件冒泡
+type: references
+order: 1.3
+version: 0.10
+---
+
+# 事件冒泡 <span class="api-version">v0.13+</span>
+
+Weex 1.0 实现了 W3C 标准的事件冒泡机制。
+
+### 使用
+
+```html
+<template>
+ <div class="root" onclick="rootClick" bubble="true">
+ <div>
+ <text style="font-size: 40px;">{{rootText}}</text>
+ </div>
+ <div class="outer" onclick="parentClick">
+ <div>
+ <text style="font-size: 40px;">{{parentText}}</text>
+ </div>
+ <text class="inner" onclick="click">{{innerText}}</text>
+ </div>
+ </div>
+</template>
+
+<script>
+ module.exports = {
+ data: {
+ innerText: 'click me',
+ parentText: '',
+ rootText: ''
+ },
+ methods: {
+ click: function(e) {
+ this.innerText = 'inner bubble'
+ },
+ parentClick: function(e) {
+ this.parentText = 'parent bubble'
+ },
+ rootClick: function(e) {
+ this.rootText = 'root bubble'
+ }
+ }
+ }
+</script>
+
+<style>
+ .inner {
+ font-size: 40px;
+ text-align: center;
+ background-color: #7a9b1b;
+ padding: 40px;
+ }
+
+ .outer {
+ font-size: 40px;
+ text-align: center;
+ background-color: #9b7a1b;
+ padding: 120px;
+ }
+
+ .root {
+ font-size: 40px;
+ text-align: center;
+ background-color: #7a1b9b;
+ padding: 80px;
+ }
+</style>
+```
+
+[try it](http://dotwe.org/weex/dbfeb926e003986e2eea88c8ccdadb92)
+
+运行以上代码,用客户端打开,点击中间的元素,可以看到事件向上传播,依次触发。
+
+### 注意
+
+需要注意的是: ** 为了兼容之前的版本,Weex 默认不会开启事件冒泡机制。需要在根元素的属性上,添加 `bubble="true"` 来开启冒泡机制。否则,将不会向上传播事件,保持与之前版本的效果相同。 **
+
+### stopPropagation
+
+在事件处理函数中,可以使用 `e.stopPropagation()` 方法,来阻止本次事件向上的传递过程。注意,`e.stopPropagation()` 与 `bubble="true"` 不同,前者只会影响当前元素以及父元素的传播,不会影响子元素的传播;后者是为了版本兼容而增加的开关机制,会全局关闭或者开启冒泡机制,两者可以共同存在使用,如下:
+
+```html
+<template>
+ <div class="root" onclick="rootClick" bubble="true">
+ <div>
+ <text style="font-size: 40px;">{{rootText}}</text>
+ </div>
+ <div class="outer" onclick="parentClick">
+ <div>
+ <text style="font-size: 40px;">{{parentText}}</text>
+ </div>
+ <text class="inner" onclick="click">{{innerText}}</text>
+ </div>
+ </div>
+</template>
+
+<script>
+ module.exports = {
+ data: {
+ innerText: 'click me',
+ parentText: '',
+ rootText: ''
+ },
+ methods: {
+ click: function(e) {
+ this.innerText = 'inner bubble'
+ },
+ parentClick: function(e) {
+ this.parentText = 'parent bubble'
+ e.stopPropagation()
+ },
+ rootClick: function(e) {
+ this.rootText = 'root bubble'
+ // e.stopPropagation()
+ }
+ }
+ }
+</script>
+
+<style>
+ .inner {
+ font-size: 40px;
+ text-align: center;
+ background-color: #7a9b1b;
+ padding: 40px;
+ }
+
+ .outer {
+ font-size: 40px;
+ text-align: center;
+ background-color: #9b7a1b;
+ padding: 120px;
+ }
+
+ .root {
+ font-size: 40px;
+ text-align: center;
+ background-color: #7a1b9b;
+ padding: 80px;
+ }
+</style>
+```
+
+[try it](http://dotwe.org/weex/0cab45a7c62e8bebedd2ffd83a8e1256)
+
+运行以上代码,用客户端打开,点击中间的元素,可以看到事件向上传播到父元素被终止,不再继续往根元素传播。
http://git-wip-us.apache.org/repos/asf/incubator-weex-site/blob/12e3a8bc/_drafts/v1.0/references/cheatsheet.md
----------------------------------------------------------------------
diff --git a/_drafts/v1.0/references/cheatsheet.md b/_drafts/v1.0/references/cheatsheet.md
new file mode 100644
index 0000000..777abf6
--- /dev/null
+++ b/_drafts/v1.0/references/cheatsheet.md
@@ -0,0 +1,114 @@
+---
+title: Weex 快查手册
+type: references
+order: 6
+version: 0.10
+---
+
+# Weex 备忘录
+
+## Native 组件
+<style>
+code {
+ word-break: break-all;
+}
+</style>
+
+| 组件 | 特性 | 样式 | 事件 | 特殊父组件 | 子组件 |
+| ---- | ---- | ---- | ---- | ---- | ---- |
+| `<div>` | - | **box model**<br>**flexbox**<br>`position`<br>`background-color`<br>`opacity` | `click`<br>`appear`<br>`disappear` | - | (any) |
+| `<text>` | `value` | **box model**<br>flex<br>`position`<br>`background-color`<br>`opacity`<br>`color`<br>`font-size`<br>`font-style`<br>`font-weight`<br>`text-decoration`<br>`text-align`<br>`text-overflow`<br>`line-height` | `click`<br>`appear`<br>`disappear` | - | text only |
+| `<image>` | `src` | **box model**<br>**flexbox**<br>`position`<br>`background-color`<br>`opacity`<br>`resize` | `click`<br>`appear`<br>`disappear` | - | (none) |
+| `<scroller>` | `show-scrollbar`<br>`scroll-direction` | **box model**<br>**flexbox**<br>`position`<br>`background-color`<br>`opacity` | `click`<br>`appear`<br>`disappear` | - | (any) |
+| `<list>` | `loadmoreoffset` | **box model**<br>**flexbox**<br>`position`<br>`background-color`<br>`opacity` | `click`<br>`appear`<br>`disappear`<br>`loadmore`<br>`refresh`<br>`loading` | - | `<cell>`<br>`<header>`<br>`<refresh>`<br>`<loading>` |
+| `<cell>` | - | **box model**<br>**flexbox**<br>`position`<br>`background-color`<br>`opacity` | `click`<br>`appear`<br>`disappear` | `<list>` | (any) |
+| `<slider>` | `auto-play` | **box model**<br>**flexbox**<br>`position`<br>`background-color`<br>`opacity` | `click`<br>`appear`<br>`disappear`<br>`change` | - | (any)<br>`<indicator>` |
+| `<indicator>` | - | **box model**<br>**flexbox**<br>`position`<br>`item-color`<br>`item-selected-color`<br>`item-size` | `click`<br>`appear`<br>`disappear` | `<slider>` | (none) |
+| `<wxc-navpage>` | `height`<br>`background-color`<br>`title`<br>`title-color`<br>`left-item-title`<br>`left-item-color`<br>`right-item-title`<br>`right-item-color`<br>`left-item-src`<br>`right-item-src` | **box model**<br>**flexbox**<br>`position`<br>`background-color`<br>`opacity` | `click`<br>`appear`<br>`disappear`<br>`naviBar.leftItem.click`<br>`naviBar.rightItem.click` | - | (any) |
+| `<wxc-tabbar>` | `tab-items` | **box model**<br>**flexbox**<br>`position`<br>`background-color`<br>`opacity` | `tabBar.onClick` | - | (none) |
+| `<embed>` | `src` | **box model**<br>**flexbox**<br>`position`<br>`background-color`<br>`opacity` | `click`<br>`appear`<br>`disappear` | - | (none) |
+| `<web>` | `src` | **box model**<br>**flexbox**<br>`position`<br>`background-color`<br>`opacity` | `click`<br>`appear`<br>`disappear`<br>`pagestart`<br>`pagefinish`<br>`error` | - | (none) |
+| `<video>` | `src`<br>`play-status`<br>`auto-play` | **box model**<br>**flexbox**<br>`position`<br>`background-color`<br>`opacity` | `click`<br>`appear`<br>`disappear`<br>`start`<br>`pause`<br>`finish`<br>`fail` | - | (none) |
+| `<a>` | `href` | **box model**<br>**flexbox**<br>`position`<br>`background-color`<br>`opacity` | `click`<br>`appear`<br>`disappear` | - | (any) |
+| `<input>` | `type`<br>`value`<br>`placeholder`<br>`disabled`<br>`autofocus` | **box model**<br>**flexbox**<br>`position`<br>`background-color`<br>`opacity`<br>`placeholder-color`<br>`color`<br>`font-size`<br>`font-style`<br>`font-weight`<br>`text-align` | `click`<br>`appear`<br>`disappear` | - | (none) |
+| `<switch>` | `checked` | **box model**<br>**flexbox**<br>`position`<br>`background-color`<br>`opacity` | `appear`<br>`disappear`<br>`input`<br>`change`<br>`focus`<br>`blur` | - | (none) |
+
+## Native Modules
+
+| module | apis |
+| ---- | ---- |
+| `@weex-module/dom` | `scrollToElement(node, { offset })` |
+| `@weex-module/modal` | `toast({ message, duration })`<br>`alert({ message, okTitle }, callback)`<br>`confirm({ message, okTitle, cancelTitle }, callback(result))`<br>`prompt({ message, okTitle, cancelTitle }, callback(result, data))` |
+| `@weex-module/stream` | `fetch({ method, url, headers, type, body }, callback({ status, ok, statusText, data, headers }), progressCallback({ readyState, status, length, statusText, headers}))` |
+| `@weex-module/webview` | `goBack(ref)`<br>`goForward(ref)`<br>`reload(ref)` |
+| `@weex-module/navigator` | `push({ url, animated }, callback)`<br>`pop({ animated }, callback)` |
+| `@weex-module/animation` | `transition(node, { styles, duration, timingFunction, delay, transform-origin }, callback)` |
+
+## 特殊的模版语法
+
+* `<foo x="abc">`
+* `{% raw %}<foo x="{{expr}}">{% endraw %}`
+* `<foo style="name1: value1; name2: value2">`
+* `{% raw %}<foo style="name1: value1; name2: {{expr}}; name3: ...">{% endraw %}`
+* `<foo class="a b c">`
+* `{% raw %}<foo class="a {{expr}} c">{% endraw %}`
+* `<foo onclick="methodName">`
+* `<foo id="abc">`
+* `<foo if="expr">`
+* `<foo repeat="item in list">`
+* `<foo repeat="(key,item) in list">`
+* `<component type="foo">`
+* `{% raw %}<component type="{{expr}}">{% endraw %}`
+
+## ViewModel APIs
+
+* `this.$vm(el)`
+* `this.$el(el)`
+* `this.$getConfig()`
+* `this.$emit(type, data)`
+* `this.$dispatch(type, data)`
+* `this.$broadcast(type, data)`
+
+## ViewModel Options
+
+* `data`
+* `methods`
+* `computed`
+* `init`, `created`, `ready`
+* `events`
+
+**示例:**
+
+```javascript
+module.exports = {
+
+ data: function () {
+ return {
+ x: 1,
+ y: 2
+ }
+ }
+
+ methods: {
+ foo: function () {
+ console.log('foo')
+ }
+ },
+
+ computed: {
+ z: function () {
+ return this.x + this.y
+ }
+ },
+
+ events: {
+ custom: function (e) {
+ console.log(e)
+ }
+ },
+
+ init: function () {},
+ created: function () {},
+ ready: function () {}
+}
+```
http://git-wip-us.apache.org/repos/asf/incubator-weex-site/blob/12e3a8bc/_drafts/v1.0/references/color-names.md
----------------------------------------------------------------------
diff --git a/_drafts/v1.0/references/color-names.md b/_drafts/v1.0/references/color-names.md
new file mode 100644
index 0000000..1b8a968
--- /dev/null
+++ b/_drafts/v1.0/references/color-names.md
@@ -0,0 +1,180 @@
+---
+title: 颜色名称列表
+type: references
+order: 1.8
+version: 0.10
+---
+
+# Weex 支持的所有颜色名称
+
+### 基础颜色关键词:
+
+| 颜色名 | 十六进制RGB值 |
+| --- | --- |
+| black(黑) | #000000 |
+| silver(银) | #C0C0C0 |
+| gray(灰) | #808080 |
+| white(白) | #FFFFFF |
+| maroon(褐紫红) | #800000 |
+| red(红) | #FF0000 |
+| purple(紫) | #800080 |
+| fuchsia(晚樱) | #FF00FF |
+| green(绿) | #008000 |
+| lime(石灰) | #00FF00 |
+| olive(橄榄) | #808000 |
+| yellow(黄) | #FFFF00 |
+| navy(海军蓝) | #000080 |
+| blue(蓝) | #0000FF |
+| teal(水鸭) | #008080 |
+| aqua(水蓝) | #00FFFF |
+### 扩展颜色关键词:
+
+| 颜色名 | 十六进制RGB值 |
+| --- | --- |
+| aliceblue | #F0F8FF |
+| antiquewhite | #FAEBD7 |
+| aqua | #00FFFF |
+| aquamarine | #7FFFD4 |
+| azure | #F0FFFF |
+| beige | #F5F5DC |
+| bisque | #FFE4C4 |
+| black | #000000 |
+| blanchedalmond | #FFEBCD |
+| blue | #0000FF |
+| blueviolet | #8A2BE2 |
+| brown | #A52A2A |
+| burlywood | #DEB887 |
+| cadetblue | #5F9EA0 |
+| chartreuse | #7FFF00 |
+| chocolate | #D2691E |
+| coral | #FF7F50 |
+| cornflowerblue | #6495ED |
+| cornsilk | #FFF8DC |
+| crimson | #DC143C |
+| cyan | #00FFFF |
+| darkblue | #00008B |
+| darkcyan | #008B8B |
+| darkgoldenrod | #B8860B |
+| darkgray | #A9A9A9 |
+| darkgreen | #006400 |
+| darkgrey | #A9A9A9 |
+| darkkhaki | #BDB76B |
+| darkmagenta | #8B008B |
+| darkolivegreen | #556B2F |
+| darkorange | #FF8C00 |
+| darkorchid | #9932CC |
+| darkred | #8B0000 |
+| darksalmon | #E9967A |
+| darkseagreen | #8FBC8F |
+| darkslateblue | #483D8B |
+| darkslategray | #2F4F4F |
+| darkslategrey | #2F4F4F |
+| darkturquoise | #00CED1 |
+| darkviolet | #9400D3 |
+| deeppink | #FF1493 |
+| deepskyblue | #00BFFF |
+| dimgray | #696969 |
+| dimgrey | #696969 |
+| dodgerblue | #1E90FF |
+| firebrick | #B22222 |
+| floralwhite | #FFFAF0 |
+| forestgreen | #228B22 |
+| fuchsia | #FF00FF |
+| gainsboro | #DCDCDC |
+| ghostwhite | #F8F8FF |
+| gold | #FFD700 |
+| goldenrod | #DAA520 |
+| gray | #808080 |
+| green | #008000 |
+| greenyellow | #ADFF2F |
+| grey | #808080 |
+| honeydew | #F0FFF0 |
+| hotpink | #FF69B4 |
+| indianred | #CD5C5C |
+| indigo | #4B0082 |
+| ivory | #FFFFF0 |
+| khaki | #F0E68C |
+| lavender | #E6E6FA |
+| lavenderblush | #FFF0F5 |
+| lawngreen | #7CFC00 |
+| lemonchiffon | #FFFACD |
+| lightblue | #ADD8E6 |
+| lightcoral | #F08080 |
+| lightcyan | #E0FFFF |
+| lightgoldenrodyellow | #FAFAD2 |
+| lightgray | #D3D3D3 |
+| lightgreen | #90EE90 |
+| lightgrey | #D3D3D3 |
+| lightpink | #FFB6C1 |
+| lightsalmon | #FFA07A |
+| lightseagreen | #20B2AA |
+| lightskyblue | #87CEFA |
+| lightslategray | #778899 |
+| lightslategrey | #778899 |
+| lightsteelblue | #B0C4DE |
+| lightyellow | #FFFFE0 |
+| lime | #00FF00 |
+| limegreen | #32CD32 |
+| linen | #FAF0E6 |
+| magenta | #FF00FF |
+| maroon | #800000 |
+| mediumaquamarine | #66CDAA |
+| mediumblue | #0000CD |
+| mediumorchid | #BA55D3 |
+| mediumpurple | #9370DB |
+| mediumseagreen | #3CB371 |
+| mediumslateblue | #7B68EE |
+| mediumspringgreen | #00FA9A |
+| mediumturquoise | #48D1CC |
+| mediumvioletred | #C71585 |
+| midnightblue | #191970 |
+| mintcream | #F5FFFA |
+| mistyrose | #FFE4E1 |
+| moccasin | #FFE4B5 |
+| navajowhite | #FFDEAD |
+| navy | #000080 |
+| oldlace | #FDF5E6 |
+| olive | #808000 |
+| olivedrab | #6B8E23 |
+| orange | #FFA500 |
+| orangered | #FF4500 |
+| orchid | #DA70D6 |
+| palegoldenrod | #EEE8AA |
+| palegreen | #98FB98 |
+| paleturquoise | #AFEEEE |
+| palevioletred | #DB7093 |
+| papayawhip | #FFEFD5 |
+| peachpuff | #FFDAB9 |
+| peru | #CD853F |
+| pink | #FFC0CB |
+| plum | #DDA0DD |
+| powderblue | #B0E0E6 |
+| purple | #800080 |
+| red | #FF0000 |
+| rosybrown | #BC8F8F |
+| royalblue | #4169E1 |
+| saddlebrown | #8B4513 |
+| salmon | #FA8072 |
+| sandybrown | #F4A460 |
+| seagreen | #2E8B57 |
+| seashell | #FFF5EE |
+| sienna | #A0522D |
+| silver | #C0C0C0 |
+| skyblue | #87CEEB |
+| slateblue | #6A5ACD |
+| slategray | #708090 |
+| slategrey | #708090 |
+| snow | #FFFAFA |
+| springgreen | #00FF7F |
+| steelblue | #4682B4 |
+| tan | #D2B48C |
+| teal | #008080 |
+| thistle | #D8BFD8 |
+| tomato | #FF6347 |
+| turquoise | #40E0D0 |
+| violet | #EE82EE |
+| wheat | #F5DEB3 |
+| white | #FFFFFF |
+| whitesmoke | #F5F5F5 |
+| yellow | #FFFF00 |
+| yellowgreen | #9ACD32 |
[28/51] [abbrv] incubator-weex-site git commit: rearrangement the
structure of the document
Posted by ha...@apache.org.
http://git-wip-us.apache.org/repos/asf/incubator-weex-site/blob/32a097bf/_draft/v-0.10/advanced/extend-to-ios.md
----------------------------------------------------------------------
diff --git a/_draft/v-0.10/advanced/extend-to-ios.md b/_draft/v-0.10/advanced/extend-to-ios.md
new file mode 100644
index 0000000..bddb96e
--- /dev/null
+++ b/_draft/v-0.10/advanced/extend-to-ios.md
@@ -0,0 +1,311 @@
+---
+title: Extend to iOS
+type: advanced
+order: 7
+has_chapter_content: true
+version: 0.10
+---
+
+# Extend to iOS
+
+### Module extend
+
+Weex SDK provides only rendering capabilities, rather than have other capabilities, such as network, picture, and URL redirection. If you want these features, you need to implement it.
+
+For example: If you want to implement an address jumping function, you can achieve a Module following the steps below.
+
+#### Step to customize a module
+
+1. Module
+ customized must implement WXModuleProtocol
+2. A macro named `WX_EXPORT_METHOD` must be added, as it is the only way to be recognized by Weex. It takes arguments that specifies the method in module called by JavaScript code.
+3. The weexInstance should be synthesized. Each module object is bind to a specific instance.
+4. Module methods will be invoked in UI thread, so do not put time consuming operation there. If you want to execute the whole module methods in other thread, please implement the method `- (NSThread *)targetExecuteThread` in protocol. In the way, tasks distributed to this module will be executed in targetExecuteThread.
+5. Weex params can be String or Map.
+6. Module supports to return results to Javascript in callback. This callback is type of `WXModuleCallback`, the params of which can be String or Map.
+
+```objective-c
+@implementation WXEventModule
+@synthesize weexInstance;
+ WX_EXPORT_METHOD(@selector(openURL:callback))
+
+- (void)openURL:(NSString *)url callback:(WXModuleCallback)callback
+{
+ NSString *newURL = url;
+ if ([url hasPrefix:@"//"]) {
+ newURL = [NSString stringWithFormat:@"http:%@", url];
+ } else if (![url hasPrefix:@"http"]) {
+ newURL = [NSURL URLWithString:url relativeToURL:weexInstance.scriptURL].absoluteString;
+ }
+
+ UIViewController *controller = [[WXDemoViewController alloc] init];
+ ((WXDemoViewController *)controller).url = [NSURL URLWithString:newURL];
+
+ [[weexInstance.viewController navigationController] pushViewController:controller animated:YES];
+ callback(@{@"result":@"success"});
+}
+
+@end
+```
+
+#### Register the module
+
+You can register the customized module by calling the method `registerModule:withClass` in WXSDKEngine.
+
+```objective-c
+WXSDKEngine.h
+/**
+* @abstract Registers a module for a given name
+* @param name The module name to register
+* @param clazz The module class to register
+**/
++ (void)registerModule:(NSString *)name withClass:(Class)clazz;
+
+[WXSDKEngine registerModule:@"event" withClass:[WXEventModule class]];
+```
+
+### Handler extend
+
+Weex SDK doesn't have capabilitis, such as image download 、navigator operation,please implement these protocols by yourself.
+
+#### WXImgLoaderProtocol
+<font color="gray">
+Weex SDK has no image download capability, you need to implement `WXImgLoaderProtocol`. Refer to the following examples.
+
+```objective-c
+WXImageLoaderProtocol.h
+@protocol WXImgLoaderProtocol <WXModuleProtocol>
+
+/**
+ * @abstract Creates a image download handler with a given URL
+ * @param imageUrl The URL of the image to download
+ * @param imageFrame The frame of the image you want to set
+ * @param options : The options to be used for this download
+ * @param completedBlock : A block called once the download is completed.
+ image : the image which has been download to local.
+ error : the error which has happened in download.
+ finished : a Boolean value indicating whether download action has finished.
+ */
+ -(id<WXImageOperationProtocol>)downloadImageWithURL:(NSString *)url imageFrame:(CGRect)imageFrame userInfo:(NSDictionary *)options completed:(void(^)(UIImage *image, NSError *error, BOOL finished))completedBlock;
+ @end
+```
+
+Implement above protocol as follows.
+
+
+```objective-c
+@implementation WXImgLoaderDefaultImpl
+#pragma mark -
+#pragma mark WXImgLoaderProtocol
+
+- (id<WXImageOperationProtocol>)downloadImageWithURL:(NSString *)url imageFrame:(CGRect)imageFrame userInfo:(NSDictionary *)userInfo completed:(void(^)(UIImage *image, NSError *error, BOOL finished))completedBlock
+{
+ if ([url hasPrefix:@"//"]) {
+ url = [@"http:" stringByAppendingString:url];
+ }
+ return (id<WXImageOperationProtocol>)[[SDWebImageManager sharedManager] downloadImageWithURL:[NSURL URLWithString:url] options:0 progress:^(NSInteger receivedSize, NSInteger expectedSize) {
+ } completed:^(UIImage *image, NSError *error, SDImageCacheType cacheType, BOOL finished, NSURL *imageURL) {
+ if (completedBlock) {
+ completedBlock(image, error, finished);
+ }
+ }];
+}
+@end
+```
+
+#### Register the handler
+
+You can register the handler which implements the protocol by calling `registerHandler:withProtocol` in WXSDKEngine.
+
+```objective-c
+WXSDKEngine.h
+/**
+* @abstract Registers a handler for a given handler instance and specific protocol
+* @param handler The handler instance to register
+* @param protocol The protocol to confirm
+*/
++ (void)registerHandler:(id)handler withProtocol:(Protocol *)protocol;
+
+[WXSDKEngine registerHandler:[WXImgLoaderDefaultImpl new] withProtocol:@protocol(WXImgLoaderProtocol)];
+```
+
+## Custom Native Components for iOS
+
+### Component extend
+
+There are a lot of native components ready to be used in the Weex SDK, but users always have their own use cases. You might have written an awesome native UI widget in your previous work and just want to wrap up it and export to Weex. So we provide a way to enable developers to create their own custom fully-native components.
+
+This guide will use the implementation of existing component `image` to show you how to build a native component. It will also assume that you are familiar with iOS programming.
+
+#### Registration
+
+Defining a custom native component is simple. Just call `[WXSDKEngine registerComponent:withClass:]` with the component's tag name as first argument.
+
+```objective-c
+[WXSDKEngine registerComponent:@"image" withClass:[WXImageComponent class]];
+```
+
+Then you can create a `WXImageComponent` class to represent the implementation of image component.
+
+Now you can use `<image>` wherever you want in the template.
+
+```html
+<image></image>
+```
+
+#### Adding Properties
+
+The next thing we can do is to extend some native properties to make the component more powerful. As an image, let's say we should have a `src` attribute as image's remote source and a `resize` attribute as image's resize mode(contain/cover/stretch).
+
+```objective-c
+@interface WXImageComponent ()
+
+@property (nonatomic, strong) NSString *imageSrc;
+@property (nonatomic, assign) UIViewContentMode resizeMode;
+
+@end
+```
+
+All of the styles, attributes and events will be passed to the component's initialization method, so here you can store the properties which you are interested in.
+
+```objective-c
+@implementation WXImageComponent
+
+- (instancetype)initWithRef:(NSString *)ref type:(NSString *)type styles:(NSDictionary *)styles attributes:(NSDictionary *)attributes events:(NSArray *)events weexInstance:(WXSDKInstance *)weexInstance
+{
+ if (self = [super initWithRef:ref type:type styles:styles attributes:attributes events:events weexInstance:weexInstance]) {
+ _imageSrc = [WXConvert NSString:attributes[@"src"]];
+ _resizeMode = [WXConvert UIViewContentMode:attributes[@"resize"]];
+ }
+
+ return self;
+}
+
+@end
+```
+
+The properties getted in the attributes are of `id` type, so we have to convert them to the type we want using a conversion function. Basic conversion functions can be found in the `WXConvert` file, or you can just add your own conversion function.
+
+
+#### Hooking Render Life Cycle
+
+A Native Component has a life cycle managed by Weex. Weex creates it, layout it, renders it and destroys it.
+
+Weex offers component life cycle hooks that give you visibility into these key moments and the ability to act when they occur.
+
+method| description
+:----:|------
+initWithRef:type:...| Initializes a new component using the specified properties.
+layoutDidFinish | Called when the component has just laid out.
+loadView | Creates the view that the component manages.
+viewWillLoad | Called before the load of component's view .
+viewDidLoad | Called after the component's view is loaded and set.
+viewWillUnload | Called just before releasing the component's view.
+viewDidUnload | Called when the component's view is released.
+updateStyles:| Called when component's style are updated.
+updateAttributes:| Called when component's attributes are updated.
+addEvent:| Called when adding an event to the component.
+removeEvent:| Called when removing an event frome the component.
+
+
+As in the image component example, if we need to use our own image view, we can override the `loadView` method.
+
+
+```objective-c
+- (UIView *)loadView
+{
+ return [[WXImageView alloc] init];
+}
+```
+
+Now Weex will use `WXImageView` to render the `image` component.
+
+As an image component, we will need to fetch the remote image and set it to the image view. This can be done in `viewDidLoad` method when the view is created and loaded. `viewDidLoad` is also the best time to perform additional initialization for your view, such as content mode changing.
+
+
+```objective-c
+- (void)viewDidLoad
+{
+ UIImageView *imageView = (UIImageView *)self.view;
+ imageView.contentMode = _resizeMode;
+ imageView.userInteractionEnabled = YES;
+ imageView.clipsToBounds = YES;
+ imageView.exclusiveTouch = YES;
+
+ // Do your image fetching and updating logic
+}
+```
+
+If image's remote source can be changed, you can also hook the `updateAttributes:` method to perform your attributes changing logic. Component's view always has been loaded while `updateAttributes:` or `updateStyles:` is called.
+
+
+```objective-c
+- (void)updateAttributes:(NSDictionary *)attributes
+{
+ if (attributes[@"src"]) {
+ _imageSrc = [WXConvert NSString:attributes[@"src"]];
+ // Do your image updating logic
+ }
+
+ if (attributes[@"resize"]) {
+ _resizeMode = [WXConvert UIViewContentMode:attributes[@"resize"]];
+ self.view.contentMode = _resizeMode;
+ }
+}
+```
+
+Maybe there is even more life cycle hooks you might need to consider, such as `layoutDidFinish` while layout computing is finished. If you want to go deeper, check out the `WXComponent.h` file in the source code.
+
+Now you can use `<image>` and its attributes wherever you want in the template.
+
+```html
+<image style="your-custom-style" src="image-remote-source" resize="contain/cover/stretch"></image>
+```
+#### Component Method
+from WeexSDK `0.9.5`, you can define your component method by macro `WX_EXPORT_METHOD`
+for example:
+
+```
+@implementation WXMyComponent
+ +WX_EXPORT_METHOD(@selector(focus))
+ +- (instancetype)initWithRef:(NSString *)ref type:(NSString *)type styles:(NSDictionary *)styles attributes:(NSDictionary *)attributes events:(NSArray *)events weexInstance:(WXSDKInstance *)weexInstance
+ {
+ if (self = [super initWithRef:ref type:type styles:styles attributes:attributes events:events weexInstance:weexInstance]) {
+ // handle your attributes
+ // handle your styles
+ }
+
+ return self;
+ }
+
+
+ - (void)focus
+ {
+ NSLog(@"you got it");
+ }
+@end
+```
+
+after your registration for your own custom component, now you can call it in your js file.
+
+```html
+<template>
+ <mycomponent id='mycomponent'></mycomponent>
+</template>
+<script>
+ module.exports = {
+ created: function() {
+ this.$el('mycomponent').focus();
+ }
+ }
+</script>
+```
+
+
+
+
+
+
+
+
+
http://git-wip-us.apache.org/repos/asf/incubator-weex-site/blob/32a097bf/_draft/v-0.10/advanced/how-data-binding-works.md
----------------------------------------------------------------------
diff --git a/_draft/v-0.10/advanced/how-data-binding-works.md b/_draft/v-0.10/advanced/how-data-binding-works.md
new file mode 100644
index 0000000..a207997
--- /dev/null
+++ b/_draft/v-0.10/advanced/how-data-binding-works.md
@@ -0,0 +1,39 @@
+---
+title: How data-binding works
+type: advanced
+order: 2
+has_chapter_content: true
+version: 0.10
+---
+
+# How data-binding works
+
+Weex JS Framework is a MVVM framework. It observe data and use `{% raw %}{{bindedKey}}{% endraw %}` syntax to bind in views. When data is changed in anyway, the view will automatically be updated due to data-binding.
+
+For example, The content of a `<text>` component is bound with the key `notes` in data:
+
+```html
+<template>
+ <div>
+ <text>{{notes}}</text>
+ </div>
+<template>
+
+<script>
+ module.exports = {
+ data: {
+ notes: 'Hello'
+ }
+ }
+</script>
+```
+
+Weex JS Framework first observe the data object to make sure each data change in the future will be observed. And then it will compile the whole `<template>`. When it finds that the content of the `<text>` is bound with `notes`, JS Framework will watch the `data.notes` changes and set a handler which will update the `<text>` content with new `data.notes`. So developer only need to manage the data, the view display could automatically do corresponding changes.
+
+Some special data-binding syntax here:
+
+* `{% raw %}<foo if="{{condition}}">{% endraw %}` will watch the condition value changes. When it changes to `true`, the `<foo>` element will be created and attached, otherwise it will be not created or removed.
+* `{% raw %}<foo repeat="{{list}}">{% endraw %}` will watch the mutations of a list. At the beginning the `<foo>` element will be cloned and attached with each item in list. When some items are added, removed or moved, the `<foo>` element list will be re-generated new content in the right order with minimum alterations.
+* `{% raw %}<foo if="{{condition}}" repeat="{{list}}">{% endraw %}` will process `repeat` first and `if` the second. In another way, it will walk through each item in list, if the item's condition value is true, a `<foo>` element will be cloned and attached with this certain item value.
+
+Compared with virtual DOM diff algorithm, we just "diff" the data and only calculate/update the virtual DOM with minimum alterations for each user interaction or data-change operation. So it's more lightweight and fast especially for small views in mobile devices.
http://git-wip-us.apache.org/repos/asf/incubator-weex-site/blob/32a097bf/_draft/v-0.10/advanced/images/how-arch.png
----------------------------------------------------------------------
diff --git a/_draft/v-0.10/advanced/images/how-arch.png b/_draft/v-0.10/advanced/images/how-arch.png
new file mode 100644
index 0000000..a13df7a
Binary files /dev/null and b/_draft/v-0.10/advanced/images/how-arch.png differ
http://git-wip-us.apache.org/repos/asf/incubator-weex-site/blob/32a097bf/_draft/v-0.10/advanced/images/how-render.png
----------------------------------------------------------------------
diff --git a/_draft/v-0.10/advanced/images/how-render.png b/_draft/v-0.10/advanced/images/how-render.png
new file mode 100644
index 0000000..db9b0f4
Binary files /dev/null and b/_draft/v-0.10/advanced/images/how-render.png differ
http://git-wip-us.apache.org/repos/asf/incubator-weex-site/blob/32a097bf/_draft/v-0.10/advanced/index.md
----------------------------------------------------------------------
diff --git a/_draft/v-0.10/advanced/index.md b/_draft/v-0.10/advanced/index.md
new file mode 100644
index 0000000..dca072d
--- /dev/null
+++ b/_draft/v-0.10/advanced/index.md
@@ -0,0 +1,148 @@
+---
+title: How it works
+type: advanced
+order: 1
+has_chapter_content: true
+version: 0.10
+---
+
+# How it works
+<span class="weex-version">0.4</span>
+
+## Overview
+
+Weex is a extendable cross-platform solution for dynamic programming and publishing projects. In the source code you can write pages or components with `<template>`, `<style>` and `<script>` tags, and then transform them into bundles for deploying. In server-side we can use these JS bundles for client request. When client get a bundle from server, it will be processed by client-side JavaScript engine and manages the native view rendering, the native API invoking and user interactions.
+
+### Whole Workflow
+
+```
+Weex file --------------frontend(source code)
+↓ (transform) --------- frontend(build tool)
+JS bundle ------------- frontend(bundle code)
+↓ (deploy) ------------ server
+JS bundle in server --- server
+↓ (compile) ----------- client(js-engine)
+Virtual DOM tree ------ client(weex-jsframework)
+↓ (render) ------------ client(render-engine)
+Native view ----------- client(render-engine)
+```
+
+According to the workflow above, you need:
+
+* Transformer: A nodejs tool to transform the source code into the bundle code.
+* JS Framework: A JavaScript framework runing in the client which manage Weex instance. The instance which created from a JS bundle builds virtual DOM tree. Also it sends/receives native calls for native view rendering, native APIs and user interactions.
+* Native Engine: There are many different ports for different platforms: iOS/Android/HTML5. They have the same components design, module APIs design and rendering effect. So they can work with the one and the same JS Framework and JS bundles.
+
+## Transformer
+
+The transformer transforms a source code into a bundle code. The whole work could be divided into three parts:
+
+* Transform `<template>` into a JSON-like tree and transform data-binding attribute into a function prop which return the correct data value. For example: `{% raw %}<foo a="{{x}}" b="1" />{% endraw %}` will be transformed into `{type: "foo", attr: {a: function () {return this.x}, b: 1}}`.
+* Transform `<style>` into a JSON tree. For example: `.classname {name: value;}` will be transformed into `{classname: {name: value}}`.
+* Join the two above with `<script>` content. The three parts will be joined together and wrapped into a JavaScript AMD module.
+
+A whole example (`main.we`):
+
+```html
+<template>
+ <foo a="{{x}}" b="1" class="bar"></foo>
+</template>
+<style>
+ .bar {width: 200; height: 200}
+</style>
+<script>
+ module.exports = {
+ data: function () {
+ return {x: 100}
+ }
+ }
+</script>
+```
+
+will transformed into:
+
+```
+define('@weex-component/main', function () {
+ module.exports = {
+ data: function () {
+ return {x: 100}
+ }
+ }
+ module.template = {
+ type: "foo",
+ attr: {
+ a: function () {return this.x},
+ b: 1,
+ classname: ['bar']
+ }
+ }
+ module.style = {
+ bar: {width: 200, height: 200}
+ }
+}
+bootstrap('@weex-component/main')
+```
+
+Additionally, the transformer could also do more things: combo the bundles, bootstrap with config and external data. For more information, please see the syntax specs.
+
+## NOTICE
+Most of Weex utility output JS Bundle after [Webpack](https://webpack.github.io/) re-bundle. So the eventual format of Weex JSBundle is webpack packed .
+
+## JS Framework
+
+JS Framework will run in native JavaScript engine at the beginning preparation phase. It has `define()` and `bootstrap()` functions for each the bunlde code. Once a JS bundle requested from server, the code will be executed. `define()` will register all modules first, then `bootstrap()` will start compiling main component into virtual DOM and send rendering calls to native.
+
+There are two key methods for the bridge between JS and native:
+
+* `callNative` sends commands from JavaScript to native. So it's called from JavaScript and implemented with native code. All commands are native APIs organized by modules, for example `rendering`, `networking`, `authorizing`, and other client-side features like `toast` etc.
+* `callJS` sends commands from native to JavaScript. So it's called from native and implemented by JS Framework. All commands are user interactions or native callbacks.
+
+## Native RenderEngine
+
+Native RenderEngine will supplies many native components and modules for call.
+
+**Component** is an element in the screen which have a certain view and behavior. It could be configured with some attributes and style properties, and could response user interactions. There are some common components like `<div>`, `<text>`, `<image>` etc.
+
+**Module** is a set of APIs which could be called from JS Framework. Some of them also have to make async callbacks to JS Framework, for example: send HTTP request.
+
+During a Weex instance works, Native RenderEngine receives all kinds of module API calls from JS Framework. These calls will create or update components for view and use client-side features like `toast`. When a user interaction or module API callback happens, It will call `callJS()` from JS Framework. These jobs could walk through the Weex instance lifecycle till the instance is destroyed. As is shown in the architecture figure, H5 RenderEngine is a special RenderEngine with almost the same functions as native RenderEngines.
+
+
+Weex Architecture
+
+### call native from javascript
+
+```
+[JS Framework]
+↓ callNative
+module APIs
+ rendering -> components display
+ other features
+[Native RenderEngine]
+```
+
+### call javascript from native
+
+```
+[Native RenderEngine]
+module APIs callbacks
+user interactions
+↓ callJS
+[JS Framework]
+```
+
+### Render Flow
+
+
+Weex Render Flow
+
+0. Input is virtual dom.
+0. **Build Tree**. Parse JSON data (virtual dom) to a Render Tree (RT).
+0. **Apply Style**. Attach css style to RT nodes.
+0. **Create View**. Create native views for each RT node.
+0. **Attach Event**. Attach events for each view.
+0. **CSS Layout**. Use [css-layout](https://github.com/facebook/css-layout) to calculate the layout of each view.
+0. **Update Frame**. Update layout parameters of each view.
+0. Output is Native or H5 Views.
+
+In H5 Render Flow, `CSS Layout` and `Update Frame` are implemented by browser engine like webkit.
http://git-wip-us.apache.org/repos/asf/incubator-weex-site/blob/32a097bf/_draft/v-0.10/advanced/integrate-to-android.md
----------------------------------------------------------------------
diff --git a/_draft/v-0.10/advanced/integrate-to-android.md b/_draft/v-0.10/advanced/integrate-to-android.md
new file mode 100644
index 0000000..e2b2569
--- /dev/null
+++ b/_draft/v-0.10/advanced/integrate-to-android.md
@@ -0,0 +1,204 @@
+---
+title: Integrate to Android
+type: advanced
+order: 3
+has_chapter_content: true
+version: 0.10
+---
+
+# Integrate to Android
+
+When you need to use the new features or to customize specific features, you can rely on the Source SDK for development。
+
+## Prerequisites
+
+Assuming you have the Android SDK installed, run `android` to open the Android SDK Manager.
+
+Make sure you have the following installed:
+
+1. Android SDK version 23 (compileSdkVersion in [`build.gradle`](https://github.com/apache/incubator-weex/blob/master/android/sdk/build.gradle))
+2. SDK build tools version 23.0.2 (buildToolsVersion in [`build.gradle`](https://github.com/apache/incubator-weex/blob/master/android/sdk/build.gradle))
+3. Android Support Repository >= 17 (for Android Support Library)
+4. Android NDK (download & extraction instructions [here](http://developer.android.com/ndk/downloads/index.html))
+
+Point Gradle to your Android SDK: either have `$ANDROID_SDK` and `$ANDROID_NDK ` defined, or create a local.properties file in the root of your weex checkout with the following contents:
+
+```
+sdk.dir=absolute_path_to_android_sdk
+ndk.dir=absolute_path_to_android_ndk
+```
+
+Example:
+
+```
+sdk.dir=/Users/your_name/android-sdk-macosx
+ndk.dir=/Users/your_name/android-ndk-r10e
+```
+
+
+## Building the source
+
+#### 1. Clone source from github
+
+First, you need to git clone `weex` from github:
+
+```shell
+git clone https://github.com/alibaba/weex.git
+```
+##### 2. Build APK
+ *** 1) Android studio build APK ***
+
+ ```
+ Step 1: run android studio
+ Step 2: open the file of ~/weex/android/playground/build.gradle
+ Step 3: Run the Project and the Apk will auto install in your android device
+ ```
+ *** 2) Gradle build APK ***
+
+ ```
+ Step 1: enter the direction of "/weex/android/playground"
+ Step 2: run the build command: ./gradlew clean assemble
+ Step 3: obtain the payground APK from the direction of weex/android/playground/app/build/outputs/apk/
+ Step 3: then adb install -r weex/android/playground/app/build/outputs/apk/playgroud.apk
+ ```
+#### 3. Adding the `:weex_sdk_android` project
+
+
+Add the `:weex_sdk_android` project in `android/settings.gradle`:
+
+```gradle
+include ':weex_sdk_android'
+
+project(':weex_sdk_android').projectDir = new File(
+ rootProject.projectDir, '../weex_sdk_android')
+```
+
+Modify your `android/app/build.gradle` to use the `:weex_sdk_android` project instead of the pre-compiled library, e.g. - replace `compile 'com.taobao.android:weex_sdk:0.4.1` with `compile project(':weex_sdk_android')`:
+
+```gradle
+dependencies {
+ compile fileTree(dir: 'libs', include: ['*.jar'])
+ compile 'com.android.support:appcompat-v7:23.0.1'
+
+ compile project(':weex_sdk_android')
+
+ ...
+}
+```
+
+#### 3. Making 3rd-party modules use your project
+
+If you use 3rd-party weex modules, you need to override their dependencies so that they don't build the pre-compiled library. Otherwise you'll get an error while compiling - `Error: more than one library with package name 'com.taobao.weex'`.
+
+Modify your `android/app/build.gradle` and replace `compile project(':weex-custom-module')` with:
+
+```gradle
+compile(project(':weex-custom-module')) {
+ exclude group: 'com.taobao.weex', module: 'weex_sdk_android'
+}
+```
+
+#### 4、How to load local Your Js bundle in the directory of Android assets
+Besides load a Js Bundle online, you also can load the js bundle from the directory of Android assets.
+
+For Example:
+
+ ```
+ String yourbundleStr = WXFileUtils.loadFileContent("yourBundle.js", context);
+ WXSDKInstance.render(TAG, yourbundleStr, options, null, width, Height, WXRenderStrategy.APPEND_ASYNC);
+ ```
+
+
+## Building from Android Studio
+
+From the Welcome screen of Android Studio choose "Import project" and select the `playground` folder of your app.
+
+You should be able to use the _Run_ button to run your app on a device.
+
+## Tip
+1. Since the packet size limit is currently only compiled arm , X86 does not support.
+
+2. Gradle build fails in `ndk-build`. See the section about `local.properties` file above.
+
+#Quick access
+
+## Requirements
+
+* an existing, gradle-based Android app
+
+## Prepare your app
+
+In your app's `build.gradle` file add the WEEX dependency:
+
+ compile 'com.taobao.android:weex_sdk:0.4.1'
+
+You can find the latest version of the WEEX library on [jcenter](https://bintray.com/search?query=weex_sdk&forceAgnostic=true). Next, make sure you have the Internet permission in your `AndroidManifest.xml`:
+
+ <uses-permission android:name="android.permission.INTERNET" />
+
+
+## Add native code
+
+You need to add some native code in order to start the Weex runtime and get it to render something. To do this, we're going to create an `Application` to init weex, then we we're going to create an `Activity` that creates a WeexContainerView, starts a Weex application inside it and sets it as the main content view.
+
+
+```java
+public class WXApplication extends Application {
+ @Override
+ public void onCreate() {
+ super.onCreate();
+
+ WXEnvironment.addCustomOptions("appName","TBSample");
+ WXSDKEngine.init(this);
+ try {
+
+ WXSDKEngine.registerComponent("wtRichText", WTRichText.class);
+ ......
+
+ WXSDKEngine.registerModule("event", WXEventModule.class);
+ } catch (WXException e) {
+ e.printStackTrace();
+ }
+ }
+}
+```
+
+Next,
+
+```java
+// Create or find RenderContainer view.
+// Notice: If you create RenderContainer manually, don't forget add it to view tree.
+RenderContainer renderContainer = (RenderContainer)findViewById(R.id.container);
+
+//crate Weex instance
+WXSDKInstance mInstance = new WXSDKInstance(this);
+//set render container
+mInstance.setRenderContainer(renderContainer);
+//set image Adapter
+mInstance.setImgLoaderAdapter(new ImageAdapter(this));
+//register render listener
+mInstance.registerRenderListener(new IWXRenderListener() {
+ @Override
+ public void onViewCreated(WXSDKInstance instance, View resultView) {
+ // Notice: If you don't setRenderContainer before render, you need add the resultView to view tree here.
+
+ }
+ @Override
+ public void onRenderSuccess(WXSDKInstance instance) {
+ }
+ @Override
+ public void onRefreshSuccess(WXSDKInstance instance) {
+ }
+ @Override
+ public void onException(WXSDKInstance instance, String errCode,String msg) {
+ }
+});
+//start render weex view
+mInstance.render(pageName,template, null, null, -1, -1, WXRenderStrategy.APPEND_ASYNC);
+```
+
+That's it, your activity is ready to run some JavaScript code.
+
+## Reference Example
+
+[`Weex Examples`](https://github.com/apache/incubator-weex/tree/master/examples)
http://git-wip-us.apache.org/repos/asf/incubator-weex-site/blob/32a097bf/_draft/v-0.10/advanced/integrate-to-html5.md
----------------------------------------------------------------------
diff --git a/_draft/v-0.10/advanced/integrate-to-html5.md b/_draft/v-0.10/advanced/integrate-to-html5.md
new file mode 100644
index 0000000..b71bcd7
--- /dev/null
+++ b/_draft/v-0.10/advanced/integrate-to-html5.md
@@ -0,0 +1,77 @@
+---
+title: Integrate to web
+type: advanced
+order: 5
+has_chapter_content: true
+version: 0.10
+---
+
+# Integrate Weex HTML5 to your project
+
+### Intro
+
+Weex is a extendable cross-platform solution for dynamic programming and publishing projects, which is for developers to write code once and run the code everywhere.
+
+The bundle transformed from the source can currently run on android, ios and web platform. Weex HTML5 is a renderer for weex bundle to run on a webview or a modern browser etc.
+
+### Get Weex HTML5
+
+Use npm to install the latest version of Weex HTML5, require it in your code by CommonJS and use it as a npm package.
+
+#### Install from npm
+
+Make sure you get the latest version by `npm install` or `npm update`. For more information of npm, please visit the [npm official site](https://docs.npmjs.com/).
+
+```
+npm install weex-html5
+```
+
+require weex-html5:
+
+```
+const weex = require('weex-html5')
+```
+
+### Initialize and run
+
+You can initialize weex through the API `init`. This method takes a config object as the first argument to confirm the runtime infomation and environment. Following parameters can be set by this config object:
+
+* `appId`: app instance id, can be either a string or a number
+* `source`: the requested url of weex bundle, or the transformed code it self.
+* `loader`: the loader type to load the weex bundle, which value is 'xhr' or 'jsonp' or 'source'.
+ * `xhr`: load the source (weex bundle url) by XHR
+ * `jsonp`: load the source bundle by JSONP
+ * `source`: the source parameter above should be a weex bundle content (transformed bundle).
+* `rootId`: the id of the root element. Default value is 'weex'.
+
+Here is a example to do the initialzation:
+
+```
+function weexInit() {
+ function getUrlParam (key) {
+ var reg = new RegExp('[?|&]' + key + '=([^&]+)')
+ var match = location.search.match(reg)
+ return match && match[1]
+ }
+
+ var loader = getUrlParam('loader') || 'xhr'
+ var page = getUrlParam('page')
+
+ // jsonp callback name should be specified or be the default
+ // value 'weexJsonpCallback' if the 'jsonp' loader is used.
+ var JSONP_CALLBACK_NAME = 'weexJsonpCallback'
+
+ window.weex.init({
+ jsonpCallback: JSONP_CALLBACK_NAME,
+ appId: location.href,
+ source: page,
+ loader: loader,
+ rootId: 'weex'
+ })
+}
+
+weexInit()
+```
+
+
+
http://git-wip-us.apache.org/repos/asf/incubator-weex-site/blob/32a097bf/_draft/v-0.10/advanced/integrate-to-ios.md
----------------------------------------------------------------------
diff --git a/_draft/v-0.10/advanced/integrate-to-ios.md b/_draft/v-0.10/advanced/integrate-to-ios.md
new file mode 100644
index 0000000..69dea6d
--- /dev/null
+++ b/_draft/v-0.10/advanced/integrate-to-ios.md
@@ -0,0 +1,118 @@
+---
+title: Integrate to iOS
+type: advanced
+order: 4
+has_chapter_content: true
+version: 0.10
+---
+
+# import Weex iOS to your project
+
+You will need to build Weex from source if you want to work on a new feature/bug fix, try out the latest features not released yet, or maintain your own fork with patches that cannot be merged to the core.
+
+Assuming you have installed [iOS Develop Environment](https://developer.apple.com/library/ios/documentation/IDEs/Conceptual/AppStoreDistributionTutorial/Setup/Setup.html) and [CocoaPods](https://guides.cocoapods.org/using/getting-started.html).
+
+#### 1. Clone source from github
+
+First, you need to git clone `weex` from github:
+
+```
+git clone https://github.com/alibaba/weex.git
+```
+#### 2. Import WeexSDK to project
+
+Copy the whole folder `/ios/sdk` to your project directory.
+
+Before adding the dependencies, please confirm that the project directory already exists the Podfile. If not, create a new one. Then, edit this file, adding some necessary dependecis for the target.
+
+```
+target 'YourTarget' do
+ platform :ios, '7.0'
+ pod 'WeexSDK', :path=>'./sdk/'
+end
+```
+You can get your `YourTarget` below
+
+
+
+Run pod install in current directory, for a while, .xcworkspace will be created. At this point, the dependencies have been established.
+
+#### 3. Init Weex Environment
+We are used to doing some initial tasks in appDelegate. Of course, there is no exception. You can do this in `didFinishLaunchingWithOptions` as follows.
+
+```
+//business configuration
+[WXAppConfiguration setAppGroup:@"AliApp"];
+[WXAppConfiguration setAppName:@"WeexDemo"];
+[WXAppConfiguration setAppVersion:@"1.0.0"];
+
+//init sdk enviroment
+[WXSDKEngine initSDKEnviroment];
+
+//register custom module and component,optional
+[WXSDKEngine registerComponent:@"MyView" withClass:[MyViewComponent class]];
+[WXSDKEngine registerModule:@"event" withClass:[WXEventModule class]];
+
+//register the implementation of protocol, optional
+[WXSDKEngine registerHandler:[WXNavigationDefaultImpl new] withProtocol:@protocol(WXNavigationProtocol)];
+
+//set the log level
+[WXLog setLogLevel:WXLogLevelVerbose];
+
+```
+
+#### 4. Render Weex Instance
+Weex supports two different modes, the full page rendering and part of page rendering.
+Something you have to do is to render weex view with specific URL, then add it to the parent container, which may be the viewController.
+
+```
+#import <WeexSDK/WXSDKInstance.h>
+
+- (void)viewDidLoad
+{
+ [super viewDidLoad];
+
+ _instance = [[WXSDKInstance alloc] init];
+ _instance.viewController = self;
+ _instance.frame = self.view.frame;
+
+ __weak typeof(self) weakSelf = self;
+ _instance.onCreate = ^(UIView *view) {
+ [weakSelf.weexView removeFromSuperview];
+ weakSelf.weexView = view;
+ [weakSelf.view addSubview:weakSelf.weexView];
+ };
+
+ _instance.onFailed = ^(NSError *error) {
+ //process failure
+ };
+
+ _instance.renderFinish = ^ (UIView *view) {
+ //process renderFinish
+ };
+ [_instance renderWithURL:self.url options:@{@"bundleUrl":[self.url absoluteString]} data:nil];
+}
+```
+WXSDKInstance is a very imporent class, which provides you with some basic methods and callbacks, such as renderWithURL、onCreate、onFailed and etc. You can understand their usage by reading WXSDKInstance.h.
+
+
+#### 5. Destroy Weex Instance
+
+Please release weex instance in dealloc stage of viewContoller, or it will lead to memory leak.
+
+```
+- (void)dealloc
+{
+ [_instance destroyInstance];
+}
+```
+
+#### 6. Build .IPA for Weex
+
+We can also pack all the JS files into the app's resources. This way you can run your app without development server and submit it to the AppStore.
+
+* [Install weex-toolkit](https://github.com/alibaba/weex_toolchain/tree/master/toolkit) and transform your `.we` file to JS by running `weex index.we -o index.js`, `index.we` is the entry file of your app.
+* Move `index.js` to your app's Xcode project and add the file to your target.
+* Replace `[_instance renderWithURL:'httpURL']` with: `[_instance renderWithURL: [[NSBundle mainBundle] URLForResource:@"index" withExtension:@"js"]]`
+
+* Go to Product -> Archive in Xcode and follow the steps to build your .IPA file and submit it to the AppStore.
http://git-wip-us.apache.org/repos/asf/incubator-weex-site/blob/32a097bf/_draft/v-0.10/guide/.gitkeep
----------------------------------------------------------------------
diff --git a/_draft/v-0.10/guide/.gitkeep b/_draft/v-0.10/guide/.gitkeep
new file mode 100644
index 0000000..e69de29
http://git-wip-us.apache.org/repos/asf/incubator-weex-site/blob/32a097bf/_draft/v-0.10/guide/how-to/customize-a-native-component.md
----------------------------------------------------------------------
diff --git a/_draft/v-0.10/guide/how-to/customize-a-native-component.md b/_draft/v-0.10/guide/how-to/customize-a-native-component.md
new file mode 100644
index 0000000..62c0cf0
--- /dev/null
+++ b/_draft/v-0.10/guide/how-to/customize-a-native-component.md
@@ -0,0 +1,58 @@
+---
+title: Customize a native Component
+type: guide
+order: 3.3
+version: 0.10
+---
+
+# How to customize a native Component ?
+
+Weex has wrapped up the most critical platform components, such as `ScrollView`, `ListView`, `Text`, `Imageview` and so on. Certainly these components can not completely meet your need. And thousands of native UI components that always be using in our project may be required to integrate into Weex easily. Fortunately, it's quite convenient to wrap up your own components that should be from any existing components.
+
+##### Step By Step
+
+1. Customized components must inherit from `WXComponent` or `WXContainer`;
+2. @WXComponentProp(name=value(value is attr or style of dsl)) for it be recognized by weex SDK;
+3. The access levels of method must be **public**;
+4. The component class can not be an inner class;
+5. Customized components should not be obfuscated by tools like ProGuard;
+6. Component methods will be invoked on the UI thread, so do not contain time-consuming operations here;
+7. Weex parameter's type can be int, double, float, String, Map, List, self-defined class that implements WXObject interface;
+
+
+#### Refer to the following example:
+
+```java
+package com.taobao.weex.ui.component;
+……
+
+public class MyViewComponent extends WXComponent{
+
+ public MyViewComponent(WXSDKInstance instance, WXDomObject node,
+ WXVContainer parent, String instanceId, boolean lazy) {
+ super(instance, node, parent, instanceId, lazy);
+ }
+
+ @Override
+ protected void initView() {
+ //TODO:your own code ……
+ }
+
+ @Override
+ public WXFrameLayout getView() {
+ //TODO:your own code ………
+ }
+ @WXComponentProp(name=WXDomPropConstant.WX_ATTR_VALUE)
+ public void setMyViewValue(String value) {
+ ((TextView)mHost).setText(value);
+ }
+
+}
+```
+#### Component should be registered
+
+```java
+WXSDKEngine.registerComponent("MyView", MyViewComponent.class);
+```
+
+
http://git-wip-us.apache.org/repos/asf/incubator-weex-site/blob/32a097bf/_draft/v-0.10/guide/how-to/cuszomize-native-apis.md
----------------------------------------------------------------------
diff --git a/_draft/v-0.10/guide/how-to/cuszomize-native-apis.md b/_draft/v-0.10/guide/how-to/cuszomize-native-apis.md
new file mode 100644
index 0000000..9594ff0
--- /dev/null
+++ b/_draft/v-0.10/guide/how-to/cuszomize-native-apis.md
@@ -0,0 +1,80 @@
+---
+title: Customize native APIs
+type: guide
+order: 3.4
+version: 0.10
+---
+
+# How to customize native APIs ?
+
+Weex SDK provides only rendering capability, rather than having other capabilities, such as network, picture, and URL redirection. If you want the these features, you need to implement them yourselves.
+The example below will describe how to extend weex with native logic or 'bridge' your existed native code.
+
+## A URLHelper Example
+### Create your own `WXModule` in native:
+
+```java
+public class URLHelperModule extends WXModule{
+ private static final String WEEX_CATEGORY="com.taobao.android.intent.category.WEEX";
+ @WXModuleAnno
+ public void openURL(String url){
+ if (TextUtils.isEmpty(url)) {
+ return;
+ }
+ StringBuilder builder=new StringBuilder("http:");
+ builder.append(url);
+ Uri uri = Uri.parse(builder.toString());
+ Intent intent = new Intent(Intent.ACTION_VIEW, uri);
+ intent.addCategory(WEEX_CATEGORY);
+ mWXSDKInstance.getContext().startActivity(intent);
+ }
+}
+
+```
+
+Notice the `@WXModuleAnno`, use this annotation to mark the methods you wanna expose to javascript.
+If your also want to callback to javascript, you should define a `callbackId` parameter to received 'JS callback function id':
+
+```java
+public class URLHelperModule extends WXModule{
+
+ @WXModuleAnno
+ public void openURL(String url,String callbackId){
+ //...
+ //callback to javascript
+ Map<String, Object> result = new HashMap<String, Object>();
+ result.put("ts", System.currentTimeMillis());
+ WXBridgeManager.getInstance().callback(mWXSDKInstance.getInstanceId(), callbackId, result);
+ }
+}
+```
+
+
+### Register your module to engine:
+
+```
+try {
+ WXSDKEngine.registerModule("myURL", URLHelperModule.class);//'myURL' is the name you'll use in javascript
+ } catch (WXException e) {
+ WXLogUtils.e(e.getMessage());
+ }
+```
+### Now, you can use eventModule in javascript like this:
+
+```javascript
+let URLHelper = require('@weex-module/myURL');//same as you registered
+URLHelper.openURL("http://www.taobao.com",function(ts){
+ console.log("url is open at "+ts);
+});
+
+```
+
+
+## Things you need to note:
+1. Customized components must inherit from `WXModule`;
+2. @WXModuleAnno annotation must be added, as it is the only way to be recognized by Weex;
+3. The access levels of method must be **public**;
+4. The module class also can not be an inner class;
+5. Customized components should not be obfuscated by tools like ProGuard;
+6. Module methods will be invoked on the UI thread, so do not put time-consuming operations there;
+7. Weex parameter's type can be int, double, float, String, Map, List, self-defined class that implements WXObject interface;
http://git-wip-us.apache.org/repos/asf/incubator-weex-site/blob/32a097bf/_draft/v-0.10/guide/how-to/debug-with-html5.md
----------------------------------------------------------------------
diff --git a/_draft/v-0.10/guide/how-to/debug-with-html5.md b/_draft/v-0.10/guide/how-to/debug-with-html5.md
new file mode 100644
index 0000000..c80fb69
--- /dev/null
+++ b/_draft/v-0.10/guide/how-to/debug-with-html5.md
@@ -0,0 +1,47 @@
+---
+title: Debug in html5 renderer
+type: guide
+order: 3.5
+version: 0.10
+---
+
+# How to debug in html5 renderer ?
+
+Since weex-html5 can run on a modern mobile browser, it's naturally supported to debug weex-html5 code in browsers' dev tools. Use browser's devTools to iterate, debug and profile your weex-html5 app. Take chrome's debug tool as a example:
+
+
+
+## Elements
+
+Use elements' panel to inspect the layout and design of the weex-html5 page, and manipulate the DOM and CSS to do some experiment freely.
+
+## Console
+
+You can use `console.log` to log information on console, but it's highly recommended to use `nativeLog` instead, since nativeLog can run on a native platform based on a browser. The defect of `nativeLog` is that it's not supported to trace it from the console to the source file which the `nativeLog` is called in, therefore in this situation you'd better use `console.log`, and you should make sure this code will not run on native platform (otherwise a exception or a crash will be caused).
+
+## Breakpoints
+
+You can set breakpoints to debug code. Breakpoints are one of the most effective way to debug code. Breakpoints enable you to pause script execution and then investigate the call stack variable values at that particular moment in time.
+
+Manual breakpoints are individual breakpoints that you set on a specific line of code. You can set these via Chrome DevTools GUI, or by inserting the `debugger` keyword in your code.
+
+## Locate your bug
+
+Generally speaking, there are three possible layer the bug could happen on: the renderer (weex-html5), the js-framework (weex-js-framework) and the transformer (gulp-weex).
+
+Here are some suggestions to locate your bug so that you can recognize which layer the bug is on:
+
+* check the console for errors. In debug mode if there is a error happend there will be info about it on the console.
+* in bridge/receiver.js, whether the `callNative` function is called.
+* whether the supposed to be called API method is actually called and executed.
+* whether the `callJS` method for event firing or callback executing is called.
+
+## other
+
+More info about how to debug h5 pages on chrome devTools: [chrome's devTools docs](https://developers.google.com/web/tools/chrome-devtools/?hl=en)
+
+
+
+
+
+
http://git-wip-us.apache.org/repos/asf/incubator-weex-site/blob/32a097bf/_draft/v-0.10/guide/how-to/index.md
----------------------------------------------------------------------
diff --git a/_draft/v-0.10/guide/how-to/index.md b/_draft/v-0.10/guide/how-to/index.md
new file mode 100644
index 0000000..9f9435a
--- /dev/null
+++ b/_draft/v-0.10/guide/how-to/index.md
@@ -0,0 +1,40 @@
+---
+title: Preview in browser
+type: guide
+order: 3
+has_chapter_content: false
+chapter_title: How-tos
+version: 0.10
+---
+
+# How to preview weex code in browser ?
+
+## weex-toolkit
+
+We strongly suggest you use weex-toolkit to preview weex code in your browser. This tool is Node.JS based, so you need to install Node at first. Please download and install latest stable version of Node from [https://nodejs.org/en/download/stable/](https://nodejs.org/en/download/stable/). Then you can install weex-toolkit using npm install:
+
+```bash
+$ npm install -g weex-toolkit
+```
+
+Check that the toolkit does work by typing `weex` in the command line. Normally you should see the following help text:
+
+```
+Options:
+ --qr display QR code for native runtime,
+ -o,--output transform weex we file to JS Bundle, output path (single JS bundle file or dir)
+ -s,--server start a http file server, weex .we file will be transforme to JS bundle on the server , specify local root path using the option
+ ......
+ --help Show help
+```
+
+If all work well, navigate to the path the xxx.we file you want to preview in, and type the command:
+
+```bash
+weex xxx.we
+```
+
+A browser window will be opened automatically to display the page you want to preview:
+
+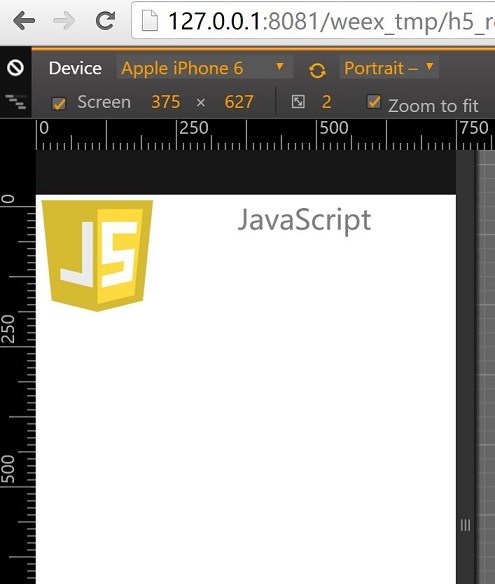
+
http://git-wip-us.apache.org/repos/asf/incubator-weex-site/blob/32a097bf/_draft/v-0.10/guide/how-to/preview-in-playground-app.md
----------------------------------------------------------------------
diff --git a/_draft/v-0.10/guide/how-to/preview-in-playground-app.md b/_draft/v-0.10/guide/how-to/preview-in-playground-app.md
new file mode 100644
index 0000000..5800737
--- /dev/null
+++ b/_draft/v-0.10/guide/how-to/preview-in-playground-app.md
@@ -0,0 +1,20 @@
+---
+title: Preview in native
+type: guide
+order: 3.2
+version: 0.10
+---
+
+# How to preview weex code in sample-app ?
+
+### Weex Sample Step By Step
+1. Clone Weex from github [`https://github.com/apache/incubator-weex/`](https://github.com/apache/incubator-weex/)
+2. Use Android Studio open Android Sample 。
+3. run Sample project.
+4. into Sample homePage,you will see this picture
+
+5. Click the icon to the top right of the page to enter the two-dimensional code scanning
+
+6. use[`Weex-Toolkit`](https://github.com/alibaba/weex_toolchain/tree/master/toolkit/ )make .we to a QR code
+7. you will see the page rended by Weex
+
http://git-wip-us.apache.org/repos/asf/incubator-weex-site/blob/32a097bf/_draft/v-0.10/guide/how-to/require-3rd-party-libs.md
----------------------------------------------------------------------
diff --git a/_draft/v-0.10/guide/how-to/require-3rd-party-libs.md b/_draft/v-0.10/guide/how-to/require-3rd-party-libs.md
new file mode 100644
index 0000000..7349520
--- /dev/null
+++ b/_draft/v-0.10/guide/how-to/require-3rd-party-libs.md
@@ -0,0 +1,56 @@
+---
+title: Require 3rd Party Libs
+type: guide
+order: 3.6
+version: 0.10
+---
+
+# How to require 3rd Party Libs ?
+
+In the paragraph Maintain Your Component Code, we learn that JavaScript code can be written in `<script>` tag in one component. But there must be some common functions or modules in your project, such as parsing url params, extending properties from some objects to another object and so on. It's a bad practice to copy and paste them in each component, therefore there's a urgent need of `require`. Weex provides CommonJS `require` syntax for developers.
+
+Let take `extend` for example.
+
+## Require Local Js Modules
+
+A basic implementation of `extend` is as follows, and it's placed in directory path `./common/utils.js`.
+
+```javascript
+function extend(dest, src) {
+ for (var key in src) {
+ dest[key] = src[key]
+ }
+}
+exports.extend = extend
+```
+
+In a `.we` file, `extend` can be used with the help of `require`:
+
+```html
+<script>
+ var utils = require('./common/utils')
+ var obj1 = {a: 1}
+ var obj2 = {b: 2}
+ utils.extend(obj1, obj2) // obj1 => {a: 1, b: 2}
+</script>
+```
+
+## Require Installed Node Modules
+
+Besides, [underscore](http://underscorejs.org) is a JavaScript library that provides a whole mess of useful functional programming helpers without extending any built-in objects. It implements a more robust version of [extend](http://underscorejs.org/#extend).
+
+We can use underscore's extend instead of the version implemented by ourselves. After installing `underscore` to the `node_modules` directory, we can `require` and use it.
+
+```bash
+$ npm install underscore
+```
+
+```html
+<script>
+ var _ = require('underscore')
+ var obj1 = {a: 1}
+ var obj2 = {b: 2}
+ var obj3 = {c: 3}
+ var ret = _.extend(obj1, obj2, obj3) // ret => {a: 1, b: 2, c: 3}
+</script>
+```
http://git-wip-us.apache.org/repos/asf/incubator-weex-site/blob/32a097bf/_draft/v-0.10/guide/how-to/transform-code-into-js-bundle.md
----------------------------------------------------------------------
diff --git a/_draft/v-0.10/guide/how-to/transform-code-into-js-bundle.md b/_draft/v-0.10/guide/how-to/transform-code-into-js-bundle.md
new file mode 100644
index 0000000..842ecd6
--- /dev/null
+++ b/_draft/v-0.10/guide/how-to/transform-code-into-js-bundle.md
@@ -0,0 +1,110 @@
+---
+title: Transform Code into Js Bundle
+type: guide
+order: 3.7
+version: 0.10
+---
+
+# Transform Code into Js Bundle
+
+Paragraphs Maintain Your Component Code and [Require 3rd Party Libs](./require-3rd-party-libs.html) show us how to write and organize weex code. However, Weex DSL code must be transformed to `js bundle` so that `js framework` can parse and execute it for iOS, Android and HTML5 portal. For more information, please refer to [How It Works
+](../../advanced/how-it-works.html) and [JS Bundle Format](../../references/specs/js-bundle-format.html).
+
+Now come back to the topic `transform code into js bundle`. There are several ways to achieve the goal.
+
+## weex-toolkit
+
+```bash
+$ npm install -g weex-toolkit
+```
+
+### transform a `we file` to JS Bundle
+
+```bash
+$ weex your_best_weex.we -o .
+```
+
+`your_best_weex.we` will be transform to JS Bundle file `your_best_weex.js` , saved in your current directory
+
+### transform a `we file` to JS Bundle , watch this file ,auto run transformer if change happen.
+
+```bash
+$ weex your_best_weex.we -o . --watch
+```
+
+### transform every we file in a directory
+
+```bash
+$ weex we/file/storage/path -o outputpath
+```
+
+every `we file` in `we/file/storage/path` will be transformed to JS Bundle , saved in `outputpath` path
+
+please access [npmjs.com](https://www.npmjs.com/package/weex-toolkit) for more information about weex-toolkit.
+
+## transformer
+
+```bash
+npm install weex-transformer
+```
+
+### CLI Tool
+
+```bash
+ Usage: transformer [options] <file...>
+
+ Options:
+
+ -h, --help output usage information
+ -V, --version output the version number
+ -l, --oldFormat [value] whether to transform to old format (default: false)
+ -e, --isEntry [value] whether is an entry module which has `bootstrap` (default: true)
+ -o, --output [path] the output file dirname
+```
+
+### API
+
+** transform(name, code, path, elements, config) **
+
+```javascript
+var transformer = require('weex-transformer')
+var output = transformer.transform('foo', '/* code here */', '.', {})
+```
+
+params:
+
+- `name`: string, current bundle name
+- `code`: string, source code
+- `path`: string *optional*, useful when find custom component in a certain path
+- `elements`: object *optional*, existed custom component map
+- `config`: object *optional*
+ * `oldFormat`: whether to transform to old format (default: false)
+ * `isEntry`: whether is an entry module which has `bootstrap` (default: true)
+
+returns:
+
+- an object with keys
+ * `result`: string, all custom components `define()` and final `bootstrap()`
+ * `logs`: array, corresponding warning & error logs
+
+## gulp weex
+
+```bash
+$ npm install gulp-weex
+```
+
+```javascript
+var gulp = require('gulp')
+var weex = require('gulp-weex')
+
+gulp.task('default', function () {
+ return gulp.src('src/*.html')
+ .pipe(weex({}))
+ .pipe(gulp.dest('./dest'))
+})
+```
+
+Options:
+
+- `oldFormat`: whether to transform to old format (default: false)
+- `isEntry`: whether is an entry module which has `bootstrap` (default: true)
http://git-wip-us.apache.org/repos/asf/incubator-weex-site/blob/32a097bf/_draft/v-0.10/guide/images/tut-cli-qrcode.png
----------------------------------------------------------------------
diff --git a/_draft/v-0.10/guide/images/tut-cli-qrcode.png b/_draft/v-0.10/guide/images/tut-cli-qrcode.png
new file mode 100644
index 0000000..9068c14
Binary files /dev/null and b/_draft/v-0.10/guide/images/tut-cli-qrcode.png differ
http://git-wip-us.apache.org/repos/asf/incubator-weex-site/blob/32a097bf/_draft/v-0.10/guide/images/tut-first.png
----------------------------------------------------------------------
diff --git a/_draft/v-0.10/guide/images/tut-first.png b/_draft/v-0.10/guide/images/tut-first.png
new file mode 100755
index 0000000..c8505e6
Binary files /dev/null and b/_draft/v-0.10/guide/images/tut-first.png differ
http://git-wip-us.apache.org/repos/asf/incubator-weex-site/blob/32a097bf/_draft/v-0.10/guide/images/tut-second.png
----------------------------------------------------------------------
diff --git a/_draft/v-0.10/guide/images/tut-second.png b/_draft/v-0.10/guide/images/tut-second.png
new file mode 100755
index 0000000..1259abf
Binary files /dev/null and b/_draft/v-0.10/guide/images/tut-second.png differ
http://git-wip-us.apache.org/repos/asf/incubator-weex-site/blob/32a097bf/_draft/v-0.10/guide/images/tut1.jpg
----------------------------------------------------------------------
diff --git a/_draft/v-0.10/guide/images/tut1.jpg b/_draft/v-0.10/guide/images/tut1.jpg
new file mode 100644
index 0000000..8af0f3f
Binary files /dev/null and b/_draft/v-0.10/guide/images/tut1.jpg differ
http://git-wip-us.apache.org/repos/asf/incubator-weex-site/blob/32a097bf/_draft/v-0.10/guide/images/tut2.jpg
----------------------------------------------------------------------
diff --git a/_draft/v-0.10/guide/images/tut2.jpg b/_draft/v-0.10/guide/images/tut2.jpg
new file mode 100644
index 0000000..c3e8a6e
Binary files /dev/null and b/_draft/v-0.10/guide/images/tut2.jpg differ
http://git-wip-us.apache.org/repos/asf/incubator-weex-site/blob/32a097bf/_draft/v-0.10/guide/images/tut3.png
----------------------------------------------------------------------
diff --git a/_draft/v-0.10/guide/images/tut3.png b/_draft/v-0.10/guide/images/tut3.png
new file mode 100644
index 0000000..5473905
Binary files /dev/null and b/_draft/v-0.10/guide/images/tut3.png differ
http://git-wip-us.apache.org/repos/asf/incubator-weex-site/blob/32a097bf/_draft/v-0.10/guide/images/tut4.gif
----------------------------------------------------------------------
diff --git a/_draft/v-0.10/guide/images/tut4.gif b/_draft/v-0.10/guide/images/tut4.gif
new file mode 100644
index 0000000..eed4395
Binary files /dev/null and b/_draft/v-0.10/guide/images/tut4.gif differ
http://git-wip-us.apache.org/repos/asf/incubator-weex-site/blob/32a097bf/_draft/v-0.10/guide/index.md
----------------------------------------------------------------------
diff --git a/_draft/v-0.10/guide/index.md b/_draft/v-0.10/guide/index.md
new file mode 100644
index 0000000..bb6941c
--- /dev/null
+++ b/_draft/v-0.10/guide/index.md
@@ -0,0 +1,211 @@
+---
+title: Tutorial
+type: guide
+order: 1
+version: 0.10
+---
+
+# Tutorial
+
+We will make a simple but realistic list, in which the technologies Weex uses will be shown. This form of list also works for a lot of e-commercial apps and mobile sites.
+
+## Getting Started
+
+Let's get started with the list item, which contains one `image` element and one `text` right behind.
+
+```html
+<template>
+ <div class="container">
+ <div class="cell">
+ <image class="thumb" src="http://t.cn/RGE3AJt"></image>
+ <text class="title">JavaScript</text>
+ </div>
+ </div>
+</template>
+
+<style>
+ .cell { margin-top: 10; margin-left: 10; flex-direction: row; }
+ .thumb { width: 200; height: 200; }
+ .title { text-align: center; flex: 1; color: grey; font-size: 50; }
+</style>
+```
+
+You can directly copy and paste the above code into a Weex file named `tech_list.we` (`.we` is our recommended filename extension).
+
+## Preview
+
+Once created, we want to see the running result of the `.we` file. But before that, we must make sure the dependencies are installed.
+
+We should install [Node](https://nodejs.org/en/download/) first, which our Weex CLI program [Weex Toolkit](https://www.npmjs.com/package/weex-toolkit) depends on. Then install `weex-toolkit` by running the command:
+
+```bash
+$ npm install -g weex-toolkit
+```
+
+When installation completed, you can check if Weex CLI is installed properly by running `weex` command in the command line. The following text is expected:
+
+```
+Usage: weex foo/bar/your_next_best_weex_script_file.we [options]
+
+Options:
+ --qr display QR code for native runtime,
+ -o,--output transform weex we file to JS Bundle, output path (single JS bundle file or dir)
+ -s,--server start a http file server, weex .we file will be transforme to JS bundle on the server , specify local root path using the option
+ ......
+ --help Show help
+ -h, --host [default: "127.0.0.1"]
+```
+
+If all work well, navigate to the directory where you saved `tech_list.we`, then type:
+
+```bash
+$ weex tech_list.we
+```
+
+A browser window will be opened automatically to display the running result like below (weex-toolkit version should be greater than 0.1.0, use `weex --version` to check it):
+
+
+
+## Introduce to Weex Syntax
+
+So it's time for introducing the syntax.
+
+Given the content of `tech_list.we`, Weex source code is composed of three parts -- *template*, *style*, and *script*, just like html, css, and javascript for the Web.
+
+Template is the skeleton that gives Weex structure. It is composed of tags which surround content and apply meaning to it. Tags have *attributes*, different attribute means different feature, for example, `class` attribute makes it possible to define the same styles for multiple tags, `onclick` attribute makes the tag respond to click event.
+
+Style describes how Weex tags are to be displayed. We prefer CSS very much. So we try to keep consistent with CSS standard as possible. Weex Style supports a lot of CSS features, like margin, padding, fixed and so on. Better yet, flexbox layout (flex) is well supported in Weex Style.
+
+Script adds *data* & *logic* to Weex tags, helping you easily access local or remote data and update tags. You can also define some methods for your tag to respond to different events. Weex Script organization learns a lot from CommonJS module style.
+
+More information about Weex syntax can be found in our [Syntax chapter](./syntax/index.html).
+
+## Add More Items
+
+We can't call one item a list, so we need to add more items to our tech list. Open `tech_list.we` in your favorite editor and update it's content like below:
+
+```html
+<template>
+ <div class="container">
+ <div class="cell">
+ <image class="thumb" src="http://t.cn/RGE3AJt"></image>
+ <text class="title">JavaScript</text>
+ </div>
+ <div class="cell">
+ <image class="thumb" src="http://t.cn/RGE3uo9"></image>
+ <text class="title">Java</text>
+ </div>
+ <div class="cell">
+ <image class="thumb" src="http://t.cn/RGE31hq"></image>
+ <text class="title">Objective C</text>
+ </div>
+ </div>
+</template>
+
+<style>
+ .cell{ margin-top:10 ; margin-left:10 ; flex-direction: row; }
+ .thumb { width: 200; height: 200; }
+ .title { text-align: center ; flex: 1; color: grey; font-size: 50; }
+</style>
+```
+
+Now we will try to render our `tech_list.we` with Weex native renderer. Open your terminal and navigate to the directory where you save the `tech_list.we` again, then type:
+
+```bash
+$ weex tech_list.we --qr -h {ip or hostname}
+```
+
+It's ***RECOMMENDED*** to use `-h` option to specify your local ip address or hostname.
+
+A QR code will be displayed in the terminal window like below:
+
+
+
+The QR code can work together with [Weex Playground App](http://alibaba.github.io/weex/download.html). Open it and tap the scan icon at the top-right corner, then scan the QR code displayed in your terminal. If all work well, a beautiful list will be displayed in your phone.
+
+
+
+Here, I must stress that the list is rendered by a native view, instead of Webkit, so your app gets faster loading and less memory overhead than common Webview renderer.
+
+Now open `tech_list.we` again and try to change some text, after changes saved the Weex playground App will immediately display these changes. We call that **Hot-Reload**, which is intended to help you use Weex better.
+
+## Add Built-in Components
+
+Instead of writing basic tags by yourself, Weex provides a lot of built-in components. For example, Slider is common to many apps and mobile websites, so Weex includes a built-in Slider so that you can easily use it in your script. Let's open `tech_list.we` and update it's content like below.
+
+```html
+<template>
+ <div style="flex-direction: column;">
+ <slider class="slider" interval="{{intervalValue}}" auto-play="{{isAutoPlay}}" >
+ <div class="slider-pages" repeat="{{itemList}}" onclick="goWeexSite" >
+ <image class="thumb" src="{{pictureUrl}}"></image>
+ <text class="title">{{title}}</text>
+ </div>
+ </slider>
+
+ <div class="container" onclick="goWeexSite" >
+ <div class="cell">
+ <image class="thumb" src="http://t.cn/RGE3AJt"></image>
+ <text class="title">JavaScript</text>
+ </div>
+ <div class="cell">
+ <image class="thumb" src="http://t.cn/RGE3uo9"></image>
+ <text class="title">Java</text>
+ </div>
+ <div class="cell">
+ <image class="thumb" src="http://t.cn/RGE31hq"></image>
+ <text class="title">Objective C</text>
+ </div>
+ </div>
+</template>
+
+<style>
+ .cell { margin-top:10 ; margin-left:10 ; flex-direction: row; }
+ .thumb { width: 200; height: 200; }
+ .title { text-align: center ; flex: 1; color: grey; font-size: 50; }
+ .slider {
+ margin: 18;
+ width: 714;
+ height: 230;
+ }
+ .slider-pages {
+ flex-direction: row;
+ width: 714;
+ height: 200;
+ }
+</style>
+
+<script>
+module.exports = {
+ data: {
+ intervalValue:"1000",
+ isShowIndicators:"true",
+ isAutoPlay:"true",
+ itemList: [
+ {title: 'Java', pictureUrl: 'http://t.cn/RGE3uo9'},
+ {title: 'Objective C', pictureUrl: 'http://t.cn/RGE31hq'},
+ {title: 'JavaScript', pictureUrl: 'http://t.cn/RGE3AJt'}
+ ]
+ },
+ methods: {
+ goWeexSite: function () {
+ this.$openURL('http://alibaba.github.io/weex/')
+ }
+ }
+}
+</script>
+```
+
+Open terminal and run the command again:
+
+```bash
+$ weex tech_list.we
+```
+
+You should see a slider prepend to our list.
+
+
+
+More information about Slider component can be found [here](../references/components/slider.html).
+
+Just as the previous example, the slider can be rendered in native, easily in Weex playground, or in your App. Please refer [the document](./advanced/integrate-to-android.html) for integrating Weex into your App.
http://git-wip-us.apache.org/repos/asf/incubator-weex-site/blob/32a097bf/_draft/v-0.10/guide/syntax/comm.md
----------------------------------------------------------------------
diff --git a/_draft/v-0.10/guide/syntax/comm.md b/_draft/v-0.10/guide/syntax/comm.md
new file mode 100644
index 0000000..84e49a1
--- /dev/null
+++ b/_draft/v-0.10/guide/syntax/comm.md
@@ -0,0 +1,228 @@
+---
+title: Communications
+type: guide
+order: 2.8
+version: 0.10
+---
+
+# Communicate Between Components
+
+## For Child-Parent Communication
+
+Children component can use `this.$dispatch([String type], [Object detail])` method passing information to parent component. first argument meaning type of message , second argument is the message object. If any parent of the child component register the same type of listener using `$on([String type], [Function callback])` method , the callback will be execute with one argument , the message object will be `detail` property of the the argument.
+
+eg:
+
+```html
+<we-element name="foo">
+ <template>
+ <div>
+ <image src="{{imageUrl}}" onclick="test"></image>
+ <text>{{title}}</text>
+ </div>
+ </template>
+ <script>
+ module.exports = {
+ data: {
+ title: '',
+ imageUrl: ''
+ },
+ methods: {
+ test: function () {
+ this.$dispatch('notify', {a: 1})
+ }
+ }
+ }
+ </script>
+</we-element>
+
+<template>
+ <foo title="..." image-url="..."></foo>
+</template>
+
+<script>
+ module.exports = {
+ created: function () {
+ this.$on('notify', function(e) {
+ // when <foo> image tag be clicked ,the function will be executing.
+ // e.detail is `{a: 1}`
+ })
+ }
+ }
+</script>
+```
+
+## For Parent-Child Communication
+
+Parent component can use `this.$vm([String id])` get vm instance of child component. you can access child component information using the vm instance.
+
+```html
+<we-element name="foo">
+ <template>
+ <div>
+ <image src="{{imageUrl}}"></image>
+ <text>{{title}}</text>
+ </div>
+ </template>
+ <script>
+ module.exports = {
+ data: {
+ title: '',
+ imageUrl: ''
+ },
+ methods: {
+ setTitle: function (t) {
+ this.title = t
+ }
+ }
+ }
+ </script>
+</we-element>
+
+<template>
+ <div>
+ <text onclick="test">click to update foo</text>
+ <foo id="fooEl" title="..." image-url="..."></foo>
+ </div>
+</template>
+
+<script>
+ module.exports = {
+ methods: {
+ test: function (e) {
+ var foo = this.$vm('fooEl')
+ foo.setTitle('...')
+ foo.imageUrl = '...'
+ }
+ }
+ }
+</script>
+```
+
+## Parent to Children (multi-child) Communication
+
+Parent can using `this.$broadcast([String type], [Object detail])` broadcast message to all of children.
+
+eg:
+
+```html
+<we-element name="bar">
+ <template>
+ <div>
+ <image src="{{imageUrl}}"></image>
+ </div>
+ </template>
+ <script>
+ module.exports = {
+ data: {
+ imageUrl: ''
+ },
+ created: function() {
+ var self = this
+ this.$on('changeImage', function(e) {
+ self.imageUrl = e.detail.imageUrl
+ })
+ }
+ }
+ </script>
+</we-element>
+
+<we-element name="foo">
+ <template>
+ <div>
+ <bar></bar>
+ <text>{{title}}</text>
+ </div>
+ </template>
+ <script>
+ module.exports = {
+ data: {
+ title: ''
+ },
+ created: function() {
+ var self = this
+ this.$on('changeTitle', function(e) {
+ self.title = e.detail.title
+ })
+ }
+ }
+ </script>
+</we-element>
+
+<template>
+ <div>
+ <text onclick="test">click to update foo</text>
+ <foo></foo>
+ <bar></bar>
+ </div>
+</template>
+
+<script>
+ module.exports = {
+ methods: {
+ test: function (e) {
+ this.$broadcast('changeTitle', {
+ title: '...'
+ })
+ this.$broadcast('changeImage', {
+ imageUrl: '...'
+ })
+ }
+ }
+ }
+</script>
+```
+
+## Siblings Communication
+
+siblings components can using common parent as bridge for passing information
+
+eg:
+
+```html
+<we-element name="foo">
+ <template>...</template>
+ <script>
+ module.exports = {
+ methods: {
+ callbar: function () {
+ this.$dispatch('callbar', {a: 1})
+ }
+ }
+ }
+ </script>
+</we-element>
+
+<we-element name="bar">
+ <template>...</template>
+ <script>
+ module.exports = {
+ created: function() {
+ this.$on('callbar', function(e) {
+ // e.detail.a
+ })
+ }
+ }
+ </script>
+</we-element>
+
+<template>
+ <div>
+ <foo></foo>
+ <bar></bar>
+ </div>
+</template>
+
+<script>
+ module.exports = {
+ created: function () {
+ var self = this
+ this.$on('callbar', function(e) {
+ self.$broadcast('callbar', e.detail)
+ })
+ }
+ }
+</script>
+```
+
+At last, you can learn how to write [config & data](./config-n-data.html) for a Weex page.
http://git-wip-us.apache.org/repos/asf/incubator-weex-site/blob/32a097bf/_draft/v-0.10/guide/syntax/composed-component.md
----------------------------------------------------------------------
diff --git a/_draft/v-0.10/guide/syntax/composed-component.md b/_draft/v-0.10/guide/syntax/composed-component.md
new file mode 100644
index 0000000..547096f
--- /dev/null
+++ b/_draft/v-0.10/guide/syntax/composed-component.md
@@ -0,0 +1,114 @@
+---
+title: Composed Component
+type: guide
+order: 2.6
+version: 0.10
+---
+
+# Composed Component
+
+If some part of weex file is reused often, you could create a composed component represent these part.
+
+You can create a file named `foo.we` to define a composed component, the component name is just `<foo>`.
+
+```html
+<!-- foo.we -->
+<template>
+ <container style="flex-direction: row;">
+ <image src="{{image}}" style="width:100;height:100;"></image>
+ <text>{{title}}</text>
+ </container>
+</template>
+<script>
+ module.exports = {
+ data: {
+ title: null,
+ image: null
+ }
+ }
+</script>
+```
+
+The content of `foo.we` also consists of `<template>`, `<style>` and `<script>`.
+
+Once composed component been defined, you can use `<foo>` in a file which is in the same folder with `foo.we`.
+
+```html
+<template>
+ <foo title="..." image="..."></foo>
+</template>
+```
+
+## Nesting Components
+
+Composed component supports nesting. For example:
+
+```html
+<!-- somepath/foo.we -->
+<template>
+ <container style="flex-direction: row;">
+ <image src="{{image}}"></image>
+ <text>{{title}}</text>
+ </container>
+</template>
+<script>
+ module.exports = {
+ data: {
+ // The key is required if you want this property observed
+ // and could be updated from changing parent attribute
+ title: null,
+ image: null
+ }
+ }
+</script>
+```
+
+```html
+<!-- somepath/foo-list.we -->
+<template>
+ <container>
+ <text>{{description}}</text>
+ <foo repeat="{{list}}" title="{{text}}" image="{{img}}"></foo>
+ </container>
+</template>
+<script>
+ module.exports = {
+ data: {
+ description: '',
+ // If no keys written here. There will be no data binding effect
+ // from parent attribute "list".
+ list: []
+ }
+ }
+</script>
+```
+
+```html
+<!-- somepath/main.we -->
+<template>
+ <foo-list list="{{list}}"></foo-list>
+</template>
+<script>
+ module.exports = {
+ data: {
+ list: [
+ {text: '...', img: '...'},
+ {text: '...', img: '...'},
+ {text: '...', img: '...'},
+ ...
+ ]
+ }
+ }
+</script>
+```
+
+The `main.we` uses `<foo-list>` from `foo-list.we`. And `<foo-list>` uses `<foo>` from `foo.we`.
+
+## Notes
+
+- Every composed component have an independent `<style>` work scope.
+- If child component have `id` attribute, you can access the context of the child component by `this.$vm(id)` and find an element by `this.$el(id)`. See more about [find an element](./id.html).
+- Please refer to [communicate between components](./comm.html) for more communication issues.
+- The keys must be existed in `data` options **explicitly** if you want to make the data observation work both through inside data changes and outside attribute changes.
+
+Next is how to [find an element](./id.html).
http://git-wip-us.apache.org/repos/asf/incubator-weex-site/blob/32a097bf/_draft/v-0.10/guide/syntax/config-n-data.md
----------------------------------------------------------------------
diff --git a/_draft/v-0.10/guide/syntax/config-n-data.md b/_draft/v-0.10/guide/syntax/config-n-data.md
new file mode 100644
index 0000000..37b8e12
--- /dev/null
+++ b/_draft/v-0.10/guide/syntax/config-n-data.md
@@ -0,0 +1,61 @@
+---
+title: Page Config & Data
+type: guide
+order: 2.9
+version: 0.10
+---
+
+# Page Config & Data
+
+You can write some instance config and data in some additional `<script>` at the **top-level** Weex component.
+
+* the instance config could declare some meta informations like which sdk/client version it supports or "downgrade" to HTML5 renderer. This part would be extended more in the future.
+* the instance data could set an external data which would be processed instead of the default top-level component data.
+
+They all make Weex files more extendable and configurable and works easy with other tools & services like CMS system.
+
+```html
+<!-- definition of sub components -->
+<element name="sub-component-a">...</element>
+<element name="sub-component-b">...</element>
+<element name="sub-component-c">...</element>
+
+<!-- definition of top-level component -->
+<template>...</template>
+<style></style>
+<script>
+ module.exports = {
+ data: function () {return {x: 1, y: 2}}
+ }
+</script>
+
+<!-- instance config and data -->
+<script type="config">
+ {
+ downgrade: {
+ ios: {
+ os: '9', // all of 9.x.x
+ app: '~5.3.2',
+ framework: '^1.3', // all of 1.3.x
+ deviceModel: ['AAAA', 'BBBB']
+ },
+ android: {
+ os: '*', // all of version
+ app: '^5',
+ framework: '',
+ deviceModel: ''
+ }
+ }
+ }
+</script>
+<script type="data">
+ {y: 200}
+</script>
+```
+
+Notice that these two additional `<script>` are both optinal and have `type="config|data"` attribute and only works when it's the top-level component of a Weex instance.
+
+So that's all about Weex syntax. For more reading, please check out:
+
+* [how-tos](../how-to/index.html) articles and
+* [advanced](../../advanced/index.html) topics.
http://git-wip-us.apache.org/repos/asf/incubator-weex-site/blob/32a097bf/_draft/v-0.10/guide/syntax/data-binding.md
----------------------------------------------------------------------
diff --git a/_draft/v-0.10/guide/syntax/data-binding.md b/_draft/v-0.10/guide/syntax/data-binding.md
new file mode 100644
index 0000000..497735c
--- /dev/null
+++ b/_draft/v-0.10/guide/syntax/data-binding.md
@@ -0,0 +1,248 @@
+---
+title: Data-Binding
+type: guide
+order: 2.1
+version: 0.10
+---
+
+# Data-Binding
+
+In Weex, we use the *mustache* syntax `{% raw %}{{...}}{% endraw %}` to bind data in `<template>` which are defined in `<script>`. Once data and template is bound, the data changes will influence the corresponding template content immediately and automatically.
+
+## Binding data path
+
+```html
+<template>
+ <container>
+ <text style="font-size: {{size}}">{{title}}</text>
+ </container>
+</template>
+
+<script>
+ module.exports = {
+ data: {
+ size: 48,
+ title: 'Alibaba Weex Team'
+ }
+ }
+</script>
+```
+
+The code above will bind the `title` and `size` data field to `template`.
+
+We can also use `.` syntax to bind cascading data structure. Let's look at the following code snippet:
+
+```html
+<template>
+ <container>
+ <text style="font-size: {{title.size}}">{{title.value}}</text>
+ </container>
+</template>
+
+<script>
+ module.exports = {
+ data: {
+ title: {
+ size: 48,
+ value: 'Alibaba Weex Team'
+ }
+ }
+ }
+</script>
+```
+
+## In-template expression
+
+Inside data bindings, Weex supports simply javascript expressions, e.g.
+
+```html
+<template>
+ <container style="flex-direction: row;">
+ <text>{{firstName + ' ' + lastName}}</text>
+ </container>
+</template>
+
+<script>
+ module.exports = {
+ data: {
+ firstName: 'John',
+ lastName: 'Smith'
+ }
+ }
+</script>
+```
+
+The expression will be evaluated in the data scope of current context.
+
+**NOTE: EACH BINDING CAN ONLY CONTAIN ONE SINGLE EXPRESSION**
+
+## Computed Properties
+<span class="weex-version">0.5</span>
+
+According to simple operations, in-template expressions are very convenient. But if you want to put more logic into the template, you should use a computed property.
+
+e.g.
+
+```html
+<template>
+ <container style="flex-direction: row;">
+ <text>{{fullName}}</text>
+ <text onclick="changeName" style="margin-left:10px;">CHANGE NAME</text>
+ </container>
+</template>
+
+<script>
+ module.exports = {
+ data: {
+ firstName: 'John',
+ lastName: 'Smith'
+ },
+ computed: {
+ fullName: {
+ get: function() {
+ return this.firstName + ' ' + this.lastName
+ },
+
+ set: function(v) {
+ var s = v.split(' ')
+ this.firstName = s[0]
+ this.lastName = s[1]
+ }
+ }
+ },
+ methods: {
+ changeName: function() {
+ this.fullName = 'Terry King'
+ }
+ }
+ }
+</script>
+```
+
+Here we have declared a computed property fullName. The function we provided will be used as the getter function for concating firstName and lastName.
+
+Otherwise when you call `changeName` after click, the setter will be invoked and this.firstName and this.lastName will be updated accordingly.
+
+**NOTE: `data` and `methods` can't have duplicated fields. 'Cause in the execution context -- `this`, we can access both of them.**
+
+## Usage of some special attributes in Data-Binding
+
+### Styles: `style` or `class`
+
+the style of a component can be bind using the `style` attribute:
+
+```html
+<template>
+ <text style="font-size: {{size}}; color: {{color}}; ...">...</text>
+</template>
+```
+
+while style can also get bound with `class` attribute, multiple classnames can be split by spaces:
+
+```html
+<template>
+ <container>
+ <text class="{{size}}"></text>
+ <text class="title {{status}}"></text>
+ </container>
+</template>
+```
+
+here if `{{size}}` and `{{status}}` have empty value, then only `class="title"` will be rendered.
+
+* [See more about style and class](./style-n-class.html)
+
+### Event Handler: `on...`
+
+The event handler is an attribute which name has a prefix `on...`. The other part of attribute name is event type and the value is event handler name. We don't need to add mustache around the method name or add parentheses to call it.
+
+```html
+<template>
+ <text onclick="toggle">Toggle</text>
+</template>
+
+<script>
+ module.exports = {
+ methods: {
+ toggle: function () {
+ // todo
+ }
+ }
+ }
+</script>
+```
+
+### `if` & `repeat`
+
+`if` attribute can control the display of a component by a truthy/falsy value.
+
+```html
+<template>
+ <container style="flex-direction: column;">
+ <text onclick="toggle">Toggle</text>
+ <image src="..." if="{{shown}}"></image>
+ </container>
+</template>
+
+<script>
+ module.exports = {
+ data: {
+ shown: true
+ },
+ methods: {
+ toggle: function () {
+ this.shown = !this.shown
+ }
+ }
+ }
+</script>
+```
+
+We can also use `repeat` attribute to generate a list.
+
+**NOTE: When you want to mutate an array in `data`. Something limitations existing below:**
+
+When you directly set an item with the index (`vm.items[0] = {};`), it won't trigger view update. So we have a prototype methods: `$set(index, item)`.
+
+```javascript
+// same as `example1.items[0] = ...` but triggers view update
+example1.items.$set(0, { childMsg: 'Changed!'})
+```
+
+When you modify the length of the Array (`vm.items.length = 0`), it won't trigger view update too. We recommend you just replace `items` with an empty array instead.
+
+```javascript
+// same as `example2.items.length = 0` but triggers view update
+example2.items = []
+```
+
+* [See more about display logic control](./display-logic.html)
+
+### `static`
+
+`static` attribute can cancel the data binding, and the data changes will not be synchronized to UI.
+
+```html
+<template>
+ <div static>
+ <text>{{ word }}</text>
+ </div>
+</template>
+
+<script>
+ module.exports = {
+ ready: function() {
+ this.word = 'Data changes'
+ },
+ data: {
+ word: 'Hello, static'
+ }
+ }
+</script>
+```
+
+As shown above, after the `static` attribute is added, the rendering result will be `Hello, static`, which is equivalent to rendering a static node. The change of the data `word` in ready function will not be listened, so the text value will not change.
+`static` property is designed to reduce the long list or pure static page memory overhead. Be careful with it, as it will likely break your page logic.
+
+Next, let's have a look at [style and class](./style-n-class.html).
+
http://git-wip-us.apache.org/repos/asf/incubator-weex-site/blob/32a097bf/_draft/v-0.10/guide/syntax/display-logic.md
----------------------------------------------------------------------
diff --git a/_draft/v-0.10/guide/syntax/display-logic.md b/_draft/v-0.10/guide/syntax/display-logic.md
new file mode 100644
index 0000000..842e188
--- /dev/null
+++ b/_draft/v-0.10/guide/syntax/display-logic.md
@@ -0,0 +1,173 @@
+---
+title: Display Logic Control
+type: guide
+order: 2.4
+version: 0.10
+---
+
+# Display Logic Control
+
+There are two attributes for display logic control: `if` and `repeat`. We can create Weex page structure and effects more flexible with them.
+
+ > **Notes:** The display logic could't apply on the root element within `<template>`, please don't use `if` or `repeat` directive on it.
+
+## `if`
+
+`if` attribute can control the display of a component by a truthy/falsy value. If the value is truthy, then the component will generated, otherwise it will be removed.
+
+```html
+<template>
+ <container>
+ <text onclick="toggle">Toggle</text>
+ <image src="..." if="{{shown}}"></image>
+ </container>
+</template>
+
+<script>
+ module.exports = {
+ data: {
+ shown: true
+ },
+ methods: {
+ toggle: function () {
+ this.shown = !this.shown
+ }
+ }
+ }
+</script>
+```
+
+## `repeat`
+
+`repeat` statement is just for array rendering. Every item in an array is also a structured data. This means in `repeat`ed component, you can bind their item properties directly.
+
+```html
+<template>
+ <container>
+ <container repeat="{{list}}" class="{{gender}}">
+ <image src="{{avatar}}"></image>
+ <text>{{nickname}}</text>
+ </container>
+ </container>
+</template>
+
+<style>
+ .male {...}
+ .female {...}
+</style>
+
+<script>
+ module.exports = {
+ data: {
+ list: [
+ {gender: 'male', nickname: 'Li Lei', avatar: '...'},
+ {gender: 'female', nickname: 'Han Meimei', avatar: '...'},
+ ...
+ ]
+ }
+ }
+</script>
+```
+
+The origin data properties which not belongs to the array will also be bound:
+
+```html
+<template>
+ <container>
+ <container repeat="{{list}}" class="{{gender}}">
+ <image src="{{avatar}}"></image>
+ <text>{{nickname}} - {{group}}</text>
+ </container>
+ </container>
+</template>
+
+<style>
+ .male {...}
+ .female {...}
+</style>
+
+<script>
+ module.exports = {
+ data: {
+ group: '...',
+ list: [
+ {gender: 'male', nickname: 'Li Lei', avatar: '...'},
+ {gender: 'female', nickname: 'Han Meimei', avatar: '...'},
+ ...
+ ]
+ }
+ }
+</script>
+```
+
+### An extension of repeat syntax
+
+#### use default `$index` for the index of array.
+
+e.g.
+
+```html
+<div repeat="{{list}}">
+ <text>No. {{$index + 1}}</text>
+<div>
+```
+
+#### specify the key and value of array.
+
+e.g.
+
+```html
+<div repeat="{{v in list}}">
+ <text>No. {{$index + 1}}, {{v.nickname}}</text>
+</div>
+```
+
+```html
+<div repeat="{{(k, v) in list}}">
+ <text>No. {{k + 1}}, {{v.nickname}}</text>
+</div>
+```
+
+#### use `track-by` to specify unique attribute
+
+By default when replacing an array, `repeat` will cause the entire list to be re-rendered. However you can use `track-by` to specify an unique attribute as a hint, so that weex can reuse existing elements as much as possible.
+
+**NOTE: DO NOT USE DATA-BINDING SYNTAX FOR `track-by`**
+
+e.g.
+
+```html
+<template>
+ <container>
+ <container repeat="{{list}}" track-by="nickname" class="{{gender}}">
+ <image src="{{avatar}}"></image>
+ <text>{{nickname}} - {{group}}</text>
+ </container>
+ </container>
+</template>
+```
+
+Later on, when you replace the array including an item of the same nickname, it knows it can reuse the existing scope and DOM elements associated with the same nickname.
+
+## Omitted mustache wrapper
+
+Particularly for the `if` and `repeat` attribute, the [mustache](https://mustache.github.io/) wrapper in values could be omitted: just the same as data-binding syntax.
+
+```html
+<template>
+ <container>
+ <text if="shown">Hello</text>
+ <text if="{{shown}}">Hello</text>
+ </container>
+</template>
+
+<script>
+ module.exports = {
+ data: function () {return {shown: true}}
+ }
+</script>
+```
+
+The two `<text>` components are both displayed.
+
+Next is [render logic control](./render-logic.html).
[48/51] [abbrv] incubator-weex-site git commit: update file structure
and fix responsive styles
Posted by ha...@apache.org.
http://git-wip-us.apache.org/repos/asf/incubator-weex-site/blob/12e3a8bc/_draft/v-0.10/references/components/textarea.md
----------------------------------------------------------------------
diff --git a/_draft/v-0.10/references/components/textarea.md b/_draft/v-0.10/references/components/textarea.md
deleted file mode 100644
index 2645385..0000000
--- a/_draft/v-0.10/references/components/textarea.md
+++ /dev/null
@@ -1,81 +0,0 @@
----
-title: <textarea>
-type: references
-order: 2.13
-version: 0.10
----
-
-# <textarea>
-<span class="weex-version">v0.8+</span>
-
-
-### Summary
-
-The weex builtin component `textarea` is used to create interactive controls to accept data from users. It can be a multi-line [input](./input.html).
-
-**Notes:** `<textarea>` support all event which `<input>` had.
-
-### Child Components
-
-This component supports no child components.
-
-### attributes
-
-- `value`: <string> the value of the control.
-- `placeholder`: <string> a hint to the user of which can be entered to the control. The placeholder text must have no carriage returns or line-feeds.
-- `disabled`: <boolean> a boolean attribute indicates that the form control is not available for interaction. In particular, the click event will not be dispatched on disabled controls.
-- `autofocus`: <boolean> a boolean attribute lets you specify that a form control should have input focus when the page loads.
-- `rows:`<number> a number which can specify the height of textarea, default is `2`.
-
-Other attributes please check out the [common attributes](../common-attrs.html).
-
-### Styles
-
-**text styles**: checkout [text styles](../text-style.html)
-
-- support `color` style.
-- support `font-size` style.
-- support `font-style` style.
-- support `font-weight` style.
-- support `text-align` style.
-
-
-**common styles**: check out [common styles for components](../common-style.html)
-
-- support flexbox related styles.
-- support box model related styles.
-- support ``position`` related styles.
-- support ``opacity``, ``background-color`` etc.
-
-### Events
-
-- `input`: the value of an element changes.
-- `change`: the change event is fired when a change to the component's value is commited by the user. It always come after a ``blur`` event.
-- `focus`: a component has received focus.
-- `blur`: a component has lost focus.
-
-**common events**: check out the [common events](../common-event.html)
-
-- support `appear` / `disappear` event. Check out [common events](../common-event.html).
-
-**Notes:** `<textarea>` does not support the common-event `click`. Please listen to the `input` or `change` event instead.
-
-### Parameters of events' object
-
-- for ``input`` and ``change`` events:
- - `value`: the value of the component who dispatched this event.
- - `timestamp`: the time stamp of the event.
-- for ``focus`` and ``blur`` events:
- - `timestamp`: the time stamp of the event.
-
-### Example
-
-```html
-<div>
- <textarea
- autofocus="true"
- placeholder="..."
- value="I am a multiple input">
- </textarea>
-</div>
-```
http://git-wip-us.apache.org/repos/asf/incubator-weex-site/blob/12e3a8bc/_draft/v-0.10/references/components/video.md
----------------------------------------------------------------------
diff --git a/_draft/v-0.10/references/components/video.md b/_draft/v-0.10/references/components/video.md
deleted file mode 100644
index fa4384e..0000000
--- a/_draft/v-0.10/references/components/video.md
+++ /dev/null
@@ -1,75 +0,0 @@
----
-title: <video>
-type: references
-order: 2.14
-version: 0.10
----
-
-# <video>
-<span class="weex-version">v0.6.1+</span>
-
-The video component can be used to embed video content in a weex page.
-
-**example**
-
-```html
-<template>
- <div>
- <text>Big Eater!</text>
- <video onstart='onstart' onpause='onpause' onfinish='onfinish' onfail='onfail'
- auto-play="false" play-status="pause" src="{{src}}" style="width:750;height:500;"></video>
-</div>
-
- </div>
-</template>
-
-<script>
- module.exports ={
- data: {
- src:'http://flv2.bn.netease.com/videolib3/1611/01/XGqSL5981/SD/XGqSL5981-mobile.mp4'
- },
- methods:{
- onstart:function(e){
- console.log('onstart');
- console.log(e);
- },
- onpause:function(e){
- console.log('onpause');
- },
- onfinish:function(e){
- console.log('onfinish');
- },
- onfail:function(e){
- console.log('onfail');
- },
- }
- }
-</script>
-```
-
-[try it](http://dotwe.org/97938570cddf76c792a1a5f9542253b1)
-
-## Child Components
-* text is the only valid type of child component.
-
-## Attributes
-
-* src: <string> The URL of the video to embed.
-* play-status: <boolean> play | pause. Use it to control video's play/pause status. Default value is pause.
-* auto-play: <boolean> true | false. Use it to control whether it is playing when the page initialization finished. Defalut value is false.
-
-Other attributes please check out the [common attributes](../common-attrs.html).
-
-## Styles
-common styles: check out [common styles for components](../common-style.html)
-
-* support flexbox related styles
-* support box model related styles
-* support position related styles
-* support opacity, background-color etc.
-
-## Events
-* onstart: triggered when playback state is Playing.
-* onpause: triggered when playback state is Paused.
-* onfinish: triggered when playback state is Finished.
-* onfail: triggered when playback state is Failed.
http://git-wip-us.apache.org/repos/asf/incubator-weex-site/blob/12e3a8bc/_draft/v-0.10/references/components/web.md
----------------------------------------------------------------------
diff --git a/_draft/v-0.10/references/components/web.md b/_draft/v-0.10/references/components/web.md
deleted file mode 100644
index 89d47c7..0000000
--- a/_draft/v-0.10/references/components/web.md
+++ /dev/null
@@ -1,152 +0,0 @@
----
-title: <web>
-type: references
-order: 2.15
-version: 0.10
----
-
-# <web>
-<span class="weex-version">v0.5+</span>
-
-Use web component to display any web content in the weex page. The `src`attribute is used to specify a special source. You also can use `webview` module to control some web operation such as goBack,goForward and reload. see [webview module](https://alibaba.github.io/weex/doc/modules/webview.html).For example,You can use web component and webview module to assemble a browser.
-
-## Child Components
-
-This component supports no child components.
-
-## Attributes
-
-**src**(string): this attribute specifies the page source to load.
-
-Other attributes please check out the [common attributes](../common-attrs.html).
-
-## Styles
-
-**width**(float): the width of the component, default value is 0. This style must be specified.
-
-**height**(float): the height of the component, default value is 0. This style must be specifed.
-
-
-### common styles
-
-check out the [common styles](../common-attrs.html).
-
-support flexbox related styles
-support box model related styles
-support `position` related styles
-
-## Events
-
-**pagestart**: sent after the web component starts loading a page.
-**pagefinish**: sent after the web component finishes loading a page.
-**error**: sent if the web component failed to load a page.
-
-### common events
-
-support `appear` / `disappear` event.
-
-Check out [common events](../common-event.html)
-
-### Notes
-not support `click` event.
-
-## Example
-
-We use a simple Browser Demo to show how to use web component and webview module. Check out [webview module](../modules/webview.html).
-
-
-```html
-<template>
- <div class="browserStyle">
- <div style="flex-direction: row">
- <input id="urlInput" type="url" autofocus="false" placeholder="..." class="textStyle" value="{{input_text}}" oninput="input">
- </input>
- </div>
- <div style="flex-direction: row">
- <wxc-button value="LoadURL" class="buttonSytle" size="small" onclick="loadURL"></wxc-button>
- <wxc-button value="Backward" class="buttonSytle" size="small" onclick="backforward"></wxc-button>
- <wxc-button value="Forward" class="buttonSytle" size="small" onclick="forward"></wxc-button>
- </div>
- <div>
- <web id="webview" src="{{src}}" class="webStyle"></web>
- </div>
- </div>
-</template>
-
-<style>
-
- .browserStyle
- {
- width:600;
- height: 825;
- background-color:#778899 ;
- }
-
- .textStyle
- {
- width:600;
- height: 50;
- background-color: #D3D3D3;
- }
-
- .buttonSytle
- {
- width:180;
- height: 50;
- font-size: 12;
- background-color: #D3D3D3;
- margin:10;
- padding-left: 5;
- padding-right: 5;
- }
-
- .webStyle
- {
- width:600;
- height: 700;
- background-color: #8B0000;
- }
-
-</style>
-
-<script>
-
- var web_module = require('@weex-module/webview');
-
- module.exports = {
- data: {
- src : "https://h5.m.taobao.com",
- input_text:"https://www.tmall.com"
- },
-
- methods: {
-
- loadURL: function (e) {
- var web_element = this.$el('webview');
- var input = this.$el("urlInput");
- this.src = this.input_text;
- web_module.reload(web_element);
- },
-
- backforward: function (e) {
- var web_element = this.$el('webview');
- web_module.goBack(web_element);
- this.input_text = web_element.attr.src;
- },
-
- forward: function (e) {
- var web_element = this.$el('webview');
- web_module.goForward(web_element);
- this.input_text = web_element.attr.src;
- },
- input:function (e) {
- var input = this.$el("urlInput");
- this.input_text = input.attr.value;
- }
-
- }
- }
-</script>
-```
-
-[Try it](http://dotwe.org/103d472645206cc1564f49717585abb4)
http://git-wip-us.apache.org/repos/asf/incubator-weex-site/blob/12e3a8bc/_draft/v-0.10/references/components/wxc-navpage.md
----------------------------------------------------------------------
diff --git a/_draft/v-0.10/references/components/wxc-navpage.md b/_draft/v-0.10/references/components/wxc-navpage.md
deleted file mode 100644
index 0ae7eba..0000000
--- a/_draft/v-0.10/references/components/wxc-navpage.md
+++ /dev/null
@@ -1,74 +0,0 @@
----
-title: <wxc-navpage>
-type: references
-order: 2.16
-version: 0.10
----
-
-# <wxc-navpage>
-
-### Summary
-
-The "wxc-navpage" tag implements a specialized component that contains a navbar at the top of the window and an embed content page. You can customize the navbar as you like. In addition, you can use `navigator` module to control the page jump, see [navigator module](../modules/navigator.html).
-
-### Child Components
-
-This type of component supports all kinds of weex component as its child components.
-
-### Attributes
-
-- `height`: <length> The height of the navbar. Default value is 88.
-- `background-color`: <color>The backgroudColor of the navbar. Default value is `white`.
-- `title`: <string> The title of the navbar.
-- `title-color`: <color>The color of the navbar title. Default value is `black`.
-- `left-item-title`: <string> The title of the leftItem.
-- `left-item-color`: <color> The color of the leftItem title. Default value is `black`.
-- `right-item-title`: <string> The title of the rightItem.
-- `right-item-color`: <color> The color of the rightItem title. Default value is `black`.
-- `left-item-src`: <string> The imageURL of the leftItem you want to set.
-- `right-item-src`: <string> The imageURL of the rightItem you want to set.
-
-Other attributes please check out the [common attributes](../references/common-attrs.html).
-
-### Styles
-
-**common styles**: check out the [common styles](../references/common-attrs.html)
-
-- support flexbox related styles
-- support box model related styles
-- support ``position`` related styles
-- support ``opacity``, ``background-color`` etc.
-
-### Events
-
-- `naviBar.leftItem.click`: triggered when the leftItem of navbar is clicked. You need to register the observer in ready or create block.
-- `naviBar.rightItem.click`: triggered when the rightItem of navbar is clicked. You need to register the observer in ready or create block.
-
-**common events**: check out the [common events](../references/common-event.html)
-
-- support `click` event. Check out [common events](../references/common-event.html)
-- support `appear` / `disappear` event. Check out [common events](../references/common-event.html)
-
-### Example
-
-```html
-<template>
- <wxc-navpage height={{...}} background-color="..." title="..." title-color="..." left-item-title="..." left-item-color="..." right-item-src="...">
- <content> ...</content>
- </wxc-navpage>
-</template>
-<script>
- require('weex-components');
- module.exports = {
- created: function() {
- this.$on('naviBar.rightItem.click',function(e){
- //handle your click event here.
- });
-
- this.$on('naviBar.leftItem.click',function(e){
- //handle your click event here.
- });
- }
- }
-</script>
-```
http://git-wip-us.apache.org/repos/asf/incubator-weex-site/blob/12e3a8bc/_draft/v-0.10/references/components/wxc-tabbar.md
----------------------------------------------------------------------
diff --git a/_draft/v-0.10/references/components/wxc-tabbar.md b/_draft/v-0.10/references/components/wxc-tabbar.md
deleted file mode 100644
index 944b06d..0000000
--- a/_draft/v-0.10/references/components/wxc-tabbar.md
+++ /dev/null
@@ -1,94 +0,0 @@
----
-title: <wxc-tabbar>
-type: references
-order: 2.17
-version: 0.10
----
-
-# <wxc-tabbar>
-
-The `wxc-tabbar` is a custom component, which belongs to the `weex-components` node package, implements a specialized component that corresponds to the radio-style selection. It displays tabs at the bottom of the window for switching between different tab pages.
-
-Usage: You can use this component by a `require` statement, `require('weex-components');`, in the script tag. e.g.
-
-```html
-<template>
- <div style="flex-direction: column;">
- <wxc-tabbar tab-items = {{tabItems}}></wxc-tabbar>
- </div>
-</template>
-
-<script>
- require('weex-components');
- // Other javascript statements.
-</script>
-```
-
-Before requiring `weex-components'`, you need to specify `weex-components` dependency in your project's package.json file. e.g.
-
-```json
-"dependencies": {
- "weex-components": "^0.2.0"
-}
-```
-
-## Child Components
-
-`wxc-tabbar` has no child components.
-
-
-## Attributes
-
-* `selected-index` : <number> default value is 0
-* `selected-color`: <color> The color of the title when it is selected. Default is red color.
-* `unselected-color`: <color> The color of the title when it is unselected. Default is black color.
-* `tab-items` This attribute accepts an array of `tabitem` objects, each of which corresponds to the tab pages. And the order of the items equals to the order of the tab pages onscreen. You can configure the appearance of tabbar by setting the tabitem object's properties. Each tabitem properties are listed as below:
- * `index`: <integer> This attribute is required, and it specifies the order of the item.
- * `title`: <string> The item’s title. and it is optional. The tile will not be displayed if empty or not provided.
- * `titleColor`: <color>The item’s titleColor. Default is black color.
- * `image`: <string>The icon displayed when the tabitem is unselected. The image will not be displayed if empty or not provided.
- * `selectedImage` : <string>The icon displayed when the tabitem is selected. The icon will not be displayed if empty or not provided.
- * `src` : <string> The weex page for the tab page.
- * `visibility`: <string>visible | hidden. This attribute specifies display status of the tab page. Default value is visible.
-
-Other attributes please check out the [common attributes](../common-attrs.html).
-
-## Styles
-common styles: check out [common styles](../common-style.html) for components
-
-* support flexbox related styles
-* support box model related styles
-* support position related styles
-* support opacity, background-color etc.
-
-## Events
-* `tabBar.onClick`: triggered when the tabitem is selected. You need to register the observer in ready or create block.
-e.g.
-
-
-```html
-<template>
- <div style="flex-direction: column;">
- <wxc-tabbar tab-items = {{tabItems}}></wxc-tabbar>
- </div>
-</template>
-
-<script>
- require('weex-components');
- module.exports = {
- data: {
- },
- methods: {
- ready: function (e) {
- var vm = this;
- vm.$on('tabBar.onClick',function(e){
- var index = e.detail.index;
- });
- },
- }
- }
-</script>
-```
-
-## Example
-You should checkout the playground's `tabbar` example.
http://git-wip-us.apache.org/repos/asf/incubator-weex-site/blob/12e3a8bc/_draft/v-0.10/references/gesture.md
----------------------------------------------------------------------
diff --git a/_draft/v-0.10/references/gesture.md b/_draft/v-0.10/references/gesture.md
deleted file mode 100644
index fc41fd4..0000000
--- a/_draft/v-0.10/references/gesture.md
+++ /dev/null
@@ -1,74 +0,0 @@
----
-title: Gesture
-type: references
-order: 1.4
-version: 0.10
----
-
-# Gesture
-
-> Experiment Feature
-
-Weex encapsulates native touch events to provide a gesture system. Using gesture is similar to use event in Weex. Just set `on` attributes on a node to listen to gesture.
-
-## Type
-For now, there are four types of gestures:
-
-* **Touch**. Touch gesture is fired when a touch point is placed, moved or removed from the touch surface. Touch gesture is accuracy as it will report every trivial event. As a result, listening to touch gesture may be slow, a great deal of events needs to be processed even a small move happened. There are three types of Touch gesture:
- * `touchstart` will be fired when a touch point is placed on the touch surface.
- * `touchmove` will be fired when a touch point is moved along the touch surface.
- * `touchend` will be fired when a touch point is removed from the touch surface.
-* **Pan**. Pan gesture also report motion of touch point on the touch surface, which is similar to touch gesture. But Pan gesture is sampled and faster than the touch event. As consequence, it is less accuracy than touch gesture. There are also three types of Pan gesture, and the meaning of these types is very close to types of Touch.
- * `panstart`
- * `panmove`
- * `panend`
-* **Swipe**. Swipe is fired when user swipe a touch point on the screen. A serial of motion will only trigger one Swipe gesture.
-* **LongPress**. Swipe is fired when a touch point is held for 500 ms or more.
-
-The Touch gesture and Pan is very close to each other, with following features hold:
-
-* **Touch**. Not sampled, accuracy, but slow.
-* **Pan**. Sampled, fast, less accuracy.
-
-Users may choose their gesture according to their situation.
-
-## Properties
-The following properties can be used in gesture callback:
-
-* `direction`. Only exists for **Swipe** gesture. Indicate the direcion of the swipe, choose from `up`, `left`, `bottom`, `right`.
-* `changedTouches`. An array of motion for every touch pointer that has contribute to the current gesture.
-
-### changedTouches
-
-`changedTouches` is an array, with the following properties in its children:
-
-* `identifier`. A unique identifier for a touch pointer.
-* `pageX`. The X coordinate of the touch pointer relative to the left edge of the document.
-* `pageY`. The Y coordinate of the touch pointer relative to the top of the document.
-* `screenX`. The X coordinate of the touch point relative to the left edge of the screen.
-* `screenY`. The Y coordinate of the touch point relative to the top edge of the screen.
-
-## Constrain
-Currently, Weex Android do not support listening to gesture on `scroller`, `list` and `webview`, as it would lead a large amount of event conflicting.
-
-## How to use
-
-Example:
-
-```html
-<template>
- <div ontouchstart="handleTouchstart"></div>
-</template>
-
-<script>
-module.exports = {
- methods: {
- handleTouchstart: function(eventProperties) {
- // handling with the Event Properties
- }
- }
-}
-</script>
-```
-
-With the code above, a `touchstart` event will be fired when a touch point is placed on the touch surface.
http://git-wip-us.apache.org/repos/asf/incubator-weex-site/blob/12e3a8bc/_draft/v-0.10/references/images/css-boxmodel.png
----------------------------------------------------------------------
diff --git a/_draft/v-0.10/references/images/css-boxmodel.png b/_draft/v-0.10/references/images/css-boxmodel.png
deleted file mode 100644
index a2063e2..0000000
Binary files a/_draft/v-0.10/references/images/css-boxmodel.png and /dev/null differ
http://git-wip-us.apache.org/repos/asf/incubator-weex-site/blob/12e3a8bc/_draft/v-0.10/references/images/css-flexbox-align.jpg
----------------------------------------------------------------------
diff --git a/_draft/v-0.10/references/images/css-flexbox-align.jpg b/_draft/v-0.10/references/images/css-flexbox-align.jpg
deleted file mode 100644
index 8a7f731..0000000
Binary files a/_draft/v-0.10/references/images/css-flexbox-align.jpg and /dev/null differ
http://git-wip-us.apache.org/repos/asf/incubator-weex-site/blob/12e3a8bc/_draft/v-0.10/references/images/css-flexbox-justify.svg
----------------------------------------------------------------------
diff --git a/_draft/v-0.10/references/images/css-flexbox-justify.svg b/_draft/v-0.10/references/images/css-flexbox-justify.svg
deleted file mode 100644
index 33e742b..0000000
--- a/_draft/v-0.10/references/images/css-flexbox-justify.svg
+++ /dev/null
@@ -1,59 +0,0 @@
-<svg xmlns="http://www.w3.org/2000/svg" width='504' height='270' viewBox="0 0 504 270">
- <defs>
- <pattern id='checker' width='20' height='20' patternUnits='userSpaceOnUse'>
- <rect x='0' y='0' width='10' height='10' fill='#eee' />
- <rect x='10' y='10' width='10' height='10' fill='#eee' />
- <rect x='0' y='10' width='10' height='10' fill='#ccc' />
- <rect x='10' y='0' width='10' height='10' fill='#ccc' />
- </pattern>
- </defs>
- <style>
- text { font-family: sans-serif; font-weight: bold; font-size: 30px; text-anchor: middle; }
- rect { stroke-width: 2px; stroke: #888; }
- g > rect:nth-child(1) { fill: #888 }
- g > rect:nth-child(2) { fill: #fcc; }
- g > rect:nth-child(3) { fill: #cfc; }
- g > rect:nth-child(4) { fill: #ccf; }
- g > rect:nth-child(5) { fill: transparent; }
- </style>
- <g transform="translate(2,2)">
- <rect x='0' y='0' width='500' height='50' />
- <rect x='0' y='0' width='100' height='50' />
- <rect x='100' y='0' width='80' height='50' />
- <rect x='180' y='0' width='200' height='50' />
- <rect x='0' y='0' width='500' height='50' />
- <text x='250' y='38'>flex-start</text>
- </g>
- <g transform="translate(2,56)">
- <rect x='0' y='0' width='500' height='50' />
- <rect x='120' y='0' width='100' height='50' />
- <rect x='220' y='0' width='80' height='50' />
- <rect x='300' y='0' width='200' height='50' />
- <rect x='0' y='0' width='500' height='50' />
- <text x='250' y='38'>flex-end</text>
- </g>
- <g transform="translate(2,110)">
- <rect x='0' y='0' width='500' height='50' />
- <rect x='60' y='0' width='100' height='50' />
- <rect x='160' y='0' width='80' height='50' />
- <rect x='240' y='0' width='200' height='50' />
- <rect x='0' y='0' width='500' height='50' />
- <text x='250' y='38'>center</text>
- </g>
- <g transform="translate(2,164)">
- <rect x='0' y='0' width='500' height='50' />
- <rect x='0' y='0' width='100' height='50' />
- <rect x='160' y='0' width='80' height='50' />
- <rect x='300' y='0' width='200' height='50' />
- <rect x='0' y='0' width='500' height='50' />
- <text x='250' y='38'>space-between</text>
- </g>
- <g transform="translate(2,218)">
- <rect x='0' y='0' width='500' height='50' />
- <rect x='20' y='0' width='100' height='50' />
- <rect x='160' y='0' width='80' height='50' />
- <rect x='280' y='0' width='200' height='50' />
- <rect x='0' y='0' width='500' height='50' />
- <text x='250' y='38'>space-around</text>
- </g>
-</svg>
\ No newline at end of file
http://git-wip-us.apache.org/repos/asf/incubator-weex-site/blob/12e3a8bc/_draft/v-0.10/references/images/css-flexbox-sample.png
----------------------------------------------------------------------
diff --git a/_draft/v-0.10/references/images/css-flexbox-sample.png b/_draft/v-0.10/references/images/css-flexbox-sample.png
deleted file mode 100644
index 0f1236d..0000000
Binary files a/_draft/v-0.10/references/images/css-flexbox-sample.png and /dev/null differ
http://git-wip-us.apache.org/repos/asf/incubator-weex-site/blob/12e3a8bc/_draft/v-0.10/references/images/nav.png
----------------------------------------------------------------------
diff --git a/_draft/v-0.10/references/images/nav.png b/_draft/v-0.10/references/images/nav.png
deleted file mode 100644
index 7081ca7..0000000
Binary files a/_draft/v-0.10/references/images/nav.png and /dev/null differ
http://git-wip-us.apache.org/repos/asf/incubator-weex-site/blob/12e3a8bc/_draft/v-0.10/references/index.md
----------------------------------------------------------------------
diff --git a/_draft/v-0.10/references/index.md b/_draft/v-0.10/references/index.md
deleted file mode 100644
index d59d654..0000000
--- a/_draft/v-0.10/references/index.md
+++ /dev/null
@@ -1,49 +0,0 @@
----
-title: Bootstrap
-type: references
-order: 1
-has_chapter_content: false
-chapter_title: Common Options
-version: 0.10
----
-
-# Bootstrap
-
-Besides its default meaning, `<script>` tag supports two more configuration with its `type` property *in the top level component of a page*.
-
-* `type="data"`: For initial data configuration, the data defined here will overwrite the data definition in the `<script>`.
-* `type="config"`: For configuration definition.
-
-```html
-<script type="data">
- /* (optional) the definition of initial data */
-</script>
-
-<script type="config">
- /* (optional) the definition of configuration */
-</script>
-```
-
-## Initial data definition
-
-Sometimes, it is hard to maintain huge data structure in the default `<script>` tag. So Weex allows us to have a `<script type="data">` tag to define initial data. The data defined in here will totally replace the data defined in the default `<script>` tag.
-
-here is an example:
-
-```html
-<script type="data">
-{
- title: 'Alibaba',
- date: new Date().toLocaleString()
-}
-</script>
-```
-
-## script configuration
-
-Weex also allows us to do some configuration with a `<script type="config">`, So far, we only support the `downgrade` configs.
-
-- `downgrade.osVersion`
-- `downgrade.appVersion`
-- `downgrade.weexVersion`
-- `downgrade.deviceModel`
http://git-wip-us.apache.org/repos/asf/incubator-weex-site/blob/12e3a8bc/_draft/v-0.10/references/modules/animation.md
----------------------------------------------------------------------
diff --git a/_draft/v-0.10/references/modules/animation.md b/_draft/v-0.10/references/modules/animation.md
deleted file mode 100644
index 4b46564..0000000
--- a/_draft/v-0.10/references/modules/animation.md
+++ /dev/null
@@ -1,63 +0,0 @@
----
-title: animation
-type: references
-order: 3.1
-version: 0.10
----
-
-# animation
-
-Smooth and meaningful animation is very effective for enhancing the user experience of mobile application, you can use the `animation` module to perform animation on components. A animation can perform a series of simple transformations (position, size, rotation, background color, and opacity) on the component. So, if you have a `image` component, you can move, rotate, grow, or shrink it.
-
-## API
-### transition(node, options, callback)
-
-[example](http://dotwe.org/5be74019d5e510fa95c5dedec24f7ce5)
-
-#### Arguments
-##### node
-
-**type:** node
-
-**position:** An element that will be animated, normally you can get this by calling `this.$el(id)`.
-
-##### options
-
-**type:** object
-
-**position:** Transition options.
-- `duration` (number): Specifies the number of milliseconds of animation execution, the default value is `0`, means that no animation will occur.
-- `delay` (number): Specifies the amount of milliseconds to wait between a change being requested to a property that is to be transitioned and the start of the transition effect. The default value is `0`.
-- `timingFunction` (string): Used to describe how the intermediate values of the styles being affected by a transition effect are calculated, default value is `linear`, the allowed attributes are listed in the following table:
-
-|name|description|example|
-|:--|:--|:--|
-|`linear`|Specifies a transition effect with the same speed from start to end|[example](http://dotwe.org/d71491ded2bede32df3e8b44b53d5e4f)|
-|`ease-in`|Specifies a transition effect with a slow start|[example](http://dotwe.org/23b104f833039f263957481f2e2c40c9)|
-|`ease-out`|Specifies a transition effect with a slow end|[example](http://dotwe.org/04dab95e073a2c3a808e6b01fc20e996)|
-|`ease-in-out`|Specifies a transition effect with a slow start and end|[example](http://dotwe.org/fc37ec17d215e786ce336a00457489e3)|
-|`cubic-bezier(x1, y1, x2, y2)`|Define your own values in the cubic-bezier function. Possible values are parameter values from 0 to 1. More information about cubic-bezier please visit [cubic-bezier](http://cubic-bezier.com/) and [Bézier curve](https://en.wikipedia.org/wiki/B%C3%A9zier_curve).|[example](http://dotwe.org/95d8f15d0014c31d3a1d15728313f2a5)|
-
-- `styles` (object): Specify the names and values of styles to which a transition effect should be applied. The allowed attributes are listed in the following table:
-
-| name | description | value type | default value |example|
-| :--- | :--- | :--- | :--- |:---|
-|width|The width applied to the component after the animation finished.|length|none|[example](http://dotwe.org/b599d273f996cfdcbeca7bd5c828ca90)|
-|height|The height applied to the component after the animation finished.|length|none|[example](http://dotwe.org/d0b1ccadf386ba00960d0c8340c682e5)|
-|backgroundColor|The background color applied to the component after the animation finished.|string|none|[example](http://dotwe.org/f4616ee18f6042b63a8fdcd2816b1712)|
-|opacity|The opacity applied to the component after the animation finished.|number between 0 to 1|`1`|[example](http://dotwe.org/f94394173301db83ae6e66d1330a0d0b)|
-|transformOrigin|The povit of transition. The possible values for `x-aris` are `left`/`center`/`right`/length or percent, and possible values of `y-axis` are `top`/`center`/`bottom`/ length or percent|`x-axis y-axis`|`center center`|[example](http://dotwe.org/de43f5a47de230dd531797458bf7fd3c)|
-|transform|Transform function to be applied to the element. The properties in the following table are supported|object|none|[example](http://dotwe.org/cfc0388441f5a53a73335885006c13e7)|
-
-properties of `transform`:
-
-| name | description | value type | default value |example|
-| :--- | :--- | :--- | :--- |:---|
-|translate/translateX/translateY|Specifies the location of which the element will be translated.|pixel or percent|none|[example](http://dotwe.org/6638e66e296723bbef3e59c83b2b5003)|
-|rotate|Specifies the angle of which the element will be rotated, the unit is degree.|number|none|[example](http://dotwe.org/ba9e9920594d9388744b2bd0d1b7695d)|
-|scale/scaleX/scaleY|Stretch or shrink the element.|number|none|[example](http://dotwe.org/14b42dde6583ab222bd2b7ed08f241c8)|
-
-#### callback
-**type:** function
-
-**position:** Callback which is called after the completion of transition.
\ No newline at end of file
http://git-wip-us.apache.org/repos/asf/incubator-weex-site/blob/12e3a8bc/_draft/v-0.10/references/modules/clipboard.md
----------------------------------------------------------------------
diff --git a/_draft/v-0.10/references/modules/clipboard.md b/_draft/v-0.10/references/modules/clipboard.md
deleted file mode 100644
index d0f45e7..0000000
--- a/_draft/v-0.10/references/modules/clipboard.md
+++ /dev/null
@@ -1,53 +0,0 @@
----
-title: clipboard
-type: references
-order: 3.2
-version: 0.10
----
-
-# clipboard
-<span class="weex-version">v0.8+ (developing)</span>
-
-clipboard allows you to `getString()` or `setString()` from the system clipboard.
-
-Not long ago, We're still suffering from such a situation that we got a verification code sent by SMS, and we had no way to get the code from the SMS text but to typed it by our hands. How frustrated it is! But now you can enable your app to get the code from the system clipboard by calling `clipboard.getString()` .
-
-## Caution
-
-* only support text.
-* only works on Android and iOS. NOT works for html5, for web security reason.
-
-## API
-
-### getString(callback)
-
-reads from clipboard.
-
-##### Arguments
-
-`callback(function)`: the callback function after executing this action. `data` is the return value.
-
-Example
-
-```js
-var clipboard = require('@weex-module/clipboard');
-clipboard.getString(function(ret) {
- // callback. 'ret' is an object that contains 'result' and 'data'.
- // use 'ret.data' to fetch the value.
- console.log("read from clipboard is " + ret.data);
-});
-
-```
-### setString(text)
-
-sets the text to clipboard, having the same effect as copying manually.
-
-##### Arguments
-
-`text(string)`: the text copied to clipboard.
-Example
-
-```js
-var clipboard = require('@weex-module/clipboard');
-clipboard.setString("SomeStringHere");
-```
http://git-wip-us.apache.org/repos/asf/incubator-weex-site/blob/12e3a8bc/_draft/v-0.10/references/modules/dom.md
----------------------------------------------------------------------
diff --git a/_draft/v-0.10/references/modules/dom.md b/_draft/v-0.10/references/modules/dom.md
deleted file mode 100644
index 948abf0..0000000
--- a/_draft/v-0.10/references/modules/dom.md
+++ /dev/null
@@ -1,114 +0,0 @@
----
-title: dom
-type: references
-order: 3.3
-version: 0.10
----
-
-# dom
-
-## Summary
-
-A series of dom apis that sending virtual-dom's messages to the native renderer to update the dom tree. The only API for developers to use in a `.we` file is `scrollToElement` <del>which you can use by calling the `$scrollTo` method</del>. Other APIs mentioned on this page should only be used through the native renderer in the `callNative` process.
-
-## API
-
-### scrollToElement(node, options)
-
-Scroll the page to the specified node. This API should only be used on the element in the `scroller` or `list` component.
-
-<del>This API can be used by calling the VM's method `$scrollTo` **(deprecated)**.</del> You can use `require('@weex-module/dom').scrollToElement` to call this API in your `.we` file.
-
-#### Arguments
-
-* `node`*(Node)*: an element that scrolled into the view.
-* `options`*(object)*: some options.
- * `offset`*(number)*: An offset to the visible position, default is `0`.
-
-#### Example
-
-```javascript
-var dom = require('@weex-module/dom');
-dom.scrollToElement(this.$el('someId'), {offset: 10});
-```
-
-### createBody(element)
-
-Create the body for the whole dom tree. Element type should only be the ones that can be used as roots (`div`, `scroller` and `list`).
-
-#### Arguments
-
-* `element`*(object)*: a object that specified the body node info like ref, type, children, etc.
-
-### addElement(parentNode, element, index)
-
-Add a element into the dom tree.
-
-#### Arguments
-
-* `parentNode`*(Node)*: specify the element's parent node.
-* `element`*(object)*: a object that specified the config info for the node to be added.
-* `index`*(number)*: insert the element to the specified position.
-
-### removeElement(node)
-
-Remove a node in the dom tree.
-
-#### Arguments
-
-* `node`*(Node)*: the node to be removed.
-
-### moveElement(node, parentNode, index)
-
-Move a exsited node into another parent (or the same parent) before the specified position.
-
-#### Arguments
-
-* `node`*(Node)*: the node to be moved.
-* `parentNode`*(Node)*: the parent node to move into.
-* `index`*(number)*:: according to the specified position index, will the node be inserted into.
-
-### addEvent(node, type)
-
-Inform the renderer that there are listeners for a specified event type.
-
-#### Arguments
-
-* `node`*(Node)*: the node to be listened on.
-* `type`*(string)*: which type of events the node should be listened for.
-
-### removeEvent(node, type)
-
-Remove event listeners on the specified node for the specified event type.
-
-#### Arguments
-
-* `node`*(Node)*: on which node should the listeners to be removed
-* `type`*(string)*: specify the event type.
-
-### updateAttrs(node, attr)
-
-Update attrbutes of the specified node.
-
-#### Arguments
-
-* `node`*(Node)*: the node to be updated.
-* `attr`*(object)*: the attributes object with the attribute items to be updated.
-
-### updateStyle(node, style)
-
-Update styles of the specified node.
-
-#### Arguments
-
-* `node`*(Node)*: the node to be updated.
-* `style`*(object)*: the style object with the style rules to be updated.
-
-### createFinish()
-
-Notify native renders that the series of messages for updating the native dom tree have reached a end.
-
-### refreshFinish()
-
-Notify native renders that the series of messages for refreshing a native dom tree have reached a end.
-
http://git-wip-us.apache.org/repos/asf/incubator-weex-site/blob/12e3a8bc/_draft/v-0.10/references/modules/globalevent.md
----------------------------------------------------------------------
diff --git a/_draft/v-0.10/references/modules/globalevent.md b/_draft/v-0.10/references/modules/globalevent.md
deleted file mode 100644
index 0db8c48..0000000
--- a/_draft/v-0.10/references/modules/globalevent.md
+++ /dev/null
@@ -1,89 +0,0 @@
----
-title: globalEvent
-type: references
-order: 3.10
-version: 0.10
----
-
-# globalEvent
-<span class="weex-version">v0.8+ (developing)</span>
-
-## Summary
-
-`globalEvent` are used to listen for persistent events, such as changes in positioning information, gyroscopes, and so on. A global event is a secondary API that requires additional APIs to work with.
-
-You can register events via `addEventListener`, which can be removed by `removeEventListener` when you do not need to listen for `globalEvent`.
-
-*AUCTION*
-- Only instance level is not application level .
-
-## How to make your Module support global events
-API development is complete, when the event needs to be sent, the need through the following methods:
-
-```javascript
-/**
- *
- * @param eventName eventName
- * @param params event params
- */
-instance.fireGlobalEventCallback(eventName,params);
-```
-
-How to dispatch a global event in a weex-html5 component or module ? Just dispatch the event on the document element:
-
-```javascript
-var evt = new Event('some-type')
-evt.data = { foo: 'bar' }
-document.dispatchEvent(evt)
-```
-
-### Example
-
-#### Android
-
-```java
-Map<String,Object> params=new HashMap<>();
-params.put("key","value");
-mWXSDKInstance.fireGlobalEventCallback("geolocation",params);
-```
-#### iOS
-
-```Objective-C
-[weexInstance fireGlobalEvent:@"geolocation" params:@{@"key":@"value"}];
-```
-
-## API
-
-### addEventListener(String eventName, String callback)
-
-register global event.
-
-#### Arguments
-
-* `eventName`*(string)*: The name of the event you want to listen to.
-* `callback`*(function)*: the callback function after executing this action.
-
-#### Example
-
-```javascript
-var globalEvent = require('@weex-module/globalEvent');
-globalEvent.addEventListener("geolocation", function (e) {
- console.log("get geolocation")
- });
-```
-
-### removeEventListener(String eventName)
-
-remove global event
-
-#### Arguments
-
-* `eventName`*(string)*: You no longer need to listen for event names.
-
-#### Example
-
-```javascript
-var globalEvent = require('@weex-module/globalEvent');
-globalEvent.removeEventListener("geolocation");
-```
-
http://git-wip-us.apache.org/repos/asf/incubator-weex-site/blob/12e3a8bc/_draft/v-0.10/references/modules/index.md
----------------------------------------------------------------------
diff --git a/_draft/v-0.10/references/modules/index.md b/_draft/v-0.10/references/modules/index.md
deleted file mode 100644
index 2a094ca..0000000
--- a/_draft/v-0.10/references/modules/index.md
+++ /dev/null
@@ -1,28 +0,0 @@
----
-title: Built-in Modules
-type: references
-order: 3
-has_chapter_content: true
-version: 0.10
----
-
-# Built-in Modules
-
-## How to use
-
-You can use a simply way like `require('@weex-module/name')` to access the apis of module. e.g.
-
-```html
-<script>
-var dom = require('@weex-module/dom')
-
-module.exports = {
- data: {},
- created: function () {
- dom.scrollToElement(this.$el('someIdForElement'), {
- offset: 0
- })
- }
-}
-</script>
-```
\ No newline at end of file
http://git-wip-us.apache.org/repos/asf/incubator-weex-site/blob/12e3a8bc/_draft/v-0.10/references/modules/modal.md
----------------------------------------------------------------------
diff --git a/_draft/v-0.10/references/modules/modal.md b/_draft/v-0.10/references/modules/modal.md
deleted file mode 100644
index 2ebad15..0000000
--- a/_draft/v-0.10/references/modules/modal.md
+++ /dev/null
@@ -1,192 +0,0 @@
----
-title: modal
-type: references
-order: 3.4
-version: 0.10
----
-
-# modal
-
-Weex provides a series of message boxes: `toast`, `alert`, `confirm` and `prompt`.
-
-## API
-### toast(options)
-
-A toast provides simple feedback about an operation in a small popup. For example, navigating away from an email before you send it triggers a "Draft saved" toast to let you know that you can continue editing later. Toasts automatically disappear after a timeout.
-
-#### Arguments
-- `options` (object): toast options.
- - `message` (string): the text message that the toast shows.
- - `duration` (number): the duration(seconds) that the toast shows.
-
-**Example:**
-
-```html
-<template>
- <div style="height: 200px; width: 400px; background-color: #00bfff;
- justify-content: center; align-items: center" onclick="{{perform}}">
- <text style="font-size: 60px; color: #ffffff">Toast</text>
- </div>
-</template>
-
-<script>
- module.exports = {
- methods: {
- perform: function () {
- var modal = require('@weex-module/modal');
- modal.toast({
- 'message': 'I am a toast',
- 'duration': 3
- });
- }
- }
- }
-</script>
-```
-### alert(options, callback)
-
-An alert box is often used if you want to make sure information comes through to the user.
-When an alert box pops up, the user will have to click "OK" to proceed.
-
-#### Arguments
-
-- `options` (object): alert box options.
- - `message` (string): the text message that the alert shows.
- - `okTitle` (string): the text of positive button, default is 'OK'.
- - `callback` (function): callback when complete.
- This method has a callback function whose arguments will be:
-- `result` (string): the title text of the confirm button that clicked by user.
-
-**Example:**
-
-```html
-<template>
- <div>
- <div style="height: 200px; width: 400px; background-color: #00bfff;
- justify-content: center; align-items: center" onclick="{{perform}}">
- <text style="font-size: 60px; color: #ffffff">Alert</text>
- </div>
- <text>{{params}}</text>
- </div>
-</template>
-
-<script>
- module.exports = {
- data: {
- params: ''
- },
- methods: {
- perform: function () {
- var modal = require('@weex-module/modal');
- var self = this;
- modal.alert({
- 'message': 'I am alert message',
- 'okTitle' : 'YES'
- }, function (result) {
- self.params = String(result)
- });
- }
- }
- }
-</script>
-```
-
-### confirm(options, callback)
-A confirm box is often used if you want the user to verify or accept something.
-
-When a confirm box pops up, the user will have to click either confirm or cancel button to proceed.
-
-#### Arguments
-- `options` (object): confirm box options.
- - `message` (string): the message that the confirm shows.
- - `okTitle` (string): the title of confirm button, default is 'OK'.
- - `cancelTitle` (string): the title of cancel button, default is 'Cancel'.
-- `callback` (function): callback when complete.
-
-This method has a callback function whose arguments will be:
-- `result`(string): the title text of the button that clicked by user.
-**Example:**
-
-```html
-<template>
- <div>
- <div style="height: 200px; width: 400px; background-color: #00bfff;
- justify-content: center; align-items: center" onclick="{{perform}}">
- <text style="font-size: 60px; color: #ffffff">Confirm</text>
- </div>
- <text>{{params}}</text>
- </div>
-</template>
-
-<script>
- module.exports = {
- data: {
- params: ''
- },
- methods: {
- perform: function () {
- var modal = require('@weex-module/modal');
- var self = this;
- modal.confirm({
- 'message': 'I have read and accept the terms.',
- 'okTitle' : 'YES',
- 'cancelTitle' : 'NO'
- }, function (e) {
- self.params = String(e)
- });
- }
- }
- }
-</script>
-```
-
-### prompt(options, callback)
-
-A prompt box is often used if you want the user to input a value before entering a page.
-When a prompt box pops up, the user will have to click either confirm or cancel button to proceed after entering an input value.
-
-#### Arguments
-- `options` (object): some options.
- - `message` (string): the message that the prompt shows.
- - `okTitle` (string): the title text of confirm button, default is 'OK'.
- - `cancelTitle` (string): the title text of cancel button, default is 'Cancel'.
-- `callback` (function): callback when complete.
- This method has a callback function whose arguments will be:
-- `ret` (object): the argument will be a object, which has attributes `result` and `data`, like `{ result: 'OK', data: 'hello world' }`
- - `result` (string): the title of the button that clicked by user.
- - `data` (string): the value of the text that entered by user.
-
-**Example:**
-
-```html
-<template>
- <div>
- <div style="height: 200px; width: 400px; background-color: #00bfff;
- justify-content: center; align-items: center" onclick="{{perform}}">
- <text style="font-size: 60px; color: #ffffff">Prompt</text>
- </div>
- <text>{{params}}</text>
- </div>
-</template>
-
-<script>
- module.exports = {
- data: {
- params: ''
- },
- methods: {
- perform: function () {
- var modal = require('@weex-module/modal');
- var self = this;
- modal.prompt({
- 'message': 'I am a prompt',
- 'okTitle' : 'YES',
- 'cancelTitle' : 'NO'
- }, function (e) {
- self.params = JSON.stringify(e)
- });
- }
- }
- }
-</script>
-```
\ No newline at end of file
http://git-wip-us.apache.org/repos/asf/incubator-weex-site/blob/12e3a8bc/_draft/v-0.10/references/modules/navigator.md
----------------------------------------------------------------------
diff --git a/_draft/v-0.10/references/modules/navigator.md b/_draft/v-0.10/references/modules/navigator.md
deleted file mode 100644
index fe4442c..0000000
--- a/_draft/v-0.10/references/modules/navigator.md
+++ /dev/null
@@ -1,198 +0,0 @@
----
-title: navigator
-type: references
-order: 3.5
-version: 0.10
----
-
-# Navigator
-<span class="weex-version">v0.6.1+</span>
-
-As it's known to all that, we can navigate back and forth in the web browser using the navigation bar.
-And The navigator module mimics the same behaviors in the iOS/Android application. Without such an ability, We will have to stay in the same page forever, so it is very important. Besides the navigation, the module can let us to specify whether to apply animation or not during the transition.
-
-**example**
-
-```html
-<template>
- <div class="div">
- <text class="text" onclick="onItemClick">click me! {{message}}</text>
- </div>
-</template>
-
-<script>
- module.exports ={
- data:{
- message:""
- },
- methods:{
- onItemClick:function(e){
-
- var navigator = require('@weex-module/navigator');
- var params = {'url':'http://weex.alibaba-inc.com/raw/html5/3d2996653c1d129603f9c935b895e998.js','animated':true};
- navigator.push(params, function(e) {
- console.log('i am the callback.')
- });
- }
- }
- }
-</script>
-<style>
- .div {
- flex-direction: row;
- justify-content: space-between;
- align-items: center;
- width: 750;
- height: 90;
- padding-left:30;
- padding-right:30;
-
- border-bottom-width: 1;
- border-style: solid;
- border-color: #dddddd;
- }
- .text{
- width: 750;
- height: 90;
- }
-</style>
-```
-
-[try it](http://dotwe.org/004a5e3f26290cf5b9ce03806a574633)
-
-## API
-### push(options, callback)
-
-push a weex page onto the navigator stack, you can specify whether apply animation when pushing. And you can also specify a callback function to be executed after the operation is over.
-
-**parameters**
-
-* options(object): some options.
- * url(stirng): The URL of the weex page to push.
- * animated(string): true, if the weex page is push through animation, otherwise, false. Default value is true.
-
-* callback(object): the callback function to be called after executing this action.
-
-```javascript
-var params = {
- 'url': 'navigator-demo.js',
- 'animated' : 'true',
-}
-var navigator = require('@weex-module/navigator');
-navigator.push(params, function(e) {
- //callback
-});
-```
-
-### pop(options, callback)
-pop a weex page onto the navigator stack, you can specify whether apply animation when popping. And you can also specify a callback function to be executed after the operation is over.
-
-**parameters**
-
-* options(object): some options.
- * animated(string): true if the weex page is pop through animation; otherwise, false. Default value is true.
-* callback(object): the callback function after executing this action.
-
-**example**
-
-```javascript
-var params = {
- 'animated' : 'true',
-}
-var navigator = require('@weex-module/navigator');
-navigator.pop(params, function(e) {
- //callback
-});
-```
-
-### close(options, callback)
-close a weex page, you can specify a callback function to be executed after the operation is over.
-
-**parameters**
-
-* options(object): some options.
- * animated(string): true, should animation be applied when closing. Default value is true.
-* callback(object): the callback function after executing this action.
-
-### setNavBarBackgroundColor(params, callback)
-set color for the navigation bar's background color, you can specify a callback function to be executed after the operation is over.
-
-**parameters**
-
-* params(object): some parameters.
- * backgroundColor(string): it's a required param, no default value provided.
-* callback(object): the callback function after executing this action.
-
-
-### setNavBarLeftItem(params,callback)
-set left item for the navigation bar, you can specify a callback function to be executed after the operation is over.
-
-**parameters**
-
-* params(object): parameters can not be empty, titleColor depends on title. And If title and icon are provided, only the title and its titleColor will be used. That's to say, icon will only be used when title is not present.
- * title(string): the title for the bar button.
- * titleColor (string): the title color.
- * icon (string): the icon for the bar button, should be an an downloadable image.
-* callback(object): the callback function after executing this action.
-
-### clearNavBarLeftItem(callback)
-clear left item for the navigation bar, you can specify a callback function to be executed after the operation is over.
-
-**parameters**
-
-* callback(object): the callback function after executing this action.
-
-### setNavBarRightItem(params,callback)
-set the right item for the navigation bar, you can specify a callback function to be executed after the operation is over.
-
-**parameters**
-
-* params(object): parameters can not be empty, titleColor depends on title. And If title and icon are provided, only the title and its titleColor will be used. That's to say, icon will be used when title is not present.
- * title(string): the title for the bar button.
- * titleColor (string): the title color.
- * icon (string): the icon for the bar button, should be an an downloadable image.
-* callback(object): the callback function after executing this action.
-
-### clearNavBarRightItem(params, callback)
-clear the right item for the navigation bar, you can specify a callback function to be executed after the operation is over.
-**parameters**
-
-* params(object): optional.
-* callback(object): the callback function after executing this action.
-
-
-### setNavBarMoreItem(params,callback)
-set the more item for the navigation bar, you can specify a callback function to be executed after the operation is over.
-
-**parameters**
-
-Actually, the function does nothing.
-* params(object): optional.
-* callback(object): the callback function after executing this action.
-
-### clearNavBarMoreItem(params, callback)
-clear the more item for the navigation bar, you can specify a callback function to be executed after the operation is over.
-
-**parameters**
-
-Actually, the function does nothing.
-* params(object): optional.
-* callback(object): the callback function after executing this action.
-
-### setNavBarTitle(params,callback)
-set the title for the navigation bar, you can specify a callback function to be executed after the operation is over.
-
-**parameters**
-
-* params(object): parameters can not be empty.
- * title(string): the title for the bar button.
-* callback(object): the callback function after executing this action.
-
-
-### clearNavBarTitle(params,callback)
-clear the title for the navigation bar, you can specify a callback function to be executed after the operation is over.
-
-**parameters**
-
-* params(object): optional.
-* callback(object): the callback function after executing this action.
http://git-wip-us.apache.org/repos/asf/incubator-weex-site/blob/12e3a8bc/_draft/v-0.10/references/modules/storage.md
----------------------------------------------------------------------
diff --git a/_draft/v-0.10/references/modules/storage.md b/_draft/v-0.10/references/modules/storage.md
deleted file mode 100644
index 9c62109..0000000
--- a/_draft/v-0.10/references/modules/storage.md
+++ /dev/null
@@ -1,111 +0,0 @@
----
-title: storage
-type: references
-order: 3.6
-version: 0.10
----
-
-# storage
-<span class="weex-version">v0.7+</span>
-
-## Summary
-
-`storage` is a series of apis, allowing you to for example add, modify or delete stored data items.
-
-## API
-
-### setItem(key, value, callback)
-
-When passed a key name and value, will add that key to the storage,
-or update that key's value if it already exists.
-
-#### Arguments
-
-* `key`*(string)*: the name of the key you want to store. "" or null is not allowed.
-* `value`*(string)*: the name of the value you want to store."" or null is not allowed.
-* `callback`*(object)*: the callback function after executing this action.
-
-##### Example
-
-```javascript
-var storage = require('@weex-module/storage');
-storage.setItem('bar', 'bar-value', function(e) {
- // callback.'e' is an object that contains 'result' and 'data'. e.result indicate whether `setItem` is succeed.
- // e.data will return 'undefined' if success or 'invalid_param' if your key/value is ""/null.
-});
-```
-
-### getItem(key, callback)
-
-When passed a key name, will return that key's value.
-
-#### Arguments
-
-* `key`*(string)*: the name of the key you want to retrieve the value of."" or null is not allowed.
-* `callback`*(object)*: the callback function after executing this action.
-
-##### Example
-
-```javascript
-var storage = require('@weex-module/storage');
-storage.getItem('foo', function(e) {
- //callback.'e' is an object that contains 'result' and 'data'.
- // use 'e.data' to fetch the value of the key,if not found,'undefined' will return.
-});
-```
-
-### removeItem(key, callback)
-
-When passed a key name, will remove that key from the storage.
-
-#### Arguments
-
-* `key`*(string)*: the name of the key you want to remove."" or null is not allowed.
-* `callback`*(object)*: the callback function after executing this action.
-
-##### Example
-
-```javascript
-var storage = require('@weex-module/storage');
-storage.removeItem('foo', function(e) {
- // callback. 'e' is an object that contains 'result' and 'data'.
- // e.result will return 'success' or 'failed' according to the executing result.
- // e.data will always return 'undefined' in this function if success.
-});
-```
-
-### length(callback)
-
-Returns an integer representing the number of data items stored in the Storage object.
-
-#### Arguments
-
-* `callback`*(object)*: the callback function after executing this action.
-
-##### Example
-
-```javascript
-var storage = require('@weex-module/storage');
-storage.length(function(e) {
- // callback. 'e' is an object that contains 'result' and 'data'.
- //e.data will return that number.
-});
-```
-
-### getAllKeys(callback)
-
-Returns an array that contains all keys stored in Storage object.
-
-#### Arguments
-
-* `callback`*(object)*: the callback function after executing this action.
-
-##### Example
-
-```javascript
-var storage = require('@weex-module/storage');
-storage.getAllKeys(function(e) {
- // callback. 'e' is an object that contains 'result' and 'data'.
- //e.data will return that array of keys.
-});
-```
http://git-wip-us.apache.org/repos/asf/incubator-weex-site/blob/12e3a8bc/_draft/v-0.10/references/modules/stream.md
----------------------------------------------------------------------
diff --git a/_draft/v-0.10/references/modules/stream.md b/_draft/v-0.10/references/modules/stream.md
deleted file mode 100644
index 522e3b0..0000000
--- a/_draft/v-0.10/references/modules/stream.md
+++ /dev/null
@@ -1,86 +0,0 @@
----
-title: stream
-type: references
-order: 3.7
-version: 0.10
----
-
-# stream
-
-A series of stream api. It provides a network request.
-
-## API
-
-### fetch(options, callback,progressCallback)
-
-Start a network request, use two callbacks to receive server's response data.
-
-**Arguments**
-
-* options(object): the request options, key value style dictionary.
-
- * method(string): the HTTP method `GET` or `POST`.
-
- * url(string): the request url.
-
- * headers(string): the HTTP request headers.
-
- * type(string): request type, 'json','text' or 'jsonp'(same as 'json' in native implementation)
-
- * body(string): the HTTP body.
-
-* callback(function): A callback function whose argument is the response object of the request. Callback function will receive a `response` object.
-
- * status(number): response status code.
-
- * ok(boolean): true if status code is bewteen 200~299.
-
- * statusText(string): status text
-
- * data(string): response data. It's a object if request option is `json`/`jsonp`, or *(string)* in other type value.
-
- * headers(object): response headers
-
-* progressCallback(function): A progress callback. This callback will be invoked before request finished.
-
- * readyState(number): Current request state.'1':request connection opened;'2':response headers received.;'3':response data is loading;
-
- * status(number): response status code.
-
- * length(number): bytes of data have received. You can read full length of response from 'headers'.
-
- * statusText(string): status text.
-
- * headers(object): response headers.
-
-### Example
-
-```html
-<template>
- <div>
- <text onclick="startStream">click here to start stream</text>
- </div>
-</template>
-
-<script>
- module.exports = {
- methods: {
- startStream: function () {
- var stream_module = require('@weex-module/stream');
- stream_module.fetch({
- method: 'GET',
- url: "http://httpbin.org/get",
- type:'json'
- }, function(response) {
- //finished response
- console.log("all received:",response);
- },function(response){
- //progress response
- console.log("current bytes received:",response.length);
- });
- }
- }
- }
-</script>
-```
-[Try it](http://dotwe.org/6e4ede64fdfe070b9696cc4cc3bdd086)
http://git-wip-us.apache.org/repos/asf/incubator-weex-site/blob/12e3a8bc/_draft/v-0.10/references/modules/timer.md
----------------------------------------------------------------------
diff --git a/_draft/v-0.10/references/modules/timer.md b/_draft/v-0.10/references/modules/timer.md
deleted file mode 100644
index c82109d..0000000
--- a/_draft/v-0.10/references/modules/timer.md
+++ /dev/null
@@ -1,60 +0,0 @@
----
-title: Timer
-type: references
-order: 3.8
-version: 0.10
----
-
-# Timer
-
-Weex encapsulates a series of APIs in order to start/stop a one-time task or a repeated task at a fixed delay. Please note that this module don't provide an accuracy delay. It provides best-effort delivery, but the actual delay may still exceed the delay user wants if the corresponding thread is busy.
-Actually, this module is made for the polyfill of HTML5 timer APIs, developers **should not** use this module directly unless they know exactly what they are doing.
-
-## API
-
-All timeout or interval in this module are measured in milliseconds.
-Also, timeout and interval should be a non-negative integer(the max of integer is 0x7FFFFFFF). If timeout or interval is negative, then it will be reset to zero, e.g. the task will be put in the task queue immediately.
-
-### setTimeout(fn, timeout)
-
-The `setTimeout()` method calls a function after a specified number of milliseconds. Use the `clearTimeout()` method to prevent the function from running. The function is only executed once. If you need to repeat execution, use the `setInterval()` method.
-
-#### Arguments
-
-- `fn` (function): The function that will be executed
-- `timeout` (number): The number of milliseconds to wait before executing the function
-
-#### Return value
-
-A Number, representing the fnId value of the timer that is set. Use this value with the `clearTimeout()` method to cancel the timer.
-
-### setInterval(fn, interval)
-
-The `setInterval()` method calls a function at specified intervals (in milliseconds), and it will continue calling the function until `clearInterval()` is called. The fnId value returned by `setInterval()` is used as the parameter for the `clearInterval()` method.
-
-#### Arguments
-
-- `fn` (function): The function that will be executed
-- `interval` (number): The intervals (in milliseconds) on how often to execute the function
-
-#### Return value
-
-A Number, representing the fnId value of the timer that is set. Use this value with the `clearInterval()` method to cancel the timer
-
-### clearTimeout(fnId)
-
-The `clearTimeout()` method clears a timer set with the `setTimeout()` method. The fnId value returned by `setTimeout()` is used as the parameter for the `clearTimeout()` method. If the function has not already been executed, you will be able to stop the execution by calling the `clearTimeout()` method, otherwise, this method has no influence on the task.
-
-#### Arguments
-
-- `fnId` (number): The fnId value of the timer returned by the `setTimeout()` method
-
-### clearInterval(fnId)
-
-The `clearInterval()` method clears a timer set with the `setInterval()` method. The fnId value returned by `setInterval()` is used as the parameter for the `clearInterval()` method.
-
-#### Arguments
-
-- `fnId` (number): The fnId of the timer returned by the `setInterval()` method
-
-[Try it](http://dotwe.org/996578e8f29b88d7d4fa01ab031fbbda)
http://git-wip-us.apache.org/repos/asf/incubator-weex-site/blob/12e3a8bc/_draft/v-0.10/references/modules/webview.md
----------------------------------------------------------------------
diff --git a/_draft/v-0.10/references/modules/webview.md b/_draft/v-0.10/references/modules/webview.md
deleted file mode 100644
index 88c6f17..0000000
--- a/_draft/v-0.10/references/modules/webview.md
+++ /dev/null
@@ -1,160 +0,0 @@
----
-title: webview
-type: references
-order: 3.9
-version: 0.10
----
-
-# webview
-
-A series of web operation api like `goBack`, `goForward`, and `reload`. 'webview' module used with the web component.
-
-## API
-
-### goBack(webElement)
-
-Loads the previous location in the history stack.
-
-**Arguments**
-
-* webElement(web): the element of the web component.
-
-#### Example
-
-```
-var webview = require('@weex-module/webview');
-var webElement = this.$el('webview');
-webview.goBack(webElement);
-```
-
-### goForward(webElement)
-
-Loads the next location in the history stack.
-
-**Arguments**
-
-* webElement(web): the element of the web component.
-
-#### Example
-
-```
-var webview = require('@weex-module/webview');
-var webElement = this.$el('webview');
-webview.goForward(webElement);
-```
-
-### reload(webElement)
-
-Reloads the current web page.
-
-**Arguments**
-
-* webElement(web): the element of the web component.
-
-#### Example
-
-```
-var webview = require('@weex-module/webview');
-var webElement = this.$el('webview');
-webview.reload(webElement.ref);
-```
-
-## Example
-
-```html
-<template>
- <div class="browserStyle">
- <div style="flex-direction: row">
- <input id="urlInput" type="url" autofocus="false" placeholder="..." class="textStyle" value="{{input_text}}" oninput="input">
- </input>
- </div>
- <div style="flex-direction: row">
- <wxc-button value="LoadURL" class="buttonSytle" size="small" onclick="loadURL"></wxc-button>
- <wxc-button value="Backward" class="buttonSytle" size="small" onclick="backforward"></wxc-button>
- <wxc-button value="Forward" class="buttonSytle" size="small" onclick="forward"></wxc-button>
- </div>
- <div>
- <web id="webview" src="{{src}}" class="webStyle"></web>
- </div>
- </div>
-</template>
-
-<style>
-
- .browserStyle
- {
- width:600;
- height: 825;
- background-color:#778899 ;
- }
-
- .textStyle
- {
- width:600;
- height: 50;
- background-color: #D3D3D3;
- }
-
- .buttonSytle
- {
- width:180;
- height: 50;
- font-size: 12;
- background-color: #D3D3D3;
- margin:10;
- padding-left: 5;
- padding-right: 5;
- }
-
- .webStyle
- {
- width:600;
- height: 700;
- background-color: #8B0000;
- }
-
-</style>
-
-<script>
-
- var web_module = require('@weex-module/webview');
-
- module.exports = {
- data: {
- src : "https://h5.m.taobao.com",
- input_text:"https://www.tmall.com"
- },
-
- methods: {
-
- loadURL: function (e) {
- var web_element = this.$el('webview');
- var input = this.$el("urlInput");
- this.src = this.input_text;
- web_module.reload(web_element);
- },
-
- backforward: function (e) {
- var web_element = this.$el('webview');
- web_module.goBack(web_element);
- this.input_text = web_element.attr.src;
- },
-
- forward: function (e) {
- var web_element = this.$el('webview');
- web_module.goForward(web_element);
- this.input_text = web_element.attr.src;
- },
- input:function (e) {
- var input = this.$el("urlInput");
- this.input_text = input.attr.value;
- }
-
- }
- }
-</script>
-```
-
-[Try it](http://dotwe.org/103d472645206cc1564f49717585abb4)
-
-
http://git-wip-us.apache.org/repos/asf/incubator-weex-site/blob/12e3a8bc/_draft/v-0.10/references/special-element.md
----------------------------------------------------------------------
diff --git a/_draft/v-0.10/references/special-element.md b/_draft/v-0.10/references/special-element.md
deleted file mode 100644
index 4a4d57e..0000000
--- a/_draft/v-0.10/references/special-element.md
+++ /dev/null
@@ -1,36 +0,0 @@
----
-title: Special Element
-type: references
-order: 1.10
-version: 0.10
----
-
-# Special Element
-
-## Content
-
-The element serves as content distribution outlet in a composed component template. The element itself will be replaced.
-
-alias: 'slot'.
-
-## Example
-
-As shown in the example, 'content' replaced by 'text'.
-
-```html
-<we-element name="item">
- <template>
- <div>
- <content></content>
- </div>
- </template>
-</we-element>
-
-<template>
- <div>
- <item>
- <text>Content Text</text>
- </item>
- </div>
-</template>
-```
http://git-wip-us.apache.org/repos/asf/incubator-weex-site/blob/12e3a8bc/_draft/v-0.10/references/specs/index.md
----------------------------------------------------------------------
diff --git a/_draft/v-0.10/references/specs/index.md b/_draft/v-0.10/references/specs/index.md
deleted file mode 100644
index d303a16..0000000
--- a/_draft/v-0.10/references/specs/index.md
+++ /dev/null
@@ -1,309 +0,0 @@
----
-title: JS Bundle format
-type: references
-order: 4
-has_chapter_content: false
-chapter_title: Low-level Specs
-version: 0.10
----
-
-# JS Bundle format
-
-JS Bundle Version: v0.3.0
-
-## v0.5.0
-
-### Whole Syntax and Structure
-
-A JS Bundle is actually a JavaScript file which follows **ES5** standard. The code is used to define some custom components for the instance and bootstrap the instance with certain name, config and data. Developers could use all kinds of JS code packager like webpack, browserify, requirejs to organize your whole instance code.
-
-### Meta Info
-
-The JS Bundle Must begin with a comment line which is a JSON object like:
-
-```javascript
-// { "framework": "Weex", "version": "0.5.0" }
-```
-
-This JSON object as least contains:
-
-* property `framework` must be `"Weex"`
-* property `version` should be corresponded with the JS Bundle format version
-
-### Global Members
-
-* `__weex_define__(name, options)`
-* `__weex_bootstrap__(name, config, data)`
-* `__weex_document__`
-* `__weex_require__(name)`
-
-#### `__weex_define__(name:string, options: object)`
-
-Define a custom component named `name` for current instance with `options`.
-
-**example:**
-
-```javascript
-__weex_define__('rmb', {
- template: {
- type: 'div',
- style: {flexDirection: 'row'},
- children: [
- {type: 'text', attr: {value: '¥'}},
- {type: 'text', attr: {value: this.value}}
- ]
- },
- data: function () {
- return {
- value: '0'
- }
- },
- methods: {...}
-})
-```
-
-The enabled component options contains:
-
-* `template`: just the same as [v0.3.0](#details-of-template-option-definitions)
-* `style`: just the same as [v0.3.0](#details-of-style-option-definitions)
-* `data`: a function which return a plain object to observe by the ViewModel
-* `methods`: a function map to proxy to the ViewModel
-* `computed`: a map of several computed keys for the ViewModel
-* `init`, `created`, `ready`: lifecycle methods
-* `events`: event handlers for the ViewModel
-<!-- * `components`: a map for options of sub components the ViewModel needed (So `__weex_define__(name, options)` equals to run `this.components[name] = options` in each custom components when `init`) -->
-
-The enabled ViewModel APIs contains:
-
-* `$el(id): Element`: find element by id in current ViewModel scope
-* `$vm(id): ViewModel`: find sub ViewModel by id
-* `$getConfig(): object`: get instance config info
-* `$broadcast`/`$emit`/`$dispatch`/`$on`/`$off`: listen and fire component events
-* `$transition` *(experimental)*: animation transition (see more in [animation native module](../animation.html))
-
-#### `__weex_require__(name: string): object`
-
-Get a Weex native module with several native APIs.
-
-**example:**
-
-```javascript
-var modal = __weex_require__('modal')
-modal.toast({
- message: 'Hey!',
- duration: 2
-})
-```
-
-polyfill for v0.3.0
-
-```javascript
-function __weex_require__(name) {
- var result
- define('__weex_require__', function (r, e, m) {
- result = r('@weex-module/' + name)
- })
- return result
-}
-```
-
-#### `__weex_bootstrap__(nameOrOptions: string|object, config: object?, data: object?): AppInstance | Error`
-
-Start to render by a certain component name or a direct component options as the root element, and some instance `config` and instance `data`. If everything fine, it will returns the root app instance. Otherwise it will return an `Error` instance which describes something wrong.
-
-**example:**
-
-```javascript
-__weex_bootstrap__(
- 'root',
- {
- // format 1:
- // downgrade: { appVersion: '>= 0.5.0' },
- // format 2:
- // downgrade: function (config) { return true }
- },
- {
- // external data
- // value: '12345'
- }
-)
-```
-
-The instance `config` now only support `downgrade` property which allows two format:
-
-1. an object like `{ osVersion, appVersion, weexVersion, deviceModel }`
-2. a function like `function (config) { return true }` to return a boolean value. `true` means normal and `false` means downgrade.
-
-The instance `data` will merge to root component data. So the root component is also easy to reuse and the instance data is easy to customize.
-
-#### `__weex_document__`
-
-An virtual-DOM `Document` instance. Also the host of [virtual-DOM APIs](./virtual-dom-apis.html). Every Weex instance has and must have just one `Document` instance.
-
-### Preserved Global Variables
-
-`define`, `bootstrap`, `module`, `exports`, `document`, `require`, `register`, `render`
-
-### A whole example
-
-```javascript
-// { "framework": "Weex", "version": "0.5.0" }
-
-var modal = __weex_require__('modal')
-
-__weex_define__('item', {
- template: {
- type: 'div',
- style: { flexDirection: 'row' },
- event: {
- click: function (e) {
- this.update(e)
- }
- },
- children: [
- { type: 'image', attr: { src: this.imageUrl }, ...},
- { type: 'text', attr: { value: this.title }, ...}
- ]
- },
- data: function () {
- return {
- imageUrl: '',
- title: ''
- }
- },
- methods: {
- update: function (e) {
- modal.toast({ message: this.title })
- }
- }
-})
-
-__weex_define__('app', {
- template: {
- type: 'div',
- children: [
- {
- type: 'item',
- repeat: {
- expression: function () {
- return this.list
- },
- key: '$index',
- value: '$value'}
- },
- attr: {
- imageUrl: function () {
- return this.$value.imageUrl
- },
- title: function () {
- return this.$value.title
- }
- }
- }
- ]
- },
- data: function () {
- return {
- list: [
- { imageUrl: 'xxx', title: '111' },
- { imageUrl: 'yyy', title: '222' },
- { imageUrl: 'zzz', title: '333' }
- ]
- }
- }
-})
-
-__weex_bootstrap__('app')
-```
-
-## v0.3.0
-
-### Whole Syntax and Structure
-
-A JS Bundle is actually a JavaScript file which follows **ES5** standard. The code is organized by several modules with AMD-like format:
-
-```javascript
-define('moduleName1', function (require, exports, module) {
- // content of module1
-})
-
-define('moduleName2', function (require, exports, module) {
- // content of module2
-})
-
-...
-```
-
-A whole Weex JS Bundle is concatenated by these modules and last a `bootstrap(rootComponentName, optionalConfig, optionalExternalData)` function call.
-
-```javascript
-define('@weex-component/a', function (require, exports, module) {
- // content of composed component <a>
-})
-
-define('@weex-component/b', function (require, exports, module) {
- // content of composed component <b>
-})
-
-bootstrap('@weex-component/b')
-```
-
-As the sample above, the component name should be hyphenated (a-z, 0-9, "-"). Other characters are not allowed.
-
-And, the method call `bootstrap()` allows 1~3 parameters: root module name (String), config info (optional JSON) and external data (optional JSON).
-
-### Content of Composed Components
-
-A module of composed component contains 3 parts: whole options definition, additional template option definition and additional style option definition.
-
-- whole options is a piece of JavaScript code to put component options (except `template` option and `style` option) into `module.exports`
-- `template` option is a piece of JSON-like object assigned to `module.exports.template` which describes the display structure of this component
-- `style` option is a piece of JSON object assigned to `module.exports.style` which describes the reusable styles in this component
-
-The `template` option is required and appeared only once, and the `style` option and whole options definition are optional.
-
-These options are defined and transformed by Transformer. Actually you can also ignore all the format limitation and write options to `module.exports` as the same result if you are not going to use Transformer. But that's not recommended.
-
-#### Details of template option definitions
-
-A piece of multi-level embedded JSON-like object which describes the view structure.
-
-Every level JSON-like object has these members below:
-
-* `type`: a required string, component name/type
-* `component`: an optional boolean, whether this component is composed or native
-* `attr`: an optional k-v pairs which contains all attributes of an element, the value could be a string, number, boolean or a function that bind some data value
-* `style`: an optional k-v pairs which contains all styles of an element, just the same format as the `attr`
-* `classList`: an optional array of strings which contains class names for styling.
-* `events`: an optional k-v pairs whose keys are event type and values are corresponding method names
-* `children`: an optional array of child components info
-* `append`: an optional string which determines a compiling workflow strategy: append node-by-node singly or a whole node tree just one time. the default value is `node` and another supported value is `tree`.
-* `shown`: a optional function which returns a boolean value to determine whether this component should be displayed
-* `repeat`: a optional function which returns a list data to displays components with each
-
-**Corresponding Keys to Weex Transformer:**
-
-- tag `name` in Weex file corresponds to `type`
-- attr `if` in Weex file corresponds to `shown`
-- attr `repeat` in Weex file corresponds to `repeat`
-- attr `append` in Weex file corresponds to `append`
-- attr `style` in Weex file with CSS syntax corresponds to `style`
-- attr `class` in Weex file with class names separated by blanks corresponds to `classList`
-- attr `on***` in Weex file with prefix `on` corresponds to a k-v pair in `events`
-- other attributes in Weex file corresponds to `attr`
-- Child nodes in Weex file corresponds to `children`
-
-All tag names, attr names are case-insensitive and transformed to lower-cased. But the attr values are case-sensitive.
-
-#### Details of style option definitions
-
-Just a two-levels JSON object.
-
-* The first levels are class names.
-* The second levels are k-v pairs which describes style names & properties for each class name.
-
-**Corresponding Keys to Weex Transformer:**
-
-* class name corresponds to first level keys
-* prop name corresponds to second level keys
-* prop value corresponds to second level values
[31/51] [abbrv] incubator-weex-site git commit: update file structure
and fix responsive styles
Posted by ha...@apache.org.
http://git-wip-us.apache.org/repos/asf/incubator-weex-site/blob/12e3a8bc/_drafts/web-standards.en.md
----------------------------------------------------------------------
diff --git a/_drafts/web-standards.en.md b/_drafts/web-standards.en.md
new file mode 100644
index 0000000..906ff76
--- /dev/null
+++ b/_drafts/web-standards.en.md
@@ -0,0 +1,584 @@
+---
+title: Web standards
+type: references
+order: 8
+version: 2.1
+has_chapter_content: true
+---
+
+# Web standards
+
+## HTML
+
+refs: https://www.advancedwebranking.com/html/ 2016-12-11
+
+### Overview
+
+| percentage | name | supported |
+| ---- | ---- | ---- |
+| 98.1% | `<head>` | - |
+| 97.9% | `<body>` | - |
+| 97.9% | `<html>` | - |
+| 97% | `<title>` | - |
+| 93.9% | `<meta>` | - |
+| 89.9% | `<div>` | ✓ |
+| 89.6% | `<a>` | ✓ |
+| 88.5% | `<script>` | ✓ |
+| 86.5% | `<link>` | - |
+| 86.3% | `<img>` | ✓ |
+| 81.5% | `<p>` | - (can be customized) |
+| 75.6% | `<span>` | - (can be customized) |
+| 73.8% | `<li>` | - (can be customized) |
+| 73.7% | `<ul>` | - (can be customized) |
+| 70.3% | `<br>` | ✕ |
+| 60.4% | `<style>` | ✓ |
+| 55.8% | `<h1>` | - (can be customized) |
+| 52.7% | `<h2>` | - (can be customized) |
+| 48.4% | `<input>` | ✓ |
+| 46.9% | `<form>` | ✕ |
+| 44.3% | `<strong>` | - (can be customized) |
+| 43.1% | `<h3>` | - (can be customized) |
+| 30.9% | `<table>` | ✕ |
+| 30.3% | `<tr>` | ✕ |
+| 30.2% | `<td>` | ✕ |
+
+### Forms
+
+| percentage | name | supported |
+| ---- | ---- | ---- |
+| 49.5% | `<option>` | ✕ |
+| 30.2% | `<input>` | ✓ |
+| 16.6% | > `[type="hidden"]` | - |
+| 8% | > `[type="text"]` | ✓ |
+| 4.2% | > `[type="submit"]` | - |
+| 2% | > `[type="checkbox"]` | - (`<switch>`) |
+| 1.2% | > `[type="email"]` | ✓ |
+| 1.1% | > `[type="radio"]` | ✕ |
+| 0.9% | > `[type="image"]` | - |
+| 0.8% | > `[type="button"]` | - |
+| 0.6% | > `[type="search"]` | ✕ |
+| 0.6% | > `[type="password"]` | ✓ |
+| 0.1% | > `[type="tel"]` | ✓ |
+| 0.1% | > `[type="number"]` | ✓ |
+| 0% | > `[type="reset"]` | - |
+| 0% | > `[type="file"]` | ✕ |
+| 0% | > `[type="date"]` | ✓ |
+| 0% | > `[type="url"]` | ✓ |
+| 0% | > `[type="range"]` | ✕ |
+| 0% | > `[type="color"]` | ✕ |
+| 0% | > `[type="time"]` | ✓ |
+| 0% | > `[type="datetime-local"]` | ✕ |
+| 7.2% | `<label>` | - |
+| 6.1% | `<form>` | - |
+| 3.7% | `<button>` | - (can be customized) |
+| 2.6% | > `[type="button"]` | - |
+| 1.3% | > `[type="submit"]` | - |
+| 0% | > `[type="reset"]` | - |
+| 1.9% | `<select>` | ✕ |
+| 0.7% | `<textarea>` | ✓ |
+| 0.5% | `<fieldset>` | - |
+| 0.1% | `<optgroup>` | ✕ |
+| 0.1% | `<legend>` | - |
+| 0% | `<progress>` | ✕ |
+| 0% | `<datalist>` | - |
+| 0% | `<output>` | - |
+| 0% | `<meter>` | - |
+
+## CSS Properties
+
+refs: https://www.chromestatus.com/metrics/feature/popularity 2016-12-11
+
+| percentage | name | supported |
+| ---- | ---- | ---- |
+| 90.5115% | display | ✕ `flex` only |
+| 89.8243% | margin | ✓ (not support combo) |
+| 88.7012% | width | ✓ |
+| 88.6468% | overflow | ✓ iOS only, `hidden` only for Android |
+| 88.6432% | background-color | ✓ |
+| 88.0803% | height | ✓ |
+| 87.7648% | font-size | ✓ |
+| 87.3837% | padding | ✓ |
+| 87.2721% | color | ✓ |
+| 86.9788% | text-align | ✓ |
+| 86.6841% | position | ✓ `relative` by default, `static` not supported |
+| 86.6039% | font-family | ✓ |
+| 86.5943% | font-weight | ✓ |
+| 85.0072% | opacity | ✓ |
+| 80.6911% | max-width | ✕ |
+| 79.4476% | box-sizing | ✕ `border-box` only |
+| 75.7623% | max-height | ✕ |
+| 74.9939% | webkit-user-select | ✕ |
+| 57.0292% | align-items | ✓ |
+| 56.8182% | justify-content | ✓ `space-around` not supported well in browser |
+| 50.5941% | flex-direction | ✓ |
+| 48.5052% | border | ✓ |
+| 47.5161% | top | ✓ |
+| 46.9136% | background | ✕ |
+| 46.1552% | cursor | ✕ |
+| 46.1443% | margin-left | ✓ |
+| 46.0956% | left | ✓ |
+| 46.0848% | text-decoration | ✓ |
+| 45.9575% | float | ✕ |
+| 45.8391% | border-bottom | ✓ |
+| 45.7639% | padding-left | ✓ |
+| 45.7128% | margin-top | ✓ |
+| 45.7013% | line-height | ✓ |
+| 45.5836% | background-image | ✕ |
+| 45.0837% | z-index | ✕ |
+| 45.0649% | right | ✓ |
+| 45.0516% | margin-bottom | ✓ |
+| 45.0459% | white-space | ✕ |
+| 44.8710% | margin-right | ✓ |
+| 44.8476% | vertical-align | ✕ |
+| 44.6306% | padding-top | ✓ |
+| 44.1466% | border-radius | ✓ |
+| 44.0136% | border-top | ✓ |
+| 43.9815% | padding-bottom | ✓ |
+| 43.9392% | padding-right | ✓ |
+| 43.8539% | visibility | ✕ |
+| 43.4306% | background-position | ✕ |
+| 43.4098% | background-repeat | ✕ |
+| 43.0391% | clear | ✕ |
+| 42.9100% | bottom | ✓ |
+| 42.2092% | content | ✕ |
+| 42.0690% | box-shadow | ✕ |
+| 41.9004% | border-color | ✓ |
+| 41.7341% | outline | ✕ |
+| 41.4297% | border-right | ✓ |
+| 41.2605% | border-left | ✓ |
+| 41.1127% | min-height | ✕ |
+| 41.0736% | font-style | ✓ |
+| 41.0523% | min-width | ✕ |
+| 40.4298% | list-style | ✕ |
+| 39.7341% | font | ✕ |
+| 38.8999% | background-size | ✕ |
+| 38.7811% | border-width | ✓ |
+| 38.7718% | border-collapse | ✕ |
+| 37.8110% | border-style | ✓ |
+| 37.4962% | text-overflow | ✓ must work with `lines` |
+| 37.3471% | text-transform | ✕ |
+| 37.2154% | transition | ✕ |
+| 36.5155% | overflow-y | ✕ |
+| 36.3025% | transform | ✕ |
+| 36.2488% | text-indent | ✕ |
+| 35.5075% | text-shadow | ✕ |
+| 34.7607% | webkit-appearance | ✕ |
+| 34.1925% | list-style-type | ✕ |
+| 34.0238% | border-spacing | ✕ |
+| 33.6664% | word-wrap | ✕ |
+| 31.9961% | overflow-x | ✕ |
+| 31.9922% | zoom | ✕ |
+| 31.2495% | border-bottom-left-radius | ✕ |
+| 31.1306% | pointer-events | ✕ |
+| 31.1229% | border-top-left-radius | ✕ |
+| 30.2131% | border-bottom-color | ✓ |
+| 29.9608% | border-top-color | ✓ |
+| 29.4297% | border-bottom-right-radius | ✕ |
+| 29.2668% | border-top-right-radius | ✕ |
+| 28.6489% | letter-spacing | ✕ |
+| 27.8327% | animation | ✕ |
+| 26.6738% | border-right-width | ✓ |
+| 26.0169% | src | ✕ |
+| 25.2661% | clip | ✕ |
+| 25.2512% | webkit-font-smoothing | ✕ |
+| 25.1971% | border-bottom-width | ✓ |
+| 25.0246% | border-right-color | ✓ |
+| 24.7790% | direction | ✕ |
+| 24.4094% | webkit-tap-highlight-color | ✕ |
+| 23.9751% | border-left-color | ✓ |
+| 23.9321% | border-top-width | ✓ |
+| 23.7902% | fill | ✕ |
+| 23.2617% | border-left-width | ✓ |
+| 22.7278% | table-layout | ✕ |
+| 21.5766% | word-break | ✕ |
+| 20.4319% | background-clip | ✕ |
+| 19.3198% | transform-origin | ✕ |
+| 18.9233% | filter | ✕ |
+| 17.7879% | resize | ✕ |
+| 16.2501% | flex | ✕ |
+| 15.1656% | font-variant | ✕ |
+| 14.9181% | text-rendering | ✕ |
+| 14.7125% | webkit-filter | ✕ |
+| 14.5263% | transition-duration | ✕ |
+| 14.3966% | transition-property | ✕ |
+| 14.2124% | webkit-box-orient | ✕ |
+| 13.5432% | outline-offset | ✕ |
+| 12.9300% | transition-timing-function | ✕ |
+| 12.2788% | unicode-range | ✕ |
+| 12.0880% | word-spacing | ✕ |
+| 11.9124% | quotes | ✕ |
+| 11.6800% | border-bottom-style | ✓ |
+| 11.4263% | webkit-background-clip | ✕ |
+| 11.0070% | flex-grow | ✕ |
+| 10.5925% | backface-visibility | ✕ |
+| 10.4417% | animation-name | ✕ |
+| 10.4302% | stroke | ✕ |
+| 10.4144% | animation-duration | ✕ |
+| 10.2804% | touch-action | ✕ |
+| 9.9663% | list-style-position | ✕ |
+| 9.8662% | order | ✕ |
+| 9.7770% | outline-width | ✕ |
+| 9.7504% | transition-delay | ✕ |
+| 9.4689% | border-top-style | ✓ |
+| 9.3474% | webkit-box-pack | ✕ |
+| 9.3078% | webkit-box-align | ✕ |
+| 9.2375% | page-break-inside | ✕ |
+| 9.1898% | webkit-line-clamp | ✕ |
+| 8.9350% | list-style-image | ✕ |
+| 8.8339% | page-break-after | ✕ |
+| 8.5735% | speak | ✕ |
+| 8.4754% | unicode-bidi | ✕ |
+| 8.4307% | animation-timing-function | ✕ |
+| 8.1464% | webkit-box-flex | ✕ |
+| 8.0048% | orphans | ✕ |
+| 7.9947% | widows | ✕ |
+| 7.6671% | flex-wrap | ✓ not supported well in browser |
+| 7.5756% | animation-fill-mode | ✕ |
+| 7.4163% | animation-delay | ✕ |
+| 7.3284% | border-left-style | ✓ |
+| 7.1586% | outline-color | ✕ |
+| 6.9102% | flex-shrink | ✕ |
+| 6.7754% | perspective | ✕ |
+| 6.7748% | border-right-style | ✓ |
+| 6.4619% | outline-style | ✕ |
+| 6.0382% | animation-iteration-count | ✕ |
+| 5.9838% | background-origin | ✕ |
+| 5.9714% | fill-opacity | ✕ |
+| 5.9357% | will-change | ✕ |
+| 5.3740% | stroke-width | ✕ |
+| 5.3172% | transform-style | ✕ |
+| 5.2608% | overflow-wrap | ✕ |
+| 5.1730% | background-attachment | ✕ |
+| 4.9039% | counter-increment | ✕ |
+| 4.5950% | counter-reset | ✕ |
+| 4.5031% | align-self | ✕ |
+| 4.4109% | webkit-box-ordinal-group | ✕ |
+| 4.4046% | webkit-animation-direction | ✕ |
+| 3.7598% | background-position-x | ✕ |
+| 3.6867% | border-image | ✕ |
+| 3.6601% | background-position-y | ✕ |
+| 3.5749% | webkit-user-drag | ✕ |
+| 3.3376% | flex-basis | ✕ |
+| 3.1840% | align-content | ✕ |
+| 3.1832% | flex-flow | ✕ |
+| 3.1774% | image-rendering | ✕ |
+| 3.0879% | webkit-margin-start | ✕ |
+| 2.9551% | font-stretch | ✕ |
+| 2.8934% | empty-cells | ✕ |
+| 2.7619% | webkit-margin-after | ✕ |
+| 2.7220% | perspective-origin | ✕ |
+| 2.6125% | webkit-margin-end | ✕ |
+| 2.6089% | column-count | ✕ |
+| 2.5880% | webkit-text-fill-color | ✕ |
+| 2.5466% | webkit-box-direction | ✕ |
+| 2.4618% | font-feature-settings | ✕ |
+| 2.3959% | webkit-mask-image | ✕ |
+| 2.3431% | webkit-padding-end | ✕ |
+| 2.2555% | stroke-dasharray | ✕ |
+| 2.1788% | user-select | ✕ |
+| 2.1679% | object-fit | ✕ |
+| 2.0643% | column-gap | ✕ |
+| 2.0459% | text-size-adjust | ✕ |
+| 2.0253% | caption-side | ✕ |
+| 1.9695% | stroke-dashoffset | ✕ |
+| 1.7923% | stroke-linecap | ✕ |
+| 1.7861% | animation-direction | ✕ |
+| 1.7559% | webkit-font-feature-settings | ✕ |
+| 1.7404% | stroke-opacity | ✕ |
+| 1.5926% | stroke-miterlimit | ✕ |
+| 1.5786% | fill-rule | ✕ |
+| 1.4859% | webkit-user-modify | ✕ |
+| 1.3439% | webkit-border-image | ✕ |
+| 1.3091% | animation-play-state | ✕ |
+| 1.2676% | contain | ✕ |
+| 1.2029% | webkit-padding-start | ✕ |
+| 1.1840% | webkit-margin-before | ✕ |
+| 1.1269% | page-break-before | ✕ |
+| 1.1222% | webkit-margin-top-collapse | ✕ |
+| 1.0418% | columns | ✕ |
+| 1.0354% | webkit-mask-size | ✕ |
+| 0.9650% | border-image-slice | ✕ |
+| 0.9425% | stop-color | ✕ |
+| 0.9408% | webkit-mask-repeat | ✕ |
+| 0.9125% | webkit-box-lines | ✕ |
+| 0.8804% | webkit-column-break-inside | ✕ |
+| 0.8752% | size | ✕ |
+| 0.8334% | font-kerning | ✕ |
+| 0.8034% | stroke-linejoin | ✕ |
+| 0.7869% | tab-size | ✕ |
+| 0.7689% | break-inside | ✕ |
+| 0.7589% | webkit-text-stroke-width | ✕ |
+| 0.7353% | column-width | ✕ |
+| 0.6924% | webkit-mask-position | ✕ |
+| 0.6869% | border-image-width | ✕ |
+| 0.6323% | border-image-repeat | ✕ |
+| 0.5994% | border-image-outset | ✕ |
+| 0.5885% | all | ✕ |
+| 0.5859% | webkit-text-stroke-color | ✕ |
+| 0.5435% | webkit-print-color-adjust | ✕ |
+| 0.5420% | webkit-text-stroke | ✕ |
+| 0.5195% | writing-mode | ✕ |
+| 0.4741% | clip-rule | ✕ |
+| 0.4685% | webkit-clip-path | ✕ |
+| 0.4578% | text-anchor | ✕ |
+| 0.4535% | shape-rendering | ✕ |
+| 0.4526% | webkit-column-break-before | ✕ |
+| 0.4494% | clip-path | ✕ |
+| 0.4452% | webkit-mask | ✕ |
+| 0.4393% | mix-blend-mode | ✕ |
+| 0.4166% | text-align-last | ✕ |
+| 0.4033% | column-rule | ✕ |
+| 0.3990% | webkit-mask-box-image | ✕ |
+| 0.3989% | font-variant-ligatures | ✕ |
+| 0.3881% | column-fill | ✕ |
+| 0.3865% | webkit-line-break | ✕ |
+| 0.3857% | border-image-source | ✕ |
+| 0.3528% | stop-opacity | ✕ |
+| 0.3075% | webkit-perspective-origin-y | ✕ |
+| 0.3054% | webkit-perspective-origin-x | ✕ |
+| 0.2994% | webkit-writing-mode | ✕ |
+| 0.2717% | dominant-baseline | ✕ |
+| 0.2634% | column-rule-color | ✕ |
+| 0.2586% | webkit-box-decoration-break | ✕ |
+| 0.2467% | webkit-text-security | ✕ |
+| 0.2374% | webkit-background-origin | ✕ |
+| 0.2146% | font-variant-caps | ✕ |
+| 0.2005% | column-rule-style | ✕ |
+| 0.1976% | shape-outside | ✕ |
+| 0.1971% | webkit-padding-before | ✕ |
+| 0.1896% | break-after | ✕ |
+| 0.1782% | webkit-padding-after | ✕ |
+| 0.1774% | text-orientation | ✕ |
+| 0.1747% | webkit-text-orientation | ✕ |
+| 0.1655% | mask | ✕ |
+| 0.1626% | alignment-baseline | ✕ |
+| 0.1572% | page | ✕ |
+| 0.1530% | webkit-column-break-after | ✕ |
+| 0.1521% | webkit-box-reflect | ✕ |
+| 0.1504% | webkit-text-emphasis-color | ✕ |
+| 0.1499% | object-position | ✕ |
+| 0.1470% | break-before | ✕ |
+| 0.1455% | webkit-margin-collapse | ✕ |
+| 0.1452% | baseline-shift | ✕ |
+| 0.1451% | hyphens | ✕ |
+| 0.1309% | rx | ✕ |
+| 0.1304% | ry | ✕ |
+| 0.1256% | background-blend-mode | ✕ |
+| 0.1136% | font-variant-numeric | ✕ |
+| 0.1135% | background-repeat-x | ✕ |
+| 0.1123% | background-repeat-y | ✕ |
+| 0.1086% | webkit-text-emphasis | ✕ |
+| 0.1058% | webkit-rtl-ordering | ✕ |
+| 0.1040% | column-rule-width | ✕ |
+| 0.1036% | isolation | ✕ |
+| 0.1002% | webkit-highlight | ✕ |
+| 0.0843% | webkit-transform-origin-y | ✕ |
+| 0.0786% | webkit-transform-origin-x | ✕ |
+| 0.0770% | webkit-app-region | ✕ |
+| 0.0685% | column-span | ✕ |
+| 0.0653% | r | ✕ |
+| 0.0611% | y | ✕ |
+| 0.0602% | x | ✕ |
+| 0.0555% | webkit-border-vertical-spacing | ✕ |
+| 0.0545% | webkit-border-horizontal-spacing | ✕ |
+| 0.0542% | webkit-border-start-width | ✕ |
+| 0.0450% | webkit-border-start-color | ✕ |
+| 0.0424% | webkit-border-after-width | ✕ |
+| 0.0424% | webkit-border-before-width | ✕ |
+| 0.0423% | webkit-border-end-width | ✕ |
+| 0.0351% | marker | ✕ |
+| 0.0349% | webkit-border-end-color | ✕ |
+| 0.0347% | webkit-border-after-color | ✕ |
+| 0.0347% | webkit-border-before-color | ✕ |
+| 0.0342% | mask-type | ✕ |
+| 0.0328% | color-interpolation-filters | ✕ |
+| 0.0325% | webkit-border-end | ✕ |
+| 0.0319% | vector-effect | ✕ |
+| 0.0307% | color-rendering | ✕ |
+
+## CSS Units and Values
+
+refs: https://drafts.csswg.org/css-values/ 2016-12-11
+
+### Textual
+
+* pre-defined keywords
+  * CSS-wide keywords
+    * `initial`
+    * `inherit`
+    * `unset`
+* `<custom-ident>`: author-defined identifiers ✓
+* `<string>`: quoted strings (`"xxx"`)
+* `<url>`: resourec locators (`url()`)
+
+### Numeric
+
+* `<integer>` ✓
+* `<number>` ✓
+* `<percentage>`
+
+### Length `<length>`
+
+* relative
+  * font-relative
+    * `em`
+    * `ex`
+    * `ch`
+    * `ic`
+    * `rem` ✓🔧
+  * viewport-percentage
+    * `vw` ✓🔧
+    * `vh` ✓🔧
+    * `vi`
+    * `vb`
+    * `vmin` ✓🔧
+    * `vmax` ✓🔧
+* absolute
+  * `cm` ✓🔧
+  * `mm` ✓🔧
+  * `Q` ✓🔧
+  * `in` ✓🔧
+  * `pc` ✓🔧
+  * `pt` ✓🔧
+  * `px` autofixed to number
+
+### Quantities
+
+* `<angle>`
+  * `deg`
+  * `grad`
+  * `rad`
+  * `turn`
+* `<time>`
+  * `s`
+  * `ms`
+* `<frequency>`
+  * `Hz`
+  * `kHz`
+* `<resolution>`
+  * `dpi`
+  * `dpcm`
+  * `dppx`
+
+### Elsewhere
+
+* `<color>` ✓
+* `<image>`
+* `<position>`
+
+### Functional
+
+* `calc()`
+* `toggle()`
+* `attr()`
+
+## JS APIs
+
+refs: https://www.w3.org/standards/techs/js 2016-12-11
+
+### Completed Work
+
+#### Standards
+
+| last update | spec | supported |
+| ---- | ---- | ---- |
+| 2016-11-17 | Media Source Extensions™ | - (media related) |
+| 2016-11-08 | Geolocation API Specification 2nd Edition | ✕ developing |
+| 2016-10-27 | Pointer Lock | - |
+| 2016-10-18 | Vibration API (Second Edition) | ✕ |
+| 2016-04-19 | Web Storage (Second Edition) | ✓ async `storage` module |
+| 2015-10-22 | Web Notifications | ✕ |
+| 2015-05-19 | HTML5 Web Messaging | ✕ `BroadcastChannel` developing |
+| 2015-02-24 | Pointer Events | - |
+| 2015-02-10 | Vibration API | ✕ |
+| 2015-02-03 | Server-Sent Events | ✕ |
+| 2015-01-08 | Indexed Database API | ✕ |
+| 2014-03-13 | Metadata API for Media Resources 1.0 | - (media related) |
+| 2014-02-11 | Progress Events | ✕ |
+| 2014-01-16 | JSON-LD 1.0 Processing Algorithms and API | - |
+| 2013-12-12 | Performance Timeline | - (perf related) |
+| 2013-12-12 | User Timing | - (perf related) |
+| 2013-10-31 | Widget Interface | - |
+| 2013-10-29 | Page Visibility (Second Edition) | ✕ `onviewappear`/`onviewdisappear` |
+| 2013-10-10 | Touch Events | ✕ |
+| 2013-02-21 | Selectors API Level 1 | - |
+| 2012-12-17 | Navigation Timing | - (perf related) |
+| 2012-12-17 | High Resolution Time | - (perf related) |
+| 2008-12-22 | Element Traversal Specification | - |
+
+### Drafts
+
+#### Proposed Recommendations
+
+| last update | spec | supported |
+| ---- | ---- | ---- |
+| 2016-09-15 | WebIDL Level 1 | - |
+
+#### Candidate Recommendations
+
+| last update | spec | supported |
+| ---- | ---- | ---- |
+| 2016-12-08 | Performance Timeline Level 2 | - (perf related) |
+| 2016-11-22 | Page Visibility Level 2 | ✕ `onviewappear`/`onviewdisappear` |
+| 2016-11-01 | High Resolution Time Level 2 | - (perf related) |
+| 2016-08-18 | DeviceOrientation Event Specification | ✕ |
+| 2016-07-21 | Resource Timing Level 1 | - (perf related) |
+| 2016-07-14 | Presentation API | - |
+| 2016-07-07 | Battery Status API | ✕ |
+| 2016-07-05 | Encrypted Media Extensions | - |
+| 2016-05-19 | Media Capture and Streams | - (media related) |
+| 2014-12-11 | Web Cryptography API | - |
+| 2014-09-09 | HTML Media Capture | - (media related) |
+| 2012-09-20 | The WebSocket API | ✕ |
+
+#### Last Call Drafts
+
+| last update | spec | supported |
+| ---- | ---- | ---- |
+| 2011-12-01 | Geolocation API Specification Level 2 | ✕ |
+
+#### Other Working Drafts
+
+| last update | spec | supported |
+| ---- | ---- | ---- |
+| 2016-12-09 | MediaStream Image Capture | - (media related) |
+| 2016-12-06 | MediaStream Recording | - (media related) |
+| 2016-12-06 | Selection API | ✕ |
+| 2016-12-05 | Input Events | ✕ |
+| 2016-12-02 | Gamepad | - |
+| 2016-11-29 | WebDriver | - |
+| 2016-11-24 | WebRTC 1.0: Real-time Communication Between Browsers | ✕ |
+| 2016-11-22 | Pointer Lock 2.0 | - |
+| 2016-11-07 | Remote Playback API | - (media related) |
+| 2016-11-03 | Resource Timing Level 2 | - (perf related) |
+| 2016-11-02 | Audio Output Devices API | - (media related) |
+| 2016-11-01 | Indexed Database API 2.0 | ✕ |
+| 2016-11-01 | User Timing Level 2 | - (perf related) |
+| 2016-10-31 | The Screen Orientation API | ✕ |
+| 2016-10-31 | High Resolution Time Level 3 | - (perf related) |
+| 2016-10-24 | UI Events KeyboardEvent code Values | - |
+| 2016-10-24 | UI Events KeyboardEvent key Values | - |
+| 2016-10-11 | Service Workers 1 | ✕ |
+| 2016-09-21 | Identifiers for WebRTC's Statistics API | - |
+| 2016-09-13 | Accelerometer Sensor | ✕ |
+| 2016-09-13 | Gyroscope Sensor | ✕ |
+| 2016-09-13 | Magnetometer Sensor | ✕ |
+| 2016-08-30 | Ambient Light Sensor | ✕ |
+| 2016-08-30 | Media Capture from DOM Elements | - (media related) |
+| 2016-08-30 | Generic Sensor API | ✕ |
+| 2016-08-03 | Wake Lock API | ✕ |
+| 2016-07-19 | Proximity Sensor | ✕ |
+| 2016-07-19 | Pointer Events - Level 2 | - |
+| 2016-07-14 | Screen Capture | ✕ |
+| 2016-07-12 | Media Capture Depth Stream Extensions | - (media related) |
+| 2016-05-17 | Cooperative Scheduling of Background Tasks | ✕ |
+| 2016-04-22 | Navigation Timing Level 2 | - (perf related) |
+| 2016-04-03 | Clipboard API and events | ✕ `clipboard` module |
+| 2015-12-15 | Push API | ✕ |
+| 2015-12-08 | Web Audio API | - (media related) |
+| 2015-10-15 | FindText API | - |
+| 2015-09-24 | Web Workers | ✕ |
+| 2015-04-21 | File API | ✕ |
+| 2014-02-20 | Network Service Discovery | ✕ |
+| 2012-03-06 | MediaStream Capture Scenarios | - (media related) |
+| 2011-12-15 | Audio Processing API | - (media related) |
\ No newline at end of file

http://git-wip-us.apache.org/repos/asf/incubator-weex-site/blob/12e3a8bc/_drafts/web-standards.md
----------------------------------------------------------------------
diff --git a/_drafts/web-standards.md b/_drafts/web-standards.md
new file mode 100644
index 0000000..3125796
--- /dev/null
+++ b/_drafts/web-standards.md
@@ -0,0 +1,585 @@
+---
+title: Web 标准
+type: references
+group: API
+order: 2.7
+version: 2.1
+has_chapter_content: true
+---
+
+# Weex 中的 Web 标准
+
+## HTML
+
+refs: https://www.advancedwebranking.com/html/ 2016-12-11
+
+### Overview
+
+| percentage | name | supported |
+| ---- | ---- | ---- |
+| 98.1% | `<head>` | - |
+| 97.9% | `<body>` | - |
+| 97.9% | `<html>` | - |
+| 97% | `<title>` | - |
+| 93.9% | `<meta>` | - |
+| 89.9% | `<div>` | ✓ |
+| 89.6% | `<a>` | ✓ |
+| 88.5% | `<script>` | ✓ |
+| 86.5% | `<link>` | - |
+| 86.3% | `<img>` | ✓ |
+| 81.5% | `<p>` | - (can be customized) |
+| 75.6% | `<span>` | - (can be customized) |
+| 73.8% | `<li>` | - (can be customized) |
+| 73.7% | `<ul>` | - (can be customized) |
+| 70.3% | `<br>` | ✕ |
+| 60.4% | `<style>` | ✓ |
+| 55.8% | `<h1>` | - (can be customized) |
+| 52.7% | `<h2>` | - (can be customized) |
+| 48.4% | `<input>` | ✓ |
+| 46.9% | `<form>` | ✕ |
+| 44.3% | `<strong>` | - (can be customized) |
+| 43.1% | `<h3>` | - (can be customized) |
+| 30.9% | `<table>` | ✕ |
+| 30.3% | `<tr>` | ✕ |
+| 30.2% | `<td>` | ✕ |
+
+### Forms
+
+| percentage | name | supported |
+| ---- | ---- | ---- |
+| 49.5% | `<option>` | ✕ |
+| 30.2% | `<input>` | ✓ |
+| 16.6% | > `[type="hidden"]` | - |
+| 8% | > `[type="text"]` | ✓ |
+| 4.2% | > `[type="submit"]` | - |
+| 2% | > `[type="checkbox"]` | - (`<switch>`) |
+| 1.2% | > `[type="email"]` | ✓ |
+| 1.1% | > `[type="radio"]` | ✕ |
+| 0.9% | > `[type="image"]` | - |
+| 0.8% | > `[type="button"]` | - |
+| 0.6% | > `[type="search"]` | ✕ |
+| 0.6% | > `[type="password"]` | ✓ |
+| 0.1% | > `[type="tel"]` | ✓ |
+| 0.1% | > `[type="number"]` | ✓ |
+| 0% | > `[type="reset"]` | - |
+| 0% | > `[type="file"]` | ✕ |
+| 0% | > `[type="date"]` | ✓ |
+| 0% | > `[type="url"]` | ✓ |
+| 0% | > `[type="range"]` | ✕ |
+| 0% | > `[type="color"]` | ✕ |
+| 0% | > `[type="time"]` | ✓ |
+| 0% | > `[type="datetime-local"]` | ✕ |
+| 7.2% | `<label>` | - |
+| 6.1% | `<form>` | - |
+| 3.7% | `<button>` | - (can be customized) |
+| 2.6% | > `[type="button"]` | - |
+| 1.3% | > `[type="submit"]` | - |
+| 0% | > `[type="reset"]` | - |
+| 1.9% | `<select>` | ✕ |
+| 0.7% | `<textarea>` | ✓ |
+| 0.5% | `<fieldset>` | - |
+| 0.1% | `<optgroup>` | ✕ |
+| 0.1% | `<legend>` | - |
+| 0% | `<progress>` | ✕ |
+| 0% | `<datalist>` | - |
+| 0% | `<output>` | - |
+| 0% | `<meter>` | - |
+
+## CSS Properties
+
+refs: https://www.chromestatus.com/metrics/feature/popularity 2016-12-11
+
+| percentage | name | supported |
+| ---- | ---- | ---- |
+| 90.5115% | display | ✕ `flex` only |
+| 89.8243% | margin | ✓ (not support combo) |
+| 88.7012% | width | ✓ |
+| 88.6468% | overflow | ✓ iOS only, `hidden` only for Android |
+| 88.6432% | background-color | ✓ |
+| 88.0803% | height | ✓ |
+| 87.7648% | font-size | ✓ |
+| 87.3837% | padding | ✓ |
+| 87.2721% | color | ✓ |
+| 86.9788% | text-align | ✓ |
+| 86.6841% | position | ✓ `relative` by default, `static` not supported |
+| 86.6039% | font-family | ✓ |
+| 86.5943% | font-weight | ✓ |
+| 85.0072% | opacity | ✓ |
+| 80.6911% | max-width | ✕ |
+| 79.4476% | box-sizing | ✕ `border-box` only |
+| 75.7623% | max-height | ✕ |
+| 74.9939% | webkit-user-select | ✕ |
+| 57.0292% | align-items | ✓ |
+| 56.8182% | justify-content | ✓ `space-around` not supported well in browser |
+| 50.5941% | flex-direction | ✓ |
+| 48.5052% | border | ✓ |
+| 47.5161% | top | ✓ |
+| 46.9136% | background | ✕ |
+| 46.1552% | cursor | ✕ |
+| 46.1443% | margin-left | ✓ |
+| 46.0956% | left | ✓ |
+| 46.0848% | text-decoration | ✓ |
+| 45.9575% | float | ✕ |
+| 45.8391% | border-bottom | ✓ |
+| 45.7639% | padding-left | ✓ |
+| 45.7128% | margin-top | ✓ |
+| 45.7013% | line-height | ✓ |
+| 45.5836% | background-image | ✕ |
+| 45.0837% | z-index | ✕ |
+| 45.0649% | right | ✓ |
+| 45.0516% | margin-bottom | ✓ |
+| 45.0459% | white-space | ✕ |
+| 44.8710% | margin-right | ✓ |
+| 44.8476% | vertical-align | ✕ |
+| 44.6306% | padding-top | ✓ |
+| 44.1466% | border-radius | ✓ |
+| 44.0136% | border-top | ✓ |
+| 43.9815% | padding-bottom | ✓ |
+| 43.9392% | padding-right | ✓ |
+| 43.8539% | visibility | ✕ |
+| 43.4306% | background-position | ✕ |
+| 43.4098% | background-repeat | ✕ |
+| 43.0391% | clear | ✕ |
+| 42.9100% | bottom | ✓ |
+| 42.2092% | content | ✕ |
+| 42.0690% | box-shadow | ✕ |
+| 41.9004% | border-color | ✓ |
+| 41.7341% | outline | ✕ |
+| 41.4297% | border-right | ✓ |
+| 41.2605% | border-left | ✓ |
+| 41.1127% | min-height | ✕ |
+| 41.0736% | font-style | ✓ |
+| 41.0523% | min-width | ✕ |
+| 40.4298% | list-style | ✕ |
+| 39.7341% | font | ✕ |
+| 38.8999% | background-size | ✕ |
+| 38.7811% | border-width | ✓ |
+| 38.7718% | border-collapse | ✕ |
+| 37.8110% | border-style | ✓ |
+| 37.4962% | text-overflow | ✓ must work with `lines` |
+| 37.3471% | text-transform | ✕ |
+| 37.2154% | transition | ✕ |
+| 36.5155% | overflow-y | ✕ |
+| 36.3025% | transform | ✕ |
+| 36.2488% | text-indent | ✕ |
+| 35.5075% | text-shadow | ✕ |
+| 34.7607% | webkit-appearance | ✕ |
+| 34.1925% | list-style-type | ✕ |
+| 34.0238% | border-spacing | ✕ |
+| 33.6664% | word-wrap | ✕ |
+| 31.9961% | overflow-x | ✕ |
+| 31.9922% | zoom | ✕ |
+| 31.2495% | border-bottom-left-radius | ✕ |
+| 31.1306% | pointer-events | ✕ |
+| 31.1229% | border-top-left-radius | ✕ |
+| 30.2131% | border-bottom-color | ✓ |
+| 29.9608% | border-top-color | ✓ |
+| 29.4297% | border-bottom-right-radius | ✕ |
+| 29.2668% | border-top-right-radius | ✕ |
+| 28.6489% | letter-spacing | ✕ |
+| 27.8327% | animation | ✕ |
+| 26.6738% | border-right-width | ✓ |
+| 26.0169% | src | ✕ |
+| 25.2661% | clip | ✕ |
+| 25.2512% | webkit-font-smoothing | ✕ |
+| 25.1971% | border-bottom-width | ✓ |
+| 25.0246% | border-right-color | ✓ |
+| 24.7790% | direction | ✕ |
+| 24.4094% | webkit-tap-highlight-color | ✕ |
+| 23.9751% | border-left-color | ✓ |
+| 23.9321% | border-top-width | ✓ |
+| 23.7902% | fill | ✕ |
+| 23.2617% | border-left-width | ✓ |
+| 22.7278% | table-layout | ✕ |
+| 21.5766% | word-break | ✕ |
+| 20.4319% | background-clip | ✕ |
+| 19.3198% | transform-origin | ✕ |
+| 18.9233% | filter | ✕ |
+| 17.7879% | resize | ✕ |
+| 16.2501% | flex | ✕ |
+| 15.1656% | font-variant | ✕ |
+| 14.9181% | text-rendering | ✕ |
+| 14.7125% | webkit-filter | ✕ |
+| 14.5263% | transition-duration | ✕ |
+| 14.3966% | transition-property | ✕ |
+| 14.2124% | webkit-box-orient | ✕ |
+| 13.5432% | outline-offset | ✕ |
+| 12.9300% | transition-timing-function | ✕ |
+| 12.2788% | unicode-range | ✕ |
+| 12.0880% | word-spacing | ✕ |
+| 11.9124% | quotes | ✕ |
+| 11.6800% | border-bottom-style | ✓ |
+| 11.4263% | webkit-background-clip | ✕ |
+| 11.0070% | flex-grow | ✕ |
+| 10.5925% | backface-visibility | ✕ |
+| 10.4417% | animation-name | ✕ |
+| 10.4302% | stroke | ✕ |
+| 10.4144% | animation-duration | ✕ |
+| 10.2804% | touch-action | ✕ |
+| 9.9663% | list-style-position | ✕ |
+| 9.8662% | order | ✕ |
+| 9.7770% | outline-width | ✕ |
+| 9.7504% | transition-delay | ✕ |
+| 9.4689% | border-top-style | ✓ |
+| 9.3474% | webkit-box-pack | ✕ |
+| 9.3078% | webkit-box-align | ✕ |
+| 9.2375% | page-break-inside | ✕ |
+| 9.1898% | webkit-line-clamp | ✕ |
+| 8.9350% | list-style-image | ✕ |
+| 8.8339% | page-break-after | ✕ |
+| 8.5735% | speak | ✕ |
+| 8.4754% | unicode-bidi | ✕ |
+| 8.4307% | animation-timing-function | ✕ |
+| 8.1464% | webkit-box-flex | ✕ |
+| 8.0048% | orphans | ✕ |
+| 7.9947% | widows | ✕ |
+| 7.6671% | flex-wrap | ✓ not supported well in browser |
+| 7.5756% | animation-fill-mode | ✕ |
+| 7.4163% | animation-delay | ✕ |
+| 7.3284% | border-left-style | ✓ |
+| 7.1586% | outline-color | ✕ |
+| 6.9102% | flex-shrink | ✕ |
+| 6.7754% | perspective | ✕ |
+| 6.7748% | border-right-style | ✓ |
+| 6.4619% | outline-style | ✕ |
+| 6.0382% | animation-iteration-count | ✕ |
+| 5.9838% | background-origin | ✕ |
+| 5.9714% | fill-opacity | ✕ |
+| 5.9357% | will-change | ✕ |
+| 5.3740% | stroke-width | ✕ |
+| 5.3172% | transform-style | ✕ |
+| 5.2608% | overflow-wrap | ✕ |
+| 5.1730% | background-attachment | ✕ |
+| 4.9039% | counter-increment | ✕ |
+| 4.5950% | counter-reset | ✕ |
+| 4.5031% | align-self | ✕ |
+| 4.4109% | webkit-box-ordinal-group | ✕ |
+| 4.4046% | webkit-animation-direction | ✕ |
+| 3.7598% | background-position-x | ✕ |
+| 3.6867% | border-image | ✕ |
+| 3.6601% | background-position-y | ✕ |
+| 3.5749% | webkit-user-drag | ✕ |
+| 3.3376% | flex-basis | ✕ |
+| 3.1840% | align-content | ✕ |
+| 3.1832% | flex-flow | ✕ |
+| 3.1774% | image-rendering | ✕ |
+| 3.0879% | webkit-margin-start | ✕ |
+| 2.9551% | font-stretch | ✕ |
+| 2.8934% | empty-cells | ✕ |
+| 2.7619% | webkit-margin-after | ✕ |
+| 2.7220% | perspective-origin | ✕ |
+| 2.6125% | webkit-margin-end | ✕ |
+| 2.6089% | column-count | ✕ |
+| 2.5880% | webkit-text-fill-color | ✕ |
+| 2.5466% | webkit-box-direction | ✕ |
+| 2.4618% | font-feature-settings | ✕ |
+| 2.3959% | webkit-mask-image | ✕ |
+| 2.3431% | webkit-padding-end | ✕ |
+| 2.2555% | stroke-dasharray | ✕ |
+| 2.1788% | user-select | ✕ |
+| 2.1679% | object-fit | ✕ |
+| 2.0643% | column-gap | ✕ |
+| 2.0459% | text-size-adjust | ✕ |
+| 2.0253% | caption-side | ✕ |
+| 1.9695% | stroke-dashoffset | ✕ |
+| 1.7923% | stroke-linecap | ✕ |
+| 1.7861% | animation-direction | ✕ |
+| 1.7559% | webkit-font-feature-settings | ✕ |
+| 1.7404% | stroke-opacity | ✕ |
+| 1.5926% | stroke-miterlimit | ✕ |
+| 1.5786% | fill-rule | ✕ |
+| 1.4859% | webkit-user-modify | ✕ |
+| 1.3439% | webkit-border-image | ✕ |
+| 1.3091% | animation-play-state | ✕ |
+| 1.2676% | contain | ✕ |
+| 1.2029% | webkit-padding-start | ✕ |
+| 1.1840% | webkit-margin-before | ✕ |
+| 1.1269% | page-break-before | ✕ |
+| 1.1222% | webkit-margin-top-collapse | ✕ |
+| 1.0418% | columns | ✕ |
+| 1.0354% | webkit-mask-size | ✕ |
+| 0.9650% | border-image-slice | ✕ |
+| 0.9425% | stop-color | ✕ |
+| 0.9408% | webkit-mask-repeat | ✕ |
+| 0.9125% | webkit-box-lines | ✕ |
+| 0.8804% | webkit-column-break-inside | ✕ |
+| 0.8752% | size | ✕ |
+| 0.8334% | font-kerning | ✕ |
+| 0.8034% | stroke-linejoin | ✕ |
+| 0.7869% | tab-size | ✕ |
+| 0.7689% | break-inside | ✕ |
+| 0.7589% | webkit-text-stroke-width | ✕ |
+| 0.7353% | column-width | ✕ |
+| 0.6924% | webkit-mask-position | ✕ |
+| 0.6869% | border-image-width | ✕ |
+| 0.6323% | border-image-repeat | ✕ |
+| 0.5994% | border-image-outset | ✕ |
+| 0.5885% | all | ✕ |
+| 0.5859% | webkit-text-stroke-color | ✕ |
+| 0.5435% | webkit-print-color-adjust | ✕ |
+| 0.5420% | webkit-text-stroke | ✕ |
+| 0.5195% | writing-mode | ✕ |
+| 0.4741% | clip-rule | ✕ |
+| 0.4685% | webkit-clip-path | ✕ |
+| 0.4578% | text-anchor | ✕ |
+| 0.4535% | shape-rendering | ✕ |
+| 0.4526% | webkit-column-break-before | ✕ |
+| 0.4494% | clip-path | ✕ |
+| 0.4452% | webkit-mask | ✕ |
+| 0.4393% | mix-blend-mode | ✕ |
+| 0.4166% | text-align-last | ✕ |
+| 0.4033% | column-rule | ✕ |
+| 0.3990% | webkit-mask-box-image | ✕ |
+| 0.3989% | font-variant-ligatures | ✕ |
+| 0.3881% | column-fill | ✕ |
+| 0.3865% | webkit-line-break | ✕ |
+| 0.3857% | border-image-source | ✕ |
+| 0.3528% | stop-opacity | ✕ |
+| 0.3075% | webkit-perspective-origin-y | ✕ |
+| 0.3054% | webkit-perspective-origin-x | ✕ |
+| 0.2994% | webkit-writing-mode | ✕ |
+| 0.2717% | dominant-baseline | ✕ |
+| 0.2634% | column-rule-color | ✕ |
+| 0.2586% | webkit-box-decoration-break | ✕ |
+| 0.2467% | webkit-text-security | ✕ |
+| 0.2374% | webkit-background-origin | ✕ |
+| 0.2146% | font-variant-caps | ✕ |
+| 0.2005% | column-rule-style | ✕ |
+| 0.1976% | shape-outside | ✕ |
+| 0.1971% | webkit-padding-before | ✕ |
+| 0.1896% | break-after | ✕ |
+| 0.1782% | webkit-padding-after | ✕ |
+| 0.1774% | text-orientation | ✕ |
+| 0.1747% | webkit-text-orientation | ✕ |
+| 0.1655% | mask | ✕ |
+| 0.1626% | alignment-baseline | ✕ |
+| 0.1572% | page | ✕ |
+| 0.1530% | webkit-column-break-after | ✕ |
+| 0.1521% | webkit-box-reflect | ✕ |
+| 0.1504% | webkit-text-emphasis-color | ✕ |
+| 0.1499% | object-position | ✕ |
+| 0.1470% | break-before | ✕ |
+| 0.1455% | webkit-margin-collapse | ✕ |
+| 0.1452% | baseline-shift | ✕ |
+| 0.1451% | hyphens | ✕ |
+| 0.1309% | rx | ✕ |
+| 0.1304% | ry | ✕ |
+| 0.1256% | background-blend-mode | ✕ |
+| 0.1136% | font-variant-numeric | ✕ |
+| 0.1135% | background-repeat-x | ✕ |
+| 0.1123% | background-repeat-y | ✕ |
+| 0.1086% | webkit-text-emphasis | ✕ |
+| 0.1058% | webkit-rtl-ordering | ✕ |
+| 0.1040% | column-rule-width | ✕ |
+| 0.1036% | isolation | ✕ |
+| 0.1002% | webkit-highlight | ✕ |
+| 0.0843% | webkit-transform-origin-y | ✕ |
+| 0.0786% | webkit-transform-origin-x | ✕ |
+| 0.0770% | webkit-app-region | ✕ |
+| 0.0685% | column-span | ✕ |
+| 0.0653% | r | ✕ |
+| 0.0611% | y | ✕ |
+| 0.0602% | x | ✕ |
+| 0.0555% | webkit-border-vertical-spacing | ✕ |
+| 0.0545% | webkit-border-horizontal-spacing | ✕ |
+| 0.0542% | webkit-border-start-width | ✕ |
+| 0.0450% | webkit-border-start-color | ✕ |
+| 0.0424% | webkit-border-after-width | ✕ |
+| 0.0424% | webkit-border-before-width | ✕ |
+| 0.0423% | webkit-border-end-width | ✕ |
+| 0.0351% | marker | ✕ |
+| 0.0349% | webkit-border-end-color | ✕ |
+| 0.0347% | webkit-border-after-color | ✕ |
+| 0.0347% | webkit-border-before-color | ✕ |
+| 0.0342% | mask-type | ✕ |
+| 0.0328% | color-interpolation-filters | ✕ |
+| 0.0325% | webkit-border-end | ✕ |
+| 0.0319% | vector-effect | ✕ |
+| 0.0307% | color-rendering | ✕ |
+
+## CSS Units and Values
+
+refs: https://drafts.csswg.org/css-values/ 2016-12-11
+
+### Textual
+
+* pre-defined keywords
+  * CSS-wide keywords
+    * `initial`
+    * `inherit`
+    * `unset`
+* `<custom-ident>`: author-defined identifiers ✓
+* `<string>`: quoted strings (`"xxx"`)
+* `<url>`: resourec locators (`url()`)
+
+### Numeric
+
+* `<integer>` ✓
+* `<number>` ✓
+* `<percentage>`
+
+### Length `<length>`
+
+* relative
+  * font-relative
+    * `em`
+    * `ex`
+    * `ch`
+    * `ic`
+    * `rem` ✓🔧
+  * viewport-percentage
+    * `vw` ✓🔧
+    * `vh` ✓🔧
+    * `vi`
+    * `vb`
+    * `vmin` ✓🔧
+    * `vmax` ✓🔧
+* absolute
+  * `cm` ✓🔧
+  * `mm` ✓🔧
+  * `Q` ✓🔧
+  * `in` ✓🔧
+  * `pc` ✓🔧
+  * `pt` ✓🔧
+  * `px` autofixed to number
+
+### Quantities
+
+* `<angle>`
+  * `deg`
+  * `grad`
+  * `rad`
+  * `turn`
+* `<time>`
+  * `s`
+  * `ms`
+* `<frequency>`
+  * `Hz`
+  * `kHz`
+* `<resolution>`
+  * `dpi`
+  * `dpcm`
+  * `dppx`
+
+### Elsewhere
+
+* `<color>` ✓
+* `<image>`
+* `<position>`
+
+### Functional
+
+* `calc()`
+* `toggle()`
+* `attr()`
+
+## JS APIs
+
+refs: https://www.w3.org/standards/techs/js 2016-12-11
+
+### Completed Work
+
+#### Standards
+
+| last update | spec | supported |
+| ---- | ---- | ---- |
+| 2016-11-17 | Media Source Extensions™ | - (media related) |
+| 2016-11-08 | Geolocation API Specification 2nd Edition | ✕ developing |
+| 2016-10-27 | Pointer Lock | - |
+| 2016-10-18 | Vibration API (Second Edition) | ✕ |
+| 2016-04-19 | Web Storage (Second Edition) | ✓ async `storage` module |
+| 2015-10-22 | Web Notifications | ✕ |
+| 2015-05-19 | HTML5 Web Messaging | ✕ `BroadcastChannel` developing |
+| 2015-02-24 | Pointer Events | - |
+| 2015-02-10 | Vibration API | ✕ |
+| 2015-02-03 | Server-Sent Events | ✕ |
+| 2015-01-08 | Indexed Database API | ✕ |
+| 2014-03-13 | Metadata API for Media Resources 1.0 | - (media related) |
+| 2014-02-11 | Progress Events | ✕ |
+| 2014-01-16 | JSON-LD 1.0 Processing Algorithms and API | - |
+| 2013-12-12 | Performance Timeline | - (perf related) |
+| 2013-12-12 | User Timing | - (perf related) |
+| 2013-10-31 | Widget Interface | - |
+| 2013-10-29 | Page Visibility (Second Edition) | ✕ `onviewappear`/`onviewdisappear` |
+| 2013-10-10 | Touch Events | ✕ |
+| 2013-02-21 | Selectors API Level 1 | - |
+| 2012-12-17 | Navigation Timing | - (perf related) |
+| 2012-12-17 | High Resolution Time | - (perf related) |
+| 2008-12-22 | Element Traversal Specification | - |
+
+### Drafts
+
+#### Proposed Recommendations
+
+| last update | spec | supported |
+| ---- | ---- | ---- |
+| 2016-09-15 | WebIDL Level 1 | - |
+
+#### Candidate Recommendations
+
+| last update | spec | supported |
+| ---- | ---- | ---- |
+| 2016-12-08 | Performance Timeline Level 2 | - (perf related) |
+| 2016-11-22 | Page Visibility Level 2 | ✕ `onviewappear`/`onviewdisappear` |
+| 2016-11-01 | High Resolution Time Level 2 | - (perf related) |
+| 2016-08-18 | DeviceOrientation Event Specification | ✕ |
+| 2016-07-21 | Resource Timing Level 1 | - (perf related) |
+| 2016-07-14 | Presentation API | - |
+| 2016-07-07 | Battery Status API | ✕ |
+| 2016-07-05 | Encrypted Media Extensions | - |
+| 2016-05-19 | Media Capture and Streams | - (media related) |
+| 2014-12-11 | Web Cryptography API | - |
+| 2014-09-09 | HTML Media Capture | - (media related) |
+| 2012-09-20 | The WebSocket API | ✕ |
+
+#### Last Call Drafts
+
+| last update | spec | supported |
+| ---- | ---- | ---- |
+| 2011-12-01 | Geolocation API Specification Level 2 | ✕ |
+
+#### Other Working Drafts
+
+| last update | spec | supported |
+| ---- | ---- | ---- |
+| 2016-12-09 | MediaStream Image Capture | - (media related) |
+| 2016-12-06 | MediaStream Recording | - (media related) |
+| 2016-12-06 | Selection API | ✕ |
+| 2016-12-05 | Input Events | ✕ |
+| 2016-12-02 | Gamepad | - |
+| 2016-11-29 | WebDriver | - |
+| 2016-11-24 | WebRTC 1.0: Real-time Communication Between Browsers | ✕ |
+| 2016-11-22 | Pointer Lock 2.0 | - |
+| 2016-11-07 | Remote Playback API | - (media related) |
+| 2016-11-03 | Resource Timing Level 2 | - (perf related) |
+| 2016-11-02 | Audio Output Devices API | - (media related) |
+| 2016-11-01 | Indexed Database API 2.0 | ✕ |
+| 2016-11-01 | User Timing Level 2 | - (perf related) |
+| 2016-10-31 | The Screen Orientation API | ✕ |
+| 2016-10-31 | High Resolution Time Level 3 | - (perf related) |
+| 2016-10-24 | UI Events KeyboardEvent code Values | - |
+| 2016-10-24 | UI Events KeyboardEvent key Values | - |
+| 2016-10-11 | Service Workers 1 | ✕ |
+| 2016-09-21 | Identifiers for WebRTC's Statistics API | - |
+| 2016-09-13 | Accelerometer Sensor | ✕ |
+| 2016-09-13 | Gyroscope Sensor | ✕ |
+| 2016-09-13 | Magnetometer Sensor | ✕ |
+| 2016-08-30 | Ambient Light Sensor | ✕ |
+| 2016-08-30 | Media Capture from DOM Elements | - (media related) |
+| 2016-08-30 | Generic Sensor API | ✕ |
+| 2016-08-03 | Wake Lock API | ✕ |
+| 2016-07-19 | Proximity Sensor | ✕ |
+| 2016-07-19 | Pointer Events - Level 2 | - |
+| 2016-07-14 | Screen Capture | ✕ |
+| 2016-07-12 | Media Capture Depth Stream Extensions | - (media related) |
+| 2016-05-17 | Cooperative Scheduling of Background Tasks | ✕ |
+| 2016-04-22 | Navigation Timing Level 2 | - (perf related) |
+| 2016-04-03 | Clipboard API and events | ✕ `clipboard` module |
+| 2015-12-15 | Push API | ✕ |
+| 2015-12-08 | Web Audio API | - (media related) |
+| 2015-10-15 | FindText API | - |
+| 2015-09-24 | Web Workers | ✕ |
+| 2015-04-21 | File API | ✕ |
+| 2014-02-20 | Network Service Discovery | ✕ |
+| 2012-03-06 | MediaStream Capture Scenarios | - (media related) |
+| 2011-12-15 | Audio Processing API | - (media related) |

http://git-wip-us.apache.org/repos/asf/incubator-weex-site/blob/12e3a8bc/_drafts/weex-dom-api.md
----------------------------------------------------------------------
diff --git a/_drafts/weex-dom-api.md b/_drafts/weex-dom-api.md
new file mode 100644
index 0000000..f18efa0
--- /dev/null
+++ b/_drafts/weex-dom-api.md
@@ -0,0 +1,224 @@
+---
+title: Native DOM APIs
+type: references
+group: API
+order: 2.8
+version: 2.1
+has_chapter_content: true
+---
+
+# Native DOM APIs
+
+Weex 在 JS 引擎中,为每个页面都提供了一套 Native DOM APIs,这套接口和 HTML DOM APIs 非常接近,利用这套接口我们可以通过 JavaScript 控制 native 的渲染逻辑。而且 Weex 上层的 Vue 2.0 也是基于这套接口进行适配的。
+
+*绝大多数情况下 JS 框架会把 Native DOM APIs 都封装好,开发者不需要直接对 Native DOM 进行操作。*
+
+* `Document` 类,整个页面文档。
+* `Node` 类,结点的基础类。
+* `Element` 类,元素结点,继承自 `Node`,单个视图单元。
+* `Comment` 类,注释结点,继承自 `Node`,无实际意义,通常用作占位符。
+
+**每个 Weex 页面都有一个 `weex.document` 对象,该对象就是一个 `Document` 类的实例,也是下面所有接口调用的起点。**
+
+接下来详细介绍它们的用法:
+
+## `Document` 类
+
+每个 `Document` 实例在创建的时候都会自动拥有一个 `documentElement` 属性,表示文档结点。该文档结点可以拥有一个 `body`,即文档的主体结点。
+
+**注意事项**: 文档的主体结点只接受 `<div>`、`<list>` 或 `<scroller>` 三种类型的元素结点。
+
+### 构造函数
+
+**`new Document(id: string, url: string?)`**
+
+### 成员方法
+
+**`createElement(tagName: string, props: Object?): Element`**
+
+* 创建一个特定类型 `tagName` 的 `Element` 实例,即一个元素结点。`props` 可以包含 `attr` 对象和 `style` 对象。比如 `createBody('div', {style: {backgroundColor: '#ffffff'}})`。
+
+**`createComment(text: string): Comment`**
+
+* 创建一个 `Comment` 的实例,即一个注释结点,并设置一段文本描述。
+
+**`createBody(tagName: string, props: Object?): Element`**
+
+* 创建文档主体结点,并自动挂载到 `documentElement` 下。
+
+**`fireEvent(el: Element, type: string, e: Object?, domChanges: Object?)`**
+
+* 触发一个特定类型的事件,并附带一个事件对象 `e`。当该事件在产生过程中修改了 DOM 的特性或样式,则第四个参数用来描述这些改变,参数格式和上面 `createElement` 方法的格式相同。
+
+**`destroy()`**
+
+* 销毁当前文档。一旦销毁之后文档将不会再工作。
+
+### 只读成员变量
+
+**`id: string`**
+
+* 每个 `Document` 实例都有一个唯一的 `id`。这同时也是每个 Weex 页面唯一拥有的 `id`。
+
+**`URL: string?`**
+
+* 如果当前 Weex 页面有 JS bundle URL 的话,这里则会返回 这个 URL。
+
+**`body: Element`**
+
+* 文档的主体结点,概念类似 HTML DOM 里的 `document.body`。
+
+**`documentElement: Element`**
+
+* 文档的对应结点,概念类似 HTML DOM 里的 `document.documentElement`。
+* `body` 和 `documentElement` 的关系是:`documentElement` 是 `body` 的父结点。
+
+**`getRef(id): Node`**
+
+* 根据结点 id 获取结点。
+
+## `Node` 类
+
+### 构造函数
+
+**`new Node()`**
+
+### 成员
+
+**`destroy()`**
+
+### 只读成员变量或方法
+
+**`ref: string`**
+
+* 每个 `Node` 实例都有各自的在整个 `Document` 实例中唯一的 `ref` 值。
+
+**`nextSibling: Node?`**
+
+**`previousSibling: Node?`**
+
+**`parentNode: Node?`**
+
+* 上述三个接口和 HTML DOM 的定义吻合。
+
+**`children: Node[]`**
+
+* 该结点拥有的所有子结点的数组。
+
+**`pureChildren: Node[]`**
+
+* 该结点拥有的所有子元素的数组。和 `children` 的区别是,`pureChildren` 只包含了 `Element` 实例而不包含 `Comment` 实例。
+
+## `Element` 类 <small>继承自 `Node`</small>
+
+### 构造函数
+
+**`new Element(type: string, props: Object?)`**
+
+* 创建一个特定类型 `type` 的元素结点,参数 `props` 可以包含 `attr` 对象或 `style` 对象。
+
+### DOM 树操作
+
+**`appendChild(node: Node)`**
+
+**`insertBefore(node: Node, before: Node?)`**
+
+* 上述两个接口类似 HTML DOM。
+
+**`insertAfter(node: Node, after: Node?)`**
+
+* 在一个子结点之前插入新结点 after。
+
+**`removeChild(node: Node, preserved: boolean?)`**
+
+* 删除子结点 `node`,参数 `preserved` 表示立刻从内存中删除还是暂时保留。
+
+**`clear()`**
+
+* 清除所有的子结点。
+
+### DOM 属性本身操作
+
+**`setAttr(key: string, value: string, silent: boolean?)`**
+
+**`setStyle(key: string, value: string, silent: boolean?)`**
+
+* 上述两个接口中,当 `silent` 为真的时候,结点仅更新自己,不会传递命令给客户端渲染层。该参数用来处理用户事件在发生时已经改变结点相关属性的情况下,不会在 Native DOM 也改变之后重复发送命令给客户端。
+
+**`addEvent(type: string, handler: Function)`**
+
+**`removeEvent(type: string)`**
+
+**`fireEvent(type: string, e: any)`**
+
+* 绑定事件、解绑定事件、触发事件。
+
+#### 特定组件类型的组件方法
+
+特殊的:不同组件类型可以拥有自己特有的方法,比如 `<web>` 组件支持 `refresh` 方法,详见各组件的描述,在此情况下,我们会产生特定组件类型的 class,比如 `WebElement`,它继承自 `Element`。
+
+如:
+
+> #### `WebElement` <small>继承自 `Element`</small>
+>
+> 表示在 Weex 页面中嵌入一个 webview
+>
+> **`refresh()`**: 刷新当前 webview
+
+### 只读成员变量或方法
+
+**`ref`, `nextSibling`, `previousSibling`, `parentNode`**
+
+* 继承自 `Node`。
+
+**`nodeType: number`**
+
+* 永远是数字 `1`。
+
+**`type: string`**
+
+* 和构造函数里的 `type` 一致。
+
+**`attr: Object`**
+
+* 当前结点的所有特性的键值对。推荐通过 `setAttr()` 方法进行修改,而不要直接修改这里的对象。
+
+**`style: Object`**
+
+* 当前结点的所有样式的键值对。推荐通过 `setStyle()` 方法进行修改,而不要直接修改这里的对象。
+
+**`event: Object`**
+
+* 当前结点的所有事件绑定。每个事件类型对应一个事件句柄方法。推荐通过 `addEvent()` / `removeEvent()` 方法进行修改,而不要直接修改这里的对象。
+
+**`toJSON(): Object`**
+
+* 返回描述该元素结点的一段 JSON 对象,形如:`{ref: string, type: string, attr: Object, style: Object, event: Array(string), children: Array}`。
+
+## `Comment` 类 <small>继承自 `Node`</small>
+
+### 构造函数
+
+**`new Comment(value: string)`**
+
+### 只读成员变量或方法
+
+**`ref`, `nextSibling`, `previousSibling`, `parentNode`**
+
+* 继承自 `Node`。
+
+**`nodeType: number`**
+
+* 永远是数字 `8`。
+
+**`type: string`**
+
+* 永远是字符串 `'comment'`
+
+**`value: string`**
+
+* 和构造函数里的 `value` 一致。
+
+**`toJSON(): Object`**
+
+* 返回描述该注释结点的一段 JSON 对象,形如:`<!-- value -->`。

http://git-wip-us.apache.org/repos/asf/incubator-weex-site/blob/12e3a8bc/_drafts/write-once.en.md
----------------------------------------------------------------------
diff --git a/_drafts/write-once.en.md b/_drafts/write-once.en.md
new file mode 100644
index 0000000..673b302
--- /dev/null
+++ b/_drafts/write-once.en.md
@@ -0,0 +1,23 @@
+---
+title: Write once, Run Everywhere
+type: guide
+order: 4.4
+version: 2.1
+---
+
+# Write Once, Run Everywhere
+
+Weex is a "Write Once, Run Everywhere" solution.
+
+* First, Weex is based on web dev experience, which includes syntax and project management.
+* Second, all components & modules in Weex are discussed by iOS, Android, web developers together to ensure it's common enough to satisfy every platforms.
+* You only need write the same Weex code for each platforms.
+
+We think about it in these aspects below:
+
+1. Today for almost all mobile apps, one app solves the same problem in different platforms. Weex hope to supply a lightweight way to describe your business logic which works well in all platforms you need.
+2. For the differences of all mobile platforms, we are willing to fill the gap in 3 points:
+    1. Design the same APIs for all platforms to ensure different platforms have the same business logic description.
+    2. Implement the APIs with different style or behaviors to ensure the implementation and user experience matches different platforms.
+    3. Platforms obviously differ among each other. We also have some environment variables to help developers in certain situations.
+3. We trust (web) standard is the best for all features in all platforms.

http://git-wip-us.apache.org/repos/asf/incubator-weex-site/blob/12e3a8bc/_drafts/write-once.md
----------------------------------------------------------------------
diff --git a/_drafts/write-once.md b/_drafts/write-once.md
new file mode 100644
index 0000000..6c0c62d
--- /dev/null
+++ b/_drafts/write-once.md
@@ -0,0 +1,25 @@
+---
+title: 一次撰写,多端运行
+type: wiki
+order: 1.4
+version: 2.1
+---
+
+# 一次撰写,多端运行
+
+Weex 提供了多端一致的技术方案。
+
+* 首先 web 开发体验在各端当中是相同的。包括语法设计和工程链路。
+* 其次,Weex 的组件、模块设计都是 iOS、Android、Web 的开发者共同讨论出来的,有一定的通用性和普遍性。
+* Weex 开发同一份代码,可以在不同的端上分别执行,避免了多端的重复研发成本。
+
+我们这样设计基于以下几点设想:
+
+1. 今天绝大多数的移动应用,虽然要同时出现在不同的移动操作系统平台上,但是要解决的问题和用户的需求是相同或非常接近的。Weex 希望提供的是一个快速直接统一描述业务的通用方式,为业务和产品需求直接服务。
+2. 针对各大操作系统平台差异的现状,我们倾向于通过以下两方面来解决这一问题
+    1. 把不同端的样式和行为设计并描述成为相同的 API,这样上层的业务逻辑是同一份,但是在不同端上可以做到不一样的展现效果。
+    2. 通过横向扩展的方式在不同的端上扩展不一样的功能、特性或表现形式。
+    3. 各端不一致的业务描述也是难免的,我们通过提供更多更丰富的环境变量来帮助开发者在同一套代码里高效适配不同的设备场景。
+3. 我们相信标准和规范的力量
+
+部分功能特性由于 native 特性的关系,会略有不同,我们会在相应的组件、模块、API 文档中做相应的描述和提示。

http://git-wip-us.apache.org/repos/asf/incubator-weex-site/blob/12e3a8bc/source/cn/development-process.md
----------------------------------------------------------------------
diff --git a/source/cn/development-process.md b/source/cn/development-process.md
new file mode 100644
index 0000000..16006d5
--- /dev/null
+++ b/source/cn/development-process.md
@@ -0,0 +1,6 @@
+---
+title: 开发流程
+type: community
+has_chapter_content: false
+version: 2.1
+---

http://git-wip-us.apache.org/repos/asf/incubator-weex-site/blob/12e3a8bc/source/development-process.md
----------------------------------------------------------------------
diff --git a/source/development-process.md b/source/development-process.md
new file mode 100644
index 0000000..d3d8732
--- /dev/null
+++ b/source/development-process.md
@@ -0,0 +1,6 @@
+---
+title: Development Process
+type: community
+has_chapter_content: false
+version: 2.1
+---

http://git-wip-us.apache.org/repos/asf/incubator-weex-site/blob/12e3a8bc/source/wiki/common-styles.md
----------------------------------------------------------------------
diff --git a/source/wiki/common-styles.md b/source/wiki/common-styles.md
index 8344dce..a2403ce 100644
--- a/source/wiki/common-styles.md
+++ b/source/wiki/common-styles.md
@@ -1,7 +1,7 @@
 ---
 title: Common Style
 type: wiki
-group: 样式
+group: Style
 order: 3.1
 version: 2.1
 ---

http://git-wip-us.apache.org/repos/asf/incubator-weex-site/blob/12e3a8bc/source/wiki/css-units.md
----------------------------------------------------------------------
diff --git a/source/wiki/css-units.md b/source/wiki/css-units.md
index b533bde..b087e32 100644
--- a/source/wiki/css-units.md
+++ b/source/wiki/css-units.md
@@ -1,7 +1,7 @@
 ---
 title: CSS Units
 type: wiki
-group: 样式
+group: Style
 order: 3.3
 version: 2.1
 ---

http://git-wip-us.apache.org/repos/asf/incubator-weex-site/blob/12e3a8bc/source/wiki/platform-difference.md
----------------------------------------------------------------------
diff --git a/source/wiki/platform-difference.md b/source/wiki/platform-difference.md
new file mode 100644
index 0000000..3ffc852
--- /dev/null
+++ b/source/wiki/platform-difference.md
@@ -0,0 +1,11 @@
+---
+title: Platform Differences with Web
+type: wiki
+group: Design
+order: 1.4
+version: 2.1
+---
+
+# Platform Differences with Web
+
+Work in progresss.

http://git-wip-us.apache.org/repos/asf/incubator-weex-site/blob/12e3a8bc/source/wiki/platfrom-difference.md
----------------------------------------------------------------------
diff --git a/source/wiki/platfrom-difference.md b/source/wiki/platfrom-difference.md
deleted file mode 100644
index 3ffc852..0000000
--- a/source/wiki/platfrom-difference.md
+++ /dev/null
@@ -1,11 +0,0 @@
----
-title: Platform Differences with Web
-type: wiki
-group: Design
-order: 1.4
-version: 2.1
----
-
-# Platform Differences with Web
-
-Work in progresss.

http://git-wip-us.apache.org/repos/asf/incubator-weex-site/blob/12e3a8bc/themes/weex/languages/cn.yml
----------------------------------------------------------------------
diff --git a/themes/weex/languages/cn.yml b/themes/weex/languages/cn.yml
index 25195c9..d7c7815 100644
--- a/themes/weex/languages/cn.yml
+++ b/themes/weex/languages/cn.yml
@@ -98,6 +98,7 @@ menu:
   legacy: 旧语法文档
   examples: 实例
   contribute: 如何参与贡献
+  developmentProcess: 开发流程
   usingWeex: 谁在使用 Weex
 playground:
   content: Weex Native 运行时实例 & Weex 文件预览工具。

http://git-wip-us.apache.org/repos/asf/incubator-weex-site/blob/12e3a8bc/themes/weex/languages/en.yml
----------------------------------------------------------------------
diff --git a/themes/weex/languages/en.yml b/themes/weex/languages/en.yml
index 90c6e9c..a50118c 100644
--- a/themes/weex/languages/en.yml
+++ b/themes/weex/languages/en.yml
@@ -98,6 +98,7 @@ menu:
   legacy: Old Syntax Doc
   examples: Examples
   contribute: How to Contribute
+  developmentProcess: Development Process
   usingWeex: Who is using Weex?
 playground:
   content: Weex Native Runtime showcase & Weex we file preview.

http://git-wip-us.apache.org/repos/asf/incubator-weex-site/blob/12e3a8bc/themes/weex/layout/_partial/article.ejs
----------------------------------------------------------------------
diff --git a/themes/weex/layout/_partial/article.ejs b/themes/weex/layout/_partial/article.ejs
index c506af3..9ab4340 100644
--- a/themes/weex/layout/_partial/article.ejs
+++ b/themes/weex/layout/_partial/article.ejs
@@ -4,8 +4,14 @@
   <div class="article-entry" itemprop="articleBody">
     <%- partial('post/title', {post: post}) %>
     <%- page_anchor(post.content) %>
+    <div class="article-tips">
+      <p class="tips-text">
+        <a class="xx" href="">Edit this page on GitHub.</a>
+      </p>
+    </div>
   </div>
   <% if (page_type === 'article') { %>
      <%- partial('_partial/post/nav') %>
   <% } %>
+  <%- partial('_partial/footer') %>
 </article>

http://git-wip-us.apache.org/repos/asf/incubator-weex-site/blob/12e3a8bc/themes/weex/layout/_partial/footer.ejs
----------------------------------------------------------------------
diff --git a/themes/weex/layout/_partial/footer.ejs b/themes/weex/layout/_partial/footer.ejs
index aaa76ee..093db9d 100644
--- a/themes/weex/layout/_partial/footer.ejs
+++ b/themes/weex/layout/_partial/footer.ejs
@@ -1,13 +1,15 @@
 <footer id="footer">
   <div class="footer-inner">
     <div class="disclaimer">
-      <p><img src="//gw.alicdn.com/tfs/TB1pTBZQFXXXXX9XXXXXXXXXXXX-794-280.png" width="120px" alt="Apache Incubator"></p>
+      <a target="_blank" href="https://incubator.apache.org/">
+        <img src="//gw.alicdn.com/tfs/TB1pTBZQFXXXXX9XXXXXXXXXXXX-794-280.png" width="100px" alt="Apache Incubator">
+      </a>
       <p>
         <span class="title">Disclaimer:</span>
         <span>Apache Weex is an effort undergoing incubation at The Apache Software Foundation (ASF), sponsored by the Apache Incubator. Incubation is required of all newly accepted projects until a further review indicates that the infrastructure, communications, and decision making process have stabilized in a manner consistent with other successful ASF projects. While incubation status is not necessarily a reflection of the completeness or stability of the code, it does indicate that the project has yet to be fully endorsed by the ASF.</span>
     </div>
     <p class="copyright">
-      <img src="//gw.alicdn.com/tfs/TB1bg8SQFXXXXcHXXXXXXXXXXXX-85-170.png" height="20px" alt="Apache"><span>Copyright(c) 2017 The Apache Software Foundation. Licensed under the </span>
+      <img src="//gw.alicdn.com/tfs/TB1bg8SQFXXXXcHXXXXXXXXXXXX-85-170.png" height="16px" alt="Apache"><span>Copyright(c) 2017 The Apache Software Foundation. Licensed under the </span>
       <a target="_blank" href="http://www.apache.org/licenses/LICENSE-2.0">Apache License, Version 2.0</a>
     </p>
   </div>

http://git-wip-us.apache.org/repos/asf/incubator-weex-site/blob/12e3a8bc/themes/weex/layout/_partial/header.ejs
----------------------------------------------------------------------
diff --git a/themes/weex/layout/_partial/header.ejs b/themes/weex/layout/_partial/header.ejs
index 1698db4..5087677 100644
--- a/themes/weex/layout/_partial/header.ejs
+++ b/themes/weex/layout/_partial/header.ejs
@@ -27,6 +27,9 @@
               <a href="<%= url_for_lang('contributing.html') %>"><%= _p('menu.contribute') %></a>
             </li>
             <li>
+              <a href="<%= url_for_lang('development-process.html') %>"><%= _p('menu.developmentProcess') %></a>
+            </li>
+            <li>
               <a href="<%= url_for_lang('who-is-using-weex.html') %>"><%= _p('menu.usingWeex') %></a>
             </li>
           </ul>

http://git-wip-us.apache.org/repos/asf/incubator-weex-site/blob/12e3a8bc/themes/weex/layout/layout.ejs
----------------------------------------------------------------------
diff --git a/themes/weex/layout/layout.ejs b/themes/weex/layout/layout.ejs
index b9bae58..17ba619 100644
--- a/themes/weex/layout/layout.ejs
+++ b/themes/weex/layout/layout.ejs
@@ -42,9 +42,10 @@
   </script>
   <%- partial('_partial/header') %>
   <%- partial('_partial/sidebar', {post: page, page_type: page_type}) %>
-  <%- body %>
-  <%- partial('_partial/footer') %>
-  <%- partial('_partial/after-footer') %>
+  <div class="main-content">
+    <%- body %>
+    <%- partial('_partial/after-footer') %>
+  </div>

   <%- js('js/reqwest.js') %>
   <%- js('js/common.js') %>

http://git-wip-us.apache.org/repos/asf/incubator-weex-site/blob/12e3a8bc/themes/weex/source/css/common.scss
----------------------------------------------------------------------
diff --git a/themes/weex/source/css/common.scss b/themes/weex/source/css/common.scss
index 78045b4..5c29ef2 100644
--- a/themes/weex/source/css/common.scss
+++ b/themes/weex/source/css/common.scss
@@ -22,7 +22,7 @@ body {
   font-family: -apple-system, BlinkMacSystemFont, "Segoe UI", Helvetica, Arial, sans-serif, "Apple Color Emoji", "Segoe UI Emoji", "Segoe UI Symbol";
   // font-family: 'PingFang SC', 'Hiragino Sans GB', 'Microsoft Yahei', 'WenQuanYi Micro Hei',sans-serif;
   // font-size:62.5%;max-height:100%;
-  font-size: 16px;
+  font-size: 15px;
   line-height: 120%;
   color: $text-light-black;
   -webkit-tap-highlight-color: transparent;

http://git-wip-us.apache.org/repos/asf/incubator-weex-site/blob/12e3a8bc/themes/weex/source/css/media-queries.scss
----------------------------------------------------------------------
diff --git a/themes/weex/source/css/media-queries.scss b/themes/weex/source/css/media-queries.scss
index 5c723ca..e9bd9a9 100644
--- a/themes/weex/source/css/media-queries.scss
+++ b/themes/weex/source/css/media-queries.scss
@@ -1,5 +1,33 @@
 @import "variable.scss";

+
+@media screen and (max-width: 1100px) {
+  #header {
+    padding: 0 30px;
+
+    .tools > li {
+      margin-left: 10px;
+    }
+    .tools .search-form {
+      width: 120px;
+    }
+
+    .main-nav {
+      li > a {
+        font-size: 1.16em;
+        padding: 0 12px;
+      }
+    }
+
+  }
+
+  .article-wrapper {
+    .doc-nav {
+      // padding:
+    }
+  }
+}
+
 @media screen and (max-width: $content-max-width) {

   /***********************************************
@@ -21,7 +49,7 @@
   }

   #sidebar {
-    display: block !important;
+    display: flex !important;
     transform: translateX(-320px);
     transition: all .3s ease;
     &.open {
@@ -30,7 +58,7 @@
   }

   #footer {
-    padding: 20px;
+    padding: 10px 20px;
     .disclaimer {
       display: none;
     }
@@ -39,9 +67,8 @@
     }
   }
   .article {
-    margin-top: 20px;
     .article-entry {
-      margin-bottom: 40px;
+      margin: 20px;
     }
   }

@@ -99,7 +126,7 @@
 }


-@media screen and (max-width: 700px) {
+@media screen and (max-width: 600px) {
   /***********************************************
    * Index
    **********************************************/
@@ -114,6 +141,13 @@
     }
   }

+  .article {
+    .article-entry {
+      margin: 10px;
+      padding: 5px;
+    }
+  }
+
   .scene.overlength {
     height: auto;
     min-height: 100%;

http://git-wip-us.apache.org/repos/asf/incubator-weex-site/blob/12e3a8bc/themes/weex/source/css/partial/article.scss
----------------------------------------------------------------------
diff --git a/themes/weex/source/css/partial/article.scss b/themes/weex/source/css/partial/article.scss
index 9b6505f..5f8b6a7 100644
--- a/themes/weex/source/css/partial/article.scss
+++ b/themes/weex/source/css/partial/article.scss
@@ -7,7 +7,7 @@
   margin-bottom: 3.5em;

   h1 {
-    font-size: 2.1em;
+    font-size: 2em;
     color: $text-black;
     margin: 0;

@@ -28,9 +28,9 @@
 }

 .article {
-  max-width: 900px;
-  margin-left: 50px;
-  margin-top: 40px;
+  display: flex;
+  flex: 1;
+  flex-direction: column;
   position: relative;
   line-height: 1.6;
   overflow-y: auto;
@@ -41,26 +41,30 @@
   }

   .article-entry {
-    margin-bottom: 90px;
+    flex: 1;
+    max-width: 800px;
+    margin-top: 50px;
+    margin-left: 40px;
+    margin-bottom: 60px;
   }

   h2 {
-    font-size: 1.85em;
+    font-size: 1.65em;
     margin: 1em 0 .8em;
   }

   h3 {
-    font-size: 1.5em;
+    font-size: 1.35em;
     margin: .85em 0 .7em;
   }

   h4 {
-    font-size: 1.2em;
+    font-size: 1.15em;
     margin: .75em 0 .55em;
   }

   h5 {
-    font-size: 1.05em;
+    font-size: 1em;
     margin: .6em 0 .4em;
   }

@@ -96,6 +100,26 @@
   }
 }

+.article-tips {
+  margin: 60px 0 0;
+  padding: 10px 0;
+  border-top: 1px solid #E6E6E6;
+}
+
+.tips-text {
+  margin: 0;
+  text-align: right;
+  padding-right: 10px;
+  font-size: 13px;
+
+  a, a:link {
+    color: #80d0ff;
+  }
+  a:active, a:hover {
+    color: $logo-color;
+  }
+}
+
 #blog .article {
   margin-left: 0;
 }

http://git-wip-us.apache.org/repos/asf/incubator-weex-site/blob/12e3a8bc/themes/weex/source/css/partial/footer.scss
----------------------------------------------------------------------
diff --git a/themes/weex/source/css/partial/footer.scss b/themes/weex/source/css/partial/footer.scss
index d56d459..007b565 100644
--- a/themes/weex/source/css/partial/footer.scss
+++ b/themes/weex/source/css/partial/footer.scss
@@ -1,18 +1,16 @@
 @import "../variable.scss";

-$footer-bg: #F2F2F2;
-$footer-text-color: #888;
+$footer-bg: #F0F0F0;
+$footer-text-color: #A0A0A0;

 #footer {
   width: 100%;
-  padding: 10px 50px;
-  display: flex;
-  align-items: center;
-  justify-content: center;
+  padding: 10px 40px 15px;
   background: $footer-bg;
-  font-size: 12px;
+  font-size: 10px;
+  font-weight: 200;
   color: $footer-text-color;
-  box-shadow: inset 0 1px 3px rgba(0, 0, 0, 0.1);
+  box-shadow: inset 0 1px 4px rgba(0, 0, 0, 0.1);

   a { text-decoration: underline; }
   p { margin: 0; }
@@ -28,8 +26,8 @@ $footer-text-color: #888;

   .copyright {
     margin-top: 15px;
-    a, a:focus { color: #666; }
-    a:active { color: #555; }
+    a, a:focus { color: #999; }
+    a:active { color: #888; }
   }
 }


http://git-wip-us.apache.org/repos/asf/incubator-weex-site/blob/12e3a8bc/themes/weex/source/css/partial/header.scss
----------------------------------------------------------------------
diff --git a/themes/weex/source/css/partial/header.scss b/themes/weex/source/css/partial/header.scss
index 3532192..07e87ba 100644
--- a/themes/weex/source/css/partial/header.scss
+++ b/themes/weex/source/css/partial/header.scss
@@ -1,6 +1,5 @@
 @import "../variable.scss";

-$header-height: 50px;
 $header-bg: #F2F2F2;
 $menu-active-bg: #EEE;

@@ -8,9 +7,9 @@ $menu-active-bg: #EEE;
   width: 100%;
   height: $header-height;
   padding: 0 40px;
-  position: fixed;
+  position: absolute;
   background-color: $header-bg;
-  box-shadow: 0 0 1px rgba(0,0,0,0.25);
+  box-shadow: 0 1px 8px rgba(0, 0, 0, 0.2);
   top: 0;
   left: 0;
   right: 0;
@@ -87,7 +86,7 @@ $menu-active-bg: #EEE;
     }

     > li {
-      margin: 0 3px;
+      margin: 0 1px;
     }
   }


http://git-wip-us.apache.org/repos/asf/incubator-weex-site/blob/12e3a8bc/themes/weex/source/css/partial/sidebar.scss
----------------------------------------------------------------------
diff --git a/themes/weex/source/css/partial/sidebar.scss b/themes/weex/source/css/partial/sidebar.scss
index 6e681b1..f2486d4 100644
--- a/themes/weex/source/css/partial/sidebar.scss
+++ b/themes/weex/source/css/partial/sidebar.scss
@@ -2,35 +2,35 @@

 #sidebar {
   display: none;
-  height: 100%;
   width: 300px;
   position: fixed;
-  top: 0;
+  top: $header-height;
+  bottom: 0;
   left: 0;
   z-index: 999;
-  padding: 90px 20px 10px;
+  padding: 20px 0;
   background: #fff;
   box-shadow: -3px 0 20px rgba(0, 0, 0, .2);
   overflow-x: hidden;
   overflow-y: auto;
+  flex-direction: column;
+  align-items: center;
   -webkit-overflow-scrolling: touch;

   .sidebar-menu {
-    z-index: 999;
-    overflow-y: auto;
-
     .btn-close-sidebar {
       cursor: pointer;
       display: block;
-      font-size: 1.5em;
+      font-size: 0.8em;
       position: absolute;
-      top: 18px;
-      left: 18px;
+      top: 10px;
+      right: 10px;
       background: transparent;
       border: none;
+      color: #BBB;
       &:hover {
         border: none;
-        color: #777;
+        color: #999;
       }
     }
   }
@@ -72,4 +72,4 @@
     left: -20px;
     right: 0;
   }
-}
\ No newline at end of file
+}

http://git-wip-us.apache.org/repos/asf/incubator-weex-site/blob/12e3a8bc/themes/weex/source/css/partial/summary.scss
----------------------------------------------------------------------
diff --git a/themes/weex/source/css/partial/summary.scss b/themes/weex/source/css/partial/summary.scss
index eddd6b6..ec1b6d9 100644
--- a/themes/weex/source/css/partial/summary.scss
+++ b/themes/weex/source/css/partial/summary.scss
@@ -1,10 +1,9 @@
 @import "../variable.scss";

 .summary {
-  overflow-x: hidden;
-  overflow-y: auto;
   -webkit-overflow-scrolling: touch;
   font-size: 15px;
+  flex: 1;

   ul, li , ol {
     margin: 0;
@@ -49,13 +48,16 @@
 }

 .sponsor {
+  flex: 0;
   margin-top: 20px;
+  margin-bottom: 20px;
 }
 .sponsor-poster {
   display: block;
-  width: 180px;
+  width: 140px;
 }
 .sponsor-title {
   color: #7f8c8d;
-  font-size:12px;
+  font-size: 10px;
+  text-align: center;
 }

http://git-wip-us.apache.org/repos/asf/incubator-weex-site/blob/12e3a8bc/themes/weex/source/css/post.scss
----------------------------------------------------------------------
diff --git a/themes/weex/source/css/post.scss b/themes/weex/source/css/post.scss
index b6e4120..d98f21a 100644
--- a/themes/weex/source/css/post.scss
+++ b/themes/weex/source/css/post.scss
@@ -1,10 +1,26 @@
 @import "variable.scss";

+body {
+  position: relative;
+}
+
+.main-content {
+  display: flex;
+  position: absolute;
+  width: 100%;
+  top: $header-height;
+  left: 0;
+  right: 0;
+  bottom: 0;
+  overflow-x: hidden;
+  overflow-y: auto;
+  flex-direction: row;
+}
+
 .article-wrapper {
   display: flex;
   width: 100%;
   margin: 0 auto;
-  margin-top: 60px;
   flex-direction: row;
   min-height: 80%;
   min-height: calc(100% - 160px);
@@ -13,9 +29,9 @@
     max-width: 850px;
   }

-  &.page-layout {
-    max-width: 1400px;
-  }
+  // &.page-layout {
+  //   max-width: 1400px;
+  // }

   .article-entry {
     padding: 0 1.2em;
@@ -50,11 +66,17 @@
   }

   .doc-nav {
-    padding: 50px 20px;
+    padding-top: 50px;
     background: $bg-white;
-    width: 300px;
+    width: 22%;
+    max-width: 450px;
+    min-width: 260px;
+    display: flex;
+    flex-direction: column;
+    align-items: center;
     overflow-x: hidden;
     overflow-y: auto;
+    border-right: 1px solid #E8E8E8;
   }

   .doc-nav-version{

http://git-wip-us.apache.org/repos/asf/incubator-weex-site/blob/12e3a8bc/themes/weex/source/css/variable.scss
----------------------------------------------------------------------
diff --git a/themes/weex/source/css/variable.scss b/themes/weex/source/css/variable.scss
index a15c636..db47711 100644
--- a/themes/weex/source/css/variable.scss
+++ b/themes/weex/source/css/variable.scss
@@ -18,7 +18,9 @@ $border-blue: $text-blue;
 $border-gray: #999ba4;

 $article-max-width: 1350px;
-$content-max-width: 900px;
+$content-max-width: 850px;
+
+$header-height: 50px;

 /***********************
 * Mixin
[03/51] [abbrv] incubator-weex-site git commit: rearrangement the
structure of the document
Posted by ha...@apache.org.
http://git-wip-us.apache.org/repos/asf/incubator-weex-site/blob/32a097bf/source/v-0.10/references/common-style.md
----------------------------------------------------------------------
diff --git a/source/v-0.10/references/common-style.md b/source/v-0.10/references/common-style.md
deleted file mode 100644
index 8ae8224..0000000
--- a/source/v-0.10/references/common-style.md
+++ /dev/null
@@ -1,208 +0,0 @@
----
-title: Common Style
-type: references
-order: 1.6
-version: 0.10
----
-
-# Common Style
-
-All of weex tags share some common style rules
-
-## Box Model
-
-
-
-Weex box model based on the CSS box model, all of weex elements can be considered as boxes. The term "box model" is used when talking about design and layout. The box model is essentially a box that wraps around every HTML element. It consists of margins, borders, paddings, and the actual content.
-
-you can use the definition below in weex box model.
-
-- `width`: `length` type, default value `0`
-- `height`: `length` type, default value `0`
-- `padding`: `length` type, default value `0`, (space around content, between element content and the element border)
- - `padding-left`: `length` type, default value `0`
- - `padding-right`: `length` type, default value `0`
- - `padding-top`: `length` type, default value `0`
- - `padding-bottom`: `length` type, default value `0`
-- `margin`: `length` type, default value `0`, (space around elements, outside the border)
- - `margin-left`: `length` type, default value `0`
- - `margin-right`: `length` type, default value `0`
- - `margin-top`: `length` type, default value `0`
- - `margin-bottom`: `length` type, default value `0`
-- `border`
- - `border-style`: values `solid` | `dashed` | `dotted`, default value `solid`
- - `border-left-style`: values `solid` | `dashed` | `dotted`, default value `solid`
- - `border-top-style`: values `solid` | `dashed` | `dotted`, default value `solid`
- - `border-right-style`: values `solid` | `dashed` | `dotted`, default value `solid`
- - `border-bottom-style`: values `solid` | `dashed` | `dotted`, default value `solid`
- - `border-width`: `length` type, non-negative, default value `0`
- **DO NOT** use `border-width:1`. There is a default viewport `<viewport width="750">`, if the actual width of a device is 720px, then `border-width:1` will be `border-width:0.96`. As weex **do not** support sub-pixel, this border would not be rendered.
- - `border-left-width`: `length` type, non-negative, default value `0`
- - `border-top-width`: `length` type, non-negative, default value `0`
- - `border-right-width`: `length` type, non-negative, default value `0`
- - `border-bottom-width`: `length` type, non-negative, default value `0`
- - `border-color`: `color` type, default value `#000000`
- - `border-left-color`: `color` type, default value `#000000`
- - `border-top-color`: `color` type, default value `#000000`
- - `border-right-color`: `color` type, default value `#000000`
- - `border-bottom-color`: `color` type, default value `#000000`
- - `border-radius`: `length` type, default value `0`, (rounded borders to elements , default value is 0 meaning right angle )
-
- Although the the default overflow style is `overflow:hidden` in android, a view will not be clipped by its parents' `border-radius`. This only happens on Android, it works fine on iOS.
- - `border-bottom-left-radius`: `length` type, non-negative, default value `0`
- - `border-bottom-right-radius`: `length` type, non-negative, default value `0`
- - `border-top-left-radius`: `length` type, non-negative, default value `0`
- - `border-top-right-radius`: `length` type, non-negative, default value `0`
-
-Notes: The rule of border-radius for a specific corner such as `border-top-left-radius` is not currently supported for component `<image>` and `<text>`.
-
-Weex box model uses `border-box` as the default value of `box-sizing`, meaning the width and height properties includes content, padding and border, but not the margin.
-
-example:
-
-```html
-<template>
- <div>
- <image src="..." style="width: 400; height: 200; margin-left: 20;"></image>
- </div>
-</template>
-```
-
-## Flexbox
-
-Weex box style model based on the CSS flexbox, ensures that elements behave predictably and the page layout can accommodates to different screen sizes and different display devices.
-
-Flexbox consists of flex containers and flex items. If a weex element can containing other elements, it is a flex container.
-
-Notice that the old version of flexbox specification has differences with the new ones, such as whether or not to support wrapping. This is described at w3c's working drafts, and you should notice the differences among them. Also notice that the old version is only supported below the 4.4 version of android.
-
-### Flex container
-
-Flexbox is the default and only style model in Weex, so you don't have to add `display: flex;` in a container.
-
-- `flex-direction`: values `row` | `column`, default value `column`
-
-The flex-direction property specifies the direction of the flexible items inside the flex container. Default value is `column` (top-to-bottom).
-
-- `justify-content`: values `flex-start` | `flex-end` | `center` | `space-between`, default value `flex-start`
-
-The justify-content property horizontally aligns the flexible container's items when the items do not use all available space on the main-axis. Default value is `flex-start` meaning the flex items are positioned at the beginning of the container. `flex-end` means the items are positioned at the end of the container. `center` means the items are positioned at the center of the container. `space-between` means the items are positioned with space between the lines.
-
-
-
-- `align-items`: values `stretch` | `flex-start` | `center` | `flex-end`, default value `stretch`
-
-The align-items property vertically aligns the flexible container's items when the items do not use all available space on the cross-axis. Default value is `stretch` meaning the items are stretched to fit the container. `flex-start` means the items are positioned at the top of the container; `flex-end` means the items are positioned at the bottom of the container; `center` means items are positioned at the center of the container (vertically).
-
-
-
-### Flex item
-
-- `flex`: `number` type, default value `0`
-
-the flex property specifies the length of the flex item, relative to the rest of the flex items inside the same container. If all of the flex items set `flex: 1`, they will have equal width or height on direction of flex container's `flex-direction`. If there are two flex items, with one setting `flex: 1`, and the other setting `flex: 2`, the first one will take 1/3 container space, and the second one will take 2/3 container space. If all of flex items don't set `flex`, they will be aligned depending on the container's `justify-content` property.
-
-
-## Examples
-
-a list of images with equal scales align at the vertical axis:
-
-```html
-<template>
- <div style="width: 300; height: 100;">
- <image src="..." style="flex: 1;"></image>
- <image src="..." style="flex: 1;"></image>
- <image src="..." style="flex: 1;"></image>
- </div>
-</template>
-```
-
-a image with fixed width aligns with a stretched text:
-
-```html
-<template>
- <div style="width: 300; height: 100;">
- <image src="..." style="width: 100; height: 100;"></image>
- <text style="flex: 1;">...</text>
- </div>
-</template>
-```
-
-mixed direction alignment:
-
-```html
-<template>
- <div style="width: 100;">
- <image src="..." style="width: 100; height: 100;"></image>
- <div style="flex-direction: row;">
- <text style="flex: 2; font-size: 32;">title</text>
- <text style="flex: 1; font-size: 16;">$100</text>
- </div>
- </div>
-</template>
-```
-
-one text align left , the other float right:
-
-
-
-```html
-<template>
-<div style="flex-direction: row; justify-content: space-between;">
- <text>WEEX</text>
- <text>2016-05-08</text>
-</div>
-</template>
-```
-
-## Position
-
-we can use properties below to control placement of weex tag
-
-- `position`: values `relative` | `absolute` | `fixed` | `sticky`, default value `relative`
-
-`relative` means the item is positioned relative to its normal position. `absolute` means the item is positioned relative to its container. `fixed` keeps the elements position fixed when the page is scrolling. `sticky` keeps elements positioned inside the viewport as "stuck" at the top or "relative" at its original place depending on whether does it about to scroll out of the view.
-
-- `top`: `number` type, default value `0`, upward offset value
-- `bottom`: `number` type, default value `0`, downward offset value
-- `left`: `number` type, default value `0`, leftward offset value
-- `right`: `number` type, default value `0`, rightward offset value
-
-### Examples
-
-```html
-<template>
- <div style="flex-direction: column;">
- <div style="height: 3000;">
- <image src="..." style="top: 50; left: 50; ..."></image>
- </div>
- <div style="height: 3000;">
- <image src="..." style="position: sticky; ..."></image>
- </div>
- <div style="height: 3000;">
- <image src="..." style="position: absolute; top: 50; left: 50; ..."></image>
- </div>
- </div>
-</template>
-```
-
-## Other Common Style
-
-- `opacity`
-- `background-color`
-
-## Type of Style Value
-
-- `length` type
-- `number` type
-- `color` type (*[The list of color keywords.](./color-names.html)*)
-- enumerated type
-
-## Simple Step
-
-These up-to-down steps may help you to plan the whole style of weex pages.
-
-1. overall style: divide the whole page to different parts
-2. flex alignment: align boxes in every part of page
-3. position box: place box, set offset
-4. element specific style: set styles for certain element if needed
http://git-wip-us.apache.org/repos/asf/incubator-weex-site/blob/32a097bf/source/v-0.10/references/component-defs.md
----------------------------------------------------------------------
diff --git a/source/v-0.10/references/component-defs.md b/source/v-0.10/references/component-defs.md
deleted file mode 100644
index baa6584..0000000
--- a/source/v-0.10/references/component-defs.md
+++ /dev/null
@@ -1,131 +0,0 @@
----
-title: Component Definition
-type: references
-order: 1.2
-version: 0.10
----
-
-# Component Definition
-
-A component definition is a set of options to describe a component. It's always assigned to `module.exports` in `<script>`.
-
-```javascript
-module.exports = {
- // a set of options here
-}
-```
-
-## Data & Methods options
-
-```javascript
-module.exports = {
- data: function () {
- return {x: 1, y: 2}
- },
- methods: {
- doThis: function () {...},
- doThat: function () {...}
- },
- ...
-}
-```
-
-The `data` option is a function that return a observable data object for this ViewModel.
-The `methods` option is a map which contains all ViewModel methods.
-
-Each `data` or `methods` property will be proxied to the ViewModel instance. So you can read and write data with `this.x`, also you can call methods with `this.doThis(...)`.
-
-A whole example:
-
-```html
-<template>
- <div style="width: {{w}}; height: {{h}}; background-color: red;" onclick="update"></div>
-</template>
-<script>
- module.exports = {
- data: function () {
- return {w: 750, h: 200}
- },
- methods: {
- update: function (e) {
- this.h += 200
- }
- }
- }
-</script>
-```
-
-## Events options
-
-```javascript
-module.exports = {
- data: ...,
- methods: {
- foo: function () {
- ...
- this.$emit('customtype1', data)
- }
- },
- events: {
- customtype1: function (e) {
- console.log(e.type, e.detail)
- }
- },
- ...
-}
-```
-
-The `events` options could allow you to add custom event listeners when ViewModel created. Then it will listen these type of events and handle them by the function-type value.
-
-The first argument is a event object which contains event data in `e.detail`.
-
-## Lifecycle options
-
-```javascript
-module.exports = {
- data: ...,
- methods: ...,
- init: function () {
- console.log('ViewModel constructor begins')
- },
- created: function () {
- console.log('Data observation finished')
- },
- ready: function () {
- console.log('Virtual DOM finished')
- },
- ...
-}
-```
-
-Weex ViewModel now supports these lifecycle hook functions which could be write as component options:
-
-* `init`: fired at the beginning of a ViewModel constructor call.
-* `created`: fired when ViewModel observes default data but not compile the template.
-* `ready`: fired when ViewModel observes default data and compiles the template to generate virtual DOM finally.
-
-**Note: If you want to use the function in `methods`, `events` or lifecycle options as a parameter, please make sure the context is correct as expect. For example:**
-
-```javascript
-module.exports = {
- data: function () {
- return {x: 1, y: 2}
- },
- ready: function () {
- // `undefined`
- // because the context changed
- this.foo(this.bar)
- // `1`
- // because the context bound correct
- this.foo(this.bar.bind(this))
- },
- methods: {
- foo: function (fn) {
- return fn()
- },
- bar: function () {
- return this.x
- }
- }
-}
-```
http://git-wip-us.apache.org/repos/asf/incubator-weex-site/blob/32a097bf/source/v-0.10/references/components/a.md
----------------------------------------------------------------------
diff --git a/source/v-0.10/references/components/a.md b/source/v-0.10/references/components/a.md
deleted file mode 100644
index e1677bf..0000000
--- a/source/v-0.10/references/components/a.md
+++ /dev/null
@@ -1,50 +0,0 @@
----
-title: <a>
-type: references
-order: 2.1
-version: 0.10
----
-
-# <a>
-
-`a` defines a hyperlink to a page in the web. Its purpose and syntax is very similar to [<a>](https://developer.mozilla.org/en-US/docs/Web/HTML/Element/a) in HTML5.
-
-## Child Components
-
-This type of component supports all kinds of weex component as it's child components except for its own kind.
-
-## Attributes
-
-* href: href attributes defines the URL of the hyperlink.
-
-## Styles:
-
-### common styles
-
-Check out the [common styles](../common-style.html)
-
-## Events
-
-### common events
-
-Check out the [common events](../common-event.html)
-
-### Notes
-
-We can't guarantee the order of execution between onclick function and href. we recommend that do not use the click event in `a`.
-
-## Examples
-
-```html
-<template>
- <div>
- <a href="http://h5.m.taobao.com">
- <text>Click me to see how 'A' element opens a new world.</text>
- </a>
- </div>
-</template>
-```
-
-[Try it](http://dotwe.org/d99f6eb55aa501c836a195ec824cada0)
-
-Use [Weex Playground](https://alibaba.github.io/weex/download.html) App to Scan the QR image and view the example for 'a'.
http://git-wip-us.apache.org/repos/asf/incubator-weex-site/blob/32a097bf/source/v-0.10/references/components/cell.md
----------------------------------------------------------------------
diff --git a/source/v-0.10/references/components/cell.md b/source/v-0.10/references/components/cell.md
deleted file mode 100644
index 34d1703..0000000
--- a/source/v-0.10/references/components/cell.md
+++ /dev/null
@@ -1,42 +0,0 @@
----
-title: <cell>
-type: references
-order: 2.6
-version: 0.10
----
-
-# <cell>
-
-### Summary
-
-This component must be used as a subcomponent of a [`list`](./list.html) component, which is for the performance optimizing during scrolling.
-
-### Child Components
-
-This type of component supports all kinds of weex component as its child components.
-
-### Attributes
-
-There is no specific attribute for this component other than the [common attributes](../common-attrs.html).
-
-**Notes:** you can't give `<cell>` a `flex` value. Width of `<cell>` is equal to the width of its parent component `<list>`, and you don't need to specify its height.
-
-### Styles
-
-**common styles**: check out the [common styles](../common-attrs.html)
-
-- support flexbox related styles
-- support box model related styles
-- support ``position`` related styles
-- support ``opacity``, ``background-color`` etc.
-
-### Events
-
-**common events**: check out the [common events](../common-event.html)
-
-- support `click` event. Check out [common events](../common-event.html)
-- support `appear` / `disappear` event. Check out [common events](../common-event.html)
-
-### Example
-
-please refer to [List](./list.html)
http://git-wip-us.apache.org/repos/asf/incubator-weex-site/blob/32a097bf/source/v-0.10/references/components/div.md
----------------------------------------------------------------------
diff --git a/source/v-0.10/references/components/div.md b/source/v-0.10/references/components/div.md
deleted file mode 100644
index 1e75523..0000000
--- a/source/v-0.10/references/components/div.md
+++ /dev/null
@@ -1,48 +0,0 @@
----
-title: <div>
-type: references
-order: 2.2
-version: 0.10
----
-
-# <div>
-
-### Summary
-
-The most fundamental component which is a contianer to wrap any other components. It supports all the common styles, attributes and layout of flexbox.
-
-alias: `<container>` (deprecated)
-
-### Child Components
-
-This type of component supports all kinds of weex component as its child components including its own kind.
-
-### Attributes
-
-There is no specific attribute for this component other than the [common attributes](../common-attrs.html).
-
-### Styles
-
-**common styles**: check out the [common styles](../common-attrs.html)
-
-- support flexbox related styles
-- support box model related styles
-- support ``position`` related styles
-- support ``opacity``, ``background-color`` etc.
-
-### Events
-
-**common events**: check out the [common events](../common-event.html)
-
-- support `click` event. Check out [common events](../common-event.html)
-- support `appear` / `disappear` event. Check out [common events](../common-event.html)
-
-### Examples
-
-```html
-<div>
- <image src="..."></image>
- <text>...</text>
-</div>
-```
-
http://git-wip-us.apache.org/repos/asf/incubator-weex-site/blob/32a097bf/source/v-0.10/references/components/image.md
----------------------------------------------------------------------
diff --git a/source/v-0.10/references/components/image.md b/source/v-0.10/references/components/image.md
deleted file mode 100644
index 3eae206..0000000
--- a/source/v-0.10/references/components/image.md
+++ /dev/null
@@ -1,55 +0,0 @@
----
-title: <image>
-type: references
-order: 2.3
-version: 0.10
----
-
-# <image>
-
-### Summary
-
-`image` tag is used to render a specified picture, and it shouldn't contain any child component. You can use `img` as alias.
-
-**Notes:** the styles of `width` and `height` should be specified, otherwise it won't work.
-
-alias: `<img>`
-
-### Child Components
-
-This component supports no child components.
-
-### Attributes
-
-- `src`: <string> image source url
-- `resize`: <span class="api-version">v0.5+</span> <string> the 'ScaleType' of the component. The default value is ``stretch``, if this attribute is not specified. Possible values are ``cover``, ``contain``, each of which has the same meaning with w3c standard.
-
-Other attributes please check out the [common attributes](../common-attrs.html).
-
-### Styles
-
-- `width`: <length> the width of the component. This style should be specified.
-- `height`: <length> the height of the component. This style should be specifed.
-
-**common styles**: check out the [common styles](../common-attrs.html)
-
-- support flexbox related styles
-- support box model related styles
-- support ``position`` related styles
-- support ``opacity``, ``background-color`` etc.
-
-### Events
-
-**common events**: check out the [common events](../common-event.html)
-
-- support `click` event. Check out [common events](../common-event.html)
-- support `appear` / `disappear` event. Check out [common events](../common-event.html)
-
-### Examples
-
-```html
-<div>
- <image src="..." ></image>
- <text>...</text>
-</div>
-```
http://git-wip-us.apache.org/repos/asf/incubator-weex-site/blob/32a097bf/source/v-0.10/references/components/index.md
----------------------------------------------------------------------
diff --git a/source/v-0.10/references/components/index.md b/source/v-0.10/references/components/index.md
deleted file mode 100644
index 66e211c..0000000
--- a/source/v-0.10/references/components/index.md
+++ /dev/null
@@ -1,24 +0,0 @@
----
-title: Build-in Components
-type: references
-order: 2
-version: 0.10
----
-
-# Build-in Components
-
-- [<a>](./a.html)
-- [<indicator>](./indicator.html)
-- [<switch>](./switch.html)
-- [<text>](./text.html)
-- [<textarea>](./textarea.html)
-- [<video>](./video.html)
-- [<web>](./web.html)
-- [<div>](./div.html)
-- [<image>](./image.html)
-- [<input>](./input.html)
-- [<list>](./list.html)
-- [<cell>](./cell.html)
-- [<refresh> & <loading>](./refresh.html)
-- [<scroller>](./scroller.html)
-- [<slider>](./slider.html)
\ No newline at end of file
http://git-wip-us.apache.org/repos/asf/incubator-weex-site/blob/32a097bf/source/v-0.10/references/components/indicator.md
----------------------------------------------------------------------
diff --git a/source/v-0.10/references/components/indicator.md b/source/v-0.10/references/components/indicator.md
deleted file mode 100644
index b06dc95..0000000
--- a/source/v-0.10/references/components/indicator.md
+++ /dev/null
@@ -1,98 +0,0 @@
----
-title: <indicator>
-type: references
-order: 2.10
-version: 0.10
----
-
-# <indicator>
-
-### Summary
-
-This component must be used as a subcomponent of a [`slider`](./slider.html) component.
-
-### Child Components
-
-This component supports no child components.
-
-### Attributes
-
-There is no specific attribute for this component other than the [common attributes](../common-attrs.html).
-
-### Styles
-
-- `item-color`: <colors> This style attribute sets the normal item color using either a named color or a color specified in the hexadecimal #RRGGBB format.
-- `item-selectedColor`: <colors> This style attribute sets the selected item color using either a named color or a color specified in the hexadecimal #RRGGBB format.
-- `item-size`: <length> The size of the indicator elements, which is an float attribute.
-
-**common styles**: check out the [common styles](../common-attrs.html)
-
-- support flexbox related styles
-- support box model related styles
-- support ``position`` related styles
-
-**Note:** There are some specific details about the style `width` and `height` on this component: the position of indicator will not only depend on the `top`, `left`, `bottom` and `right`, but also depend on the value of `width` and `height`. Imagine there is a virtual container outside the indicator, and it inherit the `width` and `height` of the indicator. The `top`, `left`, `right` and `bottom` will always take effect on this container, not the indicator points themselves, and the indicator points will be positioned in the center of it. And also you should know the default `width` and `height` is the parent slider's `width` and `height`.
-
-**Note:** `background-color` is not recommended to apply on this component, and you should use `item-color` and `item-selectedColor` instead.
-
-### Events
-
-**common events**: check out the [common events](../common-event.html)
-
-- support `click` event. Check out [common events](../common-event.html)
-- support `appear` / `disappear` event. Check out [common events](../common-event.html)
-
-### Example
-
-```html
-<template>
- <div>
- <slider class="slider">
- <div class="slider-pages" repeat="{{itemList}}">
- <image class="img" src="{{pictureUrl}}"></image>
- <text class="title">{{title}}</text>
- </div>
-
- <indicator class="indicator"></indicator>
- </slider>
- </div>
-</template>
-
-<style>
- .img {width: 150; height: 150;}
- .title {flex: 1; color: #ff0000; font-size: 48; font-weight: bold; background-color: #eeeeee;}
- .slider {
- flex-direction: row;
- margin: 18;
- width: 714;
- height: 230;
- }
- .slider-pages {
- flex-direction: row;
- width: 714;
- height: 200;
- }
- .indicator {
- width:714;
- height:200;
- position:absolute;
- top:1;
- left:1;
- item-color: red;
- item-selectedColor: blue;
- item-size: 20;
- }
-</style>
-
-<script>
- module.exports = {
- data: {
- itemList: [
- {itemId: '520421163634', title: 'item1', pictureUrl: 'https://gd2.alicdn.com/bao/uploaded/i2/T14H1LFwBcXXXXXXXX_!!0-item_pic.jpg'},
- {itemId: '522076777462', title: 'item2', pictureUrl: 'https://gd1.alicdn.com/bao/uploaded/i1/TB1PXJCJFXXXXciXFXXXXXXXXXX_!!0-item_pic.jpg'},
- {itemId: '522076777462', title: 'iten3', pictureUrl: 'https://gd3.alicdn.com/bao/uploaded/i3/TB1x6hYLXXXXXazXVXXXXXXXXXX_!!0-item_pic.jpg'}
- ]
- }
- }
-</script>
-```
http://git-wip-us.apache.org/repos/asf/incubator-weex-site/blob/32a097bf/source/v-0.10/references/components/input.md
----------------------------------------------------------------------
diff --git a/source/v-0.10/references/components/input.md b/source/v-0.10/references/components/input.md
deleted file mode 100644
index feaac53..0000000
--- a/source/v-0.10/references/components/input.md
+++ /dev/null
@@ -1,124 +0,0 @@
----
-title: <input>
-type: references
-order: 2.4
-version: 0.10
----
-
-# input
-
-The weex builtin component `input` is used to create input controls to receive the user's input characters. How a `input` component works varies considerably depending on the value of its `type` attribute, such as `text`, `password`, `url`, `email`, `tel` etc.
-
-**Notes:** does not support the common-event `click`. Please listen to the `input` or `change` event instead.
-
-## Child Components
-
-This component supports no child components.
-
-## Attributes
-
-* `type`: the type of controls to display. The default value is `text`, if this attribute is not specified. Possible values are `text`, `password`, `tel`, `email`, `url` etc. each of which has the same meaning with �W3C standard.
-
-* `value`: the value(text) of the control.
-
-* `placeholder`: a hint to the user of which can be entered to the control. The placeholder text must have no carriage returns or line-feeds.
-
-* `disabled`: a boolean attribute indicates that the form control is not available for interaction. In particular, the click event will not be dispatched on disabled controls.
-
-* `autofocus`: a boolean attribute lets you specify that a form control should have input focus when the page loads.
-
-* `maxlength`: <span class="api-version">v0.7+</span> a number value to specify maxlength of input.
-
-Other attributes please check out the [common attributes](../common-attrs.html).
-
-## Styles
-
-* placeholder-color: the color of placeholder. Default value is '#999999'.
-
-* text styles: checkout [text styles](../text-style.html)
-
- * support 'color' style.
- * support 'font-size' style.
- * support 'font-style' style.
- * support 'font-weight' style.
- * support 'text-align' style.
-
-### common styles
-check out [common styles for components](../common-style.html)
-
-* support flexbox related styles.
-* support box model related styles.
-* support 'position' related styles.
-* support 'opacity', 'background-color' etc.
-
-## Events
-
-* input: the value of an input character changes.
-* change: the change event is fired when a change to the component's value is commited by the user. It always come after a 'blur' event.
-* focus: a component has received focus.
-* blur: a component has lost focus.
-
-### common events
-check out [common events](../common-event.html)
-
-* support 'appear' / 'disappear' event.
-
-### Notes
-does not support the common-event 'click'. Please listen to the 'input' or 'change' event instead.
-
-### Parameters of events' object
-
-* for 'input' and 'change' events:'value': the value of the component who dispatched this event.'timestamp': the time stamp of the event.
-* for 'focus' and 'blur' events:'timestamp': the time stamp of the event.
-
-## Example
-
-```html
-<template>
- <div>
- <input
- type="text"
- placeholder="Input Something"
- class="input"
- autofocus="true"
- value=""
- onchange="onchange"
- oninput="oninput"
- />
- <text>oninput: {{txtInput}}</text>
- <text>onchange: {{txtChange}}</text>
- </div>
-</template>
-
-<style>
- .input {
- font-size: 60;
- height: 80;
- width: 400;
- }
-</style>
-
-<script>
- require('weex-components');
- module.exports = {
- data: {
- txtInput: '',
- txtChange: ''
- },
- methods: {
- onchange: function(event) {
- this.txtChange = event.value;
- console.log('onchange', event.value);
- },
- oninput: function(event) {
- this.txtInput = event.value;
- console.log('oninput', event.value);
- }
- }
- };
-</script>
-```
-
-[Try it](http://dotwe.org/e1b18eb89facb4e2a5467ee4bebd9be6)
-
-Use [Weex Playground](https://alibaba.github.io/weex/download.html) App to Scan the QR image and view the example for 'input'.
http://git-wip-us.apache.org/repos/asf/incubator-weex-site/blob/32a097bf/source/v-0.10/references/components/list.md
----------------------------------------------------------------------
diff --git a/source/v-0.10/references/components/list.md b/source/v-0.10/references/components/list.md
deleted file mode 100644
index 3b4745e..0000000
--- a/source/v-0.10/references/components/list.md
+++ /dev/null
@@ -1,292 +0,0 @@
----
-title: <list>
-type: references
-order: 2.5
-version: 0.10
----
-
-# List
-
-<span class="weex-version">v0.6.1+</span>
-
-The List component, which inherits from Scroller component, is a core component, and it provides the most popular features for using a list of items.
-
-It can provide excellent experience and performance while still maintaining smooth scroll and low memory usage.
-
-**example**
-
-```html
-<template>
- <list>
- <cell onappear="onappear($event, $index)" ondisappear="ondisappear($event, $index)" class="row" repeat="{{staffs}}" index="{{$index}}">
- <div class="item">
- <text>{{name}}</text>
- </div>
- </cell>
- </list>
-</template>
-
-<style>
- .row {
- width: 750;
- }
- .item {
- justify-content: center;
- border-bottom-width: 2;
- border-bottom-color: #c0c0c0;
- height: 100;
- padding:20;
- }
-</style>
-
-<script>
- module.exports = {
- data: {
- staffs:[{name:'inns'},{name:'connon'},{name:'baos'},{name:'anna'},{name:'dolley'},{name:'lucy'},{name:'john'}, {name:'lily'},{name:'locke'},{name:'jack'},{name:'danny'},{name:'rose'},{name:'harris'},{name:'lotus'},{name:'louis'}]
- },
- methods:{
- onappear: function (e, index) {
- console.log('+++++', index)
- console.log(this.staffs[index].name + ' is appearing...');
- },
- ondisappear:function (e, index) {
- console.log('+++++', index)
- }
- }
- }
-</script>
-
-```
-
-[try it](http://dotwe.org/15d58cfbca9b6a72c89c9a13ad1f6155)
-
-### Child Components
-
-Notes: The list now supports the following child components: cell, header, refresh, loading and fixed-position components. Other kinds of components will not be guaranteed to be displayed correctly.
-
-* cell 0.6.1 defines the attributes and behavior of the cells that appear in list.
-* header 0.6.1 sticks to the top when it reaches the top of the screen.
-* refresh 0.6.1 used inside list to add pull-down-to-refresh functionality.
-* loading 0.6.1 used inside list to add pull-up-to-load-more functionality.
-
-
-### Attributes
-
-* show-scrollbar: true/false whether show the scroll bar or not, default value is true
-* scroll-direction: <string> define scroll direction of component, horizontal or vertical
-* loadmoreoffset : <number> default value is 0. The loadmore event will be triggered when the list is loadmoreoffset left to reach the bottom of the list view. e.g. a list has total content length of 1000, and the loadmoreoffset is set to 400, the loadmore event will be triggered when 600 has beed scrolled and there is less than 400 left.
-* loadmoreretry : <number> default value 0,whether to reset loadmore related UI when loadmore failed, will be deprecated in further release.
-
-Please checkout [Scroller Component Attributes](./scroller.html) to have a look at the inherited attributes from direct parent.
-
-Other attributes please check out the [common attributes](../common-attrs.html).
-
-### Styles
-
-common styles: check out [common styles for components](../common-style.html)
-
-* support flexbox related styles
-* support box model related styles
-* support position related styles
-* support opacity, background-color etc.
-
-### Events
-
-onloadmore 0.5 used with loadmoreoffset attribute. if the view has less than loadmoreoffset to scroll down, the onloadmore event will be triggered.
-
-common events: check out the [common events](../common-event.html)
-
-* support onclick event. Check out [common events](../common-event.html)
-* support onappear / ondisappear event. Check out [common events](../common-event.html)
-
-
-### API
-
-All cells or cell's subcomponents in list support the scrollToElement API in [dom module](../modules/dom.html)
-
-#### Difference between loading child component and onloadmore event
-
-loading is a child component that can response to the onloading event, and this event can only be triggered when the scroller/list has been scrolled down to the bottom.
-onloadmore is an event that will be triggered when the rest of the scroller/list is less than loadmoreoffset long.
-
-
-* [scroller example](http://dotwe.org/85fd3988eefa24f058b7da7966e56203)
-* [list example](http://dotwe.org/62f895249014dde26cc0725c8005e42c)
-
-### Restrictions
-
-Nested lists or scrollers within the same direction are not supported. In other words. nested lists/scroller must have different directions.
-For example, a vertical list nested in a vertical list or scroller is not allowed. However, a vertical list nested in a horizontal list or scroller is legal.
-
-### Example
-
-```html
-<template>
- <div class="wrapper">
- <list class="list">
- <header class="header">
- <text class="title">Search Results</text>
- </header>
- <refresh style="width: 750; padding: 30;" onrefresh="refreshData" display="{{refreshDisplay}}">
- <text class="text"> ↓ Pull to refresh </text>
- <loading-indicator class="indicator"></loading-indicator>
- </refresh>
- <cell class="row" repeat="item in items" id="item-{{$index}}">
- <div>
- <text class="item">Repo name: {{item.full_name}}</text>
- </div>
- <div>
- <text class="item">Repo star: {{item.stargazers_count}}</text>
- </div>
- </cell>
- <loading onloading="loadingData" style="width: 750; padding: 30;" display="{{loadingDisplay}}">
- <text class="text">{{loadingText}}</text>
- </loading>
- </list>
- <div class="up" onclick="goToTop">
- <img class="img" src="https://img.alicdn.com/tps/TB1ZVOEOpXXXXcQaXXXXXXXXXXX-200-200.png"></img>
- </div>
- </div>
-</template>
-
-<style>
-.wrapper {
- position: absolute;
- top: 0;
- right: 0;
- bottom: 0;
- left: 0;
-}
-.list{
- background-color: #ffffff;
- flex: 1;
-}
-.header {
- height: 80;
- align-items: center;
- justify-content: center;
- background-color: #efefef;
- border-bottom-color: #eeeeee;
- border-bottom-width: 2;
- border-bottom-style: solid;
-}
-.title {
- text-align: center;
-}
-.text {
- text-align: center;
-}
-.row {
- padding: 20;
- border-bottom-color: #eeeeee;
- border-bottom-width: 2;
- border-bottom-style: solid;
-}
-.up {
- width: 70;
- height: 70;
- position: fixed;
- right: 20;
- bottom: 20;
-}
-.img {
- width: 70;
- height: 70;
-}
-</style>
-
-<script>
-var dom = require('@weex-module/dom') || {}
-var stream = require('@weex-module/stream') || {}
-var modal = require('@weex-module/modal') || {}
-
-var SEARCH_URL = 'https://api.github.com/search/repositories?q=language:javascript&sort=stars&order=desc'
-
-module.exports = {
- data: {
- isLoaded: true,
- page: 1,
- loadingDisplay: 'hide',
- refreshDisplay: 'hide',
- loadingText: 'Loading...',
- items:[]
- },
- created: function () {
- var url = SEARCH_URL + '&page=' + this.page
-
- this.renderData(url)
-
- this.page++
- },
- methods: {
- renderData: function (url) {
- var self = this
-
- stream.fetch({
- method: 'GET',
- url: url,
- type:'json'
- }, function(res) {
- self.refreshDisplay = 'hide'
- self.loadingDisplay = 'hide'
-
- try {
- var results = res.data.items || []
-
- if (Array.isArray(results)) {
- for(var i = 0; i < results.length; i++) {
- self.items.push(results[i])
- }
- }
-
- self.isLoaded = true
- } catch(e) {}
- },function(res){
-
- })
- },
- loadingData: function (e) {
- var url = SEARCH_URL + '&page=' + this.page
- var self = this
-
- if (self.isLoaded === false) return
-
- self.loadingDisplay = 'show'
-
- if (self.page <=10 ) {
- self.renderData(url)
- self.page++
- } else {
- self.loadingDisplay = 'hide'
- self.loadingText = 'NO MORE!'
- }
- },
- goToTop: function (e) {
- dom.scrollToElement(this.$el('item-0'), {
- offset: -100
- })
- },
- refreshData: function (e) {
- var url = SEARCH_URL + '&page=1'
-
- if (this.isLoaded === false) return
-
- this.refreshDisplay = 'show'
-
- modal.toast({
- 'message': 'Refreshing...',
- 'duration': 1
- })
-
- this.items = []
- this.page = 1
- this.renderData(url)
-
- this.refreshDisplay = 'hide'
- }
- }
-}
-</script>
-```
-
-[Try it](http://dotwe.org/ed524ade679b0fa96e980600c53ea5ce)
\ No newline at end of file
http://git-wip-us.apache.org/repos/asf/incubator-weex-site/blob/32a097bf/source/v-0.10/references/components/refresh-loading.md
----------------------------------------------------------------------
diff --git a/source/v-0.10/references/components/refresh-loading.md b/source/v-0.10/references/components/refresh-loading.md
deleted file mode 100644
index 8b1d610..0000000
--- a/source/v-0.10/references/components/refresh-loading.md
+++ /dev/null
@@ -1,297 +0,0 @@
----
-title: <refresh> & <loading>
-type: references
-order: 2.7
-version: 0.10
----
-
-# refresh & loading
-
-<span class="weex-version">v0.6.1+</span>
-
-## Loading Components
-
-To be rendered properly, the refresh/loading Components must appear inside the Scroller Component or the List Component.
-
-
-**example**
-
-```html
-`<template>
- <list>
- <header>
- <div class="center">
- <text style="text-align:center">I am the header</text>
- </div>
- </header>
- <loading onloading="onloading" display="{{loadingDisplay}}" style="width:750;flex-direction: row;justify-content: center;">
- <loading-indicator style="height:160;width:160;color:#3192e1"></loading-indicator>
- </loading>
- <cell onappear="onappear($event, $index)" ondisappear="ondisappear($event, $index)" class="row" repeat="{{staffs}}" index="{{$index}}">
- <div class="item">
- <text>{{name}}</text>
- </div>
- </cell>
- </list>
-</template>
-
-<style>
- .row {
- width: 750;
- }
- .item {
- justify-content: center;
- border-bottom-width: 2;
- border-bottom-color: #c0c0c0;
- height: 100;
- padding:20;
- }
- .center {
- border-bottom-width: 2;
- border-bottom-color: #cccccc;
- height: 100;
- padding:20;
- background-color:#FFFFFF;
- justify-content: center;
- }
-</style>
-
-<script>
- module.exports = {
- data: {
- staffs:[],
- loadingDisplay: 'show',
- loadingText: 'pull up to load more',
- refreshText: 'pull down to refresh'
- },
- created:function() {
- this.refreshDisplay='show'
- this.staffs=[{name:'inns'},{name:'connon'},{name:'baos'},{name:'anna'},{name:'dolley'},{name:'lucy'},{name:'john'}, {name:'lily'},{name:'locke'},{name:'jack'},{name:'danny'},{name:'rose'},{name:'harris'},{name:'lotus'},{name:'louis'}];
- },
- methods:{
- onappear: function (e, index) {
- // console.log('+++++', index);
- // console.log(this.staffs[index].name + ' is appearing...');
- },
- ondisappear:function (e, index) {
- // console.log('+++++', index);
- },
- onloading:function(e){
- console.log('onloading...');
- this.staffs.push({name:'onloading'})
- }
- }
- }
-</script>
-
-```
-
-[try it](http://weex.alibaba-inc.com/raw/html5/a34523fee395aa68018d65f0fb622310.js)
-
-### Child Components
-
-Any other components, like the text and img components, can be put inside the refresh component. And there is a special component named loading-indicator used only inside the refresh or the loading components.
-
-* loading-indicator is a child component implemented with default animation effect for the refresh component.
-[example](http://weex.alibaba-inc.com/playground/a34523fee395aa68018d65f0fb622310)
-
-### Attributes
-
-* display has value of show or hide.
-
-Other attributes please check out the [common attributes](../common-attrs.html).
-
-
-### Styles
-common styles: check out [common styles for components](../common-style.html)
-
-### Events
-
-* onloading triggered when loading
-
-
-#### Restrictions
-* refresh/loading does not support remove action, Weex 0.9 will fix it.
-* refresh/loading despite setting with display='hide', the refresh/loading view will still appear when scrolling due to known issues. it can be fixed with a another display='hide' when the refresh/loading should be hidden.
-* refresh/loading can only be hidden or displayed with an attribute display with value of show or hide. And there should be a statement of display='hide' when display='show' shows up in an event function, or your scroller may not response to user inputs.
-
-## Refresh Components
-
-To be rendered properly, the refresh/loading Components must appear inside the Scroller Component or the List Component.
-
-```html
-<template>
- <scroller onloadmore="onloadmore" loadmoreoffset="1000">
- <refresh onrefresh="onrefresh" display="{{refreshDisplay}}">
- <text id="refreshText">{{refreshText}}</text>
- </refresh>
- <div repeat="{{v in items}}">
- <text style="font-size: 40; color: #000000">{{v.item}}</text>
- </div>
- <loading onloading="onloading" display="{{loadingDisplay}}">
- <text id="loadingText">{{loadingText}}</text>
- </loading>
- </scroller>
-</template>
-<script>
- module.exports = {
- data: {
- refreshDisplay: 'show',
- loadingDisplay: 'show',
- loadingText: 'pull up to load more',
- refreshText: 'pull down to refresh',
- items: []
- },
- created: function () {
- for (var i = 0; i < 30; i++) {
- this.items.push({'item': 'test data' + i});
- }
- },
- methods: {
- onrefresh: function () {
- var vm = this;
- vm.refreshDisplay = 'show'
- if (vm.items.length > 50) {
- vm.refreshText = "no more data!"
- vm.refreshDisplay = 'hide'
- return;
- }
- var len = vm.items.length;
- for (var i = len; i < (len + 20); i++) {
- vm.items.unshift({'item': 'test data ' + i});
- }
- vm.refreshDisplay = 'hide'
- },
- onloading: function () {
- var vm = this;
- vm.loadingDisplay = 'show'
- if (vm.items.length > 30) {
- vm.loadingText = "no more data!"
- vm.loadingDisplay = 'hide'
- return;
- }
-
- var len = vm.items.length;
- for (var i = len; i < (len + 20); i++) {
- vm.items.push({'item': 'test data ' + i});
- }
- vm.loadingDisplay = 'hide'
- },
- onloadmore:function(){
- console.log("into--[onloadmore]")
- }
- }
- }
-</script>
-```
-
-[try it](http://dotwe.org/242add915e41d307f2fa6f423278425a)
-
-### Child Components
-
-Any other components, like the text and img components, can be put inside the refresh component. And there is a special component named loading-indicator used only inside the refresh or the loading components.
-
-* loading-indicator is a child component implemented with default animation effect for the refresh component.
-[example](http://dotwe.org/e65a2cb0abfcdbbabda6778064837a92)
-
-### Attributes
-* display has value of show or hide, default value is show.
-
-Other attributes please check out the [common attributes](../common-attrs.html).
-
-
-### Styles
-common styles: check out [common styles for components](../common-style.html)
-
-### Events
-* onrefresh triggered when the scroller has been pulled down
-* onpullingdown available on Android. triggered when the scroller has been pulled down. you can get dy, headerHeight, maxHeight from onpullingdowns event object. [example](http://dotwe.org/10ee6bd59ebe173f0f578a4eb8bac6f1)
-
-**example**
-
-```html
-<template>
- <list>
- <header>
- <div class="center">
- <text style="text-align:center">I am the header</text>
- </div>
- </header>
- <refresh onpullingdown='onpullingdown' onrefresh="onrefresh" display="{{refreshDisplay}}" style="width:750;flex-direction: row;justify-content: center;">
- <loading-indicator style="height:160;width:160;color:#3192e1"></loading-indicator>
- </refresh>
- <cell onappear="onappear" ondisappear="ondisappear" class="row" repeat="{{staffs}}" index="{{$index}}">
- <div class="item">
- <text>{{name}}</text>
- </div>
- </cell>
- </list>
-</template>
-
-<style>
- .row {
- width: 750;
- }
- .item {
- justify-content: center;
- border-bottom-width: 2;
- border-bottom-color: #c0c0c0;
- height: 100;
- padding:20;
- }
- .center {
- border-bottom-width: 2;
- border-bottom-color: #cccccc;
- height: 100;
- padding:20;
- background-color:#FFFFFF;
- justify-content: center;
- }
-</style>
-
-<script>
- module.exports = {
- data: {
- staffs:[],
- refreshDisplay: 'show',
- loadingDisplay: 'show',
- loadingText: 'pull up to load more',
- refreshText: 'pull down to refresh'
- },
- created:function() {
- this.refreshDisplay='show'
- this.staffs=[{name:'inns'},{name:'connon'},{name:'baos'},{name:'anna'},{name:'dolley'},{name:'lucy'},{name:'john'}, {name:'lily'},{name:'locke'},{name:'jack'},{name:'danny'},{name:'rose'},{name:'harris'},{name:'lotus'},{name:'louis'}];
- },
- methods:{
- onappear: function (e) {
- var index = e.target.attr.index
- // console.log(this.staffs[index].name + ' is appearing...');
- },
- ondisappear:function (e) {
- },
- onrefresh:function(e){
- this.refreshDisplay='show';
- // this.staffs=[{name:'inns'},{name:'connon'},{name:'baos'},{name:'anna'}];
- this.refreshDisplay='hide'
- // console.log(this.refreshDisplay);
- },
- onpullingdown:function(e){
- console.log('onpullingdown triggered.');
- console.log('dy:'+e.dy);
- console.log('headerHeight:'+e.headerHeight);
- console.log('maxHeight:'+e.maxHeight);
- }
- }
- }
-</script>
-
-```
-
-[try it ](http://dotwe.org/10ee6bd59ebe173f0f578a4eb8bac6f1)
-
-
-### Restrictions
-
-* refresh/loading does not support remove action, may support in Weex 0.9.
-* refresh/loading despite setting with display='hide', the refresh/loading view will still appear when scrolling due to known issues. it can be fixed with a another display='hide' when the refresh/loading should be hidden.
-* refresh/loading can only be hidden or displayed with an attribute display with value of show or hide. And there should be a statement of display='hide' when display='show' shows up in an event function, or your scroller may not response to user inputs.
http://git-wip-us.apache.org/repos/asf/incubator-weex-site/blob/32a097bf/source/v-0.10/references/components/scroller.md
----------------------------------------------------------------------
diff --git a/source/v-0.10/references/components/scroller.md b/source/v-0.10/references/components/scroller.md
deleted file mode 100644
index 3197ab8..0000000
--- a/source/v-0.10/references/components/scroller.md
+++ /dev/null
@@ -1,136 +0,0 @@
----
-title: <scroller>
-type: references
-order: 2.8
-version: 0.10
----
-
-# <scroller>
-<span class="weex-version">v0.6.1+</span>
-
-A scroller is a component in vertical direction which can have multiple child components in one column. If total height of its child components exceed the height of the scroller, the whole child components will be scrollable.
-
-Notes: A <scroller> can be used as a root element or a embed element. The scroll direction of this component is column, and it can't be changed.
-
-
-**example**
-
-```html
-<template>
- <scroller onloadmore="onloadmore" loadmoreoffset="100">
- <div repeat="{{v in items}}">
- <text style="font-size: 40; color: #000000">{{v.item}}</text>
- </div>
- </scroller>
-</template>
-<script>
- module.exports = {
- data: {
- items: [],
- triggered:false
- },
- created: function () {
- for (var i = 0; i < 50; i++) {
- this.items.push({'item': 'test data' + i});
- }
- },
- methods: {
- onloadmore:function(){
- if(!this.triggered){
- for (var i = 100; i >= 50; i--) {
- this.items.push({'item':'onloadmore triggered' + i});
- }
- }
- this.triggered=true;
- }
- }
- }
-</script>
-```
-
-[try it](http://dotwe.org/acf155122b9457211165680b01fae1c2)
-
-## Child Components
-
-Scroller supports all kinds of components, such as div, text, etc.
-And there are two special components that can only be used inside scroller component.
-
-* refresh 0.6.1 used inside list to add pull-down-to-refresh functionality.
-* loading 0.6.1 used inside list to add pull-up-to-load-more functionality.
-
-
-## Attributes
-
-* show-scrollbar: true/false whether show the scroll bar or not, default value is true
-* scroll-direction: <string> define scroll direction of component, horizontal or vertical
-* loadmoreoffset : <number> default value is 0. The loadmore event will be triggered when the list is loadmoreoffset left to reach the bottom of the list view. e.g. a list has total content length of 1000, and the loadmoreoffset is set to 400, the loadmore event will be triggered when 600 has beed scrolled and there is less than 400 left.
-* loadmoreretry : <number> default value 0,whether to reset loadmore related UI when loadmore failed, will be deprecated in further release.
-
-**example**
-
-```html
-<template>
- <scroller onloadmore="onloadmore" loadmoreoffset="100">
- <div repeat="{{v in items}}">
- <text style="font-size: 40; color: #000000">{{v.item}}</text>
- </div>
- </scroller>
-</template>
-<script>
-module.exports = {
- data: {
- items: [],
- triggered:false
- },
- created: function () {
- for (var i = 0; i < 50; i++) {
- this.items.push({'item': 'test data' + i});
- }
- },
- methods: {
- onloadmore:function(){
- if(!this.triggered){
- for (var i = 100; i >= 50; i--) {
- this.items.push({'item':'onloadmore triggered' + i});
- }
- }
- this.triggered=true;
- }
- }
-}
-</script>
-```
-
-[try it](http://dotwe.org/acf155122b9457211165680b01fae1c2)
-
-
-Please checkout [Scroller Component Attributes]() to have a look at the inherited attributes from direct parent.
-
-Other attributes please check out the [common attributes](../common-attrs.html).
-
-## Styles
-
-common styles: check out [common styles for components](../common-style.html)
-
-* support flexbox related styles
-* support box model related styles
-* support position related styles
-* support opacity, background-color etc.
-
-
-## Events
-
-onloadmore used with loadmoreoffset attribute. if the view has less than loadmoreoffset to scroll down, the onloadmore event will be triggered.
-
-common events: check out the [common events](../common-event.html)
-
-* support onclick event. Check out [common events](../common-event.html)
-* support onappear / ondisappear event. Check out [common events](../common-event.html)
-
-
-
-## Restrictions
-
-Nested lists or scrollers within the same direction are not supported. In other words. nested lists/scroller must have different directions.
-For example, a vertical list nested in a vertical list or scroller is not allowed. However, a vertical list nested in a horizontal list or scroller is legal.
-
http://git-wip-us.apache.org/repos/asf/incubator-weex-site/blob/32a097bf/source/v-0.10/references/components/slider.md
----------------------------------------------------------------------
diff --git a/source/v-0.10/references/components/slider.md b/source/v-0.10/references/components/slider.md
deleted file mode 100644
index b1a537f..0000000
--- a/source/v-0.10/references/components/slider.md
+++ /dev/null
@@ -1,107 +0,0 @@
----
-title: <slider>
-type: references
-order: 2.9
-version: 0.10
----
-
-# <slider>
-
-## Summary
-
-A slide's player to show slides (mostly as pictures) one page by another. The default interval between two slides is 3 seconds.
-
-## Child Components
-
-It supports all kinds of weex components as its slides, especially the `indicator` component which can be used only as a child component of `slider`.
-
-## Attributes
-
-- `auto-play`: <boolean> `true` | `false`. This value determines whether the slides plays automatically after the page rendering finished. The default value is `false`.
-- `interval`: <number> millisecond. This value determines time interval for each page displayed in slider.
-- `index`: <number> . This value determines the index of current shown slide. The default value is `0`.
-
-Other attributes please check out the [common attributes](../references/common-attrs.html).
-
-## Styles
-
-**common styles**: check out [common styles for components](../references/common-style.html)
-
-- support flexbox related styles
-- support box model related styles
-- support ``position`` related styles
-- support ``opacity``, ``background-color`` etc.
-
-## Events
-
-- `change`: triggerd when the slide's index is changed. The event object contains the attribute of `index`, which is the index number of the currently shown slide.
-
-**common events**: check out the [common events](../references/common-event.html)
-
-- support `click` event. Check out [common events](../references/common-event.html)
-- support `appear` / `disappear` event. Check out [common events](../references/common-event.html)
-
-### Example
-
-```html
-<template>
- <div>
- <slider class="slider" interval="3000" auto-play="true">
- <div class="slider-pages" repeat="item in itemList">
- <image class="img" src="{{item.pictureUrl}}"></image>
- <text class="title">{{item.title}}</text>
- </div>
- <indicator class="indicator"></indicator>
- </slider>
- </div>
-</template>
-
-<style>
- .img {
- width: 714;
- height: 150;
- }
- .title {
- position: absolute;
- top: 20;
- left: 20;
- color: #ff0000;
- font-size: 48;
- font-weight: bold;
- background-color: #eeeeee;
- }
- .slider {
- flex-direction: row;
- margin: 18;
- width: 714;
- height: 230;
- }
- .slider-pages {
- flex-direction: row;
- width: 714;
- height: 200;
- }
- .indicator {
- width:714;
- height:200;
- position:absolute;
- top:1;
- left:1;
- item-color: red;
- item-selectedColor: blue;
- item-size: 20;
- }
-</style>
-
-<script>
- module.exports = {
- data: {
- itemList: [
- {itemId: '520421163634', title: 'item1', pictureUrl: 'https://gd2.alicdn.com/bao/uploaded/i2/T14H1LFwBcXXXXXXXX_!!0-item_pic.jpg'},
- {itemId: '522076777462', title: 'item2', pictureUrl: 'https://gd1.alicdn.com/bao/uploaded/i1/TB1PXJCJFXXXXciXFXXXXXXXXXX_!!0-item_pic.jpg'},
- {itemId: '522076777462', title: 'iten3', pictureUrl: 'https://gd3.alicdn.com/bao/uploaded/i3/TB1x6hYLXXXXXazXVXXXXXXXXXX_!!0-item_pic.jpg'}
- ]
- }
- }
-</script>
-```
http://git-wip-us.apache.org/repos/asf/incubator-weex-site/blob/32a097bf/source/v-0.10/references/components/switch.md
----------------------------------------------------------------------
diff --git a/source/v-0.10/references/components/switch.md b/source/v-0.10/references/components/switch.md
deleted file mode 100644
index 441da7b..0000000
--- a/source/v-0.10/references/components/switch.md
+++ /dev/null
@@ -1,81 +0,0 @@
----
-title: <switch>
-type: references
-order: 2.11
-version: 0.10
----
-
-# <switch>
-
-<span class="weex-version">v0.6.1+</span>
-
-The weex builtin component switch is used to create and manage an IOS styled On/Off buttons, for example, the Airplane mode button in the Settings app is a switch button.
-
-**example**
-
-```html
-<template>
- <div>
- <text>muted:</text>
- <switch checked="true" onclick='onclick' onchange='onchange' ondisappear='ondisappear' onappear='onappear'></switch>
-</div>
-</template>
-
-<script>
- module.exports ={
- methods:{
- onclick:function(e){
- console.log('onclick:' + e.timestamp);
- },
- onchange:function(e){
- console.log('onchage, value:' + e.value);
- },
- ondisappear:function(e){
- console.log('ondisappear, value:' + e.value);
- },
- onappear:function(e){
- console.log('onappear, value:' + e.value);
- },
- }
- }
-</script>
-```
-
-[try it](http://dotwe.org/7306d24f4f677b6d9935dbd00e3aa981)
-
-## Child Components
-
-There are no child components for the switch component.
-
-## Attributes
-
-* checked <boolean> true|false, default value is false, indicating whether the button is on or not.
-* disabled <boolean> true|false, default value is false, indicating whether the button is enable or not.
-
-Other attributes please check out the [common attributes](../common-attrs.html).
-
-## Styles
-Notes: There are several style properties that you mustn't use on this component. And here are all the invalid properties:
-
-* width
-* height
-* min-width
-* min-height
-* margin and margin-xxs
-* padding and padding-xxs
-* border and border-xxs
-
-Notes: Specially the width and height related properties is not configurable and the size of this component is fixed to 100x60 (for the design width 750px).
-
-common styles: check out [common styles for components](../common-style.html)
-
-## Events
-
-* onappear / ondisappear event. check out [common events](../common-event.html)
-* onclick: check out [common events](../common-event.html)
-* onchange: check out [common events](../common-event.html)
-
-## Parameters of events' object for onchange event:
-
-* value: the value of the component who dispatched this event, which is the boolean value true or false.
-* timestamp: the time stamp of the event.
http://git-wip-us.apache.org/repos/asf/incubator-weex-site/blob/32a097bf/source/v-0.10/references/components/text.md
----------------------------------------------------------------------
diff --git a/source/v-0.10/references/components/text.md b/source/v-0.10/references/components/text.md
deleted file mode 100644
index 308fd4a..0000000
--- a/source/v-0.10/references/components/text.md
+++ /dev/null
@@ -1,94 +0,0 @@
----
-title: <text>
-type: references
-order: 2.12
-version: 0.10
----
-
-# <text>
-
-The weex builtin component 'text' is used to render text with specified style rule. <text> tag can contain text value only. You can use variable interpolation in the text content with the mark `{% raw %}{{}}{% endraw %}`.
-
-## Child Components
-
-This component supports no child components.
-
-## Attributes
-
-* value(string): text value of this component. This is equal to the content of 'text'.
-
-### example
-
-```
-var textComponent = this.$el("textid");
-this.text = textComponent.attr.value;
-```
-
-## Styles
-
-* lines: specify the text lines. Default value is `0` for unlimited.
-* text styles: check out [text styles](../text-style.html)
-
- * support 'color' style.
- * support 'font-size' style. iOS: default vlaue `32`. Android: platform specify. HTML5: default value `32`.
- * support 'font-style' style.
- * support 'font-weight' style.
- * support 'text-align' style.
- * support 'text-decoration' style.
- * support 'text-overflow' style.
- * support 'line-height'(available from v0.6.1) style. line-height in iOS is different from h5 and Android, text value will be placed at bottom of line box.
- * not support 'flex-direction, 'justify-content', 'align-items' which is active for child nodes, and text has no child nodes.
-
-### common styles
-check out [common styles for components](../common-style.html)
-
-* support flexbox related styles.
-* support box model related styles.
-* support 'position' related styles.
-* support 'opacity', 'background-color' etc.
-
-## Events
-
-### common events
-check out [common events](../common-event.html)
-
-* support 'click' event.
-* support 'appear' / 'disappear' event.
-
-## Example
-
-```html
-<template>
- <div>
- <text>this is text content</text>
- <text value="this is text value"></text>
- <text style="text">{{price1}}</text>
- <text id="textid" onclick={{showtext}}>this is gettext content</text>
- <text value="{{text}}"></text>
- </div>
-</template>
-
-<style>
- .text {
- font-size: 24;
- text-decoration: underline;
- }
-</style>
-
-<script>
- module.exports = {
- data: {
- price1: '99.99',
- price2: '88.88',
- text:''
- },
- methods: {
- showtext: function(event) {
- var textComponent = this.$el("textid");
- this.text = textComponent.attr.value;
- }
- }
- };
-</script>
-```
-[Try it](http://dotwe.org/48f4d7c50245145c72c33161e2bb4325)
http://git-wip-us.apache.org/repos/asf/incubator-weex-site/blob/32a097bf/source/v-0.10/references/components/textarea.md
----------------------------------------------------------------------
diff --git a/source/v-0.10/references/components/textarea.md b/source/v-0.10/references/components/textarea.md
deleted file mode 100644
index 2645385..0000000
--- a/source/v-0.10/references/components/textarea.md
+++ /dev/null
@@ -1,81 +0,0 @@
----
-title: <textarea>
-type: references
-order: 2.13
-version: 0.10
----
-
-# <textarea>
-<span class="weex-version">v0.8+</span>
-
-
-### Summary
-
-The weex builtin component `textarea` is used to create interactive controls to accept data from users. It can be a multi-line [input](./input.html).
-
-**Notes:** `<textarea>` support all event which `<input>` had.
-
-### Child Components
-
-This component supports no child components.
-
-### attributes
-
-- `value`: <string> the value of the control.
-- `placeholder`: <string> a hint to the user of which can be entered to the control. The placeholder text must have no carriage returns or line-feeds.
-- `disabled`: <boolean> a boolean attribute indicates that the form control is not available for interaction. In particular, the click event will not be dispatched on disabled controls.
-- `autofocus`: <boolean> a boolean attribute lets you specify that a form control should have input focus when the page loads.
-- `rows:`<number> a number which can specify the height of textarea, default is `2`.
-
-Other attributes please check out the [common attributes](../common-attrs.html).
-
-### Styles
-
-**text styles**: checkout [text styles](../text-style.html)
-
-- support `color` style.
-- support `font-size` style.
-- support `font-style` style.
-- support `font-weight` style.
-- support `text-align` style.
-
-
-**common styles**: check out [common styles for components](../common-style.html)
-
-- support flexbox related styles.
-- support box model related styles.
-- support ``position`` related styles.
-- support ``opacity``, ``background-color`` etc.
-
-### Events
-
-- `input`: the value of an element changes.
-- `change`: the change event is fired when a change to the component's value is commited by the user. It always come after a ``blur`` event.
-- `focus`: a component has received focus.
-- `blur`: a component has lost focus.
-
-**common events**: check out the [common events](../common-event.html)
-
-- support `appear` / `disappear` event. Check out [common events](../common-event.html).
-
-**Notes:** `<textarea>` does not support the common-event `click`. Please listen to the `input` or `change` event instead.
-
-### Parameters of events' object
-
-- for ``input`` and ``change`` events:
- - `value`: the value of the component who dispatched this event.
- - `timestamp`: the time stamp of the event.
-- for ``focus`` and ``blur`` events:
- - `timestamp`: the time stamp of the event.
-
-### Example
-
-```html
-<div>
- <textarea
- autofocus="true"
- placeholder="..."
- value="I am a multiple input">
- </textarea>
-</div>
-```
http://git-wip-us.apache.org/repos/asf/incubator-weex-site/blob/32a097bf/source/v-0.10/references/components/video.md
----------------------------------------------------------------------
diff --git a/source/v-0.10/references/components/video.md b/source/v-0.10/references/components/video.md
deleted file mode 100644
index fa4384e..0000000
--- a/source/v-0.10/references/components/video.md
+++ /dev/null
@@ -1,75 +0,0 @@
----
-title: <video>
-type: references
-order: 2.14
-version: 0.10
----
-
-# <video>
-<span class="weex-version">v0.6.1+</span>
-
-The video component can be used to embed video content in a weex page.
-
-**example**
-
-```html
-<template>
- <div>
- <text>Big Eater!</text>
- <video onstart='onstart' onpause='onpause' onfinish='onfinish' onfail='onfail'
- auto-play="false" play-status="pause" src="{{src}}" style="width:750;height:500;"></video>
-</div>
-
- </div>
-</template>
-
-<script>
- module.exports ={
- data: {
- src:'http://flv2.bn.netease.com/videolib3/1611/01/XGqSL5981/SD/XGqSL5981-mobile.mp4'
- },
- methods:{
- onstart:function(e){
- console.log('onstart');
- console.log(e);
- },
- onpause:function(e){
- console.log('onpause');
- },
- onfinish:function(e){
- console.log('onfinish');
- },
- onfail:function(e){
- console.log('onfail');
- },
- }
- }
-</script>
-```
-
-[try it](http://dotwe.org/97938570cddf76c792a1a5f9542253b1)
-
-## Child Components
-* text is the only valid type of child component.
-
-## Attributes
-
-* src: <string> The URL of the video to embed.
-* play-status: <boolean> play | pause. Use it to control video's play/pause status. Default value is pause.
-* auto-play: <boolean> true | false. Use it to control whether it is playing when the page initialization finished. Defalut value is false.
-
-Other attributes please check out the [common attributes](../common-attrs.html).
-
-## Styles
-common styles: check out [common styles for components](../common-style.html)
-
-* support flexbox related styles
-* support box model related styles
-* support position related styles
-* support opacity, background-color etc.
-
-## Events
-* onstart: triggered when playback state is Playing.
-* onpause: triggered when playback state is Paused.
-* onfinish: triggered when playback state is Finished.
-* onfail: triggered when playback state is Failed.
http://git-wip-us.apache.org/repos/asf/incubator-weex-site/blob/32a097bf/source/v-0.10/references/components/web.md
----------------------------------------------------------------------
diff --git a/source/v-0.10/references/components/web.md b/source/v-0.10/references/components/web.md
deleted file mode 100644
index 89d47c7..0000000
--- a/source/v-0.10/references/components/web.md
+++ /dev/null
@@ -1,152 +0,0 @@
----
-title: <web>
-type: references
-order: 2.15
-version: 0.10
----
-
-# <web>
-<span class="weex-version">v0.5+</span>
-
-Use web component to display any web content in the weex page. The `src`attribute is used to specify a special source. You also can use `webview` module to control some web operation such as goBack,goForward and reload. see [webview module](https://alibaba.github.io/weex/doc/modules/webview.html).For example,You can use web component and webview module to assemble a browser.
-
-## Child Components
-
-This component supports no child components.
-
-## Attributes
-
-**src**(string): this attribute specifies the page source to load.
-
-Other attributes please check out the [common attributes](../common-attrs.html).
-
-## Styles
-
-**width**(float): the width of the component, default value is 0. This style must be specified.
-
-**height**(float): the height of the component, default value is 0. This style must be specifed.
-
-
-### common styles
-
-check out the [common styles](../common-attrs.html).
-
-support flexbox related styles
-support box model related styles
-support `position` related styles
-
-## Events
-
-**pagestart**: sent after the web component starts loading a page.
-**pagefinish**: sent after the web component finishes loading a page.
-**error**: sent if the web component failed to load a page.
-
-### common events
-
-support `appear` / `disappear` event.
-
-Check out [common events](../common-event.html)
-
-### Notes
-not support `click` event.
-
-## Example
-
-We use a simple Browser Demo to show how to use web component and webview module. Check out [webview module](../modules/webview.html).
-
-
-```html
-<template>
- <div class="browserStyle">
- <div style="flex-direction: row">
- <input id="urlInput" type="url" autofocus="false" placeholder="..." class="textStyle" value="{{input_text}}" oninput="input">
- </input>
- </div>
- <div style="flex-direction: row">
- <wxc-button value="LoadURL" class="buttonSytle" size="small" onclick="loadURL"></wxc-button>
- <wxc-button value="Backward" class="buttonSytle" size="small" onclick="backforward"></wxc-button>
- <wxc-button value="Forward" class="buttonSytle" size="small" onclick="forward"></wxc-button>
- </div>
- <div>
- <web id="webview" src="{{src}}" class="webStyle"></web>
- </div>
- </div>
-</template>
-
-<style>
-
- .browserStyle
- {
- width:600;
- height: 825;
- background-color:#778899 ;
- }
-
- .textStyle
- {
- width:600;
- height: 50;
- background-color: #D3D3D3;
- }
-
- .buttonSytle
- {
- width:180;
- height: 50;
- font-size: 12;
- background-color: #D3D3D3;
- margin:10;
- padding-left: 5;
- padding-right: 5;
- }
-
- .webStyle
- {
- width:600;
- height: 700;
- background-color: #8B0000;
- }
-
-</style>
-
-<script>
-
- var web_module = require('@weex-module/webview');
-
- module.exports = {
- data: {
- src : "https://h5.m.taobao.com",
- input_text:"https://www.tmall.com"
- },
-
- methods: {
-
- loadURL: function (e) {
- var web_element = this.$el('webview');
- var input = this.$el("urlInput");
- this.src = this.input_text;
- web_module.reload(web_element);
- },
-
- backforward: function (e) {
- var web_element = this.$el('webview');
- web_module.goBack(web_element);
- this.input_text = web_element.attr.src;
- },
-
- forward: function (e) {
- var web_element = this.$el('webview');
- web_module.goForward(web_element);
- this.input_text = web_element.attr.src;
- },
- input:function (e) {
- var input = this.$el("urlInput");
- this.input_text = input.attr.value;
- }
-
- }
- }
-</script>
-```
-
-[Try it](http://dotwe.org/103d472645206cc1564f49717585abb4)
http://git-wip-us.apache.org/repos/asf/incubator-weex-site/blob/32a097bf/source/v-0.10/references/components/wxc-navpage.md
----------------------------------------------------------------------
diff --git a/source/v-0.10/references/components/wxc-navpage.md b/source/v-0.10/references/components/wxc-navpage.md
deleted file mode 100644
index 0ae7eba..0000000
--- a/source/v-0.10/references/components/wxc-navpage.md
+++ /dev/null
@@ -1,74 +0,0 @@
----
-title: <wxc-navpage>
-type: references
-order: 2.16
-version: 0.10
----
-
-# <wxc-navpage>
-
-### Summary
-
-The "wxc-navpage" tag implements a specialized component that contains a navbar at the top of the window and an embed content page. You can customize the navbar as you like. In addition, you can use `navigator` module to control the page jump, see [navigator module](../modules/navigator.html).
-
-### Child Components
-
-This type of component supports all kinds of weex component as its child components.
-
-### Attributes
-
-- `height`: <length> The height of the navbar. Default value is 88.
-- `background-color`: <color>The backgroudColor of the navbar. Default value is `white`.
-- `title`: <string> The title of the navbar.
-- `title-color`: <color>The color of the navbar title. Default value is `black`.
-- `left-item-title`: <string> The title of the leftItem.
-- `left-item-color`: <color> The color of the leftItem title. Default value is `black`.
-- `right-item-title`: <string> The title of the rightItem.
-- `right-item-color`: <color> The color of the rightItem title. Default value is `black`.
-- `left-item-src`: <string> The imageURL of the leftItem you want to set.
-- `right-item-src`: <string> The imageURL of the rightItem you want to set.
-
-Other attributes please check out the [common attributes](../references/common-attrs.html).
-
-### Styles
-
-**common styles**: check out the [common styles](../references/common-attrs.html)
-
-- support flexbox related styles
-- support box model related styles
-- support ``position`` related styles
-- support ``opacity``, ``background-color`` etc.
-
-### Events
-
-- `naviBar.leftItem.click`: triggered when the leftItem of navbar is clicked. You need to register the observer in ready or create block.
-- `naviBar.rightItem.click`: triggered when the rightItem of navbar is clicked. You need to register the observer in ready or create block.
-
-**common events**: check out the [common events](../references/common-event.html)
-
-- support `click` event. Check out [common events](../references/common-event.html)
-- support `appear` / `disappear` event. Check out [common events](../references/common-event.html)
-
-### Example
-
-```html
-<template>
- <wxc-navpage height={{...}} background-color="..." title="..." title-color="..." left-item-title="..." left-item-color="..." right-item-src="...">
- <content> ...</content>
- </wxc-navpage>
-</template>
-<script>
- require('weex-components');
- module.exports = {
- created: function() {
- this.$on('naviBar.rightItem.click',function(e){
- //handle your click event here.
- });
-
- this.$on('naviBar.leftItem.click',function(e){
- //handle your click event here.
- });
- }
- }
-</script>
-```
http://git-wip-us.apache.org/repos/asf/incubator-weex-site/blob/32a097bf/source/v-0.10/references/components/wxc-tabbar.md
----------------------------------------------------------------------
diff --git a/source/v-0.10/references/components/wxc-tabbar.md b/source/v-0.10/references/components/wxc-tabbar.md
deleted file mode 100644
index 944b06d..0000000
--- a/source/v-0.10/references/components/wxc-tabbar.md
+++ /dev/null
@@ -1,94 +0,0 @@
----
-title: <wxc-tabbar>
-type: references
-order: 2.17
-version: 0.10
----
-
-# <wxc-tabbar>
-
-The `wxc-tabbar` is a custom component, which belongs to the `weex-components` node package, implements a specialized component that corresponds to the radio-style selection. It displays tabs at the bottom of the window for switching between different tab pages.
-
-Usage: You can use this component by a `require` statement, `require('weex-components');`, in the script tag. e.g.
-
-```html
-<template>
- <div style="flex-direction: column;">
- <wxc-tabbar tab-items = {{tabItems}}></wxc-tabbar>
- </div>
-</template>
-
-<script>
- require('weex-components');
- // Other javascript statements.
-</script>
-```
-
-Before requiring `weex-components'`, you need to specify `weex-components` dependency in your project's package.json file. e.g.
-
-```json
-"dependencies": {
- "weex-components": "^0.2.0"
-}
-```
-
-## Child Components
-
-`wxc-tabbar` has no child components.
-
-
-## Attributes
-
-* `selected-index` : <number> default value is 0
-* `selected-color`: <color> The color of the title when it is selected. Default is red color.
-* `unselected-color`: <color> The color of the title when it is unselected. Default is black color.
-* `tab-items` This attribute accepts an array of `tabitem` objects, each of which corresponds to the tab pages. And the order of the items equals to the order of the tab pages onscreen. You can configure the appearance of tabbar by setting the tabitem object's properties. Each tabitem properties are listed as below:
- * `index`: <integer> This attribute is required, and it specifies the order of the item.
- * `title`: <string> The item’s title. and it is optional. The tile will not be displayed if empty or not provided.
- * `titleColor`: <color>The item’s titleColor. Default is black color.
- * `image`: <string>The icon displayed when the tabitem is unselected. The image will not be displayed if empty or not provided.
- * `selectedImage` : <string>The icon displayed when the tabitem is selected. The icon will not be displayed if empty or not provided.
- * `src` : <string> The weex page for the tab page.
- * `visibility`: <string>visible | hidden. This attribute specifies display status of the tab page. Default value is visible.
-
-Other attributes please check out the [common attributes](../common-attrs.html).
-
-## Styles
-common styles: check out [common styles](../common-style.html) for components
-
-* support flexbox related styles
-* support box model related styles
-* support position related styles
-* support opacity, background-color etc.
-
-## Events
-* `tabBar.onClick`: triggered when the tabitem is selected. You need to register the observer in ready or create block.
-e.g.
-
-
-```html
-<template>
- <div style="flex-direction: column;">
- <wxc-tabbar tab-items = {{tabItems}}></wxc-tabbar>
- </div>
-</template>
-
-<script>
- require('weex-components');
- module.exports = {
- data: {
- },
- methods: {
- ready: function (e) {
- var vm = this;
- vm.$on('tabBar.onClick',function(e){
- var index = e.detail.index;
- });
- },
- }
- }
-</script>
-```
-
-## Example
-You should checkout the playground's `tabbar` example.
http://git-wip-us.apache.org/repos/asf/incubator-weex-site/blob/32a097bf/source/v-0.10/references/gesture.md
----------------------------------------------------------------------
diff --git a/source/v-0.10/references/gesture.md b/source/v-0.10/references/gesture.md
deleted file mode 100644
index fc41fd4..0000000
--- a/source/v-0.10/references/gesture.md
+++ /dev/null
@@ -1,74 +0,0 @@
----
-title: Gesture
-type: references
-order: 1.4
-version: 0.10
----
-
-# Gesture
-
-> Experiment Feature
-
-Weex encapsulates native touch events to provide a gesture system. Using gesture is similar to use event in Weex. Just set `on` attributes on a node to listen to gesture.
-
-## Type
-For now, there are four types of gestures:
-
-* **Touch**. Touch gesture is fired when a touch point is placed, moved or removed from the touch surface. Touch gesture is accuracy as it will report every trivial event. As a result, listening to touch gesture may be slow, a great deal of events needs to be processed even a small move happened. There are three types of Touch gesture:
- * `touchstart` will be fired when a touch point is placed on the touch surface.
- * `touchmove` will be fired when a touch point is moved along the touch surface.
- * `touchend` will be fired when a touch point is removed from the touch surface.
-* **Pan**. Pan gesture also report motion of touch point on the touch surface, which is similar to touch gesture. But Pan gesture is sampled and faster than the touch event. As consequence, it is less accuracy than touch gesture. There are also three types of Pan gesture, and the meaning of these types is very close to types of Touch.
- * `panstart`
- * `panmove`
- * `panend`
-* **Swipe**. Swipe is fired when user swipe a touch point on the screen. A serial of motion will only trigger one Swipe gesture.
-* **LongPress**. Swipe is fired when a touch point is held for 500 ms or more.
-
-The Touch gesture and Pan is very close to each other, with following features hold:
-
-* **Touch**. Not sampled, accuracy, but slow.
-* **Pan**. Sampled, fast, less accuracy.
-
-Users may choose their gesture according to their situation.
-
-## Properties
-The following properties can be used in gesture callback:
-
-* `direction`. Only exists for **Swipe** gesture. Indicate the direcion of the swipe, choose from `up`, `left`, `bottom`, `right`.
-* `changedTouches`. An array of motion for every touch pointer that has contribute to the current gesture.
-
-### changedTouches
-
-`changedTouches` is an array, with the following properties in its children:
-
-* `identifier`. A unique identifier for a touch pointer.
-* `pageX`. The X coordinate of the touch pointer relative to the left edge of the document.
-* `pageY`. The Y coordinate of the touch pointer relative to the top of the document.
-* `screenX`. The X coordinate of the touch point relative to the left edge of the screen.
-* `screenY`. The Y coordinate of the touch point relative to the top edge of the screen.
-
-## Constrain
-Currently, Weex Android do not support listening to gesture on `scroller`, `list` and `webview`, as it would lead a large amount of event conflicting.
-
-## How to use
-
-Example:
-
-```html
-<template>
- <div ontouchstart="handleTouchstart"></div>
-</template>
-
-<script>
-module.exports = {
- methods: {
- handleTouchstart: function(eventProperties) {
- // handling with the Event Properties
- }
- }
-}
-</script>
-```
-
-With the code above, a `touchstart` event will be fired when a touch point is placed on the touch surface.
http://git-wip-us.apache.org/repos/asf/incubator-weex-site/blob/32a097bf/source/v-0.10/references/images/css-boxmodel.png
----------------------------------------------------------------------
diff --git a/source/v-0.10/references/images/css-boxmodel.png b/source/v-0.10/references/images/css-boxmodel.png
deleted file mode 100644
index a2063e2..0000000
Binary files a/source/v-0.10/references/images/css-boxmodel.png and /dev/null differ
http://git-wip-us.apache.org/repos/asf/incubator-weex-site/blob/32a097bf/source/v-0.10/references/images/css-flexbox-align.jpg
----------------------------------------------------------------------
diff --git a/source/v-0.10/references/images/css-flexbox-align.jpg b/source/v-0.10/references/images/css-flexbox-align.jpg
deleted file mode 100644
index 8a7f731..0000000
Binary files a/source/v-0.10/references/images/css-flexbox-align.jpg and /dev/null differ
http://git-wip-us.apache.org/repos/asf/incubator-weex-site/blob/32a097bf/source/v-0.10/references/images/css-flexbox-justify.svg
----------------------------------------------------------------------
diff --git a/source/v-0.10/references/images/css-flexbox-justify.svg b/source/v-0.10/references/images/css-flexbox-justify.svg
deleted file mode 100644
index 33e742b..0000000
--- a/source/v-0.10/references/images/css-flexbox-justify.svg
+++ /dev/null
@@ -1,59 +0,0 @@
-<svg xmlns="http://www.w3.org/2000/svg" width='504' height='270' viewBox="0 0 504 270">
- <defs>
- <pattern id='checker' width='20' height='20' patternUnits='userSpaceOnUse'>
- <rect x='0' y='0' width='10' height='10' fill='#eee' />
- <rect x='10' y='10' width='10' height='10' fill='#eee' />
- <rect x='0' y='10' width='10' height='10' fill='#ccc' />
- <rect x='10' y='0' width='10' height='10' fill='#ccc' />
- </pattern>
- </defs>
- <style>
- text { font-family: sans-serif; font-weight: bold; font-size: 30px; text-anchor: middle; }
- rect { stroke-width: 2px; stroke: #888; }
- g > rect:nth-child(1) { fill: #888 }
- g > rect:nth-child(2) { fill: #fcc; }
- g > rect:nth-child(3) { fill: #cfc; }
- g > rect:nth-child(4) { fill: #ccf; }
- g > rect:nth-child(5) { fill: transparent; }
- </style>
- <g transform="translate(2,2)">
- <rect x='0' y='0' width='500' height='50' />
- <rect x='0' y='0' width='100' height='50' />
- <rect x='100' y='0' width='80' height='50' />
- <rect x='180' y='0' width='200' height='50' />
- <rect x='0' y='0' width='500' height='50' />
- <text x='250' y='38'>flex-start</text>
- </g>
- <g transform="translate(2,56)">
- <rect x='0' y='0' width='500' height='50' />
- <rect x='120' y='0' width='100' height='50' />
- <rect x='220' y='0' width='80' height='50' />
- <rect x='300' y='0' width='200' height='50' />
- <rect x='0' y='0' width='500' height='50' />
- <text x='250' y='38'>flex-end</text>
- </g>
- <g transform="translate(2,110)">
- <rect x='0' y='0' width='500' height='50' />
- <rect x='60' y='0' width='100' height='50' />
- <rect x='160' y='0' width='80' height='50' />
- <rect x='240' y='0' width='200' height='50' />
- <rect x='0' y='0' width='500' height='50' />
- <text x='250' y='38'>center</text>
- </g>
- <g transform="translate(2,164)">
- <rect x='0' y='0' width='500' height='50' />
- <rect x='0' y='0' width='100' height='50' />
- <rect x='160' y='0' width='80' height='50' />
- <rect x='300' y='0' width='200' height='50' />
- <rect x='0' y='0' width='500' height='50' />
- <text x='250' y='38'>space-between</text>
- </g>
- <g transform="translate(2,218)">
- <rect x='0' y='0' width='500' height='50' />
- <rect x='20' y='0' width='100' height='50' />
- <rect x='160' y='0' width='80' height='50' />
- <rect x='280' y='0' width='200' height='50' />
- <rect x='0' y='0' width='500' height='50' />
- <text x='250' y='38'>space-around</text>
- </g>
-</svg>
\ No newline at end of file
http://git-wip-us.apache.org/repos/asf/incubator-weex-site/blob/32a097bf/source/v-0.10/references/images/css-flexbox-sample.png
----------------------------------------------------------------------
diff --git a/source/v-0.10/references/images/css-flexbox-sample.png b/source/v-0.10/references/images/css-flexbox-sample.png
deleted file mode 100644
index 0f1236d..0000000
Binary files a/source/v-0.10/references/images/css-flexbox-sample.png and /dev/null differ
http://git-wip-us.apache.org/repos/asf/incubator-weex-site/blob/32a097bf/source/v-0.10/references/images/nav.png
----------------------------------------------------------------------
diff --git a/source/v-0.10/references/images/nav.png b/source/v-0.10/references/images/nav.png
deleted file mode 100644
index 7081ca7..0000000
Binary files a/source/v-0.10/references/images/nav.png and /dev/null differ
http://git-wip-us.apache.org/repos/asf/incubator-weex-site/blob/32a097bf/source/v-0.10/references/index.md
----------------------------------------------------------------------
diff --git a/source/v-0.10/references/index.md b/source/v-0.10/references/index.md
deleted file mode 100644
index d59d654..0000000
--- a/source/v-0.10/references/index.md
+++ /dev/null
@@ -1,49 +0,0 @@
----
-title: Bootstrap
-type: references
-order: 1
-has_chapter_content: false
-chapter_title: Common Options
-version: 0.10
----
-
-# Bootstrap
-
-Besides its default meaning, `<script>` tag supports two more configuration with its `type` property *in the top level component of a page*.
-
-* `type="data"`: For initial data configuration, the data defined here will overwrite the data definition in the `<script>`.
-* `type="config"`: For configuration definition.
-
-```html
-<script type="data">
- /* (optional) the definition of initial data */
-</script>
-
-<script type="config">
- /* (optional) the definition of configuration */
-</script>
-```
-
-## Initial data definition
-
-Sometimes, it is hard to maintain huge data structure in the default `<script>` tag. So Weex allows us to have a `<script type="data">` tag to define initial data. The data defined in here will totally replace the data defined in the default `<script>` tag.
-
-here is an example:
-
-```html
-<script type="data">
-{
- title: 'Alibaba',
- date: new Date().toLocaleString()
-}
-</script>
-```
-
-## script configuration
-
-Weex also allows us to do some configuration with a `<script type="config">`, So far, we only support the `downgrade` configs.
-
-- `downgrade.osVersion`
-- `downgrade.appVersion`
-- `downgrade.weexVersion`
-- `downgrade.deviceModel`
[44/51] [abbrv] incubator-weex-site git commit: update file structure
and fix responsive styles
Posted by ha...@apache.org.
http://git-wip-us.apache.org/repos/asf/incubator-weex-site/blob/12e3a8bc/_draft/v1.0/references/common-event.md
----------------------------------------------------------------------
diff --git a/_draft/v1.0/references/common-event.md b/_draft/v1.0/references/common-event.md
deleted file mode 100644
index 2554fe1..0000000
--- a/_draft/v1.0/references/common-event.md
+++ /dev/null
@@ -1,492 +0,0 @@
----
-title: 通用事件
-type: references
-order: 1.10
-version: 0.10
----
-
-# 通用事件
-
-Weex 提供了通过事件触发动作的能力,例如在用户点击组件时执行 JavaScript。下面列出了可被添加到 Weex 组件上以定义事件动作的属性:
-
-## `click`
-
-当组件上发生点击手势时被触发。
-
-**注意:**
-
-`<input>` 和 `<switch>` 组件目前不支持 `click` 事件,请使用 `change` 或 `input` 事件来代替。
-
-### 事件对象
-
-- `type`: `click`
-- `target`: 触发点击事件的目标组件
-- `timestamp`: 触发点击事件时的时间戳
-
-### 示例
-
-点击按钮,将弹出弹框,再点击弹框 `×`,关闭弹框。
-
-```html
-<template>
- <div>
- <div>
- <text class="btn" onclick="openDialog">Show Dialog</text>
- </div>
-
- <div id="dialog" class="dialog" if="{{isShowDialog}}">
- <div class="dialog-backdrop"></div>
- <div class="dialog-content">
- <div class="dialog-header">
- <text class="dialog-title">{{dialogTitle}}</text>
- <text class="close" onclick="closeDialog">×</text>
- </div>
- <div class="dialog-body">
- <text>{{dialogBody}}</text>
- </div>
- </div>
- </div>
- </div>
-</template>
-
-<style>
-.dialog-backdrop {
- opacity: .5;
- position: absolute;
- top: 0;
- right: 0;
- bottom: 0;
- left: 0;
- background-color: #000000;
-}
-.dialog {
- position: fixed;
- top: 0;
- right: 0;
- bottom: 0;
- left: 0;
- justify-content: center;
- align-items: center;
-}
-.dialog-content {
- width: 450;
- background-color: #ffffff;
-}
-.dialog-header {
- padding: 20;
- border-bottom-width: 1;
- border-bottom-style: solid;
- border-bottom-color: #efefef;
-}
-.dialog-body {
- padding: 20;
-}
-.close {
- font-size: 50;
- position: absolute;
- right: 10;
- top: 10;
-}
-.btn {
- text-align: center;
- color: #ffffff;
- padding: 12;
- background-color: #3071a9;
- border-color: #285e8e;
- border-radius: 4;
-}
-</style>
-
-<script>
- module.exports = {
- data: {
- isShowDialog: false,
- dialogTitle: 'HELLO',
- dialogBody: 'Weex is best!'
- },
- methods: {
- openDialog: function (e) {
- this.isShowDialog = true
- },
- closeDialog: function (e) {
- this.isShowDialog = false
- }
- }
- }
-</script>
-```
-
-[体验一下](http://dotwe.org/6c1dd48b419e614f92581930f42fd366)
-
-## `longpress`
-
-如果一个组件被绑定了 `longpress` 事件,那么当用户长按这个组件时,该事件将会被触发。
-
-**注意:**
-
-`<input>` 和 `<switch>` 组件目前不支持 `click` 事件,请使用 `change` 或 `input` 事件来代替。
-
-### 事件对象
-- `type` : `longpress`
-- `target` : 触发长按事件的目标组件
-- `timestamp` : 长按事件触发时的时间戳
-
-### 示例
-
-长按按钮,变换背景色。
-
-```html
-<template>
- <div style="width: 400; height: 200; background-color: {{bg}};
- justify-content: center; align-items: center;" onlongpress="{{update}}">
- <text style="font-size: 60">Press me</text>
- </div>
-</template>
-
-<script>
- module.exports = {
- data: {
- bg: '#FF0000'
- },
- methods: {
- update: function () {
- this.bg = this.bg === '#FF0000' ? '#00FF00' : '#FF0000'
- }
- }
- }
-</script>
-```
-
-[体验一下](http://dotwe.org/14a646ea3d7d5e1de5baaca9061a48b3)
-
-## Appear 事件
-
-如果一个位于某个可滚动区域内的组件被绑定了 `appear` 事件,那么当这个组件的状态变为在屏幕上可见时,该事件将被触发。
-
-### 事件对象
-
-- `type` : `appear`
-- `target` : 触发 Appear 事件的组件对象
-- `timestamp` : 事件被触发时的时间戳
-- `direction` : 触发事件时屏幕的滚动方向,`up` 或 `down`
-
-### 示例
-
-当滚到最下方时,最后一个 `item` 出现,将会弹出弹框。
-
-```html
-<template>
- <scroller onviewappear="{{viewappear}}" onviewdisappear="{{viewdisappear}}">
- <div class="item">
- <text>scroll 1</text>
- </div>
- <div class="item">
- <text>scroll 2</text>
- </div>
- <div class="item">
- <text>scroll 3</text>
- </div>
- <div class="item">
- <text>scroll 4</text>
- </div>
- <div class="item">
- <text>scroll 5</text>
- </div>
- <div class="item">
- <text>scroll 6</text>
- </div>
- <div class="item">
- <text>scroll 7</text>
- </div>
- <div class="item">
- <text>scroll 8</text>
- </div>
- <div class="item">
- <text>scroll 9</text>
- </div>
- <div class="item">
- <text>scroll 10</text>
- </div>
- <div class="item" onappear="alertMsg" >
- <text>I will alert a message when I appeared.</text>
- </div>
- </scroller>
-</template>
-
-<style>
- .list {
- height: 850;
- }
-
- .count {
- font-size: 48;
- margin: 10;
- }
-
- .indicator {
- height: 40;
- width: 40;
- color: #45b5f0;
- }
-
- .row {
- width: 750;
- }
-
- .item {
- justify-content: center;
- border-bottom-width: 2;
- border-bottom-color: #c0c0c0;
- height: 200;
- padding: 20;
- }
-</style>
-
-<script>
- var modal = require('@weex-module/modal')
- module.exports = {
- data: {},
- methods: {
- alertMsg: function (e) {
- modal.alert({
- message: 'I am appeared.',
- okTitle: 'Appear'
- }, function() {
- })
- },
- viewappear: function () {
- nativeLog('>>>>>', 'viewappear')
- },
- viewdisappear: function () {
- nativeLog('>>>>>', 'viewdisappear')
- }
- }
- }
-</script>
-```
-
-[体验一下](http://dotwe.org/4d5335f086dfc9964caed5b1fe4b1aa7)
-
-## Disappear 事件
-
-如果一个位于某个可滚动区域内的组件被绑定了 `disappear` 事件,那么当这个组件被滑出屏幕变为不可见状态时,该事件将被触发。
-
-### 事件对象
-
-- `type` : `disappear`
-- `target` : 触发 Disappear 事件的组件对象
-- `timestamp` : 事件被触发时的时间戳
-- `direction` : 触发事件时屏幕的滚动方向,`up` 或 `down`
-
-### 示例
-
-当向下滚动到第一个 `item` 消失后,将会弹出弹框。
-
-```html
-<template>
- <scroller onviewappear="{{viewappear}}" onviewdisappear="{{viewdisappear}}">
- <div class="item" ondisappear="alertMsg" >
- <text>I will alert a message when I disappeared.</text>
- </div>
- <div class="item">
- <text>scroll 1</text>
- </div>
- <div class="item">
- <text>scroll 2</text>
- </div>
- <div class="item">
- <text>scroll 3</text>
- </div>
- <div class="item">
- <text>scroll 4</text>
- </div>
- <div class="item">
- <text>scroll 5</text>
- </div>
- <div class="item">
- <text>scroll 6</text>
- </div>
- <div class="item">
- <text>scroll 7</text>
- </div>
- <div class="item">
- <text>scroll 8</text>
- </div>
- <div class="item">
- <text>scroll 9</text>
- </div>
- <div class="item">
- <text>scroll 10</text>
- </div>
- </scroller>
-</template>
-
-<style>
- .list {
- height: 850;
- }
-
- .count {
- font-size: 48;
- margin: 10;
- }
-
- .indicator {
- height: 40;
- width: 40;
- color: #45b5f0;
- }
-
- .row {
- width: 750;
- }
-
- .item {
- justify-content: center;
- border-bottom-width: 2;
- border-bottom-color: #c0c0c0;
- height: 200;
- padding: 20;
- }
-</style>
-
-<script>
- var modal = require('@weex-module/modal')
- module.exports = {
- data: {},
- methods: {
- alertMsg: function (e) {
- modal.alert({
- message: 'I am disappeared.',
- okTitle: 'Disappear'
- }, function() {
- })
- },
- viewappear: function () {
- nativeLog('>>>>>', 'viewappear')
- },
- viewdisappear: function () {
- nativeLog('>>>>>', 'viewdisappear')
- }
- }
- }
-</script>
-```
-
-[体验一下](http://dotwe.org/eefa176009207a429bbaf475f6ee92d1)
-
-## Page 事件
-
-*注意:仅支持 iOS 和 Android,H5 暂不支持。*
-
-Weex 通过 `viewappear` 和 `viewdisappear` 事件提供了简单的页面状态管理能力。
-
-`viewappear` 事件会在页面就要显示或配置的任何页面动画被执行前触发,例如,当调用 `navigator` 模块的 `push` 方法时,该事件将会在打开新页面时被触发。`viewdisappear` 事件会在页面就要关闭时被触发。
-
-与组件的 `appear` 和 `disappear` 事件不同的是,`viewappear` 和 `viewdisappear` 事件关注的是整个页面的状态,所以**它们必须绑定到页面的根元素上**。
-
-特殊情况下,这两个事件也能被绑定到非根元素的body组件上,例如`wxc-navpage`组件。
-
-### 事件对象
-
-- `type` : `viewappear` 或 `viewdisappear`
-- `target` : 触发事件的组件对象
-- `timestamp` : 事件被触发时的时间戳
-
-### 示例
-
-进出页面时,都会弹框提示。
-
-```html
-<template>
- <scroller onviewappear="{{alertViewappearMsg}}" onviewdisappear="{{alertViewdisappearMsg}}">
- <div class="item">
- <text>scroll 1</text>
- </div>
- <div class="item">
- <text>scroll 2</text>
- </div>
- <div class="item">
- <text>scroll 3</text>
- </div>
- <div class="item">
- <text>scroll 4</text>
- </div>
- <div class="item">
- <text>scroll 5</text>
- </div>
- <div class="item">
- <text>scroll 6</text>
- </div>
- <div class="item">
- <text>scroll 7</text>
- </div>
- <div class="item">
- <text>scroll 8</text>
- </div>
- <div class="item">
- <text>scroll 9</text>
- </div>
- <div class="item">
- <text>scroll 10</text>
- </div>
- <div class="item" onappear="alertMsg" >
- <text>scroll 11</text>
- </div>
- </scroller>
-</template>
-
-<style>
- .list {
- height: 850;
- }
-
- .count {
- font-size: 48;
- margin: 10;
- }
-
- .indicator {
- height: 40;
- width: 40;
- color: #45b5f0;
- }
-
- .row {
- width: 750;
- }
-
- .item {
- justify-content: center;
- border-bottom-width: 2;
- border-bottom-color: #c0c0c0;
- height: 200;
- padding: 20;
- }
-</style>
-
-<script>
- var modal = require('@weex-module/modal')
- module.exports = {
- data: {},
- methods: {
- alertViewappearMsg: function () {
- modal.alert({
- message: 'viewappear.',
- okTitle: 'viewappear'
- }, function() {
- })
- },
- alertViewdisappearMsg: function () {
- modal.alert({
- message: 'viewdisappear.',
- okTitle: 'viewdisappear'
- }, function() {
- })
- }
- }
- }
-</script>
-```
-
-[体验一下](http://dotwe.org/450205a8f8612381422220ce88a562ff)
http://git-wip-us.apache.org/repos/asf/incubator-weex-site/blob/12e3a8bc/_draft/v1.0/references/common-style.md
----------------------------------------------------------------------
diff --git a/_draft/v1.0/references/common-style.md b/_draft/v1.0/references/common-style.md
deleted file mode 100644
index 8a585f2..0000000
--- a/_draft/v1.0/references/common-style.md
+++ /dev/null
@@ -1,322 +0,0 @@
----
-title: 通用样式
-type: references
-order: 1.6
-version: 0.10
----
-
-# 通用样式
-
-所有 Weex 组件都支持以下通用样式规则。
-
-## 盒模型
-
-
-
-Weex 盒模型基于 [CSS 盒模型](https://www.w3.org/TR/css3-box/),每个 Weex 元素都可视作一个盒子。我们一般在讨论设计或布局时,会提到「盒模型」这个概念。
-
-盒模型描述了一个元素所占用的空间。每一个盒子有四条边界:外边距边界 margin edge, 边框边界 border edge, 内边距边界 padding edge 与内容边界 content edge。这四层边界,形成一层层的盒子包裹起来,这就是盒模型大体上的含义。
-
-**注意:**
-Weex 对于长度值目前只支持*像素*值,单位可省略,不支持相对单位(`em`、`rem`)。
-
-- `width {length}`:,默认值 0
-- `height {length}`:,默认值 0
-- `padding {length}`:内边距,内容和边框之间的距离。默认值 0
-
- 可有如下写法:
-
- - `padding-left {length}`:,默认值 0
- - `padding-right {length}`:,默认值 0
- - `padding-top {length}`:,默认值 0
- - `padding-bottom {length}`:,默认值 0
-- `margin`:
-
- 外边距,元素和元素之间的空白距离。值类型为 length,默认值 0
-
- 可有如下写法:
-
- - `margin-left {length}`:,默认值 0
- - `margin-right {length}`:,默认值 0
- - `margin-top {length}`:,默认值 0
- - `margin-bottom {length}`:,默认值 0
-- border:
-
- 设定边框,`border` 目前不支持类似这样 `border: 1 solid #ff0000;` 的组合写法。
-
- 可有如下写法:
-
- - `border-style`:
-
- 设定边框样式,值类型为 string,可选值为 `solid` | `dashed` | `dotted`,默认值 `solid`
-
- 可有如下写法:
-
- - `border-left-style {string}`:可选值为 `solid` | `dashed` | `dotted`,默认值 `solid`
- - `border-top-style {string}`:可选值为 `solid` | `dashed` | `dotted`,默认值 `solid`
- - `border-right-style {string}`:可选值为 `solid` | `dashed` | `dotted`,默认值 `solid`
- - `border-bottom-style {string}`:可选值为 `solid` | `dashed` | `dotted`,默认值 `solid`
-
- - `border-width {length}`:
-
- 设定边框宽度,非负值, 默认值 0
-
- 可有如下写法:
-
- - `border-left-width {length}`:,非负值, 默认值 0
- - `border-top-width {length}`:,非负值, 默认值 0
- - `border-right-width {length}`:,非负值, 默认值 0
- - `border-bottom-width {length}`:,非负值, 默认值 0
-
- - `border-color {color}`:
-
- 设定边框颜色,默认值 `#000000`
-
- 可有如下写法:
-
- - `border-left-color {color}`:,默认值 `#000000`
- - `border-top-color {color}`:,默认值 `#000000`
- - `border-right-color {color}`:,默认值 `#000000`
- - `border-bottom-color {color}`:,默认值 `#000000`
- - `border-radius {length}`:
-
- 设定圆角,默认值 0
-
- 可有如下写法:
-
- - `border-bottom-left-radius {length}`:,非负值, 默认值 0
- - `border-bottom-right-radius {length}`:,非负值, 默认值 0
- - `border-top-left-radius {length}`:,非负值, 默认值 0
- - `border-top-right-radius {length}`:,非负值, 默认值 0
-
-
-注意:目前在 `<image>` 和 `<text>` 组件上尚无法只定义一个或几个角的 `border-radius`。比如你无法在这两个组件上使用 `border-top-left-radius`。
-
-Weex 盒模型的 `box-sizing` 默认为 `border-box`,即盒子的宽高包含内容、内边距和边框的宽度,不包含外边距的宽度。
-
-### 示例:
-
-```html
-<template>
- <div>
- <image style="width: 400; height: 200; margin-left: 20;" src="https://g.alicdn.com/mtb/lab-zikuan/0.0.18/weex/weex_logo_blue@3x.png"></image>
- </div>
-</template>
-```
-
-## Flexbox
-
-Weex 布局模型基于 CSS [`Flexbox`](http://www.w3.org/TR/css3-flexbox/),以便所有页面元素的排版能够一致可预测,同时页面布局能适应各种设备或者屏幕尺寸。
-
-Flexbox 包含 flex 容器和 flex 成员项。如果一个 Weex 元素可以容纳其他元素,那么它就成为 flex 容器。需要注意的是,flexbox 的老版规范相较新版有些出入,比如是否能支持 wrapping。这些都描述在 W3C 的工作草案中了,你需要注意下新老版本之间的不同。另外,老版本只在安卓 4.4 版以下得到支持。
-
-### Flex 容器
-
-在 Weex 中,Flexbox 是默认且唯一的布局模型,所以你不需要手动为元素添加 `display: flex;` 属性。
-
-- `flex-direction`:
-
- 定义了 flex 容器中 flex 成员项的排列方向。可选值为 `row` | `column`,默认值为 `column`
-
- - `column`:从上到下排列。
- - `row`:从左到右排列。
-
-- `justify-content`:
-
- 定义了 flex 容器中 flex 成员项在主轴方向上如何排列以处理空白部分。可选值为 `flex-start` | `flex-end` | `center` | `space-between`,默认值为 `flex-start`。
-
- - `flex-start`:是默认值,所有的 flex 成员项都排列在容器的前部;
- - `flex-end`:则意味着成员项排列在容器的后部;
- - `center`:即中间对齐,成员项排列在容器中间、两边留白;
- - `space-between`:表示两端对齐,空白均匀地填充到 flex 成员项之间。
-
- 
-
-- `align-items`:
-
- 定义了 flex 容器中 flex 成员项在纵轴方向上如何排列以处理空白部分。可选值为 `stretch` | `flex-start` | `center` | `flex-end`,默认值为 `stretch`。
-
- - `stretch` 是默认值,即拉伸高度至 flex 容器的大小;
- - `flex-start` 则是上对齐,所有的成员项排列在容器顶部;
- - `flex-end` 是下对齐,所有的成员项排列在容器底部;
- - `center` 是中间对齐,所有成员项都垂直地居中显示。
-
- 
-
-### Flex 成员项
-
-flex 属性定义了 flex 成员项可以占用容器中剩余空间的大小。如果所有的成员项设置相同的值 `flex: 1`,它们将平均分配剩余空间. 如果一个成员项设置的值为 `flex: 2`,其它的成员项设置的值为 `flex: 1`,那么这个成员项所占用的剩余空间是其它成员项的2倍。
-
-- `flex {number}`:值为 number 类型。
-
-### 示例
-
-一个简单的网格布局。
-
-
-
-```html
-<template>
- <div>
- <div repeat="(i, v) in list" class="row">
- <div repeat="(k, text) in v" class="item">
- <div>
- <text>{{text}}</text>
- </div>
- </div>
- </div>
- </div>
-</template>
-<style>
- .item{
- flex:1;
- justify-content: center;
- align-items:center;
- border-width:1;
- }
- .row{
- flex-direction: row;
- height:80;
- }
-</style>
-<script>
- module.exports = {
- data: function () {
- return {
- list:[
- ['A', 'B', 'C'],
- ['D', 'E', 'F'],
- ['G', 'H', 'I']
- ]
- }
- }
- }
-</script>
-```
-
-[体验一下](http://dotwe.org/ee6a898fcac2242308c24fe5882c52ac)
-
-一个在相对于屏幕水平居中,全屏居中的 `<div>`。
-
-```html
-<template>
- <div class="wrapper">
- <div class="box">
- </div>
- </div>
-</template>
-
-<style>
- .wrapper {
- position: absolute;
- top: 0;
- right: 0;
- bottom: 0;
- left: 0;
- background-color: #cccccc;
- justify-content: center;
- align-items: center;
- }
- .box {
- width: 200;
- height: 200;
- background-color: #fc0000;
- }
-</style>
-```
-
-[体验一下](http://dotwe.org/a76cd89b37c72d308ed576131830e877)
-
-## 定位
-
-Weex 支持 `position` 定位,用法与 CSS position 类似。为元素设置 `position` 后,可通过 `top`、`right`、`bottom`、`left` 四个属性设置元素坐标。
-
-- `position {string}`:
-
- 设置定位类型。可选值为 `relative` | `absolute` | `fixed` | `sticky`,默认值为 `relative`。
-
- - `relative` 是默认值,指的是相对定位;
- - `absolute` 是绝对定位,以元素的容器作为参考系;
- - `fixed` 保证元素在页面窗口中的对应位置显示;
- - `sticky` 指的是仅当元素滚动到页面之外时,元素会固定在页面窗口的顶部。
-- `top {number}`:距离上方的偏移量,默认为 0。
-- `bottom {number}`:距离下方的偏移量,默认为 0。
-- `left {number}`:距离左方的偏移量,默认为 0。
-- `right {number}`:距离右方的偏移量,默认为 0。
-
-**注意:**
-
-1. Weex 目前不支持 `z-index` 设置元素层级关系,但靠后的元素层级更高,因此,对于层级高的元素,可将其排列在后面。
-2. 如果定位元素超过容器边界,在 Android 下,超出部分将**不可见**,原因在于 Android 端元素 `overflow` 默认值为 `hidden`,但目前 Android 暂不支持设置 `overflow: visible`。
-
-### 示例
-
-
-
-```html
-<template>
- <div class="wrapper">
- <div class="box box1">
- </div>
- <div class="box box2">
- </div>
- <div class="box box3">
- </div>
- </div>
-</template>
-
-<style>
- .wrapper {
- position: absolute;
- top: 0;
- right: 0;
- bottom: 0;
- left: 0;
- background-color: #cccccc;
- }
- .box {
- width: 400;
- height: 400;
- position: absolute;
- }
- .box1 {
- top: 0;
- left: 0;
- background-color: #ff0000;
- }
- .box2 {
- top: 150;
- left: 150;
- background-color: #0055dd;
- }
- .box3 {
- top: 300;
- left: 300;
- background-color: #00ff49;
- }
-</style>
-```
-
-[体验一下](http://dotwe.org/b04339de27cfabf0710e045c0079e56a)
-
-## 其他基本样式
-
-- `opacity {number}`:取值范围为 [0, 1] 区间。默认值是 1,即完全不透明;0 是完全透明;0.5 是 50% 的透明度。
-- `background-color {color}`:设定元素的背景色,可选值为色值,支持RGB( `rgb(255, 0, 0)` );RGBA( `rgba(255, 0, 0, 0.5)` );十六进制( `#ff0000` );精简写法的十六进制( `#f00` );色值关键字(`red`),默认值是 `transparent` 。
-
-**注意:** [色值的关键字列表](./color-names.md)。
-
-## 上手样式
-
-如果对于样式写法需要更多上手参考,可参考
-
-- [如何做出高性能长列表]()
-- [如何布局]()
-- 以及每个组件的文档中,都有常见的例子可供参考。
-
-你可以按照以下步骤来规划 Weex 页面的样式。
-
-1. 全局样式规划:将整个页面分割成合适的模块。
-2. flex 布局:排列和对齐页面模块。
-3. 定位盒子:定位并设置偏移量。
-4. 细节样式处理:增加特定的具体样式。
http://git-wip-us.apache.org/repos/asf/incubator-weex-site/blob/12e3a8bc/_draft/v1.0/references/component-defs.md
----------------------------------------------------------------------
diff --git a/_draft/v1.0/references/component-defs.md b/_draft/v1.0/references/component-defs.md
deleted file mode 100644
index 11e4282..0000000
--- a/_draft/v1.0/references/component-defs.md
+++ /dev/null
@@ -1,126 +0,0 @@
----
-title: ViewModel 选项
-type: references
-order: 1.2
-version: 0.10
----
-
-# 组件定义
-
-定义组件是通过一组选项来描述一个组件。这组选项总是被赋值给 `<script>` 标签中的 `module.exports` 。
-
-``` javascript
-module.exports = {
- // a set of options here
-}
-```
-## 数据和方法
-
-``` javascript
-module.exports = {
- data: function () {
- return {x: 1, y: 2}
- },
- methods: {
- doThis: function () {...},
- doThat: function () {...}
- },
- ...
-}
-```
-
-`data` 选项是一个函数,它返回这个视图模型可监听的数据对象。而 `methods` 是一个映射,其中包含所有视图模型的方法。
-
-每个 `data` 或 `method` 属性将被代理到视图模型实例中。所以,你能通过 `this.x` 读写数据,或者通过 `this.doThis()` 调用方法。
-
-一个完整的例子:
-
-```html
-<template>
- <div style="width: {{w}}; height: {{h}}; background-color: red;" onclick="update"></div>
-</template>
-<script>
- module.exports = {
- data: function () {
- return {w: 750, h: 200}
- },
- methods: {
- update: function (e) {
- this.h += 200
- }
- }
- }
-</script>
-```
-## 事件
-
-``` javascript
-module.exports = {
- data: ...,
- methods: {
- foo: function () {
- ...
- this.$emit('customtype1', data)
- }
- },
- events: {
- customtype1: function (e) {
- console.log(e.type, e.detail)
- }
- },
- ...
-}
-```
-
-`events` 选项允许你在视图模型被创建时注册自定义事件。然后,它会监听这些类型的事件,并通过函数类型的值处理它们。
-
-Weex 会把一个事件对象作为第一个参数传递给其绑定的事件,这个事件对象在 `e.detail` 中包含事件数据。
-## 生命周期
-
-``` javascript
-module.exports = {
- data: ...,
- methods: ...,
- init: function () {
- console.log('ViewModel constructor begins')
- },
- created: function () {
- console.log('Data observation finished')
- },
- ready: function () {
- console.log('Virtual DOM finished')
- },
- ...
-}
-```
-
-Weex 视图模型现在支持生命周期内的钩子函数,这些钩子函数能被写为组件选项:
-- `init`: 在视图模型的构造函数开始调用时激活;
-- `created`: 当视图模型监听默认数据,但还未编译模板时激活;
-- `ready`: 当视图模型监听默认数据并且编译模板生成虚拟DOM后被激活。
-
-**注意:当 `methods`、`events` 或生命周期方法作为参数传递给别的函数时,务必确认函数执行时的上下文符合您的预期,例如:**
-
-``` javascript
-module.exports = {
- data: function () {
- return {x: 1, y: 2}
- },
- ready: function () {
- // `undefined`
- // 因为上下文发生了变化
- this.foo(this.bar)
- // `1`
- // 正确绑定上下文之后可以得到预期的值
- this.foo(this.bar.bind(this))
- },
- methods: {
- foo: function (fn) {
- return fn()
- },
- bar: function () {
- return this.x
- }
- }
-}
-```
http://git-wip-us.apache.org/repos/asf/incubator-weex-site/blob/12e3a8bc/_draft/v1.0/references/components/a.md
----------------------------------------------------------------------
diff --git a/_draft/v1.0/references/components/a.md b/_draft/v1.0/references/components/a.md
deleted file mode 100644
index 75bd831..0000000
--- a/_draft/v1.0/references/components/a.md
+++ /dev/null
@@ -1,273 +0,0 @@
----
-title: <a>
-type: references
-order: 2.1
-version: 0.10
----
-
-# <a>
-
-`<a>` 组件定义了指向某个页面的一个超链接. 此组件的作用和用法与HTML5中的 [`<a>`](https://developer.mozilla.org/en-US/docs/Web/HTML/Element/a) 非常类似,区别在于 Weex 的 `<a>` 组件**不能**直接在里面添加文本(字符串),如果要展示文本,应该添加 `<text>` 组件。
-
-一个简单例子:
-
-```HTML
-<template>
- <div class="wrapper">
- <a href="http://dotwe.org/raw/dist/a468998152ee680413588c38bd61c29e.js">
- <text>click</text>
- </a>
- </div>
-</template>
-
-<style>
-.wrapper {
- text-align: center;
-}
-</style>
-```
-
-[体验一下](http://dotwe.org/f63c78213ef26c25357ffa851537fff3)
-
-## 子组件
-
-此组件支持除了自己外的所有 Weex 组件作为子组件。
-
-## 特性
-
-- `href {string}`:定义了超链接的 URL。
-
-## 样式
-
-`<a>` 支持所有通用样式。
-
-- 盒模型
-- `flexbox` 布局
-- `position`
-- `opacity`
-- `background-color`
-
-查看 [组件通用样式](../common-style.html)。
-
-## 事件
-
-`<a>` 支持所有通用事件。
-
-- `click`
- **注意:**我们不能保证 `click` 事件和 `href` 跳转的执行顺序。建议不要使用 `click` 事件来处理 `href` 跳转前的逻辑处理。
-- `longpress`
-- `appear`
-- `disappear`
-
-查看 [通用事件](../common-event.html)。
-
-## 约束
-
-1. **不能**直接在 `<a>` 中添加文本。
- 错误示例,“click” 无法被正常渲染。
-
- ```HTML
- <template>
- <div class="wrapper">
- <a href="http://dotwe.org/raw/dist/a468998152ee680413588c38bd61c29e.js">
- click
- </a>
- </div>
- </template>
-
- <style>
- .wrapper {
- text-align: center;
- }
- </style>
- ```
-
-[体验一下](http://dotwe.org/0a22d65138691a208e3fb1f8f6392b38)
-
-2. 请不要为 `<a>` 添加 `click` 事件。我们不能确保 `click` 事件和 `href` 跳转的执行顺序。
-
-## 示例
-
-```html
-<template>
- <div>
- <list class="list">
- <header class="header">
- <text class="title">Search Results</text>
- </header>
- <refresh style="width: 750; padding: 30;" onrefresh="refreshData" display="{{refreshDisplay}}">
- <text class="text"> ↓ Pull to refresh </text>
- <loading-indicator class="indicator"></loading-indicator>
- </refresh>
- <cell class="row" repeat="item in items" id="item-{{$index}}">
- <div class="lines">
- <text class="item">Repo name: </text><a href="{{item.repo_url}}"><text class="link">{{item.full_name}}</text></a>
- </div>
- <div>
- <text class="item">Repo star: {{item.stargazers_count}}</text>
- </div>
- </cell>
- <loading onloading="loadingData" style="width: 750; padding: 30;" display="{{loadingDisplay}}">
- <text class="text">{{loadingText}}</text>
- </loading>
- </list>
- <div class="up" onclick="goToTop">
- <img class="img" src="https://img.alicdn.com/tps/TB1ZVOEOpXXXXcQaXXXXXXXXXXX-200-200.png"></img>
- </div>
- </div>
-</template>
-
-<style>
-.header {
- padding: 25;
- background-color: #efefef;
- border-bottom-color: #eeeeee;
- border-bottom-width: 2;
- border-bottom-style: solid;
-}
-.title {
- text-align: center;
-}
-.text {
- text-align: center;
-}
-.list {
- background-color: #ffffff;
-}
-.row {
- padding: 20;
- border-bottom-color: #eeeeee;
- border-bottom-width: 2;
- border-bottom-style: solid;
-}
-.up {
- width: 70;
- height: 70;
- position: fixed;
- right: 20;
- bottom: 20;
-}
-.img {
- width: 70;
- height: 70;
-}
-.lines {
- flex-direction: row;
-}
-.link {
- color: #008cff;
- text-decoration: underline;
-}
-</style>
-
-<script>
-var dom = require('@weex-module/dom') || {}
-var stream = require('@weex-module/stream') || {}
-var modal = require('@weex-module/modal') || {}
-
-var SEARCH_URL = 'https://api.github.com/search/repositories?q=language:javascript&sort=stars&order=desc',
- PAGE_URL = 'http://dotwe.org/raw/dist/f1fa0895d0fa0fd80896e02a589443dd.js'
-
-module.exports = {
- data: {
- isLoaded: true,
- page: 1,
- loadingDisplay: 'hide',
- refreshDisplay: 'hide',
- loadingText: 'Loading...',
- items:[]
- },
- created: function () {
- var url = SEARCH_URL + '&page=' + this.page
-
- this.renderData(url)
-
- this.page++
- },
- methods: {
- renderData: function (url) {
- var self = this
-
- stream.fetch({
- method: 'GET',
- url: url,
- type:'json'
- }, function(res) {
- try {
- var results = res.data.items || []
-
- if (Array.isArray(results)) {
- for(var i = 0; i < results.length; i++) {
- var repo_url = results[i].html_url
- if (repo_url) {
- results[i].repo_url = self.processUrl(repo_url)
- }
- self.items.push(results[i])
- }
- }
- } catch(e) {}
- },function(res){
-
- })
- },
- loadingData: function (e) {
- var url = SEARCH_URL + '&page=' + this.page
- var self = this
-
- if (self.isLoaded === false) return
-
- self.loadingDisplay = 'show'
-
- if (self.page <=10 ) {
- self.renderData(url)
- self.page++
- } else {
- self.loadingDisplay = 'hide'
- self.loadingText = 'NO MORE!'
- }
- },
- goToTop: function (e) {
- dom.scrollToElement(this.$el('item-0'), {
- offset: -100
- })
- },
- refreshData: function (e) {
- var url = SEARCH_URL + '&page=1'
-
- if (this.isLoaded === false) return
-
- this.refreshDisplay = 'show'
-
- modal.toast({
- 'message': 'Refreshing...',
- 'duration': 1
- })
-
- this.items = []
- this.page = 1
- this.renderData(url)
-
- this.refreshDisplay = 'hide'
- },
- processUrl: function (url) {
- var platform = this.$getConfig().env.platform.toLowerCase()
-
-
- if (url) {
- // iOS do not need encode
- if (platform === 'ios') {
- return PAGE_URL + '?weburl=' + url
- } else if (platform === 'web') {
- return url
- } else {
- var encodeUrl = encodeURIComponent(url)
- return PAGE_URL + '?weburl=' + encodeUrl
- }
- }
- }
- }
-}
-</script>
-```
-
-[体验一下](http://dotwe.org/3e8369efb20a169077b5331b45927ed8)。
http://git-wip-us.apache.org/repos/asf/incubator-weex-site/blob/12e3a8bc/_draft/v1.0/references/components/cell.md
----------------------------------------------------------------------
diff --git a/_draft/v1.0/references/components/cell.md b/_draft/v1.0/references/components/cell.md
deleted file mode 100644
index e977037..0000000
--- a/_draft/v1.0/references/components/cell.md
+++ /dev/null
@@ -1,191 +0,0 @@
----
-title: <cell>
-type: references
-order: 2.5
-version: 0.10
----
-
-# <cell>
-
-用于定义列表中的子列表项,类似于 HTML 中的 `ul` 之于 `li`。Weex 会对 `<cell>` 进行高效的内存回收以达到更好的性能,该组件必须作为[`<list>`](./list.html) 组件的子组件, 这是为了优化滚动时的性能。
-
-## 子组件
-
-支持所有 Weex 的组件作为它的子组件。
-
-## 样式
-
-**注意:**
-
-你不能给 `<cell>` 设定`flex`值。 `<cell>`的宽度等于父组件 `<list>` 的宽度,并且 `<cell>` 高度自适应。
-
-- 通用样式:支持所有通用样式
-
- - 盒模型
- - `flexbox` 布局
- - `position`
- - `opacity`
- - `background-color`
-
- 查看 [组件通用样式](../common-style.html)
-
-## 事件
-
-- 通用事件
-
- 支持所有通用事件:
-
- - `click`
- - `longpress`
- - `appear`
- - `disappear`
-
- 查看 [通用事件](../common-event.html)
-
-## 示例
-
-
-
-```html
-<template>
- <div>
- <list class="list">
- <header class="header">
- <text class="title">Search Results</text>
- </header>
- <refresh style="width: 750; padding: 30;" onrefresh="refreshData">
- <text class="text"> ↓ Pull to refresh </text>
- <loading-indicator class="indicator"></loading-indicator>
- </refresh>
- <cell class="row" repeat="item in items" id="item-{{$index}}">
- <div>
- <text class="item">Repo name: {{item.full_name}}</text>
- </div>
- <div>
- <text class="item">Repo star: {{item.stargazers_count}}</text>
- </div>
- </cell>
- <loading onloading="loadingData" style="width: 750; padding: 30;" display="{{loadingDisplay}}">
- <text class="text">{{loadingText}}</text>
- </loading>
- </list>
- <div class="up" onclick="goToTop">
- <img class="img" src="https://img.alicdn.com/tps/TB1ZVOEOpXXXXcQaXXXXXXXXXXX-200-200.png"></img>
- </div>
- </div>
-</template>
-
-<style>
-.header {
- padding: 25;
- background-color: #efefef;
- border-bottom-color: #eeeeee;
- border-bottom-width: 2;
- border-bottom-style: solid;
-}
-.title {
- text-align: center;
-}
-.text {
- text-align: center;
-}
-.list {
- background-color: #ffffff;
-}
-.row {
- padding: 20;
- border-bottom-color: #eeeeee;
- border-bottom-width: 2;
- border-bottom-style: solid;
-}
-.up {
- width: 70;
- height: 70;
- position: fixed;
- right: 20;
- bottom: 20;
-}
-.img {
- width: 70;
- height: 70;
-}
-</style>
-
-<script>
-var dom = require('@weex-module/dom') || {}
-var stream = require('@weex-module/stream') || {}
-var modal = require('@weex-module/modal') || {}
-
-var SEARCH_URL = 'https://api.github.com/search/repositories?q=language:javascript&sort=stars&order=desc'
-
-module.exports = {
- data: {
- page: 1,
- loadingDisplay: 'show',
- loadingText: 'Loading...',
- items:[]
- },
- created: function () {
- var url = SEARCH_URL + '&page=' + this.page
-
- this.renderData(url)
-
- this.page++
- },
- methods: {
- renderData: function (url) {
- var self = this
-
- stream.fetch({
- method: 'GET',
- url: url,
- type:'json'
- }, function(res) {
- try {
- var results = res.data.items || []
-
- if (Array.isArray(results)) {
- for(var i = 0; i < results.length; i++) {
- self.items.push(results[i])
- }
- }
- } catch(e) {}
- },function(res){
-
- })
- },
- loadingData: function (e) {
- var url = SEARCH_URL + '&page=' + this.page
- var self = this
-
- if (self.page <=10 ) {
- self.renderData(url)
- self.page++
- } else {
- self.loadingDisplay = 'hide'
- self.loadingText = 'NO MORE!'
- }
- },
- goToTop: function (e) {
- dom.scrollToElement(this.$el('item-0'), {
- offset: -100
- })
- },
- refreshData: function (e) {
- var url = SEARCH_URL + '&page=1'
-
- modal.toast({
- 'message': 'Refreshing...',
- 'duration': 1
- })
-
- this.items = []
- this.page = 1
- this.renderData(url)
- }
- }
-}
-</script>
-```
-
-[体验一下](http://dotwe.org/280fa3dc8e793ea8712451ecdf84fb7b)
\ No newline at end of file
http://git-wip-us.apache.org/repos/asf/incubator-weex-site/blob/12e3a8bc/_draft/v1.0/references/components/div.md
----------------------------------------------------------------------
diff --git a/_draft/v1.0/references/components/div.md b/_draft/v1.0/references/components/div.md
deleted file mode 100644
index 893f7a1..0000000
--- a/_draft/v1.0/references/components/div.md
+++ /dev/null
@@ -1,245 +0,0 @@
----
-title: <div>
-type: references
-order: 2.2
-version: 0.10
----
-
-# <div>
-
-`<div>` 组件是用于包装其它组件的最基本容器。支持所有的通用样式、特性、`flexbox` 布局。其类似于 HTML 的 `<div>` 容器,但**不能**直接在里面添加文本(字符串),如果要展示文本,应该使用 `<text>` 组件。历史版本中,`<div>` 别名是 `<container>`,目前**已经弃用**。
-
-**注意:**
-
-`<div>` 嵌套层级不可过深,否则容易引起性能问题,建议控制在 **10** 层以内。
-
-一个简单例子:
-
-```html
-<template>
- <div>
- <text class="text">Hello World!</text>
- </div>
-</template>
-
-<style>
-.text {
- font-size: 70;
- color: #ff0000
-}
-</style>
-
-<script></script>
-```
-
-[体验一下](http://dotwe.org/a468998152ee680413588c38bd61c29e)
-
-
-
-## 子组件
-
-`<div>` 基本容器组件,因此支持包括 `<div>` 在内的任何组件作为自己的子组件。因此,在写一个组件时,推荐外层使用 `<div>` 作为根容器。
-
-## 样式
-
-`<div>` 支持所有通用样式:
-
-- 盒模型
-- `flexbox` 布局
-- `position`
-- `opacity`
-- `background-color`
-
-查看 [组件通用样式](../common-style.html)
-
-## 事件
-
-`<div>` 支持所有通用事件:
-
-- `click`
-- `longpress`
-- `appear`
-- `disappear`
-
-查看 [通用事件](../common-event.html)
-
-## 约束
-
-1. **不能**直接在 `<div>` 中添加文本。
-
- 错误示例,“Hello World!” 无法被正常渲染。
-
- ```html
- <template>
- <div>Hello World!</div>
- </template>
-
- <style>
- .text {
- font-size: 70;
- color: #ff0000
- }
- </style>
-
- <script></script>
- ```
-
- [体验一下](http://dotwe.org/3ef3ba3f0f162b27e24c525250c46a04)
-
-2. `<div>` 不可滚动,即使显式设置高度也一样。
-
- [错误示例](http://dotwe.org/a2cc491c5b9e6f6eb06795e45e725efd)
-
-## 示例
-
-
-
-```html
-<style>
-.item {
- padding: 20;
- height: 220;
- border-bottom-width: 1;
- border-bottom-style: solid;
- border-bottom-color: #efefef;
-}
-.item-content {
- flex-direction: row;
- width: 710;
- background-color: #ffffff;
-}
-.item-imgbox {
- height: 180;
- width: 180;
- margin-right: 20;
-}
-.item-img {
- width: 180;
- height: 180;
-}
-.item-info {
- height: 180;
- width: 510;
- justify-content: center;
- position: relative;
-}
-.item-info-detail {
- position: relative;
- color: #A2A2A2;
-}
-.desc {
- lines: 4;
- text-overflow: ellipsis;
- font-size: 26;
- line-height: 30;
- color: #A2A2A2;
-}
-.title {
- lines: 1;
- text-overflow: ellipsis;
- font-size: 32;
- color: #2D2D2D;
- line-height: 40;
-}
-.detail-info {
- margin-top: 15;
-}
-.up {
- width: 70;
- height: 70;
- position: fixed;
- right: 20;
- bottom: 20;
-}
-.img {
- width: 70;
- height: 70;
-}
-</style>
-
-<template>
- <div>
- <scroller>
- <div class="item" repeat="item in items" id="item-{{$index}}">
- <div class="item-content">
- <div class="item-imgbox">
- <img class="item-img" src="{{item.img}}" alt="" />
- </div>
- <div class="item-info">
- <div class="item-info-detail">
- <text class="title">{{item.title}}</text>
- <div class="detail-info">
- <text class="desc">{{item.desc}}</text>
- </div>
- </div>
- </div>
- </div>
- </div>
- </scroller>
- <div class="up" onclick="goToTop">
- <img class="img" src="https://img.alicdn.com/tps/TB1ZVOEOpXXXXcQaXXXXXXXXXXX-200-200.png"></img>
- </div>
- </div>
-</template>
-
-<script>
- var dom = require('@weex-module/dom') || {}
-
- module.exports = {
- data: {
- items: [{
- img: 'https://img.alicdn.com/tps/TB1z.55OFXXXXcLXXXXXXXXXXXX-560-560.jpg',
- title: 'Who is Alan Mathison Turing?Who is Alan Mathison Turing?',
- desc: 'Alan Mathison Turing ( 23 June 1912 – 7 June 1954) was an English computer scientist, mathematician, logician, cryptanalyst and theoretical biologist. He was highly influential in the development of theoretical computer science, providing a formalisation of the concepts of algorithm and computation with the Turing machine, which can be considered a model of a general purpose computer.Turing is widely considered to be the father of theoretical computer science and artificial intelligence.'
- },{
- img: 'https://img.alicdn.com/tps/TB1z.55OFXXXXcLXXXXXXXXXXXX-560-560.jpg',
- title: 'Who is Alan Mathison Turing?',
- desc: 'Alan Mathison Turing ( 23 June 1912 – 7 June 1954) was an English computer scientist, mathematician, logician, cryptanalyst and theoretical biologist. He was highly influential in the development of theoretical computer science, providing a formalisation of the concepts of algorithm and computation with the Turing machine, which can be considered a model of a general purpose computer.Turing is widely considered to be the father of theoretical computer science and artificial intelligence.'
- },{
- img: 'https://img.alicdn.com/tps/TB1z.55OFXXXXcLXXXXXXXXXXXX-560-560.jpg',
- title: 'Who is Alan Mathison Turing?',
- desc: 'Alan Mathison Turing ( 23 June 1912 – 7 June 1954) was an English computer scientist, mathematician, logician, cryptanalyst and theoretical biologist. He was highly influential in the development of theoretical computer science, providing a formalisation of the concepts of algorithm and computation with the Turing machine, which can be considered a model of a general purpose computer.Turing is widely considered to be the father of theoretical computer science and artificial intelligence.'
- },{
- img: 'https://img.alicdn.com/tps/TB1z.55OFXXXXcLXXXXXXXXXXXX-560-560.jpg',
- title: 'Who is Alan Mathison Turing?',
- desc: 'Alan Mathison Turing ( 23 June 1912 – 7 June 1954) was an English computer scientist, mathematician, logician, cryptanalyst and theoretical biologist. He was highly influential in the development of theoretical computer science, providing a formalisation of the concepts of algorithm and computation with the Turing machine, which can be considered a model of a general purpose computer.Turing is widely considered to be the father of theoretical computer science and artificial intelligence.'
- },{
- img: 'https://img.alicdn.com/tps/TB1z.55OFXXXXcLXXXXXXXXXXXX-560-560.jpg',
- title: 'Who is Alan Mathison Turing?',
- desc: 'Alan Mathison Turing ( 23 June 1912 – 7 June 1954) was an English computer scientist, mathematician, logician, cryptanalyst and theoretical biologist. He was highly influential in the development of theoretical computer science, providing a formalisation of the concepts of algorithm and computation with the Turing machine, which can be considered a model of a general purpose computer.Turing is widely considered to be the father of theoretical computer science and artificial intelligence.'
- },{
- img: 'https://img.alicdn.com/tps/TB1z.55OFXXXXcLXXXXXXXXXXXX-560-560.jpg',
- title: 'Who is Alan Mathison Turing?',
- desc: 'Alan Mathison Turing ( 23 June 1912 – 7 June 1954) was an English computer scientist, mathematician, logician, cryptanalyst and theoretical biologist. He was highly influential in the development of theoretical computer science, providing a formalisation of the concepts of algorithm and computation with the Turing machine, which can be considered a model of a general purpose computer.Turing is widely considered to be the father of theoretical computer science and artificial intelligence.'
- },{
- img: 'https://img.alicdn.com/tps/TB1z.55OFXXXXcLXXXXXXXXXXXX-560-560.jpg',
- title: 'Who is Alan Mathison Turing?',
- desc: 'Alan Mathison Turing ( 23 June 1912 – 7 June 1954) was an English computer scientist, mathematician, logician, cryptanalyst and theoretical biologist. He was highly influential in the development of theoretical computer science, providing a formalisation of the concepts of algorithm and computation with the Turing machine, which can be considered a model of a general purpose computer.Turing is widely considered to be the father of theoretical computer science and artificial intelligence.'
- },{
- img: 'https://img.alicdn.com/tps/TB1z.55OFXXXXcLXXXXXXXXXXXX-560-560.jpg',
- title: 'Who is Alan Mathison Turing?',
- desc: 'Alan Mathison Turing ( 23 June 1912 – 7 June 1954) was an English computer scientist, mathematician, logician, cryptanalyst and theoretical biologist. He was highly influential in the development of theoretical computer science, providing a formalisation of the concepts of algorithm and computation with the Turing machine, which can be considered a model of a general purpose computer.Turing is widely considered to be the father of theoretical computer science and artificial intelligence.'
- },{
- img: 'https://img.alicdn.com/tps/TB1z.55OFXXXXcLXXXXXXXXXXXX-560-560.jpg',
- title: 'Who is Alan Mathison Turing?',
- desc: 'Alan Mathison Turing ( 23 June 1912 – 7 June 1954) was an English computer scientist, mathematician, logician, cryptanalyst and theoretical biologist. He was highly influential in the development of theoretical computer science, providing a formalisation of the concepts of algorithm and computation with the Turing machine, which can be considered a model of a general purpose computer.Turing is widely considered to be the father of theoretical computer science and artificial intelligence.'
- },{
- img: 'https://img.alicdn.com/tps/TB1z.55OFXXXXcLXXXXXXXXXXXX-560-560.jpg',
- title: 'Who is Alan Mathison Turing?',
- desc: 'Alan Mathison Turing ( 23 June 1912 – 7 June 1954) was an English computer scientist, mathematician, logician, cryptanalyst and theoretical biologist. He was highly influential in the development of theoretical computer science, providing a formalisation of the concepts of algorithm and computation with the Turing machine, which can be considered a model of a general purpose computer.Turing is widely considered to be the father of theoretical computer science and artificial intelligence.'
- }]
- },
- created: function () {
- },
- methods: {
- goToTop: function (e) {
- dom.scrollToElement(this.$el('item-0'), {
- offset: 0
- })
- }
- }
- }
-</script>
-```
-
-[体验一下](http://dotwe.org/799f54b32f5227f9c34cfbb5e6946ba7)
http://git-wip-us.apache.org/repos/asf/incubator-weex-site/blob/12e3a8bc/_draft/v1.0/references/components/image.md
----------------------------------------------------------------------
diff --git a/_draft/v1.0/references/components/image.md b/_draft/v1.0/references/components/image.md
deleted file mode 100644
index 5a18280..0000000
--- a/_draft/v1.0/references/components/image.md
+++ /dev/null
@@ -1,161 +0,0 @@
----
-title: <image>
-type: references
-order: 2.3
-version: 0.10
----
-
-# <image>
-
-`<image>` 组件用于渲染图片,并且它不能包含任何子组件。可以用 `<img>` 作简写。
-
-需要注意的是,需要明确指定 `width` 和 `height`,否则图片无法显示。
-
-简单例子:
-
-```html
-<template>
- <div>
- <img style="width: 560;height: 560;" src="https://img.alicdn.com/tps/TB1z.55OFXXXXcLXXXXXXXXXXXX-560-560.jpg"></img>
- </div>
-</template>
-```
-
-[体验一下](http://dotwe.org/23b6cf951e6059d2cf7b9a74a9915ace)
-
-## 子组件
-
-`<image>` 组件不支持任何子组件,因此不要尝试在 `<image>` 组件中添加任何组件。如果需要实现 `background-image` 的效果,可以使用 `<image>` 组件和 `position` 定位来现实,如下面代码。
-
-```html
-<template>
- <div>
- <img style="width:750; height:750;" src="https://img.alicdn.com/tps/TB1z.55OFXXXXcLXXXXXXXXXXXX-560-560.jpg"></img>
- <div class="title">
- <text style="font-size:50; color: #ff0000">你好,image</text>
- </div>
- </div>
-</template>
-<style>
- .title{
- position:absolute;
- top:50;
- left:10;
- }
-</style>
-```
-
-[体验一下](http://dotwe.org/08dd49aaca8bf289c5fc08f808b9c08c)
-
-## 特性
-
-`<image>` 组件,包含 `src` 和 `resize` 两个重要特性。
-
-- `src {string}`:定义图片链接,目前图片暂不支持本地图片。
-- `resize {string}`:可以控制图片的拉伸状态,值行为和 W3C 标准一致。
-
- 可选值为:
-
- - `stretch`:默认值,指定图片按照容器拉伸,有可能使图片产生形变。
- - `cover`:指定图片可以被调整到容器,以使图片完全覆盖背景区域,图片有可能被剪裁。
- - `contain`:指定可以不用考虑容器的大小,把图像扩展至最大尺寸,以使其宽度和高度完全适应内容区域。
-
- 例子:
-
- 
-
- [体验一下](http://dotwe.org/049213ab3364a86637e211c0329cdc50)
-
-## 样式
-
-- 通用样式:支持所有通用样式
-
- - 盒模型
- - `flexbox` 布局
- - `position`
- - `opacity`
- - `background-color`
-
- 查看 [组件通用样式](../common-style.html)
-
-## 事件
-
-- `load` <sup class="wx-v">v0.8+</sup>:当图片加载完成时触发。目前在 Android、iOS 上支持,H5 暂不支持。
-
-- 通用事件
-
- 支持所有通用事件:
-
- - `click`
- - `longpress`
- - `appear`
- - `disappear`
-
- 查看 [通用事件](../common-event.html)
-
-## 约束
-
-1. 需要指定宽高;
-2. 不支持子组件。
-
-## 示例
-
-我们这里展示了一篇文章,文章标题有一副背景图。
-
-
-
-这个效果实现起来非常容易,我们只需要将标题文案通过 `position: absolute` 进行定位即可。唯一需要注意的一点是,Weex 目前不支持 `z-index`,因此必须把上层元素放在后。
-
-```html
-<style>
- .page-head {
- width:750;
- height:200;
- }
- .title-bg {
- width:750;
- height:200;
- }
- .title-box {
- width: 750;
- height: 200;
- justify-content: center;
- align-items: center;
- position: absolute;
- top: 0;
- right: 0;
- bottom: 0;
- left: 0;
- }
- .title {
- color: #ffffff;
- font-size: 32;
- font-weight: bold;
- }
- .article {
- padding: 20;
- }
- .paragraph{
- margin-bottom: 15;
- }
-</style>
-
-<template>
- <scroller class="wrapper" >
- <div class="page-head" >
- <image class="title-bg" resize="cover" src="https://img.alicdn.com/tps/TB1dX5NOFXXXXc6XFXXXXXXXXXX-750-202.png"></image>
- <div class="title-box">
- <text class="title">Alan Mathison Turing</text>
- </div>
- </image>
- <div class="article">
- <text class="paragraph">Alan Mathison Turing ( 23 June 1912 – 7 June 1954) was an English computer scientist, mathematician, logician, cryptanalyst and theoretical biologist. He was highly influential in the development of theoretical computer science, providing a formalisation of the concepts of algorithm and computation with the Turing machine, which can be considered a model of a general purpose computer.Turing is widely considered to be the father of theoretical computer science and artificial intelligence.</text>
- <text class="paragraph">During the Second World War, Turing worked for the Government Code and Cypher School (GC&CS) at Bletchley Park, Britain's codebreaking centre. For a time he led Hut 8, the section responsible for German naval cryptanalysis. He devised a number of techniques for speeding the breaking of German ciphers, including improvements to the pre-war Polish bombe method, an electromechanical machine that could find settings for the Enigma machine. Turing played a pivotal role in cracking intercepted coded messages that enabled the Allies to defeat the Nazis in many crucial engagements, including the Battle of the Atlantic; it has been estimated that this work shortened the war in Europe by more than two years and saved over fourteen million lives.</text>
- <text class="paragraph">After the war, he worked at the National Physical Laboratory, where he designed the ACE, among the first designs for a stored-program computer. In 1948 Turing joined Max Newman's Computing Machine Laboratory at the Victoria University of Manchester, where he helped develop the Manchester computers and became interested in mathematical biology. He wrote a paper on the chemical basis of morphogenesis, and predicted oscillating chemical reactions such as the Belousov–Zhabotinsky reaction, first observed in the 1960s.</text>
- <text class="paragraph">Turing was prosecuted in 1952 for homosexual acts, when by the Labouchere Amendment, "gross indecency" was still criminal in the UK. He accepted chemical castration treatment, with DES, as an alternative to prison. Turing died in 1954, 16 days before his 42nd birthday, from cyanide poisoning. An inquest determined his death as suicide, but it has been noted that the known evidence is also consistent with accidental poisoning. In 2009, following an Internet campaign, British Prime Minister Gordon Brown made an official public apology on behalf of the British government for "the appalling way he was treated." Queen Elizabeth II granted him a posthumous pardon in 2013.</text>
- </div>
- </scroller>
-</template>
-```
-
-[体验一下](http://dotwe.org/bccf884672f0a76f884298b3754d2079)
\ No newline at end of file
http://git-wip-us.apache.org/repos/asf/incubator-weex-site/blob/12e3a8bc/_draft/v1.0/references/components/index.md
----------------------------------------------------------------------
diff --git a/_draft/v1.0/references/components/index.md b/_draft/v1.0/references/components/index.md
deleted file mode 100644
index 78ef46b..0000000
--- a/_draft/v1.0/references/components/index.md
+++ /dev/null
@@ -1,24 +0,0 @@
----
-title: 内建组件
-type: references
-order: 2
-version: 0.10
----
-
-# 内建组件
-
-- [<a>](./a.html)
-- [<indicator>](./indicator.html)
-- [<switch>](./switch.html)
-- [<text>](./text.html)
-- [<textarea>](./textarea.html)
-- [<video>](./video.html)
-- [<web>](./web.html)
-- [<div>](./div.html)
-- [<image>](./image.html)
-- [<input>](./input.html)
-- [<list>](./list.html)
-- [<cell>](./cell.html)
-- [<refresh> & <loading>](./refresh.html)
-- [<scroller>](./scroller.html)
-- [<slider>](./slider.html)
\ No newline at end of file
http://git-wip-us.apache.org/repos/asf/incubator-weex-site/blob/12e3a8bc/_draft/v1.0/references/components/indicator.md
----------------------------------------------------------------------
diff --git a/_draft/v1.0/references/components/indicator.md b/_draft/v1.0/references/components/indicator.md
deleted file mode 100644
index b2aa19d..0000000
--- a/_draft/v1.0/references/components/indicator.md
+++ /dev/null
@@ -1,124 +0,0 @@
----
-title: <indicator>
-type: references
-order: 2.10
-version: 0.10
----
-
-# <indicator>
-
-`<indicator>` 组件用于显示轮播图指示器效果,必须充当 [`<slider>`](./slider.html) 组件的子组件使用。
-
-## 子组件
-
-`<indicator>` 组件没有任何子组件。
-
-## 样式
-
-`<indicator>` 组件有一些私有样式,如下:
-
-- `item-color {color}`:设置项的颜色,可以是颜色的名称,例如 `red`;也可以是 16 进制的颜色,例如 `#RRGGBB`。
-
-- `item-selected-color {color}`:被选中时的颜色,可以是颜色的名称,`red`;也可以是 16 进制的颜色,例如 `#RRGGBB`。
-
-- `item-size {number}`:元素的个数。
-
-- 通用样式
- - 盒模型
- - `flexbox` 布局
- - `position`
- - `opacity`
- - `background-color`
-
- 查看 [组件通用样式](../common-style.html)
-
-**注意 1:**
-
-这里需要注意一点,`<indicator>` 的 `position` 不仅依赖 `top`、`left`、`bottom` 和 `right` 样式,同时会参考 `width`和 `height` 样式。`<indicator>` 默认的宽高继承于 `<slider>`,如果 `<slider>` 未设置宽高,需要显式的给 `<indicator>` 设置宽高值。
-
-**注意 2:**
-
-`background-color` 不推荐使用,建议使用 `item-color` 和 `item-selected-color` 代替。
-
-
-## 事件
-
-支持所有通用事件。
-
-- `click`
-- `longpress`
-- `appear`
-- `disappear`
-
-查看 [通用事件](../common-event.html)
-
-## 约束
-
-1. 不支持子组件。
-
-## 示例
-
-```html
-<template>
- <div>
- <slider class="slider">
- <div class="slider-pages" repeat="item in itemList">
- <image class="img" src="{{item.pictureUrl}}"></image>
- <text class="title">{{item.title}}</text>
- </div>
- <indicator class="indicator"></indicator>
- </slider>
- </div>
-</template>
-
-<style>
- .img {
- width: 714;
- height: 150;
- }
- .title {
- position: absolute;
- top: 20;
- left: 20;
- color: #ff0000;
- font-size: 48;
- font-weight: bold;
- background-color: #eeeeee;
- }
- .slider {
- flex-direction: row;
- margin: 18;
- width: 714;
- height: 230;
- }
- .slider-pages {
- flex-direction: row;
- width: 714;
- height: 200;
- }
- .indicator {
- width:714;
- height:200;
- position:absolute;
- top:1;
- left:1;
- item-color: red;
- item-selectedColor: blue;
- item-size: 20;
- }
-</style>
-
-<script>
- module.exports = {
- data: {
- itemList: [
- {itemId: '520421163634', title: 'item1', pictureUrl: 'https://gd2.alicdn.com/bao/uploaded/i2/T14H1LFwBcXXXXXXXX_!!0-item_pic.jpg'},
- {itemId: '522076777462', title: 'item2', pictureUrl: 'https://gd1.alicdn.com/bao/uploaded/i1/TB1PXJCJFXXXXciXFXXXXXXXXXX_!!0-item_pic.jpg'},
- {itemId: '522076777462', title: 'iten3', pictureUrl: 'https://gd3.alicdn.com/bao/uploaded/i3/TB1x6hYLXXXXXazXVXXXXXXXXXX_!!0-item_pic.jpg'}
- ]
- }
- }
-</script>
-```
-
-[体验一下](http://dotwe.org/baea3d54c503c6d3d4e4a8f275b9d47f)
\ No newline at end of file
http://git-wip-us.apache.org/repos/asf/incubator-weex-site/blob/12e3a8bc/_draft/v1.0/references/components/input.md
----------------------------------------------------------------------
diff --git a/_draft/v1.0/references/components/input.md b/_draft/v1.0/references/components/input.md
deleted file mode 100644
index 9a7b8ff..0000000
--- a/_draft/v1.0/references/components/input.md
+++ /dev/null
@@ -1,309 +0,0 @@
----
-title: <input>
-type: references
-order: 2.4
-version: 0.10
----
-
-# <input>
-
-Weex 内置的 `<input>` 组件用来创建接收用户输入字符的输入组件。 `<input>` 组件的工作方式因 `type` 属性的值而异,比如 `<text>`, `password`,`url`,`email`,`tel` 等。
-
-**注意:**
-
-此组件不支持 `click` 事件。请监听 `<input>` 或 `change` 来代替 `click` 事件。
-
-## 子组件
-
-不支持子组件。
-
-## 特性
-
-- `type {string}`:控件的类型,默认值是 `<text>`。`type` 值可以是 `text`,`password`,`url`,`email`,`tel` 。每个 `type` 值都符合 W3C 标准。
-- `value {string}`:组件的接收到的输入字符。
-- `placeholder {string}`:提示用户可以输入什么。 提示文本不能有回车或换行。
-- `disabled {boolean}`:布尔类型的数据,表示是否支持输入。通常 `click` 事件在 `disabled` 控件上是失效的。
-- `autofocus {boolean}`:布尔类型的数据,表示是否在页面加载时控件自动获得输入焦点。
-- `maxlength {nubmer}`:<sup class="wx-v">v0.7</sup>一个数值类型的值,表示输入的最大长度。
-
-## 样式
-
-- `placeholder-color {color}`:placeholder 字符颜色。默认值是 `#999999`。
-- text styles
- - 支持 `color`
- - 支持 `font-size`
- - 支持 `font-style`
- - 支持 `font-weight`
- - 支持 `text-align`
-
- 查看 [文本样式](../text-style.html)
-
-- 通用样式:支持所有通用样式
- - 盒模型
- - `flexbox` 布局
- - `position`
- - `opacity`
- - `background-color`
-
- 查看 [组件通用样式](../common-style.html)
-
-## 事件
-
-- `input`: 输入字符的值更改。
-
- 事件中 event 对象属性:
-
- - `value`: 触发事件的组件;
- - `timestamp`: 事件发生时的时间戳,仅支持Android。
-
-- `change`: 当用户输入完成时触发。通常在 `blur` 事件之后。
-
- 事件中 event 对象属性:
-
- - `value`: 触发事件的组件;
-
- - `timestamp`: 事件发生时的时间戳,仅支持Android。
-
-- `focus`: 组件获得输入焦点。
-
- 事件中 event 对象属性:
-
- - `timestamp`: 事件发生时的时间戳,仅支持Android。
-
-- `blur`: 组件失去输入焦点。
-
- 事件中 event 对象属性:
-
- - `timestamp`: 事件发生时的时间戳,仅支持Android。
-
-- 通用事件
-
- **注意:**
- 不支持 `click` 事件。 请监听 `input` 或 `change` 事件代替。
-
- 支持以下通用事件:
-
- - `longpress`
- - `appear`
- - `disappear`
-
- 查看 [通用事件](../common-event.html)
-
-# 约束
-
-目前不支持 `this.$el(id).value = ''` 这种方式改写 input value。只支持在 `<input>` 组件的 `input`、`change` 事件中改写。
-
-## 示例
-
-```html
-<template>
- <div>
- <div>
- <text style="font-size: 40px">oninput: {{txtInput}}</text>
- <text style="font-size: 40px">onchange: {{txtChange}}</text>
- <text style="font-size: 40px">onreturntype: {{txtReturnType}}</text>
- </div>
- <scroller>
- <div>
- <div style="background-color: #286090">
- <text class="title" style="height: 80 ;padding: 20;color: #FFFFFF">input type = text</text>
- </div>
- <input type="text" placeholder="Input Text" class="input" :autofocus=true value="" @change="onchange" @input="oninput" @focus="onfocus" @blur="onblur"/>
- </div>
-
- <div>
- <div style="background-color: #286090">
- <text class="title" style="height: 80 ;padding: 20;color: #FFFFFF">input type = password</text>
- </div>
- <input type="password" placeholder="Input Password" class="input" @change="onchange" @input="oninput"/>
- </div>
-
- <div>
- <div style="background-color: #286090">
- <text class="title" style="height: 80 ;padding: 20;color: #FFFFFF">input type = url</text>
- </div>
- <input type="url" placeholder="Input URL" class="input" @change="onchange" @input="oninput"/>
- </div>
-
- <div>
- <div style="background-color: #286090">
- <text class="title" style="height: 80 ;padding: 20;color: #FFFFFF">input type = email</text>
- </div>
- <input type="email" placeholder="Input Email" class="input" @change="onchange" @input="oninput"/>
- </div>
-
- <div>
- <div style="background-color: #286090">
- <text class="title" style="height: 80 ;padding: 20;color: #FFFFFF">input type = tel</text>
- </div>
- <input type="tel" placeholder="Input Tel" class="input" @change="onchange" @input="oninput"/>
- </div>
-
- <div>
- <div style="background-color: #286090">
- <text class="title" style="height: 80 ;padding: 20;color: #FFFFFF">input type = time</text>
- </div>
- <input type="time" placeholder="Input Time" class="input" @change="onchange" @input="oninput"/>
- </div>
-
- <div>
- <div style="background-color: #286090">
- <text class="title" style="height: 80 ;padding: 20;color: #FFFFFF">input type = date</text>
- </div>
- <input type="date" placeholder="Input Date" class="input" @change="onchange" @input="oninput" max="2017-12-12" min="2015-01-01"/>
- </div>
-
- <div>
- <div style="background-color: #286090">
- <text class="title" style="height: 80 ;padding: 20;color: #FFFFFF">input return-key-type = default</text>
- </div>
- <input type="text" placeholder="please input" return-key-type="default" class="input" @change="onchange" @return = "onreturn" @input="oninput" />
- </div>
-
- <div>
- <div style="background-color: #286090">
- <text class="title" style="height: 80 ;padding: 20;color: #FFFFFF">input return-key-type = go</text>
- </div>
- <input type="text" placeholder="please input" return-key-type="go" class="input" @change="onchange" @return = "onreturn" @input="oninput" />
- </div>
-
- <div>
- <div style="background-color: #286090">
- <text class="title" style="height: 80 ;padding: 20;color: #FFFFFF">input return-key-type = next</text>
- </div>
- <input type="text" placeholder="please input" return-key-type="next" class="input" @change="onchange" @return = "onreturn" @input="oninput" />
- </div>
-
- <div>
- <div style="background-color: #286090">
- <text class="title" style="height: 80 ;padding: 20;color: #FFFFFF">input return-key-type = search</text>
- </div>
- <input type="text" placeholder="please input" return-key-type="search" class="input" @change="onchange" @return = "onreturn" @input="oninput" />
- </div>
-
- <div>
- <div style="background-color: #286090">
- <text class="title" style="height: 80 ;padding: 20;color: #FFFFFF">input return-key-type = send</text>
- </div>
- <input type="text" placeholder="please input" return-key-type="send" class="input" @change="onchange" @return = "onreturn" @input="oninput" />
- </div>
-
- <div>
- <div style="background-color: #286090">
- <text class="title" style="height: 80 ;padding: 20;color: #FFFFFF">input return-key-type = done</text>
- </div>
- <input type="text" placeholder="please input" return-key-type="done" class="input" @change="onchange" @return = "onreturn" @input="oninput" />
- </div>
-
-
- <div>
- <div style="background-color: #286090">
- <text class="title" style="height: 80 ;padding: 20;color: #FFFFFF">function focus() & blur()</text>
- </div>
- <div style="flex-direction: row;margin-bottom: 16px;justify-content: space-between">
- <text class="button" value="Focus" type="primary" @click="focus"></text>
- <text class="button" value="Blur" type="primary" @click="blur"></text>
- </div>
-
- <input type="text" placeholder="Input1" class="input" value="" ref="input1"/>
- </div>
-
-
- <div>
- <div style="background-color: #286090">
- <text class="title" style="height: 80 ;padding: 20;color: #FFFFFF">input selection</text>
- </div>
- <div style="flex-direction: row;margin-bottom: 16px;justify-content: space-between">
- <text class="button" value="setRange" type="primary" @click="setRange"></text>
- </div>
- <input type="text" ref="inputselection" placeholder="please input" value="123456789" class="input" @change="onchange" @return = "onreturn" @input="oninput"/>
- </div>
-
-
-
- </scroller>
- </div>
-</template>
-
-<style scoped>
- .input {
- font-size: 60px;
- height: 80px;
- width: 750px;
- }
- .button {
- font-size: 36;
- width: 200;
- color: #41B883;
- text-align: center;
- padding-top: 10;
- padding-bottom: 10;
- border-width: 2;
- border-style: solid;
- margin-right: 20;
- border-color: rgb(162, 217, 192);
- background-color: rgba(162, 217, 192, 0.2);
- }
-</style>
-
-<script>
- const modal = weex.requireModule('modal')
- module.exports = {
- data: function () {
- return {
- txtInput: '',
- txtChange: '',
- txtReturnType: '',
- txtSelection:'',
- autofocus: false
- };
- },
- methods: {
- ready: function () {
- var self = this;
- setTimeout(function () {
- self.autofocus = true;
- }, 1000);
- },
- onchange: function (event) {
- this.txtChange = event.value;
- console.log('onchange', event.value);
- },
- onreturn: function (event) {
- this.txtReturnType = event.returnKeyType;
- console.log('onreturn', event.type);
- },
- oninput: function (event) {
- this.txtInput = event.value;
- console.log('oninput', event.value);
- },
- focus: function () {
- this.$refs['input1'].focus();
- },
- blur: function () {
- this.$refs['input1'].blur();
- },
- setRange: function() {
- console.log(this.$refs["inputselection"]);
- this.$refs["inputselection"].setSelectionRange(2, 6);
- },
- onfocus () {
- console.log('onfocus:');
- modal.toast({
- message: 'onfocus',
- duration: 0.8
- })
- },
- onblur () {
- console.log('onblur:');
- modal.toast({
- message: 'input blur',
- duration: 0.8
- })
- }
- }
- };
-</script>
-```
-
-[体验一下](http://dotwe.org/vue/dd83d941d2364f2849e45dc3c5d91ab4)
http://git-wip-us.apache.org/repos/asf/incubator-weex-site/blob/12e3a8bc/_draft/v1.0/references/components/list.md
----------------------------------------------------------------------
diff --git a/_draft/v1.0/references/components/list.md b/_draft/v1.0/references/components/list.md
deleted file mode 100644
index 842201f..0000000
--- a/_draft/v1.0/references/components/list.md
+++ /dev/null
@@ -1,375 +0,0 @@
----
-title: <list>
-type: references
-order: 2.4
-version: 0.10
----
-
-# <list>
-
-`<list>` 组件是提供垂直列表功能的核心组件,拥有平滑的滚动和高效的内存管理,非常适合用于长列表的展示。最简单的使用方法是在 `<list>` 标签内使用一组由简单数组 `repeat` 生成的 `<cell>` 标签填充。
-
-一个最简例子:
-
-```html
-<template>
- <list class="list">
- <cell class="row" repeat="item in rows" index="{{$index}}">
- <text class="item-title">row {{item.id}}</text>
- </cell>
- </list>
-</template>
-
-<style></style>
-
-<script>
-module.exports = {
- data: {
- rows:[
- {id: 1},
- {id: 2},
- {id: 3},
- {id: 4},
- {id: 5}
- ]
- }
-}
-</script>
-```
-
-[体验一下](http://dotwe.org/bcaf48a63b49750b828d2d23762d4a15)
-
-
-
-## 子组件
-
-`<list>` 组件支持更多高级功能,由以下子组件提供:
-
-- `<cell>`
-
- 用于定义列表中的子列表项,类似于 HTML 中的 `ul` 之于 `li`。Weex 会对 `<cell>` 进行高效的内存回收以达到更好的性能。
-
- 使用文档请查看 [`<cell>`](./cell.html)。
-
-- `header` <sup class="wx-v">0.6.1+</sup>
-
- 当 `<header>` 到达屏幕顶部时,吸附在屏幕顶部。
-
-- `<refresh>`
-
- 用于给列表添加下拉刷新的功能。
-
- 使用文档请查看 [`<refresh>`](./refresh.html)
-
-- `<loading>`
-
- `<loading>` 用法与特性和 `<refresh>` 类似,用于给列表添加上拉加载更多的功能。
-
- 使用文档请查看 [`<loading>`](./loading.html)
-
-**注意:**
-
-`<list>` 的子组件只能包括以上四种组件或是 `fix` 定位的组件,其他形式的组件将不能被正确的渲染。
-
-一个错误的示范,此例子无法在客户端正常渲染,因为 `<list>` 子组件是 `<div>`:
-
-```html
-<template>
- <list class="list">
- <div class="row" repeat="item in rows" index="{{$index}}">
- <text class="item-title">row {{item.id}}</text>
- </div>
- </list>
-</template>
-
-<style></style>
-
-<script>
-module.exports = {
- data: {
- rows:[
- {id: 1},
- {id: 2},
- {id: 3},
- {id: 4},
- {id: 5}
- ]
- }
-}
-</script>
-```
-
-## 特性
-
-- `loadmoreoffset {number}`:默认值为 0,触发 `loadmore` 事件所需要的垂直偏移距离(设备屏幕底部与 `<list>` 底部之间的距离)。当 `<list>` 的滚动条滚动到足够接近 `<list>` 底部时将会触发 `loadmore` 这个事件。
-
- 
-
-## 样式
-
-- 通用样式:支持所有通用样式
-
- - 盒模型
- - `flexbox` 布局
- - `position`
- - `opacity`
- - `background-color`
-
- 查看 [组件通用样式](../common-style.html)
-
-## 事件
-
-- `loadmore` <sup class="wx-v">0.5+</sup>:如果列表滚动到底部将会立即触发这个事件,你可以在这个事件的处理函数中加载下一页的列表项。
-
- [体验一下](http://dotwe.org/bc445ede8746a31360e3607d210304c5)
-
-- 通用事件
-
- 支持所有通用事件:
-
- - `click`
- - `longpress`
- - `appear`
- - `disappear`
-
- 查看 [通用事件](../common-event.html)
-
-## 扩展
-
-### scrollToElement(node, options)
-
-滚动到列表某个指定项是常见需求,`<list>` 拓展了该功能支持滚动到指定 `<cell>`。通过 `dom` module 访问,更多信息可参考 [dom module](../modules/dom.html) 。
-
-#### 参数
-
-- `node {node}`:指定目标节点。
-- `options {Object}`:
- - `offset {number}`:一个到其可见位置的偏移距离,默认是 0
-
-#### 示例
-
-```html
-<template>
- <list class="list">
- <cell>
- <div onclick="go" style="width: 750;height: 50; position: fixed; left: 0; right: 0; bottom: 0; background-color: #eeeeee;">
- <text style="text-align: center;">
- Go to 50th line.
- </text>
- </div>
- </cell>
- <cell class="row" repeat="item in rows" id="item-{{$index}}">
- <text class="item-title">row {{item.id}}</text>
- </cell>
- </list>
-</template>
-
-<script>
-var dom = require('@weex-module/dom')
-
-module.exports = {
- data: {
- rows: []
- },
- created: function () {
- for (var i = 0; i < 100; i++) {
- this.rows.push({
- id: i
- })
- }
- },
- methods: {
- go: function () {
- var el = this.$el('item-49')
-
- dom.scrollToElement(el, {
- offset: 0
- })
- }
- }
-}
-</script>
-```
-
-[体验一下](http://dotwe.org/65d91cb47d0e348c5750d2248d59b6bd)
-
-## 约束
-
-1. **不允许**相同方向的 `<list>` 或者 `<scroller>` 互相嵌套,换句话说就是嵌套的 `<list>`/`<scroller>` 必须是不同的方向。
-
- 举个例子,**不允许**一个垂直方向的 `<list>` 嵌套的一个垂直方向的 `<scroller>` 中,但是一个垂直方向的 `<list>` 是可以嵌套的一个水平方向的 list 或者 `<scroller>` 中的。
-
-2. `<list>` 为根节点时无需设置高度,但是内嵌 `<list>` 高度**必须可计算**,你可以使用 `flex` 或 `postion` 将 `<list>` 设为一个响应式高度(例如全屏显示), 也可以显式设置 `<list>` 组件的 `height` 样式。
-
-## 示例
-
-```html
-<template>
- <div class="wrapper">
- <list class="list">
- <header class="header">
- <text class="title">Search Results</text>
- </header>
- <refresh style="width: 750; padding: 30;" onrefresh="refreshData" display="{{refreshDisplay}}">
- <text class="text"> ↓ Pull to refresh </text>
- <loading-indicator class="indicator"></loading-indicator>
- </refresh>
- <cell class="row" repeat="item in items" id="item-{{$index}}">
- <div>
- <text class="item">Repo name: {{item.full_name}}</text>
- </div>
- <div>
- <text class="item">Repo star: {{item.stargazers_count}}</text>
- </div>
- </cell>
- <loading onloading="loadingData" style="width: 750; padding: 30;" display="{{loadingDisplay}}">
- <text class="text">{{loadingText}}</text>
- </loading>
- </list>
- <div class="up" onclick="goToTop">
- <img class="img" src="https://img.alicdn.com/tps/TB1ZVOEOpXXXXcQaXXXXXXXXXXX-200-200.png"></img>
- </div>
- </div>
-</template>
-
-<style>
-.wrapper {
- position: absolute;
- top: 0;
- right: 0;
- bottom: 0;
- left: 0;
-}
-.list{
- background-color: #ffffff;
- flex: 1;
-}
-.header {
- height: 80;
- align-items: center;
- justify-content: center;
- background-color: #efefef;
- border-bottom-color: #eeeeee;
- border-bottom-width: 2;
- border-bottom-style: solid;
-}
-.title {
- text-align: center;
-}
-.text {
- text-align: center;
-}
-.row {
- padding: 20;
- border-bottom-color: #eeeeee;
- border-bottom-width: 2;
- border-bottom-style: solid;
-}
-.up {
- width: 70;
- height: 70;
- position: fixed;
- right: 20;
- bottom: 20;
-}
-.img {
- width: 70;
- height: 70;
-}
-</style>
-
-<script>
-var dom = require('@weex-module/dom') || {}
-var stream = require('@weex-module/stream') || {}
-var modal = require('@weex-module/modal') || {}
-
-var SEARCH_URL = 'https://api.github.com/search/repositories?q=language:javascript&sort=stars&order=desc'
-
-module.exports = {
- data: {
- isLoaded: true,
- page: 1,
- loadingDisplay: 'hide',
- refreshDisplay: 'hide',
- loadingText: 'Loading...',
- items:[]
- },
- created: function () {
- var url = SEARCH_URL + '&page=' + this.page
-
- this.renderData(url)
-
- this.page++
- },
- methods: {
- renderData: function (url) {
- var self = this
-
- stream.fetch({
- method: 'GET',
- url: url,
- type:'json'
- }, function(res) {
- self.refreshDisplay = 'hide'
- self.loadingDisplay = 'hide'
-
- try {
- var results = res.data.items || []
-
- if (Array.isArray(results)) {
- for(var i = 0; i < results.length; i++) {
- self.items.push(results[i])
- }
- }
-
- self.isLoaded = true
- } catch(e) {}
- },function(res){
-
- })
- },
- loadingData: function (e) {
- var url = SEARCH_URL + '&page=' + this.page
- var self = this
-
- if (self.isLoaded === false) return
-
- self.loadingDisplay = 'show'
-
- if (self.page <=10 ) {
- self.renderData(url)
- self.page++
- } else {
- self.loadingDisplay = 'hide'
- self.loadingText = 'NO MORE!'
- }
- },
- goToTop: function (e) {
- dom.scrollToElement(this.$el('item-0'), {
- offset: -100
- })
- },
- refreshData: function (e) {
- var url = SEARCH_URL + '&page=1'
-
- if (this.isLoaded === false) return
-
- this.refreshDisplay = 'show'
-
- modal.toast({
- 'message': 'Refreshing...',
- 'duration': 1
- })
-
- this.items = []
- this.page = 1
- this.renderData(url)
-
- this.refreshDisplay = 'hide'
- }
- }
-}
-</script>
-```
-
-[体验一下](http://dotwe.org/ed524ade679b0fa96e980600c53ea5ce)
\ No newline at end of file
http://git-wip-us.apache.org/repos/asf/incubator-weex-site/blob/12e3a8bc/_draft/v1.0/references/components/loading.md
----------------------------------------------------------------------
diff --git a/_draft/v1.0/references/components/loading.md b/_draft/v1.0/references/components/loading.md
deleted file mode 100644
index f6d68fa..0000000
--- a/_draft/v1.0/references/components/loading.md
+++ /dev/null
@@ -1,118 +0,0 @@
----
-title: <loading>
-type: references
-order: 2.6
-version: 0.10
----
-
-# <loading>
-
-<span class="weex-version">v0.6.1+</span>
-
-`<loading>` 为 `<scroller>` 和 `<list>` 提供上拉加载功能。用法与特性与 `<refresh>` 类似, 是 `<scroller>` 和 `<list>` 的子组件,且只能在被 `<scroller>` 和 `<list>` 包含时才能被正确的渲染。
-
-## 子组件
-
-- [`<text>`](./text.html)
-- [`<image>`](./image.html)
-- `<loading-indicator>`: `<refresh>` 和 `<loading>` 组件的子组件,拥有默认的动画效果的实现。
-
-## 特性
-
-- `display {string}`:可选值为 `show` 或者 `hide`,仅隐藏 `<indicator>`,`<loading>` 其他子组件依然可见,`loading` 事件仍会被触发。
-
-## 样式
-
-支持所有通用样式。
-
-- 盒模型
-- `flexbox` 布局
-- `position`
-- `opacity`
-- `background-color`
-
-查看 [组件通用样式](../common-style.html)
-
-## 事件
-
-- `loading`:加载时被触发。
-
-## 约束
-
-- `<loading>` 不支持 `remove`,v0.9 版本会修复。
-- `display` 值为 `show` 或 `hide`。仅隐藏 `<indicator>`,`<loading>` 其他子组件依然可见,`loading` 事件仍会被触发。
-
- 如果需要 `<loading>` hide 时隐藏文案并不再触发事件,有两种解决方法:
-
- 1. 修改提示文案,并在 `loading` 事件中添加判断逻辑;
- 2. v0.9+ 可通过 `remove` 解决。
-
-- 只能通过 `display` 特性进行展示和隐藏,且必须成对出现,即设置 `display="show"`,必须有对应的 `display="hide"`。
-
-## 示例
-
-```html
-<template>
- <list>
- <header>
- <div class="center">
- <text style="text-align:center">I am the header</text>
- </div>
- </header>
- <loading onloading="onloading" display="{{loadingDisplay}}" style="width:750;flex-direction: row;justify-content: center;">
- <loading-indicator style="height:160;width:160;color:#3192e1"></loading-indicator>
- </loading>
- <cell class="row" repeat="i in staffs" index="{{$index}}">
- <div class="item">
- <text>{{i.name}}</text>
- </div>
- </cell>
- </list>
-</template>
-
-<style>
- .row {
- width: 750;
- }
- .item {
- justify-content: center;
- border-bottom-width: 2;
- border-bottom-color: #c0c0c0;
- height: 100;
- padding:20;
- }
- .center {
- border-bottom-width: 2;
- border-bottom-color: #cccccc;
- height: 100;
- padding:20;
- background-color:#FFFFFF;
- justify-content: center;
- }
-</style>
-
-<script>
- module.exports = {
- data: {
- staffs:[],
- loadingDisplay: 'show',
- loadingText: 'pull up to load more',
- refreshText: 'pull down to refresh'
- },
- created:function() {
- this.refreshDisplay='show'
- this.staffs=[{name:'inns'},{name:'connon'},{name:'baos'},{name:'anna'},{name:'dolley'},{name:'lucy'},{name:'john'}, {name:'lily'},{name:'locke'},{name:'jack'},{name:'danny'},{name:'rose'},{name:'harris'},{name:'lotus'},{name:'louis'}];
- },
- methods:{
- onloading:function(e){
- console.log('onloading...');
- this.staffs.push({name:'onloading'})
- }
- }
- }
-</script>
-```
-
-[体验一下](http://dotwe.org/6adf7add849f3c9fcdbc776a6c471f02)
-
-更多示例可查看 [`<list>`](./list.html)
[42/51] [abbrv] incubator-weex-site git commit: update file structure
and fix responsive styles
Posted by ha...@apache.org.
http://git-wip-us.apache.org/repos/asf/incubator-weex-site/blob/12e3a8bc/_draft/v1.0/references/modules/stream.md
----------------------------------------------------------------------
diff --git a/_draft/v1.0/references/modules/stream.md b/_draft/v1.0/references/modules/stream.md
deleted file mode 100644
index 6c1b893..0000000
--- a/_draft/v1.0/references/modules/stream.md
+++ /dev/null
@@ -1,220 +0,0 @@
----
-title: stream
-type: references
-order: 4.7
-version: 0.10
----
-
-# stream
-
-## 概述
-
-以下为 stream 相关的 API,用于实现网络请求。
-
-## API
-### `fetch(options, callback[,progressCallback])`
-
-发起网络请求
-
-#### 参数
-
-- `options {Object}`:请求的一些选项
- - `method {string}`:HTTP 方法 `GET` 或是 `POST`
- - `url {string}`:请求的 URL
- - `headers {Object}`:HTTP 请求头
- - `type {string}`:请求类型, `json`,`text` 或是 `jsonp` {在原生实现中其实与 json 相同)
- - `body {string}`:HTTP 请求体。
-
- **注意:**
-
- - `body` 参数仅支持 `string` 类型的参数,请勿直接传递 `JSON`,必须先将其转为字符串。
- - `GET` 请求不支持 `body` 方式传递参数,请使用 url 传参。
-
-- `callback {Function}`:响应结果回调,回调函数将收到如下的 `response` 对象:
- - `status {number}`:返回的状态码
- - `ok {boolean}`:如果状态码在 200~299 之间就为真。
- - `statusText {string}`:状态描述文本
- - `data {Object | string}`: 返回的数据,如果请求类型是 `json` 和 `jsonp`,则它就是一个 object ,如果不是,则它就是一个 string。
- - `headers {Object}`:响应头
-- `progressCallback {Function}`:关于请求状态的回调。 这个回调函数将在请求完成后就被调用:
- - `readyState {number}`:当前状态
- state:'1': 请求连接中
- opened:'2': 返回响应头中
- received:'3': 正在加载返回数据
- - `status {number}`:响应状态码.
- - `length {number}`:已经接受到的数据长度. 你可以从响应头中获取总长度
- - `statusText {string}`:状态文本
- - `headers {Object}`:响应头
-
-#### 示例
-
-```html
-<template>
- <div class="wrapper">
- <list class="list">
- <header class="header">
- <text class="title">Search Results</text>
- </header>
- <refresh style="width: 750; padding: 30;" onrefresh="refreshData" display="{{refreshDisplay}}">
- <text class="text"> ↓ Pull to refresh </text>
- <loading-indicator class="indicator"></loading-indicator>
- </refresh>
- <cell class="row" repeat="item in items" id="item-{{$index}}">
- <div>
- <text class="item">Repo name: {{item.full_name}}</text>
- </div>
- <div>
- <text class="item">Repo star: {{item.stargazers_count}}</text>
- </div>
- </cell>
- <loading onloading="loadingData" style="width: 750; padding: 30;" display="{{loadingDisplay}}">
- <text class="text">{{loadingText}}</text>
- </loading>
- </list>
- <div class="up" onclick="goToTop">
- <img class="img" src="https://img.alicdn.com/tps/TB1ZVOEOpXXXXcQaXXXXXXXXXXX-200-200.png"></img>
- </div>
- </div>
-</template>
-
-<style>
-.wrapper {
- position: absolute;
- top: 0;
- right: 0;
- bottom: 0;
- left: 0;
-}
-.list{
- background-color: #ffffff;
- flex: 1;
-}
-.header {
- height: 80;
- align-items: center;
- justify-content: center;
- background-color: #efefef;
- border-bottom-color: #eeeeee;
- border-bottom-width: 2;
- border-bottom-style: solid;
-}
-.title {
- text-align: center;
-}
-.text {
- text-align: center;
-}
-.row {
- padding: 20;
- border-bottom-color: #eeeeee;
- border-bottom-width: 2;
- border-bottom-style: solid;
-}
-.up {
- width: 70;
- height: 70;
- position: fixed;
- right: 20;
- bottom: 20;
-}
-.img {
- width: 70;
- height: 70;
-}
-</style>
-
-<script>
-var dom = require('@weex-module/dom') || {}
-var stream = require('@weex-module/stream') || {}
-var modal = require('@weex-module/modal') || {}
-
-var SEARCH_URL = 'https://api.github.com/search/repositories?q=language:javascript&sort=stars&order=desc'
-
-module.exports = {
- data: {
- isLoaded: true,
- page: 1,
- loadingDisplay: 'hide',
- refreshDisplay: 'hide',
- loadingText: 'Loading...',
- items:[]
- },
- created: function () {
- var url = SEARCH_URL + '&page=' + this.page
-
- this.renderData(url)
-
- this.page++
- },
- methods: {
- renderData: function (url) {
- var self = this
-
- stream.fetch({
- method: 'GET',
- url: url,
- type:'json'
- }, function(res) {
- self.refreshDisplay = 'hide'
- self.loadingDisplay = 'hide'
-
- try {
- var results = res.data.items || []
-
- if (Array.isArray(results)) {
- for(var i = 0; i < results.length; i++) {
- self.items.push(results[i])
- }
- }
-
- self.isLoaded = true
- } catch(e) {}
- },function(res){
-
- })
- },
- loadingData: function (e) {
- var url = SEARCH_URL + '&page=' + this.page
- var self = this
-
- if (self.isLoaded === false) return
-
- self.loadingDisplay = 'show'
-
- if (self.page <=10 ) {
- self.renderData(url)
- self.page++
- } else {
- self.loadingDisplay = 'hide'
- self.loadingText = 'NO MORE!'
- }
- },
- goToTop: function (e) {
- dom.scrollToElement(this.$el('item-0'), {
- offset: -100
- })
- },
- refreshData: function (e) {
- var url = SEARCH_URL + '&page=1'
-
- if (this.isLoaded === false) return
-
- this.refreshDisplay = 'show'
-
- modal.toast({
- 'message': 'Refreshing...',
- 'duration': 1
- })
-
- this.items = []
- this.page = 1
- this.renderData(url)
-
- this.refreshDisplay = 'hide'
- }
- }
-}
-</script>
-```
-
-[体验一下](http://dotwe.org/ed524ade679b0fa96e980600c53ea5ce)
\ No newline at end of file
http://git-wip-us.apache.org/repos/asf/incubator-weex-site/blob/12e3a8bc/_draft/v1.0/references/modules/webview.md
----------------------------------------------------------------------
diff --git a/_draft/v1.0/references/modules/webview.md b/_draft/v1.0/references/modules/webview.md
deleted file mode 100644
index b6f3cbe..0000000
--- a/_draft/v1.0/references/modules/webview.md
+++ /dev/null
@@ -1,66 +0,0 @@
----
-title: webview
-type: references
-order: 4.8
-version: 0.10
----
-
-# `webview`
-
-一系列的 `<web>` 组件操作接口。 比如 `goBack`、`goForward`、和 `reload`。`webview` module 与 `<web>` 组件共用。
-
-## 示例
-
-查看 [简单浏览器](../components/web.html) ,一个结合 `<web>` 组件和 `webview` module 的示例。
-
-## API
-
-### `goBack(webElement)`
-
-加载历史记录里的前一个资源地址。
-
-#### 参数
-
-* `webElement {Element}`:`<web>` 组件对象。
-
-#### 示例
-
-```javascript
-var webview = require('@weex-module/webview')
-var webElement = this.$el('webview')
-webview.goBack(webElement)
-```
-
-### `goForward(webElement)`
-
-加载历史记录里的下一个资源地址。
-
-#### 参数
-
-* `webElement {Element}`:`<web>` 组件对象。
-
-#### 示例
-
-```javascript
-var webview = require('@weex-module/webview')
-var webElement = this.$el('webview')
-webview.goForward(webElement)
-```
-
-### `reload(webElement)`
-
-刷新当前页面。
-
-#### 参数
-
-* `webElement {Element}`:`<web>` 组件对象。
-
-#### 示例
-
-```javascript
-var webview = require('@weex-module/webview')
-var webElement = this.$el('webview')
-webview.reload(webElement.ref)
-```
-
-*注意事项:未来 `<web>` 组件的 `Element` 对象将会支持直接这些方法,届时 `webview` module 将不再需要*
http://git-wip-us.apache.org/repos/asf/incubator-weex-site/blob/12e3a8bc/_draft/v1.0/references/replace.md
----------------------------------------------------------------------
diff --git a/_draft/v1.0/references/replace.md b/_draft/v1.0/references/replace.md
deleted file mode 100644
index 5ace251..0000000
--- a/_draft/v1.0/references/replace.md
+++ /dev/null
@@ -1,57 +0,0 @@
-# Replace option
-
-The `replace` option is boolean type. It determined whether this composed component will be replaced with the `<template>` content or just as a normal `<div>` element which include the `<template>` content.
-
-For example:
-
-```
-<element name="foo">
- <template>
- <text>Foo</text>
- </template>
- <script>
- module.exports = {
- replace: false // by default
- }
- </script>
-</element>
-
-<template>
- <foo></foo>
-</template>
-```
-
-will rendered as:
-
-```
-<div>
- <text>Foo</text>
-</div>
-```
-
-but:
-
-```
-<element name="foo">
- <template>
- <text>Foo</text>
- </template>
- <script>
- module.exports = {
- replace: true
- }
- </script>
-</element>
-
-<template>
- <foo></foo>
-</template>
-```
-
-will rendered as:
-
-```
-<text>Foo</text>
-```
-
-So you can choose a way you need or like to manage your virtual DOM structure.
http://git-wip-us.apache.org/repos/asf/incubator-weex-site/blob/12e3a8bc/_draft/v1.0/references/special-element.md
----------------------------------------------------------------------
diff --git a/_draft/v1.0/references/special-element.md b/_draft/v1.0/references/special-element.md
deleted file mode 100644
index e01a2c7..0000000
--- a/_draft/v1.0/references/special-element.md
+++ /dev/null
@@ -1,38 +0,0 @@
----
-title: 特殊元素
-type: references
-order: 1.11
-version: 0.10
----
-
-# 特殊元素
-
-## `<content>`
-
-`<content>` 在编写组件模板时作为作为内容节点元素存在,使用时将被真正的元素替换。
-
-替代写法: `<slot>`。
-
-## 示例
-
-如示例中写法,`<content>` 节点被 `<text>` 替代。
-
-```html
-<element name="item">
- <template>
- <div>
- <content></content>
- </div>
- </template>
-</element>
-
-<template>
- <div>
- <item>
- <text>Content Text</text>
- </item>
- </div>
-</template>
-```
-
-[体验一下](http://dotwe.org/bf4354a0e6dbe67470ad1a988cdd565e)
http://git-wip-us.apache.org/repos/asf/incubator-weex-site/blob/12e3a8bc/_draft/v1.0/references/specs/index.md
----------------------------------------------------------------------
diff --git a/_draft/v1.0/references/specs/index.md b/_draft/v1.0/references/specs/index.md
deleted file mode 100644
index 164e61b..0000000
--- a/_draft/v1.0/references/specs/index.md
+++ /dev/null
@@ -1,309 +0,0 @@
----
-title: JS Bundle format (英)
-type: references
-order: 5
-has_chapter_content: false
-chapter_title: 底层规范
-version: 0.10
----
-
-# JS Bundle format
-
-JS Bundle Version: v0.3.0
-
-## v0.5.0
-
-### Whole Syntax and Structure
-
-A JS Bundle is actually a JavaScript file which follows **ES5** standard. The code is used to define some custom components for the instance and bootstrap the instance with certain name, config and data. Developers could use all kinds of JS code packager like webpack, browserify, requirejs to organize your whole instance code.
-
-### Meta Info
-
-The JS Bundle Must begin with a comment line which is a JSON object like:
-
-```javascript
-// { "framework": "Weex", "version": "0.5.0" }
-```
-
-This JSON object as least contains:
-
-* property `framework` must be `"Weex"`
-* property `version` should be corresponded with the JS Bundle format version
-
-### Global Members
-
-* `__weex_define__(name, options)`
-* `__weex_bootstrap__(name, config, data)`
-* `__weex_document__`
-* `__weex_require__(name)`
-
-#### `__weex_define__(name:string, options: object)`
-
-Define a custom component named `name` for current instance with `options`.
-
-**example:**
-
-```javascript
-__weex_define__('rmb', {
- template: {
- type: 'div',
- style: {flexDirection: 'row'},
- children: [
- {type: 'text', attr: {value: '¥'}},
- {type: 'text', attr: {value: this.value}}
- ]
- },
- data: function () {
- return {
- value: '0'
- }
- },
- methods: {...}
-})
-```
-
-The enabled component options contains:
-
-* `template`: just the same as [v0.3.0](#details-of-template-option-definitions)
-* `style`: just the same as [v0.3.0](#details-of-style-option-definitions)
-* `data`: a function which return a plain object to observe by the ViewModel
-* `methods`: a function map to proxy to the ViewModel
-* `computed`: a map of several computed keys for the ViewModel
-* `init`, `created`, `ready`: lifecycle methods
-* `events`: event handlers for the ViewModel
-<!-- * `components`: a map for options of sub components the ViewModel needed (So `__weex_define__(name, options)` equals to run `this.components[name] = options` in each custom components when `init`) -->
-
-The enabled ViewModel APIs contains:
-
-* `$el(id): Element`: find element by id in current ViewModel scope
-* `$vm(id): ViewModel`: find sub ViewModel by id
-* `$getConfig(): object`: get instance config info
-* `$broadcast`/`$emit`/`$dispatch`/`$on`/`$off`: listen and fire component events
-* `$transition` *(experimental)*: animation transition (see more in [animation native module](../animation.html))
-
-#### `__weex_require__(name: string): object`
-
-Get a Weex native module with several native APIs.
-
-**example:**
-
-```javascript
-var modal = __weex_require__('modal')
-modal.toast({
- message: 'Hey!',
- duration: 2
-})
-```
-
-polyfill for v0.3.0
-
-```javascript
-function __weex_require__(name) {
- var result
- define('__weex_require__', function (r, e, m) {
- result = r('@weex-module/' + name)
- })
- return result
-}
-```
-
-#### `__weex_bootstrap__(nameOrOptions: string|object, config: object?, data: object?): AppInstance | Error`
-
-Start to render by a certain component name or a direct component options as the root element, and some instance `config` and instance `data`. If everything fine, it will returns the root app instance. Otherwise it will return an `Error` instance which describes something wrong.
-
-**example:**
-
-```javascript
-__weex_bootstrap__(
- 'root',
- {
- // format 1:
- // downgrade: { appVersion: '>= 0.5.0' },
- // format 2:
- // downgrade: function (config) { return true }
- },
- {
- // external data
- // value: '12345'
- }
-)
-```
-
-The instance `config` now only support `downgrade` property which allows two format:
-
-1. an object like `{ osVersion, appVersion, weexVersion, deviceModel }`
-2. a function like `function (config) { return true }` to return a boolean value. `true` means normal and `false` means downgrade.
-
-The instance `data` will merge to root component data. So the root component is also easy to reuse and the instance data is easy to customize.
-
-#### `__weex_document__`
-
-An virtual-DOM `Document` instance. Also the host of [virtual-DOM APIs](./virtual-dom-apis.html). Every Weex instance has and must have just one `Document` instance.
-
-### Preserved Global Variables
-
-`define`, `bootstrap`, `module`, `exports`, `document`, `require`, `register`, `render`
-
-### A whole example
-
-```javascript
-// { "framework": "Weex", "version": "0.5.0" }
-
-var modal = __weex_require__('modal')
-
-__weex_define__('item', {
- template: {
- type: 'div',
- style: { flexDirection: 'row' },
- event: {
- click: function (e) {
- this.update(e)
- }
- },
- children: [
- { type: 'image', attr: { src: this.imageUrl }, ...},
- { type: 'text', attr: { value: this.title }, ...}
- ]
- },
- data: function () {
- return {
- imageUrl: '',
- title: ''
- }
- },
- methods: {
- update: function (e) {
- modal.toast({ message: this.title })
- }
- }
-})
-
-__weex_define__('app', {
- template: {
- type: 'div',
- children: [
- {
- type: 'item',
- repeat: {
- expression: function () {
- return this.list
- },
- key: '$index',
- value: '$value'}
- },
- attr: {
- imageUrl: function () {
- return this.$value.imageUrl
- },
- title: function () {
- return this.$value.title
- }
- }
- }
- ]
- },
- data: function () {
- return {
- list: [
- { imageUrl: 'xxx', title: '111' },
- { imageUrl: 'yyy', title: '222' },
- { imageUrl: 'zzz', title: '333' }
- ]
- }
- }
-})
-
-__weex_bootstrap__('app')
-```
-
-## v0.3.0
-
-### Whole Syntax and Structure
-
-A JS Bundle is actually a JavaScript file which follows **ES5** standard. The code is organized by several modules with AMD-like format:
-
-```javascript
-define('moduleName1', function (require, exports, module) {
- // content of module1
-})
-
-define('moduleName2', function (require, exports, module) {
- // content of module2
-})
-
-...
-```
-
-A whole Weex JS Bundle is concatenated by these modules and last a `bootstrap(rootComponentName, optionalConfig, optionalExternalData)` function call.
-
-```javascript
-define('@weex-component/a', function (require, exports, module) {
- // content of composed component <a>
-})
-
-define('@weex-component/b', function (require, exports, module) {
- // content of composed component <b>
-})
-
-bootstrap('@weex-component/b')
-```
-
-As the sample above, the component name should be hyphenated (a-z, 0-9, "-"). Other characters are not allowed.
-
-And, the method call `bootstrap()` allows 1~3 parameters: root module name (String), config info (optional JSON) and external data (optional JSON).
-
-### Content of Composed Components
-
-A module of composed component contains 3 parts: whole options definition, additional template option definition and additional style option definition.
-
-- whole options is a piece of JavaScript code to put component options (except `template` option and `style` option) into `module.exports`
-- `template` option is a piece of JSON-like object assigned to `module.exports.template` which describes the display structure of this component
-- `style` option is a piece of JSON object assigned to `module.exports.style` which describes the reusable styles in this component
-
-The `template` option is required and appeared only once, and the `style` option and whole options definition are optional.
-
-These options are defined and transformed by Transformer. Actually you can also ignore all the format limitation and write options to `module.exports` as the same result if you are not going to use Transformer. But that's not recommended.
-
-#### Details of template option definitions
-
-A piece of multi-level embedded JSON-like object which describes the view structure.
-
-Every level JSON-like object has these members below:
-
-* `type`: a required string, component name/type
-* `component`: an optional boolean, whether this component is composed or native
-* `attr`: an optional k-v pairs which contains all attributes of an element, the value could be a string, number, boolean or a function that bind some data value
-* `style`: an optional k-v pairs which contains all styles of an element, just the same format as the `attr`
-* `classList`: an optional array of strings which contains class names for styling.
-* `events`: an optional k-v pairs whose keys are event type and values are corresponding method names
-* `children`: an optional array of child components info
-* `append`: an optional string which determines a compiling workflow strategy: append node-by-node singly or a whole node tree just one time. the default value is `node` and another supported value is `tree`.
-* `shown`: a optional function which returns a boolean value to determine whether this component should be displayed
-* `repeat`: a optional function which returns a list data to displays components with each
-
-**Corresponding Keys to Weex Transformer:**
-
-- tag `name` in Weex file corresponds to `type`
-- attr `if` in Weex file corresponds to `shown`
-- attr `repeat` in Weex file corresponds to `repeat`
-- attr `append` in Weex file corresponds to `append`
-- attr `style` in Weex file with CSS syntax corresponds to `style`
-- attr `class` in Weex file with class names separated by blanks corresponds to `classList`
-- attr `on***` in Weex file with prefix `on` corresponds to a k-v pair in `events`
-- other attributes in Weex file corresponds to `attr`
-- Child nodes in Weex file corresponds to `children`
-
-All tag names, attr names are case-insensitive and transformed to lower-cased. But the attr values are case-sensitive.
-
-#### Details of style option definitions
-
-Just a two-levels JSON object.
-
-* The first levels are class names.
-* The second levels are k-v pairs which describes style names & properties for each class name.
-
-**Corresponding Keys to Weex Transformer:**
-
-* class name corresponds to first level keys
-* prop name corresponds to second level keys
-* prop value corresponds to second level values
http://git-wip-us.apache.org/repos/asf/incubator-weex-site/blob/12e3a8bc/_draft/v1.0/references/specs/js-framework-apis.md
----------------------------------------------------------------------
diff --git a/_draft/v1.0/references/specs/js-framework-apis.md b/_draft/v1.0/references/specs/js-framework-apis.md
deleted file mode 100644
index d24dd3b..0000000
--- a/_draft/v1.0/references/specs/js-framework-apis.md
+++ /dev/null
@@ -1,190 +0,0 @@
----
-title: JS Framework APIs (英)
-type: references
-order: 5.2
-version: 0.10
----
-
-# JS Framework APIs
-
-## Intro about JS Runtime
-
-These APIs are designed for JS Framework and Native Engine working together.
-
-Considering the limitation of mobile phone resource, *Weex runs only one JS runtime* to handle all Weex instances. So it need a multi-instance management layer in JavaScript. These JS Framework APIs are just designed to do the management job.
-
-* First, each Weex instance have a lifecycle, from `createInstance` to `destroyInstance`. During this period, we can import some extra data by `refreshInstance`.
-* To communicate with Native Engine, we have a couple of APIs: `sendTasks` and `receiveTasks`. They are used to call each other by some commands and messages.
-* And when JS runtime start at the beginning of the app launching, we need something initialized and configured. So we supply some APIs like `registerComponents`, `registerModules`.
-* The last API is just for debugging, we supply an API named `getRoot` to return the whole virtual-DOM data for developers.
-* If any of these API calls failed, an `Error` object should be returned.
-
-## Called by native and supplied from JS Framework
-
-### `createInstance(instanceId, code, options, data)`
-
-Create a Weex instance from Native Engine
-
-* `instanceId`: The unique id for a Weex instance, generated by Native Engine.
-* `code`: The JS bundle code send from Native Engine. It will be executed by `new Function(code)` in JS Framework. The code format depends on [JS Bundle Foramt](./js-bundle-format.html)
-* `options`: *Optional*. An options object. *Currently it supports `debug` flag which enable printing log and `bundleUrl` flag which the url of bundle.*
-* `data`: *Optional*. It's an chance to supply external data instead of the original data in JS bundle.
-
-Example:
-
-```javascript
-createInstance('x', 'define(...); define(...); define(...); bootstrap(...)')
-createInstance('x', '...', { bundleUrl, debug, ... }, { a: 1, b: 2 }})
-```
-
-### `destroyInstance(instanceId)`
-
-Destroy an existed Weex instance by id from Native Engine
-
-### `refreshInstance(instanceId, data)`
-
-Refresh data to an existed Weex instance with certain external data from Native Engine
-
-Example:
-
-```javascript
-refreshInstance('x', {a: 100, b: 200})
-```
-
-### `registerComponents(components)`
-
-Register all native components
-
-* `components`: A array of whose items are component options that are force part to use. *Currently it supports `append` attribute which forces the appending mechanism (`tree` or `node`) when first time rendering.*
-
-Example:
-
-```javascript
-registerComponents([
- { type: 'container' },
- { type: 'text' },
- { type: 'image' },
- { type: 'slider', append: 'tree' },
- { type: 'list' },
- { type: 'cell', append: 'tree' },
- ...
-])
-```
-
-### `registerModules(modules)`
-
-Register the name, methods and args format of each module
-
-* `modules`: A map that collects all native module definitions. Each module definition is an array which has several API definitions. Each API definition has a `name` string and an `args` array which contains a list of each parameter's type.
-
-**NOTE: the `node` type data will actually return its `ref` property. And the `function` type data will actually return a unique function id referring to it.**
-
-Example:
-
-```javascript
-registerModules({
- event: [
- {name: 'openURL', args: ['string']}
- ],
- ...
-})
-```
-
-### `receiveTasks(instanceId, tasks)`
-
-Fire events or callbacks to an existed Weex instance from Native Engine
-
-* `tasks[]`: A task list. Each task has a `method="fireEvent|callback"` property and a list of `args`.
- - In `fireEvent` method, the `args` is `ref` of the target, event `type`, event `data` and `domChanges` description in order. **Note: if some event make virtual-DOM data changed (e.g. value changed in `<input>` or current index changed in `<slider>`), the changing of the target element will be passed as `domChanges`.**
- - In `callback` method, the `args` is `funcId` of a handler, `data` and `ifKeepAlive` which describes whether this callback handler should be keeping called. (Each callback handler is matched with a `funcId` when the original call happens.)
-
-Example:
-
-```javascript
-receiveTasks('x', [{method: 'fireEvent', args: ['x', '13', 'click', {a: 100, b: 200}]}])
-receiveTasks('x', [{method: 'callback', args: ['x', '7', {a: 100, b: 200}, true]}])
-```
-
-### `getRoot(instanceId)`
-
-Return a JSON object which describes the whole virtual DOM body of an existed Weex instance, which designed for debugging
-
-Example:
-
-```javascript
-getRoot('x')
-// {ref: '_root', type: 'container', attr: {...}, style: {...}, children: [...]}
-```
-
-## Called from JavaScript and implemented with native code
-
-### `sendTasks(instanceId, tasks)`
-
-Make native calls from JS Framework
-
-* `tasks[]`: A task list. Each task has a `module` name, a `method` name, and a `args[]` list.
-
-Example:
-
-```javascript
-sendTasks('x', [
- {module: 'dom', method: 'addElement', args: ['_root', {ref: '1', type: 'container'}, -1]},
- {module: 'dom', method: 'addElement', args: ['1', {ref: '2', type: 'text', ...}, -1]},
- {module: 'dom', method: 'addElement', args: ['1', {ref: '3', type: 'image', ...}, -1]},
- ...
-])
-```
-
-## Supporting other JS Framework <sup>(experimental)</sup>
-
-### Register a new JS Framework
-
-```javascript
-// lib/frameworks/index.js
-
-import Vue from '...'
-import React from '...'
-import Angular from '...'
-
-export const frameworks = {
- Vue,
- React,
- Angular
-}
-```
-
-### Expose JS Framework APIs
-
-```javascript
-// 3rd-party-framework.js
-
-export function createInstance (id, code, config, data) { ... }
-export function destroyInstance (id) { ... }
-export function refreshInstance (id, data) { ... }
-export function registerComponents (components) { ... }
-export function registerModules (modules) { ... }
-export function recieveTasks (id, tasks) { ... }
-export function getRoot (id) { ... }
-```
-
-The virtual-DOM tasks should follow [virtual-DOM spec](./virtual-dom-apis.html).
-
-### Framework Helper
-
-You can import `lib/runtime/helper.js` to get two important things:
-
-* `Document` class, see [virtual-DOM spec](./virtual-dom-apis.html) for more.
-* `sendTasks` method.
-
-### JS Bundle format
-
-You must ensure the JS Bundle has its first line of code like this:
-
-```javascript
-// { "framework": "Vue" }
-...
-```
-
-to allow JS Runtime to detect which JS Framework it should be opened by.
-
-If no valid annotation found. The JS Bundle will be opened by default JS Framework of Weex.
http://git-wip-us.apache.org/repos/asf/incubator-weex-site/blob/12e3a8bc/_draft/v1.0/references/specs/virtual-dom-apis.md
----------------------------------------------------------------------
diff --git a/_draft/v1.0/references/specs/virtual-dom-apis.md b/_draft/v1.0/references/specs/virtual-dom-apis.md
deleted file mode 100644
index 9291497..0000000
--- a/_draft/v1.0/references/specs/virtual-dom-apis.md
+++ /dev/null
@@ -1,148 +0,0 @@
----
-title: Virtual DOM APIs
-type: references
-order: 5.3
-version: 0.10
----
-
-# Virtual DOM APIs
-
-## `Document`
-
-每个实例有一个与实例 id 对应的 document。Document 具有组成一个节点树的多个节点。
-
-### 构造函数
-
-##### `new Document(id: string, url: string?)`
-
-### 成员
-
-##### `createElement(tagName: string, props: Object?): Element`
-
-创建一个特定类型 `Element` 对象。`props` 对象可能包含一个 `attr` 对象和一个 `style` 对象。例如 `createBody('div', {style: {backgroundColor: '#ffffff'}})`
-
-##### `createComment(text: string): Comment`
-
-创建一个具有一些注释文本的 `Comment` 对象。
-
-##### `open()`
-
-初始化渲染开始时设置一个标志,表示初始化渲染开始,每个 DOM 更新将被立即调用。
-
-##### `close()`
-
-初始化渲染完成时设置一个标志,标识初始化渲染完成,DOM 更新以后将在每个任务中批处理。
-
-##### `fireEvent(el: Element, type: string, e: Object?, domChanges: Object?)`
-
-在某个元素上触发一个带有特定类型的事件,这个事件带有一个事件对象。当事件导致一些 DOM 的变化,第四个参数将像 `createElement` 方法里的 `props` 参数一样描述这些 DOM 变化。
-
-#### 只读属性 & Getters
-
-##### `id: string`
-
-##### `URL: string?`
-
-##### `body: Element`
-
-body 元素
-
-##### `documentElement: Element`
-
-document 元素
-
-##### `getRef(ref: string): Node?`
-
-通过内部 node map 的 `ref` 获取节点。
-
-**注意:**
-
-在一个 document 被创建时会自动生成一个 `documentElement` ,并且 `body` 应该手动创建并添加到 `documentElement` 才能工作。`body` 的 `type` 必须是一个 `div`,`list` 或 `scroller`。
-
-## `Node`
-
-### 构造函数
-
-##### `new Node()`
-
-### 成员
-
-##### `destroy()`
-
-#### 只读属性 & Getters
-
-##### `ref: string`
-
-##### `nextSibling: Node?`
-
-##### `previousSibling: Node?`
-
-##### `parentNode: Node?`
-
-## `Element` extends `Node`
-
-### 构造函数
-
-##### `new Element(type: string, props: Object?, ownerDocument: Document)`
-
-创建一个元素,并且 `props` 对象可能包含一个 `attr` 对象和一个 `style` 对象。
-
-### 成员
-
-#### DOM 树
-
-##### `appendChild(node: Node)`
-
-##### `insertBefore(node: Node, before: Node?)`
-
-##### `insertAfter(node: Node, after: Node?)`
-
-##### `removeChild(node: Node, preserved: boolean?)`
-
-移除一个子节点。`preserved` 参数表示是否立即销毁删除该节点或保存它。
-
-##### `clear()`
-
-#### DOM props
-
-##### `setAttr(key: string, value: string, silent: boolean?)`
-
-如果 `silent` 为 `true`,也不会调用 native。用于有 virtual-DOM 变化的事件处理。
-
-##### `setStyle(key: string, value: string, silent: boolean?)`
-
-`silent` 参数作用与 `setAttr` 中的一样。
-
-##### `setClassStyle(classStyle: Object)`
-
-class 样式的 CSS 优先级低于内联样式,当两种样式风格出现时,内联样式的值会覆盖 class 样式的值。
-
-##### `addEvent(type: string, handler: Function)`
-
-##### `removeEvent(type: string)`
-
-##### `fireEvent(type: string, e: any)`
-
-#### 只读属性 & Getters
-
-##### `toJSON(): Object`
-
-格式化 `{ref: string, type: string, attr: Object, style: Object, event: Array(string), children: Array}`
-
-## `Comment` extends `Node`
-
-`Comment` 将不被传给渲染引擎。因此,可作为占位符使用。
-
-### 构造函数
-
-##### `new Comment(value: string)`
-
-### 成员
-
-#### 只读属性 & Getters
-
-##### `type: string`
-
-返回 `'comment'`
-
-##### `value: string`
http://git-wip-us.apache.org/repos/asf/incubator-weex-site/blob/12e3a8bc/_draft/v1.0/references/text-style.md
----------------------------------------------------------------------
diff --git a/_draft/v1.0/references/text-style.md b/_draft/v1.0/references/text-style.md
deleted file mode 100644
index 85f67c8..0000000
--- a/_draft/v1.0/references/text-style.md
+++ /dev/null
@@ -1,40 +0,0 @@
----
-title: 文本样式
-type: references
-order: 1.7
-version: 0.10
----
-
-# 文本样式
-
-<span class="weex-version">v0.5+</span>
-
-文本类组件共享一些通用样式, 这类组件目前包括 [`<text>`](./components/text.html) 和 [`<input>`](./components/input.html)。
-
-## 属性
-
-- `color {color}`:文字颜色。
-
- 可选值为色值,支持 RGB( `rgb(255, 0, 0)` );RGBA( `rgba(255, 0, 0, 0.5)` );十六进制( `#ff0000` );精简写法的十六进制( `#f00` );色值关键字(`red`)。
-
-- `lines {number}`: 指定文本行数。仅在 `<text>` 组件中支持。默认值是 `0` 代表不限制行数。
-
-- `font-size {number}`:文字大小。
-
-- `font-style {string}`:字体类别。可选值 `normal` | `italic`,默认为 `normal`。
-
-- `font-weight {string}`:字体粗细程度。可选值 `normal` | `bold`,默认为 `normal`。
-
-- `text-decoration {string}`:字体装饰,可选值 `none` | `underline` | `line-through`,默认值为 `none`。
-
-- `text-align {string}`:对齐方式。可选值 `left` | `center` | `right`,默认值为 `left`。目前暂不支持 `justify`, `justify-all`。
-
-- `font-family {string}`:设置字体。
-
- 这个设置 **不保证** 在不同平台,设备间的一致性。如所选设置在平台上不可用,将会降级到平台默认字体。
-
-- `text-overflow {string}`:设置内容超长时的省略样式。可选值 `clip` | `ellipsis`
-
-## 其它参考
-
-- [颜色关键字列表](./references/color-names.html)。
http://git-wip-us.apache.org/repos/asf/incubator-weex-site/blob/12e3a8bc/_draft/v1.0/references/units.md
----------------------------------------------------------------------
diff --git a/_draft/v1.0/references/units.md b/_draft/v1.0/references/units.md
deleted file mode 100644
index 2ff3482..0000000
--- a/_draft/v1.0/references/units.md
+++ /dev/null
@@ -1,66 +0,0 @@
----
-title: CSS 单位
-type: references
-order: 1.9
-version: 0.10
----
-
-# CSS 单位
-
-## CSS `color` 单位
-
-支持以下写法:
-
-```css
-.classA {
- /* 3-chars hex */
- color: #0f0;
- /* 6-chars hex */
- color: #00ff00;
- /* rgba */
- color: rgb(255, 0, 0);
- /* rgba */
- color: rgba(255, 0, 0, 0.5);
- /* transparent */
- color: transparent;
- /* Basic color keywords */
- color: orange;
- /* Extended color keywords */
- color: darkgray;
-}
-```
-
-### 注意
-
-* 不支持 `hsl()`, `hsla()`, `currentColor`, 8个字符的十六进制颜色。
-
-* `rgb(a,b,c)` 或 `rgba(a,b,c,d)` 的性能比其他颜色格式差很多,请选择合适的颜色格式。
-
-颜色名称可查看 [颜色名称列表](./color-names.md).
-
-## CSS `length` 单位
-
-在 Weex 中,我们只支持 `px` 长度单位。并且它将在 JavaScript 运行时和本机渲染器中解析为数字类型。所以你也可以省略 `px` 单位后缀,直接写数字。
-
-下面这些不同的写法,解析的结果完全相同。
-
-```css
-.classA { font-size: 48; line-height: 64; }
-.classB { font-size: 48px; line-height: 64px; }
-```
-
-不支持类似 `em`,`rem`,`pt` 这样的 CSS 标准中的其他长度单位。
-
-## CSS `number` 单位
-
-仅仅一个数字。用于 [`opacity`](./common-style.md#其他基本样式),[`lines`](./text-style.md)等。
-
-有时值必须是整数,例如:`lines`。
-
-**注意:**也可以将所有的 `px` `length` 值简化为一个数字。
-
-## CSS `percentage` 单位 (暂不支持)
-
-表示百分比值,如“50%”,“66.7%”等。
-
-它是 CSS 标准的一部分,但 Weex 暂不支持。
http://git-wip-us.apache.org/repos/asf/incubator-weex-site/blob/12e3a8bc/_draft/v1.0/references/wxc/index.md
----------------------------------------------------------------------
diff --git a/_draft/v1.0/references/wxc/index.md b/_draft/v1.0/references/wxc/index.md
deleted file mode 100644
index 5969ce2..0000000
--- a/_draft/v1.0/references/wxc/index.md
+++ /dev/null
@@ -1,44 +0,0 @@
----
-title: 官方扩展组件
-type: references
-order: 3
-has_chapter_content: true
-version: 0.10
----
-
-# 官方扩展组件
-
-Weex 官方扩展组件指的是以 `wxc-` 开头的组件,这些组件不属于内建组件的一部分,而是 Weex 团队基于内建组件扩展的一些常用组件。这些组件依赖 `weex-components`,需要安装依赖后才可使用。
-
-使用方式如下:
-
-1. 安装依赖
-
- 需要在工程目录下执行以下命令:
-
- ```bash
- npm install weex-components
- ```
-
-2. 使用
-
- 需要在 `<script>` 中引入依赖。
-
- ```html
- <template>
- <div style="flex-direction: column;">
- <wxc-tabbar tab-items = {{tabItems}}></wxc-tabbar>
- </div>
- </template>
-
- <script>
- require('weex-components');
-
- module.exports = {
- data: {},
- methods: {
- // more
- }
- }
- </script>
- ```
\ No newline at end of file
http://git-wip-us.apache.org/repos/asf/incubator-weex-site/blob/12e3a8bc/_draft/v1.0/references/wxc/wxc-navpage.md
----------------------------------------------------------------------
diff --git a/_draft/v1.0/references/wxc/wxc-navpage.md b/_draft/v1.0/references/wxc/wxc-navpage.md
deleted file mode 100644
index 6b15175..0000000
--- a/_draft/v1.0/references/wxc/wxc-navpage.md
+++ /dev/null
@@ -1,192 +0,0 @@
----
-title: <wxc-navpage>
-type: references
-order: 3.1
-version: 0.10
----
-
-# <wxc-navpage> <sup>(v0.5+)</sup>
-
-`<wxc-navpage>` 组件是一个包含 navbar 的容器组件,可以根据业务场景定制 navbar 组件。同时,可以使用 `navigator` 模块控制页面的跳转,具体参考 [`navigator module`](../modules/navigator.html)。一般情况,都是配合 navbar 组件使用。如果不了解 navigator 相关知识,建议先了解下 iOS 或者 Android 的相关组件。在 H5 上,其实是相当于导航栏。
-
-用法:在 `script` 标签中通过一个 `require` 语句引入,即:`require('weex-components');`
-
-**示例**
-
-```html
-<template>
- <div style="flex-direction: column;">
- <wxc-navpage tab-items = {{tabItems}}></wxc-navpage>
- </div>
-</template>
-
-<script>
- require('weex-components');
- // more
-</script>
-```
-
-在 `require('weex-components');` 之前 ,需要在工程目录下执行以下命令:
-
-```bash
-npm install weex-components
-```
-
-## 子组件
-
-`<wxc-navpage>` 组件支持任意 Weex 组件。
-
-## 特性
-
-`<wxc-navpage>` 组件的特性其实是对 navbar 进行功能设置,如下图所示,是 navbar 的一个简单示意。
-
-
-
-- `height {number}`:navbar 的高度,默认是 88。
-
-- `background-color {color}`:navbar 的背景颜色,默认是白色。
-
-- `title {string}`:navbar 的标题。
-
-- `title-color {color}`:navbar 标题的颜色,默认黑色。
-
-- `left-item-title {string}`:navbar 左侧按钮的标题。
-
-- `left-item-color {color}`:navbar 左侧按钮标题颜色,默认黑色。
-
-- `right-item-title {string}`:navbar 右侧按钮标题。
-
-- `right-item-color {color}`:navbar 右侧按钮标题颜色,默认黑色。
-
-- `left-item-src {string}`:navbar 左侧按钮的图标。
-
-- `right-item-src {string}`:navbar 右侧按钮的图标。
-
-### 样式
-
-- 通用样式:支持所有通用样式
-
- - 盒模型
- - `flexbox` 布局
- - `position`
- - `opacity`
- - `background-color`
-
- 查看 [组件通用样式](../common-style.html)
-
-## 事件
-
-`<wxc-navpage>` 组件支持左右两项点击事件。
-
-- `naviBar.leftItem.click`: 当 navbar 的左侧按钮被点击时触发事件,需要在 `created` 时期注册事件。
-- `naviBar.rightItem.click`: 当 navbar 的右侧按钮被点击时触发事件,需要在 `created` 时期注册事件。
-
-**示例:**
-
-```html
-<template>
- <wxc-navpage height={{...}} background-color="..." title="..." title-color="..." left-item-title="..." left-item-color="..." right-item-src="...">
- <content> ...</content>
- </wxc-navpage>
-</template>
-<script>
- require('weex-components');
- module.exports = {
- created: function() {
- this.$on('naviBar.rightItem.click',function(e){
- //handle your click event here.
- });
-
- this.$on('naviBar.leftItem.click',function(e){
- //handle your click event here.
- });
- }
- }
-</script>
-```
-
-- 通用事件
-
- 支持所有通用事件:
-
- - `click`
- - `longpress`
- - `appear`
- - `disappear`
-
- 查看 [通用事件](../common-event.html)
-
-## 示例
-
-**注意:**
-
-[dotwe](http://dotwe.org) 平台暂不支持 `wxc-xxx` 类型的组件。
-
-```html
-<template>
- <wxc-navpage data-role="none" height={{navBarHeight}} background-color="#ff5898" title={{title}} title-color="white" left-item-title="More" left-item-color="white" right-item-src="http://gtms02.alicdn.com/tps/i2/TB1ED7iMpXXXXXEXXXXWA_BHXXX-48-48.png">
- <wxc-panel title="push a new page">
- <wxc-button type="primary" size="small" value="push" onclick="push"></wxc-button>
- </wxc-panel>
- <wxc-panel title="pop to the last page">
- <wxc-button type="success" size="small" value="pop" onclick="pop"></wxc-button>
- </wxc-panel>
- </wxc-navpage>
-</template>
-
-<script>
- require('weex-components');
- module.exports = {
- data: {
- navBarHeight: 88,
- title: 'Navigator',
- dir: 'examples',
- baseURL: '',
- },
- created: function() {
- this.$getConfig(function (config) {
- var env = config.env;
- if(env.platform == 'iOS'){
- var scale = env.scale;
- var deviceWidth = env.deviceWidth / scale;
- this.navBarHeight = 64.0 * 750.0 / deviceWidth;
- }
- }.bind(this));
-
- this.$on('naviBar.rightItem.click',function(e){
- duration = 2;
- this.$call('modal', 'toast', {
- 'message': 'naviBar.rightItem.click',
- 'duration': duration
- });
- });
-
- this.$on('naviBar.leftItem.click',function(e){
- duration = 2;
- this.$call('modal', 'toast', {
- 'message': 'naviBar.leftItem.click',
- 'duration': duration
- });
- });
- },
- methods: {
- push: function() {
- var vm = this;
- var params = {
- 'url': 'http://dotwe.org/raw/dist/33dfcbe81979c60ba5de72c235d7d0f8.js',
- 'animated' : 'true',
- }
- vm.$call('navigator','push',params, function () {});
- },
-
- pop: function() {
- var vm = this;
- var params = {
- 'animated' : 'true',
- }
- vm.$call('navigator','pop',params, function () {});
- }
- }
- }
-</script>
-```
http://git-wip-us.apache.org/repos/asf/incubator-weex-site/blob/12e3a8bc/_draft/v1.0/references/wxc/wxc-tabbar.md
----------------------------------------------------------------------
diff --git a/_draft/v1.0/references/wxc/wxc-tabbar.md b/_draft/v1.0/references/wxc/wxc-tabbar.md
deleted file mode 100644
index 492c1cd..0000000
--- a/_draft/v1.0/references/wxc/wxc-tabbar.md
+++ /dev/null
@@ -1,176 +0,0 @@
----
-title: <wxc-tabbar>
-type: references
-order: 3.2
-version: 0.10
----
-
-# <wxc-tabbar>
-
-`<wxc-tabbar>` 是一个名为 `weex-components` 依赖库的自定义组件。`<wxc-tabbar>` 能在窗口的底部显示 tab 页面,我们可以在不同的 tab 页面之间切换。
-
-用法:在 `script` 标签中通过一个 `require` 语句引入,即:`require('weex-components');`
-
-**示例**
-
-```html
-<template>
- <div style="flex-direction: column;">
- <wxc-tabbar tab-items = {{tabItems}}></wxc-tabbar>
- </div>
-</template>
-
-<script>
- require('weex-components');
-
- module.exports = {
- data: {},
- methods: {
- // more
- }
- }
-</script>
-```
-
-在 `require('weex-components');` 之前 ,需要在工程目录下执行以下命令:
-
-```bash
-npm install weex-components
-```
-
-## 子组件
-
-该组件不支持子组件。
-
-## 特性
-
-- `selected-index {number}`:设置默认选中的 tab 索引,默认值为 0(第一个 tab)。
-- `selected-color {color}`:设置当标题被选中时标题的颜色,默认为红色。
-- `unselected-color {color}`:设置当标题不被选中时标题的颜色,默认为黑色。
-- `tab-items {Array[Object]}`:该属性接受一个 `tabitems` 对象数组, 分别对应到对应的 tab 页面,tab 页面的顺序跟对象数组的位置对应。
- 我们可以通过设置每一项的属性来配置 tabbar 的外观:
-
- - `index {integer}`:必填属性,指明了 tabitem 的次序。
- - `title {string}`:设置 tabitem 的标题,非必填,当标题为空时,标题将不会被显示
- - `titleColor {color}`:设置 tabitem 的标题颜色,默认是黑色
- - `image {string}`:当 tab 页面不被选中时显示的 icon,当不提供时,什么也不显示。
- - `selectedImage {string}`:设置 tab 页面被选中时显示的图片,不提供图片时,什么也不显示。
- - `src {string}`:设置 tab 对应的 Weex 页面的 url,为 http 开头。
- - `visibility {string}`:值为 `visible` | `hidden`,该属性指明了 tab 页面的显示状态,默认值是 visible
-
-## 样式
-
-- 通用样式:支持所有通用样式
-
- - 盒模型
- - `flexbox` 布局
- - `position`
- - `opacity`
- - `background-color`
-
- 查看 [组件通用样式](../common-style.html)
-
-## 事件
-
-- `tabBar.onClick`:当 tab 页面被选中时触发,需要在 `ready` 或者 `create` 生命周期中注册,如:
-
- **示例**
-
- ```html
- <template>
- <div style="flex-direction: column;">
- <wxc-tabbar tab-items="{{tabItems}}"></wxc-tabbar>
- </div>
- </template>
-
- <script>
- require('weex-components');
- module.exports = {
- data: {
- // ...
- },
- created: function() {
- var vm = this;
- vm.$on('tabBar.onClick',function(e){
- var detail= e.detail;
- console.log('tabBar.onClick ' + detail.index);
- });
- },
- methods: {
- }
- }
- </script>
- ```
-
-- 通用事件
- 支持所有通用事件:
-
- - `click`
- - `longpress`
- - `appear`
- - `disappear`
-
- 查看 [通用事件](../common-event.html)
-
-## 示例
-
-**注意:**
-
-[dotwe](http://dotwe.org) 平台暂不支持 `wxc-xxx` 类型的组件。
-
-```html
-<template>
- <div>
- <wxc-tabbar tab-items="{{tabItems}}"></wxc-tabbar>
- </div>
-</template>
-
-<script>
- require('weex-components');
- module.exports = {
- data: {
- dir: 'examples',
- tabItems: [
- {
- index: 0,
- title: 'tab1',
- titleColor: '#000000',
- icon: '',
- image: 'http://gtms01.alicdn.com/tps/i1/TB1qw.hMpXXXXagXXXX9t7RGVXX-46-46.png',
- selectedImage: 'http://gtms04.alicdn.com/tps/i4/TB16jjPMpXXXXazXVXX9t7RGVXX-46-46.png',
- src: 'http://dotwe.org/raw/dist/ba202bcd277285c7f3cf79f9b1055dce.js?itemId=tab1',
- visibility: 'visible',
- },
- {
- index: 1,
- title: 'tab2',
- titleColor: '#000000',
- icon: '',
- image: 'http://gtms03.alicdn.com/tps/i3/TB1LEn9MpXXXXaUXpXX9t7RGVXX-46-46.png',
- selectedImage: 'http://gtms02.alicdn.com/tps/i2/TB1qysbMpXXXXcnXXXX9t7RGVXX-46-46.png',
- src: 'http://dotwe.org/raw/dist/7e24b83c5868dbd4462e30549999245d.js?itemId=tab2',
- visibility: 'hidden',
- },
- {
- index: 2,
- title: 'tab3',
- titleColor: '#000000',
- icon: '',
- image: 'http://gtms01.alicdn.com/tps/i1/TB1B0v5MpXXXXcvXpXX9t7RGVXX-46-46.png',
- selectedImage: 'http://gtms04.alicdn.com/tps/i4/TB1NxY5MpXXXXcrXpXX9t7RGVXX-46-46.png',
- src: 'http://dotwe.org/raw/dist/8a8b49b67084423e097a6b7f549f1453.js?itemId=tab3',
- visibility: 'hidden',
- }
- ],
- },
- created: function() {
- var vm = this;
- vm.$on('tabBar.onClick',function(e){
- var detail= e.detail;
- console.log('tabBar.onClick ' + detail.index);
- });
- },
- methods: {}
- }
-</script>
-```
http://git-wip-us.apache.org/repos/asf/incubator-weex-site/blob/12e3a8bc/_draft/v1.0/tools/devtools-android.md
----------------------------------------------------------------------
diff --git a/_draft/v1.0/tools/devtools-android.md b/_draft/v1.0/tools/devtools-android.md
deleted file mode 100644
index 9ce8991..0000000
--- a/_draft/v1.0/tools/devtools-android.md
+++ /dev/null
@@ -1,123 +0,0 @@
----
-title: Devtools for Android
-type: tools
-order: 2.1
-version: 0.10
----
-
-# Devtools for Android
-
-[](https://github.com/weexteam/weex_devtools_android/releases) [](https://www.codacy.com/app/weex_devtools/weex_devtools_android?utm_source=github.com&utm_medium=referral&utm_content=weexteam/weex_devtools_android&utm_campaign=Badge_Grade) [](https://codeclimate.com/github/weexteam/weex_devtools_android) [](https://codeclimate.com/github/weexteam/weex_devtools_android) [](https://github.com/weexteam/weex_devtools_android/issues) [  ](https://bintray.com/alibabaweex/maven/weex_inspector/_latestVersion)
-
-Weex devtools is a custom devtools for weex that implements [Chrome Debugging Protocol](https://developer.chrome.com/devtools/docs/debugger-protocol) inspired by [Stetho](https://github.com/facebook/stetho), it is designed to help you quickly inspect your app and debug your JS bundle source in a chrome web page.At present The devtools consist of two part : `Inspector` and `Debugger`. If you want it work well, you must install a `weex-devtool` as debug server.
-
-- **Inspector**
- Inspector can be used to show your `Element` \ `NetWork` \ `Console log` \ `ScreenCast` \ `BoxModel` \ `Native View` and so on.
-
-- **Debugger**
- Debugger can be used to debug your bundle js source, you can set `Breakpoint` \ watch `CallStack`.
-
-## Install and launch devtools server
-Open your terminal then type `npm install -g weex-toolkit` and run.Launch it just type and run the command `weex debug`, then a Chrome web page will be opened.
-
-## Use on an android device or emulator
-
-### Taste of first debug with playground
-If you are a green hand to the debug of weex, we recommend you to try your first debug with `playground`, what you need to do is just launch the playground and scan the QR code shown in the debug page which wound opened if the `devtools server` have been launched. after you scan the QR code, the web page will list your connected devices.
-
- devices")
-
-#### How Debugger Works
-Devtools expands [Chrome Debugging Protocol](https://developer.chrome.com/devtools/docs/debugger-protocol) and the mechanism of communication between client and debug sever is based on [JSON-RPC](https://en.wikipedia.org/wiki/JSON-RPC).
-
-##### Devtools Client
-Devtools Client is integrated in App as aar, it connects to debug server through webscoket protocol with out permission check. I recommend you just packaged it in your debug version consider of the security mechanism.
-
-##### Devtools Debug Server
-Devtools Debug Server is the center node of the communication, it connects to both app and chrome, acts as the turn server of debugging protocol messages and the manager of the js runtime.
-
-##### Chrome FrontEnd
-Chrome's V8 engine acts as the javascript runtime, when debug mode is enabled, all the js code run on it. On the other side we also reuse most of the Chrome's debugging user interface, such as set breakpoint, see call stack and so on.
-
-
-
-### Enable devtools in your own app
-Of course you can reuse the code of playground to build your own app, that is the simplest way to let your app's js code debuggable. On the other hand QR code is not necessary, if your review the source code you can draw a conclusion that QR CODE is just a way to set `devtools server` address. following those steps you can do the same thing.
-
-#### Gradle dependency on inspector.
-There are two choices to set the dependency, the Choice A is recommanded if you have no change to weex_sdk or inspector, while if you use your own custom weex_sdk or inspector Choice B is suitable.
-
- * *A - aar dependency from jcenter*.
- ````
- dependencies {
- compile 'com.taobao.android:weex_inspector:0.0.8.1'
- }
- ````
-I strongly recommend you use the latest version since both weex sdk and devtools are developed iteratively and rapidly. See the release version list [here](https://github.com/weexteam/weex_devtools_android/releases). All the release version will publish to the [jcenter repo](https://bintray.com/alibabaweex/maven/weex_inspector).
-
- * *B - source code dependency.*
-
- you need to copy the dir of inspector to the same dir of your app and add `include ":inspector"`in your project's `settings.gradle` file just like playground have done, then add dependency in your app's `build.gralde`.
- ````
- dependencies {
- compile project(':inspector')
- }
- ````
-
-##### Version compatibility
-
-| weex sdk | weex inspector | debug server |
-|----------|----------------|--------------|
-|0.8.0.1+ | 0.0.8.1 |0.2.39+ |
-|0.7.0+ | 0.0.7.13 |0.2.38 |
-|0.6.0+ | 0.0.2.2 | |
-
-
-#### Initialize in your XXXApplication file.
-````
- public class MyApplication extends Application {
- public void onCreate() {
- super.onCreate();
- initDebugEnvironment(true, "xxx.xxx.xxx.xxx"/*"DEBUG_SERVER_HOST"*/);
- }
- private void initDebugEnvironment(boolean enable, String host) {
- WXEnvironment.sRemoteDebugMode = enable;
- WXEnvironment.sRemoteDebugProxyUrl = "ws://" + host + ":8088/debugProxy/native";
- }
-}
-````
-
-#### Ship It!
- 1. You must launch your bundle server firstly. In your weex dir, run command "./start";
- 2. Launch your remote debug server. Run command `weex debug`, chrome will open a web page show a simply guidance and QR code;
- 3. Launch your app and make sure debug mode was enabled. You will see a device list in the chrome web page opened by last step, each device item have two button, `Debugger` and `Inspector`;There are two way to enable debug mode:
- * scaning the QR code and handle the content just like the playground have done.
- * init it in the XXXApplication by calling `initDebugEnvironment(true, "xxx.xxx.xxx.xxx")`, if you call `initDebugEnvironment(true, "xxx.xxx.xxx.xxx")` after weex sdk inited, you need to call `WXSDKEngine.reload()` to refresh the runtime.
- 4. Once you click the button `Inspector` chrome will open a page show the inspector view, on the other side, click the button `Debugger` chrome will open a new page to show the debug view;
-
-
-
-
-
----
-
-#### OPTIONS
-
-##### [**OPTION**] *set your remote bundle server ip.*
-
- For example, in the playground it is in the `IndexActivity.java`, you need to change the value of `DEFAULT_IP` in IndexActivity.java from `"your_current_IP"` to a server ip like `"30.30.30.150"`:
-````
- private static final String DEFAULT_IP = "30.30.30.150"; // "your_current_IP";
-````
-
-##### [**OPTION**] *enable network inspection.*
-````
-OkHttpClient client = new OkHttpClient();
-client.networkInterceptors().add(new OkHttpInterceptor());
-````
-
-###### Notice
- The network inspection only support OKHttpClient right now!!! If you want to use the network inspection to catch your bundle request, you must change your bundle server ip to the real server ip.
-
-#### Known Issues
- You can report issues and bugs [here](https://github.com/weexteam/weex_devtools_android/issues). We will reply as soon as possible.
http://git-wip-us.apache.org/repos/asf/incubator-weex-site/blob/12e3a8bc/_draft/v1.0/tools/devtools-ios.md
----------------------------------------------------------------------
diff --git a/_draft/v1.0/tools/devtools-ios.md b/_draft/v1.0/tools/devtools-ios.md
deleted file mode 100644
index 801b80d..0000000
--- a/_draft/v1.0/tools/devtools-ios.md
+++ /dev/null
@@ -1,65 +0,0 @@
----
-title: Devtools for iOS
-type: tools
-order: 2.2
-version: 0.10
----
-
-# Devtools for iOS
-
-通过Chrome开发者工具远程调试你的原生iOS app
-## 启动weex-devtool:
-1. 安装和运行 weex-devtool
-
- ```
- $:npm install -g weex-devtool
-
- $:weex-devtool
- ```
-
- 它会启动chrome浏览器,展示wss ip 地址在chrome地址栏。
-## playground 安装 WXDevtool
-1. 安装依赖.
-
- $:pod install
-### 使用
-1. AppDelegate.m 头文件
-
- ```
- #import "WXDevTool.h"
- ```
-2. 在App启动的时候初始化 inspector
-
- **注意: The inspector API 必须在weex初始化之前调用**
- - (void)setDebug:(BOOL)isDebug;
-
- isDebug默认是NO,那么你打开的是inspect模式。假如设置isDebug为YES,那么打开debug模式和inspect模式。
- - (void)launchDevToolDebugWithUrl:(NSString *)url;
-
- wssip 是 展示在 chrome 地址栏的wss 地址.
- - 打开 debug 模式 和 inspector 模式
-
- eg:- (BOOL)application:(UIApplication *)application didFinishLaunchingWithOptions:(NSDictionary *)launchOptions
- {
- [WXDevTool setDebug:YES];
- [WXDevTool launchDevToolDebugWithUrl:@"ws://wssip/debugProxy/native"];
- }
- - 打开 inspect 模式, 移除 @selector(setDebug:) 或者 增加 [WXDevTool setDebug:NO]
-
- eg:- (BOOL)application:(UIApplication *)application didFinishLaunchingWithOptions:(NSDictionary *)launchOptions
- {
- [WXDevTool launchDevToolDebugWithUrl:@"ws://wssip/debugProxy/native"];
- }
-3. 编译和运行APP,chrome会显示你的设备,选择inspector。
-4. 支持不同级别的Log打印。
-
- eg: #import "WXDevTool.h"
- PDLogE()/PDLogW()
-### WXDevtool依赖
-
-你的app必须链接下面的frameworks/dylibs
-- libicucore.dylib
-- CFNetwork.framework
-- CoreData.framework
-- Security.framework
-- Foundation.framework
http://git-wip-us.apache.org/repos/asf/incubator-weex-site/blob/12e3a8bc/_draft/v1.0/tools/devtools.md
----------------------------------------------------------------------
diff --git a/_draft/v1.0/tools/devtools.md b/_draft/v1.0/tools/devtools.md
deleted file mode 100644
index ab7ddb3..0000000
--- a/_draft/v1.0/tools/devtools.md
+++ /dev/null
@@ -1,99 +0,0 @@
----
-title: Devtools
-type: tools
-order: 2
-has_chapter_content: true
-version: 0.10
----
-
-# Devtools
-
-**weex devtools**是专门为weex定制的一款实现了[**Chrome Debugging Protocol**](https://developer.chrome.com/devtools/docs/debugger-protocol)的inspect/debug工具,能够帮助你快速查看app运行状态和调试weex中的Javascript代码,当前支持**IOS**和**Android**两个平台。
-## 安装
-
-```
-$ npm install -g weex-toolkit
-```
-## 用法
-
- weex debug [options] [we_file|bundles_dir]
-
- 选项:
-
-```
--h, --help 显示帮助
--V, --verbose 显示debug服务器运行时的各种log
--v, --version 显示版本
--p, --port [port] 设置debug服务器端口号 默认为8088
--e, --entry [entry] debug一个目录时,这个参数指定整个目录的入口bundle文件,这个bundle文件的地址会显示在debug主页上(作为二维码)
--m, --mode [mode] 设置构建we文件的方式,transformer 最基础的风格适合单文件,loader:wepack风格 适合模块化的多文件.默认为transformer
-```
-#### 开启调试
-
-```
-$weex debug
-```
-
-单纯启动一个调试服务器,并同时唤起chrome浏览器打开`调试主页`.
-这个`调试主页`上会有一个二维码,使用Playground App扫这个二维码可以开启Playground调试.
-开启调试后,设备列表中会出现您的设备,根据提示进行后续的调试操作
-#### 调试 we文件
-
-```
-$weex debug your_weex.we
-```
-
-这个命令会将your_weex.we编译成bundlejs文件 部署到debug服务器
-并启动debug服务器如上述命令那样.打开的`调试主页`会多显示一个二维码,使用playground app
-扫这个码可以加载your_weex.we.(注意要先扫描开启调试的那个码)
-这个命令会自动检测your_weex.we文件变动,如果发现内容被修改则立即重新编译部署,并刷新debugger页面
-.
-#### 调试整个bundle/we文件夹
-
-```
-$weex debug your/we/path -e index.we
-```
-
-这个命令会编译你指定目录下的所有的we文件,并把编译好的bundlejs部署到debug服务器,他们的地址会映射到 http://lcoalhost:8088/weex/ 下
-比如 your/we/path/`index.we` 可以通过http://lcoalhost:8088/weex/index.js访问
-your/we/path/`demo/test.we` 可以通过http://lcoalhost:8088/weex/demo/index.js
-
--e参数可以指定一个入口的we文件,这个文件的地址会显示在`调试主页`上(作为二维码)
-## 特性
-### 连接设备
-
-
-### Inspector
-
- Inspector 能够用来查看 `Element` \ `NetWork` \ `Console log` \ `ScreenCast` \ `BoxModel` \ `Native View` 等。
-
-
-#### Element
-
-
-#### NetWork
-##### 查看网络请求的总耗时和延时
-
-
-##### 查看网络请求的header和response
-
-
-#### 控制台
-
-
-#### 资源
-
-
-### Debugger
-
- 调试器用来调试weex中的js代码,能够设置断点、查看调用栈。
-
-
-##### Breakpoint and CallStack
-
-
-#### 集成devtools
-- Android
- - 请参考文档 [Weex devtools (Android)](../advanced/integrate-devtools-to-android.html), 其中有详细说明。
-- IOS
- - 请参考文档 [Weex devtools (IOS)](../advanced/integrate-devtools-to-ios.html), 其中有详细说明。
http://git-wip-us.apache.org/repos/asf/incubator-weex-site/blob/12e3a8bc/_draft/v1.0/tools/index.md
----------------------------------------------------------------------
diff --git a/_draft/v1.0/tools/index.md b/_draft/v1.0/tools/index.md
deleted file mode 100644
index 06c424a..0000000
--- a/_draft/v1.0/tools/index.md
+++ /dev/null
@@ -1,96 +0,0 @@
----
-title: CLI (英)
-type: tools
-order: 1
-has_chapter_content: true
-version: 0.10
----
-
-# CLI
-
-Please access [npmjs.com](https://www.npmjs.com/package/weex-toolkit) for latest version
-
-Weex CLI tool set
-
-## Pre Install
-some dependencies need recent version of npm to install
-
-if your
-```
-$ npm --version
-```
-output less than `2.15.1`, please run below cmd to upgrade your npm at first
-```
-sudo npm install -g npm
-```
-
-## Install
-```
-$npm install -g weex-toolkit
-```
-
-## Usage
-
-```
-$weex foo/bar/input_path [options]
-
-$weex create file_name [options]
-
-Options:
- --qr display QR code for native runtime, **default action**
- -o,--output transform weex we file to JS Bundle, output path (single JS bundle file or dir)
- [for create sub cmd] it specified we file output path
- --watch using with -o, watch input path, auto run transform if change
- happen
- -s,--server start a http file server, weex .we file will be transformed to JS
- bundle on the server, specify local root path using the option
- --port http listening port number, default is 8081
- --wsport websocket listening port number, default is 8082
- -f, --force [for create sub cmd] force to replace exsisting file(s)
- --version show version of weex toolkit
- --help Show help
-```
-
-## Examples
-
-#### create a `we file`(weex source file) using standard template
-```
-$weex create hello-world-weex
-```
-a file named 'hello-world-weex.we' will be created in current directory
-
-
-#### transform a `we file` to JS Bundle
-```
-$weex your_best_weex.we -o .
-```
-`your_best_weex.we` will be transformed to JS Bundle file `your_best_weex.js` and saved in your current directory
-
-#### transform a `we file` to JS Bundle, watch this file,auto run transformer if any change happens.
-```
-$weex your_best_weex.we -o . --watch
-```
-
-#### transform every we file in a directory
-```
-$weex we/file/storage/path -o outputpath
-```
-every `we file` in `we/file/storage/path` will be transformed to JS Bundle and saved in `outputpath` path
-
-#### preview your we file using Weex Playground App
-download & install [weex playground App](http://alibaba.github.io/weex/download.html)
-```
-$weex your_best_weex.we --qr
-```
-a QR code will display in your terminal, using Playground App scan that.
-
-
-#### start http server
-```
-$weex -s .
-```
-a http server will start running, your current directory(.) will be the document root for the server, every weex.we file will be transformed to JS Bundle when accessed through the server
-
-## Issue & Feedback
-
-[Github Issue List](https://github.com/weexteam/weex-toolkit/issues)
http://git-wip-us.apache.org/repos/asf/incubator-weex-site/blob/12e3a8bc/_draft/v1.0/tools/playground.md
----------------------------------------------------------------------
diff --git a/_draft/v1.0/tools/playground.md b/_draft/v1.0/tools/playground.md
deleted file mode 100644
index dc7bbec..0000000
--- a/_draft/v1.0/tools/playground.md
+++ /dev/null
@@ -1,22 +0,0 @@
----
-title: Playground
-type: tools
-order: 4
-has_chapter_content: true
-version: 0.10
----
-
-Weex Playground App
-===================
-
-Weex 的最棒的一个部分是 Native Runtime。你的 `.we` 文件可以使用 weex-toolkit CLI 在浏览器中预览 Web 效果,也可以通过 Weex Playground App 这样一个单独的应用来预览原生效果。不仅如此,Weex playground App 还内置了大量的 Demo 和展示案例,这样你就可以更加容易地体验到 Weex 在 Native 层面的效果了。
-
-Playground App 的下载地址在 [这里](http://alibaba.github.io/weex/download.html)。
-
-截图:
-
-
-
-上图就是 Weex Playground App 的主界面,点击列表中的每一项即可进入某个 Demo 或者展示案例。用 Weex toolkit CLI 生成二维码,用 Weex Playground App 扫描二维码(点击右上角图标即可开始扫描)可以预览你的文件。
-
-请参阅 [起步教程](/get-started.md)。
http://git-wip-us.apache.org/repos/asf/incubator-weex-site/blob/12e3a8bc/_draft/v1.0/tools/transformer.md
----------------------------------------------------------------------
diff --git a/_draft/v1.0/tools/transformer.md b/_draft/v1.0/tools/transformer.md
deleted file mode 100644
index 47a7b4c..0000000
--- a/_draft/v1.0/tools/transformer.md
+++ /dev/null
@@ -1,38 +0,0 @@
----
-title: Transormer (英)
-type: tools
-order: 3
-has_chapter_content: true
-version: 0.10
----
-
-# gulp-weex
-
-> gulp plugin for weex transformer
-
-## Usage
-
-```javascript
-var gulp = require('gulp')
-var weex = require('gulp-weex')
-
-gulp.task('default', function () {
- return gulp.src('src/*.html')
- .pipe(weex({}))
- .pipe(gulp.dest('./dest'))
-})
-```
-
-## Options
-
-### oldFormat
-
-whether transform to old format.
-
-default: `false`.
-
-### isEntry
-
-whether is an entry module which has `bootstrap(...)`.
-
-default: `true`.
\ No newline at end of file
http://git-wip-us.apache.org/repos/asf/incubator-weex-site/blob/12e3a8bc/_draft/web-dev-experience.en.md
----------------------------------------------------------------------
diff --git a/_draft/web-dev-experience.en.md b/_draft/web-dev-experience.en.md
deleted file mode 100644
index 81d0ff2..0000000
--- a/_draft/web-dev-experience.en.md
+++ /dev/null
@@ -1,36 +0,0 @@
----
-title: Web Dev Experience
-type: guide
-order: 4.2
-version: 2.1
----
-
-# Web Dev Experience
-
-## What is Web Dev Experience?
-
-Weex dev experience is very close to web dev experience. It describes the UI structure and content with HTML or HTML-based template, describes the UI style with CSS, and describes user behavior and business logic with JavaScript. And it has completed project mechanism.
-
-## Why We Choose Web Dev Experience?
-
-1. There are a huge number of web developers in the community today. Weex can give more web developers abilities to build high-performance and great-experienced mobile apps.
-2. Web development itself has very high efficiency and flexibility. And Weex is committed to solve the dynamic requirement of mobile apps. They just match each other.
-3. Web standards and web dev experience is built by a lot of outstanding technology companies together. It has very high quality assurance.
-4. Standard itself is a force. Base on standards, respect for standards, close to the standard means that there are more possibilities.
-5. The eco-system and community of web today are very prosperous. There are many mature tools, libraries, systems, best practices to be used.
-
-## How Does Weex Support Web Standard?
-
-We have the following aspects to sort out:
-
-* HTML tags: Weex currently supports basic container (div), text, image, video and other components. And almost all of HTML block-level tags can be simulated through the custom container components. Inline-level tags can be simulated through the custom text components. And Weex also supports some form components such as input / textarea.
-* CSS: Weex supports some commonly used CSS properties, values and units. We will continue to support more based on user feedback and the usage frequency in web.
-* JavaScript: Weex currently offers a simplified version of the DOM APIs for operating the native UI. And Weex will continue to support more W3C Device APIs.
-* About frameworks, Weex officially build Vue 2.0 in. and support its related libs such as vuex, vue-router, etc. At the same time developers can directly use all kinds of third-party JavaScript libs.
-* About engineering, we recommend using npm to pack and manage deps. And we recommend webpack for the JS bundle package. Also we provide weex-devtool, which make developers debug native app just like in Chrome devtools. Weex also is friendly to current mainstream web page publishing system, caching mechanism and other best practices.
-
-**Links**
-
-* [Differences between Weex and web standard](../../references/web-standards.html)
-* [Using Vue.js](./using-vue.html)
-* [Using Devtools](./devtools.html)
http://git-wip-us.apache.org/repos/asf/incubator-weex-site/blob/12e3a8bc/_draft/web-dev-experience.md
----------------------------------------------------------------------
diff --git a/_draft/web-dev-experience.md b/_draft/web-dev-experience.md
deleted file mode 100644
index cb7ff24..0000000
--- a/_draft/web-dev-experience.md
+++ /dev/null
@@ -1,38 +0,0 @@
----
-title: Web 开发体验
-type: wiki
-order: 1.2
-version: 2.1
----
-
-# Web 开发体验
-
-## 什么是 Web 开发体验
-
-Weex 的开发体验和 web 的开发体验是非常接近的,它通过 HTML 或基于 HTML 模板来描述界面的结构和内容,通过 CSS 的方式描述界面的展现形式,用 JavaScript 来描述用户行为和业务逻辑。同时有完整的工程机制,如创建、开发、调试、部署。
-
-## 为什么选择 Web 开发体验
-
-我们选择基于 Web 开发体验有以下几方面原因:
-
-1. 今天在技术社区有大量的 web 开发者,Weex 可以赋能更多的 web 开发者构建高性能和高体验的移动应用。
-2. Web 开发本身具有非常强的高效率和灵活性,这和 Weex 想解决的移动端动态性问题不谋而合。
-3. Web 标准和开发体验是很多顶尖而优秀的科技公司共同讨论和建设的结果,本身的设计和理念都有极高的品质保障,同时 Weex 也希望可以借此机会努力为标准贡献一点自己的微薄之力。
-4. Web 是一种标准化的技术,标准本身就是一种力量,基于标准、尊重标准、贴近标准都意味着拥有更多的可能性。
-5. Web 今天的生态和社区是非常繁荣的,有很多成熟的工具、库、工程体系、最佳实践可以使用、引入和借鉴。
-
-## Weex 对 Web 标准的支持情况怎么样?
-
-我们从以下几个方面进行介绍和梳理:
-
-* HTML 标签:目前 Weex 支持了基本的容器 (div)、文本 (text)、图片 (image)、视频 (video) 等组件,HTML 中几乎所有的块级标签都可以通过容器组件进行自定义模拟,inline 的标签则可以通过文本组件进行自定义模拟,另外 Weex 还支持了 input/textarea 这样的表单型组件。
-* CSS:Weex 支持了部分常用的 CSS 属性、值类型和单位,并且会根据用户反馈和在 web 中的使用频度陆续支持更多。
-* JavaScript:目前 Weex 提供了一套简化版的 DOM APIs,用来操作原生界面,同时 Weex 在陆续支持更多的 W3C Device APIs。
-* 在框架方面,Weex 官方支持了 Vue 2.0,以及相关的 vuex, vue-router 等,同时开发者可以直接使用各种第三方 JavaScript 工具库。
-* 在工程方面,Weex 推荐 npm 包管理工具,也推荐用 webpack 进行 JS bundle 打包,并提供了 weex-devtool 开发工具,让开发者可以像调试 Chrome 一样调试 Weex 原生应用,同时 Weex 的页面发布系统、客户端缓存机制都尊重目前 Web 的最佳实践。
-
-**相关链接**
-
-* [Weex 和 web 标准的差异](../../references/web-standards.html)
-* [使用 Vue.js](./using-vue.html)
-* [使用 Devtools](./devtools.html)
[47/51] [abbrv] incubator-weex-site git commit: update file structure
and fix responsive styles
Posted by ha...@apache.org.
http://git-wip-us.apache.org/repos/asf/incubator-weex-site/blob/12e3a8bc/_draft/v-0.10/references/specs/js-bundle-format.md
----------------------------------------------------------------------
diff --git a/_draft/v-0.10/references/specs/js-bundle-format.md b/_draft/v-0.10/references/specs/js-bundle-format.md
deleted file mode 100644
index 0b103d9..0000000
--- a/_draft/v-0.10/references/specs/js-bundle-format.md
+++ /dev/null
@@ -1,307 +0,0 @@
----
-title: JS Bundle format
-type: references
-order: 4.1
-version: 0.10
----
-
-# JS Bundle format
-
-JS Bundle Version: v0.3.0
-
-## v0.5.0
-
-### Whole Syntax and Structure
-
-A JS Bundle is actually a JavaScript file which follows **ES5** standard. The code is used to define some custom components for the instance and bootstrap the instance with certain name, config and data. Developers could use all kinds of JS code packager like webpack, browserify, requirejs to organize your whole instance code.
-
-### Meta Info
-
-The JS Bundle Must begin with a comment line which is a JSON object like:
-
-```javascript
-// { "framework": "Weex", "version": "0.5.0" }
-```
-
-This JSON object as least contains:
-
-* property `framework` must be `"Weex"`
-* property `version` should be corresponded with the JS Bundle format version
-
-### Global Members
-
-* `__weex_define__(name, options)`
-* `__weex_bootstrap__(name, config, data)`
-* `__weex_document__`
-* `__weex_require__(name)`
-
-#### `__weex_define__(name:string, options: object)`
-
-Define a custom component named `name` for current instance with `options`.
-
-**example:**
-
-```javascript
-__weex_define__('rmb', {
- template: {
- type: 'div',
- style: {flexDirection: 'row'},
- children: [
- {type: 'text', attr: {value: '¥'}},
- {type: 'text', attr: {value: this.value}}
- ]
- },
- data: function () {
- return {
- value: '0'
- }
- },
- methods: {...}
-})
-```
-
-The enabled component options contains:
-
-* `template`: just the same as [v0.3.0](#details-of-template-option-definitions)
-* `style`: just the same as [v0.3.0](#details-of-style-option-definitions)
-* `data`: a function which return a plain object to observe by the ViewModel
-* `methods`: a function map to proxy to the ViewModel
-* `computed`: a map of several computed keys for the ViewModel
-* `init`, `created`, `ready`: lifecycle methods
-* `events`: event handlers for the ViewModel
-<!-- * `components`: a map for options of sub components the ViewModel needed (So `__weex_define__(name, options)` equals to run `this.components[name] = options` in each custom components when `init`) -->
-
-The enabled ViewModel APIs contains:
-
-* `$el(id): Element`: find element by id in current ViewModel scope
-* `$vm(id): ViewModel`: find sub ViewModel by id
-* `$getConfig(): object`: get instance config info
-* `$broadcast`/`$emit`/`$dispatch`/`$on`/`$off`: listen and fire component events
-* `$transition` *(experimental)*: animation transition (see more in [animation native module](../animation.html))
-
-#### `__weex_require__(name: string): object`
-
-Get a Weex native module with several native APIs.
-
-**example:**
-
-```javascript
-var modal = __weex_require__('modal')
-modal.toast({
- message: 'Hey!',
- duration: 2
-})
-```
-
-polyfill for v0.3.0
-
-```javascript
-function __weex_require__(name) {
- var result
- define('__weex_require__', function (r, e, m) {
- result = r('@weex-module/' + name)
- })
- return result
-}
-```
-
-#### `__weex_bootstrap__(nameOrOptions: string|object, config: object?, data: object?): AppInstance | Error`
-
-Start to render by a certain component name or a direct component options as the root element, and some instance `config` and instance `data`. If everything fine, it will returns the root app instance. Otherwise it will return an `Error` instance which describes something wrong.
-
-**example:**
-
-```javascript
-__weex_bootstrap__(
- 'root',
- {
- // format 1:
- // downgrade: { appVersion: '>= 0.5.0' },
- // format 2:
- // downgrade: function (config) { return true }
- },
- {
- // external data
- // value: '12345'
- }
-)
-```
-
-The instance `config` now only support `downgrade` property which allows two format:
-
-1. an object like `{ osVersion, appVersion, weexVersion, deviceModel }`
-2. a function like `function (config) { return true }` to return a boolean value. `true` means normal and `false` means downgrade.
-
-The instance `data` will merge to root component data. So the root component is also easy to reuse and the instance data is easy to customize.
-
-#### `__weex_document__`
-
-An virtual-DOM `Document` instance. Also the host of [virtual-DOM APIs](./virtual-dom-apis.html). Every Weex instance has and must have just one `Document` instance.
-
-### Preserved Global Variables
-
-`define`, `bootstrap`, `module`, `exports`, `document`, `require`, `register`, `render`
-
-### A whole example
-
-```javascript
-// { "framework": "Weex", "version": "0.5.0" }
-
-var modal = __weex_require__('modal')
-
-__weex_define__('item', {
- template: {
- type: 'div',
- style: { flexDirection: 'row' },
- event: {
- click: function (e) {
- this.update(e)
- }
- },
- children: [
- { type: 'image', attr: { src: this.imageUrl }, ...},
- { type: 'text', attr: { value: this.title }, ...}
- ]
- },
- data: function () {
- return {
- imageUrl: '',
- title: ''
- }
- },
- methods: {
- update: function (e) {
- modal.toast({ message: this.title })
- }
- }
-})
-
-__weex_define__('app', {
- template: {
- type: 'div',
- children: [
- {
- type: 'item',
- repeat: {
- expression: function () {
- return this.list
- },
- key: '$index',
- value: '$value'}
- },
- attr: {
- imageUrl: function () {
- return this.$value.imageUrl
- },
- title: function () {
- return this.$value.title
- }
- }
- }
- ]
- },
- data: function () {
- return {
- list: [
- { imageUrl: 'xxx', title: '111' },
- { imageUrl: 'yyy', title: '222' },
- { imageUrl: 'zzz', title: '333' }
- ]
- }
- }
-})
-
-__weex_bootstrap__('app')
-```
-
-## v0.3.0
-
-### Whole Syntax and Structure
-
-A JS Bundle is actually a JavaScript file which follows **ES5** standard. The code is organized by several modules with AMD-like format:
-
-```javascript
-define('moduleName1', function (require, exports, module) {
- // content of module1
-})
-
-define('moduleName2', function (require, exports, module) {
- // content of module2
-})
-
-...
-```
-
-A whole Weex JS Bundle is concatenated by these modules and last a `bootstrap(rootComponentName, optionalConfig, optionalExternalData)` function call.
-
-```javascript
-define('@weex-component/a', function (require, exports, module) {
- // content of composed component <a>
-})
-
-define('@weex-component/b', function (require, exports, module) {
- // content of composed component <b>
-})
-
-bootstrap('@weex-component/b')
-```
-
-As the sample above, the component name should be hyphenated (a-z, 0-9, "-"). Other characters are not allowed.
-
-And, the method call `bootstrap()` allows 1~3 parameters: root module name (String), config info (optional JSON) and external data (optional JSON).
-
-### Content of Composed Components
-
-A module of composed component contains 3 parts: whole options definition, additional template option definition and additional style option definition.
-
-- whole options is a piece of JavaScript code to put component options (except `template` option and `style` option) into `module.exports`
-- `template` option is a piece of JSON-like object assigned to `module.exports.template` which describes the display structure of this component
-- `style` option is a piece of JSON object assigned to `module.exports.style` which describes the reusable styles in this component
-
-The `template` option is required and appeared only once, and the `style` option and whole options definition are optional.
-
-These options are defined and transformed by Transformer. Actually you can also ignore all the format limitation and write options to `module.exports` as the same result if you are not going to use Transformer. But that's not recommended.
-
-#### Details of template option definitions
-
-A piece of multi-level embedded JSON-like object which describes the view structure.
-
-Every level JSON-like object has these members below:
-
-* `type`: a required string, component name/type
-* `component`: an optional boolean, whether this component is composed or native
-* `attr`: an optional k-v pairs which contains all attributes of an element, the value could be a string, number, boolean or a function that bind some data value
-* `style`: an optional k-v pairs which contains all styles of an element, just the same format as the `attr`
-* `classList`: an optional array of strings which contains class names for styling.
-* `events`: an optional k-v pairs whose keys are event type and values are corresponding method names
-* `children`: an optional array of child components info
-* `append`: an optional string which determines a compiling workflow strategy: append node-by-node singly or a whole node tree just one time. the default value is `node` and another supported value is `tree`.
-* `shown`: a optional function which returns a boolean value to determine whether this component should be displayed
-* `repeat`: a optional function which returns a list data to displays components with each
-
-**Corresponding Keys to Weex Transformer:**
-
-- tag `name` in Weex file corresponds to `type`
-- attr `if` in Weex file corresponds to `shown`
-- attr `repeat` in Weex file corresponds to `repeat`
-- attr `append` in Weex file corresponds to `append`
-- attr `style` in Weex file with CSS syntax corresponds to `style`
-- attr `class` in Weex file with class names separated by blanks corresponds to `classList`
-- attr `on***` in Weex file with prefix `on` corresponds to a k-v pair in `events`
-- other attributes in Weex file corresponds to `attr`
-- Child nodes in Weex file corresponds to `children`
-
-All tag names, attr names are case-insensitive and transformed to lower-cased. But the attr values are case-sensitive.
-
-#### Details of style option definitions
-
-Just a two-levels JSON object.
-
-* The first levels are class names.
-* The second levels are k-v pairs which describes style names & properties for each class name.
-
-**Corresponding Keys to Weex Transformer:**
-
-* class name corresponds to first level keys
-* prop name corresponds to second level keys
-* prop value corresponds to second level values
http://git-wip-us.apache.org/repos/asf/incubator-weex-site/blob/12e3a8bc/_draft/v-0.10/references/specs/js-framework-apis.md
----------------------------------------------------------------------
diff --git a/_draft/v-0.10/references/specs/js-framework-apis.md b/_draft/v-0.10/references/specs/js-framework-apis.md
deleted file mode 100644
index e1412c6..0000000
--- a/_draft/v-0.10/references/specs/js-framework-apis.md
+++ /dev/null
@@ -1,191 +0,0 @@
----
-title: JS Framework APIs
-type: references
-order: 4.2
-version: 0.10
----
-
-# JS Framework APIs
-<span class="weex-version">0.4</span>
-
-## Intro about JS Runtime
-
-These APIs are designed for JS Framework and Native Engine working together.
-
-Considering the limitation of mobile phone resource, *Weex runs only one JS runtime* to handle all Weex instances. So it need a multi-instance management layer in JavaScript. These JS Framework APIs are just designed to do the management job.
-
-* First, each Weex instance have a lifecycle, from `createInstance` to `destroyInstance`. During this period, we can import some extra data by `refreshInstance`.
-* To communicate with Native Engine, we have a couple of APIs: `sendTasks` and `receiveTasks`. They are used to call each other by some commands and messages.
-* And when JS runtime start at the beginning of the app launching, we need something initialized and configured. So we supply some APIs like `registerComponents`, `registerModules`.
-* The last API is just for debugging, we supply an API named `getRoot` to return the whole virtual-DOM data for developers.
-* If any of these API calls failed, an `Error` object should be returned.
-
-## Called by native and supplied from JS Framework
-
-### `createInstance(instanceId, code, options, data)`
-
-Create a Weex instance from Native Engine
-
-* `instanceId`: The unique id for a Weex instance, generated by Native Engine.
-* `code`: The JS bundle code send from Native Engine. It will be executed by `new Function(code)` in JS Framework. The code format depends on [JS Bundle Foramt](./js-bundle-format.html)
-* `options`: *Optional*. An options object. *Currently it supports `debug` flag which enable printing log and `bundleUrl` flag which the url of bundle.*
-* `data`: *Optional*. It's an chance to supply external data instead of the original data in JS bundle.
-
-Example:
-
-```javascript
-createInstance('x', 'define(...); define(...); define(...); bootstrap(...)')
-createInstance('x', '...', { bundleUrl, debug, ... }, { a: 1, b: 2 }})
-```
-
-### `destroyInstance(instanceId)`
-
-Destroy an existed Weex instance by id from Native Engine
-
-### `refreshInstance(instanceId, data)`
-
-Refresh data to an existed Weex instance with certain external data from Native Engine
-
-Example:
-
-```javascript
-refreshInstance('x', {a: 100, b: 200})
-```
-
-### `registerComponents(components)`
-
-Register all native components
-
-* `components`: A array of whose items are component options that are force part to use. *Currently it supports `append` attribute which forces the appending mechanism (`tree` or `node`) when first time rendering.*
-
-Example:
-
-```javascript
-registerComponents([
- { type: 'container' },
- { type: 'text' },
- { type: 'image' },
- { type: 'slider', append: 'tree' },
- { type: 'list' },
- { type: 'cell', append: 'tree' },
- ...
-])
-```
-
-### `registerModules(modules)`
-
-Register the name, methods and args format of each module
-
-* `modules`: A map that collects all native module definitions. Each module definition is an array which has several API definitions. Each API definition has a `name` string and an `args` array which contains a list of each parameter's type.
-
-**NOTE: the `node` type data will actually return its `ref` property. And the `function` type data will actually return a unique function id referring to it.**
-
-Example:
-
-```javascript
-registerModules({
- event: [
- {name: 'openURL', args: ['string']}
- ],
- ...
-})
-```
-
-### `receiveTasks(instanceId, tasks)`
-
-Fire events or callbacks to an existed Weex instance from Native Engine
-
-* `tasks[]`: A task list. Each task has a `method="fireEvent|callback"` property and a list of `args`.
- - In `fireEvent` method, the `args` is `ref` of the target, event `type`, event `data` and `domChanges` description in order. **Note: if some event make virtual-DOM data changed (e.g. value changed in `<input>` or current index changed in `<slider>`), the changing of the target element will be passed as `domChanges`.**
- - In `callback` method, the `args` is `funcId` of a handler, `data` and `ifKeepAlive` which describes whether this callback handler should be keeping called. (Each callback handler is matched with a `funcId` when the original call happens.)
-
-Example:
-
-```javascript
-receiveTasks('x', [{method: 'fireEvent', args: ['x', '13', 'click', {a: 100, b: 200}]}])
-receiveTasks('x', [{method: 'callback', args: ['x', '7', {a: 100, b: 200}, true]}])
-```
-
-### `getRoot(instanceId)`
-
-Return a JSON object which describes the whole virtual DOM body of an existed Weex instance, which designed for debugging
-
-Example:
-
-```javascript
-getRoot('x')
-// {ref: '_root', type: 'container', attr: {...}, style: {...}, children: [...]}
-```
-
-## Called from JavaScript and implemented with native code
-
-### `sendTasks(instanceId, tasks)`
-
-Make native calls from JS Framework
-
-* `tasks[]`: A task list. Each task has a `module` name, a `method` name, and a `args[]` list.
-
-Example:
-
-```javascript
-sendTasks('x', [
- {module: 'dom', method: 'addElement', args: ['_root', {ref: '1', type: 'container'}, -1]},
- {module: 'dom', method: 'addElement', args: ['1', {ref: '2', type: 'text', ...}, -1]},
- {module: 'dom', method: 'addElement', args: ['1', {ref: '3', type: 'image', ...}, -1]},
- ...
-])
-```
-
-## Supporting other JS Framework <sup>(experimental)</sup>
-
-### Register a new JS Framework
-
-```javascript
-// lib/frameworks/index.js
-
-import Vue from '...'
-import React from '...'
-import Angular from '...'
-
-export const frameworks = {
- Vue,
- React,
- Angular
-}
-```
-
-### Expose JS Framework APIs
-
-```javascript
-// 3rd-party-framework.js
-
-export function createInstance (id, code, config, data) { ... }
-export function destroyInstance (id) { ... }
-export function refreshInstance (id, data) { ... }
-export function registerComponents (components) { ... }
-export function registerModules (modules) { ... }
-export function recieveTasks (id, tasks) { ... }
-export function getRoot (id) { ... }
-```
-
-The virtual-DOM tasks should follow [virtual-DOM spec](./virtual-dom-apis.html).
-
-### Framework Helper
-
-You can import `lib/runtime/helper.js` to get two important things:
-
-* `Document` class, see [virtual-DOM spec](./virtual-dom-apis.html) for more.
-* `sendTasks` method.
-
-### JS Bundle format
-
-You must ensure the JS Bundle has its first line of code like this:
-
-```javascript
-// { "framework": "Vue" }
-...
-```
-
-to allow JS Runtime to detect which JS Framework it should be opened by.
-
-If no valid annotation found. The JS Bundle will be opened by default JS Framework of Weex.
http://git-wip-us.apache.org/repos/asf/incubator-weex-site/blob/12e3a8bc/_draft/v-0.10/references/specs/virtual-dom-apis.md
----------------------------------------------------------------------
diff --git a/_draft/v-0.10/references/specs/virtual-dom-apis.md b/_draft/v-0.10/references/specs/virtual-dom-apis.md
deleted file mode 100644
index 566de1a..0000000
--- a/_draft/v-0.10/references/specs/virtual-dom-apis.md
+++ /dev/null
@@ -1,147 +0,0 @@
----
-title: Virtual DOM APIs
-type: references
-order: 4.3
-version: 0.10
----
-
-# Virtual DOM APIs
-<span class="weex-version">0.4</span>
-
-## `Document`
-
-Each instance has a corresponding document with the instance id. A document has many nodes which compose a node tree.
-
-### Constructor
-
-##### `new Document(id: string, url: string?)`
-
-### Members
-
-##### `createElement(tagName: string, props: Object?): Element`
-
-Create a certain type `Element`. And the `props` may contain `attr` object and `style` object. e.g. `createBody('div', {style: {backgroundColor: '#ffffff'}})`
-
-##### `createComment(text: string): Comment`
-
-Create a `Comment` with a certain comment text.
-
-##### `open()`
-
-Set a flag which means init rendering start, so each dom update will be called immediately
-
-##### `close()`
-
-Set a flag which means init rendering finished, so the dom updates later will be batched in each task.
-
-##### `fireEvent(el: Element, type: string, e: Object?, domChanges: Object?)`
-
-Fire an certain type of event on a certain element with an event object. When the event leads to some dom changes, the fourth parameter will describe the change just like `props` parameter in `createElement` method.
-
-#### Read-only & Getters
-
-##### `id: string`
-
-##### `URL: string?`
-
-##### `body: Element`
-
-body element
-
-##### `documentElement: Element`
-
-document element
-
-##### `getRef(ref: string): Node?`
-
-Get node by `ref` from the internal node map
-
-**Note**: the `documentElement` will be generated automatically when a document created, and the `body` should to be created manually and appended to `documentElement` to work. The `type` of a `body` must be one of `div`, `list` or `scroller`.
-
-## `Node`
-
-### Constructor
-
-##### `new Node()`
-
-### Members
-
-##### `destroy()`
-
-#### Read-only & Getters
-
-##### `ref: string`
-
-##### `nextSibling: Node?`
-
-##### `previousSibling: Node?`
-
-##### `parentNode: Node?`
-
-## `Element` extends `Node`
-
-### Constructor
-
-##### `new Element(type: string, props: Object?, ownerDocument: Document)`
-
-Create an element and the `props` may contain `attr` object and `style` object.
-
-### Members
-
-#### DOM Tree
-
-##### `appendChild(node: Node)`
-
-##### `insertBefore(node: Node, before: Node?)`
-
-##### `insertAfter(node: Node, after: Node?)`
-
-##### `removeChild(node: Node, preserved: boolean?)`
-
-Removes a child. The parameter `preserved` means whether destroy the removed node immediately or preserve it.
-
-##### `clear()`
-
-#### DOM props
-
-##### `setAttr(key: string, value: string, silent: boolean?)`
-
-If `silent` is true, it won't cause native calls. Used for handling event with virtual-DOM changes.
-
-##### `setStyle(key: string, value: string, silent: boolean?)`
-
-The `silent` parameter is just same as `setAttr` method.
-
-##### `setClassStyle(classStyle: Object)`
-
-The specificity of class style is lower than normal style. In another way the normal style will override the same name value in class style.
-
-##### `addEvent(type: string, handler: Function)`
-
-##### `removeEvent(type: string)`
-
-##### `fireEvent(type: string, e: any)`
-
-#### Read-only & Getters
-
-##### `toJSON(): Object`
-
-Format of `{ref: string, type: string, attr: Object, style: Object, event: Array(string), children: Array}`
-
-## `Comment` extends `Node`
-
-`Comment` won't be passed to the rendering engine. So it's very useful as a assistant placeholder sometimes.
-
-### Constructor
-
-##### `new Comment(value: string)`
-
-### Members
-
-#### Read-only & Getters
-
-##### `type: string`
-
-Returns `'comment'`
-
-##### `value: string`
http://git-wip-us.apache.org/repos/asf/incubator-weex-site/blob/12e3a8bc/_draft/v-0.10/references/text-style.md
----------------------------------------------------------------------
diff --git a/_draft/v-0.10/references/text-style.md b/_draft/v-0.10/references/text-style.md
deleted file mode 100644
index 6b9ee4f..0000000
--- a/_draft/v-0.10/references/text-style.md
+++ /dev/null
@@ -1,43 +0,0 @@
----
-title: Text Style
-type: references
-version: 0.10
-order: 1.8
----
-
-# Text Style
-<span class="weex-version">0.5</span>
-
-Text alike components share some common style rules. The text alike components currently includes [`text`](./components/text.html) and [`input`](./components/input.html).
-
-## Properties
-
-- `color`: <colors> this property set the foreground color of an component's text content.
-- `font-size`: <length> this property specifies the size of the font.
-- `font-style`: <enum> `normal` | `italic`. This property lets you select italic or normal faces within a font-family. Default value is `normal`.
-- `font-weight`: <enum> `normal` | `bold`. This property specifies the boldness of the font. Default value is `normal`.
-- `text-decoration`: <enum> `none` | `underline` | `line-through`. This property is used to set the text formatting to underline or line-through. The default value is `none`.
-- `text-align`: <enum> `left` | `center` | `right`. This property describes how inline content like text is aligned in its parent component. The default value is `left`.
-- `font-family`:<string> this property set the font-family of the text. This property **doesn't guarantee** the given font will always be set to the text. If the specified font cannot be found at the device, a typeface fallback will occur and the default typeface will be load. The fallback mechanism may vary in different devices.
-- `text-overflow`:<string> `clip` | `ellipsis`. This property determines how overflowed content that is not displayed is signaled to users. It can be clipped, display an ellipsis.
-
-The property `color` support multiple fomats of values, contains rgb, rgba, #fff, #ffffff, named-color.
-
-Example:
-
-```css
-.my-class { color: red; }
-.my-class { color: #f00; }
-.my-class { color: #ff0000; }
-.my-class { color: rgb(255, 0, 0); }
-.my-class { color: rgba(255, 0, 0, 0.5); }
-```
-
-## Type of Style Value
-
-- length: number followed by length unit `px`, `px` can be omitted.
-- colors: support multiple formats of values, including rgb (`rgb(255, 0, 0)`), rgba (`rgba(255, 0, 0, 0.5)`), hexadecimal (`#ff0000`), short hexadecimal (`#f00`), named color (`red`).
-- enumerated values: a limited number of string values.
-
-**Note:** [The list of color keywords.](./color-names.html)
-
http://git-wip-us.apache.org/repos/asf/incubator-weex-site/blob/12e3a8bc/_draft/v-0.10/tools/devtools-android.md
----------------------------------------------------------------------
diff --git a/_draft/v-0.10/tools/devtools-android.md b/_draft/v-0.10/tools/devtools-android.md
deleted file mode 100644
index 9ce8991..0000000
--- a/_draft/v-0.10/tools/devtools-android.md
+++ /dev/null
@@ -1,123 +0,0 @@
----
-title: Devtools for Android
-type: tools
-order: 2.1
-version: 0.10
----
-
-# Devtools for Android
-
-[](https://github.com/weexteam/weex_devtools_android/releases) [](https://www.codacy.com/app/weex_devtools/weex_devtools_android?utm_source=github.com&utm_medium=referral&utm_content=weexteam/weex_devtools_android&utm_campaign=Badge_Grade) [](https://codeclimate.com/github/weexteam/weex_devtools_android) [](https://codeclimate.com/github/weexteam/weex_devtools_android) [](https://github.com/weexteam/weex_devtools_android/issues) [  ](https://bintray.com/alibabaweex/maven/weex_inspector/_latestVersion)
-
-Weex devtools is a custom devtools for weex that implements [Chrome Debugging Protocol](https://developer.chrome.com/devtools/docs/debugger-protocol) inspired by [Stetho](https://github.com/facebook/stetho), it is designed to help you quickly inspect your app and debug your JS bundle source in a chrome web page.At present The devtools consist of two part : `Inspector` and `Debugger`. If you want it work well, you must install a `weex-devtool` as debug server.
-
-- **Inspector**
- Inspector can be used to show your `Element` \ `NetWork` \ `Console log` \ `ScreenCast` \ `BoxModel` \ `Native View` and so on.
-
-- **Debugger**
- Debugger can be used to debug your bundle js source, you can set `Breakpoint` \ watch `CallStack`.
-
-## Install and launch devtools server
-Open your terminal then type `npm install -g weex-toolkit` and run.Launch it just type and run the command `weex debug`, then a Chrome web page will be opened.
-
-## Use on an android device or emulator
-
-### Taste of first debug with playground
-If you are a green hand to the debug of weex, we recommend you to try your first debug with `playground`, what you need to do is just launch the playground and scan the QR code shown in the debug page which wound opened if the `devtools server` have been launched. after you scan the QR code, the web page will list your connected devices.
-
- devices")
-
-#### How Debugger Works
-Devtools expands [Chrome Debugging Protocol](https://developer.chrome.com/devtools/docs/debugger-protocol) and the mechanism of communication between client and debug sever is based on [JSON-RPC](https://en.wikipedia.org/wiki/JSON-RPC).
-
-##### Devtools Client
-Devtools Client is integrated in App as aar, it connects to debug server through webscoket protocol with out permission check. I recommend you just packaged it in your debug version consider of the security mechanism.
-
-##### Devtools Debug Server
-Devtools Debug Server is the center node of the communication, it connects to both app and chrome, acts as the turn server of debugging protocol messages and the manager of the js runtime.
-
-##### Chrome FrontEnd
-Chrome's V8 engine acts as the javascript runtime, when debug mode is enabled, all the js code run on it. On the other side we also reuse most of the Chrome's debugging user interface, such as set breakpoint, see call stack and so on.
-
-
-
-### Enable devtools in your own app
-Of course you can reuse the code of playground to build your own app, that is the simplest way to let your app's js code debuggable. On the other hand QR code is not necessary, if your review the source code you can draw a conclusion that QR CODE is just a way to set `devtools server` address. following those steps you can do the same thing.
-
-#### Gradle dependency on inspector.
-There are two choices to set the dependency, the Choice A is recommanded if you have no change to weex_sdk or inspector, while if you use your own custom weex_sdk or inspector Choice B is suitable.
-
- * *A - aar dependency from jcenter*.
- ````
- dependencies {
- compile 'com.taobao.android:weex_inspector:0.0.8.1'
- }
- ````
-I strongly recommend you use the latest version since both weex sdk and devtools are developed iteratively and rapidly. See the release version list [here](https://github.com/weexteam/weex_devtools_android/releases). All the release version will publish to the [jcenter repo](https://bintray.com/alibabaweex/maven/weex_inspector).
-
- * *B - source code dependency.*
-
- you need to copy the dir of inspector to the same dir of your app and add `include ":inspector"`in your project's `settings.gradle` file just like playground have done, then add dependency in your app's `build.gralde`.
- ````
- dependencies {
- compile project(':inspector')
- }
- ````
-
-##### Version compatibility
-
-| weex sdk | weex inspector | debug server |
-|----------|----------------|--------------|
-|0.8.0.1+ | 0.0.8.1 |0.2.39+ |
-|0.7.0+ | 0.0.7.13 |0.2.38 |
-|0.6.0+ | 0.0.2.2 | |
-
-
-#### Initialize in your XXXApplication file.
-````
- public class MyApplication extends Application {
- public void onCreate() {
- super.onCreate();
- initDebugEnvironment(true, "xxx.xxx.xxx.xxx"/*"DEBUG_SERVER_HOST"*/);
- }
- private void initDebugEnvironment(boolean enable, String host) {
- WXEnvironment.sRemoteDebugMode = enable;
- WXEnvironment.sRemoteDebugProxyUrl = "ws://" + host + ":8088/debugProxy/native";
- }
-}
-````
-
-#### Ship It!
- 1. You must launch your bundle server firstly. In your weex dir, run command "./start";
- 2. Launch your remote debug server. Run command `weex debug`, chrome will open a web page show a simply guidance and QR code;
- 3. Launch your app and make sure debug mode was enabled. You will see a device list in the chrome web page opened by last step, each device item have two button, `Debugger` and `Inspector`;There are two way to enable debug mode:
- * scaning the QR code and handle the content just like the playground have done.
- * init it in the XXXApplication by calling `initDebugEnvironment(true, "xxx.xxx.xxx.xxx")`, if you call `initDebugEnvironment(true, "xxx.xxx.xxx.xxx")` after weex sdk inited, you need to call `WXSDKEngine.reload()` to refresh the runtime.
- 4. Once you click the button `Inspector` chrome will open a page show the inspector view, on the other side, click the button `Debugger` chrome will open a new page to show the debug view;
-
-
-
-
-
----
-
-#### OPTIONS
-
-##### [**OPTION**] *set your remote bundle server ip.*
-
- For example, in the playground it is in the `IndexActivity.java`, you need to change the value of `DEFAULT_IP` in IndexActivity.java from `"your_current_IP"` to a server ip like `"30.30.30.150"`:
-````
- private static final String DEFAULT_IP = "30.30.30.150"; // "your_current_IP";
-````
-
-##### [**OPTION**] *enable network inspection.*
-````
-OkHttpClient client = new OkHttpClient();
-client.networkInterceptors().add(new OkHttpInterceptor());
-````
-
-###### Notice
- The network inspection only support OKHttpClient right now!!! If you want to use the network inspection to catch your bundle request, you must change your bundle server ip to the real server ip.
-
-#### Known Issues
- You can report issues and bugs [here](https://github.com/weexteam/weex_devtools_android/issues). We will reply as soon as possible.
http://git-wip-us.apache.org/repos/asf/incubator-weex-site/blob/12e3a8bc/_draft/v-0.10/tools/devtools-ios.md
----------------------------------------------------------------------
diff --git a/_draft/v-0.10/tools/devtools-ios.md b/_draft/v-0.10/tools/devtools-ios.md
deleted file mode 100644
index 602f63d..0000000
--- a/_draft/v-0.10/tools/devtools-ios.md
+++ /dev/null
@@ -1,76 +0,0 @@
----
-title: Devtools for IOS
-type: tools
-order: 2.2
-version: 0.10
----
-
-# Devtools for IOS
-
-Remote debug for your native iOS app using Chrome Developer Tools
-
-## weex-devtool launch:
-
-0. install and run weex-devtool
-
- $:npm install -g weex-devtool
-
- $:weex-devtool
-
- it will launch chrome browser, showing wss ip address in chrome address bar.
-
-
-## playground install WXDevtool
-
-1. Install dependencies.
-
- $:pod install
-
-### Usage
-
-1. AppDelegate.m header file
-
- #import "WXDevTool.h"
-
-2. Initialize inspector when the APP launched
-
- **Note: The inspector API must be called before weex is initialized**
-
- + (void)setDebug:(BOOL)isDebug;
-
- isDebug default is NO, now you open inspect model. opposite is YES, if you set isDebug to YES, then open debug model and inspect model.
-
- + (void)launchDevToolDebugWithUrl:(NSString *)url;
- wssip was the wss address showing in the chrome address bar.
-
- * open debug model and inspector model
-
- eg:- (BOOL)application:(UIApplication *)application didFinishLaunchingWithOptions:(NSDictionary *)launchOptions
- {
- [WXDevTool setDebug:YES];
- [WXDevTool launchDevToolDebugWithUrl:@"ws://wssip/debugProxy/native"];
- }
-
- * open inspect model, remove the @selector(setDebug:) or add [WXDevTool setDebug:NO]
-
- eg:- (BOOL)application:(UIApplication *)application didFinishLaunchingWithOptions:(NSDictionary *)launchOptions
- {
- [WXDevTool launchDevToolDebugWithUrl:@"ws://wssip/debugProxy/native"];
- }
-
-
-3. Build and running APP, this time chrome will display your device with App name, select inspector to open the inspector tab.
-4. Log print support for different levels of print.
-
- eg: #import "WXDevTool.h"
- PDLogE()/PDLogW()
-
-### WXDevtool Dependencies
-
-Your app must be linked against the following frameworks/dylibs
-
-* libicucore.dylib
-* CFNetwork.framework
-* CoreData.framework
-* Security.framework
-* Foundation.framework
http://git-wip-us.apache.org/repos/asf/incubator-weex-site/blob/12e3a8bc/_draft/v-0.10/tools/devtools.md
----------------------------------------------------------------------
diff --git a/_draft/v-0.10/tools/devtools.md b/_draft/v-0.10/tools/devtools.md
deleted file mode 100644
index f883055..0000000
--- a/_draft/v-0.10/tools/devtools.md
+++ /dev/null
@@ -1,102 +0,0 @@
----
-title: Devtools
-type: tools
-order: 2
-has_chapter_content: true
-version: 0.10
----
-
-# Devtools
-
-Weex devtools is a custom devtools for weex that implements [Chrome Debugging Protocol](https://developer.chrome.com/devtools/docs/debugger-protocol), it is designed to help you quickly inspect your app and debug your JS bundle source in a chrome web page, both Android and IOS platform are supported.
-
-## Install
-
-```
- $ npm install -g weex-toolkit
-```
-#### usage
-```
-weex debug [options] [we_file|bundles_dir]
-
- Options:
-
- -h, --help output usage information
- -V, --verbose display logs of debugger server
- -v, --version display version
- -p, --port [port] set debugger server port
- -e, --entry [entry] set the entry bundlejs path when you specific the bundle server root path
- -m, --mode [mode] set build mode [transformer|loader]
- -w, --watch watch we file changes auto build them and refresh debugger page![default enabled]
-```
-
-#### start debugger
-```
-$weex debug
-```
-this command will start debug server and launch a chrome opening `DeviceList` page.
-this page will display a qrcode ,you can use `Playground App` scan it for starting debug.
-
-#### start debugger with a we file
-```
-$weex debug your_weex.we
-```
-this command will compile `your_weex.we` to `your_weex.js` and start the debug server as upon command.
-`your_weex.js` will deploy on the server and displayed in `DeviceList` page as another qrcode contain the url of your_weex.js
-
-
-#### start debugger with a directory of we files
-```
-$weex debug your/we/path -e index.we
-```
-this command will build every file in your/we/path and deploy them on the bundle server. your directory will mapping to http://localhost:port/weex/
-use -e to set the entry of these bundles. and the url of "index.we" will display on device list page as another qrcode.
-
-## Features
-
-### Connect devices
- devices")
-
-### Inspector
- Inspector can be used to show your `Element` \ `Network` \ `Console log` \ `ScreenCast` \ `BoxModel` \ `Native View` and so on.
-
-
-
-#### Element
-##### native view element
-
-
-##### weex dom element
-
-
-#### Network
-
-##### show the total time and latency
-
-
-##### show the header and response
-
-
-#### Console
-
-
-#### Resource
-
-
-### Debugger
-
- Debugger can be used to debug your bundle js source, you can set `Breakpoint` \ watch `CallStack`.
-
-
-
-#### Breakpoint and CallStack
-
-
-
-## Integrate devtools
-
-* Android
- * See the doc [Weex devtools (Android)](/tools/devtools-android.html), it will lead you to config and use it step by step.
-* IOS
- * See the doc [Weex devtools (IOS)](/tools/devtools-ios.html), it will lead you to config and use it step by step.
-
http://git-wip-us.apache.org/repos/asf/incubator-weex-site/blob/12e3a8bc/_draft/v-0.10/tools/index.md
----------------------------------------------------------------------
diff --git a/_draft/v-0.10/tools/index.md b/_draft/v-0.10/tools/index.md
deleted file mode 100644
index 731c2f9..0000000
--- a/_draft/v-0.10/tools/index.md
+++ /dev/null
@@ -1,97 +0,0 @@
----
-title: CLI
-type: tools
-order: 1
-has_chapter_content: true
-version: 0.10
----
-
-# Weex-Toolkit
-
-Please access [npmjs.com](https://www.npmjs.com/package/weex-toolkit) for latest version
-
-Weex CLI tool set
-
-## Pre Install
-some dependencies need recent version of npm to install
-
-if your
-```
-$ npm --version
-```
-output less then `2.15.1`, please run below cmd upgrade your npm at first
-```
-sudo npm install -g npm
-```
-
-## Install
-```
-$npm install -g weex-toolkit
-```
-
-## Usage
-
-```
-$weex foo/bar/input_path [options]
-
-$weex create file_name [options]
-
-Options:
- --qr display QR code for native runtime, **default action**
- -o,--output transform weex we file to JS Bundle, output path (single JS bundle file or dir)
- [for create sub cmd] it specified we file output path
- --watch using with -o , watch input path , auto run transform if change
- happen
- -s,--server start a http file server, weex .we file will be transforme to JS
- bundle on the server , specify local root path using the option
- --port http listening port number ,default is 8081
- --wsport websocket listening port number ,default is 8082
- -f, --force [for create sub cmd] force to replace exsisting file(s)
- --version show version of weex toolkit
- --help Show help
-```
-
-## Examples
-
-#### crate a `we file`(weex source file) using standard template
-```
-$weex create hello-world-weex
-```
-a file named 'hello-world-weex.we' we be created in current directory
-
-
-#### transform a `we file` to JS Bundle
-```
-$weex your_best_weex.we -o .
-```
-`your_best_weex.we` will be transform to JS Bundle file `your_best_weex.js` , saved in your current directory
-
-#### transform a `we file` to JS Bundle , watch this file ,auto run transformer if change happen.
-```
-$weex your_best_weex.we -o . --watch
-```
-
-#### transform every we file in a directory
-```
-$weex we/file/storage/path -o outputpath
-```
-every `we file` in `we/file/storage/path` we be transform to JS Bundle , saved in `outputpath` path
-
-#### preview your we file using Weex Playground App
-download & install [weex playground App](http://alibaba.github.io/weex/download.html)
-```
-$weex your_best_weex.we --qr
-```
-a QR code will display in your terminal , using Playground App scan that.
-
-
-#### start http server
-```
-$weex -s .
-```
-a http server will start running , your current directory(.) will be the document root for the server , every weex .we file will be transforme to JS Bundle when access through the server
-
-## Issue & Feedback
-
-[Github Issue List](https://github.com/weexteam/weex-toolkit/issues)
-
http://git-wip-us.apache.org/repos/asf/incubator-weex-site/blob/12e3a8bc/_draft/v-0.10/tools/playground.md
----------------------------------------------------------------------
diff --git a/_draft/v-0.10/tools/playground.md b/_draft/v-0.10/tools/playground.md
deleted file mode 100644
index f315054..0000000
--- a/_draft/v-0.10/tools/playground.md
+++ /dev/null
@@ -1,24 +0,0 @@
----
-title: Playground
-type: tools
-order: 4
-has_chapter_content: true
-version: 0.10
----
-
-# Weex Playground App
-
-One of best parts of Weex is Native Runtime . After preview your `we file` render in H5 using weex-toolkit CLI , you can try Native Runtime in a standalone App , this is Weex Playground App . More then that ,Weex playground App preset a lot of Demo & ShowCase ,so you will get to experience performance of Weex native runtime easily.
-
-Android and IOS version of Playground App can be downloaded [here](http://alibaba.github.io/weex/download.html).
-
-## Screenshot
-
-
-
-
-This is main interface of Weex Playground App , you can click the item to see the corresponding demo . click top right corner Icon will active QR scaner that work with Weex [toolkit CLI](../tools/index.html)
-
-please refer to [Weex Tutorial](../guide/index.html)
-
-
http://git-wip-us.apache.org/repos/asf/incubator-weex-site/blob/12e3a8bc/_draft/v-0.10/tools/transformer.md
----------------------------------------------------------------------
diff --git a/_draft/v-0.10/tools/transformer.md b/_draft/v-0.10/tools/transformer.md
deleted file mode 100644
index 7df3b60..0000000
--- a/_draft/v-0.10/tools/transformer.md
+++ /dev/null
@@ -1,38 +0,0 @@
----
-title: Transformer
-type: tools
-order: 3
-has_chapter_content: true
-version: 0.10
----
-
-# gulp-weex
-
-> gulp plugin for weex transformer
-
-## Usage
-
-```javascript
-var gulp = require('gulp')
-var weex = require('gulp-weex')
-
-gulp.task('default', function () {
- return gulp.src('src/*.html')
- .pipe(weex({}))
- .pipe(gulp.dest('./dest'))
-})
-```
-
-## Options
-
-### oldFormat
-
-whether transform to old format.
-
-default: `false`.
-
-### isEntry
-
-whether is an entry module which has `bootstrap(...)`.
-
-default: `true`.
\ No newline at end of file
http://git-wip-us.apache.org/repos/asf/incubator-weex-site/blob/12e3a8bc/_draft/v1.0/advanced/create-a-weex-project.md
----------------------------------------------------------------------
diff --git a/_draft/v1.0/advanced/create-a-weex-project.md b/_draft/v1.0/advanced/create-a-weex-project.md
deleted file mode 100644
index 780341b..0000000
--- a/_draft/v1.0/advanced/create-a-weex-project.md
+++ /dev/null
@@ -1,271 +0,0 @@
----
-title: 如何创建一个 Weex 项目
-type: advanced
-order: 3
-has_chapter_content: true
-version: 0.10
----
-
-# 如何创建一个 Weex 项目
-
-对于前端开发者来说开发一个 app 是不容易的,既然 Weex 能以 web 的开发体验构建高性能、可扩展的 native 应用,那我们怎么利用 Weex 简单高效的开发一个 native 应用呢?Weex 替你考虑了这件事。在本章中,我们将学习如何使用 Weexpack 工具快速生成一个全新的 Weex 项目。
-
-根据你的操作系统的不同,步骤也略有差异,如果你从未接触过 native 开发,请慢慢来,遇到问题随时查阅 [FAQ](../faq.md)。
-
-首先,不论任何平台,我们都需要 node.js 和 Weexpack。在本节中,默认你已经安装好了 node.js 和 npm,如有疑问,可参考上一章 [如何在本地开发 Weex 页面](../guide/develop-on-your-local-machine.html)。
-
-Weexpack 是 Weex 新一代的工程开发套件,它允许开发者通过简单的命令,创建 weex 工程项目,将项目运行在不同的开发平台上。未来,我们考虑会将其集成在 weex-toolkits 上,但目前仍需要单独安装。好在安装 Weexpack 非常简单,可以直接使用 npm 安装:
-
-```bash
-npm install weexpack -g
-```
-
-或者用 cnpm:
-
-```bash
-cnpm install weexpack -g
-```
-
-接下来的步骤会有一些复杂和区别,根据开发平台的不同,我们提供了快速导航便于阅读:
-
-- [iOS](#ios)
-- [Android](#android)
-
-## iOS
-
-Mac 是唯一可以开发 iOS 应用的平台,因此创建 iOS 项目只支持 mac。对于 iOS,你需要安装 [Xcode](https://developer.apple.com/xcode/) 和 [CocoaPods](https://guides.cocoapods.org/using/getting-started.html) 。
-
-安装 Xcode 最简单的方法是到 [Mac App Store](https://itunes.apple.com/us/app/xcode/id497799835?mt=12)。Xcode 体积较大,下载请耐心等待。
-
-安装好 Xcode 后,你需要运行 Xcode,使 Xcode 自动安装开发者工具和确认使用协议。
-
-之后你还需要安装 [CocoaPods](https://guides.cocoapods.org/using/getting-started.html) 。CocoaPods 是 Xcode 项目的类库管理工具,可以使用如下命令安装:
-
-```bash
-$ sudo gem install cocoapods
-```
-
-如果执行该命令无反应,很可能是 gem source 问题,你可以切换为淘宝 gem source:
-
-```bash
-$ gem sources --remove https://rubygems.org/
-$ gem sources -a https://ruby.taobao.org/
-$ sudo gem install cocoapods
-```
-
-如有问题,可参考 [CocoaPods 官方文档](https://guides.cocoapods.org/using/getting-started.html)
-
-### 创建项目
-
-然后,就可以使用 weexpack 创建 weex 工程了:
-
-```bash
-$ weexpack init appName
-```
-
-weexpack 会自动新建以 appName 命名的目录,并将项目模板拉取到该目录。
-
-最终形成如下目录结构:
-
-```bash
--> /appName
-.
-|—— .gitignore
-|—— README.md
-|—— package.json
-|-- android.config.json
-|-- ios.config.json
-|—— webpack.config.js
-|—— /src
-| |—— index.we
-|—— /html5
-| |—— index.html
-|—— /ios
-| |—— /playground
-| |—— /sdk
-| |—— /WXDevtool
-|—— /android
-| |—— /playground
-| |—— /appframework
-```
-
-其中:
-
-- `webpack.config.js` 是 webpack 配置文件,用于生成 `.we` 文件的 JSBunlde
-- `ios.config.json` 是 iOS 项目配置文件
-- `android.config.json` 是 Android 项目配置文件
-- `/src` 目录放置 Weex 页面
-- `/html5` 是 H5 端入口文件
-- `/ios` 放置 iOS 项目
-- `/android` 放置 Android 项目
-
-紧接着,进入目录,并且安装依赖:
-
-```bash
-$ cd appName && npm install
-```
-
-至此,项目模版创建完成,接下来我们可以自定义我们的 APP 信息并打包运行。
-
-### 运行与打包
-
-如果一切正常,你可以使用 weexpack 打包或模拟器运行了:
-
-模拟器运行
-
-```bash
-$ weexpack run ios
-```
-
-构建 ipa 包:
-
-```bash
-$ weexpack build ios
-```
-
-构建包的过程中,将会提示让您输入 CodeSign(证书)、Profile(provisioning profile)、AppId,只有输入真实的这些信息才能成功打包。 其余如AppName,和入口 weex bundle 文件可以编辑项目目录下的 `ios.config.json` 配置。 打完包成功之后,可以在 `/playground/build/ipa_build/` 目录下获取 ipa 文件。
-
-注:证书需要预先安装到 keychain 中,在 keychain 中点击右键获取证书 id(证书名称)、provisioning profile 文件(\*mobileprovision)需要获取 UUID,进入目录可以看到 mobileprovision_UUID.sh 文件,此文件可以获取到 UUID。
-
-mobileprovision_UUID.sh 用法如下:
-
-```bash
-$ ./mobileprovision_UUID.sh *mobileprovision
-```
-
-参数(\*mobileprovision)为 provisioning profile 文件路径
-
-** 注:run 与 build 部分涉及 pod 的依赖安装问题。**
-
-- 首先要安装 cocoapods ,具体安装步骤可查看[这里](https://cocoapods.org/),建议安装 0.39.0 版本。
-- 为了加快 CLI 执行速度,weexpack 创建的工程默认安装了需要的依赖库。但是命令执行依然会更新需要升级的依赖库。
- - 如果出现这种错误提示 `unable to find a specification for 'WeexSDK'` 这种错误,说明你本地没有更新 cocoapods master 仓库,运行 `pod repo update` ,此时运行 `pod search WeexSDK`:
-
- 
-
- 说明 master repo 更新成功。以上是以 `WeexSDK` 为例,其他库类似。
-
- - 如果出现这种错误 `error: The sandbox is not in sync with the Podfile.lock. Run 'pod install' or update your CocoaPods installation.` 进入 playground 目录(podfile 文件所在目录)按提示执行。
-
- 更多 pod 使用细节请移步[cocoapods](https://cocoapods.org/)
-
-- mobileprovision,参数(\*mobileprovision)为 provisioning profile 文件路径。
-
-----
-
-## Android
-
-在 Mac 平台开发 Android 首先需要下载 [Android Studio](https://developer.android.com/studio/install.html)(你可能需要翻墙才能访问)。[Android Studio](https://developer.android.com/studio/install.html) 为我们提供了 Android SDK 及 AVD(模拟器)以便我们快速运行 Android 项目。
-
-下载完成后运行 Android Studio,任意新建一个 Android 项目,在第二步中选择 **Android 5.1**,然后点击 next 完成项目创建,如图所示:
-
-
-
-待 Android Studio 打开后,在顶部菜单栏选择 Tools -> Android -> AVD Manager,安装 Android 模拟器:
-
-
-
-之后,打开模拟器运行 Android。
-
-**注意:**
-
-1. 必须保持模拟器运行。
-2. 保证 Android build-tool 的版本为 23.0。【可以在 Android Studio 的 SDK Manager 里查看是否已安装这个版本,如果没有可选择安装这一版本】。
-
-### 配置环境变量
-
-因为 Android Studio 安装的 SDK 不会自动配置环境变量(你自己安装的 SDK 同样不会)。所以需要您自己手动配置 Android_HOME 环境变量和 PATH
-
-如果是 Android Studio 安装的 SDK 安装路径可已在 SDK manager 里找到(打开 SDK manager 的方式请参照图2)
-
-Windows 下请参照 [window 下如何设置 ANDROID 环境变量](http://jingyan.baidu.com/article/09ea3ede1b4df6c0aede39ab.html)
-
-Linux/Mac 下只需编辑 `.bash_profile` 增加 PATH 即可:
-
-```bash
-vim ~/.bash_profile
-```
-
-然后添加下列代码进去(路径替换为你的真实路径)
-
-```bash
-export ANDROID_HOME=/xxx/Library/Android/sdk
-export PATH=${PATH}:$ANDROID_HOME/tools:$ANDROID_HOME/platform-tools:$ANDROID_HOME/build-tools
-```
-
-然后保存退出(:wq)。再执行下列命令:
-
-```bash
-source ~/.bash_profile
-```
-
-### 创建项目
-
-然后,就可以使用 weexpack 创建 weex 工程了:
-
-```bash
-$ weexpack init appName
-```
-
-weexpack 会自动新建以 appName 命名的目录,并将项目模板拉取到该目录。
-
-最终形成如下目录结构:
-
-```bash
--> /appName
-.
-|—— .gitignore
-|—— README.md
-|—— package.json
-|-- android.config.json
-|-- ios.config.json
-|—— webpack.config.js
-|—— /src
-| |—— index.we
-|—— /html5
-| |—— index.html
-|—— /ios
-| |—— /playground
-| |—— /sdk
-| |—— /WXDevtool
-|—— /android
-| |—— /playground
-| |—— /appframework
-```
-
-其中:
-
-- `webpack.config.js` 是 webpack 配置文件,用于生成 `.we` 文件的 JSBunlde
-- `ios.config.json` 是 iOS 项目配置文件
-- `android.config.json` 是 Android 项目配置文件
-- `/src` 目录放置 Weex 页面
-- `/html5` 是 H5 端入口文件
-- `/ios` 放置 iOS 项目
-- `/android` 放置 Android 项目
-
-紧接着,进入目录,并且安装依赖:
-
-```bash
-$ cd appName && npm install
-```
-
-至此,项目模版创建完成,接下来我们可以自定义我们的 APP 信息并打包运行。
-
-### 运行与打包
-
-如果一切正常,你可以使用 weexpack 打包或模拟器运行了:
-
-Android 的打包和构建是一体的 :
-
-```bash
-$ weexpack run android
-```
-
-同样的你可以更改项目目录下的android.config.json
-
-- `AppName`: 应用名
-- `AppId`: application_id 包名
-- `SplashText`: 欢迎页上面的文字
-- `WeexBundle`: 指定的 weex bundle 文件(支持文件名和 url 的形式)
-
- 指定文件名则以本地文件的方式加载 bundle,指定 url 则以远程的方式加载 JSBundle。如果以本地方式指定 bundle `.we` 文件请放到 `src` 目录。
http://git-wip-us.apache.org/repos/asf/incubator-weex-site/blob/12e3a8bc/_draft/v1.0/advanced/customize-a-native-component.md
----------------------------------------------------------------------
diff --git a/_draft/v1.0/advanced/customize-a-native-component.md b/_draft/v1.0/advanced/customize-a-native-component.md
deleted file mode 100644
index 404f25c..0000000
--- a/_draft/v1.0/advanced/customize-a-native-component.md
+++ /dev/null
@@ -1,168 +0,0 @@
----
-title: 自定义 native 组件
-type: advanced
-order: 7
-has_chapter_content: true
-version: 0.10
----
-
-# 如何自定义 native 组件?
-
-Weex 已经包含了最关键的平台组件,例如 `ScrollView, ListView, Text, Imageview` 等等。当然,这些组件并不能完全满足你的需求。另外,那些在你的工程中常用的大量原生 UI 组件,可能需要被简单地集合到 Weex 中。幸运的是,通过任意已存在的组件来创建你的自定义组件是一件很方便的事。
-
-## Android
-
-### 步骤:
-
-1.自定义组件必须继承自 `WXComponent` 或者 `WXContainer` ;
-2.weex SDK 可以识别 @WXComponentProp (name = value(value 是 attr 或者 dsl style));
-3.方法必须是 `public` 的;
-4.组件类不能是一个内部类;
-5.自定义组件不能被 ProGuard 之类的工具混淆;
-6.组件方法在 UI 线程被调用,因此不要在里面进行耗时的操作;
-7.Weex 的参数类型可以是 int, double, float, String, Map, List 和实现了 WXObject 接口的自定义类;
-
-### 参考以下例子:
-
-``` java
- `package com.taobao.weex.ui.component;
-// ……
-
-public class MyViewComponent extends WXComponent{
-
- public MyViewComponent(WXSDKInstance instance, WXDomObject node,
- WXVContainer parent, String instanceId, boolean lazy) {
- super(instance, node, parent, instanceId, lazy);
- }
-
- @Override
- protected void initView() {
- //TODO:your own code ……
- }
-
- @Override
- public WXFrameLayout getView() {
- //TODO:your own code ………
- }
- @WXComponentProp(name=WXDomPropConstant.WX_ATTR_VALUE)
- public void setMyViewValue(String value) {
- ((TextView)mHost).setText(value);
- }
-
-}
-```
-
-必须注册组件:
-
-``` java
-WXSDKEngine.registerComponent("MyView", MyViewComponent.class);
-```
-
-## iOS
-
-虽然 WeexSDK 中有很多的 native 的 Component,但这有可能并不能满足你的需求。在之前你可能已经写了一些很酷炫 native 的组件,想包装一下,导入到 Weex 中,因此我们提供了让开发者实现自己的 native Component。下面将以 WeexSDK 中已经存在的 Component:`image` 为例子,介绍一下如何构建一个 native Component。假设你已经了解 iOS 开发
-
-### 注册 Component
-
-注册一个 component 比较简单,调用 `WXSDKEngine` 中的 `registerComponent:withClass:` 方法,传入组件的标签名称,还有对应的 class 然后你可以创建一个 `WXImageComponent` 表示 `image` 组件的实现。在 `.we` 文件中,只需要写 `<image></image>`
-
-### 添加属性
-
-现在我们要做一些让 image component 更加强大的事情。既然作为一个图片的 component,那它应该要有源,给他加上一个 `src` 的属性,同时给它加上一个 `resize` 的属性(可以配置的有 `contain/cover/stretch`)
-
-```object-c
-@interface WXImageComponent ()
-
-@property (nonatomic, strong) NSString *imageSrc;
-@property (nonatomic, assign) UIViewContentMode resizeMode;
-
-@end
-```
-
-component 中所有的 style,attribute,events 都会被传递到 Component 的初始化方法中,所以,你可以在初始化方法中存储你感兴趣的一些属性值
-
-```object-c
-@implementation WXImageComponent
-
-- (instancetype)initWithRef:(NSString *)ref type:(NSString *)type styles:(NSDictionary *)styles attributes:(NSDictionary *)attributes events:(NSArray *)events weexInstance:(WXSDKInstance *)weexInstance
-{
- if (self = [super initWithRef:ref type:type styles:styles attributes:attributes events:events weexInstance:weexInstance]) {
- _imageSrc = [WXConvert NSString:attributes[@"src"]];
- _resizeMode = [WXConvert UIViewContentMode:attributes[@"resize"]];
-}
-
- return self;
-}
-
-@end
-```
-
-attribute 中拿到的值的类型都是 `id`,我们可以用转换方法把它转换到任何值。Weex SDK 提供了一些基础的转换方法,可以参考 `WXConvert` 类,或者你可以添加自己的转换函数。
-
-### Hooking 渲染生命周期
-
-native 的 component 是由 Weex 管理的,Weex 创建,布局,渲染,销毁。Weex 的 component 生命周期都是可以 hook 的,你可以在这些生命周期中去做自己的事情。
-
-| 方法 | 描述 |
-| :-: | --- |
-| initWithRef:type:... | 用给定的属性初始化一个component. |
-| layoutDidFinish | 在component完成布局时候会调用. |
-| loadView | 创建component管理的view. |
-| viewWillLoad | 在component的view加载之前会调用. |
-| viewDidLoad | 在component的view加载完之后调用. |
-| viewWillUnload | 在component的view被释放之前调用. |
-| viewDidUnload | 在component的view被释放之后调用. |
-| updateStyles: | 在component的style更新时候调用. |
-| updateAttributes: | 在component的attribute更新时候调用. |
-| addEvent: | 给component添加event的时候调用. |
-| removeEvent: | 在event移除的时候调用. |
-
-在 image component 的例子里面,如果我们需要我们自己的 image view 的话,可以复写 `loadView`这个方法.
-
-```object-c
-- (UIView *)loadView
-{
-return [[WXImageView alloc] init];
-}
-```
-
-现在我们使用 `WXImageView` 渲染 `image` component。
-作为一个 image component,我们需要拿到服务器图片,而且把它设置进 image view 里. 这个操作可以在 `viewDidLoad` 方法中做,这个方法是在 view 已经被创建而且加载了时候 Weex SDK 会调用到,而且 `viewDidLoad` 这个方法是你做额外初始化工作比如改变 content mode(也就是设置resize) 的最好时间.
-
-```object-c
-- (void)viewDidLoad
-{
- UIImageView *imageView = (UIImageView *)self.view;
- imageView.contentMode = _resizeMode;
- imageView.userInteractionEnabled = YES;
- imageView.clipsToBounds = YES;
- imageView.exclusiveTouch = YES;
-
- // Do your image fetching and updating logic
-}
-```
-
-如果可以改变 image 的 src,也可以 hook `updateAttributes:` 方法来做属性更新操作,当 `updateAttributes:` 或者 `updateStyles:` 被调用的时候, component 的 view 已经加载完成
-
-```object-c
-- (void)updateAttributes:(NSDictionary *)attributes
-{
- if (attributes[@"src"]) {
- _imageSrc = [WXConvert NSString:attributes[@"src"]];
- // Do your image updating logic
- }
-
- if (attributes[@"resize"]) {
- _resizeMode = [WXConvert UIViewContentMode:attributes[@"resize"]];
- self.view.contentMode = _resizeMode;
- }
-}
-```
-
-或许你需要考虑更多的生命周期方法去 Hook,当布局完成时候,像 `layoutDidFinish`,如果你想了解更多,可以参考一下`WXComponent.h` 声明的方法。
-
-现在你可以用在任何 `.we` 文件里面使用 `<image>`,而且可以加上 image 的属性。
-
-```html
-<image style="your-custom-style" src="image-remote-source" resize="contain/cover/stretch"></image>
-```
http://git-wip-us.apache.org/repos/asf/incubator-weex-site/blob/12e3a8bc/_draft/v1.0/advanced/cuszomize-native-apis.md
----------------------------------------------------------------------
diff --git a/_draft/v1.0/advanced/cuszomize-native-apis.md b/_draft/v1.0/advanced/cuszomize-native-apis.md
deleted file mode 100644
index 55e5e4c..0000000
--- a/_draft/v1.0/advanced/cuszomize-native-apis.md
+++ /dev/null
@@ -1,85 +0,0 @@
----
-title: 自定义 native API
-type: advanced
-order: 8
-has_chapter_content: true
-version: 0.10
----
-
-# 如何自定义 native API?
-
-Weex 的 SDK 只提供了页面渲染的能力,但是一些其它操作,比如网络请求、图片加载、重定向等功能需要你自己去实现,这个例子讲述了如何用原生代码去扩展 Weex 的功能。
-
-## 关于 URLHelper 的例子
-
-### 新建一个 WXModule
-
-```java
-public class URLHelperModule extends WXModule{
- private static final String WEEX_CATEGORY="com.taobao.android.intent.category.WEEX";
- @WXModuleAnno
- public void openURL(String url){
- if (TextUtils.isEmpty(url)) {
- return;
- }
- StringBuilder builder=new StringBuilder("http:");
- builder.append(url);
- Uri uri = Uri.parse(builder.toString());
- Intent intent = new Intent(Intent.ACTION_VIEW, uri);
- intent.addCategory(WEEX_CATEGORY);
- mWXSDKInstance.getContext().startActivity(intent);
- }
-}
-```
-
-这里要注意 `@WXModuleAnno` 这个注解,它表示了你把这个方法暴露给 JavaScript。
-
-```java
-public class URLHelperModule extends WXModule{
-
- @WXModuleAnno
- public void openURL(String url,String callbackId){
- //...
- //callback to javascript
- Map<String, Object> result = new HashMap<String, Object>();
- result.put("ts", System.currentTimeMillis());
- WXBridgeManager.getInstance().callback(mWXSDKInstance.getInstanceId(), callbackId, result);
- }
-}
-```
-
-### 把module注册到WXSDKEngine:
-
-```java
-try {
- WXSDKEngine.registerModule("myURL", URLHelperModule.class);
- //'myURL' is the name you'll use in javascript
- } catch (WXException e) {
- WXLogUtils.e(e.getMessage());
- }
-```
-
-### 在 JavaScript 中使用 `eventModule`:
-
-```javascript
-let URLHelper = require('@weex-module/myURL');//same as you registered
-URLHelper.openURL("http://www.taobao.com",function(ts){
- console.log("url is open at "+ts);
-});
-```
-
-## 一些注意事项:
-
-1. 定义一个 components 需要继承 `WXModule`
-
-2. 不要忘记添加 `@WXModuleAnno` 注解,不然 Weex 没法识别这个方法
-
-3. 定义的方法必须是 `public 的
-
-4. module 类一定不能是内部类
-
-5. 你定义的 components 不能被混淆,不然会找不到
-
-6. Module 中的方法会在 UI 线程中被调用,所以一定不要做一些耗时操作
-
-7. Moudle 中的方法参数类型可以为 `int`,`double`,`float`,`String`,`Map`,`List`,以及实现 `WXObject` 接口的类。
http://git-wip-us.apache.org/repos/asf/incubator-weex-site/blob/12e3a8bc/_draft/v1.0/advanced/extend-to-android.md
----------------------------------------------------------------------
diff --git a/_draft/v1.0/advanced/extend-to-android.md b/_draft/v1.0/advanced/extend-to-android.md
deleted file mode 100644
index f816ebd..0000000
--- a/_draft/v1.0/advanced/extend-to-android.md
+++ /dev/null
@@ -1,170 +0,0 @@
----
-title: Android 扩展
-type: advanced
-order: 9
-has_chapter_content: true
-version: 0.10
----
-
-# Android 扩展
-
-Weex 提供了扩展机制,可以根据自己的业务进行定制自己的功能。
-主要分为两类扩展:
-
-- Module 扩展 非 UI 的特定功能。例如 sendHttp、openURL 等。
-- Component 扩展 实现特别功能的 Native 控件。例如:RichTextview,RefreshListview 等。
-- Adapter 扩展 Weex 对一些基础功能实现了统一的接口,可实现这些接口来定制自己的业务。例如:图片下载等。
-
-## Module 扩展
-
-1. Module 扩展必须继承 WXModule 类。
-2. 扩展方法必须加上 @WXModuleAnno 注解。Weex 会根据注解来判断当前方法是否要运行在 UI 线程,和当前方法是否是扩展方法。
-3. Weex是根据反射来进行调用 Module 扩展方法,所以Module中的扩展方法必须是 public 类型。
-4. 同样因为是通过反射调用,Module 不能被混淆。请在混淆文件中添加代码:`-keep public class * extends com.taobao.weex.common.WXModule{*;}`
-5. Module 扩展的方法可以使用 int, double, float, String, Map, List 类型的参数
-6. 完成 Module 后一定要在初始化时注册 `WXSDKEngine.registerModule("myModule", MyModule.class);` 否则会报类似错误:`ReportException :undefined:9: TypeError: Object #<Object> has no method 'printLog'`
-
-示例如下:
-
-```java
-public class MyModule extends WXModule {
-
- @WXModuleAnno(runOnUIThread = true)
- public void printLog(String msg) {
- Toast.makeText(mWXSDKInstance.getContext(),msg,Toast.LENGTH_SHORT).show();
- }
-}
-```
-
-JS 调用如下:
-
-```html
-<template>
- <div>
- <text onclick="click">点击我测试</text>
- </div>
-</template>
-
-<script>
- module.exports = {
- methods: {
- click: function() {
- require('@weex-module/myModule').printLog("我是一个测试!");
- }
- }
- }
-</script>
-```
-
-## Component 扩展
-
-1. Component 扩展类必须集成 WXComponent.
-2. Component 对应的设置属性的方法必须添加注解 @WXComponentProp(name=value(value is attr or style of dsl))
-3. Weex sdk 通过反射调用对应的方法,所以 Component 对应的属性方法必须是 public,并且不能被混淆。请在混淆文件中添加代码 `-keep public class * extends com.taobao.weex.ui.component.WXComponent{*;}`
-4. Component 扩展的方法可以使用 int, double, float, String, Map, List 类型的参数
-5. 完成 Component 后一定要在初始化时注册 `WXSDKEngine.registerComponent("richtext",RichText.class);`
-
-示例如下:
-
-```java
-public class RichText extends WXComponent {
-
- public RichText(WXSDKInstance instance, WXDomObject dom, WXVContainer parent, boolean isLazy) {
- super(instance, dom, parent, isLazy);
- }
-
- @Override
- protected void initView() {
- mHost=new TextView(mContext);
- ((TextView)mHost).setMovementMethod(LinkMovementMethod.getInstance());
- }
-
- @WXComponentProp(name = "tel")
- public void setTelLink(String tel){
- SpannableString spannable=new SpannableString(tel);
- spannable.setSpan(new URLSpan("tel:"+tel),0,tel.length(), Spanned.SPAN_EXCLUSIVE_EXCLUSIVE);
- ((TextView)mHost).setText(spannable);
- }
-}
-```
-
-JS 调用如下:
-
-```html
-<template>
- <div>
- <richText tel="12305" style="width:200;height:100">12305</text>
- </div>
-</template>
-```
-## Adapter扩展
-
-图片下载:
-
-需要时集成接口 IWXImgLoaderAdapter,实现 setImage 方法。
-
-示例如下:
-
-```java
-public class ImageAdapter implements IWXImgLoaderAdapter {
-
- public ImageAdapter() {
- }
-
- @Override
- public void setImage(final String url, final ImageView view,
- WXImageQuality quality, WXImageStrategy strategy) {
-
- WXSDKManager.getInstance().postOnUiThread(new Runnable() {
-
- @Override
- public void run() {
- if(view==null||view.getLayoutParams()==null){
- return;
- }
- if (TextUtils.isEmpty(url)) {
- view.setImageBitmap(null);
- return;
- }
- String temp = url;
- if (url.startsWith("//")) {
- temp = "http:" + url;
- }
- if (view.getLayoutParams().width <= 0 || view.getLayoutParams().height <= 0) {
- return;
- }
- Picasso.with(WXEnvironment.getApplication())
- .load(temp)
- .into(view);
- }
- },0);
- }
-}
-```
-#### 组件方法支持
-从WeexSDK 0.9.5开始,你可以定义组件方法
-
-- 在组件中如下声明一个组件方法
-
- ```java
- @JSMethod
- public void focus(){
- //method implementation
- }
- ```
-- 注册组之后,你可以在weex 文件中调用
-
- ```html
- <template>
- <mycomponent id='mycomponent'></mycomponent>
- </template>
- <script>
- module.exports = {
- created: function() {
- this.$el('mycomponent').focus();
- }
- }
- </script>
- ```
-
-注:工程要添加依赖 `compile 'com.squareup.picasso:picasso:2.5.2'`
http://git-wip-us.apache.org/repos/asf/incubator-weex-site/blob/12e3a8bc/_draft/v1.0/advanced/extend-to-html5.md
----------------------------------------------------------------------
diff --git a/_draft/v1.0/advanced/extend-to-html5.md b/_draft/v1.0/advanced/extend-to-html5.md
deleted file mode 100644
index ff99629..0000000
--- a/_draft/v1.0/advanced/extend-to-html5.md
+++ /dev/null
@@ -1,253 +0,0 @@
----
-title: weex-html5 扩展
-type: advanced
-order: 11
-has_chapter_content: true
-version: 0.10
----
-
-# 扩展 weex-html5
-
-### 简介
-
-Weex 是一个高可扩展性的跨平台动态化开发方案,你可以在现有组件基础上定制自己需要的三端组件。你可以为 Weex API 模块添加新的方法,或者创建新的 API 模块和新的加载器。按照以下几个步骤扩展你的组件,API 或者加载器。
-
-首先要明确的是,组件和 API 模块是基于 Weex 的扩展,但是独立于 Weex,组件的定义本身是不需要依赖于 Weex 的,这样有助于组件的分散化管理,去除中心化依赖。
-
-其次,当你扩展一个组件,你需要同时扩展三端的组件(android, ios 和 web 端),毕竟 Weex 是一个重视三端一致体验的跨平台移动框架。你可以一个端一个端的扩展,也可以召唤其他端上的开发者来共同完成你在其他端上的组件(你总是可以在社区找到对某个功能有共同需求的开发者)。这里有一些在 [android 端](./extend-to-android.md)和 [ios 端](./extend-to-ios.md)做扩展的文档可以参考。
-
-你应该将你的扩展发布到 Weex 开发者可以方便找到和使用的渠道,比如 `npm`。我们推荐你将你开发的组件发布到 `npm` 供其他 Weex 开发者使用。
-
-最重要的是,你的组件的命名需要遵守 Weex 组件命名规范:以 `weex-` 开头作为组件的前缀,并且以 `-<platform>` 做为结尾后缀,除非你发布的包是三端的实现都包含在内的。这里有个 [`<weex-hello-web`>](https://github.com/MrRaindrop/weex-hello-web) 的例子作为参考,这里注册了一个简单的自定义的组件。
-
-### 创建新组件
-
-步骤:
-1. 在你的组件实现中必须继承 `Weex.Component` 这个类, 并选择性的重写其中的一些方法。
-2. 你的组件的 exports 需要暴露一个 `init` 方法,并在其中使用 `Weex.registerComponent` 注册你的组件。
-
-**这里用一个例子展示如何扩展一个新的组件**
-
-看这个组件扩展的代码( web 端上的组件):
-
-``` javascript
-const attr = {
- // ...
-}
-const style = {
- // ...
-}
-const event = {
- // ...
-}
-// 每个扩展组件都需要实现一个init方法,Weex会通过这方法进行安装和注册.
-function init (Weex) {
- const Component = Weex.Component
- const extend = Weex.utils.extend
-
- // 组件的构造函数
- function Hello (data) {
- Component.call(this, data)
- }
-
- // prototype继承
- Hello.prototype = Object.create(Component.prototype)
- extend(Hello.prototype, proto)
-
- // 配置属性、样式以及事件
- extend(Hello.prototype, { attr })
- extend(Hello.prototype, {
- style: extend(Object.create(Component.prototype.style), style)
- })
- extend(Hello.prototype, { event })
-
- Weex.registerComponent('weex-hello', Hello)
-}
-
-// 暴露init方法接口.
-export default { init }
-```
-
-上述代码摘引自 [weex-hello-web/src/index.js](https://github.com/MrRaindrop/weex-hello-web/blob/master/src/index.js#L46-L65)
-
-这个demo重写了基类 `Component`中的`create`方法。你也可以选择重写`Component`中的一些其他方法来定制组件的行为。典型的方法包括:
-- `create`: 创建组件的节点,在方法体中return这个节点.
-- `createChildren` 创建子节点.
-- `insertBefore` 在某个子节点之前插入一个新的子节点.
-- `appendChild` 在子节点列表的最后加上一个节点.
-- `removeChild` 移除一个子节点.
-
-**进阶**:更多关于组件定制和扩展的细节和代码展示,可以参考 [weex 主仓库的代码](https://github.com/apache/incubator-weex/tree/dev/html5),这里的组件基本上都是通过上述方式进行定义的。
-
-重要的一点,注册组件的关键方法是 `Weex.registerComponent`,如示例里的 `weex-hello` 组件的注册:
-
-``` javascript
-Weex.registerComponent('weex-hello', Hello)
-```
-
-上述代码引自 [weex-hello-web/src/index.js](https://github.com/MrRaindrop/weex-hello-web/blob/master/src/index.js#L62)
-
-在某个需要使用该组件的weex项目中使用 `Weex.install` 方法安装该组件:
-
-``` javascript
-// import the original weex-html5.
-import weex from 'weex-html5'
-import hello from 'weex-hello-web'
-// install the component.
-weex.install(hello)
-```
-
-上述代码引自 [weex_extend_demo/src/main.js](https://github.com/MrRaindrop/weex_extend_demo/blob/master/src/main.js#L1-L5)
-
-在你的 `.we` 文件中直接使用这个组件:
-
-``` html
-<template>
- <div>
- <weex-hello class="hello" style="txt-color:#fff;bg-color:green"
- value="WEEX" onclick="handleClick">
- </weex-hello>
- </div>
-</template>
-```
-
-上述代码引自[weex_extend_demo/demo/index.we](https://github.com/MrRaindrop/weex_extend_demo/blob/master/demo/index.we#L10-L15)
-### 扩展API
-
-你可以扩展新的 API 模块,或者为某个已有的模块添加新的 API. 比如,你可以添加一个 API 模块叫做 `user`,在里面添加一些用户登录登出处理的 API,比如 `login`, `logout` 等等。你可以通过 `require('@weex-module/moduleName)[methodName](arg1, arg2, ...)` ([Module APIs](../references/api.md)) 的方式调用你的 API.
-
-步骤:
-1. 实现你的 API module.
-2. 在你的 API 安装模块里暴露一个 `init` 方法,并在这个方法里面使用 `Weex.registerAPIModules` 注册你的 API module.
-
-**这里用一个例子展示如何扩展一个新的 API 模块**
-
-创建一个文件 `user.js`,在其中定义登录登出 `login/logout` 方法.
-
-``` javascript
-const user = {
- // 定义用户登录方法.
- login (callbackId) {
- login.then(res => {
- this.sender.performCallback(callbackId, res)
- }).catch(err => {
- this.sender.performCallback(callbackId, err)
- })
- },
-
- // 定义用户登出方法.
- logout (callbackId) {
- logout.then(res => {
- this.sender.performCallback(callbackId, res)
- }).catch(err => {
- this.sender.performCallback(callbackId, err)
- })
- }
-}
-
-// 定义user模块的元 (meta) 信息.
-const meta = {
- user: [{
- name: 'login',
- args: ['function']
- }, {
- name: 'logout',
- args: ['function']
- }]
-}
-
-export default {
- init (Weex) {
- // 注册这个模块,最后一个参数是模块的元信息.
- Weex.registerApiModule('user', user, meta)
- }
-}
-```
-
-这个简单的 user helper 模块就实现好了,可以发布到 npm 上,我们可以给这个模块取个名字,比如说 `weex-user-helper`。
-
-在你的新的 Weex 项目里安装这个模块:
-
-``` javascript
-import Weex from 'weex-html5'
-import user from 'weex-user-helper'
-
-Weex.install(user)
-```
-
-安装了这个模块,你就可以在 DSL 代码里引用这个模块干点事情了:
-
-``` html
-<template>
- <div>
- <div class="btn" onclick="handleClick">
- <text>LOGIN</text>
- </div>
- </div>
-</template>
-
-<script>
- var userHelper = require('@weex-module/user')
- module.exports = {
- methods: {
- handleClick: function () {
- userHelper.login(function () {
- // ... do sth. in callback.
- })
- }
- }
- }
-</script>
-```
-
-### 定制加载器loader
-
-**Loader仅用于weex-html5 (web端)加载dsl打包出来的bundle代码,native平台有其他的加载机制**
-
-已有的加载器包括 `xhr`, `jsonp` 和 `source`. 你可以使用 `weex.registerLoader` 注册一个新的加载器。例如,你有一个获取 Weex bundle 的服务 `myServe.getWeexBundle` , 通过这个服务可以加载 weex bundle,为此你可以定义一个加载器:
-
-``` javascript
-function loadByMyServe(pageId, callback) {
- myServe.getWeexBundle(pageId).then(function (bundle) {
- callback(bundle)
- }).catch(function(err) {
- callback(err)
- })
-}
-
-// 暴露init方法用于Weex安装此加载器.
-export default {
- init (Weex) {
- Weex.registerLoader('myserve', loadByMyServe)
- }
-}
-```
-
-在你的 weex-html5 项目的启动文件里安装并使用这个加载器:
-
-``` javascript
-import Weex from 'weex-html5'
-
-// 或者import from './myserve.js',不管是import一个npm模块还是import一个文件.
-import loader from 'myLoader'
-
-Weex.install(loader)
-
-// 在init方法里使用这个加载器加载bundle文件.
-(function () {
- function getUrlParam (key) {
- const reg = new RegExp('[?|&]' + key + '=([^&]+)')
- const match = location.search.match(reg)
- return match && match[1]
- }
- const page = getUrlParam('page') || 'examples/build/index.js'
- Weex.init({
- appId: location.href,
- loader: 'myserve', // 使用刚才定义的loader类型
- source: page,
- rootId: 'weex'
- })
-})();
-```
-
-以上是 Weex 带来的扩展性里比较主要的一部分,更多实现细节可以在 [weex 项目代码库](https://github.com/alibaba/weex)以及 weex 的开源社区里找到。
[49/51] [abbrv] incubator-weex-site git commit: update file structure
and fix responsive styles
Posted by ha...@apache.org.
http://git-wip-us.apache.org/repos/asf/incubator-weex-site/blob/12e3a8bc/_draft/v-0.10/references/api.md
----------------------------------------------------------------------
diff --git a/_draft/v-0.10/references/api.md b/_draft/v-0.10/references/api.md
deleted file mode 100644
index a62d5b8..0000000
--- a/_draft/v-0.10/references/api.md
+++ /dev/null
@@ -1,84 +0,0 @@
----
-title: Component APIs
-type: references
-order: 1.3
-version: 0.10
----
-
-# APIs
-
-You can access these apis through `this`(Vm) context in script methods.
-
-e.g.
-
-```html
-<script>
-module.exports = {
- methods: {
- somemethod: function() {
- this.$vm('someId');
- }
- }
-}
-</script>
-```
-
-## $(id)
-
-**Deprecated**, please use `$vm` instead.
-
-## $el(id)
-
-Return the element referenced by specific id.
-
-### Arguments
-
-* `id`*(string)*: the unique identifier.
-
-### Returns
-
-* *(Element)*: an Element object referenced.
-
-### Tips
-* id is only guaranteed to be unique within the current (page)components, if you are looking for the parent components or child components, you can make use of the communication mode between components.
-* Further reading: [id](../guide/syntax/id.html), [Communicate Between Components](../guide/syntax/comm.html)
-
-## $vm(id)
-
-Return the vm object referenced by specific id.
-
-### Arguments
-
-* `id`*(string)*: the unique identifier.
-
-### Returns
-
-* `vm`*(Vm)*: a Vm object referenced.
-
-### Tips
-* id is only guaranteed to be unique within the current (page)components, if you are looking for the parent components or child components, you can make use of the communication mode between components.
-* Further reading: [id](../guide/syntax/id.html), [Communicate Between Components](../guide/syntax/comm.html)
-
-## $getConfig()
-
-Get the current global environment variables and configuration information.
-
-### Returns
-
- * `config`*(object)*: the object of config.
- * `bundleUrl`*(string)*: the url of bundle.
- * `debug`*(boolean)*: if is debug mode.
- * `env`*(object)*: a object of envrioment.
- * `weexVersion`*(string)*: a version of weex sdk.
- * `appName`*(string)*: a name of app.
- * `appVersion`*(string)*: a version of app.
- * `platform`*(string)*: the platform, one of `iOS`, `Android` and `Web`.
- * `osVersion`*(string)*: the version of os.
- * `deviceModel`*(string)*: the model of device. **native only**
- * `deviceWidth`*(number)*: the width of device, in pixels.
- * `deviceHeight`*(number)*: the height of device, in pixels.
-
-## $call(module, method, ...args)
-
-**Deprecated**, please use `require('@weex-module/module')[method](...args)` instead. See [modules](./modules/index.html) for more information
-
http://git-wip-us.apache.org/repos/asf/incubator-weex-site/blob/12e3a8bc/_draft/v-0.10/references/bubble.md
----------------------------------------------------------------------
diff --git a/_draft/v-0.10/references/bubble.md b/_draft/v-0.10/references/bubble.md
deleted file mode 100644
index ba59a90..0000000
--- a/_draft/v-0.10/references/bubble.md
+++ /dev/null
@@ -1,150 +0,0 @@
----
-title: Event Bubble
-type: references
-order: 1.3
-version: 0.10
----
-
-# Event Bubble <span class="api-version">v0.13+</span>
-
-Weex 1.0 implements the W3C standard event bubbling mechanism.
-
-### Usage
-
-```html
-<template>
- <div class="root" onclick="rootClick" bubble="true">
- <div>
- <text style="font-size: 40px;">{{rootText}}</text>
- </div>
- <div class="outer" onclick="parentClick">
- <div>
- <text style="font-size: 40px;">{{parentText}}</text>
- </div>
- <text class="inner" onclick="click">{{innerText}}</text>
- </div>
- </div>
-</template>
-
-<script>
- module.exports = {
- data: {
- innerText: 'click me',
- parentText: '',
- rootText: ''
- },
- methods: {
- click: function(e) {
- this.innerText = 'inner bubble'
- },
- parentClick: function(e) {
- this.parentText = 'parent bubble'
- },
- rootClick: function(e) {
- this.rootText = 'root bubble'
- }
- }
- }
-</script>
-
-<style>
- .inner {
- font-size: 40px;
- text-align: center;
- background-color: #7a9b1b;
- padding: 40px;
- }
-
- .outer {
- font-size: 40px;
- text-align: center;
- background-color: #9b7a1b;
- padding: 120px;
- }
-
- .root {
- font-size: 40px;
- text-align: center;
- background-color: #7a1b9b;
- padding: 80px;
- }
-</style>
-```
-
-[try it](http://dotwe.org/weex/dbfeb926e003986e2eea88c8ccdadb92)
-
-Run the above code, open with the client, click on the middle of the elements, you can see the event spread up, followed by the trigger.
-
-### Notice
-
-One thing should be noticed: **For compatibility with previous versions, Weex does not turn on event bubbling by default. You need to add `bubble = "true"` on the root element's properties to turn on the bubbling mechanism. Otherwise, the event will not be propagated upwards, keeping the same effect as the previous version.**
-
-### stopPropagation
-
-In the event handler function, you can use the `e.stopPropagation()` method to prevent the event from escalating. Note that `e.stopPropagation()` differs from `bubble = "true"`, which affects only the current elements and the propagation of parent elements, without affecting the propagation of child elements; the latter is a switching mechanism that is added for compatibility, Will be a global shutdown or open the bubble mechanism, the two can co-exist, as follows:
-
-```html
-<template>
- <div class="root" onclick="rootClick" bubble="true">
- <div>
- <text style="font-size: 40px;">{{rootText}}</text>
- </div>
- <div class="outer" onclick="parentClick">
- <div>
- <text style="font-size: 40px;">{{parentText}}</text>
- </div>
- <text class="inner" onclick="click">{{innerText}}</text>
- </div>
- </div>
-</template>
-
-<script>
- module.exports = {
- data: {
- innerText: 'click me',
- parentText: '',
- rootText: ''
- },
- methods: {
- click: function(e) {
- this.innerText = 'inner bubble'
- },
- parentClick: function(e) {
- this.parentText = 'parent bubble'
- e.stopPropagation()
- },
- rootClick: function(e) {
- this.rootText = 'root bubble'
- // e.stopPropagation()
- }
- }
- }
-</script>
-
-<style>
- .inner {
- font-size: 40px;
- text-align: center;
- background-color: #7a9b1b;
- padding: 40px;
- }
-
- .outer {
- font-size: 40px;
- text-align: center;
- background-color: #9b7a1b;
- padding: 120px;
- }
-
- .root {
- font-size: 40px;
- text-align: center;
- background-color: #7a1b9b;
- padding: 80px;
- }
-</style>
-```
-
-[try it](http://dotwe.org/weex/0cab45a7c62e8bebedd2ffd83a8e1256)
-
-Run the above code, open with the client, click on the middle of the element, you can see the event up to the parent element is terminated, no longer continue to spread to the root element.
http://git-wip-us.apache.org/repos/asf/incubator-weex-site/blob/12e3a8bc/_draft/v-0.10/references/cheatsheet.md
----------------------------------------------------------------------
diff --git a/_draft/v-0.10/references/cheatsheet.md b/_draft/v-0.10/references/cheatsheet.md
deleted file mode 100644
index 68ac69a..0000000
--- a/_draft/v-0.10/references/cheatsheet.md
+++ /dev/null
@@ -1,102 +0,0 @@
-# Weex Cheat Sheet
-
-## Native Components
-
-| component | attribtues | styles | events | special parent | children |
-| ---- | ---- | ---- | ---- | ---- | ---- |
-| `<div>` | - | **box model**<br>**flexbox**<br>`position`<br>`background-color`<br>`opacity` | `click`<br>`appear`<br>`disappear` | - | (any) |
-| `<text>` | `value` | **box model**<br>flex<br>`position`<br>`background-color`<br>`opacity`<br>`color`<br>`font-size`<br>`font-style`<br>`font-weight`<br>`text-decoration`<br>`text-align`<br>`text-overflow`<br>`line-height` | `click`<br>`appear`<br>`disappear` | - | text only |
-| `<image>` | `src` | **box model**<br>**flexbox**<br>`position`<br>`background-color`<br>`opacity`<br>`resize` | `click`<br>`appear`<br>`disappear` | - | (none) |
-| `<scroller>` | `show-scrollbar`<br>`scroll-direction` | **box model**<br>**flexbox**<br>`position`<br>`background-color`<br>`opacity` | `click`<br>`appear`<br>`disappear` | - | (any) |
-| `<list>` | `loadmoreoffset` | **box model**<br>**flexbox**<br>`position`<br>`background-color`<br>`opacity` | `click`<br>`appear`<br>`disappear`<br>`loadmore`<br>`refresh`<br>`loading` | - | `<cell>`<br>`<header>`<br>`<refresh>`<br>`<loading>` |
-| `<cell>` | - | **box model**<br>**flexbox**<br>`position`<br>`background-color`<br>`opacity` | `click`<br>`appear`<br>`disappear` | `<list>` | (any) |
-| `<slider>` | `auto-play` | **box model**<br>**flexbox**<br>`position`<br>`background-color`<br>`opacity` | `click`<br>`appear`<br>`disappear`<br>`change` | - | (any)<br>`<indicator>` |
-| `<indicator>` | - | **box model**<br>**flexbox**<br>`position`<br>`item-color`<br>`item-selected-color`<br>`item-size` | `click`<br>`appear`<br>`disappear` | `<slider>` | (none) |
-| `<wxc-navpage>` | `height`<br>`background-color`<br>`title`<br>`title-color`<br>`left-item-title`<br>`left-item-color`<br>`right-item-title`<br>`right-item-color`<br>`left-item-src`<br>`right-item-src` | **box model**<br>**flexbox**<br>`position`<br>`background-color`<br>`opacity` | `click`<br>`appear`<br>`disappear`<br>`naviBar.leftItem.click`<br>`naviBar.rightItem.click` | - | (any) |
-| `<wxc-tabbar>` | `tab-items` | **box model**<br>**flexbox**<br>`position`<br>`background-color`<br>`opacity` | `tabBar.onClick` | - | (none) |
-| `<embed>` | `src` | **box model**<br>**flexbox**<br>`position`<br>`background-color`<br>`opacity` | `click`<br>`appear`<br>`disappear` | - | (none) |
-| `<web>` | `src` | **box model**<br>**flexbox**<br>`position`<br>`background-color`<br>`opacity` | `click`<br>`appear`<br>`disappear`<br>`pagestart`<br>`pagefinish`<br>`error` | - | (none) |
-| `<video>` | `src`<br>`play-status`<br>`auto-play` | **box model**<br>**flexbox**<br>`position`<br>`background-color`<br>`opacity` | `click`<br>`appear`<br>`disappear`<br>`start`<br>`pause`<br>`finish`<br>`fail` | - | (none) |
-| `<a>` | `href` | **box model**<br>**flexbox**<br>`position`<br>`background-color`<br>`opacity` | `click`<br>`appear`<br>`disappear` | - | (any) |
-| `<input>` | `type`<br>`value`<br>`placeholder`<br>`disabled`<br>`autofocus` | **box model**<br>**flexbox**<br>`position`<br>`background-color`<br>`opacity`<br>`placeholder-color`<br>`color`<br>`font-size`<br>`font-style`<br>`font-weight`<br>`text-align` | `click`<br>`appear`<br>`disappear` | - | (none) |
-| `<switch>` | `checked`<br>`disabled` | **box model**<br>**flexbox**<br>`position`<br>`background-color`<br>`opacity` | `appear`<br>`disappear`<br>`input`<br>`change`<br>`focus`<br>`blur` | - | (none) |
-
-## Native Modules
-
-| module | apis |
-| ---- | ---- |
-| `@weex-module/dom` | `scrollToElement(node, { offset })` |
-| `@weex-module/modal` | `toast({ message, duration })`<br>`alert({ message, okTitle }, callback)`<br>`confirm({ message, okTitle, cancelTitle }, callback(result))`<br>`prompt({ message, okTitle, cancelTitle }, callback(result, data))` |
-| `@weex-module/stream` | `fetch({ method, url, headers, type, body }, callback({ status, ok, statusText, data, headers }), progressCallback({ readyState, status, length, statusText, headers}))` |
-| `@weex-module/webview` | `goBack(ref)`<br>`goForward(ref)`<br>`reload(ref)` |
-| `@weex-module/navigator` | `push({ url, animated }, callback)`<br>`pop({ animated }, callback)` |
-| `@weex-module/animation` | `transition(node, { styles, duration, timingFunction, delay, transform-origin }, callback)` |
-
-## Special Template Syntax
-
-* `<foo x="abc">`
-* `{% raw %}<foo x="{{expr}}">{% endraw %}`
-* `<foo style="name1: value1; name2: value2">`
-* `{% raw %}<foo style="name1: value1; name2: {{expr}}; name3: ...">{% endraw %}`
-* `<foo class="a b c">`
-* `{% raw %}<foo class="a {{expr}} c">{% endraw %}`
-* `<foo onclick="methodName">`
-* `<foo id="abc">`
-* `<foo if="expr">`
-* `<foo repeat="item in list">`
-* `<foo repeat="(key,item) in list">`
-* `<component type="foo">`
-* `{% raw %}<component type="{{expr}}">{% endraw %}`
-
-## ViewModel APIs
-
-* `this.$vm(el)`
-* `this.$el(el)`
-* `this.$getConfig()`
-* `this.$emit(type, data)`
-* `this.$dispatch(type, data)`
-* `this.$broadcast(type, data)`
-
-## ViewModel Options
-
-* `data`
-* `methods`
-* `computed`
-* `init`, `created`, `ready`
-* `events`
-
-example:
-
-```javascript
-module.exports = {
-
- data: function () {
- return {
- x: 1,
- y: 2
- }
- }
-
- methods: {
- foo: function () {
- console.log('foo')
- }
- },
-
- computed: {
- z: function () {
- return this.x + this.y
- }
- },
-
- events: {
- custom: function (e) {
- console.log(e)
- }
- },
-
- init: function () {},
- created: function () {},
- ready: function () {}
-}
-```
http://git-wip-us.apache.org/repos/asf/incubator-weex-site/blob/12e3a8bc/_draft/v-0.10/references/color-names.md
----------------------------------------------------------------------
diff --git a/_draft/v-0.10/references/color-names.md b/_draft/v-0.10/references/color-names.md
deleted file mode 100644
index a61112b..0000000
--- a/_draft/v-0.10/references/color-names.md
+++ /dev/null
@@ -1,182 +0,0 @@
----
-title: List of the names of colors
-type: references
-order: 1.7
-version: 0.10
----
-
-# List of the names of colors
-
-### Basic color keywords:
-
-| Color Name | Hex rgb |
-| ---------- | ------- |
-| black | #000000 |
-| silver | #C0C0C0 |
-| gray | #808080 |
-| white | #FFFFFF |
-| maroon | #800000 |
-| red | #FF0000 |
-| purple | #800080 |
-| fuchsia | #FF00FF |
-| green | #008000 |
-| lime | #00FF00 |
-| olive | #808000 |
-| yellow | #FFFF00 |
-| navy | #000080 |
-| blue | #0000FF |
-| teal | #008080 |
-| aqua | #00FFFF |
-
-### Extended color keywords:
-
-| Color Name | Hex rgb |
-| ---------- | ------- |
-| aliceblue | #F0F8FF |
-| antiquewhite | #FAEBD7 |
-| aqua | #00FFFF |
-| aquamarine | #7FFFD4 |
-| azure | #F0FFFF |
-| beige | #F5F5DC |
-| bisque | #FFE4C4 |
-| black | #000000 |
-| blanchedalmond | #FFEBCD |
-| blue | #0000FF |
-| blueviolet | #8A2BE2 |
-| brown | #A52A2A |
-| burlywood | #DEB887 |
-| cadetblue | #5F9EA0 |
-| chartreuse | #7FFF00 |
-| chocolate | #D2691E |
-| coral | #FF7F50 |
-| cornflowerblue | #6495ED |
-| cornsilk | #FFF8DC |
-| crimson | #DC143C |
-| cyan | #00FFFF |
-| darkblue | #00008B |
-| darkcyan | #008B8B |
-| darkgoldenrod | #B8860B |
-| darkgray | #A9A9A9 |
-| darkgreen | #006400 |
-| darkgrey | #A9A9A9 |
-| darkkhaki | #BDB76B |
-| darkmagenta | #8B008B |
-| darkolivegreen | #556B2F |
-| darkorange | #FF8C00 |
-| darkorchid | #9932CC |
-| darkred | #8B0000 |
-| darksalmon | #E9967A |
-| darkseagreen | #8FBC8F |
-| darkslateblue | #483D8B |
-| darkslategray | #2F4F4F |
-| darkslategrey | #2F4F4F |
-| darkturquoise | #00CED1 |
-| darkviolet | #9400D3 |
-| deeppink | #FF1493 |
-| deepskyblue | #00BFFF |
-| dimgray | #696969 |
-| dimgrey | #696969 |
-| dodgerblue | #1E90FF |
-| firebrick | #B22222 |
-| floralwhite | #FFFAF0 |
-| forestgreen | #228B22 |
-| fuchsia | #FF00FF |
-| gainsboro | #DCDCDC |
-| ghostwhite | #F8F8FF |
-| gold | #FFD700 |
-| goldenrod | #DAA520 |
-| gray | #808080 |
-| green | #008000 |
-| greenyellow | #ADFF2F |
-| grey | #808080 |
-| honeydew | #F0FFF0 |
-| hotpink | #FF69B4 |
-| indianred | #CD5C5C |
-| indigo | #4B0082 |
-| ivory | #FFFFF0 |
-| khaki | #F0E68C |
-| lavender | #E6E6FA |
-| lavenderblush | #FFF0F5 |
-| lawngreen | #7CFC00 |
-| lemonchiffon | #FFFACD |
-| lightblue | #ADD8E6 |
-| lightcoral | #F08080 |
-| lightcyan | #E0FFFF |
-| lightgoldenrodyellow | #FAFAD2 |
-| lightgray | #D3D3D3 |
-| lightgreen | #90EE90 |
-| lightgrey | #D3D3D3 |
-| lightpink | #FFB6C1 |
-| lightsalmon | #FFA07A |
-| lightseagreen | #20B2AA |
-| lightskyblue | #87CEFA |
-| lightslategray | #778899 |
-| lightslategrey | #778899 |
-| lightsteelblue | #B0C4DE |
-| lightyellow | #FFFFE0 |
-| lime | #00FF00 |
-| limegreen | #32CD32 |
-| linen | #FAF0E6 |
-| magenta | #FF00FF |
-| maroon | #800000 |
-| mediumaquamarine | #66CDAA |
-| mediumblue | #0000CD |
-| mediumorchid | #BA55D3 |
-| mediumpurple | #9370DB |
-| mediumseagreen | #3CB371 |
-| mediumslateblue | #7B68EE |
-| mediumspringgreen | #00FA9A |
-| mediumturquoise | #48D1CC |
-| mediumvioletred | #C71585 |
-| midnightblue | #191970 |
-| mintcream | #F5FFFA |
-| mistyrose | #FFE4E1 |
-| moccasin | #FFE4B5 |
-| navajowhite | #FFDEAD |
-| navy | #000080 |
-| oldlace | #FDF5E6 |
-| olive | #808000 |
-| olivedrab | #6B8E23 |
-| orange | #FFA500 |
-| orangered | #FF4500 |
-| orchid | #DA70D6 |
-| palegoldenrod | #EEE8AA |
-| palegreen | #98FB98 |
-| paleturquoise | #AFEEEE |
-| palevioletred | #DB7093 |
-| papayawhip | #FFEFD5 |
-| peachpuff | #FFDAB9 |
-| peru | #CD853F |
-| pink | #FFC0CB |
-| plum | #DDA0DD |
-| powderblue | #B0E0E6 |
-| purple | #800080 |
-| red | #FF0000 |
-| rosybrown | #BC8F8F |
-| royalblue | #4169E1 |
-| saddlebrown | #8B4513 |
-| salmon | #FA8072 |
-| sandybrown | #F4A460 |
-| seagreen | #2E8B57 |
-| seashell | #FFF5EE |
-| sienna | #A0522D |
-| silver | #C0C0C0 |
-| skyblue | #87CEEB |
-| slateblue | #6A5ACD |
-| slategray | #708090 |
-| slategrey | #708090 |
-| snow | #FFFAFA |
-| springgreen | #00FF7F |
-| steelblue | #4682B4 |
-| tan | #D2B48C |
-| teal | #008080 |
-| thistle | #D8BFD8 |
-| tomato | #FF6347 |
-| turquoise | #40E0D0 |
-| violet | #EE82EE |
-| wheat | #F5DEB3 |
-| white | #FFFFFF |
-| whitesmoke | #F5F5F5 |
-| yellow | #FFFF00 |
-| yellowgreen | #9ACD32 |
-
http://git-wip-us.apache.org/repos/asf/incubator-weex-site/blob/12e3a8bc/_draft/v-0.10/references/common-attrs.md
----------------------------------------------------------------------
diff --git a/_draft/v-0.10/references/common-attrs.md b/_draft/v-0.10/references/common-attrs.md
deleted file mode 100644
index 2ed0310..0000000
--- a/_draft/v-0.10/references/common-attrs.md
+++ /dev/null
@@ -1,78 +0,0 @@
----
-title: Common Attribute
-type: references
-order: 1.5
-version: 0.10
----
-
-# Common Attribute
-
-Attributes provide additional information about weex tags. All weex tags can have attributes, attributes are always specified in the start tag and usually come in name/value pairs like: name="value". Mustache can be used inside a value.
-All of weex tags have the following attributes:
-
-## id
-
-Specifies a unique id for an element in `<template>` scope. With `id` attribute you can easily refer a weex tag.
-
-```html
-<div id="logo"></div>
-<div id="item-{{index}}"></div>
-```
-
-## style
-
-Specifies an inline style for an element.
-
-```html
-<div style="width: 200; height: 200"></div>
-<div style="padding: {{x}}; margin: 0"></div>
-```
-
-## class
-
-Specifies one or more classnames for an element (refers to a class in a style sheet).
-
-```html
-<div class="button"></div>
-<div class="button {{btnStatus}}"></div>
-```
-
-## repeat
-
-We can use the `repeat` attribute to render a list of items based on an array. The `repeat` attribute has a special syntax in the form of `item in items`, where `items` is the source data array and `item` is an alias for the array element being iterated on.
-
-```html
-<div repeat={{list}}></div>
-<div repeat={{item in list}}></div>
-```
-
-## if
-
-Provide a boolean value to decide whether or not to display current tag.
-
-```html
-<div if="true"></div>
-<div if="{{opened}}"></div>
-<div if="{{direction === 'row'}}"></div>
-```
-
-## append
-
-By providing the value of tree or node, it determines the progress of rendering.
-
-```html
-<div append="tree/node"></div>
-```
-
-## Event Handing (on...)
-
-Register event handlers on weex tag.
-
-```html
-<div onclick="openDetail"></div>
-<div onappear="{{loadMore}}"></div>
-```
-
-## Notes!
-
-Weex is basically following [HTML attribute](https://en.wikipedia.org/wiki/HTML_attribute) naming rule, so please **do not use CamelCase** in your attribute, **kebab-case** with "-" as delimiter is much better.
http://git-wip-us.apache.org/repos/asf/incubator-weex-site/blob/12e3a8bc/_draft/v-0.10/references/common-event.md
----------------------------------------------------------------------
diff --git a/_draft/v-0.10/references/common-event.md b/_draft/v-0.10/references/common-event.md
deleted file mode 100644
index c8e0836..0000000
--- a/_draft/v-0.10/references/common-event.md
+++ /dev/null
@@ -1,120 +0,0 @@
----
-title: Common Events
-type: references
-order: 1.9
-version: 0.10
----
-
-# Common Events
-
-Weex provide the ability to let events trigger action, like starting a JavaScript when a user click on a component. Bellow are the common event attributes that can be added to weex components to define event actions.
-
-## Click event
-
-The onclick attribute fires on a click gesture on the element.
-**Notes: ** The `input` and `switch` component does not currently support the `click` event, please use `change` or `input` event instead.
-
-### event object
-
-- `type` : `click`
-- `target` : The target component where the event is triggered
-- `timestamp` : Timestamp when event is triggered
-
-**Example:**
-
-```html
-<template>
- <text style="font-size: 60px" onclick="{{update}}">I am {{name}}</text>
-</template>
-
-<script>
- module.exports = {
- data: {
- name: 'Tom'
- },
- methods: {
- update: function () {
- this.name = this.name === 'Tom' ? 'Jerry' : 'Tom'
- }
- }
- }
-</script>
-```
-
-
-## Longpress event
-
-If a `longpress` event is bound to a component, the event will be triggered when user long press on it.
-**Notes: ** The `input` and `switch` component does not currently support the `click` event, please use `change` or `input` event instead.
-
-### event object
-
-- `type` : `longpress`
-- `target` : The target component where the event is triggered
-- `timestamp` : Timestamp when event is triggered
-
-**Example:**
-
-```html
-<template>
- <div style="width: 400px; height: 200px; background-color: {{bg}};
- justify-content: center; align-items: center;" onlongpress="{{update}}">
- <text style="font-size: 60px">Press me</text>
- </div>
-</template>
-
-<script>
- module.exports = {
- data: {
- bg: '#FF0000'
- },
- methods: {
- update: function () {
- this.bg = this.bg === '#FF0000' ? '#00FF00' : '#FF0000'
- }
- }
- }
-</script>
-```
-
-## Appear event
-
-If a appear event is bound to a component inside a scrollable container, the event will be triggered when the component comes to be visible.
-
-### event object
-
-- `type` : `appear`
-- `target` : The target component where the event is triggered
-- `timestamp` : Timestamp when event is triggered
-- `direction` : The direction in which the scroller is scrolling. Could be `up` or `down`.
-
-[example](http://dotwe.org/3fa162a65fbf0c7e2655fbc1bebbfc38)
-
-## Disappear event
-
-If a `disappear` event is bound to a component inside a scrollable container, the event will be triggered when the component scrolls out of viewport and disappears from your sight.
-
-### event object
-
-- `type` : `disappear`
-- `target` : The target component where the event is triggered
-- `timestamp` : Timestamp when event is triggered
-- `direction` : The direction in which the scroller is scrolling. Could be `up` or `down`.
-
-[example](http://dotwe.org/3fa162a65fbf0c7e2655fbc1bebbfc38)
-
-## Page event
-
-Weex provides you with simple management of page status, such as `viewappear` and `viewdisappear`.
-The `viewappear` event will be triggered when page is about to show or before any animations are configured for showing. For example, when calling `push` method in `navigator` module, this event will be trigged in new page.
-The `viewdisappear` event will be triggeded when page is about to dismiss.
-Different from `appear` and `disappear` of component, these two events focus on the status of whole page, so **they must be bound to the root component**.
-In addititon, these events also can be bound to body component which is not root actually such as `wxc-navpage`.
-
-### event object
-
-- `type` : `viewappear` or `viewdisappear`
-- `target` : The target component where the event is triggered
-- `timestamp` : Timestamp when event is triggered
-
-[example](http://dotwe.org/3fa162a65fbf0c7e2655fbc1bebbfc38)
http://git-wip-us.apache.org/repos/asf/incubator-weex-site/blob/12e3a8bc/_draft/v-0.10/references/common-style.md
----------------------------------------------------------------------
diff --git a/_draft/v-0.10/references/common-style.md b/_draft/v-0.10/references/common-style.md
deleted file mode 100644
index 8ae8224..0000000
--- a/_draft/v-0.10/references/common-style.md
+++ /dev/null
@@ -1,208 +0,0 @@
----
-title: Common Style
-type: references
-order: 1.6
-version: 0.10
----
-
-# Common Style
-
-All of weex tags share some common style rules
-
-## Box Model
-
-
-
-Weex box model based on the CSS box model, all of weex elements can be considered as boxes. The term "box model" is used when talking about design and layout. The box model is essentially a box that wraps around every HTML element. It consists of margins, borders, paddings, and the actual content.
-
-you can use the definition below in weex box model.
-
-- `width`: `length` type, default value `0`
-- `height`: `length` type, default value `0`
-- `padding`: `length` type, default value `0`, (space around content, between element content and the element border)
- - `padding-left`: `length` type, default value `0`
- - `padding-right`: `length` type, default value `0`
- - `padding-top`: `length` type, default value `0`
- - `padding-bottom`: `length` type, default value `0`
-- `margin`: `length` type, default value `0`, (space around elements, outside the border)
- - `margin-left`: `length` type, default value `0`
- - `margin-right`: `length` type, default value `0`
- - `margin-top`: `length` type, default value `0`
- - `margin-bottom`: `length` type, default value `0`
-- `border`
- - `border-style`: values `solid` | `dashed` | `dotted`, default value `solid`
- - `border-left-style`: values `solid` | `dashed` | `dotted`, default value `solid`
- - `border-top-style`: values `solid` | `dashed` | `dotted`, default value `solid`
- - `border-right-style`: values `solid` | `dashed` | `dotted`, default value `solid`
- - `border-bottom-style`: values `solid` | `dashed` | `dotted`, default value `solid`
- - `border-width`: `length` type, non-negative, default value `0`
- **DO NOT** use `border-width:1`. There is a default viewport `<viewport width="750">`, if the actual width of a device is 720px, then `border-width:1` will be `border-width:0.96`. As weex **do not** support sub-pixel, this border would not be rendered.
- - `border-left-width`: `length` type, non-negative, default value `0`
- - `border-top-width`: `length` type, non-negative, default value `0`
- - `border-right-width`: `length` type, non-negative, default value `0`
- - `border-bottom-width`: `length` type, non-negative, default value `0`
- - `border-color`: `color` type, default value `#000000`
- - `border-left-color`: `color` type, default value `#000000`
- - `border-top-color`: `color` type, default value `#000000`
- - `border-right-color`: `color` type, default value `#000000`
- - `border-bottom-color`: `color` type, default value `#000000`
- - `border-radius`: `length` type, default value `0`, (rounded borders to elements , default value is 0 meaning right angle )
-
- Although the the default overflow style is `overflow:hidden` in android, a view will not be clipped by its parents' `border-radius`. This only happens on Android, it works fine on iOS.
- - `border-bottom-left-radius`: `length` type, non-negative, default value `0`
- - `border-bottom-right-radius`: `length` type, non-negative, default value `0`
- - `border-top-left-radius`: `length` type, non-negative, default value `0`
- - `border-top-right-radius`: `length` type, non-negative, default value `0`
-
-Notes: The rule of border-radius for a specific corner such as `border-top-left-radius` is not currently supported for component `<image>` and `<text>`.
-
-Weex box model uses `border-box` as the default value of `box-sizing`, meaning the width and height properties includes content, padding and border, but not the margin.
-
-example:
-
-```html
-<template>
- <div>
- <image src="..." style="width: 400; height: 200; margin-left: 20;"></image>
- </div>
-</template>
-```
-
-## Flexbox
-
-Weex box style model based on the CSS flexbox, ensures that elements behave predictably and the page layout can accommodates to different screen sizes and different display devices.
-
-Flexbox consists of flex containers and flex items. If a weex element can containing other elements, it is a flex container.
-
-Notice that the old version of flexbox specification has differences with the new ones, such as whether or not to support wrapping. This is described at w3c's working drafts, and you should notice the differences among them. Also notice that the old version is only supported below the 4.4 version of android.
-
-### Flex container
-
-Flexbox is the default and only style model in Weex, so you don't have to add `display: flex;` in a container.
-
-- `flex-direction`: values `row` | `column`, default value `column`
-
-The flex-direction property specifies the direction of the flexible items inside the flex container. Default value is `column` (top-to-bottom).
-
-- `justify-content`: values `flex-start` | `flex-end` | `center` | `space-between`, default value `flex-start`
-
-The justify-content property horizontally aligns the flexible container's items when the items do not use all available space on the main-axis. Default value is `flex-start` meaning the flex items are positioned at the beginning of the container. `flex-end` means the items are positioned at the end of the container. `center` means the items are positioned at the center of the container. `space-between` means the items are positioned with space between the lines.
-
-
-
-- `align-items`: values `stretch` | `flex-start` | `center` | `flex-end`, default value `stretch`
-
-The align-items property vertically aligns the flexible container's items when the items do not use all available space on the cross-axis. Default value is `stretch` meaning the items are stretched to fit the container. `flex-start` means the items are positioned at the top of the container; `flex-end` means the items are positioned at the bottom of the container; `center` means items are positioned at the center of the container (vertically).
-
-
-
-### Flex item
-
-- `flex`: `number` type, default value `0`
-
-the flex property specifies the length of the flex item, relative to the rest of the flex items inside the same container. If all of the flex items set `flex: 1`, they will have equal width or height on direction of flex container's `flex-direction`. If there are two flex items, with one setting `flex: 1`, and the other setting `flex: 2`, the first one will take 1/3 container space, and the second one will take 2/3 container space. If all of flex items don't set `flex`, they will be aligned depending on the container's `justify-content` property.
-
-
-## Examples
-
-a list of images with equal scales align at the vertical axis:
-
-```html
-<template>
- <div style="width: 300; height: 100;">
- <image src="..." style="flex: 1;"></image>
- <image src="..." style="flex: 1;"></image>
- <image src="..." style="flex: 1;"></image>
- </div>
-</template>
-```
-
-a image with fixed width aligns with a stretched text:
-
-```html
-<template>
- <div style="width: 300; height: 100;">
- <image src="..." style="width: 100; height: 100;"></image>
- <text style="flex: 1;">...</text>
- </div>
-</template>
-```
-
-mixed direction alignment:
-
-```html
-<template>
- <div style="width: 100;">
- <image src="..." style="width: 100; height: 100;"></image>
- <div style="flex-direction: row;">
- <text style="flex: 2; font-size: 32;">title</text>
- <text style="flex: 1; font-size: 16;">$100</text>
- </div>
- </div>
-</template>
-```
-
-one text align left , the other float right:
-
-
-
-```html
-<template>
-<div style="flex-direction: row; justify-content: space-between;">
- <text>WEEX</text>
- <text>2016-05-08</text>
-</div>
-</template>
-```
-
-## Position
-
-we can use properties below to control placement of weex tag
-
-- `position`: values `relative` | `absolute` | `fixed` | `sticky`, default value `relative`
-
-`relative` means the item is positioned relative to its normal position. `absolute` means the item is positioned relative to its container. `fixed` keeps the elements position fixed when the page is scrolling. `sticky` keeps elements positioned inside the viewport as "stuck" at the top or "relative" at its original place depending on whether does it about to scroll out of the view.
-
-- `top`: `number` type, default value `0`, upward offset value
-- `bottom`: `number` type, default value `0`, downward offset value
-- `left`: `number` type, default value `0`, leftward offset value
-- `right`: `number` type, default value `0`, rightward offset value
-
-### Examples
-
-```html
-<template>
- <div style="flex-direction: column;">
- <div style="height: 3000;">
- <image src="..." style="top: 50; left: 50; ..."></image>
- </div>
- <div style="height: 3000;">
- <image src="..." style="position: sticky; ..."></image>
- </div>
- <div style="height: 3000;">
- <image src="..." style="position: absolute; top: 50; left: 50; ..."></image>
- </div>
- </div>
-</template>
-```
-
-## Other Common Style
-
-- `opacity`
-- `background-color`
-
-## Type of Style Value
-
-- `length` type
-- `number` type
-- `color` type (*[The list of color keywords.](./color-names.html)*)
-- enumerated type
-
-## Simple Step
-
-These up-to-down steps may help you to plan the whole style of weex pages.
-
-1. overall style: divide the whole page to different parts
-2. flex alignment: align boxes in every part of page
-3. position box: place box, set offset
-4. element specific style: set styles for certain element if needed
http://git-wip-us.apache.org/repos/asf/incubator-weex-site/blob/12e3a8bc/_draft/v-0.10/references/component-defs.md
----------------------------------------------------------------------
diff --git a/_draft/v-0.10/references/component-defs.md b/_draft/v-0.10/references/component-defs.md
deleted file mode 100644
index baa6584..0000000
--- a/_draft/v-0.10/references/component-defs.md
+++ /dev/null
@@ -1,131 +0,0 @@
----
-title: Component Definition
-type: references
-order: 1.2
-version: 0.10
----
-
-# Component Definition
-
-A component definition is a set of options to describe a component. It's always assigned to `module.exports` in `<script>`.
-
-```javascript
-module.exports = {
- // a set of options here
-}
-```
-
-## Data & Methods options
-
-```javascript
-module.exports = {
- data: function () {
- return {x: 1, y: 2}
- },
- methods: {
- doThis: function () {...},
- doThat: function () {...}
- },
- ...
-}
-```
-
-The `data` option is a function that return a observable data object for this ViewModel.
-The `methods` option is a map which contains all ViewModel methods.
-
-Each `data` or `methods` property will be proxied to the ViewModel instance. So you can read and write data with `this.x`, also you can call methods with `this.doThis(...)`.
-
-A whole example:
-
-```html
-<template>
- <div style="width: {{w}}; height: {{h}}; background-color: red;" onclick="update"></div>
-</template>
-<script>
- module.exports = {
- data: function () {
- return {w: 750, h: 200}
- },
- methods: {
- update: function (e) {
- this.h += 200
- }
- }
- }
-</script>
-```
-
-## Events options
-
-```javascript
-module.exports = {
- data: ...,
- methods: {
- foo: function () {
- ...
- this.$emit('customtype1', data)
- }
- },
- events: {
- customtype1: function (e) {
- console.log(e.type, e.detail)
- }
- },
- ...
-}
-```
-
-The `events` options could allow you to add custom event listeners when ViewModel created. Then it will listen these type of events and handle them by the function-type value.
-
-The first argument is a event object which contains event data in `e.detail`.
-
-## Lifecycle options
-
-```javascript
-module.exports = {
- data: ...,
- methods: ...,
- init: function () {
- console.log('ViewModel constructor begins')
- },
- created: function () {
- console.log('Data observation finished')
- },
- ready: function () {
- console.log('Virtual DOM finished')
- },
- ...
-}
-```
-
-Weex ViewModel now supports these lifecycle hook functions which could be write as component options:
-
-* `init`: fired at the beginning of a ViewModel constructor call.
-* `created`: fired when ViewModel observes default data but not compile the template.
-* `ready`: fired when ViewModel observes default data and compiles the template to generate virtual DOM finally.
-
-**Note: If you want to use the function in `methods`, `events` or lifecycle options as a parameter, please make sure the context is correct as expect. For example:**
-
-```javascript
-module.exports = {
- data: function () {
- return {x: 1, y: 2}
- },
- ready: function () {
- // `undefined`
- // because the context changed
- this.foo(this.bar)
- // `1`
- // because the context bound correct
- this.foo(this.bar.bind(this))
- },
- methods: {
- foo: function (fn) {
- return fn()
- },
- bar: function () {
- return this.x
- }
- }
-}
-```
http://git-wip-us.apache.org/repos/asf/incubator-weex-site/blob/12e3a8bc/_draft/v-0.10/references/components/a.md
----------------------------------------------------------------------
diff --git a/_draft/v-0.10/references/components/a.md b/_draft/v-0.10/references/components/a.md
deleted file mode 100644
index e1677bf..0000000
--- a/_draft/v-0.10/references/components/a.md
+++ /dev/null
@@ -1,50 +0,0 @@
----
-title: <a>
-type: references
-order: 2.1
-version: 0.10
----
-
-# <a>
-
-`a` defines a hyperlink to a page in the web. Its purpose and syntax is very similar to [<a>](https://developer.mozilla.org/en-US/docs/Web/HTML/Element/a) in HTML5.
-
-## Child Components
-
-This type of component supports all kinds of weex component as it's child components except for its own kind.
-
-## Attributes
-
-* href: href attributes defines the URL of the hyperlink.
-
-## Styles:
-
-### common styles
-
-Check out the [common styles](../common-style.html)
-
-## Events
-
-### common events
-
-Check out the [common events](../common-event.html)
-
-### Notes
-
-We can't guarantee the order of execution between onclick function and href. we recommend that do not use the click event in `a`.
-
-## Examples
-
-```html
-<template>
- <div>
- <a href="http://h5.m.taobao.com">
- <text>Click me to see how 'A' element opens a new world.</text>
- </a>
- </div>
-</template>
-```
-
-[Try it](http://dotwe.org/d99f6eb55aa501c836a195ec824cada0)
-
-Use [Weex Playground](https://alibaba.github.io/weex/download.html) App to Scan the QR image and view the example for 'a'.
http://git-wip-us.apache.org/repos/asf/incubator-weex-site/blob/12e3a8bc/_draft/v-0.10/references/components/cell.md
----------------------------------------------------------------------
diff --git a/_draft/v-0.10/references/components/cell.md b/_draft/v-0.10/references/components/cell.md
deleted file mode 100644
index 34d1703..0000000
--- a/_draft/v-0.10/references/components/cell.md
+++ /dev/null
@@ -1,42 +0,0 @@
----
-title: <cell>
-type: references
-order: 2.6
-version: 0.10
----
-
-# <cell>
-
-### Summary
-
-This component must be used as a subcomponent of a [`list`](./list.html) component, which is for the performance optimizing during scrolling.
-
-### Child Components
-
-This type of component supports all kinds of weex component as its child components.
-
-### Attributes
-
-There is no specific attribute for this component other than the [common attributes](../common-attrs.html).
-
-**Notes:** you can't give `<cell>` a `flex` value. Width of `<cell>` is equal to the width of its parent component `<list>`, and you don't need to specify its height.
-
-### Styles
-
-**common styles**: check out the [common styles](../common-attrs.html)
-
-- support flexbox related styles
-- support box model related styles
-- support ``position`` related styles
-- support ``opacity``, ``background-color`` etc.
-
-### Events
-
-**common events**: check out the [common events](../common-event.html)
-
-- support `click` event. Check out [common events](../common-event.html)
-- support `appear` / `disappear` event. Check out [common events](../common-event.html)
-
-### Example
-
-please refer to [List](./list.html)
http://git-wip-us.apache.org/repos/asf/incubator-weex-site/blob/12e3a8bc/_draft/v-0.10/references/components/div.md
----------------------------------------------------------------------
diff --git a/_draft/v-0.10/references/components/div.md b/_draft/v-0.10/references/components/div.md
deleted file mode 100644
index 1e75523..0000000
--- a/_draft/v-0.10/references/components/div.md
+++ /dev/null
@@ -1,48 +0,0 @@
----
-title: <div>
-type: references
-order: 2.2
-version: 0.10
----
-
-# <div>
-
-### Summary
-
-The most fundamental component which is a contianer to wrap any other components. It supports all the common styles, attributes and layout of flexbox.
-
-alias: `<container>` (deprecated)
-
-### Child Components
-
-This type of component supports all kinds of weex component as its child components including its own kind.
-
-### Attributes
-
-There is no specific attribute for this component other than the [common attributes](../common-attrs.html).
-
-### Styles
-
-**common styles**: check out the [common styles](../common-attrs.html)
-
-- support flexbox related styles
-- support box model related styles
-- support ``position`` related styles
-- support ``opacity``, ``background-color`` etc.
-
-### Events
-
-**common events**: check out the [common events](../common-event.html)
-
-- support `click` event. Check out [common events](../common-event.html)
-- support `appear` / `disappear` event. Check out [common events](../common-event.html)
-
-### Examples
-
-```html
-<div>
- <image src="..."></image>
- <text>...</text>
-</div>
-```
-
http://git-wip-us.apache.org/repos/asf/incubator-weex-site/blob/12e3a8bc/_draft/v-0.10/references/components/image.md
----------------------------------------------------------------------
diff --git a/_draft/v-0.10/references/components/image.md b/_draft/v-0.10/references/components/image.md
deleted file mode 100644
index 3eae206..0000000
--- a/_draft/v-0.10/references/components/image.md
+++ /dev/null
@@ -1,55 +0,0 @@
----
-title: <image>
-type: references
-order: 2.3
-version: 0.10
----
-
-# <image>
-
-### Summary
-
-`image` tag is used to render a specified picture, and it shouldn't contain any child component. You can use `img` as alias.
-
-**Notes:** the styles of `width` and `height` should be specified, otherwise it won't work.
-
-alias: `<img>`
-
-### Child Components
-
-This component supports no child components.
-
-### Attributes
-
-- `src`: <string> image source url
-- `resize`: <span class="api-version">v0.5+</span> <string> the 'ScaleType' of the component. The default value is ``stretch``, if this attribute is not specified. Possible values are ``cover``, ``contain``, each of which has the same meaning with w3c standard.
-
-Other attributes please check out the [common attributes](../common-attrs.html).
-
-### Styles
-
-- `width`: <length> the width of the component. This style should be specified.
-- `height`: <length> the height of the component. This style should be specifed.
-
-**common styles**: check out the [common styles](../common-attrs.html)
-
-- support flexbox related styles
-- support box model related styles
-- support ``position`` related styles
-- support ``opacity``, ``background-color`` etc.
-
-### Events
-
-**common events**: check out the [common events](../common-event.html)
-
-- support `click` event. Check out [common events](../common-event.html)
-- support `appear` / `disappear` event. Check out [common events](../common-event.html)
-
-### Examples
-
-```html
-<div>
- <image src="..." ></image>
- <text>...</text>
-</div>
-```
http://git-wip-us.apache.org/repos/asf/incubator-weex-site/blob/12e3a8bc/_draft/v-0.10/references/components/index.md
----------------------------------------------------------------------
diff --git a/_draft/v-0.10/references/components/index.md b/_draft/v-0.10/references/components/index.md
deleted file mode 100644
index 66e211c..0000000
--- a/_draft/v-0.10/references/components/index.md
+++ /dev/null
@@ -1,24 +0,0 @@
----
-title: Build-in Components
-type: references
-order: 2
-version: 0.10
----
-
-# Build-in Components
-
-- [<a>](./a.html)
-- [<indicator>](./indicator.html)
-- [<switch>](./switch.html)
-- [<text>](./text.html)
-- [<textarea>](./textarea.html)
-- [<video>](./video.html)
-- [<web>](./web.html)
-- [<div>](./div.html)
-- [<image>](./image.html)
-- [<input>](./input.html)
-- [<list>](./list.html)
-- [<cell>](./cell.html)
-- [<refresh> & <loading>](./refresh.html)
-- [<scroller>](./scroller.html)
-- [<slider>](./slider.html)
\ No newline at end of file
http://git-wip-us.apache.org/repos/asf/incubator-weex-site/blob/12e3a8bc/_draft/v-0.10/references/components/indicator.md
----------------------------------------------------------------------
diff --git a/_draft/v-0.10/references/components/indicator.md b/_draft/v-0.10/references/components/indicator.md
deleted file mode 100644
index b06dc95..0000000
--- a/_draft/v-0.10/references/components/indicator.md
+++ /dev/null
@@ -1,98 +0,0 @@
----
-title: <indicator>
-type: references
-order: 2.10
-version: 0.10
----
-
-# <indicator>
-
-### Summary
-
-This component must be used as a subcomponent of a [`slider`](./slider.html) component.
-
-### Child Components
-
-This component supports no child components.
-
-### Attributes
-
-There is no specific attribute for this component other than the [common attributes](../common-attrs.html).
-
-### Styles
-
-- `item-color`: <colors> This style attribute sets the normal item color using either a named color or a color specified in the hexadecimal #RRGGBB format.
-- `item-selectedColor`: <colors> This style attribute sets the selected item color using either a named color or a color specified in the hexadecimal #RRGGBB format.
-- `item-size`: <length> The size of the indicator elements, which is an float attribute.
-
-**common styles**: check out the [common styles](../common-attrs.html)
-
-- support flexbox related styles
-- support box model related styles
-- support ``position`` related styles
-
-**Note:** There are some specific details about the style `width` and `height` on this component: the position of indicator will not only depend on the `top`, `left`, `bottom` and `right`, but also depend on the value of `width` and `height`. Imagine there is a virtual container outside the indicator, and it inherit the `width` and `height` of the indicator. The `top`, `left`, `right` and `bottom` will always take effect on this container, not the indicator points themselves, and the indicator points will be positioned in the center of it. And also you should know the default `width` and `height` is the parent slider's `width` and `height`.
-
-**Note:** `background-color` is not recommended to apply on this component, and you should use `item-color` and `item-selectedColor` instead.
-
-### Events
-
-**common events**: check out the [common events](../common-event.html)
-
-- support `click` event. Check out [common events](../common-event.html)
-- support `appear` / `disappear` event. Check out [common events](../common-event.html)
-
-### Example
-
-```html
-<template>
- <div>
- <slider class="slider">
- <div class="slider-pages" repeat="{{itemList}}">
- <image class="img" src="{{pictureUrl}}"></image>
- <text class="title">{{title}}</text>
- </div>
-
- <indicator class="indicator"></indicator>
- </slider>
- </div>
-</template>
-
-<style>
- .img {width: 150; height: 150;}
- .title {flex: 1; color: #ff0000; font-size: 48; font-weight: bold; background-color: #eeeeee;}
- .slider {
- flex-direction: row;
- margin: 18;
- width: 714;
- height: 230;
- }
- .slider-pages {
- flex-direction: row;
- width: 714;
- height: 200;
- }
- .indicator {
- width:714;
- height:200;
- position:absolute;
- top:1;
- left:1;
- item-color: red;
- item-selectedColor: blue;
- item-size: 20;
- }
-</style>
-
-<script>
- module.exports = {
- data: {
- itemList: [
- {itemId: '520421163634', title: 'item1', pictureUrl: 'https://gd2.alicdn.com/bao/uploaded/i2/T14H1LFwBcXXXXXXXX_!!0-item_pic.jpg'},
- {itemId: '522076777462', title: 'item2', pictureUrl: 'https://gd1.alicdn.com/bao/uploaded/i1/TB1PXJCJFXXXXciXFXXXXXXXXXX_!!0-item_pic.jpg'},
- {itemId: '522076777462', title: 'iten3', pictureUrl: 'https://gd3.alicdn.com/bao/uploaded/i3/TB1x6hYLXXXXXazXVXXXXXXXXXX_!!0-item_pic.jpg'}
- ]
- }
- }
-</script>
-```
http://git-wip-us.apache.org/repos/asf/incubator-weex-site/blob/12e3a8bc/_draft/v-0.10/references/components/input.md
----------------------------------------------------------------------
diff --git a/_draft/v-0.10/references/components/input.md b/_draft/v-0.10/references/components/input.md
deleted file mode 100644
index feaac53..0000000
--- a/_draft/v-0.10/references/components/input.md
+++ /dev/null
@@ -1,124 +0,0 @@
----
-title: <input>
-type: references
-order: 2.4
-version: 0.10
----
-
-# input
-
-The weex builtin component `input` is used to create input controls to receive the user's input characters. How a `input` component works varies considerably depending on the value of its `type` attribute, such as `text`, `password`, `url`, `email`, `tel` etc.
-
-**Notes:** does not support the common-event `click`. Please listen to the `input` or `change` event instead.
-
-## Child Components
-
-This component supports no child components.
-
-## Attributes
-
-* `type`: the type of controls to display. The default value is `text`, if this attribute is not specified. Possible values are `text`, `password`, `tel`, `email`, `url` etc. each of which has the same meaning with �W3C standard.
-
-* `value`: the value(text) of the control.
-
-* `placeholder`: a hint to the user of which can be entered to the control. The placeholder text must have no carriage returns or line-feeds.
-
-* `disabled`: a boolean attribute indicates that the form control is not available for interaction. In particular, the click event will not be dispatched on disabled controls.
-
-* `autofocus`: a boolean attribute lets you specify that a form control should have input focus when the page loads.
-
-* `maxlength`: <span class="api-version">v0.7+</span> a number value to specify maxlength of input.
-
-Other attributes please check out the [common attributes](../common-attrs.html).
-
-## Styles
-
-* placeholder-color: the color of placeholder. Default value is '#999999'.
-
-* text styles: checkout [text styles](../text-style.html)
-
- * support 'color' style.
- * support 'font-size' style.
- * support 'font-style' style.
- * support 'font-weight' style.
- * support 'text-align' style.
-
-### common styles
-check out [common styles for components](../common-style.html)
-
-* support flexbox related styles.
-* support box model related styles.
-* support 'position' related styles.
-* support 'opacity', 'background-color' etc.
-
-## Events
-
-* input: the value of an input character changes.
-* change: the change event is fired when a change to the component's value is commited by the user. It always come after a 'blur' event.
-* focus: a component has received focus.
-* blur: a component has lost focus.
-
-### common events
-check out [common events](../common-event.html)
-
-* support 'appear' / 'disappear' event.
-
-### Notes
-does not support the common-event 'click'. Please listen to the 'input' or 'change' event instead.
-
-### Parameters of events' object
-
-* for 'input' and 'change' events:'value': the value of the component who dispatched this event.'timestamp': the time stamp of the event.
-* for 'focus' and 'blur' events:'timestamp': the time stamp of the event.
-
-## Example
-
-```html
-<template>
- <div>
- <input
- type="text"
- placeholder="Input Something"
- class="input"
- autofocus="true"
- value=""
- onchange="onchange"
- oninput="oninput"
- />
- <text>oninput: {{txtInput}}</text>
- <text>onchange: {{txtChange}}</text>
- </div>
-</template>
-
-<style>
- .input {
- font-size: 60;
- height: 80;
- width: 400;
- }
-</style>
-
-<script>
- require('weex-components');
- module.exports = {
- data: {
- txtInput: '',
- txtChange: ''
- },
- methods: {
- onchange: function(event) {
- this.txtChange = event.value;
- console.log('onchange', event.value);
- },
- oninput: function(event) {
- this.txtInput = event.value;
- console.log('oninput', event.value);
- }
- }
- };
-</script>
-```
-
-[Try it](http://dotwe.org/e1b18eb89facb4e2a5467ee4bebd9be6)
-
-Use [Weex Playground](https://alibaba.github.io/weex/download.html) App to Scan the QR image and view the example for 'input'.
http://git-wip-us.apache.org/repos/asf/incubator-weex-site/blob/12e3a8bc/_draft/v-0.10/references/components/list.md
----------------------------------------------------------------------
diff --git a/_draft/v-0.10/references/components/list.md b/_draft/v-0.10/references/components/list.md
deleted file mode 100644
index 3b4745e..0000000
--- a/_draft/v-0.10/references/components/list.md
+++ /dev/null
@@ -1,292 +0,0 @@
----
-title: <list>
-type: references
-order: 2.5
-version: 0.10
----
-
-# List
-
-<span class="weex-version">v0.6.1+</span>
-
-The List component, which inherits from Scroller component, is a core component, and it provides the most popular features for using a list of items.
-
-It can provide excellent experience and performance while still maintaining smooth scroll and low memory usage.
-
-**example**
-
-```html
-<template>
- <list>
- <cell onappear="onappear($event, $index)" ondisappear="ondisappear($event, $index)" class="row" repeat="{{staffs}}" index="{{$index}}">
- <div class="item">
- <text>{{name}}</text>
- </div>
- </cell>
- </list>
-</template>
-
-<style>
- .row {
- width: 750;
- }
- .item {
- justify-content: center;
- border-bottom-width: 2;
- border-bottom-color: #c0c0c0;
- height: 100;
- padding:20;
- }
-</style>
-
-<script>
- module.exports = {
- data: {
- staffs:[{name:'inns'},{name:'connon'},{name:'baos'},{name:'anna'},{name:'dolley'},{name:'lucy'},{name:'john'}, {name:'lily'},{name:'locke'},{name:'jack'},{name:'danny'},{name:'rose'},{name:'harris'},{name:'lotus'},{name:'louis'}]
- },
- methods:{
- onappear: function (e, index) {
- console.log('+++++', index)
- console.log(this.staffs[index].name + ' is appearing...');
- },
- ondisappear:function (e, index) {
- console.log('+++++', index)
- }
- }
- }
-</script>
-
-```
-
-[try it](http://dotwe.org/15d58cfbca9b6a72c89c9a13ad1f6155)
-
-### Child Components
-
-Notes: The list now supports the following child components: cell, header, refresh, loading and fixed-position components. Other kinds of components will not be guaranteed to be displayed correctly.
-
-* cell 0.6.1 defines the attributes and behavior of the cells that appear in list.
-* header 0.6.1 sticks to the top when it reaches the top of the screen.
-* refresh 0.6.1 used inside list to add pull-down-to-refresh functionality.
-* loading 0.6.1 used inside list to add pull-up-to-load-more functionality.
-
-
-### Attributes
-
-* show-scrollbar: true/false whether show the scroll bar or not, default value is true
-* scroll-direction: <string> define scroll direction of component, horizontal or vertical
-* loadmoreoffset : <number> default value is 0. The loadmore event will be triggered when the list is loadmoreoffset left to reach the bottom of the list view. e.g. a list has total content length of 1000, and the loadmoreoffset is set to 400, the loadmore event will be triggered when 600 has beed scrolled and there is less than 400 left.
-* loadmoreretry : <number> default value 0,whether to reset loadmore related UI when loadmore failed, will be deprecated in further release.
-
-Please checkout [Scroller Component Attributes](./scroller.html) to have a look at the inherited attributes from direct parent.
-
-Other attributes please check out the [common attributes](../common-attrs.html).
-
-### Styles
-
-common styles: check out [common styles for components](../common-style.html)
-
-* support flexbox related styles
-* support box model related styles
-* support position related styles
-* support opacity, background-color etc.
-
-### Events
-
-onloadmore 0.5 used with loadmoreoffset attribute. if the view has less than loadmoreoffset to scroll down, the onloadmore event will be triggered.
-
-common events: check out the [common events](../common-event.html)
-
-* support onclick event. Check out [common events](../common-event.html)
-* support onappear / ondisappear event. Check out [common events](../common-event.html)
-
-
-### API
-
-All cells or cell's subcomponents in list support the scrollToElement API in [dom module](../modules/dom.html)
-
-#### Difference between loading child component and onloadmore event
-
-loading is a child component that can response to the onloading event, and this event can only be triggered when the scroller/list has been scrolled down to the bottom.
-onloadmore is an event that will be triggered when the rest of the scroller/list is less than loadmoreoffset long.
-
-
-* [scroller example](http://dotwe.org/85fd3988eefa24f058b7da7966e56203)
-* [list example](http://dotwe.org/62f895249014dde26cc0725c8005e42c)
-
-### Restrictions
-
-Nested lists or scrollers within the same direction are not supported. In other words. nested lists/scroller must have different directions.
-For example, a vertical list nested in a vertical list or scroller is not allowed. However, a vertical list nested in a horizontal list or scroller is legal.
-
-### Example
-
-```html
-<template>
- <div class="wrapper">
- <list class="list">
- <header class="header">
- <text class="title">Search Results</text>
- </header>
- <refresh style="width: 750; padding: 30;" onrefresh="refreshData" display="{{refreshDisplay}}">
- <text class="text"> ↓ Pull to refresh </text>
- <loading-indicator class="indicator"></loading-indicator>
- </refresh>
- <cell class="row" repeat="item in items" id="item-{{$index}}">
- <div>
- <text class="item">Repo name: {{item.full_name}}</text>
- </div>
- <div>
- <text class="item">Repo star: {{item.stargazers_count}}</text>
- </div>
- </cell>
- <loading onloading="loadingData" style="width: 750; padding: 30;" display="{{loadingDisplay}}">
- <text class="text">{{loadingText}}</text>
- </loading>
- </list>
- <div class="up" onclick="goToTop">
- <img class="img" src="https://img.alicdn.com/tps/TB1ZVOEOpXXXXcQaXXXXXXXXXXX-200-200.png"></img>
- </div>
- </div>
-</template>
-
-<style>
-.wrapper {
- position: absolute;
- top: 0;
- right: 0;
- bottom: 0;
- left: 0;
-}
-.list{
- background-color: #ffffff;
- flex: 1;
-}
-.header {
- height: 80;
- align-items: center;
- justify-content: center;
- background-color: #efefef;
- border-bottom-color: #eeeeee;
- border-bottom-width: 2;
- border-bottom-style: solid;
-}
-.title {
- text-align: center;
-}
-.text {
- text-align: center;
-}
-.row {
- padding: 20;
- border-bottom-color: #eeeeee;
- border-bottom-width: 2;
- border-bottom-style: solid;
-}
-.up {
- width: 70;
- height: 70;
- position: fixed;
- right: 20;
- bottom: 20;
-}
-.img {
- width: 70;
- height: 70;
-}
-</style>
-
-<script>
-var dom = require('@weex-module/dom') || {}
-var stream = require('@weex-module/stream') || {}
-var modal = require('@weex-module/modal') || {}
-
-var SEARCH_URL = 'https://api.github.com/search/repositories?q=language:javascript&sort=stars&order=desc'
-
-module.exports = {
- data: {
- isLoaded: true,
- page: 1,
- loadingDisplay: 'hide',
- refreshDisplay: 'hide',
- loadingText: 'Loading...',
- items:[]
- },
- created: function () {
- var url = SEARCH_URL + '&page=' + this.page
-
- this.renderData(url)
-
- this.page++
- },
- methods: {
- renderData: function (url) {
- var self = this
-
- stream.fetch({
- method: 'GET',
- url: url,
- type:'json'
- }, function(res) {
- self.refreshDisplay = 'hide'
- self.loadingDisplay = 'hide'
-
- try {
- var results = res.data.items || []
-
- if (Array.isArray(results)) {
- for(var i = 0; i < results.length; i++) {
- self.items.push(results[i])
- }
- }
-
- self.isLoaded = true
- } catch(e) {}
- },function(res){
-
- })
- },
- loadingData: function (e) {
- var url = SEARCH_URL + '&page=' + this.page
- var self = this
-
- if (self.isLoaded === false) return
-
- self.loadingDisplay = 'show'
-
- if (self.page <=10 ) {
- self.renderData(url)
- self.page++
- } else {
- self.loadingDisplay = 'hide'
- self.loadingText = 'NO MORE!'
- }
- },
- goToTop: function (e) {
- dom.scrollToElement(this.$el('item-0'), {
- offset: -100
- })
- },
- refreshData: function (e) {
- var url = SEARCH_URL + '&page=1'
-
- if (this.isLoaded === false) return
-
- this.refreshDisplay = 'show'
-
- modal.toast({
- 'message': 'Refreshing...',
- 'duration': 1
- })
-
- this.items = []
- this.page = 1
- this.renderData(url)
-
- this.refreshDisplay = 'hide'
- }
- }
-}
-</script>
-```
-
-[Try it](http://dotwe.org/ed524ade679b0fa96e980600c53ea5ce)
\ No newline at end of file
http://git-wip-us.apache.org/repos/asf/incubator-weex-site/blob/12e3a8bc/_draft/v-0.10/references/components/refresh-loading.md
----------------------------------------------------------------------
diff --git a/_draft/v-0.10/references/components/refresh-loading.md b/_draft/v-0.10/references/components/refresh-loading.md
deleted file mode 100644
index 8b1d610..0000000
--- a/_draft/v-0.10/references/components/refresh-loading.md
+++ /dev/null
@@ -1,297 +0,0 @@
----
-title: <refresh> & <loading>
-type: references
-order: 2.7
-version: 0.10
----
-
-# refresh & loading
-
-<span class="weex-version">v0.6.1+</span>
-
-## Loading Components
-
-To be rendered properly, the refresh/loading Components must appear inside the Scroller Component or the List Component.
-
-
-**example**
-
-```html
-`<template>
- <list>
- <header>
- <div class="center">
- <text style="text-align:center">I am the header</text>
- </div>
- </header>
- <loading onloading="onloading" display="{{loadingDisplay}}" style="width:750;flex-direction: row;justify-content: center;">
- <loading-indicator style="height:160;width:160;color:#3192e1"></loading-indicator>
- </loading>
- <cell onappear="onappear($event, $index)" ondisappear="ondisappear($event, $index)" class="row" repeat="{{staffs}}" index="{{$index}}">
- <div class="item">
- <text>{{name}}</text>
- </div>
- </cell>
- </list>
-</template>
-
-<style>
- .row {
- width: 750;
- }
- .item {
- justify-content: center;
- border-bottom-width: 2;
- border-bottom-color: #c0c0c0;
- height: 100;
- padding:20;
- }
- .center {
- border-bottom-width: 2;
- border-bottom-color: #cccccc;
- height: 100;
- padding:20;
- background-color:#FFFFFF;
- justify-content: center;
- }
-</style>
-
-<script>
- module.exports = {
- data: {
- staffs:[],
- loadingDisplay: 'show',
- loadingText: 'pull up to load more',
- refreshText: 'pull down to refresh'
- },
- created:function() {
- this.refreshDisplay='show'
- this.staffs=[{name:'inns'},{name:'connon'},{name:'baos'},{name:'anna'},{name:'dolley'},{name:'lucy'},{name:'john'}, {name:'lily'},{name:'locke'},{name:'jack'},{name:'danny'},{name:'rose'},{name:'harris'},{name:'lotus'},{name:'louis'}];
- },
- methods:{
- onappear: function (e, index) {
- // console.log('+++++', index);
- // console.log(this.staffs[index].name + ' is appearing...');
- },
- ondisappear:function (e, index) {
- // console.log('+++++', index);
- },
- onloading:function(e){
- console.log('onloading...');
- this.staffs.push({name:'onloading'})
- }
- }
- }
-</script>
-
-```
-
-[try it](http://weex.alibaba-inc.com/raw/html5/a34523fee395aa68018d65f0fb622310.js)
-
-### Child Components
-
-Any other components, like the text and img components, can be put inside the refresh component. And there is a special component named loading-indicator used only inside the refresh or the loading components.
-
-* loading-indicator is a child component implemented with default animation effect for the refresh component.
-[example](http://weex.alibaba-inc.com/playground/a34523fee395aa68018d65f0fb622310)
-
-### Attributes
-
-* display has value of show or hide.
-
-Other attributes please check out the [common attributes](../common-attrs.html).
-
-
-### Styles
-common styles: check out [common styles for components](../common-style.html)
-
-### Events
-
-* onloading triggered when loading
-
-
-#### Restrictions
-* refresh/loading does not support remove action, Weex 0.9 will fix it.
-* refresh/loading despite setting with display='hide', the refresh/loading view will still appear when scrolling due to known issues. it can be fixed with a another display='hide' when the refresh/loading should be hidden.
-* refresh/loading can only be hidden or displayed with an attribute display with value of show or hide. And there should be a statement of display='hide' when display='show' shows up in an event function, or your scroller may not response to user inputs.
-
-## Refresh Components
-
-To be rendered properly, the refresh/loading Components must appear inside the Scroller Component or the List Component.
-
-```html
-<template>
- <scroller onloadmore="onloadmore" loadmoreoffset="1000">
- <refresh onrefresh="onrefresh" display="{{refreshDisplay}}">
- <text id="refreshText">{{refreshText}}</text>
- </refresh>
- <div repeat="{{v in items}}">
- <text style="font-size: 40; color: #000000">{{v.item}}</text>
- </div>
- <loading onloading="onloading" display="{{loadingDisplay}}">
- <text id="loadingText">{{loadingText}}</text>
- </loading>
- </scroller>
-</template>
-<script>
- module.exports = {
- data: {
- refreshDisplay: 'show',
- loadingDisplay: 'show',
- loadingText: 'pull up to load more',
- refreshText: 'pull down to refresh',
- items: []
- },
- created: function () {
- for (var i = 0; i < 30; i++) {
- this.items.push({'item': 'test data' + i});
- }
- },
- methods: {
- onrefresh: function () {
- var vm = this;
- vm.refreshDisplay = 'show'
- if (vm.items.length > 50) {
- vm.refreshText = "no more data!"
- vm.refreshDisplay = 'hide'
- return;
- }
- var len = vm.items.length;
- for (var i = len; i < (len + 20); i++) {
- vm.items.unshift({'item': 'test data ' + i});
- }
- vm.refreshDisplay = 'hide'
- },
- onloading: function () {
- var vm = this;
- vm.loadingDisplay = 'show'
- if (vm.items.length > 30) {
- vm.loadingText = "no more data!"
- vm.loadingDisplay = 'hide'
- return;
- }
-
- var len = vm.items.length;
- for (var i = len; i < (len + 20); i++) {
- vm.items.push({'item': 'test data ' + i});
- }
- vm.loadingDisplay = 'hide'
- },
- onloadmore:function(){
- console.log("into--[onloadmore]")
- }
- }
- }
-</script>
-```
-
-[try it](http://dotwe.org/242add915e41d307f2fa6f423278425a)
-
-### Child Components
-
-Any other components, like the text and img components, can be put inside the refresh component. And there is a special component named loading-indicator used only inside the refresh or the loading components.
-
-* loading-indicator is a child component implemented with default animation effect for the refresh component.
-[example](http://dotwe.org/e65a2cb0abfcdbbabda6778064837a92)
-
-### Attributes
-* display has value of show or hide, default value is show.
-
-Other attributes please check out the [common attributes](../common-attrs.html).
-
-
-### Styles
-common styles: check out [common styles for components](../common-style.html)
-
-### Events
-* onrefresh triggered when the scroller has been pulled down
-* onpullingdown available on Android. triggered when the scroller has been pulled down. you can get dy, headerHeight, maxHeight from onpullingdowns event object. [example](http://dotwe.org/10ee6bd59ebe173f0f578a4eb8bac6f1)
-
-**example**
-
-```html
-<template>
- <list>
- <header>
- <div class="center">
- <text style="text-align:center">I am the header</text>
- </div>
- </header>
- <refresh onpullingdown='onpullingdown' onrefresh="onrefresh" display="{{refreshDisplay}}" style="width:750;flex-direction: row;justify-content: center;">
- <loading-indicator style="height:160;width:160;color:#3192e1"></loading-indicator>
- </refresh>
- <cell onappear="onappear" ondisappear="ondisappear" class="row" repeat="{{staffs}}" index="{{$index}}">
- <div class="item">
- <text>{{name}}</text>
- </div>
- </cell>
- </list>
-</template>
-
-<style>
- .row {
- width: 750;
- }
- .item {
- justify-content: center;
- border-bottom-width: 2;
- border-bottom-color: #c0c0c0;
- height: 100;
- padding:20;
- }
- .center {
- border-bottom-width: 2;
- border-bottom-color: #cccccc;
- height: 100;
- padding:20;
- background-color:#FFFFFF;
- justify-content: center;
- }
-</style>
-
-<script>
- module.exports = {
- data: {
- staffs:[],
- refreshDisplay: 'show',
- loadingDisplay: 'show',
- loadingText: 'pull up to load more',
- refreshText: 'pull down to refresh'
- },
- created:function() {
- this.refreshDisplay='show'
- this.staffs=[{name:'inns'},{name:'connon'},{name:'baos'},{name:'anna'},{name:'dolley'},{name:'lucy'},{name:'john'}, {name:'lily'},{name:'locke'},{name:'jack'},{name:'danny'},{name:'rose'},{name:'harris'},{name:'lotus'},{name:'louis'}];
- },
- methods:{
- onappear: function (e) {
- var index = e.target.attr.index
- // console.log(this.staffs[index].name + ' is appearing...');
- },
- ondisappear:function (e) {
- },
- onrefresh:function(e){
- this.refreshDisplay='show';
- // this.staffs=[{name:'inns'},{name:'connon'},{name:'baos'},{name:'anna'}];
- this.refreshDisplay='hide'
- // console.log(this.refreshDisplay);
- },
- onpullingdown:function(e){
- console.log('onpullingdown triggered.');
- console.log('dy:'+e.dy);
- console.log('headerHeight:'+e.headerHeight);
- console.log('maxHeight:'+e.maxHeight);
- }
- }
- }
-</script>
-
-```
-
-[try it ](http://dotwe.org/10ee6bd59ebe173f0f578a4eb8bac6f1)
-
-
-### Restrictions
-
-* refresh/loading does not support remove action, may support in Weex 0.9.
-* refresh/loading despite setting with display='hide', the refresh/loading view will still appear when scrolling due to known issues. it can be fixed with a another display='hide' when the refresh/loading should be hidden.
-* refresh/loading can only be hidden or displayed with an attribute display with value of show or hide. And there should be a statement of display='hide' when display='show' shows up in an event function, or your scroller may not response to user inputs.
http://git-wip-us.apache.org/repos/asf/incubator-weex-site/blob/12e3a8bc/_draft/v-0.10/references/components/scroller.md
----------------------------------------------------------------------
diff --git a/_draft/v-0.10/references/components/scroller.md b/_draft/v-0.10/references/components/scroller.md
deleted file mode 100644
index 3197ab8..0000000
--- a/_draft/v-0.10/references/components/scroller.md
+++ /dev/null
@@ -1,136 +0,0 @@
----
-title: <scroller>
-type: references
-order: 2.8
-version: 0.10
----
-
-# <scroller>
-<span class="weex-version">v0.6.1+</span>
-
-A scroller is a component in vertical direction which can have multiple child components in one column. If total height of its child components exceed the height of the scroller, the whole child components will be scrollable.
-
-Notes: A <scroller> can be used as a root element or a embed element. The scroll direction of this component is column, and it can't be changed.
-
-
-**example**
-
-```html
-<template>
- <scroller onloadmore="onloadmore" loadmoreoffset="100">
- <div repeat="{{v in items}}">
- <text style="font-size: 40; color: #000000">{{v.item}}</text>
- </div>
- </scroller>
-</template>
-<script>
- module.exports = {
- data: {
- items: [],
- triggered:false
- },
- created: function () {
- for (var i = 0; i < 50; i++) {
- this.items.push({'item': 'test data' + i});
- }
- },
- methods: {
- onloadmore:function(){
- if(!this.triggered){
- for (var i = 100; i >= 50; i--) {
- this.items.push({'item':'onloadmore triggered' + i});
- }
- }
- this.triggered=true;
- }
- }
- }
-</script>
-```
-
-[try it](http://dotwe.org/acf155122b9457211165680b01fae1c2)
-
-## Child Components
-
-Scroller supports all kinds of components, such as div, text, etc.
-And there are two special components that can only be used inside scroller component.
-
-* refresh 0.6.1 used inside list to add pull-down-to-refresh functionality.
-* loading 0.6.1 used inside list to add pull-up-to-load-more functionality.
-
-
-## Attributes
-
-* show-scrollbar: true/false whether show the scroll bar or not, default value is true
-* scroll-direction: <string> define scroll direction of component, horizontal or vertical
-* loadmoreoffset : <number> default value is 0. The loadmore event will be triggered when the list is loadmoreoffset left to reach the bottom of the list view. e.g. a list has total content length of 1000, and the loadmoreoffset is set to 400, the loadmore event will be triggered when 600 has beed scrolled and there is less than 400 left.
-* loadmoreretry : <number> default value 0,whether to reset loadmore related UI when loadmore failed, will be deprecated in further release.
-
-**example**
-
-```html
-<template>
- <scroller onloadmore="onloadmore" loadmoreoffset="100">
- <div repeat="{{v in items}}">
- <text style="font-size: 40; color: #000000">{{v.item}}</text>
- </div>
- </scroller>
-</template>
-<script>
-module.exports = {
- data: {
- items: [],
- triggered:false
- },
- created: function () {
- for (var i = 0; i < 50; i++) {
- this.items.push({'item': 'test data' + i});
- }
- },
- methods: {
- onloadmore:function(){
- if(!this.triggered){
- for (var i = 100; i >= 50; i--) {
- this.items.push({'item':'onloadmore triggered' + i});
- }
- }
- this.triggered=true;
- }
- }
-}
-</script>
-```
-
-[try it](http://dotwe.org/acf155122b9457211165680b01fae1c2)
-
-
-Please checkout [Scroller Component Attributes]() to have a look at the inherited attributes from direct parent.
-
-Other attributes please check out the [common attributes](../common-attrs.html).
-
-## Styles
-
-common styles: check out [common styles for components](../common-style.html)
-
-* support flexbox related styles
-* support box model related styles
-* support position related styles
-* support opacity, background-color etc.
-
-
-## Events
-
-onloadmore used with loadmoreoffset attribute. if the view has less than loadmoreoffset to scroll down, the onloadmore event will be triggered.
-
-common events: check out the [common events](../common-event.html)
-
-* support onclick event. Check out [common events](../common-event.html)
-* support onappear / ondisappear event. Check out [common events](../common-event.html)
-
-
-
-## Restrictions
-
-Nested lists or scrollers within the same direction are not supported. In other words. nested lists/scroller must have different directions.
-For example, a vertical list nested in a vertical list or scroller is not allowed. However, a vertical list nested in a horizontal list or scroller is legal.
-
http://git-wip-us.apache.org/repos/asf/incubator-weex-site/blob/12e3a8bc/_draft/v-0.10/references/components/slider.md
----------------------------------------------------------------------
diff --git a/_draft/v-0.10/references/components/slider.md b/_draft/v-0.10/references/components/slider.md
deleted file mode 100644
index b1a537f..0000000
--- a/_draft/v-0.10/references/components/slider.md
+++ /dev/null
@@ -1,107 +0,0 @@
----
-title: <slider>
-type: references
-order: 2.9
-version: 0.10
----
-
-# <slider>
-
-## Summary
-
-A slide's player to show slides (mostly as pictures) one page by another. The default interval between two slides is 3 seconds.
-
-## Child Components
-
-It supports all kinds of weex components as its slides, especially the `indicator` component which can be used only as a child component of `slider`.
-
-## Attributes
-
-- `auto-play`: <boolean> `true` | `false`. This value determines whether the slides plays automatically after the page rendering finished. The default value is `false`.
-- `interval`: <number> millisecond. This value determines time interval for each page displayed in slider.
-- `index`: <number> . This value determines the index of current shown slide. The default value is `0`.
-
-Other attributes please check out the [common attributes](../references/common-attrs.html).
-
-## Styles
-
-**common styles**: check out [common styles for components](../references/common-style.html)
-
-- support flexbox related styles
-- support box model related styles
-- support ``position`` related styles
-- support ``opacity``, ``background-color`` etc.
-
-## Events
-
-- `change`: triggerd when the slide's index is changed. The event object contains the attribute of `index`, which is the index number of the currently shown slide.
-
-**common events**: check out the [common events](../references/common-event.html)
-
-- support `click` event. Check out [common events](../references/common-event.html)
-- support `appear` / `disappear` event. Check out [common events](../references/common-event.html)
-
-### Example
-
-```html
-<template>
- <div>
- <slider class="slider" interval="3000" auto-play="true">
- <div class="slider-pages" repeat="item in itemList">
- <image class="img" src="{{item.pictureUrl}}"></image>
- <text class="title">{{item.title}}</text>
- </div>
- <indicator class="indicator"></indicator>
- </slider>
- </div>
-</template>
-
-<style>
- .img {
- width: 714;
- height: 150;
- }
- .title {
- position: absolute;
- top: 20;
- left: 20;
- color: #ff0000;
- font-size: 48;
- font-weight: bold;
- background-color: #eeeeee;
- }
- .slider {
- flex-direction: row;
- margin: 18;
- width: 714;
- height: 230;
- }
- .slider-pages {
- flex-direction: row;
- width: 714;
- height: 200;
- }
- .indicator {
- width:714;
- height:200;
- position:absolute;
- top:1;
- left:1;
- item-color: red;
- item-selectedColor: blue;
- item-size: 20;
- }
-</style>
-
-<script>
- module.exports = {
- data: {
- itemList: [
- {itemId: '520421163634', title: 'item1', pictureUrl: 'https://gd2.alicdn.com/bao/uploaded/i2/T14H1LFwBcXXXXXXXX_!!0-item_pic.jpg'},
- {itemId: '522076777462', title: 'item2', pictureUrl: 'https://gd1.alicdn.com/bao/uploaded/i1/TB1PXJCJFXXXXciXFXXXXXXXXXX_!!0-item_pic.jpg'},
- {itemId: '522076777462', title: 'iten3', pictureUrl: 'https://gd3.alicdn.com/bao/uploaded/i3/TB1x6hYLXXXXXazXVXXXXXXXXXX_!!0-item_pic.jpg'}
- ]
- }
- }
-</script>
-```
http://git-wip-us.apache.org/repos/asf/incubator-weex-site/blob/12e3a8bc/_draft/v-0.10/references/components/switch.md
----------------------------------------------------------------------
diff --git a/_draft/v-0.10/references/components/switch.md b/_draft/v-0.10/references/components/switch.md
deleted file mode 100644
index 441da7b..0000000
--- a/_draft/v-0.10/references/components/switch.md
+++ /dev/null
@@ -1,81 +0,0 @@
----
-title: <switch>
-type: references
-order: 2.11
-version: 0.10
----
-
-# <switch>
-
-<span class="weex-version">v0.6.1+</span>
-
-The weex builtin component switch is used to create and manage an IOS styled On/Off buttons, for example, the Airplane mode button in the Settings app is a switch button.
-
-**example**
-
-```html
-<template>
- <div>
- <text>muted:</text>
- <switch checked="true" onclick='onclick' onchange='onchange' ondisappear='ondisappear' onappear='onappear'></switch>
-</div>
-</template>
-
-<script>
- module.exports ={
- methods:{
- onclick:function(e){
- console.log('onclick:' + e.timestamp);
- },
- onchange:function(e){
- console.log('onchage, value:' + e.value);
- },
- ondisappear:function(e){
- console.log('ondisappear, value:' + e.value);
- },
- onappear:function(e){
- console.log('onappear, value:' + e.value);
- },
- }
- }
-</script>
-```
-
-[try it](http://dotwe.org/7306d24f4f677b6d9935dbd00e3aa981)
-
-## Child Components
-
-There are no child components for the switch component.
-
-## Attributes
-
-* checked <boolean> true|false, default value is false, indicating whether the button is on or not.
-* disabled <boolean> true|false, default value is false, indicating whether the button is enable or not.
-
-Other attributes please check out the [common attributes](../common-attrs.html).
-
-## Styles
-Notes: There are several style properties that you mustn't use on this component. And here are all the invalid properties:
-
-* width
-* height
-* min-width
-* min-height
-* margin and margin-xxs
-* padding and padding-xxs
-* border and border-xxs
-
-Notes: Specially the width and height related properties is not configurable and the size of this component is fixed to 100x60 (for the design width 750px).
-
-common styles: check out [common styles for components](../common-style.html)
-
-## Events
-
-* onappear / ondisappear event. check out [common events](../common-event.html)
-* onclick: check out [common events](../common-event.html)
-* onchange: check out [common events](../common-event.html)
-
-## Parameters of events' object for onchange event:
-
-* value: the value of the component who dispatched this event, which is the boolean value true or false.
-* timestamp: the time stamp of the event.
http://git-wip-us.apache.org/repos/asf/incubator-weex-site/blob/12e3a8bc/_draft/v-0.10/references/components/text.md
----------------------------------------------------------------------
diff --git a/_draft/v-0.10/references/components/text.md b/_draft/v-0.10/references/components/text.md
deleted file mode 100644
index 308fd4a..0000000
--- a/_draft/v-0.10/references/components/text.md
+++ /dev/null
@@ -1,94 +0,0 @@
----
-title: <text>
-type: references
-order: 2.12
-version: 0.10
----
-
-# <text>
-
-The weex builtin component 'text' is used to render text with specified style rule. <text> tag can contain text value only. You can use variable interpolation in the text content with the mark `{% raw %}{{}}{% endraw %}`.
-
-## Child Components
-
-This component supports no child components.
-
-## Attributes
-
-* value(string): text value of this component. This is equal to the content of 'text'.
-
-### example
-
-```
-var textComponent = this.$el("textid");
-this.text = textComponent.attr.value;
-```
-
-## Styles
-
-* lines: specify the text lines. Default value is `0` for unlimited.
-* text styles: check out [text styles](../text-style.html)
-
- * support 'color' style.
- * support 'font-size' style. iOS: default vlaue `32`. Android: platform specify. HTML5: default value `32`.
- * support 'font-style' style.
- * support 'font-weight' style.
- * support 'text-align' style.
- * support 'text-decoration' style.
- * support 'text-overflow' style.
- * support 'line-height'(available from v0.6.1) style. line-height in iOS is different from h5 and Android, text value will be placed at bottom of line box.
- * not support 'flex-direction, 'justify-content', 'align-items' which is active for child nodes, and text has no child nodes.
-
-### common styles
-check out [common styles for components](../common-style.html)
-
-* support flexbox related styles.
-* support box model related styles.
-* support 'position' related styles.
-* support 'opacity', 'background-color' etc.
-
-## Events
-
-### common events
-check out [common events](../common-event.html)
-
-* support 'click' event.
-* support 'appear' / 'disappear' event.
-
-## Example
-
-```html
-<template>
- <div>
- <text>this is text content</text>
- <text value="this is text value"></text>
- <text style="text">{{price1}}</text>
- <text id="textid" onclick={{showtext}}>this is gettext content</text>
- <text value="{{text}}"></text>
- </div>
-</template>
-
-<style>
- .text {
- font-size: 24;
- text-decoration: underline;
- }
-</style>
-
-<script>
- module.exports = {
- data: {
- price1: '99.99',
- price2: '88.88',
- text:''
- },
- methods: {
- showtext: function(event) {
- var textComponent = this.$el("textid");
- this.text = textComponent.attr.value;
- }
- }
- };
-</script>
-```
-[Try it](http://dotwe.org/48f4d7c50245145c72c33161e2bb4325)
[38/51] [abbrv] incubator-weex-site git commit: update file structure
and fix responsive styles
Posted by ha...@apache.org.
http://git-wip-us.apache.org/repos/asf/incubator-weex-site/blob/12e3a8bc/_drafts/v-0.10/references/components/refresh-loading.md
----------------------------------------------------------------------
diff --git a/_drafts/v-0.10/references/components/refresh-loading.md b/_drafts/v-0.10/references/components/refresh-loading.md
new file mode 100644
index 0000000..8b1d610
--- /dev/null
+++ b/_drafts/v-0.10/references/components/refresh-loading.md
@@ -0,0 +1,297 @@
+---
+title: <refresh> & <loading>
+type: references
+order: 2.7
+version: 0.10
+---
+
+# refresh & loading
+
+<span class="weex-version">v0.6.1+</span>
+
+## Loading Components
+
+To be rendered properly, the refresh/loading Components must appear inside the Scroller Component or the List Component.
+
+
+**example**
+
+```html
+`<template>
+ <list>
+ <header>
+ <div class="center">
+ <text style="text-align:center">I am the header</text>
+ </div>
+ </header>
+ <loading onloading="onloading" display="{{loadingDisplay}}" style="width:750;flex-direction: row;justify-content: center;">
+ <loading-indicator style="height:160;width:160;color:#3192e1"></loading-indicator>
+ </loading>
+ <cell onappear="onappear($event, $index)" ondisappear="ondisappear($event, $index)" class="row" repeat="{{staffs}}" index="{{$index}}">
+ <div class="item">
+ <text>{{name}}</text>
+ </div>
+ </cell>
+ </list>
+</template>
+
+<style>
+ .row {
+ width: 750;
+ }
+ .item {
+ justify-content: center;
+ border-bottom-width: 2;
+ border-bottom-color: #c0c0c0;
+ height: 100;
+ padding:20;
+ }
+ .center {
+ border-bottom-width: 2;
+ border-bottom-color: #cccccc;
+ height: 100;
+ padding:20;
+ background-color:#FFFFFF;
+ justify-content: center;
+ }
+</style>
+
+<script>
+ module.exports = {
+ data: {
+ staffs:[],
+ loadingDisplay: 'show',
+ loadingText: 'pull up to load more',
+ refreshText: 'pull down to refresh'
+ },
+ created:function() {
+ this.refreshDisplay='show'
+ this.staffs=[{name:'inns'},{name:'connon'},{name:'baos'},{name:'anna'},{name:'dolley'},{name:'lucy'},{name:'john'}, {name:'lily'},{name:'locke'},{name:'jack'},{name:'danny'},{name:'rose'},{name:'harris'},{name:'lotus'},{name:'louis'}];
+ },
+ methods:{
+ onappear: function (e, index) {
+ // console.log('+++++', index);
+ // console.log(this.staffs[index].name + ' is appearing...');
+ },
+ ondisappear:function (e, index) {
+ // console.log('+++++', index);
+ },
+ onloading:function(e){
+ console.log('onloading...');
+ this.staffs.push({name:'onloading'})
+ }
+ }
+ }
+</script>
+
+```
+
+[try it](http://weex.alibaba-inc.com/raw/html5/a34523fee395aa68018d65f0fb622310.js)
+
+### Child Components
+
+Any other components, like the text and img components, can be put inside the refresh component. And there is a special component named loading-indicator used only inside the refresh or the loading components.
+
+* loading-indicator is a child component implemented with default animation effect for the refresh component.
+[example](http://weex.alibaba-inc.com/playground/a34523fee395aa68018d65f0fb622310)
+
+### Attributes
+
+* display has value of show or hide.
+
+Other attributes please check out the [common attributes](../common-attrs.html).
+
+
+### Styles
+common styles: check out [common styles for components](../common-style.html)
+
+### Events
+
+* onloading triggered when loading
+
+
+#### Restrictions
+* refresh/loading does not support remove action, Weex 0.9 will fix it.
+* refresh/loading despite setting with display='hide', the refresh/loading view will still appear when scrolling due to known issues. it can be fixed with a another display='hide' when the refresh/loading should be hidden.
+* refresh/loading can only be hidden or displayed with an attribute display with value of show or hide. And there should be a statement of display='hide' when display='show' shows up in an event function, or your scroller may not response to user inputs.
+
+## Refresh Components
+
+To be rendered properly, the refresh/loading Components must appear inside the Scroller Component or the List Component.
+
+```html
+<template>
+ <scroller onloadmore="onloadmore" loadmoreoffset="1000">
+ <refresh onrefresh="onrefresh" display="{{refreshDisplay}}">
+ <text id="refreshText">{{refreshText}}</text>
+ </refresh>
+ <div repeat="{{v in items}}">
+ <text style="font-size: 40; color: #000000">{{v.item}}</text>
+ </div>
+ <loading onloading="onloading" display="{{loadingDisplay}}">
+ <text id="loadingText">{{loadingText}}</text>
+ </loading>
+ </scroller>
+</template>
+<script>
+ module.exports = {
+ data: {
+ refreshDisplay: 'show',
+ loadingDisplay: 'show',
+ loadingText: 'pull up to load more',
+ refreshText: 'pull down to refresh',
+ items: []
+ },
+ created: function () {
+ for (var i = 0; i < 30; i++) {
+ this.items.push({'item': 'test data' + i});
+ }
+ },
+ methods: {
+ onrefresh: function () {
+ var vm = this;
+ vm.refreshDisplay = 'show'
+ if (vm.items.length > 50) {
+ vm.refreshText = "no more data!"
+ vm.refreshDisplay = 'hide'
+ return;
+ }
+ var len = vm.items.length;
+ for (var i = len; i < (len + 20); i++) {
+ vm.items.unshift({'item': 'test data ' + i});
+ }
+ vm.refreshDisplay = 'hide'
+ },
+ onloading: function () {
+ var vm = this;
+ vm.loadingDisplay = 'show'
+ if (vm.items.length > 30) {
+ vm.loadingText = "no more data!"
+ vm.loadingDisplay = 'hide'
+ return;
+ }
+
+ var len = vm.items.length;
+ for (var i = len; i < (len + 20); i++) {
+ vm.items.push({'item': 'test data ' + i});
+ }
+ vm.loadingDisplay = 'hide'
+ },
+ onloadmore:function(){
+ console.log("into--[onloadmore]")
+ }
+ }
+ }
+</script>
+```
+
+[try it](http://dotwe.org/242add915e41d307f2fa6f423278425a)
+
+### Child Components
+
+Any other components, like the text and img components, can be put inside the refresh component. And there is a special component named loading-indicator used only inside the refresh or the loading components.
+
+* loading-indicator is a child component implemented with default animation effect for the refresh component.
+[example](http://dotwe.org/e65a2cb0abfcdbbabda6778064837a92)
+
+### Attributes
+* display has value of show or hide, default value is show.
+
+Other attributes please check out the [common attributes](../common-attrs.html).
+
+
+### Styles
+common styles: check out [common styles for components](../common-style.html)
+
+### Events
+* onrefresh triggered when the scroller has been pulled down
+* onpullingdown available on Android. triggered when the scroller has been pulled down. you can get dy, headerHeight, maxHeight from onpullingdowns event object. [example](http://dotwe.org/10ee6bd59ebe173f0f578a4eb8bac6f1)
+
+**example**
+
+```html
+<template>
+ <list>
+ <header>
+ <div class="center">
+ <text style="text-align:center">I am the header</text>
+ </div>
+ </header>
+ <refresh onpullingdown='onpullingdown' onrefresh="onrefresh" display="{{refreshDisplay}}" style="width:750;flex-direction: row;justify-content: center;">
+ <loading-indicator style="height:160;width:160;color:#3192e1"></loading-indicator>
+ </refresh>
+ <cell onappear="onappear" ondisappear="ondisappear" class="row" repeat="{{staffs}}" index="{{$index}}">
+ <div class="item">
+ <text>{{name}}</text>
+ </div>
+ </cell>
+ </list>
+</template>
+
+<style>
+ .row {
+ width: 750;
+ }
+ .item {
+ justify-content: center;
+ border-bottom-width: 2;
+ border-bottom-color: #c0c0c0;
+ height: 100;
+ padding:20;
+ }
+ .center {
+ border-bottom-width: 2;
+ border-bottom-color: #cccccc;
+ height: 100;
+ padding:20;
+ background-color:#FFFFFF;
+ justify-content: center;
+ }
+</style>
+
+<script>
+ module.exports = {
+ data: {
+ staffs:[],
+ refreshDisplay: 'show',
+ loadingDisplay: 'show',
+ loadingText: 'pull up to load more',
+ refreshText: 'pull down to refresh'
+ },
+ created:function() {
+ this.refreshDisplay='show'
+ this.staffs=[{name:'inns'},{name:'connon'},{name:'baos'},{name:'anna'},{name:'dolley'},{name:'lucy'},{name:'john'}, {name:'lily'},{name:'locke'},{name:'jack'},{name:'danny'},{name:'rose'},{name:'harris'},{name:'lotus'},{name:'louis'}];
+ },
+ methods:{
+ onappear: function (e) {
+ var index = e.target.attr.index
+ // console.log(this.staffs[index].name + ' is appearing...');
+ },
+ ondisappear:function (e) {
+ },
+ onrefresh:function(e){
+ this.refreshDisplay='show';
+ // this.staffs=[{name:'inns'},{name:'connon'},{name:'baos'},{name:'anna'}];
+ this.refreshDisplay='hide'
+ // console.log(this.refreshDisplay);
+ },
+ onpullingdown:function(e){
+ console.log('onpullingdown triggered.');
+ console.log('dy:'+e.dy);
+ console.log('headerHeight:'+e.headerHeight);
+ console.log('maxHeight:'+e.maxHeight);
+ }
+ }
+ }
+</script>
+
+```
+
+[try it ](http://dotwe.org/10ee6bd59ebe173f0f578a4eb8bac6f1)
+
+
+### Restrictions
+
+* refresh/loading does not support remove action, may support in Weex 0.9.
+* refresh/loading despite setting with display='hide', the refresh/loading view will still appear when scrolling due to known issues. it can be fixed with a another display='hide' when the refresh/loading should be hidden.
+* refresh/loading can only be hidden or displayed with an attribute display with value of show or hide. And there should be a statement of display='hide' when display='show' shows up in an event function, or your scroller may not response to user inputs.
http://git-wip-us.apache.org/repos/asf/incubator-weex-site/blob/12e3a8bc/_drafts/v-0.10/references/components/scroller.md
----------------------------------------------------------------------
diff --git a/_drafts/v-0.10/references/components/scroller.md b/_drafts/v-0.10/references/components/scroller.md
new file mode 100644
index 0000000..3197ab8
--- /dev/null
+++ b/_drafts/v-0.10/references/components/scroller.md
@@ -0,0 +1,136 @@
+---
+title: <scroller>
+type: references
+order: 2.8
+version: 0.10
+---
+
+# <scroller>
+<span class="weex-version">v0.6.1+</span>
+
+A scroller is a component in vertical direction which can have multiple child components in one column. If total height of its child components exceed the height of the scroller, the whole child components will be scrollable.
+
+Notes: A <scroller> can be used as a root element or a embed element. The scroll direction of this component is column, and it can't be changed.
+
+
+**example**
+
+```html
+<template>
+ <scroller onloadmore="onloadmore" loadmoreoffset="100">
+ <div repeat="{{v in items}}">
+ <text style="font-size: 40; color: #000000">{{v.item}}</text>
+ </div>
+ </scroller>
+</template>
+<script>
+ module.exports = {
+ data: {
+ items: [],
+ triggered:false
+ },
+ created: function () {
+ for (var i = 0; i < 50; i++) {
+ this.items.push({'item': 'test data' + i});
+ }
+ },
+ methods: {
+ onloadmore:function(){
+ if(!this.triggered){
+ for (var i = 100; i >= 50; i--) {
+ this.items.push({'item':'onloadmore triggered' + i});
+ }
+ }
+ this.triggered=true;
+ }
+ }
+ }
+</script>
+```
+
+[try it](http://dotwe.org/acf155122b9457211165680b01fae1c2)
+
+## Child Components
+
+Scroller supports all kinds of components, such as div, text, etc.
+And there are two special components that can only be used inside scroller component.
+
+* refresh 0.6.1 used inside list to add pull-down-to-refresh functionality.
+* loading 0.6.1 used inside list to add pull-up-to-load-more functionality.
+
+
+## Attributes
+
+* show-scrollbar: true/false whether show the scroll bar or not, default value is true
+* scroll-direction: <string> define scroll direction of component, horizontal or vertical
+* loadmoreoffset : <number> default value is 0. The loadmore event will be triggered when the list is loadmoreoffset left to reach the bottom of the list view. e.g. a list has total content length of 1000, and the loadmoreoffset is set to 400, the loadmore event will be triggered when 600 has beed scrolled and there is less than 400 left.
+* loadmoreretry : <number> default value 0,whether to reset loadmore related UI when loadmore failed, will be deprecated in further release.
+
+**example**
+
+```html
+<template>
+ <scroller onloadmore="onloadmore" loadmoreoffset="100">
+ <div repeat="{{v in items}}">
+ <text style="font-size: 40; color: #000000">{{v.item}}</text>
+ </div>
+ </scroller>
+</template>
+<script>
+module.exports = {
+ data: {
+ items: [],
+ triggered:false
+ },
+ created: function () {
+ for (var i = 0; i < 50; i++) {
+ this.items.push({'item': 'test data' + i});
+ }
+ },
+ methods: {
+ onloadmore:function(){
+ if(!this.triggered){
+ for (var i = 100; i >= 50; i--) {
+ this.items.push({'item':'onloadmore triggered' + i});
+ }
+ }
+ this.triggered=true;
+ }
+ }
+}
+</script>
+```
+
+[try it](http://dotwe.org/acf155122b9457211165680b01fae1c2)
+
+
+Please checkout [Scroller Component Attributes]() to have a look at the inherited attributes from direct parent.
+
+Other attributes please check out the [common attributes](../common-attrs.html).
+
+## Styles
+
+common styles: check out [common styles for components](../common-style.html)
+
+* support flexbox related styles
+* support box model related styles
+* support position related styles
+* support opacity, background-color etc.
+
+
+## Events
+
+onloadmore used with loadmoreoffset attribute. if the view has less than loadmoreoffset to scroll down, the onloadmore event will be triggered.
+
+common events: check out the [common events](../common-event.html)
+
+* support onclick event. Check out [common events](../common-event.html)
+* support onappear / ondisappear event. Check out [common events](../common-event.html)
+
+
+
+## Restrictions
+
+Nested lists or scrollers within the same direction are not supported. In other words. nested lists/scroller must have different directions.
+For example, a vertical list nested in a vertical list or scroller is not allowed. However, a vertical list nested in a horizontal list or scroller is legal.
+
http://git-wip-us.apache.org/repos/asf/incubator-weex-site/blob/12e3a8bc/_drafts/v-0.10/references/components/slider.md
----------------------------------------------------------------------
diff --git a/_drafts/v-0.10/references/components/slider.md b/_drafts/v-0.10/references/components/slider.md
new file mode 100644
index 0000000..b1a537f
--- /dev/null
+++ b/_drafts/v-0.10/references/components/slider.md
@@ -0,0 +1,107 @@
+---
+title: <slider>
+type: references
+order: 2.9
+version: 0.10
+---
+
+# <slider>
+
+## Summary
+
+A slide's player to show slides (mostly as pictures) one page by another. The default interval between two slides is 3 seconds.
+
+## Child Components
+
+It supports all kinds of weex components as its slides, especially the `indicator` component which can be used only as a child component of `slider`.
+
+## Attributes
+
+- `auto-play`: <boolean> `true` | `false`. This value determines whether the slides plays automatically after the page rendering finished. The default value is `false`.
+- `interval`: <number> millisecond. This value determines time interval for each page displayed in slider.
+- `index`: <number> . This value determines the index of current shown slide. The default value is `0`.
+
+Other attributes please check out the [common attributes](../references/common-attrs.html).
+
+## Styles
+
+**common styles**: check out [common styles for components](../references/common-style.html)
+
+- support flexbox related styles
+- support box model related styles
+- support ``position`` related styles
+- support ``opacity``, ``background-color`` etc.
+
+## Events
+
+- `change`: triggerd when the slide's index is changed. The event object contains the attribute of `index`, which is the index number of the currently shown slide.
+
+**common events**: check out the [common events](../references/common-event.html)
+
+- support `click` event. Check out [common events](../references/common-event.html)
+- support `appear` / `disappear` event. Check out [common events](../references/common-event.html)
+
+### Example
+
+```html
+<template>
+ <div>
+ <slider class="slider" interval="3000" auto-play="true">
+ <div class="slider-pages" repeat="item in itemList">
+ <image class="img" src="{{item.pictureUrl}}"></image>
+ <text class="title">{{item.title}}</text>
+ </div>
+ <indicator class="indicator"></indicator>
+ </slider>
+ </div>
+</template>
+
+<style>
+ .img {
+ width: 714;
+ height: 150;
+ }
+ .title {
+ position: absolute;
+ top: 20;
+ left: 20;
+ color: #ff0000;
+ font-size: 48;
+ font-weight: bold;
+ background-color: #eeeeee;
+ }
+ .slider {
+ flex-direction: row;
+ margin: 18;
+ width: 714;
+ height: 230;
+ }
+ .slider-pages {
+ flex-direction: row;
+ width: 714;
+ height: 200;
+ }
+ .indicator {
+ width:714;
+ height:200;
+ position:absolute;
+ top:1;
+ left:1;
+ item-color: red;
+ item-selectedColor: blue;
+ item-size: 20;
+ }
+</style>
+
+<script>
+ module.exports = {
+ data: {
+ itemList: [
+ {itemId: '520421163634', title: 'item1', pictureUrl: 'https://gd2.alicdn.com/bao/uploaded/i2/T14H1LFwBcXXXXXXXX_!!0-item_pic.jpg'},
+ {itemId: '522076777462', title: 'item2', pictureUrl: 'https://gd1.alicdn.com/bao/uploaded/i1/TB1PXJCJFXXXXciXFXXXXXXXXXX_!!0-item_pic.jpg'},
+ {itemId: '522076777462', title: 'iten3', pictureUrl: 'https://gd3.alicdn.com/bao/uploaded/i3/TB1x6hYLXXXXXazXVXXXXXXXXXX_!!0-item_pic.jpg'}
+ ]
+ }
+ }
+</script>
+```
http://git-wip-us.apache.org/repos/asf/incubator-weex-site/blob/12e3a8bc/_drafts/v-0.10/references/components/switch.md
----------------------------------------------------------------------
diff --git a/_drafts/v-0.10/references/components/switch.md b/_drafts/v-0.10/references/components/switch.md
new file mode 100644
index 0000000..441da7b
--- /dev/null
+++ b/_drafts/v-0.10/references/components/switch.md
@@ -0,0 +1,81 @@
+---
+title: <switch>
+type: references
+order: 2.11
+version: 0.10
+---
+
+# <switch>
+
+<span class="weex-version">v0.6.1+</span>
+
+The weex builtin component switch is used to create and manage an IOS styled On/Off buttons, for example, the Airplane mode button in the Settings app is a switch button.
+
+**example**
+
+```html
+<template>
+ <div>
+ <text>muted:</text>
+ <switch checked="true" onclick='onclick' onchange='onchange' ondisappear='ondisappear' onappear='onappear'></switch>
+</div>
+</template>
+
+<script>
+ module.exports ={
+ methods:{
+ onclick:function(e){
+ console.log('onclick:' + e.timestamp);
+ },
+ onchange:function(e){
+ console.log('onchage, value:' + e.value);
+ },
+ ondisappear:function(e){
+ console.log('ondisappear, value:' + e.value);
+ },
+ onappear:function(e){
+ console.log('onappear, value:' + e.value);
+ },
+ }
+ }
+</script>
+```
+
+[try it](http://dotwe.org/7306d24f4f677b6d9935dbd00e3aa981)
+
+## Child Components
+
+There are no child components for the switch component.
+
+## Attributes
+
+* checked <boolean> true|false, default value is false, indicating whether the button is on or not.
+* disabled <boolean> true|false, default value is false, indicating whether the button is enable or not.
+
+Other attributes please check out the [common attributes](../common-attrs.html).
+
+## Styles
+Notes: There are several style properties that you mustn't use on this component. And here are all the invalid properties:
+
+* width
+* height
+* min-width
+* min-height
+* margin and margin-xxs
+* padding and padding-xxs
+* border and border-xxs
+
+Notes: Specially the width and height related properties is not configurable and the size of this component is fixed to 100x60 (for the design width 750px).
+
+common styles: check out [common styles for components](../common-style.html)
+
+## Events
+
+* onappear / ondisappear event. check out [common events](../common-event.html)
+* onclick: check out [common events](../common-event.html)
+* onchange: check out [common events](../common-event.html)
+
+## Parameters of events' object for onchange event:
+
+* value: the value of the component who dispatched this event, which is the boolean value true or false.
+* timestamp: the time stamp of the event.
http://git-wip-us.apache.org/repos/asf/incubator-weex-site/blob/12e3a8bc/_drafts/v-0.10/references/components/text.md
----------------------------------------------------------------------
diff --git a/_drafts/v-0.10/references/components/text.md b/_drafts/v-0.10/references/components/text.md
new file mode 100644
index 0000000..308fd4a
--- /dev/null
+++ b/_drafts/v-0.10/references/components/text.md
@@ -0,0 +1,94 @@
+---
+title: <text>
+type: references
+order: 2.12
+version: 0.10
+---
+
+# <text>
+
+The weex builtin component 'text' is used to render text with specified style rule. <text> tag can contain text value only. You can use variable interpolation in the text content with the mark `{% raw %}{{}}{% endraw %}`.
+
+## Child Components
+
+This component supports no child components.
+
+## Attributes
+
+* value(string): text value of this component. This is equal to the content of 'text'.
+
+### example
+
+```
+var textComponent = this.$el("textid");
+this.text = textComponent.attr.value;
+```
+
+## Styles
+
+* lines: specify the text lines. Default value is `0` for unlimited.
+* text styles: check out [text styles](../text-style.html)
+
+ * support 'color' style.
+ * support 'font-size' style. iOS: default vlaue `32`. Android: platform specify. HTML5: default value `32`.
+ * support 'font-style' style.
+ * support 'font-weight' style.
+ * support 'text-align' style.
+ * support 'text-decoration' style.
+ * support 'text-overflow' style.
+ * support 'line-height'(available from v0.6.1) style. line-height in iOS is different from h5 and Android, text value will be placed at bottom of line box.
+ * not support 'flex-direction, 'justify-content', 'align-items' which is active for child nodes, and text has no child nodes.
+
+### common styles
+check out [common styles for components](../common-style.html)
+
+* support flexbox related styles.
+* support box model related styles.
+* support 'position' related styles.
+* support 'opacity', 'background-color' etc.
+
+## Events
+
+### common events
+check out [common events](../common-event.html)
+
+* support 'click' event.
+* support 'appear' / 'disappear' event.
+
+## Example
+
+```html
+<template>
+ <div>
+ <text>this is text content</text>
+ <text value="this is text value"></text>
+ <text style="text">{{price1}}</text>
+ <text id="textid" onclick={{showtext}}>this is gettext content</text>
+ <text value="{{text}}"></text>
+ </div>
+</template>
+
+<style>
+ .text {
+ font-size: 24;
+ text-decoration: underline;
+ }
+</style>
+
+<script>
+ module.exports = {
+ data: {
+ price1: '99.99',
+ price2: '88.88',
+ text:''
+ },
+ methods: {
+ showtext: function(event) {
+ var textComponent = this.$el("textid");
+ this.text = textComponent.attr.value;
+ }
+ }
+ };
+</script>
+```
+[Try it](http://dotwe.org/48f4d7c50245145c72c33161e2bb4325)
http://git-wip-us.apache.org/repos/asf/incubator-weex-site/blob/12e3a8bc/_drafts/v-0.10/references/components/textarea.md
----------------------------------------------------------------------
diff --git a/_drafts/v-0.10/references/components/textarea.md b/_drafts/v-0.10/references/components/textarea.md
new file mode 100644
index 0000000..2645385
--- /dev/null
+++ b/_drafts/v-0.10/references/components/textarea.md
@@ -0,0 +1,81 @@
+---
+title: <textarea>
+type: references
+order: 2.13
+version: 0.10
+---
+
+# <textarea>
+<span class="weex-version">v0.8+</span>
+
+
+### Summary
+
+The weex builtin component `textarea` is used to create interactive controls to accept data from users. It can be a multi-line [input](./input.html).
+
+**Notes:** `<textarea>` support all event which `<input>` had.
+
+### Child Components
+
+This component supports no child components.
+
+### attributes
+
+- `value`: <string> the value of the control.
+- `placeholder`: <string> a hint to the user of which can be entered to the control. The placeholder text must have no carriage returns or line-feeds.
+- `disabled`: <boolean> a boolean attribute indicates that the form control is not available for interaction. In particular, the click event will not be dispatched on disabled controls.
+- `autofocus`: <boolean> a boolean attribute lets you specify that a form control should have input focus when the page loads.
+- `rows:`<number> a number which can specify the height of textarea, default is `2`.
+
+Other attributes please check out the [common attributes](../common-attrs.html).
+
+### Styles
+
+**text styles**: checkout [text styles](../text-style.html)
+
+- support `color` style.
+- support `font-size` style.
+- support `font-style` style.
+- support `font-weight` style.
+- support `text-align` style.
+
+
+**common styles**: check out [common styles for components](../common-style.html)
+
+- support flexbox related styles.
+- support box model related styles.
+- support ``position`` related styles.
+- support ``opacity``, ``background-color`` etc.
+
+### Events
+
+- `input`: the value of an element changes.
+- `change`: the change event is fired when a change to the component's value is commited by the user. It always come after a ``blur`` event.
+- `focus`: a component has received focus.
+- `blur`: a component has lost focus.
+
+**common events**: check out the [common events](../common-event.html)
+
+- support `appear` / `disappear` event. Check out [common events](../common-event.html).
+
+**Notes:** `<textarea>` does not support the common-event `click`. Please listen to the `input` or `change` event instead.
+
+### Parameters of events' object
+
+- for ``input`` and ``change`` events:
+ - `value`: the value of the component who dispatched this event.
+ - `timestamp`: the time stamp of the event.
+- for ``focus`` and ``blur`` events:
+ - `timestamp`: the time stamp of the event.
+
+### Example
+
+```html
+<div>
+ <textarea
+ autofocus="true"
+ placeholder="..."
+ value="I am a multiple input">
+ </textarea>
+</div>
+```
http://git-wip-us.apache.org/repos/asf/incubator-weex-site/blob/12e3a8bc/_drafts/v-0.10/references/components/video.md
----------------------------------------------------------------------
diff --git a/_drafts/v-0.10/references/components/video.md b/_drafts/v-0.10/references/components/video.md
new file mode 100644
index 0000000..fa4384e
--- /dev/null
+++ b/_drafts/v-0.10/references/components/video.md
@@ -0,0 +1,75 @@
+---
+title: <video>
+type: references
+order: 2.14
+version: 0.10
+---
+
+# <video>
+<span class="weex-version">v0.6.1+</span>
+
+The video component can be used to embed video content in a weex page.
+
+**example**
+
+```html
+<template>
+ <div>
+ <text>Big Eater!</text>
+ <video onstart='onstart' onpause='onpause' onfinish='onfinish' onfail='onfail'
+ auto-play="false" play-status="pause" src="{{src}}" style="width:750;height:500;"></video>
+</div>
+
+ </div>
+</template>
+
+<script>
+ module.exports ={
+ data: {
+ src:'http://flv2.bn.netease.com/videolib3/1611/01/XGqSL5981/SD/XGqSL5981-mobile.mp4'
+ },
+ methods:{
+ onstart:function(e){
+ console.log('onstart');
+ console.log(e);
+ },
+ onpause:function(e){
+ console.log('onpause');
+ },
+ onfinish:function(e){
+ console.log('onfinish');
+ },
+ onfail:function(e){
+ console.log('onfail');
+ },
+ }
+ }
+</script>
+```
+
+[try it](http://dotwe.org/97938570cddf76c792a1a5f9542253b1)
+
+## Child Components
+* text is the only valid type of child component.
+
+## Attributes
+
+* src: <string> The URL of the video to embed.
+* play-status: <boolean> play | pause. Use it to control video's play/pause status. Default value is pause.
+* auto-play: <boolean> true | false. Use it to control whether it is playing when the page initialization finished. Defalut value is false.
+
+Other attributes please check out the [common attributes](../common-attrs.html).
+
+## Styles
+common styles: check out [common styles for components](../common-style.html)
+
+* support flexbox related styles
+* support box model related styles
+* support position related styles
+* support opacity, background-color etc.
+
+## Events
+* onstart: triggered when playback state is Playing.
+* onpause: triggered when playback state is Paused.
+* onfinish: triggered when playback state is Finished.
+* onfail: triggered when playback state is Failed.
http://git-wip-us.apache.org/repos/asf/incubator-weex-site/blob/12e3a8bc/_drafts/v-0.10/references/components/web.md
----------------------------------------------------------------------
diff --git a/_drafts/v-0.10/references/components/web.md b/_drafts/v-0.10/references/components/web.md
new file mode 100644
index 0000000..89d47c7
--- /dev/null
+++ b/_drafts/v-0.10/references/components/web.md
@@ -0,0 +1,152 @@
+---
+title: <web>
+type: references
+order: 2.15
+version: 0.10
+---
+
+# <web>
+<span class="weex-version">v0.5+</span>
+
+Use web component to display any web content in the weex page. The `src`attribute is used to specify a special source. You also can use `webview` module to control some web operation such as goBack,goForward and reload. see [webview module](https://alibaba.github.io/weex/doc/modules/webview.html).For example,You can use web component and webview module to assemble a browser.
+
+## Child Components
+
+This component supports no child components.
+
+## Attributes
+
+**src**(string): this attribute specifies the page source to load.
+
+Other attributes please check out the [common attributes](../common-attrs.html).
+
+## Styles
+
+**width**(float): the width of the component, default value is 0. This style must be specified.
+
+**height**(float): the height of the component, default value is 0. This style must be specifed.
+
+
+### common styles
+
+check out the [common styles](../common-attrs.html).
+
+support flexbox related styles
+support box model related styles
+support `position` related styles
+
+## Events
+
+**pagestart**: sent after the web component starts loading a page.
+**pagefinish**: sent after the web component finishes loading a page.
+**error**: sent if the web component failed to load a page.
+
+### common events
+
+support `appear` / `disappear` event.
+
+Check out [common events](../common-event.html)
+
+### Notes
+not support `click` event.
+
+## Example
+
+We use a simple Browser Demo to show how to use web component and webview module. Check out [webview module](../modules/webview.html).
+
+
+```html
+<template>
+ <div class="browserStyle">
+ <div style="flex-direction: row">
+ <input id="urlInput" type="url" autofocus="false" placeholder="..." class="textStyle" value="{{input_text}}" oninput="input">
+ </input>
+ </div>
+ <div style="flex-direction: row">
+ <wxc-button value="LoadURL" class="buttonSytle" size="small" onclick="loadURL"></wxc-button>
+ <wxc-button value="Backward" class="buttonSytle" size="small" onclick="backforward"></wxc-button>
+ <wxc-button value="Forward" class="buttonSytle" size="small" onclick="forward"></wxc-button>
+ </div>
+ <div>
+ <web id="webview" src="{{src}}" class="webStyle"></web>
+ </div>
+ </div>
+</template>
+
+<style>
+
+ .browserStyle
+ {
+ width:600;
+ height: 825;
+ background-color:#778899 ;
+ }
+
+ .textStyle
+ {
+ width:600;
+ height: 50;
+ background-color: #D3D3D3;
+ }
+
+ .buttonSytle
+ {
+ width:180;
+ height: 50;
+ font-size: 12;
+ background-color: #D3D3D3;
+ margin:10;
+ padding-left: 5;
+ padding-right: 5;
+ }
+
+ .webStyle
+ {
+ width:600;
+ height: 700;
+ background-color: #8B0000;
+ }
+
+</style>
+
+<script>
+
+ var web_module = require('@weex-module/webview');
+
+ module.exports = {
+ data: {
+ src : "https://h5.m.taobao.com",
+ input_text:"https://www.tmall.com"
+ },
+
+ methods: {
+
+ loadURL: function (e) {
+ var web_element = this.$el('webview');
+ var input = this.$el("urlInput");
+ this.src = this.input_text;
+ web_module.reload(web_element);
+ },
+
+ backforward: function (e) {
+ var web_element = this.$el('webview');
+ web_module.goBack(web_element);
+ this.input_text = web_element.attr.src;
+ },
+
+ forward: function (e) {
+ var web_element = this.$el('webview');
+ web_module.goForward(web_element);
+ this.input_text = web_element.attr.src;
+ },
+ input:function (e) {
+ var input = this.$el("urlInput");
+ this.input_text = input.attr.value;
+ }
+
+ }
+ }
+</script>
+```
+
+[Try it](http://dotwe.org/103d472645206cc1564f49717585abb4)
http://git-wip-us.apache.org/repos/asf/incubator-weex-site/blob/12e3a8bc/_drafts/v-0.10/references/components/wxc-navpage.md
----------------------------------------------------------------------
diff --git a/_drafts/v-0.10/references/components/wxc-navpage.md b/_drafts/v-0.10/references/components/wxc-navpage.md
new file mode 100644
index 0000000..0ae7eba
--- /dev/null
+++ b/_drafts/v-0.10/references/components/wxc-navpage.md
@@ -0,0 +1,74 @@
+---
+title: <wxc-navpage>
+type: references
+order: 2.16
+version: 0.10
+---
+
+# <wxc-navpage>
+
+### Summary
+
+The "wxc-navpage" tag implements a specialized component that contains a navbar at the top of the window and an embed content page. You can customize the navbar as you like. In addition, you can use `navigator` module to control the page jump, see [navigator module](../modules/navigator.html).
+
+### Child Components
+
+This type of component supports all kinds of weex component as its child components.
+
+### Attributes
+
+- `height`: <length> The height of the navbar. Default value is 88.
+- `background-color`: <color>The backgroudColor of the navbar. Default value is `white`.
+- `title`: <string> The title of the navbar.
+- `title-color`: <color>The color of the navbar title. Default value is `black`.
+- `left-item-title`: <string> The title of the leftItem.
+- `left-item-color`: <color> The color of the leftItem title. Default value is `black`.
+- `right-item-title`: <string> The title of the rightItem.
+- `right-item-color`: <color> The color of the rightItem title. Default value is `black`.
+- `left-item-src`: <string> The imageURL of the leftItem you want to set.
+- `right-item-src`: <string> The imageURL of the rightItem you want to set.
+
+Other attributes please check out the [common attributes](../references/common-attrs.html).
+
+### Styles
+
+**common styles**: check out the [common styles](../references/common-attrs.html)
+
+- support flexbox related styles
+- support box model related styles
+- support ``position`` related styles
+- support ``opacity``, ``background-color`` etc.
+
+### Events
+
+- `naviBar.leftItem.click`: triggered when the leftItem of navbar is clicked. You need to register the observer in ready or create block.
+- `naviBar.rightItem.click`: triggered when the rightItem of navbar is clicked. You need to register the observer in ready or create block.
+
+**common events**: check out the [common events](../references/common-event.html)
+
+- support `click` event. Check out [common events](../references/common-event.html)
+- support `appear` / `disappear` event. Check out [common events](../references/common-event.html)
+
+### Example
+
+```html
+<template>
+ <wxc-navpage height={{...}} background-color="..." title="..." title-color="..." left-item-title="..." left-item-color="..." right-item-src="...">
+ <content> ...</content>
+ </wxc-navpage>
+</template>
+<script>
+ require('weex-components');
+ module.exports = {
+ created: function() {
+ this.$on('naviBar.rightItem.click',function(e){
+ //handle your click event here.
+ });
+
+ this.$on('naviBar.leftItem.click',function(e){
+ //handle your click event here.
+ });
+ }
+ }
+</script>
+```
http://git-wip-us.apache.org/repos/asf/incubator-weex-site/blob/12e3a8bc/_drafts/v-0.10/references/components/wxc-tabbar.md
----------------------------------------------------------------------
diff --git a/_drafts/v-0.10/references/components/wxc-tabbar.md b/_drafts/v-0.10/references/components/wxc-tabbar.md
new file mode 100644
index 0000000..944b06d
--- /dev/null
+++ b/_drafts/v-0.10/references/components/wxc-tabbar.md
@@ -0,0 +1,94 @@
+---
+title: <wxc-tabbar>
+type: references
+order: 2.17
+version: 0.10
+---
+
+# <wxc-tabbar>
+
+The `wxc-tabbar` is a custom component, which belongs to the `weex-components` node package, implements a specialized component that corresponds to the radio-style selection. It displays tabs at the bottom of the window for switching between different tab pages.
+
+Usage: You can use this component by a `require` statement, `require('weex-components');`, in the script tag. e.g.
+
+```html
+<template>
+ <div style="flex-direction: column;">
+ <wxc-tabbar tab-items = {{tabItems}}></wxc-tabbar>
+ </div>
+</template>
+
+<script>
+ require('weex-components');
+ // Other javascript statements.
+</script>
+```
+
+Before requiring `weex-components'`, you need to specify `weex-components` dependency in your project's package.json file. e.g.
+
+```json
+"dependencies": {
+ "weex-components": "^0.2.0"
+}
+```
+
+## Child Components
+
+`wxc-tabbar` has no child components.
+
+
+## Attributes
+
+* `selected-index` : <number> default value is 0
+* `selected-color`: <color> The color of the title when it is selected. Default is red color.
+* `unselected-color`: <color> The color of the title when it is unselected. Default is black color.
+* `tab-items` This attribute accepts an array of `tabitem` objects, each of which corresponds to the tab pages. And the order of the items equals to the order of the tab pages onscreen. You can configure the appearance of tabbar by setting the tabitem object's properties. Each tabitem properties are listed as below:
+ * `index`: <integer> This attribute is required, and it specifies the order of the item.
+ * `title`: <string> The item’s title. and it is optional. The tile will not be displayed if empty or not provided.
+ * `titleColor`: <color>The item’s titleColor. Default is black color.
+ * `image`: <string>The icon displayed when the tabitem is unselected. The image will not be displayed if empty or not provided.
+ * `selectedImage` : <string>The icon displayed when the tabitem is selected. The icon will not be displayed if empty or not provided.
+ * `src` : <string> The weex page for the tab page.
+ * `visibility`: <string>visible | hidden. This attribute specifies display status of the tab page. Default value is visible.
+
+Other attributes please check out the [common attributes](../common-attrs.html).
+
+## Styles
+common styles: check out [common styles](../common-style.html) for components
+
+* support flexbox related styles
+* support box model related styles
+* support position related styles
+* support opacity, background-color etc.
+
+## Events
+* `tabBar.onClick`: triggered when the tabitem is selected. You need to register the observer in ready or create block.
+e.g.
+
+
+```html
+<template>
+ <div style="flex-direction: column;">
+ <wxc-tabbar tab-items = {{tabItems}}></wxc-tabbar>
+ </div>
+</template>
+
+<script>
+ require('weex-components');
+ module.exports = {
+ data: {
+ },
+ methods: {
+ ready: function (e) {
+ var vm = this;
+ vm.$on('tabBar.onClick',function(e){
+ var index = e.detail.index;
+ });
+ },
+ }
+ }
+</script>
+```
+
+## Example
+You should checkout the playground's `tabbar` example.
http://git-wip-us.apache.org/repos/asf/incubator-weex-site/blob/12e3a8bc/_drafts/v-0.10/references/gesture.md
----------------------------------------------------------------------
diff --git a/_drafts/v-0.10/references/gesture.md b/_drafts/v-0.10/references/gesture.md
new file mode 100644
index 0000000..fc41fd4
--- /dev/null
+++ b/_drafts/v-0.10/references/gesture.md
@@ -0,0 +1,74 @@
+---
+title: Gesture
+type: references
+order: 1.4
+version: 0.10
+---
+
+# Gesture
+
+> Experiment Feature
+
+Weex encapsulates native touch events to provide a gesture system. Using gesture is similar to use event in Weex. Just set `on` attributes on a node to listen to gesture.
+
+## Type
+For now, there are four types of gestures:
+
+* **Touch**. Touch gesture is fired when a touch point is placed, moved or removed from the touch surface. Touch gesture is accuracy as it will report every trivial event. As a result, listening to touch gesture may be slow, a great deal of events needs to be processed even a small move happened. There are three types of Touch gesture:
+ * `touchstart` will be fired when a touch point is placed on the touch surface.
+ * `touchmove` will be fired when a touch point is moved along the touch surface.
+ * `touchend` will be fired when a touch point is removed from the touch surface.
+* **Pan**. Pan gesture also report motion of touch point on the touch surface, which is similar to touch gesture. But Pan gesture is sampled and faster than the touch event. As consequence, it is less accuracy than touch gesture. There are also three types of Pan gesture, and the meaning of these types is very close to types of Touch.
+ * `panstart`
+ * `panmove`
+ * `panend`
+* **Swipe**. Swipe is fired when user swipe a touch point on the screen. A serial of motion will only trigger one Swipe gesture.
+* **LongPress**. Swipe is fired when a touch point is held for 500 ms or more.
+
+The Touch gesture and Pan is very close to each other, with following features hold:
+
+* **Touch**. Not sampled, accuracy, but slow.
+* **Pan**. Sampled, fast, less accuracy.
+
+Users may choose their gesture according to their situation.
+
+## Properties
+The following properties can be used in gesture callback:
+
+* `direction`. Only exists for **Swipe** gesture. Indicate the direcion of the swipe, choose from `up`, `left`, `bottom`, `right`.
+* `changedTouches`. An array of motion for every touch pointer that has contribute to the current gesture.
+
+### changedTouches
+
+`changedTouches` is an array, with the following properties in its children:
+
+* `identifier`. A unique identifier for a touch pointer.
+* `pageX`. The X coordinate of the touch pointer relative to the left edge of the document.
+* `pageY`. The Y coordinate of the touch pointer relative to the top of the document.
+* `screenX`. The X coordinate of the touch point relative to the left edge of the screen.
+* `screenY`. The Y coordinate of the touch point relative to the top edge of the screen.
+
+## Constrain
+Currently, Weex Android do not support listening to gesture on `scroller`, `list` and `webview`, as it would lead a large amount of event conflicting.
+
+## How to use
+
+Example:
+
+```html
+<template>
+ <div ontouchstart="handleTouchstart"></div>
+</template>
+
+<script>
+module.exports = {
+ methods: {
+ handleTouchstart: function(eventProperties) {
+ // handling with the Event Properties
+ }
+ }
+}
+</script>
+```
+
+With the code above, a `touchstart` event will be fired when a touch point is placed on the touch surface.
http://git-wip-us.apache.org/repos/asf/incubator-weex-site/blob/12e3a8bc/_drafts/v-0.10/references/images/css-boxmodel.png
----------------------------------------------------------------------
diff --git a/_drafts/v-0.10/references/images/css-boxmodel.png b/_drafts/v-0.10/references/images/css-boxmodel.png
new file mode 100644
index 0000000..a2063e2
Binary files /dev/null and b/_drafts/v-0.10/references/images/css-boxmodel.png differ
http://git-wip-us.apache.org/repos/asf/incubator-weex-site/blob/12e3a8bc/_drafts/v-0.10/references/images/css-flexbox-align.jpg
----------------------------------------------------------------------
diff --git a/_drafts/v-0.10/references/images/css-flexbox-align.jpg b/_drafts/v-0.10/references/images/css-flexbox-align.jpg
new file mode 100644
index 0000000..8a7f731
Binary files /dev/null and b/_drafts/v-0.10/references/images/css-flexbox-align.jpg differ
http://git-wip-us.apache.org/repos/asf/incubator-weex-site/blob/12e3a8bc/_drafts/v-0.10/references/images/css-flexbox-justify.svg
----------------------------------------------------------------------
diff --git a/_drafts/v-0.10/references/images/css-flexbox-justify.svg b/_drafts/v-0.10/references/images/css-flexbox-justify.svg
new file mode 100644
index 0000000..33e742b
--- /dev/null
+++ b/_drafts/v-0.10/references/images/css-flexbox-justify.svg
@@ -0,0 +1,59 @@
+<svg xmlns="http://www.w3.org/2000/svg" width='504' height='270' viewBox="0 0 504 270">
+ <defs>
+ <pattern id='checker' width='20' height='20' patternUnits='userSpaceOnUse'>
+ <rect x='0' y='0' width='10' height='10' fill='#eee' />
+ <rect x='10' y='10' width='10' height='10' fill='#eee' />
+ <rect x='0' y='10' width='10' height='10' fill='#ccc' />
+ <rect x='10' y='0' width='10' height='10' fill='#ccc' />
+ </pattern>
+ </defs>
+ <style>
+ text { font-family: sans-serif; font-weight: bold; font-size: 30px; text-anchor: middle; }
+ rect { stroke-width: 2px; stroke: #888; }
+ g > rect:nth-child(1) { fill: #888 }
+ g > rect:nth-child(2) { fill: #fcc; }
+ g > rect:nth-child(3) { fill: #cfc; }
+ g > rect:nth-child(4) { fill: #ccf; }
+ g > rect:nth-child(5) { fill: transparent; }
+ </style>
+ <g transform="translate(2,2)">
+ <rect x='0' y='0' width='500' height='50' />
+ <rect x='0' y='0' width='100' height='50' />
+ <rect x='100' y='0' width='80' height='50' />
+ <rect x='180' y='0' width='200' height='50' />
+ <rect x='0' y='0' width='500' height='50' />
+ <text x='250' y='38'>flex-start</text>
+ </g>
+ <g transform="translate(2,56)">
+ <rect x='0' y='0' width='500' height='50' />
+ <rect x='120' y='0' width='100' height='50' />
+ <rect x='220' y='0' width='80' height='50' />
+ <rect x='300' y='0' width='200' height='50' />
+ <rect x='0' y='0' width='500' height='50' />
+ <text x='250' y='38'>flex-end</text>
+ </g>
+ <g transform="translate(2,110)">
+ <rect x='0' y='0' width='500' height='50' />
+ <rect x='60' y='0' width='100' height='50' />
+ <rect x='160' y='0' width='80' height='50' />
+ <rect x='240' y='0' width='200' height='50' />
+ <rect x='0' y='0' width='500' height='50' />
+ <text x='250' y='38'>center</text>
+ </g>
+ <g transform="translate(2,164)">
+ <rect x='0' y='0' width='500' height='50' />
+ <rect x='0' y='0' width='100' height='50' />
+ <rect x='160' y='0' width='80' height='50' />
+ <rect x='300' y='0' width='200' height='50' />
+ <rect x='0' y='0' width='500' height='50' />
+ <text x='250' y='38'>space-between</text>
+ </g>
+ <g transform="translate(2,218)">
+ <rect x='0' y='0' width='500' height='50' />
+ <rect x='20' y='0' width='100' height='50' />
+ <rect x='160' y='0' width='80' height='50' />
+ <rect x='280' y='0' width='200' height='50' />
+ <rect x='0' y='0' width='500' height='50' />
+ <text x='250' y='38'>space-around</text>
+ </g>
+</svg>
\ No newline at end of file
http://git-wip-us.apache.org/repos/asf/incubator-weex-site/blob/12e3a8bc/_drafts/v-0.10/references/images/css-flexbox-sample.png
----------------------------------------------------------------------
diff --git a/_drafts/v-0.10/references/images/css-flexbox-sample.png b/_drafts/v-0.10/references/images/css-flexbox-sample.png
new file mode 100644
index 0000000..0f1236d
Binary files /dev/null and b/_drafts/v-0.10/references/images/css-flexbox-sample.png differ
http://git-wip-us.apache.org/repos/asf/incubator-weex-site/blob/12e3a8bc/_drafts/v-0.10/references/images/nav.png
----------------------------------------------------------------------
diff --git a/_drafts/v-0.10/references/images/nav.png b/_drafts/v-0.10/references/images/nav.png
new file mode 100644
index 0000000..7081ca7
Binary files /dev/null and b/_drafts/v-0.10/references/images/nav.png differ
http://git-wip-us.apache.org/repos/asf/incubator-weex-site/blob/12e3a8bc/_drafts/v-0.10/references/index.md
----------------------------------------------------------------------
diff --git a/_drafts/v-0.10/references/index.md b/_drafts/v-0.10/references/index.md
new file mode 100644
index 0000000..d59d654
--- /dev/null
+++ b/_drafts/v-0.10/references/index.md
@@ -0,0 +1,49 @@
+---
+title: Bootstrap
+type: references
+order: 1
+has_chapter_content: false
+chapter_title: Common Options
+version: 0.10
+---
+
+# Bootstrap
+
+Besides its default meaning, `<script>` tag supports two more configuration with its `type` property *in the top level component of a page*.
+
+* `type="data"`: For initial data configuration, the data defined here will overwrite the data definition in the `<script>`.
+* `type="config"`: For configuration definition.
+
+```html
+<script type="data">
+ /* (optional) the definition of initial data */
+</script>
+
+<script type="config">
+ /* (optional) the definition of configuration */
+</script>
+```
+
+## Initial data definition
+
+Sometimes, it is hard to maintain huge data structure in the default `<script>` tag. So Weex allows us to have a `<script type="data">` tag to define initial data. The data defined in here will totally replace the data defined in the default `<script>` tag.
+
+here is an example:
+
+```html
+<script type="data">
+{
+ title: 'Alibaba',
+ date: new Date().toLocaleString()
+}
+</script>
+```
+
+## script configuration
+
+Weex also allows us to do some configuration with a `<script type="config">`, So far, we only support the `downgrade` configs.
+
+- `downgrade.osVersion`
+- `downgrade.appVersion`
+- `downgrade.weexVersion`
+- `downgrade.deviceModel`
http://git-wip-us.apache.org/repos/asf/incubator-weex-site/blob/12e3a8bc/_drafts/v-0.10/references/modules/animation.md
----------------------------------------------------------------------
diff --git a/_drafts/v-0.10/references/modules/animation.md b/_drafts/v-0.10/references/modules/animation.md
new file mode 100644
index 0000000..4b46564
--- /dev/null
+++ b/_drafts/v-0.10/references/modules/animation.md
@@ -0,0 +1,63 @@
+---
+title: animation
+type: references
+order: 3.1
+version: 0.10
+---
+
+# animation
+
+Smooth and meaningful animation is very effective for enhancing the user experience of mobile application, you can use the `animation` module to perform animation on components. A animation can perform a series of simple transformations (position, size, rotation, background color, and opacity) on the component. So, if you have a `image` component, you can move, rotate, grow, or shrink it.
+
+## API
+### transition(node, options, callback)
+
+[example](http://dotwe.org/5be74019d5e510fa95c5dedec24f7ce5)
+
+#### Arguments
+##### node
+
+**type:** node
+
+**position:** An element that will be animated, normally you can get this by calling `this.$el(id)`.
+
+##### options
+
+**type:** object
+
+**position:** Transition options.
+- `duration` (number): Specifies the number of milliseconds of animation execution, the default value is `0`, means that no animation will occur.
+- `delay` (number): Specifies the amount of milliseconds to wait between a change being requested to a property that is to be transitioned and the start of the transition effect. The default value is `0`.
+- `timingFunction` (string): Used to describe how the intermediate values of the styles being affected by a transition effect are calculated, default value is `linear`, the allowed attributes are listed in the following table:
+
+|name|description|example|
+|:--|:--|:--|
+|`linear`|Specifies a transition effect with the same speed from start to end|[example](http://dotwe.org/d71491ded2bede32df3e8b44b53d5e4f)|
+|`ease-in`|Specifies a transition effect with a slow start|[example](http://dotwe.org/23b104f833039f263957481f2e2c40c9)|
+|`ease-out`|Specifies a transition effect with a slow end|[example](http://dotwe.org/04dab95e073a2c3a808e6b01fc20e996)|
+|`ease-in-out`|Specifies a transition effect with a slow start and end|[example](http://dotwe.org/fc37ec17d215e786ce336a00457489e3)|
+|`cubic-bezier(x1, y1, x2, y2)`|Define your own values in the cubic-bezier function. Possible values are parameter values from 0 to 1. More information about cubic-bezier please visit [cubic-bezier](http://cubic-bezier.com/) and [Bézier curve](https://en.wikipedia.org/wiki/B%C3%A9zier_curve).|[example](http://dotwe.org/95d8f15d0014c31d3a1d15728313f2a5)|
+
+- `styles` (object): Specify the names and values of styles to which a transition effect should be applied. The allowed attributes are listed in the following table:
+
+| name | description | value type | default value |example|
+| :--- | :--- | :--- | :--- |:---|
+|width|The width applied to the component after the animation finished.|length|none|[example](http://dotwe.org/b599d273f996cfdcbeca7bd5c828ca90)|
+|height|The height applied to the component after the animation finished.|length|none|[example](http://dotwe.org/d0b1ccadf386ba00960d0c8340c682e5)|
+|backgroundColor|The background color applied to the component after the animation finished.|string|none|[example](http://dotwe.org/f4616ee18f6042b63a8fdcd2816b1712)|
+|opacity|The opacity applied to the component after the animation finished.|number between 0 to 1|`1`|[example](http://dotwe.org/f94394173301db83ae6e66d1330a0d0b)|
+|transformOrigin|The povit of transition. The possible values for `x-aris` are `left`/`center`/`right`/length or percent, and possible values of `y-axis` are `top`/`center`/`bottom`/ length or percent|`x-axis y-axis`|`center center`|[example](http://dotwe.org/de43f5a47de230dd531797458bf7fd3c)|
+|transform|Transform function to be applied to the element. The properties in the following table are supported|object|none|[example](http://dotwe.org/cfc0388441f5a53a73335885006c13e7)|
+
+properties of `transform`:
+
+| name | description | value type | default value |example|
+| :--- | :--- | :--- | :--- |:---|
+|translate/translateX/translateY|Specifies the location of which the element will be translated.|pixel or percent|none|[example](http://dotwe.org/6638e66e296723bbef3e59c83b2b5003)|
+|rotate|Specifies the angle of which the element will be rotated, the unit is degree.|number|none|[example](http://dotwe.org/ba9e9920594d9388744b2bd0d1b7695d)|
+|scale/scaleX/scaleY|Stretch or shrink the element.|number|none|[example](http://dotwe.org/14b42dde6583ab222bd2b7ed08f241c8)|
+
+#### callback
+**type:** function
+
+**position:** Callback which is called after the completion of transition.
\ No newline at end of file
http://git-wip-us.apache.org/repos/asf/incubator-weex-site/blob/12e3a8bc/_drafts/v-0.10/references/modules/clipboard.md
----------------------------------------------------------------------
diff --git a/_drafts/v-0.10/references/modules/clipboard.md b/_drafts/v-0.10/references/modules/clipboard.md
new file mode 100644
index 0000000..d0f45e7
--- /dev/null
+++ b/_drafts/v-0.10/references/modules/clipboard.md
@@ -0,0 +1,53 @@
+---
+title: clipboard
+type: references
+order: 3.2
+version: 0.10
+---
+
+# clipboard
+<span class="weex-version">v0.8+ (developing)</span>
+
+clipboard allows you to `getString()` or `setString()` from the system clipboard.
+
+Not long ago, We're still suffering from such a situation that we got a verification code sent by SMS, and we had no way to get the code from the SMS text but to typed it by our hands. How frustrated it is! But now you can enable your app to get the code from the system clipboard by calling `clipboard.getString()` .
+
+## Caution
+
+* only support text.
+* only works on Android and iOS. NOT works for html5, for web security reason.
+
+## API
+
+### getString(callback)
+
+reads from clipboard.
+
+##### Arguments
+
+`callback(function)`: the callback function after executing this action. `data` is the return value.
+
+Example
+
+```js
+var clipboard = require('@weex-module/clipboard');
+clipboard.getString(function(ret) {
+ // callback. 'ret' is an object that contains 'result' and 'data'.
+ // use 'ret.data' to fetch the value.
+ console.log("read from clipboard is " + ret.data);
+});
+
+```
+### setString(text)
+
+sets the text to clipboard, having the same effect as copying manually.
+
+##### Arguments
+
+`text(string)`: the text copied to clipboard.
+Example
+
+```js
+var clipboard = require('@weex-module/clipboard');
+clipboard.setString("SomeStringHere");
+```
http://git-wip-us.apache.org/repos/asf/incubator-weex-site/blob/12e3a8bc/_drafts/v-0.10/references/modules/dom.md
----------------------------------------------------------------------
diff --git a/_drafts/v-0.10/references/modules/dom.md b/_drafts/v-0.10/references/modules/dom.md
new file mode 100644
index 0000000..948abf0
--- /dev/null
+++ b/_drafts/v-0.10/references/modules/dom.md
@@ -0,0 +1,114 @@
+---
+title: dom
+type: references
+order: 3.3
+version: 0.10
+---
+
+# dom
+
+## Summary
+
+A series of dom apis that sending virtual-dom's messages to the native renderer to update the dom tree. The only API for developers to use in a `.we` file is `scrollToElement` <del>which you can use by calling the `$scrollTo` method</del>. Other APIs mentioned on this page should only be used through the native renderer in the `callNative` process.
+
+## API
+
+### scrollToElement(node, options)
+
+Scroll the page to the specified node. This API should only be used on the element in the `scroller` or `list` component.
+
+<del>This API can be used by calling the VM's method `$scrollTo` **(deprecated)**.</del> You can use `require('@weex-module/dom').scrollToElement` to call this API in your `.we` file.
+
+#### Arguments
+
+* `node`*(Node)*: an element that scrolled into the view.
+* `options`*(object)*: some options.
+ * `offset`*(number)*: An offset to the visible position, default is `0`.
+
+#### Example
+
+```javascript
+var dom = require('@weex-module/dom');
+dom.scrollToElement(this.$el('someId'), {offset: 10});
+```
+
+### createBody(element)
+
+Create the body for the whole dom tree. Element type should only be the ones that can be used as roots (`div`, `scroller` and `list`).
+
+#### Arguments
+
+* `element`*(object)*: a object that specified the body node info like ref, type, children, etc.
+
+### addElement(parentNode, element, index)
+
+Add a element into the dom tree.
+
+#### Arguments
+
+* `parentNode`*(Node)*: specify the element's parent node.
+* `element`*(object)*: a object that specified the config info for the node to be added.
+* `index`*(number)*: insert the element to the specified position.
+
+### removeElement(node)
+
+Remove a node in the dom tree.
+
+#### Arguments
+
+* `node`*(Node)*: the node to be removed.
+
+### moveElement(node, parentNode, index)
+
+Move a exsited node into another parent (or the same parent) before the specified position.
+
+#### Arguments
+
+* `node`*(Node)*: the node to be moved.
+* `parentNode`*(Node)*: the parent node to move into.
+* `index`*(number)*:: according to the specified position index, will the node be inserted into.
+
+### addEvent(node, type)
+
+Inform the renderer that there are listeners for a specified event type.
+
+#### Arguments
+
+* `node`*(Node)*: the node to be listened on.
+* `type`*(string)*: which type of events the node should be listened for.
+
+### removeEvent(node, type)
+
+Remove event listeners on the specified node for the specified event type.
+
+#### Arguments
+
+* `node`*(Node)*: on which node should the listeners to be removed
+* `type`*(string)*: specify the event type.
+
+### updateAttrs(node, attr)
+
+Update attrbutes of the specified node.
+
+#### Arguments
+
+* `node`*(Node)*: the node to be updated.
+* `attr`*(object)*: the attributes object with the attribute items to be updated.
+
+### updateStyle(node, style)
+
+Update styles of the specified node.
+
+#### Arguments
+
+* `node`*(Node)*: the node to be updated.
+* `style`*(object)*: the style object with the style rules to be updated.
+
+### createFinish()
+
+Notify native renders that the series of messages for updating the native dom tree have reached a end.
+
+### refreshFinish()
+
+Notify native renders that the series of messages for refreshing a native dom tree have reached a end.
+
http://git-wip-us.apache.org/repos/asf/incubator-weex-site/blob/12e3a8bc/_drafts/v-0.10/references/modules/globalevent.md
----------------------------------------------------------------------
diff --git a/_drafts/v-0.10/references/modules/globalevent.md b/_drafts/v-0.10/references/modules/globalevent.md
new file mode 100644
index 0000000..0db8c48
--- /dev/null
+++ b/_drafts/v-0.10/references/modules/globalevent.md
@@ -0,0 +1,89 @@
+---
+title: globalEvent
+type: references
+order: 3.10
+version: 0.10
+---
+
+# globalEvent
+<span class="weex-version">v0.8+ (developing)</span>
+
+## Summary
+
+`globalEvent` are used to listen for persistent events, such as changes in positioning information, gyroscopes, and so on. A global event is a secondary API that requires additional APIs to work with.
+
+You can register events via `addEventListener`, which can be removed by `removeEventListener` when you do not need to listen for `globalEvent`.
+
+*AUCTION*
+- Only instance level is not application level .
+
+## How to make your Module support global events
+API development is complete, when the event needs to be sent, the need through the following methods:
+
+```javascript
+/**
+ *
+ * @param eventName eventName
+ * @param params event params
+ */
+instance.fireGlobalEventCallback(eventName,params);
+```
+
+How to dispatch a global event in a weex-html5 component or module ? Just dispatch the event on the document element:
+
+```javascript
+var evt = new Event('some-type')
+evt.data = { foo: 'bar' }
+document.dispatchEvent(evt)
+```
+
+### Example
+
+#### Android
+
+```java
+Map<String,Object> params=new HashMap<>();
+params.put("key","value");
+mWXSDKInstance.fireGlobalEventCallback("geolocation",params);
+```
+#### iOS
+
+```Objective-C
+[weexInstance fireGlobalEvent:@"geolocation" params:@{@"key":@"value"}];
+```
+
+## API
+
+### addEventListener(String eventName, String callback)
+
+register global event.
+
+#### Arguments
+
+* `eventName`*(string)*: The name of the event you want to listen to.
+* `callback`*(function)*: the callback function after executing this action.
+
+#### Example
+
+```javascript
+var globalEvent = require('@weex-module/globalEvent');
+globalEvent.addEventListener("geolocation", function (e) {
+ console.log("get geolocation")
+ });
+```
+
+### removeEventListener(String eventName)
+
+remove global event
+
+#### Arguments
+
+* `eventName`*(string)*: You no longer need to listen for event names.
+
+#### Example
+
+```javascript
+var globalEvent = require('@weex-module/globalEvent');
+globalEvent.removeEventListener("geolocation");
+```
+
http://git-wip-us.apache.org/repos/asf/incubator-weex-site/blob/12e3a8bc/_drafts/v-0.10/references/modules/index.md
----------------------------------------------------------------------
diff --git a/_drafts/v-0.10/references/modules/index.md b/_drafts/v-0.10/references/modules/index.md
new file mode 100644
index 0000000..2a094ca
--- /dev/null
+++ b/_drafts/v-0.10/references/modules/index.md
@@ -0,0 +1,28 @@
+---
+title: Built-in Modules
+type: references
+order: 3
+has_chapter_content: true
+version: 0.10
+---
+
+# Built-in Modules
+
+## How to use
+
+You can use a simply way like `require('@weex-module/name')` to access the apis of module. e.g.
+
+```html
+<script>
+var dom = require('@weex-module/dom')
+
+module.exports = {
+ data: {},
+ created: function () {
+ dom.scrollToElement(this.$el('someIdForElement'), {
+ offset: 0
+ })
+ }
+}
+</script>
+```
\ No newline at end of file
http://git-wip-us.apache.org/repos/asf/incubator-weex-site/blob/12e3a8bc/_drafts/v-0.10/references/modules/modal.md
----------------------------------------------------------------------
diff --git a/_drafts/v-0.10/references/modules/modal.md b/_drafts/v-0.10/references/modules/modal.md
new file mode 100644
index 0000000..2ebad15
--- /dev/null
+++ b/_drafts/v-0.10/references/modules/modal.md
@@ -0,0 +1,192 @@
+---
+title: modal
+type: references
+order: 3.4
+version: 0.10
+---
+
+# modal
+
+Weex provides a series of message boxes: `toast`, `alert`, `confirm` and `prompt`.
+
+## API
+### toast(options)
+
+A toast provides simple feedback about an operation in a small popup. For example, navigating away from an email before you send it triggers a "Draft saved" toast to let you know that you can continue editing later. Toasts automatically disappear after a timeout.
+
+#### Arguments
+- `options` (object): toast options.
+ - `message` (string): the text message that the toast shows.
+ - `duration` (number): the duration(seconds) that the toast shows.
+
+**Example:**
+
+```html
+<template>
+ <div style="height: 200px; width: 400px; background-color: #00bfff;
+ justify-content: center; align-items: center" onclick="{{perform}}">
+ <text style="font-size: 60px; color: #ffffff">Toast</text>
+ </div>
+</template>
+
+<script>
+ module.exports = {
+ methods: {
+ perform: function () {
+ var modal = require('@weex-module/modal');
+ modal.toast({
+ 'message': 'I am a toast',
+ 'duration': 3
+ });
+ }
+ }
+ }
+</script>
+```
+### alert(options, callback)
+
+An alert box is often used if you want to make sure information comes through to the user.
+When an alert box pops up, the user will have to click "OK" to proceed.
+
+#### Arguments
+
+- `options` (object): alert box options.
+ - `message` (string): the text message that the alert shows.
+ - `okTitle` (string): the text of positive button, default is 'OK'.
+ - `callback` (function): callback when complete.
+ This method has a callback function whose arguments will be:
+- `result` (string): the title text of the confirm button that clicked by user.
+
+**Example:**
+
+```html
+<template>
+ <div>
+ <div style="height: 200px; width: 400px; background-color: #00bfff;
+ justify-content: center; align-items: center" onclick="{{perform}}">
+ <text style="font-size: 60px; color: #ffffff">Alert</text>
+ </div>
+ <text>{{params}}</text>
+ </div>
+</template>
+
+<script>
+ module.exports = {
+ data: {
+ params: ''
+ },
+ methods: {
+ perform: function () {
+ var modal = require('@weex-module/modal');
+ var self = this;
+ modal.alert({
+ 'message': 'I am alert message',
+ 'okTitle' : 'YES'
+ }, function (result) {
+ self.params = String(result)
+ });
+ }
+ }
+ }
+</script>
+```
+
+### confirm(options, callback)
+A confirm box is often used if you want the user to verify or accept something.
+
+When a confirm box pops up, the user will have to click either confirm or cancel button to proceed.
+
+#### Arguments
+- `options` (object): confirm box options.
+ - `message` (string): the message that the confirm shows.
+ - `okTitle` (string): the title of confirm button, default is 'OK'.
+ - `cancelTitle` (string): the title of cancel button, default is 'Cancel'.
+- `callback` (function): callback when complete.
+
+This method has a callback function whose arguments will be:
+- `result`(string): the title text of the button that clicked by user.
+**Example:**
+
+```html
+<template>
+ <div>
+ <div style="height: 200px; width: 400px; background-color: #00bfff;
+ justify-content: center; align-items: center" onclick="{{perform}}">
+ <text style="font-size: 60px; color: #ffffff">Confirm</text>
+ </div>
+ <text>{{params}}</text>
+ </div>
+</template>
+
+<script>
+ module.exports = {
+ data: {
+ params: ''
+ },
+ methods: {
+ perform: function () {
+ var modal = require('@weex-module/modal');
+ var self = this;
+ modal.confirm({
+ 'message': 'I have read and accept the terms.',
+ 'okTitle' : 'YES',
+ 'cancelTitle' : 'NO'
+ }, function (e) {
+ self.params = String(e)
+ });
+ }
+ }
+ }
+</script>
+```
+
+### prompt(options, callback)
+
+A prompt box is often used if you want the user to input a value before entering a page.
+When a prompt box pops up, the user will have to click either confirm or cancel button to proceed after entering an input value.
+
+#### Arguments
+- `options` (object): some options.
+ - `message` (string): the message that the prompt shows.
+ - `okTitle` (string): the title text of confirm button, default is 'OK'.
+ - `cancelTitle` (string): the title text of cancel button, default is 'Cancel'.
+- `callback` (function): callback when complete.
+ This method has a callback function whose arguments will be:
+- `ret` (object): the argument will be a object, which has attributes `result` and `data`, like `{ result: 'OK', data: 'hello world' }`
+ - `result` (string): the title of the button that clicked by user.
+ - `data` (string): the value of the text that entered by user.
+
+**Example:**
+
+```html
+<template>
+ <div>
+ <div style="height: 200px; width: 400px; background-color: #00bfff;
+ justify-content: center; align-items: center" onclick="{{perform}}">
+ <text style="font-size: 60px; color: #ffffff">Prompt</text>
+ </div>
+ <text>{{params}}</text>
+ </div>
+</template>
+
+<script>
+ module.exports = {
+ data: {
+ params: ''
+ },
+ methods: {
+ perform: function () {
+ var modal = require('@weex-module/modal');
+ var self = this;
+ modal.prompt({
+ 'message': 'I am a prompt',
+ 'okTitle' : 'YES',
+ 'cancelTitle' : 'NO'
+ }, function (e) {
+ self.params = JSON.stringify(e)
+ });
+ }
+ }
+ }
+</script>
+```
\ No newline at end of file
http://git-wip-us.apache.org/repos/asf/incubator-weex-site/blob/12e3a8bc/_drafts/v-0.10/references/modules/navigator.md
----------------------------------------------------------------------
diff --git a/_drafts/v-0.10/references/modules/navigator.md b/_drafts/v-0.10/references/modules/navigator.md
new file mode 100644
index 0000000..fe4442c
--- /dev/null
+++ b/_drafts/v-0.10/references/modules/navigator.md
@@ -0,0 +1,198 @@
+---
+title: navigator
+type: references
+order: 3.5
+version: 0.10
+---
+
+# Navigator
+<span class="weex-version">v0.6.1+</span>
+
+As it's known to all that, we can navigate back and forth in the web browser using the navigation bar.
+And The navigator module mimics the same behaviors in the iOS/Android application. Without such an ability, We will have to stay in the same page forever, so it is very important. Besides the navigation, the module can let us to specify whether to apply animation or not during the transition.
+
+**example**
+
+```html
+<template>
+ <div class="div">
+ <text class="text" onclick="onItemClick">click me! {{message}}</text>
+ </div>
+</template>
+
+<script>
+ module.exports ={
+ data:{
+ message:""
+ },
+ methods:{
+ onItemClick:function(e){
+
+ var navigator = require('@weex-module/navigator');
+ var params = {'url':'http://weex.alibaba-inc.com/raw/html5/3d2996653c1d129603f9c935b895e998.js','animated':true};
+ navigator.push(params, function(e) {
+ console.log('i am the callback.')
+ });
+ }
+ }
+ }
+</script>
+<style>
+ .div {
+ flex-direction: row;
+ justify-content: space-between;
+ align-items: center;
+ width: 750;
+ height: 90;
+ padding-left:30;
+ padding-right:30;
+
+ border-bottom-width: 1;
+ border-style: solid;
+ border-color: #dddddd;
+ }
+ .text{
+ width: 750;
+ height: 90;
+ }
+</style>
+```
+
+[try it](http://dotwe.org/004a5e3f26290cf5b9ce03806a574633)
+
+## API
+### push(options, callback)
+
+push a weex page onto the navigator stack, you can specify whether apply animation when pushing. And you can also specify a callback function to be executed after the operation is over.
+
+**parameters**
+
+* options(object): some options.
+ * url(stirng): The URL of the weex page to push.
+ * animated(string): true, if the weex page is push through animation, otherwise, false. Default value is true.
+
+* callback(object): the callback function to be called after executing this action.
+
+```javascript
+var params = {
+ 'url': 'navigator-demo.js',
+ 'animated' : 'true',
+}
+var navigator = require('@weex-module/navigator');
+navigator.push(params, function(e) {
+ //callback
+});
+```
+
+### pop(options, callback)
+pop a weex page onto the navigator stack, you can specify whether apply animation when popping. And you can also specify a callback function to be executed after the operation is over.
+
+**parameters**
+
+* options(object): some options.
+ * animated(string): true if the weex page is pop through animation; otherwise, false. Default value is true.
+* callback(object): the callback function after executing this action.
+
+**example**
+
+```javascript
+var params = {
+ 'animated' : 'true',
+}
+var navigator = require('@weex-module/navigator');
+navigator.pop(params, function(e) {
+ //callback
+});
+```
+
+### close(options, callback)
+close a weex page, you can specify a callback function to be executed after the operation is over.
+
+**parameters**
+
+* options(object): some options.
+ * animated(string): true, should animation be applied when closing. Default value is true.
+* callback(object): the callback function after executing this action.
+
+### setNavBarBackgroundColor(params, callback)
+set color for the navigation bar's background color, you can specify a callback function to be executed after the operation is over.
+
+**parameters**
+
+* params(object): some parameters.
+ * backgroundColor(string): it's a required param, no default value provided.
+* callback(object): the callback function after executing this action.
+
+
+### setNavBarLeftItem(params,callback)
+set left item for the navigation bar, you can specify a callback function to be executed after the operation is over.
+
+**parameters**
+
+* params(object): parameters can not be empty, titleColor depends on title. And If title and icon are provided, only the title and its titleColor will be used. That's to say, icon will only be used when title is not present.
+ * title(string): the title for the bar button.
+ * titleColor (string): the title color.
+ * icon (string): the icon for the bar button, should be an an downloadable image.
+* callback(object): the callback function after executing this action.
+
+### clearNavBarLeftItem(callback)
+clear left item for the navigation bar, you can specify a callback function to be executed after the operation is over.
+
+**parameters**
+
+* callback(object): the callback function after executing this action.
+
+### setNavBarRightItem(params,callback)
+set the right item for the navigation bar, you can specify a callback function to be executed after the operation is over.
+
+**parameters**
+
+* params(object): parameters can not be empty, titleColor depends on title. And If title and icon are provided, only the title and its titleColor will be used. That's to say, icon will be used when title is not present.
+ * title(string): the title for the bar button.
+ * titleColor (string): the title color.
+ * icon (string): the icon for the bar button, should be an an downloadable image.
+* callback(object): the callback function after executing this action.
+
+### clearNavBarRightItem(params, callback)
+clear the right item for the navigation bar, you can specify a callback function to be executed after the operation is over.
+**parameters**
+
+* params(object): optional.
+* callback(object): the callback function after executing this action.
+
+
+### setNavBarMoreItem(params,callback)
+set the more item for the navigation bar, you can specify a callback function to be executed after the operation is over.
+
+**parameters**
+
+Actually, the function does nothing.
+* params(object): optional.
+* callback(object): the callback function after executing this action.
+
+### clearNavBarMoreItem(params, callback)
+clear the more item for the navigation bar, you can specify a callback function to be executed after the operation is over.
+
+**parameters**
+
+Actually, the function does nothing.
+* params(object): optional.
+* callback(object): the callback function after executing this action.
+
+### setNavBarTitle(params,callback)
+set the title for the navigation bar, you can specify a callback function to be executed after the operation is over.
+
+**parameters**
+
+* params(object): parameters can not be empty.
+ * title(string): the title for the bar button.
+* callback(object): the callback function after executing this action.
+
+
+### clearNavBarTitle(params,callback)
+clear the title for the navigation bar, you can specify a callback function to be executed after the operation is over.
+
+**parameters**
+
+* params(object): optional.
+* callback(object): the callback function after executing this action.
http://git-wip-us.apache.org/repos/asf/incubator-weex-site/blob/12e3a8bc/_drafts/v-0.10/references/modules/storage.md
----------------------------------------------------------------------
diff --git a/_drafts/v-0.10/references/modules/storage.md b/_drafts/v-0.10/references/modules/storage.md
new file mode 100644
index 0000000..9c62109
--- /dev/null
+++ b/_drafts/v-0.10/references/modules/storage.md
@@ -0,0 +1,111 @@
+---
+title: storage
+type: references
+order: 3.6
+version: 0.10
+---
+
+# storage
+<span class="weex-version">v0.7+</span>
+
+## Summary
+
+`storage` is a series of apis, allowing you to for example add, modify or delete stored data items.
+
+## API
+
+### setItem(key, value, callback)
+
+When passed a key name and value, will add that key to the storage,
+or update that key's value if it already exists.
+
+#### Arguments
+
+* `key`*(string)*: the name of the key you want to store. "" or null is not allowed.
+* `value`*(string)*: the name of the value you want to store."" or null is not allowed.
+* `callback`*(object)*: the callback function after executing this action.
+
+##### Example
+
+```javascript
+var storage = require('@weex-module/storage');
+storage.setItem('bar', 'bar-value', function(e) {
+ // callback.'e' is an object that contains 'result' and 'data'. e.result indicate whether `setItem` is succeed.
+ // e.data will return 'undefined' if success or 'invalid_param' if your key/value is ""/null.
+});
+```
+
+### getItem(key, callback)
+
+When passed a key name, will return that key's value.
+
+#### Arguments
+
+* `key`*(string)*: the name of the key you want to retrieve the value of."" or null is not allowed.
+* `callback`*(object)*: the callback function after executing this action.
+
+##### Example
+
+```javascript
+var storage = require('@weex-module/storage');
+storage.getItem('foo', function(e) {
+ //callback.'e' is an object that contains 'result' and 'data'.
+ // use 'e.data' to fetch the value of the key,if not found,'undefined' will return.
+});
+```
+
+### removeItem(key, callback)
+
+When passed a key name, will remove that key from the storage.
+
+#### Arguments
+
+* `key`*(string)*: the name of the key you want to remove."" or null is not allowed.
+* `callback`*(object)*: the callback function after executing this action.
+
+##### Example
+
+```javascript
+var storage = require('@weex-module/storage');
+storage.removeItem('foo', function(e) {
+ // callback. 'e' is an object that contains 'result' and 'data'.
+ // e.result will return 'success' or 'failed' according to the executing result.
+ // e.data will always return 'undefined' in this function if success.
+});
+```
+
+### length(callback)
+
+Returns an integer representing the number of data items stored in the Storage object.
+
+#### Arguments
+
+* `callback`*(object)*: the callback function after executing this action.
+
+##### Example
+
+```javascript
+var storage = require('@weex-module/storage');
+storage.length(function(e) {
+ // callback. 'e' is an object that contains 'result' and 'data'.
+ //e.data will return that number.
+});
+```
+
+### getAllKeys(callback)
+
+Returns an array that contains all keys stored in Storage object.
+
+#### Arguments
+
+* `callback`*(object)*: the callback function after executing this action.
+
+##### Example
+
+```javascript
+var storage = require('@weex-module/storage');
+storage.getAllKeys(function(e) {
+ // callback. 'e' is an object that contains 'result' and 'data'.
+ //e.data will return that array of keys.
+});
+```
http://git-wip-us.apache.org/repos/asf/incubator-weex-site/blob/12e3a8bc/_drafts/v-0.10/references/modules/stream.md
----------------------------------------------------------------------
diff --git a/_drafts/v-0.10/references/modules/stream.md b/_drafts/v-0.10/references/modules/stream.md
new file mode 100644
index 0000000..522e3b0
--- /dev/null
+++ b/_drafts/v-0.10/references/modules/stream.md
@@ -0,0 +1,86 @@
+---
+title: stream
+type: references
+order: 3.7
+version: 0.10
+---
+
+# stream
+
+A series of stream api. It provides a network request.
+
+## API
+
+### fetch(options, callback,progressCallback)
+
+Start a network request, use two callbacks to receive server's response data.
+
+**Arguments**
+
+* options(object): the request options, key value style dictionary.
+
+ * method(string): the HTTP method `GET` or `POST`.
+
+ * url(string): the request url.
+
+ * headers(string): the HTTP request headers.
+
+ * type(string): request type, 'json','text' or 'jsonp'(same as 'json' in native implementation)
+
+ * body(string): the HTTP body.
+
+* callback(function): A callback function whose argument is the response object of the request. Callback function will receive a `response` object.
+
+ * status(number): response status code.
+
+ * ok(boolean): true if status code is bewteen 200~299.
+
+ * statusText(string): status text
+
+ * data(string): response data. It's a object if request option is `json`/`jsonp`, or *(string)* in other type value.
+
+ * headers(object): response headers
+
+* progressCallback(function): A progress callback. This callback will be invoked before request finished.
+
+ * readyState(number): Current request state.'1':request connection opened;'2':response headers received.;'3':response data is loading;
+
+ * status(number): response status code.
+
+ * length(number): bytes of data have received. You can read full length of response from 'headers'.
+
+ * statusText(string): status text.
+
+ * headers(object): response headers.
+
+### Example
+
+```html
+<template>
+ <div>
+ <text onclick="startStream">click here to start stream</text>
+ </div>
+</template>
+
+<script>
+ module.exports = {
+ methods: {
+ startStream: function () {
+ var stream_module = require('@weex-module/stream');
+ stream_module.fetch({
+ method: 'GET',
+ url: "http://httpbin.org/get",
+ type:'json'
+ }, function(response) {
+ //finished response
+ console.log("all received:",response);
+ },function(response){
+ //progress response
+ console.log("current bytes received:",response.length);
+ });
+ }
+ }
+ }
+</script>
+```
+[Try it](http://dotwe.org/6e4ede64fdfe070b9696cc4cc3bdd086)
http://git-wip-us.apache.org/repos/asf/incubator-weex-site/blob/12e3a8bc/_drafts/v-0.10/references/modules/timer.md
----------------------------------------------------------------------
diff --git a/_drafts/v-0.10/references/modules/timer.md b/_drafts/v-0.10/references/modules/timer.md
new file mode 100644
index 0000000..c82109d
--- /dev/null
+++ b/_drafts/v-0.10/references/modules/timer.md
@@ -0,0 +1,60 @@
+---
+title: Timer
+type: references
+order: 3.8
+version: 0.10
+---
+
+# Timer
+
+Weex encapsulates a series of APIs in order to start/stop a one-time task or a repeated task at a fixed delay. Please note that this module don't provide an accuracy delay. It provides best-effort delivery, but the actual delay may still exceed the delay user wants if the corresponding thread is busy.
+Actually, this module is made for the polyfill of HTML5 timer APIs, developers **should not** use this module directly unless they know exactly what they are doing.
+
+## API
+
+All timeout or interval in this module are measured in milliseconds.
+Also, timeout and interval should be a non-negative integer(the max of integer is 0x7FFFFFFF). If timeout or interval is negative, then it will be reset to zero, e.g. the task will be put in the task queue immediately.
+
+### setTimeout(fn, timeout)
+
+The `setTimeout()` method calls a function after a specified number of milliseconds. Use the `clearTimeout()` method to prevent the function from running. The function is only executed once. If you need to repeat execution, use the `setInterval()` method.
+
+#### Arguments
+
+- `fn` (function): The function that will be executed
+- `timeout` (number): The number of milliseconds to wait before executing the function
+
+#### Return value
+
+A Number, representing the fnId value of the timer that is set. Use this value with the `clearTimeout()` method to cancel the timer.
+
+### setInterval(fn, interval)
+
+The `setInterval()` method calls a function at specified intervals (in milliseconds), and it will continue calling the function until `clearInterval()` is called. The fnId value returned by `setInterval()` is used as the parameter for the `clearInterval()` method.
+
+#### Arguments
+
+- `fn` (function): The function that will be executed
+- `interval` (number): The intervals (in milliseconds) on how often to execute the function
+
+#### Return value
+
+A Number, representing the fnId value of the timer that is set. Use this value with the `clearInterval()` method to cancel the timer
+
+### clearTimeout(fnId)
+
+The `clearTimeout()` method clears a timer set with the `setTimeout()` method. The fnId value returned by `setTimeout()` is used as the parameter for the `clearTimeout()` method. If the function has not already been executed, you will be able to stop the execution by calling the `clearTimeout()` method, otherwise, this method has no influence on the task.
+
+#### Arguments
+
+- `fnId` (number): The fnId value of the timer returned by the `setTimeout()` method
+
+### clearInterval(fnId)
+
+The `clearInterval()` method clears a timer set with the `setInterval()` method. The fnId value returned by `setInterval()` is used as the parameter for the `clearInterval()` method.
+
+#### Arguments
+
+- `fnId` (number): The fnId of the timer returned by the `setInterval()` method
+
+[Try it](http://dotwe.org/996578e8f29b88d7d4fa01ab031fbbda)
[30/51] [abbrv] incubator-weex-site git commit: fix the markdown
syntax parse error
Posted by ha...@apache.org.
fix the markdown syntax parse error
Project: http://git-wip-us.apache.org/repos/asf/incubator-weex-site/repo
Commit: http://git-wip-us.apache.org/repos/asf/incubator-weex-site/commit/0e912800
Tree: http://git-wip-us.apache.org/repos/asf/incubator-weex-site/tree/0e912800
Diff: http://git-wip-us.apache.org/repos/asf/incubator-weex-site/diff/0e912800
Branch: refs/heads/master
Commit: 0e912800ffe0c2ae158e335902b3d89c4012390a
Parents: 32a097b
Author: Hanks <zh...@gmail.com>
Authored: Fri Oct 13 12:21:02 2017 +0800
Committer: Hanks <zh...@gmail.com>
Committed: Fri Oct 13 12:21:02 2017 +0800
----------------------------------------------------------------------
_config.yml | 18 ++++++
_config_cn.yml | 18 ++++++
package.json | 3 +-
source/cn/guide/advanced/app-architecture.md | 2 +-
source/cn/wiki/how-it-works.md | 63 -------------------
source/cn/wiki/index.md | 61 ++++++++++++++++++-
source/download.ejs | 3 -
source/playground.ejs | 3 -
source/wiki/css-units.md | 2 +-
source/wiki/how-it-works.md | 71 ----------------------
source/wiki/index.md | 69 ++++++++++++++++++++-
themes/weex/_config.yml | 8 ++-
themes/weex/layout/_partial/post/title.ejs | 4 +-
themes/weex/scripts/helper.js | 4 +-
themes/weex/source/css/partial/highlight.scss | 13 +++-
15 files changed, 188 insertions(+), 154 deletions(-)
----------------------------------------------------------------------
http://git-wip-us.apache.org/repos/asf/incubator-weex-site/blob/0e912800/_config.yml
----------------------------------------------------------------------
diff --git a/_config.yml b/_config.yml
index 9dced8b..0b935fa 100644
--- a/_config.yml
+++ b/_config.yml
@@ -111,6 +111,24 @@ pagination_dir: page
## Themes: https://hexo.io/themes/
theme: weex
+# Markdown Syntax
+marked:
+ gfm: true
+ pedantic: false
+ sanitize: false
+ tables: true
+ breaks: true
+ smartLists: true
+ smartypants: true
+ modifyAnchors: ''
+ autolink: true
+
+# Code Highlight
+highlight:
+ enable: true
+ line_number: false
+ tab_replace:
+
# css autoprefixer
autoprefixer:
exclude:
http://git-wip-us.apache.org/repos/asf/incubator-weex-site/blob/0e912800/_config_cn.yml
----------------------------------------------------------------------
diff --git a/_config_cn.yml b/_config_cn.yml
index 2634b9a..f26b72b 100644
--- a/_config_cn.yml
+++ b/_config_cn.yml
@@ -109,6 +109,24 @@ pagination_dir: page
## Themes: https://hexo.io/themes/
theme: weex
+# Markdown Syntax
+marked:
+ gfm: true
+ pedantic: false
+ sanitize: false
+ tables: true
+ breaks: true
+ smartLists: true
+ smartypants: true
+ modifyAnchors: ''
+ autolink: true
+
+# Code Highlight
+highlight:
+ enable: true
+ line_number: false
+ tab_replace:
+
# css autoprefixer
autoprefixer:
exclude:
http://git-wip-us.apache.org/repos/asf/incubator-weex-site/blob/0e912800/package.json
----------------------------------------------------------------------
diff --git a/package.json b/package.json
index 083e3b0..c3d43e9 100644
--- a/package.json
+++ b/package.json
@@ -6,7 +6,8 @@
"version": "3.3.9"
},
"scripts": {
- "server": "hexo server"
+ "server": "hexo server",
+ "build": "hexo g -d -w"
},
"dependencies": {
"cheerio": "^1.0.0-rc.2",
http://git-wip-us.apache.org/repos/asf/incubator-weex-site/blob/0e912800/source/cn/guide/advanced/app-architecture.md
----------------------------------------------------------------------
diff --git a/source/cn/guide/advanced/app-architecture.md b/source/cn/guide/advanced/app-architecture.md
index b19a97e..d68d568 100644
--- a/source/cn/guide/advanced/app-architecture.md
+++ b/source/cn/guide/advanced/app-architecture.md
@@ -1,5 +1,5 @@
---
-title: 用 Weex 构建完整移动应用
+title: 构建完整移动应用
type: guide
group: 高阶特性
order: 8.5
http://git-wip-us.apache.org/repos/asf/incubator-weex-site/blob/0e912800/source/cn/wiki/how-it-works.md
----------------------------------------------------------------------
diff --git a/source/cn/wiki/how-it-works.md b/source/cn/wiki/how-it-works.md
deleted file mode 100644
index e21fa47..0000000
--- a/source/cn/wiki/how-it-works.md
+++ /dev/null
@@ -1,63 +0,0 @@
----
-title: 工作原理
-type: wiki
-group: Design
-order: 1.1
-has_chapter_content: false
-chapter_title: 优势介绍
-version: 2.1
----
-
-# 工作原理
-
-## 整体架构
-
-Weex 表面上是一个客户端技术,但实际上它串联起了从本地开发环境到云端部署和分发的整个链路。开发者首先可以在本地像撰写 web 页面一样撰写一个 app 的页面,然后编译成一段 JavaScript 代码,形成 Weex 的一个 JS bundle;在云端,开发者可以把生成的 JS bundle 部署上去,然后通过网络请求或预下发的方式传递到用户的移动应用客户端;在移动应用客户端里,WeexSDK 会准备好一个 JavaScript 引擎,并且在用户打开一个 Weex 页面时执行相应的 JS bundle,并在执行过程中产生各种命令发送到 native 端进行的界面渲染或数据存储、网络通信、调用设备功能、用户交互响应等移动应用的场景实践;同时,如果用户没有安装移动应用,他仍然可以在浏览器里打开一个相同的 web 页面,这个页面是使用相同的页面源代码,通过浏览器里的 JavaScript 引擎运行起来的。
-
-
-
-## 本地开发环境
-
-Weex 的本地开发环境基于 web 开发体验而设计,web 开发者可以通过自己熟悉的 HTML/CSS/JavaScript 技术和语法实现移动应用的界面。同时 Weex 也对 [Vue.js](https://vuejs.org/) 这一非常优秀的前端框架做了官方的支持。
-
-除此之外,Weex 的工程设计也是 web 开发者非常熟悉的,首先 web 开发者可以使用自己熟悉的 npm 进行依赖管理;其次 web 开发者在通过项目脚手架初始化工程、开发、调试、质量控制等各个环节,都可以参考 web 开发已有的最佳实践。
-
-和如今 web 开发的最佳实践一样,Weex 会把一个页面的源代码全部编译打包成一个 JS bundle,在浏览器中,我们需要把这个 JS bundle 作为一段 `<script>` 载入网页,在客户端里,我们把这段 JS bundle 载入本地,并通过 WeexSDK 直接执行。
-
-**相关阅读**
-
-* [Weex 和 web 平台的差异](../../references/platform-difference.html)
-* [Vue 2.x 在 Weex 和 web 中的差异](../../references/vue/difference-with-web.html)
-* [快速上手](../index.html)
-* [使用 Devtools](./devtools.html)
-
-## 云端部署和分发
-
-Weex 的 JS bundle 可以作为 web 开发中的一段静态资源进行部署和下发。几乎可以复用 HTML5 所有的工程体系和最佳实践。比如在本地开发环境通过部署工具将 JS bundle 部署到 CDN、通过 CMS 或搭建平台把业务数据和模块化的前端组件自动化拼接生成 JS bundle、通过服务端 JS bundle 的流量和日志统计页面的访问情况、通过 AppCache 或类似的方式对 JS bundle 在客户端进行缓存或预加载以降低网络通信的成本等。
-
-## 客户端 JavaScript 引擎
-
-Weex 的 iOS 和 Android 客户端中都会运行一个 JavaScript 引擎,来执行 JS bundle,同时向各端的渲染层发送规范化的指令,调度客户端的渲染和其它各种能力。我们在 iOS 下选择了 JavaScriptCore 内核,而在 Android 下选择了 UC 提供的 v8 内核。无论是从性能还是稳定性方面都提供了强有力的保障。
-
-为了让整个移动应用的资源利用得更好,我们在客户端提供的 JavaScript 引擎是单例的,即所有 JS bundle 公用一个 JavaScript 内核实例,同时对每个 JS bundle 在运行时进行了上下文的隔离,使得每个 JS bundle 都能够高效安全的工作。我们还把 Vue 2.0 这样的 JS Framework 做了预置,开发者不必把 JS Framework 打包在每个 JS bundle 里,从而大大减少了 JS bundle 的体积,也就进一步保障了页面打开的速度。
-
-## 客户端渲染层
-
-Weex 目前提供了 iOS 和 Android 两个客户端的 native 渲染层。每个端都基于 DOM 模型设计并实现了标准的界面渲染接口供 JavaScript 引擎调用。并且结合 web 标准和 native 的特点和优势实现了一套统一的组件和模块。Weex 在性能方面的表现也是非常优异的,尤其是界面首屏加载时间、native 下长列表的资源开销和复用情况、CPU、内存、帧率 等关键指标。当然,尽管 Weex 官方已经提供了一组开发者最常用的组件和模块,但面对丰富多样的移动应用研发需求,团队也难免会力不从心,为此我们提供了灵活自由的横向扩展能力,开发者可以根据自身的情况定制属于自己的客户端组件和模块,进一步丰富 Weex 在客户端上的能力。
-
-**相关链接**
-
-* [Weex 的组件和模块跟 web 标准的区别](../../references/web-standards.html)
-* [如何使用 iOS](../../references/ios-apis.html)
-* [如何使用 Android](../../references/android-apis.html)
-* [如何扩展 iOS](../../references/advanced/extend-to-ios.html)
-* [如何扩展 Android](../../references/advanced/extend-to-android.html)
-
-## 浏览器渲染
-
-Weex 除了提供 iOS 和 Android 的客户端渲染层之外,还基于 Vue 2.0 对官方的所有组件和模块进行了封装,开发者可以基于 Vue 2.0 用同一套源代码构建出在浏览器中相同效果的页面。并且同样可以横向扩展。
-
-**相关链接**
-
-* [如何使用 HTML5](../../references/html5-apis.html)
-* [如何扩展 HTML5](../../references/advanced/extend-to-html5.html)
http://git-wip-us.apache.org/repos/asf/incubator-weex-site/blob/0e912800/source/cn/wiki/index.md
----------------------------------------------------------------------
diff --git a/source/cn/wiki/index.md b/source/cn/wiki/index.md
index 8a36f64..e21fa47 100644
--- a/source/cn/wiki/index.md
+++ b/source/cn/wiki/index.md
@@ -1,6 +1,63 @@
---
-title: WiKi
+title: 工作原理
type: wiki
-order: 0
+group: Design
+order: 1.1
+has_chapter_content: false
+chapter_title: 优势介绍
version: 2.1
---
+
+# 工作原理
+
+## 整体架构
+
+Weex 表面上是一个客户端技术,但实际上它串联起了从本地开发环境到云端部署和分发的整个链路。开发者首先可以在本地像撰写 web 页面一样撰写一个 app 的页面,然后编译成一段 JavaScript 代码,形成 Weex 的一个 JS bundle;在云端,开发者可以把生成的 JS bundle 部署上去,然后通过网络请求或预下发的方式传递到用户的移动应用客户端;在移动应用客户端里,WeexSDK 会准备好一个 JavaScript 引擎,并且在用户打开一个 Weex 页面时执行相应的 JS bundle,并在执行过程中产生各种命令发送到 native 端进行的界面渲染或数据存储、网络通信、调用设备功能、用户交互响应等移动应用的场景实践;同时,如果用户没有安装移动应用,他仍然可以在浏览器里打开一个相同的 web 页面,这个页面是使用相同的页面源代码,通过浏览器里的 JavaScript 引擎运行起来的。
+
+
+
+## 本地开发环境
+
+Weex 的本地开发环境基于 web 开发体验而设计,web 开发者可以通过自己熟悉的 HTML/CSS/JavaScript 技术和语法实现移动应用的界面。同时 Weex 也对 [Vue.js](https://vuejs.org/) 这一非常优秀的前端框架做了官方的支持。
+
+除此之外,Weex 的工程设计也是 web 开发者非常熟悉的,首先 web 开发者可以使用自己熟悉的 npm 进行依赖管理;其次 web 开发者在通过项目脚手架初始化工程、开发、调试、质量控制等各个环节,都可以参考 web 开发已有的最佳实践。
+
+和如今 web 开发的最佳实践一样,Weex 会把一个页面的源代码全部编译打包成一个 JS bundle,在浏览器中,我们需要把这个 JS bundle 作为一段 `<script>` 载入网页,在客户端里,我们把这段 JS bundle 载入本地,并通过 WeexSDK 直接执行。
+
+**相关阅读**
+
+* [Weex 和 web 平台的差异](../../references/platform-difference.html)
+* [Vue 2.x 在 Weex 和 web 中的差异](../../references/vue/difference-with-web.html)
+* [快速上手](../index.html)
+* [使用 Devtools](./devtools.html)
+
+## 云端部署和分发
+
+Weex 的 JS bundle 可以作为 web 开发中的一段静态资源进行部署和下发。几乎可以复用 HTML5 所有的工程体系和最佳实践。比如在本地开发环境通过部署工具将 JS bundle 部署到 CDN、通过 CMS 或搭建平台把业务数据和模块化的前端组件自动化拼接生成 JS bundle、通过服务端 JS bundle 的流量和日志统计页面的访问情况、通过 AppCache 或类似的方式对 JS bundle 在客户端进行缓存或预加载以降低网络通信的成本等。
+
+## 客户端 JavaScript 引擎
+
+Weex 的 iOS 和 Android 客户端中都会运行一个 JavaScript 引擎,来执行 JS bundle,同时向各端的渲染层发送规范化的指令,调度客户端的渲染和其它各种能力。我们在 iOS 下选择了 JavaScriptCore 内核,而在 Android 下选择了 UC 提供的 v8 内核。无论是从性能还是稳定性方面都提供了强有力的保障。
+
+为了让整个移动应用的资源利用得更好,我们在客户端提供的 JavaScript 引擎是单例的,即所有 JS bundle 公用一个 JavaScript 内核实例,同时对每个 JS bundle 在运行时进行了上下文的隔离,使得每个 JS bundle 都能够高效安全的工作。我们还把 Vue 2.0 这样的 JS Framework 做了预置,开发者不必把 JS Framework 打包在每个 JS bundle 里,从而大大减少了 JS bundle 的体积,也就进一步保障了页面打开的速度。
+
+## 客户端渲染层
+
+Weex 目前提供了 iOS 和 Android 两个客户端的 native 渲染层。每个端都基于 DOM 模型设计并实现了标准的界面渲染接口供 JavaScript 引擎调用。并且结合 web 标准和 native 的特点和优势实现了一套统一的组件和模块。Weex 在性能方面的表现也是非常优异的,尤其是界面首屏加载时间、native 下长列表的资源开销和复用情况、CPU、内存、帧率 等关键指标。当然,尽管 Weex 官方已经提供了一组开发者最常用的组件和模块,但面对丰富多样的移动应用研发需求,团队也难免会力不从心,为此我们提供了灵活自由的横向扩展能力,开发者可以根据自身的情况定制属于自己的客户端组件和模块,进一步丰富 Weex 在客户端上的能力。
+
+**相关链接**
+
+* [Weex 的组件和模块跟 web 标准的区别](../../references/web-standards.html)
+* [如何使用 iOS](../../references/ios-apis.html)
+* [如何使用 Android](../../references/android-apis.html)
+* [如何扩展 iOS](../../references/advanced/extend-to-ios.html)
+* [如何扩展 Android](../../references/advanced/extend-to-android.html)
+
+## 浏览器渲染
+
+Weex 除了提供 iOS 和 Android 的客户端渲染层之外,还基于 Vue 2.0 对官方的所有组件和模块进行了封装,开发者可以基于 Vue 2.0 用同一套源代码构建出在浏览器中相同效果的页面。并且同样可以横向扩展。
+
+**相关链接**
+
+* [如何使用 HTML5](../../references/html5-apis.html)
+* [如何扩展 HTML5](../../references/advanced/extend-to-html5.html)
http://git-wip-us.apache.org/repos/asf/incubator-weex-site/blob/0e912800/source/download.ejs
----------------------------------------------------------------------
diff --git a/source/download.ejs b/source/download.ejs
deleted file mode 100644
index ef2c86f..0000000
--- a/source/download.ejs
+++ /dev/null
@@ -1,3 +0,0 @@
-layout: download
-type: download
----
\ No newline at end of file
http://git-wip-us.apache.org/repos/asf/incubator-weex-site/blob/0e912800/source/playground.ejs
----------------------------------------------------------------------
diff --git a/source/playground.ejs b/source/playground.ejs
deleted file mode 100644
index 7f3b070..0000000
--- a/source/playground.ejs
+++ /dev/null
@@ -1,3 +0,0 @@
-layout: playground
-type: playground
----
\ No newline at end of file
http://git-wip-us.apache.org/repos/asf/incubator-weex-site/blob/0e912800/source/wiki/css-units.md
----------------------------------------------------------------------
diff --git a/source/wiki/css-units.md b/source/wiki/css-units.md
index cb6d93e..b533bde 100644
--- a/source/wiki/css-units.md
+++ b/source/wiki/css-units.md
@@ -1,5 +1,5 @@
---
-title: CSS unit
+title: CSS Units
type: wiki
group: 样式
order: 3.3
http://git-wip-us.apache.org/repos/asf/incubator-weex-site/blob/0e912800/source/wiki/how-it-works.md
----------------------------------------------------------------------
diff --git a/source/wiki/how-it-works.md b/source/wiki/how-it-works.md
deleted file mode 100644
index 274e195..0000000
--- a/source/wiki/how-it-works.md
+++ /dev/null
@@ -1,71 +0,0 @@
----
-title: How it works
-type: wiki
-group: Design
-order: 1.1
-version: 2.1
----
-
-# How it works
-
-## Overall Structure
-
-Weex is a client-side technology on the surface, but in fact it connects the whole way from the local development environment to the cloud deployment and distribution.
-
-Developers can first write an app page just like writing a web page, and then compile the app page into a piece of JavaScript which is called Weex JS bundle.
-
-In the cloud, developers can deploy the generated JS bundle. And then it can be requested or pre-fetched from a mobile app with WeexSDK.
-
-The WeexSDK would prepare a JavaScript engine to run corresponding JS bundle when user opens a Weex page anytime. Usually the JS bundle will make some calls to native-side through Weex JS bridge. They let native-side render the user interface or handle user interactions, storage data, make network communications, call device powers and so on.
-
-Even if a user does not install the App, he can still open a same web page in the browser, using the same source code.
-
-
-
-## Local Development Environment
-
-The design of local development environment of Weex is based on the web development experience. It help web developers writing mobile app UI with their familiar HTML / CSS / JavaScript. At the same time Weex also do the official support to [Vue.js](https://vuejs.org/), a very great front-end framework.
-
-In addition, the management of a Weex project is also very familiar with a web project. First, web developers can use npm packages to manage dependencies. Second, web developers can refer to all best practices from every process of a web project such as scaffolding, development, preview, debugging, test etc.
-
-Also same as the best practice of web development, each Weex page will be built into a JS bundle. In the browser, we put JS bundle into the web page as a `<script>` tag. In the client, we put JS bundle into the local, and execute it in WeexSDK.
-
-**Links**
-
-* [Platform differences between Weex and web](../../references/platform-difference.html)
-* [Differences of using Vue between Weex with web](../../references/vue/difference-with-web.html)
-* [Get Started](../index.html)
-* [Using Devtools](./devtools.html)
-
-## Cloud Deployment & Distribution
-
-Weex JS bundle can be deployed and distributed as a static resource. Almost all current web development system and best practice can be applied to Weex directly such as generating JS bundle through CMS system or deploying JS bundle to static CDN, monitoring JS bundle traffic through server log, caching or pre-fetching JS bundle to reduce networking cost etc.
-
-## Client-side JavaScript Engine
-
-Both iOS and Android client-side of Weex run a JavaScript engine to execute JS bundles and send well defined instructions to the native render layers. We choose JavaScriptCore in iOS and v8 in Android which provide strong performance and stability.
-
-In order to make the mobile resources better utilized, we just run only one instance of JavaScript for all Weex pages. That is, all JS bundles share the same JavaScript instance, but each JS bundle context also isolated well by default in the runtime. We also put Vue 2.0 as a built-in JS Framework, developers do not have to pack it in each JS bundle, which save the size and time of networking.
-
-## Client Rendering Layer
-
-Weex offers both iOS and Android native rendering layers. Each of them are based on the Native DOM model and exposed to JavaScript APIs. At the same time we provide a set of native components and modules to use. Also Weex has high performance especially on first-screen loading time, memory cost and re-reuse of long list, etc.
-
-Although Weex has provided a group of most commonly used components and modules officially. But we definitely know they couldn't satisfy everyone. So we design our native render as extendable as possible. You can extend more components and modules on your own. We can build and share an Weex eco-system together.
-
-**Links**
-
-* [Differences between Weex and web standard](../../references/web-standards.html)
-* [Using Weex in iOS](../../references/ios-apis.html)
-* [Using Weex in Android](../../references/android-apis.html)
-* [Extend to iOS](../../references/advanced/extend-to-ios.html)
-* [Extend to Android](../../references/advanced/extend-to-android.html)
-
-## In the Browser
-
-Besides iOS and Android client, Weex also has a web version based on Vue 2.0. Developers can just use Vue 2.0 to build the same page in browsers.
-
-**Links**
-
-* [Using Weex in HTML5](../../references/html5-apis.html)
-* [Extend to HTML5](../../references/advanced/extend-to-html5.html)
http://git-wip-us.apache.org/repos/asf/incubator-weex-site/blob/0e912800/source/wiki/index.md
----------------------------------------------------------------------
diff --git a/source/wiki/index.md b/source/wiki/index.md
index 8a36f64..274e195 100644
--- a/source/wiki/index.md
+++ b/source/wiki/index.md
@@ -1,6 +1,71 @@
---
-title: WiKi
+title: How it works
type: wiki
-order: 0
+group: Design
+order: 1.1
version: 2.1
---
+
+# How it works
+
+## Overall Structure
+
+Weex is a client-side technology on the surface, but in fact it connects the whole way from the local development environment to the cloud deployment and distribution.
+
+Developers can first write an app page just like writing a web page, and then compile the app page into a piece of JavaScript which is called Weex JS bundle.
+
+In the cloud, developers can deploy the generated JS bundle. And then it can be requested or pre-fetched from a mobile app with WeexSDK.
+
+The WeexSDK would prepare a JavaScript engine to run corresponding JS bundle when user opens a Weex page anytime. Usually the JS bundle will make some calls to native-side through Weex JS bridge. They let native-side render the user interface or handle user interactions, storage data, make network communications, call device powers and so on.
+
+Even if a user does not install the App, he can still open a same web page in the browser, using the same source code.
+
+
+
+## Local Development Environment
+
+The design of local development environment of Weex is based on the web development experience. It help web developers writing mobile app UI with their familiar HTML / CSS / JavaScript. At the same time Weex also do the official support to [Vue.js](https://vuejs.org/), a very great front-end framework.
+
+In addition, the management of a Weex project is also very familiar with a web project. First, web developers can use npm packages to manage dependencies. Second, web developers can refer to all best practices from every process of a web project such as scaffolding, development, preview, debugging, test etc.
+
+Also same as the best practice of web development, each Weex page will be built into a JS bundle. In the browser, we put JS bundle into the web page as a `<script>` tag. In the client, we put JS bundle into the local, and execute it in WeexSDK.
+
+**Links**
+
+* [Platform differences between Weex and web](../../references/platform-difference.html)
+* [Differences of using Vue between Weex with web](../../references/vue/difference-with-web.html)
+* [Get Started](../index.html)
+* [Using Devtools](./devtools.html)
+
+## Cloud Deployment & Distribution
+
+Weex JS bundle can be deployed and distributed as a static resource. Almost all current web development system and best practice can be applied to Weex directly such as generating JS bundle through CMS system or deploying JS bundle to static CDN, monitoring JS bundle traffic through server log, caching or pre-fetching JS bundle to reduce networking cost etc.
+
+## Client-side JavaScript Engine
+
+Both iOS and Android client-side of Weex run a JavaScript engine to execute JS bundles and send well defined instructions to the native render layers. We choose JavaScriptCore in iOS and v8 in Android which provide strong performance and stability.
+
+In order to make the mobile resources better utilized, we just run only one instance of JavaScript for all Weex pages. That is, all JS bundles share the same JavaScript instance, but each JS bundle context also isolated well by default in the runtime. We also put Vue 2.0 as a built-in JS Framework, developers do not have to pack it in each JS bundle, which save the size and time of networking.
+
+## Client Rendering Layer
+
+Weex offers both iOS and Android native rendering layers. Each of them are based on the Native DOM model and exposed to JavaScript APIs. At the same time we provide a set of native components and modules to use. Also Weex has high performance especially on first-screen loading time, memory cost and re-reuse of long list, etc.
+
+Although Weex has provided a group of most commonly used components and modules officially. But we definitely know they couldn't satisfy everyone. So we design our native render as extendable as possible. You can extend more components and modules on your own. We can build and share an Weex eco-system together.
+
+**Links**
+
+* [Differences between Weex and web standard](../../references/web-standards.html)
+* [Using Weex in iOS](../../references/ios-apis.html)
+* [Using Weex in Android](../../references/android-apis.html)
+* [Extend to iOS](../../references/advanced/extend-to-ios.html)
+* [Extend to Android](../../references/advanced/extend-to-android.html)
+
+## In the Browser
+
+Besides iOS and Android client, Weex also has a web version based on Vue 2.0. Developers can just use Vue 2.0 to build the same page in browsers.
+
+**Links**
+
+* [Using Weex in HTML5](../../references/html5-apis.html)
+* [Extend to HTML5](../../references/advanced/extend-to-html5.html)
http://git-wip-us.apache.org/repos/asf/incubator-weex-site/blob/0e912800/themes/weex/_config.yml
----------------------------------------------------------------------
diff --git a/themes/weex/_config.yml b/themes/weex/_config.yml
index 357381c..2f5670e 100644
--- a/themes/weex/_config.yml
+++ b/themes/weex/_config.yml
@@ -7,6 +7,12 @@ rss: /atom.xml
# Content
excerpt_link: Read More
+# Code Highlight
+highlight:
+ enable: true
+ line_number: false
+ tab_replace:
+
# Sidebar
sidebar: right
widgets:
@@ -39,4 +45,4 @@ node_sass:
debug: false
outputStyle: nested
precision: 5
- sourceComments: false
\ No newline at end of file
+ sourceComments: false
http://git-wip-us.apache.org/repos/asf/incubator-weex-site/blob/0e912800/themes/weex/layout/_partial/post/title.ejs
----------------------------------------------------------------------
diff --git a/themes/weex/layout/_partial/post/title.ejs b/themes/weex/layout/_partial/post/title.ejs
index 2b487bf..f032749 100644
--- a/themes/weex/layout/_partial/post/title.ejs
+++ b/themes/weex/layout/_partial/post/title.ejs
@@ -14,5 +14,5 @@
</h1>
<% } %>
<% } %>
- <time class="article-date" datetime="<%= date_xml(post.date) %>">Updated time: <%= date(post.date, 'DD/MM/YYYY') %></time>
-</header>
\ No newline at end of file
+ <!-- <time class="article-date" datetime="<%= date_xml(post.date) %>">Updated time: <%= date(post.date, 'DD/MM/YYYY') %></time> -->
+</header>
http://git-wip-us.apache.org/repos/asf/incubator-weex-site/blob/0e912800/themes/weex/scripts/helper.js
----------------------------------------------------------------------
diff --git a/themes/weex/scripts/helper.js b/themes/weex/scripts/helper.js
index 7efab2a..07a7df5 100644
--- a/themes/weex/scripts/helper.js
+++ b/themes/weex/scripts/helper.js
@@ -15,7 +15,7 @@ hexo.extend.helper.register('url_for_lang', function(path){
})
hexo.extend.helper.register('page_anchor', function(str){
- var $ = cheerio.load(str, {decodeEntities: false});
+ var $ = cheerio.load(str, {decodeEntities: true});
var headings = $('h1, h2, h3, h4, h5, h6');
if (!headings.length) return str;
@@ -53,4 +53,4 @@ hexo.extend.helper.register('pick_lang', function(lang){
}
return url
-})
\ No newline at end of file
+})
http://git-wip-us.apache.org/repos/asf/incubator-weex-site/blob/0e912800/themes/weex/source/css/partial/highlight.scss
----------------------------------------------------------------------
diff --git a/themes/weex/source/css/partial/highlight.scss b/themes/weex/source/css/partial/highlight.scss
index 9c9a63f..3fa65c2 100644
--- a/themes/weex/source/css/partial/highlight.scss
+++ b/themes/weex/source/css/partial/highlight.scss
@@ -27,10 +27,19 @@ pre code {
.highlight {
margin: 5px 0 15px 0;
overflow-x: auto;
- pre {
+
+ .gutter pre {
+ background: #F3F5F7;
+ margin: 0;
+ padding: 10px 5px;
+ width: 50px;
+ color: #585d65;
+ }
+
+ .code pre {
background: #F3F5F7;
margin: 0;
- padding: 10 20px;
+ padding: 10px 20px;
color: #585d65;
overflow-x: auto;
border-radius: 5px;
[06/51] [abbrv] incubator-weex-site git commit: rearrangement the
structure of the document
Posted by ha...@apache.org.
http://git-wip-us.apache.org/repos/asf/incubator-weex-site/blob/32a097bf/source/references/components/list.md
----------------------------------------------------------------------
diff --git a/source/references/components/list.md b/source/references/components/list.md
index 0a0a174..deffbaa 100644
--- a/source/references/components/list.md
+++ b/source/references/components/list.md
@@ -1,7 +1,8 @@
---
title: <list>
type: references
-order: 2.5
+group: Build-in Components
+order: 8.06
version: 2.1
---
@@ -172,4 +173,4 @@ For example, a vertical list nested in a vertical list or scroller is not allowe
</style>
```
-[try it](http://dotwe.org/vue/d31c85e7cd2dc54fa098e920a5376c38)
\ No newline at end of file
+[try it](http://dotwe.org/vue/d31c85e7cd2dc54fa098e920a5376c38)
http://git-wip-us.apache.org/repos/asf/incubator-weex-site/blob/32a097bf/source/references/components/refresh.md
----------------------------------------------------------------------
diff --git a/source/references/components/refresh.md b/source/references/components/refresh.md
index ed3ef0a..e3f7526 100644
--- a/source/references/components/refresh.md
+++ b/source/references/components/refresh.md
@@ -1,7 +1,8 @@
---
title: <refresh> & <loading>
type: references
-order: 2.7
+group: Build-in Components
+order: 8.08
version: 2.1
---
@@ -138,7 +139,7 @@ common styles: check out [common styles for components](../common-style.html)
```
dy: the differencen between two scroll actions
pullingDistance: the distance of pulling
- viewHeight: the height of refreshView
+ viewHeight: the height of refreshView
type: "pullingdown" constant string type for this event
```
@@ -218,4 +219,4 @@ common styles: check out [common styles for components](../common-style.html)
</style>
```
-[try it](http://dotwe.org/vue/d3db5f344220a6339de044a5e33c502b)
\ No newline at end of file
+[try it](http://dotwe.org/vue/d3db5f344220a6339de044a5e33c502b)
http://git-wip-us.apache.org/repos/asf/incubator-weex-site/blob/32a097bf/source/references/components/scroller.md
----------------------------------------------------------------------
diff --git a/source/references/components/scroller.md b/source/references/components/scroller.md
index 4218757..5c9f637 100644
--- a/source/references/components/scroller.md
+++ b/source/references/components/scroller.md
@@ -1,7 +1,8 @@
---
title: <scroller>
type: references
-order: 2.8
+group: Build-in Components
+order: 8.09
version: 2.1
---
@@ -19,8 +20,8 @@ Notes: A <scroller> can be used as a root element or a embed element. The scroll
Scroller supports all kinds of components, such as div, text, etc.
And there are two special components that can only be used inside scroller component.
-* refresh 0.6.1 used inside list to add pull-down-to-refresh functionality.
-* loading 0.6.1 used inside list to add pull-up-to-load-more functionality.
+* refresh 0.6.1 used inside list to add pull-down-to-refresh functionality.
+* loading 0.6.1 used inside list to add pull-up-to-load-more functionality.
## Attributes
@@ -152,4 +153,4 @@ For example, a vertical list nested in a vertical list or scroller is not allowe
</style>
```
-[try it](http://dotwe.org/vue/2f22f14fb711d88515e63c3f67bed46a)
\ No newline at end of file
+[try it](http://dotwe.org/vue/2f22f14fb711d88515e63c3f67bed46a)
http://git-wip-us.apache.org/repos/asf/incubator-weex-site/blob/32a097bf/source/references/components/slider.md
----------------------------------------------------------------------
diff --git a/source/references/components/slider.md b/source/references/components/slider.md
index b7ede27..920a6b8 100644
--- a/source/references/components/slider.md
+++ b/source/references/components/slider.md
@@ -1,7 +1,8 @@
---
title: <slider>
type: references
-order: 2.9
+group: Build-in Components
+order: 8.13
version: 2.1
---
@@ -90,4 +91,4 @@ It supports all kinds of weex components as its slides, especially the `indicato
</script>
```
-[try it](http://dotwe.org/vue/0c43ffd743c90b3bd9f5371062652e60)
\ No newline at end of file
+[try it](http://dotwe.org/vue/0c43ffd743c90b3bd9f5371062652e60)
http://git-wip-us.apache.org/repos/asf/incubator-weex-site/blob/32a097bf/source/references/components/switch.md
----------------------------------------------------------------------
diff --git a/source/references/components/switch.md b/source/references/components/switch.md
index 8281c5f..be44c25 100644
--- a/source/references/components/switch.md
+++ b/source/references/components/switch.md
@@ -1,7 +1,8 @@
---
title: <switch>
type: references
-order: 2.11
+group: Build-in Components
+order: 8.12
version: 2.1
---
@@ -32,7 +33,7 @@ Notes: There are several style properties that you mustn't use on this component
* padding and padding-xxs
* border and border-xxs
-Notes: If the container of `<switch>` is not set to `align-items:flex-start`, the switch in android will be stretched.
+Notes: If the container of `<switch>` is not set to `align-items:flex-start`, the switch in android will be stretched.
common styles: check out [common styles for components](../common-style.html)
@@ -112,4 +113,4 @@ common styles: check out [common styles for components](../common-style.html)
</style>
```
-[try it](http://dotwe.org/vue/06b1d740fb69d04f9ebe9eaf730974d1)
\ No newline at end of file
+[try it](http://dotwe.org/vue/06b1d740fb69d04f9ebe9eaf730974d1)
http://git-wip-us.apache.org/repos/asf/incubator-weex-site/blob/32a097bf/source/references/components/text.md
----------------------------------------------------------------------
diff --git a/source/references/components/text.md b/source/references/components/text.md
index f0a1bc5..f8417b0 100644
--- a/source/references/components/text.md
+++ b/source/references/components/text.md
@@ -1,7 +1,8 @@
---
title: <text>
type: references
-order: 2.12
+group: Build-in Components
+order: 8.02
version: 2.1
---
@@ -15,7 +16,7 @@ This component supports no child components.
## Attributes
-* value(string): text value of this component. This is equal to the content of 'text'.
+* value(string): text value of this component. This is equal to the content of 'text'.
### example
@@ -53,7 +54,7 @@ check out [common styles for components](../common-style.html)
check out [common events](../common-event.html)
* support 'click' event.
-* support 'appear' / 'disappear' event.
+* support 'appear' / 'disappear' event.
## iconfont
@@ -128,4 +129,4 @@ support `ttf` and `woff` font format to custom your text, call [addRule](../modu
</style>
```
-[try it](http://dotwe.org/vue/154e20171d350a081fba7878c53cf7d2)
\ No newline at end of file
+[try it](http://dotwe.org/vue/154e20171d350a081fba7878c53cf7d2)
http://git-wip-us.apache.org/repos/asf/incubator-weex-site/blob/32a097bf/source/references/components/textarea.md
----------------------------------------------------------------------
diff --git a/source/references/components/textarea.md b/source/references/components/textarea.md
index 9b995da..db5fe63 100644
--- a/source/references/components/textarea.md
+++ b/source/references/components/textarea.md
@@ -1,7 +1,8 @@
---
title: <textarea>
type: references
-order: 2.13
+group: Build-in Components
+order: 8.11
version: 2.1
---
@@ -137,4 +138,4 @@ This component supports no child components.
</style>
```
-[try it](http://dotwe.org/vue/a1877866e8b91ffa1e6ea9bc66c200fa)
\ No newline at end of file
+[try it](http://dotwe.org/vue/a1877866e8b91ffa1e6ea9bc66c200fa)
http://git-wip-us.apache.org/repos/asf/incubator-weex-site/blob/32a097bf/source/references/components/video.md
----------------------------------------------------------------------
diff --git a/source/references/components/video.md b/source/references/components/video.md
index d73c616..9295a12 100644
--- a/source/references/components/video.md
+++ b/source/references/components/video.md
@@ -1,7 +1,8 @@
---
title: <video>
type: references
-order: 2.14
+group: Build-in Components
+order: 8.15
version: 2.1
---
@@ -84,4 +85,4 @@ common styles: check out [common styles for components](../common-style.html)
</script>
```
-[try it](http://dotwe.org/vue/01d3d27073a471bb234b1a76e130d197)
\ No newline at end of file
+[try it](http://dotwe.org/vue/01d3d27073a471bb234b1a76e130d197)
http://git-wip-us.apache.org/repos/asf/incubator-weex-site/blob/32a097bf/source/references/components/waterfall.md
----------------------------------------------------------------------
diff --git a/source/references/components/waterfall.md b/source/references/components/waterfall.md
index 57e1306..dea3742 100644
--- a/source/references/components/waterfall.md
+++ b/source/references/components/waterfall.md
@@ -1,7 +1,8 @@
---
title: <waterfall>
type: references
-order: 2.5
+group: Build-in Components
+order: 8.17
version: 2.1
---
@@ -52,4 +53,4 @@ All subcomponents in waterfall support the scrollToElement API in [dom module](.
### Example
-see [playground waterfall example](http://dotwe.org/vue/7a9195643e9e8da352b0d879cdbe68c0)
\ No newline at end of file
+see [playground waterfall example](http://dotwe.org/vue/7a9195643e9e8da352b0d879cdbe68c0)
http://git-wip-us.apache.org/repos/asf/incubator-weex-site/blob/32a097bf/source/references/components/web.md
----------------------------------------------------------------------
diff --git a/source/references/components/web.md b/source/references/components/web.md
index 1bac6d6..385f1a6 100644
--- a/source/references/components/web.md
+++ b/source/references/components/web.md
@@ -1,7 +1,8 @@
---
title: <web>
type: references
-order: 2.15
+group: Build-in Components
+order: 8.16
version: 2.1
---
@@ -145,4 +146,4 @@ We use a simple Browser Demo to show how to use web component and webview module
</style>
```
-[try it](http://dotwe.org/vue/221ff37113a12d692a7a92a100f20162)
\ No newline at end of file
+[try it](http://dotwe.org/vue/221ff37113a12d692a7a92a100f20162)
http://git-wip-us.apache.org/repos/asf/incubator-weex-site/blob/32a097bf/source/references/downgrade.md
----------------------------------------------------------------------
diff --git a/source/references/downgrade.md b/source/references/downgrade.md
deleted file mode 100644
index f0271b1..0000000
--- a/source/references/downgrade.md
+++ /dev/null
@@ -1,11 +0,0 @@
----
-title: downgrade
-type: references
-order: 1.3
-version: 2.1
----
-
-# downgrade
-
-Weex 2.0 downgrade change to module,please refer to [downgrade](https://www.npmjs.com/package/@weex-project/downgrade)
-
http://git-wip-us.apache.org/repos/asf/incubator-weex-site/blob/32a097bf/source/references/gesture.md
----------------------------------------------------------------------
diff --git a/source/references/gesture.md b/source/references/gesture.md
deleted file mode 100644
index d93d836..0000000
--- a/source/references/gesture.md
+++ /dev/null
@@ -1,56 +0,0 @@
----
-title: Gesture
-type: references
-order: 1.8
-version: 2.1
-has_chapter_content: true
----
-
-# Gesture
-
-> Experiment Feature
-
-Weex encapsulates native touch events to provide a gesture system. Using gesture is similar to use event in Weex. Just set `on` attributes on a node to listen to gesture.
-
-## Type
-For now, there are four types of gestures:
-
-* **Touch**. Touch gesture is fired when a touch point is placed, moved or removed from the touch surface. Touch gesture is accuracy as it will report every trivial event. As a result, listening to touch gesture may be slow, a great deal of events needs to be processed even a small move happened. There are three types of Touch gesture:
- * `touchstart` will be fired when a touch point is placed on the touch surface.
- * `touchmove` will be fired when a touch point is moved along the touch surface.
- * `touchend` will be fired when a touch point is removed from the touch surface.
-* **Pan**. Pan gesture also report motion of touch point on the touch surface, which is similar to touch gesture. But Pan gesture is sampled and faster than the touch event. As consequence, it is less accuracy than touch gesture. There are also three types of Pan gesture, and the meaning of these types is very close to types of Touch.
- * `panstart`
- * `panmove`
- * `panend`
-* **Horizontal/Vertical Pan** <span class="api-version">v0.10+</span> . Mainly used for cell swipe gestures before conflict resolving system is completed. start/move/end state of the gesture will be passed by `state` property. **Note**: These gestures are in conflict with click event on Android currently.
- * `horizontalpan`
- * `verticalpan`
-* **Swipe**. Swipe is fired when user swipe a touch point on the screen. A serial of motion will only trigger one Swipe gesture.
-* **LongPress**. LongPress is fired when a touch point is held for 500 ms or more.
-
-The Touch gesture and Pan is very close to each other, with following features hold:
-
-* **Touch**. Not sampled, accuracy, but slow.
-* **Pan**. Sampled, fast, less accuracy.
-
-Users may choose their gesture according to their situation.
-
-## Properties
-The following properties can be used in gesture callback:
-
-* `direction`. Only exists for **Swipe** gesture. Indicate the direcion of the swipe, choose from `up`, `left`, `bottom`, `right`.
-* `changedTouches`. An array of motion for every touch pointer that has contribute to the current gesture.
-
-### changedTouches
-
-`changedTouches` is an array, with the following properties in its children:
-
-* `identifier`. A unique identifier for a touch pointer.
-* `pageX`. The X coordinate of the touch pointer relative to the left edge of the document.
-* `pageY`. The Y coordinate of the touch pointer relative to the top of the document.
-* `screenX`. The X coordinate of the touch point relative to the left edge of the screen.
-* `screenY`. The Y coordinate of the touch point relative to the top edge of the screen.
-
-## Constrain
-Currently, Weex Android do not support listening to gesture on `scroller`, `list` and `webview`, as it would lead a large amount of event conflicting.
http://git-wip-us.apache.org/repos/asf/incubator-weex-site/blob/32a097bf/source/references/html5-apis.md
----------------------------------------------------------------------
diff --git a/source/references/html5-apis.md b/source/references/html5-apis.md
deleted file mode 100644
index 8d61076..0000000
--- a/source/references/html5-apis.md
+++ /dev/null
@@ -1,10 +0,0 @@
----
-title: HTML5 APIs
-type: references
-order: 1.4
-version: 2.1
----
-
-# HTML5 APIs
-
-[Vue APIs](https://vuejs.org/v2/api/)
\ No newline at end of file
http://git-wip-us.apache.org/repos/asf/incubator-weex-site/blob/32a097bf/source/references/index.md
----------------------------------------------------------------------
diff --git a/source/references/index.md b/source/references/index.md
index b20a713..6e74848 100644
--- a/source/references/index.md
+++ b/source/references/index.md
@@ -1,8 +1,9 @@
---
-title: Common Options
+title: References
type: references
-order: 1
+order: 0
version: 2.1
+has_chapter_content: true
---
# Common Options
http://git-wip-us.apache.org/repos/asf/incubator-weex-site/blob/32a097bf/source/references/ios-apis.md
----------------------------------------------------------------------
diff --git a/source/references/ios-apis.md b/source/references/ios-apis.md
index 071644e..6e5daad 100644
--- a/source/references/ios-apis.md
+++ b/source/references/ios-apis.md
@@ -1,7 +1,8 @@
---
-title: iOS APIs
+title: iOS APIs
type: references
-order: 1.1
+group: API
+order: 2.3
version: 2.1
---
@@ -28,7 +29,7 @@ version: 2.1
* finished : a Boolean value indicating whether download action has finished.
*/
- (id<WXImageOperationProtocol>)downloadImageWithURL:(NSString *)url imageFrame:(CGRect)imageFrame userInfo:(NSDictionary *)options completed:(void(^)(UIImage *image, NSError *error, BOOL finished))completedBlock;
- @end
+ @end
```
## Native interacts with JavaScript
@@ -39,7 +40,7 @@ version: 2.1
```object-c
/**
- * @abstract Fire an event to the component and tell Javascript which value has been changed.
+ * @abstract Fire an event to the component and tell Javascript which value has been changed.
* @param eventName
* @param params
* @param domChanges
@@ -73,4 +74,4 @@ You can use the `setFrame(CGRect)` method to change the size of the Weex contain
Weex in the development stage will add some new features and new methods, but these new features and functions must be upgraded to achieve the SDK, for the application should not be upgraded how to deal with it? You can use the downgrade feature.
-Native can be handled by the `onFailed` method in interface `WXSDKInstance`, and if it is an active demoulding error domain is `TemplateErrorType`, and the Native side can jump to the corresponding H5 page. Or otherwise prompted the user’s current environment does not support Weex.
\ No newline at end of file
+Native can be handled by the `onFailed` method in interface `WXSDKInstance`, and if it is an active demoulding error domain is `TemplateErrorType`, and the Native side can jump to the corresponding H5 page. Or otherwise prompted the user’s current environment does not support Weex.
http://git-wip-us.apache.org/repos/asf/incubator-weex-site/blob/32a097bf/source/references/js-service.md
----------------------------------------------------------------------
diff --git a/source/references/js-service.md b/source/references/js-service.md
new file mode 100644
index 0000000..232f27b
--- /dev/null
+++ b/source/references/js-service.md
@@ -0,0 +1,115 @@
+---
+title: JS Service
+type: references
+group: API
+order: 2.6
+version: 2.1
+---
+
+
+# JS Service
+
+<span class="weex-version">v0.9.5+</span>
+
+JS service and Weex instance are parallel in js runtime. Weex instance lifecycle will invoke JS service lifecycle. Currently provide create, refresh, destroy of lifecycle.
+
+!!!Important: JS Service is very powerful. Please be careful to use.
+
+
+## Register JS Service
+
+### iOS
+```objective-c
+[WeexSDKEngine registerService:@"SERVICE_NAME" withScript: @"SERVICE_JS_CODE" withOptions: @{}];
+```
+
+### Android
+```java
+HashMap<String, String> options = new HashMap<>()
+options.put("k1", "v1")
+String SERVICE_NAME = "SERVICE_NAME"
+String SERVICE_JS_CODE = "SERVICE_JS_CODE"
+boolean result = WXSDKEngine.registerService(SERVICE_NAME, SERVICE_JS_CODE, options)
+```
+
+### Web
+```html
+<!-- Should be loaded after then jsfm -->
+<script src="SERVICE_JS_CODE_URL"></script>
+```
+
+
+
+## Write a JS Service
+```javascript
+// options: native inject options
+// options.serviceName is native options name
+service.register(options.serviceName, {
+ /**
+ * JS Service lifecycle. JS Service `create` will before then each instance lifecycle `create`. The return param `instance` is Weex protected param. This object will return to instance global. Other params will in the `services` at instance.
+ *
+ * @param {String} id instance id
+ * @param {Object} env device environment
+ * @return {Object}
+ */
+ create: function(id, env, config) {
+ return {
+ instance: {
+ InstanceService: function(weex) {
+ var modal = weex.requireModule('modal')
+ return {
+ toast: function(title) {
+ modal.toast({ message: title })
+ }
+ }
+ }
+ },
+ NormalService: function(weex) {
+ var modal = weex.requireModule('modal')
+ return {
+ toast: function(title) {
+ modal.toast({ message: title })
+ }
+ }
+ }
+ }
+ },
+
+ /**
+ * JS Service lifecycle. JS Service `refresh` will before then each instance lifecycle `refresh`. If you want to reset variable or something on instance refresh.
+ *
+ * @param {String} id instance id
+ * @param {Object} env device environment
+ */
+ refresh: function(id, env, config){
+
+ },
+
+ /**
+ * JS Service lifecycle. JS Service `destroy` will before then each instance lifecycle `destroy`. You can deleted variable here. If you doesn't detete variable define in JS Service. The variable will always in the js runtime. It's would be memory leak risk.
+ *
+ * @param {String} id instance id
+ * @param {Object} env device environment
+ * @return {Object}
+ */
+ destroy: function(id, env) {
+
+ }
+})
+```
+
+## Using JS Service (vuejs)
+```html
+<script>
+var _InstanceService = new InstanceService(weex)
+var _NormalService = new service.normalService(weex)
+
+module.exports = {
+ created: fucntion() {
+ // called modal module to toast something
+ _InstanceService.toast('Instance JS Service')
+ _NormalService.toast('Normal JS Service')
+ }
+}
+</script>
+```
http://git-wip-us.apache.org/repos/asf/incubator-weex-site/blob/32a097bf/source/references/js-service/index.md
----------------------------------------------------------------------
diff --git a/source/references/js-service/index.md b/source/references/js-service/index.md
deleted file mode 100644
index 9414452..0000000
--- a/source/references/js-service/index.md
+++ /dev/null
@@ -1,114 +0,0 @@
----
-title: JS Service
-type: references
-order: 9
-version: 2.1
----
-
-
-# JS Service
-
-<span class="weex-version">v0.9.5+</span>
-
-JS service and Weex instance are parallel in js runtime. Weex instance lifecycle will invoke JS service lifecycle. Currently provide create, refresh, destroy of lifecycle.
-
-!!!Important: JS Service is very powerful. Please be careful to use.
-
-
-## Register JS Service
-
-### iOS
-```objective-c
-[WeexSDKEngine registerService:@"SERVICE_NAME" withScript: @"SERVICE_JS_CODE" withOptions: @{}];
-```
-
-### Android
-```java
-HashMap<String, String> options = new HashMap<>()
-options.put("k1", "v1")
-String SERVICE_NAME = "SERVICE_NAME"
-String SERVICE_JS_CODE = "SERVICE_JS_CODE"
-boolean result = WXSDKEngine.registerService(SERVICE_NAME, SERVICE_JS_CODE, options)
-```
-
-### Web
-```html
-<!-- Should be loaded after then jsfm -->
-<script src="SERVICE_JS_CODE_URL"></script>
-```
-
-
-
-## Write a JS Service
-```javascript
-// options: native inject options
-// options.serviceName is native options name
-service.register(options.serviceName, {
- /**
- * JS Service lifecycle. JS Service `create` will before then each instance lifecycle `create`. The return param `instance` is Weex protected param. This object will return to instance global. Other params will in the `services` at instance.
- *
- * @param {String} id instance id
- * @param {Object} env device environment
- * @return {Object}
- */
- create: function(id, env, config) {
- return {
- instance: {
- InstanceService: function(weex) {
- var modal = weex.requireModule('modal')
- return {
- toast: function(title) {
- modal.toast({ message: title })
- }
- }
- }
- },
- NormalService: function(weex) {
- var modal = weex.requireModule('modal')
- return {
- toast: function(title) {
- modal.toast({ message: title })
- }
- }
- }
- }
- },
-
- /**
- * JS Service lifecycle. JS Service `refresh` will before then each instance lifecycle `refresh`. If you want to reset variable or something on instance refresh.
- *
- * @param {String} id instance id
- * @param {Object} env device environment
- */
- refresh: function(id, env, config){
-
- },
-
- /**
- * JS Service lifecycle. JS Service `destroy` will before then each instance lifecycle `destroy`. You can deleted variable here. If you doesn't detete variable define in JS Service. The variable will always in the js runtime. It's would be memory leak risk.
- *
- * @param {String} id instance id
- * @param {Object} env device environment
- * @return {Object}
- */
- destroy: function(id, env) {
-
- }
-})
-```
-
-## Using JS Service (vuejs)
-```html
-<script>
-var _InstanceService = new InstanceService(weex)
-var _NormalService = new service.normalService(weex)
-
-module.exports = {
- created: fucntion() {
- // called modal module to toast something
- _InstanceService.toast('Instance JS Service')
- _NormalService.toast('Normal JS Service')
- }
-}
-</script>
-```
http://git-wip-us.apache.org/repos/asf/incubator-weex-site/blob/32a097bf/source/references/js_framework-apis.md
----------------------------------------------------------------------
diff --git a/source/references/js_framework-apis.md b/source/references/js_framework-apis.md
new file mode 100644
index 0000000..4f5a129
--- /dev/null
+++ b/source/references/js_framework-apis.md
@@ -0,0 +1,67 @@
+---
+title: JS Framework APIs
+type: references
+group: API
+order: 2.4
+version: 2.1
+---
+
+# JS Framework APIs
+
+## BroadcastChannel <span class="api-version">v0.9+</span>
+
+`BroadcastChannel` API is the solution for inter-instance communication.
+
+### Reference
+
++ [BroadcastChannel specification](https://html.spec.whatwg.org/multipage/comms.html#broadcasting-to-other-browsing-contexts).
++ [MessageEvent specification](https://html.spec.whatwg.org/multipage/comms.html#messageevent)
+
+### API
+
++ `postMessage(message)`: Sends the given message to other BroadcastChannel objects set up for this channel.
++ `close`: Closes the BroadcastChannel object, opening it up to garbage collection.
++ `onmessage`: Event handler, the event will be triggered when the instance receive a message.
+
+### Usage
+
+```javascript
+const Stack = new BroadcastChannel('Avengers')
+Stack.onmessage = function (event) {
+ console.log(event.data) // in this case, it's "Hulk Smash !!!"
+}
+
+// in another instance
+const Hulk = new BroadcastChannel('Avengers')
+Hulk.postMessage("Hulk Smash !!!")
+```
+
+Run the code above, Stack can receive the message from Hulk.
+
+### Notice
+
+One thing should be noticed: **The `message` object is not deep cloned.**
+
+See the demo below:
+
+```javascript
+const a = new BroadcastChannel('app')
+const b = new BroadcastChannel('app')
+
+const message = {
+ lists: ['A', 'B']
+}
+
+a.onmessage = function (event) {
+
+ // in this case, event.data is a reference of message
+ console.assert(event.data === message)
+
+}
+
+b.postMessage(message)
+```
+
+In this case, `event.data` is strict equal to `message`.
+
+Compared to the deep clone, this behavior improves efficiency and reduces memory cost. However, developers are not recommended to cache or modify the `event` object when they are using it (All type of event handlers should have this restriction).
http://git-wip-us.apache.org/repos/asf/incubator-weex-site/blob/32a097bf/source/references/jsfm-apis.md
----------------------------------------------------------------------
diff --git a/source/references/jsfm-apis.md b/source/references/jsfm-apis.md
deleted file mode 100644
index 15f6ee7..0000000
--- a/source/references/jsfm-apis.md
+++ /dev/null
@@ -1,66 +0,0 @@
----
-title: JS Framework APIs
-type: references
-order: 1.3
-version: 2.1
----
-
-# JS Framework APIs
-
-## BroadcastChannel <span class="api-version">v0.9+</span>
-
-`BroadcastChannel` API is the solution for inter-instance communication.
-
-### Reference
-
-+ [BroadcastChannel specification](https://html.spec.whatwg.org/multipage/comms.html#broadcasting-to-other-browsing-contexts).
-+ [MessageEvent specification](https://html.spec.whatwg.org/multipage/comms.html#messageevent)
-
-### API
-
-+ `postMessage(message)`: Sends the given message to other BroadcastChannel objects set up for this channel.
-+ `close`: Closes the BroadcastChannel object, opening it up to garbage collection.
-+ `onmessage`: Event handler, the event will be triggered when the instance receive a message.
-
-### Usage
-
-```javascript
-const Stack = new BroadcastChannel('Avengers')
-Stack.onmessage = function (event) {
- console.log(event.data) // in this case, it's "Hulk Smash !!!"
-}
-
-// in another instance
-const Hulk = new BroadcastChannel('Avengers')
-Hulk.postMessage("Hulk Smash !!!")
-```
-
-Run the code above, Stack can receive the message from Hulk.
-
-### Notice
-
-One thing should be noticed: **The `message` object is not deep cloned.**
-
-See the demo below:
-
-```javascript
-const a = new BroadcastChannel('app')
-const b = new BroadcastChannel('app')
-
-const message = {
- lists: ['A', 'B']
-}
-
-a.onmessage = function (event) {
-
- // in this case, event.data is a reference of message
- console.assert(event.data === message)
-
-}
-
-b.postMessage(message)
-```
-
-In this case, `event.data` is strict equal to `message`.
-
-Compared to the deep clone, this behavior improves efficiency and reduces memory cost. However, developers are not recommended to cache or modify the `event` object when they are using it (All type of event handlers should have this restriction).
http://git-wip-us.apache.org/repos/asf/incubator-weex-site/blob/32a097bf/source/references/migration/difference.md
----------------------------------------------------------------------
diff --git a/source/references/migration/difference.md b/source/references/migration/difference.md
deleted file mode 100644
index 9d31738..0000000
--- a/source/references/migration/difference.md
+++ /dev/null
@@ -1,10 +0,0 @@
----
-title: The difference between Weex and Vue
-type: references
-order: 12.2
-version: 2.1
----
-
-# The difference between Weex and Vue
-
-Work in progresss.
\ No newline at end of file
http://git-wip-us.apache.org/repos/asf/incubator-weex-site/blob/32a097bf/source/references/migration/index.md
----------------------------------------------------------------------
diff --git a/source/references/migration/index.md b/source/references/migration/index.md
deleted file mode 100644
index 36ac86b..0000000
--- a/source/references/migration/index.md
+++ /dev/null
@@ -1,11 +0,0 @@
----
-title: Migration
-type: references
-order: 12
-version: 2.1
----
-
-# Migration
-
-- [Migration from Weex](./migration-from-weex.html)
-- [The difference between Weex and Vue](./difference.html)
\ No newline at end of file
http://git-wip-us.apache.org/repos/asf/incubator-weex-site/blob/32a097bf/source/references/migration/migration-from-weex.md
----------------------------------------------------------------------
diff --git a/source/references/migration/migration-from-weex.md b/source/references/migration/migration-from-weex.md
deleted file mode 100644
index 2d2fad2..0000000
--- a/source/references/migration/migration-from-weex.md
+++ /dev/null
@@ -1,10 +0,0 @@
----
-title: Migration from Weex
-type: references
-order: 12.1
-version: 2.1
----
-
-# Migration from Weex
-
-Work in progresss.
\ No newline at end of file
http://git-wip-us.apache.org/repos/asf/incubator-weex-site/blob/32a097bf/source/references/modules/animation.md
----------------------------------------------------------------------
diff --git a/source/references/modules/animation.md b/source/references/modules/animation.md
index 870afb1..b77b06f 100644
--- a/source/references/modules/animation.md
+++ b/source/references/modules/animation.md
@@ -1,7 +1,8 @@
---
title: animation
type: references
-order: 3.1
+group: Build-in Modules
+order: 9.04
version: 2.1
---
@@ -21,13 +22,13 @@ Smooth and meaningful animation is very effective for enhancing the user experie
##### options
-**type:** object
+**type:** object
-**position:** Transition options.
-- `duration` (number): Specifies the number of milliseconds of animation execution, the default value is `0`, means that no animation will occur.
-- `delay` (number): Specifies the amount of milliseconds to wait between a change being requested to a property that is to be transitioned and the start of the transition effect. The default value is `0`.
+**position:** Transition options.
+- `duration` (number): Specifies the number of milliseconds of animation execution, the default value is `0`, means that no animation will occur.
+- `delay` (number): Specifies the amount of milliseconds to wait between a change being requested to a property that is to be transitioned and the start of the transition effect. The default value is `0`.
- `needLayout`(boolean):Whether or not the layout animation occurs when animation is executed,default value is `false`
-- `timingFunction` (string): Used to describe how the intermediate values of the styles being affected by a transition effect are calculated, default value is `linear`, the allowed attributes are listed in the following table:
+- `timingFunction` (string): Used to describe how the intermediate values of the styles being affected by a transition effect are calculated, default value is `linear`, the allowed attributes are listed in the following table:
| name | description |
| :----------------------------- | :--------------------------------------- |
@@ -37,7 +38,7 @@ Smooth and meaningful animation is very effective for enhancing the user experie
| `ease-in-out` | Specifies a transition effect with a slow start and end |
| `cubic-bezier(x1, y1, x2, y2)` | Define your own values in the cubic-bezier function. Possible values are parameter values from 0 to 1. More information about cubic-bezier please visit [cubic-bezier](http://cubic-bezier.com/) and [Bézier curve](https://en.wikipedia.org/wiki/B%C3%A9zier_curve). |
-- `styles` (object): Specify the names and values of styles to which a transition effect should be applied. The allowed attributes are listed in the following table:
+- `styles` (object): Specify the names and values of styles to which a transition effect should be applied. The allowed attributes are listed in the following table:
| name | description | value type | default value |
| :-------------- | :--------------------------------------- | :-------------------- | :-------------- |
@@ -48,7 +49,7 @@ Smooth and meaningful animation is very effective for enhancing the user experie
| transformOrigin | The povit of transition. The possible values for `x-aris` are `left`/`center`/`right`/length or percent, and possible values of `y-axis` are `top`/`center`/`bottom`/ length or percent | `x-axis y-axis` | `center center` |
| transform | Transform function to be applied to the element. The properties in the following table are supported | object | none |
-properties of `transform`:
+properties of `transform`:
| name | description | value type | default value |
| :------------------------------ | :--------------------------------------- | :--------------- | :------------ |
http://git-wip-us.apache.org/repos/asf/incubator-weex-site/blob/32a097bf/source/references/modules/clipboard.md
----------------------------------------------------------------------
diff --git a/source/references/modules/clipboard.md b/source/references/modules/clipboard.md
index 5728cc4..6572dd1 100644
--- a/source/references/modules/clipboard.md
+++ b/source/references/modules/clipboard.md
@@ -1,7 +1,8 @@
---
title: clipboard
type: references
-order: 3.2
+group: Build-in Modules
+order: 9.08
version: 2.1
---
@@ -95,4 +96,4 @@ sets the text to clipboard, having the same effect as copying manually.
</style>
```
-[try it](http://dotwe.org/vue/126d3cfc5533393e28943978b07aa5c1)
\ No newline at end of file
+[try it](http://dotwe.org/vue/126d3cfc5533393e28943978b07aa5c1)
http://git-wip-us.apache.org/repos/asf/incubator-weex-site/blob/32a097bf/source/references/modules/dom.md
----------------------------------------------------------------------
diff --git a/source/references/modules/dom.md b/source/references/modules/dom.md
index 0209f64..0298b53 100644
--- a/source/references/modules/dom.md
+++ b/source/references/modules/dom.md
@@ -1,7 +1,8 @@
---
title: dom
type: references
-order: 3.3
+group: Build-in Modules
+order: 9.01
version: 2.1
---
@@ -152,15 +153,15 @@ Example Useage:
<text class="info">Left: {{size.left}}</text>
<text class="info">Right: {{size.right}}</text>
</div>
-
+
<text class="info btn" @click='click()'>{{this.tip}}</text>
-
+
</div>
-</template>
+</template>
<script>
const dom = weex.requireModule('dom')
-
+
function round(size) {
var roundSize = {
'width': Math.round(size.width),
@@ -194,7 +195,7 @@ Example Useage:
this.size = round.call(this,option.size);
})
},
-
+
methods:{
click:function() {
if (this.ref === 'viewport') {
@@ -204,14 +205,14 @@ Example Useage:
this.ref = 'viewport'
this.tip = "get box rect"
}
-
+
const result = dom.getComponentRect(this.ref, option => {
console.log('getComponentRect:', option)
this.size = round.call(this,option.size);
})
}
}
-
+
}
</script>
@@ -225,13 +226,13 @@ Example Useage:
margin-left:170px;
padding-left:35px;
border-color: rgb(162, 217, 192);
-
+
}
.btn:active {
background-color: #8fbc8f;
border-color: gray;
}
-
+
.box {
align-items:center;
margin-left: 150px;
http://git-wip-us.apache.org/repos/asf/incubator-weex-site/blob/32a097bf/source/references/modules/globalevent.md
----------------------------------------------------------------------
diff --git a/source/references/modules/globalevent.md b/source/references/modules/globalevent.md
index aa53957..ee673a7 100644
--- a/source/references/modules/globalevent.md
+++ b/source/references/modules/globalevent.md
@@ -1,7 +1,8 @@
---
title: globalEvent
type: references
-order: 3.10
+group: Build-in Modules
+order: 9.13
version: 2.1
---
@@ -14,15 +15,15 @@ version: 2.1
You can register events via `addEventListener`, which can be removed by `removeEventListener` when you do not need to listen for `globalEvent`.
-*AUCTION*
-- Only instance level is not application level .
+*AUCTION*
+- Only instance level is not application level .
## How to make your Module support global events
API development is complete, when the event needs to be sent, the need through the following methods:
```javascript
/**
- *
+ *
* @param eventName eventName
* @param params event params
*/
@@ -60,8 +61,8 @@ register global event.
#### Arguments
-* `eventName`*(string)*: The name of the event you want to listen to.
-* `callback`*(function)*: the callback function after executing this action.
+* `eventName`*(string)*: The name of the event you want to listen to.
+* `callback`*(function)*: the callback function after executing this action.
#### Example
@@ -74,7 +75,7 @@ globalEvent.addEventListener("geolocation", function (e) {
### removeEventListener(String eventName)
-remove global event
+remove global event
#### Arguments
http://git-wip-us.apache.org/repos/asf/incubator-weex-site/blob/32a097bf/source/references/modules/index.md
----------------------------------------------------------------------
diff --git a/source/references/modules/index.md b/source/references/modules/index.md
deleted file mode 100644
index 444ec81..0000000
--- a/source/references/modules/index.md
+++ /dev/null
@@ -1,20 +0,0 @@
----
-title: Built-in Modules
-type: references
-order: 3
-version: 2.1
----
-
-# Built-in Modules
-
-- [animation](./animation.html)
-- [WebSocket](./websocket.html)
-- [picker](./picker.html)
-- [clipboard](./clipboard.html)
-- [dom](./dom.html)
-- [modal](./modal.html)
-- [navigator](./navigator.html)
-- [storage](./storage.html)
-- [stream](./stream.html)
-- [webview](./webview.html)
-- [globalEvent](./globalevent.html)
http://git-wip-us.apache.org/repos/asf/incubator-weex-site/blob/32a097bf/source/references/modules/meta.md
----------------------------------------------------------------------
diff --git a/source/references/modules/meta.md b/source/references/modules/meta.md
index b9160b2..ebb60a6 100644
--- a/source/references/modules/meta.md
+++ b/source/references/modules/meta.md
@@ -1,7 +1,8 @@
---
title: meta
type: references
-order: 3.12
+group: Build-in Modules
+order: 9.06
version: 2.1
---
@@ -42,11 +43,11 @@ import App from './app.vue'
const meta = weex.requireModule('meta')
// The width of the viewport is set to 640px
-meta.setViewport({
+meta.setViewport({
width: 640
})
-App.el = '#root'
+App.el = '#root'
new Vue(App)
```
http://git-wip-us.apache.org/repos/asf/incubator-weex-site/blob/32a097bf/source/references/modules/modal.md
----------------------------------------------------------------------
diff --git a/source/references/modules/modal.md b/source/references/modules/modal.md
index 5fd034e..fff2c17 100644
--- a/source/references/modules/modal.md
+++ b/source/references/modules/modal.md
@@ -1,44 +1,45 @@
---
title: modal
type: references
-order: 3.4
+group: Build-in Modules
+order: 9.02
version: 2.1
---
-# modal
+# modal
-Weex provides a series of message boxes: `toast`, `alert`, `confirm` and `prompt`.
+Weex provides a series of message boxes: `toast`, `alert`, `confirm` and `prompt`.
-## API
-### toast(options)
+## API
+### toast(options)
-A toast provides simple feedback about an operation in a small popup. For example, navigating away from an email before you send it triggers a "Draft saved" toast to let you know that you can continue editing later. Toasts automatically disappear after a timeout.
+A toast provides simple feedback about an operation in a small popup. For example, navigating away from an email before you send it triggers a "Draft saved" toast to let you know that you can continue editing later. Toasts automatically disappear after a timeout.
#### Arguments
- `options` (object): toast options.
- `message` (string): the text message that the toast shows.
- - `duration` (number): the duration(seconds) that the toast shows.
+ - `duration` (number): the duration(seconds) that the toast shows.
- For Android: If the duration is longer than 3, it will use a system defined variable called **LONG**, otherwise it will use another variable called **SHORT**
- For iOS: It will show the toast during the specified time.
-
-### alert(options, callback)
-An alert box is often used if you want to make sure information comes through to the user.
-When an alert box pops up, the user will have to click "OK" to proceed.
+### alert(options, callback)
-#### Arguments
+An alert box is often used if you want to make sure information comes through to the user.
+When an alert box pops up, the user will have to click "OK" to proceed.
+
+#### Arguments
- `options` (object): alert box options.
- `message` (string): the text message that the alert shows.
- `okTitle` (string): the text of positive button, default is 'OK'.
- - `callback` (function): callback when complete.
- This method has a callback function whose arguments will be:
+ - `callback` (function): callback when complete.
+ This method has a callback function whose arguments will be:
- `result` (string): the title text of the confirm button that clicked by user.
-### confirm(options, callback)
-A confirm box is often used if you want the user to verify or accept something.
+### confirm(options, callback)
+A confirm box is often used if you want the user to verify or accept something.
-When a confirm box pops up, the user will have to click either confirm or cancel button to proceed.
+When a confirm box pops up, the user will have to click either confirm or cancel button to proceed.
#### Arguments
- `options` (object): confirm box options.
@@ -47,24 +48,24 @@ When a confirm box pops up, the user will have to click either confirm or cancel
- `cancelTitle` (string): the title of cancel button, default is 'Cancel'.
- `callback` (function): callback when complete.
-This method has a callback function whose arguments will be:
-- `result`(string): the title text of the button that clicked by user.
+This method has a callback function whose arguments will be:
+- `result`(string): the title text of the button that clicked by user.
-### prompt(options, callback)
+### prompt(options, callback)
-A prompt box is often used if you want the user to input a value before entering a page.
-When a prompt box pops up, the user will have to click either confirm or cancel button to proceed after entering an input value.
+A prompt box is often used if you want the user to input a value before entering a page.
+When a prompt box pops up, the user will have to click either confirm or cancel button to proceed after entering an input value.
-#### Arguments
+#### Arguments
- `options` (object): some options.
- `message` (string): the message that the prompt shows.
- `okTitle` (string): the title text of confirm button, default is 'OK'.
- `cancelTitle` (string): the title text of cancel button, default is 'Cancel'.
-- `callback` (function): callback when complete.
- This method has a callback function whose arguments will be:
+- `callback` (function): callback when complete.
+ This method has a callback function whose arguments will be:
- `ret` (object): the argument will be a object, which has attributes `result` and `data`, like `{ result: 'OK', data: 'hello world' }`
- `result` (string): the title of the button that clicked by user.
- - `data` (string): the value of the text that entered by user.
+ - `data` (string): the value of the text that entered by user.
## Example
@@ -143,4 +144,4 @@ When a prompt box pops up, the user will have to click either confirm or cancel
</style>
```
-[try it](http://dotwe.org/vue/a7dddfb24edb72be947fc4eec3803f1d)
\ No newline at end of file
+[try it](http://dotwe.org/vue/a7dddfb24edb72be947fc4eec3803f1d)
http://git-wip-us.apache.org/repos/asf/incubator-weex-site/blob/32a097bf/source/references/modules/navigator.md
----------------------------------------------------------------------
diff --git a/source/references/modules/navigator.md b/source/references/modules/navigator.md
index e3ce51a..8f28143 100644
--- a/source/references/modules/navigator.md
+++ b/source/references/modules/navigator.md
@@ -1,11 +1,12 @@
---
title: navigator
type: references
-order: 3.5
+group: Build-in Modules
+order: 9.05
version: 2.1
---
-# Navigator
+# Navigator
<span class="weex-version">v0.6.1+</span>
@@ -86,4 +87,4 @@ pop a weex page onto the navigator stack, you can specify whether apply animatio
</style>
```
-[try it](http://dotwe.org/vue/5c670b07735ee6d08de5c8eb93f91f11)
\ No newline at end of file
+[try it](http://dotwe.org/vue/5c670b07735ee6d08de5c8eb93f91f11)
http://git-wip-us.apache.org/repos/asf/incubator-weex-site/blob/32a097bf/source/references/modules/picker.md
----------------------------------------------------------------------
diff --git a/source/references/modules/picker.md b/source/references/modules/picker.md
index 64f0ed6..1ecdedf 100644
--- a/source/references/modules/picker.md
+++ b/source/references/modules/picker.md
@@ -1,7 +1,8 @@
---
title: picker
type: references
-order: 3.11
+group: Build-in Modules
+order: 9.10
version: 2.1
---
@@ -126,4 +127,4 @@ pick time
background-color: rgba(162, 217, 192, 0.2);
}
</style>
-```
\ No newline at end of file
+```
http://git-wip-us.apache.org/repos/asf/incubator-weex-site/blob/32a097bf/source/references/modules/storage.md
----------------------------------------------------------------------
diff --git a/source/references/modules/storage.md b/source/references/modules/storage.md
index faac53c..10875ff 100644
--- a/source/references/modules/storage.md
+++ b/source/references/modules/storage.md
@@ -1,7 +1,8 @@
---
title: storage
type: references
-order: 3.6
+group: Build-in Modules
+order: 9.09
version: 2.1
---
@@ -23,7 +24,7 @@ or update that key's value if it already exists.
* `key`*(string)*: the name of the key you want to store. "" or null is not allowed.
* `value`*(string)*: the name of the value you want to store."" or null is not allowed.
-* `callback`*(object)*: the callback function after executing this action.
+* `callback`*(object)*: the callback function after executing this action.
### getItem(key, callback)
@@ -32,7 +33,7 @@ When passed a key name, will return that key's value.
#### Arguments
* `key`*(string)*: the name of the key you want to retrieve the value of."" or null is not allowed.
-* `callback`*(object)*: the callback function after executing this action.
+* `callback`*(object)*: the callback function after executing this action.
### removeItem(key, callback)
@@ -41,7 +42,7 @@ When passed a key name, will remove that key from the storage.
#### Arguments
* `key`*(string)*: the name of the key you want to remove."" or null is not allowed.
-* `callback`*(object)*: the callback function after executing this action.
+* `callback`*(object)*: the callback function after executing this action.
##### Example
@@ -60,7 +61,7 @@ Returns an integer representing the number of data items stored in the Storage o
#### Arguments
-* `callback`*(object)*: the callback function after executing this action.
+* `callback`*(object)*: the callback function after executing this action.
### getAllKeys(callback)
@@ -68,7 +69,7 @@ Returns an array that contains all keys stored in Storage object.
#### Arguments
-* `callback`*(object)*: the callback function after executing this action.
+* `callback`*(object)*: the callback function after executing this action.
## Example
@@ -169,4 +170,4 @@ Returns an array that contains all keys stored in Storage object.
</style>
```
-[try it](http://dotwe.org/vue/3fdd3e2d1646ca41199d80c7be799858)
\ No newline at end of file
+[try it](http://dotwe.org/vue/3fdd3e2d1646ca41199d80c7be799858)
http://git-wip-us.apache.org/repos/asf/incubator-weex-site/blob/32a097bf/source/references/modules/stream.md
----------------------------------------------------------------------
diff --git a/source/references/modules/stream.md b/source/references/modules/stream.md
index 986ccdb..5c16bd2 100644
--- a/source/references/modules/stream.md
+++ b/source/references/modules/stream.md
@@ -1,7 +1,8 @@
---
title: stream
type: references
-order: 3.7
+group: Build-in Modules
+order: 9.07
version: 2.1
---
@@ -128,4 +129,4 @@ Start a network request, use two callbacks to receive server's response data.
</style>
```
-[try it](http://dotwe.org/vue/29bbf2d49fc8a204f98240044bbe211a)
\ No newline at end of file
+[try it](http://dotwe.org/vue/29bbf2d49fc8a204f98240044bbe211a)
http://git-wip-us.apache.org/repos/asf/incubator-weex-site/blob/32a097bf/source/references/modules/timer.md
----------------------------------------------------------------------
diff --git a/source/references/modules/timer.md b/source/references/modules/timer.md
deleted file mode 100644
index 9e7da63..0000000
--- a/source/references/modules/timer.md
+++ /dev/null
@@ -1,58 +0,0 @@
----
-title: Timer
-type: references
-version: 0.10
----
-
-# Timer
-
-Weex encapsulates a series of APIs in order to start/stop a one-time task or a repeated task at a fixed delay. Please note that this module don't provide an accuracy delay. It provides best-effort delivery, but the actual delay may still exceed the delay user wants if the corresponding thread is busy.
-Actually, this module is made for the polyfill of HTML5 timer APIs, developers **should not** use this module directly unless they know exactly what they are doing.
-
-## API
-
-All timeout or interval in this module are measured in milliseconds. Also, timeout and interval should be a non-negative **integer**(the max of integer is 0x7FFFFFFF). The behavior of invalid value for timeout or interval is undefined.
-
-### setTimeout(fn, timeout)
-
-The `setTimeout()` method calls a function after a specified number of milliseconds. Use the `clearTimeout()` method to prevent the function from running. The function is only executed once. If you need to repeat execution, use the `setInterval()` method.
-
-#### Arguments
-
-- `fn` (function): The function that will be executed
-- `timeout` (number): The number of milliseconds to wait before executing the function
-
-#### Return value
-
-A Number, representing the fnId value of the timer that is set. Use this value with the `clearTimeout()` method to cancel the timer.
-
-### setInterval(fn, interval)
-
-The `setInterval()` method calls a function at specified intervals (in milliseconds), and it will continue calling the function until `clearInterval()` is called. The fnId value returned by `setInterval()` is used as the parameter for the `clearInterval()` method.
-
-#### Arguments
-
-- `fn` (function): The function that will be executed
-- `interval` (number): The intervals (in milliseconds) on how often to execute the function
-
-#### Return value
-
-A Number, representing the fnId value of the timer that is set. Use this value with the `clearInterval()` method to cancel the timer
-
-### clearTimeout(fnId)
-
-The `clearTimeout()` method clears a timer set with the `setTimeout()` method. The fnId value returned by `setTimeout()` is used as the parameter for the `clearTimeout()` method. If the function has not already been executed, you will be able to stop the execution by calling the `clearTimeout()` method, otherwise, this method has no influence on the task.
-
-#### Arguments
-
-- `fnId` (number): The fnId value of the timer returned by the `setTimeout()` method
-
-### clearInterval(fnId)
-
-The `clearInterval()` method clears a timer set with the `setInterval()` method. The fnId value returned by `setInterval()` is used as the parameter for the `clearInterval()` method.
-
-#### Arguments
-
-- `fnId` (number): The fnId of the timer returned by the `setInterval()` method
-
-[Try it](http://dotwe.org/vue/ad564965f1eac5a4bc86946ecff70a0c)
http://git-wip-us.apache.org/repos/asf/incubator-weex-site/blob/32a097bf/source/references/modules/websocket.md
----------------------------------------------------------------------
diff --git a/source/references/modules/websocket.md b/source/references/modules/websocket.md
index cb36ed1..1c8a445 100644
--- a/source/references/modules/websocket.md
+++ b/source/references/modules/websocket.md
@@ -1,7 +1,8 @@
---
title: WebSocket
type: references
-order: 3.11
+group: Build-in Modules
+order: 9.12
version: 2.1
---
http://git-wip-us.apache.org/repos/asf/incubator-weex-site/blob/32a097bf/source/references/modules/webview.md
----------------------------------------------------------------------
diff --git a/source/references/modules/webview.md b/source/references/modules/webview.md
index c67dfe7..2314aa0 100644
--- a/source/references/modules/webview.md
+++ b/source/references/modules/webview.md
@@ -1,7 +1,8 @@
---
title: webview
type: references
-order: 3.9
+group: Build-in Modules
+order: 9.11
version: 2.1
---
@@ -153,4 +154,4 @@ webview.reload(webElement.ref);
</style>
```
-[try it](http://dotwe.org/vue/221ff37113a12d692a7a92a100f20162)
\ No newline at end of file
+[try it](http://dotwe.org/vue/221ff37113a12d692a7a92a100f20162)
http://git-wip-us.apache.org/repos/asf/incubator-weex-site/blob/32a097bf/source/references/native-dom-api.md
----------------------------------------------------------------------
diff --git a/source/references/native-dom-api.md b/source/references/native-dom-api.md
deleted file mode 100644
index 37729a2..0000000
--- a/source/references/native-dom-api.md
+++ /dev/null
@@ -1,212 +0,0 @@
----
-title: Native DOM APIs
-type: references
-order: 6
-version: 2.1
-has_chapter_content: true
----
-
-# Native DOM APIs
-
-Weex in the JS engine, for each page provides a set of Native DOM APIs. This interface is very close to the HTML DOM APIs. Using this interface we can control native rendering logic via JavaScript. And Weex upper layer of Vue 2.0 is based on this interface to adapt.
-
-In most cases, the JS framework will encapsulate native DOM APIs. That way, the developer does not need to work directly on the Native DOM.
-
-+ `Document` class: full page document.
-+ `Node` class: the base class of nodes.
-+ `Element` class: element node, inherited from Node, single view unit.
-+ `Comment` class: comment node, inherited from Node, no practical meaning, usually used as placeholders.
-
-Each Weex page has a `weex.document` object, which is an instance of the Document class and is the starting point for all the following interface calls.
-
-Let's take a look at their usage in detail:
-
-## `Document` class
-Each `Document` instance will automatically have a `documentElement` property when it is created. This attribute represents the document node. The document node can have a body, which is the main node of the document.
-
-Note: The document node body only accepts `<div>`, `<list>`, or `<scroller>` three types of element nodes.
-
-### Constructor
-`new Document(id: string, url: string?)`
-
-### Member method
-`createElement(tagName: string, props: Object?): Element`
-
-+ Creates an `Element` instance of a specific type `tagName`, which is an element node. Props can contain attr objects and style objects. Such as `createBody ('div', {style: {backgroundColor: '#ffffff'}})`.
-
-`createComment(text: string): Comment`
-
-+ Create an instance of ·`Comment`, which is a comment node and set a text description.
-
-`createBody(tagName: string, props: Object?): Element`
-
-+ Create a document body node and automatically mount it under `documentElement`.
-
-`fireEvent(el: Element, type: string, e: Object?, domChanges: Object?)`
-Triggers a particular type of event. When the event modifies the DOM's properties or styles during the generation process, the fourth argument is used to describe the changes, and the parameter format is the same as the format of the `createElement` method above.
-
-`destroy()`
-
-+ Destroy the current document. Once the document is destroyed, it will no longer work.
-
-### Read-only member variables
-`id: string`
-
-+ Each `Document` instance has a unique id. This is also the only id that each Weex page has.
-
-`URL: string?`
-
-+ If the current Weex page has a JS bundle URL, the URL will be returned here.
-
-`body: Element`
-
-+ The main body of the document, the concept similar to the HTML DOM document.body.
-
-`documentElement: Element`
-
-+ Document node, the concept similar to the HTML DOM document.documentElement.
-+ The relationship between body and documentElement is: documentElement is the parent of the body.
-
-`getRef(id): Node`
-
-+ Get the node based on the node id.
-
-## `Node` Class
-### Constructor
-`new Node()`
-
-### Member method
-`destroy()`
-
-### Read-only member variables or methods
-`ref: string`
-
-+ Each `Node` instance has its own unique ref value in the entire `Document instance.
-
-`nextSibling: Node?`
-
-`previousSibling: Node?`
-
-`parentNode: Node?`
-
-+ The three interfaces are consistent with the definition of HTML DOM.
-
-`children: Node[]`
-
-+ The node has an array of all child nodes.
-
-`pureChildren: Node[]`
-
-The node has an array of all the child elements. The difference between it and `children` is that `pureChildren` contains only the `Element` instance and not the `Comment` instance.
-
-
-## `Element` class, inherited from `Node`
-### Constructor
-`new Element(type: string, props: Object?)`
-
-+ Creates an element node of a particular type `type`, and the `props` parameter can contain an `attr` object or a `style` object.
-
-### DOM tree operation
-`appendChild(node: Node)`
-`insertBefore(node: Node, before: Node?)`
-
-+ The two interfaces are similar to HTML DOM.
-
-`insertAfter(node: Node, after: Node?)`
-
-+ Insert a new node before a child node.
-
-`removeChild(node: Node, preserved: boolean?)`
-
-+ Delete the child node node. Parameters `preserved` whether it is immediately removed from memory or temporarily retained.
-
-`clear()`
-
-+ Clear all child nodes.
-
-### The DOM property itself operates
-
-`setAttr(key: string, value: string, silent: boolean?)`
-
-`setStyle(key: string, value: string, silent: boolean?)`
-
-+ In the above two interfaces, when `silent` is true, the node only updates itself, does not pass the command to the client render layer. This parameter is used to handle user events that have changed the node-related properties at the time of occurrence, and will not send commands repeatedly to the client after the Native DOM has changed.
-
-`addEvent(type: string, handler: Function)`
-
-`removeEvent(type: string)`
-
-`fireEvent(type: string, e: any)`
-
-+ Bind events, unbind events, trigger events.
-
-#### Component method for a specific component type
-
-Special: Different component types can have their own unique methods, such as `<web>` components support `refresh` method. You can see the description of each component. In this case, we will generate a specific component type of class, such as `WebElement`, which inherited from `Element`.
-
-Such as:
-
->`WebElement` inherited from `Element`
->Indicates that a webview is embedded in the Wex page
-
->`Refresh ()`: Refreshes the current webview
-
-
-### Read-only member variables or methods
-
-`ref`, `nextSibling`, `previousSibling`, `parentNode`
-
-+ Inherited from `Node`.
-
-`nodeType: number`
-
-+ The number is always 1.
-
-
-`type: string`
-
-+ Consistent with the `type` in the constructor.
-
-`attr: Object`
-
-+ The key pair of all the characteristics of the current node. It is recommended to use the `setAttr ()` method to modify, rather than directly modify the object here.
-
-`style: Object`
-
-+ The value of all the keys of the current node. It is recommended to modify the `setStyle ()` method, rather than directly modify the object here.
-
-`event: Object`
-
-+ All events of the current node are bound. Each event type corresponds to an event handler method. It is recommended to use the `addEvent () / removeEvent ()` method to modify, rather than directly modify the object here.
-
-`toJSON(): Object`
-
-+ Returns a JSON object that describes the element's node, such as: `{ref: string, type: string, attr: Object, style: Object, event: Array (string), children: Array}`.
-
-
-## `Comment` class, inherited from `Node`
-
-### Constructor
-`new Comment(value: string)`
-
-### Read-only member variables or methods
-
-`ref`, `nextSibling`, `previousSibling`, `parentNode`
-
-+ Inherited from `Node`.
-
-`nodeType: number`
-
-+ The number is always 8.
-
-`type: string`
-
-+ The type is always `'comment'`
-
-`value: string`
-
-+ Consistent with the value in the constructor.
-
-`toJSON(): Object`
-
-+ Returns a JSON object describing the annotation node. For example: `<! - value ->`.
http://git-wip-us.apache.org/repos/asf/incubator-weex-site/blob/32a097bf/source/references/path.md
----------------------------------------------------------------------
diff --git a/source/references/path.md b/source/references/path.md
deleted file mode 100644
index 20f7322..0000000
--- a/source/references/path.md
+++ /dev/null
@@ -1,37 +0,0 @@
----
-title: Path
-type: references
-order: 1.9
-version: 2.1
-has_chapter_content: true
----
-
-# Path
-
-<span class="weex-version">0.9</span>
-
-This article will cover uri (url) usage in Weex. Including using image/typeface resources, deal with relative uri and how to access local and packaged asset files.
-
-## Schemes
-
-* Local
-Weex SDK provide `local` scheme to access resources packaged with application, and of cource, it's not working in the HTML5 runtime.
-Currently, developers can use this scheme with `image` and text's font file location.
- * In iOS, it's always locate file in 'bundle resources'. For example, a `image` component with `local:///app_icon` will load image file named 'app_icon' in bundle resouce, and font file work in the same way.
- * In Android, image component will load from 'drawable' resource folder like 'res/drawable-xxx'. But load font file is different, android framework can not load font file from 'res', so SDK will load it from `asserts` folder.
-
-* HTTP/HTTPS
-It's working in the same way as in web, Weex support these at very beginning.
-
-* File
-Use `file` scheme to access local disk file. This scheme has its limitations: You would not hard coded a file url in source page. Because not matter it's running in different platform(iOS, Android) or not, the content will be totally different in another device, which is depend to the specific device.
-So one possible case is getting the file url in runtime dynamically, which you can use it to diaplay a local disk image, or maybe upload it later.
-
-## Relative URI
-
-[Like we do in HTML](https://www.w3.org/TR/html4/types.html#type-uri), weex process 'relative URI' in the same way. The relative URI, which start with `/`,`.`,`..`,`//`, will resolve by the bunle url.
-Means URL start with `/` will resolve to the root folder as bundle js file, `.` and `..` will resolve to current and parent folder, and `//` will resolve to same scheme bundle js have.
-
-## URI Adapter
-
-All the above is the default implementation, developers can extend or override these their own by providing a 'URI Adapter'. Same as the other adapters, Custom adapter should be set before Weex SDK is initializing.
\ No newline at end of file
http://git-wip-us.apache.org/repos/asf/incubator-weex-site/blob/32a097bf/source/references/platfrom-difference.md
----------------------------------------------------------------------
diff --git a/source/references/platfrom-difference.md b/source/references/platfrom-difference.md
deleted file mode 100644
index 0aadfae..0000000
--- a/source/references/platfrom-difference.md
+++ /dev/null
@@ -1,11 +0,0 @@
----
-title: Platform Differences Between Weex and Web
-type: references
-order: 12
-version: 2.1
-has_chapter_content: true
----
-
-# Platform Differences Between Weex and Web
-
-Work in progresss.
http://git-wip-us.apache.org/repos/asf/incubator-weex-site/blob/32a097bf/source/references/text-style.md
----------------------------------------------------------------------
diff --git a/source/references/text-style.md b/source/references/text-style.md
deleted file mode 100644
index c8e140f..0000000
--- a/source/references/text-style.md
+++ /dev/null
@@ -1,50 +0,0 @@
----
-title: Text Style
-type: references
-order: 1.6
-version: 2.1
----
-
-# Text Style
-
-Text alike components share some common style rules. The text alike components currently includes [`text`](./components/text.html) and [`input`](./components/input.html).
-
-## Properties
-
-- `color`: <colors> this property set the foreground color of an component's text content.
-- `font-size`: <length> this property specifies the size of the font.
-- `font-style`: <enum> `normal` | `italic`. This property lets you select italic or normal faces within a font-family. Default value is `normal`.
-- `font-weight`<span class="api-version">v0.9+</span>:
- * values: `normal`, `bold`, `100`, `200`, `300`, `400`, `500`, `600`, `700`, `800`, `900`
- * normal is equal to 400, bold equel to 700
- * default value: `normal`
- * apply to: `<text>`, `<input>`
- * ios support showing 9 kind of font-weight.
- * android support showing 2 kind of font-weight:400,700, other value will map to 400 or 700
- * Some standard values like `lighter`, `bolder`, number unit are not supported.
- * The effect not apply to all elements, just `<text>` and `<input>`. In another way, it's not inherited.
-- `text-decoration`: <enum> `none` | `underline` | `line-through`. This property is used to set the text formatting to underline or line-through. The default value is `none`.
-- `text-align`: <enum> `left` | `center` | `right`. This property describes how inline content like text is aligned in its parent component. The default value is `left`.
-- `font-family`:<string> this property set the font-family of the text. This property **doesn't guarantee** the given font will always be set to the text. If the specified font cannot be found at the device, a typeface fallback will occur and the default typeface will be load. The fallback mechanism may vary in different devices.
-- `text-overflow`:<string> `clip` | `ellipsis`. This property determines how overflowed content that is not displayed is signaled to users. It can be clipped, display an ellipsis.
-
-The property `color` support multiple fomats of values, contains rgb, rgba, #fff, #ffffff, named-color.
-
-Example:
-
-```css
-.my-class { color: red; }
-.my-class { color: #f00; }
-.my-class { color: #ff0000; }
-.my-class { color: rgb(255, 0, 0); }
-.my-class { color: rgba(255, 0, 0, 0.5); }
-```
-
-## Type of Style Value
-
-- length: number followed by length unit `px`, `px` can be omitted.
-- colors: support multiple formats of values, including rgb (`rgb(255, 0, 0)`), rgba (`rgba(255, 0, 0, 0.5)`), hexadecimal (`#ff0000`), short hexadecimal (`#f00`), named color (`red`).
-- enumerated values: a limited number of string values.
-
-**Note:** [The list of color keywords.](./color-names.html)
-
http://git-wip-us.apache.org/repos/asf/incubator-weex-site/blob/32a097bf/source/references/unit.md
----------------------------------------------------------------------
diff --git a/source/references/unit.md b/source/references/unit.md
deleted file mode 100644
index 6140557..0000000
--- a/source/references/unit.md
+++ /dev/null
@@ -1,11 +0,0 @@
----
-title: CSS unit
-type: references
-order: 4
-version: 2.1
-has_chapter_content: true
----
-
-# CSS unit
-
-Work in progresss.
\ No newline at end of file
http://git-wip-us.apache.org/repos/asf/incubator-weex-site/blob/32a097bf/source/references/vue/difference-of-vuex.md
----------------------------------------------------------------------
diff --git a/source/references/vue/difference-of-vuex.md b/source/references/vue/difference-of-vuex.md
deleted file mode 100644
index 5929769..0000000
--- a/source/references/vue/difference-of-vuex.md
+++ /dev/null
@@ -1,89 +0,0 @@
----
-title: Using Vuex and vue-router
-type: references
-order: 10.2
-version: 2.1
----
-
-# Using Vuex and vue-router
-
-Vue.js also has many peripheral technology products such as [Vuex](https://github.com/vuejs/vuex) and [vue-router](https://github.com/vuejs/vue-router), etc. Those libraries can also works well in Weex.
-
-> We developed a complete project based on Weex and Vue.js which named [weex-hackernews](https://github.com/weepteam/web-ehackernews). We used Vuex and vue-loader in it, and it works well on both iOS, Android and web.
-
-## Using Vuex
-
-> [Official Vuex documents](https://vuex.vuejs.org/en/)
-
-
-
-Vuex is a state management pattern + library for Vue.js applications. it's also a library implementation tailored specifically for Vue.js to take advantage of its granular reactivity system for efficient updates. It serves as a centralized store for all the components in an application, with rules ensuring that the state can only be mutated in a predictable fashion.
-
-As a kind of state management library, Vuex is platform-independent, It also can be used in Weex. Read its [official documents](https://vuex.vuejs.org/en/) for more details.
-
-It also integrates with Vue's official [devtools extension](https://github.com/vuejs/vue-devtools) to provide advanced features on web platform, such as zero-config time-travel debugging and state snapshot export / import. (web platform only)
-
-## Using vue-router
-
-> [Official vue-router documents](https://router.vuejs.org/en/)
-
-Creating a Single-page Application with Vue.js + vue-router is dead simple. With Vue.js, you are already composing our application with components. When adding vue-router to the mix, all you need to do is map your components to the routes and let vue-router know where to render them.
-
-However, there are many difference between web and Android or iOS, some features of vue-router are limited in Weex.
-
-### Router mode
-
-vue-router provides three routing modes:
-
-+ `hash`: uses the URL hash for routing. Works in all Vue-supported browsers, including those that do not support HTML5 History API. (**default**)
-+ `history`: requires HTML5 History API and server config. See [HTML5 History Mode](https://router.vuejs.org/en/essentials/history-mode.html).
-+ `abstract`: works in all JavaScript environments, e.g. server-side with Node.js.
-
-You can pass the `mode` parameter when creating a router:
-
-```js
-new Router({
- mode: 'abstract',
- // ...
-})
-```
-
-Obviously "hash" mode and "history" mode are only available on the web, and have no effect in Weex. That is, you have to use "abstract" mode in Android and iOS. However, **vue-router will automatically be forced into "abstract" mode if no browser API is present.** so, just don't set the `mode` option, or set it to "abstract".
-
-### Programmatic navigation
-
-vue-router use `<router-link>` to create a navigation link, but in which some of the features based on the DOM events, it doesn't work well in the native environment. In Weex, you must use the [Programmatic Navigation](https://router.vuejs.org/en/essentials/navigation.html) to manage the router.
-
-Here is an basic example using `<router-link>`:
-
-```html
-<!-- Can only be used on the web, it takes no effects on Android or iOS! -->
-<template>
- <div>
- <router-link to="profile">
- <text>Profile</text>
- </router-link>
- </div>
-</template>
-```
-
-For native platforms, you have to use the `router.push`:
-
-```html
-<template>
- <div>
- <text @click="jump">Profile</text>
- </div>
-</template>
-
-<script>
- import router from './path/to/router'
- export default {
- methods: {
- jump () {
- router.push('profile')
- }
- }
- }
-</script>
-```
http://git-wip-us.apache.org/repos/asf/incubator-weex-site/blob/32a097bf/source/references/vue/difference-with-web.md
----------------------------------------------------------------------
diff --git a/source/references/vue/difference-with-web.md b/source/references/vue/difference-with-web.md
deleted file mode 100644
index 2af11f9..0000000
--- a/source/references/vue/difference-with-web.md
+++ /dev/null
@@ -1,149 +0,0 @@
----
-title: Difference with Web
-type: references
-order: 10.1
-version: 2.1
----
-
-# Differences between using Vue in Web and Weex
-
-## Platform Differences
-
-Vue.js was designed for the Web platform at the begining. Although it can be based on Weex to develop native applications, there are still many differences between web and native. See [Platform Differences Between Weex and Web](../ platform-difference.html) for more details.
-
-Due to those differences, Weex doesn't support those features in Vue.js (mostly are DOM-related):
-
-+ Event bubbling and capturing are not supported. Event modifiers, such as `.prevent`,` .capture`, `.stop`,` .self` are meaningless in the native environment.
-+ The keyboard event modifiers, like `.{KeyCode | keyAlias}` is also meaningless. (see [docs in Vue.js](https://vuejs.org/v2/guide/events.html#Key-Modifiers))
-+ No need to call `vm.$mount` manually, the entry component will mount to the root view of the native container by default.
-+ `v-html` and` v-text` directives are not supported.
-
-## Functional differences
-
-### Vue 2.0 Runtime-only build
-
-Vue 2.0 provides two available builds, the standalone build and the runtime-only build. see the [official document](https://vuejs.org/v2/guide/installation.html#Standalone-vs-Runtime-only-Build) for more information.
-
-Weex only required the runtime-only build of Vue 2.0 for better performance and less code size.
-
-The specific differences are:
-
-+ The `template` attribute is not supported when defining a component.
-+ Does not support using `x-templates`.
-+ Does not support using `Vue.compile`.
-
-### Isolate the context of multiple pages
-
-Weex use the "multiple-pages" concept in native, different js bundle will be run in different native views, there context is isolated. Even the `Vue` variable is not the same instance between js bundles. (However, all the js bundle will share the same Weex runtime.)
-
-Based on this feature, the global configurations in `Vue` will only take effect on the current page:
-
-+ `Vue.config`
-+ `Vue.component`
-+ `Vue.directive`
-+ `Vue.filter`
-+ `Vue.mixin`
-+ `Vue.use`
-
-> Note: Those methods are still work, but its effect will be limited to the current page.
-
-## Restrictions in style
-
-CSS is very flexible, has a lot of properties, support a variety of layout modes. This is the advantage of CSS, but also a bottleneck in browser performance optimization.
-
-The style in Weex is parsed by the native renderer, and for the sake of performance and complexity, Weex makes some trade-offs about CSS features to make it better suited to *"best practices"*.
-
-### Single class selector
-
-Weex only supports to use single class name in `<style>`, does not support *type selectors*, *ID selectors*, *attribute selectors*, *adjacent sibling selectors* and the *combinators*.
-
-```CSS
-/* Support single class name selector */
-.one-class {
- font-size: 36px;
-}
-
-/* Does not support to use combinators between selector */
-.parent > .child {
- padding-top: 10px;
-}
-.foo + .bar {
- margin-left: 20px;
-}
-
-/* Does not support attribute selectors. The `v-cloak` directive is not supported */
-[V-cloak] {
- color: #FF6600;
-}
-```
-
-The restriction is only for the style definition, does not affect the use of class names. You can still use multiple class names on a single tag, such as:
-
-```Html
-<template>
- <div class="one two three"><div>
-</template>
-```
-
-### Scoped by default
-
-In Weex, For single file components, the styles written in the `<style>` can only be used in the current component.
-
-In order to maintain consistency with Native, it is recommended that you write the style in the `.vue` file with the` scoped` attribute, that is, `<style scoped>`.
-
-### Supported CSS attributes
-
-Weex supports a subset of CSS, and will continue to expand.
-
-Weex supports *box-model* and *flexbox*, as well as other common styles. See [Weex Common Style](../ common-style.html) and [Supported Web Standards](http://weex.apache.org/references/web-standards.html) for more information.
-
-In addition, you should also pay attention to the following points:
-
-+ No need to write style prefix.
-+ Weex doesn't support `display: none;` and therefore doesn't support the `v-show` directive.
-+ In order to optimize the efficiency of CSS parser, Weex doesn't support shorthand attributes, involving the following attributes:
- + `flex`
- + `border`, `border-(top|bottom|left|right)`
- + `margin`
- + `padding`
- + `font`
- + `background`
-
-## Differences in development
-
-Because of the platform difference, you have to compile your source file in two different ways:
-
-+ For the web, you can compile source files in any official way, such as Webpack + vue-loader or Browserify + vueify. and require the [weex-vue-render](https://www.npmjs.com/package/weex-vue-render), which is a group of Weex build-in components.
-+ For Android and iOS, we've provided [weex-loader](https://github.com/weexteam/weex-loader) to compile the `.vue` files. That is, use Webpack + weex-loader to generate the js bundle that is available for the native.
-
-### Use weex-loader
-
-[weex-loader](https://github.com/weexteam/weex-loader) is a loader for Webpack, see the [official document](http://webpack.github.io/docs/using-loaders.html) to learn how to use it.
-
-One more thing should be reminded is that if the *entry file* of your webpack config is a `.vue` file, you also need to pass an additional ` entry` parameter, usually set to `true`.
-
-```Js
-module.exports = {
- // Add the entry parameter for the .vue file
- entry: './path/to/App.vue?entry=true',
-
- // other configurations ...
-
- module: {
- loaders: [{
-
- // matches the .vue file path that contains the entry parameter
- test: /\.vue(\?^^]+)?$/,
- loaders: ['weex-loader']
- }]
- },
-}
-```
-
-**You don't need to write those additional parameters if you are using `.js` file as entry file.** We recommend using javascript files as the entry file of webpack config.
-
-### Setup native development environments
-
-Since your are using Weex to develop native apps, setup native development environments, both Android and iOS, would be very useful.
-
-See [Integrating Weex to the existing application](../../guide/integrate-to-your-app.html) for more information.
http://git-wip-us.apache.org/repos/asf/incubator-weex-site/blob/32a097bf/source/references/vue/index.md
----------------------------------------------------------------------
diff --git a/source/references/vue/index.md b/source/references/vue/index.md
deleted file mode 100644
index 9caf556..0000000
--- a/source/references/vue/index.md
+++ /dev/null
@@ -1,11 +0,0 @@
----
-title: Vue
-type: references
-order: 10
-version: 2.1
----
-
-# Vue
-
-- [Difference with Web](./difference-with-web.html)
-- [Using Vuex & vue-router](./difference-of-vuex.html)
\ No newline at end of file
[17/51] [abbrv] incubator-weex-site git commit: rearrangement the
structure of the document
Posted by ha...@apache.org.
http://git-wip-us.apache.org/repos/asf/incubator-weex-site/blob/32a097bf/source/cn/guide/tools/plugin.md
----------------------------------------------------------------------
diff --git a/source/cn/guide/tools/plugin.md b/source/cn/guide/tools/plugin.md
deleted file mode 100644
index 539bcb0..0000000
--- a/source/cn/guide/tools/plugin.md
+++ /dev/null
@@ -1,77 +0,0 @@
----
-title: Weex语法支持插件
-type: guide
-order: 5.1
-version: 2.1
----
-
-# Weex语法支持插件
-
-[Weex Language Support](https://plugins.jetbrains.com/plugin/9189-weex-language-support) 插件是官方提供的一个工具,你可以使用它在IntelliJ IDEA,WebStorm等一系列IDE上对Weex DSL进行语法高亮,自动补全和错误检查等操作。
-
-### 支持的IDE
-你可以在任何操作系统上的下列IDE上安装和使用Weex Language Support插件:
-**IntelliJ IDEA Ultimate, PhpStorm, WebStorm, PyCharm, RubyMine, AppCode, CLion, Gogland, Rider**
-
-### 安装
-在IDE的插件仓库中搜索`Weex Language Support`来安装该插件,安装完毕后重启IDE即可激活插件相关功能
-
-
-### 配置
-打开`Preferences -> Other Settings -> Weex language support`可配置插件的相关功能
-
-- Target Weex Version: 配置插件以哪一个版本的语法规则来对DSL进行提示及检查,默认值`LATEST`表示总是应用最行��新版本weex的语法规则
-- Vue Support: 配置插件是否支持Weex 2.0版本的DSL(.vue文件),开启后重启生效(注意:如果IDE内有其他支持Vue语法的插件,则需要关闭相应的插件后Weex插件才能生效)
-- Custom Rules: 引入自定义的Weex DSL规则,如果你在native中定义了自己的Module或Component,可通过自定义规则引入插件中来提供相应的提示和补全支持,自定义规则的�格式将在后文列出
-- Global Weex Components: 默认地,插件会解析当前工程及npm root路径下的`node_modules`�目录,解析其中包含的Weex Components并对其提供补全支持。如果你的项目中引用了这两个路径以外的Components,可以在此处将其添加到搜索路径中,�插件将会将其中的Components载入,并在编写DSL时为相应的标签提供补全支持
-
-### 自定义规则格式
-自定义规则包含在一个json文件中,json文件的根节点为数组类型,数组中的每一个元素对应DSL中的一个标签。
-我们以`<loading>`标签的规则来举例:
-```js
-{
- "tag": "loading", //标签名,不可为空
- "attrs": [ //标签属性列表,可为空
- {
- "name": "display", //属性名,不可为空
- "valuePattern": null, //属性值的正则表达式,用于检测�值是否合法,可为空
- "valueEnum": [ //属性值枚举,可为空
- "show",
- "hide"
- ],
- "valueType": "var", //属性值类型,必须是var或function,决定该从数据列表还是函数列表中查找属性值补全的候选值,不可为空
- "since": 0, //该属性何时被添加到sdk中,例如0.11,�默认为0
- "weexOnly": false //该属性是否仅在1.0语法中可用,默认为false
- }
- ],
- "events": [ //事件列表。可为空
- {
- "name": "loading", //事件名称,不可为空
- "since": 0 //该事件何时被添加到sdk中
- }
- ],
- "parents": [ //该标签允许被作为哪些标签的子元素,空表示可以作为任意元素的子元素
- "list",
- "scroller"
- ],
- "childes": [ //该标签允许哪些元素作为自己的子元素,空表示任意元素都可作为子元素
- "text",
- "image",
- "loading-indicator"
- ],
- "document": "/references/components/loading.html" //文档地址,配置该属性之后可在编辑界面中对应的标签上直接打开文档
- }
-```
-
-### 使用
-插件的绝大部分功能�被集成到编辑器上下文中,会随用户输入在需要补全,提示或Lint时被触发,无需特殊干预。下列功能需要用户手动触发:
-#### 文档搜索
-打开IDE右侧工具栏的`Weex Documents`即可对文档进行搜索,搜索结果与官网保持同步,勾选 `EN` 可切换搜索结果为英文内容
-
-
-#### 打开标签对应的文档
-�将光标定位到标签上,并通过`Show Intention Actions`操作(OSX上默认键为 option + enter,可通过Keymap查看)打开Intenion菜单,�选择`Open Document`可打开标签对应的文档
-
-
-### 参与插件建设
-请将Issues及Pull Requests提交到[weex-language-support](https://github.com/misakuo/weex-language-support)项目中
\ No newline at end of file
http://git-wip-us.apache.org/repos/asf/incubator-weex-site/blob/32a097bf/source/cn/guide/tools/toolkit.md
----------------------------------------------------------------------
diff --git a/source/cn/guide/tools/toolkit.md b/source/cn/guide/tools/toolkit.md
deleted file mode 100644
index d721118..0000000
--- a/source/cn/guide/tools/toolkit.md
+++ /dev/null
@@ -1,231 +0,0 @@
----
-title: 使用 weex-toolkit
-type: guide
-order: 5.1
-version: 2.1
----
-
-# weex-toolkit
-
-[weex-toolkit](https://github.com/weexteam/weex-toolkit) 是官方提供的一个脚手架命令行工具,你可以使用它进行 Weex 项目的创建,调试以及打包等功能。
-
-### 安装
-
-使用 `npm` 安装:
-
-``` bash
-$ npm install -g weex-toolkit
-```
-安装成功后,你输入 `weex` 应该可以看到下面的提示效果;
-
-
-
-如果你本地没有安装 node.js 你可以前往[官网](https://nodejs.org/en/)下载安装。
-
-*请确保你的 node 版本是>=6,你可以使用 [n](https://github.com/tj/n) 来进行 node 的版本管理。
-
-中国用户如果npm遭遇网络问题,可以使用淘宝的 [cnpm](https://npm.taobao.org/) 镜像:
-
-``` bash
-$ npm install -g cnpm --registry=https://registry.npm.taobao.org
-$ cnpm install -g weex-toolkit
-```
-
-如果你安装的过程中遇到了问题,比如 *permission error* 你可以去 [weex-toolkit issues](https://github.com/weexteam/weex-toolkit/issues) 找到解决方法。
-
-
-### 初始化 weex 项目
-
-
-```bash
-$ weex init awesome-project
-```
-
-执行完命令后,在 `awesome-project` 目录中就创建了一个使用 `Weex` 和 `Vue` 的模板项目。
-
-
-然后我们进入项目所在路径,`weex-toolkit` 已经为我们生成了标准项目结构。
-
-在 `package.json` 中,已经配置好了几个常用的 npm script,分别是:
-
-- `build`: 源码打包,生成 JS Bundle
-- `dev`: webpack watch 模式,方便开发
-- `serve`: 开启静态服务器
-- `debug`: 调试模式
-
-我们先通过 `npm install` 安装项目依赖。之后运行根目录下的 `npm run dev & npm run serve` 开启 watch 模式和静态服务器。
-
-然后我们打开浏览器,进入 `http://localhost:8080/index.html` 即可看到 Weex h5 页面。
-
-
-### 实时预览
-
-`weex-toolkit` 支持预览你当前开发的weex页面(`.we`或者`.vue`),你只需要指定预览的文件路径即可:
-
-``` bash
-$ weex src/foo.vue
-```
-
-浏览器会自动弹出页面,这个时候你可以看到你所编辑的 Weex页面的具体效果和页面布局。如果你使用 [Playground](https://weex.apache.org/cn/playground.html) 扫描右边的二维码,就能够看到 Weex 在 Android/IOS 设备上的效果了。
-
-如果你需要预览整个项目目录,你可以输入这样的命令:
-
-``` bash
-$ weex src --entry src/foo.vue
-```
-你需要在传入的参数指定预览的目录和入口文件。
-
-### 打包weex项目
-
-如果开发完成后,你可以使用 `weex compile` 通过命令行工具进行单个文件或者整个项目的打包。
-
-``` bash
-weex compile src/foo.vue dist
-```
-命令行需要两个参数,你的源码文件或者目录, 以及你生成打包后的目录地址。
-
-
-### 调试 Weex 页面
-
-weex-toolkit支持调试工具。**[weex devtools](https://github.com/weexteam/weex-devtool)** ,它是专门为Weex定制的一款实现了 [**Chrome Debugging Protocol**](https://developer.chrome.com/devtools/docs/debugger-protocol) 的 inspect/debug 工具,能够帮助你快速查看 app 运行状态和调试 Weex 中的 JS 代码,当前支持 **IOS** 和 **Android** 两个平台。
-
-#### 用法
-
-``` bash
- weex debug [options] [we_file|bundles_dir]
- ```
-
- 选项:
-
-```
--h, --help 显示帮助
--V, --verbose 显示 debug 服务器运行时的各种 log
--v, --version 显示版本
--p, --port [port] 设置 debug 服务器端口号 默认为8088
--e, --entry [entry] debug 一个目录时,这个参数指定整个目录的入口 bundle 文件,这个 bundle 文件的地址会显示在 debug 主页上(作为二维码)
--m, --mode [mode] 设置构建 we 文件的方式,transformer 最基础的风格适合单文件, loader:webpack 风格 适合模块化的多文件 . 默认为 transformer
-```
-#### 开启调试
-
-```
-$ weex debug
-```
-
-单纯启动一个调试服务器,并同时唤起Chrome浏览器打开`调试主页`。
-这个`调试主页`上会有一个二维码,使用 Playground App 扫这个二维码可以开启 Playground 调试。
-开启调试后,设备列表中会出现您的设备,根据提示进行后续的调试操作。
-
-#### 调试 `.we` | `.vue` 文件
-
-```
-$ weex debug your_weex.vue
-```
-
-这个命令会将 `your_weex.vue` 编译成 `JS Bundle` 文件 部署到 debug 服务器;
-并启动debug服务器如上述命令那样打开的`调试vue主页`会多显示一个二维码,使用 Playground App扫这个二维码码可以加载 `your_weex.we` (注意要先扫描开启调试的那个二维码码)。
-这个命令会自动检测 `your_weex.we` 文件变动,如果发现内容被修改则立即重新编译部署,并刷新 `debugger` 页面。
-.
-#### 调试整个bundle/we文件夹
-
-同样你也可以调试整个目录的文件,你只需要传入目录的路径和入口文件即可;
-
-```
-$weex debug your/we/path -e index.we
-```
-
-这个命令会编译你指定目录下的所有的 `.we` 文件,并把编译好的 JS Bundle 部署到 debug 服务器,他们的地址会映射到 http://lcoalhost:8088/weex/ 下
-比如 `your/we/path/index.we` 可以通过 http://lcoalhost:8088/weex/index.js 访问。
-`your/we/path/demo/test.we` 可以通过 http://lcoalhost:8088/weex/demo/index.js 。
-
-`-e` 参数可以指定一个入口的 `.we` 文件,这个文件的地址会显示在`调试主页`上(作为二维码)。
-
-#### 特性
-##### 连接设备
-
-
-##### Inspector
-
- Inspector 能够用来查看 `Element` \ `NetWork` \ `Console log` \ `ScreenCast` \ `BoxModel` \ `Native View` 等。
-
-
-##### Element
-
-
-##### NetWork
-##### 查看网络请求的总耗时和延时
-
-
-##### 查看网络请求的header和response
-
-
-##### 控制台
-
-
-##### 资源
-
-
-#### Debugger
-
- 调试器用来调试 Weex 中的 JS 代码,能够设置断点、查看调用栈。
-
-
-##### Breakpoint and CallStack
-
-
-#### 集成devtools
-- Android
- - 请参考文档 [Weex devtools (Android)](../../references/advanced/integrate-devtool-to-android.html),其中有详细说明。
-- IOS
- - 请参考文档 [Weex devtools (iOS)](../../references/advanced/integrate-devtool-to-ios.html), 其中有详细说明。
-
-
-### weex-toolkit 对 weexpack 的水平扩展
-
-[weexpack](https://github.com/weexteam/weex-pack) 是基于 Weex 快速搭建应用原型的利器。它能够帮助开发者通过命令行创建 Weex 工程,添加相应平台的 Weex app 模版,并基于模版从本地,GitHub 或者 Weex 应用市场安装插件,快速打包 Weex 应用并安装到手机运行,对于具有分享精神的开发者而言还能够创建 Weex 插件模版并发布插件到 Weex 应用市场。
-
-现在使用 `weex-toolkit` 同样支持对 `weexpack` 的命令调用,如果你当前的项目与 `weexpack` 生成的项目目录一致,那么你可以直接实现对于 `platform` 的操作,从而构建具体的 Android/IOS app 。
-
-### weex platform 以及 run 命令
-
-如果我们希望在模拟器或者真机上查看 Weex 运行的效果,我们可以使用 `platform` 添加或者删除 Weex 应用模板。
-
-``` bash
-$ weex platform add ios
-```
-在第一次使用 platform/plugin 命令的时候,可能会遇到下面的界面,你只需要输入 Y 或者直接 enter 键即可。
-
-
-添加ios平台,然后这个时候只要输入:
-
-``` bash
-$ weex run ios
-```
-
-就能看到启动的模拟器运行的效果了。
-
-
-### weex plugin 命令
-
-如果你想使用[插件市场](https://market.dotwe.org)的插件,你可以使用:
-
-```bash
-$ weex plugin add plugin_name
-```
-
-你只需要输入插件的名称就可以从远程添加插件到你本地的项目,比如添加 weex-chart,我们可以输入命令:
-
-``` bash
-$ weex plugin add weex-chart
-```
-
-
-我们可以使用`plugin remove`移除插件,比如移除安装好的 weex-cahrt:
-
-``` bash
-$ weex plugin remove weex-chart
-```
-
-关于 `weexpack` 更加详细的介绍,你可以阅读 [官方文档](https://github.com/weexteam/weex-pack)。
-
-
-
http://git-wip-us.apache.org/repos/asf/incubator-weex-site/blob/32a097bf/source/cn/guide/using-rax.md
----------------------------------------------------------------------
diff --git a/source/cn/guide/using-rax.md b/source/cn/guide/using-rax.md
new file mode 100644
index 0000000..092a446
--- /dev/null
+++ b/source/cn/guide/using-rax.md
@@ -0,0 +1,7 @@
+---
+title: 使用 Rax
+type: guide
+group: 开发
+order: 5.3
+version: 2.1
+---
http://git-wip-us.apache.org/repos/asf/incubator-weex-site/blob/32a097bf/source/cn/guide/using-vue.md
----------------------------------------------------------------------
diff --git a/source/cn/guide/using-vue.md b/source/cn/guide/using-vue.md
new file mode 100644
index 0000000..e40c08f
--- /dev/null
+++ b/source/cn/guide/using-vue.md
@@ -0,0 +1,63 @@
+---
+title: 使用 Vue.js
+type: guide
+group: 开发
+order: 5.2
+version: 2.1
+---
+
+# 使用 Vue 开发 Weex 页面
+
+## Vue in Weex
+
+[Vue.js](https://vuejs.org/) 是 Evan You 开发的渐进式 JavaScript 框架,在易用性、灵活性和性能等方面都非常优秀。开发者能够通过撰写 `*.vue` 文件,基于 `<template>`, `<style>`, `<script>` 快速构建组件化的 web 应用。
+
+
+
+Vue.js 在 2016 年 10 月正式发布了 2.0 版本,该版本加入了 Virtual-DOM 和预编译器的设计,使得该框架在运行时能够脱离 HTML 和 CSS 解析,只依赖 JavaScript;同时 Virtual-DOM 也使得 Vue 2.x 渲染成原生 UI 成为了可能。
+
+目前 Weex 与 Vue 正在展开官方合作,并将 Vue 2.x 作为内置的前端框架,Vue 也因此具备了开发原生应用的能力。
+
+**相关链接**
+
+* [Weex 快速上手](../index.html)
+* [Vue 介绍](https://cn.vuejs.org/v2/guide/)
+* [Weex 工作原理](./index.html)
+
+## Vue 2.x 在 Weex 中的特色功能
+
+### 流式渲染
+
+在 Weex 中,我们可以通过 `<foo append="tree|node">` 的方式定义页面首次渲染时的渲染颗粒度,这让开发者有机会根据界面的复杂度和业务需求对首次渲染过程进行定制。`append="tree"` 表示整个结点包括其所有子结点全部生成完毕之后,才会一次性渲染到界面上;而 `append="node"` 则表示该结点会先渲染在界面上作为一个容器,其子结点会稍后做进一步渲染。
+
+<!-- dotwe demo -->
+
+### 表单控件绑定
+
+在 Weex 中,我们针对 `<input>` 和 `<textarea>` 这两个表单控件提供了和 web 体验相同的 `v-model` 指令。通过 `<input v-model="message">` 或 `<textarea v-model="message">`,开发者可以把数据 `message` 的值自动展示在文本框上,同时用户修改了文本框的值的时候,数据 `message` 会自动被更新。
+
+<!-- dotwe demo -->
+
+### 多页面上下文隔离
+
+如 Weex 工作原理文中所述,所有 Weex 的 JS bundle 公用一个 JavaScript 内核实例。所以如何能够让多个 JS bundle 中使用的 Vue 是完全隔离的,并且其中一个页面对 Vue 进行扩展或改写不会影响到其它页面就变成了一个问题,通过 Weex 和 Vue 双方的协作,这一问题已经得以解决。大家可以放心使用。
+
+<!-- html5 apis -->
+
+### `<transition>` 过渡状态
+
+Weex 支持了 Vue 2.x 中经典的 `<transition>` 写法,开发者可以通过 `<transition>` 轻松定义一个界面在两种状态中的过渡方式。
+
+## 注意事项
+
+Vue.js 最初是为 Web 设计的,虽然可以基于 Weex 开发移动应用,但是 Web 开发和原生开发毕竟不同,在功能和开发体验上都有一些差异,这些差异从本质上讲是原生开发平台和 Web 平台之间的差异,Weex 正在努力缩小这个差异的范围。
+
+参考文章[《Vue 2.x 在 Weex 和 Web 中的差异》](../../references/vue/index.html)了解存在差异的原因和细节。
+
+## 使用其他 Vue 的工具库
+
+Vue.js 也有较多周边技术产品,如 [Vuex](https://github.com/vuejs/vuex) 和 [vue-router](https://github.com/vuejs/vue-router) 等,这些库也可以在 Weex 中很好的工作。
+
+关于 Vuex 和 vue-router 的使用方法,可以参考[《在 Weex 项目中使用 Vuex 和 vue-router》](../../references/vue/difference-of-vuex.html)。
+
+> 我们基于 Weex 和 Vue 开发了一个的完整项目 [weex-hackernews](https://github.com/weexteam/weex-hackernews) ,引入了包含 Vue 2.x 的 WeexSDK,创建了三端的项目和基本的编译配置。在项目中使用了 Vuex 和 vue-router ,能够实现同一份代码,在 iOS、Android、Web 下都能完整地工作。
http://git-wip-us.apache.org/repos/asf/incubator-weex-site/blob/32a097bf/source/cn/index.md
----------------------------------------------------------------------
diff --git a/source/cn/index.md b/source/cn/index.md
index ee7bdcd..baf4a7c 100644
--- a/source/cn/index.md
+++ b/source/cn/index.md
@@ -1,4 +1,4 @@
layout: index
type: index
subtitle: 快速、简洁且高效
----
\ No newline at end of file
+---
http://git-wip-us.apache.org/repos/asf/incubator-weex-site/blob/32a097bf/source/cn/playground.ejs
----------------------------------------------------------------------
diff --git a/source/cn/playground.ejs b/source/cn/playground.ejs
deleted file mode 100644
index 7f3b070..0000000
--- a/source/cn/playground.ejs
+++ /dev/null
@@ -1,3 +0,0 @@
-layout: playground
-type: playground
----
\ No newline at end of file
http://git-wip-us.apache.org/repos/asf/incubator-weex-site/blob/32a097bf/source/cn/references/advanced/extend-jsfm.md
----------------------------------------------------------------------
diff --git a/source/cn/references/advanced/extend-jsfm.md b/source/cn/references/advanced/extend-jsfm.md
deleted file mode 100644
index a57ccad..0000000
--- a/source/cn/references/advanced/extend-jsfm.md
+++ /dev/null
@@ -1,172 +0,0 @@
----
-title: 拓展 JS framework
-type: references
-order: 11.4
-version: 2.1
----
-
-# 定制自己的 JS Framework
-
-*这部分扩展能力还在讨论尝试中,可能随时会有调整,请留意。*
-
-Weex 希望能够尊重尽可能多的开发者的使用习惯,所以除了 Weex 官方支持的 Vue 2.0 之外,开发者还可以定制并横向扩展自己的或自己喜欢的 JS Framework。完整一套 JS Framework 的定制和扩展需要以下几个步骤:
-
-1. 首先你要有一套完整的 JS Framework。
-2. 了解 Weex 的 JS 引擎的特性支持情况。
-3. 适配 Weex 的 native DOM APIs。
-4. 适配 Weex 的初始化入口和多实例管理机制。
-5. 在 Weex JS runtime 的 framework 配置中加入自己的 JS Framework 然后打包。
-6. 基于该 JS Framework 撰写 JS bundle,并加入特定的前缀注释,以便 Weex JS runtime 能够正确识别。
-
-## Weex JS 引擎的特性支持情况
-
-* 在 iOS 下,Weex 使用的是系统自带的 JavaScriptCore,所以 ES 支持情况取决于操作系统的版本。目前保守判断,ES5 的特性市面上主流的 iOS 设备都是可以完美支持的,但是 ES6+ 的特性存在一定的碎片化。
-* 在 Android 下,Weex 使用的是 UC 提供的 v8 内核,出于体积、性能和稳定性的考虑,我们使用的并不是最新版本的 v8 内核,同样的保守判断,ES5 特性能够全部支持,包括严格模式、`Object.freeze` 等。
-* Weex JS 引擎不支持 HTML DOM APIs 和 HTML5 JS APIs,这包括 `document`, `setTimeout` 等。
-* 在此基础上,我们加入了 `Promise` 的 polyfill,以及 `console` 的 polyfill。
-* 额外的,为了尽可能的确保 JS 引擎的长效内存管理,我们对一个通用的全局对象进行了 `Object.freeze()` 冻结操作,这包括:
- * `Object`
- * `Object.prototype`
- * `Array`
- * `Array.prototype`
- * `String.prototype`
- * `Number.prototype`
- * `Boolean.prototype`
- * `Error.prototype`
- * `Date.prototype`
- * `RegExp.prototype`
-
-## 适配 Weex 的初始化入口和多实例管理机制
-
-开发者提供的 JS Framework 最终需要包装成一个 CommonJS 包,并且这个包需要对外暴露以下方法:
-
-### 框架初始化
-
-* `init(config)`
- * `config`
- * `Document`
- * `Element`
- * `Comment`
- * `TaskSender`
- * `CallbackManager`
-
-该方法会把 Weex 提供的 Native DOM 类和两个辅助类放到 `config` 参数中,并允许框架本身完成初始化。
-
-*小提示:同时,框架作者也能够通过在框架初始化时传入不同的 `config` 来进行框架的测试或环境模拟。*
-
-#### 参数格式介绍
-
-* `TaskSender`: wip...
-* `CallbackManager`: wip...
-
-### 注册可用的 native 组件和模块
-
-* `registerComponents(components)`
-* `registerModules(modules)`
-
-这两个方法会在框架初始化之后立刻调用,这样框架就能够知道当前的客户端支持哪些组件和模块,在一些特殊逻辑或必要的情况下,有机会为框架本身提供参考信息。
-
-#### 参数格式介绍
-
-* `components: Array`: 描述组件的数组,每一项包括:
- * `type: string`: 组件名称,比如 `div`。
- * `methods: string[]`: 可选项,该组件支持的方法名称列表,这些方法可以遵循 Weex 的 native DOM APIs 的组件方法调用方式。
-* `modules: Object`: 描述一系列模块的散列表,每一项的 key 是模块名,每一项的值是一个数组,数组里的每一项描述了一个该模块中的一个方法,该方法的信息包括:
- * `name: string`: 方法名
- * `args: string[]`: 参数个数和类型描述
-
-例如:
-
-```js
-registerComponents([
- { type: 'web', methods: ['goBack', 'goForward', 'refresh']}
-])
-
-registerModules({
- event: [
- {name: 'openURL', args: ['string']}
- ]
-})
-```
-
-### 多实例生命周期管理
-
-* `createInstance(instanceId, code, config, data, env)`
-* `refreshInstance(instanceId, data)`
-* `destroyInstance(instanceId)`
-
-每个 Weex 页面都有被创建、被销毁两个必经阶段,同时在 Weex 页面运行过程中,native 有机会主动向 Weex 页面发送消息,不同的框架可以根据自己框架的设计对这样的消息有自己的理解和设计实现。
-
-#### 参数格式介绍
-
-* `instanceId: string`: 该 Weex 页面的唯一 id,由 native 产生。
-* `code: string`: 该 Weex 页面的 JS bundle 的代码,通过 native 传入。
-* `config: Object?`: 该 Weex 页面的配置信息,比如代表该 bundle 地址的 `bundleUrl`,由 native 配置产生,和 JS bundle 本身的内容无关。
-* `data: Object?`: Native 有机会在创建一个 Weex 页面的时候,传入一份外部数据,JS 框架也有机会接此机会为相同的 JS bundle 配合不同的 `data` 生成不同的页面内容。
-* `env: Object?`: 当前 Weex 页面的相关环境信息,各字段的含义:
- * `info: Object`: 框架 info 信息,详见之后的 “JS Bundle 格式要求”。
- * `config: Object`: 等同该方法的第三个参数 `config`。
- * `callbacks: CallbackManager`: 该 Weex 页面唯一的 `CallbackManager` 实例。
- * `created: number`: 该 Weex 页面的创建时间毫秒数。
- * `framework: string`: 该 Weex 页面基于的框架名,等同于 `info.framework`。
-
-### Native 通信
-
-* `receiveTasks(instanceId, tasks)`
-
-Native 除了通过 `refreshInstance` 方法向 JS 框架层发送消息之外,更多的会通过 `receiveTasks` 发送用户事件或方法回调给 JS 框架。
-
-比如用户点击了一个按钮,native 就会发送一个 `fireEvent` 类型的任务给 JS 框架,然后 JS 框架再处理相应的事件逻辑。这部分工作机制和 native DOM 接口中的 `addEvent` 的设计有关。
-
-再比如用户发起了一个 `fetch` 网络请求,当请求在 native 端完成时,会以一个 `callback` 类型的任务发给 JS 框架。由于 native 无法传递 JavaScript 中的 function,所以实际上知会发送一个 `callbackId` 给 JS 框架。这部分工作机制和之前出现过的 `CallbackManager` 的设计有关。
-
-### 辅助方法
-
-* `getRoot(instanceId): JSON`
-
-该方法可以返回文档主体结点的完整 JSON 描述,开发者可以以此查看到完整的 native DOM 树,具体返回值的格式和 native DOM 接口中的 `toJSON()` 方法返回值格式一致。此功能多用作开发者工具扩展。
-
-## 在 WeexSDK 中配置 JS Framework
-
-### 准备好你的 JS Framework 代码
-
-```javascript
-// your-own-js-framework.js
-
-export function init (config) { ... }
-
-export function registerComponents (components) { ... }
-export function registerModules (modules) { ... }
-
-export function createInstance (id, code, config, data, env) { ... }
-export function destroyInstance (id) { ... }
-export function refreshInstance (id, data) { ... }
-
-export function recieveTasks (id, tasks) { ... }
-export function getRoot (id) { ... }
-```
-
-### 注册一个 JS Framework
-
-```javascript
-import * as Vue from '...'
-import * as React from '...'
-import * as Angular from '...'
-
-export default { Vue, React, Angular };
-```
-
-然后打包 JS runtime,集成到 WeexSDK 中。
-
-### JS Bundle 格式要求
-
-**框架 info**
-
-你需要保障基于该 JS Framework 的 JS Bundle 在文件开头带有如下格式的注释,我们称其为框架 info:
-
-```javascript
-// { "framework": "Vue" }
-...
-```
-
-这样 Weex JS 引擎就会识别出这个 JS bundle 需要用 Vue 框架来解析。并分发给 Vue 框架处理。同理,Weex 支持同时多种框架在一个移动应用中共存并各自解析基于不同框架的 JS bundle。
\ No newline at end of file
http://git-wip-us.apache.org/repos/asf/incubator-weex-site/blob/32a097bf/source/cn/references/advanced/extend-to-android.md
----------------------------------------------------------------------
diff --git a/source/cn/references/advanced/extend-to-android.md b/source/cn/references/advanced/extend-to-android.md
deleted file mode 100644
index 0dcfa14..0000000
--- a/source/cn/references/advanced/extend-to-android.md
+++ /dev/null
@@ -1,218 +0,0 @@
----
-title: Android 扩展
-type: references
-order: 11.2
-version: 2.1
----
-
-# Android 扩展
-
-Weex 提供了扩展机制,可以根据自己的业务进行定制自己的功能。
-主要分为两类扩展:
-
-- Module 扩展 非 UI 的特定功能。例如 sendHttp、openURL 等。
-- Component 扩展 实现特别功能的 Native 控件。例如:RichTextview,RefreshListview 等。
-- Adapter 扩展 Weex 对一些基础功能实现了统一的接口,可实现这些接口来定制自己的业务。例如:图片下载等。
-
-## Module 扩展
-
-1. Module 扩展必须继承 WXModule 类。
-2. 扩展方法必须加上 @WXModuleAnno 注解。Weex 会根据注解来判断当前方法是否要运行在 UI 线程,和当前方法是否是扩展方法。
-3. Weex是根据反射来进行调用 Module 扩展方法,所以Module中的扩展方法必须是 public 类型。
-4. 同样因为是通过反射调用,Module 不能被混淆。请在混淆文件中添加代码:`-keep public class * extends com.taobao.weex.common.WXModule{*;}`
-5. Module 扩展的方法可以使用 int, double, float, String, Map, List 类型的参数
-6. 完成 Module 后一定要在初始化时注册 `WXSDKEngine.registerModule("myModule", MyModule.class);` 否则会报类似错误:`ReportException :undefined:9: TypeError: Object #<Object> has no method 'printLog'`
-
-示例如下:
-
-```java
-public class MyModule extends WXModule {
-
- @WXModuleAnno(runOnUIThread = true)
- public void printLog(String msg) {
- Toast.makeText(mWXSDKInstance.getContext(),msg,Toast.LENGTH_SHORT).show();
- }
-}
-```
-
-JS 调用如下:
-
-```html
-<template>
- <div>
- <text onclick="click">点击我测试</text>
- </div>
-</template>
-
-<script>
- module.exports = {
- methods: {
- click: function() {
- weex.requireModule('myModule').printLog("我是一个测试!");
- }
- }
- }
-</script>
-```
-
-#### 支持 synchronous/asynchronous 回调
-
-你可以添加 `@JSMethod(uiThread = false或true)` 注释来选择 moudle 的回调模式。请参见以下示例:
-
-```java
- // as sync-callback mode
-@JSMethod (uiThread = false)
-public void testSyncCall(){
- WXLogUtils.d("WXComponentSyncTest : Thread.currentThread().getName());
-}
-
-// as async-callback mode
-@JSMethod (uiThread = true)
-public void testAsyncCall(){
- WXLogUtils.e("WXComponentASynTest : Thread.currentThread().getName() );
-}
-```
-
-## Component 扩展
-
-1. Component 扩展类必须集成 WXComponent.
-2. Component 对应的设置属性的方法必须添加注解 @WXComponentProp(name=value(value is attr or style of dsl))
-3. Weex sdk 通过反射调用对应的方法,所以 Component 对应的属性方法必须是 public,并且不能被混淆。请在混淆文件中添加代码 `-keep public class * extends com.taobao.weex.ui.component.WXComponent{*;}`
-4. Component 扩展的方法可以使用 int, double, float, String, Map, List 类型的参数
-5. 完成 Component 后一定要在初始化时注册 `WXSDKEngine.registerComponent("richtext",RichText.class);`
-
-示例如下:
-
-```java
-public class RichText extends WXComponent {
-
- public RichText(WXSDKInstance instance, WXDomObject dom, WXVContainer parent, boolean isLazy) {
- super(instance, dom, parent, isLazy);
- }
-
- @Override
- protected void initView() {
- mHost=new TextView(mContext);
- ((TextView)mHost).setMovementMethod(LinkMovementMethod.getInstance());
- }
-
- @WXComponentProp(name = "tel")
- public void setTelLink(String tel){
- SpannableString spannable=new SpannableString(tel);
- spannable.setSpan(new URLSpan("tel:"+tel),0,tel.length(), Spanned.SPAN_EXCLUSIVE_EXCLUSIVE);
- ((TextView)mHost).setText(spannable);
- }
-}
-```
-
-JS 调用如下:
-
-```html
-<template>
- <div>
- <richText tel="12305" style="width:200;height:100">12305</text>
- </div>
-</template>
-```
-## Adapter扩展
-
-图片下载:
-
-需要时集成接口 IWXImgLoaderAdapter,实现 setImage 方法。
-
-示例如下:
-
-```java
-public class ImageAdapter implements IWXImgLoaderAdapter {
-
- public ImageAdapter() {
- }
-
- @Override
- public void setImage(final String url, final ImageView view,
- WXImageQuality quality, WXImageStrategy strategy) {
-
- WXSDKManager.getInstance().postOnUiThread(new Runnable() {
-
- @Override
- public void run() {
- if(view==null||view.getLayoutParams()==null){
- return;
- }
- if (TextUtils.isEmpty(url)) {
- view.setImageBitmap(null);
- return;
- }
- String temp = url;
- if (url.startsWith("//")) {
- temp = "http:" + url;
- }
- if (view.getLayoutParams().width <= 0 || view.getLayoutParams().height <= 0) {
- return;
- }
- Picasso.with(WXEnvironment.getApplication())
- .load(temp)
- .into(view);
- }
- },0);
- }
-}
-```
-#### 组件方法支持
-从WeexSDK 0.9.5开始,你可以定义组件方法
-
-- 在组件中如下声明一个组件方法
-
- ```java
- @JSMethod
- public void focus(){
- //method implementation
- }
- ```
-
-- 注册组之后,你可以在weex 文件中调用
-
- ```html
- <template>
- <mycomponent id='mycomponent'></mycomponent>
- </template>
- <script>
- module.exports = {
- created: function() {
- this.$el('mycomponent').focus();
- }
- }
- </script>
- ```
-
-注:工程要添加依赖 `compile 'com.squareup.picasso:picasso:2.5.2'`
-
-#### SDK混淆规则
-若要在APP中使用混淆,请在相应的配置文件中添加如下规则:
-
-```java
--keep class com.taobao.weex.WXDebugTool{*;}
--keep class com.taobao.weex.devtools.common.LogUtil{*;}
--keepclassmembers class ** {
- @com.taobao.weex.ui.component.WXComponentProp public *;
-}
--keep class com.taobao.weex.bridge.**{*;}
--keep class com.taobao.weex.dom.**{*;}
--keep class com.taobao.weex.adapter.**{*;}
--keep class com.taobao.weex.common.**{*;}
--keep class * implements com.taobao.weex.IWXObject{*;}
--keep class com.taobao.weex.ui.**{*;}
--keep class com.taobao.weex.ui.component.**{*;}
--keep class com.taobao.weex.utils.**{
- public <fields>;
- public <methods>;
- }
--keep class com.taobao.weex.view.**{*;}
--keep class com.taobao.weex.module.**{*;}
--keep public class * extends com.taobao.weex.common.WXModule{*;}
--keep public class * extends com.taobao.weex.ui.component.WXComponent{*;}
--keep public class com.taobao.taolive.ui.weex.**{*;}
--keep class * implements com.taobao.weex.ui.IExternalComponentGetter{*;}
--keep class com.alibaba.aliweex.hc.HCConfig{*;}
--keep class com.alibaba.dynamic.**{*;}
-```
\ No newline at end of file
http://git-wip-us.apache.org/repos/asf/incubator-weex-site/blob/32a097bf/source/cn/references/advanced/extend-to-html5.md
----------------------------------------------------------------------
diff --git a/source/cn/references/advanced/extend-to-html5.md b/source/cn/references/advanced/extend-to-html5.md
deleted file mode 100644
index 35f33a7..0000000
--- a/source/cn/references/advanced/extend-to-html5.md
+++ /dev/null
@@ -1,103 +0,0 @@
----
-title: HTML5 扩展
-type: references
-order: 11.3
-version: 2.1
----
-
-# 如何扩展 Weex Web 端的组件和模块
-
-Weex 本身提供了很多内置组件和模块,也具备横向扩展的能力,允许开发者自行扩展和定制。需要注意的是,Weex 是一个跨平台的解决方案,扩展其内置组件或模块,需要在三端(Android、iOS、Web)中都有相应的实现。
-
-Weex 将内核切换成 Vue 2.x 之后,在 Web 端扩展 Vue 组件将变得更加容易。
-
-## 扩展 Web 组件
-
-Vue.js 本身就是一个独立的前端框架,在浏览器中完全能够不基于 Weex 容器渲染。因此,针对 Weex 平台扩展 Vue.js 的 Web 端组件,和直接使用 Vue.js 开发一个 Web 组件是一样的。具体的组件编写方法可以参考其官方文档:[组件](https://cn.vuejs.org/v2/guide/components.html) ,另外建议使用 `.vue` 格式的文件编写组件,使用方法参考:[单文件组件](https://cn.vuejs.org/v2/guide/single-file-components.html)。
-
-### 扩展组件示例
-
-以扩展 `<sidebar>` 为例,首先应该编写组件自身的逻辑:
-
-```html
-<!-- sidebar.vue -->
-
-<template>
- <div class="sidebar">
- <slot></slot>
- </div>
-</template>
-
-<style scoped>
- .sidebar {
- /* ... */
- }
-</style>
-
-<script>
- export default {
- props: [],
- data () {
- return {}
- }
- }
-</script>
-```
-
-然后在使用之前,全局注册 `<sidebar>` 组件:
-
-```js
-import Vue from 'vue'
-import Sidebar from './path/to/sidebar.vue'
-
-// 全局注册 sidebar 组件
-Vue.component('sidebar', Sidebar)
-```
-
-在扩展 Weex 组件时,如果只使用了 Weex 提供的内置组件,并且使用的都是 Weex 支持的样式,那么就和普通的自定义组件无异,不需要 Native 端再有相应的实现。
-
-如果你定制组件时不得不用到目前 Weex 不支持的标签和样式,在这种情况下才是真正的“扩展”了 Weex 的组件,你还需要在 Android 和 iOS 中有相应的实现,不然会导致渲染异常。
-
-## 扩展 Web 模块
-
-除了通用组件以外,Weex 还有提供了通用的模块,可以方便的调用原生 API。通常来说,注册 Weex 模块要求三端都得有相应的实现,否则会影响其正常的使用。
-
-### 注册模块
-
-如果你引入了 `weex-vue-render` 这个库,那么在全局能获取到 `weex` 这个变量,其中提供了 `registerModule` 方法可以注册模块。
-
-#### API 格式
-
-+ `registerModule`
- 0. `name`: {String} 必选,模块名称。
- 0. `define`: {Object} 必选,模块的定义。
-
-#### 注册模块示例
-
-下边的代码注册了一个名为 `guide` 的模块:
-
-```js
-weex.registerModule('guide', {
- greeting () {
- console.log('Hello, nice to meet you. I am your guide.')
- },
- farewell () {
- console.log('Goodbye, I am always at your service.')
- }
-})
-```
-
-### 使用模块
-
-在 `weex` 上提供了 `require` 方法用于获取已注册的模块,直接传递模块名即可:
-
-```js
-// 获取模块
-const guide = weex.requireModule('guide')
-
-// 可以直接调用模块中的方法
-guide.greeting()
-guide.farewell()
-```
-
-上述写法在 Native 环境中依然有效,只不过模块中的方法是由 Native 提供的。
http://git-wip-us.apache.org/repos/asf/incubator-weex-site/blob/32a097bf/source/cn/references/advanced/extend-to-ios.md
----------------------------------------------------------------------
diff --git a/source/cn/references/advanced/extend-to-ios.md b/source/cn/references/advanced/extend-to-ios.md
deleted file mode 100644
index 3b3b54b..0000000
--- a/source/cn/references/advanced/extend-to-ios.md
+++ /dev/null
@@ -1,325 +0,0 @@
----
-title: iOS 扩展
-type: references
-order: 11.1
-version: 2.1
----
-
-## 注意
-
-**Weex 所有暴露给 JS 的内置 module 或 component API 都是安全和可控的, 它们不会去访问系统的私有 API ,也不会去做任何 runtime 上的 hack 更不会去改变应用原有的功能定位。**
-
-**如果需要扩展自定义的 module 或者 component ,一定注意不要将 OC 的 runtime 暴露给 JS , 不要将一些诸如 `dlopen()`, `dlsym()`, `respondsToSelector:`,`performSelector:`,`method_exchangeImplementations()` 的动态和不可控的方法暴露给JS, 也不要将系统的私有API暴露给JS**
-
-## Module 扩展
-
-[swift](https://github.com/weexteam/article/issues/55) 扩展 module
-
-Weex SDK 只提供渲染,而不是其他的能力,如果你需要 像网络,图片,URL跳转这些特性,需要自己动手实现他们
-例如,如果你想实现一个url地址跳转函数,你可以按照如下步骤实现一个 Module
-
-### **自定义module的步骤**
-1. 自定义的module类 必须实现 `WXModuleProtocol`
-2. 必须添加宏`WX_EXPORT_METHOD`, 它可以被weex识别,它的参数是 JavaScript调用 module指定方法的参数
-3. 添加`@synthesized weexInstance`,每个moudle对象被绑定到一个指定的实例上
-4. Module 方法会在UI线程中被调用,所以不要做太多耗时的任务在这里,如果要在其他线程执行整个module 方法,需要实现`WXModuleProtocol`中`- (NSThread *)targetExecuteThread`的方法,这样,分发到这个module的任务会在指定的线程中运行
-5. Weex 的参数可以是 String 或者Map
-6. Module 支持返回值给 JavaScript中的回调,回调的类型是`WXModuleCallback`,回调的参数可以是String或者Map
-
- ```object-c
- @implementation WXEventModule
-
- @synthesize weexInstance;
- WX_EXPORT_METHOD(@selector(openURL:callback:))
-
- - (void)openURL:(NSString *)url callback:(WXModuleCallback)callback
- {
- NSString *newURL = url;
- if ([url hasPrefix:@"//"]) {
- newURL = [NSString stringWithFormat:@"http:%@", url];
- } else if (![url hasPrefix:@"http"]) {
- newURL = [NSURL URLWithString:url relativeToURL:weexInstance.scriptURL].absoluteString;
- }
-
- UIViewController *controller = [[WXDemoViewController alloc] init];
- ((WXDemoViewController *)controller).url = [NSURL URLWithString:newURL];
-
- [[weexInstance.viewController navigationController] pushViewController:controller animated:YES];
- callback(@{@"result":@"success"});
- }
-
- @end
- ```
-
-#### 暴露同步方法<span class="api-version">v0.10+</span>
-
-如果你想要暴露同步的native方法给JS, 即JS可以直接拿到Native的返回值。 你可以使用`WX_EXPORT_METHOD_SYNC` 宏。
-
-native 代码:
-
-```objective-c
-@implementation WXEventModule
-
-WX_EXPORT_METHOD_SYNC(@selector(getString))
-
-- (NSString *)getString
-{
- return @"testString";
-}
-
-@end
-```
-
-js 代码:
-
-```javascript
-const eventModule = weex.requireModule('event')
-const returnString = syncTest.getString() // return "testString"
-```
-
-除了string, 你也可以返回 `number/array/dictionary` 类型.
-
-`注意:` 暴露的同步方法只能在 JS 线程执行,请不要做太多同步的工作导致JS执行阻塞。
-
-`注意:` Vue 2.0 还未支持这个特性,最早会在 0.12 版本支持
-
-
-
-### 注册 module
-
-通过调用 WXSDKEngine 中的 `registerModule:withClass`方法来注册自己的module
-
-```object-c
-WXSDKEngine.h
-/**
-* @abstract Registers a module for a given name
-* @param name The module name to register
-* @param clazz The module class to register
-**/
-+ (void)registerModule:(NSString *)name withClass:(Class)clazz;
-[WXSDKEngine registerModule:@"event" withClass:[WXEventModule class]];
-```
-
-### 使用自己的 module
-
-这里的 require 里面的 event 就是在 上一步调用 `registerModule:` 注册 module 时候的 name
-
-```javascript
-var eventModule = weex.requireModule('event');
-eventModule.openURL('url',function(ret) {
- nativeLog(ret);
-});
-```
-
-Weex SDK 没有 图片下载,navigation 操作的能力,请大家自己实现这些 protocol
-
-## WXImgLoaderProtocol
-
-weexSDK 没有图片下载的能力,需要实现 WXImgLoaderProtocol, 参考下面的例子
-
-```object-c
-WXImageLoaderProtocol.h
-@protocol WXImgLoaderProtocol <WXModuleProtocol>
-/**
-* @abstract Creates a image download handler with a given URL
-* @param imageUrl The URL of the image to download
-* @param imageFrame The frame of the image you want to set
-* @param options : The options to be used for this download
-* @param completedBlock : A block called once the download is completed.
- image : the image which has been download to local.
- error : the error which has happened in download.
- finished : a Boolean value indicating whether download action has finished.
-*/
--(id<WXImageOperationProtocol>)downloadImageWithURL:(NSString *)url imageFrame:(CGRect)imageFrame userInfo:(NSDictionary *)options completed:(void(^)(UIImage *image, NSError *error, BOOL finished))completedBlock;
-@end
-```
-
-实现上述协议
-
-```object-c
-@implementation WXImgLoaderDefaultImpl
-#pragma mark -
-#pragma mark WXImgLoaderProtocol
-
-- (id<WXImageOperationProtocol>)downloadImageWithURL:(NSString *)url imageFrame:(CGRect)imageFrame userInfo:(NSDictionary *)userInfo completed:(void(^)(UIImage *image, NSError *error, BOOL finished))completedBlock
-{
- if ([url hasPrefix:@"//"]) {
- url = [@"http:" stringByAppendingString:url];
- }
- return (id<WXImageOperationProtocol>)[[SDWebImageManager sharedManager] downloadImageWithURL:[NSURL URLWithString:url] options:0 progress:^(NSInteger receivedSize, NSInteger expectedSize) {
- } completed:^(UIImage *image, NSError *error, SDImageCacheType cacheType, BOOL finished, NSURL *imageURL) {
- if (completedBlock) {
- completedBlock(image, error, finished);
- }
- }];
-}
-@end
-```
-
-### handler注册
-
-你可以通过WXSDKEngine 中的 `registerHandler:withProtocol`注册handler
-
-```object-c
-WXSDKEngine.h
-/**
-* @abstract Registers a handler for a given handler instance and specific protocol
-* @param handler The handler instance to register
-* @param protocol The protocol to confirm
-*/
-+ (void)registerHandler:(id)handler withProtocol:(Protocol *)protocol;
-
-[WXSDKEngine registerHandler:[WXImgLoaderDefaultImpl new] withProtocol:@protocol(WXImgLoaderProtocol)]
-```
-
-## Components 扩展
-
-虽然 WeexSDK 中有很多的 native 的 Component,但这有可能并不能满足你的需求。在之前你可能已经写了一些很酷炫 native 的组件,想包装一下,导入到 Weex 中,因此我们提供了让开发者实现自己的 native Component。下面将以 WeexSDK 中已经存在的 Component:`image` 为例子,介绍一下如何构建一个 native Component。假设你已经了解 iOS 开发
-
-### 注册 Component
-
-注册一个 component 比较简单,调用 `WXSDKEngine` 中的 `registerComponent:withClass:` 方法,传入组件的标签名称,还有对应的 class 然后你可以创建一个 `WXImageComponent` 表示 `image` 组件的实现。在 `.we` 文件中,只需要写 `<image></image>`
-
-### 添加属性
-
-现在我们要做一些让 image component 更加强大的事情。既然作为一个图片的 component,那它应该要有源,给他加上一个 `src` 的属性,同时给它加上一个 `resize` 的属性(可以配置的有 `contain/cover/stretch`)
-
-```object-c
-@interface WXImageComponent ()
-
-@property (nonatomic, strong) NSString *imageSrc;
-@property (nonatomic, assign) UIViewContentMode resizeMode;
-
-@end
-```
-
-component 中所有的 style,attribute,events 都会被传递到 Component 的初始化方法中,所以,你可以在初始化方法中存储你感兴趣的一些属性值
-
-```object-c
-@implementation WXImageComponent
-
-- (instancetype)initWithRef:(NSString *)ref type:(NSString *)type styles:(NSDictionary *)styles attributes:(NSDictionary *)attributes events:(NSArray *)events weexInstance:(WXSDKInstance *)weexInstance
-{
- if (self = [super initWithRef:ref type:type styles:styles attributes:attributes events:events weexInstance:weexInstance]) {
- _imageSrc = [WXConvert NSString:attributes[@"src"]];
- _resizeMode = [WXConvert UIViewContentMode:attributes[@"resize"]];
-}
-
- return self;
-}
-
-@end
-```
-
-attribute 中拿到的值的类型都是 `id`,我们可以用转换方法把它转换到任何值。Weex SDK 提供了一些基础的转换方法,可以参考 `WXConvert` 类,或者你可以添加自己的转换函数。
-
-### Hooking 渲染生命周期
-
-native 的 component 是由 Weex 管理的,Weex 创建,布局,渲染,销毁。Weex 的 component 生命周期都是可以 hook 的,你可以在这些生命周期中去做自己的事情。
-
-| 方法 | 描述 |
-| :------------------: | --------------------------- |
-| initWithRef:type:... | 用给定的属性初始化一个component. |
-| layoutDidFinish | 在component完成布局时候会调用. |
-| loadView | 创建component管理的view. |
-| viewWillLoad | 在component的view加载之前会调用. |
-| viewDidLoad | 在component的view加载完之后调用. |
-| viewWillUnload | 在component的view被释放之前调用. |
-| viewDidUnload | 在component的view被释放之后调用. |
-| updateStyles: | 在component的style更新时候调用. |
-| updateAttributes: | 在component的attribute更新时候调用. |
-| addEvent: | 给component添加event的时候调用. |
-| removeEvent: | 在event移除的时候调用. |
-
-在 image component 的例子里面,如果我们需要我们自己的 image view 的话,可以复写 `loadView`这个方法.
-
-```object-c
-- (UIView *)loadView
-{
-return [[WXImageView alloc] init];
-}
-```
-
-现在我们使用 `WXImageView` 渲染 `image` component。
-作为一个 image component,我们需要拿到服务器图片,而且把它设置进 image view 里. 这个操作可以在 `viewDidLoad` 方法中做,这个方法是在 view 已经被创建而且加载了时候 Weex SDK 会调用到,而且 `viewDidLoad` 这个方法是你做额外初始化工作比如改变 content mode(也就是设置resize) 的最好时间.
-
-```object-c
-- (void)viewDidLoad
-{
- UIImageView *imageView = (UIImageView *)self.view;
- imageView.contentMode = _resizeMode;
- imageView.userInteractionEnabled = YES;
- imageView.clipsToBounds = YES;
- imageView.exclusiveTouch = YES;
-
- // Do your image fetching and updating logic
-}
-```
-
-如果可以改变 image 的 src,也可以 hook `updateAttributes:` 方法来做属性更新操作,当 `updateAttributes:` 或者 `updateStyles:` 被调用的时候, component 的 view 已经加载完成
-
-```object-c
-- (void)updateAttributes:(NSDictionary *)attributes
-{
- if (attributes[@"src"]) {
- _imageSrc = [WXConvert NSString:attributes[@"src"]];
- // Do your image updating logic
- }
-
- if (attributes[@"resize"]) {
- _resizeMode = [WXConvert UIViewContentMode:attributes[@"resize"]];
- self.view.contentMode = _resizeMode;
- }
-}
-```
-
-或许你需要考虑更多的生命周期方法去 Hook,当布局完成时候,像 `layoutDidFinish`,如果你想了解更多,可以参考一下`WXComponent.h` 声明的方法。
-
-现在你可以用在任何 `.we` 文件里面使用 `<image>`,而且可以加上 image 的属性。
-
-```html
-<image style="your-custom-style" src="image-remote-source" resize="contain/cover/stretch"></image>
-```
-
-##### component 方法
-
-WeexSDK 0.9.5 之后支持了在 js 中直接调用 component 的方法,这里提供一个例子
-
-- 自定义一个 WXMyCompoenent 的组件
-
- ```
- @implementation WXMyComponent
- WX_EXPORT_METHOD(@selector(focus)) // 暴露该方法给js
- - (instancetype)initWithRef:(NSString *)ref type:(NSString *)type styles:(NSDictionary *)styles attributes:(NSDictionary *)attributes events:(NSArray *)events weexInstance:(WXSDKInstance *)weexInstance
- {
- if (self = [super initWithRef:ref type:type styles:styles attributes:attributes events:events weexInstance:weexInstance]) {
- // handle your attributes
- // handle your styles
- }
-
- return self;
- }
-
- - (void)focus
- {
- NSLog(@"you got it");
- }
- @end
- ```
-
-- 注册组件 `[WXSDKEngine registerComponent:@"mycomponent" withClass:[WXMyComponent class]]`
-
-- 在 weex 文件中调用
-
- ```html
- <template>
- <mycomponent ref='mycomponent'></mycomponent>
- </template>
- <script>
- module.exports = {
- created:function() {
- this.$refs.mycomponent.focus();
- }
- }
- </script>
- ```
http://git-wip-us.apache.org/repos/asf/incubator-weex-site/blob/32a097bf/source/cn/references/advanced/index.md
----------------------------------------------------------------------
diff --git a/source/cn/references/advanced/index.md b/source/cn/references/advanced/index.md
deleted file mode 100644
index 280a125..0000000
--- a/source/cn/references/advanced/index.md
+++ /dev/null
@@ -1,15 +0,0 @@
----
-title: 高阶知识
-type: references
-order: 11
-version: 2.1
----
-
-# 高阶知识
-
-- [iOS 扩展](./extend-to-ios.html)
-- [Android 扩展](./extend-to-android.html)
-- [HTML5 扩展](./extend-to-html5.html)
-- [JS framework 扩展](./extend-jsfm.html)
-- [集成 Devtools 到 Android](./integrate-devtool-to-android.html)
-- [集成 Devtools 到 iOS](./integrate-devtool-to-ios.html)
\ No newline at end of file
http://git-wip-us.apache.org/repos/asf/incubator-weex-site/blob/32a097bf/source/cn/references/advanced/integrate-devtool-to-android.md
----------------------------------------------------------------------
diff --git a/source/cn/references/advanced/integrate-devtool-to-android.md b/source/cn/references/advanced/integrate-devtool-to-android.md
deleted file mode 100644
index c26c814..0000000
--- a/source/cn/references/advanced/integrate-devtool-to-android.md
+++ /dev/null
@@ -1,353 +0,0 @@
----
-title: 集成 Devtools 到 Android
-type: references
-order: 11.6
-version: 2.1
----
-
-# 集成 Devtools 到 Android
-
-Weex Devtools 能够方便调试 Weex 页面,但此功能离不开 Native 的支持。如何让你的 App 也集成 Devtools,在本章将会详细说明 Android 端如何接入 Weex Devtools。
-
-## Android 应用接入
-
-### 添加依赖
-
-可以通过 Gradle 或者 Maven 添加对 devtools aar 的依赖,也可以直接对源码依赖。强烈建议使用最新版本,因为 Weex SDK 和 devtools 都在快速的迭代开发中,新版本会有更多惊喜,同时也修复老版本中一些问题。最新的 release 版本可在[这里](https://github.com/weexteam/weex_devtools_android/releases)查看。所有的 release 版本都会发布到 [jcenter repo](https://bintray.com/alibabaweex/maven/weex_inspector)。
-
-- *Gradle 依赖*
-
- ```gradle
- dependencies {
- compile 'com.taobao.android:weex_inspector:${version}'
- }
- ```
-
-- *Maven依赖*
-
- ```xml
- <dependency>
- <groupId>com.taobao.android</groupId>
- <artifactId>weex_inspector</artifactId>
- <version>${version}</version>
- <type>pom</type>
- </dependency>
- ```
-
-- *源码依赖*
-
- 需要复制 [inspector](https://github.com/weexteam/weex_devtools_android/tree/master/inspector) 目录到你的 App 的同级目录,然后在工程的 `settings.gradle` 文件下添加 `include ":inspector"`,此过程可以参考 playground 源码的工程配置及其配置,然后在 App 的 `build.gralde` 中添加依赖。
-
- ```gradle
- dependencies {
- compile project(':inspector')
- }
- ```
-
- 另外 weex_inspector 中有一部分包是以 provided 的方式引入,接入方需要自行解决依赖和版本冲突。
-
- - **provided方式引用的包**
-
- ```gradle
- dependencies {
- provided 'com.google.code.findbugs:jsr305:2.0.1'
- provided 'com.android.support:appcompat-v7:23.1.1'
- provided 'com.taobao.android:weex_sdk:0.8.0'
- provided 'com.alibaba:fastjson:1.1.45+'
- ...
- }
- ```
-
- - **反射引用的包(0.8.0.0以上版本)**
-
- ```gradle
- dependencies {
- compile 'com.squareup.okhttp:okhttp:2.3.0'
- compile 'com.squareup.okhttp:okhttp-ws:2.3.0'
- ...
- }
- ```
-
- 或者
-
- ```gradle
- dependencies {
- compile 'com.squareup.okhttp:okhttp:3.4.1'
- compile 'com.squareup.okhttp:okhttp-ws:3.4.1'
- ...
- }
- ```
-
-#### 版本兼容
-
-| weex sdk | weex inspector | Debugger Server |
-|----------|----------------|-----------------|
-| 0.13+ | 0.12+ | 0.2.39+ |
-| 0.8.0.1+ | 0.0.8.1+ | 0.2.39+ |
-| 0.7.0+ | 0.0.7.13 | 0.2.38 |
-| 0.6.0+ | 0.0.2.2 | - |
-
-
-### 添加 Debug 模式开关
-
-控制调试模式的打开和关闭的关键点可以概括为三条规则。
-
-**规则一:通过 `sRemoteDebugMode` 和 `sRemoteDebugProxyUrl` 来设置开关和 Debugger Server 地址。**
-
-Weex SDK 的 `WXEnvironment` 类里有一对静态变量标记了 Weex 当前的调试模式是否开启分别是:
-
-```java
-public static boolean sRemoteDebugMode; // 是否开启 debug 模式,默认关闭
-public static String sRemoteDebugProxyUrl; // DebugServer的websocket地址
-```
-
-无论在 App 中无论以何种方式设置 Debug 模式,都必须在恰当的时机调用类似如下的方法来设置 `WXEnvironment.sRemoteDebugMode` 和 `WXEnvironment.sRemoteDebugProxyUrl`。
-
-```java
-private void initDebugEnvironment(boolean enable, String host) {
- WXEnvironment.sRemoteDebugMode = enable;
- WXEnvironment.sRemoteDebugProxyUrl = "ws://" + host + ":8088/debugProxy/native";
-}
-```
-
-**规则二:修改 `sRemoteDebugMode` 后一定要调用``WXSDKEngine.reload()`。**
-
-一般來說,在修改了 `WXEnvironment.sRemoteDebugMode` 以后调用了 `WXSDKEngine.reload()` 方法才能够使 Debug模式生效。`WXSDKEngine.reload()` 用来重置 Weex 的运行环境上下文,在切换调试模式时需要调用此方法来创建新的 Weex 运行时和 DebugBridge 并将所有的 JS 调用桥接到调试服务器执行。在 reload 过程中会调用 launchInspector,这就是 SDK 控制 Debug 模式最核心一个方法,其传入参数即为 `sRemoteDebugMode`,若为 `true` 则该方法中尝试以反射的方式获取 DebugBridge 用来在远端执行 JS,否则在本地运行。
-
-```java
-private void launchInspector(boolean remoteDebug) {
- if (WXEnvironment.isApkDebugable()) {
- try {
- if (mWxDebugProxy != null) {
- mWxDebugProxy.stop();
- }
- HackedClass<Object> debugProxyClass = WXHack.into("com.taobao.weex.devtools.debug.DebugServerProxy");
- mWxDebugProxy = (IWXDebugProxy) debugProxyClass.constructor(Context.class, WXBridgeManager.class)
- .getInstance(WXEnvironment.getApplication(), WXBridgeManager.this);
- if (mWxDebugProxy != null) {
- mWxDebugProxy.start();
- if (remoteDebug) {
- mWXBridge = mWxDebugProxy.getWXBridge();
- } else {
- if (mWXBridge != null && !(mWXBridge instanceof WXBridge)) {
- mWXBridge = null;
- }
- }
- }
- } catch (HackAssertionException e) {
- WXLogUtils.e("launchInspector HackAssertionException ", e);
- }
- }
-}
-```
-
-只要遵循上面的原理,开启 Debug 模式的方式和时机可由接入方灵活实现。从 launchInspector 可以看到,SDK 对 devtools 的 aar 包并无强依赖,我们的 App 只需要在 Debug 包中打包该 aar 即可,这样多少可以缓解包大小问题和安全问题。
-
-**例外:** _若修改 `WXEnvironment.sRemoteDebugMode` 的时机在 `WXBridgeManager` 初始化和 restart 和之前则 `WXSDKEngine.reload()` 可忽略._
-
-**规则三:通过响应 `ACTION_DEBUG_INSTANCE_REFRESH` 广播及时刷新。**
-
-广播 `ACTION_DEBUG_INSTANCE_REFRESH` 在调试模式切换和 Chrome 调试页面刷新时发出,主要用来通知当前的 Weex容器以 Debug 模式重新加载当前页。在 playground 中的处理过程如下:
-
-```java
-public class RefreshBroadcastReceiver extends BroadcastReceiver {
- @Override
- public void onReceive(Context context, Intent intent) {
- if (IWXDebugProxy.ACTION_DEBUG_INSTANCE_REFRESH.equals(intent.getAction())) {
- if (mUri != null) {
- if (TextUtils.equals(mUri.getScheme(), "http") || TextUtils.equals(mUri.getScheme(), "https")) {
- loadWXfromService(mUri.toString());
- } else {
- loadWXfromLocal(true);
- }
- }
- }
- }
-}
-```
-
-如果接入方的容器未对该广播做处理,那么将不支持刷新和调试过程中编辑代码时的 watch 功能。
-
-## 接入示例
-
-最简单方式就是复用 Playground 的相关代码,比如扫码和刷新等模块,但是扫码不是必须的,它只是与 App 通信的一种形式,二维码里的包含 DebugServer IP 及 bundle 地址等信息,用于建立 App 和 Debugger Server 之间的连接及动态加载 bundle。在 Playground 中给出了两种开启 debug 模式的范例。
-
-* 范例1:通过在 `XXXApplication` 中设置开关打开调试模式
-
-```java
-public class MyApplication extends Application {
- public void onCreate() {
- super.onCreate();
- initDebugEnvironment(true, "xxx.xxx.xxx.xxx"/*"DEBUG_SERVER_HOST"*/);
- }
-}
-```
-
-这种方式最直接,在代码中直接 hardcode 了开启调试模式,如果在 SDK 初始化之前调用甚至连 `WXSDKEngine.reload()` 都不需要调用,接入方如果需要更灵活的策略可以将 `initDebugEnvironment(boolean enable, String host)` 和 `WXSDKEngine.reload()` 组合在一起在合适的位置和时机调用即可。
-
-* 范例2:通过扫码打开调试模式
-
-Playground 中较多的使用扫码的方式传递信息,不仅用这种方式控制 Debug 模式的开关,而且还通过它来传入 bundle 的 url 直接调试。应当说在开发中这种方式是比较高效的,省去了修改 SDK 代码重复编译和安装 App 的麻烦,缺点就是调试工具这种方式接入需要 App 具有扫码和处理特定规则二维码的能力。除了 Playground 中的方式,接入方亦可根据业务场景对 Debugger 和接入方式进行二次开发。
-
-Playground 集成的具体代码可参考如下两个文件:
-
-* 开关控制,主要参考对二维码的处理部分,详见 [`WXApplication.java`](https://github.com/weexteam/weex_devtools_android/blob/master/playground/app/src/main/java/com/alibaba/weex/WXApplication.java)
-
-* 刷新控制 ,主要参考是对容器 `ACTION_DEBUG_INSTANCE_REFRESH`的处理,详见 [`WXPageActivity.java`](https://github.com/weexteam/weex_devtools_android/blob/master/playground/app/src/main/java/com/alibaba/weex/WXPageActivity.java)
-
-## 牛刀小试
-
-### 前置工作
-
-如果未安装 Debugger Server,在命令行执行 `npm install -g weex-toolkit` 既可以安装调试服务器,运行命令 `weex debug` 就会启动 DebugServer 并打开一个调试页面(详情请查看 [《Get Started》](../../guide/index.html))。页面下方会展示一个二维码,这个二维码用于向 App 传递 Server 端的地址建立连接。
-
-
-
-### 开始调试
-
-如果你的 App 客户端完成了以上步骤那么恭喜你已经接入完毕,可以愉快的调试 Weex bundle 了,调试体验和网页调试一致!建议新手首先用官方的 Playground 体验一下调试流程。只需要启动 App 扫描 Chrome 调试页面下方的第一个二维码即可建立与 Debugger Server 的通信,Chorome 的调试页面将会列出连接成功的设备信息。
-
-
-
-#### 主要步骤如下
-
-1. 如果你要加载服务器上 bundle,第一步就是要让你的 bundle sever 跑起来. 在 Playground 中特别简单,只需要你到 Weex 源码目录下,运行 `./start` 即可。
-2. 命令行运行 `weex debug` 启动 Debugger Server,Chrome 将会打开一个网页,在网页下方有一个二维码和简单的介绍。
-3. 启动 App 并确认打开调试模式。你将在上一步中打开的网页中看到一个设备列表,每个设备项都有两个按钮,分别是 `Debugger` 和 `Inspector`。
-4. 点击 `Inspector` Chrome 将创建 Inspector 网页;点击 `Debugger` Chrome 将创建 Debugger 网页;二者是相互独立的功能,不相互依赖。
-
----
-
-## 背景知识
-
-### Devtools 组件介绍
-Devtools 扩展了 [Chrome Debugging Protocol](https://developer.chrome.com/devtools/docs/debugger-protocol),在客户端和调试服务器之间的采用 [JSON-RPC](https://en.wikipedia.org/wiki/JSON-RPC) 作为通信机制,本质上调试过程是两个进程间协同,相互交换控制权及运行结果的过程。更多细节还请阅读 [Weex Devtools Debugger 的技术选型实录](http://www.atatech.org/articles/59284)这篇文章。
-
-* **客户端**
-
- Devtools 客户端作为 aar 被集成 App 中,它通过 webscoket 连接到调试服务器,此处并未做安全检查。出于安全机制及包大小考虑,强烈建议接入方只在 debug 版本中打包此 aar。
-
-* **服务器**
-
- Devtools 服务器端是信息交换的中枢,既连接客户端,又连接 Chrome,大多数情况下扮演一个消息转发服务器和 Runtime Manager 的角色。
-
-* **Web端**
-
- Chrome 的 V8 引擎扮演着 Bundle javascript runtime 的角色。开启 debug 模式后,所有的 bundle js 代码都在该引擎上运行。另一方面我们也复用了 Chrome 前端的调试界面,例如设置断点,查看调用栈等,调试页关闭则 runtime 将会被清理。
-
-调试的大致过程请参考如下时序图。
-
-
-
-## FAQ
-
-在各业务接入过程中,陆续发现一些问题,对高频次的问题解答如下,开发中以 weex debug -V 的方式启动 Debugger Server 可以看到 server 端的 log 信息,对照上文中的时序图对于定位问题还是非常有帮助,建议调试中默认开启 server 端 log。
-
-1. **扫码 App 在 DebugServerProxy 中抛出 class not found**
-
- 已知的原因如下:
-
- * weex_inspector 以 provided 方式引用的包是否引入成功,如 fastjson 等。
- * weex_inspector 以 compile 方式引用的包是否引入成功,某些 app 重新引入 `com.squareup.okhttp:okhttp:2.3.0` 和 `com.squareup.okhttp:okhttp-ws:2.3.0` 则不再报错。
- * 混淆规则影响反射。
-
-2. **playground 扫码调试 crash**
-
- 已知的原因如下:
-
- * 系统为 android 6+,崩溃信息提示进程需要 `android.permission.READ_PHONE_STATE` 权限,代码中未做权限检查,在 0.0.2.7 版本以后已修复,不再需要此权限。
-
-3. **扫码后设备列表页并没有出现我的设备信息**
-
- 已知的原因如下:
-
- * Debugger Server 和手机在不同网段,被防火墙隔离。
- * 手机连接了 PC 端的代理,当前尚不支持。
- * 多进程连接服务器端的同一端口,比如在 Application 的 `onCreate` 中初始化 sdk,若多个进程连接服务器端的同一端口则报错,在 0.0.2.3 版本以后已支持多进程无此问题。
-
-4. **调试过程中频繁刷新连接失败,Server 端提示重新启动 App,非必现**
-
- 已知的原因如下:
-
- * 多线程操作网络连接引起,在频繁的即断即连时容易触发。在 0.0.7.1 版本已修复。
-
-## 注入自定义WebSocket Client
-目前Inspector以反射的方式动态调用了okhttp-ws库中的相关代码,可以兼容的okhttp与okhttp-ws版本为:
-- okhttp, okhttp-ws 2.7.5版本以下
-- okhttp3, okhttp3-ws 3.5版本以下
-
-如果客户端中集成的版本与上述版本不匹配,则可以使用`WeexInspector.overrideWebSocketClient`方法来注入自定义的WebSocket实现,示例:
-```java
-
- public class CustomWebSocketClient implements IWebSocketClient {
-
- private WebSocket ws;
-
- @Override
- public boolean isOpen() {
- return ws != null;
- }
-
- @Override
- public void connect(String wsAddress, final WSListener listener) {
- OkHttpClient okHttpClient = new OkHttpClient();
- okHttpClient.setConnectTimeout(5, TimeUnit.SECONDS);
- okHttpClient.setReadTimeout(5, TimeUnit.SECONDS);
- okHttpClient.setWriteTimeout(5, TimeUnit.SECONDS);
-
- Request request = new Request.Builder().url(wsAddress).build();
- WebSocketCall webSocketCall = WebSocketCall.create(okHttpClient, request);
- webSocketCall.enqueue(new WebSocketListener() {
- @Override
- public void onOpen(WebSocket webSocket, Request request, Response response) throws IOException {
- ws = webSocket;
- listener.onOpen();
- }
-
- @Override
- public void onMessage(BufferedSource payload, WebSocket.PayloadType type) throws IOException {
- if (WebSocket.PayloadType.TEXT == type) {
- listener.onMessage(payload.readUtf8());
- }
- }
-
- @Override
- public void onPong(Buffer payload) {
- //ignore
- }
-
- @Override
- public void onClose(int code, String reason) {
- listener.onClose();
- }
-
- @Override
- public void onFailure(IOException e) {
- listener.onFailure(e);
- }
- });
- }
-
- @Override
- public void close() {
- if (ws != null) {
- try {
- ws.close(CloseCodes.NORMAL_CLOSURE, "Normal closure");
- } catch (IOException e) {
- e.printStackTrace();
- }
- }
- }
-
- @Override
- public void sendMessage(int requestId, String message) {
- if (ws != null) {
- try {
- ws.sendMessage(WebSocket.PayloadType.TEXT, new Buffer().writeString(message, Charset.defaultCharset()));
- } catch (IOException e) {
- e.printStackTrace();
- }
- }
- }
- }
-```
http://git-wip-us.apache.org/repos/asf/incubator-weex-site/blob/32a097bf/source/cn/references/advanced/integrate-devtool-to-ios.md
----------------------------------------------------------------------
diff --git a/source/cn/references/advanced/integrate-devtool-to-ios.md b/source/cn/references/advanced/integrate-devtool-to-ios.md
deleted file mode 100644
index bf573c6..0000000
--- a/source/cn/references/advanced/integrate-devtool-to-ios.md
+++ /dev/null
@@ -1,229 +0,0 @@
----
-title: 集成 Devtools 到 iOS
-type: references
-order: 11.7
-version: 2.1
----
-
-# 集成 Devtools 到 iOS
-
-Weex Devtools 能够方便调试 Weex 页面,但此功能离不开 Native 的支持。如何让你的 App 也集成 Devtools,在本章将会详细说明 iOS 端如何接入 Weex Devtools。
-
-## iOS 应用接入
-
-### 添加依赖
-
-#### 方法一:cocoapods 依赖
-
-在工程目录的 podfile 添加如下代码
-
-```
-source https://github.com/CocoaPods/Specs.git,
-pod 'WXDevtool', '0.7.0', :configurations => ['Debug'],
-```
-
-目前有如下几个版本:
-
-0.7.0, 0.6.1, 0.1.1, 0.1.0 [master repo]
-
----
-
-可以通过更新本地 podspec repo,pod search 来查询最新版本,在 podfile 文件添加依赖。
-
-
-*** 推荐在DEBUG模式下依赖。 ***
-
-#### 方法二:github 源码依赖
-
-
-1. [拉取](https://github.com/weexteam/weex-devtool-iOS)最新的WXDevtool代码。
-
-2. 按照如下图示:直接拖动source目录源文件到目标工程中
-
- 
-
-3. 按照红框中配置勾选
-
- 
-
-
- 在相对较大的互联网 App 研发中, framework 静态库被广泛应用,所以推荐使用方法一接入。
-
-### 集成功能
-
-如果按照方法一接入:podfile 的方式,添加头文件包含:
-
-```
-#import <TBWXDevtool/WXDevtool.h>
-```
-
-如果按照方法二接入:源码依赖的方式,添加头文件包含:
-
-```
-#import "WXDevtool.h"
-```
-
-查看 WXDevtool 头文件如下:
-
-```object-c
-#import <Foundation/Foundation.h>
-
-@interface WXDevTool : NSObject
-/**
-* set debug status
-* @param isDebug : YES:open debug model and inspect model;
-* default is NO,if isDebug is NO, open inspect only;
-* */
-+ (void)setDebug:(BOOL)isDebug;
-
-
-/**
-* get debug status
-* */
-+ (BOOL)isDebug;
-
-
-/**
-* launch weex debug
-* @param url : ws://ip:port/debugProxy/native, ip and port is your devtool server address
-* eg:@"ws://30.30.29.242:8088/debugProxy/native"
-* */
-+ (void)launchDevToolDebugWithUrl:(NSString *)url;
-
-@end
-```
-
-`setDebug`:参数为 `YES` 时,直接开启 debug 模式,反之关闭,使用场景如下所述
-
-在你自己的程序中添加如下代码:
-
-```object-c
-[WXDevTool launchDevToolDebugWithUrl:@"ws://30.30.31.7:8088/debugProxy/native"];
-```
-
-其中的 ws 地址正是 Weex debug 控制台中出现的地址,直接 copy 到 `launchDevToolDebugWithUrl` 接口中。
-
-如果程序一启动就开启 Weex 调试,**需要在 WeexSDK 引擎初始化之前**添加代码:
-
-```object-c
-[WXDevTool setDebug:YES];
-[WXDevTool launchDevToolDebugWithUrl:@"ws://30.30.31.7:8088/debugProxy/native"];
-```
-
-#### 附加页面刷新功能
-
-- 为什么需要页面刷新功能?
-
- 如下图所示,当点击 debugger 按钮时,js 的运行环境会从手机端(JavaScriptCore)切换到 Chrome(V8),这时需要重新初始化 Weex 环境,重新渲染页面。页面渲染是需要接入方在自己的页面添加。
-
- 
-
-- 什么场景下需要添加页面刷新功能?
-
- - 点击 debugger 按钮调试
- - 切换 RemoteDebug 开关
- - 刷新 Chrome 页面(command+R)
-
-- 如何添加刷新
-
- 在 Weex 页面初始化或 `viewDidLoad` 方法时添加注册通知,举例如下:
-
- ```object-c
- [[NSNotificationCenter defaultCenter] addObserver:self selector:notificationRefreshInstance: name:@"RefreshInstance" object:nil];
- ```
-
- 最后**千万记得**在 `dealloc` 方法中取消通知,如下所示
-
- ```
- - (void)dealloc
- {
- [[NSNotificationCenter defaultCenter] removeObserver:self];
- }
- ```
-
- 页面刷新实现,先销毁当前 instance,然后重新创建 instance,举例如下:
-
- ```
- - (void)render
- {
- CGFloat width = self.view.frame.size.width;
- [_instance destroyInstance];
- _instance = [[WXSDKInstance alloc] init];
- _instance.viewController = self;
- _instance.frame = CGRectMake(self.view.frame.size.width-width, 0, width, _weexHeight);
-
- __weak typeof(self) weakSelf = self;
- _instance.onCreate = ^(UIView *view) {
- [weakSelf.weexView removeFromSuperview];
- weakSelf.weexView = view;
- [weakSelf.view addSubview:weakSelf.weexView];
- UIAccessibilityPostNotification(UIAccessibilityScreenChangedNotification, weakSelf.weexView);
- };
- _instance.onFailed = ^(NSError *error) {
-
- };
-
- _instance.renderFinish = ^(UIView *view) {
- [weakSelf updateInstanceState:WeexInstanceAppear];
- };
-
- _instance.updateFinish = ^(UIView *view) {
- };
- if (!self.url) {
- return;
- }
- NSURL *URL = [self testURL: [self.url absoluteString]];
- NSString *randomURL = [NSString stringWithFormat:@"%@?random=%d",URL.absoluteString,arc4random()];
- [_instance renderWithURL:[NSURL URLWithString:randomURL] options:@{@"bundleUrl":URL.absoluteString} data:nil];
- }
- ```
-
-具体实现可参考 [playground](https://github.com/weexteam/weex-devtool-iOS/blob/master/Devtools/playground/WeexDemo/WXDemoViewController.m) `WXDemoViewController.m` 文件
-
-*说明:目前版本需要注册的通知名称为固定的 “RefreshInstance”,下个版本会添加用户自定义 name 。*
-
-## 使用
-
-如果未安装 Debugger Server,在命令行执行 `npm install -g weex-toolkit` 既可以安装调试服务器,运行命令 `weex debug` 就会启动 DebugServer 并打开一个调试页面(详情请查看 [《Get started》](../../guide/index.html))。页面下方会展示一个二维码,这个二维码用于向 App 传递 Server 端的地址建立连接。
-
-
-1. 日志级别控制
-
- 
- 日志级别可以控制native端关于weex的日志。
-
- 日记级别描述如下:
-
- ```
- Off = 0,
- Error = Error
- Warning = Error | Warning,
- Info = Warning | Info,
- Log = Log | Info,
- Debug = Log | Debug,
- All = NSUIntegerMax
- ```
-
- 解释:off 关闭日志,Warning 包含 Error、Warning,Info 包含 Warning、Info,Log 包含 Info、Log,Debug 包含 Log、Debug,All 包含所有。
-
-2. Vdom/Native tree选择
-
- 
-
- *图一*
-
- 
-
- *图二*
-
- 点击图一所示native选项会打开图二,方便查看native tree以及view property
-
- 
-
- *图三*
-
- 
-
- *图四*
-
- 点击图三所示 vdom 选项会打开图四,方便查看 vdom tree 以及 component property。
http://git-wip-us.apache.org/repos/asf/incubator-weex-site/blob/32a097bf/source/cn/references/android-apis.md
----------------------------------------------------------------------
diff --git a/source/cn/references/android-apis.md b/source/cn/references/android-apis.md
index 4247673..a00b83b 100644
--- a/source/cn/references/android-apis.md
+++ b/source/cn/references/android-apis.md
@@ -1,7 +1,8 @@
---
title: Android APIs
type: references
-order: 1.2
+group: API
+order: 2.2
version: 2.1
---
@@ -100,7 +101,7 @@ Weex 为了重用 Native 通用库提供了对应的接口进行设置。
多用于某个自定义控件进行事件通知,例如自定义点击事件,响应下拉事件等。
- WXSDKInstance.java
+ WXSDKInstance.java
```java
public void fireEvent(String elementRef,final String type, final Map<String, Object> data,final Map<String, Object> domChanges){ }
@@ -122,7 +123,7 @@ Weex 为了重用 Native 通用库提供了对应的接口进行设置。
`domChanges`:更新 ref 对应控件的 Attribute 和 Style。
-2. 事件回调
+2. 事件回调
多用于 Module 回调,例如定位 Module 完成后需要通知 JS。使用方法如下:
@@ -139,7 +140,7 @@ Weex 为了重用 Native 通用库提供了对应的接口进行设置。
callback.invoke(data);
//持续通知
callback.invokeAndKeepAlive(data);
-
+
//invoke方法和invokeAndKeepAlive两个方法二选一
}
}
@@ -205,7 +206,7 @@ WXSDKEngine.setActivityNavBarSetter(new IActivityNavBarSetter(){
```java
/**
- *
+ *
* @param width 容器宽度
* @param height 容器高度
*/
http://git-wip-us.apache.org/repos/asf/incubator-weex-site/blob/32a097bf/source/cn/references/bubble.md
----------------------------------------------------------------------
diff --git a/source/cn/references/bubble.md b/source/cn/references/bubble.md
deleted file mode 100644
index 6f8f0ed..0000000
--- a/source/cn/references/bubble.md
+++ /dev/null
@@ -1,146 +0,0 @@
----
-title: 事件冒泡
-type: references
-order: 1.3
-version: 2.1
----
-
-# 事件冒泡 <span class="api-version">v0.13+</span>
-
-Weex 2.0 实现了 W3C 标准的事件冒泡机制。
-
-### 使用
-
-```html
-<template>
- <div class="root" @click="rootClick" bubble="true">
- <text style="font-size: 40px;">{{rootText}}</text>
- <div class="outer" @click="parentClick">
- <div>
- <text style="font-size: 40px;">{{parentText}}</text>
- </div>
- <text class="inner" @click="click">{{innerText}}</text>
- </div>
- </div>
-</template>
-
-<script>
- module.exports = {
- data: {
- innerText: 'click me',
- parentText: '',
- rootText: ''
- },
- methods: {
- click: function(e) {
- this.innerText = 'inner bubble'
- },
- parentClick: function(e) {
- this.parentText = 'parent bubble'
- },
- rootClick: function(e) {
- this.rootText = 'root bubble'
- }
- }
- }
-</script>
-
-<style scoped>
- .inner {
- font-size: 40px;
- text-align: center;
- background-color: #7a9b1b;
- padding: 40px;
- }
-
- .outer {
- font-size: 40px;
- text-align: center;
- background-color: #9b7a1b;
- padding: 120px;
- }
-
- .root {
- font-size: 40px;
- text-align: center;
- background-color: #7a1b9b;
- padding: 80px;
- }
-</style>
-```
-
-[try it](http://dotwe.org/vue/fa2957ce3e9eb47ad9ae1da22d845e95)
-
-运行以上代码,用客户端打开,点击中间的元素,可以看到事件向上传播,依次触发。
-
-### 注意
-
-需要注意的是: ** 为了兼容之前的版本,Weex 默认不会开启事件冒泡机制。需要在根元素的属性上,添加 `bubble="true"` 来开启冒泡机制。否则,将不会向上传播事件,保持与之前版本的效果相同。 **
-
-### stopPropagation
-
-在事件处理函数中,可以使用 `e.stopPropagation()` 方法,来阻止本次事件向上的传递过程。注意,`e.stopPropagation()` 与 `bubble="true"` 不同,前者只会影响当前元素以及父元素的传播,不会影响子元素的传播;后者是为了版本兼容而增加的开关机制,会全局关闭或者开启冒泡机制,两者可以共同存在使用,如下:
-
-```html
-<template>
- <div class="root" @click="rootClick" bubble="true">
- <text style="font-size: 40px;">{{rootText}}</text>
- <div class="outer" @click="parentClick">
- <div>
- <text style="font-size: 40px;">{{parentText}}</text>
- </div>
- <text class="inner" @click="click">{{innerText}}</text>
- </div>
- </div>
-</template>
-
-<script>
- module.exports = {
- data: {
- innerText: 'click me',
- parentText: '',
- rootText: ''
- },
- methods: {
- click: function(e) {
- this.innerText = 'inner bubble'
- },
- parentClick: function(e) {
- this.parentText = 'parent bubble'
- e.stopPropagation()
- },
- rootClick: function(e) {
- this.rootText = 'root bubble'
- // e.stopPropagation()
- }
- }
- }
-</script>
-
-<style scoped>
- .inner {
- font-size: 40px;
- text-align: center;
- background-color: #7a9b1b;
- padding: 40px;
- }
-
- .outer {
- font-size: 40px;
- text-align: center;
- background-color: #9b7a1b;
- padding: 120px;
- }
-
- .root {
- font-size: 40px;
- text-align: center;
- background-color: #7a1b9b;
- padding: 80px;
- }
-</style>
-```
-
-[try it](http://dotwe.org/vue/2cc80e19c9b2430fb780234628065a69)
-
-运行以上代码,用客户端打开,点击中间的元素,可以看到事件向上传播到父元素被终止,不再继续往根元素传播。
http://git-wip-us.apache.org/repos/asf/incubator-weex-site/blob/32a097bf/source/cn/references/color-names.md
----------------------------------------------------------------------
diff --git a/source/cn/references/color-names.md b/source/cn/references/color-names.md
deleted file mode 100644
index 2498007..0000000
--- a/source/cn/references/color-names.md
+++ /dev/null
@@ -1,180 +0,0 @@
----
-title: 颜色名称列表
-type: references
-order: 1.6
-version: 2.1
----
-
-# Weex 支持的所有颜色名称
-
-### 基础颜色关键词:
-
-| 颜色名 | 十六进制RGB值 |
-| --- | --- |
-| black(黑) | #000000 |
-| silver(银) | #C0C0C0 |
-| gray(灰) | #808080 |
-| white(白) | #FFFFFF |
-| maroon(褐紫红) | #800000 |
-| red(红) | #FF0000 |
-| purple(紫) | #800080 |
-| fuchsia(晚樱) | #FF00FF |
-| green(绿) | #008000 |
-| lime(石灰) | #00FF00 |
-| olive(橄榄) | #808000 |
-| yellow(黄) | #FFFF00 |
-| navy(海军蓝) | #000080 |
-| blue(蓝) | #0000FF |
-| teal(水鸭) | #008080 |
-| aqua(水蓝) | #00FFFF |
-### 扩展颜色关键词:
-
-| 颜色名 | 十六进制RGB值 |
-| --- | --- |
-| aliceblue | #F0F8FF |
-| antiquewhite | #FAEBD7 |
-| aqua | #00FFFF |
-| aquamarine | #7FFFD4 |
-| azure | #F0FFFF |
-| beige | #F5F5DC |
-| bisque | #FFE4C4 |
-| black | #000000 |
-| blanchedalmond | #FFEBCD |
-| blue | #0000FF |
-| blueviolet | #8A2BE2 |
-| brown | #A52A2A |
-| burlywood | #DEB887 |
-| cadetblue | #5F9EA0 |
-| chartreuse | #7FFF00 |
-| chocolate | #D2691E |
-| coral | #FF7F50 |
-| cornflowerblue | #6495ED |
-| cornsilk | #FFF8DC |
-| crimson | #DC143C |
-| cyan | #00FFFF |
-| darkblue | #00008B |
-| darkcyan | #008B8B |
-| darkgoldenrod | #B8860B |
-| darkgray | #A9A9A9 |
-| darkgreen | #006400 |
-| darkgrey | #A9A9A9 |
-| darkkhaki | #BDB76B |
-| darkmagenta | #8B008B |
-| darkolivegreen | #556B2F |
-| darkorange | #FF8C00 |
-| darkorchid | #9932CC |
-| darkred | #8B0000 |
-| darksalmon | #E9967A |
-| darkseagreen | #8FBC8F |
-| darkslateblue | #483D8B |
-| darkslategray | #2F4F4F |
-| darkslategrey | #2F4F4F |
-| darkturquoise | #00CED1 |
-| darkviolet | #9400D3 |
-| deeppink | #FF1493 |
-| deepskyblue | #00BFFF |
-| dimgray | #696969 |
-| dimgrey | #696969 |
-| dodgerblue | #1E90FF |
-| firebrick | #B22222 |
-| floralwhite | #FFFAF0 |
-| forestgreen | #228B22 |
-| fuchsia | #FF00FF |
-| gainsboro | #DCDCDC |
-| ghostwhite | #F8F8FF |
-| gold | #FFD700 |
-| goldenrod | #DAA520 |
-| gray | #808080 |
-| green | #008000 |
-| greenyellow | #ADFF2F |
-| grey | #808080 |
-| honeydew | #F0FFF0 |
-| hotpink | #FF69B4 |
-| indianred | #CD5C5C |
-| indigo | #4B0082 |
-| ivory | #FFFFF0 |
-| khaki | #F0E68C |
-| lavender | #E6E6FA |
-| lavenderblush | #FFF0F5 |
-| lawngreen | #7CFC00 |
-| lemonchiffon | #FFFACD |
-| lightblue | #ADD8E6 |
-| lightcoral | #F08080 |
-| lightcyan | #E0FFFF |
-| lightgoldenrodyellow | #FAFAD2 |
-| lightgray | #D3D3D3 |
-| lightgreen | #90EE90 |
-| lightgrey | #D3D3D3 |
-| lightpink | #FFB6C1 |
-| lightsalmon | #FFA07A |
-| lightseagreen | #20B2AA |
-| lightskyblue | #87CEFA |
-| lightslategray | #778899 |
-| lightslategrey | #778899 |
-| lightsteelblue | #B0C4DE |
-| lightyellow | #FFFFE0 |
-| lime | #00FF00 |
-| limegreen | #32CD32 |
-| linen | #FAF0E6 |
-| magenta | #FF00FF |
-| maroon | #800000 |
-| mediumaquamarine | #66CDAA |
-| mediumblue | #0000CD |
-| mediumorchid | #BA55D3 |
-| mediumpurple | #9370DB |
-| mediumseagreen | #3CB371 |
-| mediumslateblue | #7B68EE |
-| mediumspringgreen | #00FA9A |
-| mediumturquoise | #48D1CC |
-| mediumvioletred | #C71585 |
-| midnightblue | #191970 |
-| mintcream | #F5FFFA |
-| mistyrose | #FFE4E1 |
-| moccasin | #FFE4B5 |
-| navajowhite | #FFDEAD |
-| navy | #000080 |
-| oldlace | #FDF5E6 |
-| olive | #808000 |
-| olivedrab | #6B8E23 |
-| orange | #FFA500 |
-| orangered | #FF4500 |
-| orchid | #DA70D6 |
-| palegoldenrod | #EEE8AA |
-| palegreen | #98FB98 |
-| paleturquoise | #AFEEEE |
-| palevioletred | #DB7093 |
-| papayawhip | #FFEFD5 |
-| peachpuff | #FFDAB9 |
-| peru | #CD853F |
-| pink | #FFC0CB |
-| plum | #DDA0DD |
-| powderblue | #B0E0E6 |
-| purple | #800080 |
-| red | #FF0000 |
-| rosybrown | #BC8F8F |
-| royalblue | #4169E1 |
-| saddlebrown | #8B4513 |
-| salmon | #FA8072 |
-| sandybrown | #F4A460 |
-| seagreen | #2E8B57 |
-| seashell | #FFF5EE |
-| sienna | #A0522D |
-| silver | #C0C0C0 |
-| skyblue | #87CEEB |
-| slateblue | #6A5ACD |
-| slategray | #708090 |
-| slategrey | #708090 |
-| snow | #FFFAFA |
-| springgreen | #00FF7F |
-| steelblue | #4682B4 |
-| tan | #D2B48C |
-| teal | #008080 |
-| thistle | #D8BFD8 |
-| tomato | #FF6347 |
-| turquoise | #40E0D0 |
-| violet | #EE82EE |
-| wheat | #F5DEB3 |
-| white | #FFFFFF |
-| whitesmoke | #F5F5F5 |
-| yellow | #FFFF00 |
-| yellowgreen | #9ACD32 |
[32/51] [abbrv] incubator-weex-site git commit: update file structure
and fix responsive styles
Posted by ha...@apache.org.
http://git-wip-us.apache.org/repos/asf/incubator-weex-site/blob/12e3a8bc/_drafts/v1.0/references/modules/stream.md
----------------------------------------------------------------------
diff --git a/_drafts/v1.0/references/modules/stream.md b/_drafts/v1.0/references/modules/stream.md
new file mode 100644
index 0000000..6c1b893
--- /dev/null
+++ b/_drafts/v1.0/references/modules/stream.md
@@ -0,0 +1,220 @@
+---
+title: stream
+type: references
+order: 4.7
+version: 0.10
+---
+
+# stream
+
+## 概述
+
+以下为 stream 相关的 API,用于实现网络请求。
+
+## API
+### `fetch(options, callback[,progressCallback])`
+
+发起网络请求
+
+#### 参数
+
+- `options {Object}`:请求的一些选项
+ - `method {string}`:HTTP 方法 `GET` 或是 `POST`
+ - `url {string}`:请求的 URL
+ - `headers {Object}`:HTTP 请求头
+ - `type {string}`:请求类型, `json`,`text` 或是 `jsonp` {在原生实现中其实与 json 相同)
+ - `body {string}`:HTTP 请求体。
+
+ **注意:**
+
+ - `body` 参数仅支持 `string` 类型的参数,请勿直接传递 `JSON`,必须先将其转为字符串。
+ - `GET` 请求不支持 `body` 方式传递参数,请使用 url 传参。
+
+- `callback {Function}`:响应结果回调,回调函数将收到如下的 `response` 对象:
+ - `status {number}`:返回的状态码
+ - `ok {boolean}`:如果状态码在 200~299 之间就为真。
+ - `statusText {string}`:状态描述文本
+ - `data {Object | string}`: 返回的数据,如果请求类型是 `json` 和 `jsonp`,则它就是一个 object ,如果不是,则它就是一个 string。
+ - `headers {Object}`:响应头
+- `progressCallback {Function}`:关于请求状态的回调。 这个回调函数将在请求完成后就被调用:
+ - `readyState {number}`:当前状态
+ state:'1': 请求连接中
+ opened:'2': 返回响应头中
+ received:'3': 正在加载返回数据
+ - `status {number}`:响应状态码.
+ - `length {number}`:已经接受到的数据长度. 你可以从响应头中获取总长度
+ - `statusText {string}`:状态文本
+ - `headers {Object}`:响应头
+
+#### 示例
+
+```html
+<template>
+ <div class="wrapper">
+ <list class="list">
+ <header class="header">
+ <text class="title">Search Results</text>
+ </header>
+ <refresh style="width: 750; padding: 30;" onrefresh="refreshData" display="{{refreshDisplay}}">
+ <text class="text"> ↓ Pull to refresh </text>
+ <loading-indicator class="indicator"></loading-indicator>
+ </refresh>
+ <cell class="row" repeat="item in items" id="item-{{$index}}">
+ <div>
+ <text class="item">Repo name: {{item.full_name}}</text>
+ </div>
+ <div>
+ <text class="item">Repo star: {{item.stargazers_count}}</text>
+ </div>
+ </cell>
+ <loading onloading="loadingData" style="width: 750; padding: 30;" display="{{loadingDisplay}}">
+ <text class="text">{{loadingText}}</text>
+ </loading>
+ </list>
+ <div class="up" onclick="goToTop">
+ <img class="img" src="https://img.alicdn.com/tps/TB1ZVOEOpXXXXcQaXXXXXXXXXXX-200-200.png"></img>
+ </div>
+ </div>
+</template>
+
+<style>
+.wrapper {
+ position: absolute;
+ top: 0;
+ right: 0;
+ bottom: 0;
+ left: 0;
+}
+.list{
+ background-color: #ffffff;
+ flex: 1;
+}
+.header {
+ height: 80;
+ align-items: center;
+ justify-content: center;
+ background-color: #efefef;
+ border-bottom-color: #eeeeee;
+ border-bottom-width: 2;
+ border-bottom-style: solid;
+}
+.title {
+ text-align: center;
+}
+.text {
+ text-align: center;
+}
+.row {
+ padding: 20;
+ border-bottom-color: #eeeeee;
+ border-bottom-width: 2;
+ border-bottom-style: solid;
+}
+.up {
+ width: 70;
+ height: 70;
+ position: fixed;
+ right: 20;
+ bottom: 20;
+}
+.img {
+ width: 70;
+ height: 70;
+}
+</style>
+
+<script>
+var dom = require('@weex-module/dom') || {}
+var stream = require('@weex-module/stream') || {}
+var modal = require('@weex-module/modal') || {}
+
+var SEARCH_URL = 'https://api.github.com/search/repositories?q=language:javascript&sort=stars&order=desc'
+
+module.exports = {
+ data: {
+ isLoaded: true,
+ page: 1,
+ loadingDisplay: 'hide',
+ refreshDisplay: 'hide',
+ loadingText: 'Loading...',
+ items:[]
+ },
+ created: function () {
+ var url = SEARCH_URL + '&page=' + this.page
+
+ this.renderData(url)
+
+ this.page++
+ },
+ methods: {
+ renderData: function (url) {
+ var self = this
+
+ stream.fetch({
+ method: 'GET',
+ url: url,
+ type:'json'
+ }, function(res) {
+ self.refreshDisplay = 'hide'
+ self.loadingDisplay = 'hide'
+
+ try {
+ var results = res.data.items || []
+
+ if (Array.isArray(results)) {
+ for(var i = 0; i < results.length; i++) {
+ self.items.push(results[i])
+ }
+ }
+
+ self.isLoaded = true
+ } catch(e) {}
+ },function(res){
+
+ })
+ },
+ loadingData: function (e) {
+ var url = SEARCH_URL + '&page=' + this.page
+ var self = this
+
+ if (self.isLoaded === false) return
+
+ self.loadingDisplay = 'show'
+
+ if (self.page <=10 ) {
+ self.renderData(url)
+ self.page++
+ } else {
+ self.loadingDisplay = 'hide'
+ self.loadingText = 'NO MORE!'
+ }
+ },
+ goToTop: function (e) {
+ dom.scrollToElement(this.$el('item-0'), {
+ offset: -100
+ })
+ },
+ refreshData: function (e) {
+ var url = SEARCH_URL + '&page=1'
+
+ if (this.isLoaded === false) return
+
+ this.refreshDisplay = 'show'
+
+ modal.toast({
+ 'message': 'Refreshing...',
+ 'duration': 1
+ })
+
+ this.items = []
+ this.page = 1
+ this.renderData(url)
+
+ this.refreshDisplay = 'hide'
+ }
+ }
+}
+</script>
+```
+
+[体验一下](http://dotwe.org/ed524ade679b0fa96e980600c53ea5ce)
\ No newline at end of file
http://git-wip-us.apache.org/repos/asf/incubator-weex-site/blob/12e3a8bc/_drafts/v1.0/references/modules/webview.md
----------------------------------------------------------------------
diff --git a/_drafts/v1.0/references/modules/webview.md b/_drafts/v1.0/references/modules/webview.md
new file mode 100644
index 0000000..b6f3cbe
--- /dev/null
+++ b/_drafts/v1.0/references/modules/webview.md
@@ -0,0 +1,66 @@
+---
+title: webview
+type: references
+order: 4.8
+version: 0.10
+---
+
+# `webview`
+
+一系列的 `<web>` 组件操作接口。 比如 `goBack`、`goForward`、和 `reload`。`webview` module 与 `<web>` 组件共用。
+
+## 示例
+
+查看 [简单浏览器](../components/web.html) ,一个结合 `<web>` 组件和 `webview` module 的示例。
+
+## API
+
+### `goBack(webElement)`
+
+加载历史记录里的前一个资源地址。
+
+#### 参数
+
+* `webElement {Element}`:`<web>` 组件对象。
+
+#### 示例
+
+```javascript
+var webview = require('@weex-module/webview')
+var webElement = this.$el('webview')
+webview.goBack(webElement)
+```
+
+### `goForward(webElement)`
+
+加载历史记录里的下一个资源地址。
+
+#### 参数
+
+* `webElement {Element}`:`<web>` 组件对象。
+
+#### 示例
+
+```javascript
+var webview = require('@weex-module/webview')
+var webElement = this.$el('webview')
+webview.goForward(webElement)
+```
+
+### `reload(webElement)`
+
+刷新当前页面。
+
+#### 参数
+
+* `webElement {Element}`:`<web>` 组件对象。
+
+#### 示例
+
+```javascript
+var webview = require('@weex-module/webview')
+var webElement = this.$el('webview')
+webview.reload(webElement.ref)
+```
+
+*注意事项:未来 `<web>` 组件的 `Element` 对象将会支持直接这些方法,届时 `webview` module 将不再需要*
http://git-wip-us.apache.org/repos/asf/incubator-weex-site/blob/12e3a8bc/_drafts/v1.0/references/replace.md
----------------------------------------------------------------------
diff --git a/_drafts/v1.0/references/replace.md b/_drafts/v1.0/references/replace.md
new file mode 100644
index 0000000..5ace251
--- /dev/null
+++ b/_drafts/v1.0/references/replace.md
@@ -0,0 +1,57 @@
+# Replace option
+
+The `replace` option is boolean type. It determined whether this composed component will be replaced with the `<template>` content or just as a normal `<div>` element which include the `<template>` content.
+
+For example:
+
+```
+<element name="foo">
+ <template>
+ <text>Foo</text>
+ </template>
+ <script>
+ module.exports = {
+ replace: false // by default
+ }
+ </script>
+</element>
+
+<template>
+ <foo></foo>
+</template>
+```
+
+will rendered as:
+
+```
+<div>
+ <text>Foo</text>
+</div>
+```
+
+but:
+
+```
+<element name="foo">
+ <template>
+ <text>Foo</text>
+ </template>
+ <script>
+ module.exports = {
+ replace: true
+ }
+ </script>
+</element>
+
+<template>
+ <foo></foo>
+</template>
+```
+
+will rendered as:
+
+```
+<text>Foo</text>
+```
+
+So you can choose a way you need or like to manage your virtual DOM structure.
http://git-wip-us.apache.org/repos/asf/incubator-weex-site/blob/12e3a8bc/_drafts/v1.0/references/special-element.md
----------------------------------------------------------------------
diff --git a/_drafts/v1.0/references/special-element.md b/_drafts/v1.0/references/special-element.md
new file mode 100644
index 0000000..e01a2c7
--- /dev/null
+++ b/_drafts/v1.0/references/special-element.md
@@ -0,0 +1,38 @@
+---
+title: 特殊元素
+type: references
+order: 1.11
+version: 0.10
+---
+
+# 特殊元素
+
+## `<content>`
+
+`<content>` 在编写组件模板时作为作为内容节点元素存在,使用时将被真正的元素替换。
+
+替代写法: `<slot>`。
+
+## 示例
+
+如示例中写法,`<content>` 节点被 `<text>` 替代。
+
+```html
+<element name="item">
+ <template>
+ <div>
+ <content></content>
+ </div>
+ </template>
+</element>
+
+<template>
+ <div>
+ <item>
+ <text>Content Text</text>
+ </item>
+ </div>
+</template>
+```
+
+[体验一下](http://dotwe.org/bf4354a0e6dbe67470ad1a988cdd565e)
http://git-wip-us.apache.org/repos/asf/incubator-weex-site/blob/12e3a8bc/_drafts/v1.0/references/specs/index.md
----------------------------------------------------------------------
diff --git a/_drafts/v1.0/references/specs/index.md b/_drafts/v1.0/references/specs/index.md
new file mode 100644
index 0000000..164e61b
--- /dev/null
+++ b/_drafts/v1.0/references/specs/index.md
@@ -0,0 +1,309 @@
+---
+title: JS Bundle format (英)
+type: references
+order: 5
+has_chapter_content: false
+chapter_title: 底层规范
+version: 0.10
+---
+
+# JS Bundle format
+
+JS Bundle Version: v0.3.0
+
+## v0.5.0
+
+### Whole Syntax and Structure
+
+A JS Bundle is actually a JavaScript file which follows **ES5** standard. The code is used to define some custom components for the instance and bootstrap the instance with certain name, config and data. Developers could use all kinds of JS code packager like webpack, browserify, requirejs to organize your whole instance code.
+
+### Meta Info
+
+The JS Bundle Must begin with a comment line which is a JSON object like:
+
+```javascript
+// { "framework": "Weex", "version": "0.5.0" }
+```
+
+This JSON object as least contains:
+
+* property `framework` must be `"Weex"`
+* property `version` should be corresponded with the JS Bundle format version
+
+### Global Members
+
+* `__weex_define__(name, options)`
+* `__weex_bootstrap__(name, config, data)`
+* `__weex_document__`
+* `__weex_require__(name)`
+
+#### `__weex_define__(name:string, options: object)`
+
+Define a custom component named `name` for current instance with `options`.
+
+**example:**
+
+```javascript
+__weex_define__('rmb', {
+ template: {
+ type: 'div',
+ style: {flexDirection: 'row'},
+ children: [
+ {type: 'text', attr: {value: '¥'}},
+ {type: 'text', attr: {value: this.value}}
+ ]
+ },
+ data: function () {
+ return {
+ value: '0'
+ }
+ },
+ methods: {...}
+})
+```
+
+The enabled component options contains:
+
+* `template`: just the same as [v0.3.0](#details-of-template-option-definitions)
+* `style`: just the same as [v0.3.0](#details-of-style-option-definitions)
+* `data`: a function which return a plain object to observe by the ViewModel
+* `methods`: a function map to proxy to the ViewModel
+* `computed`: a map of several computed keys for the ViewModel
+* `init`, `created`, `ready`: lifecycle methods
+* `events`: event handlers for the ViewModel
+<!-- * `components`: a map for options of sub components the ViewModel needed (So `__weex_define__(name, options)` equals to run `this.components[name] = options` in each custom components when `init`) -->
+
+The enabled ViewModel APIs contains:
+
+* `$el(id): Element`: find element by id in current ViewModel scope
+* `$vm(id): ViewModel`: find sub ViewModel by id
+* `$getConfig(): object`: get instance config info
+* `$broadcast`/`$emit`/`$dispatch`/`$on`/`$off`: listen and fire component events
+* `$transition` *(experimental)*: animation transition (see more in [animation native module](../animation.html))
+
+#### `__weex_require__(name: string): object`
+
+Get a Weex native module with several native APIs.
+
+**example:**
+
+```javascript
+var modal = __weex_require__('modal')
+modal.toast({
+ message: 'Hey!',
+ duration: 2
+})
+```
+
+polyfill for v0.3.0
+
+```javascript
+function __weex_require__(name) {
+ var result
+ define('__weex_require__', function (r, e, m) {
+ result = r('@weex-module/' + name)
+ })
+ return result
+}
+```
+
+#### `__weex_bootstrap__(nameOrOptions: string|object, config: object?, data: object?): AppInstance | Error`
+
+Start to render by a certain component name or a direct component options as the root element, and some instance `config` and instance `data`. If everything fine, it will returns the root app instance. Otherwise it will return an `Error` instance which describes something wrong.
+
+**example:**
+
+```javascript
+__weex_bootstrap__(
+ 'root',
+ {
+ // format 1:
+ // downgrade: { appVersion: '>= 0.5.0' },
+ // format 2:
+ // downgrade: function (config) { return true }
+ },
+ {
+ // external data
+ // value: '12345'
+ }
+)
+```
+
+The instance `config` now only support `downgrade` property which allows two format:
+
+1. an object like `{ osVersion, appVersion, weexVersion, deviceModel }`
+2. a function like `function (config) { return true }` to return a boolean value. `true` means normal and `false` means downgrade.
+
+The instance `data` will merge to root component data. So the root component is also easy to reuse and the instance data is easy to customize.
+
+#### `__weex_document__`
+
+An virtual-DOM `Document` instance. Also the host of [virtual-DOM APIs](./virtual-dom-apis.html). Every Weex instance has and must have just one `Document` instance.
+
+### Preserved Global Variables
+
+`define`, `bootstrap`, `module`, `exports`, `document`, `require`, `register`, `render`
+
+### A whole example
+
+```javascript
+// { "framework": "Weex", "version": "0.5.0" }
+
+var modal = __weex_require__('modal')
+
+__weex_define__('item', {
+ template: {
+ type: 'div',
+ style: { flexDirection: 'row' },
+ event: {
+ click: function (e) {
+ this.update(e)
+ }
+ },
+ children: [
+ { type: 'image', attr: { src: this.imageUrl }, ...},
+ { type: 'text', attr: { value: this.title }, ...}
+ ]
+ },
+ data: function () {
+ return {
+ imageUrl: '',
+ title: ''
+ }
+ },
+ methods: {
+ update: function (e) {
+ modal.toast({ message: this.title })
+ }
+ }
+})
+
+__weex_define__('app', {
+ template: {
+ type: 'div',
+ children: [
+ {
+ type: 'item',
+ repeat: {
+ expression: function () {
+ return this.list
+ },
+ key: '$index',
+ value: '$value'}
+ },
+ attr: {
+ imageUrl: function () {
+ return this.$value.imageUrl
+ },
+ title: function () {
+ return this.$value.title
+ }
+ }
+ }
+ ]
+ },
+ data: function () {
+ return {
+ list: [
+ { imageUrl: 'xxx', title: '111' },
+ { imageUrl: 'yyy', title: '222' },
+ { imageUrl: 'zzz', title: '333' }
+ ]
+ }
+ }
+})
+
+__weex_bootstrap__('app')
+```
+
+## v0.3.0
+
+### Whole Syntax and Structure
+
+A JS Bundle is actually a JavaScript file which follows **ES5** standard. The code is organized by several modules with AMD-like format:
+
+```javascript
+define('moduleName1', function (require, exports, module) {
+ // content of module1
+})
+
+define('moduleName2', function (require, exports, module) {
+ // content of module2
+})
+
+...
+```
+
+A whole Weex JS Bundle is concatenated by these modules and last a `bootstrap(rootComponentName, optionalConfig, optionalExternalData)` function call.
+
+```javascript
+define('@weex-component/a', function (require, exports, module) {
+ // content of composed component <a>
+})
+
+define('@weex-component/b', function (require, exports, module) {
+ // content of composed component <b>
+})
+
+bootstrap('@weex-component/b')
+```
+
+As the sample above, the component name should be hyphenated (a-z, 0-9, "-"). Other characters are not allowed.
+
+And, the method call `bootstrap()` allows 1~3 parameters: root module name (String), config info (optional JSON) and external data (optional JSON).
+
+### Content of Composed Components
+
+A module of composed component contains 3 parts: whole options definition, additional template option definition and additional style option definition.
+
+- whole options is a piece of JavaScript code to put component options (except `template` option and `style` option) into `module.exports`
+- `template` option is a piece of JSON-like object assigned to `module.exports.template` which describes the display structure of this component
+- `style` option is a piece of JSON object assigned to `module.exports.style` which describes the reusable styles in this component
+
+The `template` option is required and appeared only once, and the `style` option and whole options definition are optional.
+
+These options are defined and transformed by Transformer. Actually you can also ignore all the format limitation and write options to `module.exports` as the same result if you are not going to use Transformer. But that's not recommended.
+
+#### Details of template option definitions
+
+A piece of multi-level embedded JSON-like object which describes the view structure.
+
+Every level JSON-like object has these members below:
+
+* `type`: a required string, component name/type
+* `component`: an optional boolean, whether this component is composed or native
+* `attr`: an optional k-v pairs which contains all attributes of an element, the value could be a string, number, boolean or a function that bind some data value
+* `style`: an optional k-v pairs which contains all styles of an element, just the same format as the `attr`
+* `classList`: an optional array of strings which contains class names for styling.
+* `events`: an optional k-v pairs whose keys are event type and values are corresponding method names
+* `children`: an optional array of child components info
+* `append`: an optional string which determines a compiling workflow strategy: append node-by-node singly or a whole node tree just one time. the default value is `node` and another supported value is `tree`.
+* `shown`: a optional function which returns a boolean value to determine whether this component should be displayed
+* `repeat`: a optional function which returns a list data to displays components with each
+
+**Corresponding Keys to Weex Transformer:**
+
+- tag `name` in Weex file corresponds to `type`
+- attr `if` in Weex file corresponds to `shown`
+- attr `repeat` in Weex file corresponds to `repeat`
+- attr `append` in Weex file corresponds to `append`
+- attr `style` in Weex file with CSS syntax corresponds to `style`
+- attr `class` in Weex file with class names separated by blanks corresponds to `classList`
+- attr `on***` in Weex file with prefix `on` corresponds to a k-v pair in `events`
+- other attributes in Weex file corresponds to `attr`
+- Child nodes in Weex file corresponds to `children`
+
+All tag names, attr names are case-insensitive and transformed to lower-cased. But the attr values are case-sensitive.
+
+#### Details of style option definitions
+
+Just a two-levels JSON object.
+
+* The first levels are class names.
+* The second levels are k-v pairs which describes style names & properties for each class name.
+
+**Corresponding Keys to Weex Transformer:**
+
+* class name corresponds to first level keys
+* prop name corresponds to second level keys
+* prop value corresponds to second level values
http://git-wip-us.apache.org/repos/asf/incubator-weex-site/blob/12e3a8bc/_drafts/v1.0/references/specs/js-framework-apis.md
----------------------------------------------------------------------
diff --git a/_drafts/v1.0/references/specs/js-framework-apis.md b/_drafts/v1.0/references/specs/js-framework-apis.md
new file mode 100644
index 0000000..d24dd3b
--- /dev/null
+++ b/_drafts/v1.0/references/specs/js-framework-apis.md
@@ -0,0 +1,190 @@
+---
+title: JS Framework APIs (英)
+type: references
+order: 5.2
+version: 0.10
+---
+
+# JS Framework APIs
+
+## Intro about JS Runtime
+
+These APIs are designed for JS Framework and Native Engine working together.
+
+Considering the limitation of mobile phone resource, *Weex runs only one JS runtime* to handle all Weex instances. So it need a multi-instance management layer in JavaScript. These JS Framework APIs are just designed to do the management job.
+
+* First, each Weex instance have a lifecycle, from `createInstance` to `destroyInstance`. During this period, we can import some extra data by `refreshInstance`.
+* To communicate with Native Engine, we have a couple of APIs: `sendTasks` and `receiveTasks`. They are used to call each other by some commands and messages.
+* And when JS runtime start at the beginning of the app launching, we need something initialized and configured. So we supply some APIs like `registerComponents`, `registerModules`.
+* The last API is just for debugging, we supply an API named `getRoot` to return the whole virtual-DOM data for developers.
+* If any of these API calls failed, an `Error` object should be returned.
+
+## Called by native and supplied from JS Framework
+
+### `createInstance(instanceId, code, options, data)`
+
+Create a Weex instance from Native Engine
+
+* `instanceId`: The unique id for a Weex instance, generated by Native Engine.
+* `code`: The JS bundle code send from Native Engine. It will be executed by `new Function(code)` in JS Framework. The code format depends on [JS Bundle Foramt](./js-bundle-format.html)
+* `options`: *Optional*. An options object. *Currently it supports `debug` flag which enable printing log and `bundleUrl` flag which the url of bundle.*
+* `data`: *Optional*. It's an chance to supply external data instead of the original data in JS bundle.
+
+Example:
+
+```javascript
+createInstance('x', 'define(...); define(...); define(...); bootstrap(...)')
+createInstance('x', '...', { bundleUrl, debug, ... }, { a: 1, b: 2 }})
+```
+
+### `destroyInstance(instanceId)`
+
+Destroy an existed Weex instance by id from Native Engine
+
+### `refreshInstance(instanceId, data)`
+
+Refresh data to an existed Weex instance with certain external data from Native Engine
+
+Example:
+
+```javascript
+refreshInstance('x', {a: 100, b: 200})
+```
+
+### `registerComponents(components)`
+
+Register all native components
+
+* `components`: A array of whose items are component options that are force part to use. *Currently it supports `append` attribute which forces the appending mechanism (`tree` or `node`) when first time rendering.*
+
+Example:
+
+```javascript
+registerComponents([
+ { type: 'container' },
+ { type: 'text' },
+ { type: 'image' },
+ { type: 'slider', append: 'tree' },
+ { type: 'list' },
+ { type: 'cell', append: 'tree' },
+ ...
+])
+```
+
+### `registerModules(modules)`
+
+Register the name, methods and args format of each module
+
+* `modules`: A map that collects all native module definitions. Each module definition is an array which has several API definitions. Each API definition has a `name` string and an `args` array which contains a list of each parameter's type.
+
+**NOTE: the `node` type data will actually return its `ref` property. And the `function` type data will actually return a unique function id referring to it.**
+
+Example:
+
+```javascript
+registerModules({
+ event: [
+ {name: 'openURL', args: ['string']}
+ ],
+ ...
+})
+```
+
+### `receiveTasks(instanceId, tasks)`
+
+Fire events or callbacks to an existed Weex instance from Native Engine
+
+* `tasks[]`: A task list. Each task has a `method="fireEvent|callback"` property and a list of `args`.
+ - In `fireEvent` method, the `args` is `ref` of the target, event `type`, event `data` and `domChanges` description in order. **Note: if some event make virtual-DOM data changed (e.g. value changed in `<input>` or current index changed in `<slider>`), the changing of the target element will be passed as `domChanges`.**
+ - In `callback` method, the `args` is `funcId` of a handler, `data` and `ifKeepAlive` which describes whether this callback handler should be keeping called. (Each callback handler is matched with a `funcId` when the original call happens.)
+
+Example:
+
+```javascript
+receiveTasks('x', [{method: 'fireEvent', args: ['x', '13', 'click', {a: 100, b: 200}]}])
+receiveTasks('x', [{method: 'callback', args: ['x', '7', {a: 100, b: 200}, true]}])
+```
+
+### `getRoot(instanceId)`
+
+Return a JSON object which describes the whole virtual DOM body of an existed Weex instance, which designed for debugging
+
+Example:
+
+```javascript
+getRoot('x')
+// {ref: '_root', type: 'container', attr: {...}, style: {...}, children: [...]}
+```
+
+## Called from JavaScript and implemented with native code
+
+### `sendTasks(instanceId, tasks)`
+
+Make native calls from JS Framework
+
+* `tasks[]`: A task list. Each task has a `module` name, a `method` name, and a `args[]` list.
+
+Example:
+
+```javascript
+sendTasks('x', [
+ {module: 'dom', method: 'addElement', args: ['_root', {ref: '1', type: 'container'}, -1]},
+ {module: 'dom', method: 'addElement', args: ['1', {ref: '2', type: 'text', ...}, -1]},
+ {module: 'dom', method: 'addElement', args: ['1', {ref: '3', type: 'image', ...}, -1]},
+ ...
+])
+```
+
+## Supporting other JS Framework <sup>(experimental)</sup>
+
+### Register a new JS Framework
+
+```javascript
+// lib/frameworks/index.js
+
+import Vue from '...'
+import React from '...'
+import Angular from '...'
+
+export const frameworks = {
+ Vue,
+ React,
+ Angular
+}
+```
+
+### Expose JS Framework APIs
+
+```javascript
+// 3rd-party-framework.js
+
+export function createInstance (id, code, config, data) { ... }
+export function destroyInstance (id) { ... }
+export function refreshInstance (id, data) { ... }
+export function registerComponents (components) { ... }
+export function registerModules (modules) { ... }
+export function recieveTasks (id, tasks) { ... }
+export function getRoot (id) { ... }
+```
+
+The virtual-DOM tasks should follow [virtual-DOM spec](./virtual-dom-apis.html).
+
+### Framework Helper
+
+You can import `lib/runtime/helper.js` to get two important things:
+
+* `Document` class, see [virtual-DOM spec](./virtual-dom-apis.html) for more.
+* `sendTasks` method.
+
+### JS Bundle format
+
+You must ensure the JS Bundle has its first line of code like this:
+
+```javascript
+// { "framework": "Vue" }
+...
+```
+
+to allow JS Runtime to detect which JS Framework it should be opened by.
+
+If no valid annotation found. The JS Bundle will be opened by default JS Framework of Weex.
http://git-wip-us.apache.org/repos/asf/incubator-weex-site/blob/12e3a8bc/_drafts/v1.0/references/specs/virtual-dom-apis.md
----------------------------------------------------------------------
diff --git a/_drafts/v1.0/references/specs/virtual-dom-apis.md b/_drafts/v1.0/references/specs/virtual-dom-apis.md
new file mode 100644
index 0000000..9291497
--- /dev/null
+++ b/_drafts/v1.0/references/specs/virtual-dom-apis.md
@@ -0,0 +1,148 @@
+---
+title: Virtual DOM APIs
+type: references
+order: 5.3
+version: 0.10
+---
+
+# Virtual DOM APIs
+
+## `Document`
+
+每个实例有一个与实例 id 对应的 document。Document 具有组成一个节点树的多个节点。
+
+### 构造函数
+
+##### `new Document(id: string, url: string?)`
+
+### 成员
+
+##### `createElement(tagName: string, props: Object?): Element`
+
+创建一个特定类型 `Element` 对象。`props` 对象可能包含一个 `attr` 对象和一个 `style` 对象。例如 `createBody('div', {style: {backgroundColor: '#ffffff'}})`
+
+##### `createComment(text: string): Comment`
+
+创建一个具有一些注释文本的 `Comment` 对象。
+
+##### `open()`
+
+初始化渲染开始时设置一个标志,表示初始化渲染开始,每个 DOM 更新将被立即调用。
+
+##### `close()`
+
+初始化渲染完成时设置一个标志,标识初始化渲染完成,DOM 更新以后将在每个任务中批处理。
+
+##### `fireEvent(el: Element, type: string, e: Object?, domChanges: Object?)`
+
+在某个元素上触发一个带有特定类型的事件,这个事件带有一个事件对象。当事件导致一些 DOM 的变化,第四个参数将像 `createElement` 方法里的 `props` 参数一样描述这些 DOM 变化。
+
+#### 只读属性 & Getters
+
+##### `id: string`
+
+##### `URL: string?`
+
+##### `body: Element`
+
+body 元素
+
+##### `documentElement: Element`
+
+document 元素
+
+##### `getRef(ref: string): Node?`
+
+通过内部 node map 的 `ref` 获取节点。
+
+**注意:**
+
+在一个 document 被创建时会自动生成一个 `documentElement` ,并且 `body` 应该手动创建并添加到 `documentElement` 才能工作。`body` 的 `type` 必须是一个 `div`,`list` 或 `scroller`。
+
+## `Node`
+
+### 构造函数
+
+##### `new Node()`
+
+### 成员
+
+##### `destroy()`
+
+#### 只读属性 & Getters
+
+##### `ref: string`
+
+##### `nextSibling: Node?`
+
+##### `previousSibling: Node?`
+
+##### `parentNode: Node?`
+
+## `Element` extends `Node`
+
+### 构造函数
+
+##### `new Element(type: string, props: Object?, ownerDocument: Document)`
+
+创建一个元素,并且 `props` 对象可能包含一个 `attr` 对象和一个 `style` 对象。
+
+### 成员
+
+#### DOM 树
+
+##### `appendChild(node: Node)`
+
+##### `insertBefore(node: Node, before: Node?)`
+
+##### `insertAfter(node: Node, after: Node?)`
+
+##### `removeChild(node: Node, preserved: boolean?)`
+
+移除一个子节点。`preserved` 参数表示是否立即销毁删除该节点或保存它。
+
+##### `clear()`
+
+#### DOM props
+
+##### `setAttr(key: string, value: string, silent: boolean?)`
+
+如果 `silent` 为 `true`,也不会调用 native。用于有 virtual-DOM 变化的事件处理。
+
+##### `setStyle(key: string, value: string, silent: boolean?)`
+
+`silent` 参数作用与 `setAttr` 中的一样。
+
+##### `setClassStyle(classStyle: Object)`
+
+class 样式的 CSS 优先级低于内联样式,当两种样式风格出现时,内联样式的值会覆盖 class 样式的值。
+
+##### `addEvent(type: string, handler: Function)`
+
+##### `removeEvent(type: string)`
+
+##### `fireEvent(type: string, e: any)`
+
+#### 只读属性 & Getters
+
+##### `toJSON(): Object`
+
+格式化 `{ref: string, type: string, attr: Object, style: Object, event: Array(string), children: Array}`
+
+## `Comment` extends `Node`
+
+`Comment` 将不被传给渲染引擎。因此,可作为占位符使用。
+
+### 构造函数
+
+##### `new Comment(value: string)`
+
+### 成员
+
+#### 只读属性 & Getters
+
+##### `type: string`
+
+返回 `'comment'`
+
+##### `value: string`
http://git-wip-us.apache.org/repos/asf/incubator-weex-site/blob/12e3a8bc/_drafts/v1.0/references/text-style.md
----------------------------------------------------------------------
diff --git a/_drafts/v1.0/references/text-style.md b/_drafts/v1.0/references/text-style.md
new file mode 100644
index 0000000..85f67c8
--- /dev/null
+++ b/_drafts/v1.0/references/text-style.md
@@ -0,0 +1,40 @@
+---
+title: 文本样式
+type: references
+order: 1.7
+version: 0.10
+---
+
+# 文本样式
+
+<span class="weex-version">v0.5+</span>
+
+文本类组件共享一些通用样式, 这类组件目前包括 [`<text>`](./components/text.html) 和 [`<input>`](./components/input.html)。
+
+## 属性
+
+- `color {color}`:文字颜色。
+
+ 可选值为色值,支持 RGB( `rgb(255, 0, 0)` );RGBA( `rgba(255, 0, 0, 0.5)` );十六进制( `#ff0000` );精简写法的十六进制( `#f00` );色值关键字(`red`)。
+
+- `lines {number}`: 指定文本行数。仅在 `<text>` 组件中支持。默认值是 `0` 代表不限制行数。
+
+- `font-size {number}`:文字大小。
+
+- `font-style {string}`:字体类别。可选值 `normal` | `italic`,默认为 `normal`。
+
+- `font-weight {string}`:字体粗细程度。可选值 `normal` | `bold`,默认为 `normal`。
+
+- `text-decoration {string}`:字体装饰,可选值 `none` | `underline` | `line-through`,默认值为 `none`。
+
+- `text-align {string}`:对齐方式。可选值 `left` | `center` | `right`,默认值为 `left`。目前暂不支持 `justify`, `justify-all`。
+
+- `font-family {string}`:设置字体。
+
+ 这个设置 **不保证** 在不同平台,设备间的一致性。如所选设置在平台上不可用,将会降级到平台默认字体。
+
+- `text-overflow {string}`:设置内容超长时的省略样式。可选值 `clip` | `ellipsis`
+
+## 其它参考
+
+- [颜色关键字列表](./references/color-names.html)。
http://git-wip-us.apache.org/repos/asf/incubator-weex-site/blob/12e3a8bc/_drafts/v1.0/references/units.md
----------------------------------------------------------------------
diff --git a/_drafts/v1.0/references/units.md b/_drafts/v1.0/references/units.md
new file mode 100644
index 0000000..2ff3482
--- /dev/null
+++ b/_drafts/v1.0/references/units.md
@@ -0,0 +1,66 @@
+---
+title: CSS 单位
+type: references
+order: 1.9
+version: 0.10
+---
+
+# CSS 单位
+
+## CSS `color` 单位
+
+支持以下写法:
+
+```css
+.classA {
+ /* 3-chars hex */
+ color: #0f0;
+ /* 6-chars hex */
+ color: #00ff00;
+ /* rgba */
+ color: rgb(255, 0, 0);
+ /* rgba */
+ color: rgba(255, 0, 0, 0.5);
+ /* transparent */
+ color: transparent;
+ /* Basic color keywords */
+ color: orange;
+ /* Extended color keywords */
+ color: darkgray;
+}
+```
+
+### 注意
+
+* 不支持 `hsl()`, `hsla()`, `currentColor`, 8个字符的十六进制颜色。
+
+* `rgb(a,b,c)` 或 `rgba(a,b,c,d)` 的性能比其他颜色格式差很多,请选择合适的颜色格式。
+
+颜色名称可查看 [颜色名称列表](./color-names.md).
+
+## CSS `length` 单位
+
+在 Weex 中,我们只支持 `px` 长度单位。并且它将在 JavaScript 运行时和本机渲染器中解析为数字类型。所以你也可以省略 `px` 单位后缀,直接写数字。
+
+下面这些不同的写法,解析的结果完全相同。
+
+```css
+.classA { font-size: 48; line-height: 64; }
+.classB { font-size: 48px; line-height: 64px; }
+```
+
+不支持类似 `em`,`rem`,`pt` 这样的 CSS 标准中的其他长度单位。
+
+## CSS `number` 单位
+
+仅仅一个数字。用于 [`opacity`](./common-style.md#其他基本样式),[`lines`](./text-style.md)等。
+
+有时值必须是整数,例如:`lines`。
+
+**注意:**也可以将所有的 `px` `length` 值简化为一个数字。
+
+## CSS `percentage` 单位 (暂不支持)
+
+表示百分比值,如“50%”,“66.7%”等。
+
+它是 CSS 标准的一部分,但 Weex 暂不支持。
http://git-wip-us.apache.org/repos/asf/incubator-weex-site/blob/12e3a8bc/_drafts/v1.0/references/wxc/index.md
----------------------------------------------------------------------
diff --git a/_drafts/v1.0/references/wxc/index.md b/_drafts/v1.0/references/wxc/index.md
new file mode 100644
index 0000000..5969ce2
--- /dev/null
+++ b/_drafts/v1.0/references/wxc/index.md
@@ -0,0 +1,44 @@
+---
+title: 官方扩展组件
+type: references
+order: 3
+has_chapter_content: true
+version: 0.10
+---
+
+# 官方扩展组件
+
+Weex 官方扩展组件指的是以 `wxc-` 开头的组件,这些组件不属于内建组件的一部分,而是 Weex 团队基于内建组件扩展的一些常用组件。这些组件依赖 `weex-components`,需要安装依赖后才可使用。
+
+使用方式如下:
+
+1. 安装依赖
+
+ 需要在工程目录下执行以下命令:
+
+ ```bash
+ npm install weex-components
+ ```
+
+2. 使用
+
+ 需要在 `<script>` 中引入依赖。
+
+ ```html
+ <template>
+ <div style="flex-direction: column;">
+ <wxc-tabbar tab-items = {{tabItems}}></wxc-tabbar>
+ </div>
+ </template>
+
+ <script>
+ require('weex-components');
+
+ module.exports = {
+ data: {},
+ methods: {
+ // more
+ }
+ }
+ </script>
+ ```
\ No newline at end of file
http://git-wip-us.apache.org/repos/asf/incubator-weex-site/blob/12e3a8bc/_drafts/v1.0/references/wxc/wxc-navpage.md
----------------------------------------------------------------------
diff --git a/_drafts/v1.0/references/wxc/wxc-navpage.md b/_drafts/v1.0/references/wxc/wxc-navpage.md
new file mode 100644
index 0000000..6b15175
--- /dev/null
+++ b/_drafts/v1.0/references/wxc/wxc-navpage.md
@@ -0,0 +1,192 @@
+---
+title: <wxc-navpage>
+type: references
+order: 3.1
+version: 0.10
+---
+
+# <wxc-navpage> <sup>(v0.5+)</sup>
+
+`<wxc-navpage>` 组件是一个包含 navbar 的容器组件,可以根据业务场景定制 navbar 组件。同时,可以使用 `navigator` 模块控制页面的跳转,具体参考 [`navigator module`](../modules/navigator.html)。一般情况,都是配合 navbar 组件使用。如果不了解 navigator 相关知识,建议先了解下 iOS 或者 Android 的相关组件。在 H5 上,其实是相当于导航栏。
+
+用法:在 `script` 标签中通过一个 `require` 语句引入,即:`require('weex-components');`
+
+**示例**
+
+```html
+<template>
+ <div style="flex-direction: column;">
+ <wxc-navpage tab-items = {{tabItems}}></wxc-navpage>
+ </div>
+</template>
+
+<script>
+ require('weex-components');
+ // more
+</script>
+```
+
+在 `require('weex-components');` 之前 ,需要在工程目录下执行以下命令:
+
+```bash
+npm install weex-components
+```
+
+## 子组件
+
+`<wxc-navpage>` 组件支持任意 Weex 组件。
+
+## 特性
+
+`<wxc-navpage>` 组件的特性其实是对 navbar 进行功能设置,如下图所示,是 navbar 的一个简单示意。
+
+
+
+- `height {number}`:navbar 的高度,默认是 88。
+
+- `background-color {color}`:navbar 的背景颜色,默认是白色。
+
+- `title {string}`:navbar 的标题。
+
+- `title-color {color}`:navbar 标题的颜色,默认黑色。
+
+- `left-item-title {string}`:navbar 左侧按钮的标题。
+
+- `left-item-color {color}`:navbar 左侧按钮标题颜色,默认黑色。
+
+- `right-item-title {string}`:navbar 右侧按钮标题。
+
+- `right-item-color {color}`:navbar 右侧按钮标题颜色,默认黑色。
+
+- `left-item-src {string}`:navbar 左侧按钮的图标。
+
+- `right-item-src {string}`:navbar 右侧按钮的图标。
+
+### 样式
+
+- 通用样式:支持所有通用样式
+
+ - 盒模型
+ - `flexbox` 布局
+ - `position`
+ - `opacity`
+ - `background-color`
+
+ 查看 [组件通用样式](../common-style.html)
+
+## 事件
+
+`<wxc-navpage>` 组件支持左右两项点击事件。
+
+- `naviBar.leftItem.click`: 当 navbar 的左侧按钮被点击时触发事件,需要在 `created` 时期注册事件。
+- `naviBar.rightItem.click`: 当 navbar 的右侧按钮被点击时触发事件,需要在 `created` 时期注册事件。
+
+**示例:**
+
+```html
+<template>
+ <wxc-navpage height={{...}} background-color="..." title="..." title-color="..." left-item-title="..." left-item-color="..." right-item-src="...">
+ <content> ...</content>
+ </wxc-navpage>
+</template>
+<script>
+ require('weex-components');
+ module.exports = {
+ created: function() {
+ this.$on('naviBar.rightItem.click',function(e){
+ //handle your click event here.
+ });
+
+ this.$on('naviBar.leftItem.click',function(e){
+ //handle your click event here.
+ });
+ }
+ }
+</script>
+```
+
+- 通用事件
+
+ 支持所有通用事件:
+
+ - `click`
+ - `longpress`
+ - `appear`
+ - `disappear`
+
+ 查看 [通用事件](../common-event.html)
+
+## 示例
+
+**注意:**
+
+[dotwe](http://dotwe.org) 平台暂不支持 `wxc-xxx` 类型的组件。
+
+```html
+<template>
+ <wxc-navpage data-role="none" height={{navBarHeight}} background-color="#ff5898" title={{title}} title-color="white" left-item-title="More" left-item-color="white" right-item-src="http://gtms02.alicdn.com/tps/i2/TB1ED7iMpXXXXXEXXXXWA_BHXXX-48-48.png">
+ <wxc-panel title="push a new page">
+ <wxc-button type="primary" size="small" value="push" onclick="push"></wxc-button>
+ </wxc-panel>
+ <wxc-panel title="pop to the last page">
+ <wxc-button type="success" size="small" value="pop" onclick="pop"></wxc-button>
+ </wxc-panel>
+ </wxc-navpage>
+</template>
+
+<script>
+ require('weex-components');
+ module.exports = {
+ data: {
+ navBarHeight: 88,
+ title: 'Navigator',
+ dir: 'examples',
+ baseURL: '',
+ },
+ created: function() {
+ this.$getConfig(function (config) {
+ var env = config.env;
+ if(env.platform == 'iOS'){
+ var scale = env.scale;
+ var deviceWidth = env.deviceWidth / scale;
+ this.navBarHeight = 64.0 * 750.0 / deviceWidth;
+ }
+ }.bind(this));
+
+ this.$on('naviBar.rightItem.click',function(e){
+ duration = 2;
+ this.$call('modal', 'toast', {
+ 'message': 'naviBar.rightItem.click',
+ 'duration': duration
+ });
+ });
+
+ this.$on('naviBar.leftItem.click',function(e){
+ duration = 2;
+ this.$call('modal', 'toast', {
+ 'message': 'naviBar.leftItem.click',
+ 'duration': duration
+ });
+ });
+ },
+ methods: {
+ push: function() {
+ var vm = this;
+ var params = {
+ 'url': 'http://dotwe.org/raw/dist/33dfcbe81979c60ba5de72c235d7d0f8.js',
+ 'animated' : 'true',
+ }
+ vm.$call('navigator','push',params, function () {});
+ },
+
+ pop: function() {
+ var vm = this;
+ var params = {
+ 'animated' : 'true',
+ }
+ vm.$call('navigator','pop',params, function () {});
+ }
+ }
+ }
+</script>
+```
http://git-wip-us.apache.org/repos/asf/incubator-weex-site/blob/12e3a8bc/_drafts/v1.0/references/wxc/wxc-tabbar.md
----------------------------------------------------------------------
diff --git a/_drafts/v1.0/references/wxc/wxc-tabbar.md b/_drafts/v1.0/references/wxc/wxc-tabbar.md
new file mode 100644
index 0000000..492c1cd
--- /dev/null
+++ b/_drafts/v1.0/references/wxc/wxc-tabbar.md
@@ -0,0 +1,176 @@
+---
+title: <wxc-tabbar>
+type: references
+order: 3.2
+version: 0.10
+---
+
+# <wxc-tabbar>
+
+`<wxc-tabbar>` 是一个名为 `weex-components` 依赖库的自定义组件。`<wxc-tabbar>` 能在窗口的底部显示 tab 页面,我们可以在不同的 tab 页面之间切换。
+
+用法:在 `script` 标签中通过一个 `require` 语句引入,即:`require('weex-components');`
+
+**示例**
+
+```html
+<template>
+ <div style="flex-direction: column;">
+ <wxc-tabbar tab-items = {{tabItems}}></wxc-tabbar>
+ </div>
+</template>
+
+<script>
+ require('weex-components');
+
+ module.exports = {
+ data: {},
+ methods: {
+ // more
+ }
+ }
+</script>
+```
+
+在 `require('weex-components');` 之前 ,需要在工程目录下执行以下命令:
+
+```bash
+npm install weex-components
+```
+
+## 子组件
+
+该组件不支持子组件。
+
+## 特性
+
+- `selected-index {number}`:设置默认选中的 tab 索引,默认值为 0(第一个 tab)。
+- `selected-color {color}`:设置当标题被选中时标题的颜色,默认为红色。
+- `unselected-color {color}`:设置当标题不被选中时标题的颜色,默认为黑色。
+- `tab-items {Array[Object]}`:该属性接受一个 `tabitems` 对象数组, 分别对应到对应的 tab 页面,tab 页面的顺序跟对象数组的位置对应。
+ 我们可以通过设置每一项的属性来配置 tabbar 的外观:
+
+ - `index {integer}`:必填属性,指明了 tabitem 的次序。
+ - `title {string}`:设置 tabitem 的标题,非必填,当标题为空时,标题将不会被显示
+ - `titleColor {color}`:设置 tabitem 的标题颜色,默认是黑色
+ - `image {string}`:当 tab 页面不被选中时显示的 icon,当不提供时,什么也不显示。
+ - `selectedImage {string}`:设置 tab 页面被选中时显示的图片,不提供图片时,什么也不显示。
+ - `src {string}`:设置 tab 对应的 Weex 页面的 url,为 http 开头。
+ - `visibility {string}`:值为 `visible` | `hidden`,该属性指明了 tab 页面的显示状态,默认值是 visible
+
+## 样式
+
+- 通用样式:支持所有通用样式
+
+ - 盒模型
+ - `flexbox` 布局
+ - `position`
+ - `opacity`
+ - `background-color`
+
+ 查看 [组件通用样式](../common-style.html)
+
+## 事件
+
+- `tabBar.onClick`:当 tab 页面被选中时触发,需要在 `ready` 或者 `create` 生命周期中注册,如:
+
+ **示例**
+
+ ```html
+ <template>
+ <div style="flex-direction: column;">
+ <wxc-tabbar tab-items="{{tabItems}}"></wxc-tabbar>
+ </div>
+ </template>
+
+ <script>
+ require('weex-components');
+ module.exports = {
+ data: {
+ // ...
+ },
+ created: function() {
+ var vm = this;
+ vm.$on('tabBar.onClick',function(e){
+ var detail= e.detail;
+ console.log('tabBar.onClick ' + detail.index);
+ });
+ },
+ methods: {
+ }
+ }
+ </script>
+ ```
+
+- 通用事件
+ 支持所有通用事件:
+
+ - `click`
+ - `longpress`
+ - `appear`
+ - `disappear`
+
+ 查看 [通用事件](../common-event.html)
+
+## 示例
+
+**注意:**
+
+[dotwe](http://dotwe.org) 平台暂不支持 `wxc-xxx` 类型的组件。
+
+```html
+<template>
+ <div>
+ <wxc-tabbar tab-items="{{tabItems}}"></wxc-tabbar>
+ </div>
+</template>
+
+<script>
+ require('weex-components');
+ module.exports = {
+ data: {
+ dir: 'examples',
+ tabItems: [
+ {
+ index: 0,
+ title: 'tab1',
+ titleColor: '#000000',
+ icon: '',
+ image: 'http://gtms01.alicdn.com/tps/i1/TB1qw.hMpXXXXagXXXX9t7RGVXX-46-46.png',
+ selectedImage: 'http://gtms04.alicdn.com/tps/i4/TB16jjPMpXXXXazXVXX9t7RGVXX-46-46.png',
+ src: 'http://dotwe.org/raw/dist/ba202bcd277285c7f3cf79f9b1055dce.js?itemId=tab1',
+ visibility: 'visible',
+ },
+ {
+ index: 1,
+ title: 'tab2',
+ titleColor: '#000000',
+ icon: '',
+ image: 'http://gtms03.alicdn.com/tps/i3/TB1LEn9MpXXXXaUXpXX9t7RGVXX-46-46.png',
+ selectedImage: 'http://gtms02.alicdn.com/tps/i2/TB1qysbMpXXXXcnXXXX9t7RGVXX-46-46.png',
+ src: 'http://dotwe.org/raw/dist/7e24b83c5868dbd4462e30549999245d.js?itemId=tab2',
+ visibility: 'hidden',
+ },
+ {
+ index: 2,
+ title: 'tab3',
+ titleColor: '#000000',
+ icon: '',
+ image: 'http://gtms01.alicdn.com/tps/i1/TB1B0v5MpXXXXcvXpXX9t7RGVXX-46-46.png',
+ selectedImage: 'http://gtms04.alicdn.com/tps/i4/TB1NxY5MpXXXXcrXpXX9t7RGVXX-46-46.png',
+ src: 'http://dotwe.org/raw/dist/8a8b49b67084423e097a6b7f549f1453.js?itemId=tab3',
+ visibility: 'hidden',
+ }
+ ],
+ },
+ created: function() {
+ var vm = this;
+ vm.$on('tabBar.onClick',function(e){
+ var detail= e.detail;
+ console.log('tabBar.onClick ' + detail.index);
+ });
+ },
+ methods: {}
+ }
+</script>
+```
http://git-wip-us.apache.org/repos/asf/incubator-weex-site/blob/12e3a8bc/_drafts/v1.0/tools/devtools-android.md
----------------------------------------------------------------------
diff --git a/_drafts/v1.0/tools/devtools-android.md b/_drafts/v1.0/tools/devtools-android.md
new file mode 100644
index 0000000..9ce8991
--- /dev/null
+++ b/_drafts/v1.0/tools/devtools-android.md
@@ -0,0 +1,123 @@
+---
+title: Devtools for Android
+type: tools
+order: 2.1
+version: 0.10
+---
+
+# Devtools for Android
+
+[](https://github.com/weexteam/weex_devtools_android/releases) [](https://www.codacy.com/app/weex_devtools/weex_devtools_android?utm_source=github.com&utm_medium=referral&utm_content=weexteam/weex_devtools_android&utm_campaign=Badge_Grade) [](https://codeclimate.com/github/weexteam/weex_devtools_android) [](https://codeclimate.com/github/weexteam/weex_devtools_android) [](https://github.com/weexteam/weex_devtools_android/issues) [  ](https://bintray.com/alibabaweex/maven/weex_inspector/_latestVersion)
+
+Weex devtools is a custom devtools for weex that implements [Chrome Debugging Protocol](https://developer.chrome.com/devtools/docs/debugger-protocol) inspired by [Stetho](https://github.com/facebook/stetho), it is designed to help you quickly inspect your app and debug your JS bundle source in a chrome web page.At present The devtools consist of two part : `Inspector` and `Debugger`. If you want it work well, you must install a `weex-devtool` as debug server.
+
+- **Inspector**
+ Inspector can be used to show your `Element` \ `NetWork` \ `Console log` \ `ScreenCast` \ `BoxModel` \ `Native View` and so on.
+
+- **Debugger**
+ Debugger can be used to debug your bundle js source, you can set `Breakpoint` \ watch `CallStack`.
+
+## Install and launch devtools server
+Open your terminal then type `npm install -g weex-toolkit` and run.Launch it just type and run the command `weex debug`, then a Chrome web page will be opened.
+
+## Use on an android device or emulator
+
+### Taste of first debug with playground
+If you are a green hand to the debug of weex, we recommend you to try your first debug with `playground`, what you need to do is just launch the playground and scan the QR code shown in the debug page which wound opened if the `devtools server` have been launched. after you scan the QR code, the web page will list your connected devices.
+
+ devices")
+
+#### How Debugger Works
+Devtools expands [Chrome Debugging Protocol](https://developer.chrome.com/devtools/docs/debugger-protocol) and the mechanism of communication between client and debug sever is based on [JSON-RPC](https://en.wikipedia.org/wiki/JSON-RPC).
+
+##### Devtools Client
+Devtools Client is integrated in App as aar, it connects to debug server through webscoket protocol with out permission check. I recommend you just packaged it in your debug version consider of the security mechanism.
+
+##### Devtools Debug Server
+Devtools Debug Server is the center node of the communication, it connects to both app and chrome, acts as the turn server of debugging protocol messages and the manager of the js runtime.
+
+##### Chrome FrontEnd
+Chrome's V8 engine acts as the javascript runtime, when debug mode is enabled, all the js code run on it. On the other side we also reuse most of the Chrome's debugging user interface, such as set breakpoint, see call stack and so on.
+
+
+
+### Enable devtools in your own app
+Of course you can reuse the code of playground to build your own app, that is the simplest way to let your app's js code debuggable. On the other hand QR code is not necessary, if your review the source code you can draw a conclusion that QR CODE is just a way to set `devtools server` address. following those steps you can do the same thing.
+
+#### Gradle dependency on inspector.
+There are two choices to set the dependency, the Choice A is recommanded if you have no change to weex_sdk or inspector, while if you use your own custom weex_sdk or inspector Choice B is suitable.
+
+ * *A - aar dependency from jcenter*.
+ ````
+ dependencies {
+ compile 'com.taobao.android:weex_inspector:0.0.8.1'
+ }
+ ````
+I strongly recommend you use the latest version since both weex sdk and devtools are developed iteratively and rapidly. See the release version list [here](https://github.com/weexteam/weex_devtools_android/releases). All the release version will publish to the [jcenter repo](https://bintray.com/alibabaweex/maven/weex_inspector).
+
+ * *B - source code dependency.*
+
+ you need to copy the dir of inspector to the same dir of your app and add `include ":inspector"`in your project's `settings.gradle` file just like playground have done, then add dependency in your app's `build.gralde`.
+ ````
+ dependencies {
+ compile project(':inspector')
+ }
+ ````
+
+##### Version compatibility
+
+| weex sdk | weex inspector | debug server |
+|----------|----------------|--------------|
+|0.8.0.1+ | 0.0.8.1 |0.2.39+ |
+|0.7.0+ | 0.0.7.13 |0.2.38 |
+|0.6.0+ | 0.0.2.2 | |
+
+
+#### Initialize in your XXXApplication file.
+````
+ public class MyApplication extends Application {
+ public void onCreate() {
+ super.onCreate();
+ initDebugEnvironment(true, "xxx.xxx.xxx.xxx"/*"DEBUG_SERVER_HOST"*/);
+ }
+ private void initDebugEnvironment(boolean enable, String host) {
+ WXEnvironment.sRemoteDebugMode = enable;
+ WXEnvironment.sRemoteDebugProxyUrl = "ws://" + host + ":8088/debugProxy/native";
+ }
+}
+````
+
+#### Ship It!
+ 1. You must launch your bundle server firstly. In your weex dir, run command "./start";
+ 2. Launch your remote debug server. Run command `weex debug`, chrome will open a web page show a simply guidance and QR code;
+ 3. Launch your app and make sure debug mode was enabled. You will see a device list in the chrome web page opened by last step, each device item have two button, `Debugger` and `Inspector`;There are two way to enable debug mode:
+ * scaning the QR code and handle the content just like the playground have done.
+ * init it in the XXXApplication by calling `initDebugEnvironment(true, "xxx.xxx.xxx.xxx")`, if you call `initDebugEnvironment(true, "xxx.xxx.xxx.xxx")` after weex sdk inited, you need to call `WXSDKEngine.reload()` to refresh the runtime.
+ 4. Once you click the button `Inspector` chrome will open a page show the inspector view, on the other side, click the button `Debugger` chrome will open a new page to show the debug view;
+
+
+
+
+
+---
+
+#### OPTIONS
+
+##### [**OPTION**] *set your remote bundle server ip.*
+
+ For example, in the playground it is in the `IndexActivity.java`, you need to change the value of `DEFAULT_IP` in IndexActivity.java from `"your_current_IP"` to a server ip like `"30.30.30.150"`:
+````
+ private static final String DEFAULT_IP = "30.30.30.150"; // "your_current_IP";
+````
+
+##### [**OPTION**] *enable network inspection.*
+````
+OkHttpClient client = new OkHttpClient();
+client.networkInterceptors().add(new OkHttpInterceptor());
+````
+
+###### Notice
+ The network inspection only support OKHttpClient right now!!! If you want to use the network inspection to catch your bundle request, you must change your bundle server ip to the real server ip.
+
+#### Known Issues
+ You can report issues and bugs [here](https://github.com/weexteam/weex_devtools_android/issues). We will reply as soon as possible.
http://git-wip-us.apache.org/repos/asf/incubator-weex-site/blob/12e3a8bc/_drafts/v1.0/tools/devtools-ios.md
----------------------------------------------------------------------
diff --git a/_drafts/v1.0/tools/devtools-ios.md b/_drafts/v1.0/tools/devtools-ios.md
new file mode 100644
index 0000000..801b80d
--- /dev/null
+++ b/_drafts/v1.0/tools/devtools-ios.md
@@ -0,0 +1,65 @@
+---
+title: Devtools for iOS
+type: tools
+order: 2.2
+version: 0.10
+---
+
+# Devtools for iOS
+
+通过Chrome开发者工具远程调试你的原生iOS app
+## 启动weex-devtool:
+1. 安装和运行 weex-devtool
+
+ ```
+ $:npm install -g weex-devtool
+
+ $:weex-devtool
+ ```
+
+ 它会启动chrome浏览器,展示wss ip 地址在chrome地址栏。
+## playground 安装 WXDevtool
+1. 安装依赖.
+
+ $:pod install
+### 使用
+1. AppDelegate.m 头文件
+
+ ```
+ #import "WXDevTool.h"
+ ```
+2. 在App启动的时候初始化 inspector
+
+ **注意: The inspector API 必须在weex初始化之前调用**
+ - (void)setDebug:(BOOL)isDebug;
+
+ isDebug默认是NO,那么你打开的是inspect模式。假如设置isDebug为YES,那么打开debug模式和inspect模式。
+ - (void)launchDevToolDebugWithUrl:(NSString *)url;
+
+ wssip 是 展示在 chrome 地址栏的wss 地址.
+ - 打开 debug 模式 和 inspector 模式
+
+ eg:- (BOOL)application:(UIApplication *)application didFinishLaunchingWithOptions:(NSDictionary *)launchOptions
+ {
+ [WXDevTool setDebug:YES];
+ [WXDevTool launchDevToolDebugWithUrl:@"ws://wssip/debugProxy/native"];
+ }
+ - 打开 inspect 模式, 移除 @selector(setDebug:) 或者 增加 [WXDevTool setDebug:NO]
+
+ eg:- (BOOL)application:(UIApplication *)application didFinishLaunchingWithOptions:(NSDictionary *)launchOptions
+ {
+ [WXDevTool launchDevToolDebugWithUrl:@"ws://wssip/debugProxy/native"];
+ }
+3. 编译和运行APP,chrome会显示你的设备,选择inspector。
+4. 支持不同级别的Log打印。
+
+ eg: #import "WXDevTool.h"
+ PDLogE()/PDLogW()
+### WXDevtool依赖
+
+你的app必须链接下面的frameworks/dylibs
+- libicucore.dylib
+- CFNetwork.framework
+- CoreData.framework
+- Security.framework
+- Foundation.framework
http://git-wip-us.apache.org/repos/asf/incubator-weex-site/blob/12e3a8bc/_drafts/v1.0/tools/devtools.md
----------------------------------------------------------------------
diff --git a/_drafts/v1.0/tools/devtools.md b/_drafts/v1.0/tools/devtools.md
new file mode 100644
index 0000000..ab7ddb3
--- /dev/null
+++ b/_drafts/v1.0/tools/devtools.md
@@ -0,0 +1,99 @@
+---
+title: Devtools
+type: tools
+order: 2
+has_chapter_content: true
+version: 0.10
+---
+
+# Devtools
+
+**weex devtools**是专门为weex定制的一款实现了[**Chrome Debugging Protocol**](https://developer.chrome.com/devtools/docs/debugger-protocol)的inspect/debug工具,能够帮助你快速查看app运行状态和调试weex中的Javascript代码,当前支持**IOS**和**Android**两个平台。
+## 安装
+
+```
+$ npm install -g weex-toolkit
+```
+## 用法
+
+ weex debug [options] [we_file|bundles_dir]
+
+ 选项:
+
+```
+-h, --help 显示帮助
+-V, --verbose 显示debug服务器运行时的各种log
+-v, --version 显示版本
+-p, --port [port] 设置debug服务器端口号 默认为8088
+-e, --entry [entry] debug一个目录时,这个参数指定整个目录的入口bundle文件,这个bundle文件的地址会显示在debug主页上(作为二维码)
+-m, --mode [mode] 设置构建we文件的方式,transformer 最基础的风格适合单文件,loader:wepack风格 适合模块化的多文件.默认为transformer
+```
+#### 开启调试
+
+```
+$weex debug
+```
+
+单纯启动一个调试服务器,并同时唤起chrome浏览器打开`调试主页`.
+这个`调试主页`上会有一个二维码,使用Playground App扫这个二维码可以开启Playground调试.
+开启调试后,设备列表中会出现您的设备,根据提示进行后续的调试操作
+#### 调试 we文件
+
+```
+$weex debug your_weex.we
+```
+
+这个命令会将your_weex.we编译成bundlejs文件 部署到debug服务器
+并启动debug服务器如上述命令那样.打开的`调试主页`会多显示一个二维码,使用playground app
+扫这个码可以加载your_weex.we.(注意要先扫描开启调试的那个码)
+这个命令会自动检测your_weex.we文件变动,如果发现内容被修改则立即重新编译部署,并刷新debugger页面
+.
+#### 调试整个bundle/we文件夹
+
+```
+$weex debug your/we/path -e index.we
+```
+
+这个命令会编译你指定目录下的所有的we文件,并把编译好的bundlejs部署到debug服务器,他们的地址会映射到 http://lcoalhost:8088/weex/ 下
+比如 your/we/path/`index.we` 可以通过http://lcoalhost:8088/weex/index.js访问
+your/we/path/`demo/test.we` 可以通过http://lcoalhost:8088/weex/demo/index.js
+
+-e参数可以指定一个入口的we文件,这个文件的地址会显示在`调试主页`上(作为二维码)
+## 特性
+### 连接设备
+
+
+### Inspector
+
+ Inspector 能够用来查看 `Element` \ `NetWork` \ `Console log` \ `ScreenCast` \ `BoxModel` \ `Native View` 等。
+
+
+#### Element
+
+
+#### NetWork
+##### 查看网络请求的总耗时和延时
+
+
+##### 查看网络请求的header和response
+
+
+#### 控制台
+
+
+#### 资源
+
+
+### Debugger
+
+ 调试器用来调试weex中的js代码,能够设置断点、查看调用栈。
+
+
+##### Breakpoint and CallStack
+
+
+#### 集成devtools
+- Android
+ - 请参考文档 [Weex devtools (Android)](../advanced/integrate-devtools-to-android.html), 其中有详细说明。
+- IOS
+ - 请参考文档 [Weex devtools (IOS)](../advanced/integrate-devtools-to-ios.html), 其中有详细说明。
http://git-wip-us.apache.org/repos/asf/incubator-weex-site/blob/12e3a8bc/_drafts/v1.0/tools/index.md
----------------------------------------------------------------------
diff --git a/_drafts/v1.0/tools/index.md b/_drafts/v1.0/tools/index.md
new file mode 100644
index 0000000..06c424a
--- /dev/null
+++ b/_drafts/v1.0/tools/index.md
@@ -0,0 +1,96 @@
+---
+title: CLI (英)
+type: tools
+order: 1
+has_chapter_content: true
+version: 0.10
+---
+
+# CLI
+
+Please access [npmjs.com](https://www.npmjs.com/package/weex-toolkit) for latest version
+
+Weex CLI tool set
+
+## Pre Install
+some dependencies need recent version of npm to install
+
+if your
+```
+$ npm --version
+```
+output less than `2.15.1`, please run below cmd to upgrade your npm at first
+```
+sudo npm install -g npm
+```
+
+## Install
+```
+$npm install -g weex-toolkit
+```
+
+## Usage
+
+```
+$weex foo/bar/input_path [options]
+
+$weex create file_name [options]
+
+Options:
+ --qr display QR code for native runtime, **default action**
+ -o,--output transform weex we file to JS Bundle, output path (single JS bundle file or dir)
+ [for create sub cmd] it specified we file output path
+ --watch using with -o, watch input path, auto run transform if change
+ happen
+ -s,--server start a http file server, weex .we file will be transformed to JS
+ bundle on the server, specify local root path using the option
+ --port http listening port number, default is 8081
+ --wsport websocket listening port number, default is 8082
+ -f, --force [for create sub cmd] force to replace exsisting file(s)
+ --version show version of weex toolkit
+ --help Show help
+```
+
+## Examples
+
+#### create a `we file`(weex source file) using standard template
+```
+$weex create hello-world-weex
+```
+a file named 'hello-world-weex.we' will be created in current directory
+
+
+#### transform a `we file` to JS Bundle
+```
+$weex your_best_weex.we -o .
+```
+`your_best_weex.we` will be transformed to JS Bundle file `your_best_weex.js` and saved in your current directory
+
+#### transform a `we file` to JS Bundle, watch this file,auto run transformer if any change happens.
+```
+$weex your_best_weex.we -o . --watch
+```
+
+#### transform every we file in a directory
+```
+$weex we/file/storage/path -o outputpath
+```
+every `we file` in `we/file/storage/path` will be transformed to JS Bundle and saved in `outputpath` path
+
+#### preview your we file using Weex Playground App
+download & install [weex playground App](http://alibaba.github.io/weex/download.html)
+```
+$weex your_best_weex.we --qr
+```
+a QR code will display in your terminal, using Playground App scan that.
+
+
+#### start http server
+```
+$weex -s .
+```
+a http server will start running, your current directory(.) will be the document root for the server, every weex.we file will be transformed to JS Bundle when accessed through the server
+
+## Issue & Feedback
+
+[Github Issue List](https://github.com/weexteam/weex-toolkit/issues)
http://git-wip-us.apache.org/repos/asf/incubator-weex-site/blob/12e3a8bc/_drafts/v1.0/tools/playground.md
----------------------------------------------------------------------
diff --git a/_drafts/v1.0/tools/playground.md b/_drafts/v1.0/tools/playground.md
new file mode 100644
index 0000000..dc7bbec
--- /dev/null
+++ b/_drafts/v1.0/tools/playground.md
@@ -0,0 +1,22 @@
+---
+title: Playground
+type: tools
+order: 4
+has_chapter_content: true
+version: 0.10
+---
+
+Weex Playground App
+===================
+
+Weex 的最棒的一个部分是 Native Runtime。你的 `.we` 文件可以使用 weex-toolkit CLI 在浏览器中预览 Web 效果,也可以通过 Weex Playground App 这样一个单独的应用来预览原生效果。不仅如此,Weex playground App 还内置了大量的 Demo 和展示案例,这样你就可以更加容易地体验到 Weex 在 Native 层面的效果了。
+
+Playground App 的下载地址在 [这里](http://alibaba.github.io/weex/download.html)。
+
+截图:
+
+
+
+上图就是 Weex Playground App 的主界面,点击列表中的每一项即可进入某个 Demo 或者展示案例。用 Weex toolkit CLI 生成二维码,用 Weex Playground App 扫描二维码(点击右上角图标即可开始扫描)可以预览你的文件。
+
+请参阅 [起步教程](/get-started.md)。
http://git-wip-us.apache.org/repos/asf/incubator-weex-site/blob/12e3a8bc/_drafts/v1.0/tools/transformer.md
----------------------------------------------------------------------
diff --git a/_drafts/v1.0/tools/transformer.md b/_drafts/v1.0/tools/transformer.md
new file mode 100644
index 0000000..47a7b4c
--- /dev/null
+++ b/_drafts/v1.0/tools/transformer.md
@@ -0,0 +1,38 @@
+---
+title: Transormer (英)
+type: tools
+order: 3
+has_chapter_content: true
+version: 0.10
+---
+
+# gulp-weex
+
+> gulp plugin for weex transformer
+
+## Usage
+
+```javascript
+var gulp = require('gulp')
+var weex = require('gulp-weex')
+
+gulp.task('default', function () {
+ return gulp.src('src/*.html')
+ .pipe(weex({}))
+ .pipe(gulp.dest('./dest'))
+})
+```
+
+## Options
+
+### oldFormat
+
+whether transform to old format.
+
+default: `false`.
+
+### isEntry
+
+whether is an entry module which has `bootstrap(...)`.
+
+default: `true`.
\ No newline at end of file
http://git-wip-us.apache.org/repos/asf/incubator-weex-site/blob/12e3a8bc/_drafts/web-dev-experience.en.md
----------------------------------------------------------------------
diff --git a/_drafts/web-dev-experience.en.md b/_drafts/web-dev-experience.en.md
new file mode 100644
index 0000000..81d0ff2
--- /dev/null
+++ b/_drafts/web-dev-experience.en.md
@@ -0,0 +1,36 @@
+---
+title: Web Dev Experience
+type: guide
+order: 4.2
+version: 2.1
+---
+
+# Web Dev Experience
+
+## What is Web Dev Experience?
+
+Weex dev experience is very close to web dev experience. It describes the UI structure and content with HTML or HTML-based template, describes the UI style with CSS, and describes user behavior and business logic with JavaScript. And it has completed project mechanism.
+
+## Why We Choose Web Dev Experience?
+
+1. There are a huge number of web developers in the community today. Weex can give more web developers abilities to build high-performance and great-experienced mobile apps.
+2. Web development itself has very high efficiency and flexibility. And Weex is committed to solve the dynamic requirement of mobile apps. They just match each other.
+3. Web standards and web dev experience is built by a lot of outstanding technology companies together. It has very high quality assurance.
+4. Standard itself is a force. Base on standards, respect for standards, close to the standard means that there are more possibilities.
+5. The eco-system and community of web today are very prosperous. There are many mature tools, libraries, systems, best practices to be used.
+
+## How Does Weex Support Web Standard?
+
+We have the following aspects to sort out:
+
+* HTML tags: Weex currently supports basic container (div), text, image, video and other components. And almost all of HTML block-level tags can be simulated through the custom container components. Inline-level tags can be simulated through the custom text components. And Weex also supports some form components such as input / textarea.
+* CSS: Weex supports some commonly used CSS properties, values and units. We will continue to support more based on user feedback and the usage frequency in web.
+* JavaScript: Weex currently offers a simplified version of the DOM APIs for operating the native UI. And Weex will continue to support more W3C Device APIs.
+* About frameworks, Weex officially build Vue 2.0 in. and support its related libs such as vuex, vue-router, etc. At the same time developers can directly use all kinds of third-party JavaScript libs.
+* About engineering, we recommend using npm to pack and manage deps. And we recommend webpack for the JS bundle package. Also we provide weex-devtool, which make developers debug native app just like in Chrome devtools. Weex also is friendly to current mainstream web page publishing system, caching mechanism and other best practices.
+
+**Links**
+
+* [Differences between Weex and web standard](../../references/web-standards.html)
+* [Using Vue.js](./using-vue.html)
+* [Using Devtools](./devtools.html)
http://git-wip-us.apache.org/repos/asf/incubator-weex-site/blob/12e3a8bc/_drafts/web-dev-experience.md
----------------------------------------------------------------------
diff --git a/_drafts/web-dev-experience.md b/_drafts/web-dev-experience.md
new file mode 100644
index 0000000..cb7ff24
--- /dev/null
+++ b/_drafts/web-dev-experience.md
@@ -0,0 +1,38 @@
+---
+title: Web 开发体验
+type: wiki
+order: 1.2
+version: 2.1
+---
+
+# Web 开发体验
+
+## 什么是 Web 开发体验
+
+Weex 的开发体验和 web 的开发体验是非常接近的,它通过 HTML 或基于 HTML 模板来描述界面的结构和内容,通过 CSS 的方式描述界面的展现形式,用 JavaScript 来描述用户行为和业务逻辑。同时有完整的工程机制,如创建、开发、调试、部署。
+
+## 为什么选择 Web 开发体验
+
+我们选择基于 Web 开发体验有以下几方面原因:
+
+1. 今天在技术社区有大量的 web 开发者,Weex 可以赋能更多的 web 开发者构建高性能和高体验的移动应用。
+2. Web 开发本身具有非常强的高效率和灵活性,这和 Weex 想解决的移动端动态性问题不谋而合。
+3. Web 标准和开发体验是很多顶尖而优秀的科技公司共同讨论和建设的结果,本身的设计和理念都有极高的品质保障,同时 Weex 也希望可以借此机会努力为标准贡献一点自己的微薄之力。
+4. Web 是一种标准化的技术,标准本身就是一种力量,基于标准、尊重标准、贴近标准都意味着拥有更多的可能性。
+5. Web 今天的生态和社区是非常繁荣的,有很多成熟的工具、库、工程体系、最佳实践可以使用、引入和借鉴。
+
+## Weex 对 Web 标准的支持情况怎么样?
+
+我们从以下几个方面进行介绍和梳理:
+
+* HTML 标签:目前 Weex 支持了基本的容器 (div)、文本 (text)、图片 (image)、视频 (video) 等组件,HTML 中几乎所有的块级标签都可以通过容器组件进行自定义模拟,inline 的标签则可以通过文本组件进行自定义模拟,另外 Weex 还支持了 input/textarea 这样的表单型组件。
+* CSS:Weex 支持了部分常用的 CSS 属性、值类型和单位,并且会根据用户反馈和在 web 中的使用频度陆续支持更多。
+* JavaScript:目前 Weex 提供了一套简化版的 DOM APIs,用来操作原生界面,同时 Weex 在陆续支持更多的 W3C Device APIs。
+* 在框架方面,Weex 官方支持了 Vue 2.0,以及相关的 vuex, vue-router 等,同时开发者可以直接使用各种第三方 JavaScript 工具库。
+* 在工程方面,Weex 推荐 npm 包管理工具,也推荐用 webpack 进行 JS bundle 打包,并提供了 weex-devtool 开发工具,让开发者可以像调试 Chrome 一样调试 Weex 原生应用,同时 Weex 的页面发布系统、客户端缓存机制都尊重目前 Web 的最佳实践。
+
+**相关链接**
+
+* [Weex 和 web 标准的差异](../../references/web-standards.html)
+* [使用 Vue.js](./using-vue.html)
+* [使用 Devtools](./devtools.html)
[43/51] [abbrv] incubator-weex-site git commit: update file structure
and fix responsive styles
Posted by ha...@apache.org.
http://git-wip-us.apache.org/repos/asf/incubator-weex-site/blob/12e3a8bc/_draft/v1.0/references/components/refresh.md
----------------------------------------------------------------------
diff --git a/_draft/v1.0/references/components/refresh.md b/_draft/v1.0/references/components/refresh.md
deleted file mode 100644
index 868dad7..0000000
--- a/_draft/v1.0/references/components/refresh.md
+++ /dev/null
@@ -1,204 +0,0 @@
----
-title: <refresh>
-type: references
-order: 2.7
-version: 0.10
----
-
-# <refresh>
-
-<span class="weex-version">v0.6.1+</span>
-
-`<refresh>` 为 `<scroller>` 和 `<list>` 提供下拉加载功能。用法与特性与 `<loading>` 类似,`<scroller>` 和 `<list>` 的子组件,且只能在被 `<scroller>` 和 `<list>` 包含时才能被正确的渲染。
-
-一个简单例子:
-
-```html
-<template>
- <list>
- <header>
- <div class="center">
- <text style="text-align:center">I am the header</text>
- </div>
- </header>
- <refresh onpullingdown='onpullingdown' onrefresh="onrefresh" display="{{refreshDisplay}}" style="width:750;flex-direction: row;justify-content: center;">
- <loading-indicator style="height:160;width:160;color:#3192e1"></loading-indicator>
- </refresh>
- <cell class="row" repeat="i in staffs" index="{{$index}}">
- <div class="item">
- <text>{{i.name}}</text>
- </div>
- </cell>
- </list>
-</template>
-
-<style>
- .row {
- width: 750;
- }
- .item {
- justify-content: center;
- border-bottom-width: 2;
- border-bottom-color: #c0c0c0;
- height: 100;
- padding:20;
- }
- .center {
- border-bottom-width: 2;
- border-bottom-color: #cccccc;
- height: 100;
- padding:20;
- background-color:#FFFFFF;
- justify-content: center;
- }
-</style>
-
-<script>
- module.exports = {
- data: {
- staffs:[],
- refreshDisplay: 'show',
- loadingDisplay: 'show',
- loadingText: 'pull up to load more',
- refreshText: 'pull down to refresh'
- },
- created:function() {
- this.refreshDisplay='show'
- this.staffs=[{name:'inns'},{name:'connon'},{name:'baos'},{name:'anna'},{name:'dolley'},{name:'lucy'},{name:'john'}, {name:'lily'},{name:'locke'},{name:'jack'},{name:'danny'},{name:'rose'},{name:'harris'},{name:'lotus'},{name:'louis'}];
- },
- methods:{
- onrefresh:function(e){
- this.refreshDisplay='show';
- this.staffs=[{name:'anna'},{name:'baos'},{name:'connon'},{name:'inns'}];
- this.refreshDisplay='hide'
- },
- onpullingdown:function(e){
- console.log('onpullingdown triggered.');
- console.log('dy:'+e.dy);
- console.log('headerHeight:'+e.headerHeight);
- console.log('maxHeight:'+e.maxHeight);
- }
- }
- }
-</script>
-```
-
-[体验一下](http://dotwe.org/64cb982f67186c76f9f27fe3000a2fe8)
-
-## 子组件
-
-- [`<text>`](./text.html)
-- [`<image>`](./image.html)
-- `<loading-indicator>`: `<refresh>` 和 `<loading>` 组件的子组件,拥有默认的动画效果的实现。
-
-## 特性
-
-- `display {string}`:可选值为 `show` 或者 `hide`,仅隐藏 `<indicator>`,`<loading>` 其他子组件依然可见,`<loading>` 事件仍会被触发。
-
-## 样式
-
-支持所有通用样式。
-
-- 盒模型
-- `flexbox` 布局
-- `position`
-- `opacity`
-- `background-color`
-
-查看 [组件通用样式](../common-style.html)
-
-## 事件
-
-- `refresh`: 当 `<scroller>`/`<list>` 被下拉时触发。
-- `pullingdown`:仅在 Android 支持。当 `<scroller>`/`<list>` 被下拉时触发,可以从事件的参数对象中获取 dy,headerHeight,maxHeight
-
-## 约束
-
-- `<refresh>` 不支持 `remove`,v0.9 版本会修复。
-- `display` 值为 `show` 或 `hide`。仅隐藏 `<indicator>`,`<refresh>` 其他子组件依然可见,`refresh` 事件仍会被触发。
-
- 如果需要 `<refresh>` hide 时隐藏文案并不再触发事件,有两种解决方法:
-
- 1. 修改提示文案,并在 `refresh` 事件中添加判断逻辑;
- 2. v0.9+ 可通过 `remove` 解决。
-
-- 只能通过 `display` 特性进行展示和隐藏,且必须成对出现,即设置 `display="show"`,必须有对应的 `display="hide"`。
-
-## 示例
-
-```html
-<template>
- <scroller onloadmore="onloadmore" loadmoreoffset="1000">
- <refresh onrefresh="onrefresh" display="{{refreshDisplay}}">
- <text id="refreshText">{{refreshText}}</text>
- </refresh>
- <div repeat="v in items">
- <text style="font-size: 40; color: #000000">{{v.item}}</text>
- </div>
- <loading onloading="onloading" display="{{loadingDisplay}}">
- <text id="loadingText">{{loadingText}}</text>
- </loading>
- </scroller>
-</template>
-
-<script>
- module.exports = {
- data: {
- refreshDisplay: 'show',
- loadingDisplay: 'show',
- loadingText: 'pull up to load more',
- refreshText: 'pull down to refresh',
- items: []
- },
- created: function () {
- for (var i = 0; i < 30; i++) {
- this.items.push({
- 'item': 'test data' + i
- });
- }
- },
- methods: {
- onrefresh: function () {
- var vm = this;
- vm.refreshDisplay = 'show'
- if (vm.items.length > 50) {
- vm.refreshText = "no more data!"
- vm.refreshDisplay = 'hide'
- return;
- }
- var len = vm.items.length;
- for (var i = len; i < (len + 20); i++) {
- vm.items.unshift({
- 'item': 'test data ' + i
- });
- }
- vm.refreshDisplay = 'hide'
- },
- onloading: function () {
- var vm = this;
- vm.loadingDisplay = 'show'
- if (vm.items.length > 30) {
- vm.loadingText = "no more data!"
- vm.loadingDisplay = 'hide'
- return;
- }
-
- var len = vm.items.length;
- for (var i = len; i < (len + 20); i++) {
- vm.items.push({
- 'item': 'test data ' + i
- });
- }
- vm.loadingDisplay = 'hide'
- },
- onloadmore: function () {
- console.log("into--[onloadmore]")
- }
- }
- }
-</script>
-```
-
-[体验一下](http://dotwe.org/80c027d6bfb337195c25cc0ba9317ea5)
-
-更多示例可查看 [`<list>`](./list.html)
http://git-wip-us.apache.org/repos/asf/incubator-weex-site/blob/12e3a8bc/_draft/v1.0/references/components/scroller.md
----------------------------------------------------------------------
diff --git a/_draft/v1.0/references/components/scroller.md b/_draft/v1.0/references/components/scroller.md
deleted file mode 100644
index 0fac77c..0000000
--- a/_draft/v1.0/references/components/scroller.md
+++ /dev/null
@@ -1,324 +0,0 @@
----
-title: <scroller>
-type: references
-order: 2.8
-version: 0.10
----
-
-# <scroller>
-
-<span class="weex-version">v0.6.1+</span>
-
-`<scroller>` 是一个竖直的,可以容纳多个排成一列的子组件的滚动器。如果子组件的总高度高于其本身,那么所有的子组件都可滚动。
-
-**注意:** `<scroller>` 可以当作根元素或者嵌套元素使用。此组件的滚动方向是垂直方向的形式。
-
-一个简单例子:
-
-```html
-<template>
- <scroller onloadmore="onloadmore" loadmoreoffset="100">
- <div repeat="v in items">
- <text style="font-size: 40; color: #000000">{{v.item}}</text>
- </div>
- </scroller>
-</template>
-<script>
- module.exports = {
- data: {
- items: [],
- triggered: false
- },
- created: function () {
- for (var i = 0; i < 50; i++) {
- this.items.push({
- 'item': 'test data' + i
- });
- }
- },
- methods: {
- onloadmore: function () {
- if (!this.triggered) {
- for (var i = 100; i >= 50; i--) {
- this.items.push({
- 'item': 'onloadmore triggered' + i
- });
- }
- }
- this.triggered = true;
- }
- }
- }
-</script>
-```
-
-[体验一下](http://dotwe.org/6910f0b87aeabe3f2a0d62c0d658dbd2)
-
-## 子组件
-
-支持任意类型的 Weex 组件作为其子组件。 其中,还支持以下两个特殊组件作为子组件:
-
-- `<refresh>`
-
- 用于给列表添加下拉刷新的功能。
-
- 使用文档请查看 [`<refresh>`](./refresh.html)
-
-- `<loading>`
-
- `<loading>` 用法与特性和 `<refresh>` 类似,用于给列表添加上拉加载更多的功能。
-
- 使用文档请查看 [`<loading>`](./loading.html)
-
-## 特性
-
-- `show-scrollbar {boolean}`:可选值为 `true`/ `false`,默认值为 `true`。控制是否出现滚动条。
-- `scroll-direction {string}`:可选为 `horizontal` 或者 `vertical`,默认值为 `vertical` 。定义滚动的方向。
-- `loadmoreoffset {number}`:默认值为 0,触发 `loadmore` 事件所需要的垂直偏移距离(设备屏幕底部与页面底部之间的距离)。当页面的滚动条滚动到足够接近页面底部时将会触发 `loadmore` 这个事件。
-
- 
-
-- `loadmoreretry {number}`:默认值为 0,当 `loadmore` 失败时是否重置 `loadmore` 相关的 UI,值不一样就会重置。
-
-## 样式
-
-- 通用样式:支持所有通用样式
-
- - 盒模型
- - `flexbox` 布局
- - `position`
- - `opacity`
- - `background-color`
-
- 查看 [组件通用样式](../common-style.html)
-
-## 事件
-
-- `loadmore` <sup class="wx-v">v0.5+</sup>:如果滚动到底部将会立即触发这个事件,你可以在这个事件的处理函数中加载下一页的列表项。
-- 通用事件
-
- 支持所有通用事件:
-
- - `click`
- - `longpress`
- - `appear`
- - `disappear`
-
- 查看 [通用事件](../common-event.html)
-
-## 扩展
-
-### scrollToElement(node, options)
-
-滚动到列表某个指定项是常见需求,`<list>` 拓展了该功能支持滚动到指定 `<cell>`。通过 `dom` module 访问,更多信息可参考 [dom module](../modules/dom.html) 。
-
-#### 参数
-
-- `node {node}`:指定目标节点。
-- `options {Object}`:
- - `offset {number}`:一个到其可见位置的偏移距离,默认是0
-
-#### 示例
-
-```html
-<template>
- <scroller>
- <div class="row" repeat="item in rows" id="item-{{$index}}">
- <text class="item-title">row {{item.id}}</text>
- </div>
- <div onclick="go" style="width: 750;height: 50; position: fixed; left: 0; right: 0; bottom: 0; background-color: #eeeeee;">
- <text style="text-align: center;">
- Go to 50th line.
- </text>
- </div>
- </scroller>
-</template>
-
-<script>
-var dom = require('@weex-module/dom')
-
-module.exports = {
- data: {
- rows: []
- },
- created: function () {
- for (var i = 0; i < 100; i++) {
- this.rows.push({
- id: i
- })
- }
- },
- methods: {
- go: function () {
- var el = this.$el('item-49')
-
- dom.scrollToElement(el, {
- offset: 0
- })
- }
- }
-}
-</script>
-```
-
-[体验一下](http://dotwe.org/483e5c878c52c0891e6e35e478f19854)
-
-## 约束
-
-**不允许**相同方向的 `<list>` 或者 `<scroller>` 互相嵌套,换句话说就是嵌套的 `<list>`/`<scroller>` 必须是不同的方向。
-
-举个例子,**不允许**一个垂直方向的 `<list>` 嵌套的一个垂直方向的 `<scroller>` 中,但是一个垂直方向的 `<list>` 是可以嵌套的一个水平方向的 `<list>` 或者 `<scroller>` 中的。
-
-## 示例
-
-
-
-```html
-<style>
-.item {
- padding: 20;
- height: 220;
- border-bottom-width: 1;
- border-bottom-style: solid;
- border-bottom-color: #efefef;
-}
-.item-content {
- flex-direction: row;
- width: 710;
- background-color: #ffffff;
-}
-.item-imgbox {
- height: 180;
- width: 180;
- margin-right: 20;
-}
-.item-img {
- width: 180;
- height: 180;
-}
-.item-info {
- height: 180;
- width: 510;
- justify-content: center;
- position: relative;
-}
-.item-info-detail {
- position: relative;
- color: #A2A2A2;
-}
-.desc {
- lines: 4;
- text-overflow: ellipsis;
- font-size: 26;
- line-height: 30;
- color: #A2A2A2;
-}
-.title {
- lines: 1;
- text-overflow: ellipsis;
- font-size: 32;
- color: #2D2D2D;
- line-height: 40;
-}
-.detail-info {
- margin-top: 15;
-}
-.up {
- width: 70;
- height: 70;
- position: fixed;
- right: 20;
- bottom: 20;
-}
-.img {
- width: 70;
- height: 70;
-}
-</style>
-
-<template>
- <div>
- <scroller>
- <div class="item" repeat="item in items" id="item-{{$index}}">
- <div class="item-content">
- <div class="item-imgbox">
- <img class="item-img" src="{{item.img}}" alt="" />
- </div>
- <div class="item-info">
- <div class="item-info-detail">
- <text class="title">{{item.title}}</text>
- <div class="detail-info">
- <text class="desc">{{item.desc}}</text>
- </div>
- </div>
- </div>
- </div>
- </div>
- </scroller>
- <div class="up" onclick="goToTop">
- <img class="img" src="https://img.alicdn.com/tps/TB1ZVOEOpXXXXcQaXXXXXXXXXXX-200-200.png"></img>
- </div>
- </div>
-</template>
-
-<script>
- var dom = require('@weex-module/dom') || {}
-
- module.exports = {
- data: {
- items: [{
- img: 'https://img.alicdn.com/tps/TB1z.55OFXXXXcLXXXXXXXXXXXX-560-560.jpg',
- title: 'Who is Alan Mathison Turing?Who is Alan Mathison Turing?',
- desc: 'Alan Mathison Turing ( 23 June 1912 – 7 June 1954) was an English computer scientist, mathematician, logician, cryptanalyst and theoretical biologist. He was highly influential in the development of theoretical computer science, providing a formalisation of the concepts of algorithm and computation with the Turing machine, which can be considered a model of a general purpose computer.Turing is widely considered to be the father of theoretical computer science and artificial intelligence.'
- },{
- img: 'https://img.alicdn.com/tps/TB1z.55OFXXXXcLXXXXXXXXXXXX-560-560.jpg',
- title: 'Who is Alan Mathison Turing?',
- desc: 'Alan Mathison Turing ( 23 June 1912 – 7 June 1954) was an English computer scientist, mathematician, logician, cryptanalyst and theoretical biologist. He was highly influential in the development of theoretical computer science, providing a formalisation of the concepts of algorithm and computation with the Turing machine, which can be considered a model of a general purpose computer.Turing is widely considered to be the father of theoretical computer science and artificial intelligence.'
- },{
- img: 'https://img.alicdn.com/tps/TB1z.55OFXXXXcLXXXXXXXXXXXX-560-560.jpg',
- title: 'Who is Alan Mathison Turing?',
- desc: 'Alan Mathison Turing ( 23 June 1912 – 7 June 1954) was an English computer scientist, mathematician, logician, cryptanalyst and theoretical biologist. He was highly influential in the development of theoretical computer science, providing a formalisation of the concepts of algorithm and computation with the Turing machine, which can be considered a model of a general purpose computer.Turing is widely considered to be the father of theoretical computer science and artificial intelligence.'
- },{
- img: 'https://img.alicdn.com/tps/TB1z.55OFXXXXcLXXXXXXXXXXXX-560-560.jpg',
- title: 'Who is Alan Mathison Turing?',
- desc: 'Alan Mathison Turing ( 23 June 1912 – 7 June 1954) was an English computer scientist, mathematician, logician, cryptanalyst and theoretical biologist. He was highly influential in the development of theoretical computer science, providing a formalisation of the concepts of algorithm and computation with the Turing machine, which can be considered a model of a general purpose computer.Turing is widely considered to be the father of theoretical computer science and artificial intelligence.'
- },{
- img: 'https://img.alicdn.com/tps/TB1z.55OFXXXXcLXXXXXXXXXXXX-560-560.jpg',
- title: 'Who is Alan Mathison Turing?',
- desc: 'Alan Mathison Turing ( 23 June 1912 – 7 June 1954) was an English computer scientist, mathematician, logician, cryptanalyst and theoretical biologist. He was highly influential in the development of theoretical computer science, providing a formalisation of the concepts of algorithm and computation with the Turing machine, which can be considered a model of a general purpose computer.Turing is widely considered to be the father of theoretical computer science and artificial intelligence.'
- },{
- img: 'https://img.alicdn.com/tps/TB1z.55OFXXXXcLXXXXXXXXXXXX-560-560.jpg',
- title: 'Who is Alan Mathison Turing?',
- desc: 'Alan Mathison Turing ( 23 June 1912 – 7 June 1954) was an English computer scientist, mathematician, logician, cryptanalyst and theoretical biologist. He was highly influential in the development of theoretical computer science, providing a formalisation of the concepts of algorithm and computation with the Turing machine, which can be considered a model of a general purpose computer.Turing is widely considered to be the father of theoretical computer science and artificial intelligence.'
- },{
- img: 'https://img.alicdn.com/tps/TB1z.55OFXXXXcLXXXXXXXXXXXX-560-560.jpg',
- title: 'Who is Alan Mathison Turing?',
- desc: 'Alan Mathison Turing ( 23 June 1912 – 7 June 1954) was an English computer scientist, mathematician, logician, cryptanalyst and theoretical biologist. He was highly influential in the development of theoretical computer science, providing a formalisation of the concepts of algorithm and computation with the Turing machine, which can be considered a model of a general purpose computer.Turing is widely considered to be the father of theoretical computer science and artificial intelligence.'
- },{
- img: 'https://img.alicdn.com/tps/TB1z.55OFXXXXcLXXXXXXXXXXXX-560-560.jpg',
- title: 'Who is Alan Mathison Turing?',
- desc: 'Alan Mathison Turing ( 23 June 1912 – 7 June 1954) was an English computer scientist, mathematician, logician, cryptanalyst and theoretical biologist. He was highly influential in the development of theoretical computer science, providing a formalisation of the concepts of algorithm and computation with the Turing machine, which can be considered a model of a general purpose computer.Turing is widely considered to be the father of theoretical computer science and artificial intelligence.'
- },{
- img: 'https://img.alicdn.com/tps/TB1z.55OFXXXXcLXXXXXXXXXXXX-560-560.jpg',
- title: 'Who is Alan Mathison Turing?',
- desc: 'Alan Mathison Turing ( 23 June 1912 – 7 June 1954) was an English computer scientist, mathematician, logician, cryptanalyst and theoretical biologist. He was highly influential in the development of theoretical computer science, providing a formalisation of the concepts of algorithm and computation with the Turing machine, which can be considered a model of a general purpose computer.Turing is widely considered to be the father of theoretical computer science and artificial intelligence.'
- },{
- img: 'https://img.alicdn.com/tps/TB1z.55OFXXXXcLXXXXXXXXXXXX-560-560.jpg',
- title: 'Who is Alan Mathison Turing?',
- desc: 'Alan Mathison Turing ( 23 June 1912 – 7 June 1954) was an English computer scientist, mathematician, logician, cryptanalyst and theoretical biologist. He was highly influential in the development of theoretical computer science, providing a formalisation of the concepts of algorithm and computation with the Turing machine, which can be considered a model of a general purpose computer.Turing is widely considered to be the father of theoretical computer science and artificial intelligence.'
- }]
- },
- created: function () {
- },
- methods: {
- goToTop: function (e) {
- dom.scrollToElement(this.$el('item-0'), {
- offset: 0
- })
- }
- }
- }
-</script>
-```
-
-[体验一下](http://dotwe.org/799f54b32f5227f9c34cfbb5e6946ba7)
\ No newline at end of file
http://git-wip-us.apache.org/repos/asf/incubator-weex-site/blob/12e3a8bc/_draft/v1.0/references/components/slider.md
----------------------------------------------------------------------
diff --git a/_draft/v1.0/references/components/slider.md b/_draft/v1.0/references/components/slider.md
deleted file mode 100644
index b12a8aa..0000000
--- a/_draft/v1.0/references/components/slider.md
+++ /dev/null
@@ -1,121 +0,0 @@
----
-title: <slider>
-type: references
-order: 2.9
-version: 0.10
----
-
-# <slider>
-
-`<slider>` 组件用于在一个页面中展示多个图片,在前端,这种效果被称为 `轮播图`。
-
-## 子组件
-
-支持任意类型的 Weex 组件作为其子组件。 其中,还支持以下组件作为子组件展示特殊效果:
-
- - `<indicator>`:用于显示轮播图指示器效果,必须充当 [`<slider>`](./slider.html) 组件的子组件使用。
-
-## 特性
-
-- `auto-play {boolean}`:可选值为 `true`/`false`,默认的是 `false`。
-
- 该值决定是否自动播放轮播。重置 `loadmore` 相关的 UI,值不一样就会重置。
-
-- `interval {number}`:值为毫秒数,此值设定 slider 切换时间间隔。当 `auto-play` 值为 `true` 时生效。
-
-## 样式
-
-- 通用样式:支持所有通用样式
-
- - 盒模型
- - `flexbox` 布局
- - `position`
- - `opacity`
- - `background-color`
-
- 查看 [组件通用样式](../common-style.html)
-
-## 事件
-
-- `change`: 当轮播索引改变时,触发该事件。
-
- 事件中 event 对象属性:
- - `index`:展示的图片索引
-
-- 通用事件
-
- 支持所有通用事件:
-
- - `click`
- - `longpress`
- - `appear`
- - `disappear`
-
- 查看 [通用事件](../common-event.html)
-
-## 示例
-
-```html
-<template>
- <div>
- <slider class="slider" interval="3000" auto-play="true">
- <div class="slider-pages" repeat="item in itemList">
- <image class="img" src="{{item.pictureUrl}}"></image>
- <text class="title">{{item.title}}</text>
- </div>
- <indicator class="indicator"></indicator>
- </slider>
- </div>
-</template>
-
-<style>
- .img {
- width: 714;
- height: 150;
- }
- .title {
- position: absolute;
- top: 20;
- left: 20;
- color: #ff0000;
- font-size: 48;
- font-weight: bold;
- background-color: #eeeeee;
- }
- .slider {
- flex-direction: row;
- margin: 18;
- width: 714;
- height: 230;
- }
- .slider-pages {
- flex-direction: row;
- width: 714;
- height: 200;
- }
- .indicator {
- width:714;
- height:200;
- position:absolute;
- top:1;
- left:1;
- item-color: red;
- item-selectedColor: blue;
- item-size: 20;
- }
-</style>
-
-<script>
- module.exports = {
- data: {
- itemList: [
- {itemId: '520421163634', title: 'item1', pictureUrl: 'https://gd2.alicdn.com/bao/uploaded/i2/T14H1LFwBcXXXXXXXX_!!0-item_pic.jpg'},
- {itemId: '522076777462', title: 'item2', pictureUrl: 'https://gd1.alicdn.com/bao/uploaded/i1/TB1PXJCJFXXXXciXFXXXXXXXXXX_!!0-item_pic.jpg'},
- {itemId: '522076777462', title: 'iten3', pictureUrl: 'https://gd3.alicdn.com/bao/uploaded/i3/TB1x6hYLXXXXXazXVXXXXXXXXXX_!!0-item_pic.jpg'}
- ]
- }
- }
-</script>
-```
-
-[体验一下](http://dotwe.org/37784d97811f4c91594a9ad6f118c0f7)
http://git-wip-us.apache.org/repos/asf/incubator-weex-site/blob/12e3a8bc/_draft/v1.0/references/components/switch.md
----------------------------------------------------------------------
diff --git a/_draft/v1.0/references/components/switch.md b/_draft/v1.0/references/components/switch.md
deleted file mode 100644
index 8a3d614..0000000
--- a/_draft/v1.0/references/components/switch.md
+++ /dev/null
@@ -1,98 +0,0 @@
----
-title: <switch>
-type: references
-order: 2.11
-version: 0.10
----
-
-# <switch>
-
-<span class="weex-version">v0.6.1+</span>
-
-`<switch>` 是 Weex 的内置组件,用来创建与 iOS 一致样式的按钮。例如,在 iPhone 中的设置应用中的飞行模式按钮就是一个 switch 按钮。
-
-## 子组件
-
-`<switch>` 组件**不支持**任何子组件。
-
-## 特性
-
-- `checked {boolean}`:默认值为 `false`,表明按钮是否开启 is on or not.
-- `disabled {boolean}`:默认值为 `false`,表明是否激活按钮
-
-## 样式
-
-值得注意的是,在这个组件上,有些样式组件属性**不能使用**,它们是:
-
-- `width`
-- `height`
-- `min-width`
-- `min-height`
-- `margin`
-- `padding`
-- `border`
-
-**注意:**
-
-由于设计宽度为 750px,宽度和高度相关的属性不能配置,组件的尺寸限定在 100x60。
-
-- 通用样式
-
- - `flexbox` 布局
- - `position`
- - `opacity`
- - `background-color`
-
- 查看 [组件通用样式](../common-style.html)
-
-## 事件
-
-- `change`:改变开关状态时触发该事件。
-
- 事件中 event 对象属性:
-
- - `value`: 组件布尔值真或假。
- - `timestamp`: 事件的时间戳。
-
-- 通用事件
-
- 支持所有通用事件:
-
- - `click`
- - `longpress`
- - `appear`
- - `disappear`
-
- 查看 [通用事件](../common-event.html)
-
-## 示例
-
-```html
-<template>
- <div>
- <text>muted:</text>
- <switch checked="true" onclick='onclick' onchange='onchange' ondisappear='ondisappear' onappear='onappear'></switch>
- </div>
-</template>
-
-<script>
- module.exports ={
- methods:{
- onclick:function(e){
- console.log('onclick:' + e.timestamp);
- },
- onchange:function(e){
- console.log('onchage, value:' + e.value);
- },
- ondisappear:function(e){
- console.log('ondisappear, value:' + e.value);
- },
- onappear:function(e){
- console.log('onappear, value:' + e.value);
- },
- }
- }
-</script>
-```
-
-[体验一下](http://dotwe.org/5f8b9d9c0e429e61f4a004dc8ee637e1)
\ No newline at end of file
http://git-wip-us.apache.org/repos/asf/incubator-weex-site/blob/12e3a8bc/_draft/v1.0/references/components/text.md
----------------------------------------------------------------------
diff --git a/_draft/v1.0/references/components/text.md b/_draft/v1.0/references/components/text.md
deleted file mode 100644
index edd6a05..0000000
--- a/_draft/v1.0/references/components/text.md
+++ /dev/null
@@ -1,116 +0,0 @@
----
-title: <text>
-type: references
-order: 2.12
-version: 0.10
----
-
-# <text>
-
-`<text>` 是 Weex 内置的组件,用来将文本按照指定的样式渲染出来。`<text>` 只能包含文本值,你可以使用 `{% raw %}{{}}{% endraw %}` 标记插入变量值作为文本内容。
-
-## 子组件
-
-此组件不支持子组件。
-
-## 特性
-
-- `value {string}`: 组件的值,与 `<text>` 标签中的文本内容相同。
-
-## 样式
-
-- `lines {number}`: 指定文本行数。默认值是 `0` 代表不限制行数。
-- text styles: 查看 [文本样式](../text-style.html)
-
- - 支持 `color` 样式.
- - 支持 `font-size` 样式. iOS默认值:`32`,Android:不同设备不同,H5 默认值:`32`.
- - 支持 `font-style` 样式.
- - 支持 `font-weight` 样式.
- - 支持 `text-align` 样式.
- - 支持 `text-decoration` 样式.
- - 支持 `text-overflow` 样式.
- - 支持 `line-height`样式<sup class="wx-v">0.6.1+</sup> 。`line-height` 在 iOS 中与 H5 和 Android 中不同, 文本值将放置在框的底部。
- - 不支持 `flex-direction`, `justify-content`, `align-items` 这些为子节点设置的属性,并且`<text>`没有子节点。
-
-- 通用样式:支持所有通用样式
-
- - 盒模型
- - `flexbox` 布局
- - `position`
- - `opacity`
- - `background-color`
-
- 查看 [组件通用样式](../common-style.html)
-
-## 事件
-
-- 通用事件
- 支持所有通用事件:
-
- - `click`
- - `longpress`
- - `appear`
- - `disappear`
-
- 查看 [通用事件](../common-event.html)
-
-## 约束
-
-1. `<text>` 里直接写文本头尾空白会被过滤,如果需要保留头尾空白,暂时只能通过数据绑定写头尾空格。
-
-```html
-<template>
- <div>
- <text> 测试1,直接放置头尾用空白的文本 </text>
- <text>{{msg}}</text>
- </div>
-</template>
-<script>
-module.exports = {
- data: {
- msg: ' 测试2,使用数据绑定 '
- }
-}
-</script>
-```
-
-[体验一下](http://dotwe.org/473d451e48ba322b606c4ba2577fd96a)
-
-## 示例
-
-```html
-<template>
- <div>
- <text>this is text content</text>
- <text value="this is text value"></text>
- <text id="textid" onclick={{showtext}}>this is gettext content</text>
- <text value="{{text}}"></text>
- <text style="lines: 3;">Alan Mathison Turing ( 23 June 1912 – 7 June 1954) was an English computer scientist, mathematician, logician, cryptanalyst and theoretical biologist. He was highly influential in the development of theoretical computer science, providing a formalisation of the concepts of algorithm and computation with the Turing machine, which can be considered a model of a general purpose computer.Turing is widely considered to be the father of theoretical computer science and artificial intelligence.</text>
-</div>
-</template>
-
-<style>
- .text {
- font-size: 24;
- text-decoration: underline;
- }
-</style>
-
-<script>
- module.exports = {
- data: {
- price1: '99.99',
- price2: '88.88',
- text:''
- },
- methods: {
- showtext: function(event) {
- var textComponent = this.$el("textid");
- this.text = textComponent.attr.value;
- }
- }
- };
-</script>
-```
-
-[体验一下](http://dotwe.org/b2796940d6b9766000778c61446fcd26)
http://git-wip-us.apache.org/repos/asf/incubator-weex-site/blob/12e3a8bc/_draft/v1.0/references/components/textarea.md
----------------------------------------------------------------------
diff --git a/_draft/v1.0/references/components/textarea.md b/_draft/v1.0/references/components/textarea.md
deleted file mode 100644
index 9470173..0000000
--- a/_draft/v1.0/references/components/textarea.md
+++ /dev/null
@@ -1,115 +0,0 @@
----
-title: <textarea>
-type: references
-order: 2.13
-version: 0.10
----
-
-# <textarea>
-
-<span class="weex-version">v0.8+</span>
-
-`textarea` 是 Weex 内置的一个组件,用于用户交互,接受用户输入数据。 可以认为是允许多行的 `<input>`
-
-**Notes:** `<textarea>`支持 `<input>` 支持的所有的事件。
-
-## 子组件
-
-`textarea` 组件不支持子组件。
-
-## 特性
-
-- `value {string}`:组件的接收到的输入字符。
-- `placeholder {string}`:提示用户可以输入什么。 提示文本不能有回车或换行。
-- `disabled {boolean}`:表示是否支持输入。通常 `click` 事件在 `disabled` 控件上是失效的。
-- `autofocus {boolean}`:表示是否在页面加载时控件自动获得输入焦点。
-- `rows {number}`:接收 number 类型的数据,指定组件的高度,默认值是 2
-
-## 样式
-
-- text styles
- - 支持 `color`
- - 支持 `font-size`
- - 支持 `font-style`
- - 支持 `font-weight`
- - 支持 `text-align`
-
- 查看 [文本样式](../text-style.html)
-
-- 通用样式:支持所有通用样式
-
- - 盒模型
- - `flexbox` 布局
- - `position`
- - `opacity`
- - `background-color`
-
- 查看 [组件通用样式](../common-style.html)
-
-## 事件
-
-- `input`: 输入字符的值更改。
-
- 事件中 event 对象属性:
-
- - `value`: 触发事件的组件;
- - `timestamp`: 事件发生时的时间戳。
-
-- `change`: 当用户输入完成时触发。通常在 `blur` 事件之后。
-
- 事件中 event 对象属性:
-
- - `value`: 触发事件的组件;
-
- - `timestamp`: 事件发生时的时间戳。
-
-- `focus`: 组件获得输入焦点。
-
- 事件中 event 对象属性:
-
- - `timestamp`: 事件发生时的时间戳。
-
-- `blur`: 组件失去输入焦点。
-
- 事件中 event 对象属性:
-
- - `timestamp`: 事件发生时的时间戳。
-
-- 通用事件
-
- **注意:**
- 不支持 `click` 事件。 请监听 `input` 或 `change` 事件代替。
-
- 支持以下通用事件:
-
- - `longpress`
- - `appear`
- - `disappear`
-
- 查看 [通用事件](../common-event.html)
-
-## 示例
-
-```html
-<template>
- <div>
- <textarea
- class="textarea"
- autofocus="true"
- placeholder="..."
- value="我是一个多行版本的input组件">
- </textarea>
- </div>
-</template>
-<style>
- .textarea {
- margin: 20;
- border-width: 2;
- border-style: solid;
- border-color: #efefef;
- border-radius: 5;
- }
-</style>
-```
-
-[体验一下](http://dotwe.org/31d67beda847cd5b5cf7b78ff21895ba)
http://git-wip-us.apache.org/repos/asf/incubator-weex-site/blob/12e3a8bc/_draft/v1.0/references/components/video.md
----------------------------------------------------------------------
diff --git a/_draft/v1.0/references/components/video.md b/_draft/v1.0/references/components/video.md
deleted file mode 100644
index ac17c8b..0000000
--- a/_draft/v1.0/references/components/video.md
+++ /dev/null
@@ -1,82 +0,0 @@
----
-title: <video>
-type: references
-order: 2.14
-version: 0.10
----
-
-# <video>
-
-<span class="weex-version">v0.6.1+</span>
-
-`<video>` 组件可以让我们在 Weex 页面中嵌入视频内容。
-
-## 子组件
-
-- `<text>` 是唯一合法的子组件。
-
-### 特性
-
-- `src {string}`:内嵌的视频指向的URL
-- `play-status {string}`:可选值为 `play` | `pause`,用来控制视频的播放状态,`play` 或者 `pause`,默认值是 `pause`。
-- `auto-play {boolean}`:可选值为 `true` | `false`,当页面加载初始化完成后,用来控制视频是否立即播放,默认值是 `false`。
-
-## 样式
-
-- 通用样式:支持所有通用样式
-
- - 盒模型
- - `flexbox` 布局
- - `position`
- - `opacity`
- - `background-color`
-
- 查看 [组件通用样式](../common-style.html)
-
-## 事件
-
-- `start`:当 playback 的状态是 Playing 时触发
-- `pause`:当 playback 的状态是 Paused 时触发
-- `finish`:当 playback 的状态是 Finished 时触发
-- `fail`:当 playback 状态是 Failed 时触发
-
-## 示例
-
-```html
-<template>
- <div>
- <text>Big Eater!</text>
- <video class="video" onstart="onstart" onpause="onpause" onfinish="onfinish" onfail="onfail"
- auto-play="false" play-status="pause" src="{{src}}" style="width:750;height:500;"></video>
- <text>state: {{msg}}</text>
- </div>
-</template>
-
-<style>
-</style>
-
-<script>
- module.exports ={
- data: {
- msg: '',
- src:'http://flv2.bn.netease.com/videolib3/1611/01/XGqSL5981/SD/XGqSL5981-mobile.mp4'
- },
- methods:{
- onstart:function(e){
- this.msg = 'onstart'
- },
- onpause:function(e){
- this.msg = 'onpause'
- },
- onfinish:function(e){
- this.msg = 'onfinish'
- },
- onfail:function(e){
- this.msg = 'onfinish'
- },
- }
- }
-</script>
-```
-
-[体验一下](http://dotwe.org/d83a00bbd180bd5dc4e7f9381d39b4dd)
http://git-wip-us.apache.org/repos/asf/incubator-weex-site/blob/12e3a8bc/_draft/v1.0/references/components/web.md
----------------------------------------------------------------------
diff --git a/_draft/v1.0/references/components/web.md b/_draft/v1.0/references/components/web.md
deleted file mode 100644
index 073fb4b..0000000
--- a/_draft/v1.0/references/components/web.md
+++ /dev/null
@@ -1,143 +0,0 @@
----
-title: <web>
-type: references
-order: 2.15
-version: 0.10
----
-
-# <web>
-
-<span class="weex-version">v0.5+</span>
-
-使用 `<web>` 组件在 Weex 页面中嵌入一张网页内容。`src` 属性用来指定资源地址。你也可以使用 `webview module` 来控制 `web` 的行为,比如前进、后退和重载。可以在这里查看 [`webview` module](../modules/webview.html)。
-
-## 子组件
-
-不支持子组件。
-
-## 特性
-
-- `src {string}`:此特性指定嵌入的 web 页面 url。
-
-## 样式
-
-- 通用样式:不支持部分盒模型样式,支持列表如下:
-
- - `width`
-
- 组件的宽度,默认值是0。这个样式定义必须指定数值。
-
- - `height`
-
- 组件的高度,默认值是0。这个样式定义必须指定数值。
-
- - `flexbox` 布局
- - `position`
- - `opacity`
- - `background-color`
-
- 查看 [组件通用样式](../common-style.html)
-
-## 事件
-
-- `pagestart`: `<web>` 组件开始加载时发送此事件消息。
-- `pagefinish`: `<web>` 组件完成加载时发送此事件消息。
-- `error`: �如果 `<web>` 组件加载出现错误,会发送此事件消息。
-
-- 通用事件
-
- 支持以下通用事件:
- - `appear`
- - `disappear`
-
- 查看 [通用事件](../common-event.html)
-
-**注意:**
-
-不支持 `click` 事件。
-
-## 示例
-
-我们用一个简易浏览器示例,来展示如何使用 `<web>` 组件和 `webview` module。 查看 [webview module](../modules/webview.html)。
-
-```html
-<template>
- <div class="browserStyle">
- <div style="flex-direction: row">
- <input id="urlInput" type="url" autofocus="false" placeholder="input url" onchange="change" oninput="input" class="textStyle" value="https://www.baidu.com">
- </input>
- </div>
- <div style="flex-direction: row">
- <text class="buttonSytle" onclick="loadURL">LoadURL</text>
- <text class="buttonSytle" onclick="backforward">Backward</text>
- <text class="buttonSytle" onclick="forward">Forward</text>
- </div>
- <div>
- <web id="webview" src="{{src}}" class="webStyle"></web>
- </div>
- </div>
-</template>
-
-<style>
- .browserStyle {
- position: absolute;
- top: 0;
- right: 0;
- bottom: 0;
- left: 0;
- background-color:#778899 ;
- }
-
- .textStyle {
- width: 750;
- height: 50;
- background-color: #D3D3D3;
- font-size: 30;
- }
-
- .buttonSytle {
- width:200;
- height: 50;
- background-color: #D3D3D3;
- margin:10;
- padding-left: 5;
- padding-right: 5;
- font-size: 30;
- }
-
- .webStyle {
- width: 750;
- height: 800;
- background-color: #8B0000;
- }
-</style>
-
-<script>
- var web_module = require('@weex-module/webview')
-
- module.exports = {
- data: {
- src : "https://h5.m.taobao.com",
- },
-
- methods: {
- loadURL: function (e) {
- var input = this.$el("urlInput");
- this.src = input.attr.value;
- },
-
- backforward: function (e) {
- var web_element = this.$el('webview');
- web_module.goBack(web_element);
- },
-
- forward: function (e) {
- var web_element = this.$el('webview');
- web_module.goForward(web_element);
- }
- }
- }
-</script>
-```
-
-[体验一下](http://dotwe.org/84741a6befeb0f1e5ce11b47ecf1123f)
http://git-wip-us.apache.org/repos/asf/incubator-weex-site/blob/12e3a8bc/_draft/v1.0/references/gesture.md
----------------------------------------------------------------------
diff --git a/_draft/v1.0/references/gesture.md b/_draft/v1.0/references/gesture.md
deleted file mode 100644
index 4377af9..0000000
--- a/_draft/v1.0/references/gesture.md
+++ /dev/null
@@ -1,79 +0,0 @@
----
-title: 手势
-type: references
-order: 1.4
-version: 0.10
----
-
-# 手势
-
-*注:该功能属于实验性功能*
-
-Weex 封装了原生的触摸事件以提供手势系统。使用手势类似于在 Weex 中使用事件,只需在节点上设置 `on` 特性来监听手势即可。
-
-## 手势类型
-
-目前,仅支持以下四种手势类型:
-
-- **Touch**:当触摸到一个点,移动或从触摸面移开时触发 `touch` 手势。触摸手势很精准,它会返回所有详细的事件信息。所以,监听 `touch` 手势可能很慢,即使只移动一丁点也需要处理大量事件。有三种类型的 `touch` 手势:
-
- - `touchstart` 将在触摸到触摸面上时触发。
- - `touchmove` 将在触摸点在触摸面移动时被触发。
- - `touchend` 将在从触摸面离开时被触发。
-
-- **Pan**:`pan` 手势也会返回触摸点在触摸面的移动信息,有点类似于 `touch` 手势。但是 `pan` 手势只会采样收集部分事件信息因此比 `touch` 事件要快得多,当然精准性差于 `touch`。`pan` 也有三中类型的手势,这些手势的意义与 `touch` 完全一样:
-
- - `panstart`
- - `panmove`
- - `panend`
-
-- **Swipe**:`swipe` 将会在用户在屏幕上滑动时触发,一次连续的滑动只会触发一次 `swiper` 手势。
-- **LongPress**:`LongPress` 将会在触摸点连续保持 500 ms以上时触发。
-
-`touch` 和 `pan` 非常接近,它们的特点可以总结成这样:
-
-- **Touch**:完整信息,精准、很慢
-- **Pan**:抽样信息,很快,不够精准
-
-开发者可以根据自己的情况选择合适的手势。
-
-## 属性
-
-以下属性可以在手势的回调中使用:
-
-- `direction`:仅在 `swipe` 手势中存在,返回滑动方向,返回值可能为 `up`, `left`, `bottom`, `right`。
-- `changedTouches`:一个数组,包含了当前手势的触摸点的运动轨迹
-
-### changedTouches
-
-`changedTouches` 是一个数组,其子元素中包含以下属性:
-
-- `identifier`:触摸点的唯一标识符。
-- `pageX`:触摸点相对于文档左侧边缘的 X 轴坐标。
-- `pageY`:触摸点相对于文档顶部边缘的 Y 轴坐标。
-- `screenX`:触摸点相对于屏幕左侧边缘的 X 轴坐标。
-- `screenY`:触摸点相对于屏幕顶部边缘的 Y 轴坐标。
-
-## 约束
-
-目前,由于会触发大量事件冲突,Weex Android 还不支持在滚动类型的元素上监听手势,例如 `scroller`, `list` 和 `webview` 这三个组件。
-
-## 示例
-
-```html
-<template>
- <div ontouchstart="handleTouchstart"></div>
-</template>
-
-<script>
-module.exports = {
- methods: {
- handleTouchstart: function(eventProperties) {
- // handling with the Event Properties
- }
- }
-}
-</script>
-```
-
-如上面代码所示,一个 `touchstart` 事件会在触摸点与触摸面接触的时候触发。
http://git-wip-us.apache.org/repos/asf/incubator-weex-site/blob/12e3a8bc/_draft/v1.0/references/images/Artboard.jpg
----------------------------------------------------------------------
diff --git a/_draft/v1.0/references/images/Artboard.jpg b/_draft/v1.0/references/images/Artboard.jpg
deleted file mode 100644
index 2f6bb95..0000000
Binary files a/_draft/v1.0/references/images/Artboard.jpg and /dev/null differ
http://git-wip-us.apache.org/repos/asf/incubator-weex-site/blob/12e3a8bc/_draft/v1.0/references/images/coding_weex_1.jpg
----------------------------------------------------------------------
diff --git a/_draft/v1.0/references/images/coding_weex_1.jpg b/_draft/v1.0/references/images/coding_weex_1.jpg
deleted file mode 100644
index 8080578..0000000
Binary files a/_draft/v1.0/references/images/coding_weex_1.jpg and /dev/null differ
http://git-wip-us.apache.org/repos/asf/incubator-weex-site/blob/12e3a8bc/_draft/v1.0/references/images/css-boxmodel.png
----------------------------------------------------------------------
diff --git a/_draft/v1.0/references/images/css-boxmodel.png b/_draft/v1.0/references/images/css-boxmodel.png
deleted file mode 100644
index a2063e2..0000000
Binary files a/_draft/v1.0/references/images/css-boxmodel.png and /dev/null differ
http://git-wip-us.apache.org/repos/asf/incubator-weex-site/blob/12e3a8bc/_draft/v1.0/references/images/css-flexbox-align.jpg
----------------------------------------------------------------------
diff --git a/_draft/v1.0/references/images/css-flexbox-align.jpg b/_draft/v1.0/references/images/css-flexbox-align.jpg
deleted file mode 100644
index 8a7f731..0000000
Binary files a/_draft/v1.0/references/images/css-flexbox-align.jpg and /dev/null differ
http://git-wip-us.apache.org/repos/asf/incubator-weex-site/blob/12e3a8bc/_draft/v1.0/references/images/css-flexbox-justify.svg
----------------------------------------------------------------------
diff --git a/_draft/v1.0/references/images/css-flexbox-justify.svg b/_draft/v1.0/references/images/css-flexbox-justify.svg
deleted file mode 100644
index 33e742b..0000000
--- a/_draft/v1.0/references/images/css-flexbox-justify.svg
+++ /dev/null
@@ -1,59 +0,0 @@
-<svg xmlns="http://www.w3.org/2000/svg" width='504' height='270' viewBox="0 0 504 270">
- <defs>
- <pattern id='checker' width='20' height='20' patternUnits='userSpaceOnUse'>
- <rect x='0' y='0' width='10' height='10' fill='#eee' />
- <rect x='10' y='10' width='10' height='10' fill='#eee' />
- <rect x='0' y='10' width='10' height='10' fill='#ccc' />
- <rect x='10' y='0' width='10' height='10' fill='#ccc' />
- </pattern>
- </defs>
- <style>
- text { font-family: sans-serif; font-weight: bold; font-size: 30px; text-anchor: middle; }
- rect { stroke-width: 2px; stroke: #888; }
- g > rect:nth-child(1) { fill: #888 }
- g > rect:nth-child(2) { fill: #fcc; }
- g > rect:nth-child(3) { fill: #cfc; }
- g > rect:nth-child(4) { fill: #ccf; }
- g > rect:nth-child(5) { fill: transparent; }
- </style>
- <g transform="translate(2,2)">
- <rect x='0' y='0' width='500' height='50' />
- <rect x='0' y='0' width='100' height='50' />
- <rect x='100' y='0' width='80' height='50' />
- <rect x='180' y='0' width='200' height='50' />
- <rect x='0' y='0' width='500' height='50' />
- <text x='250' y='38'>flex-start</text>
- </g>
- <g transform="translate(2,56)">
- <rect x='0' y='0' width='500' height='50' />
- <rect x='120' y='0' width='100' height='50' />
- <rect x='220' y='0' width='80' height='50' />
- <rect x='300' y='0' width='200' height='50' />
- <rect x='0' y='0' width='500' height='50' />
- <text x='250' y='38'>flex-end</text>
- </g>
- <g transform="translate(2,110)">
- <rect x='0' y='0' width='500' height='50' />
- <rect x='60' y='0' width='100' height='50' />
- <rect x='160' y='0' width='80' height='50' />
- <rect x='240' y='0' width='200' height='50' />
- <rect x='0' y='0' width='500' height='50' />
- <text x='250' y='38'>center</text>
- </g>
- <g transform="translate(2,164)">
- <rect x='0' y='0' width='500' height='50' />
- <rect x='0' y='0' width='100' height='50' />
- <rect x='160' y='0' width='80' height='50' />
- <rect x='300' y='0' width='200' height='50' />
- <rect x='0' y='0' width='500' height='50' />
- <text x='250' y='38'>space-between</text>
- </g>
- <g transform="translate(2,218)">
- <rect x='0' y='0' width='500' height='50' />
- <rect x='20' y='0' width='100' height='50' />
- <rect x='160' y='0' width='80' height='50' />
- <rect x='280' y='0' width='200' height='50' />
- <rect x='0' y='0' width='500' height='50' />
- <text x='250' y='38'>space-around</text>
- </g>
-</svg>
\ No newline at end of file
http://git-wip-us.apache.org/repos/asf/incubator-weex-site/blob/12e3a8bc/_draft/v1.0/references/images/div_1.jpg
----------------------------------------------------------------------
diff --git a/_draft/v1.0/references/images/div_1.jpg b/_draft/v1.0/references/images/div_1.jpg
deleted file mode 100644
index 3c89773..0000000
Binary files a/_draft/v1.0/references/images/div_1.jpg and /dev/null differ
http://git-wip-us.apache.org/repos/asf/incubator-weex-site/blob/12e3a8bc/_draft/v1.0/references/images/div_2.jpg
----------------------------------------------------------------------
diff --git a/_draft/v1.0/references/images/div_2.jpg b/_draft/v1.0/references/images/div_2.jpg
deleted file mode 100644
index 67395bb..0000000
Binary files a/_draft/v1.0/references/images/div_2.jpg and /dev/null differ
http://git-wip-us.apache.org/repos/asf/incubator-weex-site/blob/12e3a8bc/_draft/v1.0/references/images/div_3.jpg
----------------------------------------------------------------------
diff --git a/_draft/v1.0/references/images/div_3.jpg b/_draft/v1.0/references/images/div_3.jpg
deleted file mode 100644
index b10f69e..0000000
Binary files a/_draft/v1.0/references/images/div_3.jpg and /dev/null differ
http://git-wip-us.apache.org/repos/asf/incubator-weex-site/blob/12e3a8bc/_draft/v1.0/references/images/div_4.jpg
----------------------------------------------------------------------
diff --git a/_draft/v1.0/references/images/div_4.jpg b/_draft/v1.0/references/images/div_4.jpg
deleted file mode 100644
index acc2518..0000000
Binary files a/_draft/v1.0/references/images/div_4.jpg and /dev/null differ
http://git-wip-us.apache.org/repos/asf/incubator-weex-site/blob/12e3a8bc/_draft/v1.0/references/images/image_1.jpg
----------------------------------------------------------------------
diff --git a/_draft/v1.0/references/images/image_1.jpg b/_draft/v1.0/references/images/image_1.jpg
deleted file mode 100644
index b87de15..0000000
Binary files a/_draft/v1.0/references/images/image_1.jpg and /dev/null differ
http://git-wip-us.apache.org/repos/asf/incubator-weex-site/blob/12e3a8bc/_draft/v1.0/references/images/image_2.jpg
----------------------------------------------------------------------
diff --git a/_draft/v1.0/references/images/image_2.jpg b/_draft/v1.0/references/images/image_2.jpg
deleted file mode 100644
index 598a242..0000000
Binary files a/_draft/v1.0/references/images/image_2.jpg and /dev/null differ
http://git-wip-us.apache.org/repos/asf/incubator-weex-site/blob/12e3a8bc/_draft/v1.0/references/images/list_2.jpg
----------------------------------------------------------------------
diff --git a/_draft/v1.0/references/images/list_2.jpg b/_draft/v1.0/references/images/list_2.jpg
deleted file mode 100644
index 8c2cc55..0000000
Binary files a/_draft/v1.0/references/images/list_2.jpg and /dev/null differ
http://git-wip-us.apache.org/repos/asf/incubator-weex-site/blob/12e3a8bc/_draft/v1.0/references/images/list_3.jpg
----------------------------------------------------------------------
diff --git a/_draft/v1.0/references/images/list_3.jpg b/_draft/v1.0/references/images/list_3.jpg
deleted file mode 100644
index f2968c7..0000000
Binary files a/_draft/v1.0/references/images/list_3.jpg and /dev/null differ
http://git-wip-us.apache.org/repos/asf/incubator-weex-site/blob/12e3a8bc/_draft/v1.0/references/images/list_4.jpg
----------------------------------------------------------------------
diff --git a/_draft/v1.0/references/images/list_4.jpg b/_draft/v1.0/references/images/list_4.jpg
deleted file mode 100644
index 0123171..0000000
Binary files a/_draft/v1.0/references/images/list_4.jpg and /dev/null differ
http://git-wip-us.apache.org/repos/asf/incubator-weex-site/blob/12e3a8bc/_draft/v1.0/references/images/nav.jpg
----------------------------------------------------------------------
diff --git a/_draft/v1.0/references/images/nav.jpg b/_draft/v1.0/references/images/nav.jpg
deleted file mode 100644
index 8c6ed03..0000000
Binary files a/_draft/v1.0/references/images/nav.jpg and /dev/null differ
http://git-wip-us.apache.org/repos/asf/incubator-weex-site/blob/12e3a8bc/_draft/v1.0/references/images/scroller_1.jpg
----------------------------------------------------------------------
diff --git a/_draft/v1.0/references/images/scroller_1.jpg b/_draft/v1.0/references/images/scroller_1.jpg
deleted file mode 100644
index 3e995cb..0000000
Binary files a/_draft/v1.0/references/images/scroller_1.jpg and /dev/null differ
http://git-wip-us.apache.org/repos/asf/incubator-weex-site/blob/12e3a8bc/_draft/v1.0/references/images/style_1.jpg
----------------------------------------------------------------------
diff --git a/_draft/v1.0/references/images/style_1.jpg b/_draft/v1.0/references/images/style_1.jpg
deleted file mode 100644
index 2482710..0000000
Binary files a/_draft/v1.0/references/images/style_1.jpg and /dev/null differ
http://git-wip-us.apache.org/repos/asf/incubator-weex-site/blob/12e3a8bc/_draft/v1.0/references/images/style_2.jpg
----------------------------------------------------------------------
diff --git a/_draft/v1.0/references/images/style_2.jpg b/_draft/v1.0/references/images/style_2.jpg
deleted file mode 100644
index 6b6f2e1..0000000
Binary files a/_draft/v1.0/references/images/style_2.jpg and /dev/null differ
http://git-wip-us.apache.org/repos/asf/incubator-weex-site/blob/12e3a8bc/_draft/v1.0/references/index.md
----------------------------------------------------------------------
diff --git a/_draft/v1.0/references/index.md b/_draft/v1.0/references/index.md
deleted file mode 100644
index 644c16f..0000000
--- a/_draft/v1.0/references/index.md
+++ /dev/null
@@ -1,46 +0,0 @@
----
-title: Bootstrap
-type: references
-order: 1
-has_chapter_content: false
-chapter_title: 通用选项
-version: 0.10
----
-
-# Bootstrap
-
-除了其默认的意义,`<script>`标签支持在页面的顶级组件中通过 `type` 属性定义两种配置。
-- `type="data"`: 配置初始化数据,这里定义的数据会覆盖定义在`<script>`中的数据;
-- `type="config"`: 定义配置项。
-
-``` html
-<script type="data">
- /* (可选) 定义初始化数据 */
-</script>
-
-<script type="config">
- /* (可选) 定义配置项 */
-</script>
-
-```
-## 定义初始化数据
-
-有时,很难在默认的`<script>`标签中维护巨大的数据结构。所以 Weex 允许我们通过 `<script type="data">` 标签定义初始化数据。在这里定义的数据将完全取代默认的 `<script>` 标签中定义的数据。
-
-例如:
-
-```html
-<script type="data">
- module.exports = {
- title: 'Alibaba',
- date: new Date().toLocaleString()
- }
-</script>
-```
-## 配置项
-
-Weex 也允许我们通过 `<script type="config">` 定义一些配置项,目前,仅只支持配置 `downgrade`。
-- `downgrade.osVersion`
-- `downgrade.appVersion`
-- `downgrade.weexVersion`
-- `downgrade.deviceModel`
http://git-wip-us.apache.org/repos/asf/incubator-weex-site/blob/12e3a8bc/_draft/v1.0/references/modules/animation.md
----------------------------------------------------------------------
diff --git a/_draft/v1.0/references/modules/animation.md b/_draft/v1.0/references/modules/animation.md
deleted file mode 100644
index 821bfac..0000000
--- a/_draft/v1.0/references/modules/animation.md
+++ /dev/null
@@ -1,90 +0,0 @@
----
-title: animation
-type: references
-order: 4.1
-version: 0.10
----
-
-# `animation` 动画
-
-流畅且有意义的动画是一个十分有效的提升移动应用用户体验的手段,`animation` 模块被用于在组件上执行动画。动画可以对组件执行一系列简单的变换 (位置、大小、旋转角度、背景颜色和不透明度)。举个例子,如果有一个 `<image>` 组件,通过动画你可以对其进行移动、旋转、拉伸或收缩等动作。
-
-## 示例
-
-```html
-<template>
- <div>
- <div id="test" class="test" onclick="run"></div>
- </div>
-</template>
-<style>
- .test { background-color: #6666ff; width: 200; height: 200; }
-</style>
-<script>
- var animation = require('@weex-module/animation')
- module.exports = {
- methods: {
- run: function () {
- var testEl = this.$el('test')
- animation.transition(testEl, {
- styles: {
- backgroundColor: '#FF0000',
- transform: 'translate(100px, 100px)'
- },
- duration: 0, //ms
- timingFunction: 'ease',
- 'transform-origin': 'center center',
- delay: 0 //ms
- }, function () {
- console.log('animation finished.')
- })
- }
- }
- }
-</script>
-```
-
-[体验一下](http://dotwe.org/2ae04d3a7017a2ec748cf40905fcd98c)
-
-## API
-
-### `transition(el, options, callback)`
-
-[example](http://dotwe.org/a034a49b5863da099843eb9a0eea9f93)
-
-#### 参数
-
-* `el {Element}`:将要执行动画的元素,通常可以通过调用 [`this.$el(id)`](../api.html) 来获取元素的引用。
-* `options {Object}`:描述动画过程的对象。
- * `options.duration {number}`:指定动画的持续时间 (单位是毫秒),默认值是 `0`,表示没有动画效果。
- * `options.delay {number}`:指定请求动画操作到执行动画之间的时间间隔 (单位是毫秒),默认值是 `0`,表示没有延迟,在请求后立即执行动画。
- * `options.timingFunction {string}`:描述动画执行的速度曲线,用于使动画变化更为平滑。默认值是 `linear`,表示动画从开始到结束都拥有同样的速度。下表列出了所有合法的属性:
-
-| 属性名 | 描述 | 示例 |
-| ---- | ---- | ---- |
-| `linear` | 动画从头到尾的速度是相同的 | [example](http://dotwe.org/70e0c243ffde30abd8fd353f8c6d1d9a) |
-| `ease-in` | 动画速度由慢到快 | [example](http://dotwe.org/23b104f833039f263957481f2e2c40c9) |
-| `ease-out` | 动画速度由快到慢 | [example](http://dotwe.org/04dab95e073a2c3a808e6b01fc20e996) |
-| `ease-in-out` | 动画先加速到达中间点后减速到达终点 | [example](http://dotwe.org/fc37ec17d215e786ce336a00457489e3) |
-| `cubic-bezier(x1, y1, x2, y2)` | 在三次贝塞尔函数中定义变化过程,函数的参数值必须处于 0 到 1 之间。更多关于三次贝塞尔的信息请参阅 [cubic-bezier](http://cubic-bezier.com/) 和 [Bézier curve](https://en.wikipedia.org/wiki/B%C3%A9zier_curve). | [example](http://weex.alibaba-inc.com/playground/95d8f15d0014c31d3a1d15728313f2a5) |
-
-* `options.styles {Object}`:设置不同样式过渡效果的键值对,下表列出了所有合法的参数:
-
-| 参数名 | 描述 | 值类型 | 默认值 | 示例 |
-| ---- | ---- | ---- | ---- |---- |
-| width | 动画执行后应用到组件上的宽度值 | length | 无 | [example](http://dotwe.org/b599d273f996cfdcbeca7bd5c828ca90) |
-| height | 动画执行后应用到组件上的高度值 | length | 无 | [example](http://dotwe.org/d0b1ccadf386ba00960d0c8340c682e5) |
-| backgroundColor | 动画执行后应用到组件上的背景颜色 | string | none | [example](http://dotwe.org/f4616ee18f6042b63a8fdcd2816b1712) |
-| opacity | 动画执行后应用到组件上的不透明度值 | 介于 0 到 1 间的数值 | `1` | [example](http://dotwe.org/f94394173301db83ae6e66d1330a0d0b) |
-| transformOrigin | 定义变化过程的中心点. 参数 `x-aris` 可能的值为 `left`、`center`、`right`、长度值或百分比值, 参数 `y-axis` 可能的值为 `top`、`center`、`bottom`、长度值或百分比值 | `x-axis y-axis` | `center center` | [example](http://dotwe.org/de43f5a47de230dd531797458bf7fd3c) |
-| transform | 定义应用在元素上的变换类型,支持下表列出的属性 | object | 无 | [example](http://dotwe.org/6766dab0589f7831d4bb6030f4226996) |
-
-`transform`属性的合法值:
-
-| 名称 | 描述 | 值类型 | 默认值 | 示例 |
-| ---- | ---- | ---- | ---- | ---- |
-| `translate`/`translateX`/`translateY` | 指定元素将已被移动到的新位置 | 像素值或百分比 | 无 | [example](http://dotwe.org/6638e66e296723bbef3e59c83b2b5003) |
-| `rotate` | 指定元素将被旋转的角度,单位是度 | number | 无 | [example](http://dotwe.org/ba9e9920594d9388744b2bd0d1b7695d) |
-| `scale`/`scaleX`/`scaleY` | 按比例放大或缩小元素 | number | 无 | [example](http://dotwe.org/14b42dde6583ab222bd2b7ed08f241c8) |
-
-* `callback {Function}`:动画执行完毕之后的回调
http://git-wip-us.apache.org/repos/asf/incubator-weex-site/blob/12e3a8bc/_draft/v1.0/references/modules/clipboard.md
----------------------------------------------------------------------
diff --git a/_draft/v1.0/references/modules/clipboard.md b/_draft/v1.0/references/modules/clipboard.md
deleted file mode 100644
index f4525f2..0000000
--- a/_draft/v1.0/references/modules/clipboard.md
+++ /dev/null
@@ -1,112 +0,0 @@
----
-title: clipboard
-type: references
-order: 4.2
-version: 0.10
----
-
-# `clipboard` 剪切板
-<span class="weex-version">v0.8+</span>
-
-我们可以通过 `clipboard` 模块的 `getString()`、`setString()` 接口从系统的粘贴板获取内容或者设置内容。
-
-以前当我们收到一条短信验证码信息时,除了人肉拷贝,我们无法获取拷贝短信的内容。这是非常苦恼的。但是现在我们可以通过简单的调用 `clipboard.getString()` 接口来获取短信内容了。
-
-## 示例
-
-```html
-<template>
- <div>
- <div class="div">
- <text class="text" onclick="onItemClick">hello {{message}}</text>
- </div>
- <div class="div">
- <text class="text" onclick="setContent">click me to set: {{tobecopied}}</text>
- </div>
- </div>
-</template>
-
-<script>
- var clipboard = require('@weex-module/clipboard');
- module.exports ={
- data:{
- tobecopied:'yay!',
- message:"nothing."
- },
- methods:{
- setContent:function(e){
- clipboard.setString(this.tobecopied);
- },
- onItemClick:function(e){
- this.message='clicked! ';
- clipboard.getString(function(ret) {
- this.message = 'text from clipboard:'+ ret;
- }.bind(this));
- }
- }
- }
-</script>
-
-<style>
- .div {
- flex-direction: row;
- justify-content: space-between;
- align-items: center;
- width: 750;
- height: 90;
- padding-left:30;
- padding-right:30;
-
- border-bottom-width: 1;
- border-style: solid;
- border-color: #dddddd;
- }
- .text {
- width: 750;
- height: 90;
- }
-</style>
-```
-
-[体验一下](http://dotwe.org/b6a9d613462d85dce56f81085b094dfa)
-
-**注意**
-
-* 仅支持文本拷贝
-* 出于安全考虑和平台限制,只支持 Android 和 iOS,不支持 html5。
-
-## API
-
-### `getString(callback)`
-
-从系统粘贴板读取内容。
-
-#### 参数
-
-* `callback {function (ret)}`:执行完读取操作后的回调函数。`ret {Object}` 为 `callback` 函数的参数,有两个属性:
- - `ret.data`:获取到的文本内容;
- - `ret.result`:返回状态,可能为 `success` 或 `fail`。
-
-#### 示例
-
-```javascript
-var clipboard = require('@weex-module/clipboard');
-clipboard.getString(function(ret) {
- console.log("text from clipboard: " + ret.data);
-});
-```
-
-### `setString(text)`
-
-将一段文本复制到剪切板,相当于手动复制文本。
-
-#### 参数
-
-* `text {string}`:要复制到剪切板的字符串。
-
-#### 示例
-
-```javascript
-var clipboard = require('@weex-module/clipboard');
-clipboard.setString("SomeStringHere");
-```
http://git-wip-us.apache.org/repos/asf/incubator-weex-site/blob/12e3a8bc/_draft/v1.0/references/modules/dom.md
----------------------------------------------------------------------
diff --git a/_draft/v1.0/references/modules/dom.md b/_draft/v1.0/references/modules/dom.md
deleted file mode 100644
index 270ec2b..0000000
--- a/_draft/v1.0/references/modules/dom.md
+++ /dev/null
@@ -1,79 +0,0 @@
----
-title: dom
-type: references
-order: 4.3
-version: 0.10
----
-
-# dom
-
-包含如下可以更新 dom 树的 dom API。
-
-这部分API是通过把 virtual-dom 的消息发送到 native 渲染器来做到的。
-
-开发者在日常开发中,唯一可在 `.we` 文件中使用的是 `scrollToElement`。
-~~你也可以调用 `$scrollTo` 方法来使用它~~
-
-这个页面提及的其他的 API,只在 `callNative` 进程中的 native 渲染器用。
-(关于 `callNative` 进程的进一步介绍,可以在 [How it works](../../advanced/how-it-works.html)中的 JS Framework 部分看到 )
-
-## API
-### scrollToElement(node, options)
-
-让页面滚动到那个对应的节点,这个API只能在 `<scroller>` 和 `<list>` 组件中用。
-
-~~这个API也能通过调用VM的方法 `$scrollTo` 来使用(已弃用)~~
-
-要在你的 `.we` 文件中使用这个 API,可以使用 `require('@weex-module/dom').scrollToElement`。
-
-#### 参数
-- `node {Node}`:你要滚动到的那个节点
-- `options {Object}`:如下选项
- - `offset {number}`:一个到其可见位置的偏移距离,默认是 `0`
-
-#### 示例
-
-```html
-<template>
- <scroller>
- <div class="row" repeat="item in rows" id="item-{{$index}}">
- <text class="item-title">row {{item.id}}</text>
- </div>
- <div onclick="go" style="width: 750;height: 50; position: fixed; left: 0; right: 0; bottom: 0; background-color: #eeeeee;">
- <text style="text-align: center;">
- Go to 50th line.
- </text>
- </div>
- </scroller>
-</template>
-
-<script>
-var dom = require('@weex-module/dom')
-
-module.exports = {
- data: {
- rows: []
- },
- created: function () {
- for (var i = 0; i < 100; i++) {
- this.rows.push({
- id: i
- })
- }
- },
- methods: {
- go: function () {
- var el = this.$el('item-49')
-
- dom.scrollToElement(el, {
- offset: 0
- })
- }
- }
-}
-</script>
-```
-
-## 其他
-
-dom 还有一些底层接口用于创建 Weex 实例时调用,比如 `createBody`、`updateAttrs` 等,但并未开放供外部使用。
http://git-wip-us.apache.org/repos/asf/incubator-weex-site/blob/12e3a8bc/_draft/v1.0/references/modules/globalevent.md
----------------------------------------------------------------------
diff --git a/_draft/v1.0/references/modules/globalevent.md b/_draft/v1.0/references/modules/globalevent.md
deleted file mode 100644
index 9a04dc0..0000000
--- a/_draft/v1.0/references/modules/globalevent.md
+++ /dev/null
@@ -1,87 +0,0 @@
----
-title: globalEvent
-type: references
-order: 4.9
-version: 0.10
----
-
-# 全局事件
-<span class="weex-version">0.8 (开发中)</span>
-
-`globalEvent` 用于监听持久性事件,例如定位信息,陀螺仪等的变化。全局事件是需要额外 APIs 处理的次要 API。你能通过 `addEventListener` 注册事件监听,当你不再需要的时候,也可以通过 `removeEventListener` 取消事件监听。
-
-*提醒*
-
-- 这是一个实例级别的事件,而非应用级别。
-
-## 如何让你的模块支持全局事件
-
-API 开发完成后,当需要发送事件时,需要通过以下方法:
-
-```javascript
-/**
- *
- * @param eventName eventName
- * @param params event params
- */
-instance.fireGlobalEventCallback(eventName,params);
-```
-
-如何在 weex-html5 组件或模块中分发全局事件?只需在文档元素上分派事件:
-
-```javascript
-var evt = new Event('some-type')
-evt.data = { foo: 'bar' }
-document.dispatchEvent(evt)
-```
-
-**示例**
-
-### Android
-
-```java
-Map<String,Object> params=new HashMap<>();
-params.put("key","value");
-mWXSDKInstance.fireGlobalEventCallback("geolocation",params);
-```
-
-### iOS
-
-```object-c
-[weexInstance fireGlobalEvent:@"geolocation" params:@{@"key":@"value"}];
-```
-
-## API
-
-### `addEventListener(String eventName, String callback)`
-
-注册全局事件。
-
-#### 参数
-
-- `eventName {string}`:需要监听的事件名称。
-- `callback {Function}`:触发事件后的回调函数。
-
-#### 示例
-
-```javascript
-var globalEvent = require('@weex-module/globalEvent');
-globalEvent.addEventListener("geolocation", function (e) {
- console.log("get geolocation")
-});
-```
-
-### `removeEventListener(String eventName)`
-
-取消事件监听。
-
-#### 参数
-
-- `eventName {string}`:需要取消的事件名称。
-
-#### 示例
-
-```javascript
-var globalEvent = require('@weex-module/globalEvent');
-globalEvent.removeEventListener("geolocation");
-```
http://git-wip-us.apache.org/repos/asf/incubator-weex-site/blob/12e3a8bc/_draft/v1.0/references/modules/index.md
----------------------------------------------------------------------
diff --git a/_draft/v1.0/references/modules/index.md b/_draft/v1.0/references/modules/index.md
deleted file mode 100644
index c76e401..0000000
--- a/_draft/v1.0/references/modules/index.md
+++ /dev/null
@@ -1,20 +0,0 @@
----
-title: 内建模块
-type: references
-order: 4
-has_chapter_content: true
-version: 0.10
----
-
-# 内建模块
-
-## 如何使用
-
-你可以简单的通过类似 `require('@weex-module/name')` 这样的语法获取一个模块的 API,比如:
-
-```javascript
-var dom = require('@weex-module/dom')
-dom.scrollToElement(this.$el('someIdForElement'), {
- offset: 0
-})
-```
http://git-wip-us.apache.org/repos/asf/incubator-weex-site/blob/12e3a8bc/_draft/v1.0/references/modules/modal.md
----------------------------------------------------------------------
diff --git a/_draft/v1.0/references/modules/modal.md b/_draft/v1.0/references/modules/modal.md
deleted file mode 100644
index 3e652a8..0000000
--- a/_draft/v1.0/references/modules/modal.md
+++ /dev/null
@@ -1,196 +0,0 @@
----
-title: modal
-type: references
-order: 4.4
-version: 0.10
----
-
-# `modal` 模态
-
-`modal` 模块提供了以下展示消息框的 API:`toast`、`alert`、`confirm` 和 `prompt`。
-
-## API
-
-### `toast(options)`
-
-`toast()` 会在一个小浮层里展示关于某个操作的简单反馈。例如,在邮件发送前离开邮编编辑界面,可以触发一个“草稿已保存”的 toast,告知用户以后可以继续编辑。toast 会在显示一段时间之后自动消失。
-
-#### 参数
-
-- `options {Object}`:相关选项
- - `message {string}`:展示的内容
- - `duration {number}`:展示的持续时间(以秒为单位)
-
-#### 示例
-
-```html
-<template>
- <div style="height: 200px; width: 400px; background-color: #00bfff;
- justify-content: center; align-items: center" onclick="{{perform}}">
- <text style="font-size: 60px; color: #ffffff">Toast</text>
- </div>
-</template>
-
-<script>
- module.exports = {
- methods: {
- perform: function () {
- var modal = require('@weex-module/modal');
- modal.toast({
- 'message': 'I am a toast',
- 'duration': 3
- });
- }
- }
- }
-</script>
-```
-
-[体验一下](http://dotwe.org/a1b8699c49d1cbb3d0de66c1c5175387)
-
-### `alert(options, callback)`
-
-警告框经常用于确保用户可以得到某些信息。当警告框出现后,用户需要点击确定按钮才能继续进行操作。
-
-#### 参数
-
-- `options {Object}`:alert选项
- - `message {string}`:警告框内显示的文字信息
- - `okTitle {string}`:确定按钮上显示的文字信息,默认是“OK”
- - `callback {Function}`:用户操作完成后的回调
-
-#### 示例
-
-```html
-<template>
- <div>
- <div style="height: 200px; width: 400px; background-color: #00bfff;
- justify-content: center; align-items: center" onclick="{{perform}}">
- <text style="font-size: 60px; color: #ffffff">Alert</text>
- </div>
- <text>{{params}}</text>
- </div>
-</template>
-
-<script>
- module.exports = {
- data: {
- params: ''
- },
- methods: {
- perform: function () {
- var modal = require('@weex-module/modal');
- var self = this;
- modal.alert({
- 'message': 'I am alert message',
- 'okTitle': 'YES'
- }, function (result) {
- self.params = String(result)
- });
- }
- }
- }
-</script>
-```
-
-[体验一下](http://dotwe.org/18e2a4bdff4d2f7db865c11eadfcd13e)
-
-### `confirm(options, callback)`
-
-确认框用于使用户可以验证或者接受某些信息。当确认框出现后,用户需要点击确定或者取消按钮才能继续进行操作。
-
-#### 参数
-
-- `options {object}`:confirm 选项
- - `message {string}`:确认框内显示的文字信息
- - `okTitle {string}`:确认按钮上显示的文字信息,默认是 `OK`
- - `cancelTitle {string}`:取消按钮上显示的文字信息,默认是 `Cancel`
-- `callback {function (result)}`:用户操作完成后的回调,回调函数的参数 `result` 是确定按钮上的文字信息字符串
-
-#### 示例
-
-```html
-<template>
- <div>
- <div style="height: 200px; width: 400px; background-color: #00bfff;
- justify-content: center; align-items: center" onclick="{{perform}}">
- <text style="font-size: 60px; color: #ffffff">Confirm</text>
- </div>
- <text>{{params}}</text>
- </div>
-</template>
-
-<script>
- module.exports = {
- data: {
- params: ''
- },
- methods: {
- perform: function () {
- var modal = require('@weex-module/modal');
- var self = this;
- modal.confirm({
- 'message': 'I have read and accept the terms.',
- 'okTitle': 'YES',
- 'cancelTitle': 'NO'
- }, function (e) {
- self.params = String(e)
- });
- }
- }
- }
-</script>
-```
-
-[体验一下](http://dotwe.org/3534b9d5eac99045015d97b20af22c27)
-
-### `prompt(options, callback)`
-
-提示框经常用于提示用户在进入页面前输入某个值。当提示框出现后,用户需要输入某个值,然后点击确认或取消按钮才能继续操作。
-
-#### 参数
-
-- `options {object}`:prompt 选项
- - `message {string}`:提示框内要显示的文字信息
- - `okTitle {string}`:确认按钮上显示的文字信息,默认是 `OK`
- - `cancelTitle {string}`:取消按钮上显示的文字信息,默认是 `Cancel`
-- `callback {function (ret)}`:用户操作完成后的回调,回调函数的参数 `ret` 格式形如 `{ result: 'OK', data: 'hello world' }`,如下
- - `result {string}`:用户按下的按钮上的文字信息
- - `data {string}`:用户输入的文字信息
-
-### 示例
-
-```html
-<template>
- <div>
- <div style="height: 200px; width: 400px; background-color: #00bfff;
- justify-content: center; align-items: center" onclick="{{perform}}">
- <text style="font-size: 60px; color: #ffffff">Prompt</text>
- </div>
- <text>{{params}}</text>
- </div>
-</template>
-
-<script>
- module.exports = {
- data: {
- params: ''
- },
- methods: {
- perform: function () {
- var modal = require('@weex-module/modal');
- var self = this;
- modal.prompt({
- 'message': 'I am a prompt',
- 'okTitle': 'YES',
- 'cancelTitle': 'NO'
- }, function (e) {
- self.params = JSON.stringify(e)
- });
- }
- }
- }
-</script>
-```
-
-[体验一下](http://dotwe.org/9f089100f5808dbc55ef4872a2c0c77b)
http://git-wip-us.apache.org/repos/asf/incubator-weex-site/blob/12e3a8bc/_draft/v1.0/references/modules/navigator.md
----------------------------------------------------------------------
diff --git a/_draft/v1.0/references/modules/navigator.md b/_draft/v1.0/references/modules/navigator.md
deleted file mode 100644
index fdd4e76..0000000
--- a/_draft/v1.0/references/modules/navigator.md
+++ /dev/null
@@ -1,110 +0,0 @@
----
-title: navigator
-type: references
-order: 4.5
-version: 0.10
----
-
-# `navigator` 导航控制
-<span class="weex-version">v0.6.1+</span>
-
-众所周知,在浏览器里,我们可以通过前进或者回退按钮来切换页面,iOS/Android 的 `navigator` 模块就是用来实现类似的效果的。除了前进、回退功能,该模块还允许我们指定在切换页面的时候是否应用动画效果。
-
-## 示例
-
-```html
-<template>
- <div class="div">
- <text class="text" onclick="onItemClick">click me! {{message}}</text>
- </div>
-</template>
-
-<script>
- var navigator = require('@weex-module/navigator')
- var nextUrl = 'http://dotwe.org/raw/dist/6cd1703a45d7b2752cf05303069ce881.js'
- module.exports ={
- data:{
- message:''
- },
- methods:{
- onItemClick:function(e){
- var params = {'url':nextUrl,'animated':'true'}
- navigator.push(params, function(e) {
- console.log('i am the callback.')
- });
- }
- }
- }
-</script>
-<style>
- .div {
- flex-direction: row;
- justify-content: space-between;
- align-items: center;
- width: 750;
- height: 90;
- padding-left:30;
- padding-right:30;
-
- border-bottom-width: 1;
- border-style: solid;
- border-color: #dddddd;
- }
- .text{
- width: 750;
- height: 90;
- }
-</style>
-```
-
-[体验一下](http://dotwe.org/dba03a1660e6242778fd19d3d8f5944b)
-
-## API
-
-### `push(options, callback)`
-
-把一个weex页面URL压入导航堆栈中,可指定在页面跳转时是否需要动画,以及操作完成后需要执行的回调函数
-
-#### 参数
-
-* `options {Object}`:选项参数
- * `url {stirng}`:要压入的 Weex 页面的 URL
- * `animated {string}`:`"true"` 示意为页面压入时需要动画效果,`"false"` 则不需要,默认值为 `"true"`
-* `callback {Function}`:执行完该操作后的回调函数
-
-#### 示例
-
-```javascript
-var navigator = require('@weex-module/navigator')
-var params = {
- url: 'navigator-demo.js',
- animated: 'true'
-}
-navigator.push(params, function () {
- // callback
-})
-```
-
-### `pop(options, callback)`
-
-把一个 Weex 页面 URL 弹出导航堆栈中,可指定在页面弹出时是否需要动画,以及操作完成后需要执行的回调函数。
-
-#### 参数
-
-* `options {object}`:选项参数对象
- * `animated {string}`:`"true"` 示意为弹出页面时需要动画效果,`"false"` 则不需要,默认值为 `"true"`
-* `callback {function}`:执行完该操作后的回调函数
-
-#### 示例
-
-```javascript
-var navigator = require('@weex-module/navigator')
-var params = {
- animated: 'true'
-}
-navigator.pop(params, function () {
- // callback
-})
-```
-
-*注意事项:`animated` 二级参数目前仅支持字符串的 `"true"` 和 `"false"`,传入布尔值类型会导致程序崩溃,未来版本会修复这个问题*
http://git-wip-us.apache.org/repos/asf/incubator-weex-site/blob/12e3a8bc/_draft/v1.0/references/modules/storage.md
----------------------------------------------------------------------
diff --git a/_draft/v1.0/references/modules/storage.md b/_draft/v1.0/references/modules/storage.md
deleted file mode 100644
index c18b9ae..0000000
--- a/_draft/v1.0/references/modules/storage.md
+++ /dev/null
@@ -1,224 +0,0 @@
----
-title: storage
-type: references
-order: 4.6
-version: 0.10
----
-
-# `storage` 本地存储
-<span class="weex-version">v0.7+</span>
-
-**备注**:0.7及以上版本可用
-
-`storage` 是一个在前端比较常用的模块,可以对本地数据进行存储、修改、删除,并且该数据是永久保存的,除非手动清除或者代码清除。但是,`storage` 模块有一个限制就是浏览器端(H5)只能存储小于5M的数据,因为在 H5/Web 端的实现是采用 `HTML5 LocalStorage API`。而 Android 和 iOS 这块是没什么限制的。
- storage 常用在一些被用户经常查询,但是又不频繁更新的数据,比如搜索历史、用户的订单列表等。搜索历史一般情况都是作为本地数据存储的,因此使用 storage 比较合适。而用户订单列表是需要本地存储和服务端器检索配合的场景。当一个用户下单后,会经常查阅个人的订单列表。但是,订单的列表数据不是频繁更新的,往往只有在收到货品时,才更新“已签收”,其余平时的状态是“已发货”。因此,可以使用 storage 存储订单列表,可以减少服务器的压力,例如减少 SQL 查询或者缓存的压力。当用户查看订单详情的时候,再更新数据状态。
-
-这里,我们简单模拟“搜索”记录的场景。在搜索的时候写入,然后读取出来展示成列表。
-
-```html
-<template>
- <div style="background-color:#F6F6F6;">
- <div class="search_view">
- <input class="search" placeholder="Please input" onchange="change"/>
- <text class="btn" onclick="search">Search</text>
- </div>
- <text class="item">History</text>
- <list>
- <cell repeat="(i, v) in items">
- <text class="item">{{v}}</text>
- </cell>
- </list>
- </div>
-</template>
-
-<style>
- .search_view{
- height:70;
- margin-top:20;
- margin-left:10;
- margin-right:10;
- flex-direction:row;
- }
- .search{
- height:70;
- border-width:1;
- border-color:#dddddd;
- padding-left:10;
- font-size:28;
- flex:1;
- }
- .btn{
- width:80;
- text-align:center;
- justify-content:center;
- font-size:28;
- background-color:#1A89EA;
- color:#ffffff;
- }
- .item{
- text-align:center;
- font-size:25;
- height:50;
- margin-top:10;
- color:#5E5E5E;
- border-bottom-width:1;
- border-bottom-color:#dddddd;
- justify-content:center;
- }
-</style>
-
-<script>
- var storage = require('@weex-module/storage');
- module.exports = {
- data: {
- items: [],
- keywords:''
- },
- created: function(){
- var that = this;
- storage.getAllKeys(function(e) {
- if(e.result == 'success' && e.data.length){
- e.data.forEach(function(item){
- if(item.indexOf('search_') > -1){
- that.items.push(item.split('search_')[1]);
- }
- });
- }
- });
- },
- methods:{
- search: function(){
- var that = this;
- if(!this.keywords) return;
- storage.setItem('search_' + this.keywords, this.keywords, function(e) {
- that.items.push(that.keywords);
- });
- },
- change: function(e){
- if(!e.value) return;
- this.keywords = e.value;
- }
- }
- };
-</script>
-```
-
-[体验一下](http://dotwe.org/b0f9a8f5df916c91bfb39e54e03a9ba8)
-
-这里,逐一解释下上面的代码。`input` 组件监听了 `change` 事件,可以保存用户输入的搜索关键字。如果用户点击了搜索按钮,则将关键字存储到 storage。这里,使用了 `search_` 作为 storage key 的前缀。因此,我们在页面加载时,在 `created` 生命周期中可以先使用 `storage.getAllKeys` 获取所有的 `key`。如果 `key` 包含了 `search_ `,则说明是搜索记录。因此,将该记录压入数组 items 中,于是界面就会展示出搜索记录的列表。
-
-## API
-
-`storage` 提供了一系列的 API 供我们调用。我们只需要引入该模块,然后调用对应的 API 即可。
-
-### `setItem(key, value, callback)`
-
-该方法可以通过键值对的形式将数据存储到本地。同时可以通过该方法,更新已有的数据。
-
-#### 参数
-
-* `key {string}`:要存储的键,不允许是 `""` 或 `null`
-* `value {string}`:要存储的值,不允许是 `""` 或 `null`
-* `callback {function (e)}`:执行操作成功后的回调
- * `e.result`:表示设置是否成功,如果成功返回 `"success"`
- * `e.data`:`undefined` 表示设置成功,`invalid_param` 表示 key/value 为 `""` 或者 `null`
-
-#### 示例
-
-```javascript
-var storage = require('@weex-module/storage')
-storage.setItem('bar', 'bar-value', function (e) {
- e.result
- e.data
-})
-```
-
-这里,对返回值做一个简单的介绍:
-
-`e` 包含两个属性:`e.result` 和 `e.data`。如果 `e.result` 返回值是 “success”,则说明成功。`e.data` 返回 `undefined` 表示设置成功,返回 `invalid_param` 表示` key/value` 为 "" 或者 null。因此,你可以判断两个返回判断是否插入成功。
-
-### `getItem(key, callback)`
-
-传入键名返回对应的键值
-
-#### 参数
-
-* `key {string}`:要获取的值的名称,不允许是 `""` 或 `null`
-* `callback {function (e)}`:执行操作成功后的回调
- * `e.result`:表示设置是否成功,如果成功返回 `"success"`
- * `e.data`:获取对应的键值字符串,如果没有找到则返回 `undefined`
-
-#### 示例
-
-```javascript
-var storage = require('@weex-module/storage')
-storage.getItem('foo', function (e) {
- e.data
-});
-```
-
-### `removeItem(key, callback)`
-
-传入一个键名将会删除本地存储中对应的键值
-
-#### 参数
-
-* `key {string}`:要删除的值的名称,不允许是 `""` 或 `null`
-* `callback {function (e)}`:执行操作成功后的回调.
- * `e.result`:表示删除是否成功,如果成功返回 `"success"`
- * `e.data`:`undefined` 表示删除成功
-
-#### 示例
-
-```javascript
-var storage = require('@weex-module/storage')
-storage.removeItem('foo', function (e) {
- e.result
- e.data
-})
-```
-
-### `length(callback)`
-
-返回本地存储的数据中所有存储项数量的整数
-
-#### 参数
-
-* `callback {function (e)}`:执行操作成功后的回调
- * `e.result`:表示设置是否成功,如果成功返回 `"success"`
- * `e.data`:当前已存储项的数量
-
-#### 示例
-
-````javascript
-var storage = require('@weex-module/storage')
-storage.length(function (e) {
- e.result
- e.data
-})
-````
-
-### `getAllKeys(callback)`
-
-返回一个包含全部已存储项键名的数组
-
-#### 参数
-
-* `callback {function (e)}`:执行操作成功后的回调。
- * `e.result`:表示设置是否成功,如果成功返回 `"success"`
- * `e.data`:所有键名组成的数组
-
-#### 示例
-
-````javascript
-var storage = require('@weex-module/storage')
-storage.getAllKeys(function (e) {
- e.result
- e.data
-})
-````
-
-## 其它参考
-
-* [W3school: html5 localStorage](http://www.w3school.com.cn/html5/html_5_webstorage.asp)
-* [storage 模块完整的 Demo](https://github.com/apache/incubator-weex/blob/dev/examples/module/storage-demo.we)
[08/51] [abbrv] incubator-weex-site git commit: rearrangement the
structure of the document
Posted by ha...@apache.org.
http://git-wip-us.apache.org/repos/asf/incubator-weex-site/blob/32a097bf/source/guide/extend-ios.md
----------------------------------------------------------------------
diff --git a/source/guide/extend-ios.md b/source/guide/extend-ios.md
new file mode 100644
index 0000000..83a297c
--- /dev/null
+++ b/source/guide/extend-ios.md
@@ -0,0 +1,340 @@
+---
+title: Extend iOS
+type: guide
+group: Extend
+order: 6.3
+version: 2.1
+---
+
+#### Notice
+
+**All of the exported APIs in Weex are controllable and safe, they can not access private APIs or do any system hacks at runtime, neither can they change the primary purpose of the Application**.
+
+**If you are extending your custom modules/components, be sure NOT to export the ability of Objective-C runtime, be sure NOT to export dynamic and uncontrolled methods such as `dlopen()`, `dlsym()`, `respondsToSelector:`, `performSelector:`, `method_exchangeImplementations()`, be sure NOT to export any private methods. **
+
+### Module extend
+
+Weex SDK provides only rendering capabilities, rather than have other capabilities, such as network, picture, and URL redirection. If you want these features, you need to implement it.
+
+For example: If you want to implement an address jumping function, you can achieve a Module following the steps below.
+
+#### Step to customize a module
+
+1. Module
+ customized must implement WXModuleProtocol
+2. A macro named `WX_EXPORT_METHOD` must be added, as it is the only way to export methods to JavaScript.
+3. The weexInstance should be synthesized. Each module object is bind to a specific instance.
+4. Module methods will be invoked in UI thread, so do not put time consuming operation there. If you want to execute the whole module methods in other thread, please implement the method `- (NSThread *)targetExecuteThread` in protocol. In the way, tasks distributed to this module will be executed in targetExecuteThread.
+5. Weex params can be String or Map.
+6. Module supports to return results to Javascript in callback. This callback is type of `WXModuleCallback`, the params of which can be String or Map.
+
+```objective-c
+@implementation WXEventModule
+
+@synthesize weexInstance;
+WX_EXPORT_METHOD(@selector(openURL:callback:))
+
+- (void)openURL:(NSString *)url callback:(WXModuleCallback)callback
+{
+ NSString *newURL = url;
+ if ([url hasPrefix:@"//"]) {
+ newURL = [NSString stringWithFormat:@"http:%@", url];
+ } else if (![url hasPrefix:@"http"]) {
+ newURL = [NSURL URLWithString:url relativeToURL:weexInstance.scriptURL].absoluteString;
+ }
+
+ UIViewController *controller = [[WXDemoViewController alloc] init];
+ ((WXDemoViewController *)controller).url = [NSURL URLWithString:newURL];
+
+ [[weexInstance.viewController navigationController] pushViewController:controller animated:YES];
+ callback(@{@"result":@"success"});
+}
+
+@end
+```
+
+#### export synchronous methods <span class="api-version">v0.10+</span>
+
+If you want to export synchronous methods which could make Javascript receive return values from natvie, you can use `WX_EXPORT_METHOD_SYNC` macro.
+
+native code:
+
+```objective-c
+@implementation WXEventModule
+
+WX_EXPORT_METHOD_SYNC(@selector(getString))
+
+- (NSString *)getString
+{
+ return @"testString";
+}
+
+@end
+```
+
+js code:
+
+```javascript
+const eventModule = weex.requireModule('event')
+const returnString = syncTest.getString() // return "testString"
+```
+
+You can alse return number/array/dictionary except string.
+
+`notice:` the exported synchronous native method **can only be called on JS thread**. **Do not** do heavy work which will block js execution.
+
+`notice:` Vue 2.0 has not supported this feature yet. It will be supported in version 0.12 at the soonest.
+
+#### Register the module
+
+You can register the customized module by calling the method `registerModule:withClass` in WXSDKEngine.
+
+```objective-c
+WXSDKEngine.h
+/**
+* @abstract Registers a module for a given name
+* @param name The module name to register
+* @param clazz The module class to register
+**/
++ (void)registerModule:(NSString *)name withClass:(Class)clazz;
+
+[WXSDKEngine registerModule:@"event" withClass:[WXEventModule class]];
+```
+
+### Handler extend
+
+Weex SDK doesn't have capabilitis, such as image download 、navigator operation,please implement these protocols by yourself.
+
+#### WXImgLoaderProtocol
+<font color="gray">
+Weex SDK has no image download capability, you need to implement `WXImgLoaderProtocol`. Refer to the following examples.
+
+```objective-c
+WXImageLoaderProtocol.h
+@protocol WXImgLoaderProtocol <WXModuleProtocol>
+
+/**
+ * @abstract Creates a image download handler with a given URL
+ * @param imageUrl The URL of the image to download
+ * @param imageFrame The frame of the image you want to set
+ * @param options : The options to be used for this download
+ * @param completedBlock : A block called once the download is completed.
+ image : the image which has been download to local.
+ error : the error which has happened in download.
+ finished : a Boolean value indicating whether download action has finished.
+ */
+ -(id<WXImageOperationProtocol>)downloadImageWithURL:(NSString *)url imageFrame:(CGRect)imageFrame userInfo:(NSDictionary *)options completed:(void(^)(UIImage *image, NSError *error, BOOL finished))completedBlock;
+ @end
+```
+
+Implement above protocol as follows.
+
+
+```objective-c
+@implementation WXImgLoaderDefaultImpl
+#pragma mark -
+#pragma mark WXImgLoaderProtocol
+
+- (id<WXImageOperationProtocol>)downloadImageWithURL:(NSString *)url imageFrame:(CGRect)imageFrame userInfo:(NSDictionary *)userInfo completed:(void(^)(UIImage *image, NSError *error, BOOL finished))completedBlock
+{
+ if ([url hasPrefix:@"//"]) {
+ url = [@"http:" stringByAppendingString:url];
+ }
+ return (id<WXImageOperationProtocol>)[[SDWebImageManager sharedManager] downloadImageWithURL:[NSURL URLWithString:url] options:0 progress:^(NSInteger receivedSize, NSInteger expectedSize) {
+ } completed:^(UIImage *image, NSError *error, SDImageCacheType cacheType, BOOL finished, NSURL *imageURL) {
+ if (completedBlock) {
+ completedBlock(image, error, finished);
+ }
+ }];
+}
+@end
+```
+
+#### Register the handler
+
+You can register the handler which implements the protocol by calling `registerHandler:withProtocol` in WXSDKEngine.
+
+```objective-c
+WXSDKEngine.h
+/**
+* @abstract Registers a handler for a given handler instance and specific protocol
+* @param handler The handler instance to register
+* @param protocol The protocol to confirm
+*/
++ (void)registerHandler:(id)handler withProtocol:(Protocol *)protocol;
+
+[WXSDKEngine registerHandler:[WXImgLoaderDefaultImpl new] withProtocol:@protocol(WXImgLoaderProtocol)];
+```
+
+## Custom Native Components for iOS
+
+### Component extend
+
+There are a lot of native components ready to be used in the Weex SDK, but users always have their own use cases. You might have written an awesome native UI widget in your previous work and just want to wrap up it and export to Weex. So we provide a way to enable developers to create their own custom fully-native components.
+
+This guide will use the implementation of existing component `image` to show you how to build a native component. It will also assume that you are familiar with iOS programming.
+
+#### Registration
+
+Defining a custom native component is simple. Just call `[WXSDKEngine registerComponent:withClass:]` with the component's tag name as first argument.
+
+```objective-c
+[WXSDKEngine registerComponent:@"image" withClass:[WXImageComponent class]];
+```
+
+Then you can create a `WXImageComponent` class to represent the implementation of image component.
+
+Now you can use `<image>` wherever you want in the template.
+
+```html
+<image></image>
+```
+
+#### Adding Properties
+
+The next thing we can do is to extend some native properties to make the component more powerful. As an image, let's say we should have a `src` attribute as image's remote source and a `resize` attribute as image's resize mode(contain/cover/stretch).
+
+```objective-c
+@interface WXImageComponent ()
+
+@property (nonatomic, strong) NSString *imageSrc;
+@property (nonatomic, assign) UIViewContentMode resizeMode;
+
+@end
+```
+
+All of the styles, attributes and events will be passed to the component's initialization method, so here you can store the properties which you are interested in.
+
+```objective-c
+@implementation WXImageComponent
+
+- (instancetype)initWithRef:(NSString *)ref type:(NSString *)type styles:(NSDictionary *)styles attributes:(NSDictionary *)attributes events:(NSArray *)events weexInstance:(WXSDKInstance *)weexInstance
+{
+ if (self = [super initWithRef:ref type:type styles:styles attributes:attributes events:events weexInstance:weexInstance]) {
+ _imageSrc = [WXConvert NSString:attributes[@"src"]];
+ _resizeMode = [WXConvert UIViewContentMode:attributes[@"resize"]];
+ }
+
+ return self;
+}
+
+@end
+```
+
+The properties getted in the attributes are of `id` type, so we have to convert them to the type we want using a conversion function. Basic conversion functions can be found in the `WXConvert` file, or you can just add your own conversion function.
+
+
+#### Hooking Render Life Cycle
+
+A Native Component has a life cycle managed by Weex. Weex creates it, layout it, renders it and destroys it.
+
+Weex offers component life cycle hooks that give you visibility into these key moments and the ability to act when they occur.
+
+| method | description |
+| :------------------: | ---------------------------------------- |
+| initWithRef:type:... | Initializes a new component using the specified properties. |
+| layoutDidFinish | Called when the component has just laid out. |
+| loadView | Creates the view that the component manages. |
+| viewWillLoad | Called before the load of component's view . |
+| viewDidLoad | Called after the component's view is loaded and set. |
+| viewWillUnload | Called just before releasing the component's view. |
+| viewDidUnload | Called when the component's view is released. |
+| updateStyles: | Called when component's style are updated. |
+| updateAttributes: | Called when component's attributes are updated. |
+| addEvent: | Called when adding an event to the component. |
+| removeEvent: | Called when removing an event frome the component. |
+
+
+As in the image component example, if we need to use our own image view, we can override the `loadView` method.
+
+
+```objective-c
+- (UIView *)loadView
+{
+ return [[WXImageView alloc] init];
+}
+```
+
+Now Weex will use `WXImageView` to render the `image` component.
+
+As an image component, we will need to fetch the remote image and set it to the image view. This can be done in `viewDidLoad` method when the view is created and loaded. `viewDidLoad` is also the best time to perform additional initialization for your view, such as content mode changing.
+
+
+```objective-c
+- (void)viewDidLoad
+{
+ UIImageView *imageView = (UIImageView *)self.view;
+ imageView.contentMode = _resizeMode;
+ imageView.userInteractionEnabled = YES;
+ imageView.clipsToBounds = YES;
+ imageView.exclusiveTouch = YES;
+
+ // Do your image fetching and updating logic
+}
+```
+
+If image's remote source can be changed, you can also hook the `updateAttributes:` method to perform your attributes changing logic. Component's view always has been loaded while `updateAttributes:` or `updateStyles:` is called.
+
+
+```objective-c
+- (void)updateAttributes:(NSDictionary *)attributes
+{
+ if (attributes[@"src"]) {
+ _imageSrc = [WXConvert NSString:attributes[@"src"]];
+ // Do your image updating logic
+ }
+
+ if (attributes[@"resize"]) {
+ _resizeMode = [WXConvert UIViewContentMode:attributes[@"resize"]];
+ self.view.contentMode = _resizeMode;
+ }
+}
+```
+
+Maybe there is even more life cycle hooks you might need to consider, such as `layoutDidFinish` while layout computing is finished. If you want to go deeper, check out the `WXComponent.h` file in the source code.
+
+Now you can use `<image>` and its attributes wherever you want in the template.
+
+```html
+<image style="your-custom-style" src="image-remote-source" resize="contain/cover/stretch"></image>
+```
+
+#### Component Method
+from WeexSDK `0.9.5`, you can define your component method by macro `WX_EXPORT_METHOD`
+for example:
+
+```
+@implementation WXMyComponent
+ +WX_EXPORT_METHOD(@selector(focus))
+ +- (instancetype)initWithRef:(NSString *)ref type:(NSString *)type styles:(NSDictionary *)styles attributes:(NSDictionary *)attributes events:(NSArray *)events weexInstance:(WXSDKInstance *)weexInstance
+ {
+ if (self = [super initWithRef:ref type:type styles:styles attributes:attributes events:events weexInstance:weexInstance]) {
+ // handle your attributes
+ // handle your styles
+ }
+
+ return self;
+ }
+
+
+ - (void)focus
+ {
+ NSLog(@"you got it");
+ }
+@end
+```
+
+after your registration for your own custom component, now you can call it in your js file.
+
+```html
+<template>
+ <mycomponent ref='mycomponent'></mycomponent>
+</template>
+<script>
+ module.exports = {
+ created: function() {
+ this.$refs.mycomponent.focus();
+ }
+ }
+</script>
+```
http://git-wip-us.apache.org/repos/asf/incubator-weex-site/blob/32a097bf/source/guide/extend-js-framework.md
----------------------------------------------------------------------
diff --git a/source/guide/extend-js-framework.md b/source/guide/extend-js-framework.md
new file mode 100644
index 0000000..d7fcf6d
--- /dev/null
+++ b/source/guide/extend-js-framework.md
@@ -0,0 +1,168 @@
+---
+title: Extend JS framework
+type: guide
+group: Extend
+order: 6.4
+version: 2.1
+---
+
+# Extend JS framework
+
+This part of the extension of JS framework is still in the discussion, may be adjusted at any time, please pay attention.
+
+Weex wants to be able to respect as many developer development habits as possible.So, in addition to Weex official support Vue 2.0, the developer can also customize and horizontally extension their own or their favorite JS Framework.The steps to customize the JS Framework are as follows:
+
++ First you have a complete set of JS Framework.
++ Learn about Weex's JS engine feature support.
++ Adapting Weex's native DOM APIs.
++ Adapting Weex's initialization portal and multi-instance management mechanism.
++ Add your own JS Framework to the framework configuration of the Weex JS runtime. Then pack it.
++ Build JS bundles based on the JS Framework. You need to add a specific prefix comment so that the Weex JS runtime can recognize it.
+
+## Weex JS engine features support
+
++ Under iOS, Weex uses the JavaScriptCore that comes with the system, so the ES support depends on the version of the operating system.
+The current conservative judgments, ES5 features on the market mainstream iOS devices are perfectly supported, but some of the features of ES6 + is not supported.
+
++ Under Android, Weex uses the v8 kernel provided by UC. For performance and stability considerations, we are not using the latest version of the v8 kernel.The same conservative judgment, the ES5 feature can all support, including strict mode `Object.freeze` and so on.
+
++ The Weex JS engine does not support HTML DOM APIs and HTML5 JS APIs, including `document`, `set`Timeout`, and so on.
+
++ We added `Promise`'s polyfill, as well as the `console`'s polyfill.
+
++ In addition, in order to ensure that the JS engine can manage memory as much as possible, we have a generic global object for the `Object.freeze ()` freeze operation, which includes:
+
+ - `Object`
+ - `Object.prototype`
+ - `Array`
+ - `Array.prototype`
+ - `String.prototype`
+ - `Number.prototype`
+ - `Boolean.prototype`
+ - `Error.prototype`
+ - `Date.prototype`
+ - `RegExp.prototype`
+
+## Adapt to Weex's initial entry and multi-instance management mechanism
+
+The JS Framework provided by the developer needs to be packaged as a **CommonJS** package, and the package needs to be extension to the following methods:
+
+### Framework initialization
+
++ `init(config)`
+ - `config`
+ - `Document`
+ - `Element`
+ - `Comment`
+ - `TaskSender`
+ - `CallbackManager`
+
+This method places the Native DOM class and two auxiliary classes provided by Weex in the `config` parameter and allows the framework itself to be initialized.
+
+Tip: At the same time, the author can pass in a different `config` in the framework of the initialization time. This allows for framework testing or environmental simulation.
+
+#### Introduction to parameter format
+
++ `TaskSender`: wip…
++ `CallbackManager`: wip…
+
+### Register available native components and modules
+
++ `registerComponents(components)`
++ `registerModules(modules)`
+
+These two methods are called immediately after the frame is initialized. This framework will be able to know which components and modules the current client supports.
+
+#### Introduction to parameter format
+
++ `components: Array`: Describe the array of components, each of which includes:
+ + `type: string`: Component name, for example `div`。
+ + `methods: string[]`: Optional, a list of method names supported by this component. These methods can follow the native DOM APIs call.
++ `modules: Object`: Describe the hash table of a series of modules. Key is the module name, the value is an array. The elements of the array describe a method in the module. The information of the method includes:
+ + `name: string`: Method name
+ + `args: string[]`: Parameter number and type description
+
+**E.g:**
+
+```javascript
+registerComponents([
+ { type: 'web', methods: ['goBack', 'goForward', 'refresh']}
+])
+registerModules({
+ event: [
+ {name: 'openURL', args: ['string']}
+ ]
+})
+```
+
+### Multi - instance lifecycle management
+
++ `createInstance(instanceId, code, config, data, env)`
++ `refreshInstance(instanceId, data)`
++ `destroyInstance(instanceId)`
+
+Each Weex page has two stages: created and destroyed. At the same time in the Weex page running process, native can send messages to the Weex page. Different frameworks can follow their own ideas to achieve the message.
+
+#### Introduction to parameter format
+
++ `instanceId: string`: The unique id of the Weex page is generated by native.
++ `code: string`:The Wex page's JS bundle's code is passed through native.
++ `config: Object?`: The configuration information for the Wex page, such as the bundleUrl representing the bundle address, is generated by the native configuration. It has nothing to do with the contents of the JS bundle itself.
++ `data: Object?`: Native can import an external data when creating a Weex page. The JS framework can also generate different page content for the same JS bundle with different data.
++ `env: Object?`:The current environment information about the Weex page, the meaning of each field:
+ - `info: Object`: Framework information, see the "JS Bundle format requirements" later.
+ - `config: Object`:Equivalent to the third parameter of the method `config`
+ - `callbacks: CallbackManager`: only `CallbackManager`instance of Weex page.
+ - `created: number`:The number of seconds that the Wex page was created.
+ - `framework: string`:The name of the framework used by the Wex page. Equivalent to `info.framework`.
+
+### Native communication
+
++ `receiveTasks(instanceId, tasks)`
+
+Native can use the `refreshInstance` method to send a message to the JS framework layer. But in many cases will use `receiveTasks` to send user events or methods callback to the JS framework.
+
+For example, if the user clicks on a button, native will send a `fireEvent` type of task to the JS framework, and then the JS framework will handle the corresponding event logic. This part of the working mechanism is related to the design of the `addEvent` in the native DOM interface.
+
+Another example is the user using fetch to send network requests. When the request is done at the native end, it will be sent to the JS framework with a callback type of task. Since native can not pass the function in JavaScript, it actually only sends a callbackId to the JS framework. This part of the working mechanism is related to the design of CallbackManager.
+
+#### Auxiliary method
+
++ `getRoot(instanceId): JSON`
+
+This method returns the full JSON description of the document body node. Developers can view the full native DOM tree as a result. The format of the specific return value is the same as the return method of the toJSON () method in the native DOM interface. This feature is used extensively as a developer tool extension.
+
+## Configure the JS Framework in WeexSDK
+### Prepare your JS Framework code
+
+```javascript
+// your-own-js-framework.js
+export function init (config) { ... }
+export function registerComponents (components) { ... }
+export function registerModules (modules) { ... }
+export function createInstance (id, code, config, data, env) { ... }
+export function destroyInstance (id) { ... }
+export function refreshInstance (id, data) { ... }
+export function recieveTasks (id, tasks) { ... }
+export function getRoot (id) { ... }
+```
+
+### Register a JS Framework
+
+```javascript
+import * as Vue from '...'
+import * as React from '...'
+import * as Angular from '...'
+export default { Vue, React, Angular };
+```
+And then packaged JS runtime, integrated into WeexSDK.
+
+#### JS Bundle format requirements
+
+**Framework info**
+The note(alias framework info) at the beginning of the JS Bundle file is very important. The format is as follows:
+
+```javascript
+// { "framework": "Vue" }
+```
+So that the Weex JS engine will know that the JS bundle needs to use the Vue framework to resolve.Similarly, Weex supports multiple frameworks.It will be based on js bundle notes to select the corresponding framework resolution.
http://git-wip-us.apache.org/repos/asf/incubator-weex-site/blob/32a097bf/source/guide/extend-web-render.md
----------------------------------------------------------------------
diff --git a/source/guide/extend-web-render.md b/source/guide/extend-web-render.md
new file mode 100644
index 0000000..7fa09ba
--- /dev/null
+++ b/source/guide/extend-web-render.md
@@ -0,0 +1,96 @@
+---
+title: Extend Web Render
+type: guide
+group: Extend
+order: 6.1
+version: 2.1
+---
+
+# Extend to HTML5
+
+Weex itself offers a lot of built-in components and modules, but also has the ability to expand horizontally. It allows developers to expand and customize themselves. But it is important to note that Weex is a cross-platform solution. When extending its built-in components or modules, you need to implement it on the three ends (Android, iOS, Web).
+
+After Weex switches the kernel to Vue 2.x, it will be easier to extend the Vue component on the Web side.
+
+## Extend Web components
+
+Vue.js is an independent front-end framework. In the browser, you can not use the Weex container for page rendering. So, the two things are the same: (1) for the Weex platform to expand Vue.js Web components. (2) directly using Vue.js to develop a Web component. The development of components can refer to its documentation: [component](https://vuejs.org/v2/guide/components.html). It is also recommended to use the ```.vue``` file to write components. How to use it: [Single file component](https://vuejs.org/v2/guide/single-file-components.html).
+
+### Example of component extension
+To extend ```<sidebar>``` as an example, you should first write the logic of the component itself:
+
+```html
+<!-- sidebar.vue -->
+<template>
+ <div class="sidebar">
+ <slot></slot>
+ </div>
+</template>
+<style scoped>
+ .sidebar {
+ /* ... */
+ }
+</style>
+<script>
+ export default {
+ props: [],
+ data () {
+ return {}
+ }
+ }
+</script>
+```
+
+And then register the ```<sidebar>``` component globally before using it:
+
+```javascript
+import Vue from 'vue'
+import Sidebar from './path/to/sidebar.vue'
+// register the ```<sidebar>``` component globally
+Vue.component('sidebar', Sidebar)
+```
+
+When you extend the Weex component, if you only use the built-in components provided by Weex and use the styles that Weex supports, it is no different from the normal custom component and does not need to be implemented at the Native side.
+
+If you find a component that does not support labels and styles that are not supported by Weex, you will need to really extend the Weex component. At the same time, you also need to extend in the Android side and the iOS side, or will lead to rendering exception.
+
+## Extend the Web module
+
+In addition to the common components, Weex also provides a common module, you can easily call the native API. In general, the registered Weex module requires three ends to be implemented, otherwise it will affect its normal use.
+
+### Register the module
+If we import the ```weex-vue-render``` library, we can get the weex variable globally. You can register the module using the ```registerModule```method.
+
+#### API format
++ `registerModule`
+
+ 1.```name```: {String} Required, module name.
+ 2.```define```: {Object} Required, module definition.
+
+#### The example of register module
+The following code registers a module called guide:
+
+```javascript
+weex.registerModule('guide', {
+ greeting () {
+ console.log('Hello, nice to meet you. I am your guide.')
+ },
+ farewell () {
+ console.log('Goodbye, I am always at your service.')
+ }
+})
+```
+
+### Use the module
+
+Weex provides the require method for getting registered modules. You only need to pass the module name directly:
+
+```javascript
+//import module
+const guide = weex.requireModule('guide')
+// use the methods of module
+guide.greeting()
+guide.farewell()
+```
+
+The above wording is as useful as the native end, except that the methods in the module are provided by Native.
http://git-wip-us.apache.org/repos/asf/incubator-weex-site/blob/32a097bf/source/guide/front-end-frameworks.md
----------------------------------------------------------------------
diff --git a/source/guide/front-end-frameworks.md b/source/guide/front-end-frameworks.md
new file mode 100644
index 0000000..3b19259
--- /dev/null
+++ b/source/guide/front-end-frameworks.md
@@ -0,0 +1,12 @@
+---
+title: Front-End Frameworks
+type: guide
+group: Overview
+order: 1.3
+version: 2.1
+has_chapter_content: true
+---
+
+## Vue.js
+
+## Rax
http://git-wip-us.apache.org/repos/asf/incubator-weex-site/blob/32a097bf/source/guide/index.md
----------------------------------------------------------------------
diff --git a/source/guide/index.md b/source/guide/index.md
index a7f5139..98d8060 100644
--- a/source/guide/index.md
+++ b/source/guide/index.md
@@ -1,7 +1,8 @@
---
-title: Get Started
+title: Get Started
type: guide
-order: 1
+group: Overview
+order: 1.1
version: 2.1
has_chapter_content: true
---
@@ -20,14 +21,14 @@ Weex now fully supports VueJS 2.x officailly. Weex put Vue 2.x as its built-in J
## Hello world Example
-The easiest way to try Weex is to use the [Playground App](../playground.html) to write a [Hello World](http://dotwe.org/vue/4d5a0471ece3daabd4681bc6d703c4c1) example at [dotWe](http://dotwe.org). No installation is required and you do not even have to write native code.
+The easiest way to try Weex is to use the [Playground App](../playground.html) to write a [Hello World](http://dotwe.org/vue/4d5a0471ece3daabd4681bc6d703c4c1) example at [dotWe](http://dotwe.org). No installation is required and you do not even have to write native code.
To test Weex online using our Playground App:
- Install the [Playground App](../playground.html) on your phone.
- Open [the Hello World example](http://dotwe.org/vue/4d5a0471ece3daabd4681bc6d703c4c1) in a new tab, click run, and then use the Playground App to scan the QR code.
-Nailed it!
+Nailed it!
If you took the procedure above, you can see simple HTML semantic tags, CSS styles and Javascript code. This is one of the simplest Weex examples. The demo applications renders a "Hello World" in the page. Please note that this is not a Web page. You are running native!.
http://git-wip-us.apache.org/repos/asf/incubator-weex-site/blob/32a097bf/source/guide/integrate-devtool-to-android.md
----------------------------------------------------------------------
diff --git a/source/guide/integrate-devtool-to-android.md b/source/guide/integrate-devtool-to-android.md
new file mode 100644
index 0000000..525ed7b
--- /dev/null
+++ b/source/guide/integrate-devtool-to-android.md
@@ -0,0 +1,147 @@
+---
+title: Integrate Devtool to Android
+type: guide
+group: Develop
+order: 5.4
+version: 2.1
+---
+
+# Integrate Devtool to Android
+
+Weex devtools is a custom devtools for weex that implements Chrome Debugging Protocol inspired by Stetho, it is designed to help you quickly inspect your app and debug your JS bundle source in a Chrome web page. To make it work, at first you must integrate devtool to your App. This page will help you integrate devtool to your Android App.
+
+## Integrate to Android
+
+### Installing Dependencies
+
+Weex Devtools depend on `weex_inspector`. I strongly recommend you use the latest version since both Weex SDK and devtools are developed iteratively and rapidly. See the release version list [here](https://github.com/weexteam/weex_devtools_android/releases). All the release version will publish to the [jcenter repo](https://bintray.com/alibabaweex/maven/weex_inspector). There are two choices to install it:
+
+- From Gradle
+
+ ```gradle
+ dependencies {
+ compile 'com.taobao.android:weex_inspector:0.8.0.0'
+ }
+ ```
+
+- From source code
+
+ you need to copy the dir of inspector to the same dir of your app and add `include ":inspector"`in your project's `settings.gradle` file just like playground have done, then add dependency in your app's `build.gralde`.
+
+ ```gradle
+ dependencies {
+ compile project(':inspector')
+ }
+ ```
+
+#### Version compatibility
+
+| weex sdk | weex inspector | Debugger Server |
+|----------|----------------|-----------------|
+| 0.8.0.1+ | 0.0.8.1+ | 0.2.39+ |
+| 0.7.0+ | 0.0.7.13 | 0.2.38 |
+| 0.6.0+ | 0.0.2.2 | - |
+
+
+### Adding Debug mode switch
+
+The key to control the opening and closing of the debug mode can be summarized as three rules:
+
+**No.1: Set the switch and Debugger Server addresses via `sRemoteDebugMode` and ` sRemoteDebugProxyUrl`.**
+
+`WXEnvironment` class has a pair of static variables mark Weex current debug mode:
+
+```java
+public static boolean sRemoteDebugMode; // default close
+public static String sRemoteDebugProxyUrl; // Debugger Server addresses
+```
+
+You have to set `WXEnvironment.sRemoteDebugMode` and `WXEnvironment.sRemoteDebugProxyUrl` at the right time, for example:
+
+```java
+private void initDebugEnvironment(boolean enable, String host) {
+ WXEnvironment.sRemoteDebugMode = enable;
+ WXEnvironment.sRemoteDebugProxyUrl = "ws://" + host + ":8088/debugProxy/native";
+}
+```
+
+**No.2: You must call `WXSDKEngine.reload()` method when `sRemoteDebugMode` was changed.**
+
+You can control a state of debug mode via the `WXEnvironment.sRemoteDebugMode`, but you need reset Weex runtime if you changed a state of debug mode.
+
+```java
+private void launchInspector(boolean remoteDebug) {
+ if (WXEnvironment.isApkDebugable()) {
+ try {
+ if (mWxDebugProxy != null) {
+ mWxDebugProxy.stop();
+ }
+ HackedClass<Object> debugProxyClass = WXHack.into("com.taobao.weex.devtools.debug.DebugServerProxy");
+ mWxDebugProxy = (IWXDebugProxy) debugProxyClass.constructor(Context.class, WXBridgeManager.class)
+ .getInstance(WXEnvironment.getApplication(), WXBridgeManager.this);
+ if (mWxDebugProxy != null) {
+ mWxDebugProxy.start();
+ if (remoteDebug) {
+ mWXBridge = mWxDebugProxy.getWXBridge();
+ } else {
+ if (mWXBridge != null && !(mWXBridge instanceof WXBridge)) {
+ mWXBridge = null;
+ }
+ }
+ }
+ } catch (HackAssertionException e) {
+ WXLogUtils.e("launchInspector HackAssertionException ", e);
+ }
+ }
+}
+```
+
+In this way, You can control the debug mode flexibly.
+
+**No.3: Auto refresh page via `ACTION_DEBUG_INSTANCE_REFRESH` broadcast**
+
+`ACTION_DEBUG_INSTANCE_REFRESH` can be broadcast messages when the debug mode is switched or Chrome page refresh. You can use this mechanism to inform the current page to refresh in time.
+
+```java
+public class RefreshBroadcastReceiver extends BroadcastReceiver {
+ @Override
+ public void onReceive(Context context, Intent intent) {
+ if (IWXDebugProxy.ACTION_DEBUG_INSTANCE_REFRESH.equals(intent.getAction())) {
+ if (mUri != null) {
+ if (TextUtils.equals(mUri.getScheme(), "http") || TextUtils.equals(mUri.getScheme(), "https")) {
+ loadWXfromService(mUri.toString());
+ } else {
+ loadWXfromLocal(true);
+ }
+ }
+ }
+ }
+}
+```
+
+### Example
+
+The easiest way is reuse the code of playground. On the other hand QR code is not necessary, if you review the source code you can draw a conclusion that QR CODE is just a way to set devtools server address. There are two examples of how to open debug modes in the Playground App:
+
+- Set the debug mode via `XXXApplication`
+
+ ```java
+ public class MyApplication extends Application {
+ public void onCreate() {
+ super.onCreate();
+ initDebugEnvironment(true, "xxx.xxx.xxx.xxx"/*"DEBUG_SERVER_HOST"*/);
+ }
+ }
+ ```
+
+- Set the debug mode by scan QR code
+
+ You review the source code of playground.
+
+ - Debug mode switch control: [`WXApplication.java`](https://github.com/weexteam/weex_devtools_android/blob/master/playground/app/src/main/java/com/alibaba/weex/WXApplication.java)
+ - Refresh control [`WXPageActivity.java`](https://github.com/weexteam/weex_devtools_android/blob/master/playground/app/src/main/java/com/alibaba/weex/WXPageActivity.java)
+
+
+## Known Issues
+
+You can report issues and bugs [here](https://github.com/weexteam/weex_devtools_android/issues). We will reply as soon as possible.
http://git-wip-us.apache.org/repos/asf/incubator-weex-site/blob/32a097bf/source/guide/integrate-devtool-to-ios.md
----------------------------------------------------------------------
diff --git a/source/guide/integrate-devtool-to-ios.md b/source/guide/integrate-devtool-to-ios.md
new file mode 100644
index 0000000..1899092
--- /dev/null
+++ b/source/guide/integrate-devtool-to-ios.md
@@ -0,0 +1,193 @@
+---
+title: Integrate Devtool to iOS
+type: guide
+group: Develop
+order: 5.5
+version: 2.1
+---
+
+# Integrate Devtool to iOS
+
+Weex devtools is a custom devtools for weex that implements Chrome Debugging Protocol inspired by Stetho, it is designed to help you quickly inspect your app and debug your JS bundle source in a Chrome web page. To make it work, at first you must integrate devtool to your App. This page will help you integrate devtool to your iOS App.
+
+## Integrate to iOS
+
+### Installing Dependencies
+
+There are two choices to install dependencies:
+
+#### No.1 From cocoapods
+
+```
+source https://github.com/CocoaPods/Specs.git,
+pod 'WXDevtool', '0.7.0', :configurations => ['Debug'],
+```
+
+I strongly recommend you use the latest version since both Weex SDK and devtools are developed iteratively and rapidly.
+
+#### No.2 From source code
+
+1. Get source code by [GitHub](https://github.com/weexteam/weex-devtool-iOS).
+
+2. Copy source folder to your project.
+
+ 
+
+3. Choose options as the picture shows.
+
+ 
+
+### Integrate
+
+#### Step 1. Add header file in `AppDelegate.m`
+
+ - From cocoapods:
+
+ ```
+ #import <TBWXDevtool/WXDevtool.h>
+ ``
+
+ - From source code
+
+ ```
+ #import "WXDevtool.h"
+ ```
+
+#### Step 2. Initialize inspector when the APP launched
+
+You can see the WXDevtool header file as follows:
+
+```object-c
+#import <Foundation/Foundation.h>
+
+@interface WXDevTool : NSObject
+/**
+* set debug status
+* @param isDebug : YES:open debug model and inspect model;
+* default is NO,if isDebug is NO, open inspect only;
+* */
++ (void)setDebug:(BOOL)isDebug;
+
+
+/**
+* get debug status
+* */
++ (BOOL)isDebug;
+
+
+/**
+* launch weex debug
+* @param url : ws://ip:port/debugProxy/native, ip and port is your devtool server address
+* eg:@"ws://30.30.29.242:8088/debugProxy/native"
+* */
++ (void)launchDevToolDebugWithUrl:(NSString *)url;
+
+@end
+```
+
+**Note: The inspector API must be called before weex is initialized**
+
+- `setDebug`
+
+ `setDebug` is used to control the state of debug mode, when its value is `YES`, open the debug mode, otherwise closed.
+
+- `(void)launchDevToolDebugWithUrl:(NSString *)url;`
+
+ wssip was the wss address showing in the chrome address bar.
+
+open debug model and inspector model
+
+eg:
+
+```object-c
+- (BOOL)application:(UIApplication *)application didFinishLaunchingWithOptions:(NSDictionary *)launchOptions { [WXDevTool setDebug:YES]; [WXDevTool launchDevToolDebugWithUrl:@"ws://wssip/debugProxy/native"]; }
+```
+
+open inspect model, remove the `@selector
+(setDebug:)` or add `[WXDevTool setDebug:NO]`
+
+eg:
+
+```object-c
+- (BOOL)application:(UIApplication *)application didFinishLaunchingWithOptions:(NSDictionary *)launchOptions { [WXDevTool launchDevToolDebugWithUrl:@"ws://wssip/debugProxy/native"]; }
+```
+
+#### Step 3. Auto refresh
+
+Q: Why do we need auto refresh feature?
+
+A: As shown in future, when you click the debugger button, Javascript runtime environment will change from the phone (JavaScriptCore) to PC (Chrome V8), then Weex need to re-initialize the Weex environment, re-render the page. Page rendering is required for the developer to add on its own page.
+
+
+
+Q: What kind of scene need to add refresh feature?
+
+- Click debugger button
+- Switch remoteDebug
+- Refresh inspect page
+
+Q: How to add auto refresh feature?
+
+Register events when Weex initialization.
+
+```object-c
+[[NSNotificationCenter defaultCenter] addObserver:self selector:notificationRefreshInstance: name:@"RefreshInstance" object:nil];
+```
+
+**Notes: You must cancel this event in the `dealloc` method. For example:**
+
+```
+- (void)dealloc
+{
+ [[NSNotificationCenter defaultCenter] removeObserver:self];
+}
+```
+
+For example, First you can destroy the current instance, and then re-create instance:
+
+
+```
+- (void)dealloc
+{
+ [[NSNotificationCenter defaultCenter] removeObserver:self];
+}
+```
+
+页面刷新实现,先销毁当前 instance,然后重新创建 instance,举例如下:
+
+```
+ - (void)render
+ {
+ CGFloat width = self.view.frame.size.width;
+ [_instance destroyInstance];
+ _instance = [[WXSDKInstance alloc] init];
+ _instance.viewController = self;
+ _instance.frame = CGRectMake(self.view.frame.size.width-width, 0, width, _weexHeight);
+
+ __weak typeof(self) weakSelf = self;
+ _instance.onCreate = ^(UIView *view) {
+ [weakSelf.weexView removeFromSuperview];
+ weakSelf.weexView = view;
+ [weakSelf.view addSubview:weakSelf.weexView];
+ UIAccessibilityPostNotification(UIAccessibilityScreenChangedNotification, weakSelf.weexView);
+ };
+ _instance.onFailed = ^(NSError *error) {
+
+ };
+
+ _instance.renderFinish = ^(UIView *view) {
+ [weakSelf updateInstanceState:WeexInstanceAppear];
+ };
+
+ _instance.updateFinish = ^(UIView *view) {
+ };
+ if (!self.url) {
+ return;
+ }
+ NSURL *URL = [self testURL: [self.url absoluteString]];
+ NSString *randomURL = [NSString stringWithFormat:@"%@?random=%d",URL.absoluteString,arc4random()];
+ [_instance renderWithURL:[NSURL URLWithString:randomURL] options:@{@"bundleUrl":URL.absoluteString} data:nil];
+}
+```
+
+You can see the details in this case [WXDemoViewController.m](https://github.com/weexteam/weex-devtool-iOS/blob/master/Devtools/playground/WeexDemo/WXDemoViewController.m)
http://git-wip-us.apache.org/repos/asf/incubator-weex-site/blob/32a097bf/source/guide/integrate-to-your-app.md
----------------------------------------------------------------------
diff --git a/source/guide/integrate-to-your-app.md b/source/guide/integrate-to-your-app.md
index d458ac0..df92b77 100644
--- a/source/guide/integrate-to-your-app.md
+++ b/source/guide/integrate-to-your-app.md
@@ -1,34 +1,33 @@
---
-title: Integrate to Your App
+title: Integrate to Your App
type: guide
-order: 1.2
-has_chapter_content: false
-chapter_title: Intro
+group: Overview
+order: 1.3
version: 2.1
---
# Integrate to Your App
## Integrate to Android
-Tip:The following documents assume that you already have a certain Android development experience.
+Tip:The following documents assume that you already have a certain Android development experience.
### Android has two ways to integrate weex
1.using source code: Can quickly use the latest features of WEEX, according to your own characteristics of the project. So, you can do some related improvements.
-2.using SDK: WEEX will regularly release a stable version at jcenter.[jcenter](https://bintray.com/alibabaweex/maven/weex_sdk/view)
+2.using SDK: WEEX will regularly release a stable version at jcenter.[jcenter](https://bintray.com/alibabaweex/maven/weex_sdk/view)
### Prerequisites
-Make sure the following configuration is complete:
+Make sure the following configuration is complete:
-+ [JDK](http://www.oracle.com/technetwork/java/javase/downloads/jdk8-downloads-2133151.html) version >= 1.7 , and configure the environment variable
-+ Android SDK installed and configure the environment variable
++ [JDK](http://www.oracle.com/technetwork/java/javase/downloads/jdk8-downloads-2133151.html) version >= 1.7 , and configure the environment variable
++ Android SDK installed and configure the environment variable
+ Android SDK version 23 (compileSdkVersion in build.gradle)
+ SDK build tools version 23.0.1 (buildToolsVersion in build.gradle)
-+ Android Support Repository >= 17 (for Android Support Library)
++ Android Support Repository >= 17 (for Android Support Library)
### Quick to use
-If you are the first time to try or have a higher demand for stability, you can use the way to dependence on the SDK.
-The steps are as follows:
+If you are the first time to try or have a higher demand for stability, you can use the way to dependence on the SDK.
+The steps are as follows:
1. Create an Android project. There is nothing to be specified, according to your habits to.
2. Update build.gradle by adding the following dependencies:
@@ -41,13 +40,13 @@ compile 'com.alibaba:fastjson:1.1.46.android'
compile 'com.taobao.android:weex_sdk:0.5.1@aar'
```
-Note: the version can be high can not be low.
+Note: the version can be high can not be low.
#### Start writing code
-Note: There is a complete code address in the appendix
+Note: There is a complete code address in the appendix
-+ Implement the picture download interface, set the initialization.
++ Implement the picture download interface, set the initialization.
```java
package com.weex.sample;
@@ -94,7 +93,7 @@ public class WXApplication extends Application {
}
```
-+ Start rendering
++ Start rendering
```java
package com.weex.sample;
@@ -115,7 +114,7 @@ public class MainActivity extends AppCompatActivity implements IWXRenderListener
mWXSDKInstance.registerRenderListener(this);
/**
* WXSample can be replaced by any string
- * Template is js file that .we converted
+ * Template is js file that .we converted
* Option can be empty, or through the option passed js required parameters. Such as the address of the bundle js.
* JsonInitData can be empty.
* width is -1 , default full screen, you can customize it.
@@ -167,86 +166,86 @@ public class MainActivity extends AppCompatActivity implements IWXRenderListener
}
```
-### Dependence on source code (IDE Android Studio)
-1.Download source code. git clone https://github.com/alibaba/weex.
+### Dependence on source code (IDE Android Studio)
+1.Download source code. git clone https://github.com/alibaba/weex.
2.Create an android project.
-3.Import the SDK Module through the following path:
-` File->New-Import Module-> chose WEEX SDK Module(weex/android/sdk) -> Finish`
+3.Import the SDK Module through the following path:
+` File->New-Import Module-> chose WEEX SDK Module(weex/android/sdk) -> Finish`
4.Add the following dependencies: compile project (': weex_sdk') to build.gradle file.
5.Other settings please refer to the above "Quick to use".
-Appendix: [WXSample address](https://github.com/xkli/WXSample.git) `https://github.com/xkli/WXSample.git`
+Appendix: [WXSample address](https://github.com/xkli/WXSample.git) `https://github.com/xkli/WXSample.git`
## Integrated to iOS
-Through the cocoaPods integrated Weex iOS SDK to the project.
-First assume that you have finished installing the [iOS development environment](https://developer.apple.com/library/ios/documentation/IDEs/Conceptual/AppStoreDistributionTutorial/Setup/Setup.html) and [CocoaPods](https://guides.cocoapods.org/using/getting-started.html).
+Through the cocoaPods integrated Weex iOS SDK to the project.
+First assume that you have finished installing the [iOS development environment](https://developer.apple.com/library/ios/documentation/IDEs/Conceptual/AppStoreDistributionTutorial/Setup/Setup.html) and [CocoaPods](https://guides.cocoapods.org/using/getting-started.html).
### Step 1: Add Dependencies
-Import Weex iOS SDK to your existing project, if not, you can create a new project.
-Before proceeding, make sure that the Podfile file is under the project file. If not, create one and open with text editor.
+Import Weex iOS SDK to your existing project, if not, you can create a new project.
+Before proceeding, make sure that the Podfile file is under the project file. If not, create one and open with text editor.
+ Integration framework
-WeexSDK The latest version on cocoaPods can be obtained [here](https://cocoapods.org/pods/WeexSDK) .
-Add the following to the Podfile file:
+WeexSDK The latest version on cocoaPods can be obtained [here](https://cocoapods.org/pods/WeexSDK) .
+Add the following to the Podfile file:
```object-c
-source 'git@github.com:CocoaPods/Specs.git'
+source 'git@github.com:CocoaPods/Specs.git'
target 'YourTarget' do
- platform :ios, '7.0'
+ platform :ios, '7.0'
pod 'WeexSDK', '0.9.5' ## Suggest using latest Weex SDK
-end
+end
```
+ Integrate with source code
-First copy the ios / sdk directory to your existing project directory (here to copy the root directory of your existing project as an example), and then add the Podfile file.
+First copy the ios / sdk directory to your existing project directory (here to copy the root directory of your existing project as an example), and then add the Podfile file.
```object-c
-source 'git@github.com:CocoaPods/Specs.git'
+source 'git@github.com:CocoaPods/Specs.git'
target 'YourTarget' do
- platform :ios, '7.0'
- pod 'WeexSDK', :path=>'./sdk/'
-end
+ platform :ios, '7.0'
+ pod 'WeexSDK', :path=>'./sdk/'
+end
```
### Step 2: Install Dependencies
-Open the command line, switch to the directory of the Podfile file, and run the pod install command. If there are no errors, it means that the environment has been configured.
+Open the command line, switch to the directory of the Podfile file, and run the pod install command. If there are no errors, it means that the environment has been configured.
-### Step 3: Initialize the Weex environment
-In the AppDelegate.m file to do the initialization operation, usually in the didFinishLaunchingWithOptions method as follows to add.
+### Step 3: Initialize the Weex environment
+In the AppDelegate.m file to do the initialization operation, usually in the didFinishLaunchingWithOptions method as follows to add.
```object-c
//business configuration
[WXAppConfiguration setAppGroup:@"AliApp"];
[WXAppConfiguration setAppName:@"WeexDemo"];
[WXAppConfiguration setAppVersion:@"1.0.0"];
-//init sdk environment
+//init sdk environment
[WXSDKEngine initSDKEnvironment];
//register custom module and component,optional
[WXSDKEngine registerComponent:@"MyView" withClass:[MyViewComponent class]];
[WXSDKEngine registerModule:@"event" withClass:[WXEventModule class]];
//register the implementation of protocol, optional
[WXSDKEngine registerHandler:[WXNavigationDefaultImpl new] withProtocol:@protocol(WXNavigationProtocol)];
-//set the log level
+//set the log level
[WXLog setLogLevel: WXLogLevelAll];
```
-### Step 4: Render weex Instance
+### Step 4: Render weex Instance
-Weex supports both full page rendering and partial rendering. What you need to do is render Weex's view with the specified URL and add it to its parent container. The parent container is generally a viewController.
+Weex supports both full page rendering and partial rendering. What you need to do is render Weex's view with the specified URL and add it to its parent container. The parent container is generally a viewController.
```object-c
#import <WeexSDK/WXSDKInstance.h>
-- (void)viewDidLoad
+- (void)viewDidLoad
{
[super viewDidLoad];
_instance = [[WXSDKInstance alloc] init];
_instance.viewController = self;
- _instance.frame = self.view.frame;
+ _instance.frame = self.view.frame;
__weak typeof(self) weakSelf = self;
_instance.onCreate = ^(UIView *view) {
[weakSelf.weexView removeFromSuperview];
@@ -264,10 +263,10 @@ Weex supports both full page rendering and partial rendering. What you need to d
}
```
-WXSDKInstance is a very important class that provides a basic method and some callbacks, such as renderWithURL, onCreate, onFailed, etc., can be found in WXSDKInstance.h.
+WXSDKInstance is a very important class that provides a basic method and some callbacks, such as renderWithURL, onCreate, onFailed, etc., can be found in WXSDKInstance.h.
-### Step 5: Destroy Weex Instance
-In the dealloc phase of the viewController destroyed Weex instance, can play a role in avoiding memory leaks.
+### Step 5: Destroy Weex Instance
+In the dealloc phase of the viewController destroyed Weex instance, can play a role in avoiding memory leaks.
```object-c
- (void)dealloc
@@ -276,6 +275,6 @@ In the dealloc phase of the viewController destroyed Weex instance, can play a r
}
```
-#### Import the Weex SDK framework to the project.
-The Weex SDK can be compiled from the source code. You can try the latest feature in the new feature or bugfix branch.
+#### Import the Weex SDK framework to the project.
+The Weex SDK can be compiled from the source code. You can try the latest feature in the new feature or bugfix branch.
Refer to [here](https://open.taobao.com/doc2/detail?spm=a219a.7629140.0.0.tFddsV&&docType=1&articleId=104829) for direct import of weexSDK.
http://git-wip-us.apache.org/repos/asf/incubator-weex-site/blob/32a097bf/source/guide/intro/app-architecture.md
----------------------------------------------------------------------
diff --git a/source/guide/intro/app-architecture.md b/source/guide/intro/app-architecture.md
deleted file mode 100644
index d7b3bc6..0000000
--- a/source/guide/intro/app-architecture.md
+++ /dev/null
@@ -1,61 +0,0 @@
----
-title: Mobile App Architecture
-type: guide
-order: 4.5
-version: 2.1
----
-
-# Mobile App Architecture
-
-## Today's Mobile App
-
-Let's talk about what we think a mobile app should be.
-
-### Mobile App Needs Parallel Development
-
-Nowadays, all mobile app teams requires the ability to develop in parallel. When a mobile app keeps growing, supporting large-scale parallel development must become a very important key thing. Otherwise it's really easy to become a bottleneck.
-
-### Mobile App Needs to be Dynamic
-
-Today the development of mobile apps is very heavy. And it's really slow in iteration, release, distribution and online bugfix. The size of the package of an app is growing fast too. All of this is not suitable for this mobile internet age. Mobile app needs to be dynaimic which is out of the cumbersome process of version deployment and distribution.
-
-### Mobile App Needs Open Interconnection
-
-Today in your phone, things are hard to connect and share between different apps. They needs some container with common standard and specs to be shared with each other.
-
-## Our Thinking of Mobile App
-
-We think a dynamic, parallel development supported, standardized mobile app should be like this:
-
-```
-|------|------|------|------| |-----|
-| page | page | page | page | | api |
-|------|------|------|------| | api |
-| page | page | page | page | | api |
-|------|------|------|------| | api |
-| page | page | page | page | | api |
-|---------------------------| | api |
-| router | | api |
-|---------------------------| |-----|
-```
-
-* Pages: A whole mobile app should be divided into several mobile pages. Each mobile page has its own "URL".
-* Router: All the mobile pages above will be connected with router. And navigators or tab bars are just doing this job.
-* Features: All kinds of APIs or services provided from the device. Every mobile page could use these features as they like.
-
-So before you build your mobile app, make sure how many mobile pages your mobile app has and what are they. How do they connect each other. Give each mobile page a URL. And sort out all the APIs and services your mobile app needs.
-
-Then create the pages and develop, debug and deploy them using Weex.
-
-**Links**
-
-* [Mobile page architecture](./page-architecture.html)
-
-If you have built a complete mobile app already and just want to using Weex to rebuild part of these pages, that's absolutely no problem. Because Weex is just a SDK to build mobile pages which can coexist very well with other native views or hybrid pages.
-
-If the feature of WeexSDK is limited to your mobile app. You can extend your own components and modules. It requires some native development knowledge. But with our efforts on delivering more and more features, we believe this part of job will be getting smaller and smaller.
-
-**Links**
-
-* [Extend to iOS](../../references/advanced/extend-to-ios.html)
-* [Extend to Android](../../references/advanced/extend-to-android.html)
http://git-wip-us.apache.org/repos/asf/incubator-weex-site/blob/32a097bf/source/guide/intro/how-it-works.md
----------------------------------------------------------------------
diff --git a/source/guide/intro/how-it-works.md b/source/guide/intro/how-it-works.md
deleted file mode 100644
index f67f8b4..0000000
--- a/source/guide/intro/how-it-works.md
+++ /dev/null
@@ -1,72 +0,0 @@
----
-title: How it works
-type: guide
-order: 4.1
-has_chapter_content: false
-chapter_title: Intro
-version: 2.1
----
-
-# How it works
-
-## Overall Structure
-
-Weex is a client-side technology on the surface, but in fact it connects the whole way from the local development environment to the cloud deployment and distribution.
-
-Developers can first write an app page just like writing a web page, and then compile the app page into a piece of JavaScript which is called Weex JS bundle.
-
-In the cloud, developers can deploy the generated JS bundle. And then it can be requested or pre-fetched from a mobile app with WeexSDK.
-
-The WeexSDK would prepare a JavaScript engine to run corresponding JS bundle when user opens a Weex page anytime. Usually the JS bundle will make some calls to native-side through Weex JS bridge. They let native-side render the user interface or handle user interactions, storage data, make network communications, call device powers and so on.
-
-Even if a user does not install the App, he can still open a same web page in the browser, using the same source code.
-
-
-
-## Local Development Environment
-
-The design of local development environment of Weex is based on the web development experience. It help web developers writing mobile app UI with their familiar HTML / CSS / JavaScript. At the same time Weex also do the official support to [Vue.js](https://vuejs.org/), a very great front-end framework.
-
-In addition, the management of a Weex project is also very familiar with a web project. First, web developers can use npm packages to manage dependencies. Second, web developers can refer to all best practices from every process of a web project such as scaffolding, development, preview, debugging, test etc.
-
-Also same as the best practice of web development, each Weex page will be built into a JS bundle. In the browser, we put JS bundle into the web page as a `<script>` tag. In the client, we put JS bundle into the local, and execute it in WeexSDK.
-
-**Links**
-
-* [Platform differences between Weex and web](../../references/platform-difference.html)
-* [Differences of using Vue between Weex with web](../../references/vue/difference-with-web.html)
-* [Get Started](../index.html)
-* [Using Devtools](./devtools.html)
-
-## Cloud Deployment & Distribution
-
-Weex JS bundle can be deployed and distributed as a static resource. Almost all current web development system and best practice can be applied to Weex directly such as generating JS bundle through CMS system or deploying JS bundle to static CDN, monitoring JS bundle traffic through server log, caching or pre-fetching JS bundle to reduce networking cost etc.
-
-## Client-side JavaScript Engine
-
-Both iOS and Android client-side of Weex run a JavaScript engine to execute JS bundles and send well defined instructions to the native render layers. We choose JavaScriptCore in iOS and v8 in Android which provide strong performance and stability.
-
-In order to make the mobile resources better utilized, we just run only one instance of JavaScript for all Weex pages. That is, all JS bundles share the same JavaScript instance, but each JS bundle context also isolated well by default in the runtime. We also put Vue 2.0 as a built-in JS Framework, developers do not have to pack it in each JS bundle, which save the size and time of networking.
-
-## Client Rendering Layer
-
-Weex offers both iOS and Android native rendering layers. Each of them are based on the Native DOM model and exposed to JavaScript APIs. At the same time we provide a set of native components and modules to use. Also Weex has high performance especially on first-screen loading time, memory cost and re-reuse of long list, etc.
-
-Although Weex has provided a group of most commonly used components and modules officially. But we definitely know they couldn't satisfy everyone. So we design our native render as extendable as possible. You can extend more components and modules on your own. We can build and share an Weex eco-system together.
-
-**Links**
-
-* [Differences between Weex and web standard](../../references/web-standards.html)
-* [Using Weex in iOS](../../references/ios-apis.html)
-* [Using Weex in Android](../../references/android-apis.html)
-* [Extend to iOS](../../references/advanced/extend-to-ios.html)
-* [Extend to Android](../../references/advanced/extend-to-android.html)
-
-## In the Browser
-
-Besides iOS and Android client, Weex also has a web version based on Vue 2.0. Developers can just use Vue 2.0 to build the same page in browsers.
-
-**Links**
-
-* [Using Weex in HTML5](../../references/html5-apis.html)
-* [Extend to HTML5](../../references/advanced/extend-to-html5.html)
http://git-wip-us.apache.org/repos/asf/incubator-weex-site/blob/32a097bf/source/guide/intro/index.md
----------------------------------------------------------------------
diff --git a/source/guide/intro/index.md b/source/guide/intro/index.md
deleted file mode 100644
index 24c8236..0000000
--- a/source/guide/intro/index.md
+++ /dev/null
@@ -1,17 +0,0 @@
----
-title: Intro
-type: guide
-order: 4
-has_chapter_content: false
-chapter_title: Intro
-version: 2.1
----
-
-# Intro
-
-- [How it works](./how-it-works.html)
-- [Web Dev Experience](./web-dev-experience.html)
-- [Using Vue](./using-vue.html)
-- [Write once, Run Everywhere](./write-once.html)
-- [App Architecture](./app-architecture.html)
-- [Weex Page Architecture](./page-architecture.html)
http://git-wip-us.apache.org/repos/asf/incubator-weex-site/blob/32a097bf/source/guide/intro/page-architecture.md
----------------------------------------------------------------------
diff --git a/source/guide/intro/page-architecture.md b/source/guide/intro/page-architecture.md
deleted file mode 100644
index a9d8014..0000000
--- a/source/guide/intro/page-architecture.md
+++ /dev/null
@@ -1,48 +0,0 @@
----
-title: Weex Page Architecture
-type: guide
-order: 4.6
-version: 2.1
----
-
-# Weex Page Architecture
-
-A Weex page is a independent mobile page which includes UI, interaction logic, device power, lifecycle management etc.
-
-## UI
-
-### Native DOM Model
-
-Weex page has its HTML-like DOM model to manage UI. It will be decomposed into a DOM tree which consists of some DOM nodes.
-
-**Links**
-
-* [Weex Native DOM APIs](../../references/native-dom-api.html)
-
-### Components
-
-Weex supports many kinds of components. Some of them are content components such as text, image and videos. Some of them are container components such as div, list, scroller. Also there are some special components like slider, input, textarea, and switch.
-
-**Links**
-
-* [All components Weex supports](../../references/components/index.html)
-
-### Layout System
-
-Weex use some CSS properties to layout every nodes in the DOM tree together. It includes:
-
-* Box model: Describe the `width`, `height`, `padding`, `margin` and `border` of a component node.
-* Flexbox: Describe the relations between different nodes with CSS Flexbox Spec.
-* Supportting `absolute`, `relative`, `fixed` and `sticky` value of CSS `position` property.
-
-### Features
-
-Weex supports lots of device features through modules such as storage, navigation, modals etc. Each of them exposes some JS APIs.
-
-**Links**
-
-* [All modules Weex supports](../../references/modules/index.html)
-
-### Lifecycle
-
-Every Weex page has its lifecycle which is defined and implemented in WeexSDK. All Weex pages will go through the whole process, from being created and last to being destroyed.
http://git-wip-us.apache.org/repos/asf/incubator-weex-site/blob/32a097bf/source/guide/intro/using-vue.md
----------------------------------------------------------------------
diff --git a/source/guide/intro/using-vue.md b/source/guide/intro/using-vue.md
deleted file mode 100644
index 56c1ca4..0000000
--- a/source/guide/intro/using-vue.md
+++ /dev/null
@@ -1,58 +0,0 @@
----
-title: Using Vue
-type: guide
-order: 4.3
-version: 2.1
----
-
-# Using Vue
-
-## Vue in Weex
-
-[Vue.js](https://vuejs.org/) is an excellent progressive JavaScript framework written by [Evan You](https://twitter.com/youyuxi) which is very easy and flexible to use. Developers can write `*.vue` files with friendly `<template>`, `<style>`, `<script>` tags to build componentized web apps.
-
-
-
-In Oct 2016 Vue.js launched 2.0, which includes the virtual-DOM and pre-compiler for HTML templates. This means Vue.js can run in a JS-only environment without HTML / CSS parsers. The virtual-DOM layer also makes Vue 2.x able to render native UIs through JavaScript.
-
-Weex and Vue now support each other officially. Now that Weex includes Vue 2.x as its built-in JS Framework, Vue can be used to develop native mobile apps.
-
-**Links**
-
-* [Weex tutorial](../index.html)
-* [Vue Introduction](https://vuejs.org/v2/guide/)
-* [How Weex works](./index.html)
-
-## New Features of Vue 2.x in Weex
-
-### Stream Rendering
-
-In Weex, developers can use `<foo append="tree|node">` to customize the rendering granularity to balance different UI complexity and business logic in order to get the best first-paint performance. `append=tree` means that the entire node, including all its child nodes, will be one-time rendered to native UI after all of the nodes generated completely. And `append=node` means just render the current node itself first and its child nodes will be futher rendered later.
-
-<!-- dotwe demo -->
-
-### Two-way Data Binding in Form Controls
-
-In Weex, we provide the same `v-model` directive as web dev exprience for both `<input>` and `<textarea>` components. Developers can write `<input v-model="message">` or `<textarea v-model="message">` to bind data `message` and show it on the text box automatically. When user modifies the text box, the value of data `message` will be automatically updated.
-
-<!-- dotwe demo -->
-
-### Isolate Each Page Contexts
-
-As described in [how Weex works](./index.html), all Weex's JS bundles share a JavaScript instance. So how can we make Vue 2.x used in multiple JS bundles completely isolated, and that one page which extends or rewrites Vue does not affect other pages becomes a problem. Through the collaboration between Weex and Vue. The problem has been solved.
-
-<!-- html5 apis -->
-
-### `<transition>`
-
-Weex supports the awesome `<transition>` syntax in Vue 2.x. Developers can easily define the transition of an interface in both states with `<transition>` tag.
-
-## Notice
-
-Web development and native development, after all, there are some differences in functionality and development experience, which are essentially the differences between the native development platform and the Web platform, and Weex is trying to narrow the scope of this difference. See [differences of Vue 2.x between Weex and web](../../references/vue/index.html)
-
-## Using Vue-related Libs
-
-Vue.js also has more cool related libs. For example [Vuex](https://github.com/vuejs/vuex) and [vue-router](https://github.com/vuejs/vue-router). They all work well in Weex. For using Vuex and vue-router, see [Using Vuex and vue-router in Weex](../../references/vue/difference-of-vuex.html)。
-
-> We developed a complete project based on Weex and Vue 2.x which named [weex-hackernews](https://github.com/weepteam/web-ehackernews). It includes WeexSDK with Vue 2.x in iOS, Android and web. Also we use Vuex and vue-router. The whole project uses the same source code for three different platforms.
http://git-wip-us.apache.org/repos/asf/incubator-weex-site/blob/32a097bf/source/guide/intro/web-dev-experience.md
----------------------------------------------------------------------
diff --git a/source/guide/intro/web-dev-experience.md b/source/guide/intro/web-dev-experience.md
deleted file mode 100644
index 81d0ff2..0000000
--- a/source/guide/intro/web-dev-experience.md
+++ /dev/null
@@ -1,36 +0,0 @@
----
-title: Web Dev Experience
-type: guide
-order: 4.2
-version: 2.1
----
-
-# Web Dev Experience
-
-## What is Web Dev Experience?
-
-Weex dev experience is very close to web dev experience. It describes the UI structure and content with HTML or HTML-based template, describes the UI style with CSS, and describes user behavior and business logic with JavaScript. And it has completed project mechanism.
-
-## Why We Choose Web Dev Experience?
-
-1. There are a huge number of web developers in the community today. Weex can give more web developers abilities to build high-performance and great-experienced mobile apps.
-2. Web development itself has very high efficiency and flexibility. And Weex is committed to solve the dynamic requirement of mobile apps. They just match each other.
-3. Web standards and web dev experience is built by a lot of outstanding technology companies together. It has very high quality assurance.
-4. Standard itself is a force. Base on standards, respect for standards, close to the standard means that there are more possibilities.
-5. The eco-system and community of web today are very prosperous. There are many mature tools, libraries, systems, best practices to be used.
-
-## How Does Weex Support Web Standard?
-
-We have the following aspects to sort out:
-
-* HTML tags: Weex currently supports basic container (div), text, image, video and other components. And almost all of HTML block-level tags can be simulated through the custom container components. Inline-level tags can be simulated through the custom text components. And Weex also supports some form components such as input / textarea.
-* CSS: Weex supports some commonly used CSS properties, values and units. We will continue to support more based on user feedback and the usage frequency in web.
-* JavaScript: Weex currently offers a simplified version of the DOM APIs for operating the native UI. And Weex will continue to support more W3C Device APIs.
-* About frameworks, Weex officially build Vue 2.0 in. and support its related libs such as vuex, vue-router, etc. At the same time developers can directly use all kinds of third-party JavaScript libs.
-* About engineering, we recommend using npm to pack and manage deps. And we recommend webpack for the JS bundle package. Also we provide weex-devtool, which make developers debug native app just like in Chrome devtools. Weex also is friendly to current mainstream web page publishing system, caching mechanism and other best practices.
-
-**Links**
-
-* [Differences between Weex and web standard](../../references/web-standards.html)
-* [Using Vue.js](./using-vue.html)
-* [Using Devtools](./devtools.html)
http://git-wip-us.apache.org/repos/asf/incubator-weex-site/blob/32a097bf/source/guide/intro/write-once.md
----------------------------------------------------------------------
diff --git a/source/guide/intro/write-once.md b/source/guide/intro/write-once.md
deleted file mode 100644
index 673b302..0000000
--- a/source/guide/intro/write-once.md
+++ /dev/null
@@ -1,23 +0,0 @@
----
-title: Write once, Run Everywhere
-type: guide
-order: 4.4
-version: 2.1
----
-
-# Write Once, Run Everywhere
-
-Weex is a "Write Once, Run Everywhere" solution.
-
-* First, Weex is based on web dev experience, which includes syntax and project management.
-* Second, all components & modules in Weex are discussed by iOS, Android, web developers together to ensure it's common enough to satisfy every platforms.
-* You only need write the same Weex code for each platforms.
-
-We think about it in these aspects below:
-
-1. Today for almost all mobile apps, one app solves the same problem in different platforms. Weex hope to supply a lightweight way to describe your business logic which works well in all platforms you need.
-2. For the differences of all mobile platforms, we are willing to fill the gap in 3 points:
- 1. Design the same APIs for all platforms to ensure different platforms have the same business logic description.
- 2. Implement the APIs with different style or behaviors to ensure the implementation and user experience matches different platforms.
- 3. Platforms obviously differ among each other. We also have some environment variables to help developers in certain situations.
-3. We trust (web) standard is the best for all features in all platforms.
http://git-wip-us.apache.org/repos/asf/incubator-weex-site/blob/32a097bf/source/guide/set-up-env.md
----------------------------------------------------------------------
diff --git a/source/guide/set-up-env.md b/source/guide/set-up-env.md
index ac52367..2986875 100644
--- a/source/guide/set-up-env.md
+++ b/source/guide/set-up-env.md
@@ -1,14 +1,14 @@
---
-title: Setup Development Environment
+title: Setup Develop Environment
type: guide
-order: 1.1
+group: Develop
+order: 5.1
version: 2.1
-has_chapter_content: true
---
-# Setup Development Environment
+# Setup Develop Environment
-Using [dotWe](http://dotwe.org/vue) is a good choice, but if you want to develop locally on your own machine, you will need to set up your development environment.
+Using [dotWe](http://dotwe.org/vue) is a good choice, but if you want to develop locally on your own machine, you will need to set up your develop environment.
You will need Node.js and the [Weex CLI](https://github.com/weexteam/weex-toolkit).
http://git-wip-us.apache.org/repos/asf/incubator-weex-site/blob/32a097bf/source/guide/tools/index.md
----------------------------------------------------------------------
diff --git a/source/guide/tools/index.md b/source/guide/tools/index.md
deleted file mode 100644
index 356bf98..0000000
--- a/source/guide/tools/index.md
+++ /dev/null
@@ -1,11 +0,0 @@
----
-title: Tools
-type: guide
-order: 5
-version: 2.1
----
-
-# Tools
-
-- [weex-toolkit](./toolkit.html)
-- [IDEA / WebStorm Plugin](./plugin.html)
http://git-wip-us.apache.org/repos/asf/incubator-weex-site/blob/32a097bf/source/guide/tools/plugin.md
----------------------------------------------------------------------
diff --git a/source/guide/tools/plugin.md b/source/guide/tools/plugin.md
deleted file mode 100644
index a74d866..0000000
--- a/source/guide/tools/plugin.md
+++ /dev/null
@@ -1,68 +0,0 @@
----
-title: Weex Language Support Plugin
-type: guide
-order: 5.1
-version: 2.1
----
-
-# Weex Language Support Plugin
-
-[Weex Language Support](https://plugins.jetbrains.com/plugin/9189-weex-language-support) is a official tools to code highlight, automatic completion,lint and other functions in IDEA, WebStorm or the others IDEs.
-
-### Supported IDEs
-You can install and use this plugin on the following IDEs on any operating system:
-**IntelliJ IDEA Ultimate, PhpStorm, WebStorm, PyCharm, RubyMine, AppCode, CLion, Gogland, Rider**
-
-### Install
-Just searching the `Weex Language Support` in plugin repo to install, next you need restart IDE to enable it.
-
-
-### Configurations
-Open `Preferences -> Other Settings -> Weex language support` to configuration plugin
-
-- Target Weex Version: Config the version of Weex that your current project in use, default is `LATEST`, it means always using the latest version
-- Vue Support: Config whether to support Vue, you need to restart IDE after turning on or off the set to take effect
-- Custom Rules: Import the custom Weex DSL rules, The format of the custom rules will be listed later
-- Global Weex Components: Sets the location of the module that is applied in the project, in particular, the `node_modules` directory in current project and npm root will be automatically included, you do not need to add them here
-
-
-### Format of Custom DSL Rules
-Custom rules are included in a json file, the root node of the json file is an array, each element in the array corresponds to a label in the DSL.
-Let's take the example of the `loading>` tag:
-```js
-{
- "tag": "loading", //tag name, not null
- "attrs": [ //attributes of tag, can be null
- {
- "name": "display", //attribute name, not null
- "valuePattern": null, //pattern expression to check the attribute value, can be null
- "valueEnum": [ //attribute value enumeration, can be null
- "show",
- "hide"
- ],
- "valueType": "var", //type of attribute value, must be var or function
- "since": 0, //which version the attribute is added to sdk, such as 0.11
- "weexOnly": false //whether the attribute is available only in 1.0 syntax, default is false
- }
- ],
- "events": [ //events list, can be null
- {
- "name": "loading", //event name, not null
- "since": 0 //which version the event is added to sdk
- }
- ],
- "parents": [ //The tag is allowed to be a child of which tags, null means no restrictions
- "list",
- "scroller"
- ],
- "childes": [ //which tags are allowed as their own child tags, null means no restrictions
- "text",
- "image",
- "loading-indicator"
- ],
- "document": "/references/components/loading.html" //document link
- }
-```
-
-### Contribution
-Please commiting Issues and Pull Requests into the [weex-language-support](https://github.com/misakuo/weex-language-support) project
\ No newline at end of file
http://git-wip-us.apache.org/repos/asf/incubator-weex-site/blob/32a097bf/source/guide/tools/toolkit.md
----------------------------------------------------------------------
diff --git a/source/guide/tools/toolkit.md b/source/guide/tools/toolkit.md
deleted file mode 100644
index a325923..0000000
--- a/source/guide/tools/toolkit.md
+++ /dev/null
@@ -1,197 +0,0 @@
----
-title: use weex-toolkit
-type: guide
-order: 5.1
-version: 2.1
----
-
-# weex-toolkit
-
-[weex-toolkit](https://github.com/weexteam/weex-toolkit) is an official command line tool to help developers to create, debug and build their Weex project.
-
-### Install
-use npm to install weex-toolkit:
-
-``` bash
-$ npm install -g weex-toolkit
-```
-if you make it, you can input "weex" in your command line terminal to test it. The right output:
-
-
-
-
-if you have never installed node.js, you should go [node.js.org]( https://nodejs.org/en/) to download and install it.
-* node engine version >= 6. You can try [n](https://github.com/tj/n) to manage your node versions*
-If you meet some errors when installing like `permission error`, please go [weex-toolkit issues](https://github.com/weexteam/weex-toolkit/issues) to find some solution or have a discuss with us.
-
-
-### initialize Weex project
-```bash
-$ weex init awesome-project
-```
-After command running, you can find `awesome-project` directory and there are some Weex templates in it.
-There are some useful npm scripts you will use in the future:
-
-- `build`: build the source code and generate the JS bundle
-- `dev`: run webpack watch configuration
-- `serve`: start a web server
-- `debug`: open the debug mode
-
-Then we run `npm run dev & npm run serve` in root directory to start watch mode and static server.
-
-Finally, we can see the Weex page in `http://localhost:8080/index.html`.
-
-### preview Weex page in time
-
-weex-toolkit supports previewing your Weex file(`.we` or `.vue`) in a watch mode. You only need specify your file path.
-
-``` bash
-$ weex src/foo.vue
-```
-The browser will auto open the location and you could see the layout and effects of your Weex page. If you have a [Playground](https://weex.apache.org/cn/playground.html) app in your mobile devices, you can scan the QR code at the opened page.
-Try the command below, you’ll preview the whole directory files.
-
-``` bash
-$ weex src --entry src/foo.vue
-```
-You need to specify the directory path and the entry file(`--entry`).
-### build Weex project
-Use ` weex compile ` to build your single weex file or the whole project.
-``` bash
-weex compile src/foo.vue dist
-```
-There are two arguments. One is your code source path (a single file or a directory) and another is your destination path you want to build
-
-### debug
-
-weex-toolkit has the ability to extend third party script. And **[Weex devtools](https://github.com/weexteam/weex-devtool)** is a custom devtools for Weex that implements [Chrome Debugging Protocol](https://developer.chrome.com/devtools/docs/debugger-protocol), it is designed to help you quickly inspect your app and debug your JS bundle source in a Chrome web page, both android and iOS platform are supported. So you can use weex-devtools feature by weex-toolkit.
-
-#### usage
-
-``` bash
-weex debug [options] [we_file|bundles_dir]
-
- Options:
-
- -h, --help output usage information
- -V, --verbose display logs of debugger server
- -v, --version display version
- -p, --port [port] set debugger server port
- -e, --entry [entry] set the entry bundlejs path when you specific the bundle server root path
- -m, --mode [mode] set build mode [transformer|loader]
- -w, --watch watch we file changes auto build them and refresh debugger page![default enabled]
-```
-#### start debugger
-
-```
-$ weex debug
-```
-
-
-this command will start debug server and launch a chrome opening `DeviceList` page.
-this page will display a qrcode ,you can use `Playground App` scan it for starting debug.
-
-#### debug `.we` | `.vue` file
-
-```
-$ weex debug your_weex.vue
-```
-
-this command will compile `your_weex.we` to `your_weex.js` and start the debug server as upon command.
-`your_weex.js` will deploy on the server and displayed in `DeviceList` page as another qrcode contain the url of your_weex.js.
-
-.
-#### start debugger with a directory of we files
-
-
-```
-$weex debug your/we/path -e index.we
-```
-
-this command will build every file in `your/we/path `and deploy them on the bundle server. your directory will mapping to http://localhost:port/weex/
-use `-e` to set the entry of these bundles. and the url of `index.we` will display on device list page as another qrcode.
-
-
-#### Features
-
-##### Connect devices
-
-
-
-##### Inspector
-
- Inspector can be used to show your `Element` \ `Network` \ `Console log` \ `ScreenCast` \ `BoxModel` \ `Native View` and so on.
-
-
-##### Element
-
-
-##### NetWork
-##### show the total time and latency
-
-
-##### show the header and response
-
-
-##### Console
-
-
-##### Resource
-
-
-#### Debugger
-
-
-##### Breakpoint and CallStack
-
-
-#### Integrate devtools
-* Android
- * See the doc [Weex devtools (Android)](../../references/advanced/integrate-devtool-to-android.html), it will lead you to config and use it step by step.
-* IOS
- * See the doc [Weex devtools (IOS)](../../references/advanced/integrate-devtool-to-ios.html), it will lead you to config and use it step by step.
-
-### weex-toolkit extends weexpack command
-
-[weexpack](https://github.com/weexteam/weex-pack) helps to setup Weex application from scratch quickly. With simple commands, developers could create a Weex project, add different platform template, could install plugins from local, GitHub or Weex market, could pack up his application project and run on mobile. For those who would like to share his own plugins, he could publish them to the Weex market.
-
-Now weex-toolkit can run the same commands of `weexpack` because of the new architecture. If your directory is generated by `weexpack`, you can build your iOS or android app.
-
-### weex platform and run commands
-
-Use `platform add|remove` to add or remove Weex app template and run it in your target devices.
-
-``` bash
-$ weex platform add ios
-```
-If you use these commands firstly, you might see the prompt. Just enter Y.
-
-
-
-Then run platform, you will see an iPhone simulator.
-
-``` bash
-$ weex run ios
-```
-
-
-### weex plugin commands
-
-If you want to use some plugins on the [weex market](https://market.dotwe.org), weex-toolkit is the right choice.
-
-```bash
-$ weex plugin add plugin_name
-```
-You need to specify the plugin name from market like "weex-chart":
-
-``` bash
-$ weex plugin add weex-chart
-```
-
-Remove some plugins(eg: weex-chart):
-
-``` bash
-$ weex plugin remove weex-chart
-```
-
-Learn more about [weexpack](https://github.com/weexteam/weex-pack) .
\ No newline at end of file
http://git-wip-us.apache.org/repos/asf/incubator-weex-site/blob/32a097bf/source/guide/using-rax.md
----------------------------------------------------------------------
diff --git a/source/guide/using-rax.md b/source/guide/using-rax.md
new file mode 100644
index 0000000..7aa9b77
--- /dev/null
+++ b/source/guide/using-rax.md
@@ -0,0 +1,7 @@
+---
+title: Using Rax
+type: guide
+group: Develop
+order: 5.3
+version: 2.1
+---
http://git-wip-us.apache.org/repos/asf/incubator-weex-site/blob/32a097bf/source/guide/using-vue.md
----------------------------------------------------------------------
diff --git a/source/guide/using-vue.md b/source/guide/using-vue.md
new file mode 100644
index 0000000..3da03f6
--- /dev/null
+++ b/source/guide/using-vue.md
@@ -0,0 +1,59 @@
+---
+title: Using Vue
+type: guide
+group: Develop
+order: 5.2
+version: 2.1
+---
+
+# Using Vue
+
+## Vue in Weex
+
+[Vue.js](https://vuejs.org/) is an excellent progressive JavaScript framework written by [Evan You](https://twitter.com/youyuxi) which is very easy and flexible to use. Developers can write `*.vue` files with friendly `<template>`, `<style>`, `<script>` tags to build componentized web apps.
+
+
+
+In Oct 2016 Vue.js launched 2.0, which includes the virtual-DOM and pre-compiler for HTML templates. This means Vue.js can run in a JS-only environment without HTML / CSS parsers. The virtual-DOM layer also makes Vue 2.x able to render native UIs through JavaScript.
+
+Weex and Vue now support each other officially. Now that Weex includes Vue 2.x as its built-in JS Framework, Vue can be used to develop native mobile apps.
+
+**Links**
+
+* [Weex tutorial](../index.html)
+* [Vue Introduction](https://vuejs.org/v2/guide/)
+* [How Weex works](./index.html)
+
+## New Features of Vue 2.x in Weex
+
+### Stream Rendering
+
+In Weex, developers can use `<foo append="tree|node">` to customize the rendering granularity to balance different UI complexity and business logic in order to get the best first-paint performance. `append=tree` means that the entire node, including all its child nodes, will be one-time rendered to native UI after all of the nodes generated completely. And `append=node` means just render the current node itself first and its child nodes will be futher rendered later.
+
+<!-- dotwe demo -->
+
+### Two-way Data Binding in Form Controls
+
+In Weex, we provide the same `v-model` directive as web dev exprience for both `<input>` and `<textarea>` components. Developers can write `<input v-model="message">` or `<textarea v-model="message">` to bind data `message` and show it on the text box automatically. When user modifies the text box, the value of data `message` will be automatically updated.
+
+<!-- dotwe demo -->
+
+### Isolate Each Page Contexts
+
+As described in [how Weex works](./index.html), all Weex's JS bundles share a JavaScript instance. So how can we make Vue 2.x used in multiple JS bundles completely isolated, and that one page which extends or rewrites Vue does not affect other pages becomes a problem. Through the collaboration between Weex and Vue. The problem has been solved.
+
+<!-- html5 apis -->
+
+### `<transition>`
+
+Weex supports the awesome `<transition>` syntax in Vue 2.x. Developers can easily define the transition of an interface in both states with `<transition>` tag.
+
+## Notice
+
+Web development and native development, after all, there are some differences in functionality and development experience, which are essentially the differences between the native development platform and the Web platform, and Weex is trying to narrow the scope of this difference. See [differences of Vue 2.x between Weex and web](../../references/vue/index.html)
+
+## Using Vue-related Libs
+
+Vue.js also has more cool related libs. For example [Vuex](https://github.com/vuejs/vuex) and [vue-router](https://github.com/vuejs/vue-router). They all work well in Weex. For using Vuex and vue-router, see [Using Vuex and vue-router in Weex](../../references/vue/difference-of-vuex.html)。
+
+> We developed a complete project based on Weex and Vue 2.x which named [weex-hackernews](https://github.com/weepteam/web-ehackernews). It includes WeexSDK with Vue 2.x in iOS, Android and web. Also we use Vuex and vue-router. The whole project uses the same source code for three different platforms.
[39/51] [abbrv] incubator-weex-site git commit: update file structure
and fix responsive styles
Posted by ha...@apache.org.
http://git-wip-us.apache.org/repos/asf/incubator-weex-site/blob/12e3a8bc/_drafts/v-0.10/guide/syntax/data-binding.md
----------------------------------------------------------------------
diff --git a/_drafts/v-0.10/guide/syntax/data-binding.md b/_drafts/v-0.10/guide/syntax/data-binding.md
new file mode 100644
index 0000000..497735c
--- /dev/null
+++ b/_drafts/v-0.10/guide/syntax/data-binding.md
@@ -0,0 +1,248 @@
+---
+title: Data-Binding
+type: guide
+order: 2.1
+version: 0.10
+---
+
+# Data-Binding
+
+In Weex, we use the *mustache* syntax `{% raw %}{{...}}{% endraw %}` to bind data in `<template>` which are defined in `<script>`. Once data and template is bound, the data changes will influence the corresponding template content immediately and automatically.
+
+## Binding data path
+
+```html
+<template>
+ <container>
+ <text style="font-size: {{size}}">{{title}}</text>
+ </container>
+</template>
+
+<script>
+ module.exports = {
+ data: {
+ size: 48,
+ title: 'Alibaba Weex Team'
+ }
+ }
+</script>
+```
+
+The code above will bind the `title` and `size` data field to `template`.
+
+We can also use `.` syntax to bind cascading data structure. Let's look at the following code snippet:
+
+```html
+<template>
+ <container>
+ <text style="font-size: {{title.size}}">{{title.value}}</text>
+ </container>
+</template>
+
+<script>
+ module.exports = {
+ data: {
+ title: {
+ size: 48,
+ value: 'Alibaba Weex Team'
+ }
+ }
+ }
+</script>
+```
+
+## In-template expression
+
+Inside data bindings, Weex supports simply javascript expressions, e.g.
+
+```html
+<template>
+ <container style="flex-direction: row;">
+ <text>{{firstName + ' ' + lastName}}</text>
+ </container>
+</template>
+
+<script>
+ module.exports = {
+ data: {
+ firstName: 'John',
+ lastName: 'Smith'
+ }
+ }
+</script>
+```
+
+The expression will be evaluated in the data scope of current context.
+
+**NOTE: EACH BINDING CAN ONLY CONTAIN ONE SINGLE EXPRESSION**
+
+## Computed Properties
+<span class="weex-version">0.5</span>
+
+According to simple operations, in-template expressions are very convenient. But if you want to put more logic into the template, you should use a computed property.
+
+e.g.
+
+```html
+<template>
+ <container style="flex-direction: row;">
+ <text>{{fullName}}</text>
+ <text onclick="changeName" style="margin-left:10px;">CHANGE NAME</text>
+ </container>
+</template>
+
+<script>
+ module.exports = {
+ data: {
+ firstName: 'John',
+ lastName: 'Smith'
+ },
+ computed: {
+ fullName: {
+ get: function() {
+ return this.firstName + ' ' + this.lastName
+ },
+
+ set: function(v) {
+ var s = v.split(' ')
+ this.firstName = s[0]
+ this.lastName = s[1]
+ }
+ }
+ },
+ methods: {
+ changeName: function() {
+ this.fullName = 'Terry King'
+ }
+ }
+ }
+</script>
+```
+
+Here we have declared a computed property fullName. The function we provided will be used as the getter function for concating firstName and lastName.
+
+Otherwise when you call `changeName` after click, the setter will be invoked and this.firstName and this.lastName will be updated accordingly.
+
+**NOTE: `data` and `methods` can't have duplicated fields. 'Cause in the execution context -- `this`, we can access both of them.**
+
+## Usage of some special attributes in Data-Binding
+
+### Styles: `style` or `class`
+
+the style of a component can be bind using the `style` attribute:
+
+```html
+<template>
+ <text style="font-size: {{size}}; color: {{color}}; ...">...</text>
+</template>
+```
+
+while style can also get bound with `class` attribute, multiple classnames can be split by spaces:
+
+```html
+<template>
+ <container>
+ <text class="{{size}}"></text>
+ <text class="title {{status}}"></text>
+ </container>
+</template>
+```
+
+here if `{{size}}` and `{{status}}` have empty value, then only `class="title"` will be rendered.
+
+* [See more about style and class](./style-n-class.html)
+
+### Event Handler: `on...`
+
+The event handler is an attribute which name has a prefix `on...`. The other part of attribute name is event type and the value is event handler name. We don't need to add mustache around the method name or add parentheses to call it.
+
+```html
+<template>
+ <text onclick="toggle">Toggle</text>
+</template>
+
+<script>
+ module.exports = {
+ methods: {
+ toggle: function () {
+ // todo
+ }
+ }
+ }
+</script>
+```
+
+### `if` & `repeat`
+
+`if` attribute can control the display of a component by a truthy/falsy value.
+
+```html
+<template>
+ <container style="flex-direction: column;">
+ <text onclick="toggle">Toggle</text>
+ <image src="..." if="{{shown}}"></image>
+ </container>
+</template>
+
+<script>
+ module.exports = {
+ data: {
+ shown: true
+ },
+ methods: {
+ toggle: function () {
+ this.shown = !this.shown
+ }
+ }
+ }
+</script>
+```
+
+We can also use `repeat` attribute to generate a list.
+
+**NOTE: When you want to mutate an array in `data`. Something limitations existing below:**
+
+When you directly set an item with the index (`vm.items[0] = {};`), it won't trigger view update. So we have a prototype methods: `$set(index, item)`.
+
+```javascript
+// same as `example1.items[0] = ...` but triggers view update
+example1.items.$set(0, { childMsg: 'Changed!'})
+```
+
+When you modify the length of the Array (`vm.items.length = 0`), it won't trigger view update too. We recommend you just replace `items` with an empty array instead.
+
+```javascript
+// same as `example2.items.length = 0` but triggers view update
+example2.items = []
+```
+
+* [See more about display logic control](./display-logic.html)
+
+### `static`
+
+`static` attribute can cancel the data binding, and the data changes will not be synchronized to UI.
+
+```html
+<template>
+ <div static>
+ <text>{{ word }}</text>
+ </div>
+</template>
+
+<script>
+ module.exports = {
+ ready: function() {
+ this.word = 'Data changes'
+ },
+ data: {
+ word: 'Hello, static'
+ }
+ }
+</script>
+```
+
+As shown above, after the `static` attribute is added, the rendering result will be `Hello, static`, which is equivalent to rendering a static node. The change of the data `word` in ready function will not be listened, so the text value will not change.
+`static` property is designed to reduce the long list or pure static page memory overhead. Be careful with it, as it will likely break your page logic.
+
+Next, let's have a look at [style and class](./style-n-class.html).
+
http://git-wip-us.apache.org/repos/asf/incubator-weex-site/blob/12e3a8bc/_drafts/v-0.10/guide/syntax/display-logic.md
----------------------------------------------------------------------
diff --git a/_drafts/v-0.10/guide/syntax/display-logic.md b/_drafts/v-0.10/guide/syntax/display-logic.md
new file mode 100644
index 0000000..842e188
--- /dev/null
+++ b/_drafts/v-0.10/guide/syntax/display-logic.md
@@ -0,0 +1,173 @@
+---
+title: Display Logic Control
+type: guide
+order: 2.4
+version: 0.10
+---
+
+# Display Logic Control
+
+There are two attributes for display logic control: `if` and `repeat`. We can create Weex page structure and effects more flexible with them.
+
+ > **Notes:** The display logic could't apply on the root element within `<template>`, please don't use `if` or `repeat` directive on it.
+
+## `if`
+
+`if` attribute can control the display of a component by a truthy/falsy value. If the value is truthy, then the component will generated, otherwise it will be removed.
+
+```html
+<template>
+ <container>
+ <text onclick="toggle">Toggle</text>
+ <image src="..." if="{{shown}}"></image>
+ </container>
+</template>
+
+<script>
+ module.exports = {
+ data: {
+ shown: true
+ },
+ methods: {
+ toggle: function () {
+ this.shown = !this.shown
+ }
+ }
+ }
+</script>
+```
+
+## `repeat`
+
+`repeat` statement is just for array rendering. Every item in an array is also a structured data. This means in `repeat`ed component, you can bind their item properties directly.
+
+```html
+<template>
+ <container>
+ <container repeat="{{list}}" class="{{gender}}">
+ <image src="{{avatar}}"></image>
+ <text>{{nickname}}</text>
+ </container>
+ </container>
+</template>
+
+<style>
+ .male {...}
+ .female {...}
+</style>
+
+<script>
+ module.exports = {
+ data: {
+ list: [
+ {gender: 'male', nickname: 'Li Lei', avatar: '...'},
+ {gender: 'female', nickname: 'Han Meimei', avatar: '...'},
+ ...
+ ]
+ }
+ }
+</script>
+```
+
+The origin data properties which not belongs to the array will also be bound:
+
+```html
+<template>
+ <container>
+ <container repeat="{{list}}" class="{{gender}}">
+ <image src="{{avatar}}"></image>
+ <text>{{nickname}} - {{group}}</text>
+ </container>
+ </container>
+</template>
+
+<style>
+ .male {...}
+ .female {...}
+</style>
+
+<script>
+ module.exports = {
+ data: {
+ group: '...',
+ list: [
+ {gender: 'male', nickname: 'Li Lei', avatar: '...'},
+ {gender: 'female', nickname: 'Han Meimei', avatar: '...'},
+ ...
+ ]
+ }
+ }
+</script>
+```
+
+### An extension of repeat syntax
+
+#### use default `$index` for the index of array.
+
+e.g.
+
+```html
+<div repeat="{{list}}">
+ <text>No. {{$index + 1}}</text>
+<div>
+```
+
+#### specify the key and value of array.
+
+e.g.
+
+```html
+<div repeat="{{v in list}}">
+ <text>No. {{$index + 1}}, {{v.nickname}}</text>
+</div>
+```
+
+```html
+<div repeat="{{(k, v) in list}}">
+ <text>No. {{k + 1}}, {{v.nickname}}</text>
+</div>
+```
+
+#### use `track-by` to specify unique attribute
+
+By default when replacing an array, `repeat` will cause the entire list to be re-rendered. However you can use `track-by` to specify an unique attribute as a hint, so that weex can reuse existing elements as much as possible.
+
+**NOTE: DO NOT USE DATA-BINDING SYNTAX FOR `track-by`**
+
+e.g.
+
+```html
+<template>
+ <container>
+ <container repeat="{{list}}" track-by="nickname" class="{{gender}}">
+ <image src="{{avatar}}"></image>
+ <text>{{nickname}} - {{group}}</text>
+ </container>
+ </container>
+</template>
+```
+
+Later on, when you replace the array including an item of the same nickname, it knows it can reuse the existing scope and DOM elements associated with the same nickname.
+
+## Omitted mustache wrapper
+
+Particularly for the `if` and `repeat` attribute, the [mustache](https://mustache.github.io/) wrapper in values could be omitted: just the same as data-binding syntax.
+
+```html
+<template>
+ <container>
+ <text if="shown">Hello</text>
+ <text if="{{shown}}">Hello</text>
+ </container>
+</template>
+
+<script>
+ module.exports = {
+ data: function () {return {shown: true}}
+ }
+</script>
+```
+
+The two `<text>` components are both displayed.
+
+Next is [render logic control](./render-logic.html).
http://git-wip-us.apache.org/repos/asf/incubator-weex-site/blob/12e3a8bc/_drafts/v-0.10/guide/syntax/events.md
----------------------------------------------------------------------
diff --git a/_drafts/v-0.10/guide/syntax/events.md b/_drafts/v-0.10/guide/syntax/events.md
new file mode 100644
index 0000000..c79dd2b
--- /dev/null
+++ b/_drafts/v-0.10/guide/syntax/events.md
@@ -0,0 +1,59 @@
+---
+title: Events
+type: guide
+order: 2.3
+version: 0.10
+---
+
+# Events
+
+Weex allow `<template>` to bind event type and handler on an Element. The attribute name is the event type with prefix `on...` and the attribute value is handler method name. For instance: `onclick="handler"`. e.g.
+
+```html
+<template>
+ <image onclick="handler" ...></image>
+</template>
+
+<script>
+ module.exports = {
+ methods: {
+ handler: function (e) {
+ // TODO
+ }
+ }
+ }
+</script>
+```
+
+When user clicks the image , handler function which defined in `<script>` code will be executed.
+
+## Inline Handler
+
+Beside a handler method name, you can also call a handler inline.
+
+e.g.
+```html
+<template>
+ <image onclick="handler('arg1', $event)" ...></image>
+</template>
+
+<script>
+ module.exports = {
+ methods: {
+ handler: function (arg1, e) {
+ // TODO
+ }
+ }
+ }
+</script>
+```
+
+## Event Object
+
+When an event handler called, it will receive an event object as the first argument. Every event object will contains following properties.
+
+* `type`: event name, eg: `click`
+* `target`: target `Element` of the event
+* `timestamp`: time stamp that event triggered
+
+Next, let's have a look at [display logic control](./display-logic.html).
http://git-wip-us.apache.org/repos/asf/incubator-weex-site/blob/12e3a8bc/_drafts/v-0.10/guide/syntax/id.md
----------------------------------------------------------------------
diff --git a/_drafts/v-0.10/guide/syntax/id.md b/_drafts/v-0.10/guide/syntax/id.md
new file mode 100644
index 0000000..eaa6e04
--- /dev/null
+++ b/_drafts/v-0.10/guide/syntax/id.md
@@ -0,0 +1,65 @@
+---
+title: Find an Element
+type: guide
+order: 2.7
+version: 0.10
+---
+
+# Find an Element
+
+In Weex, we may set the `id` property for a particular element, just as unique identification of a particular element.
+
+`id` can be used by `this.$el(id)` to find an element with a certain id. Take the API [`scrollToElement()`](../../references/modules/dom.html#scrolltoelementnode-options) For example:
+
+```html
+<template>
+ <container>
+ <text id="top">Top</text>
+ <container style="height: 10000; background-color: #999999;">
+ </container>
+ <text onclick="back2Top">Back to Top</text>
+ </container>
+</template>
+<script>
+ var dom = require('@weex-module/dom')
+ module.exports = {
+ methods: {
+ back2Top: function () {
+ var top = this.$el('top')
+ dom.scrollToElement(top)
+ }
+ }
+ }
+</script>
+```
+
+`id` can also work with `repeat` attribute [See more about display logical control](./display-logic.html), and ensure repetitive elements with different `id`:
+
+```html
+<template>
+ <container>
+ <image id="{{imgId}}" src="{{imgUrl}}" onclick="getImageId" repeat="{{images}}"></image>
+ </container>
+</template>
+<script>
+ module.exports = {
+ data: {
+ images: [
+ {imgId: 1, imgUrl: '...'},
+ {imgId: 2, imgUrl: '...'},
+ {imgId: 3, imgUrl: '...'},
+ ...
+ ]
+ },
+ methods: {
+ getImageId: function(e) {
+ // get e.target.id
+ }
+ }
+ }
+</script>
+```
+
+Additionally, in the [composed components](./composed-component.html), we can get the corresponding sub component through `this.$vm(id)` APIs.
+
+Next is how to [send messages between composed components](./comm.html).
http://git-wip-us.apache.org/repos/asf/incubator-weex-site/blob/12e3a8bc/_drafts/v-0.10/guide/syntax/index.md
----------------------------------------------------------------------
diff --git a/_drafts/v-0.10/guide/syntax/index.md b/_drafts/v-0.10/guide/syntax/index.md
new file mode 100644
index 0000000..448c40a
--- /dev/null
+++ b/_drafts/v-0.10/guide/syntax/index.md
@@ -0,0 +1,122 @@
+---
+title: Syntax
+type: guide
+order: 2
+has_chapter_content: true
+version: 0.10
+---
+
+# Syntax
+
+*The syntax of Weex is deeply inspired from [Vue.js](http://vuejs.org/), an elegant JavaScript framework with component system and reactive data binding.*
+
+A simple Weex page sample is just a piece of `<template>` code, a piece of `<style>` code and a piece of `<script>` code. The three parts together describe a whole Weex page.
+
+- `<template>`: *required*. Just uses HTML syntax and describes the structure of a Weex page, which is build upon several tags. Each tag means a type of *component*.
+- `<style>`: *optional*. Describes the presentation details, and the content is based on CSS syntax.
+- `<script>`: *optional*. Describes the data and behavior with JavaScript syntax. It defines data and how these data are processed etc.
+
+```html
+<template>
+ <!-- (required) the structure of page -->
+</template>
+
+<style>
+ /* (optional) stylesheet */
+</style>
+
+<script>
+ /* (optional) the definition of data, methods and life-circle */
+</script>
+```
+
+## `<template>`
+
+We describe page structure in `<template>` tag like the following definition:
+
+```html
+<template>
+ <container>
+ <image style="width: 200; height: 200;" src="http://gtms02.alicdn.com/tps/i2/TB1QHKjMXXXXXadXVXX20ySQVXX-512-512.png"></image>
+ <text>Alibaba Weex Team</text>
+ </container>
+</template>
+```
+
+Here `container` tag is the root element of the component. `image` tag describes a picture, while `text` tag means a paragraph of text.
+
+Just similar to HTML, each component could have its own attributes, some components also have children as their sub components.
+
+The root element of template: In a `template` tag, there could be only one root component which has no display logics directive. Here are three types of root component we support now:
+
+- `<container>`: a common native container
+- `<scroller>`: a native scroll view
+- `<list>`: a native cell-reusable list view
+
+Only these type of components are allowed for root element.
+
+* [See all built-in components](../../references/components/index.html).
+
+## `<style>`
+
+You can consider the Weex style syntax is a subset of the CSS syntax, but there is still some differences.
+
+First we could write inline `style` attribute in `<template>` element. Second we could use the `class` attribute to apply stylesheets, which are defined with single-class selectors in `<style>` code. Here is an example:
+
+```html
+<template>
+ <container>
+ <text style="font-size: 64;">Alibaba</text>
+ <text class="large">Weex Team</text>
+ </container>
+</template>
+
+<style>
+ .large {font-size: 64;}
+</style>
+```
+
+Both the two `text` components above have the same `font-size`, which is `64` pixel.
+
+* [See common styles in Weex](../../references/common-style.html)
+
+
+### Notes!
+weex is basically following [HTML attribute](https://en.wikipedia.org/wiki/HTML_attribute) naming rule , so please **do not use CamelCase** in your attribute , **long-name** with “-” as delimiter is much better.
+
+## `<script>`
+
+The syntax is JavaScript (ES5) and it describes data and behavior of a Weex page. Here we create three paragraphs:
+
+```html
+<template>
+ <container>
+ <text>The time is {{datetime}}</text>
+ <text>{{title}}</text>
+ <text>{{getTitle()}}</text>
+ </container>
+</template>
+
+<script>
+ module.exports = {
+ data: {
+ title: 'Alibaba',
+ datetime: null
+ },
+ methods: {
+ getTitle: function () {
+ return 'Weex Team'
+ }
+ },
+ created: function() {
+ this.datetime = new Date().toLocaleString()
+ }
+ }
+</script>
+```
+
+This piece of `<script>` code will generate some component options and assign it to `module.exports`. The three text components above respectively shows the current datetime, 'Alibaba' and 'Weex Team'. The `data` in the `<script>` code stores component data which could be used for [data-binding](./data-binding.html) in the `<template>`. When data changes, the bound value will be updated automatically. Also it could be read and written by `this.x` in its methods.
+
+* [See component definitions references](../../references/component-defs.html)
+
+Next, let's have a look at [data-binding](./data-binding.html).
http://git-wip-us.apache.org/repos/asf/incubator-weex-site/blob/12e3a8bc/_drafts/v-0.10/guide/syntax/render-logic.md
----------------------------------------------------------------------
diff --git a/_drafts/v-0.10/guide/syntax/render-logic.md b/_drafts/v-0.10/guide/syntax/render-logic.md
new file mode 100644
index 0000000..be967e1
--- /dev/null
+++ b/_drafts/v-0.10/guide/syntax/render-logic.md
@@ -0,0 +1,35 @@
+---
+title: Render Logic Control
+type: guide
+order: 2.5
+version: 0.10
+---
+
+# Render Logic Control
+
+## `append`
+
+Attribute `append` do not have data-binding. It won't change the final rendering effect. But it determines whether this component should be rendered as a whole tree or a single node with child nodes appended after.
+
+`append` has two key attributes, `tree` and `node`, the usage is:
+
+```html
+<template>
+ <container>
+ <container id="world" append="tree">
+ <text>Hello World!</text>
+ </container>
+ <container id="weex" append="node">
+ <text>Hello Weex!</text>
+ </container>
+ </container>
+</template>
+```
+
+In the code snippet above, the element with id 'world' will wait for all its children to be rendered then it will be rendered entirely, while the element with id 'weex' will only render itself to the page, then its child elements will be rendered to page one by one.
+
+The rendering result is obvious, The latter statement will render the element a bit faster on the first-paint, but the total time might be longger than `append="tree"` case.
+
+By default, elements are rendered as `node` mode. Once an element is in `tree` rendering mode, its children elements will always be rendered in `tree` mode.
+
+Next we will introduce [composed component](./composed-component.html).
http://git-wip-us.apache.org/repos/asf/incubator-weex-site/blob/12e3a8bc/_drafts/v-0.10/guide/syntax/style-n-class.md
----------------------------------------------------------------------
diff --git a/_drafts/v-0.10/guide/syntax/style-n-class.md b/_drafts/v-0.10/guide/syntax/style-n-class.md
new file mode 100644
index 0000000..4337992
--- /dev/null
+++ b/_drafts/v-0.10/guide/syntax/style-n-class.md
@@ -0,0 +1,118 @@
+---
+title: Style & Class
+type: guide
+order: 2.2
+version: 0.10
+---
+
+# Style & Class
+
+## The Basic Syntax
+
+CSS style description can be viewed as a series of key-value pairs,each of which describes a particular style, such as the width and height of a component.
+
+```css
+.box {
+ width: 400;
+ height: 50;
+}
+```
+
+The format of key-value pairs is `prop-name: prop-value;`. The key name is `prop-name`, the value name is `prop-value`. Usually,the key name and the value name follow Horizontal connection nomenclature, the value may be a number(the default units is px); The key and the value must be separated by `:`, between each key-value pairs must be separated by `;`.
+
+The style description will appear on a weex page in two formats:
+
+* Style attribute of `<template>` label
+* Stylesheets of `<style>` label
+
+### style attribute
+
+The style written in the style label, for example:
+
+```html
+<template>
+ <container style="width: 400; height: 50;">
+ ...
+ </container>
+</template>
+```
+
+It is said that the width and height of `<container>` label is 400 pixels and 50 pixels respectively.
+
+### the `<style>` tag
+
+For example:
+
+```html
+<style>
+ .wrapper {width: 600;}
+ .title {width: 400; height: 50;}
+ .highlight {color: #ff0000;}
+</style>
+```
+
+The stylesheets contain multiple style rules, each style rule has only one class which is contained by its style selector, a pair of curly braces `{...}`, and the styles of the curly braces. For example:
+
+```css
+.title {
+ width: 400;
+ height: 50;
+}
+```
+
+The above is a rule.
+
+### Class attribute
+
+The selectors of `<style>` label are matched with the class attribute of `<template>` label, we should use spaces to separate the class names. For example:
+
+```html
+<template>
+ <container class="wrapper">
+ <text class="title">...</text>
+ <text class="title highlight">...</text>
+ </container>
+</template>
+<style>
+ .wrapper {width: 600;}
+ .title {width: 400; height: 50;}
+ .highlight {color: #ff0000;}
+</style>
+```
+
+It means that the width of the outermost container is 600px, The inside of the two title text is 400 pixels wide 50 pixels high, the second piece of text is red.
+
+### Notes
+
+* In order to simplify the page design and the complete underlying implementation, the width of our default screen is unified to 750 pixels, different screens should be scaled with corresponding ratio.
+* The CSS standard may support a lot of selectors, but now weex only support single-class selector.
+* The CSS standard can support many types of length units, but now weex only support pixel, and the `px` unit could be ignored, you can write number directly. More details can be found in [commmon styles](../../references/common-style.html).
+* The styles of Weex cannot be inherited to children elements, this is different to the CSS standard, such as `color` and `font-size`.
+* The CSS standard contains a lot of styles, but weex only sopport few styles which include layouts such as box model, flexbox, positions. And styles include `font-size`, `color`, etc.
+
+## With Data-binding
+
+Page [data](./data-binding.html) can be bound in `style` and `class` attribute. For example:
+
+```html
+<template>
+ <container>
+ <text style="font-size: {{fontSize}};">Alibaba</text>
+ <text class="large {{textClass}}">Weex Team</text>
+ </container>
+</template>
+<style>
+ .large {font-size: 32;}
+ .highlight {color: #ff0000;}
+</style>
+<script>
+ module.exports = {
+ data: {
+ fontSize: 32,
+ textClass: 'highlight'
+ }
+ }
+</script>
+```
+
+Next, let's have a look at [events](./events.html).
http://git-wip-us.apache.org/repos/asf/incubator-weex-site/blob/12e3a8bc/_drafts/v-0.10/references/api.md
----------------------------------------------------------------------
diff --git a/_drafts/v-0.10/references/api.md b/_drafts/v-0.10/references/api.md
new file mode 100644
index 0000000..a62d5b8
--- /dev/null
+++ b/_drafts/v-0.10/references/api.md
@@ -0,0 +1,84 @@
+---
+title: Component APIs
+type: references
+order: 1.3
+version: 0.10
+---
+
+# APIs
+
+You can access these apis through `this`(Vm) context in script methods.
+
+e.g.
+
+```html
+<script>
+module.exports = {
+ methods: {
+ somemethod: function() {
+ this.$vm('someId');
+ }
+ }
+}
+</script>
+```
+
+## $(id)
+
+**Deprecated**, please use `$vm` instead.
+
+## $el(id)
+
+Return the element referenced by specific id.
+
+### Arguments
+
+* `id`*(string)*: the unique identifier.
+
+### Returns
+
+* *(Element)*: an Element object referenced.
+
+### Tips
+* id is only guaranteed to be unique within the current (page)components, if you are looking for the parent components or child components, you can make use of the communication mode between components.
+* Further reading: [id](../guide/syntax/id.html), [Communicate Between Components](../guide/syntax/comm.html)
+
+## $vm(id)
+
+Return the vm object referenced by specific id.
+
+### Arguments
+
+* `id`*(string)*: the unique identifier.
+
+### Returns
+
+* `vm`*(Vm)*: a Vm object referenced.
+
+### Tips
+* id is only guaranteed to be unique within the current (page)components, if you are looking for the parent components or child components, you can make use of the communication mode between components.
+* Further reading: [id](../guide/syntax/id.html), [Communicate Between Components](../guide/syntax/comm.html)
+
+## $getConfig()
+
+Get the current global environment variables and configuration information.
+
+### Returns
+
+ * `config`*(object)*: the object of config.
+ * `bundleUrl`*(string)*: the url of bundle.
+ * `debug`*(boolean)*: if is debug mode.
+ * `env`*(object)*: a object of envrioment.
+ * `weexVersion`*(string)*: a version of weex sdk.
+ * `appName`*(string)*: a name of app.
+ * `appVersion`*(string)*: a version of app.
+ * `platform`*(string)*: the platform, one of `iOS`, `Android` and `Web`.
+ * `osVersion`*(string)*: the version of os.
+ * `deviceModel`*(string)*: the model of device. **native only**
+ * `deviceWidth`*(number)*: the width of device, in pixels.
+ * `deviceHeight`*(number)*: the height of device, in pixels.
+
+## $call(module, method, ...args)
+
+**Deprecated**, please use `require('@weex-module/module')[method](...args)` instead. See [modules](./modules/index.html) for more information
+
http://git-wip-us.apache.org/repos/asf/incubator-weex-site/blob/12e3a8bc/_drafts/v-0.10/references/bubble.md
----------------------------------------------------------------------
diff --git a/_drafts/v-0.10/references/bubble.md b/_drafts/v-0.10/references/bubble.md
new file mode 100644
index 0000000..ba59a90
--- /dev/null
+++ b/_drafts/v-0.10/references/bubble.md
@@ -0,0 +1,150 @@
+---
+title: Event Bubble
+type: references
+order: 1.3
+version: 0.10
+---
+
+# Event Bubble <span class="api-version">v0.13+</span>
+
+Weex 1.0 implements the W3C standard event bubbling mechanism.
+
+### Usage
+
+```html
+<template>
+ <div class="root" onclick="rootClick" bubble="true">
+ <div>
+ <text style="font-size: 40px;">{{rootText}}</text>
+ </div>
+ <div class="outer" onclick="parentClick">
+ <div>
+ <text style="font-size: 40px;">{{parentText}}</text>
+ </div>
+ <text class="inner" onclick="click">{{innerText}}</text>
+ </div>
+ </div>
+</template>
+
+<script>
+ module.exports = {
+ data: {
+ innerText: 'click me',
+ parentText: '',
+ rootText: ''
+ },
+ methods: {
+ click: function(e) {
+ this.innerText = 'inner bubble'
+ },
+ parentClick: function(e) {
+ this.parentText = 'parent bubble'
+ },
+ rootClick: function(e) {
+ this.rootText = 'root bubble'
+ }
+ }
+ }
+</script>
+
+<style>
+ .inner {
+ font-size: 40px;
+ text-align: center;
+ background-color: #7a9b1b;
+ padding: 40px;
+ }
+
+ .outer {
+ font-size: 40px;
+ text-align: center;
+ background-color: #9b7a1b;
+ padding: 120px;
+ }
+
+ .root {
+ font-size: 40px;
+ text-align: center;
+ background-color: #7a1b9b;
+ padding: 80px;
+ }
+</style>
+```
+
+[try it](http://dotwe.org/weex/dbfeb926e003986e2eea88c8ccdadb92)
+
+Run the above code, open with the client, click on the middle of the elements, you can see the event spread up, followed by the trigger.
+
+### Notice
+
+One thing should be noticed: **For compatibility with previous versions, Weex does not turn on event bubbling by default. You need to add `bubble = "true"` on the root element's properties to turn on the bubbling mechanism. Otherwise, the event will not be propagated upwards, keeping the same effect as the previous version.**
+
+### stopPropagation
+
+In the event handler function, you can use the `e.stopPropagation()` method to prevent the event from escalating. Note that `e.stopPropagation()` differs from `bubble = "true"`, which affects only the current elements and the propagation of parent elements, without affecting the propagation of child elements; the latter is a switching mechanism that is added for compatibility, Will be a global shutdown or open the bubble mechanism, the two can co-exist, as follows:
+
+```html
+<template>
+ <div class="root" onclick="rootClick" bubble="true">
+ <div>
+ <text style="font-size: 40px;">{{rootText}}</text>
+ </div>
+ <div class="outer" onclick="parentClick">
+ <div>
+ <text style="font-size: 40px;">{{parentText}}</text>
+ </div>
+ <text class="inner" onclick="click">{{innerText}}</text>
+ </div>
+ </div>
+</template>
+
+<script>
+ module.exports = {
+ data: {
+ innerText: 'click me',
+ parentText: '',
+ rootText: ''
+ },
+ methods: {
+ click: function(e) {
+ this.innerText = 'inner bubble'
+ },
+ parentClick: function(e) {
+ this.parentText = 'parent bubble'
+ e.stopPropagation()
+ },
+ rootClick: function(e) {
+ this.rootText = 'root bubble'
+ // e.stopPropagation()
+ }
+ }
+ }
+</script>
+
+<style>
+ .inner {
+ font-size: 40px;
+ text-align: center;
+ background-color: #7a9b1b;
+ padding: 40px;
+ }
+
+ .outer {
+ font-size: 40px;
+ text-align: center;
+ background-color: #9b7a1b;
+ padding: 120px;
+ }
+
+ .root {
+ font-size: 40px;
+ text-align: center;
+ background-color: #7a1b9b;
+ padding: 80px;
+ }
+</style>
+```
+
+[try it](http://dotwe.org/weex/0cab45a7c62e8bebedd2ffd83a8e1256)
+
+Run the above code, open with the client, click on the middle of the element, you can see the event up to the parent element is terminated, no longer continue to spread to the root element.
http://git-wip-us.apache.org/repos/asf/incubator-weex-site/blob/12e3a8bc/_drafts/v-0.10/references/cheatsheet.md
----------------------------------------------------------------------
diff --git a/_drafts/v-0.10/references/cheatsheet.md b/_drafts/v-0.10/references/cheatsheet.md
new file mode 100644
index 0000000..68ac69a
--- /dev/null
+++ b/_drafts/v-0.10/references/cheatsheet.md
@@ -0,0 +1,102 @@
+# Weex Cheat Sheet
+
+## Native Components
+
+| component | attribtues | styles | events | special parent | children |
+| ---- | ---- | ---- | ---- | ---- | ---- |
+| `<div>` | - | **box model**<br>**flexbox**<br>`position`<br>`background-color`<br>`opacity` | `click`<br>`appear`<br>`disappear` | - | (any) |
+| `<text>` | `value` | **box model**<br>flex<br>`position`<br>`background-color`<br>`opacity`<br>`color`<br>`font-size`<br>`font-style`<br>`font-weight`<br>`text-decoration`<br>`text-align`<br>`text-overflow`<br>`line-height` | `click`<br>`appear`<br>`disappear` | - | text only |
+| `<image>` | `src` | **box model**<br>**flexbox**<br>`position`<br>`background-color`<br>`opacity`<br>`resize` | `click`<br>`appear`<br>`disappear` | - | (none) |
+| `<scroller>` | `show-scrollbar`<br>`scroll-direction` | **box model**<br>**flexbox**<br>`position`<br>`background-color`<br>`opacity` | `click`<br>`appear`<br>`disappear` | - | (any) |
+| `<list>` | `loadmoreoffset` | **box model**<br>**flexbox**<br>`position`<br>`background-color`<br>`opacity` | `click`<br>`appear`<br>`disappear`<br>`loadmore`<br>`refresh`<br>`loading` | - | `<cell>`<br>`<header>`<br>`<refresh>`<br>`<loading>` |
+| `<cell>` | - | **box model**<br>**flexbox**<br>`position`<br>`background-color`<br>`opacity` | `click`<br>`appear`<br>`disappear` | `<list>` | (any) |
+| `<slider>` | `auto-play` | **box model**<br>**flexbox**<br>`position`<br>`background-color`<br>`opacity` | `click`<br>`appear`<br>`disappear`<br>`change` | - | (any)<br>`<indicator>` |
+| `<indicator>` | - | **box model**<br>**flexbox**<br>`position`<br>`item-color`<br>`item-selected-color`<br>`item-size` | `click`<br>`appear`<br>`disappear` | `<slider>` | (none) |
+| `<wxc-navpage>` | `height`<br>`background-color`<br>`title`<br>`title-color`<br>`left-item-title`<br>`left-item-color`<br>`right-item-title`<br>`right-item-color`<br>`left-item-src`<br>`right-item-src` | **box model**<br>**flexbox**<br>`position`<br>`background-color`<br>`opacity` | `click`<br>`appear`<br>`disappear`<br>`naviBar.leftItem.click`<br>`naviBar.rightItem.click` | - | (any) |
+| `<wxc-tabbar>` | `tab-items` | **box model**<br>**flexbox**<br>`position`<br>`background-color`<br>`opacity` | `tabBar.onClick` | - | (none) |
+| `<embed>` | `src` | **box model**<br>**flexbox**<br>`position`<br>`background-color`<br>`opacity` | `click`<br>`appear`<br>`disappear` | - | (none) |
+| `<web>` | `src` | **box model**<br>**flexbox**<br>`position`<br>`background-color`<br>`opacity` | `click`<br>`appear`<br>`disappear`<br>`pagestart`<br>`pagefinish`<br>`error` | - | (none) |
+| `<video>` | `src`<br>`play-status`<br>`auto-play` | **box model**<br>**flexbox**<br>`position`<br>`background-color`<br>`opacity` | `click`<br>`appear`<br>`disappear`<br>`start`<br>`pause`<br>`finish`<br>`fail` | - | (none) |
+| `<a>` | `href` | **box model**<br>**flexbox**<br>`position`<br>`background-color`<br>`opacity` | `click`<br>`appear`<br>`disappear` | - | (any) |
+| `<input>` | `type`<br>`value`<br>`placeholder`<br>`disabled`<br>`autofocus` | **box model**<br>**flexbox**<br>`position`<br>`background-color`<br>`opacity`<br>`placeholder-color`<br>`color`<br>`font-size`<br>`font-style`<br>`font-weight`<br>`text-align` | `click`<br>`appear`<br>`disappear` | - | (none) |
+| `<switch>` | `checked`<br>`disabled` | **box model**<br>**flexbox**<br>`position`<br>`background-color`<br>`opacity` | `appear`<br>`disappear`<br>`input`<br>`change`<br>`focus`<br>`blur` | - | (none) |
+
+## Native Modules
+
+| module | apis |
+| ---- | ---- |
+| `@weex-module/dom` | `scrollToElement(node, { offset })` |
+| `@weex-module/modal` | `toast({ message, duration })`<br>`alert({ message, okTitle }, callback)`<br>`confirm({ message, okTitle, cancelTitle }, callback(result))`<br>`prompt({ message, okTitle, cancelTitle }, callback(result, data))` |
+| `@weex-module/stream` | `fetch({ method, url, headers, type, body }, callback({ status, ok, statusText, data, headers }), progressCallback({ readyState, status, length, statusText, headers}))` |
+| `@weex-module/webview` | `goBack(ref)`<br>`goForward(ref)`<br>`reload(ref)` |
+| `@weex-module/navigator` | `push({ url, animated }, callback)`<br>`pop({ animated }, callback)` |
+| `@weex-module/animation` | `transition(node, { styles, duration, timingFunction, delay, transform-origin }, callback)` |
+
+## Special Template Syntax
+
+* `<foo x="abc">`
+* `{% raw %}<foo x="{{expr}}">{% endraw %}`
+* `<foo style="name1: value1; name2: value2">`
+* `{% raw %}<foo style="name1: value1; name2: {{expr}}; name3: ...">{% endraw %}`
+* `<foo class="a b c">`
+* `{% raw %}<foo class="a {{expr}} c">{% endraw %}`
+* `<foo onclick="methodName">`
+* `<foo id="abc">`
+* `<foo if="expr">`
+* `<foo repeat="item in list">`
+* `<foo repeat="(key,item) in list">`
+* `<component type="foo">`
+* `{% raw %}<component type="{{expr}}">{% endraw %}`
+
+## ViewModel APIs
+
+* `this.$vm(el)`
+* `this.$el(el)`
+* `this.$getConfig()`
+* `this.$emit(type, data)`
+* `this.$dispatch(type, data)`
+* `this.$broadcast(type, data)`
+
+## ViewModel Options
+
+* `data`
+* `methods`
+* `computed`
+* `init`, `created`, `ready`
+* `events`
+
+example:
+
+```javascript
+module.exports = {
+
+ data: function () {
+ return {
+ x: 1,
+ y: 2
+ }
+ }
+
+ methods: {
+ foo: function () {
+ console.log('foo')
+ }
+ },
+
+ computed: {
+ z: function () {
+ return this.x + this.y
+ }
+ },
+
+ events: {
+ custom: function (e) {
+ console.log(e)
+ }
+ },
+
+ init: function () {},
+ created: function () {},
+ ready: function () {}
+}
+```
http://git-wip-us.apache.org/repos/asf/incubator-weex-site/blob/12e3a8bc/_drafts/v-0.10/references/color-names.md
----------------------------------------------------------------------
diff --git a/_drafts/v-0.10/references/color-names.md b/_drafts/v-0.10/references/color-names.md
new file mode 100644
index 0000000..a61112b
--- /dev/null
+++ b/_drafts/v-0.10/references/color-names.md
@@ -0,0 +1,182 @@
+---
+title: List of the names of colors
+type: references
+order: 1.7
+version: 0.10
+---
+
+# List of the names of colors
+
+### Basic color keywords:
+
+| Color Name | Hex rgb |
+| ---------- | ------- |
+| black | #000000 |
+| silver | #C0C0C0 |
+| gray | #808080 |
+| white | #FFFFFF |
+| maroon | #800000 |
+| red | #FF0000 |
+| purple | #800080 |
+| fuchsia | #FF00FF |
+| green | #008000 |
+| lime | #00FF00 |
+| olive | #808000 |
+| yellow | #FFFF00 |
+| navy | #000080 |
+| blue | #0000FF |
+| teal | #008080 |
+| aqua | #00FFFF |
+
+### Extended color keywords:
+
+| Color Name | Hex rgb |
+| ---------- | ------- |
+| aliceblue | #F0F8FF |
+| antiquewhite | #FAEBD7 |
+| aqua | #00FFFF |
+| aquamarine | #7FFFD4 |
+| azure | #F0FFFF |
+| beige | #F5F5DC |
+| bisque | #FFE4C4 |
+| black | #000000 |
+| blanchedalmond | #FFEBCD |
+| blue | #0000FF |
+| blueviolet | #8A2BE2 |
+| brown | #A52A2A |
+| burlywood | #DEB887 |
+| cadetblue | #5F9EA0 |
+| chartreuse | #7FFF00 |
+| chocolate | #D2691E |
+| coral | #FF7F50 |
+| cornflowerblue | #6495ED |
+| cornsilk | #FFF8DC |
+| crimson | #DC143C |
+| cyan | #00FFFF |
+| darkblue | #00008B |
+| darkcyan | #008B8B |
+| darkgoldenrod | #B8860B |
+| darkgray | #A9A9A9 |
+| darkgreen | #006400 |
+| darkgrey | #A9A9A9 |
+| darkkhaki | #BDB76B |
+| darkmagenta | #8B008B |
+| darkolivegreen | #556B2F |
+| darkorange | #FF8C00 |
+| darkorchid | #9932CC |
+| darkred | #8B0000 |
+| darksalmon | #E9967A |
+| darkseagreen | #8FBC8F |
+| darkslateblue | #483D8B |
+| darkslategray | #2F4F4F |
+| darkslategrey | #2F4F4F |
+| darkturquoise | #00CED1 |
+| darkviolet | #9400D3 |
+| deeppink | #FF1493 |
+| deepskyblue | #00BFFF |
+| dimgray | #696969 |
+| dimgrey | #696969 |
+| dodgerblue | #1E90FF |
+| firebrick | #B22222 |
+| floralwhite | #FFFAF0 |
+| forestgreen | #228B22 |
+| fuchsia | #FF00FF |
+| gainsboro | #DCDCDC |
+| ghostwhite | #F8F8FF |
+| gold | #FFD700 |
+| goldenrod | #DAA520 |
+| gray | #808080 |
+| green | #008000 |
+| greenyellow | #ADFF2F |
+| grey | #808080 |
+| honeydew | #F0FFF0 |
+| hotpink | #FF69B4 |
+| indianred | #CD5C5C |
+| indigo | #4B0082 |
+| ivory | #FFFFF0 |
+| khaki | #F0E68C |
+| lavender | #E6E6FA |
+| lavenderblush | #FFF0F5 |
+| lawngreen | #7CFC00 |
+| lemonchiffon | #FFFACD |
+| lightblue | #ADD8E6 |
+| lightcoral | #F08080 |
+| lightcyan | #E0FFFF |
+| lightgoldenrodyellow | #FAFAD2 |
+| lightgray | #D3D3D3 |
+| lightgreen | #90EE90 |
+| lightgrey | #D3D3D3 |
+| lightpink | #FFB6C1 |
+| lightsalmon | #FFA07A |
+| lightseagreen | #20B2AA |
+| lightskyblue | #87CEFA |
+| lightslategray | #778899 |
+| lightslategrey | #778899 |
+| lightsteelblue | #B0C4DE |
+| lightyellow | #FFFFE0 |
+| lime | #00FF00 |
+| limegreen | #32CD32 |
+| linen | #FAF0E6 |
+| magenta | #FF00FF |
+| maroon | #800000 |
+| mediumaquamarine | #66CDAA |
+| mediumblue | #0000CD |
+| mediumorchid | #BA55D3 |
+| mediumpurple | #9370DB |
+| mediumseagreen | #3CB371 |
+| mediumslateblue | #7B68EE |
+| mediumspringgreen | #00FA9A |
+| mediumturquoise | #48D1CC |
+| mediumvioletred | #C71585 |
+| midnightblue | #191970 |
+| mintcream | #F5FFFA |
+| mistyrose | #FFE4E1 |
+| moccasin | #FFE4B5 |
+| navajowhite | #FFDEAD |
+| navy | #000080 |
+| oldlace | #FDF5E6 |
+| olive | #808000 |
+| olivedrab | #6B8E23 |
+| orange | #FFA500 |
+| orangered | #FF4500 |
+| orchid | #DA70D6 |
+| palegoldenrod | #EEE8AA |
+| palegreen | #98FB98 |
+| paleturquoise | #AFEEEE |
+| palevioletred | #DB7093 |
+| papayawhip | #FFEFD5 |
+| peachpuff | #FFDAB9 |
+| peru | #CD853F |
+| pink | #FFC0CB |
+| plum | #DDA0DD |
+| powderblue | #B0E0E6 |
+| purple | #800080 |
+| red | #FF0000 |
+| rosybrown | #BC8F8F |
+| royalblue | #4169E1 |
+| saddlebrown | #8B4513 |
+| salmon | #FA8072 |
+| sandybrown | #F4A460 |
+| seagreen | #2E8B57 |
+| seashell | #FFF5EE |
+| sienna | #A0522D |
+| silver | #C0C0C0 |
+| skyblue | #87CEEB |
+| slateblue | #6A5ACD |
+| slategray | #708090 |
+| slategrey | #708090 |
+| snow | #FFFAFA |
+| springgreen | #00FF7F |
+| steelblue | #4682B4 |
+| tan | #D2B48C |
+| teal | #008080 |
+| thistle | #D8BFD8 |
+| tomato | #FF6347 |
+| turquoise | #40E0D0 |
+| violet | #EE82EE |
+| wheat | #F5DEB3 |
+| white | #FFFFFF |
+| whitesmoke | #F5F5F5 |
+| yellow | #FFFF00 |
+| yellowgreen | #9ACD32 |
+
http://git-wip-us.apache.org/repos/asf/incubator-weex-site/blob/12e3a8bc/_drafts/v-0.10/references/common-attrs.md
----------------------------------------------------------------------
diff --git a/_drafts/v-0.10/references/common-attrs.md b/_drafts/v-0.10/references/common-attrs.md
new file mode 100644
index 0000000..2ed0310
--- /dev/null
+++ b/_drafts/v-0.10/references/common-attrs.md
@@ -0,0 +1,78 @@
+---
+title: Common Attribute
+type: references
+order: 1.5
+version: 0.10
+---
+
+# Common Attribute
+
+Attributes provide additional information about weex tags. All weex tags can have attributes, attributes are always specified in the start tag and usually come in name/value pairs like: name="value". Mustache can be used inside a value.
+All of weex tags have the following attributes:
+
+## id
+
+Specifies a unique id for an element in `<template>` scope. With `id` attribute you can easily refer a weex tag.
+
+```html
+<div id="logo"></div>
+<div id="item-{{index}}"></div>
+```
+
+## style
+
+Specifies an inline style for an element.
+
+```html
+<div style="width: 200; height: 200"></div>
+<div style="padding: {{x}}; margin: 0"></div>
+```
+
+## class
+
+Specifies one or more classnames for an element (refers to a class in a style sheet).
+
+```html
+<div class="button"></div>
+<div class="button {{btnStatus}}"></div>
+```
+
+## repeat
+
+We can use the `repeat` attribute to render a list of items based on an array. The `repeat` attribute has a special syntax in the form of `item in items`, where `items` is the source data array and `item` is an alias for the array element being iterated on.
+
+```html
+<div repeat={{list}}></div>
+<div repeat={{item in list}}></div>
+```
+
+## if
+
+Provide a boolean value to decide whether or not to display current tag.
+
+```html
+<div if="true"></div>
+<div if="{{opened}}"></div>
+<div if="{{direction === 'row'}}"></div>
+```
+
+## append
+
+By providing the value of tree or node, it determines the progress of rendering.
+
+```html
+<div append="tree/node"></div>
+```
+
+## Event Handing (on...)
+
+Register event handlers on weex tag.
+
+```html
+<div onclick="openDetail"></div>
+<div onappear="{{loadMore}}"></div>
+```
+
+## Notes!
+
+Weex is basically following [HTML attribute](https://en.wikipedia.org/wiki/HTML_attribute) naming rule, so please **do not use CamelCase** in your attribute, **kebab-case** with "-" as delimiter is much better.
http://git-wip-us.apache.org/repos/asf/incubator-weex-site/blob/12e3a8bc/_drafts/v-0.10/references/common-event.md
----------------------------------------------------------------------
diff --git a/_drafts/v-0.10/references/common-event.md b/_drafts/v-0.10/references/common-event.md
new file mode 100644
index 0000000..c8e0836
--- /dev/null
+++ b/_drafts/v-0.10/references/common-event.md
@@ -0,0 +1,120 @@
+---
+title: Common Events
+type: references
+order: 1.9
+version: 0.10
+---
+
+# Common Events
+
+Weex provide the ability to let events trigger action, like starting a JavaScript when a user click on a component. Bellow are the common event attributes that can be added to weex components to define event actions.
+
+## Click event
+
+The onclick attribute fires on a click gesture on the element.
+**Notes: ** The `input` and `switch` component does not currently support the `click` event, please use `change` or `input` event instead.
+
+### event object
+
+- `type` : `click`
+- `target` : The target component where the event is triggered
+- `timestamp` : Timestamp when event is triggered
+
+**Example:**
+
+```html
+<template>
+ <text style="font-size: 60px" onclick="{{update}}">I am {{name}}</text>
+</template>
+
+<script>
+ module.exports = {
+ data: {
+ name: 'Tom'
+ },
+ methods: {
+ update: function () {
+ this.name = this.name === 'Tom' ? 'Jerry' : 'Tom'
+ }
+ }
+ }
+</script>
+```
+
+
+## Longpress event
+
+If a `longpress` event is bound to a component, the event will be triggered when user long press on it.
+**Notes: ** The `input` and `switch` component does not currently support the `click` event, please use `change` or `input` event instead.
+
+### event object
+
+- `type` : `longpress`
+- `target` : The target component where the event is triggered
+- `timestamp` : Timestamp when event is triggered
+
+**Example:**
+
+```html
+<template>
+ <div style="width: 400px; height: 200px; background-color: {{bg}};
+ justify-content: center; align-items: center;" onlongpress="{{update}}">
+ <text style="font-size: 60px">Press me</text>
+ </div>
+</template>
+
+<script>
+ module.exports = {
+ data: {
+ bg: '#FF0000'
+ },
+ methods: {
+ update: function () {
+ this.bg = this.bg === '#FF0000' ? '#00FF00' : '#FF0000'
+ }
+ }
+ }
+</script>
+```
+
+## Appear event
+
+If a appear event is bound to a component inside a scrollable container, the event will be triggered when the component comes to be visible.
+
+### event object
+
+- `type` : `appear`
+- `target` : The target component where the event is triggered
+- `timestamp` : Timestamp when event is triggered
+- `direction` : The direction in which the scroller is scrolling. Could be `up` or `down`.
+
+[example](http://dotwe.org/3fa162a65fbf0c7e2655fbc1bebbfc38)
+
+## Disappear event
+
+If a `disappear` event is bound to a component inside a scrollable container, the event will be triggered when the component scrolls out of viewport and disappears from your sight.
+
+### event object
+
+- `type` : `disappear`
+- `target` : The target component where the event is triggered
+- `timestamp` : Timestamp when event is triggered
+- `direction` : The direction in which the scroller is scrolling. Could be `up` or `down`.
+
+[example](http://dotwe.org/3fa162a65fbf0c7e2655fbc1bebbfc38)
+
+## Page event
+
+Weex provides you with simple management of page status, such as `viewappear` and `viewdisappear`.
+The `viewappear` event will be triggered when page is about to show or before any animations are configured for showing. For example, when calling `push` method in `navigator` module, this event will be trigged in new page.
+The `viewdisappear` event will be triggeded when page is about to dismiss.
+Different from `appear` and `disappear` of component, these two events focus on the status of whole page, so **they must be bound to the root component**.
+In addititon, these events also can be bound to body component which is not root actually such as `wxc-navpage`.
+
+### event object
+
+- `type` : `viewappear` or `viewdisappear`
+- `target` : The target component where the event is triggered
+- `timestamp` : Timestamp when event is triggered
+
+[example](http://dotwe.org/3fa162a65fbf0c7e2655fbc1bebbfc38)
http://git-wip-us.apache.org/repos/asf/incubator-weex-site/blob/12e3a8bc/_drafts/v-0.10/references/common-style.md
----------------------------------------------------------------------
diff --git a/_drafts/v-0.10/references/common-style.md b/_drafts/v-0.10/references/common-style.md
new file mode 100644
index 0000000..8ae8224
--- /dev/null
+++ b/_drafts/v-0.10/references/common-style.md
@@ -0,0 +1,208 @@
+---
+title: Common Style
+type: references
+order: 1.6
+version: 0.10
+---
+
+# Common Style
+
+All of weex tags share some common style rules
+
+## Box Model
+
+
+
+Weex box model based on the CSS box model, all of weex elements can be considered as boxes. The term "box model" is used when talking about design and layout. The box model is essentially a box that wraps around every HTML element. It consists of margins, borders, paddings, and the actual content.
+
+you can use the definition below in weex box model.
+
+- `width`: `length` type, default value `0`
+- `height`: `length` type, default value `0`
+- `padding`: `length` type, default value `0`, (space around content, between element content and the element border)
+ - `padding-left`: `length` type, default value `0`
+ - `padding-right`: `length` type, default value `0`
+ - `padding-top`: `length` type, default value `0`
+ - `padding-bottom`: `length` type, default value `0`
+- `margin`: `length` type, default value `0`, (space around elements, outside the border)
+ - `margin-left`: `length` type, default value `0`
+ - `margin-right`: `length` type, default value `0`
+ - `margin-top`: `length` type, default value `0`
+ - `margin-bottom`: `length` type, default value `0`
+- `border`
+ - `border-style`: values `solid` | `dashed` | `dotted`, default value `solid`
+ - `border-left-style`: values `solid` | `dashed` | `dotted`, default value `solid`
+ - `border-top-style`: values `solid` | `dashed` | `dotted`, default value `solid`
+ - `border-right-style`: values `solid` | `dashed` | `dotted`, default value `solid`
+ - `border-bottom-style`: values `solid` | `dashed` | `dotted`, default value `solid`
+ - `border-width`: `length` type, non-negative, default value `0`
+ **DO NOT** use `border-width:1`. There is a default viewport `<viewport width="750">`, if the actual width of a device is 720px, then `border-width:1` will be `border-width:0.96`. As weex **do not** support sub-pixel, this border would not be rendered.
+ - `border-left-width`: `length` type, non-negative, default value `0`
+ - `border-top-width`: `length` type, non-negative, default value `0`
+ - `border-right-width`: `length` type, non-negative, default value `0`
+ - `border-bottom-width`: `length` type, non-negative, default value `0`
+ - `border-color`: `color` type, default value `#000000`
+ - `border-left-color`: `color` type, default value `#000000`
+ - `border-top-color`: `color` type, default value `#000000`
+ - `border-right-color`: `color` type, default value `#000000`
+ - `border-bottom-color`: `color` type, default value `#000000`
+ - `border-radius`: `length` type, default value `0`, (rounded borders to elements , default value is 0 meaning right angle )
+
+ Although the the default overflow style is `overflow:hidden` in android, a view will not be clipped by its parents' `border-radius`. This only happens on Android, it works fine on iOS.
+ - `border-bottom-left-radius`: `length` type, non-negative, default value `0`
+ - `border-bottom-right-radius`: `length` type, non-negative, default value `0`
+ - `border-top-left-radius`: `length` type, non-negative, default value `0`
+ - `border-top-right-radius`: `length` type, non-negative, default value `0`
+
+Notes: The rule of border-radius for a specific corner such as `border-top-left-radius` is not currently supported for component `<image>` and `<text>`.
+
+Weex box model uses `border-box` as the default value of `box-sizing`, meaning the width and height properties includes content, padding and border, but not the margin.
+
+example:
+
+```html
+<template>
+ <div>
+ <image src="..." style="width: 400; height: 200; margin-left: 20;"></image>
+ </div>
+</template>
+```
+
+## Flexbox
+
+Weex box style model based on the CSS flexbox, ensures that elements behave predictably and the page layout can accommodates to different screen sizes and different display devices.
+
+Flexbox consists of flex containers and flex items. If a weex element can containing other elements, it is a flex container.
+
+Notice that the old version of flexbox specification has differences with the new ones, such as whether or not to support wrapping. This is described at w3c's working drafts, and you should notice the differences among them. Also notice that the old version is only supported below the 4.4 version of android.
+
+### Flex container
+
+Flexbox is the default and only style model in Weex, so you don't have to add `display: flex;` in a container.
+
+- `flex-direction`: values `row` | `column`, default value `column`
+
+The flex-direction property specifies the direction of the flexible items inside the flex container. Default value is `column` (top-to-bottom).
+
+- `justify-content`: values `flex-start` | `flex-end` | `center` | `space-between`, default value `flex-start`
+
+The justify-content property horizontally aligns the flexible container's items when the items do not use all available space on the main-axis. Default value is `flex-start` meaning the flex items are positioned at the beginning of the container. `flex-end` means the items are positioned at the end of the container. `center` means the items are positioned at the center of the container. `space-between` means the items are positioned with space between the lines.
+
+
+
+- `align-items`: values `stretch` | `flex-start` | `center` | `flex-end`, default value `stretch`
+
+The align-items property vertically aligns the flexible container's items when the items do not use all available space on the cross-axis. Default value is `stretch` meaning the items are stretched to fit the container. `flex-start` means the items are positioned at the top of the container; `flex-end` means the items are positioned at the bottom of the container; `center` means items are positioned at the center of the container (vertically).
+
+
+
+### Flex item
+
+- `flex`: `number` type, default value `0`
+
+the flex property specifies the length of the flex item, relative to the rest of the flex items inside the same container. If all of the flex items set `flex: 1`, they will have equal width or height on direction of flex container's `flex-direction`. If there are two flex items, with one setting `flex: 1`, and the other setting `flex: 2`, the first one will take 1/3 container space, and the second one will take 2/3 container space. If all of flex items don't set `flex`, they will be aligned depending on the container's `justify-content` property.
+
+
+## Examples
+
+a list of images with equal scales align at the vertical axis:
+
+```html
+<template>
+ <div style="width: 300; height: 100;">
+ <image src="..." style="flex: 1;"></image>
+ <image src="..." style="flex: 1;"></image>
+ <image src="..." style="flex: 1;"></image>
+ </div>
+</template>
+```
+
+a image with fixed width aligns with a stretched text:
+
+```html
+<template>
+ <div style="width: 300; height: 100;">
+ <image src="..." style="width: 100; height: 100;"></image>
+ <text style="flex: 1;">...</text>
+ </div>
+</template>
+```
+
+mixed direction alignment:
+
+```html
+<template>
+ <div style="width: 100;">
+ <image src="..." style="width: 100; height: 100;"></image>
+ <div style="flex-direction: row;">
+ <text style="flex: 2; font-size: 32;">title</text>
+ <text style="flex: 1; font-size: 16;">$100</text>
+ </div>
+ </div>
+</template>
+```
+
+one text align left , the other float right:
+
+
+
+```html
+<template>
+<div style="flex-direction: row; justify-content: space-between;">
+ <text>WEEX</text>
+ <text>2016-05-08</text>
+</div>
+</template>
+```
+
+## Position
+
+we can use properties below to control placement of weex tag
+
+- `position`: values `relative` | `absolute` | `fixed` | `sticky`, default value `relative`
+
+`relative` means the item is positioned relative to its normal position. `absolute` means the item is positioned relative to its container. `fixed` keeps the elements position fixed when the page is scrolling. `sticky` keeps elements positioned inside the viewport as "stuck" at the top or "relative" at its original place depending on whether does it about to scroll out of the view.
+
+- `top`: `number` type, default value `0`, upward offset value
+- `bottom`: `number` type, default value `0`, downward offset value
+- `left`: `number` type, default value `0`, leftward offset value
+- `right`: `number` type, default value `0`, rightward offset value
+
+### Examples
+
+```html
+<template>
+ <div style="flex-direction: column;">
+ <div style="height: 3000;">
+ <image src="..." style="top: 50; left: 50; ..."></image>
+ </div>
+ <div style="height: 3000;">
+ <image src="..." style="position: sticky; ..."></image>
+ </div>
+ <div style="height: 3000;">
+ <image src="..." style="position: absolute; top: 50; left: 50; ..."></image>
+ </div>
+ </div>
+</template>
+```
+
+## Other Common Style
+
+- `opacity`
+- `background-color`
+
+## Type of Style Value
+
+- `length` type
+- `number` type
+- `color` type (*[The list of color keywords.](./color-names.html)*)
+- enumerated type
+
+## Simple Step
+
+These up-to-down steps may help you to plan the whole style of weex pages.
+
+1. overall style: divide the whole page to different parts
+2. flex alignment: align boxes in every part of page
+3. position box: place box, set offset
+4. element specific style: set styles for certain element if needed
http://git-wip-us.apache.org/repos/asf/incubator-weex-site/blob/12e3a8bc/_drafts/v-0.10/references/component-defs.md
----------------------------------------------------------------------
diff --git a/_drafts/v-0.10/references/component-defs.md b/_drafts/v-0.10/references/component-defs.md
new file mode 100644
index 0000000..baa6584
--- /dev/null
+++ b/_drafts/v-0.10/references/component-defs.md
@@ -0,0 +1,131 @@
+---
+title: Component Definition
+type: references
+order: 1.2
+version: 0.10
+---
+
+# Component Definition
+
+A component definition is a set of options to describe a component. It's always assigned to `module.exports` in `<script>`.
+
+```javascript
+module.exports = {
+ // a set of options here
+}
+```
+
+## Data & Methods options
+
+```javascript
+module.exports = {
+ data: function () {
+ return {x: 1, y: 2}
+ },
+ methods: {
+ doThis: function () {...},
+ doThat: function () {...}
+ },
+ ...
+}
+```
+
+The `data` option is a function that return a observable data object for this ViewModel.
+The `methods` option is a map which contains all ViewModel methods.
+
+Each `data` or `methods` property will be proxied to the ViewModel instance. So you can read and write data with `this.x`, also you can call methods with `this.doThis(...)`.
+
+A whole example:
+
+```html
+<template>
+ <div style="width: {{w}}; height: {{h}}; background-color: red;" onclick="update"></div>
+</template>
+<script>
+ module.exports = {
+ data: function () {
+ return {w: 750, h: 200}
+ },
+ methods: {
+ update: function (e) {
+ this.h += 200
+ }
+ }
+ }
+</script>
+```
+
+## Events options
+
+```javascript
+module.exports = {
+ data: ...,
+ methods: {
+ foo: function () {
+ ...
+ this.$emit('customtype1', data)
+ }
+ },
+ events: {
+ customtype1: function (e) {
+ console.log(e.type, e.detail)
+ }
+ },
+ ...
+}
+```
+
+The `events` options could allow you to add custom event listeners when ViewModel created. Then it will listen these type of events and handle them by the function-type value.
+
+The first argument is a event object which contains event data in `e.detail`.
+
+## Lifecycle options
+
+```javascript
+module.exports = {
+ data: ...,
+ methods: ...,
+ init: function () {
+ console.log('ViewModel constructor begins')
+ },
+ created: function () {
+ console.log('Data observation finished')
+ },
+ ready: function () {
+ console.log('Virtual DOM finished')
+ },
+ ...
+}
+```
+
+Weex ViewModel now supports these lifecycle hook functions which could be write as component options:
+
+* `init`: fired at the beginning of a ViewModel constructor call.
+* `created`: fired when ViewModel observes default data but not compile the template.
+* `ready`: fired when ViewModel observes default data and compiles the template to generate virtual DOM finally.
+
+**Note: If you want to use the function in `methods`, `events` or lifecycle options as a parameter, please make sure the context is correct as expect. For example:**
+
+```javascript
+module.exports = {
+ data: function () {
+ return {x: 1, y: 2}
+ },
+ ready: function () {
+ // `undefined`
+ // because the context changed
+ this.foo(this.bar)
+ // `1`
+ // because the context bound correct
+ this.foo(this.bar.bind(this))
+ },
+ methods: {
+ foo: function (fn) {
+ return fn()
+ },
+ bar: function () {
+ return this.x
+ }
+ }
+}
+```
http://git-wip-us.apache.org/repos/asf/incubator-weex-site/blob/12e3a8bc/_drafts/v-0.10/references/components/a.md
----------------------------------------------------------------------
diff --git a/_drafts/v-0.10/references/components/a.md b/_drafts/v-0.10/references/components/a.md
new file mode 100644
index 0000000..e1677bf
--- /dev/null
+++ b/_drafts/v-0.10/references/components/a.md
@@ -0,0 +1,50 @@
+---
+title: <a>
+type: references
+order: 2.1
+version: 0.10
+---
+
+# <a>
+
+`a` defines a hyperlink to a page in the web. Its purpose and syntax is very similar to [<a>](https://developer.mozilla.org/en-US/docs/Web/HTML/Element/a) in HTML5.
+
+## Child Components
+
+This type of component supports all kinds of weex component as it's child components except for its own kind.
+
+## Attributes
+
+* href: href attributes defines the URL of the hyperlink.
+
+## Styles:
+
+### common styles
+
+Check out the [common styles](../common-style.html)
+
+## Events
+
+### common events
+
+Check out the [common events](../common-event.html)
+
+### Notes
+
+We can't guarantee the order of execution between onclick function and href. we recommend that do not use the click event in `a`.
+
+## Examples
+
+```html
+<template>
+ <div>
+ <a href="http://h5.m.taobao.com">
+ <text>Click me to see how 'A' element opens a new world.</text>
+ </a>
+ </div>
+</template>
+```
+
+[Try it](http://dotwe.org/d99f6eb55aa501c836a195ec824cada0)
+
+Use [Weex Playground](https://alibaba.github.io/weex/download.html) App to Scan the QR image and view the example for 'a'.
http://git-wip-us.apache.org/repos/asf/incubator-weex-site/blob/12e3a8bc/_drafts/v-0.10/references/components/cell.md
----------------------------------------------------------------------
diff --git a/_drafts/v-0.10/references/components/cell.md b/_drafts/v-0.10/references/components/cell.md
new file mode 100644
index 0000000..34d1703
--- /dev/null
+++ b/_drafts/v-0.10/references/components/cell.md
@@ -0,0 +1,42 @@
+---
+title: <cell>
+type: references
+order: 2.6
+version: 0.10
+---
+
+# <cell>
+
+### Summary
+
+This component must be used as a subcomponent of a [`list`](./list.html) component, which is for the performance optimizing during scrolling.
+
+### Child Components
+
+This type of component supports all kinds of weex component as its child components.
+
+### Attributes
+
+There is no specific attribute for this component other than the [common attributes](../common-attrs.html).
+
+**Notes:** you can't give `<cell>` a `flex` value. Width of `<cell>` is equal to the width of its parent component `<list>`, and you don't need to specify its height.
+
+### Styles
+
+**common styles**: check out the [common styles](../common-attrs.html)
+
+- support flexbox related styles
+- support box model related styles
+- support ``position`` related styles
+- support ``opacity``, ``background-color`` etc.
+
+### Events
+
+**common events**: check out the [common events](../common-event.html)
+
+- support `click` event. Check out [common events](../common-event.html)
+- support `appear` / `disappear` event. Check out [common events](../common-event.html)
+
+### Example
+
+please refer to [List](./list.html)
http://git-wip-us.apache.org/repos/asf/incubator-weex-site/blob/12e3a8bc/_drafts/v-0.10/references/components/div.md
----------------------------------------------------------------------
diff --git a/_drafts/v-0.10/references/components/div.md b/_drafts/v-0.10/references/components/div.md
new file mode 100644
index 0000000..1e75523
--- /dev/null
+++ b/_drafts/v-0.10/references/components/div.md
@@ -0,0 +1,48 @@
+---
+title: <div>
+type: references
+order: 2.2
+version: 0.10
+---
+
+# <div>
+
+### Summary
+
+The most fundamental component which is a contianer to wrap any other components. It supports all the common styles, attributes and layout of flexbox.
+
+alias: `<container>` (deprecated)
+
+### Child Components
+
+This type of component supports all kinds of weex component as its child components including its own kind.
+
+### Attributes
+
+There is no specific attribute for this component other than the [common attributes](../common-attrs.html).
+
+### Styles
+
+**common styles**: check out the [common styles](../common-attrs.html)
+
+- support flexbox related styles
+- support box model related styles
+- support ``position`` related styles
+- support ``opacity``, ``background-color`` etc.
+
+### Events
+
+**common events**: check out the [common events](../common-event.html)
+
+- support `click` event. Check out [common events](../common-event.html)
+- support `appear` / `disappear` event. Check out [common events](../common-event.html)
+
+### Examples
+
+```html
+<div>
+ <image src="..."></image>
+ <text>...</text>
+</div>
+```
+
http://git-wip-us.apache.org/repos/asf/incubator-weex-site/blob/12e3a8bc/_drafts/v-0.10/references/components/image.md
----------------------------------------------------------------------
diff --git a/_drafts/v-0.10/references/components/image.md b/_drafts/v-0.10/references/components/image.md
new file mode 100644
index 0000000..3eae206
--- /dev/null
+++ b/_drafts/v-0.10/references/components/image.md
@@ -0,0 +1,55 @@
+---
+title: <image>
+type: references
+order: 2.3
+version: 0.10
+---
+
+# <image>
+
+### Summary
+
+`image` tag is used to render a specified picture, and it shouldn't contain any child component. You can use `img` as alias.
+
+**Notes:** the styles of `width` and `height` should be specified, otherwise it won't work.
+
+alias: `<img>`
+
+### Child Components
+
+This component supports no child components.
+
+### Attributes
+
+- `src`: <string> image source url
+- `resize`: <span class="api-version">v0.5+</span> <string> the 'ScaleType' of the component. The default value is ``stretch``, if this attribute is not specified. Possible values are ``cover``, ``contain``, each of which has the same meaning with w3c standard.
+
+Other attributes please check out the [common attributes](../common-attrs.html).
+
+### Styles
+
+- `width`: <length> the width of the component. This style should be specified.
+- `height`: <length> the height of the component. This style should be specifed.
+
+**common styles**: check out the [common styles](../common-attrs.html)
+
+- support flexbox related styles
+- support box model related styles
+- support ``position`` related styles
+- support ``opacity``, ``background-color`` etc.
+
+### Events
+
+**common events**: check out the [common events](../common-event.html)
+
+- support `click` event. Check out [common events](../common-event.html)
+- support `appear` / `disappear` event. Check out [common events](../common-event.html)
+
+### Examples
+
+```html
+<div>
+ <image src="..." ></image>
+ <text>...</text>
+</div>
+```
http://git-wip-us.apache.org/repos/asf/incubator-weex-site/blob/12e3a8bc/_drafts/v-0.10/references/components/index.md
----------------------------------------------------------------------
diff --git a/_drafts/v-0.10/references/components/index.md b/_drafts/v-0.10/references/components/index.md
new file mode 100644
index 0000000..66e211c
--- /dev/null
+++ b/_drafts/v-0.10/references/components/index.md
@@ -0,0 +1,24 @@
+---
+title: Build-in Components
+type: references
+order: 2
+version: 0.10
+---
+
+# Build-in Components
+
+- [<a>](./a.html)
+- [<indicator>](./indicator.html)
+- [<switch>](./switch.html)
+- [<text>](./text.html)
+- [<textarea>](./textarea.html)
+- [<video>](./video.html)
+- [<web>](./web.html)
+- [<div>](./div.html)
+- [<image>](./image.html)
+- [<input>](./input.html)
+- [<list>](./list.html)
+- [<cell>](./cell.html)
+- [<refresh> & <loading>](./refresh.html)
+- [<scroller>](./scroller.html)
+- [<slider>](./slider.html)
\ No newline at end of file
http://git-wip-us.apache.org/repos/asf/incubator-weex-site/blob/12e3a8bc/_drafts/v-0.10/references/components/indicator.md
----------------------------------------------------------------------
diff --git a/_drafts/v-0.10/references/components/indicator.md b/_drafts/v-0.10/references/components/indicator.md
new file mode 100644
index 0000000..b06dc95
--- /dev/null
+++ b/_drafts/v-0.10/references/components/indicator.md
@@ -0,0 +1,98 @@
+---
+title: <indicator>
+type: references
+order: 2.10
+version: 0.10
+---
+
+# <indicator>
+
+### Summary
+
+This component must be used as a subcomponent of a [`slider`](./slider.html) component.
+
+### Child Components
+
+This component supports no child components.
+
+### Attributes
+
+There is no specific attribute for this component other than the [common attributes](../common-attrs.html).
+
+### Styles
+
+- `item-color`: <colors> This style attribute sets the normal item color using either a named color or a color specified in the hexadecimal #RRGGBB format.
+- `item-selectedColor`: <colors> This style attribute sets the selected item color using either a named color or a color specified in the hexadecimal #RRGGBB format.
+- `item-size`: <length> The size of the indicator elements, which is an float attribute.
+
+**common styles**: check out the [common styles](../common-attrs.html)
+
+- support flexbox related styles
+- support box model related styles
+- support ``position`` related styles
+
+**Note:** There are some specific details about the style `width` and `height` on this component: the position of indicator will not only depend on the `top`, `left`, `bottom` and `right`, but also depend on the value of `width` and `height`. Imagine there is a virtual container outside the indicator, and it inherit the `width` and `height` of the indicator. The `top`, `left`, `right` and `bottom` will always take effect on this container, not the indicator points themselves, and the indicator points will be positioned in the center of it. And also you should know the default `width` and `height` is the parent slider's `width` and `height`.
+
+**Note:** `background-color` is not recommended to apply on this component, and you should use `item-color` and `item-selectedColor` instead.
+
+### Events
+
+**common events**: check out the [common events](../common-event.html)
+
+- support `click` event. Check out [common events](../common-event.html)
+- support `appear` / `disappear` event. Check out [common events](../common-event.html)
+
+### Example
+
+```html
+<template>
+ <div>
+ <slider class="slider">
+ <div class="slider-pages" repeat="{{itemList}}">
+ <image class="img" src="{{pictureUrl}}"></image>
+ <text class="title">{{title}}</text>
+ </div>
+
+ <indicator class="indicator"></indicator>
+ </slider>
+ </div>
+</template>
+
+<style>
+ .img {width: 150; height: 150;}
+ .title {flex: 1; color: #ff0000; font-size: 48; font-weight: bold; background-color: #eeeeee;}
+ .slider {
+ flex-direction: row;
+ margin: 18;
+ width: 714;
+ height: 230;
+ }
+ .slider-pages {
+ flex-direction: row;
+ width: 714;
+ height: 200;
+ }
+ .indicator {
+ width:714;
+ height:200;
+ position:absolute;
+ top:1;
+ left:1;
+ item-color: red;
+ item-selectedColor: blue;
+ item-size: 20;
+ }
+</style>
+
+<script>
+ module.exports = {
+ data: {
+ itemList: [
+ {itemId: '520421163634', title: 'item1', pictureUrl: 'https://gd2.alicdn.com/bao/uploaded/i2/T14H1LFwBcXXXXXXXX_!!0-item_pic.jpg'},
+ {itemId: '522076777462', title: 'item2', pictureUrl: 'https://gd1.alicdn.com/bao/uploaded/i1/TB1PXJCJFXXXXciXFXXXXXXXXXX_!!0-item_pic.jpg'},
+ {itemId: '522076777462', title: 'iten3', pictureUrl: 'https://gd3.alicdn.com/bao/uploaded/i3/TB1x6hYLXXXXXazXVXXXXXXXXXX_!!0-item_pic.jpg'}
+ ]
+ }
+ }
+</script>
+```
http://git-wip-us.apache.org/repos/asf/incubator-weex-site/blob/12e3a8bc/_drafts/v-0.10/references/components/input.md
----------------------------------------------------------------------
diff --git a/_drafts/v-0.10/references/components/input.md b/_drafts/v-0.10/references/components/input.md
new file mode 100644
index 0000000..feaac53
--- /dev/null
+++ b/_drafts/v-0.10/references/components/input.md
@@ -0,0 +1,124 @@
+---
+title: <input>
+type: references
+order: 2.4
+version: 0.10
+---
+
+# input
+
+The weex builtin component `input` is used to create input controls to receive the user's input characters. How a `input` component works varies considerably depending on the value of its `type` attribute, such as `text`, `password`, `url`, `email`, `tel` etc.
+
+**Notes:** does not support the common-event `click`. Please listen to the `input` or `change` event instead.
+
+## Child Components
+
+This component supports no child components.
+
+## Attributes
+
+* `type`: the type of controls to display. The default value is `text`, if this attribute is not specified. Possible values are `text`, `password`, `tel`, `email`, `url` etc. each of which has the same meaning with �W3C standard.
+
+* `value`: the value(text) of the control.
+
+* `placeholder`: a hint to the user of which can be entered to the control. The placeholder text must have no carriage returns or line-feeds.
+
+* `disabled`: a boolean attribute indicates that the form control is not available for interaction. In particular, the click event will not be dispatched on disabled controls.
+
+* `autofocus`: a boolean attribute lets you specify that a form control should have input focus when the page loads.
+
+* `maxlength`: <span class="api-version">v0.7+</span> a number value to specify maxlength of input.
+
+Other attributes please check out the [common attributes](../common-attrs.html).
+
+## Styles
+
+* placeholder-color: the color of placeholder. Default value is '#999999'.
+
+* text styles: checkout [text styles](../text-style.html)
+
+ * support 'color' style.
+ * support 'font-size' style.
+ * support 'font-style' style.
+ * support 'font-weight' style.
+ * support 'text-align' style.
+
+### common styles
+check out [common styles for components](../common-style.html)
+
+* support flexbox related styles.
+* support box model related styles.
+* support 'position' related styles.
+* support 'opacity', 'background-color' etc.
+
+## Events
+
+* input: the value of an input character changes.
+* change: the change event is fired when a change to the component's value is commited by the user. It always come after a 'blur' event.
+* focus: a component has received focus.
+* blur: a component has lost focus.
+
+### common events
+check out [common events](../common-event.html)
+
+* support 'appear' / 'disappear' event.
+
+### Notes
+does not support the common-event 'click'. Please listen to the 'input' or 'change' event instead.
+
+### Parameters of events' object
+
+* for 'input' and 'change' events:'value': the value of the component who dispatched this event.'timestamp': the time stamp of the event.
+* for 'focus' and 'blur' events:'timestamp': the time stamp of the event.
+
+## Example
+
+```html
+<template>
+ <div>
+ <input
+ type="text"
+ placeholder="Input Something"
+ class="input"
+ autofocus="true"
+ value=""
+ onchange="onchange"
+ oninput="oninput"
+ />
+ <text>oninput: {{txtInput}}</text>
+ <text>onchange: {{txtChange}}</text>
+ </div>
+</template>
+
+<style>
+ .input {
+ font-size: 60;
+ height: 80;
+ width: 400;
+ }
+</style>
+
+<script>
+ require('weex-components');
+ module.exports = {
+ data: {
+ txtInput: '',
+ txtChange: ''
+ },
+ methods: {
+ onchange: function(event) {
+ this.txtChange = event.value;
+ console.log('onchange', event.value);
+ },
+ oninput: function(event) {
+ this.txtInput = event.value;
+ console.log('oninput', event.value);
+ }
+ }
+ };
+</script>
+```
+
+[Try it](http://dotwe.org/e1b18eb89facb4e2a5467ee4bebd9be6)
+
+Use [Weex Playground](https://alibaba.github.io/weex/download.html) App to Scan the QR image and view the example for 'input'.
http://git-wip-us.apache.org/repos/asf/incubator-weex-site/blob/12e3a8bc/_drafts/v-0.10/references/components/list.md
----------------------------------------------------------------------
diff --git a/_drafts/v-0.10/references/components/list.md b/_drafts/v-0.10/references/components/list.md
new file mode 100644
index 0000000..3b4745e
--- /dev/null
+++ b/_drafts/v-0.10/references/components/list.md
@@ -0,0 +1,292 @@
+---
+title: <list>
+type: references
+order: 2.5
+version: 0.10
+---
+
+# List
+
+<span class="weex-version">v0.6.1+</span>
+
+The List component, which inherits from Scroller component, is a core component, and it provides the most popular features for using a list of items.
+
+It can provide excellent experience and performance while still maintaining smooth scroll and low memory usage.
+
+**example**
+
+```html
+<template>
+ <list>
+ <cell onappear="onappear($event, $index)" ondisappear="ondisappear($event, $index)" class="row" repeat="{{staffs}}" index="{{$index}}">
+ <div class="item">
+ <text>{{name}}</text>
+ </div>
+ </cell>
+ </list>
+</template>
+
+<style>
+ .row {
+ width: 750;
+ }
+ .item {
+ justify-content: center;
+ border-bottom-width: 2;
+ border-bottom-color: #c0c0c0;
+ height: 100;
+ padding:20;
+ }
+</style>
+
+<script>
+ module.exports = {
+ data: {
+ staffs:[{name:'inns'},{name:'connon'},{name:'baos'},{name:'anna'},{name:'dolley'},{name:'lucy'},{name:'john'}, {name:'lily'},{name:'locke'},{name:'jack'},{name:'danny'},{name:'rose'},{name:'harris'},{name:'lotus'},{name:'louis'}]
+ },
+ methods:{
+ onappear: function (e, index) {
+ console.log('+++++', index)
+ console.log(this.staffs[index].name + ' is appearing...');
+ },
+ ondisappear:function (e, index) {
+ console.log('+++++', index)
+ }
+ }
+ }
+</script>
+
+```
+
+[try it](http://dotwe.org/15d58cfbca9b6a72c89c9a13ad1f6155)
+
+### Child Components
+
+Notes: The list now supports the following child components: cell, header, refresh, loading and fixed-position components. Other kinds of components will not be guaranteed to be displayed correctly.
+
+* cell 0.6.1 defines the attributes and behavior of the cells that appear in list.
+* header 0.6.1 sticks to the top when it reaches the top of the screen.
+* refresh 0.6.1 used inside list to add pull-down-to-refresh functionality.
+* loading 0.6.1 used inside list to add pull-up-to-load-more functionality.
+
+
+### Attributes
+
+* show-scrollbar: true/false whether show the scroll bar or not, default value is true
+* scroll-direction: <string> define scroll direction of component, horizontal or vertical
+* loadmoreoffset : <number> default value is 0. The loadmore event will be triggered when the list is loadmoreoffset left to reach the bottom of the list view. e.g. a list has total content length of 1000, and the loadmoreoffset is set to 400, the loadmore event will be triggered when 600 has beed scrolled and there is less than 400 left.
+* loadmoreretry : <number> default value 0,whether to reset loadmore related UI when loadmore failed, will be deprecated in further release.
+
+Please checkout [Scroller Component Attributes](./scroller.html) to have a look at the inherited attributes from direct parent.
+
+Other attributes please check out the [common attributes](../common-attrs.html).
+
+### Styles
+
+common styles: check out [common styles for components](../common-style.html)
+
+* support flexbox related styles
+* support box model related styles
+* support position related styles
+* support opacity, background-color etc.
+
+### Events
+
+onloadmore 0.5 used with loadmoreoffset attribute. if the view has less than loadmoreoffset to scroll down, the onloadmore event will be triggered.
+
+common events: check out the [common events](../common-event.html)
+
+* support onclick event. Check out [common events](../common-event.html)
+* support onappear / ondisappear event. Check out [common events](../common-event.html)
+
+
+### API
+
+All cells or cell's subcomponents in list support the scrollToElement API in [dom module](../modules/dom.html)
+
+#### Difference between loading child component and onloadmore event
+
+loading is a child component that can response to the onloading event, and this event can only be triggered when the scroller/list has been scrolled down to the bottom.
+onloadmore is an event that will be triggered when the rest of the scroller/list is less than loadmoreoffset long.
+
+
+* [scroller example](http://dotwe.org/85fd3988eefa24f058b7da7966e56203)
+* [list example](http://dotwe.org/62f895249014dde26cc0725c8005e42c)
+
+### Restrictions
+
+Nested lists or scrollers within the same direction are not supported. In other words. nested lists/scroller must have different directions.
+For example, a vertical list nested in a vertical list or scroller is not allowed. However, a vertical list nested in a horizontal list or scroller is legal.
+
+### Example
+
+```html
+<template>
+ <div class="wrapper">
+ <list class="list">
+ <header class="header">
+ <text class="title">Search Results</text>
+ </header>
+ <refresh style="width: 750; padding: 30;" onrefresh="refreshData" display="{{refreshDisplay}}">
+ <text class="text"> ↓ Pull to refresh </text>
+ <loading-indicator class="indicator"></loading-indicator>
+ </refresh>
+ <cell class="row" repeat="item in items" id="item-{{$index}}">
+ <div>
+ <text class="item">Repo name: {{item.full_name}}</text>
+ </div>
+ <div>
+ <text class="item">Repo star: {{item.stargazers_count}}</text>
+ </div>
+ </cell>
+ <loading onloading="loadingData" style="width: 750; padding: 30;" display="{{loadingDisplay}}">
+ <text class="text">{{loadingText}}</text>
+ </loading>
+ </list>
+ <div class="up" onclick="goToTop">
+ <img class="img" src="https://img.alicdn.com/tps/TB1ZVOEOpXXXXcQaXXXXXXXXXXX-200-200.png"></img>
+ </div>
+ </div>
+</template>
+
+<style>
+.wrapper {
+ position: absolute;
+ top: 0;
+ right: 0;
+ bottom: 0;
+ left: 0;
+}
+.list{
+ background-color: #ffffff;
+ flex: 1;
+}
+.header {
+ height: 80;
+ align-items: center;
+ justify-content: center;
+ background-color: #efefef;
+ border-bottom-color: #eeeeee;
+ border-bottom-width: 2;
+ border-bottom-style: solid;
+}
+.title {
+ text-align: center;
+}
+.text {
+ text-align: center;
+}
+.row {
+ padding: 20;
+ border-bottom-color: #eeeeee;
+ border-bottom-width: 2;
+ border-bottom-style: solid;
+}
+.up {
+ width: 70;
+ height: 70;
+ position: fixed;
+ right: 20;
+ bottom: 20;
+}
+.img {
+ width: 70;
+ height: 70;
+}
+</style>
+
+<script>
+var dom = require('@weex-module/dom') || {}
+var stream = require('@weex-module/stream') || {}
+var modal = require('@weex-module/modal') || {}
+
+var SEARCH_URL = 'https://api.github.com/search/repositories?q=language:javascript&sort=stars&order=desc'
+
+module.exports = {
+ data: {
+ isLoaded: true,
+ page: 1,
+ loadingDisplay: 'hide',
+ refreshDisplay: 'hide',
+ loadingText: 'Loading...',
+ items:[]
+ },
+ created: function () {
+ var url = SEARCH_URL + '&page=' + this.page
+
+ this.renderData(url)
+
+ this.page++
+ },
+ methods: {
+ renderData: function (url) {
+ var self = this
+
+ stream.fetch({
+ method: 'GET',
+ url: url,
+ type:'json'
+ }, function(res) {
+ self.refreshDisplay = 'hide'
+ self.loadingDisplay = 'hide'
+
+ try {
+ var results = res.data.items || []
+
+ if (Array.isArray(results)) {
+ for(var i = 0; i < results.length; i++) {
+ self.items.push(results[i])
+ }
+ }
+
+ self.isLoaded = true
+ } catch(e) {}
+ },function(res){
+
+ })
+ },
+ loadingData: function (e) {
+ var url = SEARCH_URL + '&page=' + this.page
+ var self = this
+
+ if (self.isLoaded === false) return
+
+ self.loadingDisplay = 'show'
+
+ if (self.page <=10 ) {
+ self.renderData(url)
+ self.page++
+ } else {
+ self.loadingDisplay = 'hide'
+ self.loadingText = 'NO MORE!'
+ }
+ },
+ goToTop: function (e) {
+ dom.scrollToElement(this.$el('item-0'), {
+ offset: -100
+ })
+ },
+ refreshData: function (e) {
+ var url = SEARCH_URL + '&page=1'
+
+ if (this.isLoaded === false) return
+
+ this.refreshDisplay = 'show'
+
+ modal.toast({
+ 'message': 'Refreshing...',
+ 'duration': 1
+ })
+
+ this.items = []
+ this.page = 1
+ this.renderData(url)
+
+ this.refreshDisplay = 'hide'
+ }
+ }
+}
+</script>
+```
+
+[Try it](http://dotwe.org/ed524ade679b0fa96e980600c53ea5ce)
\ No newline at end of file
[36/51] [abbrv] incubator-weex-site git commit: update file structure
and fix responsive styles
Posted by ha...@apache.org.
http://git-wip-us.apache.org/repos/asf/incubator-weex-site/blob/12e3a8bc/_drafts/v1.0/advanced/extend-to-html5.md
----------------------------------------------------------------------
diff --git a/_drafts/v1.0/advanced/extend-to-html5.md b/_drafts/v1.0/advanced/extend-to-html5.md
new file mode 100644
index 0000000..ff99629
--- /dev/null
+++ b/_drafts/v1.0/advanced/extend-to-html5.md
@@ -0,0 +1,253 @@
+---
+title: weex-html5 扩展
+type: advanced
+order: 11
+has_chapter_content: true
+version: 0.10
+---
+
+# 扩展 weex-html5
+
+### 简介
+
+Weex 是一个高可扩展性的跨平台动态化开发方案,你可以在现有组件基础上定制自己需要的三端组件。你可以为 Weex API 模块添加新的方法,或者创建新的 API 模块和新的加载器。按照以下几个步骤扩展你的组件,API 或者加载器。
+
+首先要明确的是,组件和 API 模块是基于 Weex 的扩展,但是独立于 Weex,组件的定义本身是不需要依赖于 Weex 的,这样有助于组件的分散化管理,去除中心化依赖。
+
+其次,当你扩展一个组件,你需要同时扩展三端的组件(android, ios 和 web 端),毕竟 Weex 是一个重视三端一致体验的跨平台移动框架。你可以一个端一个端的扩展,也可以召唤其他端上的开发者来共同完成你在其他端上的组件(你总是可以在社区找到对某个功能有共同需求的开发者)。这里有一些在 [android 端](./extend-to-android.md)和 [ios 端](./extend-to-ios.md)做扩展的文档可以参考。
+
+你应该将你的扩展发布到 Weex 开发者可以方便找到和使用的渠道,比如 `npm`。我们推荐你将你开发的组件发布到 `npm` 供其他 Weex 开发者使用。
+
+最重要的是,你的组件的命名需要遵守 Weex 组件命名规范:以 `weex-` 开头作为组件的前缀,并且以 `-<platform>` 做为结尾后缀,除非你发布的包是三端的实现都包含在内的。这里有个 [`<weex-hello-web`>](https://github.com/MrRaindrop/weex-hello-web) 的例子作为参考,这里注册了一个简单的自定义的组件。
+
+### 创建新组件
+
+步骤:
+1. 在你的组件实现中必须继承 `Weex.Component` 这个类, 并选择性的重写其中的一些方法。
+2. 你的组件的 exports 需要暴露一个 `init` 方法,并在其中使用 `Weex.registerComponent` 注册你的组件。
+
+**这里用一个例子展示如何扩展一个新的组件**
+
+看这个组件扩展的代码( web 端上的组件):
+
+``` javascript
+const attr = {
+ // ...
+}
+const style = {
+ // ...
+}
+const event = {
+ // ...
+}
+// 每个扩展组件都需要实现一个init方法,Weex会通过这方法进行安装和注册.
+function init (Weex) {
+ const Component = Weex.Component
+ const extend = Weex.utils.extend
+
+ // 组件的构造函数
+ function Hello (data) {
+ Component.call(this, data)
+ }
+
+ // prototype继承
+ Hello.prototype = Object.create(Component.prototype)
+ extend(Hello.prototype, proto)
+
+ // 配置属性、样式以及事件
+ extend(Hello.prototype, { attr })
+ extend(Hello.prototype, {
+ style: extend(Object.create(Component.prototype.style), style)
+ })
+ extend(Hello.prototype, { event })
+
+ Weex.registerComponent('weex-hello', Hello)
+}
+
+// 暴露init方法接口.
+export default { init }
+```
+
+上述代码摘引自 [weex-hello-web/src/index.js](https://github.com/MrRaindrop/weex-hello-web/blob/master/src/index.js#L46-L65)
+
+这个demo重写了基类 `Component`中的`create`方法。你也可以选择重写`Component`中的一些其他方法来定制组件的行为。典型的方法包括:
+- `create`: 创建组件的节点,在方法体中return这个节点.
+- `createChildren` 创建子节点.
+- `insertBefore` 在某个子节点之前插入一个新的子节点.
+- `appendChild` 在子节点列表的最后加上一个节点.
+- `removeChild` 移除一个子节点.
+
+**进阶**:更多关于组件定制和扩展的细节和代码展示,可以参考 [weex 主仓库的代码](https://github.com/apache/incubator-weex/tree/dev/html5),这里的组件基本上都是通过上述方式进行定义的。
+
+重要的一点,注册组件的关键方法是 `Weex.registerComponent`,如示例里的 `weex-hello` 组件的注册:
+
+``` javascript
+Weex.registerComponent('weex-hello', Hello)
+```
+
+上述代码引自 [weex-hello-web/src/index.js](https://github.com/MrRaindrop/weex-hello-web/blob/master/src/index.js#L62)
+
+在某个需要使用该组件的weex项目中使用 `Weex.install` 方法安装该组件:
+
+``` javascript
+// import the original weex-html5.
+import weex from 'weex-html5'
+import hello from 'weex-hello-web'
+// install the component.
+weex.install(hello)
+```
+
+上述代码引自 [weex_extend_demo/src/main.js](https://github.com/MrRaindrop/weex_extend_demo/blob/master/src/main.js#L1-L5)
+
+在你的 `.we` 文件中直接使用这个组件:
+
+``` html
+<template>
+ <div>
+ <weex-hello class="hello" style="txt-color:#fff;bg-color:green"
+ value="WEEX" onclick="handleClick">
+ </weex-hello>
+ </div>
+</template>
+```
+
+上述代码引自[weex_extend_demo/demo/index.we](https://github.com/MrRaindrop/weex_extend_demo/blob/master/demo/index.we#L10-L15)
+### 扩展API
+
+你可以扩展新的 API 模块,或者为某个已有的模块添加新的 API. 比如,你可以添加一个 API 模块叫做 `user`,在里面添加一些用户登录登出处理的 API,比如 `login`, `logout` 等等。你可以通过 `require('@weex-module/moduleName)[methodName](arg1, arg2, ...)` ([Module APIs](../references/api.md)) 的方式调用你的 API.
+
+步骤:
+1. 实现你的 API module.
+2. 在你的 API 安装模块里暴露一个 `init` 方法,并在这个方法里面使用 `Weex.registerAPIModules` 注册你的 API module.
+
+**这里用一个例子展示如何扩展一个新的 API 模块**
+
+创建一个文件 `user.js`,在其中定义登录登出 `login/logout` 方法.
+
+``` javascript
+const user = {
+ // 定义用户登录方法.
+ login (callbackId) {
+ login.then(res => {
+ this.sender.performCallback(callbackId, res)
+ }).catch(err => {
+ this.sender.performCallback(callbackId, err)
+ })
+ },
+
+ // 定义用户登出方法.
+ logout (callbackId) {
+ logout.then(res => {
+ this.sender.performCallback(callbackId, res)
+ }).catch(err => {
+ this.sender.performCallback(callbackId, err)
+ })
+ }
+}
+
+// 定义user模块的元 (meta) 信息.
+const meta = {
+ user: [{
+ name: 'login',
+ args: ['function']
+ }, {
+ name: 'logout',
+ args: ['function']
+ }]
+}
+
+export default {
+ init (Weex) {
+ // 注册这个模块,最后一个参数是模块的元信息.
+ Weex.registerApiModule('user', user, meta)
+ }
+}
+```
+
+这个简单的 user helper 模块就实现好了,可以发布到 npm 上,我们可以给这个模块取个名字,比如说 `weex-user-helper`。
+
+在你的新的 Weex 项目里安装这个模块:
+
+``` javascript
+import Weex from 'weex-html5'
+import user from 'weex-user-helper'
+
+Weex.install(user)
+```
+
+安装了这个模块,你就可以在 DSL 代码里引用这个模块干点事情了:
+
+``` html
+<template>
+ <div>
+ <div class="btn" onclick="handleClick">
+ <text>LOGIN</text>
+ </div>
+ </div>
+</template>
+
+<script>
+ var userHelper = require('@weex-module/user')
+ module.exports = {
+ methods: {
+ handleClick: function () {
+ userHelper.login(function () {
+ // ... do sth. in callback.
+ })
+ }
+ }
+ }
+</script>
+```
+
+### 定制加载器loader
+
+**Loader仅用于weex-html5 (web端)加载dsl打包出来的bundle代码,native平台有其他的加载机制**
+
+已有的加载器包括 `xhr`, `jsonp` 和 `source`. 你可以使用 `weex.registerLoader` 注册一个新的加载器。例如,你有一个获取 Weex bundle 的服务 `myServe.getWeexBundle` , 通过这个服务可以加载 weex bundle,为此你可以定义一个加载器:
+
+``` javascript
+function loadByMyServe(pageId, callback) {
+ myServe.getWeexBundle(pageId).then(function (bundle) {
+ callback(bundle)
+ }).catch(function(err) {
+ callback(err)
+ })
+}
+
+// 暴露init方法用于Weex安装此加载器.
+export default {
+ init (Weex) {
+ Weex.registerLoader('myserve', loadByMyServe)
+ }
+}
+```
+
+在你的 weex-html5 项目的启动文件里安装并使用这个加载器:
+
+``` javascript
+import Weex from 'weex-html5'
+
+// 或者import from './myserve.js',不管是import一个npm模块还是import一个文件.
+import loader from 'myLoader'
+
+Weex.install(loader)
+
+// 在init方法里使用这个加载器加载bundle文件.
+(function () {
+ function getUrlParam (key) {
+ const reg = new RegExp('[?|&]' + key + '=([^&]+)')
+ const match = location.search.match(reg)
+ return match && match[1]
+ }
+ const page = getUrlParam('page') || 'examples/build/index.js'
+ Weex.init({
+ appId: location.href,
+ loader: 'myserve', // 使用刚才定义的loader类型
+ source: page,
+ rootId: 'weex'
+ })
+})();
+```
+
+以上是 Weex 带来的扩展性里比较主要的一部分,更多实现细节可以在 [weex 项目代码库](https://github.com/alibaba/weex)以及 weex 的开源社区里找到。
http://git-wip-us.apache.org/repos/asf/incubator-weex-site/blob/12e3a8bc/_drafts/v1.0/advanced/extend-to-ios.md
----------------------------------------------------------------------
diff --git a/_drafts/v1.0/advanced/extend-to-ios.md b/_drafts/v1.0/advanced/extend-to-ios.md
new file mode 100644
index 0000000..b163d62
--- /dev/null
+++ b/_drafts/v1.0/advanced/extend-to-ios.md
@@ -0,0 +1,279 @@
+---
+title: iOS 扩展
+type: advanced
+order: 10
+has_chapter_content: true
+version: 0.10
+---
+
+## iOS 扩展
+
+### Module 扩展
+
+[swift](https://github.com/weexteam/article/issues/55) 扩展 module
+
+Weex SDK 只提供渲染,而不是其他的能力,如果你需要 像网络,图片,URL跳转这些特性,需要自己动手实现他们
+例如,如果你想实现一个url地址跳转函数,你可以按照如下步骤实现一个 Module
+1. **自定义module的步骤**
+ 1. 自定义的module类 必须实现 `WXModuleProtocol`
+ 2. 必须添加宏`WX_EXPORT_METHOD`, 它可以被weex识别,它的参数是 JavaScript调用 module指定方法的参数
+ 3. 添加`@synthesized weexInstance`,每个moudle对象被绑定到一个指定的实例上
+ 4. Module 方法会在UI线程中被调用,所以不要做太多耗时的任务在这里,如果要在其他线程执行整个module 方法,需要实现`WXModuleProtocol`中`- (NSThread *)targetExecuteThread`的方法,这样,分发到这个module的任务会在指定的线程中运行
+ 5. Weex 的参数可以是 String 或者Map
+ 6. Module 支持返回值给 JavaScript中的回调,回调的类型是`WXModuleCallback`,回调的参数可以是String或者Map
+
+ ```object-c
+ @implementation WXEventModule
+ @synthesize weexInstance;
+ WX_EXPORT_METHOD(@selector(openURL:callback))
+ - (void)openURL:(NSString *)url callback:(WXModuleCallback)callback
+ {
+ NSString *newURL = url;
+ if ([url hasPrefix:@"//"]) {
+ newURL = [NSString stringWithFormat:@"http:%@", url];
+ } else if (![url hasPrefix:@"http"]) {
+ newURL = [NSURL URLWithString:url relativeToURL:weexInstance.scriptURL].absoluteString;
+ }
+
+ UIViewController *controller = [[WXDemoViewController alloc] init];
+ ((WXDemoViewController *)controller).url = [NSURL URLWithString:newURL];
+
+ [[weexInstance.viewController navigationController] pushViewController:controller animated:YES];
+ callback(@{@"result":@"success"});
+ }
+
+ @end
+ ```
+2. **Register the module**
+ 通过调用 WXSDKEngine 中的 `registerModule:withClass`方法来注册自己的module
+
+ ```object-c
+ WXSDKEngine.h
+ /**
+ * @abstract Registers a module for a given name
+ * @param name The module name to register
+ * @param clazz The module class to register
+ **/
+ + (void)registerModule:(NSString *)name withClass:(Class)clazz;
+ [WXSDKEngine registerModule:@"event" withClass:[WXEventModule class]];
+ ```
+3. **使用自己的module**
+ 这里的 require 里面的event 就是在 上一步调用`registerModule:` 注册module 时候的name
+
+ ```javascript
+ var eventModule = require('@weex-module/event');
+ eventModule.openURL('url',function(ret) {
+ nativeLog(ret);
+ });
+ ```
+
+ Weex SDK没有 图片下载,navigation 操作的能力,请大家自己实现这些 protocol
+
+### handler 扩展
+ **WXImgLoaderProtocol**
+
+ weexSDK 没有提供图片下载的能力,需要实现 WXImgLoaderProtocol,参考下面的例子
+
+ ```object-c
+ WXImageLoaderProtocol.h
+ @protocol WXImgLoaderProtocol <WXModuleProtocol>
+ /**
+ * @abstract Creates a image download handler with a given URL
+ * @param imageUrl The URL of the image to download
+ * @param imageFrame The frame of the image you want to set
+ * @param options : The options to be used for this download
+ * @param completedBlock : A block called once the download is completed.
+ image : the image which has been download to local.
+ error : the error which has happened in download.
+ finished : a Boolean value indicating whether download action has finished.
+ */
+ -(id<WXImageOperationProtocol>)downloadImageWithURL:(NSString *)url imageFrame:(CGRect)imageFrame userInfo:(NSDictionary *)options completed:(void(^)(UIImage *image, NSError *error, BOOL finished))completedBlock;
+ @end
+ ```
+
+ 实现上述协议
+
+ ```object-c
+ @implementation WXImgLoaderDefaultImpl
+ #pragma mark -
+ #pragma mark WXImgLoaderProtocol
+
+ - (id<WXImageOperationProtocol>)downloadImageWithURL:(NSString *)url imageFrame:(CGRect)imageFrame userInfo:(NSDictionary *)userInfo completed:(void(^)(UIImage *image, NSError *error, BOOL finished))completedBlock
+ {
+ if ([url hasPrefix:@"//"]) {
+ url = [@"http:" stringByAppendingString:url];
+ }
+ return (id<WXImageOperationProtocol>)[[SDWebImageManager sharedManager] downloadImageWithURL:[NSURL URLWithString:url] options:0 progress:^(NSInteger receivedSize, NSInteger expectedSize) {
+ } completed:^(UIImage *image, NSError *error, SDImageCacheType cacheType, BOOL finished, NSURL *imageURL) {
+ if (completedBlock) {
+ completedBlock(image, error, finished);
+ }
+ }];
+ }
+ @end
+ ```
+
+5. **handler注册**
+
+ 你可以通过WXSDKEngine 中的 `registerHandler:withProtocol`注册handler
+
+ ```object-c
+ WXSDKEngine.h
+ /**
+ * @abstract Registers a handler for a given handler instance and specific protocol
+ * @param handler The handler instance to register
+ * @param protocol The protocol to confirm
+ */
+ + (void)registerHandler:(id)handler withProtocol:(Protocol *)protocol;
+
+ [WXSDKEngine registerHandler:[WXImgLoaderDefaultImpl new] withProtocol:@protocol(WXImgLoaderProtocol)]
+ ```
+
+#### Component 扩展
+ 虽然WeexSDK中有提供内置的一些Component,但这有可能并不能满足你的需求。在之前你可能已经写了一些很酷炫native的组件,想包装一下,导入到Weex中,因此我们提供了让开发者实现自己的native Component
+ 下面将以WeexSDK 中已经存在的 Component:`image`为例子,介绍一下如何构建一个native Component.
+ 假设你已经了解IOS开发
+ 1. 注册 Component
+ 注册一个component比较简单,调用 `WXSDKEngine` 中的 `registerComponent:withClass:`方法,传入组件的标签名称,还有对应的class
+ 然后你可以创建一个 `WXImageComponent` 表示`image`组件的实现 在.we 文件中,只需要写
+ <image></image>
+ 2. 添加属性
+ 现在我们要做一些让image component更加强大的事情。既然作为一个图片的component,那它应该要有源,给他加上一个 `src`的属性,同时给它加上一个`resize`的属性(可以配置的有`contain/cover/stretch`)
+
+ ```
+ @interface WXImageComponent ()
+
+ @property (nonatomic, strong) NSString *imageSrc;
+ @property (nonatomic, assign) UIViewContentMode resizeMode;
+
+ @end
+ ```
+ component中所有的style,attribute,events都会被传递到 Component的初始化方法中,所以,你可以在初始化方法中存储你感兴趣的一些属性值
+
+ ```
+ @implementation WXImageComponent
+
+ - (instancetype)initWithRef:(NSString *)ref type:(NSString *)type styles:(NSDictionary *)styles attributes:(NSDictionary *)attributes events:(NSArray *)events weexInstance:(WXSDKInstance *)weexInstance
+ {
+ if (self = [super initWithRef:ref type:type styles:styles attributes:attributes events:events weexInstance:weexInstance]) {
+ _imageSrc = [WXConvert NSString:attributes[@"src"]];
+ _resizeMode = [WXConvert UIViewContentMode:attributes[@"resize"]];
+ }
+
+ return self;
+ }
+
+ @end
+ ```
+
+ attribute中拿到的值的类型都是`id`,我们可以用转换方法把它转换到任何值。Weex SDK提供了一些基础的转换方法,可以参考 `WXConvert`类,或者你可以添加自己的转换函数
+
+ 1. Hooking 渲染生命周期
+ native 的component 是由Weex管理的,weex 创建,布局,渲染,销毁。weex的component生命周期都是可以hook的,你可以在这些生命周期中去做自己的事情
+
+ | 方法 | 描述 |
+ | :-: | --- |
+ | initWithRef:type:... | 用给定的属性初始化一个component. |
+ | layoutDidFinish | 在component完成布局时候会调用. |
+ | loadView | 创建component管理的view. |
+ | viewWillLoad | 在component的view加载之前会调用. |
+ | viewDidLoad | 在component的view加载完之后调用. |
+ | viewWillUnload | 在component的view被释放之前调用. |
+ | viewDidUnload | 在component的view被释放之后调用. |
+ | updateStyles: | 在component的style更新时候调用. |
+ | updateAttributes: | 在component的attribute更新时候调用. |
+ | addEvent: | 给component添加event的时候调用. |
+ | removeEvent: | 在event移除的时候调用. |
+
+ 在image component的例子里面,如果我们需要我们自己的image view 的话,可以复写 `loadView`这个方法.
+
+ ```
+ - (UIView *)loadView
+ {
+ return [[WXImageView alloc] init];
+ }
+ ```
+
+ 现在我们使用 `WXImageView` 渲染 `image` component。
+ 1. 作为一个image component,我们需要拿到服务器图片,而且把它设置进image view 里. 这个操作可以在 `viewDidLoad` 方法中做,这个方法是在view已经被创建而且加载了时候weex SDK会调用到,而且`viewDidLoad`这个方法是你做额外初始化工作比如改变content mode(也就是设置resize) 的最好时间.
+
+ ```
+ - (void)viewDidLoad
+ {
+ UIImageView *imageView = (UIImageView *)self.view;
+ imageView.contentMode = _resizeMode;
+ imageView.userInteractionEnabled = YES;
+ imageView.clipsToBounds = YES;
+ imageView.exclusiveTouch = YES;
+
+ // Do your image fetching and updating logic
+ }
+ ```
+
+ 1. 如果可以改变image的src,也可以hook `updateAttributes:`方法来做属性更新操作,当`updateAttributes:`或者 `updateStyles:`被调用的时候, component的view 已经加载完成
+
+ ```
+ - (void)updateAttributes:(NSDictionary *)attributes
+ {
+ if (attributes[@"src"]) {
+ _imageSrc = [WXConvert NSString:attributes[@"src"]];
+ // Do your image updating logic
+ }
+
+ if (attributes[@"resize"]) {
+ _resizeMode = [WXConvert UIViewContentMode:attributes[@"resize"]];
+ self.view.contentMode = _resizeMode;
+ }
+ }
+ ```
+
+ 或许你需要考虑更多的生命周期方法去Hook,当布局完成时候,像`layoutDidFinish`,如果你想了解更多,可以参考一下`WXComponent.h` 声明的方法
+ 现在你可以用在任何 .we文件里面使用 `<image>`,而且可以加上 image的属性
+
+ ```
+ <image style="your-custom-style" src="image-remote-source" resize="contain/cover/stretch"></image>
+ ```
+##### component 方法
+WeexSDK 0.9.5 之后支持了在js中直接调用component的方法,这里提供一个例子,
+
+- 自定义一个WXMyCompoenent 的组件
+
+ ```
+ @implementation WXMyComponent
+ WX_EXPORT_METHOD(@selector(focus)) // 暴露该方法给js
+ - (instancetype)initWithRef:(NSString *)ref type:(NSString *)type styles:(NSDictionary *)styles attributes:(NSDictionary *)attributes events:(NSArray *)events weexInstance:(WXSDKInstance *)weexInstance
+ {
+ if (self = [super initWithRef:ref type:type styles:styles attributes:attributes events:events weexInstance:weexInstance]) {
+ // handle your attributes
+ // handle your styles
+ }
+
+ return self;
+ }
+
+ - (void)focus
+ {
+ NSLog(@"you got it");
+ }
+ @end
+ ```
+
+- 注册组件 `[WXSDKEngine registerComponent:@"mycomponent" withClass:[WXMyComponent class]] `
+- 在weex 文件中调用
+
+ ```html
+ <template>
+ <mycomponent id='mycomponent'></mycomponent>
+ </template>
+ <script>
+ module.exports = {
+ created: function() {
+ this.$el('mycomponent').focus();
+ }
+ }
+ </script>
+ ```
+
+
+
+
\ No newline at end of file
http://git-wip-us.apache.org/repos/asf/incubator-weex-site/blob/12e3a8bc/_drafts/v1.0/advanced/how-data-binding-works.md
----------------------------------------------------------------------
diff --git a/_drafts/v1.0/advanced/how-data-binding-works.md b/_drafts/v1.0/advanced/how-data-binding-works.md
new file mode 100644
index 0000000..a905422
--- /dev/null
+++ b/_drafts/v1.0/advanced/how-data-binding-works.md
@@ -0,0 +1,39 @@
+---
+title: 数据绑定原理
+type: advanced
+order: 2
+has_chapter_content: true
+version: 0.10
+---
+
+# 数据绑定实现原理
+
+Weex 的 JS Framework 是一个 MVVM,即 Model-View-ViewModel 框架。他会自动监听数据的变化,并通过 `{% raw %}{{字段名}}{% endraw %}` 的语法把数据和视图中所展示的内容自动绑定起来。当数据被改写的时候,视图会自动根据数据的变化而发生相应的变化。
+
+比如下面这个例子,`<text>` 的内容被绑定在了 `notes` 数据字段上:
+
+```html
+<template>
+ <div>
+ <text>{{notes}}</text>
+ </div>
+<template>
+
+<script>
+ module.exports = {
+ data: {
+ notes: 'Hello'
+ }
+ }
+</script>
+```
+
+Weex 的 JS Framework 会首先对 `data` 里的数据进行监听,这样未来的数据变化都能够被监听到。然后我们会编译整个 `<template>` 标签里的内容。当我们找到 `<text>` 标签里的 `{% raw %}{{notes}}{% endraw %}` 时,JS Framework 会跟踪 `data.notes` 的变化并在其发生变化时触发一个句柄,将 `<text>` 的内容设置为 `data.notes` 最新的值。这样的话开发者就不必手动关心数据和视图之间的数据同步问题了。
+
+在这个基础上我们还设计了一些特殊的语法:
+
+- `<foo if="...">` 代表一个条件监听,当其值为 `true` 时,`<foo>` 元素将会被创建和载入,反之则不会被创建或被移除掉。
+- `<foo repeat="...">` 代表一个列表监听,第一次加载的时候 `<foo>` 元素会被按照数组里的数据逐条 clone 并赋值。而当有列表项增加、移动或移除时,视图层也会自动触发相应的改变,并且智能优化至最小变更策略
+- `<foo if="..." repeat="...">` 两个特殊语法共用时,将会优先展开 `repeat` 然后逐条判断 `if`。
+
+相比于一些 virtual-DOM 的 diff 计算机制,我们会直接对数据进行 diff,而且只会 diff 由于用户操作或数据操作发生改变的那部分数据和视图,这是一种更小范围的计算方式。尤其在追求轻量快速的移动端界面上,这种更新机制更加显得具有优势。
http://git-wip-us.apache.org/repos/asf/incubator-weex-site/blob/12e3a8bc/_drafts/v1.0/advanced/images/how-arch.png
----------------------------------------------------------------------
diff --git a/_drafts/v1.0/advanced/images/how-arch.png b/_drafts/v1.0/advanced/images/how-arch.png
new file mode 100644
index 0000000..a13df7a
Binary files /dev/null and b/_drafts/v1.0/advanced/images/how-arch.png differ
http://git-wip-us.apache.org/repos/asf/incubator-weex-site/blob/12e3a8bc/_drafts/v1.0/advanced/images/how-render.png
----------------------------------------------------------------------
diff --git a/_drafts/v1.0/advanced/images/how-render.png b/_drafts/v1.0/advanced/images/how-render.png
new file mode 100644
index 0000000..db9b0f4
Binary files /dev/null and b/_drafts/v1.0/advanced/images/how-render.png differ
http://git-wip-us.apache.org/repos/asf/incubator-weex-site/blob/12e3a8bc/_drafts/v1.0/advanced/index.md
----------------------------------------------------------------------
diff --git a/_drafts/v1.0/advanced/index.md b/_drafts/v1.0/advanced/index.md
new file mode 100644
index 0000000..8fea01e
--- /dev/null
+++ b/_drafts/v1.0/advanced/index.md
@@ -0,0 +1,146 @@
+---
+title: Weex 工作原理
+type: advanced
+order: 1
+has_chapter_content: true
+version: 0.10
+---
+
+# Weex 工作原理概述
+
+## 总览
+
+Weex是跨平台,可扩展的动态化技术. 你能通过在Weex源码中写`<template>`, `<style>` 和 `<script>`标签,然后把这些标签转换为JS Bundle用于部署, 在服务端以这些JS Bundle响应请求. 当客户端接收到JS Bundle时,它能用被客户端中的JS引擎用于管理Native渲染;API调用和用户交互.
+
+### 工作流
+
+```
+Weex we 文件 --------------前端(we源码)
+↓ (转换) ------------------前端(构建过程)
+JS Bundle -----------------前端(JS Bundle代码)
+↓ (部署) ------------------服务器
+在服务器上的JS bundle ----服务器
+↓ (编译) ------------------ 客户端(JS引擎)
+虚拟 DOM 树 --------------- 客户端(Weex JS Framework)
+↓ (渲染) ------------------ 客户端(渲染引擎)
+Native视图 --------------- 客户端(渲染引擎)
+```
+
+在上面的工作流中,我们提到:
+
+- Transformer(转换器): 一个Node JS工具, 转换Weex源码为JS Bundle
+- Weex JS Framework(JS框架): 运行于客户端的的JS框架,管理着Weex实例的运行。Weex实例由JS Bundle创建并构建起虚拟DOM树. 另外,它发送/接受 Native 渲染层产生的系统调用,从而间接的响应用户交互。
+- Native引擎: 在不同的端上,有着不同的实现: iOS/Android/HTML5. 他们有着共同的组件设计, 模块API 和渲染效果. 所以他们能配合同样的 JS Framework 和 JS Bundle工作。
+
+## 转换器
+
+转换器转换Weex源码为JS Bundle. 整体工作可以分为三个部分:
+
+- 转换 `<template>` 为类JSON的树状数据结构, 转换数据绑定为返回数据的函数原型.例如. For example: `<foo a="{% raw %}{{x}}{% endraw %}" b="1" />` 将转换为 `{type: "foo", attr: {a: function () {return this.x}, b: 1}}`.
+- 转换 `<style>` 为类JSON的树状数据结构. 例如: `.classname {name: value;}` 将转换为 `{classname: {name: value}}`.
+- 把上面两部分的内容和 `<script>` 中的内容结合. 上面的三个部分将结合成一个JavaScript AMD 模块.
+
+一个完整的例子:
+
+```html
+<template>
+ <foo a="{{x}}" b="1" class="bar"></foo>
+</template>
+<style>
+ .bar {width: 200; height: 200}
+</style>
+<script>
+ module.exports = {
+ data: function () {
+ return {x: 100}
+ }
+ }
+</script>
+```
+
+将转换为:
+
+```javascript
+define('@weex-component/main', function () {
+ module.exports = {
+ data: function () {
+ return {x: 100}
+ }
+ }
+ module.template = {
+ type: "foo",
+ attr: {
+ a: function () {return this.x},
+ b: 1,
+ classname: ['bar']
+ }
+ }
+ module.style = {
+ bar: {width: 200, height: 200}
+ }
+})
+bootstrap('@weex-component/main')
+```
+
+除此之外,转换器还会做一些额外的事情: 合并Bundle ,添加引导函数,配置外部数据等等,更详细的,请参阅[Synatax](../references/specs/js-bundle-format.html)章节.
+
+## 注意
+
+当前大部分Weex工具最终输出的JS Bundle格式都经过了[Webpack](https://webpack.github.io/)的二次处理,所以你实际使用工具输出的JS Bundle会和上面的有所区别.
+## JS Framework
+
+JS Framework 在初始化阶段被原生 JavaScript 引擎运行. 它提供被每个JS Bundle调用的 `define()` 和 `bootstrap()` 函数. 一旦JS Bundle从服务器下载后,这些函数就会执行. `define()` 函数以注册模块;`bootstrap()`会编译主要的模块为虚拟DOM,并发送渲染指令给Native .
+
+JS 和 Native 的沟通主要通过两个关键方法进行:
+
+- `callNative` 是一个由native代码实现的函数, 它被JS代码调用并向native发送指令,例如 `rendering`, `networking`, `authorizing`和其他客户端侧的 `toast` 等API.
+- `callJS` 是一个由JS实现的函数, 它用于Native向JS发送指令. 目前这些指令由用户交互和Native的回调函数组成.
+## Native 渲染引擎
+
+Native 渲染引擎提供客户端组件和模块.
+
+**Component(组件)** 在屏幕内可见,有特定行为. 能被配置不同的属性和样式,能响应用户交互. 常见的组件有: `<div>`, `<text>`, `<image>`.
+
+**Module(模块)** 是一组能被JS Framework调用的API. 其中的一些能以异步的方式调用JS Framework, 例如: 发送HTTP请求.
+
+在Weex实例运行期间,Native渲染引擎将接收各种各样不同模块的API调用。这些调用创建或更新组件外观,运行如`toast`的Native API.当用户交互或模块回调时,`callJS()`会由JS Framework调用. 这样的循环往复将从Weex实例初始化到销毁一直持续. 如下面的架构图所示, HTML5渲染引擎提供和Native渲染引擎几乎一致的功能。
+
+
+
+Weex架构图
+
+### 从Javascript中调用Native
+
+```
+[JS Framework]
+↓ callNative
+模块 APIs
+ 渲染 -> 模块显示
+ 其他功能
+[Native 渲染引擎]
+```
+### 从Native中调用Javascript
+
+```
+[Native 渲染引擎]
+模块 APIs 回调
+用户交互
+↓ callJS
+[JS Framework]
+```
+### 渲染流程
+
+
+
+Weex 渲染流程
+
+1. 虚拟DOM.
+2. **构造树结构**. 分析虚拟DOM JSON数据以构造渲染树(RT).
+3. **添加样式**. 为渲染树的各个节点添加样式.
+4. **创建视图**. 为渲染树各个节点创建Native视图.
+5. **绑定事件**. 为Native视图绑定事件.
+6. **CSS布局**. 使用 [css-layout](https://github.com/facebook/css-layout) 来计算各个视图的布局.
+7. **更新视窗(Frame)**. 采用上一步的计算结果来更新视窗中各个视图的最终布局位置.
+8. 最终页面呈现.
+
+在Weex HTML5环境下 `CSS 布局` and `更新视窗` 由浏览器引擎(例如webkit)实现.
http://git-wip-us.apache.org/repos/asf/incubator-weex-site/blob/12e3a8bc/_drafts/v1.0/advanced/integrate-devtools-to-android.md
----------------------------------------------------------------------
diff --git a/_drafts/v1.0/advanced/integrate-devtools-to-android.md b/_drafts/v1.0/advanced/integrate-devtools-to-android.md
new file mode 100644
index 0000000..5bffd05
--- /dev/null
+++ b/_drafts/v1.0/advanced/integrate-devtools-to-android.md
@@ -0,0 +1,272 @@
+---
+title: 集成 Devtools 到 Android
+type: advanced
+order: 12
+has_chapter_content: true
+version: 0.10
+---
+
+# 集成 Devtools 到 Android
+
+Weex Devtools 能够方便调试 Weex 页面,但此功能离不开 Native 的支持。如何让你的 App 也集成 Devtools,在本章将会详细说明 Android 端如何接入 Weex Devtools。
+
+## Android 应用接入
+
+### 添加依赖
+
+可以通过 Gradle 或者 Maven 添加对 devtools aar 的依赖,也可以直接对源码依赖。强烈建议使用最新版本,因为 Weex SDK 和 devtools 都在快速的迭代开发中,新版本会有更多惊喜,同时也修复老版本中一些问题。最新的 release 版本可在[这里](https://github.com/weexteam/weex_devtools_android/releases)查看。所有的 release 版本都会发布到 [jcenter repo](https://bintray.com/alibabaweex/maven/weex_inspector)。
+
+- *Gradle 依赖*
+
+ ```gradle
+ dependencies {
+ compile 'com.taobao.android:weex_inspector:0.8.0.0'
+ }
+ ```
+
+- *Maven依赖*
+
+ ```xml
+ <dependency>
+ <groupId>com.taobao.android</groupId>
+ <artifactId>weex_inspector</artifactId>
+ <version>0.8.0.0</version>
+ <type>pom</type>
+ </dependency>
+ ```
+
+- *源码依赖*
+
+ 需要复制 [inspector](https://github.com/weexteam/weex_devtools_android/tree/master/inspector) 目录到你的 App 的同级目录,然后在工程的 `settings.gradle` 文件下添加 `include ":inspector"`,此过程可以参考 playground 源码的工程配置及其配置,然后在 App 的 `build.gralde` 中添加依赖。
+
+ ```gradle
+ dependencies {
+ compile project(':inspector')
+ }
+ ```
+
+ 另外 weex_inspector 中有一部分包是以 provided 的方式引入,接入方需要自行解决依赖和版本冲突。
+
+ - **provided方式引用的包**
+
+ ```gradle
+ dependencies {
+ provided 'com.google.code.findbugs:jsr305:2.0.1'
+ provided 'com.android.support:appcompat-v7:23.1.1'
+ provided 'com.taobao.android:weex_sdk:0.8.0'
+ provided 'com.alibaba:fastjson:1.1.45+'
+ ...
+ }
+ ```
+
+ - **反射引用的包(0.8.0.0以上版本)**
+
+ ```gradle
+ dependencies {
+ compile 'com.squareup.okhttp:okhttp:2.3.0'
+ compile 'com.squareup.okhttp:okhttp-ws:2.3.0'
+ ...
+ }
+ ```
+
+ 或者
+
+ ```gradle
+ dependencies {
+ compile 'com.squareup.okhttp:okhttp:3.4.1'
+ compile 'com.squareup.okhttp:okhttp-ws:3.4.1'
+ ...
+ }
+ ```
+
+#### 版本兼容
+
+| weex sdk | weex inspector | Debugger Server |
+|----------|----------------|-----------------|
+| 0.8.0.1+ | 0.0.8.1+ | 0.2.39+ |
+| 0.7.0+ | 0.0.7.13 | 0.2.38 |
+| 0.6.0+ | 0.0.2.2 | - |
+
+
+### 添加 Debug 模式开关
+
+控制调试模式的打开和关闭的关键点可以概括为三条规则。
+
+**规则一:通过 `sRemoteDebugMode` 和 `sRemoteDebugProxyUrl` 和来设置开关和 Debugger Server 地址。**
+
+Weex SDK 的 `WXEnvironment` 类里有一对静态变量标记了 Weex 当前的调试模式是否开启分别是:
+
+```java
+public static boolean sRemoteDebugMode; // 是否开启 debug 模式,默认关闭
+public static String sRemoteDebugProxyUrl; // DebugServer的websocket地址
+```
+
+无论在 App 中无论以何种方式设置 Debug 模式,都必须在恰当的时机调用类似如下的方法来设置 `WXEnvironment.sRemoteDebugMode` 和 `WXEnvironment.sRemoteDebugProxyUrl`。
+
+```java
+private void initDebugEnvironment(boolean enable, String host) {
+ WXEnvironment.sRemoteDebugMode = enable;
+ WXEnvironment.sRemoteDebugProxyUrl = "ws://" + host + ":8088/debugProxy/native";
+}
+```
+
+**规则二:修改 `sRemoteDebugMode` 后一定要调用``WXSDKEngine.reload()`。**
+
+一般來說,在修改了 `WXEnvironment.sRemoteDebugMode` 以后调用了 `WXSDKEngine.reload()` 方法才能够使 Debug模式生效。`WXSDKEngine.reload()` 用来重置 Weex 的运行环境上下文,在切换调试模式时需要调用此方法来创建新的 Weex 运行时和 DebugBridge 并将所有的 JS 调用桥接到调试服务器执行。在 reload 过程中会调用 launchInspector,这就是 SDK 控制 Debug 模式最核心一个方法,其传入参数即为 `sRemoteDebugMode`,若为 `true` 则该方法中尝试以反射的方式获取 DebugBridge 用来在远端执行 JS,否则在本地运行。
+
+```java
+private void launchInspector(boolean remoteDebug) {
+ if (WXEnvironment.isApkDebugable()) {
+ try {
+ if (mWxDebugProxy != null) {
+ mWxDebugProxy.stop();
+ }
+ HackedClass<Object> debugProxyClass = WXHack.into("com.taobao.weex.devtools.debug.DebugServerProxy");
+ mWxDebugProxy = (IWXDebugProxy) debugProxyClass.constructor(Context.class, WXBridgeManager.class)
+ .getInstance(WXEnvironment.getApplication(), WXBridgeManager.this);
+ if (mWxDebugProxy != null) {
+ mWxDebugProxy.start();
+ if (remoteDebug) {
+ mWXBridge = mWxDebugProxy.getWXBridge();
+ } else {
+ if (mWXBridge != null && !(mWXBridge instanceof WXBridge)) {
+ mWXBridge = null;
+ }
+ }
+ }
+ } catch (HackAssertionException e) {
+ WXLogUtils.e("launchInspector HackAssertionException ", e);
+ }
+ }
+}
+```
+
+只要遵循上面的原理,开启 Debug 模式的方式和时机可由接入方灵活实现。从 launchInspector 可以看到,SDK 对 devtools 的 aar 包并无强依赖,我们的 App 只需要在 Debug 包中打包该 aar 即可,这样多少可以缓解包大小问题和安全问题。
+
+**例外:** _若修改 `WXEnvironment.sRemoteDebugMode` 的时机在 `WXBridgeManager` 初始化和 restart 和之前则 `WXSDKEngine.reload()` 可忽略._
+
+**规则三:通过响应 `ACTION_DEBUG_INSTANCE_REFRESH` 广播及时刷新。**
+
+广播 `ACTION_DEBUG_INSTANCE_REFRESH` 在调试模式切换和 Chrome 调试页面刷新时发出,主要用来通知当前的 Weex容器以 Debug 模式重新加载当前页。在 playground 中的处理过程如下:
+
+```java
+public class RefreshBroadcastReceiver extends BroadcastReceiver {
+ @Override
+ public void onReceive(Context context, Intent intent) {
+ if (IWXDebugProxy.ACTION_DEBUG_INSTANCE_REFRESH.equals(intent.getAction())) {
+ if (mUri != null) {
+ if (TextUtils.equals(mUri.getScheme(), "http") || TextUtils.equals(mUri.getScheme(), "https")) {
+ loadWXfromService(mUri.toString());
+ } else {
+ loadWXfromLocal(true);
+ }
+ }
+ }
+ }
+}
+```
+
+如果接入方的容器未对该广播做处理,那么将不支持刷新和调试过程中编辑代码时的 watch 功能。
+
+## 接入示例
+
+最简单方式就是复用 Playground 的相关代码,比如扫码和刷新等模块,但是扫码不是必须的,它只是与 App 通信的一种形式,二维码里的包含DebugServer IP 及 bundle 地址等信息,用于建立 App 和 Debugger Server 之间的连接及动态加载 bundle。在 Playground 中给出了两种开启 debug 模式的范例。
+
+* 范例1:通过在 `XXXApplication` 中设置开关打开调试模式
+
+```java
+public class MyApplication extends Application {
+ public void onCreate() {
+ super.onCreate();
+ initDebugEnvironment(true, "xxx.xxx.xxx.xxx"/*"DEBUG_SERVER_HOST"*/);
+ }
+}
+```
+
+这种方式最直接,在代码中直接 hardcode 了开启调试模式,如果在 SDK 初始化之前调用甚至连 `WXSDKEngine.reload()` 都不需要调用,接入方如果需要更灵活的策略可以将 `initDebugEnvironment(boolean enable, String host)` 和 `WXSDKEngine.reload()` 组合在一起在合适的位置和时机调用即可。
+
+* 范例2:通过扫码打开调试模式
+
+Playground 中较多的使用扫码的方式传递信息,不仅用这种方式控制 Debug 模式的开关,而且还通过它来传入 bundle 的 url 直接调试。应当说在开发中这种方式是比较高效的,省去了修改 SDK 代码重复编译和安装 App 的麻烦,缺点就是调试工具这种方式接入需要 App 具有扫码和处理特定规则二维码的能力。除了 Playground 中的方式,接入方亦可根据业务场景对 Debugger 和接入方式进行二次开发。
+
+Playground 集成的具体代码可参考如下两个文件:
+
+* 开关控制,主要参考对二维码的处理部分,详见 [`WXApplication.java`](https://github.com/weexteam/weex_devtools_android/blob/master/playground/app/src/main/java/com/alibaba/weex/WXApplication.java)
+
+* 刷新控制 ,主要参考是对容器 `ACTION_DEBUG_INSTANCE_REFRESH`的处理,详见 [`WXPageActivity.java`](https://github.com/weexteam/weex_devtools_android/blob/master/playground/app/src/main/java/com/alibaba/weex/WXPageActivity.java)
+
+## 牛刀小试
+
+### 前置工作
+
+如果未安装 Debugger Server,在命令行执行 `npm install -g weex-toolkit` 既可以安装调试服务器,运行命令 `weex debug` 就会启动 DebugServer 并打开一个调试页面(详情请查看 [本地开发](/develop-on-your-local-machine.md))。页面下方会展示一个二维码,这个二维码用于向 App 传递 Server 端的地址建立连接。
+
+
+
+### 开始调试
+
+如果你的 App 客户端完成了以上步骤那么恭喜你已经接入完毕,可以愉快的调试 Weex bundle 了,调试体验和网页调试一致!建议新手首先用官方的 Playground 体验一下调试流程。只需要启动 App 扫描 Chrome 调试页面下方的第一个二维码即可建立与 Debugger Server 的通信,Chorome 的调试页面将会列出连接成功的设备信息。
+
+
+
+#### 主要步骤如下
+
+1. 如果你要加载服务器上 bundle,第一步就是要让你的 bundle sever 跑起来. 在 Playground 中特别简单,只需要你到 Weex 源码目录下,运行 `./start` 即可。
+2. 命令行运行 `weex debug` 启动 Debugger Server,Chrome 将会打开一个网页,在网页下方有一个二维码和简单的介绍。
+3. 启动 App 并确认打开调试模式。你将在上一步中打开的网页中看到一个设备列表,每个设备项都有两个按钮,分别是 `Debugger` 和 `Inspector`。
+4. 点击 `Inspector` Chrome 将创建 Inspector 网页;点击 `Debugger` Chrome 将创建 Debugger 网页;二者是相互独立的功能,不相互依赖。
+
+---
+
+## 背景知识
+
+### Devtools 组件介绍
+Devtools 扩展了 [Chrome Debugging Protocol](https://developer.chrome.com/devtools/docs/debugger-protocol),在客户端和调试服务器之间的采用 [JSON-RPC](https://en.wikipedia.org/wiki/JSON-RPC) 作为通信机制,本质上调试过程是两个进程间协同,相互交换控制权及运行结果的过程。更多细节还请阅读 [Weex Devtools Debugger 的技术选型实录](http://www.atatech.org/articles/59284)这篇文章。
+
+* **客户端**
+
+ Devtools 客户端作为 aar 被集成 App 中,它通过 webscoket 连接到调试服务器,此处并未做安全检查。出于安全机制及包大小考虑,强烈建议接入方只在 debug 版本中打包此 aar。
+
+* **服务器**
+
+ Devtools 服务器端是信息交换的中枢,既连接客户端,又连接 Chrome,大多数情况下扮演一个消息转发服务器和 Runtime Manager 的角色。
+
+* **Web端**
+
+ Chrome 的 V8 引擎扮演着 Bundle javascript runtime 的角色。开启 debug 模式后,所有的 bundle js 代码都在该引擎上运行。另一方面我们也复用了 Chrome 前端的调试界面,例如设置断点,查看调用栈等,调试页关闭则 runtime 将会被清理。
+
+调试的大致过程请参考如下时序图。
+
+
+
+## FAQ
+
+在各业务接入过程中,陆续发现一些问题,对高频次的问题解答如下,开发中以 weex debug -V 的方式启动 Debugger Server 可以看到 server 端的 log 信息,对照上文中的时序图对于定位问题还是非常有帮助,建议调试中默认开启 server 端 log。
+
+1. **扫码 App 在 DebugServerProxy 中抛出 class not found**
+
+ 已知的原因如下:
+
+ * weex_inspector 以 provided 方式引用的包是否引入成功,如 fastjson 等。
+ * weex_inspector 以 compile 方式引用的包是否引入成功,某些 app 重新引入 `com.squareup.okhttp:okhttp:2.3.0` 和 `com.squareup.okhttp:okhttp-ws:2.3.0` 则不再报错。
+ * 混淆规则影响反射。
+
+2. **playground 扫码调试 crash**
+
+ 已知的原因如下:
+
+ * 系统为 android 6+,崩溃信息提示进程需要 `android.permission.READ_PHONE_STATE` 权限,代码中未做权限检查,在 0.0.2.7 版本以后已修复,不再需要此权限。
+
+3. **扫码后设备列表页并没有出现我的设备信息**
+
+ 已知的原因如下:
+
+ * Debugger Server 和手机在不同网段,被防火墙隔离。
+ * 手机连接了 PC 端的代理,当前尚不支持。
+ * 多进程连接服务器端的同一端口,比如在 Application 的 `onCreate` 中初始化 sdk,若多个进程连接服务器端的同一端口则报错,在 0.0.2.3 版本以后已支持多进程无此问题。
+
+4. **调试过程中频繁刷新连接失败,Server 端提示重新启动 App,非必现**
+
+ 已知的原因如下:
+
+ * 多线程操作网络连接引起,在频繁的即断即连时容易触发。在 0.0.7.1 版本已修复。
http://git-wip-us.apache.org/repos/asf/incubator-weex-site/blob/12e3a8bc/_drafts/v1.0/advanced/integrate-devtools-to-ios.md
----------------------------------------------------------------------
diff --git a/_drafts/v1.0/advanced/integrate-devtools-to-ios.md b/_drafts/v1.0/advanced/integrate-devtools-to-ios.md
new file mode 100644
index 0000000..18e0050
--- /dev/null
+++ b/_drafts/v1.0/advanced/integrate-devtools-to-ios.md
@@ -0,0 +1,230 @@
+---
+title: 集成 Devtools 到 iOS
+type: advanced
+order: 13
+has_chapter_content: true
+version: 0.10
+---
+
+# 集成 Devtools 到 iOS
+
+Weex Devtools 能够方便调试 Weex 页面,但此功能离不开 Native 的支持。如何让你的 App 也集成 Devtools,在本章将会详细说明 iOS 端如何接入 Weex Devtools。
+
+## iOS 应用接入
+
+### 添加依赖
+
+#### 方法一:cocoapods 依赖
+
+在工程目录的 podfile 添加如下代码
+
+```
+source https://github.com/CocoaPods/Specs.git,
+pod 'WXDevtool', '0.7.0', :configurations => ['Debug'],
+```
+
+目前有如下几个版本:
+
+0.7.0, 0.6.1, 0.1.1, 0.1.0 [master repo]
+
+---
+
+可以通过更新本地 podspec repo,pod search 来查询最新版本,在 podfile 文件添加依赖。
+
+
+*** 推荐在DEBUG模式下依赖。 ***
+
+#### 方法二:github 源码依赖
+
+
+1. [拉取](https://github.com/weexteam/weex-devtool-iOS)最新的WXDevtool代码。
+
+2. 按照如下图示:直接拖动source目录源文件到目标工程中
+
+ 
+
+3. 按照红框中配置勾选
+
+ 
+
+
+ 在相对较大的互联网App研发中, framework 静态库被广泛应用,所以推荐使用方法一接入。
+
+### 集成功能
+
+如果按照方法一接入:podfile 的方式,添加头文件包含:
+
+```
+#import <TBWXDevtool/WXDevtool.h>
+```
+
+如果按照方法二接入:源码依赖的方式,添加头文件包含:
+
+```
+#import "WXDevtool.h"
+```
+
+查看 WXDevtool 头文件如下:
+
+```object-c
+#import <Foundation/Foundation.h>
+
+@interface WXDevTool : NSObject
+/**
+* set debug status
+* @param isDebug : YES:open debug model and inspect model;
+* default is NO,if isDebug is NO, open inspect only;
+* */
++ (void)setDebug:(BOOL)isDebug;
+
+
+/**
+* get debug status
+* */
++ (BOOL)isDebug;
+
+
+/**
+* launch weex debug
+* @param url : ws://ip:port/debugProxy/native, ip and port is your devtool server address
+* eg:@"ws://30.30.29.242:8088/debugProxy/native"
+* */
++ (void)launchDevToolDebugWithUrl:(NSString *)url;
+
+@end
+```
+
+`setDebug`:参数为 `YES` 时,直接开启 debug 模式,反之关闭,使用场景如下所述
+
+在你自己的程序中添加如下代码:
+
+```object-c
+[WXDevTool launchDevToolDebugWithUrl:@"ws://30.30.31.7:8088/debugProxy/native"];
+```
+
+其中的 ws 地址正是 Weex debug 控制台中出现的地址,直接 copy 到 `launchDevToolDebugWithUrl` 接口中。
+
+如果程序一启动就开启 Weex 调试,**需要在 WeexSDK 引擎初始化之前**添加代码:
+
+```object-c
+[WXDevTool setDebug:YES];
+[WXDevTool launchDevToolDebugWithUrl:@"ws://30.30.31.7:8088/debugProxy/native"];
+```
+
+#### 附加页面刷新功能
+
+- 为什么需要页面刷新功能?
+
+ 如下图所示,当点击 debug 按钮时,js 的运行环境会从手机端(JavaScriptCore)切换到 Chrome(V8),这时需要重新初始化 Weex 环境,重新渲染页面。页面渲染是需要接入方在自己的页面添加。
+
+ 
+
+- 什么场景下需要添加页面刷新功能?
+
+ - 点击 debug 按钮调试
+ - 切换 RemoteDebug 开关
+ - 刷新 Chrome 页面(command+R)
+
+- 如何添加刷新
+
+ 在 Weex 页面初始化或 `viewDidLoad` 方法时添加注册通知,举例如下:
+
+ ```object-c
+ [[NSNotificationCenter defaultCenter] addObserver:self selector:notificationRefreshInstance: name:@"RefreshInstance" object:nil];
+ ```
+
+ 最后**千万记得**在 `dealloc` 方法中取消通知,如下所示
+
+ ```
+ - (void)dealloc
+ {
+ [[NSNotificationCenter defaultCenter] removeObserver:self];
+ }
+ ```
+
+ 页面刷新实现,先销毁当前 instance,然后重新创建 instance,举例如下:
+
+ ```
+ - (void)render
+ {
+ CGFloat width = self.view.frame.size.width;
+ [_instance destroyInstance];
+ _instance = [[WXSDKInstance alloc] init];
+ _instance.viewController = self;
+ _instance.frame = CGRectMake(self.view.frame.size.width-width, 0, width, _weexHeight);
+
+ __weak typeof(self) weakSelf = self;
+ _instance.onCreate = ^(UIView *view) {
+ [weakSelf.weexView removeFromSuperview];
+ weakSelf.weexView = view;
+ [weakSelf.view addSubview:weakSelf.weexView];
+ UIAccessibilityPostNotification(UIAccessibilityScreenChangedNotification, weakSelf.weexView);
+ };
+ _instance.onFailed = ^(NSError *error) {
+
+ };
+
+ _instance.renderFinish = ^(UIView *view) {
+ [weakSelf updateInstanceState:WeexInstanceAppear];
+ };
+
+ _instance.updateFinish = ^(UIView *view) {
+ };
+ if (!self.url) {
+ return;
+ }
+ NSURL *URL = [self testURL: [self.url absoluteString]];
+ NSString *randomURL = [NSString stringWithFormat:@"%@?random=%d",URL.absoluteString,arc4random()];
+ [_instance renderWithURL:[NSURL URLWithString:randomURL] options:@{@"bundleUrl":URL.absoluteString} data:nil];
+ }
+ ```
+
+具体实现可参考 [playground](https://github.com/weexteam/weex-devtool-iOS/blob/master/Devtools/playground/WeexDemo/WXDemoViewController.m) `WXDemoViewController.m` 文件
+
+*说明:目前版本需要注册的通知名称为固定的 “RefreshInstance”,下个版本会添加用户自定义 name 。*
+
+## 使用
+
+如果未安装 Debugger Server,在命令行执行 `npm install -g weex-toolkit` 既可以安装调试服务器,运行命令 `weex debug` 就会启动 DebugServer 并打开一个调试页面(详情请查看 [本地开发](../guide/develop-on-your-local-machine.html))。页面下方会展示一个二维码,这个二维码用于向 App 传递 Server 端的地址建立连接。
+
+
+1. 日志级别控制
+
+ 
+ 日志级别可以控制native端关于weex的日志。
+
+ 日记级别描述如下:
+
+ ```
+ Off = 0,
+ Error = Error
+ Warning = Error | Warning,
+ Info = Warning | Info,
+ Log = Log | Info,
+ Debug = Log | Debug,
+ All = NSUIntegerMax
+ ```
+
+ 解释:off 关闭日志,Warning 包含 Error、Warning,Info 包含 Warning、Info,Log 包含 Info、Log,Debug 包含 Log、Debug,All 包含所有。
+
+2. Vdom/Native tree选择
+
+ 
+
+ *图一*
+
+ 
+
+ *图二*
+
+ 点击图一所示native选项会打开图二,方便查看native tree以及view property
+
+ 
+
+ *图三*
+
+ 
+
+ *图四*
+
+ 点击图三所示 vdom 选项会打开图四,方便查看 vdom tree 以及 component property。
http://git-wip-us.apache.org/repos/asf/incubator-weex-site/blob/12e3a8bc/_drafts/v1.0/advanced/integrate-to-android.md
----------------------------------------------------------------------
diff --git a/_drafts/v1.0/advanced/integrate-to-android.md b/_drafts/v1.0/advanced/integrate-to-android.md
new file mode 100644
index 0000000..b5bbf8c
--- /dev/null
+++ b/_drafts/v1.0/advanced/integrate-to-android.md
@@ -0,0 +1,201 @@
+---
+title: 集成到 Android
+type: advanced
+order: 4
+has_chapter_content: true
+version: 0.10
+---
+
+# WEEX SDK 集成到 Android 工程
+
+注:以下文档都是假设您已经具备一定的Android开发经验。
+### Android 集成有两种方式
+
+1. 源码依赖:能够快速使用WEEX最新功能,可以根据自己项目的特性进行相关改进。
+2. SDK依赖:WEEX 会在jcenter 定期发布稳定版本。[jcenter](https://bintray.com/alibabaweex/maven/weex_sdk/view)
+ 注:国内可能需要翻墙
+
+## 前期准备
+
+- 已经安装了[JDK](http://www.oracle.com/technetwork/java/javase/downloads/jdk8-downloads-2133151.html) version>=1.7 并配置了环境变量
+- 已经安装[Android SDK](https://developer.android.com/studio/index.html) 并配置环境变量。
+- Android SDK version 23 (compileSdkVersion in [`build.gradle`](https://github.com/apache/incubator-weex/blob/master/android/sdk/build.gradle))
+- SDK build tools version 23.0.1 (buildToolsVersion in [`build.gradle`](https://github.com/apache/incubator-weex/blob/master/android/sdk/build.gradle))
+- Android Support Repository >= 17 (for Android Support Library)
+
+## 快速接入
+
+如果你是尝鲜或者对稳定性要求比较高可以使用依赖SDK的方式。
+步骤如下:
+1. 创建Android工程,没有什么要特别说明的,按照你的习惯来。
+2. 修改build.gradle 加入如下基础依赖
+
+ ```gradle
+ compile 'com.android.support:recyclerview-v7:23.1.1'
+ compile 'com.android.support:support-v4:23.1.1'
+ compile 'com.android.support:appcompat-v7:23.1.1'
+ compile 'com.alibaba:fastjson:1.1.46.android'
+ compile 'com.taobao.android:weex_sdk:0.5.1@aar'
+ ```
+
+ 注:版本可以高不可以低。
+### 代码实现
+
+注:附录中有完整代码地址
+- 实现图片下载接口,初始化时设置。
+
+```java
+package com.weex.sample;
+
+import android.widget.ImageView;
+
+import com.taobao.weex.adapter.IWXImgLoaderAdapter;
+import com.taobao.weex.common.WXImageStrategy;
+import com.taobao.weex.dom.WXImageQuality;
+
+/**
+ * Created by lixinke on 16/6/1.
+ */
+public class ImageAdapter implements IWXImgLoaderAdapter {
+
+
+ @Override
+ public void setImage(String url, ImageView view, WXImageQuality quality, WXImageStrategy strategy) {
+ //实现你自己的图片下载,否则图片无法显示。
+ }
+}
+```
+- 初始化
+
+```java
+package com.weex.sample;
+
+import android.app.Application;
+
+import com.taobao.weex.InitConfig;
+import com.taobao.weex.WXSDKEngine;
+
+/**
+ * 注意要在Manifest中设置android:name=".WXApplication"
+ * 要实现ImageAdapter 否则图片不能下载
+ * gradle 中一定要添加一些依赖,否则初始化会失败。
+ * compile 'com.android.support:recyclerview-v7:23.1.1'
+ * compile 'com.android.support:support-v4:23.1.1'
+ * compile 'com.android.support:appcompat-v7:23.1.1'
+ * compile 'com.alibaba:fastjson:1.1.45'
+ */
+public class WXApplication extends Application {
+
+ @Override
+ public void onCreate() {
+ super.onCreate();
+ InitConfig config=new InitConfig.Builder().setImgAdapter(new ImageAdapter()).build();
+ WXSDKEngine.initialize(this,config);
+ }
+}
+
+```
+- 开始渲染
+
+```java
+package com.weex.sample;
+
+import android.os.Bundle;
+import android.support.v7.app.AppCompatActivity;
+import android.view.View;
+
+import com.taobao.weex.IWXRenderListener;
+import com.taobao.weex.WXSDKInstance;
+import com.taobao.weex.common.WXRenderStrategy;
+import com.taobao.weex.utils.WXFileUtils;
+
+public class MainActivity extends AppCompatActivity implements IWXRenderListener {
+
+ WXSDKInstance mWXSDKInstance;
+
+ @Override
+ protected void onCreate(Bundle savedInstanceState) {
+ super.onCreate(savedInstanceState);
+ setContentView(R.layout.activity_main);
+
+ mWXSDKInstance = new WXSDKInstance(this);
+ mWXSDKInstance.registerRenderListener(this);
+ /**
+ * WXSample 可以替换成自定义的字符串,针对埋点有效。
+ * template 是.we transform 后的 js文件。
+ * option 可以为空,或者通过option传入 js需要的参数。例如bundle js的地址等。
+ * jsonInitData 可以为空。
+ * width 为-1 默认全屏,可以自己定制。
+ * height =-1 默认全屏,可以自己定制。
+ */
+ mWXSDKInstance.render("WXSample", WXFileUtils.loadFileContent("hello.js", this), null, null, -1, -1, WXRenderStrategy.APPEND_ASYNC);
+ }
+
+ @Override
+ public void onViewCreated(WXSDKInstance instance, View view) {
+ setContentView(view);
+ }
+
+ @Override
+ public void onRenderSuccess(WXSDKInstance instance, int width, int height) {
+
+ }
+
+ @Override
+ public void onRefreshSuccess(WXSDKInstance instance, int width, int height) {
+
+ }
+
+ @Override
+ public void onException(WXSDKInstance instance, String errCode, String msg) {
+
+ }
+
+
+ @Override
+ protected void onResume() {
+ super.onResume();
+ if(mWXSDKInstance!=null){
+ mWXSDKInstance.onActivityResume();
+ }
+ }
+
+ @Override
+ protected void onPause() {
+ super.onPause();
+ if(mWXSDKInstance!=null){
+ mWXSDKInstance.onActivityPause();
+ }
+ }
+
+ @Override
+ protected void onStop() {
+ super.onStop();
+ if(mWXSDKInstance!=null){
+ mWXSDKInstance.onActivityStop();
+ }
+ }
+
+ @Override
+ protected void onDestroy() {
+ super.onDestroy();
+ if(mWXSDKInstance!=null){
+ mWXSDKInstance.onActivityDestroy();
+ }
+ }
+}
+```
+
+## 源码依赖(IDE Android Studio)
+
+1. 下载源码 `git clone https://github.com/alibaba/weex`
+2. 创建 Android 工程。
+3. 通过以下路径引入 SDK Module
+ File->New-Import Module-> 选择 WEEX SDK Module(weex/android/sdk) -> Finish
+4. app 的 build.gradle 中添加如下依赖:`compile project(':weex_sdk')`
+5. 其他设置请参考上面快速接入
+
+### 附录
+
+WXSample地址
+`https://github.com/xkli/WXSample.git`
http://git-wip-us.apache.org/repos/asf/incubator-weex-site/blob/12e3a8bc/_drafts/v1.0/advanced/integrate-to-html5.md
----------------------------------------------------------------------
diff --git a/_drafts/v1.0/advanced/integrate-to-html5.md b/_drafts/v1.0/advanced/integrate-to-html5.md
new file mode 100644
index 0000000..30ee3fd
--- /dev/null
+++ b/_drafts/v1.0/advanced/integrate-to-html5.md
@@ -0,0 +1,69 @@
+---
+title: 集成到 web
+type: advanced
+order: 6
+has_chapter_content: true
+version: 0.10
+---
+
+## 项目中引入 html5 版 Weex
+
+### 简介
+
+Weex 是一个跨平台可扩展的动态化移动框架,能够真正帮助开发者实现'一次开发,到处运行'。由 Weex 提供的相关工具进行打包好的 bundle 文件可以运行在 android, ios 以及 web(这里我们也称之为html5)平台的渲染器上。Weex HTML5 是一个专用于在移动端 webview 以及各种现代浏览器上渲染 weex 文件的渲染器。
+### 获取 Weex HTML5
+
+使用 npm 安装最新版本的 Weex HTML5,并在你的项目中 require 进来。
+#### 从 npm 安装
+
+请确保通过 `npm install` 或者 `npm update` 获取 Weex HTML5 的最新版本 npm 包。更多关于 npm 的信息情查阅 [npm 官方网站](https://docs.npmjs.com/)。
+
+```bash
+npm install weex-html5
+```
+
+通过 require 引入 weex-html5:
+
+```bash
+var weex = require('weex-html5')
+```
+
+**注意:** 介于 Weex 目前仍处于开源内测阶段,还没有完全开放源代码,因此 `weex-jsframework` 可能还没有在 npm 上发布。当前版本的 `weex-html5` 包含了 `weex-jsframework`,你只需要 require `weex-html5` 即可暂时在 web 平台上运行 weex 代码。建议关注 Weex 的后续版本发布并做必要的引用方式调整。
+### 初始化 Weex
+
+你可以通过 Weex 暴露的 API `init` 来初始化一个 Weex 实例。这个方法需要传递一些配置信息已确定一些环境变量等信息,这些配置信息介绍如下:
+- `appId`: Weex 实例的 id,可以是任意字符串或者数字,并注意不要重复.
+- `source`: 请求的 Weex bundle 文件地址,或者 Weex bundle 文件代码本身,取决于下面的 loader 配置.
+- `loader`: 加载器类型,用于加载 weex bundle,值可以是 'xhr', 'jsonp' 或者 'source'.
+ - `xhr`: 通过 XMLHttpRequest 加载 source(即 weex bundle 的 url 地址).
+ - `jsonp`: 通过 JSONP 加载 weex bundle.
+ - `source`: 直接接受 weex bundle 的代码作为参数.
+- `rootId`: root 容器的 id,默认容器 id 是 'weex'.
+
+以下是一个 Weex 初始化的示例:
+
+``` javascript
+function weexInit() {
+ function getUrlParam (key) {
+ var reg = new RegExp('[?|&]' + key + '=([^&]+)')
+ var match = location.search.match(reg)
+ return match && match[1]
+ }
+
+ var loader = getUrlParam('loader') || 'xhr'
+ var page = getUrlParam('page')
+
+ // 需要指定一个jsonp回调函数名称,如果没有则用默认值'weexJsonpCallback'
+ var JSONP_CALLBACK_NAME = 'weexJsonpCallback'
+
+ window.weex.init({
+ jsonpCallback: JSONP_CALLBACK_NAME,
+ appId: location.href,
+ source: page,
+ loader: loader,
+ rootId: 'weex'
+ })
+}
+
+weexInit()
+```
http://git-wip-us.apache.org/repos/asf/incubator-weex-site/blob/12e3a8bc/_drafts/v1.0/advanced/integrate-to-ios.md
----------------------------------------------------------------------
diff --git a/_drafts/v1.0/advanced/integrate-to-ios.md b/_drafts/v1.0/advanced/integrate-to-ios.md
new file mode 100644
index 0000000..54a5ca7
--- /dev/null
+++ b/_drafts/v1.0/advanced/integrate-to-ios.md
@@ -0,0 +1,110 @@
+---
+title: 集成到 iOS
+type: advanced
+order: 5
+has_chapter_content: true
+version: 0.10
+---
+
+# Weex SDK 集成到 iOS
+
+### cocoaPods 引入 Weex iOS SDK到工程
+
+可以通过源码编译出 Weex SDK,可以在新的 feature 或者 bugfix 分支,尝试最新的 feature
+#### cocoaPods集成
+
+ 假设你已经完成了安装[iOS 开发环境](https://developer.apple.com/library/ios/documentation/IDEs/Conceptual/AppStoreDistributionTutorial/Setup/Setup.html) 和 [CocoaPods](https://guides.cocoapods.org/using/getting-started.html)
+
+1. 从 github 上 clone 一份代码
+
+ ```
+ git clone https://github.com/alibaba/weex.git
+ ```
+
+2. 把 WeexSDK 导入到你已有的项目,如果没有,可以[参考](https://developer.apple.com/library/ios/documentation/IDEs/Conceptual/AppStoreDistributionTutorial/Setup/Setup.html)新建项目
+ 拷贝 `ios/sdk` 下面目录到你的项目目录,在添加依赖之前,确保项目目录有 `Podfile`,如果没有,创建一个,用文本编辑器打开,添加如下依赖
+
+ 如果使用正式版本如 0.6.1 的,就不需要做 拷贝 `ios/sdk` 这个操作,直接引用 cocoaPods 的 master repo 上就可以,这个需要在 Podfile 最前面添加
+
+ ```
+ source 'https://github.com/CocoaPods/Specs.git'
+ ```
+
+ ```object-c
+ target 'YourTarget' do
+ platform :ios, '7.0'
+ pod 'WeexSDK', :path=>'./sdk/' # pod 'WeexSDK', '0.6.1'
+ end
+ ```
+
+ 在命令行(terminal)中,切换到当前目录,运行 `pod install`, 过一会,项目的 .workspace 结尾的文件就被创建出来,到这步,依赖已经添加完了
+
+3. 初始化 Weex 环境
+ 在 AppDelegate.m 文件中做初始化操作,一般会在 `didFinishLaunchingWithOptions` 方法中如下添加
+
+ ```object-c
+ //business configuration
+ [WXAppConfiguration setAppGroup:@"AliApp"];
+ [WXAppConfiguration setAppName:@"WeexDemo"];
+ [WXAppConfiguration setAppVersion:@"1.0.0"];
+
+ //init sdk enviroment
+ [WXSDKEngine initSDKEnviroment];
+
+ //register custom module and component,optional
+ [WXSDKEngine registerComponent:@"MyView" withClass:[MyViewComponent class]];
+ [WXSDKEngine registerModule:@"event" withClass:[WXEventModule class]];
+
+ //register the implementation of protocol, optional
+ [WXSDKEngine registerHandler:[WXNavigationDefaultImpl new] withProtocol:@protocol(WXNavigationProtocol)];
+
+ //set the log level
+ [WXLog setLogLevel: WXLogLevelAll];
+ ```
+
+4. 渲染 weex Instance
+ Weex 支持整体页面渲染和部分渲染两种模式,你需要做的事情是用指定的 URL 渲染 weex 的 view,然后添加到它的父容器上,父容器一般都是 viewController
+
+ ```object-c
+ #import <WeexSDK/WXSDKInstance.h>
+ - (void)viewDidLoad
+ {
+ [super viewDidLoad];
+
+ _instance = [[WXSDKInstance alloc] init];
+ _instance.viewController = self;
+ _instance.frame = self.view.frame;
+
+ __weak typeof(self) weakSelf = self;
+ _instance.onCreate = ^(UIView *view) {
+ [weakSelf.weexView removeFromSuperview];
+ [weakSelf.view addSubview:weakSelf.weexView];
+ };
+
+ _instance.onFailed = ^(NSError *error) {
+ //process failure
+ };
+
+ _instance.renderFinish = ^ (UIView *view) {
+ //process renderFinish
+ };
+ [_instance renderWithURL:self.url options:@{@"bundleUrl":[self.url absoluteString]} data:nil];
+ }
+ ```
+
+ WXSDKInstance 是很重要的一个类,提供了基础的方法和一些回调,如`renderWithURL`,`onCreate`,`onFailed`等,可以参见 `WXSDKInstance.h`的 声明
+
+5. 销毁 Weex Instance
+
+ 在 viewController 的 dealloc 阶段 销毁掉 weex instance, 释放内存,避免造成内存泄露
+
+ ```object-c
+ - (void)dealloc
+ {
+ [_instance destroyInstance];
+ }
+ ```
+
+### 导入 Weex SDK framework到工程
+
+ 参考[此处](https://open.taobao.com/doc2/detail?spm=a219a.7629140.0.0.tFddsV&&docType=1&articleId=104829)直接导入weexSDK
http://git-wip-us.apache.org/repos/asf/incubator-weex-site/blob/12e3a8bc/_drafts/v1.0/blog/index.md
----------------------------------------------------------------------
diff --git a/_drafts/v1.0/blog/index.md b/_drafts/v1.0/blog/index.md
new file mode 100644
index 0000000..ef7b31d
--- /dev/null
+++ b/_drafts/v1.0/blog/index.md
@@ -0,0 +1,4 @@
+type: blog
+index: true
+layout: blog
+---
\ No newline at end of file
http://git-wip-us.apache.org/repos/asf/incubator-weex-site/blob/12e3a8bc/_drafts/v1.0/guide/develop-on-your-local-machine.md
----------------------------------------------------------------------
diff --git a/_drafts/v1.0/guide/develop-on-your-local-machine.md b/_drafts/v1.0/guide/develop-on-your-local-machine.md
new file mode 100644
index 0000000..276a9f9
--- /dev/null
+++ b/_drafts/v1.0/guide/develop-on-your-local-machine.md
@@ -0,0 +1,175 @@
+---
+title: 如何在本地开发 Weex 页面
+type: guide
+order: 2
+has_chapter_content: true
+version: 0.10
+---
+
+# 如何在本地开发 Weex 页面
+
+使用 [dotWe](http://dotwe.org) 对 Weex 尝鲜是一个不错的选择,但如果你想更专业的开发 Weex, [dotWe](http://dotwe.org) 就不怎么够用了。本章会教你如何搭建本地开发环境进行 Weex 开发。
+
+## 第一步:安装依赖
+
+首先,你需要 Node.js 和 weex-toolkit。
+
+安装 Node.js 方式多种多样,最简单的方式是在 [Node.js 官网](https://nodejs.org/en/) 下载可执行程序直接安装即可。
+
+对于 Mac,可以使用 [Homebrew](http://brew.sh/) 进行安装:
+
+```bash
+brew install node
+```
+
+> 更多安装方式可参考 [Node.js 官方信息](https://nodejs.org/en/download/)
+
+安装完成后,可以使用以下命令检测是否安装成功:
+
+```bash
+$ node -v
+v6.3.1
+$ npm -v
+3.10.3
+```
+
+通常,安装了 Node.js 环境,npm 包管理工具也随之安装了。因此,直接使用 npm 来安装 weex-toolkit。
+
+> npm 是一个 JavaScript 包管理工具,它可以让开发者轻松共享和重用代码。Weex 很多依赖来自社区,同样,Weex 也将很多工具发布到社区方便开发者使用。
+
+```bash
+$ npm install -g weex-toolkit
+```
+
+国内开发者可以考虑使用淘宝的 npm 镜像 —— [cnpm](https://npm.taobao.org/) 安装 weex-toolkit
+
+```bash
+$ npm install -g cnpm
+$ cnpm install -g weex-toolkit
+```
+
+*提示:*
+
+如果提示权限错误(*permission error*),使用 `sudo` 关键字进行安装
+
+```bash
+$ sudo cnpm install -g weex-toolkit
+```
+
+安装结束后你可以直接使用 `weex` 命令验证是否安装成功,它会显示 `weex` 命令行工具各参数:
+
+
+
+## 第2步:创建文件
+
+现在可以开始编写代码了。首先,我们创建一个 `.we` 文件(Weex 程序的文件后缀(扩展名)是 `.we`)。
+
+打开空白的 `hello.we` 文件,输入三个标签,内容为:
+
+```html
+<template>
+</template>
+
+<style>
+</style>
+
+<script>
+</script>
+```
+
+我们在 [Get started](./index.md) 里已经介绍过 Weex 基本的代码结构:`<template>`、`<style>`、`<script>` 分别对应于 Web 中的 HTML,CSS(`<style>` 标签),JavaScript(`<script>` 标签)。
+
+其实,上面的代码就是最简单的 Weex 程序。但是 `.we` 文件是不能直接运行的,这时候需要使用刚才安装好的 weex-toolkit。weex-toolkit 会编译 `.we` 文件,并且创建静态服务器。
+
+这里,使用 `weex hello.we` 命令编译该程序。
+
+```bash
+$ weex hello.we
+```
+
+这时,命令行会做几件事:
+
+- 编译 `.we` 文件;
+- 启动热加载服务;
+- 启动静态服务器;
+- 拉起浏览器,访问 `http://127.0.0.1:8081/weex_tmp/h5_render/?hot-reload_controller&page=hello.js&loader=xhr`
+
+这时候,已经可以在浏览器预览 Weex 页面了。不过此时页面是空白的,因为 `.we` 文件中没有任何实质的内容。
+
+## 第3步:添加内容
+
+修改 `weex.we` 文件,向 `<template>` 标签中添加内容。具体代码如下:
+
+```html
+<template>
+ <div>
+ <text>Hello world</text>
+ </div>
+</template>
+
+<style></style>
+
+<script></script>
+```
+
+保存代码后,浏览器会自动刷新页面,这时会看到浏览器显示了 “Hello world”。
+
+## 第4步:添加样式
+
+现在,对已有的文本内容进行样式修饰。这里将文本颜色设置为红色,字体大小为 50 像素。具体代码如下:
+
+```html
+<template>
+ <div>
+ <text class="text" style="color: #FF0000;">Hello world</text>
+ </div>
+</template>
+
+<style>
+ .text{
+ font-size: 50;
+ }
+</style>
+
+<script></script>
+```
+
+这时候,浏览器已经重新载入了页面。其实,是weex-toolkit开启了热加载。可以看到红色的 “Hello world”。
+
+**注意:**
+Weex 支持通过 `style` 标签来设定样式,也支持内联样式风格。 对于数值,无需添加任何单位(包括 px、em、rem 等),这是建议的写法。如需了解有哪些通用的样式,可以参考 [通用样式](../references/common-style.md)。
+
+## 第5步:预览
+
+已经在浏览器中看到了刚才的代码效果,为了验证三端是否一致,我们还需 [Playground App](https://alibaba.github.io/weex/download.html) 验证。
+
+这里,我们需要为 `weex hello.we` 增加 `--qr` 参数,表示生成二维码。
+
+```bash
+$ weex hello.we --qr
+```
+
+然后,使用 [Playground](https://alibaba.github.io/weex/download.html) 扫码即可。
+
+
+
+## 第6步:调试
+
+weex-toolkit 已经集成了 Debugger,只需要使用如下命令即可开启 Debugger 开关调试 `hello.we`:
+
+```bash
+$ weex debug hello.we
+```
+
+我们输入以上命令开启,会自动打开浏览器,页面上有两个二维码,第一个是 Debugger Server,第二个是 `.we` 文件的地址。我们在 Playground 中先扫第一个,此时浏览器会进入一个新的页面,请你选择你需要的调试模式:
+
+- Debugger:将会打开 js debugger 页面,您可以通过 debugger 页面调试 js(诸如打断点 查看js log 和查看调用堆栈等信息);
+- Inspector:将会打开 inspector 页面,您可以通过这个页面查看 Weex 页面的 element 属性结构,包含高亮元素,展示样式表,以及显示 native 的 log。同时可以打开一个远程的手机镜像,便于查看界面。另外调试方块中的 ElementMode 可以用来选择 element 树显示原始的 native 组件树还是显示面向前端同学的 DSL (HTML)组件树。
+
+选择一种模式后会新开窗口进入调试页面,这时我们再扫第二个二维码即可进入我们想要调试的页面进行调试了。
+
+## 接下来做什么?
+
+到目前为止,你已经可以在 [dotWe](http://dotwe.org) 或者本地开发 Weex 页面。接下来你可以去学习 Weex [语法](./syntax/main.md) 和 [开发手册](../references/main.md) 了解 Weex 更多特性。这些语法和特性,你完全可以用 [Playground](https://alibaba.github.io/weex/download.html) 运行起来。
+
+如果你已经熟悉 Weex 开发,你应该考虑如何让你的 App 也支持 Weex 页面,或者,怎样用 Weex 开发一个全新的 App 呢?带着这些问题,你可以阅读 [开发进阶](./how-to/main.md)。
http://git-wip-us.apache.org/repos/asf/incubator-weex-site/blob/12e3a8bc/_drafts/v1.0/guide/how-to/debug-with-html5.md
----------------------------------------------------------------------
diff --git a/_drafts/v1.0/guide/how-to/debug-with-html5.md b/_drafts/v1.0/guide/how-to/debug-with-html5.md
new file mode 100644
index 0000000..c4ba245
--- /dev/null
+++ b/_drafts/v1.0/guide/how-to/debug-with-html5.md
@@ -0,0 +1,47 @@
+---
+title: 在浏览器中调试
+type: guide
+order: 4.2
+version: 0.10
+---
+
+# 如何在浏览器中调试?
+
+由于 weex-html5 可以在现代移动浏览器上运行,因此自然支持在浏览器的开发工具中调试 weex-html5 代码。下面将介绍如何使用浏览器的 devTools 调试和分析 weex-html5 程序。以chrome的调试工具为例:
+
+
+
+## Elements
+
+使用 Elements 面板来检查 weex-html5 页面的布局和设计,并操纵 DOM 和 CSS 来自由地做一些开发实验。
+
+## Console
+
+您可以使用 `console.log` 在控制台上记录信息。
+
+## 断点
+
+您可以设置断点来调试代码,断点是调试代码的最有效的方法之一。断点使您能够暂停脚本执行,然后查看该时刻的调用堆栈变量值。
+
+手动断点是您在特定代码行上设置的各个断点。您可以通过 Chrome DevTools GUI 或在代码中插入 debugger 关键字来设置这些断点。
+
+## 找出 bug 的精确位置
+
+一般来说,有三个可能发生错误的地方:渲染器(weex-html5),js 框架(weex-js框架)和变压器(gulp-weex)。
+
+这里有一些方便以找出错误建议,以便你可以快速识别哪个是哪个地方的错误:
+
+* 请检查控制台是否有错误。在调试模式如果有一个错误出现,将会在 console 中打印有关于它的信息。
+* 在 bridge/receiver.js,查看是否调用了 `callNative` 函数。
+* 是否被认为是 API 的方法被执行。
+* 是否调用用于事件触发或执行回调的 `callJS` 方法。
+
+## 其他
+
+更多关于如何调试 H5 页面的信息请查看 [chrome's devTools docs](https://developers.google.com/web/tools/chrome-devtools/?hl=en)
+
+
+
+
+
+
http://git-wip-us.apache.org/repos/asf/incubator-weex-site/blob/12e3a8bc/_drafts/v1.0/guide/how-to/index.md
----------------------------------------------------------------------
diff --git a/_drafts/v1.0/guide/how-to/index.md b/_drafts/v1.0/guide/how-to/index.md
new file mode 100644
index 0000000..c20ecb0
--- /dev/null
+++ b/_drafts/v1.0/guide/how-to/index.md
@@ -0,0 +1,185 @@
+---
+title: 使用 Devtools 调试 Weex 页面
+type: guide
+order: 4
+has_chapter_content: false
+chapter_title: 最佳实践
+version: 0.10
+---
+
+# 如何使用 Devtools 调试 Weex 页面
+
+Weex Devtools 是为 Weex 开发者服务的一款调试工具,能够审查 Weex app 运行时属性,可对 `.we` 代码及 JavaScript 代码断点调试,支持 iOS 和 Android 两个平台。
+
+Weex Devtools 基于 Chrome devtools 实现了 [Chrome Debugging Protocol](https://developer.chrome.com/devtools/docs/debugger-protocol),能够使用 Chrome devtools 调试 Weex 项目,其主要功能分为两大部分—— Debugger 和 Inspector。
+
+## Devtools 主要功能一览
+
+### 连接设备
+devtools 可以动态检测客户端的连接绑定请求,同时连接/调试多个 device(或者模拟器)是很容易的事情,连接到 Devtools 的客户端显示在 “Device List” 界面。如下图所示。
+
+
+
+点击对应设备的 Debugger 按钮即开始调试流程,并弹出JS断点调试的页面;随后点击 Inspector 按钮可弹出调试 DOM 的页面。
+
+### Debugger
+
+这个是用来调试 Weex 的 JSBundle 代码的页面,“Sources” tab 能够显示所有 JS 源码,包括 Weex JSFramework 和 JSBundle 代码。可以设置断点、查看调用栈,与 Chrome 浏览器调试类似。“Console” 控制台显示前端的 Log 信息,并能根据级别(info/warn/error等)和关键字过滤。
+
+
+
+### 断点调试
+
+
+
+### Inspector
+
+Inspector 功能丰富,能够用来查看 `Element` \ `Network` \ `Console log` \ `Screencast` \ `BoxModel` \ `Native View` 等。
+
+
+
+### Device Screencast & View Inspect
+
+如下图所示,通过 Inspector 页面的两个开关,点击右侧 Icon 可以打开设备投屏,然后点击左侧 Icon 再在投屏上点选元素则可以自动在 DOM tree 中定位并审查该元素。
+
+
+
+### Elements
+
+这里展示的是在 Android/iOS 上的 native DOM 树,及其 style 属性和 layout 图。鼠标在 DOM 树移动时,在 device(或模拟器)上对应节点会高亮显示,有助于 native 开发者定位和发现节点。
+
+**注意:**
+screencast 只是对屏幕图像拷贝,在远程调试时能看到远程设备界面,数据网络下 screencast 也将有较大流量花销,如果设备就在手头儿则建议关掉。
+
+Elements 审查有两种模式分别是:native 和 vdom。其中,native 模式下展示的是 Weex 所映射的 native view 的结构,它更接近实现本质;vdom 模式则对应 `.we` 文件中定义的 dom 结构,主要用来审查 `.we` 文件编译为 JSBundle 之后对应的 dom tree 的逻辑构成。
+
+#### native view element
+
+
+
+#### weex dom element
+
+
+
+### Network
+
+这里展示的是 JSBundle 资源加载网络访问的性能。所以如果 JSBundle 资源在设备本地,Network 是没有数据的。
+
+#### 查看网络请求的总耗时和延时
+
+
+
+#### 查看网络请求的header和response
+
+
+
+### 控制台
+
+这里显示的是 Android/iOS 上的 native log,并不是 JS log(JS log 显示在 Debugger 页面)。同样 native log 也有对应级别--warn/error 等和关键字过滤,native 开发查询很方便。
+
+
+
+### 资源(Android Only)
+
+远端访问的资源文件会显示在这里,这里不是查看源码的最佳方式。在 Debugger 页面,“Sources” 里已经有源码并可以断点调试。如果你的应用里有 SQLITE 数据库文件,在这里无需 root 便可以查看和更新,对于 mock 数据来说比较便利。
+
+
+
+### 远程控制 (Android Only)
+
+Android 版本支持在 screencast 上进行远程控制,能够通过鼠标模拟在手机的输入事件,方便手机不在本地的用户进行远程调试。
+
+## 如何安装和启动devtools
+
+无论是跑在 iOS 或者 Android 端,[weex-devtool](https://github.com/weexteam/weex-devtool) 都是必需的,用来启动服务器和 Chrome 页面。
+
+### 安装
+
+如果你已经在前面的教程中安装过 weex-toolkit,就无需再次安装了。
+
+```bash
+$ npm install -g weex-toolkit
+```
+
+#### 用法
+
+ weex debug [options] [we_file|bundles_dir]
+
+ 选项:
+
+ -h, --help 显示帮助
+ -V, --verbose 显示debug服务器运行时的各种log
+ -v, --version 显示版本
+ -p, --port [port] 设置debug服务器端口号 默认为8088
+ -e, --entry [entry] debug一个目录时,这个参数指定整个目录的入口bundle文件,这个bundle文件的地址会显示在debug主页上(作为二维码)
+ -m, --mode [mode] 设置构建we文件的方式,transformer 最基础的风格适合单文件,loader:wepack风格 适合模块化的多文件.默认为transformer
+
+
+## 如何在设备或者模拟器上调试
+
+### weex调试初体验之playground
+
+如果你是一名 Weex 调试的新手,那么推荐你先下载 [Playground](http://alibaba.github.io/weex/download.html) 体验一下 Devtools 调试 JSBundle 的基础流程.
+
+- 前提:
+ - 安装 `weex-toolkit`,内含调试命令 `weex debug`
+ - android/iOS 设备与 PC 在同一局域网,若位于不同网段请确保防火墙可访问性
+
+- Inspector 功能演示
+
+<embed src="//cloud.video.taobao.com/play/u/1955166971/p/2/e/1/t/1/45803002.swf" quality="high" width="100%" height="500px" align="middle" allowScriptAccess="never" allowFullScreen="true" type="application/x-shockwave-flash"></embed>
+
+- Debugger功能演示
+
+<embed src="//cloud.video.taobao.com/play/u/1955166971/p/2/e/1/t/1/45803641.swf" quality="high" width="100%" height="500px" align="middle" allowScriptAccess="never" allowFullScreen="true" type="application/x-shockwave-flash"></embed>
+
+- 调试步骤:
+ - **启动 debug server**
+
+ 执行命令 `weex debug` 将启动 debug server。如果启动成功将会在 Chrome 打开一个 welcome 页面,在网页下方有一个二维码。
+
+ - **启动 Playground 并扫码**
+
+ 点击启首页左上角的扫码按钮扫码上一步中网页下方的二维码。此时 welcome 页面将会出现你的设备信息。Playground 进入 loading 页面,等待你的下一步操作。
+
+ - **点击网页上的 Debugger 按钮**
+
+ app 结束 loading 进入 debugging 状态。同时 Chrome 将会打开 Debugger 页面。按照页面提示打开该页的 JavaScript 控制台并进入 source tab。
+
+ - **设置断点刷新当前页**
+
+ 点击 Playground 首页 list 中的任意项将打开一个 Weex 页面,此时在 Sources 里会出现相应的 JSBundle 文件,设置断点并刷新 Playground 即可调试。
+
+ - **点击网页上的 Inspector 按钮**
+
+ Chrome 会打开 inspector页面,可以查看Element, Console, Network状态。
+
+### Weex调试初体验之应用
+
+如果是接入 Weex 的应用想调试自己的 Weex 代码,有以下几个方式:
+
+1. 借助 Playground 扫码调试
+ - 先确定 Playground 已经是可调试状态
+ - 使用命令行工具打开调试功能 `weex debug`,用 Playground 扫浏览器打开的页面中的二维码
+ - 用 Playground 扫描 JSBundle 二维码
+ - 手机上即显示 Weex 页面的结果。相应在 “Debugger” 和 “Inspector” 页面调试。
+
+2. 为应用接入 Devtools 接口
+
+ - [Android sdk接入指南](https://github.com/weexteam/weex_devtools_android/blob/master/README-zh.html)
+ - [iOS sdk接入指南](https://github.com/weexteam/weex-devtool-iOS/blob/master/README-zh.html)
+
+有任何问题或者建议,请提交[这里](https://github.com/weexteam/weex-devtool/issues),会很快得到解答。
+
+## 更详细的视频讲解
+
+- 第一集 devtools简介
+http://cloud.video.taobao.com/play/u/1955166971/p/1/e/1/t/1/45796387.swf
+- 第二集 inspector功能演示
+http://cloud.video.taobao.com/play/u/1955166971/p/1/e/1/t/1/45803002.swf
+- 第三集 debugger功能演示
+http://cloud.video.taobao.com/play/u/1955166971/p/1/e/1/t/1/45803641.swf
+- 第四集 native 与 weex 联调
+http://cloud.video.taobao.com/play/u/1955166971/p/1/e/1/t/1/45804472.swf
+- 第五集 第三方App接入指南
+http://cloud.video.taobao.com/play/u/1955166971/p/1/e/1/t/1/45805276.swf
\ No newline at end of file
http://git-wip-us.apache.org/repos/asf/incubator-weex-site/blob/12e3a8bc/_drafts/v1.0/guide/how-to/require-3rd-party-libs.md
----------------------------------------------------------------------
diff --git a/_drafts/v1.0/guide/how-to/require-3rd-party-libs.md b/_drafts/v1.0/guide/how-to/require-3rd-party-libs.md
new file mode 100644
index 0000000..7d3748e
--- /dev/null
+++ b/_drafts/v1.0/guide/how-to/require-3rd-party-libs.md
@@ -0,0 +1,57 @@
+---
+title: 如何引入第三方库
+type: guide
+order: 4.3
+version: 0.10
+---
+
+# 如何引入第三方库
+<span class="weex-version">0.4</span>
+
+在 [Get started](../index.html) 中,我们学习了知道可以在 `<script>` 标签中编写 JavaScript 代码。但是在项目中常用的功能或模块,例如解析url参数,将属性从一些对象扩展到另一个对象等等,在每个组件中复制和粘贴这些代码是一个糟糕的做法,因此迫切需要通过 `require` 的方式对可复用的代码进行管理。Weex 为开发人员提供了 CommonJS 风格的 require 语法。
+
+我们以 `extend` 作为例子。
+
+## 引入本地 JS Modules
+
+下面是 `extend` 最简单的实现,并将其放在 `./common/utils.js` 路径中。
+
+```javascript
+function extend(dest, src) {
+ for (var key in src) {
+ dest[key] = src[key]
+ }
+}
+exports.extend = extend
+```
+
+在 `.we` 文件中,`extend` 可以与`require`一起使用:
+
+```html
+<script>
+ var utils = require('./common/utils')
+ var obj1 = {a: 1}
+ var obj2 = {b: 2}
+ utils.extend(obj1, obj2) // obj1 => {a: 1, b: 2}
+</script>
+```
+
+## 引入已经安装的 Node.js Modules
+
+[underscore](http://underscorejs.org) 是一个 JavaScript 库,它提供了一整套函数式编程的实用功能,而不扩展任何 JavaScript 内置对象。它提供了一个更具稳健性的 [`extend`](http://underscorejs.org/#extend)。
+
+我们可以使用 underscore 的 `extend`,而不是我们自己实现的版本。首先,在项目中安装 underscore,然后我们便可以将 underscore `reuqire` 进来并使用它。
+
+```bash
+npm install underscore
+```
+
+```html
+<script>
+ var _ = require('underscore')
+ var obj1 = {a: 1}
+ var obj2 = {b: 2}
+ var obj3 = {c: 3}
+ var ret = _.extend(obj1, obj2, obj3) // ret => {a: 1, b: 2, c: 3}
+</script>
+```
[40/51] [abbrv] incubator-weex-site git commit: update file structure
and fix responsive styles
Posted by ha...@apache.org.
http://git-wip-us.apache.org/repos/asf/incubator-weex-site/blob/12e3a8bc/_drafts/v-0.10/advanced/extend-to-html5.md
----------------------------------------------------------------------
diff --git a/_drafts/v-0.10/advanced/extend-to-html5.md b/_drafts/v-0.10/advanced/extend-to-html5.md
new file mode 100644
index 0000000..6201fc7
--- /dev/null
+++ b/_drafts/v-0.10/advanced/extend-to-html5.md
@@ -0,0 +1,258 @@
+---
+title: Extend to web
+type: advanced
+order: 8
+has_chapter_content: true
+version: 0.10
+---
+
+# Extend Weex HTML5
+
+### Intro
+
+Weex is a extendable cross-platform solution for dynamic programming and publishing projects. You can build your own components on web platform or native platform by extending the components system. Also you can extend weex by adding new methods for one module, new moudles or new bundle loaders. Follow the steps bellow you can dive into the journy of creating multiple builtin components, APIs and loaders.
+
+First of all, components, APIs and loaders are extensions to weex, so you can create your extensions without requiring the weex package, that means your extensions can be totally standalone.
+
+Second, you should always implement a extension for all the three platforms (android, ios and web), except that you only use it on one specific platform. After all weex is a cross platform framework and the equality of user expierence in all platforms is very important. Although you can create components separately on one platform by another, or welcome other developers on other platforms to join your work (You can always find coders who want the same feature with you in the commity). Here are docs about how to create native extensions on [ios](./extend-to-ios.html) and [android](./extend-to-android.html).
+
+You should publish your extensions somewhere weex developers can easily find, somewhere popular, independent and easy to search and use, such as, npm. Npm is what we strongly recommended.
+
+The most important thing is, you'd better name your extension appropriately: it should begin with a `weex-` if it is a weex extension, and it should end up with a `-<platform>` as a platform mark. If your package is wrapped up with all the three platforms you can ignore it through. Here is a demonstrating component [`<weex-hello-web>`](https://github.com/MrRaindrop/weex-hello-web) to show how to define your own component.
+
+### Create a new component
+
+Steps:
+
+1. Extend `Weex.Component`, override methods of component class.
+2. Use `Weex.registerComponent` to register your customized component in the `init` method of the installation module.
+3. export the `init` method for the installation (Every weex-html5 extension has to have a `init` method in the export object, which is for another weex project to install.)
+
+Here's a example to create a weex component for web platform (weex-html5):
+
+```javascript
+const attr = {
+ // ...
+}
+const style = {
+ // ...
+}
+const event = {
+ // ...
+}
+// every extension file should have a init method.
+function init (Weex) {
+ const Component = Weex.Component
+ const extend = Weex.utils.extend
+
+ // the component's constructor
+ function Hello (data) {
+ Component.call(this, data)
+ }
+
+ // extend the prototype
+ Hello.prototype = Object.create(Component.prototype)
+ extend(Hello.prototype, proto)
+
+ // config the attributes, styles and events.
+ extend(Hello.prototype, { attr })
+ extend(Hello.prototype, {
+ style: extend(Object.create(Component.prototype.style), style)
+ })
+ extend(Hello.prototype, { event })
+
+ Weex.registerComponent('weex-hello', Hello)
+}
+
+// export the init method.
+export default { init }
+```
+
+The code above is extracted from [weex-hello-web/src/index.js](https://github.com/MrRaindrop/weex-hello-web/blob/master/src/index.js#L46-L65).
+
+This demo has overrided the `create` method of the base class `Component`. You can also override other methods to customize your component's behavior. The typical methods of class `Component` you may override are:
+
+* `create`: to create the node of the component, and return it.
+* `createChildren` to create the children's nodes.
+* `insertBefore` to insert a child before another child.
+* `appendChild` to append a child in the children list.
+* `removeChild` to remove a child in the children list.
+
+**Advanced**: Need more code demonstrations about overriding the component's methods ? Just take a look at the [weex repo's code](https://github.com/apache/incubator-weex/tree/dev/html5/). Basically the most of the built-in components are defined this way.
+
+Important! To register your component in the `init` method, use `Weex.registerComponent`. Here's the demo code:
+
+```javascript
+Weex.registerComponent('weex-hello', Hello)
+```
+
+The code above is from [weex-hello-web/src/index.js](https://github.com/MrRaindrop/weex-hello-web/blob/master/src/index.js#L62)
+
+Install the component using `Weex.install`.
+
+```javascript
+// import the original weex-html5.
+import weex from 'weex-html5'
+import hello from 'weex-hello-web'
+// install the component.
+weex.install(hello)
+```
+
+The code above is from [weex_extend_demo/src/main.js](https://github.com/MrRaindrop/weex_extend_demo/blob/master/src/main.js#L1-L5)
+
+use the component in your `.we` file:
+
+```html
+<template>
+ <div>
+ <weex-hello class="hello" style="txt-color:#fff;bg-color:green"
+ value="WEEX" onclick="handleClick">
+ </weex-hello>
+ </div>
+</template>
+```
+
+The code above is from [weex_extend_demo/demo/index.we](https://github.com/MrRaindrop/weex_extend_demo/blob/master/demo/index.we#L10-L15)
+
+### Add a new API
+
+You can add new API modules, or just add a new API for any existing API modules. For example, you can add a new module `user` with APIs like 'login', 'logout' etc. The developer can invoke the API by using `require('@weex-module/moduleName)[methodName](arg1, arg2, ...)` ([Module APIs](../references/api.html)).
+
+Steps:
+
+1. Implement your API modules.
+2. Use `Weex.registerAPIModules` to register your API modules in the init method of your installation module.
+
+**Here is a example for register a new API module**
+
+First create a file named `user.js` for a new module, then define `login/logout` methods.
+
+```javascript
+const user = {
+ // for user to login.
+ login (callbackId) {
+ login.then(res => {
+ this.sender.performCallback(callbackId, res)
+ }).catch(err => {
+ this.sender.performCallback(callbackId, err)
+ })
+ },
+
+ // for user to logout.
+ logout (callbackId) {
+ logout.then(res => {
+ this.sender.performCallback(callbackId, res)
+ }).catch(err => {
+ this.sender.performCallback(callbackId, err)
+ })
+ }
+}
+
+// add meta info to user module.
+const meta = {
+ user: [{
+ name: 'login',
+ args: ['function']
+ }, {
+ name: 'logout',
+ args: ['function']
+ }]
+}
+
+export default {
+ init (Weex) {
+ // Register your new module. The last parameter is your
+ // new API module's meta info.
+ Weex.registerApiModule('user', user, meta)
+ }
+}
+```
+
+After above coding work, you can publish this user helper API to npm now, for example, with the name of `weex-user-helper`.
+
+Install the component using `Weex.install` in your new weex project.
+
+```javascript
+import Weex from 'weex-html5'
+import user from 'weex-user-helper'
+
+Weex.install(user)
+```
+
+Use the user helper API in your dsl code (xxx.we):
+
+```html
+<template>
+ <div>
+ <div class="btn" onclick="handleClick">
+ <text>LOGIN</text>
+ </div>
+ </div>
+</template>
+
+<script>
+ var userHelper = require('@weex-module/user')
+ module.exports = {
+ methods: {
+ handleClick: function () {
+ userHelper.login(function () {
+ // ... do sth. in callback.
+ })
+ }
+ }
+ }
+</script>
+```
+
+### Add a new loader
+
+**Loader is only a type of extension for weex-html5 (web platform), native platform is not needing this.**
+
+Weex's builtin loaders to load a weex bundle are `xhr`, `jsonp` and `source`. The default loader is `xhr`. You can register your own loader by using `weex.registerLoader`. For example, you got a service method named `myServe.getWeexBundle`, which can load a weex bundle file through some magical tunnel:
+
+```javascript
+function loadByMyServe(pageId, callback) {
+ myServe.getWeexBundle(pageId).then(function (bundle) {
+ callback(bundle)
+ }).catch(function(err) {
+ callback(err)
+ })
+}
+
+// export the init method to enable weex install this loader.
+export default {
+ init (Weex) {
+ Weex.registerLoader('myserve', loadByMyServe)
+ }
+}
+```
+
+install and use your loader in your project's entry file:
+
+```javascript
+import Weex from 'weex-html5'
+
+// or import from './myserve.js', no matter where you can import your loader file.
+import loader from 'myLoader'
+
+Weex.install(loader)
+
+// use your loader in the init function:
+(function () {
+ function getUrlParam (key) {
+ const reg = new RegExp('[?|&]' + key + '=([^&]+)')
+ const match = location.search.match(reg)
+ return match && match[1]
+ }
+ const page = getUrlParam('page') || 'examples/build/index.js'
+ Weex.init({
+ appId: location.href,
+ loader: 'myserve', // use the loader type you defined.
+ source: page,
+ rootId: 'weex'
+ })
+})();
+```
+
+That's the major extension feature weex brought to you. The deep details can be found in the [weex's repo](https://github.com/alibaba/weex) and the weex's community.
+
http://git-wip-us.apache.org/repos/asf/incubator-weex-site/blob/12e3a8bc/_drafts/v-0.10/advanced/extend-to-ios.md
----------------------------------------------------------------------
diff --git a/_drafts/v-0.10/advanced/extend-to-ios.md b/_drafts/v-0.10/advanced/extend-to-ios.md
new file mode 100644
index 0000000..bddb96e
--- /dev/null
+++ b/_drafts/v-0.10/advanced/extend-to-ios.md
@@ -0,0 +1,311 @@
+---
+title: Extend to iOS
+type: advanced
+order: 7
+has_chapter_content: true
+version: 0.10
+---
+
+# Extend to iOS
+
+### Module extend
+
+Weex SDK provides only rendering capabilities, rather than have other capabilities, such as network, picture, and URL redirection. If you want these features, you need to implement it.
+
+For example: If you want to implement an address jumping function, you can achieve a Module following the steps below.
+
+#### Step to customize a module
+
+1. Module
+ customized must implement WXModuleProtocol
+2. A macro named `WX_EXPORT_METHOD` must be added, as it is the only way to be recognized by Weex. It takes arguments that specifies the method in module called by JavaScript code.
+3. The weexInstance should be synthesized. Each module object is bind to a specific instance.
+4. Module methods will be invoked in UI thread, so do not put time consuming operation there. If you want to execute the whole module methods in other thread, please implement the method `- (NSThread *)targetExecuteThread` in protocol. In the way, tasks distributed to this module will be executed in targetExecuteThread.
+5. Weex params can be String or Map.
+6. Module supports to return results to Javascript in callback. This callback is type of `WXModuleCallback`, the params of which can be String or Map.
+
+```objective-c
+@implementation WXEventModule
+@synthesize weexInstance;
+ WX_EXPORT_METHOD(@selector(openURL:callback))
+
+- (void)openURL:(NSString *)url callback:(WXModuleCallback)callback
+{
+ NSString *newURL = url;
+ if ([url hasPrefix:@"//"]) {
+ newURL = [NSString stringWithFormat:@"http:%@", url];
+ } else if (![url hasPrefix:@"http"]) {
+ newURL = [NSURL URLWithString:url relativeToURL:weexInstance.scriptURL].absoluteString;
+ }
+
+ UIViewController *controller = [[WXDemoViewController alloc] init];
+ ((WXDemoViewController *)controller).url = [NSURL URLWithString:newURL];
+
+ [[weexInstance.viewController navigationController] pushViewController:controller animated:YES];
+ callback(@{@"result":@"success"});
+}
+
+@end
+```
+
+#### Register the module
+
+You can register the customized module by calling the method `registerModule:withClass` in WXSDKEngine.
+
+```objective-c
+WXSDKEngine.h
+/**
+* @abstract Registers a module for a given name
+* @param name The module name to register
+* @param clazz The module class to register
+**/
++ (void)registerModule:(NSString *)name withClass:(Class)clazz;
+
+[WXSDKEngine registerModule:@"event" withClass:[WXEventModule class]];
+```
+
+### Handler extend
+
+Weex SDK doesn't have capabilitis, such as image download 、navigator operation,please implement these protocols by yourself.
+
+#### WXImgLoaderProtocol
+<font color="gray">
+Weex SDK has no image download capability, you need to implement `WXImgLoaderProtocol`. Refer to the following examples.
+
+```objective-c
+WXImageLoaderProtocol.h
+@protocol WXImgLoaderProtocol <WXModuleProtocol>
+
+/**
+ * @abstract Creates a image download handler with a given URL
+ * @param imageUrl The URL of the image to download
+ * @param imageFrame The frame of the image you want to set
+ * @param options : The options to be used for this download
+ * @param completedBlock : A block called once the download is completed.
+ image : the image which has been download to local.
+ error : the error which has happened in download.
+ finished : a Boolean value indicating whether download action has finished.
+ */
+ -(id<WXImageOperationProtocol>)downloadImageWithURL:(NSString *)url imageFrame:(CGRect)imageFrame userInfo:(NSDictionary *)options completed:(void(^)(UIImage *image, NSError *error, BOOL finished))completedBlock;
+ @end
+```
+
+Implement above protocol as follows.
+
+
+```objective-c
+@implementation WXImgLoaderDefaultImpl
+#pragma mark -
+#pragma mark WXImgLoaderProtocol
+
+- (id<WXImageOperationProtocol>)downloadImageWithURL:(NSString *)url imageFrame:(CGRect)imageFrame userInfo:(NSDictionary *)userInfo completed:(void(^)(UIImage *image, NSError *error, BOOL finished))completedBlock
+{
+ if ([url hasPrefix:@"//"]) {
+ url = [@"http:" stringByAppendingString:url];
+ }
+ return (id<WXImageOperationProtocol>)[[SDWebImageManager sharedManager] downloadImageWithURL:[NSURL URLWithString:url] options:0 progress:^(NSInteger receivedSize, NSInteger expectedSize) {
+ } completed:^(UIImage *image, NSError *error, SDImageCacheType cacheType, BOOL finished, NSURL *imageURL) {
+ if (completedBlock) {
+ completedBlock(image, error, finished);
+ }
+ }];
+}
+@end
+```
+
+#### Register the handler
+
+You can register the handler which implements the protocol by calling `registerHandler:withProtocol` in WXSDKEngine.
+
+```objective-c
+WXSDKEngine.h
+/**
+* @abstract Registers a handler for a given handler instance and specific protocol
+* @param handler The handler instance to register
+* @param protocol The protocol to confirm
+*/
++ (void)registerHandler:(id)handler withProtocol:(Protocol *)protocol;
+
+[WXSDKEngine registerHandler:[WXImgLoaderDefaultImpl new] withProtocol:@protocol(WXImgLoaderProtocol)];
+```
+
+## Custom Native Components for iOS
+
+### Component extend
+
+There are a lot of native components ready to be used in the Weex SDK, but users always have their own use cases. You might have written an awesome native UI widget in your previous work and just want to wrap up it and export to Weex. So we provide a way to enable developers to create their own custom fully-native components.
+
+This guide will use the implementation of existing component `image` to show you how to build a native component. It will also assume that you are familiar with iOS programming.
+
+#### Registration
+
+Defining a custom native component is simple. Just call `[WXSDKEngine registerComponent:withClass:]` with the component's tag name as first argument.
+
+```objective-c
+[WXSDKEngine registerComponent:@"image" withClass:[WXImageComponent class]];
+```
+
+Then you can create a `WXImageComponent` class to represent the implementation of image component.
+
+Now you can use `<image>` wherever you want in the template.
+
+```html
+<image></image>
+```
+
+#### Adding Properties
+
+The next thing we can do is to extend some native properties to make the component more powerful. As an image, let's say we should have a `src` attribute as image's remote source and a `resize` attribute as image's resize mode(contain/cover/stretch).
+
+```objective-c
+@interface WXImageComponent ()
+
+@property (nonatomic, strong) NSString *imageSrc;
+@property (nonatomic, assign) UIViewContentMode resizeMode;
+
+@end
+```
+
+All of the styles, attributes and events will be passed to the component's initialization method, so here you can store the properties which you are interested in.
+
+```objective-c
+@implementation WXImageComponent
+
+- (instancetype)initWithRef:(NSString *)ref type:(NSString *)type styles:(NSDictionary *)styles attributes:(NSDictionary *)attributes events:(NSArray *)events weexInstance:(WXSDKInstance *)weexInstance
+{
+ if (self = [super initWithRef:ref type:type styles:styles attributes:attributes events:events weexInstance:weexInstance]) {
+ _imageSrc = [WXConvert NSString:attributes[@"src"]];
+ _resizeMode = [WXConvert UIViewContentMode:attributes[@"resize"]];
+ }
+
+ return self;
+}
+
+@end
+```
+
+The properties getted in the attributes are of `id` type, so we have to convert them to the type we want using a conversion function. Basic conversion functions can be found in the `WXConvert` file, or you can just add your own conversion function.
+
+
+#### Hooking Render Life Cycle
+
+A Native Component has a life cycle managed by Weex. Weex creates it, layout it, renders it and destroys it.
+
+Weex offers component life cycle hooks that give you visibility into these key moments and the ability to act when they occur.
+
+method| description
+:----:|------
+initWithRef:type:...| Initializes a new component using the specified properties.
+layoutDidFinish | Called when the component has just laid out.
+loadView | Creates the view that the component manages.
+viewWillLoad | Called before the load of component's view .
+viewDidLoad | Called after the component's view is loaded and set.
+viewWillUnload | Called just before releasing the component's view.
+viewDidUnload | Called when the component's view is released.
+updateStyles:| Called when component's style are updated.
+updateAttributes:| Called when component's attributes are updated.
+addEvent:| Called when adding an event to the component.
+removeEvent:| Called when removing an event frome the component.
+
+
+As in the image component example, if we need to use our own image view, we can override the `loadView` method.
+
+
+```objective-c
+- (UIView *)loadView
+{
+ return [[WXImageView alloc] init];
+}
+```
+
+Now Weex will use `WXImageView` to render the `image` component.
+
+As an image component, we will need to fetch the remote image and set it to the image view. This can be done in `viewDidLoad` method when the view is created and loaded. `viewDidLoad` is also the best time to perform additional initialization for your view, such as content mode changing.
+
+
+```objective-c
+- (void)viewDidLoad
+{
+ UIImageView *imageView = (UIImageView *)self.view;
+ imageView.contentMode = _resizeMode;
+ imageView.userInteractionEnabled = YES;
+ imageView.clipsToBounds = YES;
+ imageView.exclusiveTouch = YES;
+
+ // Do your image fetching and updating logic
+}
+```
+
+If image's remote source can be changed, you can also hook the `updateAttributes:` method to perform your attributes changing logic. Component's view always has been loaded while `updateAttributes:` or `updateStyles:` is called.
+
+
+```objective-c
+- (void)updateAttributes:(NSDictionary *)attributes
+{
+ if (attributes[@"src"]) {
+ _imageSrc = [WXConvert NSString:attributes[@"src"]];
+ // Do your image updating logic
+ }
+
+ if (attributes[@"resize"]) {
+ _resizeMode = [WXConvert UIViewContentMode:attributes[@"resize"]];
+ self.view.contentMode = _resizeMode;
+ }
+}
+```
+
+Maybe there is even more life cycle hooks you might need to consider, such as `layoutDidFinish` while layout computing is finished. If you want to go deeper, check out the `WXComponent.h` file in the source code.
+
+Now you can use `<image>` and its attributes wherever you want in the template.
+
+```html
+<image style="your-custom-style" src="image-remote-source" resize="contain/cover/stretch"></image>
+```
+#### Component Method
+from WeexSDK `0.9.5`, you can define your component method by macro `WX_EXPORT_METHOD`
+for example:
+
+```
+@implementation WXMyComponent
+ +WX_EXPORT_METHOD(@selector(focus))
+ +- (instancetype)initWithRef:(NSString *)ref type:(NSString *)type styles:(NSDictionary *)styles attributes:(NSDictionary *)attributes events:(NSArray *)events weexInstance:(WXSDKInstance *)weexInstance
+ {
+ if (self = [super initWithRef:ref type:type styles:styles attributes:attributes events:events weexInstance:weexInstance]) {
+ // handle your attributes
+ // handle your styles
+ }
+
+ return self;
+ }
+
+
+ - (void)focus
+ {
+ NSLog(@"you got it");
+ }
+@end
+```
+
+after your registration for your own custom component, now you can call it in your js file.
+
+```html
+<template>
+ <mycomponent id='mycomponent'></mycomponent>
+</template>
+<script>
+ module.exports = {
+ created: function() {
+ this.$el('mycomponent').focus();
+ }
+ }
+</script>
+```
+
+
+
+
+
+
+
+
+
http://git-wip-us.apache.org/repos/asf/incubator-weex-site/blob/12e3a8bc/_drafts/v-0.10/advanced/how-data-binding-works.md
----------------------------------------------------------------------
diff --git a/_drafts/v-0.10/advanced/how-data-binding-works.md b/_drafts/v-0.10/advanced/how-data-binding-works.md
new file mode 100644
index 0000000..a207997
--- /dev/null
+++ b/_drafts/v-0.10/advanced/how-data-binding-works.md
@@ -0,0 +1,39 @@
+---
+title: How data-binding works
+type: advanced
+order: 2
+has_chapter_content: true
+version: 0.10
+---
+
+# How data-binding works
+
+Weex JS Framework is a MVVM framework. It observe data and use `{% raw %}{{bindedKey}}{% endraw %}` syntax to bind in views. When data is changed in anyway, the view will automatically be updated due to data-binding.
+
+For example, The content of a `<text>` component is bound with the key `notes` in data:
+
+```html
+<template>
+ <div>
+ <text>{{notes}}</text>
+ </div>
+<template>
+
+<script>
+ module.exports = {
+ data: {
+ notes: 'Hello'
+ }
+ }
+</script>
+```
+
+Weex JS Framework first observe the data object to make sure each data change in the future will be observed. And then it will compile the whole `<template>`. When it finds that the content of the `<text>` is bound with `notes`, JS Framework will watch the `data.notes` changes and set a handler which will update the `<text>` content with new `data.notes`. So developer only need to manage the data, the view display could automatically do corresponding changes.
+
+Some special data-binding syntax here:
+
+* `{% raw %}<foo if="{{condition}}">{% endraw %}` will watch the condition value changes. When it changes to `true`, the `<foo>` element will be created and attached, otherwise it will be not created or removed.
+* `{% raw %}<foo repeat="{{list}}">{% endraw %}` will watch the mutations of a list. At the beginning the `<foo>` element will be cloned and attached with each item in list. When some items are added, removed or moved, the `<foo>` element list will be re-generated new content in the right order with minimum alterations.
+* `{% raw %}<foo if="{{condition}}" repeat="{{list}}">{% endraw %}` will process `repeat` first and `if` the second. In another way, it will walk through each item in list, if the item's condition value is true, a `<foo>` element will be cloned and attached with this certain item value.
+
+Compared with virtual DOM diff algorithm, we just "diff" the data and only calculate/update the virtual DOM with minimum alterations for each user interaction or data-change operation. So it's more lightweight and fast especially for small views in mobile devices.
http://git-wip-us.apache.org/repos/asf/incubator-weex-site/blob/12e3a8bc/_drafts/v-0.10/advanced/images/how-arch.png
----------------------------------------------------------------------
diff --git a/_drafts/v-0.10/advanced/images/how-arch.png b/_drafts/v-0.10/advanced/images/how-arch.png
new file mode 100644
index 0000000..a13df7a
Binary files /dev/null and b/_drafts/v-0.10/advanced/images/how-arch.png differ
http://git-wip-us.apache.org/repos/asf/incubator-weex-site/blob/12e3a8bc/_drafts/v-0.10/advanced/images/how-render.png
----------------------------------------------------------------------
diff --git a/_drafts/v-0.10/advanced/images/how-render.png b/_drafts/v-0.10/advanced/images/how-render.png
new file mode 100644
index 0000000..db9b0f4
Binary files /dev/null and b/_drafts/v-0.10/advanced/images/how-render.png differ
http://git-wip-us.apache.org/repos/asf/incubator-weex-site/blob/12e3a8bc/_drafts/v-0.10/advanced/index.md
----------------------------------------------------------------------
diff --git a/_drafts/v-0.10/advanced/index.md b/_drafts/v-0.10/advanced/index.md
new file mode 100644
index 0000000..dca072d
--- /dev/null
+++ b/_drafts/v-0.10/advanced/index.md
@@ -0,0 +1,148 @@
+---
+title: How it works
+type: advanced
+order: 1
+has_chapter_content: true
+version: 0.10
+---
+
+# How it works
+<span class="weex-version">0.4</span>
+
+## Overview
+
+Weex is a extendable cross-platform solution for dynamic programming and publishing projects. In the source code you can write pages or components with `<template>`, `<style>` and `<script>` tags, and then transform them into bundles for deploying. In server-side we can use these JS bundles for client request. When client get a bundle from server, it will be processed by client-side JavaScript engine and manages the native view rendering, the native API invoking and user interactions.
+
+### Whole Workflow
+
+```
+Weex file --------------frontend(source code)
+↓ (transform) --------- frontend(build tool)
+JS bundle ------------- frontend(bundle code)
+↓ (deploy) ------------ server
+JS bundle in server --- server
+↓ (compile) ----------- client(js-engine)
+Virtual DOM tree ------ client(weex-jsframework)
+↓ (render) ------------ client(render-engine)
+Native view ----------- client(render-engine)
+```
+
+According to the workflow above, you need:
+
+* Transformer: A nodejs tool to transform the source code into the bundle code.
+* JS Framework: A JavaScript framework runing in the client which manage Weex instance. The instance which created from a JS bundle builds virtual DOM tree. Also it sends/receives native calls for native view rendering, native APIs and user interactions.
+* Native Engine: There are many different ports for different platforms: iOS/Android/HTML5. They have the same components design, module APIs design and rendering effect. So they can work with the one and the same JS Framework and JS bundles.
+
+## Transformer
+
+The transformer transforms a source code into a bundle code. The whole work could be divided into three parts:
+
+* Transform `<template>` into a JSON-like tree and transform data-binding attribute into a function prop which return the correct data value. For example: `{% raw %}<foo a="{{x}}" b="1" />{% endraw %}` will be transformed into `{type: "foo", attr: {a: function () {return this.x}, b: 1}}`.
+* Transform `<style>` into a JSON tree. For example: `.classname {name: value;}` will be transformed into `{classname: {name: value}}`.
+* Join the two above with `<script>` content. The three parts will be joined together and wrapped into a JavaScript AMD module.
+
+A whole example (`main.we`):
+
+```html
+<template>
+ <foo a="{{x}}" b="1" class="bar"></foo>
+</template>
+<style>
+ .bar {width: 200; height: 200}
+</style>
+<script>
+ module.exports = {
+ data: function () {
+ return {x: 100}
+ }
+ }
+</script>
+```
+
+will transformed into:
+
+```
+define('@weex-component/main', function () {
+ module.exports = {
+ data: function () {
+ return {x: 100}
+ }
+ }
+ module.template = {
+ type: "foo",
+ attr: {
+ a: function () {return this.x},
+ b: 1,
+ classname: ['bar']
+ }
+ }
+ module.style = {
+ bar: {width: 200, height: 200}
+ }
+}
+bootstrap('@weex-component/main')
+```
+
+Additionally, the transformer could also do more things: combo the bundles, bootstrap with config and external data. For more information, please see the syntax specs.
+
+## NOTICE
+Most of Weex utility output JS Bundle after [Webpack](https://webpack.github.io/) re-bundle. So the eventual format of Weex JSBundle is webpack packed .
+
+## JS Framework
+
+JS Framework will run in native JavaScript engine at the beginning preparation phase. It has `define()` and `bootstrap()` functions for each the bunlde code. Once a JS bundle requested from server, the code will be executed. `define()` will register all modules first, then `bootstrap()` will start compiling main component into virtual DOM and send rendering calls to native.
+
+There are two key methods for the bridge between JS and native:
+
+* `callNative` sends commands from JavaScript to native. So it's called from JavaScript and implemented with native code. All commands are native APIs organized by modules, for example `rendering`, `networking`, `authorizing`, and other client-side features like `toast` etc.
+* `callJS` sends commands from native to JavaScript. So it's called from native and implemented by JS Framework. All commands are user interactions or native callbacks.
+
+## Native RenderEngine
+
+Native RenderEngine will supplies many native components and modules for call.
+
+**Component** is an element in the screen which have a certain view and behavior. It could be configured with some attributes and style properties, and could response user interactions. There are some common components like `<div>`, `<text>`, `<image>` etc.
+
+**Module** is a set of APIs which could be called from JS Framework. Some of them also have to make async callbacks to JS Framework, for example: send HTTP request.
+
+During a Weex instance works, Native RenderEngine receives all kinds of module API calls from JS Framework. These calls will create or update components for view and use client-side features like `toast`. When a user interaction or module API callback happens, It will call `callJS()` from JS Framework. These jobs could walk through the Weex instance lifecycle till the instance is destroyed. As is shown in the architecture figure, H5 RenderEngine is a special RenderEngine with almost the same functions as native RenderEngines.
+
+
+Weex Architecture
+
+### call native from javascript
+
+```
+[JS Framework]
+↓ callNative
+module APIs
+ rendering -> components display
+ other features
+[Native RenderEngine]
+```
+
+### call javascript from native
+
+```
+[Native RenderEngine]
+module APIs callbacks
+user interactions
+↓ callJS
+[JS Framework]
+```
+
+### Render Flow
+
+
+Weex Render Flow
+
+0. Input is virtual dom.
+0. **Build Tree**. Parse JSON data (virtual dom) to a Render Tree (RT).
+0. **Apply Style**. Attach css style to RT nodes.
+0. **Create View**. Create native views for each RT node.
+0. **Attach Event**. Attach events for each view.
+0. **CSS Layout**. Use [css-layout](https://github.com/facebook/css-layout) to calculate the layout of each view.
+0. **Update Frame**. Update layout parameters of each view.
+0. Output is Native or H5 Views.
+
+In H5 Render Flow, `CSS Layout` and `Update Frame` are implemented by browser engine like webkit.
http://git-wip-us.apache.org/repos/asf/incubator-weex-site/blob/12e3a8bc/_drafts/v-0.10/advanced/integrate-to-android.md
----------------------------------------------------------------------
diff --git a/_drafts/v-0.10/advanced/integrate-to-android.md b/_drafts/v-0.10/advanced/integrate-to-android.md
new file mode 100644
index 0000000..e2b2569
--- /dev/null
+++ b/_drafts/v-0.10/advanced/integrate-to-android.md
@@ -0,0 +1,204 @@
+---
+title: Integrate to Android
+type: advanced
+order: 3
+has_chapter_content: true
+version: 0.10
+---
+
+# Integrate to Android
+
+When you need to use the new features or to customize specific features, you can rely on the Source SDK for development。
+
+## Prerequisites
+
+Assuming you have the Android SDK installed, run `android` to open the Android SDK Manager.
+
+Make sure you have the following installed:
+
+1. Android SDK version 23 (compileSdkVersion in [`build.gradle`](https://github.com/apache/incubator-weex/blob/master/android/sdk/build.gradle))
+2. SDK build tools version 23.0.2 (buildToolsVersion in [`build.gradle`](https://github.com/apache/incubator-weex/blob/master/android/sdk/build.gradle))
+3. Android Support Repository >= 17 (for Android Support Library)
+4. Android NDK (download & extraction instructions [here](http://developer.android.com/ndk/downloads/index.html))
+
+Point Gradle to your Android SDK: either have `$ANDROID_SDK` and `$ANDROID_NDK ` defined, or create a local.properties file in the root of your weex checkout with the following contents:
+
+```
+sdk.dir=absolute_path_to_android_sdk
+ndk.dir=absolute_path_to_android_ndk
+```
+
+Example:
+
+```
+sdk.dir=/Users/your_name/android-sdk-macosx
+ndk.dir=/Users/your_name/android-ndk-r10e
+```
+
+
+## Building the source
+
+#### 1. Clone source from github
+
+First, you need to git clone `weex` from github:
+
+```shell
+git clone https://github.com/alibaba/weex.git
+```
+##### 2. Build APK
+ *** 1) Android studio build APK ***
+
+ ```
+ Step 1: run android studio
+ Step 2: open the file of ~/weex/android/playground/build.gradle
+ Step 3: Run the Project and the Apk will auto install in your android device
+ ```
+ *** 2) Gradle build APK ***
+
+ ```
+ Step 1: enter the direction of "/weex/android/playground"
+ Step 2: run the build command: ./gradlew clean assemble
+ Step 3: obtain the payground APK from the direction of weex/android/playground/app/build/outputs/apk/
+ Step 3: then adb install -r weex/android/playground/app/build/outputs/apk/playgroud.apk
+ ```
+#### 3. Adding the `:weex_sdk_android` project
+
+
+Add the `:weex_sdk_android` project in `android/settings.gradle`:
+
+```gradle
+include ':weex_sdk_android'
+
+project(':weex_sdk_android').projectDir = new File(
+ rootProject.projectDir, '../weex_sdk_android')
+```
+
+Modify your `android/app/build.gradle` to use the `:weex_sdk_android` project instead of the pre-compiled library, e.g. - replace `compile 'com.taobao.android:weex_sdk:0.4.1` with `compile project(':weex_sdk_android')`:
+
+```gradle
+dependencies {
+ compile fileTree(dir: 'libs', include: ['*.jar'])
+ compile 'com.android.support:appcompat-v7:23.0.1'
+
+ compile project(':weex_sdk_android')
+
+ ...
+}
+```
+
+#### 3. Making 3rd-party modules use your project
+
+If you use 3rd-party weex modules, you need to override their dependencies so that they don't build the pre-compiled library. Otherwise you'll get an error while compiling - `Error: more than one library with package name 'com.taobao.weex'`.
+
+Modify your `android/app/build.gradle` and replace `compile project(':weex-custom-module')` with:
+
+```gradle
+compile(project(':weex-custom-module')) {
+ exclude group: 'com.taobao.weex', module: 'weex_sdk_android'
+}
+```
+
+#### 4、How to load local Your Js bundle in the directory of Android assets
+Besides load a Js Bundle online, you also can load the js bundle from the directory of Android assets.
+
+For Example:
+
+ ```
+ String yourbundleStr = WXFileUtils.loadFileContent("yourBundle.js", context);
+ WXSDKInstance.render(TAG, yourbundleStr, options, null, width, Height, WXRenderStrategy.APPEND_ASYNC);
+ ```
+
+
+## Building from Android Studio
+
+From the Welcome screen of Android Studio choose "Import project" and select the `playground` folder of your app.
+
+You should be able to use the _Run_ button to run your app on a device.
+
+## Tip
+1. Since the packet size limit is currently only compiled arm , X86 does not support.
+
+2. Gradle build fails in `ndk-build`. See the section about `local.properties` file above.
+
+#Quick access
+
+## Requirements
+
+* an existing, gradle-based Android app
+
+## Prepare your app
+
+In your app's `build.gradle` file add the WEEX dependency:
+
+ compile 'com.taobao.android:weex_sdk:0.4.1'
+
+You can find the latest version of the WEEX library on [jcenter](https://bintray.com/search?query=weex_sdk&forceAgnostic=true). Next, make sure you have the Internet permission in your `AndroidManifest.xml`:
+
+ <uses-permission android:name="android.permission.INTERNET" />
+
+
+## Add native code
+
+You need to add some native code in order to start the Weex runtime and get it to render something. To do this, we're going to create an `Application` to init weex, then we we're going to create an `Activity` that creates a WeexContainerView, starts a Weex application inside it and sets it as the main content view.
+
+
+```java
+public class WXApplication extends Application {
+ @Override
+ public void onCreate() {
+ super.onCreate();
+
+ WXEnvironment.addCustomOptions("appName","TBSample");
+ WXSDKEngine.init(this);
+ try {
+
+ WXSDKEngine.registerComponent("wtRichText", WTRichText.class);
+ ......
+
+ WXSDKEngine.registerModule("event", WXEventModule.class);
+ } catch (WXException e) {
+ e.printStackTrace();
+ }
+ }
+}
+```
+
+Next,
+
+```java
+// Create or find RenderContainer view.
+// Notice: If you create RenderContainer manually, don't forget add it to view tree.
+RenderContainer renderContainer = (RenderContainer)findViewById(R.id.container);
+
+//crate Weex instance
+WXSDKInstance mInstance = new WXSDKInstance(this);
+//set render container
+mInstance.setRenderContainer(renderContainer);
+//set image Adapter
+mInstance.setImgLoaderAdapter(new ImageAdapter(this));
+//register render listener
+mInstance.registerRenderListener(new IWXRenderListener() {
+ @Override
+ public void onViewCreated(WXSDKInstance instance, View resultView) {
+ // Notice: If you don't setRenderContainer before render, you need add the resultView to view tree here.
+
+ }
+ @Override
+ public void onRenderSuccess(WXSDKInstance instance) {
+ }
+ @Override
+ public void onRefreshSuccess(WXSDKInstance instance) {
+ }
+ @Override
+ public void onException(WXSDKInstance instance, String errCode,String msg) {
+ }
+});
+//start render weex view
+mInstance.render(pageName,template, null, null, -1, -1, WXRenderStrategy.APPEND_ASYNC);
+```
+
+That's it, your activity is ready to run some JavaScript code.
+
+## Reference Example
+
+[`Weex Examples`](https://github.com/apache/incubator-weex/tree/master/examples)
http://git-wip-us.apache.org/repos/asf/incubator-weex-site/blob/12e3a8bc/_drafts/v-0.10/advanced/integrate-to-html5.md
----------------------------------------------------------------------
diff --git a/_drafts/v-0.10/advanced/integrate-to-html5.md b/_drafts/v-0.10/advanced/integrate-to-html5.md
new file mode 100644
index 0000000..b71bcd7
--- /dev/null
+++ b/_drafts/v-0.10/advanced/integrate-to-html5.md
@@ -0,0 +1,77 @@
+---
+title: Integrate to web
+type: advanced
+order: 5
+has_chapter_content: true
+version: 0.10
+---
+
+# Integrate Weex HTML5 to your project
+
+### Intro
+
+Weex is a extendable cross-platform solution for dynamic programming and publishing projects, which is for developers to write code once and run the code everywhere.
+
+The bundle transformed from the source can currently run on android, ios and web platform. Weex HTML5 is a renderer for weex bundle to run on a webview or a modern browser etc.
+
+### Get Weex HTML5
+
+Use npm to install the latest version of Weex HTML5, require it in your code by CommonJS and use it as a npm package.
+
+#### Install from npm
+
+Make sure you get the latest version by `npm install` or `npm update`. For more information of npm, please visit the [npm official site](https://docs.npmjs.com/).
+
+```
+npm install weex-html5
+```
+
+require weex-html5:
+
+```
+const weex = require('weex-html5')
+```
+
+### Initialize and run
+
+You can initialize weex through the API `init`. This method takes a config object as the first argument to confirm the runtime infomation and environment. Following parameters can be set by this config object:
+
+* `appId`: app instance id, can be either a string or a number
+* `source`: the requested url of weex bundle, or the transformed code it self.
+* `loader`: the loader type to load the weex bundle, which value is 'xhr' or 'jsonp' or 'source'.
+ * `xhr`: load the source (weex bundle url) by XHR
+ * `jsonp`: load the source bundle by JSONP
+ * `source`: the source parameter above should be a weex bundle content (transformed bundle).
+* `rootId`: the id of the root element. Default value is 'weex'.
+
+Here is a example to do the initialzation:
+
+```
+function weexInit() {
+ function getUrlParam (key) {
+ var reg = new RegExp('[?|&]' + key + '=([^&]+)')
+ var match = location.search.match(reg)
+ return match && match[1]
+ }
+
+ var loader = getUrlParam('loader') || 'xhr'
+ var page = getUrlParam('page')
+
+ // jsonp callback name should be specified or be the default
+ // value 'weexJsonpCallback' if the 'jsonp' loader is used.
+ var JSONP_CALLBACK_NAME = 'weexJsonpCallback'
+
+ window.weex.init({
+ jsonpCallback: JSONP_CALLBACK_NAME,
+ appId: location.href,
+ source: page,
+ loader: loader,
+ rootId: 'weex'
+ })
+}
+
+weexInit()
+```
+
+
+
http://git-wip-us.apache.org/repos/asf/incubator-weex-site/blob/12e3a8bc/_drafts/v-0.10/advanced/integrate-to-ios.md
----------------------------------------------------------------------
diff --git a/_drafts/v-0.10/advanced/integrate-to-ios.md b/_drafts/v-0.10/advanced/integrate-to-ios.md
new file mode 100644
index 0000000..69dea6d
--- /dev/null
+++ b/_drafts/v-0.10/advanced/integrate-to-ios.md
@@ -0,0 +1,118 @@
+---
+title: Integrate to iOS
+type: advanced
+order: 4
+has_chapter_content: true
+version: 0.10
+---
+
+# import Weex iOS to your project
+
+You will need to build Weex from source if you want to work on a new feature/bug fix, try out the latest features not released yet, or maintain your own fork with patches that cannot be merged to the core.
+
+Assuming you have installed [iOS Develop Environment](https://developer.apple.com/library/ios/documentation/IDEs/Conceptual/AppStoreDistributionTutorial/Setup/Setup.html) and [CocoaPods](https://guides.cocoapods.org/using/getting-started.html).
+
+#### 1. Clone source from github
+
+First, you need to git clone `weex` from github:
+
+```
+git clone https://github.com/alibaba/weex.git
+```
+#### 2. Import WeexSDK to project
+
+Copy the whole folder `/ios/sdk` to your project directory.
+
+Before adding the dependencies, please confirm that the project directory already exists the Podfile. If not, create a new one. Then, edit this file, adding some necessary dependecis for the target.
+
+```
+target 'YourTarget' do
+ platform :ios, '7.0'
+ pod 'WeexSDK', :path=>'./sdk/'
+end
+```
+You can get your `YourTarget` below
+
+
+
+Run pod install in current directory, for a while, .xcworkspace will be created. At this point, the dependencies have been established.
+
+#### 3. Init Weex Environment
+We are used to doing some initial tasks in appDelegate. Of course, there is no exception. You can do this in `didFinishLaunchingWithOptions` as follows.
+
+```
+//business configuration
+[WXAppConfiguration setAppGroup:@"AliApp"];
+[WXAppConfiguration setAppName:@"WeexDemo"];
+[WXAppConfiguration setAppVersion:@"1.0.0"];
+
+//init sdk enviroment
+[WXSDKEngine initSDKEnviroment];
+
+//register custom module and component,optional
+[WXSDKEngine registerComponent:@"MyView" withClass:[MyViewComponent class]];
+[WXSDKEngine registerModule:@"event" withClass:[WXEventModule class]];
+
+//register the implementation of protocol, optional
+[WXSDKEngine registerHandler:[WXNavigationDefaultImpl new] withProtocol:@protocol(WXNavigationProtocol)];
+
+//set the log level
+[WXLog setLogLevel:WXLogLevelVerbose];
+
+```
+
+#### 4. Render Weex Instance
+Weex supports two different modes, the full page rendering and part of page rendering.
+Something you have to do is to render weex view with specific URL, then add it to the parent container, which may be the viewController.
+
+```
+#import <WeexSDK/WXSDKInstance.h>
+
+- (void)viewDidLoad
+{
+ [super viewDidLoad];
+
+ _instance = [[WXSDKInstance alloc] init];
+ _instance.viewController = self;
+ _instance.frame = self.view.frame;
+
+ __weak typeof(self) weakSelf = self;
+ _instance.onCreate = ^(UIView *view) {
+ [weakSelf.weexView removeFromSuperview];
+ weakSelf.weexView = view;
+ [weakSelf.view addSubview:weakSelf.weexView];
+ };
+
+ _instance.onFailed = ^(NSError *error) {
+ //process failure
+ };
+
+ _instance.renderFinish = ^ (UIView *view) {
+ //process renderFinish
+ };
+ [_instance renderWithURL:self.url options:@{@"bundleUrl":[self.url absoluteString]} data:nil];
+}
+```
+WXSDKInstance is a very imporent class, which provides you with some basic methods and callbacks, such as renderWithURL、onCreate、onFailed and etc. You can understand their usage by reading WXSDKInstance.h.
+
+
+#### 5. Destroy Weex Instance
+
+Please release weex instance in dealloc stage of viewContoller, or it will lead to memory leak.
+
+```
+- (void)dealloc
+{
+ [_instance destroyInstance];
+}
+```
+
+#### 6. Build .IPA for Weex
+
+We can also pack all the JS files into the app's resources. This way you can run your app without development server and submit it to the AppStore.
+
+* [Install weex-toolkit](https://github.com/alibaba/weex_toolchain/tree/master/toolkit) and transform your `.we` file to JS by running `weex index.we -o index.js`, `index.we` is the entry file of your app.
+* Move `index.js` to your app's Xcode project and add the file to your target.
+* Replace `[_instance renderWithURL:'httpURL']` with: `[_instance renderWithURL: [[NSBundle mainBundle] URLForResource:@"index" withExtension:@"js"]]`
+
+* Go to Product -> Archive in Xcode and follow the steps to build your .IPA file and submit it to the AppStore.
http://git-wip-us.apache.org/repos/asf/incubator-weex-site/blob/12e3a8bc/_drafts/v-0.10/guide/.gitkeep
----------------------------------------------------------------------
diff --git a/_drafts/v-0.10/guide/.gitkeep b/_drafts/v-0.10/guide/.gitkeep
new file mode 100644
index 0000000..e69de29
http://git-wip-us.apache.org/repos/asf/incubator-weex-site/blob/12e3a8bc/_drafts/v-0.10/guide/how-to/customize-a-native-component.md
----------------------------------------------------------------------
diff --git a/_drafts/v-0.10/guide/how-to/customize-a-native-component.md b/_drafts/v-0.10/guide/how-to/customize-a-native-component.md
new file mode 100644
index 0000000..62c0cf0
--- /dev/null
+++ b/_drafts/v-0.10/guide/how-to/customize-a-native-component.md
@@ -0,0 +1,58 @@
+---
+title: Customize a native Component
+type: guide
+order: 3.3
+version: 0.10
+---
+
+# How to customize a native Component ?
+
+Weex has wrapped up the most critical platform components, such as `ScrollView`, `ListView`, `Text`, `Imageview` and so on. Certainly these components can not completely meet your need. And thousands of native UI components that always be using in our project may be required to integrate into Weex easily. Fortunately, it's quite convenient to wrap up your own components that should be from any existing components.
+
+##### Step By Step
+
+1. Customized components must inherit from `WXComponent` or `WXContainer`;
+2. @WXComponentProp(name=value(value is attr or style of dsl)) for it be recognized by weex SDK;
+3. The access levels of method must be **public**;
+4. The component class can not be an inner class;
+5. Customized components should not be obfuscated by tools like ProGuard;
+6. Component methods will be invoked on the UI thread, so do not contain time-consuming operations here;
+7. Weex parameter's type can be int, double, float, String, Map, List, self-defined class that implements WXObject interface;
+
+
+#### Refer to the following example:
+
+```java
+package com.taobao.weex.ui.component;
+……
+
+public class MyViewComponent extends WXComponent{
+
+ public MyViewComponent(WXSDKInstance instance, WXDomObject node,
+ WXVContainer parent, String instanceId, boolean lazy) {
+ super(instance, node, parent, instanceId, lazy);
+ }
+
+ @Override
+ protected void initView() {
+ //TODO:your own code ……
+ }
+
+ @Override
+ public WXFrameLayout getView() {
+ //TODO:your own code ………
+ }
+ @WXComponentProp(name=WXDomPropConstant.WX_ATTR_VALUE)
+ public void setMyViewValue(String value) {
+ ((TextView)mHost).setText(value);
+ }
+
+}
+```
+#### Component should be registered
+
+```java
+WXSDKEngine.registerComponent("MyView", MyViewComponent.class);
+```
+
+
http://git-wip-us.apache.org/repos/asf/incubator-weex-site/blob/12e3a8bc/_drafts/v-0.10/guide/how-to/cuszomize-native-apis.md
----------------------------------------------------------------------
diff --git a/_drafts/v-0.10/guide/how-to/cuszomize-native-apis.md b/_drafts/v-0.10/guide/how-to/cuszomize-native-apis.md
new file mode 100644
index 0000000..9594ff0
--- /dev/null
+++ b/_drafts/v-0.10/guide/how-to/cuszomize-native-apis.md
@@ -0,0 +1,80 @@
+---
+title: Customize native APIs
+type: guide
+order: 3.4
+version: 0.10
+---
+
+# How to customize native APIs ?
+
+Weex SDK provides only rendering capability, rather than having other capabilities, such as network, picture, and URL redirection. If you want the these features, you need to implement them yourselves.
+The example below will describe how to extend weex with native logic or 'bridge' your existed native code.
+
+## A URLHelper Example
+### Create your own `WXModule` in native:
+
+```java
+public class URLHelperModule extends WXModule{
+ private static final String WEEX_CATEGORY="com.taobao.android.intent.category.WEEX";
+ @WXModuleAnno
+ public void openURL(String url){
+ if (TextUtils.isEmpty(url)) {
+ return;
+ }
+ StringBuilder builder=new StringBuilder("http:");
+ builder.append(url);
+ Uri uri = Uri.parse(builder.toString());
+ Intent intent = new Intent(Intent.ACTION_VIEW, uri);
+ intent.addCategory(WEEX_CATEGORY);
+ mWXSDKInstance.getContext().startActivity(intent);
+ }
+}
+
+```
+
+Notice the `@WXModuleAnno`, use this annotation to mark the methods you wanna expose to javascript.
+If your also want to callback to javascript, you should define a `callbackId` parameter to received 'JS callback function id':
+
+```java
+public class URLHelperModule extends WXModule{
+
+ @WXModuleAnno
+ public void openURL(String url,String callbackId){
+ //...
+ //callback to javascript
+ Map<String, Object> result = new HashMap<String, Object>();
+ result.put("ts", System.currentTimeMillis());
+ WXBridgeManager.getInstance().callback(mWXSDKInstance.getInstanceId(), callbackId, result);
+ }
+}
+```
+
+
+### Register your module to engine:
+
+```
+try {
+ WXSDKEngine.registerModule("myURL", URLHelperModule.class);//'myURL' is the name you'll use in javascript
+ } catch (WXException e) {
+ WXLogUtils.e(e.getMessage());
+ }
+```
+### Now, you can use eventModule in javascript like this:
+
+```javascript
+let URLHelper = require('@weex-module/myURL');//same as you registered
+URLHelper.openURL("http://www.taobao.com",function(ts){
+ console.log("url is open at "+ts);
+});
+
+```
+
+
+## Things you need to note:
+1. Customized components must inherit from `WXModule`;
+2. @WXModuleAnno annotation must be added, as it is the only way to be recognized by Weex;
+3. The access levels of method must be **public**;
+4. The module class also can not be an inner class;
+5. Customized components should not be obfuscated by tools like ProGuard;
+6. Module methods will be invoked on the UI thread, so do not put time-consuming operations there;
+7. Weex parameter's type can be int, double, float, String, Map, List, self-defined class that implements WXObject interface;
http://git-wip-us.apache.org/repos/asf/incubator-weex-site/blob/12e3a8bc/_drafts/v-0.10/guide/how-to/debug-with-html5.md
----------------------------------------------------------------------
diff --git a/_drafts/v-0.10/guide/how-to/debug-with-html5.md b/_drafts/v-0.10/guide/how-to/debug-with-html5.md
new file mode 100644
index 0000000..c80fb69
--- /dev/null
+++ b/_drafts/v-0.10/guide/how-to/debug-with-html5.md
@@ -0,0 +1,47 @@
+---
+title: Debug in html5 renderer
+type: guide
+order: 3.5
+version: 0.10
+---
+
+# How to debug in html5 renderer ?
+
+Since weex-html5 can run on a modern mobile browser, it's naturally supported to debug weex-html5 code in browsers' dev tools. Use browser's devTools to iterate, debug and profile your weex-html5 app. Take chrome's debug tool as a example:
+
+
+
+## Elements
+
+Use elements' panel to inspect the layout and design of the weex-html5 page, and manipulate the DOM and CSS to do some experiment freely.
+
+## Console
+
+You can use `console.log` to log information on console, but it's highly recommended to use `nativeLog` instead, since nativeLog can run on a native platform based on a browser. The defect of `nativeLog` is that it's not supported to trace it from the console to the source file which the `nativeLog` is called in, therefore in this situation you'd better use `console.log`, and you should make sure this code will not run on native platform (otherwise a exception or a crash will be caused).
+
+## Breakpoints
+
+You can set breakpoints to debug code. Breakpoints are one of the most effective way to debug code. Breakpoints enable you to pause script execution and then investigate the call stack variable values at that particular moment in time.
+
+Manual breakpoints are individual breakpoints that you set on a specific line of code. You can set these via Chrome DevTools GUI, or by inserting the `debugger` keyword in your code.
+
+## Locate your bug
+
+Generally speaking, there are three possible layer the bug could happen on: the renderer (weex-html5), the js-framework (weex-js-framework) and the transformer (gulp-weex).
+
+Here are some suggestions to locate your bug so that you can recognize which layer the bug is on:
+
+* check the console for errors. In debug mode if there is a error happend there will be info about it on the console.
+* in bridge/receiver.js, whether the `callNative` function is called.
+* whether the supposed to be called API method is actually called and executed.
+* whether the `callJS` method for event firing or callback executing is called.
+
+## other
+
+More info about how to debug h5 pages on chrome devTools: [chrome's devTools docs](https://developers.google.com/web/tools/chrome-devtools/?hl=en)
+
+
+
+
+
+
http://git-wip-us.apache.org/repos/asf/incubator-weex-site/blob/12e3a8bc/_drafts/v-0.10/guide/how-to/index.md
----------------------------------------------------------------------
diff --git a/_drafts/v-0.10/guide/how-to/index.md b/_drafts/v-0.10/guide/how-to/index.md
new file mode 100644
index 0000000..9f9435a
--- /dev/null
+++ b/_drafts/v-0.10/guide/how-to/index.md
@@ -0,0 +1,40 @@
+---
+title: Preview in browser
+type: guide
+order: 3
+has_chapter_content: false
+chapter_title: How-tos
+version: 0.10
+---
+
+# How to preview weex code in browser ?
+
+## weex-toolkit
+
+We strongly suggest you use weex-toolkit to preview weex code in your browser. This tool is Node.JS based, so you need to install Node at first. Please download and install latest stable version of Node from [https://nodejs.org/en/download/stable/](https://nodejs.org/en/download/stable/). Then you can install weex-toolkit using npm install:
+
+```bash
+$ npm install -g weex-toolkit
+```
+
+Check that the toolkit does work by typing `weex` in the command line. Normally you should see the following help text:
+
+```
+Options:
+ --qr display QR code for native runtime,
+ -o,--output transform weex we file to JS Bundle, output path (single JS bundle file or dir)
+ -s,--server start a http file server, weex .we file will be transforme to JS bundle on the server , specify local root path using the option
+ ......
+ --help Show help
+```
+
+If all work well, navigate to the path the xxx.we file you want to preview in, and type the command:
+
+```bash
+weex xxx.we
+```
+
+A browser window will be opened automatically to display the page you want to preview:
+
+
+
http://git-wip-us.apache.org/repos/asf/incubator-weex-site/blob/12e3a8bc/_drafts/v-0.10/guide/how-to/preview-in-playground-app.md
----------------------------------------------------------------------
diff --git a/_drafts/v-0.10/guide/how-to/preview-in-playground-app.md b/_drafts/v-0.10/guide/how-to/preview-in-playground-app.md
new file mode 100644
index 0000000..5800737
--- /dev/null
+++ b/_drafts/v-0.10/guide/how-to/preview-in-playground-app.md
@@ -0,0 +1,20 @@
+---
+title: Preview in native
+type: guide
+order: 3.2
+version: 0.10
+---
+
+# How to preview weex code in sample-app ?
+
+### Weex Sample Step By Step
+1. Clone Weex from github [`https://github.com/apache/incubator-weex/`](https://github.com/apache/incubator-weex/)
+2. Use Android Studio open Android Sample 。
+3. run Sample project.
+4. into Sample homePage,you will see this picture
+
+5. Click the icon to the top right of the page to enter the two-dimensional code scanning
+
+6. use[`Weex-Toolkit`](https://github.com/alibaba/weex_toolchain/tree/master/toolkit/ )make .we to a QR code
+7. you will see the page rended by Weex
+
http://git-wip-us.apache.org/repos/asf/incubator-weex-site/blob/12e3a8bc/_drafts/v-0.10/guide/how-to/require-3rd-party-libs.md
----------------------------------------------------------------------
diff --git a/_drafts/v-0.10/guide/how-to/require-3rd-party-libs.md b/_drafts/v-0.10/guide/how-to/require-3rd-party-libs.md
new file mode 100644
index 0000000..7349520
--- /dev/null
+++ b/_drafts/v-0.10/guide/how-to/require-3rd-party-libs.md
@@ -0,0 +1,56 @@
+---
+title: Require 3rd Party Libs
+type: guide
+order: 3.6
+version: 0.10
+---
+
+# How to require 3rd Party Libs ?
+
+In the paragraph Maintain Your Component Code, we learn that JavaScript code can be written in `<script>` tag in one component. But there must be some common functions or modules in your project, such as parsing url params, extending properties from some objects to another object and so on. It's a bad practice to copy and paste them in each component, therefore there's a urgent need of `require`. Weex provides CommonJS `require` syntax for developers.
+
+Let take `extend` for example.
+
+## Require Local Js Modules
+
+A basic implementation of `extend` is as follows, and it's placed in directory path `./common/utils.js`.
+
+```javascript
+function extend(dest, src) {
+ for (var key in src) {
+ dest[key] = src[key]
+ }
+}
+exports.extend = extend
+```
+
+In a `.we` file, `extend` can be used with the help of `require`:
+
+```html
+<script>
+ var utils = require('./common/utils')
+ var obj1 = {a: 1}
+ var obj2 = {b: 2}
+ utils.extend(obj1, obj2) // obj1 => {a: 1, b: 2}
+</script>
+```
+
+## Require Installed Node Modules
+
+Besides, [underscore](http://underscorejs.org) is a JavaScript library that provides a whole mess of useful functional programming helpers without extending any built-in objects. It implements a more robust version of [extend](http://underscorejs.org/#extend).
+
+We can use underscore's extend instead of the version implemented by ourselves. After installing `underscore` to the `node_modules` directory, we can `require` and use it.
+
+```bash
+$ npm install underscore
+```
+
+```html
+<script>
+ var _ = require('underscore')
+ var obj1 = {a: 1}
+ var obj2 = {b: 2}
+ var obj3 = {c: 3}
+ var ret = _.extend(obj1, obj2, obj3) // ret => {a: 1, b: 2, c: 3}
+</script>
+```
http://git-wip-us.apache.org/repos/asf/incubator-weex-site/blob/12e3a8bc/_drafts/v-0.10/guide/how-to/transform-code-into-js-bundle.md
----------------------------------------------------------------------
diff --git a/_drafts/v-0.10/guide/how-to/transform-code-into-js-bundle.md b/_drafts/v-0.10/guide/how-to/transform-code-into-js-bundle.md
new file mode 100644
index 0000000..842ecd6
--- /dev/null
+++ b/_drafts/v-0.10/guide/how-to/transform-code-into-js-bundle.md
@@ -0,0 +1,110 @@
+---
+title: Transform Code into Js Bundle
+type: guide
+order: 3.7
+version: 0.10
+---
+
+# Transform Code into Js Bundle
+
+Paragraphs Maintain Your Component Code and [Require 3rd Party Libs](./require-3rd-party-libs.html) show us how to write and organize weex code. However, Weex DSL code must be transformed to `js bundle` so that `js framework` can parse and execute it for iOS, Android and HTML5 portal. For more information, please refer to [How It Works
+](../../advanced/how-it-works.html) and [JS Bundle Format](../../references/specs/js-bundle-format.html).
+
+Now come back to the topic `transform code into js bundle`. There are several ways to achieve the goal.
+
+## weex-toolkit
+
+```bash
+$ npm install -g weex-toolkit
+```
+
+### transform a `we file` to JS Bundle
+
+```bash
+$ weex your_best_weex.we -o .
+```
+
+`your_best_weex.we` will be transform to JS Bundle file `your_best_weex.js` , saved in your current directory
+
+### transform a `we file` to JS Bundle , watch this file ,auto run transformer if change happen.
+
+```bash
+$ weex your_best_weex.we -o . --watch
+```
+
+### transform every we file in a directory
+
+```bash
+$ weex we/file/storage/path -o outputpath
+```
+
+every `we file` in `we/file/storage/path` will be transformed to JS Bundle , saved in `outputpath` path
+
+please access [npmjs.com](https://www.npmjs.com/package/weex-toolkit) for more information about weex-toolkit.
+
+## transformer
+
+```bash
+npm install weex-transformer
+```
+
+### CLI Tool
+
+```bash
+ Usage: transformer [options] <file...>
+
+ Options:
+
+ -h, --help output usage information
+ -V, --version output the version number
+ -l, --oldFormat [value] whether to transform to old format (default: false)
+ -e, --isEntry [value] whether is an entry module which has `bootstrap` (default: true)
+ -o, --output [path] the output file dirname
+```
+
+### API
+
+** transform(name, code, path, elements, config) **
+
+```javascript
+var transformer = require('weex-transformer')
+var output = transformer.transform('foo', '/* code here */', '.', {})
+```
+
+params:
+
+- `name`: string, current bundle name
+- `code`: string, source code
+- `path`: string *optional*, useful when find custom component in a certain path
+- `elements`: object *optional*, existed custom component map
+- `config`: object *optional*
+ * `oldFormat`: whether to transform to old format (default: false)
+ * `isEntry`: whether is an entry module which has `bootstrap` (default: true)
+
+returns:
+
+- an object with keys
+ * `result`: string, all custom components `define()` and final `bootstrap()`
+ * `logs`: array, corresponding warning & error logs
+
+## gulp weex
+
+```bash
+$ npm install gulp-weex
+```
+
+```javascript
+var gulp = require('gulp')
+var weex = require('gulp-weex')
+
+gulp.task('default', function () {
+ return gulp.src('src/*.html')
+ .pipe(weex({}))
+ .pipe(gulp.dest('./dest'))
+})
+```
+
+Options:
+
+- `oldFormat`: whether to transform to old format (default: false)
+- `isEntry`: whether is an entry module which has `bootstrap` (default: true)
http://git-wip-us.apache.org/repos/asf/incubator-weex-site/blob/12e3a8bc/_drafts/v-0.10/guide/images/tut-cli-qrcode.png
----------------------------------------------------------------------
diff --git a/_drafts/v-0.10/guide/images/tut-cli-qrcode.png b/_drafts/v-0.10/guide/images/tut-cli-qrcode.png
new file mode 100644
index 0000000..9068c14
Binary files /dev/null and b/_drafts/v-0.10/guide/images/tut-cli-qrcode.png differ
http://git-wip-us.apache.org/repos/asf/incubator-weex-site/blob/12e3a8bc/_drafts/v-0.10/guide/images/tut-first.png
----------------------------------------------------------------------
diff --git a/_drafts/v-0.10/guide/images/tut-first.png b/_drafts/v-0.10/guide/images/tut-first.png
new file mode 100755
index 0000000..c8505e6
Binary files /dev/null and b/_drafts/v-0.10/guide/images/tut-first.png differ
http://git-wip-us.apache.org/repos/asf/incubator-weex-site/blob/12e3a8bc/_drafts/v-0.10/guide/images/tut-second.png
----------------------------------------------------------------------
diff --git a/_drafts/v-0.10/guide/images/tut-second.png b/_drafts/v-0.10/guide/images/tut-second.png
new file mode 100755
index 0000000..1259abf
Binary files /dev/null and b/_drafts/v-0.10/guide/images/tut-second.png differ
http://git-wip-us.apache.org/repos/asf/incubator-weex-site/blob/12e3a8bc/_drafts/v-0.10/guide/images/tut1.jpg
----------------------------------------------------------------------
diff --git a/_drafts/v-0.10/guide/images/tut1.jpg b/_drafts/v-0.10/guide/images/tut1.jpg
new file mode 100644
index 0000000..8af0f3f
Binary files /dev/null and b/_drafts/v-0.10/guide/images/tut1.jpg differ
http://git-wip-us.apache.org/repos/asf/incubator-weex-site/blob/12e3a8bc/_drafts/v-0.10/guide/images/tut2.jpg
----------------------------------------------------------------------
diff --git a/_drafts/v-0.10/guide/images/tut2.jpg b/_drafts/v-0.10/guide/images/tut2.jpg
new file mode 100644
index 0000000..c3e8a6e
Binary files /dev/null and b/_drafts/v-0.10/guide/images/tut2.jpg differ
http://git-wip-us.apache.org/repos/asf/incubator-weex-site/blob/12e3a8bc/_drafts/v-0.10/guide/images/tut3.png
----------------------------------------------------------------------
diff --git a/_drafts/v-0.10/guide/images/tut3.png b/_drafts/v-0.10/guide/images/tut3.png
new file mode 100644
index 0000000..5473905
Binary files /dev/null and b/_drafts/v-0.10/guide/images/tut3.png differ
http://git-wip-us.apache.org/repos/asf/incubator-weex-site/blob/12e3a8bc/_drafts/v-0.10/guide/images/tut4.gif
----------------------------------------------------------------------
diff --git a/_drafts/v-0.10/guide/images/tut4.gif b/_drafts/v-0.10/guide/images/tut4.gif
new file mode 100644
index 0000000..eed4395
Binary files /dev/null and b/_drafts/v-0.10/guide/images/tut4.gif differ
http://git-wip-us.apache.org/repos/asf/incubator-weex-site/blob/12e3a8bc/_drafts/v-0.10/guide/index.md
----------------------------------------------------------------------
diff --git a/_drafts/v-0.10/guide/index.md b/_drafts/v-0.10/guide/index.md
new file mode 100644
index 0000000..bb6941c
--- /dev/null
+++ b/_drafts/v-0.10/guide/index.md
@@ -0,0 +1,211 @@
+---
+title: Tutorial
+type: guide
+order: 1
+version: 0.10
+---
+
+# Tutorial
+
+We will make a simple but realistic list, in which the technologies Weex uses will be shown. This form of list also works for a lot of e-commercial apps and mobile sites.
+
+## Getting Started
+
+Let's get started with the list item, which contains one `image` element and one `text` right behind.
+
+```html
+<template>
+ <div class="container">
+ <div class="cell">
+ <image class="thumb" src="http://t.cn/RGE3AJt"></image>
+ <text class="title">JavaScript</text>
+ </div>
+ </div>
+</template>
+
+<style>
+ .cell { margin-top: 10; margin-left: 10; flex-direction: row; }
+ .thumb { width: 200; height: 200; }
+ .title { text-align: center; flex: 1; color: grey; font-size: 50; }
+</style>
+```
+
+You can directly copy and paste the above code into a Weex file named `tech_list.we` (`.we` is our recommended filename extension).
+
+## Preview
+
+Once created, we want to see the running result of the `.we` file. But before that, we must make sure the dependencies are installed.
+
+We should install [Node](https://nodejs.org/en/download/) first, which our Weex CLI program [Weex Toolkit](https://www.npmjs.com/package/weex-toolkit) depends on. Then install `weex-toolkit` by running the command:
+
+```bash
+$ npm install -g weex-toolkit
+```
+
+When installation completed, you can check if Weex CLI is installed properly by running `weex` command in the command line. The following text is expected:
+
+```
+Usage: weex foo/bar/your_next_best_weex_script_file.we [options]
+
+Options:
+ --qr display QR code for native runtime,
+ -o,--output transform weex we file to JS Bundle, output path (single JS bundle file or dir)
+ -s,--server start a http file server, weex .we file will be transforme to JS bundle on the server , specify local root path using the option
+ ......
+ --help Show help
+ -h, --host [default: "127.0.0.1"]
+```
+
+If all work well, navigate to the directory where you saved `tech_list.we`, then type:
+
+```bash
+$ weex tech_list.we
+```
+
+A browser window will be opened automatically to display the running result like below (weex-toolkit version should be greater than 0.1.0, use `weex --version` to check it):
+
+
+
+## Introduce to Weex Syntax
+
+So it's time for introducing the syntax.
+
+Given the content of `tech_list.we`, Weex source code is composed of three parts -- *template*, *style*, and *script*, just like html, css, and javascript for the Web.
+
+Template is the skeleton that gives Weex structure. It is composed of tags which surround content and apply meaning to it. Tags have *attributes*, different attribute means different feature, for example, `class` attribute makes it possible to define the same styles for multiple tags, `onclick` attribute makes the tag respond to click event.
+
+Style describes how Weex tags are to be displayed. We prefer CSS very much. So we try to keep consistent with CSS standard as possible. Weex Style supports a lot of CSS features, like margin, padding, fixed and so on. Better yet, flexbox layout (flex) is well supported in Weex Style.
+
+Script adds *data* & *logic* to Weex tags, helping you easily access local or remote data and update tags. You can also define some methods for your tag to respond to different events. Weex Script organization learns a lot from CommonJS module style.
+
+More information about Weex syntax can be found in our [Syntax chapter](./syntax/index.html).
+
+## Add More Items
+
+We can't call one item a list, so we need to add more items to our tech list. Open `tech_list.we` in your favorite editor and update it's content like below:
+
+```html
+<template>
+ <div class="container">
+ <div class="cell">
+ <image class="thumb" src="http://t.cn/RGE3AJt"></image>
+ <text class="title">JavaScript</text>
+ </div>
+ <div class="cell">
+ <image class="thumb" src="http://t.cn/RGE3uo9"></image>
+ <text class="title">Java</text>
+ </div>
+ <div class="cell">
+ <image class="thumb" src="http://t.cn/RGE31hq"></image>
+ <text class="title">Objective C</text>
+ </div>
+ </div>
+</template>
+
+<style>
+ .cell{ margin-top:10 ; margin-left:10 ; flex-direction: row; }
+ .thumb { width: 200; height: 200; }
+ .title { text-align: center ; flex: 1; color: grey; font-size: 50; }
+</style>
+```
+
+Now we will try to render our `tech_list.we` with Weex native renderer. Open your terminal and navigate to the directory where you save the `tech_list.we` again, then type:
+
+```bash
+$ weex tech_list.we --qr -h {ip or hostname}
+```
+
+It's ***RECOMMENDED*** to use `-h` option to specify your local ip address or hostname.
+
+A QR code will be displayed in the terminal window like below:
+
+
+
+The QR code can work together with [Weex Playground App](http://alibaba.github.io/weex/download.html). Open it and tap the scan icon at the top-right corner, then scan the QR code displayed in your terminal. If all work well, a beautiful list will be displayed in your phone.
+
+
+
+Here, I must stress that the list is rendered by a native view, instead of Webkit, so your app gets faster loading and less memory overhead than common Webview renderer.
+
+Now open `tech_list.we` again and try to change some text, after changes saved the Weex playground App will immediately display these changes. We call that **Hot-Reload**, which is intended to help you use Weex better.
+
+## Add Built-in Components
+
+Instead of writing basic tags by yourself, Weex provides a lot of built-in components. For example, Slider is common to many apps and mobile websites, so Weex includes a built-in Slider so that you can easily use it in your script. Let's open `tech_list.we` and update it's content like below.
+
+```html
+<template>
+ <div style="flex-direction: column;">
+ <slider class="slider" interval="{{intervalValue}}" auto-play="{{isAutoPlay}}" >
+ <div class="slider-pages" repeat="{{itemList}}" onclick="goWeexSite" >
+ <image class="thumb" src="{{pictureUrl}}"></image>
+ <text class="title">{{title}}</text>
+ </div>
+ </slider>
+
+ <div class="container" onclick="goWeexSite" >
+ <div class="cell">
+ <image class="thumb" src="http://t.cn/RGE3AJt"></image>
+ <text class="title">JavaScript</text>
+ </div>
+ <div class="cell">
+ <image class="thumb" src="http://t.cn/RGE3uo9"></image>
+ <text class="title">Java</text>
+ </div>
+ <div class="cell">
+ <image class="thumb" src="http://t.cn/RGE31hq"></image>
+ <text class="title">Objective C</text>
+ </div>
+ </div>
+</template>
+
+<style>
+ .cell { margin-top:10 ; margin-left:10 ; flex-direction: row; }
+ .thumb { width: 200; height: 200; }
+ .title { text-align: center ; flex: 1; color: grey; font-size: 50; }
+ .slider {
+ margin: 18;
+ width: 714;
+ height: 230;
+ }
+ .slider-pages {
+ flex-direction: row;
+ width: 714;
+ height: 200;
+ }
+</style>
+
+<script>
+module.exports = {
+ data: {
+ intervalValue:"1000",
+ isShowIndicators:"true",
+ isAutoPlay:"true",
+ itemList: [
+ {title: 'Java', pictureUrl: 'http://t.cn/RGE3uo9'},
+ {title: 'Objective C', pictureUrl: 'http://t.cn/RGE31hq'},
+ {title: 'JavaScript', pictureUrl: 'http://t.cn/RGE3AJt'}
+ ]
+ },
+ methods: {
+ goWeexSite: function () {
+ this.$openURL('http://alibaba.github.io/weex/')
+ }
+ }
+}
+</script>
+```
+
+Open terminal and run the command again:
+
+```bash
+$ weex tech_list.we
+```
+
+You should see a slider prepend to our list.
+
+
+
+More information about Slider component can be found [here](../references/components/slider.html).
+
+Just as the previous example, the slider can be rendered in native, easily in Weex playground, or in your App. Please refer [the document](./advanced/integrate-to-android.html) for integrating Weex into your App.
http://git-wip-us.apache.org/repos/asf/incubator-weex-site/blob/12e3a8bc/_drafts/v-0.10/guide/syntax/comm.md
----------------------------------------------------------------------
diff --git a/_drafts/v-0.10/guide/syntax/comm.md b/_drafts/v-0.10/guide/syntax/comm.md
new file mode 100644
index 0000000..84e49a1
--- /dev/null
+++ b/_drafts/v-0.10/guide/syntax/comm.md
@@ -0,0 +1,228 @@
+---
+title: Communications
+type: guide
+order: 2.8
+version: 0.10
+---
+
+# Communicate Between Components
+
+## For Child-Parent Communication
+
+Children component can use `this.$dispatch([String type], [Object detail])` method passing information to parent component. first argument meaning type of message , second argument is the message object. If any parent of the child component register the same type of listener using `$on([String type], [Function callback])` method , the callback will be execute with one argument , the message object will be `detail` property of the the argument.
+
+eg:
+
+```html
+<we-element name="foo">
+ <template>
+ <div>
+ <image src="{{imageUrl}}" onclick="test"></image>
+ <text>{{title}}</text>
+ </div>
+ </template>
+ <script>
+ module.exports = {
+ data: {
+ title: '',
+ imageUrl: ''
+ },
+ methods: {
+ test: function () {
+ this.$dispatch('notify', {a: 1})
+ }
+ }
+ }
+ </script>
+</we-element>
+
+<template>
+ <foo title="..." image-url="..."></foo>
+</template>
+
+<script>
+ module.exports = {
+ created: function () {
+ this.$on('notify', function(e) {
+ // when <foo> image tag be clicked ,the function will be executing.
+ // e.detail is `{a: 1}`
+ })
+ }
+ }
+</script>
+```
+
+## For Parent-Child Communication
+
+Parent component can use `this.$vm([String id])` get vm instance of child component. you can access child component information using the vm instance.
+
+```html
+<we-element name="foo">
+ <template>
+ <div>
+ <image src="{{imageUrl}}"></image>
+ <text>{{title}}</text>
+ </div>
+ </template>
+ <script>
+ module.exports = {
+ data: {
+ title: '',
+ imageUrl: ''
+ },
+ methods: {
+ setTitle: function (t) {
+ this.title = t
+ }
+ }
+ }
+ </script>
+</we-element>
+
+<template>
+ <div>
+ <text onclick="test">click to update foo</text>
+ <foo id="fooEl" title="..." image-url="..."></foo>
+ </div>
+</template>
+
+<script>
+ module.exports = {
+ methods: {
+ test: function (e) {
+ var foo = this.$vm('fooEl')
+ foo.setTitle('...')
+ foo.imageUrl = '...'
+ }
+ }
+ }
+</script>
+```
+
+## Parent to Children (multi-child) Communication
+
+Parent can using `this.$broadcast([String type], [Object detail])` broadcast message to all of children.
+
+eg:
+
+```html
+<we-element name="bar">
+ <template>
+ <div>
+ <image src="{{imageUrl}}"></image>
+ </div>
+ </template>
+ <script>
+ module.exports = {
+ data: {
+ imageUrl: ''
+ },
+ created: function() {
+ var self = this
+ this.$on('changeImage', function(e) {
+ self.imageUrl = e.detail.imageUrl
+ })
+ }
+ }
+ </script>
+</we-element>
+
+<we-element name="foo">
+ <template>
+ <div>
+ <bar></bar>
+ <text>{{title}}</text>
+ </div>
+ </template>
+ <script>
+ module.exports = {
+ data: {
+ title: ''
+ },
+ created: function() {
+ var self = this
+ this.$on('changeTitle', function(e) {
+ self.title = e.detail.title
+ })
+ }
+ }
+ </script>
+</we-element>
+
+<template>
+ <div>
+ <text onclick="test">click to update foo</text>
+ <foo></foo>
+ <bar></bar>
+ </div>
+</template>
+
+<script>
+ module.exports = {
+ methods: {
+ test: function (e) {
+ this.$broadcast('changeTitle', {
+ title: '...'
+ })
+ this.$broadcast('changeImage', {
+ imageUrl: '...'
+ })
+ }
+ }
+ }
+</script>
+```
+
+## Siblings Communication
+
+siblings components can using common parent as bridge for passing information
+
+eg:
+
+```html
+<we-element name="foo">
+ <template>...</template>
+ <script>
+ module.exports = {
+ methods: {
+ callbar: function () {
+ this.$dispatch('callbar', {a: 1})
+ }
+ }
+ }
+ </script>
+</we-element>
+
+<we-element name="bar">
+ <template>...</template>
+ <script>
+ module.exports = {
+ created: function() {
+ this.$on('callbar', function(e) {
+ // e.detail.a
+ })
+ }
+ }
+ </script>
+</we-element>
+
+<template>
+ <div>
+ <foo></foo>
+ <bar></bar>
+ </div>
+</template>
+
+<script>
+ module.exports = {
+ created: function () {
+ var self = this
+ this.$on('callbar', function(e) {
+ self.$broadcast('callbar', e.detail)
+ })
+ }
+ }
+</script>
+```
+
+At last, you can learn how to write [config & data](./config-n-data.html) for a Weex page.
http://git-wip-us.apache.org/repos/asf/incubator-weex-site/blob/12e3a8bc/_drafts/v-0.10/guide/syntax/composed-component.md
----------------------------------------------------------------------
diff --git a/_drafts/v-0.10/guide/syntax/composed-component.md b/_drafts/v-0.10/guide/syntax/composed-component.md
new file mode 100644
index 0000000..547096f
--- /dev/null
+++ b/_drafts/v-0.10/guide/syntax/composed-component.md
@@ -0,0 +1,114 @@
+---
+title: Composed Component
+type: guide
+order: 2.6
+version: 0.10
+---
+
+# Composed Component
+
+If some part of weex file is reused often, you could create a composed component represent these part.
+
+You can create a file named `foo.we` to define a composed component, the component name is just `<foo>`.
+
+```html
+<!-- foo.we -->
+<template>
+ <container style="flex-direction: row;">
+ <image src="{{image}}" style="width:100;height:100;"></image>
+ <text>{{title}}</text>
+ </container>
+</template>
+<script>
+ module.exports = {
+ data: {
+ title: null,
+ image: null
+ }
+ }
+</script>
+```
+
+The content of `foo.we` also consists of `<template>`, `<style>` and `<script>`.
+
+Once composed component been defined, you can use `<foo>` in a file which is in the same folder with `foo.we`.
+
+```html
+<template>
+ <foo title="..." image="..."></foo>
+</template>
+```
+
+## Nesting Components
+
+Composed component supports nesting. For example:
+
+```html
+<!-- somepath/foo.we -->
+<template>
+ <container style="flex-direction: row;">
+ <image src="{{image}}"></image>
+ <text>{{title}}</text>
+ </container>
+</template>
+<script>
+ module.exports = {
+ data: {
+ // The key is required if you want this property observed
+ // and could be updated from changing parent attribute
+ title: null,
+ image: null
+ }
+ }
+</script>
+```
+
+```html
+<!-- somepath/foo-list.we -->
+<template>
+ <container>
+ <text>{{description}}</text>
+ <foo repeat="{{list}}" title="{{text}}" image="{{img}}"></foo>
+ </container>
+</template>
+<script>
+ module.exports = {
+ data: {
+ description: '',
+ // If no keys written here. There will be no data binding effect
+ // from parent attribute "list".
+ list: []
+ }
+ }
+</script>
+```
+
+```html
+<!-- somepath/main.we -->
+<template>
+ <foo-list list="{{list}}"></foo-list>
+</template>
+<script>
+ module.exports = {
+ data: {
+ list: [
+ {text: '...', img: '...'},
+ {text: '...', img: '...'},
+ {text: '...', img: '...'},
+ ...
+ ]
+ }
+ }
+</script>
+```
+
+The `main.we` uses `<foo-list>` from `foo-list.we`. And `<foo-list>` uses `<foo>` from `foo.we`.
+
+## Notes
+
+- Every composed component have an independent `<style>` work scope.
+- If child component have `id` attribute, you can access the context of the child component by `this.$vm(id)` and find an element by `this.$el(id)`. See more about [find an element](./id.html).
+- Please refer to [communicate between components](./comm.html) for more communication issues.
+- The keys must be existed in `data` options **explicitly** if you want to make the data observation work both through inside data changes and outside attribute changes.
+
+Next is how to [find an element](./id.html).
http://git-wip-us.apache.org/repos/asf/incubator-weex-site/blob/12e3a8bc/_drafts/v-0.10/guide/syntax/config-n-data.md
----------------------------------------------------------------------
diff --git a/_drafts/v-0.10/guide/syntax/config-n-data.md b/_drafts/v-0.10/guide/syntax/config-n-data.md
new file mode 100644
index 0000000..37b8e12
--- /dev/null
+++ b/_drafts/v-0.10/guide/syntax/config-n-data.md
@@ -0,0 +1,61 @@
+---
+title: Page Config & Data
+type: guide
+order: 2.9
+version: 0.10
+---
+
+# Page Config & Data
+
+You can write some instance config and data in some additional `<script>` at the **top-level** Weex component.
+
+* the instance config could declare some meta informations like which sdk/client version it supports or "downgrade" to HTML5 renderer. This part would be extended more in the future.
+* the instance data could set an external data which would be processed instead of the default top-level component data.
+
+They all make Weex files more extendable and configurable and works easy with other tools & services like CMS system.
+
+```html
+<!-- definition of sub components -->
+<element name="sub-component-a">...</element>
+<element name="sub-component-b">...</element>
+<element name="sub-component-c">...</element>
+
+<!-- definition of top-level component -->
+<template>...</template>
+<style></style>
+<script>
+ module.exports = {
+ data: function () {return {x: 1, y: 2}}
+ }
+</script>
+
+<!-- instance config and data -->
+<script type="config">
+ {
+ downgrade: {
+ ios: {
+ os: '9', // all of 9.x.x
+ app: '~5.3.2',
+ framework: '^1.3', // all of 1.3.x
+ deviceModel: ['AAAA', 'BBBB']
+ },
+ android: {
+ os: '*', // all of version
+ app: '^5',
+ framework: '',
+ deviceModel: ''
+ }
+ }
+ }
+</script>
+<script type="data">
+ {y: 200}
+</script>
+```
+
+Notice that these two additional `<script>` are both optinal and have `type="config|data"` attribute and only works when it's the top-level component of a Weex instance.
+
+So that's all about Weex syntax. For more reading, please check out:
+
+* [how-tos](../how-to/index.html) articles and
+* [advanced](../../advanced/index.html) topics.
[20/51] [abbrv] incubator-weex-site git commit: rearrangement the
structure of the document
Posted by ha...@apache.org.
http://git-wip-us.apache.org/repos/asf/incubator-weex-site/blob/32a097bf/_draft/v1.0/references/modules/stream.md
----------------------------------------------------------------------
diff --git a/_draft/v1.0/references/modules/stream.md b/_draft/v1.0/references/modules/stream.md
new file mode 100644
index 0000000..6c1b893
--- /dev/null
+++ b/_draft/v1.0/references/modules/stream.md
@@ -0,0 +1,220 @@
+---
+title: stream
+type: references
+order: 4.7
+version: 0.10
+---
+
+# stream
+
+## 概述
+
+以下为 stream 相关的 API,用于实现网络请求。
+
+## API
+### `fetch(options, callback[,progressCallback])`
+
+发起网络请求
+
+#### 参数
+
+- `options {Object}`:请求的一些选项
+ - `method {string}`:HTTP 方法 `GET` 或是 `POST`
+ - `url {string}`:请求的 URL
+ - `headers {Object}`:HTTP 请求头
+ - `type {string}`:请求类型, `json`,`text` 或是 `jsonp` {在原生实现中其实与 json 相同)
+ - `body {string}`:HTTP 请求体。
+
+ **注意:**
+
+ - `body` 参数仅支持 `string` 类型的参数,请勿直接传递 `JSON`,必须先将其转为字符串。
+ - `GET` 请求不支持 `body` 方式传递参数,请使用 url 传参。
+
+- `callback {Function}`:响应结果回调,回调函数将收到如下的 `response` 对象:
+ - `status {number}`:返回的状态码
+ - `ok {boolean}`:如果状态码在 200~299 之间就为真。
+ - `statusText {string}`:状态描述文本
+ - `data {Object | string}`: 返回的数据,如果请求类型是 `json` 和 `jsonp`,则它就是一个 object ,如果不是,则它就是一个 string。
+ - `headers {Object}`:响应头
+- `progressCallback {Function}`:关于请求状态的回调。 这个回调函数将在请求完成后就被调用:
+ - `readyState {number}`:当前状态
+ state:'1': 请求连接中
+ opened:'2': 返回响应头中
+ received:'3': 正在加载返回数据
+ - `status {number}`:响应状态码.
+ - `length {number}`:已经接受到的数据长度. 你可以从响应头中获取总长度
+ - `statusText {string}`:状态文本
+ - `headers {Object}`:响应头
+
+#### 示例
+
+```html
+<template>
+ <div class="wrapper">
+ <list class="list">
+ <header class="header">
+ <text class="title">Search Results</text>
+ </header>
+ <refresh style="width: 750; padding: 30;" onrefresh="refreshData" display="{{refreshDisplay}}">
+ <text class="text"> ↓ Pull to refresh </text>
+ <loading-indicator class="indicator"></loading-indicator>
+ </refresh>
+ <cell class="row" repeat="item in items" id="item-{{$index}}">
+ <div>
+ <text class="item">Repo name: {{item.full_name}}</text>
+ </div>
+ <div>
+ <text class="item">Repo star: {{item.stargazers_count}}</text>
+ </div>
+ </cell>
+ <loading onloading="loadingData" style="width: 750; padding: 30;" display="{{loadingDisplay}}">
+ <text class="text">{{loadingText}}</text>
+ </loading>
+ </list>
+ <div class="up" onclick="goToTop">
+ <img class="img" src="https://img.alicdn.com/tps/TB1ZVOEOpXXXXcQaXXXXXXXXXXX-200-200.png"></img>
+ </div>
+ </div>
+</template>
+
+<style>
+.wrapper {
+ position: absolute;
+ top: 0;
+ right: 0;
+ bottom: 0;
+ left: 0;
+}
+.list{
+ background-color: #ffffff;
+ flex: 1;
+}
+.header {
+ height: 80;
+ align-items: center;
+ justify-content: center;
+ background-color: #efefef;
+ border-bottom-color: #eeeeee;
+ border-bottom-width: 2;
+ border-bottom-style: solid;
+}
+.title {
+ text-align: center;
+}
+.text {
+ text-align: center;
+}
+.row {
+ padding: 20;
+ border-bottom-color: #eeeeee;
+ border-bottom-width: 2;
+ border-bottom-style: solid;
+}
+.up {
+ width: 70;
+ height: 70;
+ position: fixed;
+ right: 20;
+ bottom: 20;
+}
+.img {
+ width: 70;
+ height: 70;
+}
+</style>
+
+<script>
+var dom = require('@weex-module/dom') || {}
+var stream = require('@weex-module/stream') || {}
+var modal = require('@weex-module/modal') || {}
+
+var SEARCH_URL = 'https://api.github.com/search/repositories?q=language:javascript&sort=stars&order=desc'
+
+module.exports = {
+ data: {
+ isLoaded: true,
+ page: 1,
+ loadingDisplay: 'hide',
+ refreshDisplay: 'hide',
+ loadingText: 'Loading...',
+ items:[]
+ },
+ created: function () {
+ var url = SEARCH_URL + '&page=' + this.page
+
+ this.renderData(url)
+
+ this.page++
+ },
+ methods: {
+ renderData: function (url) {
+ var self = this
+
+ stream.fetch({
+ method: 'GET',
+ url: url,
+ type:'json'
+ }, function(res) {
+ self.refreshDisplay = 'hide'
+ self.loadingDisplay = 'hide'
+
+ try {
+ var results = res.data.items || []
+
+ if (Array.isArray(results)) {
+ for(var i = 0; i < results.length; i++) {
+ self.items.push(results[i])
+ }
+ }
+
+ self.isLoaded = true
+ } catch(e) {}
+ },function(res){
+
+ })
+ },
+ loadingData: function (e) {
+ var url = SEARCH_URL + '&page=' + this.page
+ var self = this
+
+ if (self.isLoaded === false) return
+
+ self.loadingDisplay = 'show'
+
+ if (self.page <=10 ) {
+ self.renderData(url)
+ self.page++
+ } else {
+ self.loadingDisplay = 'hide'
+ self.loadingText = 'NO MORE!'
+ }
+ },
+ goToTop: function (e) {
+ dom.scrollToElement(this.$el('item-0'), {
+ offset: -100
+ })
+ },
+ refreshData: function (e) {
+ var url = SEARCH_URL + '&page=1'
+
+ if (this.isLoaded === false) return
+
+ this.refreshDisplay = 'show'
+
+ modal.toast({
+ 'message': 'Refreshing...',
+ 'duration': 1
+ })
+
+ this.items = []
+ this.page = 1
+ this.renderData(url)
+
+ this.refreshDisplay = 'hide'
+ }
+ }
+}
+</script>
+```
+
+[体验一下](http://dotwe.org/ed524ade679b0fa96e980600c53ea5ce)
\ No newline at end of file
http://git-wip-us.apache.org/repos/asf/incubator-weex-site/blob/32a097bf/_draft/v1.0/references/modules/webview.md
----------------------------------------------------------------------
diff --git a/_draft/v1.0/references/modules/webview.md b/_draft/v1.0/references/modules/webview.md
new file mode 100644
index 0000000..b6f3cbe
--- /dev/null
+++ b/_draft/v1.0/references/modules/webview.md
@@ -0,0 +1,66 @@
+---
+title: webview
+type: references
+order: 4.8
+version: 0.10
+---
+
+# `webview`
+
+一系列的 `<web>` 组件操作接口。 比如 `goBack`、`goForward`、和 `reload`。`webview` module 与 `<web>` 组件共用。
+
+## 示例
+
+查看 [简单浏览器](../components/web.html) ,一个结合 `<web>` 组件和 `webview` module 的示例。
+
+## API
+
+### `goBack(webElement)`
+
+加载历史记录里的前一个资源地址。
+
+#### 参数
+
+* `webElement {Element}`:`<web>` 组件对象。
+
+#### 示例
+
+```javascript
+var webview = require('@weex-module/webview')
+var webElement = this.$el('webview')
+webview.goBack(webElement)
+```
+
+### `goForward(webElement)`
+
+加载历史记录里的下一个资源地址。
+
+#### 参数
+
+* `webElement {Element}`:`<web>` 组件对象。
+
+#### 示例
+
+```javascript
+var webview = require('@weex-module/webview')
+var webElement = this.$el('webview')
+webview.goForward(webElement)
+```
+
+### `reload(webElement)`
+
+刷新当前页面。
+
+#### 参数
+
+* `webElement {Element}`:`<web>` 组件对象。
+
+#### 示例
+
+```javascript
+var webview = require('@weex-module/webview')
+var webElement = this.$el('webview')
+webview.reload(webElement.ref)
+```
+
+*注意事项:未来 `<web>` 组件的 `Element` 对象将会支持直接这些方法,届时 `webview` module 将不再需要*
http://git-wip-us.apache.org/repos/asf/incubator-weex-site/blob/32a097bf/_draft/v1.0/references/replace.md
----------------------------------------------------------------------
diff --git a/_draft/v1.0/references/replace.md b/_draft/v1.0/references/replace.md
new file mode 100644
index 0000000..5ace251
--- /dev/null
+++ b/_draft/v1.0/references/replace.md
@@ -0,0 +1,57 @@
+# Replace option
+
+The `replace` option is boolean type. It determined whether this composed component will be replaced with the `<template>` content or just as a normal `<div>` element which include the `<template>` content.
+
+For example:
+
+```
+<element name="foo">
+ <template>
+ <text>Foo</text>
+ </template>
+ <script>
+ module.exports = {
+ replace: false // by default
+ }
+ </script>
+</element>
+
+<template>
+ <foo></foo>
+</template>
+```
+
+will rendered as:
+
+```
+<div>
+ <text>Foo</text>
+</div>
+```
+
+but:
+
+```
+<element name="foo">
+ <template>
+ <text>Foo</text>
+ </template>
+ <script>
+ module.exports = {
+ replace: true
+ }
+ </script>
+</element>
+
+<template>
+ <foo></foo>
+</template>
+```
+
+will rendered as:
+
+```
+<text>Foo</text>
+```
+
+So you can choose a way you need or like to manage your virtual DOM structure.
http://git-wip-us.apache.org/repos/asf/incubator-weex-site/blob/32a097bf/_draft/v1.0/references/special-element.md
----------------------------------------------------------------------
diff --git a/_draft/v1.0/references/special-element.md b/_draft/v1.0/references/special-element.md
new file mode 100644
index 0000000..e01a2c7
--- /dev/null
+++ b/_draft/v1.0/references/special-element.md
@@ -0,0 +1,38 @@
+---
+title: 特殊元素
+type: references
+order: 1.11
+version: 0.10
+---
+
+# 特殊元素
+
+## `<content>`
+
+`<content>` 在编写组件模板时作为作为内容节点元素存在,使用时将被真正的元素替换。
+
+替代写法: `<slot>`。
+
+## 示例
+
+如示例中写法,`<content>` 节点被 `<text>` 替代。
+
+```html
+<element name="item">
+ <template>
+ <div>
+ <content></content>
+ </div>
+ </template>
+</element>
+
+<template>
+ <div>
+ <item>
+ <text>Content Text</text>
+ </item>
+ </div>
+</template>
+```
+
+[体验一下](http://dotwe.org/bf4354a0e6dbe67470ad1a988cdd565e)
http://git-wip-us.apache.org/repos/asf/incubator-weex-site/blob/32a097bf/_draft/v1.0/references/specs/index.md
----------------------------------------------------------------------
diff --git a/_draft/v1.0/references/specs/index.md b/_draft/v1.0/references/specs/index.md
new file mode 100644
index 0000000..164e61b
--- /dev/null
+++ b/_draft/v1.0/references/specs/index.md
@@ -0,0 +1,309 @@
+---
+title: JS Bundle format (英)
+type: references
+order: 5
+has_chapter_content: false
+chapter_title: 底层规范
+version: 0.10
+---
+
+# JS Bundle format
+
+JS Bundle Version: v0.3.0
+
+## v0.5.0
+
+### Whole Syntax and Structure
+
+A JS Bundle is actually a JavaScript file which follows **ES5** standard. The code is used to define some custom components for the instance and bootstrap the instance with certain name, config and data. Developers could use all kinds of JS code packager like webpack, browserify, requirejs to organize your whole instance code.
+
+### Meta Info
+
+The JS Bundle Must begin with a comment line which is a JSON object like:
+
+```javascript
+// { "framework": "Weex", "version": "0.5.0" }
+```
+
+This JSON object as least contains:
+
+* property `framework` must be `"Weex"`
+* property `version` should be corresponded with the JS Bundle format version
+
+### Global Members
+
+* `__weex_define__(name, options)`
+* `__weex_bootstrap__(name, config, data)`
+* `__weex_document__`
+* `__weex_require__(name)`
+
+#### `__weex_define__(name:string, options: object)`
+
+Define a custom component named `name` for current instance with `options`.
+
+**example:**
+
+```javascript
+__weex_define__('rmb', {
+ template: {
+ type: 'div',
+ style: {flexDirection: 'row'},
+ children: [
+ {type: 'text', attr: {value: '¥'}},
+ {type: 'text', attr: {value: this.value}}
+ ]
+ },
+ data: function () {
+ return {
+ value: '0'
+ }
+ },
+ methods: {...}
+})
+```
+
+The enabled component options contains:
+
+* `template`: just the same as [v0.3.0](#details-of-template-option-definitions)
+* `style`: just the same as [v0.3.0](#details-of-style-option-definitions)
+* `data`: a function which return a plain object to observe by the ViewModel
+* `methods`: a function map to proxy to the ViewModel
+* `computed`: a map of several computed keys for the ViewModel
+* `init`, `created`, `ready`: lifecycle methods
+* `events`: event handlers for the ViewModel
+<!-- * `components`: a map for options of sub components the ViewModel needed (So `__weex_define__(name, options)` equals to run `this.components[name] = options` in each custom components when `init`) -->
+
+The enabled ViewModel APIs contains:
+
+* `$el(id): Element`: find element by id in current ViewModel scope
+* `$vm(id): ViewModel`: find sub ViewModel by id
+* `$getConfig(): object`: get instance config info
+* `$broadcast`/`$emit`/`$dispatch`/`$on`/`$off`: listen and fire component events
+* `$transition` *(experimental)*: animation transition (see more in [animation native module](../animation.html))
+
+#### `__weex_require__(name: string): object`
+
+Get a Weex native module with several native APIs.
+
+**example:**
+
+```javascript
+var modal = __weex_require__('modal')
+modal.toast({
+ message: 'Hey!',
+ duration: 2
+})
+```
+
+polyfill for v0.3.0
+
+```javascript
+function __weex_require__(name) {
+ var result
+ define('__weex_require__', function (r, e, m) {
+ result = r('@weex-module/' + name)
+ })
+ return result
+}
+```
+
+#### `__weex_bootstrap__(nameOrOptions: string|object, config: object?, data: object?): AppInstance | Error`
+
+Start to render by a certain component name or a direct component options as the root element, and some instance `config` and instance `data`. If everything fine, it will returns the root app instance. Otherwise it will return an `Error` instance which describes something wrong.
+
+**example:**
+
+```javascript
+__weex_bootstrap__(
+ 'root',
+ {
+ // format 1:
+ // downgrade: { appVersion: '>= 0.5.0' },
+ // format 2:
+ // downgrade: function (config) { return true }
+ },
+ {
+ // external data
+ // value: '12345'
+ }
+)
+```
+
+The instance `config` now only support `downgrade` property which allows two format:
+
+1. an object like `{ osVersion, appVersion, weexVersion, deviceModel }`
+2. a function like `function (config) { return true }` to return a boolean value. `true` means normal and `false` means downgrade.
+
+The instance `data` will merge to root component data. So the root component is also easy to reuse and the instance data is easy to customize.
+
+#### `__weex_document__`
+
+An virtual-DOM `Document` instance. Also the host of [virtual-DOM APIs](./virtual-dom-apis.html). Every Weex instance has and must have just one `Document` instance.
+
+### Preserved Global Variables
+
+`define`, `bootstrap`, `module`, `exports`, `document`, `require`, `register`, `render`
+
+### A whole example
+
+```javascript
+// { "framework": "Weex", "version": "0.5.0" }
+
+var modal = __weex_require__('modal')
+
+__weex_define__('item', {
+ template: {
+ type: 'div',
+ style: { flexDirection: 'row' },
+ event: {
+ click: function (e) {
+ this.update(e)
+ }
+ },
+ children: [
+ { type: 'image', attr: { src: this.imageUrl }, ...},
+ { type: 'text', attr: { value: this.title }, ...}
+ ]
+ },
+ data: function () {
+ return {
+ imageUrl: '',
+ title: ''
+ }
+ },
+ methods: {
+ update: function (e) {
+ modal.toast({ message: this.title })
+ }
+ }
+})
+
+__weex_define__('app', {
+ template: {
+ type: 'div',
+ children: [
+ {
+ type: 'item',
+ repeat: {
+ expression: function () {
+ return this.list
+ },
+ key: '$index',
+ value: '$value'}
+ },
+ attr: {
+ imageUrl: function () {
+ return this.$value.imageUrl
+ },
+ title: function () {
+ return this.$value.title
+ }
+ }
+ }
+ ]
+ },
+ data: function () {
+ return {
+ list: [
+ { imageUrl: 'xxx', title: '111' },
+ { imageUrl: 'yyy', title: '222' },
+ { imageUrl: 'zzz', title: '333' }
+ ]
+ }
+ }
+})
+
+__weex_bootstrap__('app')
+```
+
+## v0.3.0
+
+### Whole Syntax and Structure
+
+A JS Bundle is actually a JavaScript file which follows **ES5** standard. The code is organized by several modules with AMD-like format:
+
+```javascript
+define('moduleName1', function (require, exports, module) {
+ // content of module1
+})
+
+define('moduleName2', function (require, exports, module) {
+ // content of module2
+})
+
+...
+```
+
+A whole Weex JS Bundle is concatenated by these modules and last a `bootstrap(rootComponentName, optionalConfig, optionalExternalData)` function call.
+
+```javascript
+define('@weex-component/a', function (require, exports, module) {
+ // content of composed component <a>
+})
+
+define('@weex-component/b', function (require, exports, module) {
+ // content of composed component <b>
+})
+
+bootstrap('@weex-component/b')
+```
+
+As the sample above, the component name should be hyphenated (a-z, 0-9, "-"). Other characters are not allowed.
+
+And, the method call `bootstrap()` allows 1~3 parameters: root module name (String), config info (optional JSON) and external data (optional JSON).
+
+### Content of Composed Components
+
+A module of composed component contains 3 parts: whole options definition, additional template option definition and additional style option definition.
+
+- whole options is a piece of JavaScript code to put component options (except `template` option and `style` option) into `module.exports`
+- `template` option is a piece of JSON-like object assigned to `module.exports.template` which describes the display structure of this component
+- `style` option is a piece of JSON object assigned to `module.exports.style` which describes the reusable styles in this component
+
+The `template` option is required and appeared only once, and the `style` option and whole options definition are optional.
+
+These options are defined and transformed by Transformer. Actually you can also ignore all the format limitation and write options to `module.exports` as the same result if you are not going to use Transformer. But that's not recommended.
+
+#### Details of template option definitions
+
+A piece of multi-level embedded JSON-like object which describes the view structure.
+
+Every level JSON-like object has these members below:
+
+* `type`: a required string, component name/type
+* `component`: an optional boolean, whether this component is composed or native
+* `attr`: an optional k-v pairs which contains all attributes of an element, the value could be a string, number, boolean or a function that bind some data value
+* `style`: an optional k-v pairs which contains all styles of an element, just the same format as the `attr`
+* `classList`: an optional array of strings which contains class names for styling.
+* `events`: an optional k-v pairs whose keys are event type and values are corresponding method names
+* `children`: an optional array of child components info
+* `append`: an optional string which determines a compiling workflow strategy: append node-by-node singly or a whole node tree just one time. the default value is `node` and another supported value is `tree`.
+* `shown`: a optional function which returns a boolean value to determine whether this component should be displayed
+* `repeat`: a optional function which returns a list data to displays components with each
+
+**Corresponding Keys to Weex Transformer:**
+
+- tag `name` in Weex file corresponds to `type`
+- attr `if` in Weex file corresponds to `shown`
+- attr `repeat` in Weex file corresponds to `repeat`
+- attr `append` in Weex file corresponds to `append`
+- attr `style` in Weex file with CSS syntax corresponds to `style`
+- attr `class` in Weex file with class names separated by blanks corresponds to `classList`
+- attr `on***` in Weex file with prefix `on` corresponds to a k-v pair in `events`
+- other attributes in Weex file corresponds to `attr`
+- Child nodes in Weex file corresponds to `children`
+
+All tag names, attr names are case-insensitive and transformed to lower-cased. But the attr values are case-sensitive.
+
+#### Details of style option definitions
+
+Just a two-levels JSON object.
+
+* The first levels are class names.
+* The second levels are k-v pairs which describes style names & properties for each class name.
+
+**Corresponding Keys to Weex Transformer:**
+
+* class name corresponds to first level keys
+* prop name corresponds to second level keys
+* prop value corresponds to second level values
http://git-wip-us.apache.org/repos/asf/incubator-weex-site/blob/32a097bf/_draft/v1.0/references/specs/js-framework-apis.md
----------------------------------------------------------------------
diff --git a/_draft/v1.0/references/specs/js-framework-apis.md b/_draft/v1.0/references/specs/js-framework-apis.md
new file mode 100644
index 0000000..d24dd3b
--- /dev/null
+++ b/_draft/v1.0/references/specs/js-framework-apis.md
@@ -0,0 +1,190 @@
+---
+title: JS Framework APIs (英)
+type: references
+order: 5.2
+version: 0.10
+---
+
+# JS Framework APIs
+
+## Intro about JS Runtime
+
+These APIs are designed for JS Framework and Native Engine working together.
+
+Considering the limitation of mobile phone resource, *Weex runs only one JS runtime* to handle all Weex instances. So it need a multi-instance management layer in JavaScript. These JS Framework APIs are just designed to do the management job.
+
+* First, each Weex instance have a lifecycle, from `createInstance` to `destroyInstance`. During this period, we can import some extra data by `refreshInstance`.
+* To communicate with Native Engine, we have a couple of APIs: `sendTasks` and `receiveTasks`. They are used to call each other by some commands and messages.
+* And when JS runtime start at the beginning of the app launching, we need something initialized and configured. So we supply some APIs like `registerComponents`, `registerModules`.
+* The last API is just for debugging, we supply an API named `getRoot` to return the whole virtual-DOM data for developers.
+* If any of these API calls failed, an `Error` object should be returned.
+
+## Called by native and supplied from JS Framework
+
+### `createInstance(instanceId, code, options, data)`
+
+Create a Weex instance from Native Engine
+
+* `instanceId`: The unique id for a Weex instance, generated by Native Engine.
+* `code`: The JS bundle code send from Native Engine. It will be executed by `new Function(code)` in JS Framework. The code format depends on [JS Bundle Foramt](./js-bundle-format.html)
+* `options`: *Optional*. An options object. *Currently it supports `debug` flag which enable printing log and `bundleUrl` flag which the url of bundle.*
+* `data`: *Optional*. It's an chance to supply external data instead of the original data in JS bundle.
+
+Example:
+
+```javascript
+createInstance('x', 'define(...); define(...); define(...); bootstrap(...)')
+createInstance('x', '...', { bundleUrl, debug, ... }, { a: 1, b: 2 }})
+```
+
+### `destroyInstance(instanceId)`
+
+Destroy an existed Weex instance by id from Native Engine
+
+### `refreshInstance(instanceId, data)`
+
+Refresh data to an existed Weex instance with certain external data from Native Engine
+
+Example:
+
+```javascript
+refreshInstance('x', {a: 100, b: 200})
+```
+
+### `registerComponents(components)`
+
+Register all native components
+
+* `components`: A array of whose items are component options that are force part to use. *Currently it supports `append` attribute which forces the appending mechanism (`tree` or `node`) when first time rendering.*
+
+Example:
+
+```javascript
+registerComponents([
+ { type: 'container' },
+ { type: 'text' },
+ { type: 'image' },
+ { type: 'slider', append: 'tree' },
+ { type: 'list' },
+ { type: 'cell', append: 'tree' },
+ ...
+])
+```
+
+### `registerModules(modules)`
+
+Register the name, methods and args format of each module
+
+* `modules`: A map that collects all native module definitions. Each module definition is an array which has several API definitions. Each API definition has a `name` string and an `args` array which contains a list of each parameter's type.
+
+**NOTE: the `node` type data will actually return its `ref` property. And the `function` type data will actually return a unique function id referring to it.**
+
+Example:
+
+```javascript
+registerModules({
+ event: [
+ {name: 'openURL', args: ['string']}
+ ],
+ ...
+})
+```
+
+### `receiveTasks(instanceId, tasks)`
+
+Fire events or callbacks to an existed Weex instance from Native Engine
+
+* `tasks[]`: A task list. Each task has a `method="fireEvent|callback"` property and a list of `args`.
+ - In `fireEvent` method, the `args` is `ref` of the target, event `type`, event `data` and `domChanges` description in order. **Note: if some event make virtual-DOM data changed (e.g. value changed in `<input>` or current index changed in `<slider>`), the changing of the target element will be passed as `domChanges`.**
+ - In `callback` method, the `args` is `funcId` of a handler, `data` and `ifKeepAlive` which describes whether this callback handler should be keeping called. (Each callback handler is matched with a `funcId` when the original call happens.)
+
+Example:
+
+```javascript
+receiveTasks('x', [{method: 'fireEvent', args: ['x', '13', 'click', {a: 100, b: 200}]}])
+receiveTasks('x', [{method: 'callback', args: ['x', '7', {a: 100, b: 200}, true]}])
+```
+
+### `getRoot(instanceId)`
+
+Return a JSON object which describes the whole virtual DOM body of an existed Weex instance, which designed for debugging
+
+Example:
+
+```javascript
+getRoot('x')
+// {ref: '_root', type: 'container', attr: {...}, style: {...}, children: [...]}
+```
+
+## Called from JavaScript and implemented with native code
+
+### `sendTasks(instanceId, tasks)`
+
+Make native calls from JS Framework
+
+* `tasks[]`: A task list. Each task has a `module` name, a `method` name, and a `args[]` list.
+
+Example:
+
+```javascript
+sendTasks('x', [
+ {module: 'dom', method: 'addElement', args: ['_root', {ref: '1', type: 'container'}, -1]},
+ {module: 'dom', method: 'addElement', args: ['1', {ref: '2', type: 'text', ...}, -1]},
+ {module: 'dom', method: 'addElement', args: ['1', {ref: '3', type: 'image', ...}, -1]},
+ ...
+])
+```
+
+## Supporting other JS Framework <sup>(experimental)</sup>
+
+### Register a new JS Framework
+
+```javascript
+// lib/frameworks/index.js
+
+import Vue from '...'
+import React from '...'
+import Angular from '...'
+
+export const frameworks = {
+ Vue,
+ React,
+ Angular
+}
+```
+
+### Expose JS Framework APIs
+
+```javascript
+// 3rd-party-framework.js
+
+export function createInstance (id, code, config, data) { ... }
+export function destroyInstance (id) { ... }
+export function refreshInstance (id, data) { ... }
+export function registerComponents (components) { ... }
+export function registerModules (modules) { ... }
+export function recieveTasks (id, tasks) { ... }
+export function getRoot (id) { ... }
+```
+
+The virtual-DOM tasks should follow [virtual-DOM spec](./virtual-dom-apis.html).
+
+### Framework Helper
+
+You can import `lib/runtime/helper.js` to get two important things:
+
+* `Document` class, see [virtual-DOM spec](./virtual-dom-apis.html) for more.
+* `sendTasks` method.
+
+### JS Bundle format
+
+You must ensure the JS Bundle has its first line of code like this:
+
+```javascript
+// { "framework": "Vue" }
+...
+```
+
+to allow JS Runtime to detect which JS Framework it should be opened by.
+
+If no valid annotation found. The JS Bundle will be opened by default JS Framework of Weex.
http://git-wip-us.apache.org/repos/asf/incubator-weex-site/blob/32a097bf/_draft/v1.0/references/specs/virtual-dom-apis.md
----------------------------------------------------------------------
diff --git a/_draft/v1.0/references/specs/virtual-dom-apis.md b/_draft/v1.0/references/specs/virtual-dom-apis.md
new file mode 100644
index 0000000..9291497
--- /dev/null
+++ b/_draft/v1.0/references/specs/virtual-dom-apis.md
@@ -0,0 +1,148 @@
+---
+title: Virtual DOM APIs
+type: references
+order: 5.3
+version: 0.10
+---
+
+# Virtual DOM APIs
+
+## `Document`
+
+每个实例有一个与实例 id 对应的 document。Document 具有组成一个节点树的多个节点。
+
+### 构造函数
+
+##### `new Document(id: string, url: string?)`
+
+### 成员
+
+##### `createElement(tagName: string, props: Object?): Element`
+
+创建一个特定类型 `Element` 对象。`props` 对象可能包含一个 `attr` 对象和一个 `style` 对象。例如 `createBody('div', {style: {backgroundColor: '#ffffff'}})`
+
+##### `createComment(text: string): Comment`
+
+创建一个具有一些注释文本的 `Comment` 对象。
+
+##### `open()`
+
+初始化渲染开始时设置一个标志,表示初始化渲染开始,每个 DOM 更新将被立即调用。
+
+##### `close()`
+
+初始化渲染完成时设置一个标志,标识初始化渲染完成,DOM 更新以后将在每个任务中批处理。
+
+##### `fireEvent(el: Element, type: string, e: Object?, domChanges: Object?)`
+
+在某个元素上触发一个带有特定类型的事件,这个事件带有一个事件对象。当事件导致一些 DOM 的变化,第四个参数将像 `createElement` 方法里的 `props` 参数一样描述这些 DOM 变化。
+
+#### 只读属性 & Getters
+
+##### `id: string`
+
+##### `URL: string?`
+
+##### `body: Element`
+
+body 元素
+
+##### `documentElement: Element`
+
+document 元素
+
+##### `getRef(ref: string): Node?`
+
+通过内部 node map 的 `ref` 获取节点。
+
+**注意:**
+
+在一个 document 被创建时会自动生成一个 `documentElement` ,并且 `body` 应该手动创建并添加到 `documentElement` 才能工作。`body` 的 `type` 必须是一个 `div`,`list` 或 `scroller`。
+
+## `Node`
+
+### 构造函数
+
+##### `new Node()`
+
+### 成员
+
+##### `destroy()`
+
+#### 只读属性 & Getters
+
+##### `ref: string`
+
+##### `nextSibling: Node?`
+
+##### `previousSibling: Node?`
+
+##### `parentNode: Node?`
+
+## `Element` extends `Node`
+
+### 构造函数
+
+##### `new Element(type: string, props: Object?, ownerDocument: Document)`
+
+创建一个元素,并且 `props` 对象可能包含一个 `attr` 对象和一个 `style` 对象。
+
+### 成员
+
+#### DOM 树
+
+##### `appendChild(node: Node)`
+
+##### `insertBefore(node: Node, before: Node?)`
+
+##### `insertAfter(node: Node, after: Node?)`
+
+##### `removeChild(node: Node, preserved: boolean?)`
+
+移除一个子节点。`preserved` 参数表示是否立即销毁删除该节点或保存它。
+
+##### `clear()`
+
+#### DOM props
+
+##### `setAttr(key: string, value: string, silent: boolean?)`
+
+如果 `silent` 为 `true`,也不会调用 native。用于有 virtual-DOM 变化的事件处理。
+
+##### `setStyle(key: string, value: string, silent: boolean?)`
+
+`silent` 参数作用与 `setAttr` 中的一样。
+
+##### `setClassStyle(classStyle: Object)`
+
+class 样式的 CSS 优先级低于内联样式,当两种样式风格出现时,内联样式的值会覆盖 class 样式的值。
+
+##### `addEvent(type: string, handler: Function)`
+
+##### `removeEvent(type: string)`
+
+##### `fireEvent(type: string, e: any)`
+
+#### 只读属性 & Getters
+
+##### `toJSON(): Object`
+
+格式化 `{ref: string, type: string, attr: Object, style: Object, event: Array(string), children: Array}`
+
+## `Comment` extends `Node`
+
+`Comment` 将不被传给渲染引擎。因此,可作为占位符使用。
+
+### 构造函数
+
+##### `new Comment(value: string)`
+
+### 成员
+
+#### 只读属性 & Getters
+
+##### `type: string`
+
+返回 `'comment'`
+
+##### `value: string`
http://git-wip-us.apache.org/repos/asf/incubator-weex-site/blob/32a097bf/_draft/v1.0/references/text-style.md
----------------------------------------------------------------------
diff --git a/_draft/v1.0/references/text-style.md b/_draft/v1.0/references/text-style.md
new file mode 100644
index 0000000..85f67c8
--- /dev/null
+++ b/_draft/v1.0/references/text-style.md
@@ -0,0 +1,40 @@
+---
+title: 文本样式
+type: references
+order: 1.7
+version: 0.10
+---
+
+# 文本样式
+
+<span class="weex-version">v0.5+</span>
+
+文本类组件共享一些通用样式, 这类组件目前包括 [`<text>`](./components/text.html) 和 [`<input>`](./components/input.html)。
+
+## 属性
+
+- `color {color}`:文字颜色。
+
+ 可选值为色值,支持 RGB( `rgb(255, 0, 0)` );RGBA( `rgba(255, 0, 0, 0.5)` );十六进制( `#ff0000` );精简写法的十六进制( `#f00` );色值关键字(`red`)。
+
+- `lines {number}`: 指定文本行数。仅在 `<text>` 组件中支持。默认值是 `0` 代表不限制行数。
+
+- `font-size {number}`:文字大小。
+
+- `font-style {string}`:字体类别。可选值 `normal` | `italic`,默认为 `normal`。
+
+- `font-weight {string}`:字体粗细程度。可选值 `normal` | `bold`,默认为 `normal`。
+
+- `text-decoration {string}`:字体装饰,可选值 `none` | `underline` | `line-through`,默认值为 `none`。
+
+- `text-align {string}`:对齐方式。可选值 `left` | `center` | `right`,默认值为 `left`。目前暂不支持 `justify`, `justify-all`。
+
+- `font-family {string}`:设置字体。
+
+ 这个设置 **不保证** 在不同平台,设备间的一致性。如所选设置在平台上不可用,将会降级到平台默认字体。
+
+- `text-overflow {string}`:设置内容超长时的省略样式。可选值 `clip` | `ellipsis`
+
+## 其它参考
+
+- [颜色关键字列表](./references/color-names.html)。
http://git-wip-us.apache.org/repos/asf/incubator-weex-site/blob/32a097bf/_draft/v1.0/references/units.md
----------------------------------------------------------------------
diff --git a/_draft/v1.0/references/units.md b/_draft/v1.0/references/units.md
new file mode 100644
index 0000000..2ff3482
--- /dev/null
+++ b/_draft/v1.0/references/units.md
@@ -0,0 +1,66 @@
+---
+title: CSS 单位
+type: references
+order: 1.9
+version: 0.10
+---
+
+# CSS 单位
+
+## CSS `color` 单位
+
+支持以下写法:
+
+```css
+.classA {
+ /* 3-chars hex */
+ color: #0f0;
+ /* 6-chars hex */
+ color: #00ff00;
+ /* rgba */
+ color: rgb(255, 0, 0);
+ /* rgba */
+ color: rgba(255, 0, 0, 0.5);
+ /* transparent */
+ color: transparent;
+ /* Basic color keywords */
+ color: orange;
+ /* Extended color keywords */
+ color: darkgray;
+}
+```
+
+### 注意
+
+* 不支持 `hsl()`, `hsla()`, `currentColor`, 8个字符的十六进制颜色。
+
+* `rgb(a,b,c)` 或 `rgba(a,b,c,d)` 的性能比其他颜色格式差很多,请选择合适的颜色格式。
+
+颜色名称可查看 [颜色名称列表](./color-names.md).
+
+## CSS `length` 单位
+
+在 Weex 中,我们只支持 `px` 长度单位。并且它将在 JavaScript 运行时和本机渲染器中解析为数字类型。所以你也可以省略 `px` 单位后缀,直接写数字。
+
+下面这些不同的写法,解析的结果完全相同。
+
+```css
+.classA { font-size: 48; line-height: 64; }
+.classB { font-size: 48px; line-height: 64px; }
+```
+
+不支持类似 `em`,`rem`,`pt` 这样的 CSS 标准中的其他长度单位。
+
+## CSS `number` 单位
+
+仅仅一个数字。用于 [`opacity`](./common-style.md#其他基本样式),[`lines`](./text-style.md)等。
+
+有时值必须是整数,例如:`lines`。
+
+**注意:**也可以将所有的 `px` `length` 值简化为一个数字。
+
+## CSS `percentage` 单位 (暂不支持)
+
+表示百分比值,如“50%”,“66.7%”等。
+
+它是 CSS 标准的一部分,但 Weex 暂不支持。
http://git-wip-us.apache.org/repos/asf/incubator-weex-site/blob/32a097bf/_draft/v1.0/references/wxc/index.md
----------------------------------------------------------------------
diff --git a/_draft/v1.0/references/wxc/index.md b/_draft/v1.0/references/wxc/index.md
new file mode 100644
index 0000000..5969ce2
--- /dev/null
+++ b/_draft/v1.0/references/wxc/index.md
@@ -0,0 +1,44 @@
+---
+title: 官方扩展组件
+type: references
+order: 3
+has_chapter_content: true
+version: 0.10
+---
+
+# 官方扩展组件
+
+Weex 官方扩展组件指的是以 `wxc-` 开头的组件,这些组件不属于内建组件的一部分,而是 Weex 团队基于内建组件扩展的一些常用组件。这些组件依赖 `weex-components`,需要安装依赖后才可使用。
+
+使用方式如下:
+
+1. 安装依赖
+
+ 需要在工程目录下执行以下命令:
+
+ ```bash
+ npm install weex-components
+ ```
+
+2. 使用
+
+ 需要在 `<script>` 中引入依赖。
+
+ ```html
+ <template>
+ <div style="flex-direction: column;">
+ <wxc-tabbar tab-items = {{tabItems}}></wxc-tabbar>
+ </div>
+ </template>
+
+ <script>
+ require('weex-components');
+
+ module.exports = {
+ data: {},
+ methods: {
+ // more
+ }
+ }
+ </script>
+ ```
\ No newline at end of file
http://git-wip-us.apache.org/repos/asf/incubator-weex-site/blob/32a097bf/_draft/v1.0/references/wxc/wxc-navpage.md
----------------------------------------------------------------------
diff --git a/_draft/v1.0/references/wxc/wxc-navpage.md b/_draft/v1.0/references/wxc/wxc-navpage.md
new file mode 100644
index 0000000..6b15175
--- /dev/null
+++ b/_draft/v1.0/references/wxc/wxc-navpage.md
@@ -0,0 +1,192 @@
+---
+title: <wxc-navpage>
+type: references
+order: 3.1
+version: 0.10
+---
+
+# <wxc-navpage> <sup>(v0.5+)</sup>
+
+`<wxc-navpage>` 组件是一个包含 navbar 的容器组件,可以根据业务场景定制 navbar 组件。同时,可以使用 `navigator` 模块控制页面的跳转,具体参考 [`navigator module`](../modules/navigator.html)。一般情况,都是配合 navbar 组件使用。如果不了解 navigator 相关知识,建议先了解下 iOS 或者 Android 的相关组件。在 H5 上,其实是相当于导航栏。
+
+用法:在 `script` 标签中通过一个 `require` 语句引入,即:`require('weex-components');`
+
+**示例**
+
+```html
+<template>
+ <div style="flex-direction: column;">
+ <wxc-navpage tab-items = {{tabItems}}></wxc-navpage>
+ </div>
+</template>
+
+<script>
+ require('weex-components');
+ // more
+</script>
+```
+
+在 `require('weex-components');` 之前 ,需要在工程目录下执行以下命令:
+
+```bash
+npm install weex-components
+```
+
+## 子组件
+
+`<wxc-navpage>` 组件支持任意 Weex 组件。
+
+## 特性
+
+`<wxc-navpage>` 组件的特性其实是对 navbar 进行功能设置,如下图所示,是 navbar 的一个简单示意。
+
+
+
+- `height {number}`:navbar 的高度,默认是 88。
+
+- `background-color {color}`:navbar 的背景颜色,默认是白色。
+
+- `title {string}`:navbar 的标题。
+
+- `title-color {color}`:navbar 标题的颜色,默认黑色。
+
+- `left-item-title {string}`:navbar 左侧按钮的标题。
+
+- `left-item-color {color}`:navbar 左侧按钮标题颜色,默认黑色。
+
+- `right-item-title {string}`:navbar 右侧按钮标题。
+
+- `right-item-color {color}`:navbar 右侧按钮标题颜色,默认黑色。
+
+- `left-item-src {string}`:navbar 左侧按钮的图标。
+
+- `right-item-src {string}`:navbar 右侧按钮的图标。
+
+### 样式
+
+- 通用样式:支持所有通用样式
+
+ - 盒模型
+ - `flexbox` 布局
+ - `position`
+ - `opacity`
+ - `background-color`
+
+ 查看 [组件通用样式](../common-style.html)
+
+## 事件
+
+`<wxc-navpage>` 组件支持左右两项点击事件。
+
+- `naviBar.leftItem.click`: 当 navbar 的左侧按钮被点击时触发事件,需要在 `created` 时期注册事件。
+- `naviBar.rightItem.click`: 当 navbar 的右侧按钮被点击时触发事件,需要在 `created` 时期注册事件。
+
+**示例:**
+
+```html
+<template>
+ <wxc-navpage height={{...}} background-color="..." title="..." title-color="..." left-item-title="..." left-item-color="..." right-item-src="...">
+ <content> ...</content>
+ </wxc-navpage>
+</template>
+<script>
+ require('weex-components');
+ module.exports = {
+ created: function() {
+ this.$on('naviBar.rightItem.click',function(e){
+ //handle your click event here.
+ });
+
+ this.$on('naviBar.leftItem.click',function(e){
+ //handle your click event here.
+ });
+ }
+ }
+</script>
+```
+
+- 通用事件
+
+ 支持所有通用事件:
+
+ - `click`
+ - `longpress`
+ - `appear`
+ - `disappear`
+
+ 查看 [通用事件](../common-event.html)
+
+## 示例
+
+**注意:**
+
+[dotwe](http://dotwe.org) 平台暂不支持 `wxc-xxx` 类型的组件。
+
+```html
+<template>
+ <wxc-navpage data-role="none" height={{navBarHeight}} background-color="#ff5898" title={{title}} title-color="white" left-item-title="More" left-item-color="white" right-item-src="http://gtms02.alicdn.com/tps/i2/TB1ED7iMpXXXXXEXXXXWA_BHXXX-48-48.png">
+ <wxc-panel title="push a new page">
+ <wxc-button type="primary" size="small" value="push" onclick="push"></wxc-button>
+ </wxc-panel>
+ <wxc-panel title="pop to the last page">
+ <wxc-button type="success" size="small" value="pop" onclick="pop"></wxc-button>
+ </wxc-panel>
+ </wxc-navpage>
+</template>
+
+<script>
+ require('weex-components');
+ module.exports = {
+ data: {
+ navBarHeight: 88,
+ title: 'Navigator',
+ dir: 'examples',
+ baseURL: '',
+ },
+ created: function() {
+ this.$getConfig(function (config) {
+ var env = config.env;
+ if(env.platform == 'iOS'){
+ var scale = env.scale;
+ var deviceWidth = env.deviceWidth / scale;
+ this.navBarHeight = 64.0 * 750.0 / deviceWidth;
+ }
+ }.bind(this));
+
+ this.$on('naviBar.rightItem.click',function(e){
+ duration = 2;
+ this.$call('modal', 'toast', {
+ 'message': 'naviBar.rightItem.click',
+ 'duration': duration
+ });
+ });
+
+ this.$on('naviBar.leftItem.click',function(e){
+ duration = 2;
+ this.$call('modal', 'toast', {
+ 'message': 'naviBar.leftItem.click',
+ 'duration': duration
+ });
+ });
+ },
+ methods: {
+ push: function() {
+ var vm = this;
+ var params = {
+ 'url': 'http://dotwe.org/raw/dist/33dfcbe81979c60ba5de72c235d7d0f8.js',
+ 'animated' : 'true',
+ }
+ vm.$call('navigator','push',params, function () {});
+ },
+
+ pop: function() {
+ var vm = this;
+ var params = {
+ 'animated' : 'true',
+ }
+ vm.$call('navigator','pop',params, function () {});
+ }
+ }
+ }
+</script>
+```
http://git-wip-us.apache.org/repos/asf/incubator-weex-site/blob/32a097bf/_draft/v1.0/references/wxc/wxc-tabbar.md
----------------------------------------------------------------------
diff --git a/_draft/v1.0/references/wxc/wxc-tabbar.md b/_draft/v1.0/references/wxc/wxc-tabbar.md
new file mode 100644
index 0000000..492c1cd
--- /dev/null
+++ b/_draft/v1.0/references/wxc/wxc-tabbar.md
@@ -0,0 +1,176 @@
+---
+title: <wxc-tabbar>
+type: references
+order: 3.2
+version: 0.10
+---
+
+# <wxc-tabbar>
+
+`<wxc-tabbar>` 是一个名为 `weex-components` 依赖库的自定义组件。`<wxc-tabbar>` 能在窗口的底部显示 tab 页面,我们可以在不同的 tab 页面之间切换。
+
+用法:在 `script` 标签中通过一个 `require` 语句引入,即:`require('weex-components');`
+
+**示例**
+
+```html
+<template>
+ <div style="flex-direction: column;">
+ <wxc-tabbar tab-items = {{tabItems}}></wxc-tabbar>
+ </div>
+</template>
+
+<script>
+ require('weex-components');
+
+ module.exports = {
+ data: {},
+ methods: {
+ // more
+ }
+ }
+</script>
+```
+
+在 `require('weex-components');` 之前 ,需要在工程目录下执行以下命令:
+
+```bash
+npm install weex-components
+```
+
+## 子组件
+
+该组件不支持子组件。
+
+## 特性
+
+- `selected-index {number}`:设置默认选中的 tab 索引,默认值为 0(第一个 tab)。
+- `selected-color {color}`:设置当标题被选中时标题的颜色,默认为红色。
+- `unselected-color {color}`:设置当标题不被选中时标题的颜色,默认为黑色。
+- `tab-items {Array[Object]}`:该属性接受一个 `tabitems` 对象数组, 分别对应到对应的 tab 页面,tab 页面的顺序跟对象数组的位置对应。
+ 我们可以通过设置每一项的属性来配置 tabbar 的外观:
+
+ - `index {integer}`:必填属性,指明了 tabitem 的次序。
+ - `title {string}`:设置 tabitem 的标题,非必填,当标题为空时,标题将不会被显示
+ - `titleColor {color}`:设置 tabitem 的标题颜色,默认是黑色
+ - `image {string}`:当 tab 页面不被选中时显示的 icon,当不提供时,什么也不显示。
+ - `selectedImage {string}`:设置 tab 页面被选中时显示的图片,不提供图片时,什么也不显示。
+ - `src {string}`:设置 tab 对应的 Weex 页面的 url,为 http 开头。
+ - `visibility {string}`:值为 `visible` | `hidden`,该属性指明了 tab 页面的显示状态,默认值是 visible
+
+## 样式
+
+- 通用样式:支持所有通用样式
+
+ - 盒模型
+ - `flexbox` 布局
+ - `position`
+ - `opacity`
+ - `background-color`
+
+ 查看 [组件通用样式](../common-style.html)
+
+## 事件
+
+- `tabBar.onClick`:当 tab 页面被选中时触发,需要在 `ready` 或者 `create` 生命周期中注册,如:
+
+ **示例**
+
+ ```html
+ <template>
+ <div style="flex-direction: column;">
+ <wxc-tabbar tab-items="{{tabItems}}"></wxc-tabbar>
+ </div>
+ </template>
+
+ <script>
+ require('weex-components');
+ module.exports = {
+ data: {
+ // ...
+ },
+ created: function() {
+ var vm = this;
+ vm.$on('tabBar.onClick',function(e){
+ var detail= e.detail;
+ console.log('tabBar.onClick ' + detail.index);
+ });
+ },
+ methods: {
+ }
+ }
+ </script>
+ ```
+
+- 通用事件
+ 支持所有通用事件:
+
+ - `click`
+ - `longpress`
+ - `appear`
+ - `disappear`
+
+ 查看 [通用事件](../common-event.html)
+
+## 示例
+
+**注意:**
+
+[dotwe](http://dotwe.org) 平台暂不支持 `wxc-xxx` 类型的组件。
+
+```html
+<template>
+ <div>
+ <wxc-tabbar tab-items="{{tabItems}}"></wxc-tabbar>
+ </div>
+</template>
+
+<script>
+ require('weex-components');
+ module.exports = {
+ data: {
+ dir: 'examples',
+ tabItems: [
+ {
+ index: 0,
+ title: 'tab1',
+ titleColor: '#000000',
+ icon: '',
+ image: 'http://gtms01.alicdn.com/tps/i1/TB1qw.hMpXXXXagXXXX9t7RGVXX-46-46.png',
+ selectedImage: 'http://gtms04.alicdn.com/tps/i4/TB16jjPMpXXXXazXVXX9t7RGVXX-46-46.png',
+ src: 'http://dotwe.org/raw/dist/ba202bcd277285c7f3cf79f9b1055dce.js?itemId=tab1',
+ visibility: 'visible',
+ },
+ {
+ index: 1,
+ title: 'tab2',
+ titleColor: '#000000',
+ icon: '',
+ image: 'http://gtms03.alicdn.com/tps/i3/TB1LEn9MpXXXXaUXpXX9t7RGVXX-46-46.png',
+ selectedImage: 'http://gtms02.alicdn.com/tps/i2/TB1qysbMpXXXXcnXXXX9t7RGVXX-46-46.png',
+ src: 'http://dotwe.org/raw/dist/7e24b83c5868dbd4462e30549999245d.js?itemId=tab2',
+ visibility: 'hidden',
+ },
+ {
+ index: 2,
+ title: 'tab3',
+ titleColor: '#000000',
+ icon: '',
+ image: 'http://gtms01.alicdn.com/tps/i1/TB1B0v5MpXXXXcvXpXX9t7RGVXX-46-46.png',
+ selectedImage: 'http://gtms04.alicdn.com/tps/i4/TB1NxY5MpXXXXcrXpXX9t7RGVXX-46-46.png',
+ src: 'http://dotwe.org/raw/dist/8a8b49b67084423e097a6b7f549f1453.js?itemId=tab3',
+ visibility: 'hidden',
+ }
+ ],
+ },
+ created: function() {
+ var vm = this;
+ vm.$on('tabBar.onClick',function(e){
+ var detail= e.detail;
+ console.log('tabBar.onClick ' + detail.index);
+ });
+ },
+ methods: {}
+ }
+</script>
+```
http://git-wip-us.apache.org/repos/asf/incubator-weex-site/blob/32a097bf/_draft/v1.0/tools/devtools-android.md
----------------------------------------------------------------------
diff --git a/_draft/v1.0/tools/devtools-android.md b/_draft/v1.0/tools/devtools-android.md
new file mode 100644
index 0000000..9ce8991
--- /dev/null
+++ b/_draft/v1.0/tools/devtools-android.md
@@ -0,0 +1,123 @@
+---
+title: Devtools for Android
+type: tools
+order: 2.1
+version: 0.10
+---
+
+# Devtools for Android
+
+[](https://github.com/weexteam/weex_devtools_android/releases) [](https://www.codacy.com/app/weex_devtools/weex_devtools_android?utm_source=github.com&utm_medium=referral&utm_content=weexteam/weex_devtools_android&utm_campaign=Badge_Grade) [](https://codeclimate.com/github/weexteam/weex_devtools_android) [](https://codeclimate.com/github/weexteam/weex_devtools_android) [](https://github.com/weexteam/weex_devtools_android/issues) [  ](https://bintray.com/alibabaweex/maven/weex_inspector/_latestVersion)
+
+Weex devtools is a custom devtools for weex that implements [Chrome Debugging Protocol](https://developer.chrome.com/devtools/docs/debugger-protocol) inspired by [Stetho](https://github.com/facebook/stetho), it is designed to help you quickly inspect your app and debug your JS bundle source in a chrome web page.At present The devtools consist of two part : `Inspector` and `Debugger`. If you want it work well, you must install a `weex-devtool` as debug server.
+
+- **Inspector**
+ Inspector can be used to show your `Element` \ `NetWork` \ `Console log` \ `ScreenCast` \ `BoxModel` \ `Native View` and so on.
+
+- **Debugger**
+ Debugger can be used to debug your bundle js source, you can set `Breakpoint` \ watch `CallStack`.
+
+## Install and launch devtools server
+Open your terminal then type `npm install -g weex-toolkit` and run.Launch it just type and run the command `weex debug`, then a Chrome web page will be opened.
+
+## Use on an android device or emulator
+
+### Taste of first debug with playground
+If you are a green hand to the debug of weex, we recommend you to try your first debug with `playground`, what you need to do is just launch the playground and scan the QR code shown in the debug page which wound opened if the `devtools server` have been launched. after you scan the QR code, the web page will list your connected devices.
+
+ devices")
+
+#### How Debugger Works
+Devtools expands [Chrome Debugging Protocol](https://developer.chrome.com/devtools/docs/debugger-protocol) and the mechanism of communication between client and debug sever is based on [JSON-RPC](https://en.wikipedia.org/wiki/JSON-RPC).
+
+##### Devtools Client
+Devtools Client is integrated in App as aar, it connects to debug server through webscoket protocol with out permission check. I recommend you just packaged it in your debug version consider of the security mechanism.
+
+##### Devtools Debug Server
+Devtools Debug Server is the center node of the communication, it connects to both app and chrome, acts as the turn server of debugging protocol messages and the manager of the js runtime.
+
+##### Chrome FrontEnd
+Chrome's V8 engine acts as the javascript runtime, when debug mode is enabled, all the js code run on it. On the other side we also reuse most of the Chrome's debugging user interface, such as set breakpoint, see call stack and so on.
+
+
+
+### Enable devtools in your own app
+Of course you can reuse the code of playground to build your own app, that is the simplest way to let your app's js code debuggable. On the other hand QR code is not necessary, if your review the source code you can draw a conclusion that QR CODE is just a way to set `devtools server` address. following those steps you can do the same thing.
+
+#### Gradle dependency on inspector.
+There are two choices to set the dependency, the Choice A is recommanded if you have no change to weex_sdk or inspector, while if you use your own custom weex_sdk or inspector Choice B is suitable.
+
+ * *A - aar dependency from jcenter*.
+ ````
+ dependencies {
+ compile 'com.taobao.android:weex_inspector:0.0.8.1'
+ }
+ ````
+I strongly recommend you use the latest version since both weex sdk and devtools are developed iteratively and rapidly. See the release version list [here](https://github.com/weexteam/weex_devtools_android/releases). All the release version will publish to the [jcenter repo](https://bintray.com/alibabaweex/maven/weex_inspector).
+
+ * *B - source code dependency.*
+
+ you need to copy the dir of inspector to the same dir of your app and add `include ":inspector"`in your project's `settings.gradle` file just like playground have done, then add dependency in your app's `build.gralde`.
+ ````
+ dependencies {
+ compile project(':inspector')
+ }
+ ````
+
+##### Version compatibility
+
+| weex sdk | weex inspector | debug server |
+|----------|----------------|--------------|
+|0.8.0.1+ | 0.0.8.1 |0.2.39+ |
+|0.7.0+ | 0.0.7.13 |0.2.38 |
+|0.6.0+ | 0.0.2.2 | |
+
+
+#### Initialize in your XXXApplication file.
+````
+ public class MyApplication extends Application {
+ public void onCreate() {
+ super.onCreate();
+ initDebugEnvironment(true, "xxx.xxx.xxx.xxx"/*"DEBUG_SERVER_HOST"*/);
+ }
+ private void initDebugEnvironment(boolean enable, String host) {
+ WXEnvironment.sRemoteDebugMode = enable;
+ WXEnvironment.sRemoteDebugProxyUrl = "ws://" + host + ":8088/debugProxy/native";
+ }
+}
+````
+
+#### Ship It!
+ 1. You must launch your bundle server firstly. In your weex dir, run command "./start";
+ 2. Launch your remote debug server. Run command `weex debug`, chrome will open a web page show a simply guidance and QR code;
+ 3. Launch your app and make sure debug mode was enabled. You will see a device list in the chrome web page opened by last step, each device item have two button, `Debugger` and `Inspector`;There are two way to enable debug mode:
+ * scaning the QR code and handle the content just like the playground have done.
+ * init it in the XXXApplication by calling `initDebugEnvironment(true, "xxx.xxx.xxx.xxx")`, if you call `initDebugEnvironment(true, "xxx.xxx.xxx.xxx")` after weex sdk inited, you need to call `WXSDKEngine.reload()` to refresh the runtime.
+ 4. Once you click the button `Inspector` chrome will open a page show the inspector view, on the other side, click the button `Debugger` chrome will open a new page to show the debug view;
+
+
+
+
+
+---
+
+#### OPTIONS
+
+##### [**OPTION**] *set your remote bundle server ip.*
+
+ For example, in the playground it is in the `IndexActivity.java`, you need to change the value of `DEFAULT_IP` in IndexActivity.java from `"your_current_IP"` to a server ip like `"30.30.30.150"`:
+````
+ private static final String DEFAULT_IP = "30.30.30.150"; // "your_current_IP";
+````
+
+##### [**OPTION**] *enable network inspection.*
+````
+OkHttpClient client = new OkHttpClient();
+client.networkInterceptors().add(new OkHttpInterceptor());
+````
+
+###### Notice
+ The network inspection only support OKHttpClient right now!!! If you want to use the network inspection to catch your bundle request, you must change your bundle server ip to the real server ip.
+
+#### Known Issues
+ You can report issues and bugs [here](https://github.com/weexteam/weex_devtools_android/issues). We will reply as soon as possible.
http://git-wip-us.apache.org/repos/asf/incubator-weex-site/blob/32a097bf/_draft/v1.0/tools/devtools-ios.md
----------------------------------------------------------------------
diff --git a/_draft/v1.0/tools/devtools-ios.md b/_draft/v1.0/tools/devtools-ios.md
new file mode 100644
index 0000000..801b80d
--- /dev/null
+++ b/_draft/v1.0/tools/devtools-ios.md
@@ -0,0 +1,65 @@
+---
+title: Devtools for iOS
+type: tools
+order: 2.2
+version: 0.10
+---
+
+# Devtools for iOS
+
+通过Chrome开发者工具远程调试你的原生iOS app
+## 启动weex-devtool:
+1. 安装和运行 weex-devtool
+
+ ```
+ $:npm install -g weex-devtool
+
+ $:weex-devtool
+ ```
+
+ 它会启动chrome浏览器,展示wss ip 地址在chrome地址栏。
+## playground 安装 WXDevtool
+1. 安装依赖.
+
+ $:pod install
+### 使用
+1. AppDelegate.m 头文件
+
+ ```
+ #import "WXDevTool.h"
+ ```
+2. 在App启动的时候初始化 inspector
+
+ **注意: The inspector API 必须在weex初始化之前调用**
+ - (void)setDebug:(BOOL)isDebug;
+
+ isDebug默认是NO,那么你打开的是inspect模式。假如设置isDebug为YES,那么打开debug模式和inspect模式。
+ - (void)launchDevToolDebugWithUrl:(NSString *)url;
+
+ wssip 是 展示在 chrome 地址栏的wss 地址.
+ - 打开 debug 模式 和 inspector 模式
+
+ eg:- (BOOL)application:(UIApplication *)application didFinishLaunchingWithOptions:(NSDictionary *)launchOptions
+ {
+ [WXDevTool setDebug:YES];
+ [WXDevTool launchDevToolDebugWithUrl:@"ws://wssip/debugProxy/native"];
+ }
+ - 打开 inspect 模式, 移除 @selector(setDebug:) 或者 增加 [WXDevTool setDebug:NO]
+
+ eg:- (BOOL)application:(UIApplication *)application didFinishLaunchingWithOptions:(NSDictionary *)launchOptions
+ {
+ [WXDevTool launchDevToolDebugWithUrl:@"ws://wssip/debugProxy/native"];
+ }
+3. 编译和运行APP,chrome会显示你的设备,选择inspector。
+4. 支持不同级别的Log打印。
+
+ eg: #import "WXDevTool.h"
+ PDLogE()/PDLogW()
+### WXDevtool依赖
+
+你的app必须链接下面的frameworks/dylibs
+- libicucore.dylib
+- CFNetwork.framework
+- CoreData.framework
+- Security.framework
+- Foundation.framework
http://git-wip-us.apache.org/repos/asf/incubator-weex-site/blob/32a097bf/_draft/v1.0/tools/devtools.md
----------------------------------------------------------------------
diff --git a/_draft/v1.0/tools/devtools.md b/_draft/v1.0/tools/devtools.md
new file mode 100644
index 0000000..ab7ddb3
--- /dev/null
+++ b/_draft/v1.0/tools/devtools.md
@@ -0,0 +1,99 @@
+---
+title: Devtools
+type: tools
+order: 2
+has_chapter_content: true
+version: 0.10
+---
+
+# Devtools
+
+**weex devtools**是专门为weex定制的一款实现了[**Chrome Debugging Protocol**](https://developer.chrome.com/devtools/docs/debugger-protocol)的inspect/debug工具,能够帮助你快速查看app运行状态和调试weex中的Javascript代码,当前支持**IOS**和**Android**两个平台。
+## 安装
+
+```
+$ npm install -g weex-toolkit
+```
+## 用法
+
+ weex debug [options] [we_file|bundles_dir]
+
+ 选项:
+
+```
+-h, --help 显示帮助
+-V, --verbose 显示debug服务器运行时的各种log
+-v, --version 显示版本
+-p, --port [port] 设置debug服务器端口号 默认为8088
+-e, --entry [entry] debug一个目录时,这个参数指定整个目录的入口bundle文件,这个bundle文件的地址会显示在debug主页上(作为二维码)
+-m, --mode [mode] 设置构建we文件的方式,transformer 最基础的风格适合单文件,loader:wepack风格 适合模块化的多文件.默认为transformer
+```
+#### 开启调试
+
+```
+$weex debug
+```
+
+单纯启动一个调试服务器,并同时唤起chrome浏览器打开`调试主页`.
+这个`调试主页`上会有一个二维码,使用Playground App扫这个二维码可以开启Playground调试.
+开启调试后,设备列表中会出现您的设备,根据提示进行后续的调试操作
+#### 调试 we文件
+
+```
+$weex debug your_weex.we
+```
+
+这个命令会将your_weex.we编译成bundlejs文件 部署到debug服务器
+并启动debug服务器如上述命令那样.打开的`调试主页`会多显示一个二维码,使用playground app
+扫这个码可以加载your_weex.we.(注意要先扫描开启调试的那个码)
+这个命令会自动检测your_weex.we文件变动,如果发现内容被修改则立即重新编译部署,并刷新debugger页面
+.
+#### 调试整个bundle/we文件夹
+
+```
+$weex debug your/we/path -e index.we
+```
+
+这个命令会编译你指定目录下的所有的we文件,并把编译好的bundlejs部署到debug服务器,他们的地址会映射到 http://lcoalhost:8088/weex/ 下
+比如 your/we/path/`index.we` 可以通过http://lcoalhost:8088/weex/index.js访问
+your/we/path/`demo/test.we` 可以通过http://lcoalhost:8088/weex/demo/index.js
+
+-e参数可以指定一个入口的we文件,这个文件的地址会显示在`调试主页`上(作为二维码)
+## 特性
+### 连接设备
+
+
+### Inspector
+
+ Inspector 能够用来查看 `Element` \ `NetWork` \ `Console log` \ `ScreenCast` \ `BoxModel` \ `Native View` 等。
+
+
+#### Element
+
+
+#### NetWork
+##### 查看网络请求的总耗时和延时
+
+
+##### 查看网络请求的header和response
+
+
+#### 控制台
+
+
+#### 资源
+
+
+### Debugger
+
+ 调试器用来调试weex中的js代码,能够设置断点、查看调用栈。
+
+
+##### Breakpoint and CallStack
+
+
+#### 集成devtools
+- Android
+ - 请参考文档 [Weex devtools (Android)](../advanced/integrate-devtools-to-android.html), 其中有详细说明。
+- IOS
+ - 请参考文档 [Weex devtools (IOS)](../advanced/integrate-devtools-to-ios.html), 其中有详细说明。
http://git-wip-us.apache.org/repos/asf/incubator-weex-site/blob/32a097bf/_draft/v1.0/tools/index.md
----------------------------------------------------------------------
diff --git a/_draft/v1.0/tools/index.md b/_draft/v1.0/tools/index.md
new file mode 100644
index 0000000..06c424a
--- /dev/null
+++ b/_draft/v1.0/tools/index.md
@@ -0,0 +1,96 @@
+---
+title: CLI (英)
+type: tools
+order: 1
+has_chapter_content: true
+version: 0.10
+---
+
+# CLI
+
+Please access [npmjs.com](https://www.npmjs.com/package/weex-toolkit) for latest version
+
+Weex CLI tool set
+
+## Pre Install
+some dependencies need recent version of npm to install
+
+if your
+```
+$ npm --version
+```
+output less than `2.15.1`, please run below cmd to upgrade your npm at first
+```
+sudo npm install -g npm
+```
+
+## Install
+```
+$npm install -g weex-toolkit
+```
+
+## Usage
+
+```
+$weex foo/bar/input_path [options]
+
+$weex create file_name [options]
+
+Options:
+ --qr display QR code for native runtime, **default action**
+ -o,--output transform weex we file to JS Bundle, output path (single JS bundle file or dir)
+ [for create sub cmd] it specified we file output path
+ --watch using with -o, watch input path, auto run transform if change
+ happen
+ -s,--server start a http file server, weex .we file will be transformed to JS
+ bundle on the server, specify local root path using the option
+ --port http listening port number, default is 8081
+ --wsport websocket listening port number, default is 8082
+ -f, --force [for create sub cmd] force to replace exsisting file(s)
+ --version show version of weex toolkit
+ --help Show help
+```
+
+## Examples
+
+#### create a `we file`(weex source file) using standard template
+```
+$weex create hello-world-weex
+```
+a file named 'hello-world-weex.we' will be created in current directory
+
+
+#### transform a `we file` to JS Bundle
+```
+$weex your_best_weex.we -o .
+```
+`your_best_weex.we` will be transformed to JS Bundle file `your_best_weex.js` and saved in your current directory
+
+#### transform a `we file` to JS Bundle, watch this file,auto run transformer if any change happens.
+```
+$weex your_best_weex.we -o . --watch
+```
+
+#### transform every we file in a directory
+```
+$weex we/file/storage/path -o outputpath
+```
+every `we file` in `we/file/storage/path` will be transformed to JS Bundle and saved in `outputpath` path
+
+#### preview your we file using Weex Playground App
+download & install [weex playground App](http://alibaba.github.io/weex/download.html)
+```
+$weex your_best_weex.we --qr
+```
+a QR code will display in your terminal, using Playground App scan that.
+
+
+#### start http server
+```
+$weex -s .
+```
+a http server will start running, your current directory(.) will be the document root for the server, every weex.we file will be transformed to JS Bundle when accessed through the server
+
+## Issue & Feedback
+
+[Github Issue List](https://github.com/weexteam/weex-toolkit/issues)
http://git-wip-us.apache.org/repos/asf/incubator-weex-site/blob/32a097bf/_draft/v1.0/tools/playground.md
----------------------------------------------------------------------
diff --git a/_draft/v1.0/tools/playground.md b/_draft/v1.0/tools/playground.md
new file mode 100644
index 0000000..dc7bbec
--- /dev/null
+++ b/_draft/v1.0/tools/playground.md
@@ -0,0 +1,22 @@
+---
+title: Playground
+type: tools
+order: 4
+has_chapter_content: true
+version: 0.10
+---
+
+Weex Playground App
+===================
+
+Weex 的最棒的一个部分是 Native Runtime。你的 `.we` 文件可以使用 weex-toolkit CLI 在浏览器中预览 Web 效果,也可以通过 Weex Playground App 这样一个单独的应用来预览原生效果。不仅如此,Weex playground App 还内置了大量的 Demo 和展示案例,这样你就可以更加容易地体验到 Weex 在 Native 层面的效果了。
+
+Playground App 的下载地址在 [这里](http://alibaba.github.io/weex/download.html)。
+
+截图:
+
+
+
+上图就是 Weex Playground App 的主界面,点击列表中的每一项即可进入某个 Demo 或者展示案例。用 Weex toolkit CLI 生成二维码,用 Weex Playground App 扫描二维码(点击右上角图标即可开始扫描)可以预览你的文件。
+
+请参阅 [起步教程](/get-started.md)。
http://git-wip-us.apache.org/repos/asf/incubator-weex-site/blob/32a097bf/_draft/v1.0/tools/transformer.md
----------------------------------------------------------------------
diff --git a/_draft/v1.0/tools/transformer.md b/_draft/v1.0/tools/transformer.md
new file mode 100644
index 0000000..47a7b4c
--- /dev/null
+++ b/_draft/v1.0/tools/transformer.md
@@ -0,0 +1,38 @@
+---
+title: Transormer (英)
+type: tools
+order: 3
+has_chapter_content: true
+version: 0.10
+---
+
+# gulp-weex
+
+> gulp plugin for weex transformer
+
+## Usage
+
+```javascript
+var gulp = require('gulp')
+var weex = require('gulp-weex')
+
+gulp.task('default', function () {
+ return gulp.src('src/*.html')
+ .pipe(weex({}))
+ .pipe(gulp.dest('./dest'))
+})
+```
+
+## Options
+
+### oldFormat
+
+whether transform to old format.
+
+default: `false`.
+
+### isEntry
+
+whether is an entry module which has `bootstrap(...)`.
+
+default: `true`.
\ No newline at end of file
http://git-wip-us.apache.org/repos/asf/incubator-weex-site/blob/32a097bf/_draft/web-dev-experience.en.md
----------------------------------------------------------------------
diff --git a/_draft/web-dev-experience.en.md b/_draft/web-dev-experience.en.md
new file mode 100644
index 0000000..81d0ff2
--- /dev/null
+++ b/_draft/web-dev-experience.en.md
@@ -0,0 +1,36 @@
+---
+title: Web Dev Experience
+type: guide
+order: 4.2
+version: 2.1
+---
+
+# Web Dev Experience
+
+## What is Web Dev Experience?
+
+Weex dev experience is very close to web dev experience. It describes the UI structure and content with HTML or HTML-based template, describes the UI style with CSS, and describes user behavior and business logic with JavaScript. And it has completed project mechanism.
+
+## Why We Choose Web Dev Experience?
+
+1. There are a huge number of web developers in the community today. Weex can give more web developers abilities to build high-performance and great-experienced mobile apps.
+2. Web development itself has very high efficiency and flexibility. And Weex is committed to solve the dynamic requirement of mobile apps. They just match each other.
+3. Web standards and web dev experience is built by a lot of outstanding technology companies together. It has very high quality assurance.
+4. Standard itself is a force. Base on standards, respect for standards, close to the standard means that there are more possibilities.
+5. The eco-system and community of web today are very prosperous. There are many mature tools, libraries, systems, best practices to be used.
+
+## How Does Weex Support Web Standard?
+
+We have the following aspects to sort out:
+
+* HTML tags: Weex currently supports basic container (div), text, image, video and other components. And almost all of HTML block-level tags can be simulated through the custom container components. Inline-level tags can be simulated through the custom text components. And Weex also supports some form components such as input / textarea.
+* CSS: Weex supports some commonly used CSS properties, values and units. We will continue to support more based on user feedback and the usage frequency in web.
+* JavaScript: Weex currently offers a simplified version of the DOM APIs for operating the native UI. And Weex will continue to support more W3C Device APIs.
+* About frameworks, Weex officially build Vue 2.0 in. and support its related libs such as vuex, vue-router, etc. At the same time developers can directly use all kinds of third-party JavaScript libs.
+* About engineering, we recommend using npm to pack and manage deps. And we recommend webpack for the JS bundle package. Also we provide weex-devtool, which make developers debug native app just like in Chrome devtools. Weex also is friendly to current mainstream web page publishing system, caching mechanism and other best practices.
+
+**Links**
+
+* [Differences between Weex and web standard](../../references/web-standards.html)
+* [Using Vue.js](./using-vue.html)
+* [Using Devtools](./devtools.html)
http://git-wip-us.apache.org/repos/asf/incubator-weex-site/blob/32a097bf/_draft/web-dev-experience.md
----------------------------------------------------------------------
diff --git a/_draft/web-dev-experience.md b/_draft/web-dev-experience.md
new file mode 100644
index 0000000..cb7ff24
--- /dev/null
+++ b/_draft/web-dev-experience.md
@@ -0,0 +1,38 @@
+---
+title: Web 开发体验
+type: wiki
+order: 1.2
+version: 2.1
+---
+
+# Web 开发体验
+
+## 什么是 Web 开发体验
+
+Weex 的开发体验和 web 的开发体验是非常接近的,它通过 HTML 或基于 HTML 模板来描述界面的结构和内容,通过 CSS 的方式描述界面的展现形式,用 JavaScript 来描述用户行为和业务逻辑。同时有完整的工程机制,如创建、开发、调试、部署。
+
+## 为什么选择 Web 开发体验
+
+我们选择基于 Web 开发体验有以下几方面原因:
+
+1. 今天在技术社区有大量的 web 开发者,Weex 可以赋能更多的 web 开发者构建高性能和高体验的移动应用。
+2. Web 开发本身具有非常强的高效率和灵活性,这和 Weex 想解决的移动端动态性问题不谋而合。
+3. Web 标准和开发体验是很多顶尖而优秀的科技公司共同讨论和建设的结果,本身的设计和理念都有极高的品质保障,同时 Weex 也希望可以借此机会努力为标准贡献一点自己的微薄之力。
+4. Web 是一种标准化的技术,标准本身就是一种力量,基于标准、尊重标准、贴近标准都意味着拥有更多的可能性。
+5. Web 今天的生态和社区是非常繁荣的,有很多成熟的工具、库、工程体系、最佳实践可以使用、引入和借鉴。
+
+## Weex 对 Web 标准的支持情况怎么样?
+
+我们从以下几个方面进行介绍和梳理:
+
+* HTML 标签:目前 Weex 支持了基本的容器 (div)、文本 (text)、图片 (image)、视频 (video) 等组件,HTML 中几乎所有的块级标签都可以通过容器组件进行自定义模拟,inline 的标签则可以通过文本组件进行自定义模拟,另外 Weex 还支持了 input/textarea 这样的表单型组件。
+* CSS:Weex 支持了部分常用的 CSS 属性、值类型和单位,并且会根据用户反馈和在 web 中的使用频度陆续支持更多。
+* JavaScript:目前 Weex 提供了一套简化版的 DOM APIs,用来操作原生界面,同时 Weex 在陆续支持更多的 W3C Device APIs。
+* 在框架方面,Weex 官方支持了 Vue 2.0,以及相关的 vuex, vue-router 等,同时开发者可以直接使用各种第三方 JavaScript 工具库。
+* 在工程方面,Weex 推荐 npm 包管理工具,也推荐用 webpack 进行 JS bundle 打包,并提供了 weex-devtool 开发工具,让开发者可以像调试 Chrome 一样调试 Weex 原生应用,同时 Weex 的页面发布系统、客户端缓存机制都尊重目前 Web 的最佳实践。
+
+**相关链接**
+
+* [Weex 和 web 标准的差异](../../references/web-standards.html)
+* [使用 Vue.js](./using-vue.html)
+* [使用 Devtools](./devtools.html)
[02/51] [abbrv] incubator-weex-site git commit: rearrangement the
structure of the document
Posted by ha...@apache.org.
http://git-wip-us.apache.org/repos/asf/incubator-weex-site/blob/32a097bf/source/v-0.10/references/modules/animation.md
----------------------------------------------------------------------
diff --git a/source/v-0.10/references/modules/animation.md b/source/v-0.10/references/modules/animation.md
deleted file mode 100644
index 4b46564..0000000
--- a/source/v-0.10/references/modules/animation.md
+++ /dev/null
@@ -1,63 +0,0 @@
----
-title: animation
-type: references
-order: 3.1
-version: 0.10
----
-
-# animation
-
-Smooth and meaningful animation is very effective for enhancing the user experience of mobile application, you can use the `animation` module to perform animation on components. A animation can perform a series of simple transformations (position, size, rotation, background color, and opacity) on the component. So, if you have a `image` component, you can move, rotate, grow, or shrink it.
-
-## API
-### transition(node, options, callback)
-
-[example](http://dotwe.org/5be74019d5e510fa95c5dedec24f7ce5)
-
-#### Arguments
-##### node
-
-**type:** node
-
-**position:** An element that will be animated, normally you can get this by calling `this.$el(id)`.
-
-##### options
-
-**type:** object
-
-**position:** Transition options.
-- `duration` (number): Specifies the number of milliseconds of animation execution, the default value is `0`, means that no animation will occur.
-- `delay` (number): Specifies the amount of milliseconds to wait between a change being requested to a property that is to be transitioned and the start of the transition effect. The default value is `0`.
-- `timingFunction` (string): Used to describe how the intermediate values of the styles being affected by a transition effect are calculated, default value is `linear`, the allowed attributes are listed in the following table:
-
-|name|description|example|
-|:--|:--|:--|
-|`linear`|Specifies a transition effect with the same speed from start to end|[example](http://dotwe.org/d71491ded2bede32df3e8b44b53d5e4f)|
-|`ease-in`|Specifies a transition effect with a slow start|[example](http://dotwe.org/23b104f833039f263957481f2e2c40c9)|
-|`ease-out`|Specifies a transition effect with a slow end|[example](http://dotwe.org/04dab95e073a2c3a808e6b01fc20e996)|
-|`ease-in-out`|Specifies a transition effect with a slow start and end|[example](http://dotwe.org/fc37ec17d215e786ce336a00457489e3)|
-|`cubic-bezier(x1, y1, x2, y2)`|Define your own values in the cubic-bezier function. Possible values are parameter values from 0 to 1. More information about cubic-bezier please visit [cubic-bezier](http://cubic-bezier.com/) and [Bézier curve](https://en.wikipedia.org/wiki/B%C3%A9zier_curve).|[example](http://dotwe.org/95d8f15d0014c31d3a1d15728313f2a5)|
-
-- `styles` (object): Specify the names and values of styles to which a transition effect should be applied. The allowed attributes are listed in the following table:
-
-| name | description | value type | default value |example|
-| :--- | :--- | :--- | :--- |:---|
-|width|The width applied to the component after the animation finished.|length|none|[example](http://dotwe.org/b599d273f996cfdcbeca7bd5c828ca90)|
-|height|The height applied to the component after the animation finished.|length|none|[example](http://dotwe.org/d0b1ccadf386ba00960d0c8340c682e5)|
-|backgroundColor|The background color applied to the component after the animation finished.|string|none|[example](http://dotwe.org/f4616ee18f6042b63a8fdcd2816b1712)|
-|opacity|The opacity applied to the component after the animation finished.|number between 0 to 1|`1`|[example](http://dotwe.org/f94394173301db83ae6e66d1330a0d0b)|
-|transformOrigin|The povit of transition. The possible values for `x-aris` are `left`/`center`/`right`/length or percent, and possible values of `y-axis` are `top`/`center`/`bottom`/ length or percent|`x-axis y-axis`|`center center`|[example](http://dotwe.org/de43f5a47de230dd531797458bf7fd3c)|
-|transform|Transform function to be applied to the element. The properties in the following table are supported|object|none|[example](http://dotwe.org/cfc0388441f5a53a73335885006c13e7)|
-
-properties of `transform`:
-
-| name | description | value type | default value |example|
-| :--- | :--- | :--- | :--- |:---|
-|translate/translateX/translateY|Specifies the location of which the element will be translated.|pixel or percent|none|[example](http://dotwe.org/6638e66e296723bbef3e59c83b2b5003)|
-|rotate|Specifies the angle of which the element will be rotated, the unit is degree.|number|none|[example](http://dotwe.org/ba9e9920594d9388744b2bd0d1b7695d)|
-|scale/scaleX/scaleY|Stretch or shrink the element.|number|none|[example](http://dotwe.org/14b42dde6583ab222bd2b7ed08f241c8)|
-
-#### callback
-**type:** function
-
-**position:** Callback which is called after the completion of transition.
\ No newline at end of file
http://git-wip-us.apache.org/repos/asf/incubator-weex-site/blob/32a097bf/source/v-0.10/references/modules/clipboard.md
----------------------------------------------------------------------
diff --git a/source/v-0.10/references/modules/clipboard.md b/source/v-0.10/references/modules/clipboard.md
deleted file mode 100644
index d0f45e7..0000000
--- a/source/v-0.10/references/modules/clipboard.md
+++ /dev/null
@@ -1,53 +0,0 @@
----
-title: clipboard
-type: references
-order: 3.2
-version: 0.10
----
-
-# clipboard
-<span class="weex-version">v0.8+ (developing)</span>
-
-clipboard allows you to `getString()` or `setString()` from the system clipboard.
-
-Not long ago, We're still suffering from such a situation that we got a verification code sent by SMS, and we had no way to get the code from the SMS text but to typed it by our hands. How frustrated it is! But now you can enable your app to get the code from the system clipboard by calling `clipboard.getString()` .
-
-## Caution
-
-* only support text.
-* only works on Android and iOS. NOT works for html5, for web security reason.
-
-## API
-
-### getString(callback)
-
-reads from clipboard.
-
-##### Arguments
-
-`callback(function)`: the callback function after executing this action. `data` is the return value.
-
-Example
-
-```js
-var clipboard = require('@weex-module/clipboard');
-clipboard.getString(function(ret) {
- // callback. 'ret' is an object that contains 'result' and 'data'.
- // use 'ret.data' to fetch the value.
- console.log("read from clipboard is " + ret.data);
-});
-
-```
-### setString(text)
-
-sets the text to clipboard, having the same effect as copying manually.
-
-##### Arguments
-
-`text(string)`: the text copied to clipboard.
-Example
-
-```js
-var clipboard = require('@weex-module/clipboard');
-clipboard.setString("SomeStringHere");
-```
http://git-wip-us.apache.org/repos/asf/incubator-weex-site/blob/32a097bf/source/v-0.10/references/modules/dom.md
----------------------------------------------------------------------
diff --git a/source/v-0.10/references/modules/dom.md b/source/v-0.10/references/modules/dom.md
deleted file mode 100644
index 948abf0..0000000
--- a/source/v-0.10/references/modules/dom.md
+++ /dev/null
@@ -1,114 +0,0 @@
----
-title: dom
-type: references
-order: 3.3
-version: 0.10
----
-
-# dom
-
-## Summary
-
-A series of dom apis that sending virtual-dom's messages to the native renderer to update the dom tree. The only API for developers to use in a `.we` file is `scrollToElement` <del>which you can use by calling the `$scrollTo` method</del>. Other APIs mentioned on this page should only be used through the native renderer in the `callNative` process.
-
-## API
-
-### scrollToElement(node, options)
-
-Scroll the page to the specified node. This API should only be used on the element in the `scroller` or `list` component.
-
-<del>This API can be used by calling the VM's method `$scrollTo` **(deprecated)**.</del> You can use `require('@weex-module/dom').scrollToElement` to call this API in your `.we` file.
-
-#### Arguments
-
-* `node`*(Node)*: an element that scrolled into the view.
-* `options`*(object)*: some options.
- * `offset`*(number)*: An offset to the visible position, default is `0`.
-
-#### Example
-
-```javascript
-var dom = require('@weex-module/dom');
-dom.scrollToElement(this.$el('someId'), {offset: 10});
-```
-
-### createBody(element)
-
-Create the body for the whole dom tree. Element type should only be the ones that can be used as roots (`div`, `scroller` and `list`).
-
-#### Arguments
-
-* `element`*(object)*: a object that specified the body node info like ref, type, children, etc.
-
-### addElement(parentNode, element, index)
-
-Add a element into the dom tree.
-
-#### Arguments
-
-* `parentNode`*(Node)*: specify the element's parent node.
-* `element`*(object)*: a object that specified the config info for the node to be added.
-* `index`*(number)*: insert the element to the specified position.
-
-### removeElement(node)
-
-Remove a node in the dom tree.
-
-#### Arguments
-
-* `node`*(Node)*: the node to be removed.
-
-### moveElement(node, parentNode, index)
-
-Move a exsited node into another parent (or the same parent) before the specified position.
-
-#### Arguments
-
-* `node`*(Node)*: the node to be moved.
-* `parentNode`*(Node)*: the parent node to move into.
-* `index`*(number)*:: according to the specified position index, will the node be inserted into.
-
-### addEvent(node, type)
-
-Inform the renderer that there are listeners for a specified event type.
-
-#### Arguments
-
-* `node`*(Node)*: the node to be listened on.
-* `type`*(string)*: which type of events the node should be listened for.
-
-### removeEvent(node, type)
-
-Remove event listeners on the specified node for the specified event type.
-
-#### Arguments
-
-* `node`*(Node)*: on which node should the listeners to be removed
-* `type`*(string)*: specify the event type.
-
-### updateAttrs(node, attr)
-
-Update attrbutes of the specified node.
-
-#### Arguments
-
-* `node`*(Node)*: the node to be updated.
-* `attr`*(object)*: the attributes object with the attribute items to be updated.
-
-### updateStyle(node, style)
-
-Update styles of the specified node.
-
-#### Arguments
-
-* `node`*(Node)*: the node to be updated.
-* `style`*(object)*: the style object with the style rules to be updated.
-
-### createFinish()
-
-Notify native renders that the series of messages for updating the native dom tree have reached a end.
-
-### refreshFinish()
-
-Notify native renders that the series of messages for refreshing a native dom tree have reached a end.
-
http://git-wip-us.apache.org/repos/asf/incubator-weex-site/blob/32a097bf/source/v-0.10/references/modules/globalevent.md
----------------------------------------------------------------------
diff --git a/source/v-0.10/references/modules/globalevent.md b/source/v-0.10/references/modules/globalevent.md
deleted file mode 100644
index 0db8c48..0000000
--- a/source/v-0.10/references/modules/globalevent.md
+++ /dev/null
@@ -1,89 +0,0 @@
----
-title: globalEvent
-type: references
-order: 3.10
-version: 0.10
----
-
-# globalEvent
-<span class="weex-version">v0.8+ (developing)</span>
-
-## Summary
-
-`globalEvent` are used to listen for persistent events, such as changes in positioning information, gyroscopes, and so on. A global event is a secondary API that requires additional APIs to work with.
-
-You can register events via `addEventListener`, which can be removed by `removeEventListener` when you do not need to listen for `globalEvent`.
-
-*AUCTION*
-- Only instance level is not application level .
-
-## How to make your Module support global events
-API development is complete, when the event needs to be sent, the need through the following methods:
-
-```javascript
-/**
- *
- * @param eventName eventName
- * @param params event params
- */
-instance.fireGlobalEventCallback(eventName,params);
-```
-
-How to dispatch a global event in a weex-html5 component or module ? Just dispatch the event on the document element:
-
-```javascript
-var evt = new Event('some-type')
-evt.data = { foo: 'bar' }
-document.dispatchEvent(evt)
-```
-
-### Example
-
-#### Android
-
-```java
-Map<String,Object> params=new HashMap<>();
-params.put("key","value");
-mWXSDKInstance.fireGlobalEventCallback("geolocation",params);
-```
-#### iOS
-
-```Objective-C
-[weexInstance fireGlobalEvent:@"geolocation" params:@{@"key":@"value"}];
-```
-
-## API
-
-### addEventListener(String eventName, String callback)
-
-register global event.
-
-#### Arguments
-
-* `eventName`*(string)*: The name of the event you want to listen to.
-* `callback`*(function)*: the callback function after executing this action.
-
-#### Example
-
-```javascript
-var globalEvent = require('@weex-module/globalEvent');
-globalEvent.addEventListener("geolocation", function (e) {
- console.log("get geolocation")
- });
-```
-
-### removeEventListener(String eventName)
-
-remove global event
-
-#### Arguments
-
-* `eventName`*(string)*: You no longer need to listen for event names.
-
-#### Example
-
-```javascript
-var globalEvent = require('@weex-module/globalEvent');
-globalEvent.removeEventListener("geolocation");
-```
-
http://git-wip-us.apache.org/repos/asf/incubator-weex-site/blob/32a097bf/source/v-0.10/references/modules/index.md
----------------------------------------------------------------------
diff --git a/source/v-0.10/references/modules/index.md b/source/v-0.10/references/modules/index.md
deleted file mode 100644
index 2a094ca..0000000
--- a/source/v-0.10/references/modules/index.md
+++ /dev/null
@@ -1,28 +0,0 @@
----
-title: Built-in Modules
-type: references
-order: 3
-has_chapter_content: true
-version: 0.10
----
-
-# Built-in Modules
-
-## How to use
-
-You can use a simply way like `require('@weex-module/name')` to access the apis of module. e.g.
-
-```html
-<script>
-var dom = require('@weex-module/dom')
-
-module.exports = {
- data: {},
- created: function () {
- dom.scrollToElement(this.$el('someIdForElement'), {
- offset: 0
- })
- }
-}
-</script>
-```
\ No newline at end of file
http://git-wip-us.apache.org/repos/asf/incubator-weex-site/blob/32a097bf/source/v-0.10/references/modules/modal.md
----------------------------------------------------------------------
diff --git a/source/v-0.10/references/modules/modal.md b/source/v-0.10/references/modules/modal.md
deleted file mode 100644
index 2ebad15..0000000
--- a/source/v-0.10/references/modules/modal.md
+++ /dev/null
@@ -1,192 +0,0 @@
----
-title: modal
-type: references
-order: 3.4
-version: 0.10
----
-
-# modal
-
-Weex provides a series of message boxes: `toast`, `alert`, `confirm` and `prompt`.
-
-## API
-### toast(options)
-
-A toast provides simple feedback about an operation in a small popup. For example, navigating away from an email before you send it triggers a "Draft saved" toast to let you know that you can continue editing later. Toasts automatically disappear after a timeout.
-
-#### Arguments
-- `options` (object): toast options.
- - `message` (string): the text message that the toast shows.
- - `duration` (number): the duration(seconds) that the toast shows.
-
-**Example:**
-
-```html
-<template>
- <div style="height: 200px; width: 400px; background-color: #00bfff;
- justify-content: center; align-items: center" onclick="{{perform}}">
- <text style="font-size: 60px; color: #ffffff">Toast</text>
- </div>
-</template>
-
-<script>
- module.exports = {
- methods: {
- perform: function () {
- var modal = require('@weex-module/modal');
- modal.toast({
- 'message': 'I am a toast',
- 'duration': 3
- });
- }
- }
- }
-</script>
-```
-### alert(options, callback)
-
-An alert box is often used if you want to make sure information comes through to the user.
-When an alert box pops up, the user will have to click "OK" to proceed.
-
-#### Arguments
-
-- `options` (object): alert box options.
- - `message` (string): the text message that the alert shows.
- - `okTitle` (string): the text of positive button, default is 'OK'.
- - `callback` (function): callback when complete.
- This method has a callback function whose arguments will be:
-- `result` (string): the title text of the confirm button that clicked by user.
-
-**Example:**
-
-```html
-<template>
- <div>
- <div style="height: 200px; width: 400px; background-color: #00bfff;
- justify-content: center; align-items: center" onclick="{{perform}}">
- <text style="font-size: 60px; color: #ffffff">Alert</text>
- </div>
- <text>{{params}}</text>
- </div>
-</template>
-
-<script>
- module.exports = {
- data: {
- params: ''
- },
- methods: {
- perform: function () {
- var modal = require('@weex-module/modal');
- var self = this;
- modal.alert({
- 'message': 'I am alert message',
- 'okTitle' : 'YES'
- }, function (result) {
- self.params = String(result)
- });
- }
- }
- }
-</script>
-```
-
-### confirm(options, callback)
-A confirm box is often used if you want the user to verify or accept something.
-
-When a confirm box pops up, the user will have to click either confirm or cancel button to proceed.
-
-#### Arguments
-- `options` (object): confirm box options.
- - `message` (string): the message that the confirm shows.
- - `okTitle` (string): the title of confirm button, default is 'OK'.
- - `cancelTitle` (string): the title of cancel button, default is 'Cancel'.
-- `callback` (function): callback when complete.
-
-This method has a callback function whose arguments will be:
-- `result`(string): the title text of the button that clicked by user.
-**Example:**
-
-```html
-<template>
- <div>
- <div style="height: 200px; width: 400px; background-color: #00bfff;
- justify-content: center; align-items: center" onclick="{{perform}}">
- <text style="font-size: 60px; color: #ffffff">Confirm</text>
- </div>
- <text>{{params}}</text>
- </div>
-</template>
-
-<script>
- module.exports = {
- data: {
- params: ''
- },
- methods: {
- perform: function () {
- var modal = require('@weex-module/modal');
- var self = this;
- modal.confirm({
- 'message': 'I have read and accept the terms.',
- 'okTitle' : 'YES',
- 'cancelTitle' : 'NO'
- }, function (e) {
- self.params = String(e)
- });
- }
- }
- }
-</script>
-```
-
-### prompt(options, callback)
-
-A prompt box is often used if you want the user to input a value before entering a page.
-When a prompt box pops up, the user will have to click either confirm or cancel button to proceed after entering an input value.
-
-#### Arguments
-- `options` (object): some options.
- - `message` (string): the message that the prompt shows.
- - `okTitle` (string): the title text of confirm button, default is 'OK'.
- - `cancelTitle` (string): the title text of cancel button, default is 'Cancel'.
-- `callback` (function): callback when complete.
- This method has a callback function whose arguments will be:
-- `ret` (object): the argument will be a object, which has attributes `result` and `data`, like `{ result: 'OK', data: 'hello world' }`
- - `result` (string): the title of the button that clicked by user.
- - `data` (string): the value of the text that entered by user.
-
-**Example:**
-
-```html
-<template>
- <div>
- <div style="height: 200px; width: 400px; background-color: #00bfff;
- justify-content: center; align-items: center" onclick="{{perform}}">
- <text style="font-size: 60px; color: #ffffff">Prompt</text>
- </div>
- <text>{{params}}</text>
- </div>
-</template>
-
-<script>
- module.exports = {
- data: {
- params: ''
- },
- methods: {
- perform: function () {
- var modal = require('@weex-module/modal');
- var self = this;
- modal.prompt({
- 'message': 'I am a prompt',
- 'okTitle' : 'YES',
- 'cancelTitle' : 'NO'
- }, function (e) {
- self.params = JSON.stringify(e)
- });
- }
- }
- }
-</script>
-```
\ No newline at end of file
http://git-wip-us.apache.org/repos/asf/incubator-weex-site/blob/32a097bf/source/v-0.10/references/modules/navigator.md
----------------------------------------------------------------------
diff --git a/source/v-0.10/references/modules/navigator.md b/source/v-0.10/references/modules/navigator.md
deleted file mode 100644
index fe4442c..0000000
--- a/source/v-0.10/references/modules/navigator.md
+++ /dev/null
@@ -1,198 +0,0 @@
----
-title: navigator
-type: references
-order: 3.5
-version: 0.10
----
-
-# Navigator
-<span class="weex-version">v0.6.1+</span>
-
-As it's known to all that, we can navigate back and forth in the web browser using the navigation bar.
-And The navigator module mimics the same behaviors in the iOS/Android application. Without such an ability, We will have to stay in the same page forever, so it is very important. Besides the navigation, the module can let us to specify whether to apply animation or not during the transition.
-
-**example**
-
-```html
-<template>
- <div class="div">
- <text class="text" onclick="onItemClick">click me! {{message}}</text>
- </div>
-</template>
-
-<script>
- module.exports ={
- data:{
- message:""
- },
- methods:{
- onItemClick:function(e){
-
- var navigator = require('@weex-module/navigator');
- var params = {'url':'http://weex.alibaba-inc.com/raw/html5/3d2996653c1d129603f9c935b895e998.js','animated':true};
- navigator.push(params, function(e) {
- console.log('i am the callback.')
- });
- }
- }
- }
-</script>
-<style>
- .div {
- flex-direction: row;
- justify-content: space-between;
- align-items: center;
- width: 750;
- height: 90;
- padding-left:30;
- padding-right:30;
-
- border-bottom-width: 1;
- border-style: solid;
- border-color: #dddddd;
- }
- .text{
- width: 750;
- height: 90;
- }
-</style>
-```
-
-[try it](http://dotwe.org/004a5e3f26290cf5b9ce03806a574633)
-
-## API
-### push(options, callback)
-
-push a weex page onto the navigator stack, you can specify whether apply animation when pushing. And you can also specify a callback function to be executed after the operation is over.
-
-**parameters**
-
-* options(object): some options.
- * url(stirng): The URL of the weex page to push.
- * animated(string): true, if the weex page is push through animation, otherwise, false. Default value is true.
-
-* callback(object): the callback function to be called after executing this action.
-
-```javascript
-var params = {
- 'url': 'navigator-demo.js',
- 'animated' : 'true',
-}
-var navigator = require('@weex-module/navigator');
-navigator.push(params, function(e) {
- //callback
-});
-```
-
-### pop(options, callback)
-pop a weex page onto the navigator stack, you can specify whether apply animation when popping. And you can also specify a callback function to be executed after the operation is over.
-
-**parameters**
-
-* options(object): some options.
- * animated(string): true if the weex page is pop through animation; otherwise, false. Default value is true.
-* callback(object): the callback function after executing this action.
-
-**example**
-
-```javascript
-var params = {
- 'animated' : 'true',
-}
-var navigator = require('@weex-module/navigator');
-navigator.pop(params, function(e) {
- //callback
-});
-```
-
-### close(options, callback)
-close a weex page, you can specify a callback function to be executed after the operation is over.
-
-**parameters**
-
-* options(object): some options.
- * animated(string): true, should animation be applied when closing. Default value is true.
-* callback(object): the callback function after executing this action.
-
-### setNavBarBackgroundColor(params, callback)
-set color for the navigation bar's background color, you can specify a callback function to be executed after the operation is over.
-
-**parameters**
-
-* params(object): some parameters.
- * backgroundColor(string): it's a required param, no default value provided.
-* callback(object): the callback function after executing this action.
-
-
-### setNavBarLeftItem(params,callback)
-set left item for the navigation bar, you can specify a callback function to be executed after the operation is over.
-
-**parameters**
-
-* params(object): parameters can not be empty, titleColor depends on title. And If title and icon are provided, only the title and its titleColor will be used. That's to say, icon will only be used when title is not present.
- * title(string): the title for the bar button.
- * titleColor (string): the title color.
- * icon (string): the icon for the bar button, should be an an downloadable image.
-* callback(object): the callback function after executing this action.
-
-### clearNavBarLeftItem(callback)
-clear left item for the navigation bar, you can specify a callback function to be executed after the operation is over.
-
-**parameters**
-
-* callback(object): the callback function after executing this action.
-
-### setNavBarRightItem(params,callback)
-set the right item for the navigation bar, you can specify a callback function to be executed after the operation is over.
-
-**parameters**
-
-* params(object): parameters can not be empty, titleColor depends on title. And If title and icon are provided, only the title and its titleColor will be used. That's to say, icon will be used when title is not present.
- * title(string): the title for the bar button.
- * titleColor (string): the title color.
- * icon (string): the icon for the bar button, should be an an downloadable image.
-* callback(object): the callback function after executing this action.
-
-### clearNavBarRightItem(params, callback)
-clear the right item for the navigation bar, you can specify a callback function to be executed after the operation is over.
-**parameters**
-
-* params(object): optional.
-* callback(object): the callback function after executing this action.
-
-
-### setNavBarMoreItem(params,callback)
-set the more item for the navigation bar, you can specify a callback function to be executed after the operation is over.
-
-**parameters**
-
-Actually, the function does nothing.
-* params(object): optional.
-* callback(object): the callback function after executing this action.
-
-### clearNavBarMoreItem(params, callback)
-clear the more item for the navigation bar, you can specify a callback function to be executed after the operation is over.
-
-**parameters**
-
-Actually, the function does nothing.
-* params(object): optional.
-* callback(object): the callback function after executing this action.
-
-### setNavBarTitle(params,callback)
-set the title for the navigation bar, you can specify a callback function to be executed after the operation is over.
-
-**parameters**
-
-* params(object): parameters can not be empty.
- * title(string): the title for the bar button.
-* callback(object): the callback function after executing this action.
-
-
-### clearNavBarTitle(params,callback)
-clear the title for the navigation bar, you can specify a callback function to be executed after the operation is over.
-
-**parameters**
-
-* params(object): optional.
-* callback(object): the callback function after executing this action.
http://git-wip-us.apache.org/repos/asf/incubator-weex-site/blob/32a097bf/source/v-0.10/references/modules/storage.md
----------------------------------------------------------------------
diff --git a/source/v-0.10/references/modules/storage.md b/source/v-0.10/references/modules/storage.md
deleted file mode 100644
index 9c62109..0000000
--- a/source/v-0.10/references/modules/storage.md
+++ /dev/null
@@ -1,111 +0,0 @@
----
-title: storage
-type: references
-order: 3.6
-version: 0.10
----
-
-# storage
-<span class="weex-version">v0.7+</span>
-
-## Summary
-
-`storage` is a series of apis, allowing you to for example add, modify or delete stored data items.
-
-## API
-
-### setItem(key, value, callback)
-
-When passed a key name and value, will add that key to the storage,
-or update that key's value if it already exists.
-
-#### Arguments
-
-* `key`*(string)*: the name of the key you want to store. "" or null is not allowed.
-* `value`*(string)*: the name of the value you want to store."" or null is not allowed.
-* `callback`*(object)*: the callback function after executing this action.
-
-##### Example
-
-```javascript
-var storage = require('@weex-module/storage');
-storage.setItem('bar', 'bar-value', function(e) {
- // callback.'e' is an object that contains 'result' and 'data'. e.result indicate whether `setItem` is succeed.
- // e.data will return 'undefined' if success or 'invalid_param' if your key/value is ""/null.
-});
-```
-
-### getItem(key, callback)
-
-When passed a key name, will return that key's value.
-
-#### Arguments
-
-* `key`*(string)*: the name of the key you want to retrieve the value of."" or null is not allowed.
-* `callback`*(object)*: the callback function after executing this action.
-
-##### Example
-
-```javascript
-var storage = require('@weex-module/storage');
-storage.getItem('foo', function(e) {
- //callback.'e' is an object that contains 'result' and 'data'.
- // use 'e.data' to fetch the value of the key,if not found,'undefined' will return.
-});
-```
-
-### removeItem(key, callback)
-
-When passed a key name, will remove that key from the storage.
-
-#### Arguments
-
-* `key`*(string)*: the name of the key you want to remove."" or null is not allowed.
-* `callback`*(object)*: the callback function after executing this action.
-
-##### Example
-
-```javascript
-var storage = require('@weex-module/storage');
-storage.removeItem('foo', function(e) {
- // callback. 'e' is an object that contains 'result' and 'data'.
- // e.result will return 'success' or 'failed' according to the executing result.
- // e.data will always return 'undefined' in this function if success.
-});
-```
-
-### length(callback)
-
-Returns an integer representing the number of data items stored in the Storage object.
-
-#### Arguments
-
-* `callback`*(object)*: the callback function after executing this action.
-
-##### Example
-
-```javascript
-var storage = require('@weex-module/storage');
-storage.length(function(e) {
- // callback. 'e' is an object that contains 'result' and 'data'.
- //e.data will return that number.
-});
-```
-
-### getAllKeys(callback)
-
-Returns an array that contains all keys stored in Storage object.
-
-#### Arguments
-
-* `callback`*(object)*: the callback function after executing this action.
-
-##### Example
-
-```javascript
-var storage = require('@weex-module/storage');
-storage.getAllKeys(function(e) {
- // callback. 'e' is an object that contains 'result' and 'data'.
- //e.data will return that array of keys.
-});
-```
http://git-wip-us.apache.org/repos/asf/incubator-weex-site/blob/32a097bf/source/v-0.10/references/modules/stream.md
----------------------------------------------------------------------
diff --git a/source/v-0.10/references/modules/stream.md b/source/v-0.10/references/modules/stream.md
deleted file mode 100644
index 522e3b0..0000000
--- a/source/v-0.10/references/modules/stream.md
+++ /dev/null
@@ -1,86 +0,0 @@
----
-title: stream
-type: references
-order: 3.7
-version: 0.10
----
-
-# stream
-
-A series of stream api. It provides a network request.
-
-## API
-
-### fetch(options, callback,progressCallback)
-
-Start a network request, use two callbacks to receive server's response data.
-
-**Arguments**
-
-* options(object): the request options, key value style dictionary.
-
- * method(string): the HTTP method `GET` or `POST`.
-
- * url(string): the request url.
-
- * headers(string): the HTTP request headers.
-
- * type(string): request type, 'json','text' or 'jsonp'(same as 'json' in native implementation)
-
- * body(string): the HTTP body.
-
-* callback(function): A callback function whose argument is the response object of the request. Callback function will receive a `response` object.
-
- * status(number): response status code.
-
- * ok(boolean): true if status code is bewteen 200~299.
-
- * statusText(string): status text
-
- * data(string): response data. It's a object if request option is `json`/`jsonp`, or *(string)* in other type value.
-
- * headers(object): response headers
-
-* progressCallback(function): A progress callback. This callback will be invoked before request finished.
-
- * readyState(number): Current request state.'1':request connection opened;'2':response headers received.;'3':response data is loading;
-
- * status(number): response status code.
-
- * length(number): bytes of data have received. You can read full length of response from 'headers'.
-
- * statusText(string): status text.
-
- * headers(object): response headers.
-
-### Example
-
-```html
-<template>
- <div>
- <text onclick="startStream">click here to start stream</text>
- </div>
-</template>
-
-<script>
- module.exports = {
- methods: {
- startStream: function () {
- var stream_module = require('@weex-module/stream');
- stream_module.fetch({
- method: 'GET',
- url: "http://httpbin.org/get",
- type:'json'
- }, function(response) {
- //finished response
- console.log("all received:",response);
- },function(response){
- //progress response
- console.log("current bytes received:",response.length);
- });
- }
- }
- }
-</script>
-```
-[Try it](http://dotwe.org/6e4ede64fdfe070b9696cc4cc3bdd086)
http://git-wip-us.apache.org/repos/asf/incubator-weex-site/blob/32a097bf/source/v-0.10/references/modules/timer.md
----------------------------------------------------------------------
diff --git a/source/v-0.10/references/modules/timer.md b/source/v-0.10/references/modules/timer.md
deleted file mode 100644
index c82109d..0000000
--- a/source/v-0.10/references/modules/timer.md
+++ /dev/null
@@ -1,60 +0,0 @@
----
-title: Timer
-type: references
-order: 3.8
-version: 0.10
----
-
-# Timer
-
-Weex encapsulates a series of APIs in order to start/stop a one-time task or a repeated task at a fixed delay. Please note that this module don't provide an accuracy delay. It provides best-effort delivery, but the actual delay may still exceed the delay user wants if the corresponding thread is busy.
-Actually, this module is made for the polyfill of HTML5 timer APIs, developers **should not** use this module directly unless they know exactly what they are doing.
-
-## API
-
-All timeout or interval in this module are measured in milliseconds.
-Also, timeout and interval should be a non-negative integer(the max of integer is 0x7FFFFFFF). If timeout or interval is negative, then it will be reset to zero, e.g. the task will be put in the task queue immediately.
-
-### setTimeout(fn, timeout)
-
-The `setTimeout()` method calls a function after a specified number of milliseconds. Use the `clearTimeout()` method to prevent the function from running. The function is only executed once. If you need to repeat execution, use the `setInterval()` method.
-
-#### Arguments
-
-- `fn` (function): The function that will be executed
-- `timeout` (number): The number of milliseconds to wait before executing the function
-
-#### Return value
-
-A Number, representing the fnId value of the timer that is set. Use this value with the `clearTimeout()` method to cancel the timer.
-
-### setInterval(fn, interval)
-
-The `setInterval()` method calls a function at specified intervals (in milliseconds), and it will continue calling the function until `clearInterval()` is called. The fnId value returned by `setInterval()` is used as the parameter for the `clearInterval()` method.
-
-#### Arguments
-
-- `fn` (function): The function that will be executed
-- `interval` (number): The intervals (in milliseconds) on how often to execute the function
-
-#### Return value
-
-A Number, representing the fnId value of the timer that is set. Use this value with the `clearInterval()` method to cancel the timer
-
-### clearTimeout(fnId)
-
-The `clearTimeout()` method clears a timer set with the `setTimeout()` method. The fnId value returned by `setTimeout()` is used as the parameter for the `clearTimeout()` method. If the function has not already been executed, you will be able to stop the execution by calling the `clearTimeout()` method, otherwise, this method has no influence on the task.
-
-#### Arguments
-
-- `fnId` (number): The fnId value of the timer returned by the `setTimeout()` method
-
-### clearInterval(fnId)
-
-The `clearInterval()` method clears a timer set with the `setInterval()` method. The fnId value returned by `setInterval()` is used as the parameter for the `clearInterval()` method.
-
-#### Arguments
-
-- `fnId` (number): The fnId of the timer returned by the `setInterval()` method
-
-[Try it](http://dotwe.org/996578e8f29b88d7d4fa01ab031fbbda)
http://git-wip-us.apache.org/repos/asf/incubator-weex-site/blob/32a097bf/source/v-0.10/references/modules/webview.md
----------------------------------------------------------------------
diff --git a/source/v-0.10/references/modules/webview.md b/source/v-0.10/references/modules/webview.md
deleted file mode 100644
index 88c6f17..0000000
--- a/source/v-0.10/references/modules/webview.md
+++ /dev/null
@@ -1,160 +0,0 @@
----
-title: webview
-type: references
-order: 3.9
-version: 0.10
----
-
-# webview
-
-A series of web operation api like `goBack`, `goForward`, and `reload`. 'webview' module used with the web component.
-
-## API
-
-### goBack(webElement)
-
-Loads the previous location in the history stack.
-
-**Arguments**
-
-* webElement(web): the element of the web component.
-
-#### Example
-
-```
-var webview = require('@weex-module/webview');
-var webElement = this.$el('webview');
-webview.goBack(webElement);
-```
-
-### goForward(webElement)
-
-Loads the next location in the history stack.
-
-**Arguments**
-
-* webElement(web): the element of the web component.
-
-#### Example
-
-```
-var webview = require('@weex-module/webview');
-var webElement = this.$el('webview');
-webview.goForward(webElement);
-```
-
-### reload(webElement)
-
-Reloads the current web page.
-
-**Arguments**
-
-* webElement(web): the element of the web component.
-
-#### Example
-
-```
-var webview = require('@weex-module/webview');
-var webElement = this.$el('webview');
-webview.reload(webElement.ref);
-```
-
-## Example
-
-```html
-<template>
- <div class="browserStyle">
- <div style="flex-direction: row">
- <input id="urlInput" type="url" autofocus="false" placeholder="..." class="textStyle" value="{{input_text}}" oninput="input">
- </input>
- </div>
- <div style="flex-direction: row">
- <wxc-button value="LoadURL" class="buttonSytle" size="small" onclick="loadURL"></wxc-button>
- <wxc-button value="Backward" class="buttonSytle" size="small" onclick="backforward"></wxc-button>
- <wxc-button value="Forward" class="buttonSytle" size="small" onclick="forward"></wxc-button>
- </div>
- <div>
- <web id="webview" src="{{src}}" class="webStyle"></web>
- </div>
- </div>
-</template>
-
-<style>
-
- .browserStyle
- {
- width:600;
- height: 825;
- background-color:#778899 ;
- }
-
- .textStyle
- {
- width:600;
- height: 50;
- background-color: #D3D3D3;
- }
-
- .buttonSytle
- {
- width:180;
- height: 50;
- font-size: 12;
- background-color: #D3D3D3;
- margin:10;
- padding-left: 5;
- padding-right: 5;
- }
-
- .webStyle
- {
- width:600;
- height: 700;
- background-color: #8B0000;
- }
-
-</style>
-
-<script>
-
- var web_module = require('@weex-module/webview');
-
- module.exports = {
- data: {
- src : "https://h5.m.taobao.com",
- input_text:"https://www.tmall.com"
- },
-
- methods: {
-
- loadURL: function (e) {
- var web_element = this.$el('webview');
- var input = this.$el("urlInput");
- this.src = this.input_text;
- web_module.reload(web_element);
- },
-
- backforward: function (e) {
- var web_element = this.$el('webview');
- web_module.goBack(web_element);
- this.input_text = web_element.attr.src;
- },
-
- forward: function (e) {
- var web_element = this.$el('webview');
- web_module.goForward(web_element);
- this.input_text = web_element.attr.src;
- },
- input:function (e) {
- var input = this.$el("urlInput");
- this.input_text = input.attr.value;
- }
-
- }
- }
-</script>
-```
-
-[Try it](http://dotwe.org/103d472645206cc1564f49717585abb4)
-
-
http://git-wip-us.apache.org/repos/asf/incubator-weex-site/blob/32a097bf/source/v-0.10/references/special-element.md
----------------------------------------------------------------------
diff --git a/source/v-0.10/references/special-element.md b/source/v-0.10/references/special-element.md
deleted file mode 100644
index 4a4d57e..0000000
--- a/source/v-0.10/references/special-element.md
+++ /dev/null
@@ -1,36 +0,0 @@
----
-title: Special Element
-type: references
-order: 1.10
-version: 0.10
----
-
-# Special Element
-
-## Content
-
-The element serves as content distribution outlet in a composed component template. The element itself will be replaced.
-
-alias: 'slot'.
-
-## Example
-
-As shown in the example, 'content' replaced by 'text'.
-
-```html
-<we-element name="item">
- <template>
- <div>
- <content></content>
- </div>
- </template>
-</we-element>
-
-<template>
- <div>
- <item>
- <text>Content Text</text>
- </item>
- </div>
-</template>
-```
http://git-wip-us.apache.org/repos/asf/incubator-weex-site/blob/32a097bf/source/v-0.10/references/specs/index.md
----------------------------------------------------------------------
diff --git a/source/v-0.10/references/specs/index.md b/source/v-0.10/references/specs/index.md
deleted file mode 100644
index d303a16..0000000
--- a/source/v-0.10/references/specs/index.md
+++ /dev/null
@@ -1,309 +0,0 @@
----
-title: JS Bundle format
-type: references
-order: 4
-has_chapter_content: false
-chapter_title: Low-level Specs
-version: 0.10
----
-
-# JS Bundle format
-
-JS Bundle Version: v0.3.0
-
-## v0.5.0
-
-### Whole Syntax and Structure
-
-A JS Bundle is actually a JavaScript file which follows **ES5** standard. The code is used to define some custom components for the instance and bootstrap the instance with certain name, config and data. Developers could use all kinds of JS code packager like webpack, browserify, requirejs to organize your whole instance code.
-
-### Meta Info
-
-The JS Bundle Must begin with a comment line which is a JSON object like:
-
-```javascript
-// { "framework": "Weex", "version": "0.5.0" }
-```
-
-This JSON object as least contains:
-
-* property `framework` must be `"Weex"`
-* property `version` should be corresponded with the JS Bundle format version
-
-### Global Members
-
-* `__weex_define__(name, options)`
-* `__weex_bootstrap__(name, config, data)`
-* `__weex_document__`
-* `__weex_require__(name)`
-
-#### `__weex_define__(name:string, options: object)`
-
-Define a custom component named `name` for current instance with `options`.
-
-**example:**
-
-```javascript
-__weex_define__('rmb', {
- template: {
- type: 'div',
- style: {flexDirection: 'row'},
- children: [
- {type: 'text', attr: {value: '¥'}},
- {type: 'text', attr: {value: this.value}}
- ]
- },
- data: function () {
- return {
- value: '0'
- }
- },
- methods: {...}
-})
-```
-
-The enabled component options contains:
-
-* `template`: just the same as [v0.3.0](#details-of-template-option-definitions)
-* `style`: just the same as [v0.3.0](#details-of-style-option-definitions)
-* `data`: a function which return a plain object to observe by the ViewModel
-* `methods`: a function map to proxy to the ViewModel
-* `computed`: a map of several computed keys for the ViewModel
-* `init`, `created`, `ready`: lifecycle methods
-* `events`: event handlers for the ViewModel
-<!-- * `components`: a map for options of sub components the ViewModel needed (So `__weex_define__(name, options)` equals to run `this.components[name] = options` in each custom components when `init`) -->
-
-The enabled ViewModel APIs contains:
-
-* `$el(id): Element`: find element by id in current ViewModel scope
-* `$vm(id): ViewModel`: find sub ViewModel by id
-* `$getConfig(): object`: get instance config info
-* `$broadcast`/`$emit`/`$dispatch`/`$on`/`$off`: listen and fire component events
-* `$transition` *(experimental)*: animation transition (see more in [animation native module](../animation.html))
-
-#### `__weex_require__(name: string): object`
-
-Get a Weex native module with several native APIs.
-
-**example:**
-
-```javascript
-var modal = __weex_require__('modal')
-modal.toast({
- message: 'Hey!',
- duration: 2
-})
-```
-
-polyfill for v0.3.0
-
-```javascript
-function __weex_require__(name) {
- var result
- define('__weex_require__', function (r, e, m) {
- result = r('@weex-module/' + name)
- })
- return result
-}
-```
-
-#### `__weex_bootstrap__(nameOrOptions: string|object, config: object?, data: object?): AppInstance | Error`
-
-Start to render by a certain component name or a direct component options as the root element, and some instance `config` and instance `data`. If everything fine, it will returns the root app instance. Otherwise it will return an `Error` instance which describes something wrong.
-
-**example:**
-
-```javascript
-__weex_bootstrap__(
- 'root',
- {
- // format 1:
- // downgrade: { appVersion: '>= 0.5.0' },
- // format 2:
- // downgrade: function (config) { return true }
- },
- {
- // external data
- // value: '12345'
- }
-)
-```
-
-The instance `config` now only support `downgrade` property which allows two format:
-
-1. an object like `{ osVersion, appVersion, weexVersion, deviceModel }`
-2. a function like `function (config) { return true }` to return a boolean value. `true` means normal and `false` means downgrade.
-
-The instance `data` will merge to root component data. So the root component is also easy to reuse and the instance data is easy to customize.
-
-#### `__weex_document__`
-
-An virtual-DOM `Document` instance. Also the host of [virtual-DOM APIs](./virtual-dom-apis.html). Every Weex instance has and must have just one `Document` instance.
-
-### Preserved Global Variables
-
-`define`, `bootstrap`, `module`, `exports`, `document`, `require`, `register`, `render`
-
-### A whole example
-
-```javascript
-// { "framework": "Weex", "version": "0.5.0" }
-
-var modal = __weex_require__('modal')
-
-__weex_define__('item', {
- template: {
- type: 'div',
- style: { flexDirection: 'row' },
- event: {
- click: function (e) {
- this.update(e)
- }
- },
- children: [
- { type: 'image', attr: { src: this.imageUrl }, ...},
- { type: 'text', attr: { value: this.title }, ...}
- ]
- },
- data: function () {
- return {
- imageUrl: '',
- title: ''
- }
- },
- methods: {
- update: function (e) {
- modal.toast({ message: this.title })
- }
- }
-})
-
-__weex_define__('app', {
- template: {
- type: 'div',
- children: [
- {
- type: 'item',
- repeat: {
- expression: function () {
- return this.list
- },
- key: '$index',
- value: '$value'}
- },
- attr: {
- imageUrl: function () {
- return this.$value.imageUrl
- },
- title: function () {
- return this.$value.title
- }
- }
- }
- ]
- },
- data: function () {
- return {
- list: [
- { imageUrl: 'xxx', title: '111' },
- { imageUrl: 'yyy', title: '222' },
- { imageUrl: 'zzz', title: '333' }
- ]
- }
- }
-})
-
-__weex_bootstrap__('app')
-```
-
-## v0.3.0
-
-### Whole Syntax and Structure
-
-A JS Bundle is actually a JavaScript file which follows **ES5** standard. The code is organized by several modules with AMD-like format:
-
-```javascript
-define('moduleName1', function (require, exports, module) {
- // content of module1
-})
-
-define('moduleName2', function (require, exports, module) {
- // content of module2
-})
-
-...
-```
-
-A whole Weex JS Bundle is concatenated by these modules and last a `bootstrap(rootComponentName, optionalConfig, optionalExternalData)` function call.
-
-```javascript
-define('@weex-component/a', function (require, exports, module) {
- // content of composed component <a>
-})
-
-define('@weex-component/b', function (require, exports, module) {
- // content of composed component <b>
-})
-
-bootstrap('@weex-component/b')
-```
-
-As the sample above, the component name should be hyphenated (a-z, 0-9, "-"). Other characters are not allowed.
-
-And, the method call `bootstrap()` allows 1~3 parameters: root module name (String), config info (optional JSON) and external data (optional JSON).
-
-### Content of Composed Components
-
-A module of composed component contains 3 parts: whole options definition, additional template option definition and additional style option definition.
-
-- whole options is a piece of JavaScript code to put component options (except `template` option and `style` option) into `module.exports`
-- `template` option is a piece of JSON-like object assigned to `module.exports.template` which describes the display structure of this component
-- `style` option is a piece of JSON object assigned to `module.exports.style` which describes the reusable styles in this component
-
-The `template` option is required and appeared only once, and the `style` option and whole options definition are optional.
-
-These options are defined and transformed by Transformer. Actually you can also ignore all the format limitation and write options to `module.exports` as the same result if you are not going to use Transformer. But that's not recommended.
-
-#### Details of template option definitions
-
-A piece of multi-level embedded JSON-like object which describes the view structure.
-
-Every level JSON-like object has these members below:
-
-* `type`: a required string, component name/type
-* `component`: an optional boolean, whether this component is composed or native
-* `attr`: an optional k-v pairs which contains all attributes of an element, the value could be a string, number, boolean or a function that bind some data value
-* `style`: an optional k-v pairs which contains all styles of an element, just the same format as the `attr`
-* `classList`: an optional array of strings which contains class names for styling.
-* `events`: an optional k-v pairs whose keys are event type and values are corresponding method names
-* `children`: an optional array of child components info
-* `append`: an optional string which determines a compiling workflow strategy: append node-by-node singly or a whole node tree just one time. the default value is `node` and another supported value is `tree`.
-* `shown`: a optional function which returns a boolean value to determine whether this component should be displayed
-* `repeat`: a optional function which returns a list data to displays components with each
-
-**Corresponding Keys to Weex Transformer:**
-
-- tag `name` in Weex file corresponds to `type`
-- attr `if` in Weex file corresponds to `shown`
-- attr `repeat` in Weex file corresponds to `repeat`
-- attr `append` in Weex file corresponds to `append`
-- attr `style` in Weex file with CSS syntax corresponds to `style`
-- attr `class` in Weex file with class names separated by blanks corresponds to `classList`
-- attr `on***` in Weex file with prefix `on` corresponds to a k-v pair in `events`
-- other attributes in Weex file corresponds to `attr`
-- Child nodes in Weex file corresponds to `children`
-
-All tag names, attr names are case-insensitive and transformed to lower-cased. But the attr values are case-sensitive.
-
-#### Details of style option definitions
-
-Just a two-levels JSON object.
-
-* The first levels are class names.
-* The second levels are k-v pairs which describes style names & properties for each class name.
-
-**Corresponding Keys to Weex Transformer:**
-
-* class name corresponds to first level keys
-* prop name corresponds to second level keys
-* prop value corresponds to second level values
http://git-wip-us.apache.org/repos/asf/incubator-weex-site/blob/32a097bf/source/v-0.10/references/specs/js-bundle-format.md
----------------------------------------------------------------------
diff --git a/source/v-0.10/references/specs/js-bundle-format.md b/source/v-0.10/references/specs/js-bundle-format.md
deleted file mode 100644
index 0b103d9..0000000
--- a/source/v-0.10/references/specs/js-bundle-format.md
+++ /dev/null
@@ -1,307 +0,0 @@
----
-title: JS Bundle format
-type: references
-order: 4.1
-version: 0.10
----
-
-# JS Bundle format
-
-JS Bundle Version: v0.3.0
-
-## v0.5.0
-
-### Whole Syntax and Structure
-
-A JS Bundle is actually a JavaScript file which follows **ES5** standard. The code is used to define some custom components for the instance and bootstrap the instance with certain name, config and data. Developers could use all kinds of JS code packager like webpack, browserify, requirejs to organize your whole instance code.
-
-### Meta Info
-
-The JS Bundle Must begin with a comment line which is a JSON object like:
-
-```javascript
-// { "framework": "Weex", "version": "0.5.0" }
-```
-
-This JSON object as least contains:
-
-* property `framework` must be `"Weex"`
-* property `version` should be corresponded with the JS Bundle format version
-
-### Global Members
-
-* `__weex_define__(name, options)`
-* `__weex_bootstrap__(name, config, data)`
-* `__weex_document__`
-* `__weex_require__(name)`
-
-#### `__weex_define__(name:string, options: object)`
-
-Define a custom component named `name` for current instance with `options`.
-
-**example:**
-
-```javascript
-__weex_define__('rmb', {
- template: {
- type: 'div',
- style: {flexDirection: 'row'},
- children: [
- {type: 'text', attr: {value: '¥'}},
- {type: 'text', attr: {value: this.value}}
- ]
- },
- data: function () {
- return {
- value: '0'
- }
- },
- methods: {...}
-})
-```
-
-The enabled component options contains:
-
-* `template`: just the same as [v0.3.0](#details-of-template-option-definitions)
-* `style`: just the same as [v0.3.0](#details-of-style-option-definitions)
-* `data`: a function which return a plain object to observe by the ViewModel
-* `methods`: a function map to proxy to the ViewModel
-* `computed`: a map of several computed keys for the ViewModel
-* `init`, `created`, `ready`: lifecycle methods
-* `events`: event handlers for the ViewModel
-<!-- * `components`: a map for options of sub components the ViewModel needed (So `__weex_define__(name, options)` equals to run `this.components[name] = options` in each custom components when `init`) -->
-
-The enabled ViewModel APIs contains:
-
-* `$el(id): Element`: find element by id in current ViewModel scope
-* `$vm(id): ViewModel`: find sub ViewModel by id
-* `$getConfig(): object`: get instance config info
-* `$broadcast`/`$emit`/`$dispatch`/`$on`/`$off`: listen and fire component events
-* `$transition` *(experimental)*: animation transition (see more in [animation native module](../animation.html))
-
-#### `__weex_require__(name: string): object`
-
-Get a Weex native module with several native APIs.
-
-**example:**
-
-```javascript
-var modal = __weex_require__('modal')
-modal.toast({
- message: 'Hey!',
- duration: 2
-})
-```
-
-polyfill for v0.3.0
-
-```javascript
-function __weex_require__(name) {
- var result
- define('__weex_require__', function (r, e, m) {
- result = r('@weex-module/' + name)
- })
- return result
-}
-```
-
-#### `__weex_bootstrap__(nameOrOptions: string|object, config: object?, data: object?): AppInstance | Error`
-
-Start to render by a certain component name or a direct component options as the root element, and some instance `config` and instance `data`. If everything fine, it will returns the root app instance. Otherwise it will return an `Error` instance which describes something wrong.
-
-**example:**
-
-```javascript
-__weex_bootstrap__(
- 'root',
- {
- // format 1:
- // downgrade: { appVersion: '>= 0.5.0' },
- // format 2:
- // downgrade: function (config) { return true }
- },
- {
- // external data
- // value: '12345'
- }
-)
-```
-
-The instance `config` now only support `downgrade` property which allows two format:
-
-1. an object like `{ osVersion, appVersion, weexVersion, deviceModel }`
-2. a function like `function (config) { return true }` to return a boolean value. `true` means normal and `false` means downgrade.
-
-The instance `data` will merge to root component data. So the root component is also easy to reuse and the instance data is easy to customize.
-
-#### `__weex_document__`
-
-An virtual-DOM `Document` instance. Also the host of [virtual-DOM APIs](./virtual-dom-apis.html). Every Weex instance has and must have just one `Document` instance.
-
-### Preserved Global Variables
-
-`define`, `bootstrap`, `module`, `exports`, `document`, `require`, `register`, `render`
-
-### A whole example
-
-```javascript
-// { "framework": "Weex", "version": "0.5.0" }
-
-var modal = __weex_require__('modal')
-
-__weex_define__('item', {
- template: {
- type: 'div',
- style: { flexDirection: 'row' },
- event: {
- click: function (e) {
- this.update(e)
- }
- },
- children: [
- { type: 'image', attr: { src: this.imageUrl }, ...},
- { type: 'text', attr: { value: this.title }, ...}
- ]
- },
- data: function () {
- return {
- imageUrl: '',
- title: ''
- }
- },
- methods: {
- update: function (e) {
- modal.toast({ message: this.title })
- }
- }
-})
-
-__weex_define__('app', {
- template: {
- type: 'div',
- children: [
- {
- type: 'item',
- repeat: {
- expression: function () {
- return this.list
- },
- key: '$index',
- value: '$value'}
- },
- attr: {
- imageUrl: function () {
- return this.$value.imageUrl
- },
- title: function () {
- return this.$value.title
- }
- }
- }
- ]
- },
- data: function () {
- return {
- list: [
- { imageUrl: 'xxx', title: '111' },
- { imageUrl: 'yyy', title: '222' },
- { imageUrl: 'zzz', title: '333' }
- ]
- }
- }
-})
-
-__weex_bootstrap__('app')
-```
-
-## v0.3.0
-
-### Whole Syntax and Structure
-
-A JS Bundle is actually a JavaScript file which follows **ES5** standard. The code is organized by several modules with AMD-like format:
-
-```javascript
-define('moduleName1', function (require, exports, module) {
- // content of module1
-})
-
-define('moduleName2', function (require, exports, module) {
- // content of module2
-})
-
-...
-```
-
-A whole Weex JS Bundle is concatenated by these modules and last a `bootstrap(rootComponentName, optionalConfig, optionalExternalData)` function call.
-
-```javascript
-define('@weex-component/a', function (require, exports, module) {
- // content of composed component <a>
-})
-
-define('@weex-component/b', function (require, exports, module) {
- // content of composed component <b>
-})
-
-bootstrap('@weex-component/b')
-```
-
-As the sample above, the component name should be hyphenated (a-z, 0-9, "-"). Other characters are not allowed.
-
-And, the method call `bootstrap()` allows 1~3 parameters: root module name (String), config info (optional JSON) and external data (optional JSON).
-
-### Content of Composed Components
-
-A module of composed component contains 3 parts: whole options definition, additional template option definition and additional style option definition.
-
-- whole options is a piece of JavaScript code to put component options (except `template` option and `style` option) into `module.exports`
-- `template` option is a piece of JSON-like object assigned to `module.exports.template` which describes the display structure of this component
-- `style` option is a piece of JSON object assigned to `module.exports.style` which describes the reusable styles in this component
-
-The `template` option is required and appeared only once, and the `style` option and whole options definition are optional.
-
-These options are defined and transformed by Transformer. Actually you can also ignore all the format limitation and write options to `module.exports` as the same result if you are not going to use Transformer. But that's not recommended.
-
-#### Details of template option definitions
-
-A piece of multi-level embedded JSON-like object which describes the view structure.
-
-Every level JSON-like object has these members below:
-
-* `type`: a required string, component name/type
-* `component`: an optional boolean, whether this component is composed or native
-* `attr`: an optional k-v pairs which contains all attributes of an element, the value could be a string, number, boolean or a function that bind some data value
-* `style`: an optional k-v pairs which contains all styles of an element, just the same format as the `attr`
-* `classList`: an optional array of strings which contains class names for styling.
-* `events`: an optional k-v pairs whose keys are event type and values are corresponding method names
-* `children`: an optional array of child components info
-* `append`: an optional string which determines a compiling workflow strategy: append node-by-node singly or a whole node tree just one time. the default value is `node` and another supported value is `tree`.
-* `shown`: a optional function which returns a boolean value to determine whether this component should be displayed
-* `repeat`: a optional function which returns a list data to displays components with each
-
-**Corresponding Keys to Weex Transformer:**
-
-- tag `name` in Weex file corresponds to `type`
-- attr `if` in Weex file corresponds to `shown`
-- attr `repeat` in Weex file corresponds to `repeat`
-- attr `append` in Weex file corresponds to `append`
-- attr `style` in Weex file with CSS syntax corresponds to `style`
-- attr `class` in Weex file with class names separated by blanks corresponds to `classList`
-- attr `on***` in Weex file with prefix `on` corresponds to a k-v pair in `events`
-- other attributes in Weex file corresponds to `attr`
-- Child nodes in Weex file corresponds to `children`
-
-All tag names, attr names are case-insensitive and transformed to lower-cased. But the attr values are case-sensitive.
-
-#### Details of style option definitions
-
-Just a two-levels JSON object.
-
-* The first levels are class names.
-* The second levels are k-v pairs which describes style names & properties for each class name.
-
-**Corresponding Keys to Weex Transformer:**
-
-* class name corresponds to first level keys
-* prop name corresponds to second level keys
-* prop value corresponds to second level values
http://git-wip-us.apache.org/repos/asf/incubator-weex-site/blob/32a097bf/source/v-0.10/references/specs/js-framework-apis.md
----------------------------------------------------------------------
diff --git a/source/v-0.10/references/specs/js-framework-apis.md b/source/v-0.10/references/specs/js-framework-apis.md
deleted file mode 100644
index e1412c6..0000000
--- a/source/v-0.10/references/specs/js-framework-apis.md
+++ /dev/null
@@ -1,191 +0,0 @@
----
-title: JS Framework APIs
-type: references
-order: 4.2
-version: 0.10
----
-
-# JS Framework APIs
-<span class="weex-version">0.4</span>
-
-## Intro about JS Runtime
-
-These APIs are designed for JS Framework and Native Engine working together.
-
-Considering the limitation of mobile phone resource, *Weex runs only one JS runtime* to handle all Weex instances. So it need a multi-instance management layer in JavaScript. These JS Framework APIs are just designed to do the management job.
-
-* First, each Weex instance have a lifecycle, from `createInstance` to `destroyInstance`. During this period, we can import some extra data by `refreshInstance`.
-* To communicate with Native Engine, we have a couple of APIs: `sendTasks` and `receiveTasks`. They are used to call each other by some commands and messages.
-* And when JS runtime start at the beginning of the app launching, we need something initialized and configured. So we supply some APIs like `registerComponents`, `registerModules`.
-* The last API is just for debugging, we supply an API named `getRoot` to return the whole virtual-DOM data for developers.
-* If any of these API calls failed, an `Error` object should be returned.
-
-## Called by native and supplied from JS Framework
-
-### `createInstance(instanceId, code, options, data)`
-
-Create a Weex instance from Native Engine
-
-* `instanceId`: The unique id for a Weex instance, generated by Native Engine.
-* `code`: The JS bundle code send from Native Engine. It will be executed by `new Function(code)` in JS Framework. The code format depends on [JS Bundle Foramt](./js-bundle-format.html)
-* `options`: *Optional*. An options object. *Currently it supports `debug` flag which enable printing log and `bundleUrl` flag which the url of bundle.*
-* `data`: *Optional*. It's an chance to supply external data instead of the original data in JS bundle.
-
-Example:
-
-```javascript
-createInstance('x', 'define(...); define(...); define(...); bootstrap(...)')
-createInstance('x', '...', { bundleUrl, debug, ... }, { a: 1, b: 2 }})
-```
-
-### `destroyInstance(instanceId)`
-
-Destroy an existed Weex instance by id from Native Engine
-
-### `refreshInstance(instanceId, data)`
-
-Refresh data to an existed Weex instance with certain external data from Native Engine
-
-Example:
-
-```javascript
-refreshInstance('x', {a: 100, b: 200})
-```
-
-### `registerComponents(components)`
-
-Register all native components
-
-* `components`: A array of whose items are component options that are force part to use. *Currently it supports `append` attribute which forces the appending mechanism (`tree` or `node`) when first time rendering.*
-
-Example:
-
-```javascript
-registerComponents([
- { type: 'container' },
- { type: 'text' },
- { type: 'image' },
- { type: 'slider', append: 'tree' },
- { type: 'list' },
- { type: 'cell', append: 'tree' },
- ...
-])
-```
-
-### `registerModules(modules)`
-
-Register the name, methods and args format of each module
-
-* `modules`: A map that collects all native module definitions. Each module definition is an array which has several API definitions. Each API definition has a `name` string and an `args` array which contains a list of each parameter's type.
-
-**NOTE: the `node` type data will actually return its `ref` property. And the `function` type data will actually return a unique function id referring to it.**
-
-Example:
-
-```javascript
-registerModules({
- event: [
- {name: 'openURL', args: ['string']}
- ],
- ...
-})
-```
-
-### `receiveTasks(instanceId, tasks)`
-
-Fire events or callbacks to an existed Weex instance from Native Engine
-
-* `tasks[]`: A task list. Each task has a `method="fireEvent|callback"` property and a list of `args`.
- - In `fireEvent` method, the `args` is `ref` of the target, event `type`, event `data` and `domChanges` description in order. **Note: if some event make virtual-DOM data changed (e.g. value changed in `<input>` or current index changed in `<slider>`), the changing of the target element will be passed as `domChanges`.**
- - In `callback` method, the `args` is `funcId` of a handler, `data` and `ifKeepAlive` which describes whether this callback handler should be keeping called. (Each callback handler is matched with a `funcId` when the original call happens.)
-
-Example:
-
-```javascript
-receiveTasks('x', [{method: 'fireEvent', args: ['x', '13', 'click', {a: 100, b: 200}]}])
-receiveTasks('x', [{method: 'callback', args: ['x', '7', {a: 100, b: 200}, true]}])
-```
-
-### `getRoot(instanceId)`
-
-Return a JSON object which describes the whole virtual DOM body of an existed Weex instance, which designed for debugging
-
-Example:
-
-```javascript
-getRoot('x')
-// {ref: '_root', type: 'container', attr: {...}, style: {...}, children: [...]}
-```
-
-## Called from JavaScript and implemented with native code
-
-### `sendTasks(instanceId, tasks)`
-
-Make native calls from JS Framework
-
-* `tasks[]`: A task list. Each task has a `module` name, a `method` name, and a `args[]` list.
-
-Example:
-
-```javascript
-sendTasks('x', [
- {module: 'dom', method: 'addElement', args: ['_root', {ref: '1', type: 'container'}, -1]},
- {module: 'dom', method: 'addElement', args: ['1', {ref: '2', type: 'text', ...}, -1]},
- {module: 'dom', method: 'addElement', args: ['1', {ref: '3', type: 'image', ...}, -1]},
- ...
-])
-```
-
-## Supporting other JS Framework <sup>(experimental)</sup>
-
-### Register a new JS Framework
-
-```javascript
-// lib/frameworks/index.js
-
-import Vue from '...'
-import React from '...'
-import Angular from '...'
-
-export const frameworks = {
- Vue,
- React,
- Angular
-}
-```
-
-### Expose JS Framework APIs
-
-```javascript
-// 3rd-party-framework.js
-
-export function createInstance (id, code, config, data) { ... }
-export function destroyInstance (id) { ... }
-export function refreshInstance (id, data) { ... }
-export function registerComponents (components) { ... }
-export function registerModules (modules) { ... }
-export function recieveTasks (id, tasks) { ... }
-export function getRoot (id) { ... }
-```
-
-The virtual-DOM tasks should follow [virtual-DOM spec](./virtual-dom-apis.html).
-
-### Framework Helper
-
-You can import `lib/runtime/helper.js` to get two important things:
-
-* `Document` class, see [virtual-DOM spec](./virtual-dom-apis.html) for more.
-* `sendTasks` method.
-
-### JS Bundle format
-
-You must ensure the JS Bundle has its first line of code like this:
-
-```javascript
-// { "framework": "Vue" }
-...
-```
-
-to allow JS Runtime to detect which JS Framework it should be opened by.
-
-If no valid annotation found. The JS Bundle will be opened by default JS Framework of Weex.
http://git-wip-us.apache.org/repos/asf/incubator-weex-site/blob/32a097bf/source/v-0.10/references/specs/virtual-dom-apis.md
----------------------------------------------------------------------
diff --git a/source/v-0.10/references/specs/virtual-dom-apis.md b/source/v-0.10/references/specs/virtual-dom-apis.md
deleted file mode 100644
index 566de1a..0000000
--- a/source/v-0.10/references/specs/virtual-dom-apis.md
+++ /dev/null
@@ -1,147 +0,0 @@
----
-title: Virtual DOM APIs
-type: references
-order: 4.3
-version: 0.10
----
-
-# Virtual DOM APIs
-<span class="weex-version">0.4</span>
-
-## `Document`
-
-Each instance has a corresponding document with the instance id. A document has many nodes which compose a node tree.
-
-### Constructor
-
-##### `new Document(id: string, url: string?)`
-
-### Members
-
-##### `createElement(tagName: string, props: Object?): Element`
-
-Create a certain type `Element`. And the `props` may contain `attr` object and `style` object. e.g. `createBody('div', {style: {backgroundColor: '#ffffff'}})`
-
-##### `createComment(text: string): Comment`
-
-Create a `Comment` with a certain comment text.
-
-##### `open()`
-
-Set a flag which means init rendering start, so each dom update will be called immediately
-
-##### `close()`
-
-Set a flag which means init rendering finished, so the dom updates later will be batched in each task.
-
-##### `fireEvent(el: Element, type: string, e: Object?, domChanges: Object?)`
-
-Fire an certain type of event on a certain element with an event object. When the event leads to some dom changes, the fourth parameter will describe the change just like `props` parameter in `createElement` method.
-
-#### Read-only & Getters
-
-##### `id: string`
-
-##### `URL: string?`
-
-##### `body: Element`
-
-body element
-
-##### `documentElement: Element`
-
-document element
-
-##### `getRef(ref: string): Node?`
-
-Get node by `ref` from the internal node map
-
-**Note**: the `documentElement` will be generated automatically when a document created, and the `body` should to be created manually and appended to `documentElement` to work. The `type` of a `body` must be one of `div`, `list` or `scroller`.
-
-## `Node`
-
-### Constructor
-
-##### `new Node()`
-
-### Members
-
-##### `destroy()`
-
-#### Read-only & Getters
-
-##### `ref: string`
-
-##### `nextSibling: Node?`
-
-##### `previousSibling: Node?`
-
-##### `parentNode: Node?`
-
-## `Element` extends `Node`
-
-### Constructor
-
-##### `new Element(type: string, props: Object?, ownerDocument: Document)`
-
-Create an element and the `props` may contain `attr` object and `style` object.
-
-### Members
-
-#### DOM Tree
-
-##### `appendChild(node: Node)`
-
-##### `insertBefore(node: Node, before: Node?)`
-
-##### `insertAfter(node: Node, after: Node?)`
-
-##### `removeChild(node: Node, preserved: boolean?)`
-
-Removes a child. The parameter `preserved` means whether destroy the removed node immediately or preserve it.
-
-##### `clear()`
-
-#### DOM props
-
-##### `setAttr(key: string, value: string, silent: boolean?)`
-
-If `silent` is true, it won't cause native calls. Used for handling event with virtual-DOM changes.
-
-##### `setStyle(key: string, value: string, silent: boolean?)`
-
-The `silent` parameter is just same as `setAttr` method.
-
-##### `setClassStyle(classStyle: Object)`
-
-The specificity of class style is lower than normal style. In another way the normal style will override the same name value in class style.
-
-##### `addEvent(type: string, handler: Function)`
-
-##### `removeEvent(type: string)`
-
-##### `fireEvent(type: string, e: any)`
-
-#### Read-only & Getters
-
-##### `toJSON(): Object`
-
-Format of `{ref: string, type: string, attr: Object, style: Object, event: Array(string), children: Array}`
-
-## `Comment` extends `Node`
-
-`Comment` won't be passed to the rendering engine. So it's very useful as a assistant placeholder sometimes.
-
-### Constructor
-
-##### `new Comment(value: string)`
-
-### Members
-
-#### Read-only & Getters
-
-##### `type: string`
-
-Returns `'comment'`
-
-##### `value: string`
http://git-wip-us.apache.org/repos/asf/incubator-weex-site/blob/32a097bf/source/v-0.10/references/text-style.md
----------------------------------------------------------------------
diff --git a/source/v-0.10/references/text-style.md b/source/v-0.10/references/text-style.md
deleted file mode 100644
index 6b9ee4f..0000000
--- a/source/v-0.10/references/text-style.md
+++ /dev/null
@@ -1,43 +0,0 @@
----
-title: Text Style
-type: references
-version: 0.10
-order: 1.8
----
-
-# Text Style
-<span class="weex-version">0.5</span>
-
-Text alike components share some common style rules. The text alike components currently includes [`text`](./components/text.html) and [`input`](./components/input.html).
-
-## Properties
-
-- `color`: <colors> this property set the foreground color of an component's text content.
-- `font-size`: <length> this property specifies the size of the font.
-- `font-style`: <enum> `normal` | `italic`. This property lets you select italic or normal faces within a font-family. Default value is `normal`.
-- `font-weight`: <enum> `normal` | `bold`. This property specifies the boldness of the font. Default value is `normal`.
-- `text-decoration`: <enum> `none` | `underline` | `line-through`. This property is used to set the text formatting to underline or line-through. The default value is `none`.
-- `text-align`: <enum> `left` | `center` | `right`. This property describes how inline content like text is aligned in its parent component. The default value is `left`.
-- `font-family`:<string> this property set the font-family of the text. This property **doesn't guarantee** the given font will always be set to the text. If the specified font cannot be found at the device, a typeface fallback will occur and the default typeface will be load. The fallback mechanism may vary in different devices.
-- `text-overflow`:<string> `clip` | `ellipsis`. This property determines how overflowed content that is not displayed is signaled to users. It can be clipped, display an ellipsis.
-
-The property `color` support multiple fomats of values, contains rgb, rgba, #fff, #ffffff, named-color.
-
-Example:
-
-```css
-.my-class { color: red; }
-.my-class { color: #f00; }
-.my-class { color: #ff0000; }
-.my-class { color: rgb(255, 0, 0); }
-.my-class { color: rgba(255, 0, 0, 0.5); }
-```
-
-## Type of Style Value
-
-- length: number followed by length unit `px`, `px` can be omitted.
-- colors: support multiple formats of values, including rgb (`rgb(255, 0, 0)`), rgba (`rgba(255, 0, 0, 0.5)`), hexadecimal (`#ff0000`), short hexadecimal (`#f00`), named color (`red`).
-- enumerated values: a limited number of string values.
-
-**Note:** [The list of color keywords.](./color-names.html)
-
http://git-wip-us.apache.org/repos/asf/incubator-weex-site/blob/32a097bf/source/v-0.10/tools/devtools-android.md
----------------------------------------------------------------------
diff --git a/source/v-0.10/tools/devtools-android.md b/source/v-0.10/tools/devtools-android.md
deleted file mode 100644
index 9ce8991..0000000
--- a/source/v-0.10/tools/devtools-android.md
+++ /dev/null
@@ -1,123 +0,0 @@
----
-title: Devtools for Android
-type: tools
-order: 2.1
-version: 0.10
----
-
-# Devtools for Android
-
-[](https://github.com/weexteam/weex_devtools_android/releases) [](https://www.codacy.com/app/weex_devtools/weex_devtools_android?utm_source=github.com&utm_medium=referral&utm_content=weexteam/weex_devtools_android&utm_campaign=Badge_Grade) [](https://codeclimate.com/github/weexteam/weex_devtools_android) [](https://codeclimate.com/github/weexteam/weex_devtools_android) [](https://github.com/weexteam/weex_devtools_android/issues) [  ](https://bintray.com/alibabaweex/maven/weex_inspector/_latestVersion)
-
-Weex devtools is a custom devtools for weex that implements [Chrome Debugging Protocol](https://developer.chrome.com/devtools/docs/debugger-protocol) inspired by [Stetho](https://github.com/facebook/stetho), it is designed to help you quickly inspect your app and debug your JS bundle source in a chrome web page.At present The devtools consist of two part : `Inspector` and `Debugger`. If you want it work well, you must install a `weex-devtool` as debug server.
-
-- **Inspector**
- Inspector can be used to show your `Element` \ `NetWork` \ `Console log` \ `ScreenCast` \ `BoxModel` \ `Native View` and so on.
-
-- **Debugger**
- Debugger can be used to debug your bundle js source, you can set `Breakpoint` \ watch `CallStack`.
-
-## Install and launch devtools server
-Open your terminal then type `npm install -g weex-toolkit` and run.Launch it just type and run the command `weex debug`, then a Chrome web page will be opened.
-
-## Use on an android device or emulator
-
-### Taste of first debug with playground
-If you are a green hand to the debug of weex, we recommend you to try your first debug with `playground`, what you need to do is just launch the playground and scan the QR code shown in the debug page which wound opened if the `devtools server` have been launched. after you scan the QR code, the web page will list your connected devices.
-
- devices")
-
-#### How Debugger Works
-Devtools expands [Chrome Debugging Protocol](https://developer.chrome.com/devtools/docs/debugger-protocol) and the mechanism of communication between client and debug sever is based on [JSON-RPC](https://en.wikipedia.org/wiki/JSON-RPC).
-
-##### Devtools Client
-Devtools Client is integrated in App as aar, it connects to debug server through webscoket protocol with out permission check. I recommend you just packaged it in your debug version consider of the security mechanism.
-
-##### Devtools Debug Server
-Devtools Debug Server is the center node of the communication, it connects to both app and chrome, acts as the turn server of debugging protocol messages and the manager of the js runtime.
-
-##### Chrome FrontEnd
-Chrome's V8 engine acts as the javascript runtime, when debug mode is enabled, all the js code run on it. On the other side we also reuse most of the Chrome's debugging user interface, such as set breakpoint, see call stack and so on.
-
-
-
-### Enable devtools in your own app
-Of course you can reuse the code of playground to build your own app, that is the simplest way to let your app's js code debuggable. On the other hand QR code is not necessary, if your review the source code you can draw a conclusion that QR CODE is just a way to set `devtools server` address. following those steps you can do the same thing.
-
-#### Gradle dependency on inspector.
-There are two choices to set the dependency, the Choice A is recommanded if you have no change to weex_sdk or inspector, while if you use your own custom weex_sdk or inspector Choice B is suitable.
-
- * *A - aar dependency from jcenter*.
- ````
- dependencies {
- compile 'com.taobao.android:weex_inspector:0.0.8.1'
- }
- ````
-I strongly recommend you use the latest version since both weex sdk and devtools are developed iteratively and rapidly. See the release version list [here](https://github.com/weexteam/weex_devtools_android/releases). All the release version will publish to the [jcenter repo](https://bintray.com/alibabaweex/maven/weex_inspector).
-
- * *B - source code dependency.*
-
- you need to copy the dir of inspector to the same dir of your app and add `include ":inspector"`in your project's `settings.gradle` file just like playground have done, then add dependency in your app's `build.gralde`.
- ````
- dependencies {
- compile project(':inspector')
- }
- ````
-
-##### Version compatibility
-
-| weex sdk | weex inspector | debug server |
-|----------|----------------|--------------|
-|0.8.0.1+ | 0.0.8.1 |0.2.39+ |
-|0.7.0+ | 0.0.7.13 |0.2.38 |
-|0.6.0+ | 0.0.2.2 | |
-
-
-#### Initialize in your XXXApplication file.
-````
- public class MyApplication extends Application {
- public void onCreate() {
- super.onCreate();
- initDebugEnvironment(true, "xxx.xxx.xxx.xxx"/*"DEBUG_SERVER_HOST"*/);
- }
- private void initDebugEnvironment(boolean enable, String host) {
- WXEnvironment.sRemoteDebugMode = enable;
- WXEnvironment.sRemoteDebugProxyUrl = "ws://" + host + ":8088/debugProxy/native";
- }
-}
-````
-
-#### Ship It!
- 1. You must launch your bundle server firstly. In your weex dir, run command "./start";
- 2. Launch your remote debug server. Run command `weex debug`, chrome will open a web page show a simply guidance and QR code;
- 3. Launch your app and make sure debug mode was enabled. You will see a device list in the chrome web page opened by last step, each device item have two button, `Debugger` and `Inspector`;There are two way to enable debug mode:
- * scaning the QR code and handle the content just like the playground have done.
- * init it in the XXXApplication by calling `initDebugEnvironment(true, "xxx.xxx.xxx.xxx")`, if you call `initDebugEnvironment(true, "xxx.xxx.xxx.xxx")` after weex sdk inited, you need to call `WXSDKEngine.reload()` to refresh the runtime.
- 4. Once you click the button `Inspector` chrome will open a page show the inspector view, on the other side, click the button `Debugger` chrome will open a new page to show the debug view;
-
-
-
-
-
----
-
-#### OPTIONS
-
-##### [**OPTION**] *set your remote bundle server ip.*
-
- For example, in the playground it is in the `IndexActivity.java`, you need to change the value of `DEFAULT_IP` in IndexActivity.java from `"your_current_IP"` to a server ip like `"30.30.30.150"`:
-````
- private static final String DEFAULT_IP = "30.30.30.150"; // "your_current_IP";
-````
-
-##### [**OPTION**] *enable network inspection.*
-````
-OkHttpClient client = new OkHttpClient();
-client.networkInterceptors().add(new OkHttpInterceptor());
-````
-
-###### Notice
- The network inspection only support OKHttpClient right now!!! If you want to use the network inspection to catch your bundle request, you must change your bundle server ip to the real server ip.
-
-#### Known Issues
- You can report issues and bugs [here](https://github.com/weexteam/weex_devtools_android/issues). We will reply as soon as possible.
http://git-wip-us.apache.org/repos/asf/incubator-weex-site/blob/32a097bf/source/v-0.10/tools/devtools-ios.md
----------------------------------------------------------------------
diff --git a/source/v-0.10/tools/devtools-ios.md b/source/v-0.10/tools/devtools-ios.md
deleted file mode 100644
index 602f63d..0000000
--- a/source/v-0.10/tools/devtools-ios.md
+++ /dev/null
@@ -1,76 +0,0 @@
----
-title: Devtools for IOS
-type: tools
-order: 2.2
-version: 0.10
----
-
-# Devtools for IOS
-
-Remote debug for your native iOS app using Chrome Developer Tools
-
-## weex-devtool launch:
-
-0. install and run weex-devtool
-
- $:npm install -g weex-devtool
-
- $:weex-devtool
-
- it will launch chrome browser, showing wss ip address in chrome address bar.
-
-
-## playground install WXDevtool
-
-1. Install dependencies.
-
- $:pod install
-
-### Usage
-
-1. AppDelegate.m header file
-
- #import "WXDevTool.h"
-
-2. Initialize inspector when the APP launched
-
- **Note: The inspector API must be called before weex is initialized**
-
- + (void)setDebug:(BOOL)isDebug;
-
- isDebug default is NO, now you open inspect model. opposite is YES, if you set isDebug to YES, then open debug model and inspect model.
-
- + (void)launchDevToolDebugWithUrl:(NSString *)url;
- wssip was the wss address showing in the chrome address bar.
-
- * open debug model and inspector model
-
- eg:- (BOOL)application:(UIApplication *)application didFinishLaunchingWithOptions:(NSDictionary *)launchOptions
- {
- [WXDevTool setDebug:YES];
- [WXDevTool launchDevToolDebugWithUrl:@"ws://wssip/debugProxy/native"];
- }
-
- * open inspect model, remove the @selector(setDebug:) or add [WXDevTool setDebug:NO]
-
- eg:- (BOOL)application:(UIApplication *)application didFinishLaunchingWithOptions:(NSDictionary *)launchOptions
- {
- [WXDevTool launchDevToolDebugWithUrl:@"ws://wssip/debugProxy/native"];
- }
-
-
-3. Build and running APP, this time chrome will display your device with App name, select inspector to open the inspector tab.
-4. Log print support for different levels of print.
-
- eg: #import "WXDevTool.h"
- PDLogE()/PDLogW()
-
-### WXDevtool Dependencies
-
-Your app must be linked against the following frameworks/dylibs
-
-* libicucore.dylib
-* CFNetwork.framework
-* CoreData.framework
-* Security.framework
-* Foundation.framework
[27/51] [abbrv] incubator-weex-site git commit: rearrangement the
structure of the document
Posted by ha...@apache.org.
http://git-wip-us.apache.org/repos/asf/incubator-weex-site/blob/32a097bf/_draft/v-0.10/guide/syntax/events.md
----------------------------------------------------------------------
diff --git a/_draft/v-0.10/guide/syntax/events.md b/_draft/v-0.10/guide/syntax/events.md
new file mode 100644
index 0000000..c79dd2b
--- /dev/null
+++ b/_draft/v-0.10/guide/syntax/events.md
@@ -0,0 +1,59 @@
+---
+title: Events
+type: guide
+order: 2.3
+version: 0.10
+---
+
+# Events
+
+Weex allow `<template>` to bind event type and handler on an Element. The attribute name is the event type with prefix `on...` and the attribute value is handler method name. For instance: `onclick="handler"`. e.g.
+
+```html
+<template>
+ <image onclick="handler" ...></image>
+</template>
+
+<script>
+ module.exports = {
+ methods: {
+ handler: function (e) {
+ // TODO
+ }
+ }
+ }
+</script>
+```
+
+When user clicks the image , handler function which defined in `<script>` code will be executed.
+
+## Inline Handler
+
+Beside a handler method name, you can also call a handler inline.
+
+e.g.
+```html
+<template>
+ <image onclick="handler('arg1', $event)" ...></image>
+</template>
+
+<script>
+ module.exports = {
+ methods: {
+ handler: function (arg1, e) {
+ // TODO
+ }
+ }
+ }
+</script>
+```
+
+## Event Object
+
+When an event handler called, it will receive an event object as the first argument. Every event object will contains following properties.
+
+* `type`: event name, eg: `click`
+* `target`: target `Element` of the event
+* `timestamp`: time stamp that event triggered
+
+Next, let's have a look at [display logic control](./display-logic.html).
http://git-wip-us.apache.org/repos/asf/incubator-weex-site/blob/32a097bf/_draft/v-0.10/guide/syntax/id.md
----------------------------------------------------------------------
diff --git a/_draft/v-0.10/guide/syntax/id.md b/_draft/v-0.10/guide/syntax/id.md
new file mode 100644
index 0000000..eaa6e04
--- /dev/null
+++ b/_draft/v-0.10/guide/syntax/id.md
@@ -0,0 +1,65 @@
+---
+title: Find an Element
+type: guide
+order: 2.7
+version: 0.10
+---
+
+# Find an Element
+
+In Weex, we may set the `id` property for a particular element, just as unique identification of a particular element.
+
+`id` can be used by `this.$el(id)` to find an element with a certain id. Take the API [`scrollToElement()`](../../references/modules/dom.html#scrolltoelementnode-options) For example:
+
+```html
+<template>
+ <container>
+ <text id="top">Top</text>
+ <container style="height: 10000; background-color: #999999;">
+ </container>
+ <text onclick="back2Top">Back to Top</text>
+ </container>
+</template>
+<script>
+ var dom = require('@weex-module/dom')
+ module.exports = {
+ methods: {
+ back2Top: function () {
+ var top = this.$el('top')
+ dom.scrollToElement(top)
+ }
+ }
+ }
+</script>
+```
+
+`id` can also work with `repeat` attribute [See more about display logical control](./display-logic.html), and ensure repetitive elements with different `id`:
+
+```html
+<template>
+ <container>
+ <image id="{{imgId}}" src="{{imgUrl}}" onclick="getImageId" repeat="{{images}}"></image>
+ </container>
+</template>
+<script>
+ module.exports = {
+ data: {
+ images: [
+ {imgId: 1, imgUrl: '...'},
+ {imgId: 2, imgUrl: '...'},
+ {imgId: 3, imgUrl: '...'},
+ ...
+ ]
+ },
+ methods: {
+ getImageId: function(e) {
+ // get e.target.id
+ }
+ }
+ }
+</script>
+```
+
+Additionally, in the [composed components](./composed-component.html), we can get the corresponding sub component through `this.$vm(id)` APIs.
+
+Next is how to [send messages between composed components](./comm.html).
http://git-wip-us.apache.org/repos/asf/incubator-weex-site/blob/32a097bf/_draft/v-0.10/guide/syntax/index.md
----------------------------------------------------------------------
diff --git a/_draft/v-0.10/guide/syntax/index.md b/_draft/v-0.10/guide/syntax/index.md
new file mode 100644
index 0000000..448c40a
--- /dev/null
+++ b/_draft/v-0.10/guide/syntax/index.md
@@ -0,0 +1,122 @@
+---
+title: Syntax
+type: guide
+order: 2
+has_chapter_content: true
+version: 0.10
+---
+
+# Syntax
+
+*The syntax of Weex is deeply inspired from [Vue.js](http://vuejs.org/), an elegant JavaScript framework with component system and reactive data binding.*
+
+A simple Weex page sample is just a piece of `<template>` code, a piece of `<style>` code and a piece of `<script>` code. The three parts together describe a whole Weex page.
+
+- `<template>`: *required*. Just uses HTML syntax and describes the structure of a Weex page, which is build upon several tags. Each tag means a type of *component*.
+- `<style>`: *optional*. Describes the presentation details, and the content is based on CSS syntax.
+- `<script>`: *optional*. Describes the data and behavior with JavaScript syntax. It defines data and how these data are processed etc.
+
+```html
+<template>
+ <!-- (required) the structure of page -->
+</template>
+
+<style>
+ /* (optional) stylesheet */
+</style>
+
+<script>
+ /* (optional) the definition of data, methods and life-circle */
+</script>
+```
+
+## `<template>`
+
+We describe page structure in `<template>` tag like the following definition:
+
+```html
+<template>
+ <container>
+ <image style="width: 200; height: 200;" src="http://gtms02.alicdn.com/tps/i2/TB1QHKjMXXXXXadXVXX20ySQVXX-512-512.png"></image>
+ <text>Alibaba Weex Team</text>
+ </container>
+</template>
+```
+
+Here `container` tag is the root element of the component. `image` tag describes a picture, while `text` tag means a paragraph of text.
+
+Just similar to HTML, each component could have its own attributes, some components also have children as their sub components.
+
+The root element of template: In a `template` tag, there could be only one root component which has no display logics directive. Here are three types of root component we support now:
+
+- `<container>`: a common native container
+- `<scroller>`: a native scroll view
+- `<list>`: a native cell-reusable list view
+
+Only these type of components are allowed for root element.
+
+* [See all built-in components](../../references/components/index.html).
+
+## `<style>`
+
+You can consider the Weex style syntax is a subset of the CSS syntax, but there is still some differences.
+
+First we could write inline `style` attribute in `<template>` element. Second we could use the `class` attribute to apply stylesheets, which are defined with single-class selectors in `<style>` code. Here is an example:
+
+```html
+<template>
+ <container>
+ <text style="font-size: 64;">Alibaba</text>
+ <text class="large">Weex Team</text>
+ </container>
+</template>
+
+<style>
+ .large {font-size: 64;}
+</style>
+```
+
+Both the two `text` components above have the same `font-size`, which is `64` pixel.
+
+* [See common styles in Weex](../../references/common-style.html)
+
+
+### Notes!
+weex is basically following [HTML attribute](https://en.wikipedia.org/wiki/HTML_attribute) naming rule , so please **do not use CamelCase** in your attribute , **long-name** with “-” as delimiter is much better.
+
+## `<script>`
+
+The syntax is JavaScript (ES5) and it describes data and behavior of a Weex page. Here we create three paragraphs:
+
+```html
+<template>
+ <container>
+ <text>The time is {{datetime}}</text>
+ <text>{{title}}</text>
+ <text>{{getTitle()}}</text>
+ </container>
+</template>
+
+<script>
+ module.exports = {
+ data: {
+ title: 'Alibaba',
+ datetime: null
+ },
+ methods: {
+ getTitle: function () {
+ return 'Weex Team'
+ }
+ },
+ created: function() {
+ this.datetime = new Date().toLocaleString()
+ }
+ }
+</script>
+```
+
+This piece of `<script>` code will generate some component options and assign it to `module.exports`. The three text components above respectively shows the current datetime, 'Alibaba' and 'Weex Team'. The `data` in the `<script>` code stores component data which could be used for [data-binding](./data-binding.html) in the `<template>`. When data changes, the bound value will be updated automatically. Also it could be read and written by `this.x` in its methods.
+
+* [See component definitions references](../../references/component-defs.html)
+
+Next, let's have a look at [data-binding](./data-binding.html).
http://git-wip-us.apache.org/repos/asf/incubator-weex-site/blob/32a097bf/_draft/v-0.10/guide/syntax/render-logic.md
----------------------------------------------------------------------
diff --git a/_draft/v-0.10/guide/syntax/render-logic.md b/_draft/v-0.10/guide/syntax/render-logic.md
new file mode 100644
index 0000000..be967e1
--- /dev/null
+++ b/_draft/v-0.10/guide/syntax/render-logic.md
@@ -0,0 +1,35 @@
+---
+title: Render Logic Control
+type: guide
+order: 2.5
+version: 0.10
+---
+
+# Render Logic Control
+
+## `append`
+
+Attribute `append` do not have data-binding. It won't change the final rendering effect. But it determines whether this component should be rendered as a whole tree or a single node with child nodes appended after.
+
+`append` has two key attributes, `tree` and `node`, the usage is:
+
+```html
+<template>
+ <container>
+ <container id="world" append="tree">
+ <text>Hello World!</text>
+ </container>
+ <container id="weex" append="node">
+ <text>Hello Weex!</text>
+ </container>
+ </container>
+</template>
+```
+
+In the code snippet above, the element with id 'world' will wait for all its children to be rendered then it will be rendered entirely, while the element with id 'weex' will only render itself to the page, then its child elements will be rendered to page one by one.
+
+The rendering result is obvious, The latter statement will render the element a bit faster on the first-paint, but the total time might be longger than `append="tree"` case.
+
+By default, elements are rendered as `node` mode. Once an element is in `tree` rendering mode, its children elements will always be rendered in `tree` mode.
+
+Next we will introduce [composed component](./composed-component.html).
http://git-wip-us.apache.org/repos/asf/incubator-weex-site/blob/32a097bf/_draft/v-0.10/guide/syntax/style-n-class.md
----------------------------------------------------------------------
diff --git a/_draft/v-0.10/guide/syntax/style-n-class.md b/_draft/v-0.10/guide/syntax/style-n-class.md
new file mode 100644
index 0000000..4337992
--- /dev/null
+++ b/_draft/v-0.10/guide/syntax/style-n-class.md
@@ -0,0 +1,118 @@
+---
+title: Style & Class
+type: guide
+order: 2.2
+version: 0.10
+---
+
+# Style & Class
+
+## The Basic Syntax
+
+CSS style description can be viewed as a series of key-value pairs,each of which describes a particular style, such as the width and height of a component.
+
+```css
+.box {
+ width: 400;
+ height: 50;
+}
+```
+
+The format of key-value pairs is `prop-name: prop-value;`. The key name is `prop-name`, the value name is `prop-value`. Usually,the key name and the value name follow Horizontal connection nomenclature, the value may be a number(the default units is px); The key and the value must be separated by `:`, between each key-value pairs must be separated by `;`.
+
+The style description will appear on a weex page in two formats:
+
+* Style attribute of `<template>` label
+* Stylesheets of `<style>` label
+
+### style attribute
+
+The style written in the style label, for example:
+
+```html
+<template>
+ <container style="width: 400; height: 50;">
+ ...
+ </container>
+</template>
+```
+
+It is said that the width and height of `<container>` label is 400 pixels and 50 pixels respectively.
+
+### the `<style>` tag
+
+For example:
+
+```html
+<style>
+ .wrapper {width: 600;}
+ .title {width: 400; height: 50;}
+ .highlight {color: #ff0000;}
+</style>
+```
+
+The stylesheets contain multiple style rules, each style rule has only one class which is contained by its style selector, a pair of curly braces `{...}`, and the styles of the curly braces. For example:
+
+```css
+.title {
+ width: 400;
+ height: 50;
+}
+```
+
+The above is a rule.
+
+### Class attribute
+
+The selectors of `<style>` label are matched with the class attribute of `<template>` label, we should use spaces to separate the class names. For example:
+
+```html
+<template>
+ <container class="wrapper">
+ <text class="title">...</text>
+ <text class="title highlight">...</text>
+ </container>
+</template>
+<style>
+ .wrapper {width: 600;}
+ .title {width: 400; height: 50;}
+ .highlight {color: #ff0000;}
+</style>
+```
+
+It means that the width of the outermost container is 600px, The inside of the two title text is 400 pixels wide 50 pixels high, the second piece of text is red.
+
+### Notes
+
+* In order to simplify the page design and the complete underlying implementation, the width of our default screen is unified to 750 pixels, different screens should be scaled with corresponding ratio.
+* The CSS standard may support a lot of selectors, but now weex only support single-class selector.
+* The CSS standard can support many types of length units, but now weex only support pixel, and the `px` unit could be ignored, you can write number directly. More details can be found in [commmon styles](../../references/common-style.html).
+* The styles of Weex cannot be inherited to children elements, this is different to the CSS standard, such as `color` and `font-size`.
+* The CSS standard contains a lot of styles, but weex only sopport few styles which include layouts such as box model, flexbox, positions. And styles include `font-size`, `color`, etc.
+
+## With Data-binding
+
+Page [data](./data-binding.html) can be bound in `style` and `class` attribute. For example:
+
+```html
+<template>
+ <container>
+ <text style="font-size: {{fontSize}};">Alibaba</text>
+ <text class="large {{textClass}}">Weex Team</text>
+ </container>
+</template>
+<style>
+ .large {font-size: 32;}
+ .highlight {color: #ff0000;}
+</style>
+<script>
+ module.exports = {
+ data: {
+ fontSize: 32,
+ textClass: 'highlight'
+ }
+ }
+</script>
+```
+
+Next, let's have a look at [events](./events.html).
http://git-wip-us.apache.org/repos/asf/incubator-weex-site/blob/32a097bf/_draft/v-0.10/references/api.md
----------------------------------------------------------------------
diff --git a/_draft/v-0.10/references/api.md b/_draft/v-0.10/references/api.md
new file mode 100644
index 0000000..a62d5b8
--- /dev/null
+++ b/_draft/v-0.10/references/api.md
@@ -0,0 +1,84 @@
+---
+title: Component APIs
+type: references
+order: 1.3
+version: 0.10
+---
+
+# APIs
+
+You can access these apis through `this`(Vm) context in script methods.
+
+e.g.
+
+```html
+<script>
+module.exports = {
+ methods: {
+ somemethod: function() {
+ this.$vm('someId');
+ }
+ }
+}
+</script>
+```
+
+## $(id)
+
+**Deprecated**, please use `$vm` instead.
+
+## $el(id)
+
+Return the element referenced by specific id.
+
+### Arguments
+
+* `id`*(string)*: the unique identifier.
+
+### Returns
+
+* *(Element)*: an Element object referenced.
+
+### Tips
+* id is only guaranteed to be unique within the current (page)components, if you are looking for the parent components or child components, you can make use of the communication mode between components.
+* Further reading: [id](../guide/syntax/id.html), [Communicate Between Components](../guide/syntax/comm.html)
+
+## $vm(id)
+
+Return the vm object referenced by specific id.
+
+### Arguments
+
+* `id`*(string)*: the unique identifier.
+
+### Returns
+
+* `vm`*(Vm)*: a Vm object referenced.
+
+### Tips
+* id is only guaranteed to be unique within the current (page)components, if you are looking for the parent components or child components, you can make use of the communication mode between components.
+* Further reading: [id](../guide/syntax/id.html), [Communicate Between Components](../guide/syntax/comm.html)
+
+## $getConfig()
+
+Get the current global environment variables and configuration information.
+
+### Returns
+
+ * `config`*(object)*: the object of config.
+ * `bundleUrl`*(string)*: the url of bundle.
+ * `debug`*(boolean)*: if is debug mode.
+ * `env`*(object)*: a object of envrioment.
+ * `weexVersion`*(string)*: a version of weex sdk.
+ * `appName`*(string)*: a name of app.
+ * `appVersion`*(string)*: a version of app.
+ * `platform`*(string)*: the platform, one of `iOS`, `Android` and `Web`.
+ * `osVersion`*(string)*: the version of os.
+ * `deviceModel`*(string)*: the model of device. **native only**
+ * `deviceWidth`*(number)*: the width of device, in pixels.
+ * `deviceHeight`*(number)*: the height of device, in pixels.
+
+## $call(module, method, ...args)
+
+**Deprecated**, please use `require('@weex-module/module')[method](...args)` instead. See [modules](./modules/index.html) for more information
+
http://git-wip-us.apache.org/repos/asf/incubator-weex-site/blob/32a097bf/_draft/v-0.10/references/bubble.md
----------------------------------------------------------------------
diff --git a/_draft/v-0.10/references/bubble.md b/_draft/v-0.10/references/bubble.md
new file mode 100644
index 0000000..ba59a90
--- /dev/null
+++ b/_draft/v-0.10/references/bubble.md
@@ -0,0 +1,150 @@
+---
+title: Event Bubble
+type: references
+order: 1.3
+version: 0.10
+---
+
+# Event Bubble <span class="api-version">v0.13+</span>
+
+Weex 1.0 implements the W3C standard event bubbling mechanism.
+
+### Usage
+
+```html
+<template>
+ <div class="root" onclick="rootClick" bubble="true">
+ <div>
+ <text style="font-size: 40px;">{{rootText}}</text>
+ </div>
+ <div class="outer" onclick="parentClick">
+ <div>
+ <text style="font-size: 40px;">{{parentText}}</text>
+ </div>
+ <text class="inner" onclick="click">{{innerText}}</text>
+ </div>
+ </div>
+</template>
+
+<script>
+ module.exports = {
+ data: {
+ innerText: 'click me',
+ parentText: '',
+ rootText: ''
+ },
+ methods: {
+ click: function(e) {
+ this.innerText = 'inner bubble'
+ },
+ parentClick: function(e) {
+ this.parentText = 'parent bubble'
+ },
+ rootClick: function(e) {
+ this.rootText = 'root bubble'
+ }
+ }
+ }
+</script>
+
+<style>
+ .inner {
+ font-size: 40px;
+ text-align: center;
+ background-color: #7a9b1b;
+ padding: 40px;
+ }
+
+ .outer {
+ font-size: 40px;
+ text-align: center;
+ background-color: #9b7a1b;
+ padding: 120px;
+ }
+
+ .root {
+ font-size: 40px;
+ text-align: center;
+ background-color: #7a1b9b;
+ padding: 80px;
+ }
+</style>
+```
+
+[try it](http://dotwe.org/weex/dbfeb926e003986e2eea88c8ccdadb92)
+
+Run the above code, open with the client, click on the middle of the elements, you can see the event spread up, followed by the trigger.
+
+### Notice
+
+One thing should be noticed: **For compatibility with previous versions, Weex does not turn on event bubbling by default. You need to add `bubble = "true"` on the root element's properties to turn on the bubbling mechanism. Otherwise, the event will not be propagated upwards, keeping the same effect as the previous version.**
+
+### stopPropagation
+
+In the event handler function, you can use the `e.stopPropagation()` method to prevent the event from escalating. Note that `e.stopPropagation()` differs from `bubble = "true"`, which affects only the current elements and the propagation of parent elements, without affecting the propagation of child elements; the latter is a switching mechanism that is added for compatibility, Will be a global shutdown or open the bubble mechanism, the two can co-exist, as follows:
+
+```html
+<template>
+ <div class="root" onclick="rootClick" bubble="true">
+ <div>
+ <text style="font-size: 40px;">{{rootText}}</text>
+ </div>
+ <div class="outer" onclick="parentClick">
+ <div>
+ <text style="font-size: 40px;">{{parentText}}</text>
+ </div>
+ <text class="inner" onclick="click">{{innerText}}</text>
+ </div>
+ </div>
+</template>
+
+<script>
+ module.exports = {
+ data: {
+ innerText: 'click me',
+ parentText: '',
+ rootText: ''
+ },
+ methods: {
+ click: function(e) {
+ this.innerText = 'inner bubble'
+ },
+ parentClick: function(e) {
+ this.parentText = 'parent bubble'
+ e.stopPropagation()
+ },
+ rootClick: function(e) {
+ this.rootText = 'root bubble'
+ // e.stopPropagation()
+ }
+ }
+ }
+</script>
+
+<style>
+ .inner {
+ font-size: 40px;
+ text-align: center;
+ background-color: #7a9b1b;
+ padding: 40px;
+ }
+
+ .outer {
+ font-size: 40px;
+ text-align: center;
+ background-color: #9b7a1b;
+ padding: 120px;
+ }
+
+ .root {
+ font-size: 40px;
+ text-align: center;
+ background-color: #7a1b9b;
+ padding: 80px;
+ }
+</style>
+```
+
+[try it](http://dotwe.org/weex/0cab45a7c62e8bebedd2ffd83a8e1256)
+
+Run the above code, open with the client, click on the middle of the element, you can see the event up to the parent element is terminated, no longer continue to spread to the root element.
http://git-wip-us.apache.org/repos/asf/incubator-weex-site/blob/32a097bf/_draft/v-0.10/references/cheatsheet.md
----------------------------------------------------------------------
diff --git a/_draft/v-0.10/references/cheatsheet.md b/_draft/v-0.10/references/cheatsheet.md
new file mode 100644
index 0000000..68ac69a
--- /dev/null
+++ b/_draft/v-0.10/references/cheatsheet.md
@@ -0,0 +1,102 @@
+# Weex Cheat Sheet
+
+## Native Components
+
+| component | attribtues | styles | events | special parent | children |
+| ---- | ---- | ---- | ---- | ---- | ---- |
+| `<div>` | - | **box model**<br>**flexbox**<br>`position`<br>`background-color`<br>`opacity` | `click`<br>`appear`<br>`disappear` | - | (any) |
+| `<text>` | `value` | **box model**<br>flex<br>`position`<br>`background-color`<br>`opacity`<br>`color`<br>`font-size`<br>`font-style`<br>`font-weight`<br>`text-decoration`<br>`text-align`<br>`text-overflow`<br>`line-height` | `click`<br>`appear`<br>`disappear` | - | text only |
+| `<image>` | `src` | **box model**<br>**flexbox**<br>`position`<br>`background-color`<br>`opacity`<br>`resize` | `click`<br>`appear`<br>`disappear` | - | (none) |
+| `<scroller>` | `show-scrollbar`<br>`scroll-direction` | **box model**<br>**flexbox**<br>`position`<br>`background-color`<br>`opacity` | `click`<br>`appear`<br>`disappear` | - | (any) |
+| `<list>` | `loadmoreoffset` | **box model**<br>**flexbox**<br>`position`<br>`background-color`<br>`opacity` | `click`<br>`appear`<br>`disappear`<br>`loadmore`<br>`refresh`<br>`loading` | - | `<cell>`<br>`<header>`<br>`<refresh>`<br>`<loading>` |
+| `<cell>` | - | **box model**<br>**flexbox**<br>`position`<br>`background-color`<br>`opacity` | `click`<br>`appear`<br>`disappear` | `<list>` | (any) |
+| `<slider>` | `auto-play` | **box model**<br>**flexbox**<br>`position`<br>`background-color`<br>`opacity` | `click`<br>`appear`<br>`disappear`<br>`change` | - | (any)<br>`<indicator>` |
+| `<indicator>` | - | **box model**<br>**flexbox**<br>`position`<br>`item-color`<br>`item-selected-color`<br>`item-size` | `click`<br>`appear`<br>`disappear` | `<slider>` | (none) |
+| `<wxc-navpage>` | `height`<br>`background-color`<br>`title`<br>`title-color`<br>`left-item-title`<br>`left-item-color`<br>`right-item-title`<br>`right-item-color`<br>`left-item-src`<br>`right-item-src` | **box model**<br>**flexbox**<br>`position`<br>`background-color`<br>`opacity` | `click`<br>`appear`<br>`disappear`<br>`naviBar.leftItem.click`<br>`naviBar.rightItem.click` | - | (any) |
+| `<wxc-tabbar>` | `tab-items` | **box model**<br>**flexbox**<br>`position`<br>`background-color`<br>`opacity` | `tabBar.onClick` | - | (none) |
+| `<embed>` | `src` | **box model**<br>**flexbox**<br>`position`<br>`background-color`<br>`opacity` | `click`<br>`appear`<br>`disappear` | - | (none) |
+| `<web>` | `src` | **box model**<br>**flexbox**<br>`position`<br>`background-color`<br>`opacity` | `click`<br>`appear`<br>`disappear`<br>`pagestart`<br>`pagefinish`<br>`error` | - | (none) |
+| `<video>` | `src`<br>`play-status`<br>`auto-play` | **box model**<br>**flexbox**<br>`position`<br>`background-color`<br>`opacity` | `click`<br>`appear`<br>`disappear`<br>`start`<br>`pause`<br>`finish`<br>`fail` | - | (none) |
+| `<a>` | `href` | **box model**<br>**flexbox**<br>`position`<br>`background-color`<br>`opacity` | `click`<br>`appear`<br>`disappear` | - | (any) |
+| `<input>` | `type`<br>`value`<br>`placeholder`<br>`disabled`<br>`autofocus` | **box model**<br>**flexbox**<br>`position`<br>`background-color`<br>`opacity`<br>`placeholder-color`<br>`color`<br>`font-size`<br>`font-style`<br>`font-weight`<br>`text-align` | `click`<br>`appear`<br>`disappear` | - | (none) |
+| `<switch>` | `checked`<br>`disabled` | **box model**<br>**flexbox**<br>`position`<br>`background-color`<br>`opacity` | `appear`<br>`disappear`<br>`input`<br>`change`<br>`focus`<br>`blur` | - | (none) |
+
+## Native Modules
+
+| module | apis |
+| ---- | ---- |
+| `@weex-module/dom` | `scrollToElement(node, { offset })` |
+| `@weex-module/modal` | `toast({ message, duration })`<br>`alert({ message, okTitle }, callback)`<br>`confirm({ message, okTitle, cancelTitle }, callback(result))`<br>`prompt({ message, okTitle, cancelTitle }, callback(result, data))` |
+| `@weex-module/stream` | `fetch({ method, url, headers, type, body }, callback({ status, ok, statusText, data, headers }), progressCallback({ readyState, status, length, statusText, headers}))` |
+| `@weex-module/webview` | `goBack(ref)`<br>`goForward(ref)`<br>`reload(ref)` |
+| `@weex-module/navigator` | `push({ url, animated }, callback)`<br>`pop({ animated }, callback)` |
+| `@weex-module/animation` | `transition(node, { styles, duration, timingFunction, delay, transform-origin }, callback)` |
+
+## Special Template Syntax
+
+* `<foo x="abc">`
+* `{% raw %}<foo x="{{expr}}">{% endraw %}`
+* `<foo style="name1: value1; name2: value2">`
+* `{% raw %}<foo style="name1: value1; name2: {{expr}}; name3: ...">{% endraw %}`
+* `<foo class="a b c">`
+* `{% raw %}<foo class="a {{expr}} c">{% endraw %}`
+* `<foo onclick="methodName">`
+* `<foo id="abc">`
+* `<foo if="expr">`
+* `<foo repeat="item in list">`
+* `<foo repeat="(key,item) in list">`
+* `<component type="foo">`
+* `{% raw %}<component type="{{expr}}">{% endraw %}`
+
+## ViewModel APIs
+
+* `this.$vm(el)`
+* `this.$el(el)`
+* `this.$getConfig()`
+* `this.$emit(type, data)`
+* `this.$dispatch(type, data)`
+* `this.$broadcast(type, data)`
+
+## ViewModel Options
+
+* `data`
+* `methods`
+* `computed`
+* `init`, `created`, `ready`
+* `events`
+
+example:
+
+```javascript
+module.exports = {
+
+ data: function () {
+ return {
+ x: 1,
+ y: 2
+ }
+ }
+
+ methods: {
+ foo: function () {
+ console.log('foo')
+ }
+ },
+
+ computed: {
+ z: function () {
+ return this.x + this.y
+ }
+ },
+
+ events: {
+ custom: function (e) {
+ console.log(e)
+ }
+ },
+
+ init: function () {},
+ created: function () {},
+ ready: function () {}
+}
+```
http://git-wip-us.apache.org/repos/asf/incubator-weex-site/blob/32a097bf/_draft/v-0.10/references/color-names.md
----------------------------------------------------------------------
diff --git a/_draft/v-0.10/references/color-names.md b/_draft/v-0.10/references/color-names.md
new file mode 100644
index 0000000..a61112b
--- /dev/null
+++ b/_draft/v-0.10/references/color-names.md
@@ -0,0 +1,182 @@
+---
+title: List of the names of colors
+type: references
+order: 1.7
+version: 0.10
+---
+
+# List of the names of colors
+
+### Basic color keywords:
+
+| Color Name | Hex rgb |
+| ---------- | ------- |
+| black | #000000 |
+| silver | #C0C0C0 |
+| gray | #808080 |
+| white | #FFFFFF |
+| maroon | #800000 |
+| red | #FF0000 |
+| purple | #800080 |
+| fuchsia | #FF00FF |
+| green | #008000 |
+| lime | #00FF00 |
+| olive | #808000 |
+| yellow | #FFFF00 |
+| navy | #000080 |
+| blue | #0000FF |
+| teal | #008080 |
+| aqua | #00FFFF |
+
+### Extended color keywords:
+
+| Color Name | Hex rgb |
+| ---------- | ------- |
+| aliceblue | #F0F8FF |
+| antiquewhite | #FAEBD7 |
+| aqua | #00FFFF |
+| aquamarine | #7FFFD4 |
+| azure | #F0FFFF |
+| beige | #F5F5DC |
+| bisque | #FFE4C4 |
+| black | #000000 |
+| blanchedalmond | #FFEBCD |
+| blue | #0000FF |
+| blueviolet | #8A2BE2 |
+| brown | #A52A2A |
+| burlywood | #DEB887 |
+| cadetblue | #5F9EA0 |
+| chartreuse | #7FFF00 |
+| chocolate | #D2691E |
+| coral | #FF7F50 |
+| cornflowerblue | #6495ED |
+| cornsilk | #FFF8DC |
+| crimson | #DC143C |
+| cyan | #00FFFF |
+| darkblue | #00008B |
+| darkcyan | #008B8B |
+| darkgoldenrod | #B8860B |
+| darkgray | #A9A9A9 |
+| darkgreen | #006400 |
+| darkgrey | #A9A9A9 |
+| darkkhaki | #BDB76B |
+| darkmagenta | #8B008B |
+| darkolivegreen | #556B2F |
+| darkorange | #FF8C00 |
+| darkorchid | #9932CC |
+| darkred | #8B0000 |
+| darksalmon | #E9967A |
+| darkseagreen | #8FBC8F |
+| darkslateblue | #483D8B |
+| darkslategray | #2F4F4F |
+| darkslategrey | #2F4F4F |
+| darkturquoise | #00CED1 |
+| darkviolet | #9400D3 |
+| deeppink | #FF1493 |
+| deepskyblue | #00BFFF |
+| dimgray | #696969 |
+| dimgrey | #696969 |
+| dodgerblue | #1E90FF |
+| firebrick | #B22222 |
+| floralwhite | #FFFAF0 |
+| forestgreen | #228B22 |
+| fuchsia | #FF00FF |
+| gainsboro | #DCDCDC |
+| ghostwhite | #F8F8FF |
+| gold | #FFD700 |
+| goldenrod | #DAA520 |
+| gray | #808080 |
+| green | #008000 |
+| greenyellow | #ADFF2F |
+| grey | #808080 |
+| honeydew | #F0FFF0 |
+| hotpink | #FF69B4 |
+| indianred | #CD5C5C |
+| indigo | #4B0082 |
+| ivory | #FFFFF0 |
+| khaki | #F0E68C |
+| lavender | #E6E6FA |
+| lavenderblush | #FFF0F5 |
+| lawngreen | #7CFC00 |
+| lemonchiffon | #FFFACD |
+| lightblue | #ADD8E6 |
+| lightcoral | #F08080 |
+| lightcyan | #E0FFFF |
+| lightgoldenrodyellow | #FAFAD2 |
+| lightgray | #D3D3D3 |
+| lightgreen | #90EE90 |
+| lightgrey | #D3D3D3 |
+| lightpink | #FFB6C1 |
+| lightsalmon | #FFA07A |
+| lightseagreen | #20B2AA |
+| lightskyblue | #87CEFA |
+| lightslategray | #778899 |
+| lightslategrey | #778899 |
+| lightsteelblue | #B0C4DE |
+| lightyellow | #FFFFE0 |
+| lime | #00FF00 |
+| limegreen | #32CD32 |
+| linen | #FAF0E6 |
+| magenta | #FF00FF |
+| maroon | #800000 |
+| mediumaquamarine | #66CDAA |
+| mediumblue | #0000CD |
+| mediumorchid | #BA55D3 |
+| mediumpurple | #9370DB |
+| mediumseagreen | #3CB371 |
+| mediumslateblue | #7B68EE |
+| mediumspringgreen | #00FA9A |
+| mediumturquoise | #48D1CC |
+| mediumvioletred | #C71585 |
+| midnightblue | #191970 |
+| mintcream | #F5FFFA |
+| mistyrose | #FFE4E1 |
+| moccasin | #FFE4B5 |
+| navajowhite | #FFDEAD |
+| navy | #000080 |
+| oldlace | #FDF5E6 |
+| olive | #808000 |
+| olivedrab | #6B8E23 |
+| orange | #FFA500 |
+| orangered | #FF4500 |
+| orchid | #DA70D6 |
+| palegoldenrod | #EEE8AA |
+| palegreen | #98FB98 |
+| paleturquoise | #AFEEEE |
+| palevioletred | #DB7093 |
+| papayawhip | #FFEFD5 |
+| peachpuff | #FFDAB9 |
+| peru | #CD853F |
+| pink | #FFC0CB |
+| plum | #DDA0DD |
+| powderblue | #B0E0E6 |
+| purple | #800080 |
+| red | #FF0000 |
+| rosybrown | #BC8F8F |
+| royalblue | #4169E1 |
+| saddlebrown | #8B4513 |
+| salmon | #FA8072 |
+| sandybrown | #F4A460 |
+| seagreen | #2E8B57 |
+| seashell | #FFF5EE |
+| sienna | #A0522D |
+| silver | #C0C0C0 |
+| skyblue | #87CEEB |
+| slateblue | #6A5ACD |
+| slategray | #708090 |
+| slategrey | #708090 |
+| snow | #FFFAFA |
+| springgreen | #00FF7F |
+| steelblue | #4682B4 |
+| tan | #D2B48C |
+| teal | #008080 |
+| thistle | #D8BFD8 |
+| tomato | #FF6347 |
+| turquoise | #40E0D0 |
+| violet | #EE82EE |
+| wheat | #F5DEB3 |
+| white | #FFFFFF |
+| whitesmoke | #F5F5F5 |
+| yellow | #FFFF00 |
+| yellowgreen | #9ACD32 |
+
http://git-wip-us.apache.org/repos/asf/incubator-weex-site/blob/32a097bf/_draft/v-0.10/references/common-attrs.md
----------------------------------------------------------------------
diff --git a/_draft/v-0.10/references/common-attrs.md b/_draft/v-0.10/references/common-attrs.md
new file mode 100644
index 0000000..2ed0310
--- /dev/null
+++ b/_draft/v-0.10/references/common-attrs.md
@@ -0,0 +1,78 @@
+---
+title: Common Attribute
+type: references
+order: 1.5
+version: 0.10
+---
+
+# Common Attribute
+
+Attributes provide additional information about weex tags. All weex tags can have attributes, attributes are always specified in the start tag and usually come in name/value pairs like: name="value". Mustache can be used inside a value.
+All of weex tags have the following attributes:
+
+## id
+
+Specifies a unique id for an element in `<template>` scope. With `id` attribute you can easily refer a weex tag.
+
+```html
+<div id="logo"></div>
+<div id="item-{{index}}"></div>
+```
+
+## style
+
+Specifies an inline style for an element.
+
+```html
+<div style="width: 200; height: 200"></div>
+<div style="padding: {{x}}; margin: 0"></div>
+```
+
+## class
+
+Specifies one or more classnames for an element (refers to a class in a style sheet).
+
+```html
+<div class="button"></div>
+<div class="button {{btnStatus}}"></div>
+```
+
+## repeat
+
+We can use the `repeat` attribute to render a list of items based on an array. The `repeat` attribute has a special syntax in the form of `item in items`, where `items` is the source data array and `item` is an alias for the array element being iterated on.
+
+```html
+<div repeat={{list}}></div>
+<div repeat={{item in list}}></div>
+```
+
+## if
+
+Provide a boolean value to decide whether or not to display current tag.
+
+```html
+<div if="true"></div>
+<div if="{{opened}}"></div>
+<div if="{{direction === 'row'}}"></div>
+```
+
+## append
+
+By providing the value of tree or node, it determines the progress of rendering.
+
+```html
+<div append="tree/node"></div>
+```
+
+## Event Handing (on...)
+
+Register event handlers on weex tag.
+
+```html
+<div onclick="openDetail"></div>
+<div onappear="{{loadMore}}"></div>
+```
+
+## Notes!
+
+Weex is basically following [HTML attribute](https://en.wikipedia.org/wiki/HTML_attribute) naming rule, so please **do not use CamelCase** in your attribute, **kebab-case** with "-" as delimiter is much better.
http://git-wip-us.apache.org/repos/asf/incubator-weex-site/blob/32a097bf/_draft/v-0.10/references/common-event.md
----------------------------------------------------------------------
diff --git a/_draft/v-0.10/references/common-event.md b/_draft/v-0.10/references/common-event.md
new file mode 100644
index 0000000..c8e0836
--- /dev/null
+++ b/_draft/v-0.10/references/common-event.md
@@ -0,0 +1,120 @@
+---
+title: Common Events
+type: references
+order: 1.9
+version: 0.10
+---
+
+# Common Events
+
+Weex provide the ability to let events trigger action, like starting a JavaScript when a user click on a component. Bellow are the common event attributes that can be added to weex components to define event actions.
+
+## Click event
+
+The onclick attribute fires on a click gesture on the element.
+**Notes: ** The `input` and `switch` component does not currently support the `click` event, please use `change` or `input` event instead.
+
+### event object
+
+- `type` : `click`
+- `target` : The target component where the event is triggered
+- `timestamp` : Timestamp when event is triggered
+
+**Example:**
+
+```html
+<template>
+ <text style="font-size: 60px" onclick="{{update}}">I am {{name}}</text>
+</template>
+
+<script>
+ module.exports = {
+ data: {
+ name: 'Tom'
+ },
+ methods: {
+ update: function () {
+ this.name = this.name === 'Tom' ? 'Jerry' : 'Tom'
+ }
+ }
+ }
+</script>
+```
+
+
+## Longpress event
+
+If a `longpress` event is bound to a component, the event will be triggered when user long press on it.
+**Notes: ** The `input` and `switch` component does not currently support the `click` event, please use `change` or `input` event instead.
+
+### event object
+
+- `type` : `longpress`
+- `target` : The target component where the event is triggered
+- `timestamp` : Timestamp when event is triggered
+
+**Example:**
+
+```html
+<template>
+ <div style="width: 400px; height: 200px; background-color: {{bg}};
+ justify-content: center; align-items: center;" onlongpress="{{update}}">
+ <text style="font-size: 60px">Press me</text>
+ </div>
+</template>
+
+<script>
+ module.exports = {
+ data: {
+ bg: '#FF0000'
+ },
+ methods: {
+ update: function () {
+ this.bg = this.bg === '#FF0000' ? '#00FF00' : '#FF0000'
+ }
+ }
+ }
+</script>
+```
+
+## Appear event
+
+If a appear event is bound to a component inside a scrollable container, the event will be triggered when the component comes to be visible.
+
+### event object
+
+- `type` : `appear`
+- `target` : The target component where the event is triggered
+- `timestamp` : Timestamp when event is triggered
+- `direction` : The direction in which the scroller is scrolling. Could be `up` or `down`.
+
+[example](http://dotwe.org/3fa162a65fbf0c7e2655fbc1bebbfc38)
+
+## Disappear event
+
+If a `disappear` event is bound to a component inside a scrollable container, the event will be triggered when the component scrolls out of viewport and disappears from your sight.
+
+### event object
+
+- `type` : `disappear`
+- `target` : The target component where the event is triggered
+- `timestamp` : Timestamp when event is triggered
+- `direction` : The direction in which the scroller is scrolling. Could be `up` or `down`.
+
+[example](http://dotwe.org/3fa162a65fbf0c7e2655fbc1bebbfc38)
+
+## Page event
+
+Weex provides you with simple management of page status, such as `viewappear` and `viewdisappear`.
+The `viewappear` event will be triggered when page is about to show or before any animations are configured for showing. For example, when calling `push` method in `navigator` module, this event will be trigged in new page.
+The `viewdisappear` event will be triggeded when page is about to dismiss.
+Different from `appear` and `disappear` of component, these two events focus on the status of whole page, so **they must be bound to the root component**.
+In addititon, these events also can be bound to body component which is not root actually such as `wxc-navpage`.
+
+### event object
+
+- `type` : `viewappear` or `viewdisappear`
+- `target` : The target component where the event is triggered
+- `timestamp` : Timestamp when event is triggered
+
+[example](http://dotwe.org/3fa162a65fbf0c7e2655fbc1bebbfc38)
http://git-wip-us.apache.org/repos/asf/incubator-weex-site/blob/32a097bf/_draft/v-0.10/references/common-style.md
----------------------------------------------------------------------
diff --git a/_draft/v-0.10/references/common-style.md b/_draft/v-0.10/references/common-style.md
new file mode 100644
index 0000000..8ae8224
--- /dev/null
+++ b/_draft/v-0.10/references/common-style.md
@@ -0,0 +1,208 @@
+---
+title: Common Style
+type: references
+order: 1.6
+version: 0.10
+---
+
+# Common Style
+
+All of weex tags share some common style rules
+
+## Box Model
+
+
+
+Weex box model based on the CSS box model, all of weex elements can be considered as boxes. The term "box model" is used when talking about design and layout. The box model is essentially a box that wraps around every HTML element. It consists of margins, borders, paddings, and the actual content.
+
+you can use the definition below in weex box model.
+
+- `width`: `length` type, default value `0`
+- `height`: `length` type, default value `0`
+- `padding`: `length` type, default value `0`, (space around content, between element content and the element border)
+ - `padding-left`: `length` type, default value `0`
+ - `padding-right`: `length` type, default value `0`
+ - `padding-top`: `length` type, default value `0`
+ - `padding-bottom`: `length` type, default value `0`
+- `margin`: `length` type, default value `0`, (space around elements, outside the border)
+ - `margin-left`: `length` type, default value `0`
+ - `margin-right`: `length` type, default value `0`
+ - `margin-top`: `length` type, default value `0`
+ - `margin-bottom`: `length` type, default value `0`
+- `border`
+ - `border-style`: values `solid` | `dashed` | `dotted`, default value `solid`
+ - `border-left-style`: values `solid` | `dashed` | `dotted`, default value `solid`
+ - `border-top-style`: values `solid` | `dashed` | `dotted`, default value `solid`
+ - `border-right-style`: values `solid` | `dashed` | `dotted`, default value `solid`
+ - `border-bottom-style`: values `solid` | `dashed` | `dotted`, default value `solid`
+ - `border-width`: `length` type, non-negative, default value `0`
+ **DO NOT** use `border-width:1`. There is a default viewport `<viewport width="750">`, if the actual width of a device is 720px, then `border-width:1` will be `border-width:0.96`. As weex **do not** support sub-pixel, this border would not be rendered.
+ - `border-left-width`: `length` type, non-negative, default value `0`
+ - `border-top-width`: `length` type, non-negative, default value `0`
+ - `border-right-width`: `length` type, non-negative, default value `0`
+ - `border-bottom-width`: `length` type, non-negative, default value `0`
+ - `border-color`: `color` type, default value `#000000`
+ - `border-left-color`: `color` type, default value `#000000`
+ - `border-top-color`: `color` type, default value `#000000`
+ - `border-right-color`: `color` type, default value `#000000`
+ - `border-bottom-color`: `color` type, default value `#000000`
+ - `border-radius`: `length` type, default value `0`, (rounded borders to elements , default value is 0 meaning right angle )
+
+ Although the the default overflow style is `overflow:hidden` in android, a view will not be clipped by its parents' `border-radius`. This only happens on Android, it works fine on iOS.
+ - `border-bottom-left-radius`: `length` type, non-negative, default value `0`
+ - `border-bottom-right-radius`: `length` type, non-negative, default value `0`
+ - `border-top-left-radius`: `length` type, non-negative, default value `0`
+ - `border-top-right-radius`: `length` type, non-negative, default value `0`
+
+Notes: The rule of border-radius for a specific corner such as `border-top-left-radius` is not currently supported for component `<image>` and `<text>`.
+
+Weex box model uses `border-box` as the default value of `box-sizing`, meaning the width and height properties includes content, padding and border, but not the margin.
+
+example:
+
+```html
+<template>
+ <div>
+ <image src="..." style="width: 400; height: 200; margin-left: 20;"></image>
+ </div>
+</template>
+```
+
+## Flexbox
+
+Weex box style model based on the CSS flexbox, ensures that elements behave predictably and the page layout can accommodates to different screen sizes and different display devices.
+
+Flexbox consists of flex containers and flex items. If a weex element can containing other elements, it is a flex container.
+
+Notice that the old version of flexbox specification has differences with the new ones, such as whether or not to support wrapping. This is described at w3c's working drafts, and you should notice the differences among them. Also notice that the old version is only supported below the 4.4 version of android.
+
+### Flex container
+
+Flexbox is the default and only style model in Weex, so you don't have to add `display: flex;` in a container.
+
+- `flex-direction`: values `row` | `column`, default value `column`
+
+The flex-direction property specifies the direction of the flexible items inside the flex container. Default value is `column` (top-to-bottom).
+
+- `justify-content`: values `flex-start` | `flex-end` | `center` | `space-between`, default value `flex-start`
+
+The justify-content property horizontally aligns the flexible container's items when the items do not use all available space on the main-axis. Default value is `flex-start` meaning the flex items are positioned at the beginning of the container. `flex-end` means the items are positioned at the end of the container. `center` means the items are positioned at the center of the container. `space-between` means the items are positioned with space between the lines.
+
+
+
+- `align-items`: values `stretch` | `flex-start` | `center` | `flex-end`, default value `stretch`
+
+The align-items property vertically aligns the flexible container's items when the items do not use all available space on the cross-axis. Default value is `stretch` meaning the items are stretched to fit the container. `flex-start` means the items are positioned at the top of the container; `flex-end` means the items are positioned at the bottom of the container; `center` means items are positioned at the center of the container (vertically).
+
+
+
+### Flex item
+
+- `flex`: `number` type, default value `0`
+
+the flex property specifies the length of the flex item, relative to the rest of the flex items inside the same container. If all of the flex items set `flex: 1`, they will have equal width or height on direction of flex container's `flex-direction`. If there are two flex items, with one setting `flex: 1`, and the other setting `flex: 2`, the first one will take 1/3 container space, and the second one will take 2/3 container space. If all of flex items don't set `flex`, they will be aligned depending on the container's `justify-content` property.
+
+
+## Examples
+
+a list of images with equal scales align at the vertical axis:
+
+```html
+<template>
+ <div style="width: 300; height: 100;">
+ <image src="..." style="flex: 1;"></image>
+ <image src="..." style="flex: 1;"></image>
+ <image src="..." style="flex: 1;"></image>
+ </div>
+</template>
+```
+
+a image with fixed width aligns with a stretched text:
+
+```html
+<template>
+ <div style="width: 300; height: 100;">
+ <image src="..." style="width: 100; height: 100;"></image>
+ <text style="flex: 1;">...</text>
+ </div>
+</template>
+```
+
+mixed direction alignment:
+
+```html
+<template>
+ <div style="width: 100;">
+ <image src="..." style="width: 100; height: 100;"></image>
+ <div style="flex-direction: row;">
+ <text style="flex: 2; font-size: 32;">title</text>
+ <text style="flex: 1; font-size: 16;">$100</text>
+ </div>
+ </div>
+</template>
+```
+
+one text align left , the other float right:
+
+
+
+```html
+<template>
+<div style="flex-direction: row; justify-content: space-between;">
+ <text>WEEX</text>
+ <text>2016-05-08</text>
+</div>
+</template>
+```
+
+## Position
+
+we can use properties below to control placement of weex tag
+
+- `position`: values `relative` | `absolute` | `fixed` | `sticky`, default value `relative`
+
+`relative` means the item is positioned relative to its normal position. `absolute` means the item is positioned relative to its container. `fixed` keeps the elements position fixed when the page is scrolling. `sticky` keeps elements positioned inside the viewport as "stuck" at the top or "relative" at its original place depending on whether does it about to scroll out of the view.
+
+- `top`: `number` type, default value `0`, upward offset value
+- `bottom`: `number` type, default value `0`, downward offset value
+- `left`: `number` type, default value `0`, leftward offset value
+- `right`: `number` type, default value `0`, rightward offset value
+
+### Examples
+
+```html
+<template>
+ <div style="flex-direction: column;">
+ <div style="height: 3000;">
+ <image src="..." style="top: 50; left: 50; ..."></image>
+ </div>
+ <div style="height: 3000;">
+ <image src="..." style="position: sticky; ..."></image>
+ </div>
+ <div style="height: 3000;">
+ <image src="..." style="position: absolute; top: 50; left: 50; ..."></image>
+ </div>
+ </div>
+</template>
+```
+
+## Other Common Style
+
+- `opacity`
+- `background-color`
+
+## Type of Style Value
+
+- `length` type
+- `number` type
+- `color` type (*[The list of color keywords.](./color-names.html)*)
+- enumerated type
+
+## Simple Step
+
+These up-to-down steps may help you to plan the whole style of weex pages.
+
+1. overall style: divide the whole page to different parts
+2. flex alignment: align boxes in every part of page
+3. position box: place box, set offset
+4. element specific style: set styles for certain element if needed
http://git-wip-us.apache.org/repos/asf/incubator-weex-site/blob/32a097bf/_draft/v-0.10/references/component-defs.md
----------------------------------------------------------------------
diff --git a/_draft/v-0.10/references/component-defs.md b/_draft/v-0.10/references/component-defs.md
new file mode 100644
index 0000000..baa6584
--- /dev/null
+++ b/_draft/v-0.10/references/component-defs.md
@@ -0,0 +1,131 @@
+---
+title: Component Definition
+type: references
+order: 1.2
+version: 0.10
+---
+
+# Component Definition
+
+A component definition is a set of options to describe a component. It's always assigned to `module.exports` in `<script>`.
+
+```javascript
+module.exports = {
+ // a set of options here
+}
+```
+
+## Data & Methods options
+
+```javascript
+module.exports = {
+ data: function () {
+ return {x: 1, y: 2}
+ },
+ methods: {
+ doThis: function () {...},
+ doThat: function () {...}
+ },
+ ...
+}
+```
+
+The `data` option is a function that return a observable data object for this ViewModel.
+The `methods` option is a map which contains all ViewModel methods.
+
+Each `data` or `methods` property will be proxied to the ViewModel instance. So you can read and write data with `this.x`, also you can call methods with `this.doThis(...)`.
+
+A whole example:
+
+```html
+<template>
+ <div style="width: {{w}}; height: {{h}}; background-color: red;" onclick="update"></div>
+</template>
+<script>
+ module.exports = {
+ data: function () {
+ return {w: 750, h: 200}
+ },
+ methods: {
+ update: function (e) {
+ this.h += 200
+ }
+ }
+ }
+</script>
+```
+
+## Events options
+
+```javascript
+module.exports = {
+ data: ...,
+ methods: {
+ foo: function () {
+ ...
+ this.$emit('customtype1', data)
+ }
+ },
+ events: {
+ customtype1: function (e) {
+ console.log(e.type, e.detail)
+ }
+ },
+ ...
+}
+```
+
+The `events` options could allow you to add custom event listeners when ViewModel created. Then it will listen these type of events and handle them by the function-type value.
+
+The first argument is a event object which contains event data in `e.detail`.
+
+## Lifecycle options
+
+```javascript
+module.exports = {
+ data: ...,
+ methods: ...,
+ init: function () {
+ console.log('ViewModel constructor begins')
+ },
+ created: function () {
+ console.log('Data observation finished')
+ },
+ ready: function () {
+ console.log('Virtual DOM finished')
+ },
+ ...
+}
+```
+
+Weex ViewModel now supports these lifecycle hook functions which could be write as component options:
+
+* `init`: fired at the beginning of a ViewModel constructor call.
+* `created`: fired when ViewModel observes default data but not compile the template.
+* `ready`: fired when ViewModel observes default data and compiles the template to generate virtual DOM finally.
+
+**Note: If you want to use the function in `methods`, `events` or lifecycle options as a parameter, please make sure the context is correct as expect. For example:**
+
+```javascript
+module.exports = {
+ data: function () {
+ return {x: 1, y: 2}
+ },
+ ready: function () {
+ // `undefined`
+ // because the context changed
+ this.foo(this.bar)
+ // `1`
+ // because the context bound correct
+ this.foo(this.bar.bind(this))
+ },
+ methods: {
+ foo: function (fn) {
+ return fn()
+ },
+ bar: function () {
+ return this.x
+ }
+ }
+}
+```
http://git-wip-us.apache.org/repos/asf/incubator-weex-site/blob/32a097bf/_draft/v-0.10/references/components/a.md
----------------------------------------------------------------------
diff --git a/_draft/v-0.10/references/components/a.md b/_draft/v-0.10/references/components/a.md
new file mode 100644
index 0000000..e1677bf
--- /dev/null
+++ b/_draft/v-0.10/references/components/a.md
@@ -0,0 +1,50 @@
+---
+title: <a>
+type: references
+order: 2.1
+version: 0.10
+---
+
+# <a>
+
+`a` defines a hyperlink to a page in the web. Its purpose and syntax is very similar to [<a>](https://developer.mozilla.org/en-US/docs/Web/HTML/Element/a) in HTML5.
+
+## Child Components
+
+This type of component supports all kinds of weex component as it's child components except for its own kind.
+
+## Attributes
+
+* href: href attributes defines the URL of the hyperlink.
+
+## Styles:
+
+### common styles
+
+Check out the [common styles](../common-style.html)
+
+## Events
+
+### common events
+
+Check out the [common events](../common-event.html)
+
+### Notes
+
+We can't guarantee the order of execution between onclick function and href. we recommend that do not use the click event in `a`.
+
+## Examples
+
+```html
+<template>
+ <div>
+ <a href="http://h5.m.taobao.com">
+ <text>Click me to see how 'A' element opens a new world.</text>
+ </a>
+ </div>
+</template>
+```
+
+[Try it](http://dotwe.org/d99f6eb55aa501c836a195ec824cada0)
+
+Use [Weex Playground](https://alibaba.github.io/weex/download.html) App to Scan the QR image and view the example for 'a'.
http://git-wip-us.apache.org/repos/asf/incubator-weex-site/blob/32a097bf/_draft/v-0.10/references/components/cell.md
----------------------------------------------------------------------
diff --git a/_draft/v-0.10/references/components/cell.md b/_draft/v-0.10/references/components/cell.md
new file mode 100644
index 0000000..34d1703
--- /dev/null
+++ b/_draft/v-0.10/references/components/cell.md
@@ -0,0 +1,42 @@
+---
+title: <cell>
+type: references
+order: 2.6
+version: 0.10
+---
+
+# <cell>
+
+### Summary
+
+This component must be used as a subcomponent of a [`list`](./list.html) component, which is for the performance optimizing during scrolling.
+
+### Child Components
+
+This type of component supports all kinds of weex component as its child components.
+
+### Attributes
+
+There is no specific attribute for this component other than the [common attributes](../common-attrs.html).
+
+**Notes:** you can't give `<cell>` a `flex` value. Width of `<cell>` is equal to the width of its parent component `<list>`, and you don't need to specify its height.
+
+### Styles
+
+**common styles**: check out the [common styles](../common-attrs.html)
+
+- support flexbox related styles
+- support box model related styles
+- support ``position`` related styles
+- support ``opacity``, ``background-color`` etc.
+
+### Events
+
+**common events**: check out the [common events](../common-event.html)
+
+- support `click` event. Check out [common events](../common-event.html)
+- support `appear` / `disappear` event. Check out [common events](../common-event.html)
+
+### Example
+
+please refer to [List](./list.html)
http://git-wip-us.apache.org/repos/asf/incubator-weex-site/blob/32a097bf/_draft/v-0.10/references/components/div.md
----------------------------------------------------------------------
diff --git a/_draft/v-0.10/references/components/div.md b/_draft/v-0.10/references/components/div.md
new file mode 100644
index 0000000..1e75523
--- /dev/null
+++ b/_draft/v-0.10/references/components/div.md
@@ -0,0 +1,48 @@
+---
+title: <div>
+type: references
+order: 2.2
+version: 0.10
+---
+
+# <div>
+
+### Summary
+
+The most fundamental component which is a contianer to wrap any other components. It supports all the common styles, attributes and layout of flexbox.
+
+alias: `<container>` (deprecated)
+
+### Child Components
+
+This type of component supports all kinds of weex component as its child components including its own kind.
+
+### Attributes
+
+There is no specific attribute for this component other than the [common attributes](../common-attrs.html).
+
+### Styles
+
+**common styles**: check out the [common styles](../common-attrs.html)
+
+- support flexbox related styles
+- support box model related styles
+- support ``position`` related styles
+- support ``opacity``, ``background-color`` etc.
+
+### Events
+
+**common events**: check out the [common events](../common-event.html)
+
+- support `click` event. Check out [common events](../common-event.html)
+- support `appear` / `disappear` event. Check out [common events](../common-event.html)
+
+### Examples
+
+```html
+<div>
+ <image src="..."></image>
+ <text>...</text>
+</div>
+```
+
http://git-wip-us.apache.org/repos/asf/incubator-weex-site/blob/32a097bf/_draft/v-0.10/references/components/image.md
----------------------------------------------------------------------
diff --git a/_draft/v-0.10/references/components/image.md b/_draft/v-0.10/references/components/image.md
new file mode 100644
index 0000000..3eae206
--- /dev/null
+++ b/_draft/v-0.10/references/components/image.md
@@ -0,0 +1,55 @@
+---
+title: <image>
+type: references
+order: 2.3
+version: 0.10
+---
+
+# <image>
+
+### Summary
+
+`image` tag is used to render a specified picture, and it shouldn't contain any child component. You can use `img` as alias.
+
+**Notes:** the styles of `width` and `height` should be specified, otherwise it won't work.
+
+alias: `<img>`
+
+### Child Components
+
+This component supports no child components.
+
+### Attributes
+
+- `src`: <string> image source url
+- `resize`: <span class="api-version">v0.5+</span> <string> the 'ScaleType' of the component. The default value is ``stretch``, if this attribute is not specified. Possible values are ``cover``, ``contain``, each of which has the same meaning with w3c standard.
+
+Other attributes please check out the [common attributes](../common-attrs.html).
+
+### Styles
+
+- `width`: <length> the width of the component. This style should be specified.
+- `height`: <length> the height of the component. This style should be specifed.
+
+**common styles**: check out the [common styles](../common-attrs.html)
+
+- support flexbox related styles
+- support box model related styles
+- support ``position`` related styles
+- support ``opacity``, ``background-color`` etc.
+
+### Events
+
+**common events**: check out the [common events](../common-event.html)
+
+- support `click` event. Check out [common events](../common-event.html)
+- support `appear` / `disappear` event. Check out [common events](../common-event.html)
+
+### Examples
+
+```html
+<div>
+ <image src="..." ></image>
+ <text>...</text>
+</div>
+```
http://git-wip-us.apache.org/repos/asf/incubator-weex-site/blob/32a097bf/_draft/v-0.10/references/components/index.md
----------------------------------------------------------------------
diff --git a/_draft/v-0.10/references/components/index.md b/_draft/v-0.10/references/components/index.md
new file mode 100644
index 0000000..66e211c
--- /dev/null
+++ b/_draft/v-0.10/references/components/index.md
@@ -0,0 +1,24 @@
+---
+title: Build-in Components
+type: references
+order: 2
+version: 0.10
+---
+
+# Build-in Components
+
+- [<a>](./a.html)
+- [<indicator>](./indicator.html)
+- [<switch>](./switch.html)
+- [<text>](./text.html)
+- [<textarea>](./textarea.html)
+- [<video>](./video.html)
+- [<web>](./web.html)
+- [<div>](./div.html)
+- [<image>](./image.html)
+- [<input>](./input.html)
+- [<list>](./list.html)
+- [<cell>](./cell.html)
+- [<refresh> & <loading>](./refresh.html)
+- [<scroller>](./scroller.html)
+- [<slider>](./slider.html)
\ No newline at end of file
http://git-wip-us.apache.org/repos/asf/incubator-weex-site/blob/32a097bf/_draft/v-0.10/references/components/indicator.md
----------------------------------------------------------------------
diff --git a/_draft/v-0.10/references/components/indicator.md b/_draft/v-0.10/references/components/indicator.md
new file mode 100644
index 0000000..b06dc95
--- /dev/null
+++ b/_draft/v-0.10/references/components/indicator.md
@@ -0,0 +1,98 @@
+---
+title: <indicator>
+type: references
+order: 2.10
+version: 0.10
+---
+
+# <indicator>
+
+### Summary
+
+This component must be used as a subcomponent of a [`slider`](./slider.html) component.
+
+### Child Components
+
+This component supports no child components.
+
+### Attributes
+
+There is no specific attribute for this component other than the [common attributes](../common-attrs.html).
+
+### Styles
+
+- `item-color`: <colors> This style attribute sets the normal item color using either a named color or a color specified in the hexadecimal #RRGGBB format.
+- `item-selectedColor`: <colors> This style attribute sets the selected item color using either a named color or a color specified in the hexadecimal #RRGGBB format.
+- `item-size`: <length> The size of the indicator elements, which is an float attribute.
+
+**common styles**: check out the [common styles](../common-attrs.html)
+
+- support flexbox related styles
+- support box model related styles
+- support ``position`` related styles
+
+**Note:** There are some specific details about the style `width` and `height` on this component: the position of indicator will not only depend on the `top`, `left`, `bottom` and `right`, but also depend on the value of `width` and `height`. Imagine there is a virtual container outside the indicator, and it inherit the `width` and `height` of the indicator. The `top`, `left`, `right` and `bottom` will always take effect on this container, not the indicator points themselves, and the indicator points will be positioned in the center of it. And also you should know the default `width` and `height` is the parent slider's `width` and `height`.
+
+**Note:** `background-color` is not recommended to apply on this component, and you should use `item-color` and `item-selectedColor` instead.
+
+### Events
+
+**common events**: check out the [common events](../common-event.html)
+
+- support `click` event. Check out [common events](../common-event.html)
+- support `appear` / `disappear` event. Check out [common events](../common-event.html)
+
+### Example
+
+```html
+<template>
+ <div>
+ <slider class="slider">
+ <div class="slider-pages" repeat="{{itemList}}">
+ <image class="img" src="{{pictureUrl}}"></image>
+ <text class="title">{{title}}</text>
+ </div>
+
+ <indicator class="indicator"></indicator>
+ </slider>
+ </div>
+</template>
+
+<style>
+ .img {width: 150; height: 150;}
+ .title {flex: 1; color: #ff0000; font-size: 48; font-weight: bold; background-color: #eeeeee;}
+ .slider {
+ flex-direction: row;
+ margin: 18;
+ width: 714;
+ height: 230;
+ }
+ .slider-pages {
+ flex-direction: row;
+ width: 714;
+ height: 200;
+ }
+ .indicator {
+ width:714;
+ height:200;
+ position:absolute;
+ top:1;
+ left:1;
+ item-color: red;
+ item-selectedColor: blue;
+ item-size: 20;
+ }
+</style>
+
+<script>
+ module.exports = {
+ data: {
+ itemList: [
+ {itemId: '520421163634', title: 'item1', pictureUrl: 'https://gd2.alicdn.com/bao/uploaded/i2/T14H1LFwBcXXXXXXXX_!!0-item_pic.jpg'},
+ {itemId: '522076777462', title: 'item2', pictureUrl: 'https://gd1.alicdn.com/bao/uploaded/i1/TB1PXJCJFXXXXciXFXXXXXXXXXX_!!0-item_pic.jpg'},
+ {itemId: '522076777462', title: 'iten3', pictureUrl: 'https://gd3.alicdn.com/bao/uploaded/i3/TB1x6hYLXXXXXazXVXXXXXXXXXX_!!0-item_pic.jpg'}
+ ]
+ }
+ }
+</script>
+```
http://git-wip-us.apache.org/repos/asf/incubator-weex-site/blob/32a097bf/_draft/v-0.10/references/components/input.md
----------------------------------------------------------------------
diff --git a/_draft/v-0.10/references/components/input.md b/_draft/v-0.10/references/components/input.md
new file mode 100644
index 0000000..feaac53
--- /dev/null
+++ b/_draft/v-0.10/references/components/input.md
@@ -0,0 +1,124 @@
+---
+title: <input>
+type: references
+order: 2.4
+version: 0.10
+---
+
+# input
+
+The weex builtin component `input` is used to create input controls to receive the user's input characters. How a `input` component works varies considerably depending on the value of its `type` attribute, such as `text`, `password`, `url`, `email`, `tel` etc.
+
+**Notes:** does not support the common-event `click`. Please listen to the `input` or `change` event instead.
+
+## Child Components
+
+This component supports no child components.
+
+## Attributes
+
+* `type`: the type of controls to display. The default value is `text`, if this attribute is not specified. Possible values are `text`, `password`, `tel`, `email`, `url` etc. each of which has the same meaning with �W3C standard.
+
+* `value`: the value(text) of the control.
+
+* `placeholder`: a hint to the user of which can be entered to the control. The placeholder text must have no carriage returns or line-feeds.
+
+* `disabled`: a boolean attribute indicates that the form control is not available for interaction. In particular, the click event will not be dispatched on disabled controls.
+
+* `autofocus`: a boolean attribute lets you specify that a form control should have input focus when the page loads.
+
+* `maxlength`: <span class="api-version">v0.7+</span> a number value to specify maxlength of input.
+
+Other attributes please check out the [common attributes](../common-attrs.html).
+
+## Styles
+
+* placeholder-color: the color of placeholder. Default value is '#999999'.
+
+* text styles: checkout [text styles](../text-style.html)
+
+ * support 'color' style.
+ * support 'font-size' style.
+ * support 'font-style' style.
+ * support 'font-weight' style.
+ * support 'text-align' style.
+
+### common styles
+check out [common styles for components](../common-style.html)
+
+* support flexbox related styles.
+* support box model related styles.
+* support 'position' related styles.
+* support 'opacity', 'background-color' etc.
+
+## Events
+
+* input: the value of an input character changes.
+* change: the change event is fired when a change to the component's value is commited by the user. It always come after a 'blur' event.
+* focus: a component has received focus.
+* blur: a component has lost focus.
+
+### common events
+check out [common events](../common-event.html)
+
+* support 'appear' / 'disappear' event.
+
+### Notes
+does not support the common-event 'click'. Please listen to the 'input' or 'change' event instead.
+
+### Parameters of events' object
+
+* for 'input' and 'change' events:'value': the value of the component who dispatched this event.'timestamp': the time stamp of the event.
+* for 'focus' and 'blur' events:'timestamp': the time stamp of the event.
+
+## Example
+
+```html
+<template>
+ <div>
+ <input
+ type="text"
+ placeholder="Input Something"
+ class="input"
+ autofocus="true"
+ value=""
+ onchange="onchange"
+ oninput="oninput"
+ />
+ <text>oninput: {{txtInput}}</text>
+ <text>onchange: {{txtChange}}</text>
+ </div>
+</template>
+
+<style>
+ .input {
+ font-size: 60;
+ height: 80;
+ width: 400;
+ }
+</style>
+
+<script>
+ require('weex-components');
+ module.exports = {
+ data: {
+ txtInput: '',
+ txtChange: ''
+ },
+ methods: {
+ onchange: function(event) {
+ this.txtChange = event.value;
+ console.log('onchange', event.value);
+ },
+ oninput: function(event) {
+ this.txtInput = event.value;
+ console.log('oninput', event.value);
+ }
+ }
+ };
+</script>
+```
+
+[Try it](http://dotwe.org/e1b18eb89facb4e2a5467ee4bebd9be6)
+
+Use [Weex Playground](https://alibaba.github.io/weex/download.html) App to Scan the QR image and view the example for 'input'.
http://git-wip-us.apache.org/repos/asf/incubator-weex-site/blob/32a097bf/_draft/v-0.10/references/components/list.md
----------------------------------------------------------------------
diff --git a/_draft/v-0.10/references/components/list.md b/_draft/v-0.10/references/components/list.md
new file mode 100644
index 0000000..3b4745e
--- /dev/null
+++ b/_draft/v-0.10/references/components/list.md
@@ -0,0 +1,292 @@
+---
+title: <list>
+type: references
+order: 2.5
+version: 0.10
+---
+
+# List
+
+<span class="weex-version">v0.6.1+</span>
+
+The List component, which inherits from Scroller component, is a core component, and it provides the most popular features for using a list of items.
+
+It can provide excellent experience and performance while still maintaining smooth scroll and low memory usage.
+
+**example**
+
+```html
+<template>
+ <list>
+ <cell onappear="onappear($event, $index)" ondisappear="ondisappear($event, $index)" class="row" repeat="{{staffs}}" index="{{$index}}">
+ <div class="item">
+ <text>{{name}}</text>
+ </div>
+ </cell>
+ </list>
+</template>
+
+<style>
+ .row {
+ width: 750;
+ }
+ .item {
+ justify-content: center;
+ border-bottom-width: 2;
+ border-bottom-color: #c0c0c0;
+ height: 100;
+ padding:20;
+ }
+</style>
+
+<script>
+ module.exports = {
+ data: {
+ staffs:[{name:'inns'},{name:'connon'},{name:'baos'},{name:'anna'},{name:'dolley'},{name:'lucy'},{name:'john'}, {name:'lily'},{name:'locke'},{name:'jack'},{name:'danny'},{name:'rose'},{name:'harris'},{name:'lotus'},{name:'louis'}]
+ },
+ methods:{
+ onappear: function (e, index) {
+ console.log('+++++', index)
+ console.log(this.staffs[index].name + ' is appearing...');
+ },
+ ondisappear:function (e, index) {
+ console.log('+++++', index)
+ }
+ }
+ }
+</script>
+
+```
+
+[try it](http://dotwe.org/15d58cfbca9b6a72c89c9a13ad1f6155)
+
+### Child Components
+
+Notes: The list now supports the following child components: cell, header, refresh, loading and fixed-position components. Other kinds of components will not be guaranteed to be displayed correctly.
+
+* cell 0.6.1 defines the attributes and behavior of the cells that appear in list.
+* header 0.6.1 sticks to the top when it reaches the top of the screen.
+* refresh 0.6.1 used inside list to add pull-down-to-refresh functionality.
+* loading 0.6.1 used inside list to add pull-up-to-load-more functionality.
+
+
+### Attributes
+
+* show-scrollbar: true/false whether show the scroll bar or not, default value is true
+* scroll-direction: <string> define scroll direction of component, horizontal or vertical
+* loadmoreoffset : <number> default value is 0. The loadmore event will be triggered when the list is loadmoreoffset left to reach the bottom of the list view. e.g. a list has total content length of 1000, and the loadmoreoffset is set to 400, the loadmore event will be triggered when 600 has beed scrolled and there is less than 400 left.
+* loadmoreretry : <number> default value 0,whether to reset loadmore related UI when loadmore failed, will be deprecated in further release.
+
+Please checkout [Scroller Component Attributes](./scroller.html) to have a look at the inherited attributes from direct parent.
+
+Other attributes please check out the [common attributes](../common-attrs.html).
+
+### Styles
+
+common styles: check out [common styles for components](../common-style.html)
+
+* support flexbox related styles
+* support box model related styles
+* support position related styles
+* support opacity, background-color etc.
+
+### Events
+
+onloadmore 0.5 used with loadmoreoffset attribute. if the view has less than loadmoreoffset to scroll down, the onloadmore event will be triggered.
+
+common events: check out the [common events](../common-event.html)
+
+* support onclick event. Check out [common events](../common-event.html)
+* support onappear / ondisappear event. Check out [common events](../common-event.html)
+
+
+### API
+
+All cells or cell's subcomponents in list support the scrollToElement API in [dom module](../modules/dom.html)
+
+#### Difference between loading child component and onloadmore event
+
+loading is a child component that can response to the onloading event, and this event can only be triggered when the scroller/list has been scrolled down to the bottom.
+onloadmore is an event that will be triggered when the rest of the scroller/list is less than loadmoreoffset long.
+
+
+* [scroller example](http://dotwe.org/85fd3988eefa24f058b7da7966e56203)
+* [list example](http://dotwe.org/62f895249014dde26cc0725c8005e42c)
+
+### Restrictions
+
+Nested lists or scrollers within the same direction are not supported. In other words. nested lists/scroller must have different directions.
+For example, a vertical list nested in a vertical list or scroller is not allowed. However, a vertical list nested in a horizontal list or scroller is legal.
+
+### Example
+
+```html
+<template>
+ <div class="wrapper">
+ <list class="list">
+ <header class="header">
+ <text class="title">Search Results</text>
+ </header>
+ <refresh style="width: 750; padding: 30;" onrefresh="refreshData" display="{{refreshDisplay}}">
+ <text class="text"> ↓ Pull to refresh </text>
+ <loading-indicator class="indicator"></loading-indicator>
+ </refresh>
+ <cell class="row" repeat="item in items" id="item-{{$index}}">
+ <div>
+ <text class="item">Repo name: {{item.full_name}}</text>
+ </div>
+ <div>
+ <text class="item">Repo star: {{item.stargazers_count}}</text>
+ </div>
+ </cell>
+ <loading onloading="loadingData" style="width: 750; padding: 30;" display="{{loadingDisplay}}">
+ <text class="text">{{loadingText}}</text>
+ </loading>
+ </list>
+ <div class="up" onclick="goToTop">
+ <img class="img" src="https://img.alicdn.com/tps/TB1ZVOEOpXXXXcQaXXXXXXXXXXX-200-200.png"></img>
+ </div>
+ </div>
+</template>
+
+<style>
+.wrapper {
+ position: absolute;
+ top: 0;
+ right: 0;
+ bottom: 0;
+ left: 0;
+}
+.list{
+ background-color: #ffffff;
+ flex: 1;
+}
+.header {
+ height: 80;
+ align-items: center;
+ justify-content: center;
+ background-color: #efefef;
+ border-bottom-color: #eeeeee;
+ border-bottom-width: 2;
+ border-bottom-style: solid;
+}
+.title {
+ text-align: center;
+}
+.text {
+ text-align: center;
+}
+.row {
+ padding: 20;
+ border-bottom-color: #eeeeee;
+ border-bottom-width: 2;
+ border-bottom-style: solid;
+}
+.up {
+ width: 70;
+ height: 70;
+ position: fixed;
+ right: 20;
+ bottom: 20;
+}
+.img {
+ width: 70;
+ height: 70;
+}
+</style>
+
+<script>
+var dom = require('@weex-module/dom') || {}
+var stream = require('@weex-module/stream') || {}
+var modal = require('@weex-module/modal') || {}
+
+var SEARCH_URL = 'https://api.github.com/search/repositories?q=language:javascript&sort=stars&order=desc'
+
+module.exports = {
+ data: {
+ isLoaded: true,
+ page: 1,
+ loadingDisplay: 'hide',
+ refreshDisplay: 'hide',
+ loadingText: 'Loading...',
+ items:[]
+ },
+ created: function () {
+ var url = SEARCH_URL + '&page=' + this.page
+
+ this.renderData(url)
+
+ this.page++
+ },
+ methods: {
+ renderData: function (url) {
+ var self = this
+
+ stream.fetch({
+ method: 'GET',
+ url: url,
+ type:'json'
+ }, function(res) {
+ self.refreshDisplay = 'hide'
+ self.loadingDisplay = 'hide'
+
+ try {
+ var results = res.data.items || []
+
+ if (Array.isArray(results)) {
+ for(var i = 0; i < results.length; i++) {
+ self.items.push(results[i])
+ }
+ }
+
+ self.isLoaded = true
+ } catch(e) {}
+ },function(res){
+
+ })
+ },
+ loadingData: function (e) {
+ var url = SEARCH_URL + '&page=' + this.page
+ var self = this
+
+ if (self.isLoaded === false) return
+
+ self.loadingDisplay = 'show'
+
+ if (self.page <=10 ) {
+ self.renderData(url)
+ self.page++
+ } else {
+ self.loadingDisplay = 'hide'
+ self.loadingText = 'NO MORE!'
+ }
+ },
+ goToTop: function (e) {
+ dom.scrollToElement(this.$el('item-0'), {
+ offset: -100
+ })
+ },
+ refreshData: function (e) {
+ var url = SEARCH_URL + '&page=1'
+
+ if (this.isLoaded === false) return
+
+ this.refreshDisplay = 'show'
+
+ modal.toast({
+ 'message': 'Refreshing...',
+ 'duration': 1
+ })
+
+ this.items = []
+ this.page = 1
+ this.renderData(url)
+
+ this.refreshDisplay = 'hide'
+ }
+ }
+}
+</script>
+```
+
+[Try it](http://dotwe.org/ed524ade679b0fa96e980600c53ea5ce)
\ No newline at end of file
http://git-wip-us.apache.org/repos/asf/incubator-weex-site/blob/32a097bf/_draft/v-0.10/references/components/refresh-loading.md
----------------------------------------------------------------------
diff --git a/_draft/v-0.10/references/components/refresh-loading.md b/_draft/v-0.10/references/components/refresh-loading.md
new file mode 100644
index 0000000..8b1d610
--- /dev/null
+++ b/_draft/v-0.10/references/components/refresh-loading.md
@@ -0,0 +1,297 @@
+---
+title: <refresh> & <loading>
+type: references
+order: 2.7
+version: 0.10
+---
+
+# refresh & loading
+
+<span class="weex-version">v0.6.1+</span>
+
+## Loading Components
+
+To be rendered properly, the refresh/loading Components must appear inside the Scroller Component or the List Component.
+
+
+**example**
+
+```html
+`<template>
+ <list>
+ <header>
+ <div class="center">
+ <text style="text-align:center">I am the header</text>
+ </div>
+ </header>
+ <loading onloading="onloading" display="{{loadingDisplay}}" style="width:750;flex-direction: row;justify-content: center;">
+ <loading-indicator style="height:160;width:160;color:#3192e1"></loading-indicator>
+ </loading>
+ <cell onappear="onappear($event, $index)" ondisappear="ondisappear($event, $index)" class="row" repeat="{{staffs}}" index="{{$index}}">
+ <div class="item">
+ <text>{{name}}</text>
+ </div>
+ </cell>
+ </list>
+</template>
+
+<style>
+ .row {
+ width: 750;
+ }
+ .item {
+ justify-content: center;
+ border-bottom-width: 2;
+ border-bottom-color: #c0c0c0;
+ height: 100;
+ padding:20;
+ }
+ .center {
+ border-bottom-width: 2;
+ border-bottom-color: #cccccc;
+ height: 100;
+ padding:20;
+ background-color:#FFFFFF;
+ justify-content: center;
+ }
+</style>
+
+<script>
+ module.exports = {
+ data: {
+ staffs:[],
+ loadingDisplay: 'show',
+ loadingText: 'pull up to load more',
+ refreshText: 'pull down to refresh'
+ },
+ created:function() {
+ this.refreshDisplay='show'
+ this.staffs=[{name:'inns'},{name:'connon'},{name:'baos'},{name:'anna'},{name:'dolley'},{name:'lucy'},{name:'john'}, {name:'lily'},{name:'locke'},{name:'jack'},{name:'danny'},{name:'rose'},{name:'harris'},{name:'lotus'},{name:'louis'}];
+ },
+ methods:{
+ onappear: function (e, index) {
+ // console.log('+++++', index);
+ // console.log(this.staffs[index].name + ' is appearing...');
+ },
+ ondisappear:function (e, index) {
+ // console.log('+++++', index);
+ },
+ onloading:function(e){
+ console.log('onloading...');
+ this.staffs.push({name:'onloading'})
+ }
+ }
+ }
+</script>
+
+```
+
+[try it](http://weex.alibaba-inc.com/raw/html5/a34523fee395aa68018d65f0fb622310.js)
+
+### Child Components
+
+Any other components, like the text and img components, can be put inside the refresh component. And there is a special component named loading-indicator used only inside the refresh or the loading components.
+
+* loading-indicator is a child component implemented with default animation effect for the refresh component.
+[example](http://weex.alibaba-inc.com/playground/a34523fee395aa68018d65f0fb622310)
+
+### Attributes
+
+* display has value of show or hide.
+
+Other attributes please check out the [common attributes](../common-attrs.html).
+
+
+### Styles
+common styles: check out [common styles for components](../common-style.html)
+
+### Events
+
+* onloading triggered when loading
+
+
+#### Restrictions
+* refresh/loading does not support remove action, Weex 0.9 will fix it.
+* refresh/loading despite setting with display='hide', the refresh/loading view will still appear when scrolling due to known issues. it can be fixed with a another display='hide' when the refresh/loading should be hidden.
+* refresh/loading can only be hidden or displayed with an attribute display with value of show or hide. And there should be a statement of display='hide' when display='show' shows up in an event function, or your scroller may not response to user inputs.
+
+## Refresh Components
+
+To be rendered properly, the refresh/loading Components must appear inside the Scroller Component or the List Component.
+
+```html
+<template>
+ <scroller onloadmore="onloadmore" loadmoreoffset="1000">
+ <refresh onrefresh="onrefresh" display="{{refreshDisplay}}">
+ <text id="refreshText">{{refreshText}}</text>
+ </refresh>
+ <div repeat="{{v in items}}">
+ <text style="font-size: 40; color: #000000">{{v.item}}</text>
+ </div>
+ <loading onloading="onloading" display="{{loadingDisplay}}">
+ <text id="loadingText">{{loadingText}}</text>
+ </loading>
+ </scroller>
+</template>
+<script>
+ module.exports = {
+ data: {
+ refreshDisplay: 'show',
+ loadingDisplay: 'show',
+ loadingText: 'pull up to load more',
+ refreshText: 'pull down to refresh',
+ items: []
+ },
+ created: function () {
+ for (var i = 0; i < 30; i++) {
+ this.items.push({'item': 'test data' + i});
+ }
+ },
+ methods: {
+ onrefresh: function () {
+ var vm = this;
+ vm.refreshDisplay = 'show'
+ if (vm.items.length > 50) {
+ vm.refreshText = "no more data!"
+ vm.refreshDisplay = 'hide'
+ return;
+ }
+ var len = vm.items.length;
+ for (var i = len; i < (len + 20); i++) {
+ vm.items.unshift({'item': 'test data ' + i});
+ }
+ vm.refreshDisplay = 'hide'
+ },
+ onloading: function () {
+ var vm = this;
+ vm.loadingDisplay = 'show'
+ if (vm.items.length > 30) {
+ vm.loadingText = "no more data!"
+ vm.loadingDisplay = 'hide'
+ return;
+ }
+
+ var len = vm.items.length;
+ for (var i = len; i < (len + 20); i++) {
+ vm.items.push({'item': 'test data ' + i});
+ }
+ vm.loadingDisplay = 'hide'
+ },
+ onloadmore:function(){
+ console.log("into--[onloadmore]")
+ }
+ }
+ }
+</script>
+```
+
+[try it](http://dotwe.org/242add915e41d307f2fa6f423278425a)
+
+### Child Components
+
+Any other components, like the text and img components, can be put inside the refresh component. And there is a special component named loading-indicator used only inside the refresh or the loading components.
+
+* loading-indicator is a child component implemented with default animation effect for the refresh component.
+[example](http://dotwe.org/e65a2cb0abfcdbbabda6778064837a92)
+
+### Attributes
+* display has value of show or hide, default value is show.
+
+Other attributes please check out the [common attributes](../common-attrs.html).
+
+
+### Styles
+common styles: check out [common styles for components](../common-style.html)
+
+### Events
+* onrefresh triggered when the scroller has been pulled down
+* onpullingdown available on Android. triggered when the scroller has been pulled down. you can get dy, headerHeight, maxHeight from onpullingdowns event object. [example](http://dotwe.org/10ee6bd59ebe173f0f578a4eb8bac6f1)
+
+**example**
+
+```html
+<template>
+ <list>
+ <header>
+ <div class="center">
+ <text style="text-align:center">I am the header</text>
+ </div>
+ </header>
+ <refresh onpullingdown='onpullingdown' onrefresh="onrefresh" display="{{refreshDisplay}}" style="width:750;flex-direction: row;justify-content: center;">
+ <loading-indicator style="height:160;width:160;color:#3192e1"></loading-indicator>
+ </refresh>
+ <cell onappear="onappear" ondisappear="ondisappear" class="row" repeat="{{staffs}}" index="{{$index}}">
+ <div class="item">
+ <text>{{name}}</text>
+ </div>
+ </cell>
+ </list>
+</template>
+
+<style>
+ .row {
+ width: 750;
+ }
+ .item {
+ justify-content: center;
+ border-bottom-width: 2;
+ border-bottom-color: #c0c0c0;
+ height: 100;
+ padding:20;
+ }
+ .center {
+ border-bottom-width: 2;
+ border-bottom-color: #cccccc;
+ height: 100;
+ padding:20;
+ background-color:#FFFFFF;
+ justify-content: center;
+ }
+</style>
+
+<script>
+ module.exports = {
+ data: {
+ staffs:[],
+ refreshDisplay: 'show',
+ loadingDisplay: 'show',
+ loadingText: 'pull up to load more',
+ refreshText: 'pull down to refresh'
+ },
+ created:function() {
+ this.refreshDisplay='show'
+ this.staffs=[{name:'inns'},{name:'connon'},{name:'baos'},{name:'anna'},{name:'dolley'},{name:'lucy'},{name:'john'}, {name:'lily'},{name:'locke'},{name:'jack'},{name:'danny'},{name:'rose'},{name:'harris'},{name:'lotus'},{name:'louis'}];
+ },
+ methods:{
+ onappear: function (e) {
+ var index = e.target.attr.index
+ // console.log(this.staffs[index].name + ' is appearing...');
+ },
+ ondisappear:function (e) {
+ },
+ onrefresh:function(e){
+ this.refreshDisplay='show';
+ // this.staffs=[{name:'inns'},{name:'connon'},{name:'baos'},{name:'anna'}];
+ this.refreshDisplay='hide'
+ // console.log(this.refreshDisplay);
+ },
+ onpullingdown:function(e){
+ console.log('onpullingdown triggered.');
+ console.log('dy:'+e.dy);
+ console.log('headerHeight:'+e.headerHeight);
+ console.log('maxHeight:'+e.maxHeight);
+ }
+ }
+ }
+</script>
+
+```
+
+[try it ](http://dotwe.org/10ee6bd59ebe173f0f578a4eb8bac6f1)
+
+
+### Restrictions
+
+* refresh/loading does not support remove action, may support in Weex 0.9.
+* refresh/loading despite setting with display='hide', the refresh/loading view will still appear when scrolling due to known issues. it can be fixed with a another display='hide' when the refresh/loading should be hidden.
+* refresh/loading can only be hidden or displayed with an attribute display with value of show or hide. And there should be a statement of display='hide' when display='show' shows up in an event function, or your scroller may not response to user inputs.
[46/51] [abbrv] incubator-weex-site git commit: update file structure
and fix responsive styles
Posted by ha...@apache.org.
http://git-wip-us.apache.org/repos/asf/incubator-weex-site/blob/12e3a8bc/_draft/v1.0/advanced/extend-to-ios.md
----------------------------------------------------------------------
diff --git a/_draft/v1.0/advanced/extend-to-ios.md b/_draft/v1.0/advanced/extend-to-ios.md
deleted file mode 100644
index b163d62..0000000
--- a/_draft/v1.0/advanced/extend-to-ios.md
+++ /dev/null
@@ -1,279 +0,0 @@
----
-title: iOS 扩展
-type: advanced
-order: 10
-has_chapter_content: true
-version: 0.10
----
-
-## iOS 扩展
-
-### Module 扩展
-
-[swift](https://github.com/weexteam/article/issues/55) 扩展 module
-
-Weex SDK 只提供渲染,而不是其他的能力,如果你需要 像网络,图片,URL跳转这些特性,需要自己动手实现他们
-例如,如果你想实现一个url地址跳转函数,你可以按照如下步骤实现一个 Module
-1. **自定义module的步骤**
- 1. 自定义的module类 必须实现 `WXModuleProtocol`
- 2. 必须添加宏`WX_EXPORT_METHOD`, 它可以被weex识别,它的参数是 JavaScript调用 module指定方法的参数
- 3. 添加`@synthesized weexInstance`,每个moudle对象被绑定到一个指定的实例上
- 4. Module 方法会在UI线程中被调用,所以不要做太多耗时的任务在这里,如果要在其他线程执行整个module 方法,需要实现`WXModuleProtocol`中`- (NSThread *)targetExecuteThread`的方法,这样,分发到这个module的任务会在指定的线程中运行
- 5. Weex 的参数可以是 String 或者Map
- 6. Module 支持返回值给 JavaScript中的回调,回调的类型是`WXModuleCallback`,回调的参数可以是String或者Map
-
- ```object-c
- @implementation WXEventModule
- @synthesize weexInstance;
- WX_EXPORT_METHOD(@selector(openURL:callback))
- - (void)openURL:(NSString *)url callback:(WXModuleCallback)callback
- {
- NSString *newURL = url;
- if ([url hasPrefix:@"//"]) {
- newURL = [NSString stringWithFormat:@"http:%@", url];
- } else if (![url hasPrefix:@"http"]) {
- newURL = [NSURL URLWithString:url relativeToURL:weexInstance.scriptURL].absoluteString;
- }
-
- UIViewController *controller = [[WXDemoViewController alloc] init];
- ((WXDemoViewController *)controller).url = [NSURL URLWithString:newURL];
-
- [[weexInstance.viewController navigationController] pushViewController:controller animated:YES];
- callback(@{@"result":@"success"});
- }
-
- @end
- ```
-2. **Register the module**
- 通过调用 WXSDKEngine 中的 `registerModule:withClass`方法来注册自己的module
-
- ```object-c
- WXSDKEngine.h
- /**
- * @abstract Registers a module for a given name
- * @param name The module name to register
- * @param clazz The module class to register
- **/
- + (void)registerModule:(NSString *)name withClass:(Class)clazz;
- [WXSDKEngine registerModule:@"event" withClass:[WXEventModule class]];
- ```
-3. **使用自己的module**
- 这里的 require 里面的event 就是在 上一步调用`registerModule:` 注册module 时候的name
-
- ```javascript
- var eventModule = require('@weex-module/event');
- eventModule.openURL('url',function(ret) {
- nativeLog(ret);
- });
- ```
-
- Weex SDK没有 图片下载,navigation 操作的能力,请大家自己实现这些 protocol
-
-### handler 扩展
- **WXImgLoaderProtocol**
-
- weexSDK 没有提供图片下载的能力,需要实现 WXImgLoaderProtocol,参考下面的例子
-
- ```object-c
- WXImageLoaderProtocol.h
- @protocol WXImgLoaderProtocol <WXModuleProtocol>
- /**
- * @abstract Creates a image download handler with a given URL
- * @param imageUrl The URL of the image to download
- * @param imageFrame The frame of the image you want to set
- * @param options : The options to be used for this download
- * @param completedBlock : A block called once the download is completed.
- image : the image which has been download to local.
- error : the error which has happened in download.
- finished : a Boolean value indicating whether download action has finished.
- */
- -(id<WXImageOperationProtocol>)downloadImageWithURL:(NSString *)url imageFrame:(CGRect)imageFrame userInfo:(NSDictionary *)options completed:(void(^)(UIImage *image, NSError *error, BOOL finished))completedBlock;
- @end
- ```
-
- 实现上述协议
-
- ```object-c
- @implementation WXImgLoaderDefaultImpl
- #pragma mark -
- #pragma mark WXImgLoaderProtocol
-
- - (id<WXImageOperationProtocol>)downloadImageWithURL:(NSString *)url imageFrame:(CGRect)imageFrame userInfo:(NSDictionary *)userInfo completed:(void(^)(UIImage *image, NSError *error, BOOL finished))completedBlock
- {
- if ([url hasPrefix:@"//"]) {
- url = [@"http:" stringByAppendingString:url];
- }
- return (id<WXImageOperationProtocol>)[[SDWebImageManager sharedManager] downloadImageWithURL:[NSURL URLWithString:url] options:0 progress:^(NSInteger receivedSize, NSInteger expectedSize) {
- } completed:^(UIImage *image, NSError *error, SDImageCacheType cacheType, BOOL finished, NSURL *imageURL) {
- if (completedBlock) {
- completedBlock(image, error, finished);
- }
- }];
- }
- @end
- ```
-
-5. **handler注册**
-
- 你可以通过WXSDKEngine 中的 `registerHandler:withProtocol`注册handler
-
- ```object-c
- WXSDKEngine.h
- /**
- * @abstract Registers a handler for a given handler instance and specific protocol
- * @param handler The handler instance to register
- * @param protocol The protocol to confirm
- */
- + (void)registerHandler:(id)handler withProtocol:(Protocol *)protocol;
-
- [WXSDKEngine registerHandler:[WXImgLoaderDefaultImpl new] withProtocol:@protocol(WXImgLoaderProtocol)]
- ```
-
-#### Component 扩展
- 虽然WeexSDK中有提供内置的一些Component,但这有可能并不能满足你的需求。在之前你可能已经写了一些很酷炫native的组件,想包装一下,导入到Weex中,因此我们提供了让开发者实现自己的native Component
- 下面将以WeexSDK 中已经存在的 Component:`image`为例子,介绍一下如何构建一个native Component.
- 假设你已经了解IOS开发
- 1. 注册 Component
- 注册一个component比较简单,调用 `WXSDKEngine` 中的 `registerComponent:withClass:`方法,传入组件的标签名称,还有对应的class
- 然后你可以创建一个 `WXImageComponent` 表示`image`组件的实现 在.we 文件中,只需要写
- <image></image>
- 2. 添加属性
- 现在我们要做一些让image component更加强大的事情。既然作为一个图片的component,那它应该要有源,给他加上一个 `src`的属性,同时给它加上一个`resize`的属性(可以配置的有`contain/cover/stretch`)
-
- ```
- @interface WXImageComponent ()
-
- @property (nonatomic, strong) NSString *imageSrc;
- @property (nonatomic, assign) UIViewContentMode resizeMode;
-
- @end
- ```
- component中所有的style,attribute,events都会被传递到 Component的初始化方法中,所以,你可以在初始化方法中存储你感兴趣的一些属性值
-
- ```
- @implementation WXImageComponent
-
- - (instancetype)initWithRef:(NSString *)ref type:(NSString *)type styles:(NSDictionary *)styles attributes:(NSDictionary *)attributes events:(NSArray *)events weexInstance:(WXSDKInstance *)weexInstance
- {
- if (self = [super initWithRef:ref type:type styles:styles attributes:attributes events:events weexInstance:weexInstance]) {
- _imageSrc = [WXConvert NSString:attributes[@"src"]];
- _resizeMode = [WXConvert UIViewContentMode:attributes[@"resize"]];
- }
-
- return self;
- }
-
- @end
- ```
-
- attribute中拿到的值的类型都是`id`,我们可以用转换方法把它转换到任何值。Weex SDK提供了一些基础的转换方法,可以参考 `WXConvert`类,或者你可以添加自己的转换函数
-
- 1. Hooking 渲染生命周期
- native 的component 是由Weex管理的,weex 创建,布局,渲染,销毁。weex的component生命周期都是可以hook的,你可以在这些生命周期中去做自己的事情
-
- | 方法 | 描述 |
- | :-: | --- |
- | initWithRef:type:... | 用给定的属性初始化一个component. |
- | layoutDidFinish | 在component完成布局时候会调用. |
- | loadView | 创建component管理的view. |
- | viewWillLoad | 在component的view加载之前会调用. |
- | viewDidLoad | 在component的view加载完之后调用. |
- | viewWillUnload | 在component的view被释放之前调用. |
- | viewDidUnload | 在component的view被释放之后调用. |
- | updateStyles: | 在component的style更新时候调用. |
- | updateAttributes: | 在component的attribute更新时候调用. |
- | addEvent: | 给component添加event的时候调用. |
- | removeEvent: | 在event移除的时候调用. |
-
- 在image component的例子里面,如果我们需要我们自己的image view 的话,可以复写 `loadView`这个方法.
-
- ```
- - (UIView *)loadView
- {
- return [[WXImageView alloc] init];
- }
- ```
-
- 现在我们使用 `WXImageView` 渲染 `image` component。
- 1. 作为一个image component,我们需要拿到服务器图片,而且把它设置进image view 里. 这个操作可以在 `viewDidLoad` 方法中做,这个方法是在view已经被创建而且加载了时候weex SDK会调用到,而且`viewDidLoad`这个方法是你做额外初始化工作比如改变content mode(也就是设置resize) 的最好时间.
-
- ```
- - (void)viewDidLoad
- {
- UIImageView *imageView = (UIImageView *)self.view;
- imageView.contentMode = _resizeMode;
- imageView.userInteractionEnabled = YES;
- imageView.clipsToBounds = YES;
- imageView.exclusiveTouch = YES;
-
- // Do your image fetching and updating logic
- }
- ```
-
- 1. 如果可以改变image的src,也可以hook `updateAttributes:`方法来做属性更新操作,当`updateAttributes:`或者 `updateStyles:`被调用的时候, component的view 已经加载完成
-
- ```
- - (void)updateAttributes:(NSDictionary *)attributes
- {
- if (attributes[@"src"]) {
- _imageSrc = [WXConvert NSString:attributes[@"src"]];
- // Do your image updating logic
- }
-
- if (attributes[@"resize"]) {
- _resizeMode = [WXConvert UIViewContentMode:attributes[@"resize"]];
- self.view.contentMode = _resizeMode;
- }
- }
- ```
-
- 或许你需要考虑更多的生命周期方法去Hook,当布局完成时候,像`layoutDidFinish`,如果你想了解更多,可以参考一下`WXComponent.h` 声明的方法
- 现在你可以用在任何 .we文件里面使用 `<image>`,而且可以加上 image的属性
-
- ```
- <image style="your-custom-style" src="image-remote-source" resize="contain/cover/stretch"></image>
- ```
-##### component 方法
-WeexSDK 0.9.5 之后支持了在js中直接调用component的方法,这里提供一个例子,
-
-- 自定义一个WXMyCompoenent 的组件
-
- ```
- @implementation WXMyComponent
- WX_EXPORT_METHOD(@selector(focus)) // 暴露该方法给js
- - (instancetype)initWithRef:(NSString *)ref type:(NSString *)type styles:(NSDictionary *)styles attributes:(NSDictionary *)attributes events:(NSArray *)events weexInstance:(WXSDKInstance *)weexInstance
- {
- if (self = [super initWithRef:ref type:type styles:styles attributes:attributes events:events weexInstance:weexInstance]) {
- // handle your attributes
- // handle your styles
- }
-
- return self;
- }
-
- - (void)focus
- {
- NSLog(@"you got it");
- }
- @end
- ```
-
-- 注册组件 `[WXSDKEngine registerComponent:@"mycomponent" withClass:[WXMyComponent class]] `
-- 在weex 文件中调用
-
- ```html
- <template>
- <mycomponent id='mycomponent'></mycomponent>
- </template>
- <script>
- module.exports = {
- created: function() {
- this.$el('mycomponent').focus();
- }
- }
- </script>
- ```
-
-
-
-
\ No newline at end of file
http://git-wip-us.apache.org/repos/asf/incubator-weex-site/blob/12e3a8bc/_draft/v1.0/advanced/how-data-binding-works.md
----------------------------------------------------------------------
diff --git a/_draft/v1.0/advanced/how-data-binding-works.md b/_draft/v1.0/advanced/how-data-binding-works.md
deleted file mode 100644
index a905422..0000000
--- a/_draft/v1.0/advanced/how-data-binding-works.md
+++ /dev/null
@@ -1,39 +0,0 @@
----
-title: 数据绑定原理
-type: advanced
-order: 2
-has_chapter_content: true
-version: 0.10
----
-
-# 数据绑定实现原理
-
-Weex 的 JS Framework 是一个 MVVM,即 Model-View-ViewModel 框架。他会自动监听数据的变化,并通过 `{% raw %}{{字段名}}{% endraw %}` 的语法把数据和视图中所展示的内容自动绑定起来。当数据被改写的时候,视图会自动根据数据的变化而发生相应的变化。
-
-比如下面这个例子,`<text>` 的内容被绑定在了 `notes` 数据字段上:
-
-```html
-<template>
- <div>
- <text>{{notes}}</text>
- </div>
-<template>
-
-<script>
- module.exports = {
- data: {
- notes: 'Hello'
- }
- }
-</script>
-```
-
-Weex 的 JS Framework 会首先对 `data` 里的数据进行监听,这样未来的数据变化都能够被监听到。然后我们会编译整个 `<template>` 标签里的内容。当我们找到 `<text>` 标签里的 `{% raw %}{{notes}}{% endraw %}` 时,JS Framework 会跟踪 `data.notes` 的变化并在其发生变化时触发一个句柄,将 `<text>` 的内容设置为 `data.notes` 最新的值。这样的话开发者就不必手动关心数据和视图之间的数据同步问题了。
-
-在这个基础上我们还设计了一些特殊的语法:
-
-- `<foo if="...">` 代表一个条件监听,当其值为 `true` 时,`<foo>` 元素将会被创建和载入,反之则不会被创建或被移除掉。
-- `<foo repeat="...">` 代表一个列表监听,第一次加载的时候 `<foo>` 元素会被按照数组里的数据逐条 clone 并赋值。而当有列表项增加、移动或移除时,视图层也会自动触发相应的改变,并且智能优化至最小变更策略
-- `<foo if="..." repeat="...">` 两个特殊语法共用时,将会优先展开 `repeat` 然后逐条判断 `if`。
-
-相比于一些 virtual-DOM 的 diff 计算机制,我们会直接对数据进行 diff,而且只会 diff 由于用户操作或数据操作发生改变的那部分数据和视图,这是一种更小范围的计算方式。尤其在追求轻量快速的移动端界面上,这种更新机制更加显得具有优势。
http://git-wip-us.apache.org/repos/asf/incubator-weex-site/blob/12e3a8bc/_draft/v1.0/advanced/images/how-arch.png
----------------------------------------------------------------------
diff --git a/_draft/v1.0/advanced/images/how-arch.png b/_draft/v1.0/advanced/images/how-arch.png
deleted file mode 100644
index a13df7a..0000000
Binary files a/_draft/v1.0/advanced/images/how-arch.png and /dev/null differ
http://git-wip-us.apache.org/repos/asf/incubator-weex-site/blob/12e3a8bc/_draft/v1.0/advanced/images/how-render.png
----------------------------------------------------------------------
diff --git a/_draft/v1.0/advanced/images/how-render.png b/_draft/v1.0/advanced/images/how-render.png
deleted file mode 100644
index db9b0f4..0000000
Binary files a/_draft/v1.0/advanced/images/how-render.png and /dev/null differ
http://git-wip-us.apache.org/repos/asf/incubator-weex-site/blob/12e3a8bc/_draft/v1.0/advanced/index.md
----------------------------------------------------------------------
diff --git a/_draft/v1.0/advanced/index.md b/_draft/v1.0/advanced/index.md
deleted file mode 100644
index 8fea01e..0000000
--- a/_draft/v1.0/advanced/index.md
+++ /dev/null
@@ -1,146 +0,0 @@
----
-title: Weex 工作原理
-type: advanced
-order: 1
-has_chapter_content: true
-version: 0.10
----
-
-# Weex 工作原理概述
-
-## 总览
-
-Weex是跨平台,可扩展的动态化技术. 你能通过在Weex源码中写`<template>`, `<style>` 和 `<script>`标签,然后把这些标签转换为JS Bundle用于部署, 在服务端以这些JS Bundle响应请求. 当客户端接收到JS Bundle时,它能用被客户端中的JS引擎用于管理Native渲染;API调用和用户交互.
-
-### 工作流
-
-```
-Weex we 文件 --------------前端(we源码)
-↓ (转换) ------------------前端(构建过程)
-JS Bundle -----------------前端(JS Bundle代码)
-↓ (部署) ------------------服务器
-在服务器上的JS bundle ----服务器
-↓ (编译) ------------------ 客户端(JS引擎)
-虚拟 DOM 树 --------------- 客户端(Weex JS Framework)
-↓ (渲染) ------------------ 客户端(渲染引擎)
-Native视图 --------------- 客户端(渲染引擎)
-```
-
-在上面的工作流中,我们提到:
-
-- Transformer(转换器): 一个Node JS工具, 转换Weex源码为JS Bundle
-- Weex JS Framework(JS框架): 运行于客户端的的JS框架,管理着Weex实例的运行。Weex实例由JS Bundle创建并构建起虚拟DOM树. 另外,它发送/接受 Native 渲染层产生的系统调用,从而间接的响应用户交互。
-- Native引擎: 在不同的端上,有着不同的实现: iOS/Android/HTML5. 他们有着共同的组件设计, 模块API 和渲染效果. 所以他们能配合同样的 JS Framework 和 JS Bundle工作。
-
-## 转换器
-
-转换器转换Weex源码为JS Bundle. 整体工作可以分为三个部分:
-
-- 转换 `<template>` 为类JSON的树状数据结构, 转换数据绑定为返回数据的函数原型.例如. For example: `<foo a="{% raw %}{{x}}{% endraw %}" b="1" />` 将转换为 `{type: "foo", attr: {a: function () {return this.x}, b: 1}}`.
-- 转换 `<style>` 为类JSON的树状数据结构. 例如: `.classname {name: value;}` 将转换为 `{classname: {name: value}}`.
-- 把上面两部分的内容和 `<script>` 中的内容结合. 上面的三个部分将结合成一个JavaScript AMD 模块.
-
-一个完整的例子:
-
-```html
-<template>
- <foo a="{{x}}" b="1" class="bar"></foo>
-</template>
-<style>
- .bar {width: 200; height: 200}
-</style>
-<script>
- module.exports = {
- data: function () {
- return {x: 100}
- }
- }
-</script>
-```
-
-将转换为:
-
-```javascript
-define('@weex-component/main', function () {
- module.exports = {
- data: function () {
- return {x: 100}
- }
- }
- module.template = {
- type: "foo",
- attr: {
- a: function () {return this.x},
- b: 1,
- classname: ['bar']
- }
- }
- module.style = {
- bar: {width: 200, height: 200}
- }
-})
-bootstrap('@weex-component/main')
-```
-
-除此之外,转换器还会做一些额外的事情: 合并Bundle ,添加引导函数,配置外部数据等等,更详细的,请参阅[Synatax](../references/specs/js-bundle-format.html)章节.
-
-## 注意
-
-当前大部分Weex工具最终输出的JS Bundle格式都经过了[Webpack](https://webpack.github.io/)的二次处理,所以你实际使用工具输出的JS Bundle会和上面的有所区别.
-## JS Framework
-
-JS Framework 在初始化阶段被原生 JavaScript 引擎运行. 它提供被每个JS Bundle调用的 `define()` 和 `bootstrap()` 函数. 一旦JS Bundle从服务器下载后,这些函数就会执行. `define()` 函数以注册模块;`bootstrap()`会编译主要的模块为虚拟DOM,并发送渲染指令给Native .
-
-JS 和 Native 的沟通主要通过两个关键方法进行:
-
-- `callNative` 是一个由native代码实现的函数, 它被JS代码调用并向native发送指令,例如 `rendering`, `networking`, `authorizing`和其他客户端侧的 `toast` 等API.
-- `callJS` 是一个由JS实现的函数, 它用于Native向JS发送指令. 目前这些指令由用户交互和Native的回调函数组成.
-## Native 渲染引擎
-
-Native 渲染引擎提供客户端组件和模块.
-
-**Component(组件)** 在屏幕内可见,有特定行为. 能被配置不同的属性和样式,能响应用户交互. 常见的组件有: `<div>`, `<text>`, `<image>`.
-
-**Module(模块)** 是一组能被JS Framework调用的API. 其中的一些能以异步的方式调用JS Framework, 例如: 发送HTTP请求.
-
-在Weex实例运行期间,Native渲染引擎将接收各种各样不同模块的API调用。这些调用创建或更新组件外观,运行如`toast`的Native API.当用户交互或模块回调时,`callJS()`会由JS Framework调用. 这样的循环往复将从Weex实例初始化到销毁一直持续. 如下面的架构图所示, HTML5渲染引擎提供和Native渲染引擎几乎一致的功能。
-
-
-
-Weex架构图
-
-### 从Javascript中调用Native
-
-```
-[JS Framework]
-↓ callNative
-模块 APIs
- 渲染 -> 模块显示
- 其他功能
-[Native 渲染引擎]
-```
-### 从Native中调用Javascript
-
-```
-[Native 渲染引擎]
-模块 APIs 回调
-用户交互
-↓ callJS
-[JS Framework]
-```
-### 渲染流程
-
-
-
-Weex 渲染流程
-
-1. 虚拟DOM.
-2. **构造树结构**. 分析虚拟DOM JSON数据以构造渲染树(RT).
-3. **添加样式**. 为渲染树的各个节点添加样式.
-4. **创建视图**. 为渲染树各个节点创建Native视图.
-5. **绑定事件**. 为Native视图绑定事件.
-6. **CSS布局**. 使用 [css-layout](https://github.com/facebook/css-layout) 来计算各个视图的布局.
-7. **更新视窗(Frame)**. 采用上一步的计算结果来更新视窗中各个视图的最终布局位置.
-8. 最终页面呈现.
-
-在Weex HTML5环境下 `CSS 布局` and `更新视窗` 由浏览器引擎(例如webkit)实现.
http://git-wip-us.apache.org/repos/asf/incubator-weex-site/blob/12e3a8bc/_draft/v1.0/advanced/integrate-devtools-to-android.md
----------------------------------------------------------------------
diff --git a/_draft/v1.0/advanced/integrate-devtools-to-android.md b/_draft/v1.0/advanced/integrate-devtools-to-android.md
deleted file mode 100644
index 5bffd05..0000000
--- a/_draft/v1.0/advanced/integrate-devtools-to-android.md
+++ /dev/null
@@ -1,272 +0,0 @@
----
-title: 集成 Devtools 到 Android
-type: advanced
-order: 12
-has_chapter_content: true
-version: 0.10
----
-
-# 集成 Devtools 到 Android
-
-Weex Devtools 能够方便调试 Weex 页面,但此功能离不开 Native 的支持。如何让你的 App 也集成 Devtools,在本章将会详细说明 Android 端如何接入 Weex Devtools。
-
-## Android 应用接入
-
-### 添加依赖
-
-可以通过 Gradle 或者 Maven 添加对 devtools aar 的依赖,也可以直接对源码依赖。强烈建议使用最新版本,因为 Weex SDK 和 devtools 都在快速的迭代开发中,新版本会有更多惊喜,同时也修复老版本中一些问题。最新的 release 版本可在[这里](https://github.com/weexteam/weex_devtools_android/releases)查看。所有的 release 版本都会发布到 [jcenter repo](https://bintray.com/alibabaweex/maven/weex_inspector)。
-
-- *Gradle 依赖*
-
- ```gradle
- dependencies {
- compile 'com.taobao.android:weex_inspector:0.8.0.0'
- }
- ```
-
-- *Maven依赖*
-
- ```xml
- <dependency>
- <groupId>com.taobao.android</groupId>
- <artifactId>weex_inspector</artifactId>
- <version>0.8.0.0</version>
- <type>pom</type>
- </dependency>
- ```
-
-- *源码依赖*
-
- 需要复制 [inspector](https://github.com/weexteam/weex_devtools_android/tree/master/inspector) 目录到你的 App 的同级目录,然后在工程的 `settings.gradle` 文件下添加 `include ":inspector"`,此过程可以参考 playground 源码的工程配置及其配置,然后在 App 的 `build.gralde` 中添加依赖。
-
- ```gradle
- dependencies {
- compile project(':inspector')
- }
- ```
-
- 另外 weex_inspector 中有一部分包是以 provided 的方式引入,接入方需要自行解决依赖和版本冲突。
-
- - **provided方式引用的包**
-
- ```gradle
- dependencies {
- provided 'com.google.code.findbugs:jsr305:2.0.1'
- provided 'com.android.support:appcompat-v7:23.1.1'
- provided 'com.taobao.android:weex_sdk:0.8.0'
- provided 'com.alibaba:fastjson:1.1.45+'
- ...
- }
- ```
-
- - **反射引用的包(0.8.0.0以上版本)**
-
- ```gradle
- dependencies {
- compile 'com.squareup.okhttp:okhttp:2.3.0'
- compile 'com.squareup.okhttp:okhttp-ws:2.3.0'
- ...
- }
- ```
-
- 或者
-
- ```gradle
- dependencies {
- compile 'com.squareup.okhttp:okhttp:3.4.1'
- compile 'com.squareup.okhttp:okhttp-ws:3.4.1'
- ...
- }
- ```
-
-#### 版本兼容
-
-| weex sdk | weex inspector | Debugger Server |
-|----------|----------------|-----------------|
-| 0.8.0.1+ | 0.0.8.1+ | 0.2.39+ |
-| 0.7.0+ | 0.0.7.13 | 0.2.38 |
-| 0.6.0+ | 0.0.2.2 | - |
-
-
-### 添加 Debug 模式开关
-
-控制调试模式的打开和关闭的关键点可以概括为三条规则。
-
-**规则一:通过 `sRemoteDebugMode` 和 `sRemoteDebugProxyUrl` 和来设置开关和 Debugger Server 地址。**
-
-Weex SDK 的 `WXEnvironment` 类里有一对静态变量标记了 Weex 当前的调试模式是否开启分别是:
-
-```java
-public static boolean sRemoteDebugMode; // 是否开启 debug 模式,默认关闭
-public static String sRemoteDebugProxyUrl; // DebugServer的websocket地址
-```
-
-无论在 App 中无论以何种方式设置 Debug 模式,都必须在恰当的时机调用类似如下的方法来设置 `WXEnvironment.sRemoteDebugMode` 和 `WXEnvironment.sRemoteDebugProxyUrl`。
-
-```java
-private void initDebugEnvironment(boolean enable, String host) {
- WXEnvironment.sRemoteDebugMode = enable;
- WXEnvironment.sRemoteDebugProxyUrl = "ws://" + host + ":8088/debugProxy/native";
-}
-```
-
-**规则二:修改 `sRemoteDebugMode` 后一定要调用``WXSDKEngine.reload()`。**
-
-一般來說,在修改了 `WXEnvironment.sRemoteDebugMode` 以后调用了 `WXSDKEngine.reload()` 方法才能够使 Debug模式生效。`WXSDKEngine.reload()` 用来重置 Weex 的运行环境上下文,在切换调试模式时需要调用此方法来创建新的 Weex 运行时和 DebugBridge 并将所有的 JS 调用桥接到调试服务器执行。在 reload 过程中会调用 launchInspector,这就是 SDK 控制 Debug 模式最核心一个方法,其传入参数即为 `sRemoteDebugMode`,若为 `true` 则该方法中尝试以反射的方式获取 DebugBridge 用来在远端执行 JS,否则在本地运行。
-
-```java
-private void launchInspector(boolean remoteDebug) {
- if (WXEnvironment.isApkDebugable()) {
- try {
- if (mWxDebugProxy != null) {
- mWxDebugProxy.stop();
- }
- HackedClass<Object> debugProxyClass = WXHack.into("com.taobao.weex.devtools.debug.DebugServerProxy");
- mWxDebugProxy = (IWXDebugProxy) debugProxyClass.constructor(Context.class, WXBridgeManager.class)
- .getInstance(WXEnvironment.getApplication(), WXBridgeManager.this);
- if (mWxDebugProxy != null) {
- mWxDebugProxy.start();
- if (remoteDebug) {
- mWXBridge = mWxDebugProxy.getWXBridge();
- } else {
- if (mWXBridge != null && !(mWXBridge instanceof WXBridge)) {
- mWXBridge = null;
- }
- }
- }
- } catch (HackAssertionException e) {
- WXLogUtils.e("launchInspector HackAssertionException ", e);
- }
- }
-}
-```
-
-只要遵循上面的原理,开启 Debug 模式的方式和时机可由接入方灵活实现。从 launchInspector 可以看到,SDK 对 devtools 的 aar 包并无强依赖,我们的 App 只需要在 Debug 包中打包该 aar 即可,这样多少可以缓解包大小问题和安全问题。
-
-**例外:** _若修改 `WXEnvironment.sRemoteDebugMode` 的时机在 `WXBridgeManager` 初始化和 restart 和之前则 `WXSDKEngine.reload()` 可忽略._
-
-**规则三:通过响应 `ACTION_DEBUG_INSTANCE_REFRESH` 广播及时刷新。**
-
-广播 `ACTION_DEBUG_INSTANCE_REFRESH` 在调试模式切换和 Chrome 调试页面刷新时发出,主要用来通知当前的 Weex容器以 Debug 模式重新加载当前页。在 playground 中的处理过程如下:
-
-```java
-public class RefreshBroadcastReceiver extends BroadcastReceiver {
- @Override
- public void onReceive(Context context, Intent intent) {
- if (IWXDebugProxy.ACTION_DEBUG_INSTANCE_REFRESH.equals(intent.getAction())) {
- if (mUri != null) {
- if (TextUtils.equals(mUri.getScheme(), "http") || TextUtils.equals(mUri.getScheme(), "https")) {
- loadWXfromService(mUri.toString());
- } else {
- loadWXfromLocal(true);
- }
- }
- }
- }
-}
-```
-
-如果接入方的容器未对该广播做处理,那么将不支持刷新和调试过程中编辑代码时的 watch 功能。
-
-## 接入示例
-
-最简单方式就是复用 Playground 的相关代码,比如扫码和刷新等模块,但是扫码不是必须的,它只是与 App 通信的一种形式,二维码里的包含DebugServer IP 及 bundle 地址等信息,用于建立 App 和 Debugger Server 之间的连接及动态加载 bundle。在 Playground 中给出了两种开启 debug 模式的范例。
-
-* 范例1:通过在 `XXXApplication` 中设置开关打开调试模式
-
-```java
-public class MyApplication extends Application {
- public void onCreate() {
- super.onCreate();
- initDebugEnvironment(true, "xxx.xxx.xxx.xxx"/*"DEBUG_SERVER_HOST"*/);
- }
-}
-```
-
-这种方式最直接,在代码中直接 hardcode 了开启调试模式,如果在 SDK 初始化之前调用甚至连 `WXSDKEngine.reload()` 都不需要调用,接入方如果需要更灵活的策略可以将 `initDebugEnvironment(boolean enable, String host)` 和 `WXSDKEngine.reload()` 组合在一起在合适的位置和时机调用即可。
-
-* 范例2:通过扫码打开调试模式
-
-Playground 中较多的使用扫码的方式传递信息,不仅用这种方式控制 Debug 模式的开关,而且还通过它来传入 bundle 的 url 直接调试。应当说在开发中这种方式是比较高效的,省去了修改 SDK 代码重复编译和安装 App 的麻烦,缺点就是调试工具这种方式接入需要 App 具有扫码和处理特定规则二维码的能力。除了 Playground 中的方式,接入方亦可根据业务场景对 Debugger 和接入方式进行二次开发。
-
-Playground 集成的具体代码可参考如下两个文件:
-
-* 开关控制,主要参考对二维码的处理部分,详见 [`WXApplication.java`](https://github.com/weexteam/weex_devtools_android/blob/master/playground/app/src/main/java/com/alibaba/weex/WXApplication.java)
-
-* 刷新控制 ,主要参考是对容器 `ACTION_DEBUG_INSTANCE_REFRESH`的处理,详见 [`WXPageActivity.java`](https://github.com/weexteam/weex_devtools_android/blob/master/playground/app/src/main/java/com/alibaba/weex/WXPageActivity.java)
-
-## 牛刀小试
-
-### 前置工作
-
-如果未安装 Debugger Server,在命令行执行 `npm install -g weex-toolkit` 既可以安装调试服务器,运行命令 `weex debug` 就会启动 DebugServer 并打开一个调试页面(详情请查看 [本地开发](/develop-on-your-local-machine.md))。页面下方会展示一个二维码,这个二维码用于向 App 传递 Server 端的地址建立连接。
-
-
-
-### 开始调试
-
-如果你的 App 客户端完成了以上步骤那么恭喜你已经接入完毕,可以愉快的调试 Weex bundle 了,调试体验和网页调试一致!建议新手首先用官方的 Playground 体验一下调试流程。只需要启动 App 扫描 Chrome 调试页面下方的第一个二维码即可建立与 Debugger Server 的通信,Chorome 的调试页面将会列出连接成功的设备信息。
-
-
-
-#### 主要步骤如下
-
-1. 如果你要加载服务器上 bundle,第一步就是要让你的 bundle sever 跑起来. 在 Playground 中特别简单,只需要你到 Weex 源码目录下,运行 `./start` 即可。
-2. 命令行运行 `weex debug` 启动 Debugger Server,Chrome 将会打开一个网页,在网页下方有一个二维码和简单的介绍。
-3. 启动 App 并确认打开调试模式。你将在上一步中打开的网页中看到一个设备列表,每个设备项都有两个按钮,分别是 `Debugger` 和 `Inspector`。
-4. 点击 `Inspector` Chrome 将创建 Inspector 网页;点击 `Debugger` Chrome 将创建 Debugger 网页;二者是相互独立的功能,不相互依赖。
-
----
-
-## 背景知识
-
-### Devtools 组件介绍
-Devtools 扩展了 [Chrome Debugging Protocol](https://developer.chrome.com/devtools/docs/debugger-protocol),在客户端和调试服务器之间的采用 [JSON-RPC](https://en.wikipedia.org/wiki/JSON-RPC) 作为通信机制,本质上调试过程是两个进程间协同,相互交换控制权及运行结果的过程。更多细节还请阅读 [Weex Devtools Debugger 的技术选型实录](http://www.atatech.org/articles/59284)这篇文章。
-
-* **客户端**
-
- Devtools 客户端作为 aar 被集成 App 中,它通过 webscoket 连接到调试服务器,此处并未做安全检查。出于安全机制及包大小考虑,强烈建议接入方只在 debug 版本中打包此 aar。
-
-* **服务器**
-
- Devtools 服务器端是信息交换的中枢,既连接客户端,又连接 Chrome,大多数情况下扮演一个消息转发服务器和 Runtime Manager 的角色。
-
-* **Web端**
-
- Chrome 的 V8 引擎扮演着 Bundle javascript runtime 的角色。开启 debug 模式后,所有的 bundle js 代码都在该引擎上运行。另一方面我们也复用了 Chrome 前端的调试界面,例如设置断点,查看调用栈等,调试页关闭则 runtime 将会被清理。
-
-调试的大致过程请参考如下时序图。
-
-
-
-## FAQ
-
-在各业务接入过程中,陆续发现一些问题,对高频次的问题解答如下,开发中以 weex debug -V 的方式启动 Debugger Server 可以看到 server 端的 log 信息,对照上文中的时序图对于定位问题还是非常有帮助,建议调试中默认开启 server 端 log。
-
-1. **扫码 App 在 DebugServerProxy 中抛出 class not found**
-
- 已知的原因如下:
-
- * weex_inspector 以 provided 方式引用的包是否引入成功,如 fastjson 等。
- * weex_inspector 以 compile 方式引用的包是否引入成功,某些 app 重新引入 `com.squareup.okhttp:okhttp:2.3.0` 和 `com.squareup.okhttp:okhttp-ws:2.3.0` 则不再报错。
- * 混淆规则影响反射。
-
-2. **playground 扫码调试 crash**
-
- 已知的原因如下:
-
- * 系统为 android 6+,崩溃信息提示进程需要 `android.permission.READ_PHONE_STATE` 权限,代码中未做权限检查,在 0.0.2.7 版本以后已修复,不再需要此权限。
-
-3. **扫码后设备列表页并没有出现我的设备信息**
-
- 已知的原因如下:
-
- * Debugger Server 和手机在不同网段,被防火墙隔离。
- * 手机连接了 PC 端的代理,当前尚不支持。
- * 多进程连接服务器端的同一端口,比如在 Application 的 `onCreate` 中初始化 sdk,若多个进程连接服务器端的同一端口则报错,在 0.0.2.3 版本以后已支持多进程无此问题。
-
-4. **调试过程中频繁刷新连接失败,Server 端提示重新启动 App,非必现**
-
- 已知的原因如下:
-
- * 多线程操作网络连接引起,在频繁的即断即连时容易触发。在 0.0.7.1 版本已修复。
http://git-wip-us.apache.org/repos/asf/incubator-weex-site/blob/12e3a8bc/_draft/v1.0/advanced/integrate-devtools-to-ios.md
----------------------------------------------------------------------
diff --git a/_draft/v1.0/advanced/integrate-devtools-to-ios.md b/_draft/v1.0/advanced/integrate-devtools-to-ios.md
deleted file mode 100644
index 18e0050..0000000
--- a/_draft/v1.0/advanced/integrate-devtools-to-ios.md
+++ /dev/null
@@ -1,230 +0,0 @@
----
-title: 集成 Devtools 到 iOS
-type: advanced
-order: 13
-has_chapter_content: true
-version: 0.10
----
-
-# 集成 Devtools 到 iOS
-
-Weex Devtools 能够方便调试 Weex 页面,但此功能离不开 Native 的支持。如何让你的 App 也集成 Devtools,在本章将会详细说明 iOS 端如何接入 Weex Devtools。
-
-## iOS 应用接入
-
-### 添加依赖
-
-#### 方法一:cocoapods 依赖
-
-在工程目录的 podfile 添加如下代码
-
-```
-source https://github.com/CocoaPods/Specs.git,
-pod 'WXDevtool', '0.7.0', :configurations => ['Debug'],
-```
-
-目前有如下几个版本:
-
-0.7.0, 0.6.1, 0.1.1, 0.1.0 [master repo]
-
----
-
-可以通过更新本地 podspec repo,pod search 来查询最新版本,在 podfile 文件添加依赖。
-
-
-*** 推荐在DEBUG模式下依赖。 ***
-
-#### 方法二:github 源码依赖
-
-
-1. [拉取](https://github.com/weexteam/weex-devtool-iOS)最新的WXDevtool代码。
-
-2. 按照如下图示:直接拖动source目录源文件到目标工程中
-
- 
-
-3. 按照红框中配置勾选
-
- 
-
-
- 在相对较大的互联网App研发中, framework 静态库被广泛应用,所以推荐使用方法一接入。
-
-### 集成功能
-
-如果按照方法一接入:podfile 的方式,添加头文件包含:
-
-```
-#import <TBWXDevtool/WXDevtool.h>
-```
-
-如果按照方法二接入:源码依赖的方式,添加头文件包含:
-
-```
-#import "WXDevtool.h"
-```
-
-查看 WXDevtool 头文件如下:
-
-```object-c
-#import <Foundation/Foundation.h>
-
-@interface WXDevTool : NSObject
-/**
-* set debug status
-* @param isDebug : YES:open debug model and inspect model;
-* default is NO,if isDebug is NO, open inspect only;
-* */
-+ (void)setDebug:(BOOL)isDebug;
-
-
-/**
-* get debug status
-* */
-+ (BOOL)isDebug;
-
-
-/**
-* launch weex debug
-* @param url : ws://ip:port/debugProxy/native, ip and port is your devtool server address
-* eg:@"ws://30.30.29.242:8088/debugProxy/native"
-* */
-+ (void)launchDevToolDebugWithUrl:(NSString *)url;
-
-@end
-```
-
-`setDebug`:参数为 `YES` 时,直接开启 debug 模式,反之关闭,使用场景如下所述
-
-在你自己的程序中添加如下代码:
-
-```object-c
-[WXDevTool launchDevToolDebugWithUrl:@"ws://30.30.31.7:8088/debugProxy/native"];
-```
-
-其中的 ws 地址正是 Weex debug 控制台中出现的地址,直接 copy 到 `launchDevToolDebugWithUrl` 接口中。
-
-如果程序一启动就开启 Weex 调试,**需要在 WeexSDK 引擎初始化之前**添加代码:
-
-```object-c
-[WXDevTool setDebug:YES];
-[WXDevTool launchDevToolDebugWithUrl:@"ws://30.30.31.7:8088/debugProxy/native"];
-```
-
-#### 附加页面刷新功能
-
-- 为什么需要页面刷新功能?
-
- 如下图所示,当点击 debug 按钮时,js 的运行环境会从手机端(JavaScriptCore)切换到 Chrome(V8),这时需要重新初始化 Weex 环境,重新渲染页面。页面渲染是需要接入方在自己的页面添加。
-
- 
-
-- 什么场景下需要添加页面刷新功能?
-
- - 点击 debug 按钮调试
- - 切换 RemoteDebug 开关
- - 刷新 Chrome 页面(command+R)
-
-- 如何添加刷新
-
- 在 Weex 页面初始化或 `viewDidLoad` 方法时添加注册通知,举例如下:
-
- ```object-c
- [[NSNotificationCenter defaultCenter] addObserver:self selector:notificationRefreshInstance: name:@"RefreshInstance" object:nil];
- ```
-
- 最后**千万记得**在 `dealloc` 方法中取消通知,如下所示
-
- ```
- - (void)dealloc
- {
- [[NSNotificationCenter defaultCenter] removeObserver:self];
- }
- ```
-
- 页面刷新实现,先销毁当前 instance,然后重新创建 instance,举例如下:
-
- ```
- - (void)render
- {
- CGFloat width = self.view.frame.size.width;
- [_instance destroyInstance];
- _instance = [[WXSDKInstance alloc] init];
- _instance.viewController = self;
- _instance.frame = CGRectMake(self.view.frame.size.width-width, 0, width, _weexHeight);
-
- __weak typeof(self) weakSelf = self;
- _instance.onCreate = ^(UIView *view) {
- [weakSelf.weexView removeFromSuperview];
- weakSelf.weexView = view;
- [weakSelf.view addSubview:weakSelf.weexView];
- UIAccessibilityPostNotification(UIAccessibilityScreenChangedNotification, weakSelf.weexView);
- };
- _instance.onFailed = ^(NSError *error) {
-
- };
-
- _instance.renderFinish = ^(UIView *view) {
- [weakSelf updateInstanceState:WeexInstanceAppear];
- };
-
- _instance.updateFinish = ^(UIView *view) {
- };
- if (!self.url) {
- return;
- }
- NSURL *URL = [self testURL: [self.url absoluteString]];
- NSString *randomURL = [NSString stringWithFormat:@"%@?random=%d",URL.absoluteString,arc4random()];
- [_instance renderWithURL:[NSURL URLWithString:randomURL] options:@{@"bundleUrl":URL.absoluteString} data:nil];
- }
- ```
-
-具体实现可参考 [playground](https://github.com/weexteam/weex-devtool-iOS/blob/master/Devtools/playground/WeexDemo/WXDemoViewController.m) `WXDemoViewController.m` 文件
-
-*说明:目前版本需要注册的通知名称为固定的 “RefreshInstance”,下个版本会添加用户自定义 name 。*
-
-## 使用
-
-如果未安装 Debugger Server,在命令行执行 `npm install -g weex-toolkit` 既可以安装调试服务器,运行命令 `weex debug` 就会启动 DebugServer 并打开一个调试页面(详情请查看 [本地开发](../guide/develop-on-your-local-machine.html))。页面下方会展示一个二维码,这个二维码用于向 App 传递 Server 端的地址建立连接。
-
-
-1. 日志级别控制
-
- 
- 日志级别可以控制native端关于weex的日志。
-
- 日记级别描述如下:
-
- ```
- Off = 0,
- Error = Error
- Warning = Error | Warning,
- Info = Warning | Info,
- Log = Log | Info,
- Debug = Log | Debug,
- All = NSUIntegerMax
- ```
-
- 解释:off 关闭日志,Warning 包含 Error、Warning,Info 包含 Warning、Info,Log 包含 Info、Log,Debug 包含 Log、Debug,All 包含所有。
-
-2. Vdom/Native tree选择
-
- 
-
- *图一*
-
- 
-
- *图二*
-
- 点击图一所示native选项会打开图二,方便查看native tree以及view property
-
- 
-
- *图三*
-
- 
-
- *图四*
-
- 点击图三所示 vdom 选项会打开图四,方便查看 vdom tree 以及 component property。
http://git-wip-us.apache.org/repos/asf/incubator-weex-site/blob/12e3a8bc/_draft/v1.0/advanced/integrate-to-android.md
----------------------------------------------------------------------
diff --git a/_draft/v1.0/advanced/integrate-to-android.md b/_draft/v1.0/advanced/integrate-to-android.md
deleted file mode 100644
index b5bbf8c..0000000
--- a/_draft/v1.0/advanced/integrate-to-android.md
+++ /dev/null
@@ -1,201 +0,0 @@
----
-title: 集成到 Android
-type: advanced
-order: 4
-has_chapter_content: true
-version: 0.10
----
-
-# WEEX SDK 集成到 Android 工程
-
-注:以下文档都是假设您已经具备一定的Android开发经验。
-### Android 集成有两种方式
-
-1. 源码依赖:能够快速使用WEEX最新功能,可以根据自己项目的特性进行相关改进。
-2. SDK依赖:WEEX 会在jcenter 定期发布稳定版本。[jcenter](https://bintray.com/alibabaweex/maven/weex_sdk/view)
- 注:国内可能需要翻墙
-
-## 前期准备
-
-- 已经安装了[JDK](http://www.oracle.com/technetwork/java/javase/downloads/jdk8-downloads-2133151.html) version>=1.7 并配置了环境变量
-- 已经安装[Android SDK](https://developer.android.com/studio/index.html) 并配置环境变量。
-- Android SDK version 23 (compileSdkVersion in [`build.gradle`](https://github.com/apache/incubator-weex/blob/master/android/sdk/build.gradle))
-- SDK build tools version 23.0.1 (buildToolsVersion in [`build.gradle`](https://github.com/apache/incubator-weex/blob/master/android/sdk/build.gradle))
-- Android Support Repository >= 17 (for Android Support Library)
-
-## 快速接入
-
-如果你是尝鲜或者对稳定性要求比较高可以使用依赖SDK的方式。
-步骤如下:
-1. 创建Android工程,没有什么要特别说明的,按照你的习惯来。
-2. 修改build.gradle 加入如下基础依赖
-
- ```gradle
- compile 'com.android.support:recyclerview-v7:23.1.1'
- compile 'com.android.support:support-v4:23.1.1'
- compile 'com.android.support:appcompat-v7:23.1.1'
- compile 'com.alibaba:fastjson:1.1.46.android'
- compile 'com.taobao.android:weex_sdk:0.5.1@aar'
- ```
-
- 注:版本可以高不可以低。
-### 代码实现
-
-注:附录中有完整代码地址
-- 实现图片下载接口,初始化时设置。
-
-```java
-package com.weex.sample;
-
-import android.widget.ImageView;
-
-import com.taobao.weex.adapter.IWXImgLoaderAdapter;
-import com.taobao.weex.common.WXImageStrategy;
-import com.taobao.weex.dom.WXImageQuality;
-
-/**
- * Created by lixinke on 16/6/1.
- */
-public class ImageAdapter implements IWXImgLoaderAdapter {
-
-
- @Override
- public void setImage(String url, ImageView view, WXImageQuality quality, WXImageStrategy strategy) {
- //实现你自己的图片下载,否则图片无法显示。
- }
-}
-```
-- 初始化
-
-```java
-package com.weex.sample;
-
-import android.app.Application;
-
-import com.taobao.weex.InitConfig;
-import com.taobao.weex.WXSDKEngine;
-
-/**
- * 注意要在Manifest中设置android:name=".WXApplication"
- * 要实现ImageAdapter 否则图片不能下载
- * gradle 中一定要添加一些依赖,否则初始化会失败。
- * compile 'com.android.support:recyclerview-v7:23.1.1'
- * compile 'com.android.support:support-v4:23.1.1'
- * compile 'com.android.support:appcompat-v7:23.1.1'
- * compile 'com.alibaba:fastjson:1.1.45'
- */
-public class WXApplication extends Application {
-
- @Override
- public void onCreate() {
- super.onCreate();
- InitConfig config=new InitConfig.Builder().setImgAdapter(new ImageAdapter()).build();
- WXSDKEngine.initialize(this,config);
- }
-}
-
-```
-- 开始渲染
-
-```java
-package com.weex.sample;
-
-import android.os.Bundle;
-import android.support.v7.app.AppCompatActivity;
-import android.view.View;
-
-import com.taobao.weex.IWXRenderListener;
-import com.taobao.weex.WXSDKInstance;
-import com.taobao.weex.common.WXRenderStrategy;
-import com.taobao.weex.utils.WXFileUtils;
-
-public class MainActivity extends AppCompatActivity implements IWXRenderListener {
-
- WXSDKInstance mWXSDKInstance;
-
- @Override
- protected void onCreate(Bundle savedInstanceState) {
- super.onCreate(savedInstanceState);
- setContentView(R.layout.activity_main);
-
- mWXSDKInstance = new WXSDKInstance(this);
- mWXSDKInstance.registerRenderListener(this);
- /**
- * WXSample 可以替换成自定义的字符串,针对埋点有效。
- * template 是.we transform 后的 js文件。
- * option 可以为空,或者通过option传入 js需要的参数。例如bundle js的地址等。
- * jsonInitData 可以为空。
- * width 为-1 默认全屏,可以自己定制。
- * height =-1 默认全屏,可以自己定制。
- */
- mWXSDKInstance.render("WXSample", WXFileUtils.loadFileContent("hello.js", this), null, null, -1, -1, WXRenderStrategy.APPEND_ASYNC);
- }
-
- @Override
- public void onViewCreated(WXSDKInstance instance, View view) {
- setContentView(view);
- }
-
- @Override
- public void onRenderSuccess(WXSDKInstance instance, int width, int height) {
-
- }
-
- @Override
- public void onRefreshSuccess(WXSDKInstance instance, int width, int height) {
-
- }
-
- @Override
- public void onException(WXSDKInstance instance, String errCode, String msg) {
-
- }
-
-
- @Override
- protected void onResume() {
- super.onResume();
- if(mWXSDKInstance!=null){
- mWXSDKInstance.onActivityResume();
- }
- }
-
- @Override
- protected void onPause() {
- super.onPause();
- if(mWXSDKInstance!=null){
- mWXSDKInstance.onActivityPause();
- }
- }
-
- @Override
- protected void onStop() {
- super.onStop();
- if(mWXSDKInstance!=null){
- mWXSDKInstance.onActivityStop();
- }
- }
-
- @Override
- protected void onDestroy() {
- super.onDestroy();
- if(mWXSDKInstance!=null){
- mWXSDKInstance.onActivityDestroy();
- }
- }
-}
-```
-
-## 源码依赖(IDE Android Studio)
-
-1. 下载源码 `git clone https://github.com/alibaba/weex`
-2. 创建 Android 工程。
-3. 通过以下路径引入 SDK Module
- File->New-Import Module-> 选择 WEEX SDK Module(weex/android/sdk) -> Finish
-4. app 的 build.gradle 中添加如下依赖:`compile project(':weex_sdk')`
-5. 其他设置请参考上面快速接入
-
-### 附录
-
-WXSample地址
-`https://github.com/xkli/WXSample.git`
http://git-wip-us.apache.org/repos/asf/incubator-weex-site/blob/12e3a8bc/_draft/v1.0/advanced/integrate-to-html5.md
----------------------------------------------------------------------
diff --git a/_draft/v1.0/advanced/integrate-to-html5.md b/_draft/v1.0/advanced/integrate-to-html5.md
deleted file mode 100644
index 30ee3fd..0000000
--- a/_draft/v1.0/advanced/integrate-to-html5.md
+++ /dev/null
@@ -1,69 +0,0 @@
----
-title: 集成到 web
-type: advanced
-order: 6
-has_chapter_content: true
-version: 0.10
----
-
-## 项目中引入 html5 版 Weex
-
-### 简介
-
-Weex 是一个跨平台可扩展的动态化移动框架,能够真正帮助开发者实现'一次开发,到处运行'。由 Weex 提供的相关工具进行打包好的 bundle 文件可以运行在 android, ios 以及 web(这里我们也称之为html5)平台的渲染器上。Weex HTML5 是一个专用于在移动端 webview 以及各种现代浏览器上渲染 weex 文件的渲染器。
-### 获取 Weex HTML5
-
-使用 npm 安装最新版本的 Weex HTML5,并在你的项目中 require 进来。
-#### 从 npm 安装
-
-请确保通过 `npm install` 或者 `npm update` 获取 Weex HTML5 的最新版本 npm 包。更多关于 npm 的信息情查阅 [npm 官方网站](https://docs.npmjs.com/)。
-
-```bash
-npm install weex-html5
-```
-
-通过 require 引入 weex-html5:
-
-```bash
-var weex = require('weex-html5')
-```
-
-**注意:** 介于 Weex 目前仍处于开源内测阶段,还没有完全开放源代码,因此 `weex-jsframework` 可能还没有在 npm 上发布。当前版本的 `weex-html5` 包含了 `weex-jsframework`,你只需要 require `weex-html5` 即可暂时在 web 平台上运行 weex 代码。建议关注 Weex 的后续版本发布并做必要的引用方式调整。
-### 初始化 Weex
-
-你可以通过 Weex 暴露的 API `init` 来初始化一个 Weex 实例。这个方法需要传递一些配置信息已确定一些环境变量等信息,这些配置信息介绍如下:
-- `appId`: Weex 实例的 id,可以是任意字符串或者数字,并注意不要重复.
-- `source`: 请求的 Weex bundle 文件地址,或者 Weex bundle 文件代码本身,取决于下面的 loader 配置.
-- `loader`: 加载器类型,用于加载 weex bundle,值可以是 'xhr', 'jsonp' 或者 'source'.
- - `xhr`: 通过 XMLHttpRequest 加载 source(即 weex bundle 的 url 地址).
- - `jsonp`: 通过 JSONP 加载 weex bundle.
- - `source`: 直接接受 weex bundle 的代码作为参数.
-- `rootId`: root 容器的 id,默认容器 id 是 'weex'.
-
-以下是一个 Weex 初始化的示例:
-
-``` javascript
-function weexInit() {
- function getUrlParam (key) {
- var reg = new RegExp('[?|&]' + key + '=([^&]+)')
- var match = location.search.match(reg)
- return match && match[1]
- }
-
- var loader = getUrlParam('loader') || 'xhr'
- var page = getUrlParam('page')
-
- // 需要指定一个jsonp回调函数名称,如果没有则用默认值'weexJsonpCallback'
- var JSONP_CALLBACK_NAME = 'weexJsonpCallback'
-
- window.weex.init({
- jsonpCallback: JSONP_CALLBACK_NAME,
- appId: location.href,
- source: page,
- loader: loader,
- rootId: 'weex'
- })
-}
-
-weexInit()
-```
http://git-wip-us.apache.org/repos/asf/incubator-weex-site/blob/12e3a8bc/_draft/v1.0/advanced/integrate-to-ios.md
----------------------------------------------------------------------
diff --git a/_draft/v1.0/advanced/integrate-to-ios.md b/_draft/v1.0/advanced/integrate-to-ios.md
deleted file mode 100644
index 54a5ca7..0000000
--- a/_draft/v1.0/advanced/integrate-to-ios.md
+++ /dev/null
@@ -1,110 +0,0 @@
----
-title: 集成到 iOS
-type: advanced
-order: 5
-has_chapter_content: true
-version: 0.10
----
-
-# Weex SDK 集成到 iOS
-
-### cocoaPods 引入 Weex iOS SDK到工程
-
-可以通过源码编译出 Weex SDK,可以在新的 feature 或者 bugfix 分支,尝试最新的 feature
-#### cocoaPods集成
-
- 假设你已经完成了安装[iOS 开发环境](https://developer.apple.com/library/ios/documentation/IDEs/Conceptual/AppStoreDistributionTutorial/Setup/Setup.html) 和 [CocoaPods](https://guides.cocoapods.org/using/getting-started.html)
-
-1. 从 github 上 clone 一份代码
-
- ```
- git clone https://github.com/alibaba/weex.git
- ```
-
-2. 把 WeexSDK 导入到你已有的项目,如果没有,可以[参考](https://developer.apple.com/library/ios/documentation/IDEs/Conceptual/AppStoreDistributionTutorial/Setup/Setup.html)新建项目
- 拷贝 `ios/sdk` 下面目录到你的项目目录,在添加依赖之前,确保项目目录有 `Podfile`,如果没有,创建一个,用文本编辑器打开,添加如下依赖
-
- 如果使用正式版本如 0.6.1 的,就不需要做 拷贝 `ios/sdk` 这个操作,直接引用 cocoaPods 的 master repo 上就可以,这个需要在 Podfile 最前面添加
-
- ```
- source 'https://github.com/CocoaPods/Specs.git'
- ```
-
- ```object-c
- target 'YourTarget' do
- platform :ios, '7.0'
- pod 'WeexSDK', :path=>'./sdk/' # pod 'WeexSDK', '0.6.1'
- end
- ```
-
- 在命令行(terminal)中,切换到当前目录,运行 `pod install`, 过一会,项目的 .workspace 结尾的文件就被创建出来,到这步,依赖已经添加完了
-
-3. 初始化 Weex 环境
- 在 AppDelegate.m 文件中做初始化操作,一般会在 `didFinishLaunchingWithOptions` 方法中如下添加
-
- ```object-c
- //business configuration
- [WXAppConfiguration setAppGroup:@"AliApp"];
- [WXAppConfiguration setAppName:@"WeexDemo"];
- [WXAppConfiguration setAppVersion:@"1.0.0"];
-
- //init sdk enviroment
- [WXSDKEngine initSDKEnviroment];
-
- //register custom module and component,optional
- [WXSDKEngine registerComponent:@"MyView" withClass:[MyViewComponent class]];
- [WXSDKEngine registerModule:@"event" withClass:[WXEventModule class]];
-
- //register the implementation of protocol, optional
- [WXSDKEngine registerHandler:[WXNavigationDefaultImpl new] withProtocol:@protocol(WXNavigationProtocol)];
-
- //set the log level
- [WXLog setLogLevel: WXLogLevelAll];
- ```
-
-4. 渲染 weex Instance
- Weex 支持整体页面渲染和部分渲染两种模式,你需要做的事情是用指定的 URL 渲染 weex 的 view,然后添加到它的父容器上,父容器一般都是 viewController
-
- ```object-c
- #import <WeexSDK/WXSDKInstance.h>
- - (void)viewDidLoad
- {
- [super viewDidLoad];
-
- _instance = [[WXSDKInstance alloc] init];
- _instance.viewController = self;
- _instance.frame = self.view.frame;
-
- __weak typeof(self) weakSelf = self;
- _instance.onCreate = ^(UIView *view) {
- [weakSelf.weexView removeFromSuperview];
- [weakSelf.view addSubview:weakSelf.weexView];
- };
-
- _instance.onFailed = ^(NSError *error) {
- //process failure
- };
-
- _instance.renderFinish = ^ (UIView *view) {
- //process renderFinish
- };
- [_instance renderWithURL:self.url options:@{@"bundleUrl":[self.url absoluteString]} data:nil];
- }
- ```
-
- WXSDKInstance 是很重要的一个类,提供了基础的方法和一些回调,如`renderWithURL`,`onCreate`,`onFailed`等,可以参见 `WXSDKInstance.h`的 声明
-
-5. 销毁 Weex Instance
-
- 在 viewController 的 dealloc 阶段 销毁掉 weex instance, 释放内存,避免造成内存泄露
-
- ```object-c
- - (void)dealloc
- {
- [_instance destroyInstance];
- }
- ```
-
-### 导入 Weex SDK framework到工程
-
- 参考[此处](https://open.taobao.com/doc2/detail?spm=a219a.7629140.0.0.tFddsV&&docType=1&articleId=104829)直接导入weexSDK
http://git-wip-us.apache.org/repos/asf/incubator-weex-site/blob/12e3a8bc/_draft/v1.0/blog/index.md
----------------------------------------------------------------------
diff --git a/_draft/v1.0/blog/index.md b/_draft/v1.0/blog/index.md
deleted file mode 100644
index ef7b31d..0000000
--- a/_draft/v1.0/blog/index.md
+++ /dev/null
@@ -1,4 +0,0 @@
-type: blog
-index: true
-layout: blog
----
\ No newline at end of file
http://git-wip-us.apache.org/repos/asf/incubator-weex-site/blob/12e3a8bc/_draft/v1.0/guide/develop-on-your-local-machine.md
----------------------------------------------------------------------
diff --git a/_draft/v1.0/guide/develop-on-your-local-machine.md b/_draft/v1.0/guide/develop-on-your-local-machine.md
deleted file mode 100644
index 276a9f9..0000000
--- a/_draft/v1.0/guide/develop-on-your-local-machine.md
+++ /dev/null
@@ -1,175 +0,0 @@
----
-title: 如何在本地开发 Weex 页面
-type: guide
-order: 2
-has_chapter_content: true
-version: 0.10
----
-
-# 如何在本地开发 Weex 页面
-
-使用 [dotWe](http://dotwe.org) 对 Weex 尝鲜是一个不错的选择,但如果你想更专业的开发 Weex, [dotWe](http://dotwe.org) 就不怎么够用了。本章会教你如何搭建本地开发环境进行 Weex 开发。
-
-## 第一步:安装依赖
-
-首先,你需要 Node.js 和 weex-toolkit。
-
-安装 Node.js 方式多种多样,最简单的方式是在 [Node.js 官网](https://nodejs.org/en/) 下载可执行程序直接安装即可。
-
-对于 Mac,可以使用 [Homebrew](http://brew.sh/) 进行安装:
-
-```bash
-brew install node
-```
-
-> 更多安装方式可参考 [Node.js 官方信息](https://nodejs.org/en/download/)
-
-安装完成后,可以使用以下命令检测是否安装成功:
-
-```bash
-$ node -v
-v6.3.1
-$ npm -v
-3.10.3
-```
-
-通常,安装了 Node.js 环境,npm 包管理工具也随之安装了。因此,直接使用 npm 来安装 weex-toolkit。
-
-> npm 是一个 JavaScript 包管理工具,它可以让开发者轻松共享和重用代码。Weex 很多依赖来自社区,同样,Weex 也将很多工具发布到社区方便开发者使用。
-
-```bash
-$ npm install -g weex-toolkit
-```
-
-国内开发者可以考虑使用淘宝的 npm 镜像 —— [cnpm](https://npm.taobao.org/) 安装 weex-toolkit
-
-```bash
-$ npm install -g cnpm
-$ cnpm install -g weex-toolkit
-```
-
-*提示:*
-
-如果提示权限错误(*permission error*),使用 `sudo` 关键字进行安装
-
-```bash
-$ sudo cnpm install -g weex-toolkit
-```
-
-安装结束后你可以直接使用 `weex` 命令验证是否安装成功,它会显示 `weex` 命令行工具各参数:
-
-
-
-## 第2步:创建文件
-
-现在可以开始编写代码了。首先,我们创建一个 `.we` 文件(Weex 程序的文件后缀(扩展名)是 `.we`)。
-
-打开空白的 `hello.we` 文件,输入三个标签,内容为:
-
-```html
-<template>
-</template>
-
-<style>
-</style>
-
-<script>
-</script>
-```
-
-我们在 [Get started](./index.md) 里已经介绍过 Weex 基本的代码结构:`<template>`、`<style>`、`<script>` 分别对应于 Web 中的 HTML,CSS(`<style>` 标签),JavaScript(`<script>` 标签)。
-
-其实,上面的代码就是最简单的 Weex 程序。但是 `.we` 文件是不能直接运行的,这时候需要使用刚才安装好的 weex-toolkit。weex-toolkit 会编译 `.we` 文件,并且创建静态服务器。
-
-这里,使用 `weex hello.we` 命令编译该程序。
-
-```bash
-$ weex hello.we
-```
-
-这时,命令行会做几件事:
-
-- 编译 `.we` 文件;
-- 启动热加载服务;
-- 启动静态服务器;
-- 拉起浏览器,访问 `http://127.0.0.1:8081/weex_tmp/h5_render/?hot-reload_controller&page=hello.js&loader=xhr`
-
-这时候,已经可以在浏览器预览 Weex 页面了。不过此时页面是空白的,因为 `.we` 文件中没有任何实质的内容。
-
-## 第3步:添加内容
-
-修改 `weex.we` 文件,向 `<template>` 标签中添加内容。具体代码如下:
-
-```html
-<template>
- <div>
- <text>Hello world</text>
- </div>
-</template>
-
-<style></style>
-
-<script></script>
-```
-
-保存代码后,浏览器会自动刷新页面,这时会看到浏览器显示了 “Hello world”。
-
-## 第4步:添加样式
-
-现在,对已有的文本内容进行样式修饰。这里将文本颜色设置为红色,字体大小为 50 像素。具体代码如下:
-
-```html
-<template>
- <div>
- <text class="text" style="color: #FF0000;">Hello world</text>
- </div>
-</template>
-
-<style>
- .text{
- font-size: 50;
- }
-</style>
-
-<script></script>
-```
-
-这时候,浏览器已经重新载入了页面。其实,是weex-toolkit开启了热加载。可以看到红色的 “Hello world”。
-
-**注意:**
-Weex 支持通过 `style` 标签来设定样式,也支持内联样式风格。 对于数值,无需添加任何单位(包括 px、em、rem 等),这是建议的写法。如需了解有哪些通用的样式,可以参考 [通用样式](../references/common-style.md)。
-
-## 第5步:预览
-
-已经在浏览器中看到了刚才的代码效果,为了验证三端是否一致,我们还需 [Playground App](https://alibaba.github.io/weex/download.html) 验证。
-
-这里,我们需要为 `weex hello.we` 增加 `--qr` 参数,表示生成二维码。
-
-```bash
-$ weex hello.we --qr
-```
-
-然后,使用 [Playground](https://alibaba.github.io/weex/download.html) 扫码即可。
-
-
-
-## 第6步:调试
-
-weex-toolkit 已经集成了 Debugger,只需要使用如下命令即可开启 Debugger 开关调试 `hello.we`:
-
-```bash
-$ weex debug hello.we
-```
-
-我们输入以上命令开启,会自动打开浏览器,页面上有两个二维码,第一个是 Debugger Server,第二个是 `.we` 文件的地址。我们在 Playground 中先扫第一个,此时浏览器会进入一个新的页面,请你选择你需要的调试模式:
-
-- Debugger:将会打开 js debugger 页面,您可以通过 debugger 页面调试 js(诸如打断点 查看js log 和查看调用堆栈等信息);
-- Inspector:将会打开 inspector 页面,您可以通过这个页面查看 Weex 页面的 element 属性结构,包含高亮元素,展示样式表,以及显示 native 的 log。同时可以打开一个远程的手机镜像,便于查看界面。另外调试方块中的 ElementMode 可以用来选择 element 树显示原始的 native 组件树还是显示面向前端同学的 DSL (HTML)组件树。
-
-选择一种模式后会新开窗口进入调试页面,这时我们再扫第二个二维码即可进入我们想要调试的页面进行调试了。
-
-## 接下来做什么?
-
-到目前为止,你已经可以在 [dotWe](http://dotwe.org) 或者本地开发 Weex 页面。接下来你可以去学习 Weex [语法](./syntax/main.md) 和 [开发手册](../references/main.md) 了解 Weex 更多特性。这些语法和特性,你完全可以用 [Playground](https://alibaba.github.io/weex/download.html) 运行起来。
-
-如果你已经熟悉 Weex 开发,你应该考虑如何让你的 App 也支持 Weex 页面,或者,怎样用 Weex 开发一个全新的 App 呢?带着这些问题,你可以阅读 [开发进阶](./how-to/main.md)。
http://git-wip-us.apache.org/repos/asf/incubator-weex-site/blob/12e3a8bc/_draft/v1.0/guide/how-to/debug-with-html5.md
----------------------------------------------------------------------
diff --git a/_draft/v1.0/guide/how-to/debug-with-html5.md b/_draft/v1.0/guide/how-to/debug-with-html5.md
deleted file mode 100644
index c4ba245..0000000
--- a/_draft/v1.0/guide/how-to/debug-with-html5.md
+++ /dev/null
@@ -1,47 +0,0 @@
----
-title: 在浏览器中调试
-type: guide
-order: 4.2
-version: 0.10
----
-
-# 如何在浏览器中调试?
-
-由于 weex-html5 可以在现代移动浏览器上运行,因此自然支持在浏览器的开发工具中调试 weex-html5 代码。下面将介绍如何使用浏览器的 devTools 调试和分析 weex-html5 程序。以chrome的调试工具为例:
-
-
-
-## Elements
-
-使用 Elements 面板来检查 weex-html5 页面的布局和设计,并操纵 DOM 和 CSS 来自由地做一些开发实验。
-
-## Console
-
-您可以使用 `console.log` 在控制台上记录信息。
-
-## 断点
-
-您可以设置断点来调试代码,断点是调试代码的最有效的方法之一。断点使您能够暂停脚本执行,然后查看该时刻的调用堆栈变量值。
-
-手动断点是您在特定代码行上设置的各个断点。您可以通过 Chrome DevTools GUI 或在代码中插入 debugger 关键字来设置这些断点。
-
-## 找出 bug 的精确位置
-
-一般来说,有三个可能发生错误的地方:渲染器(weex-html5),js 框架(weex-js框架)和变压器(gulp-weex)。
-
-这里有一些方便以找出错误建议,以便你可以快速识别哪个是哪个地方的错误:
-
-* 请检查控制台是否有错误。在调试模式如果有一个错误出现,将会在 console 中打印有关于它的信息。
-* 在 bridge/receiver.js,查看是否调用了 `callNative` 函数。
-* 是否被认为是 API 的方法被执行。
-* 是否调用用于事件触发或执行回调的 `callJS` 方法。
-
-## 其他
-
-更多关于如何调试 H5 页面的信息请查看 [chrome's devTools docs](https://developers.google.com/web/tools/chrome-devtools/?hl=en)
-
-
-
-
-
-
http://git-wip-us.apache.org/repos/asf/incubator-weex-site/blob/12e3a8bc/_draft/v1.0/guide/how-to/index.md
----------------------------------------------------------------------
diff --git a/_draft/v1.0/guide/how-to/index.md b/_draft/v1.0/guide/how-to/index.md
deleted file mode 100644
index c20ecb0..0000000
--- a/_draft/v1.0/guide/how-to/index.md
+++ /dev/null
@@ -1,185 +0,0 @@
----
-title: 使用 Devtools 调试 Weex 页面
-type: guide
-order: 4
-has_chapter_content: false
-chapter_title: 最佳实践
-version: 0.10
----
-
-# 如何使用 Devtools 调试 Weex 页面
-
-Weex Devtools 是为 Weex 开发者服务的一款调试工具,能够审查 Weex app 运行时属性,可对 `.we` 代码及 JavaScript 代码断点调试,支持 iOS 和 Android 两个平台。
-
-Weex Devtools 基于 Chrome devtools 实现了 [Chrome Debugging Protocol](https://developer.chrome.com/devtools/docs/debugger-protocol),能够使用 Chrome devtools 调试 Weex 项目,其主要功能分为两大部分—— Debugger 和 Inspector。
-
-## Devtools 主要功能一览
-
-### 连接设备
-devtools 可以动态检测客户端的连接绑定请求,同时连接/调试多个 device(或者模拟器)是很容易的事情,连接到 Devtools 的客户端显示在 “Device List” 界面。如下图所示。
-
-
-
-点击对应设备的 Debugger 按钮即开始调试流程,并弹出JS断点调试的页面;随后点击 Inspector 按钮可弹出调试 DOM 的页面。
-
-### Debugger
-
-这个是用来调试 Weex 的 JSBundle 代码的页面,“Sources” tab 能够显示所有 JS 源码,包括 Weex JSFramework 和 JSBundle 代码。可以设置断点、查看调用栈,与 Chrome 浏览器调试类似。“Console” 控制台显示前端的 Log 信息,并能根据级别(info/warn/error等)和关键字过滤。
-
-
-
-### 断点调试
-
-
-
-### Inspector
-
-Inspector 功能丰富,能够用来查看 `Element` \ `Network` \ `Console log` \ `Screencast` \ `BoxModel` \ `Native View` 等。
-
-
-
-### Device Screencast & View Inspect
-
-如下图所示,通过 Inspector 页面的两个开关,点击右侧 Icon 可以打开设备投屏,然后点击左侧 Icon 再在投屏上点选元素则可以自动在 DOM tree 中定位并审查该元素。
-
-
-
-### Elements
-
-这里展示的是在 Android/iOS 上的 native DOM 树,及其 style 属性和 layout 图。鼠标在 DOM 树移动时,在 device(或模拟器)上对应节点会高亮显示,有助于 native 开发者定位和发现节点。
-
-**注意:**
-screencast 只是对屏幕图像拷贝,在远程调试时能看到远程设备界面,数据网络下 screencast 也将有较大流量花销,如果设备就在手头儿则建议关掉。
-
-Elements 审查有两种模式分别是:native 和 vdom。其中,native 模式下展示的是 Weex 所映射的 native view 的结构,它更接近实现本质;vdom 模式则对应 `.we` 文件中定义的 dom 结构,主要用来审查 `.we` 文件编译为 JSBundle 之后对应的 dom tree 的逻辑构成。
-
-#### native view element
-
-
-
-#### weex dom element
-
-
-
-### Network
-
-这里展示的是 JSBundle 资源加载网络访问的性能。所以如果 JSBundle 资源在设备本地,Network 是没有数据的。
-
-#### 查看网络请求的总耗时和延时
-
-
-
-#### 查看网络请求的header和response
-
-
-
-### 控制台
-
-这里显示的是 Android/iOS 上的 native log,并不是 JS log(JS log 显示在 Debugger 页面)。同样 native log 也有对应级别--warn/error 等和关键字过滤,native 开发查询很方便。
-
-
-
-### 资源(Android Only)
-
-远端访问的资源文件会显示在这里,这里不是查看源码的最佳方式。在 Debugger 页面,“Sources” 里已经有源码并可以断点调试。如果你的应用里有 SQLITE 数据库文件,在这里无需 root 便可以查看和更新,对于 mock 数据来说比较便利。
-
-
-
-### 远程控制 (Android Only)
-
-Android 版本支持在 screencast 上进行远程控制,能够通过鼠标模拟在手机的输入事件,方便手机不在本地的用户进行远程调试。
-
-## 如何安装和启动devtools
-
-无论是跑在 iOS 或者 Android 端,[weex-devtool](https://github.com/weexteam/weex-devtool) 都是必需的,用来启动服务器和 Chrome 页面。
-
-### 安装
-
-如果你已经在前面的教程中安装过 weex-toolkit,就无需再次安装了。
-
-```bash
-$ npm install -g weex-toolkit
-```
-
-#### 用法
-
- weex debug [options] [we_file|bundles_dir]
-
- 选项:
-
- -h, --help 显示帮助
- -V, --verbose 显示debug服务器运行时的各种log
- -v, --version 显示版本
- -p, --port [port] 设置debug服务器端口号 默认为8088
- -e, --entry [entry] debug一个目录时,这个参数指定整个目录的入口bundle文件,这个bundle文件的地址会显示在debug主页上(作为二维码)
- -m, --mode [mode] 设置构建we文件的方式,transformer 最基础的风格适合单文件,loader:wepack风格 适合模块化的多文件.默认为transformer
-
-
-## 如何在设备或者模拟器上调试
-
-### weex调试初体验之playground
-
-如果你是一名 Weex 调试的新手,那么推荐你先下载 [Playground](http://alibaba.github.io/weex/download.html) 体验一下 Devtools 调试 JSBundle 的基础流程.
-
-- 前提:
- - 安装 `weex-toolkit`,内含调试命令 `weex debug`
- - android/iOS 设备与 PC 在同一局域网,若位于不同网段请确保防火墙可访问性
-
-- Inspector 功能演示
-
-<embed src="//cloud.video.taobao.com/play/u/1955166971/p/2/e/1/t/1/45803002.swf" quality="high" width="100%" height="500px" align="middle" allowScriptAccess="never" allowFullScreen="true" type="application/x-shockwave-flash"></embed>
-
-- Debugger功能演示
-
-<embed src="//cloud.video.taobao.com/play/u/1955166971/p/2/e/1/t/1/45803641.swf" quality="high" width="100%" height="500px" align="middle" allowScriptAccess="never" allowFullScreen="true" type="application/x-shockwave-flash"></embed>
-
-- 调试步骤:
- - **启动 debug server**
-
- 执行命令 `weex debug` 将启动 debug server。如果启动成功将会在 Chrome 打开一个 welcome 页面,在网页下方有一个二维码。
-
- - **启动 Playground 并扫码**
-
- 点击启首页左上角的扫码按钮扫码上一步中网页下方的二维码。此时 welcome 页面将会出现你的设备信息。Playground 进入 loading 页面,等待你的下一步操作。
-
- - **点击网页上的 Debugger 按钮**
-
- app 结束 loading 进入 debugging 状态。同时 Chrome 将会打开 Debugger 页面。按照页面提示打开该页的 JavaScript 控制台并进入 source tab。
-
- - **设置断点刷新当前页**
-
- 点击 Playground 首页 list 中的任意项将打开一个 Weex 页面,此时在 Sources 里会出现相应的 JSBundle 文件,设置断点并刷新 Playground 即可调试。
-
- - **点击网页上的 Inspector 按钮**
-
- Chrome 会打开 inspector页面,可以查看Element, Console, Network状态。
-
-### Weex调试初体验之应用
-
-如果是接入 Weex 的应用想调试自己的 Weex 代码,有以下几个方式:
-
-1. 借助 Playground 扫码调试
- - 先确定 Playground 已经是可调试状态
- - 使用命令行工具打开调试功能 `weex debug`,用 Playground 扫浏览器打开的页面中的二维码
- - 用 Playground 扫描 JSBundle 二维码
- - 手机上即显示 Weex 页面的结果。相应在 “Debugger” 和 “Inspector” 页面调试。
-
-2. 为应用接入 Devtools 接口
-
- - [Android sdk接入指南](https://github.com/weexteam/weex_devtools_android/blob/master/README-zh.html)
- - [iOS sdk接入指南](https://github.com/weexteam/weex-devtool-iOS/blob/master/README-zh.html)
-
-有任何问题或者建议,请提交[这里](https://github.com/weexteam/weex-devtool/issues),会很快得到解答。
-
-## 更详细的视频讲解
-
-- 第一集 devtools简介
-http://cloud.video.taobao.com/play/u/1955166971/p/1/e/1/t/1/45796387.swf
-- 第二集 inspector功能演示
-http://cloud.video.taobao.com/play/u/1955166971/p/1/e/1/t/1/45803002.swf
-- 第三集 debugger功能演示
-http://cloud.video.taobao.com/play/u/1955166971/p/1/e/1/t/1/45803641.swf
-- 第四集 native 与 weex 联调
-http://cloud.video.taobao.com/play/u/1955166971/p/1/e/1/t/1/45804472.swf
-- 第五集 第三方App接入指南
-http://cloud.video.taobao.com/play/u/1955166971/p/1/e/1/t/1/45805276.swf
\ No newline at end of file
http://git-wip-us.apache.org/repos/asf/incubator-weex-site/blob/12e3a8bc/_draft/v1.0/guide/how-to/require-3rd-party-libs.md
----------------------------------------------------------------------
diff --git a/_draft/v1.0/guide/how-to/require-3rd-party-libs.md b/_draft/v1.0/guide/how-to/require-3rd-party-libs.md
deleted file mode 100644
index 7d3748e..0000000
--- a/_draft/v1.0/guide/how-to/require-3rd-party-libs.md
+++ /dev/null
@@ -1,57 +0,0 @@
----
-title: 如何引入第三方库
-type: guide
-order: 4.3
-version: 0.10
----
-
-# 如何引入第三方库
-<span class="weex-version">0.4</span>
-
-在 [Get started](../index.html) 中,我们学习了知道可以在 `<script>` 标签中编写 JavaScript 代码。但是在项目中常用的功能或模块,例如解析url参数,将属性从一些对象扩展到另一个对象等等,在每个组件中复制和粘贴这些代码是一个糟糕的做法,因此迫切需要通过 `require` 的方式对可复用的代码进行管理。Weex 为开发人员提供了 CommonJS 风格的 require 语法。
-
-我们以 `extend` 作为例子。
-
-## 引入本地 JS Modules
-
-下面是 `extend` 最简单的实现,并将其放在 `./common/utils.js` 路径中。
-
-```javascript
-function extend(dest, src) {
- for (var key in src) {
- dest[key] = src[key]
- }
-}
-exports.extend = extend
-```
-
-在 `.we` 文件中,`extend` 可以与`require`一起使用:
-
-```html
-<script>
- var utils = require('./common/utils')
- var obj1 = {a: 1}
- var obj2 = {b: 2}
- utils.extend(obj1, obj2) // obj1 => {a: 1, b: 2}
-</script>
-```
-
-## 引入已经安装的 Node.js Modules
-
-[underscore](http://underscorejs.org) 是一个 JavaScript 库,它提供了一整套函数式编程的实用功能,而不扩展任何 JavaScript 内置对象。它提供了一个更具稳健性的 [`extend`](http://underscorejs.org/#extend)。
-
-我们可以使用 underscore 的 `extend`,而不是我们自己实现的版本。首先,在项目中安装 underscore,然后我们便可以将 underscore `reuqire` 进来并使用它。
-
-```bash
-npm install underscore
-```
-
-```html
-<script>
- var _ = require('underscore')
- var obj1 = {a: 1}
- var obj2 = {b: 2}
- var obj3 = {c: 3}
- var ret = _.extend(obj1, obj2, obj3) // ret => {a: 1, b: 2, c: 3}
-</script>
-```
http://git-wip-us.apache.org/repos/asf/incubator-weex-site/blob/12e3a8bc/_draft/v1.0/guide/how-to/transform-code-into-js-bundle.md
----------------------------------------------------------------------
diff --git a/_draft/v1.0/guide/how-to/transform-code-into-js-bundle.md b/_draft/v1.0/guide/how-to/transform-code-into-js-bundle.md
deleted file mode 100644
index 69667ae..0000000
--- a/_draft/v1.0/guide/how-to/transform-code-into-js-bundle.md
+++ /dev/null
@@ -1,112 +0,0 @@
----
-title: 将 `.we` 源代码转换成 JS Bundle
-type: guide
-order: 4.4
-version: 0.10
----
-
-# 将 `.we` 源代码转换成 JS Bundle
-<span class="weex-version">0.4</span>
-
-在前面的章节中你已经了解到如何编写及组织 Weex 代码,如果你还有疑问,可参考 [语法](../syntax/main.html) 及 [手册](../../references/main.html)。 但是,Weex 语法的代码必须转换为 JSBundle,以便 Weex JSFramework 可以在 iOS,Android 和浏览器端解析和执行。了解更多信息,可参考 [Weex 工作原理](../../advanced/how-it-works.html) 和 [JS Bundle 格式](../../references/specs/js-bundle-format.html)
-
-现在,回到将 `.we` 源代码转换成 JS Bundle 的主题。有几种方法来实现这一目标。
-
-## 使用 weex-toolkit
-
-如果你已经有了 node.js 开发环境,可以直接使用以下命令。关于 node.js 及其他依赖安装可参考[安装依赖](../develop-on-your-local-machine.html#第一步:安装依赖)
-```bash
-$npm install -g weex-toolkit
-```
-
-### 将 `.we` 文件转换为 JS Bundle
-
-```bash
-$ weex your_best_weex.we -o .
-```
-
-`your_best_weex.we` 将会被转换为 `your_best_weex.js` 并保存在当前目录。
-
-### 将 `.we` 文件转换为 JS Bundle 并开启 watch 功能,实时自动转换
-
-```bash
-
-$ weex your_best_weex.we -o . --watch
-```
-
-### 将所有 `.we` 文件转换到一个目录中
-
-```bash
-$ weex we/file/storage/path -o outputpath
-```
-
- `we/file/storage/path` 目录下的每个 `.we` 文件都会被转换为 JS Bundle 并保存到 `outputpath` 目录。
-
-请访问 [npmjs.com](https://www.npmjs.com/package/weex-toolkit) 了解更多关于 `weex-toolkit`。
-
-## transformer
-
-```bash
-npm install weex-transformer
-```
-
-### CLI Tool
-
-```
- Usage: transformer [options] <file...>
-
- Options:
-
- -h, --help output usage information
- -V, --version output the version number
- -l, --oldFormat [value] whether to transform to old format (default: false)
- -e, --isEntry [value] whether is an entry module which has `bootstrap` (default: true)
- -o, --output [path] the output file dirname
-```
-
-### API
-
-** transform(name, code, path, elements, config) **
-
-```javascript
-var transformer = require('weex-transformer')
-var output = transformer.transform('foo', '/* code here */', '.', {})
-```
-
-参数:
-
-- `name {string}`:当前 bundle 文件名
-- `code {string}`:源码
-- `path {string}`: *可选*,当在某个路径中查找自定义组件时很有用
-- `elements {Object}`:*可选*,存在的自定义组件映射
-- `config {Object}`:*可选*
-
- * `oldFormat {boolean}`:是否转换为旧格式 (默认:`false`)
- * `isEntry {boolean}`:是否是具有 `bootstrap` 的入口模块 (默认:`true`)
-
-返回值:
-- 一个对象:
- - `result {string}`:所有自定义组件的 `define()` 方法和最终的 `bootstrap()`
- - `logs {Array}`:相应的警告和错误日志
-
-## gulp weex
-
-```bash
-npm install gulp-weex
-```
-
-```javascript
-var gulp = require('gulp')
-var weex = require('gulp-weex')
-
-gulp.task('default', function () {
- return gulp.src('src/*.html')
- .pipe(weex({}))
- .pipe(gulp.dest('./dest'))
-})
-```
-
-参数:
-
-- `oldFormat {boolean}`:是否转换为旧格式 (默认:`false`)
-- `isEntry {boolean}`:是否是具有 `bootstrap` 的入口模块 (默认:`true`)
http://git-wip-us.apache.org/repos/asf/incubator-weex-site/blob/12e3a8bc/_draft/v1.0/guide/index.md
----------------------------------------------------------------------
diff --git a/_draft/v1.0/guide/index.md b/_draft/v1.0/guide/index.md
deleted file mode 100644
index 73d1a98..0000000
--- a/_draft/v1.0/guide/index.md
+++ /dev/null
@@ -1,60 +0,0 @@
----
-title: 上手教程
-type: guide
-order: 1
-has_chapter_content: true
-version: 0.10
----
-
-# 起步教程
-
-Weex 是一套简单易用的跨平台开发方案,能以 web 的开发体验构建高性能、可扩展的 native 应用,为了做到这些,Weex 与 Vue 合作,使用 Vue 作为上层框架,并遵循 W3C 标准实现了统一的 JSEngine 和 DOM API,这样一来,你甚至可以使用其他框架驱动 Weex,打造三端一致的 native 应用。
-
-尝试 Weex 最简单的方法是使用 [Playground App](https://alibaba.github.io/weex/download.html) 和在 [dotWe](http://dotwe.org) 编写一个 [Hello World](http://dotwe.org/656345423a7ef46f4b897ff471fd2ab5) 例子。你不需要考虑安装开发环境或编写 native 代码,只需要做下面两件事:
-
-- 为你的手机安装 [Playground App](https://alibaba.github.io/weex/download.html),当然,Weex 是跨平台的框架,你依然可以使用浏览器进行预览,只是这样你就无法感受到 native 优秀的体验了。
-- 在新标签页中打开 [Hello World](http://dotwe.org/656345423a7ef46f4b897ff471fd2ab5) 例子,点击预览,然后用 Playground 扫码即可。
-
-在这个例子中,我们看到了熟悉的 HTML 语义化标签、CSS 样式和 Javascript 代码。这是一个最简单的 Weex 示例,它在页面中渲染了一个 "Hello World"。
-
-
-
-## 发生了什么?
-
-就如示例代码所示:
-
-```html
-<template>
- <div>
- <text class="text">{{text}}</text>
- </div>
-</template>
-
-<style>
- .text {
- font-size: 50;
- }
-</style>
-
-<script>
- module.exports = {
- data: {
- text: 'Hello World.'
- }
- }
-</script>
-```
-
-我们暂时不去关心 Weex 的技术细节,仅看大致的代码结构。Weex 代码由三部分构成:`template`、`style`、`script`,这三个概念之于 Weex 就如 HTML,CSS,JavaScript 之于 Web。
-
-模板部分赋予 Weex 以骨架,由标签以及标签包围的内容构成,标签中能添加 `attribute(特性)`,不同的 `attribute` 有不同的含义,例如 class 特性让同样的样式可以作用于多组 Weex 标签, onclick 特性让标签能对用户点击事件作出回应。
-
-样式部分描述 Weex 标签如何显示。和你一样,我们喜欢 CSS,所以 Weex 中的样式尽量和 CSS 标准一致。Weex 支持很多 CSS 中的特性: margin, padding, fixed...... 更好的是, flexbox 布局模型在 Weex 中获得了很好的支持。
-
-脚本部分为 Weex 标签添加数据与逻辑,在这里你能方便的访问本地或远程的数据并动态更新。你还能定义方法并让这些方法响应不同的事件。Weex 脚本的组织方式基本遵循于 CommonJS module 规范。
-
-是不是觉得这些语法有些眼熟?没错,Weex 语法参考了 [Vue](https://github.com/vuejs/vue),如果你熟悉 Vue,你会很快适应 Weex 语法(最新的 Weex framework 将会基于 [Vue 2.0](https://github.com/vuejs/vue) 开发,完全兼容 Vue,可参见我们的 [Roadmap](https://github.com/weexteam/weex-vue-framework/issues/9)),更好的是,我们拥抱规范,尽可能的按照 W3C 标准进行实现,因此,你大可不必担心 Weex 三端差异。
-
-你可以试着修改 [Hello World](http://dotwe.org/656345423a7ef46f4b897ff471fd2ab5) 的代码,再次点击预览即可生成新的二维码进行扫描。
-
-Weex 不止是个 Demo,在接下来的章节中,你还会看到更多 Weex 开发 native 应用并将其集成到你的 App 中的精彩教程。不要忘了随时在 [dotWe](http://dotwe.org) 中编写代码验证并通过 [Playground App](https://alibaba.github.io/weex/download.html) 预览。
[50/51] [abbrv] incubator-weex-site git commit: update file structure
and fix responsive styles
Posted by ha...@apache.org.
http://git-wip-us.apache.org/repos/asf/incubator-weex-site/blob/12e3a8bc/_draft/v-0.10/advanced/index.md
----------------------------------------------------------------------
diff --git a/_draft/v-0.10/advanced/index.md b/_draft/v-0.10/advanced/index.md
deleted file mode 100644
index dca072d..0000000
--- a/_draft/v-0.10/advanced/index.md
+++ /dev/null
@@ -1,148 +0,0 @@
----
-title: How it works
-type: advanced
-order: 1
-has_chapter_content: true
-version: 0.10
----
-
-# How it works
-<span class="weex-version">0.4</span>
-
-## Overview
-
-Weex is a extendable cross-platform solution for dynamic programming and publishing projects. In the source code you can write pages or components with `<template>`, `<style>` and `<script>` tags, and then transform them into bundles for deploying. In server-side we can use these JS bundles for client request. When client get a bundle from server, it will be processed by client-side JavaScript engine and manages the native view rendering, the native API invoking and user interactions.
-
-### Whole Workflow
-
-```
-Weex file --------------frontend(source code)
-↓ (transform) --------- frontend(build tool)
-JS bundle ------------- frontend(bundle code)
-↓ (deploy) ------------ server
-JS bundle in server --- server
-↓ (compile) ----------- client(js-engine)
-Virtual DOM tree ------ client(weex-jsframework)
-↓ (render) ------------ client(render-engine)
-Native view ----------- client(render-engine)
-```
-
-According to the workflow above, you need:
-
-* Transformer: A nodejs tool to transform the source code into the bundle code.
-* JS Framework: A JavaScript framework runing in the client which manage Weex instance. The instance which created from a JS bundle builds virtual DOM tree. Also it sends/receives native calls for native view rendering, native APIs and user interactions.
-* Native Engine: There are many different ports for different platforms: iOS/Android/HTML5. They have the same components design, module APIs design and rendering effect. So they can work with the one and the same JS Framework and JS bundles.
-
-## Transformer
-
-The transformer transforms a source code into a bundle code. The whole work could be divided into three parts:
-
-* Transform `<template>` into a JSON-like tree and transform data-binding attribute into a function prop which return the correct data value. For example: `{% raw %}<foo a="{{x}}" b="1" />{% endraw %}` will be transformed into `{type: "foo", attr: {a: function () {return this.x}, b: 1}}`.
-* Transform `<style>` into a JSON tree. For example: `.classname {name: value;}` will be transformed into `{classname: {name: value}}`.
-* Join the two above with `<script>` content. The three parts will be joined together and wrapped into a JavaScript AMD module.
-
-A whole example (`main.we`):
-
-```html
-<template>
- <foo a="{{x}}" b="1" class="bar"></foo>
-</template>
-<style>
- .bar {width: 200; height: 200}
-</style>
-<script>
- module.exports = {
- data: function () {
- return {x: 100}
- }
- }
-</script>
-```
-
-will transformed into:
-
-```
-define('@weex-component/main', function () {
- module.exports = {
- data: function () {
- return {x: 100}
- }
- }
- module.template = {
- type: "foo",
- attr: {
- a: function () {return this.x},
- b: 1,
- classname: ['bar']
- }
- }
- module.style = {
- bar: {width: 200, height: 200}
- }
-}
-bootstrap('@weex-component/main')
-```
-
-Additionally, the transformer could also do more things: combo the bundles, bootstrap with config and external data. For more information, please see the syntax specs.
-
-## NOTICE
-Most of Weex utility output JS Bundle after [Webpack](https://webpack.github.io/) re-bundle. So the eventual format of Weex JSBundle is webpack packed .
-
-## JS Framework
-
-JS Framework will run in native JavaScript engine at the beginning preparation phase. It has `define()` and `bootstrap()` functions for each the bunlde code. Once a JS bundle requested from server, the code will be executed. `define()` will register all modules first, then `bootstrap()` will start compiling main component into virtual DOM and send rendering calls to native.
-
-There are two key methods for the bridge between JS and native:
-
-* `callNative` sends commands from JavaScript to native. So it's called from JavaScript and implemented with native code. All commands are native APIs organized by modules, for example `rendering`, `networking`, `authorizing`, and other client-side features like `toast` etc.
-* `callJS` sends commands from native to JavaScript. So it's called from native and implemented by JS Framework. All commands are user interactions or native callbacks.
-
-## Native RenderEngine
-
-Native RenderEngine will supplies many native components and modules for call.
-
-**Component** is an element in the screen which have a certain view and behavior. It could be configured with some attributes and style properties, and could response user interactions. There are some common components like `<div>`, `<text>`, `<image>` etc.
-
-**Module** is a set of APIs which could be called from JS Framework. Some of them also have to make async callbacks to JS Framework, for example: send HTTP request.
-
-During a Weex instance works, Native RenderEngine receives all kinds of module API calls from JS Framework. These calls will create or update components for view and use client-side features like `toast`. When a user interaction or module API callback happens, It will call `callJS()` from JS Framework. These jobs could walk through the Weex instance lifecycle till the instance is destroyed. As is shown in the architecture figure, H5 RenderEngine is a special RenderEngine with almost the same functions as native RenderEngines.
-
-
-Weex Architecture
-
-### call native from javascript
-
-```
-[JS Framework]
-↓ callNative
-module APIs
- rendering -> components display
- other features
-[Native RenderEngine]
-```
-
-### call javascript from native
-
-```
-[Native RenderEngine]
-module APIs callbacks
-user interactions
-↓ callJS
-[JS Framework]
-```
-
-### Render Flow
-
-
-Weex Render Flow
-
-0. Input is virtual dom.
-0. **Build Tree**. Parse JSON data (virtual dom) to a Render Tree (RT).
-0. **Apply Style**. Attach css style to RT nodes.
-0. **Create View**. Create native views for each RT node.
-0. **Attach Event**. Attach events for each view.
-0. **CSS Layout**. Use [css-layout](https://github.com/facebook/css-layout) to calculate the layout of each view.
-0. **Update Frame**. Update layout parameters of each view.
-0. Output is Native or H5 Views.
-
-In H5 Render Flow, `CSS Layout` and `Update Frame` are implemented by browser engine like webkit.
http://git-wip-us.apache.org/repos/asf/incubator-weex-site/blob/12e3a8bc/_draft/v-0.10/advanced/integrate-to-android.md
----------------------------------------------------------------------
diff --git a/_draft/v-0.10/advanced/integrate-to-android.md b/_draft/v-0.10/advanced/integrate-to-android.md
deleted file mode 100644
index e2b2569..0000000
--- a/_draft/v-0.10/advanced/integrate-to-android.md
+++ /dev/null
@@ -1,204 +0,0 @@
----
-title: Integrate to Android
-type: advanced
-order: 3
-has_chapter_content: true
-version: 0.10
----
-
-# Integrate to Android
-
-When you need to use the new features or to customize specific features, you can rely on the Source SDK for development。
-
-## Prerequisites
-
-Assuming you have the Android SDK installed, run `android` to open the Android SDK Manager.
-
-Make sure you have the following installed:
-
-1. Android SDK version 23 (compileSdkVersion in [`build.gradle`](https://github.com/apache/incubator-weex/blob/master/android/sdk/build.gradle))
-2. SDK build tools version 23.0.2 (buildToolsVersion in [`build.gradle`](https://github.com/apache/incubator-weex/blob/master/android/sdk/build.gradle))
-3. Android Support Repository >= 17 (for Android Support Library)
-4. Android NDK (download & extraction instructions [here](http://developer.android.com/ndk/downloads/index.html))
-
-Point Gradle to your Android SDK: either have `$ANDROID_SDK` and `$ANDROID_NDK ` defined, or create a local.properties file in the root of your weex checkout with the following contents:
-
-```
-sdk.dir=absolute_path_to_android_sdk
-ndk.dir=absolute_path_to_android_ndk
-```
-
-Example:
-
-```
-sdk.dir=/Users/your_name/android-sdk-macosx
-ndk.dir=/Users/your_name/android-ndk-r10e
-```
-
-
-## Building the source
-
-#### 1. Clone source from github
-
-First, you need to git clone `weex` from github:
-
-```shell
-git clone https://github.com/alibaba/weex.git
-```
-##### 2. Build APK
- *** 1) Android studio build APK ***
-
- ```
- Step 1: run android studio
- Step 2: open the file of ~/weex/android/playground/build.gradle
- Step 3: Run the Project and the Apk will auto install in your android device
- ```
- *** 2) Gradle build APK ***
-
- ```
- Step 1: enter the direction of "/weex/android/playground"
- Step 2: run the build command: ./gradlew clean assemble
- Step 3: obtain the payground APK from the direction of weex/android/playground/app/build/outputs/apk/
- Step 3: then adb install -r weex/android/playground/app/build/outputs/apk/playgroud.apk
- ```
-#### 3. Adding the `:weex_sdk_android` project
-
-
-Add the `:weex_sdk_android` project in `android/settings.gradle`:
-
-```gradle
-include ':weex_sdk_android'
-
-project(':weex_sdk_android').projectDir = new File(
- rootProject.projectDir, '../weex_sdk_android')
-```
-
-Modify your `android/app/build.gradle` to use the `:weex_sdk_android` project instead of the pre-compiled library, e.g. - replace `compile 'com.taobao.android:weex_sdk:0.4.1` with `compile project(':weex_sdk_android')`:
-
-```gradle
-dependencies {
- compile fileTree(dir: 'libs', include: ['*.jar'])
- compile 'com.android.support:appcompat-v7:23.0.1'
-
- compile project(':weex_sdk_android')
-
- ...
-}
-```
-
-#### 3. Making 3rd-party modules use your project
-
-If you use 3rd-party weex modules, you need to override their dependencies so that they don't build the pre-compiled library. Otherwise you'll get an error while compiling - `Error: more than one library with package name 'com.taobao.weex'`.
-
-Modify your `android/app/build.gradle` and replace `compile project(':weex-custom-module')` with:
-
-```gradle
-compile(project(':weex-custom-module')) {
- exclude group: 'com.taobao.weex', module: 'weex_sdk_android'
-}
-```
-
-#### 4、How to load local Your Js bundle in the directory of Android assets
-Besides load a Js Bundle online, you also can load the js bundle from the directory of Android assets.
-
-For Example:
-
- ```
- String yourbundleStr = WXFileUtils.loadFileContent("yourBundle.js", context);
- WXSDKInstance.render(TAG, yourbundleStr, options, null, width, Height, WXRenderStrategy.APPEND_ASYNC);
- ```
-
-
-## Building from Android Studio
-
-From the Welcome screen of Android Studio choose "Import project" and select the `playground` folder of your app.
-
-You should be able to use the _Run_ button to run your app on a device.
-
-## Tip
-1. Since the packet size limit is currently only compiled arm , X86 does not support.
-
-2. Gradle build fails in `ndk-build`. See the section about `local.properties` file above.
-
-#Quick access
-
-## Requirements
-
-* an existing, gradle-based Android app
-
-## Prepare your app
-
-In your app's `build.gradle` file add the WEEX dependency:
-
- compile 'com.taobao.android:weex_sdk:0.4.1'
-
-You can find the latest version of the WEEX library on [jcenter](https://bintray.com/search?query=weex_sdk&forceAgnostic=true). Next, make sure you have the Internet permission in your `AndroidManifest.xml`:
-
- <uses-permission android:name="android.permission.INTERNET" />
-
-
-## Add native code
-
-You need to add some native code in order to start the Weex runtime and get it to render something. To do this, we're going to create an `Application` to init weex, then we we're going to create an `Activity` that creates a WeexContainerView, starts a Weex application inside it and sets it as the main content view.
-
-
-```java
-public class WXApplication extends Application {
- @Override
- public void onCreate() {
- super.onCreate();
-
- WXEnvironment.addCustomOptions("appName","TBSample");
- WXSDKEngine.init(this);
- try {
-
- WXSDKEngine.registerComponent("wtRichText", WTRichText.class);
- ......
-
- WXSDKEngine.registerModule("event", WXEventModule.class);
- } catch (WXException e) {
- e.printStackTrace();
- }
- }
-}
-```
-
-Next,
-
-```java
-// Create or find RenderContainer view.
-// Notice: If you create RenderContainer manually, don't forget add it to view tree.
-RenderContainer renderContainer = (RenderContainer)findViewById(R.id.container);
-
-//crate Weex instance
-WXSDKInstance mInstance = new WXSDKInstance(this);
-//set render container
-mInstance.setRenderContainer(renderContainer);
-//set image Adapter
-mInstance.setImgLoaderAdapter(new ImageAdapter(this));
-//register render listener
-mInstance.registerRenderListener(new IWXRenderListener() {
- @Override
- public void onViewCreated(WXSDKInstance instance, View resultView) {
- // Notice: If you don't setRenderContainer before render, you need add the resultView to view tree here.
-
- }
- @Override
- public void onRenderSuccess(WXSDKInstance instance) {
- }
- @Override
- public void onRefreshSuccess(WXSDKInstance instance) {
- }
- @Override
- public void onException(WXSDKInstance instance, String errCode,String msg) {
- }
-});
-//start render weex view
-mInstance.render(pageName,template, null, null, -1, -1, WXRenderStrategy.APPEND_ASYNC);
-```
-
-That's it, your activity is ready to run some JavaScript code.
-
-## Reference Example
-
-[`Weex Examples`](https://github.com/apache/incubator-weex/tree/master/examples)
http://git-wip-us.apache.org/repos/asf/incubator-weex-site/blob/12e3a8bc/_draft/v-0.10/advanced/integrate-to-html5.md
----------------------------------------------------------------------
diff --git a/_draft/v-0.10/advanced/integrate-to-html5.md b/_draft/v-0.10/advanced/integrate-to-html5.md
deleted file mode 100644
index b71bcd7..0000000
--- a/_draft/v-0.10/advanced/integrate-to-html5.md
+++ /dev/null
@@ -1,77 +0,0 @@
----
-title: Integrate to web
-type: advanced
-order: 5
-has_chapter_content: true
-version: 0.10
----
-
-# Integrate Weex HTML5 to your project
-
-### Intro
-
-Weex is a extendable cross-platform solution for dynamic programming and publishing projects, which is for developers to write code once and run the code everywhere.
-
-The bundle transformed from the source can currently run on android, ios and web platform. Weex HTML5 is a renderer for weex bundle to run on a webview or a modern browser etc.
-
-### Get Weex HTML5
-
-Use npm to install the latest version of Weex HTML5, require it in your code by CommonJS and use it as a npm package.
-
-#### Install from npm
-
-Make sure you get the latest version by `npm install` or `npm update`. For more information of npm, please visit the [npm official site](https://docs.npmjs.com/).
-
-```
-npm install weex-html5
-```
-
-require weex-html5:
-
-```
-const weex = require('weex-html5')
-```
-
-### Initialize and run
-
-You can initialize weex through the API `init`. This method takes a config object as the first argument to confirm the runtime infomation and environment. Following parameters can be set by this config object:
-
-* `appId`: app instance id, can be either a string or a number
-* `source`: the requested url of weex bundle, or the transformed code it self.
-* `loader`: the loader type to load the weex bundle, which value is 'xhr' or 'jsonp' or 'source'.
- * `xhr`: load the source (weex bundle url) by XHR
- * `jsonp`: load the source bundle by JSONP
- * `source`: the source parameter above should be a weex bundle content (transformed bundle).
-* `rootId`: the id of the root element. Default value is 'weex'.
-
-Here is a example to do the initialzation:
-
-```
-function weexInit() {
- function getUrlParam (key) {
- var reg = new RegExp('[?|&]' + key + '=([^&]+)')
- var match = location.search.match(reg)
- return match && match[1]
- }
-
- var loader = getUrlParam('loader') || 'xhr'
- var page = getUrlParam('page')
-
- // jsonp callback name should be specified or be the default
- // value 'weexJsonpCallback' if the 'jsonp' loader is used.
- var JSONP_CALLBACK_NAME = 'weexJsonpCallback'
-
- window.weex.init({
- jsonpCallback: JSONP_CALLBACK_NAME,
- appId: location.href,
- source: page,
- loader: loader,
- rootId: 'weex'
- })
-}
-
-weexInit()
-```
-
-
-
http://git-wip-us.apache.org/repos/asf/incubator-weex-site/blob/12e3a8bc/_draft/v-0.10/advanced/integrate-to-ios.md
----------------------------------------------------------------------
diff --git a/_draft/v-0.10/advanced/integrate-to-ios.md b/_draft/v-0.10/advanced/integrate-to-ios.md
deleted file mode 100644
index 69dea6d..0000000
--- a/_draft/v-0.10/advanced/integrate-to-ios.md
+++ /dev/null
@@ -1,118 +0,0 @@
----
-title: Integrate to iOS
-type: advanced
-order: 4
-has_chapter_content: true
-version: 0.10
----
-
-# import Weex iOS to your project
-
-You will need to build Weex from source if you want to work on a new feature/bug fix, try out the latest features not released yet, or maintain your own fork with patches that cannot be merged to the core.
-
-Assuming you have installed [iOS Develop Environment](https://developer.apple.com/library/ios/documentation/IDEs/Conceptual/AppStoreDistributionTutorial/Setup/Setup.html) and [CocoaPods](https://guides.cocoapods.org/using/getting-started.html).
-
-#### 1. Clone source from github
-
-First, you need to git clone `weex` from github:
-
-```
-git clone https://github.com/alibaba/weex.git
-```
-#### 2. Import WeexSDK to project
-
-Copy the whole folder `/ios/sdk` to your project directory.
-
-Before adding the dependencies, please confirm that the project directory already exists the Podfile. If not, create a new one. Then, edit this file, adding some necessary dependecis for the target.
-
-```
-target 'YourTarget' do
- platform :ios, '7.0'
- pod 'WeexSDK', :path=>'./sdk/'
-end
-```
-You can get your `YourTarget` below
-
-
-
-Run pod install in current directory, for a while, .xcworkspace will be created. At this point, the dependencies have been established.
-
-#### 3. Init Weex Environment
-We are used to doing some initial tasks in appDelegate. Of course, there is no exception. You can do this in `didFinishLaunchingWithOptions` as follows.
-
-```
-//business configuration
-[WXAppConfiguration setAppGroup:@"AliApp"];
-[WXAppConfiguration setAppName:@"WeexDemo"];
-[WXAppConfiguration setAppVersion:@"1.0.0"];
-
-//init sdk enviroment
-[WXSDKEngine initSDKEnviroment];
-
-//register custom module and component,optional
-[WXSDKEngine registerComponent:@"MyView" withClass:[MyViewComponent class]];
-[WXSDKEngine registerModule:@"event" withClass:[WXEventModule class]];
-
-//register the implementation of protocol, optional
-[WXSDKEngine registerHandler:[WXNavigationDefaultImpl new] withProtocol:@protocol(WXNavigationProtocol)];
-
-//set the log level
-[WXLog setLogLevel:WXLogLevelVerbose];
-
-```
-
-#### 4. Render Weex Instance
-Weex supports two different modes, the full page rendering and part of page rendering.
-Something you have to do is to render weex view with specific URL, then add it to the parent container, which may be the viewController.
-
-```
-#import <WeexSDK/WXSDKInstance.h>
-
-- (void)viewDidLoad
-{
- [super viewDidLoad];
-
- _instance = [[WXSDKInstance alloc] init];
- _instance.viewController = self;
- _instance.frame = self.view.frame;
-
- __weak typeof(self) weakSelf = self;
- _instance.onCreate = ^(UIView *view) {
- [weakSelf.weexView removeFromSuperview];
- weakSelf.weexView = view;
- [weakSelf.view addSubview:weakSelf.weexView];
- };
-
- _instance.onFailed = ^(NSError *error) {
- //process failure
- };
-
- _instance.renderFinish = ^ (UIView *view) {
- //process renderFinish
- };
- [_instance renderWithURL:self.url options:@{@"bundleUrl":[self.url absoluteString]} data:nil];
-}
-```
-WXSDKInstance is a very imporent class, which provides you with some basic methods and callbacks, such as renderWithURL、onCreate、onFailed and etc. You can understand their usage by reading WXSDKInstance.h.
-
-
-#### 5. Destroy Weex Instance
-
-Please release weex instance in dealloc stage of viewContoller, or it will lead to memory leak.
-
-```
-- (void)dealloc
-{
- [_instance destroyInstance];
-}
-```
-
-#### 6. Build .IPA for Weex
-
-We can also pack all the JS files into the app's resources. This way you can run your app without development server and submit it to the AppStore.
-
-* [Install weex-toolkit](https://github.com/alibaba/weex_toolchain/tree/master/toolkit) and transform your `.we` file to JS by running `weex index.we -o index.js`, `index.we` is the entry file of your app.
-* Move `index.js` to your app's Xcode project and add the file to your target.
-* Replace `[_instance renderWithURL:'httpURL']` with: `[_instance renderWithURL: [[NSBundle mainBundle] URLForResource:@"index" withExtension:@"js"]]`
-
-* Go to Product -> Archive in Xcode and follow the steps to build your .IPA file and submit it to the AppStore.
http://git-wip-us.apache.org/repos/asf/incubator-weex-site/blob/12e3a8bc/_draft/v-0.10/guide/.gitkeep
----------------------------------------------------------------------
diff --git a/_draft/v-0.10/guide/.gitkeep b/_draft/v-0.10/guide/.gitkeep
deleted file mode 100644
index e69de29..0000000
http://git-wip-us.apache.org/repos/asf/incubator-weex-site/blob/12e3a8bc/_draft/v-0.10/guide/how-to/customize-a-native-component.md
----------------------------------------------------------------------
diff --git a/_draft/v-0.10/guide/how-to/customize-a-native-component.md b/_draft/v-0.10/guide/how-to/customize-a-native-component.md
deleted file mode 100644
index 62c0cf0..0000000
--- a/_draft/v-0.10/guide/how-to/customize-a-native-component.md
+++ /dev/null
@@ -1,58 +0,0 @@
----
-title: Customize a native Component
-type: guide
-order: 3.3
-version: 0.10
----
-
-# How to customize a native Component ?
-
-Weex has wrapped up the most critical platform components, such as `ScrollView`, `ListView`, `Text`, `Imageview` and so on. Certainly these components can not completely meet your need. And thousands of native UI components that always be using in our project may be required to integrate into Weex easily. Fortunately, it's quite convenient to wrap up your own components that should be from any existing components.
-
-##### Step By Step
-
-1. Customized components must inherit from `WXComponent` or `WXContainer`;
-2. @WXComponentProp(name=value(value is attr or style of dsl)) for it be recognized by weex SDK;
-3. The access levels of method must be **public**;
-4. The component class can not be an inner class;
-5. Customized components should not be obfuscated by tools like ProGuard;
-6. Component methods will be invoked on the UI thread, so do not contain time-consuming operations here;
-7. Weex parameter's type can be int, double, float, String, Map, List, self-defined class that implements WXObject interface;
-
-
-#### Refer to the following example:
-
-```java
-package com.taobao.weex.ui.component;
-……
-
-public class MyViewComponent extends WXComponent{
-
- public MyViewComponent(WXSDKInstance instance, WXDomObject node,
- WXVContainer parent, String instanceId, boolean lazy) {
- super(instance, node, parent, instanceId, lazy);
- }
-
- @Override
- protected void initView() {
- //TODO:your own code ……
- }
-
- @Override
- public WXFrameLayout getView() {
- //TODO:your own code ………
- }
- @WXComponentProp(name=WXDomPropConstant.WX_ATTR_VALUE)
- public void setMyViewValue(String value) {
- ((TextView)mHost).setText(value);
- }
-
-}
-```
-#### Component should be registered
-
-```java
-WXSDKEngine.registerComponent("MyView", MyViewComponent.class);
-```
-
-
http://git-wip-us.apache.org/repos/asf/incubator-weex-site/blob/12e3a8bc/_draft/v-0.10/guide/how-to/cuszomize-native-apis.md
----------------------------------------------------------------------
diff --git a/_draft/v-0.10/guide/how-to/cuszomize-native-apis.md b/_draft/v-0.10/guide/how-to/cuszomize-native-apis.md
deleted file mode 100644
index 9594ff0..0000000
--- a/_draft/v-0.10/guide/how-to/cuszomize-native-apis.md
+++ /dev/null
@@ -1,80 +0,0 @@
----
-title: Customize native APIs
-type: guide
-order: 3.4
-version: 0.10
----
-
-# How to customize native APIs ?
-
-Weex SDK provides only rendering capability, rather than having other capabilities, such as network, picture, and URL redirection. If you want the these features, you need to implement them yourselves.
-The example below will describe how to extend weex with native logic or 'bridge' your existed native code.
-
-## A URLHelper Example
-### Create your own `WXModule` in native:
-
-```java
-public class URLHelperModule extends WXModule{
- private static final String WEEX_CATEGORY="com.taobao.android.intent.category.WEEX";
- @WXModuleAnno
- public void openURL(String url){
- if (TextUtils.isEmpty(url)) {
- return;
- }
- StringBuilder builder=new StringBuilder("http:");
- builder.append(url);
- Uri uri = Uri.parse(builder.toString());
- Intent intent = new Intent(Intent.ACTION_VIEW, uri);
- intent.addCategory(WEEX_CATEGORY);
- mWXSDKInstance.getContext().startActivity(intent);
- }
-}
-
-```
-
-Notice the `@WXModuleAnno`, use this annotation to mark the methods you wanna expose to javascript.
-If your also want to callback to javascript, you should define a `callbackId` parameter to received 'JS callback function id':
-
-```java
-public class URLHelperModule extends WXModule{
-
- @WXModuleAnno
- public void openURL(String url,String callbackId){
- //...
- //callback to javascript
- Map<String, Object> result = new HashMap<String, Object>();
- result.put("ts", System.currentTimeMillis());
- WXBridgeManager.getInstance().callback(mWXSDKInstance.getInstanceId(), callbackId, result);
- }
-}
-```
-
-
-### Register your module to engine:
-
-```
-try {
- WXSDKEngine.registerModule("myURL", URLHelperModule.class);//'myURL' is the name you'll use in javascript
- } catch (WXException e) {
- WXLogUtils.e(e.getMessage());
- }
-```
-### Now, you can use eventModule in javascript like this:
-
-```javascript
-let URLHelper = require('@weex-module/myURL');//same as you registered
-URLHelper.openURL("http://www.taobao.com",function(ts){
- console.log("url is open at "+ts);
-});
-
-```
-
-
-## Things you need to note:
-1. Customized components must inherit from `WXModule`;
-2. @WXModuleAnno annotation must be added, as it is the only way to be recognized by Weex;
-3. The access levels of method must be **public**;
-4. The module class also can not be an inner class;
-5. Customized components should not be obfuscated by tools like ProGuard;
-6. Module methods will be invoked on the UI thread, so do not put time-consuming operations there;
-7. Weex parameter's type can be int, double, float, String, Map, List, self-defined class that implements WXObject interface;
http://git-wip-us.apache.org/repos/asf/incubator-weex-site/blob/12e3a8bc/_draft/v-0.10/guide/how-to/debug-with-html5.md
----------------------------------------------------------------------
diff --git a/_draft/v-0.10/guide/how-to/debug-with-html5.md b/_draft/v-0.10/guide/how-to/debug-with-html5.md
deleted file mode 100644
index c80fb69..0000000
--- a/_draft/v-0.10/guide/how-to/debug-with-html5.md
+++ /dev/null
@@ -1,47 +0,0 @@
----
-title: Debug in html5 renderer
-type: guide
-order: 3.5
-version: 0.10
----
-
-# How to debug in html5 renderer ?
-
-Since weex-html5 can run on a modern mobile browser, it's naturally supported to debug weex-html5 code in browsers' dev tools. Use browser's devTools to iterate, debug and profile your weex-html5 app. Take chrome's debug tool as a example:
-
-
-
-## Elements
-
-Use elements' panel to inspect the layout and design of the weex-html5 page, and manipulate the DOM and CSS to do some experiment freely.
-
-## Console
-
-You can use `console.log` to log information on console, but it's highly recommended to use `nativeLog` instead, since nativeLog can run on a native platform based on a browser. The defect of `nativeLog` is that it's not supported to trace it from the console to the source file which the `nativeLog` is called in, therefore in this situation you'd better use `console.log`, and you should make sure this code will not run on native platform (otherwise a exception or a crash will be caused).
-
-## Breakpoints
-
-You can set breakpoints to debug code. Breakpoints are one of the most effective way to debug code. Breakpoints enable you to pause script execution and then investigate the call stack variable values at that particular moment in time.
-
-Manual breakpoints are individual breakpoints that you set on a specific line of code. You can set these via Chrome DevTools GUI, or by inserting the `debugger` keyword in your code.
-
-## Locate your bug
-
-Generally speaking, there are three possible layer the bug could happen on: the renderer (weex-html5), the js-framework (weex-js-framework) and the transformer (gulp-weex).
-
-Here are some suggestions to locate your bug so that you can recognize which layer the bug is on:
-
-* check the console for errors. In debug mode if there is a error happend there will be info about it on the console.
-* in bridge/receiver.js, whether the `callNative` function is called.
-* whether the supposed to be called API method is actually called and executed.
-* whether the `callJS` method for event firing or callback executing is called.
-
-## other
-
-More info about how to debug h5 pages on chrome devTools: [chrome's devTools docs](https://developers.google.com/web/tools/chrome-devtools/?hl=en)
-
-
-
-
-
-
http://git-wip-us.apache.org/repos/asf/incubator-weex-site/blob/12e3a8bc/_draft/v-0.10/guide/how-to/index.md
----------------------------------------------------------------------
diff --git a/_draft/v-0.10/guide/how-to/index.md b/_draft/v-0.10/guide/how-to/index.md
deleted file mode 100644
index 9f9435a..0000000
--- a/_draft/v-0.10/guide/how-to/index.md
+++ /dev/null
@@ -1,40 +0,0 @@
----
-title: Preview in browser
-type: guide
-order: 3
-has_chapter_content: false
-chapter_title: How-tos
-version: 0.10
----
-
-# How to preview weex code in browser ?
-
-## weex-toolkit
-
-We strongly suggest you use weex-toolkit to preview weex code in your browser. This tool is Node.JS based, so you need to install Node at first. Please download and install latest stable version of Node from [https://nodejs.org/en/download/stable/](https://nodejs.org/en/download/stable/). Then you can install weex-toolkit using npm install:
-
-```bash
-$ npm install -g weex-toolkit
-```
-
-Check that the toolkit does work by typing `weex` in the command line. Normally you should see the following help text:
-
-```
-Options:
- --qr display QR code for native runtime,
- -o,--output transform weex we file to JS Bundle, output path (single JS bundle file or dir)
- -s,--server start a http file server, weex .we file will be transforme to JS bundle on the server , specify local root path using the option
- ......
- --help Show help
-```
-
-If all work well, navigate to the path the xxx.we file you want to preview in, and type the command:
-
-```bash
-weex xxx.we
-```
-
-A browser window will be opened automatically to display the page you want to preview:
-
-
-
http://git-wip-us.apache.org/repos/asf/incubator-weex-site/blob/12e3a8bc/_draft/v-0.10/guide/how-to/preview-in-playground-app.md
----------------------------------------------------------------------
diff --git a/_draft/v-0.10/guide/how-to/preview-in-playground-app.md b/_draft/v-0.10/guide/how-to/preview-in-playground-app.md
deleted file mode 100644
index 5800737..0000000
--- a/_draft/v-0.10/guide/how-to/preview-in-playground-app.md
+++ /dev/null
@@ -1,20 +0,0 @@
----
-title: Preview in native
-type: guide
-order: 3.2
-version: 0.10
----
-
-# How to preview weex code in sample-app ?
-
-### Weex Sample Step By Step
-1. Clone Weex from github [`https://github.com/apache/incubator-weex/`](https://github.com/apache/incubator-weex/)
-2. Use Android Studio open Android Sample 。
-3. run Sample project.
-4. into Sample homePage,you will see this picture
-
-5. Click the icon to the top right of the page to enter the two-dimensional code scanning
-
-6. use[`Weex-Toolkit`](https://github.com/alibaba/weex_toolchain/tree/master/toolkit/ )make .we to a QR code
-7. you will see the page rended by Weex
-
http://git-wip-us.apache.org/repos/asf/incubator-weex-site/blob/12e3a8bc/_draft/v-0.10/guide/how-to/require-3rd-party-libs.md
----------------------------------------------------------------------
diff --git a/_draft/v-0.10/guide/how-to/require-3rd-party-libs.md b/_draft/v-0.10/guide/how-to/require-3rd-party-libs.md
deleted file mode 100644
index 7349520..0000000
--- a/_draft/v-0.10/guide/how-to/require-3rd-party-libs.md
+++ /dev/null
@@ -1,56 +0,0 @@
----
-title: Require 3rd Party Libs
-type: guide
-order: 3.6
-version: 0.10
----
-
-# How to require 3rd Party Libs ?
-
-In the paragraph Maintain Your Component Code, we learn that JavaScript code can be written in `<script>` tag in one component. But there must be some common functions or modules in your project, such as parsing url params, extending properties from some objects to another object and so on. It's a bad practice to copy and paste them in each component, therefore there's a urgent need of `require`. Weex provides CommonJS `require` syntax for developers.
-
-Let take `extend` for example.
-
-## Require Local Js Modules
-
-A basic implementation of `extend` is as follows, and it's placed in directory path `./common/utils.js`.
-
-```javascript
-function extend(dest, src) {
- for (var key in src) {
- dest[key] = src[key]
- }
-}
-exports.extend = extend
-```
-
-In a `.we` file, `extend` can be used with the help of `require`:
-
-```html
-<script>
- var utils = require('./common/utils')
- var obj1 = {a: 1}
- var obj2 = {b: 2}
- utils.extend(obj1, obj2) // obj1 => {a: 1, b: 2}
-</script>
-```
-
-## Require Installed Node Modules
-
-Besides, [underscore](http://underscorejs.org) is a JavaScript library that provides a whole mess of useful functional programming helpers without extending any built-in objects. It implements a more robust version of [extend](http://underscorejs.org/#extend).
-
-We can use underscore's extend instead of the version implemented by ourselves. After installing `underscore` to the `node_modules` directory, we can `require` and use it.
-
-```bash
-$ npm install underscore
-```
-
-```html
-<script>
- var _ = require('underscore')
- var obj1 = {a: 1}
- var obj2 = {b: 2}
- var obj3 = {c: 3}
- var ret = _.extend(obj1, obj2, obj3) // ret => {a: 1, b: 2, c: 3}
-</script>
-```
http://git-wip-us.apache.org/repos/asf/incubator-weex-site/blob/12e3a8bc/_draft/v-0.10/guide/how-to/transform-code-into-js-bundle.md
----------------------------------------------------------------------
diff --git a/_draft/v-0.10/guide/how-to/transform-code-into-js-bundle.md b/_draft/v-0.10/guide/how-to/transform-code-into-js-bundle.md
deleted file mode 100644
index 842ecd6..0000000
--- a/_draft/v-0.10/guide/how-to/transform-code-into-js-bundle.md
+++ /dev/null
@@ -1,110 +0,0 @@
----
-title: Transform Code into Js Bundle
-type: guide
-order: 3.7
-version: 0.10
----
-
-# Transform Code into Js Bundle
-
-Paragraphs Maintain Your Component Code and [Require 3rd Party Libs](./require-3rd-party-libs.html) show us how to write and organize weex code. However, Weex DSL code must be transformed to `js bundle` so that `js framework` can parse and execute it for iOS, Android and HTML5 portal. For more information, please refer to [How It Works
-](../../advanced/how-it-works.html) and [JS Bundle Format](../../references/specs/js-bundle-format.html).
-
-Now come back to the topic `transform code into js bundle`. There are several ways to achieve the goal.
-
-## weex-toolkit
-
-```bash
-$ npm install -g weex-toolkit
-```
-
-### transform a `we file` to JS Bundle
-
-```bash
-$ weex your_best_weex.we -o .
-```
-
-`your_best_weex.we` will be transform to JS Bundle file `your_best_weex.js` , saved in your current directory
-
-### transform a `we file` to JS Bundle , watch this file ,auto run transformer if change happen.
-
-```bash
-$ weex your_best_weex.we -o . --watch
-```
-
-### transform every we file in a directory
-
-```bash
-$ weex we/file/storage/path -o outputpath
-```
-
-every `we file` in `we/file/storage/path` will be transformed to JS Bundle , saved in `outputpath` path
-
-please access [npmjs.com](https://www.npmjs.com/package/weex-toolkit) for more information about weex-toolkit.
-
-## transformer
-
-```bash
-npm install weex-transformer
-```
-
-### CLI Tool
-
-```bash
- Usage: transformer [options] <file...>
-
- Options:
-
- -h, --help output usage information
- -V, --version output the version number
- -l, --oldFormat [value] whether to transform to old format (default: false)
- -e, --isEntry [value] whether is an entry module which has `bootstrap` (default: true)
- -o, --output [path] the output file dirname
-```
-
-### API
-
-** transform(name, code, path, elements, config) **
-
-```javascript
-var transformer = require('weex-transformer')
-var output = transformer.transform('foo', '/* code here */', '.', {})
-```
-
-params:
-
-- `name`: string, current bundle name
-- `code`: string, source code
-- `path`: string *optional*, useful when find custom component in a certain path
-- `elements`: object *optional*, existed custom component map
-- `config`: object *optional*
- * `oldFormat`: whether to transform to old format (default: false)
- * `isEntry`: whether is an entry module which has `bootstrap` (default: true)
-
-returns:
-
-- an object with keys
- * `result`: string, all custom components `define()` and final `bootstrap()`
- * `logs`: array, corresponding warning & error logs
-
-## gulp weex
-
-```bash
-$ npm install gulp-weex
-```
-
-```javascript
-var gulp = require('gulp')
-var weex = require('gulp-weex')
-
-gulp.task('default', function () {
- return gulp.src('src/*.html')
- .pipe(weex({}))
- .pipe(gulp.dest('./dest'))
-})
-```
-
-Options:
-
-- `oldFormat`: whether to transform to old format (default: false)
-- `isEntry`: whether is an entry module which has `bootstrap` (default: true)
http://git-wip-us.apache.org/repos/asf/incubator-weex-site/blob/12e3a8bc/_draft/v-0.10/guide/images/tut-cli-qrcode.png
----------------------------------------------------------------------
diff --git a/_draft/v-0.10/guide/images/tut-cli-qrcode.png b/_draft/v-0.10/guide/images/tut-cli-qrcode.png
deleted file mode 100644
index 9068c14..0000000
Binary files a/_draft/v-0.10/guide/images/tut-cli-qrcode.png and /dev/null differ
http://git-wip-us.apache.org/repos/asf/incubator-weex-site/blob/12e3a8bc/_draft/v-0.10/guide/images/tut-first.png
----------------------------------------------------------------------
diff --git a/_draft/v-0.10/guide/images/tut-first.png b/_draft/v-0.10/guide/images/tut-first.png
deleted file mode 100755
index c8505e6..0000000
Binary files a/_draft/v-0.10/guide/images/tut-first.png and /dev/null differ
http://git-wip-us.apache.org/repos/asf/incubator-weex-site/blob/12e3a8bc/_draft/v-0.10/guide/images/tut-second.png
----------------------------------------------------------------------
diff --git a/_draft/v-0.10/guide/images/tut-second.png b/_draft/v-0.10/guide/images/tut-second.png
deleted file mode 100755
index 1259abf..0000000
Binary files a/_draft/v-0.10/guide/images/tut-second.png and /dev/null differ
http://git-wip-us.apache.org/repos/asf/incubator-weex-site/blob/12e3a8bc/_draft/v-0.10/guide/images/tut1.jpg
----------------------------------------------------------------------
diff --git a/_draft/v-0.10/guide/images/tut1.jpg b/_draft/v-0.10/guide/images/tut1.jpg
deleted file mode 100644
index 8af0f3f..0000000
Binary files a/_draft/v-0.10/guide/images/tut1.jpg and /dev/null differ
http://git-wip-us.apache.org/repos/asf/incubator-weex-site/blob/12e3a8bc/_draft/v-0.10/guide/images/tut2.jpg
----------------------------------------------------------------------
diff --git a/_draft/v-0.10/guide/images/tut2.jpg b/_draft/v-0.10/guide/images/tut2.jpg
deleted file mode 100644
index c3e8a6e..0000000
Binary files a/_draft/v-0.10/guide/images/tut2.jpg and /dev/null differ
http://git-wip-us.apache.org/repos/asf/incubator-weex-site/blob/12e3a8bc/_draft/v-0.10/guide/images/tut3.png
----------------------------------------------------------------------
diff --git a/_draft/v-0.10/guide/images/tut3.png b/_draft/v-0.10/guide/images/tut3.png
deleted file mode 100644
index 5473905..0000000
Binary files a/_draft/v-0.10/guide/images/tut3.png and /dev/null differ
http://git-wip-us.apache.org/repos/asf/incubator-weex-site/blob/12e3a8bc/_draft/v-0.10/guide/images/tut4.gif
----------------------------------------------------------------------
diff --git a/_draft/v-0.10/guide/images/tut4.gif b/_draft/v-0.10/guide/images/tut4.gif
deleted file mode 100644
index eed4395..0000000
Binary files a/_draft/v-0.10/guide/images/tut4.gif and /dev/null differ
http://git-wip-us.apache.org/repos/asf/incubator-weex-site/blob/12e3a8bc/_draft/v-0.10/guide/index.md
----------------------------------------------------------------------
diff --git a/_draft/v-0.10/guide/index.md b/_draft/v-0.10/guide/index.md
deleted file mode 100644
index bb6941c..0000000
--- a/_draft/v-0.10/guide/index.md
+++ /dev/null
@@ -1,211 +0,0 @@
----
-title: Tutorial
-type: guide
-order: 1
-version: 0.10
----
-
-# Tutorial
-
-We will make a simple but realistic list, in which the technologies Weex uses will be shown. This form of list also works for a lot of e-commercial apps and mobile sites.
-
-## Getting Started
-
-Let's get started with the list item, which contains one `image` element and one `text` right behind.
-
-```html
-<template>
- <div class="container">
- <div class="cell">
- <image class="thumb" src="http://t.cn/RGE3AJt"></image>
- <text class="title">JavaScript</text>
- </div>
- </div>
-</template>
-
-<style>
- .cell { margin-top: 10; margin-left: 10; flex-direction: row; }
- .thumb { width: 200; height: 200; }
- .title { text-align: center; flex: 1; color: grey; font-size: 50; }
-</style>
-```
-
-You can directly copy and paste the above code into a Weex file named `tech_list.we` (`.we` is our recommended filename extension).
-
-## Preview
-
-Once created, we want to see the running result of the `.we` file. But before that, we must make sure the dependencies are installed.
-
-We should install [Node](https://nodejs.org/en/download/) first, which our Weex CLI program [Weex Toolkit](https://www.npmjs.com/package/weex-toolkit) depends on. Then install `weex-toolkit` by running the command:
-
-```bash
-$ npm install -g weex-toolkit
-```
-
-When installation completed, you can check if Weex CLI is installed properly by running `weex` command in the command line. The following text is expected:
-
-```
-Usage: weex foo/bar/your_next_best_weex_script_file.we [options]
-
-Options:
- --qr display QR code for native runtime,
- -o,--output transform weex we file to JS Bundle, output path (single JS bundle file or dir)
- -s,--server start a http file server, weex .we file will be transforme to JS bundle on the server , specify local root path using the option
- ......
- --help Show help
- -h, --host [default: "127.0.0.1"]
-```
-
-If all work well, navigate to the directory where you saved `tech_list.we`, then type:
-
-```bash
-$ weex tech_list.we
-```
-
-A browser window will be opened automatically to display the running result like below (weex-toolkit version should be greater than 0.1.0, use `weex --version` to check it):
-
-
-
-## Introduce to Weex Syntax
-
-So it's time for introducing the syntax.
-
-Given the content of `tech_list.we`, Weex source code is composed of three parts -- *template*, *style*, and *script*, just like html, css, and javascript for the Web.
-
-Template is the skeleton that gives Weex structure. It is composed of tags which surround content and apply meaning to it. Tags have *attributes*, different attribute means different feature, for example, `class` attribute makes it possible to define the same styles for multiple tags, `onclick` attribute makes the tag respond to click event.
-
-Style describes how Weex tags are to be displayed. We prefer CSS very much. So we try to keep consistent with CSS standard as possible. Weex Style supports a lot of CSS features, like margin, padding, fixed and so on. Better yet, flexbox layout (flex) is well supported in Weex Style.
-
-Script adds *data* & *logic* to Weex tags, helping you easily access local or remote data and update tags. You can also define some methods for your tag to respond to different events. Weex Script organization learns a lot from CommonJS module style.
-
-More information about Weex syntax can be found in our [Syntax chapter](./syntax/index.html).
-
-## Add More Items
-
-We can't call one item a list, so we need to add more items to our tech list. Open `tech_list.we` in your favorite editor and update it's content like below:
-
-```html
-<template>
- <div class="container">
- <div class="cell">
- <image class="thumb" src="http://t.cn/RGE3AJt"></image>
- <text class="title">JavaScript</text>
- </div>
- <div class="cell">
- <image class="thumb" src="http://t.cn/RGE3uo9"></image>
- <text class="title">Java</text>
- </div>
- <div class="cell">
- <image class="thumb" src="http://t.cn/RGE31hq"></image>
- <text class="title">Objective C</text>
- </div>
- </div>
-</template>
-
-<style>
- .cell{ margin-top:10 ; margin-left:10 ; flex-direction: row; }
- .thumb { width: 200; height: 200; }
- .title { text-align: center ; flex: 1; color: grey; font-size: 50; }
-</style>
-```
-
-Now we will try to render our `tech_list.we` with Weex native renderer. Open your terminal and navigate to the directory where you save the `tech_list.we` again, then type:
-
-```bash
-$ weex tech_list.we --qr -h {ip or hostname}
-```
-
-It's ***RECOMMENDED*** to use `-h` option to specify your local ip address or hostname.
-
-A QR code will be displayed in the terminal window like below:
-
-
-
-The QR code can work together with [Weex Playground App](http://alibaba.github.io/weex/download.html). Open it and tap the scan icon at the top-right corner, then scan the QR code displayed in your terminal. If all work well, a beautiful list will be displayed in your phone.
-
-
-
-Here, I must stress that the list is rendered by a native view, instead of Webkit, so your app gets faster loading and less memory overhead than common Webview renderer.
-
-Now open `tech_list.we` again and try to change some text, after changes saved the Weex playground App will immediately display these changes. We call that **Hot-Reload**, which is intended to help you use Weex better.
-
-## Add Built-in Components
-
-Instead of writing basic tags by yourself, Weex provides a lot of built-in components. For example, Slider is common to many apps and mobile websites, so Weex includes a built-in Slider so that you can easily use it in your script. Let's open `tech_list.we` and update it's content like below.
-
-```html
-<template>
- <div style="flex-direction: column;">
- <slider class="slider" interval="{{intervalValue}}" auto-play="{{isAutoPlay}}" >
- <div class="slider-pages" repeat="{{itemList}}" onclick="goWeexSite" >
- <image class="thumb" src="{{pictureUrl}}"></image>
- <text class="title">{{title}}</text>
- </div>
- </slider>
-
- <div class="container" onclick="goWeexSite" >
- <div class="cell">
- <image class="thumb" src="http://t.cn/RGE3AJt"></image>
- <text class="title">JavaScript</text>
- </div>
- <div class="cell">
- <image class="thumb" src="http://t.cn/RGE3uo9"></image>
- <text class="title">Java</text>
- </div>
- <div class="cell">
- <image class="thumb" src="http://t.cn/RGE31hq"></image>
- <text class="title">Objective C</text>
- </div>
- </div>
-</template>
-
-<style>
- .cell { margin-top:10 ; margin-left:10 ; flex-direction: row; }
- .thumb { width: 200; height: 200; }
- .title { text-align: center ; flex: 1; color: grey; font-size: 50; }
- .slider {
- margin: 18;
- width: 714;
- height: 230;
- }
- .slider-pages {
- flex-direction: row;
- width: 714;
- height: 200;
- }
-</style>
-
-<script>
-module.exports = {
- data: {
- intervalValue:"1000",
- isShowIndicators:"true",
- isAutoPlay:"true",
- itemList: [
- {title: 'Java', pictureUrl: 'http://t.cn/RGE3uo9'},
- {title: 'Objective C', pictureUrl: 'http://t.cn/RGE31hq'},
- {title: 'JavaScript', pictureUrl: 'http://t.cn/RGE3AJt'}
- ]
- },
- methods: {
- goWeexSite: function () {
- this.$openURL('http://alibaba.github.io/weex/')
- }
- }
-}
-</script>
-```
-
-Open terminal and run the command again:
-
-```bash
-$ weex tech_list.we
-```
-
-You should see a slider prepend to our list.
-
-
-
-More information about Slider component can be found [here](../references/components/slider.html).
-
-Just as the previous example, the slider can be rendered in native, easily in Weex playground, or in your App. Please refer [the document](./advanced/integrate-to-android.html) for integrating Weex into your App.
http://git-wip-us.apache.org/repos/asf/incubator-weex-site/blob/12e3a8bc/_draft/v-0.10/guide/syntax/comm.md
----------------------------------------------------------------------
diff --git a/_draft/v-0.10/guide/syntax/comm.md b/_draft/v-0.10/guide/syntax/comm.md
deleted file mode 100644
index 84e49a1..0000000
--- a/_draft/v-0.10/guide/syntax/comm.md
+++ /dev/null
@@ -1,228 +0,0 @@
----
-title: Communications
-type: guide
-order: 2.8
-version: 0.10
----
-
-# Communicate Between Components
-
-## For Child-Parent Communication
-
-Children component can use `this.$dispatch([String type], [Object detail])` method passing information to parent component. first argument meaning type of message , second argument is the message object. If any parent of the child component register the same type of listener using `$on([String type], [Function callback])` method , the callback will be execute with one argument , the message object will be `detail` property of the the argument.
-
-eg:
-
-```html
-<we-element name="foo">
- <template>
- <div>
- <image src="{{imageUrl}}" onclick="test"></image>
- <text>{{title}}</text>
- </div>
- </template>
- <script>
- module.exports = {
- data: {
- title: '',
- imageUrl: ''
- },
- methods: {
- test: function () {
- this.$dispatch('notify', {a: 1})
- }
- }
- }
- </script>
-</we-element>
-
-<template>
- <foo title="..." image-url="..."></foo>
-</template>
-
-<script>
- module.exports = {
- created: function () {
- this.$on('notify', function(e) {
- // when <foo> image tag be clicked ,the function will be executing.
- // e.detail is `{a: 1}`
- })
- }
- }
-</script>
-```
-
-## For Parent-Child Communication
-
-Parent component can use `this.$vm([String id])` get vm instance of child component. you can access child component information using the vm instance.
-
-```html
-<we-element name="foo">
- <template>
- <div>
- <image src="{{imageUrl}}"></image>
- <text>{{title}}</text>
- </div>
- </template>
- <script>
- module.exports = {
- data: {
- title: '',
- imageUrl: ''
- },
- methods: {
- setTitle: function (t) {
- this.title = t
- }
- }
- }
- </script>
-</we-element>
-
-<template>
- <div>
- <text onclick="test">click to update foo</text>
- <foo id="fooEl" title="..." image-url="..."></foo>
- </div>
-</template>
-
-<script>
- module.exports = {
- methods: {
- test: function (e) {
- var foo = this.$vm('fooEl')
- foo.setTitle('...')
- foo.imageUrl = '...'
- }
- }
- }
-</script>
-```
-
-## Parent to Children (multi-child) Communication
-
-Parent can using `this.$broadcast([String type], [Object detail])` broadcast message to all of children.
-
-eg:
-
-```html
-<we-element name="bar">
- <template>
- <div>
- <image src="{{imageUrl}}"></image>
- </div>
- </template>
- <script>
- module.exports = {
- data: {
- imageUrl: ''
- },
- created: function() {
- var self = this
- this.$on('changeImage', function(e) {
- self.imageUrl = e.detail.imageUrl
- })
- }
- }
- </script>
-</we-element>
-
-<we-element name="foo">
- <template>
- <div>
- <bar></bar>
- <text>{{title}}</text>
- </div>
- </template>
- <script>
- module.exports = {
- data: {
- title: ''
- },
- created: function() {
- var self = this
- this.$on('changeTitle', function(e) {
- self.title = e.detail.title
- })
- }
- }
- </script>
-</we-element>
-
-<template>
- <div>
- <text onclick="test">click to update foo</text>
- <foo></foo>
- <bar></bar>
- </div>
-</template>
-
-<script>
- module.exports = {
- methods: {
- test: function (e) {
- this.$broadcast('changeTitle', {
- title: '...'
- })
- this.$broadcast('changeImage', {
- imageUrl: '...'
- })
- }
- }
- }
-</script>
-```
-
-## Siblings Communication
-
-siblings components can using common parent as bridge for passing information
-
-eg:
-
-```html
-<we-element name="foo">
- <template>...</template>
- <script>
- module.exports = {
- methods: {
- callbar: function () {
- this.$dispatch('callbar', {a: 1})
- }
- }
- }
- </script>
-</we-element>
-
-<we-element name="bar">
- <template>...</template>
- <script>
- module.exports = {
- created: function() {
- this.$on('callbar', function(e) {
- // e.detail.a
- })
- }
- }
- </script>
-</we-element>
-
-<template>
- <div>
- <foo></foo>
- <bar></bar>
- </div>
-</template>
-
-<script>
- module.exports = {
- created: function () {
- var self = this
- this.$on('callbar', function(e) {
- self.$broadcast('callbar', e.detail)
- })
- }
- }
-</script>
-```
-
-At last, you can learn how to write [config & data](./config-n-data.html) for a Weex page.
http://git-wip-us.apache.org/repos/asf/incubator-weex-site/blob/12e3a8bc/_draft/v-0.10/guide/syntax/composed-component.md
----------------------------------------------------------------------
diff --git a/_draft/v-0.10/guide/syntax/composed-component.md b/_draft/v-0.10/guide/syntax/composed-component.md
deleted file mode 100644
index 547096f..0000000
--- a/_draft/v-0.10/guide/syntax/composed-component.md
+++ /dev/null
@@ -1,114 +0,0 @@
----
-title: Composed Component
-type: guide
-order: 2.6
-version: 0.10
----
-
-# Composed Component
-
-If some part of weex file is reused often, you could create a composed component represent these part.
-
-You can create a file named `foo.we` to define a composed component, the component name is just `<foo>`.
-
-```html
-<!-- foo.we -->
-<template>
- <container style="flex-direction: row;">
- <image src="{{image}}" style="width:100;height:100;"></image>
- <text>{{title}}</text>
- </container>
-</template>
-<script>
- module.exports = {
- data: {
- title: null,
- image: null
- }
- }
-</script>
-```
-
-The content of `foo.we` also consists of `<template>`, `<style>` and `<script>`.
-
-Once composed component been defined, you can use `<foo>` in a file which is in the same folder with `foo.we`.
-
-```html
-<template>
- <foo title="..." image="..."></foo>
-</template>
-```
-
-## Nesting Components
-
-Composed component supports nesting. For example:
-
-```html
-<!-- somepath/foo.we -->
-<template>
- <container style="flex-direction: row;">
- <image src="{{image}}"></image>
- <text>{{title}}</text>
- </container>
-</template>
-<script>
- module.exports = {
- data: {
- // The key is required if you want this property observed
- // and could be updated from changing parent attribute
- title: null,
- image: null
- }
- }
-</script>
-```
-
-```html
-<!-- somepath/foo-list.we -->
-<template>
- <container>
- <text>{{description}}</text>
- <foo repeat="{{list}}" title="{{text}}" image="{{img}}"></foo>
- </container>
-</template>
-<script>
- module.exports = {
- data: {
- description: '',
- // If no keys written here. There will be no data binding effect
- // from parent attribute "list".
- list: []
- }
- }
-</script>
-```
-
-```html
-<!-- somepath/main.we -->
-<template>
- <foo-list list="{{list}}"></foo-list>
-</template>
-<script>
- module.exports = {
- data: {
- list: [
- {text: '...', img: '...'},
- {text: '...', img: '...'},
- {text: '...', img: '...'},
- ...
- ]
- }
- }
-</script>
-```
-
-The `main.we` uses `<foo-list>` from `foo-list.we`. And `<foo-list>` uses `<foo>` from `foo.we`.
-
-## Notes
-
-- Every composed component have an independent `<style>` work scope.
-- If child component have `id` attribute, you can access the context of the child component by `this.$vm(id)` and find an element by `this.$el(id)`. See more about [find an element](./id.html).
-- Please refer to [communicate between components](./comm.html) for more communication issues.
-- The keys must be existed in `data` options **explicitly** if you want to make the data observation work both through inside data changes and outside attribute changes.
-
-Next is how to [find an element](./id.html).
http://git-wip-us.apache.org/repos/asf/incubator-weex-site/blob/12e3a8bc/_draft/v-0.10/guide/syntax/config-n-data.md
----------------------------------------------------------------------
diff --git a/_draft/v-0.10/guide/syntax/config-n-data.md b/_draft/v-0.10/guide/syntax/config-n-data.md
deleted file mode 100644
index 37b8e12..0000000
--- a/_draft/v-0.10/guide/syntax/config-n-data.md
+++ /dev/null
@@ -1,61 +0,0 @@
----
-title: Page Config & Data
-type: guide
-order: 2.9
-version: 0.10
----
-
-# Page Config & Data
-
-You can write some instance config and data in some additional `<script>` at the **top-level** Weex component.
-
-* the instance config could declare some meta informations like which sdk/client version it supports or "downgrade" to HTML5 renderer. This part would be extended more in the future.
-* the instance data could set an external data which would be processed instead of the default top-level component data.
-
-They all make Weex files more extendable and configurable and works easy with other tools & services like CMS system.
-
-```html
-<!-- definition of sub components -->
-<element name="sub-component-a">...</element>
-<element name="sub-component-b">...</element>
-<element name="sub-component-c">...</element>
-
-<!-- definition of top-level component -->
-<template>...</template>
-<style></style>
-<script>
- module.exports = {
- data: function () {return {x: 1, y: 2}}
- }
-</script>
-
-<!-- instance config and data -->
-<script type="config">
- {
- downgrade: {
- ios: {
- os: '9', // all of 9.x.x
- app: '~5.3.2',
- framework: '^1.3', // all of 1.3.x
- deviceModel: ['AAAA', 'BBBB']
- },
- android: {
- os: '*', // all of version
- app: '^5',
- framework: '',
- deviceModel: ''
- }
- }
- }
-</script>
-<script type="data">
- {y: 200}
-</script>
-```
-
-Notice that these two additional `<script>` are both optinal and have `type="config|data"` attribute and only works when it's the top-level component of a Weex instance.
-
-So that's all about Weex syntax. For more reading, please check out:
-
-* [how-tos](../how-to/index.html) articles and
-* [advanced](../../advanced/index.html) topics.
http://git-wip-us.apache.org/repos/asf/incubator-weex-site/blob/12e3a8bc/_draft/v-0.10/guide/syntax/data-binding.md
----------------------------------------------------------------------
diff --git a/_draft/v-0.10/guide/syntax/data-binding.md b/_draft/v-0.10/guide/syntax/data-binding.md
deleted file mode 100644
index 497735c..0000000
--- a/_draft/v-0.10/guide/syntax/data-binding.md
+++ /dev/null
@@ -1,248 +0,0 @@
----
-title: Data-Binding
-type: guide
-order: 2.1
-version: 0.10
----
-
-# Data-Binding
-
-In Weex, we use the *mustache* syntax `{% raw %}{{...}}{% endraw %}` to bind data in `<template>` which are defined in `<script>`. Once data and template is bound, the data changes will influence the corresponding template content immediately and automatically.
-
-## Binding data path
-
-```html
-<template>
- <container>
- <text style="font-size: {{size}}">{{title}}</text>
- </container>
-</template>
-
-<script>
- module.exports = {
- data: {
- size: 48,
- title: 'Alibaba Weex Team'
- }
- }
-</script>
-```
-
-The code above will bind the `title` and `size` data field to `template`.
-
-We can also use `.` syntax to bind cascading data structure. Let's look at the following code snippet:
-
-```html
-<template>
- <container>
- <text style="font-size: {{title.size}}">{{title.value}}</text>
- </container>
-</template>
-
-<script>
- module.exports = {
- data: {
- title: {
- size: 48,
- value: 'Alibaba Weex Team'
- }
- }
- }
-</script>
-```
-
-## In-template expression
-
-Inside data bindings, Weex supports simply javascript expressions, e.g.
-
-```html
-<template>
- <container style="flex-direction: row;">
- <text>{{firstName + ' ' + lastName}}</text>
- </container>
-</template>
-
-<script>
- module.exports = {
- data: {
- firstName: 'John',
- lastName: 'Smith'
- }
- }
-</script>
-```
-
-The expression will be evaluated in the data scope of current context.
-
-**NOTE: EACH BINDING CAN ONLY CONTAIN ONE SINGLE EXPRESSION**
-
-## Computed Properties
-<span class="weex-version">0.5</span>
-
-According to simple operations, in-template expressions are very convenient. But if you want to put more logic into the template, you should use a computed property.
-
-e.g.
-
-```html
-<template>
- <container style="flex-direction: row;">
- <text>{{fullName}}</text>
- <text onclick="changeName" style="margin-left:10px;">CHANGE NAME</text>
- </container>
-</template>
-
-<script>
- module.exports = {
- data: {
- firstName: 'John',
- lastName: 'Smith'
- },
- computed: {
- fullName: {
- get: function() {
- return this.firstName + ' ' + this.lastName
- },
-
- set: function(v) {
- var s = v.split(' ')
- this.firstName = s[0]
- this.lastName = s[1]
- }
- }
- },
- methods: {
- changeName: function() {
- this.fullName = 'Terry King'
- }
- }
- }
-</script>
-```
-
-Here we have declared a computed property fullName. The function we provided will be used as the getter function for concating firstName and lastName.
-
-Otherwise when you call `changeName` after click, the setter will be invoked and this.firstName and this.lastName will be updated accordingly.
-
-**NOTE: `data` and `methods` can't have duplicated fields. 'Cause in the execution context -- `this`, we can access both of them.**
-
-## Usage of some special attributes in Data-Binding
-
-### Styles: `style` or `class`
-
-the style of a component can be bind using the `style` attribute:
-
-```html
-<template>
- <text style="font-size: {{size}}; color: {{color}}; ...">...</text>
-</template>
-```
-
-while style can also get bound with `class` attribute, multiple classnames can be split by spaces:
-
-```html
-<template>
- <container>
- <text class="{{size}}"></text>
- <text class="title {{status}}"></text>
- </container>
-</template>
-```
-
-here if `{{size}}` and `{{status}}` have empty value, then only `class="title"` will be rendered.
-
-* [See more about style and class](./style-n-class.html)
-
-### Event Handler: `on...`
-
-The event handler is an attribute which name has a prefix `on...`. The other part of attribute name is event type and the value is event handler name. We don't need to add mustache around the method name or add parentheses to call it.
-
-```html
-<template>
- <text onclick="toggle">Toggle</text>
-</template>
-
-<script>
- module.exports = {
- methods: {
- toggle: function () {
- // todo
- }
- }
- }
-</script>
-```
-
-### `if` & `repeat`
-
-`if` attribute can control the display of a component by a truthy/falsy value.
-
-```html
-<template>
- <container style="flex-direction: column;">
- <text onclick="toggle">Toggle</text>
- <image src="..." if="{{shown}}"></image>
- </container>
-</template>
-
-<script>
- module.exports = {
- data: {
- shown: true
- },
- methods: {
- toggle: function () {
- this.shown = !this.shown
- }
- }
- }
-</script>
-```
-
-We can also use `repeat` attribute to generate a list.
-
-**NOTE: When you want to mutate an array in `data`. Something limitations existing below:**
-
-When you directly set an item with the index (`vm.items[0] = {};`), it won't trigger view update. So we have a prototype methods: `$set(index, item)`.
-
-```javascript
-// same as `example1.items[0] = ...` but triggers view update
-example1.items.$set(0, { childMsg: 'Changed!'})
-```
-
-When you modify the length of the Array (`vm.items.length = 0`), it won't trigger view update too. We recommend you just replace `items` with an empty array instead.
-
-```javascript
-// same as `example2.items.length = 0` but triggers view update
-example2.items = []
-```
-
-* [See more about display logic control](./display-logic.html)
-
-### `static`
-
-`static` attribute can cancel the data binding, and the data changes will not be synchronized to UI.
-
-```html
-<template>
- <div static>
- <text>{{ word }}</text>
- </div>
-</template>
-
-<script>
- module.exports = {
- ready: function() {
- this.word = 'Data changes'
- },
- data: {
- word: 'Hello, static'
- }
- }
-</script>
-```
-
-As shown above, after the `static` attribute is added, the rendering result will be `Hello, static`, which is equivalent to rendering a static node. The change of the data `word` in ready function will not be listened, so the text value will not change.
-`static` property is designed to reduce the long list or pure static page memory overhead. Be careful with it, as it will likely break your page logic.
-
-Next, let's have a look at [style and class](./style-n-class.html).
-
http://git-wip-us.apache.org/repos/asf/incubator-weex-site/blob/12e3a8bc/_draft/v-0.10/guide/syntax/display-logic.md
----------------------------------------------------------------------
diff --git a/_draft/v-0.10/guide/syntax/display-logic.md b/_draft/v-0.10/guide/syntax/display-logic.md
deleted file mode 100644
index 842e188..0000000
--- a/_draft/v-0.10/guide/syntax/display-logic.md
+++ /dev/null
@@ -1,173 +0,0 @@
----
-title: Display Logic Control
-type: guide
-order: 2.4
-version: 0.10
----
-
-# Display Logic Control
-
-There are two attributes for display logic control: `if` and `repeat`. We can create Weex page structure and effects more flexible with them.
-
- > **Notes:** The display logic could't apply on the root element within `<template>`, please don't use `if` or `repeat` directive on it.
-
-## `if`
-
-`if` attribute can control the display of a component by a truthy/falsy value. If the value is truthy, then the component will generated, otherwise it will be removed.
-
-```html
-<template>
- <container>
- <text onclick="toggle">Toggle</text>
- <image src="..." if="{{shown}}"></image>
- </container>
-</template>
-
-<script>
- module.exports = {
- data: {
- shown: true
- },
- methods: {
- toggle: function () {
- this.shown = !this.shown
- }
- }
- }
-</script>
-```
-
-## `repeat`
-
-`repeat` statement is just for array rendering. Every item in an array is also a structured data. This means in `repeat`ed component, you can bind their item properties directly.
-
-```html
-<template>
- <container>
- <container repeat="{{list}}" class="{{gender}}">
- <image src="{{avatar}}"></image>
- <text>{{nickname}}</text>
- </container>
- </container>
-</template>
-
-<style>
- .male {...}
- .female {...}
-</style>
-
-<script>
- module.exports = {
- data: {
- list: [
- {gender: 'male', nickname: 'Li Lei', avatar: '...'},
- {gender: 'female', nickname: 'Han Meimei', avatar: '...'},
- ...
- ]
- }
- }
-</script>
-```
-
-The origin data properties which not belongs to the array will also be bound:
-
-```html
-<template>
- <container>
- <container repeat="{{list}}" class="{{gender}}">
- <image src="{{avatar}}"></image>
- <text>{{nickname}} - {{group}}</text>
- </container>
- </container>
-</template>
-
-<style>
- .male {...}
- .female {...}
-</style>
-
-<script>
- module.exports = {
- data: {
- group: '...',
- list: [
- {gender: 'male', nickname: 'Li Lei', avatar: '...'},
- {gender: 'female', nickname: 'Han Meimei', avatar: '...'},
- ...
- ]
- }
- }
-</script>
-```
-
-### An extension of repeat syntax
-
-#### use default `$index` for the index of array.
-
-e.g.
-
-```html
-<div repeat="{{list}}">
- <text>No. {{$index + 1}}</text>
-<div>
-```
-
-#### specify the key and value of array.
-
-e.g.
-
-```html
-<div repeat="{{v in list}}">
- <text>No. {{$index + 1}}, {{v.nickname}}</text>
-</div>
-```
-
-```html
-<div repeat="{{(k, v) in list}}">
- <text>No. {{k + 1}}, {{v.nickname}}</text>
-</div>
-```
-
-#### use `track-by` to specify unique attribute
-
-By default when replacing an array, `repeat` will cause the entire list to be re-rendered. However you can use `track-by` to specify an unique attribute as a hint, so that weex can reuse existing elements as much as possible.
-
-**NOTE: DO NOT USE DATA-BINDING SYNTAX FOR `track-by`**
-
-e.g.
-
-```html
-<template>
- <container>
- <container repeat="{{list}}" track-by="nickname" class="{{gender}}">
- <image src="{{avatar}}"></image>
- <text>{{nickname}} - {{group}}</text>
- </container>
- </container>
-</template>
-```
-
-Later on, when you replace the array including an item of the same nickname, it knows it can reuse the existing scope and DOM elements associated with the same nickname.
-
-## Omitted mustache wrapper
-
-Particularly for the `if` and `repeat` attribute, the [mustache](https://mustache.github.io/) wrapper in values could be omitted: just the same as data-binding syntax.
-
-```html
-<template>
- <container>
- <text if="shown">Hello</text>
- <text if="{{shown}}">Hello</text>
- </container>
-</template>
-
-<script>
- module.exports = {
- data: function () {return {shown: true}}
- }
-</script>
-```
-
-The two `<text>` components are both displayed.
-
-Next is [render logic control](./render-logic.html).
http://git-wip-us.apache.org/repos/asf/incubator-weex-site/blob/12e3a8bc/_draft/v-0.10/guide/syntax/events.md
----------------------------------------------------------------------
diff --git a/_draft/v-0.10/guide/syntax/events.md b/_draft/v-0.10/guide/syntax/events.md
deleted file mode 100644
index c79dd2b..0000000
--- a/_draft/v-0.10/guide/syntax/events.md
+++ /dev/null
@@ -1,59 +0,0 @@
----
-title: Events
-type: guide
-order: 2.3
-version: 0.10
----
-
-# Events
-
-Weex allow `<template>` to bind event type and handler on an Element. The attribute name is the event type with prefix `on...` and the attribute value is handler method name. For instance: `onclick="handler"`. e.g.
-
-```html
-<template>
- <image onclick="handler" ...></image>
-</template>
-
-<script>
- module.exports = {
- methods: {
- handler: function (e) {
- // TODO
- }
- }
- }
-</script>
-```
-
-When user clicks the image , handler function which defined in `<script>` code will be executed.
-
-## Inline Handler
-
-Beside a handler method name, you can also call a handler inline.
-
-e.g.
-```html
-<template>
- <image onclick="handler('arg1', $event)" ...></image>
-</template>
-
-<script>
- module.exports = {
- methods: {
- handler: function (arg1, e) {
- // TODO
- }
- }
- }
-</script>
-```
-
-## Event Object
-
-When an event handler called, it will receive an event object as the first argument. Every event object will contains following properties.
-
-* `type`: event name, eg: `click`
-* `target`: target `Element` of the event
-* `timestamp`: time stamp that event triggered
-
-Next, let's have a look at [display logic control](./display-logic.html).
http://git-wip-us.apache.org/repos/asf/incubator-weex-site/blob/12e3a8bc/_draft/v-0.10/guide/syntax/id.md
----------------------------------------------------------------------
diff --git a/_draft/v-0.10/guide/syntax/id.md b/_draft/v-0.10/guide/syntax/id.md
deleted file mode 100644
index eaa6e04..0000000
--- a/_draft/v-0.10/guide/syntax/id.md
+++ /dev/null
@@ -1,65 +0,0 @@
----
-title: Find an Element
-type: guide
-order: 2.7
-version: 0.10
----
-
-# Find an Element
-
-In Weex, we may set the `id` property for a particular element, just as unique identification of a particular element.
-
-`id` can be used by `this.$el(id)` to find an element with a certain id. Take the API [`scrollToElement()`](../../references/modules/dom.html#scrolltoelementnode-options) For example:
-
-```html
-<template>
- <container>
- <text id="top">Top</text>
- <container style="height: 10000; background-color: #999999;">
- </container>
- <text onclick="back2Top">Back to Top</text>
- </container>
-</template>
-<script>
- var dom = require('@weex-module/dom')
- module.exports = {
- methods: {
- back2Top: function () {
- var top = this.$el('top')
- dom.scrollToElement(top)
- }
- }
- }
-</script>
-```
-
-`id` can also work with `repeat` attribute [See more about display logical control](./display-logic.html), and ensure repetitive elements with different `id`:
-
-```html
-<template>
- <container>
- <image id="{{imgId}}" src="{{imgUrl}}" onclick="getImageId" repeat="{{images}}"></image>
- </container>
-</template>
-<script>
- module.exports = {
- data: {
- images: [
- {imgId: 1, imgUrl: '...'},
- {imgId: 2, imgUrl: '...'},
- {imgId: 3, imgUrl: '...'},
- ...
- ]
- },
- methods: {
- getImageId: function(e) {
- // get e.target.id
- }
- }
- }
-</script>
-```
-
-Additionally, in the [composed components](./composed-component.html), we can get the corresponding sub component through `this.$vm(id)` APIs.
-
-Next is how to [send messages between composed components](./comm.html).
http://git-wip-us.apache.org/repos/asf/incubator-weex-site/blob/12e3a8bc/_draft/v-0.10/guide/syntax/index.md
----------------------------------------------------------------------
diff --git a/_draft/v-0.10/guide/syntax/index.md b/_draft/v-0.10/guide/syntax/index.md
deleted file mode 100644
index 448c40a..0000000
--- a/_draft/v-0.10/guide/syntax/index.md
+++ /dev/null
@@ -1,122 +0,0 @@
----
-title: Syntax
-type: guide
-order: 2
-has_chapter_content: true
-version: 0.10
----
-
-# Syntax
-
-*The syntax of Weex is deeply inspired from [Vue.js](http://vuejs.org/), an elegant JavaScript framework with component system and reactive data binding.*
-
-A simple Weex page sample is just a piece of `<template>` code, a piece of `<style>` code and a piece of `<script>` code. The three parts together describe a whole Weex page.
-
-- `<template>`: *required*. Just uses HTML syntax and describes the structure of a Weex page, which is build upon several tags. Each tag means a type of *component*.
-- `<style>`: *optional*. Describes the presentation details, and the content is based on CSS syntax.
-- `<script>`: *optional*. Describes the data and behavior with JavaScript syntax. It defines data and how these data are processed etc.
-
-```html
-<template>
- <!-- (required) the structure of page -->
-</template>
-
-<style>
- /* (optional) stylesheet */
-</style>
-
-<script>
- /* (optional) the definition of data, methods and life-circle */
-</script>
-```
-
-## `<template>`
-
-We describe page structure in `<template>` tag like the following definition:
-
-```html
-<template>
- <container>
- <image style="width: 200; height: 200;" src="http://gtms02.alicdn.com/tps/i2/TB1QHKjMXXXXXadXVXX20ySQVXX-512-512.png"></image>
- <text>Alibaba Weex Team</text>
- </container>
-</template>
-```
-
-Here `container` tag is the root element of the component. `image` tag describes a picture, while `text` tag means a paragraph of text.
-
-Just similar to HTML, each component could have its own attributes, some components also have children as their sub components.
-
-The root element of template: In a `template` tag, there could be only one root component which has no display logics directive. Here are three types of root component we support now:
-
-- `<container>`: a common native container
-- `<scroller>`: a native scroll view
-- `<list>`: a native cell-reusable list view
-
-Only these type of components are allowed for root element.
-
-* [See all built-in components](../../references/components/index.html).
-
-## `<style>`
-
-You can consider the Weex style syntax is a subset of the CSS syntax, but there is still some differences.
-
-First we could write inline `style` attribute in `<template>` element. Second we could use the `class` attribute to apply stylesheets, which are defined with single-class selectors in `<style>` code. Here is an example:
-
-```html
-<template>
- <container>
- <text style="font-size: 64;">Alibaba</text>
- <text class="large">Weex Team</text>
- </container>
-</template>
-
-<style>
- .large {font-size: 64;}
-</style>
-```
-
-Both the two `text` components above have the same `font-size`, which is `64` pixel.
-
-* [See common styles in Weex](../../references/common-style.html)
-
-
-### Notes!
-weex is basically following [HTML attribute](https://en.wikipedia.org/wiki/HTML_attribute) naming rule , so please **do not use CamelCase** in your attribute , **long-name** with “-” as delimiter is much better.
-
-## `<script>`
-
-The syntax is JavaScript (ES5) and it describes data and behavior of a Weex page. Here we create three paragraphs:
-
-```html
-<template>
- <container>
- <text>The time is {{datetime}}</text>
- <text>{{title}}</text>
- <text>{{getTitle()}}</text>
- </container>
-</template>
-
-<script>
- module.exports = {
- data: {
- title: 'Alibaba',
- datetime: null
- },
- methods: {
- getTitle: function () {
- return 'Weex Team'
- }
- },
- created: function() {
- this.datetime = new Date().toLocaleString()
- }
- }
-</script>
-```
-
-This piece of `<script>` code will generate some component options and assign it to `module.exports`. The three text components above respectively shows the current datetime, 'Alibaba' and 'Weex Team'. The `data` in the `<script>` code stores component data which could be used for [data-binding](./data-binding.html) in the `<template>`. When data changes, the bound value will be updated automatically. Also it could be read and written by `this.x` in its methods.
-
-* [See component definitions references](../../references/component-defs.html)
-
-Next, let's have a look at [data-binding](./data-binding.html).
http://git-wip-us.apache.org/repos/asf/incubator-weex-site/blob/12e3a8bc/_draft/v-0.10/guide/syntax/render-logic.md
----------------------------------------------------------------------
diff --git a/_draft/v-0.10/guide/syntax/render-logic.md b/_draft/v-0.10/guide/syntax/render-logic.md
deleted file mode 100644
index be967e1..0000000
--- a/_draft/v-0.10/guide/syntax/render-logic.md
+++ /dev/null
@@ -1,35 +0,0 @@
----
-title: Render Logic Control
-type: guide
-order: 2.5
-version: 0.10
----
-
-# Render Logic Control
-
-## `append`
-
-Attribute `append` do not have data-binding. It won't change the final rendering effect. But it determines whether this component should be rendered as a whole tree or a single node with child nodes appended after.
-
-`append` has two key attributes, `tree` and `node`, the usage is:
-
-```html
-<template>
- <container>
- <container id="world" append="tree">
- <text>Hello World!</text>
- </container>
- <container id="weex" append="node">
- <text>Hello Weex!</text>
- </container>
- </container>
-</template>
-```
-
-In the code snippet above, the element with id 'world' will wait for all its children to be rendered then it will be rendered entirely, while the element with id 'weex' will only render itself to the page, then its child elements will be rendered to page one by one.
-
-The rendering result is obvious, The latter statement will render the element a bit faster on the first-paint, but the total time might be longger than `append="tree"` case.
-
-By default, elements are rendered as `node` mode. Once an element is in `tree` rendering mode, its children elements will always be rendered in `tree` mode.
-
-Next we will introduce [composed component](./composed-component.html).
http://git-wip-us.apache.org/repos/asf/incubator-weex-site/blob/12e3a8bc/_draft/v-0.10/guide/syntax/style-n-class.md
----------------------------------------------------------------------
diff --git a/_draft/v-0.10/guide/syntax/style-n-class.md b/_draft/v-0.10/guide/syntax/style-n-class.md
deleted file mode 100644
index 4337992..0000000
--- a/_draft/v-0.10/guide/syntax/style-n-class.md
+++ /dev/null
@@ -1,118 +0,0 @@
----
-title: Style & Class
-type: guide
-order: 2.2
-version: 0.10
----
-
-# Style & Class
-
-## The Basic Syntax
-
-CSS style description can be viewed as a series of key-value pairs,each of which describes a particular style, such as the width and height of a component.
-
-```css
-.box {
- width: 400;
- height: 50;
-}
-```
-
-The format of key-value pairs is `prop-name: prop-value;`. The key name is `prop-name`, the value name is `prop-value`. Usually,the key name and the value name follow Horizontal connection nomenclature, the value may be a number(the default units is px); The key and the value must be separated by `:`, between each key-value pairs must be separated by `;`.
-
-The style description will appear on a weex page in two formats:
-
-* Style attribute of `<template>` label
-* Stylesheets of `<style>` label
-
-### style attribute
-
-The style written in the style label, for example:
-
-```html
-<template>
- <container style="width: 400; height: 50;">
- ...
- </container>
-</template>
-```
-
-It is said that the width and height of `<container>` label is 400 pixels and 50 pixels respectively.
-
-### the `<style>` tag
-
-For example:
-
-```html
-<style>
- .wrapper {width: 600;}
- .title {width: 400; height: 50;}
- .highlight {color: #ff0000;}
-</style>
-```
-
-The stylesheets contain multiple style rules, each style rule has only one class which is contained by its style selector, a pair of curly braces `{...}`, and the styles of the curly braces. For example:
-
-```css
-.title {
- width: 400;
- height: 50;
-}
-```
-
-The above is a rule.
-
-### Class attribute
-
-The selectors of `<style>` label are matched with the class attribute of `<template>` label, we should use spaces to separate the class names. For example:
-
-```html
-<template>
- <container class="wrapper">
- <text class="title">...</text>
- <text class="title highlight">...</text>
- </container>
-</template>
-<style>
- .wrapper {width: 600;}
- .title {width: 400; height: 50;}
- .highlight {color: #ff0000;}
-</style>
-```
-
-It means that the width of the outermost container is 600px, The inside of the two title text is 400 pixels wide 50 pixels high, the second piece of text is red.
-
-### Notes
-
-* In order to simplify the page design and the complete underlying implementation, the width of our default screen is unified to 750 pixels, different screens should be scaled with corresponding ratio.
-* The CSS standard may support a lot of selectors, but now weex only support single-class selector.
-* The CSS standard can support many types of length units, but now weex only support pixel, and the `px` unit could be ignored, you can write number directly. More details can be found in [commmon styles](../../references/common-style.html).
-* The styles of Weex cannot be inherited to children elements, this is different to the CSS standard, such as `color` and `font-size`.
-* The CSS standard contains a lot of styles, but weex only sopport few styles which include layouts such as box model, flexbox, positions. And styles include `font-size`, `color`, etc.
-
-## With Data-binding
-
-Page [data](./data-binding.html) can be bound in `style` and `class` attribute. For example:
-
-```html
-<template>
- <container>
- <text style="font-size: {{fontSize}};">Alibaba</text>
- <text class="large {{textClass}}">Weex Team</text>
- </container>
-</template>
-<style>
- .large {font-size: 32;}
- .highlight {color: #ff0000;}
-</style>
-<script>
- module.exports = {
- data: {
- fontSize: 32,
- textClass: 'highlight'
- }
- }
-</script>
-```
-
-Next, let's have a look at [events](./events.html).
[23/51] [abbrv] incubator-weex-site git commit: rearrangement the
structure of the document
Posted by ha...@apache.org.
http://git-wip-us.apache.org/repos/asf/incubator-weex-site/blob/32a097bf/_draft/v1.0/guide/how-to/transform-code-into-js-bundle.md
----------------------------------------------------------------------
diff --git a/_draft/v1.0/guide/how-to/transform-code-into-js-bundle.md b/_draft/v1.0/guide/how-to/transform-code-into-js-bundle.md
new file mode 100644
index 0000000..69667ae
--- /dev/null
+++ b/_draft/v1.0/guide/how-to/transform-code-into-js-bundle.md
@@ -0,0 +1,112 @@
+---
+title: 将 `.we` 源代码转换成 JS Bundle
+type: guide
+order: 4.4
+version: 0.10
+---
+
+# 将 `.we` 源代码转换成 JS Bundle
+<span class="weex-version">0.4</span>
+
+在前面的章节中你已经了解到如何编写及组织 Weex 代码,如果你还有疑问,可参考 [语法](../syntax/main.html) 及 [手册](../../references/main.html)。 但是,Weex 语法的代码必须转换为 JSBundle,以便 Weex JSFramework 可以在 iOS,Android 和浏览器端解析和执行。了解更多信息,可参考 [Weex 工作原理](../../advanced/how-it-works.html) 和 [JS Bundle 格式](../../references/specs/js-bundle-format.html)
+
+现在,回到将 `.we` 源代码转换成 JS Bundle 的主题。有几种方法来实现这一目标。
+
+## 使用 weex-toolkit
+
+如果你已经有了 node.js 开发环境,可以直接使用以下命令。关于 node.js 及其他依赖安装可参考[安装依赖](../develop-on-your-local-machine.html#第一步:安装依赖)
+```bash
+$npm install -g weex-toolkit
+```
+
+### 将 `.we` 文件转换为 JS Bundle
+
+```bash
+$ weex your_best_weex.we -o .
+```
+
+`your_best_weex.we` 将会被转换为 `your_best_weex.js` 并保存在当前目录。
+
+### 将 `.we` 文件转换为 JS Bundle 并开启 watch 功能,实时自动转换
+
+```bash
+
+$ weex your_best_weex.we -o . --watch
+```
+
+### 将所有 `.we` 文件转换到一个目录中
+
+```bash
+$ weex we/file/storage/path -o outputpath
+```
+
+ `we/file/storage/path` 目录下的每个 `.we` 文件都会被转换为 JS Bundle 并保存到 `outputpath` 目录。
+
+请访问 [npmjs.com](https://www.npmjs.com/package/weex-toolkit) 了解更多关于 `weex-toolkit`。
+
+## transformer
+
+```bash
+npm install weex-transformer
+```
+
+### CLI Tool
+
+```
+ Usage: transformer [options] <file...>
+
+ Options:
+
+ -h, --help output usage information
+ -V, --version output the version number
+ -l, --oldFormat [value] whether to transform to old format (default: false)
+ -e, --isEntry [value] whether is an entry module which has `bootstrap` (default: true)
+ -o, --output [path] the output file dirname
+```
+
+### API
+
+** transform(name, code, path, elements, config) **
+
+```javascript
+var transformer = require('weex-transformer')
+var output = transformer.transform('foo', '/* code here */', '.', {})
+```
+
+参数:
+
+- `name {string}`:当前 bundle 文件名
+- `code {string}`:源码
+- `path {string}`: *可选*,当在某个路径中查找自定义组件时很有用
+- `elements {Object}`:*可选*,存在的自定义组件映射
+- `config {Object}`:*可选*
+
+ * `oldFormat {boolean}`:是否转换为旧格式 (默认:`false`)
+ * `isEntry {boolean}`:是否是具有 `bootstrap` 的入口模块 (默认:`true`)
+
+返回值:
+- 一个对象:
+ - `result {string}`:所有自定义组件的 `define()` 方法和最终的 `bootstrap()`
+ - `logs {Array}`:相应的警告和错误日志
+
+## gulp weex
+
+```bash
+npm install gulp-weex
+```
+
+```javascript
+var gulp = require('gulp')
+var weex = require('gulp-weex')
+
+gulp.task('default', function () {
+ return gulp.src('src/*.html')
+ .pipe(weex({}))
+ .pipe(gulp.dest('./dest'))
+})
+```
+
+参数:
+
+- `oldFormat {boolean}`:是否转换为旧格式 (默认:`false`)
+- `isEntry {boolean}`:是否是具有 `bootstrap` 的入口模块 (默认:`true`)
http://git-wip-us.apache.org/repos/asf/incubator-weex-site/blob/32a097bf/_draft/v1.0/guide/index.md
----------------------------------------------------------------------
diff --git a/_draft/v1.0/guide/index.md b/_draft/v1.0/guide/index.md
new file mode 100644
index 0000000..73d1a98
--- /dev/null
+++ b/_draft/v1.0/guide/index.md
@@ -0,0 +1,60 @@
+---
+title: 上手教程
+type: guide
+order: 1
+has_chapter_content: true
+version: 0.10
+---
+
+# 起步教程
+
+Weex 是一套简单易用的跨平台开发方案,能以 web 的开发体验构建高性能、可扩展的 native 应用,为了做到这些,Weex 与 Vue 合作,使用 Vue 作为上层框架,并遵循 W3C 标准实现了统一的 JSEngine 和 DOM API,这样一来,你甚至可以使用其他框架驱动 Weex,打造三端一致的 native 应用。
+
+尝试 Weex 最简单的方法是使用 [Playground App](https://alibaba.github.io/weex/download.html) 和在 [dotWe](http://dotwe.org) 编写一个 [Hello World](http://dotwe.org/656345423a7ef46f4b897ff471fd2ab5) 例子。你不需要考虑安装开发环境或编写 native 代码,只需要做下面两件事:
+
+- 为你的手机安装 [Playground App](https://alibaba.github.io/weex/download.html),当然,Weex 是跨平台的框架,你依然可以使用浏览器进行预览,只是这样你就无法感受到 native 优秀的体验了。
+- 在新标签页中打开 [Hello World](http://dotwe.org/656345423a7ef46f4b897ff471fd2ab5) 例子,点击预览,然后用 Playground 扫码即可。
+
+在这个例子中,我们看到了熟悉的 HTML 语义化标签、CSS 样式和 Javascript 代码。这是一个最简单的 Weex 示例,它在页面中渲染了一个 "Hello World"。
+
+
+
+## 发生了什么?
+
+就如示例代码所示:
+
+```html
+<template>
+ <div>
+ <text class="text">{{text}}</text>
+ </div>
+</template>
+
+<style>
+ .text {
+ font-size: 50;
+ }
+</style>
+
+<script>
+ module.exports = {
+ data: {
+ text: 'Hello World.'
+ }
+ }
+</script>
+```
+
+我们暂时不去关心 Weex 的技术细节,仅看大致的代码结构。Weex 代码由三部分构成:`template`、`style`、`script`,这三个概念之于 Weex 就如 HTML,CSS,JavaScript 之于 Web。
+
+模板部分赋予 Weex 以骨架,由标签以及标签包围的内容构成,标签中能添加 `attribute(特性)`,不同的 `attribute` 有不同的含义,例如 class 特性让同样的样式可以作用于多组 Weex 标签, onclick 特性让标签能对用户点击事件作出回应。
+
+样式部分描述 Weex 标签如何显示。和你一样,我们喜欢 CSS,所以 Weex 中的样式尽量和 CSS 标准一致。Weex 支持很多 CSS 中的特性: margin, padding, fixed...... 更好的是, flexbox 布局模型在 Weex 中获得了很好的支持。
+
+脚本部分为 Weex 标签添加数据与逻辑,在这里你能方便的访问本地或远程的数据并动态更新。你还能定义方法并让这些方法响应不同的事件。Weex 脚本的组织方式基本遵循于 CommonJS module 规范。
+
+是不是觉得这些语法有些眼熟?没错,Weex 语法参考了 [Vue](https://github.com/vuejs/vue),如果你熟悉 Vue,你会很快适应 Weex 语法(最新的 Weex framework 将会基于 [Vue 2.0](https://github.com/vuejs/vue) 开发,完全兼容 Vue,可参见我们的 [Roadmap](https://github.com/weexteam/weex-vue-framework/issues/9)),更好的是,我们拥抱规范,尽可能的按照 W3C 标准进行实现,因此,你大可不必担心 Weex 三端差异。
+
+你可以试着修改 [Hello World](http://dotwe.org/656345423a7ef46f4b897ff471fd2ab5) 的代码,再次点击预览即可生成新的二维码进行扫描。
+
+Weex 不止是个 Demo,在接下来的章节中,你还会看到更多 Weex 开发 native 应用并将其集成到你的 App 中的精彩教程。不要忘了随时在 [dotWe](http://dotwe.org) 中编写代码验证并通过 [Playground App](https://alibaba.github.io/weex/download.html) 预览。
http://git-wip-us.apache.org/repos/asf/incubator-weex-site/blob/32a097bf/_draft/v1.0/guide/syntax/comm.md
----------------------------------------------------------------------
diff --git a/_draft/v1.0/guide/syntax/comm.md b/_draft/v1.0/guide/syntax/comm.md
new file mode 100644
index 0000000..7923ef7
--- /dev/null
+++ b/_draft/v1.0/guide/syntax/comm.md
@@ -0,0 +1,134 @@
+---
+title: 组件通信
+type: guide
+order: 3.8
+version: 0.10
+---
+
+# 组件间通信
+
+## 自定义事件
+
+Weex 支持自定义事件,这里有两个相关的设计:1,监听自定义事件;2,创建自定义事件。
+
+## 监听自定义事件
+
+每个 Weex 的 ViewModel 都支持 `this.$on(type, handler)` 和 `this.$off(type[, handler])` 的 API。`type` 是监听的自定义事件类型,`handler` 是事件处理函数。
+
+当 `handler` 被触发时,会有一个事件对象 `event` 作为第一个参数被传入,事件对象的数据格式基于[事件机制](./events.html)中提到的事件描述对象。
+
+## 创建自定义事件
+
+每个 Weex 的 ViewModel 都支持 `this.$emit(type, detail)` 的 API,可以在当前 ViewModel 中产生一个自定义事件。`type` 是自定义事件的类型,`detail` 则是一个对该事件细节补充描述的 JSON 对象,会以 `event.detail` 的形式出现在处理此事件的函数中。
+
+## 从子组件向父组件通信
+
+首先父组件要监听特定类型的自定义事件,而子组件可以使用 `this._parent` 找到父组件,然后再调用 `this._parent.$emit(type, detail)` 方法,即可实现自下而上的通信。例如:
+
+```html
+<element name="foo">
+ <template>
+ <div>
+ <image src="{{imageUrl}}" class="thumb" onclick="test"></image>
+ <text>{{title}}</text>
+ </div>
+ </template>
+ <style>
+ .thumb { width: 200; height: 200; }
+ </style>
+ <script>
+ module.exports = {
+ data: {
+ title: '',
+ imageUrl: ''
+ },
+ methods: {
+ test: function () {
+ // Emit notify to parent
+ this._parent.$emit('notify', {a: 1})
+ }
+ }
+ }
+ </script>
+</element>
+
+<template>
+ <div>
+ <foo title="Hello" image-url="https://gtms02.alicdn.com/tps/i2/TB1QHKjMXXXXXadXVXX20ySQVXX-512-512.png"></foo>
+ <text if="eventType">event: {{eventType}} - {{eventDetail}}</text>
+ </div>
+</template>
+
+<script>
+ module.exports = {
+ data: {
+ eventType: '',
+ eventDetail: {}
+ },
+ created: function () {
+ this.$on('notify', function(event) {
+ // When a notify comes, this handler will be run.
+ // `event.detail` will be `{a: 1}`
+ this.eventType = event.type
+ this.eventDetail = JSON.stringify(event.detail)
+ })
+ }
+ }
+</script>
+```
+
+[体验一下](http://dotwe.org/51e553ef43e5c744d05da1bb811903bf)
+
+## 从父组件向子组件通信
+
+同理,首先子组件要监听特定类型的自定义事件,而父组件可以使用 `this.$vm(id)` 找到父组件,然后再调用 `this.$vm(id).$emit(type, detail)` 方法,即可实现自上而下的通信。例如:
+
+```html
+<element name="foo">
+ <template>
+ <div>
+ <image if="imageUrl" src="{{imageUrl}}" class="thumb"></image>
+ <text>Foo</text>
+ </div>
+ </template>
+ <style>
+ .thumb { width: 200; height: 200; }
+ </style>
+ <script>
+ module.exports = {
+ data: {
+ imageUrl: ''
+ },
+ created: function() {
+ this.$on('changeImage', function (e) {
+ this.imageUrl = e.detail
+ }.bind(this))
+ }
+ }
+ </script>
+</element>
+
+<template>
+ <div>
+ <foo id="sub"></foo>
+ <text onclick="test">click to update foo</text>
+ </div>
+</template>
+
+<script>
+ module.exports = {
+ methods: {
+ test: function (e) {
+ this.$vm('sub').$emit(
+ 'changeImage',
+ 'https://gtms02.alicdn.com/tps/i2/TB1QHKjMXXXXXadXVXX20ySQVXX-512-512.png'
+ )
+ }
+ }
+ }
+</script>
+```
+
+[体验一下](http://dotwe.org/ea616d180620648e66554d42f57db82b)
+
+下一节:[页面整体配置](./config-n-data.html)
http://git-wip-us.apache.org/repos/asf/incubator-weex-site/blob/32a097bf/_draft/v1.0/guide/syntax/composed-component.md
----------------------------------------------------------------------
diff --git a/_draft/v1.0/guide/syntax/composed-component.md b/_draft/v1.0/guide/syntax/composed-component.md
new file mode 100644
index 0000000..061eaf4
--- /dev/null
+++ b/_draft/v1.0/guide/syntax/composed-component.md
@@ -0,0 +1,158 @@
+---
+title: 组件封装
+type: guide
+order: 3.6
+version: 0.10
+---
+
+# 组件封装
+
+经常我们会发现 Weex 的 `<template>` 中有很多可复用的部分,这时候我们可以将其封装成上层的自定义组件并重用。例如我们可以直接创建一个名为 `foo.we` 的文件,`<foo>` 就是自定义组件的组件名称:
+
+```html
+<!-- foo.we -->
+<template>
+ <div style="flex-direction: row;">
+ <image src="{{image}}"></image>
+ <text>{{title}}</text>
+ </div>
+</template>
+<script>
+ var env = 'foo'
+ module.exports = {
+ data: {
+ title: null,
+ image: null
+ }
+ }
+</script>
+```
+
+`foo.we` 的也包含 `<template>`,`<style>` 和 `<script>`,定义好了后,直接用 `<foo>` 标签即可将其引入到其它组件的 `<template>` 中,并且在 `<foo>` 标签上设置其 `data` 同名的特性会将这个值赋给 `<foo>` 的上下文:
+
+_注意事项:由于 HTML 语法中特性名是不区分大小写的,所以您无法直接用驼峰命名,我们提供了 hyphenated 语法,在解析之后这些名称会自动转换为驼峰命名 (比如在 `<template>` 的组件特性里用 `aaa-bbb-ccc` 表示其 `data` 或上下文里的 `aaaBbbCcc`)。_
+
+```html
+<!-- bar.we -->
+<template>
+ <foo title="..." image="..."></foo>
+</template>
+<script>
+ var env = 'bar'
+</script>
+```
+
+_注意事项:这里 `bar.we` 和 `foo.we` 必须在同目录下才能自动建立依赖关系。_
+
+_注意事项:`foo.we` 文件的 `<script>` 具有相对独立的作用域,不会和 `bar.we` 中的 `<script>` 产生干扰。同时 `<foo>` 对象具有相对独立的子组件上下文,即 `this`,也包括其定义的完全不同的数据和方法。_
+
+## 组件嵌套
+
+自定义组件也支持嵌套,如下:
+
+```html
+<!-- somepath/foo.we -->
+<template>
+ <div style="flex-direction: row;">
+ <image src="{{image}}"></image>
+ <text>{{title}}</text>
+ </div>
+</template>
+<script>
+ module.exports = {
+ data: {
+ // These keys must be declared explicitly here
+ // or data-binding will not work from its parent.
+ title: null,
+ image: null
+ }
+ }
+</script>
+```
+
+```html
+<!-- samepath/foo.list.we -->
+<template>
+ <div>
+ <text>{{description}}</text>
+ <foo repeat="item in list" title="{{item.text}}" image="{{item.img}}"></foo>
+ </div>
+</template>
+<script>
+ module.exports = {
+ data: {
+ description: '',
+ // This key must be declared explicitly here
+ // or data-binding will not work from its parent.
+ list: []
+ }
+ }
+</script>
+```
+
+```html
+<!-- samepath/main.we -->
+<template>
+ <foo-list list="{{list}}"></foo-list>
+</template>
+<script>
+ module.exports = {
+ data: {
+ list: [
+ {text: '...', img: '...'},
+ {text: '...', img: '...'},
+ {text: '...', img: '...'},
+ ...
+ ]
+ }
+ }
+</script>
+```
+
+这里的 `main.we` 嵌套了 `<foo-list>`,`<foo-list>` 嵌套了 `<foo>`,同时组件可以正常的配合数据绑定、`repeat` 特性等使用。
+
+## 更多子组件的定义和书写方式
+
+除了在主文件同目录下创建和被封装组件同名的 `we` 文件之外,Weex 还支持另外几种子组件的书写方式:
+
+* 在 `<script>` 中通过 `require` 其它目录的 `we` 文件定义同名组件
+* 在主文件下新增 `<element name="xxx">` 标签,`name` 特性的值为新创建的组件名,其 `<element>` 内部的内容是定义该组件的代码
+
+比如:
+
+```html
+<!-- path-a/main.we -->
+<element name="foo">
+ <text>Foo</text>
+</element>
+
+<template>
+ <div>
+ <foo></foo>
+ <bar></bar>
+ </div>
+</template>
+
+<script>
+ require('path-b/bar.we')
+</script>
+```
+
+```html
+<!-- path-b/bar.we -->
+<template>
+ <text>Bar</text>
+</template>
+```
+
+这样的话,`path-a/main.we` 最终展示的结果是“Foo”和“Bar”两段文本。
+
+## 注意事项
+
+- 组件各自的 `<style>` 是相互独立的,不会担心不同组件中相同的 class name 相互干扰。
+- 如果自定义组件在父组件中有 `id` 特性,则可以在父组件上下文中通过 `this.$vm(id)` 接口来访问该自定义组件的上下文,也可以通过 `this.$el(id)` 来找到其背后真实的原生组件。更多详见[获取子组件信息](./id.html)
+- 自定义组件之间通信的问题可以参考[组件间通信](./comm.html)
+- 不论通过父组件把数据传递进来还是在当前组件内部对数据发起修改,只有在组件的 `data` 选项中明确写明的字段才会被正常的监听。
+- 任何组件目前均不支持自闭合标签的写法,请勿使用。
+
+下一节:[获取子组件信息](./id.html)
http://git-wip-us.apache.org/repos/asf/incubator-weex-site/blob/32a097bf/_draft/v1.0/guide/syntax/config-n-data.md
----------------------------------------------------------------------
diff --git a/_draft/v1.0/guide/syntax/config-n-data.md b/_draft/v1.0/guide/syntax/config-n-data.md
new file mode 100644
index 0000000..cad39ab
--- /dev/null
+++ b/_draft/v1.0/guide/syntax/config-n-data.md
@@ -0,0 +1,72 @@
+---
+title: 页面配置和页面数据
+type: guide
+order: 3.9
+version: 0.10
+---
+
+# 页面配置和页面数据
+
+在 Weex 中,你可以通过一些特殊的 `<script>` 进行页面整体配置。
+
+_注意事项:这些配置会代表页面整体,所以写在自定义子组件中是无效的,只有写在顶级 ViewModel 的 `<sctipt>` 中才会生效。_
+
+先举个例子:
+
+```html
+<!-- definition of sub components -->
+<element name="sub-component-a">...</element>
+<element name="sub-component-b">...</element>
+<element name="sub-component-c">...</element>
+
+<!-- definition of top-level component -->
+<template>...</template>
+<style></style>
+<script>
+ module.exports = {
+ data: { x: 1, y: 2 }
+ }
+</script>
+
+<!-- config and data -->
+<script type="config">
+ downgrade: {
+ ios: {
+ os: '9', // all of 9.x.x
+ app: '~5.3.2',
+ framework: '^1.3', // all of 1.3.x
+ deviceModel: ['AAAA', 'BBBB']
+ },
+ android: {
+ os: '*', // all of version
+ app: '^5',
+ framework: '',
+ deviceModel: ''
+ }
+ }
+</script>
+<script type="data">
+ { y: 200 }
+</script>
+```
+
+## `<script type="config">`
+
+开发者可以在顶级 ViewModel 中加入这样一段 `<script>`,以 JSON 格式描述页面整体的配置信息。
+
+目前支持的配置信息只有 `downgrade`:用来从平台、应用等维度描述页面的降级规则。这样设计对于产品迭代最大的帮助是可以在高版本中使用 Weex,而在低版本中使用之前已有的渲染方式,这部分控制降级的细节需要 native 接入的时候进行相应的识别和具体操作。
+
+未来这里会有更多的配置项出现在这里。
+
+## `<script type="data">`
+
+开发者可以在顶级 ViewModel 中加入这样一段 `<script>`,以 JSON 格式额外配置顶级 ViewModel 的数据,它会覆盖顶级 ViewModel 数据中相应的字段。比如上述例子中,最终的顶级 ViewModel 中的数据为 `{ x: 1, y: 200 }`。
+
+## 总结
+
+至此,Weex 基本的语法已经全部介绍过了。相信您对 Weex 的使用方式和开发方式有了更多的了解。
+
+接下来我们推荐您阅读:
+
+* [最佳实践](../how-to/index.html)
+* [Weex 手册](../../references/index.html)
http://git-wip-us.apache.org/repos/asf/incubator-weex-site/blob/32a097bf/_draft/v1.0/guide/syntax/data-binding.md
----------------------------------------------------------------------
diff --git a/_draft/v1.0/guide/syntax/data-binding.md b/_draft/v1.0/guide/syntax/data-binding.md
new file mode 100644
index 0000000..bbefdd1
--- /dev/null
+++ b/_draft/v1.0/guide/syntax/data-binding.md
@@ -0,0 +1,332 @@
+---
+title: 数据绑定
+type: guide
+order: 3.1
+version: 0.10
+---
+
+# 数据绑定
+
+Weex使用 _mustache_ 的语法 (`{% raw %}{{...}}{% endraw %}`) 来对 `<template>` 中的模板和 `<script>` 里的数据进行绑定. 一旦数据额模板绑定了, 数据上的修改会实时的在模板内容中生效。
+
+## 数据绑定路径
+
+```html
+<template>
+ <div>
+ <text style="font-size: {{size}}">{{title}}</text>
+ </div>
+</template>
+
+<script>
+ module.exports = {
+ data: {
+ size: 48,
+ title: 'Alibaba Weex Team'
+ }
+ }
+</script>
+```
+
+[体验一下](http://dotwe.org/6d18c0e696d33705083e34ef387ac529)
+
+上面的代码会把 `title` 和 `size` 的数值绑定到模板内容上。
+
+我们也可以通过 `.` 符号来绑定数据结构中的字段。看一下下面的代码片段:
+
+```html
+<template>
+ <div>
+ <text style="font-size: {{title.size}}">{{title.value}}</text>
+ </div>
+</template>
+
+<script>
+ module.exports = {
+ data: {
+ title: {
+ size: 48,
+ value: 'Alibaba Weex Team'
+ }
+ }
+ }
+</script>
+```
+
+[体验一下](http://dotwe.org/e291bbe2d5c34fe04db92bc827697a4b)
+
+## 数据绑定表达式
+
+进行数据绑定时,Weex 支持一些简单的 JavaScript 表达式,例如:
+
+```html
+<template>
+ <div style="flex-direction: row;">
+ <text>{{firstName + ' ' + lastName}}</text>
+ </div>
+</template>
+
+<script>
+ module.exports = {
+ data: {
+ firstName: 'John',
+ lastName: 'Smith'
+ }
+ }
+</script>
+```
+
+[体验一下](http://dotwe.org/aeef6c2ca9bd9b7c5d039ed84572e1ee)
+
+这些表达式会在当前的上下文中进行运算。
+
+## 计算属性 <sup>v0.5+</sup>
+
+数据绑定表达式已经非常方便了,但如果希望在模板里实现更复杂的逻辑判断,你也可以使用计算属性。例如:
+
+```html
+<template>
+ <div style="flex-direction: row;">
+ <text>{{fullName}}</text>
+ <text onclick="changeName" style="margin-left: 10;">CHANGE NAME</text>
+ </div>
+</template>
+
+<script>
+ module.exports = {
+ data: {
+ firstName: 'John',
+ lastName: 'Smith'
+ },
+ computed: {
+ fullName: function() {
+ return this.firstName + ' ' + this.lastName
+ }
+ },
+ methods: {
+ changeName: function() {
+ this.firstName = 'Terry'
+ }
+ }
+ }
+</script>
+```
+
+[体验一下](http://dotwe.org/276e7c42a2d480d669868476e62b326e)
+
+同样能够达到相同的效果。这里我们引入了一个叫做 `fullName` 的计算属性,由 `firstName` 和 `lastName` 计算而成,在数据绑定的时候,如果 `firstName` 或 `lastName` 发生改变,`fullName` 都会自动重新计算并触发改变。
+
+另外计算属性还支持另外一种写法,就是同时定义一个计算属性的 getter 和 setter,这样的话当下面例子中的 `fullName` 被赋值时,`data` 里的 `firstName` 和 `lastName` 会被自动改变:
+
+```html
+<template>
+ <div style="flex-direction: row;">
+ <text>{{fullName}}</text>
+ <text onclick="changeName" style="margin-left: 10;">CHANGE NAME</text>
+ </div>
+</template>
+
+<script>
+ module.exports = {
+ data: {
+ firstName: 'John',
+ lastName: 'Smith'
+ },
+ computed: {
+ fullName: {
+ get: function() {
+ return this.firstName + ' ' + this.lastName
+ },
+
+ set: function(v) {
+ var s = v.split(' ')
+ this.firstName = s[0]
+ this.lastName = s[1]
+ }
+ }
+ },
+ methods: {
+ changeName: function() {
+ this.fullName = 'Terry King'
+ }
+ }
+ }
+</script>
+```
+
+[体验一下](http://dotwe.org/9f33809592391c566c886029c509c167)
+
+**注意事项:`data`、`methods`、`computed` 中的字段是不能相互重复的,因为它们都会通过组件实例的 `this` 访问到。**
+
+## 数据绑定在 `<template>` 中的特殊用法
+
+### 样式: `style` 或 `class`
+
+组件的样式能够通过 `style` 特性进行绑定:
+
+```html
+<template>
+ <div>
+ <text style="font-size: {{size}}; color: {{color}};">Hello World</text>
+ </div>
+</template>
+
+<script>
+ module.exports = {
+ data: {
+ size: 32,
+ color: '#ff0000'
+ }
+ }
+</script>
+```
+
+[体验一下](http://dotwe.org/f53674fa7910d266e0a2d8a5c285d2b1)
+
+样式也能够通过 `class` 特性实现样式绑定,多个 class 名通过空格分隔:
+
+```html
+<template>
+ <div>
+ <text class="{{size}}">Hello</text>
+ <text class="title {{status}}">World</text>
+ </div>
+</template>
+
+<style>
+ .large { font-size: 64; }
+ .small { font-size: 32; }
+ .title { font-weight: bold; }
+ .success { color: #00ff00; }
+ .error { color: #ff0000; }
+</style>
+
+<script>
+ module.exports = {
+ data: {
+ size: 'large',
+ status: 'success'
+ }
+ }
+</script>
+```
+
+[体验一下](http://dotwe.org/4260897c1526a685672dca95af271493)
+
+在上面的代码中如果 `{% raw %}{{size}}{% endraw %}` 和 `{% raw %}{{status}}{% endraw %}` 是空值, 就只有 `class="title"` 会被解析。
+
+延伸阅读:[style 和 class](./style-n-class.html)
+
+### 事件绑定:`on...`
+
+以 `on...` 开头的就是用于绑定事件的特性,特性名中 `on` 之后的部分就是事件的类型,特性的值就是处理该事件的函数名。_函数名外不需要添加 mustache 语法中的大括号_。例如:
+
+```html
+<template>
+ <div>
+ <text onclick="toggle">Toggle: {{result}}</text>
+ </div>
+</template>
+
+<script>
+ module.exports = {
+ data: {
+ result: true
+ },
+ methods: {
+ toggle: function () {
+ this.result = !this.result
+ }
+ }
+ }
+</script>
+```
+
+[体验一下](http://dotwe.org/2f9f910a60ffc1ed54c797390d6615e1)
+
+除此之外 Weex 还支持更多的事件处理方式。
+
+延伸阅读:[事件处理](./events.html)
+
+### 展示逻辑控制 `if` & `repeat`
+
+`if` 特性能够通过特性值的真假来控制组建是否显示,_且 mustache 大括号可以省略_。例如:
+
+```html
+<template>
+ <div style="flex-direction: column;">
+ <text onclick="toggle">Toggle</text>
+ <image if="{{shown}}" src="{{imageUrl}}" class="logo"></image>
+ </div>
+</template>
+
+<style>
+ .logo { width: 512; height: 512; }
+</style>
+
+<script>
+ module.exports = {
+ data: {
+ shown: true,
+ imageUrl: 'https://gtms02.alicdn.com/tps/i2/TB1QHKjMXXXXXadXVXX20ySQVXX-512-512.png'
+ },
+ methods: {
+ toggle: function () {
+ this.shown = !this.shown
+ }
+ }
+ }
+</script>
+```
+
+[体验一下](http://dotwe.org/3ec9347e4810f503b641849d214d8c15)
+
+`repeat` 特性可以根据一组数组数据重复生成相同或相似的顺序排列的界面。例如:
+
+```html
+<template>
+ <div>
+ <text repeat="(k,v) in list">{{k}} - {{v}}</text>
+ </div>
+</template>
+<script>
+ module.exports = {
+ data: {
+ list: ['a', 'b', 'c']
+ }
+ }
+</script>
+```
+
+[体验一下](http://dotwe.org/db40d2341fdbf16d3d806f502189843d)
+
+延伸阅读:[展示逻辑控制](./display-logic.html)
+
+### 静态模板优化 `static` <sup>v0.9.2+</sup>
+
+`static` 特性可以一次性把数据设置到模板相应的位置上,但是今后不会随着数据的变化而更新。这样可以减少无谓的数据绑定,有效控制和优化长列表、纯静态页面在运行时的开销。不过你也要小心使用不要导致原本需要更新的视图没有触发更新。
+
+```html
+<template>
+ <div static>
+ <text>{{ word }}</text>
+ </div>
+</template>
+
+<script>
+ module.exports = {
+ ready: function() {
+ this.word = 'Data changes' // UI won't be updated
+ },
+ data: {
+ word: 'Hello static'
+ }
+ }
+</script>
+```
+
+[体验一下](http://dotwe.org/dbadfd66463a2c03e3e06d391b0ad8ec)
+
+如上所示,添加 `static` 关键字,渲染结果会是“Hello static”字样,相当于渲染一个静态的节点,`ready` 函数中对数据 `word` 的改变不会更新到视图。
+
+下一篇:[style 和 class](./style-n-class.html)
http://git-wip-us.apache.org/repos/asf/incubator-weex-site/blob/32a097bf/_draft/v1.0/guide/syntax/display-logic.md
----------------------------------------------------------------------
diff --git a/_draft/v1.0/guide/syntax/display-logic.md b/_draft/v1.0/guide/syntax/display-logic.md
new file mode 100644
index 0000000..9498de2
--- /dev/null
+++ b/_draft/v1.0/guide/syntax/display-logic.md
@@ -0,0 +1,252 @@
+---
+title: 展示逻辑控制
+type: guide
+order: 3.4
+version: 0.10
+---
+
+# 展示逻辑控制
+
+Weex 支持通过两种特殊的特性 `if` 和 `repeat` 确定组件的显示逻辑,这会使得整个界面的展示逻辑控制更加简单灵活。
+
+## `if`
+
+通过设置 `if` 特性值,你可以控制当前组件是否显示。如果值为真,则当前组件会被渲染出来,如果值为假则会被移除。例如:
+
+```html
+<template>
+ <div>
+ <text onclick="toggle">Toggle Image</text>
+ <image if="shown" src="{{imageUrl}}" style="width: 512; height: 512;"></image>
+ </div>
+</template>
+
+<script>
+module.exports = {
+ data: {
+ imageUrl: 'https://gtms02.alicdn.com/tps/i2/TB1QHKjMXXXXXadXVXX20ySQVXX-512-512.png',
+ shown: true
+ },
+ methods: {
+ toggle: function () {
+ this.shown = !this.shown
+ }
+ }
+}
+</script>
+```
+
+[体验一下](http://dotwe.org/e0999a51fa404f48bbae177f1569cd0e)
+
+_注意事项:`if="condition"` 和 `if="{% raw %}{{condition}}{% endraw %}"` 都是可以的,两者等价使用。_
+
+_注意事项:`if` 不能用在 `<template>` 的根组件上,否则将无法被 Weex 正常的识别和处理。_
+
+### `if` 不会阻断子元素的数据更新
+
+下面这个例子在数据更新后 `item` 或 `item.image` 不存在的情况下会报错:
+
+```html
+<template>
+ <div if="{{(item && item.image)}}" style="width: 200; height: 200;">
+ <image style="width: 100; height: 100;" src="{{item.image.url}}"></image>
+ </div>
+</template>
+```
+
+原因在于 Weex 本身的机制是数据更新在 DOM 更新之前,因此 `if` 数据更新之后,不支持阻断其子元素的数据更新,即 `if` 数据更新为 `false` 之后,内部的子元素仍然会触发自身的数据更新,找不到对应字段,导致报错,可参考这个 [issue](https://github.com/alibaba/weex/issues/1758)。
+
+因此,有两种解决方案:
+
+- 为 `img` 组件的 `src` 也增加容错方案:
+
+ ```html
+ <div if="{{(item && item.image)}}" style="width: 200; height: 200;">
+ <image style="width: 100; height: 100;" src="{{item && item.image && item.image.url}}"></image>
+ </div>
+ ```
+
+- 如果是在 `repeat` 的列表中,还可以使用 `track-by`强制不复用子元素解决。
+
+## `repeat`
+
+`repeat` 特性用于重复渲染一组相同的组件。它绑定的数据类型必须为数组,数组里的每一项数据可以体现在不同的组件特性、样式、事件绑定等。例如:
+
+``` html
+<template>
+ <div>
+ <div repeat="person in list" class="{{person.gender}}">
+ <text>{{person.nickname}}</text>
+ </div>
+ </div>
+</template>
+
+<style>
+ .male { background-color: #9999ff; }
+ .female { background-color: #ff9999; }
+</style>
+
+<script>
+module.exports = {
+ data: {
+ list: [
+ { gender: 'male', nickname: 'Li Lei' },
+ { gender: 'female', nickname: 'Han Meimei' },
+ { gender: 'male', nickname: 'Jim Green' }
+ ]
+ }
+}
+</script>
+```
+
+[体验一下](http://dotwe.org/8c87aac2820531090181c32fca41e913)
+
+此外,`repeat` 特性还支持绑定数组中数据项目的索引值。例如:
+
+``` html
+<template>
+ <div>
+ <div repeat="(index, person) in list" class="{{person.gender}}">
+ <text>{{index}} - {{person.nickname}}</text>
+ </div>
+ </div>
+</template>
+
+<style>
+ .male { background-color: #9999ff; }
+ .female { background-color: #ff9999; }
+</style>
+
+<script>
+module.exports = {
+ data: {
+ list: [
+ { gender: 'male', nickname: 'Li Lei' },
+ { gender: 'female', nickname: 'Han Meimei' },
+ { gender: 'male', nickname: 'Jim Green' }
+ ]
+ }
+}
+</script>
+```
+
+[体验一下](http://dotwe.org/65d348256ab5c54aa996d3ee6b4ea115)
+
+每一个昵称之前都有对应数组项目的索引值。
+
+_注意事项:同样的 `repeat="..."` 和 `repeat="{% raw %}{{...}}{% endraw %}"` 都是可以的,两者等价使用。_
+
+_注意事项:`if` 不能用在 `<template>` 的根组件上,否则将无法被 Weex 正常的识别和处理。_
+
+**注意事项: 当你修改 `repeat` 中的数组时,在写法上会受到一定的限制,具体如下:**
+
+**直接通过“角标”修改数组的某个项目 (如 `this.items[0] = ...`) 是不会触发视图自动更新的。我们在数组的原型上提供了一个额外的方法:`this.items.$set(index, item)` 来完成相同的事情。**
+
+```javascript
+// 和 `this.items[0] = ...` 作用相同,但会自动触发视图更新
+this.items.$set(0, { childMsg: 'Changed!'})
+```
+
+**直接通过修改 `length` 来改变数组长度 (如 `this.items.length = 0`) 也是不会触发视图自动更新的。我们推荐您直接赋值一个新的空数组把旧的替换掉。**
+
+```javascript
+// 和 `this.items.length = 0` 作用相同,但会自动触发视图更新
+this.items = []
+```
+
+### `repeat` 特性中的 `$index` 形参
+
+在 `repeat` 特性值中,如果没有指定索引值的形参,则可以通过绑定形参 `$index` 来展示数组项目的索引值。例如:
+
+``` html
+<template>
+ <div>
+ <div repeat="person in list" class="{{person.gender}}">
+ <text>{{$index}} - {{person.nickname}}</text>
+ </div>
+ </div>
+</template>
+
+<style>
+ .male { background-color: #9999ff; }
+ .female { background-color: #ff9999; }
+</style>
+
+<script>
+module.exports = {
+ data: {
+ list: [
+ { gender: 'male', nickname: 'Li Lei' },
+ { gender: 'female', nickname: 'Han Meimei' },
+ { gender: 'male', nickname: 'Jim Green' }
+ ]
+ }
+}
+</script>
+```
+
+[体验一下](http://dotwe.org/65d348256ab5c54aa996d3ee6b4ea115)
+
+渲染效果和上一个例子应该是相同的。
+
+### 在 `repeat` 中使用 `track-by` 特性追踪变化
+
+通常情况下,当更新 `repeat` 中绑定的数组时,所有数组项目关联的组件都会被重新渲染。如果其中部分索引值对应的数据未发生变更,那么最好是让这些组件在渲染层保持原样,仅更新数据有变化的节点。Weex 提供了 `track-by` 特性来辅助判断哪些数组项目发生了改变。
+
+首先 `track-by` 特性的值必须是在每一条数组项目中都有且值没有重复的一个字段名,用来区分和追踪每一条数据项增删与否或次序变化与否的关键依据。每当数组发生变化之后,新老数组数据会根据 `track-by` 特性值所代表的字段重新匹配,然后再决定渲染层应该新建或删除一个组件?还是移动一个组件?还是讲组件保持原来的位置。默认的 `track-by` 的值就是数组的索引值。例如:
+
+``` html
+<template>
+ <div>
+ <div repeat="person in list" class="{{person.gender}}">
+ <text>{{$index}} - {{person.id}} - {{person.nickname}}</text>
+ </div>
+ <text>----</text>
+ <div repeat="person in list" class="{{person.gender}}" track-by="id">
+ <text>{{$index}} - {{person.id}} - {{person.nickname}}</text>
+ </div>
+ <text>----</text>
+ <!-- something wrong here: duplicated track-by value -->
+ <div repeat="person in list" class="{{person.gender}}" track-by="nickname">
+ <text>{{$index}} - {{person.id}} - {{person.nickname}}</text>
+ </div>
+ </div>
+</template>
+
+<style>
+ .male { background-color: #9999ff; }
+ .female { background-color: #ff9999; }
+</style>
+
+<script>
+module.exports = {
+ data: {
+ list: [
+ { id: 11, gender: 'male', nickname: 'Li Lei' },
+ { id: 22, gender: 'female', nickname: 'Han Meimei' },
+ { id: 33, gender: 'male', nickname: 'Jim Green' }
+ ]
+ },
+ ready: function () {
+ this.list.unshift({ id: 44, gender: 'female', nickname: 'Han Meimei' })
+ }
+}
+</script>
+```
+
+[体验一下](http://dotwe.org/c124bfc21e6d92271356acbea232089b)
+
+这种情况下,第一个列表的更新策略是:
+
+1. 把第一个 `<text>` 赋值为 `Han Meimei`
+2. 第二个赋值为 `Li Lei`
+3. 第三个赋值为 `Han Meimei`
+4. 最后新建一个 `<text>` 并赋值为 `Jin Green`
+
+第二个列表的更新策略是:
+
+1. 在最前面新建一个 `<text>` 并赋值为 `Han Meimei`
+
+第三个列表的更新会遇到问题,因为有两个数组项目的 `nickname` 值都是 `Han Meimei` 所以造成意料之外的渲染结果 (只渲染了三个数组项目)。
+
+下一节:[渲染过程控制](./render-logic.html)
http://git-wip-us.apache.org/repos/asf/incubator-weex-site/blob/32a097bf/_draft/v1.0/guide/syntax/events.md
----------------------------------------------------------------------
diff --git a/_draft/v1.0/guide/syntax/events.md b/_draft/v1.0/guide/syntax/events.md
new file mode 100644
index 0000000..4898219
--- /dev/null
+++ b/_draft/v1.0/guide/syntax/events.md
@@ -0,0 +1,103 @@
+---
+title: 事件处理
+type: guide
+order: 3.3
+version: 0.10
+---
+
+# 事件处理
+
+Weex 允许对 `<template>` 中的元素绑定事件处理函数。
+
+## 基本语法
+
+以 `on...` 开头的就是用于绑定事件的特性,特性名中 `on` 之后的部分就是事件的类型,特性的值就是处理该事件的函数名。_函数名外不需要添加 mustache 语法中的大括号_。例如:
+
+```html
+<template>
+ <div>
+ <text onclick="toggle">Toggle: {{result}}</text>
+ </div>
+</template>
+
+<script>
+ module.exports = {
+ data: {
+ result: true
+ },
+ methods: {
+ toggle: function () {
+ this.result = !this.result
+ }
+ }
+ }
+</script>
+```
+
+[体验一下](http://dotwe.org/2f9f910a60ffc1ed54c797390d6615e1)
+
+## 内联事件处理参数
+
+同时我们也支持在事件绑定的特性值中内联写明被传入的参数。例如:
+
+```html
+<template>
+ <div>
+ <text onclick="update(1, 2)">Result: {{result}}</text>
+ </div>
+</template>
+
+<script>
+ module.exports = {
+ data: {
+ result: '<empty>'
+ },
+ methods: {
+ update: function (x, y) {
+ this.result = x + y
+ }
+ }
+ }
+</script>
+```
+
+[体验一下](http://dotwe.org/777056d8985e73567464e2d66cbe73fc)
+
+## 特殊的内联事件处理参数
+
+额外的,在这种内联的事件绑定写法中,你可以使用一个特殊的参数 `$event`,代表事件描述对象,即默认事件处理函数的第一个参数。所以 `<template>` 中的 `onclick="foo"` 和 `onclick="foo($event)"` 是等价的,`$event` 的用法可以更多参考下面的例子
+
+```html
+<template>
+ <div>
+ <text onclick="update($event, 1, 2)">Result: {{result}}</text>
+ </div>
+</template>
+
+<script>
+ module.exports = {
+ data: {
+ result: '<empty>'
+ },
+ methods: {
+ update: function (e, x, y) {
+ this.result = e.type + (x + y)
+ }
+ }
+ }
+</script>
+```
+
+[体验一下](http://dotwe.org/5e1e7c22f036725e44c3ff492f173400)
+
+## 事件描述对象
+
+每当一次事件被触发的时候,都会产生一个事件描述对象,该对象会默认作为第一个参数传递给事件处理函数,或以 `$event` 形参的方式出现在内联事件处理函数中。
+
+每个事件描述对象至少包含以下几个特性:
+
+- `type` (`string`): 事件名称, 如: `click`
+- `target` (`Element`): 目标元素
+- `timestamp` (`number`): 事件触发时的时间戳数字
+
+下一节:[展示逻辑控制](./display-logic.html)
http://git-wip-us.apache.org/repos/asf/incubator-weex-site/blob/32a097bf/_draft/v1.0/guide/syntax/id.md
----------------------------------------------------------------------
diff --git a/_draft/v1.0/guide/syntax/id.md b/_draft/v1.0/guide/syntax/id.md
new file mode 100644
index 0000000..0a204ad
--- /dev/null
+++ b/_draft/v1.0/guide/syntax/id.md
@@ -0,0 +1,124 @@
+---
+title: 找节点
+type: guide
+order: 3.7
+version: 0.10
+---
+
+# 找节点
+
+在 Weex 中,您可以通过在特定的子组件上设置 `id` 特性,以此在该 `<template>` 内唯一标识这个组件。
+
+## 获取子组件
+
+您可以在父组件上下文中使用 `this.$el(id)` 来找到该组件,以运用 `scrollToElement()` 为例:
+
+```html
+<template>
+ <div>
+ <text id="goto-top">Top</text>
+ <div style="height: 10000; background-color: #999999;"></div>
+ <text onclick="back2Top">Back to Top</text>
+ </div>
+</template>
+<script>
+ var dom = require('@weex-module/dom')
+ module.exports = {
+ methods: {
+ back2Top: function () {
+ var el = this.$el('goto-top')
+ dom.scrollToElement(el, { offset: 10 })
+ }
+ }
+ }
+</script>
+```
+
+[体验一下](http://dotwe.org/ed07068ef6f038d6c39af6c971ad08a0)
+
+### `id` 和 `repeat` 特性配合使用
+
+`id` 也可以和 `repeat` 语法配合使用,关于 `repeat` 更多详见 [展示逻辑控制](./display-logic.html),但是要确保循环的节点需要用不同的 `id`,比如:
+
+```html
+<template>
+ <div>
+ <image
+ repeat="image in images"
+ id="img-{{image.id}}"
+ src="{{image.url}}"
+ onclick="getImageId"></image>
+ </div>
+</template>
+<script>
+module.exports = {
+ data: {
+ images: [
+ {id: 1, url: '...'},
+ {id: 2, url: '...'},
+ {id: 3, url: '...'},
+ ...
+ ]
+ },
+ methods: {
+ getImageId: function(e) {
+ // get e.target.id
+ }
+ }
+}
+</script>
+```
+
+### 获取自定义子组件的上下文
+
+另外,我们还可以通过 `this.$vm(id)` 方法可以访问自定义子组件的上下文:
+
+```html
+<element name="foo">
+ <template>
+ <div style="flex-direction: row;">
+ <text>{{title}}</text>
+ </div>
+ </template>
+ <script>
+ module.exports = {
+ data: {
+ title: null
+ },
+ methods: {
+ setTitle: function (text) {
+ this.title = text
+ }
+ }
+ }
+ </script>
+</element>
+
+<template>
+ <div>
+ <foo id="sub" title="Hello"></foo>
+ <text onclick="update">Click Me to Update</text>
+ </div>
+</template>
+<script>
+ module.exports = {
+ methods: {
+ update: function (e) {
+ this.$vm('sub').setTitle('Updated')
+ }
+ }
+ }
+</script>
+```
+
+[体验一下](http://dotwe.org/1d332e6c238462e841743035c6bc697e)
+
+实际上,如上述的例子,我们找到子组件上下文之后,直接在这个上下文中调用子组件方法或修改子组件的数据并不是我们认为最好的方式,我们更倾向于通过一套确定的组件间通信机制来完成这一工作。
+
+### 获取父级组件或其上下文
+
+除了可以自上而下寻找组件或其上下文,Weex 也支持自下而上做相同的事情。当前上下文中的 `this._parent` 可以获取其父级上下文。除了父级上下文,对于父级组件本身,相关处理也可以基于先获取父级上下文,然后在父级组件内部完成更多更细致的处理。更多内容可以深入了解组件间通信的部分。
+
+_注意事项:在未来的版本中 `this._parent` 将改为 `this.$parent`。_
+
+下一篇: [组件间通信](./comm.html)
http://git-wip-us.apache.org/repos/asf/incubator-weex-site/blob/32a097bf/_draft/v1.0/guide/syntax/index.md
----------------------------------------------------------------------
diff --git a/_draft/v1.0/guide/syntax/index.md b/_draft/v1.0/guide/syntax/index.md
new file mode 100644
index 0000000..df0c33a
--- /dev/null
+++ b/_draft/v1.0/guide/syntax/index.md
@@ -0,0 +1,134 @@
+---
+title: 语法介绍
+type: guide
+order: 3
+has_chapter_content: true
+version: 0.10
+---
+
+# 语法综述
+
+Weex 代码由 `<template>`、`<style>`、`<script>` 三个部分构成。
+
+- `<template>`:_必须的_,使用 HTML 语法描述页面结构,内容由多个标签组成,不同的标签代表不同的组件。
+- `<style>`:_可选的_,使用 CSS 语法描述页面的具体展现形式。
+- `<script>`:_可选的_,使用 JavaScript 描述页面中的数据和页面的行为,Weex 中的数据定义也在 `<script>` 中进行。
+
+```html
+<template>
+ <!-- (required) the structure of page -->
+</template>
+
+<style>
+ /* (optional) stylesheet */
+</style>
+
+<script>
+ /* (optional) the definition of data, methods and life-circle */
+</script>
+```
+
+这是一个典型的 M-V-VM 架构:通过 ViewModel 把 Model 和 View 建立更直接有效的关系,ViewModel 的实现以 `<script>` 的内容为主。
+
+## `<template>` 模板
+
+`<template>` 中的标签组织类似如下代码:
+
+``` html
+<template>
+ <div>
+ <image style="width: 200; height: 200;" src="https://gtms02.alicdn.com/tps/i2/TB1QHKjMXXXXXadXVXX20ySQVXX-512-512.png"></image>
+ <text>Alibaba Weex Team</text>
+ </div>
+</template>
+```
+
+[体验一下](http://dotwe.org/5256e6e610ded330369f2e8010f7f0e6)
+
+`<div>` 标签是一个根节点,里面包含描述图片的 `<image>` 标签和描述文字的 `<text>` 标签。
+
+和 HTML 类似,不同标签代表的组件有各自的特性 (attribute),部分组件可以拥有自己的子组件。
+
+延伸阅读:[内置组件列表](../../references/components/index.html)
+
+根节点:每个 Weex 页面最顶层的节点,我们称为根节点。下面是目前我们支持的三种根节点:
+
+- `<div>`:普通根节点,有确定的尺寸,不可滚动。
+- `<scroller>`:可滚动根节点,适用于需要全页滚动的场景。
+- `<list>`:列表根节点,适用于其中包含重复的子元素的列表场景。
+
+目前 Weex 仅支持以上三种根节点。
+
+_注意事项:`<template>` 只支持一个根节点,多个根节点将无法被 Weex 正常的识别和处理。_
+
+## `<style>` 样式
+
+我们可以把 Weex 中的样式语法理解为 CSS 的一个子集,两者有一些细微的区别
+
+第一种写法是,你能在标签上,直接通过内联 `style` 特性编写样式. 第二种写法,通过标签中的 `class` 特性与 `<style>` 标签中定义的样式建立对应关系,让 `<style>` 标签中定义的样式作用于特定标签之上。以下是例子:
+
+```html
+<template>
+ <div>
+ <text style="font-size: 64;">Alibaba</text>
+ <text class="large">Weex Team</text>
+ </div>
+</template>
+
+<style>
+ .large {font-size: 64;}
+</style>
+```
+
+[体验一下](http://dotwe.org/d8af9186bf045df74e7a538d91798db4)
+
+上面的两个 `<text>` 组件都被设置了同样的字体大小,但分别用了两种不同的方式。
+
+延伸阅读:[Weex 通用样式](../references/common-style.html)
+
+**注意**:Weex 遵循 [HTML 特性](https://en.wikipedia.org/wiki/HTML_attribute) 命名规范,所以特性命名时**请不要使用陀峰格式 (CamelCase)**,采用以“-”分割的 **long-name** 形式。
+
+## `<script>` 脚本
+
+`<script>` 描述页面中的数据和页面的行为,代码遵循 JavaScript (ES5) 语法 (目前 iOS 端和浏览器端取决于内置 JavaScript 引擎对 ES 版本的支持情况,安卓端能够完整支持 ES5,但不原生支持 ES6,需要用类似 [babel](http://babeljs.io) 的工具对源代码进行转换)。下面是一个例子:
+
+``` html
+<template>
+ <div>
+ <text>The time is {{datetime}}</text>
+ <text>{{title}}</text>
+ <text>{{getTitle()}}</text>
+ </div>
+</template>
+
+<script>
+ module.exports = {
+ data: {
+ title: 'Alibaba',
+ datetime: null
+ },
+ methods: {
+ getTitle: function () {
+ return 'Weex Team'
+ }
+ },
+ created: function() {
+ this.datetime = new Date().toLocaleString()
+ }
+ }
+</script>
+```
+
+[体验一下](http://dotwe.org/8095bed0d9db4299fb39975d4b35b13f)
+
+上面 `<script>` 标签中定义了被赋值给 `module.exports` 的对象,这个对象其实就是一个 ViewModel 选项,让三个 `<text>` 标签显示当前时间、“Alibaba”字样和“Weex Team”字样。
+
+选项中的 `data` 用于存储数据,这些数据可以通过[数据绑定](./data-binding.html)机制和 `<template>` 标签中的内容绑定起来。当这些数据变更时,被绑定的模板内容也会自动更新。这些数据在 `<script>` 中的各个方法中可以通过类似 `this.x` 的方式进行读写操作。
+
+而选项中的 `methods` 里则列出了当前上下文可执行的各种函数,比如 `getTitle()`。
+
+选项中最后的 `created` 是生命周期函数,会在数据初始化之后、界面被绑定数据并渲染之前执行。类似的生命周期函数还有 `init`、`ready` 等,在这个例子中,`datetime` 会在界面渲染之前被更新为当前的时间。
+
+延伸阅读:[ViewModel 选项](../../references/component-defs.html)
+
+接下来,我们来详细介绍[数据绑定](./data-binding.html)的相关知识。
http://git-wip-us.apache.org/repos/asf/incubator-weex-site/blob/32a097bf/_draft/v1.0/guide/syntax/render-logic.md
----------------------------------------------------------------------
diff --git a/_draft/v1.0/guide/syntax/render-logic.md b/_draft/v1.0/guide/syntax/render-logic.md
new file mode 100644
index 0000000..f516733
--- /dev/null
+++ b/_draft/v1.0/guide/syntax/render-logic.md
@@ -0,0 +1,44 @@
+---
+title: 渲染过程控制
+type: guide
+order: 3.5
+version: 0.10
+---
+
+# 渲染过程控制
+
+## `append`
+
+`append` 特性定义了当前组件的子组件:
+
+1. 以一整棵树的方式一次性添加到视图中 (`append="tree"`),还是
+2. 每个子组件都产生一次单独的添加到视图的指令 (`append="node"`)
+
+``` html
+<template>
+ <div>
+ <div>
+ <text>Hello</text>
+ <text>Weex</text>
+ </div>
+ <div append="node">
+ <text>Hello</text>
+ <text>Weex</text>
+ </div>
+ <div append="tree">
+ <text>Hello</text>
+ <text>Weex</text>
+ </div>
+ </div>
+</template>
+```
+
+[体验一下](http://dotwe.org/417c75415efce66d8e22bf5942b380ee)
+
+在上面的代码中,第一组和第二组 `<div>` 的渲染过程相同,即先添加空的父级 `<div>`,然后插入第一个 `<text>` Hello,然后插入第二个 `<text>` Weex;第三组 `<div>` 则是连带两个 `<text>` 子组件一齐传给渲染层进行渲染的。
+
+渲染结果显而易见,前两组渲染方式会使首次绘制的响应速度比后者快些,但是总渲染时间可能比第三组 `append="tree"` 更长。开发者可以根据实际界面的情况自行选择合理的渲染过程。
+
+默认情况下,除了 `<cell>` 组件的默认渲染过程是 `tree` 模式,其它组件都默认按照 `node` 模式进行渲染。
+
+下一节:[自定义组件](./composed-component.html)
http://git-wip-us.apache.org/repos/asf/incubator-weex-site/blob/32a097bf/_draft/v1.0/guide/syntax/style-n-class.md
----------------------------------------------------------------------
diff --git a/_draft/v1.0/guide/syntax/style-n-class.md b/_draft/v1.0/guide/syntax/style-n-class.md
new file mode 100644
index 0000000..afe2de1
--- /dev/null
+++ b/_draft/v1.0/guide/syntax/style-n-class.md
@@ -0,0 +1,117 @@
+---
+title: CSS 样式和类
+type: guide
+order: 3.2
+version: 0.10
+---
+
+# CSS 样式和类
+
+## 基础语法
+
+CSS 样式可以理解为一系列的键值对,其中的每一对描述了一个特定的样式,例如组件的宽或者高。
+
+```css
+.div {
+ width: 400;
+ height: 50;
+}
+```
+
+键值对的形式是 `prop-name: prop-value;`。键名是 `prop-name`,键值是 `prop-value`。 一般情况下,键名按照连接符的方式进行命名,键和值之间由冒号 `:` 进行分隔,每对键值之间由分号 `;` 进行分隔。
+
+在 Weex 页面上样式有两种形式:
+
+- `<template>` 中的 `style` 特性
+- `<style>` 样式表
+
+### `<template>` 中的 `style` 特性
+
+在 `style` 特性中编写样式,例如:
+
+```html
+<template>
+ <div style="width: 400; height: 50;">
+ ...
+ </div>
+</template>
+```
+
+这段代码的意思是 `<div>` 组件的宽和高分别为 400 像素和 50 像素。
+
+### `<style>` 样式表
+
+例如:
+
+```html
+<style>
+ .wrapper { width: 600; }
+ .title { width: 400; height: 50; }
+ .highlight { color: #ff0000; }
+</style>
+```
+
+样式表包含了多个样式规则,每条规则有一个对应的类,以及由 `{...}` 包括的若干条样式。例如:
+
+```css
+.title { width: 400; height: 50; }
+```
+
+### `class` 特性
+
+`<template>` 标签中的 `class` 特性值用来匹配 `<style>` 样式表中的一个或多个 class 名,多个 class name 之间由空格分隔。例如:
+
+```html
+<template>
+ <div class="wrapper">
+ <text class="title">...</text>
+ <text class="title highlight">...</text>
+ </div>
+</template>
+<style>
+ .wrapper { width: 600; }
+ .title { width: 400; height: 50; }
+ .highlight { color: #ff0000; }
+</style>
+```
+
+[体验一下](http://dotwe.org/8487e2a33cd051c9adfa887d0bafbb44)
+
+这段代码的含义是 `<div>` 组件的宽度是 600 像素,两个 `<text>` 组件的尺寸为 400x50,其中第二个文本组件是红色字。
+
+**注意事项**
+
+- 为了简化页面设计和实现,屏幕的宽度统一为 750 像素,不同设备屏幕都会按照比例转化为这一尺寸进行长度计算。
+- 标准 CSS 支持很多样式选择器,但 Weex 目前只支持单个 class name 的选择器。
+- 标准 CSS 支持很多的长度单位,但 Weex 目前只支持像素,并且 `px` 单位可以忽略不写,直接使用对应的数值。更多详情请查看[通用样式](../references/common-style.html)。
+- 子元素的样式不会继承自父元素,这一点与标准 CSS 不同,比如 `color` 和 `font-size` 等样式作用在 `<text>` 上层的 `<div>` 上是无效的。
+- 标准 CSS 包含了非常多的样式属性,但 Weex 只支持了其中的一部分,比如盒模型、flexbox、position 等布局属性,以及 `font-size`、`color` 等其它样式。
+
+## 与数据绑定结合
+
+请查阅[数据绑定](./data-binding.html)中有关 `style` 和 `class` 特性的相关部分。这里简单举个例子:
+
+```html
+<template>
+ <div>
+ <text style="font-size: {{fontSize}};">Alibaba</text>
+ <text class="large {{textClass}}">Weex Team</text>
+ </div>
+</template>
+<style>
+ .large {font-size: 32;}
+ .highlight {color: #ff0000;}
+</style>
+<script>
+ module.exports = {
+ data: {
+ fontSize: 32,
+ textClass: 'highlight'
+ }
+ }
+</script>
+```
+
+[体验一下](http://dotwe.org/440d3318dc7b83e3bb0a110f3b3236ca)
+
+下一篇:[事件处理](./events.html)
http://git-wip-us.apache.org/repos/asf/incubator-weex-site/blob/32a097bf/_draft/v1.0/index.md
----------------------------------------------------------------------
diff --git a/_draft/v1.0/index.md b/_draft/v1.0/index.md
new file mode 100644
index 0000000..9e59b8c
--- /dev/null
+++ b/_draft/v1.0/index.md
@@ -0,0 +1,5 @@
+layout: index
+type: index
+subtitle: 快速、简洁且高效
+version: 0.10
+---
\ No newline at end of file
http://git-wip-us.apache.org/repos/asf/incubator-weex-site/blob/32a097bf/_draft/v1.0/migration/difference.md
----------------------------------------------------------------------
diff --git a/_draft/v1.0/migration/difference.md b/_draft/v1.0/migration/difference.md
new file mode 100644
index 0000000..b11c6c2
--- /dev/null
+++ b/_draft/v1.0/migration/difference.md
@@ -0,0 +1,249 @@
+---
+title: Weex 和 Vue 2.x 的语法差异
+type: references
+order: 12.2
+version: 2.1
+---
+
+# Weex 和 Vue 2.x 的语法差异
+
+## Overview
+
+
+| | Weex | Vue |
+| ---- | ---- | --- |
+| 生命周期 | `ready: function() {}` | `mounted: function() {}` |
+| 条件指令 | `if="{% raw %}{{!foo}}{% endraw %}"` | `v-if="!foo"` |
+| 循环指令 | `repeat="{% raw %}{{item in list}}{% endraw %}"` | `v-for="item in list"` |
+| 样式类名 | `class="btn btn-{% raw %}{{type}}{% endraw %}"` | `:class="['btn', 'btn-' + type]"` |
+| 内联样式 | `style="color:{% raw %}{{textColor}}{% endraw %}"` | `:style="{ color: textColor }"` |
+| 事件绑定 | `onclick="handler"` | `@click="handler"` |
+| 原生事件 | `onclick="xxx"` | `@click.native="xxx"` |
+| 数据绑定 | `src="{% raw %}{{rightItemSrc}}{% endraw %}"` | `:src="rightItemSrc"` |
+| 内容/槽 | `<content></content>` | `<slot></slot>` |
+| 数据初始化 | `data: { value: 'x' }` | `data: function() { return { value: 'x' } }` |
+| 标签 ID | `id="xxx"` | `ref="xxx"` |
+| 获取节点 | `this.$el('xxx')` | `this.$refs.xxx` |
+
+
+## Reference
+
+See the source code of `weex-vue-migration` for more details:
+
++ [template-rewriter](https://github.com/songsiqi/weex-vue-migration/blob/master/src/template-rewriter/rewriter.js)
++ [script-rewriter](https://github.com/songsiqi/weex-vue-migration/blob/master/src/script-rewriter/rewriter.js)
+
+## LifeCycle Hooks 生命周期钩子
+| weex | vue | Description |
+| --------- | ------------- | ------------------------- |
+| init | beforeCreate | 组件实例刚刚被创建,组件属性如data计算之前 |
+| created | created | 组件实例创建完成,属性已绑定,但DOM还未生成 |
+| | beforeMount | 模板编译/挂载之前 |
+| ready | mounted | 模板编译/挂载之后 |
+| | beforeUpdate | 组件更新之前 |
+| | updated | 组件更新之后 |
+| | activated | for`keep-alive`, 组件被激活时调用 |
+| | deactivated | for`keep-alive`, 组件被移除时调用 |
+| | beforeDestroy | 组件被销毁前调用 |
+| destroyed | destroyed | 组件被销毁后调用 |
+
+# Data Binding 数据绑定
+
+在weex中,使用{% raw %}{{…}}{% endraw %}在`<template>`中绑定在`<script>`里定义的数据;在vue中,需要在要绑定的属性前加 `:` 。如以下示例。
+
+* 类名
+
+ - weex
+
+ ```html
+ <div class="btn btn-{{type}}"></div>
+ ```
+
+ - vue
+
+ ```html
+ <div :class="['btn', 'btn-' + type]"></div>
+ ```
+
+* 样式绑定
+
+ * weex
+
+ ```html
+ <div style="color:{{textColor}}"></div>
+ ```
+
+ * vue
+
+ ```html
+ <div :style="{color: textColor}"></div>
+ ```
+
+# if指令
+
+* weex
+
+ ```html
+ <image src="..." if="{{shown}}"></image>
+ ```
+
+ or
+
+ ```html
+ <image src="..." if="shown"></image>
+ ```
+
+* vue
+
+ ```html
+ <image src="..." v-if="shown"></image>
+ ```
+
+# 循环指令
+
+* weex: repeat
+ - `$index`为索引
+
+ ```html
+ <div repeat="{{list}}">
+ <text>No. {{$index + 1}}</text>
+ <div>
+ ```
+
+ or
+
+ ```html
+ <div repeat="{{v in list}}">
+ <text>No. {{$index + 1}}, {{v.nickname}}</text>
+ </div>
+ ```
+
+ - 对象参数的顺序
+
+ ```html
+ <div repeat="{{(key, value) in list}}">
+ <text>No. {{key + 1}}, {{value.nickname}}</text>
+ </div>
+ ```
+
+ - `track-by`
+
+ ```html
+ <div repeat="{{item in items}}" track-by="item.id" class="{{gender}}"></div>
+ ```
+
+* vue: v-for
+
+ - 移除`$index`索引
+
+ - 对象参数的改变:改为(value, key), 与通用的对象迭代器保持一致
+
+ ```html
+ <div repeat="{{(value, key) in list}}">
+ <text>No. {{key + 1}}, {{value.nickname}}</text>
+ </div>
+ ```
+
+ - `track-by` 替换为`v-bind`
+
+ ```html
+ <div v-for="item in items" v-bind:key="item.id">
+ ```
+
+# 初始化数据
+
+* weex
+
+ ```javascript
+ data: { value: 'x' }
+ ```
+
+* vue
+
+ ```javascript
+ props: { value: { default: 'x' } }
+ ```
+
+ 动态数据
+
+ ```javascript
+ data: function () { return { value: 'x' } }
+ ```
+
+
+# 围绕DOM的实例方法
+
+* 获取节点
+
+ - weex: `this.$el('xxx')`
+
+ ```html
+ <template>
+ <container>
+ <text id="top">Top</text>
+ </container>
+ </template>
+ <script>
+ module.exports = {
+ methods: {
+ toTop: function () {
+ var top = this.$el('top')
+ }
+ }
+ }
+ </script>
+ ```
+
+ - vue
+
+ ```javascript
+ this.$refs.xxx
+ ```
+
+
+
+# 事件
+* 事件绑定
+ - weex
+
+ ```html
+ <div onclick="handler"></div>
+ ```
+
+ - vue
+
+ ```html
+ <div @click="handler"></div>
+ ```
+
+* 事件触发
+ - weex: dispatch和broadcast
+
+ ```javascript
+ this.$dispatch()
+ ```
+
+ ```javascript
+ this.$broadcast()
+ ```
+
+ - vue: emit
+
+ ```javascript
+ this.$emit()
+ ```
+
+ > 注:Weex 的 `$dispatch` 与组件无关,在任意组件中都可以通过 `$on` 捕获到,Vue 的`$emit` 用于触发组件(标签)的自定义事件。
+
+* 原生事件
+ - weex
+
+ ```javascript
+ onclick="xxx"
+ ```
+
+ - vue
+
+ ```javascript
+ @click.native="xxx"
+ ```
http://git-wip-us.apache.org/repos/asf/incubator-weex-site/blob/32a097bf/_draft/v1.0/migration/index.md
----------------------------------------------------------------------
diff --git a/_draft/v1.0/migration/index.md b/_draft/v1.0/migration/index.md
new file mode 100644
index 0000000..1238936
--- /dev/null
+++ b/_draft/v1.0/migration/index.md
@@ -0,0 +1,11 @@
+---
+title: 迁移
+type: references
+order: 12
+version: 2.1
+---
+
+# 迁移
+
+- [如何将原有 Weex 项目改造成 Vue 版本](./migration-from-weex.html)
+- [Weex 和 Vue 2.x 的语法差异](./difference.html)
\ No newline at end of file
http://git-wip-us.apache.org/repos/asf/incubator-weex-site/blob/32a097bf/_draft/v1.0/migration/migration-from-weex.md
----------------------------------------------------------------------
diff --git a/_draft/v1.0/migration/migration-from-weex.md b/_draft/v1.0/migration/migration-from-weex.md
new file mode 100644
index 0000000..34c3c6d
--- /dev/null
+++ b/_draft/v1.0/migration/migration-from-weex.md
@@ -0,0 +1,116 @@
+---
+title: 如何将原有 Weex 项目改造成 Vue 版本
+type: references
+order: 12.1
+version: 2.1
+---
+
+# 如何将原有 Weex 项目改造成 Vue 版本
+
+Weex 本身有一套语法规则,和 Vue 本身很相似,现在 Weex 与 Vue 有了官方合作,支持将 Vue 2.x 作为内置的前端框架,我们也推荐大家使用 Vue 2.x 的语法开发原生应用。对于现存旧版的 `.we` 文件,建议大家将其改造成 Vue 版本。
+
+## 要解决的问题
+
+> 将内核切换成 Vue 之后,原先基于 Weex 语法开发的项目将如何过渡到 Vue ?
+
+首先需要明确一点:Weex 原有的前端框架也会继续存在于 WeexSDK 中,依然支持 `.we` 文件格式的写法。
+
+此外,由于 `.we` 和 `.vue` 文件的格式本身就比较接近,所以迁移成本比较小,建议大家将现有 `.we` 格式的文件都转换成 `.vue` 格式。我们也推出了相应的工具和方法辅助迁移,在内部也有大量的成功实践,下边将重点介绍一下将 `.we` 文件转成 `.vue` 文件的方法。
+
+## 第一步,借助工具实现语法转换
+
+首先介绍一个工具: **[weex-vue-migration](https://github.com/songsiqi/weex-vue-migration)** ,它可以自动将 `.we` 文件转为 `.vue` 文件,绝大多数的模板语法都能自动转换,语法差异如下:
+
+| | Weex | Vue |
+| ---- | ---- | --- |
+| 生命周期 | `ready: function() {}` | `mounted: function() {}` |
+| 条件指令 | `if="{% raw %}{{!foo}}{% endraw %}"` | `v-if="!foo"` |
+| 循环指令 | `repeat="{% raw %}{{item in list}}{% endraw %}"` | `v-for="item in list"` |
+| 样式类名 | `class="btn btn-{% raw %}{{type}}{% endraw %}"` | `:class="['btn', 'btn-' + type]"` |
+| 内联样式 | `style="color:{% raw %}{{textColor}}{% endraw %}"` | `:style="{ color: textColor }"` |
+| 事件绑定 | `onclick="handler"` | `@click="handler"` |
+| 原生事件 | `onclick="xxx"` | `@click.native="xxx"` |
+| 数据绑定 | `src="{% raw %}{{rightItemSrc}}{% endraw %}"` | `:src="rightItemSrc"` |
+| 内容/槽 | `<content></content>` | `<slot></slot>` |
+| 数据初始化 | `data: { value: 'x' }` | `data: function() { return { value: 'x' } }` |
+| 标签 ID | `id="xxx"` | `ref="xxx"` |
+| 获取节点 | `this.$el('xxx')` | `this.$refs.xxx` |
+
+想要了解更多语法差异的细节,可以参考这篇文章:[《Weex 和 Vue 2.x 的语法差异》](./difference.html) 。
+
+### 使用方法
+
+首先安装工具:
+
+```bash
+npm install weex-vue-migration -g
+```
+
+转换文件:
+
+```bash
+weex-vue-migrate demo.we
+```
+
+转换成功后,将会在当前目录下生成 `demo.vue` 文件,控制台将会有如下输出:
+
+```
+[Success]: Migrate demo.we => demo.vue in 33ms
+Migration finished in 0.035s
+```
+
+除了逐个转换 `.we` 文件以外,`weex-vue-migration` 还支持批量转换整个目录,参考其[说明文档](https://github.com/songsiqi/weex-vue-migration/blob/master/README.md)可以了解更详细的使用方法。
+
+### 注意事项
+
+转换工具将不再支持 Weex 中废弃的语法,如果代码中有如下写法,建议先手动修改再做转换。
+
+0. 忽略 `require('@weex-components')` 语句,可以通过 npm 包的方式引入外部组件。
+0. 无法转换 `repeat="list"` 写法,仅支持 `repeat="item in list"` 格式。
+0. 不支持转换 `<script type="config"></script>`,目前 Vue 中不支持原有的降级配置。
+
+## 第二步,手动调整代码细节
+
+模板和样式的转换都可以借助工具轻易转换过来,`<script>` 中基本的语法也可以转换;但是由于 javascript 的写法比较灵活,仅仅使用工具做转换,并不一定能完美过渡。工具只能处理语法但是理解不了代码中的逻辑,在 Weex 和 Vue 的框架特性存在一些差异,有些差异还是需要手动修改才可以生效。
+
+> 提示:在代码中使用的“黑科技”越多,项目就越难以转换。
+
+### 样式单位
+
+在 `.we` 文件写样式时,开发者通常都不写长度单位,默认会被视为 `px`。在新的 Vue 版本的 Web 渲染器中,`<style>` 中的样式将会直接转化成 CSS class,如果不写单位、浏览器将无法正确识别,会导致在 Web 端无法正常渲染。Native 环境中不受影响。
+
+尽管不影响 Native 页面的渲染,也建议给样式长度加上单位 `px`。
+
+### 旧框架中的内置属性
+
++ `vm._app`
+ + `vm._app.differ`
+ + `vm._app.doc`
+ + `vm._app.updateActions()`
+
+### 事件派发机制
+
++ `$dispatch` 、`$broadcast` 、`$call` 方法已经废弃。
++ `$emit` 行为不一致。
+
+可以使用 Vuex 管理数据状态。
+
+### 直接操作 Virtual-DOM
+
+Weex 和 Vue 中的 Virtual-DOM 格式并不相同,如果你使用了 `this.$el('id')` 获取了某个组件的 element 之后,又修改了其中的某些属性或者调用了某些方法,这些操作在 Vue 中很难找到直接的对应写法。
+
+从另一个角度讲,我们也非常不建议在 Weex 或 Vue 项目中直接操作 Virtual-DOM,这些写法都应该修改。
+
+## 调整开发环境和工具
+
+在文件转换完成后,还需要重新调整一下开发环境。
+
+### 文件的编译
+
+`weex-loader` 同时支持编译 `.we` 和 `.vue` 文件,如果你使用的是 `webpack` 来配置编译环境,将不需要做任何改变就能直接编译 `.vue` 文件。
+
+需要注意的是,Vue 本身就是一个独立的前端框架,使用 Vue 编写的项目在 Web 上完全可以不依赖 Weex 容器运行。在这种情况下,需要配置基于 `vue-loader` 的编译脚本生成适用于 Web 平台 js 文件;然后引入 Vue 格式的 Weex 组件库就可以在 Web 中。
+
+### 辅助工具
+
+Weex 提供了 [weex-toolkit](https://github.com/weexteam/weex-toolkit) 的脚手架工具来辅助开发和调试、[weex-pack](https://github.com/weexteam/weex-pack) 实现打包原生应用;同样在 Vue 中也有 [vue-cli](https://github.com/vuejs/vue-cli) 脚手架工具。Weex 和 Vue 的工具互相做了适配,建议在创建项目和开发 Vue 项目的时候使用 `vue-cli` ,在调试时使用 `weex-toolkit`,在打包原生应用时使用 `weex-pack` 。
http://git-wip-us.apache.org/repos/asf/incubator-weex-site/blob/32a097bf/_draft/v1.0/references/api.md
----------------------------------------------------------------------
diff --git a/_draft/v1.0/references/api.md b/_draft/v1.0/references/api.md
new file mode 100644
index 0000000..e3e5e4b
--- /dev/null
+++ b/_draft/v1.0/references/api.md
@@ -0,0 +1,67 @@
+---
+title: ViewModel APIs
+type: references
+order: 1.3
+version: 0.10
+---
+
+# 接口
+
+你可以在组件的方法中通过 `this` (Vm)上下文访问这些 API。
+
+例子:
+
+```html
+<script>
+module.exports = {
+ methods: {
+ somemethod: function() {
+ this.$vm('someId');
+ }
+ }
+}
+</script>
+```
+
+## $(id)
+
+**不建议使用**,请使用 `$vm` 代替。
+## $el(id)
+
+返回对应 id 的元素对象的引用。
+### Arguments
+- `id` _(string)_: 唯一标识符。
+### Returns
+- _(Element)_: 一个元素对象的引用。
+### Tips
+- id 只能保证是当前(页面)组件中是唯一的,如果你需要寻找父组件或子组件,你可以利用组件间的通信模式实现。
+- 延伸阅读: [id](../guide/syntax/id.md),[Communicate Between Components](../guide/syntax/comm.md)
+## $vm(id)
+
+返回对应 id 的 vm 对象引用。
+### Arguments
+- `id` _(String)_: 唯一标识符。
+### Returns
+- `vm` _(Vm)_: 一个 Vm 对象引用。
+### Tips
+- id 只能保证是当前(页面)组件中是唯一的,如果你需要寻找父组件或子组件,你可以利用组件间的通信模式实现。
+- 延伸阅读: [id](../guide/syntax/id.md),[Communicate Between Components](../guide/syntax/comm.md)
+## $getConfig()
+
+获取当前全局环境变量和配置信息。
+### Returns
+- `config` _(object)_: 配置对象;
+- `bundleUrl` _(string)_: bundle 的 url;
+- `debug` _(boolean)_: 是否是调试模式;
+- `env` _(object)_: 环境对象;
+ - `weexVersion` _(string)_: Weex sdk 版本;
+ - `appName` _(string)_: 应用名字;
+ - `appVersion` _(string)_: 应用版本;
+ - `platform` _(string)_: 平台信息,是 `iOS`、`Android` 还是 `Web`;
+ - `osVersion` _(string)_: 系统版本;
+ - `deviceModel` _(string)_: 设备型号 **(仅原生应用)**;
+ - `deviceWidth` _(number)_: 设备宽度,默认为 `750`;
+ - `deviceHeight` _(number)_: 设备高度。
+## $call(module, method, ...args)
+
+**不建议使用**,请使用 `require('@weex-module/module')[method](...args)` 代替。查看更多信息:[modules](./modules/main)。
http://git-wip-us.apache.org/repos/asf/incubator-weex-site/blob/32a097bf/_draft/v1.0/references/bubble.md
----------------------------------------------------------------------
diff --git a/_draft/v1.0/references/bubble.md b/_draft/v1.0/references/bubble.md
new file mode 100644
index 0000000..74b7e98
--- /dev/null
+++ b/_draft/v1.0/references/bubble.md
@@ -0,0 +1,150 @@
+---
+title: 事件冒泡
+type: references
+order: 1.3
+version: 0.10
+---
+
+# 事件冒泡 <span class="api-version">v0.13+</span>
+
+Weex 1.0 实现了 W3C 标准的事件冒泡机制。
+
+### 使用
+
+```html
+<template>
+ <div class="root" onclick="rootClick" bubble="true">
+ <div>
+ <text style="font-size: 40px;">{{rootText}}</text>
+ </div>
+ <div class="outer" onclick="parentClick">
+ <div>
+ <text style="font-size: 40px;">{{parentText}}</text>
+ </div>
+ <text class="inner" onclick="click">{{innerText}}</text>
+ </div>
+ </div>
+</template>
+
+<script>
+ module.exports = {
+ data: {
+ innerText: 'click me',
+ parentText: '',
+ rootText: ''
+ },
+ methods: {
+ click: function(e) {
+ this.innerText = 'inner bubble'
+ },
+ parentClick: function(e) {
+ this.parentText = 'parent bubble'
+ },
+ rootClick: function(e) {
+ this.rootText = 'root bubble'
+ }
+ }
+ }
+</script>
+
+<style>
+ .inner {
+ font-size: 40px;
+ text-align: center;
+ background-color: #7a9b1b;
+ padding: 40px;
+ }
+
+ .outer {
+ font-size: 40px;
+ text-align: center;
+ background-color: #9b7a1b;
+ padding: 120px;
+ }
+
+ .root {
+ font-size: 40px;
+ text-align: center;
+ background-color: #7a1b9b;
+ padding: 80px;
+ }
+</style>
+```
+
+[try it](http://dotwe.org/weex/dbfeb926e003986e2eea88c8ccdadb92)
+
+运行以上代码,用客户端打开,点击中间的元素,可以看到事件向上传播,依次触发。
+
+### 注意
+
+需要注意的是: ** 为了兼容之前的版本,Weex 默认不会开启事件冒泡机制。需要在根元素的属性上,添加 `bubble="true"` 来开启冒泡机制。否则,将不会向上传播事件,保持与之前版本的效果相同。 **
+
+### stopPropagation
+
+在事件处理函数中,可以使用 `e.stopPropagation()` 方法,来阻止本次事件向上的传递过程。注意,`e.stopPropagation()` 与 `bubble="true"` 不同,前者只会影响当前元素以及父元素的传播,不会影响子元素的传播;后者是为了版本兼容而增加的开关机制,会全局关闭或者开启冒泡机制,两者可以共同存在使用,如下:
+
+```html
+<template>
+ <div class="root" onclick="rootClick" bubble="true">
+ <div>
+ <text style="font-size: 40px;">{{rootText}}</text>
+ </div>
+ <div class="outer" onclick="parentClick">
+ <div>
+ <text style="font-size: 40px;">{{parentText}}</text>
+ </div>
+ <text class="inner" onclick="click">{{innerText}}</text>
+ </div>
+ </div>
+</template>
+
+<script>
+ module.exports = {
+ data: {
+ innerText: 'click me',
+ parentText: '',
+ rootText: ''
+ },
+ methods: {
+ click: function(e) {
+ this.innerText = 'inner bubble'
+ },
+ parentClick: function(e) {
+ this.parentText = 'parent bubble'
+ e.stopPropagation()
+ },
+ rootClick: function(e) {
+ this.rootText = 'root bubble'
+ // e.stopPropagation()
+ }
+ }
+ }
+</script>
+
+<style>
+ .inner {
+ font-size: 40px;
+ text-align: center;
+ background-color: #7a9b1b;
+ padding: 40px;
+ }
+
+ .outer {
+ font-size: 40px;
+ text-align: center;
+ background-color: #9b7a1b;
+ padding: 120px;
+ }
+
+ .root {
+ font-size: 40px;
+ text-align: center;
+ background-color: #7a1b9b;
+ padding: 80px;
+ }
+</style>
+```
+
+[try it](http://dotwe.org/weex/0cab45a7c62e8bebedd2ffd83a8e1256)
+
+运行以上代码,用客户端打开,点击中间的元素,可以看到事件向上传播到父元素被终止,不再继续往根元素传播。
http://git-wip-us.apache.org/repos/asf/incubator-weex-site/blob/32a097bf/_draft/v1.0/references/cheatsheet.md
----------------------------------------------------------------------
diff --git a/_draft/v1.0/references/cheatsheet.md b/_draft/v1.0/references/cheatsheet.md
new file mode 100644
index 0000000..777abf6
--- /dev/null
+++ b/_draft/v1.0/references/cheatsheet.md
@@ -0,0 +1,114 @@
+---
+title: Weex 快查手册
+type: references
+order: 6
+version: 0.10
+---
+
+# Weex 备忘录
+
+## Native 组件
+<style>
+code {
+ word-break: break-all;
+}
+</style>
+
+| 组件 | 特性 | 样式 | 事件 | 特殊父组件 | 子组件 |
+| ---- | ---- | ---- | ---- | ---- | ---- |
+| `<div>` | - | **box model**<br>**flexbox**<br>`position`<br>`background-color`<br>`opacity` | `click`<br>`appear`<br>`disappear` | - | (any) |
+| `<text>` | `value` | **box model**<br>flex<br>`position`<br>`background-color`<br>`opacity`<br>`color`<br>`font-size`<br>`font-style`<br>`font-weight`<br>`text-decoration`<br>`text-align`<br>`text-overflow`<br>`line-height` | `click`<br>`appear`<br>`disappear` | - | text only |
+| `<image>` | `src` | **box model**<br>**flexbox**<br>`position`<br>`background-color`<br>`opacity`<br>`resize` | `click`<br>`appear`<br>`disappear` | - | (none) |
+| `<scroller>` | `show-scrollbar`<br>`scroll-direction` | **box model**<br>**flexbox**<br>`position`<br>`background-color`<br>`opacity` | `click`<br>`appear`<br>`disappear` | - | (any) |
+| `<list>` | `loadmoreoffset` | **box model**<br>**flexbox**<br>`position`<br>`background-color`<br>`opacity` | `click`<br>`appear`<br>`disappear`<br>`loadmore`<br>`refresh`<br>`loading` | - | `<cell>`<br>`<header>`<br>`<refresh>`<br>`<loading>` |
+| `<cell>` | - | **box model**<br>**flexbox**<br>`position`<br>`background-color`<br>`opacity` | `click`<br>`appear`<br>`disappear` | `<list>` | (any) |
+| `<slider>` | `auto-play` | **box model**<br>**flexbox**<br>`position`<br>`background-color`<br>`opacity` | `click`<br>`appear`<br>`disappear`<br>`change` | - | (any)<br>`<indicator>` |
+| `<indicator>` | - | **box model**<br>**flexbox**<br>`position`<br>`item-color`<br>`item-selected-color`<br>`item-size` | `click`<br>`appear`<br>`disappear` | `<slider>` | (none) |
+| `<wxc-navpage>` | `height`<br>`background-color`<br>`title`<br>`title-color`<br>`left-item-title`<br>`left-item-color`<br>`right-item-title`<br>`right-item-color`<br>`left-item-src`<br>`right-item-src` | **box model**<br>**flexbox**<br>`position`<br>`background-color`<br>`opacity` | `click`<br>`appear`<br>`disappear`<br>`naviBar.leftItem.click`<br>`naviBar.rightItem.click` | - | (any) |
+| `<wxc-tabbar>` | `tab-items` | **box model**<br>**flexbox**<br>`position`<br>`background-color`<br>`opacity` | `tabBar.onClick` | - | (none) |
+| `<embed>` | `src` | **box model**<br>**flexbox**<br>`position`<br>`background-color`<br>`opacity` | `click`<br>`appear`<br>`disappear` | - | (none) |
+| `<web>` | `src` | **box model**<br>**flexbox**<br>`position`<br>`background-color`<br>`opacity` | `click`<br>`appear`<br>`disappear`<br>`pagestart`<br>`pagefinish`<br>`error` | - | (none) |
+| `<video>` | `src`<br>`play-status`<br>`auto-play` | **box model**<br>**flexbox**<br>`position`<br>`background-color`<br>`opacity` | `click`<br>`appear`<br>`disappear`<br>`start`<br>`pause`<br>`finish`<br>`fail` | - | (none) |
+| `<a>` | `href` | **box model**<br>**flexbox**<br>`position`<br>`background-color`<br>`opacity` | `click`<br>`appear`<br>`disappear` | - | (any) |
+| `<input>` | `type`<br>`value`<br>`placeholder`<br>`disabled`<br>`autofocus` | **box model**<br>**flexbox**<br>`position`<br>`background-color`<br>`opacity`<br>`placeholder-color`<br>`color`<br>`font-size`<br>`font-style`<br>`font-weight`<br>`text-align` | `click`<br>`appear`<br>`disappear` | - | (none) |
+| `<switch>` | `checked` | **box model**<br>**flexbox**<br>`position`<br>`background-color`<br>`opacity` | `appear`<br>`disappear`<br>`input`<br>`change`<br>`focus`<br>`blur` | - | (none) |
+
+## Native Modules
+
+| module | apis |
+| ---- | ---- |
+| `@weex-module/dom` | `scrollToElement(node, { offset })` |
+| `@weex-module/modal` | `toast({ message, duration })`<br>`alert({ message, okTitle }, callback)`<br>`confirm({ message, okTitle, cancelTitle }, callback(result))`<br>`prompt({ message, okTitle, cancelTitle }, callback(result, data))` |
+| `@weex-module/stream` | `fetch({ method, url, headers, type, body }, callback({ status, ok, statusText, data, headers }), progressCallback({ readyState, status, length, statusText, headers}))` |
+| `@weex-module/webview` | `goBack(ref)`<br>`goForward(ref)`<br>`reload(ref)` |
+| `@weex-module/navigator` | `push({ url, animated }, callback)`<br>`pop({ animated }, callback)` |
+| `@weex-module/animation` | `transition(node, { styles, duration, timingFunction, delay, transform-origin }, callback)` |
+
+## 特殊的模版语法
+
+* `<foo x="abc">`
+* `{% raw %}<foo x="{{expr}}">{% endraw %}`
+* `<foo style="name1: value1; name2: value2">`
+* `{% raw %}<foo style="name1: value1; name2: {{expr}}; name3: ...">{% endraw %}`
+* `<foo class="a b c">`
+* `{% raw %}<foo class="a {{expr}} c">{% endraw %}`
+* `<foo onclick="methodName">`
+* `<foo id="abc">`
+* `<foo if="expr">`
+* `<foo repeat="item in list">`
+* `<foo repeat="(key,item) in list">`
+* `<component type="foo">`
+* `{% raw %}<component type="{{expr}}">{% endraw %}`
+
+## ViewModel APIs
+
+* `this.$vm(el)`
+* `this.$el(el)`
+* `this.$getConfig()`
+* `this.$emit(type, data)`
+* `this.$dispatch(type, data)`
+* `this.$broadcast(type, data)`
+
+## ViewModel Options
+
+* `data`
+* `methods`
+* `computed`
+* `init`, `created`, `ready`
+* `events`
+
+**示例:**
+
+```javascript
+module.exports = {
+
+ data: function () {
+ return {
+ x: 1,
+ y: 2
+ }
+ }
+
+ methods: {
+ foo: function () {
+ console.log('foo')
+ }
+ },
+
+ computed: {
+ z: function () {
+ return this.x + this.y
+ }
+ },
+
+ events: {
+ custom: function (e) {
+ console.log(e)
+ }
+ },
+
+ init: function () {},
+ created: function () {},
+ ready: function () {}
+}
+```
http://git-wip-us.apache.org/repos/asf/incubator-weex-site/blob/32a097bf/_draft/v1.0/references/color-names.md
----------------------------------------------------------------------
diff --git a/_draft/v1.0/references/color-names.md b/_draft/v1.0/references/color-names.md
new file mode 100644
index 0000000..1b8a968
--- /dev/null
+++ b/_draft/v1.0/references/color-names.md
@@ -0,0 +1,180 @@
+---
+title: 颜色名称列表
+type: references
+order: 1.8
+version: 0.10
+---
+
+# Weex 支持的所有颜色名称
+
+### 基础颜色关键词:
+
+| 颜色名 | 十六进制RGB值 |
+| --- | --- |
+| black(黑) | #000000 |
+| silver(银) | #C0C0C0 |
+| gray(灰) | #808080 |
+| white(白) | #FFFFFF |
+| maroon(褐紫红) | #800000 |
+| red(红) | #FF0000 |
+| purple(紫) | #800080 |
+| fuchsia(晚樱) | #FF00FF |
+| green(绿) | #008000 |
+| lime(石灰) | #00FF00 |
+| olive(橄榄) | #808000 |
+| yellow(黄) | #FFFF00 |
+| navy(海军蓝) | #000080 |
+| blue(蓝) | #0000FF |
+| teal(水鸭) | #008080 |
+| aqua(水蓝) | #00FFFF |
+### 扩展颜色关键词:
+
+| 颜色名 | 十六进制RGB值 |
+| --- | --- |
+| aliceblue | #F0F8FF |
+| antiquewhite | #FAEBD7 |
+| aqua | #00FFFF |
+| aquamarine | #7FFFD4 |
+| azure | #F0FFFF |
+| beige | #F5F5DC |
+| bisque | #FFE4C4 |
+| black | #000000 |
+| blanchedalmond | #FFEBCD |
+| blue | #0000FF |
+| blueviolet | #8A2BE2 |
+| brown | #A52A2A |
+| burlywood | #DEB887 |
+| cadetblue | #5F9EA0 |
+| chartreuse | #7FFF00 |
+| chocolate | #D2691E |
+| coral | #FF7F50 |
+| cornflowerblue | #6495ED |
+| cornsilk | #FFF8DC |
+| crimson | #DC143C |
+| cyan | #00FFFF |
+| darkblue | #00008B |
+| darkcyan | #008B8B |
+| darkgoldenrod | #B8860B |
+| darkgray | #A9A9A9 |
+| darkgreen | #006400 |
+| darkgrey | #A9A9A9 |
+| darkkhaki | #BDB76B |
+| darkmagenta | #8B008B |
+| darkolivegreen | #556B2F |
+| darkorange | #FF8C00 |
+| darkorchid | #9932CC |
+| darkred | #8B0000 |
+| darksalmon | #E9967A |
+| darkseagreen | #8FBC8F |
+| darkslateblue | #483D8B |
+| darkslategray | #2F4F4F |
+| darkslategrey | #2F4F4F |
+| darkturquoise | #00CED1 |
+| darkviolet | #9400D3 |
+| deeppink | #FF1493 |
+| deepskyblue | #00BFFF |
+| dimgray | #696969 |
+| dimgrey | #696969 |
+| dodgerblue | #1E90FF |
+| firebrick | #B22222 |
+| floralwhite | #FFFAF0 |
+| forestgreen | #228B22 |
+| fuchsia | #FF00FF |
+| gainsboro | #DCDCDC |
+| ghostwhite | #F8F8FF |
+| gold | #FFD700 |
+| goldenrod | #DAA520 |
+| gray | #808080 |
+| green | #008000 |
+| greenyellow | #ADFF2F |
+| grey | #808080 |
+| honeydew | #F0FFF0 |
+| hotpink | #FF69B4 |
+| indianred | #CD5C5C |
+| indigo | #4B0082 |
+| ivory | #FFFFF0 |
+| khaki | #F0E68C |
+| lavender | #E6E6FA |
+| lavenderblush | #FFF0F5 |
+| lawngreen | #7CFC00 |
+| lemonchiffon | #FFFACD |
+| lightblue | #ADD8E6 |
+| lightcoral | #F08080 |
+| lightcyan | #E0FFFF |
+| lightgoldenrodyellow | #FAFAD2 |
+| lightgray | #D3D3D3 |
+| lightgreen | #90EE90 |
+| lightgrey | #D3D3D3 |
+| lightpink | #FFB6C1 |
+| lightsalmon | #FFA07A |
+| lightseagreen | #20B2AA |
+| lightskyblue | #87CEFA |
+| lightslategray | #778899 |
+| lightslategrey | #778899 |
+| lightsteelblue | #B0C4DE |
+| lightyellow | #FFFFE0 |
+| lime | #00FF00 |
+| limegreen | #32CD32 |
+| linen | #FAF0E6 |
+| magenta | #FF00FF |
+| maroon | #800000 |
+| mediumaquamarine | #66CDAA |
+| mediumblue | #0000CD |
+| mediumorchid | #BA55D3 |
+| mediumpurple | #9370DB |
+| mediumseagreen | #3CB371 |
+| mediumslateblue | #7B68EE |
+| mediumspringgreen | #00FA9A |
+| mediumturquoise | #48D1CC |
+| mediumvioletred | #C71585 |
+| midnightblue | #191970 |
+| mintcream | #F5FFFA |
+| mistyrose | #FFE4E1 |
+| moccasin | #FFE4B5 |
+| navajowhite | #FFDEAD |
+| navy | #000080 |
+| oldlace | #FDF5E6 |
+| olive | #808000 |
+| olivedrab | #6B8E23 |
+| orange | #FFA500 |
+| orangered | #FF4500 |
+| orchid | #DA70D6 |
+| palegoldenrod | #EEE8AA |
+| palegreen | #98FB98 |
+| paleturquoise | #AFEEEE |
+| palevioletred | #DB7093 |
+| papayawhip | #FFEFD5 |
+| peachpuff | #FFDAB9 |
+| peru | #CD853F |
+| pink | #FFC0CB |
+| plum | #DDA0DD |
+| powderblue | #B0E0E6 |
+| purple | #800080 |
+| red | #FF0000 |
+| rosybrown | #BC8F8F |
+| royalblue | #4169E1 |
+| saddlebrown | #8B4513 |
+| salmon | #FA8072 |
+| sandybrown | #F4A460 |
+| seagreen | #2E8B57 |
+| seashell | #FFF5EE |
+| sienna | #A0522D |
+| silver | #C0C0C0 |
+| skyblue | #87CEEB |
+| slateblue | #6A5ACD |
+| slategray | #708090 |
+| slategrey | #708090 |
+| snow | #FFFAFA |
+| springgreen | #00FF7F |
+| steelblue | #4682B4 |
+| tan | #D2B48C |
+| teal | #008080 |
+| thistle | #D8BFD8 |
+| tomato | #FF6347 |
+| turquoise | #40E0D0 |
+| violet | #EE82EE |
+| wheat | #F5DEB3 |
+| white | #FFFFFF |
+| whitesmoke | #F5F5F5 |
+| yellow | #FFFF00 |
+| yellowgreen | #9ACD32 |
[18/51] [abbrv] incubator-weex-site git commit: rearrangement the
structure of the document
Posted by ha...@apache.org.
http://git-wip-us.apache.org/repos/asf/incubator-weex-site/blob/32a097bf/source/cn/guide/extend-android.md
----------------------------------------------------------------------
diff --git a/source/cn/guide/extend-android.md b/source/cn/guide/extend-android.md
new file mode 100644
index 0000000..289cc25
--- /dev/null
+++ b/source/cn/guide/extend-android.md
@@ -0,0 +1,219 @@
+---
+title: Android 扩展
+type: guide
+group: 扩展
+order: 6.2
+version: 2.1
+---
+
+# Android 扩展
+
+Weex 提供了扩展机制,可以根据自己的业务进行定制自己的功能。
+主要分为两类扩展:
+
+- Module 扩展 非 UI 的特定功能。例如 sendHttp、openURL 等。
+- Component 扩展 实现特别功能的 Native 控件。例如:RichTextview,RefreshListview 等。
+- Adapter 扩展 Weex 对一些基础功能实现了统一的接口,可实现这些接口来定制自己的业务。例如:图片下载等。
+
+## Module 扩展
+
+1. Module 扩展必须继承 WXModule 类。
+2. 扩展方法必须加上 @WXModuleAnno 注解。Weex 会根据注解来判断当前方法是否要运行在 UI 线程,和当前方法是否是扩展方法。
+3. Weex是根据反射来进行调用 Module 扩展方法,所以Module中的扩展方法必须是 public 类型。
+4. 同样因为是通过反射调用,Module 不能被混淆。请在混淆文件中添加代码:`-keep public class * extends com.taobao.weex.common.WXModule{*;}`
+5. Module 扩展的方法可以使用 int, double, float, String, Map, List 类型的参数
+6. 完成 Module 后一定要在初始化时注册 `WXSDKEngine.registerModule("myModule", MyModule.class);` 否则会报类似错误:`ReportException :undefined:9: TypeError: Object #<Object> has no method 'printLog'`
+
+示例如下:
+
+```java
+public class MyModule extends WXModule {
+
+ @WXModuleAnno(runOnUIThread = true)
+ public void printLog(String msg) {
+ Toast.makeText(mWXSDKInstance.getContext(),msg,Toast.LENGTH_SHORT).show();
+ }
+}
+```
+
+JS 调用如下:
+
+```html
+<template>
+ <div>
+ <text onclick="click">点击我测试</text>
+ </div>
+</template>
+
+<script>
+ module.exports = {
+ methods: {
+ click: function() {
+ weex.requireModule('myModule').printLog("我是一个测试!");
+ }
+ }
+ }
+</script>
+```
+
+#### 支持 synchronous/asynchronous 回调
+
+你可以添加 `@JSMethod(uiThread = false或true)` 注释来选择 moudle 的回调模式。请参见以下示例:
+
+```java
+ // as sync-callback mode
+@JSMethod (uiThread = false)
+public void testSyncCall(){
+ WXLogUtils.d("WXComponentSyncTest : Thread.currentThread().getName());
+}
+
+// as async-callback mode
+@JSMethod (uiThread = true)
+public void testAsyncCall(){
+ WXLogUtils.e("WXComponentASynTest : Thread.currentThread().getName() );
+}
+```
+
+## Component 扩展
+
+1. Component 扩展类必须集成 WXComponent.
+2. Component 对应的设置属性的方法必须添加注解 @WXComponentProp(name=value(value is attr or style of dsl))
+3. Weex sdk 通过反射调用对应的方法,所以 Component 对应的属性方法必须是 public,并且不能被混淆。请在混淆文件中添加代码 `-keep public class * extends com.taobao.weex.ui.component.WXComponent{*;}`
+4. Component 扩展的方法可以使用 int, double, float, String, Map, List 类型的参数
+5. 完成 Component 后一定要在初始化时注册 `WXSDKEngine.registerComponent("richtext",RichText.class);`
+
+示例如下:
+
+```java
+public class RichText extends WXComponent {
+
+ public RichText(WXSDKInstance instance, WXDomObject dom, WXVContainer parent, boolean isLazy) {
+ super(instance, dom, parent, isLazy);
+ }
+
+ @Override
+ protected void initView() {
+ mHost=new TextView(mContext);
+ ((TextView)mHost).setMovementMethod(LinkMovementMethod.getInstance());
+ }
+
+ @WXComponentProp(name = "tel")
+ public void setTelLink(String tel){
+ SpannableString spannable=new SpannableString(tel);
+ spannable.setSpan(new URLSpan("tel:"+tel),0,tel.length(), Spanned.SPAN_EXCLUSIVE_EXCLUSIVE);
+ ((TextView)mHost).setText(spannable);
+ }
+}
+```
+
+JS 调用如下:
+
+```html
+<template>
+ <div>
+ <richText tel="12305" style="width:200;height:100">12305</text>
+ </div>
+</template>
+```
+## Adapter扩展
+
+图片下载:
+
+需要时集成接口 IWXImgLoaderAdapter,实现 setImage 方法。
+
+示例如下:
+
+```java
+public class ImageAdapter implements IWXImgLoaderAdapter {
+
+ public ImageAdapter() {
+ }
+
+ @Override
+ public void setImage(final String url, final ImageView view,
+ WXImageQuality quality, WXImageStrategy strategy) {
+
+ WXSDKManager.getInstance().postOnUiThread(new Runnable() {
+
+ @Override
+ public void run() {
+ if(view==null||view.getLayoutParams()==null){
+ return;
+ }
+ if (TextUtils.isEmpty(url)) {
+ view.setImageBitmap(null);
+ return;
+ }
+ String temp = url;
+ if (url.startsWith("//")) {
+ temp = "http:" + url;
+ }
+ if (view.getLayoutParams().width <= 0 || view.getLayoutParams().height <= 0) {
+ return;
+ }
+ Picasso.with(WXEnvironment.getApplication())
+ .load(temp)
+ .into(view);
+ }
+ },0);
+ }
+}
+```
+#### 组件方法支持
+从WeexSDK 0.9.5开始,你可以定义组件方法
+
+- 在组件中如下声明一个组件方法
+
+ ```java
+ @JSMethod
+ public void focus(){
+ //method implementation
+ }
+ ```
+
+- 注册组之后,你可以在weex 文件中调用
+
+ ```html
+ <template>
+ <mycomponent id='mycomponent'></mycomponent>
+ </template>
+ <script>
+ module.exports = {
+ created: function() {
+ this.$el('mycomponent').focus();
+ }
+ }
+ </script>
+ ```
+
+注:工程要添加依赖 `compile 'com.squareup.picasso:picasso:2.5.2'`
+
+#### SDK混淆规则
+若要在APP中使用混淆,请在相应的配置文件中添加如下规则:
+
+```java
+-keep class com.taobao.weex.WXDebugTool{*;}
+-keep class com.taobao.weex.devtools.common.LogUtil{*;}
+-keepclassmembers class ** {
+ @com.taobao.weex.ui.component.WXComponentProp public *;
+}
+-keep class com.taobao.weex.bridge.**{*;}
+-keep class com.taobao.weex.dom.**{*;}
+-keep class com.taobao.weex.adapter.**{*;}
+-keep class com.taobao.weex.common.**{*;}
+-keep class * implements com.taobao.weex.IWXObject{*;}
+-keep class com.taobao.weex.ui.**{*;}
+-keep class com.taobao.weex.ui.component.**{*;}
+-keep class com.taobao.weex.utils.**{
+ public <fields>;
+ public <methods>;
+ }
+-keep class com.taobao.weex.view.**{*;}
+-keep class com.taobao.weex.module.**{*;}
+-keep public class * extends com.taobao.weex.common.WXModule{*;}
+-keep public class * extends com.taobao.weex.ui.component.WXComponent{*;}
+-keep public class com.taobao.taolive.ui.weex.**{*;}
+-keep class * implements com.taobao.weex.ui.IExternalComponentGetter{*;}
+-keep class com.alibaba.aliweex.hc.HCConfig{*;}
+-keep class com.alibaba.dynamic.**{*;}
+```
http://git-wip-us.apache.org/repos/asf/incubator-weex-site/blob/32a097bf/source/cn/guide/extend-ios.md
----------------------------------------------------------------------
diff --git a/source/cn/guide/extend-ios.md b/source/cn/guide/extend-ios.md
new file mode 100644
index 0000000..3b9ba70
--- /dev/null
+++ b/source/cn/guide/extend-ios.md
@@ -0,0 +1,326 @@
+---
+title: iOS 扩展
+type: guide
+group: 扩展
+order: 6.3
+version: 2.1
+---
+
+## 注意
+
+**Weex 所有暴露给 JS 的内置 module 或 component API 都是安全和可控的, 它们不会去访问系统的私有 API ,也不会去做任何 runtime 上的 hack 更不会去改变应用原有的功能定位。**
+
+**如果需要扩展自定义的 module 或者 component ,一定注意不要将 OC 的 runtime 暴露给 JS , 不要将一些诸如 `dlopen()`, `dlsym()`, `respondsToSelector:`,`performSelector:`,`method_exchangeImplementations()` 的动态和不可控的方法暴露给JS, 也不要将系统的私有API暴露给JS**
+
+## Module 扩展
+
+[swift](https://github.com/weexteam/article/issues/55) 扩展 module
+
+Weex SDK 只提供渲染,而不是其他的能力,如果你需要 像网络,图片,URL跳转这些特性,需要自己动手实现他们
+例如,如果你想实现一个url地址跳转函数,你可以按照如下步骤实现一个 Module
+
+### **自定义module的步骤**
+1. 自定义的module类 必须实现 `WXModuleProtocol`
+2. 必须添加宏`WX_EXPORT_METHOD`, 它可以被weex识别,它的参数是 JavaScript调用 module指定方法的参数
+3. 添加`@synthesized weexInstance`,每个moudle对象被绑定到一个指定的实例上
+4. Module 方法会在UI线程中被调用,所以不要做太多耗时的任务在这里,如果要在其他线程执行整个module 方法,需要实现`WXModuleProtocol`中`- (NSThread *)targetExecuteThread`的方法,这样,分发到这个module的任务会在指定的线程中运行
+5. Weex 的参数可以是 String 或者Map
+6. Module 支持返回值给 JavaScript中的回调,回调的类型是`WXModuleCallback`,回调的参数可以是String或者Map
+
+ ```object-c
+ @implementation WXEventModule
+
+ @synthesize weexInstance;
+ WX_EXPORT_METHOD(@selector(openURL:callback:))
+
+ - (void)openURL:(NSString *)url callback:(WXModuleCallback)callback
+ {
+ NSString *newURL = url;
+ if ([url hasPrefix:@"//"]) {
+ newURL = [NSString stringWithFormat:@"http:%@", url];
+ } else if (![url hasPrefix:@"http"]) {
+ newURL = [NSURL URLWithString:url relativeToURL:weexInstance.scriptURL].absoluteString;
+ }
+
+ UIViewController *controller = [[WXDemoViewController alloc] init];
+ ((WXDemoViewController *)controller).url = [NSURL URLWithString:newURL];
+
+ [[weexInstance.viewController navigationController] pushViewController:controller animated:YES];
+ callback(@{@"result":@"success"});
+ }
+
+ @end
+ ```
+
+#### 暴露同步方法<span class="api-version">v0.10+</span>
+
+如果你想要暴露同步的native方法给JS, 即JS可以直接拿到Native的返回值。 你可以使用`WX_EXPORT_METHOD_SYNC` 宏。
+
+native 代码:
+
+```objective-c
+@implementation WXEventModule
+
+WX_EXPORT_METHOD_SYNC(@selector(getString))
+
+- (NSString *)getString
+{
+ return @"testString";
+}
+
+@end
+```
+
+js 代码:
+
+```javascript
+const eventModule = weex.requireModule('event')
+const returnString = syncTest.getString() // return "testString"
+```
+
+除了string, 你也可以返回 `number/array/dictionary` 类型.
+
+`注意:` 暴露的同步方法只能在 JS 线程执行,请不要做太多同步的工作导致JS执行阻塞。
+
+`注意:` Vue 2.0 还未支持这个特性,最早会在 0.12 版本支持
+
+
+
+### 注册 module
+
+通过调用 WXSDKEngine 中的 `registerModule:withClass`方法来注册自己的module
+
+```object-c
+WXSDKEngine.h
+/**
+* @abstract Registers a module for a given name
+* @param name The module name to register
+* @param clazz The module class to register
+**/
++ (void)registerModule:(NSString *)name withClass:(Class)clazz;
+[WXSDKEngine registerModule:@"event" withClass:[WXEventModule class]];
+```
+
+### 使用自己的 module
+
+这里的 require 里面的 event 就是在 上一步调用 `registerModule:` 注册 module 时候的 name
+
+```javascript
+var eventModule = weex.requireModule('event');
+eventModule.openURL('url',function(ret) {
+ nativeLog(ret);
+});
+```
+
+Weex SDK 没有 图片下载,navigation 操作的能力,请大家自己实现这些 protocol
+
+## WXImgLoaderProtocol
+
+weexSDK 没有图片下载的能力,需要实现 WXImgLoaderProtocol, 参考下面的例子
+
+```object-c
+WXImageLoaderProtocol.h
+@protocol WXImgLoaderProtocol <WXModuleProtocol>
+/**
+* @abstract Creates a image download handler with a given URL
+* @param imageUrl The URL of the image to download
+* @param imageFrame The frame of the image you want to set
+* @param options : The options to be used for this download
+* @param completedBlock : A block called once the download is completed.
+ image : the image which has been download to local.
+ error : the error which has happened in download.
+ finished : a Boolean value indicating whether download action has finished.
+*/
+-(id<WXImageOperationProtocol>)downloadImageWithURL:(NSString *)url imageFrame:(CGRect)imageFrame userInfo:(NSDictionary *)options completed:(void(^)(UIImage *image, NSError *error, BOOL finished))completedBlock;
+@end
+```
+
+实现上述协议
+
+```object-c
+@implementation WXImgLoaderDefaultImpl
+#pragma mark -
+#pragma mark WXImgLoaderProtocol
+
+- (id<WXImageOperationProtocol>)downloadImageWithURL:(NSString *)url imageFrame:(CGRect)imageFrame userInfo:(NSDictionary *)userInfo completed:(void(^)(UIImage *image, NSError *error, BOOL finished))completedBlock
+{
+ if ([url hasPrefix:@"//"]) {
+ url = [@"http:" stringByAppendingString:url];
+ }
+ return (id<WXImageOperationProtocol>)[[SDWebImageManager sharedManager] downloadImageWithURL:[NSURL URLWithString:url] options:0 progress:^(NSInteger receivedSize, NSInteger expectedSize) {
+ } completed:^(UIImage *image, NSError *error, SDImageCacheType cacheType, BOOL finished, NSURL *imageURL) {
+ if (completedBlock) {
+ completedBlock(image, error, finished);
+ }
+ }];
+}
+@end
+```
+
+### handler注册
+
+你可以通过WXSDKEngine 中的 `registerHandler:withProtocol`注册handler
+
+```object-c
+WXSDKEngine.h
+/**
+* @abstract Registers a handler for a given handler instance and specific protocol
+* @param handler The handler instance to register
+* @param protocol The protocol to confirm
+*/
++ (void)registerHandler:(id)handler withProtocol:(Protocol *)protocol;
+
+[WXSDKEngine registerHandler:[WXImgLoaderDefaultImpl new] withProtocol:@protocol(WXImgLoaderProtocol)]
+```
+
+## Components 扩展
+
+虽然 WeexSDK 中有很多的 native 的 Component,但这有可能并不能满足你的需求。在之前你可能已经写了一些很酷炫 native 的组件,想包装一下,导入到 Weex 中,因此我们提供了让开发者实现自己的 native Component。下面将以 WeexSDK 中已经存在的 Component:`image` 为例子,介绍一下如何构建一个 native Component。假设你已经了解 iOS 开发
+
+### 注册 Component
+
+注册一个 component 比较简单,调用 `WXSDKEngine` 中的 `registerComponent:withClass:` 方法,传入组件的标签名称,还有对应的 class 然后你可以创建一个 `WXImageComponent` 表示 `image` 组件的实现。在 `.we` 文件中,只需要写 `<image></image>`
+
+### 添加属性
+
+现在我们要做一些让 image component 更加强大的事情。既然作为一个图片的 component,那它应该要有源,给他加上一个 `src` 的属性,同时给它加上一个 `resize` 的属性(可以配置的有 `contain/cover/stretch`)
+
+```object-c
+@interface WXImageComponent ()
+
+@property (nonatomic, strong) NSString *imageSrc;
+@property (nonatomic, assign) UIViewContentMode resizeMode;
+
+@end
+```
+
+component 中所有的 style,attribute,events 都会被传递到 Component 的初始化方法中,所以,你可以在初始化方法中存储你感兴趣的一些属性值
+
+```object-c
+@implementation WXImageComponent
+
+- (instancetype)initWithRef:(NSString *)ref type:(NSString *)type styles:(NSDictionary *)styles attributes:(NSDictionary *)attributes events:(NSArray *)events weexInstance:(WXSDKInstance *)weexInstance
+{
+ if (self = [super initWithRef:ref type:type styles:styles attributes:attributes events:events weexInstance:weexInstance]) {
+ _imageSrc = [WXConvert NSString:attributes[@"src"]];
+ _resizeMode = [WXConvert UIViewContentMode:attributes[@"resize"]];
+}
+
+ return self;
+}
+
+@end
+```
+
+attribute 中拿到的值的类型都是 `id`,我们可以用转换方法把它转换到任何值。Weex SDK 提供了一些基础的转换方法,可以参考 `WXConvert` 类,或者你可以添加自己的转换函数。
+
+### Hooking 渲染生命周期
+
+native 的 component 是由 Weex 管理的,Weex 创建,布局,渲染,销毁。Weex 的 component 生命周期都是可以 hook 的,你可以在这些生命周期中去做自己的事情。
+
+| 方法 | 描述 |
+| :------------------: | --------------------------- |
+| initWithRef:type:... | 用给定的属性初始化一个component. |
+| layoutDidFinish | 在component完成布局时候会调用. |
+| loadView | 创建component管理的view. |
+| viewWillLoad | 在component的view加载之前会调用. |
+| viewDidLoad | 在component的view加载完之后调用. |
+| viewWillUnload | 在component的view被释放之前调用. |
+| viewDidUnload | 在component的view被释放之后调用. |
+| updateStyles: | 在component的style更新时候调用. |
+| updateAttributes: | 在component的attribute更新时候调用. |
+| addEvent: | 给component添加event的时候调用. |
+| removeEvent: | 在event移除的时候调用. |
+
+在 image component 的例子里面,如果我们需要我们自己的 image view 的话,可以复写 `loadView`这个方法.
+
+```object-c
+- (UIView *)loadView
+{
+return [[WXImageView alloc] init];
+}
+```
+
+现在我们使用 `WXImageView` 渲染 `image` component。
+作为一个 image component,我们需要拿到服务器图片,而且把它设置进 image view 里. 这个操作可以在 `viewDidLoad` 方法中做,这个方法是在 view 已经被创建而且加载了时候 Weex SDK 会调用到,而且 `viewDidLoad` 这个方法是你做额外初始化工作比如改变 content mode(也就是设置resize) 的最好时间.
+
+```object-c
+- (void)viewDidLoad
+{
+ UIImageView *imageView = (UIImageView *)self.view;
+ imageView.contentMode = _resizeMode;
+ imageView.userInteractionEnabled = YES;
+ imageView.clipsToBounds = YES;
+ imageView.exclusiveTouch = YES;
+
+ // Do your image fetching and updating logic
+}
+```
+
+如果可以改变 image 的 src,也可以 hook `updateAttributes:` 方法来做属性更新操作,当 `updateAttributes:` 或者 `updateStyles:` 被调用的时候, component 的 view 已经加载完成
+
+```object-c
+- (void)updateAttributes:(NSDictionary *)attributes
+{
+ if (attributes[@"src"]) {
+ _imageSrc = [WXConvert NSString:attributes[@"src"]];
+ // Do your image updating logic
+ }
+
+ if (attributes[@"resize"]) {
+ _resizeMode = [WXConvert UIViewContentMode:attributes[@"resize"]];
+ self.view.contentMode = _resizeMode;
+ }
+}
+```
+
+或许你需要考虑更多的生命周期方法去 Hook,当布局完成时候,像 `layoutDidFinish`,如果你想了解更多,可以参考一下`WXComponent.h` 声明的方法。
+
+现在你可以用在任何 `.we` 文件里面使用 `<image>`,而且可以加上 image 的属性。
+
+```html
+<image style="your-custom-style" src="image-remote-source" resize="contain/cover/stretch"></image>
+```
+
+##### component 方法
+
+WeexSDK 0.9.5 之后支持了在 js 中直接调用 component 的方法,这里提供一个例子
+
+- 自定义一个 WXMyCompoenent 的组件
+
+ ```
+ @implementation WXMyComponent
+ WX_EXPORT_METHOD(@selector(focus)) // 暴露该方法给js
+ - (instancetype)initWithRef:(NSString *)ref type:(NSString *)type styles:(NSDictionary *)styles attributes:(NSDictionary *)attributes events:(NSArray *)events weexInstance:(WXSDKInstance *)weexInstance
+ {
+ if (self = [super initWithRef:ref type:type styles:styles attributes:attributes events:events weexInstance:weexInstance]) {
+ // handle your attributes
+ // handle your styles
+ }
+
+ return self;
+ }
+
+ - (void)focus
+ {
+ NSLog(@"you got it");
+ }
+ @end
+ ```
+
+- 注册组件 `[WXSDKEngine registerComponent:@"mycomponent" withClass:[WXMyComponent class]]`
+
+- 在 weex 文件中调用
+
+ ```html
+ <template>
+ <mycomponent ref='mycomponent'></mycomponent>
+ </template>
+ <script>
+ module.exports = {
+ created:function() {
+ this.$refs.mycomponent.focus();
+ }
+ }
+ </script>
+ ```
http://git-wip-us.apache.org/repos/asf/incubator-weex-site/blob/32a097bf/source/cn/guide/extend-js-framework.md
----------------------------------------------------------------------
diff --git a/source/cn/guide/extend-js-framework.md b/source/cn/guide/extend-js-framework.md
new file mode 100644
index 0000000..1e9db01
--- /dev/null
+++ b/source/cn/guide/extend-js-framework.md
@@ -0,0 +1,173 @@
+---
+title: 拓展 JS framework
+type: guide
+group: 扩展
+order: 6.4
+version: 2.1
+---
+
+# 定制自己的 JS Framework
+
+*这部分扩展能力还在讨论尝试中,可能随时会有调整,请留意。*
+
+Weex 希望能够尊重尽可能多的开发者的使用习惯,所以除了 Weex 官方支持的 Vue 2.0 之外,开发者还可以定制并横向扩展自己的或自己喜欢的 JS Framework。完整一套 JS Framework 的定制和扩展需要以下几个步骤:
+
+1. 首先你要有一套完整的 JS Framework。
+2. 了解 Weex 的 JS 引擎的特性支持情况。
+3. 适配 Weex 的 native DOM APIs。
+4. 适配 Weex 的初始化入口和多实例管理机制。
+5. 在 Weex JS runtime 的 framework 配置中加入自己的 JS Framework 然后打包。
+6. 基于该 JS Framework 撰写 JS bundle,并加入特定的前缀注释,以便 Weex JS runtime 能够正确识别。
+
+## Weex JS 引擎的特性支持情况
+
+* 在 iOS 下,Weex 使用的是系统自带的 JavaScriptCore,所以 ES 支持情况取决于操作系统的版本。目前保守判断,ES5 的特性市面上主流的 iOS 设备都是可以完美支持的,但是 ES6+ 的特性存在一定的碎片化。
+* 在 Android 下,Weex 使用的是 UC 提供的 v8 内核,出于体积、性能和稳定性的考虑,我们使用的并不是最新版本的 v8 内核,同样的保守判断,ES5 特性能够全部支持,包括严格模式、`Object.freeze` 等。
+* Weex JS 引擎不支持 HTML DOM APIs 和 HTML5 JS APIs,这包括 `document`, `setTimeout` 等。
+* 在此基础上,我们加入了 `Promise` 的 polyfill,以及 `console` 的 polyfill。
+* 额外的,为了尽可能的确保 JS 引擎的长效内存管理,我们对一个通用的全局对象进行了 `Object.freeze()` 冻结操作,这包括:
+ * `Object`
+ * `Object.prototype`
+ * `Array`
+ * `Array.prototype`
+ * `String.prototype`
+ * `Number.prototype`
+ * `Boolean.prototype`
+ * `Error.prototype`
+ * `Date.prototype`
+ * `RegExp.prototype`
+
+## 适配 Weex 的初始化入口和多实例管理机制
+
+开发者提供的 JS Framework 最终需要包装成一个 CommonJS 包,并且这个包需要对外暴露以下方法:
+
+### 框架初始化
+
+* `init(config)`
+ * `config`
+ * `Document`
+ * `Element`
+ * `Comment`
+ * `TaskSender`
+ * `CallbackManager`
+
+该方法会把 Weex 提供的 Native DOM 类和两个辅助类放到 `config` 参数中,并允许框架本身完成初始化。
+
+*小提示:同时,框架作者也能够通过在框架初始化时传入不同的 `config` 来进行框架的测试或环境模拟。*
+
+#### 参数格式介绍
+
+* `TaskSender`: wip...
+* `CallbackManager`: wip...
+
+### 注册可用的 native 组件和模块
+
+* `registerComponents(components)`
+* `registerModules(modules)`
+
+这两个方法会在框架初始化之后立刻调用,这样框架就能够知道当前的客户端支持哪些组件和模块,在一些特殊逻辑或必要的情况下,有机会为框架本身提供参考信息。
+
+#### 参数格式介绍
+
+* `components: Array`: 描述组件的数组,每一项包括:
+ * `type: string`: 组件名称,比如 `div`。
+ * `methods: string[]`: 可选项,该组件支持的方法名称列表,这些方法可以遵循 Weex 的 native DOM APIs 的组件方法调用方式。
+* `modules: Object`: 描述一系列模块的散列表,每一项的 key 是模块名,每一项的值是一个数组,数组里的每一项描述了一个该模块中的一个方法,该方法的信息包括:
+ * `name: string`: 方法名
+ * `args: string[]`: 参数个数和类型描述
+
+例如:
+
+```js
+registerComponents([
+ { type: 'web', methods: ['goBack', 'goForward', 'refresh']}
+])
+
+registerModules({
+ event: [
+ {name: 'openURL', args: ['string']}
+ ]
+})
+```
+
+### 多实例生命周期管理
+
+* `createInstance(instanceId, code, config, data, env)`
+* `refreshInstance(instanceId, data)`
+* `destroyInstance(instanceId)`
+
+每个 Weex 页面都有被创建、被销毁两个必经阶段,同时在 Weex 页面运行过程中,native 有机会主动向 Weex 页面发送消息,不同的框架可以根据自己框架的设计对这样的消息有自己的理解和设计实现。
+
+#### 参数格式介绍
+
+* `instanceId: string`: 该 Weex 页面的唯一 id,由 native 产生。
+* `code: string`: 该 Weex 页面的 JS bundle 的代码,通过 native 传入。
+* `config: Object?`: 该 Weex 页面的配置信息,比如代表该 bundle 地址的 `bundleUrl`,由 native 配置产生,和 JS bundle 本身的内容无关。
+* `data: Object?`: Native 有机会在创建一个 Weex 页面的时候,传入一份外部数据,JS 框架也有机会接此机会为相同的 JS bundle 配合不同的 `data` 生成不同的页面内容。
+* `env: Object?`: 当前 Weex 页面的相关环境信息,各字段的含义:
+ * `info: Object`: 框架 info 信息,详见之后的 “JS Bundle 格式要求”。
+ * `config: Object`: 等同该方法的第三个参数 `config`。
+ * `callbacks: CallbackManager`: 该 Weex 页面唯一的 `CallbackManager` 实例。
+ * `created: number`: 该 Weex 页面的创建时间毫秒数。
+ * `framework: string`: 该 Weex 页面基于的框架名,等同于 `info.framework`。
+
+### Native 通信
+
+* `receiveTasks(instanceId, tasks)`
+
+Native 除了通过 `refreshInstance` 方法向 JS 框架层发送消息之外,更多的会通过 `receiveTasks` 发送用户事件或方法回调给 JS 框架。
+
+比如用户点击了一个按钮,native 就会发送一个 `fireEvent` 类型的任务给 JS 框架,然后 JS 框架再处理相应的事件逻辑。这部分工作机制和 native DOM 接口中的 `addEvent` 的设计有关。
+
+再比如用户发起了一个 `fetch` 网络请求,当请求在 native 端完成时,会以一个 `callback` 类型的任务发给 JS 框架。由于 native 无法传递 JavaScript 中的 function,所以实际上知会发送一个 `callbackId` 给 JS 框架。这部分工作机制和之前出现过的 `CallbackManager` 的设计有关。
+
+### 辅助方法
+
+* `getRoot(instanceId): JSON`
+
+该方法可以返回文档主体结点的完整 JSON 描述,开发者可以以此查看到完整的 native DOM 树,具体返回值的格式和 native DOM 接口中的 `toJSON()` 方法返回值格式一致。此功能多用作开发者工具扩展。
+
+## 在 WeexSDK 中配置 JS Framework
+
+### 准备好你的 JS Framework 代码
+
+```javascript
+// your-own-js-framework.js
+
+export function init (config) { ... }
+
+export function registerComponents (components) { ... }
+export function registerModules (modules) { ... }
+
+export function createInstance (id, code, config, data, env) { ... }
+export function destroyInstance (id) { ... }
+export function refreshInstance (id, data) { ... }
+
+export function recieveTasks (id, tasks) { ... }
+export function getRoot (id) { ... }
+```
+
+### 注册一个 JS Framework
+
+```javascript
+import * as Vue from '...'
+import * as React from '...'
+import * as Angular from '...'
+
+export default { Vue, React, Angular };
+```
+
+然后打包 JS runtime,集成到 WeexSDK 中。
+
+### JS Bundle 格式要求
+
+**框架 info**
+
+你需要保障基于该 JS Framework 的 JS Bundle 在文件开头带有如下格式的注释,我们称其为框架 info:
+
+```javascript
+// { "framework": "Vue" }
+...
+```
+
+这样 Weex JS 引擎就会识别出这个 JS bundle 需要用 Vue 框架来解析。并分发给 Vue 框架处理。同理,Weex 支持同时多种框架在一个移动应用中共存并各自解析基于不同框架的 JS bundle。
http://git-wip-us.apache.org/repos/asf/incubator-weex-site/blob/32a097bf/source/cn/guide/extend-web-render.md
----------------------------------------------------------------------
diff --git a/source/cn/guide/extend-web-render.md b/source/cn/guide/extend-web-render.md
new file mode 100644
index 0000000..afbca7f
--- /dev/null
+++ b/source/cn/guide/extend-web-render.md
@@ -0,0 +1,104 @@
+---
+title: HTML5 扩展
+type: guide
+group: 扩展
+order: 6.1
+version: 2.1
+---
+
+# 如何扩展 Weex Web 端的组件和模块
+
+Weex 本身提供了很多内置组件和模块,也具备横向扩展的能力,允许开发者自行扩展和定制。需要注意的是,Weex 是一个跨平台的解决方案,扩展其内置组件或模块,需要在三端(Android、iOS、Web)中都有相应的实现。
+
+Weex 将内核切换成 Vue 2.x 之后,在 Web 端扩展 Vue 组件将变得更加容易。
+
+## 扩展 Web 组件
+
+Vue.js 本身就是一个独立的前端框架,在浏览器中完全能够不基于 Weex 容器渲染。因此,针对 Weex 平台扩展 Vue.js 的 Web 端组件,和直接使用 Vue.js 开发一个 Web 组件是一样的。具体的组件编写方法可以参考其官方文档:[组件](https://cn.vuejs.org/v2/guide/components.html) ,另外建议使用 `.vue` 格式的文件编写组件,使用方法参考:[单文件组件](https://cn.vuejs.org/v2/guide/single-file-components.html)。
+
+### 扩展组件示例
+
+以扩展 `<sidebar>` 为例,首先应该编写组件自身的逻辑:
+
+```html
+<!-- sidebar.vue -->
+
+<template>
+ <div class="sidebar">
+ <slot></slot>
+ </div>
+</template>
+
+<style scoped>
+ .sidebar {
+ /* ... */
+ }
+</style>
+
+<script>
+ export default {
+ props: [],
+ data () {
+ return {}
+ }
+ }
+</script>
+```
+
+然后在使用之前,全局注册 `<sidebar>` 组件:
+
+```js
+import Vue from 'vue'
+import Sidebar from './path/to/sidebar.vue'
+
+// 全局注册 sidebar 组件
+Vue.component('sidebar', Sidebar)
+```
+
+在扩展 Weex 组件时,如果只使用了 Weex 提供的内置组件,并且使用的都是 Weex 支持的样式,那么就和普通的自定义组件无异,不需要 Native 端再有相应的实现。
+
+如果你定制组件时不得不用到目前 Weex 不支持的标签和样式,在这种情况下才是真正的“扩展”了 Weex 的组件,你还需要在 Android 和 iOS 中有相应的实现,不然会导致渲染异常。
+
+## 扩展 Web 模块
+
+除了通用组件以外,Weex 还有提供了通用的模块,可以方便的调用原生 API。通常来说,注册 Weex 模块要求三端都得有相应的实现,否则会影响其正常的使用。
+
+### 注册模块
+
+如果你引入了 `weex-vue-render` 这个库,那么在全局能获取到 `weex` 这个变量,其中提供了 `registerModule` 方法可以注册模块。
+
+#### API 格式
+
++ `registerModule`
+ 0. `name`: {String} 必选,模块名称。
+ 0. `define`: {Object} 必选,模块的定义。
+
+#### 注册模块示例
+
+下边的代码注册了一个名为 `guide` 的模块:
+
+```js
+weex.registerModule('guide', {
+ greeting () {
+ console.log('Hello, nice to meet you. I am your guide.')
+ },
+ farewell () {
+ console.log('Goodbye, I am always at your service.')
+ }
+})
+```
+
+### 使用模块
+
+在 `weex` 上提供了 `require` 方法用于获取已注册的模块,直接传递模块名即可:
+
+```js
+// 获取模块
+const guide = weex.requireModule('guide')
+
+// 可以直接调用模块中的方法
+guide.greeting()
+guide.farewell()
+```
+
+上述写法在 Native 环境中依然有效,只不过模块中的方法是由 Native 提供的。
http://git-wip-us.apache.org/repos/asf/incubator-weex-site/blob/32a097bf/source/cn/guide/front-end-frameworks.md
----------------------------------------------------------------------
diff --git a/source/cn/guide/front-end-frameworks.md b/source/cn/guide/front-end-frameworks.md
new file mode 100644
index 0000000..7907fee
--- /dev/null
+++ b/source/cn/guide/front-end-frameworks.md
@@ -0,0 +1,12 @@
+---
+title: 支持的前端框架
+type: guide
+group: Overview
+order: 1.3
+version: 2.1
+has_chapter_content: true
+---
+
+## Vue.js
+
+## Rax
http://git-wip-us.apache.org/repos/asf/incubator-weex-site/blob/32a097bf/source/cn/guide/index.md
----------------------------------------------------------------------
diff --git a/source/cn/guide/index.md b/source/cn/guide/index.md
index 8208629..b64d5d6 100644
--- a/source/cn/guide/index.md
+++ b/source/cn/guide/index.md
@@ -1,7 +1,8 @@
---
title: 快速上手
type: guide
-order: 1
+group: Overview
+order: 1.1
version: 2.1
has_chapter_content: true
---
@@ -10,7 +11,7 @@ has_chapter_content: true
Weex 是一套简单易用的跨平台开发方案,能以 web 的开发体验构建高性能、可扩展的 native 应用,为了做到这些,Weex 与 Vue 合作,使用 Vue 作为上层框架,并遵循 W3C 标准实现了统一的 JSEngine 和 DOM API,这样一来,你甚至可以使用其他框架驱动 Weex,打造三端一致的 native 应用。
-## VueJS简介
+## Vue.js 简介
> [VueJS](https://vuejs.org/) 是 Evan You 开发的渐进式 JavaScript 框架。开发者能够通过撰写 `*.vue` 文件,基于 `<template>`, `<style>`, `<script>` 快速构建组件化的 web 应用。
http://git-wip-us.apache.org/repos/asf/incubator-weex-site/blob/32a097bf/source/cn/guide/integrate-devtool-to-android.md
----------------------------------------------------------------------
diff --git a/source/cn/guide/integrate-devtool-to-android.md b/source/cn/guide/integrate-devtool-to-android.md
new file mode 100644
index 0000000..9abca6f
--- /dev/null
+++ b/source/cn/guide/integrate-devtool-to-android.md
@@ -0,0 +1,354 @@
+---
+title: 集成 Devtools 到 Android
+type: guide
+group: 开发
+order: 5.4
+version: 2.1
+---
+
+# 集成 Devtools 到 Android
+
+Weex Devtools 能够方便调试 Weex 页面,但此功能离不开 Native 的支持。如何让你的 App 也集成 Devtools,在本章将会详细说明 Android 端如何接入 Weex Devtools。
+
+## Android 应用接入
+
+### 添加依赖
+
+可以通过 Gradle 或者 Maven 添加对 devtools aar 的依赖,也可以直接对源码依赖。强烈建议使用最新版本,因为 Weex SDK 和 devtools 都在快速的迭代开发中,新版本会有更多惊喜,同时也修复老版本中一些问题。最新的 release 版本可在[这里](https://github.com/weexteam/weex_devtools_android/releases)查看。所有的 release 版本都会发布到 [jcenter repo](https://bintray.com/alibabaweex/maven/weex_inspector)。
+
+- *Gradle 依赖*
+
+ ```gradle
+ dependencies {
+ compile 'com.taobao.android:weex_inspector:${version}'
+ }
+ ```
+
+- *Maven依赖*
+
+ ```xml
+ <dependency>
+ <groupId>com.taobao.android</groupId>
+ <artifactId>weex_inspector</artifactId>
+ <version>${version}</version>
+ <type>pom</type>
+ </dependency>
+ ```
+
+- *源码依赖*
+
+ 需要复制 [inspector](https://github.com/weexteam/weex_devtools_android/tree/master/inspector) 目录到你的 App 的同级目录,然后在工程的 `settings.gradle` 文件下添加 `include ":inspector"`,此过程可以参考 playground 源码的工程配置及其配置,然后在 App 的 `build.gralde` 中添加依赖。
+
+ ```gradle
+ dependencies {
+ compile project(':inspector')
+ }
+ ```
+
+ 另外 weex_inspector 中有一部分包是以 provided 的方式引入,接入方需要自行解决依赖和版本冲突。
+
+ - **provided方式引用的包**
+
+ ```gradle
+ dependencies {
+ provided 'com.google.code.findbugs:jsr305:2.0.1'
+ provided 'com.android.support:appcompat-v7:23.1.1'
+ provided 'com.taobao.android:weex_sdk:0.8.0'
+ provided 'com.alibaba:fastjson:1.1.45+'
+ ...
+ }
+ ```
+
+ - **反射引用的包(0.8.0.0以上版本)**
+
+ ```gradle
+ dependencies {
+ compile 'com.squareup.okhttp:okhttp:2.3.0'
+ compile 'com.squareup.okhttp:okhttp-ws:2.3.0'
+ ...
+ }
+ ```
+
+ 或者
+
+ ```gradle
+ dependencies {
+ compile 'com.squareup.okhttp:okhttp:3.4.1'
+ compile 'com.squareup.okhttp:okhttp-ws:3.4.1'
+ ...
+ }
+ ```
+
+#### 版本兼容
+
+| weex sdk | weex inspector | Debugger Server |
+|----------|----------------|-----------------|
+| 0.13+ | 0.12+ | 0.2.39+ |
+| 0.8.0.1+ | 0.0.8.1+ | 0.2.39+ |
+| 0.7.0+ | 0.0.7.13 | 0.2.38 |
+| 0.6.0+ | 0.0.2.2 | - |
+
+
+### 添加 Debug 模式开关
+
+控制调试模式的打开和关闭的关键点可以概括为三条规则。
+
+**规则一:通过 `sRemoteDebugMode` 和 `sRemoteDebugProxyUrl` 来设置开关和 Debugger Server 地址。**
+
+Weex SDK 的 `WXEnvironment` 类里有一对静态变量标记了 Weex 当前的调试模式是否开启分别是:
+
+```java
+public static boolean sRemoteDebugMode; // 是否开启 debug 模式,默认关闭
+public static String sRemoteDebugProxyUrl; // DebugServer的websocket地址
+```
+
+无论在 App 中无论以何种方式设置 Debug 模式,都必须在恰当的时机调用类似如下的方法来设置 `WXEnvironment.sRemoteDebugMode` 和 `WXEnvironment.sRemoteDebugProxyUrl`。
+
+```java
+private void initDebugEnvironment(boolean enable, String host) {
+ WXEnvironment.sRemoteDebugMode = enable;
+ WXEnvironment.sRemoteDebugProxyUrl = "ws://" + host + ":8088/debugProxy/native";
+}
+```
+
+**规则二:修改 `sRemoteDebugMode` 后一定要调用``WXSDKEngine.reload()`。**
+
+一般來說,在修改了 `WXEnvironment.sRemoteDebugMode` 以后调用了 `WXSDKEngine.reload()` 方法才能够使 Debug模式生效。`WXSDKEngine.reload()` 用来重置 Weex 的运行环境上下文,在切换调试模式时需要调用此方法来创建新的 Weex 运行时和 DebugBridge 并将所有的 JS 调用桥接到调试服务器执行。在 reload 过程中会调用 launchInspector,这就是 SDK 控制 Debug 模式最核心一个方法,其传入参数即为 `sRemoteDebugMode`,若为 `true` 则该方法中尝试以反射的方式获取 DebugBridge 用来在远端执行 JS,否则在本地运行。
+
+```java
+private void launchInspector(boolean remoteDebug) {
+ if (WXEnvironment.isApkDebugable()) {
+ try {
+ if (mWxDebugProxy != null) {
+ mWxDebugProxy.stop();
+ }
+ HackedClass<Object> debugProxyClass = WXHack.into("com.taobao.weex.devtools.debug.DebugServerProxy");
+ mWxDebugProxy = (IWXDebugProxy) debugProxyClass.constructor(Context.class, WXBridgeManager.class)
+ .getInstance(WXEnvironment.getApplication(), WXBridgeManager.this);
+ if (mWxDebugProxy != null) {
+ mWxDebugProxy.start();
+ if (remoteDebug) {
+ mWXBridge = mWxDebugProxy.getWXBridge();
+ } else {
+ if (mWXBridge != null && !(mWXBridge instanceof WXBridge)) {
+ mWXBridge = null;
+ }
+ }
+ }
+ } catch (HackAssertionException e) {
+ WXLogUtils.e("launchInspector HackAssertionException ", e);
+ }
+ }
+}
+```
+
+只要遵循上面的原理,开启 Debug 模式的方式和时机可由接入方灵活实现。从 launchInspector 可以看到,SDK 对 devtools 的 aar 包并无强依赖,我们的 App 只需要在 Debug 包中打包该 aar 即可,这样多少可以缓解包大小问题和安全问题。
+
+**例外:** _若修改 `WXEnvironment.sRemoteDebugMode` 的时机在 `WXBridgeManager` 初始化和 restart 和之前则 `WXSDKEngine.reload()` 可忽略._
+
+**规则三:通过响应 `ACTION_DEBUG_INSTANCE_REFRESH` 广播及时刷新。**
+
+广播 `ACTION_DEBUG_INSTANCE_REFRESH` 在调试模式切换和 Chrome 调试页面刷新时发出,主要用来通知当前的 Weex容器以 Debug 模式重新加载当前页。在 playground 中的处理过程如下:
+
+```java
+public class RefreshBroadcastReceiver extends BroadcastReceiver {
+ @Override
+ public void onReceive(Context context, Intent intent) {
+ if (IWXDebugProxy.ACTION_DEBUG_INSTANCE_REFRESH.equals(intent.getAction())) {
+ if (mUri != null) {
+ if (TextUtils.equals(mUri.getScheme(), "http") || TextUtils.equals(mUri.getScheme(), "https")) {
+ loadWXfromService(mUri.toString());
+ } else {
+ loadWXfromLocal(true);
+ }
+ }
+ }
+ }
+}
+```
+
+如果接入方的容器未对该广播做处理,那么将不支持刷新和调试过程中编辑代码时的 watch 功能。
+
+## 接入示例
+
+最简单方式就是复用 Playground 的相关代码,比如扫码和刷新等模块,但是扫码不是必须的,它只是与 App 通信的一种形式,二维码里的包含 DebugServer IP 及 bundle 地址等信息,用于建立 App 和 Debugger Server 之间的连接及动态加载 bundle。在 Playground 中给出了两种开启 debug 模式的范例。
+
+* 范例1:通过在 `XXXApplication` 中设置开关打开调试模式
+
+```java
+public class MyApplication extends Application {
+ public void onCreate() {
+ super.onCreate();
+ initDebugEnvironment(true, "xxx.xxx.xxx.xxx"/*"DEBUG_SERVER_HOST"*/);
+ }
+}
+```
+
+这种方式最直接,在代码中直接 hardcode 了开启调试模式,如果在 SDK 初始化之前调用甚至连 `WXSDKEngine.reload()` 都不需要调用,接入方如果需要更灵活的策略可以将 `initDebugEnvironment(boolean enable, String host)` 和 `WXSDKEngine.reload()` 组合在一起在合适的位置和时机调用即可。
+
+* 范例2:通过扫码打开调试模式
+
+Playground 中较多的使用扫码的方式传递信息,不仅用这种方式控制 Debug 模式的开关,而且还通过它来传入 bundle 的 url 直接调试。应当说在开发中这种方式是比较高效的,省去了修改 SDK 代码重复编译和安装 App 的麻烦,缺点就是调试工具这种方式接入需要 App 具有扫码和处理特定规则二维码的能力。除了 Playground 中的方式,接入方亦可根据业务场景对 Debugger 和接入方式进行二次开发。
+
+Playground 集成的具体代码可参考如下两个文件:
+
+* 开关控制,主要参考对二维码的处理部分,详见 [`WXApplication.java`](https://github.com/weexteam/weex_devtools_android/blob/master/playground/app/src/main/java/com/alibaba/weex/WXApplication.java)
+
+* 刷新控制 ,主要参考是对容器 `ACTION_DEBUG_INSTANCE_REFRESH`的处理,详见 [`WXPageActivity.java`](https://github.com/weexteam/weex_devtools_android/blob/master/playground/app/src/main/java/com/alibaba/weex/WXPageActivity.java)
+
+## 牛刀小试
+
+### 前置工作
+
+如果未安装 Debugger Server,在命令行执行 `npm install -g weex-toolkit` 既可以安装调试服务器,运行命令 `weex debug` 就会启动 DebugServer 并打开一个调试页面(详情请查看 [《Get Started》](../../guide/index.html))。页面下方会展示一个二维码,这个二维码用于向 App 传递 Server 端的地址建立连接。
+
+
+
+### 开始调试
+
+如果你的 App 客户端完成了以上步骤那么恭喜你已经接入完毕,可以愉快的调试 Weex bundle 了,调试体验和网页调试一致!建议新手首先用官方的 Playground 体验一下调试流程。只需要启动 App 扫描 Chrome 调试页面下方的第一个二维码即可建立与 Debugger Server 的通信,Chorome 的调试页面将会列出连接成功的设备信息。
+
+
+
+#### 主要步骤如下
+
+1. 如果你要加载服务器上 bundle,第一步就是要让你的 bundle sever 跑起来. 在 Playground 中特别简单,只需要你到 Weex 源码目录下,运行 `./start` 即可。
+2. 命令行运行 `weex debug` 启动 Debugger Server,Chrome 将会打开一个网页,在网页下方有一个二维码和简单的介绍。
+3. 启动 App 并确认打开调试模式。你将在上一步中打开的网页中看到一个设备列表,每个设备项都有两个按钮,分别是 `Debugger` 和 `Inspector`。
+4. 点击 `Inspector` Chrome 将创建 Inspector 网页;点击 `Debugger` Chrome 将创建 Debugger 网页;二者是相互独立的功能,不相互依赖。
+
+---
+
+## 背景知识
+
+### Devtools 组件介绍
+Devtools 扩展了 [Chrome Debugging Protocol](https://developer.chrome.com/devtools/docs/debugger-protocol),在客户端和调试服务器之间的采用 [JSON-RPC](https://en.wikipedia.org/wiki/JSON-RPC) 作为通信机制,本质上调试过程是两个进程间协同,相互交换控制权及运行结果的过程。更多细节还请阅读 [Weex Devtools Debugger 的技术选型实录](http://www.atatech.org/articles/59284)这篇文章。
+
+* **客户端**
+
+ Devtools 客户端作为 aar 被集成 App 中,它通过 webscoket 连接到调试服务器,此处并未做安全检查。出于安全机制及包大小考虑,强烈建议接入方只在 debug 版本中打包此 aar。
+
+* **服务器**
+
+ Devtools 服务器端是信息交换的中枢,既连接客户端,又连接 Chrome,大多数情况下扮演一个消息转发服务器和 Runtime Manager 的角色。
+
+* **Web端**
+
+ Chrome 的 V8 引擎扮演着 Bundle javascript runtime 的角色。开启 debug 模式后,所有的 bundle js 代码都在该引擎上运行。另一方面我们也复用了 Chrome 前端的调试界面,例如设置断点,查看调用栈等,调试页关闭则 runtime 将会被清理。
+
+调试的大致过程请参考如下时序图。
+
+
+
+## FAQ
+
+在各业务接入过程中,陆续发现一些问题,对高频次的问题解答如下,开发中以 weex debug -V 的方式启动 Debugger Server 可以看到 server 端的 log 信息,对照上文中的时序图对于定位问题还是非常有帮助,建议调试中默认开启 server 端 log。
+
+1. **扫码 App 在 DebugServerProxy 中抛出 class not found**
+
+ 已知的原因如下:
+
+ * weex_inspector 以 provided 方式引用的包是否引入成功,如 fastjson 等。
+ * weex_inspector 以 compile 方式引用的包是否引入成功,某些 app 重新引入 `com.squareup.okhttp:okhttp:2.3.0` 和 `com.squareup.okhttp:okhttp-ws:2.3.0` 则不再报错。
+ * 混淆规则影响反射。
+
+2. **playground 扫码调试 crash**
+
+ 已知的原因如下:
+
+ * 系统为 android 6+,崩溃信息提示进程需要 `android.permission.READ_PHONE_STATE` 权限,代码中未做权限检查,在 0.0.2.7 版本以后已修复,不再需要此权限。
+
+3. **扫码后设备列表页并没有出现我的设备信息**
+
+ 已知的原因如下:
+
+ * Debugger Server 和手机在不同网段,被防火墙隔离。
+ * 手机连接了 PC 端的代理,当前尚不支持。
+ * 多进程连接服务器端的同一端口,比如在 Application 的 `onCreate` 中初始化 sdk,若多个进程连接服务器端的同一端口则报错,在 0.0.2.3 版本以后已支持多进程无此问题。
+
+4. **调试过程中频繁刷新连接失败,Server 端提示重新启动 App,非必现**
+
+ 已知的原因如下:
+
+ * 多线程操作网络连接引起,在频繁的即断即连时容易触发。在 0.0.7.1 版本已修复。
+
+## 注入自定义WebSocket Client
+目前Inspector以反射的方式动态调用了okhttp-ws库中的相关代码,可以兼容的okhttp与okhttp-ws版本为:
+- okhttp, okhttp-ws 2.7.5版本以下
+- okhttp3, okhttp3-ws 3.5版本以下
+
+如果客户端中集成的版本与上述版本不匹配,则可以使用`WeexInspector.overrideWebSocketClient`方法来注入自定义的WebSocket实现,示例:
+```java
+
+ public class CustomWebSocketClient implements IWebSocketClient {
+
+ private WebSocket ws;
+
+ @Override
+ public boolean isOpen() {
+ return ws != null;
+ }
+
+ @Override
+ public void connect(String wsAddress, final WSListener listener) {
+ OkHttpClient okHttpClient = new OkHttpClient();
+ okHttpClient.setConnectTimeout(5, TimeUnit.SECONDS);
+ okHttpClient.setReadTimeout(5, TimeUnit.SECONDS);
+ okHttpClient.setWriteTimeout(5, TimeUnit.SECONDS);
+
+ Request request = new Request.Builder().url(wsAddress).build();
+ WebSocketCall webSocketCall = WebSocketCall.create(okHttpClient, request);
+ webSocketCall.enqueue(new WebSocketListener() {
+ @Override
+ public void onOpen(WebSocket webSocket, Request request, Response response) throws IOException {
+ ws = webSocket;
+ listener.onOpen();
+ }
+
+ @Override
+ public void onMessage(BufferedSource payload, WebSocket.PayloadType type) throws IOException {
+ if (WebSocket.PayloadType.TEXT == type) {
+ listener.onMessage(payload.readUtf8());
+ }
+ }
+
+ @Override
+ public void onPong(Buffer payload) {
+ //ignore
+ }
+
+ @Override
+ public void onClose(int code, String reason) {
+ listener.onClose();
+ }
+
+ @Override
+ public void onFailure(IOException e) {
+ listener.onFailure(e);
+ }
+ });
+ }
+
+ @Override
+ public void close() {
+ if (ws != null) {
+ try {
+ ws.close(CloseCodes.NORMAL_CLOSURE, "Normal closure");
+ } catch (IOException e) {
+ e.printStackTrace();
+ }
+ }
+ }
+
+ @Override
+ public void sendMessage(int requestId, String message) {
+ if (ws != null) {
+ try {
+ ws.sendMessage(WebSocket.PayloadType.TEXT, new Buffer().writeString(message, Charset.defaultCharset()));
+ } catch (IOException e) {
+ e.printStackTrace();
+ }
+ }
+ }
+ }
+```
http://git-wip-us.apache.org/repos/asf/incubator-weex-site/blob/32a097bf/source/cn/guide/integrate-devtool-to-ios.md
----------------------------------------------------------------------
diff --git a/source/cn/guide/integrate-devtool-to-ios.md b/source/cn/guide/integrate-devtool-to-ios.md
new file mode 100644
index 0000000..7cc6193
--- /dev/null
+++ b/source/cn/guide/integrate-devtool-to-ios.md
@@ -0,0 +1,230 @@
+---
+title: 集成 Devtools 到 iOS
+type: guide
+group: 开发
+order: 5.5
+version: 2.1
+---
+
+# 集成 Devtools 到 iOS
+
+Weex Devtools 能够方便调试 Weex 页面,但此功能离不开 Native 的支持。如何让你的 App 也集成 Devtools,在本章将会详细说明 iOS 端如何接入 Weex Devtools。
+
+## iOS 应用接入
+
+### 添加依赖
+
+#### 方法一:cocoapods 依赖
+
+在工程目录的 podfile 添加如下代码
+
+```
+source https://github.com/CocoaPods/Specs.git,
+pod 'WXDevtool', '0.7.0', :configurations => ['Debug'],
+```
+
+目前有如下几个版本:
+
+0.7.0, 0.6.1, 0.1.1, 0.1.0 [master repo]
+
+---
+
+可以通过更新本地 podspec repo,pod search 来查询最新版本,在 podfile 文件添加依赖。
+
+
+*** 推荐在DEBUG模式下依赖。 ***
+
+#### 方法二:github 源码依赖
+
+
+1. [拉取](https://github.com/weexteam/weex-devtool-iOS)最新的WXDevtool代码。
+
+2. 按照如下图示:直接拖动source目录源文件到目标工程中
+
+ 
+
+3. 按照红框中配置勾选
+
+ 
+
+
+ 在相对较大的互联网 App 研发中, framework 静态库被广泛应用,所以推荐使用方法一接入。
+
+### 集成功能
+
+如果按照方法一接入:podfile 的方式,添加头文件包含:
+
+```
+#import <TBWXDevtool/WXDevtool.h>
+```
+
+如果按照方法二接入:源码依赖的方式,添加头文件包含:
+
+```
+#import "WXDevtool.h"
+```
+
+查看 WXDevtool 头文件如下:
+
+```object-c
+#import <Foundation/Foundation.h>
+
+@interface WXDevTool : NSObject
+/**
+* set debug status
+* @param isDebug : YES:open debug model and inspect model;
+* default is NO,if isDebug is NO, open inspect only;
+* */
++ (void)setDebug:(BOOL)isDebug;
+
+
+/**
+* get debug status
+* */
++ (BOOL)isDebug;
+
+
+/**
+* launch weex debug
+* @param url : ws://ip:port/debugProxy/native, ip and port is your devtool server address
+* eg:@"ws://30.30.29.242:8088/debugProxy/native"
+* */
++ (void)launchDevToolDebugWithUrl:(NSString *)url;
+
+@end
+```
+
+`setDebug`:参数为 `YES` 时,直接开启 debug 模式,反之关闭,使用场景如下所述
+
+在你自己的程序中添加如下代码:
+
+```object-c
+[WXDevTool launchDevToolDebugWithUrl:@"ws://30.30.31.7:8088/debugProxy/native"];
+```
+
+其中的 ws 地址正是 Weex debug 控制台中出现的地址,直接 copy 到 `launchDevToolDebugWithUrl` 接口中。
+
+如果程序一启动就开启 Weex 调试,**需要在 WeexSDK 引擎初始化之前**添加代码:
+
+```object-c
+[WXDevTool setDebug:YES];
+[WXDevTool launchDevToolDebugWithUrl:@"ws://30.30.31.7:8088/debugProxy/native"];
+```
+
+#### 附加页面刷新功能
+
+- 为什么需要页面刷新功能?
+
+ 如下图所示,当点击 debugger 按钮时,js 的运行环境会从手机端(JavaScriptCore)切换到 Chrome(V8),这时需要重新初始化 Weex 环境,重新渲染页面。页面渲染是需要接入方在自己的页面添加。
+
+ 
+
+- 什么场景下需要添加页面刷新功能?
+
+ - 点击 debugger 按钮调试
+ - 切换 RemoteDebug 开关
+ - 刷新 Chrome 页面(command+R)
+
+- 如何添加刷新
+
+ 在 Weex 页面初始化或 `viewDidLoad` 方法时添加注册通知,举例如下:
+
+ ```object-c
+ [[NSNotificationCenter defaultCenter] addObserver:self selector:notificationRefreshInstance: name:@"RefreshInstance" object:nil];
+ ```
+
+ 最后**千万记得**在 `dealloc` 方法中取消通知,如下所示
+
+ ```
+ - (void)dealloc
+ {
+ [[NSNotificationCenter defaultCenter] removeObserver:self];
+ }
+ ```
+
+ 页面刷新实现,先销毁当前 instance,然后重新创建 instance,举例如下:
+
+ ```
+ - (void)render
+ {
+ CGFloat width = self.view.frame.size.width;
+ [_instance destroyInstance];
+ _instance = [[WXSDKInstance alloc] init];
+ _instance.viewController = self;
+ _instance.frame = CGRectMake(self.view.frame.size.width-width, 0, width, _weexHeight);
+
+ __weak typeof(self) weakSelf = self;
+ _instance.onCreate = ^(UIView *view) {
+ [weakSelf.weexView removeFromSuperview];
+ weakSelf.weexView = view;
+ [weakSelf.view addSubview:weakSelf.weexView];
+ UIAccessibilityPostNotification(UIAccessibilityScreenChangedNotification, weakSelf.weexView);
+ };
+ _instance.onFailed = ^(NSError *error) {
+
+ };
+
+ _instance.renderFinish = ^(UIView *view) {
+ [weakSelf updateInstanceState:WeexInstanceAppear];
+ };
+
+ _instance.updateFinish = ^(UIView *view) {
+ };
+ if (!self.url) {
+ return;
+ }
+ NSURL *URL = [self testURL: [self.url absoluteString]];
+ NSString *randomURL = [NSString stringWithFormat:@"%@?random=%d",URL.absoluteString,arc4random()];
+ [_instance renderWithURL:[NSURL URLWithString:randomURL] options:@{@"bundleUrl":URL.absoluteString} data:nil];
+ }
+ ```
+
+具体实现可参考 [playground](https://github.com/weexteam/weex-devtool-iOS/blob/master/Devtools/playground/WeexDemo/WXDemoViewController.m) `WXDemoViewController.m` 文件
+
+*说明:目前版本需要注册的通知名称为固定的 “RefreshInstance”,下个版本会添加用户自定义 name 。*
+
+## 使用
+
+如果未安装 Debugger Server,在命令行执行 `npm install -g weex-toolkit` 既可以安装调试服务器,运行命令 `weex debug` 就会启动 DebugServer 并打开一个调试页面(详情请查看 [《Get started》](../../guide/index.html))。页面下方会展示一个二维码,这个二维码用于向 App 传递 Server 端的地址建立连接。
+
+
+1. 日志级别控制
+
+ 
+ 日志级别可以控制native端关于weex的日志。
+
+ 日记级别描述如下:
+
+ ```
+ Off = 0,
+ Error = Error
+ Warning = Error | Warning,
+ Info = Warning | Info,
+ Log = Log | Info,
+ Debug = Log | Debug,
+ All = NSUIntegerMax
+ ```
+
+ 解释:off 关闭日志,Warning 包含 Error、Warning,Info 包含 Warning、Info,Log 包含 Info、Log,Debug 包含 Log、Debug,All 包含所有。
+
+2. Vdom/Native tree选择
+
+ 
+
+ *图一*
+
+ 
+
+ *图二*
+
+ 点击图一所示native选项会打开图二,方便查看native tree以及view property
+
+ 
+
+ *图三*
+
+ 
+
+ *图四*
+
+ 点击图三所示 vdom 选项会打开图四,方便查看 vdom tree 以及 component property。
http://git-wip-us.apache.org/repos/asf/incubator-weex-site/blob/32a097bf/source/cn/guide/integrate-to-your-app.md
----------------------------------------------------------------------
diff --git a/source/cn/guide/integrate-to-your-app.md b/source/cn/guide/integrate-to-your-app.md
index 318301c..8cc3b4a 100644
--- a/source/cn/guide/integrate-to-your-app.md
+++ b/source/cn/guide/integrate-to-your-app.md
@@ -1,6 +1,7 @@
---
title: 集成 Weex 到已有应用
type: guide
+group: Overview
order: 1.2
version: 2.1
has_chapter_content: true
@@ -15,7 +16,7 @@ has_chapter_content: true
### Android 集成有两种方式
1. 源码依赖:能够快速使用WEEX最新功能,可以根据自己项目的特性进行相关改进。
-2. SDK依赖:WEEX 会在jcenter 定期发布稳定版本。[jcenter](https://bintray.com/alibabaweex/maven/weex_sdk/view)
+2. SDK依赖:WEEX 会在jcenter 定期发布稳定版本。[jcenter](https://bintray.com/alibabaweex/maven/weex_sdk/view)
注:国内可能需要翻墙
### 前期准备
@@ -28,10 +29,10 @@ has_chapter_content: true
### 快速接入
-如果你是尝鲜或者对稳定性要求比较高可以使用依赖SDK的方式。
-步骤如下:
+如果你是尝鲜或者对稳定性要求比较高可以使用依赖SDK的方式。
+步骤如下:
1. 创建Android工程,没有什么要特别说明的,按照你的习惯来。
-2. 修改build.gradle 加入如下基础依赖
+2. 修改build.gradle 加入如下基础依赖
```gradle
compile 'com.android.support:recyclerview-v7:23.1.1'
@@ -41,7 +42,7 @@ has_chapter_content: true
compile 'com.taobao.android:weex_sdk:0.5.1@aar'
```
- 注:版本可以高不可以低。
+ 注:版本可以高不可以低。
#### 代码实现
@@ -194,8 +195,8 @@ public class MainActivity extends AppCompatActivity implements IWXRenderListener
1. 下载源码 `git clone https://github.com/alibaba/weex`
2. 创建 Android 工程。
-3. 通过以下路径引入 SDK Module
- File->New-Import Module-> 选择 WEEX SDK Module(weex/android/sdk) -> Finish
+3. 通过以下路径引入 SDK Module
+ File->New-Import Module-> 选择 WEEX SDK Module(weex/android/sdk) -> Finish
4. app 的 build.gradle 中添加如下依赖:`compile project(':weex_sdk')`
5. 其他设置请参考上面快速接入
@@ -216,17 +217,17 @@ WXSample地址
导入 Weex iOS SDK 到你已有的项目, 如果没有,可以[参考](https://developer.apple.com/library/ios/documentation/IDEs/Conceptual/AppStoreDistributionTutorial/Setup/Setup.html)新建项目
在继续下面内容之前,确保你已有的项目目录有名称为 `Podfile` 文件,如果没有,创建一个,用文本编辑器打开
-- 集成 framework
+- 集成 framework
- WeexSDK 在 cocoaPods 上最新版本 可以在[这](https://cocoapods.org/pods/WeexSDK)获取
+ WeexSDK 在 cocoaPods 上最新版本 可以在[这](https://cocoapods.org/pods/WeexSDK)获取
在 `Podfile` 文件中添加如下内容
```
- source 'git@github.com:CocoaPods/Specs.git'
+ source 'git@github.com:CocoaPods/Specs.git'
target 'YourTarget' do
- platform :ios, '7.0'
- pod 'WeexSDK', '0.9.5' ## 建议使用WeexSDK新版本
+ platform :ios, '7.0'
+ pod 'WeexSDK', '0.9.5' ## 建议使用WeexSDK新版本
end
```
@@ -235,10 +236,10 @@ WXSample地址
首先 拷贝 `ios/sdk` 目录到你已有项目目录 (此处以拷贝到你已有项目的根目录为例子),然后在 `Podfile` 文件中添加
````object-c
- source 'git@github.com:CocoaPods/Specs.git'
+ source 'git@github.com:CocoaPods/Specs.git'
target 'YourTarget' do
- platform :ios, '7.0'
- pod 'WeexSDK', :path=>'./sdk/'
+ platform :ios, '7.0'
+ pod 'WeexSDK', :path=>'./sdk/'
end
````
@@ -246,7 +247,7 @@ WXSample地址
打开命令行,切换到你已有项目 `Podfile` 这个文件存在的目录,执行 `pod install`,没有出现任何错误表示已经完成环境配置。
-#### 第三步:初始化 Weex 环境
+#### 第三步:初始化 Weex 环境
在 `AppDelegate.m` 文件中做初始化操作,一般会在 `didFinishLaunchingWithOptions` 方法中如下添加。
@@ -256,7 +257,7 @@ WXSample地址
[WXAppConfiguration setAppName:@"WeexDemo"];
[WXAppConfiguration setAppVersion:@"1.0.0"];
-//init sdk environment
+//init sdk environment
[WXSDKEngine initSDKEnvironment];
//register custom module and component,optional
@@ -266,7 +267,7 @@ WXSample地址
//register the implementation of protocol, optional
[WXSDKEngine registerHandler:[WXNavigationDefaultImpl new] withProtocol:@protocol(WXNavigationProtocol)];
-//set the log level
+//set the log level
[WXLog setLogLevel: WXLogLevelAll];
```
@@ -276,13 +277,13 @@ Weex 支持整体页面渲染和部分渲染两种模式,你需要做的事情
```objective-c
#import <WeexSDK/WXSDKInstance.h>
-- (void)viewDidLoad
+- (void)viewDidLoad
{
[super viewDidLoad];
_instance = [[WXSDKInstance alloc] init];
_instance.viewController = self;
- _instance.frame = self.view.frame;
+ _instance.frame = self.view.frame;
__weak typeof(self) weakSelf = self;
_instance.onCreate = ^(UIView *view) {
http://git-wip-us.apache.org/repos/asf/incubator-weex-site/blob/32a097bf/source/cn/guide/intro/app-architecture.md
----------------------------------------------------------------------
diff --git a/source/cn/guide/intro/app-architecture.md b/source/cn/guide/intro/app-architecture.md
deleted file mode 100644
index a3f39ce..0000000
--- a/source/cn/guide/intro/app-architecture.md
+++ /dev/null
@@ -1,61 +0,0 @@
----
-title: 用 Weex 构建移动应用
-type: guide
-order: 4.5
-version: 2.1
----
-
-# 用 Weex 构建移动应用
-
-## 今天的移动应用
-
-这里谈一谈 Weex 对移动应用的理解。
-
-### 移动应用需要支撑并行研发
-
-如今移动应用的开发需要并行研发的能力,当一个移动应用发展到一定规模的时候,能否支撑大规模的并行研发就成为了一件非常关键而又重要的事情。否则很容易变成工程瓶颈。
-
-### 移动应用需要动态性
-
-如今移动应用不论从研发节奏、部署的灵活性和时效性、包大小、还是从研发到发布再到反馈的迭代周期上,都和移动互联网的发展速度极不相符。移动应用需要更简单轻量的研发模型,需要摆脱版本部署和分发的笨重过程。
-
-### 移动应用需要开放互联
-
-如今移动应用的内容和信息都是相互孤立的,应用之间的交流变得非常复杂和困难,也缺乏一定的标准和规范化的容器来承载。
-
-## 整体结构设计
-
-我们认为一个具有高并行研发能力、动态化和标准化规范化的移动应用应该由以下几个方面构成:
-
-```
-|------|------|------|------| |-----|
-| page | page | page | page | | api |
-|------|------|------|------| | api |
-| page | page | page | page | | api |
-|------|------|------|------| | api |
-| page | page | page | page | | api |
-|---------------------------| | api |
-| router | | api |
-|---------------------------| |-----|
-```
-
-* 页面:首先移动应用应该可以被拆解成若干个页面,每个页面相对解耦独立,同时每个页面都有一个 URL 进行唯一标识。
-* 路由:这些页面将会通过路由机制有机的串联起来,页面之间的关系是通过路由来进行调度的。常见的移动应用路由包括导航栏、tab 切换等。
-* 设备能力:以各种 API 或服务的方式提供出来,供页面自由使用。
-
-这样的话,在构建一个完整的移动应用之前,先确定你的应用有多少页面,每个页面分别是什么 URL,页面之间的关联和跳转逻辑是怎样的,然后梳理整个移动应用需要的所有 API 和服务。
-
-然后通过 Weex 创建不同的页面,并分别进行开发、调试和发布。
-
-**相关链接**
-
-* [页面结构](./page-architecture.html)
-
-如果你已经有一个做好的移动应用,只想用 Weex 开发其中的一部分页面甚至仅仅其中的一两个页面,这对 Weex 来说完全不是问题。Weex 只是一个 SDK,对整体的移动应用架构不会产生任何侵入性。并且完全可以和纯 native 界面或 hybrid 页面共存。
-
-如果需要 WeexSDK 额外的组件、模块或其它功能,可以通过 Weex 的扩展机制进行扩展。这部分工作需要 native 的研发知识,但是随着 Weex 组件和模块的丰富以及业务迭代的深入,这部分成本会承下降和收敛的趋势。
-
-**相关链接**
-
-* [如何扩展 iOS](../../references/advanced/extend-to-ios.html)
-* [如何扩展 Android](../../references/advanced/extend-to-android.html)
http://git-wip-us.apache.org/repos/asf/incubator-weex-site/blob/32a097bf/source/cn/guide/intro/how-it-works.md
----------------------------------------------------------------------
diff --git a/source/cn/guide/intro/how-it-works.md b/source/cn/guide/intro/how-it-works.md
deleted file mode 100644
index 4480005..0000000
--- a/source/cn/guide/intro/how-it-works.md
+++ /dev/null
@@ -1,62 +0,0 @@
----
-title: 工作原理
-type: guide
-order: 4.1
-has_chapter_content: false
-chapter_title: 优势介绍
-version: 2.1
----
-
-# 工作原理
-
-## 整体架构
-
-Weex 表面上是一个客户端技术,但实际上它串联起了从本地开发环境到云端部署和分发的整个链路。开发者首先可以在本地像撰写 web 页面一样撰写一个 app 的页面,然后编译成一段 JavaScript 代码,形成 Weex 的一个 JS bundle;在云端,开发者可以把生成的 JS bundle 部署上去,然后通过网络请求或预下发的方式传递到用户的移动应用客户端;在移动应用客户端里,WeexSDK 会准备好一个 JavaScript 引擎,并且在用户打开一个 Weex 页面时执行相应的 JS bundle,并在执行过程中产生各种命令发送到 native 端进行的界面渲染或数据存储、网络通信、调用设备功能、用户交互响应等移动应用的场景实践;同时,如果用户没有安装移动应用,他仍然可以在浏览器里打开一个相同的 web 页面,这个页面是使用相同的页面源代码,通过浏览器里的 JavaScript 引擎运行起来的。
-
-
-
-## 本地开发环境
-
-Weex 的本地开发环境基于 web 开发体验而设计,web 开发者可以通过自己熟悉的 HTML/CSS/JavaScript 技术和语法实现移动应用的界面。同时 Weex 也对 [Vue.js](https://vuejs.org/) 这一非常优秀的前端框架做了官方的支持。
-
-除此之外,Weex 的工程设计也是 web 开发者非常熟悉的,首先 web 开发者可以使用自己熟悉的 npm 进行依赖管理;其次 web 开发者在通过项目脚手架初始化工程、开发、调试、质量控制等各个环节,都可以参考 web 开发已有的最佳实践。
-
-和如今 web 开发的最佳实践一样,Weex 会把一个页面的源代码全部编译打包成一个 JS bundle,在浏览器中,我们需要把这个 JS bundle 作为一段 `<script>` 载入网页,在客户端里,我们把这段 JS bundle 载入本地,并通过 WeexSDK 直接执行。
-
-**相关阅读**
-
-* [Weex 和 web 平台的差异](../../references/platform-difference.html)
-* [Vue 2.x 在 Weex 和 web 中的差异](../../references/vue/difference-with-web.html)
-* [快速上手](../index.html)
-* [使用 Devtools](./devtools.html)
-
-## 云端部署和分发
-
-Weex 的 JS bundle 可以作为 web 开发中的一段静态资源进行部署和下发。几乎可以复用 HTML5 所有的工程体系和最佳实践。比如在本地开发环境通过部署工具将 JS bundle 部署到 CDN、通过 CMS 或搭建平台把业务数据和模块化的前端组件自动化拼接生成 JS bundle、通过服务端 JS bundle 的流量和日志统计页面的访问情况、通过 AppCache 或类似的方式对 JS bundle 在客户端进行缓存或预加载以降低网络通信的成本等。
-
-## 客户端 JavaScript 引擎
-
-Weex 的 iOS 和 Android 客户端中都会运行一个 JavaScript 引擎,来执行 JS bundle,同时向各端的渲染层发送规范化的指令,调度客户端的渲染和其它各种能力。我们在 iOS 下选择了 JavaScriptCore 内核,而在 Android 下选择了 UC 提供的 v8 内核。无论是从性能还是稳定性方面都提供了强有力的保障。
-
-为了让整个移动应用的资源利用得更好,我们在客户端提供的 JavaScript 引擎是单例的,即所有 JS bundle 公用一个 JavaScript 内核实例,同时对每个 JS bundle 在运行时进行了上下文的隔离,使得每个 JS bundle 都能够高效安全的工作。我们还把 Vue 2.0 这样的 JS Framework 做了预置,开发者不必把 JS Framework 打包在每个 JS bundle 里,从而大大减少了 JS bundle 的体积,也就进一步保障了页面打开的速度。
-
-## 客户端渲染层
-
-Weex 目前提供了 iOS 和 Android 两个客户端的 native 渲染层。每个端都基于 DOM 模型设计并实现了标准的界面渲染接口供 JavaScript 引擎调用。并且结合 web 标准和 native 的特点和优势实现了一套统一的组件和模块。Weex 在性能方面的表现也是非常优异的,尤其是界面首屏加载时间、native 下长列表的资源开销和复用情况、CPU、内存、帧率 等关键指标。当然,尽管 Weex 官方已经提供了一组开发者最常用的组件和模块,但面对丰富多样的移动应用研发需求,团队也难免会力不从心,为此我们提供了灵活自由的横向扩展能力,开发者可以根据自身的情况定制属于自己的客户端组件和模块,进一步丰富 Weex 在客户端上的能力。
-
-**相关链接**
-
-* [Weex 的组件和模块跟 web 标准的区别](../../references/web-standards.html)
-* [如何使用 iOS](../../references/ios-apis.html)
-* [如何使用 Android](../../references/android-apis.html)
-* [如何扩展 iOS](../../references/advanced/extend-to-ios.html)
-* [如何扩展 Android](../../references/advanced/extend-to-android.html)
-
-## 浏览器渲染
-
-Weex 除了提供 iOS 和 Android 的客户端渲染层之外,还基于 Vue 2.0 对官方的所有组件和模块进行了封装,开发者可以基于 Vue 2.0 用同一套源代码构建出在浏览器中相同效果的页面。并且同样可以横向扩展。
-
-**相关链接**
-
-* [如何使用 HTML5](../../references/html5-apis.html)
-* [如何扩展 HTML5](../../references/advanced/extend-to-html5.html)
http://git-wip-us.apache.org/repos/asf/incubator-weex-site/blob/32a097bf/source/cn/guide/intro/index.md
----------------------------------------------------------------------
diff --git a/source/cn/guide/intro/index.md b/source/cn/guide/intro/index.md
deleted file mode 100644
index 7040c1b..0000000
--- a/source/cn/guide/intro/index.md
+++ /dev/null
@@ -1,15 +0,0 @@
----
-title: 介绍
-type: guide
-order: 4
-version: 2.1
----
-
-# Intro
-
-- [工作原理](./how-it-works.html)
-- [Web 开发体验](./web-dev-experience.html)
-- [使用 Vue 开发 Weex 页面](./using-vue.html)
-- [一次撰写,多端运行](./write-once.html)
-- [用 Weex 构建移动应用](./app-architecture.html)
-- [Weex 页面结构](./page-architecture.html)
http://git-wip-us.apache.org/repos/asf/incubator-weex-site/blob/32a097bf/source/cn/guide/intro/page-architecture.md
----------------------------------------------------------------------
diff --git a/source/cn/guide/intro/page-architecture.md b/source/cn/guide/intro/page-architecture.md
deleted file mode 100644
index 296ee98..0000000
--- a/source/cn/guide/intro/page-architecture.md
+++ /dev/null
@@ -1,48 +0,0 @@
----
-title: Weex 页面结构
-type: guide
-order: 4.6
-version: 2.1
----
-
-# Weex 页面结构
-
-一个 Weex 页面就是一个相对独立解耦的移动应用界面,它不仅包括了界面展示、更包含了逻辑处理、设备能力使用、生命周期管理等部分。
-
-## 界面
-
-### DOM 模型
-
-Weex 页面通过类似 HTML DOM 的方式管理界面,首先页面会被分解为一个 DOM 树,,每个 DOM 结点都代表了一个相对独立的 native 视图的单元。然后不同的视图单元之间通过树形结构组合在了一起,构成一个完整的页面。
-
-**相关链接**
-
-* [Weex Native DOM APIs](../../references/native-dom-api.html)
-
-### 组件
-
-Weex 支持文字、图片、视频等内容型组件,也支持 div、list、scroller 等容器型组件,还包括 slider、input、textarea、switch 等多种特殊的组件。Weex 的界面就是由这些组件以 DOM 树的方式构建出来的。
-
-**相关链接**
-
-* [Weex 组件列表](../../references/components/index.html)
-
-### 布局系统
-
-Weex 页面中的组件会按照一定的布局规范来进行排布,我们这里提供了 CSS 中的盒模型、flexbox 和 绝对/相对/固定/吸附布局这三大块布局模型。
-
-* 盒模型:通过宽、高、边框、内外边距、边框等 CSS 属性描述一个组件本身的尺寸。
-* flexbox:通过 CSS 3 Flexbox 布局规范定义和描述组件之间的空间分布情况。
-* position:支持 CSS position 属性中的 `absolute`, `relative`, `fixed`, `sticky` 位置类型,其中 `relative` 是默认值。
-
-## 功能
-
-Weex 提供了非常丰富的系统功能 API,包括弹出存储、网络、导航、弹对话框和 toast 等,开发者可以在 Weex 页面通过获取一个 native module 的方式引入并调用这些客户端功能 API。
-
-**相关链接**
-
-* [Weex 模块列表](../../references/modules/index.html)
-
-## 生命周期
-
-每个 Weex 页面都有其自身的生命周期,页面从开始被创建到最后被销毁,会经历到整个过程。这是通过对 Weex 页面的创建和销毁,在路由中通过 SDK 自行定义并实现的。
http://git-wip-us.apache.org/repos/asf/incubator-weex-site/blob/32a097bf/source/cn/guide/intro/using-vue.md
----------------------------------------------------------------------
diff --git a/source/cn/guide/intro/using-vue.md b/source/cn/guide/intro/using-vue.md
deleted file mode 100644
index 3083340..0000000
--- a/source/cn/guide/intro/using-vue.md
+++ /dev/null
@@ -1,62 +0,0 @@
----
-title: 使用 Vue 开发 Weex 页面
-type: guide
-order: 4.3
-version: 2.1
----
-
-# 使用 Vue 开发 Weex 页面
-
-## Vue in Weex
-
-[Vue.js](https://vuejs.org/) 是 Evan You 开发的渐进式 JavaScript 框架,在易用性、灵活性和性能等方面都非常优秀。开发者能够通过撰写 `*.vue` 文件,基于 `<template>`, `<style>`, `<script>` 快速构建组件化的 web 应用。
-
-
-
-Vue.js 在 2016 年 10 月正式发布了 2.0 版本,该版本加入了 Virtual-DOM 和预编译器的设计,使得该框架在运行时能够脱离 HTML 和 CSS 解析,只依赖 JavaScript;同时 Virtual-DOM 也使得 Vue 2.x 渲染成原生 UI 成为了可能。
-
-目前 Weex 与 Vue 正在展开官方合作,并将 Vue 2.x 作为内置的前端框架,Vue 也因此具备了开发原生应用的能力。
-
-**相关链接**
-
-* [Weex 快速上手](../index.html)
-* [Vue 介绍](https://cn.vuejs.org/v2/guide/)
-* [Weex 工作原理](./index.html)
-
-## Vue 2.x 在 Weex 中的特色功能
-
-### 流式渲染
-
-在 Weex 中,我们可以通过 `<foo append="tree|node">` 的方式定义页面首次渲染时的渲染颗粒度,这让开发者有机会根据界面的复杂度和业务需求对首次渲染过程进行定制。`append="tree"` 表示整个结点包括其所有子结点全部生成完毕之后,才会一次性渲染到界面上;而 `append="node"` 则表示该结点会先渲染在界面上作为一个容器,其子结点会稍后做进一步渲染。
-
-<!-- dotwe demo -->
-
-### 表单控件绑定
-
-在 Weex 中,我们针对 `<input>` 和 `<textarea>` 这两个表单控件提供了和 web 体验相同的 `v-model` 指令。通过 `<input v-model="message">` 或 `<textarea v-model="message">`,开发者可以把数据 `message` 的值自动展示在文本框上,同时用户修改了文本框的值的时候,数据 `message` 会自动被更新。
-
-<!-- dotwe demo -->
-
-### 多页面上下文隔离
-
-如 Weex 工作原理文中所述,所有 Weex 的 JS bundle 公用一个 JavaScript 内核实例。所以如何能够让多个 JS bundle 中使用的 Vue 是完全隔离的,并且其中一个页面对 Vue 进行扩展或改写不会影响到其它页面就变成了一个问题,通过 Weex 和 Vue 双方的协作,这一问题已经得以解决。大家可以放心使用。
-
-<!-- html5 apis -->
-
-### `<transition>` 过渡状态
-
-Weex 支持了 Vue 2.x 中经典的 `<transition>` 写法,开发者可以通过 `<transition>` 轻松定义一个界面在两种状态中的过渡方式。
-
-## 注意事项
-
-Vue.js 最初是为 Web 设计的,虽然可以基于 Weex 开发移动应用,但是 Web 开发和原生开发毕竟不同,在功能和开发体验上都有一些差异,这些差异从本质上讲是原生开发平台和 Web 平台之间的差异,Weex 正在努力缩小这个差异的范围。
-
-参考文章[《Vue 2.x 在 Weex 和 Web 中的差异》](../../references/vue/index.html)了解存在差异的原因和细节。
-
-## 使用其他 Vue 的工具库
-
-Vue.js 也有较多周边技术产品,如 [Vuex](https://github.com/vuejs/vuex) 和 [vue-router](https://github.com/vuejs/vue-router) 等,这些库也可以在 Weex 中很好的工作。
-
-关于 Vuex 和 vue-router 的使用方法,可以参考[《在 Weex 项目中使用 Vuex 和 vue-router》](../../references/vue/difference-of-vuex.html)。
-
-> 我们基于 Weex 和 Vue 开发了一个的完整项目 [weex-hackernews](https://github.com/weexteam/weex-hackernews) ,引入了包含 Vue 2.x 的 WeexSDK,创建了三端的项目和基本的编译配置。在项目中使用了 Vuex 和 vue-router ,能够实现同一份代码,在 iOS、Android、Web 下都能完整地工作。
http://git-wip-us.apache.org/repos/asf/incubator-weex-site/blob/32a097bf/source/cn/guide/intro/web-dev-experience.md
----------------------------------------------------------------------
diff --git a/source/cn/guide/intro/web-dev-experience.md b/source/cn/guide/intro/web-dev-experience.md
deleted file mode 100644
index 03d33e4..0000000
--- a/source/cn/guide/intro/web-dev-experience.md
+++ /dev/null
@@ -1,38 +0,0 @@
----
-title: Web 开发体验
-type: guide
-order: 4.2
-version: 2.1
----
-
-# Web 开发体验
-
-## 什么是 Web 开发体验
-
-Weex 的开发体验和 web 的开发体验是非常接近的,它通过 HTML 或基于 HTML 模板来描述界面的结构和内容,通过 CSS 的方式描述界面的展现形式,用 JavaScript 来描述用户行为和业务逻辑。同时有完整的工程机制,如创建、开发、调试、部署。
-
-## 为什么选择 Web 开发体验
-
-我们选择基于 Web 开发体验有以下几方面原因:
-
-1. 今天在技术社区有大量的 web 开发者,Weex 可以赋能更多的 web 开发者构建高性能和高体验的移动应用。
-2. Web 开发本身具有非常强的高效率和灵活性,这和 Weex 想解决的移动端动态性问题不谋而合。
-3. Web 标准和开发体验是很多顶尖而优秀的科技公司共同讨论和建设的结果,本身的设计和理念都有极高的品质保障,同时 Weex 也希望可以借此机会努力为标准贡献一点自己的微薄之力。
-4. Web 是一种标准化的技术,标准本身就是一种力量,基于标准、尊重标准、贴近标准都意味着拥有更多的可能性。
-5. Web 今天的生态和社区是非常繁荣的,有很多成熟的工具、库、工程体系、最佳实践可以使用、引入和借鉴。
-
-## Weex 对 Web 标准的支持情况怎么样?
-
-我们从以下几个方面进行介绍和梳理:
-
-* HTML 标签:目前 Weex 支持了基本的容器 (div)、文本 (text)、图片 (image)、视频 (video) 等组件,HTML 中几乎所有的块级标签都可以通过容器组件进行自定义模拟,inline 的标签则可以通过文本组件进行自定义模拟,另外 Weex 还支持了 input/textarea 这样的表单型组件。
-* CSS:Weex 支持了部分常用的 CSS 属性、值类型和单位,并且会根据用户反馈和在 web 中的使用频度陆续支持更多。
-* JavaScript:目前 Weex 提供了一套简化版的 DOM APIs,用来操作原生界面,同时 Weex 在陆续支持更多的 W3C Device APIs。
-* 在框架方面,Weex 官方支持了 Vue 2.0,以及相关的 vuex, vue-router 等,同时开发者可以直接使用各种第三方 JavaScript 工具库。
-* 在工程方面,Weex 推荐 npm 包管理工具,也推荐用 webpack 进行 JS bundle 打包,并提供了 weex-devtool 开发工具,让开发者可以像调试 Chrome 一样调试 Weex 原生应用,同时 Weex 的页面发布系统、客户端缓存机制都尊重目前 Web 的最佳实践。
-
-**相关链接**
-
-* [Weex 和 web 标准的差异](../../references/web-standards.html)
-* [使用 Vue.js](./using-vue.html)
-* [使用 Devtools](./devtools.html)
http://git-wip-us.apache.org/repos/asf/incubator-weex-site/blob/32a097bf/source/cn/guide/intro/write-once.md
----------------------------------------------------------------------
diff --git a/source/cn/guide/intro/write-once.md b/source/cn/guide/intro/write-once.md
deleted file mode 100644
index d483c5b..0000000
--- a/source/cn/guide/intro/write-once.md
+++ /dev/null
@@ -1,25 +0,0 @@
----
-title: 一次撰写,多端运行
-type: guide
-order: 4.4
-version: 2.1
----
-
-# 一次撰写,多端运行
-
-Weex 提供了多端一致的技术方案。
-
-* 首先 web 开发体验在各端当中是相同的。包括语法设计和工程链路。
-* 其次,Weex 的组件、模块设计都是 iOS、Android、Web 的开发者共同讨论出来的,有一定的通用性和普遍性。
-* Weex 开发同一份代码,可以在不同的端上分别执行,避免了多端的重复研发成本。
-
-我们这样设计基于以下几点设想:
-
-1. 今天绝大多数的移动应用,虽然要同时出现在不同的移动操作系统平台上,但是要解决的问题和用户的需求是相同或非常接近的。Weex 希望提供的是一个快速直接统一描述业务的通用方式,为业务和产品需求直接服务。
-2. 针对各大操作系统平台差异的现状,我们倾向于通过以下两方面来解决这一问题
- 1. 把不同端的样式和行为设计并描述成为相同的 API,这样上层的业务逻辑是同一份,但是在不同端上可以做到不一样的展现效果。
- 2. 通过横向扩展的方式在不同的端上扩展不一样的功能、特性或表现形式。
- 3. 各端不一致的业务描述也是难免的,我们通过提供更多更丰富的环境变量来帮助开发者在同一套代码里高效适配不同的设备场景。
-3. 我们相信标准和规范的力量
-
-部分功能特性由于 native 特性的关系,会略有不同,我们会在相应的组件、模块、API 文档中做相应的描述和提示。
http://git-wip-us.apache.org/repos/asf/incubator-weex-site/blob/32a097bf/source/cn/guide/set-up-env.md
----------------------------------------------------------------------
diff --git a/source/cn/guide/set-up-env.md b/source/cn/guide/set-up-env.md
index 222495a..9631079 100644
--- a/source/cn/guide/set-up-env.md
+++ b/source/cn/guide/set-up-env.md
@@ -1,7 +1,8 @@
---
-title: 搭建开发环境
+title: 搭建开发环境
type: guide
-order: 1.1
+group: 开发
+order: 5.1
version: 2.1
has_chapter_content: true
---
@@ -91,7 +92,7 @@ $ weex create awesome-project
我们先通过 `npm install` 安装项目依赖。之后运行根目录下的 `npm run dev & npm run serve` 开启 watch 模式和静态服务器。
-然后我们打开浏览器,进入 `http://localhost:8080/index.html` 即可看到 weex h5 页面。
+然后我们打开浏览器,进入 `http://localhost:8080/index.html` 即可看到 weex h5 页面。
初始化时已经为我们创建了基本的示例,我们可以在 `src/index.vue` 中查看。
http://git-wip-us.apache.org/repos/asf/incubator-weex-site/blob/32a097bf/source/cn/guide/tools/index.md
----------------------------------------------------------------------
diff --git a/source/cn/guide/tools/index.md b/source/cn/guide/tools/index.md
deleted file mode 100644
index 2abb520..0000000
--- a/source/cn/guide/tools/index.md
+++ /dev/null
@@ -1,11 +0,0 @@
----
-title: 周边工具
-type: guide
-order: 5
-version: 2.1
----
-
-# 周边工具
-
-- [weex-toolkit](./toolkit.html)
-- [Weex Language Support插件](./plugin.html)
[37/51] [abbrv] incubator-weex-site git commit: update file structure
and fix responsive styles
Posted by ha...@apache.org.
http://git-wip-us.apache.org/repos/asf/incubator-weex-site/blob/12e3a8bc/_drafts/v-0.10/references/modules/webview.md
----------------------------------------------------------------------
diff --git a/_drafts/v-0.10/references/modules/webview.md b/_drafts/v-0.10/references/modules/webview.md
new file mode 100644
index 0000000..88c6f17
--- /dev/null
+++ b/_drafts/v-0.10/references/modules/webview.md
@@ -0,0 +1,160 @@
+---
+title: webview
+type: references
+order: 3.9
+version: 0.10
+---
+
+# webview
+
+A series of web operation api like `goBack`, `goForward`, and `reload`. 'webview' module used with the web component.
+
+## API
+
+### goBack(webElement)
+
+Loads the previous location in the history stack.
+
+**Arguments**
+
+* webElement(web): the element of the web component.
+
+#### Example
+
+```
+var webview = require('@weex-module/webview');
+var webElement = this.$el('webview');
+webview.goBack(webElement);
+```
+
+### goForward(webElement)
+
+Loads the next location in the history stack.
+
+**Arguments**
+
+* webElement(web): the element of the web component.
+
+#### Example
+
+```
+var webview = require('@weex-module/webview');
+var webElement = this.$el('webview');
+webview.goForward(webElement);
+```
+
+### reload(webElement)
+
+Reloads the current web page.
+
+**Arguments**
+
+* webElement(web): the element of the web component.
+
+#### Example
+
+```
+var webview = require('@weex-module/webview');
+var webElement = this.$el('webview');
+webview.reload(webElement.ref);
+```
+
+## Example
+
+```html
+<template>
+ <div class="browserStyle">
+ <div style="flex-direction: row">
+ <input id="urlInput" type="url" autofocus="false" placeholder="..." class="textStyle" value="{{input_text}}" oninput="input">
+ </input>
+ </div>
+ <div style="flex-direction: row">
+ <wxc-button value="LoadURL" class="buttonSytle" size="small" onclick="loadURL"></wxc-button>
+ <wxc-button value="Backward" class="buttonSytle" size="small" onclick="backforward"></wxc-button>
+ <wxc-button value="Forward" class="buttonSytle" size="small" onclick="forward"></wxc-button>
+ </div>
+ <div>
+ <web id="webview" src="{{src}}" class="webStyle"></web>
+ </div>
+ </div>
+</template>
+
+<style>
+
+ .browserStyle
+ {
+ width:600;
+ height: 825;
+ background-color:#778899 ;
+ }
+
+ .textStyle
+ {
+ width:600;
+ height: 50;
+ background-color: #D3D3D3;
+ }
+
+ .buttonSytle
+ {
+ width:180;
+ height: 50;
+ font-size: 12;
+ background-color: #D3D3D3;
+ margin:10;
+ padding-left: 5;
+ padding-right: 5;
+ }
+
+ .webStyle
+ {
+ width:600;
+ height: 700;
+ background-color: #8B0000;
+ }
+
+</style>
+
+<script>
+
+ var web_module = require('@weex-module/webview');
+
+ module.exports = {
+ data: {
+ src : "https://h5.m.taobao.com",
+ input_text:"https://www.tmall.com"
+ },
+
+ methods: {
+
+ loadURL: function (e) {
+ var web_element = this.$el('webview');
+ var input = this.$el("urlInput");
+ this.src = this.input_text;
+ web_module.reload(web_element);
+ },
+
+ backforward: function (e) {
+ var web_element = this.$el('webview');
+ web_module.goBack(web_element);
+ this.input_text = web_element.attr.src;
+ },
+
+ forward: function (e) {
+ var web_element = this.$el('webview');
+ web_module.goForward(web_element);
+ this.input_text = web_element.attr.src;
+ },
+ input:function (e) {
+ var input = this.$el("urlInput");
+ this.input_text = input.attr.value;
+ }
+
+ }
+ }
+</script>
+```
+
+[Try it](http://dotwe.org/103d472645206cc1564f49717585abb4)
+
+
http://git-wip-us.apache.org/repos/asf/incubator-weex-site/blob/12e3a8bc/_drafts/v-0.10/references/special-element.md
----------------------------------------------------------------------
diff --git a/_drafts/v-0.10/references/special-element.md b/_drafts/v-0.10/references/special-element.md
new file mode 100644
index 0000000..4a4d57e
--- /dev/null
+++ b/_drafts/v-0.10/references/special-element.md
@@ -0,0 +1,36 @@
+---
+title: Special Element
+type: references
+order: 1.10
+version: 0.10
+---
+
+# Special Element
+
+## Content
+
+The element serves as content distribution outlet in a composed component template. The element itself will be replaced.
+
+alias: 'slot'.
+
+## Example
+
+As shown in the example, 'content' replaced by 'text'.
+
+```html
+<we-element name="item">
+ <template>
+ <div>
+ <content></content>
+ </div>
+ </template>
+</we-element>
+
+<template>
+ <div>
+ <item>
+ <text>Content Text</text>
+ </item>
+ </div>
+</template>
+```
http://git-wip-us.apache.org/repos/asf/incubator-weex-site/blob/12e3a8bc/_drafts/v-0.10/references/specs/index.md
----------------------------------------------------------------------
diff --git a/_drafts/v-0.10/references/specs/index.md b/_drafts/v-0.10/references/specs/index.md
new file mode 100644
index 0000000..d303a16
--- /dev/null
+++ b/_drafts/v-0.10/references/specs/index.md
@@ -0,0 +1,309 @@
+---
+title: JS Bundle format
+type: references
+order: 4
+has_chapter_content: false
+chapter_title: Low-level Specs
+version: 0.10
+---
+
+# JS Bundle format
+
+JS Bundle Version: v0.3.0
+
+## v0.5.0
+
+### Whole Syntax and Structure
+
+A JS Bundle is actually a JavaScript file which follows **ES5** standard. The code is used to define some custom components for the instance and bootstrap the instance with certain name, config and data. Developers could use all kinds of JS code packager like webpack, browserify, requirejs to organize your whole instance code.
+
+### Meta Info
+
+The JS Bundle Must begin with a comment line which is a JSON object like:
+
+```javascript
+// { "framework": "Weex", "version": "0.5.0" }
+```
+
+This JSON object as least contains:
+
+* property `framework` must be `"Weex"`
+* property `version` should be corresponded with the JS Bundle format version
+
+### Global Members
+
+* `__weex_define__(name, options)`
+* `__weex_bootstrap__(name, config, data)`
+* `__weex_document__`
+* `__weex_require__(name)`
+
+#### `__weex_define__(name:string, options: object)`
+
+Define a custom component named `name` for current instance with `options`.
+
+**example:**
+
+```javascript
+__weex_define__('rmb', {
+ template: {
+ type: 'div',
+ style: {flexDirection: 'row'},
+ children: [
+ {type: 'text', attr: {value: '¥'}},
+ {type: 'text', attr: {value: this.value}}
+ ]
+ },
+ data: function () {
+ return {
+ value: '0'
+ }
+ },
+ methods: {...}
+})
+```
+
+The enabled component options contains:
+
+* `template`: just the same as [v0.3.0](#details-of-template-option-definitions)
+* `style`: just the same as [v0.3.0](#details-of-style-option-definitions)
+* `data`: a function which return a plain object to observe by the ViewModel
+* `methods`: a function map to proxy to the ViewModel
+* `computed`: a map of several computed keys for the ViewModel
+* `init`, `created`, `ready`: lifecycle methods
+* `events`: event handlers for the ViewModel
+<!-- * `components`: a map for options of sub components the ViewModel needed (So `__weex_define__(name, options)` equals to run `this.components[name] = options` in each custom components when `init`) -->
+
+The enabled ViewModel APIs contains:
+
+* `$el(id): Element`: find element by id in current ViewModel scope
+* `$vm(id): ViewModel`: find sub ViewModel by id
+* `$getConfig(): object`: get instance config info
+* `$broadcast`/`$emit`/`$dispatch`/`$on`/`$off`: listen and fire component events
+* `$transition` *(experimental)*: animation transition (see more in [animation native module](../animation.html))
+
+#### `__weex_require__(name: string): object`
+
+Get a Weex native module with several native APIs.
+
+**example:**
+
+```javascript
+var modal = __weex_require__('modal')
+modal.toast({
+ message: 'Hey!',
+ duration: 2
+})
+```
+
+polyfill for v0.3.0
+
+```javascript
+function __weex_require__(name) {
+ var result
+ define('__weex_require__', function (r, e, m) {
+ result = r('@weex-module/' + name)
+ })
+ return result
+}
+```
+
+#### `__weex_bootstrap__(nameOrOptions: string|object, config: object?, data: object?): AppInstance | Error`
+
+Start to render by a certain component name or a direct component options as the root element, and some instance `config` and instance `data`. If everything fine, it will returns the root app instance. Otherwise it will return an `Error` instance which describes something wrong.
+
+**example:**
+
+```javascript
+__weex_bootstrap__(
+ 'root',
+ {
+ // format 1:
+ // downgrade: { appVersion: '>= 0.5.0' },
+ // format 2:
+ // downgrade: function (config) { return true }
+ },
+ {
+ // external data
+ // value: '12345'
+ }
+)
+```
+
+The instance `config` now only support `downgrade` property which allows two format:
+
+1. an object like `{ osVersion, appVersion, weexVersion, deviceModel }`
+2. a function like `function (config) { return true }` to return a boolean value. `true` means normal and `false` means downgrade.
+
+The instance `data` will merge to root component data. So the root component is also easy to reuse and the instance data is easy to customize.
+
+#### `__weex_document__`
+
+An virtual-DOM `Document` instance. Also the host of [virtual-DOM APIs](./virtual-dom-apis.html). Every Weex instance has and must have just one `Document` instance.
+
+### Preserved Global Variables
+
+`define`, `bootstrap`, `module`, `exports`, `document`, `require`, `register`, `render`
+
+### A whole example
+
+```javascript
+// { "framework": "Weex", "version": "0.5.0" }
+
+var modal = __weex_require__('modal')
+
+__weex_define__('item', {
+ template: {
+ type: 'div',
+ style: { flexDirection: 'row' },
+ event: {
+ click: function (e) {
+ this.update(e)
+ }
+ },
+ children: [
+ { type: 'image', attr: { src: this.imageUrl }, ...},
+ { type: 'text', attr: { value: this.title }, ...}
+ ]
+ },
+ data: function () {
+ return {
+ imageUrl: '',
+ title: ''
+ }
+ },
+ methods: {
+ update: function (e) {
+ modal.toast({ message: this.title })
+ }
+ }
+})
+
+__weex_define__('app', {
+ template: {
+ type: 'div',
+ children: [
+ {
+ type: 'item',
+ repeat: {
+ expression: function () {
+ return this.list
+ },
+ key: '$index',
+ value: '$value'}
+ },
+ attr: {
+ imageUrl: function () {
+ return this.$value.imageUrl
+ },
+ title: function () {
+ return this.$value.title
+ }
+ }
+ }
+ ]
+ },
+ data: function () {
+ return {
+ list: [
+ { imageUrl: 'xxx', title: '111' },
+ { imageUrl: 'yyy', title: '222' },
+ { imageUrl: 'zzz', title: '333' }
+ ]
+ }
+ }
+})
+
+__weex_bootstrap__('app')
+```
+
+## v0.3.0
+
+### Whole Syntax and Structure
+
+A JS Bundle is actually a JavaScript file which follows **ES5** standard. The code is organized by several modules with AMD-like format:
+
+```javascript
+define('moduleName1', function (require, exports, module) {
+ // content of module1
+})
+
+define('moduleName2', function (require, exports, module) {
+ // content of module2
+})
+
+...
+```
+
+A whole Weex JS Bundle is concatenated by these modules and last a `bootstrap(rootComponentName, optionalConfig, optionalExternalData)` function call.
+
+```javascript
+define('@weex-component/a', function (require, exports, module) {
+ // content of composed component <a>
+})
+
+define('@weex-component/b', function (require, exports, module) {
+ // content of composed component <b>
+})
+
+bootstrap('@weex-component/b')
+```
+
+As the sample above, the component name should be hyphenated (a-z, 0-9, "-"). Other characters are not allowed.
+
+And, the method call `bootstrap()` allows 1~3 parameters: root module name (String), config info (optional JSON) and external data (optional JSON).
+
+### Content of Composed Components
+
+A module of composed component contains 3 parts: whole options definition, additional template option definition and additional style option definition.
+
+- whole options is a piece of JavaScript code to put component options (except `template` option and `style` option) into `module.exports`
+- `template` option is a piece of JSON-like object assigned to `module.exports.template` which describes the display structure of this component
+- `style` option is a piece of JSON object assigned to `module.exports.style` which describes the reusable styles in this component
+
+The `template` option is required and appeared only once, and the `style` option and whole options definition are optional.
+
+These options are defined and transformed by Transformer. Actually you can also ignore all the format limitation and write options to `module.exports` as the same result if you are not going to use Transformer. But that's not recommended.
+
+#### Details of template option definitions
+
+A piece of multi-level embedded JSON-like object which describes the view structure.
+
+Every level JSON-like object has these members below:
+
+* `type`: a required string, component name/type
+* `component`: an optional boolean, whether this component is composed or native
+* `attr`: an optional k-v pairs which contains all attributes of an element, the value could be a string, number, boolean or a function that bind some data value
+* `style`: an optional k-v pairs which contains all styles of an element, just the same format as the `attr`
+* `classList`: an optional array of strings which contains class names for styling.
+* `events`: an optional k-v pairs whose keys are event type and values are corresponding method names
+* `children`: an optional array of child components info
+* `append`: an optional string which determines a compiling workflow strategy: append node-by-node singly or a whole node tree just one time. the default value is `node` and another supported value is `tree`.
+* `shown`: a optional function which returns a boolean value to determine whether this component should be displayed
+* `repeat`: a optional function which returns a list data to displays components with each
+
+**Corresponding Keys to Weex Transformer:**
+
+- tag `name` in Weex file corresponds to `type`
+- attr `if` in Weex file corresponds to `shown`
+- attr `repeat` in Weex file corresponds to `repeat`
+- attr `append` in Weex file corresponds to `append`
+- attr `style` in Weex file with CSS syntax corresponds to `style`
+- attr `class` in Weex file with class names separated by blanks corresponds to `classList`
+- attr `on***` in Weex file with prefix `on` corresponds to a k-v pair in `events`
+- other attributes in Weex file corresponds to `attr`
+- Child nodes in Weex file corresponds to `children`
+
+All tag names, attr names are case-insensitive and transformed to lower-cased. But the attr values are case-sensitive.
+
+#### Details of style option definitions
+
+Just a two-levels JSON object.
+
+* The first levels are class names.
+* The second levels are k-v pairs which describes style names & properties for each class name.
+
+**Corresponding Keys to Weex Transformer:**
+
+* class name corresponds to first level keys
+* prop name corresponds to second level keys
+* prop value corresponds to second level values
http://git-wip-us.apache.org/repos/asf/incubator-weex-site/blob/12e3a8bc/_drafts/v-0.10/references/specs/js-bundle-format.md
----------------------------------------------------------------------
diff --git a/_drafts/v-0.10/references/specs/js-bundle-format.md b/_drafts/v-0.10/references/specs/js-bundle-format.md
new file mode 100644
index 0000000..0b103d9
--- /dev/null
+++ b/_drafts/v-0.10/references/specs/js-bundle-format.md
@@ -0,0 +1,307 @@
+---
+title: JS Bundle format
+type: references
+order: 4.1
+version: 0.10
+---
+
+# JS Bundle format
+
+JS Bundle Version: v0.3.0
+
+## v0.5.0
+
+### Whole Syntax and Structure
+
+A JS Bundle is actually a JavaScript file which follows **ES5** standard. The code is used to define some custom components for the instance and bootstrap the instance with certain name, config and data. Developers could use all kinds of JS code packager like webpack, browserify, requirejs to organize your whole instance code.
+
+### Meta Info
+
+The JS Bundle Must begin with a comment line which is a JSON object like:
+
+```javascript
+// { "framework": "Weex", "version": "0.5.0" }
+```
+
+This JSON object as least contains:
+
+* property `framework` must be `"Weex"`
+* property `version` should be corresponded with the JS Bundle format version
+
+### Global Members
+
+* `__weex_define__(name, options)`
+* `__weex_bootstrap__(name, config, data)`
+* `__weex_document__`
+* `__weex_require__(name)`
+
+#### `__weex_define__(name:string, options: object)`
+
+Define a custom component named `name` for current instance with `options`.
+
+**example:**
+
+```javascript
+__weex_define__('rmb', {
+ template: {
+ type: 'div',
+ style: {flexDirection: 'row'},
+ children: [
+ {type: 'text', attr: {value: '¥'}},
+ {type: 'text', attr: {value: this.value}}
+ ]
+ },
+ data: function () {
+ return {
+ value: '0'
+ }
+ },
+ methods: {...}
+})
+```
+
+The enabled component options contains:
+
+* `template`: just the same as [v0.3.0](#details-of-template-option-definitions)
+* `style`: just the same as [v0.3.0](#details-of-style-option-definitions)
+* `data`: a function which return a plain object to observe by the ViewModel
+* `methods`: a function map to proxy to the ViewModel
+* `computed`: a map of several computed keys for the ViewModel
+* `init`, `created`, `ready`: lifecycle methods
+* `events`: event handlers for the ViewModel
+<!-- * `components`: a map for options of sub components the ViewModel needed (So `__weex_define__(name, options)` equals to run `this.components[name] = options` in each custom components when `init`) -->
+
+The enabled ViewModel APIs contains:
+
+* `$el(id): Element`: find element by id in current ViewModel scope
+* `$vm(id): ViewModel`: find sub ViewModel by id
+* `$getConfig(): object`: get instance config info
+* `$broadcast`/`$emit`/`$dispatch`/`$on`/`$off`: listen and fire component events
+* `$transition` *(experimental)*: animation transition (see more in [animation native module](../animation.html))
+
+#### `__weex_require__(name: string): object`
+
+Get a Weex native module with several native APIs.
+
+**example:**
+
+```javascript
+var modal = __weex_require__('modal')
+modal.toast({
+ message: 'Hey!',
+ duration: 2
+})
+```
+
+polyfill for v0.3.0
+
+```javascript
+function __weex_require__(name) {
+ var result
+ define('__weex_require__', function (r, e, m) {
+ result = r('@weex-module/' + name)
+ })
+ return result
+}
+```
+
+#### `__weex_bootstrap__(nameOrOptions: string|object, config: object?, data: object?): AppInstance | Error`
+
+Start to render by a certain component name or a direct component options as the root element, and some instance `config` and instance `data`. If everything fine, it will returns the root app instance. Otherwise it will return an `Error` instance which describes something wrong.
+
+**example:**
+
+```javascript
+__weex_bootstrap__(
+ 'root',
+ {
+ // format 1:
+ // downgrade: { appVersion: '>= 0.5.0' },
+ // format 2:
+ // downgrade: function (config) { return true }
+ },
+ {
+ // external data
+ // value: '12345'
+ }
+)
+```
+
+The instance `config` now only support `downgrade` property which allows two format:
+
+1. an object like `{ osVersion, appVersion, weexVersion, deviceModel }`
+2. a function like `function (config) { return true }` to return a boolean value. `true` means normal and `false` means downgrade.
+
+The instance `data` will merge to root component data. So the root component is also easy to reuse and the instance data is easy to customize.
+
+#### `__weex_document__`
+
+An virtual-DOM `Document` instance. Also the host of [virtual-DOM APIs](./virtual-dom-apis.html). Every Weex instance has and must have just one `Document` instance.
+
+### Preserved Global Variables
+
+`define`, `bootstrap`, `module`, `exports`, `document`, `require`, `register`, `render`
+
+### A whole example
+
+```javascript
+// { "framework": "Weex", "version": "0.5.0" }
+
+var modal = __weex_require__('modal')
+
+__weex_define__('item', {
+ template: {
+ type: 'div',
+ style: { flexDirection: 'row' },
+ event: {
+ click: function (e) {
+ this.update(e)
+ }
+ },
+ children: [
+ { type: 'image', attr: { src: this.imageUrl }, ...},
+ { type: 'text', attr: { value: this.title }, ...}
+ ]
+ },
+ data: function () {
+ return {
+ imageUrl: '',
+ title: ''
+ }
+ },
+ methods: {
+ update: function (e) {
+ modal.toast({ message: this.title })
+ }
+ }
+})
+
+__weex_define__('app', {
+ template: {
+ type: 'div',
+ children: [
+ {
+ type: 'item',
+ repeat: {
+ expression: function () {
+ return this.list
+ },
+ key: '$index',
+ value: '$value'}
+ },
+ attr: {
+ imageUrl: function () {
+ return this.$value.imageUrl
+ },
+ title: function () {
+ return this.$value.title
+ }
+ }
+ }
+ ]
+ },
+ data: function () {
+ return {
+ list: [
+ { imageUrl: 'xxx', title: '111' },
+ { imageUrl: 'yyy', title: '222' },
+ { imageUrl: 'zzz', title: '333' }
+ ]
+ }
+ }
+})
+
+__weex_bootstrap__('app')
+```
+
+## v0.3.0
+
+### Whole Syntax and Structure
+
+A JS Bundle is actually a JavaScript file which follows **ES5** standard. The code is organized by several modules with AMD-like format:
+
+```javascript
+define('moduleName1', function (require, exports, module) {
+ // content of module1
+})
+
+define('moduleName2', function (require, exports, module) {
+ // content of module2
+})
+
+...
+```
+
+A whole Weex JS Bundle is concatenated by these modules and last a `bootstrap(rootComponentName, optionalConfig, optionalExternalData)` function call.
+
+```javascript
+define('@weex-component/a', function (require, exports, module) {
+ // content of composed component <a>
+})
+
+define('@weex-component/b', function (require, exports, module) {
+ // content of composed component <b>
+})
+
+bootstrap('@weex-component/b')
+```
+
+As the sample above, the component name should be hyphenated (a-z, 0-9, "-"). Other characters are not allowed.
+
+And, the method call `bootstrap()` allows 1~3 parameters: root module name (String), config info (optional JSON) and external data (optional JSON).
+
+### Content of Composed Components
+
+A module of composed component contains 3 parts: whole options definition, additional template option definition and additional style option definition.
+
+- whole options is a piece of JavaScript code to put component options (except `template` option and `style` option) into `module.exports`
+- `template` option is a piece of JSON-like object assigned to `module.exports.template` which describes the display structure of this component
+- `style` option is a piece of JSON object assigned to `module.exports.style` which describes the reusable styles in this component
+
+The `template` option is required and appeared only once, and the `style` option and whole options definition are optional.
+
+These options are defined and transformed by Transformer. Actually you can also ignore all the format limitation and write options to `module.exports` as the same result if you are not going to use Transformer. But that's not recommended.
+
+#### Details of template option definitions
+
+A piece of multi-level embedded JSON-like object which describes the view structure.
+
+Every level JSON-like object has these members below:
+
+* `type`: a required string, component name/type
+* `component`: an optional boolean, whether this component is composed or native
+* `attr`: an optional k-v pairs which contains all attributes of an element, the value could be a string, number, boolean or a function that bind some data value
+* `style`: an optional k-v pairs which contains all styles of an element, just the same format as the `attr`
+* `classList`: an optional array of strings which contains class names for styling.
+* `events`: an optional k-v pairs whose keys are event type and values are corresponding method names
+* `children`: an optional array of child components info
+* `append`: an optional string which determines a compiling workflow strategy: append node-by-node singly or a whole node tree just one time. the default value is `node` and another supported value is `tree`.
+* `shown`: a optional function which returns a boolean value to determine whether this component should be displayed
+* `repeat`: a optional function which returns a list data to displays components with each
+
+**Corresponding Keys to Weex Transformer:**
+
+- tag `name` in Weex file corresponds to `type`
+- attr `if` in Weex file corresponds to `shown`
+- attr `repeat` in Weex file corresponds to `repeat`
+- attr `append` in Weex file corresponds to `append`
+- attr `style` in Weex file with CSS syntax corresponds to `style`
+- attr `class` in Weex file with class names separated by blanks corresponds to `classList`
+- attr `on***` in Weex file with prefix `on` corresponds to a k-v pair in `events`
+- other attributes in Weex file corresponds to `attr`
+- Child nodes in Weex file corresponds to `children`
+
+All tag names, attr names are case-insensitive and transformed to lower-cased. But the attr values are case-sensitive.
+
+#### Details of style option definitions
+
+Just a two-levels JSON object.
+
+* The first levels are class names.
+* The second levels are k-v pairs which describes style names & properties for each class name.
+
+**Corresponding Keys to Weex Transformer:**
+
+* class name corresponds to first level keys
+* prop name corresponds to second level keys
+* prop value corresponds to second level values
http://git-wip-us.apache.org/repos/asf/incubator-weex-site/blob/12e3a8bc/_drafts/v-0.10/references/specs/js-framework-apis.md
----------------------------------------------------------------------
diff --git a/_drafts/v-0.10/references/specs/js-framework-apis.md b/_drafts/v-0.10/references/specs/js-framework-apis.md
new file mode 100644
index 0000000..e1412c6
--- /dev/null
+++ b/_drafts/v-0.10/references/specs/js-framework-apis.md
@@ -0,0 +1,191 @@
+---
+title: JS Framework APIs
+type: references
+order: 4.2
+version: 0.10
+---
+
+# JS Framework APIs
+<span class="weex-version">0.4</span>
+
+## Intro about JS Runtime
+
+These APIs are designed for JS Framework and Native Engine working together.
+
+Considering the limitation of mobile phone resource, *Weex runs only one JS runtime* to handle all Weex instances. So it need a multi-instance management layer in JavaScript. These JS Framework APIs are just designed to do the management job.
+
+* First, each Weex instance have a lifecycle, from `createInstance` to `destroyInstance`. During this period, we can import some extra data by `refreshInstance`.
+* To communicate with Native Engine, we have a couple of APIs: `sendTasks` and `receiveTasks`. They are used to call each other by some commands and messages.
+* And when JS runtime start at the beginning of the app launching, we need something initialized and configured. So we supply some APIs like `registerComponents`, `registerModules`.
+* The last API is just for debugging, we supply an API named `getRoot` to return the whole virtual-DOM data for developers.
+* If any of these API calls failed, an `Error` object should be returned.
+
+## Called by native and supplied from JS Framework
+
+### `createInstance(instanceId, code, options, data)`
+
+Create a Weex instance from Native Engine
+
+* `instanceId`: The unique id for a Weex instance, generated by Native Engine.
+* `code`: The JS bundle code send from Native Engine. It will be executed by `new Function(code)` in JS Framework. The code format depends on [JS Bundle Foramt](./js-bundle-format.html)
+* `options`: *Optional*. An options object. *Currently it supports `debug` flag which enable printing log and `bundleUrl` flag which the url of bundle.*
+* `data`: *Optional*. It's an chance to supply external data instead of the original data in JS bundle.
+
+Example:
+
+```javascript
+createInstance('x', 'define(...); define(...); define(...); bootstrap(...)')
+createInstance('x', '...', { bundleUrl, debug, ... }, { a: 1, b: 2 }})
+```
+
+### `destroyInstance(instanceId)`
+
+Destroy an existed Weex instance by id from Native Engine
+
+### `refreshInstance(instanceId, data)`
+
+Refresh data to an existed Weex instance with certain external data from Native Engine
+
+Example:
+
+```javascript
+refreshInstance('x', {a: 100, b: 200})
+```
+
+### `registerComponents(components)`
+
+Register all native components
+
+* `components`: A array of whose items are component options that are force part to use. *Currently it supports `append` attribute which forces the appending mechanism (`tree` or `node`) when first time rendering.*
+
+Example:
+
+```javascript
+registerComponents([
+ { type: 'container' },
+ { type: 'text' },
+ { type: 'image' },
+ { type: 'slider', append: 'tree' },
+ { type: 'list' },
+ { type: 'cell', append: 'tree' },
+ ...
+])
+```
+
+### `registerModules(modules)`
+
+Register the name, methods and args format of each module
+
+* `modules`: A map that collects all native module definitions. Each module definition is an array which has several API definitions. Each API definition has a `name` string and an `args` array which contains a list of each parameter's type.
+
+**NOTE: the `node` type data will actually return its `ref` property. And the `function` type data will actually return a unique function id referring to it.**
+
+Example:
+
+```javascript
+registerModules({
+ event: [
+ {name: 'openURL', args: ['string']}
+ ],
+ ...
+})
+```
+
+### `receiveTasks(instanceId, tasks)`
+
+Fire events or callbacks to an existed Weex instance from Native Engine
+
+* `tasks[]`: A task list. Each task has a `method="fireEvent|callback"` property and a list of `args`.
+ - In `fireEvent` method, the `args` is `ref` of the target, event `type`, event `data` and `domChanges` description in order. **Note: if some event make virtual-DOM data changed (e.g. value changed in `<input>` or current index changed in `<slider>`), the changing of the target element will be passed as `domChanges`.**
+ - In `callback` method, the `args` is `funcId` of a handler, `data` and `ifKeepAlive` which describes whether this callback handler should be keeping called. (Each callback handler is matched with a `funcId` when the original call happens.)
+
+Example:
+
+```javascript
+receiveTasks('x', [{method: 'fireEvent', args: ['x', '13', 'click', {a: 100, b: 200}]}])
+receiveTasks('x', [{method: 'callback', args: ['x', '7', {a: 100, b: 200}, true]}])
+```
+
+### `getRoot(instanceId)`
+
+Return a JSON object which describes the whole virtual DOM body of an existed Weex instance, which designed for debugging
+
+Example:
+
+```javascript
+getRoot('x')
+// {ref: '_root', type: 'container', attr: {...}, style: {...}, children: [...]}
+```
+
+## Called from JavaScript and implemented with native code
+
+### `sendTasks(instanceId, tasks)`
+
+Make native calls from JS Framework
+
+* `tasks[]`: A task list. Each task has a `module` name, a `method` name, and a `args[]` list.
+
+Example:
+
+```javascript
+sendTasks('x', [
+ {module: 'dom', method: 'addElement', args: ['_root', {ref: '1', type: 'container'}, -1]},
+ {module: 'dom', method: 'addElement', args: ['1', {ref: '2', type: 'text', ...}, -1]},
+ {module: 'dom', method: 'addElement', args: ['1', {ref: '3', type: 'image', ...}, -1]},
+ ...
+])
+```
+
+## Supporting other JS Framework <sup>(experimental)</sup>
+
+### Register a new JS Framework
+
+```javascript
+// lib/frameworks/index.js
+
+import Vue from '...'
+import React from '...'
+import Angular from '...'
+
+export const frameworks = {
+ Vue,
+ React,
+ Angular
+}
+```
+
+### Expose JS Framework APIs
+
+```javascript
+// 3rd-party-framework.js
+
+export function createInstance (id, code, config, data) { ... }
+export function destroyInstance (id) { ... }
+export function refreshInstance (id, data) { ... }
+export function registerComponents (components) { ... }
+export function registerModules (modules) { ... }
+export function recieveTasks (id, tasks) { ... }
+export function getRoot (id) { ... }
+```
+
+The virtual-DOM tasks should follow [virtual-DOM spec](./virtual-dom-apis.html).
+
+### Framework Helper
+
+You can import `lib/runtime/helper.js` to get two important things:
+
+* `Document` class, see [virtual-DOM spec](./virtual-dom-apis.html) for more.
+* `sendTasks` method.
+
+### JS Bundle format
+
+You must ensure the JS Bundle has its first line of code like this:
+
+```javascript
+// { "framework": "Vue" }
+...
+```
+
+to allow JS Runtime to detect which JS Framework it should be opened by.
+
+If no valid annotation found. The JS Bundle will be opened by default JS Framework of Weex.
http://git-wip-us.apache.org/repos/asf/incubator-weex-site/blob/12e3a8bc/_drafts/v-0.10/references/specs/virtual-dom-apis.md
----------------------------------------------------------------------
diff --git a/_drafts/v-0.10/references/specs/virtual-dom-apis.md b/_drafts/v-0.10/references/specs/virtual-dom-apis.md
new file mode 100644
index 0000000..566de1a
--- /dev/null
+++ b/_drafts/v-0.10/references/specs/virtual-dom-apis.md
@@ -0,0 +1,147 @@
+---
+title: Virtual DOM APIs
+type: references
+order: 4.3
+version: 0.10
+---
+
+# Virtual DOM APIs
+<span class="weex-version">0.4</span>
+
+## `Document`
+
+Each instance has a corresponding document with the instance id. A document has many nodes which compose a node tree.
+
+### Constructor
+
+##### `new Document(id: string, url: string?)`
+
+### Members
+
+##### `createElement(tagName: string, props: Object?): Element`
+
+Create a certain type `Element`. And the `props` may contain `attr` object and `style` object. e.g. `createBody('div', {style: {backgroundColor: '#ffffff'}})`
+
+##### `createComment(text: string): Comment`
+
+Create a `Comment` with a certain comment text.
+
+##### `open()`
+
+Set a flag which means init rendering start, so each dom update will be called immediately
+
+##### `close()`
+
+Set a flag which means init rendering finished, so the dom updates later will be batched in each task.
+
+##### `fireEvent(el: Element, type: string, e: Object?, domChanges: Object?)`
+
+Fire an certain type of event on a certain element with an event object. When the event leads to some dom changes, the fourth parameter will describe the change just like `props` parameter in `createElement` method.
+
+#### Read-only & Getters
+
+##### `id: string`
+
+##### `URL: string?`
+
+##### `body: Element`
+
+body element
+
+##### `documentElement: Element`
+
+document element
+
+##### `getRef(ref: string): Node?`
+
+Get node by `ref` from the internal node map
+
+**Note**: the `documentElement` will be generated automatically when a document created, and the `body` should to be created manually and appended to `documentElement` to work. The `type` of a `body` must be one of `div`, `list` or `scroller`.
+
+## `Node`
+
+### Constructor
+
+##### `new Node()`
+
+### Members
+
+##### `destroy()`
+
+#### Read-only & Getters
+
+##### `ref: string`
+
+##### `nextSibling: Node?`
+
+##### `previousSibling: Node?`
+
+##### `parentNode: Node?`
+
+## `Element` extends `Node`
+
+### Constructor
+
+##### `new Element(type: string, props: Object?, ownerDocument: Document)`
+
+Create an element and the `props` may contain `attr` object and `style` object.
+
+### Members
+
+#### DOM Tree
+
+##### `appendChild(node: Node)`
+
+##### `insertBefore(node: Node, before: Node?)`
+
+##### `insertAfter(node: Node, after: Node?)`
+
+##### `removeChild(node: Node, preserved: boolean?)`
+
+Removes a child. The parameter `preserved` means whether destroy the removed node immediately or preserve it.
+
+##### `clear()`
+
+#### DOM props
+
+##### `setAttr(key: string, value: string, silent: boolean?)`
+
+If `silent` is true, it won't cause native calls. Used for handling event with virtual-DOM changes.
+
+##### `setStyle(key: string, value: string, silent: boolean?)`
+
+The `silent` parameter is just same as `setAttr` method.
+
+##### `setClassStyle(classStyle: Object)`
+
+The specificity of class style is lower than normal style. In another way the normal style will override the same name value in class style.
+
+##### `addEvent(type: string, handler: Function)`
+
+##### `removeEvent(type: string)`
+
+##### `fireEvent(type: string, e: any)`
+
+#### Read-only & Getters
+
+##### `toJSON(): Object`
+
+Format of `{ref: string, type: string, attr: Object, style: Object, event: Array(string), children: Array}`
+
+## `Comment` extends `Node`
+
+`Comment` won't be passed to the rendering engine. So it's very useful as a assistant placeholder sometimes.
+
+### Constructor
+
+##### `new Comment(value: string)`
+
+### Members
+
+#### Read-only & Getters
+
+##### `type: string`
+
+Returns `'comment'`
+
+##### `value: string`
http://git-wip-us.apache.org/repos/asf/incubator-weex-site/blob/12e3a8bc/_drafts/v-0.10/references/text-style.md
----------------------------------------------------------------------
diff --git a/_drafts/v-0.10/references/text-style.md b/_drafts/v-0.10/references/text-style.md
new file mode 100644
index 0000000..6b9ee4f
--- /dev/null
+++ b/_drafts/v-0.10/references/text-style.md
@@ -0,0 +1,43 @@
+---
+title: Text Style
+type: references
+version: 0.10
+order: 1.8
+---
+
+# Text Style
+<span class="weex-version">0.5</span>
+
+Text alike components share some common style rules. The text alike components currently includes [`text`](./components/text.html) and [`input`](./components/input.html).
+
+## Properties
+
+- `color`: <colors> this property set the foreground color of an component's text content.
+- `font-size`: <length> this property specifies the size of the font.
+- `font-style`: <enum> `normal` | `italic`. This property lets you select italic or normal faces within a font-family. Default value is `normal`.
+- `font-weight`: <enum> `normal` | `bold`. This property specifies the boldness of the font. Default value is `normal`.
+- `text-decoration`: <enum> `none` | `underline` | `line-through`. This property is used to set the text formatting to underline or line-through. The default value is `none`.
+- `text-align`: <enum> `left` | `center` | `right`. This property describes how inline content like text is aligned in its parent component. The default value is `left`.
+- `font-family`:<string> this property set the font-family of the text. This property **doesn't guarantee** the given font will always be set to the text. If the specified font cannot be found at the device, a typeface fallback will occur and the default typeface will be load. The fallback mechanism may vary in different devices.
+- `text-overflow`:<string> `clip` | `ellipsis`. This property determines how overflowed content that is not displayed is signaled to users. It can be clipped, display an ellipsis.
+
+The property `color` support multiple fomats of values, contains rgb, rgba, #fff, #ffffff, named-color.
+
+Example:
+
+```css
+.my-class { color: red; }
+.my-class { color: #f00; }
+.my-class { color: #ff0000; }
+.my-class { color: rgb(255, 0, 0); }
+.my-class { color: rgba(255, 0, 0, 0.5); }
+```
+
+## Type of Style Value
+
+- length: number followed by length unit `px`, `px` can be omitted.
+- colors: support multiple formats of values, including rgb (`rgb(255, 0, 0)`), rgba (`rgba(255, 0, 0, 0.5)`), hexadecimal (`#ff0000`), short hexadecimal (`#f00`), named color (`red`).
+- enumerated values: a limited number of string values.
+
+**Note:** [The list of color keywords.](./color-names.html)
+
http://git-wip-us.apache.org/repos/asf/incubator-weex-site/blob/12e3a8bc/_drafts/v-0.10/tools/devtools-android.md
----------------------------------------------------------------------
diff --git a/_drafts/v-0.10/tools/devtools-android.md b/_drafts/v-0.10/tools/devtools-android.md
new file mode 100644
index 0000000..9ce8991
--- /dev/null
+++ b/_drafts/v-0.10/tools/devtools-android.md
@@ -0,0 +1,123 @@
+---
+title: Devtools for Android
+type: tools
+order: 2.1
+version: 0.10
+---
+
+# Devtools for Android
+
+[](https://github.com/weexteam/weex_devtools_android/releases) [](https://www.codacy.com/app/weex_devtools/weex_devtools_android?utm_source=github.com&utm_medium=referral&utm_content=weexteam/weex_devtools_android&utm_campaign=Badge_Grade) [](https://codeclimate.com/github/weexteam/weex_devtools_android) [](https://codeclimate.com/github/weexteam/weex_devtools_android) [](https://github.com/weexteam/weex_devtools_android/issues) [  ](https://bintray.com/alibabaweex/maven/weex_inspector/_latestVersion)
+
+Weex devtools is a custom devtools for weex that implements [Chrome Debugging Protocol](https://developer.chrome.com/devtools/docs/debugger-protocol) inspired by [Stetho](https://github.com/facebook/stetho), it is designed to help you quickly inspect your app and debug your JS bundle source in a chrome web page.At present The devtools consist of two part : `Inspector` and `Debugger`. If you want it work well, you must install a `weex-devtool` as debug server.
+
+- **Inspector**
+ Inspector can be used to show your `Element` \ `NetWork` \ `Console log` \ `ScreenCast` \ `BoxModel` \ `Native View` and so on.
+
+- **Debugger**
+ Debugger can be used to debug your bundle js source, you can set `Breakpoint` \ watch `CallStack`.
+
+## Install and launch devtools server
+Open your terminal then type `npm install -g weex-toolkit` and run.Launch it just type and run the command `weex debug`, then a Chrome web page will be opened.
+
+## Use on an android device or emulator
+
+### Taste of first debug with playground
+If you are a green hand to the debug of weex, we recommend you to try your first debug with `playground`, what you need to do is just launch the playground and scan the QR code shown in the debug page which wound opened if the `devtools server` have been launched. after you scan the QR code, the web page will list your connected devices.
+
+ devices")
+
+#### How Debugger Works
+Devtools expands [Chrome Debugging Protocol](https://developer.chrome.com/devtools/docs/debugger-protocol) and the mechanism of communication between client and debug sever is based on [JSON-RPC](https://en.wikipedia.org/wiki/JSON-RPC).
+
+##### Devtools Client
+Devtools Client is integrated in App as aar, it connects to debug server through webscoket protocol with out permission check. I recommend you just packaged it in your debug version consider of the security mechanism.
+
+##### Devtools Debug Server
+Devtools Debug Server is the center node of the communication, it connects to both app and chrome, acts as the turn server of debugging protocol messages and the manager of the js runtime.
+
+##### Chrome FrontEnd
+Chrome's V8 engine acts as the javascript runtime, when debug mode is enabled, all the js code run on it. On the other side we also reuse most of the Chrome's debugging user interface, such as set breakpoint, see call stack and so on.
+
+
+
+### Enable devtools in your own app
+Of course you can reuse the code of playground to build your own app, that is the simplest way to let your app's js code debuggable. On the other hand QR code is not necessary, if your review the source code you can draw a conclusion that QR CODE is just a way to set `devtools server` address. following those steps you can do the same thing.
+
+#### Gradle dependency on inspector.
+There are two choices to set the dependency, the Choice A is recommanded if you have no change to weex_sdk or inspector, while if you use your own custom weex_sdk or inspector Choice B is suitable.
+
+ * *A - aar dependency from jcenter*.
+ ````
+ dependencies {
+ compile 'com.taobao.android:weex_inspector:0.0.8.1'
+ }
+ ````
+I strongly recommend you use the latest version since both weex sdk and devtools are developed iteratively and rapidly. See the release version list [here](https://github.com/weexteam/weex_devtools_android/releases). All the release version will publish to the [jcenter repo](https://bintray.com/alibabaweex/maven/weex_inspector).
+
+ * *B - source code dependency.*
+
+ you need to copy the dir of inspector to the same dir of your app and add `include ":inspector"`in your project's `settings.gradle` file just like playground have done, then add dependency in your app's `build.gralde`.
+ ````
+ dependencies {
+ compile project(':inspector')
+ }
+ ````
+
+##### Version compatibility
+
+| weex sdk | weex inspector | debug server |
+|----------|----------------|--------------|
+|0.8.0.1+ | 0.0.8.1 |0.2.39+ |
+|0.7.0+ | 0.0.7.13 |0.2.38 |
+|0.6.0+ | 0.0.2.2 | |
+
+
+#### Initialize in your XXXApplication file.
+````
+ public class MyApplication extends Application {
+ public void onCreate() {
+ super.onCreate();
+ initDebugEnvironment(true, "xxx.xxx.xxx.xxx"/*"DEBUG_SERVER_HOST"*/);
+ }
+ private void initDebugEnvironment(boolean enable, String host) {
+ WXEnvironment.sRemoteDebugMode = enable;
+ WXEnvironment.sRemoteDebugProxyUrl = "ws://" + host + ":8088/debugProxy/native";
+ }
+}
+````
+
+#### Ship It!
+ 1. You must launch your bundle server firstly. In your weex dir, run command "./start";
+ 2. Launch your remote debug server. Run command `weex debug`, chrome will open a web page show a simply guidance and QR code;
+ 3. Launch your app and make sure debug mode was enabled. You will see a device list in the chrome web page opened by last step, each device item have two button, `Debugger` and `Inspector`;There are two way to enable debug mode:
+ * scaning the QR code and handle the content just like the playground have done.
+ * init it in the XXXApplication by calling `initDebugEnvironment(true, "xxx.xxx.xxx.xxx")`, if you call `initDebugEnvironment(true, "xxx.xxx.xxx.xxx")` after weex sdk inited, you need to call `WXSDKEngine.reload()` to refresh the runtime.
+ 4. Once you click the button `Inspector` chrome will open a page show the inspector view, on the other side, click the button `Debugger` chrome will open a new page to show the debug view;
+
+
+
+
+
+---
+
+#### OPTIONS
+
+##### [**OPTION**] *set your remote bundle server ip.*
+
+ For example, in the playground it is in the `IndexActivity.java`, you need to change the value of `DEFAULT_IP` in IndexActivity.java from `"your_current_IP"` to a server ip like `"30.30.30.150"`:
+````
+ private static final String DEFAULT_IP = "30.30.30.150"; // "your_current_IP";
+````
+
+##### [**OPTION**] *enable network inspection.*
+````
+OkHttpClient client = new OkHttpClient();
+client.networkInterceptors().add(new OkHttpInterceptor());
+````
+
+###### Notice
+ The network inspection only support OKHttpClient right now!!! If you want to use the network inspection to catch your bundle request, you must change your bundle server ip to the real server ip.
+
+#### Known Issues
+ You can report issues and bugs [here](https://github.com/weexteam/weex_devtools_android/issues). We will reply as soon as possible.
http://git-wip-us.apache.org/repos/asf/incubator-weex-site/blob/12e3a8bc/_drafts/v-0.10/tools/devtools-ios.md
----------------------------------------------------------------------
diff --git a/_drafts/v-0.10/tools/devtools-ios.md b/_drafts/v-0.10/tools/devtools-ios.md
new file mode 100644
index 0000000..602f63d
--- /dev/null
+++ b/_drafts/v-0.10/tools/devtools-ios.md
@@ -0,0 +1,76 @@
+---
+title: Devtools for IOS
+type: tools
+order: 2.2
+version: 0.10
+---
+
+# Devtools for IOS
+
+Remote debug for your native iOS app using Chrome Developer Tools
+
+## weex-devtool launch:
+
+0. install and run weex-devtool
+
+ $:npm install -g weex-devtool
+
+ $:weex-devtool
+
+ it will launch chrome browser, showing wss ip address in chrome address bar.
+
+
+## playground install WXDevtool
+
+1. Install dependencies.
+
+ $:pod install
+
+### Usage
+
+1. AppDelegate.m header file
+
+ #import "WXDevTool.h"
+
+2. Initialize inspector when the APP launched
+
+ **Note: The inspector API must be called before weex is initialized**
+
+ + (void)setDebug:(BOOL)isDebug;
+
+ isDebug default is NO, now you open inspect model. opposite is YES, if you set isDebug to YES, then open debug model and inspect model.
+
+ + (void)launchDevToolDebugWithUrl:(NSString *)url;
+ wssip was the wss address showing in the chrome address bar.
+
+ * open debug model and inspector model
+
+ eg:- (BOOL)application:(UIApplication *)application didFinishLaunchingWithOptions:(NSDictionary *)launchOptions
+ {
+ [WXDevTool setDebug:YES];
+ [WXDevTool launchDevToolDebugWithUrl:@"ws://wssip/debugProxy/native"];
+ }
+
+ * open inspect model, remove the @selector(setDebug:) or add [WXDevTool setDebug:NO]
+
+ eg:- (BOOL)application:(UIApplication *)application didFinishLaunchingWithOptions:(NSDictionary *)launchOptions
+ {
+ [WXDevTool launchDevToolDebugWithUrl:@"ws://wssip/debugProxy/native"];
+ }
+
+
+3. Build and running APP, this time chrome will display your device with App name, select inspector to open the inspector tab.
+4. Log print support for different levels of print.
+
+ eg: #import "WXDevTool.h"
+ PDLogE()/PDLogW()
+
+### WXDevtool Dependencies
+
+Your app must be linked against the following frameworks/dylibs
+
+* libicucore.dylib
+* CFNetwork.framework
+* CoreData.framework
+* Security.framework
+* Foundation.framework
http://git-wip-us.apache.org/repos/asf/incubator-weex-site/blob/12e3a8bc/_drafts/v-0.10/tools/devtools.md
----------------------------------------------------------------------
diff --git a/_drafts/v-0.10/tools/devtools.md b/_drafts/v-0.10/tools/devtools.md
new file mode 100644
index 0000000..f883055
--- /dev/null
+++ b/_drafts/v-0.10/tools/devtools.md
@@ -0,0 +1,102 @@
+---
+title: Devtools
+type: tools
+order: 2
+has_chapter_content: true
+version: 0.10
+---
+
+# Devtools
+
+Weex devtools is a custom devtools for weex that implements [Chrome Debugging Protocol](https://developer.chrome.com/devtools/docs/debugger-protocol), it is designed to help you quickly inspect your app and debug your JS bundle source in a chrome web page, both Android and IOS platform are supported.
+
+## Install
+
+```
+ $ npm install -g weex-toolkit
+```
+#### usage
+```
+weex debug [options] [we_file|bundles_dir]
+
+ Options:
+
+ -h, --help output usage information
+ -V, --verbose display logs of debugger server
+ -v, --version display version
+ -p, --port [port] set debugger server port
+ -e, --entry [entry] set the entry bundlejs path when you specific the bundle server root path
+ -m, --mode [mode] set build mode [transformer|loader]
+ -w, --watch watch we file changes auto build them and refresh debugger page![default enabled]
+```
+
+#### start debugger
+```
+$weex debug
+```
+this command will start debug server and launch a chrome opening `DeviceList` page.
+this page will display a qrcode ,you can use `Playground App` scan it for starting debug.
+
+#### start debugger with a we file
+```
+$weex debug your_weex.we
+```
+this command will compile `your_weex.we` to `your_weex.js` and start the debug server as upon command.
+`your_weex.js` will deploy on the server and displayed in `DeviceList` page as another qrcode contain the url of your_weex.js
+
+
+#### start debugger with a directory of we files
+```
+$weex debug your/we/path -e index.we
+```
+this command will build every file in your/we/path and deploy them on the bundle server. your directory will mapping to http://localhost:port/weex/
+use -e to set the entry of these bundles. and the url of "index.we" will display on device list page as another qrcode.
+
+## Features
+
+### Connect devices
+ devices")
+
+### Inspector
+ Inspector can be used to show your `Element` \ `Network` \ `Console log` \ `ScreenCast` \ `BoxModel` \ `Native View` and so on.
+
+
+
+#### Element
+##### native view element
+
+
+##### weex dom element
+
+
+#### Network
+
+##### show the total time and latency
+
+
+##### show the header and response
+
+
+#### Console
+
+
+#### Resource
+
+
+### Debugger
+
+ Debugger can be used to debug your bundle js source, you can set `Breakpoint` \ watch `CallStack`.
+
+
+
+#### Breakpoint and CallStack
+
+
+
+## Integrate devtools
+
+* Android
+ * See the doc [Weex devtools (Android)](/tools/devtools-android.html), it will lead you to config and use it step by step.
+* IOS
+ * See the doc [Weex devtools (IOS)](/tools/devtools-ios.html), it will lead you to config and use it step by step.
+
http://git-wip-us.apache.org/repos/asf/incubator-weex-site/blob/12e3a8bc/_drafts/v-0.10/tools/index.md
----------------------------------------------------------------------
diff --git a/_drafts/v-0.10/tools/index.md b/_drafts/v-0.10/tools/index.md
new file mode 100644
index 0000000..731c2f9
--- /dev/null
+++ b/_drafts/v-0.10/tools/index.md
@@ -0,0 +1,97 @@
+---
+title: CLI
+type: tools
+order: 1
+has_chapter_content: true
+version: 0.10
+---
+
+# Weex-Toolkit
+
+Please access [npmjs.com](https://www.npmjs.com/package/weex-toolkit) for latest version
+
+Weex CLI tool set
+
+## Pre Install
+some dependencies need recent version of npm to install
+
+if your
+```
+$ npm --version
+```
+output less then `2.15.1`, please run below cmd upgrade your npm at first
+```
+sudo npm install -g npm
+```
+
+## Install
+```
+$npm install -g weex-toolkit
+```
+
+## Usage
+
+```
+$weex foo/bar/input_path [options]
+
+$weex create file_name [options]
+
+Options:
+ --qr display QR code for native runtime, **default action**
+ -o,--output transform weex we file to JS Bundle, output path (single JS bundle file or dir)
+ [for create sub cmd] it specified we file output path
+ --watch using with -o , watch input path , auto run transform if change
+ happen
+ -s,--server start a http file server, weex .we file will be transforme to JS
+ bundle on the server , specify local root path using the option
+ --port http listening port number ,default is 8081
+ --wsport websocket listening port number ,default is 8082
+ -f, --force [for create sub cmd] force to replace exsisting file(s)
+ --version show version of weex toolkit
+ --help Show help
+```
+
+## Examples
+
+#### crate a `we file`(weex source file) using standard template
+```
+$weex create hello-world-weex
+```
+a file named 'hello-world-weex.we' we be created in current directory
+
+
+#### transform a `we file` to JS Bundle
+```
+$weex your_best_weex.we -o .
+```
+`your_best_weex.we` will be transform to JS Bundle file `your_best_weex.js` , saved in your current directory
+
+#### transform a `we file` to JS Bundle , watch this file ,auto run transformer if change happen.
+```
+$weex your_best_weex.we -o . --watch
+```
+
+#### transform every we file in a directory
+```
+$weex we/file/storage/path -o outputpath
+```
+every `we file` in `we/file/storage/path` we be transform to JS Bundle , saved in `outputpath` path
+
+#### preview your we file using Weex Playground App
+download & install [weex playground App](http://alibaba.github.io/weex/download.html)
+```
+$weex your_best_weex.we --qr
+```
+a QR code will display in your terminal , using Playground App scan that.
+
+
+#### start http server
+```
+$weex -s .
+```
+a http server will start running , your current directory(.) will be the document root for the server , every weex .we file will be transforme to JS Bundle when access through the server
+
+## Issue & Feedback
+
+[Github Issue List](https://github.com/weexteam/weex-toolkit/issues)
+
http://git-wip-us.apache.org/repos/asf/incubator-weex-site/blob/12e3a8bc/_drafts/v-0.10/tools/playground.md
----------------------------------------------------------------------
diff --git a/_drafts/v-0.10/tools/playground.md b/_drafts/v-0.10/tools/playground.md
new file mode 100644
index 0000000..f315054
--- /dev/null
+++ b/_drafts/v-0.10/tools/playground.md
@@ -0,0 +1,24 @@
+---
+title: Playground
+type: tools
+order: 4
+has_chapter_content: true
+version: 0.10
+---
+
+# Weex Playground App
+
+One of best parts of Weex is Native Runtime . After preview your `we file` render in H5 using weex-toolkit CLI , you can try Native Runtime in a standalone App , this is Weex Playground App . More then that ,Weex playground App preset a lot of Demo & ShowCase ,so you will get to experience performance of Weex native runtime easily.
+
+Android and IOS version of Playground App can be downloaded [here](http://alibaba.github.io/weex/download.html).
+
+## Screenshot
+
+
+
+
+This is main interface of Weex Playground App , you can click the item to see the corresponding demo . click top right corner Icon will active QR scaner that work with Weex [toolkit CLI](../tools/index.html)
+
+please refer to [Weex Tutorial](../guide/index.html)
+
+
http://git-wip-us.apache.org/repos/asf/incubator-weex-site/blob/12e3a8bc/_drafts/v-0.10/tools/transformer.md
----------------------------------------------------------------------
diff --git a/_drafts/v-0.10/tools/transformer.md b/_drafts/v-0.10/tools/transformer.md
new file mode 100644
index 0000000..7df3b60
--- /dev/null
+++ b/_drafts/v-0.10/tools/transformer.md
@@ -0,0 +1,38 @@
+---
+title: Transformer
+type: tools
+order: 3
+has_chapter_content: true
+version: 0.10
+---
+
+# gulp-weex
+
+> gulp plugin for weex transformer
+
+## Usage
+
+```javascript
+var gulp = require('gulp')
+var weex = require('gulp-weex')
+
+gulp.task('default', function () {
+ return gulp.src('src/*.html')
+ .pipe(weex({}))
+ .pipe(gulp.dest('./dest'))
+})
+```
+
+## Options
+
+### oldFormat
+
+whether transform to old format.
+
+default: `false`.
+
+### isEntry
+
+whether is an entry module which has `bootstrap(...)`.
+
+default: `true`.
\ No newline at end of file
http://git-wip-us.apache.org/repos/asf/incubator-weex-site/blob/12e3a8bc/_drafts/v1.0/advanced/create-a-weex-project.md
----------------------------------------------------------------------
diff --git a/_drafts/v1.0/advanced/create-a-weex-project.md b/_drafts/v1.0/advanced/create-a-weex-project.md
new file mode 100644
index 0000000..780341b
--- /dev/null
+++ b/_drafts/v1.0/advanced/create-a-weex-project.md
@@ -0,0 +1,271 @@
+---
+title: 如何创建一个 Weex 项目
+type: advanced
+order: 3
+has_chapter_content: true
+version: 0.10
+---
+
+# 如何创建一个 Weex 项目
+
+对于前端开发者来说开发一个 app 是不容易的,既然 Weex 能以 web 的开发体验构建高性能、可扩展的 native 应用,那我们怎么利用 Weex 简单高效的开发一个 native 应用呢?Weex 替你考虑了这件事。在本章中,我们将学习如何使用 Weexpack 工具快速生成一个全新的 Weex 项目。
+
+根据你的操作系统的不同,步骤也略有差异,如果你从未接触过 native 开发,请慢慢来,遇到问题随时查阅 [FAQ](../faq.md)。
+
+首先,不论任何平台,我们都需要 node.js 和 Weexpack。在本节中,默认你已经安装好了 node.js 和 npm,如有疑问,可参考上一章 [如何在本地开发 Weex 页面](../guide/develop-on-your-local-machine.html)。
+
+Weexpack 是 Weex 新一代的工程开发套件,它允许开发者通过简单的命令,创建 weex 工程项目,将项目运行在不同的开发平台上。未来,我们考虑会将其集成在 weex-toolkits 上,但目前仍需要单独安装。好在安装 Weexpack 非常简单,可以直接使用 npm 安装:
+
+```bash
+npm install weexpack -g
+```
+
+或者用 cnpm:
+
+```bash
+cnpm install weexpack -g
+```
+
+接下来的步骤会有一些复杂和区别,根据开发平台的不同,我们提供了快速导航便于阅读:
+
+- [iOS](#ios)
+- [Android](#android)
+
+## iOS
+
+Mac 是唯一可以开发 iOS 应用的平台,因此创建 iOS 项目只支持 mac。对于 iOS,你需要安装 [Xcode](https://developer.apple.com/xcode/) 和 [CocoaPods](https://guides.cocoapods.org/using/getting-started.html) 。
+
+安装 Xcode 最简单的方法是到 [Mac App Store](https://itunes.apple.com/us/app/xcode/id497799835?mt=12)。Xcode 体积较大,下载请耐心等待。
+
+安装好 Xcode 后,你需要运行 Xcode,使 Xcode 自动安装开发者工具和确认使用协议。
+
+之后你还需要安装 [CocoaPods](https://guides.cocoapods.org/using/getting-started.html) 。CocoaPods 是 Xcode 项目的类库管理工具,可以使用如下命令安装:
+
+```bash
+$ sudo gem install cocoapods
+```
+
+如果执行该命令无反应,很可能是 gem source 问题,你可以切换为淘宝 gem source:
+
+```bash
+$ gem sources --remove https://rubygems.org/
+$ gem sources -a https://ruby.taobao.org/
+$ sudo gem install cocoapods
+```
+
+如有问题,可参考 [CocoaPods 官方文档](https://guides.cocoapods.org/using/getting-started.html)
+
+### 创建项目
+
+然后,就可以使用 weexpack 创建 weex 工程了:
+
+```bash
+$ weexpack init appName
+```
+
+weexpack 会自动新建以 appName 命名的目录,并将项目模板拉取到该目录。
+
+最终形成如下目录结构:
+
+```bash
+-> /appName
+.
+|—— .gitignore
+|—— README.md
+|—— package.json
+|-- android.config.json
+|-- ios.config.json
+|—— webpack.config.js
+|—— /src
+| |—— index.we
+|—— /html5
+| |—— index.html
+|—— /ios
+| |—— /playground
+| |—— /sdk
+| |—— /WXDevtool
+|—— /android
+| |—— /playground
+| |—— /appframework
+```
+
+其中:
+
+- `webpack.config.js` 是 webpack 配置文件,用于生成 `.we` 文件的 JSBunlde
+- `ios.config.json` 是 iOS 项目配置文件
+- `android.config.json` 是 Android 项目配置文件
+- `/src` 目录放置 Weex 页面
+- `/html5` 是 H5 端入口文件
+- `/ios` 放置 iOS 项目
+- `/android` 放置 Android 项目
+
+紧接着,进入目录,并且安装依赖:
+
+```bash
+$ cd appName && npm install
+```
+
+至此,项目模版创建完成,接下来我们可以自定义我们的 APP 信息并打包运行。
+
+### 运行与打包
+
+如果一切正常,你可以使用 weexpack 打包或模拟器运行了:
+
+模拟器运行
+
+```bash
+$ weexpack run ios
+```
+
+构建 ipa 包:
+
+```bash
+$ weexpack build ios
+```
+
+构建包的过程中,将会提示让您输入 CodeSign(证书)、Profile(provisioning profile)、AppId,只有输入真实的这些信息才能成功打包。 其余如AppName,和入口 weex bundle 文件可以编辑项目目录下的 `ios.config.json` 配置。 打完包成功之后,可以在 `/playground/build/ipa_build/` 目录下获取 ipa 文件。
+
+注:证书需要预先安装到 keychain 中,在 keychain 中点击右键获取证书 id(证书名称)、provisioning profile 文件(\*mobileprovision)需要获取 UUID,进入目录可以看到 mobileprovision_UUID.sh 文件,此文件可以获取到 UUID。
+
+mobileprovision_UUID.sh 用法如下:
+
+```bash
+$ ./mobileprovision_UUID.sh *mobileprovision
+```
+
+参数(\*mobileprovision)为 provisioning profile 文件路径
+
+** 注:run 与 build 部分涉及 pod 的依赖安装问题。**
+
+- 首先要安装 cocoapods ,具体安装步骤可查看[这里](https://cocoapods.org/),建议安装 0.39.0 版本。
+- 为了加快 CLI 执行速度,weexpack 创建的工程默认安装了需要的依赖库。但是命令执行依然会更新需要升级的依赖库。
+ - 如果出现这种错误提示 `unable to find a specification for 'WeexSDK'` 这种错误,说明你本地没有更新 cocoapods master 仓库,运行 `pod repo update` ,此时运行 `pod search WeexSDK`:
+
+ 
+
+ 说明 master repo 更新成功。以上是以 `WeexSDK` 为例,其他库类似。
+
+ - 如果出现这种错误 `error: The sandbox is not in sync with the Podfile.lock. Run 'pod install' or update your CocoaPods installation.` 进入 playground 目录(podfile 文件所在目录)按提示执行。
+
+ 更多 pod 使用细节请移步[cocoapods](https://cocoapods.org/)
+
+- mobileprovision,参数(\*mobileprovision)为 provisioning profile 文件路径。
+
+----
+
+## Android
+
+在 Mac 平台开发 Android 首先需要下载 [Android Studio](https://developer.android.com/studio/install.html)(你可能需要翻墙才能访问)。[Android Studio](https://developer.android.com/studio/install.html) 为我们提供了 Android SDK 及 AVD(模拟器)以便我们快速运行 Android 项目。
+
+下载完成后运行 Android Studio,任意新建一个 Android 项目,在第二步中选择 **Android 5.1**,然后点击 next 完成项目创建,如图所示:
+
+
+
+待 Android Studio 打开后,在顶部菜单栏选择 Tools -> Android -> AVD Manager,安装 Android 模拟器:
+
+
+
+之后,打开模拟器运行 Android。
+
+**注意:**
+
+1. 必须保持模拟器运行。
+2. 保证 Android build-tool 的版本为 23.0。【可以在 Android Studio 的 SDK Manager 里查看是否已安装这个版本,如果没有可选择安装这一版本】。
+
+### 配置环境变量
+
+因为 Android Studio 安装的 SDK 不会自动配置环境变量(你自己安装的 SDK 同样不会)。所以需要您自己手动配置 Android_HOME 环境变量和 PATH
+
+如果是 Android Studio 安装的 SDK 安装路径可已在 SDK manager 里找到(打开 SDK manager 的方式请参照图2)
+
+Windows 下请参照 [window 下如何设置 ANDROID 环境变量](http://jingyan.baidu.com/article/09ea3ede1b4df6c0aede39ab.html)
+
+Linux/Mac 下只需编辑 `.bash_profile` 增加 PATH 即可:
+
+```bash
+vim ~/.bash_profile
+```
+
+然后添加下列代码进去(路径替换为你的真实路径)
+
+```bash
+export ANDROID_HOME=/xxx/Library/Android/sdk
+export PATH=${PATH}:$ANDROID_HOME/tools:$ANDROID_HOME/platform-tools:$ANDROID_HOME/build-tools
+```
+
+然后保存退出(:wq)。再执行下列命令:
+
+```bash
+source ~/.bash_profile
+```
+
+### 创建项目
+
+然后,就可以使用 weexpack 创建 weex 工程了:
+
+```bash
+$ weexpack init appName
+```
+
+weexpack 会自动新建以 appName 命名的目录,并将项目模板拉取到该目录。
+
+最终形成如下目录结构:
+
+```bash
+-> /appName
+.
+|—— .gitignore
+|—— README.md
+|—— package.json
+|-- android.config.json
+|-- ios.config.json
+|—— webpack.config.js
+|—— /src
+| |—— index.we
+|—— /html5
+| |—— index.html
+|—— /ios
+| |—— /playground
+| |—— /sdk
+| |—— /WXDevtool
+|—— /android
+| |—— /playground
+| |—— /appframework
+```
+
+其中:
+
+- `webpack.config.js` 是 webpack 配置文件,用于生成 `.we` 文件的 JSBunlde
+- `ios.config.json` 是 iOS 项目配置文件
+- `android.config.json` 是 Android 项目配置文件
+- `/src` 目录放置 Weex 页面
+- `/html5` 是 H5 端入口文件
+- `/ios` 放置 iOS 项目
+- `/android` 放置 Android 项目
+
+紧接着,进入目录,并且安装依赖:
+
+```bash
+$ cd appName && npm install
+```
+
+至此,项目模版创建完成,接下来我们可以自定义我们的 APP 信息并打包运行。
+
+### 运行与打包
+
+如果一切正常,你可以使用 weexpack 打包或模拟器运行了:
+
+Android 的打包和构建是一体的 :
+
+```bash
+$ weexpack run android
+```
+
+同样的你可以更改项目目录下的android.config.json
+
+- `AppName`: 应用名
+- `AppId`: application_id 包名
+- `SplashText`: 欢迎页上面的文字
+- `WeexBundle`: 指定的 weex bundle 文件(支持文件名和 url 的形式)
+
+ 指定文件名则以本地文件的方式加载 bundle,指定 url 则以远程的方式加载 JSBundle。如果以本地方式指定 bundle `.we` 文件请放到 `src` 目录。
http://git-wip-us.apache.org/repos/asf/incubator-weex-site/blob/12e3a8bc/_drafts/v1.0/advanced/customize-a-native-component.md
----------------------------------------------------------------------
diff --git a/_drafts/v1.0/advanced/customize-a-native-component.md b/_drafts/v1.0/advanced/customize-a-native-component.md
new file mode 100644
index 0000000..404f25c
--- /dev/null
+++ b/_drafts/v1.0/advanced/customize-a-native-component.md
@@ -0,0 +1,168 @@
+---
+title: 自定义 native 组件
+type: advanced
+order: 7
+has_chapter_content: true
+version: 0.10
+---
+
+# 如何自定义 native 组件?
+
+Weex 已经包含了最关键的平台组件,例如 `ScrollView, ListView, Text, Imageview` 等等。当然,这些组件并不能完全满足你的需求。另外,那些在你的工程中常用的大量原生 UI 组件,可能需要被简单地集合到 Weex 中。幸运的是,通过任意已存在的组件来创建你的自定义组件是一件很方便的事。
+
+## Android
+
+### 步骤:
+
+1.自定义组件必须继承自 `WXComponent` 或者 `WXContainer` ;
+2.weex SDK 可以识别 @WXComponentProp (name = value(value 是 attr 或者 dsl style));
+3.方法必须是 `public` 的;
+4.组件类不能是一个内部类;
+5.自定义组件不能被 ProGuard 之类的工具混淆;
+6.组件方法在 UI 线程被调用,因此不要在里面进行耗时的操作;
+7.Weex 的参数类型可以是 int, double, float, String, Map, List 和实现了 WXObject 接口的自定义类;
+
+### 参考以下例子:
+
+``` java
+ `package com.taobao.weex.ui.component;
+// ……
+
+public class MyViewComponent extends WXComponent{
+
+ public MyViewComponent(WXSDKInstance instance, WXDomObject node,
+ WXVContainer parent, String instanceId, boolean lazy) {
+ super(instance, node, parent, instanceId, lazy);
+ }
+
+ @Override
+ protected void initView() {
+ //TODO:your own code ……
+ }
+
+ @Override
+ public WXFrameLayout getView() {
+ //TODO:your own code ………
+ }
+ @WXComponentProp(name=WXDomPropConstant.WX_ATTR_VALUE)
+ public void setMyViewValue(String value) {
+ ((TextView)mHost).setText(value);
+ }
+
+}
+```
+
+必须注册组件:
+
+``` java
+WXSDKEngine.registerComponent("MyView", MyViewComponent.class);
+```
+
+## iOS
+
+虽然 WeexSDK 中有很多的 native 的 Component,但这有可能并不能满足你的需求。在之前你可能已经写了一些很酷炫 native 的组件,想包装一下,导入到 Weex 中,因此我们提供了让开发者实现自己的 native Component。下面将以 WeexSDK 中已经存在的 Component:`image` 为例子,介绍一下如何构建一个 native Component。假设你已经了解 iOS 开发
+
+### 注册 Component
+
+注册一个 component 比较简单,调用 `WXSDKEngine` 中的 `registerComponent:withClass:` 方法,传入组件的标签名称,还有对应的 class 然后你可以创建一个 `WXImageComponent` 表示 `image` 组件的实现。在 `.we` 文件中,只需要写 `<image></image>`
+
+### 添加属性
+
+现在我们要做一些让 image component 更加强大的事情。既然作为一个图片的 component,那它应该要有源,给他加上一个 `src` 的属性,同时给它加上一个 `resize` 的属性(可以配置的有 `contain/cover/stretch`)
+
+```object-c
+@interface WXImageComponent ()
+
+@property (nonatomic, strong) NSString *imageSrc;
+@property (nonatomic, assign) UIViewContentMode resizeMode;
+
+@end
+```
+
+component 中所有的 style,attribute,events 都会被传递到 Component 的初始化方法中,所以,你可以在初始化方法中存储你感兴趣的一些属性值
+
+```object-c
+@implementation WXImageComponent
+
+- (instancetype)initWithRef:(NSString *)ref type:(NSString *)type styles:(NSDictionary *)styles attributes:(NSDictionary *)attributes events:(NSArray *)events weexInstance:(WXSDKInstance *)weexInstance
+{
+ if (self = [super initWithRef:ref type:type styles:styles attributes:attributes events:events weexInstance:weexInstance]) {
+ _imageSrc = [WXConvert NSString:attributes[@"src"]];
+ _resizeMode = [WXConvert UIViewContentMode:attributes[@"resize"]];
+}
+
+ return self;
+}
+
+@end
+```
+
+attribute 中拿到的值的类型都是 `id`,我们可以用转换方法把它转换到任何值。Weex SDK 提供了一些基础的转换方法,可以参考 `WXConvert` 类,或者你可以添加自己的转换函数。
+
+### Hooking 渲染生命周期
+
+native 的 component 是由 Weex 管理的,Weex 创建,布局,渲染,销毁。Weex 的 component 生命周期都是可以 hook 的,你可以在这些生命周期中去做自己的事情。
+
+| 方法 | 描述 |
+| :-: | --- |
+| initWithRef:type:... | 用给定的属性初始化一个component. |
+| layoutDidFinish | 在component完成布局时候会调用. |
+| loadView | 创建component管理的view. |
+| viewWillLoad | 在component的view加载之前会调用. |
+| viewDidLoad | 在component的view加载完之后调用. |
+| viewWillUnload | 在component的view被释放之前调用. |
+| viewDidUnload | 在component的view被释放之后调用. |
+| updateStyles: | 在component的style更新时候调用. |
+| updateAttributes: | 在component的attribute更新时候调用. |
+| addEvent: | 给component添加event的时候调用. |
+| removeEvent: | 在event移除的时候调用. |
+
+在 image component 的例子里面,如果我们需要我们自己的 image view 的话,可以复写 `loadView`这个方法.
+
+```object-c
+- (UIView *)loadView
+{
+return [[WXImageView alloc] init];
+}
+```
+
+现在我们使用 `WXImageView` 渲染 `image` component。
+作为一个 image component,我们需要拿到服务器图片,而且把它设置进 image view 里. 这个操作可以在 `viewDidLoad` 方法中做,这个方法是在 view 已经被创建而且加载了时候 Weex SDK 会调用到,而且 `viewDidLoad` 这个方法是你做额外初始化工作比如改变 content mode(也就是设置resize) 的最好时间.
+
+```object-c
+- (void)viewDidLoad
+{
+ UIImageView *imageView = (UIImageView *)self.view;
+ imageView.contentMode = _resizeMode;
+ imageView.userInteractionEnabled = YES;
+ imageView.clipsToBounds = YES;
+ imageView.exclusiveTouch = YES;
+
+ // Do your image fetching and updating logic
+}
+```
+
+如果可以改变 image 的 src,也可以 hook `updateAttributes:` 方法来做属性更新操作,当 `updateAttributes:` 或者 `updateStyles:` 被调用的时候, component 的 view 已经加载完成
+
+```object-c
+- (void)updateAttributes:(NSDictionary *)attributes
+{
+ if (attributes[@"src"]) {
+ _imageSrc = [WXConvert NSString:attributes[@"src"]];
+ // Do your image updating logic
+ }
+
+ if (attributes[@"resize"]) {
+ _resizeMode = [WXConvert UIViewContentMode:attributes[@"resize"]];
+ self.view.contentMode = _resizeMode;
+ }
+}
+```
+
+或许你需要考虑更多的生命周期方法去 Hook,当布局完成时候,像 `layoutDidFinish`,如果你想了解更多,可以参考一下`WXComponent.h` 声明的方法。
+
+现在你可以用在任何 `.we` 文件里面使用 `<image>`,而且可以加上 image 的属性。
+
+```html
+<image style="your-custom-style" src="image-remote-source" resize="contain/cover/stretch"></image>
+```
http://git-wip-us.apache.org/repos/asf/incubator-weex-site/blob/12e3a8bc/_drafts/v1.0/advanced/cuszomize-native-apis.md
----------------------------------------------------------------------
diff --git a/_drafts/v1.0/advanced/cuszomize-native-apis.md b/_drafts/v1.0/advanced/cuszomize-native-apis.md
new file mode 100644
index 0000000..55e5e4c
--- /dev/null
+++ b/_drafts/v1.0/advanced/cuszomize-native-apis.md
@@ -0,0 +1,85 @@
+---
+title: 自定义 native API
+type: advanced
+order: 8
+has_chapter_content: true
+version: 0.10
+---
+
+# 如何自定义 native API?
+
+Weex 的 SDK 只提供了页面渲染的能力,但是一些其它操作,比如网络请求、图片加载、重定向等功能需要你自己去实现,这个例子讲述了如何用原生代码去扩展 Weex 的功能。
+
+## 关于 URLHelper 的例子
+
+### 新建一个 WXModule
+
+```java
+public class URLHelperModule extends WXModule{
+ private static final String WEEX_CATEGORY="com.taobao.android.intent.category.WEEX";
+ @WXModuleAnno
+ public void openURL(String url){
+ if (TextUtils.isEmpty(url)) {
+ return;
+ }
+ StringBuilder builder=new StringBuilder("http:");
+ builder.append(url);
+ Uri uri = Uri.parse(builder.toString());
+ Intent intent = new Intent(Intent.ACTION_VIEW, uri);
+ intent.addCategory(WEEX_CATEGORY);
+ mWXSDKInstance.getContext().startActivity(intent);
+ }
+}
+```
+
+这里要注意 `@WXModuleAnno` 这个注解,它表示了你把这个方法暴露给 JavaScript。
+
+```java
+public class URLHelperModule extends WXModule{
+
+ @WXModuleAnno
+ public void openURL(String url,String callbackId){
+ //...
+ //callback to javascript
+ Map<String, Object> result = new HashMap<String, Object>();
+ result.put("ts", System.currentTimeMillis());
+ WXBridgeManager.getInstance().callback(mWXSDKInstance.getInstanceId(), callbackId, result);
+ }
+}
+```
+
+### 把module注册到WXSDKEngine:
+
+```java
+try {
+ WXSDKEngine.registerModule("myURL", URLHelperModule.class);
+ //'myURL' is the name you'll use in javascript
+ } catch (WXException e) {
+ WXLogUtils.e(e.getMessage());
+ }
+```
+
+### 在 JavaScript 中使用 `eventModule`:
+
+```javascript
+let URLHelper = require('@weex-module/myURL');//same as you registered
+URLHelper.openURL("http://www.taobao.com",function(ts){
+ console.log("url is open at "+ts);
+});
+```
+
+## 一些注意事项:
+
+1. 定义一个 components 需要继承 `WXModule`
+
+2. 不要忘记添加 `@WXModuleAnno` 注解,不然 Weex 没法识别这个方法
+
+3. 定义的方法必须是 `public 的
+
+4. module 类一定不能是内部类
+
+5. 你定义的 components 不能被混淆,不然会找不到
+
+6. Module 中的方法会在 UI 线程中被调用,所以一定不要做一些耗时操作
+
+7. Moudle 中的方法参数类型可以为 `int`,`double`,`float`,`String`,`Map`,`List`,以及实现 `WXObject` 接口的类。
http://git-wip-us.apache.org/repos/asf/incubator-weex-site/blob/12e3a8bc/_drafts/v1.0/advanced/extend-to-android.md
----------------------------------------------------------------------
diff --git a/_drafts/v1.0/advanced/extend-to-android.md b/_drafts/v1.0/advanced/extend-to-android.md
new file mode 100644
index 0000000..f816ebd
--- /dev/null
+++ b/_drafts/v1.0/advanced/extend-to-android.md
@@ -0,0 +1,170 @@
+---
+title: Android 扩展
+type: advanced
+order: 9
+has_chapter_content: true
+version: 0.10
+---
+
+# Android 扩展
+
+Weex 提供了扩展机制,可以根据自己的业务进行定制自己的功能。
+主要分为两类扩展:
+
+- Module 扩展 非 UI 的特定功能。例如 sendHttp、openURL 等。
+- Component 扩展 实现特别功能的 Native 控件。例如:RichTextview,RefreshListview 等。
+- Adapter 扩展 Weex 对一些基础功能实现了统一的接口,可实现这些接口来定制自己的业务。例如:图片下载等。
+
+## Module 扩展
+
+1. Module 扩展必须继承 WXModule 类。
+2. 扩展方法必须加上 @WXModuleAnno 注解。Weex 会根据注解来判断当前方法是否要运行在 UI 线程,和当前方法是否是扩展方法。
+3. Weex是根据反射来进行调用 Module 扩展方法,所以Module中的扩展方法必须是 public 类型。
+4. 同样因为是通过反射调用,Module 不能被混淆。请在混淆文件中添加代码:`-keep public class * extends com.taobao.weex.common.WXModule{*;}`
+5. Module 扩展的方法可以使用 int, double, float, String, Map, List 类型的参数
+6. 完成 Module 后一定要在初始化时注册 `WXSDKEngine.registerModule("myModule", MyModule.class);` 否则会报类似错误:`ReportException :undefined:9: TypeError: Object #<Object> has no method 'printLog'`
+
+示例如下:
+
+```java
+public class MyModule extends WXModule {
+
+ @WXModuleAnno(runOnUIThread = true)
+ public void printLog(String msg) {
+ Toast.makeText(mWXSDKInstance.getContext(),msg,Toast.LENGTH_SHORT).show();
+ }
+}
+```
+
+JS 调用如下:
+
+```html
+<template>
+ <div>
+ <text onclick="click">点击我测试</text>
+ </div>
+</template>
+
+<script>
+ module.exports = {
+ methods: {
+ click: function() {
+ require('@weex-module/myModule').printLog("我是一个测试!");
+ }
+ }
+ }
+</script>
+```
+
+## Component 扩展
+
+1. Component 扩展类必须集成 WXComponent.
+2. Component 对应的设置属性的方法必须添加注解 @WXComponentProp(name=value(value is attr or style of dsl))
+3. Weex sdk 通过反射调用对应的方法,所以 Component 对应的属性方法必须是 public,并且不能被混淆。请在混淆文件中添加代码 `-keep public class * extends com.taobao.weex.ui.component.WXComponent{*;}`
+4. Component 扩展的方法可以使用 int, double, float, String, Map, List 类型的参数
+5. 完成 Component 后一定要在初始化时注册 `WXSDKEngine.registerComponent("richtext",RichText.class);`
+
+示例如下:
+
+```java
+public class RichText extends WXComponent {
+
+ public RichText(WXSDKInstance instance, WXDomObject dom, WXVContainer parent, boolean isLazy) {
+ super(instance, dom, parent, isLazy);
+ }
+
+ @Override
+ protected void initView() {
+ mHost=new TextView(mContext);
+ ((TextView)mHost).setMovementMethod(LinkMovementMethod.getInstance());
+ }
+
+ @WXComponentProp(name = "tel")
+ public void setTelLink(String tel){
+ SpannableString spannable=new SpannableString(tel);
+ spannable.setSpan(new URLSpan("tel:"+tel),0,tel.length(), Spanned.SPAN_EXCLUSIVE_EXCLUSIVE);
+ ((TextView)mHost).setText(spannable);
+ }
+}
+```
+
+JS 调用如下:
+
+```html
+<template>
+ <div>
+ <richText tel="12305" style="width:200;height:100">12305</text>
+ </div>
+</template>
+```
+## Adapter扩展
+
+图片下载:
+
+需要时集成接口 IWXImgLoaderAdapter,实现 setImage 方法。
+
+示例如下:
+
+```java
+public class ImageAdapter implements IWXImgLoaderAdapter {
+
+ public ImageAdapter() {
+ }
+
+ @Override
+ public void setImage(final String url, final ImageView view,
+ WXImageQuality quality, WXImageStrategy strategy) {
+
+ WXSDKManager.getInstance().postOnUiThread(new Runnable() {
+
+ @Override
+ public void run() {
+ if(view==null||view.getLayoutParams()==null){
+ return;
+ }
+ if (TextUtils.isEmpty(url)) {
+ view.setImageBitmap(null);
+ return;
+ }
+ String temp = url;
+ if (url.startsWith("//")) {
+ temp = "http:" + url;
+ }
+ if (view.getLayoutParams().width <= 0 || view.getLayoutParams().height <= 0) {
+ return;
+ }
+ Picasso.with(WXEnvironment.getApplication())
+ .load(temp)
+ .into(view);
+ }
+ },0);
+ }
+}
+```
+#### 组件方法支持
+从WeexSDK 0.9.5开始,你可以定义组件方法
+
+- 在组件中如下声明一个组件方法
+
+ ```java
+ @JSMethod
+ public void focus(){
+ //method implementation
+ }
+ ```
+- 注册组之后,你可以在weex 文件中调用
+
+ ```html
+ <template>
+ <mycomponent id='mycomponent'></mycomponent>
+ </template>
+ <script>
+ module.exports = {
+ created: function() {
+ this.$el('mycomponent').focus();
+ }
+ }
+ </script>
+ ```
+
+注:工程要添加依赖 `compile 'com.squareup.picasso:picasso:2.5.2'`
[13/51] [abbrv] incubator-weex-site git commit: rearrangement the
structure of the document
Posted by ha...@apache.org.
http://git-wip-us.apache.org/repos/asf/incubator-weex-site/blob/32a097bf/source/cn/v-0.10/guide/how-to/index.md
----------------------------------------------------------------------
diff --git a/source/cn/v-0.10/guide/how-to/index.md b/source/cn/v-0.10/guide/how-to/index.md
deleted file mode 100644
index c20ecb0..0000000
--- a/source/cn/v-0.10/guide/how-to/index.md
+++ /dev/null
@@ -1,185 +0,0 @@
----
-title: 使用 Devtools 调试 Weex 页面
-type: guide
-order: 4
-has_chapter_content: false
-chapter_title: 最佳实践
-version: 0.10
----
-
-# 如何使用 Devtools 调试 Weex 页面
-
-Weex Devtools 是为 Weex 开发者服务的一款调试工具,能够审查 Weex app 运行时属性,可对 `.we` 代码及 JavaScript 代码断点调试,支持 iOS 和 Android 两个平台。
-
-Weex Devtools 基于 Chrome devtools 实现了 [Chrome Debugging Protocol](https://developer.chrome.com/devtools/docs/debugger-protocol),能够使用 Chrome devtools 调试 Weex 项目,其主要功能分为两大部分—— Debugger 和 Inspector。
-
-## Devtools 主要功能一览
-
-### 连接设备
-devtools 可以动态检测客户端的连接绑定请求,同时连接/调试多个 device(或者模拟器)是很容易的事情,连接到 Devtools 的客户端显示在 “Device List” 界面。如下图所示。
-
-
-
-点击对应设备的 Debugger 按钮即开始调试流程,并弹出JS断点调试的页面;随后点击 Inspector 按钮可弹出调试 DOM 的页面。
-
-### Debugger
-
-这个是用来调试 Weex 的 JSBundle 代码的页面,“Sources” tab 能够显示所有 JS 源码,包括 Weex JSFramework 和 JSBundle 代码。可以设置断点、查看调用栈,与 Chrome 浏览器调试类似。“Console” 控制台显示前端的 Log 信息,并能根据级别(info/warn/error等)和关键字过滤。
-
-
-
-### 断点调试
-
-
-
-### Inspector
-
-Inspector 功能丰富,能够用来查看 `Element` \ `Network` \ `Console log` \ `Screencast` \ `BoxModel` \ `Native View` 等。
-
-
-
-### Device Screencast & View Inspect
-
-如下图所示,通过 Inspector 页面的两个开关,点击右侧 Icon 可以打开设备投屏,然后点击左侧 Icon 再在投屏上点选元素则可以自动在 DOM tree 中定位并审查该元素。
-
-
-
-### Elements
-
-这里展示的是在 Android/iOS 上的 native DOM 树,及其 style 属性和 layout 图。鼠标在 DOM 树移动时,在 device(或模拟器)上对应节点会高亮显示,有助于 native 开发者定位和发现节点。
-
-**注意:**
-screencast 只是对屏幕图像拷贝,在远程调试时能看到远程设备界面,数据网络下 screencast 也将有较大流量花销,如果设备就在手头儿则建议关掉。
-
-Elements 审查有两种模式分别是:native 和 vdom。其中,native 模式下展示的是 Weex 所映射的 native view 的结构,它更接近实现本质;vdom 模式则对应 `.we` 文件中定义的 dom 结构,主要用来审查 `.we` 文件编译为 JSBundle 之后对应的 dom tree 的逻辑构成。
-
-#### native view element
-
-
-
-#### weex dom element
-
-
-
-### Network
-
-这里展示的是 JSBundle 资源加载网络访问的性能。所以如果 JSBundle 资源在设备本地,Network 是没有数据的。
-
-#### 查看网络请求的总耗时和延时
-
-
-
-#### 查看网络请求的header和response
-
-
-
-### 控制台
-
-这里显示的是 Android/iOS 上的 native log,并不是 JS log(JS log 显示在 Debugger 页面)。同样 native log 也有对应级别--warn/error 等和关键字过滤,native 开发查询很方便。
-
-
-
-### 资源(Android Only)
-
-远端访问的资源文件会显示在这里,这里不是查看源码的最佳方式。在 Debugger 页面,“Sources” 里已经有源码并可以断点调试。如果你的应用里有 SQLITE 数据库文件,在这里无需 root 便可以查看和更新,对于 mock 数据来说比较便利。
-
-
-
-### 远程控制 (Android Only)
-
-Android 版本支持在 screencast 上进行远程控制,能够通过鼠标模拟在手机的输入事件,方便手机不在本地的用户进行远程调试。
-
-## 如何安装和启动devtools
-
-无论是跑在 iOS 或者 Android 端,[weex-devtool](https://github.com/weexteam/weex-devtool) 都是必需的,用来启动服务器和 Chrome 页面。
-
-### 安装
-
-如果你已经在前面的教程中安装过 weex-toolkit,就无需再次安装了。
-
-```bash
-$ npm install -g weex-toolkit
-```
-
-#### 用法
-
- weex debug [options] [we_file|bundles_dir]
-
- 选项:
-
- -h, --help 显示帮助
- -V, --verbose 显示debug服务器运行时的各种log
- -v, --version 显示版本
- -p, --port [port] 设置debug服务器端口号 默认为8088
- -e, --entry [entry] debug一个目录时,这个参数指定整个目录的入口bundle文件,这个bundle文件的地址会显示在debug主页上(作为二维码)
- -m, --mode [mode] 设置构建we文件的方式,transformer 最基础的风格适合单文件,loader:wepack风格 适合模块化的多文件.默认为transformer
-
-
-## 如何在设备或者模拟器上调试
-
-### weex调试初体验之playground
-
-如果你是一名 Weex 调试的新手,那么推荐你先下载 [Playground](http://alibaba.github.io/weex/download.html) 体验一下 Devtools 调试 JSBundle 的基础流程.
-
-- 前提:
- - 安装 `weex-toolkit`,内含调试命令 `weex debug`
- - android/iOS 设备与 PC 在同一局域网,若位于不同网段请确保防火墙可访问性
-
-- Inspector 功能演示
-
-<embed src="//cloud.video.taobao.com/play/u/1955166971/p/2/e/1/t/1/45803002.swf" quality="high" width="100%" height="500px" align="middle" allowScriptAccess="never" allowFullScreen="true" type="application/x-shockwave-flash"></embed>
-
-- Debugger功能演示
-
-<embed src="//cloud.video.taobao.com/play/u/1955166971/p/2/e/1/t/1/45803641.swf" quality="high" width="100%" height="500px" align="middle" allowScriptAccess="never" allowFullScreen="true" type="application/x-shockwave-flash"></embed>
-
-- 调试步骤:
- - **启动 debug server**
-
- 执行命令 `weex debug` 将启动 debug server。如果启动成功将会在 Chrome 打开一个 welcome 页面,在网页下方有一个二维码。
-
- - **启动 Playground 并扫码**
-
- 点击启首页左上角的扫码按钮扫码上一步中网页下方的二维码。此时 welcome 页面将会出现你的设备信息。Playground 进入 loading 页面,等待你的下一步操作。
-
- - **点击网页上的 Debugger 按钮**
-
- app 结束 loading 进入 debugging 状态。同时 Chrome 将会打开 Debugger 页面。按照页面提示打开该页的 JavaScript 控制台并进入 source tab。
-
- - **设置断点刷新当前页**
-
- 点击 Playground 首页 list 中的任意项将打开一个 Weex 页面,此时在 Sources 里会出现相应的 JSBundle 文件,设置断点并刷新 Playground 即可调试。
-
- - **点击网页上的 Inspector 按钮**
-
- Chrome 会打开 inspector页面,可以查看Element, Console, Network状态。
-
-### Weex调试初体验之应用
-
-如果是接入 Weex 的应用想调试自己的 Weex 代码,有以下几个方式:
-
-1. 借助 Playground 扫码调试
- - 先确定 Playground 已经是可调试状态
- - 使用命令行工具打开调试功能 `weex debug`,用 Playground 扫浏览器打开的页面中的二维码
- - 用 Playground 扫描 JSBundle 二维码
- - 手机上即显示 Weex 页面的结果。相应在 “Debugger” 和 “Inspector” 页面调试。
-
-2. 为应用接入 Devtools 接口
-
- - [Android sdk接入指南](https://github.com/weexteam/weex_devtools_android/blob/master/README-zh.html)
- - [iOS sdk接入指南](https://github.com/weexteam/weex-devtool-iOS/blob/master/README-zh.html)
-
-有任何问题或者建议,请提交[这里](https://github.com/weexteam/weex-devtool/issues),会很快得到解答。
-
-## 更详细的视频讲解
-
-- 第一集 devtools简介
-http://cloud.video.taobao.com/play/u/1955166971/p/1/e/1/t/1/45796387.swf
-- 第二集 inspector功能演示
-http://cloud.video.taobao.com/play/u/1955166971/p/1/e/1/t/1/45803002.swf
-- 第三集 debugger功能演示
-http://cloud.video.taobao.com/play/u/1955166971/p/1/e/1/t/1/45803641.swf
-- 第四集 native 与 weex 联调
-http://cloud.video.taobao.com/play/u/1955166971/p/1/e/1/t/1/45804472.swf
-- 第五集 第三方App接入指南
-http://cloud.video.taobao.com/play/u/1955166971/p/1/e/1/t/1/45805276.swf
\ No newline at end of file
http://git-wip-us.apache.org/repos/asf/incubator-weex-site/blob/32a097bf/source/cn/v-0.10/guide/how-to/require-3rd-party-libs.md
----------------------------------------------------------------------
diff --git a/source/cn/v-0.10/guide/how-to/require-3rd-party-libs.md b/source/cn/v-0.10/guide/how-to/require-3rd-party-libs.md
deleted file mode 100644
index 7d3748e..0000000
--- a/source/cn/v-0.10/guide/how-to/require-3rd-party-libs.md
+++ /dev/null
@@ -1,57 +0,0 @@
----
-title: 如何引入第三方库
-type: guide
-order: 4.3
-version: 0.10
----
-
-# 如何引入第三方库
-<span class="weex-version">0.4</span>
-
-在 [Get started](../index.html) 中,我们学习了知道可以在 `<script>` 标签中编写 JavaScript 代码。但是在项目中常用的功能或模块,例如解析url参数,将属性从一些对象扩展到另一个对象等等,在每个组件中复制和粘贴这些代码是一个糟糕的做法,因此迫切需要通过 `require` 的方式对可复用的代码进行管理。Weex 为开发人员提供了 CommonJS 风格的 require 语法。
-
-我们以 `extend` 作为例子。
-
-## 引入本地 JS Modules
-
-下面是 `extend` 最简单的实现,并将其放在 `./common/utils.js` 路径中。
-
-```javascript
-function extend(dest, src) {
- for (var key in src) {
- dest[key] = src[key]
- }
-}
-exports.extend = extend
-```
-
-在 `.we` 文件中,`extend` 可以与`require`一起使用:
-
-```html
-<script>
- var utils = require('./common/utils')
- var obj1 = {a: 1}
- var obj2 = {b: 2}
- utils.extend(obj1, obj2) // obj1 => {a: 1, b: 2}
-</script>
-```
-
-## 引入已经安装的 Node.js Modules
-
-[underscore](http://underscorejs.org) 是一个 JavaScript 库,它提供了一整套函数式编程的实用功能,而不扩展任何 JavaScript 内置对象。它提供了一个更具稳健性的 [`extend`](http://underscorejs.org/#extend)。
-
-我们可以使用 underscore 的 `extend`,而不是我们自己实现的版本。首先,在项目中安装 underscore,然后我们便可以将 underscore `reuqire` 进来并使用它。
-
-```bash
-npm install underscore
-```
-
-```html
-<script>
- var _ = require('underscore')
- var obj1 = {a: 1}
- var obj2 = {b: 2}
- var obj3 = {c: 3}
- var ret = _.extend(obj1, obj2, obj3) // ret => {a: 1, b: 2, c: 3}
-</script>
-```
http://git-wip-us.apache.org/repos/asf/incubator-weex-site/blob/32a097bf/source/cn/v-0.10/guide/how-to/transform-code-into-js-bundle.md
----------------------------------------------------------------------
diff --git a/source/cn/v-0.10/guide/how-to/transform-code-into-js-bundle.md b/source/cn/v-0.10/guide/how-to/transform-code-into-js-bundle.md
deleted file mode 100644
index 69667ae..0000000
--- a/source/cn/v-0.10/guide/how-to/transform-code-into-js-bundle.md
+++ /dev/null
@@ -1,112 +0,0 @@
----
-title: 将 `.we` 源代码转换成 JS Bundle
-type: guide
-order: 4.4
-version: 0.10
----
-
-# 将 `.we` 源代码转换成 JS Bundle
-<span class="weex-version">0.4</span>
-
-在前面的章节中你已经了解到如何编写及组织 Weex 代码,如果你还有疑问,可参考 [语法](../syntax/main.html) 及 [手册](../../references/main.html)。 但是,Weex 语法的代码必须转换为 JSBundle,以便 Weex JSFramework 可以在 iOS,Android 和浏览器端解析和执行。了解更多信息,可参考 [Weex 工作原理](../../advanced/how-it-works.html) 和 [JS Bundle 格式](../../references/specs/js-bundle-format.html)
-
-现在,回到将 `.we` 源代码转换成 JS Bundle 的主题。有几种方法来实现这一目标。
-
-## 使用 weex-toolkit
-
-如果你已经有了 node.js 开发环境,可以直接使用以下命令。关于 node.js 及其他依赖安装可参考[安装依赖](../develop-on-your-local-machine.html#第一步:安装依赖)
-```bash
-$npm install -g weex-toolkit
-```
-
-### 将 `.we` 文件转换为 JS Bundle
-
-```bash
-$ weex your_best_weex.we -o .
-```
-
-`your_best_weex.we` 将会被转换为 `your_best_weex.js` 并保存在当前目录。
-
-### 将 `.we` 文件转换为 JS Bundle 并开启 watch 功能,实时自动转换
-
-```bash
-
-$ weex your_best_weex.we -o . --watch
-```
-
-### 将所有 `.we` 文件转换到一个目录中
-
-```bash
-$ weex we/file/storage/path -o outputpath
-```
-
- `we/file/storage/path` 目录下的每个 `.we` 文件都会被转换为 JS Bundle 并保存到 `outputpath` 目录。
-
-请访问 [npmjs.com](https://www.npmjs.com/package/weex-toolkit) 了解更多关于 `weex-toolkit`。
-
-## transformer
-
-```bash
-npm install weex-transformer
-```
-
-### CLI Tool
-
-```
- Usage: transformer [options] <file...>
-
- Options:
-
- -h, --help output usage information
- -V, --version output the version number
- -l, --oldFormat [value] whether to transform to old format (default: false)
- -e, --isEntry [value] whether is an entry module which has `bootstrap` (default: true)
- -o, --output [path] the output file dirname
-```
-
-### API
-
-** transform(name, code, path, elements, config) **
-
-```javascript
-var transformer = require('weex-transformer')
-var output = transformer.transform('foo', '/* code here */', '.', {})
-```
-
-参数:
-
-- `name {string}`:当前 bundle 文件名
-- `code {string}`:源码
-- `path {string}`: *可选*,当在某个路径中查找自定义组件时很有用
-- `elements {Object}`:*可选*,存在的自定义组件映射
-- `config {Object}`:*可选*
-
- * `oldFormat {boolean}`:是否转换为旧格式 (默认:`false`)
- * `isEntry {boolean}`:是否是具有 `bootstrap` 的入口模块 (默认:`true`)
-
-返回值:
-- 一个对象:
- - `result {string}`:所有自定义组件的 `define()` 方法和最终的 `bootstrap()`
- - `logs {Array}`:相应的警告和错误日志
-
-## gulp weex
-
-```bash
-npm install gulp-weex
-```
-
-```javascript
-var gulp = require('gulp')
-var weex = require('gulp-weex')
-
-gulp.task('default', function () {
- return gulp.src('src/*.html')
- .pipe(weex({}))
- .pipe(gulp.dest('./dest'))
-})
-```
-
-参数:
-
-- `oldFormat {boolean}`:是否转换为旧格式 (默认:`false`)
-- `isEntry {boolean}`:是否是具有 `bootstrap` 的入口模块 (默认:`true`)
http://git-wip-us.apache.org/repos/asf/incubator-weex-site/blob/32a097bf/source/cn/v-0.10/guide/index.md
----------------------------------------------------------------------
diff --git a/source/cn/v-0.10/guide/index.md b/source/cn/v-0.10/guide/index.md
deleted file mode 100644
index 73d1a98..0000000
--- a/source/cn/v-0.10/guide/index.md
+++ /dev/null
@@ -1,60 +0,0 @@
----
-title: 上手教程
-type: guide
-order: 1
-has_chapter_content: true
-version: 0.10
----
-
-# 起步教程
-
-Weex 是一套简单易用的跨平台开发方案,能以 web 的开发体验构建高性能、可扩展的 native 应用,为了做到这些,Weex 与 Vue 合作,使用 Vue 作为上层框架,并遵循 W3C 标准实现了统一的 JSEngine 和 DOM API,这样一来,你甚至可以使用其他框架驱动 Weex,打造三端一致的 native 应用。
-
-尝试 Weex 最简单的方法是使用 [Playground App](https://alibaba.github.io/weex/download.html) 和在 [dotWe](http://dotwe.org) 编写一个 [Hello World](http://dotwe.org/656345423a7ef46f4b897ff471fd2ab5) 例子。你不需要考虑安装开发环境或编写 native 代码,只需要做下面两件事:
-
-- 为你的手机安装 [Playground App](https://alibaba.github.io/weex/download.html),当然,Weex 是跨平台的框架,你依然可以使用浏览器进行预览,只是这样你就无法感受到 native 优秀的体验了。
-- 在新标签页中打开 [Hello World](http://dotwe.org/656345423a7ef46f4b897ff471fd2ab5) 例子,点击预览,然后用 Playground 扫码即可。
-
-在这个例子中,我们看到了熟悉的 HTML 语义化标签、CSS 样式和 Javascript 代码。这是一个最简单的 Weex 示例,它在页面中渲染了一个 "Hello World"。
-
-
-
-## 发生了什么?
-
-就如示例代码所示:
-
-```html
-<template>
- <div>
- <text class="text">{{text}}</text>
- </div>
-</template>
-
-<style>
- .text {
- font-size: 50;
- }
-</style>
-
-<script>
- module.exports = {
- data: {
- text: 'Hello World.'
- }
- }
-</script>
-```
-
-我们暂时不去关心 Weex 的技术细节,仅看大致的代码结构。Weex 代码由三部分构成:`template`、`style`、`script`,这三个概念之于 Weex 就如 HTML,CSS,JavaScript 之于 Web。
-
-模板部分赋予 Weex 以骨架,由标签以及标签包围的内容构成,标签中能添加 `attribute(特性)`,不同的 `attribute` 有不同的含义,例如 class 特性让同样的样式可以作用于多组 Weex 标签, onclick 特性让标签能对用户点击事件作出回应。
-
-样式部分描述 Weex 标签如何显示。和你一样,我们喜欢 CSS,所以 Weex 中的样式尽量和 CSS 标准一致。Weex 支持很多 CSS 中的特性: margin, padding, fixed...... 更好的是, flexbox 布局模型在 Weex 中获得了很好的支持。
-
-脚本部分为 Weex 标签添加数据与逻辑,在这里你能方便的访问本地或远程的数据并动态更新。你还能定义方法并让这些方法响应不同的事件。Weex 脚本的组织方式基本遵循于 CommonJS module 规范。
-
-是不是觉得这些语法有些眼熟?没错,Weex 语法参考了 [Vue](https://github.com/vuejs/vue),如果你熟悉 Vue,你会很快适应 Weex 语法(最新的 Weex framework 将会基于 [Vue 2.0](https://github.com/vuejs/vue) 开发,完全兼容 Vue,可参见我们的 [Roadmap](https://github.com/weexteam/weex-vue-framework/issues/9)),更好的是,我们拥抱规范,尽可能的按照 W3C 标准进行实现,因此,你大可不必担心 Weex 三端差异。
-
-你可以试着修改 [Hello World](http://dotwe.org/656345423a7ef46f4b897ff471fd2ab5) 的代码,再次点击预览即可生成新的二维码进行扫描。
-
-Weex 不止是个 Demo,在接下来的章节中,你还会看到更多 Weex 开发 native 应用并将其集成到你的 App 中的精彩教程。不要忘了随时在 [dotWe](http://dotwe.org) 中编写代码验证并通过 [Playground App](https://alibaba.github.io/weex/download.html) 预览。
http://git-wip-us.apache.org/repos/asf/incubator-weex-site/blob/32a097bf/source/cn/v-0.10/guide/syntax/comm.md
----------------------------------------------------------------------
diff --git a/source/cn/v-0.10/guide/syntax/comm.md b/source/cn/v-0.10/guide/syntax/comm.md
deleted file mode 100644
index 7923ef7..0000000
--- a/source/cn/v-0.10/guide/syntax/comm.md
+++ /dev/null
@@ -1,134 +0,0 @@
----
-title: 组件通信
-type: guide
-order: 3.8
-version: 0.10
----
-
-# 组件间通信
-
-## 自定义事件
-
-Weex 支持自定义事件,这里有两个相关的设计:1,监听自定义事件;2,创建自定义事件。
-
-## 监听自定义事件
-
-每个 Weex 的 ViewModel 都支持 `this.$on(type, handler)` 和 `this.$off(type[, handler])` 的 API。`type` 是监听的自定义事件类型,`handler` 是事件处理函数。
-
-当 `handler` 被触发时,会有一个事件对象 `event` 作为第一个参数被传入,事件对象的数据格式基于[事件机制](./events.html)中提到的事件描述对象。
-
-## 创建自定义事件
-
-每个 Weex 的 ViewModel 都支持 `this.$emit(type, detail)` 的 API,可以在当前 ViewModel 中产生一个自定义事件。`type` 是自定义事件的类型,`detail` 则是一个对该事件细节补充描述的 JSON 对象,会以 `event.detail` 的形式出现在处理此事件的函数中。
-
-## 从子组件向父组件通信
-
-首先父组件要监听特定类型的自定义事件,而子组件可以使用 `this._parent` 找到父组件,然后再调用 `this._parent.$emit(type, detail)` 方法,即可实现自下而上的通信。例如:
-
-```html
-<element name="foo">
- <template>
- <div>
- <image src="{{imageUrl}}" class="thumb" onclick="test"></image>
- <text>{{title}}</text>
- </div>
- </template>
- <style>
- .thumb { width: 200; height: 200; }
- </style>
- <script>
- module.exports = {
- data: {
- title: '',
- imageUrl: ''
- },
- methods: {
- test: function () {
- // Emit notify to parent
- this._parent.$emit('notify', {a: 1})
- }
- }
- }
- </script>
-</element>
-
-<template>
- <div>
- <foo title="Hello" image-url="https://gtms02.alicdn.com/tps/i2/TB1QHKjMXXXXXadXVXX20ySQVXX-512-512.png"></foo>
- <text if="eventType">event: {{eventType}} - {{eventDetail}}</text>
- </div>
-</template>
-
-<script>
- module.exports = {
- data: {
- eventType: '',
- eventDetail: {}
- },
- created: function () {
- this.$on('notify', function(event) {
- // When a notify comes, this handler will be run.
- // `event.detail` will be `{a: 1}`
- this.eventType = event.type
- this.eventDetail = JSON.stringify(event.detail)
- })
- }
- }
-</script>
-```
-
-[体验一下](http://dotwe.org/51e553ef43e5c744d05da1bb811903bf)
-
-## 从父组件向子组件通信
-
-同理,首先子组件要监听特定类型的自定义事件,而父组件可以使用 `this.$vm(id)` 找到父组件,然后再调用 `this.$vm(id).$emit(type, detail)` 方法,即可实现自上而下的通信。例如:
-
-```html
-<element name="foo">
- <template>
- <div>
- <image if="imageUrl" src="{{imageUrl}}" class="thumb"></image>
- <text>Foo</text>
- </div>
- </template>
- <style>
- .thumb { width: 200; height: 200; }
- </style>
- <script>
- module.exports = {
- data: {
- imageUrl: ''
- },
- created: function() {
- this.$on('changeImage', function (e) {
- this.imageUrl = e.detail
- }.bind(this))
- }
- }
- </script>
-</element>
-
-<template>
- <div>
- <foo id="sub"></foo>
- <text onclick="test">click to update foo</text>
- </div>
-</template>
-
-<script>
- module.exports = {
- methods: {
- test: function (e) {
- this.$vm('sub').$emit(
- 'changeImage',
- 'https://gtms02.alicdn.com/tps/i2/TB1QHKjMXXXXXadXVXX20ySQVXX-512-512.png'
- )
- }
- }
- }
-</script>
-```
-
-[体验一下](http://dotwe.org/ea616d180620648e66554d42f57db82b)
-
-下一节:[页面整体配置](./config-n-data.html)
http://git-wip-us.apache.org/repos/asf/incubator-weex-site/blob/32a097bf/source/cn/v-0.10/guide/syntax/composed-component.md
----------------------------------------------------------------------
diff --git a/source/cn/v-0.10/guide/syntax/composed-component.md b/source/cn/v-0.10/guide/syntax/composed-component.md
deleted file mode 100644
index 061eaf4..0000000
--- a/source/cn/v-0.10/guide/syntax/composed-component.md
+++ /dev/null
@@ -1,158 +0,0 @@
----
-title: 组件封装
-type: guide
-order: 3.6
-version: 0.10
----
-
-# 组件封装
-
-经常我们会发现 Weex 的 `<template>` 中有很多可复用的部分,这时候我们可以将其封装成上层的自定义组件并重用。例如我们可以直接创建一个名为 `foo.we` 的文件,`<foo>` 就是自定义组件的组件名称:
-
-```html
-<!-- foo.we -->
-<template>
- <div style="flex-direction: row;">
- <image src="{{image}}"></image>
- <text>{{title}}</text>
- </div>
-</template>
-<script>
- var env = 'foo'
- module.exports = {
- data: {
- title: null,
- image: null
- }
- }
-</script>
-```
-
-`foo.we` 的也包含 `<template>`,`<style>` 和 `<script>`,定义好了后,直接用 `<foo>` 标签即可将其引入到其它组件的 `<template>` 中,并且在 `<foo>` 标签上设置其 `data` 同名的特性会将这个值赋给 `<foo>` 的上下文:
-
-_注意事项:由于 HTML 语法中特性名是不区分大小写的,所以您无法直接用驼峰命名,我们提供了 hyphenated 语法,在解析之后这些名称会自动转换为驼峰命名 (比如在 `<template>` 的组件特性里用 `aaa-bbb-ccc` 表示其 `data` 或上下文里的 `aaaBbbCcc`)。_
-
-```html
-<!-- bar.we -->
-<template>
- <foo title="..." image="..."></foo>
-</template>
-<script>
- var env = 'bar'
-</script>
-```
-
-_注意事项:这里 `bar.we` 和 `foo.we` 必须在同目录下才能自动建立依赖关系。_
-
-_注意事项:`foo.we` 文件的 `<script>` 具有相对独立的作用域,不会和 `bar.we` 中的 `<script>` 产生干扰。同时 `<foo>` 对象具有相对独立的子组件上下文,即 `this`,也包括其定义的完全不同的数据和方法。_
-
-## 组件嵌套
-
-自定义组件也支持嵌套,如下:
-
-```html
-<!-- somepath/foo.we -->
-<template>
- <div style="flex-direction: row;">
- <image src="{{image}}"></image>
- <text>{{title}}</text>
- </div>
-</template>
-<script>
- module.exports = {
- data: {
- // These keys must be declared explicitly here
- // or data-binding will not work from its parent.
- title: null,
- image: null
- }
- }
-</script>
-```
-
-```html
-<!-- samepath/foo.list.we -->
-<template>
- <div>
- <text>{{description}}</text>
- <foo repeat="item in list" title="{{item.text}}" image="{{item.img}}"></foo>
- </div>
-</template>
-<script>
- module.exports = {
- data: {
- description: '',
- // This key must be declared explicitly here
- // or data-binding will not work from its parent.
- list: []
- }
- }
-</script>
-```
-
-```html
-<!-- samepath/main.we -->
-<template>
- <foo-list list="{{list}}"></foo-list>
-</template>
-<script>
- module.exports = {
- data: {
- list: [
- {text: '...', img: '...'},
- {text: '...', img: '...'},
- {text: '...', img: '...'},
- ...
- ]
- }
- }
-</script>
-```
-
-这里的 `main.we` 嵌套了 `<foo-list>`,`<foo-list>` 嵌套了 `<foo>`,同时组件可以正常的配合数据绑定、`repeat` 特性等使用。
-
-## 更多子组件的定义和书写方式
-
-除了在主文件同目录下创建和被封装组件同名的 `we` 文件之外,Weex 还支持另外几种子组件的书写方式:
-
-* 在 `<script>` 中通过 `require` 其它目录的 `we` 文件定义同名组件
-* 在主文件下新增 `<element name="xxx">` 标签,`name` 特性的值为新创建的组件名,其 `<element>` 内部的内容是定义该组件的代码
-
-比如:
-
-```html
-<!-- path-a/main.we -->
-<element name="foo">
- <text>Foo</text>
-</element>
-
-<template>
- <div>
- <foo></foo>
- <bar></bar>
- </div>
-</template>
-
-<script>
- require('path-b/bar.we')
-</script>
-```
-
-```html
-<!-- path-b/bar.we -->
-<template>
- <text>Bar</text>
-</template>
-```
-
-这样的话,`path-a/main.we` 最终展示的结果是“Foo”和“Bar”两段文本。
-
-## 注意事项
-
-- 组件各自的 `<style>` 是相互独立的,不会担心不同组件中相同的 class name 相互干扰。
-- 如果自定义组件在父组件中有 `id` 特性,则可以在父组件上下文中通过 `this.$vm(id)` 接口来访问该自定义组件的上下文,也可以通过 `this.$el(id)` 来找到其背后真实的原生组件。更多详见[获取子组件信息](./id.html)
-- 自定义组件之间通信的问题可以参考[组件间通信](./comm.html)
-- 不论通过父组件把数据传递进来还是在当前组件内部对数据发起修改,只有在组件的 `data` 选项中明确写明的字段才会被正常的监听。
-- 任何组件目前均不支持自闭合标签的写法,请勿使用。
-
-下一节:[获取子组件信息](./id.html)
http://git-wip-us.apache.org/repos/asf/incubator-weex-site/blob/32a097bf/source/cn/v-0.10/guide/syntax/config-n-data.md
----------------------------------------------------------------------
diff --git a/source/cn/v-0.10/guide/syntax/config-n-data.md b/source/cn/v-0.10/guide/syntax/config-n-data.md
deleted file mode 100644
index cad39ab..0000000
--- a/source/cn/v-0.10/guide/syntax/config-n-data.md
+++ /dev/null
@@ -1,72 +0,0 @@
----
-title: 页面配置和页面数据
-type: guide
-order: 3.9
-version: 0.10
----
-
-# 页面配置和页面数据
-
-在 Weex 中,你可以通过一些特殊的 `<script>` 进行页面整体配置。
-
-_注意事项:这些配置会代表页面整体,所以写在自定义子组件中是无效的,只有写在顶级 ViewModel 的 `<sctipt>` 中才会生效。_
-
-先举个例子:
-
-```html
-<!-- definition of sub components -->
-<element name="sub-component-a">...</element>
-<element name="sub-component-b">...</element>
-<element name="sub-component-c">...</element>
-
-<!-- definition of top-level component -->
-<template>...</template>
-<style></style>
-<script>
- module.exports = {
- data: { x: 1, y: 2 }
- }
-</script>
-
-<!-- config and data -->
-<script type="config">
- downgrade: {
- ios: {
- os: '9', // all of 9.x.x
- app: '~5.3.2',
- framework: '^1.3', // all of 1.3.x
- deviceModel: ['AAAA', 'BBBB']
- },
- android: {
- os: '*', // all of version
- app: '^5',
- framework: '',
- deviceModel: ''
- }
- }
-</script>
-<script type="data">
- { y: 200 }
-</script>
-```
-
-## `<script type="config">`
-
-开发者可以在顶级 ViewModel 中加入这样一段 `<script>`,以 JSON 格式描述页面整体的配置信息。
-
-目前支持的配置信息只有 `downgrade`:用来从平台、应用等维度描述页面的降级规则。这样设计对于产品迭代最大的帮助是可以在高版本中使用 Weex,而在低版本中使用之前已有的渲染方式,这部分控制降级的细节需要 native 接入的时候进行相应的识别和具体操作。
-
-未来这里会有更多的配置项出现在这里。
-
-## `<script type="data">`
-
-开发者可以在顶级 ViewModel 中加入这样一段 `<script>`,以 JSON 格式额外配置顶级 ViewModel 的数据,它会覆盖顶级 ViewModel 数据中相应的字段。比如上述例子中,最终的顶级 ViewModel 中的数据为 `{ x: 1, y: 200 }`。
-
-## 总结
-
-至此,Weex 基本的语法已经全部介绍过了。相信您对 Weex 的使用方式和开发方式有了更多的了解。
-
-接下来我们推荐您阅读:
-
-* [最佳实践](../how-to/index.html)
-* [Weex 手册](../../references/index.html)
http://git-wip-us.apache.org/repos/asf/incubator-weex-site/blob/32a097bf/source/cn/v-0.10/guide/syntax/data-binding.md
----------------------------------------------------------------------
diff --git a/source/cn/v-0.10/guide/syntax/data-binding.md b/source/cn/v-0.10/guide/syntax/data-binding.md
deleted file mode 100644
index bbefdd1..0000000
--- a/source/cn/v-0.10/guide/syntax/data-binding.md
+++ /dev/null
@@ -1,332 +0,0 @@
----
-title: 数据绑定
-type: guide
-order: 3.1
-version: 0.10
----
-
-# 数据绑定
-
-Weex使用 _mustache_ 的语法 (`{% raw %}{{...}}{% endraw %}`) 来对 `<template>` 中的模板和 `<script>` 里的数据进行绑定. 一旦数据额模板绑定了, 数据上的修改会实时的在模板内容中生效。
-
-## 数据绑定路径
-
-```html
-<template>
- <div>
- <text style="font-size: {{size}}">{{title}}</text>
- </div>
-</template>
-
-<script>
- module.exports = {
- data: {
- size: 48,
- title: 'Alibaba Weex Team'
- }
- }
-</script>
-```
-
-[体验一下](http://dotwe.org/6d18c0e696d33705083e34ef387ac529)
-
-上面的代码会把 `title` 和 `size` 的数值绑定到模板内容上。
-
-我们也可以通过 `.` 符号来绑定数据结构中的字段。看一下下面的代码片段:
-
-```html
-<template>
- <div>
- <text style="font-size: {{title.size}}">{{title.value}}</text>
- </div>
-</template>
-
-<script>
- module.exports = {
- data: {
- title: {
- size: 48,
- value: 'Alibaba Weex Team'
- }
- }
- }
-</script>
-```
-
-[体验一下](http://dotwe.org/e291bbe2d5c34fe04db92bc827697a4b)
-
-## 数据绑定表达式
-
-进行数据绑定时,Weex 支持一些简单的 JavaScript 表达式,例如:
-
-```html
-<template>
- <div style="flex-direction: row;">
- <text>{{firstName + ' ' + lastName}}</text>
- </div>
-</template>
-
-<script>
- module.exports = {
- data: {
- firstName: 'John',
- lastName: 'Smith'
- }
- }
-</script>
-```
-
-[体验一下](http://dotwe.org/aeef6c2ca9bd9b7c5d039ed84572e1ee)
-
-这些表达式会在当前的上下文中进行运算。
-
-## 计算属性 <sup>v0.5+</sup>
-
-数据绑定表达式已经非常方便了,但如果希望在模板里实现更复杂的逻辑判断,你也可以使用计算属性。例如:
-
-```html
-<template>
- <div style="flex-direction: row;">
- <text>{{fullName}}</text>
- <text onclick="changeName" style="margin-left: 10;">CHANGE NAME</text>
- </div>
-</template>
-
-<script>
- module.exports = {
- data: {
- firstName: 'John',
- lastName: 'Smith'
- },
- computed: {
- fullName: function() {
- return this.firstName + ' ' + this.lastName
- }
- },
- methods: {
- changeName: function() {
- this.firstName = 'Terry'
- }
- }
- }
-</script>
-```
-
-[体验一下](http://dotwe.org/276e7c42a2d480d669868476e62b326e)
-
-同样能够达到相同的效果。这里我们引入了一个叫做 `fullName` 的计算属性,由 `firstName` 和 `lastName` 计算而成,在数据绑定的时候,如果 `firstName` 或 `lastName` 发生改变,`fullName` 都会自动重新计算并触发改变。
-
-另外计算属性还支持另外一种写法,就是同时定义一个计算属性的 getter 和 setter,这样的话当下面例子中的 `fullName` 被赋值时,`data` 里的 `firstName` 和 `lastName` 会被自动改变:
-
-```html
-<template>
- <div style="flex-direction: row;">
- <text>{{fullName}}</text>
- <text onclick="changeName" style="margin-left: 10;">CHANGE NAME</text>
- </div>
-</template>
-
-<script>
- module.exports = {
- data: {
- firstName: 'John',
- lastName: 'Smith'
- },
- computed: {
- fullName: {
- get: function() {
- return this.firstName + ' ' + this.lastName
- },
-
- set: function(v) {
- var s = v.split(' ')
- this.firstName = s[0]
- this.lastName = s[1]
- }
- }
- },
- methods: {
- changeName: function() {
- this.fullName = 'Terry King'
- }
- }
- }
-</script>
-```
-
-[体验一下](http://dotwe.org/9f33809592391c566c886029c509c167)
-
-**注意事项:`data`、`methods`、`computed` 中的字段是不能相互重复的,因为它们都会通过组件实例的 `this` 访问到。**
-
-## 数据绑定在 `<template>` 中的特殊用法
-
-### 样式: `style` 或 `class`
-
-组件的样式能够通过 `style` 特性进行绑定:
-
-```html
-<template>
- <div>
- <text style="font-size: {{size}}; color: {{color}};">Hello World</text>
- </div>
-</template>
-
-<script>
- module.exports = {
- data: {
- size: 32,
- color: '#ff0000'
- }
- }
-</script>
-```
-
-[体验一下](http://dotwe.org/f53674fa7910d266e0a2d8a5c285d2b1)
-
-样式也能够通过 `class` 特性实现样式绑定,多个 class 名通过空格分隔:
-
-```html
-<template>
- <div>
- <text class="{{size}}">Hello</text>
- <text class="title {{status}}">World</text>
- </div>
-</template>
-
-<style>
- .large { font-size: 64; }
- .small { font-size: 32; }
- .title { font-weight: bold; }
- .success { color: #00ff00; }
- .error { color: #ff0000; }
-</style>
-
-<script>
- module.exports = {
- data: {
- size: 'large',
- status: 'success'
- }
- }
-</script>
-```
-
-[体验一下](http://dotwe.org/4260897c1526a685672dca95af271493)
-
-在上面的代码中如果 `{% raw %}{{size}}{% endraw %}` 和 `{% raw %}{{status}}{% endraw %}` 是空值, 就只有 `class="title"` 会被解析。
-
-延伸阅读:[style 和 class](./style-n-class.html)
-
-### 事件绑定:`on...`
-
-以 `on...` 开头的就是用于绑定事件的特性,特性名中 `on` 之后的部分就是事件的类型,特性的值就是处理该事件的函数名。_函数名外不需要添加 mustache 语法中的大括号_。例如:
-
-```html
-<template>
- <div>
- <text onclick="toggle">Toggle: {{result}}</text>
- </div>
-</template>
-
-<script>
- module.exports = {
- data: {
- result: true
- },
- methods: {
- toggle: function () {
- this.result = !this.result
- }
- }
- }
-</script>
-```
-
-[体验一下](http://dotwe.org/2f9f910a60ffc1ed54c797390d6615e1)
-
-除此之外 Weex 还支持更多的事件处理方式。
-
-延伸阅读:[事件处理](./events.html)
-
-### 展示逻辑控制 `if` & `repeat`
-
-`if` 特性能够通过特性值的真假来控制组建是否显示,_且 mustache 大括号可以省略_。例如:
-
-```html
-<template>
- <div style="flex-direction: column;">
- <text onclick="toggle">Toggle</text>
- <image if="{{shown}}" src="{{imageUrl}}" class="logo"></image>
- </div>
-</template>
-
-<style>
- .logo { width: 512; height: 512; }
-</style>
-
-<script>
- module.exports = {
- data: {
- shown: true,
- imageUrl: 'https://gtms02.alicdn.com/tps/i2/TB1QHKjMXXXXXadXVXX20ySQVXX-512-512.png'
- },
- methods: {
- toggle: function () {
- this.shown = !this.shown
- }
- }
- }
-</script>
-```
-
-[体验一下](http://dotwe.org/3ec9347e4810f503b641849d214d8c15)
-
-`repeat` 特性可以根据一组数组数据重复生成相同或相似的顺序排列的界面。例如:
-
-```html
-<template>
- <div>
- <text repeat="(k,v) in list">{{k}} - {{v}}</text>
- </div>
-</template>
-<script>
- module.exports = {
- data: {
- list: ['a', 'b', 'c']
- }
- }
-</script>
-```
-
-[体验一下](http://dotwe.org/db40d2341fdbf16d3d806f502189843d)
-
-延伸阅读:[展示逻辑控制](./display-logic.html)
-
-### 静态模板优化 `static` <sup>v0.9.2+</sup>
-
-`static` 特性可以一次性把数据设置到模板相应的位置上,但是今后不会随着数据的变化而更新。这样可以减少无谓的数据绑定,有效控制和优化长列表、纯静态页面在运行时的开销。不过你也要小心使用不要导致原本需要更新的视图没有触发更新。
-
-```html
-<template>
- <div static>
- <text>{{ word }}</text>
- </div>
-</template>
-
-<script>
- module.exports = {
- ready: function() {
- this.word = 'Data changes' // UI won't be updated
- },
- data: {
- word: 'Hello static'
- }
- }
-</script>
-```
-
-[体验一下](http://dotwe.org/dbadfd66463a2c03e3e06d391b0ad8ec)
-
-如上所示,添加 `static` 关键字,渲染结果会是“Hello static”字样,相当于渲染一个静态的节点,`ready` 函数中对数据 `word` 的改变不会更新到视图。
-
-下一篇:[style 和 class](./style-n-class.html)
http://git-wip-us.apache.org/repos/asf/incubator-weex-site/blob/32a097bf/source/cn/v-0.10/guide/syntax/display-logic.md
----------------------------------------------------------------------
diff --git a/source/cn/v-0.10/guide/syntax/display-logic.md b/source/cn/v-0.10/guide/syntax/display-logic.md
deleted file mode 100644
index 9498de2..0000000
--- a/source/cn/v-0.10/guide/syntax/display-logic.md
+++ /dev/null
@@ -1,252 +0,0 @@
----
-title: 展示逻辑控制
-type: guide
-order: 3.4
-version: 0.10
----
-
-# 展示逻辑控制
-
-Weex 支持通过两种特殊的特性 `if` 和 `repeat` 确定组件的显示逻辑,这会使得整个界面的展示逻辑控制更加简单灵活。
-
-## `if`
-
-通过设置 `if` 特性值,你可以控制当前组件是否显示。如果值为真,则当前组件会被渲染出来,如果值为假则会被移除。例如:
-
-```html
-<template>
- <div>
- <text onclick="toggle">Toggle Image</text>
- <image if="shown" src="{{imageUrl}}" style="width: 512; height: 512;"></image>
- </div>
-</template>
-
-<script>
-module.exports = {
- data: {
- imageUrl: 'https://gtms02.alicdn.com/tps/i2/TB1QHKjMXXXXXadXVXX20ySQVXX-512-512.png',
- shown: true
- },
- methods: {
- toggle: function () {
- this.shown = !this.shown
- }
- }
-}
-</script>
-```
-
-[体验一下](http://dotwe.org/e0999a51fa404f48bbae177f1569cd0e)
-
-_注意事项:`if="condition"` 和 `if="{% raw %}{{condition}}{% endraw %}"` 都是可以的,两者等价使用。_
-
-_注意事项:`if` 不能用在 `<template>` 的根组件上,否则将无法被 Weex 正常的识别和处理。_
-
-### `if` 不会阻断子元素的数据更新
-
-下面这个例子在数据更新后 `item` 或 `item.image` 不存在的情况下会报错:
-
-```html
-<template>
- <div if="{{(item && item.image)}}" style="width: 200; height: 200;">
- <image style="width: 100; height: 100;" src="{{item.image.url}}"></image>
- </div>
-</template>
-```
-
-原因在于 Weex 本身的机制是数据更新在 DOM 更新之前,因此 `if` 数据更新之后,不支持阻断其子元素的数据更新,即 `if` 数据更新为 `false` 之后,内部的子元素仍然会触发自身的数据更新,找不到对应字段,导致报错,可参考这个 [issue](https://github.com/alibaba/weex/issues/1758)。
-
-因此,有两种解决方案:
-
-- 为 `img` 组件的 `src` 也增加容错方案:
-
- ```html
- <div if="{{(item && item.image)}}" style="width: 200; height: 200;">
- <image style="width: 100; height: 100;" src="{{item && item.image && item.image.url}}"></image>
- </div>
- ```
-
-- 如果是在 `repeat` 的列表中,还可以使用 `track-by`强制不复用子元素解决。
-
-## `repeat`
-
-`repeat` 特性用于重复渲染一组相同的组件。它绑定的数据类型必须为数组,数组里的每一项数据可以体现在不同的组件特性、样式、事件绑定等。例如:
-
-``` html
-<template>
- <div>
- <div repeat="person in list" class="{{person.gender}}">
- <text>{{person.nickname}}</text>
- </div>
- </div>
-</template>
-
-<style>
- .male { background-color: #9999ff; }
- .female { background-color: #ff9999; }
-</style>
-
-<script>
-module.exports = {
- data: {
- list: [
- { gender: 'male', nickname: 'Li Lei' },
- { gender: 'female', nickname: 'Han Meimei' },
- { gender: 'male', nickname: 'Jim Green' }
- ]
- }
-}
-</script>
-```
-
-[体验一下](http://dotwe.org/8c87aac2820531090181c32fca41e913)
-
-此外,`repeat` 特性还支持绑定数组中数据项目的索引值。例如:
-
-``` html
-<template>
- <div>
- <div repeat="(index, person) in list" class="{{person.gender}}">
- <text>{{index}} - {{person.nickname}}</text>
- </div>
- </div>
-</template>
-
-<style>
- .male { background-color: #9999ff; }
- .female { background-color: #ff9999; }
-</style>
-
-<script>
-module.exports = {
- data: {
- list: [
- { gender: 'male', nickname: 'Li Lei' },
- { gender: 'female', nickname: 'Han Meimei' },
- { gender: 'male', nickname: 'Jim Green' }
- ]
- }
-}
-</script>
-```
-
-[体验一下](http://dotwe.org/65d348256ab5c54aa996d3ee6b4ea115)
-
-每一个昵称之前都有对应数组项目的索引值。
-
-_注意事项:同样的 `repeat="..."` 和 `repeat="{% raw %}{{...}}{% endraw %}"` 都是可以的,两者等价使用。_
-
-_注意事项:`if` 不能用在 `<template>` 的根组件上,否则将无法被 Weex 正常的识别和处理。_
-
-**注意事项: 当你修改 `repeat` 中的数组时,在写法上会受到一定的限制,具体如下:**
-
-**直接通过“角标”修改数组的某个项目 (如 `this.items[0] = ...`) 是不会触发视图自动更新的。我们在数组的原型上提供了一个额外的方法:`this.items.$set(index, item)` 来完成相同的事情。**
-
-```javascript
-// 和 `this.items[0] = ...` 作用相同,但会自动触发视图更新
-this.items.$set(0, { childMsg: 'Changed!'})
-```
-
-**直接通过修改 `length` 来改变数组长度 (如 `this.items.length = 0`) 也是不会触发视图自动更新的。我们推荐您直接赋值一个新的空数组把旧的替换掉。**
-
-```javascript
-// 和 `this.items.length = 0` 作用相同,但会自动触发视图更新
-this.items = []
-```
-
-### `repeat` 特性中的 `$index` 形参
-
-在 `repeat` 特性值中,如果没有指定索引值的形参,则可以通过绑定形参 `$index` 来展示数组项目的索引值。例如:
-
-``` html
-<template>
- <div>
- <div repeat="person in list" class="{{person.gender}}">
- <text>{{$index}} - {{person.nickname}}</text>
- </div>
- </div>
-</template>
-
-<style>
- .male { background-color: #9999ff; }
- .female { background-color: #ff9999; }
-</style>
-
-<script>
-module.exports = {
- data: {
- list: [
- { gender: 'male', nickname: 'Li Lei' },
- { gender: 'female', nickname: 'Han Meimei' },
- { gender: 'male', nickname: 'Jim Green' }
- ]
- }
-}
-</script>
-```
-
-[体验一下](http://dotwe.org/65d348256ab5c54aa996d3ee6b4ea115)
-
-渲染效果和上一个例子应该是相同的。
-
-### 在 `repeat` 中使用 `track-by` 特性追踪变化
-
-通常情况下,当更新 `repeat` 中绑定的数组时,所有数组项目关联的组件都会被重新渲染。如果其中部分索引值对应的数据未发生变更,那么最好是让这些组件在渲染层保持原样,仅更新数据有变化的节点。Weex 提供了 `track-by` 特性来辅助判断哪些数组项目发生了改变。
-
-首先 `track-by` 特性的值必须是在每一条数组项目中都有且值没有重复的一个字段名,用来区分和追踪每一条数据项增删与否或次序变化与否的关键依据。每当数组发生变化之后,新老数组数据会根据 `track-by` 特性值所代表的字段重新匹配,然后再决定渲染层应该新建或删除一个组件?还是移动一个组件?还是讲组件保持原来的位置。默认的 `track-by` 的值就是数组的索引值。例如:
-
-``` html
-<template>
- <div>
- <div repeat="person in list" class="{{person.gender}}">
- <text>{{$index}} - {{person.id}} - {{person.nickname}}</text>
- </div>
- <text>----</text>
- <div repeat="person in list" class="{{person.gender}}" track-by="id">
- <text>{{$index}} - {{person.id}} - {{person.nickname}}</text>
- </div>
- <text>----</text>
- <!-- something wrong here: duplicated track-by value -->
- <div repeat="person in list" class="{{person.gender}}" track-by="nickname">
- <text>{{$index}} - {{person.id}} - {{person.nickname}}</text>
- </div>
- </div>
-</template>
-
-<style>
- .male { background-color: #9999ff; }
- .female { background-color: #ff9999; }
-</style>
-
-<script>
-module.exports = {
- data: {
- list: [
- { id: 11, gender: 'male', nickname: 'Li Lei' },
- { id: 22, gender: 'female', nickname: 'Han Meimei' },
- { id: 33, gender: 'male', nickname: 'Jim Green' }
- ]
- },
- ready: function () {
- this.list.unshift({ id: 44, gender: 'female', nickname: 'Han Meimei' })
- }
-}
-</script>
-```
-
-[体验一下](http://dotwe.org/c124bfc21e6d92271356acbea232089b)
-
-这种情况下,第一个列表的更新策略是:
-
-1. 把第一个 `<text>` 赋值为 `Han Meimei`
-2. 第二个赋值为 `Li Lei`
-3. 第三个赋值为 `Han Meimei`
-4. 最后新建一个 `<text>` 并赋值为 `Jin Green`
-
-第二个列表的更新策略是:
-
-1. 在最前面新建一个 `<text>` 并赋值为 `Han Meimei`
-
-第三个列表的更新会遇到问题,因为有两个数组项目的 `nickname` 值都是 `Han Meimei` 所以造成意料之外的渲染结果 (只渲染了三个数组项目)。
-
-下一节:[渲染过程控制](./render-logic.html)
http://git-wip-us.apache.org/repos/asf/incubator-weex-site/blob/32a097bf/source/cn/v-0.10/guide/syntax/events.md
----------------------------------------------------------------------
diff --git a/source/cn/v-0.10/guide/syntax/events.md b/source/cn/v-0.10/guide/syntax/events.md
deleted file mode 100644
index 4898219..0000000
--- a/source/cn/v-0.10/guide/syntax/events.md
+++ /dev/null
@@ -1,103 +0,0 @@
----
-title: 事件处理
-type: guide
-order: 3.3
-version: 0.10
----
-
-# 事件处理
-
-Weex 允许对 `<template>` 中的元素绑定事件处理函数。
-
-## 基本语法
-
-以 `on...` 开头的就是用于绑定事件的特性,特性名中 `on` 之后的部分就是事件的类型,特性的值就是处理该事件的函数名。_函数名外不需要添加 mustache 语法中的大括号_。例如:
-
-```html
-<template>
- <div>
- <text onclick="toggle">Toggle: {{result}}</text>
- </div>
-</template>
-
-<script>
- module.exports = {
- data: {
- result: true
- },
- methods: {
- toggle: function () {
- this.result = !this.result
- }
- }
- }
-</script>
-```
-
-[体验一下](http://dotwe.org/2f9f910a60ffc1ed54c797390d6615e1)
-
-## 内联事件处理参数
-
-同时我们也支持在事件绑定的特性值中内联写明被传入的参数。例如:
-
-```html
-<template>
- <div>
- <text onclick="update(1, 2)">Result: {{result}}</text>
- </div>
-</template>
-
-<script>
- module.exports = {
- data: {
- result: '<empty>'
- },
- methods: {
- update: function (x, y) {
- this.result = x + y
- }
- }
- }
-</script>
-```
-
-[体验一下](http://dotwe.org/777056d8985e73567464e2d66cbe73fc)
-
-## 特殊的内联事件处理参数
-
-额外的,在这种内联的事件绑定写法中,你可以使用一个特殊的参数 `$event`,代表事件描述对象,即默认事件处理函数的第一个参数。所以 `<template>` 中的 `onclick="foo"` 和 `onclick="foo($event)"` 是等价的,`$event` 的用法可以更多参考下面的例子
-
-```html
-<template>
- <div>
- <text onclick="update($event, 1, 2)">Result: {{result}}</text>
- </div>
-</template>
-
-<script>
- module.exports = {
- data: {
- result: '<empty>'
- },
- methods: {
- update: function (e, x, y) {
- this.result = e.type + (x + y)
- }
- }
- }
-</script>
-```
-
-[体验一下](http://dotwe.org/5e1e7c22f036725e44c3ff492f173400)
-
-## 事件描述对象
-
-每当一次事件被触发的时候,都会产生一个事件描述对象,该对象会默认作为第一个参数传递给事件处理函数,或以 `$event` 形参的方式出现在内联事件处理函数中。
-
-每个事件描述对象至少包含以下几个特性:
-
-- `type` (`string`): 事件名称, 如: `click`
-- `target` (`Element`): 目标元素
-- `timestamp` (`number`): 事件触发时的时间戳数字
-
-下一节:[展示逻辑控制](./display-logic.html)
http://git-wip-us.apache.org/repos/asf/incubator-weex-site/blob/32a097bf/source/cn/v-0.10/guide/syntax/id.md
----------------------------------------------------------------------
diff --git a/source/cn/v-0.10/guide/syntax/id.md b/source/cn/v-0.10/guide/syntax/id.md
deleted file mode 100644
index 0a204ad..0000000
--- a/source/cn/v-0.10/guide/syntax/id.md
+++ /dev/null
@@ -1,124 +0,0 @@
----
-title: 找节点
-type: guide
-order: 3.7
-version: 0.10
----
-
-# 找节点
-
-在 Weex 中,您可以通过在特定的子组件上设置 `id` 特性,以此在该 `<template>` 内唯一标识这个组件。
-
-## 获取子组件
-
-您可以在父组件上下文中使用 `this.$el(id)` 来找到该组件,以运用 `scrollToElement()` 为例:
-
-```html
-<template>
- <div>
- <text id="goto-top">Top</text>
- <div style="height: 10000; background-color: #999999;"></div>
- <text onclick="back2Top">Back to Top</text>
- </div>
-</template>
-<script>
- var dom = require('@weex-module/dom')
- module.exports = {
- methods: {
- back2Top: function () {
- var el = this.$el('goto-top')
- dom.scrollToElement(el, { offset: 10 })
- }
- }
- }
-</script>
-```
-
-[体验一下](http://dotwe.org/ed07068ef6f038d6c39af6c971ad08a0)
-
-### `id` 和 `repeat` 特性配合使用
-
-`id` 也可以和 `repeat` 语法配合使用,关于 `repeat` 更多详见 [展示逻辑控制](./display-logic.html),但是要确保循环的节点需要用不同的 `id`,比如:
-
-```html
-<template>
- <div>
- <image
- repeat="image in images"
- id="img-{{image.id}}"
- src="{{image.url}}"
- onclick="getImageId"></image>
- </div>
-</template>
-<script>
-module.exports = {
- data: {
- images: [
- {id: 1, url: '...'},
- {id: 2, url: '...'},
- {id: 3, url: '...'},
- ...
- ]
- },
- methods: {
- getImageId: function(e) {
- // get e.target.id
- }
- }
-}
-</script>
-```
-
-### 获取自定义子组件的上下文
-
-另外,我们还可以通过 `this.$vm(id)` 方法可以访问自定义子组件的上下文:
-
-```html
-<element name="foo">
- <template>
- <div style="flex-direction: row;">
- <text>{{title}}</text>
- </div>
- </template>
- <script>
- module.exports = {
- data: {
- title: null
- },
- methods: {
- setTitle: function (text) {
- this.title = text
- }
- }
- }
- </script>
-</element>
-
-<template>
- <div>
- <foo id="sub" title="Hello"></foo>
- <text onclick="update">Click Me to Update</text>
- </div>
-</template>
-<script>
- module.exports = {
- methods: {
- update: function (e) {
- this.$vm('sub').setTitle('Updated')
- }
- }
- }
-</script>
-```
-
-[体验一下](http://dotwe.org/1d332e6c238462e841743035c6bc697e)
-
-实际上,如上述的例子,我们找到子组件上下文之后,直接在这个上下文中调用子组件方法或修改子组件的数据并不是我们认为最好的方式,我们更倾向于通过一套确定的组件间通信机制来完成这一工作。
-
-### 获取父级组件或其上下文
-
-除了可以自上而下寻找组件或其上下文,Weex 也支持自下而上做相同的事情。当前上下文中的 `this._parent` 可以获取其父级上下文。除了父级上下文,对于父级组件本身,相关处理也可以基于先获取父级上下文,然后在父级组件内部完成更多更细致的处理。更多内容可以深入了解组件间通信的部分。
-
-_注意事项:在未来的版本中 `this._parent` 将改为 `this.$parent`。_
-
-下一篇: [组件间通信](./comm.html)
http://git-wip-us.apache.org/repos/asf/incubator-weex-site/blob/32a097bf/source/cn/v-0.10/guide/syntax/index.md
----------------------------------------------------------------------
diff --git a/source/cn/v-0.10/guide/syntax/index.md b/source/cn/v-0.10/guide/syntax/index.md
deleted file mode 100644
index df0c33a..0000000
--- a/source/cn/v-0.10/guide/syntax/index.md
+++ /dev/null
@@ -1,134 +0,0 @@
----
-title: 语法介绍
-type: guide
-order: 3
-has_chapter_content: true
-version: 0.10
----
-
-# 语法综述
-
-Weex 代码由 `<template>`、`<style>`、`<script>` 三个部分构成。
-
-- `<template>`:_必须的_,使用 HTML 语法描述页面结构,内容由多个标签组成,不同的标签代表不同的组件。
-- `<style>`:_可选的_,使用 CSS 语法描述页面的具体展现形式。
-- `<script>`:_可选的_,使用 JavaScript 描述页面中的数据和页面的行为,Weex 中的数据定义也在 `<script>` 中进行。
-
-```html
-<template>
- <!-- (required) the structure of page -->
-</template>
-
-<style>
- /* (optional) stylesheet */
-</style>
-
-<script>
- /* (optional) the definition of data, methods and life-circle */
-</script>
-```
-
-这是一个典型的 M-V-VM 架构:通过 ViewModel 把 Model 和 View 建立更直接有效的关系,ViewModel 的实现以 `<script>` 的内容为主。
-
-## `<template>` 模板
-
-`<template>` 中的标签组织类似如下代码:
-
-``` html
-<template>
- <div>
- <image style="width: 200; height: 200;" src="https://gtms02.alicdn.com/tps/i2/TB1QHKjMXXXXXadXVXX20ySQVXX-512-512.png"></image>
- <text>Alibaba Weex Team</text>
- </div>
-</template>
-```
-
-[体验一下](http://dotwe.org/5256e6e610ded330369f2e8010f7f0e6)
-
-`<div>` 标签是一个根节点,里面包含描述图片的 `<image>` 标签和描述文字的 `<text>` 标签。
-
-和 HTML 类似,不同标签代表的组件有各自的特性 (attribute),部分组件可以拥有自己的子组件。
-
-延伸阅读:[内置组件列表](../../references/components/index.html)
-
-根节点:每个 Weex 页面最顶层的节点,我们称为根节点。下面是目前我们支持的三种根节点:
-
-- `<div>`:普通根节点,有确定的尺寸,不可滚动。
-- `<scroller>`:可滚动根节点,适用于需要全页滚动的场景。
-- `<list>`:列表根节点,适用于其中包含重复的子元素的列表场景。
-
-目前 Weex 仅支持以上三种根节点。
-
-_注意事项:`<template>` 只支持一个根节点,多个根节点将无法被 Weex 正常的识别和处理。_
-
-## `<style>` 样式
-
-我们可以把 Weex 中的样式语法理解为 CSS 的一个子集,两者有一些细微的区别
-
-第一种写法是,你能在标签上,直接通过内联 `style` 特性编写样式. 第二种写法,通过标签中的 `class` 特性与 `<style>` 标签中定义的样式建立对应关系,让 `<style>` 标签中定义的样式作用于特定标签之上。以下是例子:
-
-```html
-<template>
- <div>
- <text style="font-size: 64;">Alibaba</text>
- <text class="large">Weex Team</text>
- </div>
-</template>
-
-<style>
- .large {font-size: 64;}
-</style>
-```
-
-[体验一下](http://dotwe.org/d8af9186bf045df74e7a538d91798db4)
-
-上面的两个 `<text>` 组件都被设置了同样的字体大小,但分别用了两种不同的方式。
-
-延伸阅读:[Weex 通用样式](../references/common-style.html)
-
-**注意**:Weex 遵循 [HTML 特性](https://en.wikipedia.org/wiki/HTML_attribute) 命名规范,所以特性命名时**请不要使用陀峰格式 (CamelCase)**,采用以“-”分割的 **long-name** 形式。
-
-## `<script>` 脚本
-
-`<script>` 描述页面中的数据和页面的行为,代码遵循 JavaScript (ES5) 语法 (目前 iOS 端和浏览器端取决于内置 JavaScript 引擎对 ES 版本的支持情况,安卓端能够完整支持 ES5,但不原生支持 ES6,需要用类似 [babel](http://babeljs.io) 的工具对源代码进行转换)。下面是一个例子:
-
-``` html
-<template>
- <div>
- <text>The time is {{datetime}}</text>
- <text>{{title}}</text>
- <text>{{getTitle()}}</text>
- </div>
-</template>
-
-<script>
- module.exports = {
- data: {
- title: 'Alibaba',
- datetime: null
- },
- methods: {
- getTitle: function () {
- return 'Weex Team'
- }
- },
- created: function() {
- this.datetime = new Date().toLocaleString()
- }
- }
-</script>
-```
-
-[体验一下](http://dotwe.org/8095bed0d9db4299fb39975d4b35b13f)
-
-上面 `<script>` 标签中定义了被赋值给 `module.exports` 的对象,这个对象其实就是一个 ViewModel 选项,让三个 `<text>` 标签显示当前时间、“Alibaba”字样和“Weex Team”字样。
-
-选项中的 `data` 用于存储数据,这些数据可以通过[数据绑定](./data-binding.html)机制和 `<template>` 标签中的内容绑定起来。当这些数据变更时,被绑定的模板内容也会自动更新。这些数据在 `<script>` 中的各个方法中可以通过类似 `this.x` 的方式进行读写操作。
-
-而选项中的 `methods` 里则列出了当前上下文可执行的各种函数,比如 `getTitle()`。
-
-选项中最后的 `created` 是生命周期函数,会在数据初始化之后、界面被绑定数据并渲染之前执行。类似的生命周期函数还有 `init`、`ready` 等,在这个例子中,`datetime` 会在界面渲染之前被更新为当前的时间。
-
-延伸阅读:[ViewModel 选项](../../references/component-defs.html)
-
-接下来,我们来详细介绍[数据绑定](./data-binding.html)的相关知识。
http://git-wip-us.apache.org/repos/asf/incubator-weex-site/blob/32a097bf/source/cn/v-0.10/guide/syntax/render-logic.md
----------------------------------------------------------------------
diff --git a/source/cn/v-0.10/guide/syntax/render-logic.md b/source/cn/v-0.10/guide/syntax/render-logic.md
deleted file mode 100644
index f516733..0000000
--- a/source/cn/v-0.10/guide/syntax/render-logic.md
+++ /dev/null
@@ -1,44 +0,0 @@
----
-title: 渲染过程控制
-type: guide
-order: 3.5
-version: 0.10
----
-
-# 渲染过程控制
-
-## `append`
-
-`append` 特性定义了当前组件的子组件:
-
-1. 以一整棵树的方式一次性添加到视图中 (`append="tree"`),还是
-2. 每个子组件都产生一次单独的添加到视图的指令 (`append="node"`)
-
-``` html
-<template>
- <div>
- <div>
- <text>Hello</text>
- <text>Weex</text>
- </div>
- <div append="node">
- <text>Hello</text>
- <text>Weex</text>
- </div>
- <div append="tree">
- <text>Hello</text>
- <text>Weex</text>
- </div>
- </div>
-</template>
-```
-
-[体验一下](http://dotwe.org/417c75415efce66d8e22bf5942b380ee)
-
-在上面的代码中,第一组和第二组 `<div>` 的渲染过程相同,即先添加空的父级 `<div>`,然后插入第一个 `<text>` Hello,然后插入第二个 `<text>` Weex;第三组 `<div>` 则是连带两个 `<text>` 子组件一齐传给渲染层进行渲染的。
-
-渲染结果显而易见,前两组渲染方式会使首次绘制的响应速度比后者快些,但是总渲染时间可能比第三组 `append="tree"` 更长。开发者可以根据实际界面的情况自行选择合理的渲染过程。
-
-默认情况下,除了 `<cell>` 组件的默认渲染过程是 `tree` 模式,其它组件都默认按照 `node` 模式进行渲染。
-
-下一节:[自定义组件](./composed-component.html)
http://git-wip-us.apache.org/repos/asf/incubator-weex-site/blob/32a097bf/source/cn/v-0.10/guide/syntax/style-n-class.md
----------------------------------------------------------------------
diff --git a/source/cn/v-0.10/guide/syntax/style-n-class.md b/source/cn/v-0.10/guide/syntax/style-n-class.md
deleted file mode 100644
index afe2de1..0000000
--- a/source/cn/v-0.10/guide/syntax/style-n-class.md
+++ /dev/null
@@ -1,117 +0,0 @@
----
-title: CSS 样式和类
-type: guide
-order: 3.2
-version: 0.10
----
-
-# CSS 样式和类
-
-## 基础语法
-
-CSS 样式可以理解为一系列的键值对,其中的每一对描述了一个特定的样式,例如组件的宽或者高。
-
-```css
-.div {
- width: 400;
- height: 50;
-}
-```
-
-键值对的形式是 `prop-name: prop-value;`。键名是 `prop-name`,键值是 `prop-value`。 一般情况下,键名按照连接符的方式进行命名,键和值之间由冒号 `:` 进行分隔,每对键值之间由分号 `;` 进行分隔。
-
-在 Weex 页面上样式有两种形式:
-
-- `<template>` 中的 `style` 特性
-- `<style>` 样式表
-
-### `<template>` 中的 `style` 特性
-
-在 `style` 特性中编写样式,例如:
-
-```html
-<template>
- <div style="width: 400; height: 50;">
- ...
- </div>
-</template>
-```
-
-这段代码的意思是 `<div>` 组件的宽和高分别为 400 像素和 50 像素。
-
-### `<style>` 样式表
-
-例如:
-
-```html
-<style>
- .wrapper { width: 600; }
- .title { width: 400; height: 50; }
- .highlight { color: #ff0000; }
-</style>
-```
-
-样式表包含了多个样式规则,每条规则有一个对应的类,以及由 `{...}` 包括的若干条样式。例如:
-
-```css
-.title { width: 400; height: 50; }
-```
-
-### `class` 特性
-
-`<template>` 标签中的 `class` 特性值用来匹配 `<style>` 样式表中的一个或多个 class 名,多个 class name 之间由空格分隔。例如:
-
-```html
-<template>
- <div class="wrapper">
- <text class="title">...</text>
- <text class="title highlight">...</text>
- </div>
-</template>
-<style>
- .wrapper { width: 600; }
- .title { width: 400; height: 50; }
- .highlight { color: #ff0000; }
-</style>
-```
-
-[体验一下](http://dotwe.org/8487e2a33cd051c9adfa887d0bafbb44)
-
-这段代码的含义是 `<div>` 组件的宽度是 600 像素,两个 `<text>` 组件的尺寸为 400x50,其中第二个文本组件是红色字。
-
-**注意事项**
-
-- 为了简化页面设计和实现,屏幕的宽度统一为 750 像素,不同设备屏幕都会按照比例转化为这一尺寸进行长度计算。
-- 标准 CSS 支持很多样式选择器,但 Weex 目前只支持单个 class name 的选择器。
-- 标准 CSS 支持很多的长度单位,但 Weex 目前只支持像素,并且 `px` 单位可以忽略不写,直接使用对应的数值。更多详情请查看[通用样式](../references/common-style.html)。
-- 子元素的样式不会继承自父元素,这一点与标准 CSS 不同,比如 `color` 和 `font-size` 等样式作用在 `<text>` 上层的 `<div>` 上是无效的。
-- 标准 CSS 包含了非常多的样式属性,但 Weex 只支持了其中的一部分,比如盒模型、flexbox、position 等布局属性,以及 `font-size`、`color` 等其它样式。
-
-## 与数据绑定结合
-
-请查阅[数据绑定](./data-binding.html)中有关 `style` 和 `class` 特性的相关部分。这里简单举个例子:
-
-```html
-<template>
- <div>
- <text style="font-size: {{fontSize}};">Alibaba</text>
- <text class="large {{textClass}}">Weex Team</text>
- </div>
-</template>
-<style>
- .large {font-size: 32;}
- .highlight {color: #ff0000;}
-</style>
-<script>
- module.exports = {
- data: {
- fontSize: 32,
- textClass: 'highlight'
- }
- }
-</script>
-```
-
-[体验一下](http://dotwe.org/440d3318dc7b83e3bb0a110f3b3236ca)
-
-下一篇:[事件处理](./events.html)
http://git-wip-us.apache.org/repos/asf/incubator-weex-site/blob/32a097bf/source/cn/v-0.10/index.md
----------------------------------------------------------------------
diff --git a/source/cn/v-0.10/index.md b/source/cn/v-0.10/index.md
deleted file mode 100644
index 9e59b8c..0000000
--- a/source/cn/v-0.10/index.md
+++ /dev/null
@@ -1,5 +0,0 @@
-layout: index
-type: index
-subtitle: 快速、简洁且高效
-version: 0.10
----
\ No newline at end of file
http://git-wip-us.apache.org/repos/asf/incubator-weex-site/blob/32a097bf/source/cn/v-0.10/references/api.md
----------------------------------------------------------------------
diff --git a/source/cn/v-0.10/references/api.md b/source/cn/v-0.10/references/api.md
deleted file mode 100644
index e3e5e4b..0000000
--- a/source/cn/v-0.10/references/api.md
+++ /dev/null
@@ -1,67 +0,0 @@
----
-title: ViewModel APIs
-type: references
-order: 1.3
-version: 0.10
----
-
-# 接口
-
-你可以在组件的方法中通过 `this` (Vm)上下文访问这些 API。
-
-例子:
-
-```html
-<script>
-module.exports = {
- methods: {
- somemethod: function() {
- this.$vm('someId');
- }
- }
-}
-</script>
-```
-
-## $(id)
-
-**不建议使用**,请使用 `$vm` 代替。
-## $el(id)
-
-返回对应 id 的元素对象的引用。
-### Arguments
-- `id` _(string)_: 唯一标识符。
-### Returns
-- _(Element)_: 一个元素对象的引用。
-### Tips
-- id 只能保证是当前(页面)组件中是唯一的,如果你需要寻找父组件或子组件,你可以利用组件间的通信模式实现。
-- 延伸阅读: [id](../guide/syntax/id.md),[Communicate Between Components](../guide/syntax/comm.md)
-## $vm(id)
-
-返回对应 id 的 vm 对象引用。
-### Arguments
-- `id` _(String)_: 唯一标识符。
-### Returns
-- `vm` _(Vm)_: 一个 Vm 对象引用。
-### Tips
-- id 只能保证是当前(页面)组件中是唯一的,如果你需要寻找父组件或子组件,你可以利用组件间的通信模式实现。
-- 延伸阅读: [id](../guide/syntax/id.md),[Communicate Between Components](../guide/syntax/comm.md)
-## $getConfig()
-
-获取当前全局环境变量和配置信息。
-### Returns
-- `config` _(object)_: 配置对象;
-- `bundleUrl` _(string)_: bundle 的 url;
-- `debug` _(boolean)_: 是否是调试模式;
-- `env` _(object)_: 环境对象;
- - `weexVersion` _(string)_: Weex sdk 版本;
- - `appName` _(string)_: 应用名字;
- - `appVersion` _(string)_: 应用版本;
- - `platform` _(string)_: 平台信息,是 `iOS`、`Android` 还是 `Web`;
- - `osVersion` _(string)_: 系统版本;
- - `deviceModel` _(string)_: 设备型号 **(仅原生应用)**;
- - `deviceWidth` _(number)_: 设备宽度,默认为 `750`;
- - `deviceHeight` _(number)_: 设备高度。
-## $call(module, method, ...args)
-
-**不建议使用**,请使用 `require('@weex-module/module')[method](...args)` 代替。查看更多信息:[modules](./modules/main)。
http://git-wip-us.apache.org/repos/asf/incubator-weex-site/blob/32a097bf/source/cn/v-0.10/references/bubble.md
----------------------------------------------------------------------
diff --git a/source/cn/v-0.10/references/bubble.md b/source/cn/v-0.10/references/bubble.md
deleted file mode 100644
index 74b7e98..0000000
--- a/source/cn/v-0.10/references/bubble.md
+++ /dev/null
@@ -1,150 +0,0 @@
----
-title: 事件冒泡
-type: references
-order: 1.3
-version: 0.10
----
-
-# 事件冒泡 <span class="api-version">v0.13+</span>
-
-Weex 1.0 实现了 W3C 标准的事件冒泡机制。
-
-### 使用
-
-```html
-<template>
- <div class="root" onclick="rootClick" bubble="true">
- <div>
- <text style="font-size: 40px;">{{rootText}}</text>
- </div>
- <div class="outer" onclick="parentClick">
- <div>
- <text style="font-size: 40px;">{{parentText}}</text>
- </div>
- <text class="inner" onclick="click">{{innerText}}</text>
- </div>
- </div>
-</template>
-
-<script>
- module.exports = {
- data: {
- innerText: 'click me',
- parentText: '',
- rootText: ''
- },
- methods: {
- click: function(e) {
- this.innerText = 'inner bubble'
- },
- parentClick: function(e) {
- this.parentText = 'parent bubble'
- },
- rootClick: function(e) {
- this.rootText = 'root bubble'
- }
- }
- }
-</script>
-
-<style>
- .inner {
- font-size: 40px;
- text-align: center;
- background-color: #7a9b1b;
- padding: 40px;
- }
-
- .outer {
- font-size: 40px;
- text-align: center;
- background-color: #9b7a1b;
- padding: 120px;
- }
-
- .root {
- font-size: 40px;
- text-align: center;
- background-color: #7a1b9b;
- padding: 80px;
- }
-</style>
-```
-
-[try it](http://dotwe.org/weex/dbfeb926e003986e2eea88c8ccdadb92)
-
-运行以上代码,用客户端打开,点击中间的元素,可以看到事件向上传播,依次触发。
-
-### 注意
-
-需要注意的是: ** 为了兼容之前的版本,Weex 默认不会开启事件冒泡机制。需要在根元素的属性上,添加 `bubble="true"` 来开启冒泡机制。否则,将不会向上传播事件,保持与之前版本的效果相同。 **
-
-### stopPropagation
-
-在事件处理函数中,可以使用 `e.stopPropagation()` 方法,来阻止本次事件向上的传递过程。注意,`e.stopPropagation()` 与 `bubble="true"` 不同,前者只会影响当前元素以及父元素的传播,不会影响子元素的传播;后者是为了版本兼容而增加的开关机制,会全局关闭或者开启冒泡机制,两者可以共同存在使用,如下:
-
-```html
-<template>
- <div class="root" onclick="rootClick" bubble="true">
- <div>
- <text style="font-size: 40px;">{{rootText}}</text>
- </div>
- <div class="outer" onclick="parentClick">
- <div>
- <text style="font-size: 40px;">{{parentText}}</text>
- </div>
- <text class="inner" onclick="click">{{innerText}}</text>
- </div>
- </div>
-</template>
-
-<script>
- module.exports = {
- data: {
- innerText: 'click me',
- parentText: '',
- rootText: ''
- },
- methods: {
- click: function(e) {
- this.innerText = 'inner bubble'
- },
- parentClick: function(e) {
- this.parentText = 'parent bubble'
- e.stopPropagation()
- },
- rootClick: function(e) {
- this.rootText = 'root bubble'
- // e.stopPropagation()
- }
- }
- }
-</script>
-
-<style>
- .inner {
- font-size: 40px;
- text-align: center;
- background-color: #7a9b1b;
- padding: 40px;
- }
-
- .outer {
- font-size: 40px;
- text-align: center;
- background-color: #9b7a1b;
- padding: 120px;
- }
-
- .root {
- font-size: 40px;
- text-align: center;
- background-color: #7a1b9b;
- padding: 80px;
- }
-</style>
-```
-
-[try it](http://dotwe.org/weex/0cab45a7c62e8bebedd2ffd83a8e1256)
-
-运行以上代码,用客户端打开,点击中间的元素,可以看到事件向上传播到父元素被终止,不再继续往根元素传播。
http://git-wip-us.apache.org/repos/asf/incubator-weex-site/blob/32a097bf/source/cn/v-0.10/references/cheatsheet.md
----------------------------------------------------------------------
diff --git a/source/cn/v-0.10/references/cheatsheet.md b/source/cn/v-0.10/references/cheatsheet.md
deleted file mode 100644
index 777abf6..0000000
--- a/source/cn/v-0.10/references/cheatsheet.md
+++ /dev/null
@@ -1,114 +0,0 @@
----
-title: Weex 快查手册
-type: references
-order: 6
-version: 0.10
----
-
-# Weex 备忘录
-
-## Native 组件
-<style>
-code {
- word-break: break-all;
-}
-</style>
-
-| 组件 | 特性 | 样式 | 事件 | 特殊父组件 | 子组件 |
-| ---- | ---- | ---- | ---- | ---- | ---- |
-| `<div>` | - | **box model**<br>**flexbox**<br>`position`<br>`background-color`<br>`opacity` | `click`<br>`appear`<br>`disappear` | - | (any) |
-| `<text>` | `value` | **box model**<br>flex<br>`position`<br>`background-color`<br>`opacity`<br>`color`<br>`font-size`<br>`font-style`<br>`font-weight`<br>`text-decoration`<br>`text-align`<br>`text-overflow`<br>`line-height` | `click`<br>`appear`<br>`disappear` | - | text only |
-| `<image>` | `src` | **box model**<br>**flexbox**<br>`position`<br>`background-color`<br>`opacity`<br>`resize` | `click`<br>`appear`<br>`disappear` | - | (none) |
-| `<scroller>` | `show-scrollbar`<br>`scroll-direction` | **box model**<br>**flexbox**<br>`position`<br>`background-color`<br>`opacity` | `click`<br>`appear`<br>`disappear` | - | (any) |
-| `<list>` | `loadmoreoffset` | **box model**<br>**flexbox**<br>`position`<br>`background-color`<br>`opacity` | `click`<br>`appear`<br>`disappear`<br>`loadmore`<br>`refresh`<br>`loading` | - | `<cell>`<br>`<header>`<br>`<refresh>`<br>`<loading>` |
-| `<cell>` | - | **box model**<br>**flexbox**<br>`position`<br>`background-color`<br>`opacity` | `click`<br>`appear`<br>`disappear` | `<list>` | (any) |
-| `<slider>` | `auto-play` | **box model**<br>**flexbox**<br>`position`<br>`background-color`<br>`opacity` | `click`<br>`appear`<br>`disappear`<br>`change` | - | (any)<br>`<indicator>` |
-| `<indicator>` | - | **box model**<br>**flexbox**<br>`position`<br>`item-color`<br>`item-selected-color`<br>`item-size` | `click`<br>`appear`<br>`disappear` | `<slider>` | (none) |
-| `<wxc-navpage>` | `height`<br>`background-color`<br>`title`<br>`title-color`<br>`left-item-title`<br>`left-item-color`<br>`right-item-title`<br>`right-item-color`<br>`left-item-src`<br>`right-item-src` | **box model**<br>**flexbox**<br>`position`<br>`background-color`<br>`opacity` | `click`<br>`appear`<br>`disappear`<br>`naviBar.leftItem.click`<br>`naviBar.rightItem.click` | - | (any) |
-| `<wxc-tabbar>` | `tab-items` | **box model**<br>**flexbox**<br>`position`<br>`background-color`<br>`opacity` | `tabBar.onClick` | - | (none) |
-| `<embed>` | `src` | **box model**<br>**flexbox**<br>`position`<br>`background-color`<br>`opacity` | `click`<br>`appear`<br>`disappear` | - | (none) |
-| `<web>` | `src` | **box model**<br>**flexbox**<br>`position`<br>`background-color`<br>`opacity` | `click`<br>`appear`<br>`disappear`<br>`pagestart`<br>`pagefinish`<br>`error` | - | (none) |
-| `<video>` | `src`<br>`play-status`<br>`auto-play` | **box model**<br>**flexbox**<br>`position`<br>`background-color`<br>`opacity` | `click`<br>`appear`<br>`disappear`<br>`start`<br>`pause`<br>`finish`<br>`fail` | - | (none) |
-| `<a>` | `href` | **box model**<br>**flexbox**<br>`position`<br>`background-color`<br>`opacity` | `click`<br>`appear`<br>`disappear` | - | (any) |
-| `<input>` | `type`<br>`value`<br>`placeholder`<br>`disabled`<br>`autofocus` | **box model**<br>**flexbox**<br>`position`<br>`background-color`<br>`opacity`<br>`placeholder-color`<br>`color`<br>`font-size`<br>`font-style`<br>`font-weight`<br>`text-align` | `click`<br>`appear`<br>`disappear` | - | (none) |
-| `<switch>` | `checked` | **box model**<br>**flexbox**<br>`position`<br>`background-color`<br>`opacity` | `appear`<br>`disappear`<br>`input`<br>`change`<br>`focus`<br>`blur` | - | (none) |
-
-## Native Modules
-
-| module | apis |
-| ---- | ---- |
-| `@weex-module/dom` | `scrollToElement(node, { offset })` |
-| `@weex-module/modal` | `toast({ message, duration })`<br>`alert({ message, okTitle }, callback)`<br>`confirm({ message, okTitle, cancelTitle }, callback(result))`<br>`prompt({ message, okTitle, cancelTitle }, callback(result, data))` |
-| `@weex-module/stream` | `fetch({ method, url, headers, type, body }, callback({ status, ok, statusText, data, headers }), progressCallback({ readyState, status, length, statusText, headers}))` |
-| `@weex-module/webview` | `goBack(ref)`<br>`goForward(ref)`<br>`reload(ref)` |
-| `@weex-module/navigator` | `push({ url, animated }, callback)`<br>`pop({ animated }, callback)` |
-| `@weex-module/animation` | `transition(node, { styles, duration, timingFunction, delay, transform-origin }, callback)` |
-
-## 特殊的模版语法
-
-* `<foo x="abc">`
-* `{% raw %}<foo x="{{expr}}">{% endraw %}`
-* `<foo style="name1: value1; name2: value2">`
-* `{% raw %}<foo style="name1: value1; name2: {{expr}}; name3: ...">{% endraw %}`
-* `<foo class="a b c">`
-* `{% raw %}<foo class="a {{expr}} c">{% endraw %}`
-* `<foo onclick="methodName">`
-* `<foo id="abc">`
-* `<foo if="expr">`
-* `<foo repeat="item in list">`
-* `<foo repeat="(key,item) in list">`
-* `<component type="foo">`
-* `{% raw %}<component type="{{expr}}">{% endraw %}`
-
-## ViewModel APIs
-
-* `this.$vm(el)`
-* `this.$el(el)`
-* `this.$getConfig()`
-* `this.$emit(type, data)`
-* `this.$dispatch(type, data)`
-* `this.$broadcast(type, data)`
-
-## ViewModel Options
-
-* `data`
-* `methods`
-* `computed`
-* `init`, `created`, `ready`
-* `events`
-
-**示例:**
-
-```javascript
-module.exports = {
-
- data: function () {
- return {
- x: 1,
- y: 2
- }
- }
-
- methods: {
- foo: function () {
- console.log('foo')
- }
- },
-
- computed: {
- z: function () {
- return this.x + this.y
- }
- },
-
- events: {
- custom: function (e) {
- console.log(e)
- }
- },
-
- init: function () {},
- created: function () {},
- ready: function () {}
-}
-```
http://git-wip-us.apache.org/repos/asf/incubator-weex-site/blob/32a097bf/source/cn/v-0.10/references/color-names.md
----------------------------------------------------------------------
diff --git a/source/cn/v-0.10/references/color-names.md b/source/cn/v-0.10/references/color-names.md
deleted file mode 100644
index 1b8a968..0000000
--- a/source/cn/v-0.10/references/color-names.md
+++ /dev/null
@@ -1,180 +0,0 @@
----
-title: 颜色名称列表
-type: references
-order: 1.8
-version: 0.10
----
-
-# Weex 支持的所有颜色名称
-
-### 基础颜色关键词:
-
-| 颜色名 | 十六进制RGB值 |
-| --- | --- |
-| black(黑) | #000000 |
-| silver(银) | #C0C0C0 |
-| gray(灰) | #808080 |
-| white(白) | #FFFFFF |
-| maroon(褐紫红) | #800000 |
-| red(红) | #FF0000 |
-| purple(紫) | #800080 |
-| fuchsia(晚樱) | #FF00FF |
-| green(绿) | #008000 |
-| lime(石灰) | #00FF00 |
-| olive(橄榄) | #808000 |
-| yellow(黄) | #FFFF00 |
-| navy(海军蓝) | #000080 |
-| blue(蓝) | #0000FF |
-| teal(水鸭) | #008080 |
-| aqua(水蓝) | #00FFFF |
-### 扩展颜色关键词:
-
-| 颜色名 | 十六进制RGB值 |
-| --- | --- |
-| aliceblue | #F0F8FF |
-| antiquewhite | #FAEBD7 |
-| aqua | #00FFFF |
-| aquamarine | #7FFFD4 |
-| azure | #F0FFFF |
-| beige | #F5F5DC |
-| bisque | #FFE4C4 |
-| black | #000000 |
-| blanchedalmond | #FFEBCD |
-| blue | #0000FF |
-| blueviolet | #8A2BE2 |
-| brown | #A52A2A |
-| burlywood | #DEB887 |
-| cadetblue | #5F9EA0 |
-| chartreuse | #7FFF00 |
-| chocolate | #D2691E |
-| coral | #FF7F50 |
-| cornflowerblue | #6495ED |
-| cornsilk | #FFF8DC |
-| crimson | #DC143C |
-| cyan | #00FFFF |
-| darkblue | #00008B |
-| darkcyan | #008B8B |
-| darkgoldenrod | #B8860B |
-| darkgray | #A9A9A9 |
-| darkgreen | #006400 |
-| darkgrey | #A9A9A9 |
-| darkkhaki | #BDB76B |
-| darkmagenta | #8B008B |
-| darkolivegreen | #556B2F |
-| darkorange | #FF8C00 |
-| darkorchid | #9932CC |
-| darkred | #8B0000 |
-| darksalmon | #E9967A |
-| darkseagreen | #8FBC8F |
-| darkslateblue | #483D8B |
-| darkslategray | #2F4F4F |
-| darkslategrey | #2F4F4F |
-| darkturquoise | #00CED1 |
-| darkviolet | #9400D3 |
-| deeppink | #FF1493 |
-| deepskyblue | #00BFFF |
-| dimgray | #696969 |
-| dimgrey | #696969 |
-| dodgerblue | #1E90FF |
-| firebrick | #B22222 |
-| floralwhite | #FFFAF0 |
-| forestgreen | #228B22 |
-| fuchsia | #FF00FF |
-| gainsboro | #DCDCDC |
-| ghostwhite | #F8F8FF |
-| gold | #FFD700 |
-| goldenrod | #DAA520 |
-| gray | #808080 |
-| green | #008000 |
-| greenyellow | #ADFF2F |
-| grey | #808080 |
-| honeydew | #F0FFF0 |
-| hotpink | #FF69B4 |
-| indianred | #CD5C5C |
-| indigo | #4B0082 |
-| ivory | #FFFFF0 |
-| khaki | #F0E68C |
-| lavender | #E6E6FA |
-| lavenderblush | #FFF0F5 |
-| lawngreen | #7CFC00 |
-| lemonchiffon | #FFFACD |
-| lightblue | #ADD8E6 |
-| lightcoral | #F08080 |
-| lightcyan | #E0FFFF |
-| lightgoldenrodyellow | #FAFAD2 |
-| lightgray | #D3D3D3 |
-| lightgreen | #90EE90 |
-| lightgrey | #D3D3D3 |
-| lightpink | #FFB6C1 |
-| lightsalmon | #FFA07A |
-| lightseagreen | #20B2AA |
-| lightskyblue | #87CEFA |
-| lightslategray | #778899 |
-| lightslategrey | #778899 |
-| lightsteelblue | #B0C4DE |
-| lightyellow | #FFFFE0 |
-| lime | #00FF00 |
-| limegreen | #32CD32 |
-| linen | #FAF0E6 |
-| magenta | #FF00FF |
-| maroon | #800000 |
-| mediumaquamarine | #66CDAA |
-| mediumblue | #0000CD |
-| mediumorchid | #BA55D3 |
-| mediumpurple | #9370DB |
-| mediumseagreen | #3CB371 |
-| mediumslateblue | #7B68EE |
-| mediumspringgreen | #00FA9A |
-| mediumturquoise | #48D1CC |
-| mediumvioletred | #C71585 |
-| midnightblue | #191970 |
-| mintcream | #F5FFFA |
-| mistyrose | #FFE4E1 |
-| moccasin | #FFE4B5 |
-| navajowhite | #FFDEAD |
-| navy | #000080 |
-| oldlace | #FDF5E6 |
-| olive | #808000 |
-| olivedrab | #6B8E23 |
-| orange | #FFA500 |
-| orangered | #FF4500 |
-| orchid | #DA70D6 |
-| palegoldenrod | #EEE8AA |
-| palegreen | #98FB98 |
-| paleturquoise | #AFEEEE |
-| palevioletred | #DB7093 |
-| papayawhip | #FFEFD5 |
-| peachpuff | #FFDAB9 |
-| peru | #CD853F |
-| pink | #FFC0CB |
-| plum | #DDA0DD |
-| powderblue | #B0E0E6 |
-| purple | #800080 |
-| red | #FF0000 |
-| rosybrown | #BC8F8F |
-| royalblue | #4169E1 |
-| saddlebrown | #8B4513 |
-| salmon | #FA8072 |
-| sandybrown | #F4A460 |
-| seagreen | #2E8B57 |
-| seashell | #FFF5EE |
-| sienna | #A0522D |
-| silver | #C0C0C0 |
-| skyblue | #87CEEB |
-| slateblue | #6A5ACD |
-| slategray | #708090 |
-| slategrey | #708090 |
-| snow | #FFFAFA |
-| springgreen | #00FF7F |
-| steelblue | #4682B4 |
-| tan | #D2B48C |
-| teal | #008080 |
-| thistle | #D8BFD8 |
-| tomato | #FF6347 |
-| turquoise | #40E0D0 |
-| violet | #EE82EE |
-| wheat | #F5DEB3 |
-| white | #FFFFFF |
-| whitesmoke | #F5F5F5 |
-| yellow | #FFFF00 |
-| yellowgreen | #9ACD32 |
[15/51] [abbrv] incubator-weex-site git commit: rearrangement the
structure of the document
Posted by ha...@apache.org.
http://git-wip-us.apache.org/repos/asf/incubator-weex-site/blob/32a097bf/source/cn/references/native-dom-api.md
----------------------------------------------------------------------
diff --git a/source/cn/references/native-dom-api.md b/source/cn/references/native-dom-api.md
deleted file mode 100644
index 91c2308..0000000
--- a/source/cn/references/native-dom-api.md
+++ /dev/null
@@ -1,223 +0,0 @@
----
-title: Native DOM APIs
-type: references
-order: 6
-version: 2.1
-has_chapter_content: true
----
-
-# Native DOM APIs
-
-Weex 在 JS 引擎中,为每个页面都提供了一套 Native DOM APIs,这套接口和 HTML DOM APIs 非常接近,利用这套接口我们可以通过 JavaScript 控制 native 的渲染逻辑。而且 Weex 上层的 Vue 2.0 也是基于这套接口进行适配的。
-
-*绝大多数情况下 JS 框架会把 Native DOM APIs 都封装好,开发者不需要直接对 Native DOM 进行操作。*
-
-* `Document` 类,整个页面文档。
-* `Node` 类,结点的基础类。
-* `Element` 类,元素结点,继承自 `Node`,单个视图单元。
-* `Comment` 类,注释结点,继承自 `Node`,无实际意义,通常用作占位符。
-
-**每个 Weex 页面都有一个 `weex.document` 对象,该对象就是一个 `Document` 类的实例,也是下面所有接口调用的起点。**
-
-接下来详细介绍它们的用法:
-
-## `Document` 类
-
-每个 `Document` 实例在创建的时候都会自动拥有一个 `documentElement` 属性,表示文档结点。该文档结点可以拥有一个 `body`,即文档的主体结点。
-
-**注意事项**: 文档的主体结点只接受 `<div>`、`<list>` 或 `<scroller>` 三种类型的元素结点。
-
-### 构造函数
-
-**`new Document(id: string, url: string?)`**
-
-### 成员方法
-
-**`createElement(tagName: string, props: Object?): Element`**
-
-* 创建一个特定类型 `tagName` 的 `Element` 实例,即一个元素结点。`props` 可以包含 `attr` 对象和 `style` 对象。比如 `createBody('div', {style: {backgroundColor: '#ffffff'}})`。
-
-**`createComment(text: string): Comment`**
-
-* 创建一个 `Comment` 的实例,即一个注释结点,并设置一段文本描述。
-
-**`createBody(tagName: string, props: Object?): Element`**
-
-* 创建文档主体结点,并自动挂载到 `documentElement` 下。
-
-**`fireEvent(el: Element, type: string, e: Object?, domChanges: Object?)`**
-
-* 触发一个特定类型的事件,并附带一个事件对象 `e`。当该事件在产生过程中修改了 DOM 的特性或样式,则第四个参数用来描述这些改变,参数格式和上面 `createElement` 方法的格式相同。
-
-**`destroy()`**
-
-* 销毁当前文档。一旦销毁之后文档将不会再工作。
-
-### 只读成员变量
-
-**`id: string`**
-
-* 每个 `Document` 实例都有一个唯一的 `id`。这同时也是每个 Weex 页面唯一拥有的 `id`。
-
-**`URL: string?`**
-
-* 如果当前 Weex 页面有 JS bundle URL 的话,这里则会返回 这个 URL。
-
-**`body: Element`**
-
-* 文档的主体结点,概念类似 HTML DOM 里的 `document.body`。
-
-**`documentElement: Element`**
-
-* 文档的对应结点,概念类似 HTML DOM 里的 `document.documentElement`。
-* `body` 和 `documentElement` 的关系是:`documentElement` 是 `body` 的父结点。
-
-**`getRef(id): Node`**
-
-* 根据结点 id 获取结点。
-
-## `Node` 类
-
-### 构造函数
-
-**`new Node()`**
-
-### 成员
-
-**`destroy()`**
-
-### 只读成员变量或方法
-
-**`ref: string`**
-
-* 每个 `Node` 实例都有各自的在整个 `Document` 实例中唯一的 `ref` 值。
-
-**`nextSibling: Node?`**
-
-**`previousSibling: Node?`**
-
-**`parentNode: Node?`**
-
-* 上述三个接口和 HTML DOM 的定义吻合。
-
-**`children: Node[]`**
-
-* 该结点拥有的所有子结点的数组。
-
-**`pureChildren: Node[]`**
-
-* 该结点拥有的所有子元素的数组。和 `children` 的区别是,`pureChildren` 只包含了 `Element` 实例而不包含 `Comment` 实例。
-
-## `Element` 类 <small>继承自 `Node`</small>
-
-### 构造函数
-
-**`new Element(type: string, props: Object?)`**
-
-* 创建一个特定类型 `type` 的元素结点,参数 `props` 可以包含 `attr` 对象或 `style` 对象。
-
-### DOM 树操作
-
-**`appendChild(node: Node)`**
-
-**`insertBefore(node: Node, before: Node?)`**
-
-* 上述两个接口类似 HTML DOM。
-
-**`insertAfter(node: Node, after: Node?)`**
-
-* 在一个子结点之前插入新结点 after。
-
-**`removeChild(node: Node, preserved: boolean?)`**
-
-* 删除子结点 `node`,参数 `preserved` 表示立刻从内存中删除还是暂时保留。
-
-**`clear()`**
-
-* 清除所有的子结点。
-
-### DOM 属性本身操作
-
-**`setAttr(key: string, value: string, silent: boolean?)`**
-
-**`setStyle(key: string, value: string, silent: boolean?)`**
-
-* 上述两个接口中,当 `silent` 为真的时候,结点仅更新自己,不会传递命令给客户端渲染层。该参数用来处理用户事件在发生时已经改变结点相关属性的情况下,不会在 Native DOM 也改变之后重复发送命令给客户端。
-
-**`addEvent(type: string, handler: Function)`**
-
-**`removeEvent(type: string)`**
-
-**`fireEvent(type: string, e: any)`**
-
-* 绑定事件、解绑定事件、触发事件。
-
-#### 特定组件类型的组件方法
-
-特殊的:不同组件类型可以拥有自己特有的方法,比如 `<web>` 组件支持 `refresh` 方法,详见各组件的描述,在此情况下,我们会产生特定组件类型的 class,比如 `WebElement`,它继承自 `Element`。
-
-如:
-
-> #### `WebElement` <small>继承自 `Element`</small>
->
-> 表示在 Weex 页面中嵌入一个 webview
->
-> **`refresh()`**: 刷新当前 webview
-
-### 只读成员变量或方法
-
-**`ref`, `nextSibling`, `previousSibling`, `parentNode`**
-
-* 继承自 `Node`。
-
-**`nodeType: number`**
-
-* 永远是数字 `1`。
-
-**`type: string`**
-
-* 和构造函数里的 `type` 一致。
-
-**`attr: Object`**
-
-* 当前结点的所有特性的键值对。推荐通过 `setAttr()` 方法进行修改,而不要直接修改这里的对象。
-
-**`style: Object`**
-
-* 当前结点的所有样式的键值对。推荐通过 `setStyle()` 方法进行修改,而不要直接修改这里的对象。
-
-**`event: Object`**
-
-* 当前结点的所有事件绑定。每个事件类型对应一个事件句柄方法。推荐通过 `addEvent()` / `removeEvent()` 方法进行修改,而不要直接修改这里的对象。
-
-**`toJSON(): Object`**
-
-* 返回描述该元素结点的一段 JSON 对象,形如:`{ref: string, type: string, attr: Object, style: Object, event: Array(string), children: Array}`。
-
-## `Comment` 类 <small>继承自 `Node`</small>
-
-### 构造函数
-
-**`new Comment(value: string)`**
-
-### 只读成员变量或方法
-
-**`ref`, `nextSibling`, `previousSibling`, `parentNode`**
-
-* 继承自 `Node`。
-
-**`nodeType: number`**
-
-* 永远是数字 `8`。
-
-**`type: string`**
-
-* 永远是字符串 `'comment'`
-
-**`value: string`**
-
-* 和构造函数里的 `value` 一致。
-
-**`toJSON(): Object`**
-
-* 返回描述该注释结点的一段 JSON 对象,形如:`<!-- value -->`。
\ No newline at end of file
http://git-wip-us.apache.org/repos/asf/incubator-weex-site/blob/32a097bf/source/cn/references/path.md
----------------------------------------------------------------------
diff --git a/source/cn/references/path.md b/source/cn/references/path.md
deleted file mode 100644
index 9e5a889..0000000
--- a/source/cn/references/path.md
+++ /dev/null
@@ -1,43 +0,0 @@
----
-title: Path (英)
-type: references
-order: 1.9
-version: 2.1
-has_chapter_content: true
----
-
-# Path
-
-<span class="weex-version">v0.9+</span>
-
-本文将介绍 Weex 中 uri(url) 的用法。包括使用图像、字体等资源,处理相对路径以及如何访问本地及打包的资源文件。
-
-## Schemes
-
-* 本地资源
-
- Weex SDK 提供 `local` scheme 来访问打包在应用程序中的资源,此 scheme 无法在 H5 环境下使用。目前,开发者可以在 `image` 组件和字体文件中使用本地资源。
-
- * 在 iOS 中,Weex 会在 `bundle resources` 中查找。例如,`image` 组件的 `src` 属性为 `local:///app_icon'`, Weex 会加载 `bundle resouce` 中名为 `app_icon` 的图像资源,而字体文件也以相同的方式工作。
-
- * 在 Android 中,`image` 组件将从 `drawable` 资源文件夹加载,如 `res/drawable-xxx`。但加载字体文件是不同的,Android 框架无法从 `res` 加载字体文件,因此 SDK 将从 `asserts` 文件夹加载它。
-
-* HTTP/HTTPS
-
- 它的工作方式与 web 相同,Weex 一直支持这种方式。
-
-* File
-
-使用 `file` scheme 访问本地磁盘文件。这个方案有其局限性:你不应该在源页面中硬编码文件 url。因为不管它是否在不同的平台(iOS,Android)上运行,内容将在另一个设备上完全不同,这取决于具体的设备。
-
-所以一种可行的方案是在运行时动态获取文件 url,你可以使用它来显示本地磁盘的图像,或者稍后上传它。
-
-## 相对路径
-
-[与我们在 HTML 中的用法类似](https://www.w3.org/TR/html4/types.html#type-uri),Weex 以相同的方式处理相对路径。以`/`、`.`、`..`、`//` 开头的相对 URI 将相对于 bunle url 解析。
-
-这意味着, 一个以 `/` 开头的路径将是相对于 JS Bundle 文件的根文件夹。`.` 则是当前文件夹,`..` 是父文件夹。 `//` 则被解析为与 JS Bundle 相同的 scheme。
-
-## URI Adapter
-
-以上所有是默认实现,开发者可以通过提供一个 `URI Adapter` 来扩展或覆盖默认实现。与其他 Adapter 相同,应在 Weex SDK 初始化之前设置自定义 Adapter。
\ No newline at end of file
http://git-wip-us.apache.org/repos/asf/incubator-weex-site/blob/32a097bf/source/cn/references/platform-difference.md
----------------------------------------------------------------------
diff --git a/source/cn/references/platform-difference.md b/source/cn/references/platform-difference.md
deleted file mode 100644
index 8789ebf..0000000
--- a/source/cn/references/platform-difference.md
+++ /dev/null
@@ -1,70 +0,0 @@
----
-title: Weex 和 Web 平台的差异
-type: references
-order: 12
-version: 2.1
-has_chapter_content: true
----
-
-# Weex 和 Web 平台的差异
-
-Weex 是一个跨平台解决方案,Web 平台只是其一种运行环境,除此之外还可以在 Android 和 iOS 客户端中运行。原生开发平台和 Web 平台之间的差异,在功能和开发体验上都有一些差异。
-
-## Weex 环境中没有 DOM
-
-DOM(Document Object Model),即文档对象模型,是 HTML 和 XML 文档的编程接口,是 Web 中的概念。Weex 的运行环境以原生应用为主,在 Android 和 iOS 环境中渲染出来的是原生的组件,不是 DOM Element。
-
-### 不支持 DOM 操作
-
-既然原生环境中不支持 Web API,没有 `Element` 、`Event` 、`File` 等对象,详细列表可以参考 [Web APIs on MDN](https://developer.mozilla.org/en-US/docs/Web/API)。不支持选中元素,如 `document.getElementById` 、 `document.querySelector` 等;当然也不支持基于 DOM API 的程序库(如 jQuery)。
-
-### 有限的事件类型
-
-Weex 支持在标签上绑定事件,和在浏览器中的写法一样,但是 Weex 中的事件是由原生组件捕获并触发的,行为和浏览器中有所不同,事件中的属性也和 Web 中有差异。
-
-+ 并不支持 Web 中所有的事件类型,详情请参考[《通用事件》](./common-event.html)。
-+ 不区分事件的捕获阶段和冒泡阶段,相当于 DOM 0 级事件。
-
-## Weex 环境中没有 BOM
-
-BOM(Browser Object Model),即浏览器对象模型,是浏览器环境为 javascript 提供的接口。Weex 在原生端没有并不基于浏览器运行,不支持浏览器提供的 BOM 接口。
-
-### 没有 `window` 、`screen` 对象
-
-Weex 中并未提供浏览器中的 `window` 和 `screen` 对象,不支持使用全局变量。如果是想要获取设备的屏幕或环境信息,可以使用 `WXEnvironment` 变量。
-
-+ `WXEnvironment`
- + `weexVersion`: WeexSDK 的版本。
- + `appName`: 应用的名称。
- + `appVersion`: 应用的版本。
- + `platform`: 运行平台,可能的值是 `Web` 、`Android` 、`iOS` 之一。
- + `osName`: 系统的名称。
- + `osVersion`: 系统版本。
- + `deviceWidth`: 设备宽度。
- + `deviceHeight`: 设备高度。
-
-### 没有 `document` 对象
-
-在浏览器中 `document` 表示了当前活动的文档模型,在 Android 和 iOS 环境中并没有这个对象,也不支持与其相关的 DOM 操作。
-
-### 没有 `history` 、`location` 、`navigator` 对象
-
-+ `history` 保存了当前页面的历史记录,并且提供了前进后退操作。
-+ `location` 记录了当前页面 URL 相关的信息。
-+ `navigator` 记录了当前浏览器中的信息。
-
-这些接口与浏览器自身的实现有关,可以控制页面的前进后退并且获取状态信息。虽然在 Android 和 iOS 中也有“历史”和“导航”的概念,但是它是用于多个管理视图之间的跳转的。换句话说,在浏览器中执行“前进”、“后退”仍然会处于同一个页签中,在原生应用中“前进”、“后退”则会真实的跳转到其他页面。
-
-此外 Weex 也提供了 `navigator` 模块来操作页面的跳转,使用方法参考[《navigator 导航控制》](./modules/navigator.html)。
-
-## 能够调用移动设备原生 API
-
-在 Weex 中能够调用移动设备原生 API,使用方法是通过注册、调用模块来实现。其中有一些模块是 Weex 内置的,如 clipboard 、 navigator 、storage 等。
-
-+ [《clipboard 剪切板》](./modules/clipboard.html)
-+ [《navigator 导航控制》](./modules/navigator.html)
-+ [《storage 本地存储 》](./modules/storage.html)
-
-为了保持框架的通用性,Weex 内置的原生模块有限,不过 Weex 提供了横向扩展的能力,可以扩展原生模块,具体的扩展方法请参考[《iOS 扩展》](./advanced/index.html) 和[《Android 扩展》](./advanced/extend-to-android.html)。
-
-> 有些接口在浏览器环境中也存在,不过在使用时应该注意浏览器的兼容性;如剪贴板功能,出于安全性考虑,绝大多数浏览器都限制其使用。
http://git-wip-us.apache.org/repos/asf/incubator-weex-site/blob/32a097bf/source/cn/references/text-style.md
----------------------------------------------------------------------
diff --git a/source/cn/references/text-style.md b/source/cn/references/text-style.md
deleted file mode 100644
index 06ebf5a..0000000
--- a/source/cn/references/text-style.md
+++ /dev/null
@@ -1,46 +0,0 @@
----
-title: 文本样式
-type: references
-order: 1.5
-version: 2.1
----
-
-# 文本样式
-
-<span class="weex-version">v0.5+</span>
-
-文本类组件共享一些通用样式, 这类组件目前包括 [`<text>`](./components/text.html) 和 [`<input>`](./components/input.html)。
-
-## 属性
-
-- `color {color}`:文字颜色。
-
- 可选值为色值,支持 RGB( `rgb(255, 0, 0)` );RGBA( `rgba(255, 0, 0, 0.5)` );十六进制( `#ff0000` );精简写法的十六进制( `#f00` );色值关键字(`red`)。
-
-- `lines {number}`: 指定文本行数。仅在 `<text>` 组件中支持。默认值是 `0` 代表不限制行数。
-
-- `font-size {number}`:文字大小。
-
-- `font-style {string}`:字体类别。可选值 `normal` | `italic`,默认为 `normal`。
-
-- `font-weight {string}`<span class="api-version">v0.9+</span>:字体粗细程度
-
- * 可选值: `normal`, `bold`, `100`, `200`, `300`, `400`, `500`, `600`, `700`, `800`, `900`
- * normal 等同于 400, bold 等同于 700;
- * 默认值: `normal`;
- * iOS 支持 9 种 font-weight值;Android 仅支持 400 和 700, 其他值会设为 400 或 700
- * 类似 `lighter`, `bolder` 这样的值暂时不支持
-
-- `text-decoration {string}`:字体装饰,可选值 `none` | `underline` | `line-through`,默认值为 `none`。
-
-- `text-align {string}`:对齐方式。可选值 `left` | `center` | `right`,默认值为 `left`。目前暂不支持 `justify`, `justify-all`。
-
-- `font-family {string}`:设置字体。
-
- 这个设置 **不保证** 在不同平台,设备间的一致性。如所选设置在平台上不可用,将会降级到平台默认字体。
-
-- `text-overflow {string}`:设置内容超长时的省略样式。可选值 `clip` | `ellipsis`
-
-## 其它参考
-
-- [颜色关键字列表](./color-names.html)。
http://git-wip-us.apache.org/repos/asf/incubator-weex-site/blob/32a097bf/source/cn/references/unit.md
----------------------------------------------------------------------
diff --git a/source/cn/references/unit.md b/source/cn/references/unit.md
deleted file mode 100644
index 65931bf..0000000
--- a/source/cn/references/unit.md
+++ /dev/null
@@ -1,64 +0,0 @@
----
-title: CSS 单位
-type: references
-order: 4
-version: 2.1
-has_chapter_content: true
----
-
-# CSS 单位
-
-## CSS `color` 单位
-
-支持以下写法:
-
-```css
-.classA {
- /* 3-chars hex */
- color: #0f0;
- /* 6-chars hex */
- color: #00ff00;
- /* rgba */
- color: rgb(255, 0, 0);
- /* rgba */
- color: rgba(255, 0, 0, 0.5);
- /* transparent */
- color: transparent;
- /* Basic color keywords */
- color: orange;
- /* Extended color keywords */
- color: darkgray;
-}
-```
-
-### 注意
-
-* 不支持 `hsl()`, `hsla()`, `currentColor`, 8个字符的十六进制颜色。
-
-* `rgb(a,b,c)` 或 `rgba(a,b,c,d)` 的性能比其他颜色格式差很多,请选择合适的颜色格式。
-
-颜色名称可查看 [颜色名称列表](./color-names.html).
-
-## CSS `length` 单位
-
-在 Weex 中,我们只支持 `px` 长度单位。并且它将在 JavaScript 运行时和本机渲染器中解析为数字类型。
-
-下面这些不同的写法,解析的结果完全相同。
-
-```css
-.classA { font-size: 48px; line-height: 64px; }
-```
-
-不支持类似 `em`,`rem`,`pt` 这样的 CSS 标准中的其他长度单位。
-
-## CSS `number` 单位
-
-仅仅一个数字。用于 [`opacity`](./common-style.html),[`lines`](./text-style.html)等。
-
-有时值必须是整数,例如:`lines`。
-
-## CSS `percentage` 单位 (暂不支持)
-
-表示百分比值,如“50%”,“66.7%”等。
-
-它是 CSS 标准的一部分,但 Weex 暂不支持。
http://git-wip-us.apache.org/repos/asf/incubator-weex-site/blob/32a097bf/source/cn/references/vue/difference-of-vuex.md
----------------------------------------------------------------------
diff --git a/source/cn/references/vue/difference-of-vuex.md b/source/cn/references/vue/difference-of-vuex.md
deleted file mode 100644
index ce1a560..0000000
--- a/source/cn/references/vue/difference-of-vuex.md
+++ /dev/null
@@ -1,87 +0,0 @@
----
-title: 使用 Vuex 和 vue-router
-type: references
-order: 10.2
-version: 2.1
----
-
-# 使用 Vuex 和 vue-router
-
-Vue.js 也有较多周边技术产品,如 [Vuex](https://github.com/vuejs/vuex) 和 [vue-router](https://github.com/vuejs/vue-router) 等,这些库也可以在 Weex 中很好的工作。
-
-> 我们基于 Weex 和 Vue 开发了一个的完整项目 [weex-hackernews](https://github.com/weexteam/weex-hackernews) ,在项目中使用了 Vuex 和 vue-router ,能够实现同一份代码,在 iOS、Android、Web 下都能完整地工作。
-
-## 使用 Vuex
-
-
-
-Vuex 是一个专为 Vue.js 应用程序开发的状态管理工具库,可以利用 Vue.js 的细粒度数据响应机制来进行高效的状态更新。它采用集中式存储管理应用的所有组件的状态,并以相应的规则保证状态以一种可预测的方式发生变化。
-
-由于在 Vuex 本身就是平台无关的,有较强的移植能力,完全可以在 Weex 中正常地使用 Vuex ,阅读其[官方文档](https://vuex.vuejs.org/zh-cn/)可以了解详细的使用方法。
-
-Vuex 也集成到了其官方调试工具 [devtools extension](https://github.com/vuejs/vue-devtools)中,提供了诸如 time-travel 调试、状态快照导入导出等高级调试功能。这些工具在 Web 平台中可以一如既往地工作。
-
-## 使用 vue-router
-
-vue-router 是专为 Vue.js 开发的便于实现单页应用的工具库,能够以声明式的方法编写页面的导航和跳转信息。
-
-由于 Weex 的运行环境不只是浏览器,通常是以移动端原生环境为主,然而在 Android 和 iOS 中都没有浏览器的 History API,也不存在 DOM,因此如果想在 Weex 环境中使用 vue-router ,有些功能受到了限制,使用时应该注意。
-
-### 路由模式
-
-vue-router 提供了三种运行模式:
-
-+ `hash`: 使用 URL hash 值来作路由。默认模式。
-+ `history`: 依赖 HTML5 History API 和服务器配置。查看 [HTML5 History 模式](https://router.vuejs.org/zh-cn/essentials/history-mode.html)。
-+ `abstract`: 支持所有 JavaScript 运行环境,如 Node.js 服务器端。
-
-配置方法是在定义路由时,传递 `mode` 属性:
-
-```js
-new Router({
- mode: 'abstract',
- // ...
-})
-```
-
-从三种模式的介绍中也可以看出来,Weex 环境中只支持使用 abstract 模式。不过,vue-router 自身会对环境做校验,**如果发现没有浏览器的 API,vue-router 会自动强制进入 abstract 模式**,所以在使用时只要不写 `mode` 配置即可。默认 vue-router 会在浏览器环境中使用 hash 模式,在移动端原生环境中使用 abstract 模式。
-
-### 编程式导航
-
-vue-router 中使用 `<router-link>` 创建导航链接,不过在其中使用了基于 DOM 事件的一些特性,在 Weex 原生环境中并不能很好的工作。在 Weex 中,你必须使用[编程式导航](https://router.vuejs.org/zh-cn/essentials/navigation.html)来编写页面跳转逻辑。
-
-编程式导航其实就是通过主动调用 router 实例上的 `push` 方法实现跳转。
-
-使用 `<router-link>` 的代码示例:
-
-```html
-<!-- 只能在 Web 中使用,Native 环境不支持! -->
-<template>
- <div>
- <router-link to="profile">
- <text>Profile</text>
- </router-link>
- </div>
-</template>
-```
-
-在 Weex 中,需要写成这个样子:
-
-```html
-<template>
- <div>
- <text @click="jump">Profile</text>
- </div>
-</template>
-
-<script>
- import router from './path/to/router'
- export default {
- methods: {
- jump () {
- router.push('profile')
- }
- }
- }
-</script>
-```
http://git-wip-us.apache.org/repos/asf/incubator-weex-site/blob/32a097bf/source/cn/references/vue/difference-with-web.md
----------------------------------------------------------------------
diff --git a/source/cn/references/vue/difference-with-web.md b/source/cn/references/vue/difference-with-web.md
deleted file mode 100644
index 99ac620..0000000
--- a/source/cn/references/vue/difference-with-web.md
+++ /dev/null
@@ -1,137 +0,0 @@
----
-title: Vue 2.x 在 Weex 和 Web 中的差异
-type: references
-order: 10.1
-version: 2.1
----
-
-
-# Vue.js 在 Weex 和 Web 中的差异
-
-## 平台差异
-
-Vue.js 最初是为 Web 平台设计的,虽然可以基于 Weex 开发原生应用,但是 Web 开发和原生开发毕竟不同,在功能和开发体验上都有一些差异,这些差异从本质上讲是原生开发平台和 Web 平台之间的差异,可以通过[《Weex 和 Web 平台的差异》](../platform-difference.html)了解更多细节和原因。
-
-由于运行平台存在差异,Weex 不支持 Vue.js 中与 DOM 相关的功能:
-
-+ 不支持事件冒泡和捕获机制,`.prevent` 、`.capture` 、`.stop` 、`.self` 等事件修饰符在原生环境中无意义。
-+ 键盘事件的 `.{keyCode | keyAlias}` 修饰符在原生环境中无意义。(参考 [Vue 相关文档](https://cn.vuejs.org/v2/guide/events.html#按键修饰符))
-+ 无需自行调用 `vm.$mount`,默认会将入口组件挂载到原生应用的视图中。
-+ 不支持 `v-html` 和 `v-text` 指令。
-
-## 功能差异
-
-### 仅引入了 Vue Runtime
-
-Vue 除了提供默认的完整包以外,还提供一个更小巧的 `vue.runtime.js`,在这个文件中移除了模板编译的相关操作,Weex 中也仅引入 Vue Runtime 的功能,这样做除了可以减少代码体积以外,还能减少运行期编译模板的负担,提升性能。
-
-具体的差异有:
-
-+ 定义组件时不支持使用 `template` 属性。
-+ 不支持使用 `x-templates`。
-+ 不支持使用 `Vue.compile`。
-
-### 隔离多页面的作用域
-
-Weex 在原生端使用的是“多页”的实现,不同的 js bundle 将会在不同的原生页面中执行;也就是说,不同的 js bundle 之间将不同共享 js 变量。即使是 `Vue` 这个变量,在不同页面中也对应了不同的引用。
-
-基于这个特性,Vue 中全局功能将只在当前页面内生效:
-
-+ `Vue.config`
-+ `Vue.component`
-+ `Vue.directive`
-+ `Vue.filter`
-+ `Vue.mixin`
-+ `Vue.use`
-
-> 注:以上接口的功能并未受影响,只是其生效范围将会限制在同一页面内。
-
-## 样式差异
-
-Web 中的 CSS 非常的灵活,积累了特别多的属性,支持多种布局方法;这是其优势,也是浏览器性能优化的一个瓶颈。
-
-Weex 中的样式是由原生渲染器解析的,出于性能和功能复杂度的考虑,Weex 对 CSS 的特性做了一些取舍,使其更符合最佳实践。
-
-### 单类名选择器和作用域
-
-Weex 中只支持单个类名选择器,不支持关系选择器,也不支持属性选择器。
-
-```css
-/* 支持单个类名选择器 */
-.one-class {
- font-size: 36px;
-}
-
-/* 不支持关系选择器 */
-.parent > .child {
- padding-top: 10px;
-}
-
-/* 不支持属性选择器,不支持 `v-cloak` 指令 */
-[v-cloak] {
- color: #FF6600;
-}
-```
-
-这个只是对样式定义的限制,不影响样式类名的使用,在标签中可以添加多个样式类名,如:
-
-```html
-<template>
- <div class="one two three"><div>
-</template>
-```
-
-### 组件级别的作用域
-
-在 Weex 中,写在组件 `<style>` 里的样式只能用在当前组件中,默认是 `scoped` 作用域。为了保持和 Native 的一致性,建议在 `.vue` 文件中写样式时,加上 `scoped` 属性,即: `<style scoped>`。
-
-### 支持的样式属性
-
-Weex 支持的样式特性是 CSS 的子集,并且会不断扩充;在实现过程中我们参考了 [CSS 属性在浏览器中的使用频率](https://gist.github.com/Jinjiang/ea6b403036b7287cf8b8508729b77ac0#css-properties),优先实现其中频率最高的一些属性。
-
-Weex 支持了基本的盒模型和 flexbox 布局,以及其他常用样式,详情可参考[Weex 通用样式文档](../common-style.html)。
-
-在编写样式时,还应该注意一下几点:
-
-+ 不需要写样式前缀。
-+ Weex 不支持 `display: none;`,因此也不支持 `v-show` 指令。
-+ 为了优化样式解析的效率,样式属性暂不支持简写,涉及一下属性:
- + `border` 、`border-(top|bottom|left|right)`
- + `margin`
- + `padding`
- + `flex`
-
-## 编译环境的差异
-
-在 Weex 中使用 Vue.js ,你所需要关注的运行平台除了 Web 之外还有 Android 和 iOS ,在开发和编译环境上还有一些不同点。针对 Web 和原生平台,将 Vue 项目源文件编译成目标文件,有两种不同的方式:
-
-+ 针对 Web 平台,和普通 Vue 2.X 项目一样,可以使用任意官方推荐的方式编译源文件,如 Webpack + vue-loader 或者 Browserify + vueify 。
-+ 针对 Android 和 iOS 平台,我们提供了 [weex-loader](https://github.com/weexteam/weex-loader) 工具支持编译 `.vue` 格式的单文件组件;也就是说,目前只能使用 Webpack + weex-loader 来生成原生端可用的 js bundle。
-
-### 使用 weex-loader
-
-weex-loader 是 Webpack 的一个加载器,使用方法参考其[官方文档](http://webpack.github.io/docs/using-loaders.html)。需要提醒的是,如果 Webpack 配置的入口文件是个 `.vue` 格式的文件的话,还需要额外传递 `entry` 参数,通常设置为 `true`,表示将当前组件作为入口组件。为了能正常匹配 `.vue` 文件,Webpack 配置文件中 weex-loader 的匹配规则也需要有所调整。
-
-```js
-module.exports = {
- // 针对 .vue 文件要添加 entry 参数
- entry: './path/to/App.vue?entry=true',
-
- // 其他配置项 ...
-
- module: {
- loaders: [{
-
- // 匹配包含了 entry 参数的 .vue 文件路径
- test: /\.vue(\?[^?]+)?$/,
- loaders: ['weex-loader']
- }]
- },
-}
-```
-
-如果使用 `.js` 文件作为 Webpack 配置的入口文件,则不需要额外配置这些参数,我们推荐使用 Javascript 文件作为编译的入口文件。
-
-### 搭建原生开发环境
-
-Weex 项目生成的是原生应用,学习一些开发原生应用的基础知识,会对你开发 Weex 项目很有帮助。参考[《集成 Weex 到已有应用》](../../guide/integrate-to-your-app.html)了解更多信息。
http://git-wip-us.apache.org/repos/asf/incubator-weex-site/blob/32a097bf/source/cn/references/vue/index.md
----------------------------------------------------------------------
diff --git a/source/cn/references/vue/index.md b/source/cn/references/vue/index.md
deleted file mode 100644
index 75d165f..0000000
--- a/source/cn/references/vue/index.md
+++ /dev/null
@@ -1,12 +0,0 @@
----
-title: Vue
-type: references
-order: 10
-version: 2.1
----
-
-
-# Vue
-
-- [Vue 2.x 在 Weex 和 Web 中的差异](./difference-with-web.html)
-- [使用 Vuex 和 vue-router](./difference-of-vuex.html)
http://git-wip-us.apache.org/repos/asf/incubator-weex-site/blob/32a097bf/source/cn/references/web-standards.md
----------------------------------------------------------------------
diff --git a/source/cn/references/web-standards.md b/source/cn/references/web-standards.md
deleted file mode 100644
index 3d35a47..0000000
--- a/source/cn/references/web-standards.md
+++ /dev/null
@@ -1,584 +0,0 @@
----
-title: Web 标准
-type: references
-order: 8
-version: 2.1
-has_chapter_content: true
----
-
-# Weex 中的 Web 标准
-
-## HTML
-
-refs: https://www.advancedwebranking.com/html/ 2016-12-11
-
-### Overview
-
-| percentage | name | supported |
-| ---- | ---- | ---- |
-| 98.1% | `<head>` | - |
-| 97.9% | `<body>` | - |
-| 97.9% | `<html>` | - |
-| 97% | `<title>` | - |
-| 93.9% | `<meta>` | - |
-| 89.9% | `<div>` | ✓ |
-| 89.6% | `<a>` | ✓ |
-| 88.5% | `<script>` | ✓ |
-| 86.5% | `<link>` | - |
-| 86.3% | `<img>` | ✓ |
-| 81.5% | `<p>` | - (can be customized) |
-| 75.6% | `<span>` | - (can be customized) |
-| 73.8% | `<li>` | - (can be customized) |
-| 73.7% | `<ul>` | - (can be customized) |
-| 70.3% | `<br>` | ✕ |
-| 60.4% | `<style>` | ✓ |
-| 55.8% | `<h1>` | - (can be customized) |
-| 52.7% | `<h2>` | - (can be customized) |
-| 48.4% | `<input>` | ✓ |
-| 46.9% | `<form>` | ✕ |
-| 44.3% | `<strong>` | - (can be customized) |
-| 43.1% | `<h3>` | - (can be customized) |
-| 30.9% | `<table>` | ✕ |
-| 30.3% | `<tr>` | ✕ |
-| 30.2% | `<td>` | ✕ |
-
-### Forms
-
-| percentage | name | supported |
-| ---- | ---- | ---- |
-| 49.5% | `<option>` | ✕ |
-| 30.2% | `<input>` | ✓ |
-| 16.6% | > `[type="hidden"]` | - |
-| 8% | > `[type="text"]` | ✓ |
-| 4.2% | > `[type="submit"]` | - |
-| 2% | > `[type="checkbox"]` | - (`<switch>`) |
-| 1.2% | > `[type="email"]` | ✓ |
-| 1.1% | > `[type="radio"]` | ✕ |
-| 0.9% | > `[type="image"]` | - |
-| 0.8% | > `[type="button"]` | - |
-| 0.6% | > `[type="search"]` | ✕ |
-| 0.6% | > `[type="password"]` | ✓ |
-| 0.1% | > `[type="tel"]` | ✓ |
-| 0.1% | > `[type="number"]` | ✓ |
-| 0% | > `[type="reset"]` | - |
-| 0% | > `[type="file"]` | ✕ |
-| 0% | > `[type="date"]` | ✓ |
-| 0% | > `[type="url"]` | ✓ |
-| 0% | > `[type="range"]` | ✕ |
-| 0% | > `[type="color"]` | ✕ |
-| 0% | > `[type="time"]` | ✓ |
-| 0% | > `[type="datetime-local"]` | ✕ |
-| 7.2% | `<label>` | - |
-| 6.1% | `<form>` | - |
-| 3.7% | `<button>` | - (can be customized) |
-| 2.6% | > `[type="button"]` | - |
-| 1.3% | > `[type="submit"]` | - |
-| 0% | > `[type="reset"]` | - |
-| 1.9% | `<select>` | ✕ |
-| 0.7% | `<textarea>` | ✓ |
-| 0.5% | `<fieldset>` | - |
-| 0.1% | `<optgroup>` | ✕ |
-| 0.1% | `<legend>` | - |
-| 0% | `<progress>` | ✕ |
-| 0% | `<datalist>` | - |
-| 0% | `<output>` | - |
-| 0% | `<meter>` | - |
-
-## CSS Properties
-
-refs: https://www.chromestatus.com/metrics/feature/popularity 2016-12-11
-
-| percentage | name | supported |
-| ---- | ---- | ---- |
-| 90.5115% | display | ✕ `flex` only |
-| 89.8243% | margin | ✓ (not support combo) |
-| 88.7012% | width | ✓ |
-| 88.6468% | overflow | ✓ iOS only, `hidden` only for Android |
-| 88.6432% | background-color | ✓ |
-| 88.0803% | height | ✓ |
-| 87.7648% | font-size | ✓ |
-| 87.3837% | padding | ✓ |
-| 87.2721% | color | ✓ |
-| 86.9788% | text-align | ✓ |
-| 86.6841% | position | ✓ `relative` by default, `static` not supported |
-| 86.6039% | font-family | ✓ |
-| 86.5943% | font-weight | ✓ |
-| 85.0072% | opacity | ✓ |
-| 80.6911% | max-width | ✕ |
-| 79.4476% | box-sizing | ✕ `border-box` only |
-| 75.7623% | max-height | ✕ |
-| 74.9939% | webkit-user-select | ✕ |
-| 57.0292% | align-items | ✓ |
-| 56.8182% | justify-content | ✓ `space-around` not supported well in browser |
-| 50.5941% | flex-direction | ✓ |
-| 48.5052% | border | ✓ |
-| 47.5161% | top | ✓ |
-| 46.9136% | background | ✕ |
-| 46.1552% | cursor | ✕ |
-| 46.1443% | margin-left | ✓ |
-| 46.0956% | left | ✓ |
-| 46.0848% | text-decoration | ✓ |
-| 45.9575% | float | ✕ |
-| 45.8391% | border-bottom | ✓ |
-| 45.7639% | padding-left | ✓ |
-| 45.7128% | margin-top | ✓ |
-| 45.7013% | line-height | ✓ |
-| 45.5836% | background-image | ✕ |
-| 45.0837% | z-index | ✕ |
-| 45.0649% | right | ✓ |
-| 45.0516% | margin-bottom | ✓ |
-| 45.0459% | white-space | ✕ |
-| 44.8710% | margin-right | ✓ |
-| 44.8476% | vertical-align | ✕ |
-| 44.6306% | padding-top | ✓ |
-| 44.1466% | border-radius | ✓ |
-| 44.0136% | border-top | ✓ |
-| 43.9815% | padding-bottom | ✓ |
-| 43.9392% | padding-right | ✓ |
-| 43.8539% | visibility | ✕ |
-| 43.4306% | background-position | ✕ |
-| 43.4098% | background-repeat | ✕ |
-| 43.0391% | clear | ✕ |
-| 42.9100% | bottom | ✓ |
-| 42.2092% | content | ✕ |
-| 42.0690% | box-shadow | ✕ |
-| 41.9004% | border-color | ✓ |
-| 41.7341% | outline | ✕ |
-| 41.4297% | border-right | ✓ |
-| 41.2605% | border-left | ✓ |
-| 41.1127% | min-height | ✕ |
-| 41.0736% | font-style | ✓ |
-| 41.0523% | min-width | ✕ |
-| 40.4298% | list-style | ✕ |
-| 39.7341% | font | ✕ |
-| 38.8999% | background-size | ✕ |
-| 38.7811% | border-width | ✓ |
-| 38.7718% | border-collapse | ✕ |
-| 37.8110% | border-style | ✓ |
-| 37.4962% | text-overflow | ✓ must work with `lines` |
-| 37.3471% | text-transform | ✕ |
-| 37.2154% | transition | ✕ |
-| 36.5155% | overflow-y | ✕ |
-| 36.3025% | transform | ✕ |
-| 36.2488% | text-indent | ✕ |
-| 35.5075% | text-shadow | ✕ |
-| 34.7607% | webkit-appearance | ✕ |
-| 34.1925% | list-style-type | ✕ |
-| 34.0238% | border-spacing | ✕ |
-| 33.6664% | word-wrap | ✕ |
-| 31.9961% | overflow-x | ✕ |
-| 31.9922% | zoom | ✕ |
-| 31.2495% | border-bottom-left-radius | ✕ |
-| 31.1306% | pointer-events | ✕ |
-| 31.1229% | border-top-left-radius | ✕ |
-| 30.2131% | border-bottom-color | ✓ |
-| 29.9608% | border-top-color | ✓ |
-| 29.4297% | border-bottom-right-radius | ✕ |
-| 29.2668% | border-top-right-radius | ✕ |
-| 28.6489% | letter-spacing | ✕ |
-| 27.8327% | animation | ✕ |
-| 26.6738% | border-right-width | ✓ |
-| 26.0169% | src | ✕ |
-| 25.2661% | clip | ✕ |
-| 25.2512% | webkit-font-smoothing | ✕ |
-| 25.1971% | border-bottom-width | ✓ |
-| 25.0246% | border-right-color | ✓ |
-| 24.7790% | direction | ✕ |
-| 24.4094% | webkit-tap-highlight-color | ✕ |
-| 23.9751% | border-left-color | ✓ |
-| 23.9321% | border-top-width | ✓ |
-| 23.7902% | fill | ✕ |
-| 23.2617% | border-left-width | ✓ |
-| 22.7278% | table-layout | ✕ |
-| 21.5766% | word-break | ✕ |
-| 20.4319% | background-clip | ✕ |
-| 19.3198% | transform-origin | ✕ |
-| 18.9233% | filter | ✕ |
-| 17.7879% | resize | ✕ |
-| 16.2501% | flex | ✕ |
-| 15.1656% | font-variant | ✕ |
-| 14.9181% | text-rendering | ✕ |
-| 14.7125% | webkit-filter | ✕ |
-| 14.5263% | transition-duration | ✕ |
-| 14.3966% | transition-property | ✕ |
-| 14.2124% | webkit-box-orient | ✕ |
-| 13.5432% | outline-offset | ✕ |
-| 12.9300% | transition-timing-function | ✕ |
-| 12.2788% | unicode-range | ✕ |
-| 12.0880% | word-spacing | ✕ |
-| 11.9124% | quotes | ✕ |
-| 11.6800% | border-bottom-style | ✓ |
-| 11.4263% | webkit-background-clip | ✕ |
-| 11.0070% | flex-grow | ✕ |
-| 10.5925% | backface-visibility | ✕ |
-| 10.4417% | animation-name | ✕ |
-| 10.4302% | stroke | ✕ |
-| 10.4144% | animation-duration | ✕ |
-| 10.2804% | touch-action | ✕ |
-| 9.9663% | list-style-position | ✕ |
-| 9.8662% | order | ✕ |
-| 9.7770% | outline-width | ✕ |
-| 9.7504% | transition-delay | ✕ |
-| 9.4689% | border-top-style | ✓ |
-| 9.3474% | webkit-box-pack | ✕ |
-| 9.3078% | webkit-box-align | ✕ |
-| 9.2375% | page-break-inside | ✕ |
-| 9.1898% | webkit-line-clamp | ✕ |
-| 8.9350% | list-style-image | ✕ |
-| 8.8339% | page-break-after | ✕ |
-| 8.5735% | speak | ✕ |
-| 8.4754% | unicode-bidi | ✕ |
-| 8.4307% | animation-timing-function | ✕ |
-| 8.1464% | webkit-box-flex | ✕ |
-| 8.0048% | orphans | ✕ |
-| 7.9947% | widows | ✕ |
-| 7.6671% | flex-wrap | ✓ not supported well in browser |
-| 7.5756% | animation-fill-mode | ✕ |
-| 7.4163% | animation-delay | ✕ |
-| 7.3284% | border-left-style | ✓ |
-| 7.1586% | outline-color | ✕ |
-| 6.9102% | flex-shrink | ✕ |
-| 6.7754% | perspective | ✕ |
-| 6.7748% | border-right-style | ✓ |
-| 6.4619% | outline-style | ✕ |
-| 6.0382% | animation-iteration-count | ✕ |
-| 5.9838% | background-origin | ✕ |
-| 5.9714% | fill-opacity | ✕ |
-| 5.9357% | will-change | ✕ |
-| 5.3740% | stroke-width | ✕ |
-| 5.3172% | transform-style | ✕ |
-| 5.2608% | overflow-wrap | ✕ |
-| 5.1730% | background-attachment | ✕ |
-| 4.9039% | counter-increment | ✕ |
-| 4.5950% | counter-reset | ✕ |
-| 4.5031% | align-self | ✕ |
-| 4.4109% | webkit-box-ordinal-group | ✕ |
-| 4.4046% | webkit-animation-direction | ✕ |
-| 3.7598% | background-position-x | ✕ |
-| 3.6867% | border-image | ✕ |
-| 3.6601% | background-position-y | ✕ |
-| 3.5749% | webkit-user-drag | ✕ |
-| 3.3376% | flex-basis | ✕ |
-| 3.1840% | align-content | ✕ |
-| 3.1832% | flex-flow | ✕ |
-| 3.1774% | image-rendering | ✕ |
-| 3.0879% | webkit-margin-start | ✕ |
-| 2.9551% | font-stretch | ✕ |
-| 2.8934% | empty-cells | ✕ |
-| 2.7619% | webkit-margin-after | ✕ |
-| 2.7220% | perspective-origin | ✕ |
-| 2.6125% | webkit-margin-end | ✕ |
-| 2.6089% | column-count | ✕ |
-| 2.5880% | webkit-text-fill-color | ✕ |
-| 2.5466% | webkit-box-direction | ✕ |
-| 2.4618% | font-feature-settings | ✕ |
-| 2.3959% | webkit-mask-image | ✕ |
-| 2.3431% | webkit-padding-end | ✕ |
-| 2.2555% | stroke-dasharray | ✕ |
-| 2.1788% | user-select | ✕ |
-| 2.1679% | object-fit | ✕ |
-| 2.0643% | column-gap | ✕ |
-| 2.0459% | text-size-adjust | ✕ |
-| 2.0253% | caption-side | ✕ |
-| 1.9695% | stroke-dashoffset | ✕ |
-| 1.7923% | stroke-linecap | ✕ |
-| 1.7861% | animation-direction | ✕ |
-| 1.7559% | webkit-font-feature-settings | ✕ |
-| 1.7404% | stroke-opacity | ✕ |
-| 1.5926% | stroke-miterlimit | ✕ |
-| 1.5786% | fill-rule | ✕ |
-| 1.4859% | webkit-user-modify | ✕ |
-| 1.3439% | webkit-border-image | ✕ |
-| 1.3091% | animation-play-state | ✕ |
-| 1.2676% | contain | ✕ |
-| 1.2029% | webkit-padding-start | ✕ |
-| 1.1840% | webkit-margin-before | ✕ |
-| 1.1269% | page-break-before | ✕ |
-| 1.1222% | webkit-margin-top-collapse | ✕ |
-| 1.0418% | columns | ✕ |
-| 1.0354% | webkit-mask-size | ✕ |
-| 0.9650% | border-image-slice | ✕ |
-| 0.9425% | stop-color | ✕ |
-| 0.9408% | webkit-mask-repeat | ✕ |
-| 0.9125% | webkit-box-lines | ✕ |
-| 0.8804% | webkit-column-break-inside | ✕ |
-| 0.8752% | size | ✕ |
-| 0.8334% | font-kerning | ✕ |
-| 0.8034% | stroke-linejoin | ✕ |
-| 0.7869% | tab-size | ✕ |
-| 0.7689% | break-inside | ✕ |
-| 0.7589% | webkit-text-stroke-width | ✕ |
-| 0.7353% | column-width | ✕ |
-| 0.6924% | webkit-mask-position | ✕ |
-| 0.6869% | border-image-width | ✕ |
-| 0.6323% | border-image-repeat | ✕ |
-| 0.5994% | border-image-outset | ✕ |
-| 0.5885% | all | ✕ |
-| 0.5859% | webkit-text-stroke-color | ✕ |
-| 0.5435% | webkit-print-color-adjust | ✕ |
-| 0.5420% | webkit-text-stroke | ✕ |
-| 0.5195% | writing-mode | ✕ |
-| 0.4741% | clip-rule | ✕ |
-| 0.4685% | webkit-clip-path | ✕ |
-| 0.4578% | text-anchor | ✕ |
-| 0.4535% | shape-rendering | ✕ |
-| 0.4526% | webkit-column-break-before | ✕ |
-| 0.4494% | clip-path | ✕ |
-| 0.4452% | webkit-mask | ✕ |
-| 0.4393% | mix-blend-mode | ✕ |
-| 0.4166% | text-align-last | ✕ |
-| 0.4033% | column-rule | ✕ |
-| 0.3990% | webkit-mask-box-image | ✕ |
-| 0.3989% | font-variant-ligatures | ✕ |
-| 0.3881% | column-fill | ✕ |
-| 0.3865% | webkit-line-break | ✕ |
-| 0.3857% | border-image-source | ✕ |
-| 0.3528% | stop-opacity | ✕ |
-| 0.3075% | webkit-perspective-origin-y | ✕ |
-| 0.3054% | webkit-perspective-origin-x | ✕ |
-| 0.2994% | webkit-writing-mode | ✕ |
-| 0.2717% | dominant-baseline | ✕ |
-| 0.2634% | column-rule-color | ✕ |
-| 0.2586% | webkit-box-decoration-break | ✕ |
-| 0.2467% | webkit-text-security | ✕ |
-| 0.2374% | webkit-background-origin | ✕ |
-| 0.2146% | font-variant-caps | ✕ |
-| 0.2005% | column-rule-style | ✕ |
-| 0.1976% | shape-outside | ✕ |
-| 0.1971% | webkit-padding-before | ✕ |
-| 0.1896% | break-after | ✕ |
-| 0.1782% | webkit-padding-after | ✕ |
-| 0.1774% | text-orientation | ✕ |
-| 0.1747% | webkit-text-orientation | ✕ |
-| 0.1655% | mask | ✕ |
-| 0.1626% | alignment-baseline | ✕ |
-| 0.1572% | page | ✕ |
-| 0.1530% | webkit-column-break-after | ✕ |
-| 0.1521% | webkit-box-reflect | ✕ |
-| 0.1504% | webkit-text-emphasis-color | ✕ |
-| 0.1499% | object-position | ✕ |
-| 0.1470% | break-before | ✕ |
-| 0.1455% | webkit-margin-collapse | ✕ |
-| 0.1452% | baseline-shift | ✕ |
-| 0.1451% | hyphens | ✕ |
-| 0.1309% | rx | ✕ |
-| 0.1304% | ry | ✕ |
-| 0.1256% | background-blend-mode | ✕ |
-| 0.1136% | font-variant-numeric | ✕ |
-| 0.1135% | background-repeat-x | ✕ |
-| 0.1123% | background-repeat-y | ✕ |
-| 0.1086% | webkit-text-emphasis | ✕ |
-| 0.1058% | webkit-rtl-ordering | ✕ |
-| 0.1040% | column-rule-width | ✕ |
-| 0.1036% | isolation | ✕ |
-| 0.1002% | webkit-highlight | ✕ |
-| 0.0843% | webkit-transform-origin-y | ✕ |
-| 0.0786% | webkit-transform-origin-x | ✕ |
-| 0.0770% | webkit-app-region | ✕ |
-| 0.0685% | column-span | ✕ |
-| 0.0653% | r | ✕ |
-| 0.0611% | y | ✕ |
-| 0.0602% | x | ✕ |
-| 0.0555% | webkit-border-vertical-spacing | ✕ |
-| 0.0545% | webkit-border-horizontal-spacing | ✕ |
-| 0.0542% | webkit-border-start-width | ✕ |
-| 0.0450% | webkit-border-start-color | ✕ |
-| 0.0424% | webkit-border-after-width | ✕ |
-| 0.0424% | webkit-border-before-width | ✕ |
-| 0.0423% | webkit-border-end-width | ✕ |
-| 0.0351% | marker | ✕ |
-| 0.0349% | webkit-border-end-color | ✕ |
-| 0.0347% | webkit-border-after-color | ✕ |
-| 0.0347% | webkit-border-before-color | ✕ |
-| 0.0342% | mask-type | ✕ |
-| 0.0328% | color-interpolation-filters | ✕ |
-| 0.0325% | webkit-border-end | ✕ |
-| 0.0319% | vector-effect | ✕ |
-| 0.0307% | color-rendering | ✕ |
-
-## CSS Units and Values
-
-refs: https://drafts.csswg.org/css-values/ 2016-12-11
-
-### Textual
-
-* pre-defined keywords
- * CSS-wide keywords
- * `initial`
- * `inherit`
- * `unset`
-* `<custom-ident>`: author-defined identifiers ✓
-* `<string>`: quoted strings (`"xxx"`)
-* `<url>`: resourec locators (`url()`)
-
-### Numeric
-
-* `<integer>` ✓
-* `<number>` ✓
-* `<percentage>`
-
-### Length `<length>`
-
-* relative
- * font-relative
- * `em`
- * `ex`
- * `ch`
- * `ic`
- * `rem` ✓🔧
- * viewport-percentage
- * `vw` ✓🔧
- * `vh` ✓🔧
- * `vi`
- * `vb`
- * `vmin` ✓🔧
- * `vmax` ✓🔧
-* absolute
- * `cm` ✓🔧
- * `mm` ✓🔧
- * `Q` ✓🔧
- * `in` ✓🔧
- * `pc` ✓🔧
- * `pt` ✓🔧
- * `px` autofixed to number
-
-### Quantities
-
-* `<angle>`
- * `deg`
- * `grad`
- * `rad`
- * `turn`
-* `<time>`
- * `s`
- * `ms`
-* `<frequency>`
- * `Hz`
- * `kHz`
-* `<resolution>`
- * `dpi`
- * `dpcm`
- * `dppx`
-
-### Elsewhere
-
-* `<color>` ✓
-* `<image>`
-* `<position>`
-
-### Functional
-
-* `calc()`
-* `toggle()`
-* `attr()`
-
-## JS APIs
-
-refs: https://www.w3.org/standards/techs/js 2016-12-11
-
-### Completed Work
-
-#### Standards
-
-| last update | spec | supported |
-| ---- | ---- | ---- |
-| 2016-11-17 | Media Source Extensions™ | - (media related) |
-| 2016-11-08 | Geolocation API Specification 2nd Edition | ✕ developing |
-| 2016-10-27 | Pointer Lock | - |
-| 2016-10-18 | Vibration API (Second Edition) | ✕ |
-| 2016-04-19 | Web Storage (Second Edition) | ✓ async `storage` module |
-| 2015-10-22 | Web Notifications | ✕ |
-| 2015-05-19 | HTML5 Web Messaging | ✕ `BroadcastChannel` developing |
-| 2015-02-24 | Pointer Events | - |
-| 2015-02-10 | Vibration API | ✕ |
-| 2015-02-03 | Server-Sent Events | ✕ |
-| 2015-01-08 | Indexed Database API | ✕ |
-| 2014-03-13 | Metadata API for Media Resources 1.0 | - (media related) |
-| 2014-02-11 | Progress Events | ✕ |
-| 2014-01-16 | JSON-LD 1.0 Processing Algorithms and API | - |
-| 2013-12-12 | Performance Timeline | - (perf related) |
-| 2013-12-12 | User Timing | - (perf related) |
-| 2013-10-31 | Widget Interface | - |
-| 2013-10-29 | Page Visibility (Second Edition) | ✕ `onviewappear`/`onviewdisappear` |
-| 2013-10-10 | Touch Events | ✕ |
-| 2013-02-21 | Selectors API Level 1 | - |
-| 2012-12-17 | Navigation Timing | - (perf related) |
-| 2012-12-17 | High Resolution Time | - (perf related) |
-| 2008-12-22 | Element Traversal Specification | - |
-
-### Drafts
-
-#### Proposed Recommendations
-
-| last update | spec | supported |
-| ---- | ---- | ---- |
-| 2016-09-15 | WebIDL Level 1 | - |
-
-#### Candidate Recommendations
-
-| last update | spec | supported |
-| ---- | ---- | ---- |
-| 2016-12-08 | Performance Timeline Level 2 | - (perf related) |
-| 2016-11-22 | Page Visibility Level 2 | ✕ `onviewappear`/`onviewdisappear` |
-| 2016-11-01 | High Resolution Time Level 2 | - (perf related) |
-| 2016-08-18 | DeviceOrientation Event Specification | ✕ |
-| 2016-07-21 | Resource Timing Level 1 | - (perf related) |
-| 2016-07-14 | Presentation API | - |
-| 2016-07-07 | Battery Status API | ✕ |
-| 2016-07-05 | Encrypted Media Extensions | - |
-| 2016-05-19 | Media Capture and Streams | - (media related) |
-| 2014-12-11 | Web Cryptography API | - |
-| 2014-09-09 | HTML Media Capture | - (media related) |
-| 2012-09-20 | The WebSocket API | ✕ |
-
-#### Last Call Drafts
-
-| last update | spec | supported |
-| ---- | ---- | ---- |
-| 2011-12-01 | Geolocation API Specification Level 2 | ✕ |
-
-#### Other Working Drafts
-
-| last update | spec | supported |
-| ---- | ---- | ---- |
-| 2016-12-09 | MediaStream Image Capture | - (media related) |
-| 2016-12-06 | MediaStream Recording | - (media related) |
-| 2016-12-06 | Selection API | ✕ |
-| 2016-12-05 | Input Events | ✕ |
-| 2016-12-02 | Gamepad | - |
-| 2016-11-29 | WebDriver | - |
-| 2016-11-24 | WebRTC 1.0: Real-time Communication Between Browsers | ✕ |
-| 2016-11-22 | Pointer Lock 2.0 | - |
-| 2016-11-07 | Remote Playback API | - (media related) |
-| 2016-11-03 | Resource Timing Level 2 | - (perf related) |
-| 2016-11-02 | Audio Output Devices API | - (media related) |
-| 2016-11-01 | Indexed Database API 2.0 | ✕ |
-| 2016-11-01 | User Timing Level 2 | - (perf related) |
-| 2016-10-31 | The Screen Orientation API | ✕ |
-| 2016-10-31 | High Resolution Time Level 3 | - (perf related) |
-| 2016-10-24 | UI Events KeyboardEvent code Values | - |
-| 2016-10-24 | UI Events KeyboardEvent key Values | - |
-| 2016-10-11 | Service Workers 1 | ✕ |
-| 2016-09-21 | Identifiers for WebRTC's Statistics API | - |
-| 2016-09-13 | Accelerometer Sensor | ✕ |
-| 2016-09-13 | Gyroscope Sensor | ✕ |
-| 2016-09-13 | Magnetometer Sensor | ✕ |
-| 2016-08-30 | Ambient Light Sensor | ✕ |
-| 2016-08-30 | Media Capture from DOM Elements | - (media related) |
-| 2016-08-30 | Generic Sensor API | ✕ |
-| 2016-08-03 | Wake Lock API | ✕ |
-| 2016-07-19 | Proximity Sensor | ✕ |
-| 2016-07-19 | Pointer Events - Level 2 | - |
-| 2016-07-14 | Screen Capture | ✕ |
-| 2016-07-12 | Media Capture Depth Stream Extensions | - (media related) |
-| 2016-05-17 | Cooperative Scheduling of Background Tasks | ✕ |
-| 2016-04-22 | Navigation Timing Level 2 | - (perf related) |
-| 2016-04-03 | Clipboard API and events | ✕ `clipboard` module |
-| 2015-12-15 | Push API | ✕ |
-| 2015-12-08 | Web Audio API | - (media related) |
-| 2015-10-15 | FindText API | - |
-| 2015-09-24 | Web Workers | ✕ |
-| 2015-04-21 | File API | ✕ |
-| 2014-02-20 | Network Service Discovery | ✕ |
-| 2012-03-06 | MediaStream Capture Scenarios | - (media related) |
-| 2011-12-15 | Audio Processing API | - (media related) |
\ No newline at end of file
http://git-wip-us.apache.org/repos/asf/incubator-weex-site/blob/32a097bf/source/cn/references/weex-variable.md
----------------------------------------------------------------------
diff --git a/source/cn/references/weex-variable.md b/source/cn/references/weex-variable.md
index 1fa8688..a6bdd11 100644
--- a/source/cn/references/weex-variable.md
+++ b/source/cn/references/weex-variable.md
@@ -1,7 +1,8 @@
---
title: Weex 实例变量
type: references
-order: 7
+group: API
+order: 2.5
version: 2.1
has_chapter_content: true
---
http://git-wip-us.apache.org/repos/asf/incubator-weex-site/blob/32a097bf/source/cn/resources.md
----------------------------------------------------------------------
diff --git a/source/cn/resources.md b/source/cn/resources.md
new file mode 100644
index 0000000..f2cb72c
--- /dev/null
+++ b/source/cn/resources.md
@@ -0,0 +1,6 @@
+---
+title: 资源
+type: community
+has_chapter_content: false
+version: 2.1
+---
http://git-wip-us.apache.org/repos/asf/incubator-weex-site/blob/32a097bf/source/cn/tools/download.ejs
----------------------------------------------------------------------
diff --git a/source/cn/tools/download.ejs b/source/cn/tools/download.ejs
new file mode 100644
index 0000000..ef2c86f
--- /dev/null
+++ b/source/cn/tools/download.ejs
@@ -0,0 +1,3 @@
+layout: download
+type: download
+---
\ No newline at end of file
http://git-wip-us.apache.org/repos/asf/incubator-weex-site/blob/32a097bf/source/cn/tools/helpers.md
----------------------------------------------------------------------
diff --git a/source/cn/tools/helpers.md b/source/cn/tools/helpers.md
new file mode 100644
index 0000000..58fba73
--- /dev/null
+++ b/source/cn/tools/helpers.md
@@ -0,0 +1,77 @@
+---
+title: Weex语法支持插件
+type: tools
+order: 5.1
+version: 2.1
+---
+
+# Weex语法支持插件
+
+[Weex Language Support](https://plugins.jetbrains.com/plugin/9189-weex-language-support) 插件是官方提供的一个工具,你可以使用它在IntelliJ IDEA,WebStorm等一系列IDE上对Weex DSL进行语法高亮,自动补全和错误检查等操作。
+
+### 支持的IDE
+你可以在任何操作系统上的下列IDE上安装和使用Weex Language Support插件:
+**IntelliJ IDEA Ultimate, PhpStorm, WebStorm, PyCharm, RubyMine, AppCode, CLion, Gogland, Rider**
+
+### 安装
+在IDE的插件仓库中搜索`Weex Language Support`来安装该插件,安装完毕后重启IDE即可激活插件相关功能
+
+
+### 配置
+打开`Preferences -> Other Settings -> Weex language support`可配置插件的相关功能
+
+- Target Weex Version: 配置插件以哪一个版本的语法规则来对DSL进行提示及检查,默认值`LATEST`表示总是应用最行��新版本weex的语法规则
+- Vue Support: 配置插件是否支持Weex 2.0版本的DSL(.vue文件),开启后重启生效(注意:如果IDE内有其他支持Vue语法的插件,则需要关闭相应的插件后Weex插件才能生效)
+- Custom Rules: 引入自定义的Weex DSL规则,如果你在native中定义了自己的Module或Component,可通过自定义规则引入插件中来提供相应的提示和补全支持,自定义规则的�格式将在后文列出
+- Global Weex Components: 默认地,插件会解析当前工程及npm root路径下的`node_modules`�目录,解析其中包含的Weex Components并对其提供补全支持。如果你的项目中引用了这两个路径以外的Components,可以在此处将其添加到搜索路径中,�插件将会将其中的Components载入,并在编写DSL时为相应的标签提供补全支持
+
+### 自定义规则格式
+自定义规则包含在一个json文件中,json文件的根节点为数组类型,数组中的每一个元素对应DSL中的一个标签。
+我们以`<loading>`标签的规则来举例:
+```js
+{
+ "tag": "loading", //标签名,不可为空
+ "attrs": [ //标签属性列表,可为空
+ {
+ "name": "display", //属性名,不可为空
+ "valuePattern": null, //属性值的正则表达式,用于检测�值是否合法,可为空
+ "valueEnum": [ //属性值枚举,可为空
+ "show",
+ "hide"
+ ],
+ "valueType": "var", //属性值类型,必须是var或function,决定该从数据列表还是函数列表中查找属性值补全的候选值,不可为空
+ "since": 0, //该属性何时被添加到sdk中,例如0.11,�默认为0
+ "weexOnly": false //该属性是否仅在1.0语法中可用,默认为false
+ }
+ ],
+ "events": [ //事件列表。可为空
+ {
+ "name": "loading", //事件名称,不可为空
+ "since": 0 //该事件何时被添加到sdk中
+ }
+ ],
+ "parents": [ //该标签允许被作为哪些标签的子元素,空表示可以作为任意元素的子元素
+ "list",
+ "scroller"
+ ],
+ "childes": [ //该标签允许哪些元素作为自己的子元素,空表示任意元素都可作为子元素
+ "text",
+ "image",
+ "loading-indicator"
+ ],
+ "document": "/references/components/loading.html" //文档地址,配置该属性之后可在编辑界面中对应的标签上直接打开文档
+ }
+```
+
+### 使用
+插件的绝大部分功能�被集成到编辑器上下文中,会随用户输入在需要补全,提示或Lint时被触发,无需特殊干预。下列功能需要用户手动触发:
+#### 文档搜索
+打开IDE右侧工具栏的`Weex Documents`即可对文档进行搜索,搜索结果与官网保持同步,勾选 `EN` 可切换搜索结果为英文内容
+
+
+#### 打开标签对应的文档
+�将光标定位到标签上,并通过`Show Intention Actions`操作(OSX上默认键为 option + enter,可通过Keymap查看)打开Intenion菜单,�选择`Open Document`可打开标签对应的文档
+
+
+### 参与插件建设
+请将Issues及Pull Requests提交到[weex-language-support](https://github.com/misakuo/weex-language-support)项目中
http://git-wip-us.apache.org/repos/asf/incubator-weex-site/blob/32a097bf/source/cn/tools/index.md
----------------------------------------------------------------------
diff --git a/source/cn/tools/index.md b/source/cn/tools/index.md
new file mode 100644
index 0000000..c6c4517
--- /dev/null
+++ b/source/cn/tools/index.md
@@ -0,0 +1,13 @@
+---
+title: 开发工具
+type: tools
+order: 5
+version: 2.1
+---
+
+# 开发工具
+
++ [Playground App](./playground.html)
++ [Online Playground](http://dotwe.org/vue/)
++ [weex-toolkit](./toolkit.html)
++ [Weex Language Support插件](./plugin.html)
http://git-wip-us.apache.org/repos/asf/incubator-weex-site/blob/32a097bf/source/cn/tools/market.md
----------------------------------------------------------------------
diff --git a/source/cn/tools/market.md b/source/cn/tools/market.md
new file mode 100644
index 0000000..5d2c774
--- /dev/null
+++ b/source/cn/tools/market.md
@@ -0,0 +1,6 @@
+---
+title: Weex Market
+type: tools
+order: 5.3
+version: 2.1
+---
http://git-wip-us.apache.org/repos/asf/incubator-weex-site/blob/32a097bf/source/cn/tools/playground.ejs
----------------------------------------------------------------------
diff --git a/source/cn/tools/playground.ejs b/source/cn/tools/playground.ejs
new file mode 100644
index 0000000..7f3b070
--- /dev/null
+++ b/source/cn/tools/playground.ejs
@@ -0,0 +1,3 @@
+layout: playground
+type: playground
+---
\ No newline at end of file
http://git-wip-us.apache.org/repos/asf/incubator-weex-site/blob/32a097bf/source/cn/tools/toolkit.md
----------------------------------------------------------------------
diff --git a/source/cn/tools/toolkit.md b/source/cn/tools/toolkit.md
new file mode 100644
index 0000000..2cc9674
--- /dev/null
+++ b/source/cn/tools/toolkit.md
@@ -0,0 +1,231 @@
+---
+title: 使用 weex-toolkit
+type: tools
+order: 5.1
+version: 2.1
+---
+
+# weex-toolkit
+
+[weex-toolkit](https://github.com/weexteam/weex-toolkit) 是官方提供的一个脚手架命令行工具,你可以使用它进行 Weex 项目的创建,调试以及打包等功能。
+
+### 安装
+
+使用 `npm` 安装:
+
+``` bash
+$ npm install -g weex-toolkit
+```
+安装成功后,你输入 `weex` 应该可以看到下面的提示效果;
+
+
+
+如果你本地没有安装 node.js 你可以前往[官网](https://nodejs.org/en/)下载安装。
+
+*请确保你的 node 版本是>=6,你可以使用 [n](https://github.com/tj/n) 来进行 node 的版本管理。
+
+中国用户如果npm遭遇网络问题,可以使用淘宝的 [cnpm](https://npm.taobao.org/) 镜像:
+
+``` bash
+$ npm install -g cnpm --registry=https://registry.npm.taobao.org
+$ cnpm install -g weex-toolkit
+```
+
+如果你安装的过程中遇到了问题,比如 *permission error* 你可以去 [weex-toolkit issues](https://github.com/weexteam/weex-toolkit/issues) 找到解决方法。
+
+
+### 初始化 weex 项目
+
+
+```bash
+$ weex init awesome-project
+```
+
+执行完命令后,在 `awesome-project` 目录中就创建了一个使用 `Weex` 和 `Vue` 的模板项目。
+
+
+然后我们进入项目所在路径,`weex-toolkit` 已经为我们生成了标准项目结构。
+
+在 `package.json` 中,已经配置好了几个常用的 npm script,分别是:
+
+- `build`: 源码打包,生成 JS Bundle
+- `dev`: webpack watch 模式,方便开发
+- `serve`: 开启静态服务器
+- `debug`: 调试模式
+
+我们先通过 `npm install` 安装项目依赖。之后运行根目录下的 `npm run dev & npm run serve` 开启 watch 模式和静态服务器。
+
+然后我们打开浏览器,进入 `http://localhost:8080/index.html` 即可看到 Weex h5 页面。
+
+
+### 实时预览
+
+`weex-toolkit` 支持预览你当前开发的weex页面(`.we`或者`.vue`),你只需要指定预览的文件路径即可:
+
+``` bash
+$ weex src/foo.vue
+```
+
+浏览器会自动弹出页面,这个时候你可以看到你所编辑的 Weex页面的具体效果和页面布局。如果你使用 [Playground](https://weex.apache.org/cn/playground.html) 扫描右边的二维码,就能够看到 Weex 在 Android/IOS 设备上的效果了。
+
+如果你需要预览整个项目目录,你可以输入这样的命令:
+
+``` bash
+$ weex src --entry src/foo.vue
+```
+你需要在传入的参数指定预览的目录和入口文件。
+
+### 打包weex项目
+
+如果开发完成后,你可以使用 `weex compile` 通过命令行工具进行单个文件或者整个项目的打包。
+
+``` bash
+weex compile src/foo.vue dist
+```
+命令行需要两个参数,你的源码文件或者目录, 以及你生成打包后的目录地址。
+
+
+### 调试 Weex 页面
+
+weex-toolkit支持调试工具。**[weex devtools](https://github.com/weexteam/weex-devtool)** ,它是专门为Weex定制的一款实现了 [**Chrome Debugging Protocol**](https://developer.chrome.com/devtools/docs/debugger-protocol) 的 inspect/debug 工具,能够帮助你快速查看 app 运行状态和调试 Weex 中的 JS 代码,当前支持 **IOS** 和 **Android** 两个平台。
+
+#### 用法
+
+``` bash
+ weex debug [options] [we_file|bundles_dir]
+ ```
+
+ 选项:
+
+```
+-h, --help 显示帮助
+-V, --verbose 显示 debug 服务器运行时的各种 log
+-v, --version 显示版本
+-p, --port [port] 设置 debug 服务器端口号 默认为8088
+-e, --entry [entry] debug 一个目录时,这个参数指定整个目录的入口 bundle 文件,这个 bundle 文件的地址会显示在 debug 主页上(作为二维码)
+-m, --mode [mode] 设置构建 we 文件的方式,transformer 最基础的风格适合单文件, loader:webpack 风格 适合模块化的多文件 . 默认为 transformer
+```
+#### 开启调试
+
+```
+$ weex debug
+```
+
+单纯启动一个调试服务器,并同时唤起Chrome浏览器打开`调试主页`。
+这个`调试主页`上会有一个二维码,使用 Playground App 扫这个二维码可以开启 Playground 调试。
+开启调试后,设备列表中会出现您的设备,根据提示进行后续的调试操作。
+
+#### 调试 `.we` | `.vue` 文件
+
+```
+$ weex debug your_weex.vue
+```
+
+这个命令会将 `your_weex.vue` 编译成 `JS Bundle` 文件 部署到 debug 服务器;
+并启动debug服务器如上述命令那样打开的`调试vue主页`会多显示一个二维码,使用 Playground App扫这个二维码码可以加载 `your_weex.we` (注意要先扫描开启调试的那个二维码码)。
+这个命令会自动检测 `your_weex.we` 文件变动,如果发现内容被修改则立即重新编译部署,并刷新 `debugger` 页面。
+.
+#### 调试整个bundle/we文件夹
+
+同样你也可以调试整个目录的文件,你只需要传入目录的路径和入口文件即可;
+
+```
+$weex debug your/we/path -e index.we
+```
+
+这个命令会编译你指定目录下的所有的 `.we` 文件,并把编译好的 JS Bundle 部署到 debug 服务器,他们的地址会映射到 http://lcoalhost:8088/weex/ 下
+比如 `your/we/path/index.we` 可以通过 http://lcoalhost:8088/weex/index.js 访问。
+`your/we/path/demo/test.we` 可以通过 http://lcoalhost:8088/weex/demo/index.js 。
+
+`-e` 参数可以指定一个入口的 `.we` 文件,这个文件的地址会显示在`调试主页`上(作为二维码)。
+
+#### 特性
+##### 连接设备
+
+
+##### Inspector
+
+ Inspector 能够用来查看 `Element` \ `NetWork` \ `Console log` \ `ScreenCast` \ `BoxModel` \ `Native View` 等。
+
+
+##### Element
+
+
+##### NetWork
+##### 查看网络请求的总耗时和延时
+
+
+##### 查看网络请求的header和response
+
+
+##### 控制台
+
+
+##### 资源
+
+
+#### Debugger
+
+ 调试器用来调试 Weex 中的 JS 代码,能够设置断点、查看调用栈。
+
+
+##### Breakpoint and CallStack
+
+
+#### 集成devtools
+- Android
+ - 请参考文档 [Weex devtools (Android)](../../references/advanced/integrate-devtool-to-android.html),其中有详细说明。
+- IOS
+ - 请参考文档 [Weex devtools (iOS)](../../references/advanced/integrate-devtool-to-ios.html), 其中有详细说明。
+
+
+### weex-toolkit 对 weexpack 的水平扩展
+
+[weexpack](https://github.com/weexteam/weex-pack) 是基于 Weex 快速搭建应用原型的利器。它能够帮助开发者通过命令行创建 Weex 工程,添加相应平台的 Weex app 模版,并基于模版从本地,GitHub 或者 Weex 应用市场安装插件,快速打包 Weex 应用并安装到手机运行,对于具有分享精神的开发者而言还能够创建 Weex 插件模版并发布插件到 Weex 应用市场。
+
+现在使用 `weex-toolkit` 同样支持对 `weexpack` 的命令调用,如果你当前的项目与 `weexpack` 生成的项目目录一致,那么你可以直接实现对于 `platform` 的操作,从而构建具体的 Android/IOS app 。
+
+### weex platform 以及 run 命令
+
+如果我们希望在模拟器或者真机上查看 Weex 运行的效果,我们可以使用 `platform` 添加或者删除 Weex 应用模板。
+
+``` bash
+$ weex platform add ios
+```
+在第一次使用 platform/plugin 命令的时候,可能会遇到下面的界面,你只需要输入 Y 或者直接 enter 键即可。
+
+
+添加ios平台,然后这个时候只要输入:
+
+``` bash
+$ weex run ios
+```
+
+就能看到启动的模拟器运行的效果了。
+
+
+### weex plugin 命令
+
+如果你想使用[插件市场](https://market.dotwe.org)的插件,你可以使用:
+
+```bash
+$ weex plugin add plugin_name
+```
+
+你只需要输入插件的名称就可以从远程添加插件到你本地的项目,比如添加 weex-chart,我们可以输入命令:
+
+``` bash
+$ weex plugin add weex-chart
+```
+
+
+我们可以使用`plugin remove`移除插件,比如移除安装好的 weex-cahrt:
+
+``` bash
+$ weex plugin remove weex-chart
+```
+
+关于 `weexpack` 更加详细的介绍,你可以阅读 [官方文档](https://github.com/weexteam/weex-pack)。
+
+
+
http://git-wip-us.apache.org/repos/asf/incubator-weex-site/blob/32a097bf/source/cn/v-0.10/advanced/create-a-weex-project.md
----------------------------------------------------------------------
diff --git a/source/cn/v-0.10/advanced/create-a-weex-project.md b/source/cn/v-0.10/advanced/create-a-weex-project.md
deleted file mode 100644
index 780341b..0000000
--- a/source/cn/v-0.10/advanced/create-a-weex-project.md
+++ /dev/null
@@ -1,271 +0,0 @@
----
-title: 如何创建一个 Weex 项目
-type: advanced
-order: 3
-has_chapter_content: true
-version: 0.10
----
-
-# 如何创建一个 Weex 项目
-
-对于前端开发者来说开发一个 app 是不容易的,既然 Weex 能以 web 的开发体验构建高性能、可扩展的 native 应用,那我们怎么利用 Weex 简单高效的开发一个 native 应用呢?Weex 替你考虑了这件事。在本章中,我们将学习如何使用 Weexpack 工具快速生成一个全新的 Weex 项目。
-
-根据你的操作系统的不同,步骤也略有差异,如果你从未接触过 native 开发,请慢慢来,遇到问题随时查阅 [FAQ](../faq.md)。
-
-首先,不论任何平台,我们都需要 node.js 和 Weexpack。在本节中,默认你已经安装好了 node.js 和 npm,如有疑问,可参考上一章 [如何在本地开发 Weex 页面](../guide/develop-on-your-local-machine.html)。
-
-Weexpack 是 Weex 新一代的工程开发套件,它允许开发者通过简单的命令,创建 weex 工程项目,将项目运行在不同的开发平台上。未来,我们考虑会将其集成在 weex-toolkits 上,但目前仍需要单独安装。好在安装 Weexpack 非常简单,可以直接使用 npm 安装:
-
-```bash
-npm install weexpack -g
-```
-
-或者用 cnpm:
-
-```bash
-cnpm install weexpack -g
-```
-
-接下来的步骤会有一些复杂和区别,根据开发平台的不同,我们提供了快速导航便于阅读:
-
-- [iOS](#ios)
-- [Android](#android)
-
-## iOS
-
-Mac 是唯一可以开发 iOS 应用的平台,因此创建 iOS 项目只支持 mac。对于 iOS,你需要安装 [Xcode](https://developer.apple.com/xcode/) 和 [CocoaPods](https://guides.cocoapods.org/using/getting-started.html) 。
-
-安装 Xcode 最简单的方法是到 [Mac App Store](https://itunes.apple.com/us/app/xcode/id497799835?mt=12)。Xcode 体积较大,下载请耐心等待。
-
-安装好 Xcode 后,你需要运行 Xcode,使 Xcode 自动安装开发者工具和确认使用协议。
-
-之后你还需要安装 [CocoaPods](https://guides.cocoapods.org/using/getting-started.html) 。CocoaPods 是 Xcode 项目的类库管理工具,可以使用如下命令安装:
-
-```bash
-$ sudo gem install cocoapods
-```
-
-如果执行该命令无反应,很可能是 gem source 问题,你可以切换为淘宝 gem source:
-
-```bash
-$ gem sources --remove https://rubygems.org/
-$ gem sources -a https://ruby.taobao.org/
-$ sudo gem install cocoapods
-```
-
-如有问题,可参考 [CocoaPods 官方文档](https://guides.cocoapods.org/using/getting-started.html)
-
-### 创建项目
-
-然后,就可以使用 weexpack 创建 weex 工程了:
-
-```bash
-$ weexpack init appName
-```
-
-weexpack 会自动新建以 appName 命名的目录,并将项目模板拉取到该目录。
-
-最终形成如下目录结构:
-
-```bash
--> /appName
-.
-|—— .gitignore
-|—— README.md
-|—— package.json
-|-- android.config.json
-|-- ios.config.json
-|—— webpack.config.js
-|—— /src
-| |—— index.we
-|—— /html5
-| |—— index.html
-|—— /ios
-| |—— /playground
-| |—— /sdk
-| |—— /WXDevtool
-|—— /android
-| |—— /playground
-| |—— /appframework
-```
-
-其中:
-
-- `webpack.config.js` 是 webpack 配置文件,用于生成 `.we` 文件的 JSBunlde
-- `ios.config.json` 是 iOS 项目配置文件
-- `android.config.json` 是 Android 项目配置文件
-- `/src` 目录放置 Weex 页面
-- `/html5` 是 H5 端入口文件
-- `/ios` 放置 iOS 项目
-- `/android` 放置 Android 项目
-
-紧接着,进入目录,并且安装依赖:
-
-```bash
-$ cd appName && npm install
-```
-
-至此,项目模版创建完成,接下来我们可以自定义我们的 APP 信息并打包运行。
-
-### 运行与打包
-
-如果一切正常,你可以使用 weexpack 打包或模拟器运行了:
-
-模拟器运行
-
-```bash
-$ weexpack run ios
-```
-
-构建 ipa 包:
-
-```bash
-$ weexpack build ios
-```
-
-构建包的过程中,将会提示让您输入 CodeSign(证书)、Profile(provisioning profile)、AppId,只有输入真实的这些信息才能成功打包。 其余如AppName,和入口 weex bundle 文件可以编辑项目目录下的 `ios.config.json` 配置。 打完包成功之后,可以在 `/playground/build/ipa_build/` 目录下获取 ipa 文件。
-
-注:证书需要预先安装到 keychain 中,在 keychain 中点击右键获取证书 id(证书名称)、provisioning profile 文件(\*mobileprovision)需要获取 UUID,进入目录可以看到 mobileprovision_UUID.sh 文件,此文件可以获取到 UUID。
-
-mobileprovision_UUID.sh 用法如下:
-
-```bash
-$ ./mobileprovision_UUID.sh *mobileprovision
-```
-
-参数(\*mobileprovision)为 provisioning profile 文件路径
-
-** 注:run 与 build 部分涉及 pod 的依赖安装问题。**
-
-- 首先要安装 cocoapods ,具体安装步骤可查看[这里](https://cocoapods.org/),建议安装 0.39.0 版本。
-- 为了加快 CLI 执行速度,weexpack 创建的工程默认安装了需要的依赖库。但是命令执行依然会更新需要升级的依赖库。
- - 如果出现这种错误提示 `unable to find a specification for 'WeexSDK'` 这种错误,说明你本地没有更新 cocoapods master 仓库,运行 `pod repo update` ,此时运行 `pod search WeexSDK`:
-
- 
-
- 说明 master repo 更新成功。以上是以 `WeexSDK` 为例,其他库类似。
-
- - 如果出现这种错误 `error: The sandbox is not in sync with the Podfile.lock. Run 'pod install' or update your CocoaPods installation.` 进入 playground 目录(podfile 文件所在目录)按提示执行。
-
- 更多 pod 使用细节请移步[cocoapods](https://cocoapods.org/)
-
-- mobileprovision,参数(\*mobileprovision)为 provisioning profile 文件路径。
-
-----
-
-## Android
-
-在 Mac 平台开发 Android 首先需要下载 [Android Studio](https://developer.android.com/studio/install.html)(你可能需要翻墙才能访问)。[Android Studio](https://developer.android.com/studio/install.html) 为我们提供了 Android SDK 及 AVD(模拟器)以便我们快速运行 Android 项目。
-
-下载完成后运行 Android Studio,任意新建一个 Android 项目,在第二步中选择 **Android 5.1**,然后点击 next 完成项目创建,如图所示:
-
-
-
-待 Android Studio 打开后,在顶部菜单栏选择 Tools -> Android -> AVD Manager,安装 Android 模拟器:
-
-
-
-之后,打开模拟器运行 Android。
-
-**注意:**
-
-1. 必须保持模拟器运行。
-2. 保证 Android build-tool 的版本为 23.0。【可以在 Android Studio 的 SDK Manager 里查看是否已安装这个版本,如果没有可选择安装这一版本】。
-
-### 配置环境变量
-
-因为 Android Studio 安装的 SDK 不会自动配置环境变量(你自己安装的 SDK 同样不会)。所以需要您自己手动配置 Android_HOME 环境变量和 PATH
-
-如果是 Android Studio 安装的 SDK 安装路径可已在 SDK manager 里找到(打开 SDK manager 的方式请参照图2)
-
-Windows 下请参照 [window 下如何设置 ANDROID 环境变量](http://jingyan.baidu.com/article/09ea3ede1b4df6c0aede39ab.html)
-
-Linux/Mac 下只需编辑 `.bash_profile` 增加 PATH 即可:
-
-```bash
-vim ~/.bash_profile
-```
-
-然后添加下列代码进去(路径替换为你的真实路径)
-
-```bash
-export ANDROID_HOME=/xxx/Library/Android/sdk
-export PATH=${PATH}:$ANDROID_HOME/tools:$ANDROID_HOME/platform-tools:$ANDROID_HOME/build-tools
-```
-
-然后保存退出(:wq)。再执行下列命令:
-
-```bash
-source ~/.bash_profile
-```
-
-### 创建项目
-
-然后,就可以使用 weexpack 创建 weex 工程了:
-
-```bash
-$ weexpack init appName
-```
-
-weexpack 会自动新建以 appName 命名的目录,并将项目模板拉取到该目录。
-
-最终形成如下目录结构:
-
-```bash
--> /appName
-.
-|—— .gitignore
-|—— README.md
-|—— package.json
-|-- android.config.json
-|-- ios.config.json
-|—— webpack.config.js
-|—— /src
-| |—— index.we
-|—— /html5
-| |—— index.html
-|—— /ios
-| |—— /playground
-| |—— /sdk
-| |—— /WXDevtool
-|—— /android
-| |—— /playground
-| |—— /appframework
-```
-
-其中:
-
-- `webpack.config.js` 是 webpack 配置文件,用于生成 `.we` 文件的 JSBunlde
-- `ios.config.json` 是 iOS 项目配置文件
-- `android.config.json` 是 Android 项目配置文件
-- `/src` 目录放置 Weex 页面
-- `/html5` 是 H5 端入口文件
-- `/ios` 放置 iOS 项目
-- `/android` 放置 Android 项目
-
-紧接着,进入目录,并且安装依赖:
-
-```bash
-$ cd appName && npm install
-```
-
-至此,项目模版创建完成,接下来我们可以自定义我们的 APP 信息并打包运行。
-
-### 运行与打包
-
-如果一切正常,你可以使用 weexpack 打包或模拟器运行了:
-
-Android 的打包和构建是一体的 :
-
-```bash
-$ weexpack run android
-```
-
-同样的你可以更改项目目录下的android.config.json
-
-- `AppName`: 应用名
-- `AppId`: application_id 包名
-- `SplashText`: 欢迎页上面的文字
-- `WeexBundle`: 指定的 weex bundle 文件(支持文件名和 url 的形式)
-
- 指定文件名则以本地文件的方式加载 bundle,指定 url 则以远程的方式加载 JSBundle。如果以本地方式指定 bundle `.we` 文件请放到 `src` 目录。
http://git-wip-us.apache.org/repos/asf/incubator-weex-site/blob/32a097bf/source/cn/v-0.10/advanced/customize-a-native-component.md
----------------------------------------------------------------------
diff --git a/source/cn/v-0.10/advanced/customize-a-native-component.md b/source/cn/v-0.10/advanced/customize-a-native-component.md
deleted file mode 100644
index 404f25c..0000000
--- a/source/cn/v-0.10/advanced/customize-a-native-component.md
+++ /dev/null
@@ -1,168 +0,0 @@
----
-title: 自定义 native 组件
-type: advanced
-order: 7
-has_chapter_content: true
-version: 0.10
----
-
-# 如何自定义 native 组件?
-
-Weex 已经包含了最关键的平台组件,例如 `ScrollView, ListView, Text, Imageview` 等等。当然,这些组件并不能完全满足你的需求。另外,那些在你的工程中常用的大量原生 UI 组件,可能需要被简单地集合到 Weex 中。幸运的是,通过任意已存在的组件来创建你的自定义组件是一件很方便的事。
-
-## Android
-
-### 步骤:
-
-1.自定义组件必须继承自 `WXComponent` 或者 `WXContainer` ;
-2.weex SDK 可以识别 @WXComponentProp (name = value(value 是 attr 或者 dsl style));
-3.方法必须是 `public` 的;
-4.组件类不能是一个内部类;
-5.自定义组件不能被 ProGuard 之类的工具混淆;
-6.组件方法在 UI 线程被调用,因此不要在里面进行耗时的操作;
-7.Weex 的参数类型可以是 int, double, float, String, Map, List 和实现了 WXObject 接口的自定义类;
-
-### 参考以下例子:
-
-``` java
- `package com.taobao.weex.ui.component;
-// ……
-
-public class MyViewComponent extends WXComponent{
-
- public MyViewComponent(WXSDKInstance instance, WXDomObject node,
- WXVContainer parent, String instanceId, boolean lazy) {
- super(instance, node, parent, instanceId, lazy);
- }
-
- @Override
- protected void initView() {
- //TODO:your own code ……
- }
-
- @Override
- public WXFrameLayout getView() {
- //TODO:your own code ………
- }
- @WXComponentProp(name=WXDomPropConstant.WX_ATTR_VALUE)
- public void setMyViewValue(String value) {
- ((TextView)mHost).setText(value);
- }
-
-}
-```
-
-必须注册组件:
-
-``` java
-WXSDKEngine.registerComponent("MyView", MyViewComponent.class);
-```
-
-## iOS
-
-虽然 WeexSDK 中有很多的 native 的 Component,但这有可能并不能满足你的需求。在之前你可能已经写了一些很酷炫 native 的组件,想包装一下,导入到 Weex 中,因此我们提供了让开发者实现自己的 native Component。下面将以 WeexSDK 中已经存在的 Component:`image` 为例子,介绍一下如何构建一个 native Component。假设你已经了解 iOS 开发
-
-### 注册 Component
-
-注册一个 component 比较简单,调用 `WXSDKEngine` 中的 `registerComponent:withClass:` 方法,传入组件的标签名称,还有对应的 class 然后你可以创建一个 `WXImageComponent` 表示 `image` 组件的实现。在 `.we` 文件中,只需要写 `<image></image>`
-
-### 添加属性
-
-现在我们要做一些让 image component 更加强大的事情。既然作为一个图片的 component,那它应该要有源,给他加上一个 `src` 的属性,同时给它加上一个 `resize` 的属性(可以配置的有 `contain/cover/stretch`)
-
-```object-c
-@interface WXImageComponent ()
-
-@property (nonatomic, strong) NSString *imageSrc;
-@property (nonatomic, assign) UIViewContentMode resizeMode;
-
-@end
-```
-
-component 中所有的 style,attribute,events 都会被传递到 Component 的初始化方法中,所以,你可以在初始化方法中存储你感兴趣的一些属性值
-
-```object-c
-@implementation WXImageComponent
-
-- (instancetype)initWithRef:(NSString *)ref type:(NSString *)type styles:(NSDictionary *)styles attributes:(NSDictionary *)attributes events:(NSArray *)events weexInstance:(WXSDKInstance *)weexInstance
-{
- if (self = [super initWithRef:ref type:type styles:styles attributes:attributes events:events weexInstance:weexInstance]) {
- _imageSrc = [WXConvert NSString:attributes[@"src"]];
- _resizeMode = [WXConvert UIViewContentMode:attributes[@"resize"]];
-}
-
- return self;
-}
-
-@end
-```
-
-attribute 中拿到的值的类型都是 `id`,我们可以用转换方法把它转换到任何值。Weex SDK 提供了一些基础的转换方法,可以参考 `WXConvert` 类,或者你可以添加自己的转换函数。
-
-### Hooking 渲染生命周期
-
-native 的 component 是由 Weex 管理的,Weex 创建,布局,渲染,销毁。Weex 的 component 生命周期都是可以 hook 的,你可以在这些生命周期中去做自己的事情。
-
-| 方法 | 描述 |
-| :-: | --- |
-| initWithRef:type:... | 用给定的属性初始化一个component. |
-| layoutDidFinish | 在component完成布局时候会调用. |
-| loadView | 创建component管理的view. |
-| viewWillLoad | 在component的view加载之前会调用. |
-| viewDidLoad | 在component的view加载完之后调用. |
-| viewWillUnload | 在component的view被释放之前调用. |
-| viewDidUnload | 在component的view被释放之后调用. |
-| updateStyles: | 在component的style更新时候调用. |
-| updateAttributes: | 在component的attribute更新时候调用. |
-| addEvent: | 给component添加event的时候调用. |
-| removeEvent: | 在event移除的时候调用. |
-
-在 image component 的例子里面,如果我们需要我们自己的 image view 的话,可以复写 `loadView`这个方法.
-
-```object-c
-- (UIView *)loadView
-{
-return [[WXImageView alloc] init];
-}
-```
-
-现在我们使用 `WXImageView` 渲染 `image` component。
-作为一个 image component,我们需要拿到服务器图片,而且把它设置进 image view 里. 这个操作可以在 `viewDidLoad` 方法中做,这个方法是在 view 已经被创建而且加载了时候 Weex SDK 会调用到,而且 `viewDidLoad` 这个方法是你做额外初始化工作比如改变 content mode(也就是设置resize) 的最好时间.
-
-```object-c
-- (void)viewDidLoad
-{
- UIImageView *imageView = (UIImageView *)self.view;
- imageView.contentMode = _resizeMode;
- imageView.userInteractionEnabled = YES;
- imageView.clipsToBounds = YES;
- imageView.exclusiveTouch = YES;
-
- // Do your image fetching and updating logic
-}
-```
-
-如果可以改变 image 的 src,也可以 hook `updateAttributes:` 方法来做属性更新操作,当 `updateAttributes:` 或者 `updateStyles:` 被调用的时候, component 的 view 已经加载完成
-
-```object-c
-- (void)updateAttributes:(NSDictionary *)attributes
-{
- if (attributes[@"src"]) {
- _imageSrc = [WXConvert NSString:attributes[@"src"]];
- // Do your image updating logic
- }
-
- if (attributes[@"resize"]) {
- _resizeMode = [WXConvert UIViewContentMode:attributes[@"resize"]];
- self.view.contentMode = _resizeMode;
- }
-}
-```
-
-或许你需要考虑更多的生命周期方法去 Hook,当布局完成时候,像 `layoutDidFinish`,如果你想了解更多,可以参考一下`WXComponent.h` 声明的方法。
-
-现在你可以用在任何 `.we` 文件里面使用 `<image>`,而且可以加上 image 的属性。
-
-```html
-<image style="your-custom-style" src="image-remote-source" resize="contain/cover/stretch"></image>
-```
http://git-wip-us.apache.org/repos/asf/incubator-weex-site/blob/32a097bf/source/cn/v-0.10/advanced/cuszomize-native-apis.md
----------------------------------------------------------------------
diff --git a/source/cn/v-0.10/advanced/cuszomize-native-apis.md b/source/cn/v-0.10/advanced/cuszomize-native-apis.md
deleted file mode 100644
index 55e5e4c..0000000
--- a/source/cn/v-0.10/advanced/cuszomize-native-apis.md
+++ /dev/null
@@ -1,85 +0,0 @@
----
-title: 自定义 native API
-type: advanced
-order: 8
-has_chapter_content: true
-version: 0.10
----
-
-# 如何自定义 native API?
-
-Weex 的 SDK 只提供了页面渲染的能力,但是一些其它操作,比如网络请求、图片加载、重定向等功能需要你自己去实现,这个例子讲述了如何用原生代码去扩展 Weex 的功能。
-
-## 关于 URLHelper 的例子
-
-### 新建一个 WXModule
-
-```java
-public class URLHelperModule extends WXModule{
- private static final String WEEX_CATEGORY="com.taobao.android.intent.category.WEEX";
- @WXModuleAnno
- public void openURL(String url){
- if (TextUtils.isEmpty(url)) {
- return;
- }
- StringBuilder builder=new StringBuilder("http:");
- builder.append(url);
- Uri uri = Uri.parse(builder.toString());
- Intent intent = new Intent(Intent.ACTION_VIEW, uri);
- intent.addCategory(WEEX_CATEGORY);
- mWXSDKInstance.getContext().startActivity(intent);
- }
-}
-```
-
-这里要注意 `@WXModuleAnno` 这个注解,它表示了你把这个方法暴露给 JavaScript。
-
-```java
-public class URLHelperModule extends WXModule{
-
- @WXModuleAnno
- public void openURL(String url,String callbackId){
- //...
- //callback to javascript
- Map<String, Object> result = new HashMap<String, Object>();
- result.put("ts", System.currentTimeMillis());
- WXBridgeManager.getInstance().callback(mWXSDKInstance.getInstanceId(), callbackId, result);
- }
-}
-```
-
-### 把module注册到WXSDKEngine:
-
-```java
-try {
- WXSDKEngine.registerModule("myURL", URLHelperModule.class);
- //'myURL' is the name you'll use in javascript
- } catch (WXException e) {
- WXLogUtils.e(e.getMessage());
- }
-```
-
-### 在 JavaScript 中使用 `eventModule`:
-
-```javascript
-let URLHelper = require('@weex-module/myURL');//same as you registered
-URLHelper.openURL("http://www.taobao.com",function(ts){
- console.log("url is open at "+ts);
-});
-```
-
-## 一些注意事项:
-
-1. 定义一个 components 需要继承 `WXModule`
-
-2. 不要忘记添加 `@WXModuleAnno` 注解,不然 Weex 没法识别这个方法
-
-3. 定义的方法必须是 `public 的
-
-4. module 类一定不能是内部类
-
-5. 你定义的 components 不能被混淆,不然会找不到
-
-6. Module 中的方法会在 UI 线程中被调用,所以一定不要做一些耗时操作
-
-7. Moudle 中的方法参数类型可以为 `int`,`double`,`float`,`String`,`Map`,`List`,以及实现 `WXObject` 接口的类。
[25/51] [abbrv] incubator-weex-site git commit: rearrangement the
structure of the document
Posted by ha...@apache.org.
http://git-wip-us.apache.org/repos/asf/incubator-weex-site/blob/32a097bf/_draft/v-0.10/references/specs/index.md
----------------------------------------------------------------------
diff --git a/_draft/v-0.10/references/specs/index.md b/_draft/v-0.10/references/specs/index.md
new file mode 100644
index 0000000..d303a16
--- /dev/null
+++ b/_draft/v-0.10/references/specs/index.md
@@ -0,0 +1,309 @@
+---
+title: JS Bundle format
+type: references
+order: 4
+has_chapter_content: false
+chapter_title: Low-level Specs
+version: 0.10
+---
+
+# JS Bundle format
+
+JS Bundle Version: v0.3.0
+
+## v0.5.0
+
+### Whole Syntax and Structure
+
+A JS Bundle is actually a JavaScript file which follows **ES5** standard. The code is used to define some custom components for the instance and bootstrap the instance with certain name, config and data. Developers could use all kinds of JS code packager like webpack, browserify, requirejs to organize your whole instance code.
+
+### Meta Info
+
+The JS Bundle Must begin with a comment line which is a JSON object like:
+
+```javascript
+// { "framework": "Weex", "version": "0.5.0" }
+```
+
+This JSON object as least contains:
+
+* property `framework` must be `"Weex"`
+* property `version` should be corresponded with the JS Bundle format version
+
+### Global Members
+
+* `__weex_define__(name, options)`
+* `__weex_bootstrap__(name, config, data)`
+* `__weex_document__`
+* `__weex_require__(name)`
+
+#### `__weex_define__(name:string, options: object)`
+
+Define a custom component named `name` for current instance with `options`.
+
+**example:**
+
+```javascript
+__weex_define__('rmb', {
+ template: {
+ type: 'div',
+ style: {flexDirection: 'row'},
+ children: [
+ {type: 'text', attr: {value: '¥'}},
+ {type: 'text', attr: {value: this.value}}
+ ]
+ },
+ data: function () {
+ return {
+ value: '0'
+ }
+ },
+ methods: {...}
+})
+```
+
+The enabled component options contains:
+
+* `template`: just the same as [v0.3.0](#details-of-template-option-definitions)
+* `style`: just the same as [v0.3.0](#details-of-style-option-definitions)
+* `data`: a function which return a plain object to observe by the ViewModel
+* `methods`: a function map to proxy to the ViewModel
+* `computed`: a map of several computed keys for the ViewModel
+* `init`, `created`, `ready`: lifecycle methods
+* `events`: event handlers for the ViewModel
+<!-- * `components`: a map for options of sub components the ViewModel needed (So `__weex_define__(name, options)` equals to run `this.components[name] = options` in each custom components when `init`) -->
+
+The enabled ViewModel APIs contains:
+
+* `$el(id): Element`: find element by id in current ViewModel scope
+* `$vm(id): ViewModel`: find sub ViewModel by id
+* `$getConfig(): object`: get instance config info
+* `$broadcast`/`$emit`/`$dispatch`/`$on`/`$off`: listen and fire component events
+* `$transition` *(experimental)*: animation transition (see more in [animation native module](../animation.html))
+
+#### `__weex_require__(name: string): object`
+
+Get a Weex native module with several native APIs.
+
+**example:**
+
+```javascript
+var modal = __weex_require__('modal')
+modal.toast({
+ message: 'Hey!',
+ duration: 2
+})
+```
+
+polyfill for v0.3.0
+
+```javascript
+function __weex_require__(name) {
+ var result
+ define('__weex_require__', function (r, e, m) {
+ result = r('@weex-module/' + name)
+ })
+ return result
+}
+```
+
+#### `__weex_bootstrap__(nameOrOptions: string|object, config: object?, data: object?): AppInstance | Error`
+
+Start to render by a certain component name or a direct component options as the root element, and some instance `config` and instance `data`. If everything fine, it will returns the root app instance. Otherwise it will return an `Error` instance which describes something wrong.
+
+**example:**
+
+```javascript
+__weex_bootstrap__(
+ 'root',
+ {
+ // format 1:
+ // downgrade: { appVersion: '>= 0.5.0' },
+ // format 2:
+ // downgrade: function (config) { return true }
+ },
+ {
+ // external data
+ // value: '12345'
+ }
+)
+```
+
+The instance `config` now only support `downgrade` property which allows two format:
+
+1. an object like `{ osVersion, appVersion, weexVersion, deviceModel }`
+2. a function like `function (config) { return true }` to return a boolean value. `true` means normal and `false` means downgrade.
+
+The instance `data` will merge to root component data. So the root component is also easy to reuse and the instance data is easy to customize.
+
+#### `__weex_document__`
+
+An virtual-DOM `Document` instance. Also the host of [virtual-DOM APIs](./virtual-dom-apis.html). Every Weex instance has and must have just one `Document` instance.
+
+### Preserved Global Variables
+
+`define`, `bootstrap`, `module`, `exports`, `document`, `require`, `register`, `render`
+
+### A whole example
+
+```javascript
+// { "framework": "Weex", "version": "0.5.0" }
+
+var modal = __weex_require__('modal')
+
+__weex_define__('item', {
+ template: {
+ type: 'div',
+ style: { flexDirection: 'row' },
+ event: {
+ click: function (e) {
+ this.update(e)
+ }
+ },
+ children: [
+ { type: 'image', attr: { src: this.imageUrl }, ...},
+ { type: 'text', attr: { value: this.title }, ...}
+ ]
+ },
+ data: function () {
+ return {
+ imageUrl: '',
+ title: ''
+ }
+ },
+ methods: {
+ update: function (e) {
+ modal.toast({ message: this.title })
+ }
+ }
+})
+
+__weex_define__('app', {
+ template: {
+ type: 'div',
+ children: [
+ {
+ type: 'item',
+ repeat: {
+ expression: function () {
+ return this.list
+ },
+ key: '$index',
+ value: '$value'}
+ },
+ attr: {
+ imageUrl: function () {
+ return this.$value.imageUrl
+ },
+ title: function () {
+ return this.$value.title
+ }
+ }
+ }
+ ]
+ },
+ data: function () {
+ return {
+ list: [
+ { imageUrl: 'xxx', title: '111' },
+ { imageUrl: 'yyy', title: '222' },
+ { imageUrl: 'zzz', title: '333' }
+ ]
+ }
+ }
+})
+
+__weex_bootstrap__('app')
+```
+
+## v0.3.0
+
+### Whole Syntax and Structure
+
+A JS Bundle is actually a JavaScript file which follows **ES5** standard. The code is organized by several modules with AMD-like format:
+
+```javascript
+define('moduleName1', function (require, exports, module) {
+ // content of module1
+})
+
+define('moduleName2', function (require, exports, module) {
+ // content of module2
+})
+
+...
+```
+
+A whole Weex JS Bundle is concatenated by these modules and last a `bootstrap(rootComponentName, optionalConfig, optionalExternalData)` function call.
+
+```javascript
+define('@weex-component/a', function (require, exports, module) {
+ // content of composed component <a>
+})
+
+define('@weex-component/b', function (require, exports, module) {
+ // content of composed component <b>
+})
+
+bootstrap('@weex-component/b')
+```
+
+As the sample above, the component name should be hyphenated (a-z, 0-9, "-"). Other characters are not allowed.
+
+And, the method call `bootstrap()` allows 1~3 parameters: root module name (String), config info (optional JSON) and external data (optional JSON).
+
+### Content of Composed Components
+
+A module of composed component contains 3 parts: whole options definition, additional template option definition and additional style option definition.
+
+- whole options is a piece of JavaScript code to put component options (except `template` option and `style` option) into `module.exports`
+- `template` option is a piece of JSON-like object assigned to `module.exports.template` which describes the display structure of this component
+- `style` option is a piece of JSON object assigned to `module.exports.style` which describes the reusable styles in this component
+
+The `template` option is required and appeared only once, and the `style` option and whole options definition are optional.
+
+These options are defined and transformed by Transformer. Actually you can also ignore all the format limitation and write options to `module.exports` as the same result if you are not going to use Transformer. But that's not recommended.
+
+#### Details of template option definitions
+
+A piece of multi-level embedded JSON-like object which describes the view structure.
+
+Every level JSON-like object has these members below:
+
+* `type`: a required string, component name/type
+* `component`: an optional boolean, whether this component is composed or native
+* `attr`: an optional k-v pairs which contains all attributes of an element, the value could be a string, number, boolean or a function that bind some data value
+* `style`: an optional k-v pairs which contains all styles of an element, just the same format as the `attr`
+* `classList`: an optional array of strings which contains class names for styling.
+* `events`: an optional k-v pairs whose keys are event type and values are corresponding method names
+* `children`: an optional array of child components info
+* `append`: an optional string which determines a compiling workflow strategy: append node-by-node singly or a whole node tree just one time. the default value is `node` and another supported value is `tree`.
+* `shown`: a optional function which returns a boolean value to determine whether this component should be displayed
+* `repeat`: a optional function which returns a list data to displays components with each
+
+**Corresponding Keys to Weex Transformer:**
+
+- tag `name` in Weex file corresponds to `type`
+- attr `if` in Weex file corresponds to `shown`
+- attr `repeat` in Weex file corresponds to `repeat`
+- attr `append` in Weex file corresponds to `append`
+- attr `style` in Weex file with CSS syntax corresponds to `style`
+- attr `class` in Weex file with class names separated by blanks corresponds to `classList`
+- attr `on***` in Weex file with prefix `on` corresponds to a k-v pair in `events`
+- other attributes in Weex file corresponds to `attr`
+- Child nodes in Weex file corresponds to `children`
+
+All tag names, attr names are case-insensitive and transformed to lower-cased. But the attr values are case-sensitive.
+
+#### Details of style option definitions
+
+Just a two-levels JSON object.
+
+* The first levels are class names.
+* The second levels are k-v pairs which describes style names & properties for each class name.
+
+**Corresponding Keys to Weex Transformer:**
+
+* class name corresponds to first level keys
+* prop name corresponds to second level keys
+* prop value corresponds to second level values
http://git-wip-us.apache.org/repos/asf/incubator-weex-site/blob/32a097bf/_draft/v-0.10/references/specs/js-bundle-format.md
----------------------------------------------------------------------
diff --git a/_draft/v-0.10/references/specs/js-bundle-format.md b/_draft/v-0.10/references/specs/js-bundle-format.md
new file mode 100644
index 0000000..0b103d9
--- /dev/null
+++ b/_draft/v-0.10/references/specs/js-bundle-format.md
@@ -0,0 +1,307 @@
+---
+title: JS Bundle format
+type: references
+order: 4.1
+version: 0.10
+---
+
+# JS Bundle format
+
+JS Bundle Version: v0.3.0
+
+## v0.5.0
+
+### Whole Syntax and Structure
+
+A JS Bundle is actually a JavaScript file which follows **ES5** standard. The code is used to define some custom components for the instance and bootstrap the instance with certain name, config and data. Developers could use all kinds of JS code packager like webpack, browserify, requirejs to organize your whole instance code.
+
+### Meta Info
+
+The JS Bundle Must begin with a comment line which is a JSON object like:
+
+```javascript
+// { "framework": "Weex", "version": "0.5.0" }
+```
+
+This JSON object as least contains:
+
+* property `framework` must be `"Weex"`
+* property `version` should be corresponded with the JS Bundle format version
+
+### Global Members
+
+* `__weex_define__(name, options)`
+* `__weex_bootstrap__(name, config, data)`
+* `__weex_document__`
+* `__weex_require__(name)`
+
+#### `__weex_define__(name:string, options: object)`
+
+Define a custom component named `name` for current instance with `options`.
+
+**example:**
+
+```javascript
+__weex_define__('rmb', {
+ template: {
+ type: 'div',
+ style: {flexDirection: 'row'},
+ children: [
+ {type: 'text', attr: {value: '¥'}},
+ {type: 'text', attr: {value: this.value}}
+ ]
+ },
+ data: function () {
+ return {
+ value: '0'
+ }
+ },
+ methods: {...}
+})
+```
+
+The enabled component options contains:
+
+* `template`: just the same as [v0.3.0](#details-of-template-option-definitions)
+* `style`: just the same as [v0.3.0](#details-of-style-option-definitions)
+* `data`: a function which return a plain object to observe by the ViewModel
+* `methods`: a function map to proxy to the ViewModel
+* `computed`: a map of several computed keys for the ViewModel
+* `init`, `created`, `ready`: lifecycle methods
+* `events`: event handlers for the ViewModel
+<!-- * `components`: a map for options of sub components the ViewModel needed (So `__weex_define__(name, options)` equals to run `this.components[name] = options` in each custom components when `init`) -->
+
+The enabled ViewModel APIs contains:
+
+* `$el(id): Element`: find element by id in current ViewModel scope
+* `$vm(id): ViewModel`: find sub ViewModel by id
+* `$getConfig(): object`: get instance config info
+* `$broadcast`/`$emit`/`$dispatch`/`$on`/`$off`: listen and fire component events
+* `$transition` *(experimental)*: animation transition (see more in [animation native module](../animation.html))
+
+#### `__weex_require__(name: string): object`
+
+Get a Weex native module with several native APIs.
+
+**example:**
+
+```javascript
+var modal = __weex_require__('modal')
+modal.toast({
+ message: 'Hey!',
+ duration: 2
+})
+```
+
+polyfill for v0.3.0
+
+```javascript
+function __weex_require__(name) {
+ var result
+ define('__weex_require__', function (r, e, m) {
+ result = r('@weex-module/' + name)
+ })
+ return result
+}
+```
+
+#### `__weex_bootstrap__(nameOrOptions: string|object, config: object?, data: object?): AppInstance | Error`
+
+Start to render by a certain component name or a direct component options as the root element, and some instance `config` and instance `data`. If everything fine, it will returns the root app instance. Otherwise it will return an `Error` instance which describes something wrong.
+
+**example:**
+
+```javascript
+__weex_bootstrap__(
+ 'root',
+ {
+ // format 1:
+ // downgrade: { appVersion: '>= 0.5.0' },
+ // format 2:
+ // downgrade: function (config) { return true }
+ },
+ {
+ // external data
+ // value: '12345'
+ }
+)
+```
+
+The instance `config` now only support `downgrade` property which allows two format:
+
+1. an object like `{ osVersion, appVersion, weexVersion, deviceModel }`
+2. a function like `function (config) { return true }` to return a boolean value. `true` means normal and `false` means downgrade.
+
+The instance `data` will merge to root component data. So the root component is also easy to reuse and the instance data is easy to customize.
+
+#### `__weex_document__`
+
+An virtual-DOM `Document` instance. Also the host of [virtual-DOM APIs](./virtual-dom-apis.html). Every Weex instance has and must have just one `Document` instance.
+
+### Preserved Global Variables
+
+`define`, `bootstrap`, `module`, `exports`, `document`, `require`, `register`, `render`
+
+### A whole example
+
+```javascript
+// { "framework": "Weex", "version": "0.5.0" }
+
+var modal = __weex_require__('modal')
+
+__weex_define__('item', {
+ template: {
+ type: 'div',
+ style: { flexDirection: 'row' },
+ event: {
+ click: function (e) {
+ this.update(e)
+ }
+ },
+ children: [
+ { type: 'image', attr: { src: this.imageUrl }, ...},
+ { type: 'text', attr: { value: this.title }, ...}
+ ]
+ },
+ data: function () {
+ return {
+ imageUrl: '',
+ title: ''
+ }
+ },
+ methods: {
+ update: function (e) {
+ modal.toast({ message: this.title })
+ }
+ }
+})
+
+__weex_define__('app', {
+ template: {
+ type: 'div',
+ children: [
+ {
+ type: 'item',
+ repeat: {
+ expression: function () {
+ return this.list
+ },
+ key: '$index',
+ value: '$value'}
+ },
+ attr: {
+ imageUrl: function () {
+ return this.$value.imageUrl
+ },
+ title: function () {
+ return this.$value.title
+ }
+ }
+ }
+ ]
+ },
+ data: function () {
+ return {
+ list: [
+ { imageUrl: 'xxx', title: '111' },
+ { imageUrl: 'yyy', title: '222' },
+ { imageUrl: 'zzz', title: '333' }
+ ]
+ }
+ }
+})
+
+__weex_bootstrap__('app')
+```
+
+## v0.3.0
+
+### Whole Syntax and Structure
+
+A JS Bundle is actually a JavaScript file which follows **ES5** standard. The code is organized by several modules with AMD-like format:
+
+```javascript
+define('moduleName1', function (require, exports, module) {
+ // content of module1
+})
+
+define('moduleName2', function (require, exports, module) {
+ // content of module2
+})
+
+...
+```
+
+A whole Weex JS Bundle is concatenated by these modules and last a `bootstrap(rootComponentName, optionalConfig, optionalExternalData)` function call.
+
+```javascript
+define('@weex-component/a', function (require, exports, module) {
+ // content of composed component <a>
+})
+
+define('@weex-component/b', function (require, exports, module) {
+ // content of composed component <b>
+})
+
+bootstrap('@weex-component/b')
+```
+
+As the sample above, the component name should be hyphenated (a-z, 0-9, "-"). Other characters are not allowed.
+
+And, the method call `bootstrap()` allows 1~3 parameters: root module name (String), config info (optional JSON) and external data (optional JSON).
+
+### Content of Composed Components
+
+A module of composed component contains 3 parts: whole options definition, additional template option definition and additional style option definition.
+
+- whole options is a piece of JavaScript code to put component options (except `template` option and `style` option) into `module.exports`
+- `template` option is a piece of JSON-like object assigned to `module.exports.template` which describes the display structure of this component
+- `style` option is a piece of JSON object assigned to `module.exports.style` which describes the reusable styles in this component
+
+The `template` option is required and appeared only once, and the `style` option and whole options definition are optional.
+
+These options are defined and transformed by Transformer. Actually you can also ignore all the format limitation and write options to `module.exports` as the same result if you are not going to use Transformer. But that's not recommended.
+
+#### Details of template option definitions
+
+A piece of multi-level embedded JSON-like object which describes the view structure.
+
+Every level JSON-like object has these members below:
+
+* `type`: a required string, component name/type
+* `component`: an optional boolean, whether this component is composed or native
+* `attr`: an optional k-v pairs which contains all attributes of an element, the value could be a string, number, boolean or a function that bind some data value
+* `style`: an optional k-v pairs which contains all styles of an element, just the same format as the `attr`
+* `classList`: an optional array of strings which contains class names for styling.
+* `events`: an optional k-v pairs whose keys are event type and values are corresponding method names
+* `children`: an optional array of child components info
+* `append`: an optional string which determines a compiling workflow strategy: append node-by-node singly or a whole node tree just one time. the default value is `node` and another supported value is `tree`.
+* `shown`: a optional function which returns a boolean value to determine whether this component should be displayed
+* `repeat`: a optional function which returns a list data to displays components with each
+
+**Corresponding Keys to Weex Transformer:**
+
+- tag `name` in Weex file corresponds to `type`
+- attr `if` in Weex file corresponds to `shown`
+- attr `repeat` in Weex file corresponds to `repeat`
+- attr `append` in Weex file corresponds to `append`
+- attr `style` in Weex file with CSS syntax corresponds to `style`
+- attr `class` in Weex file with class names separated by blanks corresponds to `classList`
+- attr `on***` in Weex file with prefix `on` corresponds to a k-v pair in `events`
+- other attributes in Weex file corresponds to `attr`
+- Child nodes in Weex file corresponds to `children`
+
+All tag names, attr names are case-insensitive and transformed to lower-cased. But the attr values are case-sensitive.
+
+#### Details of style option definitions
+
+Just a two-levels JSON object.
+
+* The first levels are class names.
+* The second levels are k-v pairs which describes style names & properties for each class name.
+
+**Corresponding Keys to Weex Transformer:**
+
+* class name corresponds to first level keys
+* prop name corresponds to second level keys
+* prop value corresponds to second level values
http://git-wip-us.apache.org/repos/asf/incubator-weex-site/blob/32a097bf/_draft/v-0.10/references/specs/js-framework-apis.md
----------------------------------------------------------------------
diff --git a/_draft/v-0.10/references/specs/js-framework-apis.md b/_draft/v-0.10/references/specs/js-framework-apis.md
new file mode 100644
index 0000000..e1412c6
--- /dev/null
+++ b/_draft/v-0.10/references/specs/js-framework-apis.md
@@ -0,0 +1,191 @@
+---
+title: JS Framework APIs
+type: references
+order: 4.2
+version: 0.10
+---
+
+# JS Framework APIs
+<span class="weex-version">0.4</span>
+
+## Intro about JS Runtime
+
+These APIs are designed for JS Framework and Native Engine working together.
+
+Considering the limitation of mobile phone resource, *Weex runs only one JS runtime* to handle all Weex instances. So it need a multi-instance management layer in JavaScript. These JS Framework APIs are just designed to do the management job.
+
+* First, each Weex instance have a lifecycle, from `createInstance` to `destroyInstance`. During this period, we can import some extra data by `refreshInstance`.
+* To communicate with Native Engine, we have a couple of APIs: `sendTasks` and `receiveTasks`. They are used to call each other by some commands and messages.
+* And when JS runtime start at the beginning of the app launching, we need something initialized and configured. So we supply some APIs like `registerComponents`, `registerModules`.
+* The last API is just for debugging, we supply an API named `getRoot` to return the whole virtual-DOM data for developers.
+* If any of these API calls failed, an `Error` object should be returned.
+
+## Called by native and supplied from JS Framework
+
+### `createInstance(instanceId, code, options, data)`
+
+Create a Weex instance from Native Engine
+
+* `instanceId`: The unique id for a Weex instance, generated by Native Engine.
+* `code`: The JS bundle code send from Native Engine. It will be executed by `new Function(code)` in JS Framework. The code format depends on [JS Bundle Foramt](./js-bundle-format.html)
+* `options`: *Optional*. An options object. *Currently it supports `debug` flag which enable printing log and `bundleUrl` flag which the url of bundle.*
+* `data`: *Optional*. It's an chance to supply external data instead of the original data in JS bundle.
+
+Example:
+
+```javascript
+createInstance('x', 'define(...); define(...); define(...); bootstrap(...)')
+createInstance('x', '...', { bundleUrl, debug, ... }, { a: 1, b: 2 }})
+```
+
+### `destroyInstance(instanceId)`
+
+Destroy an existed Weex instance by id from Native Engine
+
+### `refreshInstance(instanceId, data)`
+
+Refresh data to an existed Weex instance with certain external data from Native Engine
+
+Example:
+
+```javascript
+refreshInstance('x', {a: 100, b: 200})
+```
+
+### `registerComponents(components)`
+
+Register all native components
+
+* `components`: A array of whose items are component options that are force part to use. *Currently it supports `append` attribute which forces the appending mechanism (`tree` or `node`) when first time rendering.*
+
+Example:
+
+```javascript
+registerComponents([
+ { type: 'container' },
+ { type: 'text' },
+ { type: 'image' },
+ { type: 'slider', append: 'tree' },
+ { type: 'list' },
+ { type: 'cell', append: 'tree' },
+ ...
+])
+```
+
+### `registerModules(modules)`
+
+Register the name, methods and args format of each module
+
+* `modules`: A map that collects all native module definitions. Each module definition is an array which has several API definitions. Each API definition has a `name` string and an `args` array which contains a list of each parameter's type.
+
+**NOTE: the `node` type data will actually return its `ref` property. And the `function` type data will actually return a unique function id referring to it.**
+
+Example:
+
+```javascript
+registerModules({
+ event: [
+ {name: 'openURL', args: ['string']}
+ ],
+ ...
+})
+```
+
+### `receiveTasks(instanceId, tasks)`
+
+Fire events or callbacks to an existed Weex instance from Native Engine
+
+* `tasks[]`: A task list. Each task has a `method="fireEvent|callback"` property and a list of `args`.
+ - In `fireEvent` method, the `args` is `ref` of the target, event `type`, event `data` and `domChanges` description in order. **Note: if some event make virtual-DOM data changed (e.g. value changed in `<input>` or current index changed in `<slider>`), the changing of the target element will be passed as `domChanges`.**
+ - In `callback` method, the `args` is `funcId` of a handler, `data` and `ifKeepAlive` which describes whether this callback handler should be keeping called. (Each callback handler is matched with a `funcId` when the original call happens.)
+
+Example:
+
+```javascript
+receiveTasks('x', [{method: 'fireEvent', args: ['x', '13', 'click', {a: 100, b: 200}]}])
+receiveTasks('x', [{method: 'callback', args: ['x', '7', {a: 100, b: 200}, true]}])
+```
+
+### `getRoot(instanceId)`
+
+Return a JSON object which describes the whole virtual DOM body of an existed Weex instance, which designed for debugging
+
+Example:
+
+```javascript
+getRoot('x')
+// {ref: '_root', type: 'container', attr: {...}, style: {...}, children: [...]}
+```
+
+## Called from JavaScript and implemented with native code
+
+### `sendTasks(instanceId, tasks)`
+
+Make native calls from JS Framework
+
+* `tasks[]`: A task list. Each task has a `module` name, a `method` name, and a `args[]` list.
+
+Example:
+
+```javascript
+sendTasks('x', [
+ {module: 'dom', method: 'addElement', args: ['_root', {ref: '1', type: 'container'}, -1]},
+ {module: 'dom', method: 'addElement', args: ['1', {ref: '2', type: 'text', ...}, -1]},
+ {module: 'dom', method: 'addElement', args: ['1', {ref: '3', type: 'image', ...}, -1]},
+ ...
+])
+```
+
+## Supporting other JS Framework <sup>(experimental)</sup>
+
+### Register a new JS Framework
+
+```javascript
+// lib/frameworks/index.js
+
+import Vue from '...'
+import React from '...'
+import Angular from '...'
+
+export const frameworks = {
+ Vue,
+ React,
+ Angular
+}
+```
+
+### Expose JS Framework APIs
+
+```javascript
+// 3rd-party-framework.js
+
+export function createInstance (id, code, config, data) { ... }
+export function destroyInstance (id) { ... }
+export function refreshInstance (id, data) { ... }
+export function registerComponents (components) { ... }
+export function registerModules (modules) { ... }
+export function recieveTasks (id, tasks) { ... }
+export function getRoot (id) { ... }
+```
+
+The virtual-DOM tasks should follow [virtual-DOM spec](./virtual-dom-apis.html).
+
+### Framework Helper
+
+You can import `lib/runtime/helper.js` to get two important things:
+
+* `Document` class, see [virtual-DOM spec](./virtual-dom-apis.html) for more.
+* `sendTasks` method.
+
+### JS Bundle format
+
+You must ensure the JS Bundle has its first line of code like this:
+
+```javascript
+// { "framework": "Vue" }
+...
+```
+
+to allow JS Runtime to detect which JS Framework it should be opened by.
+
+If no valid annotation found. The JS Bundle will be opened by default JS Framework of Weex.
http://git-wip-us.apache.org/repos/asf/incubator-weex-site/blob/32a097bf/_draft/v-0.10/references/specs/virtual-dom-apis.md
----------------------------------------------------------------------
diff --git a/_draft/v-0.10/references/specs/virtual-dom-apis.md b/_draft/v-0.10/references/specs/virtual-dom-apis.md
new file mode 100644
index 0000000..566de1a
--- /dev/null
+++ b/_draft/v-0.10/references/specs/virtual-dom-apis.md
@@ -0,0 +1,147 @@
+---
+title: Virtual DOM APIs
+type: references
+order: 4.3
+version: 0.10
+---
+
+# Virtual DOM APIs
+<span class="weex-version">0.4</span>
+
+## `Document`
+
+Each instance has a corresponding document with the instance id. A document has many nodes which compose a node tree.
+
+### Constructor
+
+##### `new Document(id: string, url: string?)`
+
+### Members
+
+##### `createElement(tagName: string, props: Object?): Element`
+
+Create a certain type `Element`. And the `props` may contain `attr` object and `style` object. e.g. `createBody('div', {style: {backgroundColor: '#ffffff'}})`
+
+##### `createComment(text: string): Comment`
+
+Create a `Comment` with a certain comment text.
+
+##### `open()`
+
+Set a flag which means init rendering start, so each dom update will be called immediately
+
+##### `close()`
+
+Set a flag which means init rendering finished, so the dom updates later will be batched in each task.
+
+##### `fireEvent(el: Element, type: string, e: Object?, domChanges: Object?)`
+
+Fire an certain type of event on a certain element with an event object. When the event leads to some dom changes, the fourth parameter will describe the change just like `props` parameter in `createElement` method.
+
+#### Read-only & Getters
+
+##### `id: string`
+
+##### `URL: string?`
+
+##### `body: Element`
+
+body element
+
+##### `documentElement: Element`
+
+document element
+
+##### `getRef(ref: string): Node?`
+
+Get node by `ref` from the internal node map
+
+**Note**: the `documentElement` will be generated automatically when a document created, and the `body` should to be created manually and appended to `documentElement` to work. The `type` of a `body` must be one of `div`, `list` or `scroller`.
+
+## `Node`
+
+### Constructor
+
+##### `new Node()`
+
+### Members
+
+##### `destroy()`
+
+#### Read-only & Getters
+
+##### `ref: string`
+
+##### `nextSibling: Node?`
+
+##### `previousSibling: Node?`
+
+##### `parentNode: Node?`
+
+## `Element` extends `Node`
+
+### Constructor
+
+##### `new Element(type: string, props: Object?, ownerDocument: Document)`
+
+Create an element and the `props` may contain `attr` object and `style` object.
+
+### Members
+
+#### DOM Tree
+
+##### `appendChild(node: Node)`
+
+##### `insertBefore(node: Node, before: Node?)`
+
+##### `insertAfter(node: Node, after: Node?)`
+
+##### `removeChild(node: Node, preserved: boolean?)`
+
+Removes a child. The parameter `preserved` means whether destroy the removed node immediately or preserve it.
+
+##### `clear()`
+
+#### DOM props
+
+##### `setAttr(key: string, value: string, silent: boolean?)`
+
+If `silent` is true, it won't cause native calls. Used for handling event with virtual-DOM changes.
+
+##### `setStyle(key: string, value: string, silent: boolean?)`
+
+The `silent` parameter is just same as `setAttr` method.
+
+##### `setClassStyle(classStyle: Object)`
+
+The specificity of class style is lower than normal style. In another way the normal style will override the same name value in class style.
+
+##### `addEvent(type: string, handler: Function)`
+
+##### `removeEvent(type: string)`
+
+##### `fireEvent(type: string, e: any)`
+
+#### Read-only & Getters
+
+##### `toJSON(): Object`
+
+Format of `{ref: string, type: string, attr: Object, style: Object, event: Array(string), children: Array}`
+
+## `Comment` extends `Node`
+
+`Comment` won't be passed to the rendering engine. So it's very useful as a assistant placeholder sometimes.
+
+### Constructor
+
+##### `new Comment(value: string)`
+
+### Members
+
+#### Read-only & Getters
+
+##### `type: string`
+
+Returns `'comment'`
+
+##### `value: string`
http://git-wip-us.apache.org/repos/asf/incubator-weex-site/blob/32a097bf/_draft/v-0.10/references/text-style.md
----------------------------------------------------------------------
diff --git a/_draft/v-0.10/references/text-style.md b/_draft/v-0.10/references/text-style.md
new file mode 100644
index 0000000..6b9ee4f
--- /dev/null
+++ b/_draft/v-0.10/references/text-style.md
@@ -0,0 +1,43 @@
+---
+title: Text Style
+type: references
+version: 0.10
+order: 1.8
+---
+
+# Text Style
+<span class="weex-version">0.5</span>
+
+Text alike components share some common style rules. The text alike components currently includes [`text`](./components/text.html) and [`input`](./components/input.html).
+
+## Properties
+
+- `color`: <colors> this property set the foreground color of an component's text content.
+- `font-size`: <length> this property specifies the size of the font.
+- `font-style`: <enum> `normal` | `italic`. This property lets you select italic or normal faces within a font-family. Default value is `normal`.
+- `font-weight`: <enum> `normal` | `bold`. This property specifies the boldness of the font. Default value is `normal`.
+- `text-decoration`: <enum> `none` | `underline` | `line-through`. This property is used to set the text formatting to underline or line-through. The default value is `none`.
+- `text-align`: <enum> `left` | `center` | `right`. This property describes how inline content like text is aligned in its parent component. The default value is `left`.
+- `font-family`:<string> this property set the font-family of the text. This property **doesn't guarantee** the given font will always be set to the text. If the specified font cannot be found at the device, a typeface fallback will occur and the default typeface will be load. The fallback mechanism may vary in different devices.
+- `text-overflow`:<string> `clip` | `ellipsis`. This property determines how overflowed content that is not displayed is signaled to users. It can be clipped, display an ellipsis.
+
+The property `color` support multiple fomats of values, contains rgb, rgba, #fff, #ffffff, named-color.
+
+Example:
+
+```css
+.my-class { color: red; }
+.my-class { color: #f00; }
+.my-class { color: #ff0000; }
+.my-class { color: rgb(255, 0, 0); }
+.my-class { color: rgba(255, 0, 0, 0.5); }
+```
+
+## Type of Style Value
+
+- length: number followed by length unit `px`, `px` can be omitted.
+- colors: support multiple formats of values, including rgb (`rgb(255, 0, 0)`), rgba (`rgba(255, 0, 0, 0.5)`), hexadecimal (`#ff0000`), short hexadecimal (`#f00`), named color (`red`).
+- enumerated values: a limited number of string values.
+
+**Note:** [The list of color keywords.](./color-names.html)
+
http://git-wip-us.apache.org/repos/asf/incubator-weex-site/blob/32a097bf/_draft/v-0.10/tools/devtools-android.md
----------------------------------------------------------------------
diff --git a/_draft/v-0.10/tools/devtools-android.md b/_draft/v-0.10/tools/devtools-android.md
new file mode 100644
index 0000000..9ce8991
--- /dev/null
+++ b/_draft/v-0.10/tools/devtools-android.md
@@ -0,0 +1,123 @@
+---
+title: Devtools for Android
+type: tools
+order: 2.1
+version: 0.10
+---
+
+# Devtools for Android
+
+[](https://github.com/weexteam/weex_devtools_android/releases) [](https://www.codacy.com/app/weex_devtools/weex_devtools_android?utm_source=github.com&utm_medium=referral&utm_content=weexteam/weex_devtools_android&utm_campaign=Badge_Grade) [](https://codeclimate.com/github/weexteam/weex_devtools_android) [](https://codeclimate.com/github/weexteam/weex_devtools_android) [](https://github.com/weexteam/weex_devtools_android/issues) [  ](https://bintray.com/alibabaweex/maven/weex_inspector/_latestVersion)
+
+Weex devtools is a custom devtools for weex that implements [Chrome Debugging Protocol](https://developer.chrome.com/devtools/docs/debugger-protocol) inspired by [Stetho](https://github.com/facebook/stetho), it is designed to help you quickly inspect your app and debug your JS bundle source in a chrome web page.At present The devtools consist of two part : `Inspector` and `Debugger`. If you want it work well, you must install a `weex-devtool` as debug server.
+
+- **Inspector**
+ Inspector can be used to show your `Element` \ `NetWork` \ `Console log` \ `ScreenCast` \ `BoxModel` \ `Native View` and so on.
+
+- **Debugger**
+ Debugger can be used to debug your bundle js source, you can set `Breakpoint` \ watch `CallStack`.
+
+## Install and launch devtools server
+Open your terminal then type `npm install -g weex-toolkit` and run.Launch it just type and run the command `weex debug`, then a Chrome web page will be opened.
+
+## Use on an android device or emulator
+
+### Taste of first debug with playground
+If you are a green hand to the debug of weex, we recommend you to try your first debug with `playground`, what you need to do is just launch the playground and scan the QR code shown in the debug page which wound opened if the `devtools server` have been launched. after you scan the QR code, the web page will list your connected devices.
+
+ devices")
+
+#### How Debugger Works
+Devtools expands [Chrome Debugging Protocol](https://developer.chrome.com/devtools/docs/debugger-protocol) and the mechanism of communication between client and debug sever is based on [JSON-RPC](https://en.wikipedia.org/wiki/JSON-RPC).
+
+##### Devtools Client
+Devtools Client is integrated in App as aar, it connects to debug server through webscoket protocol with out permission check. I recommend you just packaged it in your debug version consider of the security mechanism.
+
+##### Devtools Debug Server
+Devtools Debug Server is the center node of the communication, it connects to both app and chrome, acts as the turn server of debugging protocol messages and the manager of the js runtime.
+
+##### Chrome FrontEnd
+Chrome's V8 engine acts as the javascript runtime, when debug mode is enabled, all the js code run on it. On the other side we also reuse most of the Chrome's debugging user interface, such as set breakpoint, see call stack and so on.
+
+
+
+### Enable devtools in your own app
+Of course you can reuse the code of playground to build your own app, that is the simplest way to let your app's js code debuggable. On the other hand QR code is not necessary, if your review the source code you can draw a conclusion that QR CODE is just a way to set `devtools server` address. following those steps you can do the same thing.
+
+#### Gradle dependency on inspector.
+There are two choices to set the dependency, the Choice A is recommanded if you have no change to weex_sdk or inspector, while if you use your own custom weex_sdk or inspector Choice B is suitable.
+
+ * *A - aar dependency from jcenter*.
+ ````
+ dependencies {
+ compile 'com.taobao.android:weex_inspector:0.0.8.1'
+ }
+ ````
+I strongly recommend you use the latest version since both weex sdk and devtools are developed iteratively and rapidly. See the release version list [here](https://github.com/weexteam/weex_devtools_android/releases). All the release version will publish to the [jcenter repo](https://bintray.com/alibabaweex/maven/weex_inspector).
+
+ * *B - source code dependency.*
+
+ you need to copy the dir of inspector to the same dir of your app and add `include ":inspector"`in your project's `settings.gradle` file just like playground have done, then add dependency in your app's `build.gralde`.
+ ````
+ dependencies {
+ compile project(':inspector')
+ }
+ ````
+
+##### Version compatibility
+
+| weex sdk | weex inspector | debug server |
+|----------|----------------|--------------|
+|0.8.0.1+ | 0.0.8.1 |0.2.39+ |
+|0.7.0+ | 0.0.7.13 |0.2.38 |
+|0.6.0+ | 0.0.2.2 | |
+
+
+#### Initialize in your XXXApplication file.
+````
+ public class MyApplication extends Application {
+ public void onCreate() {
+ super.onCreate();
+ initDebugEnvironment(true, "xxx.xxx.xxx.xxx"/*"DEBUG_SERVER_HOST"*/);
+ }
+ private void initDebugEnvironment(boolean enable, String host) {
+ WXEnvironment.sRemoteDebugMode = enable;
+ WXEnvironment.sRemoteDebugProxyUrl = "ws://" + host + ":8088/debugProxy/native";
+ }
+}
+````
+
+#### Ship It!
+ 1. You must launch your bundle server firstly. In your weex dir, run command "./start";
+ 2. Launch your remote debug server. Run command `weex debug`, chrome will open a web page show a simply guidance and QR code;
+ 3. Launch your app and make sure debug mode was enabled. You will see a device list in the chrome web page opened by last step, each device item have two button, `Debugger` and `Inspector`;There are two way to enable debug mode:
+ * scaning the QR code and handle the content just like the playground have done.
+ * init it in the XXXApplication by calling `initDebugEnvironment(true, "xxx.xxx.xxx.xxx")`, if you call `initDebugEnvironment(true, "xxx.xxx.xxx.xxx")` after weex sdk inited, you need to call `WXSDKEngine.reload()` to refresh the runtime.
+ 4. Once you click the button `Inspector` chrome will open a page show the inspector view, on the other side, click the button `Debugger` chrome will open a new page to show the debug view;
+
+
+
+
+
+---
+
+#### OPTIONS
+
+##### [**OPTION**] *set your remote bundle server ip.*
+
+ For example, in the playground it is in the `IndexActivity.java`, you need to change the value of `DEFAULT_IP` in IndexActivity.java from `"your_current_IP"` to a server ip like `"30.30.30.150"`:
+````
+ private static final String DEFAULT_IP = "30.30.30.150"; // "your_current_IP";
+````
+
+##### [**OPTION**] *enable network inspection.*
+````
+OkHttpClient client = new OkHttpClient();
+client.networkInterceptors().add(new OkHttpInterceptor());
+````
+
+###### Notice
+ The network inspection only support OKHttpClient right now!!! If you want to use the network inspection to catch your bundle request, you must change your bundle server ip to the real server ip.
+
+#### Known Issues
+ You can report issues and bugs [here](https://github.com/weexteam/weex_devtools_android/issues). We will reply as soon as possible.
http://git-wip-us.apache.org/repos/asf/incubator-weex-site/blob/32a097bf/_draft/v-0.10/tools/devtools-ios.md
----------------------------------------------------------------------
diff --git a/_draft/v-0.10/tools/devtools-ios.md b/_draft/v-0.10/tools/devtools-ios.md
new file mode 100644
index 0000000..602f63d
--- /dev/null
+++ b/_draft/v-0.10/tools/devtools-ios.md
@@ -0,0 +1,76 @@
+---
+title: Devtools for IOS
+type: tools
+order: 2.2
+version: 0.10
+---
+
+# Devtools for IOS
+
+Remote debug for your native iOS app using Chrome Developer Tools
+
+## weex-devtool launch:
+
+0. install and run weex-devtool
+
+ $:npm install -g weex-devtool
+
+ $:weex-devtool
+
+ it will launch chrome browser, showing wss ip address in chrome address bar.
+
+
+## playground install WXDevtool
+
+1. Install dependencies.
+
+ $:pod install
+
+### Usage
+
+1. AppDelegate.m header file
+
+ #import "WXDevTool.h"
+
+2. Initialize inspector when the APP launched
+
+ **Note: The inspector API must be called before weex is initialized**
+
+ + (void)setDebug:(BOOL)isDebug;
+
+ isDebug default is NO, now you open inspect model. opposite is YES, if you set isDebug to YES, then open debug model and inspect model.
+
+ + (void)launchDevToolDebugWithUrl:(NSString *)url;
+ wssip was the wss address showing in the chrome address bar.
+
+ * open debug model and inspector model
+
+ eg:- (BOOL)application:(UIApplication *)application didFinishLaunchingWithOptions:(NSDictionary *)launchOptions
+ {
+ [WXDevTool setDebug:YES];
+ [WXDevTool launchDevToolDebugWithUrl:@"ws://wssip/debugProxy/native"];
+ }
+
+ * open inspect model, remove the @selector(setDebug:) or add [WXDevTool setDebug:NO]
+
+ eg:- (BOOL)application:(UIApplication *)application didFinishLaunchingWithOptions:(NSDictionary *)launchOptions
+ {
+ [WXDevTool launchDevToolDebugWithUrl:@"ws://wssip/debugProxy/native"];
+ }
+
+
+3. Build and running APP, this time chrome will display your device with App name, select inspector to open the inspector tab.
+4. Log print support for different levels of print.
+
+ eg: #import "WXDevTool.h"
+ PDLogE()/PDLogW()
+
+### WXDevtool Dependencies
+
+Your app must be linked against the following frameworks/dylibs
+
+* libicucore.dylib
+* CFNetwork.framework
+* CoreData.framework
+* Security.framework
+* Foundation.framework
http://git-wip-us.apache.org/repos/asf/incubator-weex-site/blob/32a097bf/_draft/v-0.10/tools/devtools.md
----------------------------------------------------------------------
diff --git a/_draft/v-0.10/tools/devtools.md b/_draft/v-0.10/tools/devtools.md
new file mode 100644
index 0000000..f883055
--- /dev/null
+++ b/_draft/v-0.10/tools/devtools.md
@@ -0,0 +1,102 @@
+---
+title: Devtools
+type: tools
+order: 2
+has_chapter_content: true
+version: 0.10
+---
+
+# Devtools
+
+Weex devtools is a custom devtools for weex that implements [Chrome Debugging Protocol](https://developer.chrome.com/devtools/docs/debugger-protocol), it is designed to help you quickly inspect your app and debug your JS bundle source in a chrome web page, both Android and IOS platform are supported.
+
+## Install
+
+```
+ $ npm install -g weex-toolkit
+```
+#### usage
+```
+weex debug [options] [we_file|bundles_dir]
+
+ Options:
+
+ -h, --help output usage information
+ -V, --verbose display logs of debugger server
+ -v, --version display version
+ -p, --port [port] set debugger server port
+ -e, --entry [entry] set the entry bundlejs path when you specific the bundle server root path
+ -m, --mode [mode] set build mode [transformer|loader]
+ -w, --watch watch we file changes auto build them and refresh debugger page![default enabled]
+```
+
+#### start debugger
+```
+$weex debug
+```
+this command will start debug server and launch a chrome opening `DeviceList` page.
+this page will display a qrcode ,you can use `Playground App` scan it for starting debug.
+
+#### start debugger with a we file
+```
+$weex debug your_weex.we
+```
+this command will compile `your_weex.we` to `your_weex.js` and start the debug server as upon command.
+`your_weex.js` will deploy on the server and displayed in `DeviceList` page as another qrcode contain the url of your_weex.js
+
+
+#### start debugger with a directory of we files
+```
+$weex debug your/we/path -e index.we
+```
+this command will build every file in your/we/path and deploy them on the bundle server. your directory will mapping to http://localhost:port/weex/
+use -e to set the entry of these bundles. and the url of "index.we" will display on device list page as another qrcode.
+
+## Features
+
+### Connect devices
+ devices")
+
+### Inspector
+ Inspector can be used to show your `Element` \ `Network` \ `Console log` \ `ScreenCast` \ `BoxModel` \ `Native View` and so on.
+
+
+
+#### Element
+##### native view element
+
+
+##### weex dom element
+
+
+#### Network
+
+##### show the total time and latency
+
+
+##### show the header and response
+
+
+#### Console
+
+
+#### Resource
+
+
+### Debugger
+
+ Debugger can be used to debug your bundle js source, you can set `Breakpoint` \ watch `CallStack`.
+
+
+
+#### Breakpoint and CallStack
+
+
+
+## Integrate devtools
+
+* Android
+ * See the doc [Weex devtools (Android)](/tools/devtools-android.html), it will lead you to config and use it step by step.
+* IOS
+ * See the doc [Weex devtools (IOS)](/tools/devtools-ios.html), it will lead you to config and use it step by step.
+
http://git-wip-us.apache.org/repos/asf/incubator-weex-site/blob/32a097bf/_draft/v-0.10/tools/index.md
----------------------------------------------------------------------
diff --git a/_draft/v-0.10/tools/index.md b/_draft/v-0.10/tools/index.md
new file mode 100644
index 0000000..731c2f9
--- /dev/null
+++ b/_draft/v-0.10/tools/index.md
@@ -0,0 +1,97 @@
+---
+title: CLI
+type: tools
+order: 1
+has_chapter_content: true
+version: 0.10
+---
+
+# Weex-Toolkit
+
+Please access [npmjs.com](https://www.npmjs.com/package/weex-toolkit) for latest version
+
+Weex CLI tool set
+
+## Pre Install
+some dependencies need recent version of npm to install
+
+if your
+```
+$ npm --version
+```
+output less then `2.15.1`, please run below cmd upgrade your npm at first
+```
+sudo npm install -g npm
+```
+
+## Install
+```
+$npm install -g weex-toolkit
+```
+
+## Usage
+
+```
+$weex foo/bar/input_path [options]
+
+$weex create file_name [options]
+
+Options:
+ --qr display QR code for native runtime, **default action**
+ -o,--output transform weex we file to JS Bundle, output path (single JS bundle file or dir)
+ [for create sub cmd] it specified we file output path
+ --watch using with -o , watch input path , auto run transform if change
+ happen
+ -s,--server start a http file server, weex .we file will be transforme to JS
+ bundle on the server , specify local root path using the option
+ --port http listening port number ,default is 8081
+ --wsport websocket listening port number ,default is 8082
+ -f, --force [for create sub cmd] force to replace exsisting file(s)
+ --version show version of weex toolkit
+ --help Show help
+```
+
+## Examples
+
+#### crate a `we file`(weex source file) using standard template
+```
+$weex create hello-world-weex
+```
+a file named 'hello-world-weex.we' we be created in current directory
+
+
+#### transform a `we file` to JS Bundle
+```
+$weex your_best_weex.we -o .
+```
+`your_best_weex.we` will be transform to JS Bundle file `your_best_weex.js` , saved in your current directory
+
+#### transform a `we file` to JS Bundle , watch this file ,auto run transformer if change happen.
+```
+$weex your_best_weex.we -o . --watch
+```
+
+#### transform every we file in a directory
+```
+$weex we/file/storage/path -o outputpath
+```
+every `we file` in `we/file/storage/path` we be transform to JS Bundle , saved in `outputpath` path
+
+#### preview your we file using Weex Playground App
+download & install [weex playground App](http://alibaba.github.io/weex/download.html)
+```
+$weex your_best_weex.we --qr
+```
+a QR code will display in your terminal , using Playground App scan that.
+
+
+#### start http server
+```
+$weex -s .
+```
+a http server will start running , your current directory(.) will be the document root for the server , every weex .we file will be transforme to JS Bundle when access through the server
+
+## Issue & Feedback
+
+[Github Issue List](https://github.com/weexteam/weex-toolkit/issues)
+
http://git-wip-us.apache.org/repos/asf/incubator-weex-site/blob/32a097bf/_draft/v-0.10/tools/playground.md
----------------------------------------------------------------------
diff --git a/_draft/v-0.10/tools/playground.md b/_draft/v-0.10/tools/playground.md
new file mode 100644
index 0000000..f315054
--- /dev/null
+++ b/_draft/v-0.10/tools/playground.md
@@ -0,0 +1,24 @@
+---
+title: Playground
+type: tools
+order: 4
+has_chapter_content: true
+version: 0.10
+---
+
+# Weex Playground App
+
+One of best parts of Weex is Native Runtime . After preview your `we file` render in H5 using weex-toolkit CLI , you can try Native Runtime in a standalone App , this is Weex Playground App . More then that ,Weex playground App preset a lot of Demo & ShowCase ,so you will get to experience performance of Weex native runtime easily.
+
+Android and IOS version of Playground App can be downloaded [here](http://alibaba.github.io/weex/download.html).
+
+## Screenshot
+
+
+
+
+This is main interface of Weex Playground App , you can click the item to see the corresponding demo . click top right corner Icon will active QR scaner that work with Weex [toolkit CLI](../tools/index.html)
+
+please refer to [Weex Tutorial](../guide/index.html)
+
+
http://git-wip-us.apache.org/repos/asf/incubator-weex-site/blob/32a097bf/_draft/v-0.10/tools/transformer.md
----------------------------------------------------------------------
diff --git a/_draft/v-0.10/tools/transformer.md b/_draft/v-0.10/tools/transformer.md
new file mode 100644
index 0000000..7df3b60
--- /dev/null
+++ b/_draft/v-0.10/tools/transformer.md
@@ -0,0 +1,38 @@
+---
+title: Transformer
+type: tools
+order: 3
+has_chapter_content: true
+version: 0.10
+---
+
+# gulp-weex
+
+> gulp plugin for weex transformer
+
+## Usage
+
+```javascript
+var gulp = require('gulp')
+var weex = require('gulp-weex')
+
+gulp.task('default', function () {
+ return gulp.src('src/*.html')
+ .pipe(weex({}))
+ .pipe(gulp.dest('./dest'))
+})
+```
+
+## Options
+
+### oldFormat
+
+whether transform to old format.
+
+default: `false`.
+
+### isEntry
+
+whether is an entry module which has `bootstrap(...)`.
+
+default: `true`.
\ No newline at end of file
http://git-wip-us.apache.org/repos/asf/incubator-weex-site/blob/32a097bf/_draft/v1.0/advanced/create-a-weex-project.md
----------------------------------------------------------------------
diff --git a/_draft/v1.0/advanced/create-a-weex-project.md b/_draft/v1.0/advanced/create-a-weex-project.md
new file mode 100644
index 0000000..780341b
--- /dev/null
+++ b/_draft/v1.0/advanced/create-a-weex-project.md
@@ -0,0 +1,271 @@
+---
+title: 如何创建一个 Weex 项目
+type: advanced
+order: 3
+has_chapter_content: true
+version: 0.10
+---
+
+# 如何创建一个 Weex 项目
+
+对于前端开发者来说开发一个 app 是不容易的,既然 Weex 能以 web 的开发体验构建高性能、可扩展的 native 应用,那我们怎么利用 Weex 简单高效的开发一个 native 应用呢?Weex 替你考虑了这件事。在本章中,我们将学习如何使用 Weexpack 工具快速生成一个全新的 Weex 项目。
+
+根据你的操作系统的不同,步骤也略有差异,如果你从未接触过 native 开发,请慢慢来,遇到问题随时查阅 [FAQ](../faq.md)。
+
+首先,不论任何平台,我们都需要 node.js 和 Weexpack。在本节中,默认你已经安装好了 node.js 和 npm,如有疑问,可参考上一章 [如何在本地开发 Weex 页面](../guide/develop-on-your-local-machine.html)。
+
+Weexpack 是 Weex 新一代的工程开发套件,它允许开发者通过简单的命令,创建 weex 工程项目,将项目运行在不同的开发平台上。未来,我们考虑会将其集成在 weex-toolkits 上,但目前仍需要单独安装。好在安装 Weexpack 非常简单,可以直接使用 npm 安装:
+
+```bash
+npm install weexpack -g
+```
+
+或者用 cnpm:
+
+```bash
+cnpm install weexpack -g
+```
+
+接下来的步骤会有一些复杂和区别,根据开发平台的不同,我们提供了快速导航便于阅读:
+
+- [iOS](#ios)
+- [Android](#android)
+
+## iOS
+
+Mac 是唯一可以开发 iOS 应用的平台,因此创建 iOS 项目只支持 mac。对于 iOS,你需要安装 [Xcode](https://developer.apple.com/xcode/) 和 [CocoaPods](https://guides.cocoapods.org/using/getting-started.html) 。
+
+安装 Xcode 最简单的方法是到 [Mac App Store](https://itunes.apple.com/us/app/xcode/id497799835?mt=12)。Xcode 体积较大,下载请耐心等待。
+
+安装好 Xcode 后,你需要运行 Xcode,使 Xcode 自动安装开发者工具和确认使用协议。
+
+之后你还需要安装 [CocoaPods](https://guides.cocoapods.org/using/getting-started.html) 。CocoaPods 是 Xcode 项目的类库管理工具,可以使用如下命令安装:
+
+```bash
+$ sudo gem install cocoapods
+```
+
+如果执行该命令无反应,很可能是 gem source 问题,你可以切换为淘宝 gem source:
+
+```bash
+$ gem sources --remove https://rubygems.org/
+$ gem sources -a https://ruby.taobao.org/
+$ sudo gem install cocoapods
+```
+
+如有问题,可参考 [CocoaPods 官方文档](https://guides.cocoapods.org/using/getting-started.html)
+
+### 创建项目
+
+然后,就可以使用 weexpack 创建 weex 工程了:
+
+```bash
+$ weexpack init appName
+```
+
+weexpack 会自动新建以 appName 命名的目录,并将项目模板拉取到该目录。
+
+最终形成如下目录结构:
+
+```bash
+-> /appName
+.
+|—— .gitignore
+|—— README.md
+|—— package.json
+|-- android.config.json
+|-- ios.config.json
+|—— webpack.config.js
+|—— /src
+| |—— index.we
+|—— /html5
+| |—— index.html
+|—— /ios
+| |—— /playground
+| |—— /sdk
+| |—— /WXDevtool
+|—— /android
+| |—— /playground
+| |—— /appframework
+```
+
+其中:
+
+- `webpack.config.js` 是 webpack 配置文件,用于生成 `.we` 文件的 JSBunlde
+- `ios.config.json` 是 iOS 项目配置文件
+- `android.config.json` 是 Android 项目配置文件
+- `/src` 目录放置 Weex 页面
+- `/html5` 是 H5 端入口文件
+- `/ios` 放置 iOS 项目
+- `/android` 放置 Android 项目
+
+紧接着,进入目录,并且安装依赖:
+
+```bash
+$ cd appName && npm install
+```
+
+至此,项目模版创建完成,接下来我们可以自定义我们的 APP 信息并打包运行。
+
+### 运行与打包
+
+如果一切正常,你可以使用 weexpack 打包或模拟器运行了:
+
+模拟器运行
+
+```bash
+$ weexpack run ios
+```
+
+构建 ipa 包:
+
+```bash
+$ weexpack build ios
+```
+
+构建包的过程中,将会提示让您输入 CodeSign(证书)、Profile(provisioning profile)、AppId,只有输入真实的这些信息才能成功打包。 其余如AppName,和入口 weex bundle 文件可以编辑项目目录下的 `ios.config.json` 配置。 打完包成功之后,可以在 `/playground/build/ipa_build/` 目录下获取 ipa 文件。
+
+注:证书需要预先安装到 keychain 中,在 keychain 中点击右键获取证书 id(证书名称)、provisioning profile 文件(\*mobileprovision)需要获取 UUID,进入目录可以看到 mobileprovision_UUID.sh 文件,此文件可以获取到 UUID。
+
+mobileprovision_UUID.sh 用法如下:
+
+```bash
+$ ./mobileprovision_UUID.sh *mobileprovision
+```
+
+参数(\*mobileprovision)为 provisioning profile 文件路径
+
+** 注:run 与 build 部分涉及 pod 的依赖安装问题。**
+
+- 首先要安装 cocoapods ,具体安装步骤可查看[这里](https://cocoapods.org/),建议安装 0.39.0 版本。
+- 为了加快 CLI 执行速度,weexpack 创建的工程默认安装了需要的依赖库。但是命令执行依然会更新需要升级的依赖库。
+ - 如果出现这种错误提示 `unable to find a specification for 'WeexSDK'` 这种错误,说明你本地没有更新 cocoapods master 仓库,运行 `pod repo update` ,此时运行 `pod search WeexSDK`:
+
+ 
+
+ 说明 master repo 更新成功。以上是以 `WeexSDK` 为例,其他库类似。
+
+ - 如果出现这种错误 `error: The sandbox is not in sync with the Podfile.lock. Run 'pod install' or update your CocoaPods installation.` 进入 playground 目录(podfile 文件所在目录)按提示执行。
+
+ 更多 pod 使用细节请移步[cocoapods](https://cocoapods.org/)
+
+- mobileprovision,参数(\*mobileprovision)为 provisioning profile 文件路径。
+
+----
+
+## Android
+
+在 Mac 平台开发 Android 首先需要下载 [Android Studio](https://developer.android.com/studio/install.html)(你可能需要翻墙才能访问)。[Android Studio](https://developer.android.com/studio/install.html) 为我们提供了 Android SDK 及 AVD(模拟器)以便我们快速运行 Android 项目。
+
+下载完成后运行 Android Studio,任意新建一个 Android 项目,在第二步中选择 **Android 5.1**,然后点击 next 完成项目创建,如图所示:
+
+
+
+待 Android Studio 打开后,在顶部菜单栏选择 Tools -> Android -> AVD Manager,安装 Android 模拟器:
+
+
+
+之后,打开模拟器运行 Android。
+
+**注意:**
+
+1. 必须保持模拟器运行。
+2. 保证 Android build-tool 的版本为 23.0。【可以在 Android Studio 的 SDK Manager 里查看是否已安装这个版本,如果没有可选择安装这一版本】。
+
+### 配置环境变量
+
+因为 Android Studio 安装的 SDK 不会自动配置环境变量(你自己安装的 SDK 同样不会)。所以需要您自己手动配置 Android_HOME 环境变量和 PATH
+
+如果是 Android Studio 安装的 SDK 安装路径可已在 SDK manager 里找到(打开 SDK manager 的方式请参照图2)
+
+Windows 下请参照 [window 下如何设置 ANDROID 环境变量](http://jingyan.baidu.com/article/09ea3ede1b4df6c0aede39ab.html)
+
+Linux/Mac 下只需编辑 `.bash_profile` 增加 PATH 即可:
+
+```bash
+vim ~/.bash_profile
+```
+
+然后添加下列代码进去(路径替换为你的真实路径)
+
+```bash
+export ANDROID_HOME=/xxx/Library/Android/sdk
+export PATH=${PATH}:$ANDROID_HOME/tools:$ANDROID_HOME/platform-tools:$ANDROID_HOME/build-tools
+```
+
+然后保存退出(:wq)。再执行下列命令:
+
+```bash
+source ~/.bash_profile
+```
+
+### 创建项目
+
+然后,就可以使用 weexpack 创建 weex 工程了:
+
+```bash
+$ weexpack init appName
+```
+
+weexpack 会自动新建以 appName 命名的目录,并将项目模板拉取到该目录。
+
+最终形成如下目录结构:
+
+```bash
+-> /appName
+.
+|—— .gitignore
+|—— README.md
+|—— package.json
+|-- android.config.json
+|-- ios.config.json
+|—— webpack.config.js
+|—— /src
+| |—— index.we
+|—— /html5
+| |—— index.html
+|—— /ios
+| |—— /playground
+| |—— /sdk
+| |—— /WXDevtool
+|—— /android
+| |—— /playground
+| |—— /appframework
+```
+
+其中:
+
+- `webpack.config.js` 是 webpack 配置文件,用于生成 `.we` 文件的 JSBunlde
+- `ios.config.json` 是 iOS 项目配置文件
+- `android.config.json` 是 Android 项目配置文件
+- `/src` 目录放置 Weex 页面
+- `/html5` 是 H5 端入口文件
+- `/ios` 放置 iOS 项目
+- `/android` 放置 Android 项目
+
+紧接着,进入目录,并且安装依赖:
+
+```bash
+$ cd appName && npm install
+```
+
+至此,项目模版创建完成,接下来我们可以自定义我们的 APP 信息并打包运行。
+
+### 运行与打包
+
+如果一切正常,你可以使用 weexpack 打包或模拟器运行了:
+
+Android 的打包和构建是一体的 :
+
+```bash
+$ weexpack run android
+```
+
+同样的你可以更改项目目录下的android.config.json
+
+- `AppName`: 应用名
+- `AppId`: application_id 包名
+- `SplashText`: 欢迎页上面的文字
+- `WeexBundle`: 指定的 weex bundle 文件(支持文件名和 url 的形式)
+
+ 指定文件名则以本地文件的方式加载 bundle,指定 url 则以远程的方式加载 JSBundle。如果以本地方式指定 bundle `.we` 文件请放到 `src` 目录。
http://git-wip-us.apache.org/repos/asf/incubator-weex-site/blob/32a097bf/_draft/v1.0/advanced/customize-a-native-component.md
----------------------------------------------------------------------
diff --git a/_draft/v1.0/advanced/customize-a-native-component.md b/_draft/v1.0/advanced/customize-a-native-component.md
new file mode 100644
index 0000000..404f25c
--- /dev/null
+++ b/_draft/v1.0/advanced/customize-a-native-component.md
@@ -0,0 +1,168 @@
+---
+title: 自定义 native 组件
+type: advanced
+order: 7
+has_chapter_content: true
+version: 0.10
+---
+
+# 如何自定义 native 组件?
+
+Weex 已经包含了最关键的平台组件,例如 `ScrollView, ListView, Text, Imageview` 等等。当然,这些组件并不能完全满足你的需求。另外,那些在你的工程中常用的大量原生 UI 组件,可能需要被简单地集合到 Weex 中。幸运的是,通过任意已存在的组件来创建你的自定义组件是一件很方便的事。
+
+## Android
+
+### 步骤:
+
+1.自定义组件必须继承自 `WXComponent` 或者 `WXContainer` ;
+2.weex SDK 可以识别 @WXComponentProp (name = value(value 是 attr 或者 dsl style));
+3.方法必须是 `public` 的;
+4.组件类不能是一个内部类;
+5.自定义组件不能被 ProGuard 之类的工具混淆;
+6.组件方法在 UI 线程被调用,因此不要在里面进行耗时的操作;
+7.Weex 的参数类型可以是 int, double, float, String, Map, List 和实现了 WXObject 接口的自定义类;
+
+### 参考以下例子:
+
+``` java
+ `package com.taobao.weex.ui.component;
+// ……
+
+public class MyViewComponent extends WXComponent{
+
+ public MyViewComponent(WXSDKInstance instance, WXDomObject node,
+ WXVContainer parent, String instanceId, boolean lazy) {
+ super(instance, node, parent, instanceId, lazy);
+ }
+
+ @Override
+ protected void initView() {
+ //TODO:your own code ……
+ }
+
+ @Override
+ public WXFrameLayout getView() {
+ //TODO:your own code ………
+ }
+ @WXComponentProp(name=WXDomPropConstant.WX_ATTR_VALUE)
+ public void setMyViewValue(String value) {
+ ((TextView)mHost).setText(value);
+ }
+
+}
+```
+
+必须注册组件:
+
+``` java
+WXSDKEngine.registerComponent("MyView", MyViewComponent.class);
+```
+
+## iOS
+
+虽然 WeexSDK 中有很多的 native 的 Component,但这有可能并不能满足你的需求。在之前你可能已经写了一些很酷炫 native 的组件,想包装一下,导入到 Weex 中,因此我们提供了让开发者实现自己的 native Component。下面将以 WeexSDK 中已经存在的 Component:`image` 为例子,介绍一下如何构建一个 native Component。假设你已经了解 iOS 开发
+
+### 注册 Component
+
+注册一个 component 比较简单,调用 `WXSDKEngine` 中的 `registerComponent:withClass:` 方法,传入组件的标签名称,还有对应的 class 然后你可以创建一个 `WXImageComponent` 表示 `image` 组件的实现。在 `.we` 文件中,只需要写 `<image></image>`
+
+### 添加属性
+
+现在我们要做一些让 image component 更加强大的事情。既然作为一个图片的 component,那它应该要有源,给他加上一个 `src` 的属性,同时给它加上一个 `resize` 的属性(可以配置的有 `contain/cover/stretch`)
+
+```object-c
+@interface WXImageComponent ()
+
+@property (nonatomic, strong) NSString *imageSrc;
+@property (nonatomic, assign) UIViewContentMode resizeMode;
+
+@end
+```
+
+component 中所有的 style,attribute,events 都会被传递到 Component 的初始化方法中,所以,你可以在初始化方法中存储你感兴趣的一些属性值
+
+```object-c
+@implementation WXImageComponent
+
+- (instancetype)initWithRef:(NSString *)ref type:(NSString *)type styles:(NSDictionary *)styles attributes:(NSDictionary *)attributes events:(NSArray *)events weexInstance:(WXSDKInstance *)weexInstance
+{
+ if (self = [super initWithRef:ref type:type styles:styles attributes:attributes events:events weexInstance:weexInstance]) {
+ _imageSrc = [WXConvert NSString:attributes[@"src"]];
+ _resizeMode = [WXConvert UIViewContentMode:attributes[@"resize"]];
+}
+
+ return self;
+}
+
+@end
+```
+
+attribute 中拿到的值的类型都是 `id`,我们可以用转换方法把它转换到任何值。Weex SDK 提供了一些基础的转换方法,可以参考 `WXConvert` 类,或者你可以添加自己的转换函数。
+
+### Hooking 渲染生命周期
+
+native 的 component 是由 Weex 管理的,Weex 创建,布局,渲染,销毁。Weex 的 component 生命周期都是可以 hook 的,你可以在这些生命周期中去做自己的事情。
+
+| 方法 | 描述 |
+| :-: | --- |
+| initWithRef:type:... | 用给定的属性初始化一个component. |
+| layoutDidFinish | 在component完成布局时候会调用. |
+| loadView | 创建component管理的view. |
+| viewWillLoad | 在component的view加载之前会调用. |
+| viewDidLoad | 在component的view加载完之后调用. |
+| viewWillUnload | 在component的view被释放之前调用. |
+| viewDidUnload | 在component的view被释放之后调用. |
+| updateStyles: | 在component的style更新时候调用. |
+| updateAttributes: | 在component的attribute更新时候调用. |
+| addEvent: | 给component添加event的时候调用. |
+| removeEvent: | 在event移除的时候调用. |
+
+在 image component 的例子里面,如果我们需要我们自己的 image view 的话,可以复写 `loadView`这个方法.
+
+```object-c
+- (UIView *)loadView
+{
+return [[WXImageView alloc] init];
+}
+```
+
+现在我们使用 `WXImageView` 渲染 `image` component。
+作为一个 image component,我们需要拿到服务器图片,而且把它设置进 image view 里. 这个操作可以在 `viewDidLoad` 方法中做,这个方法是在 view 已经被创建而且加载了时候 Weex SDK 会调用到,而且 `viewDidLoad` 这个方法是你做额外初始化工作比如改变 content mode(也就是设置resize) 的最好时间.
+
+```object-c
+- (void)viewDidLoad
+{
+ UIImageView *imageView = (UIImageView *)self.view;
+ imageView.contentMode = _resizeMode;
+ imageView.userInteractionEnabled = YES;
+ imageView.clipsToBounds = YES;
+ imageView.exclusiveTouch = YES;
+
+ // Do your image fetching and updating logic
+}
+```
+
+如果可以改变 image 的 src,也可以 hook `updateAttributes:` 方法来做属性更新操作,当 `updateAttributes:` 或者 `updateStyles:` 被调用的时候, component 的 view 已经加载完成
+
+```object-c
+- (void)updateAttributes:(NSDictionary *)attributes
+{
+ if (attributes[@"src"]) {
+ _imageSrc = [WXConvert NSString:attributes[@"src"]];
+ // Do your image updating logic
+ }
+
+ if (attributes[@"resize"]) {
+ _resizeMode = [WXConvert UIViewContentMode:attributes[@"resize"]];
+ self.view.contentMode = _resizeMode;
+ }
+}
+```
+
+或许你需要考虑更多的生命周期方法去 Hook,当布局完成时候,像 `layoutDidFinish`,如果你想了解更多,可以参考一下`WXComponent.h` 声明的方法。
+
+现在你可以用在任何 `.we` 文件里面使用 `<image>`,而且可以加上 image 的属性。
+
+```html
+<image style="your-custom-style" src="image-remote-source" resize="contain/cover/stretch"></image>
+```
http://git-wip-us.apache.org/repos/asf/incubator-weex-site/blob/32a097bf/_draft/v1.0/advanced/cuszomize-native-apis.md
----------------------------------------------------------------------
diff --git a/_draft/v1.0/advanced/cuszomize-native-apis.md b/_draft/v1.0/advanced/cuszomize-native-apis.md
new file mode 100644
index 0000000..55e5e4c
--- /dev/null
+++ b/_draft/v1.0/advanced/cuszomize-native-apis.md
@@ -0,0 +1,85 @@
+---
+title: 自定义 native API
+type: advanced
+order: 8
+has_chapter_content: true
+version: 0.10
+---
+
+# 如何自定义 native API?
+
+Weex 的 SDK 只提供了页面渲染的能力,但是一些其它操作,比如网络请求、图片加载、重定向等功能需要你自己去实现,这个例子讲述了如何用原生代码去扩展 Weex 的功能。
+
+## 关于 URLHelper 的例子
+
+### 新建一个 WXModule
+
+```java
+public class URLHelperModule extends WXModule{
+ private static final String WEEX_CATEGORY="com.taobao.android.intent.category.WEEX";
+ @WXModuleAnno
+ public void openURL(String url){
+ if (TextUtils.isEmpty(url)) {
+ return;
+ }
+ StringBuilder builder=new StringBuilder("http:");
+ builder.append(url);
+ Uri uri = Uri.parse(builder.toString());
+ Intent intent = new Intent(Intent.ACTION_VIEW, uri);
+ intent.addCategory(WEEX_CATEGORY);
+ mWXSDKInstance.getContext().startActivity(intent);
+ }
+}
+```
+
+这里要注意 `@WXModuleAnno` 这个注解,它表示了你把这个方法暴露给 JavaScript。
+
+```java
+public class URLHelperModule extends WXModule{
+
+ @WXModuleAnno
+ public void openURL(String url,String callbackId){
+ //...
+ //callback to javascript
+ Map<String, Object> result = new HashMap<String, Object>();
+ result.put("ts", System.currentTimeMillis());
+ WXBridgeManager.getInstance().callback(mWXSDKInstance.getInstanceId(), callbackId, result);
+ }
+}
+```
+
+### 把module注册到WXSDKEngine:
+
+```java
+try {
+ WXSDKEngine.registerModule("myURL", URLHelperModule.class);
+ //'myURL' is the name you'll use in javascript
+ } catch (WXException e) {
+ WXLogUtils.e(e.getMessage());
+ }
+```
+
+### 在 JavaScript 中使用 `eventModule`:
+
+```javascript
+let URLHelper = require('@weex-module/myURL');//same as you registered
+URLHelper.openURL("http://www.taobao.com",function(ts){
+ console.log("url is open at "+ts);
+});
+```
+
+## 一些注意事项:
+
+1. 定义一个 components 需要继承 `WXModule`
+
+2. 不要忘记添加 `@WXModuleAnno` 注解,不然 Weex 没法识别这个方法
+
+3. 定义的方法必须是 `public 的
+
+4. module 类一定不能是内部类
+
+5. 你定义的 components 不能被混淆,不然会找不到
+
+6. Module 中的方法会在 UI 线程中被调用,所以一定不要做一些耗时操作
+
+7. Moudle 中的方法参数类型可以为 `int`,`double`,`float`,`String`,`Map`,`List`,以及实现 `WXObject` 接口的类。
http://git-wip-us.apache.org/repos/asf/incubator-weex-site/blob/32a097bf/_draft/v1.0/advanced/extend-to-android.md
----------------------------------------------------------------------
diff --git a/_draft/v1.0/advanced/extend-to-android.md b/_draft/v1.0/advanced/extend-to-android.md
new file mode 100644
index 0000000..f816ebd
--- /dev/null
+++ b/_draft/v1.0/advanced/extend-to-android.md
@@ -0,0 +1,170 @@
+---
+title: Android 扩展
+type: advanced
+order: 9
+has_chapter_content: true
+version: 0.10
+---
+
+# Android 扩展
+
+Weex 提供了扩展机制,可以根据自己的业务进行定制自己的功能。
+主要分为两类扩展:
+
+- Module 扩展 非 UI 的特定功能。例如 sendHttp、openURL 等。
+- Component 扩展 实现特别功能的 Native 控件。例如:RichTextview,RefreshListview 等。
+- Adapter 扩展 Weex 对一些基础功能实现了统一的接口,可实现这些接口来定制自己的业务。例如:图片下载等。
+
+## Module 扩展
+
+1. Module 扩展必须继承 WXModule 类。
+2. 扩展方法必须加上 @WXModuleAnno 注解。Weex 会根据注解来判断当前方法是否要运行在 UI 线程,和当前方法是否是扩展方法。
+3. Weex是根据反射来进行调用 Module 扩展方法,所以Module中的扩展方法必须是 public 类型。
+4. 同样因为是通过反射调用,Module 不能被混淆。请在混淆文件中添加代码:`-keep public class * extends com.taobao.weex.common.WXModule{*;}`
+5. Module 扩展的方法可以使用 int, double, float, String, Map, List 类型的参数
+6. 完成 Module 后一定要在初始化时注册 `WXSDKEngine.registerModule("myModule", MyModule.class);` 否则会报类似错误:`ReportException :undefined:9: TypeError: Object #<Object> has no method 'printLog'`
+
+示例如下:
+
+```java
+public class MyModule extends WXModule {
+
+ @WXModuleAnno(runOnUIThread = true)
+ public void printLog(String msg) {
+ Toast.makeText(mWXSDKInstance.getContext(),msg,Toast.LENGTH_SHORT).show();
+ }
+}
+```
+
+JS 调用如下:
+
+```html
+<template>
+ <div>
+ <text onclick="click">点击我测试</text>
+ </div>
+</template>
+
+<script>
+ module.exports = {
+ methods: {
+ click: function() {
+ require('@weex-module/myModule').printLog("我是一个测试!");
+ }
+ }
+ }
+</script>
+```
+
+## Component 扩展
+
+1. Component 扩展类必须集成 WXComponent.
+2. Component 对应的设置属性的方法必须添加注解 @WXComponentProp(name=value(value is attr or style of dsl))
+3. Weex sdk 通过反射调用对应的方法,所以 Component 对应的属性方法必须是 public,并且不能被混淆。请在混淆文件中添加代码 `-keep public class * extends com.taobao.weex.ui.component.WXComponent{*;}`
+4. Component 扩展的方法可以使用 int, double, float, String, Map, List 类型的参数
+5. 完成 Component 后一定要在初始化时注册 `WXSDKEngine.registerComponent("richtext",RichText.class);`
+
+示例如下:
+
+```java
+public class RichText extends WXComponent {
+
+ public RichText(WXSDKInstance instance, WXDomObject dom, WXVContainer parent, boolean isLazy) {
+ super(instance, dom, parent, isLazy);
+ }
+
+ @Override
+ protected void initView() {
+ mHost=new TextView(mContext);
+ ((TextView)mHost).setMovementMethod(LinkMovementMethod.getInstance());
+ }
+
+ @WXComponentProp(name = "tel")
+ public void setTelLink(String tel){
+ SpannableString spannable=new SpannableString(tel);
+ spannable.setSpan(new URLSpan("tel:"+tel),0,tel.length(), Spanned.SPAN_EXCLUSIVE_EXCLUSIVE);
+ ((TextView)mHost).setText(spannable);
+ }
+}
+```
+
+JS 调用如下:
+
+```html
+<template>
+ <div>
+ <richText tel="12305" style="width:200;height:100">12305</text>
+ </div>
+</template>
+```
+## Adapter扩展
+
+图片下载:
+
+需要时集成接口 IWXImgLoaderAdapter,实现 setImage 方法。
+
+示例如下:
+
+```java
+public class ImageAdapter implements IWXImgLoaderAdapter {
+
+ public ImageAdapter() {
+ }
+
+ @Override
+ public void setImage(final String url, final ImageView view,
+ WXImageQuality quality, WXImageStrategy strategy) {
+
+ WXSDKManager.getInstance().postOnUiThread(new Runnable() {
+
+ @Override
+ public void run() {
+ if(view==null||view.getLayoutParams()==null){
+ return;
+ }
+ if (TextUtils.isEmpty(url)) {
+ view.setImageBitmap(null);
+ return;
+ }
+ String temp = url;
+ if (url.startsWith("//")) {
+ temp = "http:" + url;
+ }
+ if (view.getLayoutParams().width <= 0 || view.getLayoutParams().height <= 0) {
+ return;
+ }
+ Picasso.with(WXEnvironment.getApplication())
+ .load(temp)
+ .into(view);
+ }
+ },0);
+ }
+}
+```
+#### 组件方法支持
+从WeexSDK 0.9.5开始,你可以定义组件方法
+
+- 在组件中如下声明一个组件方法
+
+ ```java
+ @JSMethod
+ public void focus(){
+ //method implementation
+ }
+ ```
+- 注册组之后,你可以在weex 文件中调用
+
+ ```html
+ <template>
+ <mycomponent id='mycomponent'></mycomponent>
+ </template>
+ <script>
+ module.exports = {
+ created: function() {
+ this.$el('mycomponent').focus();
+ }
+ }
+ </script>
+ ```
+
+注:工程要添加依赖 `compile 'com.squareup.picasso:picasso:2.5.2'`
[34/51] [abbrv] incubator-weex-site git commit: update file structure
and fix responsive styles
Posted by ha...@apache.org.
http://git-wip-us.apache.org/repos/asf/incubator-weex-site/blob/12e3a8bc/_drafts/v1.0/references/common-attrs.md
----------------------------------------------------------------------
diff --git a/_drafts/v1.0/references/common-attrs.md b/_drafts/v1.0/references/common-attrs.md
new file mode 100644
index 0000000..8ac1c0f
--- /dev/null
+++ b/_drafts/v1.0/references/common-attrs.md
@@ -0,0 +1,166 @@
+---
+title: 通用特性
+type: references
+order: 1.5
+version: 0.10
+---
+
+# 通用特性
+
+特性(attribute)与 HTML 中元素特性类似,提供了与 Weex 元素有关的其他附加信息。所有的元素都可以拥有特性, 特性总是在 Weex 元素的起始标签中定义,并总是以键值对的形式出现,例如:`name="value"`。可以使用 [Mustache](https://mustache.github.io/) 对特性值进行数据绑定。
+
+**Notes!**
+
+Weex 遵循 [HTML attribute](https://en.wikipedia.org/wiki/HTML_attribute) 命名规范, 所以请 **不要在特性中使用驼峰风格(CamelCase)** , 使用`-`连接符的**羊肉串风格(kebab-case)** 才是更好的命名方式。
+
+所有 Weex 元素都拥有以下特性:
+
+## id
+
+为 `<template>` 内定义的元素指定一个唯一的 id,通过 `this.$el(id)` 可以容易地获取一个 Weex 元素的引用。更多信息可参考 [Instance APIs](./api.html)
+
+```html
+<template>
+ <div id="wrapper">
+ <list class="list">
+ <cell class="row" repeat="item in rows" id="item-{{$index}}">
+ <text class="item-title">row {{item.id}}</text>
+ </cell>
+ </list>
+ </div>
+</template>
+<style></style>
+
+<script>
+module.exports = {
+ data: {
+ rows:[
+ {id: 1},
+ {id: 2},
+ {id: 3},
+ {id: 4},
+ {id: 5}
+ ]
+ }
+}
+</script>
+```
+
+[体验一下](http://dotwe.org/b5032fa96e3e657711916148b1978ad3)
+
+## style
+
+为元素定义行内样式。
+
+```html
+<div style="width: 200px; height: 200px; color: #ff0000;"></div>
+<div style="padding: {{x}}; margin: 0"></div>
+```
+
+## class
+
+为元素定义一个或多个类名(引用样式表中的类)。
+
+```html
+<div class="button"></div>
+<div class="button {{btnStatus}}"></div>
+```
+
+## repeat
+
+我们可以通过 `repeat` 特性根据一个数组进行渲染,迭代地生成当前标签的内容。`repeat` 特性有着 `item in items` 形式的特殊语法,其中,`items` 是数组数据,`item` 是数组元素迭代的别名。
+
+```html
+<template>
+ <div>
+ <list class="list">
+ <cell class="row" repeat="item in rows" id="item-{{$index}}">
+ <text class="item-title">row {{item.id}}</text>
+ </cell>
+ </list>
+ </div>
+</template>
+
+<style></style>
+
+<script>
+module.exports = {
+ data: {
+ rows:[
+ {id: 1},
+ {id: 2},
+ {id: 3},
+ {id: 4},
+ {id: 5}
+ ]
+ }
+}
+</script>
+```
+
+[体验一下](http://dotwe.org/b5032fa96e3e657711916148b1978ad3)
+
+## if
+
+提供一个布尔值来决定是否显示当前标签。当值为 `true` 时,元素显示,为 `false` 时元素隐藏。
+
+```html
+<div if="true"></div>
+<div if="{{opened}}"></div>
+<div if="{{direction === 'row'}}"></div>
+```
+
+## append
+
+append 特性用于控制渲染次序。它的可选值为 `tree` 或 `node`,默认为 `tree`,不支持数据绑定。不同的值会执行不同的渲染过程:
+
+- `append="tree"` 是一次性渲染整个节点树,渲染更高效,但是如果页面太大容易造成较长时间的白屏。
+- `append="node"` 所有节点逐个渲染,整体渲染速度略慢,但是用户体验好一些。
+
+通过 `node` 和 `tree` 可以精细化地控制页面展示的逻辑和颗粒度,一般比较好的实践为首屏以内按 `tree` 解析,首屏以外按 `node` 解析。
+
+```html
+<div append="tree"></div>
+<div append="node"></div>
+```
+
+## 事件处理 (on...)
+
+在 Weex 标签上注册事件处理器。以 `on` 加 事件名为 `key`,事件处理函数为 `value`。
+
+```html
+<template>
+ <div class="btn" onClick="alertMsg"><text>Click me</text></div>
+</template>
+
+<style>
+.btn {
+ justify-content: center;
+ align-items: center;
+ width: 200;
+ height: 100;
+ background-color: #ff0000;
+ border-radius: 5;
+ color: #ffffff;
+}
+</style>
+
+<script>
+var modal = require('@weex-module/modal')
+
+module.exports = {
+ data: {},
+ methods: {
+ alertMsg: function (e) {
+ modal.alert({
+ message: 'click',
+ okTitle: 'alert'
+ }, function() {
+ })
+ }
+ }
+}
+</script>
+```
+
+[体验一下](http://dotwe.org/97de59d24d7667aa91187d59123d24a6)
http://git-wip-us.apache.org/repos/asf/incubator-weex-site/blob/12e3a8bc/_drafts/v1.0/references/common-event.md
----------------------------------------------------------------------
diff --git a/_drafts/v1.0/references/common-event.md b/_drafts/v1.0/references/common-event.md
new file mode 100644
index 0000000..2554fe1
--- /dev/null
+++ b/_drafts/v1.0/references/common-event.md
@@ -0,0 +1,492 @@
+---
+title: 通用事件
+type: references
+order: 1.10
+version: 0.10
+---
+
+# 通用事件
+
+Weex 提供了通过事件触发动作的能力,例如在用户点击组件时执行 JavaScript。下面列出了可被添加到 Weex 组件上以定义事件动作的属性:
+
+## `click`
+
+当组件上发生点击手势时被触发。
+
+**注意:**
+
+`<input>` 和 `<switch>` 组件目前不支持 `click` 事件,请使用 `change` 或 `input` 事件来代替。
+
+### 事件对象
+
+- `type`: `click`
+- `target`: 触发点击事件的目标组件
+- `timestamp`: 触发点击事件时的时间戳
+
+### 示例
+
+点击按钮,将弹出弹框,再点击弹框 `×`,关闭弹框。
+
+```html
+<template>
+ <div>
+ <div>
+ <text class="btn" onclick="openDialog">Show Dialog</text>
+ </div>
+
+ <div id="dialog" class="dialog" if="{{isShowDialog}}">
+ <div class="dialog-backdrop"></div>
+ <div class="dialog-content">
+ <div class="dialog-header">
+ <text class="dialog-title">{{dialogTitle}}</text>
+ <text class="close" onclick="closeDialog">×</text>
+ </div>
+ <div class="dialog-body">
+ <text>{{dialogBody}}</text>
+ </div>
+ </div>
+ </div>
+ </div>
+</template>
+
+<style>
+.dialog-backdrop {
+ opacity: .5;
+ position: absolute;
+ top: 0;
+ right: 0;
+ bottom: 0;
+ left: 0;
+ background-color: #000000;
+}
+.dialog {
+ position: fixed;
+ top: 0;
+ right: 0;
+ bottom: 0;
+ left: 0;
+ justify-content: center;
+ align-items: center;
+}
+.dialog-content {
+ width: 450;
+ background-color: #ffffff;
+}
+.dialog-header {
+ padding: 20;
+ border-bottom-width: 1;
+ border-bottom-style: solid;
+ border-bottom-color: #efefef;
+}
+.dialog-body {
+ padding: 20;
+}
+.close {
+ font-size: 50;
+ position: absolute;
+ right: 10;
+ top: 10;
+}
+.btn {
+ text-align: center;
+ color: #ffffff;
+ padding: 12;
+ background-color: #3071a9;
+ border-color: #285e8e;
+ border-radius: 4;
+}
+</style>
+
+<script>
+ module.exports = {
+ data: {
+ isShowDialog: false,
+ dialogTitle: 'HELLO',
+ dialogBody: 'Weex is best!'
+ },
+ methods: {
+ openDialog: function (e) {
+ this.isShowDialog = true
+ },
+ closeDialog: function (e) {
+ this.isShowDialog = false
+ }
+ }
+ }
+</script>
+```
+
+[体验一下](http://dotwe.org/6c1dd48b419e614f92581930f42fd366)
+
+## `longpress`
+
+如果一个组件被绑定了 `longpress` 事件,那么当用户长按这个组件时,该事件将会被触发。
+
+**注意:**
+
+`<input>` 和 `<switch>` 组件目前不支持 `click` 事件,请使用 `change` 或 `input` 事件来代替。
+
+### 事件对象
+- `type` : `longpress`
+- `target` : 触发长按事件的目标组件
+- `timestamp` : 长按事件触发时的时间戳
+
+### 示例
+
+长按按钮,变换背景色。
+
+```html
+<template>
+ <div style="width: 400; height: 200; background-color: {{bg}};
+ justify-content: center; align-items: center;" onlongpress="{{update}}">
+ <text style="font-size: 60">Press me</text>
+ </div>
+</template>
+
+<script>
+ module.exports = {
+ data: {
+ bg: '#FF0000'
+ },
+ methods: {
+ update: function () {
+ this.bg = this.bg === '#FF0000' ? '#00FF00' : '#FF0000'
+ }
+ }
+ }
+</script>
+```
+
+[体验一下](http://dotwe.org/14a646ea3d7d5e1de5baaca9061a48b3)
+
+## Appear 事件
+
+如果一个位于某个可滚动区域内的组件被绑定了 `appear` 事件,那么当这个组件的状态变为在屏幕上可见时,该事件将被触发。
+
+### 事件对象
+
+- `type` : `appear`
+- `target` : 触发 Appear 事件的组件对象
+- `timestamp` : 事件被触发时的时间戳
+- `direction` : 触发事件时屏幕的滚动方向,`up` 或 `down`
+
+### 示例
+
+当滚到最下方时,最后一个 `item` 出现,将会弹出弹框。
+
+```html
+<template>
+ <scroller onviewappear="{{viewappear}}" onviewdisappear="{{viewdisappear}}">
+ <div class="item">
+ <text>scroll 1</text>
+ </div>
+ <div class="item">
+ <text>scroll 2</text>
+ </div>
+ <div class="item">
+ <text>scroll 3</text>
+ </div>
+ <div class="item">
+ <text>scroll 4</text>
+ </div>
+ <div class="item">
+ <text>scroll 5</text>
+ </div>
+ <div class="item">
+ <text>scroll 6</text>
+ </div>
+ <div class="item">
+ <text>scroll 7</text>
+ </div>
+ <div class="item">
+ <text>scroll 8</text>
+ </div>
+ <div class="item">
+ <text>scroll 9</text>
+ </div>
+ <div class="item">
+ <text>scroll 10</text>
+ </div>
+ <div class="item" onappear="alertMsg" >
+ <text>I will alert a message when I appeared.</text>
+ </div>
+ </scroller>
+</template>
+
+<style>
+ .list {
+ height: 850;
+ }
+
+ .count {
+ font-size: 48;
+ margin: 10;
+ }
+
+ .indicator {
+ height: 40;
+ width: 40;
+ color: #45b5f0;
+ }
+
+ .row {
+ width: 750;
+ }
+
+ .item {
+ justify-content: center;
+ border-bottom-width: 2;
+ border-bottom-color: #c0c0c0;
+ height: 200;
+ padding: 20;
+ }
+</style>
+
+<script>
+ var modal = require('@weex-module/modal')
+ module.exports = {
+ data: {},
+ methods: {
+ alertMsg: function (e) {
+ modal.alert({
+ message: 'I am appeared.',
+ okTitle: 'Appear'
+ }, function() {
+ })
+ },
+ viewappear: function () {
+ nativeLog('>>>>>', 'viewappear')
+ },
+ viewdisappear: function () {
+ nativeLog('>>>>>', 'viewdisappear')
+ }
+ }
+ }
+</script>
+```
+
+[体验一下](http://dotwe.org/4d5335f086dfc9964caed5b1fe4b1aa7)
+
+## Disappear 事件
+
+如果一个位于某个可滚动区域内的组件被绑定了 `disappear` 事件,那么当这个组件被滑出屏幕变为不可见状态时,该事件将被触发。
+
+### 事件对象
+
+- `type` : `disappear`
+- `target` : 触发 Disappear 事件的组件对象
+- `timestamp` : 事件被触发时的时间戳
+- `direction` : 触发事件时屏幕的滚动方向,`up` 或 `down`
+
+### 示例
+
+当向下滚动到第一个 `item` 消失后,将会弹出弹框。
+
+```html
+<template>
+ <scroller onviewappear="{{viewappear}}" onviewdisappear="{{viewdisappear}}">
+ <div class="item" ondisappear="alertMsg" >
+ <text>I will alert a message when I disappeared.</text>
+ </div>
+ <div class="item">
+ <text>scroll 1</text>
+ </div>
+ <div class="item">
+ <text>scroll 2</text>
+ </div>
+ <div class="item">
+ <text>scroll 3</text>
+ </div>
+ <div class="item">
+ <text>scroll 4</text>
+ </div>
+ <div class="item">
+ <text>scroll 5</text>
+ </div>
+ <div class="item">
+ <text>scroll 6</text>
+ </div>
+ <div class="item">
+ <text>scroll 7</text>
+ </div>
+ <div class="item">
+ <text>scroll 8</text>
+ </div>
+ <div class="item">
+ <text>scroll 9</text>
+ </div>
+ <div class="item">
+ <text>scroll 10</text>
+ </div>
+ </scroller>
+</template>
+
+<style>
+ .list {
+ height: 850;
+ }
+
+ .count {
+ font-size: 48;
+ margin: 10;
+ }
+
+ .indicator {
+ height: 40;
+ width: 40;
+ color: #45b5f0;
+ }
+
+ .row {
+ width: 750;
+ }
+
+ .item {
+ justify-content: center;
+ border-bottom-width: 2;
+ border-bottom-color: #c0c0c0;
+ height: 200;
+ padding: 20;
+ }
+</style>
+
+<script>
+ var modal = require('@weex-module/modal')
+ module.exports = {
+ data: {},
+ methods: {
+ alertMsg: function (e) {
+ modal.alert({
+ message: 'I am disappeared.',
+ okTitle: 'Disappear'
+ }, function() {
+ })
+ },
+ viewappear: function () {
+ nativeLog('>>>>>', 'viewappear')
+ },
+ viewdisappear: function () {
+ nativeLog('>>>>>', 'viewdisappear')
+ }
+ }
+ }
+</script>
+```
+
+[体验一下](http://dotwe.org/eefa176009207a429bbaf475f6ee92d1)
+
+## Page 事件
+
+*注意:仅支持 iOS 和 Android,H5 暂不支持。*
+
+Weex 通过 `viewappear` 和 `viewdisappear` 事件提供了简单的页面状态管理能力。
+
+`viewappear` 事件会在页面就要显示或配置的任何页面动画被执行前触发,例如,当调用 `navigator` 模块的 `push` 方法时,该事件将会在打开新页面时被触发。`viewdisappear` 事件会在页面就要关闭时被触发。
+
+与组件的 `appear` 和 `disappear` 事件不同的是,`viewappear` 和 `viewdisappear` 事件关注的是整个页面的状态,所以**它们必须绑定到页面的根元素上**。
+
+特殊情况下,这两个事件也能被绑定到非根元素的body组件上,例如`wxc-navpage`组件。
+
+### 事件对象
+
+- `type` : `viewappear` 或 `viewdisappear`
+- `target` : 触发事件的组件对象
+- `timestamp` : 事件被触发时的时间戳
+
+### 示例
+
+进出页面时,都会弹框提示。
+
+```html
+<template>
+ <scroller onviewappear="{{alertViewappearMsg}}" onviewdisappear="{{alertViewdisappearMsg}}">
+ <div class="item">
+ <text>scroll 1</text>
+ </div>
+ <div class="item">
+ <text>scroll 2</text>
+ </div>
+ <div class="item">
+ <text>scroll 3</text>
+ </div>
+ <div class="item">
+ <text>scroll 4</text>
+ </div>
+ <div class="item">
+ <text>scroll 5</text>
+ </div>
+ <div class="item">
+ <text>scroll 6</text>
+ </div>
+ <div class="item">
+ <text>scroll 7</text>
+ </div>
+ <div class="item">
+ <text>scroll 8</text>
+ </div>
+ <div class="item">
+ <text>scroll 9</text>
+ </div>
+ <div class="item">
+ <text>scroll 10</text>
+ </div>
+ <div class="item" onappear="alertMsg" >
+ <text>scroll 11</text>
+ </div>
+ </scroller>
+</template>
+
+<style>
+ .list {
+ height: 850;
+ }
+
+ .count {
+ font-size: 48;
+ margin: 10;
+ }
+
+ .indicator {
+ height: 40;
+ width: 40;
+ color: #45b5f0;
+ }
+
+ .row {
+ width: 750;
+ }
+
+ .item {
+ justify-content: center;
+ border-bottom-width: 2;
+ border-bottom-color: #c0c0c0;
+ height: 200;
+ padding: 20;
+ }
+</style>
+
+<script>
+ var modal = require('@weex-module/modal')
+ module.exports = {
+ data: {},
+ methods: {
+ alertViewappearMsg: function () {
+ modal.alert({
+ message: 'viewappear.',
+ okTitle: 'viewappear'
+ }, function() {
+ })
+ },
+ alertViewdisappearMsg: function () {
+ modal.alert({
+ message: 'viewdisappear.',
+ okTitle: 'viewdisappear'
+ }, function() {
+ })
+ }
+ }
+ }
+</script>
+```
+
+[体验一下](http://dotwe.org/450205a8f8612381422220ce88a562ff)
http://git-wip-us.apache.org/repos/asf/incubator-weex-site/blob/12e3a8bc/_drafts/v1.0/references/common-style.md
----------------------------------------------------------------------
diff --git a/_drafts/v1.0/references/common-style.md b/_drafts/v1.0/references/common-style.md
new file mode 100644
index 0000000..8a585f2
--- /dev/null
+++ b/_drafts/v1.0/references/common-style.md
@@ -0,0 +1,322 @@
+---
+title: 通用样式
+type: references
+order: 1.6
+version: 0.10
+---
+
+# 通用样式
+
+所有 Weex 组件都支持以下通用样式规则。
+
+## 盒模型
+
+
+
+Weex 盒模型基于 [CSS 盒模型](https://www.w3.org/TR/css3-box/),每个 Weex 元素都可视作一个盒子。我们一般在讨论设计或布局时,会提到「盒模型」这个概念。
+
+盒模型描述了一个元素所占用的空间。每一个盒子有四条边界:外边距边界 margin edge, 边框边界 border edge, 内边距边界 padding edge 与内容边界 content edge。这四层边界,形成一层层的盒子包裹起来,这就是盒模型大体上的含义。
+
+**注意:**
+Weex 对于长度值目前只支持*像素*值,单位可省略,不支持相对单位(`em`、`rem`)。
+
+- `width {length}`:,默认值 0
+- `height {length}`:,默认值 0
+- `padding {length}`:内边距,内容和边框之间的距离。默认值 0
+
+ 可有如下写法:
+
+ - `padding-left {length}`:,默认值 0
+ - `padding-right {length}`:,默认值 0
+ - `padding-top {length}`:,默认值 0
+ - `padding-bottom {length}`:,默认值 0
+- `margin`:
+
+ 外边距,元素和元素之间的空白距离。值类型为 length,默认值 0
+
+ 可有如下写法:
+
+ - `margin-left {length}`:,默认值 0
+ - `margin-right {length}`:,默认值 0
+ - `margin-top {length}`:,默认值 0
+ - `margin-bottom {length}`:,默认值 0
+- border:
+
+ 设定边框,`border` 目前不支持类似这样 `border: 1 solid #ff0000;` 的组合写法。
+
+ 可有如下写法:
+
+ - `border-style`:
+
+ 设定边框样式,值类型为 string,可选值为 `solid` | `dashed` | `dotted`,默认值 `solid`
+
+ 可有如下写法:
+
+ - `border-left-style {string}`:可选值为 `solid` | `dashed` | `dotted`,默认值 `solid`
+ - `border-top-style {string}`:可选值为 `solid` | `dashed` | `dotted`,默认值 `solid`
+ - `border-right-style {string}`:可选值为 `solid` | `dashed` | `dotted`,默认值 `solid`
+ - `border-bottom-style {string}`:可选值为 `solid` | `dashed` | `dotted`,默认值 `solid`
+
+ - `border-width {length}`:
+
+ 设定边框宽度,非负值, 默认值 0
+
+ 可有如下写法:
+
+ - `border-left-width {length}`:,非负值, 默认值 0
+ - `border-top-width {length}`:,非负值, 默认值 0
+ - `border-right-width {length}`:,非负值, 默认值 0
+ - `border-bottom-width {length}`:,非负值, 默认值 0
+
+ - `border-color {color}`:
+
+ 设定边框颜色,默认值 `#000000`
+
+ 可有如下写法:
+
+ - `border-left-color {color}`:,默认值 `#000000`
+ - `border-top-color {color}`:,默认值 `#000000`
+ - `border-right-color {color}`:,默认值 `#000000`
+ - `border-bottom-color {color}`:,默认值 `#000000`
+ - `border-radius {length}`:
+
+ 设定圆角,默认值 0
+
+ 可有如下写法:
+
+ - `border-bottom-left-radius {length}`:,非负值, 默认值 0
+ - `border-bottom-right-radius {length}`:,非负值, 默认值 0
+ - `border-top-left-radius {length}`:,非负值, 默认值 0
+ - `border-top-right-radius {length}`:,非负值, 默认值 0
+
+
+注意:目前在 `<image>` 和 `<text>` 组件上尚无法只定义一个或几个角的 `border-radius`。比如你无法在这两个组件上使用 `border-top-left-radius`。
+
+Weex 盒模型的 `box-sizing` 默认为 `border-box`,即盒子的宽高包含内容、内边距和边框的宽度,不包含外边距的宽度。
+
+### 示例:
+
+```html
+<template>
+ <div>
+ <image style="width: 400; height: 200; margin-left: 20;" src="https://g.alicdn.com/mtb/lab-zikuan/0.0.18/weex/weex_logo_blue@3x.png"></image>
+ </div>
+</template>
+```
+
+## Flexbox
+
+Weex 布局模型基于 CSS [`Flexbox`](http://www.w3.org/TR/css3-flexbox/),以便所有页面元素的排版能够一致可预测,同时页面布局能适应各种设备或者屏幕尺寸。
+
+Flexbox 包含 flex 容器和 flex 成员项。如果一个 Weex 元素可以容纳其他元素,那么它就成为 flex 容器。需要注意的是,flexbox 的老版规范相较新版有些出入,比如是否能支持 wrapping。这些都描述在 W3C 的工作草案中了,你需要注意下新老版本之间的不同。另外,老版本只在安卓 4.4 版以下得到支持。
+
+### Flex 容器
+
+在 Weex 中,Flexbox 是默认且唯一的布局模型,所以你不需要手动为元素添加 `display: flex;` 属性。
+
+- `flex-direction`:
+
+ 定义了 flex 容器中 flex 成员项的排列方向。可选值为 `row` | `column`,默认值为 `column`
+
+ - `column`:从上到下排列。
+ - `row`:从左到右排列。
+
+- `justify-content`:
+
+ 定义了 flex 容器中 flex 成员项在主轴方向上如何排列以处理空白部分。可选值为 `flex-start` | `flex-end` | `center` | `space-between`,默认值为 `flex-start`。
+
+ - `flex-start`:是默认值,所有的 flex 成员项都排列在容器的前部;
+ - `flex-end`:则意味着成员项排列在容器的后部;
+ - `center`:即中间对齐,成员项排列在容器中间、两边留白;
+ - `space-between`:表示两端对齐,空白均匀地填充到 flex 成员项之间。
+
+ 
+
+- `align-items`:
+
+ 定义了 flex 容器中 flex 成员项在纵轴方向上如何排列以处理空白部分。可选值为 `stretch` | `flex-start` | `center` | `flex-end`,默认值为 `stretch`。
+
+ - `stretch` 是默认值,即拉伸高度至 flex 容器的大小;
+ - `flex-start` 则是上对齐,所有的成员项排列在容器顶部;
+ - `flex-end` 是下对齐,所有的成员项排列在容器底部;
+ - `center` 是中间对齐,所有成员项都垂直地居中显示。
+
+ 
+
+### Flex 成员项
+
+flex 属性定义了 flex 成员项可以占用容器中剩余空间的大小。如果所有的成员项设置相同的值 `flex: 1`,它们将平均分配剩余空间. 如果一个成员项设置的值为 `flex: 2`,其它的成员项设置的值为 `flex: 1`,那么这个成员项所占用的剩余空间是其它成员项的2倍。
+
+- `flex {number}`:值为 number 类型。
+
+### 示例
+
+一个简单的网格布局。
+
+
+
+```html
+<template>
+ <div>
+ <div repeat="(i, v) in list" class="row">
+ <div repeat="(k, text) in v" class="item">
+ <div>
+ <text>{{text}}</text>
+ </div>
+ </div>
+ </div>
+ </div>
+</template>
+<style>
+ .item{
+ flex:1;
+ justify-content: center;
+ align-items:center;
+ border-width:1;
+ }
+ .row{
+ flex-direction: row;
+ height:80;
+ }
+</style>
+<script>
+ module.exports = {
+ data: function () {
+ return {
+ list:[
+ ['A', 'B', 'C'],
+ ['D', 'E', 'F'],
+ ['G', 'H', 'I']
+ ]
+ }
+ }
+ }
+</script>
+```
+
+[体验一下](http://dotwe.org/ee6a898fcac2242308c24fe5882c52ac)
+
+一个在相对于屏幕水平居中,全屏居中的 `<div>`。
+
+```html
+<template>
+ <div class="wrapper">
+ <div class="box">
+ </div>
+ </div>
+</template>
+
+<style>
+ .wrapper {
+ position: absolute;
+ top: 0;
+ right: 0;
+ bottom: 0;
+ left: 0;
+ background-color: #cccccc;
+ justify-content: center;
+ align-items: center;
+ }
+ .box {
+ width: 200;
+ height: 200;
+ background-color: #fc0000;
+ }
+</style>
+```
+
+[体验一下](http://dotwe.org/a76cd89b37c72d308ed576131830e877)
+
+## 定位
+
+Weex 支持 `position` 定位,用法与 CSS position 类似。为元素设置 `position` 后,可通过 `top`、`right`、`bottom`、`left` 四个属性设置元素坐标。
+
+- `position {string}`:
+
+ 设置定位类型。可选值为 `relative` | `absolute` | `fixed` | `sticky`,默认值为 `relative`。
+
+ - `relative` 是默认值,指的是相对定位;
+ - `absolute` 是绝对定位,以元素的容器作为参考系;
+ - `fixed` 保证元素在页面窗口中的对应位置显示;
+ - `sticky` 指的是仅当元素滚动到页面之外时,元素会固定在页面窗口的顶部。
+- `top {number}`:距离上方的偏移量,默认为 0。
+- `bottom {number}`:距离下方的偏移量,默认为 0。
+- `left {number}`:距离左方的偏移量,默认为 0。
+- `right {number}`:距离右方的偏移量,默认为 0。
+
+**注意:**
+
+1. Weex 目前不支持 `z-index` 设置元素层级关系,但靠后的元素层级更高,因此,对于层级高的元素,可将其排列在后面。
+2. 如果定位元素超过容器边界,在 Android 下,超出部分将**不可见**,原因在于 Android 端元素 `overflow` 默认值为 `hidden`,但目前 Android 暂不支持设置 `overflow: visible`。
+
+### 示例
+
+
+
+```html
+<template>
+ <div class="wrapper">
+ <div class="box box1">
+ </div>
+ <div class="box box2">
+ </div>
+ <div class="box box3">
+ </div>
+ </div>
+</template>
+
+<style>
+ .wrapper {
+ position: absolute;
+ top: 0;
+ right: 0;
+ bottom: 0;
+ left: 0;
+ background-color: #cccccc;
+ }
+ .box {
+ width: 400;
+ height: 400;
+ position: absolute;
+ }
+ .box1 {
+ top: 0;
+ left: 0;
+ background-color: #ff0000;
+ }
+ .box2 {
+ top: 150;
+ left: 150;
+ background-color: #0055dd;
+ }
+ .box3 {
+ top: 300;
+ left: 300;
+ background-color: #00ff49;
+ }
+</style>
+```
+
+[体验一下](http://dotwe.org/b04339de27cfabf0710e045c0079e56a)
+
+## 其他基本样式
+
+- `opacity {number}`:取值范围为 [0, 1] 区间。默认值是 1,即完全不透明;0 是完全透明;0.5 是 50% 的透明度。
+- `background-color {color}`:设定元素的背景色,可选值为色值,支持RGB( `rgb(255, 0, 0)` );RGBA( `rgba(255, 0, 0, 0.5)` );十六进制( `#ff0000` );精简写法的十六进制( `#f00` );色值关键字(`red`),默认值是 `transparent` 。
+
+**注意:** [色值的关键字列表](./color-names.md)。
+
+## 上手样式
+
+如果对于样式写法需要更多上手参考,可参考
+
+- [如何做出高性能长列表]()
+- [如何布局]()
+- 以及每个组件的文档中,都有常见的例子可供参考。
+
+你可以按照以下步骤来规划 Weex 页面的样式。
+
+1. 全局样式规划:将整个页面分割成合适的模块。
+2. flex 布局:排列和对齐页面模块。
+3. 定位盒子:定位并设置偏移量。
+4. 细节样式处理:增加特定的具体样式。
http://git-wip-us.apache.org/repos/asf/incubator-weex-site/blob/12e3a8bc/_drafts/v1.0/references/component-defs.md
----------------------------------------------------------------------
diff --git a/_drafts/v1.0/references/component-defs.md b/_drafts/v1.0/references/component-defs.md
new file mode 100644
index 0000000..11e4282
--- /dev/null
+++ b/_drafts/v1.0/references/component-defs.md
@@ -0,0 +1,126 @@
+---
+title: ViewModel 选项
+type: references
+order: 1.2
+version: 0.10
+---
+
+# 组件定义
+
+定义组件是通过一组选项来描述一个组件。这组选项总是被赋值给 `<script>` 标签中的 `module.exports` 。
+
+``` javascript
+module.exports = {
+ // a set of options here
+}
+```
+## 数据和方法
+
+``` javascript
+module.exports = {
+ data: function () {
+ return {x: 1, y: 2}
+ },
+ methods: {
+ doThis: function () {...},
+ doThat: function () {...}
+ },
+ ...
+}
+```
+
+`data` 选项是一个函数,它返回这个视图模型可监听的数据对象。而 `methods` 是一个映射,其中包含所有视图模型的方法。
+
+每个 `data` 或 `method` 属性将被代理到视图模型实例中。所以,你能通过 `this.x` 读写数据,或者通过 `this.doThis()` 调用方法。
+
+一个完整的例子:
+
+```html
+<template>
+ <div style="width: {{w}}; height: {{h}}; background-color: red;" onclick="update"></div>
+</template>
+<script>
+ module.exports = {
+ data: function () {
+ return {w: 750, h: 200}
+ },
+ methods: {
+ update: function (e) {
+ this.h += 200
+ }
+ }
+ }
+</script>
+```
+## 事件
+
+``` javascript
+module.exports = {
+ data: ...,
+ methods: {
+ foo: function () {
+ ...
+ this.$emit('customtype1', data)
+ }
+ },
+ events: {
+ customtype1: function (e) {
+ console.log(e.type, e.detail)
+ }
+ },
+ ...
+}
+```
+
+`events` 选项允许你在视图模型被创建时注册自定义事件。然后,它会监听这些类型的事件,并通过函数类型的值处理它们。
+
+Weex 会把一个事件对象作为第一个参数传递给其绑定的事件,这个事件对象在 `e.detail` 中包含事件数据。
+## 生命周期
+
+``` javascript
+module.exports = {
+ data: ...,
+ methods: ...,
+ init: function () {
+ console.log('ViewModel constructor begins')
+ },
+ created: function () {
+ console.log('Data observation finished')
+ },
+ ready: function () {
+ console.log('Virtual DOM finished')
+ },
+ ...
+}
+```
+
+Weex 视图模型现在支持生命周期内的钩子函数,这些钩子函数能被写为组件选项:
+- `init`: 在视图模型的构造函数开始调用时激活;
+- `created`: 当视图模型监听默认数据,但还未编译模板时激活;
+- `ready`: 当视图模型监听默认数据并且编译模板生成虚拟DOM后被激活。
+
+**注意:当 `methods`、`events` 或生命周期方法作为参数传递给别的函数时,务必确认函数执行时的上下文符合您的预期,例如:**
+
+``` javascript
+module.exports = {
+ data: function () {
+ return {x: 1, y: 2}
+ },
+ ready: function () {
+ // `undefined`
+ // 因为上下文发生了变化
+ this.foo(this.bar)
+ // `1`
+ // 正确绑定上下文之后可以得到预期的值
+ this.foo(this.bar.bind(this))
+ },
+ methods: {
+ foo: function (fn) {
+ return fn()
+ },
+ bar: function () {
+ return this.x
+ }
+ }
+}
+```
http://git-wip-us.apache.org/repos/asf/incubator-weex-site/blob/12e3a8bc/_drafts/v1.0/references/components/a.md
----------------------------------------------------------------------
diff --git a/_drafts/v1.0/references/components/a.md b/_drafts/v1.0/references/components/a.md
new file mode 100644
index 0000000..75bd831
--- /dev/null
+++ b/_drafts/v1.0/references/components/a.md
@@ -0,0 +1,273 @@
+---
+title: <a>
+type: references
+order: 2.1
+version: 0.10
+---
+
+# <a>
+
+`<a>` 组件定义了指向某个页面的一个超链接. 此组件的作用和用法与HTML5中的 [`<a>`](https://developer.mozilla.org/en-US/docs/Web/HTML/Element/a) 非常类似,区别在于 Weex 的 `<a>` 组件**不能**直接在里面添加文本(字符串),如果要展示文本,应该添加 `<text>` 组件。
+
+一个简单例子:
+
+```HTML
+<template>
+ <div class="wrapper">
+ <a href="http://dotwe.org/raw/dist/a468998152ee680413588c38bd61c29e.js">
+ <text>click</text>
+ </a>
+ </div>
+</template>
+
+<style>
+.wrapper {
+ text-align: center;
+}
+</style>
+```
+
+[体验一下](http://dotwe.org/f63c78213ef26c25357ffa851537fff3)
+
+## 子组件
+
+此组件支持除了自己外的所有 Weex 组件作为子组件。
+
+## 特性
+
+- `href {string}`:定义了超链接的 URL。
+
+## 样式
+
+`<a>` 支持所有通用样式。
+
+- 盒模型
+- `flexbox` 布局
+- `position`
+- `opacity`
+- `background-color`
+
+查看 [组件通用样式](../common-style.html)。
+
+## 事件
+
+`<a>` 支持所有通用事件。
+
+- `click`
+ **注意:**我们不能保证 `click` 事件和 `href` 跳转的执行顺序。建议不要使用 `click` 事件来处理 `href` 跳转前的逻辑处理。
+- `longpress`
+- `appear`
+- `disappear`
+
+查看 [通用事件](../common-event.html)。
+
+## 约束
+
+1. **不能**直接在 `<a>` 中添加文本。
+ 错误示例,“click” 无法被正常渲染。
+
+ ```HTML
+ <template>
+ <div class="wrapper">
+ <a href="http://dotwe.org/raw/dist/a468998152ee680413588c38bd61c29e.js">
+ click
+ </a>
+ </div>
+ </template>
+
+ <style>
+ .wrapper {
+ text-align: center;
+ }
+ </style>
+ ```
+
+[体验一下](http://dotwe.org/0a22d65138691a208e3fb1f8f6392b38)
+
+2. 请不要为 `<a>` 添加 `click` 事件。我们不能确保 `click` 事件和 `href` 跳转的执行顺序。
+
+## 示例
+
+```html
+<template>
+ <div>
+ <list class="list">
+ <header class="header">
+ <text class="title">Search Results</text>
+ </header>
+ <refresh style="width: 750; padding: 30;" onrefresh="refreshData" display="{{refreshDisplay}}">
+ <text class="text"> ↓ Pull to refresh </text>
+ <loading-indicator class="indicator"></loading-indicator>
+ </refresh>
+ <cell class="row" repeat="item in items" id="item-{{$index}}">
+ <div class="lines">
+ <text class="item">Repo name: </text><a href="{{item.repo_url}}"><text class="link">{{item.full_name}}</text></a>
+ </div>
+ <div>
+ <text class="item">Repo star: {{item.stargazers_count}}</text>
+ </div>
+ </cell>
+ <loading onloading="loadingData" style="width: 750; padding: 30;" display="{{loadingDisplay}}">
+ <text class="text">{{loadingText}}</text>
+ </loading>
+ </list>
+ <div class="up" onclick="goToTop">
+ <img class="img" src="https://img.alicdn.com/tps/TB1ZVOEOpXXXXcQaXXXXXXXXXXX-200-200.png"></img>
+ </div>
+ </div>
+</template>
+
+<style>
+.header {
+ padding: 25;
+ background-color: #efefef;
+ border-bottom-color: #eeeeee;
+ border-bottom-width: 2;
+ border-bottom-style: solid;
+}
+.title {
+ text-align: center;
+}
+.text {
+ text-align: center;
+}
+.list {
+ background-color: #ffffff;
+}
+.row {
+ padding: 20;
+ border-bottom-color: #eeeeee;
+ border-bottom-width: 2;
+ border-bottom-style: solid;
+}
+.up {
+ width: 70;
+ height: 70;
+ position: fixed;
+ right: 20;
+ bottom: 20;
+}
+.img {
+ width: 70;
+ height: 70;
+}
+.lines {
+ flex-direction: row;
+}
+.link {
+ color: #008cff;
+ text-decoration: underline;
+}
+</style>
+
+<script>
+var dom = require('@weex-module/dom') || {}
+var stream = require('@weex-module/stream') || {}
+var modal = require('@weex-module/modal') || {}
+
+var SEARCH_URL = 'https://api.github.com/search/repositories?q=language:javascript&sort=stars&order=desc',
+ PAGE_URL = 'http://dotwe.org/raw/dist/f1fa0895d0fa0fd80896e02a589443dd.js'
+
+module.exports = {
+ data: {
+ isLoaded: true,
+ page: 1,
+ loadingDisplay: 'hide',
+ refreshDisplay: 'hide',
+ loadingText: 'Loading...',
+ items:[]
+ },
+ created: function () {
+ var url = SEARCH_URL + '&page=' + this.page
+
+ this.renderData(url)
+
+ this.page++
+ },
+ methods: {
+ renderData: function (url) {
+ var self = this
+
+ stream.fetch({
+ method: 'GET',
+ url: url,
+ type:'json'
+ }, function(res) {
+ try {
+ var results = res.data.items || []
+
+ if (Array.isArray(results)) {
+ for(var i = 0; i < results.length; i++) {
+ var repo_url = results[i].html_url
+ if (repo_url) {
+ results[i].repo_url = self.processUrl(repo_url)
+ }
+ self.items.push(results[i])
+ }
+ }
+ } catch(e) {}
+ },function(res){
+
+ })
+ },
+ loadingData: function (e) {
+ var url = SEARCH_URL + '&page=' + this.page
+ var self = this
+
+ if (self.isLoaded === false) return
+
+ self.loadingDisplay = 'show'
+
+ if (self.page <=10 ) {
+ self.renderData(url)
+ self.page++
+ } else {
+ self.loadingDisplay = 'hide'
+ self.loadingText = 'NO MORE!'
+ }
+ },
+ goToTop: function (e) {
+ dom.scrollToElement(this.$el('item-0'), {
+ offset: -100
+ })
+ },
+ refreshData: function (e) {
+ var url = SEARCH_URL + '&page=1'
+
+ if (this.isLoaded === false) return
+
+ this.refreshDisplay = 'show'
+
+ modal.toast({
+ 'message': 'Refreshing...',
+ 'duration': 1
+ })
+
+ this.items = []
+ this.page = 1
+ this.renderData(url)
+
+ this.refreshDisplay = 'hide'
+ },
+ processUrl: function (url) {
+ var platform = this.$getConfig().env.platform.toLowerCase()
+
+
+ if (url) {
+ // iOS do not need encode
+ if (platform === 'ios') {
+ return PAGE_URL + '?weburl=' + url
+ } else if (platform === 'web') {
+ return url
+ } else {
+ var encodeUrl = encodeURIComponent(url)
+ return PAGE_URL + '?weburl=' + encodeUrl
+ }
+ }
+ }
+ }
+}
+</script>
+```
+
+[体验一下](http://dotwe.org/3e8369efb20a169077b5331b45927ed8)。
http://git-wip-us.apache.org/repos/asf/incubator-weex-site/blob/12e3a8bc/_drafts/v1.0/references/components/cell.md
----------------------------------------------------------------------
diff --git a/_drafts/v1.0/references/components/cell.md b/_drafts/v1.0/references/components/cell.md
new file mode 100644
index 0000000..e977037
--- /dev/null
+++ b/_drafts/v1.0/references/components/cell.md
@@ -0,0 +1,191 @@
+---
+title: <cell>
+type: references
+order: 2.5
+version: 0.10
+---
+
+# <cell>
+
+用于定义列表中的子列表项,类似于 HTML 中的 `ul` 之于 `li`。Weex 会对 `<cell>` 进行高效的内存回收以达到更好的性能,该组件必须作为[`<list>`](./list.html) 组件的子组件, 这是为了优化滚动时的性能。
+
+## 子组件
+
+支持所有 Weex 的组件作为它的子组件。
+
+## 样式
+
+**注意:**
+
+你不能给 `<cell>` 设定`flex`值。 `<cell>`的宽度等于父组件 `<list>` 的宽度,并且 `<cell>` 高度自适应。
+
+- 通用样式:支持所有通用样式
+
+ - 盒模型
+ - `flexbox` 布局
+ - `position`
+ - `opacity`
+ - `background-color`
+
+ 查看 [组件通用样式](../common-style.html)
+
+## 事件
+
+- 通用事件
+
+ 支持所有通用事件:
+
+ - `click`
+ - `longpress`
+ - `appear`
+ - `disappear`
+
+ 查看 [通用事件](../common-event.html)
+
+## 示例
+
+
+
+```html
+<template>
+ <div>
+ <list class="list">
+ <header class="header">
+ <text class="title">Search Results</text>
+ </header>
+ <refresh style="width: 750; padding: 30;" onrefresh="refreshData">
+ <text class="text"> ↓ Pull to refresh </text>
+ <loading-indicator class="indicator"></loading-indicator>
+ </refresh>
+ <cell class="row" repeat="item in items" id="item-{{$index}}">
+ <div>
+ <text class="item">Repo name: {{item.full_name}}</text>
+ </div>
+ <div>
+ <text class="item">Repo star: {{item.stargazers_count}}</text>
+ </div>
+ </cell>
+ <loading onloading="loadingData" style="width: 750; padding: 30;" display="{{loadingDisplay}}">
+ <text class="text">{{loadingText}}</text>
+ </loading>
+ </list>
+ <div class="up" onclick="goToTop">
+ <img class="img" src="https://img.alicdn.com/tps/TB1ZVOEOpXXXXcQaXXXXXXXXXXX-200-200.png"></img>
+ </div>
+ </div>
+</template>
+
+<style>
+.header {
+ padding: 25;
+ background-color: #efefef;
+ border-bottom-color: #eeeeee;
+ border-bottom-width: 2;
+ border-bottom-style: solid;
+}
+.title {
+ text-align: center;
+}
+.text {
+ text-align: center;
+}
+.list {
+ background-color: #ffffff;
+}
+.row {
+ padding: 20;
+ border-bottom-color: #eeeeee;
+ border-bottom-width: 2;
+ border-bottom-style: solid;
+}
+.up {
+ width: 70;
+ height: 70;
+ position: fixed;
+ right: 20;
+ bottom: 20;
+}
+.img {
+ width: 70;
+ height: 70;
+}
+</style>
+
+<script>
+var dom = require('@weex-module/dom') || {}
+var stream = require('@weex-module/stream') || {}
+var modal = require('@weex-module/modal') || {}
+
+var SEARCH_URL = 'https://api.github.com/search/repositories?q=language:javascript&sort=stars&order=desc'
+
+module.exports = {
+ data: {
+ page: 1,
+ loadingDisplay: 'show',
+ loadingText: 'Loading...',
+ items:[]
+ },
+ created: function () {
+ var url = SEARCH_URL + '&page=' + this.page
+
+ this.renderData(url)
+
+ this.page++
+ },
+ methods: {
+ renderData: function (url) {
+ var self = this
+
+ stream.fetch({
+ method: 'GET',
+ url: url,
+ type:'json'
+ }, function(res) {
+ try {
+ var results = res.data.items || []
+
+ if (Array.isArray(results)) {
+ for(var i = 0; i < results.length; i++) {
+ self.items.push(results[i])
+ }
+ }
+ } catch(e) {}
+ },function(res){
+
+ })
+ },
+ loadingData: function (e) {
+ var url = SEARCH_URL + '&page=' + this.page
+ var self = this
+
+ if (self.page <=10 ) {
+ self.renderData(url)
+ self.page++
+ } else {
+ self.loadingDisplay = 'hide'
+ self.loadingText = 'NO MORE!'
+ }
+ },
+ goToTop: function (e) {
+ dom.scrollToElement(this.$el('item-0'), {
+ offset: -100
+ })
+ },
+ refreshData: function (e) {
+ var url = SEARCH_URL + '&page=1'
+
+ modal.toast({
+ 'message': 'Refreshing...',
+ 'duration': 1
+ })
+
+ this.items = []
+ this.page = 1
+ this.renderData(url)
+ }
+ }
+}
+</script>
+```
+
+[体验一下](http://dotwe.org/280fa3dc8e793ea8712451ecdf84fb7b)
\ No newline at end of file
http://git-wip-us.apache.org/repos/asf/incubator-weex-site/blob/12e3a8bc/_drafts/v1.0/references/components/div.md
----------------------------------------------------------------------
diff --git a/_drafts/v1.0/references/components/div.md b/_drafts/v1.0/references/components/div.md
new file mode 100644
index 0000000..893f7a1
--- /dev/null
+++ b/_drafts/v1.0/references/components/div.md
@@ -0,0 +1,245 @@
+---
+title: <div>
+type: references
+order: 2.2
+version: 0.10
+---
+
+# <div>
+
+`<div>` 组件是用于包装其它组件的最基本容器。支持所有的通用样式、特性、`flexbox` 布局。其类似于 HTML 的 `<div>` 容器,但**不能**直接在里面添加文本(字符串),如果要展示文本,应该使用 `<text>` 组件。历史版本中,`<div>` 别名是 `<container>`,目前**已经弃用**。
+
+**注意:**
+
+`<div>` 嵌套层级不可过深,否则容易引起性能问题,建议控制在 **10** 层以内。
+
+一个简单例子:
+
+```html
+<template>
+ <div>
+ <text class="text">Hello World!</text>
+ </div>
+</template>
+
+<style>
+.text {
+ font-size: 70;
+ color: #ff0000
+}
+</style>
+
+<script></script>
+```
+
+[体验一下](http://dotwe.org/a468998152ee680413588c38bd61c29e)
+
+
+
+## 子组件
+
+`<div>` 基本容器组件,因此支持包括 `<div>` 在内的任何组件作为自己的子组件。因此,在写一个组件时,推荐外层使用 `<div>` 作为根容器。
+
+## 样式
+
+`<div>` 支持所有通用样式:
+
+- 盒模型
+- `flexbox` 布局
+- `position`
+- `opacity`
+- `background-color`
+
+查看 [组件通用样式](../common-style.html)
+
+## 事件
+
+`<div>` 支持所有通用事件:
+
+- `click`
+- `longpress`
+- `appear`
+- `disappear`
+
+查看 [通用事件](../common-event.html)
+
+## 约束
+
+1. **不能**直接在 `<div>` 中添加文本。
+
+ 错误示例,“Hello World!” 无法被正常渲染。
+
+ ```html
+ <template>
+ <div>Hello World!</div>
+ </template>
+
+ <style>
+ .text {
+ font-size: 70;
+ color: #ff0000
+ }
+ </style>
+
+ <script></script>
+ ```
+
+ [体验一下](http://dotwe.org/3ef3ba3f0f162b27e24c525250c46a04)
+
+2. `<div>` 不可滚动,即使显式设置高度也一样。
+
+ [错误示例](http://dotwe.org/a2cc491c5b9e6f6eb06795e45e725efd)
+
+## 示例
+
+
+
+```html
+<style>
+.item {
+ padding: 20;
+ height: 220;
+ border-bottom-width: 1;
+ border-bottom-style: solid;
+ border-bottom-color: #efefef;
+}
+.item-content {
+ flex-direction: row;
+ width: 710;
+ background-color: #ffffff;
+}
+.item-imgbox {
+ height: 180;
+ width: 180;
+ margin-right: 20;
+}
+.item-img {
+ width: 180;
+ height: 180;
+}
+.item-info {
+ height: 180;
+ width: 510;
+ justify-content: center;
+ position: relative;
+}
+.item-info-detail {
+ position: relative;
+ color: #A2A2A2;
+}
+.desc {
+ lines: 4;
+ text-overflow: ellipsis;
+ font-size: 26;
+ line-height: 30;
+ color: #A2A2A2;
+}
+.title {
+ lines: 1;
+ text-overflow: ellipsis;
+ font-size: 32;
+ color: #2D2D2D;
+ line-height: 40;
+}
+.detail-info {
+ margin-top: 15;
+}
+.up {
+ width: 70;
+ height: 70;
+ position: fixed;
+ right: 20;
+ bottom: 20;
+}
+.img {
+ width: 70;
+ height: 70;
+}
+</style>
+
+<template>
+ <div>
+ <scroller>
+ <div class="item" repeat="item in items" id="item-{{$index}}">
+ <div class="item-content">
+ <div class="item-imgbox">
+ <img class="item-img" src="{{item.img}}" alt="" />
+ </div>
+ <div class="item-info">
+ <div class="item-info-detail">
+ <text class="title">{{item.title}}</text>
+ <div class="detail-info">
+ <text class="desc">{{item.desc}}</text>
+ </div>
+ </div>
+ </div>
+ </div>
+ </div>
+ </scroller>
+ <div class="up" onclick="goToTop">
+ <img class="img" src="https://img.alicdn.com/tps/TB1ZVOEOpXXXXcQaXXXXXXXXXXX-200-200.png"></img>
+ </div>
+ </div>
+</template>
+
+<script>
+ var dom = require('@weex-module/dom') || {}
+
+ module.exports = {
+ data: {
+ items: [{
+ img: 'https://img.alicdn.com/tps/TB1z.55OFXXXXcLXXXXXXXXXXXX-560-560.jpg',
+ title: 'Who is Alan Mathison Turing?Who is Alan Mathison Turing?',
+ desc: 'Alan Mathison Turing ( 23 June 1912 – 7 June 1954) was an English computer scientist, mathematician, logician, cryptanalyst and theoretical biologist. He was highly influential in the development of theoretical computer science, providing a formalisation of the concepts of algorithm and computation with the Turing machine, which can be considered a model of a general purpose computer.Turing is widely considered to be the father of theoretical computer science and artificial intelligence.'
+ },{
+ img: 'https://img.alicdn.com/tps/TB1z.55OFXXXXcLXXXXXXXXXXXX-560-560.jpg',
+ title: 'Who is Alan Mathison Turing?',
+ desc: 'Alan Mathison Turing ( 23 June 1912 – 7 June 1954) was an English computer scientist, mathematician, logician, cryptanalyst and theoretical biologist. He was highly influential in the development of theoretical computer science, providing a formalisation of the concepts of algorithm and computation with the Turing machine, which can be considered a model of a general purpose computer.Turing is widely considered to be the father of theoretical computer science and artificial intelligence.'
+ },{
+ img: 'https://img.alicdn.com/tps/TB1z.55OFXXXXcLXXXXXXXXXXXX-560-560.jpg',
+ title: 'Who is Alan Mathison Turing?',
+ desc: 'Alan Mathison Turing ( 23 June 1912 – 7 June 1954) was an English computer scientist, mathematician, logician, cryptanalyst and theoretical biologist. He was highly influential in the development of theoretical computer science, providing a formalisation of the concepts of algorithm and computation with the Turing machine, which can be considered a model of a general purpose computer.Turing is widely considered to be the father of theoretical computer science and artificial intelligence.'
+ },{
+ img: 'https://img.alicdn.com/tps/TB1z.55OFXXXXcLXXXXXXXXXXXX-560-560.jpg',
+ title: 'Who is Alan Mathison Turing?',
+ desc: 'Alan Mathison Turing ( 23 June 1912 – 7 June 1954) was an English computer scientist, mathematician, logician, cryptanalyst and theoretical biologist. He was highly influential in the development of theoretical computer science, providing a formalisation of the concepts of algorithm and computation with the Turing machine, which can be considered a model of a general purpose computer.Turing is widely considered to be the father of theoretical computer science and artificial intelligence.'
+ },{
+ img: 'https://img.alicdn.com/tps/TB1z.55OFXXXXcLXXXXXXXXXXXX-560-560.jpg',
+ title: 'Who is Alan Mathison Turing?',
+ desc: 'Alan Mathison Turing ( 23 June 1912 – 7 June 1954) was an English computer scientist, mathematician, logician, cryptanalyst and theoretical biologist. He was highly influential in the development of theoretical computer science, providing a formalisation of the concepts of algorithm and computation with the Turing machine, which can be considered a model of a general purpose computer.Turing is widely considered to be the father of theoretical computer science and artificial intelligence.'
+ },{
+ img: 'https://img.alicdn.com/tps/TB1z.55OFXXXXcLXXXXXXXXXXXX-560-560.jpg',
+ title: 'Who is Alan Mathison Turing?',
+ desc: 'Alan Mathison Turing ( 23 June 1912 – 7 June 1954) was an English computer scientist, mathematician, logician, cryptanalyst and theoretical biologist. He was highly influential in the development of theoretical computer science, providing a formalisation of the concepts of algorithm and computation with the Turing machine, which can be considered a model of a general purpose computer.Turing is widely considered to be the father of theoretical computer science and artificial intelligence.'
+ },{
+ img: 'https://img.alicdn.com/tps/TB1z.55OFXXXXcLXXXXXXXXXXXX-560-560.jpg',
+ title: 'Who is Alan Mathison Turing?',
+ desc: 'Alan Mathison Turing ( 23 June 1912 – 7 June 1954) was an English computer scientist, mathematician, logician, cryptanalyst and theoretical biologist. He was highly influential in the development of theoretical computer science, providing a formalisation of the concepts of algorithm and computation with the Turing machine, which can be considered a model of a general purpose computer.Turing is widely considered to be the father of theoretical computer science and artificial intelligence.'
+ },{
+ img: 'https://img.alicdn.com/tps/TB1z.55OFXXXXcLXXXXXXXXXXXX-560-560.jpg',
+ title: 'Who is Alan Mathison Turing?',
+ desc: 'Alan Mathison Turing ( 23 June 1912 – 7 June 1954) was an English computer scientist, mathematician, logician, cryptanalyst and theoretical biologist. He was highly influential in the development of theoretical computer science, providing a formalisation of the concepts of algorithm and computation with the Turing machine, which can be considered a model of a general purpose computer.Turing is widely considered to be the father of theoretical computer science and artificial intelligence.'
+ },{
+ img: 'https://img.alicdn.com/tps/TB1z.55OFXXXXcLXXXXXXXXXXXX-560-560.jpg',
+ title: 'Who is Alan Mathison Turing?',
+ desc: 'Alan Mathison Turing ( 23 June 1912 – 7 June 1954) was an English computer scientist, mathematician, logician, cryptanalyst and theoretical biologist. He was highly influential in the development of theoretical computer science, providing a formalisation of the concepts of algorithm and computation with the Turing machine, which can be considered a model of a general purpose computer.Turing is widely considered to be the father of theoretical computer science and artificial intelligence.'
+ },{
+ img: 'https://img.alicdn.com/tps/TB1z.55OFXXXXcLXXXXXXXXXXXX-560-560.jpg',
+ title: 'Who is Alan Mathison Turing?',
+ desc: 'Alan Mathison Turing ( 23 June 1912 – 7 June 1954) was an English computer scientist, mathematician, logician, cryptanalyst and theoretical biologist. He was highly influential in the development of theoretical computer science, providing a formalisation of the concepts of algorithm and computation with the Turing machine, which can be considered a model of a general purpose computer.Turing is widely considered to be the father of theoretical computer science and artificial intelligence.'
+ }]
+ },
+ created: function () {
+ },
+ methods: {
+ goToTop: function (e) {
+ dom.scrollToElement(this.$el('item-0'), {
+ offset: 0
+ })
+ }
+ }
+ }
+</script>
+```
+
+[体验一下](http://dotwe.org/799f54b32f5227f9c34cfbb5e6946ba7)
http://git-wip-us.apache.org/repos/asf/incubator-weex-site/blob/12e3a8bc/_drafts/v1.0/references/components/image.md
----------------------------------------------------------------------
diff --git a/_drafts/v1.0/references/components/image.md b/_drafts/v1.0/references/components/image.md
new file mode 100644
index 0000000..5a18280
--- /dev/null
+++ b/_drafts/v1.0/references/components/image.md
@@ -0,0 +1,161 @@
+---
+title: <image>
+type: references
+order: 2.3
+version: 0.10
+---
+
+# <image>
+
+`<image>` 组件用于渲染图片,并且它不能包含任何子组件。可以用 `<img>` 作简写。
+
+需要注意的是,需要明确指定 `width` 和 `height`,否则图片无法显示。
+
+简单例子:
+
+```html
+<template>
+ <div>
+ <img style="width: 560;height: 560;" src="https://img.alicdn.com/tps/TB1z.55OFXXXXcLXXXXXXXXXXXX-560-560.jpg"></img>
+ </div>
+</template>
+```
+
+[体验一下](http://dotwe.org/23b6cf951e6059d2cf7b9a74a9915ace)
+
+## 子组件
+
+`<image>` 组件不支持任何子组件,因此不要尝试在 `<image>` 组件中添加任何组件。如果需要实现 `background-image` 的效果,可以使用 `<image>` 组件和 `position` 定位来现实,如下面代码。
+
+```html
+<template>
+ <div>
+ <img style="width:750; height:750;" src="https://img.alicdn.com/tps/TB1z.55OFXXXXcLXXXXXXXXXXXX-560-560.jpg"></img>
+ <div class="title">
+ <text style="font-size:50; color: #ff0000">你好,image</text>
+ </div>
+ </div>
+</template>
+<style>
+ .title{
+ position:absolute;
+ top:50;
+ left:10;
+ }
+</style>
+```
+
+[体验一下](http://dotwe.org/08dd49aaca8bf289c5fc08f808b9c08c)
+
+## 特性
+
+`<image>` 组件,包含 `src` 和 `resize` 两个重要特性。
+
+- `src {string}`:定义图片链接,目前图片暂不支持本地图片。
+- `resize {string}`:可以控制图片的拉伸状态,值行为和 W3C 标准一致。
+
+ 可选值为:
+
+ - `stretch`:默认值,指定图片按照容器拉伸,有可能使图片产生形变。
+ - `cover`:指定图片可以被调整到容器,以使图片完全覆盖背景区域,图片有可能被剪裁。
+ - `contain`:指定可以不用考虑容器的大小,把图像扩展至最大尺寸,以使其宽度和高度完全适应内容区域。
+
+ 例子:
+
+ 
+
+ [体验一下](http://dotwe.org/049213ab3364a86637e211c0329cdc50)
+
+## 样式
+
+- 通用样式:支持所有通用样式
+
+ - 盒模型
+ - `flexbox` 布局
+ - `position`
+ - `opacity`
+ - `background-color`
+
+ 查看 [组件通用样式](../common-style.html)
+
+## 事件
+
+- `load` <sup class="wx-v">v0.8+</sup>:当图片加载完成时触发。目前在 Android、iOS 上支持,H5 暂不支持。
+
+- 通用事件
+
+ 支持所有通用事件:
+
+ - `click`
+ - `longpress`
+ - `appear`
+ - `disappear`
+
+ 查看 [通用事件](../common-event.html)
+
+## 约束
+
+1. 需要指定宽高;
+2. 不支持子组件。
+
+## 示例
+
+我们这里展示了一篇文章,文章标题有一副背景图。
+
+
+
+这个效果实现起来非常容易,我们只需要将标题文案通过 `position: absolute` 进行定位即可。唯一需要注意的一点是,Weex 目前不支持 `z-index`,因此必须把上层元素放在后。
+
+```html
+<style>
+ .page-head {
+ width:750;
+ height:200;
+ }
+ .title-bg {
+ width:750;
+ height:200;
+ }
+ .title-box {
+ width: 750;
+ height: 200;
+ justify-content: center;
+ align-items: center;
+ position: absolute;
+ top: 0;
+ right: 0;
+ bottom: 0;
+ left: 0;
+ }
+ .title {
+ color: #ffffff;
+ font-size: 32;
+ font-weight: bold;
+ }
+ .article {
+ padding: 20;
+ }
+ .paragraph{
+ margin-bottom: 15;
+ }
+</style>
+
+<template>
+ <scroller class="wrapper" >
+ <div class="page-head" >
+ <image class="title-bg" resize="cover" src="https://img.alicdn.com/tps/TB1dX5NOFXXXXc6XFXXXXXXXXXX-750-202.png"></image>
+ <div class="title-box">
+ <text class="title">Alan Mathison Turing</text>
+ </div>
+ </image>
+ <div class="article">
+ <text class="paragraph">Alan Mathison Turing ( 23 June 1912 – 7 June 1954) was an English computer scientist, mathematician, logician, cryptanalyst and theoretical biologist. He was highly influential in the development of theoretical computer science, providing a formalisation of the concepts of algorithm and computation with the Turing machine, which can be considered a model of a general purpose computer.Turing is widely considered to be the father of theoretical computer science and artificial intelligence.</text>
+ <text class="paragraph">During the Second World War, Turing worked for the Government Code and Cypher School (GC&CS) at Bletchley Park, Britain's codebreaking centre. For a time he led Hut 8, the section responsible for German naval cryptanalysis. He devised a number of techniques for speeding the breaking of German ciphers, including improvements to the pre-war Polish bombe method, an electromechanical machine that could find settings for the Enigma machine. Turing played a pivotal role in cracking intercepted coded messages that enabled the Allies to defeat the Nazis in many crucial engagements, including the Battle of the Atlantic; it has been estimated that this work shortened the war in Europe by more than two years and saved over fourteen million lives.</text>
+ <text class="paragraph">After the war, he worked at the National Physical Laboratory, where he designed the ACE, among the first designs for a stored-program computer. In 1948 Turing joined Max Newman's Computing Machine Laboratory at the Victoria University of Manchester, where he helped develop the Manchester computers and became interested in mathematical biology. He wrote a paper on the chemical basis of morphogenesis, and predicted oscillating chemical reactions such as the Belousov–Zhabotinsky reaction, first observed in the 1960s.</text>
+ <text class="paragraph">Turing was prosecuted in 1952 for homosexual acts, when by the Labouchere Amendment, "gross indecency" was still criminal in the UK. He accepted chemical castration treatment, with DES, as an alternative to prison. Turing died in 1954, 16 days before his 42nd birthday, from cyanide poisoning. An inquest determined his death as suicide, but it has been noted that the known evidence is also consistent with accidental poisoning. In 2009, following an Internet campaign, British Prime Minister Gordon Brown made an official public apology on behalf of the British government for "the appalling way he was treated." Queen Elizabeth II granted him a posthumous pardon in 2013.</text>
+ </div>
+ </scroller>
+</template>
+```
+
+[体验一下](http://dotwe.org/bccf884672f0a76f884298b3754d2079)
\ No newline at end of file
http://git-wip-us.apache.org/repos/asf/incubator-weex-site/blob/12e3a8bc/_drafts/v1.0/references/components/index.md
----------------------------------------------------------------------
diff --git a/_drafts/v1.0/references/components/index.md b/_drafts/v1.0/references/components/index.md
new file mode 100644
index 0000000..78ef46b
--- /dev/null
+++ b/_drafts/v1.0/references/components/index.md
@@ -0,0 +1,24 @@
+---
+title: 内建组件
+type: references
+order: 2
+version: 0.10
+---
+
+# 内建组件
+
+- [<a>](./a.html)
+- [<indicator>](./indicator.html)
+- [<switch>](./switch.html)
+- [<text>](./text.html)
+- [<textarea>](./textarea.html)
+- [<video>](./video.html)
+- [<web>](./web.html)
+- [<div>](./div.html)
+- [<image>](./image.html)
+- [<input>](./input.html)
+- [<list>](./list.html)
+- [<cell>](./cell.html)
+- [<refresh> & <loading>](./refresh.html)
+- [<scroller>](./scroller.html)
+- [<slider>](./slider.html)
\ No newline at end of file
http://git-wip-us.apache.org/repos/asf/incubator-weex-site/blob/12e3a8bc/_drafts/v1.0/references/components/indicator.md
----------------------------------------------------------------------
diff --git a/_drafts/v1.0/references/components/indicator.md b/_drafts/v1.0/references/components/indicator.md
new file mode 100644
index 0000000..b2aa19d
--- /dev/null
+++ b/_drafts/v1.0/references/components/indicator.md
@@ -0,0 +1,124 @@
+---
+title: <indicator>
+type: references
+order: 2.10
+version: 0.10
+---
+
+# <indicator>
+
+`<indicator>` 组件用于显示轮播图指示器效果,必须充当 [`<slider>`](./slider.html) 组件的子组件使用。
+
+## 子组件
+
+`<indicator>` 组件没有任何子组件。
+
+## 样式
+
+`<indicator>` 组件有一些私有样式,如下:
+
+- `item-color {color}`:设置项的颜色,可以是颜色的名称,例如 `red`;也可以是 16 进制的颜色,例如 `#RRGGBB`。
+
+- `item-selected-color {color}`:被选中时的颜色,可以是颜色的名称,`red`;也可以是 16 进制的颜色,例如 `#RRGGBB`。
+
+- `item-size {number}`:元素的个数。
+
+- 通用样式
+ - 盒模型
+ - `flexbox` 布局
+ - `position`
+ - `opacity`
+ - `background-color`
+
+ 查看 [组件通用样式](../common-style.html)
+
+**注意 1:**
+
+这里需要注意一点,`<indicator>` 的 `position` 不仅依赖 `top`、`left`、`bottom` 和 `right` 样式,同时会参考 `width`和 `height` 样式。`<indicator>` 默认的宽高继承于 `<slider>`,如果 `<slider>` 未设置宽高,需要显式的给 `<indicator>` 设置宽高值。
+
+**注意 2:**
+
+`background-color` 不推荐使用,建议使用 `item-color` 和 `item-selected-color` 代替。
+
+
+## 事件
+
+支持所有通用事件。
+
+- `click`
+- `longpress`
+- `appear`
+- `disappear`
+
+查看 [通用事件](../common-event.html)
+
+## 约束
+
+1. 不支持子组件。
+
+## 示例
+
+```html
+<template>
+ <div>
+ <slider class="slider">
+ <div class="slider-pages" repeat="item in itemList">
+ <image class="img" src="{{item.pictureUrl}}"></image>
+ <text class="title">{{item.title}}</text>
+ </div>
+ <indicator class="indicator"></indicator>
+ </slider>
+ </div>
+</template>
+
+<style>
+ .img {
+ width: 714;
+ height: 150;
+ }
+ .title {
+ position: absolute;
+ top: 20;
+ left: 20;
+ color: #ff0000;
+ font-size: 48;
+ font-weight: bold;
+ background-color: #eeeeee;
+ }
+ .slider {
+ flex-direction: row;
+ margin: 18;
+ width: 714;
+ height: 230;
+ }
+ .slider-pages {
+ flex-direction: row;
+ width: 714;
+ height: 200;
+ }
+ .indicator {
+ width:714;
+ height:200;
+ position:absolute;
+ top:1;
+ left:1;
+ item-color: red;
+ item-selectedColor: blue;
+ item-size: 20;
+ }
+</style>
+
+<script>
+ module.exports = {
+ data: {
+ itemList: [
+ {itemId: '520421163634', title: 'item1', pictureUrl: 'https://gd2.alicdn.com/bao/uploaded/i2/T14H1LFwBcXXXXXXXX_!!0-item_pic.jpg'},
+ {itemId: '522076777462', title: 'item2', pictureUrl: 'https://gd1.alicdn.com/bao/uploaded/i1/TB1PXJCJFXXXXciXFXXXXXXXXXX_!!0-item_pic.jpg'},
+ {itemId: '522076777462', title: 'iten3', pictureUrl: 'https://gd3.alicdn.com/bao/uploaded/i3/TB1x6hYLXXXXXazXVXXXXXXXXXX_!!0-item_pic.jpg'}
+ ]
+ }
+ }
+</script>
+```
+
+[体验一下](http://dotwe.org/baea3d54c503c6d3d4e4a8f275b9d47f)
\ No newline at end of file
http://git-wip-us.apache.org/repos/asf/incubator-weex-site/blob/12e3a8bc/_drafts/v1.0/references/components/input.md
----------------------------------------------------------------------
diff --git a/_drafts/v1.0/references/components/input.md b/_drafts/v1.0/references/components/input.md
new file mode 100644
index 0000000..9a7b8ff
--- /dev/null
+++ b/_drafts/v1.0/references/components/input.md
@@ -0,0 +1,309 @@
+---
+title: <input>
+type: references
+order: 2.4
+version: 0.10
+---
+
+# <input>
+
+Weex 内置的 `<input>` 组件用来创建接收用户输入字符的输入组件。 `<input>` 组件的工作方式因 `type` 属性的值而异,比如 `<text>`, `password`,`url`,`email`,`tel` 等。
+
+**注意:**
+
+此组件不支持 `click` 事件。请监听 `<input>` 或 `change` 来代替 `click` 事件。
+
+## 子组件
+
+不支持子组件。
+
+## 特性
+
+- `type {string}`:控件的类型,默认值是 `<text>`。`type` 值可以是 `text`,`password`,`url`,`email`,`tel` 。每个 `type` 值都符合 W3C 标准。
+- `value {string}`:组件的接收到的输入字符。
+- `placeholder {string}`:提示用户可以输入什么。 提示文本不能有回车或换行。
+- `disabled {boolean}`:布尔类型的数据,表示是否支持输入。通常 `click` 事件在 `disabled` 控件上是失效的。
+- `autofocus {boolean}`:布尔类型的数据,表示是否在页面加载时控件自动获得输入焦点。
+- `maxlength {nubmer}`:<sup class="wx-v">v0.7</sup>一个数值类型的值,表示输入的最大长度。
+
+## 样式
+
+- `placeholder-color {color}`:placeholder 字符颜色。默认值是 `#999999`。
+- text styles
+ - 支持 `color`
+ - 支持 `font-size`
+ - 支持 `font-style`
+ - 支持 `font-weight`
+ - 支持 `text-align`
+
+ 查看 [文本样式](../text-style.html)
+
+- 通用样式:支持所有通用样式
+ - 盒模型
+ - `flexbox` 布局
+ - `position`
+ - `opacity`
+ - `background-color`
+
+ 查看 [组件通用样式](../common-style.html)
+
+## 事件
+
+- `input`: 输入字符的值更改。
+
+ 事件中 event 对象属性:
+
+ - `value`: 触发事件的组件;
+ - `timestamp`: 事件发生时的时间戳,仅支持Android。
+
+- `change`: 当用户输入完成时触发。通常在 `blur` 事件之后。
+
+ 事件中 event 对象属性:
+
+ - `value`: 触发事件的组件;
+
+ - `timestamp`: 事件发生时的时间戳,仅支持Android。
+
+- `focus`: 组件获得输入焦点。
+
+ 事件中 event 对象属性:
+
+ - `timestamp`: 事件发生时的时间戳,仅支持Android。
+
+- `blur`: 组件失去输入焦点。
+
+ 事件中 event 对象属性:
+
+ - `timestamp`: 事件发生时的时间戳,仅支持Android。
+
+- 通用事件
+
+ **注意:**
+ 不支持 `click` 事件。 请监听 `input` 或 `change` 事件代替。
+
+ 支持以下通用事件:
+
+ - `longpress`
+ - `appear`
+ - `disappear`
+
+ 查看 [通用事件](../common-event.html)
+
+# 约束
+
+目前不支持 `this.$el(id).value = ''` 这种方式改写 input value。只支持在 `<input>` 组件的 `input`、`change` 事件中改写。
+
+## 示例
+
+```html
+<template>
+ <div>
+ <div>
+ <text style="font-size: 40px">oninput: {{txtInput}}</text>
+ <text style="font-size: 40px">onchange: {{txtChange}}</text>
+ <text style="font-size: 40px">onreturntype: {{txtReturnType}}</text>
+ </div>
+ <scroller>
+ <div>
+ <div style="background-color: #286090">
+ <text class="title" style="height: 80 ;padding: 20;color: #FFFFFF">input type = text</text>
+ </div>
+ <input type="text" placeholder="Input Text" class="input" :autofocus=true value="" @change="onchange" @input="oninput" @focus="onfocus" @blur="onblur"/>
+ </div>
+
+ <div>
+ <div style="background-color: #286090">
+ <text class="title" style="height: 80 ;padding: 20;color: #FFFFFF">input type = password</text>
+ </div>
+ <input type="password" placeholder="Input Password" class="input" @change="onchange" @input="oninput"/>
+ </div>
+
+ <div>
+ <div style="background-color: #286090">
+ <text class="title" style="height: 80 ;padding: 20;color: #FFFFFF">input type = url</text>
+ </div>
+ <input type="url" placeholder="Input URL" class="input" @change="onchange" @input="oninput"/>
+ </div>
+
+ <div>
+ <div style="background-color: #286090">
+ <text class="title" style="height: 80 ;padding: 20;color: #FFFFFF">input type = email</text>
+ </div>
+ <input type="email" placeholder="Input Email" class="input" @change="onchange" @input="oninput"/>
+ </div>
+
+ <div>
+ <div style="background-color: #286090">
+ <text class="title" style="height: 80 ;padding: 20;color: #FFFFFF">input type = tel</text>
+ </div>
+ <input type="tel" placeholder="Input Tel" class="input" @change="onchange" @input="oninput"/>
+ </div>
+
+ <div>
+ <div style="background-color: #286090">
+ <text class="title" style="height: 80 ;padding: 20;color: #FFFFFF">input type = time</text>
+ </div>
+ <input type="time" placeholder="Input Time" class="input" @change="onchange" @input="oninput"/>
+ </div>
+
+ <div>
+ <div style="background-color: #286090">
+ <text class="title" style="height: 80 ;padding: 20;color: #FFFFFF">input type = date</text>
+ </div>
+ <input type="date" placeholder="Input Date" class="input" @change="onchange" @input="oninput" max="2017-12-12" min="2015-01-01"/>
+ </div>
+
+ <div>
+ <div style="background-color: #286090">
+ <text class="title" style="height: 80 ;padding: 20;color: #FFFFFF">input return-key-type = default</text>
+ </div>
+ <input type="text" placeholder="please input" return-key-type="default" class="input" @change="onchange" @return = "onreturn" @input="oninput" />
+ </div>
+
+ <div>
+ <div style="background-color: #286090">
+ <text class="title" style="height: 80 ;padding: 20;color: #FFFFFF">input return-key-type = go</text>
+ </div>
+ <input type="text" placeholder="please input" return-key-type="go" class="input" @change="onchange" @return = "onreturn" @input="oninput" />
+ </div>
+
+ <div>
+ <div style="background-color: #286090">
+ <text class="title" style="height: 80 ;padding: 20;color: #FFFFFF">input return-key-type = next</text>
+ </div>
+ <input type="text" placeholder="please input" return-key-type="next" class="input" @change="onchange" @return = "onreturn" @input="oninput" />
+ </div>
+
+ <div>
+ <div style="background-color: #286090">
+ <text class="title" style="height: 80 ;padding: 20;color: #FFFFFF">input return-key-type = search</text>
+ </div>
+ <input type="text" placeholder="please input" return-key-type="search" class="input" @change="onchange" @return = "onreturn" @input="oninput" />
+ </div>
+
+ <div>
+ <div style="background-color: #286090">
+ <text class="title" style="height: 80 ;padding: 20;color: #FFFFFF">input return-key-type = send</text>
+ </div>
+ <input type="text" placeholder="please input" return-key-type="send" class="input" @change="onchange" @return = "onreturn" @input="oninput" />
+ </div>
+
+ <div>
+ <div style="background-color: #286090">
+ <text class="title" style="height: 80 ;padding: 20;color: #FFFFFF">input return-key-type = done</text>
+ </div>
+ <input type="text" placeholder="please input" return-key-type="done" class="input" @change="onchange" @return = "onreturn" @input="oninput" />
+ </div>
+
+
+ <div>
+ <div style="background-color: #286090">
+ <text class="title" style="height: 80 ;padding: 20;color: #FFFFFF">function focus() & blur()</text>
+ </div>
+ <div style="flex-direction: row;margin-bottom: 16px;justify-content: space-between">
+ <text class="button" value="Focus" type="primary" @click="focus"></text>
+ <text class="button" value="Blur" type="primary" @click="blur"></text>
+ </div>
+
+ <input type="text" placeholder="Input1" class="input" value="" ref="input1"/>
+ </div>
+
+
+ <div>
+ <div style="background-color: #286090">
+ <text class="title" style="height: 80 ;padding: 20;color: #FFFFFF">input selection</text>
+ </div>
+ <div style="flex-direction: row;margin-bottom: 16px;justify-content: space-between">
+ <text class="button" value="setRange" type="primary" @click="setRange"></text>
+ </div>
+ <input type="text" ref="inputselection" placeholder="please input" value="123456789" class="input" @change="onchange" @return = "onreturn" @input="oninput"/>
+ </div>
+
+
+
+ </scroller>
+ </div>
+</template>
+
+<style scoped>
+ .input {
+ font-size: 60px;
+ height: 80px;
+ width: 750px;
+ }
+ .button {
+ font-size: 36;
+ width: 200;
+ color: #41B883;
+ text-align: center;
+ padding-top: 10;
+ padding-bottom: 10;
+ border-width: 2;
+ border-style: solid;
+ margin-right: 20;
+ border-color: rgb(162, 217, 192);
+ background-color: rgba(162, 217, 192, 0.2);
+ }
+</style>
+
+<script>
+ const modal = weex.requireModule('modal')
+ module.exports = {
+ data: function () {
+ return {
+ txtInput: '',
+ txtChange: '',
+ txtReturnType: '',
+ txtSelection:'',
+ autofocus: false
+ };
+ },
+ methods: {
+ ready: function () {
+ var self = this;
+ setTimeout(function () {
+ self.autofocus = true;
+ }, 1000);
+ },
+ onchange: function (event) {
+ this.txtChange = event.value;
+ console.log('onchange', event.value);
+ },
+ onreturn: function (event) {
+ this.txtReturnType = event.returnKeyType;
+ console.log('onreturn', event.type);
+ },
+ oninput: function (event) {
+ this.txtInput = event.value;
+ console.log('oninput', event.value);
+ },
+ focus: function () {
+ this.$refs['input1'].focus();
+ },
+ blur: function () {
+ this.$refs['input1'].blur();
+ },
+ setRange: function() {
+ console.log(this.$refs["inputselection"]);
+ this.$refs["inputselection"].setSelectionRange(2, 6);
+ },
+ onfocus () {
+ console.log('onfocus:');
+ modal.toast({
+ message: 'onfocus',
+ duration: 0.8
+ })
+ },
+ onblur () {
+ console.log('onblur:');
+ modal.toast({
+ message: 'input blur',
+ duration: 0.8
+ })
+ }
+ }
+ };
+</script>
+```
+
+[体验一下](http://dotwe.org/vue/dd83d941d2364f2849e45dc3c5d91ab4)
http://git-wip-us.apache.org/repos/asf/incubator-weex-site/blob/12e3a8bc/_drafts/v1.0/references/components/list.md
----------------------------------------------------------------------
diff --git a/_drafts/v1.0/references/components/list.md b/_drafts/v1.0/references/components/list.md
new file mode 100644
index 0000000..842201f
--- /dev/null
+++ b/_drafts/v1.0/references/components/list.md
@@ -0,0 +1,375 @@
+---
+title: <list>
+type: references
+order: 2.4
+version: 0.10
+---
+
+# <list>
+
+`<list>` 组件是提供垂直列表功能的核心组件,拥有平滑的滚动和高效的内存管理,非常适合用于长列表的展示。最简单的使用方法是在 `<list>` 标签内使用一组由简单数组 `repeat` 生成的 `<cell>` 标签填充。
+
+一个最简例子:
+
+```html
+<template>
+ <list class="list">
+ <cell class="row" repeat="item in rows" index="{{$index}}">
+ <text class="item-title">row {{item.id}}</text>
+ </cell>
+ </list>
+</template>
+
+<style></style>
+
+<script>
+module.exports = {
+ data: {
+ rows:[
+ {id: 1},
+ {id: 2},
+ {id: 3},
+ {id: 4},
+ {id: 5}
+ ]
+ }
+}
+</script>
+```
+
+[体验一下](http://dotwe.org/bcaf48a63b49750b828d2d23762d4a15)
+
+
+
+## 子组件
+
+`<list>` 组件支持更多高级功能,由以下子组件提供:
+
+- `<cell>`
+
+ 用于定义列表中的子列表项,类似于 HTML 中的 `ul` 之于 `li`。Weex 会对 `<cell>` 进行高效的内存回收以达到更好的性能。
+
+ 使用文档请查看 [`<cell>`](./cell.html)。
+
+- `header` <sup class="wx-v">0.6.1+</sup>
+
+ 当 `<header>` 到达屏幕顶部时,吸附在屏幕顶部。
+
+- `<refresh>`
+
+ 用于给列表添加下拉刷新的功能。
+
+ 使用文档请查看 [`<refresh>`](./refresh.html)
+
+- `<loading>`
+
+ `<loading>` 用法与特性和 `<refresh>` 类似,用于给列表添加上拉加载更多的功能。
+
+ 使用文档请查看 [`<loading>`](./loading.html)
+
+**注意:**
+
+`<list>` 的子组件只能包括以上四种组件或是 `fix` 定位的组件,其他形式的组件将不能被正确的渲染。
+
+一个错误的示范,此例子无法在客户端正常渲染,因为 `<list>` 子组件是 `<div>`:
+
+```html
+<template>
+ <list class="list">
+ <div class="row" repeat="item in rows" index="{{$index}}">
+ <text class="item-title">row {{item.id}}</text>
+ </div>
+ </list>
+</template>
+
+<style></style>
+
+<script>
+module.exports = {
+ data: {
+ rows:[
+ {id: 1},
+ {id: 2},
+ {id: 3},
+ {id: 4},
+ {id: 5}
+ ]
+ }
+}
+</script>
+```
+
+## 特性
+
+- `loadmoreoffset {number}`:默认值为 0,触发 `loadmore` 事件所需要的垂直偏移距离(设备屏幕底部与 `<list>` 底部之间的距离)。当 `<list>` 的滚动条滚动到足够接近 `<list>` 底部时将会触发 `loadmore` 这个事件。
+
+ 
+
+## 样式
+
+- 通用样式:支持所有通用样式
+
+ - 盒模型
+ - `flexbox` 布局
+ - `position`
+ - `opacity`
+ - `background-color`
+
+ 查看 [组件通用样式](../common-style.html)
+
+## 事件
+
+- `loadmore` <sup class="wx-v">0.5+</sup>:如果列表滚动到底部将会立即触发这个事件,你可以在这个事件的处理函数中加载下一页的列表项。
+
+ [体验一下](http://dotwe.org/bc445ede8746a31360e3607d210304c5)
+
+- 通用事件
+
+ 支持所有通用事件:
+
+ - `click`
+ - `longpress`
+ - `appear`
+ - `disappear`
+
+ 查看 [通用事件](../common-event.html)
+
+## 扩展
+
+### scrollToElement(node, options)
+
+滚动到列表某个指定项是常见需求,`<list>` 拓展了该功能支持滚动到指定 `<cell>`。通过 `dom` module 访问,更多信息可参考 [dom module](../modules/dom.html) 。
+
+#### 参数
+
+- `node {node}`:指定目标节点。
+- `options {Object}`:
+ - `offset {number}`:一个到其可见位置的偏移距离,默认是 0
+
+#### 示例
+
+```html
+<template>
+ <list class="list">
+ <cell>
+ <div onclick="go" style="width: 750;height: 50; position: fixed; left: 0; right: 0; bottom: 0; background-color: #eeeeee;">
+ <text style="text-align: center;">
+ Go to 50th line.
+ </text>
+ </div>
+ </cell>
+ <cell class="row" repeat="item in rows" id="item-{{$index}}">
+ <text class="item-title">row {{item.id}}</text>
+ </cell>
+ </list>
+</template>
+
+<script>
+var dom = require('@weex-module/dom')
+
+module.exports = {
+ data: {
+ rows: []
+ },
+ created: function () {
+ for (var i = 0; i < 100; i++) {
+ this.rows.push({
+ id: i
+ })
+ }
+ },
+ methods: {
+ go: function () {
+ var el = this.$el('item-49')
+
+ dom.scrollToElement(el, {
+ offset: 0
+ })
+ }
+ }
+}
+</script>
+```
+
+[体验一下](http://dotwe.org/65d91cb47d0e348c5750d2248d59b6bd)
+
+## 约束
+
+1. **不允许**相同方向的 `<list>` 或者 `<scroller>` 互相嵌套,换句话说就是嵌套的 `<list>`/`<scroller>` 必须是不同的方向。
+
+ 举个例子,**不允许**一个垂直方向的 `<list>` 嵌套的一个垂直方向的 `<scroller>` 中,但是一个垂直方向的 `<list>` 是可以嵌套的一个水平方向的 list 或者 `<scroller>` 中的。
+
+2. `<list>` 为根节点时无需设置高度,但是内嵌 `<list>` 高度**必须可计算**,你可以使用 `flex` 或 `postion` 将 `<list>` 设为一个响应式高度(例如全屏显示), 也可以显式设置 `<list>` 组件的 `height` 样式。
+
+## 示例
+
+```html
+<template>
+ <div class="wrapper">
+ <list class="list">
+ <header class="header">
+ <text class="title">Search Results</text>
+ </header>
+ <refresh style="width: 750; padding: 30;" onrefresh="refreshData" display="{{refreshDisplay}}">
+ <text class="text"> ↓ Pull to refresh </text>
+ <loading-indicator class="indicator"></loading-indicator>
+ </refresh>
+ <cell class="row" repeat="item in items" id="item-{{$index}}">
+ <div>
+ <text class="item">Repo name: {{item.full_name}}</text>
+ </div>
+ <div>
+ <text class="item">Repo star: {{item.stargazers_count}}</text>
+ </div>
+ </cell>
+ <loading onloading="loadingData" style="width: 750; padding: 30;" display="{{loadingDisplay}}">
+ <text class="text">{{loadingText}}</text>
+ </loading>
+ </list>
+ <div class="up" onclick="goToTop">
+ <img class="img" src="https://img.alicdn.com/tps/TB1ZVOEOpXXXXcQaXXXXXXXXXXX-200-200.png"></img>
+ </div>
+ </div>
+</template>
+
+<style>
+.wrapper {
+ position: absolute;
+ top: 0;
+ right: 0;
+ bottom: 0;
+ left: 0;
+}
+.list{
+ background-color: #ffffff;
+ flex: 1;
+}
+.header {
+ height: 80;
+ align-items: center;
+ justify-content: center;
+ background-color: #efefef;
+ border-bottom-color: #eeeeee;
+ border-bottom-width: 2;
+ border-bottom-style: solid;
+}
+.title {
+ text-align: center;
+}
+.text {
+ text-align: center;
+}
+.row {
+ padding: 20;
+ border-bottom-color: #eeeeee;
+ border-bottom-width: 2;
+ border-bottom-style: solid;
+}
+.up {
+ width: 70;
+ height: 70;
+ position: fixed;
+ right: 20;
+ bottom: 20;
+}
+.img {
+ width: 70;
+ height: 70;
+}
+</style>
+
+<script>
+var dom = require('@weex-module/dom') || {}
+var stream = require('@weex-module/stream') || {}
+var modal = require('@weex-module/modal') || {}
+
+var SEARCH_URL = 'https://api.github.com/search/repositories?q=language:javascript&sort=stars&order=desc'
+
+module.exports = {
+ data: {
+ isLoaded: true,
+ page: 1,
+ loadingDisplay: 'hide',
+ refreshDisplay: 'hide',
+ loadingText: 'Loading...',
+ items:[]
+ },
+ created: function () {
+ var url = SEARCH_URL + '&page=' + this.page
+
+ this.renderData(url)
+
+ this.page++
+ },
+ methods: {
+ renderData: function (url) {
+ var self = this
+
+ stream.fetch({
+ method: 'GET',
+ url: url,
+ type:'json'
+ }, function(res) {
+ self.refreshDisplay = 'hide'
+ self.loadingDisplay = 'hide'
+
+ try {
+ var results = res.data.items || []
+
+ if (Array.isArray(results)) {
+ for(var i = 0; i < results.length; i++) {
+ self.items.push(results[i])
+ }
+ }
+
+ self.isLoaded = true
+ } catch(e) {}
+ },function(res){
+
+ })
+ },
+ loadingData: function (e) {
+ var url = SEARCH_URL + '&page=' + this.page
+ var self = this
+
+ if (self.isLoaded === false) return
+
+ self.loadingDisplay = 'show'
+
+ if (self.page <=10 ) {
+ self.renderData(url)
+ self.page++
+ } else {
+ self.loadingDisplay = 'hide'
+ self.loadingText = 'NO MORE!'
+ }
+ },
+ goToTop: function (e) {
+ dom.scrollToElement(this.$el('item-0'), {
+ offset: -100
+ })
+ },
+ refreshData: function (e) {
+ var url = SEARCH_URL + '&page=1'
+
+ if (this.isLoaded === false) return
+
+ this.refreshDisplay = 'show'
+
+ modal.toast({
+ 'message': 'Refreshing...',
+ 'duration': 1
+ })
+
+ this.items = []
+ this.page = 1
+ this.renderData(url)
+
+ this.refreshDisplay = 'hide'
+ }
+ }
+}
+</script>
+```
+
+[体验一下](http://dotwe.org/ed524ade679b0fa96e980600c53ea5ce)
\ No newline at end of file
http://git-wip-us.apache.org/repos/asf/incubator-weex-site/blob/12e3a8bc/_drafts/v1.0/references/components/loading.md
----------------------------------------------------------------------
diff --git a/_drafts/v1.0/references/components/loading.md b/_drafts/v1.0/references/components/loading.md
new file mode 100644
index 0000000..f6d68fa
--- /dev/null
+++ b/_drafts/v1.0/references/components/loading.md
@@ -0,0 +1,118 @@
+---
+title: <loading>
+type: references
+order: 2.6
+version: 0.10
+---
+
+# <loading>
+
+<span class="weex-version">v0.6.1+</span>
+
+`<loading>` 为 `<scroller>` 和 `<list>` 提供上拉加载功能。用法与特性与 `<refresh>` 类似, 是 `<scroller>` 和 `<list>` 的子组件,且只能在被 `<scroller>` 和 `<list>` 包含时才能被正确的渲染。
+
+## 子组件
+
+- [`<text>`](./text.html)
+- [`<image>`](./image.html)
+- `<loading-indicator>`: `<refresh>` 和 `<loading>` 组件的子组件,拥有默认的动画效果的实现。
+
+## 特性
+
+- `display {string}`:可选值为 `show` 或者 `hide`,仅隐藏 `<indicator>`,`<loading>` 其他子组件依然可见,`loading` 事件仍会被触发。
+
+## 样式
+
+支持所有通用样式。
+
+- 盒模型
+- `flexbox` 布局
+- `position`
+- `opacity`
+- `background-color`
+
+查看 [组件通用样式](../common-style.html)
+
+## 事件
+
+- `loading`:加载时被触发。
+
+## 约束
+
+- `<loading>` 不支持 `remove`,v0.9 版本会修复。
+- `display` 值为 `show` 或 `hide`。仅隐藏 `<indicator>`,`<loading>` 其他子组件依然可见,`loading` 事件仍会被触发。
+
+ 如果需要 `<loading>` hide 时隐藏文案并不再触发事件,有两种解决方法:
+
+ 1. 修改提示文案,并在 `loading` 事件中添加判断逻辑;
+ 2. v0.9+ 可通过 `remove` 解决。
+
+- 只能通过 `display` 特性进行展示和隐藏,且必须成对出现,即设置 `display="show"`,必须有对应的 `display="hide"`。
+
+## 示例
+
+```html
+<template>
+ <list>
+ <header>
+ <div class="center">
+ <text style="text-align:center">I am the header</text>
+ </div>
+ </header>
+ <loading onloading="onloading" display="{{loadingDisplay}}" style="width:750;flex-direction: row;justify-content: center;">
+ <loading-indicator style="height:160;width:160;color:#3192e1"></loading-indicator>
+ </loading>
+ <cell class="row" repeat="i in staffs" index="{{$index}}">
+ <div class="item">
+ <text>{{i.name}}</text>
+ </div>
+ </cell>
+ </list>
+</template>
+
+<style>
+ .row {
+ width: 750;
+ }
+ .item {
+ justify-content: center;
+ border-bottom-width: 2;
+ border-bottom-color: #c0c0c0;
+ height: 100;
+ padding:20;
+ }
+ .center {
+ border-bottom-width: 2;
+ border-bottom-color: #cccccc;
+ height: 100;
+ padding:20;
+ background-color:#FFFFFF;
+ justify-content: center;
+ }
+</style>
+
+<script>
+ module.exports = {
+ data: {
+ staffs:[],
+ loadingDisplay: 'show',
+ loadingText: 'pull up to load more',
+ refreshText: 'pull down to refresh'
+ },
+ created:function() {
+ this.refreshDisplay='show'
+ this.staffs=[{name:'inns'},{name:'connon'},{name:'baos'},{name:'anna'},{name:'dolley'},{name:'lucy'},{name:'john'}, {name:'lily'},{name:'locke'},{name:'jack'},{name:'danny'},{name:'rose'},{name:'harris'},{name:'lotus'},{name:'louis'}];
+ },
+ methods:{
+ onloading:function(e){
+ console.log('onloading...');
+ this.staffs.push({name:'onloading'})
+ }
+ }
+ }
+</script>
+```
+
+[体验一下](http://dotwe.org/6adf7add849f3c9fcdbc776a6c471f02)
+
+更多示例可查看 [`<list>`](./list.html)
[19/51] [abbrv] incubator-weex-site git commit: rearrangement the
structure of the document
Posted by ha...@apache.org.
http://git-wip-us.apache.org/repos/asf/incubator-weex-site/blob/32a097bf/_draft/web-standards.en.md
----------------------------------------------------------------------
diff --git a/_draft/web-standards.en.md b/_draft/web-standards.en.md
new file mode 100644
index 0000000..906ff76
--- /dev/null
+++ b/_draft/web-standards.en.md
@@ -0,0 +1,584 @@
+---
+title: Web standards
+type: references
+order: 8
+version: 2.1
+has_chapter_content: true
+---
+
+# Web standards
+
+## HTML
+
+refs: https://www.advancedwebranking.com/html/ 2016-12-11
+
+### Overview
+
+| percentage | name | supported |
+| ---- | ---- | ---- |
+| 98.1% | `<head>` | - |
+| 97.9% | `<body>` | - |
+| 97.9% | `<html>` | - |
+| 97% | `<title>` | - |
+| 93.9% | `<meta>` | - |
+| 89.9% | `<div>` | ✓ |
+| 89.6% | `<a>` | ✓ |
+| 88.5% | `<script>` | ✓ |
+| 86.5% | `<link>` | - |
+| 86.3% | `<img>` | ✓ |
+| 81.5% | `<p>` | - (can be customized) |
+| 75.6% | `<span>` | - (can be customized) |
+| 73.8% | `<li>` | - (can be customized) |
+| 73.7% | `<ul>` | - (can be customized) |
+| 70.3% | `<br>` | ✕ |
+| 60.4% | `<style>` | ✓ |
+| 55.8% | `<h1>` | - (can be customized) |
+| 52.7% | `<h2>` | - (can be customized) |
+| 48.4% | `<input>` | ✓ |
+| 46.9% | `<form>` | ✕ |
+| 44.3% | `<strong>` | - (can be customized) |
+| 43.1% | `<h3>` | - (can be customized) |
+| 30.9% | `<table>` | ✕ |
+| 30.3% | `<tr>` | ✕ |
+| 30.2% | `<td>` | ✕ |
+
+### Forms
+
+| percentage | name | supported |
+| ---- | ---- | ---- |
+| 49.5% | `<option>` | ✕ |
+| 30.2% | `<input>` | ✓ |
+| 16.6% | > `[type="hidden"]` | - |
+| 8% | > `[type="text"]` | ✓ |
+| 4.2% | > `[type="submit"]` | - |
+| 2% | > `[type="checkbox"]` | - (`<switch>`) |
+| 1.2% | > `[type="email"]` | ✓ |
+| 1.1% | > `[type="radio"]` | ✕ |
+| 0.9% | > `[type="image"]` | - |
+| 0.8% | > `[type="button"]` | - |
+| 0.6% | > `[type="search"]` | ✕ |
+| 0.6% | > `[type="password"]` | ✓ |
+| 0.1% | > `[type="tel"]` | ✓ |
+| 0.1% | > `[type="number"]` | ✓ |
+| 0% | > `[type="reset"]` | - |
+| 0% | > `[type="file"]` | ✕ |
+| 0% | > `[type="date"]` | ✓ |
+| 0% | > `[type="url"]` | ✓ |
+| 0% | > `[type="range"]` | ✕ |
+| 0% | > `[type="color"]` | ✕ |
+| 0% | > `[type="time"]` | ✓ |
+| 0% | > `[type="datetime-local"]` | ✕ |
+| 7.2% | `<label>` | - |
+| 6.1% | `<form>` | - |
+| 3.7% | `<button>` | - (can be customized) |
+| 2.6% | > `[type="button"]` | - |
+| 1.3% | > `[type="submit"]` | - |
+| 0% | > `[type="reset"]` | - |
+| 1.9% | `<select>` | ✕ |
+| 0.7% | `<textarea>` | ✓ |
+| 0.5% | `<fieldset>` | - |
+| 0.1% | `<optgroup>` | ✕ |
+| 0.1% | `<legend>` | - |
+| 0% | `<progress>` | ✕ |
+| 0% | `<datalist>` | - |
+| 0% | `<output>` | - |
+| 0% | `<meter>` | - |
+
+## CSS Properties
+
+refs: https://www.chromestatus.com/metrics/feature/popularity 2016-12-11
+
+| percentage | name | supported |
+| ---- | ---- | ---- |
+| 90.5115% | display | ✕ `flex` only |
+| 89.8243% | margin | ✓ (not support combo) |
+| 88.7012% | width | ✓ |
+| 88.6468% | overflow | ✓ iOS only, `hidden` only for Android |
+| 88.6432% | background-color | ✓ |
+| 88.0803% | height | ✓ |
+| 87.7648% | font-size | ✓ |
+| 87.3837% | padding | ✓ |
+| 87.2721% | color | ✓ |
+| 86.9788% | text-align | ✓ |
+| 86.6841% | position | ✓ `relative` by default, `static` not supported |
+| 86.6039% | font-family | ✓ |
+| 86.5943% | font-weight | ✓ |
+| 85.0072% | opacity | ✓ |
+| 80.6911% | max-width | ✕ |
+| 79.4476% | box-sizing | ✕ `border-box` only |
+| 75.7623% | max-height | ✕ |
+| 74.9939% | webkit-user-select | ✕ |
+| 57.0292% | align-items | ✓ |
+| 56.8182% | justify-content | ✓ `space-around` not supported well in browser |
+| 50.5941% | flex-direction | ✓ |
+| 48.5052% | border | ✓ |
+| 47.5161% | top | ✓ |
+| 46.9136% | background | ✕ |
+| 46.1552% | cursor | ✕ |
+| 46.1443% | margin-left | ✓ |
+| 46.0956% | left | ✓ |
+| 46.0848% | text-decoration | ✓ |
+| 45.9575% | float | ✕ |
+| 45.8391% | border-bottom | ✓ |
+| 45.7639% | padding-left | ✓ |
+| 45.7128% | margin-top | ✓ |
+| 45.7013% | line-height | ✓ |
+| 45.5836% | background-image | ✕ |
+| 45.0837% | z-index | ✕ |
+| 45.0649% | right | ✓ |
+| 45.0516% | margin-bottom | ✓ |
+| 45.0459% | white-space | ✕ |
+| 44.8710% | margin-right | ✓ |
+| 44.8476% | vertical-align | ✕ |
+| 44.6306% | padding-top | ✓ |
+| 44.1466% | border-radius | ✓ |
+| 44.0136% | border-top | ✓ |
+| 43.9815% | padding-bottom | ✓ |
+| 43.9392% | padding-right | ✓ |
+| 43.8539% | visibility | ✕ |
+| 43.4306% | background-position | ✕ |
+| 43.4098% | background-repeat | ✕ |
+| 43.0391% | clear | ✕ |
+| 42.9100% | bottom | ✓ |
+| 42.2092% | content | ✕ |
+| 42.0690% | box-shadow | ✕ |
+| 41.9004% | border-color | ✓ |
+| 41.7341% | outline | ✕ |
+| 41.4297% | border-right | ✓ |
+| 41.2605% | border-left | ✓ |
+| 41.1127% | min-height | ✕ |
+| 41.0736% | font-style | ✓ |
+| 41.0523% | min-width | ✕ |
+| 40.4298% | list-style | ✕ |
+| 39.7341% | font | ✕ |
+| 38.8999% | background-size | ✕ |
+| 38.7811% | border-width | ✓ |
+| 38.7718% | border-collapse | ✕ |
+| 37.8110% | border-style | ✓ |
+| 37.4962% | text-overflow | ✓ must work with `lines` |
+| 37.3471% | text-transform | ✕ |
+| 37.2154% | transition | ✕ |
+| 36.5155% | overflow-y | ✕ |
+| 36.3025% | transform | ✕ |
+| 36.2488% | text-indent | ✕ |
+| 35.5075% | text-shadow | ✕ |
+| 34.7607% | webkit-appearance | ✕ |
+| 34.1925% | list-style-type | ✕ |
+| 34.0238% | border-spacing | ✕ |
+| 33.6664% | word-wrap | ✕ |
+| 31.9961% | overflow-x | ✕ |
+| 31.9922% | zoom | ✕ |
+| 31.2495% | border-bottom-left-radius | ✕ |
+| 31.1306% | pointer-events | ✕ |
+| 31.1229% | border-top-left-radius | ✕ |
+| 30.2131% | border-bottom-color | ✓ |
+| 29.9608% | border-top-color | ✓ |
+| 29.4297% | border-bottom-right-radius | ✕ |
+| 29.2668% | border-top-right-radius | ✕ |
+| 28.6489% | letter-spacing | ✕ |
+| 27.8327% | animation | ✕ |
+| 26.6738% | border-right-width | ✓ |
+| 26.0169% | src | ✕ |
+| 25.2661% | clip | ✕ |
+| 25.2512% | webkit-font-smoothing | ✕ |
+| 25.1971% | border-bottom-width | ✓ |
+| 25.0246% | border-right-color | ✓ |
+| 24.7790% | direction | ✕ |
+| 24.4094% | webkit-tap-highlight-color | ✕ |
+| 23.9751% | border-left-color | ✓ |
+| 23.9321% | border-top-width | ✓ |
+| 23.7902% | fill | ✕ |
+| 23.2617% | border-left-width | ✓ |
+| 22.7278% | table-layout | ✕ |
+| 21.5766% | word-break | ✕ |
+| 20.4319% | background-clip | ✕ |
+| 19.3198% | transform-origin | ✕ |
+| 18.9233% | filter | ✕ |
+| 17.7879% | resize | ✕ |
+| 16.2501% | flex | ✕ |
+| 15.1656% | font-variant | ✕ |
+| 14.9181% | text-rendering | ✕ |
+| 14.7125% | webkit-filter | ✕ |
+| 14.5263% | transition-duration | ✕ |
+| 14.3966% | transition-property | ✕ |
+| 14.2124% | webkit-box-orient | ✕ |
+| 13.5432% | outline-offset | ✕ |
+| 12.9300% | transition-timing-function | ✕ |
+| 12.2788% | unicode-range | ✕ |
+| 12.0880% | word-spacing | ✕ |
+| 11.9124% | quotes | ✕ |
+| 11.6800% | border-bottom-style | ✓ |
+| 11.4263% | webkit-background-clip | ✕ |
+| 11.0070% | flex-grow | ✕ |
+| 10.5925% | backface-visibility | ✕ |
+| 10.4417% | animation-name | ✕ |
+| 10.4302% | stroke | ✕ |
+| 10.4144% | animation-duration | ✕ |
+| 10.2804% | touch-action | ✕ |
+| 9.9663% | list-style-position | ✕ |
+| 9.8662% | order | ✕ |
+| 9.7770% | outline-width | ✕ |
+| 9.7504% | transition-delay | ✕ |
+| 9.4689% | border-top-style | ✓ |
+| 9.3474% | webkit-box-pack | ✕ |
+| 9.3078% | webkit-box-align | ✕ |
+| 9.2375% | page-break-inside | ✕ |
+| 9.1898% | webkit-line-clamp | ✕ |
+| 8.9350% | list-style-image | ✕ |
+| 8.8339% | page-break-after | ✕ |
+| 8.5735% | speak | ✕ |
+| 8.4754% | unicode-bidi | ✕ |
+| 8.4307% | animation-timing-function | ✕ |
+| 8.1464% | webkit-box-flex | ✕ |
+| 8.0048% | orphans | ✕ |
+| 7.9947% | widows | ✕ |
+| 7.6671% | flex-wrap | ✓ not supported well in browser |
+| 7.5756% | animation-fill-mode | ✕ |
+| 7.4163% | animation-delay | ✕ |
+| 7.3284% | border-left-style | ✓ |
+| 7.1586% | outline-color | ✕ |
+| 6.9102% | flex-shrink | ✕ |
+| 6.7754% | perspective | ✕ |
+| 6.7748% | border-right-style | ✓ |
+| 6.4619% | outline-style | ✕ |
+| 6.0382% | animation-iteration-count | ✕ |
+| 5.9838% | background-origin | ✕ |
+| 5.9714% | fill-opacity | ✕ |
+| 5.9357% | will-change | ✕ |
+| 5.3740% | stroke-width | ✕ |
+| 5.3172% | transform-style | ✕ |
+| 5.2608% | overflow-wrap | ✕ |
+| 5.1730% | background-attachment | ✕ |
+| 4.9039% | counter-increment | ✕ |
+| 4.5950% | counter-reset | ✕ |
+| 4.5031% | align-self | ✕ |
+| 4.4109% | webkit-box-ordinal-group | ✕ |
+| 4.4046% | webkit-animation-direction | ✕ |
+| 3.7598% | background-position-x | ✕ |
+| 3.6867% | border-image | ✕ |
+| 3.6601% | background-position-y | ✕ |
+| 3.5749% | webkit-user-drag | ✕ |
+| 3.3376% | flex-basis | ✕ |
+| 3.1840% | align-content | ✕ |
+| 3.1832% | flex-flow | ✕ |
+| 3.1774% | image-rendering | ✕ |
+| 3.0879% | webkit-margin-start | ✕ |
+| 2.9551% | font-stretch | ✕ |
+| 2.8934% | empty-cells | ✕ |
+| 2.7619% | webkit-margin-after | ✕ |
+| 2.7220% | perspective-origin | ✕ |
+| 2.6125% | webkit-margin-end | ✕ |
+| 2.6089% | column-count | ✕ |
+| 2.5880% | webkit-text-fill-color | ✕ |
+| 2.5466% | webkit-box-direction | ✕ |
+| 2.4618% | font-feature-settings | ✕ |
+| 2.3959% | webkit-mask-image | ✕ |
+| 2.3431% | webkit-padding-end | ✕ |
+| 2.2555% | stroke-dasharray | ✕ |
+| 2.1788% | user-select | ✕ |
+| 2.1679% | object-fit | ✕ |
+| 2.0643% | column-gap | ✕ |
+| 2.0459% | text-size-adjust | ✕ |
+| 2.0253% | caption-side | ✕ |
+| 1.9695% | stroke-dashoffset | ✕ |
+| 1.7923% | stroke-linecap | ✕ |
+| 1.7861% | animation-direction | ✕ |
+| 1.7559% | webkit-font-feature-settings | ✕ |
+| 1.7404% | stroke-opacity | ✕ |
+| 1.5926% | stroke-miterlimit | ✕ |
+| 1.5786% | fill-rule | ✕ |
+| 1.4859% | webkit-user-modify | ✕ |
+| 1.3439% | webkit-border-image | ✕ |
+| 1.3091% | animation-play-state | ✕ |
+| 1.2676% | contain | ✕ |
+| 1.2029% | webkit-padding-start | ✕ |
+| 1.1840% | webkit-margin-before | ✕ |
+| 1.1269% | page-break-before | ✕ |
+| 1.1222% | webkit-margin-top-collapse | ✕ |
+| 1.0418% | columns | ✕ |
+| 1.0354% | webkit-mask-size | ✕ |
+| 0.9650% | border-image-slice | ✕ |
+| 0.9425% | stop-color | ✕ |
+| 0.9408% | webkit-mask-repeat | ✕ |
+| 0.9125% | webkit-box-lines | ✕ |
+| 0.8804% | webkit-column-break-inside | ✕ |
+| 0.8752% | size | ✕ |
+| 0.8334% | font-kerning | ✕ |
+| 0.8034% | stroke-linejoin | ✕ |
+| 0.7869% | tab-size | ✕ |
+| 0.7689% | break-inside | ✕ |
+| 0.7589% | webkit-text-stroke-width | ✕ |
+| 0.7353% | column-width | ✕ |
+| 0.6924% | webkit-mask-position | ✕ |
+| 0.6869% | border-image-width | ✕ |
+| 0.6323% | border-image-repeat | ✕ |
+| 0.5994% | border-image-outset | ✕ |
+| 0.5885% | all | ✕ |
+| 0.5859% | webkit-text-stroke-color | ✕ |
+| 0.5435% | webkit-print-color-adjust | ✕ |
+| 0.5420% | webkit-text-stroke | ✕ |
+| 0.5195% | writing-mode | ✕ |
+| 0.4741% | clip-rule | ✕ |
+| 0.4685% | webkit-clip-path | ✕ |
+| 0.4578% | text-anchor | ✕ |
+| 0.4535% | shape-rendering | ✕ |
+| 0.4526% | webkit-column-break-before | ✕ |
+| 0.4494% | clip-path | ✕ |
+| 0.4452% | webkit-mask | ✕ |
+| 0.4393% | mix-blend-mode | ✕ |
+| 0.4166% | text-align-last | ✕ |
+| 0.4033% | column-rule | ✕ |
+| 0.3990% | webkit-mask-box-image | ✕ |
+| 0.3989% | font-variant-ligatures | ✕ |
+| 0.3881% | column-fill | ✕ |
+| 0.3865% | webkit-line-break | ✕ |
+| 0.3857% | border-image-source | ✕ |
+| 0.3528% | stop-opacity | ✕ |
+| 0.3075% | webkit-perspective-origin-y | ✕ |
+| 0.3054% | webkit-perspective-origin-x | ✕ |
+| 0.2994% | webkit-writing-mode | ✕ |
+| 0.2717% | dominant-baseline | ✕ |
+| 0.2634% | column-rule-color | ✕ |
+| 0.2586% | webkit-box-decoration-break | ✕ |
+| 0.2467% | webkit-text-security | ✕ |
+| 0.2374% | webkit-background-origin | ✕ |
+| 0.2146% | font-variant-caps | ✕ |
+| 0.2005% | column-rule-style | ✕ |
+| 0.1976% | shape-outside | ✕ |
+| 0.1971% | webkit-padding-before | ✕ |
+| 0.1896% | break-after | ✕ |
+| 0.1782% | webkit-padding-after | ✕ |
+| 0.1774% | text-orientation | ✕ |
+| 0.1747% | webkit-text-orientation | ✕ |
+| 0.1655% | mask | ✕ |
+| 0.1626% | alignment-baseline | ✕ |
+| 0.1572% | page | ✕ |
+| 0.1530% | webkit-column-break-after | ✕ |
+| 0.1521% | webkit-box-reflect | ✕ |
+| 0.1504% | webkit-text-emphasis-color | ✕ |
+| 0.1499% | object-position | ✕ |
+| 0.1470% | break-before | ✕ |
+| 0.1455% | webkit-margin-collapse | ✕ |
+| 0.1452% | baseline-shift | ✕ |
+| 0.1451% | hyphens | ✕ |
+| 0.1309% | rx | ✕ |
+| 0.1304% | ry | ✕ |
+| 0.1256% | background-blend-mode | ✕ |
+| 0.1136% | font-variant-numeric | ✕ |
+| 0.1135% | background-repeat-x | ✕ |
+| 0.1123% | background-repeat-y | ✕ |
+| 0.1086% | webkit-text-emphasis | ✕ |
+| 0.1058% | webkit-rtl-ordering | ✕ |
+| 0.1040% | column-rule-width | ✕ |
+| 0.1036% | isolation | ✕ |
+| 0.1002% | webkit-highlight | ✕ |
+| 0.0843% | webkit-transform-origin-y | ✕ |
+| 0.0786% | webkit-transform-origin-x | ✕ |
+| 0.0770% | webkit-app-region | ✕ |
+| 0.0685% | column-span | ✕ |
+| 0.0653% | r | ✕ |
+| 0.0611% | y | ✕ |
+| 0.0602% | x | ✕ |
+| 0.0555% | webkit-border-vertical-spacing | ✕ |
+| 0.0545% | webkit-border-horizontal-spacing | ✕ |
+| 0.0542% | webkit-border-start-width | ✕ |
+| 0.0450% | webkit-border-start-color | ✕ |
+| 0.0424% | webkit-border-after-width | ✕ |
+| 0.0424% | webkit-border-before-width | ✕ |
+| 0.0423% | webkit-border-end-width | ✕ |
+| 0.0351% | marker | ✕ |
+| 0.0349% | webkit-border-end-color | ✕ |
+| 0.0347% | webkit-border-after-color | ✕ |
+| 0.0347% | webkit-border-before-color | ✕ |
+| 0.0342% | mask-type | ✕ |
+| 0.0328% | color-interpolation-filters | ✕ |
+| 0.0325% | webkit-border-end | ✕ |
+| 0.0319% | vector-effect | ✕ |
+| 0.0307% | color-rendering | ✕ |
+
+## CSS Units and Values
+
+refs: https://drafts.csswg.org/css-values/ 2016-12-11
+
+### Textual
+
+* pre-defined keywords
+ * CSS-wide keywords
+ * `initial`
+ * `inherit`
+ * `unset`
+* `<custom-ident>`: author-defined identifiers ✓
+* `<string>`: quoted strings (`"xxx"`)
+* `<url>`: resourec locators (`url()`)
+
+### Numeric
+
+* `<integer>` ✓
+* `<number>` ✓
+* `<percentage>`
+
+### Length `<length>`
+
+* relative
+ * font-relative
+ * `em`
+ * `ex`
+ * `ch`
+ * `ic`
+ * `rem` ✓🔧
+ * viewport-percentage
+ * `vw` ✓🔧
+ * `vh` ✓🔧
+ * `vi`
+ * `vb`
+ * `vmin` ✓🔧
+ * `vmax` ✓🔧
+* absolute
+ * `cm` ✓🔧
+ * `mm` ✓🔧
+ * `Q` ✓🔧
+ * `in` ✓🔧
+ * `pc` ✓🔧
+ * `pt` ✓🔧
+ * `px` autofixed to number
+
+### Quantities
+
+* `<angle>`
+ * `deg`
+ * `grad`
+ * `rad`
+ * `turn`
+* `<time>`
+ * `s`
+ * `ms`
+* `<frequency>`
+ * `Hz`
+ * `kHz`
+* `<resolution>`
+ * `dpi`
+ * `dpcm`
+ * `dppx`
+
+### Elsewhere
+
+* `<color>` ✓
+* `<image>`
+* `<position>`
+
+### Functional
+
+* `calc()`
+* `toggle()`
+* `attr()`
+
+## JS APIs
+
+refs: https://www.w3.org/standards/techs/js 2016-12-11
+
+### Completed Work
+
+#### Standards
+
+| last update | spec | supported |
+| ---- | ---- | ---- |
+| 2016-11-17 | Media Source Extensions™ | - (media related) |
+| 2016-11-08 | Geolocation API Specification 2nd Edition | ✕ developing |
+| 2016-10-27 | Pointer Lock | - |
+| 2016-10-18 | Vibration API (Second Edition) | ✕ |
+| 2016-04-19 | Web Storage (Second Edition) | ✓ async `storage` module |
+| 2015-10-22 | Web Notifications | ✕ |
+| 2015-05-19 | HTML5 Web Messaging | ✕ `BroadcastChannel` developing |
+| 2015-02-24 | Pointer Events | - |
+| 2015-02-10 | Vibration API | ✕ |
+| 2015-02-03 | Server-Sent Events | ✕ |
+| 2015-01-08 | Indexed Database API | ✕ |
+| 2014-03-13 | Metadata API for Media Resources 1.0 | - (media related) |
+| 2014-02-11 | Progress Events | ✕ |
+| 2014-01-16 | JSON-LD 1.0 Processing Algorithms and API | - |
+| 2013-12-12 | Performance Timeline | - (perf related) |
+| 2013-12-12 | User Timing | - (perf related) |
+| 2013-10-31 | Widget Interface | - |
+| 2013-10-29 | Page Visibility (Second Edition) | ✕ `onviewappear`/`onviewdisappear` |
+| 2013-10-10 | Touch Events | ✕ |
+| 2013-02-21 | Selectors API Level 1 | - |
+| 2012-12-17 | Navigation Timing | - (perf related) |
+| 2012-12-17 | High Resolution Time | - (perf related) |
+| 2008-12-22 | Element Traversal Specification | - |
+
+### Drafts
+
+#### Proposed Recommendations
+
+| last update | spec | supported |
+| ---- | ---- | ---- |
+| 2016-09-15 | WebIDL Level 1 | - |
+
+#### Candidate Recommendations
+
+| last update | spec | supported |
+| ---- | ---- | ---- |
+| 2016-12-08 | Performance Timeline Level 2 | - (perf related) |
+| 2016-11-22 | Page Visibility Level 2 | ✕ `onviewappear`/`onviewdisappear` |
+| 2016-11-01 | High Resolution Time Level 2 | - (perf related) |
+| 2016-08-18 | DeviceOrientation Event Specification | ✕ |
+| 2016-07-21 | Resource Timing Level 1 | - (perf related) |
+| 2016-07-14 | Presentation API | - |
+| 2016-07-07 | Battery Status API | ✕ |
+| 2016-07-05 | Encrypted Media Extensions | - |
+| 2016-05-19 | Media Capture and Streams | - (media related) |
+| 2014-12-11 | Web Cryptography API | - |
+| 2014-09-09 | HTML Media Capture | - (media related) |
+| 2012-09-20 | The WebSocket API | ✕ |
+
+#### Last Call Drafts
+
+| last update | spec | supported |
+| ---- | ---- | ---- |
+| 2011-12-01 | Geolocation API Specification Level 2 | ✕ |
+
+#### Other Working Drafts
+
+| last update | spec | supported |
+| ---- | ---- | ---- |
+| 2016-12-09 | MediaStream Image Capture | - (media related) |
+| 2016-12-06 | MediaStream Recording | - (media related) |
+| 2016-12-06 | Selection API | ✕ |
+| 2016-12-05 | Input Events | ✕ |
+| 2016-12-02 | Gamepad | - |
+| 2016-11-29 | WebDriver | - |
+| 2016-11-24 | WebRTC 1.0: Real-time Communication Between Browsers | ✕ |
+| 2016-11-22 | Pointer Lock 2.0 | - |
+| 2016-11-07 | Remote Playback API | - (media related) |
+| 2016-11-03 | Resource Timing Level 2 | - (perf related) |
+| 2016-11-02 | Audio Output Devices API | - (media related) |
+| 2016-11-01 | Indexed Database API 2.0 | ✕ |
+| 2016-11-01 | User Timing Level 2 | - (perf related) |
+| 2016-10-31 | The Screen Orientation API | ✕ |
+| 2016-10-31 | High Resolution Time Level 3 | - (perf related) |
+| 2016-10-24 | UI Events KeyboardEvent code Values | - |
+| 2016-10-24 | UI Events KeyboardEvent key Values | - |
+| 2016-10-11 | Service Workers 1 | ✕ |
+| 2016-09-21 | Identifiers for WebRTC's Statistics API | - |
+| 2016-09-13 | Accelerometer Sensor | ✕ |
+| 2016-09-13 | Gyroscope Sensor | ✕ |
+| 2016-09-13 | Magnetometer Sensor | ✕ |
+| 2016-08-30 | Ambient Light Sensor | ✕ |
+| 2016-08-30 | Media Capture from DOM Elements | - (media related) |
+| 2016-08-30 | Generic Sensor API | ✕ |
+| 2016-08-03 | Wake Lock API | ✕ |
+| 2016-07-19 | Proximity Sensor | ✕ |
+| 2016-07-19 | Pointer Events - Level 2 | - |
+| 2016-07-14 | Screen Capture | ✕ |
+| 2016-07-12 | Media Capture Depth Stream Extensions | - (media related) |
+| 2016-05-17 | Cooperative Scheduling of Background Tasks | ✕ |
+| 2016-04-22 | Navigation Timing Level 2 | - (perf related) |
+| 2016-04-03 | Clipboard API and events | ✕ `clipboard` module |
+| 2015-12-15 | Push API | ✕ |
+| 2015-12-08 | Web Audio API | - (media related) |
+| 2015-10-15 | FindText API | - |
+| 2015-09-24 | Web Workers | ✕ |
+| 2015-04-21 | File API | ✕ |
+| 2014-02-20 | Network Service Discovery | ✕ |
+| 2012-03-06 | MediaStream Capture Scenarios | - (media related) |
+| 2011-12-15 | Audio Processing API | - (media related) |
\ No newline at end of file
http://git-wip-us.apache.org/repos/asf/incubator-weex-site/blob/32a097bf/_draft/web-standards.md
----------------------------------------------------------------------
diff --git a/_draft/web-standards.md b/_draft/web-standards.md
new file mode 100644
index 0000000..3125796
--- /dev/null
+++ b/_draft/web-standards.md
@@ -0,0 +1,585 @@
+---
+title: Web 标准
+type: references
+group: API
+order: 2.7
+version: 2.1
+has_chapter_content: true
+---
+
+# Weex 中的 Web 标准
+
+## HTML
+
+refs: https://www.advancedwebranking.com/html/ 2016-12-11
+
+### Overview
+
+| percentage | name | supported |
+| ---- | ---- | ---- |
+| 98.1% | `<head>` | - |
+| 97.9% | `<body>` | - |
+| 97.9% | `<html>` | - |
+| 97% | `<title>` | - |
+| 93.9% | `<meta>` | - |
+| 89.9% | `<div>` | ✓ |
+| 89.6% | `<a>` | ✓ |
+| 88.5% | `<script>` | ✓ |
+| 86.5% | `<link>` | - |
+| 86.3% | `<img>` | ✓ |
+| 81.5% | `<p>` | - (can be customized) |
+| 75.6% | `<span>` | - (can be customized) |
+| 73.8% | `<li>` | - (can be customized) |
+| 73.7% | `<ul>` | - (can be customized) |
+| 70.3% | `<br>` | ✕ |
+| 60.4% | `<style>` | ✓ |
+| 55.8% | `<h1>` | - (can be customized) |
+| 52.7% | `<h2>` | - (can be customized) |
+| 48.4% | `<input>` | ✓ |
+| 46.9% | `<form>` | ✕ |
+| 44.3% | `<strong>` | - (can be customized) |
+| 43.1% | `<h3>` | - (can be customized) |
+| 30.9% | `<table>` | ✕ |
+| 30.3% | `<tr>` | ✕ |
+| 30.2% | `<td>` | ✕ |
+
+### Forms
+
+| percentage | name | supported |
+| ---- | ---- | ---- |
+| 49.5% | `<option>` | ✕ |
+| 30.2% | `<input>` | ✓ |
+| 16.6% | > `[type="hidden"]` | - |
+| 8% | > `[type="text"]` | ✓ |
+| 4.2% | > `[type="submit"]` | - |
+| 2% | > `[type="checkbox"]` | - (`<switch>`) |
+| 1.2% | > `[type="email"]` | ✓ |
+| 1.1% | > `[type="radio"]` | ✕ |
+| 0.9% | > `[type="image"]` | - |
+| 0.8% | > `[type="button"]` | - |
+| 0.6% | > `[type="search"]` | ✕ |
+| 0.6% | > `[type="password"]` | ✓ |
+| 0.1% | > `[type="tel"]` | ✓ |
+| 0.1% | > `[type="number"]` | ✓ |
+| 0% | > `[type="reset"]` | - |
+| 0% | > `[type="file"]` | ✕ |
+| 0% | > `[type="date"]` | ✓ |
+| 0% | > `[type="url"]` | ✓ |
+| 0% | > `[type="range"]` | ✕ |
+| 0% | > `[type="color"]` | ✕ |
+| 0% | > `[type="time"]` | ✓ |
+| 0% | > `[type="datetime-local"]` | ✕ |
+| 7.2% | `<label>` | - |
+| 6.1% | `<form>` | - |
+| 3.7% | `<button>` | - (can be customized) |
+| 2.6% | > `[type="button"]` | - |
+| 1.3% | > `[type="submit"]` | - |
+| 0% | > `[type="reset"]` | - |
+| 1.9% | `<select>` | ✕ |
+| 0.7% | `<textarea>` | ✓ |
+| 0.5% | `<fieldset>` | - |
+| 0.1% | `<optgroup>` | ✕ |
+| 0.1% | `<legend>` | - |
+| 0% | `<progress>` | ✕ |
+| 0% | `<datalist>` | - |
+| 0% | `<output>` | - |
+| 0% | `<meter>` | - |
+
+## CSS Properties
+
+refs: https://www.chromestatus.com/metrics/feature/popularity 2016-12-11
+
+| percentage | name | supported |
+| ---- | ---- | ---- |
+| 90.5115% | display | ✕ `flex` only |
+| 89.8243% | margin | ✓ (not support combo) |
+| 88.7012% | width | ✓ |
+| 88.6468% | overflow | ✓ iOS only, `hidden` only for Android |
+| 88.6432% | background-color | ✓ |
+| 88.0803% | height | ✓ |
+| 87.7648% | font-size | ✓ |
+| 87.3837% | padding | ✓ |
+| 87.2721% | color | ✓ |
+| 86.9788% | text-align | ✓ |
+| 86.6841% | position | ✓ `relative` by default, `static` not supported |
+| 86.6039% | font-family | ✓ |
+| 86.5943% | font-weight | ✓ |
+| 85.0072% | opacity | ✓ |
+| 80.6911% | max-width | ✕ |
+| 79.4476% | box-sizing | ✕ `border-box` only |
+| 75.7623% | max-height | ✕ |
+| 74.9939% | webkit-user-select | ✕ |
+| 57.0292% | align-items | ✓ |
+| 56.8182% | justify-content | ✓ `space-around` not supported well in browser |
+| 50.5941% | flex-direction | ✓ |
+| 48.5052% | border | ✓ |
+| 47.5161% | top | ✓ |
+| 46.9136% | background | ✕ |
+| 46.1552% | cursor | ✕ |
+| 46.1443% | margin-left | ✓ |
+| 46.0956% | left | ✓ |
+| 46.0848% | text-decoration | ✓ |
+| 45.9575% | float | ✕ |
+| 45.8391% | border-bottom | ✓ |
+| 45.7639% | padding-left | ✓ |
+| 45.7128% | margin-top | ✓ |
+| 45.7013% | line-height | ✓ |
+| 45.5836% | background-image | ✕ |
+| 45.0837% | z-index | ✕ |
+| 45.0649% | right | ✓ |
+| 45.0516% | margin-bottom | ✓ |
+| 45.0459% | white-space | ✕ |
+| 44.8710% | margin-right | ✓ |
+| 44.8476% | vertical-align | ✕ |
+| 44.6306% | padding-top | ✓ |
+| 44.1466% | border-radius | ✓ |
+| 44.0136% | border-top | ✓ |
+| 43.9815% | padding-bottom | ✓ |
+| 43.9392% | padding-right | ✓ |
+| 43.8539% | visibility | ✕ |
+| 43.4306% | background-position | ✕ |
+| 43.4098% | background-repeat | ✕ |
+| 43.0391% | clear | ✕ |
+| 42.9100% | bottom | ✓ |
+| 42.2092% | content | ✕ |
+| 42.0690% | box-shadow | ✕ |
+| 41.9004% | border-color | ✓ |
+| 41.7341% | outline | ✕ |
+| 41.4297% | border-right | ✓ |
+| 41.2605% | border-left | ✓ |
+| 41.1127% | min-height | ✕ |
+| 41.0736% | font-style | ✓ |
+| 41.0523% | min-width | ✕ |
+| 40.4298% | list-style | ✕ |
+| 39.7341% | font | ✕ |
+| 38.8999% | background-size | ✕ |
+| 38.7811% | border-width | ✓ |
+| 38.7718% | border-collapse | ✕ |
+| 37.8110% | border-style | ✓ |
+| 37.4962% | text-overflow | ✓ must work with `lines` |
+| 37.3471% | text-transform | ✕ |
+| 37.2154% | transition | ✕ |
+| 36.5155% | overflow-y | ✕ |
+| 36.3025% | transform | ✕ |
+| 36.2488% | text-indent | ✕ |
+| 35.5075% | text-shadow | ✕ |
+| 34.7607% | webkit-appearance | ✕ |
+| 34.1925% | list-style-type | ✕ |
+| 34.0238% | border-spacing | ✕ |
+| 33.6664% | word-wrap | ✕ |
+| 31.9961% | overflow-x | ✕ |
+| 31.9922% | zoom | ✕ |
+| 31.2495% | border-bottom-left-radius | ✕ |
+| 31.1306% | pointer-events | ✕ |
+| 31.1229% | border-top-left-radius | ✕ |
+| 30.2131% | border-bottom-color | ✓ |
+| 29.9608% | border-top-color | ✓ |
+| 29.4297% | border-bottom-right-radius | ✕ |
+| 29.2668% | border-top-right-radius | ✕ |
+| 28.6489% | letter-spacing | ✕ |
+| 27.8327% | animation | ✕ |
+| 26.6738% | border-right-width | ✓ |
+| 26.0169% | src | ✕ |
+| 25.2661% | clip | ✕ |
+| 25.2512% | webkit-font-smoothing | ✕ |
+| 25.1971% | border-bottom-width | ✓ |
+| 25.0246% | border-right-color | ✓ |
+| 24.7790% | direction | ✕ |
+| 24.4094% | webkit-tap-highlight-color | ✕ |
+| 23.9751% | border-left-color | ✓ |
+| 23.9321% | border-top-width | ✓ |
+| 23.7902% | fill | ✕ |
+| 23.2617% | border-left-width | ✓ |
+| 22.7278% | table-layout | ✕ |
+| 21.5766% | word-break | ✕ |
+| 20.4319% | background-clip | ✕ |
+| 19.3198% | transform-origin | ✕ |
+| 18.9233% | filter | ✕ |
+| 17.7879% | resize | ✕ |
+| 16.2501% | flex | ✕ |
+| 15.1656% | font-variant | ✕ |
+| 14.9181% | text-rendering | ✕ |
+| 14.7125% | webkit-filter | ✕ |
+| 14.5263% | transition-duration | ✕ |
+| 14.3966% | transition-property | ✕ |
+| 14.2124% | webkit-box-orient | ✕ |
+| 13.5432% | outline-offset | ✕ |
+| 12.9300% | transition-timing-function | ✕ |
+| 12.2788% | unicode-range | ✕ |
+| 12.0880% | word-spacing | ✕ |
+| 11.9124% | quotes | ✕ |
+| 11.6800% | border-bottom-style | ✓ |
+| 11.4263% | webkit-background-clip | ✕ |
+| 11.0070% | flex-grow | ✕ |
+| 10.5925% | backface-visibility | ✕ |
+| 10.4417% | animation-name | ✕ |
+| 10.4302% | stroke | ✕ |
+| 10.4144% | animation-duration | ✕ |
+| 10.2804% | touch-action | ✕ |
+| 9.9663% | list-style-position | ✕ |
+| 9.8662% | order | ✕ |
+| 9.7770% | outline-width | ✕ |
+| 9.7504% | transition-delay | ✕ |
+| 9.4689% | border-top-style | ✓ |
+| 9.3474% | webkit-box-pack | ✕ |
+| 9.3078% | webkit-box-align | ✕ |
+| 9.2375% | page-break-inside | ✕ |
+| 9.1898% | webkit-line-clamp | ✕ |
+| 8.9350% | list-style-image | ✕ |
+| 8.8339% | page-break-after | ✕ |
+| 8.5735% | speak | ✕ |
+| 8.4754% | unicode-bidi | ✕ |
+| 8.4307% | animation-timing-function | ✕ |
+| 8.1464% | webkit-box-flex | ✕ |
+| 8.0048% | orphans | ✕ |
+| 7.9947% | widows | ✕ |
+| 7.6671% | flex-wrap | ✓ not supported well in browser |
+| 7.5756% | animation-fill-mode | ✕ |
+| 7.4163% | animation-delay | ✕ |
+| 7.3284% | border-left-style | ✓ |
+| 7.1586% | outline-color | ✕ |
+| 6.9102% | flex-shrink | ✕ |
+| 6.7754% | perspective | ✕ |
+| 6.7748% | border-right-style | ✓ |
+| 6.4619% | outline-style | ✕ |
+| 6.0382% | animation-iteration-count | ✕ |
+| 5.9838% | background-origin | ✕ |
+| 5.9714% | fill-opacity | ✕ |
+| 5.9357% | will-change | ✕ |
+| 5.3740% | stroke-width | ✕ |
+| 5.3172% | transform-style | ✕ |
+| 5.2608% | overflow-wrap | ✕ |
+| 5.1730% | background-attachment | ✕ |
+| 4.9039% | counter-increment | ✕ |
+| 4.5950% | counter-reset | ✕ |
+| 4.5031% | align-self | ✕ |
+| 4.4109% | webkit-box-ordinal-group | ✕ |
+| 4.4046% | webkit-animation-direction | ✕ |
+| 3.7598% | background-position-x | ✕ |
+| 3.6867% | border-image | ✕ |
+| 3.6601% | background-position-y | ✕ |
+| 3.5749% | webkit-user-drag | ✕ |
+| 3.3376% | flex-basis | ✕ |
+| 3.1840% | align-content | ✕ |
+| 3.1832% | flex-flow | ✕ |
+| 3.1774% | image-rendering | ✕ |
+| 3.0879% | webkit-margin-start | ✕ |
+| 2.9551% | font-stretch | ✕ |
+| 2.8934% | empty-cells | ✕ |
+| 2.7619% | webkit-margin-after | ✕ |
+| 2.7220% | perspective-origin | ✕ |
+| 2.6125% | webkit-margin-end | ✕ |
+| 2.6089% | column-count | ✕ |
+| 2.5880% | webkit-text-fill-color | ✕ |
+| 2.5466% | webkit-box-direction | ✕ |
+| 2.4618% | font-feature-settings | ✕ |
+| 2.3959% | webkit-mask-image | ✕ |
+| 2.3431% | webkit-padding-end | ✕ |
+| 2.2555% | stroke-dasharray | ✕ |
+| 2.1788% | user-select | ✕ |
+| 2.1679% | object-fit | ✕ |
+| 2.0643% | column-gap | ✕ |
+| 2.0459% | text-size-adjust | ✕ |
+| 2.0253% | caption-side | ✕ |
+| 1.9695% | stroke-dashoffset | ✕ |
+| 1.7923% | stroke-linecap | ✕ |
+| 1.7861% | animation-direction | ✕ |
+| 1.7559% | webkit-font-feature-settings | ✕ |
+| 1.7404% | stroke-opacity | ✕ |
+| 1.5926% | stroke-miterlimit | ✕ |
+| 1.5786% | fill-rule | ✕ |
+| 1.4859% | webkit-user-modify | ✕ |
+| 1.3439% | webkit-border-image | ✕ |
+| 1.3091% | animation-play-state | ✕ |
+| 1.2676% | contain | ✕ |
+| 1.2029% | webkit-padding-start | ✕ |
+| 1.1840% | webkit-margin-before | ✕ |
+| 1.1269% | page-break-before | ✕ |
+| 1.1222% | webkit-margin-top-collapse | ✕ |
+| 1.0418% | columns | ✕ |
+| 1.0354% | webkit-mask-size | ✕ |
+| 0.9650% | border-image-slice | ✕ |
+| 0.9425% | stop-color | ✕ |
+| 0.9408% | webkit-mask-repeat | ✕ |
+| 0.9125% | webkit-box-lines | ✕ |
+| 0.8804% | webkit-column-break-inside | ✕ |
+| 0.8752% | size | ✕ |
+| 0.8334% | font-kerning | ✕ |
+| 0.8034% | stroke-linejoin | ✕ |
+| 0.7869% | tab-size | ✕ |
+| 0.7689% | break-inside | ✕ |
+| 0.7589% | webkit-text-stroke-width | ✕ |
+| 0.7353% | column-width | ✕ |
+| 0.6924% | webkit-mask-position | ✕ |
+| 0.6869% | border-image-width | ✕ |
+| 0.6323% | border-image-repeat | ✕ |
+| 0.5994% | border-image-outset | ✕ |
+| 0.5885% | all | ✕ |
+| 0.5859% | webkit-text-stroke-color | ✕ |
+| 0.5435% | webkit-print-color-adjust | ✕ |
+| 0.5420% | webkit-text-stroke | ✕ |
+| 0.5195% | writing-mode | ✕ |
+| 0.4741% | clip-rule | ✕ |
+| 0.4685% | webkit-clip-path | ✕ |
+| 0.4578% | text-anchor | ✕ |
+| 0.4535% | shape-rendering | ✕ |
+| 0.4526% | webkit-column-break-before | ✕ |
+| 0.4494% | clip-path | ✕ |
+| 0.4452% | webkit-mask | ✕ |
+| 0.4393% | mix-blend-mode | ✕ |
+| 0.4166% | text-align-last | ✕ |
+| 0.4033% | column-rule | ✕ |
+| 0.3990% | webkit-mask-box-image | ✕ |
+| 0.3989% | font-variant-ligatures | ✕ |
+| 0.3881% | column-fill | ✕ |
+| 0.3865% | webkit-line-break | ✕ |
+| 0.3857% | border-image-source | ✕ |
+| 0.3528% | stop-opacity | ✕ |
+| 0.3075% | webkit-perspective-origin-y | ✕ |
+| 0.3054% | webkit-perspective-origin-x | ✕ |
+| 0.2994% | webkit-writing-mode | ✕ |
+| 0.2717% | dominant-baseline | ✕ |
+| 0.2634% | column-rule-color | ✕ |
+| 0.2586% | webkit-box-decoration-break | ✕ |
+| 0.2467% | webkit-text-security | ✕ |
+| 0.2374% | webkit-background-origin | ✕ |
+| 0.2146% | font-variant-caps | ✕ |
+| 0.2005% | column-rule-style | ✕ |
+| 0.1976% | shape-outside | ✕ |
+| 0.1971% | webkit-padding-before | ✕ |
+| 0.1896% | break-after | ✕ |
+| 0.1782% | webkit-padding-after | ✕ |
+| 0.1774% | text-orientation | ✕ |
+| 0.1747% | webkit-text-orientation | ✕ |
+| 0.1655% | mask | ✕ |
+| 0.1626% | alignment-baseline | ✕ |
+| 0.1572% | page | ✕ |
+| 0.1530% | webkit-column-break-after | ✕ |
+| 0.1521% | webkit-box-reflect | ✕ |
+| 0.1504% | webkit-text-emphasis-color | ✕ |
+| 0.1499% | object-position | ✕ |
+| 0.1470% | break-before | ✕ |
+| 0.1455% | webkit-margin-collapse | ✕ |
+| 0.1452% | baseline-shift | ✕ |
+| 0.1451% | hyphens | ✕ |
+| 0.1309% | rx | ✕ |
+| 0.1304% | ry | ✕ |
+| 0.1256% | background-blend-mode | ✕ |
+| 0.1136% | font-variant-numeric | ✕ |
+| 0.1135% | background-repeat-x | ✕ |
+| 0.1123% | background-repeat-y | ✕ |
+| 0.1086% | webkit-text-emphasis | ✕ |
+| 0.1058% | webkit-rtl-ordering | ✕ |
+| 0.1040% | column-rule-width | ✕ |
+| 0.1036% | isolation | ✕ |
+| 0.1002% | webkit-highlight | ✕ |
+| 0.0843% | webkit-transform-origin-y | ✕ |
+| 0.0786% | webkit-transform-origin-x | ✕ |
+| 0.0770% | webkit-app-region | ✕ |
+| 0.0685% | column-span | ✕ |
+| 0.0653% | r | ✕ |
+| 0.0611% | y | ✕ |
+| 0.0602% | x | ✕ |
+| 0.0555% | webkit-border-vertical-spacing | ✕ |
+| 0.0545% | webkit-border-horizontal-spacing | ✕ |
+| 0.0542% | webkit-border-start-width | ✕ |
+| 0.0450% | webkit-border-start-color | ✕ |
+| 0.0424% | webkit-border-after-width | ✕ |
+| 0.0424% | webkit-border-before-width | ✕ |
+| 0.0423% | webkit-border-end-width | ✕ |
+| 0.0351% | marker | ✕ |
+| 0.0349% | webkit-border-end-color | ✕ |
+| 0.0347% | webkit-border-after-color | ✕ |
+| 0.0347% | webkit-border-before-color | ✕ |
+| 0.0342% | mask-type | ✕ |
+| 0.0328% | color-interpolation-filters | ✕ |
+| 0.0325% | webkit-border-end | ✕ |
+| 0.0319% | vector-effect | ✕ |
+| 0.0307% | color-rendering | ✕ |
+
+## CSS Units and Values
+
+refs: https://drafts.csswg.org/css-values/ 2016-12-11
+
+### Textual
+
+* pre-defined keywords
+ * CSS-wide keywords
+ * `initial`
+ * `inherit`
+ * `unset`
+* `<custom-ident>`: author-defined identifiers ✓
+* `<string>`: quoted strings (`"xxx"`)
+* `<url>`: resourec locators (`url()`)
+
+### Numeric
+
+* `<integer>` ✓
+* `<number>` ✓
+* `<percentage>`
+
+### Length `<length>`
+
+* relative
+ * font-relative
+ * `em`
+ * `ex`
+ * `ch`
+ * `ic`
+ * `rem` ✓🔧
+ * viewport-percentage
+ * `vw` ✓🔧
+ * `vh` ✓🔧
+ * `vi`
+ * `vb`
+ * `vmin` ✓🔧
+ * `vmax` ✓🔧
+* absolute
+ * `cm` ✓🔧
+ * `mm` ✓🔧
+ * `Q` ✓🔧
+ * `in` ✓🔧
+ * `pc` ✓🔧
+ * `pt` ✓🔧
+ * `px` autofixed to number
+
+### Quantities
+
+* `<angle>`
+ * `deg`
+ * `grad`
+ * `rad`
+ * `turn`
+* `<time>`
+ * `s`
+ * `ms`
+* `<frequency>`
+ * `Hz`
+ * `kHz`
+* `<resolution>`
+ * `dpi`
+ * `dpcm`
+ * `dppx`
+
+### Elsewhere
+
+* `<color>` ✓
+* `<image>`
+* `<position>`
+
+### Functional
+
+* `calc()`
+* `toggle()`
+* `attr()`
+
+## JS APIs
+
+refs: https://www.w3.org/standards/techs/js 2016-12-11
+
+### Completed Work
+
+#### Standards
+
+| last update | spec | supported |
+| ---- | ---- | ---- |
+| 2016-11-17 | Media Source Extensions™ | - (media related) |
+| 2016-11-08 | Geolocation API Specification 2nd Edition | ✕ developing |
+| 2016-10-27 | Pointer Lock | - |
+| 2016-10-18 | Vibration API (Second Edition) | ✕ |
+| 2016-04-19 | Web Storage (Second Edition) | ✓ async `storage` module |
+| 2015-10-22 | Web Notifications | ✕ |
+| 2015-05-19 | HTML5 Web Messaging | ✕ `BroadcastChannel` developing |
+| 2015-02-24 | Pointer Events | - |
+| 2015-02-10 | Vibration API | ✕ |
+| 2015-02-03 | Server-Sent Events | ✕ |
+| 2015-01-08 | Indexed Database API | ✕ |
+| 2014-03-13 | Metadata API for Media Resources 1.0 | - (media related) |
+| 2014-02-11 | Progress Events | ✕ |
+| 2014-01-16 | JSON-LD 1.0 Processing Algorithms and API | - |
+| 2013-12-12 | Performance Timeline | - (perf related) |
+| 2013-12-12 | User Timing | - (perf related) |
+| 2013-10-31 | Widget Interface | - |
+| 2013-10-29 | Page Visibility (Second Edition) | ✕ `onviewappear`/`onviewdisappear` |
+| 2013-10-10 | Touch Events | ✕ |
+| 2013-02-21 | Selectors API Level 1 | - |
+| 2012-12-17 | Navigation Timing | - (perf related) |
+| 2012-12-17 | High Resolution Time | - (perf related) |
+| 2008-12-22 | Element Traversal Specification | - |
+
+### Drafts
+
+#### Proposed Recommendations
+
+| last update | spec | supported |
+| ---- | ---- | ---- |
+| 2016-09-15 | WebIDL Level 1 | - |
+
+#### Candidate Recommendations
+
+| last update | spec | supported |
+| ---- | ---- | ---- |
+| 2016-12-08 | Performance Timeline Level 2 | - (perf related) |
+| 2016-11-22 | Page Visibility Level 2 | ✕ `onviewappear`/`onviewdisappear` |
+| 2016-11-01 | High Resolution Time Level 2 | - (perf related) |
+| 2016-08-18 | DeviceOrientation Event Specification | ✕ |
+| 2016-07-21 | Resource Timing Level 1 | - (perf related) |
+| 2016-07-14 | Presentation API | - |
+| 2016-07-07 | Battery Status API | ✕ |
+| 2016-07-05 | Encrypted Media Extensions | - |
+| 2016-05-19 | Media Capture and Streams | - (media related) |
+| 2014-12-11 | Web Cryptography API | - |
+| 2014-09-09 | HTML Media Capture | - (media related) |
+| 2012-09-20 | The WebSocket API | ✕ |
+
+#### Last Call Drafts
+
+| last update | spec | supported |
+| ---- | ---- | ---- |
+| 2011-12-01 | Geolocation API Specification Level 2 | ✕ |
+
+#### Other Working Drafts
+
+| last update | spec | supported |
+| ---- | ---- | ---- |
+| 2016-12-09 | MediaStream Image Capture | - (media related) |
+| 2016-12-06 | MediaStream Recording | - (media related) |
+| 2016-12-06 | Selection API | ✕ |
+| 2016-12-05 | Input Events | ✕ |
+| 2016-12-02 | Gamepad | - |
+| 2016-11-29 | WebDriver | - |
+| 2016-11-24 | WebRTC 1.0: Real-time Communication Between Browsers | ✕ |
+| 2016-11-22 | Pointer Lock 2.0 | - |
+| 2016-11-07 | Remote Playback API | - (media related) |
+| 2016-11-03 | Resource Timing Level 2 | - (perf related) |
+| 2016-11-02 | Audio Output Devices API | - (media related) |
+| 2016-11-01 | Indexed Database API 2.0 | ✕ |
+| 2016-11-01 | User Timing Level 2 | - (perf related) |
+| 2016-10-31 | The Screen Orientation API | ✕ |
+| 2016-10-31 | High Resolution Time Level 3 | - (perf related) |
+| 2016-10-24 | UI Events KeyboardEvent code Values | - |
+| 2016-10-24 | UI Events KeyboardEvent key Values | - |
+| 2016-10-11 | Service Workers 1 | ✕ |
+| 2016-09-21 | Identifiers for WebRTC's Statistics API | - |
+| 2016-09-13 | Accelerometer Sensor | ✕ |
+| 2016-09-13 | Gyroscope Sensor | ✕ |
+| 2016-09-13 | Magnetometer Sensor | ✕ |
+| 2016-08-30 | Ambient Light Sensor | ✕ |
+| 2016-08-30 | Media Capture from DOM Elements | - (media related) |
+| 2016-08-30 | Generic Sensor API | ✕ |
+| 2016-08-03 | Wake Lock API | ✕ |
+| 2016-07-19 | Proximity Sensor | ✕ |
+| 2016-07-19 | Pointer Events - Level 2 | - |
+| 2016-07-14 | Screen Capture | ✕ |
+| 2016-07-12 | Media Capture Depth Stream Extensions | - (media related) |
+| 2016-05-17 | Cooperative Scheduling of Background Tasks | ✕ |
+| 2016-04-22 | Navigation Timing Level 2 | - (perf related) |
+| 2016-04-03 | Clipboard API and events | ✕ `clipboard` module |
+| 2015-12-15 | Push API | ✕ |
+| 2015-12-08 | Web Audio API | - (media related) |
+| 2015-10-15 | FindText API | - |
+| 2015-09-24 | Web Workers | ✕ |
+| 2015-04-21 | File API | ✕ |
+| 2014-02-20 | Network Service Discovery | ✕ |
+| 2012-03-06 | MediaStream Capture Scenarios | - (media related) |
+| 2011-12-15 | Audio Processing API | - (media related) |
http://git-wip-us.apache.org/repos/asf/incubator-weex-site/blob/32a097bf/_draft/weex-dom-api.md
----------------------------------------------------------------------
diff --git a/_draft/weex-dom-api.md b/_draft/weex-dom-api.md
new file mode 100644
index 0000000..f18efa0
--- /dev/null
+++ b/_draft/weex-dom-api.md
@@ -0,0 +1,224 @@
+---
+title: Native DOM APIs
+type: references
+group: API
+order: 2.8
+version: 2.1
+has_chapter_content: true
+---
+
+# Native DOM APIs
+
+Weex 在 JS 引擎中,为每个页面都提供了一套 Native DOM APIs,这套接口和 HTML DOM APIs 非常接近,利用这套接口我们可以通过 JavaScript 控制 native 的渲染逻辑。而且 Weex 上层的 Vue 2.0 也是基于这套接口进行适配的。
+
+*绝大多数情况下 JS 框架会把 Native DOM APIs 都封装好,开发者不需要直接对 Native DOM 进行操作。*
+
+* `Document` 类,整个页面文档。
+* `Node` 类,结点的基础类。
+* `Element` 类,元素结点,继承自 `Node`,单个视图单元。
+* `Comment` 类,注释结点,继承自 `Node`,无实际意义,通常用作占位符。
+
+**每个 Weex 页面都有一个 `weex.document` 对象,该对象就是一个 `Document` 类的实例,也是下面所有接口调用的起点。**
+
+接下来详细介绍它们的用法:
+
+## `Document` 类
+
+每个 `Document` 实例在创建的时候都会自动拥有一个 `documentElement` 属性,表示文档结点。该文档结点可以拥有一个 `body`,即文档的主体结点。
+
+**注意事项**: 文档的主体结点只接受 `<div>`、`<list>` 或 `<scroller>` 三种类型的元素结点。
+
+### 构造函数
+
+**`new Document(id: string, url: string?)`**
+
+### 成员方法
+
+**`createElement(tagName: string, props: Object?): Element`**
+
+* 创建一个特定类型 `tagName` 的 `Element` 实例,即一个元素结点。`props` 可以包含 `attr` 对象和 `style` 对象。比如 `createBody('div', {style: {backgroundColor: '#ffffff'}})`。
+
+**`createComment(text: string): Comment`**
+
+* 创建一个 `Comment` 的实例,即一个注释结点,并设置一段文本描述。
+
+**`createBody(tagName: string, props: Object?): Element`**
+
+* 创建文档主体结点,并自动挂载到 `documentElement` 下。
+
+**`fireEvent(el: Element, type: string, e: Object?, domChanges: Object?)`**
+
+* 触发一个特定类型的事件,并附带一个事件对象 `e`。当该事件在产生过程中修改了 DOM 的特性或样式,则第四个参数用来描述这些改变,参数格式和上面 `createElement` 方法的格式相同。
+
+**`destroy()`**
+
+* 销毁当前文档。一旦销毁之后文档将不会再工作。
+
+### 只读成员变量
+
+**`id: string`**
+
+* 每个 `Document` 实例都有一个唯一的 `id`。这同时也是每个 Weex 页面唯一拥有的 `id`。
+
+**`URL: string?`**
+
+* 如果当前 Weex 页面有 JS bundle URL 的话,这里则会返回 这个 URL。
+
+**`body: Element`**
+
+* 文档的主体结点,概念类似 HTML DOM 里的 `document.body`。
+
+**`documentElement: Element`**
+
+* 文档的对应结点,概念类似 HTML DOM 里的 `document.documentElement`。
+* `body` 和 `documentElement` 的关系是:`documentElement` 是 `body` 的父结点。
+
+**`getRef(id): Node`**
+
+* 根据结点 id 获取结点。
+
+## `Node` 类
+
+### 构造函数
+
+**`new Node()`**
+
+### 成员
+
+**`destroy()`**
+
+### 只读成员变量或方法
+
+**`ref: string`**
+
+* 每个 `Node` 实例都有各自的在整个 `Document` 实例中唯一的 `ref` 值。
+
+**`nextSibling: Node?`**
+
+**`previousSibling: Node?`**
+
+**`parentNode: Node?`**
+
+* 上述三个接口和 HTML DOM 的定义吻合。
+
+**`children: Node[]`**
+
+* 该结点拥有的所有子结点的数组。
+
+**`pureChildren: Node[]`**
+
+* 该结点拥有的所有子元素的数组。和 `children` 的区别是,`pureChildren` 只包含了 `Element` 实例而不包含 `Comment` 实例。
+
+## `Element` 类 <small>继承自 `Node`</small>
+
+### 构造函数
+
+**`new Element(type: string, props: Object?)`**
+
+* 创建一个特定类型 `type` 的元素结点,参数 `props` 可以包含 `attr` 对象或 `style` 对象。
+
+### DOM 树操作
+
+**`appendChild(node: Node)`**
+
+**`insertBefore(node: Node, before: Node?)`**
+
+* 上述两个接口类似 HTML DOM。
+
+**`insertAfter(node: Node, after: Node?)`**
+
+* 在一个子结点之前插入新结点 after。
+
+**`removeChild(node: Node, preserved: boolean?)`**
+
+* 删除子结点 `node`,参数 `preserved` 表示立刻从内存中删除还是暂时保留。
+
+**`clear()`**
+
+* 清除所有的子结点。
+
+### DOM 属性本身操作
+
+**`setAttr(key: string, value: string, silent: boolean?)`**
+
+**`setStyle(key: string, value: string, silent: boolean?)`**
+
+* 上述两个接口中,当 `silent` 为真的时候,结点仅更新自己,不会传递命令给客户端渲染层。该参数用来处理用户事件在发生时已经改变结点相关属性的情况下,不会在 Native DOM 也改变之后重复发送命令给客户端。
+
+**`addEvent(type: string, handler: Function)`**
+
+**`removeEvent(type: string)`**
+
+**`fireEvent(type: string, e: any)`**
+
+* 绑定事件、解绑定事件、触发事件。
+
+#### 特定组件类型的组件方法
+
+特殊的:不同组件类型可以拥有自己特有的方法,比如 `<web>` 组件支持 `refresh` 方法,详见各组件的描述,在此情况下,我们会产生特定组件类型的 class,比如 `WebElement`,它继承自 `Element`。
+
+如:
+
+> #### `WebElement` <small>继承自 `Element`</small>
+>
+> 表示在 Weex 页面中嵌入一个 webview
+>
+> **`refresh()`**: 刷新当前 webview
+
+### 只读成员变量或方法
+
+**`ref`, `nextSibling`, `previousSibling`, `parentNode`**
+
+* 继承自 `Node`。
+
+**`nodeType: number`**
+
+* 永远是数字 `1`。
+
+**`type: string`**
+
+* 和构造函数里的 `type` 一致。
+
+**`attr: Object`**
+
+* 当前结点的所有特性的键值对。推荐通过 `setAttr()` 方法进行修改,而不要直接修改这里的对象。
+
+**`style: Object`**
+
+* 当前结点的所有样式的键值对。推荐通过 `setStyle()` 方法进行修改,而不要直接修改这里的对象。
+
+**`event: Object`**
+
+* 当前结点的所有事件绑定。每个事件类型对应一个事件句柄方法。推荐通过 `addEvent()` / `removeEvent()` 方法进行修改,而不要直接修改这里的对象。
+
+**`toJSON(): Object`**
+
+* 返回描述该元素结点的一段 JSON 对象,形如:`{ref: string, type: string, attr: Object, style: Object, event: Array(string), children: Array}`。
+
+## `Comment` 类 <small>继承自 `Node`</small>
+
+### 构造函数
+
+**`new Comment(value: string)`**
+
+### 只读成员变量或方法
+
+**`ref`, `nextSibling`, `previousSibling`, `parentNode`**
+
+* 继承自 `Node`。
+
+**`nodeType: number`**
+
+* 永远是数字 `8`。
+
+**`type: string`**
+
+* 永远是字符串 `'comment'`
+
+**`value: string`**
+
+* 和构造函数里的 `value` 一致。
+
+**`toJSON(): Object`**
+
+* 返回描述该注释结点的一段 JSON 对象,形如:`<!-- value -->`。
http://git-wip-us.apache.org/repos/asf/incubator-weex-site/blob/32a097bf/_draft/write-once.en.md
----------------------------------------------------------------------
diff --git a/_draft/write-once.en.md b/_draft/write-once.en.md
new file mode 100644
index 0000000..673b302
--- /dev/null
+++ b/_draft/write-once.en.md
@@ -0,0 +1,23 @@
+---
+title: Write once, Run Everywhere
+type: guide
+order: 4.4
+version: 2.1
+---
+
+# Write Once, Run Everywhere
+
+Weex is a "Write Once, Run Everywhere" solution.
+
+* First, Weex is based on web dev experience, which includes syntax and project management.
+* Second, all components & modules in Weex are discussed by iOS, Android, web developers together to ensure it's common enough to satisfy every platforms.
+* You only need write the same Weex code for each platforms.
+
+We think about it in these aspects below:
+
+1. Today for almost all mobile apps, one app solves the same problem in different platforms. Weex hope to supply a lightweight way to describe your business logic which works well in all platforms you need.
+2. For the differences of all mobile platforms, we are willing to fill the gap in 3 points:
+ 1. Design the same APIs for all platforms to ensure different platforms have the same business logic description.
+ 2. Implement the APIs with different style or behaviors to ensure the implementation and user experience matches different platforms.
+ 3. Platforms obviously differ among each other. We also have some environment variables to help developers in certain situations.
+3. We trust (web) standard is the best for all features in all platforms.
http://git-wip-us.apache.org/repos/asf/incubator-weex-site/blob/32a097bf/_draft/write-once.md
----------------------------------------------------------------------
diff --git a/_draft/write-once.md b/_draft/write-once.md
new file mode 100644
index 0000000..6c0c62d
--- /dev/null
+++ b/_draft/write-once.md
@@ -0,0 +1,25 @@
+---
+title: 一次撰写,多端运行
+type: wiki
+order: 1.4
+version: 2.1
+---
+
+# 一次撰写,多端运行
+
+Weex 提供了多端一致的技术方案。
+
+* 首先 web 开发体验在各端当中是相同的。包括语法设计和工程链路。
+* 其次,Weex 的组件、模块设计都是 iOS、Android、Web 的开发者共同讨论出来的,有一定的通用性和普遍性。
+* Weex 开发同一份代码,可以在不同的端上分别执行,避免了多端的重复研发成本。
+
+我们这样设计基于以下几点设想:
+
+1. 今天绝大多数的移动应用,虽然要同时出现在不同的移动操作系统平台上,但是要解决的问题和用户的需求是相同或非常接近的。Weex 希望提供的是一个快速直接统一描述业务的通用方式,为业务和产品需求直接服务。
+2. 针对各大操作系统平台差异的现状,我们倾向于通过以下两方面来解决这一问题
+ 1. 把不同端的样式和行为设计并描述成为相同的 API,这样上层的业务逻辑是同一份,但是在不同端上可以做到不一样的展现效果。
+ 2. 通过横向扩展的方式在不同的端上扩展不一样的功能、特性或表现形式。
+ 3. 各端不一致的业务描述也是难免的,我们通过提供更多更丰富的环境变量来帮助开发者在同一套代码里高效适配不同的设备场景。
+3. 我们相信标准和规范的力量
+
+部分功能特性由于 native 特性的关系,会略有不同,我们会在相应的组件、模块、API 文档中做相应的描述和提示。
http://git-wip-us.apache.org/repos/asf/incubator-weex-site/blob/32a097bf/source/blog/index.md
----------------------------------------------------------------------
diff --git a/source/blog/index.md b/source/blog/index.md
deleted file mode 100644
index ef7b31d..0000000
--- a/source/blog/index.md
+++ /dev/null
@@ -1,4 +0,0 @@
-type: blog
-index: true
-layout: blog
----
\ No newline at end of file
http://git-wip-us.apache.org/repos/asf/incubator-weex-site/blob/32a097bf/source/cn/blog.md
----------------------------------------------------------------------
diff --git a/source/cn/blog.md b/source/cn/blog.md
new file mode 100644
index 0000000..ef7b31d
--- /dev/null
+++ b/source/cn/blog.md
@@ -0,0 +1,4 @@
+type: blog
+index: true
+layout: blog
+---
\ No newline at end of file
http://git-wip-us.apache.org/repos/asf/incubator-weex-site/blob/32a097bf/source/cn/contributing.md
----------------------------------------------------------------------
diff --git a/source/cn/contributing.md b/source/cn/contributing.md
new file mode 100644
index 0000000..0a36a7c
--- /dev/null
+++ b/source/cn/contributing.md
@@ -0,0 +1,106 @@
+---
+title: 如何参与 Weex 的开发
+type: community
+has_chapter_content: false
+version: 2.1
+---
+
+# 如何参与社区
+
+## 加入 Weex 邮件列表 (Mailing List)
+
+在 Weex 官方社区所有的信息都会汇聚于邮件列表。订阅开发邮件列表的方式是发送邮件到 `dev-subscribe@weex.incubator.apache.org` 然后你的邮箱会收到一封来自 Apache 的回信 (英文),把 Apache 的这封回信再次回复过去,即可完成订阅。
+
+这里需要强调的是 Apache 是一个面向全球的全英文的社区,所以我们希望您能够用英文在邮件列表中跟大家交流。
+
+如果您确实对使用英文存在很大的疑虑或困惑,我们也非常欢迎大家来中文问答平台 [SegmentFault](https://segmentfault.com/t/weex) 提问,这里有非常多热心的开发者一起讨论和解答 Weex 相关的问题。
+
+使用邮件列表的另外一个好处是它可以方便大家随时查阅之前的邮件记录: [http://mail-archives.apache.org/mod_mbox/incubator-weex-dev/](http://mail-archives.apache.org/mod_mbox/incubator-weex-dev/)
+
+*如果您对邮件列表中的内容已经不再感兴趣,这里也有退订邮件列表的方法: 发送邮件至 `dev-unsubscribe@weex.incubator.apache.org` 并根据回信的提示进行二次回复确认,完成退订。*
+
+除了开发 (dev) 邮件列表,我们还有另外几个的邮件列表供大家查阅:[http://mail-archives.apache.org/mod_mbox/#weex.incubator](http://mail-archives.apache.org/mod_mbox/#weex.incubator)
+
+## 分支管理 (英)
+
+```
+release
+ ↑
+release-{version}
+ ↑
+master <--- PR(feature/hotfix/typo)
+```
+
+0. `master` branch
+ 0. `master` is the stable developing branch.
+ 0. ***It's RECOMMENDED to commit hotfix (like typo) or feature PR to `master `***.
+0. `release-{version}` branch
+ 0. `release-{version}` is used for every version which we consider for stable publish.
+ 0. e.g. `release-0.16`
+0. `release` branch
+ 0. `release` is the latest release branch,we will make tag and publish version on this branch.
+
+### 用于PR的分支命名
+
+
+```
+{module}-{action}-{shortName}
+```
+
+* `{module}`, see [commit log module](#commit-log)
+* `{action}`
+ * `feature`: checkout from `{module}` and merge to `{module}` later. If `{module}` not exists, merge to `dev`
+ * `bugfix`: like `feature`, for bugfix only
+ * `hotfix`: checkout from `master` or release `tag`, merge to `master` and `{module}` later. If `{module}` not exists, merge to `dev`
+
+for example:
+
+* `android-bugfix-memory`
+* `jsfm-feature-communication`
+* `android-hotfix-compute-layout`
+
+## 提交日志格式 (英)
+
+```
+{action} [{module}] {description}
+```
+
+* `{action}`
+ * `+` add
+ * `*` update or bugfix
+ * `-` remove
+* `{module}`
+ * Including: android, ios, jsfm, html5, component, doc, website, example, test, all
+* `{description}`
+ * Just make it as clear and simple as possible.
+
+for example:
+
+* `+ [android] close #123, add refreshing for WebView`
+* `* [doc] fix #123, update video auto-play property`
+* `- [example] remove abc`
+
+## 发送 Pull Request (英)
+
+You can [create pull requests](https://github.com/apache/incubator-weex/compare) in GitHub.
+
+1. First we suggest you have some discussion with the community (commonly in our mailing list) before you code.
+2. Fork repo from [https://github.com/apache/incubator-weex/](https://github.com/apache/incubator-weex/)
+3. Finish the job you want to do.
+4. Create a pull request.
+
+## 编码规范 (英)
+
+### Objective-C
+
+* Tabs for indentation(not spaces)
+* `*` operator goes with the variable name (e.g. Type *variable;)
+* Function definitions: place each brace on its own line.
+* Other braces: place the open brace on the line preceding the code block; place the close brace on its own line.
+* Use `#pragma marks` to categorize methods into functional groupings and protocol implementations
+* Follow other guidelines on [GitHub Objective-C Style Guide](https://github.com/github/objective-c-style-guide)
+
+### Java & Android
+
+* Use [Google Java Style](https://google.github.io/styleguide/javaguide.html) as basic guidelines of java code.
+* Follow [AOSP Code Style](https://source.android.com/source/code-style.html) for rest of android related code style.
http://git-wip-us.apache.org/repos/asf/incubator-weex-site/blob/32a097bf/source/cn/download.ejs
----------------------------------------------------------------------
diff --git a/source/cn/download.ejs b/source/cn/download.ejs
deleted file mode 100644
index ef2c86f..0000000
--- a/source/cn/download.ejs
+++ /dev/null
@@ -1,3 +0,0 @@
-layout: download
-type: download
----
\ No newline at end of file
http://git-wip-us.apache.org/repos/asf/incubator-weex-site/blob/32a097bf/source/cn/faq.md
----------------------------------------------------------------------
diff --git a/source/cn/faq.md b/source/cn/faq.md
deleted file mode 100644
index ba6145b..0000000
--- a/source/cn/faq.md
+++ /dev/null
@@ -1,223 +0,0 @@
----
-title: 常见问题
-type: faq
-layout: post
----
-
-# 常见问题解答
-
-## 如何查阅旧文档?
-
-你可以通过文档左侧目录最后一项 “旧文档” 进入对于的历史文档页面。也可以直接访问以下链接访问:
-
-- [Guide](./v-0.10/guide/index.html)
-- [手册](./v-0.10/references/index.html)
-- [高阶知识](./v-0.10/advanced/index.html)
-- [工具](./v-0.10/tools/index.html)
-
-## Windows 指令错误
-
-请先安装 [Git for Windows](https://git-scm.com/download/win),在 [For Windows](https://github.com/apache/incubator-weex/tree/dev#for-windows) 中查看更多信息。
-
-
-## Android Studio 中 Gradle 错误
-
-下载 `license-gradle-plugin.jar` 可能引发一些错误,比如 `链接被重置(Connection reset)` 和 `证书无效(peer not authenticated)` 。这可能是由于网络问题导致的,请尝试使用代理或VPN。
-
-## 使用本地图片
-
-Weex 的原生运行机制支持从设备中加载图片,你只需要设置文件 url,例如 `file:///sdcard/image_new0.png` 这样的格式。但是 Weex 暂时还不支持加载你工程中的图片文件。
-
-## Windows 错误 `The header content contains invalid characters ` (头中包含非法字符)
-
-这是由于 weex-toolkit 的依赖 http-server 导致的,http-server 的老版本在中文 windows 中的支持不是很好。我们已经修复了这个问题,请在使用前升级 weex-toolkit 版本。
-
-## Playground 应用在扫面后什么都没有显示(白屏)
-
-最好的方法是查看 debug 日志来查找原因,你可以按照 [这篇文档](./guide/how-to/debug-with-devtools.html) 中的说明来查明导致这一问题的原因。
-
-## 关于 ECMAScript 版本问题
-
-Weex 在 iOS 中使用 JSCore ,在 Android 中使用 v8,因此他们都支持 ECMAScript 5。另外,我们还在原生环境中加了一些 polyfills:
-
-- `Promise` in iOS/Android
-- `Timer APIs` (setTimeout/clearTimeout/setInterval/clearInterval`) in iOS/Android
-- `console` in iOS/Android
-
-在浏览器中我们暂时是包含了一个 `Promise` 的 polyfill。
-
-在未来,开发者可以选择是否通过 configurations 来导入一个 polyfill。
-
-你也可以通过带有 `webpack` 的 `babel` 来写 ES6,这个加载器能够自动将 ES6 转换为 ES5。
-
-如果你还想要更多的 ES6 polyfills,你可以把他们引入到 JS Bundle 中。
-
-## 前端依赖
-
-在 Weex 中你有很多方法来 import/require 一个组件或者一个 JS 模块。以 ES5 为例:
-
-- `require('xxx.js')` : 依赖一个 JS 文件
-- `require('npm-module-name')` : 依赖一个 NPM 模块
-- `require('xxx.we')` : 包含一个 `.we` 文件来注册一个 Weex 自定义组件
-- `require('@weex-module/xxx')` : 依赖一个 Weex 原生模块。注意这只支持 `*.we` 文件而不支持 `*.js` 文件。如果你想要在一个 `*.js` 文件中使用 Weex 原生模块,暂时你可以这样写:
-
-```js
-// use this piece of code below to get Weex native module "modal"
-var modal
-__weex_define__('@weex-temp/x', function (__weex_require__) {
- modal = __weex_require__('@weex-module/modal')
-})
-
-// use APIs in "modal" module
-modal.toast({message: 'hello'})
-```
-
-以后我们会给大家带来一个更好的设计。
-
-## iOS 文本 `line-height` 样式不正常
-
-`line-height` 样式在 `<text>` 组件中的表现与 H5 和 Android 不同,文本不会在行内居中,而是贴近行底部,因为这里使用的 iOS 原生 API。我们正在努力优化,与其他两端保持一致。
-
-## Android 只支持 `overflow:hidden`
-
-`overflow` 样式在 Android 默认为 `hidden` 并且无法修改,原因是 Android View framework 限制。这个问题只出现在 Android 端,iOS 端和 H5 正常。
-
-## 如何取消 750 像素自适应并以宽高比计算真实像素?
-
-`this.$getConfig()` 方法会返回一个对象,这个对象的 `deviceHeight` 和 `deviceWidth` 属性即实际设备宽度/高度(以像素为单位),而不是以 750 适配的。
-
-因此,您可以使用它们来计算实际像素的宽度/高度。
-
-假设您需要显示固定为 88 px 的导航栏,该导航栏的高度将是:
-
-``` javascript
-var height = 88 * 750 / env.deviceWidth
-```
-
-## 如何在 JavaScript 中检测是否支持某个原生的 module/component
-
-### 检测原生 module
-
-```javascript
-var xxx = require('@weex-module/xxx')
-if (xxx) {
- // todo: use this module
-}
-else {
- // todo: handle the exception
-}
-```
-
-### 检测原生 component
-
-```html
-<template>
- <component is="{{type}}"></component>
-</template>
-
-<script>
- var type = 'xxx'
- var xxx = require('@weex-component/xxx')
- if (!xxx) {
- type = 'div' // downgrade to <div>
- }
- module.exports = {
- data: function () {
- return {
- type: type
- }
- }
- }
-</script>
-```
-
-## 如何在 pages 之间传递数据
-
-如果你有两个页面,A 页面和 B 页面
-
-1. A -> B,使用 [getConfig api](/references/api.md#getconfig) or [storage module](/modules/storage.md) 传递数据;
-2. B -> A,使用 [storage module](/modules/storage.md) 传递数据。
-
-
-## 父子组件之间进行 repeat 操作
-
-如果你有需求,在父子组件之间进行 repeat 操作,需要注意,必须严格按照官网文档的语法来书写代码。如果缺少子组件定义 data 数据,或者是没有指定需要向下传递的 props,都会导致页面不正常渲染。
-
-错误示例:
-
-```html
-<element name="child">
- <template>
- <div>
- <text style="font-size:100">{{title}}</text>
- </div>
- </template>
-</element>
-
-<template>
- <div>
- <child repeat="item in lists"></child>
- </div>
-</template>
-<script>
- module.exports = {
- data: {
- lists: [
- { title: 'A' },
- { title: 'B' },
- { title: 'C' }
- ]
- },
- ready: function () {
- this.lists.splice(0, 1)
- }
- }
-</script>
-```
-
-以上示例的理想执行情况,应该是页面上第一个元素 A 被删除,剩下 B、C 两个元素。
-但是,由于错误的写法,导致列表执行 splice 操作之后,出现错误的更新情况:页面最后一个元素 C 被删除。
-
-正确的写法如下:
-
-```html
-<element name="child">
- <template>
- <div>
- <text style="font-size:100">{{title}}</text>
- </div>
- </template>
-
- <script>
- module.exports = {
- data: {
- title: null
- }
- }
- </script>
-</element>
-
-<template>
- <div>
- <child repeat="item in lists" title="{{ item.title }}"></child>
- </div>
-</template>
-<script>
- module.exports = {
- data: {
- lists: [
- { title: 'A' },
- { title: 'B' },
- { title: 'C' }
- ]
- },
- ready: function () {
- this.lists.splice(0, 1)
- }
- }
-</script>
-```
-
-在线示例请见:
-
-* [错误示例](http://dotwe.org/de97cf2c1b7ec09a53728edc9c27ad2a)
http://git-wip-us.apache.org/repos/asf/incubator-weex-site/blob/32a097bf/source/cn/guide/advanced/app-architecture.md
----------------------------------------------------------------------
diff --git a/source/cn/guide/advanced/app-architecture.md b/source/cn/guide/advanced/app-architecture.md
new file mode 100644
index 0000000..b19a97e
--- /dev/null
+++ b/source/cn/guide/advanced/app-architecture.md
@@ -0,0 +1,62 @@
+---
+title: 用 Weex 构建完整移动应用
+type: guide
+group: 高阶特性
+order: 8.5
+version: 2.1
+---
+
+# 用 Weex 构建移动应用
+
+## 今天的移动应用
+
+这里谈一谈 Weex 对移动应用的理解。
+
+### 移动应用需要支撑并行研发
+
+如今移动应用的开发需要并行研发的能力,当一个移动应用发展到一定规模的时候,能否支撑大规模的并行研发就成为了一件非常关键而又重要的事情。否则很容易变成工程瓶颈。
+
+### 移动应用需要动态性
+
+如今移动应用不论从研发节奏、部署的灵活性和时效性、包大小、还是从研发到发布再到反馈的迭代周期上,都和移动互联网的发展速度极不相符。移动应用需要更简单轻量的研发模型,需要摆脱版本部署和分发的笨重过程。
+
+### 移动应用需要开放互联
+
+如今移动应用的内容和信息都是相互孤立的,应用之间的交流变得非常复杂和困难,也缺乏一定的标准和规范化的容器来承载。
+
+## 整体结构设计
+
+我们认为一个具有高并行研发能力、动态化和标准化规范化的移动应用应该由以下几个方面构成:
+
+```
+|------|------|------|------| |-----|
+| page | page | page | page | | api |
+|------|------|------|------| | api |
+| page | page | page | page | | api |
+|------|------|------|------| | api |
+| page | page | page | page | | api |
+|---------------------------| | api |
+| router | | api |
+|---------------------------| |-----|
+```
+
+* 页面:首先移动应用应该可以被拆解成若干个页面,每个页面相对解耦独立,同时每个页面都有一个 URL 进行唯一标识。
+* 路由:这些页面将会通过路由机制有机的串联起来,页面之间的关系是通过路由来进行调度的。常见的移动应用路由包括导航栏、tab 切换等。
+* 设备能力:以各种 API 或服务的方式提供出来,供页面自由使用。
+
+这样的话,在构建一个完整的移动应用之前,先确定你的应用有多少页面,每个页面分别是什么 URL,页面之间的关联和跳转逻辑是怎样的,然后梳理整个移动应用需要的所有 API 和服务。
+
+然后通过 Weex 创建不同的页面,并分别进行开发、调试和发布。
+
+**相关链接**
+
+* [页面结构](./page-architecture.html)
+
+如果你已经有一个做好的移动应用,只想用 Weex 开发其中的一部分页面甚至仅仅其中的一两个页面,这对 Weex 来说完全不是问题。Weex 只是一个 SDK,对整体的移动应用架构不会产生任何侵入性。并且完全可以和纯 native 界面或 hybrid 页面共存。
+
+如果需要 WeexSDK 额外的组件、模块或其它功能,可以通过 Weex 的扩展机制进行扩展。这部分工作需要 native 的研发知识,但是随着 Weex 组件和模块的丰富以及业务迭代的深入,这部分成本会承下降和收敛的趋势。
+
+**相关链接**
+
+* [如何扩展 iOS](../../references/advanced/extend-to-ios.html)
+* [如何扩展 Android](../../references/advanced/extend-to-android.html)
http://git-wip-us.apache.org/repos/asf/incubator-weex-site/blob/32a097bf/source/cn/guide/advanced/downgrade.md
----------------------------------------------------------------------
diff --git a/source/cn/guide/advanced/downgrade.md b/source/cn/guide/advanced/downgrade.md
new file mode 100644
index 0000000..99149c6
--- /dev/null
+++ b/source/cn/guide/advanced/downgrade.md
@@ -0,0 +1,12 @@
+---
+title: 降级方案
+type: guide
+group: 高阶特性
+order: 8.2
+version: 2.1
+---
+
+# 降级方案
+
+Weex 2.0 降级方案改成模块的形式支持,具体请参考[downgrade](https://www.npmjs.com/package/@weex-project/downgrade)
+
http://git-wip-us.apache.org/repos/asf/incubator-weex-site/blob/32a097bf/source/cn/guide/advanced/page-architecture.md
----------------------------------------------------------------------
diff --git a/source/cn/guide/advanced/page-architecture.md b/source/cn/guide/advanced/page-architecture.md
new file mode 100644
index 0000000..2321040
--- /dev/null
+++ b/source/cn/guide/advanced/page-architecture.md
@@ -0,0 +1,49 @@
+---
+title: Weex 页面结构
+type: guide
+group: 高阶特性
+order: 8.6
+version: 2.1
+---
+
+# Weex 页面结构
+
+一个 Weex 页面就是一个相对独立解耦的移动应用界面,它不仅包括了界面展示、更包含了逻辑处理、设备能力使用、生命周期管理等部分。
+
+## 界面
+
+### DOM 模型
+
+Weex 页面通过类似 HTML DOM 的方式管理界面,首先页面会被分解为一个 DOM 树,,每个 DOM 结点都代表了一个相对独立的 native 视图的单元。然后不同的视图单元之间通过树形结构组合在了一起,构成一个完整的页面。
+
+**相关链接**
+
+* [Weex Native DOM APIs](../../references/native-dom-api.html)
+
+### 组件
+
+Weex 支持文字、图片、视频等内容型组件,也支持 div、list、scroller 等容器型组件,还包括 slider、input、textarea、switch 等多种特殊的组件。Weex 的界面就是由这些组件以 DOM 树的方式构建出来的。
+
+**相关链接**
+
+* [Weex 组件列表](../../references/components/index.html)
+
+### 布局系统
+
+Weex 页面中的组件会按照一定的布局规范来进行排布,我们这里提供了 CSS 中的盒模型、flexbox 和 绝对/相对/固定/吸附布局这三大块布局模型。
+
+* 盒模型:通过宽、高、边框、内外边距、边框等 CSS 属性描述一个组件本身的尺寸。
+* flexbox:通过 CSS 3 Flexbox 布局规范定义和描述组件之间的空间分布情况。
+* position:支持 CSS position 属性中的 `absolute`, `relative`, `fixed`, `sticky` 位置类型,其中 `relative` 是默认值。
+
+## 功能
+
+Weex 提供了非常丰富的系统功能 API,包括弹出存储、网络、导航、弹对话框和 toast 等,开发者可以在 Weex 页面通过获取一个 native module 的方式引入并调用这些客户端功能 API。
+
+**相关链接**
+
+* [Weex 模块列表](../../references/modules/index.html)
+
+## 生命周期
+
+每个 Weex 页面都有其自身的生命周期,页面从开始被创建到最后被销毁,会经历到整个过程。这是通过对 Weex 页面的创建和销毁,在路由中通过 SDK 自行定义并实现的。
http://git-wip-us.apache.org/repos/asf/incubator-weex-site/blob/32a097bf/source/cn/guide/advanced/path.md
----------------------------------------------------------------------
diff --git a/source/cn/guide/advanced/path.md b/source/cn/guide/advanced/path.md
new file mode 100644
index 0000000..f3963ef
--- /dev/null
+++ b/source/cn/guide/advanced/path.md
@@ -0,0 +1,44 @@
+---
+title: 资源路径
+type: guide
+group: 高阶特性
+order: 8.1
+version: 2.1
+has_chapter_content: true
+---
+
+# Path
+
+<span class="weex-version">v0.9+</span>
+
+本文将介绍 Weex 中 uri(url) 的用法。包括使用图像、字体等资源,处理相对路径以及如何访问本地及打包的资源文件。
+
+## Schemes
+
+* 本地资源
+
+ Weex SDK 提供 `local` scheme 来访问打包在应用程序中的资源,此 scheme 无法在 H5 环境下使用。目前,开发者可以在 `image` 组件和字体文件中使用本地资源。
+
+ * 在 iOS 中,Weex 会在 `bundle resources` 中查找。例如,`image` 组件的 `src` 属性为 `local:///app_icon'`, Weex 会加载 `bundle resouce` 中名为 `app_icon` 的图像资源,而字体文件也以相同的方式工作。
+
+ * 在 Android 中,`image` 组件将从 `drawable` 资源文件夹加载,如 `res/drawable-xxx`。但加载字体文件是不同的,Android 框架无法从 `res` 加载字体文件,因此 SDK 将从 `asserts` 文件夹加载它。
+
+* HTTP/HTTPS
+
+ 它的工作方式与 web 相同,Weex 一直支持这种方式。
+
+* File
+
+使用 `file` scheme 访问本地磁盘文件。这个方案有其局限性:你不应该在源页面中硬编码文件 url。因为不管它是否在不同的平台(iOS,Android)上运行,内容将在另一个设备上完全不同,这取决于具体的设备。
+
+所以一种可行的方案是在运行时动态获取文件 url,你可以使用它来显示本地磁盘的图像,或者稍后上传它。
+
+## 相对路径
+
+[与我们在 HTML 中的用法类似](https://www.w3.org/TR/html4/types.html#type-uri),Weex 以相同的方式处理相对路径。以`/`、`.`、`..`、`//` 开头的相对 URI 将相对于 bunle url 解析。
+
+这意味着, 一个以 `/` 开头的路径将是相对于 JS Bundle 文件的根文件夹。`.` 则是当前文件夹,`..` 是父文件夹。 `//` 则被解析为与 JS Bundle 相同的 scheme。
+
+## URI Adapter
+
+以上所有是默认实现,开发者可以通过提供一个 `URI Adapter` 来扩展或覆盖默认实现。与其他 Adapter 相同,应在 Weex SDK 初始化之前设置自定义 Adapter。
http://git-wip-us.apache.org/repos/asf/incubator-weex-site/blob/32a097bf/source/cn/guide/advanced/use-vuex-and-vue-router.md
----------------------------------------------------------------------
diff --git a/source/cn/guide/advanced/use-vuex-and-vue-router.md b/source/cn/guide/advanced/use-vuex-and-vue-router.md
new file mode 100644
index 0000000..844f8fb
--- /dev/null
+++ b/source/cn/guide/advanced/use-vuex-and-vue-router.md
@@ -0,0 +1,88 @@
+---
+title: 使用 Vuex 和 vue-router
+type: guide
+group: 高阶特性
+order: 8.4
+version: 2.1
+---
+
+# 使用 Vuex 和 vue-router
+
+Vue.js 也有较多周边技术产品,如 [Vuex](https://github.com/vuejs/vuex) 和 [vue-router](https://github.com/vuejs/vue-router) 等,这些库也可以在 Weex 中很好的工作。
+
+> 我们基于 Weex 和 Vue 开发了一个的完整项目 [weex-hackernews](https://github.com/weexteam/weex-hackernews) ,在项目中使用了 Vuex 和 vue-router ,能够实现同一份代码,在 iOS、Android、Web 下都能完整地工作。
+
+## 使用 Vuex
+
+
+
+Vuex 是一个专为 Vue.js 应用程序开发的状态管理工具库,可以利用 Vue.js 的细粒度数据响应机制来进行高效的状态更新。它采用集中式存储管理应用的所有组件的状态,并以相应的规则保证状态以一种可预测的方式发生变化。
+
+由于在 Vuex 本身就是平台无关的,有较强的移植能力,完全可以在 Weex 中正常地使用 Vuex ,阅读其[官方文档](https://vuex.vuejs.org/zh-cn/)可以了解详细的使用方法。
+
+Vuex 也集成到了其官方调试工具 [devtools extension](https://github.com/vuejs/vue-devtools)中,提供了诸如 time-travel 调试、状态快照导入导出等高级调试功能。这些工具在 Web 平台中可以一如既往地工作。
+
+## 使用 vue-router
+
+vue-router 是专为 Vue.js 开发的便于实现单页应用的工具库,能够以声明式的方法编写页面的导航和跳转信息。
+
+由于 Weex 的运行环境不只是浏览器,通常是以移动端原生环境为主,然而在 Android 和 iOS 中都没有浏览器的 History API,也不存在 DOM,因此如果想在 Weex 环境中使用 vue-router ,有些功能受到了限制,使用时应该注意。
+
+### 路由模式
+
+vue-router 提供了三种运行模式:
+
++ `hash`: 使用 URL hash 值来作路由。默认模式。
++ `history`: 依赖 HTML5 History API 和服务器配置。查看 [HTML5 History 模式](https://router.vuejs.org/zh-cn/essentials/history-mode.html)。
++ `abstract`: 支持所有 JavaScript 运行环境,如 Node.js 服务器端。
+
+配置方法是在定义路由时,传递 `mode` 属性:
+
+```js
+new Router({
+ mode: 'abstract',
+ // ...
+})
+```
+
+从三种模式的介绍中也可以看出来,Weex 环境中只支持使用 abstract 模式。不过,vue-router 自身会对环境做校验,**如果发现没有浏览器的 API,vue-router 会自动强制进入 abstract 模式**,所以在使用时只要不写 `mode` 配置即可。默认 vue-router 会在浏览器环境中使用 hash 模式,在移动端原生环境中使用 abstract 模式。
+
+### 编程式导航
+
+vue-router 中使用 `<router-link>` 创建导航链接,不过在其中使用了基于 DOM 事件的一些特性,在 Weex 原生环境中并不能很好的工作。在 Weex 中,你必须使用[编程式导航](https://router.vuejs.org/zh-cn/essentials/navigation.html)来编写页面跳转逻辑。
+
+编程式导航其实就是通过主动调用 router 实例上的 `push` 方法实现跳转。
+
+使用 `<router-link>` 的代码示例:
+
+```html
+<!-- 只能在 Web 中使用,Native 环境不支持! -->
+<template>
+ <div>
+ <router-link to="profile">
+ <text>Profile</text>
+ </router-link>
+ </div>
+</template>
+```
+
+在 Weex 中,需要写成这个样子:
+
+```html
+<template>
+ <div>
+ <text @click="jump">Profile</text>
+ </div>
+</template>
+
+<script>
+ import router from './path/to/router'
+ export default {
+ methods: {
+ jump () {
+ router.push('profile')
+ }
+ }
+ }
+</script>
+```
http://git-wip-us.apache.org/repos/asf/incubator-weex-site/blob/32a097bf/source/cn/guide/contributing.md
----------------------------------------------------------------------
diff --git a/source/cn/guide/contributing.md b/source/cn/guide/contributing.md
deleted file mode 100644
index 32e735b..0000000
--- a/source/cn/guide/contributing.md
+++ /dev/null
@@ -1,107 +0,0 @@
----
-title: 如何参与社区
-type: guide
-order: 6
-has_chapter_content: true
-version: 2.1
----
-
-# 如何参与社区
-
-## 加入 Weex 邮件列表 (Mailing List)
-
-在 Weex 官方社区所有的信息都会汇聚于邮件列表。订阅开发邮件列表的方式是发送邮件到 `dev-subscribe@weex.incubator.apache.org` 然后你的邮箱会收到一封来自 Apache 的回信 (英文),把 Apache 的这封回信再次回复过去,即可完成订阅。
-
-这里需要强调的是 Apache 是一个面向全球的全英文的社区,所以我们希望您能够用英文在邮件列表中跟大家交流。
-
-如果您确实对使用英文存在很大的疑虑或困惑,我们也非常欢迎大家来中文问答平台 [SegmentFault](https://segmentfault.com/t/weex) 提问,这里有非常多热心的开发者一起讨论和解答 Weex 相关的问题。
-
-使用邮件列表的另外一个好处是它可以方便大家随时查阅之前的邮件记录: [http://mail-archives.apache.org/mod_mbox/incubator-weex-dev/](http://mail-archives.apache.org/mod_mbox/incubator-weex-dev/)
-
-*如果您对邮件列表中的内容已经不再感兴趣,这里也有退订邮件列表的方法: 发送邮件至 `dev-unsubscribe@weex.incubator.apache.org` 并根据回信的提示进行二次回复确认,完成退订。*
-
-除了开发 (dev) 邮件列表,我们还有另外几个的邮件列表供大家查阅:[http://mail-archives.apache.org/mod_mbox/#weex.incubator](http://mail-archives.apache.org/mod_mbox/#weex.incubator)
-
-## 分支管理 (英)
-
-```
-release
- ↑
-release-{version}
- ↑
-master <--- PR(feature/hotfix/typo)
-```
-
-0. `master` branch
- 0. `master` is the stable developing branch.
- 0. ***It's RECOMMENDED to commit hotfix (like typo) or feature PR to `master `***.
-0. `release-{version}` branch
- 0. `release-{version}` is used for every version which we consider for stable publish.
- 0. e.g. `release-0.16`
-0. `release` branch
- 0. `release` is the latest release branch,we will make tag and publish version on this branch.
-
-### 用于PR的分支命名
-
-
-```
-{module}-{action}-{shortName}
-```
-
-* `{module}`, see [commit log module](#commit-log)
-* `{action}`
- * `feature`: checkout from `{module}` and merge to `{module}` later. If `{module}` not exists, merge to `dev`
- * `bugfix`: like `feature`, for bugfix only
- * `hotfix`: checkout from `master` or release `tag`, merge to `master` and `{module}` later. If `{module}` not exists, merge to `dev`
-
-for example:
-
-* `android-bugfix-memory`
-* `jsfm-feature-communication`
-* `android-hotfix-compute-layout`
-
-## 提交日志格式 (英)
-
-```
-{action} [{module}] {description}
-```
-
-* `{action}`
- * `+` add
- * `*` update or bugfix
- * `-` remove
-* `{module}`
- * Including: android, ios, jsfm, html5, component, doc, website, example, test, all
-* `{description}`
- * Just make it as clear and simple as possible.
-
-for example:
-
-* `+ [android] close #123, add refreshing for WebView`
-* `* [doc] fix #123, update video auto-play property`
-* `- [example] remove abc`
-
-## 发送 Pull Request (英)
-
-You can [create pull requests](https://github.com/apache/incubator-weex/compare) in GitHub.
-
-1. First we suggest you have some discussion with the community (commonly in our mailing list) before you code.
-2. Fork repo from [https://github.com/apache/incubator-weex/](https://github.com/apache/incubator-weex/)
-3. Finish the job you want to do.
-4. Create a pull request.
-
-## 编码规范 (英)
-
-### Objective-C
-
-* Tabs for indentation(not spaces)
-* `*` operator goes with the variable name (e.g. Type *variable;)
-* Function definitions: place each brace on its own line.
-* Other braces: place the open brace on the line preceding the code block; place the close brace on its own line.
-* Use `#pragma marks` to categorize methods into functional groupings and protocol implementations
-* Follow other guidelines on [GitHub Objective-C Style Guide](https://github.com/github/objective-c-style-guide)
-
-### Java & Android
-
-* Use [Google Java Style](https://google.github.io/styleguide/javaguide.html) as basic guidelines of java code.
-* Follow [AOSP Code Style](https://source.android.com/source/code-style.html) for rest of android related code style.
[04/51] [abbrv] incubator-weex-site git commit: rearrangement the
structure of the document
Posted by ha...@apache.org.
http://git-wip-us.apache.org/repos/asf/incubator-weex-site/blob/32a097bf/source/v-0.10/guide/how-to/customize-a-native-component.md
----------------------------------------------------------------------
diff --git a/source/v-0.10/guide/how-to/customize-a-native-component.md b/source/v-0.10/guide/how-to/customize-a-native-component.md
deleted file mode 100644
index 62c0cf0..0000000
--- a/source/v-0.10/guide/how-to/customize-a-native-component.md
+++ /dev/null
@@ -1,58 +0,0 @@
----
-title: Customize a native Component
-type: guide
-order: 3.3
-version: 0.10
----
-
-# How to customize a native Component ?
-
-Weex has wrapped up the most critical platform components, such as `ScrollView`, `ListView`, `Text`, `Imageview` and so on. Certainly these components can not completely meet your need. And thousands of native UI components that always be using in our project may be required to integrate into Weex easily. Fortunately, it's quite convenient to wrap up your own components that should be from any existing components.
-
-##### Step By Step
-
-1. Customized components must inherit from `WXComponent` or `WXContainer`;
-2. @WXComponentProp(name=value(value is attr or style of dsl)) for it be recognized by weex SDK;
-3. The access levels of method must be **public**;
-4. The component class can not be an inner class;
-5. Customized components should not be obfuscated by tools like ProGuard;
-6. Component methods will be invoked on the UI thread, so do not contain time-consuming operations here;
-7. Weex parameter's type can be int, double, float, String, Map, List, self-defined class that implements WXObject interface;
-
-
-#### Refer to the following example:
-
-```java
-package com.taobao.weex.ui.component;
-……
-
-public class MyViewComponent extends WXComponent{
-
- public MyViewComponent(WXSDKInstance instance, WXDomObject node,
- WXVContainer parent, String instanceId, boolean lazy) {
- super(instance, node, parent, instanceId, lazy);
- }
-
- @Override
- protected void initView() {
- //TODO:your own code ……
- }
-
- @Override
- public WXFrameLayout getView() {
- //TODO:your own code ………
- }
- @WXComponentProp(name=WXDomPropConstant.WX_ATTR_VALUE)
- public void setMyViewValue(String value) {
- ((TextView)mHost).setText(value);
- }
-
-}
-```
-#### Component should be registered
-
-```java
-WXSDKEngine.registerComponent("MyView", MyViewComponent.class);
-```
-
-
http://git-wip-us.apache.org/repos/asf/incubator-weex-site/blob/32a097bf/source/v-0.10/guide/how-to/cuszomize-native-apis.md
----------------------------------------------------------------------
diff --git a/source/v-0.10/guide/how-to/cuszomize-native-apis.md b/source/v-0.10/guide/how-to/cuszomize-native-apis.md
deleted file mode 100644
index 9594ff0..0000000
--- a/source/v-0.10/guide/how-to/cuszomize-native-apis.md
+++ /dev/null
@@ -1,80 +0,0 @@
----
-title: Customize native APIs
-type: guide
-order: 3.4
-version: 0.10
----
-
-# How to customize native APIs ?
-
-Weex SDK provides only rendering capability, rather than having other capabilities, such as network, picture, and URL redirection. If you want the these features, you need to implement them yourselves.
-The example below will describe how to extend weex with native logic or 'bridge' your existed native code.
-
-## A URLHelper Example
-### Create your own `WXModule` in native:
-
-```java
-public class URLHelperModule extends WXModule{
- private static final String WEEX_CATEGORY="com.taobao.android.intent.category.WEEX";
- @WXModuleAnno
- public void openURL(String url){
- if (TextUtils.isEmpty(url)) {
- return;
- }
- StringBuilder builder=new StringBuilder("http:");
- builder.append(url);
- Uri uri = Uri.parse(builder.toString());
- Intent intent = new Intent(Intent.ACTION_VIEW, uri);
- intent.addCategory(WEEX_CATEGORY);
- mWXSDKInstance.getContext().startActivity(intent);
- }
-}
-
-```
-
-Notice the `@WXModuleAnno`, use this annotation to mark the methods you wanna expose to javascript.
-If your also want to callback to javascript, you should define a `callbackId` parameter to received 'JS callback function id':
-
-```java
-public class URLHelperModule extends WXModule{
-
- @WXModuleAnno
- public void openURL(String url,String callbackId){
- //...
- //callback to javascript
- Map<String, Object> result = new HashMap<String, Object>();
- result.put("ts", System.currentTimeMillis());
- WXBridgeManager.getInstance().callback(mWXSDKInstance.getInstanceId(), callbackId, result);
- }
-}
-```
-
-
-### Register your module to engine:
-
-```
-try {
- WXSDKEngine.registerModule("myURL", URLHelperModule.class);//'myURL' is the name you'll use in javascript
- } catch (WXException e) {
- WXLogUtils.e(e.getMessage());
- }
-```
-### Now, you can use eventModule in javascript like this:
-
-```javascript
-let URLHelper = require('@weex-module/myURL');//same as you registered
-URLHelper.openURL("http://www.taobao.com",function(ts){
- console.log("url is open at "+ts);
-});
-
-```
-
-
-## Things you need to note:
-1. Customized components must inherit from `WXModule`;
-2. @WXModuleAnno annotation must be added, as it is the only way to be recognized by Weex;
-3. The access levels of method must be **public**;
-4. The module class also can not be an inner class;
-5. Customized components should not be obfuscated by tools like ProGuard;
-6. Module methods will be invoked on the UI thread, so do not put time-consuming operations there;
-7. Weex parameter's type can be int, double, float, String, Map, List, self-defined class that implements WXObject interface;
http://git-wip-us.apache.org/repos/asf/incubator-weex-site/blob/32a097bf/source/v-0.10/guide/how-to/debug-with-html5.md
----------------------------------------------------------------------
diff --git a/source/v-0.10/guide/how-to/debug-with-html5.md b/source/v-0.10/guide/how-to/debug-with-html5.md
deleted file mode 100644
index c80fb69..0000000
--- a/source/v-0.10/guide/how-to/debug-with-html5.md
+++ /dev/null
@@ -1,47 +0,0 @@
----
-title: Debug in html5 renderer
-type: guide
-order: 3.5
-version: 0.10
----
-
-# How to debug in html5 renderer ?
-
-Since weex-html5 can run on a modern mobile browser, it's naturally supported to debug weex-html5 code in browsers' dev tools. Use browser's devTools to iterate, debug and profile your weex-html5 app. Take chrome's debug tool as a example:
-
-
-
-## Elements
-
-Use elements' panel to inspect the layout and design of the weex-html5 page, and manipulate the DOM and CSS to do some experiment freely.
-
-## Console
-
-You can use `console.log` to log information on console, but it's highly recommended to use `nativeLog` instead, since nativeLog can run on a native platform based on a browser. The defect of `nativeLog` is that it's not supported to trace it from the console to the source file which the `nativeLog` is called in, therefore in this situation you'd better use `console.log`, and you should make sure this code will not run on native platform (otherwise a exception or a crash will be caused).
-
-## Breakpoints
-
-You can set breakpoints to debug code. Breakpoints are one of the most effective way to debug code. Breakpoints enable you to pause script execution and then investigate the call stack variable values at that particular moment in time.
-
-Manual breakpoints are individual breakpoints that you set on a specific line of code. You can set these via Chrome DevTools GUI, or by inserting the `debugger` keyword in your code.
-
-## Locate your bug
-
-Generally speaking, there are three possible layer the bug could happen on: the renderer (weex-html5), the js-framework (weex-js-framework) and the transformer (gulp-weex).
-
-Here are some suggestions to locate your bug so that you can recognize which layer the bug is on:
-
-* check the console for errors. In debug mode if there is a error happend there will be info about it on the console.
-* in bridge/receiver.js, whether the `callNative` function is called.
-* whether the supposed to be called API method is actually called and executed.
-* whether the `callJS` method for event firing or callback executing is called.
-
-## other
-
-More info about how to debug h5 pages on chrome devTools: [chrome's devTools docs](https://developers.google.com/web/tools/chrome-devtools/?hl=en)
-
-
-
-
-
-
http://git-wip-us.apache.org/repos/asf/incubator-weex-site/blob/32a097bf/source/v-0.10/guide/how-to/index.md
----------------------------------------------------------------------
diff --git a/source/v-0.10/guide/how-to/index.md b/source/v-0.10/guide/how-to/index.md
deleted file mode 100644
index 9f9435a..0000000
--- a/source/v-0.10/guide/how-to/index.md
+++ /dev/null
@@ -1,40 +0,0 @@
----
-title: Preview in browser
-type: guide
-order: 3
-has_chapter_content: false
-chapter_title: How-tos
-version: 0.10
----
-
-# How to preview weex code in browser ?
-
-## weex-toolkit
-
-We strongly suggest you use weex-toolkit to preview weex code in your browser. This tool is Node.JS based, so you need to install Node at first. Please download and install latest stable version of Node from [https://nodejs.org/en/download/stable/](https://nodejs.org/en/download/stable/). Then you can install weex-toolkit using npm install:
-
-```bash
-$ npm install -g weex-toolkit
-```
-
-Check that the toolkit does work by typing `weex` in the command line. Normally you should see the following help text:
-
-```
-Options:
- --qr display QR code for native runtime,
- -o,--output transform weex we file to JS Bundle, output path (single JS bundle file or dir)
- -s,--server start a http file server, weex .we file will be transforme to JS bundle on the server , specify local root path using the option
- ......
- --help Show help
-```
-
-If all work well, navigate to the path the xxx.we file you want to preview in, and type the command:
-
-```bash
-weex xxx.we
-```
-
-A browser window will be opened automatically to display the page you want to preview:
-
-
-
http://git-wip-us.apache.org/repos/asf/incubator-weex-site/blob/32a097bf/source/v-0.10/guide/how-to/preview-in-playground-app.md
----------------------------------------------------------------------
diff --git a/source/v-0.10/guide/how-to/preview-in-playground-app.md b/source/v-0.10/guide/how-to/preview-in-playground-app.md
deleted file mode 100644
index 5800737..0000000
--- a/source/v-0.10/guide/how-to/preview-in-playground-app.md
+++ /dev/null
@@ -1,20 +0,0 @@
----
-title: Preview in native
-type: guide
-order: 3.2
-version: 0.10
----
-
-# How to preview weex code in sample-app ?
-
-### Weex Sample Step By Step
-1. Clone Weex from github [`https://github.com/apache/incubator-weex/`](https://github.com/apache/incubator-weex/)
-2. Use Android Studio open Android Sample 。
-3. run Sample project.
-4. into Sample homePage,you will see this picture
-
-5. Click the icon to the top right of the page to enter the two-dimensional code scanning
-
-6. use[`Weex-Toolkit`](https://github.com/alibaba/weex_toolchain/tree/master/toolkit/ )make .we to a QR code
-7. you will see the page rended by Weex
-
http://git-wip-us.apache.org/repos/asf/incubator-weex-site/blob/32a097bf/source/v-0.10/guide/how-to/require-3rd-party-libs.md
----------------------------------------------------------------------
diff --git a/source/v-0.10/guide/how-to/require-3rd-party-libs.md b/source/v-0.10/guide/how-to/require-3rd-party-libs.md
deleted file mode 100644
index 7349520..0000000
--- a/source/v-0.10/guide/how-to/require-3rd-party-libs.md
+++ /dev/null
@@ -1,56 +0,0 @@
----
-title: Require 3rd Party Libs
-type: guide
-order: 3.6
-version: 0.10
----
-
-# How to require 3rd Party Libs ?
-
-In the paragraph Maintain Your Component Code, we learn that JavaScript code can be written in `<script>` tag in one component. But there must be some common functions or modules in your project, such as parsing url params, extending properties from some objects to another object and so on. It's a bad practice to copy and paste them in each component, therefore there's a urgent need of `require`. Weex provides CommonJS `require` syntax for developers.
-
-Let take `extend` for example.
-
-## Require Local Js Modules
-
-A basic implementation of `extend` is as follows, and it's placed in directory path `./common/utils.js`.
-
-```javascript
-function extend(dest, src) {
- for (var key in src) {
- dest[key] = src[key]
- }
-}
-exports.extend = extend
-```
-
-In a `.we` file, `extend` can be used with the help of `require`:
-
-```html
-<script>
- var utils = require('./common/utils')
- var obj1 = {a: 1}
- var obj2 = {b: 2}
- utils.extend(obj1, obj2) // obj1 => {a: 1, b: 2}
-</script>
-```
-
-## Require Installed Node Modules
-
-Besides, [underscore](http://underscorejs.org) is a JavaScript library that provides a whole mess of useful functional programming helpers without extending any built-in objects. It implements a more robust version of [extend](http://underscorejs.org/#extend).
-
-We can use underscore's extend instead of the version implemented by ourselves. After installing `underscore` to the `node_modules` directory, we can `require` and use it.
-
-```bash
-$ npm install underscore
-```
-
-```html
-<script>
- var _ = require('underscore')
- var obj1 = {a: 1}
- var obj2 = {b: 2}
- var obj3 = {c: 3}
- var ret = _.extend(obj1, obj2, obj3) // ret => {a: 1, b: 2, c: 3}
-</script>
-```
http://git-wip-us.apache.org/repos/asf/incubator-weex-site/blob/32a097bf/source/v-0.10/guide/how-to/transform-code-into-js-bundle.md
----------------------------------------------------------------------
diff --git a/source/v-0.10/guide/how-to/transform-code-into-js-bundle.md b/source/v-0.10/guide/how-to/transform-code-into-js-bundle.md
deleted file mode 100644
index 842ecd6..0000000
--- a/source/v-0.10/guide/how-to/transform-code-into-js-bundle.md
+++ /dev/null
@@ -1,110 +0,0 @@
----
-title: Transform Code into Js Bundle
-type: guide
-order: 3.7
-version: 0.10
----
-
-# Transform Code into Js Bundle
-
-Paragraphs Maintain Your Component Code and [Require 3rd Party Libs](./require-3rd-party-libs.html) show us how to write and organize weex code. However, Weex DSL code must be transformed to `js bundle` so that `js framework` can parse and execute it for iOS, Android and HTML5 portal. For more information, please refer to [How It Works
-](../../advanced/how-it-works.html) and [JS Bundle Format](../../references/specs/js-bundle-format.html).
-
-Now come back to the topic `transform code into js bundle`. There are several ways to achieve the goal.
-
-## weex-toolkit
-
-```bash
-$ npm install -g weex-toolkit
-```
-
-### transform a `we file` to JS Bundle
-
-```bash
-$ weex your_best_weex.we -o .
-```
-
-`your_best_weex.we` will be transform to JS Bundle file `your_best_weex.js` , saved in your current directory
-
-### transform a `we file` to JS Bundle , watch this file ,auto run transformer if change happen.
-
-```bash
-$ weex your_best_weex.we -o . --watch
-```
-
-### transform every we file in a directory
-
-```bash
-$ weex we/file/storage/path -o outputpath
-```
-
-every `we file` in `we/file/storage/path` will be transformed to JS Bundle , saved in `outputpath` path
-
-please access [npmjs.com](https://www.npmjs.com/package/weex-toolkit) for more information about weex-toolkit.
-
-## transformer
-
-```bash
-npm install weex-transformer
-```
-
-### CLI Tool
-
-```bash
- Usage: transformer [options] <file...>
-
- Options:
-
- -h, --help output usage information
- -V, --version output the version number
- -l, --oldFormat [value] whether to transform to old format (default: false)
- -e, --isEntry [value] whether is an entry module which has `bootstrap` (default: true)
- -o, --output [path] the output file dirname
-```
-
-### API
-
-** transform(name, code, path, elements, config) **
-
-```javascript
-var transformer = require('weex-transformer')
-var output = transformer.transform('foo', '/* code here */', '.', {})
-```
-
-params:
-
-- `name`: string, current bundle name
-- `code`: string, source code
-- `path`: string *optional*, useful when find custom component in a certain path
-- `elements`: object *optional*, existed custom component map
-- `config`: object *optional*
- * `oldFormat`: whether to transform to old format (default: false)
- * `isEntry`: whether is an entry module which has `bootstrap` (default: true)
-
-returns:
-
-- an object with keys
- * `result`: string, all custom components `define()` and final `bootstrap()`
- * `logs`: array, corresponding warning & error logs
-
-## gulp weex
-
-```bash
-$ npm install gulp-weex
-```
-
-```javascript
-var gulp = require('gulp')
-var weex = require('gulp-weex')
-
-gulp.task('default', function () {
- return gulp.src('src/*.html')
- .pipe(weex({}))
- .pipe(gulp.dest('./dest'))
-})
-```
-
-Options:
-
-- `oldFormat`: whether to transform to old format (default: false)
-- `isEntry`: whether is an entry module which has `bootstrap` (default: true)
http://git-wip-us.apache.org/repos/asf/incubator-weex-site/blob/32a097bf/source/v-0.10/guide/images/tut-cli-qrcode.png
----------------------------------------------------------------------
diff --git a/source/v-0.10/guide/images/tut-cli-qrcode.png b/source/v-0.10/guide/images/tut-cli-qrcode.png
deleted file mode 100644
index 9068c14..0000000
Binary files a/source/v-0.10/guide/images/tut-cli-qrcode.png and /dev/null differ
http://git-wip-us.apache.org/repos/asf/incubator-weex-site/blob/32a097bf/source/v-0.10/guide/images/tut-first.png
----------------------------------------------------------------------
diff --git a/source/v-0.10/guide/images/tut-first.png b/source/v-0.10/guide/images/tut-first.png
deleted file mode 100755
index c8505e6..0000000
Binary files a/source/v-0.10/guide/images/tut-first.png and /dev/null differ
http://git-wip-us.apache.org/repos/asf/incubator-weex-site/blob/32a097bf/source/v-0.10/guide/images/tut-second.png
----------------------------------------------------------------------
diff --git a/source/v-0.10/guide/images/tut-second.png b/source/v-0.10/guide/images/tut-second.png
deleted file mode 100755
index 1259abf..0000000
Binary files a/source/v-0.10/guide/images/tut-second.png and /dev/null differ
http://git-wip-us.apache.org/repos/asf/incubator-weex-site/blob/32a097bf/source/v-0.10/guide/images/tut1.jpg
----------------------------------------------------------------------
diff --git a/source/v-0.10/guide/images/tut1.jpg b/source/v-0.10/guide/images/tut1.jpg
deleted file mode 100644
index 8af0f3f..0000000
Binary files a/source/v-0.10/guide/images/tut1.jpg and /dev/null differ
http://git-wip-us.apache.org/repos/asf/incubator-weex-site/blob/32a097bf/source/v-0.10/guide/images/tut2.jpg
----------------------------------------------------------------------
diff --git a/source/v-0.10/guide/images/tut2.jpg b/source/v-0.10/guide/images/tut2.jpg
deleted file mode 100644
index c3e8a6e..0000000
Binary files a/source/v-0.10/guide/images/tut2.jpg and /dev/null differ
http://git-wip-us.apache.org/repos/asf/incubator-weex-site/blob/32a097bf/source/v-0.10/guide/images/tut3.png
----------------------------------------------------------------------
diff --git a/source/v-0.10/guide/images/tut3.png b/source/v-0.10/guide/images/tut3.png
deleted file mode 100644
index 5473905..0000000
Binary files a/source/v-0.10/guide/images/tut3.png and /dev/null differ
http://git-wip-us.apache.org/repos/asf/incubator-weex-site/blob/32a097bf/source/v-0.10/guide/images/tut4.gif
----------------------------------------------------------------------
diff --git a/source/v-0.10/guide/images/tut4.gif b/source/v-0.10/guide/images/tut4.gif
deleted file mode 100644
index eed4395..0000000
Binary files a/source/v-0.10/guide/images/tut4.gif and /dev/null differ
http://git-wip-us.apache.org/repos/asf/incubator-weex-site/blob/32a097bf/source/v-0.10/guide/index.md
----------------------------------------------------------------------
diff --git a/source/v-0.10/guide/index.md b/source/v-0.10/guide/index.md
deleted file mode 100644
index bb6941c..0000000
--- a/source/v-0.10/guide/index.md
+++ /dev/null
@@ -1,211 +0,0 @@
----
-title: Tutorial
-type: guide
-order: 1
-version: 0.10
----
-
-# Tutorial
-
-We will make a simple but realistic list, in which the technologies Weex uses will be shown. This form of list also works for a lot of e-commercial apps and mobile sites.
-
-## Getting Started
-
-Let's get started with the list item, which contains one `image` element and one `text` right behind.
-
-```html
-<template>
- <div class="container">
- <div class="cell">
- <image class="thumb" src="http://t.cn/RGE3AJt"></image>
- <text class="title">JavaScript</text>
- </div>
- </div>
-</template>
-
-<style>
- .cell { margin-top: 10; margin-left: 10; flex-direction: row; }
- .thumb { width: 200; height: 200; }
- .title { text-align: center; flex: 1; color: grey; font-size: 50; }
-</style>
-```
-
-You can directly copy and paste the above code into a Weex file named `tech_list.we` (`.we` is our recommended filename extension).
-
-## Preview
-
-Once created, we want to see the running result of the `.we` file. But before that, we must make sure the dependencies are installed.
-
-We should install [Node](https://nodejs.org/en/download/) first, which our Weex CLI program [Weex Toolkit](https://www.npmjs.com/package/weex-toolkit) depends on. Then install `weex-toolkit` by running the command:
-
-```bash
-$ npm install -g weex-toolkit
-```
-
-When installation completed, you can check if Weex CLI is installed properly by running `weex` command in the command line. The following text is expected:
-
-```
-Usage: weex foo/bar/your_next_best_weex_script_file.we [options]
-
-Options:
- --qr display QR code for native runtime,
- -o,--output transform weex we file to JS Bundle, output path (single JS bundle file or dir)
- -s,--server start a http file server, weex .we file will be transforme to JS bundle on the server , specify local root path using the option
- ......
- --help Show help
- -h, --host [default: "127.0.0.1"]
-```
-
-If all work well, navigate to the directory where you saved `tech_list.we`, then type:
-
-```bash
-$ weex tech_list.we
-```
-
-A browser window will be opened automatically to display the running result like below (weex-toolkit version should be greater than 0.1.0, use `weex --version` to check it):
-
-
-
-## Introduce to Weex Syntax
-
-So it's time for introducing the syntax.
-
-Given the content of `tech_list.we`, Weex source code is composed of three parts -- *template*, *style*, and *script*, just like html, css, and javascript for the Web.
-
-Template is the skeleton that gives Weex structure. It is composed of tags which surround content and apply meaning to it. Tags have *attributes*, different attribute means different feature, for example, `class` attribute makes it possible to define the same styles for multiple tags, `onclick` attribute makes the tag respond to click event.
-
-Style describes how Weex tags are to be displayed. We prefer CSS very much. So we try to keep consistent with CSS standard as possible. Weex Style supports a lot of CSS features, like margin, padding, fixed and so on. Better yet, flexbox layout (flex) is well supported in Weex Style.
-
-Script adds *data* & *logic* to Weex tags, helping you easily access local or remote data and update tags. You can also define some methods for your tag to respond to different events. Weex Script organization learns a lot from CommonJS module style.
-
-More information about Weex syntax can be found in our [Syntax chapter](./syntax/index.html).
-
-## Add More Items
-
-We can't call one item a list, so we need to add more items to our tech list. Open `tech_list.we` in your favorite editor and update it's content like below:
-
-```html
-<template>
- <div class="container">
- <div class="cell">
- <image class="thumb" src="http://t.cn/RGE3AJt"></image>
- <text class="title">JavaScript</text>
- </div>
- <div class="cell">
- <image class="thumb" src="http://t.cn/RGE3uo9"></image>
- <text class="title">Java</text>
- </div>
- <div class="cell">
- <image class="thumb" src="http://t.cn/RGE31hq"></image>
- <text class="title">Objective C</text>
- </div>
- </div>
-</template>
-
-<style>
- .cell{ margin-top:10 ; margin-left:10 ; flex-direction: row; }
- .thumb { width: 200; height: 200; }
- .title { text-align: center ; flex: 1; color: grey; font-size: 50; }
-</style>
-```
-
-Now we will try to render our `tech_list.we` with Weex native renderer. Open your terminal and navigate to the directory where you save the `tech_list.we` again, then type:
-
-```bash
-$ weex tech_list.we --qr -h {ip or hostname}
-```
-
-It's ***RECOMMENDED*** to use `-h` option to specify your local ip address or hostname.
-
-A QR code will be displayed in the terminal window like below:
-
-
-
-The QR code can work together with [Weex Playground App](http://alibaba.github.io/weex/download.html). Open it and tap the scan icon at the top-right corner, then scan the QR code displayed in your terminal. If all work well, a beautiful list will be displayed in your phone.
-
-
-
-Here, I must stress that the list is rendered by a native view, instead of Webkit, so your app gets faster loading and less memory overhead than common Webview renderer.
-
-Now open `tech_list.we` again and try to change some text, after changes saved the Weex playground App will immediately display these changes. We call that **Hot-Reload**, which is intended to help you use Weex better.
-
-## Add Built-in Components
-
-Instead of writing basic tags by yourself, Weex provides a lot of built-in components. For example, Slider is common to many apps and mobile websites, so Weex includes a built-in Slider so that you can easily use it in your script. Let's open `tech_list.we` and update it's content like below.
-
-```html
-<template>
- <div style="flex-direction: column;">
- <slider class="slider" interval="{{intervalValue}}" auto-play="{{isAutoPlay}}" >
- <div class="slider-pages" repeat="{{itemList}}" onclick="goWeexSite" >
- <image class="thumb" src="{{pictureUrl}}"></image>
- <text class="title">{{title}}</text>
- </div>
- </slider>
-
- <div class="container" onclick="goWeexSite" >
- <div class="cell">
- <image class="thumb" src="http://t.cn/RGE3AJt"></image>
- <text class="title">JavaScript</text>
- </div>
- <div class="cell">
- <image class="thumb" src="http://t.cn/RGE3uo9"></image>
- <text class="title">Java</text>
- </div>
- <div class="cell">
- <image class="thumb" src="http://t.cn/RGE31hq"></image>
- <text class="title">Objective C</text>
- </div>
- </div>
-</template>
-
-<style>
- .cell { margin-top:10 ; margin-left:10 ; flex-direction: row; }
- .thumb { width: 200; height: 200; }
- .title { text-align: center ; flex: 1; color: grey; font-size: 50; }
- .slider {
- margin: 18;
- width: 714;
- height: 230;
- }
- .slider-pages {
- flex-direction: row;
- width: 714;
- height: 200;
- }
-</style>
-
-<script>
-module.exports = {
- data: {
- intervalValue:"1000",
- isShowIndicators:"true",
- isAutoPlay:"true",
- itemList: [
- {title: 'Java', pictureUrl: 'http://t.cn/RGE3uo9'},
- {title: 'Objective C', pictureUrl: 'http://t.cn/RGE31hq'},
- {title: 'JavaScript', pictureUrl: 'http://t.cn/RGE3AJt'}
- ]
- },
- methods: {
- goWeexSite: function () {
- this.$openURL('http://alibaba.github.io/weex/')
- }
- }
-}
-</script>
-```
-
-Open terminal and run the command again:
-
-```bash
-$ weex tech_list.we
-```
-
-You should see a slider prepend to our list.
-
-
-
-More information about Slider component can be found [here](../references/components/slider.html).
-
-Just as the previous example, the slider can be rendered in native, easily in Weex playground, or in your App. Please refer [the document](./advanced/integrate-to-android.html) for integrating Weex into your App.
http://git-wip-us.apache.org/repos/asf/incubator-weex-site/blob/32a097bf/source/v-0.10/guide/syntax/comm.md
----------------------------------------------------------------------
diff --git a/source/v-0.10/guide/syntax/comm.md b/source/v-0.10/guide/syntax/comm.md
deleted file mode 100644
index 84e49a1..0000000
--- a/source/v-0.10/guide/syntax/comm.md
+++ /dev/null
@@ -1,228 +0,0 @@
----
-title: Communications
-type: guide
-order: 2.8
-version: 0.10
----
-
-# Communicate Between Components
-
-## For Child-Parent Communication
-
-Children component can use `this.$dispatch([String type], [Object detail])` method passing information to parent component. first argument meaning type of message , second argument is the message object. If any parent of the child component register the same type of listener using `$on([String type], [Function callback])` method , the callback will be execute with one argument , the message object will be `detail` property of the the argument.
-
-eg:
-
-```html
-<we-element name="foo">
- <template>
- <div>
- <image src="{{imageUrl}}" onclick="test"></image>
- <text>{{title}}</text>
- </div>
- </template>
- <script>
- module.exports = {
- data: {
- title: '',
- imageUrl: ''
- },
- methods: {
- test: function () {
- this.$dispatch('notify', {a: 1})
- }
- }
- }
- </script>
-</we-element>
-
-<template>
- <foo title="..." image-url="..."></foo>
-</template>
-
-<script>
- module.exports = {
- created: function () {
- this.$on('notify', function(e) {
- // when <foo> image tag be clicked ,the function will be executing.
- // e.detail is `{a: 1}`
- })
- }
- }
-</script>
-```
-
-## For Parent-Child Communication
-
-Parent component can use `this.$vm([String id])` get vm instance of child component. you can access child component information using the vm instance.
-
-```html
-<we-element name="foo">
- <template>
- <div>
- <image src="{{imageUrl}}"></image>
- <text>{{title}}</text>
- </div>
- </template>
- <script>
- module.exports = {
- data: {
- title: '',
- imageUrl: ''
- },
- methods: {
- setTitle: function (t) {
- this.title = t
- }
- }
- }
- </script>
-</we-element>
-
-<template>
- <div>
- <text onclick="test">click to update foo</text>
- <foo id="fooEl" title="..." image-url="..."></foo>
- </div>
-</template>
-
-<script>
- module.exports = {
- methods: {
- test: function (e) {
- var foo = this.$vm('fooEl')
- foo.setTitle('...')
- foo.imageUrl = '...'
- }
- }
- }
-</script>
-```
-
-## Parent to Children (multi-child) Communication
-
-Parent can using `this.$broadcast([String type], [Object detail])` broadcast message to all of children.
-
-eg:
-
-```html
-<we-element name="bar">
- <template>
- <div>
- <image src="{{imageUrl}}"></image>
- </div>
- </template>
- <script>
- module.exports = {
- data: {
- imageUrl: ''
- },
- created: function() {
- var self = this
- this.$on('changeImage', function(e) {
- self.imageUrl = e.detail.imageUrl
- })
- }
- }
- </script>
-</we-element>
-
-<we-element name="foo">
- <template>
- <div>
- <bar></bar>
- <text>{{title}}</text>
- </div>
- </template>
- <script>
- module.exports = {
- data: {
- title: ''
- },
- created: function() {
- var self = this
- this.$on('changeTitle', function(e) {
- self.title = e.detail.title
- })
- }
- }
- </script>
-</we-element>
-
-<template>
- <div>
- <text onclick="test">click to update foo</text>
- <foo></foo>
- <bar></bar>
- </div>
-</template>
-
-<script>
- module.exports = {
- methods: {
- test: function (e) {
- this.$broadcast('changeTitle', {
- title: '...'
- })
- this.$broadcast('changeImage', {
- imageUrl: '...'
- })
- }
- }
- }
-</script>
-```
-
-## Siblings Communication
-
-siblings components can using common parent as bridge for passing information
-
-eg:
-
-```html
-<we-element name="foo">
- <template>...</template>
- <script>
- module.exports = {
- methods: {
- callbar: function () {
- this.$dispatch('callbar', {a: 1})
- }
- }
- }
- </script>
-</we-element>
-
-<we-element name="bar">
- <template>...</template>
- <script>
- module.exports = {
- created: function() {
- this.$on('callbar', function(e) {
- // e.detail.a
- })
- }
- }
- </script>
-</we-element>
-
-<template>
- <div>
- <foo></foo>
- <bar></bar>
- </div>
-</template>
-
-<script>
- module.exports = {
- created: function () {
- var self = this
- this.$on('callbar', function(e) {
- self.$broadcast('callbar', e.detail)
- })
- }
- }
-</script>
-```
-
-At last, you can learn how to write [config & data](./config-n-data.html) for a Weex page.
http://git-wip-us.apache.org/repos/asf/incubator-weex-site/blob/32a097bf/source/v-0.10/guide/syntax/composed-component.md
----------------------------------------------------------------------
diff --git a/source/v-0.10/guide/syntax/composed-component.md b/source/v-0.10/guide/syntax/composed-component.md
deleted file mode 100644
index 547096f..0000000
--- a/source/v-0.10/guide/syntax/composed-component.md
+++ /dev/null
@@ -1,114 +0,0 @@
----
-title: Composed Component
-type: guide
-order: 2.6
-version: 0.10
----
-
-# Composed Component
-
-If some part of weex file is reused often, you could create a composed component represent these part.
-
-You can create a file named `foo.we` to define a composed component, the component name is just `<foo>`.
-
-```html
-<!-- foo.we -->
-<template>
- <container style="flex-direction: row;">
- <image src="{{image}}" style="width:100;height:100;"></image>
- <text>{{title}}</text>
- </container>
-</template>
-<script>
- module.exports = {
- data: {
- title: null,
- image: null
- }
- }
-</script>
-```
-
-The content of `foo.we` also consists of `<template>`, `<style>` and `<script>`.
-
-Once composed component been defined, you can use `<foo>` in a file which is in the same folder with `foo.we`.
-
-```html
-<template>
- <foo title="..." image="..."></foo>
-</template>
-```
-
-## Nesting Components
-
-Composed component supports nesting. For example:
-
-```html
-<!-- somepath/foo.we -->
-<template>
- <container style="flex-direction: row;">
- <image src="{{image}}"></image>
- <text>{{title}}</text>
- </container>
-</template>
-<script>
- module.exports = {
- data: {
- // The key is required if you want this property observed
- // and could be updated from changing parent attribute
- title: null,
- image: null
- }
- }
-</script>
-```
-
-```html
-<!-- somepath/foo-list.we -->
-<template>
- <container>
- <text>{{description}}</text>
- <foo repeat="{{list}}" title="{{text}}" image="{{img}}"></foo>
- </container>
-</template>
-<script>
- module.exports = {
- data: {
- description: '',
- // If no keys written here. There will be no data binding effect
- // from parent attribute "list".
- list: []
- }
- }
-</script>
-```
-
-```html
-<!-- somepath/main.we -->
-<template>
- <foo-list list="{{list}}"></foo-list>
-</template>
-<script>
- module.exports = {
- data: {
- list: [
- {text: '...', img: '...'},
- {text: '...', img: '...'},
- {text: '...', img: '...'},
- ...
- ]
- }
- }
-</script>
-```
-
-The `main.we` uses `<foo-list>` from `foo-list.we`. And `<foo-list>` uses `<foo>` from `foo.we`.
-
-## Notes
-
-- Every composed component have an independent `<style>` work scope.
-- If child component have `id` attribute, you can access the context of the child component by `this.$vm(id)` and find an element by `this.$el(id)`. See more about [find an element](./id.html).
-- Please refer to [communicate between components](./comm.html) for more communication issues.
-- The keys must be existed in `data` options **explicitly** if you want to make the data observation work both through inside data changes and outside attribute changes.
-
-Next is how to [find an element](./id.html).
http://git-wip-us.apache.org/repos/asf/incubator-weex-site/blob/32a097bf/source/v-0.10/guide/syntax/config-n-data.md
----------------------------------------------------------------------
diff --git a/source/v-0.10/guide/syntax/config-n-data.md b/source/v-0.10/guide/syntax/config-n-data.md
deleted file mode 100644
index 37b8e12..0000000
--- a/source/v-0.10/guide/syntax/config-n-data.md
+++ /dev/null
@@ -1,61 +0,0 @@
----
-title: Page Config & Data
-type: guide
-order: 2.9
-version: 0.10
----
-
-# Page Config & Data
-
-You can write some instance config and data in some additional `<script>` at the **top-level** Weex component.
-
-* the instance config could declare some meta informations like which sdk/client version it supports or "downgrade" to HTML5 renderer. This part would be extended more in the future.
-* the instance data could set an external data which would be processed instead of the default top-level component data.
-
-They all make Weex files more extendable and configurable and works easy with other tools & services like CMS system.
-
-```html
-<!-- definition of sub components -->
-<element name="sub-component-a">...</element>
-<element name="sub-component-b">...</element>
-<element name="sub-component-c">...</element>
-
-<!-- definition of top-level component -->
-<template>...</template>
-<style></style>
-<script>
- module.exports = {
- data: function () {return {x: 1, y: 2}}
- }
-</script>
-
-<!-- instance config and data -->
-<script type="config">
- {
- downgrade: {
- ios: {
- os: '9', // all of 9.x.x
- app: '~5.3.2',
- framework: '^1.3', // all of 1.3.x
- deviceModel: ['AAAA', 'BBBB']
- },
- android: {
- os: '*', // all of version
- app: '^5',
- framework: '',
- deviceModel: ''
- }
- }
- }
-</script>
-<script type="data">
- {y: 200}
-</script>
-```
-
-Notice that these two additional `<script>` are both optinal and have `type="config|data"` attribute and only works when it's the top-level component of a Weex instance.
-
-So that's all about Weex syntax. For more reading, please check out:
-
-* [how-tos](../how-to/index.html) articles and
-* [advanced](../../advanced/index.html) topics.
http://git-wip-us.apache.org/repos/asf/incubator-weex-site/blob/32a097bf/source/v-0.10/guide/syntax/data-binding.md
----------------------------------------------------------------------
diff --git a/source/v-0.10/guide/syntax/data-binding.md b/source/v-0.10/guide/syntax/data-binding.md
deleted file mode 100644
index 497735c..0000000
--- a/source/v-0.10/guide/syntax/data-binding.md
+++ /dev/null
@@ -1,248 +0,0 @@
----
-title: Data-Binding
-type: guide
-order: 2.1
-version: 0.10
----
-
-# Data-Binding
-
-In Weex, we use the *mustache* syntax `{% raw %}{{...}}{% endraw %}` to bind data in `<template>` which are defined in `<script>`. Once data and template is bound, the data changes will influence the corresponding template content immediately and automatically.
-
-## Binding data path
-
-```html
-<template>
- <container>
- <text style="font-size: {{size}}">{{title}}</text>
- </container>
-</template>
-
-<script>
- module.exports = {
- data: {
- size: 48,
- title: 'Alibaba Weex Team'
- }
- }
-</script>
-```
-
-The code above will bind the `title` and `size` data field to `template`.
-
-We can also use `.` syntax to bind cascading data structure. Let's look at the following code snippet:
-
-```html
-<template>
- <container>
- <text style="font-size: {{title.size}}">{{title.value}}</text>
- </container>
-</template>
-
-<script>
- module.exports = {
- data: {
- title: {
- size: 48,
- value: 'Alibaba Weex Team'
- }
- }
- }
-</script>
-```
-
-## In-template expression
-
-Inside data bindings, Weex supports simply javascript expressions, e.g.
-
-```html
-<template>
- <container style="flex-direction: row;">
- <text>{{firstName + ' ' + lastName}}</text>
- </container>
-</template>
-
-<script>
- module.exports = {
- data: {
- firstName: 'John',
- lastName: 'Smith'
- }
- }
-</script>
-```
-
-The expression will be evaluated in the data scope of current context.
-
-**NOTE: EACH BINDING CAN ONLY CONTAIN ONE SINGLE EXPRESSION**
-
-## Computed Properties
-<span class="weex-version">0.5</span>
-
-According to simple operations, in-template expressions are very convenient. But if you want to put more logic into the template, you should use a computed property.
-
-e.g.
-
-```html
-<template>
- <container style="flex-direction: row;">
- <text>{{fullName}}</text>
- <text onclick="changeName" style="margin-left:10px;">CHANGE NAME</text>
- </container>
-</template>
-
-<script>
- module.exports = {
- data: {
- firstName: 'John',
- lastName: 'Smith'
- },
- computed: {
- fullName: {
- get: function() {
- return this.firstName + ' ' + this.lastName
- },
-
- set: function(v) {
- var s = v.split(' ')
- this.firstName = s[0]
- this.lastName = s[1]
- }
- }
- },
- methods: {
- changeName: function() {
- this.fullName = 'Terry King'
- }
- }
- }
-</script>
-```
-
-Here we have declared a computed property fullName. The function we provided will be used as the getter function for concating firstName and lastName.
-
-Otherwise when you call `changeName` after click, the setter will be invoked and this.firstName and this.lastName will be updated accordingly.
-
-**NOTE: `data` and `methods` can't have duplicated fields. 'Cause in the execution context -- `this`, we can access both of them.**
-
-## Usage of some special attributes in Data-Binding
-
-### Styles: `style` or `class`
-
-the style of a component can be bind using the `style` attribute:
-
-```html
-<template>
- <text style="font-size: {{size}}; color: {{color}}; ...">...</text>
-</template>
-```
-
-while style can also get bound with `class` attribute, multiple classnames can be split by spaces:
-
-```html
-<template>
- <container>
- <text class="{{size}}"></text>
- <text class="title {{status}}"></text>
- </container>
-</template>
-```
-
-here if `{{size}}` and `{{status}}` have empty value, then only `class="title"` will be rendered.
-
-* [See more about style and class](./style-n-class.html)
-
-### Event Handler: `on...`
-
-The event handler is an attribute which name has a prefix `on...`. The other part of attribute name is event type and the value is event handler name. We don't need to add mustache around the method name or add parentheses to call it.
-
-```html
-<template>
- <text onclick="toggle">Toggle</text>
-</template>
-
-<script>
- module.exports = {
- methods: {
- toggle: function () {
- // todo
- }
- }
- }
-</script>
-```
-
-### `if` & `repeat`
-
-`if` attribute can control the display of a component by a truthy/falsy value.
-
-```html
-<template>
- <container style="flex-direction: column;">
- <text onclick="toggle">Toggle</text>
- <image src="..." if="{{shown}}"></image>
- </container>
-</template>
-
-<script>
- module.exports = {
- data: {
- shown: true
- },
- methods: {
- toggle: function () {
- this.shown = !this.shown
- }
- }
- }
-</script>
-```
-
-We can also use `repeat` attribute to generate a list.
-
-**NOTE: When you want to mutate an array in `data`. Something limitations existing below:**
-
-When you directly set an item with the index (`vm.items[0] = {};`), it won't trigger view update. So we have a prototype methods: `$set(index, item)`.
-
-```javascript
-// same as `example1.items[0] = ...` but triggers view update
-example1.items.$set(0, { childMsg: 'Changed!'})
-```
-
-When you modify the length of the Array (`vm.items.length = 0`), it won't trigger view update too. We recommend you just replace `items` with an empty array instead.
-
-```javascript
-// same as `example2.items.length = 0` but triggers view update
-example2.items = []
-```
-
-* [See more about display logic control](./display-logic.html)
-
-### `static`
-
-`static` attribute can cancel the data binding, and the data changes will not be synchronized to UI.
-
-```html
-<template>
- <div static>
- <text>{{ word }}</text>
- </div>
-</template>
-
-<script>
- module.exports = {
- ready: function() {
- this.word = 'Data changes'
- },
- data: {
- word: 'Hello, static'
- }
- }
-</script>
-```
-
-As shown above, after the `static` attribute is added, the rendering result will be `Hello, static`, which is equivalent to rendering a static node. The change of the data `word` in ready function will not be listened, so the text value will not change.
-`static` property is designed to reduce the long list or pure static page memory overhead. Be careful with it, as it will likely break your page logic.
-
-Next, let's have a look at [style and class](./style-n-class.html).
-
http://git-wip-us.apache.org/repos/asf/incubator-weex-site/blob/32a097bf/source/v-0.10/guide/syntax/display-logic.md
----------------------------------------------------------------------
diff --git a/source/v-0.10/guide/syntax/display-logic.md b/source/v-0.10/guide/syntax/display-logic.md
deleted file mode 100644
index 842e188..0000000
--- a/source/v-0.10/guide/syntax/display-logic.md
+++ /dev/null
@@ -1,173 +0,0 @@
----
-title: Display Logic Control
-type: guide
-order: 2.4
-version: 0.10
----
-
-# Display Logic Control
-
-There are two attributes for display logic control: `if` and `repeat`. We can create Weex page structure and effects more flexible with them.
-
- > **Notes:** The display logic could't apply on the root element within `<template>`, please don't use `if` or `repeat` directive on it.
-
-## `if`
-
-`if` attribute can control the display of a component by a truthy/falsy value. If the value is truthy, then the component will generated, otherwise it will be removed.
-
-```html
-<template>
- <container>
- <text onclick="toggle">Toggle</text>
- <image src="..." if="{{shown}}"></image>
- </container>
-</template>
-
-<script>
- module.exports = {
- data: {
- shown: true
- },
- methods: {
- toggle: function () {
- this.shown = !this.shown
- }
- }
- }
-</script>
-```
-
-## `repeat`
-
-`repeat` statement is just for array rendering. Every item in an array is also a structured data. This means in `repeat`ed component, you can bind their item properties directly.
-
-```html
-<template>
- <container>
- <container repeat="{{list}}" class="{{gender}}">
- <image src="{{avatar}}"></image>
- <text>{{nickname}}</text>
- </container>
- </container>
-</template>
-
-<style>
- .male {...}
- .female {...}
-</style>
-
-<script>
- module.exports = {
- data: {
- list: [
- {gender: 'male', nickname: 'Li Lei', avatar: '...'},
- {gender: 'female', nickname: 'Han Meimei', avatar: '...'},
- ...
- ]
- }
- }
-</script>
-```
-
-The origin data properties which not belongs to the array will also be bound:
-
-```html
-<template>
- <container>
- <container repeat="{{list}}" class="{{gender}}">
- <image src="{{avatar}}"></image>
- <text>{{nickname}} - {{group}}</text>
- </container>
- </container>
-</template>
-
-<style>
- .male {...}
- .female {...}
-</style>
-
-<script>
- module.exports = {
- data: {
- group: '...',
- list: [
- {gender: 'male', nickname: 'Li Lei', avatar: '...'},
- {gender: 'female', nickname: 'Han Meimei', avatar: '...'},
- ...
- ]
- }
- }
-</script>
-```
-
-### An extension of repeat syntax
-
-#### use default `$index` for the index of array.
-
-e.g.
-
-```html
-<div repeat="{{list}}">
- <text>No. {{$index + 1}}</text>
-<div>
-```
-
-#### specify the key and value of array.
-
-e.g.
-
-```html
-<div repeat="{{v in list}}">
- <text>No. {{$index + 1}}, {{v.nickname}}</text>
-</div>
-```
-
-```html
-<div repeat="{{(k, v) in list}}">
- <text>No. {{k + 1}}, {{v.nickname}}</text>
-</div>
-```
-
-#### use `track-by` to specify unique attribute
-
-By default when replacing an array, `repeat` will cause the entire list to be re-rendered. However you can use `track-by` to specify an unique attribute as a hint, so that weex can reuse existing elements as much as possible.
-
-**NOTE: DO NOT USE DATA-BINDING SYNTAX FOR `track-by`**
-
-e.g.
-
-```html
-<template>
- <container>
- <container repeat="{{list}}" track-by="nickname" class="{{gender}}">
- <image src="{{avatar}}"></image>
- <text>{{nickname}} - {{group}}</text>
- </container>
- </container>
-</template>
-```
-
-Later on, when you replace the array including an item of the same nickname, it knows it can reuse the existing scope and DOM elements associated with the same nickname.
-
-## Omitted mustache wrapper
-
-Particularly for the `if` and `repeat` attribute, the [mustache](https://mustache.github.io/) wrapper in values could be omitted: just the same as data-binding syntax.
-
-```html
-<template>
- <container>
- <text if="shown">Hello</text>
- <text if="{{shown}}">Hello</text>
- </container>
-</template>
-
-<script>
- module.exports = {
- data: function () {return {shown: true}}
- }
-</script>
-```
-
-The two `<text>` components are both displayed.
-
-Next is [render logic control](./render-logic.html).
http://git-wip-us.apache.org/repos/asf/incubator-weex-site/blob/32a097bf/source/v-0.10/guide/syntax/events.md
----------------------------------------------------------------------
diff --git a/source/v-0.10/guide/syntax/events.md b/source/v-0.10/guide/syntax/events.md
deleted file mode 100644
index c79dd2b..0000000
--- a/source/v-0.10/guide/syntax/events.md
+++ /dev/null
@@ -1,59 +0,0 @@
----
-title: Events
-type: guide
-order: 2.3
-version: 0.10
----
-
-# Events
-
-Weex allow `<template>` to bind event type and handler on an Element. The attribute name is the event type with prefix `on...` and the attribute value is handler method name. For instance: `onclick="handler"`. e.g.
-
-```html
-<template>
- <image onclick="handler" ...></image>
-</template>
-
-<script>
- module.exports = {
- methods: {
- handler: function (e) {
- // TODO
- }
- }
- }
-</script>
-```
-
-When user clicks the image , handler function which defined in `<script>` code will be executed.
-
-## Inline Handler
-
-Beside a handler method name, you can also call a handler inline.
-
-e.g.
-```html
-<template>
- <image onclick="handler('arg1', $event)" ...></image>
-</template>
-
-<script>
- module.exports = {
- methods: {
- handler: function (arg1, e) {
- // TODO
- }
- }
- }
-</script>
-```
-
-## Event Object
-
-When an event handler called, it will receive an event object as the first argument. Every event object will contains following properties.
-
-* `type`: event name, eg: `click`
-* `target`: target `Element` of the event
-* `timestamp`: time stamp that event triggered
-
-Next, let's have a look at [display logic control](./display-logic.html).
http://git-wip-us.apache.org/repos/asf/incubator-weex-site/blob/32a097bf/source/v-0.10/guide/syntax/id.md
----------------------------------------------------------------------
diff --git a/source/v-0.10/guide/syntax/id.md b/source/v-0.10/guide/syntax/id.md
deleted file mode 100644
index eaa6e04..0000000
--- a/source/v-0.10/guide/syntax/id.md
+++ /dev/null
@@ -1,65 +0,0 @@
----
-title: Find an Element
-type: guide
-order: 2.7
-version: 0.10
----
-
-# Find an Element
-
-In Weex, we may set the `id` property for a particular element, just as unique identification of a particular element.
-
-`id` can be used by `this.$el(id)` to find an element with a certain id. Take the API [`scrollToElement()`](../../references/modules/dom.html#scrolltoelementnode-options) For example:
-
-```html
-<template>
- <container>
- <text id="top">Top</text>
- <container style="height: 10000; background-color: #999999;">
- </container>
- <text onclick="back2Top">Back to Top</text>
- </container>
-</template>
-<script>
- var dom = require('@weex-module/dom')
- module.exports = {
- methods: {
- back2Top: function () {
- var top = this.$el('top')
- dom.scrollToElement(top)
- }
- }
- }
-</script>
-```
-
-`id` can also work with `repeat` attribute [See more about display logical control](./display-logic.html), and ensure repetitive elements with different `id`:
-
-```html
-<template>
- <container>
- <image id="{{imgId}}" src="{{imgUrl}}" onclick="getImageId" repeat="{{images}}"></image>
- </container>
-</template>
-<script>
- module.exports = {
- data: {
- images: [
- {imgId: 1, imgUrl: '...'},
- {imgId: 2, imgUrl: '...'},
- {imgId: 3, imgUrl: '...'},
- ...
- ]
- },
- methods: {
- getImageId: function(e) {
- // get e.target.id
- }
- }
- }
-</script>
-```
-
-Additionally, in the [composed components](./composed-component.html), we can get the corresponding sub component through `this.$vm(id)` APIs.
-
-Next is how to [send messages between composed components](./comm.html).
http://git-wip-us.apache.org/repos/asf/incubator-weex-site/blob/32a097bf/source/v-0.10/guide/syntax/index.md
----------------------------------------------------------------------
diff --git a/source/v-0.10/guide/syntax/index.md b/source/v-0.10/guide/syntax/index.md
deleted file mode 100644
index 448c40a..0000000
--- a/source/v-0.10/guide/syntax/index.md
+++ /dev/null
@@ -1,122 +0,0 @@
----
-title: Syntax
-type: guide
-order: 2
-has_chapter_content: true
-version: 0.10
----
-
-# Syntax
-
-*The syntax of Weex is deeply inspired from [Vue.js](http://vuejs.org/), an elegant JavaScript framework with component system and reactive data binding.*
-
-A simple Weex page sample is just a piece of `<template>` code, a piece of `<style>` code and a piece of `<script>` code. The three parts together describe a whole Weex page.
-
-- `<template>`: *required*. Just uses HTML syntax and describes the structure of a Weex page, which is build upon several tags. Each tag means a type of *component*.
-- `<style>`: *optional*. Describes the presentation details, and the content is based on CSS syntax.
-- `<script>`: *optional*. Describes the data and behavior with JavaScript syntax. It defines data and how these data are processed etc.
-
-```html
-<template>
- <!-- (required) the structure of page -->
-</template>
-
-<style>
- /* (optional) stylesheet */
-</style>
-
-<script>
- /* (optional) the definition of data, methods and life-circle */
-</script>
-```
-
-## `<template>`
-
-We describe page structure in `<template>` tag like the following definition:
-
-```html
-<template>
- <container>
- <image style="width: 200; height: 200;" src="http://gtms02.alicdn.com/tps/i2/TB1QHKjMXXXXXadXVXX20ySQVXX-512-512.png"></image>
- <text>Alibaba Weex Team</text>
- </container>
-</template>
-```
-
-Here `container` tag is the root element of the component. `image` tag describes a picture, while `text` tag means a paragraph of text.
-
-Just similar to HTML, each component could have its own attributes, some components also have children as their sub components.
-
-The root element of template: In a `template` tag, there could be only one root component which has no display logics directive. Here are three types of root component we support now:
-
-- `<container>`: a common native container
-- `<scroller>`: a native scroll view
-- `<list>`: a native cell-reusable list view
-
-Only these type of components are allowed for root element.
-
-* [See all built-in components](../../references/components/index.html).
-
-## `<style>`
-
-You can consider the Weex style syntax is a subset of the CSS syntax, but there is still some differences.
-
-First we could write inline `style` attribute in `<template>` element. Second we could use the `class` attribute to apply stylesheets, which are defined with single-class selectors in `<style>` code. Here is an example:
-
-```html
-<template>
- <container>
- <text style="font-size: 64;">Alibaba</text>
- <text class="large">Weex Team</text>
- </container>
-</template>
-
-<style>
- .large {font-size: 64;}
-</style>
-```
-
-Both the two `text` components above have the same `font-size`, which is `64` pixel.
-
-* [See common styles in Weex](../../references/common-style.html)
-
-
-### Notes!
-weex is basically following [HTML attribute](https://en.wikipedia.org/wiki/HTML_attribute) naming rule , so please **do not use CamelCase** in your attribute , **long-name** with “-” as delimiter is much better.
-
-## `<script>`
-
-The syntax is JavaScript (ES5) and it describes data and behavior of a Weex page. Here we create three paragraphs:
-
-```html
-<template>
- <container>
- <text>The time is {{datetime}}</text>
- <text>{{title}}</text>
- <text>{{getTitle()}}</text>
- </container>
-</template>
-
-<script>
- module.exports = {
- data: {
- title: 'Alibaba',
- datetime: null
- },
- methods: {
- getTitle: function () {
- return 'Weex Team'
- }
- },
- created: function() {
- this.datetime = new Date().toLocaleString()
- }
- }
-</script>
-```
-
-This piece of `<script>` code will generate some component options and assign it to `module.exports`. The three text components above respectively shows the current datetime, 'Alibaba' and 'Weex Team'. The `data` in the `<script>` code stores component data which could be used for [data-binding](./data-binding.html) in the `<template>`. When data changes, the bound value will be updated automatically. Also it could be read and written by `this.x` in its methods.
-
-* [See component definitions references](../../references/component-defs.html)
-
-Next, let's have a look at [data-binding](./data-binding.html).
http://git-wip-us.apache.org/repos/asf/incubator-weex-site/blob/32a097bf/source/v-0.10/guide/syntax/render-logic.md
----------------------------------------------------------------------
diff --git a/source/v-0.10/guide/syntax/render-logic.md b/source/v-0.10/guide/syntax/render-logic.md
deleted file mode 100644
index be967e1..0000000
--- a/source/v-0.10/guide/syntax/render-logic.md
+++ /dev/null
@@ -1,35 +0,0 @@
----
-title: Render Logic Control
-type: guide
-order: 2.5
-version: 0.10
----
-
-# Render Logic Control
-
-## `append`
-
-Attribute `append` do not have data-binding. It won't change the final rendering effect. But it determines whether this component should be rendered as a whole tree or a single node with child nodes appended after.
-
-`append` has two key attributes, `tree` and `node`, the usage is:
-
-```html
-<template>
- <container>
- <container id="world" append="tree">
- <text>Hello World!</text>
- </container>
- <container id="weex" append="node">
- <text>Hello Weex!</text>
- </container>
- </container>
-</template>
-```
-
-In the code snippet above, the element with id 'world' will wait for all its children to be rendered then it will be rendered entirely, while the element with id 'weex' will only render itself to the page, then its child elements will be rendered to page one by one.
-
-The rendering result is obvious, The latter statement will render the element a bit faster on the first-paint, but the total time might be longger than `append="tree"` case.
-
-By default, elements are rendered as `node` mode. Once an element is in `tree` rendering mode, its children elements will always be rendered in `tree` mode.
-
-Next we will introduce [composed component](./composed-component.html).
http://git-wip-us.apache.org/repos/asf/incubator-weex-site/blob/32a097bf/source/v-0.10/guide/syntax/style-n-class.md
----------------------------------------------------------------------
diff --git a/source/v-0.10/guide/syntax/style-n-class.md b/source/v-0.10/guide/syntax/style-n-class.md
deleted file mode 100644
index 4337992..0000000
--- a/source/v-0.10/guide/syntax/style-n-class.md
+++ /dev/null
@@ -1,118 +0,0 @@
----
-title: Style & Class
-type: guide
-order: 2.2
-version: 0.10
----
-
-# Style & Class
-
-## The Basic Syntax
-
-CSS style description can be viewed as a series of key-value pairs,each of which describes a particular style, such as the width and height of a component.
-
-```css
-.box {
- width: 400;
- height: 50;
-}
-```
-
-The format of key-value pairs is `prop-name: prop-value;`. The key name is `prop-name`, the value name is `prop-value`. Usually,the key name and the value name follow Horizontal connection nomenclature, the value may be a number(the default units is px); The key and the value must be separated by `:`, between each key-value pairs must be separated by `;`.
-
-The style description will appear on a weex page in two formats:
-
-* Style attribute of `<template>` label
-* Stylesheets of `<style>` label
-
-### style attribute
-
-The style written in the style label, for example:
-
-```html
-<template>
- <container style="width: 400; height: 50;">
- ...
- </container>
-</template>
-```
-
-It is said that the width and height of `<container>` label is 400 pixels and 50 pixels respectively.
-
-### the `<style>` tag
-
-For example:
-
-```html
-<style>
- .wrapper {width: 600;}
- .title {width: 400; height: 50;}
- .highlight {color: #ff0000;}
-</style>
-```
-
-The stylesheets contain multiple style rules, each style rule has only one class which is contained by its style selector, a pair of curly braces `{...}`, and the styles of the curly braces. For example:
-
-```css
-.title {
- width: 400;
- height: 50;
-}
-```
-
-The above is a rule.
-
-### Class attribute
-
-The selectors of `<style>` label are matched with the class attribute of `<template>` label, we should use spaces to separate the class names. For example:
-
-```html
-<template>
- <container class="wrapper">
- <text class="title">...</text>
- <text class="title highlight">...</text>
- </container>
-</template>
-<style>
- .wrapper {width: 600;}
- .title {width: 400; height: 50;}
- .highlight {color: #ff0000;}
-</style>
-```
-
-It means that the width of the outermost container is 600px, The inside of the two title text is 400 pixels wide 50 pixels high, the second piece of text is red.
-
-### Notes
-
-* In order to simplify the page design and the complete underlying implementation, the width of our default screen is unified to 750 pixels, different screens should be scaled with corresponding ratio.
-* The CSS standard may support a lot of selectors, but now weex only support single-class selector.
-* The CSS standard can support many types of length units, but now weex only support pixel, and the `px` unit could be ignored, you can write number directly. More details can be found in [commmon styles](../../references/common-style.html).
-* The styles of Weex cannot be inherited to children elements, this is different to the CSS standard, such as `color` and `font-size`.
-* The CSS standard contains a lot of styles, but weex only sopport few styles which include layouts such as box model, flexbox, positions. And styles include `font-size`, `color`, etc.
-
-## With Data-binding
-
-Page [data](./data-binding.html) can be bound in `style` and `class` attribute. For example:
-
-```html
-<template>
- <container>
- <text style="font-size: {{fontSize}};">Alibaba</text>
- <text class="large {{textClass}}">Weex Team</text>
- </container>
-</template>
-<style>
- .large {font-size: 32;}
- .highlight {color: #ff0000;}
-</style>
-<script>
- module.exports = {
- data: {
- fontSize: 32,
- textClass: 'highlight'
- }
- }
-</script>
-```
-
-Next, let's have a look at [events](./events.html).
http://git-wip-us.apache.org/repos/asf/incubator-weex-site/blob/32a097bf/source/v-0.10/references/api.md
----------------------------------------------------------------------
diff --git a/source/v-0.10/references/api.md b/source/v-0.10/references/api.md
deleted file mode 100644
index a62d5b8..0000000
--- a/source/v-0.10/references/api.md
+++ /dev/null
@@ -1,84 +0,0 @@
----
-title: Component APIs
-type: references
-order: 1.3
-version: 0.10
----
-
-# APIs
-
-You can access these apis through `this`(Vm) context in script methods.
-
-e.g.
-
-```html
-<script>
-module.exports = {
- methods: {
- somemethod: function() {
- this.$vm('someId');
- }
- }
-}
-</script>
-```
-
-## $(id)
-
-**Deprecated**, please use `$vm` instead.
-
-## $el(id)
-
-Return the element referenced by specific id.
-
-### Arguments
-
-* `id`*(string)*: the unique identifier.
-
-### Returns
-
-* *(Element)*: an Element object referenced.
-
-### Tips
-* id is only guaranteed to be unique within the current (page)components, if you are looking for the parent components or child components, you can make use of the communication mode between components.
-* Further reading: [id](../guide/syntax/id.html), [Communicate Between Components](../guide/syntax/comm.html)
-
-## $vm(id)
-
-Return the vm object referenced by specific id.
-
-### Arguments
-
-* `id`*(string)*: the unique identifier.
-
-### Returns
-
-* `vm`*(Vm)*: a Vm object referenced.
-
-### Tips
-* id is only guaranteed to be unique within the current (page)components, if you are looking for the parent components or child components, you can make use of the communication mode between components.
-* Further reading: [id](../guide/syntax/id.html), [Communicate Between Components](../guide/syntax/comm.html)
-
-## $getConfig()
-
-Get the current global environment variables and configuration information.
-
-### Returns
-
- * `config`*(object)*: the object of config.
- * `bundleUrl`*(string)*: the url of bundle.
- * `debug`*(boolean)*: if is debug mode.
- * `env`*(object)*: a object of envrioment.
- * `weexVersion`*(string)*: a version of weex sdk.
- * `appName`*(string)*: a name of app.
- * `appVersion`*(string)*: a version of app.
- * `platform`*(string)*: the platform, one of `iOS`, `Android` and `Web`.
- * `osVersion`*(string)*: the version of os.
- * `deviceModel`*(string)*: the model of device. **native only**
- * `deviceWidth`*(number)*: the width of device, in pixels.
- * `deviceHeight`*(number)*: the height of device, in pixels.
-
-## $call(module, method, ...args)
-
-**Deprecated**, please use `require('@weex-module/module')[method](...args)` instead. See [modules](./modules/index.html) for more information
-
http://git-wip-us.apache.org/repos/asf/incubator-weex-site/blob/32a097bf/source/v-0.10/references/bubble.md
----------------------------------------------------------------------
diff --git a/source/v-0.10/references/bubble.md b/source/v-0.10/references/bubble.md
deleted file mode 100644
index ba59a90..0000000
--- a/source/v-0.10/references/bubble.md
+++ /dev/null
@@ -1,150 +0,0 @@
----
-title: Event Bubble
-type: references
-order: 1.3
-version: 0.10
----
-
-# Event Bubble <span class="api-version">v0.13+</span>
-
-Weex 1.0 implements the W3C standard event bubbling mechanism.
-
-### Usage
-
-```html
-<template>
- <div class="root" onclick="rootClick" bubble="true">
- <div>
- <text style="font-size: 40px;">{{rootText}}</text>
- </div>
- <div class="outer" onclick="parentClick">
- <div>
- <text style="font-size: 40px;">{{parentText}}</text>
- </div>
- <text class="inner" onclick="click">{{innerText}}</text>
- </div>
- </div>
-</template>
-
-<script>
- module.exports = {
- data: {
- innerText: 'click me',
- parentText: '',
- rootText: ''
- },
- methods: {
- click: function(e) {
- this.innerText = 'inner bubble'
- },
- parentClick: function(e) {
- this.parentText = 'parent bubble'
- },
- rootClick: function(e) {
- this.rootText = 'root bubble'
- }
- }
- }
-</script>
-
-<style>
- .inner {
- font-size: 40px;
- text-align: center;
- background-color: #7a9b1b;
- padding: 40px;
- }
-
- .outer {
- font-size: 40px;
- text-align: center;
- background-color: #9b7a1b;
- padding: 120px;
- }
-
- .root {
- font-size: 40px;
- text-align: center;
- background-color: #7a1b9b;
- padding: 80px;
- }
-</style>
-```
-
-[try it](http://dotwe.org/weex/dbfeb926e003986e2eea88c8ccdadb92)
-
-Run the above code, open with the client, click on the middle of the elements, you can see the event spread up, followed by the trigger.
-
-### Notice
-
-One thing should be noticed: **For compatibility with previous versions, Weex does not turn on event bubbling by default. You need to add `bubble = "true"` on the root element's properties to turn on the bubbling mechanism. Otherwise, the event will not be propagated upwards, keeping the same effect as the previous version.**
-
-### stopPropagation
-
-In the event handler function, you can use the `e.stopPropagation()` method to prevent the event from escalating. Note that `e.stopPropagation()` differs from `bubble = "true"`, which affects only the current elements and the propagation of parent elements, without affecting the propagation of child elements; the latter is a switching mechanism that is added for compatibility, Will be a global shutdown or open the bubble mechanism, the two can co-exist, as follows:
-
-```html
-<template>
- <div class="root" onclick="rootClick" bubble="true">
- <div>
- <text style="font-size: 40px;">{{rootText}}</text>
- </div>
- <div class="outer" onclick="parentClick">
- <div>
- <text style="font-size: 40px;">{{parentText}}</text>
- </div>
- <text class="inner" onclick="click">{{innerText}}</text>
- </div>
- </div>
-</template>
-
-<script>
- module.exports = {
- data: {
- innerText: 'click me',
- parentText: '',
- rootText: ''
- },
- methods: {
- click: function(e) {
- this.innerText = 'inner bubble'
- },
- parentClick: function(e) {
- this.parentText = 'parent bubble'
- e.stopPropagation()
- },
- rootClick: function(e) {
- this.rootText = 'root bubble'
- // e.stopPropagation()
- }
- }
- }
-</script>
-
-<style>
- .inner {
- font-size: 40px;
- text-align: center;
- background-color: #7a9b1b;
- padding: 40px;
- }
-
- .outer {
- font-size: 40px;
- text-align: center;
- background-color: #9b7a1b;
- padding: 120px;
- }
-
- .root {
- font-size: 40px;
- text-align: center;
- background-color: #7a1b9b;
- padding: 80px;
- }
-</style>
-```
-
-[try it](http://dotwe.org/weex/0cab45a7c62e8bebedd2ffd83a8e1256)
-
-Run the above code, open with the client, click on the middle of the element, you can see the event up to the parent element is terminated, no longer continue to spread to the root element.
http://git-wip-us.apache.org/repos/asf/incubator-weex-site/blob/32a097bf/source/v-0.10/references/cheatsheet.md
----------------------------------------------------------------------
diff --git a/source/v-0.10/references/cheatsheet.md b/source/v-0.10/references/cheatsheet.md
deleted file mode 100644
index 68ac69a..0000000
--- a/source/v-0.10/references/cheatsheet.md
+++ /dev/null
@@ -1,102 +0,0 @@
-# Weex Cheat Sheet
-
-## Native Components
-
-| component | attribtues | styles | events | special parent | children |
-| ---- | ---- | ---- | ---- | ---- | ---- |
-| `<div>` | - | **box model**<br>**flexbox**<br>`position`<br>`background-color`<br>`opacity` | `click`<br>`appear`<br>`disappear` | - | (any) |
-| `<text>` | `value` | **box model**<br>flex<br>`position`<br>`background-color`<br>`opacity`<br>`color`<br>`font-size`<br>`font-style`<br>`font-weight`<br>`text-decoration`<br>`text-align`<br>`text-overflow`<br>`line-height` | `click`<br>`appear`<br>`disappear` | - | text only |
-| `<image>` | `src` | **box model**<br>**flexbox**<br>`position`<br>`background-color`<br>`opacity`<br>`resize` | `click`<br>`appear`<br>`disappear` | - | (none) |
-| `<scroller>` | `show-scrollbar`<br>`scroll-direction` | **box model**<br>**flexbox**<br>`position`<br>`background-color`<br>`opacity` | `click`<br>`appear`<br>`disappear` | - | (any) |
-| `<list>` | `loadmoreoffset` | **box model**<br>**flexbox**<br>`position`<br>`background-color`<br>`opacity` | `click`<br>`appear`<br>`disappear`<br>`loadmore`<br>`refresh`<br>`loading` | - | `<cell>`<br>`<header>`<br>`<refresh>`<br>`<loading>` |
-| `<cell>` | - | **box model**<br>**flexbox**<br>`position`<br>`background-color`<br>`opacity` | `click`<br>`appear`<br>`disappear` | `<list>` | (any) |
-| `<slider>` | `auto-play` | **box model**<br>**flexbox**<br>`position`<br>`background-color`<br>`opacity` | `click`<br>`appear`<br>`disappear`<br>`change` | - | (any)<br>`<indicator>` |
-| `<indicator>` | - | **box model**<br>**flexbox**<br>`position`<br>`item-color`<br>`item-selected-color`<br>`item-size` | `click`<br>`appear`<br>`disappear` | `<slider>` | (none) |
-| `<wxc-navpage>` | `height`<br>`background-color`<br>`title`<br>`title-color`<br>`left-item-title`<br>`left-item-color`<br>`right-item-title`<br>`right-item-color`<br>`left-item-src`<br>`right-item-src` | **box model**<br>**flexbox**<br>`position`<br>`background-color`<br>`opacity` | `click`<br>`appear`<br>`disappear`<br>`naviBar.leftItem.click`<br>`naviBar.rightItem.click` | - | (any) |
-| `<wxc-tabbar>` | `tab-items` | **box model**<br>**flexbox**<br>`position`<br>`background-color`<br>`opacity` | `tabBar.onClick` | - | (none) |
-| `<embed>` | `src` | **box model**<br>**flexbox**<br>`position`<br>`background-color`<br>`opacity` | `click`<br>`appear`<br>`disappear` | - | (none) |
-| `<web>` | `src` | **box model**<br>**flexbox**<br>`position`<br>`background-color`<br>`opacity` | `click`<br>`appear`<br>`disappear`<br>`pagestart`<br>`pagefinish`<br>`error` | - | (none) |
-| `<video>` | `src`<br>`play-status`<br>`auto-play` | **box model**<br>**flexbox**<br>`position`<br>`background-color`<br>`opacity` | `click`<br>`appear`<br>`disappear`<br>`start`<br>`pause`<br>`finish`<br>`fail` | - | (none) |
-| `<a>` | `href` | **box model**<br>**flexbox**<br>`position`<br>`background-color`<br>`opacity` | `click`<br>`appear`<br>`disappear` | - | (any) |
-| `<input>` | `type`<br>`value`<br>`placeholder`<br>`disabled`<br>`autofocus` | **box model**<br>**flexbox**<br>`position`<br>`background-color`<br>`opacity`<br>`placeholder-color`<br>`color`<br>`font-size`<br>`font-style`<br>`font-weight`<br>`text-align` | `click`<br>`appear`<br>`disappear` | - | (none) |
-| `<switch>` | `checked`<br>`disabled` | **box model**<br>**flexbox**<br>`position`<br>`background-color`<br>`opacity` | `appear`<br>`disappear`<br>`input`<br>`change`<br>`focus`<br>`blur` | - | (none) |
-
-## Native Modules
-
-| module | apis |
-| ---- | ---- |
-| `@weex-module/dom` | `scrollToElement(node, { offset })` |
-| `@weex-module/modal` | `toast({ message, duration })`<br>`alert({ message, okTitle }, callback)`<br>`confirm({ message, okTitle, cancelTitle }, callback(result))`<br>`prompt({ message, okTitle, cancelTitle }, callback(result, data))` |
-| `@weex-module/stream` | `fetch({ method, url, headers, type, body }, callback({ status, ok, statusText, data, headers }), progressCallback({ readyState, status, length, statusText, headers}))` |
-| `@weex-module/webview` | `goBack(ref)`<br>`goForward(ref)`<br>`reload(ref)` |
-| `@weex-module/navigator` | `push({ url, animated }, callback)`<br>`pop({ animated }, callback)` |
-| `@weex-module/animation` | `transition(node, { styles, duration, timingFunction, delay, transform-origin }, callback)` |
-
-## Special Template Syntax
-
-* `<foo x="abc">`
-* `{% raw %}<foo x="{{expr}}">{% endraw %}`
-* `<foo style="name1: value1; name2: value2">`
-* `{% raw %}<foo style="name1: value1; name2: {{expr}}; name3: ...">{% endraw %}`
-* `<foo class="a b c">`
-* `{% raw %}<foo class="a {{expr}} c">{% endraw %}`
-* `<foo onclick="methodName">`
-* `<foo id="abc">`
-* `<foo if="expr">`
-* `<foo repeat="item in list">`
-* `<foo repeat="(key,item) in list">`
-* `<component type="foo">`
-* `{% raw %}<component type="{{expr}}">{% endraw %}`
-
-## ViewModel APIs
-
-* `this.$vm(el)`
-* `this.$el(el)`
-* `this.$getConfig()`
-* `this.$emit(type, data)`
-* `this.$dispatch(type, data)`
-* `this.$broadcast(type, data)`
-
-## ViewModel Options
-
-* `data`
-* `methods`
-* `computed`
-* `init`, `created`, `ready`
-* `events`
-
-example:
-
-```javascript
-module.exports = {
-
- data: function () {
- return {
- x: 1,
- y: 2
- }
- }
-
- methods: {
- foo: function () {
- console.log('foo')
- }
- },
-
- computed: {
- z: function () {
- return this.x + this.y
- }
- },
-
- events: {
- custom: function (e) {
- console.log(e)
- }
- },
-
- init: function () {},
- created: function () {},
- ready: function () {}
-}
-```
http://git-wip-us.apache.org/repos/asf/incubator-weex-site/blob/32a097bf/source/v-0.10/references/color-names.md
----------------------------------------------------------------------
diff --git a/source/v-0.10/references/color-names.md b/source/v-0.10/references/color-names.md
deleted file mode 100644
index a61112b..0000000
--- a/source/v-0.10/references/color-names.md
+++ /dev/null
@@ -1,182 +0,0 @@
----
-title: List of the names of colors
-type: references
-order: 1.7
-version: 0.10
----
-
-# List of the names of colors
-
-### Basic color keywords:
-
-| Color Name | Hex rgb |
-| ---------- | ------- |
-| black | #000000 |
-| silver | #C0C0C0 |
-| gray | #808080 |
-| white | #FFFFFF |
-| maroon | #800000 |
-| red | #FF0000 |
-| purple | #800080 |
-| fuchsia | #FF00FF |
-| green | #008000 |
-| lime | #00FF00 |
-| olive | #808000 |
-| yellow | #FFFF00 |
-| navy | #000080 |
-| blue | #0000FF |
-| teal | #008080 |
-| aqua | #00FFFF |
-
-### Extended color keywords:
-
-| Color Name | Hex rgb |
-| ---------- | ------- |
-| aliceblue | #F0F8FF |
-| antiquewhite | #FAEBD7 |
-| aqua | #00FFFF |
-| aquamarine | #7FFFD4 |
-| azure | #F0FFFF |
-| beige | #F5F5DC |
-| bisque | #FFE4C4 |
-| black | #000000 |
-| blanchedalmond | #FFEBCD |
-| blue | #0000FF |
-| blueviolet | #8A2BE2 |
-| brown | #A52A2A |
-| burlywood | #DEB887 |
-| cadetblue | #5F9EA0 |
-| chartreuse | #7FFF00 |
-| chocolate | #D2691E |
-| coral | #FF7F50 |
-| cornflowerblue | #6495ED |
-| cornsilk | #FFF8DC |
-| crimson | #DC143C |
-| cyan | #00FFFF |
-| darkblue | #00008B |
-| darkcyan | #008B8B |
-| darkgoldenrod | #B8860B |
-| darkgray | #A9A9A9 |
-| darkgreen | #006400 |
-| darkgrey | #A9A9A9 |
-| darkkhaki | #BDB76B |
-| darkmagenta | #8B008B |
-| darkolivegreen | #556B2F |
-| darkorange | #FF8C00 |
-| darkorchid | #9932CC |
-| darkred | #8B0000 |
-| darksalmon | #E9967A |
-| darkseagreen | #8FBC8F |
-| darkslateblue | #483D8B |
-| darkslategray | #2F4F4F |
-| darkslategrey | #2F4F4F |
-| darkturquoise | #00CED1 |
-| darkviolet | #9400D3 |
-| deeppink | #FF1493 |
-| deepskyblue | #00BFFF |
-| dimgray | #696969 |
-| dimgrey | #696969 |
-| dodgerblue | #1E90FF |
-| firebrick | #B22222 |
-| floralwhite | #FFFAF0 |
-| forestgreen | #228B22 |
-| fuchsia | #FF00FF |
-| gainsboro | #DCDCDC |
-| ghostwhite | #F8F8FF |
-| gold | #FFD700 |
-| goldenrod | #DAA520 |
-| gray | #808080 |
-| green | #008000 |
-| greenyellow | #ADFF2F |
-| grey | #808080 |
-| honeydew | #F0FFF0 |
-| hotpink | #FF69B4 |
-| indianred | #CD5C5C |
-| indigo | #4B0082 |
-| ivory | #FFFFF0 |
-| khaki | #F0E68C |
-| lavender | #E6E6FA |
-| lavenderblush | #FFF0F5 |
-| lawngreen | #7CFC00 |
-| lemonchiffon | #FFFACD |
-| lightblue | #ADD8E6 |
-| lightcoral | #F08080 |
-| lightcyan | #E0FFFF |
-| lightgoldenrodyellow | #FAFAD2 |
-| lightgray | #D3D3D3 |
-| lightgreen | #90EE90 |
-| lightgrey | #D3D3D3 |
-| lightpink | #FFB6C1 |
-| lightsalmon | #FFA07A |
-| lightseagreen | #20B2AA |
-| lightskyblue | #87CEFA |
-| lightslategray | #778899 |
-| lightslategrey | #778899 |
-| lightsteelblue | #B0C4DE |
-| lightyellow | #FFFFE0 |
-| lime | #00FF00 |
-| limegreen | #32CD32 |
-| linen | #FAF0E6 |
-| magenta | #FF00FF |
-| maroon | #800000 |
-| mediumaquamarine | #66CDAA |
-| mediumblue | #0000CD |
-| mediumorchid | #BA55D3 |
-| mediumpurple | #9370DB |
-| mediumseagreen | #3CB371 |
-| mediumslateblue | #7B68EE |
-| mediumspringgreen | #00FA9A |
-| mediumturquoise | #48D1CC |
-| mediumvioletred | #C71585 |
-| midnightblue | #191970 |
-| mintcream | #F5FFFA |
-| mistyrose | #FFE4E1 |
-| moccasin | #FFE4B5 |
-| navajowhite | #FFDEAD |
-| navy | #000080 |
-| oldlace | #FDF5E6 |
-| olive | #808000 |
-| olivedrab | #6B8E23 |
-| orange | #FFA500 |
-| orangered | #FF4500 |
-| orchid | #DA70D6 |
-| palegoldenrod | #EEE8AA |
-| palegreen | #98FB98 |
-| paleturquoise | #AFEEEE |
-| palevioletred | #DB7093 |
-| papayawhip | #FFEFD5 |
-| peachpuff | #FFDAB9 |
-| peru | #CD853F |
-| pink | #FFC0CB |
-| plum | #DDA0DD |
-| powderblue | #B0E0E6 |
-| purple | #800080 |
-| red | #FF0000 |
-| rosybrown | #BC8F8F |
-| royalblue | #4169E1 |
-| saddlebrown | #8B4513 |
-| salmon | #FA8072 |
-| sandybrown | #F4A460 |
-| seagreen | #2E8B57 |
-| seashell | #FFF5EE |
-| sienna | #A0522D |
-| silver | #C0C0C0 |
-| skyblue | #87CEEB |
-| slateblue | #6A5ACD |
-| slategray | #708090 |
-| slategrey | #708090 |
-| snow | #FFFAFA |
-| springgreen | #00FF7F |
-| steelblue | #4682B4 |
-| tan | #D2B48C |
-| teal | #008080 |
-| thistle | #D8BFD8 |
-| tomato | #FF6347 |
-| turquoise | #40E0D0 |
-| violet | #EE82EE |
-| wheat | #F5DEB3 |
-| white | #FFFFFF |
-| whitesmoke | #F5F5F5 |
-| yellow | #FFFF00 |
-| yellowgreen | #9ACD32 |
-
http://git-wip-us.apache.org/repos/asf/incubator-weex-site/blob/32a097bf/source/v-0.10/references/common-attrs.md
----------------------------------------------------------------------
diff --git a/source/v-0.10/references/common-attrs.md b/source/v-0.10/references/common-attrs.md
deleted file mode 100644
index 2ed0310..0000000
--- a/source/v-0.10/references/common-attrs.md
+++ /dev/null
@@ -1,78 +0,0 @@
----
-title: Common Attribute
-type: references
-order: 1.5
-version: 0.10
----
-
-# Common Attribute
-
-Attributes provide additional information about weex tags. All weex tags can have attributes, attributes are always specified in the start tag and usually come in name/value pairs like: name="value". Mustache can be used inside a value.
-All of weex tags have the following attributes:
-
-## id
-
-Specifies a unique id for an element in `<template>` scope. With `id` attribute you can easily refer a weex tag.
-
-```html
-<div id="logo"></div>
-<div id="item-{{index}}"></div>
-```
-
-## style
-
-Specifies an inline style for an element.
-
-```html
-<div style="width: 200; height: 200"></div>
-<div style="padding: {{x}}; margin: 0"></div>
-```
-
-## class
-
-Specifies one or more classnames for an element (refers to a class in a style sheet).
-
-```html
-<div class="button"></div>
-<div class="button {{btnStatus}}"></div>
-```
-
-## repeat
-
-We can use the `repeat` attribute to render a list of items based on an array. The `repeat` attribute has a special syntax in the form of `item in items`, where `items` is the source data array and `item` is an alias for the array element being iterated on.
-
-```html
-<div repeat={{list}}></div>
-<div repeat={{item in list}}></div>
-```
-
-## if
-
-Provide a boolean value to decide whether or not to display current tag.
-
-```html
-<div if="true"></div>
-<div if="{{opened}}"></div>
-<div if="{{direction === 'row'}}"></div>
-```
-
-## append
-
-By providing the value of tree or node, it determines the progress of rendering.
-
-```html
-<div append="tree/node"></div>
-```
-
-## Event Handing (on...)
-
-Register event handlers on weex tag.
-
-```html
-<div onclick="openDetail"></div>
-<div onappear="{{loadMore}}"></div>
-```
-
-## Notes!
-
-Weex is basically following [HTML attribute](https://en.wikipedia.org/wiki/HTML_attribute) naming rule, so please **do not use CamelCase** in your attribute, **kebab-case** with "-" as delimiter is much better.
http://git-wip-us.apache.org/repos/asf/incubator-weex-site/blob/32a097bf/source/v-0.10/references/common-event.md
----------------------------------------------------------------------
diff --git a/source/v-0.10/references/common-event.md b/source/v-0.10/references/common-event.md
deleted file mode 100644
index c8e0836..0000000
--- a/source/v-0.10/references/common-event.md
+++ /dev/null
@@ -1,120 +0,0 @@
----
-title: Common Events
-type: references
-order: 1.9
-version: 0.10
----
-
-# Common Events
-
-Weex provide the ability to let events trigger action, like starting a JavaScript when a user click on a component. Bellow are the common event attributes that can be added to weex components to define event actions.
-
-## Click event
-
-The onclick attribute fires on a click gesture on the element.
-**Notes: ** The `input` and `switch` component does not currently support the `click` event, please use `change` or `input` event instead.
-
-### event object
-
-- `type` : `click`
-- `target` : The target component where the event is triggered
-- `timestamp` : Timestamp when event is triggered
-
-**Example:**
-
-```html
-<template>
- <text style="font-size: 60px" onclick="{{update}}">I am {{name}}</text>
-</template>
-
-<script>
- module.exports = {
- data: {
- name: 'Tom'
- },
- methods: {
- update: function () {
- this.name = this.name === 'Tom' ? 'Jerry' : 'Tom'
- }
- }
- }
-</script>
-```
-
-
-## Longpress event
-
-If a `longpress` event is bound to a component, the event will be triggered when user long press on it.
-**Notes: ** The `input` and `switch` component does not currently support the `click` event, please use `change` or `input` event instead.
-
-### event object
-
-- `type` : `longpress`
-- `target` : The target component where the event is triggered
-- `timestamp` : Timestamp when event is triggered
-
-**Example:**
-
-```html
-<template>
- <div style="width: 400px; height: 200px; background-color: {{bg}};
- justify-content: center; align-items: center;" onlongpress="{{update}}">
- <text style="font-size: 60px">Press me</text>
- </div>
-</template>
-
-<script>
- module.exports = {
- data: {
- bg: '#FF0000'
- },
- methods: {
- update: function () {
- this.bg = this.bg === '#FF0000' ? '#00FF00' : '#FF0000'
- }
- }
- }
-</script>
-```
-
-## Appear event
-
-If a appear event is bound to a component inside a scrollable container, the event will be triggered when the component comes to be visible.
-
-### event object
-
-- `type` : `appear`
-- `target` : The target component where the event is triggered
-- `timestamp` : Timestamp when event is triggered
-- `direction` : The direction in which the scroller is scrolling. Could be `up` or `down`.
-
-[example](http://dotwe.org/3fa162a65fbf0c7e2655fbc1bebbfc38)
-
-## Disappear event
-
-If a `disappear` event is bound to a component inside a scrollable container, the event will be triggered when the component scrolls out of viewport and disappears from your sight.
-
-### event object
-
-- `type` : `disappear`
-- `target` : The target component where the event is triggered
-- `timestamp` : Timestamp when event is triggered
-- `direction` : The direction in which the scroller is scrolling. Could be `up` or `down`.
-
-[example](http://dotwe.org/3fa162a65fbf0c7e2655fbc1bebbfc38)
-
-## Page event
-
-Weex provides you with simple management of page status, such as `viewappear` and `viewdisappear`.
-The `viewappear` event will be triggered when page is about to show or before any animations are configured for showing. For example, when calling `push` method in `navigator` module, this event will be trigged in new page.
-The `viewdisappear` event will be triggeded when page is about to dismiss.
-Different from `appear` and `disappear` of component, these two events focus on the status of whole page, so **they must be bound to the root component**.
-In addititon, these events also can be bound to body component which is not root actually such as `wxc-navpage`.
-
-### event object
-
-- `type` : `viewappear` or `viewdisappear`
-- `target` : The target component where the event is triggered
-- `timestamp` : Timestamp when event is triggered
-
-[example](http://dotwe.org/3fa162a65fbf0c7e2655fbc1bebbfc38)