You are viewing a plain text version of this content. The canonical link for it is here.
Posted to notifications@apisix.apache.org by bz...@apache.org on 2022/03/04 06:59:50 UTC
[apisix-website] branch master updated: docs: add public-api plugin blog (#924)
This is an automated email from the ASF dual-hosted git repository.
bzp2010 pushed a commit to branch master
in repository https://gitbox.apache.org/repos/asf/apisix-website.git
The following commit(s) were added to refs/heads/master by this push:
new 3728330 docs: add public-api plugin blog (#924)
3728330 is described below
commit 37283309b186aef96eadb683a322b7a3e4f145c7
Author: homeward <97...@users.noreply.github.com>
AuthorDate: Fri Mar 4 14:59:46 2022 +0800
docs: add public-api plugin blog (#924)
---
.../03/01/apisix-integration-public-api-plugin.md | 249 +++++++++++++++++++++
.../03/01/apisix-integration-public-api-plugin.md | 249 +++++++++++++++++++++
2 files changed, 498 insertions(+)
diff --git a/website/blog/2022/03/01/apisix-integration-public-api-plugin.md b/website/blog/2022/03/01/apisix-integration-public-api-plugin.md
new file mode 100644
index 0000000..3421106
--- /dev/null
+++ b/website/blog/2022/03/01/apisix-integration-public-api-plugin.md
@@ -0,0 +1,249 @@
+---
+title: "API Gateway Apache APISIX provides enhancements on API Management"
+authors:
+ - name: "Zeping Bai"
+ title: "Author"
+ url: "https://github.com/bzp2010"
+ image_url: "https://avatars.githubusercontent.com/u/8078418?v=4"
+ - name: "Fei Han"
+ title: "Technical Writer"
+ url: "https://github.com/hf400159"
+ image_url: "https://avatars.githubusercontent.com/u/97138894?v=4"
+keywords:
+- Apache APISIX
+- API Gateway
+- Security
+- Ecosystem
+description: This article introduces the principle and usage of API gateway Apache APISIX native plugin `public-api`.
+tags: [Technology,Ecosystem]
+---
+
+> This article introduces the principle and usage of API gateway Apache APISIX native plugin `public-api`.
+
+<!--truncate-->
+
+## Background Information
+
+Apache APISIX is a dynamic, real-time, high-performance API gateway that provides rich traffic management features such as load balancing, dynamic upstream, canary release, circuit breaking, authentication, observability, and more. As an API gateway, Apache APISIX not only has many useful plug-ins, but also supports dynamic plug-in change and hot plug.
+
+When users develop custom plugins in Apache APISIX, they can define some APIs (hereinafter referred to as: public API) for the plugins. For example, the `jwt-auth` plugin, which implements and provides the `/apisix/plugin/jwt/sign` interface for signing JWT, because this interface is not added through the Admin API, it can't be managed like a route.
+
+In practical application scenarios, the provided interface is for internal calls, rather than being open on the public network for anyone to call. In order to deal with this scenario, Apache APISIX designed [`plugin-interceptors`](https://apisix.apache.org/zh/docs/apisix/plugin-interceptors/), which allows the public API to apply some plugins and implement request filtering, but currently only [`ip-restriction`](https://apisix.apache.org/zh/docs/apisix/plugins/ip-restriction) plugins are [...]
+
+It can be seen from the above that Apache APISIX's ability to request public API for filtering is relatively weak, so it is impossible to use the other plugins in Apache APISIX to achieve complex authentication and authorization.
+
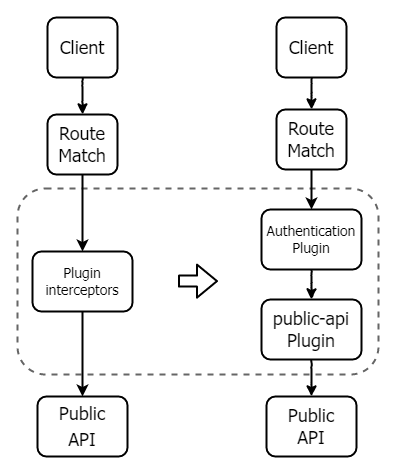
+Therefore, Apache APISIX has designed a `public-api` plugin that replaces the limited functionality and complex use of `plugin-interceptors`. With this plugin, you can solve the pain points in using the public API. You can set a custom URI for the public API and configure any type of plugin. The following figure shows the changes before and after using `public-api`.
+
+
+
+## Initial Knowledge about `public-api`
+
+This section takes the `/apisix/plugin/jwt/sign` interface of the `jwt-auth` plugin as an example to introduce two usage methods and a scenario example of the `public-api` plugin.
+
+Before using the `public-api` plugin, if the public API is registered using `_M.api()` in plugin development, APISIX will expose it by default and you can call it directly on the HTTP port. Now you need to manually create a route and configure the `public-api` plugin before you can forward the API to the `public-api` plugin.
+
+### Confirm Whether the API is Open
+
+You can request the API path by following the command below and return the result to see that `/apisix/plugin/jwt/sign` is not exposed by default and is not available.
+
+```Shell
+curl -XGET 'http://127.0.0.1:9080/apisix/plugin/jwt/sign?key=user-key'
+
+{"error_msg":"404 Route Not Found"}
+```
+
+### Prerequisites
+
+You need to create a Consumer and enable the `jwt-auth` plugin to perform the following steps.
+
+> For `jwt-auth` parameter configuration information in the example, you can refer to the [Apache APISIX official documentation](https://apisix.apache.org/zh/docs/apisix/plugins/jwt-auth).
+
+```Shell
+ curl -XPUT 'http://127.0.0.1:9080/apisix/admin/consumers' \
+ -H 'X-API-KEY: <api-key>' \
+ -H 'Content-Type: application/json' \
+ -d '{
+ "username": "APISIX",
+ "plugins": {
+ "jwt-auth": {
+ "key": "user-key",
+ "algorithm": "HS256"
+ }
+ }
+ }'
+```
+
+### Method 1: Basic Use
+
+1. Create and configure a Route.
+
+Create a Route based on the Consumer in the **Prerequisites**, set the `uri` to the API address where the JWT is issued in the `jwt-auth` plugin, and open the `public-api` plugin in the Route.
+
+```Shell
+ curl -XPUT 'http://127.0.0.1:9080/apisix/admin/routes/r1' \
+ -H 'X-API-KEY: <api-key>' \
+ -H 'Content-Type: application/json' \
+ -d'{
+ "uri": "/apisix/plugin/jwt/sign",
+ "plugins": {
+ "public-api": {}
+ }
+ }'
+```
+
+2. Test the Example.
+
+You can test with the following command, and if you see that the result is a `JWT` string, this public API is ready to use.
+
+```Shell
+ curl -XGET 'http://127.0.0.1:9080/apisix/plugin/jwt/sign?key=user-key'
+
+ <header>.<payload>.<signature>
+```
+
+### Method 2: Customize the Path
+
+Before using the `public-api` plugin, it is difficult for users to modify a `uri` that is open to the public API. Users of the `prometheus` plugin can customize the `exporter uri` by modifying the configuration file, but for other Apache APISIX plugins, this can only be done by modifying the plugin file, which is difficult and risky in a production environment.
+
+Now you can use the `public-api` plugin to modify the `uri` that the public API is open to the outside world, with the following examples.
+
+1. Create and configure a Route.
+
+Use the following command to modify the Route created in **Method 1**, set `uri=/gen_token`, and configure the original `uri` to the `uri` field in the `public-api` plugin.
+
+```Shell
+ curl -XPUT 'http://127.0.0.1:9080/apisix/admin/routes/r1' \
+ -H 'X-API-KEY: <api-key>' \
+ -H 'Content-Type: application/json' \
+ -d '{
+ "uri": "/gen_token",
+ "plugins": {
+ "public-api": {
+ "uri": "/apisix/plugin/jwt/sign"
+ }
+ }
+ }'
+```
+
+2. Test the Example.
+
+The public API is normally accessible with the new `uri`.
+
+```Shell
+ curl -XGET 'http://127.0.0.1:9080/gen_token?key=user-key'
+
+ <header>.<payload>.<signature>
+```
+
+The public API can't be accessed using the old `uri`.
+
+```Shell
+ curl -XGET 'http://127.0.0.1:9080/apisix/plugin/jwt/sign?key=user-key'
+
+ {"error_msg":"404 Route Not Found"}
+```
+
+### Scenario Example: Protecting Router
+
+This section describes how to use `public-api` plugin to address the business pain of `plugin-interceptors` plugin.
+
+The following steps take the `key-auth` plugin as an example to show you how to use the `public-api` plugin to protect the public API.
+
+> For `jwt-auth` parameter configuration information in the example, you can refer to the [Apache APISIX official documentation](https://apisix.apache.org/zh/docs/apisix/plugins/jwt-auth).
+
+1. Create and configure a Consumer.
+
+Create Consumer and configure the `key-auth` key.
+
+```Shell
+ curl -XPUT 'http://127.0.0.1:9080/apisix/admin/consumers' \
+ -H 'X-API-KEY: <api-key>' \
+ -H 'Content-Type: application/json' \
+ -d '{
+ "username": "APISIX",
+ "plugins": {
+ "key-auth": {
+ "key": "test-apikey"
+ }
+ }
+ }'
+```
+
+2. Create and configure a Route.
+
+Modify the route created in **Method 2** and open the `key-auth` plugin and `public-api` plugin.
+
+```Shell
+ curl -XPUT 'http://127.0.0.1:9080/apisix/admin/routes/r1' \
+ -H 'X-API-KEY: <api-key>' \
+ -H 'Content-Type: application/json' \
+ -d '{
+ "uri": "/gen_token",
+ "plugins": {
+ "public-api": {
+ "uri": "/apisix/plugin/jwt/sign"
+ },
+ "key-auth": {}
+ }
+ }'
+```
+
+3. Test the Example.
+
+After testing, when the request carries the correct `apikey`, the public API can respond normally. When the request does not carry the `apikey`, the `401` unauthenticated status code will be returned. If the returned results of your test are consistent with the sample status, it proves that the `key-auth` plugin you just configured has taken effect.
+
+```Shell
+ # with corrent apikey
+ curl -XGET 'http://127.0.0.1:9080/gen_token?key=user-key'
+ -H "apikey: test-apikey"
+
+ <header>.<payload>.<signature>
+
+ # without apikey
+ curl -i -XGET 'http://127.0.0.1:9080/gen_token?key=user-key'
+
+ HTTP/1.1 401 UNAUTHORIZED
+```
+
+## Principle Explanation
+
+From the above example, you can see that the `public-api` plugin can solve the defects of users when using the public API. This section introduces the implementation principle in detail.
+
+The principle of `public-api` can be described in one sentence: the `public-api` plugin transfers the previous separate public API route matching to the plugin, and only performs public API matching for the routes that open the plugin. The following will explain the principle in detail from two aspects.
+
+### Before Using `public-api` Plugin
+
+First, you need to understand how Apache APISIX realizes the function of public API before integrating `public-api` plugin.
+
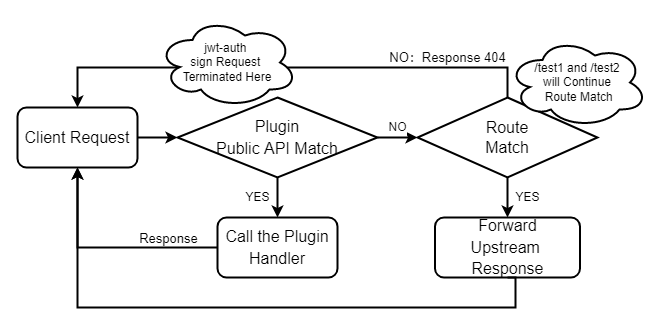
+- When apisix starts, it will load the custom plugin and build a radiotree router using the route configuration obtained from etcd. It will be responsible for matching the route according to the request information and calling the correct `handler` to forward the request.
+- APISIX will create different routers for the public API of the custom plugin and the Route created by users respectively (hereinafter referred to as public API router and Route router).
+- When a request arrives, it will be matched first by the public API router and then by the Route router. They are two completely separate parts in the request processing flow.
+
+
+
+According to this process, if you want to apply the plugin for Route router to the public API router, you need to manually maintain a list of plugins and manually execute the plugin function after the public API router is matched. It can be seen that such an architecture is complex and difficult to maintain, and brings many problems, such as complex use (configuration based on `plugin_metadata`), coarse grained configuration (it is difficult to implement different policies for multiple p [...]
+
+### After adding the `public-api` Plugin
+
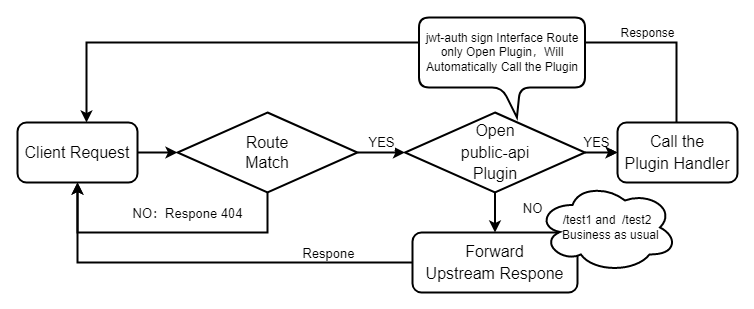
+After Apache APISIX introduce the `public-api` plugin, the above process will be simplified and the public API router matching previously executed before Route router matching will be transferred to the plugin.
+
+- When the request arrives, APISIX directly executes the Route router matching. When the corresponding route is found, the forwarding request is processed to the plugin.
+- -When a route opens the `public-api` plugin, it will call the specified public API for request processing according to the plugin configuration, and the request forwarding will no longer be performed. The route without the `public-api` plugin will not be processed.
+
+
+
+The public API provided by the user defined plugin will no longer be exposed by default. Instead, the user configures route to decide how to provide it. You can freely set routing parameters, such as `uri`, `host`, `method`, etc. after that, you only need to open the `public-api` plugin for routing.
+
+Because the `public-api` plugin has a low priority, it will be executed after most plugins are executed, so that users can configure any authentication and security plugins for route.
+
+Apache APISIX no longer performs the two stage Route route matching and performs different logic, all of which belong to Route routing matching, and the process of request processing is greatly simplified.
+
+## Summary
+
+You should note that after `public-api` is included in the official version release, Apache APISIX will no longer match the route of the public API in the HTTP request processing process of APISIX, that is, the public API registered in the plugin is not exposed by default. You can use the functions of the public API more flexibly through the use method of the `public-api` plugin.
+
+> This plug-in will be supported in `APISIX 2.13.0`. If you have completed the development of custom plug-in before `APISIX 2.13.0`, upgrading the version will affect your services. Please confirm again before upgrading.
+
+To get more information about the `public-api` plugin description and full configuration list, you can refer to the [Apache APISIX official documentation](https://apisix.apache.org/docs/apisix/next/plugins/public-api).
+
+Apache APISIX is also currently working on additional plugins to support the integration of additional services, so if you are interested, feel free to start a discussion in [GitHub Discussion](https://github.com/apache/apisix/discussions), or via the [mailing list](https://apisix.apache.org/zh/docs/general/subscribe-guide) to communicate.
diff --git a/website/i18n/zh/docusaurus-plugin-content-blog/2022/03/01/apisix-integration-public-api-plugin.md b/website/i18n/zh/docusaurus-plugin-content-blog/2022/03/01/apisix-integration-public-api-plugin.md
new file mode 100644
index 0000000..e4c147e
--- /dev/null
+++ b/website/i18n/zh/docusaurus-plugin-content-blog/2022/03/01/apisix-integration-public-api-plugin.md
@@ -0,0 +1,249 @@
+---
+title: "新插件上线,API 网关 Apache APISIX Public API 处理能力再增强"
+authors:
+ - name: "白泽平"
+ title: "Author"
+ url: "https://github.com/bzp2010"
+ image_url: "https://avatars.githubusercontent.com/u/8078418?v=4"
+ - name: "韩飞"
+ title: "Technical Writer"
+ url: "https://github.com/hf400159"
+ image_url: "https://avatars.githubusercontent.com/u/97138894?v=4"
+keywords:
+- Apache APISIX
+- API Gateway
+- Security
+- Ecosystem
+description: 本文为您介绍了 API 网关 Apache APISIX `public-api` 插件的原理及使用方法。
+tags: [Technology,Ecosystem]
+---
+
+> 本文为您介绍了 API 网关 Apache APISIX `public-api` 插件的原理及使用方法。
+
+<!--truncate-->
+
+## 背景信息
+
+Apache APISIX 是一个动态、实时、高性能的 API 网关,提供负载均衡、动态上游、灰度发布、服务熔断、身份认证、可观测性等丰富的流量管理功能。作为 API 网关,Apache APISIX 不仅拥有众多实用的插件,而且支持插件动态变更、热插拔和开发自定义插件。
+
+当前用户在 Apache APISIX 中开发自定义插件时,可以为插件定义一些 API(下称 public API),比如在当前的 `jwt-auth` 插件中,它实现并提供了一个 `/apisix/plugin/jwt/sign` 接口用于签发 JWT,由于此接口不是通过 Admin API 添加的,因此无法像管理 Route 一样管理此类接口。
+
+在实际应用场景中,提供的接口是面向内部调用的,而非开放在公网供任何人调用。为了应对这种场景,Apache APISIX 设计了 [`plugin-interceptors`](https://apisix.apache.org/zh/docs/apisix/plugin-interceptors/) (插件拦截器),通过此功能可以让 public API 应用部分插件并实现请求过滤,但是当前仅支持 [`ip-restriction`](https://apisix.apache.org/zh/docs/apisix/plugins/ip-restriction) 插件。
+
+由上可以看出,Apache APISIX 对于 public API 的请求过滤能力是比较弱的,所以不能使用 Apache APISIX 中其他插件实现复杂的认证和授权能力。
+
+因此,Apache APISIX 设计了 `public-api` 插件,它替换了功能有限且使用复杂的插件拦截器。通过这个插件,可以解决 public API 使用过程中的痛点,您可以为 public API 设置自定义的 `uri`,可以配置任何类型的插件。下图展示了使用 `public-api` 前后的变化。
+
+
+
+## 初识 public-api
+
+本节以 `jwt-auth` 插件的 `/apisix/plugin/jwt/sign` 接口为例,为您介绍 `public-api` 插件两种使用方法和一种场景示例。
+
+在使用 `public-api` 插件之前,如果在插件开发中使用 `_M.api()` 注册了 public API 后,APISIX 会默认将它暴露出来,您可以直接在 HTTP 端口调用这个 API。现在,您需要手动创建一个路由,配置 `public-api` 插件,才可以将 API 转发至 `public-api` 插件中。
+
+### 确认 API 是否被开放
+
+您可以通过下述命令请求 API 地址,通过返回结果可以看到 `/apisix/plugin/jwt/sign` 默认情况下并没有被暴露出来,是不可用的。
+
+```Shell
+curl -XGET 'http://127.0.0.1:9080/apisix/plugin/jwt/sign?key=user-key'
+
+{"error_msg":"404 Route Not Found"}
+```
+
+### 前提条件
+
+您需要创建 Consumer 并开启 `jwt-auth` 插件,才可以执行以下步骤。
+
+> 示例中 `jwt-auth` 参数配置信息,请参考 [Apache APISIX 官方文档](https://apisix.apache.org/zh/docs/apisix/plugins/jwt-auth)。
+
+```Shell
+curl -XPUT 'http://127.0.0.1:9080/apisix/admin/consumers' \
+-H 'X-API-KEY: <api-key>' \
+-H 'Content-Type: application/json' \
+-d '{
+ "username": "APISIX",
+ "plugins": {
+ "jwt-auth": {
+ "key": "user-key",
+ "algorithm": "HS256"
+ }
+ }
+}'
+```
+
+### 方法一:基础使用
+
+1. 设置路由
+
+根据**前提条件**中的 Consumer 创建 Route,设置 `uri` 为 `jwt-auth` 插件中签发 `JWT` 的 API 地址,并在此 Route 中开启 `public-api` 插件。
+
+```Shell
+ curl -XPUT 'http://127.0.0.1:9080/apisix/admin/routes/r1' \
+ -H 'X-API-KEY: <api-key>' \
+ -H 'Content-Type: application/json' \
+ -d'{
+ "uri": "/apisix/plugin/jwt/sign",
+ "plugins": {
+ "public-api": {}
+ }
+ }'
+```
+
+2. 测试示例
+
+使用如下命令进行测试,如果您看到返回结果是一个 JWT 字符串,表示此 public API 已经可以使用。
+
+```Shell
+ curl -XGET 'http://127.0.0.1:9080/apisix/plugin/jwt/sign?key=user-key'
+
+ <header>.<payload>.<signature>
+```
+
+### 方法二:自定义路径
+
+在使用 `public-api` 插件之前,用户想要修改一个 public API 对外开放的 `uri`,是比较困难的。使用 `prometheus` 插件的用户可以通过修改配置文件的方法自定义 `exporter uri`,但是对于其他 Apache APISIX 的插件,只能通过修改插件文件的方式来实现,而在生产环境中此操作是有困难且有风险的。
+
+现在您可以使用 `public-api` 插件修改 public API 对外开放的 `uri`,具体操作示例如下。
+
+1. 设置路由
+
+使用如下命令修改**方法一**中创建的 Route,并设置 `uri=/gen_token`,同时将原有的 `uri` 配置到 `public-api` 插件中的 `uri` 字段。
+
+```Shell
+ curl -XPUT 'http://127.0.0.1:9080/apisix/admin/routes/r1' \
+ -H 'X-API-KEY: <api-key>' \
+ -H 'Content-Type: application/json' \
+ -d '{
+ "uri": "/gen_token",
+ "plugins": {
+ "public-api": {
+ "uri": "/apisix/plugin/jwt/sign"
+ }
+ }
+ }'
+```
+
+2. 测试示例
+
+使用新 `uri` 可以正常访问 public API。
+
+```Shell
+ curl -XGET 'http://127.0.0.1:9080/gen_token?key=user-key'
+
+ <header>.<payload>.<signature>
+```
+
+使用旧 `uri` 无法访问 public API。
+
+```Shell
+ curl -XGET 'http://127.0.0.1:9080/apisix/plugin/jwt/sign?key=user-key'
+
+ {"error_msg":"404 Route Not Found"}
+```
+
+### 场景示例:保护路由
+
+本节将介绍如何使用 `public-api` 插件解决 `plugin-interceptors` 插件所带来的业务痛点。
+
+以下步骤以 `key-auth` 插件为例,为您介绍如何使用 `public-api` 插件保护 public API。
+
+> 示例中 `key-auth` 配置信息,请参考 [Apache APISIX 官方文档](https://apisix.apache.org/zh/docs/apisix/plugins/jwt-auth)。
+
+1. 创建 Consumer
+
+创建 Consumer,并配置 `key-auth` 密钥。
+
+```Shell
+ curl -XPUT 'http://127.0.0.1:9080/apisix/admin/consumers' \
+ -H 'X-API-KEY: <api-key>' \
+ -H 'Content-Type: application/json' \
+ -d '{
+ "username": "APISIX",
+ "plugins": {
+ "key-auth": {
+ "key": "test-apikey"
+ }
+ }
+ }'
+```
+
+2. 设置路由
+
+修改**方法二**中创建的路由,并开启 `key-auth` 插件和 `public-api` 插件。
+
+```Shell
+ curl -XPUT 'http://127.0.0.1:9080/apisix/admin/routes/r1' \
+ -H 'X-API-KEY: <api-key>' \
+ -H 'Content-Type: application/json' \
+ -d '{
+ "uri": "/gen_token",
+ "plugins": {
+ "public-api": {
+ "uri": "/apisix/plugin/jwt/sign"
+ },
+ "key-auth": {}
+ }
+ }'
+```
+
+3. 测试示例
+
+经过测试,当请求携带正确的 `apikey` 时,public API 可以正常响应,而没有携带 `apikey` 时,将返回 `401` 未认证的状态码。如果您测试的返回结果和示例状态一致,则证明您刚刚配置的 `key-auth` 插件已经生效。
+
+```Shell
+ # with corrent apikey
+ curl -XGET 'http://127.0.0.1:9080/gen_token?key=user-key'
+ -H "apikey: test-apikey"
+
+ <header>.<payload>.<signature>
+
+ # without apikey
+ curl -i -XGET 'http://127.0.0.1:9080/gen_token?key=user-key'
+
+ HTTP/1.1 401 UNAUTHORIZED
+```
+
+## 原理详解
+
+从上述示例中您可以看出,`public-api` 插件可以很好的解决用户在使用 public API 时的缺陷。本节为您详细介绍实现原理。
+
+关于 `public-api` 的原理,可以使用一句话描述:`public-api` 插件将之前单独的 public API 路由匹配转移到插件内部,仅对开启插件的路由进行 public API 匹配。以下将从两个方面为您详细解释原理。
+
+### 使用 `public-api` 插件之前
+
+首先,您需要了解 Apache APISIX 在集成 `public-api` 插件之前是如何实现 public API 的功能的。
+
+- 当 APISIX 启动时会加载自定义插件,并使用从 etcd 获取的 Route 配置构建 radixtree 路由器,它将负责根据请求信息匹配 Route 并调用正确的 `handler` 来转发请求。
+- APISIX 将为自定义插件的 public API 与用户创建的 Route 分别创建不同的路由器(下文分别称为 public API 路由器和 Route 路由器)
+- 当请求到达时,将先由 public API 路由器进行匹配,之后再由 Route 路由器进行匹配。它们在请求处理流程上是完全分开的两个部分。
+
+
+
+根据此流程,如果您想将面向 Route 路由器的插件应用在 public API 路由器上,就需要手动维护一个插件列表,并在 public API 路由器匹配到之后手动执行插件函数。由此可以看出,这样的架构是复杂且难以维护的,并且带来了许多问题,如使用复杂(基于 `plugin_metadata` 的配置方式)、粗粒度配置(难以为一个插件中提供的多个 public API 执行不同的策略)等。
+
+### 增加 `public-api` 插件之后
+
+在我们引入了 `public-api` 插件后,上述流程将会被简化,将原来先于 Route 路由匹配执行的 public API 路由匹配被转移到了插件中。
+
+- 当请求到达时,APISIX 会直接执行 Route 路由匹配,当找到相应的路由后,将转发请求至插件中进行处理。
+- 当一个 Route 开启了 `public-api` 插件时,将根据插件的配置调用指定的 public API 进行请求处理,不再执行请求的转发。而没有开启 `public-api` 插件的 Route,将不会进行处理。
+
+
+
+自定义插件提供的 public API 默认将不再暴露出来,而是由用户配置 Route 来决定以何种方式提供,可以自由的设置路由参数,如 `uri`、`host`、`method` 等,之后只需要为路由开启 `public-api` 插件即可。
+
+由于 `public-api` 插件具有较低的优先级,它将在大部分插件执行完之后再执行,这样用户就可以为 Route 配置任意认证和安全类插件。
+
+Apache APISIX 不再进行两阶段的 Route 路由匹配和执行不同的逻辑,一切归于 Route 路由匹配,请求处理的流程也被简化。
+
+## 总结
+
+需要注意,`public-api` 在被纳入正式版本发布之后,在 APISIX 的 HTTP 请求处理流程中,Apache APISIX 将不再进行 public API 的路由匹配,即默认不暴露插件中注册的 public API。您可以参考上述 `public-api` 插件的操作示例更加灵活的使用 public API 的功能。
+
+> 此插件将在 `APISIX v2.13.0` 版本上线支持,如果您已经在 `APISIX v2.13.0` 之前的版本完成自定义插件的开发,升级版本后会对您的业务造成影响,请您升级前再次确认。
+
+关于 `public-api` 插件的更多说明和完整配置信息,您可以参考 [Apache APISIX 官方文档](https://apisix.apache.org/docs/apisix/next/plugins/public-api)。
+
+Apache APISIX 项目目前正在开发其他插件以支持集成更多服务,如果您对此有兴趣,您可以通过 [GitHub Discussions](https://github.com/apache/apisix/discussions) 发起讨论,或通过[邮件列表](https://apisix.apache.org/docs/general/subscribe-guide)进行交流.