You are viewing a plain text version of this content. The canonical link for it is here.
Posted to notifications@apisix.apache.org by bz...@apache.org on 2021/12/22 08:56:55 UTC
[apisix-website] branch master updated: fix: revise based on review comments (#819)
This is an automated email from the ASF dual-hosted git repository.
bzp2010 pushed a commit to branch master
in repository https://gitbox.apache.org/repos/asf/apisix-website.git
The following commit(s) were added to refs/heads/master by this push:
new 2ed41bd fix: revise based on review comments (#819)
2ed41bd is described below
commit 2ed41bd9b250e5a0c2bc661d0d10ac355370a3bd
Author: yilinzeng <36...@users.noreply.github.com>
AuthorDate: Wed Dec 22 16:56:48 2021 +0800
fix: revise based on review comments (#819)
---
website/blog/2021/12/22/google-logging.md | 8 ++++----
.../2021/12/22/google-logging.md | 14 +++++++-------
2 files changed, 11 insertions(+), 11 deletions(-)
diff --git a/website/blog/2021/12/22/google-logging.md b/website/blog/2021/12/22/google-logging.md
index ebc6efd..056b38c 100644
--- a/website/blog/2021/12/22/google-logging.md
+++ b/website/blog/2021/12/22/google-logging.md
@@ -75,7 +75,7 @@ This article will explain how to configure and use the Google Cloud Logging serv
#### Option 1: Upload key file configuration
1. Upload the private key file to the Apache APISIX node server.
-2. Configure the file path to the google-cloud-logging. auth_file configuration item, as shown below:
+2. Configure the file path to the `google-cloud-logging.auth_file`, as shown below:
```shell
curl http://127.0.0.1:9080/apisix/admin/routes/1 -H 'X-API-KEY: edd1c9f034335f136f87ad84b625c8f1' -X PUT -d '
@@ -103,8 +103,8 @@ curl http://127.0.0.1:9080/apisix/admin/routes/1 -H 'X-API-KEY: edd1c9f034335f1
#### Option 2: Declare configurations in JSON
1. Open the private key file.
-2. Configure the value of "project_id" to google-cloud-logging. auth_config.project_id.
-3. Configure the value of "private_key" to google-cloud-logging. auth_config. private_key.
+2. Configure the value of `project_id` to `google-cloud-logging.auth_config.project_id`.
+3. Configure the value of `private_key` to `google-cloud-logging.auth_config.private_key`.
As shown below:
```shell
@@ -199,7 +199,7 @@ This article describes the detailed steps for interfacing Apache APISIX and Goog
Apache APISIX is not only committed to maintaining its own high performance, but also has always attached great importance to the construction of open source ecology. At present, Apache APISIX has 10+ logging-related plugins and supports interfacing with mainstream open source logging projects in the industry.
-If you have a need to interface to other logs, visit Apache APISIX's [GitHub](https://github.com/apache/apisix/issues) and leave your suggestions via issue; or subscribe to the Apache APISIX [mailing list](https://apisix.apache.org/zh/docs/general/subscribe-guide) and express your thoughts via email.
+If you have a need to interface to other logs, visit Apache APISIX's [GitHub](https://github.com/apache/apisix/issues) and leave your suggestions via issue; or subscribe to the Apache APISIX [mailing list](https://apisix.apache.org/docs/general/subscribe-guide/) and express your thoughts via email.
## Related articles
diff --git a/website/i18n/zh/docusaurus-plugin-content-blog/2021/12/22/google-logging.md b/website/i18n/zh/docusaurus-plugin-content-blog/2021/12/22/google-logging.md
index 472cda3..1fcfaa8 100644
--- a/website/i18n/zh/docusaurus-plugin-content-blog/2021/12/22/google-logging.md
+++ b/website/i18n/zh/docusaurus-plugin-content-blog/2021/12/22/google-logging.md
@@ -1,7 +1,7 @@
---
title: 捷报频传!Apache APISIX 现已支持对接 Google Cloud Logging
authors:
- - name: "帅近超"
+ - name: "帅进超"
title: "Author"
url: "https://github.com/shuaijinchao"
image_url: "https://avatars.githubusercontent.com/u/8529452?v=4"
@@ -33,7 +33,7 @@ Apache APISIX 在此之前已经支持集成了 HTTP Logger 、TCP Logger、Kafk
最近,Apache APISIX 对 Google Cloud Logging 也完成了支持,在使用 Apache APISIX 作为网关时用户又多了一种新的日志解决方案:使用 google-cloud-logging 插件,将 Apache APISIX 的请求日志转发到 Google Cloud Logging 服务中进行分析和存储。
-启用该插件后, Apache APISIX 将在 Log Phase 获取请求上下文信息并序列化为 Google Cloud Logging 的 日志格式,然后将序列化后的日志数据提交到批处理队列中,当批处理队列触发用户设置的时间或条目阈值时会将日志数据通过 Google Cloud API 批量转发到 Google Cloud Logging 服务中。
+启用该插件后, Apache APISIX 将在 Log Phase 获取请求上下文信息并序列化为 Google Cloud Logging 的日志格式,然后将序列化后的日志数据提交到批处理队列中,当批处理队列触发用户设置的时间或条目阈值时会将日志数据通过 Google Cloud API 批量转发到 Google Cloud Logging 服务中。
本文将为大家介绍如何在 Apache APISIX 中配置和使用 Google Cloud Logging 服务。
@@ -41,7 +41,7 @@ Apache APISIX 在此之前已经支持集成了 HTTP Logger 、TCP Logger、Kafk
1. 打开浏览器,访问 Google Cloud 首页。
2. 输入用户名和密码,登录 Google Cloud 控制台。
-3. 单击 Google Cloud 控制台左侧菜单,选择 “IAM& Admin > Create a Project”,开始创建项目。
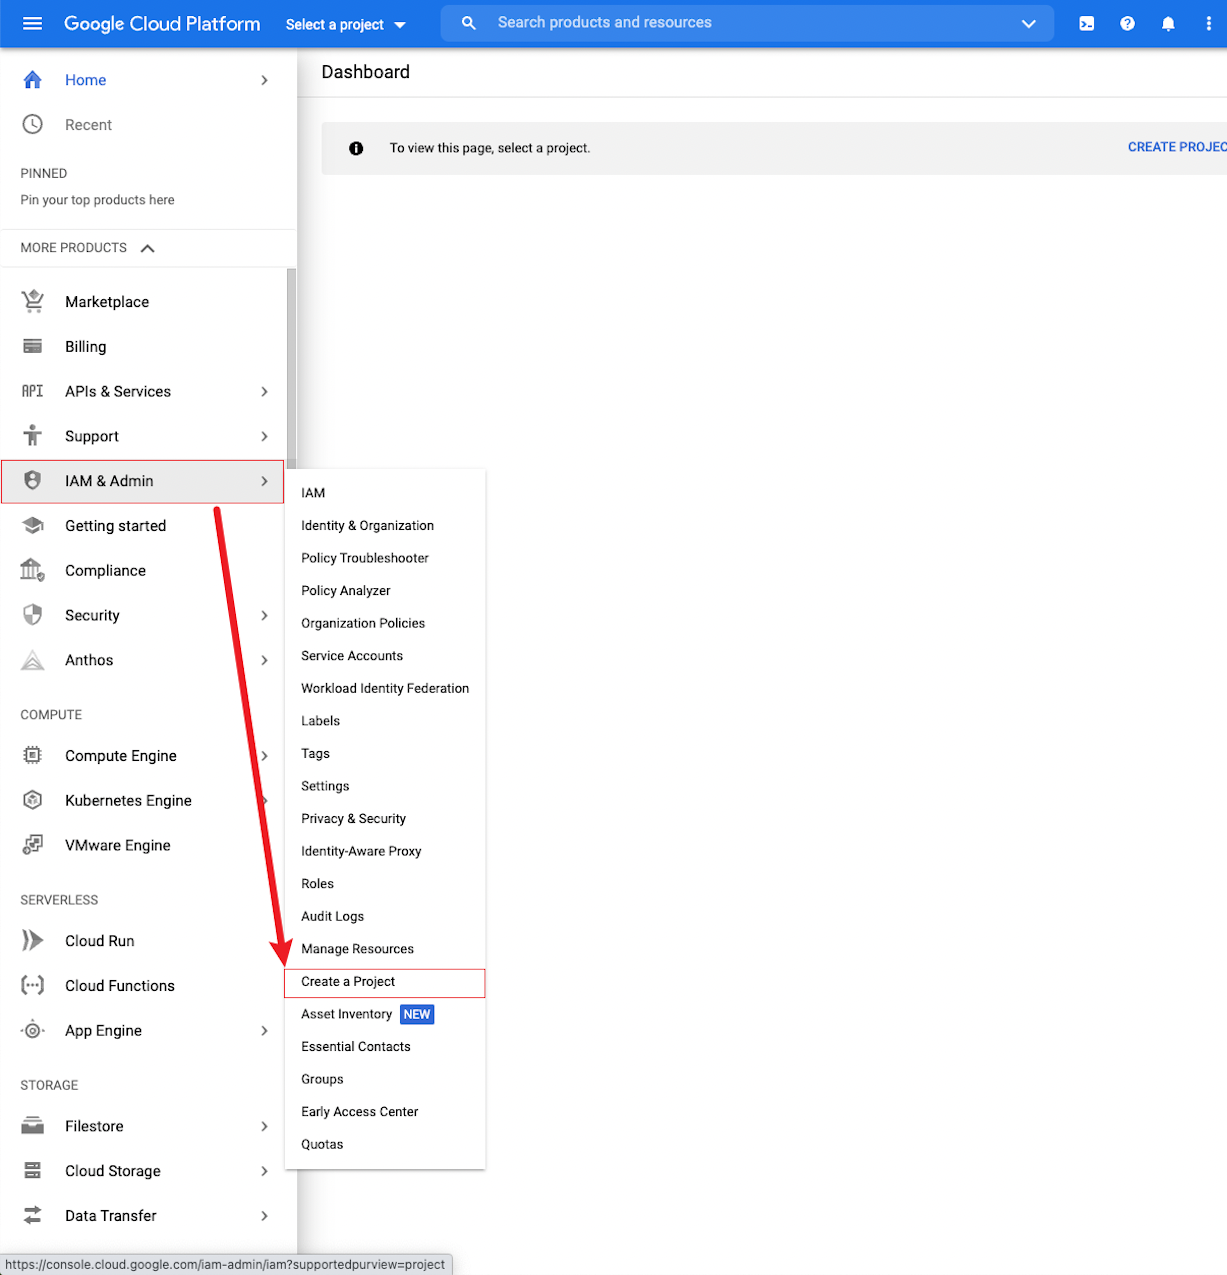
+3. 单击 Google Cloud 控制台左侧菜单,选择 “IAM & Admin > Create a Project”,开始创建项目。
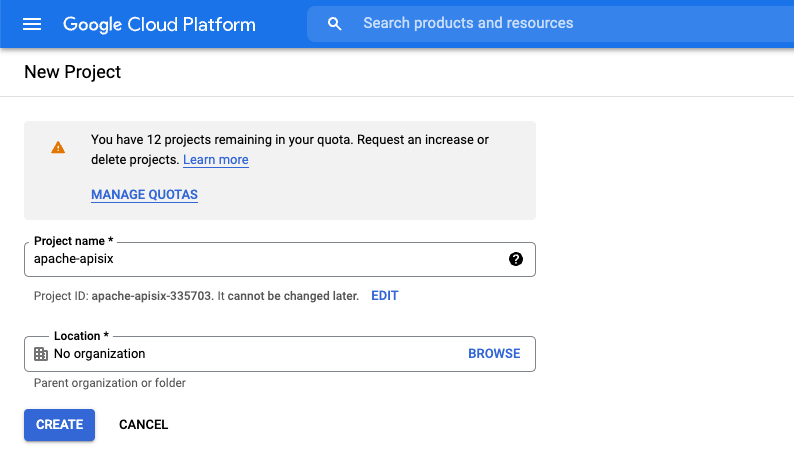
4. 输入项目名称,选择组织名称,单击 “CREATE” 创建项目。
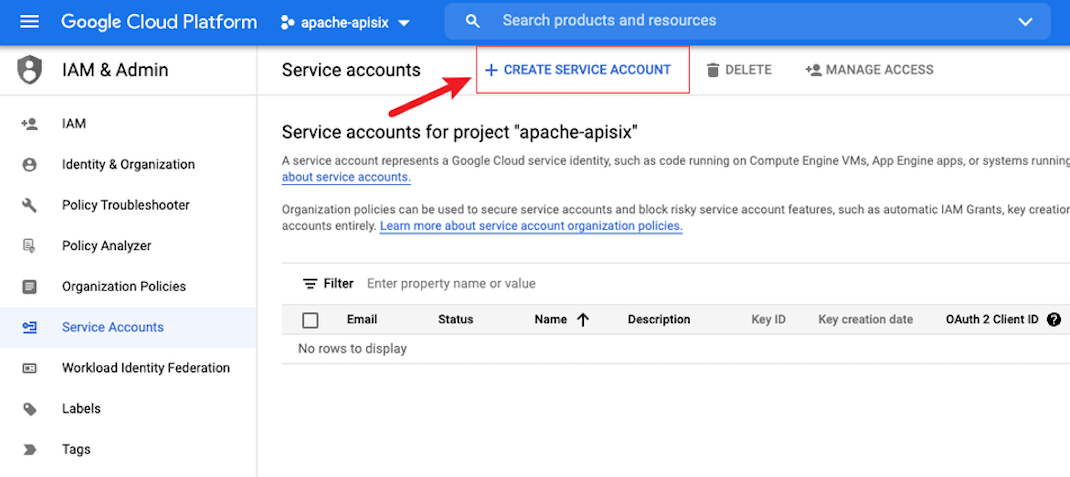
@@ -55,9 +55,9 @@ Apache APISIX 在此之前已经支持集成了 HTTP Logger 、TCP Logger、Kafk
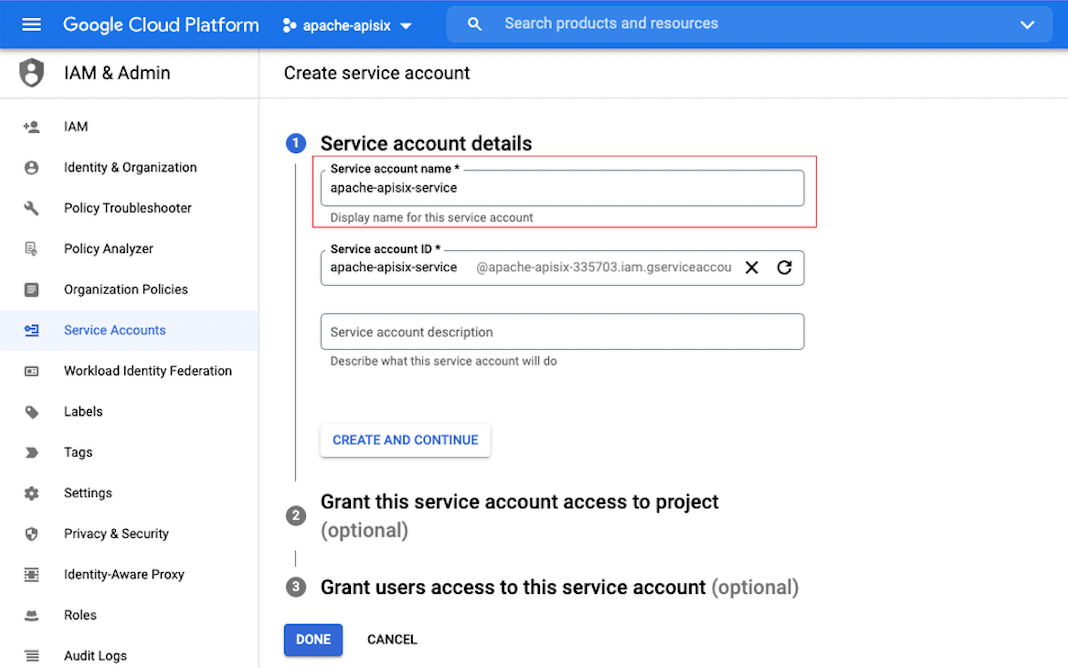
9. 输入服务账号名称及 ID(ID 一般跟随账号生成),然后单击 “CREATE AND CONTINUE”。
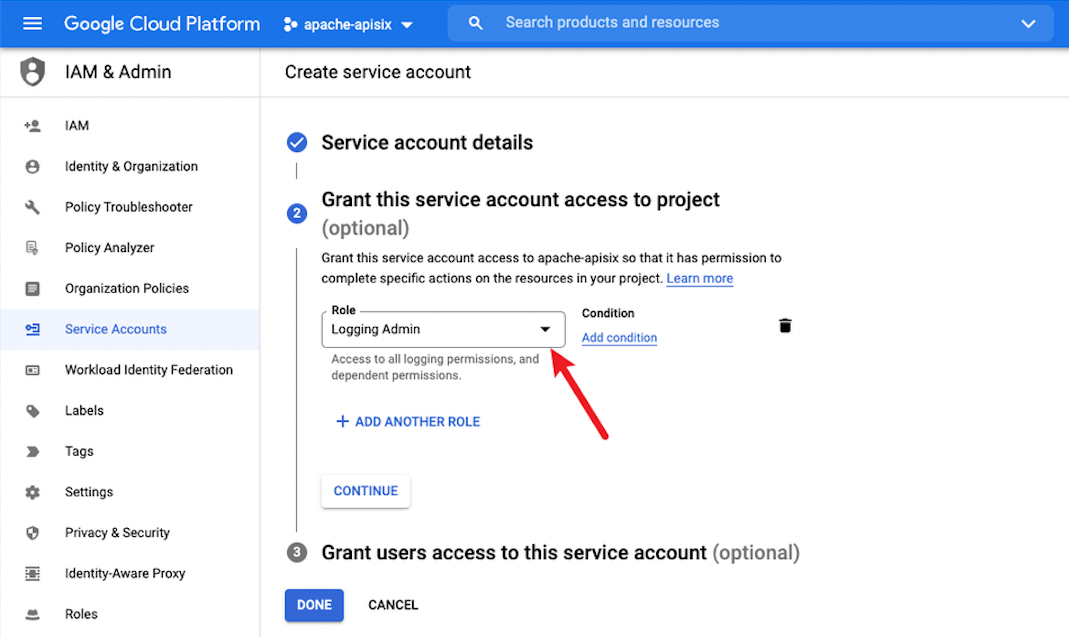
-10. 单击“Role”,在搜索框中输入“Logging Admin” 搜索这个角色,选择“Logging Admin”作为角色。
+10. 单击“Role”,在搜索框中输入“Logging Admin”搜索这个角色,选择“Logging Admin”作为角色。
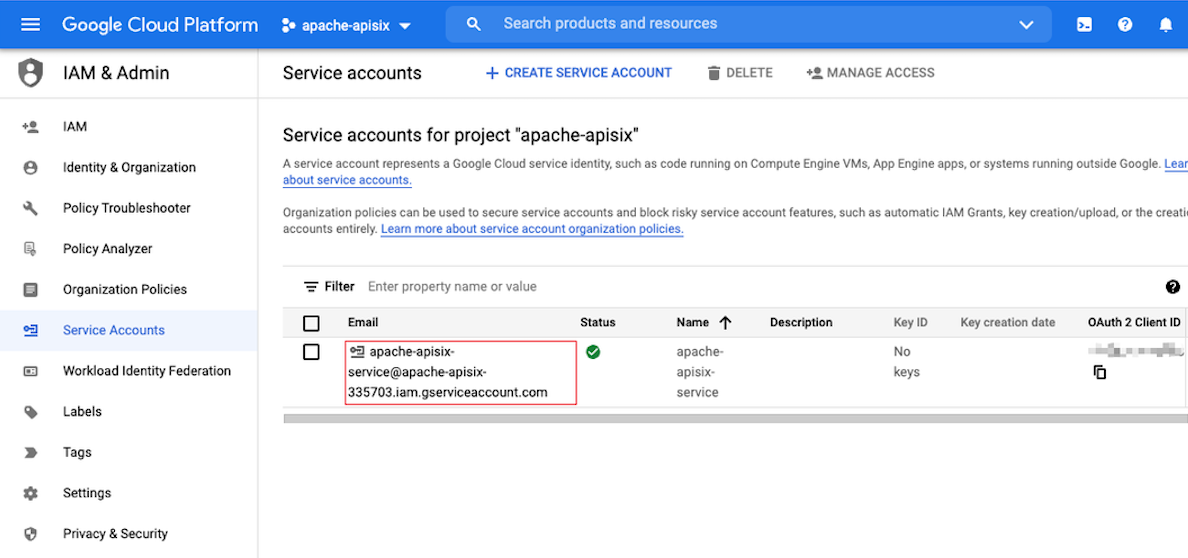
-11. 单击“DONE”, 完成服务账号创建,跳转到服务账号首页。此时你可以在列表中看到刚刚创建的账号及详情。
+11. 单击“DONE”,完成服务账号创建,跳转到服务账号首页。此时你可以在列表中看到刚刚创建的账号及详情。
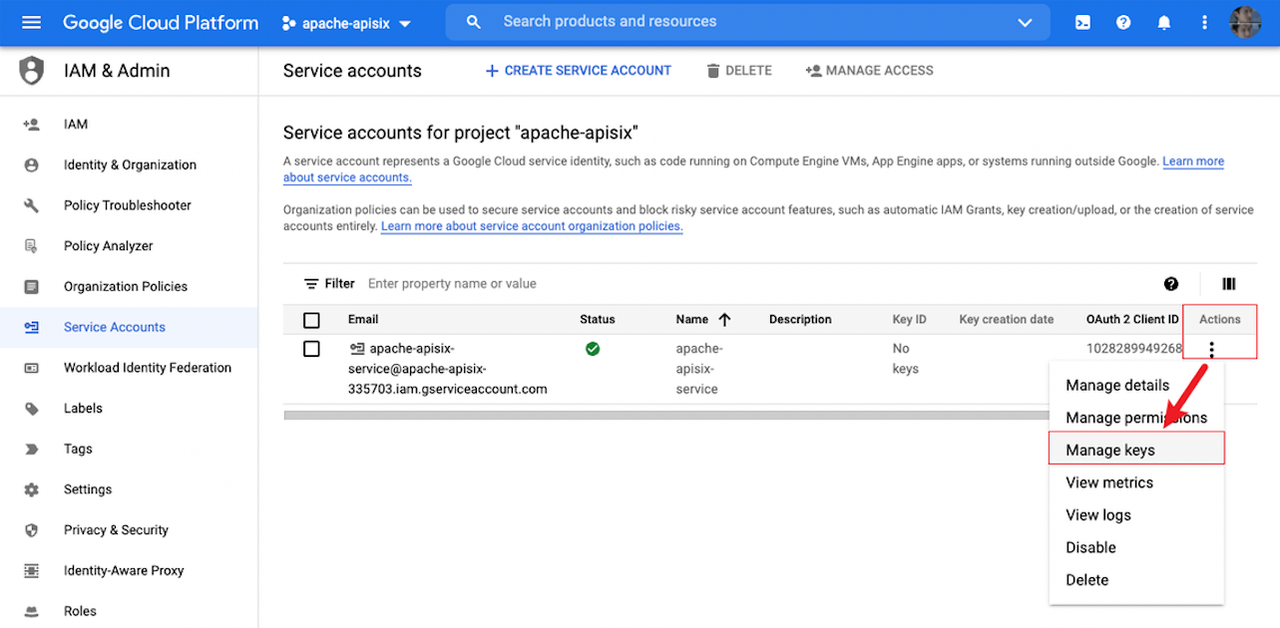
12. 在服务账号最后一列的操作栏单击“Manage keys”,进入秘钥管理界面。
@@ -103,7 +103,7 @@ curl http://127.0.0.1:9080/apisix/admin/routes/1 -H 'X-API-KEY: edd1c9f034335f1
#### 通过 JSON 文本配置
1. 打开私钥文件。
-2. 将`project_id` 的值配置到 `google-cloud-logging. auth_config.project_id` 配置项中。
+2. 将 `project_id` 的值配置到 `google-cloud-logging. auth_config.project_id` 配置项中。
3. 将 `private_key` 的值配置到 `google-cloud-logging. auth_config. private_key` 配置项中。
如下所示:
@@ -200,7 +200,7 @@ curl http://127.0.0.1:9080/apisix/admin/routes/1 -H 'X-API-KEY: edd1c9f034335f1
Apache APISIX 不仅致力于保持自身的高性能,也一直非常重视开源生态的建设。目前 Apache APISIX 已经拥有了 10+ 个日志相关的插件,支持与业界主流的开源日志项目对接。
-如果你有对接其他日志的需求,不妨访问 Apache APISIX 的 GitHub,通过 issue 留下你的建议;或订阅Apache APISIX 的邮件列表,通过邮件表达你的想法。
+如果你有对接其他日志的需求,不妨访问 Apache APISIX 的 [GitHub](https://github.com/apache/apisix/issues),通过 issue 留下你的建议;或订阅 Apache APISIX 的[邮件列表](https://apisix.apache.org/zh/docs/general/subscribe-guide),通过邮件表达你的想法。
## 相关阅读