You are viewing a plain text version of this content. The canonical link for it is here.
Posted to commits@linkis.apache.org by pe...@apache.org on 2022/02/22 15:58:54 UTC
[incubator-linkis-website] branch dev updated: adjust ppmc-related-permission-configuration.md (#164)
This is an automated email from the ASF dual-hosted git repository.
peacewong pushed a commit to branch dev
in repository https://gitbox.apache.org/repos/asf/incubator-linkis-website.git
The following commit(s) were added to refs/heads/dev by this push:
new 99a5863 adjust ppmc-related-permission-configuration.md (#164)
99a5863 is described below
commit 99a586399a9d93bb9c82f72107628e63d8d3081b
Author: Casion <ca...@gmail.com>
AuthorDate: Tue Feb 22 23:57:48 2022 +0800
adjust ppmc-related-permission-configuration.md (#164)
* adjust ppmc-related-permission-configuration.md
---
.../development_specification/_category_.json | 2 +-
community/how-committer-binds-github-account.md | 95 ---------------
community/how-to-sign-apache-icla.md | 4 +-
community/how-to-vote-a-committer-ppmc.md | 6 +-
community/how-to-write-unit-test-code.md | 41 ++++---
community/ppmc-related-permission-configuration.md | 128 +++++++++++++++++++++
docusaurus.config.js | 7 +-
i18n/zh-CN/code.json | 2 +-
.../2022-02-21-linkis-deploy.md/index.md | 82 +++++++------
.../current/how-to-sign-apache-icla.md | 6 +-
.../current/how-to-vote-a-committer-ppmc.md | 7 +-
.../current/how-to-write-unit-test-code.md | 29 +++--
...md => ppmc-related-permission-configuration.md} | 64 +++++++++--
static/img/community/mail-relay.png | Bin 0 -> 385066 bytes
static/img/community/subscribe.png | Bin 0 -> 90551 bytes
15 files changed, 280 insertions(+), 193 deletions(-)
diff --git a/community/development_specification/_category_.json b/community/development_specification/_category_.json
index 8d2fcb0..f7bcd08 100644
--- a/community/development_specification/_category_.json
+++ b/community/development_specification/_category_.json
@@ -1,4 +1,4 @@
{
"label": "Development Specification",
- "position": 7
+ "position": 9
}
\ No newline at end of file
diff --git a/community/how-committer-binds-github-account.md b/community/how-committer-binds-github-account.md
deleted file mode 100644
index cfba602..0000000
--- a/community/how-committer-binds-github-account.md
+++ /dev/null
@@ -1,95 +0,0 @@
----
-Title: PPMC members binds github account
-sidebar_ position: 2
----
-
-## Process Overview
-1. Associate Apache account with GitHub account
-2. Open 2FA authentication for GitHub personal account
-3. Open permission application on gitbox
-## 1. Associate Apache ID with GitHub account
-### Mode 1
-Landing https://id.apache.org The [Your GitHub Username] field in LDAP is set to its own GitHub ID. Enter your password and click Submit changes. You will receive an invitation to join the organization of Apache organization on GitHub within four hours. Your GitHub account email should receive an email with the title "ASF gitbox".
-
-If the invitation has expired (7 days later), you can try both method 1 and method 2 again. See if you can receive the invitation email to join ASF org again in the email associated with the GitHub account (search "ASF gitbox").
-
-If you haven't received the invitation, try the following:
-1. Delete the GitHub accounts in methods 1 and 2 first;
-2. Wait for 1 scanning cycle (4 hours to be safe), and then add back the GitHub account;
-3. Then wait another 4 hours to see if the invitation email to join ASF org can be received again in the email associated with the GitHub account (search the email title "ASF gitbox").
-
-
-
-### Mode 2
-visit https://whimsy.apache.org/roster/committer/xxx (replace with your Apache ID) modify the corresponding data, and you will receive an invitation to join Apache's GitHub organization within four hours.
-
-Check the invitation email of GitHub organization that invites you to join Apache. The invitation is valid for 7 days
-
-
-
-After successful invitation, you can see that the organization you belong to has Apache based on your GitHub account information
-
-
-
-## 2. Enable 2FA authentication (login token) for GitHub personal account
-Two factor authentication (2FA) refers to the method of authenticating users by combining password and physical conditions (credit card, SMS mobile phone, token or fingerprint and other biometrics). To ensure the security of the submitter's account, we need you to enable 2FA on GitHub to authenticate the login user and contribute code. Refer to 2FA for details.
-
-You need to install TOTP software on the mobile phone, search TOTP in the application market (Microsoft authenticator can be used for Android), and IOS Apple mobile phone recommends downloading authy token software, which can be bound to the mobile phone for cloud backup. SMS is also supported, but the GitHub configuration page has no Chinese mobile number + 86 to choose from by default. See the front-end code when you need to modify the configuration https://www.programmerall.com/articl [...]
-
-Step1 visit the personal account security setting page https://github.com/settings/security Select the fourth item [account security]
-
-
-
-Step2 select [set up using an app] next
-
-
-
-Step3 enters the QR code binding page, scans the code using the TOTP type app with the download number in advance, and enters the 6 displayed on the mobile terminal as the token
-
-
-
-Step4 download recover codes, then enter the success page and click Done to bind successfully
-
-
-
-be careful
-
-When 2FA authentication is enabled, you need to use the user name / password + Mobile authentication code to log in to GitHub.
-
-When 2FA authentication is enabled, a private access token needs to be generated for git submission and other operations. At this time, you will use the user name + private access token to submit the code instead of the user name + password (subsequent on-demand configuration).
-
-For specific operations, please refer to creating a private token.
-
-If 2FA is subsequently closed, it will be removed from the project and will not be able to access our warehouse and fork warehouse from our private warehouse.
-
-##3. Open permission application on gitbox
-
-Step1 access https://gitbox.apache.org/setup/ Authorize associated Apache account
-
-
-
-Step 2 authorized associated GitHub account
-
-
-
-Step3 MFA status verification
-
-
-
-be careful
-
-After successful execution, see the figure below. Write permission will be enabled within about an hour after success. If the MFA status prompts "user not a member of the ASF GitHub organization. Please make sure you are a part of the ASF organization on GitHub and have 2FA enabled. Visit id.apache.org and set your GitHub ID to be invited to the org." Please check whether [associate Apache and GitHub account] is completed / whether 2FA is enabled. If it is normal, please verify it later [...]
-
-
-
-##4. Other linked documents
-
-[GitHub uses TOTP to enable 2FA authentication] https://docs.github.com/cn/authentication/securing-your-account-with-two-factor-authentication-2fa/configuring-two-factor-authentication
-
-[create private token] https://docs.github.com/cn/authentication/keeping-your-account-and-data-secure/creating-a-personal-access-token
-
-[introduction to gitbox] https://gitbox.apache.org
-
-[Apache and GitHub] https://infra.apache.org/apache-github.html
-
-[git github &gitbox] https://cwiki.apache.org/confluence/display/INFRA/Git%2C +GitHub+and+Gitbox
diff --git a/community/how-to-sign-apache-icla.md b/community/how-to-sign-apache-icla.md
index 61c3e1e..fb5fb2e 100644
--- a/community/how-to-sign-apache-icla.md
+++ b/community/how-to-sign-apache-icla.md
@@ -1,6 +1,6 @@
---
-title: Apache icla signing process
-sidebar_position: 2
+title: ICLA Signing Process
+sidebar_position: 7
---
## Apache Sign ICLA Guide {#apache-sign-icla-guide}
diff --git a/community/how-to-vote-a-committer-ppmc.md b/community/how-to-vote-a-committer-ppmc.md
index 52744fb..43bc0be 100644
--- a/community/how-to-vote-a-committer-ppmc.md
+++ b/community/how-to-vote-a-committer-ppmc.md
@@ -26,7 +26,7 @@ Below are some points to consider when evaluating candidates for commitment elig
- Have a more comprehensive understanding of the project
- Ability to control project progress and version quality
- Actively participate in/lead the construction of the community, promote the healthy development of the community, and take the initiative to undertake the responsibility and governance of the project
- - Actively revive the issues raised by the ASF Board and take necessary action
+ - Respond proactively to questions raised by the ASF Board and take necessary action
- Familiar with the release process of ASF
In most cases, new PPMC members are nominated from the Committer team. But it is also possible to become a member of the PPMC directly, as long as the PPMC agrees to the nomination and is confident that the candidate is ready. This can be demonstrated, for example, by the fact that he/she was an Apache member, an Apache official, or a PPMC member of another project.
@@ -218,7 +218,6 @@ Once the invitation is accepted, new submitters must take the following steps:
- After filling in the correct information in `icla.pdf` (or `ccla.pdf`), print it, sign it by hand, scan it into PDF, and send it as an attachment to [secretary@apache.org] (email: secretary@apache.org). (If electronic signatures are preferred, follow the steps on [this page](http://www.apache.org/licenses/contributor-agreements.html#submitting))
- PPMC will wait for the Apache Secretary to confirm ICLA (or CCLA) filing. New submitters and PPMC will receive the following email:
-For detailed instructions, see [Opening Apache's github repository permissions](https://docs.qq.com/doc/DVURNYkhMV3llWEhR)
```html
Dear ${Candidate Name},
@@ -247,6 +246,9 @@ PPMC members should add new committers to the official committer list via [Roste
- Use the [GitBox Account Linking Utility] (https://gitbox.apache.org/setup/) to obtain the write permission of the Linkis project.
- [linkis-website](https://linkis.apache.org/team) related page update
+
+For detailed instructions, see [PPMC/Committer Related Permission Configuration](ppmc-related-permission-configuration.md)
+
If you want to make a public appearance in the Apache GitHub organization, you need to go to the [Apache GitHub people page](https://github.com/orgs/apache/people),
Search for yourself, then select `Organization visibility` for `Public`.
diff --git a/community/how-to-write-unit-test-code.md b/community/how-to-write-unit-test-code.md
index 4fa6cb6..d3deacf 100644
--- a/community/how-to-write-unit-test-code.md
+++ b/community/how-to-write-unit-test-code.md
@@ -1,9 +1,9 @@
---
-Title: how to write unit test code
-sidebar_ position: 3
+title: How to Write Unit Test Code
+sidebar_position: 10
---
-## 0 frame selection
+## Frame Selection
Junit5 + mockito + Jacobo + H2 local database
@@ -13,9 +13,7 @@ Idea enhancement plugin
- Create the allnewset object and set the default value for allnewset
- The association mapping between mybatisx ADO and mapper is easy to view
-controller service
-
-### Configure the template of JUnit in idea
+### Configure the Template of JUnit in Idea
```properties
@@ -120,9 +118,9 @@ public class $testClass {
-## 1 unit test criteria
+## Unit Test Criteria
-### 1.1 catalogue and naming criteria
+### Catalogue And Naming Citeria
- 1. Unit test code directory
It must be written in the following project directory: src/test/java. It is not allowed to write in the business code directory.
@@ -140,7 +138,7 @@ public class $testClass {
- 4. Specification for naming and defining test cases: use test as the prefix of method names
The naming rule of test cases is: test + method name. Avoid using names that have no meaning in test1 and test2. Secondly, necessary function and method annotations are required.
-### 1.2 preparation criteria
+### Unit Coding Specifications
- 1. System is not allowed to be used in unit test Out for human flesh verification, or if judgment for verification (log can be used for Key log output). Assertion assert must be used for verification.
@@ -157,7 +155,7 @@ public class $testClass {
- 5. For unit testing, it is necessary to ensure that the test granularity is small enough to help accurately locate the problem. Single test granularity is generally at the method level (very few scenarios such as tool classes or enumeration classes can be at the class level).
Note: only with small test granularity can we locate the error location as soon as possible. Single test is not responsible for checking cross class or cross system interaction logic, which is the field of integration testing.
-## 2 use of assertions
+## Use of Assertions
The result verification of all test cases must use the assertion pattern
use Assertions.assertEquals
@@ -169,7 +167,7 @@ public class $testClass {
Assertions.assertThat(actualObject).usingRecursiveComparison().isEqualTo(expectedObject);
-### 2.1 junit5 general assertion
+### Junit5 General Assertion
| Method | description | remarks |
|--------|-------------|-------------|
@@ -181,7 +179,7 @@ public class $testClass {
|AssertNotNull | judge whether the given object reference is not null| |
|Assert all | multiple judgment logics are processed together. As long as one error is reported, the overall test will fail| |
-### 2.2 junit5 combined assertion and exception assertion
+### Junit5 Combined Assertion and Exception Assertion
**Composite assertion**
The assertall method can process multiple judgment logics together. As long as one error is reported, the overall test will fail:
@@ -214,7 +212,7 @@ Example:
}
```
-### 2.3 assertion usage criteria
+### Assertion Usage Criteria
**Object instance equality assertion**
@@ -248,9 +246,9 @@ assertEquals(2, jobRespProtocolArrayList.size());
assertTrue(jobRespProtocolArrayList.stream(). anyMatch(statusPrecate));
```
-## 3. Compilation of unit test
+## Compilation of Unit Test
-### Class division
+### Class Division
It can be roughly classified according to the major functions of the class
@@ -263,7 +261,7 @@ It can be roughly classified according to the major functions of the class
-Entity class is used for DB interaction and parameter VO object and other entity classes processed by methods (if there are other user-defined functions besides normal get set, unit test is required)
-### 3.1 unit test of controller class
+### Unit Test of Controller class
Using mockmvc
It mainly verifies the requestmethod method of interface request, basic parameters and expected return results.
@@ -299,16 +297,17 @@ Main scenarios: scenarios with and without unnecessary parameters are abnormal
```
-### 3.2 unit test of server class
-
-### 3.3 unit test of Dao class
+### Unit Test of Server class
+ //todo
+
+### Unit Test of Dao class
Use H2 database, application. In the configuration file In properties, you need to configure the basic information of H2 database and the relevant path information of mybatis
```properties
-#h2数据库配置
+#h2 database configuration
spring.datasource.driver-class-name=org.h2.Driver
-#连接以及初始化表的脚本
+# Script to connect and initialize the table
spring.datasource.url=jdbc:h2:mem:test;MODE=MySQL;DB_CLOSE_DELAY=-1;DATABASE_TO_LOWER=true;INIT=runscript from 'classpath:create.sql'
spring.datasource.username=sa
spring.datasource.password=
diff --git a/community/ppmc-related-permission-configuration.md b/community/ppmc-related-permission-configuration.md
new file mode 100644
index 0000000..a47c74b
--- /dev/null
+++ b/community/ppmc-related-permission-configuration.md
@@ -0,0 +1,128 @@
+---
+title: PPMC/Committer Related Permission Configuration
+sidebar_position: 8
+---
+
+> PPMC (Podling Project Management Committee)/Committer member, bind github account process/and main email subscription
+
+## 1. Binding github account process
+
+### 1.1 Process overview
+1. Associate the apache account with the github account
+2. Securely enable 2FA authentication for github personal accounts
+3. Open permission application on gitbox
+
+### 1.2 Associate apache Id with github account
+**Way 1**
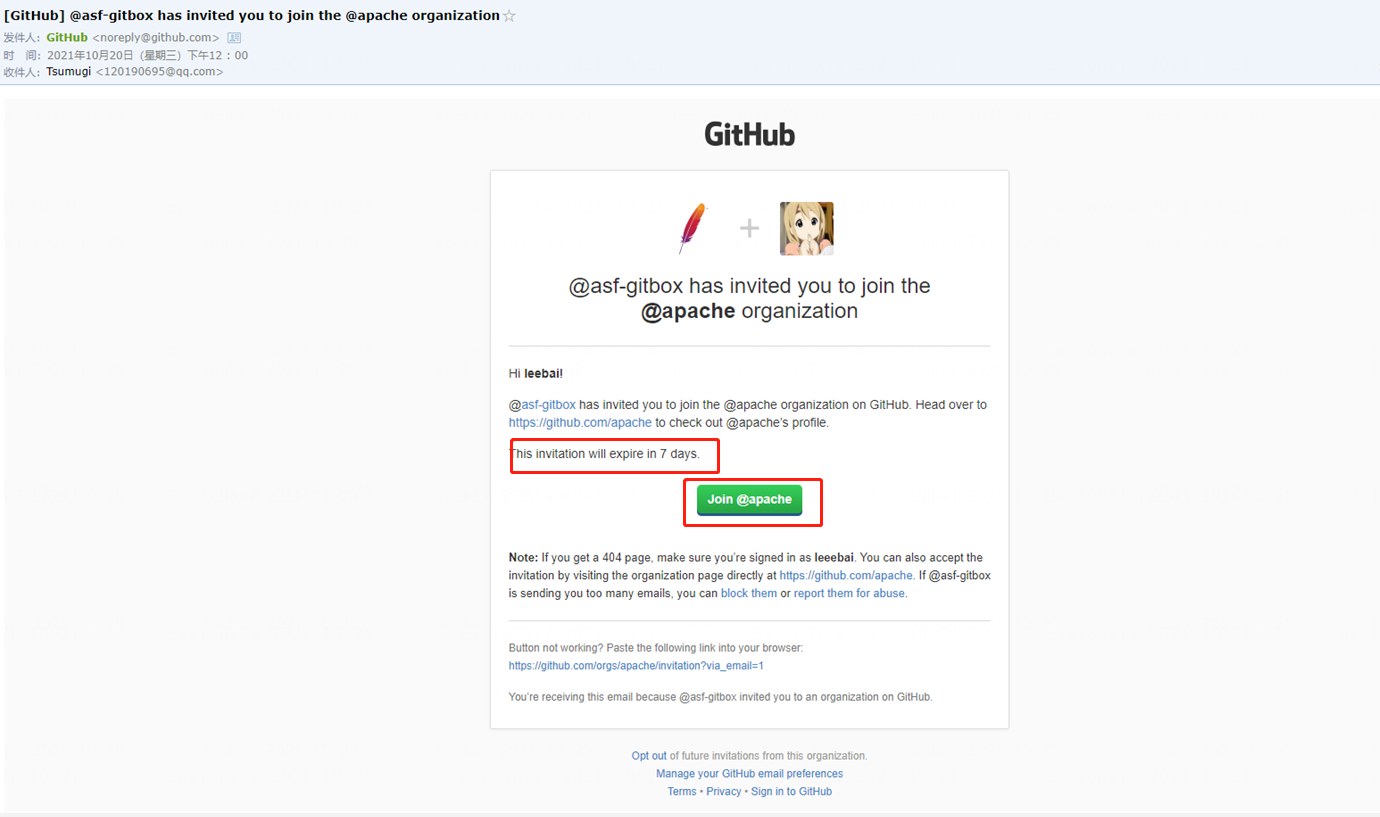
+Log in to https://id.apache.org and set the [Your GitHub Username] field in LDAP to your own GitHub ID. Enter your password Click submit changes and you will receive an invitation to join the apache organization on github within four hours. You should receive an email with "asf-gitbox" in the title of your github account email.
+If the invitation has expired (7 days expired), you can try both method 1 and method 2 again. See if you can re-receive the invitation email to join ASF org in the mailbox associated with the github account (search for "asf-gitbox").
+If you haven't received an invitation yet, try the following:
+1. Delete the github accounts in methods 1 and 2 first;
+2. After waiting for 1 scan cycle (4 hours to be safe), add the github account back again;
+3. Then wait another 4 hours to see if you can re-receive the invitation email to join ASF org in the email associated with the github account (search for the email title "asf-gitbox").
+
+
+
+**Way 2**
+Visit https://whismy.apache.org/roster/committer/xxx (replace with your apache id) to modify the corresponding data, and you will receive an invitation to join the apache github organization within four hours.
+Pay attention to check the invitation email of the github organization inviting you to join apache. Invitation is valid for 7 days
+
+
+
+After the successful invitation, the personal github account information can be seen that the affiliated organization has apache
+
+
+
+### 1.3 Enable 2FA authentication (login token)
+>github personal account security Enable 2FA authentication (login token)
+
+Two-factor authentication (2FA) refers to a method of authenticating users by combining passwords and physical items (credit cards, SMS mobile phones, tokens, or biometric indicators such as fingerprints). To keep the committer account secure, we require you to enable 2FA on GitHub to authenticate logged in users and contribute code. For details, please refer to 2FA.
+You need to install TOTP software on the mobile phone, search for TOTP in the application market (Microsoft Authenticator is available for Android), and IOS Apple mobile phone personally recommends downloading the authy token software, which can be backed up in the cloud by binding the mobile phone. Mobile SMS is also supported, but the github configuration page does not have a mobile phone number +86 in China by default. For the front-end code bypass when you need to modify the configur [...]
+
+step1 Visit the personal account security settings page https://github.com/settings/security and select the fourth item [Account security]
+
+
+
+step2 Select【Set up using an app】Next step
+
+
+
+step3 Enter the QR code binding page, scan the code with the totp type app with the download number in advance, and enter the 6 displayed on the mobile phone as the token
+
+
+
+step4 Download recover codes, then enter the success page and click done to bind successfully
+
+
+
+Notice
+When 2FA verification is turned on, you need to use the username/password + mobile phone authentication code to log in to GitHub.
+When 2FA authentication is enabled, a private access token needs to be generated for git submission and other operations. At this point, you will use username + private access token instead of username + password to submit code (subsequent configuration as needed).
+For details, see Creating a Private Token.
+
+If 2FA is turned off in the future, you will be delisted from this project, and you will not be able to access our repository and the fork repository from our private repository.
+
+### 1.4 Open permission application on gitbox
+step1 Visit https://gitbox.apache.org/setup/ to authorize the associated apache account
+
+
+
+step 2 Authorize the associated github account
+
+
+
+step3 mfa status check
+
+
+
+Notice
+After successful execution, the following figure is shown. After the success, the write permission will be activated within about an hour. If MFA Status says "User not a member of the ASF GitHub organisation. Please make sure you are a part of the ASF Organisation on GitHub and have 2FA enabled. Visit id.apache.org and set your GitHub ID to be invited to the org .” Please check whether [Associating apache and github accounts] is completed/2FA is enabled, if it is normal, please verify it [...]
+
+
+
+### 1.5 Related Links Documentation
+[github uses TOTP to enable 2FA authentication] https://docs.github.com/cn/authentication/securing-your-account-with-two-factor-authentication-2fa/configuring-two-factor-authentication
+
+[Create a private token] https://docs.github.com/cn/authentication/keeping-your-account-and-data-secure/creating-a-personal-access-token
+
+[Introduction to gitbox] https://gitbox.apache.org
+
+[apache and github] https://infra.apache.org/apache-github.html
+
+【git github &gitbox 】https://cwiki.apache.org/confluence/display/INFRA/Git%2C+GitHub+and+Gitbox
+
+## 2. Configure emails and email subscriptions
+
+### 2.1 Associate your own mailbox
+>See https://infra.apache.org/committer-email.html for details
+- Method 1: Log in to https://id.apache.org/, fill in your own email address in the `Forwarding email address` field (usually the address provided in the Independent Contributor License Agreement (ICLA) you provided), Save changes
+- Method 2: Log in to https://whismy.apache.org/roster/committer/__self__ and double-click `Email forwarded to` to edit
+
+### 2.2 Configure forwarding address
+You cannot use your Apache email address directly. You must set up forwarding for this address. When writing to your ASF address, the email will be forwarded to your forwarding address. When you reply, the message goes back through the ASF system, so people you write with will see it's coming from your ASF address
+. Configure in your email environment
+```shell script
+Server: mail-relay.apache.org Port: 587 (STARTTLS), 465 (SSL) User/Pass: {Your LDAP credentials}
+````
+
+
+### 2.2 Subscribe to related mailing lists
+As a member of PPMC, you need to actively participate in community construction, promote the healthy development of the community, undertake the responsibility and governance of the project, and this part of the work is often carried out by email (discussion/voting/answering questions, etc.),
+Every PPMC member is required to subscribe to the following mailing lists:
+
+|Name|Description|Subscribe Mail|Unsubscribe Mail|Mail Archive|
+|:-----|:-------|:------|:-------|:-----|
+| [dev@linkis.apache.org](mailto:dev@linkis.apache.org) | Linkis community activity information, project discussion announcements, etc. | [Subscribe](mailto:dev-subscribe@linkis.apache.org) | [unsubscribe](mailto:dev-unsubscribe@linkis.apache.org) | [archive](http://mail-archives.apache.org/mod_mbox/linkis-dev) |
+| [private@linkis.apache.org](mailto:private@linkis.apache.org) |This mailing list is private, visible inside PPMC, mainly for internal discussions | [Subscribe](mailto:private-subscribe@ linkis.apache.org) | [unsubscribe](mailto:private-unsubscribe@linkis.apache.org) | [archive](http://mail-archives.apache.org/mod_mbox/linkis-private) |
+| [general@incubator.apache.org](mailto:general@incubator.apache.org) | Public emails from the incubator community, mainly related to incubation projects | [Subscribe](mailto:general-subscribe@incubator.apache. org) | [unsubscribe](mailto:general-unsubscribe@incubator.apache.org) | [archive](http://mail-archives.apache.org/mod_mbox/incubator-general) |
+
+Subscription operations can be found in the guide [Subscribe to the mailing list](how-to-subscribe.md)
+:::caution note
+Note: private@linkis.apache.org subscriptions need to be reviewed by the mail moderator (shaofengshi@apache.org), so please attach personal name information to the content of the mail when subscribing for moderator review.
+:::
+If the above subscription is unsuccessful, you can try to use the web-side tool: https://whismy.apache.org/committers/subscribe.cgi
+
+
+
+
+Mailing list subscriptions, PPMC members can view here: https://whismy.apache.org/roster/ppmc/linkis
\ No newline at end of file
diff --git a/docusaurus.config.js b/docusaurus.config.js
index 396fe28..141d35b 100644
--- a/docusaurus.config.js
+++ b/docusaurus.config.js
@@ -48,9 +48,14 @@ const darkCodeTheme = require('prism-react-renderer/themes/dracula');
path: '1.0.3',
//banner: 'none',
},
+ '1.0.3': {
+ //label: 'Next v1.0.3 (WIP)',
+ path: 'latest',
+ //banner: 'none',
+ },
'1.0.2': {
//label: 'v1.0.2',
- path: 'latest',
+ path: '1.0.2',
//banner: 'unmaintained',
},
'0.11.0': {
diff --git a/i18n/zh-CN/code.json b/i18n/zh-CN/code.json
index 42ce970..d924278 100644
--- a/i18n/zh-CN/code.json
+++ b/i18n/zh-CN/code.json
@@ -36,7 +36,7 @@
"description": "The label used to navigate to the older blog posts page (next page)"
},
"theme.blog.post.readingTime.plurals": {
- "message": "1 分钟阅读|{readingTime} 分钟阅读",
+ "message": "{readingTime} 分钟阅读",
"description": "Pluralized label for \"{readingTime} min read\". Use as much plural forms (separated by \"|\") as your language support (see https://www.unicode.org/cldr/cldr-aux/charts/34/supplemental/language_plural_rules.html)"
},
"theme.blog.post.readMore": {
diff --git a/i18n/zh-CN/docusaurus-plugin-content-blog/2022-02-21-linkis-deploy.md/index.md b/i18n/zh-CN/docusaurus-plugin-content-blog/2022-02-21-linkis-deploy.md/index.md
index 69295a8..d4855b0 100644
--- a/i18n/zh-CN/docusaurus-plugin-content-blog/2022-02-21-linkis-deploy.md/index.md
+++ b/i18n/zh-CN/docusaurus-plugin-content-blog/2022-02-21-linkis-deploy.md/index.md
@@ -1,22 +1,14 @@
---
title: Linkis 部署排障
---
-> linkis的部署说明和注意点
+> linkis的单独部署说明和注意点
## 1 前置准备
-### 1.1 物料准备
-linkis安装包
-建议使用1.X及上版本
-0.X 和1.X的版本差异化比较大,
-1.0.3前是com.webank.wedatasphere.linkis的包名,linkis>=1.0.3为org.apache.linkis的包名
-
-[下载地址](https://github.com/apache/incubator-linkis/releases):https://github.com/apache/incubator-linkis/releases
-
-### linux服务器
+### 1.1 linux服务器
**硬件要求**
-安装linkis 微服务近10个,每个微服务默认配置启动的jvm -Xmx 内存大小为 512M(内存不够的情况下,可以尝试调小至256M,内存足够情况下也可以调大)
+安装linkis 微服务近10个,每个微服务默认配置启动的jvm -Xmx 内存大小为 512M(内存不够的情况下,可以尝试调小至256/128M,内存足够情况下也可以调大)
**软件要求**
基本的软件环境
@@ -41,7 +33,7 @@ command -v sed
```
-### 部署用户
+### 1.2 添加部署用户
部署用户: linkis核心进程的启动用户,同时默认还是admin管理员用户,部署过程中会生成对应的管理员登录密码,位于conf/gateway/properties文件中
@@ -51,13 +43,12 @@ linkis支持指定提交、执行的用户。linkis的主要进程服务会通
先查看系统中是否已经有 hadoop 用户,若已经存在,则直接授权即可;若不存在,先创建用户,再授权。
-查看是否存在 hadoop 用户
+查看是否已存在 hadoop 用户
```shell script
$ id hadoop
uid=2001(hadoop) gid=2001(hadoop) groups=2001(hadoop)
```
-
若不存在,则需要创建 hadoop 用户,并加入 hadoop 用户组
```shell script
$ sudo useradd hadoop -g hadoop
@@ -66,7 +57,6 @@ $ vi /etc/sudoers
hadoop ALL=(ALL) NOPASSWD: NOPASSWD: ALL
```
-
修改安装用户的环境变量,`vim /home/hadoop/.bash_rc`配置环境变量,环境变量如下:
```shell script
export JAVA_HOME=/opt/jdk1.8
@@ -91,10 +81,18 @@ $ echo $JAVA_HOME
$ echo $HADOOP_HOME
```
-<font color=red>以下操作都是在hadoop用户下进行</font>
+<font color='red'>以下操作都是在hadoop用户下进行</font>
+### 1.3 安装包准备
-### linkis底层依赖
+linkis安装包,推荐使用1.X及上版本
+0.X 和1.X的版本差异化比较大,
+1.0.3前是com.webank.wedatasphere.linkis的包名,linkis>=1.0.3为org.apache.linkis的包名
+
+[下载地址](https://github.com/apache/incubator-linkis/releases):https://github.com/apache/incubator-linkis/releases
+
+
+### 1.4 底层依赖检查
可以执行相应的命令,查看是否支持
```shell script
@@ -106,7 +104,7 @@ $ hive --version
```
-### 资源依赖
+### 1.5 资源依赖
可以访问的mysql数据库资源 用来存储linkis自身的业务元数据的数据库
可以访问的yarn资源队列 spark/hive/flink引擎的执行都需要yarn队列资源
可以访问的hive的matedata数据库资源(mysql为例) hive引擎执行时需要
@@ -115,7 +113,8 @@ $ hive --version
注意hive spark的版本,如果和默认版本区别比较大,最好重新修改版本进行编译
:::
-## 安裝
+## 2. 安裝
+### 2.1 安装包解压
上传安装包`apache-linkis-1.0.3-incubating-bin.tar.gz`后,进行解压安装包
```shell script
@@ -140,7 +139,7 @@ drwxrwxr-x 7 hadoop hadoop 4096 Feb 21 10:13 linkis-package // 实际的软
```
-配置linkis自身数据库信息
+### 2.2 配置linkis自身数据库信息
```shell script
vim deploy-config/db.sh
@@ -153,10 +152,10 @@ MYSQL_PASSWORD=xxxxx
```
-配置基础环境变量linkis-env.sh
-文件位置 deploy-config/linkis-env.sh
+### 2.3 配置基础环境变量
+文件位置`deploy-config/linkis-env.sh`
-基础目录配置
+#### 基础目录配置
>请确认部署用户deployUser,拥有这些配置目录的读写权限
```shell script
@@ -170,14 +169,18 @@ HDFS_USER_ROOT_PATH=hdfs:///tmp/linkis # 结果集日志等文件路径,用
ENGINECONN_ROOT_PATH=/appcom/tmp #存放执行引擎的工作路径,需要部署用户有写权限的本地目录 wds.linkis.engineconn.root.dir(linkis-cg-engineconnmanager.properties)
```
-
-HIVE的MATA配置
+:::notice 注意
+确认部署用户是否有对应文件目录的读写的权限
+
+:::
+#### HIVE的MATA配置
```shell script
HIVE_META_URL=jdbc:mysql://10.10.10.10:3306/hive_meta_demo?useUnicode=true&characterEncoding=UTF-8 # HiveMeta元数据库的URL
HIVE_META_USER=demo # HiveMeta元数据库的用户
HIVE_META_PASSWORD=demo123 # HiveMeta元数据库的密码
```
-Yarn的ResourceManager的地址
+
+#### Yarn的ResourceManager的地址
```shell script
@@ -186,7 +189,7 @@ YARN_RESTFUL_URL=http://xx.xx.xx.xx:8088 #可以通过访问http://xx.xx.xx.xx:
```
-LDAP 登录验证
+#### LDAP 登录验证
>linkis默认是使用静态用户和密码,静态用户即部署用户,静态密码会在执行部署是随机生成一个密码串,存储于conf/gateway/properties(>=1.0.3版本)。
```shell script
#LDAP配置,默认Linkis只支持部署用户登录,如果需要支持多用户登录可以使用LDAP,需要配置以下参数:
@@ -195,7 +198,8 @@ LDAP 登录验证
```
-基础组件环境信息 最好通过环境变量配置 deploy-config/linkis-env.sh配置文件中不进行配置 直接注释掉
+#### 基础组件环境信息
+> 最好通过环境变量配置(1.2 添加部署用户中已说明), deploy-config/linkis-env.sh配置文件中可以不进行配置 直接注释掉
```shell script
###HADOOP CONF DIR
#HADOOP_CONF_DIR=/appcom/config/hadoop-config
@@ -205,38 +209,40 @@ LDAP 登录验证
#SPARK_CONF_DIR=/appcom/config/spark-config
```
-版本信息
+#### 引擎版本信息
```shell script
##如果spark不是2.4.3的版本(可以在linkis-package/lib/linkis-engineconn-plugins/hive/plugin中查看引擎版本),需要修改参数:
#SPARK_VERSION=3.1.1
##如果hive不是2.3.3的版本,需要修改参数:
#HIVE_VERSION=2.3.4
-
```
-版本的具体配置是在 linkis.properties中
+如果配置了,执行安装部署后,实际会在`{linkisInstallPath}/conf/linkis.properties`中被更新,供程序使用
```shell script
#wds.linkis.spark.engine.version=
#wds.linkis.hive.engine.version=
-#wds.linkis.python.engine.version=
+#wds.
+# linkis.python.engine.version=
```
-
-微服务启动jvm内存配置
->可以根据机器实际情况进行调整,如果机器内存资源较少,可以尝试调小至256/128M
+#### jvm内存配置
+>微服务启动jvm内存配置,可以根据机器实际情况进行调整,如果机器内存资源较少,可以尝试调小至256/128M
```shell script
## java application default jvm memory
export SERVER_HEAP_SIZE="512M"
```
-安装目录
->linkis最终会被安装到此目录下,不配置默认是与当前安装包统一级目录下
+#### 安装目录配置
+
+>linkis最终会被安装到此目录下,不配置默认是与当前安装包同一级目录下
+>
```shell script
##The decompression directory and the installation directory need to be inconsistent
LINKIS_HOME=/appcom/Install/LinkisInstall
```
-## 执行部署
+## 部署流程
+执行部署脚本
sh bin/install.sh
可能遇到的问题
diff --git a/i18n/zh-CN/docusaurus-plugin-content-docs-community/current/how-to-sign-apache-icla.md b/i18n/zh-CN/docusaurus-plugin-content-docs-community/current/how-to-sign-apache-icla.md
index acba9c7..67c5379 100644
--- a/i18n/zh-CN/docusaurus-plugin-content-docs-community/current/how-to-sign-apache-icla.md
+++ b/i18n/zh-CN/docusaurus-plugin-content-docs-community/current/how-to-sign-apache-icla.md
@@ -1,10 +1,10 @@
---
-title: Apache ICLA 签署流程
-sidebar_position: 2
+title: ICLA 签署流程
+sidebar_position: 7
---
## Apache ICLA 签署流程指南
-注:本文参考 incubator-shenyu-website项目的Apache ICLA 签署流程指南文档 https://github.com/apache/incubator-shenyu-website/edit/main/i18n/zh/docusaurus-plugin-content-docs-community/current/9-icla.md
+>注:本文参考 incubator-shenyu-website项目的Apache ICLA 签署流程指南文档 https://github.com/apache/incubator-shenyu-website/edit/main/i18n/zh/docusaurus-plugin-content-docs-community/current/9-icla.md
Apache CLA 全称 Apache Contributor License Agreement,签署ICLA的目的是定义向ASF贡献的文档,保护知识产权,避免后续法律纠纷。ICLA在官方存档后生效,贡献者方可参与Apache项目。
diff --git a/i18n/zh-CN/docusaurus-plugin-content-docs-community/current/how-to-vote-a-committer-ppmc.md b/i18n/zh-CN/docusaurus-plugin-content-docs-community/current/how-to-vote-a-committer-ppmc.md
index 28d108a..8ba1e4b 100644
--- a/i18n/zh-CN/docusaurus-plugin-content-docs-community/current/how-to-vote-a-committer-ppmc.md
+++ b/i18n/zh-CN/docusaurus-plugin-content-docs-community/current/how-to-vote-a-committer-ppmc.md
@@ -26,7 +26,7 @@ sidebar_position: 6
- 对项目有比较全面的了解
- 能够把控项目进度和版本质量
- 积极参与/主导社区建设,推动社区健康发展,主动承当项目的责任和治理工作
- - 积极恢复 ASF 董事会提出的问题,并采取必要的行动
+ - 积极回复 ASF 董事会提出的问题,并采取必要的行动
- 熟悉 ASF 的版本发布流程
在大多数情况下,新的 PPMC 成员是从 Committer 团队中提名的。但也可以直接成为 PPMC 成员,只要 PPMC 同意提名,并确信候选人已经准备好。例如,这可以通过他/她曾是 Apache 成员、Apache 官员或另一个项目的 PPMC 成员这一事实来证明。
@@ -220,7 +220,6 @@ The Apache Linkis(Incubating) PPMC
- `icla.pdf`(或`ccla.pdf`)填写正确信息后,打印,手写签名,扫描成PDF,作为附件发送至[secretary@apache.org ](邮箱:secretary@apache.org)。 (如果首选电子签名,请按照[此页面](http://www.apache.org/licenses/contributor-agreements.html#submitting)上的步骤操作)
- PPMC 将等待Apache秘书确认ICLA(或CCLA)备案。新的提交者和 PPMC 将收到以下电子邮件:
-详细指引见[开通Apache的github仓库权限](https://docs.qq.com/doc/DVURNYkhMV3llWEhR)
```html
Dear ${Candidate Name},
@@ -240,7 +239,7 @@ for more information about roles at Apache.
PPMC 成员应通过 [Roster](https://whimsy.apache.org/roster/committee/linkis) 将新的提交者添加到官方提交者列表中。
### 2.7 设置 Apache ID 和开发环境
->需要候选人进行处理
+
- 进入【Apache Account Utility Platform】(https://id.apache.org/),创建密码,设置个人邮箱(`转发邮箱地址`)和GitHub账号(`Your GitHub Username`)。此后不久(2 小时内)将通过电子邮件向您发送组织邀请。
- 如果您想使用`xxx@apache.org`邮件服务,请参考[这里](https://infra.apache.org/committer-email.html)。推荐使用 Gmail,因为这种转发模式在大多数邮箱服务设置中都不容易找到。
@@ -248,6 +247,8 @@ PPMC 成员应通过 [Roster](https://whimsy.apache.org/roster/committee/linkis)
- 使用【GitBox Account Linking Utility】(https://gitbox.apache.org/setup/)获取Linkis项目的写权限。
- [linkis-website](https://linkis.apache.org/team)相关页面更新
+详细指引见[PPMC/Committer 相关权限配置](ppmc-related-permission-configuration.md)
+
如果您想在 Apache GitHub 组织中公开露面,您需要前往 [Apache GitHub 人员页面](https://github.com/orgs/apache/people),
搜索自己,然后选择`Organization visibility`为`Public`。
diff --git a/i18n/zh-CN/docusaurus-plugin-content-docs-community/current/how-to-write-unit-test-code.md b/i18n/zh-CN/docusaurus-plugin-content-docs-community/current/how-to-write-unit-test-code.md
index 48ad218..4581e42 100644
--- a/i18n/zh-CN/docusaurus-plugin-content-docs-community/current/how-to-write-unit-test-code.md
+++ b/i18n/zh-CN/docusaurus-plugin-content-docs-community/current/how-to-write-unit-test-code.md
@@ -1,15 +1,14 @@
---
title: 如何编写单元测试代码
-sidebar_position: 3
+sidebar_position: 10
---
-## 0 框架选型
+## 框架选型
Junit5+Mockito+jacoco+h2本地数据库
Idea增强插件
- JUnitGenerator V2.0 用于生成测试用例的标准模块
- GenerateAllSet 用于快速new创建对象,并设置默认值
- MybatisX ado与mapper的关联映射 方便查看
-controller service
### 配置IDEA的Junit的模板
```properties
########################################################################################
@@ -106,8 +105,8 @@ public class $testClass {
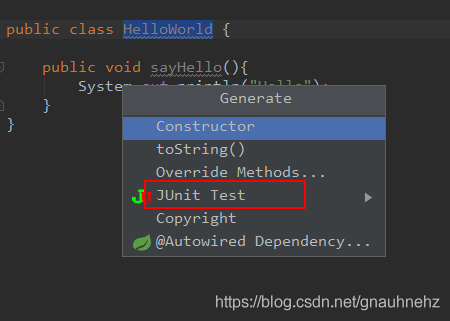
2.选择类——>右键——>Generate——>Junit Test,生成测试类
-## 1 单元测试准则
-### 1.1 目录以及命名准则
+## 单元测试准则
+### 目录以及命名准则
- 1.单元测试代码目录
必须写在如下工程目录:src/test/java,不允许写在业务代码目录下。
@@ -126,7 +125,7 @@ public class $testClass {
测试用例的命名规则是:test+方法名。避免使用test1、test2没有含义的名称,其次需要有必要的函数方法注释。
-### 1.2 编写准则
+### 编写准则
- 1.单元测试中不准使用 System.out 来进行人肉验证,或则if判断来验证(可以使用log进行关键日志输出),必须使用断言 assert 来验证。
- 2.保持单元测试的独立性。为了保证单元测试稳定可靠且便于维护,单元测试用例之间决不能互相调用,也不能依赖执行的先后次序。
@@ -143,11 +142,11 @@ public class $testClass {
说明:只有测试粒度小才能在出错时尽快定位到出错位置。单测不负责检查跨类或者跨系统的交互逻辑,那是集成测试的领域。
- ## 2 断言的使用
+ ## 断言的使用
所有的测试用例的结果验证都必须使用断言模式
优先使用Junit5的Assertions断言,极少数场景允许使用AssertJ的断言
-### 2.1 Junit5常规断言
+### Junit5常规断言
| 方法 | 说明 | 备注 |
|--------|-------------|-------------|
@@ -158,7 +157,7 @@ public class $testClass {
|assertNull| 判断给定的对象引用是否为 null| |
|assertNotNull| 判断给定的对象引用是否不为 null | |
|assertAll| 将多个判断逻辑放在一起处理,只要有一个报错就会导致整体测试不通过 | |
-### 2.2 Junit5组合断言和异常断言
+### Junit5组合断言和异常断言
**组合断言**
assertAll方法可以将多个判断逻辑放在一起处理,只要有一个报错就会导致整体测试不通过:
```java
@@ -186,7 +185,7 @@ Assertions.assertThrows方法,用来测试Executable实例执行execute方法
log.info("assertThrows通过后,返回的异常实例:{}", exception.getMessage());
}
```
-### 2.3 断言使用准则
+### 断言使用准则
**对象实例是否相等断言**
1.是否是同一个对象实例
```html
@@ -219,7 +218,7 @@ Assertions.assertThrows方法,用来测试Executable实例执行execute方法
```
-## 3.单元测试的编写
+## 单元测试的编写
### 类的划分
按类的大功能可以大体分类
- Controller 提供http服务的controller 配合mockmvc做单元测试
@@ -230,7 +229,7 @@ Assertions.assertThrows方法,用来测试Executable实例执行execute方法
- enum类 枚举类
- entity类 用于DB交互以及方法处理的参数VO对象等实体类(若除了正常得get set外还有其他自定义函数的需要进行单元测试)
-### 3.1 Controller类的单元测试
+### Controller类的单元测试
使用Mockmvc
主要验证 接口请求RequestMethod方式,基本参数,以及返回结果预期。
主要场景:带上非必要参数和不带非必要参数的场景 异常
@@ -264,9 +263,9 @@ Assertions.assertThrows方法,用来测试Executable实例执行execute方法
}
```
-### 3.2 Server 类的单元测试
-
-### 3.3 Dao 类的单元测试
+### Server 类的单元测试
+ //todo
+### Dao 类的单元测试
使用H2数据库,配置文件中application.properties中需要配置H2数据库的基本信息,以及mybatis的相关路径信息
```properties
diff --git a/i18n/zh-CN/docusaurus-plugin-content-docs-community/current/how-committer-binds-github-account.md b/i18n/zh-CN/docusaurus-plugin-content-docs-community/current/ppmc-related-permission-configuration.md
similarity index 60%
rename from i18n/zh-CN/docusaurus-plugin-content-docs-community/current/how-committer-binds-github-account.md
rename to i18n/zh-CN/docusaurus-plugin-content-docs-community/current/ppmc-related-permission-configuration.md
index 24e9e33..e2ba7f8 100644
--- a/i18n/zh-CN/docusaurus-plugin-content-docs-community/current/how-committer-binds-github-account.md
+++ b/i18n/zh-CN/docusaurus-plugin-content-docs-community/current/ppmc-related-permission-configuration.md
@@ -1,15 +1,18 @@
---
-title: PPMC成员开通Apache的github仓库权限
-sidebar_position: 2
+title: PPMC/Committer 相关权限配置
+sidebar_position: 8
---
+> PPMC(Podling Project Management Committee)成员,绑定github账号流程/以及主要邮件订阅
-## 流程总览
+## 1. 绑定github账号流程
+
+### 1.1 流程总览
1. 关联apache账号与github账号
2. github个人账号安全开启2FA认证
3. gitbox上开启权限申请
-## 1、关联apache Id与github账号
-### 方式1
+### 1.2关联apache Id与github账号
+**方式1**
登陆 https://id.apache.org LDAP中的[Your GitHub Username]字段设置为自己的 GitHub ID。输入密码 点击submit changes 四小时内会收到邀请加入github 上apache organization 的组织的邀约。您的github 账号邮箱,应该会收到一封标题包含“asf-gitbox”的邮件。
如邀约已过期(7天过期),可以尝试把方式1、方式2都再尝试一下。看看github 账号关联邮箱中,能否重新收到加入ASF org 的邀约邮件(搜索"asf-gitbox")。
如还未收到邀约,可尝试如下:
@@ -19,7 +22,7 @@ sidebar_position: 2

-### 方式2
+**方式2**
访问https://whimsy.apache.org/roster/committer/xxx (替换成你的apache id) 修改对应的数据,四小时内会收到邀请加入apache的github组织的邀约。
注意查收邀请加入apache的github组织的邀约邮件。邀约有效期是7天
@@ -29,7 +32,9 @@ sidebar_position: 2

-## 2、github个人账号安全 开启2FA认证(登陆令牌)
+### 1.3 开启2FA认证(登陆令牌)
+>github个人账号安全 开启2FA认证(登陆令牌)
+
双因子验证(2FA)是指结合密码以及实物(信用卡、SMS手机、令牌或指纹等生物标志)两种条件对用户进行认证的方法。 为保证提交者账户的安全,我们需要您在GitHub上启用2FA来验证登录用户、并贡献代码。具体内容可参考2FA。
需在手机端安装TOTP 软件,应用市场搜索TOTP(安卓可用Microsoft Authenticator),ios苹果手机个人推荐下载authy令牌软件 绑定手机可云端备份。手机短信也支持 但是github配置页面默认没有中国地区手机号+86可以选择,需要修改配置时的前端代码绕过见https://www.programmerall.com/article/5457100195/ 。
@@ -56,7 +61,7 @@ step4 下载recover codes ,然后进入成功页面 点击done 绑定成功
若后续关闭2FA,将会从本项目中除名,并且无法访问我们的仓库以及来自我们私有仓库的fork仓库。
-## 3、gitbox上开启权限申请
+### 1.4 gitbox上开启权限申请
step1 访问 https://gitbox.apache.org/setup/ 授权关联apache账号

@@ -74,13 +79,50 @@ step3 mfa status校验

-## 4、其他链接文档
-【github使用TOTP启用2FA认证】 https://docs.github.com/cn/authentication/securing-your-account-with-two-factor-authentication-2fa/configuring-two-factor-authentication
+### 1.5 相关链接文档
+【github使用TOTP启用2FA认证】https://docs.github.com/cn/authentication/securing-your-account-with-two-factor-authentication-2fa/configuring-two-factor-authentication
【创建私有Token】 https://docs.github.com/cn/authentication/keeping-your-account-and-data-secure/creating-a-personal-access-token
-【gitbox 介绍】 https://gitbox.apache.org
+【gitbox 介绍】 https://gitbox.apache.org
【apache 和github】 https://infra.apache.org/apache-github.html
【git github &gitbox 】https://cwiki.apache.org/confluence/display/INFRA/Git%2C+GitHub+and+Gitbox
+
+## 2. 配置邮件与邮件订阅
+
+### 2.1 关联自己的邮箱
+>详细见 https://infra.apache.org/committer-email.html
+- 方式1:登陆https://id.apache.org/ ,在`Forwarding email address`栏中填写自己的邮件地址(通常是在您提供的独立贡献者许可协议 (ICLA)中提供的地址),保存修改
+- 方式2:登陆https://whimsy.apache.org/roster/committer/__self__ 双击`Email forwarded to` 进行编辑
+
+### 2.2 配置转发地址
+您不能直接使用您的 Apache 电子邮件地址。您必须为此地址设置转发。当写信到您的 ASF 地址时,系统会将电子邮件转发到您的转发地址。当您回复时,消息会通过 ASF 系统返回,因此与您一起写信的人会看到它来自您的 ASF 地址
+。在您的电子邮件环境中进行配置
+```shell script
+Server: mail-relay.apache.org Port: 587 (STARTTLS), 465 (SSL) User/Pass: {Your LDAP credentials}
+```
+
+
+
+### 2.2 订阅相关邮件列表
+作为PPMC一员 需要积极参与到社区建设中,推动社区健康发展,承当项目的责任和治理工作,这部分工作很多时候是通过邮件方式进行(讨论/投票/答疑等),
+每一位PPMC成员都需要订阅以下邮件列表:
+
+|名称|描述|订阅邮件|退订邮件|邮件归档|
+|:-----|:--------|:------|:-------|:-----|
+| [dev@linkis.apache.org](mailto:dev@linkis.apache.org) | linkis的社区活动信息,项目的讨论公告等 | [订阅](mailto:dev-subscribe@linkis.apache.org) | [退订](mailto:dev-unsubscribe@linkis.apache.org) | [归档](http://mail-archives.apache.org/mod_mbox/linkis-dev) |
+| [private@linkis.apache.org](mailto:private@linkis.apache.org) |此邮件列表是不公开的,PPMC内部可见,主要用于内部讨论 | [订阅](mailto:private-subscribe@linkis.apache.org) | [退订](mailto:private-unsubscribe@linkis.apache.org) | [归档](http://mail-archives.apache.org/mod_mbox/linkis-private) |
+| [general@incubator.apache.org](mailto:general@incubator.apache.org) | 孵化社区的公开邮件,主要是孵化项目的相关动态 | [订阅](mailto:general-subscribe@incubator.apache.org) | [退订](mailto:general-unsubscribe@incubator.apache.org) | [归档](http://mail-archives.apache.org/mod_mbox/incubator-general) |
+
+订阅操作可以见指引[订阅邮件列表](how-to-subscribe.md)
+:::caution 注意
+注意:private@linkis.apache.org订阅需要邮件版主(shaofengshi@apache.org)审核,所以订阅时请在邮件内容中附上个人姓名信息,以便版主审核。
+:::
+如果上述订阅不成功可以尝试使用网页端工具:https://whimsy.apache.org/committers/subscribe.cgi
+
+
+
+
+邮件列表订阅情况,PPMC成员可以在此查看:https://whimsy.apache.org/roster/ppmc/linkis
diff --git a/static/img/community/mail-relay.png b/static/img/community/mail-relay.png
new file mode 100644
index 0000000..ec82c50
Binary files /dev/null and b/static/img/community/mail-relay.png differ
diff --git a/static/img/community/subscribe.png b/static/img/community/subscribe.png
new file mode 100644
index 0000000..f1586d0
Binary files /dev/null and b/static/img/community/subscribe.png differ
---------------------------------------------------------------------
To unsubscribe, e-mail: commits-unsubscribe@linkis.apache.org
For additional commands, e-mail: commits-help@linkis.apache.org