You are viewing a plain text version of this content. The canonical link for it is here.
Posted to commits@mxnet.apache.org by ma...@apache.org on 2019/10/27 19:34:07 UTC
[incubator-mxnet] branch master updated: fixing broken links in
multiple files - round 3 (#16634)
This is an automated email from the ASF dual-hosted git repository.
marcoabreu pushed a commit to branch master
in repository https://gitbox.apache.org/repos/asf/incubator-mxnet.git
The following commit(s) were added to refs/heads/master by this push:
new d12e674 fixing broken links in multiple files - round 3 (#16634)
d12e674 is described below
commit d12e674e58214fb73e467d16f7362320f3ad8c28
Author: Talia <31...@users.noreply.github.com>
AuthorDate: Sun Oct 27 12:33:31 2019 -0700
fixing broken links in multiple files - round 3 (#16634)
---
.../python/tutorials/extend/custom_layer.md | 2 +-
.../gluon_from_experiment_to_deployment.md | 4 +--
.../packages/gluon/training/fit_api_tutorial.md | 2 +-
.../tutorials/packages/ndarray/sparse/train.md | 4 +--
.../packages/ndarray/sparse/train_gluon.md | 35 +++++++++++-----------
.../tutorials/packages/onnx/fine_tuning_gluon.md | 2 +-
.../python/tutorials/packages/viz/index.rst | 2 +-
.../backend/mkldnn/mkldnn_quantization.md | 4 +--
.../tutorials/performance/backend/profiler.md | 2 +-
.../performance/backend/tensorrt/tensorrt.md | 4 +--
docs/static_site/src/pages/api/api.html | 2 +-
.../docs/tutorials/mxnet_cpp_inference_tutorial.md | 16 +++++-----
docs/static_site/src/pages/api/faq/float16.md | 2 +-
docs/static_site/src/pages/api/faq/perf.md | 6 ++--
.../src/pages/get_started/build_from_source.md | 2 +-
julia/docs/src/api/io.md | 2 +-
julia/docs/src/tutorial/char-lstm.md | 2 +-
julia/docs/src/tutorial/mnist.md | 4 +--
18 files changed, 48 insertions(+), 49 deletions(-)
diff --git a/docs/python_docs/python/tutorials/extend/custom_layer.md b/docs/python_docs/python/tutorials/extend/custom_layer.md
index 6002a78..2fe795b 100644
--- a/docs/python_docs/python/tutorials/extend/custom_layer.md
+++ b/docs/python_docs/python/tutorials/extend/custom_layer.md
@@ -57,7 +57,7 @@ The rest of methods of the `Block` class are already implemented, and majority o
Looking into implementation of [existing layers](https://mxnet.apache.org/api/python/gluon/nn.html), one may find that more often a block inherits from a [HybridBlock](https://github.com/apache/incubator-mxnet/blob/master/python/mxnet/gluon/block.py#L428), instead of directly inheriting from `Block`.
-The reason for that is that `HybridBlock` allows to write custom layers that can be used in imperative programming as well as in symbolic programming. It is convinient to support both ways, because the imperative programming eases the debugging of the code and the symbolic one provides faster execution speed. You can learn more about the difference between symbolic vs. imperative programming from [this article](https://mxnet.apache.org/architecture/program_model.html).
+The reason for that is that `HybridBlock` allows to write custom layers that can be used in imperative programming as well as in symbolic programming. It is convinient to support both ways, because the imperative programming eases the debugging of the code and the symbolic one provides faster execution speed. You can learn more about the difference between symbolic vs. imperative programming from [this article](/api/architecture/program_model).
Hybridization is a process that Apache MxNet uses to create a symbolic graph of a forward computation. This allows to increase computation performance by optimizing the computational symbolic graph. Once the symbolic graph is created, Apache MxNet caches and reuses it for subsequent computations.
diff --git a/docs/python_docs/python/tutorials/getting-started/gluon_from_experiment_to_deployment.md b/docs/python_docs/python/tutorials/getting-started/gluon_from_experiment_to_deployment.md
index b1f65e6..47b6299 100644
--- a/docs/python_docs/python/tutorials/getting-started/gluon_from_experiment_to_deployment.md
+++ b/docs/python_docs/python/tutorials/getting-started/gluon_from_experiment_to_deployment.md
@@ -99,14 +99,14 @@ ctx = [mx.gpu(i) for i in range(num_gpus)] if num_gpus > 0 else [mx.cpu()]
batch_size = per_device_batch_size * max(num_gpus, 1)
```
-Now we will apply data augmentations on training images. This makes minor alterations on the training images, and our model will consider them as distinct images. This can be very useful for fine-tuning on a relatively small dataset, and it will help improve the model. We can use the Gluon [DataSet API](https://mxnet.apache.org/tutorials/gluon/datasets.html), [DataLoader API](https://mxnet.apache.org/tutorials/gluon/datasets.html), and [Transform API](https://mxnet.apache.org/tutorials/g [...]
+Now we will apply data augmentations on training images. This makes minor alterations on the training images, and our model will consider them as distinct images. This can be very useful for fine-tuning on a relatively small dataset, and it will help improve the model. We can use the Gluon [DataSet API](/api/python/docs/api/gluon/data/index.html#mxnet.gluon.data.Dataset), [DataLoader API](/api/python/docs/api/gluon/data/index.html#mxnet.gluon.data.DataLoader), and [Transform API](/api/py [...]
1. Randomly crop the image and resize it to 224x224
2. Randomly flip the image horizontally
3. Randomly jitter color and add noise
4. Transpose the data from `[height, width, num_channels]` to `[num_channels, height, width]`, and map values from [0, 255] to [0, 1]
5. Normalize with the mean and standard deviation from the ImageNet dataset.
-For validation and inference, we only need to apply step 1, 4, and 5. We also need to save the mean and standard deviation values for [inference using C++](https://mxnet.apache.org/versions/master/tutorials/c++/mxnet_cpp_inference_tutorial.html).
+For validation and inference, we only need to apply step 1, 4, and 5. We also need to save the mean and standard deviation values for [inference using C++](/api/cpp/docs/tutorials/cpp_inference).
```python
jitter_param = 0.4
diff --git a/docs/python_docs/python/tutorials/packages/gluon/training/fit_api_tutorial.md b/docs/python_docs/python/tutorials/packages/gluon/training/fit_api_tutorial.md
index 9e4cbe2..896e5f2 100644
--- a/docs/python_docs/python/tutorials/packages/gluon/training/fit_api_tutorial.md
+++ b/docs/python_docs/python/tutorials/packages/gluon/training/fit_api_tutorial.md
@@ -252,7 +252,7 @@ with warnings.catch_warnings():
Epoch 2, loss 0.3229 <!--notebook-skip-line-->
```
-You can load the saved model, by using the `load_parameters` API in Gluon. For more details refer to the [Loading model parameters from file tutorial](../blocks/save_load_params.html#saving-model-parameters-to-file)
+You can load the saved model, by using the `load_parameters` API in Gluon. For more details refer to the [Loading model parameters from file tutorial](/api/python/docs/tutorials/packages/gluon/blocks/save_load_params.html#saving-model-parameters-to-file)
```python
diff --git a/docs/python_docs/python/tutorials/packages/ndarray/sparse/train.md b/docs/python_docs/python/tutorials/packages/ndarray/sparse/train.md
index 336185c..23654fc 100644
--- a/docs/python_docs/python/tutorials/packages/ndarray/sparse/train.md
+++ b/docs/python_docs/python/tutorials/packages/ndarray/sparse/train.md
@@ -240,8 +240,8 @@ The function you will explore is: *y = x<sub>1</sub> + 2x<sub>2</sub> + ... 10
### Preparing the Data
-In MXNet, both [mx.io.LibSVMIter](https://mxnet.apache.org/versions/master/api/python/io/io.html#mxnet.io.LibSVMIter)
-and [mx.io.NDArrayIter](https://mxnet.apache.org/versions/master/api/python/io/io.html#mxnet.io.NDArrayIter)
+In MXNet, both [mx.io.LibSVMIter](/api/python/docs/api/mxnet/io/index.html#mxnet.io.LibSVMIter)
+and [mx.io.NDArrayIter](/api/python/docs/api/mxnet/io/index.html#mxnet.io.NDArrayIter)
support loading sparse data in CSR format. In this example, we'll use the `NDArrayIter`.
You may see some warnings from SciPy. You don't need to worry about those for this example.
diff --git a/docs/python_docs/python/tutorials/packages/ndarray/sparse/train_gluon.md b/docs/python_docs/python/tutorials/packages/ndarray/sparse/train_gluon.md
index 402cc2a..6880710 100644
--- a/docs/python_docs/python/tutorials/packages/ndarray/sparse/train_gluon.md
+++ b/docs/python_docs/python/tutorials/packages/ndarray/sparse/train_gluon.md
@@ -20,7 +20,7 @@
When working on machine learning problems, you may encounter situations where the input data is sparse (i.e. the majority of values are zero). One example of this is in recommendation systems. You could have millions of user and product features, but only a few of these features are present for each sample. Without special treatment, the sheer magnitude of the feature space can lead to out-of-memory situations and cause significant slowdowns when training and making predictions.
-MXNet supports a number of sparse storage types (often called 'stype' for short) for these situations. In this tutorial, we'll start by generating some sparse data, write it to disk in the LibSVM format and then read back using the [`LibSVMIter`](https://mxnet.apache.org/api/python/io/io.html) for training. We use the Gluon API to train the model and leverage sparse storage types such as [`CSRNDArray`](https://mxnet.apache.org/api/python/ndarray/sparse.html?highlight=csrndarray#mxnet.nda [...]
+MXNet supports a number of sparse storage types (often called 'stype' for short) for these situations. In this tutorial, we'll start by generating some sparse data, write it to disk in the LibSVM format and then read back using the [`LibSVMIter`](/api/python/docs/api/mxnet/io/index.html#mxnet.io.LibSVMIter) for training. We use the Gluon API to train the model and leverage sparse storage types such as [`CSRNDArray`](/api/python/docs/api/ndarray/sparse/index.html#mxnet.ndarray.sparse.CSRN [...]
```python
@@ -63,7 +63,7 @@ print('{:,.0f} non-zero elements'.format(data.data.size))
10,000 non-zero elements
```
-Our storage type is CSR (Compressed Sparse Row) which is the ideal type for sparse data along multiple axes. See [this in-depth tutorial](https://mxnet.apache.org/versions/master/tutorials/sparse/csr.html) for more information. Just to confirm the generation process ran correctly, we can see that the vast majority of values are indeed zero. One of the first questions to ask would be how much memory is saved by storing this data in a [`CSRNDArray`](https://mxnet.apache.org/api/python/ndar [...]
+Our storage type is CSR (Compressed Sparse Row) which is the ideal type for sparse data along multiple axes. See [this in-depth tutorial](https://mxnet.apache.org/versions/master/tutorials/sparse/csr.html) for more information. Just to confirm the generation process ran correctly, we can see that the vast majority of values are indeed zero. One of the first questions to ask would be how much memory is saved by storing this data in a [`CSRNDArray`](/api/python/docs/api/ndarray/sparse/inde [...]
```python
@@ -94,9 +94,9 @@ Given the extremely high sparsity of the data, we observe a huge memory saving h
### Writing Sparse Data
-Since there is such a large size difference between dense and sparse storage formats here, we ideally want to store the data on disk in a sparse storage format too. MXNet supports a format called LibSVM and has a data iterator called [`LibSVMIter`](https://mxnet.apache.org/api/python/io/io.html?highlight=libsvmiter) specifically for data formatted this way.
+Since there is such a large size difference between dense and sparse storage formats here, we ideally want to store the data on disk in a sparse storage format too. MXNet supports a format called LibSVM and has a data iterator called [`LibSVMIter`](/api/python/docs/api/mxnet/io/index.html#mxnet.io.LibSVMIter) specifically for data formatted this way.
-A LibSVM file has a row for each sample, and each row starts with the label: in this case `0.0` or `1.0` since we have a classification task. After this we have a variable number of `key:value` pairs separated by spaces, where the key is column/feature index and the value is the value of that feature. When working with your own sparse data in a custom format you should try to convert your data into this format. We define a `save_as_libsvm` function to save the `data` ([`CSRNDArray`](http [...]
+A LibSVM file has a row for each sample, and each row starts with the label: in this case `0.0` or `1.0` since we have a classification task. After this we have a variable number of `key:value` pairs separated by spaces, where the key is column/feature index and the value is the value of that feature. When working with your own sparse data in a custom format you should try to convert your data into this format. We define a `save_as_libsvm` function to save the `data` ([`CSRNDArray`](/api [...]
```python
@@ -148,10 +148,9 @@ Some storage overhead is introduced by serializing the data as characters (with
### Reading Sparse Data
-Using [`LibSVMIter`](https://mxnet.apache.org/api/python/io/io.html?highlight=libsvmiter), we can quickly and easily load data into batches ready for training. Although Gluon [`Dataset`](https://mxnet.apache.org/versions/master/api/python/gluon/data.html?highlight=dataset#mxnet.gluon.data.Dataset)s can be written to return sparse arrays, Gluon [`DataLoader`](https://mxnet.apache.org/versions/master/api/python/gluon/data.html?highlight=dataloader#mxnet.gluon.data.DataLoader)s currently co [...]
-
-Similar to using a [`DataLoader`](https://mxnet.apache.org/versions/master/api/python/gluon/data.html?highlight=dataloader#mxnet.gluon.data.DataLoader), you must specify the required `batch_size`. Since we're dealing with sparse data and the column shape isn't explicitly stored in the LibSVM file, we additionally need to provide the shape of the data and label. Our [`LibSVMIter`](https://mxnet.apache.org/api/python/io/io.html?highlight=libsvmiter) returns batches in a slightly different [...]
+Using [`LibSVMIter`](/api/python/docs/api/mxnet/io/index.html#mxnet.io.LibSVMIter), we can quickly and easily load data into batches ready for training. Although Gluon [`Dataset`](/api/python/docs/api/gluon/data/index.html#mxnet.gluon.data.Dataset)s can be written to return sparse arrays, Gluon [`DataLoader`](/api/python/docs/api/gluon/data/index.html#mxnet.gluon.data.DataLoader)s currently convert each sample to dense before stacking up to create the batch. As a result, [`LibSVMIter`](/ [...]
+Similar to using a [`DataLoader`](/api/python/docs/api/gluon/data/index.html#mxnet.gluon.data.DataLoader), you must specify the required `batch_size`. Since we're dealing with sparse data and the column shape isn't explicitly stored in the LibSVM file, we additionally need to provide the shape of the data and label. Our [`LibSVMIter`](/api/python/docs/api/mxnet/io/index.html#mxnet.io.LibSVMIter) returns batches in a slightly different form to a [`DataLoader`](/api/python/docs/api/gluon/d [...]
```python
data_iter = mx.io.LibSVMIter(data_libsvm=filepath, data_shape=(num_features,), label_shape=(1,), batch_size=10)
@@ -215,7 +214,7 @@ Although results will change depending on system specifications and degree of sp
Our next step is to define a network. We have an input of 1,000,000 features and we want to make a binary prediction. We don't have any spatial or temporal relationships between features, so we'll use a 3 layer fully-connected network where the last layer has 1 output unit (with sigmoid activation). Since we're working with sparse data, we'd ideally like to use network operators that can exploit this sparsity for improved performance and memory efficiency.
-Gluon's [`nn.Dense`](https://mxnet.apache.org/versions/master/api/python/gluon/nn.html?highlight=dense#mxnet.gluon.nn.Dense) block can used with [`CSRNDArray`](https://mxnet.apache.org/api/python/ndarray/sparse.html?highlight=csrndarray#mxnet.ndarray.sparse.CSRNDArray) input arrays but it doesn't exploit the sparsity. Under the hood, [`Dense`](https://mxnet.apache.org/versions/master/api/python/gluon/nn.html?highlight=dense#mxnet.gluon.nn.Dense) uses the [`FullyConnected`](https://mxnet. [...]
+Gluon's [`nn.Dense`](/api/python/docs/api/gluon/nn/index.html#mxnet.gluon.nn.Dense) block can used with [`CSRNDArray`](/api/python/docs/api/ndarray/sparse/index.html#mxnet.ndarray.sparse.CSRNDArray) input arrays but it doesn't exploit the sparsity. Under the hood, [`Dense`](/api/python/docs/api/gluon/nn/index.html#mxnet.gluon.nn.Dense) uses the [`FullyConnected`](/api/python/docs/api/ndarray/ndarray.html#mxnet.ndarray.FullyConnected) operator which isn't optimized for [`CSRNDArray`](/api [...]
```python
@@ -235,11 +234,11 @@ class FullyConnected(mx.gluon.HybridBlock):
return F.FullyConnected(x, weight, bias, num_hidden=self._units)
```
-Our `weight` and `bias` parameters are dense (see `stype='default'`) and so are their gradients (see `grad_stype='default'`). Our `weight` parameter has shape `(units, in_units)` because the [`FullyConnected`](https://mxnet.apache.org/versions/master/api/python/ndarray/ndarray.html?highlight=fullyconnected#mxnet.ndarray.FullyConnected) operator performs the following calculation:
+Our `weight` and `bias` parameters are dense (see `stype='default'`) and so are their gradients (see `grad_stype='default'`). Our `weight` parameter has shape `(units, in_units)` because the [`FullyConnected`](/api/python/docs/api/ndarray/ndarray.html#mxnet.ndarray.FullyConnected) operator performs the following calculation:
$$Y = XW^T + b$$
-We could instead have created our parameter with shape `(in_units, units)` and avoid the transpose of the weight matrix. We'll see why this is so important later on. And instead of [`FullyConnected`](https://mxnet.apache.org/versions/master/api/python/ndarray/ndarray.html?highlight=fullyconnected#mxnet.ndarray.FullyConnected) we could have used [`mx.sparse.dot`](https://mxnet.apache.org/versions/master/api/python/ndarray/sparse.html?highlight=sparse.dot#mxnet.ndarray.sparse.dot) to fully [...]
+We could instead have created our parameter with shape `(in_units, units)` and avoid the transpose of the weight matrix. We'll see why this is so important later on. And instead of [`FullyConnected`](/api/python/docs/api/ndarray/ndarray.html#mxnet.ndarray.FullyConnected) we could have used [`mx.sparse.dot`](/api/python/docs/api/ndarray/sparse/index.html?#mxnet.ndarray.sparse.dot) to fully exploit the sparsity of the [`CSRNDArray`](/api/python/docs/api/ndarray/sparse/index.html#mxnet.ndar [...]
```python
@@ -261,7 +260,7 @@ class FullyConnectedSparse(mx.gluon.HybridBlock):
Once again, we're using a dense `weight`, so both `FullyConnected` and `FullyConnectedSparse` will return dense array outputs. When constructing a multi-layer network therefore, only the first layer needs to be optimized for sparse inputs. Our first layer is often responsible for reducing the feature dimension dramatically (e.g. 1,000,000 features down to 128 features). We'll set the number of units in our 3 layers to be 128, 8 and 1.
-We will use [`timeit`](https://docs.python.org/2/library/timeit.html) to check the performance of these two variants, and analyse some [MXNet Profiler](https://mxnet.apache.org/versions/master/tutorials/python/profiler.html) traces that have been created from these benchmarks. Additionally, we will inspect the memory usage of the weights (and gradients) using the `print_memory_allocation` function defined below:
+We will use [`timeit`](https://docs.python.org/2/library/timeit.html) to check the performance of these two variants, and analyse some [MXNet Profiler](/api/python/docs/tutorials/performance/backend/profiler.html) traces that have been created from these benchmarks. Additionally, we will inspect the memory usage of the weights (and gradients) using the `print_memory_allocation` function defined below:
```python
@@ -324,7 +323,7 @@ for batch in data_iter:
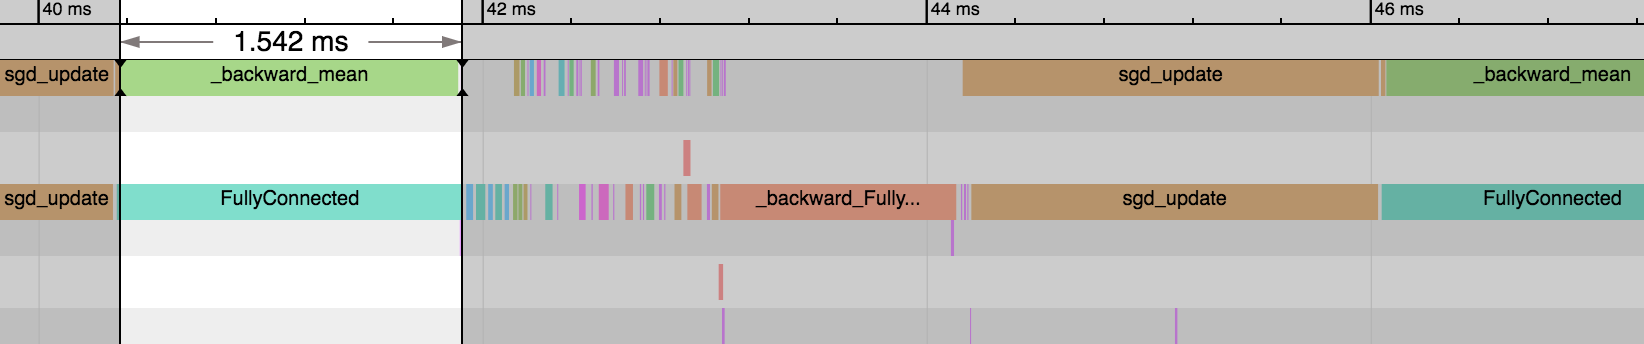
-We can see the first [`FullyConnected`](https://mxnet.apache.org/versions/master/api/python/ndarray/ndarray.html?highlight=fullyconnected#mxnet.ndarray.FullyConnected) operator takes a significant proportion of time to execute (~25% of the iteration) because there are 1,000,000 input features (to 128). After this, the other [`FullyConnected`](https://mxnet.apache.org/versions/master/api/python/ndarray/ndarray.html?highlight=fullyconnected#mxnet.ndarray.FullyConnected) operators are much [...]
+We can see the first [`FullyConnected`](/api/python/docs/api/ndarray/ndarray.html#mxnet.ndarray.FullyConnected) operator takes a significant proportion of time to execute (~25% of the iteration) because there are 1,000,000 input features (to 128). After this, the other [`FullyConnected`](/api/python/docs/api/ndarray/ndarray.html#mxnet.ndarray.FullyConnected) operators are much faster because they have input features of 128 (to 8) and 8 (to 1). On the backward pass, we see the same patter [...]
```python
@@ -384,7 +383,7 @@ for batch in data_iter:
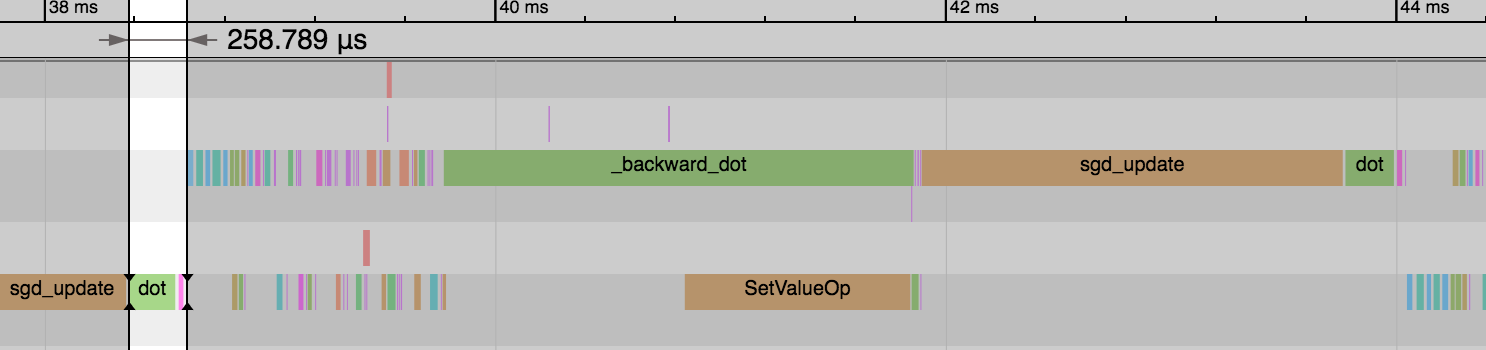
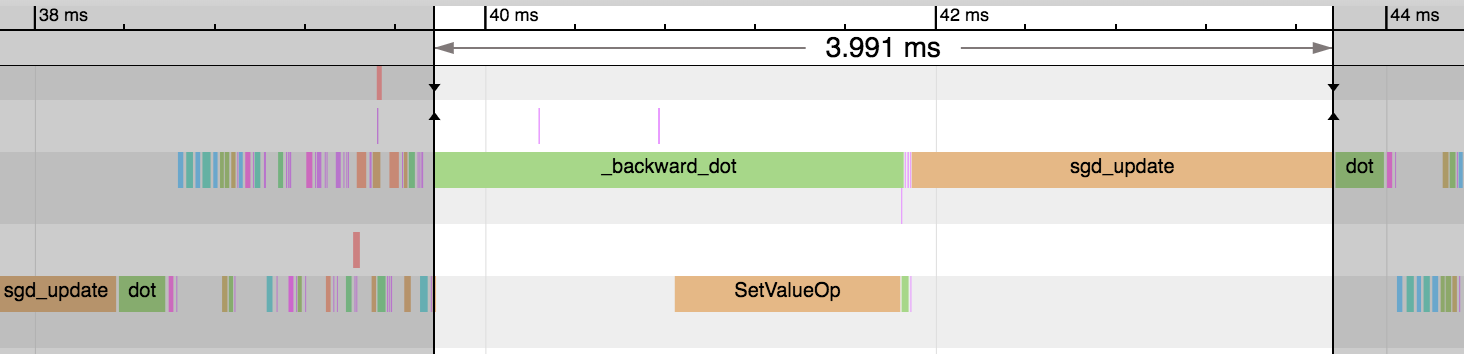
-We see the forward pass of `dot` and `add` (equivalent to [`FullyConnected`](https://mxnet.apache.org/versions/master/api/python/ndarray/ndarray.html?highlight=fullyconnected#mxnet.ndarray.FullyConnected) operator) is much faster now: 1.54ms vs 0.26ms. And this explains the reduction in overall time for the epoch. We didn't gain any benefit on the backward pass or parameter updates though.
+We see the forward pass of `dot` and `add` (equivalent to [`FullyConnected`](/api/python/docs/api/ndarray/ndarray.html#mxnet.ndarray.FullyConnected) operator) is much faster now: 1.54ms vs 0.26ms. And this explains the reduction in overall time for the epoch. We didn't gain any benefit on the backward pass or parameter updates though.
@@ -408,7 +407,7 @@ Memory Allocation for Weight Gradient:
### Benchmark: `FullyConnectedSparse` with `grad_stype=row_sparse`
-One useful outcome of sparsity in our [`CSRNDArray`](https://mxnet.apache.org/api/python/ndarray/sparse.html?highlight=csrndarray#mxnet.ndarray.sparse.CSRNDArray) input is that our gradients will be row sparse. We can exploit this fact to give us potentially huge memory savings and speed improvements. Creating our `weight` parameter with shape `(units, in_units)` and not transposing in the forward pass are important pre-requisite for obtaining row sparse gradients. Using [`nn.Dense`](htt [...]
+One useful outcome of sparsity in our [`CSRNDArray`](/api/python/docs/api/ndarray/sparse/index.html#mxnet.ndarray.sparse.CSRNDArray) input is that our gradients will be row sparse. We can exploit this fact to give us potentially huge memory savings and speed improvements. Creating our `weight` parameter with shape `(units, in_units)` and not transposing in the forward pass are important pre-requisite for obtaining row sparse gradients. Using [`nn.Dense`](/api/python/docs/api/gluon/nn/ind [...]
```python
@@ -472,12 +471,12 @@ You can optimize this example further by setting the weight's `stype` to `'row_s
## Conclusion
-As part of this tutorial, we learned how to write sparse data to disk in LibSVM format and load it back in sparse batches with the [`LibSVMIter`](https://mxnet.apache.org/api/python/io/io.html?highlight=libsvmiter). We learned how to improve the performance of Gluon's [`nn.Dense`](https://mxnet.apache.org/versions/master/api/python/gluon/nn.html?highlight=dense#mxnet.gluon.nn.Dense) on sparse arrays using `mx.nd.sparse`. And lastly, we set `grad_stype` to `'row_sparse'` to reduce the siz [...]
+As part of this tutorial, we learned how to write sparse data to disk in LibSVM format and load it back in sparse batches with the [`LibSVMIter`](/api/python/docs/api/mxnet/io/index.html#mxnet.io.LibSVMIter). We learned how to improve the performance of Gluon's [`nn.Dense`](/api/python/docs/api/gluon/nn/index.html#mxnet.gluon.nn.Dense) on sparse arrays using `mx.nd.sparse`. And lastly, we set `grad_stype` to `'row_sparse'` to reduce the size of the gradient and speed up the parameter upd [...]
## Recommended Next Steps
-* More detail on the [`CSRNDArray`](https://mxnet.apache.org/api/python/ndarray/sparse.html?highlight=csrndarray#mxnet.ndarray.sparse.CSRNDArray) sparse array format can be found in [this tutorial](https://mxnet.apache.org/versions/master/tutorials/sparse/csr.html).
-* More detail on the [`RowSparseNDArray`](https://mxnet.apache.org/api/python/ndarray/sparse.html?highlight=rowsparsendarray#mxnet.ndarray.sparse.RowSparseNDArray) sparse array format can be found in [this tutorial](https://mxnet.apache.org/versions/master/tutorials/sparse/row_sparse.html).
-* Users of the Module API can see a symbolic only example in [this tutorial](https://mxnet.apache.org/versions/master/tutorials/sparse/train.html).
+* More detail on the [`CSRNDArray`](/api/python/docs/api/ndarray/sparse/index.html#mxnet.ndarray.sparse.CSRNDArray) sparse array format can be found in [this tutorial](/api/python/docs/tutorials/packages/ndarray/sparse/csr.html).
+* More detail on the [`RowSparseNDArray`](/api/python/docs/api/ndarray/sparse/index.html#mxnet.ndarray.sparse.RowSparseNDArray) sparse array format can be found in [this tutorial](/api/python/docs/tutorials/packages/ndarray/sparse/row_sparse.html).
+* Users of the Module API can see a symbolic only example in [this tutorial](/api/python/docs/tutorials/packages/ndarray/sparse/train.html).
<!-- INSERT SOURCE DOWNLOAD BUTTONS -->
diff --git a/docs/python_docs/python/tutorials/packages/onnx/fine_tuning_gluon.md b/docs/python_docs/python/tutorials/packages/onnx/fine_tuning_gluon.md
index f777314..e1eb304 100644
--- a/docs/python_docs/python/tutorials/packages/onnx/fine_tuning_gluon.md
+++ b/docs/python_docs/python/tutorials/packages/onnx/fine_tuning_gluon.md
@@ -36,7 +36,7 @@ To run the tutorial you will need to have installed the following python modules
- matplotlib
We recommend that you have first followed this tutorial:
-- [Inference using an ONNX model on MXNet Gluon](https://mxnet.apache.org/tutorials/onnx/inference_on_onnx_model.html)
+- [Inference using an ONNX model on MXNet Gluon](/api/python/docs/tutorials/packages/onnx/inference_on_onnx_model.html)
```python
diff --git a/docs/python_docs/python/tutorials/packages/viz/index.rst b/docs/python_docs/python/tutorials/packages/viz/index.rst
index c9254a9..367c8ec 100644
--- a/docs/python_docs/python/tutorials/packages/viz/index.rst
+++ b/docs/python_docs/python/tutorials/packages/viz/index.rst
@@ -29,7 +29,7 @@ Visualization
References
----------
-- `mxnet.viz <../api/symbol-related/mxnet.visualization.html>`_
+- `mxnet.viz </api/python/docs/api/mxnet/visualization/index.html>`_
.. toctree::
:hidden:
diff --git a/docs/python_docs/python/tutorials/performance/backend/mkldnn/mkldnn_quantization.md b/docs/python_docs/python/tutorials/performance/backend/mkldnn/mkldnn_quantization.md
index da442e9..8c15af2 100644
--- a/docs/python_docs/python/tutorials/performance/backend/mkldnn/mkldnn_quantization.md
+++ b/docs/python_docs/python/tutorials/performance/backend/mkldnn/mkldnn_quantization.md
@@ -23,7 +23,7 @@ If you are not familiar with Apache/MXNet quantization flow, please reference [q
## Installation and Prerequisites
-Installing MXNet with MKLDNN backend is an easy and essential process. You can follow [How to build and install MXNet with MKL-DNN backend](https://mxnet.apache.org/tutorials/mkldnn/MKLDNN_README.html) to build and install MXNet from source. Also, you can install the release or nightly version via PyPi and pip directly by running:
+Installing MXNet with MKLDNN backend is an easy and essential process. You can follow [How to build and install MXNet with MKL-DNN backend](/api/python/docs/tutorials/performance/backend/mkldnn/mkldnn_readme.html) to build and install MXNet from source. Also, you can install the release or nightly version via PyPi and pip directly by running:
```
# release version
@@ -38,7 +38,7 @@ A quantization script [imagenet_gen_qsym_mkldnn.py](https://github.com/apache/in
## Integrate Quantization Flow to Your Project
-Quantization flow works for both symbolic and Gluon models. If you're using Gluon, you can first refer [Saving and Loading Gluon Models](https://mxnet.apache.org/versions/master/tutorials/gluon/save_load_params.html) to hybridize your computation graph and export it as a symbol before running quantization.
+Quantization flow works for both symbolic and Gluon models. If you're using Gluon, you can first refer [Saving and Loading Gluon Models](/api/python/docs/tutorials/packages/gluon/blocks/save_load_params.html) to hybridize your computation graph and export it as a symbol before running quantization.
In general, the quantization flow includes 4 steps. The user can get the acceptable accuracy from step 1 to 3 with minimum effort. Most of thing in this stage is out-of-box and the data scientists and researchers only need to focus on how to represent data and layers in their model. After a quantized model is generated, you may want to deploy it online and the performance will be the next key point. Thus, step 4, calibration, can improve the performance a lot by reducing lots of runtime [...]
diff --git a/docs/python_docs/python/tutorials/performance/backend/profiler.md b/docs/python_docs/python/tutorials/performance/backend/profiler.md
index 6969517..f90d5ba 100644
--- a/docs/python_docs/python/tutorials/performance/backend/profiler.md
+++ b/docs/python_docs/python/tutorials/performance/backend/profiler.md
@@ -212,7 +212,7 @@ Let's zoom in to check the time taken by operators
The above picture visualizes the sequence in which the operators were executed and the time taken by each operator.
### Profiling Custom Operators
-Should the existing NDArray operators fail to meet all your model's needs, MXNet supports [Custom Operators](https://mxnet.apache.org/versions/master/tutorials/gluon/customop.html) that you can define in Python. In `forward()` and `backward()` of a custom operator, there are two kinds of code: "pure Python" code (NumPy operators included) and "sub-operators" (NDArray operators called within `forward()` and `backward()`). With that said, MXNet can profile the execution time of both kinds [...]
+Should the existing NDArray operators fail to meet all your model's needs, MXNet supports [Custom Operators](/api/python/docs/tutorials/extend/customop.html) that you can define in Python. In `forward()` and `backward()` of a custom operator, there are two kinds of code: "pure Python" code (NumPy operators included) and "sub-operators" (NDArray operators called within `forward()` and `backward()`). With that said, MXNet can profile the execution time of both kinds without additional setu [...]
Let's try profiling custom operators with the following code example:
diff --git a/docs/python_docs/python/tutorials/performance/backend/tensorrt/tensorrt.md b/docs/python_docs/python/tutorials/performance/backend/tensorrt/tensorrt.md
index 8dc19f1..63dd678 100644
--- a/docs/python_docs/python/tutorials/performance/backend/tensorrt/tensorrt.md
+++ b/docs/python_docs/python/tutorials/performance/backend/tensorrt/tensorrt.md
@@ -39,7 +39,7 @@ nvidia-docker run -ti mxnet/tensorrt python
## Sample Models
### Resnet 18
-TensorRT is an inference only library, so for the purposes of this blog post we will be using a pre-trained network, in this case a Resnet 18. Resnets are a computationally intensive model architecture that are often used as a backbone for various computer vision tasks. Resnets are also commonly used as a reference for benchmarking deep learning library performance. In this section we'll use a pretrained Resnet 18 from the [Gluon Model Zoo](https://mxnet.apache.org/versions/master/api/ [...]
+TensorRT is an inference only library, so for the purposes of this blog post we will be using a pre-trained network, in this case a Resnet 18. Resnets are a computationally intensive model architecture that are often used as a backbone for various computer vision tasks. Resnets are also commonly used as a reference for benchmarking deep learning library performance. In this section we'll use a pretrained Resnet 18 from the [Gluon Model Zoo](/api/python/docs/api/gluon/model_zoo/index.ht [...]
## Model Initialization
```python
@@ -128,7 +128,7 @@ This means that when an MXNet computation graph is constructed, it will be parse
During this process MXNet will take care of passing along the input to the node and fetching the results. MXNet will also attempt to remove any duplicated weights (parameters) during the graph initialization to keep memory usage low. That is, if there are graph weights that are used only in the TensorRT sections of the graph, they will be removed from the MXNet set of parameters, and their memory will be freed.
-The examples below shows a Gluon implementation of a Wavenet before and after a TensorRT graph pass. You can see that for this network TensorRT supports a subset of the operators involved. This makes it an interesting example to visualize, as several subgraphs are extracted and replaced with special TensorRT nodes. The Resnet used as an example above would be less interesting to visualization. The entire Resnet graph is supported by TensorRT, and hence the optimized graph would be a sing [...]
+The examples below shows a Gluon implementation of a Wavenet before and after a TensorRT graph pass. You can see that for this network TensorRT supports a subset of the operators involved. This makes it an interesting example to visualize, as several subgraphs are extracted and replaced with special TensorRT nodes. The Resnet used as an example above would be less interesting to visualization. The entire Resnet graph is supported by TensorRT, and hence the optimized graph would be a sing [...]
## Before

diff --git a/docs/static_site/src/pages/api/api.html b/docs/static_site/src/pages/api/api.html
index a1f4ae1..8247568 100644
--- a/docs/static_site/src/pages/api/api.html
+++ b/docs/static_site/src/pages/api/api.html
@@ -52,7 +52,7 @@ docs:
- title: Julia
guide_link: /api/julia
api_link: /api/julia/docs/api
- tutorial_link: https://github.com/apache/incubator-mxnet/tree/master/julia/examples
+ tutorial_link: https://mxnet.incubator.apache.org/api/julia/docs/api/#tutorials
description:
icon: /assets/img/julia_logo.svg
tag: julia
diff --git a/docs/static_site/src/pages/api/cpp/docs/tutorials/mxnet_cpp_inference_tutorial.md b/docs/static_site/src/pages/api/cpp/docs/tutorials/mxnet_cpp_inference_tutorial.md
index 0d96817..6d9998d 100644
--- a/docs/static_site/src/pages/api/cpp/docs/tutorials/mxnet_cpp_inference_tutorial.md
+++ b/docs/static_site/src/pages/api/cpp/docs/tutorials/mxnet_cpp_inference_tutorial.md
@@ -28,23 +28,23 @@ tag: cpp
## Overview
MXNet provides various useful tools and interfaces for deploying your model for inference. For example, you can use [MXNet Model Server](https://github.com/awslabs/mxnet-model-server) to start a service and host your trained model easily.
-Besides that, you can also use MXNet's different language APIs to integrate your model with your existing service. We provide [Python]({{'/api/python/docs/api/symbol-related/mxnet.module'|relative_url}}), [Java]({{'/api/java/docs/api'|relative_url}}), [Scala]({{'/api/scala/docs/api'|relative_url}}), and [C++]({{'/api/cpp/docs/api'|relative_url}}) APIs.
+Besides that, you can also use MXNet's different language APIs to integrate your model with your existing service. We provide [Python](/api/python/docs/api/), [Java](/api/java/docs/api/#package), [Scala](/api/scala/docs/api), and [C++](/api/cpp/docs/api/) APIs.
We will focus on the MXNet C++ API. We have slightly modified the code in [C++ Inference Example](https://github.com/apache/incubator-mxnet/tree/master/cpp-package/example/inference) for our use case.
## Prerequisites
-To complete this tutorial, you need:
-- Complete the training part of [Gluon end to end tutorial]({{'api/python/docs/tutorials/packages/gluon/image-augmentation.html'|relative_url}})
-- Learn the basics about [MXNet C++ API]({{'/api/cpp'|relative_url}})
+To complete this tutorial, you need to:
+- Complete the training part of [Gluon end to end tutorial](/api/python/docs/tutorials/getting-started/gluon_from_experiment_to_deployment.html)
+- Learn the basics about [MXNet C++ API](/api/cpp)
## Setup the MXNet C++ API
-To use the C++ API in MXNet, you need to build MXNet from source with C++ package. Please follow the [built from source guide]({{'/get_started/ubuntu_setup.html'|relative_url}}), and [C++ Package documentation]({{'/api/cpp'|relative_url}})
+To use the C++ API in MXNet, you need to build MXNet from source with C++ package. Please follow the [built from source guide](/get_started/ubuntu_setup.html), and [C++ Package documentation](/api/cpp)
The summary of those two documents is that you need to build MXNet from source with `USE_CPP_PACKAGE` flag set to 1. For example: `make -j USE_CPP_PACKAGE=1`.
## Load the model and run inference
-After you complete [the previous tutorial]({{'/api/python/docs/tutorials/packages/gluon/gluon_from_experiment_to_deployment.html'|relative_url}}), you will get the following output files:
+After you complete [the previous tutorial](/api/python/docs/tutorials/getting-started/gluon_from_experiment_to_deployment.html), you will get the following output files:
1. Model Architecture stored in `flower-recognition-symbol.json`
2. Model parameter values stored in `flower-recognition-0040.params` (`0040` is for 40 epochs we ran)
3. Label names stored in `synset.txt`
@@ -280,8 +280,8 @@ Then it will predict your image:
Now you can explore more ways to run inference and deploy your models:
1. [Java Inference examples](https://github.com/apache/incubator-mxnet/tree/master/scala-package/examples/src/main/java/org/apache/mxnetexamples/javaapi/infer)
-2. [Scala Inference examples](/api/scala/docs/tutorials)
-3. [ONNX model inference examples](/api/python/docs/tutorials/deploy/index.html)
+2. [Scala Inference examples](https://github.com/apache/incubator-mxnet/tree/master/scala-package/examples/src/main/scala/org/apache/mxnetexamples/infer)
+3. [ONNX model inference examples](/api/python/docs/tutorials/packages/onnx/inference_on_onnx_model.html)
4. [MXNet Model Server Examples](https://github.com/awslabs/mxnet-model-server/tree/master/examples)
## References
diff --git a/docs/static_site/src/pages/api/faq/float16.md b/docs/static_site/src/pages/api/faq/float16.md
index e63bf87..6ffb040 100644
--- a/docs/static_site/src/pages/api/faq/float16.md
+++ b/docs/static_site/src/pages/api/faq/float16.md
@@ -133,7 +133,7 @@ if dtype == 'float16':
output = mx.sym.SoftmaxOutput(data=net_out, name='softmax')
```
-If you would like to train ResNet50 model on ImageNet using float16 precision, you can find the full script [here](https://github.com/apache/incubator-mxnet/tree/master/example/image-classificatiIfon/train_imagenet.py)
+If you would like to train ResNet50 model on ImageNet using float16 precision, you can find the full script [here](https://github.com/apache/incubator-mxnet/blob/master/docs/static_site/src/pages/api/faq/float16.md)
If you don't have ImageNet dataset at your disposal, you can still run the script above using synthetic float16 data by providing the following command:
diff --git a/docs/static_site/src/pages/api/faq/perf.md b/docs/static_site/src/pages/api/faq/perf.md
index 675304f..202a099 100644
--- a/docs/static_site/src/pages/api/faq/perf.md
+++ b/docs/static_site/src/pages/api/faq/perf.md
@@ -64,7 +64,7 @@ Note that _MXNet_ treats all CPUs on a single machine as a single device.
So whether you specify `cpu(0)` or `cpu()`, _MXNet_ will use all CPU cores on the machine.
### Scoring results
-The following table shows performance of [MXNet-1.2.0.rc1](https://github.com/apache/incubator-mxnet/releases/download/1.2.0.rc1/apache-mxnet-src-1.2.0.rc1-incubating.tar.gz),
+The following table shows performance of MXNet-1.2.0.rc1,
namely number of images that can be predicted per second.
We used [example/image-classification/benchmark_score.py](https://github.com/dmlc/mxnet/blob/master/example/image-classification/benchmark_score.py)
to measure the performance on different AWS EC2 machines.
@@ -151,7 +151,7 @@ and V100 (EC2 p3.2xlarge).
Based on
[example/image-classification/benchmark_score.py](https://github.com/dmlc/mxnet/blob/master/example/image-classification/benchmark_score.py)
-and [MXNet-1.2.0.rc1](https://github.com/apache/incubator-mxnet/releases/download/1.2.0.rc1/apache-mxnet-src-1.2.0.rc1-incubating.tar.gz), with cuDNN 7.0.5
+and MXNet-1.2.0.rc1, with cuDNN 7.0.5
- K80 (single GPU)
@@ -214,7 +214,7 @@ Below is the performance result on V100 using float 16.
Based on
[example/image-classification/train_imagenet.py](https://github.com/dmlc/mxnet/blob/master/example/image-classification/train_imagenet.py)
-and [MXNet-1.2.0.rc1](https://github.com/apache/incubator-mxnet/releases/download/1.2.0.rc1/apache-mxnet-src-1.2.0.rc1-incubating.tar.gz), with CUDNN 7.0.5. The benchmark script is available at
+and MXNet-1.2.0.rc1, with CUDNN 7.0.5. The benchmark script is available at
[here](https://github.com/mli/mxnet-benchmark/blob/master/run_vary_batch.sh),
where the batch size for Alexnet is increased by 16x.
diff --git a/docs/static_site/src/pages/get_started/build_from_source.md b/docs/static_site/src/pages/get_started/build_from_source.md
index 20a4542..1dfa95a 100644
--- a/docs/static_site/src/pages/get_started/build_from_source.md
+++ b/docs/static_site/src/pages/get_started/build_from_source.md
@@ -50,7 +50,7 @@ Building from source follows this general two-step flow of building the shared l
* [non-Intel CPUs](#recommended-for-Systems-with-non-Intel-CPUs)
2. [Install the language API binding(s)](#installing-mxnet-language-bindings) you would like to use for MXNet.
MXNet's newest and most popular API is Gluon. Gluon is built into the Python binding. If Python isn't your preference, you still have more options. MXNet supports several other language APIs:
- - [Python (includes Gluon)]({{'/api/python/index'|relative_url}})
+ - [Python (includes Gluon)]({{'/api/python/docs/api/index.html'|relative_url}})
- [C++]({{'/api/cpp'|relative_url}})
- [Clojure]({{'/api/clojure'|relative_url}})
- [Java]({{'/api/java'|relative_url}})
diff --git a/julia/docs/src/api/io.md b/julia/docs/src/api/io.md
index 34ad3c4..52d1720 100644
--- a/julia/docs/src/api/io.md
+++ b/julia/docs/src/api/io.md
@@ -54,7 +54,7 @@ end
By default, `eachbatch` simply returns the provider itself, so the iterator interface
is implemented on the provider type itself. But the extra layer of abstraction allows us to
implement a data provider easily via a Julia `Task` coroutine. See the
-data provider defined in [the char-lstm example](tutorial/char-lstm) for an example of using coroutine to define data
+data provider defined in [the char-lstm example](/api/julia/docs/api/tutorial/char-lstm/) for an example of using coroutine to define data
providers.
The detailed interface functions for the iterator API is listed below:
diff --git a/julia/docs/src/tutorial/char-lstm.md b/julia/docs/src/tutorial/char-lstm.md
index ab7e935..1109f35 100644
--- a/julia/docs/src/tutorial/char-lstm.md
+++ b/julia/docs/src/tutorial/char-lstm.md
@@ -38,7 +38,7 @@ network models directly.
The most important code snippets of this example is shown and explained
here. To see and run the complete code, please refer to the
-[examples/char-lstm](https://github.com/dmlc/MXNet.jl/tree/master/examples/char-lstm)
+[examples/char-lstm](https://github.com/apache/incubator-mxnet/blob/master/julia/docs/src/tutorial/char-lstm.md)
directory. You will need to install
[Iterators.jl](https://github.com/JuliaLang/Iterators.jl) and
[StatsBase.jl](https://github.com/JuliaStats/StatsBase.jl) to run this
diff --git a/julia/docs/src/tutorial/mnist.md b/julia/docs/src/tutorial/mnist.md
index a404f75..9427523 100644
--- a/julia/docs/src/tutorial/mnist.md
+++ b/julia/docs/src/tutorial/mnist.md
@@ -23,7 +23,7 @@ multi-layer perceptron and then a convolutional neural network (the
LeNet architecture) on the [MNIST handwritten digit
dataset](http://yann.lecun.com/exdb/mnist/). The code for this tutorial
could be found in
-[examples/mnist](/api/julia/docs/api/tutorial/mnist/). There are also two Jupyter notebooks that expand a little more on the [MLP](https://github.com/ultradian/julia_notebooks/blob/master/mxnet/mnistMLP.ipynb) and the [LeNet](https://github.com/ultradian/julia_notebooks/blob/master/mxnet/mnistLenet.ipynb), using the more general `ArrayDataProvider`.
+[examples/mnist](https://github.com/apache/incubator-mxnet/tree/master/julia/examples/mnist). There are also two Jupyter notebooks that expand a little more on the [MLP](https://github.com/ultradian/julia_notebooks/blob/master/mxnet/mnistMLP.ipynb) and the [LeNet](https://github.com/ultradian/julia_notebooks/blob/master/mxnet/mnistLenet.ipynb), using the more general `ArrayDataProvider`.
Simple 3-layer MLP
------------------
@@ -36,7 +36,7 @@ using MXNet
```
to load the `MXNet` module. Then we are ready to define the network
-architecture via the [symbolic API](../user-guide/overview.md). We start
+architecture via the [symbolic API](/api/julia/docs/api/user-guide/overview/). We start
with a placeholder `data` symbol,
```julia