You are viewing a plain text version of this content. The canonical link for it is here.
Posted to notifications@shardingsphere.apache.org by zh...@apache.org on 2022/03/28 12:45:59 UTC
[shardingsphere] branch master updated: Optimize docs (#16437)
This is an automated email from the ASF dual-hosted git repository.
zhaojinchao pushed a commit to branch master
in repository https://gitbox.apache.org/repos/asf/shardingsphere.git
The following commit(s) were added to refs/heads/master by this push:
new e3b6079 Optimize docs (#16437)
e3b6079 is described below
commit e3b6079166f02e4d89ed2101502d7984c10a8262
Author: 龙台 Long Tai <77...@users.noreply.github.com>
AuthorDate: Mon Mar 28 20:44:11 2022 +0800
Optimize docs (#16437)
* Document optimization
* Document optimization
---
docs/community/content/contribute/2FA.cn.md | 4 +-
docs/community/content/contribute/_index.cn.md | 6 +-
.../content/contribute/code-conduct.cn.md | 14 +--
docs/community/content/contribute/committer.cn.md | 4 +-
.../community/content/contribute/contributor.cn.md | 4 +-
.../content/contribute/document-contributor.cn.md | 14 +--
.../content/contribute/establish-project.cn.md | 22 ++--
docs/community/content/contribute/icla.cn.md | 4 +-
.../content/contribute/release-elasticjob-ui.cn.md | 68 +++++------
.../content/contribute/release-elasticjob.cn.md | 64 +++++------
docs/community/content/contribute/release.cn.md | 126 ++++++++++-----------
docs/community/content/contribute/vote.cn.md | 10 +-
docs/community/content/powered-by/_index.cn.md | 2 +-
13 files changed, 171 insertions(+), 171 deletions(-)
diff --git a/docs/community/content/contribute/2FA.cn.md b/docs/community/content/contribute/2FA.cn.md
index 74716f2..afa7585 100644
--- a/docs/community/content/contribute/2FA.cn.md
+++ b/docs/community/content/contribute/2FA.cn.md
@@ -4,12 +4,12 @@ weight = 11
chapter = true
+++
-## 双因素认证 (2FA)
+## 双因素认证(2FA)
双因子验证(2FA)是指结合密码以及实物(信用卡、SMS 手机、令牌或指纹等生物标志)两种条件对用户进行认证的方法。
为保证提交者账户的安全,我们需要您在 GitHub 上启用 2FA 来验证登录用户、并贡献代码。
-具体内容可参考[ 2FA](https://help.github.com/articles/requiring-two-factor-authentication-in-your-organization/)。
+具体内容可参考 [2FA](https://help.github.com/articles/requiring-two-factor-authentication-in-your-organization/)。
> 注意:若您不启用 2FA,您将会从本项目中除名,并且无法访问我们的仓库以及来自我们私有仓库的 fork 仓库。
diff --git a/docs/community/content/contribute/_index.cn.md b/docs/community/content/contribute/_index.cn.md
index a7f92bb..08c9918 100644
--- a/docs/community/content/contribute/_index.cn.md
+++ b/docs/community/content/contribute/_index.cn.md
@@ -5,7 +5,7 @@ weight = 1
chapter = true
+++
-ShardingSphere是一个开放且活跃的社区,非常欢迎高质量的参与者与我们共建开源之路。
+ShardingSphere 是一个开放且活跃的社区,非常欢迎高质量的参与者与我们共建开源之路。
您可以从[订阅官方邮件列表](/cn/contribute/subscribe/)开始参与社区。
@@ -13,8 +13,8 @@ ShardingSphere是一个开放且活跃的社区,非常欢迎高质量的参与
在成为一个贡献者之前,请您阅读[贡献者指南](/cn/contribute/contributor/)、[官方文档指南](/cn/contribute/document-contributor/)以及[开发规范](/cn/contribute/code-conduct/)。
-如果你想成为官方提交者,请您阅读[提交者指南](/cn/contribute/committer/)。官方提交者需要通过开启[2FA](/cn/contribute/2fa/)后,才能够行使Apache官方代码仓库权限。
+如果你想成为官方提交者,请您阅读[提交者指南](/cn/contribute/committer/)。官方提交者需要通过开启 [2FA](/cn/contribute/2fa/) 后,才能够行使 Apache 官方代码仓库权限。
如果你想成为官方版本发布经理,请您阅读[发布指南](/cn/contribute/release/)。
-感谢您关注ShardingSphere。
+感谢您关注 ShardingSphere。
diff --git a/docs/community/content/contribute/code-conduct.cn.md b/docs/community/content/contribute/code-conduct.cn.md
index e895af8..33f953c 100644
--- a/docs/community/content/contribute/code-conduct.cn.md
+++ b/docs/community/content/contribute/code-conduct.cn.md
@@ -18,7 +18,7 @@ chapter = true
## 代码提交行为规范
- - 确保构建流程中的各个步骤都成功完成,包括:Apache协议文件头检查、Checkstyle检查、编译、单元测试等。构建流程启动命令:`mvn -T 1C clean install` 或者 `./mvnw -T 1C clean install`。执行目录有2种选择,根据自己的熟悉程度做选择:1)对项目还不太熟悉,在项目根目录执行构建,所有模块都会执行构建,2)明确知道这次改动会影响到哪些模块,在这些模块执行构建,可以大大缩短构建时间。
+ - 确保构建流程中的各个步骤都成功完成,包括:Apache 协议文件头检查、Checkstyle 检查、编译、单元测试等。构建流程启动命令:`mvn -T 1C clean install` 或者 `./mvnw -T 1C clean install`。执行目录有 2 种选择,根据自己的熟悉程度做选择:1)对项目还不太熟悉,在项目根目录执行构建,所有模块都会执行构建,2)明确知道这次改动会影响到哪些模块,在这些模块执行构建,可以大大缩短构建时间。
- 确保覆盖率不低于 master 分支。
- 应尽量将设计精细化拆分;做到小幅度修改,多次数提交,但应保证提交的完整性。
- 确保遵守编码规范。
@@ -32,8 +32,8 @@ chapter = true
- 不应有无意义的空行。请提炼私有方法,代替方法体过长或代码段逻辑闭环而采用的空行间隔。
- 类、方法和变量的命名要做到顾名思义,避免使用缩写。
- 返回值变量使用 `result` 命名;循环中使用 `each` 命名循环变量;map 中使用 `entry` 代替 `each`。
- - 捕获的异常名称命名为 `ex` ;捕获异常且不做任何事情,异常名称命名为 `ignored` 。
- - 配置文件使用 `Spinal Case` 命名(一种使用`-`分割单词的特殊 `Snake Case`)。
+ - 捕获的异常名称命名为 `ex` ;捕获异常且不做任何事情,异常名称命名为 `ignored`。
+ - 配置文件使用 `Spinal Case` 命名(一种使用 `-` 分割单词的特殊 `Snake Case`)。
- 需要注释解释的代码尽量提成小方法,用方法名称解释。
- `equals` 和 `==` 条件表达式中,常量在左,变量在右;大于小于等条件表达式中,变量在左,常量在右。
- 除了构造器入参与全局变量名称相同的赋值语句外,避免使用 `this` 修饰符。
@@ -51,7 +51,7 @@ chapter = true
- 日志与注释一律使用英文。
- 注释只能包含 javadoc,todo 和 fixme。
- 公开的类和方法必须有 javadoc,其他类和方法以及覆盖自父类的方法无需 javadoc。
- - 条件运算符(<表达式1> ? <表达式2> : <表达式3>)禁止`嵌套使用`
+ - 条件运算符(<表达式1> ? <表达式2> : <表达式3>)禁止 `嵌套使用`。
## 单元测试规范
@@ -80,12 +80,12 @@ chapter = true
- 每行长度不超过 `200` 个字符,保证每一行语义完整以便于理解。
- 词法解析规范
- 每个规则一行,规则间无需空行。
- - 规则名称使用大写字母。如果名称由多个单词组成,用`下划线`间隔。`DataType` 和 `Symbol` 的规则命名以 `下划线` 结尾。与 ANTLR 内置变量或关键字重名的规则在结尾加`下划线`以示区分。
+ - 规则名称使用大写字母。如果名称由多个单词组成,用 `下划线` 间隔。`DataType` 和 `Symbol` 的规则命名以 `下划线` 结尾。与 ANTLR 内置变量或关键字重名的规则在结尾加 `下划线` 以示区分。
- 不对外暴露的规则使用 `fragment`,`fragment` 定义的规则需在其服务的规则之后声明。
- 公用规则定义放在 `Keyword.g4`,每个数据库可以有自己特有的规则定义。例如:`MySQLKeyword.g4`。
- 语法解析规范
- 每个规则结束后空一行,空行无需缩进。
- - 规则名称前面不空格,`冒号`后空一格再开始写规则,`分号`在单独一行并保持和上一行相同缩进。
+ - 规则名称前面不空格,`冒号` 后空一格再开始写规则,`分号` 在单独一行并保持和上一行相同缩进。
- 如果一个规则的分支超过 `5` 个,则每个分支一行。
- 规则命名采用 java 变量的驼峰形式。
- - 为每种 SQL 语句类型定义一个独立的语法文件,文件名称由`数据库名称` + `语句类型名称` + `Statement`。例如:`MySQLDQLStatement.g4`。
+ - 为每种 SQL 语句类型定义一个独立的语法文件,文件名称由 `数据库名称` + `语句类型名称` + `Statement`。例如:`MySQLDQLStatement.g4`。
diff --git a/docs/community/content/contribute/committer.cn.md b/docs/community/content/contribute/committer.cn.md
index c8e8c17..702a034 100644
--- a/docs/community/content/contribute/committer.cn.md
+++ b/docs/community/content/contribute/committer.cn.md
@@ -6,7 +6,7 @@ chapter = true
## 提交者提名
-ShardingSphere 社区遵循[Apache Community’s process](http://community.apache.org/newcommitter.html) 来接收新的提交者。
+ShardingSphere 社区遵循 [Apache Community’s process](http://community.apache.org/newcommitter.html) 来接收新的提交者。
当您积极地参与 ShardingSphere 社区之后,项目管理委员会和项目官方提交者会根据您的表现发起吸纳您成为官方提交者和项目管理委员会成员的流程。
## 提交者责任
@@ -35,4 +35,4 @@ ShardingSphere 社区遵循[Apache Community’s process](http://community.apach
3. Committer 提交的 PR,需要根据 PR 类型和当前发布的周期标注 Label 和 Milestone。
-4. Committer review PR 时,可以进行 squash and merge to master 的操作, 如果有问题可以加上 change request 或者@相关人员协助处理。
+4. Committer review PR 时,可以进行 squash and merge to master 的操作,如果有问题可以加上 change request 或者 @ 相关人员协助处理。
diff --git a/docs/community/content/contribute/contributor.cn.md b/docs/community/content/contribute/contributor.cn.md
index 21610bb..d223deb 100644
--- a/docs/community/content/contribute/contributor.cn.md
+++ b/docs/community/content/contribute/contributor.cn.md
@@ -9,7 +9,7 @@ chapter = true
## 提交 issue
- 在提交 issue 之前,请经过充分的搜索,确定该 issue 不是通过简单的检索即可以解决的问题。
- - 查看 [issue列表](https://github.com/apache/shardingsphere/issues),确定该 issue 不是一个重复的问题。
+ - 查看 [issue 列表](https://github.com/apache/shardingsphere/issues),确定该 issue 不是一个重复的问题。
- [新建](https://github.com/apache/shardingsphere/issues/new/choose)一个 issue 并选择您的 issue 类型。
- 使用一个清晰并有描述性的标题来定义 issue。
- 根据模板填写必要信息。
@@ -42,7 +42,7 @@ mvn clean install -Dmaven.javadoc.skip=true -Dcheckstyle.skip=true -Drat.skip=tr
**2. 选择 issue**
- - 请在选择您要修改的 issue。如果是您新发现的问题或想提供issue中没有的功能增强,请先新建一个 issue 并设置正确的标签。
+ - 请在选择您要修改的 issue。如果是您新发现的问题或想提供 issue 中没有的功能增强,请先新建一个 issue 并设置正确的标签。
- 在选中相关的 issue 之后,请回复以表明您当前正在这个 issue 上工作。并在回复的时候为自己设置一个 deadline,添加至回复内容中。
- 在[开发者列表](/cn/contribute/contributor/)中找到一个导师,导师会在设计与功能实现上给予即时的反馈。
diff --git a/docs/community/content/contribute/document-contributor.cn.md b/docs/community/content/contribute/document-contributor.cn.md
index 2a7a0d7..ffc2cf7 100644
--- a/docs/community/content/contribute/document-contributor.cn.md
+++ b/docs/community/content/contribute/document-contributor.cn.md
@@ -10,10 +10,10 @@ chapter = true
## 前置条件
-- 熟悉 [官方网站](https://shardingsphere.apache.org/index_zh.html)
-- 熟悉 [GitHub 协同开发流程](https://help.github.com/cn/github/collaborating-with-issues-and-pull-requests)
-- 熟练掌握 [Markdown](https://help.github.com/cn/github/writing-on-github/basic-writing-and-formatting-syntax)
-- 熟悉 [Hugo](https://gohugo.io/)
+- 熟悉 [官方网站](https://shardingsphere.apache.org/index_zh.html)。
+- 熟悉 [GitHub 协同开发流程](https://help.github.com/cn/github/collaborating-with-issues-and-pull-requests)。
+- 熟练掌握 [Markdown](https://help.github.com/cn/github/writing-on-github/basic-writing-and-formatting-syntax)。
+- 熟悉 [Hugo](https://gohugo.io/)。
## Fork 文档项目
@@ -79,7 +79,7 @@ shardingsphere
## 文档基础知识
-ShardingSphere 文档使用 Markdown 编写,并使用 Hugo 进行处理生成 html,部署于 [asf-site](https://github.com/apache/shardingsphere-doc/tree/asf-site) 分支,源代码位于 [Github](https://github.com/apache/shardingsphere/tree/master) 。
+ShardingSphere 文档使用 Markdown 编写,并使用 Hugo 进行处理生成 html,部署于 [asf-site](https://github.com/apache/shardingsphere-doc/tree/asf-site) 分支,源代码位于 [Github](https://github.com/apache/shardingsphere/tree/master)。
- [官方教程最新版本](https://shardingsphere.apache.org/document/current/cn/overview/) 源存储在 `/document/`
- [社区介绍及贡献](https://shardingsphere.apache.org/community/cn/contribute/) 相关文档源都储存在 `/community/content/`
@@ -115,6 +115,6 @@ ShardingSphere 文档使用 Markdown 编写,并使用 Hugo 进行处理生成
## 约定
-- 非特别说明,请使用 Hugo 的 `0.70.0` 版本
+- 非特别说明,请使用 Hugo 的 `0.70.0` 版本。
-- asf-site分支由官方定期更新,您无需向 asf-site 提交 pull request
+- asf-site 分支由官方定期更新,您无需向 asf-site 提交 pull request。
diff --git a/docs/community/content/contribute/establish-project.cn.md b/docs/community/content/contribute/establish-project.cn.md
index bd8ee26..c33e82b 100644
--- a/docs/community/content/contribute/establish-project.cn.md
+++ b/docs/community/content/contribute/establish-project.cn.md
@@ -41,18 +41,18 @@ git config --global core.longpaths true
## 选择终端
-### macOS
+### MacOS
以下终端任选其一:
-- Terminal :macOS 自带
-- iTerm2 :可自行安装
+- Terminal:MacOS 自带。
+- iTerm2:可自行安装。
### Windows
以下终端任选其一:
-- PowerShell :Windows 自带
-- Git Bash :可以通过 Git 官方客户端安装
-- [适用于 Linux 的 Windows 子系统 (WSL)]( https://docs.microsoft.com/zh-cn/windows/wsl/install ) :可自行安装
+- PowerShell:Windows 自带。
+- Git Bash:可以通过 Git 官方客户端安装。
+- [适用于 Linux 的 Windows 子系统 (WSL)]( https://docs.microsoft.com/zh-cn/windows/wsl/install ) :可自行安装。
### Linux
@@ -71,13 +71,13 @@ git config --global core.longpaths true
## 安装 IDE 插件
以下是一些常用插件:
-- Lombok :必须。最新版 IntelliJ IDEA 已自带。
-- CheckStyle :可选。可以实时或根据需要扫描 Java 文件,找出不符合代码规范的地方并提示。**注意**:不是所有不符合 [代码规范](/cn/contribute/code-conduct/) 的地方都可以被检查出来。
-- ANTLR v4 :可选。做 SQL 语法扩展任务的时候可能有用。
+- Lombok:必须。最新版 IntelliJ IDEA 已自带。
+- CheckStyle:可选。可以实时或根据需要扫描 Java 文件,找出不符合代码规范的地方并提示。**注意**:不是所有不符合 [代码规范](/cn/contribute/code-conduct/) 的地方都可以被检查出来。
+- ANTLR v4:可选。做 SQL 语法扩展任务的时候可能有用。
### CheckStyle 插件配置
-1. 添加配置文件 :使用 `src/resources/checkstyle.xml`
-2. 选择 Checkstyle 版本 :使用 `8.8`
+1. 添加配置文件 :使用 `src/resources/checkstyle.xml`;
+2. 选择 Checkstyle 版本 :使用 `8.8`。
详情请参考 [CheckStyle-IDEA 文档]( https://github.com/jshiell/checkstyle-idea/blob/main/README.md )。
diff --git a/docs/community/content/contribute/icla.cn.md b/docs/community/content/contribute/icla.cn.md
index e140921..842c4b2 100644
--- a/docs/community/content/contribute/icla.cn.md
+++ b/docs/community/content/contribute/icla.cn.md
@@ -13,7 +13,7 @@ Apache CLA 全称 Apache Contributor License Agreement,签署 ICLA 的目的
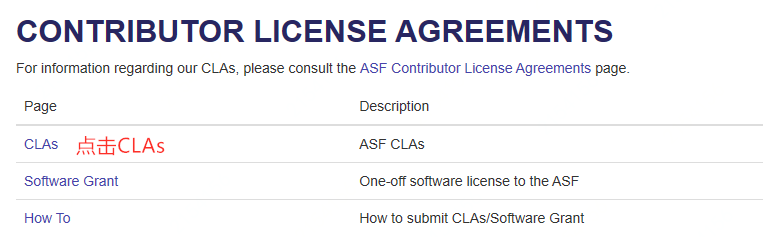
-**2. 在页面上方我们可以看到两个下载链接,选择 ICLA (个人 CLA)并下载文件。**
+**2. 在页面上方我们可以看到两个下载链接,选择 ICLA (个人 CLA)并下载文件。**

@@ -21,7 +21,7 @@ Apache CLA 全称 Apache Contributor License Agreement,签署 ICLA 的目的
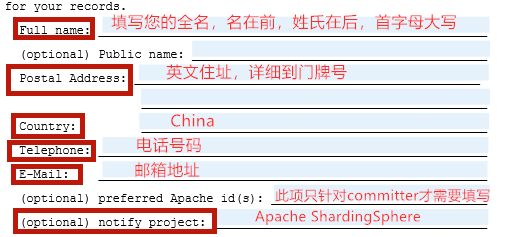
> 注意事项:
> - 姓名需要填写拼音,姓与名之间空一格,首字母均为大写,名在前姓氏在后。
-> - Committer 相关的签署,则 preferred Apache id(s) 是必填项。
+> - Committer 相关的签署,则 preferred Apache id(s) 是必填项。
diff --git a/docs/community/content/contribute/release-elasticjob-ui.cn.md b/docs/community/content/contribute/release-elasticjob-ui.cn.md
index e29134f..a4df66b 100644
--- a/docs/community/content/contribute/release-elasticjob-ui.cn.md
+++ b/docs/community/content/contribute/release-elasticjob-ui.cn.md
@@ -40,7 +40,7 @@ https://github.com/apache/shardingsphere-elasticjob-ui/blob/master/RELEASE-NOTES
**3. 创建发布分支**
-假设从 github 下载的 ElasticJob-UI 源代码在 `~/elasticjob-ui/` 目录;假设即将发布的版本为 `${RELEASE.VERSION}`。
+假设从 Github 下载的 ElasticJob-UI 源代码在 `~/elasticjob-ui/` 目录;假设即将发布的版本为 `${RELEASE.VERSION}`。
创建 `${RELEASE.VERSION}-release` 分支,接下来的操作都在该分支进行。
```shell
@@ -59,11 +59,11 @@ cd ~/elasticjob-ui
mvn release:prepare -Prelease -Darguments="-DskipTests" -DautoVersionSubmodules=true -DdryRun=true -Dusername=${Github 用户名}
```
--Prelease: 选择 release 的 profile,这个 profile 会打包所有源码、jar 文件以及 ElasticJob-UI 的可执行二进制包。
+-Prelease:选择 release 的 profile,这个 profile 会打包所有源码、jar 文件以及 ElasticJob-UI 的可执行二进制包。
-DautoVersionSubmodules=true:作用是发布过程中版本号只需要输入一次,不必为每个子模块都输入一次。
--DdryRun=true:演练,即不产生版本号提交,不生成新的tag。
+-DdryRun=true:演练,即不产生版本号提交,不生成新的 tag。
**5. 准备发布**
@@ -85,7 +85,7 @@ mvn release:prepare -Prelease -Darguments="-DskipTests" -DautoVersionSubmodules=
-DpushChanges=false:不要将修改后的版本号和 tag 自动提交至 Github。
-将本地文件检查无误后,提交至 github。
+将本地文件检查无误后,提交至 Github。
```shell
git push origin ${RELEASE.VERSION}-release
@@ -101,7 +101,7 @@ mvn release:perform -Prelease -Darguments="-DskipTests" -DautoVersionSubmodules=
## 发布 Apache SVN 仓库
-**1. 检出 shardingsphere 发布目录**
+**1. 检出 ShardingSphere 发布目录**
如无本地工作目录,则先创建本地工作目录。
@@ -110,7 +110,7 @@ mkdir -p ~/ss_svn/dev/
cd ~/ss_svn/dev/
```
-创建完毕后,从 Apache SVN 检出 shardingsphere 发布目录。
+创建完毕后,从 Apache SVN 检出 ShardingSphere 发布目录。
```shell
svn --username=${APACHE LDAP 用户名} co https://dist.apache.org/repos/dist/dev/shardingsphere
@@ -125,7 +125,7 @@ cd ~/ss_svn/dev/shardingsphere
gpg -a --export ${GPG用户名} >> KEYS
```
-**3. 将待发布的内容添加至SVN目录**
+**3. 将待发布的内容添加至 SVN 目录**
创建版本号目录。
@@ -134,7 +134,7 @@ mkdir -p ~/ss_svn/dev/shardingsphere/elasticjob-ui-${RELEASE.VERSION}
cd ~/ss_svn/dev/shardingsphere/elasticjob-ui-${RELEASE.VERSION}
```
-将源码包和二进制包添加至SVN工作目录。
+将源码包和二进制包添加至 SVN 工作目录。
```shell
cp -f ~/elasticjob-ui/shardingsphere-elasticjob-ui-distribution/shardingsphere-elasticjob-ui-src-distribution/target/*.zip ~/ss_svn/dev/shardingsphere/elasticjob-ui-${RELEASE.VERSION}
@@ -172,7 +172,7 @@ shasum -c apache-shardingsphere-elasticjob-${RELEASE.VERSION}-cloud-ui-bin.tar.g
**检查 gpg 签名**
-首先导入发布人公钥。从 svn 仓库导入 KEYS 到本地环境。(发布版本的人不需要再导入,帮助做验证的人需要导入,用户名填发版人的即可)
+首先导入发布人公钥。从 svn 仓库导入 KEYS 到本地环境。(发布版本的人不需要再导入,帮助做验证的人需要导入,用户名填发版人的即可)。
```shell
curl https://dist.apache.org/repos/dist/dev/shardingsphere/KEYS >> KEYS
@@ -215,36 +215,36 @@ diff -r apache-shardingsphere-elasticjob-${RELEASE.VERSION}-ui-src shardingspher
**检查源码包的文件内容**
-- 检查源码包是否包含由于包含不必要文件,致使 tarball 过于庞大
-- 存在 `LICENSE` 和 `NOTICE` 文件
-- `NOTICE` 文件中的年份正确
-- 只存在文本文件,不存在二进制文件
-- 所有文件的开头都有ASF许可证
-- 能够正确编译,单元测试可以通过 (./mvnw -T 1C install)
-- 检查是否有多余文件或文件夹,例如空文件夹等
+- 检查源码包是否包含由于包含不必要文件,致使 tarball 过于庞大;
+- 存在 `LICENSE` 和 `NOTICE` 文件;
+- `NOTICE` 文件中的年份正确;
+- 只存在文本文件,不存在二进制文件;
+- 所有文件的开头都有 ASF 许可证;
+- 能够正确编译,单元测试可以通过(./mvnw -T 1C install);
+- 检查是否有多余文件或文件夹,例如空文件夹等。
**检查二进制包的文件内容**
解压缩 `apache-shardingsphere-elasticjob-${RELEASE.VERSION}-lite-ui-bin.tar.gz` 和 `apache-shardingsphere-elasticjob-${RELEASE.VERSION}-cloud-ui-bin.tar.gz`
进行如下检查:
-- 存在 `LICENSE` 和 `NOTICE` 文件
-- `NOTICE` 文件中的年份正确
-- 所有文本文件开头都有 ASF 许可证
+- 存在 `LICENSE` 和 `NOTICE` 文件;
+- `NOTICE` 文件中的年份正确;
+- 所有文本文件开头都有 ASF 许可证;
- 检查第三方依赖许可证:
- - 第三方依赖的许可证兼容
- - 所有第三方依赖的许可证都在 `LICENSE` 文件中声名
- - 依赖许可证的完整版全部在 `license` 目录
- - 如果依赖的是Apache许可证并且存在 `NOTICE` 文件,那么这些 `NOTICE` 文件也需要加入到版本的 `NOTICE` 文件中
+ - 第三方依赖的许可证兼容;
+ - 所有第三方依赖的许可证都在 `LICENSE` 文件中声明;
+ - 依赖许可证的完整版全部在 `license` 目录;
+ - 如果依赖的是 Apache 许可证并且存在 `NOTICE` 文件,那么这些 `NOTICE` 文件也需要加入到版本的 `NOTICE` 文件中。
## 发起投票
**投票阶段**
1. ShardingSphere 社区投票,发起投票邮件到 `dev@shardingsphere.apache.org`。PMC 需要先按照文档检查版本的正确性,然后再进行投票。
-经过至少 72 小时并统计到3个`+1 PMC member` 票后,即可进入下一阶段的投票。
+经过至少 72 小时并统计到3个 `+1 PMC member` 票后,即可进入下一阶段的投票。
-2. 宣布投票结果,发起投票结果邮件到 `dev@shardingsphere.apache.org`。
+2. 宣布投票结果,发起投票结果邮件到 `dev@shardingsphere.apache.org`。
**投票模板**
@@ -371,7 +371,7 @@ mvn clean package -Prelease,docker
3.3 给本地 Docker 镜像打标记
-通过 `docker images` 查看到 IMAGE ID,例如为:e9ea51023687
+通过 `docker images` 查看到 IMAGE ID,例如为:e9ea51023687。
```shell
docker tag e9ea51023687 apache/shardingsphere-elasticjob-cloud-ui:latest
@@ -387,7 +387,7 @@ docker push apache/shardingsphere-elasticjob-cloud-ui:${RELEASE_VERSION}
3.5 确认发布成功
-登录 [Docker Hub](https://hub.docker.com/r/apache/shardingsphere-elasticjob-cloud-ui/) 查看是否有发布的镜像
+登录 [Docker Hub](https://hub.docker.com/r/apache/shardingsphere-elasticjob-cloud-ui/) 查看是否有发布的镜像。
**4. 发布 Docker (lite-ui)**
@@ -404,7 +404,7 @@ mvn clean package -Prelease,docker
4.3 给本地 Docker 镜像打标记
-通过`docker images`查看到IMAGE ID,例如为:e9ea51023687
+通过 `docker images` 查看到 IMAGE ID,例如为:e9ea51023687。
```shell
docker tag e9ea51023687 apache/shardingsphere-elasticjob-lite-ui:latest
@@ -421,13 +421,13 @@ docker push apache/shardingsphere-elasticjob-lite-ui:${RELEASE_VERSION}
4.5 确认发布成功
-登录 [Docker Hub](https://hub.docker.com/r/apache/shardingsphere-elasticjob-lite-ui/) 查看是否有发布的镜像
+登录 [Docker Hub](https://hub.docker.com/r/apache/shardingsphere-elasticjob-lite-ui/) 查看是否有发布的镜像。
**5. GitHub 版本发布**
-在 [GitHub Releases](https://github.com/apache/shardingsphere-elasticjob-ui/releases) 页面的 `shardingsphere-elasticjob-ui-${RELEASE_VERSION}` 版本上点击 `Edit`
+在 [GitHub Releases](https://github.com/apache/shardingsphere-elasticjob-ui/releases) 页面的 `shardingsphere-elasticjob-ui-${RELEASE_VERSION}` 版本上点击 `Edit`。
-编辑版本号及版本说明,并点击 `Publish release`
+编辑版本号及版本说明,并点击 `Publish release`。
**6. 更新下载页面**
@@ -437,13 +437,13 @@ https://shardingsphere.apache.org/elasticjob/current/en/downloads/
https://shardingsphere.apache.org/elasticjob/current/cn/downloads/
-GPG签名文件和哈希校验文件的下载连接应该使用这个前缀: `https://downloads.apache.org/shardingsphere/`
+GPG 签名文件和哈希校验文件的下载连接应该使用这个前缀:`https://downloads.apache.org/shardingsphere/`。
-`最新版本`中保留一个最新的版本。
+`最新版本` 中保留一个最新的版本。
**7. 邮件通知版本发布完成**
-发送邮件到 `dev@shardingsphere.apache.org` 和 `announce@apache.org` 通知完成版本发布
+发送邮件到 `dev@shardingsphere.apache.org` 和 `announce@apache.org` 通知完成版本发布。
通知邮件模板:
diff --git a/docs/community/content/contribute/release-elasticjob.cn.md b/docs/community/content/contribute/release-elasticjob.cn.md
index eeed47d..291c763 100644
--- a/docs/community/content/contribute/release-elasticjob.cn.md
+++ b/docs/community/content/contribute/release-elasticjob.cn.md
@@ -58,7 +58,7 @@ chapter = true
**1. 更新版本说明和示例版本**
-在Github主干上更新如下文件,并提交PR到主干:
+在 Github 主干上更新如下文件,并提交 PR 到主干:
```
https://github.com/apache/shardingsphere-elasticjob/blob/master/RELEASE-NOTES.md
@@ -68,7 +68,7 @@ https://github.com/apache/shardingsphere-elasticjob/blob/master/RELEASE-NOTES.md
**2. 创建发布分支**
-假设从 github 下载的 ElasticJob 源代码在 `~/elasticjob/` 目录;假设即将发布的版本为 `${RELEASE.VERSION}`。
+假设从 Github 下载的 ElasticJob 源代码在 `~/elasticjob/` 目录;假设即将发布的版本为 `${RELEASE.VERSION}`。
创建 `${RELEASE.VERSION}-release` 分支,接下来的操作都在该分支进行。
```shell
@@ -90,7 +90,7 @@ mvn release:prepare -Prelease -Darguments="-DskipTests" -DautoVersionSubmodules=
-DautoVersionSubmodules=true:作用是发布过程中版本号只需要输入一次,不必为每个子模块都输入一次。
--DdryRun=true:演练,即不产生版本号提交,不生成新的tag。
+-DdryRun=true:演练,即不产生版本号提交,不生成新的 tag。
**4. 准备发布**
@@ -104,11 +104,11 @@ mvn release:clean
mvn release:prepare -Prelease -Darguments="-DskipTests" -DautoVersionSubmodules=true -DpushChanges=false -Dusername=${Github用户名}
```
-和上一步演练的命令基本相同,去掉了- DdryRun=true 参数。
+和上一步演练的命令基本相同,去掉了 -DdryRun=true 参数。
-DpushChanges=false:不要将修改后的版本号和 tag 自动提交至 Github。
-将本地文件检查无误后,提交至 github。
+将本地文件检查无误后,提交至 Github。
```shell
git push origin ${RELEASE.VERSION}-release
@@ -152,7 +152,7 @@ cd ~/ss_svn/dev/shardingsphere
gpg -a --export ${GPG用户名} >> KEYS
```
-**3. 将待发布的内容添加至SVN目录**
+**3. 将待发布的内容添加至 SVN 目录**
创建版本号目录。
@@ -161,7 +161,7 @@ mkdir -p ~/ss_svn/dev/shardingsphere/elasticjob-${RELEASE.VERSION}
cd ~/ss_svn/dev/shardingsphere/elasticjob-${RELEASE.VERSION}
```
-将源码包和二进制包添加至SVN工作目录。
+将源码包和二进制包添加至 SVN 工作目录。
```shell
cp -f ~/elasticjob/elasticjob-distribution/elasticjob-src-distribution/target/*.zip* ~/ss_svn/dev/shardingsphere/elasticjob-${RELEASE.VERSION}
@@ -170,7 +170,7 @@ cp -f ~/elasticjob/elasticjob-distribution/elasticjob-cloud-executor-distributio
cp -f ~/elasticjob/elasticjob-distribution/elasticjob-cloud-scheduler-distribution/target/*.tar.gz* ~/ss_svn/dev/shardingsphere/elasticjob-${RELEASE.VERSION}
```
-**4. 提交 Apache SVN **
+**4. 提交 Apache SVN**
```shell
svn add *
@@ -187,7 +187,7 @@ shasum -c apache-shardingsphere-elasticjob-${RELEASE.VERSION}-*.sha512
**检查 gpg 签名**
-首先导入发布人公钥。从svn仓库导入KEYS到本地环境。(发布版本的人不需要再导入,帮助做验证的人需要导入,用户名填发版人的即可)
+首先导入发布人公钥。从 svn 仓库导入 KEYS 到本地环境。(发布版本的人不需要再导入,帮助做验证的人需要导入,用户名填发版人的即可)。
```shell
curl https://dist.apache.org/repos/dist/dev/shardingsphere/KEYS >> KEYS
@@ -232,13 +232,13 @@ diff -r apache-shardingsphere-elasticjob-${RELEASE.VERSION}-src-release sharding
**检查源码包的文件内容**
-- 检查源码包是否包含由于包含不必要文件,致使tarball过于庞大
-- 存在 `LICENSE` 和 `NOTICE` 文件
-- `NOTICE` 文件中的年份正确
-- 只存在文本文件,不存在二进制文件
-- 所有文件的开头都有ASF许可证
-- 能够正确编译,单元测试可以通过 (./mvnw -T 1C install)
-- 检查是否有多余文件或文件夹,例如空文件夹等
+- 检查源码包是否包含由于包含不必要文件,致使 tarball 过于庞大;
+- 存在 `LICENSE` 和 `NOTICE` 文件;
+- `NOTICE` 文件中的年份正确;
+- 只存在文本文件,不存在二进制文件;
+- 所有文件的开头都有 ASF 许可证;
+- 能够正确编译,单元测试可以通过(./mvnw -T 1C install);
+- 检查是否有多余文件或文件夹,例如空文件夹等。
**检查二进制包的文件内容**
@@ -248,23 +248,23 @@ diff -r apache-shardingsphere-elasticjob-${RELEASE.VERSION}-src-release sharding
`apache-shardingsphere-elasticjob-${RELEASE.VERSION}-cloud-scheduler-bin.tar.gz`
进行如下检查:
-- 存在 `LICENSE` 和 `NOTICE` 文件
-- `NOTICE` 文件中的年份正确
-- 所有文本文件开头都有ASF许可证
+- 存在 `LICENSE` 和 `NOTICE` 文件;
+- `NOTICE` 文件中的年份正确;
+- 所有文本文件开头都有 ASF 许可证;
- 检查第三方依赖许可证:
- - 第三方依赖的许可证兼容
- - 所有第三方依赖的许可证都在 `LICENSE` 文件中声名
- - 依赖许可证的完整版全部在 `license` 目录
- - 如果依赖的是Apache许可证并且存在 `NOTICE` 文件,那么这些 `NOTICE` 文件也需要加入到版本的 `NOTICE` 文件中
+ - 第三方依赖的许可证兼容;
+ - 所有第三方依赖的许可证都在 `LICENSE` 文件中声明;
+ - 依赖许可证的完整版全部在 `license` 目录;
+ - 如果依赖的是 Apache 许可证并且存在 `NOTICE` 文件,那么这些 `NOTICE` 文件也需要加入到版本的 `NOTICE` 文件中。
### 发起投票
**投票阶段**
1. ShardingSphere 社区投票,发起投票邮件到 `dev@shardingsphere.apache.org`。PMC 需要先按照文档检查版本的正确性,然后再进行投票。
-经过至少72小时并统计到3个`+1 PMC member` 票后,即可进入下一阶段的投票。
+经过至少 72 小时并统计到 3 个 `+1 PMC member` 票后,即可进入下一阶段的投票。
-2. 宣布投票结果,发起投票结果邮件到 `dev@shardingsphere.apache.org`。
+2. 宣布投票结果,发起投票结果邮件到 `dev@shardingsphere.apache.org`。
**投票模板**
@@ -396,7 +396,7 @@ mvn clean package -Prelease,docker
4.3 给本地 Docker 镜像打标记
-通过 `docker images` 查看到 IMAGE ID,例如为:e9ea51023687
+通过 `docker images` 查看到 IMAGE ID,例如为:e9ea51023687。
```shell
docker tag e9ea51023687 apache/shardingsphere-elasticjob-cloud-scheduler:latest
@@ -413,13 +413,13 @@ docker push apache/shardingsphere-elasticjob-cloud-scheduler:${RELEASE_VERSION}
4.5 确认发布成功
-登录 [Docker Hub](https://hub.docker.com/r/apache/shardingsphere-elasticjob-cloud-scheduler/) 查看是否有发布的镜像
+登录 [Docker Hub](https://hub.docker.com/r/apache/shardingsphere-elasticjob-cloud-scheduler/) 查看是否有发布的镜像。
**5. GitHub 版本发布**
-在 [GitHub Releases](https://github.com/apache/shardingsphere-elasticjob/releases) 页面的 `${RELEASE_VERSION}` 版本上点击 `Edit`
+在 [GitHub Releases](https://github.com/apache/shardingsphere-elasticjob/releases) 页面的 `${RELEASE_VERSION}` 版本上点击 `Edit`。
-编辑版本号及版本说明,并点击 `Publish release`
+编辑版本号及版本说明,并点击 `Publish release`。
**6. 更新下载页面**
@@ -429,13 +429,13 @@ https://shardingsphere.apache.org/elasticjob/current/en/downloads/
https://shardingsphere.apache.org/elasticjob/current/cn/downloads/
-GPG签名文件和哈希校验文件的下载连接应该使用这个前缀:`https://downloads.apache.org/shardingsphere/`
+GPG 签名文件和哈希校验文件的下载连接应该使用这个前缀:`https://downloads.apache.org/shardingsphere/`。
-`最新版本`中保留一个最新的版本。
+`最新版本` 中保留一个最新的版本。
**7. 邮件通知版本发布完成**
-发送邮件到 `dev@shardingsphere.apache.org` 和 `announce@apache.org` 通知完成版本发布
+发送邮件到 `dev@shardingsphere.apache.org` 和 `announce@apache.org` 通知完成版本发布。
通知邮件模板:
diff --git a/docs/community/content/contribute/release.cn.md b/docs/community/content/contribute/release.cn.md
index 82560a3..c5f59ec 100644
--- a/docs/community/content/contribute/release.cn.md
+++ b/docs/community/content/contribute/release.cn.md
@@ -10,46 +10,46 @@ chapter = true
Release Note 需提供中文/英文两种版本,确认中文描述是否明确,英文翻译是否准确,并按以下标签进行分类:
-1. 新功能
-2. API 变更
-3. 功能增强
-4. 重构
-5. 漏洞修复
+1. 新功能。
+2. API 变更。
+3. 功能增强。
+4. 重构。
+5. 漏洞修复。
**2. 确认 Issue 列表**
打开 [Github Issues](https://github.com/apache/shardingsphere/issues) ,过滤 Milestone 为 `${RELEASE.VERSION}` 且状态为打开的 Issue:
-1. 关闭已完成的 Issue
-2. 未完成的 Issue 与负责人进行沟通,如果不影响本次发版,修改 Milestone 为下一个版本
-3. 确认发布版本的 Milestone 下没有打开状态的 Issue
+1. 关闭已完成的 Issue;
+2. 未完成的 Issue 与负责人进行沟通,如果不影响本次发版,修改 Milestone 为下一个版本;
+3. 确认发布版本的 Milestone 下没有打开状态的 Issue。
**3. 确认 Pull request 列表**
打开 [Github Pull requests](https://github.com/apache/shardingsphere/pulls) ,过滤 Milestone 为 `${RELEASE.VERSION}` 且状态为打开的 Pull request:
-1. 对打开的 Pull request 进行 Review 并且 Merge
-2. 无法 Merge 且不影响本次发版的 Pull request,修改 Milestone 为下一个版本
-3. 确认发布版本的 Milestone 下没有打开状态的 Pull request
+1. 对打开的 Pull request 进行 Review 并且 Merge;
+2. 无法 Merge 且不影响本次发版的 Pull request,修改 Milestone 为下一个版本;
+3. 确认发布版本的 Milestone 下没有打开状态的 Pull request。
**4. 关闭 Milestone**
打开 [Github Milestone](https://github.com/apache/shardingsphere/milestones)
-1. 确认 `${RELEASE.VERSION}` 的 Milestone 完成状态为 100%
-2. 点击 `Close` 关闭 Milestone
+1. 确认 `${RELEASE.VERSION}` 的 Milestone 完成状态为 100%;
+2. 点击 `Close` 关闭 Milestone。
**5. 发送讨论邮件**
-1. 发送邮件至 `dev@shardingsphere.apache.org`,在邮件正文中描述或链接 Release Note
-2. 关注邮件列表,确认社区开发者对 Release Note 没有任何疑问
+1. 发送邮件至 `dev@shardingsphere.apache.org`,在邮件正文中描述或链接 Release Note;
+2. 关注邮件列表,确认社区开发者对 Release Note 没有任何疑问。
## GPG 设置
**1. 安装 GPG**
-在[GnuPG官网](https://www.gnupg.org/download/index.html)下载安装包。
-GnuPG 的 1.x 版本和 2.x 版本的命令有细微差别,下列说明以`GnuPG-2.1.23`版本为例。
+在 [GnuPG 官网](https://www.gnupg.org/download/index.html)下载安装包。
+GnuPG 的 1.x 版本和 2.x 版本的命令有细微差别,下列说明以 `GnuPG-2.1.23` 版本为例。
安装完成后,执行以下命令查看版本号。
@@ -61,13 +61,13 @@ gpg --version
安装完成后,执行以下命令创建 key。
-`GnuPG-2.x`可使用:
+`GnuPG-2.x` 可使用:
```shell
gpg --full-gen-key
```
-`GnuPG-1.x`可使用:
+`GnuPG-1.x` 可使用:
```shell
gpg --gen-key
@@ -141,9 +141,9 @@ gpg --keyserver hkp://keyserver.ubuntu.com --send-key 700E6065
## 发布 Apache Maven 中央仓库
-**1. 设置 settings.xml文件 **
+**1. 设置 settings.xml 文件**
-将以下模板添加到 `~/.m2/settings.xml`中,所有密码需要加密后再填入。
+将以下模板添加到 `~/.m2/settings.xml` 中,所有密码需要加密后再填入。
加密设置可参考[这里](http://maven.apache.org/guides/mini/guide-encryption.html)。
```xml
@@ -165,11 +165,11 @@ gpg --keyserver hkp://keyserver.ubuntu.com --send-key 700E6065
**2. 创建发布分支**
-假设从 github 下载的 ShardingSphere 源代码在`~/shardingsphere/`目录;假设即将发布的版本为`${RELEASE.VERSION}`。
-创建`${RELEASE.VERSION}-release`分支,接下来的操作都在该分支进行。
+假设从 Github 下载的 ShardingSphere 源代码在 `~/shardingsphere/` 目录;假设即将发布的版本为 `${RELEASE.VERSION}`。
+创建 `${RELEASE.VERSION}-release` 分支,接下来的操作都在该分支进行。
```shell
-## ${name}为源码所在分支,如:master,dev-4.x
+## ${name} 为源码所在分支,如:master,dev-4.x
git clone --branch ${name} https://github.com/apache/shardingsphere.git ~/shardingsphere
cd ~/shardingsphere/
git pull
@@ -185,7 +185,7 @@ git push origin ${RELEASE.VERSION}-release
https://github.com/apache/shardingsphere/blob/${RELEASE.VERSION}-release/RELEASE-NOTES.md
```
-更新`examples`模块的 pom,将版本由`${CURRENT.VERSION}` 替换为`${RELEASE.VERSION}`,并提交 PR 到发布分支。
+更新 `examples` 模块的 pom,将版本由 `${CURRENT.VERSION}` 替换为 `${RELEASE.VERSION}`,并提交 PR 到发布分支。
**4. 发布预校验**
@@ -193,7 +193,7 @@ https://github.com/apache/shardingsphere/blob/${RELEASE.VERSION}-release/RELEASE
mvn release:prepare -Prelease -Darguments="-DskipTests" -DautoVersionSubmodules=true -DdryRun=true -Dusername=${Github用户名}
```
--Prelease: 选择 release 的 profile,这个 profile 会打包所有源码、jar 文件以及 ShardingSphere-Proxy 的可执行二进制包。
+-Prelease:选择 release 的 profile,这个 profile 会打包所有源码、jar 文件以及 ShardingSphere-Proxy 的可执行二进制包。
-DautoVersionSubmodules=true:作用是发布过程中版本号只需要输入一次,不必为每个子模块都输入一次。
@@ -211,11 +211,11 @@ mvn release:clean
mvn release:prepare -Prelease -Darguments="-DskipTests" -DautoVersionSubmodules=true -DpushChanges=false -Dusername=${Github 用户名}
```
-和上一步演练的命令基本相同,去掉了-DdryRun=true 参数。
+和上一步演练的命令基本相同,去掉了 -DdryRun=true 参数。
-DpushChanges=false:不要将修改后的版本号和 tag 自动提交至 Github。
-将本地文件检查无误后,提交至 github。
+将本地文件检查无误后,提交至 Github。
```shell
git push origin ${RELEASE.VERSION}-release
@@ -228,14 +228,14 @@ git push origin --tags
mvn release:perform -Prelease -Darguments="-DskipTests" -DautoVersionSubmodules=true -Dusername=${Github 用户名}
```
-执行完该命令后,待发布版本会自动上传到 Apache 的临时筹备仓库(staging repository)。
-访问https://repository.apache.org/#stagingRepositories, 使用 Apache 的 LDAP 账户登录后,就会看到上传的版本,`Repository`列的内容即为 ${STAGING.REPOSITORY}。
-点击`Close`来告诉 Nexus 这个构建已经完成,只有这样该版本才是可用的。
-如果电子签名等出现问题,`Close`会失败,可以通过`Activity`查看失败信息。
+执行完该命令后,待发布版本会自动上传到 Apache 的临时筹备仓库 (staging repository)。
+访问 https://repository.apache.org/#stagingRepositories,使用 Apache 的 LDAP 账户登录后,就会看到上传的版本,`Repository` 列的内容即为 ${STAGING.REPOSITORY}。
+点击 `Close` 来告诉 Nexus 这个构建已经完成,只有这样该版本才是可用的。
+如果电子签名等出现问题,`Close` 会失败,可以通过 `Activity` 查看失败信息。
## 发布 Apache SVN 仓库
-**1. 检出 shardingsphere 发布目录**
+**1. 检出 ShardingSphere 发布目录**
如无本地工作目录,则先创建本地工作目录。
@@ -244,7 +244,7 @@ mkdir -p ~/ss_svn/dev/
cd ~/ss_svn/dev/
```
-创建完毕后,从 Apache SVN 检出 shardingsphere 发布目录。
+创建完毕后,从 Apache SVN 检出 ShardingSphere 发布目录。
```shell
svn --username=${APACHE LDAP 用户名} co https://dist.apache.org/repos/dist/dev/shardingsphere
@@ -253,7 +253,7 @@ cd ~/ss_svn/dev/shardingsphere
**2. 添加 gpg 公钥**
-仅第一次部署的账号需要添加,只要`KEYS`中包含已经部署过的账户的公钥即可。
+仅第一次部署的账号需要添加,只要 `KEYS` 中包含已经部署过的账户的公钥即可。
```shell
gpg -a --export ${GPG用户名} >> KEYS
@@ -339,13 +339,13 @@ diff -r apache-shardingsphere-${RELEASE.VERSION}-src-release shardingsphere-${RE
**检查源码包的文件内容**
-- 检查源码包是否包含由于包含不必要文件,致使 tarball 过于庞大
-- 存在`LICENSE`和`NOTICE`文件
-- `NOTICE`文件中的年份正确
-- 只存在文本文件,不存在二进制文件
-- 所有文件的开头都有 ASF 许可证
-- 能够正确编译,单元测试可以通过 (./mvnw -T 1C install)
-- 检查是否有多余文件或文件夹,例如空文件夹等
+- 检查源码包是否包含由于包含不必要文件,致使 tarball 过于庞大;
+- 存在 `LICENSE` 和 `NOTICE` 文件;
+- `NOTICE` 文件中的年份正确;
+- 只存在文本文件,不存在二进制文件;
+- 所有文件的开头都有 ASF 许可证;
+- 能够正确编译,单元测试可以通过(./mvnw -T 1C install);
+- 检查是否有多余文件或文件夹,例如空文件夹等。
**检查二进制包的文件内容**
@@ -355,23 +355,23 @@ diff -r apache-shardingsphere-${RELEASE.VERSION}-src-release shardingsphere-${RE
`apache-shardingsphere-${RELEASE.VERSION}-shardingsphere-agent-bin.tar.gz`
进行如下检查:
-- 存在`LICENSE`和`NOTICE`文件
-- `NOTICE`文件中的年份正确
-- 所有文本文件开头都有 ASF 许可证
+- 存在 `LICENSE` 和 `NOTICE` 文件;
+- `NOTICE` 文件中的年份正确;
+- 所有文本文件开头都有 ASF 许可证;
- 检查第三方依赖许可证:
- - 第三方依赖的许可证兼容
- - 所有第三方依赖的许可证都在`LICENSE`文件中声名
- - 依赖许可证的完整版全部在`license`目录
- - 如果依赖的是Apache许可证并且存在`NOTICE`文件,那么这些`NOTICE`文件也需要加入到版本的`NOTICE`文件中
+ - 第三方依赖的许可证兼容;
+ - 所有第三方依赖的许可证都在 `LICENSE` 文件中声明;
+ - 依赖许可证的完整版全部在 `license` 目录;
+ - 如果依赖的是 Apache 许可证并且存在 `NOTICE` 文件,那么这些 `NOTICE` 文件也需要加入到版本的 `NOTICE` 文件中。
## 发起投票
**投票阶段**
-1. ShardingSphere 社区投票,发起投票邮件到`dev@shardingsphere.apache.org`。PMC 需要先按照文档检查版本的正确性,然后再进行投票。
-经过至少 72 小时并统计到 3 个`+1 PMC member`票后,即可进入下一阶段的投票。
+1. ShardingSphere 社区投票,发起投票邮件到 `dev@shardingsphere.apache.org`。PMC 需要先按照文档检查版本的正确性,然后再进行投票。
+经过至少 72 小时并统计到 3 个 `+1 PMC member` 票后,即可进入下一阶段的投票。
-2. 宣布投票结果,发起投票结果邮件到`dev@shardingsphere.apache.org`。
+2. 宣布投票结果,发起投票结果邮件到 `dev@shardingsphere.apache.org`。
**投票模板**
@@ -474,9 +474,9 @@ svn delete https://dist.apache.org/repos/dist/release/shardingsphere/KEYS -m "de
svn cp https://dist.apache.org/repos/dist/dev/shardingsphere/KEYS https://dist.apache.org/repos/dist/release/shardingsphere/ -m "transfer KEYS for ${RELEASE.VERSION}"
```
-**2. 在 Apache Staging 仓库找到 ShardingSphere 并点击`Release`**
+**2. 在 Apache Staging 仓库找到 ShardingSphere 并点击 `Release`**
-**3. 合并 Github 的 release 分支到`master`, 合并完成后删除 release 分支**
+**3. 合并 Github 的 release 分支到 `master`,合并完成后删除 release 分支**
```shell
git checkout master
@@ -489,7 +489,7 @@ git branch -d ${RELEASE.VERSION}-release
**4. 修改 README 文件**
-将`README.md`和`README_ZH.md`里的`${PREVIOUS.RELEASE.VERSION}`修改为`${RELEASE.VERSION}`
+将 `README.md` 和 `README_ZH.md` 里的 `${PREVIOUS.RELEASE.VERSION}` 修改为 `${RELEASE.VERSION}`。
**5. 发布 Docker**
@@ -507,7 +507,7 @@ mvn clean package -Prelease,docker
5.3 给本地 Docker 镜像打标记
-通过`docker images`查看到 IMAGE ID,例如为:e9ea51023687
+通过 `docker images` 查看到 IMAGE ID,例如为:e9ea51023687。
```shell
docker tag e9ea51023687 apache/shardingsphere-proxy:latest
@@ -524,13 +524,13 @@ docker push apache/shardingsphere-proxy:${RELEASE_VERSION}
5.5 确认发布成功
-登录 [Docker Hub](https://hub.docker.com/r/apache/sharding-proxy/) 查看是否有发布的镜像
+登录 [Docker Hub](https://hub.docker.com/r/apache/sharding-proxy/) 查看是否有发布的镜像。
**6. GitHub版本发布**
-在 [GitHub Releases](https://github.com/apache/shardingsphere/releases) 页面的 `${RELEASE_VERSION}` 版本上点击 `Edit`
+在 [GitHub Releases](https://github.com/apache/shardingsphere/releases) 页面的 `${RELEASE_VERSION}` 版本上点击 `Edit`。
-编辑版本号及版本说明,并点击 `Publish release`
+编辑版本号及版本说明,并点击 `Publish release`。
**7. 更新下载页面**
@@ -540,9 +540,9 @@ https://shardingsphere.apache.org/document/current/en/downloads/
https://shardingsphere.apache.org/document/current/cn/downloads/
-GPG签名文件和哈希校验文件的下载连接应该使用这个前缀:`https://downloads.apache.org/shardingsphere/`
+GPG 签名文件和哈希校验文件的下载连接应该使用这个前缀:`https://downloads.apache.org/shardingsphere/`。
-`最新版本`中保留一个最新的版本。Incubator阶段历史版本会自动归档到[Archive repository](https://archive.apache.org/dist/incubator/shardingsphere/)
+`最新版本` 中保留一个最新的版本。Incubator 阶段历史版本会自动归档到 [Archive repository](https://archive.apache.org/dist/incubator/shardingsphere/)。
**8. 上传 Spring namespace xsd 文件至官方网站**
@@ -569,9 +569,9 @@ GPG签名文件和哈希校验文件的下载连接应该使用这个前缀:`h
**9. 邮件通知版本发布完成**
-发送邮件到`dev@shardingsphere.apache.org`和`announce@apache.org`通知完成版本发布
+发送邮件到 `dev@shardingsphere.apache.org` 和 `announce@apache.org` 通知完成版本发布。
-通知邮件模板(使用纯文本模式):
+通知邮件模板(使用纯文本模式):
标题:
diff --git a/docs/community/content/contribute/vote.cn.md b/docs/community/content/contribute/vote.cn.md
index 78566fa..e53ca5f 100644
--- a/docs/community/content/contribute/vote.cn.md
+++ b/docs/community/content/contribute/vote.cn.md
@@ -51,7 +51,7 @@ I am glad to receive your votes, and the voting result is,
Therefore, I will send the invitation to (提名者).
```
-**4. 如果投票通过,对提名者发布邀请函并抄送@private 邮件列表给发送邀请函。**
+**4. 如果投票通过,对提名者发布邀请函并抄送 @private 邮件列表给发送邀请函。**
```
To: (提名者邮箱)
@@ -120,9 +120,9 @@ https://shardingsphere.apache.org/community/en/contribute/committer/
**8. 等待 Secretary 通知创建账户。**
-**9. PMC添加新 Committer 到 [roster](https://whimsy.apache.org/roster/committee/shardingsphere)。**
+**9. PMC 添加新 Committer 到 [roster](https://whimsy.apache.org/roster/committee/shardingsphere)。**
-**10. 新 Committer 开通 github 权限,完成 [Setup](https://gitbox.apache.org/setup/)内容。**
+**10. 新 Committer 开通 Github 权限,完成 [Setup](https://gitbox.apache.org/setup/)内容。**
**11. PMC 在社区宣布并欢迎新的 Committer 加入。**
@@ -144,7 +144,7 @@ to announce that he has accepted.
Thanks for your contributions.
```
-**12. 新 Commiter 更新[提交者名单](/cn/team/)。**
+**12. 新 Committer 更新[提交者名单](/cn/team/)。**
**13. 如果进行 PMC 选举,需额外增加一个步骤。由投票发起人发邮件到 board@apache.org。**
@@ -154,7 +154,7 @@ The vote result is available here:
(投票详情链接)
Thank you,
-(发起人)
+(发起人)
```
diff --git a/docs/community/content/powered-by/_index.cn.md b/docs/community/content/powered-by/_index.cn.md
index ef52a12..9b2d7bd 100644
--- a/docs/community/content/powered-by/_index.cn.md
+++ b/docs/community/content/powered-by/_index.cn.md
@@ -9,7 +9,7 @@ chapter = true
欢迎采用了 ShardingSphere 的公司在此登记,您的支持是我们最大的动力。
-请按`公司名` + `首页` + `用户案例(可选)` 的格式在[此处](https://github.com/apache/shardingsphere/discussions/12255)登记。
+请按 `公司名` + `首页` + `用户案例(可选)` 的格式在[此处](https://github.com/apache/shardingsphere/discussions/12255)登记。
## 谁在使用 ShardingSphere?