You are viewing a plain text version of this content. The canonical link for it is here.
Posted to commits@weex.apache.org by ha...@apache.org on 2017/10/13 13:04:08 UTC
[13/51] [abbrv] incubator-weex-site git commit: rearrangement the
structure of the document
http://git-wip-us.apache.org/repos/asf/incubator-weex-site/blob/32a097bf/source/cn/v-0.10/guide/how-to/index.md
----------------------------------------------------------------------
diff --git a/source/cn/v-0.10/guide/how-to/index.md b/source/cn/v-0.10/guide/how-to/index.md
deleted file mode 100644
index c20ecb0..0000000
--- a/source/cn/v-0.10/guide/how-to/index.md
+++ /dev/null
@@ -1,185 +0,0 @@
----
-title: 使用 Devtools 调试 Weex 页面
-type: guide
-order: 4
-has_chapter_content: false
-chapter_title: 最佳实践
-version: 0.10
----
-
-# 如何使用 Devtools 调试 Weex 页面
-
-Weex Devtools 是为 Weex 开发者服务的一款调试工具,能够审查 Weex app 运行时属性,可对 `.we` 代码及 JavaScript 代码断点调试,支持 iOS 和 Android 两个平台。
-
-Weex Devtools 基于 Chrome devtools 实现了 [Chrome Debugging Protocol](https://developer.chrome.com/devtools/docs/debugger-protocol),能够使用 Chrome devtools 调试 Weex 项目,其主要功能分为两大部分—— Debugger 和 Inspector。
-
-## Devtools 主要功能一览
-
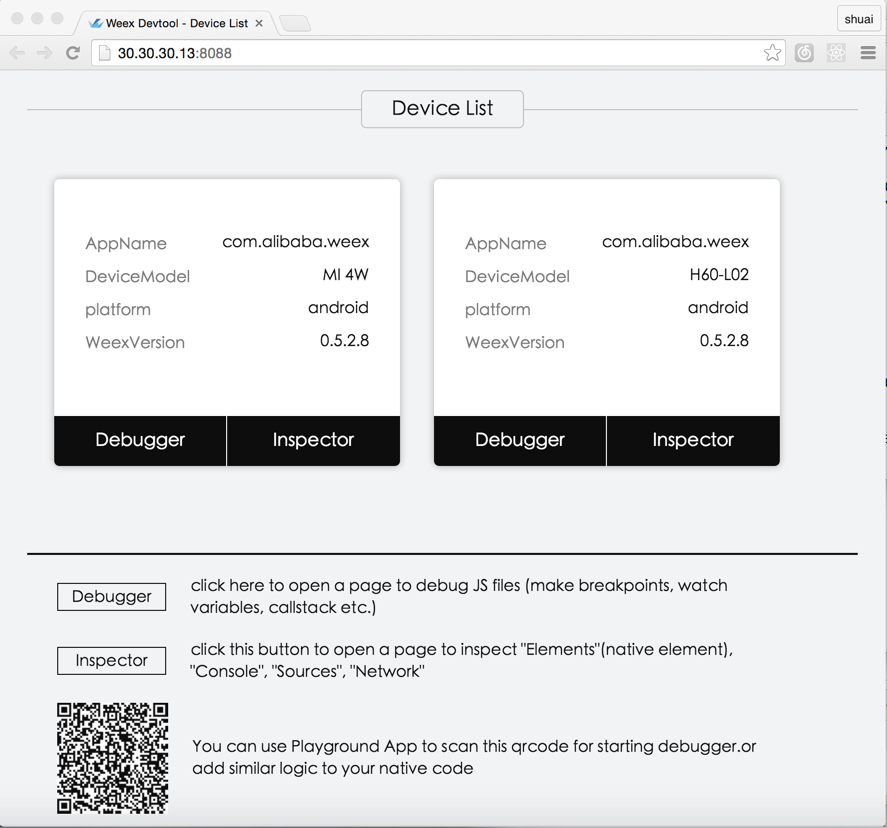
-### 连接设备
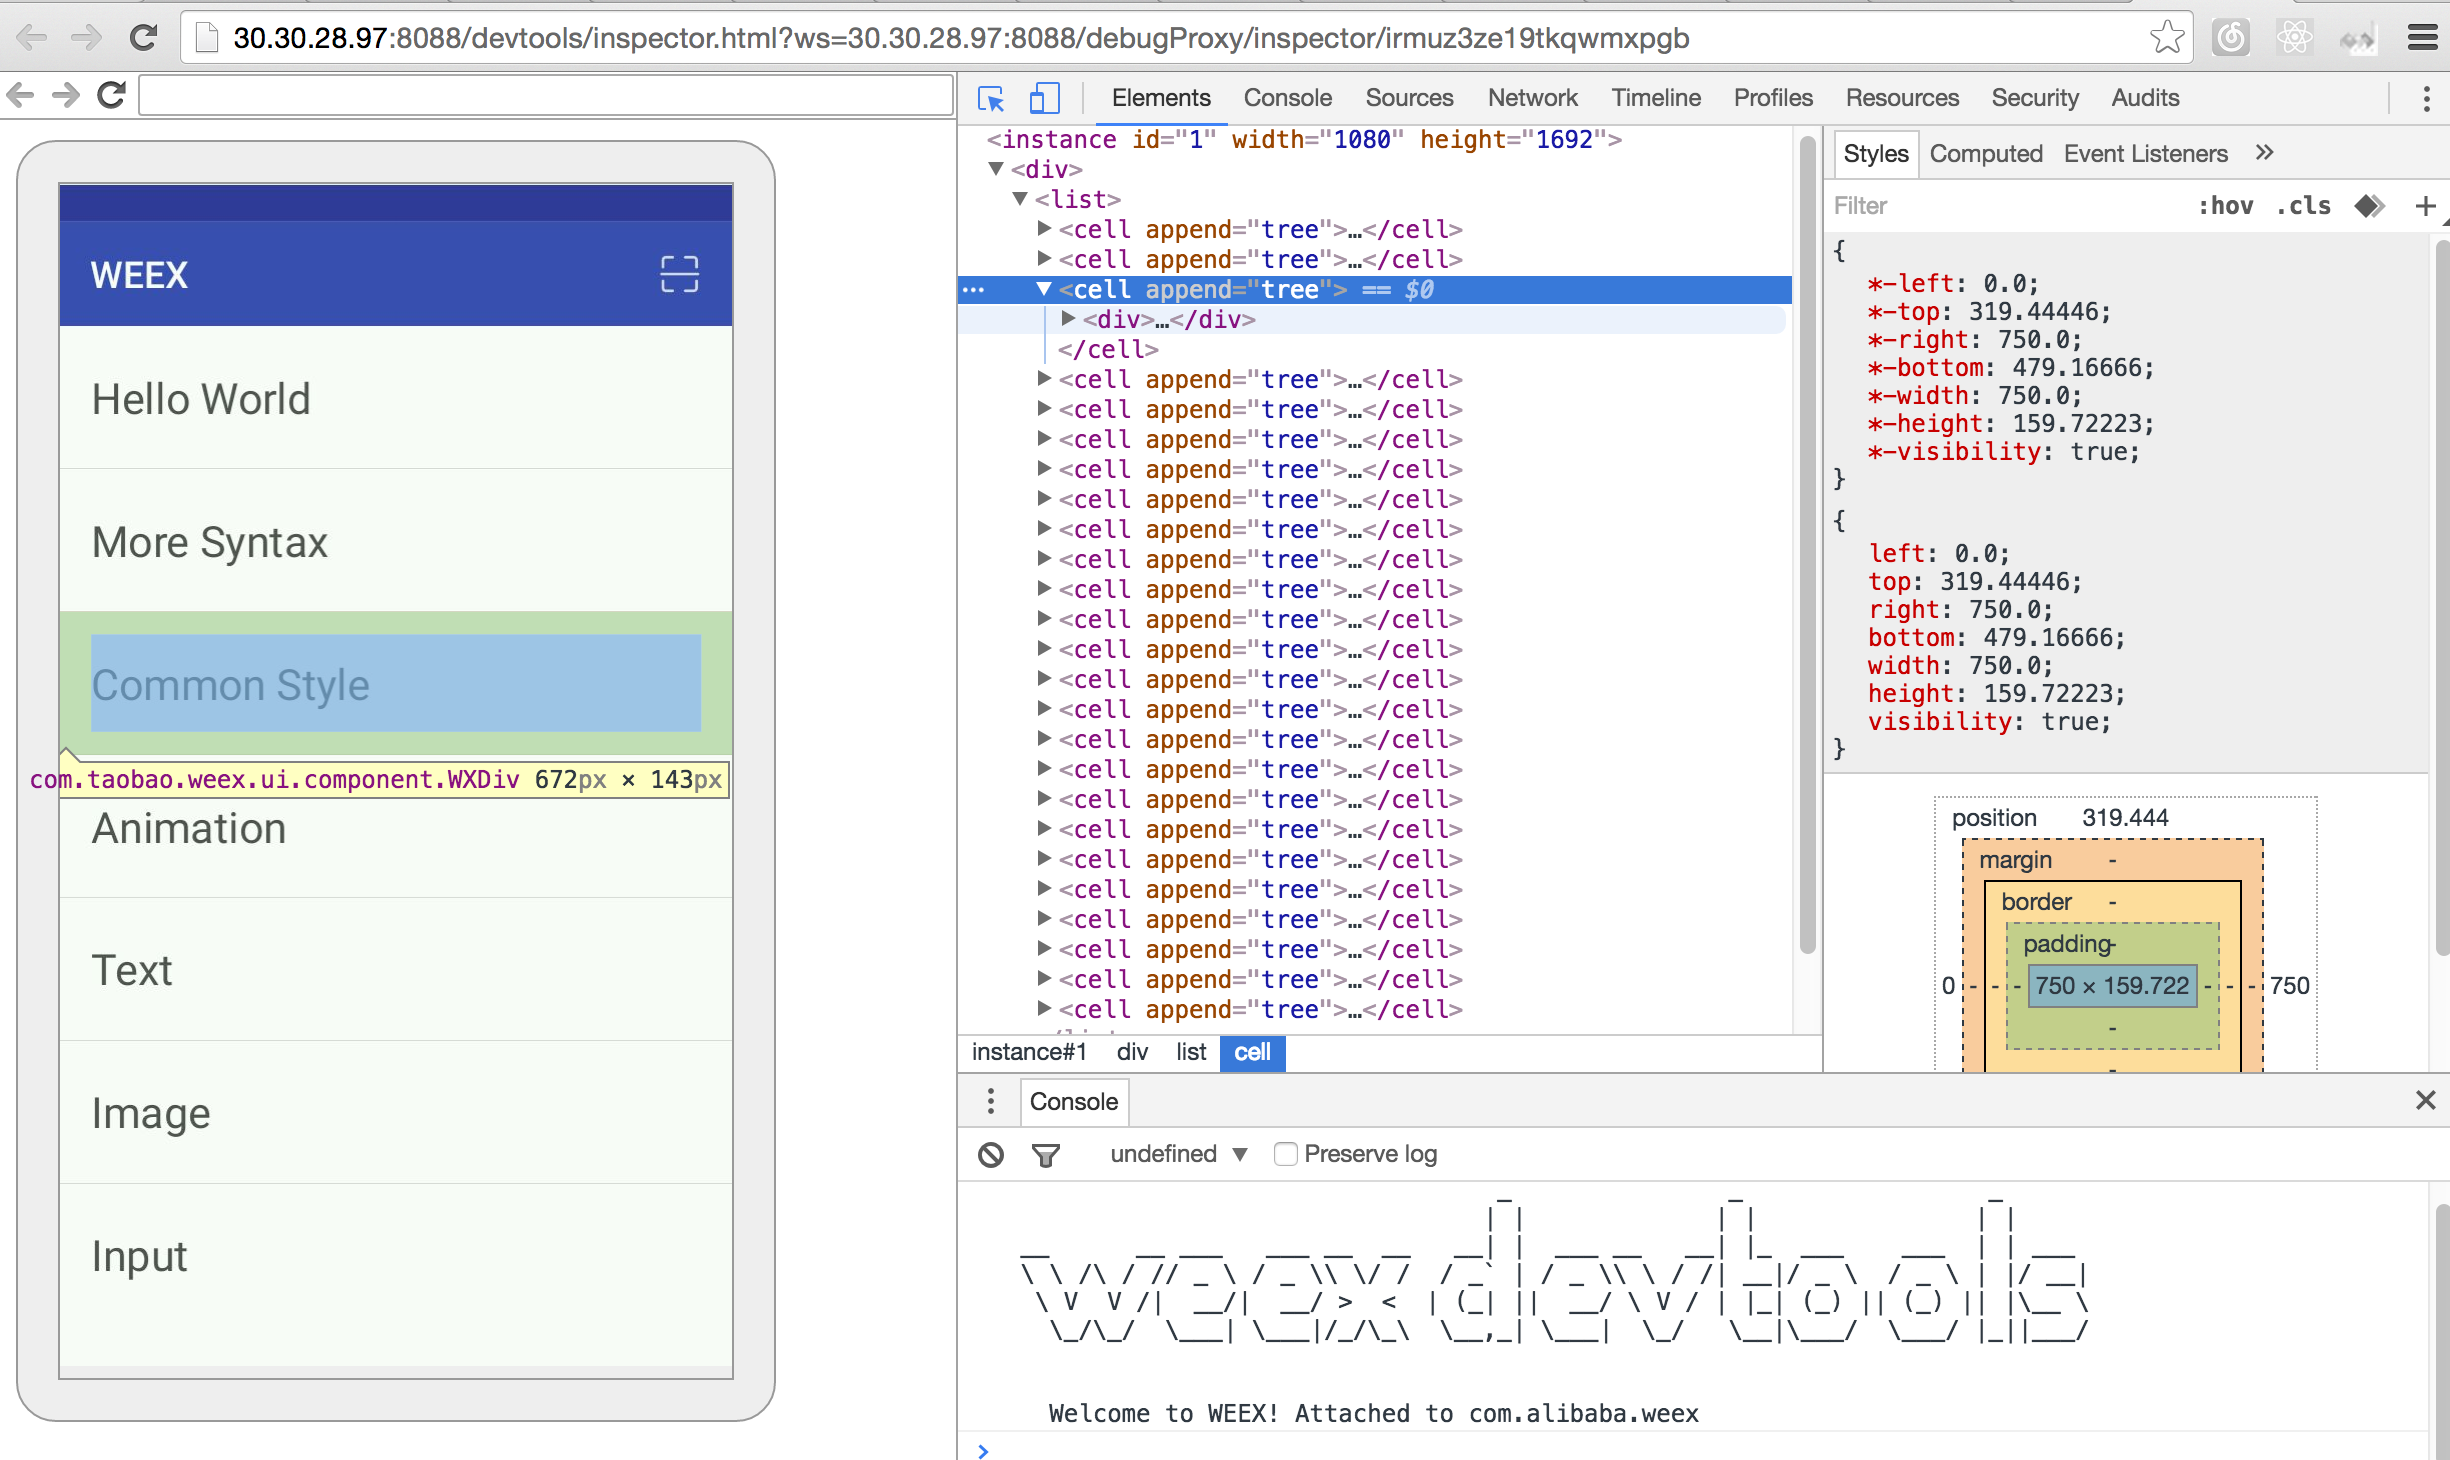
-devtools 可以动态检测客户端的连接绑定请求,同时连接/调试多个 device(或者模拟器)是很容易的事情,连接到 Devtools 的客户端显示在 “Device List” 界面。如下图所示。
-
-
-
-点击对应设备的 Debugger 按钮即开始调试流程,并弹出JS断点调试的页面;随后点击 Inspector 按钮可弹出调试 DOM 的页面。
-
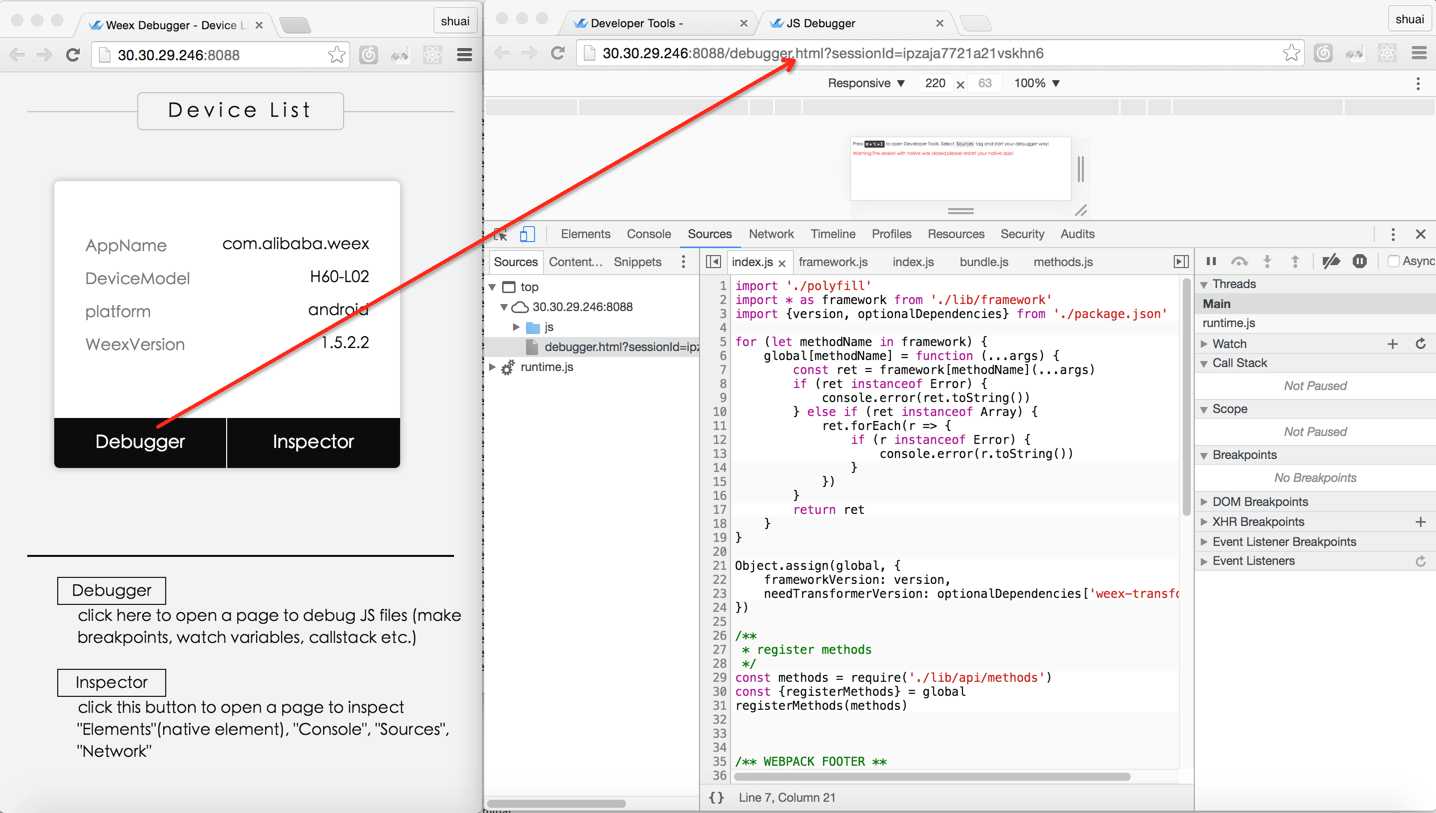
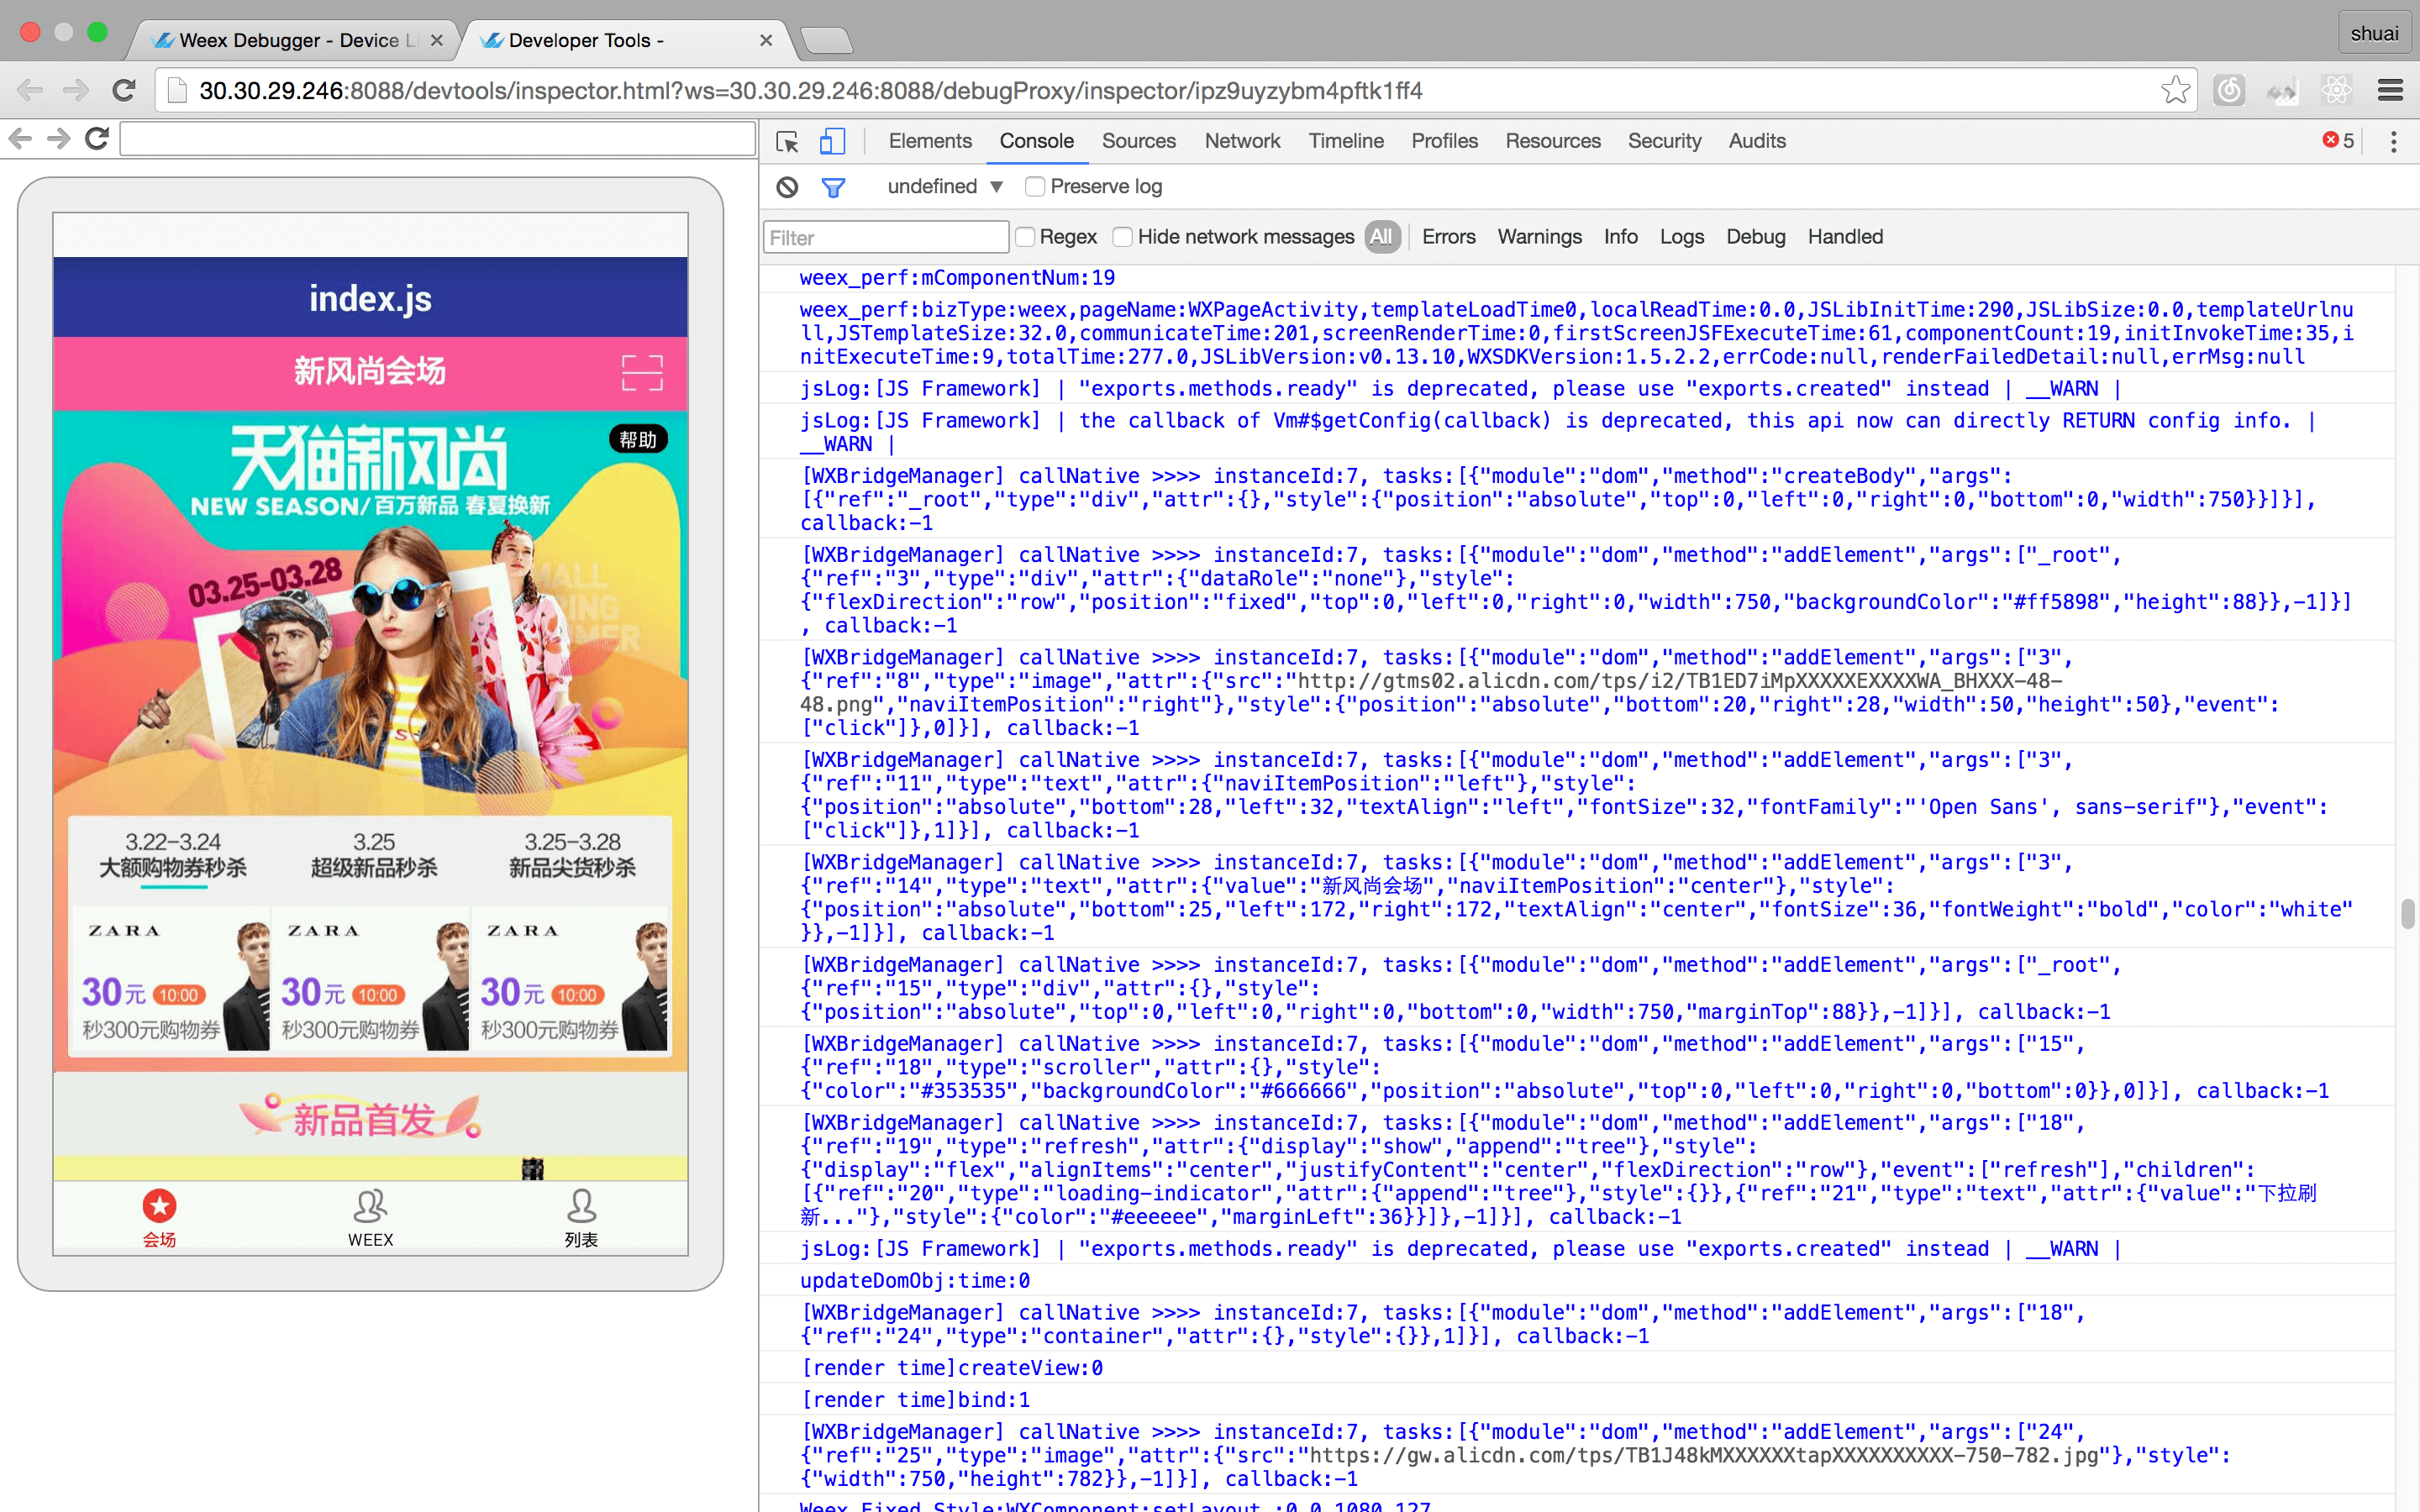
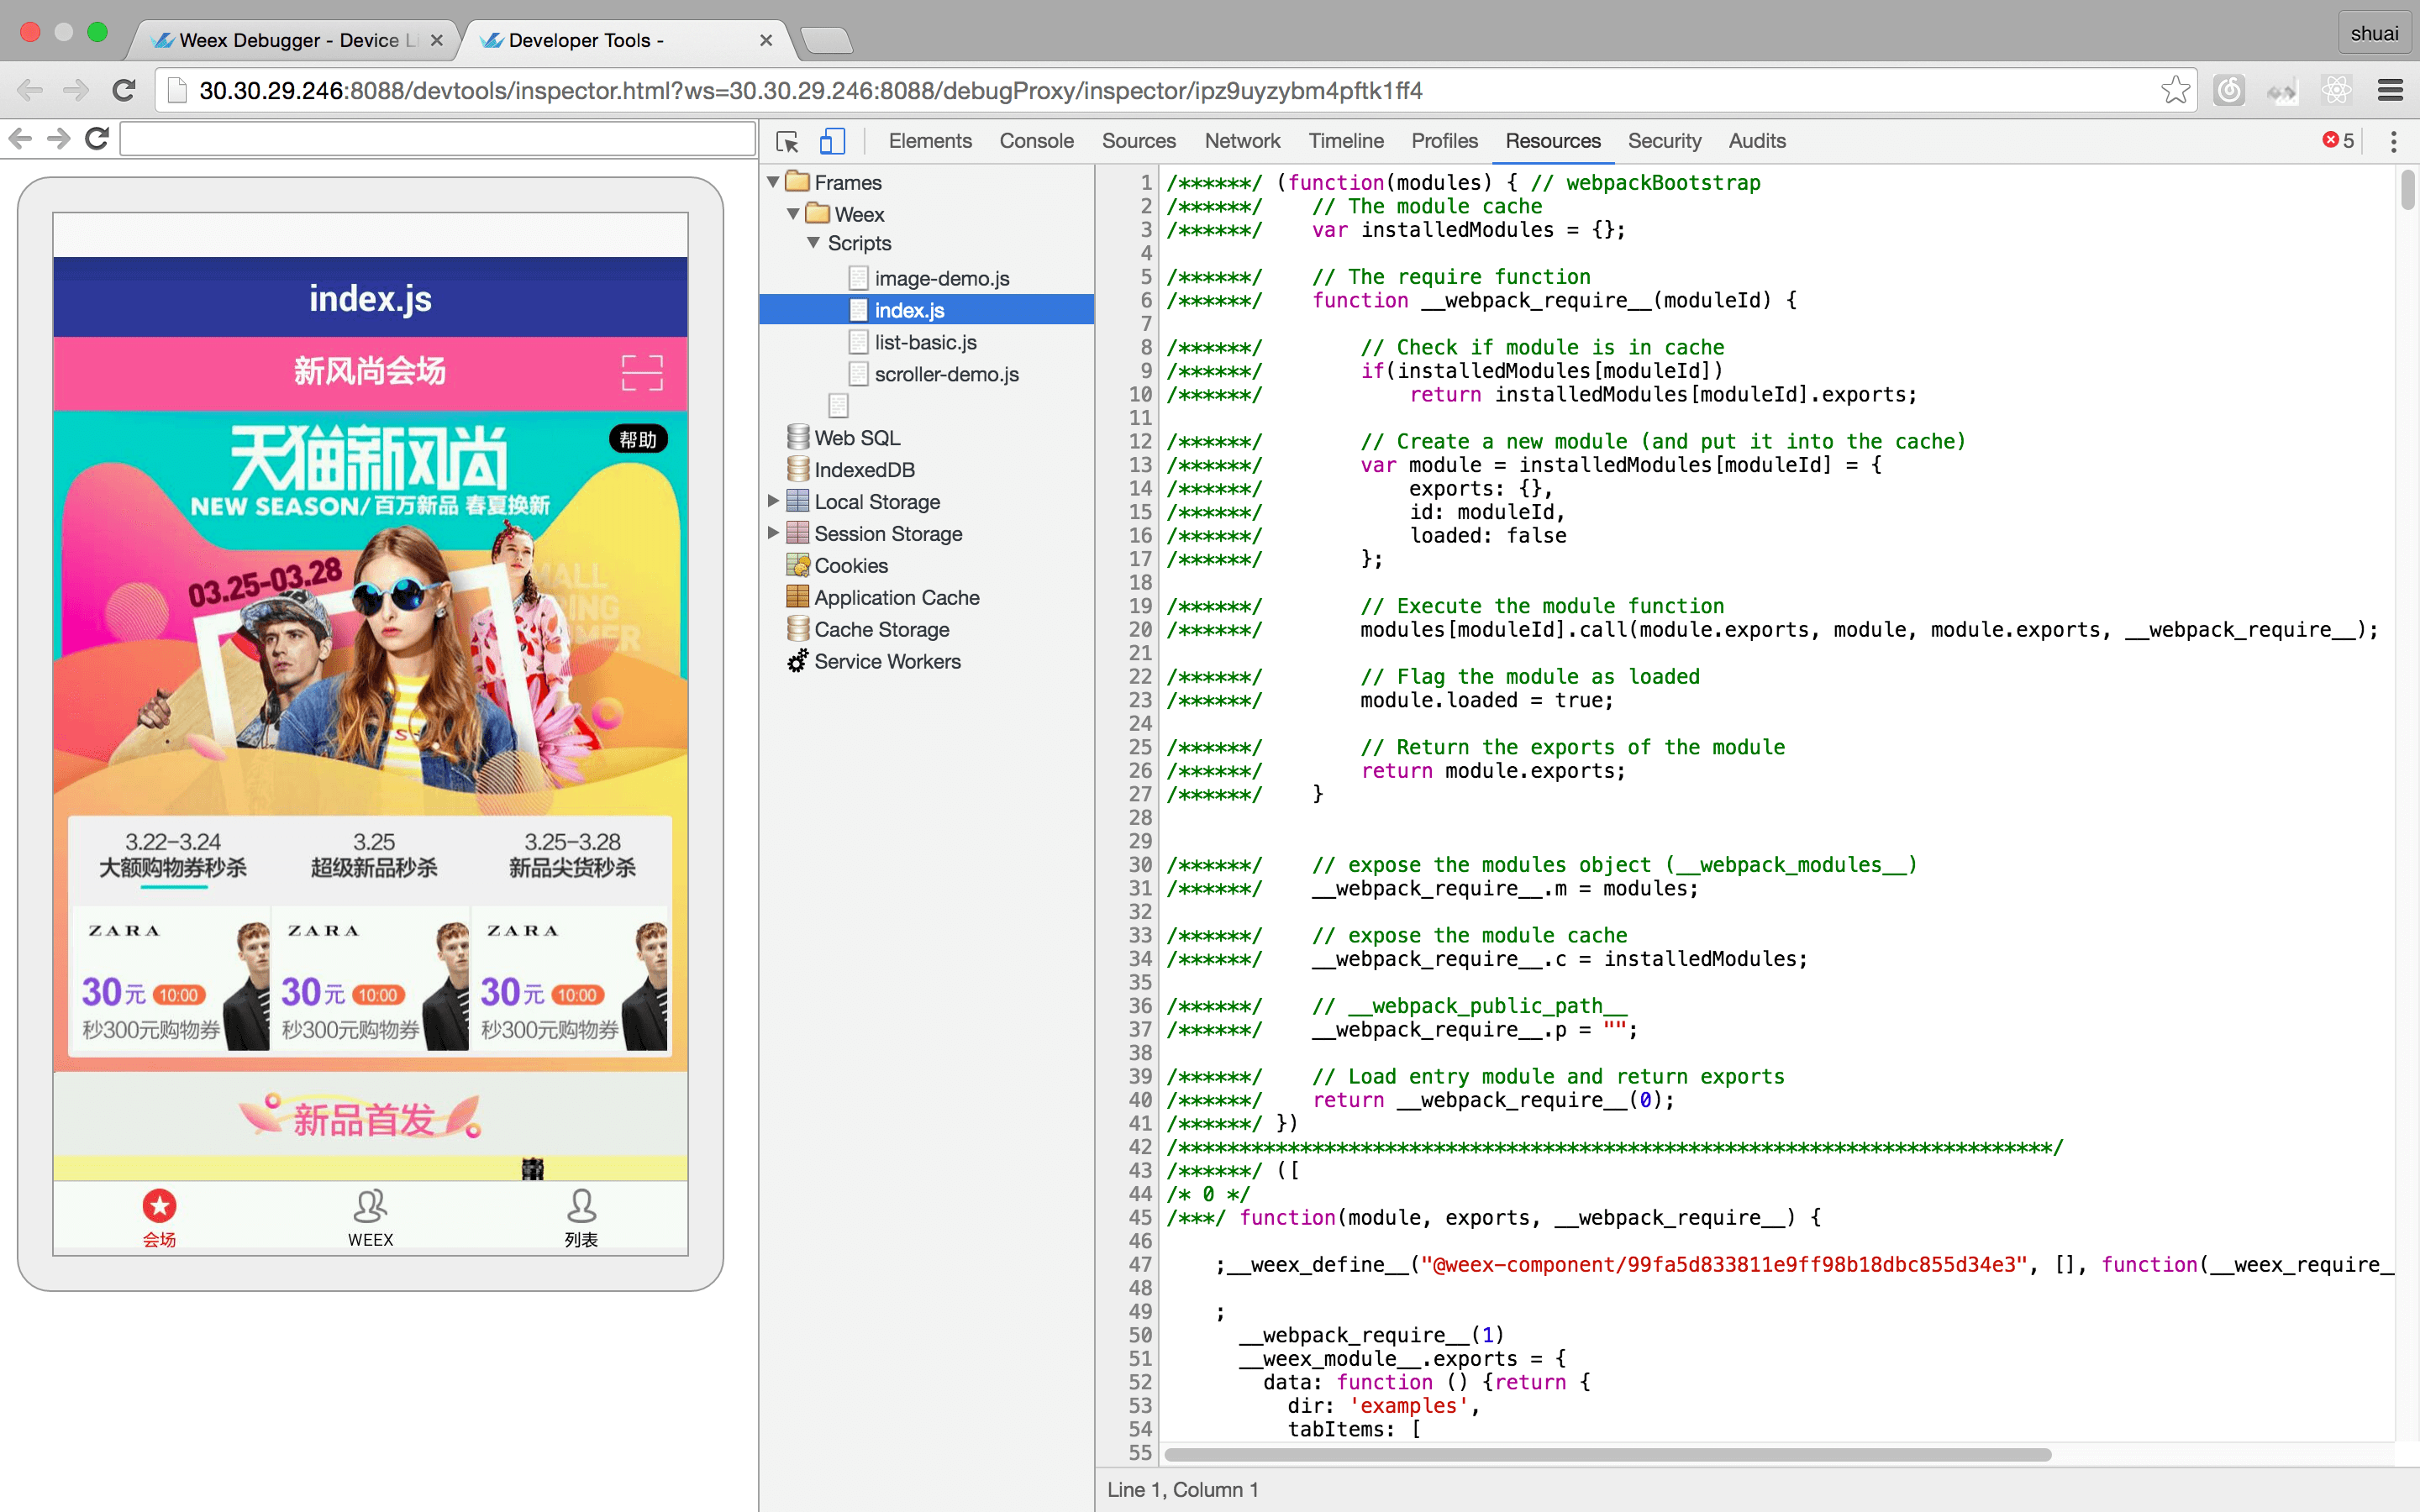
-### Debugger
-
-这个是用来调试 Weex 的 JSBundle 代码的页面,“Sources” tab 能够显示所有 JS 源码,包括 Weex JSFramework 和 JSBundle 代码。可以设置断点、查看调用栈,与 Chrome 浏览器调试类似。“Console” 控制台显示前端的 Log 信息,并能根据级别(info/warn/error等)和关键字过滤。
-
-
-
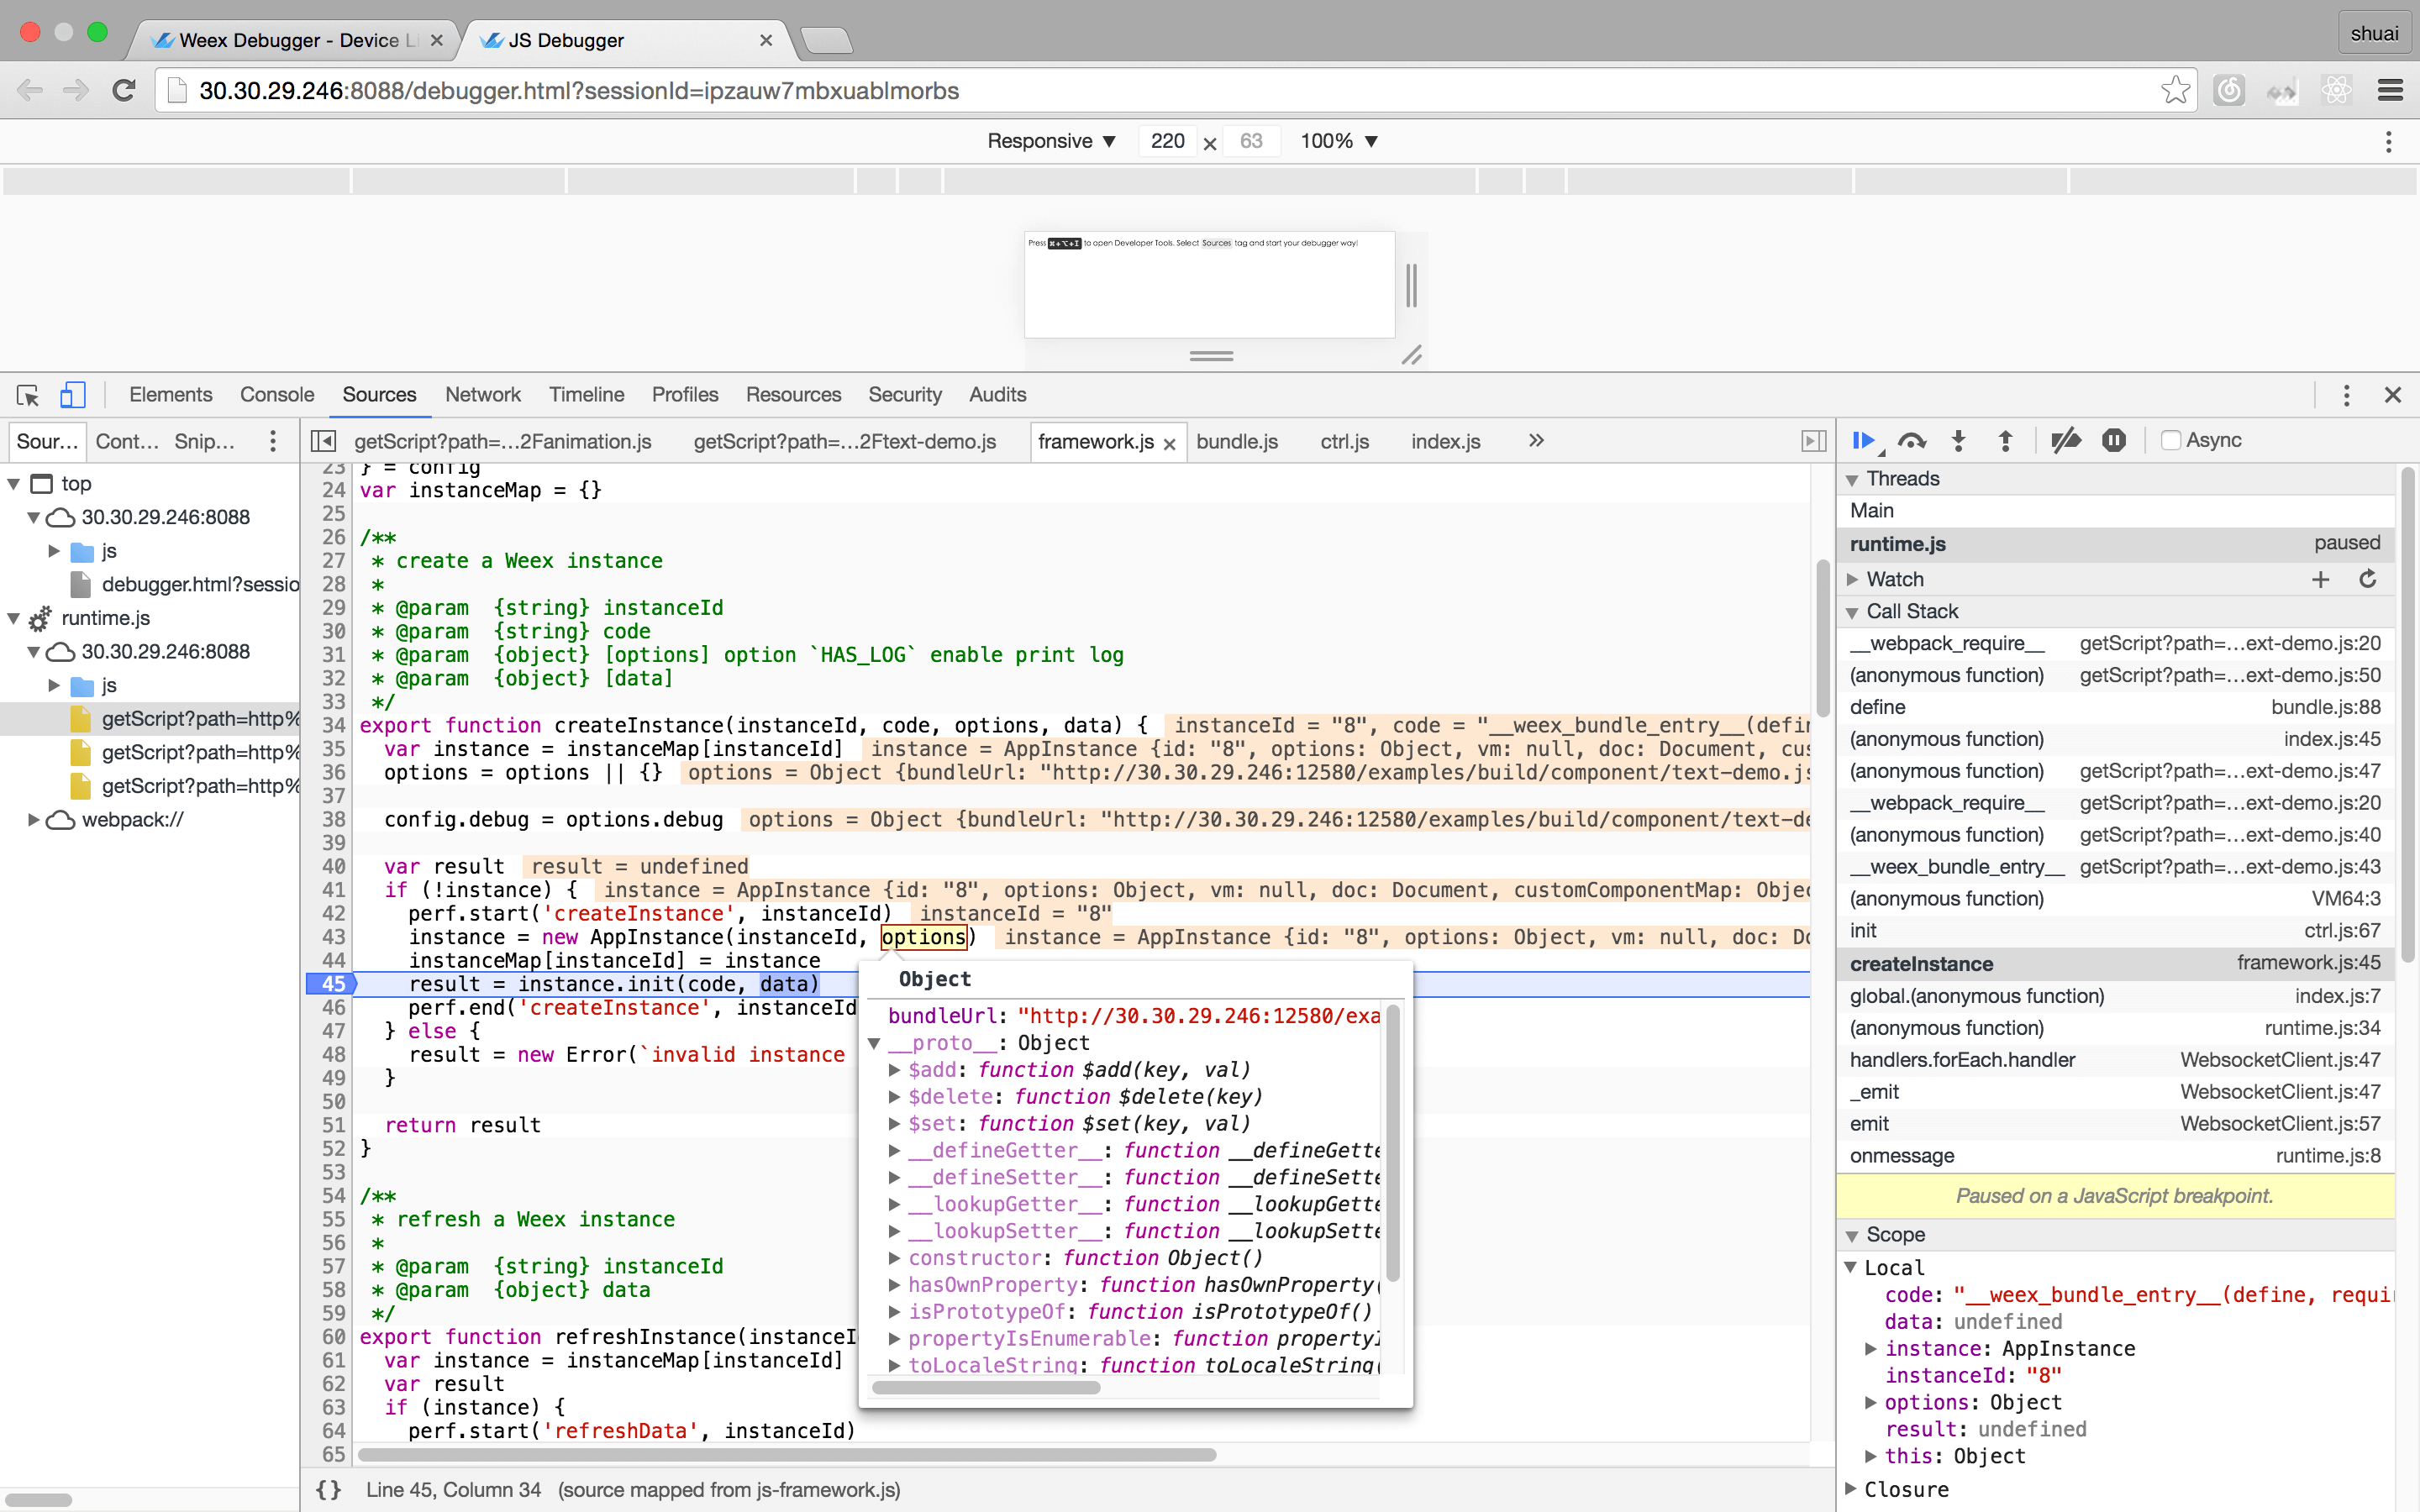
-### 断点调试
-
-
-
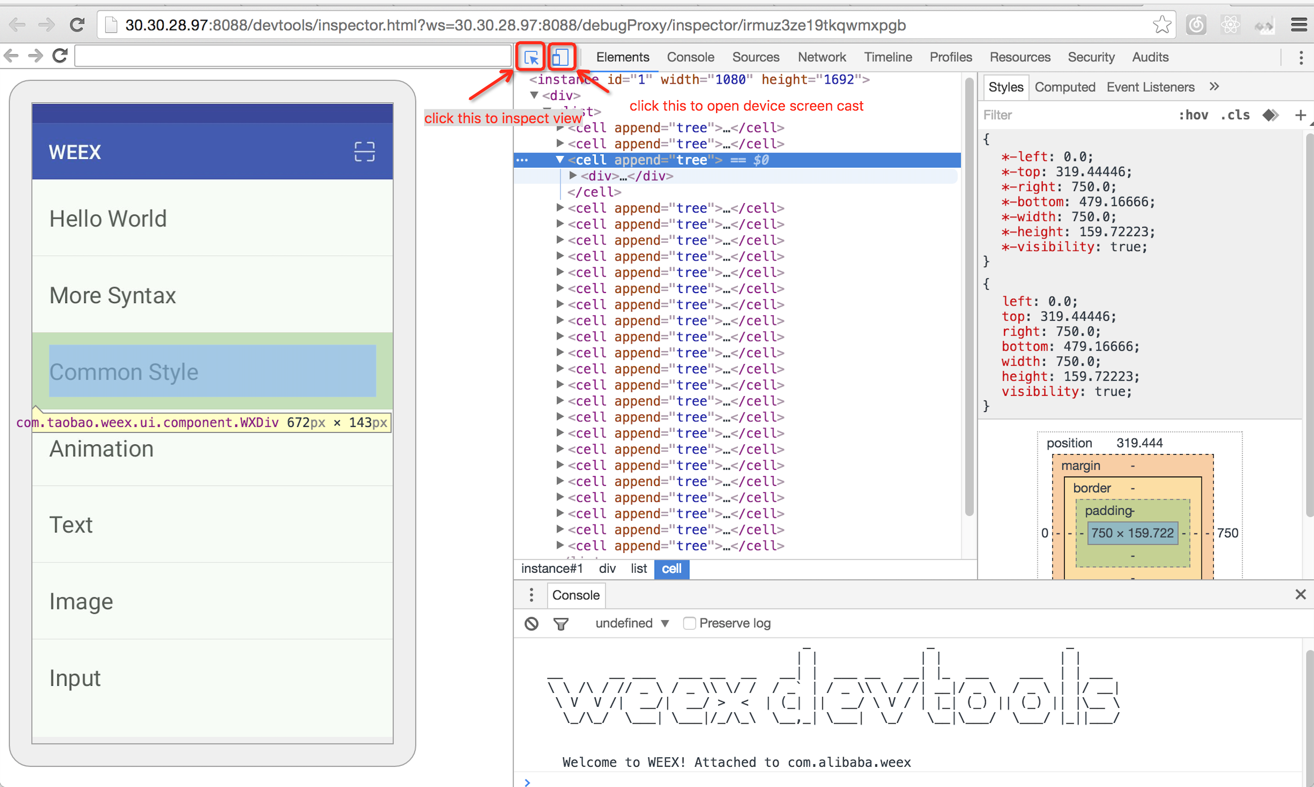
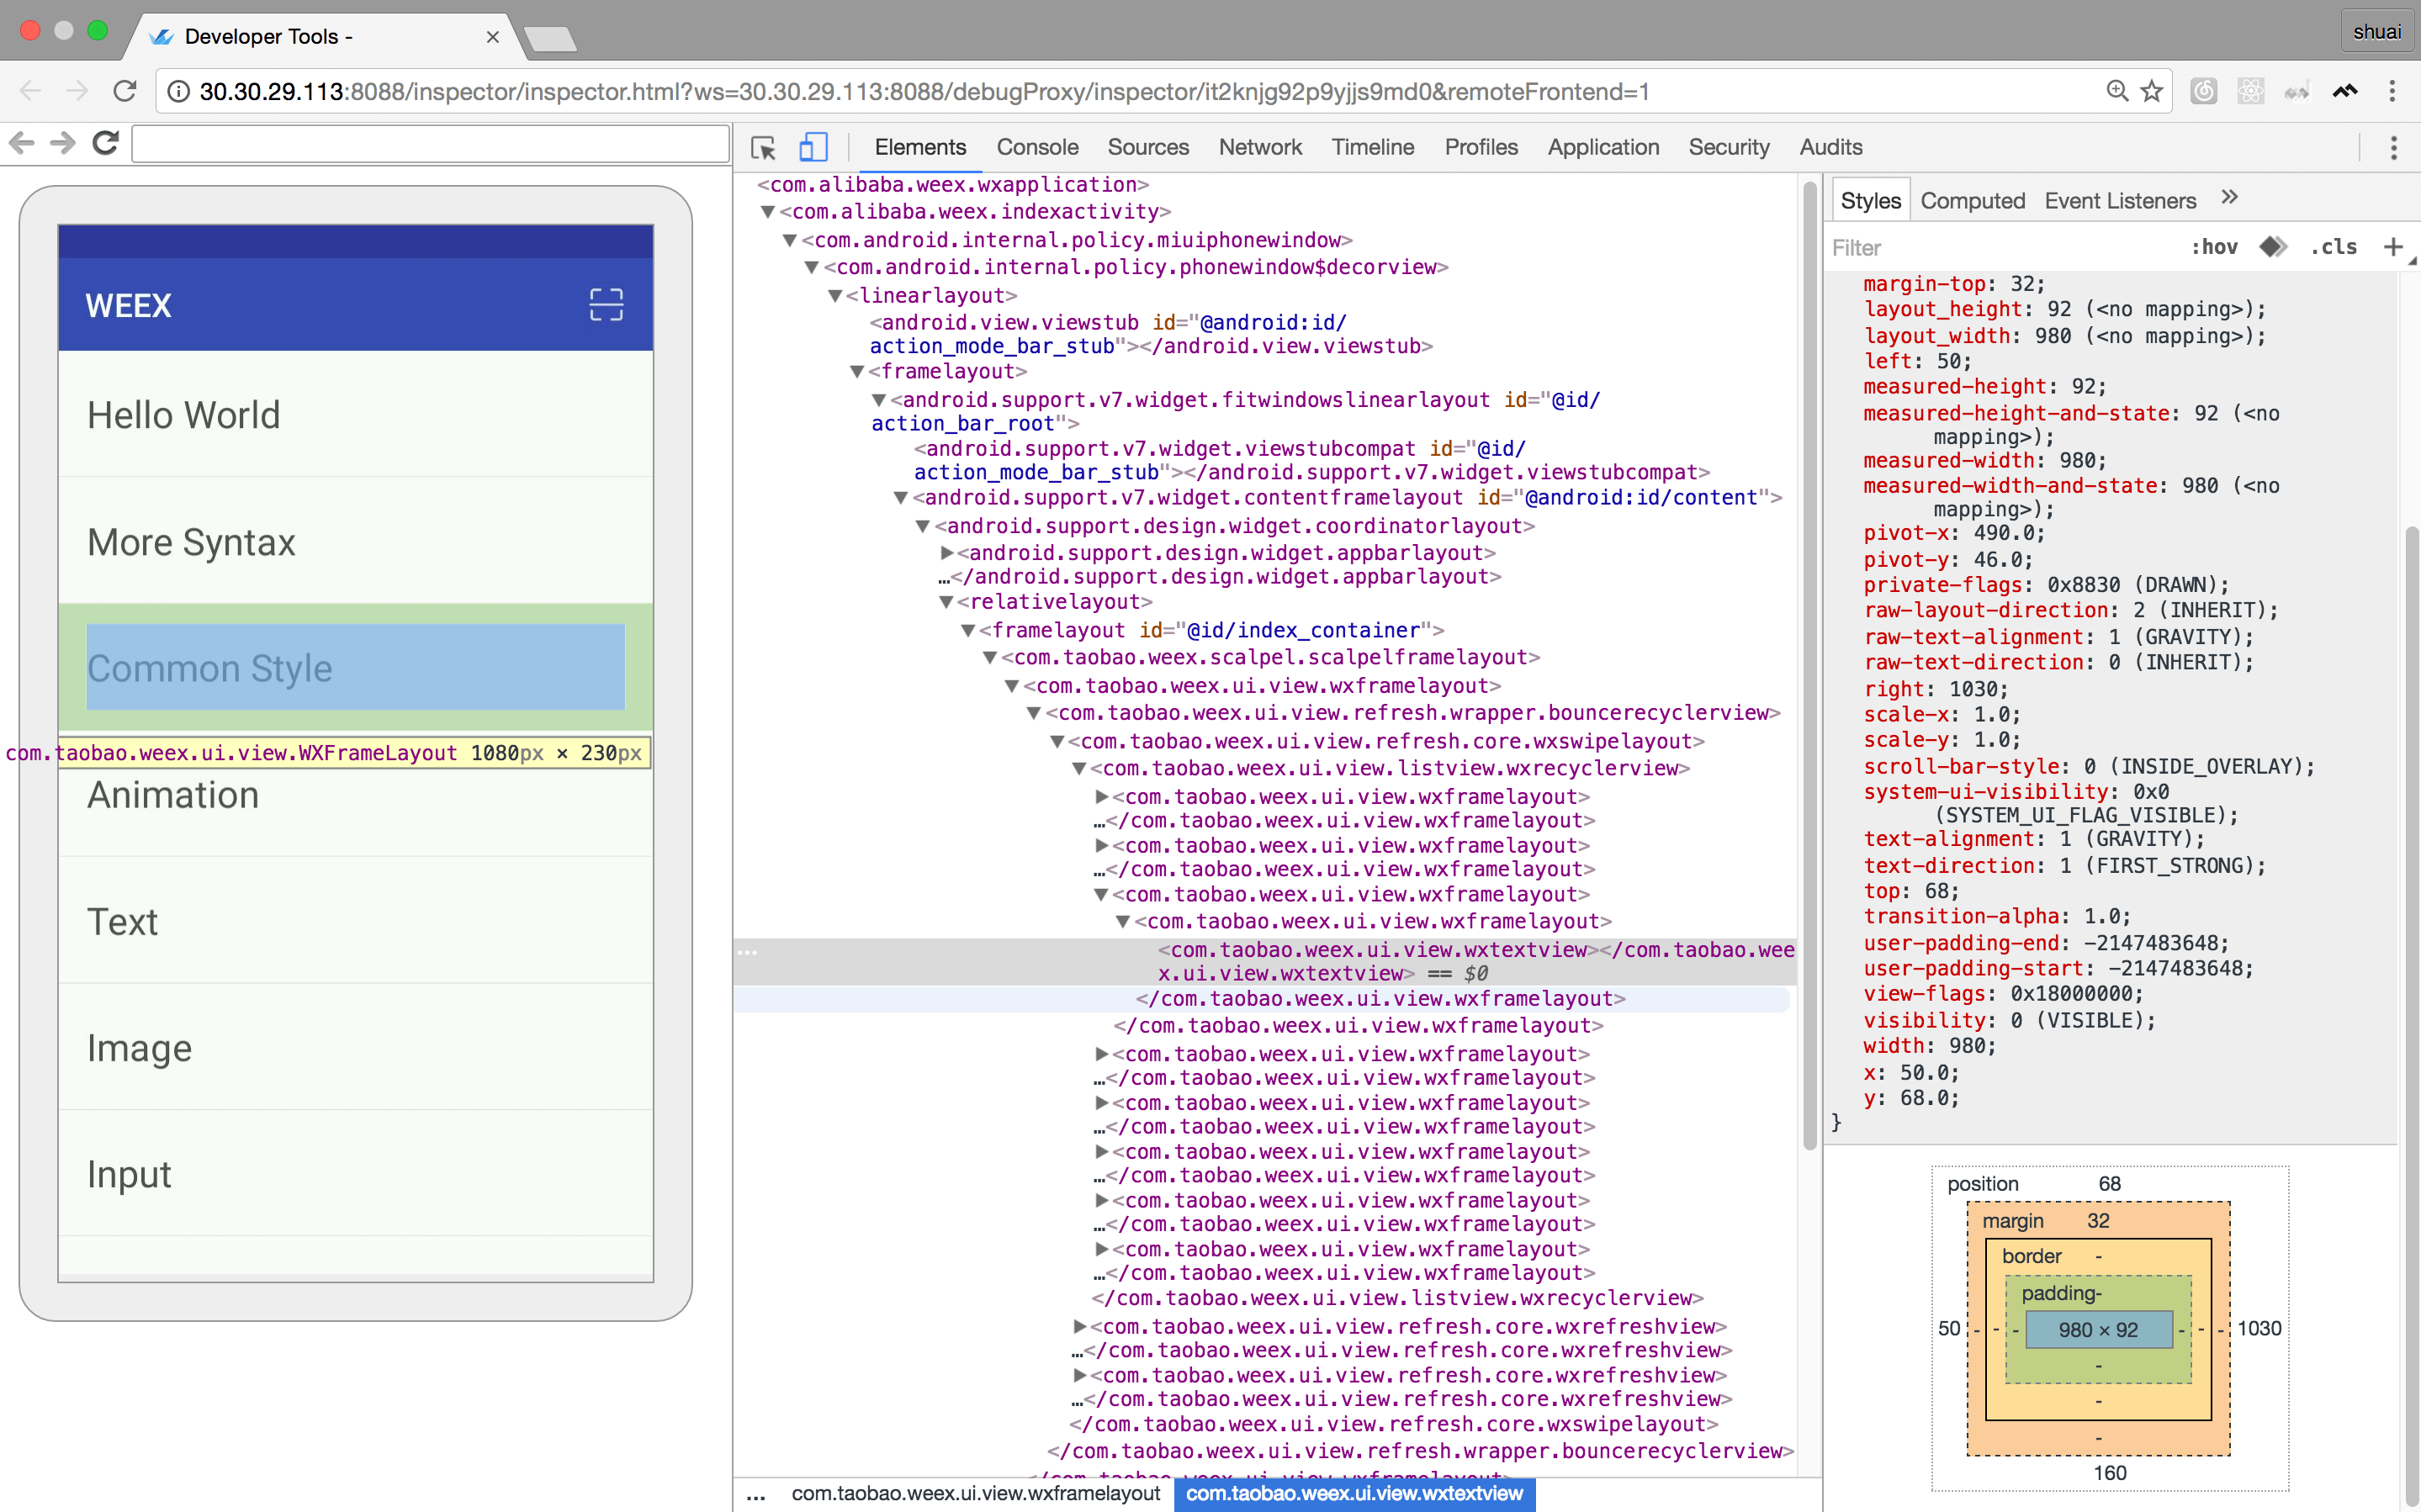
-### Inspector
-
-Inspector 功能丰富,能够用来查看 `Element` \ `Network` \ `Console log` \ `Screencast` \ `BoxModel` \ `Native View` 等。
-
-
-
-### Device Screencast & View Inspect
-
-如下图所示,通过 Inspector 页面的两个开关,点击右侧 Icon 可以打开设备投屏,然后点击左侧 Icon 再在投屏上点选元素则可以自动在 DOM tree 中定位并审查该元素。
-
-
-
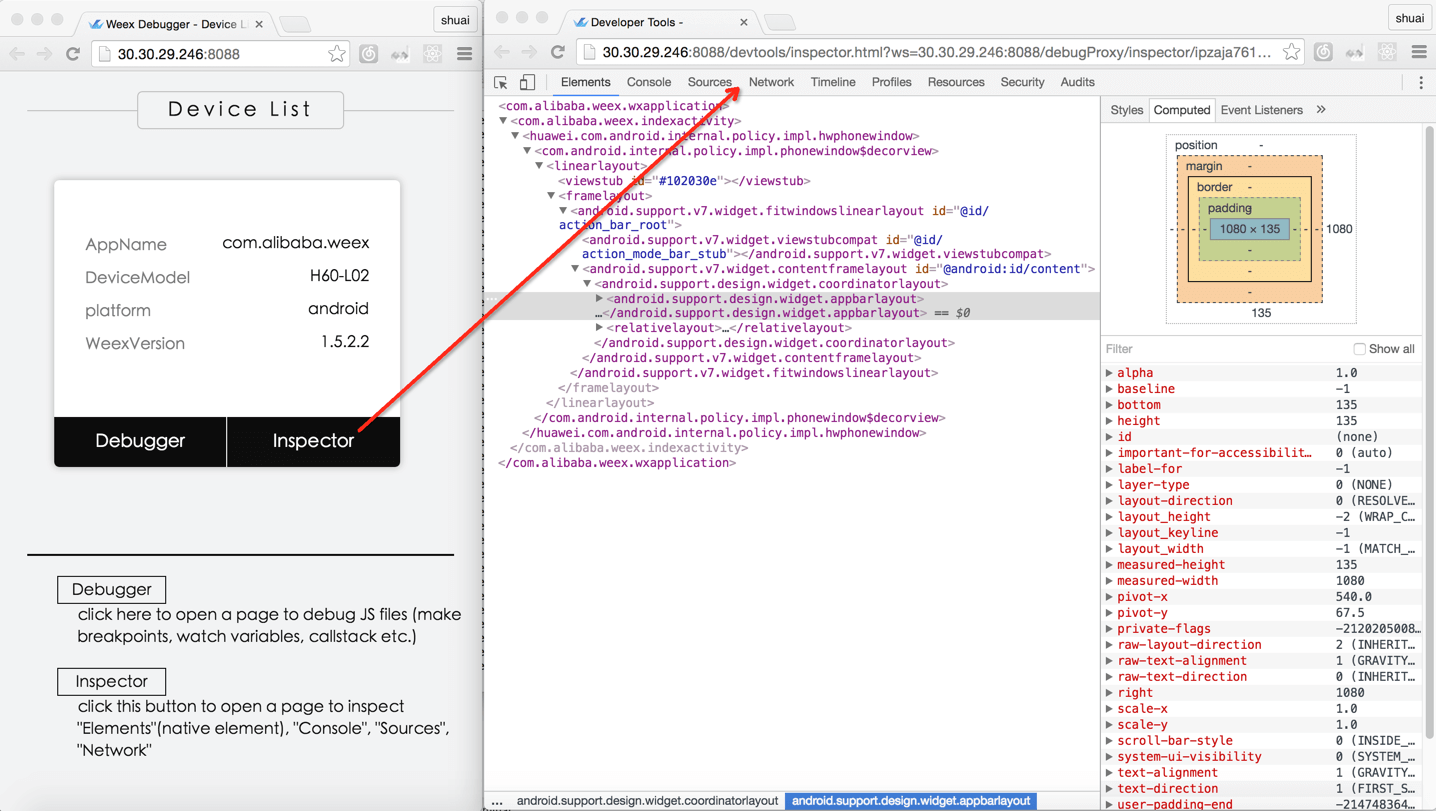
-### Elements
-
-这里展示的是在 Android/iOS 上的 native DOM 树,及其 style 属性和 layout 图。鼠标在 DOM 树移动时,在 device(或模拟器)上对应节点会高亮显示,有助于 native 开发者定位和发现节点。
-
-**注意:**
-screencast 只是对屏幕图像拷贝,在远程调试时能看到远程设备界面,数据网络下 screencast 也将有较大流量花销,如果设备就在手头儿则建议关掉。
-
-Elements 审查有两种模式分别是:native 和 vdom。其中,native 模式下展示的是 Weex 所映射的 native view 的结构,它更接近实现本质;vdom 模式则对应 `.we` 文件中定义的 dom 结构,主要用来审查 `.we` 文件编译为 JSBundle 之后对应的 dom tree 的逻辑构成。
-
-#### native view element
-
-
-
-#### weex dom element
-
-
-
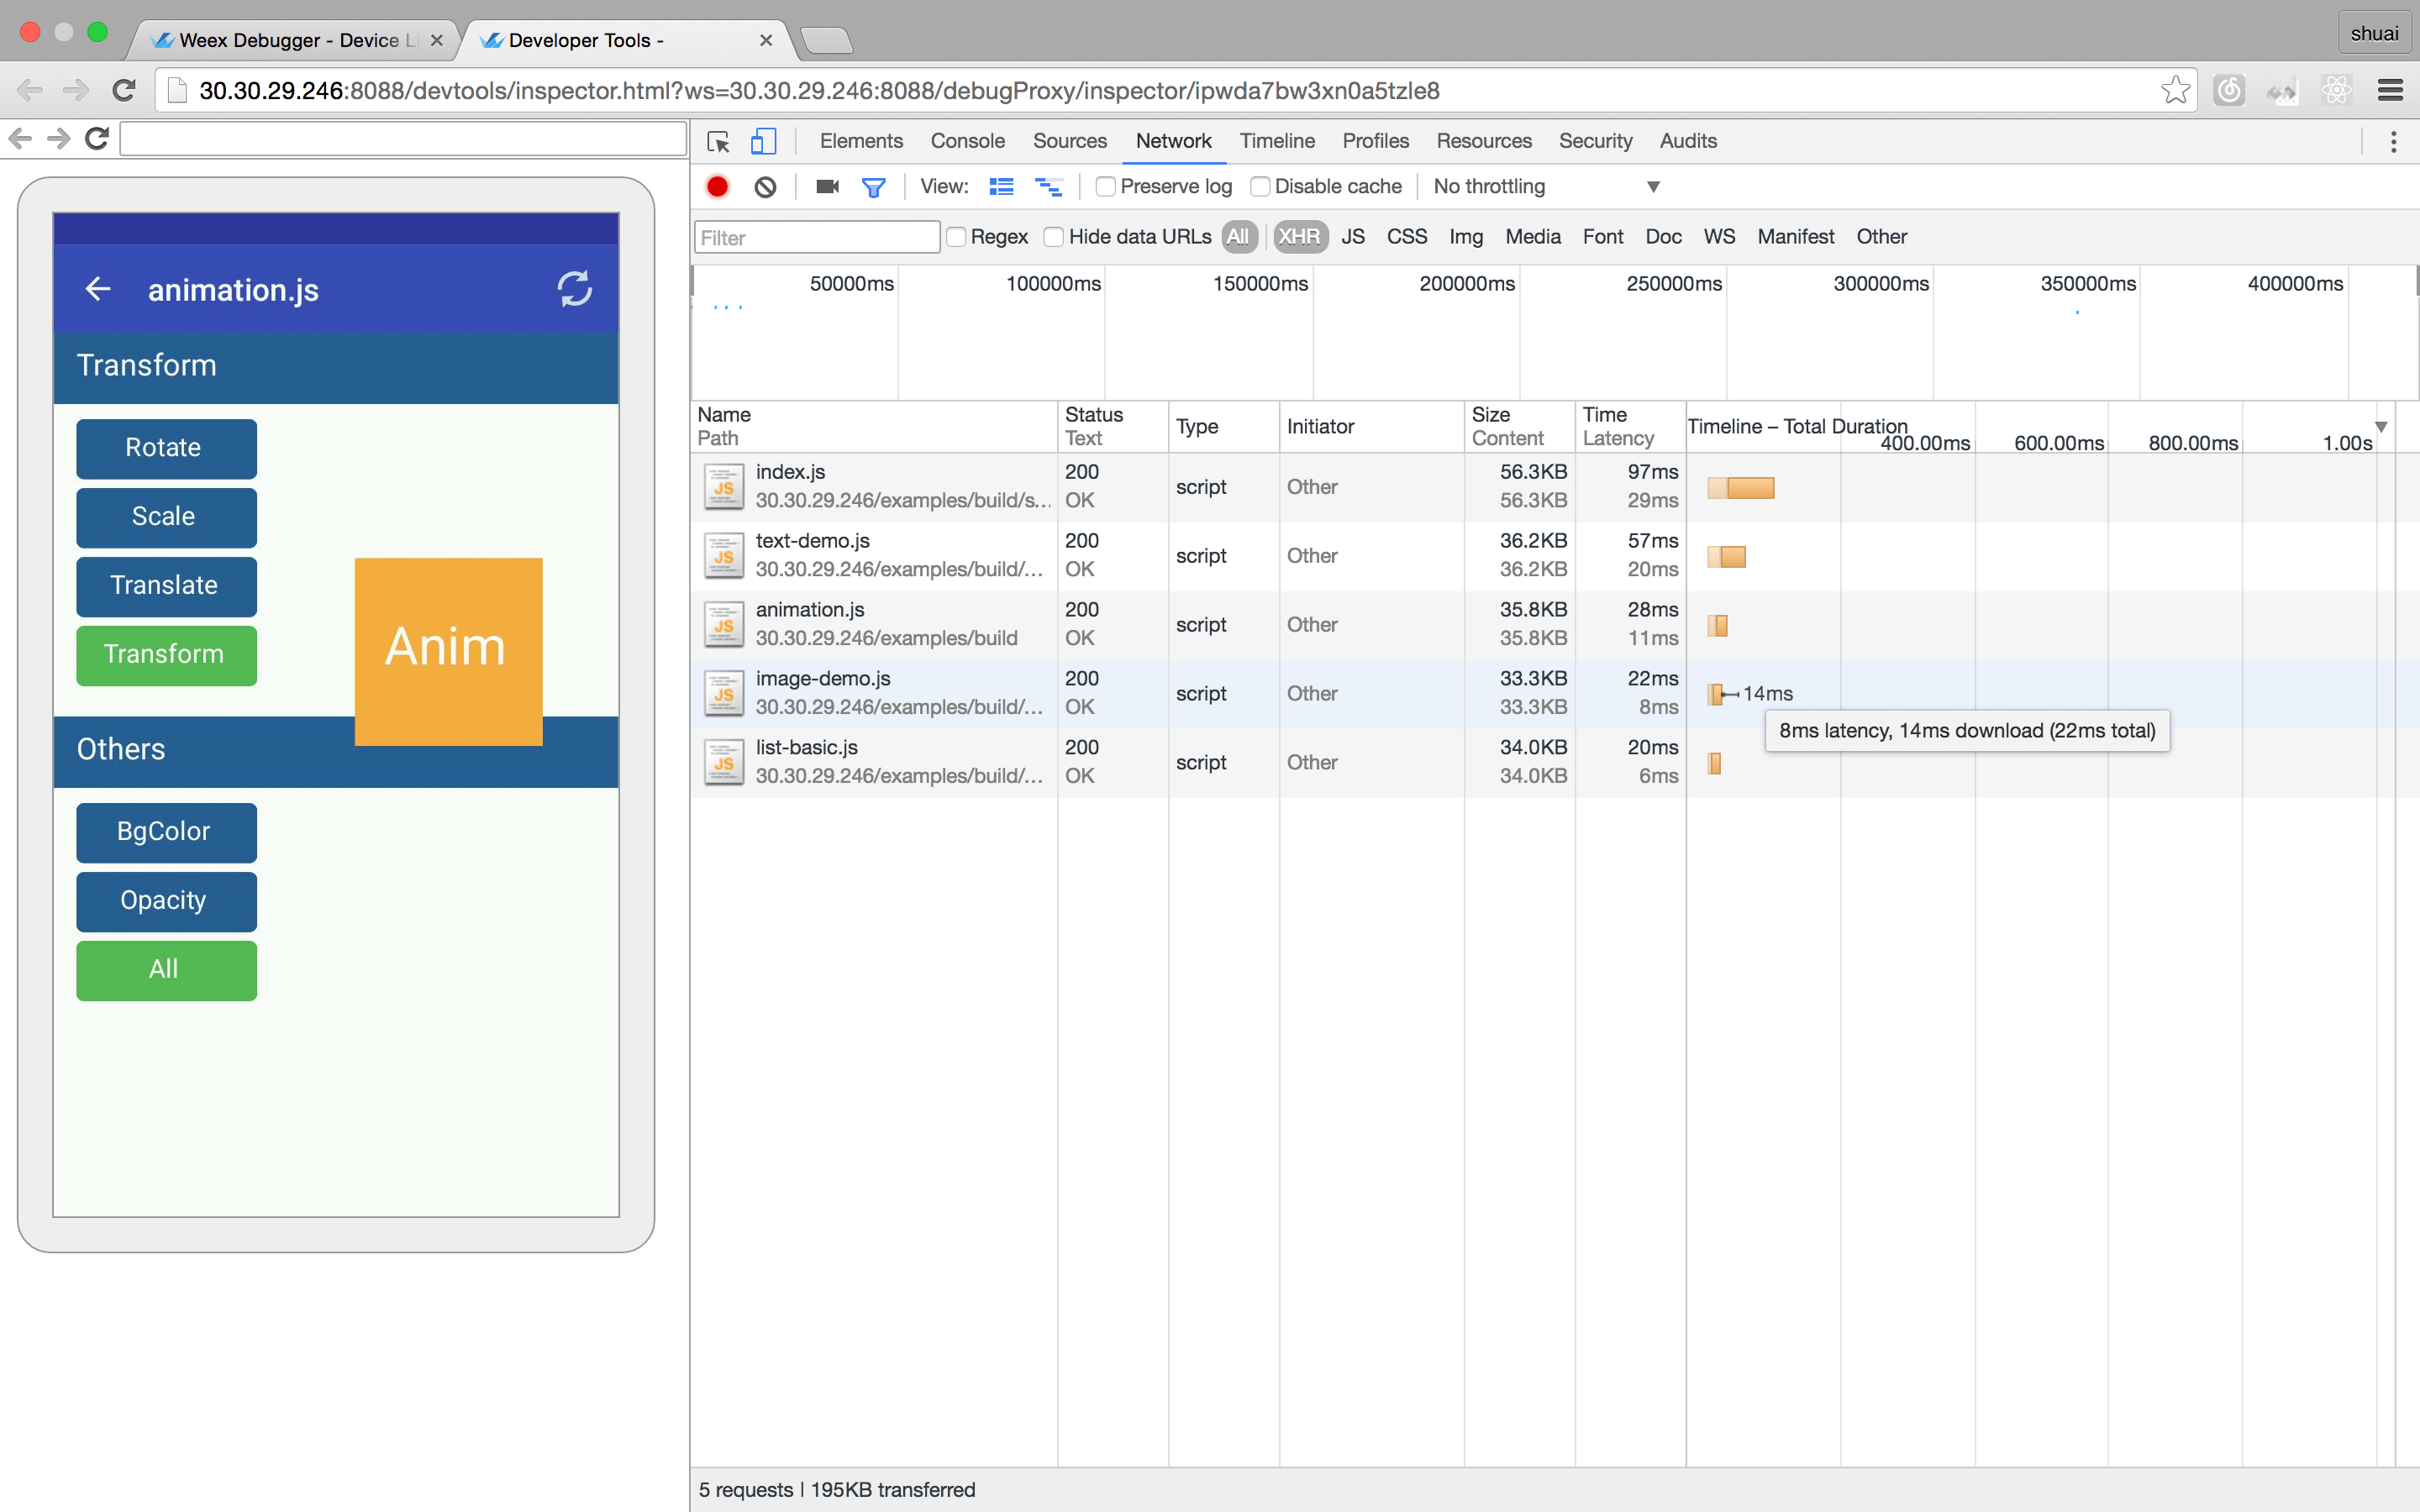
-### Network
-
-这里展示的是 JSBundle 资源加载网络访问的性能。所以如果 JSBundle 资源在设备本地,Network 是没有数据的。
-
-#### 查看网络请求的总耗时和延时
-
-
-
-#### 查看网络请求的header和response
-
-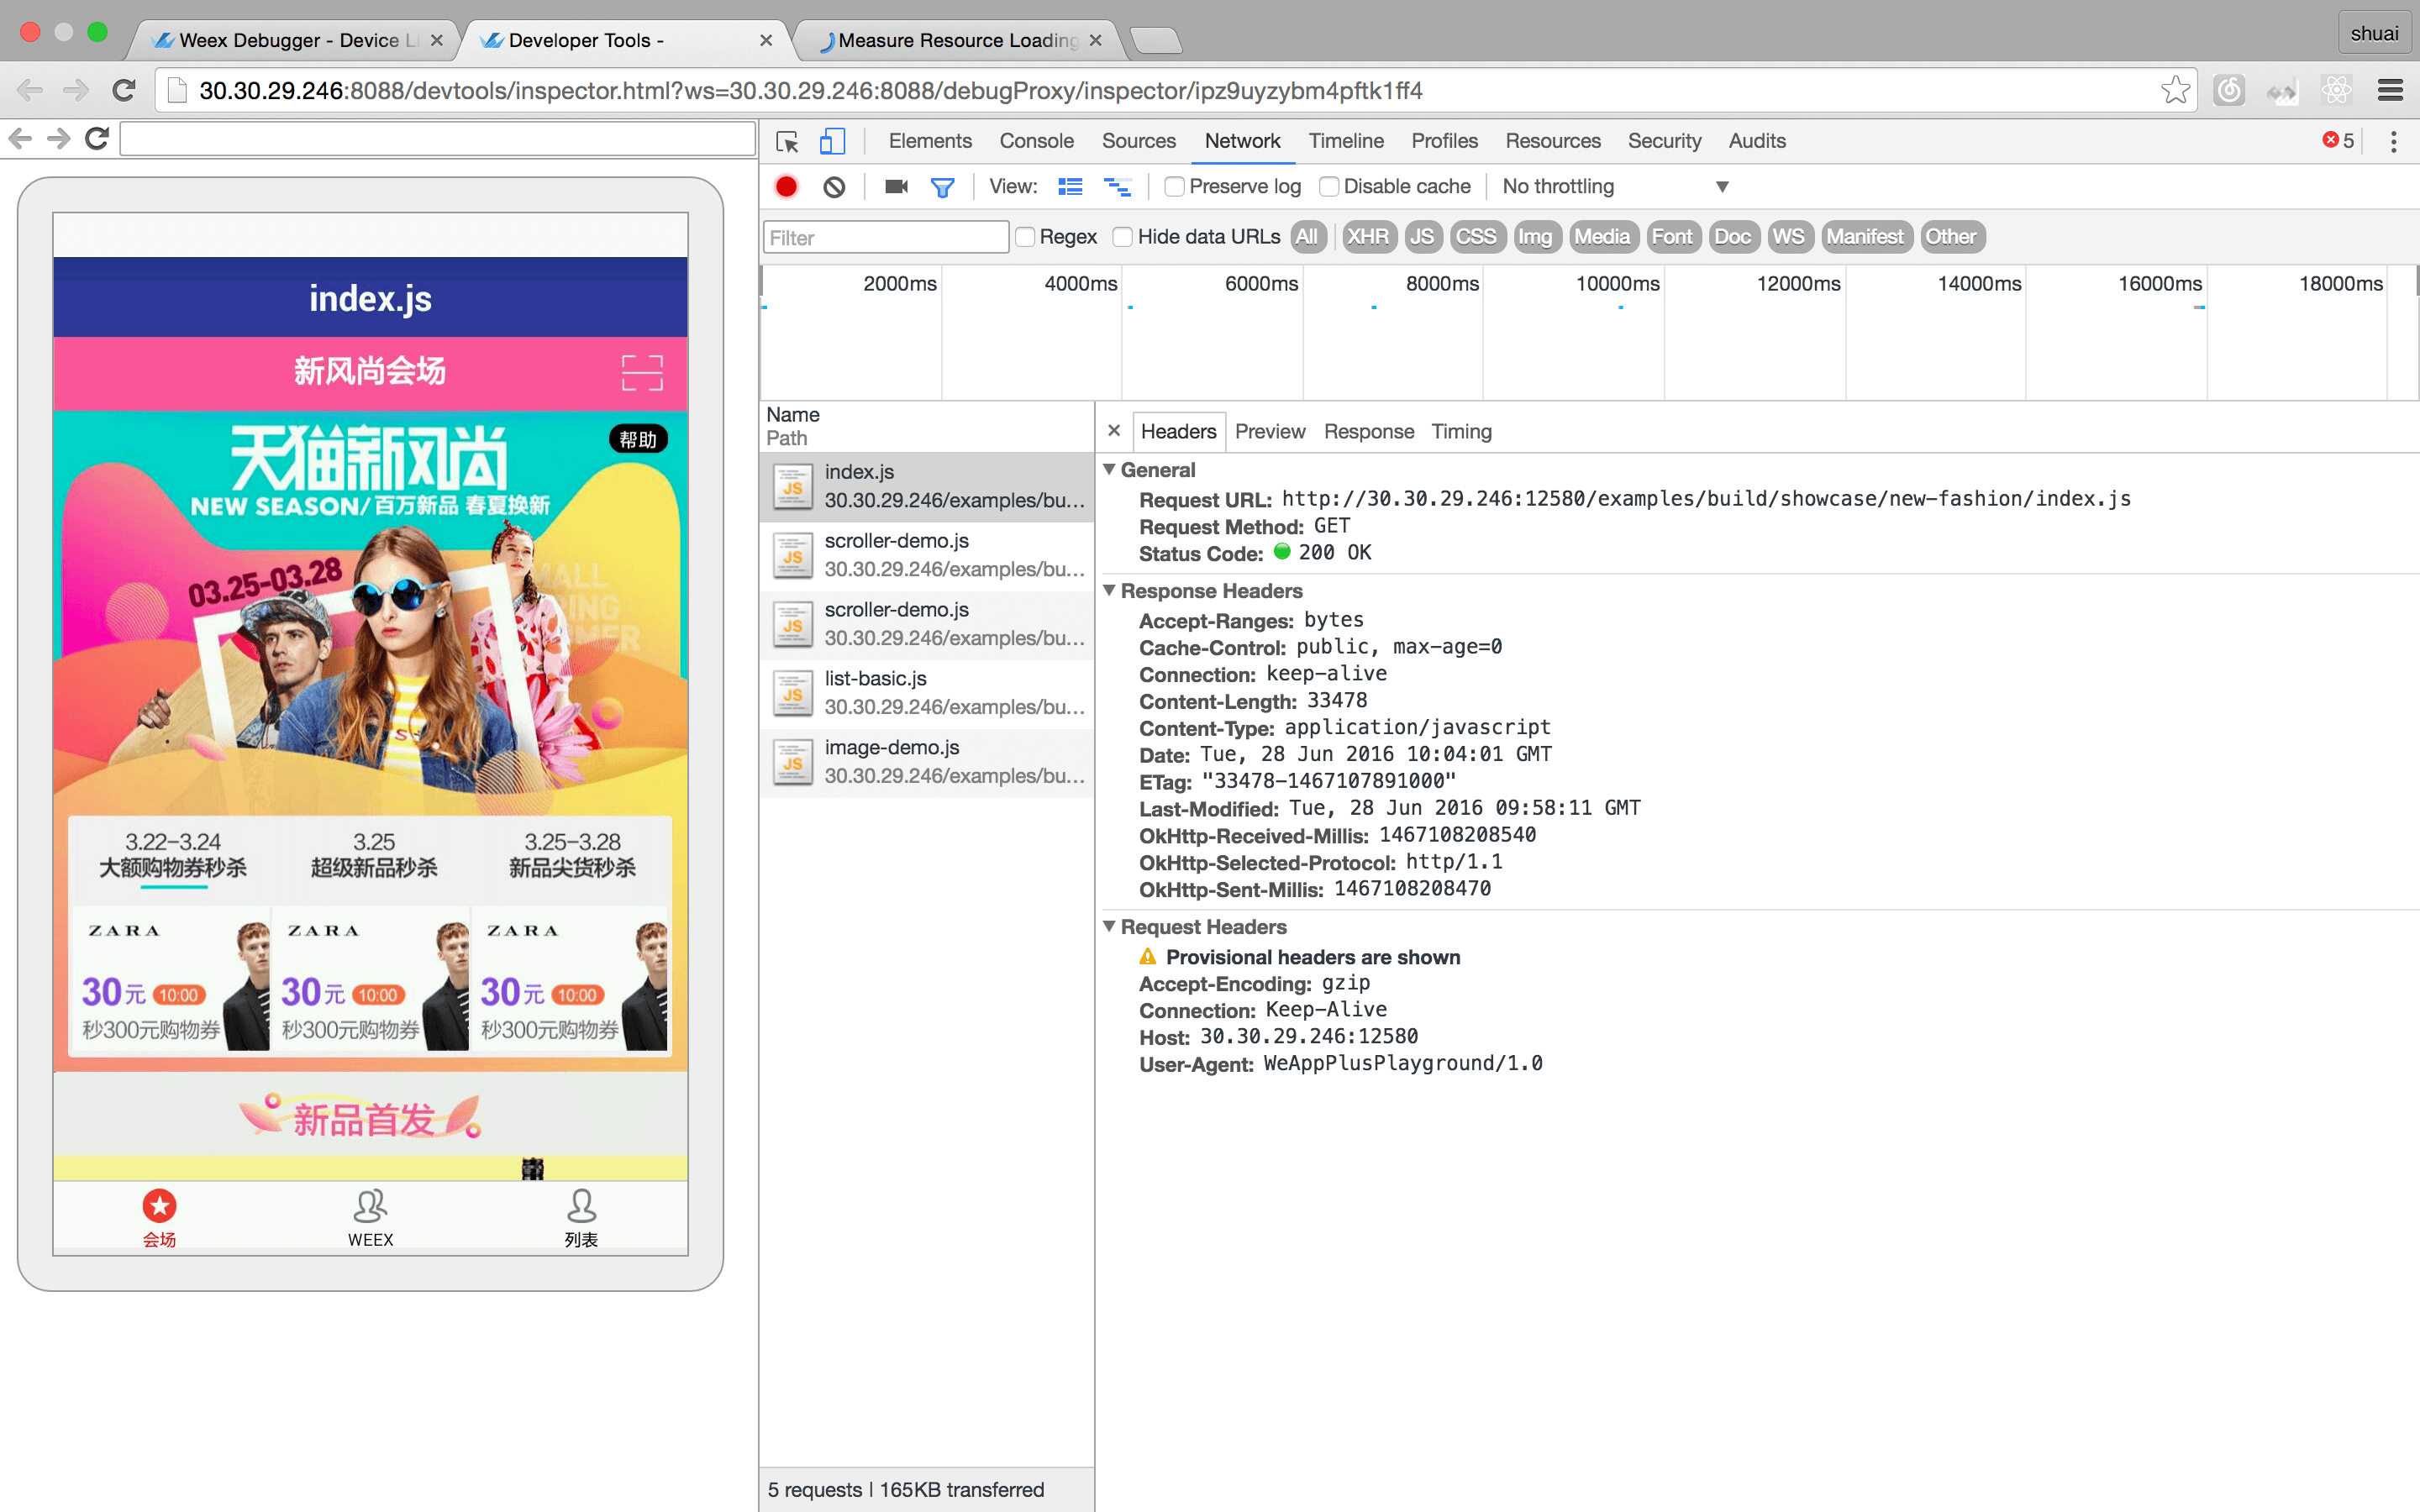
-
-### 控制台
-
-这里显示的是 Android/iOS 上的 native log,并不是 JS log(JS log 显示在 Debugger 页面)。同样 native log 也有对应级别--warn/error 等和关键字过滤,native 开发查询很方便。
-
-
-
-### 资源(Android Only)
-
-远端访问的资源文件会显示在这里,这里不是查看源码的最佳方式。在 Debugger 页面,“Sources” 里已经有源码并可以断点调试。如果你的应用里有 SQLITE 数据库文件,在这里无需 root 便可以查看和更新,对于 mock 数据来说比较便利。
-
-
-
-### 远程控制 (Android Only)
-
-Android 版本支持在 screencast 上进行远程控制,能够通过鼠标模拟在手机的输入事件,方便手机不在本地的用户进行远程调试。
-
-## 如何安装和启动devtools
-
-无论是跑在 iOS 或者 Android 端,[weex-devtool](https://github.com/weexteam/weex-devtool) 都是必需的,用来启动服务器和 Chrome 页面。
-
-### 安装
-
-如果你已经在前面的教程中安装过 weex-toolkit,就无需再次安装了。
-
-```bash
-$ npm install -g weex-toolkit
-```
-
-#### 用法
-
- weex debug [options] [we_file|bundles_dir]
-
- 选项:
-
- -h, --help 显示帮助
- -V, --verbose 显示debug服务器运行时的各种log
- -v, --version 显示版本
- -p, --port [port] 设置debug服务器端口号 默认为8088
- -e, --entry [entry] debug一个目录时,这个参数指定整个目录的入口bundle文件,这个bundle文件的地址会显示在debug主页上(作为二维码)
- -m, --mode [mode] 设置构建we文件的方式,transformer 最基础的风格适合单文件,loader:wepack风格 适合模块化的多文件.默认为transformer
-
-
-## 如何在设备或者模拟器上调试
-
-### weex调试初体验之playground
-
-如果你是一名 Weex 调试的新手,那么推荐你先下载 [Playground](http://alibaba.github.io/weex/download.html) 体验一下 Devtools 调试 JSBundle 的基础流程.
-
-- 前提:
- - 安装 `weex-toolkit`,内含调试命令 `weex debug`
- - android/iOS 设备与 PC 在同一局域网,若位于不同网段请确保防火墙可访问性
-
-- Inspector 功能演示
-
-<embed src="//cloud.video.taobao.com/play/u/1955166971/p/2/e/1/t/1/45803002.swf" quality="high" width="100%" height="500px" align="middle" allowScriptAccess="never" allowFullScreen="true" type="application/x-shockwave-flash"></embed>
-
-- Debugger功能演示
-
-<embed src="//cloud.video.taobao.com/play/u/1955166971/p/2/e/1/t/1/45803641.swf" quality="high" width="100%" height="500px" align="middle" allowScriptAccess="never" allowFullScreen="true" type="application/x-shockwave-flash"></embed>
-
-- 调试步骤:
- - **启动 debug server**
-
- 执行命令 `weex debug` 将启动 debug server。如果启动成功将会在 Chrome 打开一个 welcome 页面,在网页下方有一个二维码。
-
- - **启动 Playground 并扫码**
-
- 点击启首页左上角的扫码按钮扫码上一步中网页下方的二维码。此时 welcome 页面将会出现你的设备信息。Playground 进入 loading 页面,等待你的下一步操作。
-
- - **点击网页上的 Debugger 按钮**
-
- app 结束 loading 进入 debugging 状态。同时 Chrome 将会打开 Debugger 页面。按照页面提示打开该页的 JavaScript 控制台并进入 source tab。
-
- - **设置断点刷新当前页**
-
- 点击 Playground 首页 list 中的任意项将打开一个 Weex 页面,此时在 Sources 里会出现相应的 JSBundle 文件,设置断点并刷新 Playground 即可调试。
-
- - **点击网页上的 Inspector 按钮**
-
- Chrome 会打开 inspector页面,可以查看Element, Console, Network状态。
-
-### Weex调试初体验之应用
-
-如果是接入 Weex 的应用想调试自己的 Weex 代码,有以下几个方式:
-
-1. 借助 Playground 扫码调试
- - 先确定 Playground 已经是可调试状态
- - 使用命令行工具打开调试功能 `weex debug`,用 Playground 扫浏览器打开的页面中的二维码
- - 用 Playground 扫描 JSBundle 二维码
- - 手机上即显示 Weex 页面的结果。相应在 “Debugger” 和 “Inspector” 页面调试。
-
-2. 为应用接入 Devtools 接口
-
- - [Android sdk接入指南](https://github.com/weexteam/weex_devtools_android/blob/master/README-zh.html)
- - [iOS sdk接入指南](https://github.com/weexteam/weex-devtool-iOS/blob/master/README-zh.html)
-
-有任何问题或者建议,请提交[这里](https://github.com/weexteam/weex-devtool/issues),会很快得到解答。
-
-## 更详细的视频讲解
-
-- 第一集 devtools简介
-http://cloud.video.taobao.com/play/u/1955166971/p/1/e/1/t/1/45796387.swf
-- 第二集 inspector功能演示
-http://cloud.video.taobao.com/play/u/1955166971/p/1/e/1/t/1/45803002.swf
-- 第三集 debugger功能演示
-http://cloud.video.taobao.com/play/u/1955166971/p/1/e/1/t/1/45803641.swf
-- 第四集 native 与 weex 联调
-http://cloud.video.taobao.com/play/u/1955166971/p/1/e/1/t/1/45804472.swf
-- 第五集 第三方App接入指南
-http://cloud.video.taobao.com/play/u/1955166971/p/1/e/1/t/1/45805276.swf
\ No newline at end of file
http://git-wip-us.apache.org/repos/asf/incubator-weex-site/blob/32a097bf/source/cn/v-0.10/guide/how-to/require-3rd-party-libs.md
----------------------------------------------------------------------
diff --git a/source/cn/v-0.10/guide/how-to/require-3rd-party-libs.md b/source/cn/v-0.10/guide/how-to/require-3rd-party-libs.md
deleted file mode 100644
index 7d3748e..0000000
--- a/source/cn/v-0.10/guide/how-to/require-3rd-party-libs.md
+++ /dev/null
@@ -1,57 +0,0 @@
----
-title: 如何引入第三方库
-type: guide
-order: 4.3
-version: 0.10
----
-
-# 如何引入第三方库
-<span class="weex-version">0.4</span>
-
-在 [Get started](../index.html) 中,我们学习了知道可以在 `<script>` 标签中编写 JavaScript 代码。但是在项目中常用的功能或模块,例如解析url参数,将属性从一些对象扩展到另一个对象等等,在每个组件中复制和粘贴这些代码是一个糟糕的做法,因此迫切需要通过 `require` 的方式对可复用的代码进行管理。Weex 为开发人员提供了 CommonJS 风格的 require 语法。
-
-我们以 `extend` 作为例子。
-
-## 引入本地 JS Modules
-
-下面是 `extend` 最简单的实现,并将其放在 `./common/utils.js` 路径中。
-
-```javascript
-function extend(dest, src) {
- for (var key in src) {
- dest[key] = src[key]
- }
-}
-exports.extend = extend
-```
-
-在 `.we` 文件中,`extend` 可以与`require`一起使用:
-
-```html
-<script>
- var utils = require('./common/utils')
- var obj1 = {a: 1}
- var obj2 = {b: 2}
- utils.extend(obj1, obj2) // obj1 => {a: 1, b: 2}
-</script>
-```
-
-## 引入已经安装的 Node.js Modules
-
-[underscore](http://underscorejs.org) 是一个 JavaScript 库,它提供了一整套函数式编程的实用功能,而不扩展任何 JavaScript 内置对象。它提供了一个更具稳健性的 [`extend`](http://underscorejs.org/#extend)。
-
-我们可以使用 underscore 的 `extend`,而不是我们自己实现的版本。首先,在项目中安装 underscore,然后我们便可以将 underscore `reuqire` 进来并使用它。
-
-```bash
-npm install underscore
-```
-
-```html
-<script>
- var _ = require('underscore')
- var obj1 = {a: 1}
- var obj2 = {b: 2}
- var obj3 = {c: 3}
- var ret = _.extend(obj1, obj2, obj3) // ret => {a: 1, b: 2, c: 3}
-</script>
-```
http://git-wip-us.apache.org/repos/asf/incubator-weex-site/blob/32a097bf/source/cn/v-0.10/guide/how-to/transform-code-into-js-bundle.md
----------------------------------------------------------------------
diff --git a/source/cn/v-0.10/guide/how-to/transform-code-into-js-bundle.md b/source/cn/v-0.10/guide/how-to/transform-code-into-js-bundle.md
deleted file mode 100644
index 69667ae..0000000
--- a/source/cn/v-0.10/guide/how-to/transform-code-into-js-bundle.md
+++ /dev/null
@@ -1,112 +0,0 @@
----
-title: 将 `.we` 源代码转换成 JS Bundle
-type: guide
-order: 4.4
-version: 0.10
----
-
-# 将 `.we` 源代码转换成 JS Bundle
-<span class="weex-version">0.4</span>
-
-在前面的章节中你已经了解到如何编写及组织 Weex 代码,如果你还有疑问,可参考 [语法](../syntax/main.html) 及 [手册](../../references/main.html)。 但是,Weex 语法的代码必须转换为 JSBundle,以便 Weex JSFramework 可以在 iOS,Android 和浏览器端解析和执行。了解更多信息,可参考 [Weex 工作原理](../../advanced/how-it-works.html) 和 [JS Bundle 格式](../../references/specs/js-bundle-format.html)
-
-现在,回到将 `.we` 源代码转换成 JS Bundle 的主题。有几种方法来实现这一目标。
-
-## 使用 weex-toolkit
-
-如果你已经有了 node.js 开发环境,可以直接使用以下命令。关于 node.js 及其他依赖安装可参考[安装依赖](../develop-on-your-local-machine.html#第一步:安装依赖)
-```bash
-$npm install -g weex-toolkit
-```
-
-### 将 `.we` 文件转换为 JS Bundle
-
-```bash
-$ weex your_best_weex.we -o .
-```
-
-`your_best_weex.we` 将会被转换为 `your_best_weex.js` 并保存在当前目录。
-
-### 将 `.we` 文件转换为 JS Bundle 并开启 watch 功能,实时自动转换
-
-```bash
-
-$ weex your_best_weex.we -o . --watch
-```
-
-### 将所有 `.we` 文件转换到一个目录中
-
-```bash
-$ weex we/file/storage/path -o outputpath
-```
-
- `we/file/storage/path` 目录下的每个 `.we` 文件都会被转换为 JS Bundle 并保存到 `outputpath` 目录。
-
-请访问 [npmjs.com](https://www.npmjs.com/package/weex-toolkit) 了解更多关于 `weex-toolkit`。
-
-## transformer
-
-```bash
-npm install weex-transformer
-```
-
-### CLI Tool
-
-```
- Usage: transformer [options] <file...>
-
- Options:
-
- -h, --help output usage information
- -V, --version output the version number
- -l, --oldFormat [value] whether to transform to old format (default: false)
- -e, --isEntry [value] whether is an entry module which has `bootstrap` (default: true)
- -o, --output [path] the output file dirname
-```
-
-### API
-
-** transform(name, code, path, elements, config) **
-
-```javascript
-var transformer = require('weex-transformer')
-var output = transformer.transform('foo', '/* code here */', '.', {})
-```
-
-参数:
-
-- `name {string}`:当前 bundle 文件名
-- `code {string}`:源码
-- `path {string}`: *可选*,当在某个路径中查找自定义组件时很有用
-- `elements {Object}`:*可选*,存在的自定义组件映射
-- `config {Object}`:*可选*
-
- * `oldFormat {boolean}`:是否转换为旧格式 (默认:`false`)
- * `isEntry {boolean}`:是否是具有 `bootstrap` 的入口模块 (默认:`true`)
-
-返回值:
-- 一个对象:
- - `result {string}`:所有自定义组件的 `define()` 方法和最终的 `bootstrap()`
- - `logs {Array}`:相应的警告和错误日志
-
-## gulp weex
-
-```bash
-npm install gulp-weex
-```
-
-```javascript
-var gulp = require('gulp')
-var weex = require('gulp-weex')
-
-gulp.task('default', function () {
- return gulp.src('src/*.html')
- .pipe(weex({}))
- .pipe(gulp.dest('./dest'))
-})
-```
-
-参数:
-
-- `oldFormat {boolean}`:是否转换为旧格式 (默认:`false`)
-- `isEntry {boolean}`:是否是具有 `bootstrap` 的入口模块 (默认:`true`)
http://git-wip-us.apache.org/repos/asf/incubator-weex-site/blob/32a097bf/source/cn/v-0.10/guide/index.md
----------------------------------------------------------------------
diff --git a/source/cn/v-0.10/guide/index.md b/source/cn/v-0.10/guide/index.md
deleted file mode 100644
index 73d1a98..0000000
--- a/source/cn/v-0.10/guide/index.md
+++ /dev/null
@@ -1,60 +0,0 @@
----
-title: 上手教程
-type: guide
-order: 1
-has_chapter_content: true
-version: 0.10
----
-
-# 起步教程
-
-Weex 是一套简单易用的跨平台开发方案,能以 web 的开发体验构建高性能、可扩展的 native 应用,为了做到这些,Weex 与 Vue 合作,使用 Vue 作为上层框架,并遵循 W3C 标准实现了统一的 JSEngine 和 DOM API,这样一来,你甚至可以使用其他框架驱动 Weex,打造三端一致的 native 应用。
-
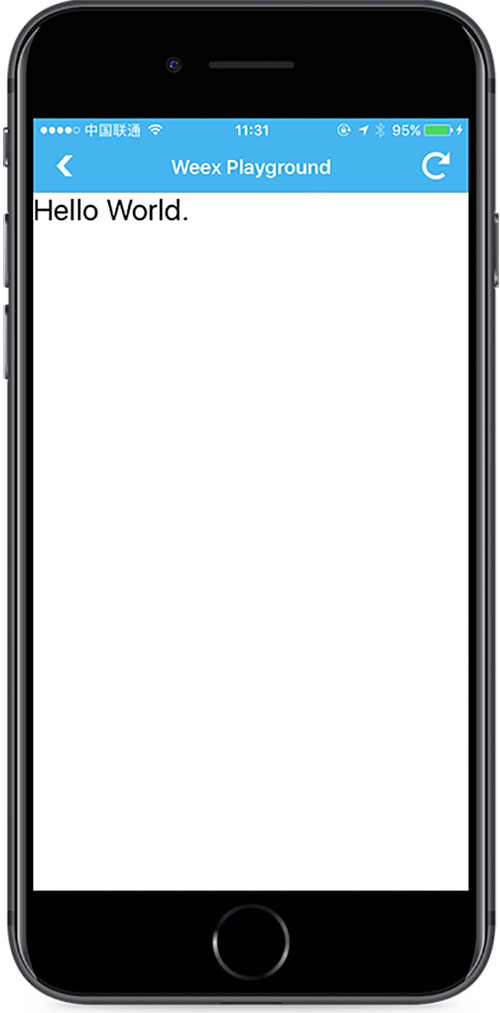
-尝试 Weex 最简单的方法是使用 [Playground App](https://alibaba.github.io/weex/download.html) 和在 [dotWe](http://dotwe.org) 编写一个 [Hello World](http://dotwe.org/656345423a7ef46f4b897ff471fd2ab5) 例子。你不需要考虑安装开发环境或编写 native 代码,只需要做下面两件事:
-
-- 为你的手机安装 [Playground App](https://alibaba.github.io/weex/download.html),当然,Weex 是跨平台的框架,你依然可以使用浏览器进行预览,只是这样你就无法感受到 native 优秀的体验了。
-- 在新标签页中打开 [Hello World](http://dotwe.org/656345423a7ef46f4b897ff471fd2ab5) 例子,点击预览,然后用 Playground 扫码即可。
-
-在这个例子中,我们看到了熟悉的 HTML 语义化标签、CSS 样式和 Javascript 代码。这是一个最简单的 Weex 示例,它在页面中渲染了一个 "Hello World"。
-
-
-
-## 发生了什么?
-
-就如示例代码所示:
-
-```html
-<template>
- <div>
- <text class="text">{{text}}</text>
- </div>
-</template>
-
-<style>
- .text {
- font-size: 50;
- }
-</style>
-
-<script>
- module.exports = {
- data: {
- text: 'Hello World.'
- }
- }
-</script>
-```
-
-我们暂时不去关心 Weex 的技术细节,仅看大致的代码结构。Weex 代码由三部分构成:`template`、`style`、`script`,这三个概念之于 Weex 就如 HTML,CSS,JavaScript 之于 Web。
-
-模板部分赋予 Weex 以骨架,由标签以及标签包围的内容构成,标签中能添加 `attribute(特性)`,不同的 `attribute` 有不同的含义,例如 class 特性让同样的样式可以作用于多组 Weex 标签, onclick 特性让标签能对用户点击事件作出回应。
-
-样式部分描述 Weex 标签如何显示。和你一样,我们喜欢 CSS,所以 Weex 中的样式尽量和 CSS 标准一致。Weex 支持很多 CSS 中的特性: margin, padding, fixed...... 更好的是, flexbox 布局模型在 Weex 中获得了很好的支持。
-
-脚本部分为 Weex 标签添加数据与逻辑,在这里你能方便的访问本地或远程的数据并动态更新。你还能定义方法并让这些方法响应不同的事件。Weex 脚本的组织方式基本遵循于 CommonJS module 规范。
-
-是不是觉得这些语法有些眼熟?没错,Weex 语法参考了 [Vue](https://github.com/vuejs/vue),如果你熟悉 Vue,你会很快适应 Weex 语法(最新的 Weex framework 将会基于 [Vue 2.0](https://github.com/vuejs/vue) 开发,完全兼容 Vue,可参见我们的 [Roadmap](https://github.com/weexteam/weex-vue-framework/issues/9)),更好的是,我们拥抱规范,尽可能的按照 W3C 标准进行实现,因此,你大可不必担心 Weex 三端差异。
-
-你可以试着修改 [Hello World](http://dotwe.org/656345423a7ef46f4b897ff471fd2ab5) 的代码,再次点击预览即可生成新的二维码进行扫描。
-
-Weex 不止是个 Demo,在接下来的章节中,你还会看到更多 Weex 开发 native 应用并将其集成到你的 App 中的精彩教程。不要忘了随时在 [dotWe](http://dotwe.org) 中编写代码验证并通过 [Playground App](https://alibaba.github.io/weex/download.html) 预览。
http://git-wip-us.apache.org/repos/asf/incubator-weex-site/blob/32a097bf/source/cn/v-0.10/guide/syntax/comm.md
----------------------------------------------------------------------
diff --git a/source/cn/v-0.10/guide/syntax/comm.md b/source/cn/v-0.10/guide/syntax/comm.md
deleted file mode 100644
index 7923ef7..0000000
--- a/source/cn/v-0.10/guide/syntax/comm.md
+++ /dev/null
@@ -1,134 +0,0 @@
----
-title: 组件通信
-type: guide
-order: 3.8
-version: 0.10
----
-
-# 组件间通信
-
-## 自定义事件
-
-Weex 支持自定义事件,这里有两个相关的设计:1,监听自定义事件;2,创建自定义事件。
-
-## 监听自定义事件
-
-每个 Weex 的 ViewModel 都支持 `this.$on(type, handler)` 和 `this.$off(type[, handler])` 的 API。`type` 是监听的自定义事件类型,`handler` 是事件处理函数。
-
-当 `handler` 被触发时,会有一个事件对象 `event` 作为第一个参数被传入,事件对象的数据格式基于[事件机制](./events.html)中提到的事件描述对象。
-
-## 创建自定义事件
-
-每个 Weex 的 ViewModel 都支持 `this.$emit(type, detail)` 的 API,可以在当前 ViewModel 中产生一个自定义事件。`type` 是自定义事件的类型,`detail` 则是一个对该事件细节补充描述的 JSON 对象,会以 `event.detail` 的形式出现在处理此事件的函数中。
-
-## 从子组件向父组件通信
-
-首先父组件要监听特定类型的自定义事件,而子组件可以使用 `this._parent` 找到父组件,然后再调用 `this._parent.$emit(type, detail)` 方法,即可实现自下而上的通信。例如:
-
-```html
-<element name="foo">
- <template>
- <div>
- <image src="{{imageUrl}}" class="thumb" onclick="test"></image>
- <text>{{title}}</text>
- </div>
- </template>
- <style>
- .thumb { width: 200; height: 200; }
- </style>
- <script>
- module.exports = {
- data: {
- title: '',
- imageUrl: ''
- },
- methods: {
- test: function () {
- // Emit notify to parent
- this._parent.$emit('notify', {a: 1})
- }
- }
- }
- </script>
-</element>
-
-<template>
- <div>
- <foo title="Hello" image-url="https://gtms02.alicdn.com/tps/i2/TB1QHKjMXXXXXadXVXX20ySQVXX-512-512.png"></foo>
- <text if="eventType">event: {{eventType}} - {{eventDetail}}</text>
- </div>
-</template>
-
-<script>
- module.exports = {
- data: {
- eventType: '',
- eventDetail: {}
- },
- created: function () {
- this.$on('notify', function(event) {
- // When a notify comes, this handler will be run.
- // `event.detail` will be `{a: 1}`
- this.eventType = event.type
- this.eventDetail = JSON.stringify(event.detail)
- })
- }
- }
-</script>
-```
-
-[体验一下](http://dotwe.org/51e553ef43e5c744d05da1bb811903bf)
-
-## 从父组件向子组件通信
-
-同理,首先子组件要监听特定类型的自定义事件,而父组件可以使用 `this.$vm(id)` 找到父组件,然后再调用 `this.$vm(id).$emit(type, detail)` 方法,即可实现自上而下的通信。例如:
-
-```html
-<element name="foo">
- <template>
- <div>
- <image if="imageUrl" src="{{imageUrl}}" class="thumb"></image>
- <text>Foo</text>
- </div>
- </template>
- <style>
- .thumb { width: 200; height: 200; }
- </style>
- <script>
- module.exports = {
- data: {
- imageUrl: ''
- },
- created: function() {
- this.$on('changeImage', function (e) {
- this.imageUrl = e.detail
- }.bind(this))
- }
- }
- </script>
-</element>
-
-<template>
- <div>
- <foo id="sub"></foo>
- <text onclick="test">click to update foo</text>
- </div>
-</template>
-
-<script>
- module.exports = {
- methods: {
- test: function (e) {
- this.$vm('sub').$emit(
- 'changeImage',
- 'https://gtms02.alicdn.com/tps/i2/TB1QHKjMXXXXXadXVXX20ySQVXX-512-512.png'
- )
- }
- }
- }
-</script>
-```
-
-[体验一下](http://dotwe.org/ea616d180620648e66554d42f57db82b)
-
-下一节:[页面整体配置](./config-n-data.html)
http://git-wip-us.apache.org/repos/asf/incubator-weex-site/blob/32a097bf/source/cn/v-0.10/guide/syntax/composed-component.md
----------------------------------------------------------------------
diff --git a/source/cn/v-0.10/guide/syntax/composed-component.md b/source/cn/v-0.10/guide/syntax/composed-component.md
deleted file mode 100644
index 061eaf4..0000000
--- a/source/cn/v-0.10/guide/syntax/composed-component.md
+++ /dev/null
@@ -1,158 +0,0 @@
----
-title: 组件封装
-type: guide
-order: 3.6
-version: 0.10
----
-
-# 组件封装
-
-经常我们会发现 Weex 的 `<template>` 中有很多可复用的部分,这时候我们可以将其封装成上层的自定义组件并重用。例如我们可以直接创建一个名为 `foo.we` 的文件,`<foo>` 就是自定义组件的组件名称:
-
-```html
-<!-- foo.we -->
-<template>
- <div style="flex-direction: row;">
- <image src="{{image}}"></image>
- <text>{{title}}</text>
- </div>
-</template>
-<script>
- var env = 'foo'
- module.exports = {
- data: {
- title: null,
- image: null
- }
- }
-</script>
-```
-
-`foo.we` 的也包含 `<template>`,`<style>` 和 `<script>`,定义好了后,直接用 `<foo>` 标签即可将其引入到其它组件的 `<template>` 中,并且在 `<foo>` 标签上设置其 `data` 同名的特性会将这个值赋给 `<foo>` 的上下文:
-
-_注意事项:由于 HTML 语法中特性名是不区分大小写的,所以您无法直接用驼峰命名,我们提供了 hyphenated 语法,在解析之后这些名称会自动转换为驼峰命名 (比如在 `<template>` 的组件特性里用 `aaa-bbb-ccc` 表示其 `data` 或上下文里的 `aaaBbbCcc`)。_
-
-```html
-<!-- bar.we -->
-<template>
- <foo title="..." image="..."></foo>
-</template>
-<script>
- var env = 'bar'
-</script>
-```
-
-_注意事项:这里 `bar.we` 和 `foo.we` 必须在同目录下才能自动建立依赖关系。_
-
-_注意事项:`foo.we` 文件的 `<script>` 具有相对独立的作用域,不会和 `bar.we` 中的 `<script>` 产生干扰。同时 `<foo>` 对象具有相对独立的子组件上下文,即 `this`,也包括其定义的完全不同的数据和方法。_
-
-## 组件嵌套
-
-自定义组件也支持嵌套,如下:
-
-```html
-<!-- somepath/foo.we -->
-<template>
- <div style="flex-direction: row;">
- <image src="{{image}}"></image>
- <text>{{title}}</text>
- </div>
-</template>
-<script>
- module.exports = {
- data: {
- // These keys must be declared explicitly here
- // or data-binding will not work from its parent.
- title: null,
- image: null
- }
- }
-</script>
-```
-
-```html
-<!-- samepath/foo.list.we -->
-<template>
- <div>
- <text>{{description}}</text>
- <foo repeat="item in list" title="{{item.text}}" image="{{item.img}}"></foo>
- </div>
-</template>
-<script>
- module.exports = {
- data: {
- description: '',
- // This key must be declared explicitly here
- // or data-binding will not work from its parent.
- list: []
- }
- }
-</script>
-```
-
-```html
-<!-- samepath/main.we -->
-<template>
- <foo-list list="{{list}}"></foo-list>
-</template>
-<script>
- module.exports = {
- data: {
- list: [
- {text: '...', img: '...'},
- {text: '...', img: '...'},
- {text: '...', img: '...'},
- ...
- ]
- }
- }
-</script>
-```
-
-这里的 `main.we` 嵌套了 `<foo-list>`,`<foo-list>` 嵌套了 `<foo>`,同时组件可以正常的配合数据绑定、`repeat` 特性等使用。
-
-## 更多子组件的定义和书写方式
-
-除了在主文件同目录下创建和被封装组件同名的 `we` 文件之外,Weex 还支持另外几种子组件的书写方式:
-
-* 在 `<script>` 中通过 `require` 其它目录的 `we` 文件定义同名组件
-* 在主文件下新增 `<element name="xxx">` 标签,`name` 特性的值为新创建的组件名,其 `<element>` 内部的内容是定义该组件的代码
-
-比如:
-
-```html
-<!-- path-a/main.we -->
-<element name="foo">
- <text>Foo</text>
-</element>
-
-<template>
- <div>
- <foo></foo>
- <bar></bar>
- </div>
-</template>
-
-<script>
- require('path-b/bar.we')
-</script>
-```
-
-```html
-<!-- path-b/bar.we -->
-<template>
- <text>Bar</text>
-</template>
-```
-
-这样的话,`path-a/main.we` 最终展示的结果是“Foo”和“Bar”两段文本。
-
-## 注意事项
-
-- 组件各自的 `<style>` 是相互独立的,不会担心不同组件中相同的 class name 相互干扰。
-- 如果自定义组件在父组件中有 `id` 特性,则可以在父组件上下文中通过 `this.$vm(id)` 接口来访问该自定义组件的上下文,也可以通过 `this.$el(id)` 来找到其背后真实的原生组件。更多详见[获取子组件信息](./id.html)
-- 自定义组件之间通信的问题可以参考[组件间通信](./comm.html)
-- 不论通过父组件把数据传递进来还是在当前组件内部对数据发起修改,只有在组件的 `data` 选项中明确写明的字段才会被正常的监听。
-- 任何组件目前均不支持自闭合标签的写法,请勿使用。
-
-下一节:[获取子组件信息](./id.html)
http://git-wip-us.apache.org/repos/asf/incubator-weex-site/blob/32a097bf/source/cn/v-0.10/guide/syntax/config-n-data.md
----------------------------------------------------------------------
diff --git a/source/cn/v-0.10/guide/syntax/config-n-data.md b/source/cn/v-0.10/guide/syntax/config-n-data.md
deleted file mode 100644
index cad39ab..0000000
--- a/source/cn/v-0.10/guide/syntax/config-n-data.md
+++ /dev/null
@@ -1,72 +0,0 @@
----
-title: 页面配置和页面数据
-type: guide
-order: 3.9
-version: 0.10
----
-
-# 页面配置和页面数据
-
-在 Weex 中,你可以通过一些特殊的 `<script>` 进行页面整体配置。
-
-_注意事项:这些配置会代表页面整体,所以写在自定义子组件中是无效的,只有写在顶级 ViewModel 的 `<sctipt>` 中才会生效。_
-
-先举个例子:
-
-```html
-<!-- definition of sub components -->
-<element name="sub-component-a">...</element>
-<element name="sub-component-b">...</element>
-<element name="sub-component-c">...</element>
-
-<!-- definition of top-level component -->
-<template>...</template>
-<style></style>
-<script>
- module.exports = {
- data: { x: 1, y: 2 }
- }
-</script>
-
-<!-- config and data -->
-<script type="config">
- downgrade: {
- ios: {
- os: '9', // all of 9.x.x
- app: '~5.3.2',
- framework: '^1.3', // all of 1.3.x
- deviceModel: ['AAAA', 'BBBB']
- },
- android: {
- os: '*', // all of version
- app: '^5',
- framework: '',
- deviceModel: ''
- }
- }
-</script>
-<script type="data">
- { y: 200 }
-</script>
-```
-
-## `<script type="config">`
-
-开发者可以在顶级 ViewModel 中加入这样一段 `<script>`,以 JSON 格式描述页面整体的配置信息。
-
-目前支持的配置信息只有 `downgrade`:用来从平台、应用等维度描述页面的降级规则。这样设计对于产品迭代最大的帮助是可以在高版本中使用 Weex,而在低版本中使用之前已有的渲染方式,这部分控制降级的细节需要 native 接入的时候进行相应的识别和具体操作。
-
-未来这里会有更多的配置项出现在这里。
-
-## `<script type="data">`
-
-开发者可以在顶级 ViewModel 中加入这样一段 `<script>`,以 JSON 格式额外配置顶级 ViewModel 的数据,它会覆盖顶级 ViewModel 数据中相应的字段。比如上述例子中,最终的顶级 ViewModel 中的数据为 `{ x: 1, y: 200 }`。
-
-## 总结
-
-至此,Weex 基本的语法已经全部介绍过了。相信您对 Weex 的使用方式和开发方式有了更多的了解。
-
-接下来我们推荐您阅读:
-
-* [最佳实践](../how-to/index.html)
-* [Weex 手册](../../references/index.html)
http://git-wip-us.apache.org/repos/asf/incubator-weex-site/blob/32a097bf/source/cn/v-0.10/guide/syntax/data-binding.md
----------------------------------------------------------------------
diff --git a/source/cn/v-0.10/guide/syntax/data-binding.md b/source/cn/v-0.10/guide/syntax/data-binding.md
deleted file mode 100644
index bbefdd1..0000000
--- a/source/cn/v-0.10/guide/syntax/data-binding.md
+++ /dev/null
@@ -1,332 +0,0 @@
----
-title: 数据绑定
-type: guide
-order: 3.1
-version: 0.10
----
-
-# 数据绑定
-
-Weex使用 _mustache_ 的语法 (`{% raw %}{{...}}{% endraw %}`) 来对 `<template>` 中的模板和 `<script>` 里的数据进行绑定. 一旦数据额模板绑定了, 数据上的修改会实时的在模板内容中生效。
-
-## 数据绑定路径
-
-```html
-<template>
- <div>
- <text style="font-size: {{size}}">{{title}}</text>
- </div>
-</template>
-
-<script>
- module.exports = {
- data: {
- size: 48,
- title: 'Alibaba Weex Team'
- }
- }
-</script>
-```
-
-[体验一下](http://dotwe.org/6d18c0e696d33705083e34ef387ac529)
-
-上面的代码会把 `title` 和 `size` 的数值绑定到模板内容上。
-
-我们也可以通过 `.` 符号来绑定数据结构中的字段。看一下下面的代码片段:
-
-```html
-<template>
- <div>
- <text style="font-size: {{title.size}}">{{title.value}}</text>
- </div>
-</template>
-
-<script>
- module.exports = {
- data: {
- title: {
- size: 48,
- value: 'Alibaba Weex Team'
- }
- }
- }
-</script>
-```
-
-[体验一下](http://dotwe.org/e291bbe2d5c34fe04db92bc827697a4b)
-
-## 数据绑定表达式
-
-进行数据绑定时,Weex 支持一些简单的 JavaScript 表达式,例如:
-
-```html
-<template>
- <div style="flex-direction: row;">
- <text>{{firstName + ' ' + lastName}}</text>
- </div>
-</template>
-
-<script>
- module.exports = {
- data: {
- firstName: 'John',
- lastName: 'Smith'
- }
- }
-</script>
-```
-
-[体验一下](http://dotwe.org/aeef6c2ca9bd9b7c5d039ed84572e1ee)
-
-这些表达式会在当前的上下文中进行运算。
-
-## 计算属性 <sup>v0.5+</sup>
-
-数据绑定表达式已经非常方便了,但如果希望在模板里实现更复杂的逻辑判断,你也可以使用计算属性。例如:
-
-```html
-<template>
- <div style="flex-direction: row;">
- <text>{{fullName}}</text>
- <text onclick="changeName" style="margin-left: 10;">CHANGE NAME</text>
- </div>
-</template>
-
-<script>
- module.exports = {
- data: {
- firstName: 'John',
- lastName: 'Smith'
- },
- computed: {
- fullName: function() {
- return this.firstName + ' ' + this.lastName
- }
- },
- methods: {
- changeName: function() {
- this.firstName = 'Terry'
- }
- }
- }
-</script>
-```
-
-[体验一下](http://dotwe.org/276e7c42a2d480d669868476e62b326e)
-
-同样能够达到相同的效果。这里我们引入了一个叫做 `fullName` 的计算属性,由 `firstName` 和 `lastName` 计算而成,在数据绑定的时候,如果 `firstName` 或 `lastName` 发生改变,`fullName` 都会自动重新计算并触发改变。
-
-另外计算属性还支持另外一种写法,就是同时定义一个计算属性的 getter 和 setter,这样的话当下面例子中的 `fullName` 被赋值时,`data` 里的 `firstName` 和 `lastName` 会被自动改变:
-
-```html
-<template>
- <div style="flex-direction: row;">
- <text>{{fullName}}</text>
- <text onclick="changeName" style="margin-left: 10;">CHANGE NAME</text>
- </div>
-</template>
-
-<script>
- module.exports = {
- data: {
- firstName: 'John',
- lastName: 'Smith'
- },
- computed: {
- fullName: {
- get: function() {
- return this.firstName + ' ' + this.lastName
- },
-
- set: function(v) {
- var s = v.split(' ')
- this.firstName = s[0]
- this.lastName = s[1]
- }
- }
- },
- methods: {
- changeName: function() {
- this.fullName = 'Terry King'
- }
- }
- }
-</script>
-```
-
-[体验一下](http://dotwe.org/9f33809592391c566c886029c509c167)
-
-**注意事项:`data`、`methods`、`computed` 中的字段是不能相互重复的,因为它们都会通过组件实例的 `this` 访问到。**
-
-## 数据绑定在 `<template>` 中的特殊用法
-
-### 样式: `style` 或 `class`
-
-组件的样式能够通过 `style` 特性进行绑定:
-
-```html
-<template>
- <div>
- <text style="font-size: {{size}}; color: {{color}};">Hello World</text>
- </div>
-</template>
-
-<script>
- module.exports = {
- data: {
- size: 32,
- color: '#ff0000'
- }
- }
-</script>
-```
-
-[体验一下](http://dotwe.org/f53674fa7910d266e0a2d8a5c285d2b1)
-
-样式也能够通过 `class` 特性实现样式绑定,多个 class 名通过空格分隔:
-
-```html
-<template>
- <div>
- <text class="{{size}}">Hello</text>
- <text class="title {{status}}">World</text>
- </div>
-</template>
-
-<style>
- .large { font-size: 64; }
- .small { font-size: 32; }
- .title { font-weight: bold; }
- .success { color: #00ff00; }
- .error { color: #ff0000; }
-</style>
-
-<script>
- module.exports = {
- data: {
- size: 'large',
- status: 'success'
- }
- }
-</script>
-```
-
-[体验一下](http://dotwe.org/4260897c1526a685672dca95af271493)
-
-在上面的代码中如果 `{% raw %}{{size}}{% endraw %}` 和 `{% raw %}{{status}}{% endraw %}` 是空值, 就只有 `class="title"` 会被解析。
-
-延伸阅读:[style 和 class](./style-n-class.html)
-
-### 事件绑定:`on...`
-
-以 `on...` 开头的就是用于绑定事件的特性,特性名中 `on` 之后的部分就是事件的类型,特性的值就是处理该事件的函数名。_函数名外不需要添加 mustache 语法中的大括号_。例如:
-
-```html
-<template>
- <div>
- <text onclick="toggle">Toggle: {{result}}</text>
- </div>
-</template>
-
-<script>
- module.exports = {
- data: {
- result: true
- },
- methods: {
- toggle: function () {
- this.result = !this.result
- }
- }
- }
-</script>
-```
-
-[体验一下](http://dotwe.org/2f9f910a60ffc1ed54c797390d6615e1)
-
-除此之外 Weex 还支持更多的事件处理方式。
-
-延伸阅读:[事件处理](./events.html)
-
-### 展示逻辑控制 `if` & `repeat`
-
-`if` 特性能够通过特性值的真假来控制组建是否显示,_且 mustache 大括号可以省略_。例如:
-
-```html
-<template>
- <div style="flex-direction: column;">
- <text onclick="toggle">Toggle</text>
- <image if="{{shown}}" src="{{imageUrl}}" class="logo"></image>
- </div>
-</template>
-
-<style>
- .logo { width: 512; height: 512; }
-</style>
-
-<script>
- module.exports = {
- data: {
- shown: true,
- imageUrl: 'https://gtms02.alicdn.com/tps/i2/TB1QHKjMXXXXXadXVXX20ySQVXX-512-512.png'
- },
- methods: {
- toggle: function () {
- this.shown = !this.shown
- }
- }
- }
-</script>
-```
-
-[体验一下](http://dotwe.org/3ec9347e4810f503b641849d214d8c15)
-
-`repeat` 特性可以根据一组数组数据重复生成相同或相似的顺序排列的界面。例如:
-
-```html
-<template>
- <div>
- <text repeat="(k,v) in list">{{k}} - {{v}}</text>
- </div>
-</template>
-<script>
- module.exports = {
- data: {
- list: ['a', 'b', 'c']
- }
- }
-</script>
-```
-
-[体验一下](http://dotwe.org/db40d2341fdbf16d3d806f502189843d)
-
-延伸阅读:[展示逻辑控制](./display-logic.html)
-
-### 静态模板优化 `static` <sup>v0.9.2+</sup>
-
-`static` 特性可以一次性把数据设置到模板相应的位置上,但是今后不会随着数据的变化而更新。这样可以减少无谓的数据绑定,有效控制和优化长列表、纯静态页面在运行时的开销。不过你也要小心使用不要导致原本需要更新的视图没有触发更新。
-
-```html
-<template>
- <div static>
- <text>{{ word }}</text>
- </div>
-</template>
-
-<script>
- module.exports = {
- ready: function() {
- this.word = 'Data changes' // UI won't be updated
- },
- data: {
- word: 'Hello static'
- }
- }
-</script>
-```
-
-[体验一下](http://dotwe.org/dbadfd66463a2c03e3e06d391b0ad8ec)
-
-如上所示,添加 `static` 关键字,渲染结果会是“Hello static”字样,相当于渲染一个静态的节点,`ready` 函数中对数据 `word` 的改变不会更新到视图。
-
-下一篇:[style 和 class](./style-n-class.html)
http://git-wip-us.apache.org/repos/asf/incubator-weex-site/blob/32a097bf/source/cn/v-0.10/guide/syntax/display-logic.md
----------------------------------------------------------------------
diff --git a/source/cn/v-0.10/guide/syntax/display-logic.md b/source/cn/v-0.10/guide/syntax/display-logic.md
deleted file mode 100644
index 9498de2..0000000
--- a/source/cn/v-0.10/guide/syntax/display-logic.md
+++ /dev/null
@@ -1,252 +0,0 @@
----
-title: 展示逻辑控制
-type: guide
-order: 3.4
-version: 0.10
----
-
-# 展示逻辑控制
-
-Weex 支持通过两种特殊的特性 `if` 和 `repeat` 确定组件的显示逻辑,这会使得整个界面的展示逻辑控制更加简单灵活。
-
-## `if`
-
-通过设置 `if` 特性值,你可以控制当前组件是否显示。如果值为真,则当前组件会被渲染出来,如果值为假则会被移除。例如:
-
-```html
-<template>
- <div>
- <text onclick="toggle">Toggle Image</text>
- <image if="shown" src="{{imageUrl}}" style="width: 512; height: 512;"></image>
- </div>
-</template>
-
-<script>
-module.exports = {
- data: {
- imageUrl: 'https://gtms02.alicdn.com/tps/i2/TB1QHKjMXXXXXadXVXX20ySQVXX-512-512.png',
- shown: true
- },
- methods: {
- toggle: function () {
- this.shown = !this.shown
- }
- }
-}
-</script>
-```
-
-[体验一下](http://dotwe.org/e0999a51fa404f48bbae177f1569cd0e)
-
-_注意事项:`if="condition"` 和 `if="{% raw %}{{condition}}{% endraw %}"` 都是可以的,两者等价使用。_
-
-_注意事项:`if` 不能用在 `<template>` 的根组件上,否则将无法被 Weex 正常的识别和处理。_
-
-### `if` 不会阻断子元素的数据更新
-
-下面这个例子在数据更新后 `item` 或 `item.image` 不存在的情况下会报错:
-
-```html
-<template>
- <div if="{{(item && item.image)}}" style="width: 200; height: 200;">
- <image style="width: 100; height: 100;" src="{{item.image.url}}"></image>
- </div>
-</template>
-```
-
-原因在于 Weex 本身的机制是数据更新在 DOM 更新之前,因此 `if` 数据更新之后,不支持阻断其子元素的数据更新,即 `if` 数据更新为 `false` 之后,内部的子元素仍然会触发自身的数据更新,找不到对应字段,导致报错,可参考这个 [issue](https://github.com/alibaba/weex/issues/1758)。
-
-因此,有两种解决方案:
-
-- 为 `img` 组件的 `src` 也增加容错方案:
-
- ```html
- <div if="{{(item && item.image)}}" style="width: 200; height: 200;">
- <image style="width: 100; height: 100;" src="{{item && item.image && item.image.url}}"></image>
- </div>
- ```
-
-- 如果是在 `repeat` 的列表中,还可以使用 `track-by`强制不复用子元素解决。
-
-## `repeat`
-
-`repeat` 特性用于重复渲染一组相同的组件。它绑定的数据类型必须为数组,数组里的每一项数据可以体现在不同的组件特性、样式、事件绑定等。例如:
-
-``` html
-<template>
- <div>
- <div repeat="person in list" class="{{person.gender}}">
- <text>{{person.nickname}}</text>
- </div>
- </div>
-</template>
-
-<style>
- .male { background-color: #9999ff; }
- .female { background-color: #ff9999; }
-</style>
-
-<script>
-module.exports = {
- data: {
- list: [
- { gender: 'male', nickname: 'Li Lei' },
- { gender: 'female', nickname: 'Han Meimei' },
- { gender: 'male', nickname: 'Jim Green' }
- ]
- }
-}
-</script>
-```
-
-[体验一下](http://dotwe.org/8c87aac2820531090181c32fca41e913)
-
-此外,`repeat` 特性还支持绑定数组中数据项目的索引值。例如:
-
-``` html
-<template>
- <div>
- <div repeat="(index, person) in list" class="{{person.gender}}">
- <text>{{index}} - {{person.nickname}}</text>
- </div>
- </div>
-</template>
-
-<style>
- .male { background-color: #9999ff; }
- .female { background-color: #ff9999; }
-</style>
-
-<script>
-module.exports = {
- data: {
- list: [
- { gender: 'male', nickname: 'Li Lei' },
- { gender: 'female', nickname: 'Han Meimei' },
- { gender: 'male', nickname: 'Jim Green' }
- ]
- }
-}
-</script>
-```
-
-[体验一下](http://dotwe.org/65d348256ab5c54aa996d3ee6b4ea115)
-
-每一个昵称之前都有对应数组项目的索引值。
-
-_注意事项:同样的 `repeat="..."` 和 `repeat="{% raw %}{{...}}{% endraw %}"` 都是可以的,两者等价使用。_
-
-_注意事项:`if` 不能用在 `<template>` 的根组件上,否则将无法被 Weex 正常的识别和处理。_
-
-**注意事项: 当你修改 `repeat` 中的数组时,在写法上会受到一定的限制,具体如下:**
-
-**直接通过“角标”修改数组的某个项目 (如 `this.items[0] = ...`) 是不会触发视图自动更新的。我们在数组的原型上提供了一个额外的方法:`this.items.$set(index, item)` 来完成相同的事情。**
-
-```javascript
-// 和 `this.items[0] = ...` 作用相同,但会自动触发视图更新
-this.items.$set(0, { childMsg: 'Changed!'})
-```
-
-**直接通过修改 `length` 来改变数组长度 (如 `this.items.length = 0`) 也是不会触发视图自动更新的。我们推荐您直接赋值一个新的空数组把旧的替换掉。**
-
-```javascript
-// 和 `this.items.length = 0` 作用相同,但会自动触发视图更新
-this.items = []
-```
-
-### `repeat` 特性中的 `$index` 形参
-
-在 `repeat` 特性值中,如果没有指定索引值的形参,则可以通过绑定形参 `$index` 来展示数组项目的索引值。例如:
-
-``` html
-<template>
- <div>
- <div repeat="person in list" class="{{person.gender}}">
- <text>{{$index}} - {{person.nickname}}</text>
- </div>
- </div>
-</template>
-
-<style>
- .male { background-color: #9999ff; }
- .female { background-color: #ff9999; }
-</style>
-
-<script>
-module.exports = {
- data: {
- list: [
- { gender: 'male', nickname: 'Li Lei' },
- { gender: 'female', nickname: 'Han Meimei' },
- { gender: 'male', nickname: 'Jim Green' }
- ]
- }
-}
-</script>
-```
-
-[体验一下](http://dotwe.org/65d348256ab5c54aa996d3ee6b4ea115)
-
-渲染效果和上一个例子应该是相同的。
-
-### 在 `repeat` 中使用 `track-by` 特性追踪变化
-
-通常情况下,当更新 `repeat` 中绑定的数组时,所有数组项目关联的组件都会被重新渲染。如果其中部分索引值对应的数据未发生变更,那么最好是让这些组件在渲染层保持原样,仅更新数据有变化的节点。Weex 提供了 `track-by` 特性来辅助判断哪些数组项目发生了改变。
-
-首先 `track-by` 特性的值必须是在每一条数组项目中都有且值没有重复的一个字段名,用来区分和追踪每一条数据项增删与否或次序变化与否的关键依据。每当数组发生变化之后,新老数组数据会根据 `track-by` 特性值所代表的字段重新匹配,然后再决定渲染层应该新建或删除一个组件?还是移动一个组件?还是讲组件保持原来的位置。默认的 `track-by` 的值就是数组的索引值。例如:
-
-``` html
-<template>
- <div>
- <div repeat="person in list" class="{{person.gender}}">
- <text>{{$index}} - {{person.id}} - {{person.nickname}}</text>
- </div>
- <text>----</text>
- <div repeat="person in list" class="{{person.gender}}" track-by="id">
- <text>{{$index}} - {{person.id}} - {{person.nickname}}</text>
- </div>
- <text>----</text>
- <!-- something wrong here: duplicated track-by value -->
- <div repeat="person in list" class="{{person.gender}}" track-by="nickname">
- <text>{{$index}} - {{person.id}} - {{person.nickname}}</text>
- </div>
- </div>
-</template>
-
-<style>
- .male { background-color: #9999ff; }
- .female { background-color: #ff9999; }
-</style>
-
-<script>
-module.exports = {
- data: {
- list: [
- { id: 11, gender: 'male', nickname: 'Li Lei' },
- { id: 22, gender: 'female', nickname: 'Han Meimei' },
- { id: 33, gender: 'male', nickname: 'Jim Green' }
- ]
- },
- ready: function () {
- this.list.unshift({ id: 44, gender: 'female', nickname: 'Han Meimei' })
- }
-}
-</script>
-```
-
-[体验一下](http://dotwe.org/c124bfc21e6d92271356acbea232089b)
-
-这种情况下,第一个列表的更新策略是:
-
-1. 把第一个 `<text>` 赋值为 `Han Meimei`
-2. 第二个赋值为 `Li Lei`
-3. 第三个赋值为 `Han Meimei`
-4. 最后新建一个 `<text>` 并赋值为 `Jin Green`
-
-第二个列表的更新策略是:
-
-1. 在最前面新建一个 `<text>` 并赋值为 `Han Meimei`
-
-第三个列表的更新会遇到问题,因为有两个数组项目的 `nickname` 值都是 `Han Meimei` 所以造成意料之外的渲染结果 (只渲染了三个数组项目)。
-
-下一节:[渲染过程控制](./render-logic.html)
http://git-wip-us.apache.org/repos/asf/incubator-weex-site/blob/32a097bf/source/cn/v-0.10/guide/syntax/events.md
----------------------------------------------------------------------
diff --git a/source/cn/v-0.10/guide/syntax/events.md b/source/cn/v-0.10/guide/syntax/events.md
deleted file mode 100644
index 4898219..0000000
--- a/source/cn/v-0.10/guide/syntax/events.md
+++ /dev/null
@@ -1,103 +0,0 @@
----
-title: 事件处理
-type: guide
-order: 3.3
-version: 0.10
----
-
-# 事件处理
-
-Weex 允许对 `<template>` 中的元素绑定事件处理函数。
-
-## 基本语法
-
-以 `on...` 开头的就是用于绑定事件的特性,特性名中 `on` 之后的部分就是事件的类型,特性的值就是处理该事件的函数名。_函数名外不需要添加 mustache 语法中的大括号_。例如:
-
-```html
-<template>
- <div>
- <text onclick="toggle">Toggle: {{result}}</text>
- </div>
-</template>
-
-<script>
- module.exports = {
- data: {
- result: true
- },
- methods: {
- toggle: function () {
- this.result = !this.result
- }
- }
- }
-</script>
-```
-
-[体验一下](http://dotwe.org/2f9f910a60ffc1ed54c797390d6615e1)
-
-## 内联事件处理参数
-
-同时我们也支持在事件绑定的特性值中内联写明被传入的参数。例如:
-
-```html
-<template>
- <div>
- <text onclick="update(1, 2)">Result: {{result}}</text>
- </div>
-</template>
-
-<script>
- module.exports = {
- data: {
- result: '<empty>'
- },
- methods: {
- update: function (x, y) {
- this.result = x + y
- }
- }
- }
-</script>
-```
-
-[体验一下](http://dotwe.org/777056d8985e73567464e2d66cbe73fc)
-
-## 特殊的内联事件处理参数
-
-额外的,在这种内联的事件绑定写法中,你可以使用一个特殊的参数 `$event`,代表事件描述对象,即默认事件处理函数的第一个参数。所以 `<template>` 中的 `onclick="foo"` 和 `onclick="foo($event)"` 是等价的,`$event` 的用法可以更多参考下面的例子
-
-```html
-<template>
- <div>
- <text onclick="update($event, 1, 2)">Result: {{result}}</text>
- </div>
-</template>
-
-<script>
- module.exports = {
- data: {
- result: '<empty>'
- },
- methods: {
- update: function (e, x, y) {
- this.result = e.type + (x + y)
- }
- }
- }
-</script>
-```
-
-[体验一下](http://dotwe.org/5e1e7c22f036725e44c3ff492f173400)
-
-## 事件描述对象
-
-每当一次事件被触发的时候,都会产生一个事件描述对象,该对象会默认作为第一个参数传递给事件处理函数,或以 `$event` 形参的方式出现在内联事件处理函数中。
-
-每个事件描述对象至少包含以下几个特性:
-
-- `type` (`string`): 事件名称, 如: `click`
-- `target` (`Element`): 目标元素
-- `timestamp` (`number`): 事件触发时的时间戳数字
-
-下一节:[展示逻辑控制](./display-logic.html)
http://git-wip-us.apache.org/repos/asf/incubator-weex-site/blob/32a097bf/source/cn/v-0.10/guide/syntax/id.md
----------------------------------------------------------------------
diff --git a/source/cn/v-0.10/guide/syntax/id.md b/source/cn/v-0.10/guide/syntax/id.md
deleted file mode 100644
index 0a204ad..0000000
--- a/source/cn/v-0.10/guide/syntax/id.md
+++ /dev/null
@@ -1,124 +0,0 @@
----
-title: 找节点
-type: guide
-order: 3.7
-version: 0.10
----
-
-# 找节点
-
-在 Weex 中,您可以通过在特定的子组件上设置 `id` 特性,以此在该 `<template>` 内唯一标识这个组件。
-
-## 获取子组件
-
-您可以在父组件上下文中使用 `this.$el(id)` 来找到该组件,以运用 `scrollToElement()` 为例:
-
-```html
-<template>
- <div>
- <text id="goto-top">Top</text>
- <div style="height: 10000; background-color: #999999;"></div>
- <text onclick="back2Top">Back to Top</text>
- </div>
-</template>
-<script>
- var dom = require('@weex-module/dom')
- module.exports = {
- methods: {
- back2Top: function () {
- var el = this.$el('goto-top')
- dom.scrollToElement(el, { offset: 10 })
- }
- }
- }
-</script>
-```
-
-[体验一下](http://dotwe.org/ed07068ef6f038d6c39af6c971ad08a0)
-
-### `id` 和 `repeat` 特性配合使用
-
-`id` 也可以和 `repeat` 语法配合使用,关于 `repeat` 更多详见 [展示逻辑控制](./display-logic.html),但是要确保循环的节点需要用不同的 `id`,比如:
-
-```html
-<template>
- <div>
- <image
- repeat="image in images"
- id="img-{{image.id}}"
- src="{{image.url}}"
- onclick="getImageId"></image>
- </div>
-</template>
-<script>
-module.exports = {
- data: {
- images: [
- {id: 1, url: '...'},
- {id: 2, url: '...'},
- {id: 3, url: '...'},
- ...
- ]
- },
- methods: {
- getImageId: function(e) {
- // get e.target.id
- }
- }
-}
-</script>
-```
-
-### 获取自定义子组件的上下文
-
-另外,我们还可以通过 `this.$vm(id)` 方法可以访问自定义子组件的上下文:
-
-```html
-<element name="foo">
- <template>
- <div style="flex-direction: row;">
- <text>{{title}}</text>
- </div>
- </template>
- <script>
- module.exports = {
- data: {
- title: null
- },
- methods: {
- setTitle: function (text) {
- this.title = text
- }
- }
- }
- </script>
-</element>
-
-<template>
- <div>
- <foo id="sub" title="Hello"></foo>
- <text onclick="update">Click Me to Update</text>
- </div>
-</template>
-<script>
- module.exports = {
- methods: {
- update: function (e) {
- this.$vm('sub').setTitle('Updated')
- }
- }
- }
-</script>
-```
-
-[体验一下](http://dotwe.org/1d332e6c238462e841743035c6bc697e)
-
-实际上,如上述的例子,我们找到子组件上下文之后,直接在这个上下文中调用子组件方法或修改子组件的数据并不是我们认为最好的方式,我们更倾向于通过一套确定的组件间通信机制来完成这一工作。
-
-### 获取父级组件或其上下文
-
-除了可以自上而下寻找组件或其上下文,Weex 也支持自下而上做相同的事情。当前上下文中的 `this._parent` 可以获取其父级上下文。除了父级上下文,对于父级组件本身,相关处理也可以基于先获取父级上下文,然后在父级组件内部完成更多更细致的处理。更多内容可以深入了解组件间通信的部分。
-
-_注意事项:在未来的版本中 `this._parent` 将改为 `this.$parent`。_
-
-下一篇: [组件间通信](./comm.html)
http://git-wip-us.apache.org/repos/asf/incubator-weex-site/blob/32a097bf/source/cn/v-0.10/guide/syntax/index.md
----------------------------------------------------------------------
diff --git a/source/cn/v-0.10/guide/syntax/index.md b/source/cn/v-0.10/guide/syntax/index.md
deleted file mode 100644
index df0c33a..0000000
--- a/source/cn/v-0.10/guide/syntax/index.md
+++ /dev/null
@@ -1,134 +0,0 @@
----
-title: 语法介绍
-type: guide
-order: 3
-has_chapter_content: true
-version: 0.10
----
-
-# 语法综述
-
-Weex 代码由 `<template>`、`<style>`、`<script>` 三个部分构成。
-
-- `<template>`:_必须的_,使用 HTML 语法描述页面结构,内容由多个标签组成,不同的标签代表不同的组件。
-- `<style>`:_可选的_,使用 CSS 语法描述页面的具体展现形式。
-- `<script>`:_可选的_,使用 JavaScript 描述页面中的数据和页面的行为,Weex 中的数据定义也在 `<script>` 中进行。
-
-```html
-<template>
- <!-- (required) the structure of page -->
-</template>
-
-<style>
- /* (optional) stylesheet */
-</style>
-
-<script>
- /* (optional) the definition of data, methods and life-circle */
-</script>
-```
-
-这是一个典型的 M-V-VM 架构:通过 ViewModel 把 Model 和 View 建立更直接有效的关系,ViewModel 的实现以 `<script>` 的内容为主。
-
-## `<template>` 模板
-
-`<template>` 中的标签组织类似如下代码:
-
-``` html
-<template>
- <div>
- <image style="width: 200; height: 200;" src="https://gtms02.alicdn.com/tps/i2/TB1QHKjMXXXXXadXVXX20ySQVXX-512-512.png"></image>
- <text>Alibaba Weex Team</text>
- </div>
-</template>
-```
-
-[体验一下](http://dotwe.org/5256e6e610ded330369f2e8010f7f0e6)
-
-`<div>` 标签是一个根节点,里面包含描述图片的 `<image>` 标签和描述文字的 `<text>` 标签。
-
-和 HTML 类似,不同标签代表的组件有各自的特性 (attribute),部分组件可以拥有自己的子组件。
-
-延伸阅读:[内置组件列表](../../references/components/index.html)
-
-根节点:每个 Weex 页面最顶层的节点,我们称为根节点。下面是目前我们支持的三种根节点:
-
-- `<div>`:普通根节点,有确定的尺寸,不可滚动。
-- `<scroller>`:可滚动根节点,适用于需要全页滚动的场景。
-- `<list>`:列表根节点,适用于其中包含重复的子元素的列表场景。
-
-目前 Weex 仅支持以上三种根节点。
-
-_注意事项:`<template>` 只支持一个根节点,多个根节点将无法被 Weex 正常的识别和处理。_
-
-## `<style>` 样式
-
-我们可以把 Weex 中的样式语法理解为 CSS 的一个子集,两者有一些细微的区别
-
-第一种写法是,你能在标签上,直接通过内联 `style` 特性编写样式. 第二种写法,通过标签中的 `class` 特性与 `<style>` 标签中定义的样式建立对应关系,让 `<style>` 标签中定义的样式作用于特定标签之上。以下是例子:
-
-```html
-<template>
- <div>
- <text style="font-size: 64;">Alibaba</text>
- <text class="large">Weex Team</text>
- </div>
-</template>
-
-<style>
- .large {font-size: 64;}
-</style>
-```
-
-[体验一下](http://dotwe.org/d8af9186bf045df74e7a538d91798db4)
-
-上面的两个 `<text>` 组件都被设置了同样的字体大小,但分别用了两种不同的方式。
-
-延伸阅读:[Weex 通用样式](../references/common-style.html)
-
-**注意**:Weex 遵循 [HTML 特性](https://en.wikipedia.org/wiki/HTML_attribute) 命名规范,所以特性命名时**请不要使用陀峰格式 (CamelCase)**,采用以“-”分割的 **long-name** 形式。
-
-## `<script>` 脚本
-
-`<script>` 描述页面中的数据和页面的行为,代码遵循 JavaScript (ES5) 语法 (目前 iOS 端和浏览器端取决于内置 JavaScript 引擎对 ES 版本的支持情况,安卓端能够完整支持 ES5,但不原生支持 ES6,需要用类似 [babel](http://babeljs.io) 的工具对源代码进行转换)。下面是一个例子:
-
-``` html
-<template>
- <div>
- <text>The time is {{datetime}}</text>
- <text>{{title}}</text>
- <text>{{getTitle()}}</text>
- </div>
-</template>
-
-<script>
- module.exports = {
- data: {
- title: 'Alibaba',
- datetime: null
- },
- methods: {
- getTitle: function () {
- return 'Weex Team'
- }
- },
- created: function() {
- this.datetime = new Date().toLocaleString()
- }
- }
-</script>
-```
-
-[体验一下](http://dotwe.org/8095bed0d9db4299fb39975d4b35b13f)
-
-上面 `<script>` 标签中定义了被赋值给 `module.exports` 的对象,这个对象其实就是一个 ViewModel 选项,让三个 `<text>` 标签显示当前时间、“Alibaba”字样和“Weex Team”字样。
-
-选项中的 `data` 用于存储数据,这些数据可以通过[数据绑定](./data-binding.html)机制和 `<template>` 标签中的内容绑定起来。当这些数据变更时,被绑定的模板内容也会自动更新。这些数据在 `<script>` 中的各个方法中可以通过类似 `this.x` 的方式进行读写操作。
-
-而选项中的 `methods` 里则列出了当前上下文可执行的各种函数,比如 `getTitle()`。
-
-选项中最后的 `created` 是生命周期函数,会在数据初始化之后、界面被绑定数据并渲染之前执行。类似的生命周期函数还有 `init`、`ready` 等,在这个例子中,`datetime` 会在界面渲染之前被更新为当前的时间。
-
-延伸阅读:[ViewModel 选项](../../references/component-defs.html)
-
-接下来,我们来详细介绍[数据绑定](./data-binding.html)的相关知识。
http://git-wip-us.apache.org/repos/asf/incubator-weex-site/blob/32a097bf/source/cn/v-0.10/guide/syntax/render-logic.md
----------------------------------------------------------------------
diff --git a/source/cn/v-0.10/guide/syntax/render-logic.md b/source/cn/v-0.10/guide/syntax/render-logic.md
deleted file mode 100644
index f516733..0000000
--- a/source/cn/v-0.10/guide/syntax/render-logic.md
+++ /dev/null
@@ -1,44 +0,0 @@
----
-title: 渲染过程控制
-type: guide
-order: 3.5
-version: 0.10
----
-
-# 渲染过程控制
-
-## `append`
-
-`append` 特性定义了当前组件的子组件:
-
-1. 以一整棵树的方式一次性添加到视图中 (`append="tree"`),还是
-2. 每个子组件都产生一次单独的添加到视图的指令 (`append="node"`)
-
-``` html
-<template>
- <div>
- <div>
- <text>Hello</text>
- <text>Weex</text>
- </div>
- <div append="node">
- <text>Hello</text>
- <text>Weex</text>
- </div>
- <div append="tree">
- <text>Hello</text>
- <text>Weex</text>
- </div>
- </div>
-</template>
-```
-
-[体验一下](http://dotwe.org/417c75415efce66d8e22bf5942b380ee)
-
-在上面的代码中,第一组和第二组 `<div>` 的渲染过程相同,即先添加空的父级 `<div>`,然后插入第一个 `<text>` Hello,然后插入第二个 `<text>` Weex;第三组 `<div>` 则是连带两个 `<text>` 子组件一齐传给渲染层进行渲染的。
-
-渲染结果显而易见,前两组渲染方式会使首次绘制的响应速度比后者快些,但是总渲染时间可能比第三组 `append="tree"` 更长。开发者可以根据实际界面的情况自行选择合理的渲染过程。
-
-默认情况下,除了 `<cell>` 组件的默认渲染过程是 `tree` 模式,其它组件都默认按照 `node` 模式进行渲染。
-
-下一节:[自定义组件](./composed-component.html)
http://git-wip-us.apache.org/repos/asf/incubator-weex-site/blob/32a097bf/source/cn/v-0.10/guide/syntax/style-n-class.md
----------------------------------------------------------------------
diff --git a/source/cn/v-0.10/guide/syntax/style-n-class.md b/source/cn/v-0.10/guide/syntax/style-n-class.md
deleted file mode 100644
index afe2de1..0000000
--- a/source/cn/v-0.10/guide/syntax/style-n-class.md
+++ /dev/null
@@ -1,117 +0,0 @@
----
-title: CSS 样式和类
-type: guide
-order: 3.2
-version: 0.10
----
-
-# CSS 样式和类
-
-## 基础语法
-
-CSS 样式可以理解为一系列的键值对,其中的每一对描述了一个特定的样式,例如组件的宽或者高。
-
-```css
-.div {
- width: 400;
- height: 50;
-}
-```
-
-键值对的形式是 `prop-name: prop-value;`。键名是 `prop-name`,键值是 `prop-value`。 一般情况下,键名按照连接符的方式进行命名,键和值之间由冒号 `:` 进行分隔,每对键值之间由分号 `;` 进行分隔。
-
-在 Weex 页面上样式有两种形式:
-
-- `<template>` 中的 `style` 特性
-- `<style>` 样式表
-
-### `<template>` 中的 `style` 特性
-
-在 `style` 特性中编写样式,例如:
-
-```html
-<template>
- <div style="width: 400; height: 50;">
- ...
- </div>
-</template>
-```
-
-这段代码的意思是 `<div>` 组件的宽和高分别为 400 像素和 50 像素。
-
-### `<style>` 样式表
-
-例如:
-
-```html
-<style>
- .wrapper { width: 600; }
- .title { width: 400; height: 50; }
- .highlight { color: #ff0000; }
-</style>
-```
-
-样式表包含了多个样式规则,每条规则有一个对应的类,以及由 `{...}` 包括的若干条样式。例如:
-
-```css
-.title { width: 400; height: 50; }
-```
-
-### `class` 特性
-
-`<template>` 标签中的 `class` 特性值用来匹配 `<style>` 样式表中的一个或多个 class 名,多个 class name 之间由空格分隔。例如:
-
-```html
-<template>
- <div class="wrapper">
- <text class="title">...</text>
- <text class="title highlight">...</text>
- </div>
-</template>
-<style>
- .wrapper { width: 600; }
- .title { width: 400; height: 50; }
- .highlight { color: #ff0000; }
-</style>
-```
-
-[体验一下](http://dotwe.org/8487e2a33cd051c9adfa887d0bafbb44)
-
-这段代码的含义是 `<div>` 组件的宽度是 600 像素,两个 `<text>` 组件的尺寸为 400x50,其中第二个文本组件是红色字。
-
-**注意事项**
-
-- 为了简化页面设计和实现,屏幕的宽度统一为 750 像素,不同设备屏幕都会按照比例转化为这一尺寸进行长度计算。
-- 标准 CSS 支持很多样式选择器,但 Weex 目前只支持单个 class name 的选择器。
-- 标准 CSS 支持很多的长度单位,但 Weex 目前只支持像素,并且 `px` 单位可以忽略不写,直接使用对应的数值。更多详情请查看[通用样式](../references/common-style.html)。
-- 子元素的样式不会继承自父元素,这一点与标准 CSS 不同,比如 `color` 和 `font-size` 等样式作用在 `<text>` 上层的 `<div>` 上是无效的。
-- 标准 CSS 包含了非常多的样式属性,但 Weex 只支持了其中的一部分,比如盒模型、flexbox、position 等布局属性,以及 `font-size`、`color` 等其它样式。
-
-## 与数据绑定结合
-
-请查阅[数据绑定](./data-binding.html)中有关 `style` 和 `class` 特性的相关部分。这里简单举个例子:
-
-```html
-<template>
- <div>
- <text style="font-size: {{fontSize}};">Alibaba</text>
- <text class="large {{textClass}}">Weex Team</text>
- </div>
-</template>
-<style>
- .large {font-size: 32;}
- .highlight {color: #ff0000;}
-</style>
-<script>
- module.exports = {
- data: {
- fontSize: 32,
- textClass: 'highlight'
- }
- }
-</script>
-```
-
-[体验一下](http://dotwe.org/440d3318dc7b83e3bb0a110f3b3236ca)
-
-下一篇:[事件处理](./events.html)
http://git-wip-us.apache.org/repos/asf/incubator-weex-site/blob/32a097bf/source/cn/v-0.10/index.md
----------------------------------------------------------------------
diff --git a/source/cn/v-0.10/index.md b/source/cn/v-0.10/index.md
deleted file mode 100644
index 9e59b8c..0000000
--- a/source/cn/v-0.10/index.md
+++ /dev/null
@@ -1,5 +0,0 @@
-layout: index
-type: index
-subtitle: 快速、简洁且高效
-version: 0.10
----
\ No newline at end of file
http://git-wip-us.apache.org/repos/asf/incubator-weex-site/blob/32a097bf/source/cn/v-0.10/references/api.md
----------------------------------------------------------------------
diff --git a/source/cn/v-0.10/references/api.md b/source/cn/v-0.10/references/api.md
deleted file mode 100644
index e3e5e4b..0000000
--- a/source/cn/v-0.10/references/api.md
+++ /dev/null
@@ -1,67 +0,0 @@
----
-title: ViewModel APIs
-type: references
-order: 1.3
-version: 0.10
----
-
-# 接口
-
-你可以在组件的方法中通过 `this` (Vm)上下文访问这些 API。
-
-例子:
-
-```html
-<script>
-module.exports = {
- methods: {
- somemethod: function() {
- this.$vm('someId');
- }
- }
-}
-</script>
-```
-
-## $(id)
-
-**不建议使用**,请使用 `$vm` 代替。
-## $el(id)
-
-返回对应 id 的元素对象的引用。
-### Arguments
-- `id` _(string)_: 唯一标识符。
-### Returns
-- _(Element)_: 一个元素对象的引用。
-### Tips
-- id 只能保证是当前(页面)组件中是唯一的,如果你需要寻找父组件或子组件,你可以利用组件间的通信模式实现。
-- 延伸阅读: [id](../guide/syntax/id.md),[Communicate Between Components](../guide/syntax/comm.md)
-## $vm(id)
-
-返回对应 id 的 vm 对象引用。
-### Arguments
-- `id` _(String)_: 唯一标识符。
-### Returns
-- `vm` _(Vm)_: 一个 Vm 对象引用。
-### Tips
-- id 只能保证是当前(页面)组件中是唯一的,如果你需要寻找父组件或子组件,你可以利用组件间的通信模式实现。
-- 延伸阅读: [id](../guide/syntax/id.md),[Communicate Between Components](../guide/syntax/comm.md)
-## $getConfig()
-
-获取当前全局环境变量和配置信息。
-### Returns
-- `config` _(object)_: 配置对象;
-- `bundleUrl` _(string)_: bundle 的 url;
-- `debug` _(boolean)_: 是否是调试模式;
-- `env` _(object)_: 环境对象;
- - `weexVersion` _(string)_: Weex sdk 版本;
- - `appName` _(string)_: 应用名字;
- - `appVersion` _(string)_: 应用版本;
- - `platform` _(string)_: 平台信息,是 `iOS`、`Android` 还是 `Web`;
- - `osVersion` _(string)_: 系统版本;
- - `deviceModel` _(string)_: 设备型号 **(仅原生应用)**;
- - `deviceWidth` _(number)_: 设备宽度,默认为 `750`;
- - `deviceHeight` _(number)_: 设备高度。
-## $call(module, method, ...args)
-
-**不建议使用**,请使用 `require('@weex-module/module')[method](...args)` 代替。查看更多信息:[modules](./modules/main)。
http://git-wip-us.apache.org/repos/asf/incubator-weex-site/blob/32a097bf/source/cn/v-0.10/references/bubble.md
----------------------------------------------------------------------
diff --git a/source/cn/v-0.10/references/bubble.md b/source/cn/v-0.10/references/bubble.md
deleted file mode 100644
index 74b7e98..0000000
--- a/source/cn/v-0.10/references/bubble.md
+++ /dev/null
@@ -1,150 +0,0 @@
----
-title: 事件冒泡
-type: references
-order: 1.3
-version: 0.10
----
-
-# 事件冒泡 <span class="api-version">v0.13+</span>
-
-Weex 1.0 实现了 W3C 标准的事件冒泡机制。
-
-### 使用
-
-```html
-<template>
- <div class="root" onclick="rootClick" bubble="true">
- <div>
- <text style="font-size: 40px;">{{rootText}}</text>
- </div>
- <div class="outer" onclick="parentClick">
- <div>
- <text style="font-size: 40px;">{{parentText}}</text>
- </div>
- <text class="inner" onclick="click">{{innerText}}</text>
- </div>
- </div>
-</template>
-
-<script>
- module.exports = {
- data: {
- innerText: 'click me',
- parentText: '',
- rootText: ''
- },
- methods: {
- click: function(e) {
- this.innerText = 'inner bubble'
- },
- parentClick: function(e) {
- this.parentText = 'parent bubble'
- },
- rootClick: function(e) {
- this.rootText = 'root bubble'
- }
- }
- }
-</script>
-
-<style>
- .inner {
- font-size: 40px;
- text-align: center;
- background-color: #7a9b1b;
- padding: 40px;
- }
-
- .outer {
- font-size: 40px;
- text-align: center;
- background-color: #9b7a1b;
- padding: 120px;
- }
-
- .root {
- font-size: 40px;
- text-align: center;
- background-color: #7a1b9b;
- padding: 80px;
- }
-</style>
-```
-
-[try it](http://dotwe.org/weex/dbfeb926e003986e2eea88c8ccdadb92)
-
-运行以上代码,用客户端打开,点击中间的元素,可以看到事件向上传播,依次触发。
-
-### 注意
-
-需要注意的是: ** 为了兼容之前的版本,Weex 默认不会开启事件冒泡机制。需要在根元素的属性上,添加 `bubble="true"` 来开启冒泡机制。否则,将不会向上传播事件,保持与之前版本的效果相同。 **
-
-### stopPropagation
-
-在事件处理函数中,可以使用 `e.stopPropagation()` 方法,来阻止本次事件向上的传递过程。注意,`e.stopPropagation()` 与 `bubble="true"` 不同,前者只会影响当前元素以及父元素的传播,不会影响子元素的传播;后者是为了版本兼容而增加的开关机制,会全局关闭或者开启冒泡机制,两者可以共同存在使用,如下:
-
-```html
-<template>
- <div class="root" onclick="rootClick" bubble="true">
- <div>
- <text style="font-size: 40px;">{{rootText}}</text>
- </div>
- <div class="outer" onclick="parentClick">
- <div>
- <text style="font-size: 40px;">{{parentText}}</text>
- </div>
- <text class="inner" onclick="click">{{innerText}}</text>
- </div>
- </div>
-</template>
-
-<script>
- module.exports = {
- data: {
- innerText: 'click me',
- parentText: '',
- rootText: ''
- },
- methods: {
- click: function(e) {
- this.innerText = 'inner bubble'
- },
- parentClick: function(e) {
- this.parentText = 'parent bubble'
- e.stopPropagation()
- },
- rootClick: function(e) {
- this.rootText = 'root bubble'
- // e.stopPropagation()
- }
- }
- }
-</script>
-
-<style>
- .inner {
- font-size: 40px;
- text-align: center;
- background-color: #7a9b1b;
- padding: 40px;
- }
-
- .outer {
- font-size: 40px;
- text-align: center;
- background-color: #9b7a1b;
- padding: 120px;
- }
-
- .root {
- font-size: 40px;
- text-align: center;
- background-color: #7a1b9b;
- padding: 80px;
- }
-</style>
-```
-
-[try it](http://dotwe.org/weex/0cab45a7c62e8bebedd2ffd83a8e1256)
-
-运行以上代码,用客户端打开,点击中间的元素,可以看到事件向上传播到父元素被终止,不再继续往根元素传播。
http://git-wip-us.apache.org/repos/asf/incubator-weex-site/blob/32a097bf/source/cn/v-0.10/references/cheatsheet.md
----------------------------------------------------------------------
diff --git a/source/cn/v-0.10/references/cheatsheet.md b/source/cn/v-0.10/references/cheatsheet.md
deleted file mode 100644
index 777abf6..0000000
--- a/source/cn/v-0.10/references/cheatsheet.md
+++ /dev/null
@@ -1,114 +0,0 @@
----
-title: Weex 快查手册
-type: references
-order: 6
-version: 0.10
----
-
-# Weex 备忘录
-
-## Native 组件
-<style>
-code {
- word-break: break-all;
-}
-</style>
-
-| 组件 | 特性 | 样式 | 事件 | 特殊父组件 | 子组件 |
-| ---- | ---- | ---- | ---- | ---- | ---- |
-| `<div>` | - | **box model**<br>**flexbox**<br>`position`<br>`background-color`<br>`opacity` | `click`<br>`appear`<br>`disappear` | - | (any) |
-| `<text>` | `value` | **box model**<br>flex<br>`position`<br>`background-color`<br>`opacity`<br>`color`<br>`font-size`<br>`font-style`<br>`font-weight`<br>`text-decoration`<br>`text-align`<br>`text-overflow`<br>`line-height` | `click`<br>`appear`<br>`disappear` | - | text only |
-| `<image>` | `src` | **box model**<br>**flexbox**<br>`position`<br>`background-color`<br>`opacity`<br>`resize` | `click`<br>`appear`<br>`disappear` | - | (none) |
-| `<scroller>` | `show-scrollbar`<br>`scroll-direction` | **box model**<br>**flexbox**<br>`position`<br>`background-color`<br>`opacity` | `click`<br>`appear`<br>`disappear` | - | (any) |
-| `<list>` | `loadmoreoffset` | **box model**<br>**flexbox**<br>`position`<br>`background-color`<br>`opacity` | `click`<br>`appear`<br>`disappear`<br>`loadmore`<br>`refresh`<br>`loading` | - | `<cell>`<br>`<header>`<br>`<refresh>`<br>`<loading>` |
-| `<cell>` | - | **box model**<br>**flexbox**<br>`position`<br>`background-color`<br>`opacity` | `click`<br>`appear`<br>`disappear` | `<list>` | (any) |
-| `<slider>` | `auto-play` | **box model**<br>**flexbox**<br>`position`<br>`background-color`<br>`opacity` | `click`<br>`appear`<br>`disappear`<br>`change` | - | (any)<br>`<indicator>` |
-| `<indicator>` | - | **box model**<br>**flexbox**<br>`position`<br>`item-color`<br>`item-selected-color`<br>`item-size` | `click`<br>`appear`<br>`disappear` | `<slider>` | (none) |
-| `<wxc-navpage>` | `height`<br>`background-color`<br>`title`<br>`title-color`<br>`left-item-title`<br>`left-item-color`<br>`right-item-title`<br>`right-item-color`<br>`left-item-src`<br>`right-item-src` | **box model**<br>**flexbox**<br>`position`<br>`background-color`<br>`opacity` | `click`<br>`appear`<br>`disappear`<br>`naviBar.leftItem.click`<br>`naviBar.rightItem.click` | - | (any) |
-| `<wxc-tabbar>` | `tab-items` | **box model**<br>**flexbox**<br>`position`<br>`background-color`<br>`opacity` | `tabBar.onClick` | - | (none) |
-| `<embed>` | `src` | **box model**<br>**flexbox**<br>`position`<br>`background-color`<br>`opacity` | `click`<br>`appear`<br>`disappear` | - | (none) |
-| `<web>` | `src` | **box model**<br>**flexbox**<br>`position`<br>`background-color`<br>`opacity` | `click`<br>`appear`<br>`disappear`<br>`pagestart`<br>`pagefinish`<br>`error` | - | (none) |
-| `<video>` | `src`<br>`play-status`<br>`auto-play` | **box model**<br>**flexbox**<br>`position`<br>`background-color`<br>`opacity` | `click`<br>`appear`<br>`disappear`<br>`start`<br>`pause`<br>`finish`<br>`fail` | - | (none) |
-| `<a>` | `href` | **box model**<br>**flexbox**<br>`position`<br>`background-color`<br>`opacity` | `click`<br>`appear`<br>`disappear` | - | (any) |
-| `<input>` | `type`<br>`value`<br>`placeholder`<br>`disabled`<br>`autofocus` | **box model**<br>**flexbox**<br>`position`<br>`background-color`<br>`opacity`<br>`placeholder-color`<br>`color`<br>`font-size`<br>`font-style`<br>`font-weight`<br>`text-align` | `click`<br>`appear`<br>`disappear` | - | (none) |
-| `<switch>` | `checked` | **box model**<br>**flexbox**<br>`position`<br>`background-color`<br>`opacity` | `appear`<br>`disappear`<br>`input`<br>`change`<br>`focus`<br>`blur` | - | (none) |
-
-## Native Modules
-
-| module | apis |
-| ---- | ---- |
-| `@weex-module/dom` | `scrollToElement(node, { offset })` |
-| `@weex-module/modal` | `toast({ message, duration })`<br>`alert({ message, okTitle }, callback)`<br>`confirm({ message, okTitle, cancelTitle }, callback(result))`<br>`prompt({ message, okTitle, cancelTitle }, callback(result, data))` |
-| `@weex-module/stream` | `fetch({ method, url, headers, type, body }, callback({ status, ok, statusText, data, headers }), progressCallback({ readyState, status, length, statusText, headers}))` |
-| `@weex-module/webview` | `goBack(ref)`<br>`goForward(ref)`<br>`reload(ref)` |
-| `@weex-module/navigator` | `push({ url, animated }, callback)`<br>`pop({ animated }, callback)` |
-| `@weex-module/animation` | `transition(node, { styles, duration, timingFunction, delay, transform-origin }, callback)` |
-
-## 特殊的模版语法
-
-* `<foo x="abc">`
-* `{% raw %}<foo x="{{expr}}">{% endraw %}`
-* `<foo style="name1: value1; name2: value2">`
-* `{% raw %}<foo style="name1: value1; name2: {{expr}}; name3: ...">{% endraw %}`
-* `<foo class="a b c">`
-* `{% raw %}<foo class="a {{expr}} c">{% endraw %}`
-* `<foo onclick="methodName">`
-* `<foo id="abc">`
-* `<foo if="expr">`
-* `<foo repeat="item in list">`
-* `<foo repeat="(key,item) in list">`
-* `<component type="foo">`
-* `{% raw %}<component type="{{expr}}">{% endraw %}`
-
-## ViewModel APIs
-
-* `this.$vm(el)`
-* `this.$el(el)`
-* `this.$getConfig()`
-* `this.$emit(type, data)`
-* `this.$dispatch(type, data)`
-* `this.$broadcast(type, data)`
-
-## ViewModel Options
-
-* `data`
-* `methods`
-* `computed`
-* `init`, `created`, `ready`
-* `events`
-
-**示例:**
-
-```javascript
-module.exports = {
-
- data: function () {
- return {
- x: 1,
- y: 2
- }
- }
-
- methods: {
- foo: function () {
- console.log('foo')
- }
- },
-
- computed: {
- z: function () {
- return this.x + this.y
- }
- },
-
- events: {
- custom: function (e) {
- console.log(e)
- }
- },
-
- init: function () {},
- created: function () {},
- ready: function () {}
-}
-```
http://git-wip-us.apache.org/repos/asf/incubator-weex-site/blob/32a097bf/source/cn/v-0.10/references/color-names.md
----------------------------------------------------------------------
diff --git a/source/cn/v-0.10/references/color-names.md b/source/cn/v-0.10/references/color-names.md
deleted file mode 100644
index 1b8a968..0000000
--- a/source/cn/v-0.10/references/color-names.md
+++ /dev/null
@@ -1,180 +0,0 @@
----
-title: 颜色名称列表
-type: references
-order: 1.8
-version: 0.10
----
-
-# Weex 支持的所有颜色名称
-
-### 基础颜色关键词:
-
-| 颜色名 | 十六进制RGB值 |
-| --- | --- |
-| black(黑) | #000000 |
-| silver(银) | #C0C0C0 |
-| gray(灰) | #808080 |
-| white(白) | #FFFFFF |
-| maroon(褐紫红) | #800000 |
-| red(红) | #FF0000 |
-| purple(紫) | #800080 |
-| fuchsia(晚樱) | #FF00FF |
-| green(绿) | #008000 |
-| lime(石灰) | #00FF00 |
-| olive(橄榄) | #808000 |
-| yellow(黄) | #FFFF00 |
-| navy(海军蓝) | #000080 |
-| blue(蓝) | #0000FF |
-| teal(水鸭) | #008080 |
-| aqua(水蓝) | #00FFFF |
-### 扩展颜色关键词:
-
-| 颜色名 | 十六进制RGB值 |
-| --- | --- |
-| aliceblue | #F0F8FF |
-| antiquewhite | #FAEBD7 |
-| aqua | #00FFFF |
-| aquamarine | #7FFFD4 |
-| azure | #F0FFFF |
-| beige | #F5F5DC |
-| bisque | #FFE4C4 |
-| black | #000000 |
-| blanchedalmond | #FFEBCD |
-| blue | #0000FF |
-| blueviolet | #8A2BE2 |
-| brown | #A52A2A |
-| burlywood | #DEB887 |
-| cadetblue | #5F9EA0 |
-| chartreuse | #7FFF00 |
-| chocolate | #D2691E |
-| coral | #FF7F50 |
-| cornflowerblue | #6495ED |
-| cornsilk | #FFF8DC |
-| crimson | #DC143C |
-| cyan | #00FFFF |
-| darkblue | #00008B |
-| darkcyan | #008B8B |
-| darkgoldenrod | #B8860B |
-| darkgray | #A9A9A9 |
-| darkgreen | #006400 |
-| darkgrey | #A9A9A9 |
-| darkkhaki | #BDB76B |
-| darkmagenta | #8B008B |
-| darkolivegreen | #556B2F |
-| darkorange | #FF8C00 |
-| darkorchid | #9932CC |
-| darkred | #8B0000 |
-| darksalmon | #E9967A |
-| darkseagreen | #8FBC8F |
-| darkslateblue | #483D8B |
-| darkslategray | #2F4F4F |
-| darkslategrey | #2F4F4F |
-| darkturquoise | #00CED1 |
-| darkviolet | #9400D3 |
-| deeppink | #FF1493 |
-| deepskyblue | #00BFFF |
-| dimgray | #696969 |
-| dimgrey | #696969 |
-| dodgerblue | #1E90FF |
-| firebrick | #B22222 |
-| floralwhite | #FFFAF0 |
-| forestgreen | #228B22 |
-| fuchsia | #FF00FF |
-| gainsboro | #DCDCDC |
-| ghostwhite | #F8F8FF |
-| gold | #FFD700 |
-| goldenrod | #DAA520 |
-| gray | #808080 |
-| green | #008000 |
-| greenyellow | #ADFF2F |
-| grey | #808080 |
-| honeydew | #F0FFF0 |
-| hotpink | #FF69B4 |
-| indianred | #CD5C5C |
-| indigo | #4B0082 |
-| ivory | #FFFFF0 |
-| khaki | #F0E68C |
-| lavender | #E6E6FA |
-| lavenderblush | #FFF0F5 |
-| lawngreen | #7CFC00 |
-| lemonchiffon | #FFFACD |
-| lightblue | #ADD8E6 |
-| lightcoral | #F08080 |
-| lightcyan | #E0FFFF |
-| lightgoldenrodyellow | #FAFAD2 |
-| lightgray | #D3D3D3 |
-| lightgreen | #90EE90 |
-| lightgrey | #D3D3D3 |
-| lightpink | #FFB6C1 |
-| lightsalmon | #FFA07A |
-| lightseagreen | #20B2AA |
-| lightskyblue | #87CEFA |
-| lightslategray | #778899 |
-| lightslategrey | #778899 |
-| lightsteelblue | #B0C4DE |
-| lightyellow | #FFFFE0 |
-| lime | #00FF00 |
-| limegreen | #32CD32 |
-| linen | #FAF0E6 |
-| magenta | #FF00FF |
-| maroon | #800000 |
-| mediumaquamarine | #66CDAA |
-| mediumblue | #0000CD |
-| mediumorchid | #BA55D3 |
-| mediumpurple | #9370DB |
-| mediumseagreen | #3CB371 |
-| mediumslateblue | #7B68EE |
-| mediumspringgreen | #00FA9A |
-| mediumturquoise | #48D1CC |
-| mediumvioletred | #C71585 |
-| midnightblue | #191970 |
-| mintcream | #F5FFFA |
-| mistyrose | #FFE4E1 |
-| moccasin | #FFE4B5 |
-| navajowhite | #FFDEAD |
-| navy | #000080 |
-| oldlace | #FDF5E6 |
-| olive | #808000 |
-| olivedrab | #6B8E23 |
-| orange | #FFA500 |
-| orangered | #FF4500 |
-| orchid | #DA70D6 |
-| palegoldenrod | #EEE8AA |
-| palegreen | #98FB98 |
-| paleturquoise | #AFEEEE |
-| palevioletred | #DB7093 |
-| papayawhip | #FFEFD5 |
-| peachpuff | #FFDAB9 |
-| peru | #CD853F |
-| pink | #FFC0CB |
-| plum | #DDA0DD |
-| powderblue | #B0E0E6 |
-| purple | #800080 |
-| red | #FF0000 |
-| rosybrown | #BC8F8F |
-| royalblue | #4169E1 |
-| saddlebrown | #8B4513 |
-| salmon | #FA8072 |
-| sandybrown | #F4A460 |
-| seagreen | #2E8B57 |
-| seashell | #FFF5EE |
-| sienna | #A0522D |
-| silver | #C0C0C0 |
-| skyblue | #87CEEB |
-| slateblue | #6A5ACD |
-| slategray | #708090 |
-| slategrey | #708090 |
-| snow | #FFFAFA |
-| springgreen | #00FF7F |
-| steelblue | #4682B4 |
-| tan | #D2B48C |
-| teal | #008080 |
-| thistle | #D8BFD8 |
-| tomato | #FF6347 |
-| turquoise | #40E0D0 |
-| violet | #EE82EE |
-| wheat | #F5DEB3 |
-| white | #FFFFFF |
-| whitesmoke | #F5F5F5 |
-| yellow | #FFFF00 |
-| yellowgreen | #9ACD32 |