You are viewing a plain text version of this content. The canonical link for it is here.
Posted to notifications@apisix.apache.org by GitBox <gi...@apache.org> on 2022/04/28 14:46:43 UTC
[GitHub] [apisix] navendu-pottekkat opened a new pull request, #6964: docs: update "Installation" guide
navendu-pottekkat opened a new pull request, #6964:
URL: https://github.com/apache/apisix/pull/6964

   Signed-off-by: Navendu Pottekkat <na...@gmail.com>

   ### Description

   This PR updates the installation guide to be comprehensive and simple.

   Note that this PR currently removes the development installation instructions. These could be moved to the apisix GitHub repo or any other relevant page in the documentation. This change can be tracked in a separate issue and could be updated in a separate PR.

   Please suggest if there needs to be any updations, additions or notes.

   See the comment below for a screenshot of the change as there is no deploy preview.


--
This is an automated message from the Apache Git Service.
To respond to the message, please log on to GitHub and use the
URL above to go to the specific comment.

To unsubscribe, e-mail: notifications-unsubscribe@apisix.apache.org

For queries about this service, please contact Infrastructure at:
users@infra.apache.org
[GitHub] [apisix] navendu-pottekkat commented on a diff in pull request #6964: docs: update "Installation" guide
Posted by GitBox <gi...@apache.org>.
navendu-pottekkat commented on code in PR #6964:
URL: https://github.com/apache/apisix/pull/6964#discussion_r867317934


##########
docs/en/latest/how-to-build.md:
##########
@@ -21,351 +25,218 @@ title: Installing Apache APISIX
 #
 -->

-This guide walks you through how you can build and get Apache APISIX running on your environment. Please refer the [Getting Started](./getting-started.md) guide for a quick walkthrough on running Apache APISIX.
+import Tabs from '@theme/Tabs';
+import TabItem from '@theme/TabItem';

-## Step 1: Install Apache APISIX
+This guide walks you through how you can install and run Apache APISIX in your environment.

-Apache APISIX can be installed via the [RPM package](#installation-via-rpm-repository-centos), [Docker image](#installation-via-docker), [Helm Chart](#installation-via-helm-chart) or the [source release package](#installation-via-source-release-package). You can install via any one of these options.
+Refer to the [Getting Started](./getting-started.md) guide for a quick walk-through on running Apache APISIX.

-### Installation via RPM Repository (CentOS)
+## Installing etcd

-> This installation method is suitable for CentOS 7 and CentOS 8.
+APISIX uses [etcd](https://github.com/etcd-io/etcd) to save and synchronize configuration. Before installing APISIX, you need to install etcd on your machine.

-If the official OpenResty repository is **not installed yet**, the following command will help you automatically install both OpenResty and Apache APISIX repositories.
+It would be installed automatically if you choose the Docker or Helm install method while installing APISIX. If you choose a different method or you need to install it manually, follow the steps shown below:

Review Comment:
   We have mentioned that it would be installed for Docker and Helm. Where should we mention etcd installation instead? Just so that users installing via RPM also have it. I was suggested to add etcd installation first [`9cde814` (#6964)](https://github.com/apache/apisix/pull/6964/commits/9cde814e87227de42e0c011306f14f2151b46206#r861433102)


--
This is an automated message from the Apache Git Service.
To respond to the message, please log on to GitHub and use the
URL above to go to the specific comment.

To unsubscribe, e-mail: notifications-unsubscribe@apisix.apache.org

For queries about this service, please contact Infrastructure at:
users@infra.apache.org
[GitHub] [apisix] moonming commented on pull request #6964: docs: update "Installation" guide
Posted by GitBox <gi...@apache.org>.
moonming commented on PR #6964:
URL: https://github.com/apache/apisix/pull/6964#issuecomment-1120154677

   @navendu-pottekkat please take a look,thx


--
This is an automated message from the Apache Git Service.
To respond to the message, please log on to GitHub and use the
URL above to go to the specific comment.

To unsubscribe, e-mail: notifications-unsubscribe@apisix.apache.org

For queries about this service, please contact Infrastructure at:
users@infra.apache.org
[GitHub] [apisix] moonming commented on a diff in pull request #6964: docs: update "Installation" guide
Posted by GitBox <gi...@apache.org>.
moonming commented on code in PR #6964:
URL: https://github.com/apache/apisix/pull/6964#discussion_r867317010


##########
docs/en/latest/how-to-build.md:
##########
@@ -21,351 +25,218 @@ title: Installing Apache APISIX
 #
 -->

-This guide walks you through how you can build and get Apache APISIX running on your environment. Please refer the [Getting Started](./getting-started.md) guide for a quick walkthrough on running Apache APISIX.
+import Tabs from '@theme/Tabs';
+import TabItem from '@theme/TabItem';

-## Step 1: Install Apache APISIX
+This guide walks you through how you can install and run Apache APISIX in your environment.

-Apache APISIX can be installed via the [RPM package](#installation-via-rpm-repository-centos), [Docker image](#installation-via-docker), [Helm Chart](#installation-via-helm-chart) or the [source release package](#installation-via-source-release-package). You can install via any one of these options.
+Refer to the [Getting Started](./getting-started.md) guide for a quick walk-through on running Apache APISIX.

-### Installation via RPM Repository (CentOS)
+## Installing etcd

-> This installation method is suitable for CentOS 7 and CentOS 8.
+APISIX uses [etcd](https://github.com/etcd-io/etcd) to save and synchronize configuration. Before installing APISIX, you need to install etcd on your machine.

-If the official OpenResty repository is **not installed yet**, the following command will help you automatically install both OpenResty and Apache APISIX repositories.
+It would be installed automatically if you choose the Docker or Helm install method while installing APISIX. If you choose a different method or you need to install it manually, follow the steps shown below:

Review Comment:
   We don't need to install etcd when installing apisix by docker-compose and Helm.
   So So this part is unnecessary for many users


--
This is an automated message from the Apache Git Service.
To respond to the message, please log on to GitHub and use the
URL above to go to the specific comment.

To unsubscribe, e-mail: notifications-unsubscribe@apisix.apache.org

For queries about this service, please contact Infrastructure at:
users@infra.apache.org
[GitHub] [apisix] navendu-pottekkat commented on a diff in pull request #6964: docs: update "Installation" guide
Posted by GitBox <gi...@apache.org>.
navendu-pottekkat commented on code in PR #6964:
URL: https://github.com/apache/apisix/pull/6964#discussion_r861444191


##########
docs/en/latest/how-to-build.md:
##########
@@ -21,351 +25,220 @@ title: Installing Apache APISIX
 #
 -->

-This guide walks you through how you can build and get Apache APISIX running on your environment. Please refer the [Getting Started](./getting-started.md) guide for a quick walkthrough on running Apache APISIX.
+import Tabs from '@theme/Tabs';
+import TabItem from '@theme/TabItem';

-## Step 1: Install Apache APISIX
+This guide walks you through how you can install and run Apache APISIX in your environment.

-Apache APISIX can be installed via the [RPM package](#installation-via-rpm-repository-centos), [Docker image](#installation-via-docker), [Helm Chart](#installation-via-helm-chart) or the [source release package](#installation-via-source-release-package). You can install via any one of these options.
+Refer to the [Getting Started](./getting-started.md) guide for a quick walk-through on running Apache APISIX.

-### Installation via RPM Repository (CentOS)
+## Installing APISIX

-> This installation method is suitable for CentOS 7 and CentOS 8.
+APISIX can be installed by the different methods listed below:

-If the official OpenResty repository is **not installed yet**, the following command will help you automatically install both OpenResty and Apache APISIX repositories.
+<Tabs
+  groupId="install-method"
+  defaultValue="docker"
+  values={[
+    {label: 'Docker', value: 'docker'},
+    {label: 'Helm', value: 'helm'},
+    {label: 'RPM', value: 'rpm'},
+  ]}>
+<TabItem value="docker">

-```shell
-sudo yum install -y https://repos.apiseven.com/packages/centos/apache-apisix-repo-1.0-1.noarch.rpm
-```
-
-If the official OpenResty repository **is installed**, the following command will help you automatically install the repositories of Apache APISIX.
-
-```shell
-sudo yum-config-manager --add-repo https://repos.apiseven.com/packages/centos/apache-apisix.repo
-```
-
-Run the following commands to install the repository and Apache APISIX.
+First clone the [apisix-docker](https://github.com/apache/apisix-docker) repository:

 ```shell
-# View the information of the latest apisix package
-sudo yum info -y apisix
-
-# Will show the existing apisix packages
-sudo yum --showduplicates list apisix
-
-# Will install the latest apisix package
-sudo yum install apisix
-
-# Will install a specified version (2.10.3 in this example) apisix package
-sudo yum install apisix-2.10.3-0.el7
+git clone https://github.com/apache/apisix-docker.git
+cd apisix-docker/example
 ```

-### Installation via RPM Offline Package (CentOS)
+Now, you can use `docker-compose` to start APISIX.

-First, download Apache APISIX offline RPM package to `./apisix` folder.
+<Tabs
+  groupId="cpu-arch"
+  defaultValue="x86"
+  values={[
+    {label: 'x86', value: 'x86'},
+    {label: 'ARM/M1', value: 'arm'},
+  ]}>
+<TabItem value="x86">

 ```shell
-sudo mkdir -p apisix
-sudo yum install -y https://repos.apiseven.com/packages/centos/apache-apisix-repo-1.0-1.noarch.rpm
-sudo yum clean all && yum makecache
-sudo yum install -y --downloadonly --downloaddir=./apisix apisix
+docker-compose -p docker-apisix up -d
 ```

-Then copy `./apisix` folder to the target host and run the following command to install.
+</TabItem>
+
+<TabItem value="arm">

 ```shell
-sudo yum install ./apisix/*.rpm
+docker-compose -p docker-apisix -f docker-compose-arm64.yml up -d
 ```

-### Installation via Docker
-
-Please refer to [Installing Apache APISIX with Docker](https://hub.docker.com/r/apache/apisix).
-
-### Installation via Helm Chart
-
-Please refer to [Installing Apache APISIX with Helm Chart](https://github.com/apache/apisix-helm-chart).
-
-### Installation via Source Release Package
-
-Note: if you want to package Apache APISIX for a specific platform, please refer to https://github.com/api7/apisix-build-tools and add the support there.
-The instruction here is only for people who want to setup their Apache APISIX development environment.
-
-Follow the steps below to install Apache APISIX via the source release package.
-
-1. Install dependencies
+</TabItem>
+</Tabs>

-  ```shell
-  curl https://raw.githubusercontent.com/apache/apisix/master/utils/install-dependencies.sh -sL | bash -
-  ```
+</TabItem>

-2. Create a directory named `apisix-2.13.0`.
+<TabItem value="helm">

-  ```shell
-  APISIX_VERSION='2.13.0'
-  mkdir apisix-${APISIX_VERSION}
-  ```
+To install APISIX via Helm, run:

-3. Download the Apache APISIX source release package.
-
-  ```shell
-  wget https://downloads.apache.org/apisix/${APISIX_VERSION}/apache-apisix-${APISIX_VERSION}-src.tgz
-  ```
-
-  You can also download the Apache APISIX source release package from the [Apache APISIX website](https://apisix.apache.org/downloads/). The website also provides source packages for Apache APISIX, APISIX Dashboard, and APISIX Ingress Controller.
-
-4. Uncompress the Apache APISIX source release package.
-
-  ```shell
-  tar zxvf apache-apisix-${APISIX_VERSION}-src.tgz -C apisix-${APISIX_VERSION}
-  ```
-
-5. Install the runtime dependent Lua libraries.
-
-  ```shell
-  # Switch to the apisix-${APISIX_VERSION} directory
-  cd apisix-${APISIX_VERSION}
-  # Create dependencies
-  make deps
-  ```
-
-  **Note**: If you fail to install dependency packages using `make deps` and get an error message like `Could not find header file for LDAP/PCRE/openssl`, you can use this general method to solve problems.
-
-  The general solution: `luarocks` supports custom compile-time dependency directories(from this [link](https://github.com/luarocks/luarocks/wiki/Config-file-format)). Use a third-party tool to install the missing package and add its installation directory to the `luarocks`'s variables table. This a general method which can be applied to macOS, Ubuntu, CentOS or other usual operating systems, and the specific solution for macOS are given here for reference only.
-
-  The following is the solution of macOS, which is similar to that of other operating systems:
-
-    1. Install `openldap` with `brew install openldap`;
-    2. Locate installation directory with `brew --prefix openldap`;
-    3. Add the path to the project configuration file(choose one of the following two methods):
-       1. Solution A: You can set `LDAP_DIR` with `luarocks config` manually, for example `luarocks config variables.LDAP_DIR /opt/homebrew/cellar/openldap/2.6.1`;
-       2. Solution B: Of course, you can also choose to change the default configuration file of luarocks directly, execute the 'cat ~/.luarocks/config-5.1.lua' command, and then add the installation directory of 'openldap' to the file;
-       3. Example as follows:
-          variables = {
-              LDAP_DIR = "/opt/homebrew/cellar/openldap/2.6.1",
-              LDAP_INCDIR = "/opt/homebrew/cellar/openldap/2.6.1/include",
-          }
-
-     `/opt/homebrew/cellar/openldap/` is default path to install openldap on macOS(Apple Silicon) using brew.
-     `/usr/local/opt/openldap/` is default path to install openldap on macOS(Intel) using brew.
-
-6. To uninstall the Apache APISIX runtime, run:
-
-   ```shell
-   # Purge dependencies
-   make undeps
-   ```
-
-   **Note**: This operation will remove the files completely.
-
-#### LTS version installation via Source Release Package
-
-The [current LTS version](https://apisix.apache.org/downloads/) of Apache APISIX is `2.13.0`.
+```shell
+helm repo add apisix https://charts.apiseven.com
+helm repo update
+helm install apisix apisix/apisix --create-namespace  --namespace apisix
+```

-To install this version, set `APISIX_VERSION` in [Installation via Source Release Package](#installation-via-source-release-package) to this version and continue with the other steps.
+You can find other Helm charts on the [apisix-helm-chart](https://github.com/apache/apisix-helm-chart) repository.

-## Step 2: Install etcd
+</TabItem>

-This step is required only if you haven't installed [etcd](https://github.com/etcd-io/etcd).
+<TabItem value="rpm">

-Run the command below to install etcd via the binary in Linux:
+This installation method is suitable for CentOS 7 and Centos 8.

-```shell
-ETCD_VERSION='3.4.18'
-wget https://github.com/etcd-io/etcd/releases/download/v${ETCD_VERSION}/etcd-v${ETCD_VERSION}-linux-amd64.tar.gz
-tar -xvf etcd-v${ETCD_VERSION}-linux-amd64.tar.gz && \
-  cd etcd-v${ETCD_VERSION}-linux-amd64 && \
-  sudo cp -a etcd etcdctl /usr/bin/
-nohup etcd >/tmp/etcd.log 2>&1 &
-```
+### Installation via RPM repository

-Run the command below to install etcd in Mac:
+If OpenResty is **not** installed, you can run the command below to install both OpenResty and APISIX repositories:

 ```shell
-brew install etcd
-# start etcd server
-brew services start etcd
+sudo yum install -y https://repos.apiseven.com/packages/centos/apache-apisix-repo-1.0-1.noarch.rpm
 ```

-## Step 3: Manage Apache APISIX Server
-
-In the Apache APISIX directory, you can initialize dependencies, start service and stop service with commands. Run `apisix help` to get a full list of available commands.
-
-### Initializing dependencies
-
-Run the following command to initialize the NGINX configuration file and etcd.
+If OpenResty is installed, the command below will install the APISIX repositories:

 ```shell
-# initialize NGINX config file and etcd
-apisix init
+sudo yum-config-manager --add-repo https://repos.apiseven.com/packages/centos/apache-apisix.repo
 ```

-### Test the configuration file
-
-Run the following command to test the configuration file. APISIX will generate `nginx.conf` from `config.yaml` and check whether the syntax of `nginx.conf` is correct.
+Then, to install APISIX, run:

 ```shell
-# generate `nginx.conf` from `config.yaml` and test it
-apisix test
+sudo yum install apisix
 ```

-### Start Apache APISIX
+:::tip

-Run the following command to start Apache APISIX.
+You can also install a specific version of APISIX by specifying it:

 ```shell
-# start Apache APISIX server
-apisix start
+sudo yum install apisix-2.10.3-0.el7
 ```

-### Stop Apache APISIX
-
-Both `apisix quit` and `apisix stop` can stop Apache APISIX. The main difference is that `apisix quit` stops Apache APISIX gracefully, while `apisix stop` stops Apache APISIX immediately.
+:::

-It is recommended to use the "gracefully stop" command `apisix quit` because it ensures that Apache APISIX will complete all the requests it has received before stopping. On the other hand, `apisix stop` will trigger a forced shutdown and will stop Apache APISIX immediately. This will cause the pending incoming requests to not be processed before shutdown.
+### Installation via RPM offline package

-To perform a graceful shutdown, run:
+First, download APISIX RPM offline package to an `apisix` folder:

 ```shell
-# stop Apache APISIX server gracefully
-apisix quit
+sudo mkdir -p apisix
+sudo yum install -y https://repos.apiseven.com/packages/centos/apache-apisix-repo-1.0-1.noarch.rpm
+sudo yum clean all && yum makecache
+sudo yum install -y --downloadonly --downloaddir=./apisix apisix
 ```

-To perform a forced shutdown, run:
+Then copy the `apisix` folder to the target host and run:

 ```shell
-# stop Apache APISIX server immediately
-apisix stop
+sudo yum install ./apisix/*.rpm
 ```

-### Other operations
+### Managing APISIX server

-You can get help and learn more about all the available operations in Apache APISIX by running the `help` command as shown below.
+Once APISIX is installed, you can initialize the configuration file and etcd by running:

 ```shell
-# show a list of available operations
-apisix help
+apisix init
 ```

-## Step 4: Run Test Cases
-
-To run the test cases, run the steps outlined below.
-
-1. [Install `cpanminus`](https://metacpan.org/pod/App::cpanminus#INSTALLATION), the package manager for `perl`.
+To start APISIX server, run:

-2. Install the test-nginx dependencies via `cpanm` as shown below.
-
-  ```shell
-  sudo cpanm --notest Test::Nginx IPC::Run > build.log 2>&1 || (cat build.log && exit 1)
-  ```
-
-3. Clone the latest source code locally by using the forked out version.
-
-  ```shell
-  git clone https://github.com/openresty/test-nginx.git
-  ```
+```shell
+apisix start
+```

-4. There are two ways to run the tests.
+:::tip

-  1. Append the current directory to the perl module directory: `export PERL5LIB=.:$PERL5LIB` and then run `make test` command.
+Run `apisix help` to get a list of all available operations.

-  2. Specify the NGINX binary path by running `TEST_NGINX_BINARY=/usr/local/bin/openresty prove -Itest-nginx/lib -r t`.
+:::

-  <!--
-  #
-  #    In addition to the basic Markdown syntax, we use remark-admonitions
-  #    alongside MDX to add support for admonitions. Admonitions are wrapped
-  #    by a set of 3 colons.
-  #    Please refer to https://docusaurus.io/docs/next/markdown-features/admonitions
-  #    for more detail.
-  #
-  -->
+</TabItem>
+</Tabs>

-  :::note Note
-  Some of the tests rely on external services and system configuration modification. For a complete test environment build, you can refer to `ci/linux_openresty_common_runner.sh`.
-  :::
+## Installing etcd

-### Troubleshoot testing
+APISIX uses [etcd](https://github.com/etcd-io/etcd) to save and synchronize configuration.

-#### Configuring NGINX path
+etcd would be installed automatically if you have chosen the Docker or Helm install method above.

-The solution to the `Error unknown directive "lua_package_path" in /API_ASPIX/apisix/t/servroot/conf/nginx.conf` error is as shown below.
+If etcd is not installed you can install it as shown below.

-Ensure that OpenResty is set to the default NGINX, and export the path as follows:
+<Tabs
+  groupId="os"
+  defaultValue="linux"
+  values={[
+    {label: 'Linux', value: 'linux'},
+    {label: 'macOS', value: 'mac'},
+  ]}>
+<TabItem value="linux">

-* `export PATH=/usr/local/openresty/nginx/sbin:$PATH`
-  * Linux default installation path:
-    * `export PATH=/usr/local/openresty/nginx/sbin:$PATH`
-  * MacOS default installation path via homebrew:
-    * `export PATH=/usr/local/opt/openresty/nginx/sbin:$PATH`
+```shell
+ETCD_VERSION='3.4.18'
+wget https://github.com/etcd-io/etcd/releases/download/v${ETCD_VERSION}/etcd-v${ETCD_VERSION}-linux-amd64.tar.gz
+tar -xvf etcd-v${ETCD_VERSION}-linux-amd64.tar.gz && \
+  cd etcd-v${ETCD_VERSION}-linux-amd64 && \
+  sudo cp -a etcd etcdctl /usr/bin/
+nohup etcd >/tmp/etcd.log 2>&1 &
+```

-#### Running a single test case
+</TabItem>

-To run a specific test case, use the command below.
+<TabItem value="mac">

 ```shell
-prove -Itest-nginx/lib -r t/plugin/openid-connect.t
+brew install etcd
+brew services start etcd
 ```

-For more details on the test cases, see the [testing framework](https://github.com/apache/apisix/blob/master/docs/en/latest/internal/testing-framework.md) document.
+</TabItem>
+</Tabs>

Review Comment:
   We don't need to as it would be installed by the docker-compose file but users on mac can know this other way to install etcd. It is purely optional depending on how they installed.


--
This is an automated message from the Apache Git Service.
To respond to the message, please log on to GitHub and use the
URL above to go to the specific comment.

To unsubscribe, e-mail: notifications-unsubscribe@apisix.apache.org

For queries about this service, please contact Infrastructure at:
users@infra.apache.org
[GitHub] [apisix] hf400159 commented on a diff in pull request #6964: docs: update "Installation" guide
Posted by GitBox <gi...@apache.org>.
hf400159 commented on code in PR #6964:
URL: https://github.com/apache/apisix/pull/6964#discussion_r861445824


##########
docs/en/latest/how-to-build.md:
##########
@@ -21,351 +25,220 @@ title: Installing Apache APISIX
 #
 -->

-This guide walks you through how you can build and get Apache APISIX running on your environment. Please refer the [Getting Started](./getting-started.md) guide for a quick walkthrough on running Apache APISIX.
+import Tabs from '@theme/Tabs';
+import TabItem from '@theme/TabItem';

-## Step 1: Install Apache APISIX
+This guide walks you through how you can install and run Apache APISIX in your environment.

-Apache APISIX can be installed via the [RPM package](#installation-via-rpm-repository-centos), [Docker image](#installation-via-docker), [Helm Chart](#installation-via-helm-chart) or the [source release package](#installation-via-source-release-package). You can install via any one of these options.
+Refer to the [Getting Started](./getting-started.md) guide for a quick walk-through on running Apache APISIX.

-### Installation via RPM Repository (CentOS)
+## Installing APISIX

-> This installation method is suitable for CentOS 7 and CentOS 8.
+APISIX can be installed by the different methods listed below:

-If the official OpenResty repository is **not installed yet**, the following command will help you automatically install both OpenResty and Apache APISIX repositories.
+<Tabs
+  groupId="install-method"
+  defaultValue="docker"
+  values={[
+    {label: 'Docker', value: 'docker'},
+    {label: 'Helm', value: 'helm'},
+    {label: 'RPM', value: 'rpm'},
+  ]}>
+<TabItem value="docker">

-```shell
-sudo yum install -y https://repos.apiseven.com/packages/centos/apache-apisix-repo-1.0-1.noarch.rpm
-```
-
-If the official OpenResty repository **is installed**, the following command will help you automatically install the repositories of Apache APISIX.
-
-```shell
-sudo yum-config-manager --add-repo https://repos.apiseven.com/packages/centos/apache-apisix.repo
-```
-
-Run the following commands to install the repository and Apache APISIX.
+First clone the [apisix-docker](https://github.com/apache/apisix-docker) repository:

 ```shell
-# View the information of the latest apisix package
-sudo yum info -y apisix
-
-# Will show the existing apisix packages
-sudo yum --showduplicates list apisix
-
-# Will install the latest apisix package
-sudo yum install apisix
-
-# Will install a specified version (2.10.3 in this example) apisix package
-sudo yum install apisix-2.10.3-0.el7
+git clone https://github.com/apache/apisix-docker.git
+cd apisix-docker/example
 ```

-### Installation via RPM Offline Package (CentOS)
+Now, you can use `docker-compose` to start APISIX.

-First, download Apache APISIX offline RPM package to `./apisix` folder.
+<Tabs
+  groupId="cpu-arch"
+  defaultValue="x86"
+  values={[
+    {label: 'x86', value: 'x86'},
+    {label: 'ARM/M1', value: 'arm'},
+  ]}>
+<TabItem value="x86">

 ```shell
-sudo mkdir -p apisix
-sudo yum install -y https://repos.apiseven.com/packages/centos/apache-apisix-repo-1.0-1.noarch.rpm
-sudo yum clean all && yum makecache
-sudo yum install -y --downloadonly --downloaddir=./apisix apisix
+docker-compose -p docker-apisix up -d
 ```

-Then copy `./apisix` folder to the target host and run the following command to install.
+</TabItem>
+
+<TabItem value="arm">

 ```shell
-sudo yum install ./apisix/*.rpm
+docker-compose -p docker-apisix -f docker-compose-arm64.yml up -d
 ```

-### Installation via Docker
-
-Please refer to [Installing Apache APISIX with Docker](https://hub.docker.com/r/apache/apisix).
-
-### Installation via Helm Chart
-
-Please refer to [Installing Apache APISIX with Helm Chart](https://github.com/apache/apisix-helm-chart).
-
-### Installation via Source Release Package
-
-Note: if you want to package Apache APISIX for a specific platform, please refer to https://github.com/api7/apisix-build-tools and add the support there.
-The instruction here is only for people who want to setup their Apache APISIX development environment.
-
-Follow the steps below to install Apache APISIX via the source release package.
-
-1. Install dependencies
+</TabItem>
+</Tabs>

-  ```shell
-  curl https://raw.githubusercontent.com/apache/apisix/master/utils/install-dependencies.sh -sL | bash -
-  ```
+</TabItem>

-2. Create a directory named `apisix-2.13.0`.
+<TabItem value="helm">

-  ```shell
-  APISIX_VERSION='2.13.0'
-  mkdir apisix-${APISIX_VERSION}
-  ```
+To install APISIX via Helm, run:

-3. Download the Apache APISIX source release package.
-
-  ```shell
-  wget https://downloads.apache.org/apisix/${APISIX_VERSION}/apache-apisix-${APISIX_VERSION}-src.tgz
-  ```
-
-  You can also download the Apache APISIX source release package from the [Apache APISIX website](https://apisix.apache.org/downloads/). The website also provides source packages for Apache APISIX, APISIX Dashboard, and APISIX Ingress Controller.
-
-4. Uncompress the Apache APISIX source release package.
-
-  ```shell
-  tar zxvf apache-apisix-${APISIX_VERSION}-src.tgz -C apisix-${APISIX_VERSION}
-  ```
-
-5. Install the runtime dependent Lua libraries.
-
-  ```shell
-  # Switch to the apisix-${APISIX_VERSION} directory
-  cd apisix-${APISIX_VERSION}
-  # Create dependencies
-  make deps
-  ```
-
-  **Note**: If you fail to install dependency packages using `make deps` and get an error message like `Could not find header file for LDAP/PCRE/openssl`, you can use this general method to solve problems.
-
-  The general solution: `luarocks` supports custom compile-time dependency directories(from this [link](https://github.com/luarocks/luarocks/wiki/Config-file-format)). Use a third-party tool to install the missing package and add its installation directory to the `luarocks`'s variables table. This a general method which can be applied to macOS, Ubuntu, CentOS or other usual operating systems, and the specific solution for macOS are given here for reference only.
-
-  The following is the solution of macOS, which is similar to that of other operating systems:
-
-    1. Install `openldap` with `brew install openldap`;
-    2. Locate installation directory with `brew --prefix openldap`;
-    3. Add the path to the project configuration file(choose one of the following two methods):
-       1. Solution A: You can set `LDAP_DIR` with `luarocks config` manually, for example `luarocks config variables.LDAP_DIR /opt/homebrew/cellar/openldap/2.6.1`;
-       2. Solution B: Of course, you can also choose to change the default configuration file of luarocks directly, execute the 'cat ~/.luarocks/config-5.1.lua' command, and then add the installation directory of 'openldap' to the file;
-       3. Example as follows:
-          variables = {
-              LDAP_DIR = "/opt/homebrew/cellar/openldap/2.6.1",
-              LDAP_INCDIR = "/opt/homebrew/cellar/openldap/2.6.1/include",
-          }
-
-     `/opt/homebrew/cellar/openldap/` is default path to install openldap on macOS(Apple Silicon) using brew.
-     `/usr/local/opt/openldap/` is default path to install openldap on macOS(Intel) using brew.
-
-6. To uninstall the Apache APISIX runtime, run:
-
-   ```shell
-   # Purge dependencies
-   make undeps
-   ```
-
-   **Note**: This operation will remove the files completely.
-
-#### LTS version installation via Source Release Package
-
-The [current LTS version](https://apisix.apache.org/downloads/) of Apache APISIX is `2.13.0`.
+```shell
+helm repo add apisix https://charts.apiseven.com
+helm repo update
+helm install apisix apisix/apisix --create-namespace  --namespace apisix
+```

-To install this version, set `APISIX_VERSION` in [Installation via Source Release Package](#installation-via-source-release-package) to this version and continue with the other steps.
+You can find other Helm charts on the [apisix-helm-chart](https://github.com/apache/apisix-helm-chart) repository.

-## Step 2: Install etcd
+</TabItem>

-This step is required only if you haven't installed [etcd](https://github.com/etcd-io/etcd).
+<TabItem value="rpm">

-Run the command below to install etcd via the binary in Linux:
+This installation method is suitable for CentOS 7 and Centos 8.

-```shell
-ETCD_VERSION='3.4.18'
-wget https://github.com/etcd-io/etcd/releases/download/v${ETCD_VERSION}/etcd-v${ETCD_VERSION}-linux-amd64.tar.gz
-tar -xvf etcd-v${ETCD_VERSION}-linux-amd64.tar.gz && \
-  cd etcd-v${ETCD_VERSION}-linux-amd64 && \
-  sudo cp -a etcd etcdctl /usr/bin/
-nohup etcd >/tmp/etcd.log 2>&1 &
-```
+### Installation via RPM repository

-Run the command below to install etcd in Mac:
+If OpenResty is **not** installed, you can run the command below to install both OpenResty and APISIX repositories:

 ```shell
-brew install etcd
-# start etcd server
-brew services start etcd
+sudo yum install -y https://repos.apiseven.com/packages/centos/apache-apisix-repo-1.0-1.noarch.rpm
 ```

-## Step 3: Manage Apache APISIX Server
-
-In the Apache APISIX directory, you can initialize dependencies, start service and stop service with commands. Run `apisix help` to get a full list of available commands.
-
-### Initializing dependencies
-
-Run the following command to initialize the NGINX configuration file and etcd.
+If OpenResty is installed, the command below will install the APISIX repositories:

 ```shell
-# initialize NGINX config file and etcd
-apisix init
+sudo yum-config-manager --add-repo https://repos.apiseven.com/packages/centos/apache-apisix.repo
 ```

-### Test the configuration file
-
-Run the following command to test the configuration file. APISIX will generate `nginx.conf` from `config.yaml` and check whether the syntax of `nginx.conf` is correct.
+Then, to install APISIX, run:

 ```shell
-# generate `nginx.conf` from `config.yaml` and test it
-apisix test
+sudo yum install apisix
 ```

-### Start Apache APISIX
+:::tip

-Run the following command to start Apache APISIX.
+You can also install a specific version of APISIX by specifying it:

 ```shell
-# start Apache APISIX server
-apisix start
+sudo yum install apisix-2.10.3-0.el7
 ```

-### Stop Apache APISIX
-
-Both `apisix quit` and `apisix stop` can stop Apache APISIX. The main difference is that `apisix quit` stops Apache APISIX gracefully, while `apisix stop` stops Apache APISIX immediately.
+:::

-It is recommended to use the "gracefully stop" command `apisix quit` because it ensures that Apache APISIX will complete all the requests it has received before stopping. On the other hand, `apisix stop` will trigger a forced shutdown and will stop Apache APISIX immediately. This will cause the pending incoming requests to not be processed before shutdown.
+### Installation via RPM offline package

-To perform a graceful shutdown, run:
+First, download APISIX RPM offline package to an `apisix` folder:

 ```shell
-# stop Apache APISIX server gracefully
-apisix quit
+sudo mkdir -p apisix
+sudo yum install -y https://repos.apiseven.com/packages/centos/apache-apisix-repo-1.0-1.noarch.rpm
+sudo yum clean all && yum makecache
+sudo yum install -y --downloadonly --downloaddir=./apisix apisix
 ```

-To perform a forced shutdown, run:
+Then copy the `apisix` folder to the target host and run:

 ```shell
-# stop Apache APISIX server immediately
-apisix stop
+sudo yum install ./apisix/*.rpm
 ```

-### Other operations
+### Managing APISIX server

-You can get help and learn more about all the available operations in Apache APISIX by running the `help` command as shown below.
+Once APISIX is installed, you can initialize the configuration file and etcd by running:

 ```shell
-# show a list of available operations
-apisix help
+apisix init
 ```

-## Step 4: Run Test Cases
-
-To run the test cases, run the steps outlined below.
-
-1. [Install `cpanminus`](https://metacpan.org/pod/App::cpanminus#INSTALLATION), the package manager for `perl`.
+To start APISIX server, run:

-2. Install the test-nginx dependencies via `cpanm` as shown below.
-
-  ```shell
-  sudo cpanm --notest Test::Nginx IPC::Run > build.log 2>&1 || (cat build.log && exit 1)
-  ```
-
-3. Clone the latest source code locally by using the forked out version.
-
-  ```shell
-  git clone https://github.com/openresty/test-nginx.git
-  ```
+```shell
+apisix start
+```

-4. There are two ways to run the tests.
+:::tip

-  1. Append the current directory to the perl module directory: `export PERL5LIB=.:$PERL5LIB` and then run `make test` command.
+Run `apisix help` to get a list of all available operations.

-  2. Specify the NGINX binary path by running `TEST_NGINX_BINARY=/usr/local/bin/openresty prove -Itest-nginx/lib -r t`.
+:::

-  <!--
-  #
-  #    In addition to the basic Markdown syntax, we use remark-admonitions
-  #    alongside MDX to add support for admonitions. Admonitions are wrapped
-  #    by a set of 3 colons.
-  #    Please refer to https://docusaurus.io/docs/next/markdown-features/admonitions
-  #    for more detail.
-  #
-  -->
+</TabItem>
+</Tabs>

-  :::note Note
-  Some of the tests rely on external services and system configuration modification. For a complete test environment build, you can refer to `ci/linux_openresty_common_runner.sh`.
-  :::
+## Installing etcd

-### Troubleshoot testing
+APISIX uses [etcd](https://github.com/etcd-io/etcd) to save and synchronize configuration.

-#### Configuring NGINX path
+etcd would be installed automatically if you have chosen the Docker or Helm install method above.

-The solution to the `Error unknown directive "lua_package_path" in /API_ASPIX/apisix/t/servroot/conf/nginx.conf` error is as shown below.
+If etcd is not installed you can install it as shown below.

-Ensure that OpenResty is set to the default NGINX, and export the path as follows:
+<Tabs
+  groupId="os"
+  defaultValue="linux"
+  values={[
+    {label: 'Linux', value: 'linux'},
+    {label: 'macOS', value: 'mac'},
+  ]}>
+<TabItem value="linux">

-* `export PATH=/usr/local/openresty/nginx/sbin:$PATH`
-  * Linux default installation path:
-    * `export PATH=/usr/local/openresty/nginx/sbin:$PATH`
-  * MacOS default installation path via homebrew:
-    * `export PATH=/usr/local/opt/openresty/nginx/sbin:$PATH`
+```shell
+ETCD_VERSION='3.4.18'
+wget https://github.com/etcd-io/etcd/releases/download/v${ETCD_VERSION}/etcd-v${ETCD_VERSION}-linux-amd64.tar.gz
+tar -xvf etcd-v${ETCD_VERSION}-linux-amd64.tar.gz && \
+  cd etcd-v${ETCD_VERSION}-linux-amd64 && \
+  sudo cp -a etcd etcdctl /usr/bin/
+nohup etcd >/tmp/etcd.log 2>&1 &
+```

-#### Running a single test case
+</TabItem>

-To run a specific test case, use the command below.
+<TabItem value="mac">

 ```shell
-prove -Itest-nginx/lib -r t/plugin/openid-connect.t
+brew install etcd
+brew services start etcd
 ```

-For more details on the test cases, see the [testing framework](https://github.com/apache/apisix/blob/master/docs/en/latest/internal/testing-framework.md) document.
+</TabItem>
+</Tabs>

-## Step 5: Update Admin API token to Secure Apache APISIX
+## Next steps

-You can modify the Admin API key to secure your Apache APISIX deployment.
+### Updating Admin API key

-This can be done by modifying the `apisix.admin_key` in `conf/config.yaml` and restarting the service.
+It is recommended to modify the Admin API key to ensure security.

-```yaml
+You can update your configuration file as shown below:
+
+```yaml title="conf/config.yaml"
 apisix:
-  # ... ...
   admin_key
     -
       name: "admin"
-      key: abcdefghabcdefgh # Modify the original key to abcdefghabcdefgh
+      key: newsupersecurekey
       role: admin
 ```

-Then to access the Admin API, you can use the above key.
-
-```shell
-curl http://127.0.0.1:9080/apisix/admin/routes?api_key=abcdefghabcdefgh -i
-```
-
-A status code of 200 in the returned result will indicate that the access was successful.
+Now, to access the Admin API, you can use the new key:

 ```shell
-HTTP/1.1 200 OK
-Date: Fri, 28 Feb 2020 07:48:04 GMT
-Content-Type: text/plain
-... ...
-{"node":{...},"action":"get"}
+curl http://127.0.0.1:9080/apisix/admin/routes?api_key=newsupersecurekey -i
 ```

-If the key you entered does not match the value of `apisix.admin_key` in `conf/config.yaml`, a response with a status code 401 will indicate that the access failed.
+### Adding APISIX systemd unit file

-```shell
-curl http://127.0.0.1:9080/apisix/admin/routes?api_key=wrong-key -i
-```
-
-```shell
-HTTP/1.1 401 Unauthorized
-Date: Fri, 28 Feb 2020 08:17:58 GMT
-Content-Type: text/html
-... ...
-{"node":{...},"action":"get"}
-```
-
-## Step 6: Build OpenResty for Apache APISIX
-
-Some features require additional NGINX modules to be introduced into OpenResty.
-
-If you need these features, you can build APISIX OpenResty. You can refer to the source of [api7/apisix-build-tools](https://github.com/api7/apisix-build-tools) for setting up your build environment and building APISIX OpenResty.
-
-## Step 7: Add Systemd unit file for Apache APISIX
-
-If you are using CentOS and installed [Apache APISIX via the RPM package](#installation-via-rpm-repository-centos), the configuration file will already be in place and you can run the following command directly.
+If you installed APISIX via RPM, the APISIX unit file will already be configured and you can start APISIX by:

 ```shell
 systemctl start apisix
 systemctl stop apisix
 ```

-If you installed Apache APISIX by other methods, please refer to the [configuration file template](https://github.com/api7/apisix-build-tools/blob/master/usr/lib/systemd/system/apisix.service) for a modification guide and copy it to the `/usr/lib/systemd/system/apisix.service` path.
+If you installed APISIX through other methods, you can create `/usr/lib/systemd/system/apisix.service` and add the [configuration from the template](https://github.com/api7/apisix-build-tools/blob/master/usr/lib/systemd/system/apisix.service).
+
+See the [Getting Started](./getting-started.md) guide for a quick walk-through of using APISIX.

Review Comment:
   ok, you're right.


--
This is an automated message from the Apache Git Service.
To respond to the message, please log on to GitHub and use the
URL above to go to the specific comment.

To unsubscribe, e-mail: notifications-unsubscribe@apisix.apache.org

For queries about this service, please contact Infrastructure at:
users@infra.apache.org
[GitHub] [apisix] navendu-pottekkat commented on a diff in pull request #6964: docs: update "Installation" guide
Posted by GitBox <gi...@apache.org>.
navendu-pottekkat commented on code in PR #6964:
URL: https://github.com/apache/apisix/pull/6964#discussion_r861470890


##########
docs/en/latest/how-to-build.md:
##########
@@ -21,351 +25,220 @@ title: Installing Apache APISIX
 #
 -->

-This guide walks you through how you can build and get Apache APISIX running on your environment. Please refer the [Getting Started](./getting-started.md) guide for a quick walkthrough on running Apache APISIX.
+import Tabs from '@theme/Tabs';
+import TabItem from '@theme/TabItem';

-## Step 1: Install Apache APISIX
+This guide walks you through how you can install and run Apache APISIX in your environment.

-Apache APISIX can be installed via the [RPM package](#installation-via-rpm-repository-centos), [Docker image](#installation-via-docker), [Helm Chart](#installation-via-helm-chart) or the [source release package](#installation-via-source-release-package). You can install via any one of these options.
+Refer to the [Getting Started](./getting-started.md) guide for a quick walk-through on running Apache APISIX.

-### Installation via RPM Repository (CentOS)
+## Installing APISIX

-> This installation method is suitable for CentOS 7 and CentOS 8.
+APISIX can be installed by the different methods listed below:

-If the official OpenResty repository is **not installed yet**, the following command will help you automatically install both OpenResty and Apache APISIX repositories.
+<Tabs
+  groupId="install-method"
+  defaultValue="docker"
+  values={[
+    {label: 'Docker', value: 'docker'},
+    {label: 'Helm', value: 'helm'},
+    {label: 'RPM', value: 'rpm'},
+  ]}>
+<TabItem value="docker">

-```shell
-sudo yum install -y https://repos.apiseven.com/packages/centos/apache-apisix-repo-1.0-1.noarch.rpm
-```
-
-If the official OpenResty repository **is installed**, the following command will help you automatically install the repositories of Apache APISIX.
-
-```shell
-sudo yum-config-manager --add-repo https://repos.apiseven.com/packages/centos/apache-apisix.repo
-```
-
-Run the following commands to install the repository and Apache APISIX.
+First clone the [apisix-docker](https://github.com/apache/apisix-docker) repository:

 ```shell
-# View the information of the latest apisix package
-sudo yum info -y apisix
-
-# Will show the existing apisix packages
-sudo yum --showduplicates list apisix
-
-# Will install the latest apisix package
-sudo yum install apisix
-
-# Will install a specified version (2.10.3 in this example) apisix package
-sudo yum install apisix-2.10.3-0.el7
+git clone https://github.com/apache/apisix-docker.git
+cd apisix-docker/example
 ```

-### Installation via RPM Offline Package (CentOS)
+Now, you can use `docker-compose` to start APISIX.

-First, download Apache APISIX offline RPM package to `./apisix` folder.
+<Tabs
+  groupId="cpu-arch"
+  defaultValue="x86"
+  values={[
+    {label: 'x86', value: 'x86'},
+    {label: 'ARM/M1', value: 'arm'},
+  ]}>
+<TabItem value="x86">

 ```shell
-sudo mkdir -p apisix
-sudo yum install -y https://repos.apiseven.com/packages/centos/apache-apisix-repo-1.0-1.noarch.rpm
-sudo yum clean all && yum makecache
-sudo yum install -y --downloadonly --downloaddir=./apisix apisix
+docker-compose -p docker-apisix up -d
 ```

-Then copy `./apisix` folder to the target host and run the following command to install.
+</TabItem>
+
+<TabItem value="arm">

 ```shell
-sudo yum install ./apisix/*.rpm
+docker-compose -p docker-apisix -f docker-compose-arm64.yml up -d
 ```

-### Installation via Docker
-
-Please refer to [Installing Apache APISIX with Docker](https://hub.docker.com/r/apache/apisix).
-
-### Installation via Helm Chart
-
-Please refer to [Installing Apache APISIX with Helm Chart](https://github.com/apache/apisix-helm-chart).
-
-### Installation via Source Release Package
-
-Note: if you want to package Apache APISIX for a specific platform, please refer to https://github.com/api7/apisix-build-tools and add the support there.
-The instruction here is only for people who want to setup their Apache APISIX development environment.
-
-Follow the steps below to install Apache APISIX via the source release package.
-
-1. Install dependencies
+</TabItem>
+</Tabs>

-  ```shell
-  curl https://raw.githubusercontent.com/apache/apisix/master/utils/install-dependencies.sh -sL | bash -
-  ```
+</TabItem>

-2. Create a directory named `apisix-2.13.0`.
+<TabItem value="helm">

-  ```shell
-  APISIX_VERSION='2.13.0'
-  mkdir apisix-${APISIX_VERSION}
-  ```
+To install APISIX via Helm, run:

-3. Download the Apache APISIX source release package.
-
-  ```shell
-  wget https://downloads.apache.org/apisix/${APISIX_VERSION}/apache-apisix-${APISIX_VERSION}-src.tgz
-  ```
-
-  You can also download the Apache APISIX source release package from the [Apache APISIX website](https://apisix.apache.org/downloads/). The website also provides source packages for Apache APISIX, APISIX Dashboard, and APISIX Ingress Controller.
-
-4. Uncompress the Apache APISIX source release package.
-
-  ```shell
-  tar zxvf apache-apisix-${APISIX_VERSION}-src.tgz -C apisix-${APISIX_VERSION}
-  ```
-
-5. Install the runtime dependent Lua libraries.
-
-  ```shell
-  # Switch to the apisix-${APISIX_VERSION} directory
-  cd apisix-${APISIX_VERSION}
-  # Create dependencies
-  make deps
-  ```
-
-  **Note**: If you fail to install dependency packages using `make deps` and get an error message like `Could not find header file for LDAP/PCRE/openssl`, you can use this general method to solve problems.
-
-  The general solution: `luarocks` supports custom compile-time dependency directories(from this [link](https://github.com/luarocks/luarocks/wiki/Config-file-format)). Use a third-party tool to install the missing package and add its installation directory to the `luarocks`'s variables table. This a general method which can be applied to macOS, Ubuntu, CentOS or other usual operating systems, and the specific solution for macOS are given here for reference only.
-
-  The following is the solution of macOS, which is similar to that of other operating systems:
-
-    1. Install `openldap` with `brew install openldap`;
-    2. Locate installation directory with `brew --prefix openldap`;
-    3. Add the path to the project configuration file(choose one of the following two methods):
-       1. Solution A: You can set `LDAP_DIR` with `luarocks config` manually, for example `luarocks config variables.LDAP_DIR /opt/homebrew/cellar/openldap/2.6.1`;
-       2. Solution B: Of course, you can also choose to change the default configuration file of luarocks directly, execute the 'cat ~/.luarocks/config-5.1.lua' command, and then add the installation directory of 'openldap' to the file;
-       3. Example as follows:
-          variables = {
-              LDAP_DIR = "/opt/homebrew/cellar/openldap/2.6.1",
-              LDAP_INCDIR = "/opt/homebrew/cellar/openldap/2.6.1/include",
-          }
-
-     `/opt/homebrew/cellar/openldap/` is default path to install openldap on macOS(Apple Silicon) using brew.
-     `/usr/local/opt/openldap/` is default path to install openldap on macOS(Intel) using brew.
-
-6. To uninstall the Apache APISIX runtime, run:
-
-   ```shell
-   # Purge dependencies
-   make undeps
-   ```
-
-   **Note**: This operation will remove the files completely.
-
-#### LTS version installation via Source Release Package
-
-The [current LTS version](https://apisix.apache.org/downloads/) of Apache APISIX is `2.13.0`.
+```shell
+helm repo add apisix https://charts.apiseven.com
+helm repo update
+helm install apisix apisix/apisix --create-namespace  --namespace apisix
+```

-To install this version, set `APISIX_VERSION` in [Installation via Source Release Package](#installation-via-source-release-package) to this version and continue with the other steps.
+You can find other Helm charts on the [apisix-helm-chart](https://github.com/apache/apisix-helm-chart) repository.

-## Step 2: Install etcd
+</TabItem>

-This step is required only if you haven't installed [etcd](https://github.com/etcd-io/etcd).
+<TabItem value="rpm">

-Run the command below to install etcd via the binary in Linux:
+This installation method is suitable for CentOS 7 and Centos 8.

-```shell
-ETCD_VERSION='3.4.18'
-wget https://github.com/etcd-io/etcd/releases/download/v${ETCD_VERSION}/etcd-v${ETCD_VERSION}-linux-amd64.tar.gz
-tar -xvf etcd-v${ETCD_VERSION}-linux-amd64.tar.gz && \
-  cd etcd-v${ETCD_VERSION}-linux-amd64 && \
-  sudo cp -a etcd etcdctl /usr/bin/
-nohup etcd >/tmp/etcd.log 2>&1 &
-```
+### Installation via RPM repository

-Run the command below to install etcd in Mac:
+If OpenResty is **not** installed, you can run the command below to install both OpenResty and APISIX repositories:

 ```shell
-brew install etcd
-# start etcd server
-brew services start etcd
+sudo yum install -y https://repos.apiseven.com/packages/centos/apache-apisix-repo-1.0-1.noarch.rpm
 ```

-## Step 3: Manage Apache APISIX Server
-
-In the Apache APISIX directory, you can initialize dependencies, start service and stop service with commands. Run `apisix help` to get a full list of available commands.
-
-### Initializing dependencies
-
-Run the following command to initialize the NGINX configuration file and etcd.
+If OpenResty is installed, the command below will install the APISIX repositories:

 ```shell
-# initialize NGINX config file and etcd
-apisix init
+sudo yum-config-manager --add-repo https://repos.apiseven.com/packages/centos/apache-apisix.repo
 ```

-### Test the configuration file
-
-Run the following command to test the configuration file. APISIX will generate `nginx.conf` from `config.yaml` and check whether the syntax of `nginx.conf` is correct.
+Then, to install APISIX, run:

 ```shell
-# generate `nginx.conf` from `config.yaml` and test it
-apisix test
+sudo yum install apisix
 ```

-### Start Apache APISIX
+:::tip

-Run the following command to start Apache APISIX.
+You can also install a specific version of APISIX by specifying it:

 ```shell
-# start Apache APISIX server
-apisix start
+sudo yum install apisix-2.10.3-0.el7
 ```

-### Stop Apache APISIX
-
-Both `apisix quit` and `apisix stop` can stop Apache APISIX. The main difference is that `apisix quit` stops Apache APISIX gracefully, while `apisix stop` stops Apache APISIX immediately.
+:::

-It is recommended to use the "gracefully stop" command `apisix quit` because it ensures that Apache APISIX will complete all the requests it has received before stopping. On the other hand, `apisix stop` will trigger a forced shutdown and will stop Apache APISIX immediately. This will cause the pending incoming requests to not be processed before shutdown.
+### Installation via RPM offline package

-To perform a graceful shutdown, run:
+First, download APISIX RPM offline package to an `apisix` folder:

 ```shell
-# stop Apache APISIX server gracefully
-apisix quit
+sudo mkdir -p apisix
+sudo yum install -y https://repos.apiseven.com/packages/centos/apache-apisix-repo-1.0-1.noarch.rpm
+sudo yum clean all && yum makecache
+sudo yum install -y --downloadonly --downloaddir=./apisix apisix
 ```

-To perform a forced shutdown, run:
+Then copy the `apisix` folder to the target host and run:

 ```shell
-# stop Apache APISIX server immediately
-apisix stop
+sudo yum install ./apisix/*.rpm
 ```

-### Other operations
+### Managing APISIX server

-You can get help and learn more about all the available operations in Apache APISIX by running the `help` command as shown below.
+Once APISIX is installed, you can initialize the configuration file and etcd by running:

 ```shell
-# show a list of available operations
-apisix help
+apisix init
 ```

-## Step 4: Run Test Cases
-
-To run the test cases, run the steps outlined below.
-
-1. [Install `cpanminus`](https://metacpan.org/pod/App::cpanminus#INSTALLATION), the package manager for `perl`.
+To start APISIX server, run:

-2. Install the test-nginx dependencies via `cpanm` as shown below.
-
-  ```shell
-  sudo cpanm --notest Test::Nginx IPC::Run > build.log 2>&1 || (cat build.log && exit 1)
-  ```
-
-3. Clone the latest source code locally by using the forked out version.
-
-  ```shell
-  git clone https://github.com/openresty/test-nginx.git
-  ```
+```shell
+apisix start
+```

-4. There are two ways to run the tests.
+:::tip

-  1. Append the current directory to the perl module directory: `export PERL5LIB=.:$PERL5LIB` and then run `make test` command.
+Run `apisix help` to get a list of all available operations.

-  2. Specify the NGINX binary path by running `TEST_NGINX_BINARY=/usr/local/bin/openresty prove -Itest-nginx/lib -r t`.
+:::

-  <!--
-  #
-  #    In addition to the basic Markdown syntax, we use remark-admonitions
-  #    alongside MDX to add support for admonitions. Admonitions are wrapped
-  #    by a set of 3 colons.
-  #    Please refer to https://docusaurus.io/docs/next/markdown-features/admonitions
-  #    for more detail.
-  #
-  -->
+</TabItem>
+</Tabs>

-  :::note Note
-  Some of the tests rely on external services and system configuration modification. For a complete test environment build, you can refer to `ci/linux_openresty_common_runner.sh`.
-  :::
+## Installing etcd

-### Troubleshoot testing
+APISIX uses [etcd](https://github.com/etcd-io/etcd) to save and synchronize configuration.

-#### Configuring NGINX path
+etcd would be installed automatically if you have chosen the Docker or Helm install method above.

-The solution to the `Error unknown directive "lua_package_path" in /API_ASPIX/apisix/t/servroot/conf/nginx.conf` error is as shown below.
+If etcd is not installed you can install it as shown below.

-Ensure that OpenResty is set to the default NGINX, and export the path as follows:
+<Tabs
+  groupId="os"
+  defaultValue="linux"
+  values={[
+    {label: 'Linux', value: 'linux'},
+    {label: 'macOS', value: 'mac'},
+  ]}>
+<TabItem value="linux">

-* `export PATH=/usr/local/openresty/nginx/sbin:$PATH`
-  * Linux default installation path:
-    * `export PATH=/usr/local/openresty/nginx/sbin:$PATH`
-  * MacOS default installation path via homebrew:
-    * `export PATH=/usr/local/opt/openresty/nginx/sbin:$PATH`
+```shell
+ETCD_VERSION='3.4.18'
+wget https://github.com/etcd-io/etcd/releases/download/v${ETCD_VERSION}/etcd-v${ETCD_VERSION}-linux-amd64.tar.gz
+tar -xvf etcd-v${ETCD_VERSION}-linux-amd64.tar.gz && \
+  cd etcd-v${ETCD_VERSION}-linux-amd64 && \
+  sudo cp -a etcd etcdctl /usr/bin/
+nohup etcd >/tmp/etcd.log 2>&1 &
+```

-#### Running a single test case
+</TabItem>

-To run a specific test case, use the command below.
+<TabItem value="mac">

 ```shell
-prove -Itest-nginx/lib -r t/plugin/openid-connect.t
+brew install etcd
+brew services start etcd
 ```

-For more details on the test cases, see the [testing framework](https://github.com/apache/apisix/blob/master/docs/en/latest/internal/testing-framework.md) document.
+</TabItem>
+</Tabs>

Review Comment:
   Yes, but mentioning etcd installation is always good as APISIX depends on it. Currently, installing using Docker will install etcd but even in that case, it might be good to mention.


--
This is an automated message from the Apache Git Service.
To respond to the message, please log on to GitHub and use the
URL above to go to the specific comment.

To unsubscribe, e-mail: notifications-unsubscribe@apisix.apache.org

For queries about this service, please contact Infrastructure at:
users@infra.apache.org
[GitHub] [apisix] hf400159 commented on a diff in pull request #6964: docs: update "Installation" guide
Posted by GitBox <gi...@apache.org>.
hf400159 commented on code in PR #6964:
URL: https://github.com/apache/apisix/pull/6964#discussion_r861431202


##########
docs/en/latest/how-to-build.md:
##########
@@ -21,351 +25,220 @@ title: Installing Apache APISIX
 #
 -->

-This guide walks you through how you can build and get Apache APISIX running on your environment. Please refer the [Getting Started](./getting-started.md) guide for a quick walkthrough on running Apache APISIX.
+import Tabs from '@theme/Tabs';
+import TabItem from '@theme/TabItem';

-## Step 1: Install Apache APISIX
+This guide walks you through how you can install and run Apache APISIX in your environment.

-Apache APISIX can be installed via the [RPM package](#installation-via-rpm-repository-centos), [Docker image](#installation-via-docker), [Helm Chart](#installation-via-helm-chart) or the [source release package](#installation-via-source-release-package). You can install via any one of these options.
+Refer to the [Getting Started](./getting-started.md) guide for a quick walk-through on running Apache APISIX.

-### Installation via RPM Repository (CentOS)
+## Installing APISIX

-> This installation method is suitable for CentOS 7 and CentOS 8.
+APISIX can be installed by the different methods listed below:

-If the official OpenResty repository is **not installed yet**, the following command will help you automatically install both OpenResty and Apache APISIX repositories.
+<Tabs
+  groupId="install-method"
+  defaultValue="docker"
+  values={[
+    {label: 'Docker', value: 'docker'},
+    {label: 'Helm', value: 'helm'},
+    {label: 'RPM', value: 'rpm'},
+  ]}>
+<TabItem value="docker">

-```shell
-sudo yum install -y https://repos.apiseven.com/packages/centos/apache-apisix-repo-1.0-1.noarch.rpm
-```
-
-If the official OpenResty repository **is installed**, the following command will help you automatically install the repositories of Apache APISIX.
-
-```shell
-sudo yum-config-manager --add-repo https://repos.apiseven.com/packages/centos/apache-apisix.repo
-```
-
-Run the following commands to install the repository and Apache APISIX.
+First clone the [apisix-docker](https://github.com/apache/apisix-docker) repository:

 ```shell
-# View the information of the latest apisix package
-sudo yum info -y apisix
-
-# Will show the existing apisix packages
-sudo yum --showduplicates list apisix
-
-# Will install the latest apisix package
-sudo yum install apisix
-
-# Will install a specified version (2.10.3 in this example) apisix package
-sudo yum install apisix-2.10.3-0.el7
+git clone https://github.com/apache/apisix-docker.git
+cd apisix-docker/example
 ```

-### Installation via RPM Offline Package (CentOS)
+Now, you can use `docker-compose` to start APISIX.

-First, download Apache APISIX offline RPM package to `./apisix` folder.
+<Tabs
+  groupId="cpu-arch"
+  defaultValue="x86"
+  values={[
+    {label: 'x86', value: 'x86'},
+    {label: 'ARM/M1', value: 'arm'},
+  ]}>
+<TabItem value="x86">

 ```shell
-sudo mkdir -p apisix
-sudo yum install -y https://repos.apiseven.com/packages/centos/apache-apisix-repo-1.0-1.noarch.rpm
-sudo yum clean all && yum makecache
-sudo yum install -y --downloadonly --downloaddir=./apisix apisix
+docker-compose -p docker-apisix up -d
 ```

-Then copy `./apisix` folder to the target host and run the following command to install.
+</TabItem>
+
+<TabItem value="arm">

 ```shell
-sudo yum install ./apisix/*.rpm
+docker-compose -p docker-apisix -f docker-compose-arm64.yml up -d
 ```

-### Installation via Docker
-
-Please refer to [Installing Apache APISIX with Docker](https://hub.docker.com/r/apache/apisix).
-
-### Installation via Helm Chart
-
-Please refer to [Installing Apache APISIX with Helm Chart](https://github.com/apache/apisix-helm-chart).
-
-### Installation via Source Release Package
-
-Note: if you want to package Apache APISIX for a specific platform, please refer to https://github.com/api7/apisix-build-tools and add the support there.
-The instruction here is only for people who want to setup their Apache APISIX development environment.
-
-Follow the steps below to install Apache APISIX via the source release package.
-
-1. Install dependencies
+</TabItem>
+</Tabs>

-  ```shell
-  curl https://raw.githubusercontent.com/apache/apisix/master/utils/install-dependencies.sh -sL | bash -
-  ```
+</TabItem>

-2. Create a directory named `apisix-2.13.0`.
+<TabItem value="helm">

-  ```shell
-  APISIX_VERSION='2.13.0'
-  mkdir apisix-${APISIX_VERSION}
-  ```
+To install APISIX via Helm, run:

-3. Download the Apache APISIX source release package.
-
-  ```shell
-  wget https://downloads.apache.org/apisix/${APISIX_VERSION}/apache-apisix-${APISIX_VERSION}-src.tgz
-  ```
-
-  You can also download the Apache APISIX source release package from the [Apache APISIX website](https://apisix.apache.org/downloads/). The website also provides source packages for Apache APISIX, APISIX Dashboard, and APISIX Ingress Controller.
-
-4. Uncompress the Apache APISIX source release package.
-
-  ```shell
-  tar zxvf apache-apisix-${APISIX_VERSION}-src.tgz -C apisix-${APISIX_VERSION}
-  ```
-
-5. Install the runtime dependent Lua libraries.
-
-  ```shell
-  # Switch to the apisix-${APISIX_VERSION} directory
-  cd apisix-${APISIX_VERSION}
-  # Create dependencies
-  make deps
-  ```
-
-  **Note**: If you fail to install dependency packages using `make deps` and get an error message like `Could not find header file for LDAP/PCRE/openssl`, you can use this general method to solve problems.
-
-  The general solution: `luarocks` supports custom compile-time dependency directories(from this [link](https://github.com/luarocks/luarocks/wiki/Config-file-format)). Use a third-party tool to install the missing package and add its installation directory to the `luarocks`'s variables table. This a general method which can be applied to macOS, Ubuntu, CentOS or other usual operating systems, and the specific solution for macOS are given here for reference only.
-
-  The following is the solution of macOS, which is similar to that of other operating systems:
-
-    1. Install `openldap` with `brew install openldap`;
-    2. Locate installation directory with `brew --prefix openldap`;
-    3. Add the path to the project configuration file(choose one of the following two methods):
-       1. Solution A: You can set `LDAP_DIR` with `luarocks config` manually, for example `luarocks config variables.LDAP_DIR /opt/homebrew/cellar/openldap/2.6.1`;
-       2. Solution B: Of course, you can also choose to change the default configuration file of luarocks directly, execute the 'cat ~/.luarocks/config-5.1.lua' command, and then add the installation directory of 'openldap' to the file;
-       3. Example as follows:
-          variables = {
-              LDAP_DIR = "/opt/homebrew/cellar/openldap/2.6.1",
-              LDAP_INCDIR = "/opt/homebrew/cellar/openldap/2.6.1/include",
-          }
-
-     `/opt/homebrew/cellar/openldap/` is default path to install openldap on macOS(Apple Silicon) using brew.
-     `/usr/local/opt/openldap/` is default path to install openldap on macOS(Intel) using brew.
-
-6. To uninstall the Apache APISIX runtime, run:
-
-   ```shell
-   # Purge dependencies
-   make undeps
-   ```
-
-   **Note**: This operation will remove the files completely.
-
-#### LTS version installation via Source Release Package
-
-The [current LTS version](https://apisix.apache.org/downloads/) of Apache APISIX is `2.13.0`.
+```shell
+helm repo add apisix https://charts.apiseven.com
+helm repo update
+helm install apisix apisix/apisix --create-namespace  --namespace apisix
+```

-To install this version, set `APISIX_VERSION` in [Installation via Source Release Package](#installation-via-source-release-package) to this version and continue with the other steps.
+You can find other Helm charts on the [apisix-helm-chart](https://github.com/apache/apisix-helm-chart) repository.

-## Step 2: Install etcd
+</TabItem>

-This step is required only if you haven't installed [etcd](https://github.com/etcd-io/etcd).
+<TabItem value="rpm">

-Run the command below to install etcd via the binary in Linux:
+This installation method is suitable for CentOS 7 and Centos 8.

-```shell
-ETCD_VERSION='3.4.18'
-wget https://github.com/etcd-io/etcd/releases/download/v${ETCD_VERSION}/etcd-v${ETCD_VERSION}-linux-amd64.tar.gz
-tar -xvf etcd-v${ETCD_VERSION}-linux-amd64.tar.gz && \
-  cd etcd-v${ETCD_VERSION}-linux-amd64 && \
-  sudo cp -a etcd etcdctl /usr/bin/
-nohup etcd >/tmp/etcd.log 2>&1 &
-```
+### Installation via RPM repository

-Run the command below to install etcd in Mac:
+If OpenResty is **not** installed, you can run the command below to install both OpenResty and APISIX repositories:

 ```shell
-brew install etcd
-# start etcd server
-brew services start etcd
+sudo yum install -y https://repos.apiseven.com/packages/centos/apache-apisix-repo-1.0-1.noarch.rpm
 ```

-## Step 3: Manage Apache APISIX Server
-
-In the Apache APISIX directory, you can initialize dependencies, start service and stop service with commands. Run `apisix help` to get a full list of available commands.
-
-### Initializing dependencies
-
-Run the following command to initialize the NGINX configuration file and etcd.
+If OpenResty is installed, the command below will install the APISIX repositories:

 ```shell
-# initialize NGINX config file and etcd
-apisix init
+sudo yum-config-manager --add-repo https://repos.apiseven.com/packages/centos/apache-apisix.repo
 ```

-### Test the configuration file
-
-Run the following command to test the configuration file. APISIX will generate `nginx.conf` from `config.yaml` and check whether the syntax of `nginx.conf` is correct.
+Then, to install APISIX, run:

 ```shell
-# generate `nginx.conf` from `config.yaml` and test it
-apisix test
+sudo yum install apisix
 ```

-### Start Apache APISIX
+:::tip

-Run the following command to start Apache APISIX.
+You can also install a specific version of APISIX by specifying it:

 ```shell
-# start Apache APISIX server
-apisix start
+sudo yum install apisix-2.10.3-0.el7

Review Comment:
   2.13.1 is the latest LTS maintenance release, can we change to 2.13.1?


##########
docs/en/latest/how-to-build.md:
##########
@@ -21,351 +25,220 @@ title: Installing Apache APISIX
 #
 -->

-This guide walks you through how you can build and get Apache APISIX running on your environment. Please refer the [Getting Started](./getting-started.md) guide for a quick walkthrough on running Apache APISIX.
+import Tabs from '@theme/Tabs';
+import TabItem from '@theme/TabItem';

-## Step 1: Install Apache APISIX
+This guide walks you through how you can install and run Apache APISIX in your environment.

-Apache APISIX can be installed via the [RPM package](#installation-via-rpm-repository-centos), [Docker image](#installation-via-docker), [Helm Chart](#installation-via-helm-chart) or the [source release package](#installation-via-source-release-package). You can install via any one of these options.
+Refer to the [Getting Started](./getting-started.md) guide for a quick walk-through on running Apache APISIX.

-### Installation via RPM Repository (CentOS)
+## Installing APISIX

-> This installation method is suitable for CentOS 7 and CentOS 8.
+APISIX can be installed by the different methods listed below:

-If the official OpenResty repository is **not installed yet**, the following command will help you automatically install both OpenResty and Apache APISIX repositories.
+<Tabs
+  groupId="install-method"
+  defaultValue="docker"
+  values={[
+    {label: 'Docker', value: 'docker'},
+    {label: 'Helm', value: 'helm'},
+    {label: 'RPM', value: 'rpm'},
+  ]}>
+<TabItem value="docker">

-```shell
-sudo yum install -y https://repos.apiseven.com/packages/centos/apache-apisix-repo-1.0-1.noarch.rpm
-```
-
-If the official OpenResty repository **is installed**, the following command will help you automatically install the repositories of Apache APISIX.
-
-```shell
-sudo yum-config-manager --add-repo https://repos.apiseven.com/packages/centos/apache-apisix.repo
-```
-
-Run the following commands to install the repository and Apache APISIX.
+First clone the [apisix-docker](https://github.com/apache/apisix-docker) repository:

 ```shell
-# View the information of the latest apisix package
-sudo yum info -y apisix
-
-# Will show the existing apisix packages
-sudo yum --showduplicates list apisix
-
-# Will install the latest apisix package
-sudo yum install apisix
-
-# Will install a specified version (2.10.3 in this example) apisix package
-sudo yum install apisix-2.10.3-0.el7
+git clone https://github.com/apache/apisix-docker.git
+cd apisix-docker/example
 ```

-### Installation via RPM Offline Package (CentOS)
+Now, you can use `docker-compose` to start APISIX.

-First, download Apache APISIX offline RPM package to `./apisix` folder.
+<Tabs
+  groupId="cpu-arch"
+  defaultValue="x86"
+  values={[
+    {label: 'x86', value: 'x86'},
+    {label: 'ARM/M1', value: 'arm'},
+  ]}>
+<TabItem value="x86">

 ```shell
-sudo mkdir -p apisix
-sudo yum install -y https://repos.apiseven.com/packages/centos/apache-apisix-repo-1.0-1.noarch.rpm
-sudo yum clean all && yum makecache
-sudo yum install -y --downloadonly --downloaddir=./apisix apisix
+docker-compose -p docker-apisix up -d
 ```

-Then copy `./apisix` folder to the target host and run the following command to install.
+</TabItem>
+
+<TabItem value="arm">

 ```shell
-sudo yum install ./apisix/*.rpm
+docker-compose -p docker-apisix -f docker-compose-arm64.yml up -d
 ```

-### Installation via Docker
-
-Please refer to [Installing Apache APISIX with Docker](https://hub.docker.com/r/apache/apisix).
-
-### Installation via Helm Chart
-
-Please refer to [Installing Apache APISIX with Helm Chart](https://github.com/apache/apisix-helm-chart).
-
-### Installation via Source Release Package
-
-Note: if you want to package Apache APISIX for a specific platform, please refer to https://github.com/api7/apisix-build-tools and add the support there.
-The instruction here is only for people who want to setup their Apache APISIX development environment.
-
-Follow the steps below to install Apache APISIX via the source release package.
-
-1. Install dependencies
+</TabItem>
+</Tabs>

-  ```shell
-  curl https://raw.githubusercontent.com/apache/apisix/master/utils/install-dependencies.sh -sL | bash -
-  ```
+</TabItem>

-2. Create a directory named `apisix-2.13.0`.
+<TabItem value="helm">

-  ```shell
-  APISIX_VERSION='2.13.0'
-  mkdir apisix-${APISIX_VERSION}
-  ```
+To install APISIX via Helm, run:

-3. Download the Apache APISIX source release package.
-
-  ```shell
-  wget https://downloads.apache.org/apisix/${APISIX_VERSION}/apache-apisix-${APISIX_VERSION}-src.tgz
-  ```
-
-  You can also download the Apache APISIX source release package from the [Apache APISIX website](https://apisix.apache.org/downloads/). The website also provides source packages for Apache APISIX, APISIX Dashboard, and APISIX Ingress Controller.
-
-4. Uncompress the Apache APISIX source release package.
-
-  ```shell
-  tar zxvf apache-apisix-${APISIX_VERSION}-src.tgz -C apisix-${APISIX_VERSION}
-  ```
-
-5. Install the runtime dependent Lua libraries.
-
-  ```shell
-  # Switch to the apisix-${APISIX_VERSION} directory
-  cd apisix-${APISIX_VERSION}
-  # Create dependencies
-  make deps
-  ```
-
-  **Note**: If you fail to install dependency packages using `make deps` and get an error message like `Could not find header file for LDAP/PCRE/openssl`, you can use this general method to solve problems.
-
-  The general solution: `luarocks` supports custom compile-time dependency directories(from this [link](https://github.com/luarocks/luarocks/wiki/Config-file-format)). Use a third-party tool to install the missing package and add its installation directory to the `luarocks`'s variables table. This a general method which can be applied to macOS, Ubuntu, CentOS or other usual operating systems, and the specific solution for macOS are given here for reference only.
-
-  The following is the solution of macOS, which is similar to that of other operating systems:
-
-    1. Install `openldap` with `brew install openldap`;
-    2. Locate installation directory with `brew --prefix openldap`;
-    3. Add the path to the project configuration file(choose one of the following two methods):
-       1. Solution A: You can set `LDAP_DIR` with `luarocks config` manually, for example `luarocks config variables.LDAP_DIR /opt/homebrew/cellar/openldap/2.6.1`;
-       2. Solution B: Of course, you can also choose to change the default configuration file of luarocks directly, execute the 'cat ~/.luarocks/config-5.1.lua' command, and then add the installation directory of 'openldap' to the file;
-       3. Example as follows:
-          variables = {
-              LDAP_DIR = "/opt/homebrew/cellar/openldap/2.6.1",
-              LDAP_INCDIR = "/opt/homebrew/cellar/openldap/2.6.1/include",
-          }
-
-     `/opt/homebrew/cellar/openldap/` is default path to install openldap on macOS(Apple Silicon) using brew.
-     `/usr/local/opt/openldap/` is default path to install openldap on macOS(Intel) using brew.
-
-6. To uninstall the Apache APISIX runtime, run:
-
-   ```shell
-   # Purge dependencies
-   make undeps
-   ```
-
-   **Note**: This operation will remove the files completely.
-
-#### LTS version installation via Source Release Package
-
-The [current LTS version](https://apisix.apache.org/downloads/) of Apache APISIX is `2.13.0`.
+```shell
+helm repo add apisix https://charts.apiseven.com
+helm repo update
+helm install apisix apisix/apisix --create-namespace  --namespace apisix
+```

-To install this version, set `APISIX_VERSION` in [Installation via Source Release Package](#installation-via-source-release-package) to this version and continue with the other steps.
+You can find other Helm charts on the [apisix-helm-chart](https://github.com/apache/apisix-helm-chart) repository.

-## Step 2: Install etcd
+</TabItem>

-This step is required only if you haven't installed [etcd](https://github.com/etcd-io/etcd).
+<TabItem value="rpm">

-Run the command below to install etcd via the binary in Linux:
+This installation method is suitable for CentOS 7 and Centos 8.

-```shell
-ETCD_VERSION='3.4.18'
-wget https://github.com/etcd-io/etcd/releases/download/v${ETCD_VERSION}/etcd-v${ETCD_VERSION}-linux-amd64.tar.gz
-tar -xvf etcd-v${ETCD_VERSION}-linux-amd64.tar.gz && \
-  cd etcd-v${ETCD_VERSION}-linux-amd64 && \
-  sudo cp -a etcd etcdctl /usr/bin/
-nohup etcd >/tmp/etcd.log 2>&1 &
-```
+### Installation via RPM repository

Review Comment:
   We should prompt the user to install etcd here instead of putting the etcd installation after the APISIX installation. We can hint here:
   If installing via RPM, you need to install [etcd](#Installing-etcd) first.


##########
docs/en/latest/how-to-build.md:
##########
@@ -21,351 +25,220 @@ title: Installing Apache APISIX
 #
 -->

-This guide walks you through how you can build and get Apache APISIX running on your environment. Please refer the [Getting Started](./getting-started.md) guide for a quick walkthrough on running Apache APISIX.
+import Tabs from '@theme/Tabs';
+import TabItem from '@theme/TabItem';

-## Step 1: Install Apache APISIX
+This guide walks you through how you can install and run Apache APISIX in your environment.

-Apache APISIX can be installed via the [RPM package](#installation-via-rpm-repository-centos), [Docker image](#installation-via-docker), [Helm Chart](#installation-via-helm-chart) or the [source release package](#installation-via-source-release-package). You can install via any one of these options.
+Refer to the [Getting Started](./getting-started.md) guide for a quick walk-through on running Apache APISIX.

-### Installation via RPM Repository (CentOS)
+## Installing APISIX

-> This installation method is suitable for CentOS 7 and CentOS 8.
+APISIX can be installed by the different methods listed below:

-If the official OpenResty repository is **not installed yet**, the following command will help you automatically install both OpenResty and Apache APISIX repositories.
+<Tabs
+  groupId="install-method"
+  defaultValue="docker"
+  values={[
+    {label: 'Docker', value: 'docker'},
+    {label: 'Helm', value: 'helm'},
+    {label: 'RPM', value: 'rpm'},
+  ]}>
+<TabItem value="docker">

-```shell
-sudo yum install -y https://repos.apiseven.com/packages/centos/apache-apisix-repo-1.0-1.noarch.rpm
-```
-
-If the official OpenResty repository **is installed**, the following command will help you automatically install the repositories of Apache APISIX.
-
-```shell
-sudo yum-config-manager --add-repo https://repos.apiseven.com/packages/centos/apache-apisix.repo
-```
-
-Run the following commands to install the repository and Apache APISIX.
+First clone the [apisix-docker](https://github.com/apache/apisix-docker) repository:

 ```shell
-# View the information of the latest apisix package
-sudo yum info -y apisix
-
-# Will show the existing apisix packages
-sudo yum --showduplicates list apisix
-
-# Will install the latest apisix package
-sudo yum install apisix
-
-# Will install a specified version (2.10.3 in this example) apisix package
-sudo yum install apisix-2.10.3-0.el7
+git clone https://github.com/apache/apisix-docker.git
+cd apisix-docker/example
 ```

-### Installation via RPM Offline Package (CentOS)
+Now, you can use `docker-compose` to start APISIX.

-First, download Apache APISIX offline RPM package to `./apisix` folder.
+<Tabs
+  groupId="cpu-arch"
+  defaultValue="x86"
+  values={[
+    {label: 'x86', value: 'x86'},
+    {label: 'ARM/M1', value: 'arm'},
+  ]}>
+<TabItem value="x86">

 ```shell
-sudo mkdir -p apisix
-sudo yum install -y https://repos.apiseven.com/packages/centos/apache-apisix-repo-1.0-1.noarch.rpm
-sudo yum clean all && yum makecache
-sudo yum install -y --downloadonly --downloaddir=./apisix apisix
+docker-compose -p docker-apisix up -d
 ```

-Then copy `./apisix` folder to the target host and run the following command to install.
+</TabItem>
+
+<TabItem value="arm">

 ```shell
-sudo yum install ./apisix/*.rpm
+docker-compose -p docker-apisix -f docker-compose-arm64.yml up -d
 ```

-### Installation via Docker
-
-Please refer to [Installing Apache APISIX with Docker](https://hub.docker.com/r/apache/apisix).
-
-### Installation via Helm Chart
-
-Please refer to [Installing Apache APISIX with Helm Chart](https://github.com/apache/apisix-helm-chart).
-
-### Installation via Source Release Package
-
-Note: if you want to package Apache APISIX for a specific platform, please refer to https://github.com/api7/apisix-build-tools and add the support there.
-The instruction here is only for people who want to setup their Apache APISIX development environment.
-
-Follow the steps below to install Apache APISIX via the source release package.
-
-1. Install dependencies
+</TabItem>
+</Tabs>

-  ```shell
-  curl https://raw.githubusercontent.com/apache/apisix/master/utils/install-dependencies.sh -sL | bash -
-  ```
+</TabItem>

-2. Create a directory named `apisix-2.13.0`.
+<TabItem value="helm">

-  ```shell
-  APISIX_VERSION='2.13.0'
-  mkdir apisix-${APISIX_VERSION}
-  ```
+To install APISIX via Helm, run:

-3. Download the Apache APISIX source release package.
-
-  ```shell
-  wget https://downloads.apache.org/apisix/${APISIX_VERSION}/apache-apisix-${APISIX_VERSION}-src.tgz
-  ```
-
-  You can also download the Apache APISIX source release package from the [Apache APISIX website](https://apisix.apache.org/downloads/). The website also provides source packages for Apache APISIX, APISIX Dashboard, and APISIX Ingress Controller.
-
-4. Uncompress the Apache APISIX source release package.
-
-  ```shell
-  tar zxvf apache-apisix-${APISIX_VERSION}-src.tgz -C apisix-${APISIX_VERSION}
-  ```
-
-5. Install the runtime dependent Lua libraries.
-
-  ```shell
-  # Switch to the apisix-${APISIX_VERSION} directory
-  cd apisix-${APISIX_VERSION}
-  # Create dependencies
-  make deps
-  ```
-
-  **Note**: If you fail to install dependency packages using `make deps` and get an error message like `Could not find header file for LDAP/PCRE/openssl`, you can use this general method to solve problems.
-
-  The general solution: `luarocks` supports custom compile-time dependency directories(from this [link](https://github.com/luarocks/luarocks/wiki/Config-file-format)). Use a third-party tool to install the missing package and add its installation directory to the `luarocks`'s variables table. This a general method which can be applied to macOS, Ubuntu, CentOS or other usual operating systems, and the specific solution for macOS are given here for reference only.
-
-  The following is the solution of macOS, which is similar to that of other operating systems:
-
-    1. Install `openldap` with `brew install openldap`;
-    2. Locate installation directory with `brew --prefix openldap`;
-    3. Add the path to the project configuration file(choose one of the following two methods):
-       1. Solution A: You can set `LDAP_DIR` with `luarocks config` manually, for example `luarocks config variables.LDAP_DIR /opt/homebrew/cellar/openldap/2.6.1`;
-       2. Solution B: Of course, you can also choose to change the default configuration file of luarocks directly, execute the 'cat ~/.luarocks/config-5.1.lua' command, and then add the installation directory of 'openldap' to the file;
-       3. Example as follows:
-          variables = {
-              LDAP_DIR = "/opt/homebrew/cellar/openldap/2.6.1",
-              LDAP_INCDIR = "/opt/homebrew/cellar/openldap/2.6.1/include",
-          }
-
-     `/opt/homebrew/cellar/openldap/` is default path to install openldap on macOS(Apple Silicon) using brew.
-     `/usr/local/opt/openldap/` is default path to install openldap on macOS(Intel) using brew.
-
-6. To uninstall the Apache APISIX runtime, run:
-
-   ```shell
-   # Purge dependencies
-   make undeps
-   ```
-
-   **Note**: This operation will remove the files completely.
-
-#### LTS version installation via Source Release Package
-
-The [current LTS version](https://apisix.apache.org/downloads/) of Apache APISIX is `2.13.0`.
+```shell
+helm repo add apisix https://charts.apiseven.com
+helm repo update
+helm install apisix apisix/apisix --create-namespace  --namespace apisix
+```

-To install this version, set `APISIX_VERSION` in [Installation via Source Release Package](#installation-via-source-release-package) to this version and continue with the other steps.
+You can find other Helm charts on the [apisix-helm-chart](https://github.com/apache/apisix-helm-chart) repository.

-## Step 2: Install etcd
+</TabItem>

-This step is required only if you haven't installed [etcd](https://github.com/etcd-io/etcd).
+<TabItem value="rpm">

-Run the command below to install etcd via the binary in Linux:
+This installation method is suitable for CentOS 7 and Centos 8.

-```shell
-ETCD_VERSION='3.4.18'
-wget https://github.com/etcd-io/etcd/releases/download/v${ETCD_VERSION}/etcd-v${ETCD_VERSION}-linux-amd64.tar.gz
-tar -xvf etcd-v${ETCD_VERSION}-linux-amd64.tar.gz && \
-  cd etcd-v${ETCD_VERSION}-linux-amd64 && \
-  sudo cp -a etcd etcdctl /usr/bin/
-nohup etcd >/tmp/etcd.log 2>&1 &
-```
+### Installation via RPM repository

-Run the command below to install etcd in Mac:
+If OpenResty is **not** installed, you can run the command below to install both OpenResty and APISIX repositories:

 ```shell
-brew install etcd
-# start etcd server
-brew services start etcd
+sudo yum install -y https://repos.apiseven.com/packages/centos/apache-apisix-repo-1.0-1.noarch.rpm
 ```

-## Step 3: Manage Apache APISIX Server
-
-In the Apache APISIX directory, you can initialize dependencies, start service and stop service with commands. Run `apisix help` to get a full list of available commands.
-
-### Initializing dependencies
-
-Run the following command to initialize the NGINX configuration file and etcd.
+If OpenResty is installed, the command below will install the APISIX repositories:

 ```shell
-# initialize NGINX config file and etcd
-apisix init
+sudo yum-config-manager --add-repo https://repos.apiseven.com/packages/centos/apache-apisix.repo
 ```

-### Test the configuration file
-
-Run the following command to test the configuration file. APISIX will generate `nginx.conf` from `config.yaml` and check whether the syntax of `nginx.conf` is correct.
+Then, to install APISIX, run:

 ```shell
-# generate `nginx.conf` from `config.yaml` and test it
-apisix test
+sudo yum install apisix
 ```

-### Start Apache APISIX
+:::tip

-Run the following command to start Apache APISIX.
+You can also install a specific version of APISIX by specifying it:

 ```shell
-# start Apache APISIX server
-apisix start
+sudo yum install apisix-2.10.3-0.el7
 ```

-### Stop Apache APISIX
-
-Both `apisix quit` and `apisix stop` can stop Apache APISIX. The main difference is that `apisix quit` stops Apache APISIX gracefully, while `apisix stop` stops Apache APISIX immediately.
+:::

-It is recommended to use the "gracefully stop" command `apisix quit` because it ensures that Apache APISIX will complete all the requests it has received before stopping. On the other hand, `apisix stop` will trigger a forced shutdown and will stop Apache APISIX immediately. This will cause the pending incoming requests to not be processed before shutdown.
+### Installation via RPM offline package

-To perform a graceful shutdown, run:
+First, download APISIX RPM offline package to an `apisix` folder:

 ```shell
-# stop Apache APISIX server gracefully
-apisix quit
+sudo mkdir -p apisix
+sudo yum install -y https://repos.apiseven.com/packages/centos/apache-apisix-repo-1.0-1.noarch.rpm
+sudo yum clean all && yum makecache
+sudo yum install -y --downloadonly --downloaddir=./apisix apisix
 ```

-To perform a forced shutdown, run:
+Then copy the `apisix` folder to the target host and run:

 ```shell
-# stop Apache APISIX server immediately
-apisix stop
+sudo yum install ./apisix/*.rpm
 ```

-### Other operations
+### Managing APISIX server

-You can get help and learn more about all the available operations in Apache APISIX by running the `help` command as shown below.
+Once APISIX is installed, you can initialize the configuration file and etcd by running:

 ```shell
-# show a list of available operations
-apisix help
+apisix init
 ```

-## Step 4: Run Test Cases
-
-To run the test cases, run the steps outlined below.
-
-1. [Install `cpanminus`](https://metacpan.org/pod/App::cpanminus#INSTALLATION), the package manager for `perl`.
+To start APISIX server, run:

-2. Install the test-nginx dependencies via `cpanm` as shown below.
-
-  ```shell
-  sudo cpanm --notest Test::Nginx IPC::Run > build.log 2>&1 || (cat build.log && exit 1)
-  ```
-
-3. Clone the latest source code locally by using the forked out version.
-
-  ```shell
-  git clone https://github.com/openresty/test-nginx.git
-  ```
+```shell
+apisix start
+```

-4. There are two ways to run the tests.
+:::tip

-  1. Append the current directory to the perl module directory: `export PERL5LIB=.:$PERL5LIB` and then run `make test` command.
+Run `apisix help` to get a list of all available operations.

-  2. Specify the NGINX binary path by running `TEST_NGINX_BINARY=/usr/local/bin/openresty prove -Itest-nginx/lib -r t`.
+:::

-  <!--
-  #
-  #    In addition to the basic Markdown syntax, we use remark-admonitions
-  #    alongside MDX to add support for admonitions. Admonitions are wrapped
-  #    by a set of 3 colons.
-  #    Please refer to https://docusaurus.io/docs/next/markdown-features/admonitions
-  #    for more detail.
-  #
-  -->
+</TabItem>
+</Tabs>

-  :::note Note
-  Some of the tests rely on external services and system configuration modification. For a complete test environment build, you can refer to `ci/linux_openresty_common_runner.sh`.
-  :::
+## Installing etcd

-### Troubleshoot testing
+APISIX uses [etcd](https://github.com/etcd-io/etcd) to save and synchronize configuration.

-#### Configuring NGINX path
+etcd would be installed automatically if you have chosen the Docker or Helm install method above.

-The solution to the `Error unknown directive "lua_package_path" in /API_ASPIX/apisix/t/servroot/conf/nginx.conf` error is as shown below.
+If etcd is not installed you can install it as shown below.

-Ensure that OpenResty is set to the default NGINX, and export the path as follows:
+<Tabs
+  groupId="os"
+  defaultValue="linux"
+  values={[
+    {label: 'Linux', value: 'linux'},
+    {label: 'macOS', value: 'mac'},
+  ]}>
+<TabItem value="linux">

-* `export PATH=/usr/local/openresty/nginx/sbin:$PATH`
-  * Linux default installation path:
-    * `export PATH=/usr/local/openresty/nginx/sbin:$PATH`
-  * MacOS default installation path via homebrew:
-    * `export PATH=/usr/local/opt/openresty/nginx/sbin:$PATH`
+```shell
+ETCD_VERSION='3.4.18'
+wget https://github.com/etcd-io/etcd/releases/download/v${ETCD_VERSION}/etcd-v${ETCD_VERSION}-linux-amd64.tar.gz
+tar -xvf etcd-v${ETCD_VERSION}-linux-amd64.tar.gz && \
+  cd etcd-v${ETCD_VERSION}-linux-amd64 && \
+  sudo cp -a etcd etcdctl /usr/bin/
+nohup etcd >/tmp/etcd.log 2>&1 &
+```

-#### Running a single test case
+</TabItem>

-To run a specific test case, use the command below.
+<TabItem value="mac">

 ```shell
-prove -Itest-nginx/lib -r t/plugin/openid-connect.t
+brew install etcd
+brew services start etcd
 ```

-For more details on the test cases, see the [testing framework](https://github.com/apache/apisix/blob/master/docs/en/latest/internal/testing-framework.md) document.
+</TabItem>
+</Tabs>

-## Step 5: Update Admin API token to Secure Apache APISIX
+## Next steps

-You can modify the Admin API key to secure your Apache APISIX deployment.
+### Updating Admin API key

-This can be done by modifying the `apisix.admin_key` in `conf/config.yaml` and restarting the service.
+It is recommended to modify the Admin API key to ensure security.

-```yaml
+You can update your configuration file as shown below:
+
+```yaml title="conf/config.yaml"
 apisix:
-  # ... ...
   admin_key
     -
       name: "admin"
-      key: abcdefghabcdefgh # Modify the original key to abcdefghabcdefgh
+      key: newsupersecurekey
       role: admin
 ```

-Then to access the Admin API, you can use the above key.
-
-```shell
-curl http://127.0.0.1:9080/apisix/admin/routes?api_key=abcdefghabcdefgh -i
-```
-
-A status code of 200 in the returned result will indicate that the access was successful.
+Now, to access the Admin API, you can use the new key:

 ```shell
-HTTP/1.1 200 OK
-Date: Fri, 28 Feb 2020 07:48:04 GMT
-Content-Type: text/plain
-... ...
-{"node":{...},"action":"get"}
+curl http://127.0.0.1:9080/apisix/admin/routes?api_key=newsupersecurekey -i
 ```

-If the key you entered does not match the value of `apisix.admin_key` in `conf/config.yaml`, a response with a status code 401 will indicate that the access failed.
+### Adding APISIX systemd unit file

-```shell
-curl http://127.0.0.1:9080/apisix/admin/routes?api_key=wrong-key -i
-```
-
-```shell
-HTTP/1.1 401 Unauthorized
-Date: Fri, 28 Feb 2020 08:17:58 GMT
-Content-Type: text/html
-... ...
-{"node":{...},"action":"get"}
-```
-
-## Step 6: Build OpenResty for Apache APISIX
-
-Some features require additional NGINX modules to be introduced into OpenResty.
-
-If you need these features, you can build APISIX OpenResty. You can refer to the source of [api7/apisix-build-tools](https://github.com/api7/apisix-build-tools) for setting up your build environment and building APISIX OpenResty.
-
-## Step 7: Add Systemd unit file for Apache APISIX
-
-If you are using CentOS and installed [Apache APISIX via the RPM package](#installation-via-rpm-repository-centos), the configuration file will already be in place and you can run the following command directly.
+If you installed APISIX via RPM, the APISIX unit file will already be configured and you can start APISIX by:

 ```shell
 systemctl start apisix
 systemctl stop apisix
 ```

-If you installed Apache APISIX by other methods, please refer to the [configuration file template](https://github.com/api7/apisix-build-tools/blob/master/usr/lib/systemd/system/apisix.service) for a modification guide and copy it to the `/usr/lib/systemd/system/apisix.service` path.
+If you installed APISIX through other methods, you can create `/usr/lib/systemd/system/apisix.service` and add the [configuration from the template](https://github.com/api7/apisix-build-tools/blob/master/usr/lib/systemd/system/apisix.service).
+
+See the [Getting Started](./getting-started.md) guide for a quick walk-through of using APISIX.

Review Comment:
   ```suggestion
   See the [Getting Started](./getting-started.md#Create-a-Route) guide for a quick walk-through of using APISIX.
   ```


##########
docs/en/latest/how-to-build.md:
##########
@@ -21,351 +25,220 @@ title: Installing Apache APISIX
 #
 -->

-This guide walks you through how you can build and get Apache APISIX running on your environment. Please refer the [Getting Started](./getting-started.md) guide for a quick walkthrough on running Apache APISIX.
+import Tabs from '@theme/Tabs';
+import TabItem from '@theme/TabItem';

-## Step 1: Install Apache APISIX
+This guide walks you through how you can install and run Apache APISIX in your environment.

-Apache APISIX can be installed via the [RPM package](#installation-via-rpm-repository-centos), [Docker image](#installation-via-docker), [Helm Chart](#installation-via-helm-chart) or the [source release package](#installation-via-source-release-package). You can install via any one of these options.
+Refer to the [Getting Started](./getting-started.md) guide for a quick walk-through on running Apache APISIX.

-### Installation via RPM Repository (CentOS)
+## Installing APISIX

-> This installation method is suitable for CentOS 7 and CentOS 8.
+APISIX can be installed by the different methods listed below:

-If the official OpenResty repository is **not installed yet**, the following command will help you automatically install both OpenResty and Apache APISIX repositories.
+<Tabs
+  groupId="install-method"
+  defaultValue="docker"
+  values={[
+    {label: 'Docker', value: 'docker'},
+    {label: 'Helm', value: 'helm'},
+    {label: 'RPM', value: 'rpm'},
+  ]}>
+<TabItem value="docker">

-```shell
-sudo yum install -y https://repos.apiseven.com/packages/centos/apache-apisix-repo-1.0-1.noarch.rpm
-```
-
-If the official OpenResty repository **is installed**, the following command will help you automatically install the repositories of Apache APISIX.
-
-```shell
-sudo yum-config-manager --add-repo https://repos.apiseven.com/packages/centos/apache-apisix.repo
-```
-
-Run the following commands to install the repository and Apache APISIX.
+First clone the [apisix-docker](https://github.com/apache/apisix-docker) repository:

 ```shell
-# View the information of the latest apisix package
-sudo yum info -y apisix
-
-# Will show the existing apisix packages
-sudo yum --showduplicates list apisix
-
-# Will install the latest apisix package
-sudo yum install apisix
-
-# Will install a specified version (2.10.3 in this example) apisix package
-sudo yum install apisix-2.10.3-0.el7
+git clone https://github.com/apache/apisix-docker.git
+cd apisix-docker/example
 ```

-### Installation via RPM Offline Package (CentOS)
+Now, you can use `docker-compose` to start APISIX.

-First, download Apache APISIX offline RPM package to `./apisix` folder.
+<Tabs
+  groupId="cpu-arch"
+  defaultValue="x86"
+  values={[
+    {label: 'x86', value: 'x86'},
+    {label: 'ARM/M1', value: 'arm'},
+  ]}>
+<TabItem value="x86">

 ```shell
-sudo mkdir -p apisix
-sudo yum install -y https://repos.apiseven.com/packages/centos/apache-apisix-repo-1.0-1.noarch.rpm
-sudo yum clean all && yum makecache
-sudo yum install -y --downloadonly --downloaddir=./apisix apisix
+docker-compose -p docker-apisix up -d
 ```

-Then copy `./apisix` folder to the target host and run the following command to install.
+</TabItem>
+
+<TabItem value="arm">

 ```shell
-sudo yum install ./apisix/*.rpm
+docker-compose -p docker-apisix -f docker-compose-arm64.yml up -d
 ```

-### Installation via Docker
-
-Please refer to [Installing Apache APISIX with Docker](https://hub.docker.com/r/apache/apisix).
-
-### Installation via Helm Chart
-
-Please refer to [Installing Apache APISIX with Helm Chart](https://github.com/apache/apisix-helm-chart).
-
-### Installation via Source Release Package
-
-Note: if you want to package Apache APISIX for a specific platform, please refer to https://github.com/api7/apisix-build-tools and add the support there.
-The instruction here is only for people who want to setup their Apache APISIX development environment.
-
-Follow the steps below to install Apache APISIX via the source release package.
-
-1. Install dependencies
+</TabItem>
+</Tabs>

-  ```shell
-  curl https://raw.githubusercontent.com/apache/apisix/master/utils/install-dependencies.sh -sL | bash -
-  ```
+</TabItem>

-2. Create a directory named `apisix-2.13.0`.
+<TabItem value="helm">

-  ```shell
-  APISIX_VERSION='2.13.0'
-  mkdir apisix-${APISIX_VERSION}
-  ```
+To install APISIX via Helm, run:

-3. Download the Apache APISIX source release package.
-
-  ```shell
-  wget https://downloads.apache.org/apisix/${APISIX_VERSION}/apache-apisix-${APISIX_VERSION}-src.tgz
-  ```
-
-  You can also download the Apache APISIX source release package from the [Apache APISIX website](https://apisix.apache.org/downloads/). The website also provides source packages for Apache APISIX, APISIX Dashboard, and APISIX Ingress Controller.
-
-4. Uncompress the Apache APISIX source release package.
-
-  ```shell
-  tar zxvf apache-apisix-${APISIX_VERSION}-src.tgz -C apisix-${APISIX_VERSION}
-  ```
-
-5. Install the runtime dependent Lua libraries.
-
-  ```shell
-  # Switch to the apisix-${APISIX_VERSION} directory
-  cd apisix-${APISIX_VERSION}
-  # Create dependencies
-  make deps
-  ```
-
-  **Note**: If you fail to install dependency packages using `make deps` and get an error message like `Could not find header file for LDAP/PCRE/openssl`, you can use this general method to solve problems.
-
-  The general solution: `luarocks` supports custom compile-time dependency directories(from this [link](https://github.com/luarocks/luarocks/wiki/Config-file-format)). Use a third-party tool to install the missing package and add its installation directory to the `luarocks`'s variables table. This a general method which can be applied to macOS, Ubuntu, CentOS or other usual operating systems, and the specific solution for macOS are given here for reference only.
-
-  The following is the solution of macOS, which is similar to that of other operating systems:
-
-    1. Install `openldap` with `brew install openldap`;
-    2. Locate installation directory with `brew --prefix openldap`;
-    3. Add the path to the project configuration file(choose one of the following two methods):
-       1. Solution A: You can set `LDAP_DIR` with `luarocks config` manually, for example `luarocks config variables.LDAP_DIR /opt/homebrew/cellar/openldap/2.6.1`;
-       2. Solution B: Of course, you can also choose to change the default configuration file of luarocks directly, execute the 'cat ~/.luarocks/config-5.1.lua' command, and then add the installation directory of 'openldap' to the file;
-       3. Example as follows:
-          variables = {
-              LDAP_DIR = "/opt/homebrew/cellar/openldap/2.6.1",
-              LDAP_INCDIR = "/opt/homebrew/cellar/openldap/2.6.1/include",
-          }
-
-     `/opt/homebrew/cellar/openldap/` is default path to install openldap on macOS(Apple Silicon) using brew.
-     `/usr/local/opt/openldap/` is default path to install openldap on macOS(Intel) using brew.
-
-6. To uninstall the Apache APISIX runtime, run:
-
-   ```shell
-   # Purge dependencies
-   make undeps
-   ```
-
-   **Note**: This operation will remove the files completely.
-
-#### LTS version installation via Source Release Package
-
-The [current LTS version](https://apisix.apache.org/downloads/) of Apache APISIX is `2.13.0`.
+```shell
+helm repo add apisix https://charts.apiseven.com
+helm repo update
+helm install apisix apisix/apisix --create-namespace  --namespace apisix
+```

-To install this version, set `APISIX_VERSION` in [Installation via Source Release Package](#installation-via-source-release-package) to this version and continue with the other steps.
+You can find other Helm charts on the [apisix-helm-chart](https://github.com/apache/apisix-helm-chart) repository.

-## Step 2: Install etcd
+</TabItem>

-This step is required only if you haven't installed [etcd](https://github.com/etcd-io/etcd).
+<TabItem value="rpm">

-Run the command below to install etcd via the binary in Linux:
+This installation method is suitable for CentOS 7 and Centos 8.

-```shell
-ETCD_VERSION='3.4.18'
-wget https://github.com/etcd-io/etcd/releases/download/v${ETCD_VERSION}/etcd-v${ETCD_VERSION}-linux-amd64.tar.gz
-tar -xvf etcd-v${ETCD_VERSION}-linux-amd64.tar.gz && \
-  cd etcd-v${ETCD_VERSION}-linux-amd64 && \
-  sudo cp -a etcd etcdctl /usr/bin/
-nohup etcd >/tmp/etcd.log 2>&1 &
-```
+### Installation via RPM repository

-Run the command below to install etcd in Mac:
+If OpenResty is **not** installed, you can run the command below to install both OpenResty and APISIX repositories:

 ```shell
-brew install etcd
-# start etcd server
-brew services start etcd
+sudo yum install -y https://repos.apiseven.com/packages/centos/apache-apisix-repo-1.0-1.noarch.rpm
 ```

-## Step 3: Manage Apache APISIX Server
-
-In the Apache APISIX directory, you can initialize dependencies, start service and stop service with commands. Run `apisix help` to get a full list of available commands.
-
-### Initializing dependencies
-
-Run the following command to initialize the NGINX configuration file and etcd.
+If OpenResty is installed, the command below will install the APISIX repositories:

 ```shell
-# initialize NGINX config file and etcd
-apisix init
+sudo yum-config-manager --add-repo https://repos.apiseven.com/packages/centos/apache-apisix.repo
 ```

-### Test the configuration file
-
-Run the following command to test the configuration file. APISIX will generate `nginx.conf` from `config.yaml` and check whether the syntax of `nginx.conf` is correct.
+Then, to install APISIX, run:

 ```shell
-# generate `nginx.conf` from `config.yaml` and test it
-apisix test
+sudo yum install apisix
 ```

-### Start Apache APISIX
+:::tip

-Run the following command to start Apache APISIX.
+You can also install a specific version of APISIX by specifying it:

 ```shell
-# start Apache APISIX server
-apisix start
+sudo yum install apisix-2.10.3-0.el7
 ```

-### Stop Apache APISIX
-
-Both `apisix quit` and `apisix stop` can stop Apache APISIX. The main difference is that `apisix quit` stops Apache APISIX gracefully, while `apisix stop` stops Apache APISIX immediately.
+:::

-It is recommended to use the "gracefully stop" command `apisix quit` because it ensures that Apache APISIX will complete all the requests it has received before stopping. On the other hand, `apisix stop` will trigger a forced shutdown and will stop Apache APISIX immediately. This will cause the pending incoming requests to not be processed before shutdown.
+### Installation via RPM offline package

-To perform a graceful shutdown, run:
+First, download APISIX RPM offline package to an `apisix` folder:

 ```shell
-# stop Apache APISIX server gracefully
-apisix quit
+sudo mkdir -p apisix
+sudo yum install -y https://repos.apiseven.com/packages/centos/apache-apisix-repo-1.0-1.noarch.rpm
+sudo yum clean all && yum makecache
+sudo yum install -y --downloadonly --downloaddir=./apisix apisix
 ```

-To perform a forced shutdown, run:
+Then copy the `apisix` folder to the target host and run:

 ```shell
-# stop Apache APISIX server immediately
-apisix stop
+sudo yum install ./apisix/*.rpm
 ```

-### Other operations
+### Managing APISIX server

-You can get help and learn more about all the available operations in Apache APISIX by running the `help` command as shown below.
+Once APISIX is installed, you can initialize the configuration file and etcd by running:

 ```shell
-# show a list of available operations
-apisix help
+apisix init
 ```

-## Step 4: Run Test Cases
-
-To run the test cases, run the steps outlined below.
-
-1. [Install `cpanminus`](https://metacpan.org/pod/App::cpanminus#INSTALLATION), the package manager for `perl`.
+To start APISIX server, run:

-2. Install the test-nginx dependencies via `cpanm` as shown below.
-
-  ```shell
-  sudo cpanm --notest Test::Nginx IPC::Run > build.log 2>&1 || (cat build.log && exit 1)
-  ```
-
-3. Clone the latest source code locally by using the forked out version.
-
-  ```shell
-  git clone https://github.com/openresty/test-nginx.git
-  ```
+```shell
+apisix start
+```

-4. There are two ways to run the tests.
+:::tip

-  1. Append the current directory to the perl module directory: `export PERL5LIB=.:$PERL5LIB` and then run `make test` command.
+Run `apisix help` to get a list of all available operations.

-  2. Specify the NGINX binary path by running `TEST_NGINX_BINARY=/usr/local/bin/openresty prove -Itest-nginx/lib -r t`.
+:::

-  <!--
-  #
-  #    In addition to the basic Markdown syntax, we use remark-admonitions
-  #    alongside MDX to add support for admonitions. Admonitions are wrapped
-  #    by a set of 3 colons.
-  #    Please refer to https://docusaurus.io/docs/next/markdown-features/admonitions
-  #    for more detail.
-  #
-  -->
+</TabItem>
+</Tabs>

-  :::note Note
-  Some of the tests rely on external services and system configuration modification. For a complete test environment build, you can refer to `ci/linux_openresty_common_runner.sh`.
-  :::
+## Installing etcd

-### Troubleshoot testing
+APISIX uses [etcd](https://github.com/etcd-io/etcd) to save and synchronize configuration.

-#### Configuring NGINX path
+etcd would be installed automatically if you have chosen the Docker or Helm install method above.

-The solution to the `Error unknown directive "lua_package_path" in /API_ASPIX/apisix/t/servroot/conf/nginx.conf` error is as shown below.
+If etcd is not installed you can install it as shown below.

-Ensure that OpenResty is set to the default NGINX, and export the path as follows:
+<Tabs
+  groupId="os"
+  defaultValue="linux"
+  values={[
+    {label: 'Linux', value: 'linux'},
+    {label: 'macOS', value: 'mac'},
+  ]}>
+<TabItem value="linux">

-* `export PATH=/usr/local/openresty/nginx/sbin:$PATH`
-  * Linux default installation path:
-    * `export PATH=/usr/local/openresty/nginx/sbin:$PATH`
-  * MacOS default installation path via homebrew:
-    * `export PATH=/usr/local/opt/openresty/nginx/sbin:$PATH`
+```shell
+ETCD_VERSION='3.4.18'
+wget https://github.com/etcd-io/etcd/releases/download/v${ETCD_VERSION}/etcd-v${ETCD_VERSION}-linux-amd64.tar.gz
+tar -xvf etcd-v${ETCD_VERSION}-linux-amd64.tar.gz && \
+  cd etcd-v${ETCD_VERSION}-linux-amd64 && \
+  sudo cp -a etcd etcdctl /usr/bin/
+nohup etcd >/tmp/etcd.log 2>&1 &
+```

-#### Running a single test case
+</TabItem>

-To run a specific test case, use the command below.
+<TabItem value="mac">

 ```shell
-prove -Itest-nginx/lib -r t/plugin/openid-connect.t
+brew install etcd
+brew services start etcd
 ```

-For more details on the test cases, see the [testing framework](https://github.com/apache/apisix/blob/master/docs/en/latest/internal/testing-framework.md) document.
+</TabItem>
+</Tabs>

Review Comment:
   We shouldn't need to install etcd on MacOS as I didn't see installing APISIX for MacOS in the installation steps.


--
This is an automated message from the Apache Git Service.
To respond to the message, please log on to GitHub and use the
URL above to go to the specific comment.

To unsubscribe, e-mail: notifications-unsubscribe@apisix.apache.org

For queries about this service, please contact Infrastructure at:
users@infra.apache.org
[GitHub] [apisix] navendu-pottekkat commented on a diff in pull request #6964: docs: update "Installation" guide
Posted by GitBox <gi...@apache.org>.
navendu-pottekkat commented on code in PR #6964:
URL: https://github.com/apache/apisix/pull/6964#discussion_r861444005


##########
docs/en/latest/how-to-build.md:
##########
@@ -21,351 +25,220 @@ title: Installing Apache APISIX
 #
 -->

-This guide walks you through how you can build and get Apache APISIX running on your environment. Please refer the [Getting Started](./getting-started.md) guide for a quick walkthrough on running Apache APISIX.
+import Tabs from '@theme/Tabs';
+import TabItem from '@theme/TabItem';

-## Step 1: Install Apache APISIX
+This guide walks you through how you can install and run Apache APISIX in your environment.

-Apache APISIX can be installed via the [RPM package](#installation-via-rpm-repository-centos), [Docker image](#installation-via-docker), [Helm Chart](#installation-via-helm-chart) or the [source release package](#installation-via-source-release-package). You can install via any one of these options.
+Refer to the [Getting Started](./getting-started.md) guide for a quick walk-through on running Apache APISIX.

-### Installation via RPM Repository (CentOS)
+## Installing APISIX

-> This installation method is suitable for CentOS 7 and CentOS 8.
+APISIX can be installed by the different methods listed below:

-If the official OpenResty repository is **not installed yet**, the following command will help you automatically install both OpenResty and Apache APISIX repositories.
+<Tabs
+  groupId="install-method"
+  defaultValue="docker"
+  values={[
+    {label: 'Docker', value: 'docker'},
+    {label: 'Helm', value: 'helm'},
+    {label: 'RPM', value: 'rpm'},
+  ]}>
+<TabItem value="docker">

-```shell
-sudo yum install -y https://repos.apiseven.com/packages/centos/apache-apisix-repo-1.0-1.noarch.rpm
-```
-
-If the official OpenResty repository **is installed**, the following command will help you automatically install the repositories of Apache APISIX.
-
-```shell
-sudo yum-config-manager --add-repo https://repos.apiseven.com/packages/centos/apache-apisix.repo
-```
-
-Run the following commands to install the repository and Apache APISIX.
+First clone the [apisix-docker](https://github.com/apache/apisix-docker) repository:

 ```shell
-# View the information of the latest apisix package
-sudo yum info -y apisix
-
-# Will show the existing apisix packages
-sudo yum --showduplicates list apisix
-
-# Will install the latest apisix package
-sudo yum install apisix
-
-# Will install a specified version (2.10.3 in this example) apisix package
-sudo yum install apisix-2.10.3-0.el7
+git clone https://github.com/apache/apisix-docker.git
+cd apisix-docker/example
 ```

-### Installation via RPM Offline Package (CentOS)
+Now, you can use `docker-compose` to start APISIX.

-First, download Apache APISIX offline RPM package to `./apisix` folder.
+<Tabs
+  groupId="cpu-arch"
+  defaultValue="x86"
+  values={[
+    {label: 'x86', value: 'x86'},
+    {label: 'ARM/M1', value: 'arm'},
+  ]}>
+<TabItem value="x86">

 ```shell
-sudo mkdir -p apisix
-sudo yum install -y https://repos.apiseven.com/packages/centos/apache-apisix-repo-1.0-1.noarch.rpm
-sudo yum clean all && yum makecache
-sudo yum install -y --downloadonly --downloaddir=./apisix apisix
+docker-compose -p docker-apisix up -d
 ```

-Then copy `./apisix` folder to the target host and run the following command to install.
+</TabItem>
+
+<TabItem value="arm">

 ```shell
-sudo yum install ./apisix/*.rpm
+docker-compose -p docker-apisix -f docker-compose-arm64.yml up -d
 ```

-### Installation via Docker
-
-Please refer to [Installing Apache APISIX with Docker](https://hub.docker.com/r/apache/apisix).
-
-### Installation via Helm Chart
-
-Please refer to [Installing Apache APISIX with Helm Chart](https://github.com/apache/apisix-helm-chart).
-
-### Installation via Source Release Package
-
-Note: if you want to package Apache APISIX for a specific platform, please refer to https://github.com/api7/apisix-build-tools and add the support there.
-The instruction here is only for people who want to setup their Apache APISIX development environment.
-
-Follow the steps below to install Apache APISIX via the source release package.
-
-1. Install dependencies
+</TabItem>
+</Tabs>

-  ```shell
-  curl https://raw.githubusercontent.com/apache/apisix/master/utils/install-dependencies.sh -sL | bash -
-  ```
+</TabItem>

-2. Create a directory named `apisix-2.13.0`.
+<TabItem value="helm">

-  ```shell
-  APISIX_VERSION='2.13.0'
-  mkdir apisix-${APISIX_VERSION}
-  ```
+To install APISIX via Helm, run:

-3. Download the Apache APISIX source release package.
-
-  ```shell
-  wget https://downloads.apache.org/apisix/${APISIX_VERSION}/apache-apisix-${APISIX_VERSION}-src.tgz
-  ```
-
-  You can also download the Apache APISIX source release package from the [Apache APISIX website](https://apisix.apache.org/downloads/). The website also provides source packages for Apache APISIX, APISIX Dashboard, and APISIX Ingress Controller.
-
-4. Uncompress the Apache APISIX source release package.
-
-  ```shell
-  tar zxvf apache-apisix-${APISIX_VERSION}-src.tgz -C apisix-${APISIX_VERSION}
-  ```
-
-5. Install the runtime dependent Lua libraries.
-
-  ```shell
-  # Switch to the apisix-${APISIX_VERSION} directory
-  cd apisix-${APISIX_VERSION}
-  # Create dependencies
-  make deps
-  ```
-
-  **Note**: If you fail to install dependency packages using `make deps` and get an error message like `Could not find header file for LDAP/PCRE/openssl`, you can use this general method to solve problems.
-
-  The general solution: `luarocks` supports custom compile-time dependency directories(from this [link](https://github.com/luarocks/luarocks/wiki/Config-file-format)). Use a third-party tool to install the missing package and add its installation directory to the `luarocks`'s variables table. This a general method which can be applied to macOS, Ubuntu, CentOS or other usual operating systems, and the specific solution for macOS are given here for reference only.
-
-  The following is the solution of macOS, which is similar to that of other operating systems:
-
-    1. Install `openldap` with `brew install openldap`;
-    2. Locate installation directory with `brew --prefix openldap`;
-    3. Add the path to the project configuration file(choose one of the following two methods):
-       1. Solution A: You can set `LDAP_DIR` with `luarocks config` manually, for example `luarocks config variables.LDAP_DIR /opt/homebrew/cellar/openldap/2.6.1`;
-       2. Solution B: Of course, you can also choose to change the default configuration file of luarocks directly, execute the 'cat ~/.luarocks/config-5.1.lua' command, and then add the installation directory of 'openldap' to the file;
-       3. Example as follows:
-          variables = {
-              LDAP_DIR = "/opt/homebrew/cellar/openldap/2.6.1",
-              LDAP_INCDIR = "/opt/homebrew/cellar/openldap/2.6.1/include",
-          }
-
-     `/opt/homebrew/cellar/openldap/` is default path to install openldap on macOS(Apple Silicon) using brew.
-     `/usr/local/opt/openldap/` is default path to install openldap on macOS(Intel) using brew.
-
-6. To uninstall the Apache APISIX runtime, run:
-
-   ```shell
-   # Purge dependencies
-   make undeps
-   ```
-
-   **Note**: This operation will remove the files completely.
-
-#### LTS version installation via Source Release Package
-
-The [current LTS version](https://apisix.apache.org/downloads/) of Apache APISIX is `2.13.0`.
+```shell
+helm repo add apisix https://charts.apiseven.com
+helm repo update
+helm install apisix apisix/apisix --create-namespace  --namespace apisix
+```

-To install this version, set `APISIX_VERSION` in [Installation via Source Release Package](#installation-via-source-release-package) to this version and continue with the other steps.
+You can find other Helm charts on the [apisix-helm-chart](https://github.com/apache/apisix-helm-chart) repository.

-## Step 2: Install etcd
+</TabItem>

-This step is required only if you haven't installed [etcd](https://github.com/etcd-io/etcd).
+<TabItem value="rpm">

-Run the command below to install etcd via the binary in Linux:
+This installation method is suitable for CentOS 7 and Centos 8.

-```shell
-ETCD_VERSION='3.4.18'
-wget https://github.com/etcd-io/etcd/releases/download/v${ETCD_VERSION}/etcd-v${ETCD_VERSION}-linux-amd64.tar.gz
-tar -xvf etcd-v${ETCD_VERSION}-linux-amd64.tar.gz && \
-  cd etcd-v${ETCD_VERSION}-linux-amd64 && \
-  sudo cp -a etcd etcdctl /usr/bin/
-nohup etcd >/tmp/etcd.log 2>&1 &
-```
+### Installation via RPM repository

-Run the command below to install etcd in Mac:
+If OpenResty is **not** installed, you can run the command below to install both OpenResty and APISIX repositories:

 ```shell
-brew install etcd
-# start etcd server
-brew services start etcd
+sudo yum install -y https://repos.apiseven.com/packages/centos/apache-apisix-repo-1.0-1.noarch.rpm
 ```

-## Step 3: Manage Apache APISIX Server
-
-In the Apache APISIX directory, you can initialize dependencies, start service and stop service with commands. Run `apisix help` to get a full list of available commands.
-
-### Initializing dependencies
-
-Run the following command to initialize the NGINX configuration file and etcd.
+If OpenResty is installed, the command below will install the APISIX repositories:

 ```shell
-# initialize NGINX config file and etcd
-apisix init
+sudo yum-config-manager --add-repo https://repos.apiseven.com/packages/centos/apache-apisix.repo
 ```

-### Test the configuration file
-
-Run the following command to test the configuration file. APISIX will generate `nginx.conf` from `config.yaml` and check whether the syntax of `nginx.conf` is correct.
+Then, to install APISIX, run:

 ```shell
-# generate `nginx.conf` from `config.yaml` and test it
-apisix test
+sudo yum install apisix
 ```

-### Start Apache APISIX
+:::tip

-Run the following command to start Apache APISIX.
+You can also install a specific version of APISIX by specifying it:

 ```shell
-# start Apache APISIX server
-apisix start
+sudo yum install apisix-2.10.3-0.el7
 ```

-### Stop Apache APISIX
-
-Both `apisix quit` and `apisix stop` can stop Apache APISIX. The main difference is that `apisix quit` stops Apache APISIX gracefully, while `apisix stop` stops Apache APISIX immediately.
+:::

-It is recommended to use the "gracefully stop" command `apisix quit` because it ensures that Apache APISIX will complete all the requests it has received before stopping. On the other hand, `apisix stop` will trigger a forced shutdown and will stop Apache APISIX immediately. This will cause the pending incoming requests to not be processed before shutdown.
+### Installation via RPM offline package

-To perform a graceful shutdown, run:
+First, download APISIX RPM offline package to an `apisix` folder:

 ```shell
-# stop Apache APISIX server gracefully
-apisix quit
+sudo mkdir -p apisix
+sudo yum install -y https://repos.apiseven.com/packages/centos/apache-apisix-repo-1.0-1.noarch.rpm
+sudo yum clean all && yum makecache
+sudo yum install -y --downloadonly --downloaddir=./apisix apisix
 ```

-To perform a forced shutdown, run:
+Then copy the `apisix` folder to the target host and run:

 ```shell
-# stop Apache APISIX server immediately
-apisix stop
+sudo yum install ./apisix/*.rpm
 ```

-### Other operations
+### Managing APISIX server

-You can get help and learn more about all the available operations in Apache APISIX by running the `help` command as shown below.
+Once APISIX is installed, you can initialize the configuration file and etcd by running:

 ```shell
-# show a list of available operations
-apisix help
+apisix init
 ```

-## Step 4: Run Test Cases
-
-To run the test cases, run the steps outlined below.
-
-1. [Install `cpanminus`](https://metacpan.org/pod/App::cpanminus#INSTALLATION), the package manager for `perl`.
+To start APISIX server, run:

-2. Install the test-nginx dependencies via `cpanm` as shown below.
-
-  ```shell
-  sudo cpanm --notest Test::Nginx IPC::Run > build.log 2>&1 || (cat build.log && exit 1)
-  ```
-
-3. Clone the latest source code locally by using the forked out version.
-
-  ```shell
-  git clone https://github.com/openresty/test-nginx.git
-  ```
+```shell
+apisix start
+```

-4. There are two ways to run the tests.
+:::tip

-  1. Append the current directory to the perl module directory: `export PERL5LIB=.:$PERL5LIB` and then run `make test` command.
+Run `apisix help` to get a list of all available operations.

-  2. Specify the NGINX binary path by running `TEST_NGINX_BINARY=/usr/local/bin/openresty prove -Itest-nginx/lib -r t`.
+:::

-  <!--
-  #
-  #    In addition to the basic Markdown syntax, we use remark-admonitions
-  #    alongside MDX to add support for admonitions. Admonitions are wrapped
-  #    by a set of 3 colons.
-  #    Please refer to https://docusaurus.io/docs/next/markdown-features/admonitions
-  #    for more detail.
-  #
-  -->
+</TabItem>
+</Tabs>

-  :::note Note
-  Some of the tests rely on external services and system configuration modification. For a complete test environment build, you can refer to `ci/linux_openresty_common_runner.sh`.
-  :::
+## Installing etcd

-### Troubleshoot testing
+APISIX uses [etcd](https://github.com/etcd-io/etcd) to save and synchronize configuration.

-#### Configuring NGINX path
+etcd would be installed automatically if you have chosen the Docker or Helm install method above.

-The solution to the `Error unknown directive "lua_package_path" in /API_ASPIX/apisix/t/servroot/conf/nginx.conf` error is as shown below.
+If etcd is not installed you can install it as shown below.

-Ensure that OpenResty is set to the default NGINX, and export the path as follows:
+<Tabs
+  groupId="os"
+  defaultValue="linux"
+  values={[
+    {label: 'Linux', value: 'linux'},
+    {label: 'macOS', value: 'mac'},
+  ]}>
+<TabItem value="linux">

-* `export PATH=/usr/local/openresty/nginx/sbin:$PATH`
-  * Linux default installation path:
-    * `export PATH=/usr/local/openresty/nginx/sbin:$PATH`
-  * MacOS default installation path via homebrew:
-    * `export PATH=/usr/local/opt/openresty/nginx/sbin:$PATH`
+```shell
+ETCD_VERSION='3.4.18'
+wget https://github.com/etcd-io/etcd/releases/download/v${ETCD_VERSION}/etcd-v${ETCD_VERSION}-linux-amd64.tar.gz
+tar -xvf etcd-v${ETCD_VERSION}-linux-amd64.tar.gz && \
+  cd etcd-v${ETCD_VERSION}-linux-amd64 && \
+  sudo cp -a etcd etcdctl /usr/bin/
+nohup etcd >/tmp/etcd.log 2>&1 &
+```

-#### Running a single test case
+</TabItem>

-To run a specific test case, use the command below.
+<TabItem value="mac">

 ```shell
-prove -Itest-nginx/lib -r t/plugin/openid-connect.t
+brew install etcd
+brew services start etcd
 ```

-For more details on the test cases, see the [testing framework](https://github.com/apache/apisix/blob/master/docs/en/latest/internal/testing-framework.md) document.
+</TabItem>
+</Tabs>

-## Step 5: Update Admin API token to Secure Apache APISIX
+## Next steps

-You can modify the Admin API key to secure your Apache APISIX deployment.
+### Updating Admin API key

-This can be done by modifying the `apisix.admin_key` in `conf/config.yaml` and restarting the service.
+It is recommended to modify the Admin API key to ensure security.

-```yaml
+You can update your configuration file as shown below:
+
+```yaml title="conf/config.yaml"
 apisix:
-  # ... ...
   admin_key
     -
       name: "admin"
-      key: abcdefghabcdefgh # Modify the original key to abcdefghabcdefgh
+      key: newsupersecurekey
       role: admin
 ```

-Then to access the Admin API, you can use the above key.
-
-```shell
-curl http://127.0.0.1:9080/apisix/admin/routes?api_key=abcdefghabcdefgh -i
-```
-
-A status code of 200 in the returned result will indicate that the access was successful.
+Now, to access the Admin API, you can use the new key:

 ```shell
-HTTP/1.1 200 OK
-Date: Fri, 28 Feb 2020 07:48:04 GMT
-Content-Type: text/plain
-... ...
-{"node":{...},"action":"get"}
+curl http://127.0.0.1:9080/apisix/admin/routes?api_key=newsupersecurekey -i
 ```

-If the key you entered does not match the value of `apisix.admin_key` in `conf/config.yaml`, a response with a status code 401 will indicate that the access failed.
+### Adding APISIX systemd unit file

-```shell
-curl http://127.0.0.1:9080/apisix/admin/routes?api_key=wrong-key -i
-```
-
-```shell
-HTTP/1.1 401 Unauthorized
-Date: Fri, 28 Feb 2020 08:17:58 GMT
-Content-Type: text/html
-... ...
-{"node":{...},"action":"get"}
-```
-
-## Step 6: Build OpenResty for Apache APISIX
-
-Some features require additional NGINX modules to be introduced into OpenResty.
-
-If you need these features, you can build APISIX OpenResty. You can refer to the source of [api7/apisix-build-tools](https://github.com/api7/apisix-build-tools) for setting up your build environment and building APISIX OpenResty.
-
-## Step 7: Add Systemd unit file for Apache APISIX
-
-If you are using CentOS and installed [Apache APISIX via the RPM package](#installation-via-rpm-repository-centos), the configuration file will already be in place and you can run the following command directly.
+If you installed APISIX via RPM, the APISIX unit file will already be configured and you can start APISIX by:

 ```shell
 systemctl start apisix
 systemctl stop apisix
 ```

-If you installed Apache APISIX by other methods, please refer to the [configuration file template](https://github.com/api7/apisix-build-tools/blob/master/usr/lib/systemd/system/apisix.service) for a modification guide and copy it to the `/usr/lib/systemd/system/apisix.service` path.
+If you installed APISIX through other methods, you can create `/usr/lib/systemd/system/apisix.service` and add the [configuration from the template](https://github.com/api7/apisix-build-tools/blob/master/usr/lib/systemd/system/apisix.service).
+
+See the [Getting Started](./getting-started.md) guide for a quick walk-through of using APISIX.

Review Comment:
   We can just link to the whole doc right? Even if someone installs APISIX, they might not be knowing some of the basics.


--
This is an automated message from the Apache Git Service.
To respond to the message, please log on to GitHub and use the
URL above to go to the specific comment.

To unsubscribe, e-mail: notifications-unsubscribe@apisix.apache.org

For queries about this service, please contact Infrastructure at:
users@infra.apache.org
[GitHub] [apisix] navendu-pottekkat commented on a diff in pull request #6964: docs: update "Installation" guide
Posted by GitBox <gi...@apache.org>.
navendu-pottekkat commented on code in PR #6964:
URL: https://github.com/apache/apisix/pull/6964#discussion_r861443856


##########
docs/en/latest/how-to-build.md:
##########
@@ -21,351 +25,220 @@ title: Installing Apache APISIX
 #
 -->

-This guide walks you through how you can build and get Apache APISIX running on your environment. Please refer the [Getting Started](./getting-started.md) guide for a quick walkthrough on running Apache APISIX.
+import Tabs from '@theme/Tabs';
+import TabItem from '@theme/TabItem';

-## Step 1: Install Apache APISIX
+This guide walks you through how you can install and run Apache APISIX in your environment.

-Apache APISIX can be installed via the [RPM package](#installation-via-rpm-repository-centos), [Docker image](#installation-via-docker), [Helm Chart](#installation-via-helm-chart) or the [source release package](#installation-via-source-release-package). You can install via any one of these options.
+Refer to the [Getting Started](./getting-started.md) guide for a quick walk-through on running Apache APISIX.

-### Installation via RPM Repository (CentOS)
+## Installing APISIX

-> This installation method is suitable for CentOS 7 and CentOS 8.
+APISIX can be installed by the different methods listed below:

-If the official OpenResty repository is **not installed yet**, the following command will help you automatically install both OpenResty and Apache APISIX repositories.
+<Tabs
+  groupId="install-method"
+  defaultValue="docker"
+  values={[
+    {label: 'Docker', value: 'docker'},
+    {label: 'Helm', value: 'helm'},
+    {label: 'RPM', value: 'rpm'},
+  ]}>
+<TabItem value="docker">

-```shell
-sudo yum install -y https://repos.apiseven.com/packages/centos/apache-apisix-repo-1.0-1.noarch.rpm
-```
-
-If the official OpenResty repository **is installed**, the following command will help you automatically install the repositories of Apache APISIX.
-
-```shell
-sudo yum-config-manager --add-repo https://repos.apiseven.com/packages/centos/apache-apisix.repo
-```
-
-Run the following commands to install the repository and Apache APISIX.
+First clone the [apisix-docker](https://github.com/apache/apisix-docker) repository:

 ```shell
-# View the information of the latest apisix package
-sudo yum info -y apisix
-
-# Will show the existing apisix packages
-sudo yum --showduplicates list apisix
-
-# Will install the latest apisix package
-sudo yum install apisix
-
-# Will install a specified version (2.10.3 in this example) apisix package
-sudo yum install apisix-2.10.3-0.el7
+git clone https://github.com/apache/apisix-docker.git
+cd apisix-docker/example
 ```

-### Installation via RPM Offline Package (CentOS)
+Now, you can use `docker-compose` to start APISIX.

-First, download Apache APISIX offline RPM package to `./apisix` folder.
+<Tabs
+  groupId="cpu-arch"
+  defaultValue="x86"
+  values={[
+    {label: 'x86', value: 'x86'},
+    {label: 'ARM/M1', value: 'arm'},
+  ]}>
+<TabItem value="x86">

 ```shell
-sudo mkdir -p apisix
-sudo yum install -y https://repos.apiseven.com/packages/centos/apache-apisix-repo-1.0-1.noarch.rpm
-sudo yum clean all && yum makecache
-sudo yum install -y --downloadonly --downloaddir=./apisix apisix
+docker-compose -p docker-apisix up -d
 ```

-Then copy `./apisix` folder to the target host and run the following command to install.
+</TabItem>
+
+<TabItem value="arm">

 ```shell
-sudo yum install ./apisix/*.rpm
+docker-compose -p docker-apisix -f docker-compose-arm64.yml up -d
 ```

-### Installation via Docker
-
-Please refer to [Installing Apache APISIX with Docker](https://hub.docker.com/r/apache/apisix).
-
-### Installation via Helm Chart
-
-Please refer to [Installing Apache APISIX with Helm Chart](https://github.com/apache/apisix-helm-chart).
-
-### Installation via Source Release Package
-
-Note: if you want to package Apache APISIX for a specific platform, please refer to https://github.com/api7/apisix-build-tools and add the support there.
-The instruction here is only for people who want to setup their Apache APISIX development environment.
-
-Follow the steps below to install Apache APISIX via the source release package.
-
-1. Install dependencies
+</TabItem>
+</Tabs>

-  ```shell
-  curl https://raw.githubusercontent.com/apache/apisix/master/utils/install-dependencies.sh -sL | bash -
-  ```
+</TabItem>

-2. Create a directory named `apisix-2.13.0`.
+<TabItem value="helm">

-  ```shell
-  APISIX_VERSION='2.13.0'
-  mkdir apisix-${APISIX_VERSION}
-  ```
+To install APISIX via Helm, run:

-3. Download the Apache APISIX source release package.
-
-  ```shell
-  wget https://downloads.apache.org/apisix/${APISIX_VERSION}/apache-apisix-${APISIX_VERSION}-src.tgz
-  ```
-
-  You can also download the Apache APISIX source release package from the [Apache APISIX website](https://apisix.apache.org/downloads/). The website also provides source packages for Apache APISIX, APISIX Dashboard, and APISIX Ingress Controller.
-
-4. Uncompress the Apache APISIX source release package.
-
-  ```shell
-  tar zxvf apache-apisix-${APISIX_VERSION}-src.tgz -C apisix-${APISIX_VERSION}
-  ```
-
-5. Install the runtime dependent Lua libraries.
-
-  ```shell
-  # Switch to the apisix-${APISIX_VERSION} directory
-  cd apisix-${APISIX_VERSION}
-  # Create dependencies
-  make deps
-  ```
-
-  **Note**: If you fail to install dependency packages using `make deps` and get an error message like `Could not find header file for LDAP/PCRE/openssl`, you can use this general method to solve problems.
-
-  The general solution: `luarocks` supports custom compile-time dependency directories(from this [link](https://github.com/luarocks/luarocks/wiki/Config-file-format)). Use a third-party tool to install the missing package and add its installation directory to the `luarocks`'s variables table. This a general method which can be applied to macOS, Ubuntu, CentOS or other usual operating systems, and the specific solution for macOS are given here for reference only.
-
-  The following is the solution of macOS, which is similar to that of other operating systems:
-
-    1. Install `openldap` with `brew install openldap`;
-    2. Locate installation directory with `brew --prefix openldap`;
-    3. Add the path to the project configuration file(choose one of the following two methods):
-       1. Solution A: You can set `LDAP_DIR` with `luarocks config` manually, for example `luarocks config variables.LDAP_DIR /opt/homebrew/cellar/openldap/2.6.1`;
-       2. Solution B: Of course, you can also choose to change the default configuration file of luarocks directly, execute the 'cat ~/.luarocks/config-5.1.lua' command, and then add the installation directory of 'openldap' to the file;
-       3. Example as follows:
-          variables = {
-              LDAP_DIR = "/opt/homebrew/cellar/openldap/2.6.1",
-              LDAP_INCDIR = "/opt/homebrew/cellar/openldap/2.6.1/include",
-          }
-
-     `/opt/homebrew/cellar/openldap/` is default path to install openldap on macOS(Apple Silicon) using brew.
-     `/usr/local/opt/openldap/` is default path to install openldap on macOS(Intel) using brew.
-
-6. To uninstall the Apache APISIX runtime, run:
-
-   ```shell
-   # Purge dependencies
-   make undeps
-   ```
-
-   **Note**: This operation will remove the files completely.
-
-#### LTS version installation via Source Release Package
-
-The [current LTS version](https://apisix.apache.org/downloads/) of Apache APISIX is `2.13.0`.
+```shell
+helm repo add apisix https://charts.apiseven.com
+helm repo update
+helm install apisix apisix/apisix --create-namespace  --namespace apisix
+```

-To install this version, set `APISIX_VERSION` in [Installation via Source Release Package](#installation-via-source-release-package) to this version and continue with the other steps.
+You can find other Helm charts on the [apisix-helm-chart](https://github.com/apache/apisix-helm-chart) repository.

-## Step 2: Install etcd
+</TabItem>

-This step is required only if you haven't installed [etcd](https://github.com/etcd-io/etcd).
+<TabItem value="rpm">

-Run the command below to install etcd via the binary in Linux:
+This installation method is suitable for CentOS 7 and Centos 8.

-```shell
-ETCD_VERSION='3.4.18'
-wget https://github.com/etcd-io/etcd/releases/download/v${ETCD_VERSION}/etcd-v${ETCD_VERSION}-linux-amd64.tar.gz
-tar -xvf etcd-v${ETCD_VERSION}-linux-amd64.tar.gz && \
-  cd etcd-v${ETCD_VERSION}-linux-amd64 && \
-  sudo cp -a etcd etcdctl /usr/bin/
-nohup etcd >/tmp/etcd.log 2>&1 &
-```
+### Installation via RPM repository

Review Comment:
   First install etcd and then install via RPM is recommended? I could add a link to the install etcd section. Since etcd installation can also be common for other installation methods as well.


--
This is an automated message from the Apache Git Service.
To respond to the message, please log on to GitHub and use the
URL above to go to the specific comment.

To unsubscribe, e-mail: notifications-unsubscribe@apisix.apache.org

For queries about this service, please contact Infrastructure at:
users@infra.apache.org
[GitHub] [apisix] navendu-pottekkat commented on pull request #6964: docs: update "Installation" guide
Posted by GitBox <gi...@apache.org>.
navendu-pottekkat commented on PR #6964:
URL: https://github.com/apache/apisix/pull/6964#issuecomment-1112299913
Screenshot of the change:
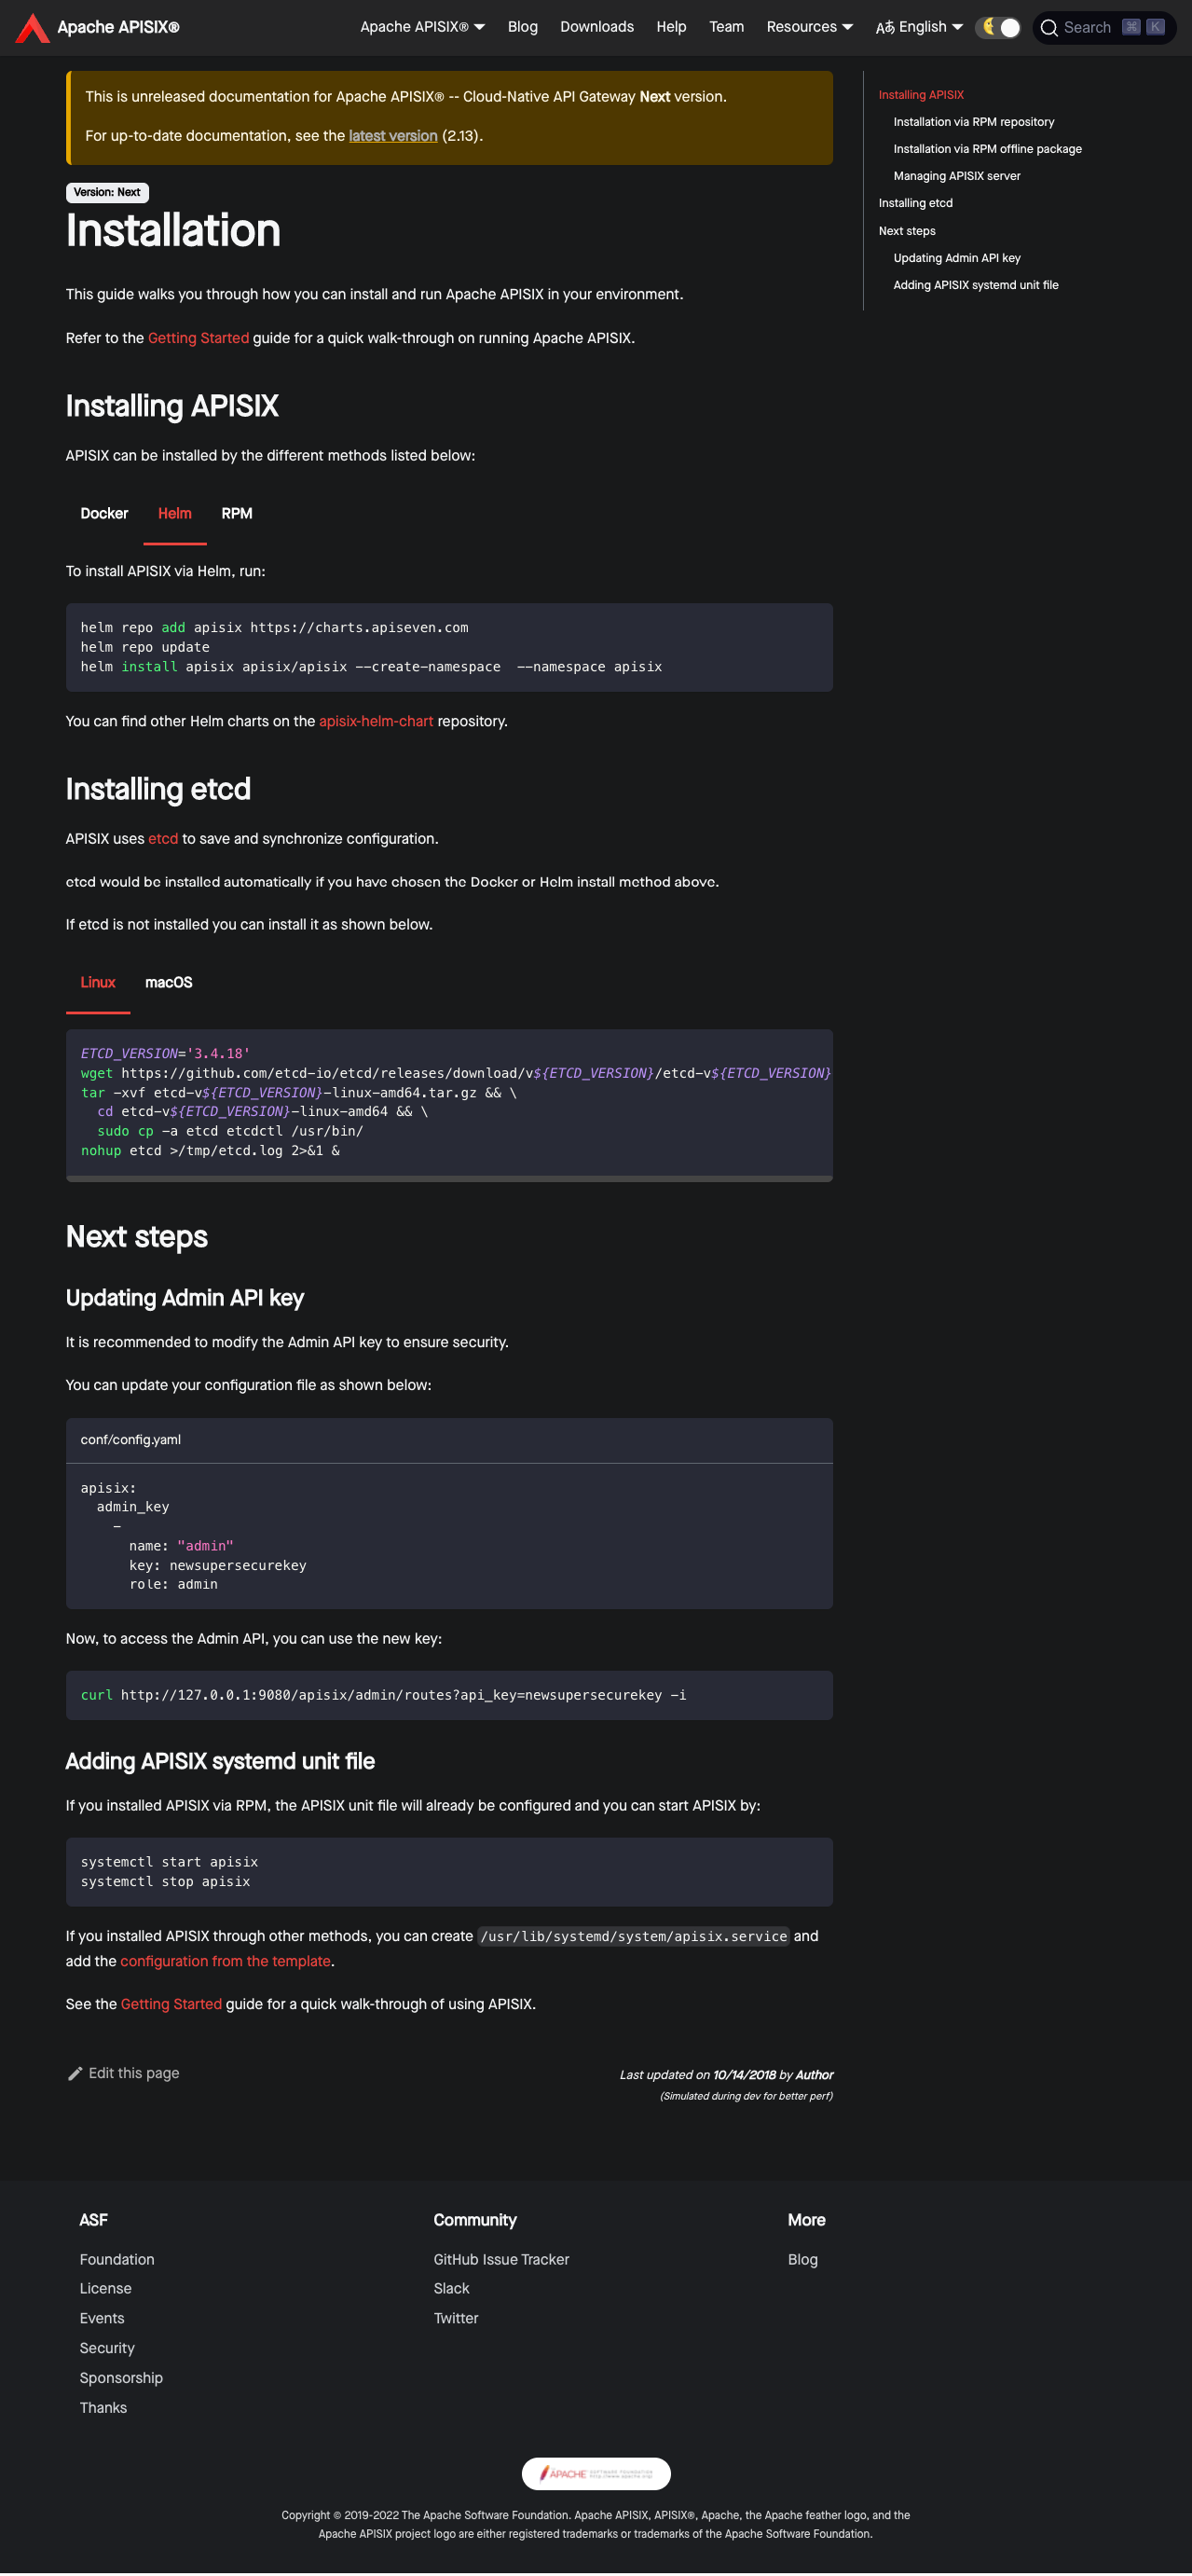
--
This is an automated message from the Apache Git Service.
To respond to the message, please log on to GitHub and use the
URL above to go to the specific comment.
To unsubscribe, e-mail: notifications-unsubscribe@apisix.apache.org
For queries about this service, please contact Infrastructure at:
users@infra.apache.org
[GitHub] [apisix] hf400159 commented on a diff in pull request #6964: docs: update "Installation" guide
Posted by GitBox <gi...@apache.org>.
hf400159 commented on code in PR #6964:
URL: https://github.com/apache/apisix/pull/6964#discussion_r861446756


##########
docs/en/latest/how-to-build.md:
##########
@@ -21,351 +25,220 @@ title: Installing Apache APISIX
 #
 -->

-This guide walks you through how you can build and get Apache APISIX running on your environment. Please refer the [Getting Started](./getting-started.md) guide for a quick walkthrough on running Apache APISIX.
+import Tabs from '@theme/Tabs';
+import TabItem from '@theme/TabItem';

-## Step 1: Install Apache APISIX
+This guide walks you through how you can install and run Apache APISIX in your environment.

-Apache APISIX can be installed via the [RPM package](#installation-via-rpm-repository-centos), [Docker image](#installation-via-docker), [Helm Chart](#installation-via-helm-chart) or the [source release package](#installation-via-source-release-package). You can install via any one of these options.
+Refer to the [Getting Started](./getting-started.md) guide for a quick walk-through on running Apache APISIX.

-### Installation via RPM Repository (CentOS)
+## Installing APISIX

-> This installation method is suitable for CentOS 7 and CentOS 8.
+APISIX can be installed by the different methods listed below:

-If the official OpenResty repository is **not installed yet**, the following command will help you automatically install both OpenResty and Apache APISIX repositories.
+<Tabs
+  groupId="install-method"
+  defaultValue="docker"
+  values={[
+    {label: 'Docker', value: 'docker'},
+    {label: 'Helm', value: 'helm'},
+    {label: 'RPM', value: 'rpm'},
+  ]}>
+<TabItem value="docker">

-```shell
-sudo yum install -y https://repos.apiseven.com/packages/centos/apache-apisix-repo-1.0-1.noarch.rpm
-```
-
-If the official OpenResty repository **is installed**, the following command will help you automatically install the repositories of Apache APISIX.
-
-```shell
-sudo yum-config-manager --add-repo https://repos.apiseven.com/packages/centos/apache-apisix.repo
-```
-
-Run the following commands to install the repository and Apache APISIX.
+First clone the [apisix-docker](https://github.com/apache/apisix-docker) repository:

 ```shell
-# View the information of the latest apisix package
-sudo yum info -y apisix
-
-# Will show the existing apisix packages
-sudo yum --showduplicates list apisix
-
-# Will install the latest apisix package
-sudo yum install apisix
-
-# Will install a specified version (2.10.3 in this example) apisix package
-sudo yum install apisix-2.10.3-0.el7
+git clone https://github.com/apache/apisix-docker.git
+cd apisix-docker/example
 ```

-### Installation via RPM Offline Package (CentOS)
+Now, you can use `docker-compose` to start APISIX.

-First, download Apache APISIX offline RPM package to `./apisix` folder.
+<Tabs
+  groupId="cpu-arch"
+  defaultValue="x86"
+  values={[
+    {label: 'x86', value: 'x86'},
+    {label: 'ARM/M1', value: 'arm'},
+  ]}>
+<TabItem value="x86">

 ```shell
-sudo mkdir -p apisix
-sudo yum install -y https://repos.apiseven.com/packages/centos/apache-apisix-repo-1.0-1.noarch.rpm
-sudo yum clean all && yum makecache
-sudo yum install -y --downloadonly --downloaddir=./apisix apisix
+docker-compose -p docker-apisix up -d
 ```

-Then copy `./apisix` folder to the target host and run the following command to install.
+</TabItem>
+
+<TabItem value="arm">

 ```shell
-sudo yum install ./apisix/*.rpm
+docker-compose -p docker-apisix -f docker-compose-arm64.yml up -d
 ```

-### Installation via Docker
-
-Please refer to [Installing Apache APISIX with Docker](https://hub.docker.com/r/apache/apisix).
-
-### Installation via Helm Chart
-
-Please refer to [Installing Apache APISIX with Helm Chart](https://github.com/apache/apisix-helm-chart).
-
-### Installation via Source Release Package
-
-Note: if you want to package Apache APISIX for a specific platform, please refer to https://github.com/api7/apisix-build-tools and add the support there.
-The instruction here is only for people who want to setup their Apache APISIX development environment.
-
-Follow the steps below to install Apache APISIX via the source release package.
-
-1. Install dependencies
+</TabItem>
+</Tabs>

-  ```shell
-  curl https://raw.githubusercontent.com/apache/apisix/master/utils/install-dependencies.sh -sL | bash -
-  ```
+</TabItem>

-2. Create a directory named `apisix-2.13.0`.
+<TabItem value="helm">

-  ```shell
-  APISIX_VERSION='2.13.0'
-  mkdir apisix-${APISIX_VERSION}
-  ```
+To install APISIX via Helm, run:

-3. Download the Apache APISIX source release package.
-
-  ```shell
-  wget https://downloads.apache.org/apisix/${APISIX_VERSION}/apache-apisix-${APISIX_VERSION}-src.tgz
-  ```
-
-  You can also download the Apache APISIX source release package from the [Apache APISIX website](https://apisix.apache.org/downloads/). The website also provides source packages for Apache APISIX, APISIX Dashboard, and APISIX Ingress Controller.
-
-4. Uncompress the Apache APISIX source release package.
-
-  ```shell
-  tar zxvf apache-apisix-${APISIX_VERSION}-src.tgz -C apisix-${APISIX_VERSION}
-  ```
-
-5. Install the runtime dependent Lua libraries.
-
-  ```shell
-  # Switch to the apisix-${APISIX_VERSION} directory
-  cd apisix-${APISIX_VERSION}
-  # Create dependencies
-  make deps
-  ```
-
-  **Note**: If you fail to install dependency packages using `make deps` and get an error message like `Could not find header file for LDAP/PCRE/openssl`, you can use this general method to solve problems.
-
-  The general solution: `luarocks` supports custom compile-time dependency directories(from this [link](https://github.com/luarocks/luarocks/wiki/Config-file-format)). Use a third-party tool to install the missing package and add its installation directory to the `luarocks`'s variables table. This a general method which can be applied to macOS, Ubuntu, CentOS or other usual operating systems, and the specific solution for macOS are given here for reference only.
-
-  The following is the solution of macOS, which is similar to that of other operating systems:
-
-    1. Install `openldap` with `brew install openldap`;
-    2. Locate installation directory with `brew --prefix openldap`;
-    3. Add the path to the project configuration file(choose one of the following two methods):
-       1. Solution A: You can set `LDAP_DIR` with `luarocks config` manually, for example `luarocks config variables.LDAP_DIR /opt/homebrew/cellar/openldap/2.6.1`;
-       2. Solution B: Of course, you can also choose to change the default configuration file of luarocks directly, execute the 'cat ~/.luarocks/config-5.1.lua' command, and then add the installation directory of 'openldap' to the file;
-       3. Example as follows:
-          variables = {
-              LDAP_DIR = "/opt/homebrew/cellar/openldap/2.6.1",
-              LDAP_INCDIR = "/opt/homebrew/cellar/openldap/2.6.1/include",
-          }
-
-     `/opt/homebrew/cellar/openldap/` is default path to install openldap on macOS(Apple Silicon) using brew.
-     `/usr/local/opt/openldap/` is default path to install openldap on macOS(Intel) using brew.
-
-6. To uninstall the Apache APISIX runtime, run:
-
-   ```shell
-   # Purge dependencies
-   make undeps
-   ```
-
-   **Note**: This operation will remove the files completely.
-
-#### LTS version installation via Source Release Package
-
-The [current LTS version](https://apisix.apache.org/downloads/) of Apache APISIX is `2.13.0`.
+```shell
+helm repo add apisix https://charts.apiseven.com
+helm repo update
+helm install apisix apisix/apisix --create-namespace  --namespace apisix
+```

-To install this version, set `APISIX_VERSION` in [Installation via Source Release Package](#installation-via-source-release-package) to this version and continue with the other steps.
+You can find other Helm charts on the [apisix-helm-chart](https://github.com/apache/apisix-helm-chart) repository.

-## Step 2: Install etcd
+</TabItem>

-This step is required only if you haven't installed [etcd](https://github.com/etcd-io/etcd).
+<TabItem value="rpm">

-Run the command below to install etcd via the binary in Linux:
+This installation method is suitable for CentOS 7 and Centos 8.

-```shell
-ETCD_VERSION='3.4.18'
-wget https://github.com/etcd-io/etcd/releases/download/v${ETCD_VERSION}/etcd-v${ETCD_VERSION}-linux-amd64.tar.gz
-tar -xvf etcd-v${ETCD_VERSION}-linux-amd64.tar.gz && \
-  cd etcd-v${ETCD_VERSION}-linux-amd64 && \
-  sudo cp -a etcd etcdctl /usr/bin/
-nohup etcd >/tmp/etcd.log 2>&1 &
-```
+### Installation via RPM repository

Review Comment:
   Yes, installing APISIX via RPM needs to install etcd first, otherwise, APISIX will not start. you can add a link.


--
This is an automated message from the Apache Git Service.
To respond to the message, please log on to GitHub and use the
URL above to go to the specific comment.

To unsubscribe, e-mail: notifications-unsubscribe@apisix.apache.org

For queries about this service, please contact Infrastructure at:
users@infra.apache.org
[GitHub] [apisix] hf400159 commented on a diff in pull request #6964: docs: update "Installation" guide
Posted by GitBox <gi...@apache.org>.
hf400159 commented on code in PR #6964:
URL: https://github.com/apache/apisix/pull/6964#discussion_r861901455


##########
docs/en/latest/how-to-build.md:
##########
@@ -21,351 +25,218 @@ title: Installing Apache APISIX
 #
 -->

-This guide walks you through how you can build and get Apache APISIX running on your environment. Please refer the [Getting Started](./getting-started.md) guide for a quick walkthrough on running Apache APISIX.
+import Tabs from '@theme/Tabs';
+import TabItem from '@theme/TabItem';

-## Step 1: Install Apache APISIX
+This guide walks you through how you can install and run Apache APISIX in your environment.

-Apache APISIX can be installed via the [RPM package](#installation-via-rpm-repository-centos), [Docker image](#installation-via-docker), [Helm Chart](#installation-via-helm-chart) or the [source release package](#installation-via-source-release-package). You can install via any one of these options.
+Refer to the [Getting Started](./getting-started.md) guide for a quick walk-through on running Apache APISIX.

-### Installation via RPM Repository (CentOS)
+## Installing etcd

-> This installation method is suitable for CentOS 7 and CentOS 8.
+APISIX uses [etcd](https://github.com/etcd-io/etcd) to save and synchronize configuration. Before installing APISIX, you need to install etcd on your machine.

-If the official OpenResty repository is **not installed yet**, the following command will help you automatically install both OpenResty and Apache APISIX repositories.
+It would be installed automatically if you choose the Docker or Helm install method while installing APISIX. If you choose a different method or you need to install it manually, follow the steps shown below:

-```shell
-sudo yum install -y https://repos.apiseven.com/packages/centos/apache-apisix-repo-1.0-1.noarch.rpm
-```
-
-If the official OpenResty repository **is installed**, the following command will help you automatically install the repositories of Apache APISIX.
+<Tabs
+  groupId="os"
+  defaultValue="linux"
+  values={[
+    {label: 'Linux', value: 'linux'},
+    {label: 'macOS', value: 'mac'},
+  ]}>
+<TabItem value="linux">

 ```shell
-sudo yum-config-manager --add-repo https://repos.apiseven.com/packages/centos/apache-apisix.repo
+ETCD_VERSION='3.4.18'
+wget https://github.com/etcd-io/etcd/releases/download/v${ETCD_VERSION}/etcd-v${ETCD_VERSION}-linux-amd64.tar.gz
+tar -xvf etcd-v${ETCD_VERSION}-linux-amd64.tar.gz && \
+  cd etcd-v${ETCD_VERSION}-linux-amd64 && \
+  sudo cp -a etcd etcdctl /usr/bin/
+nohup etcd >/tmp/etcd.log 2>&1 &
 ```

-Run the following commands to install the repository and Apache APISIX.
+</TabItem>
+
+<TabItem value="mac">

 ```shell
-# View the information of the latest apisix package
-sudo yum info -y apisix
+brew install etcd
+brew services start etcd
+```

-# Will show the existing apisix packages
-sudo yum --showduplicates list apisix
+</TabItem>
+</Tabs>

-# Will install the latest apisix package
-sudo yum install apisix
+## Installing APISIX

-# Will install a specified version (2.10.3 in this example) apisix package
-sudo yum install apisix-2.10.3-0.el7
-```
+APISIX can be installed by the different methods listed below:

-### Installation via RPM Offline Package (CentOS)
+<Tabs
+  groupId="install-method"
+  defaultValue="docker"
+  values={[
+    {label: 'Docker', value: 'docker'},
+    {label: 'Helm', value: 'helm'},
+    {label: 'RPM', value: 'rpm'},
+  ]}>
+<TabItem value="docker">

-First, download Apache APISIX offline RPM package to `./apisix` folder.
+First clone the [apisix-docker](https://github.com/apache/apisix-docker) repository:

 ```shell
-sudo mkdir -p apisix
-sudo yum install -y https://repos.apiseven.com/packages/centos/apache-apisix-repo-1.0-1.noarch.rpm
-sudo yum clean all && yum makecache
-sudo yum install -y --downloadonly --downloaddir=./apisix apisix
+git clone https://github.com/apache/apisix-docker.git
+cd apisix-docker/example
 ```

-Then copy `./apisix` folder to the target host and run the following command to install.
+Now, you can use `docker-compose` to start APISIX.
+
+<Tabs
+  groupId="cpu-arch"
+  defaultValue="x86"
+  values={[
+    {label: 'x86', value: 'x86'},
+    {label: 'ARM/M1', value: 'arm'},
+  ]}>
+<TabItem value="x86">

 ```shell
-sudo yum install ./apisix/*.rpm
+docker-compose -p docker-apisix up -d
 ```

-### Installation via Docker
-
-Please refer to [Installing Apache APISIX with Docker](https://hub.docker.com/r/apache/apisix).
-
-### Installation via Helm Chart
-
-Please refer to [Installing Apache APISIX with Helm Chart](https://github.com/apache/apisix-helm-chart).
-
-### Installation via Source Release Package
+</TabItem>

-Note: if you want to package Apache APISIX for a specific platform, please refer to https://github.com/api7/apisix-build-tools and add the support there.
-The instruction here is only for people who want to setup their Apache APISIX development environment.
+<TabItem value="arm">

-Follow the steps below to install Apache APISIX via the source release package.
-
-1. Install dependencies
-
-  ```shell
-  curl https://raw.githubusercontent.com/apache/apisix/master/utils/install-dependencies.sh -sL | bash -
-  ```
-
-2. Create a directory named `apisix-2.13.0`.
-
-  ```shell
-  APISIX_VERSION='2.13.0'
-  mkdir apisix-${APISIX_VERSION}
-  ```
-
-3. Download the Apache APISIX source release package.
-
-  ```shell
-  wget https://downloads.apache.org/apisix/${APISIX_VERSION}/apache-apisix-${APISIX_VERSION}-src.tgz
-  ```
-
-  You can also download the Apache APISIX source release package from the [Apache APISIX website](https://apisix.apache.org/downloads/). The website also provides source packages for Apache APISIX, APISIX Dashboard, and APISIX Ingress Controller.
-
-4. Uncompress the Apache APISIX source release package.
-
-  ```shell
-  tar zxvf apache-apisix-${APISIX_VERSION}-src.tgz -C apisix-${APISIX_VERSION}
-  ```
-
-5. Install the runtime dependent Lua libraries.
-
-  ```shell
-  # Switch to the apisix-${APISIX_VERSION} directory
-  cd apisix-${APISIX_VERSION}
-  # Create dependencies
-  make deps
-  ```
-
-  **Note**: If you fail to install dependency packages using `make deps` and get an error message like `Could not find header file for LDAP/PCRE/openssl`, you can use this general method to solve problems.
-
-  The general solution: `luarocks` supports custom compile-time dependency directories(from this [link](https://github.com/luarocks/luarocks/wiki/Config-file-format)). Use a third-party tool to install the missing package and add its installation directory to the `luarocks`'s variables table. This a general method which can be applied to macOS, Ubuntu, CentOS or other usual operating systems, and the specific solution for macOS are given here for reference only.
-
-  The following is the solution of macOS, which is similar to that of other operating systems:
+```shell
+docker-compose -p docker-apisix -f docker-compose-arm64.yml up -d
+```

-    1. Install `openldap` with `brew install openldap`;
-    2. Locate installation directory with `brew --prefix openldap`;
-    3. Add the path to the project configuration file(choose one of the following two methods):
-       1. Solution A: You can set `LDAP_DIR` with `luarocks config` manually, for example `luarocks config variables.LDAP_DIR /opt/homebrew/cellar/openldap/2.6.1`;
-       2. Solution B: Of course, you can also choose to change the default configuration file of luarocks directly, execute the 'cat ~/.luarocks/config-5.1.lua' command, and then add the installation directory of 'openldap' to the file;
-       3. Example as follows:
-          variables = {
-              LDAP_DIR = "/opt/homebrew/cellar/openldap/2.6.1",
-              LDAP_INCDIR = "/opt/homebrew/cellar/openldap/2.6.1/include",
-          }
+</TabItem>
+</Tabs>

-     `/opt/homebrew/cellar/openldap/` is default path to install openldap on macOS(Apple Silicon) using brew.
-     `/usr/local/opt/openldap/` is default path to install openldap on macOS(Intel) using brew.
+</TabItem>

-6. To uninstall the Apache APISIX runtime, run:
+<TabItem value="helm">

-   ```shell
-   # Purge dependencies
-   make undeps
-   ```
+To install APISIX via Helm, run:

-   **Note**: This operation will remove the files completely.
+```shell
+helm repo add apisix https://charts.apiseven.com
+helm repo update
+helm install apisix apisix/apisix --create-namespace  --namespace apisix
+```

-#### LTS version installation via Source Release Package
+You can find other Helm charts on the [apisix-helm-chart](https://github.com/apache/apisix-helm-chart) repository.

-The [current LTS version](https://apisix.apache.org/downloads/) of Apache APISIX is `2.13.0`.
+</TabItem>

-To install this version, set `APISIX_VERSION` in [Installation via Source Release Package](#installation-via-source-release-package) to this version and continue with the other steps.
+<TabItem value="rpm">

-## Step 2: Install etcd
+This installation method is suitable for CentOS 7 and Centos 8.

-This step is required only if you haven't installed [etcd](https://github.com/etcd-io/etcd).
+### Installation via RPM repository

-Run the command below to install etcd via the binary in Linux:
+If OpenResty is **not** installed, you can run the command below to install both OpenResty and APISIX repositories:

 ```shell
-ETCD_VERSION='3.4.18'
-wget https://github.com/etcd-io/etcd/releases/download/v${ETCD_VERSION}/etcd-v${ETCD_VERSION}-linux-amd64.tar.gz
-tar -xvf etcd-v${ETCD_VERSION}-linux-amd64.tar.gz && \
-  cd etcd-v${ETCD_VERSION}-linux-amd64 && \
-  sudo cp -a etcd etcdctl /usr/bin/
-nohup etcd >/tmp/etcd.log 2>&1 &
-```
-
-Run the command below to install etcd in Mac:
-
-```shell
-brew install etcd
-# start etcd server
-brew services start etcd
+sudo yum install -y https://repos.apiseven.com/packages/centos/apache-apisix-repo-1.0-1.noarch.rpm
 ```

-## Step 3: Manage Apache APISIX Server
-
-In the Apache APISIX directory, you can initialize dependencies, start service and stop service with commands. Run `apisix help` to get a full list of available commands.
-
-### Initializing dependencies
-
-Run the following command to initialize the NGINX configuration file and etcd.
+If OpenResty is installed, the command below will install the APISIX repositories:

 ```shell
-# initialize NGINX config file and etcd
-apisix init
+sudo yum-config-manager --add-repo https://repos.apiseven.com/packages/centos/apache-apisix.repo
 ```

-### Test the configuration file
-
-Run the following command to test the configuration file. APISIX will generate `nginx.conf` from `config.yaml` and check whether the syntax of `nginx.conf` is correct.
+Then, to install APISIX, run:

 ```shell
-# generate `nginx.conf` from `config.yaml` and test it
-apisix test
+sudo yum install apisix
 ```

-### Start Apache APISIX
+:::tip

-Run the following command to start Apache APISIX.
+You can also install a specific version of APISIX by specifying it:

Review Comment:
   ```suggestion
   You can also install a specific version of APISIX by specifying it, The following example is to install the APISIX v2.13.1 LTS maintenance release:
   ```
   Maybe we need to tell users that 2.13.1 is an LTS maintenance release.


--
This is an automated message from the Apache Git Service.
To respond to the message, please log on to GitHub and use the
URL above to go to the specific comment.

To unsubscribe, e-mail: notifications-unsubscribe@apisix.apache.org

For queries about this service, please contact Infrastructure at:
users@infra.apache.org
[GitHub] [apisix] navendu-pottekkat commented on pull request #6964: docs: update "Installation" guide
Posted by GitBox <gi...@apache.org>.
navendu-pottekkat commented on PR #6964:
URL: https://github.com/apache/apisix/pull/6964#issuecomment-1120155094

   > the file name is "how to build", not how to install.

   I did not change it because there might be references to this URL. We could change the link and add redirects.


--
This is an automated message from the Apache Git Service.
To respond to the message, please log on to GitHub and use the
URL above to go to the specific comment.

To unsubscribe, e-mail: notifications-unsubscribe@apisix.apache.org

For queries about this service, please contact Infrastructure at:
users@infra.apache.org
[GitHub] [apisix] yzeng25 commented on a diff in pull request #6964: docs: update "Installation" guide
Posted by GitBox <gi...@apache.org>.
yzeng25 commented on code in PR #6964:
URL: https://github.com/apache/apisix/pull/6964#discussion_r861732365


##########
docs/en/latest/how-to-build.md:
##########
@@ -21,351 +25,220 @@ title: Installing Apache APISIX
 #
 -->

-This guide walks you through how you can build and get Apache APISIX running on your environment. Please refer the [Getting Started](./getting-started.md) guide for a quick walkthrough on running Apache APISIX.
+import Tabs from '@theme/Tabs';
+import TabItem from '@theme/TabItem';

-## Step 1: Install Apache APISIX
+This guide walks you through how you can install and run Apache APISIX in your environment.

-Apache APISIX can be installed via the [RPM package](#installation-via-rpm-repository-centos), [Docker image](#installation-via-docker), [Helm Chart](#installation-via-helm-chart) or the [source release package](#installation-via-source-release-package). You can install via any one of these options.
+Refer to the [Getting Started](./getting-started.md) guide for a quick walk-through on running Apache APISIX.

-### Installation via RPM Repository (CentOS)
+## Installing APISIX

-> This installation method is suitable for CentOS 7 and CentOS 8.
+APISIX can be installed by the different methods listed below:

-If the official OpenResty repository is **not installed yet**, the following command will help you automatically install both OpenResty and Apache APISIX repositories.
+<Tabs
+  groupId="install-method"
+  defaultValue="docker"
+  values={[
+    {label: 'Docker', value: 'docker'},
+    {label: 'Helm', value: 'helm'},
+    {label: 'RPM', value: 'rpm'},
+  ]}>
+<TabItem value="docker">

-```shell
-sudo yum install -y https://repos.apiseven.com/packages/centos/apache-apisix-repo-1.0-1.noarch.rpm
-```
-
-If the official OpenResty repository **is installed**, the following command will help you automatically install the repositories of Apache APISIX.
-
-```shell
-sudo yum-config-manager --add-repo https://repos.apiseven.com/packages/centos/apache-apisix.repo
-```
-
-Run the following commands to install the repository and Apache APISIX.
+First clone the [apisix-docker](https://github.com/apache/apisix-docker) repository:

 ```shell
-# View the information of the latest apisix package
-sudo yum info -y apisix
-
-# Will show the existing apisix packages
-sudo yum --showduplicates list apisix
-
-# Will install the latest apisix package
-sudo yum install apisix
-
-# Will install a specified version (2.10.3 in this example) apisix package
-sudo yum install apisix-2.10.3-0.el7
+git clone https://github.com/apache/apisix-docker.git
+cd apisix-docker/example
 ```

-### Installation via RPM Offline Package (CentOS)
+Now, you can use `docker-compose` to start APISIX.

-First, download Apache APISIX offline RPM package to `./apisix` folder.
+<Tabs
+  groupId="cpu-arch"
+  defaultValue="x86"
+  values={[
+    {label: 'x86', value: 'x86'},
+    {label: 'ARM/M1', value: 'arm'},
+  ]}>
+<TabItem value="x86">

 ```shell
-sudo mkdir -p apisix
-sudo yum install -y https://repos.apiseven.com/packages/centos/apache-apisix-repo-1.0-1.noarch.rpm
-sudo yum clean all && yum makecache
-sudo yum install -y --downloadonly --downloaddir=./apisix apisix
+docker-compose -p docker-apisix up -d
 ```

-Then copy `./apisix` folder to the target host and run the following command to install.
+</TabItem>
+
+<TabItem value="arm">

 ```shell
-sudo yum install ./apisix/*.rpm
+docker-compose -p docker-apisix -f docker-compose-arm64.yml up -d
 ```

-### Installation via Docker
-
-Please refer to [Installing Apache APISIX with Docker](https://hub.docker.com/r/apache/apisix).
-
-### Installation via Helm Chart
-
-Please refer to [Installing Apache APISIX with Helm Chart](https://github.com/apache/apisix-helm-chart).
-
-### Installation via Source Release Package
-
-Note: if you want to package Apache APISIX for a specific platform, please refer to https://github.com/api7/apisix-build-tools and add the support there.
-The instruction here is only for people who want to setup their Apache APISIX development environment.
-
-Follow the steps below to install Apache APISIX via the source release package.
-
-1. Install dependencies
+</TabItem>
+</Tabs>

-  ```shell
-  curl https://raw.githubusercontent.com/apache/apisix/master/utils/install-dependencies.sh -sL | bash -
-  ```
+</TabItem>

-2. Create a directory named `apisix-2.13.0`.
+<TabItem value="helm">

-  ```shell
-  APISIX_VERSION='2.13.0'
-  mkdir apisix-${APISIX_VERSION}
-  ```
+To install APISIX via Helm, run:

-3. Download the Apache APISIX source release package.
-
-  ```shell
-  wget https://downloads.apache.org/apisix/${APISIX_VERSION}/apache-apisix-${APISIX_VERSION}-src.tgz
-  ```
-
-  You can also download the Apache APISIX source release package from the [Apache APISIX website](https://apisix.apache.org/downloads/). The website also provides source packages for Apache APISIX, APISIX Dashboard, and APISIX Ingress Controller.
-
-4. Uncompress the Apache APISIX source release package.
-
-  ```shell
-  tar zxvf apache-apisix-${APISIX_VERSION}-src.tgz -C apisix-${APISIX_VERSION}
-  ```
-
-5. Install the runtime dependent Lua libraries.
-
-  ```shell
-  # Switch to the apisix-${APISIX_VERSION} directory
-  cd apisix-${APISIX_VERSION}
-  # Create dependencies
-  make deps
-  ```
-
-  **Note**: If you fail to install dependency packages using `make deps` and get an error message like `Could not find header file for LDAP/PCRE/openssl`, you can use this general method to solve problems.
-
-  The general solution: `luarocks` supports custom compile-time dependency directories(from this [link](https://github.com/luarocks/luarocks/wiki/Config-file-format)). Use a third-party tool to install the missing package and add its installation directory to the `luarocks`'s variables table. This a general method which can be applied to macOS, Ubuntu, CentOS or other usual operating systems, and the specific solution for macOS are given here for reference only.
-
-  The following is the solution of macOS, which is similar to that of other operating systems:
-
-    1. Install `openldap` with `brew install openldap`;
-    2. Locate installation directory with `brew --prefix openldap`;
-    3. Add the path to the project configuration file(choose one of the following two methods):
-       1. Solution A: You can set `LDAP_DIR` with `luarocks config` manually, for example `luarocks config variables.LDAP_DIR /opt/homebrew/cellar/openldap/2.6.1`;
-       2. Solution B: Of course, you can also choose to change the default configuration file of luarocks directly, execute the 'cat ~/.luarocks/config-5.1.lua' command, and then add the installation directory of 'openldap' to the file;
-       3. Example as follows:
-          variables = {
-              LDAP_DIR = "/opt/homebrew/cellar/openldap/2.6.1",
-              LDAP_INCDIR = "/opt/homebrew/cellar/openldap/2.6.1/include",
-          }
-
-     `/opt/homebrew/cellar/openldap/` is default path to install openldap on macOS(Apple Silicon) using brew.
-     `/usr/local/opt/openldap/` is default path to install openldap on macOS(Intel) using brew.
-
-6. To uninstall the Apache APISIX runtime, run:
-
-   ```shell
-   # Purge dependencies
-   make undeps
-   ```
-
-   **Note**: This operation will remove the files completely.
-
-#### LTS version installation via Source Release Package
-
-The [current LTS version](https://apisix.apache.org/downloads/) of Apache APISIX is `2.13.0`.
+```shell
+helm repo add apisix https://charts.apiseven.com
+helm repo update
+helm install apisix apisix/apisix --create-namespace  --namespace apisix
+```

-To install this version, set `APISIX_VERSION` in [Installation via Source Release Package](#installation-via-source-release-package) to this version and continue with the other steps.
+You can find other Helm charts on the [apisix-helm-chart](https://github.com/apache/apisix-helm-chart) repository.

-## Step 2: Install etcd
+</TabItem>

-This step is required only if you haven't installed [etcd](https://github.com/etcd-io/etcd).
+<TabItem value="rpm">

-Run the command below to install etcd via the binary in Linux:
+This installation method is suitable for CentOS 7 and Centos 8.

-```shell
-ETCD_VERSION='3.4.18'
-wget https://github.com/etcd-io/etcd/releases/download/v${ETCD_VERSION}/etcd-v${ETCD_VERSION}-linux-amd64.tar.gz
-tar -xvf etcd-v${ETCD_VERSION}-linux-amd64.tar.gz && \
-  cd etcd-v${ETCD_VERSION}-linux-amd64 && \
-  sudo cp -a etcd etcdctl /usr/bin/
-nohup etcd >/tmp/etcd.log 2>&1 &
-```
+### Installation via RPM repository

Review Comment:
   I think adding a "Prerequisite" section before "Installing APISIX"section, in which you'd
   1. Mention about etcd as a prereq.
   2. Add command line(s) for users to verify if they do have ectd now.
   3. Add links and other stuff to it.

   This can solve all problems mentioned above.


--
This is an automated message from the Apache Git Service.
To respond to the message, please log on to GitHub and use the
URL above to go to the specific comment.

To unsubscribe, e-mail: notifications-unsubscribe@apisix.apache.org

For queries about this service, please contact Infrastructure at:
users@infra.apache.org
[GitHub] [apisix] navendu-pottekkat commented on a diff in pull request #6964: docs: update "Installation" guide
Posted by GitBox <gi...@apache.org>.
navendu-pottekkat commented on code in PR #6964:
URL: https://github.com/apache/apisix/pull/6964#discussion_r861843131


##########
docs/en/latest/how-to-build.md:
##########
@@ -21,351 +25,220 @@ title: Installing Apache APISIX
 #
 -->

-This guide walks you through how you can build and get Apache APISIX running on your environment. Please refer the [Getting Started](./getting-started.md) guide for a quick walkthrough on running Apache APISIX.
+import Tabs from '@theme/Tabs';
+import TabItem from '@theme/TabItem';

-## Step 1: Install Apache APISIX
+This guide walks you through how you can install and run Apache APISIX in your environment.

-Apache APISIX can be installed via the [RPM package](#installation-via-rpm-repository-centos), [Docker image](#installation-via-docker), [Helm Chart](#installation-via-helm-chart) or the [source release package](#installation-via-source-release-package). You can install via any one of these options.
+Refer to the [Getting Started](./getting-started.md) guide for a quick walk-through on running Apache APISIX.

-### Installation via RPM Repository (CentOS)
+## Installing APISIX

-> This installation method is suitable for CentOS 7 and CentOS 8.
+APISIX can be installed by the different methods listed below:

-If the official OpenResty repository is **not installed yet**, the following command will help you automatically install both OpenResty and Apache APISIX repositories.
+<Tabs
+  groupId="install-method"
+  defaultValue="docker"
+  values={[
+    {label: 'Docker', value: 'docker'},
+    {label: 'Helm', value: 'helm'},
+    {label: 'RPM', value: 'rpm'},
+  ]}>
+<TabItem value="docker">

-```shell
-sudo yum install -y https://repos.apiseven.com/packages/centos/apache-apisix-repo-1.0-1.noarch.rpm
-```
-
-If the official OpenResty repository **is installed**, the following command will help you automatically install the repositories of Apache APISIX.
-
-```shell
-sudo yum-config-manager --add-repo https://repos.apiseven.com/packages/centos/apache-apisix.repo
-```
-
-Run the following commands to install the repository and Apache APISIX.
+First clone the [apisix-docker](https://github.com/apache/apisix-docker) repository:

 ```shell
-# View the information of the latest apisix package
-sudo yum info -y apisix
-
-# Will show the existing apisix packages
-sudo yum --showduplicates list apisix
-
-# Will install the latest apisix package
-sudo yum install apisix
-
-# Will install a specified version (2.10.3 in this example) apisix package
-sudo yum install apisix-2.10.3-0.el7
+git clone https://github.com/apache/apisix-docker.git
+cd apisix-docker/example
 ```

-### Installation via RPM Offline Package (CentOS)
+Now, you can use `docker-compose` to start APISIX.

-First, download Apache APISIX offline RPM package to `./apisix` folder.
+<Tabs
+  groupId="cpu-arch"
+  defaultValue="x86"
+  values={[
+    {label: 'x86', value: 'x86'},
+    {label: 'ARM/M1', value: 'arm'},
+  ]}>
+<TabItem value="x86">

 ```shell
-sudo mkdir -p apisix
-sudo yum install -y https://repos.apiseven.com/packages/centos/apache-apisix-repo-1.0-1.noarch.rpm
-sudo yum clean all && yum makecache
-sudo yum install -y --downloadonly --downloaddir=./apisix apisix
+docker-compose -p docker-apisix up -d
 ```

-Then copy `./apisix` folder to the target host and run the following command to install.
+</TabItem>
+
+<TabItem value="arm">

 ```shell
-sudo yum install ./apisix/*.rpm
+docker-compose -p docker-apisix -f docker-compose-arm64.yml up -d
 ```

-### Installation via Docker
-
-Please refer to [Installing Apache APISIX with Docker](https://hub.docker.com/r/apache/apisix).
-
-### Installation via Helm Chart
-
-Please refer to [Installing Apache APISIX with Helm Chart](https://github.com/apache/apisix-helm-chart).
-
-### Installation via Source Release Package
-
-Note: if you want to package Apache APISIX for a specific platform, please refer to https://github.com/api7/apisix-build-tools and add the support there.
-The instruction here is only for people who want to setup their Apache APISIX development environment.
-
-Follow the steps below to install Apache APISIX via the source release package.
-
-1. Install dependencies
+</TabItem>
+</Tabs>

-  ```shell
-  curl https://raw.githubusercontent.com/apache/apisix/master/utils/install-dependencies.sh -sL | bash -
-  ```
+</TabItem>

-2. Create a directory named `apisix-2.13.0`.
+<TabItem value="helm">

-  ```shell
-  APISIX_VERSION='2.13.0'
-  mkdir apisix-${APISIX_VERSION}
-  ```
+To install APISIX via Helm, run:

-3. Download the Apache APISIX source release package.
-
-  ```shell
-  wget https://downloads.apache.org/apisix/${APISIX_VERSION}/apache-apisix-${APISIX_VERSION}-src.tgz
-  ```
-
-  You can also download the Apache APISIX source release package from the [Apache APISIX website](https://apisix.apache.org/downloads/). The website also provides source packages for Apache APISIX, APISIX Dashboard, and APISIX Ingress Controller.
-
-4. Uncompress the Apache APISIX source release package.
-
-  ```shell
-  tar zxvf apache-apisix-${APISIX_VERSION}-src.tgz -C apisix-${APISIX_VERSION}
-  ```
-
-5. Install the runtime dependent Lua libraries.
-
-  ```shell
-  # Switch to the apisix-${APISIX_VERSION} directory
-  cd apisix-${APISIX_VERSION}
-  # Create dependencies
-  make deps
-  ```
-
-  **Note**: If you fail to install dependency packages using `make deps` and get an error message like `Could not find header file for LDAP/PCRE/openssl`, you can use this general method to solve problems.
-
-  The general solution: `luarocks` supports custom compile-time dependency directories(from this [link](https://github.com/luarocks/luarocks/wiki/Config-file-format)). Use a third-party tool to install the missing package and add its installation directory to the `luarocks`'s variables table. This a general method which can be applied to macOS, Ubuntu, CentOS or other usual operating systems, and the specific solution for macOS are given here for reference only.
-
-  The following is the solution of macOS, which is similar to that of other operating systems:
-
-    1. Install `openldap` with `brew install openldap`;
-    2. Locate installation directory with `brew --prefix openldap`;
-    3. Add the path to the project configuration file(choose one of the following two methods):
-       1. Solution A: You can set `LDAP_DIR` with `luarocks config` manually, for example `luarocks config variables.LDAP_DIR /opt/homebrew/cellar/openldap/2.6.1`;
-       2. Solution B: Of course, you can also choose to change the default configuration file of luarocks directly, execute the 'cat ~/.luarocks/config-5.1.lua' command, and then add the installation directory of 'openldap' to the file;
-       3. Example as follows:
-          variables = {
-              LDAP_DIR = "/opt/homebrew/cellar/openldap/2.6.1",
-              LDAP_INCDIR = "/opt/homebrew/cellar/openldap/2.6.1/include",
-          }
-
-     `/opt/homebrew/cellar/openldap/` is default path to install openldap on macOS(Apple Silicon) using brew.
-     `/usr/local/opt/openldap/` is default path to install openldap on macOS(Intel) using brew.
-
-6. To uninstall the Apache APISIX runtime, run:
-
-   ```shell
-   # Purge dependencies
-   make undeps
-   ```
-
-   **Note**: This operation will remove the files completely.
-
-#### LTS version installation via Source Release Package
-
-The [current LTS version](https://apisix.apache.org/downloads/) of Apache APISIX is `2.13.0`.
+```shell
+helm repo add apisix https://charts.apiseven.com
+helm repo update
+helm install apisix apisix/apisix --create-namespace  --namespace apisix
+```

-To install this version, set `APISIX_VERSION` in [Installation via Source Release Package](#installation-via-source-release-package) to this version and continue with the other steps.
+You can find other Helm charts on the [apisix-helm-chart](https://github.com/apache/apisix-helm-chart) repository.

-## Step 2: Install etcd
+</TabItem>

-This step is required only if you haven't installed [etcd](https://github.com/etcd-io/etcd).
+<TabItem value="rpm">

-Run the command below to install etcd via the binary in Linux:
+This installation method is suitable for CentOS 7 and Centos 8.

-```shell
-ETCD_VERSION='3.4.18'
-wget https://github.com/etcd-io/etcd/releases/download/v${ETCD_VERSION}/etcd-v${ETCD_VERSION}-linux-amd64.tar.gz
-tar -xvf etcd-v${ETCD_VERSION}-linux-amd64.tar.gz && \
-  cd etcd-v${ETCD_VERSION}-linux-amd64 && \
-  sudo cp -a etcd etcdctl /usr/bin/
-nohup etcd >/tmp/etcd.log 2>&1 &
-```
+### Installation via RPM repository

Review Comment:
   Could you check it now?


##########
docs/en/latest/how-to-build.md:
##########
@@ -21,351 +25,220 @@ title: Installing Apache APISIX
 #
 -->

-This guide walks you through how you can build and get Apache APISIX running on your environment. Please refer the [Getting Started](./getting-started.md) guide for a quick walkthrough on running Apache APISIX.
+import Tabs from '@theme/Tabs';
+import TabItem from '@theme/TabItem';

-## Step 1: Install Apache APISIX
+This guide walks you through how you can install and run Apache APISIX in your environment.

-Apache APISIX can be installed via the [RPM package](#installation-via-rpm-repository-centos), [Docker image](#installation-via-docker), [Helm Chart](#installation-via-helm-chart) or the [source release package](#installation-via-source-release-package). You can install via any one of these options.
+Refer to the [Getting Started](./getting-started.md) guide for a quick walk-through on running Apache APISIX.

-### Installation via RPM Repository (CentOS)
+## Installing APISIX

-> This installation method is suitable for CentOS 7 and CentOS 8.
+APISIX can be installed by the different methods listed below:

-If the official OpenResty repository is **not installed yet**, the following command will help you automatically install both OpenResty and Apache APISIX repositories.
+<Tabs
+  groupId="install-method"
+  defaultValue="docker"
+  values={[
+    {label: 'Docker', value: 'docker'},
+    {label: 'Helm', value: 'helm'},
+    {label: 'RPM', value: 'rpm'},
+  ]}>
+<TabItem value="docker">

-```shell
-sudo yum install -y https://repos.apiseven.com/packages/centos/apache-apisix-repo-1.0-1.noarch.rpm
-```
-
-If the official OpenResty repository **is installed**, the following command will help you automatically install the repositories of Apache APISIX.
-
-```shell
-sudo yum-config-manager --add-repo https://repos.apiseven.com/packages/centos/apache-apisix.repo
-```
-
-Run the following commands to install the repository and Apache APISIX.
+First clone the [apisix-docker](https://github.com/apache/apisix-docker) repository:

 ```shell
-# View the information of the latest apisix package
-sudo yum info -y apisix
-
-# Will show the existing apisix packages
-sudo yum --showduplicates list apisix
-
-# Will install the latest apisix package
-sudo yum install apisix
-
-# Will install a specified version (2.10.3 in this example) apisix package
-sudo yum install apisix-2.10.3-0.el7
+git clone https://github.com/apache/apisix-docker.git
+cd apisix-docker/example
 ```

-### Installation via RPM Offline Package (CentOS)
+Now, you can use `docker-compose` to start APISIX.

-First, download Apache APISIX offline RPM package to `./apisix` folder.
+<Tabs
+  groupId="cpu-arch"
+  defaultValue="x86"
+  values={[
+    {label: 'x86', value: 'x86'},
+    {label: 'ARM/M1', value: 'arm'},
+  ]}>
+<TabItem value="x86">

 ```shell
-sudo mkdir -p apisix
-sudo yum install -y https://repos.apiseven.com/packages/centos/apache-apisix-repo-1.0-1.noarch.rpm
-sudo yum clean all && yum makecache
-sudo yum install -y --downloadonly --downloaddir=./apisix apisix
+docker-compose -p docker-apisix up -d
 ```

-Then copy `./apisix` folder to the target host and run the following command to install.
+</TabItem>
+
+<TabItem value="arm">

 ```shell
-sudo yum install ./apisix/*.rpm
+docker-compose -p docker-apisix -f docker-compose-arm64.yml up -d
 ```

-### Installation via Docker
-
-Please refer to [Installing Apache APISIX with Docker](https://hub.docker.com/r/apache/apisix).
-
-### Installation via Helm Chart
-
-Please refer to [Installing Apache APISIX with Helm Chart](https://github.com/apache/apisix-helm-chart).
-
-### Installation via Source Release Package
-
-Note: if you want to package Apache APISIX for a specific platform, please refer to https://github.com/api7/apisix-build-tools and add the support there.
-The instruction here is only for people who want to setup their Apache APISIX development environment.
-
-Follow the steps below to install Apache APISIX via the source release package.
-
-1. Install dependencies
+</TabItem>
+</Tabs>

-  ```shell
-  curl https://raw.githubusercontent.com/apache/apisix/master/utils/install-dependencies.sh -sL | bash -
-  ```
+</TabItem>

-2. Create a directory named `apisix-2.13.0`.
+<TabItem value="helm">

-  ```shell
-  APISIX_VERSION='2.13.0'
-  mkdir apisix-${APISIX_VERSION}
-  ```
+To install APISIX via Helm, run:

-3. Download the Apache APISIX source release package.
-
-  ```shell
-  wget https://downloads.apache.org/apisix/${APISIX_VERSION}/apache-apisix-${APISIX_VERSION}-src.tgz
-  ```
-
-  You can also download the Apache APISIX source release package from the [Apache APISIX website](https://apisix.apache.org/downloads/). The website also provides source packages for Apache APISIX, APISIX Dashboard, and APISIX Ingress Controller.
-
-4. Uncompress the Apache APISIX source release package.
-
-  ```shell
-  tar zxvf apache-apisix-${APISIX_VERSION}-src.tgz -C apisix-${APISIX_VERSION}
-  ```
-
-5. Install the runtime dependent Lua libraries.
-
-  ```shell
-  # Switch to the apisix-${APISIX_VERSION} directory
-  cd apisix-${APISIX_VERSION}
-  # Create dependencies
-  make deps
-  ```
-
-  **Note**: If you fail to install dependency packages using `make deps` and get an error message like `Could not find header file for LDAP/PCRE/openssl`, you can use this general method to solve problems.
-
-  The general solution: `luarocks` supports custom compile-time dependency directories(from this [link](https://github.com/luarocks/luarocks/wiki/Config-file-format)). Use a third-party tool to install the missing package and add its installation directory to the `luarocks`'s variables table. This a general method which can be applied to macOS, Ubuntu, CentOS or other usual operating systems, and the specific solution for macOS are given here for reference only.
-
-  The following is the solution of macOS, which is similar to that of other operating systems:
-
-    1. Install `openldap` with `brew install openldap`;
-    2. Locate installation directory with `brew --prefix openldap`;
-    3. Add the path to the project configuration file(choose one of the following two methods):
-       1. Solution A: You can set `LDAP_DIR` with `luarocks config` manually, for example `luarocks config variables.LDAP_DIR /opt/homebrew/cellar/openldap/2.6.1`;
-       2. Solution B: Of course, you can also choose to change the default configuration file of luarocks directly, execute the 'cat ~/.luarocks/config-5.1.lua' command, and then add the installation directory of 'openldap' to the file;
-       3. Example as follows:
-          variables = {
-              LDAP_DIR = "/opt/homebrew/cellar/openldap/2.6.1",
-              LDAP_INCDIR = "/opt/homebrew/cellar/openldap/2.6.1/include",
-          }
-
-     `/opt/homebrew/cellar/openldap/` is default path to install openldap on macOS(Apple Silicon) using brew.
-     `/usr/local/opt/openldap/` is default path to install openldap on macOS(Intel) using brew.
-
-6. To uninstall the Apache APISIX runtime, run:
-
-   ```shell
-   # Purge dependencies
-   make undeps
-   ```
-
-   **Note**: This operation will remove the files completely.
-
-#### LTS version installation via Source Release Package
-
-The [current LTS version](https://apisix.apache.org/downloads/) of Apache APISIX is `2.13.0`.
+```shell
+helm repo add apisix https://charts.apiseven.com
+helm repo update
+helm install apisix apisix/apisix --create-namespace  --namespace apisix
+```

-To install this version, set `APISIX_VERSION` in [Installation via Source Release Package](#installation-via-source-release-package) to this version and continue with the other steps.
+You can find other Helm charts on the [apisix-helm-chart](https://github.com/apache/apisix-helm-chart) repository.

-## Step 2: Install etcd
+</TabItem>

-This step is required only if you haven't installed [etcd](https://github.com/etcd-io/etcd).
+<TabItem value="rpm">

-Run the command below to install etcd via the binary in Linux:
+This installation method is suitable for CentOS 7 and Centos 8.

-```shell
-ETCD_VERSION='3.4.18'
-wget https://github.com/etcd-io/etcd/releases/download/v${ETCD_VERSION}/etcd-v${ETCD_VERSION}-linux-amd64.tar.gz
-tar -xvf etcd-v${ETCD_VERSION}-linux-amd64.tar.gz && \
-  cd etcd-v${ETCD_VERSION}-linux-amd64 && \
-  sudo cp -a etcd etcdctl /usr/bin/
-nohup etcd >/tmp/etcd.log 2>&1 &
-```
+### Installation via RPM repository

-Run the command below to install etcd in Mac:
+If OpenResty is **not** installed, you can run the command below to install both OpenResty and APISIX repositories:

 ```shell
-brew install etcd
-# start etcd server
-brew services start etcd
+sudo yum install -y https://repos.apiseven.com/packages/centos/apache-apisix-repo-1.0-1.noarch.rpm
 ```

-## Step 3: Manage Apache APISIX Server
-
-In the Apache APISIX directory, you can initialize dependencies, start service and stop service with commands. Run `apisix help` to get a full list of available commands.
-
-### Initializing dependencies
-
-Run the following command to initialize the NGINX configuration file and etcd.
+If OpenResty is installed, the command below will install the APISIX repositories:

 ```shell
-# initialize NGINX config file and etcd
-apisix init
+sudo yum-config-manager --add-repo https://repos.apiseven.com/packages/centos/apache-apisix.repo
 ```

-### Test the configuration file
-
-Run the following command to test the configuration file. APISIX will generate `nginx.conf` from `config.yaml` and check whether the syntax of `nginx.conf` is correct.
+Then, to install APISIX, run:

 ```shell
-# generate `nginx.conf` from `config.yaml` and test it
-apisix test
+sudo yum install apisix
 ```

-### Start Apache APISIX
+:::tip

-Run the following command to start Apache APISIX.
+You can also install a specific version of APISIX by specifying it:

 ```shell
-# start Apache APISIX server
-apisix start
+sudo yum install apisix-2.10.3-0.el7

Review Comment:
   Could you check the change I made here?


--
This is an automated message from the Apache Git Service.
To respond to the message, please log on to GitHub and use the
URL above to go to the specific comment.

To unsubscribe, e-mail: notifications-unsubscribe@apisix.apache.org

For queries about this service, please contact Infrastructure at:
users@infra.apache.org
[GitHub] [apisix] spacewander merged pull request #6964: docs: update "Installation" guide
Posted by GitBox <gi...@apache.org>.
spacewander merged PR #6964:
URL: https://github.com/apache/apisix/pull/6964


--
This is an automated message from the Apache Git Service.
To respond to the message, please log on to GitHub and use the
URL above to go to the specific comment.

To unsubscribe, e-mail: notifications-unsubscribe@apisix.apache.org

For queries about this service, please contact Infrastructure at:
users@infra.apache.org
[GitHub] [apisix] hf400159 commented on a diff in pull request #6964: docs: update "Installation" guide
Posted by GitBox <gi...@apache.org>.
hf400159 commented on code in PR #6964:
URL: https://github.com/apache/apisix/pull/6964#discussion_r861468645


##########
docs/en/latest/how-to-build.md:
##########
@@ -21,351 +25,220 @@ title: Installing Apache APISIX
 #
 -->

-This guide walks you through how you can build and get Apache APISIX running on your environment. Please refer the [Getting Started](./getting-started.md) guide for a quick walkthrough on running Apache APISIX.
+import Tabs from '@theme/Tabs';
+import TabItem from '@theme/TabItem';

-## Step 1: Install Apache APISIX
+This guide walks you through how you can install and run Apache APISIX in your environment.

-Apache APISIX can be installed via the [RPM package](#installation-via-rpm-repository-centos), [Docker image](#installation-via-docker), [Helm Chart](#installation-via-helm-chart) or the [source release package](#installation-via-source-release-package). You can install via any one of these options.
+Refer to the [Getting Started](./getting-started.md) guide for a quick walk-through on running Apache APISIX.

-### Installation via RPM Repository (CentOS)
+## Installing APISIX

-> This installation method is suitable for CentOS 7 and CentOS 8.
+APISIX can be installed by the different methods listed below:

-If the official OpenResty repository is **not installed yet**, the following command will help you automatically install both OpenResty and Apache APISIX repositories.
+<Tabs
+  groupId="install-method"
+  defaultValue="docker"
+  values={[
+    {label: 'Docker', value: 'docker'},
+    {label: 'Helm', value: 'helm'},
+    {label: 'RPM', value: 'rpm'},
+  ]}>
+<TabItem value="docker">

-```shell
-sudo yum install -y https://repos.apiseven.com/packages/centos/apache-apisix-repo-1.0-1.noarch.rpm
-```
-
-If the official OpenResty repository **is installed**, the following command will help you automatically install the repositories of Apache APISIX.
-
-```shell
-sudo yum-config-manager --add-repo https://repos.apiseven.com/packages/centos/apache-apisix.repo
-```
-
-Run the following commands to install the repository and Apache APISIX.
+First clone the [apisix-docker](https://github.com/apache/apisix-docker) repository:

 ```shell
-# View the information of the latest apisix package
-sudo yum info -y apisix
-
-# Will show the existing apisix packages
-sudo yum --showduplicates list apisix
-
-# Will install the latest apisix package
-sudo yum install apisix
-
-# Will install a specified version (2.10.3 in this example) apisix package
-sudo yum install apisix-2.10.3-0.el7
+git clone https://github.com/apache/apisix-docker.git
+cd apisix-docker/example
 ```

-### Installation via RPM Offline Package (CentOS)
+Now, you can use `docker-compose` to start APISIX.

-First, download Apache APISIX offline RPM package to `./apisix` folder.
+<Tabs
+  groupId="cpu-arch"
+  defaultValue="x86"
+  values={[
+    {label: 'x86', value: 'x86'},
+    {label: 'ARM/M1', value: 'arm'},
+  ]}>
+<TabItem value="x86">

 ```shell
-sudo mkdir -p apisix
-sudo yum install -y https://repos.apiseven.com/packages/centos/apache-apisix-repo-1.0-1.noarch.rpm
-sudo yum clean all && yum makecache
-sudo yum install -y --downloadonly --downloaddir=./apisix apisix
+docker-compose -p docker-apisix up -d
 ```

-Then copy `./apisix` folder to the target host and run the following command to install.
+</TabItem>
+
+<TabItem value="arm">

 ```shell
-sudo yum install ./apisix/*.rpm
+docker-compose -p docker-apisix -f docker-compose-arm64.yml up -d
 ```

-### Installation via Docker
-
-Please refer to [Installing Apache APISIX with Docker](https://hub.docker.com/r/apache/apisix).
-
-### Installation via Helm Chart
-
-Please refer to [Installing Apache APISIX with Helm Chart](https://github.com/apache/apisix-helm-chart).
-
-### Installation via Source Release Package
-
-Note: if you want to package Apache APISIX for a specific platform, please refer to https://github.com/api7/apisix-build-tools and add the support there.
-The instruction here is only for people who want to setup their Apache APISIX development environment.
-
-Follow the steps below to install Apache APISIX via the source release package.
-
-1. Install dependencies
+</TabItem>
+</Tabs>

-  ```shell
-  curl https://raw.githubusercontent.com/apache/apisix/master/utils/install-dependencies.sh -sL | bash -
-  ```
+</TabItem>

-2. Create a directory named `apisix-2.13.0`.
+<TabItem value="helm">

-  ```shell
-  APISIX_VERSION='2.13.0'
-  mkdir apisix-${APISIX_VERSION}
-  ```
+To install APISIX via Helm, run:

-3. Download the Apache APISIX source release package.
-
-  ```shell
-  wget https://downloads.apache.org/apisix/${APISIX_VERSION}/apache-apisix-${APISIX_VERSION}-src.tgz
-  ```
-
-  You can also download the Apache APISIX source release package from the [Apache APISIX website](https://apisix.apache.org/downloads/). The website also provides source packages for Apache APISIX, APISIX Dashboard, and APISIX Ingress Controller.
-
-4. Uncompress the Apache APISIX source release package.
-
-  ```shell
-  tar zxvf apache-apisix-${APISIX_VERSION}-src.tgz -C apisix-${APISIX_VERSION}
-  ```
-
-5. Install the runtime dependent Lua libraries.
-
-  ```shell
-  # Switch to the apisix-${APISIX_VERSION} directory
-  cd apisix-${APISIX_VERSION}
-  # Create dependencies
-  make deps
-  ```
-
-  **Note**: If you fail to install dependency packages using `make deps` and get an error message like `Could not find header file for LDAP/PCRE/openssl`, you can use this general method to solve problems.
-
-  The general solution: `luarocks` supports custom compile-time dependency directories(from this [link](https://github.com/luarocks/luarocks/wiki/Config-file-format)). Use a third-party tool to install the missing package and add its installation directory to the `luarocks`'s variables table. This a general method which can be applied to macOS, Ubuntu, CentOS or other usual operating systems, and the specific solution for macOS are given here for reference only.
-
-  The following is the solution of macOS, which is similar to that of other operating systems:
-
-    1. Install `openldap` with `brew install openldap`;
-    2. Locate installation directory with `brew --prefix openldap`;
-    3. Add the path to the project configuration file(choose one of the following two methods):
-       1. Solution A: You can set `LDAP_DIR` with `luarocks config` manually, for example `luarocks config variables.LDAP_DIR /opt/homebrew/cellar/openldap/2.6.1`;
-       2. Solution B: Of course, you can also choose to change the default configuration file of luarocks directly, execute the 'cat ~/.luarocks/config-5.1.lua' command, and then add the installation directory of 'openldap' to the file;
-       3. Example as follows:
-          variables = {
-              LDAP_DIR = "/opt/homebrew/cellar/openldap/2.6.1",
-              LDAP_INCDIR = "/opt/homebrew/cellar/openldap/2.6.1/include",
-          }
-
-     `/opt/homebrew/cellar/openldap/` is default path to install openldap on macOS(Apple Silicon) using brew.
-     `/usr/local/opt/openldap/` is default path to install openldap on macOS(Intel) using brew.
-
-6. To uninstall the Apache APISIX runtime, run:
-
-   ```shell
-   # Purge dependencies
-   make undeps
-   ```
-
-   **Note**: This operation will remove the files completely.
-
-#### LTS version installation via Source Release Package
-
-The [current LTS version](https://apisix.apache.org/downloads/) of Apache APISIX is `2.13.0`.
+```shell
+helm repo add apisix https://charts.apiseven.com
+helm repo update
+helm install apisix apisix/apisix --create-namespace  --namespace apisix
+```

-To install this version, set `APISIX_VERSION` in [Installation via Source Release Package](#installation-via-source-release-package) to this version and continue with the other steps.
+You can find other Helm charts on the [apisix-helm-chart](https://github.com/apache/apisix-helm-chart) repository.

-## Step 2: Install etcd
+</TabItem>

-This step is required only if you haven't installed [etcd](https://github.com/etcd-io/etcd).
+<TabItem value="rpm">

-Run the command below to install etcd via the binary in Linux:
+This installation method is suitable for CentOS 7 and Centos 8.

-```shell
-ETCD_VERSION='3.4.18'
-wget https://github.com/etcd-io/etcd/releases/download/v${ETCD_VERSION}/etcd-v${ETCD_VERSION}-linux-amd64.tar.gz
-tar -xvf etcd-v${ETCD_VERSION}-linux-amd64.tar.gz && \
-  cd etcd-v${ETCD_VERSION}-linux-amd64 && \
-  sudo cp -a etcd etcdctl /usr/bin/
-nohup etcd >/tmp/etcd.log 2>&1 &
-```
+### Installation via RPM repository

-Run the command below to install etcd in Mac:
+If OpenResty is **not** installed, you can run the command below to install both OpenResty and APISIX repositories:

 ```shell
-brew install etcd
-# start etcd server
-brew services start etcd
+sudo yum install -y https://repos.apiseven.com/packages/centos/apache-apisix-repo-1.0-1.noarch.rpm
 ```

-## Step 3: Manage Apache APISIX Server
-
-In the Apache APISIX directory, you can initialize dependencies, start service and stop service with commands. Run `apisix help` to get a full list of available commands.
-
-### Initializing dependencies
-
-Run the following command to initialize the NGINX configuration file and etcd.
+If OpenResty is installed, the command below will install the APISIX repositories:

 ```shell
-# initialize NGINX config file and etcd
-apisix init
+sudo yum-config-manager --add-repo https://repos.apiseven.com/packages/centos/apache-apisix.repo
 ```

-### Test the configuration file
-
-Run the following command to test the configuration file. APISIX will generate `nginx.conf` from `config.yaml` and check whether the syntax of `nginx.conf` is correct.
+Then, to install APISIX, run:

 ```shell
-# generate `nginx.conf` from `config.yaml` and test it
-apisix test
+sudo yum install apisix
 ```

-### Start Apache APISIX
+:::tip

-Run the following command to start Apache APISIX.
+You can also install a specific version of APISIX by specifying it:

 ```shell
-# start Apache APISIX server
-apisix start
+sudo yum install apisix-2.10.3-0.el7
 ```

-### Stop Apache APISIX
-
-Both `apisix quit` and `apisix stop` can stop Apache APISIX. The main difference is that `apisix quit` stops Apache APISIX gracefully, while `apisix stop` stops Apache APISIX immediately.
+:::

-It is recommended to use the "gracefully stop" command `apisix quit` because it ensures that Apache APISIX will complete all the requests it has received before stopping. On the other hand, `apisix stop` will trigger a forced shutdown and will stop Apache APISIX immediately. This will cause the pending incoming requests to not be processed before shutdown.
+### Installation via RPM offline package

-To perform a graceful shutdown, run:
+First, download APISIX RPM offline package to an `apisix` folder:

 ```shell
-# stop Apache APISIX server gracefully
-apisix quit
+sudo mkdir -p apisix
+sudo yum install -y https://repos.apiseven.com/packages/centos/apache-apisix-repo-1.0-1.noarch.rpm
+sudo yum clean all && yum makecache
+sudo yum install -y --downloadonly --downloaddir=./apisix apisix
 ```

-To perform a forced shutdown, run:
+Then copy the `apisix` folder to the target host and run:

 ```shell
-# stop Apache APISIX server immediately
-apisix stop
+sudo yum install ./apisix/*.rpm
 ```

-### Other operations
+### Managing APISIX server

-You can get help and learn more about all the available operations in Apache APISIX by running the `help` command as shown below.
+Once APISIX is installed, you can initialize the configuration file and etcd by running:

 ```shell
-# show a list of available operations
-apisix help
+apisix init
 ```

-## Step 4: Run Test Cases
-
-To run the test cases, run the steps outlined below.
-
-1. [Install `cpanminus`](https://metacpan.org/pod/App::cpanminus#INSTALLATION), the package manager for `perl`.
+To start APISIX server, run:

-2. Install the test-nginx dependencies via `cpanm` as shown below.
-
-  ```shell
-  sudo cpanm --notest Test::Nginx IPC::Run > build.log 2>&1 || (cat build.log && exit 1)
-  ```
-
-3. Clone the latest source code locally by using the forked out version.
-
-  ```shell
-  git clone https://github.com/openresty/test-nginx.git
-  ```
+```shell
+apisix start
+```

-4. There are two ways to run the tests.
+:::tip

-  1. Append the current directory to the perl module directory: `export PERL5LIB=.:$PERL5LIB` and then run `make test` command.
+Run `apisix help` to get a list of all available operations.

-  2. Specify the NGINX binary path by running `TEST_NGINX_BINARY=/usr/local/bin/openresty prove -Itest-nginx/lib -r t`.
+:::

-  <!--
-  #
-  #    In addition to the basic Markdown syntax, we use remark-admonitions
-  #    alongside MDX to add support for admonitions. Admonitions are wrapped
-  #    by a set of 3 colons.
-  #    Please refer to https://docusaurus.io/docs/next/markdown-features/admonitions
-  #    for more detail.
-  #
-  -->
+</TabItem>
+</Tabs>

-  :::note Note
-  Some of the tests rely on external services and system configuration modification. For a complete test environment build, you can refer to `ci/linux_openresty_common_runner.sh`.
-  :::
+## Installing etcd

-### Troubleshoot testing
+APISIX uses [etcd](https://github.com/etcd-io/etcd) to save and synchronize configuration.

-#### Configuring NGINX path
+etcd would be installed automatically if you have chosen the Docker or Helm install method above.

-The solution to the `Error unknown directive "lua_package_path" in /API_ASPIX/apisix/t/servroot/conf/nginx.conf` error is as shown below.
+If etcd is not installed you can install it as shown below.

-Ensure that OpenResty is set to the default NGINX, and export the path as follows:
+<Tabs
+  groupId="os"
+  defaultValue="linux"
+  values={[
+    {label: 'Linux', value: 'linux'},
+    {label: 'macOS', value: 'mac'},
+  ]}>
+<TabItem value="linux">

-* `export PATH=/usr/local/openresty/nginx/sbin:$PATH`
-  * Linux default installation path:
-    * `export PATH=/usr/local/openresty/nginx/sbin:$PATH`
-  * MacOS default installation path via homebrew:
-    * `export PATH=/usr/local/opt/openresty/nginx/sbin:$PATH`
+```shell
+ETCD_VERSION='3.4.18'
+wget https://github.com/etcd-io/etcd/releases/download/v${ETCD_VERSION}/etcd-v${ETCD_VERSION}-linux-amd64.tar.gz
+tar -xvf etcd-v${ETCD_VERSION}-linux-amd64.tar.gz && \
+  cd etcd-v${ETCD_VERSION}-linux-amd64 && \
+  sudo cp -a etcd etcdctl /usr/bin/
+nohup etcd >/tmp/etcd.log 2>&1 &
+```

-#### Running a single test case
+</TabItem>

-To run a specific test case, use the command below.
+<TabItem value="mac">

 ```shell
-prove -Itest-nginx/lib -r t/plugin/openid-connect.t
+brew install etcd
+brew services start etcd
 ```

-For more details on the test cases, see the [testing framework](https://github.com/apache/apisix/blob/master/docs/en/latest/internal/testing-framework.md) document.
+</TabItem>
+</Tabs>

Review Comment:
   I checked the installation guide for the previous version. Since installing APISIX on MacOS using source code was added in the 2.13 version of the documentation, installing etcd on MacOS will be added. But the source installation of APISIX has been removed, so I think this step should be removed. Or take a look at other people's ideas.


--
This is an automated message from the Apache Git Service.
To respond to the message, please log on to GitHub and use the
URL above to go to the specific comment.

To unsubscribe, e-mail: notifications-unsubscribe@apisix.apache.org

For queries about this service, please contact Infrastructure at:
users@infra.apache.org
[GitHub] [apisix] navendu-pottekkat commented on pull request #6964: docs: update "Installation" guide
Posted by GitBox <gi...@apache.org>.
navendu-pottekkat commented on PR #6964:
URL: https://github.com/apache/apisix/pull/6964#issuecomment-1113360685

   @hf400159 @yzeng25 I have made the changes you suggested.


--
This is an automated message from the Apache Git Service.
To respond to the message, please log on to GitHub and use the
URL above to go to the specific comment.

To unsubscribe, e-mail: notifications-unsubscribe@apisix.apache.org

For queries about this service, please contact Infrastructure at:
users@infra.apache.org
[GitHub] [apisix] navendu-pottekkat commented on pull request #6964: docs: update "Installation" guide
Posted by GitBox <gi...@apache.org>.
navendu-pottekkat commented on PR #6964:
URL: https://github.com/apache/apisix/pull/6964#issuecomment-1120196931

   @moonming Also, it was decided to move the "building APISIX from source" part to GitHub as it would be used more by the developers.

   In short, this doc would be for users who want to install APISIX. The file name wasn't changed because we did not want broken links. We can for now, maybe have a URL redirect which we can gradually depreciate to a new link.


--
This is an automated message from the Apache Git Service.
To respond to the message, please log on to GitHub and use the
URL above to go to the specific comment.

To unsubscribe, e-mail: notifications-unsubscribe@apisix.apache.org

For queries about this service, please contact Infrastructure at:
users@infra.apache.org