You are viewing a plain text version of this content. The canonical link for it is here.
Posted to commits@weex.apache.org by ha...@apache.org on 2018/12/21 02:38:50 UTC
[incubator-weex-site] branch draft updated: add blog zh content
(#261)
This is an automated email from the ASF dual-hosted git repository.
hanks pushed a commit to branch draft
in repository https://gitbox.apache.org/repos/asf/incubator-weex-site.git
The following commit(s) were added to refs/heads/draft by this push:
new fea6061 add blog zh content (#261)
fea6061 is described below
commit fea606166d780dc8079486afe400cb6e6d9a3ce8
Author: jasonintju <ja...@gmail.com>
AuthorDate: Fri Dec 21 10:38:47 2018 +0800
add blog zh content (#261)
* add zh blog content
* optimize styles
---
docs/.vuepress/components/IPhoneImg.vue | 32 ------
docs/.vuepress/override.styl | 3 +-
docs/zh/blog/weex-auto-test-locating.md | 183 +++++++++++++++++++++++++++++++-
3 files changed, 184 insertions(+), 34 deletions(-)
diff --git a/docs/.vuepress/components/IPhoneImg.vue b/docs/.vuepress/components/IPhoneImg.vue
deleted file mode 100644
index c815f29..0000000
--- a/docs/.vuepress/components/IPhoneImg.vue
+++ /dev/null
@@ -1,32 +0,0 @@
-<template>
- <div class="wrapper">
- <div class="iPhone-img">
- <img src="https://img.alicdn.com/tfs/TB1dZ.4nY2pK1RjSZFsXXaNlXXa-435-895.svg" width="323">
- <img class="img" :src="$withBase(imgSrc)" width="284" height="505">
- </div>
- </div>
-</template>
-
-<script>
-export default {
- props: ['imgSrc']
-}
-</script>
-
-<style>
-.wrapper {
- position: relative;
- height: 644px;
-}
-.iPhone-img {
- position: absolute;
- left: 50%;
- top: 0;
- transform: translateX(-50%);
-}
-.img {
- position: absolute;
- left: 17px;
- top: 81px;
-}
-</style>
\ No newline at end of file
diff --git a/docs/.vuepress/override.styl b/docs/.vuepress/override.styl
index 5b1cb96..3fd8746 100644
--- a/docs/.vuepress/override.styl
+++ b/docs/.vuepress/override.styl
@@ -1 +1,2 @@
-#app .sidebar { width: 15rem; }
\ No newline at end of file
+#app .sidebar { width: 15rem; }
+#app .page { padding-bottom: 0; }
\ No newline at end of file
diff --git a/docs/zh/blog/weex-auto-test-locating.md b/docs/zh/blog/weex-auto-test-locating.md
index 895429a..625eed5 100644
--- a/docs/zh/blog/weex-auto-test-locating.md
+++ b/docs/zh/blog/weex-auto-test-locating.md
@@ -1 +1,182 @@
-# 博客
\ No newline at end of file
+## 背景介绍
+在WeexSDK的日常测试和自动化沉淀过程中,作为SDK的测试同学会遇到一下的问题:
+1. 手淘Weex业务众多,并且业务逻辑复杂,人工回归成本高、效率低,并且在手工全覆盖的情况下,因为对业务逻辑的不了解,仍然会有“漏网”的bug。
+2. 对于Weex底层组件的自动化测试中,元素定位是一个比较麻烦的问题。由于Weex特殊的渲染逻辑,不会为每个元素分配一个唯一的id进行区分,在自动化脚本编写过程中,定位元素的成本和稳定性受到考验。
+3. 现有的测试框架,都无法彻底磨平Android、iOS两大平台的差异。作为一个跨平台的开发框架,配套的自动化测试,也能够从底层磨平两个平台的差异,做到一套代码,两端执行。
+
+针对上述问题,我们在手淘中落地了一个方便快捷的元素定位方案,能够让Weex业务测试同学在前端配合下为指定元素分配一个唯一的ID,方便定位。
+## 解决方案
+在手淘上的元素定位问题,我们参考了@歪木在weex playground中的一个实现方案,为Weex页面提供了一个新的test-id属性,可以方便UI自动化脚本唯一性的快速定位指定元素。具体方案和使用方法如下:
+### Android
+---
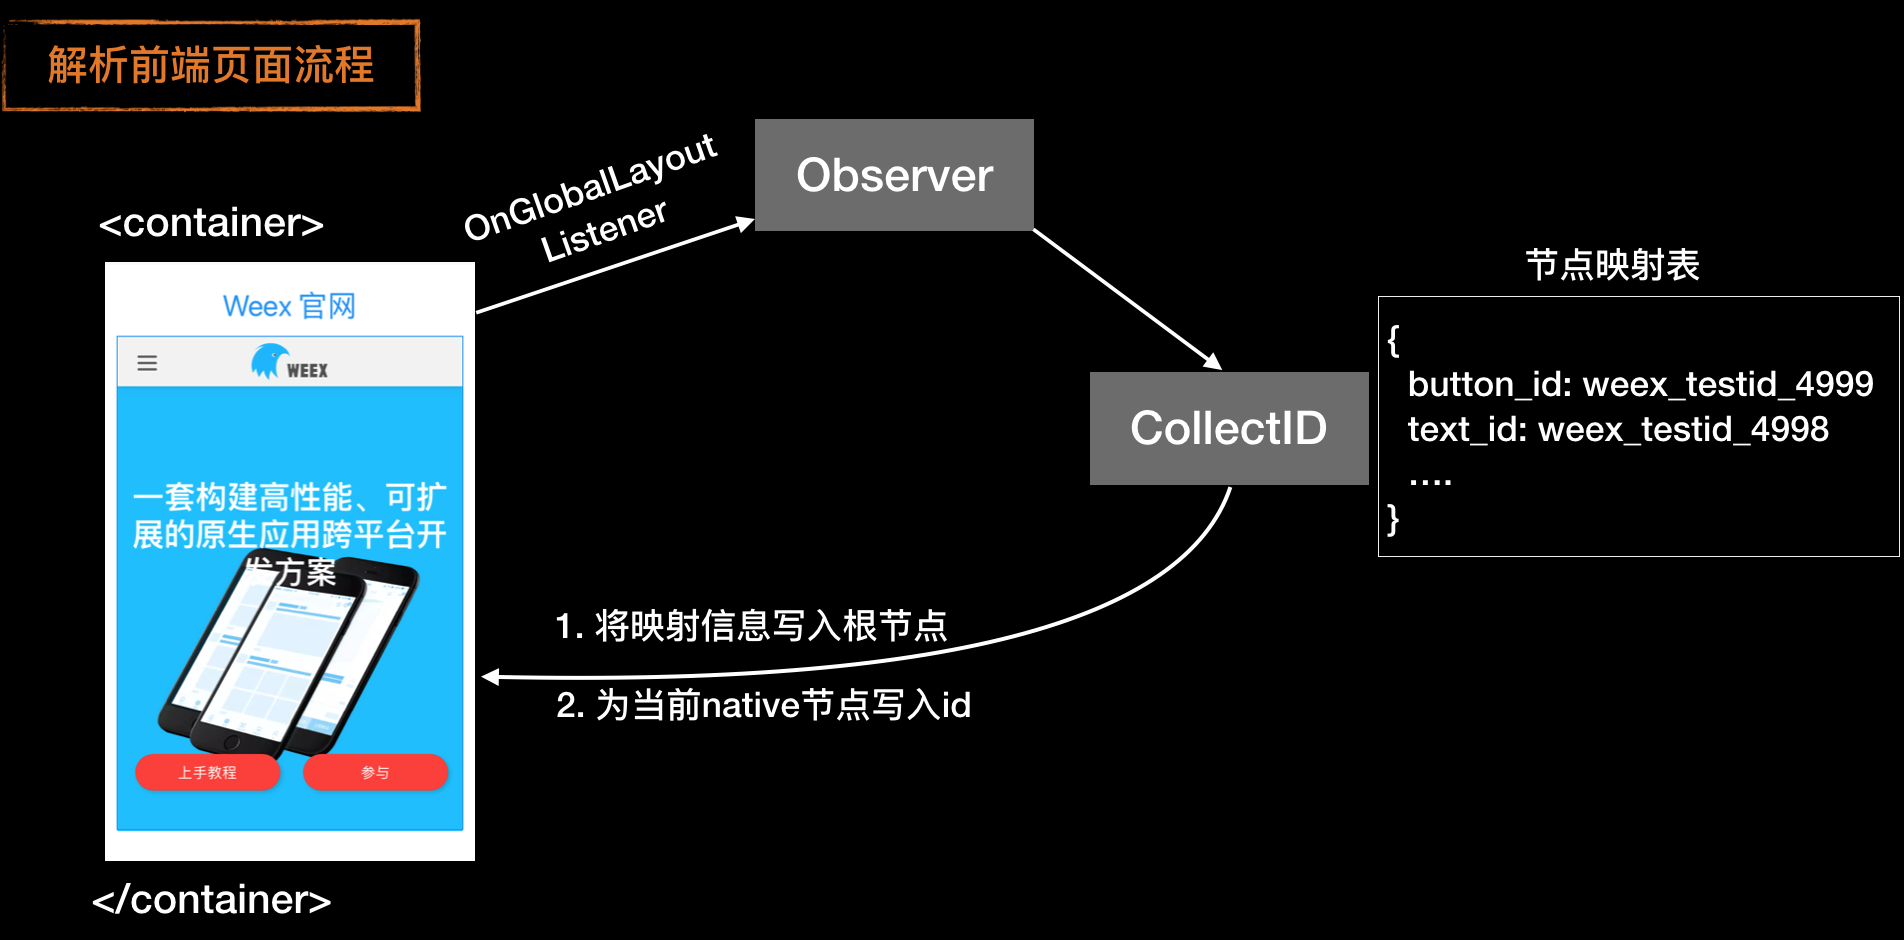
+**实现原理**
+
+
+
+如上图所示,我们首先在weex页面的根部,创建了一个container节点,用于存储当前页面所有添加test-id属性的节点其test-id值与实际节点ID的映射关系;其次,在页面的layout发生变化时,触发收集新的携带test-id节点的信息,并为其分配一个新的ID;最后,我们将该节点的test-id属性和对应的ID写入到container节点中,方便自动化脚本查询指定节点时,能够获取其真实ID的信息;
+
+**主要代码**
+- 由于Android不支持动态的创建节点ID,只能动态的将view与ID绑定,因此我们预先注册了5000个备用的ID,来作为与weex页面view绑定而使用的ID。
+- 客户端中通过监听页面Layout变化,触发遍历查找testId属性的逻辑。
+```java
+//Weex页面onCreateView回调时触发,监听当前页面Layout变化,触发执行collectIdTask()
+@Override
+public View onCreateView(WXSDKInstance instance, View view) {
+ View wrappedView = null;
+ observer = view.getViewTreeObserver();
+ mInstance = instance;
+ if (WXEnvironment.isApkDebugable()) {
+ if (instance.getContext() instanceof WXActivity) {
+ listener = new ViewTreeObserver.OnGlobalLayoutListener() {
+ @Override
+ public void onGlobalLayout() {
+ if(layoutChangeSignal == false) {
+ return;
+ }
+ else {
+ layoutChangeSignal = false;
+ new collectIdTask().execute();
+ }
+ }
+ };
+ observer.addOnGlobalLayoutListener(listener);
+ }
+ }
+ if (mAnalyzerDelegate != null) {
+ wrappedView = mAnalyzerDelegate.onWeexViewCreated(instance, view);
+ }
+ if (wrappedView == null) {
+ return view;
+ }
+ return wrappedView;
+}
+ ```
+ - 对于一个携带testId属性的节点,为其分配一个nativeId。将testId属性值与nativeId的映射关系写到页面的根节点处。将nativeId动态的赋值到当前节点中。
+ ```java
+ private static void collectId(WXComponent comp, Map<String, String> map) {
+ if (comp == null) {
+ return;
+ }
+ String id;
+ View view ;
+ if ((id = (String) comp.getAttrs().get("testId")) != null && (view = comp.getHostView()) != null
+ && !map.containsKey(id)) {
+ Pair<String, Integer> pair = Utility.nextID();
+ view.setId(pair.second);
+ map.put(id, pair.first);
+ }
+ if (comp instanceof WXVContainer) {
+ WXVContainer container = (WXVContainer) comp;
+ for (int i = container.getChildCount() - 1; i >= 0; i--) {
+ collectId(container.getChild(i), map);
+ }
+ }
+ }
+
+private void collectIDMap() {
+ if (mInstance.getContext() instanceof WXActivity) {
+ WXActivity appCompatActivity = (WXActivity) mInstance.getContext();
+ View container = appCompatActivity.findViewById(R.id.container_test_id);
+ collectId(mInstance.getRootComponent(), mIDMap);
+ container.setContentDescription(JSON.toJSONString(mIDMap));
+ }
+ }
+ ```
+
+### iOS
+相对于android,weex实现iOS的ById方式就简单多了。做过iOS自动化的同学应该听说过 iOS Accessibility,苹果为障碍人群提供的友好交互功能;iOS UI自动化正好可以与accessibility结合起来进行元素定位,参见:[User Interface Testing](https://developer.apple.com/library/content/documentation/DeveloperTools/Conceptual/testing_with_xcode/chapters/09-ui_testing.html)
+[accessibilityidentifer](https://developer.apple.com/documentation/uikit/uiaccessibilityidentification) 是Accessibility的一种方式,用来唯一地标识一个元素使用UI自动化脚本编写的接口。
+```
+An identifier can be used to uniquely identify an element in the scripts you write using the UI Automation interfaces.
+Using an identifier allows you to avoid inappropriately setting or accessing an element’s accessibility label.
+```
+所以我们只需要在创建view的同时,将test-id作为identifier设置给对应的节点,UI自动化测试时就可以通过ById的方式获得对应的节点了。
+
+此处代码已经在weexsdk中实现,不需要业务方做任何额外实现。
+代码如下:
+```
+// 前端的test-id传输到native端会默认转化成testId
+if (attributes[@"testId"]) {
+ [self.view setAccessibilityIdentifier:[WXConvert NSString:attributes[@"testId"]]];
+}
+```
+
+ ---
+### 前端实践案例
+下面给出Weex最常见的Vue页面中的使用demo
+
+对于Vue来说,由于在其内部,会将“XXX-XXX”格式的属性转为驼峰形式命名方式。因此,为了遵从http的命名方式,我们建议在节点属性命名时,使用“test-id”作为元素定位的属性。
+```
+<template>
+ <div style="align-items:center">
+ <text test-id='text' class="title">Weex 官网</text>
+ <div class="wrapper">
+ <web class="webview" src="http://weex-project.io/"></web>
+ </div>
+ </div>
+</template>
+
+<style scoped>
+ .title {
+ font-size: 60px;
+ margin-top: 40px;
+ margin-bottom: 20px;
+ color: #1B90F7;
+ }
+ .wrapper {
+ width: 704px;
+ height: 884px;
+ border-width: 2px;
+ border-style: solid;
+ border-color: #1B90F7;
+ }
+ .webview {
+ width: 700px;
+ height: 880px;
+ }
+</style>
+```
+
+### 测试脚本
+由于iOS下,只需要获取“testID”属性即可,此处我们不在赘述在iOS下定位带元素的方法。下面,我们将给出Android下查找test-id的测试代码。而业务方在实际使用过程当中,可以在自己的自动化框架中,封装统一的FindByTestID方法,来达到一套代码双端执行的效果。后续,我们也会对外推出一个基于Appium的测试框架,提供一个功能较为丰富的weex自动化执行框架给外部开发者。
+
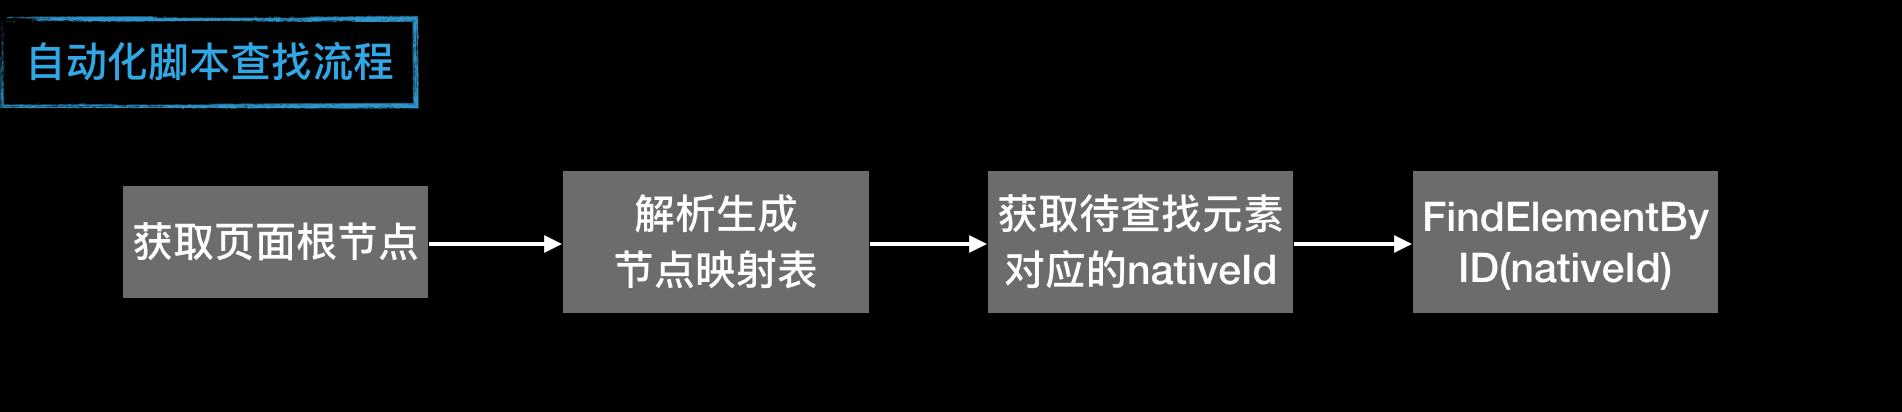
+**原理示意图**
+
+
+针对本方案,我们基于Appium测试框架,实现了对应查找元素的方法。代码逻辑如下:
+```java
+public static WebElement waitForElementByTestID(String testId, int waitTime) {
+ long startTime = System.currentTimeMillis();
+
+ while((System.currentTimeMillis() - startTime) < waitTime) {
+ WebElement container = waitForVisible(By.id("com.taobao.taobao:id/container_test_id"), 5000);
+ if (container != null) {
+ JSONObject idMap = (JSONObject) JSON.parse(container.getAttribute("name"));
+ if(idMap.get(testId) == null) {
+ continue;
+ }
+ WebElement element = waitForVisible(By.id("com.taobao.taobao:id/" + idMap.get(testId)), 3000);
+ if(element != null) {
+ logger.info("native id found!");
+ return element;
+ }
+ }
+ }
+ return null;
+ }
+
+public static WebElement waitForVisible(By by, int waitTime) {
+ WebElement el = null;
+ WebDriverWait wait = new WebDriverWait(driver, waitTime);
+ for (int attempt = 0; attempt < waitTime; attempt++) {
+ try {
+ el = getDriver().findElement(by);
+ break;
+ } catch (Exception e) {
+ getDriver().manage().timeouts().implicitlyWait(1, TimeUnit.SECONDS);
+ }
+ }
+ wait.until(ExpectedConditions.visibilityOfElementLocated(by));
+ return el;
+}
+```