You are viewing a plain text version of this content. The canonical link for it is here.
Posted to notifications@shardingsphere.apache.org by wu...@apache.org on 2022/04/08 16:34:01 UTC
[shardingsphere] branch master updated: Add an introductory article on ShardingSphere-Proxy (#16642)
This is an automated email from the ASF dual-hosted git repository.
wuweijie pushed a commit to branch master
in repository https://gitbox.apache.org/repos/asf/shardingsphere.git
The following commit(s) were added to refs/heads/master by this push:
new 68138752294 Add an introductory article on ShardingSphere-Proxy (#16642)
68138752294 is described below
commit 681387522944fa7f19a5d84028271153ea4f5c11
Author: 龙台 Long Tai <77...@users.noreply.github.com>
AuthorDate: Sat Apr 9 00:33:46 2022 +0800
Add an introductory article on ShardingSphere-Proxy (#16642)
* Add an introductory article on ShardingSphere-Proxy
* Add author profile
---
docs/blog/content/material/proxyIntroduce.cn.md | 377 ++++++++++++++++++++++++
docs/blog/static/img/proxyIntroduce1.png | Bin 0 -> 117633 bytes
docs/blog/static/img/proxyIntroduce2.png | Bin 0 -> 121294 bytes
docs/blog/static/img/proxyIntroduce3.png | Bin 0 -> 173395 bytes
docs/blog/static/img/proxyIntroduce4.png | Bin 0 -> 119315 bytes
5 files changed, 377 insertions(+)
diff --git a/docs/blog/content/material/proxyIntroduce.cn.md b/docs/blog/content/material/proxyIntroduce.cn.md
new file mode 100644
index 00000000000..5895157cfd5
--- /dev/null
+++ b/docs/blog/content/material/proxyIntroduce.cn.md
@@ -0,0 +1,377 @@
++++
+title = "ShardingSphere-Proxy:从实际场景出发,快速上手"
+weight = 37
+chapter = true
++++
+
+本篇文章主要从项目中实际场景出发,讲解分库分表等功能在日常运维中遇到的问题,以及 ShardingSphere-Proxy 对应的解决方案,版本号:v5.1.0。
+
+> 如无特别声明,以下示例中的数据库指 MySQL。
+
+## 一、这个项目做什么
+
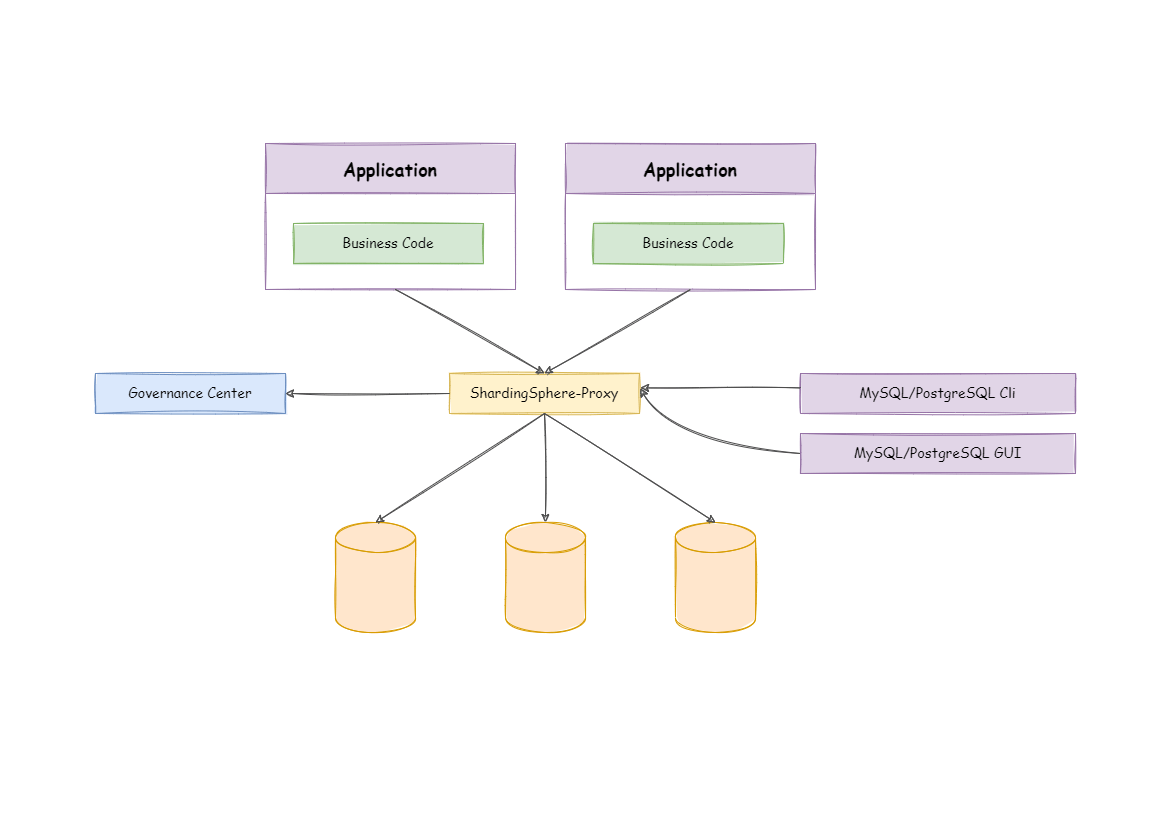
+ShardingSphere-Proxy,可以让用户像使用原生数据库一样使用 Apache ShardingSphere。
+
+了解一项技术的开始,一般从官网开始。先来看一看官网对 ShardingSphere-Proxy 的定义是什么样的:
+
+> 定位为透明化的数据库代理端,提供封装了数据库二进制协议的服务端版本,用于完成对异构语言的支持。 目前提供 MySQL 和 PostgreSQL(兼容 openGauss 等基于 PostgreSQL 的数据库)版本,它可以使用任何兼容 MySQL/PostgreSQL 协议的访问客户端(如:MySQL Command Client, MySQL Workbench, Navicat 等)操作数据,对 DBA 更加友好。
+
+
+
+先明确一个概念,ShardingSphere-Proxy 是一个服务进程。从客户端程序连接来说,它和 MySQL 数据库并没有什么区别。
+
+## 二、为什么要用 Proxy
+
+在做了分库分表或其他规则的情况下,数据会分散到多个数据库实例上,在管理上难免会有一些不便;或者使用非 Java 语言的开发者,需要 ShardingSphere 所提供的能力…… 以上这些情况,正是 ShardingSphere-Proxy 力所能及之处。
+
+### 1. Proxy 应用场景
+
+日常工作中,大家使用 ShardingSphere-JDBC 进行分库分表的场景是比较多的。假设你有一张用户表,通过用户 ID 以 Hash 的方式进行了水平分库,那么此时客户端连接数据库的方式是这样:
+
+
+
+我们举例工作中真实存在的几个场景:
+
+1. 测试同学想看下用户 ID 123456 的信息在数据库表里情况,需要你提供下用户在哪一张分表;
+2. 公司领导需要技术提供一份 2022 年用户的增长总量以及用户信息;
+3. 公司举行 8 周年活动,需要技术提供一份注册日期超过 8 周年的活跃老用户名单。
+
+因为数据分库分表后,数据是散落在不同的库表中,对于上述的场景实现并不容易;如果为了实现类似临时需求,每次都需要开发代码,显得有些笨重。这个时候就需要文章主角 ShardingSphere-Proxy 登场了。
+
+ShardingSphere-Proxy 隐藏了后端实际数据库,对于客户端来说就是在使用一个数据库,不需要关心 ShardingSphere 如何协调背后的数据库,对于使用非 Java 语言的开发者或 DBA 更友好。
+
+比如说 t_user 在数据库层面拆分为若干真实表:`t_user_0` 到 `t_user_9`,在客户端操作 ShardingSphere-Proxy 的过程中,只会知道有一张 t_user 逻辑表,路由至真实表的过程都在 ShardingSphere-Proxy 内部执行。
+
+1. 逻辑表:相同结构的水平拆分数据库(表)的逻辑名称,是 SQL 中表的逻辑标识。 例:用户数据根据主键尾数拆分为 10 张表,分别是 `t_user_0` 到 `t_user_9`,他们的逻辑表名为 `t_user`。
+2. 真实表:在水平拆分的数据库中真实存在的物理表。 即上个示例中的 `t_user_0` 到 `t_user_9`。
+
+
+
+### 2. JDBC 和 Proxy 的区别
+
+看了上面的描述,怎么感觉 ShardingSphere-Proxy 和 ShardingSphere-JDBC 这么像,两者有什么区别?
+
+| | ShardingSphere-JDBC | ShardingSphere-Proxy |
+| :--------- | :------------------------ | :----------------------------------- |
+| 数据库 | 任意 | 基于 MySQL / PostgreSQL 协议的数据库 |
+| 连接消耗数 | 高 | 低 |
+| 异构语言 | 支持 Java 等基于 JVM 语言 | 任意 |
+| 性能 | 损耗低 | 损耗略高 |
+| 无中心化 | 是 | 否 |
+| 静态入口 | 无 | 有 |
+
+简单总结下两者的不同:
+
+1. ShardingSphere-JDBC 是一个 Jar 包,底层通过重写 JDBC 组件完成 SQL 解析、路由、改写、执行等流程;需要在项目中添加对应功能的配置文件,对应用有一定侵入性;
+2. ShardingSphere-Proxy 是一个进程服务,大部分情况下定位为辅助开发运维的效率工具。它将自己伪装为数据库,应用对接后对代码是无侵入的;对 SQL 的执行逻辑同 ShardingSphere-JDBC 一致,两者复用同一内核。
+
+ShardingSphere-Proxy 既然对应用无侵入,而且两者复用同一内核,那为什么大家还要用 ShardingSphere-JDBC 呢?
+
+1. 应用通过 ShardingSphere-JDBC 是直接操作数据库,相当于只有一次网络 IO;而应用连接 ShardingSphere-Proxy 是一次网络 IO,ShardingSphere-Proxy 再操作数据库,又会发生一次网络 IO;
+2. 应用调用链路多了一层,容易形成流量瓶颈,对应用增加了潜在的风险;一般来说,应用程序会搭配 ShardingSphere-JDBC 使用。
+
+当然,ShardingSphere-JDBC 和 ShardingSphere-Proxy 可以进行混合部署,ShardingSphere-JDBC 适用于 Java 开发的高性能的轻量级 OLTP 应用,ShardingSphere-Proxy 适用于 OLAP 应用以及对分片数据库进行管理和运维的场景。
+
+
+
+## 三、如何开始
+
+ShardingSphere-Proxy 的启动方式有三种:二进制包、Docker、Helm,并分为单机部署和集群部署。文章以单机二进制包的方式启动。
+
+1. 通过 [下载页面](https://shardingsphere.apache.org/document/current/cn/downloads/) 获取 ShardingSphere-Proxy 二进制安装包;
+2. 解压缩后修改 `conf/server.yaml` 和以 `config-` 前缀开头的文件,进行分片、读写分离等规则配置;
+3. Linux 操作系统请运行 `bin/start.sh`,Windows 操作系统请运行 `bin/start.bat` 启动 ShardingSphere-Proxy。
+
+下载后的文件目录如下:
+
+```shell
+├── LICENSE
+├── NOTICE
+├── README.txt
+├── bin # 启动停止脚本
+├── conf # 服务配置,分库分表、读写分离、数据加密等功能的配置文件
+├── lib # Jar 包
+└── licenses
+```
+
+### 1. 将 MySQL 的 JDBC 驱动复制到 ext-lib 包
+
+下载驱动 [mysql-connector-java-5.1.47.jar](https://repo1.maven.org/maven2/mysql/mysql-connector-java/5.1.47/mysql-connector-java-5.1.47.jar) 或者 [mysql-connector-java-8.0.11.jar](https://repo1.maven.org/maven2/mysql/mysql-connector-java/8.0.11/mysql-connector-java-8.0.11.jar) 放入 ext-lib 包。因为初始目录中并没有 ext-lib,需要自行创建。
+
+### 2. 修改 conf/server.yaml 配置文件
+
+server.yaml 配置中默认集群运行模式,这里提供一份单机的运行配置。
+
+```yaml
+mode:
+ type: Standalone # 单机模式
+ repository:
+ type: File
+ props:
+ path: /Users/xxx/software/apache-shardingsphere-5.1.0-shardingsphere-proxy/file # 元数据配置等持久化文件路径
+ overwrite: false # 是否覆盖已存在的元数据
+
+rules: # 认证信息
+ - !AUTHORITY
+ users: # 初始化用户
+ - root@%:root
+ - sharding@:sharding
+ provider:
+ type: ALL_PRIVILEGES_PERMITTED
+ - !TRANSACTION
+ defaultType: XA
+ providerType: Atomikos
+ - !SQL_PARSER
+ sqlCommentParseEnabled: true
+ sqlStatementCache:
+ initialCapacity: 2000
+ maximumSize: 65535
+ concurrencyLevel: 4
+ parseTreeCache:
+ initialCapacity: 128
+ maximumSize: 1024
+ concurrencyLevel: 4
+
+props: # 公用配置
+ max-connections-size-per-query: 1
+ kernel-executor-size: 16 # Infinite by default.
+ proxy-frontend-flush-threshold: 128 # The default value is 128.
+ proxy-opentracing-enabled: false
+ proxy-hint-enabled: false
+ sql-show: false
+ check-table-metadata-enabled: false
+ show-process-list-enabled: false
+ # Proxy backend query fetch size. A larger value may increase the memory usage of ShardingSphere Proxy.
+ # The default value is -1, which means set the minimum value for different JDBC drivers.
+ proxy-backend-query-fetch-size: -1
+ check-duplicate-table-enabled: false
+ proxy-frontend-executor-size: 0 # Proxy frontend executor size. The default value is 0, which means let Netty decide.
+ # Available options of proxy backend executor suitable: OLAP(default), OLTP. The OLTP option may reduce time cost of writing packets to client, but it may increase the latency of SQL execution
+ # and block other clients if client connections are more than `proxy-frontend-executor-size`, especially executing slow SQL.
+ proxy-backend-executor-suitable: OLAP
+ proxy-frontend-max-connections: 0 # Less than or equal to 0 means no limitation.
+ sql-federation-enabled: false
+ # Available proxy backend driver type: JDBC (default), ExperimentalVertx
+ proxy-backend-driver-type: JDBC
+
+```
+
+> 需要注意,如果启动单机 ShardingSphere-Proxy,后续需要 Proxy 配置变更,建议将 mode.overwrite 设置为 true,这样 ShardingSphere-Proxy 在启动时就会重新加载元数据。
+
+### 3. 启动 ShardingSphere-Proxy
+
+执行启动命令:`sh bin/start.sh`。默认启动端口 `3307`,可以通过启动脚本命令追加参数的方式替换端口:`sh bin/start.sh 3308`。
+
+查看 ShardingSphere-Proxy 是否启动成功,执行查看日志命令:`tail -100f logs/stdout.log`。如最后一行出现下述信息,即为启动成功:
+
+```tex
+[INFO ] xxx-xx-xx xx:xx:xx.xxx [main] o.a.s.p.frontend.ShardingSphereProxy - ShardingSphere-Proxy Standalone mode started successfully
+```
+
+## 四、场景实践
+
+本章节从实战场景的前提出发,通过 ShardingSphere-Proxy 完成上述需求。
+
+
+
+### 1. 初始化数据库表
+
+```sql
+# CREATE DATABASE
+CREATE DATABASE user_sharding_0;
+
+CREATE DATABASE user_sharding_1;
+
+# CREATE TABLE
+use user_sharding_0;
+
+CREATE TABLE `t_user_0` (
+ `id` bigint (20) NOT NULL,
+ `user_id` bigint (20) NOT NULL,
+ `create_date` datetime DEFAULT NULL,
+ PRIMARY KEY (`id`)) ENGINE = InnoDB DEFAULT CHARSET = latin1;
+
+CREATE TABLE `t_user_1` (
+ `id` bigint (20) NOT NULL,
+ `user_id` bigint (20) NOT NULL,
+ `create_date` datetime DEFAULT NULL,
+ PRIMARY KEY (`id`)) ENGINE = InnoDB DEFAULT CHARSET = latin1;
+
+
+use user_sharding_1;
+
+CREATE TABLE `t_user_0` (
+ `id` bigint (20) NOT NULL,
+ `user_id` bigint (20) NOT NULL,
+ `create_date` datetime DEFAULT NULL,
+ PRIMARY KEY (`id`)) ENGINE = InnoDB DEFAULT CHARSET = latin1;
+
+
+CREATE TABLE `t_user_1` (
+ `id` bigint (20) NOT NULL,
+ `user_id` bigint (20) NOT NULL,
+ `create_date` datetime DEFAULT NULL,
+ PRIMARY KEY (`id`)) ENGINE = InnoDB DEFAULT CHARSET = latin1;
+```
+
+### 2. 初始化 Proxy 分片配置
+
+修改 conf/config-sharding.yaml 文件,添加分片配置。
+
+```yaml
+schemaName: sharding_db
+
+dataSources:
+ ds_0:
+ url: jdbc:mysql://127.0.0.1:3306/user_sharding_0?serverTimezone=UTC&useSSL=false
+ username: root
+ password: root
+ connectionTimeoutMilliseconds: 30000
+ idleTimeoutMilliseconds: 60000
+ maxLifetimeMilliseconds: 1800000
+ maxPoolSize: 50
+ minPoolSize: 1
+ ds_1:
+ url: jdbc:mysql://127.0.0.1:3306/user_sharding_1?serverTimezone=UTC&useSSL=false
+ username: root
+ password: root
+ connectionTimeoutMilliseconds: 30000
+ idleTimeoutMilliseconds: 60000
+ maxLifetimeMilliseconds: 1800000
+ maxPoolSize: 50
+ minPoolSize: 1
+
+rules:
+- !SHARDING
+ tables:
+ t_user:
+ actualDataNodes: ds_${0..1}.t_user_${0..1}
+ tableStrategy:
+ standard:
+ shardingColumn: user_id
+ shardingAlgorithmName: t_user_inline
+ keyGenerateStrategy:
+ column: user_id
+ keyGeneratorName: snowflake
+ bindingTables:
+ - t_user
+ defaultDatabaseStrategy:
+ standard:
+ shardingColumn: user_id
+ shardingAlgorithmName: database_inline
+ defaultTableStrategy:
+ none:
+
+ shardingAlgorithms:
+ database_inline:
+ type: INLINE
+ props:
+ algorithm-expression: ds_${user_id % 2}
+ t_user_inline:
+ type: INLINE
+ props:
+ algorithm-expression: t_user_${user_id % 2}
+
+ keyGenerators:
+ snowflake:
+ type: SNOWFLAKE
+```
+
+### 3. 分片测试
+
+使用 MySQL 终端命令连接 ShardingSphere-Proxy 服务端。如果 Docker 部署的数据库,需要加上 -h 本机 ip。因为容器内访问 127.0.0.1 不通。
+
+```sql
+# 将 {xx} 替换为实际参数
+mysql -h {ip} -u {username} -p{password} -P 3307
+# 示例命令
+mysql -h 127.0.0.1 -u root -proot -P 3307
+```
+
+> ShardingSphere-Proxy 支持 Navicat MySQL、DataGrip、WorkBench、TablePlus 等数据库管理工具连接。
+
+连接成功后,查询代理数据库,与配置文件中一致。
+
+```sql
+mysql> show databases;
++-------------+
+| schema_name |
++-------------+
+| sharding_db |
++-------------+
+1 row in set (0.02 sec)
+```
+
+执行新增 t_user 语句,插入 6 条用户数据,创建时间 2021 年 3 条,2022 年 3 条。
+
+```sql
+mysql> use sharding_db;
+mysql> INSERT INTO t_user (id, user_id, create_date) values(1, 1, '2021-01-01 00:00:00'), (2, 2, '2021-01-01 00:00:00'), (3, 3, '2021-01-01 00:00:00'), (4, 4, '2022-01-01 00:00:00'), (5, 5, '2022-02-01 00:00:00'), (6, 6, '2022-03-01 00:00:00');
+Query OK, 6 rows affected (0.16 sec)
+
+mysql> select * from t_user;
++----+---------+---------------------+
+| id | user_id | create_date |
++----+---------+---------------------+
+| 2 | 2 | 2021-01-01 00:00:00 |
+| 4 | 4 | 2022-01-01 00:00:00 |
+| 6 | 6 | 2022-03-01 00:00:00 |
+| 1 | 1 | 2021-01-01 00:00:00 |
+| 3 | 3 | 2021-01-01 00:00:00 |
+| 5 | 5 | 2022-02-01 00:00:00 |
++----+---------+---------------------+
+```
+
+此时数据分别散落在 `user_sharding_0` 和 `user_sharding_1` 库。
+
+回到最初的问题,如何定位数据信息。因为 ShardingSphere-Proxy 已经将表进行了逻辑聚合,所以直接查询就好。
+
+```sql
+mysql> select * from t_user where user_id = 1;
++----+---------+---------------------+
+| id | user_id | create_date |
++----+---------+---------------------+
+| 1 | 1 | 2021-01-01 00:00:00 |
++----+---------+---------------------+
+1 row in set (0.01 sec)
+```
+
+第二个问题,查询 2022 年用户增长数量以及用户情况。
+
+```sql
+mysql> select count(*) from t_user where create_date > '2022-00-00 00:00:00';
++----------+
+| count(*) |
++----------+
+| 3 |
++----------+
+1 row in set (0.10 sec)
+
+mysql> select * from t_user where create_date > '2022-00-00 00:00:00';
++----+---------+---------------------+
+| id | user_id | create_date |
++----+---------+---------------------+
+| 4 | 4 | 2022-01-01 00:00:00 |
+| 6 | 6 | 2022-01-01 00:00:00 |
+| 5 | 5 | 2022-01-01 00:00:00 |
++----+---------+---------------------+
+3 rows in set (0.02 sec)
+```
+
+第三个问题同上。
+
+## 五、最后总结
+
+文章通过图文并茂的方式帮助大家过了一遍 ShardingSphere-Proxy 的基本概念,引申出了分库分表后产生的实际运维场景,并演示了如何通过 ShardingSphere-Proxy 解决相关问题。
+
+相信大家看完对 ShardingSphere-Proxy 有了更深入的认识。首先要明白 ShardingSphere-Proxy 的定位是协助开发运维的产品,掌握 ShardingSphere-JDBC 和 ShardingSphere-Proxy 有哪些区别,以及理解两者的优缺点和实现方式是怎么样的。在这个基础上去阅读两者的源码,也就更容易理解了。
+
+## 六、巨人的肩膀
+
+[Apache ShardingSphere 官网](https://shardingsphere.apache.org/)
+
+[打造基于 PostgreSQL/openGauss 的分布式数据库解决方案](https://community.sphere-ex.com/t/topic/497)
+
+## 七、作者简介
+
+龙台,Apache ShardingSphere Contributor,Github 2.1k star hippo4j 作者,Github ID:longtai-cn。
diff --git a/docs/blog/static/img/proxyIntroduce1.png b/docs/blog/static/img/proxyIntroduce1.png
new file mode 100644
index 00000000000..4270905db2d
Binary files /dev/null and b/docs/blog/static/img/proxyIntroduce1.png differ
diff --git a/docs/blog/static/img/proxyIntroduce2.png b/docs/blog/static/img/proxyIntroduce2.png
new file mode 100644
index 00000000000..fd7e48d95e5
Binary files /dev/null and b/docs/blog/static/img/proxyIntroduce2.png differ
diff --git a/docs/blog/static/img/proxyIntroduce3.png b/docs/blog/static/img/proxyIntroduce3.png
new file mode 100644
index 00000000000..b73994dfbfa
Binary files /dev/null and b/docs/blog/static/img/proxyIntroduce3.png differ
diff --git a/docs/blog/static/img/proxyIntroduce4.png b/docs/blog/static/img/proxyIntroduce4.png
new file mode 100644
index 00000000000..9fb40b07dcf
Binary files /dev/null and b/docs/blog/static/img/proxyIntroduce4.png differ