You are viewing a plain text version of this content. The canonical link for it is here.
Posted to notifications@apisix.apache.org by sp...@apache.org on 2021/10/20 03:09:57 UTC
[apisix] branch master updated: docs: enabling MD045 - images with
alternate text (#5280)
This is an automated email from the ASF dual-hosted git repository.
spacewander pushed a commit to branch master
in repository https://gitbox.apache.org/repos/asf/apisix.git
The following commit(s) were added to refs/heads/master by this push:
new 1b96444 docs: enabling MD045 - images with alternate text (#5280)
1b96444 is described below
commit 1b964443c81ab80bd839cc1119e2257deb24c8a1
Author: Bisakh <bi...@gmail.com>
AuthorDate: Wed Oct 20 08:39:48 2021 +0530
docs: enabling MD045 - images with alternate text (#5280)
---
.markdownlint.yml | 1 -
docs/en/latest/aws.md | 10 +++++-----
docs/en/latest/discovery.md | 2 +-
docs/en/latest/discovery/consul_kv.md | 2 +-
docs/en/latest/plugins/hmac-auth.md | 6 ++++--
docs/en/latest/plugins/jwt-auth.md | 9 ++++++---
docs/en/latest/plugins/key-auth.md | 4 ++--
docs/en/latest/plugins/limit-conn.md | 2 +-
docs/en/latest/plugins/prometheus.md | 16 ++++++++--------
docs/en/latest/plugins/response-rewrite.md | 2 +-
docs/en/latest/plugins/sls-logger.md | 2 +-
docs/en/latest/plugins/wolf-rbac.md | 4 ++--
docs/en/latest/plugins/zipkin.md | 7 ++++---
docs/zh/latest/README.md | 4 ++--
docs/zh/latest/discovery.md | 24 ++++++++++++------------
docs/zh/latest/plugins/jwt-auth.md | 7 ++++---
docs/zh/latest/plugins/key-auth.md | 4 ++--
docs/zh/latest/plugins/limit-conn.md | 2 +-
docs/zh/latest/plugins/prometheus.md | 16 ++++++++--------
docs/zh/latest/plugins/response-rewrite.md | 2 +-
docs/zh/latest/plugins/sls-logger.md | 2 +-
docs/zh/latest/plugins/wolf-rbac.md | 4 ++--
docs/zh/latest/plugins/zipkin.md | 6 +++---
23 files changed, 72 insertions(+), 66 deletions(-)
diff --git a/.markdownlint.yml b/.markdownlint.yml
index 3836e57..36d2485 100644
--- a/.markdownlint.yml
+++ b/.markdownlint.yml
@@ -31,5 +31,4 @@ MD034: false
MD036: false
MD040: false
MD041: false
-MD045: false
MD046: false
diff --git a/docs/en/latest/aws.md b/docs/en/latest/aws.md
index 07a0e7d..ce9636c 100644
--- a/docs/en/latest/aws.md
+++ b/docs/en/latest/aws.md
@@ -27,7 +27,7 @@ title: Running APISIX in AWS with AWS CDK
This reference architecture walks you through building **APISIX** as a serverless container API Gateway on top of AWS Fargate with AWS CDK.
-
+
## Generate an AWS CDK project with `projen`
@@ -208,15 +208,15 @@ Address: 44.226.102.63
Configure the IP addresses returned as your upstream nodes in your **APISIX** dashboard followed by the **Services** and **Routes** configuration. Let's say we have a `/index.php` as the URI for the first route for our first **Service** from the **Upstream** IP addresses.
-
-
-
+
+
+
## Validation
OK. Let's test the `/index.php` on `{apiSix.ApiSixServiceServiceURL}/index.php`
-
+
Now we have been successfully running **APISIX** in AWS Fargate as serverless container API Gateway service.
diff --git a/docs/en/latest/discovery.md b/docs/en/latest/discovery.md
index 6565178..89f7ef1 100644
--- a/docs/en/latest/discovery.md
+++ b/docs/en/latest/discovery.md
@@ -25,7 +25,7 @@ title: Integration service discovery registry
When system traffic changes, the number of servers of the upstream service also increases or decreases, or the server needs to be replaced due to its hardware failure. If the gateway maintains upstream service information through configuration, the maintenance costs in the microservices architecture pattern are unpredictable. Furthermore, due to the untimely update of these information, will also bring a certain impact for the business, and the impact of human error operation can not be [...]
-
+
1. When the service starts, it will report some of its information, such as the service name, IP, port and other information to the registry. The services communicate with the registry using a mechanism such as a heartbeat, and if the registry and the service are unable to communicate for a long time, the instance will be cancel.When the service goes offline, the registry will delete the instance information.
2. The gateway gets service instance information from the registry in near-real time.
diff --git a/docs/en/latest/discovery/consul_kv.md b/docs/en/latest/discovery/consul_kv.md
index f729154..830369e 100644
--- a/docs/en/latest/discovery/consul_kv.md
+++ b/docs/en/latest/discovery/consul_kv.md
@@ -26,7 +26,7 @@ title: consul_kv
For users who used [nginx-upsync-module](https://github.com/weibocom/nginx-upsync-module) and consul key value for service discovery way, as we Weibo Mobile Team, maybe need it.
Thanks to @fatman-x guy, who developed this module, called `consul_kv`, and its worker process data flow is below:
-
+
## Configuration for discovery client
diff --git a/docs/en/latest/plugins/hmac-auth.md b/docs/en/latest/plugins/hmac-auth.md
index 2346096..7a23cff 100644
--- a/docs/en/latest/plugins/hmac-auth.md
+++ b/docs/en/latest/plugins/hmac-auth.md
@@ -29,8 +29,10 @@ title: hmac-auth
- [How To Enable](#how-to-enable)
- [Test Plugin](#test-plugin)
- [generate signature:](#generate-signature)
+ - [Request body checking](#request-body-checking)
- [Use the generated signature to try the request](#use-the-generated-signature-to-try-the-request)
- [Custom header key](#custom-header-key)
+ - [Enable request body checking](#enable-request-body-checking)
- [Disable Plugin](#disable-plugin)
- [Generate Signature Examples](#generate-signature-examples)
@@ -76,10 +78,10 @@ curl http://127.0.0.1:9080/apisix/admin/consumers -H 'X-API-KEY: edd1c9f034335f1
The default `keep_headers` is false and `encode_uri_params` is true.
You can visit the dashboard to complete the above operations through the web interface, first add a consumer:
-
+
Then add the hmac-auth plugin to the consumer page:
-
+
2. add a Route or add a Service, and enable the `hmac-auth` plugin
diff --git a/docs/en/latest/plugins/jwt-auth.md b/docs/en/latest/plugins/jwt-auth.md
index b3cbfc5..bc16d4a 100644
--- a/docs/en/latest/plugins/jwt-auth.md
+++ b/docs/en/latest/plugins/jwt-auth.md
@@ -25,8 +25,11 @@ title: jwt-auth
- [**Name**](#name)
- [**Attributes**](#attributes)
+- [**API**](#api)
- [**How To Enable**](#how-to-enable)
- [**Test Plugin**](#test-plugin)
+ - [get the token in `jwt-auth` plugin:](#get-the-token-in-jwt-auth-plugin)
+ - [try request with token](#try-request-with-token)
- [**Disable Plugin**](#disable-plugin)
## Name
@@ -111,14 +114,14 @@ You can use [APISIX Dashboard](https://github.com/apache/apisix-dashboard) to co
1. Add a Consumer through the web console:
-
+
then add jwt-auth plugin in the Consumer page:
-
+
2. Create a Route or Service object and enable the jwt-auth plugin:
-
+
## Test Plugin
diff --git a/docs/en/latest/plugins/key-auth.md b/docs/en/latest/plugins/key-auth.md
index aaea706..25fec5f 100644
--- a/docs/en/latest/plugins/key-auth.md
+++ b/docs/en/latest/plugins/key-auth.md
@@ -69,10 +69,10 @@ curl http://127.0.0.1:9080/apisix/admin/consumers -H 'X-API-KEY: edd1c9f034335f1
```
You also can complete the above operation through the web interface, first add a route:
-
+
Then add key-auth plugin:
-
+
2. creates a route or service object, and enable plugin `key-auth`.
diff --git a/docs/en/latest/plugins/limit-conn.md b/docs/en/latest/plugins/limit-conn.md
index 2a468a6..dc01c74 100644
--- a/docs/en/latest/plugins/limit-conn.md
+++ b/docs/en/latest/plugins/limit-conn.md
@@ -78,7 +78,7 @@ curl http://127.0.0.1:9080/apisix/admin/routes/1 -H 'X-API-KEY: edd1c9f034335f13
```
You also can complete the above operation through the web interface, first add a route, then add limit-conn plugin:
-
+
## Test Plugin
diff --git a/docs/en/latest/plugins/prometheus.md b/docs/en/latest/plugins/prometheus.md
index ee3073b..2a4eaf6 100644
--- a/docs/en/latest/plugins/prometheus.md
+++ b/docs/en/latest/plugins/prometheus.md
@@ -84,11 +84,11 @@ You can use [APISIX Dashboard](https://github.com/apache/apisix-dashboard) to co
First, add a Route:
-
+
Then add prometheus plugin:
-
+
## How to fetch the metric data
@@ -114,9 +114,9 @@ scrape_configs:
And we can check the status at prometheus console:
-
+
-
+
## How to specify export uri
@@ -142,13 +142,13 @@ Downloads [Grafana dashboard meta](https://github.com/apache/apisix/blob/master/
Or you can goto [Grafana official](https://grafana.com/grafana/dashboards/11719) for `Grafana` meta data.
-
+
-
+
-
+
-
+
### Available metrics
diff --git a/docs/en/latest/plugins/response-rewrite.md b/docs/en/latest/plugins/response-rewrite.md
index 37da0dd..c03ac9b 100644
--- a/docs/en/latest/plugins/response-rewrite.md
+++ b/docs/en/latest/plugins/response-rewrite.md
@@ -131,6 +131,6 @@ The `response-rewrite` plugin has been disabled now. It works for other plugins.
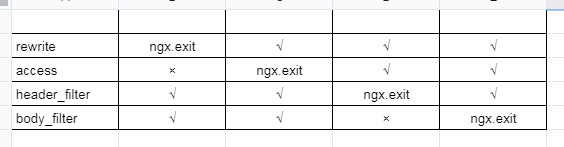
`ngx.exit` will interrupt the execution of the current request and return status code to Nginx.
-
+
However, if you execute `ngx.exit` during the access phase, it only interrupts the request processing phase, and the response phase will still process it, i.e. if you configure the `response-rewrite` plugin, it will force overwriting of your response information (e.g. response status code).
diff --git a/docs/en/latest/plugins/sls-logger.md b/docs/en/latest/plugins/sls-logger.md
index bc3834a..24dbed7 100644
--- a/docs/en/latest/plugins/sls-logger.md
+++ b/docs/en/latest/plugins/sls-logger.md
@@ -99,7 +99,7 @@ hello, world
* check log in ali cloud log service
-
+
## Disable Plugin
diff --git a/docs/en/latest/plugins/wolf-rbac.md b/docs/en/latest/plugins/wolf-rbac.md
index 8399465..c76310e 100644
--- a/docs/en/latest/plugins/wolf-rbac.md
+++ b/docs/en/latest/plugins/wolf-rbac.md
@@ -82,10 +82,10 @@ curl http://127.0.0.1:9080/apisix/admin/consumers -H 'X-API-KEY: edd1c9f034335f
```
You also can complete the above operations through the web interface, first add a consumer:
-
+
Then add the wolf-rbac plugin to the consumer page:
-
+
Notes: The `appid` filled in above needs to already exist in the wolf system.
diff --git a/docs/en/latest/plugins/zipkin.md b/docs/en/latest/plugins/zipkin.md
index 6a0c1aa..d1542c6 100644
--- a/docs/en/latest/plugins/zipkin.md
+++ b/docs/en/latest/plugins/zipkin.md
@@ -27,6 +27,7 @@ title: Zipkin
- [**Attributes**](#attributes)
- [**How To Enable**](#how-to-enable)
- [**Test Plugin**](#test-plugin)
+ - [run the Zipkin instance](#run-the-zipkin-instance)
- [**Disable Plugin**](#disable-plugin)
## Name
@@ -95,7 +96,7 @@ curl http://127.0.0.1:9080/apisix/admin/routes/1 -H 'X-API-KEY: edd1c9f034335f1
You also can complete the above operation through the web interface, first add a route, then add zipkin plugin:
-
+
## Test Plugin
@@ -121,9 +122,9 @@ Then you can use a browser to access the webUI of Zipkin:
http://127.0.0.1:9411/zipkin
```
-
+
-
+
## Disable Plugin
diff --git a/docs/zh/latest/README.md b/docs/zh/latest/README.md
index d0eed94..c8ae97b 100644
--- a/docs/zh/latest/README.md
+++ b/docs/zh/latest/README.md
@@ -54,9 +54,9 @@ Apache APISIX 的技术架构如下图所示:
- [Apache APISIX® Go Plugin Runner](https://github.com/apache/apisix-go-plugin-runner/issues?q=is%3Aopen+is%3Aissue+label%3A%22good+first+issue%22)
- [Apache APISIX® Python Plugin Runner](https://github.com/apache/apisix-python-plugin-runner/issues?q=is%3Aopen+is%3Aissue+label%3A%22good+first+issue%22)
- **微信公众号**
- <br/>
+ <br/>
- **微信视频号**
- <br/>
+ <br/>
## 特性
diff --git a/docs/zh/latest/discovery.md b/docs/zh/latest/discovery.md
index 73907c9..0466cb8 100644
--- a/docs/zh/latest/discovery.md
+++ b/docs/zh/latest/discovery.md
@@ -21,23 +21,23 @@ title: 集成服务发现注册中心
#
-->
-* [摘要](#摘要)
-* [当前支持的注册中心](#当前支持的注册中心)
-* [如何扩展注册中心?](#如何扩展注册中心)
- * [基本步骤](#基本步骤)
- * [以 Eureka 举例](#以-eureka-举例)
- * [实现 eureka.lua](#实现-eurekalua)
- * [Eureka 与 APISIX 之间数据转换逻辑](#eureka-与-apisix-之间数据转换逻辑)
-* [注册中心配置](#注册中心配置)
- * [初始化服务发现](#初始化服务发现)
- * [Eureka 的配置](#eureka-的配置)
-* [upstream 配置](#upstream-配置)
+- [摘要](#摘要)
+- [当前支持的注册中心](#当前支持的注册中心)
+- [如何扩展注册中心?](#如何扩展注册中心)
+ - [基本步骤](#基本步骤)
+ - [以 Eureka 举例](#以-eureka-举例)
+ - [实现 eureka.lua](#实现-eurekalua)
+ - [Eureka 与 APISIX 之间数据转换逻辑](#eureka-与-apisix-之间数据转换逻辑)
+- [注册中心配置](#注册中心配置)
+ - [初始化服务发现](#初始化服务发现)
+ - [Eureka 的配置](#eureka-的配置)
+- [upstream 配置](#upstream-配置)
## 摘要
当业务量发生变化时,需要对上游服务进行扩缩容,或者因服务器硬件故障需要更换服务器。如果网关是通过配置来维护上游服务信息,在微服务架构模式下,其带来的维护成本可想而知。再者因不能及时更新这些信息,也会对业务带来一定的影响,还有人为误操作带来的影响也不可忽视,所以网关非常必要通过服务注册中心动态获取最新的服务实例信息。架构图如下所示:
-
+
1. 服务启动时将自身的一些信息,比如服务名、IP、端口等信息上报到注册中心;各个服务与注册中心使用一定机制(例如心跳)通信,如果注册中心与服务长时间无法通信,就会注销该实例;当服务下线时,会删除注册中心的实例信息;
2. 网关会准实时地从注册中心获取服务实例信息;
diff --git a/docs/zh/latest/plugins/jwt-auth.md b/docs/zh/latest/plugins/jwt-auth.md
index 1e6b253..ae484dc 100644
--- a/docs/zh/latest/plugins/jwt-auth.md
+++ b/docs/zh/latest/plugins/jwt-auth.md
@@ -110,14 +110,15 @@ curl http://127.0.0.1:9080/apisix/admin/routes/1 -H 'X-API-KEY: edd1c9f034335f13
你可以使用 [APISIX Dashboard](https://github.com/apache/apisix-dashboard),通过 web 界面来完成上面的操作。
1. 先增加一个 consumer:
-
+
+
然后在 consumer 页面中添加 jwt-auth 插件:
-
+
2. 创建 Route 或 Service 对象,并开启 jwt-auth 插件:
-
+
## 测试插件
diff --git a/docs/zh/latest/plugins/key-auth.md b/docs/zh/latest/plugins/key-auth.md
index a36e7fb..48549c4 100644
--- a/docs/zh/latest/plugins/key-auth.md
+++ b/docs/zh/latest/plugins/key-auth.md
@@ -67,10 +67,10 @@ curl http://127.0.0.1:9080/apisix/admin/consumers -H 'X-API-KEY: edd1c9f034335f1
```
你也可以通过 web 界面来完成上面的操作,先增加一个 consumer:
-
+
然后在 consumer 页面中添加 key-auth 插件:
-
+
2. 创建 route 或 service 对象,并开启 `key-auth` 插件。
diff --git a/docs/zh/latest/plugins/limit-conn.md b/docs/zh/latest/plugins/limit-conn.md
index 2ff5f73..5f66480 100644
--- a/docs/zh/latest/plugins/limit-conn.md
+++ b/docs/zh/latest/plugins/limit-conn.md
@@ -69,7 +69,7 @@ curl http://127.0.0.1:9080/apisix/admin/routes/1 -H 'X-API-KEY: edd1c9f034335f13
```
你也可以通过 web 界面来完成上面的操作,先增加一个 route,然后在插件页面中添加 limit-conn 插件:
-
+
#### test plugin
diff --git a/docs/zh/latest/plugins/prometheus.md b/docs/zh/latest/plugins/prometheus.md
index 3c35879..addf30e 100644
--- a/docs/zh/latest/plugins/prometheus.md
+++ b/docs/zh/latest/plugins/prometheus.md
@@ -84,11 +84,11 @@ curl http://127.0.0.1:9080/apisix/admin/routes/1 -H 'X-API-KEY: edd1c9f034335f13
先增加一个 Route:
-
+
然后在 route 页面中添加 prometheus 插件:
-
+
## 如何提取指标数据
@@ -113,9 +113,9 @@ scrape_configs:
我们也可以在 prometheus 控制台中去检查状态:
-
+
-
+
## 如何修改暴露指标的 uri
@@ -141,13 +141,13 @@ plugin_attr:
你可以到 [Grafana 官方](https://grafana.com/grafana/dashboards/11719) 下载 `Grafana` 元数据.
-
+
-
+
-
+
-
+
### 可有的指标
diff --git a/docs/zh/latest/plugins/response-rewrite.md b/docs/zh/latest/plugins/response-rewrite.md
index cf2facf..36758d1 100644
--- a/docs/zh/latest/plugins/response-rewrite.md
+++ b/docs/zh/latest/plugins/response-rewrite.md
@@ -125,6 +125,6 @@ curl http://127.0.0.1:9080/apisix/admin/routes/1 -H 'X-API-KEY: edd1c9f034335f1
`ngx.exit`将中断当前请求的执行,并返回状态码给 Nginx。
-
+
但是很多人可能会对`ngx.exit`理解出现偏差,即如果你在`access`阶段执行`ngx.exit`,只是中断了请求处理阶段,响应阶段仍然会处理。比如,如果你配置了`response-rewrite`插件,它会强制覆盖你的响应信息(如响应代码)。
diff --git a/docs/zh/latest/plugins/sls-logger.md b/docs/zh/latest/plugins/sls-logger.md
index 902d744..c69f358 100644
--- a/docs/zh/latest/plugins/sls-logger.md
+++ b/docs/zh/latest/plugins/sls-logger.md
@@ -101,7 +101,7 @@ hello, world
```
* 查看阿里云日志服务上传记录
-
+
## 禁用插件
diff --git a/docs/zh/latest/plugins/wolf-rbac.md b/docs/zh/latest/plugins/wolf-rbac.md
index ee81c8c..a176e0f 100644
--- a/docs/zh/latest/plugins/wolf-rbac.md
+++ b/docs/zh/latest/plugins/wolf-rbac.md
@@ -82,10 +82,10 @@ curl http://127.0.0.1:9080/apisix/admin/consumers -H 'X-API-KEY: edd1c9f034335f
```
你也可以通过 web 界面来完成上面的操作,先增加一个 consumer:
-
+
然后在 consumer 页面中添加 wolf-rbac 插件:
-
+
注意: 上面填写的 `appid` 需要在 wolf 控制台中已经存在的.
diff --git a/docs/zh/latest/plugins/zipkin.md b/docs/zh/latest/plugins/zipkin.md
index 44a7b91..831b504 100644
--- a/docs/zh/latest/plugins/zipkin.md
+++ b/docs/zh/latest/plugins/zipkin.md
@@ -95,7 +95,7 @@ curl http://127.0.0.1:9080/apisix/admin/routes/1 -H 'X-API-KEY: edd1c9f034335f1
你也可以通过 web 界面来完成上面的操作,先增加一个 route,然后在插件页面中添加 zipkin 插件:
-
+
## 测试插件
@@ -121,9 +121,9 @@ HTTP/1.1 200 OK
http://127.0.0.1:9411/zipkin
```
-
+
-
+
## 禁用插件