You are viewing a plain text version of this content. The canonical link for it is here.
Posted to commits@weex.apache.org by ha...@apache.org on 2017/10/13 13:04:23 UTC
[28/51] [abbrv] incubator-weex-site git commit: rearrangement the
structure of the document
http://git-wip-us.apache.org/repos/asf/incubator-weex-site/blob/32a097bf/_draft/v-0.10/advanced/extend-to-ios.md
----------------------------------------------------------------------
diff --git a/_draft/v-0.10/advanced/extend-to-ios.md b/_draft/v-0.10/advanced/extend-to-ios.md
new file mode 100644
index 0000000..bddb96e
--- /dev/null
+++ b/_draft/v-0.10/advanced/extend-to-ios.md
@@ -0,0 +1,311 @@
+---
+title: Extend to iOS
+type: advanced
+order: 7
+has_chapter_content: true
+version: 0.10
+---
+
+# Extend to iOS
+
+### Module extend
+
+Weex SDK provides only rendering capabilities, rather than have other capabilities, such as network, picture, and URL redirection. If you want these features, you need to implement it.
+
+For example: If you want to implement an address jumping function, you can achieve a Module following the steps below.
+
+#### Step to customize a module
+
+1. Module
+ customized must implement WXModuleProtocol
+2. A macro named `WX_EXPORT_METHOD` must be added, as it is the only way to be recognized by Weex. It takes arguments that specifies the method in module called by JavaScript code.
+3. The weexInstance should be synthesized. Each module object is bind to a specific instance.
+4. Module methods will be invoked in UI thread, so do not put time consuming operation there. If you want to execute the whole module methods in other thread, please implement the method `- (NSThread *)targetExecuteThread` in protocol. In the way, tasks distributed to this module will be executed in targetExecuteThread.
+5. Weex params can be String or Map.
+6. Module supports to return results to Javascript in callback. This callback is type of `WXModuleCallback`, the params of which can be String or Map.
+
+```objective-c
+@implementation WXEventModule
+@synthesize weexInstance;
+ WX_EXPORT_METHOD(@selector(openURL:callback))
+
+- (void)openURL:(NSString *)url callback:(WXModuleCallback)callback
+{
+ NSString *newURL = url;
+ if ([url hasPrefix:@"//"]) {
+ newURL = [NSString stringWithFormat:@"http:%@", url];
+ } else if (![url hasPrefix:@"http"]) {
+ newURL = [NSURL URLWithString:url relativeToURL:weexInstance.scriptURL].absoluteString;
+ }
+
+ UIViewController *controller = [[WXDemoViewController alloc] init];
+ ((WXDemoViewController *)controller).url = [NSURL URLWithString:newURL];
+
+ [[weexInstance.viewController navigationController] pushViewController:controller animated:YES];
+ callback(@{@"result":@"success"});
+}
+
+@end
+```
+
+#### Register the module
+
+You can register the customized module by calling the method `registerModule:withClass` in WXSDKEngine.
+
+```objective-c
+WXSDKEngine.h
+/**
+* @abstract Registers a module for a given name
+* @param name The module name to register
+* @param clazz The module class to register
+**/
++ (void)registerModule:(NSString *)name withClass:(Class)clazz;
+
+[WXSDKEngine registerModule:@"event" withClass:[WXEventModule class]];
+```
+
+### Handler extend
+
+Weex SDK doesn't have capabilitis, such as image download 、navigator operation,please implement these protocols by yourself.
+
+#### WXImgLoaderProtocol
+<font color="gray">
+Weex SDK has no image download capability, you need to implement `WXImgLoaderProtocol`. Refer to the following examples.
+
+```objective-c
+WXImageLoaderProtocol.h
+@protocol WXImgLoaderProtocol <WXModuleProtocol>
+
+/**
+ * @abstract Creates a image download handler with a given URL
+ * @param imageUrl The URL of the image to download
+ * @param imageFrame The frame of the image you want to set
+ * @param options : The options to be used for this download
+ * @param completedBlock : A block called once the download is completed.
+ image : the image which has been download to local.
+ error : the error which has happened in download.
+ finished : a Boolean value indicating whether download action has finished.
+ */
+ -(id<WXImageOperationProtocol>)downloadImageWithURL:(NSString *)url imageFrame:(CGRect)imageFrame userInfo:(NSDictionary *)options completed:(void(^)(UIImage *image, NSError *error, BOOL finished))completedBlock;
+ @end
+```
+
+Implement above protocol as follows.
+
+
+```objective-c
+@implementation WXImgLoaderDefaultImpl
+#pragma mark -
+#pragma mark WXImgLoaderProtocol
+
+- (id<WXImageOperationProtocol>)downloadImageWithURL:(NSString *)url imageFrame:(CGRect)imageFrame userInfo:(NSDictionary *)userInfo completed:(void(^)(UIImage *image, NSError *error, BOOL finished))completedBlock
+{
+ if ([url hasPrefix:@"//"]) {
+ url = [@"http:" stringByAppendingString:url];
+ }
+ return (id<WXImageOperationProtocol>)[[SDWebImageManager sharedManager] downloadImageWithURL:[NSURL URLWithString:url] options:0 progress:^(NSInteger receivedSize, NSInteger expectedSize) {
+ } completed:^(UIImage *image, NSError *error, SDImageCacheType cacheType, BOOL finished, NSURL *imageURL) {
+ if (completedBlock) {
+ completedBlock(image, error, finished);
+ }
+ }];
+}
+@end
+```
+
+#### Register the handler
+
+You can register the handler which implements the protocol by calling `registerHandler:withProtocol` in WXSDKEngine.
+
+```objective-c
+WXSDKEngine.h
+/**
+* @abstract Registers a handler for a given handler instance and specific protocol
+* @param handler The handler instance to register
+* @param protocol The protocol to confirm
+*/
++ (void)registerHandler:(id)handler withProtocol:(Protocol *)protocol;
+
+[WXSDKEngine registerHandler:[WXImgLoaderDefaultImpl new] withProtocol:@protocol(WXImgLoaderProtocol)];
+```
+
+## Custom Native Components for iOS
+
+### Component extend
+
+There are a lot of native components ready to be used in the Weex SDK, but users always have their own use cases. You might have written an awesome native UI widget in your previous work and just want to wrap up it and export to Weex. So we provide a way to enable developers to create their own custom fully-native components.
+
+This guide will use the implementation of existing component `image` to show you how to build a native component. It will also assume that you are familiar with iOS programming.
+
+#### Registration
+
+Defining a custom native component is simple. Just call `[WXSDKEngine registerComponent:withClass:]` with the component's tag name as first argument.
+
+```objective-c
+[WXSDKEngine registerComponent:@"image" withClass:[WXImageComponent class]];
+```
+
+Then you can create a `WXImageComponent` class to represent the implementation of image component.
+
+Now you can use `<image>` wherever you want in the template.
+
+```html
+<image></image>
+```
+
+#### Adding Properties
+
+The next thing we can do is to extend some native properties to make the component more powerful. As an image, let's say we should have a `src` attribute as image's remote source and a `resize` attribute as image's resize mode(contain/cover/stretch).
+
+```objective-c
+@interface WXImageComponent ()
+
+@property (nonatomic, strong) NSString *imageSrc;
+@property (nonatomic, assign) UIViewContentMode resizeMode;
+
+@end
+```
+
+All of the styles, attributes and events will be passed to the component's initialization method, so here you can store the properties which you are interested in.
+
+```objective-c
+@implementation WXImageComponent
+
+- (instancetype)initWithRef:(NSString *)ref type:(NSString *)type styles:(NSDictionary *)styles attributes:(NSDictionary *)attributes events:(NSArray *)events weexInstance:(WXSDKInstance *)weexInstance
+{
+ if (self = [super initWithRef:ref type:type styles:styles attributes:attributes events:events weexInstance:weexInstance]) {
+ _imageSrc = [WXConvert NSString:attributes[@"src"]];
+ _resizeMode = [WXConvert UIViewContentMode:attributes[@"resize"]];
+ }
+
+ return self;
+}
+
+@end
+```
+
+The properties getted in the attributes are of `id` type, so we have to convert them to the type we want using a conversion function. Basic conversion functions can be found in the `WXConvert` file, or you can just add your own conversion function.
+
+
+#### Hooking Render Life Cycle
+
+A Native Component has a life cycle managed by Weex. Weex creates it, layout it, renders it and destroys it.
+
+Weex offers component life cycle hooks that give you visibility into these key moments and the ability to act when they occur.
+
+method| description
+:----:|------
+initWithRef:type:...| Initializes a new component using the specified properties.
+layoutDidFinish | Called when the component has just laid out.
+loadView | Creates the view that the component manages.
+viewWillLoad | Called before the load of component's view .
+viewDidLoad | Called after the component's view is loaded and set.
+viewWillUnload | Called just before releasing the component's view.
+viewDidUnload | Called when the component's view is released.
+updateStyles:| Called when component's style are updated.
+updateAttributes:| Called when component's attributes are updated.
+addEvent:| Called when adding an event to the component.
+removeEvent:| Called when removing an event frome the component.
+
+
+As in the image component example, if we need to use our own image view, we can override the `loadView` method.
+
+
+```objective-c
+- (UIView *)loadView
+{
+ return [[WXImageView alloc] init];
+}
+```
+
+Now Weex will use `WXImageView` to render the `image` component.
+
+As an image component, we will need to fetch the remote image and set it to the image view. This can be done in `viewDidLoad` method when the view is created and loaded. `viewDidLoad` is also the best time to perform additional initialization for your view, such as content mode changing.
+
+
+```objective-c
+- (void)viewDidLoad
+{
+ UIImageView *imageView = (UIImageView *)self.view;
+ imageView.contentMode = _resizeMode;
+ imageView.userInteractionEnabled = YES;
+ imageView.clipsToBounds = YES;
+ imageView.exclusiveTouch = YES;
+
+ // Do your image fetching and updating logic
+}
+```
+
+If image's remote source can be changed, you can also hook the `updateAttributes:` method to perform your attributes changing logic. Component's view always has been loaded while `updateAttributes:` or `updateStyles:` is called.
+
+
+```objective-c
+- (void)updateAttributes:(NSDictionary *)attributes
+{
+ if (attributes[@"src"]) {
+ _imageSrc = [WXConvert NSString:attributes[@"src"]];
+ // Do your image updating logic
+ }
+
+ if (attributes[@"resize"]) {
+ _resizeMode = [WXConvert UIViewContentMode:attributes[@"resize"]];
+ self.view.contentMode = _resizeMode;
+ }
+}
+```
+
+Maybe there is even more life cycle hooks you might need to consider, such as `layoutDidFinish` while layout computing is finished. If you want to go deeper, check out the `WXComponent.h` file in the source code.
+
+Now you can use `<image>` and its attributes wherever you want in the template.
+
+```html
+<image style="your-custom-style" src="image-remote-source" resize="contain/cover/stretch"></image>
+```
+#### Component Method
+from WeexSDK `0.9.5`, you can define your component method by macro `WX_EXPORT_METHOD`
+for example:
+
+```
+@implementation WXMyComponent
+ +WX_EXPORT_METHOD(@selector(focus))
+ +- (instancetype)initWithRef:(NSString *)ref type:(NSString *)type styles:(NSDictionary *)styles attributes:(NSDictionary *)attributes events:(NSArray *)events weexInstance:(WXSDKInstance *)weexInstance
+ {
+ if (self = [super initWithRef:ref type:type styles:styles attributes:attributes events:events weexInstance:weexInstance]) {
+ // handle your attributes
+ // handle your styles
+ }
+
+ return self;
+ }
+
+
+ - (void)focus
+ {
+ NSLog(@"you got it");
+ }
+@end
+```
+
+after your registration for your own custom component, now you can call it in your js file.
+
+```html
+<template>
+ <mycomponent id='mycomponent'></mycomponent>
+</template>
+<script>
+ module.exports = {
+ created: function() {
+ this.$el('mycomponent').focus();
+ }
+ }
+</script>
+```
+
+
+
+
+
+
+
+
+
http://git-wip-us.apache.org/repos/asf/incubator-weex-site/blob/32a097bf/_draft/v-0.10/advanced/how-data-binding-works.md
----------------------------------------------------------------------
diff --git a/_draft/v-0.10/advanced/how-data-binding-works.md b/_draft/v-0.10/advanced/how-data-binding-works.md
new file mode 100644
index 0000000..a207997
--- /dev/null
+++ b/_draft/v-0.10/advanced/how-data-binding-works.md
@@ -0,0 +1,39 @@
+---
+title: How data-binding works
+type: advanced
+order: 2
+has_chapter_content: true
+version: 0.10
+---
+
+# How data-binding works
+
+Weex JS Framework is a MVVM framework. It observe data and use `{% raw %}{{bindedKey}}{% endraw %}` syntax to bind in views. When data is changed in anyway, the view will automatically be updated due to data-binding.
+
+For example, The content of a `<text>` component is bound with the key `notes` in data:
+
+```html
+<template>
+ <div>
+ <text>{{notes}}</text>
+ </div>
+<template>
+
+<script>
+ module.exports = {
+ data: {
+ notes: 'Hello'
+ }
+ }
+</script>
+```
+
+Weex JS Framework first observe the data object to make sure each data change in the future will be observed. And then it will compile the whole `<template>`. When it finds that the content of the `<text>` is bound with `notes`, JS Framework will watch the `data.notes` changes and set a handler which will update the `<text>` content with new `data.notes`. So developer only need to manage the data, the view display could automatically do corresponding changes.
+
+Some special data-binding syntax here:
+
+* `{% raw %}<foo if="{{condition}}">{% endraw %}` will watch the condition value changes. When it changes to `true`, the `<foo>` element will be created and attached, otherwise it will be not created or removed.
+* `{% raw %}<foo repeat="{{list}}">{% endraw %}` will watch the mutations of a list. At the beginning the `<foo>` element will be cloned and attached with each item in list. When some items are added, removed or moved, the `<foo>` element list will be re-generated new content in the right order with minimum alterations.
+* `{% raw %}<foo if="{{condition}}" repeat="{{list}}">{% endraw %}` will process `repeat` first and `if` the second. In another way, it will walk through each item in list, if the item's condition value is true, a `<foo>` element will be cloned and attached with this certain item value.
+
+Compared with virtual DOM diff algorithm, we just "diff" the data and only calculate/update the virtual DOM with minimum alterations for each user interaction or data-change operation. So it's more lightweight and fast especially for small views in mobile devices.
http://git-wip-us.apache.org/repos/asf/incubator-weex-site/blob/32a097bf/_draft/v-0.10/advanced/images/how-arch.png
----------------------------------------------------------------------
diff --git a/_draft/v-0.10/advanced/images/how-arch.png b/_draft/v-0.10/advanced/images/how-arch.png
new file mode 100644
index 0000000..a13df7a
Binary files /dev/null and b/_draft/v-0.10/advanced/images/how-arch.png differ
http://git-wip-us.apache.org/repos/asf/incubator-weex-site/blob/32a097bf/_draft/v-0.10/advanced/images/how-render.png
----------------------------------------------------------------------
diff --git a/_draft/v-0.10/advanced/images/how-render.png b/_draft/v-0.10/advanced/images/how-render.png
new file mode 100644
index 0000000..db9b0f4
Binary files /dev/null and b/_draft/v-0.10/advanced/images/how-render.png differ
http://git-wip-us.apache.org/repos/asf/incubator-weex-site/blob/32a097bf/_draft/v-0.10/advanced/index.md
----------------------------------------------------------------------
diff --git a/_draft/v-0.10/advanced/index.md b/_draft/v-0.10/advanced/index.md
new file mode 100644
index 0000000..dca072d
--- /dev/null
+++ b/_draft/v-0.10/advanced/index.md
@@ -0,0 +1,148 @@
+---
+title: How it works
+type: advanced
+order: 1
+has_chapter_content: true
+version: 0.10
+---
+
+# How it works
+<span class="weex-version">0.4</span>
+
+## Overview
+
+Weex is a extendable cross-platform solution for dynamic programming and publishing projects. In the source code you can write pages or components with `<template>`, `<style>` and `<script>` tags, and then transform them into bundles for deploying. In server-side we can use these JS bundles for client request. When client get a bundle from server, it will be processed by client-side JavaScript engine and manages the native view rendering, the native API invoking and user interactions.
+
+### Whole Workflow
+
+```
+Weex file --------------frontend(source code)
+↓ (transform) --------- frontend(build tool)
+JS bundle ------------- frontend(bundle code)
+↓ (deploy) ------------ server
+JS bundle in server --- server
+↓ (compile) ----------- client(js-engine)
+Virtual DOM tree ------ client(weex-jsframework)
+↓ (render) ------------ client(render-engine)
+Native view ----------- client(render-engine)
+```
+
+According to the workflow above, you need:
+
+* Transformer: A nodejs tool to transform the source code into the bundle code.
+* JS Framework: A JavaScript framework runing in the client which manage Weex instance. The instance which created from a JS bundle builds virtual DOM tree. Also it sends/receives native calls for native view rendering, native APIs and user interactions.
+* Native Engine: There are many different ports for different platforms: iOS/Android/HTML5. They have the same components design, module APIs design and rendering effect. So they can work with the one and the same JS Framework and JS bundles.
+
+## Transformer
+
+The transformer transforms a source code into a bundle code. The whole work could be divided into three parts:
+
+* Transform `<template>` into a JSON-like tree and transform data-binding attribute into a function prop which return the correct data value. For example: `{% raw %}<foo a="{{x}}" b="1" />{% endraw %}` will be transformed into `{type: "foo", attr: {a: function () {return this.x}, b: 1}}`.
+* Transform `<style>` into a JSON tree. For example: `.classname {name: value;}` will be transformed into `{classname: {name: value}}`.
+* Join the two above with `<script>` content. The three parts will be joined together and wrapped into a JavaScript AMD module.
+
+A whole example (`main.we`):
+
+```html
+<template>
+ <foo a="{{x}}" b="1" class="bar"></foo>
+</template>
+<style>
+ .bar {width: 200; height: 200}
+</style>
+<script>
+ module.exports = {
+ data: function () {
+ return {x: 100}
+ }
+ }
+</script>
+```
+
+will transformed into:
+
+```
+define('@weex-component/main', function () {
+ module.exports = {
+ data: function () {
+ return {x: 100}
+ }
+ }
+ module.template = {
+ type: "foo",
+ attr: {
+ a: function () {return this.x},
+ b: 1,
+ classname: ['bar']
+ }
+ }
+ module.style = {
+ bar: {width: 200, height: 200}
+ }
+}
+bootstrap('@weex-component/main')
+```
+
+Additionally, the transformer could also do more things: combo the bundles, bootstrap with config and external data. For more information, please see the syntax specs.
+
+## NOTICE
+Most of Weex utility output JS Bundle after [Webpack](https://webpack.github.io/) re-bundle. So the eventual format of Weex JSBundle is webpack packed .
+
+## JS Framework
+
+JS Framework will run in native JavaScript engine at the beginning preparation phase. It has `define()` and `bootstrap()` functions for each the bunlde code. Once a JS bundle requested from server, the code will be executed. `define()` will register all modules first, then `bootstrap()` will start compiling main component into virtual DOM and send rendering calls to native.
+
+There are two key methods for the bridge between JS and native:
+
+* `callNative` sends commands from JavaScript to native. So it's called from JavaScript and implemented with native code. All commands are native APIs organized by modules, for example `rendering`, `networking`, `authorizing`, and other client-side features like `toast` etc.
+* `callJS` sends commands from native to JavaScript. So it's called from native and implemented by JS Framework. All commands are user interactions or native callbacks.
+
+## Native RenderEngine
+
+Native RenderEngine will supplies many native components and modules for call.
+
+**Component** is an element in the screen which have a certain view and behavior. It could be configured with some attributes and style properties, and could response user interactions. There are some common components like `<div>`, `<text>`, `<image>` etc.
+
+**Module** is a set of APIs which could be called from JS Framework. Some of them also have to make async callbacks to JS Framework, for example: send HTTP request.
+
+During a Weex instance works, Native RenderEngine receives all kinds of module API calls from JS Framework. These calls will create or update components for view and use client-side features like `toast`. When a user interaction or module API callback happens, It will call `callJS()` from JS Framework. These jobs could walk through the Weex instance lifecycle till the instance is destroyed. As is shown in the architecture figure, H5 RenderEngine is a special RenderEngine with almost the same functions as native RenderEngines.
+
+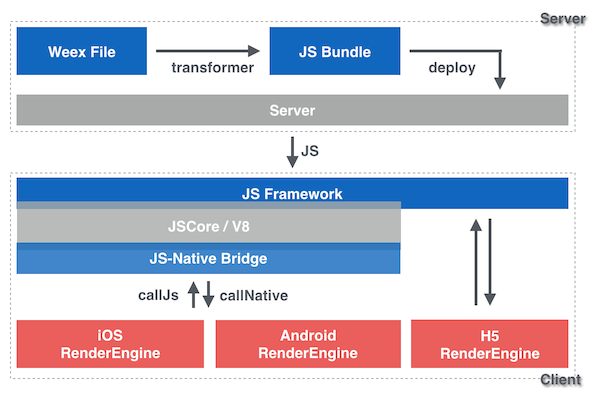
+Weex Architecture
+
+### call native from javascript
+
+```
+[JS Framework]
+↓ callNative
+module APIs
+ rendering -> components display
+ other features
+[Native RenderEngine]
+```
+
+### call javascript from native
+
+```
+[Native RenderEngine]
+module APIs callbacks
+user interactions
+↓ callJS
+[JS Framework]
+```
+
+### Render Flow
+
+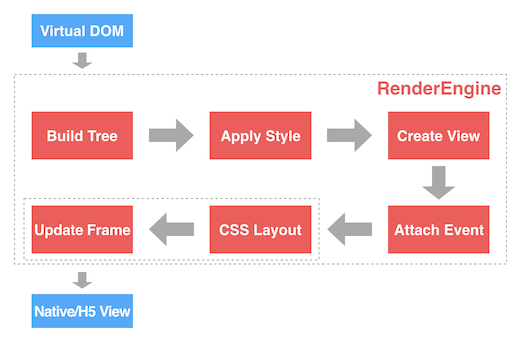
+Weex Render Flow
+
+0. Input is virtual dom.
+0. **Build Tree**. Parse JSON data (virtual dom) to a Render Tree (RT).
+0. **Apply Style**. Attach css style to RT nodes.
+0. **Create View**. Create native views for each RT node.
+0. **Attach Event**. Attach events for each view.
+0. **CSS Layout**. Use [css-layout](https://github.com/facebook/css-layout) to calculate the layout of each view.
+0. **Update Frame**. Update layout parameters of each view.
+0. Output is Native or H5 Views.
+
+In H5 Render Flow, `CSS Layout` and `Update Frame` are implemented by browser engine like webkit.
http://git-wip-us.apache.org/repos/asf/incubator-weex-site/blob/32a097bf/_draft/v-0.10/advanced/integrate-to-android.md
----------------------------------------------------------------------
diff --git a/_draft/v-0.10/advanced/integrate-to-android.md b/_draft/v-0.10/advanced/integrate-to-android.md
new file mode 100644
index 0000000..e2b2569
--- /dev/null
+++ b/_draft/v-0.10/advanced/integrate-to-android.md
@@ -0,0 +1,204 @@
+---
+title: Integrate to Android
+type: advanced
+order: 3
+has_chapter_content: true
+version: 0.10
+---
+
+# Integrate to Android
+
+When you need to use the new features or to customize specific features, you can rely on the Source SDK for development。
+
+## Prerequisites
+
+Assuming you have the Android SDK installed, run `android` to open the Android SDK Manager.
+
+Make sure you have the following installed:
+
+1. Android SDK version 23 (compileSdkVersion in [`build.gradle`](https://github.com/apache/incubator-weex/blob/master/android/sdk/build.gradle))
+2. SDK build tools version 23.0.2 (buildToolsVersion in [`build.gradle`](https://github.com/apache/incubator-weex/blob/master/android/sdk/build.gradle))
+3. Android Support Repository >= 17 (for Android Support Library)
+4. Android NDK (download & extraction instructions [here](http://developer.android.com/ndk/downloads/index.html))
+
+Point Gradle to your Android SDK: either have `$ANDROID_SDK` and `$ANDROID_NDK ` defined, or create a local.properties file in the root of your weex checkout with the following contents:
+
+```
+sdk.dir=absolute_path_to_android_sdk
+ndk.dir=absolute_path_to_android_ndk
+```
+
+Example:
+
+```
+sdk.dir=/Users/your_name/android-sdk-macosx
+ndk.dir=/Users/your_name/android-ndk-r10e
+```
+
+
+## Building the source
+
+#### 1. Clone source from github
+
+First, you need to git clone `weex` from github:
+
+```shell
+git clone https://github.com/alibaba/weex.git
+```
+##### 2. Build APK
+ *** 1) Android studio build APK ***
+
+ ```
+ Step 1: run android studio
+ Step 2: open the file of ~/weex/android/playground/build.gradle
+ Step 3: Run the Project and the Apk will auto install in your android device
+ ```
+ *** 2) Gradle build APK ***
+
+ ```
+ Step 1: enter the direction of "/weex/android/playground"
+ Step 2: run the build command: ./gradlew clean assemble
+ Step 3: obtain the payground APK from the direction of weex/android/playground/app/build/outputs/apk/
+ Step 3: then adb install -r weex/android/playground/app/build/outputs/apk/playgroud.apk
+ ```
+#### 3. Adding the `:weex_sdk_android` project
+
+
+Add the `:weex_sdk_android` project in `android/settings.gradle`:
+
+```gradle
+include ':weex_sdk_android'
+
+project(':weex_sdk_android').projectDir = new File(
+ rootProject.projectDir, '../weex_sdk_android')
+```
+
+Modify your `android/app/build.gradle` to use the `:weex_sdk_android` project instead of the pre-compiled library, e.g. - replace `compile 'com.taobao.android:weex_sdk:0.4.1` with `compile project(':weex_sdk_android')`:
+
+```gradle
+dependencies {
+ compile fileTree(dir: 'libs', include: ['*.jar'])
+ compile 'com.android.support:appcompat-v7:23.0.1'
+
+ compile project(':weex_sdk_android')
+
+ ...
+}
+```
+
+#### 3. Making 3rd-party modules use your project
+
+If you use 3rd-party weex modules, you need to override their dependencies so that they don't build the pre-compiled library. Otherwise you'll get an error while compiling - `Error: more than one library with package name 'com.taobao.weex'`.
+
+Modify your `android/app/build.gradle` and replace `compile project(':weex-custom-module')` with:
+
+```gradle
+compile(project(':weex-custom-module')) {
+ exclude group: 'com.taobao.weex', module: 'weex_sdk_android'
+}
+```
+
+#### 4、How to load local Your Js bundle in the directory of Android assets
+Besides load a Js Bundle online, you also can load the js bundle from the directory of Android assets.
+
+For Example:
+
+ ```
+ String yourbundleStr = WXFileUtils.loadFileContent("yourBundle.js", context);
+ WXSDKInstance.render(TAG, yourbundleStr, options, null, width, Height, WXRenderStrategy.APPEND_ASYNC);
+ ```
+
+
+## Building from Android Studio
+
+From the Welcome screen of Android Studio choose "Import project" and select the `playground` folder of your app.
+
+You should be able to use the _Run_ button to run your app on a device.
+
+## Tip
+1. Since the packet size limit is currently only compiled arm , X86 does not support.
+
+2. Gradle build fails in `ndk-build`. See the section about `local.properties` file above.
+
+#Quick access
+
+## Requirements
+
+* an existing, gradle-based Android app
+
+## Prepare your app
+
+In your app's `build.gradle` file add the WEEX dependency:
+
+ compile 'com.taobao.android:weex_sdk:0.4.1'
+
+You can find the latest version of the WEEX library on [jcenter](https://bintray.com/search?query=weex_sdk&forceAgnostic=true). Next, make sure you have the Internet permission in your `AndroidManifest.xml`:
+
+ <uses-permission android:name="android.permission.INTERNET" />
+
+
+## Add native code
+
+You need to add some native code in order to start the Weex runtime and get it to render something. To do this, we're going to create an `Application` to init weex, then we we're going to create an `Activity` that creates a WeexContainerView, starts a Weex application inside it and sets it as the main content view.
+
+
+```java
+public class WXApplication extends Application {
+ @Override
+ public void onCreate() {
+ super.onCreate();
+
+ WXEnvironment.addCustomOptions("appName","TBSample");
+ WXSDKEngine.init(this);
+ try {
+
+ WXSDKEngine.registerComponent("wtRichText", WTRichText.class);
+ ......
+
+ WXSDKEngine.registerModule("event", WXEventModule.class);
+ } catch (WXException e) {
+ e.printStackTrace();
+ }
+ }
+}
+```
+
+Next,
+
+```java
+// Create or find RenderContainer view.
+// Notice: If you create RenderContainer manually, don't forget add it to view tree.
+RenderContainer renderContainer = (RenderContainer)findViewById(R.id.container);
+
+//crate Weex instance
+WXSDKInstance mInstance = new WXSDKInstance(this);
+//set render container
+mInstance.setRenderContainer(renderContainer);
+//set image Adapter
+mInstance.setImgLoaderAdapter(new ImageAdapter(this));
+//register render listener
+mInstance.registerRenderListener(new IWXRenderListener() {
+ @Override
+ public void onViewCreated(WXSDKInstance instance, View resultView) {
+ // Notice: If you don't setRenderContainer before render, you need add the resultView to view tree here.
+
+ }
+ @Override
+ public void onRenderSuccess(WXSDKInstance instance) {
+ }
+ @Override
+ public void onRefreshSuccess(WXSDKInstance instance) {
+ }
+ @Override
+ public void onException(WXSDKInstance instance, String errCode,String msg) {
+ }
+});
+//start render weex view
+mInstance.render(pageName,template, null, null, -1, -1, WXRenderStrategy.APPEND_ASYNC);
+```
+
+That's it, your activity is ready to run some JavaScript code.
+
+## Reference Example
+
+[`Weex Examples`](https://github.com/apache/incubator-weex/tree/master/examples)
http://git-wip-us.apache.org/repos/asf/incubator-weex-site/blob/32a097bf/_draft/v-0.10/advanced/integrate-to-html5.md
----------------------------------------------------------------------
diff --git a/_draft/v-0.10/advanced/integrate-to-html5.md b/_draft/v-0.10/advanced/integrate-to-html5.md
new file mode 100644
index 0000000..b71bcd7
--- /dev/null
+++ b/_draft/v-0.10/advanced/integrate-to-html5.md
@@ -0,0 +1,77 @@
+---
+title: Integrate to web
+type: advanced
+order: 5
+has_chapter_content: true
+version: 0.10
+---
+
+# Integrate Weex HTML5 to your project
+
+### Intro
+
+Weex is a extendable cross-platform solution for dynamic programming and publishing projects, which is for developers to write code once and run the code everywhere.
+
+The bundle transformed from the source can currently run on android, ios and web platform. Weex HTML5 is a renderer for weex bundle to run on a webview or a modern browser etc.
+
+### Get Weex HTML5
+
+Use npm to install the latest version of Weex HTML5, require it in your code by CommonJS and use it as a npm package.
+
+#### Install from npm
+
+Make sure you get the latest version by `npm install` or `npm update`. For more information of npm, please visit the [npm official site](https://docs.npmjs.com/).
+
+```
+npm install weex-html5
+```
+
+require weex-html5:
+
+```
+const weex = require('weex-html5')
+```
+
+### Initialize and run
+
+You can initialize weex through the API `init`. This method takes a config object as the first argument to confirm the runtime infomation and environment. Following parameters can be set by this config object:
+
+* `appId`: app instance id, can be either a string or a number
+* `source`: the requested url of weex bundle, or the transformed code it self.
+* `loader`: the loader type to load the weex bundle, which value is 'xhr' or 'jsonp' or 'source'.
+ * `xhr`: load the source (weex bundle url) by XHR
+ * `jsonp`: load the source bundle by JSONP
+ * `source`: the source parameter above should be a weex bundle content (transformed bundle).
+* `rootId`: the id of the root element. Default value is 'weex'.
+
+Here is a example to do the initialzation:
+
+```
+function weexInit() {
+ function getUrlParam (key) {
+ var reg = new RegExp('[?|&]' + key + '=([^&]+)')
+ var match = location.search.match(reg)
+ return match && match[1]
+ }
+
+ var loader = getUrlParam('loader') || 'xhr'
+ var page = getUrlParam('page')
+
+ // jsonp callback name should be specified or be the default
+ // value 'weexJsonpCallback' if the 'jsonp' loader is used.
+ var JSONP_CALLBACK_NAME = 'weexJsonpCallback'
+
+ window.weex.init({
+ jsonpCallback: JSONP_CALLBACK_NAME,
+ appId: location.href,
+ source: page,
+ loader: loader,
+ rootId: 'weex'
+ })
+}
+
+weexInit()
+```
+
+
+
http://git-wip-us.apache.org/repos/asf/incubator-weex-site/blob/32a097bf/_draft/v-0.10/advanced/integrate-to-ios.md
----------------------------------------------------------------------
diff --git a/_draft/v-0.10/advanced/integrate-to-ios.md b/_draft/v-0.10/advanced/integrate-to-ios.md
new file mode 100644
index 0000000..69dea6d
--- /dev/null
+++ b/_draft/v-0.10/advanced/integrate-to-ios.md
@@ -0,0 +1,118 @@
+---
+title: Integrate to iOS
+type: advanced
+order: 4
+has_chapter_content: true
+version: 0.10
+---
+
+# import Weex iOS to your project
+
+You will need to build Weex from source if you want to work on a new feature/bug fix, try out the latest features not released yet, or maintain your own fork with patches that cannot be merged to the core.
+
+Assuming you have installed [iOS Develop Environment](https://developer.apple.com/library/ios/documentation/IDEs/Conceptual/AppStoreDistributionTutorial/Setup/Setup.html) and [CocoaPods](https://guides.cocoapods.org/using/getting-started.html).
+
+#### 1. Clone source from github
+
+First, you need to git clone `weex` from github:
+
+```
+git clone https://github.com/alibaba/weex.git
+```
+#### 2. Import WeexSDK to project
+
+Copy the whole folder `/ios/sdk` to your project directory.
+
+Before adding the dependencies, please confirm that the project directory already exists the Podfile. If not, create a new one. Then, edit this file, adding some necessary dependecis for the target.
+
+```
+target 'YourTarget' do
+ platform :ios, '7.0'
+ pod 'WeexSDK', :path=>'./sdk/'
+end
+```
+You can get your `YourTarget` below
+
+
+
+Run pod install in current directory, for a while, .xcworkspace will be created. At this point, the dependencies have been established.
+
+#### 3. Init Weex Environment
+We are used to doing some initial tasks in appDelegate. Of course, there is no exception. You can do this in `didFinishLaunchingWithOptions` as follows.
+
+```
+//business configuration
+[WXAppConfiguration setAppGroup:@"AliApp"];
+[WXAppConfiguration setAppName:@"WeexDemo"];
+[WXAppConfiguration setAppVersion:@"1.0.0"];
+
+//init sdk enviroment
+[WXSDKEngine initSDKEnviroment];
+
+//register custom module and component,optional
+[WXSDKEngine registerComponent:@"MyView" withClass:[MyViewComponent class]];
+[WXSDKEngine registerModule:@"event" withClass:[WXEventModule class]];
+
+//register the implementation of protocol, optional
+[WXSDKEngine registerHandler:[WXNavigationDefaultImpl new] withProtocol:@protocol(WXNavigationProtocol)];
+
+//set the log level
+[WXLog setLogLevel:WXLogLevelVerbose];
+
+```
+
+#### 4. Render Weex Instance
+Weex supports two different modes, the full page rendering and part of page rendering.
+Something you have to do is to render weex view with specific URL, then add it to the parent container, which may be the viewController.
+
+```
+#import <WeexSDK/WXSDKInstance.h>
+
+- (void)viewDidLoad
+{
+ [super viewDidLoad];
+
+ _instance = [[WXSDKInstance alloc] init];
+ _instance.viewController = self;
+ _instance.frame = self.view.frame;
+
+ __weak typeof(self) weakSelf = self;
+ _instance.onCreate = ^(UIView *view) {
+ [weakSelf.weexView removeFromSuperview];
+ weakSelf.weexView = view;
+ [weakSelf.view addSubview:weakSelf.weexView];
+ };
+
+ _instance.onFailed = ^(NSError *error) {
+ //process failure
+ };
+
+ _instance.renderFinish = ^ (UIView *view) {
+ //process renderFinish
+ };
+ [_instance renderWithURL:self.url options:@{@"bundleUrl":[self.url absoluteString]} data:nil];
+}
+```
+WXSDKInstance is a very imporent class, which provides you with some basic methods and callbacks, such as renderWithURL、onCreate、onFailed and etc. You can understand their usage by reading WXSDKInstance.h.
+
+
+#### 5. Destroy Weex Instance
+
+Please release weex instance in dealloc stage of viewContoller, or it will lead to memory leak.
+
+```
+- (void)dealloc
+{
+ [_instance destroyInstance];
+}
+```
+
+#### 6. Build .IPA for Weex
+
+We can also pack all the JS files into the app's resources. This way you can run your app without development server and submit it to the AppStore.
+
+* [Install weex-toolkit](https://github.com/alibaba/weex_toolchain/tree/master/toolkit) and transform your `.we` file to JS by running `weex index.we -o index.js`, `index.we` is the entry file of your app.
+* Move `index.js` to your app's Xcode project and add the file to your target.
+* Replace `[_instance renderWithURL:'httpURL']` with: `[_instance renderWithURL: [[NSBundle mainBundle] URLForResource:@"index" withExtension:@"js"]]`
+
+* Go to Product -> Archive in Xcode and follow the steps to build your .IPA file and submit it to the AppStore.
http://git-wip-us.apache.org/repos/asf/incubator-weex-site/blob/32a097bf/_draft/v-0.10/guide/.gitkeep
----------------------------------------------------------------------
diff --git a/_draft/v-0.10/guide/.gitkeep b/_draft/v-0.10/guide/.gitkeep
new file mode 100644
index 0000000..e69de29
http://git-wip-us.apache.org/repos/asf/incubator-weex-site/blob/32a097bf/_draft/v-0.10/guide/how-to/customize-a-native-component.md
----------------------------------------------------------------------
diff --git a/_draft/v-0.10/guide/how-to/customize-a-native-component.md b/_draft/v-0.10/guide/how-to/customize-a-native-component.md
new file mode 100644
index 0000000..62c0cf0
--- /dev/null
+++ b/_draft/v-0.10/guide/how-to/customize-a-native-component.md
@@ -0,0 +1,58 @@
+---
+title: Customize a native Component
+type: guide
+order: 3.3
+version: 0.10
+---
+
+# How to customize a native Component ?
+
+Weex has wrapped up the most critical platform components, such as `ScrollView`, `ListView`, `Text`, `Imageview` and so on. Certainly these components can not completely meet your need. And thousands of native UI components that always be using in our project may be required to integrate into Weex easily. Fortunately, it's quite convenient to wrap up your own components that should be from any existing components.
+
+##### Step By Step
+
+1. Customized components must inherit from `WXComponent` or `WXContainer`;
+2. @WXComponentProp(name=value(value is attr or style of dsl)) for it be recognized by weex SDK;
+3. The access levels of method must be **public**;
+4. The component class can not be an inner class;
+5. Customized components should not be obfuscated by tools like ProGuard;
+6. Component methods will be invoked on the UI thread, so do not contain time-consuming operations here;
+7. Weex parameter's type can be int, double, float, String, Map, List, self-defined class that implements WXObject interface;
+
+
+#### Refer to the following example:
+
+```java
+package com.taobao.weex.ui.component;
+……
+
+public class MyViewComponent extends WXComponent{
+
+ public MyViewComponent(WXSDKInstance instance, WXDomObject node,
+ WXVContainer parent, String instanceId, boolean lazy) {
+ super(instance, node, parent, instanceId, lazy);
+ }
+
+ @Override
+ protected void initView() {
+ //TODO:your own code ……
+ }
+
+ @Override
+ public WXFrameLayout getView() {
+ //TODO:your own code ………
+ }
+ @WXComponentProp(name=WXDomPropConstant.WX_ATTR_VALUE)
+ public void setMyViewValue(String value) {
+ ((TextView)mHost).setText(value);
+ }
+
+}
+```
+#### Component should be registered
+
+```java
+WXSDKEngine.registerComponent("MyView", MyViewComponent.class);
+```
+
+
http://git-wip-us.apache.org/repos/asf/incubator-weex-site/blob/32a097bf/_draft/v-0.10/guide/how-to/cuszomize-native-apis.md
----------------------------------------------------------------------
diff --git a/_draft/v-0.10/guide/how-to/cuszomize-native-apis.md b/_draft/v-0.10/guide/how-to/cuszomize-native-apis.md
new file mode 100644
index 0000000..9594ff0
--- /dev/null
+++ b/_draft/v-0.10/guide/how-to/cuszomize-native-apis.md
@@ -0,0 +1,80 @@
+---
+title: Customize native APIs
+type: guide
+order: 3.4
+version: 0.10
+---
+
+# How to customize native APIs ?
+
+Weex SDK provides only rendering capability, rather than having other capabilities, such as network, picture, and URL redirection. If you want the these features, you need to implement them yourselves.
+The example below will describe how to extend weex with native logic or 'bridge' your existed native code.
+
+## A URLHelper Example
+### Create your own `WXModule` in native:
+
+```java
+public class URLHelperModule extends WXModule{
+ private static final String WEEX_CATEGORY="com.taobao.android.intent.category.WEEX";
+ @WXModuleAnno
+ public void openURL(String url){
+ if (TextUtils.isEmpty(url)) {
+ return;
+ }
+ StringBuilder builder=new StringBuilder("http:");
+ builder.append(url);
+ Uri uri = Uri.parse(builder.toString());
+ Intent intent = new Intent(Intent.ACTION_VIEW, uri);
+ intent.addCategory(WEEX_CATEGORY);
+ mWXSDKInstance.getContext().startActivity(intent);
+ }
+}
+
+```
+
+Notice the `@WXModuleAnno`, use this annotation to mark the methods you wanna expose to javascript.
+If your also want to callback to javascript, you should define a `callbackId` parameter to received 'JS callback function id':
+
+```java
+public class URLHelperModule extends WXModule{
+
+ @WXModuleAnno
+ public void openURL(String url,String callbackId){
+ //...
+ //callback to javascript
+ Map<String, Object> result = new HashMap<String, Object>();
+ result.put("ts", System.currentTimeMillis());
+ WXBridgeManager.getInstance().callback(mWXSDKInstance.getInstanceId(), callbackId, result);
+ }
+}
+```
+
+
+### Register your module to engine:
+
+```
+try {
+ WXSDKEngine.registerModule("myURL", URLHelperModule.class);//'myURL' is the name you'll use in javascript
+ } catch (WXException e) {
+ WXLogUtils.e(e.getMessage());
+ }
+```
+### Now, you can use eventModule in javascript like this:
+
+```javascript
+let URLHelper = require('@weex-module/myURL');//same as you registered
+URLHelper.openURL("http://www.taobao.com",function(ts){
+ console.log("url is open at "+ts);
+});
+
+```
+
+
+## Things you need to note:
+1. Customized components must inherit from `WXModule`;
+2. @WXModuleAnno annotation must be added, as it is the only way to be recognized by Weex;
+3. The access levels of method must be **public**;
+4. The module class also can not be an inner class;
+5. Customized components should not be obfuscated by tools like ProGuard;
+6. Module methods will be invoked on the UI thread, so do not put time-consuming operations there;
+7. Weex parameter's type can be int, double, float, String, Map, List, self-defined class that implements WXObject interface;
http://git-wip-us.apache.org/repos/asf/incubator-weex-site/blob/32a097bf/_draft/v-0.10/guide/how-to/debug-with-html5.md
----------------------------------------------------------------------
diff --git a/_draft/v-0.10/guide/how-to/debug-with-html5.md b/_draft/v-0.10/guide/how-to/debug-with-html5.md
new file mode 100644
index 0000000..c80fb69
--- /dev/null
+++ b/_draft/v-0.10/guide/how-to/debug-with-html5.md
@@ -0,0 +1,47 @@
+---
+title: Debug in html5 renderer
+type: guide
+order: 3.5
+version: 0.10
+---
+
+# How to debug in html5 renderer ?
+
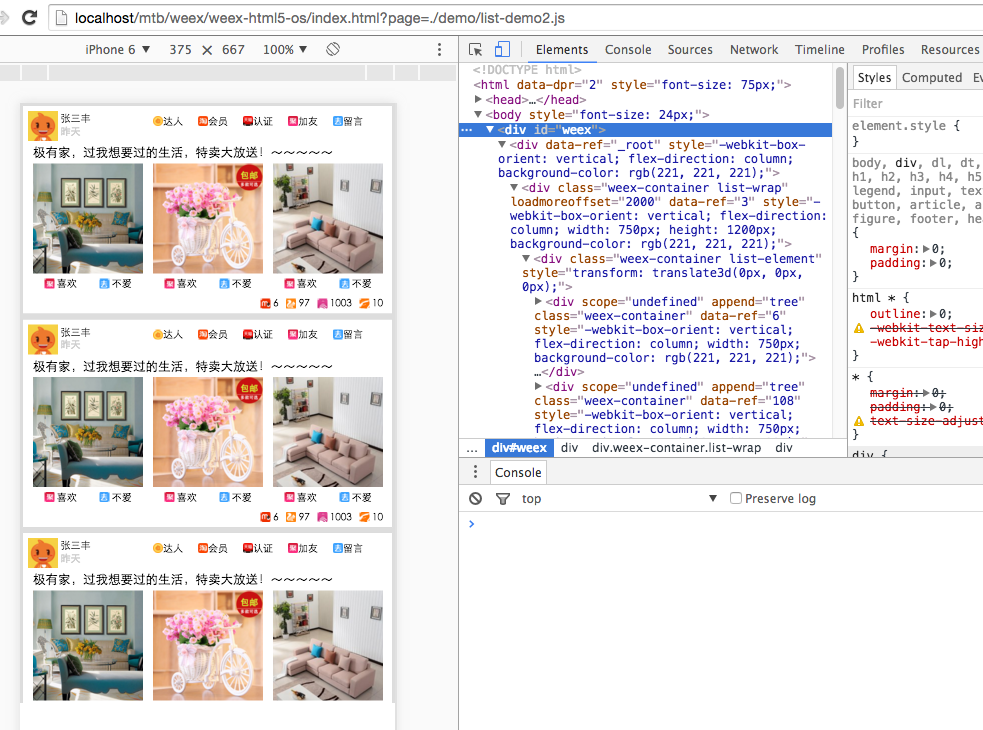
+Since weex-html5 can run on a modern mobile browser, it's naturally supported to debug weex-html5 code in browsers' dev tools. Use browser's devTools to iterate, debug and profile your weex-html5 app. Take chrome's debug tool as a example:
+
+
+
+## Elements
+
+Use elements' panel to inspect the layout and design of the weex-html5 page, and manipulate the DOM and CSS to do some experiment freely.
+
+## Console
+
+You can use `console.log` to log information on console, but it's highly recommended to use `nativeLog` instead, since nativeLog can run on a native platform based on a browser. The defect of `nativeLog` is that it's not supported to trace it from the console to the source file which the `nativeLog` is called in, therefore in this situation you'd better use `console.log`, and you should make sure this code will not run on native platform (otherwise a exception or a crash will be caused).
+
+## Breakpoints
+
+You can set breakpoints to debug code. Breakpoints are one of the most effective way to debug code. Breakpoints enable you to pause script execution and then investigate the call stack variable values at that particular moment in time.
+
+Manual breakpoints are individual breakpoints that you set on a specific line of code. You can set these via Chrome DevTools GUI, or by inserting the `debugger` keyword in your code.
+
+## Locate your bug
+
+Generally speaking, there are three possible layer the bug could happen on: the renderer (weex-html5), the js-framework (weex-js-framework) and the transformer (gulp-weex).
+
+Here are some suggestions to locate your bug so that you can recognize which layer the bug is on:
+
+* check the console for errors. In debug mode if there is a error happend there will be info about it on the console.
+* in bridge/receiver.js, whether the `callNative` function is called.
+* whether the supposed to be called API method is actually called and executed.
+* whether the `callJS` method for event firing or callback executing is called.
+
+## other
+
+More info about how to debug h5 pages on chrome devTools: [chrome's devTools docs](https://developers.google.com/web/tools/chrome-devtools/?hl=en)
+
+
+
+
+
+
http://git-wip-us.apache.org/repos/asf/incubator-weex-site/blob/32a097bf/_draft/v-0.10/guide/how-to/index.md
----------------------------------------------------------------------
diff --git a/_draft/v-0.10/guide/how-to/index.md b/_draft/v-0.10/guide/how-to/index.md
new file mode 100644
index 0000000..9f9435a
--- /dev/null
+++ b/_draft/v-0.10/guide/how-to/index.md
@@ -0,0 +1,40 @@
+---
+title: Preview in browser
+type: guide
+order: 3
+has_chapter_content: false
+chapter_title: How-tos
+version: 0.10
+---
+
+# How to preview weex code in browser ?
+
+## weex-toolkit
+
+We strongly suggest you use weex-toolkit to preview weex code in your browser. This tool is Node.JS based, so you need to install Node at first. Please download and install latest stable version of Node from [https://nodejs.org/en/download/stable/](https://nodejs.org/en/download/stable/). Then you can install weex-toolkit using npm install:
+
+```bash
+$ npm install -g weex-toolkit
+```
+
+Check that the toolkit does work by typing `weex` in the command line. Normally you should see the following help text:
+
+```
+Options:
+ --qr display QR code for native runtime,
+ -o,--output transform weex we file to JS Bundle, output path (single JS bundle file or dir)
+ -s,--server start a http file server, weex .we file will be transforme to JS bundle on the server , specify local root path using the option
+ ......
+ --help Show help
+```
+
+If all work well, navigate to the path the xxx.we file you want to preview in, and type the command:
+
+```bash
+weex xxx.we
+```
+
+A browser window will be opened automatically to display the page you want to preview:
+
+
+
http://git-wip-us.apache.org/repos/asf/incubator-weex-site/blob/32a097bf/_draft/v-0.10/guide/how-to/preview-in-playground-app.md
----------------------------------------------------------------------
diff --git a/_draft/v-0.10/guide/how-to/preview-in-playground-app.md b/_draft/v-0.10/guide/how-to/preview-in-playground-app.md
new file mode 100644
index 0000000..5800737
--- /dev/null
+++ b/_draft/v-0.10/guide/how-to/preview-in-playground-app.md
@@ -0,0 +1,20 @@
+---
+title: Preview in native
+type: guide
+order: 3.2
+version: 0.10
+---
+
+# How to preview weex code in sample-app ?
+
+### Weex Sample Step By Step
+1. Clone Weex from github [`https://github.com/apache/incubator-weex/`](https://github.com/apache/incubator-weex/)
+2. Use Android Studio open Android Sample 。
+3. run Sample project.
+4. into Sample homePage,you will see this picture
+
+5. Click the icon to the top right of the page to enter the two-dimensional code scanning
+
+6. use[`Weex-Toolkit`](https://github.com/alibaba/weex_toolchain/tree/master/toolkit/ )make .we to a QR code
+7. you will see the page rended by Weex
+
http://git-wip-us.apache.org/repos/asf/incubator-weex-site/blob/32a097bf/_draft/v-0.10/guide/how-to/require-3rd-party-libs.md
----------------------------------------------------------------------
diff --git a/_draft/v-0.10/guide/how-to/require-3rd-party-libs.md b/_draft/v-0.10/guide/how-to/require-3rd-party-libs.md
new file mode 100644
index 0000000..7349520
--- /dev/null
+++ b/_draft/v-0.10/guide/how-to/require-3rd-party-libs.md
@@ -0,0 +1,56 @@
+---
+title: Require 3rd Party Libs
+type: guide
+order: 3.6
+version: 0.10
+---
+
+# How to require 3rd Party Libs ?
+
+In the paragraph Maintain Your Component Code, we learn that JavaScript code can be written in `<script>` tag in one component. But there must be some common functions or modules in your project, such as parsing url params, extending properties from some objects to another object and so on. It's a bad practice to copy and paste them in each component, therefore there's a urgent need of `require`. Weex provides CommonJS `require` syntax for developers.
+
+Let take `extend` for example.
+
+## Require Local Js Modules
+
+A basic implementation of `extend` is as follows, and it's placed in directory path `./common/utils.js`.
+
+```javascript
+function extend(dest, src) {
+ for (var key in src) {
+ dest[key] = src[key]
+ }
+}
+exports.extend = extend
+```
+
+In a `.we` file, `extend` can be used with the help of `require`:
+
+```html
+<script>
+ var utils = require('./common/utils')
+ var obj1 = {a: 1}
+ var obj2 = {b: 2}
+ utils.extend(obj1, obj2) // obj1 => {a: 1, b: 2}
+</script>
+```
+
+## Require Installed Node Modules
+
+Besides, [underscore](http://underscorejs.org) is a JavaScript library that provides a whole mess of useful functional programming helpers without extending any built-in objects. It implements a more robust version of [extend](http://underscorejs.org/#extend).
+
+We can use underscore's extend instead of the version implemented by ourselves. After installing `underscore` to the `node_modules` directory, we can `require` and use it.
+
+```bash
+$ npm install underscore
+```
+
+```html
+<script>
+ var _ = require('underscore')
+ var obj1 = {a: 1}
+ var obj2 = {b: 2}
+ var obj3 = {c: 3}
+ var ret = _.extend(obj1, obj2, obj3) // ret => {a: 1, b: 2, c: 3}
+</script>
+```
http://git-wip-us.apache.org/repos/asf/incubator-weex-site/blob/32a097bf/_draft/v-0.10/guide/how-to/transform-code-into-js-bundle.md
----------------------------------------------------------------------
diff --git a/_draft/v-0.10/guide/how-to/transform-code-into-js-bundle.md b/_draft/v-0.10/guide/how-to/transform-code-into-js-bundle.md
new file mode 100644
index 0000000..842ecd6
--- /dev/null
+++ b/_draft/v-0.10/guide/how-to/transform-code-into-js-bundle.md
@@ -0,0 +1,110 @@
+---
+title: Transform Code into Js Bundle
+type: guide
+order: 3.7
+version: 0.10
+---
+
+# Transform Code into Js Bundle
+
+Paragraphs Maintain Your Component Code and [Require 3rd Party Libs](./require-3rd-party-libs.html) show us how to write and organize weex code. However, Weex DSL code must be transformed to `js bundle` so that `js framework` can parse and execute it for iOS, Android and HTML5 portal. For more information, please refer to [How It Works
+](../../advanced/how-it-works.html) and [JS Bundle Format](../../references/specs/js-bundle-format.html).
+
+Now come back to the topic `transform code into js bundle`. There are several ways to achieve the goal.
+
+## weex-toolkit
+
+```bash
+$ npm install -g weex-toolkit
+```
+
+### transform a `we file` to JS Bundle
+
+```bash
+$ weex your_best_weex.we -o .
+```
+
+`your_best_weex.we` will be transform to JS Bundle file `your_best_weex.js` , saved in your current directory
+
+### transform a `we file` to JS Bundle , watch this file ,auto run transformer if change happen.
+
+```bash
+$ weex your_best_weex.we -o . --watch
+```
+
+### transform every we file in a directory
+
+```bash
+$ weex we/file/storage/path -o outputpath
+```
+
+every `we file` in `we/file/storage/path` will be transformed to JS Bundle , saved in `outputpath` path
+
+please access [npmjs.com](https://www.npmjs.com/package/weex-toolkit) for more information about weex-toolkit.
+
+## transformer
+
+```bash
+npm install weex-transformer
+```
+
+### CLI Tool
+
+```bash
+ Usage: transformer [options] <file...>
+
+ Options:
+
+ -h, --help output usage information
+ -V, --version output the version number
+ -l, --oldFormat [value] whether to transform to old format (default: false)
+ -e, --isEntry [value] whether is an entry module which has `bootstrap` (default: true)
+ -o, --output [path] the output file dirname
+```
+
+### API
+
+** transform(name, code, path, elements, config) **
+
+```javascript
+var transformer = require('weex-transformer')
+var output = transformer.transform('foo', '/* code here */', '.', {})
+```
+
+params:
+
+- `name`: string, current bundle name
+- `code`: string, source code
+- `path`: string *optional*, useful when find custom component in a certain path
+- `elements`: object *optional*, existed custom component map
+- `config`: object *optional*
+ * `oldFormat`: whether to transform to old format (default: false)
+ * `isEntry`: whether is an entry module which has `bootstrap` (default: true)
+
+returns:
+
+- an object with keys
+ * `result`: string, all custom components `define()` and final `bootstrap()`
+ * `logs`: array, corresponding warning & error logs
+
+## gulp weex
+
+```bash
+$ npm install gulp-weex
+```
+
+```javascript
+var gulp = require('gulp')
+var weex = require('gulp-weex')
+
+gulp.task('default', function () {
+ return gulp.src('src/*.html')
+ .pipe(weex({}))
+ .pipe(gulp.dest('./dest'))
+})
+```
+
+Options:
+
+- `oldFormat`: whether to transform to old format (default: false)
+- `isEntry`: whether is an entry module which has `bootstrap` (default: true)
http://git-wip-us.apache.org/repos/asf/incubator-weex-site/blob/32a097bf/_draft/v-0.10/guide/images/tut-cli-qrcode.png
----------------------------------------------------------------------
diff --git a/_draft/v-0.10/guide/images/tut-cli-qrcode.png b/_draft/v-0.10/guide/images/tut-cli-qrcode.png
new file mode 100644
index 0000000..9068c14
Binary files /dev/null and b/_draft/v-0.10/guide/images/tut-cli-qrcode.png differ
http://git-wip-us.apache.org/repos/asf/incubator-weex-site/blob/32a097bf/_draft/v-0.10/guide/images/tut-first.png
----------------------------------------------------------------------
diff --git a/_draft/v-0.10/guide/images/tut-first.png b/_draft/v-0.10/guide/images/tut-first.png
new file mode 100755
index 0000000..c8505e6
Binary files /dev/null and b/_draft/v-0.10/guide/images/tut-first.png differ
http://git-wip-us.apache.org/repos/asf/incubator-weex-site/blob/32a097bf/_draft/v-0.10/guide/images/tut-second.png
----------------------------------------------------------------------
diff --git a/_draft/v-0.10/guide/images/tut-second.png b/_draft/v-0.10/guide/images/tut-second.png
new file mode 100755
index 0000000..1259abf
Binary files /dev/null and b/_draft/v-0.10/guide/images/tut-second.png differ
http://git-wip-us.apache.org/repos/asf/incubator-weex-site/blob/32a097bf/_draft/v-0.10/guide/images/tut1.jpg
----------------------------------------------------------------------
diff --git a/_draft/v-0.10/guide/images/tut1.jpg b/_draft/v-0.10/guide/images/tut1.jpg
new file mode 100644
index 0000000..8af0f3f
Binary files /dev/null and b/_draft/v-0.10/guide/images/tut1.jpg differ
http://git-wip-us.apache.org/repos/asf/incubator-weex-site/blob/32a097bf/_draft/v-0.10/guide/images/tut2.jpg
----------------------------------------------------------------------
diff --git a/_draft/v-0.10/guide/images/tut2.jpg b/_draft/v-0.10/guide/images/tut2.jpg
new file mode 100644
index 0000000..c3e8a6e
Binary files /dev/null and b/_draft/v-0.10/guide/images/tut2.jpg differ
http://git-wip-us.apache.org/repos/asf/incubator-weex-site/blob/32a097bf/_draft/v-0.10/guide/images/tut3.png
----------------------------------------------------------------------
diff --git a/_draft/v-0.10/guide/images/tut3.png b/_draft/v-0.10/guide/images/tut3.png
new file mode 100644
index 0000000..5473905
Binary files /dev/null and b/_draft/v-0.10/guide/images/tut3.png differ
http://git-wip-us.apache.org/repos/asf/incubator-weex-site/blob/32a097bf/_draft/v-0.10/guide/images/tut4.gif
----------------------------------------------------------------------
diff --git a/_draft/v-0.10/guide/images/tut4.gif b/_draft/v-0.10/guide/images/tut4.gif
new file mode 100644
index 0000000..eed4395
Binary files /dev/null and b/_draft/v-0.10/guide/images/tut4.gif differ
http://git-wip-us.apache.org/repos/asf/incubator-weex-site/blob/32a097bf/_draft/v-0.10/guide/index.md
----------------------------------------------------------------------
diff --git a/_draft/v-0.10/guide/index.md b/_draft/v-0.10/guide/index.md
new file mode 100644
index 0000000..bb6941c
--- /dev/null
+++ b/_draft/v-0.10/guide/index.md
@@ -0,0 +1,211 @@
+---
+title: Tutorial
+type: guide
+order: 1
+version: 0.10
+---
+
+# Tutorial
+
+We will make a simple but realistic list, in which the technologies Weex uses will be shown. This form of list also works for a lot of e-commercial apps and mobile sites.
+
+## Getting Started
+
+Let's get started with the list item, which contains one `image` element and one `text` right behind.
+
+```html
+<template>
+ <div class="container">
+ <div class="cell">
+ <image class="thumb" src="http://t.cn/RGE3AJt"></image>
+ <text class="title">JavaScript</text>
+ </div>
+ </div>
+</template>
+
+<style>
+ .cell { margin-top: 10; margin-left: 10; flex-direction: row; }
+ .thumb { width: 200; height: 200; }
+ .title { text-align: center; flex: 1; color: grey; font-size: 50; }
+</style>
+```
+
+You can directly copy and paste the above code into a Weex file named `tech_list.we` (`.we` is our recommended filename extension).
+
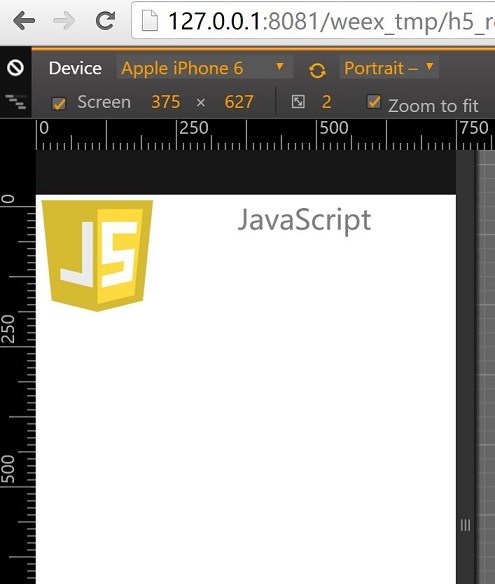
+## Preview
+
+Once created, we want to see the running result of the `.we` file. But before that, we must make sure the dependencies are installed.
+
+We should install [Node](https://nodejs.org/en/download/) first, which our Weex CLI program [Weex Toolkit](https://www.npmjs.com/package/weex-toolkit) depends on. Then install `weex-toolkit` by running the command:
+
+```bash
+$ npm install -g weex-toolkit
+```
+
+When installation completed, you can check if Weex CLI is installed properly by running `weex` command in the command line. The following text is expected:
+
+```
+Usage: weex foo/bar/your_next_best_weex_script_file.we [options]
+
+Options:
+ --qr display QR code for native runtime,
+ -o,--output transform weex we file to JS Bundle, output path (single JS bundle file or dir)
+ -s,--server start a http file server, weex .we file will be transforme to JS bundle on the server , specify local root path using the option
+ ......
+ --help Show help
+ -h, --host [default: "127.0.0.1"]
+```
+
+If all work well, navigate to the directory where you saved `tech_list.we`, then type:
+
+```bash
+$ weex tech_list.we
+```
+
+A browser window will be opened automatically to display the running result like below (weex-toolkit version should be greater than 0.1.0, use `weex --version` to check it):
+
+
+
+## Introduce to Weex Syntax
+
+So it's time for introducing the syntax.
+
+Given the content of `tech_list.we`, Weex source code is composed of three parts -- *template*, *style*, and *script*, just like html, css, and javascript for the Web.
+
+Template is the skeleton that gives Weex structure. It is composed of tags which surround content and apply meaning to it. Tags have *attributes*, different attribute means different feature, for example, `class` attribute makes it possible to define the same styles for multiple tags, `onclick` attribute makes the tag respond to click event.
+
+Style describes how Weex tags are to be displayed. We prefer CSS very much. So we try to keep consistent with CSS standard as possible. Weex Style supports a lot of CSS features, like margin, padding, fixed and so on. Better yet, flexbox layout (flex) is well supported in Weex Style.
+
+Script adds *data* & *logic* to Weex tags, helping you easily access local or remote data and update tags. You can also define some methods for your tag to respond to different events. Weex Script organization learns a lot from CommonJS module style.
+
+More information about Weex syntax can be found in our [Syntax chapter](./syntax/index.html).
+
+## Add More Items
+
+We can't call one item a list, so we need to add more items to our tech list. Open `tech_list.we` in your favorite editor and update it's content like below:
+
+```html
+<template>
+ <div class="container">
+ <div class="cell">
+ <image class="thumb" src="http://t.cn/RGE3AJt"></image>
+ <text class="title">JavaScript</text>
+ </div>
+ <div class="cell">
+ <image class="thumb" src="http://t.cn/RGE3uo9"></image>
+ <text class="title">Java</text>
+ </div>
+ <div class="cell">
+ <image class="thumb" src="http://t.cn/RGE31hq"></image>
+ <text class="title">Objective C</text>
+ </div>
+ </div>
+</template>
+
+<style>
+ .cell{ margin-top:10 ; margin-left:10 ; flex-direction: row; }
+ .thumb { width: 200; height: 200; }
+ .title { text-align: center ; flex: 1; color: grey; font-size: 50; }
+</style>
+```
+
+Now we will try to render our `tech_list.we` with Weex native renderer. Open your terminal and navigate to the directory where you save the `tech_list.we` again, then type:
+
+```bash
+$ weex tech_list.we --qr -h {ip or hostname}
+```
+
+It's ***RECOMMENDED*** to use `-h` option to specify your local ip address or hostname.
+
+A QR code will be displayed in the terminal window like below:
+
+
+
+The QR code can work together with [Weex Playground App](http://alibaba.github.io/weex/download.html). Open it and tap the scan icon at the top-right corner, then scan the QR code displayed in your terminal. If all work well, a beautiful list will be displayed in your phone.
+
+
+
+Here, I must stress that the list is rendered by a native view, instead of Webkit, so your app gets faster loading and less memory overhead than common Webview renderer.
+
+Now open `tech_list.we` again and try to change some text, after changes saved the Weex playground App will immediately display these changes. We call that **Hot-Reload**, which is intended to help you use Weex better.
+
+## Add Built-in Components
+
+Instead of writing basic tags by yourself, Weex provides a lot of built-in components. For example, Slider is common to many apps and mobile websites, so Weex includes a built-in Slider so that you can easily use it in your script. Let's open `tech_list.we` and update it's content like below.
+
+```html
+<template>
+ <div style="flex-direction: column;">
+ <slider class="slider" interval="{{intervalValue}}" auto-play="{{isAutoPlay}}" >
+ <div class="slider-pages" repeat="{{itemList}}" onclick="goWeexSite" >
+ <image class="thumb" src="{{pictureUrl}}"></image>
+ <text class="title">{{title}}</text>
+ </div>
+ </slider>
+
+ <div class="container" onclick="goWeexSite" >
+ <div class="cell">
+ <image class="thumb" src="http://t.cn/RGE3AJt"></image>
+ <text class="title">JavaScript</text>
+ </div>
+ <div class="cell">
+ <image class="thumb" src="http://t.cn/RGE3uo9"></image>
+ <text class="title">Java</text>
+ </div>
+ <div class="cell">
+ <image class="thumb" src="http://t.cn/RGE31hq"></image>
+ <text class="title">Objective C</text>
+ </div>
+ </div>
+</template>
+
+<style>
+ .cell { margin-top:10 ; margin-left:10 ; flex-direction: row; }
+ .thumb { width: 200; height: 200; }
+ .title { text-align: center ; flex: 1; color: grey; font-size: 50; }
+ .slider {
+ margin: 18;
+ width: 714;
+ height: 230;
+ }
+ .slider-pages {
+ flex-direction: row;
+ width: 714;
+ height: 200;
+ }
+</style>
+
+<script>
+module.exports = {
+ data: {
+ intervalValue:"1000",
+ isShowIndicators:"true",
+ isAutoPlay:"true",
+ itemList: [
+ {title: 'Java', pictureUrl: 'http://t.cn/RGE3uo9'},
+ {title: 'Objective C', pictureUrl: 'http://t.cn/RGE31hq'},
+ {title: 'JavaScript', pictureUrl: 'http://t.cn/RGE3AJt'}
+ ]
+ },
+ methods: {
+ goWeexSite: function () {
+ this.$openURL('http://alibaba.github.io/weex/')
+ }
+ }
+}
+</script>
+```
+
+Open terminal and run the command again:
+
+```bash
+$ weex tech_list.we
+```
+
+You should see a slider prepend to our list.
+
+
+
+More information about Slider component can be found [here](../references/components/slider.html).
+
+Just as the previous example, the slider can be rendered in native, easily in Weex playground, or in your App. Please refer [the document](./advanced/integrate-to-android.html) for integrating Weex into your App.
http://git-wip-us.apache.org/repos/asf/incubator-weex-site/blob/32a097bf/_draft/v-0.10/guide/syntax/comm.md
----------------------------------------------------------------------
diff --git a/_draft/v-0.10/guide/syntax/comm.md b/_draft/v-0.10/guide/syntax/comm.md
new file mode 100644
index 0000000..84e49a1
--- /dev/null
+++ b/_draft/v-0.10/guide/syntax/comm.md
@@ -0,0 +1,228 @@
+---
+title: Communications
+type: guide
+order: 2.8
+version: 0.10
+---
+
+# Communicate Between Components
+
+## For Child-Parent Communication
+
+Children component can use `this.$dispatch([String type], [Object detail])` method passing information to parent component. first argument meaning type of message , second argument is the message object. If any parent of the child component register the same type of listener using `$on([String type], [Function callback])` method , the callback will be execute with one argument , the message object will be `detail` property of the the argument.
+
+eg:
+
+```html
+<we-element name="foo">
+ <template>
+ <div>
+ <image src="{{imageUrl}}" onclick="test"></image>
+ <text>{{title}}</text>
+ </div>
+ </template>
+ <script>
+ module.exports = {
+ data: {
+ title: '',
+ imageUrl: ''
+ },
+ methods: {
+ test: function () {
+ this.$dispatch('notify', {a: 1})
+ }
+ }
+ }
+ </script>
+</we-element>
+
+<template>
+ <foo title="..." image-url="..."></foo>
+</template>
+
+<script>
+ module.exports = {
+ created: function () {
+ this.$on('notify', function(e) {
+ // when <foo> image tag be clicked ,the function will be executing.
+ // e.detail is `{a: 1}`
+ })
+ }
+ }
+</script>
+```
+
+## For Parent-Child Communication
+
+Parent component can use `this.$vm([String id])` get vm instance of child component. you can access child component information using the vm instance.
+
+```html
+<we-element name="foo">
+ <template>
+ <div>
+ <image src="{{imageUrl}}"></image>
+ <text>{{title}}</text>
+ </div>
+ </template>
+ <script>
+ module.exports = {
+ data: {
+ title: '',
+ imageUrl: ''
+ },
+ methods: {
+ setTitle: function (t) {
+ this.title = t
+ }
+ }
+ }
+ </script>
+</we-element>
+
+<template>
+ <div>
+ <text onclick="test">click to update foo</text>
+ <foo id="fooEl" title="..." image-url="..."></foo>
+ </div>
+</template>
+
+<script>
+ module.exports = {
+ methods: {
+ test: function (e) {
+ var foo = this.$vm('fooEl')
+ foo.setTitle('...')
+ foo.imageUrl = '...'
+ }
+ }
+ }
+</script>
+```
+
+## Parent to Children (multi-child) Communication
+
+Parent can using `this.$broadcast([String type], [Object detail])` broadcast message to all of children.
+
+eg:
+
+```html
+<we-element name="bar">
+ <template>
+ <div>
+ <image src="{{imageUrl}}"></image>
+ </div>
+ </template>
+ <script>
+ module.exports = {
+ data: {
+ imageUrl: ''
+ },
+ created: function() {
+ var self = this
+ this.$on('changeImage', function(e) {
+ self.imageUrl = e.detail.imageUrl
+ })
+ }
+ }
+ </script>
+</we-element>
+
+<we-element name="foo">
+ <template>
+ <div>
+ <bar></bar>
+ <text>{{title}}</text>
+ </div>
+ </template>
+ <script>
+ module.exports = {
+ data: {
+ title: ''
+ },
+ created: function() {
+ var self = this
+ this.$on('changeTitle', function(e) {
+ self.title = e.detail.title
+ })
+ }
+ }
+ </script>
+</we-element>
+
+<template>
+ <div>
+ <text onclick="test">click to update foo</text>
+ <foo></foo>
+ <bar></bar>
+ </div>
+</template>
+
+<script>
+ module.exports = {
+ methods: {
+ test: function (e) {
+ this.$broadcast('changeTitle', {
+ title: '...'
+ })
+ this.$broadcast('changeImage', {
+ imageUrl: '...'
+ })
+ }
+ }
+ }
+</script>
+```
+
+## Siblings Communication
+
+siblings components can using common parent as bridge for passing information
+
+eg:
+
+```html
+<we-element name="foo">
+ <template>...</template>
+ <script>
+ module.exports = {
+ methods: {
+ callbar: function () {
+ this.$dispatch('callbar', {a: 1})
+ }
+ }
+ }
+ </script>
+</we-element>
+
+<we-element name="bar">
+ <template>...</template>
+ <script>
+ module.exports = {
+ created: function() {
+ this.$on('callbar', function(e) {
+ // e.detail.a
+ })
+ }
+ }
+ </script>
+</we-element>
+
+<template>
+ <div>
+ <foo></foo>
+ <bar></bar>
+ </div>
+</template>
+
+<script>
+ module.exports = {
+ created: function () {
+ var self = this
+ this.$on('callbar', function(e) {
+ self.$broadcast('callbar', e.detail)
+ })
+ }
+ }
+</script>
+```
+
+At last, you can learn how to write [config & data](./config-n-data.html) for a Weex page.
http://git-wip-us.apache.org/repos/asf/incubator-weex-site/blob/32a097bf/_draft/v-0.10/guide/syntax/composed-component.md
----------------------------------------------------------------------
diff --git a/_draft/v-0.10/guide/syntax/composed-component.md b/_draft/v-0.10/guide/syntax/composed-component.md
new file mode 100644
index 0000000..547096f
--- /dev/null
+++ b/_draft/v-0.10/guide/syntax/composed-component.md
@@ -0,0 +1,114 @@
+---
+title: Composed Component
+type: guide
+order: 2.6
+version: 0.10
+---
+
+# Composed Component
+
+If some part of weex file is reused often, you could create a composed component represent these part.
+
+You can create a file named `foo.we` to define a composed component, the component name is just `<foo>`.
+
+```html
+<!-- foo.we -->
+<template>
+ <container style="flex-direction: row;">
+ <image src="{{image}}" style="width:100;height:100;"></image>
+ <text>{{title}}</text>
+ </container>
+</template>
+<script>
+ module.exports = {
+ data: {
+ title: null,
+ image: null
+ }
+ }
+</script>
+```
+
+The content of `foo.we` also consists of `<template>`, `<style>` and `<script>`.
+
+Once composed component been defined, you can use `<foo>` in a file which is in the same folder with `foo.we`.
+
+```html
+<template>
+ <foo title="..." image="..."></foo>
+</template>
+```
+
+## Nesting Components
+
+Composed component supports nesting. For example:
+
+```html
+<!-- somepath/foo.we -->
+<template>
+ <container style="flex-direction: row;">
+ <image src="{{image}}"></image>
+ <text>{{title}}</text>
+ </container>
+</template>
+<script>
+ module.exports = {
+ data: {
+ // The key is required if you want this property observed
+ // and could be updated from changing parent attribute
+ title: null,
+ image: null
+ }
+ }
+</script>
+```
+
+```html
+<!-- somepath/foo-list.we -->
+<template>
+ <container>
+ <text>{{description}}</text>
+ <foo repeat="{{list}}" title="{{text}}" image="{{img}}"></foo>
+ </container>
+</template>
+<script>
+ module.exports = {
+ data: {
+ description: '',
+ // If no keys written here. There will be no data binding effect
+ // from parent attribute "list".
+ list: []
+ }
+ }
+</script>
+```
+
+```html
+<!-- somepath/main.we -->
+<template>
+ <foo-list list="{{list}}"></foo-list>
+</template>
+<script>
+ module.exports = {
+ data: {
+ list: [
+ {text: '...', img: '...'},
+ {text: '...', img: '...'},
+ {text: '...', img: '...'},
+ ...
+ ]
+ }
+ }
+</script>
+```
+
+The `main.we` uses `<foo-list>` from `foo-list.we`. And `<foo-list>` uses `<foo>` from `foo.we`.
+
+## Notes
+
+- Every composed component have an independent `<style>` work scope.
+- If child component have `id` attribute, you can access the context of the child component by `this.$vm(id)` and find an element by `this.$el(id)`. See more about [find an element](./id.html).
+- Please refer to [communicate between components](./comm.html) for more communication issues.
+- The keys must be existed in `data` options **explicitly** if you want to make the data observation work both through inside data changes and outside attribute changes.
+
+Next is how to [find an element](./id.html).
http://git-wip-us.apache.org/repos/asf/incubator-weex-site/blob/32a097bf/_draft/v-0.10/guide/syntax/config-n-data.md
----------------------------------------------------------------------
diff --git a/_draft/v-0.10/guide/syntax/config-n-data.md b/_draft/v-0.10/guide/syntax/config-n-data.md
new file mode 100644
index 0000000..37b8e12
--- /dev/null
+++ b/_draft/v-0.10/guide/syntax/config-n-data.md
@@ -0,0 +1,61 @@
+---
+title: Page Config & Data
+type: guide
+order: 2.9
+version: 0.10
+---
+
+# Page Config & Data
+
+You can write some instance config and data in some additional `<script>` at the **top-level** Weex component.
+
+* the instance config could declare some meta informations like which sdk/client version it supports or "downgrade" to HTML5 renderer. This part would be extended more in the future.
+* the instance data could set an external data which would be processed instead of the default top-level component data.
+
+They all make Weex files more extendable and configurable and works easy with other tools & services like CMS system.
+
+```html
+<!-- definition of sub components -->
+<element name="sub-component-a">...</element>
+<element name="sub-component-b">...</element>
+<element name="sub-component-c">...</element>
+
+<!-- definition of top-level component -->
+<template>...</template>
+<style></style>
+<script>
+ module.exports = {
+ data: function () {return {x: 1, y: 2}}
+ }
+</script>
+
+<!-- instance config and data -->
+<script type="config">
+ {
+ downgrade: {
+ ios: {
+ os: '9', // all of 9.x.x
+ app: '~5.3.2',
+ framework: '^1.3', // all of 1.3.x
+ deviceModel: ['AAAA', 'BBBB']
+ },
+ android: {
+ os: '*', // all of version
+ app: '^5',
+ framework: '',
+ deviceModel: ''
+ }
+ }
+ }
+</script>
+<script type="data">
+ {y: 200}
+</script>
+```
+
+Notice that these two additional `<script>` are both optinal and have `type="config|data"` attribute and only works when it's the top-level component of a Weex instance.
+
+So that's all about Weex syntax. For more reading, please check out:
+
+* [how-tos](../how-to/index.html) articles and
+* [advanced](../../advanced/index.html) topics.
http://git-wip-us.apache.org/repos/asf/incubator-weex-site/blob/32a097bf/_draft/v-0.10/guide/syntax/data-binding.md
----------------------------------------------------------------------
diff --git a/_draft/v-0.10/guide/syntax/data-binding.md b/_draft/v-0.10/guide/syntax/data-binding.md
new file mode 100644
index 0000000..497735c
--- /dev/null
+++ b/_draft/v-0.10/guide/syntax/data-binding.md
@@ -0,0 +1,248 @@
+---
+title: Data-Binding
+type: guide
+order: 2.1
+version: 0.10
+---
+
+# Data-Binding
+
+In Weex, we use the *mustache* syntax `{% raw %}{{...}}{% endraw %}` to bind data in `<template>` which are defined in `<script>`. Once data and template is bound, the data changes will influence the corresponding template content immediately and automatically.
+
+## Binding data path
+
+```html
+<template>
+ <container>
+ <text style="font-size: {{size}}">{{title}}</text>
+ </container>
+</template>
+
+<script>
+ module.exports = {
+ data: {
+ size: 48,
+ title: 'Alibaba Weex Team'
+ }
+ }
+</script>
+```
+
+The code above will bind the `title` and `size` data field to `template`.
+
+We can also use `.` syntax to bind cascading data structure. Let's look at the following code snippet:
+
+```html
+<template>
+ <container>
+ <text style="font-size: {{title.size}}">{{title.value}}</text>
+ </container>
+</template>
+
+<script>
+ module.exports = {
+ data: {
+ title: {
+ size: 48,
+ value: 'Alibaba Weex Team'
+ }
+ }
+ }
+</script>
+```
+
+## In-template expression
+
+Inside data bindings, Weex supports simply javascript expressions, e.g.
+
+```html
+<template>
+ <container style="flex-direction: row;">
+ <text>{{firstName + ' ' + lastName}}</text>
+ </container>
+</template>
+
+<script>
+ module.exports = {
+ data: {
+ firstName: 'John',
+ lastName: 'Smith'
+ }
+ }
+</script>
+```
+
+The expression will be evaluated in the data scope of current context.
+
+**NOTE: EACH BINDING CAN ONLY CONTAIN ONE SINGLE EXPRESSION**
+
+## Computed Properties
+<span class="weex-version">0.5</span>
+
+According to simple operations, in-template expressions are very convenient. But if you want to put more logic into the template, you should use a computed property.
+
+e.g.
+
+```html
+<template>
+ <container style="flex-direction: row;">
+ <text>{{fullName}}</text>
+ <text onclick="changeName" style="margin-left:10px;">CHANGE NAME</text>
+ </container>
+</template>
+
+<script>
+ module.exports = {
+ data: {
+ firstName: 'John',
+ lastName: 'Smith'
+ },
+ computed: {
+ fullName: {
+ get: function() {
+ return this.firstName + ' ' + this.lastName
+ },
+
+ set: function(v) {
+ var s = v.split(' ')
+ this.firstName = s[0]
+ this.lastName = s[1]
+ }
+ }
+ },
+ methods: {
+ changeName: function() {
+ this.fullName = 'Terry King'
+ }
+ }
+ }
+</script>
+```
+
+Here we have declared a computed property fullName. The function we provided will be used as the getter function for concating firstName and lastName.
+
+Otherwise when you call `changeName` after click, the setter will be invoked and this.firstName and this.lastName will be updated accordingly.
+
+**NOTE: `data` and `methods` can't have duplicated fields. 'Cause in the execution context -- `this`, we can access both of them.**
+
+## Usage of some special attributes in Data-Binding
+
+### Styles: `style` or `class`
+
+the style of a component can be bind using the `style` attribute:
+
+```html
+<template>
+ <text style="font-size: {{size}}; color: {{color}}; ...">...</text>
+</template>
+```
+
+while style can also get bound with `class` attribute, multiple classnames can be split by spaces:
+
+```html
+<template>
+ <container>
+ <text class="{{size}}"></text>
+ <text class="title {{status}}"></text>
+ </container>
+</template>
+```
+
+here if `{{size}}` and `{{status}}` have empty value, then only `class="title"` will be rendered.
+
+* [See more about style and class](./style-n-class.html)
+
+### Event Handler: `on...`
+
+The event handler is an attribute which name has a prefix `on...`. The other part of attribute name is event type and the value is event handler name. We don't need to add mustache around the method name or add parentheses to call it.
+
+```html
+<template>
+ <text onclick="toggle">Toggle</text>
+</template>
+
+<script>
+ module.exports = {
+ methods: {
+ toggle: function () {
+ // todo
+ }
+ }
+ }
+</script>
+```
+
+### `if` & `repeat`
+
+`if` attribute can control the display of a component by a truthy/falsy value.
+
+```html
+<template>
+ <container style="flex-direction: column;">
+ <text onclick="toggle">Toggle</text>
+ <image src="..." if="{{shown}}"></image>
+ </container>
+</template>
+
+<script>
+ module.exports = {
+ data: {
+ shown: true
+ },
+ methods: {
+ toggle: function () {
+ this.shown = !this.shown
+ }
+ }
+ }
+</script>
+```
+
+We can also use `repeat` attribute to generate a list.
+
+**NOTE: When you want to mutate an array in `data`. Something limitations existing below:**
+
+When you directly set an item with the index (`vm.items[0] = {};`), it won't trigger view update. So we have a prototype methods: `$set(index, item)`.
+
+```javascript
+// same as `example1.items[0] = ...` but triggers view update
+example1.items.$set(0, { childMsg: 'Changed!'})
+```
+
+When you modify the length of the Array (`vm.items.length = 0`), it won't trigger view update too. We recommend you just replace `items` with an empty array instead.
+
+```javascript
+// same as `example2.items.length = 0` but triggers view update
+example2.items = []
+```
+
+* [See more about display logic control](./display-logic.html)
+
+### `static`
+
+`static` attribute can cancel the data binding, and the data changes will not be synchronized to UI.
+
+```html
+<template>
+ <div static>
+ <text>{{ word }}</text>
+ </div>
+</template>
+
+<script>
+ module.exports = {
+ ready: function() {
+ this.word = 'Data changes'
+ },
+ data: {
+ word: 'Hello, static'
+ }
+ }
+</script>
+```
+
+As shown above, after the `static` attribute is added, the rendering result will be `Hello, static`, which is equivalent to rendering a static node. The change of the data `word` in ready function will not be listened, so the text value will not change.
+`static` property is designed to reduce the long list or pure static page memory overhead. Be careful with it, as it will likely break your page logic.
+
+Next, let's have a look at [style and class](./style-n-class.html).
+
http://git-wip-us.apache.org/repos/asf/incubator-weex-site/blob/32a097bf/_draft/v-0.10/guide/syntax/display-logic.md
----------------------------------------------------------------------
diff --git a/_draft/v-0.10/guide/syntax/display-logic.md b/_draft/v-0.10/guide/syntax/display-logic.md
new file mode 100644
index 0000000..842e188
--- /dev/null
+++ b/_draft/v-0.10/guide/syntax/display-logic.md
@@ -0,0 +1,173 @@
+---
+title: Display Logic Control
+type: guide
+order: 2.4
+version: 0.10
+---
+
+# Display Logic Control
+
+There are two attributes for display logic control: `if` and `repeat`. We can create Weex page structure and effects more flexible with them.
+
+ > **Notes:** The display logic could't apply on the root element within `<template>`, please don't use `if` or `repeat` directive on it.
+
+## `if`
+
+`if` attribute can control the display of a component by a truthy/falsy value. If the value is truthy, then the component will generated, otherwise it will be removed.
+
+```html
+<template>
+ <container>
+ <text onclick="toggle">Toggle</text>
+ <image src="..." if="{{shown}}"></image>
+ </container>
+</template>
+
+<script>
+ module.exports = {
+ data: {
+ shown: true
+ },
+ methods: {
+ toggle: function () {
+ this.shown = !this.shown
+ }
+ }
+ }
+</script>
+```
+
+## `repeat`
+
+`repeat` statement is just for array rendering. Every item in an array is also a structured data. This means in `repeat`ed component, you can bind their item properties directly.
+
+```html
+<template>
+ <container>
+ <container repeat="{{list}}" class="{{gender}}">
+ <image src="{{avatar}}"></image>
+ <text>{{nickname}}</text>
+ </container>
+ </container>
+</template>
+
+<style>
+ .male {...}
+ .female {...}
+</style>
+
+<script>
+ module.exports = {
+ data: {
+ list: [
+ {gender: 'male', nickname: 'Li Lei', avatar: '...'},
+ {gender: 'female', nickname: 'Han Meimei', avatar: '...'},
+ ...
+ ]
+ }
+ }
+</script>
+```
+
+The origin data properties which not belongs to the array will also be bound:
+
+```html
+<template>
+ <container>
+ <container repeat="{{list}}" class="{{gender}}">
+ <image src="{{avatar}}"></image>
+ <text>{{nickname}} - {{group}}</text>
+ </container>
+ </container>
+</template>
+
+<style>
+ .male {...}
+ .female {...}
+</style>
+
+<script>
+ module.exports = {
+ data: {
+ group: '...',
+ list: [
+ {gender: 'male', nickname: 'Li Lei', avatar: '...'},
+ {gender: 'female', nickname: 'Han Meimei', avatar: '...'},
+ ...
+ ]
+ }
+ }
+</script>
+```
+
+### An extension of repeat syntax
+
+#### use default `$index` for the index of array.
+
+e.g.
+
+```html
+<div repeat="{{list}}">
+ <text>No. {{$index + 1}}</text>
+<div>
+```
+
+#### specify the key and value of array.
+
+e.g.
+
+```html
+<div repeat="{{v in list}}">
+ <text>No. {{$index + 1}}, {{v.nickname}}</text>
+</div>
+```
+
+```html
+<div repeat="{{(k, v) in list}}">
+ <text>No. {{k + 1}}, {{v.nickname}}</text>
+</div>
+```
+
+#### use `track-by` to specify unique attribute
+
+By default when replacing an array, `repeat` will cause the entire list to be re-rendered. However you can use `track-by` to specify an unique attribute as a hint, so that weex can reuse existing elements as much as possible.
+
+**NOTE: DO NOT USE DATA-BINDING SYNTAX FOR `track-by`**
+
+e.g.
+
+```html
+<template>
+ <container>
+ <container repeat="{{list}}" track-by="nickname" class="{{gender}}">
+ <image src="{{avatar}}"></image>
+ <text>{{nickname}} - {{group}}</text>
+ </container>
+ </container>
+</template>
+```
+
+Later on, when you replace the array including an item of the same nickname, it knows it can reuse the existing scope and DOM elements associated with the same nickname.
+
+## Omitted mustache wrapper
+
+Particularly for the `if` and `repeat` attribute, the [mustache](https://mustache.github.io/) wrapper in values could be omitted: just the same as data-binding syntax.
+
+```html
+<template>
+ <container>
+ <text if="shown">Hello</text>
+ <text if="{{shown}}">Hello</text>
+ </container>
+</template>
+
+<script>
+ module.exports = {
+ data: function () {return {shown: true}}
+ }
+</script>
+```
+
+The two `<text>` components are both displayed.
+
+Next is [render logic control](./render-logic.html).