You are viewing a plain text version of this content. The canonical link for it is here.
Posted to notifications@apisix.apache.org by sp...@apache.org on 2022/04/27 02:25:03 UTC
[apisix] branch master updated: docs: update "Transformation" Plugins (#6891)
This is an automated email from the ASF dual-hosted git repository.
spacewander pushed a commit to branch master
in repository https://gitbox.apache.org/repos/asf/apisix.git
The following commit(s) were added to refs/heads/master by this push:
new 13b63b8bd docs: update "Transformation" Plugins (#6891)
13b63b8bd is described below
commit 13b63b8bdeca201ce9c3d776ae9f5e7d8dfd8e66
Author: homeward <97...@users.noreply.github.com>
AuthorDate: Wed Apr 27 10:24:57 2022 +0800
docs: update "Transformation" Plugins (#6891)
---
docs/zh/latest/plugins/fault-injection.md | 364 +++++++----------------------
docs/zh/latest/plugins/grpc-transcode.md | 150 ++++++------
docs/zh/latest/plugins/grpc-web.md | 51 ++--
docs/zh/latest/plugins/mocking.md | 68 ++++--
docs/zh/latest/plugins/proxy-rewrite.md | 41 ++--
docs/zh/latest/plugins/response-rewrite.md | 87 ++++---
6 files changed, 321 insertions(+), 440 deletions(-)
diff --git a/docs/zh/latest/plugins/fault-injection.md b/docs/zh/latest/plugins/fault-injection.md
index e3e99cd8b..78a8beba2 100644
--- a/docs/zh/latest/plugins/fault-injection.md
+++ b/docs/zh/latest/plugins/fault-injection.md
@@ -1,5 +1,11 @@
---
title: fault-injection
+keywords:
+ - APISIX
+ - Plugin
+ - Fault Injection
+ - fault-injection
+description: 本文介绍了关于 Apache APISIX `fault-injection` 插件的基本信息及使用方法。
---
<!--
@@ -23,23 +29,33 @@ title: fault-injection
## 描述
-故障注入插件,该插件可以和其他插件一起使用,并且会在其他插件前被执行,配置 `abort` 参数将直接返回给客户端指定的响应码并且终止其他插件的执行,配置 `delay` 参数将延迟某个请求,并且还会执行配置的其他插件。
+`fault-injection` 插件是故障注入插件,该插件可以和其他插件一起使用,并在其他插件执行前被执行。
## 属性
-| 名称 | 类型 | 必选项 | 默认值 | 有效值 | 描述 |
-| ----------------- | ------- | ------ | ------ | ---------- | -------------------------- |
-| abort.http_status | integer | 必需 | | [200, ...] | 返回给客户端的 http 状态码 |
-| abort.body | string | 可选 | | | 返回给客户端的响应数据。支持使用 Nginx 变量,如 `client addr: $remote_addr\n`|
-| abort.percentage | integer | 可选 | | [0, 100] | 将被中断的请求占比 |
-| abort.vars | array[] | 可选 | | | 执行故障注入的规则,当规则匹配通过后才会执行故障注。`vars` 是一个表达式的列表,来自 [lua-resty-expr](https://github.com/api7/lua-resty-expr#operator-list)。 |
-| delay.duration | number | 必需 | | | 延迟时间,可以指定小数 |
-| delay.percentage | integer | 可选 | | [0, 100] | 将被延迟的请求占比 |
-| delay.vars | array[] | 可选 | | | 执行请求延迟的规则,当规则匹配通过后才会延迟请求。`vars` 是一个表达式列表,来自 [lua-resty-expr](https://github.com/api7/lua-resty-expr#operator-list)。 |
+| 名称 | 类型 | 必选项 | 有效值 | 描述 |
+| ----------------- | ------- | ---- | ---------- | -------------------------- |
+| abort.http_status | integer | 是 | [200, ...] | 返回给客户端的 HTTP 状态码 |
+| abort.body | string | 否 | | 返回给客户端的响应数据。支持使用 NGINX 变量,如 `client addr: $remote_addr\n`|
+| abort.percentage | integer | 否 | [0, 100] | 将被中断的请求占比 |
+| abort.vars | array[] | 否 | | 执行故障注入的规则,当规则匹配通过后才会执行故障注。`vars` 是一个表达式的列表,来自 [lua-resty-expr](https://github.com/api7/lua-resty-expr#operator-list)。 |
+| delay.duration | number | 是 | | 延迟时间,可以指定小数 |
+| delay.percentage | integer | 否 | [0, 100] | 将被延迟的请求占比 |
+| delay.vars | array[] | 否 | | 执行请求延迟的规则,当规则匹配通过后才会延迟请求。`vars` 是一个表达式列表,来自 [lua-resty-expr](https://github.com/api7/lua-resty-expr#operator-list)。 |
-注:参数 abort 和 delay 至少要存在一个。
+:::info IMPORTANT
-`vars` 是由 `lua-resty-expr` 的表达式组成的列表,它可以灵活的实现规则之间的 `and/or` 关系,示例:
+`abort` 属性将直接返回给客户端指定的响应码并且终止其他插件的执行。
+
+`delay` 属性将延迟某个请求,并且还会执行配置的其他插件。
+
+`abort` 和 `delay` 属性至少要配置一个。
+
+:::
+
+:::tip
+
+`vars` 是由 [`lua-resty-expr`](https://github.com/api7/lua-resty-expr) 的表达式组成的列表,它可以灵活的实现规则之间的 AND/OR 关系,示例如下::
```json
[
@@ -53,16 +69,17 @@ title: fault-injection
]
```
-这表示前两个表达式之间的关系是 `and` ,而前两个和第三个表达式之间的关系是 `or`。
+以上示例表示前两个表达式之间的关系是 AND,而前两个和第三个表达式之间的关系是 OR。
-## 示例
+:::
-### 启用插件
+## 启用插件
-示例 1:为特定路由启用 `fault-injection` 插件,并指定 `abort` 参数:
+你可以在指定路由启用 `fault-injection` 插件,并指定 `abort` 属性。如下所示:
```shell
-curl http://127.0.0.1:9080/apisix/admin/routes/1 -H 'X-API-KEY: edd1c9f034335f136f87ad84b625c8f1' -X PUT -d '
+curl http://127.0.0.1:9080/apisix/admin/routes/1 \
+-H 'X-API-KEY: edd1c9f034335f136f87ad84b625c8f1' -X PUT -d '
{
"plugins": {
"fault-injection": {
@@ -82,26 +99,11 @@ curl http://127.0.0.1:9080/apisix/admin/routes/1 -H 'X-API-KEY: edd1c9f034335f13
}'
```
-测试:
+同样,我们也可以指定 `delay` 属性。如下所示:
```shell
-$ curl http://127.0.0.1:9080/hello -i
-HTTP/1.1 200 OK
-Date: Mon, 13 Jan 2020 13:50:04 GMT
-Content-Type: text/plain
-Transfer-Encoding: chunked
-Connection: keep-alive
-Server: APISIX web server
-
-Fault Injection!
-```
-
-> http status 返回 `200` 并且响应 `body` 为 `Fault Injection!`,表示该插件已启用。
-
-示例 2:为特定路由启用 `fault-injection` 插件,并指定 `delay` 参数:
-
-```shell
-curl http://127.0.0.1:9080/apisix/admin/routes/1 -H 'X-API-KEY: edd1c9f034335f136f87ad84b625c8f1' -X PUT -d '
+curl http://127.0.0.1:9080/apisix/admin/routes/1 \
+-H 'X-API-KEY: edd1c9f034335f136f87ad84b625c8f1' -X PUT -d '
{
"plugins": {
"fault-injection": {
@@ -120,152 +122,11 @@ curl http://127.0.0.1:9080/apisix/admin/routes/1 -H 'X-API-KEY: edd1c9f034335f13
}'
```
-测试:
-
-```shell
-$ time curl http://127.0.0.1:9080/hello -i
-HTTP/1.1 200 OK
-Content-Type: application/octet-stream
-Content-Length: 6
-Connection: keep-alive
-Server: APISIX web server
-Date: Tue, 14 Jan 2020 14:30:54 GMT
-Last-Modified: Sat, 11 Jan 2020 12:46:21 GMT
-
-hello
-
-real 0m3.034s
-user 0m0.007s
-sys 0m0.010s
-```
-
-示例 3:为特定路由启用 `fault-injection` 插件,并指定 abort 参数的 vars 规则。
-
-```shell
-curl http://127.0.0.1:9080/apisix/admin/routes/1 -H 'X-API-KEY: edd1c9f034335f136f87ad84b625c8f1' -X PUT -d '
-{
- "plugins": {
- "fault-injection": {
- "abort": {
- "http_status": 403,
- "body": "Fault Injection!\n",
- "vars": [
- [
- [ "arg_name","==","jack" ]
- ]
- ]
- }
- }
- },
- "upstream": {
- "nodes": {
- "127.0.0.1:1980": 1
- },
- "type": "roundrobin"
- },
- "uri": "/hello"
-}'
-```
-
-测试:
-
-1、vars 规则匹配失败,请求返回上游响应数据:
-
-```shell
-$ curl "http://127.0.0.1:9080/hello?name=allen" -i
-HTTP/1.1 200 OK
-Content-Type: application/octet-stream
-Transfer-Encoding: chunked
-Connection: keep-alive
-Date: Wed, 20 Jan 2021 07:21:57 GMT
-Server: APISIX/2.2
-
-hello
-```
-
-2、vars 规则匹配成功,执行故障注入:
-
-```shell
-$ curl "http://127.0.0.1:9080/hello?name=jack" -i
-HTTP/1.1 403 Forbidden
-Date: Wed, 20 Jan 2021 07:23:37 GMT
-Content-Type: text/plain; charset=utf-8
-Transfer-Encoding: chunked
-Connection: keep-alive
-Server: APISIX/2.2
-
-Fault Injection!
-```
-
-示例 4:为特定路由启用 `fault-injection` 插件,并指定 delay 参数的 vars 规则。
-
-```shell
-curl http://127.0.0.1:9080/apisix/admin/routes/1 -H 'X-API-KEY: edd1c9f034335f136f87ad84b625c8f1' -X PUT -d '
-{
- "plugins": {
- "fault-injection": {
- "delay": {
- "duration": 2,
- "vars": [
- [
- [ "arg_name","==","jack" ]
- ]
- ]
- }
- }
- },
- "upstream": {
- "nodes": {
- "127.0.0.1:1980": 1
- },
- "type": "roundrobin"
- },
- "uri": "/hello"
-}'
-```
-
-测试:
-
-1、vars 规则匹配失败,不延迟请求:
-
-```shell
-$ time "curl http://127.0.0.1:9080/hello?name=allen" -i
-HTTP/1.1 200 OK
-Content-Type: application/octet-stream
-Transfer-Encoding: chunked
-Connection: keep-alive
-Date: Wed, 20 Jan 2021 07:26:17 GMT
-Server: APISIX/2.2
-
-hello
-
-real 0m0.007s
-user 0m0.003s
-sys 0m0.003s
-```
-
-2、vars 规则匹配成功,延迟请求两秒:
-
-```shell
-$ time curl "http://127.0.0.1:9080/hello?name=jack" -i
-HTTP/1.1 200 OK
-Content-Type: application/octet-stream
-Transfer-Encoding: chunked
-Connection: keep-alive
-Date: Wed, 20 Jan 2021 07:57:50 GMT
-Server: APISIX/2.2
-
-hello
-
-real 0m2.009s
-user 0m0.004s
-sys 0m0.004s
-```
-
-示例 5:为特定路由启用 `fault-injection` 插件,并指定 abort 和 delay 参数的 vars 规则。
+还可以同时为指定路由启用 `fault-injection` 插件,并指定 `abort` 属性和 `delay` 属性的 `vars` 规则。如下所示:
```shell
-curl http://127.0.0.1:9080/apisix/admin/routes/1 -H 'X-API-KEY: edd1c9f034335f136f87ad84b625c8f1' -X PUT -d '
+curl http://127.0.0.1:9080/apisix/admin/routes/1 \
+-H 'X-API-KEY: edd1c9f034335f136f87ad84b625c8f1' -X PUT -d '
{
"plugins": {
"fault-injection": {
@@ -298,99 +159,65 @@ curl http://127.0.0.1:9080/apisix/admin/routes/1 -H 'X-API-KEY: edd1c9f034335f1
}'
```
-测试:
+## 测试插件
-1、abort 和 delay 的 vars 规则匹配失败:
+通过上述示例启用插件后,可以向路由发起如下请求:
```shell
-$ time curl "http://127.0.0.1:9080/hello?name=allen" -H 'age: 20' -i
-HTTP/1.1 200 OK
-Content-Type: application/octet-stream
-Transfer-Encoding: chunked
-Connection: keep-alive
-Date: Wed, 20 Jan 2021 08:01:43 GMT
-Server: APISIX/2.2
-
-hello
-
-real 0m0.007s
-user 0m0.003s
-sys 0m0.003s
+curl http://127.0.0.1:9080/hello -i
```
-2、abort 的 vars 规则匹配失败,不执行故障注入,但延迟请求:
-
```shell
-$ time curl "http://127.0.0.1:9080/hello?name=allen" -H 'age: 18' -i
HTTP/1.1 200 OK
-Content-Type: application/octet-stream
+Date: Mon, 13 Jan 2020 13:50:04 GMT
+Content-Type: text/plain
Transfer-Encoding: chunked
Connection: keep-alive
-Date: Wed, 20 Jan 2021 08:19:03 GMT
-Server: APISIX/2.2
-
-hello
+Server: APISIX web server
-real 0m2.009s
-user 0m0.001s
-sys 0m0.006s
+Fault Injection!
```
-3、delay 的 vars 规则匹配失败,不延迟请求,但执行故障注入:
+通过如下命令可以向配置 `delay` 属性的路由发起请求:
```shell
-$ time curl "http://127.0.0.1:9080/hello?name=jack" -H 'age: 20' -i
-HTTP/1.1 403 Forbidden
-Date: Wed, 20 Jan 2021 08:20:18 GMT
-Content-Type: text/plain; charset=utf-8
-Transfer-Encoding: chunked
-Connection: keep-alive
-Server: APISIX/2.2
-
-Fault Injection!
-
-real 0m0.007s
-user 0m0.002s
-sys 0m0.004s
+time curl http://127.0.0.1:9080/hello -i
```
-4、abort 和 delay 参数的 vars 规则匹配成功,执行故障注入,并延迟请求:
-
```shell
-$ time curl "http://127.0.0.1:9080/hello?name=jack" -H 'age: 18' -i
-HTTP/1.1 403 Forbidden
-Date: Wed, 20 Jan 2021 08:21:17 GMT
-Content-Type: text/plain; charset=utf-8
-Transfer-Encoding: chunked
+HTTP/1.1 200 OK
+Content-Type: application/octet-stream
+Content-Length: 6
Connection: keep-alive
-Server: APISIX/2.2
+Server: APISIX web server
+Date: Tue, 14 Jan 2020 14:30:54 GMT
+Last-Modified: Sat, 11 Jan 2020 12:46:21 GMT
-Fault Injection!
+hello
-real 0m2.006s
-user 0m0.001s
-sys 0m0.005s
+real 0m3.034s
+user 0m0.007s
+sys 0m0.010s
```
-示例 6:为特定路由启用 `fault-injection` 插件,并指定 abort 参数的 vars 规则(`or` 的关系)。
+### 标准匹配的故障注入
-```shell
-curl http://127.0.0.1:9080/apisix/admin/routes/1 -H 'X-API-KEY: edd1c9f034335f136f87ad84b625c8f1' -X PUT -d '
+你可以在 `fault-injection` 插件中使用 `vars` 规则设置特定规则:
+
+```Shell
+curl http://127.0.0.1:9080/apisix/admin/routes/1 \
+-H 'X-API-KEY: edd1c9f034335f136f87ad84b625c8f1' -X PUT -d '
{
"plugins": {
"fault-injection": {
"abort": {
- "http_status": 403,
- "body": "Fault Injection!\n",
- "vars": [
- [
- ["arg_name","==","jack"],
- ["arg_age","!","<",18]
- ],
- [
- ["http_apikey","==","apisix-key"]
+ "http_status": 403,
+ "body": "Fault Injection!\n",
+ "vars": [
+ [
+ [ "arg_name","==","jack" ]
+ ]
]
- ]
}
}
},
@@ -404,30 +231,34 @@ curl http://127.0.0.1:9080/apisix/admin/routes/1 -H 'X-API-KEY: edd1c9f034335f1
}'
```
-表示当请求参数 name 和 age 同时满足 `name == "jack"`、`age >= 18` 时,执行故障注入。或请求头 apikey 满足 `apikey == "apisix-key"` 时,执行故障注入。
+使用不同的 `name` 参数测试路由:
-测试:
+```Shell
+curl "http://127.0.0.1:9080/hello?name=allen" -i
+```
-1、请求参数 name 和 age 匹配成功,缺少请求头 `apikey`, 执行故障注入:
+没有故障注入的情况下,你可以得到如下结果:
```shell
-$ curl "http://127.0.0.1:9080/hello?name=jack&age=19" -i
-HTTP/1.1 403 Forbidden
-Date: Fri, 22 Jan 2021 11:05:46 GMT
-Content-Type: text/plain; charset=utf-8
+HTTP/1.1 200 OK
+Content-Type: application/octet-stream
Transfer-Encoding: chunked
Connection: keep-alive
+Date: Wed, 20 Jan 2021 07:21:57 GMT
Server: APISIX/2.2
-Fault Injection!
+hello
```
-2、请求头 `apikey` 匹配成功,缺少请求参数,执行故障注入:
+如果我们将 `name` 设置为与配置相匹配的名称,`fault-injection` 插件将被执行:
+
+```Shell
+curl "http://127.0.0.1:9080/hello?name=jack" -i
+```
```shell
-$ curl http://127.0.0.1:9080/hello -H "apikey: apisix-key" -i
HTTP/1.1 403 Forbidden
-Date: Fri, 22 Jan 2021 11:08:34 GMT
+Date: Wed, 20 Jan 2021 07:23:37 GMT
Content-Type: text/plain; charset=utf-8
Transfer-Encoding: chunked
Connection: keep-alive
@@ -436,26 +267,13 @@ Server: APISIX/2.2
Fault Injection!
```
-3、请求参数与请求头都匹配失败,不执行故障注入:
+## 禁用插件
-```shell
-$ curl http://127.0.0.1:9080/hello -i
-HTTP/1.1 200 OK
-Content-Type: application/octet-stream
-Transfer-Encoding: chunked
-Connection: keep-alive
-Date: Fri, 22 Jan 2021 11:11:17 GMT
-Server: APISIX/2.2
-
-hello
-```
-
-### 禁用插件
-
-移除插件配置中相应的 JSON 配置可立即禁用该插件,无需重启服务:
+当你需要禁用 `fault-injection` 插件时,可以通过以下命令删除相应的 JSON 配置,APISIX 将会自动重新加载相关配置,无需重启服务:
```shell
-curl http://127.0.0.1:9080/apisix/admin/routes/1 -H 'X-API-KEY: edd1c9f034335f136f87ad84b625c8f1' -X PUT -d '
+curl http://127.0.0.1:9080/apisix/admin/routes/1 \
+-H 'X-API-KEY: edd1c9f034335f136f87ad84b625c8f1' -X PUT -d '
{
"uri": "/hello",
"plugins": {},
@@ -467,5 +285,3 @@ curl http://127.0.0.1:9080/apisix/admin/routes/1 -H 'X-API-KEY: edd1c9f034335f13
}
}'
```
-
-这时该插件已被禁用。
diff --git a/docs/zh/latest/plugins/grpc-transcode.md b/docs/zh/latest/plugins/grpc-transcode.md
index 553072441..b7cb2a821 100644
--- a/docs/zh/latest/plugins/grpc-transcode.md
+++ b/docs/zh/latest/plugins/grpc-transcode.md
@@ -1,5 +1,11 @@
---
-title: grpc-transcode
+title: grpc-web
+keywords:
+ - APISIX
+ - Plugin
+ - gRPC Web
+ - grpc-web
+description: 本文介绍了关于 Apache APISIX `grpc-transcode` 插件的基本信息及使用方法。
---
<!--
@@ -23,20 +29,40 @@ title: grpc-transcode
## 描述
-HTTP(s) -> APISIX -> gRPC server
+使用 `grpc-transcode` 插件可以在 HTTP 和 gRPC 请求之间进行转换。
-## Proto
+APISIX 接收 HTTP 请求后,首先对请求进行转码,并将转码后的请求转发到 gRPC 服务,获取响应并以 HTTP 格式将其返回给客户端。
-### 参数
+<!-- TODO: use an image here to explain the concept better -->
-* `content`: `.proto` 或 `.pb` 文件的内容
+## 属性
-### 添加 proto
+| 名称 | 类型 | 必选项 | 默认值 | 描述 |
+| --------- | ------------------------------------------------- | ----- | ------ ------------------------------ |
+| proto_id | string/integer | 是 | | `.proto` 内容的 id。 |
+| service | string | 是 | | gRPC 服务名。 |
+| method | string | 是 | | gRPC 服务中要调用的方法名。 |
+| deadline | number | 否 | 0 | gRPC 服务的 deadline,单位为:ms。 |
+| pb_option | array[string([pb_option_def](#pb_option-的选项))] | 否 | | proto 编码过程中的转换选项。 |
-路径中最后的数字,会被用作 proto 的 id 做唯一标识,比如下面示例的 proto `id` 是 `1` :
+### pb_option 的选项
+
+| 类型 | 有效值 |
+|-----------------|-------------------------------------------------------------------------------------------|
+| enum as result | `enum_as_name`, `enum_as_value` |
+| int64 as result | `int64_as_number`, `int64_as_string`, `int64_as_hexstring` |
+| default values | `auto_default_values`, `no_default_values`, `use_default_values`, `use_default_metatable` |
+| hooks | `enable_hooks`, `disable_hooks` |
+
+## 启用插件
+
+在启用插件之前,你必须将 `.proto` 或 `.pb` 文件的内容添加到 APISIX。
+
+可以使用 `/admin/proto/id` 接口将文件的内容添加到 `content` 字段:
```shell
-curl http://127.0.0.1:9080/apisix/admin/proto/1 -H 'X-API-KEY: edd1c9f034335f136f87ad84b625c8f1' -X PUT -d '
+curl http://127.0.0.1:9080/apisix/admin/proto/1 \
+-H 'X-API-KEY: edd1c9f034335f136f87ad84b625c8f1' -X PUT -d '
{
"content" : "syntax = \"proto3\";
package helloworld;
@@ -52,10 +78,9 @@ curl http://127.0.0.1:9080/apisix/admin/proto/1 -H 'X-API-KEY: edd1c9f034335f136
}'
```
-如果你的 `.proto` 文件包含 import,或者你想把多个 `.proto` 文件合并成一个 proto。
-你可以使用 `.pb` 文件来创建 proto。
+如果你的 `.proto` 文件包含 `import`,或者想要把多个 `.proto` 文件合并成一个 proto,你可以生成一个 `.pb` 文件并在 APISIX 中使用它。
-假设我们有一个 `.proto` 叫 `proto/helloworld.proto`,它导入了另一个 proto 文件:
+假设已经有一个 `.proto` 文件(`proto/helloworld.proto`),它导入了另一个 `proto` 文件:
```proto
syntax = "proto3";
@@ -65,7 +90,7 @@ import "proto/import.proto";
...
```
-首先,让我们从 `.proto`文件创建一个`.pb`文件。
+首先,让我们从 `.proto` 文件创建一个 `.pb` 文件。
```shell
protoc --include_imports --descriptor_set_out=proto.pb proto/helloworld.proto
@@ -73,16 +98,17 @@ protoc --include_imports --descriptor_set_out=proto.pb proto/helloworld.proto
输出的二进制文件 `proto.pb` 将同时包含 `helloworld.proto` 和 `import.proto`。
-然后我们可以将 `proto.pb` 的内容作为 proto 的 `content` 字段提交。
+然后将 `proto.pb` 的内容作为 proto 的 `content` 字段提交。
-由于内容是二进制的,我们需要先对其进行 base64 编码。这里我们用一个 Python 脚本来做。
+由于 proto 的内容是二进制的,我们需要使用以下 Python 脚本将其转换成 `base64`:
```python
#!/usr/bin/env python
# coding: utf-8
-# save this file as upload_pb.py
+
import base64
import sys
+
# sudo pip install requests
import requests
@@ -92,7 +118,7 @@ if len(sys.argv) <= 1:
with open(sys.argv[1], 'rb') as f:
content = base64.b64encode(f.read())
id = sys.argv[2]
-api_key = "edd1c9f034335f136f87ad84b625c8f1" # Change it
+api_key = "edd1c9f034335f136f87ad84b625c8f1" # use your API key
reqParam = {
"content": content,
@@ -104,36 +130,27 @@ print(resp.status_code)
print(resp.text)
```
-创建 proto:
+该脚本将使用 `.pb` 文件和要创建的 `id`,将 proto 的内容转换成 `base64`,并使用转换后的内容调用 Admin API。
+
+运行脚本:
-```bash
+```shell
chmod +x ./upload_pb.pb
./upload_pb.py proto.pb 1
-# 200
-# {"node":{"value":{"create_time":1643879753,"update_time":1643883085,"content":"CmgKEnByb3RvL2ltcG9ydC5wcm90bxIDcGtnIhoKBFVzZXISEgoEbmFtZRgBIAEoCVIEbmFtZSIeCghSZXNwb25zZRISCgRib2R5GAEgASgJUgRib2R5QglaBy4vcHJvdG9iBnByb3RvMwq9AQoPcHJvdG8vc3JjLnByb3RvEgpoZWxsb3dvcmxkGhJwcm90by9pbXBvcnQucHJvdG8iPAoHUmVxdWVzdBIdCgR1c2VyGAEgASgLMgkucGtnLlVzZXJSBHVzZXISEgoEYm9keRgCIAEoCVIEYm9keTI5CgpUZXN0SW1wb3J0EisKA1J1bhITLmhlbGxvd29ybGQuUmVxdWVzdBoNLnBrZy5SZXNwb25zZSIAQglaBy4vcHJvdG9iBnByb3RvMw=="},"key":"\ [...]
```
-## 参数列表
+返回结果:
-| 名称 | 类型 | 必选项 | 默认值 | 有效值 | 描述 |
-| --------- | -------------------------------------------------------------------------- | ------ | ------ | ------ | -------------------------- |
-| proto_id | string/integer | 必须 | | | `.proto` 内容的 id |
-| service | string | 必须 | | | grpc 服务名 |
-| method | string | 必须 | | | grpc 服务中要调用的方法名 |
-| deadline | number | 可选 | 0 | | grpc deadline, ms |
-| pb_option | array[string([pb_option_def](#使用-grpc-transcode-插件的-pb_option-选项))] | 可选 | | | proto 编码过程中的转换选项 |
-
-## 示例
-
-### 使用 grpc-transcode 插件
-
-在指定 route 中,代理 grpc 服务接口:
+```
+# 200
+# {"node":{"value":{"create_time":1643879753,"update_time":1643883085,"content":"CmgKEnByb3RvL2ltcG9ydC5wcm90bxIDcGtnIhoKBFVzZXISEgoEbmFtZRgBIAEoCVIEbmFtZSIeCghSZXNwb25zZRISCgRib2R5GAEgASgJUgRib2R5QglaBy4vcHJvdG9iBnByb3RvMwq9AQoPcHJvdG8vc3JjLnByb3RvEgpoZWxsb3dvcmxkGhJwcm90by9pbXBvcnQucHJvdG8iPAoHUmVxdWVzdBIdCgR1c2VyGAEgASgLMgkucGtnLlVzZXJSBHVzZXISEgoEYm9keRgCIAEoCVIEYm9keTI5CgpUZXN0SW1wb3J0EisKA1J1bhITLmhlbGxvd29ybGQuUmVxdWVzdBoNLnBrZy5SZXNwb25zZSIAQglaBy4vcHJvdG9iBnByb3RvMw=="},"key":"\ [...]
+```
-* 注意: 这个 route 对应的 upstream 的属性 `scheme` 必须设置为 `grpc`
-* 代理 grpc 服务例子可参考:[grpc_server_example](https://github.com/api7/grpc_server_example)
+现在我们可以在指定路由中启用 `grpc-transcode` 插件:
```shell
-curl http://127.0.0.1:9080/apisix/admin/routes/111 -H 'X-API-KEY: edd1c9f034335f136f87ad84b625c8f1' -X PUT -d '
+curl http://127.0.0.1:9080/apisix/admin/routes/1 \
+-H 'X-API-KEY: edd1c9f034335f136f87ad84b625c8f1' -X PUT -d '
{
"methods": ["GET"],
"uri": "/grpctest",
@@ -154,12 +171,27 @@ curl http://127.0.0.1:9080/apisix/admin/routes/111 -H 'X-API-KEY: edd1c9f034335f
}'
```
-### 测试
+:::note
+
+此处使用的 Upstream 应该是 gRPC 服务。请注意,`scheme` 需要设置为 `grpc`。
+
+可以使用 [grpc_server_example](https://github.com/api7/grpc_server_example) 进行测试。
+
+:::
+
+## 测试插件
+
+通过上述示例配置插件后,你可以向 APISIX 发出请求以从 gRPC 服务(通过 APISIX)获得响应:
访问上面配置的 route:
```shell
-$ curl -i http://127.0.0.1:9080/grpctest?name=world
+curl -i http://127.0.0.1:9080/grpctest?name=world
+```
+
+返回结果
+
+```Shell
HTTP/1.1 200 OK
Date: Fri, 16 Aug 2019 11:55:36 GMT
Content-Type: application/json
@@ -171,32 +203,7 @@ Proxy-Connection: keep-alive
{"message":"Hello world"}
```
-这表示已成功代理。
-
-## 使用 grpc-transcode 插件的 pb_option 选项
-
-在指定 route 中,代理 grpc 服务接口:
-
-### 选项清单
-
-* 枚举类型
- * enum_as_name
- * enum_as_value
-
-* 64 位整型
- * int64_as_number
- * int64_as_string
- * int64_as_hexstring
-
-* 使用默认值
- * auto_default_values
- * no_default_values
- * use_default_values
- * use_default_metatable
-
-* Hooks 开关
- * enable_hooks
- * disable_hooks
+你也可以配置 `pb_option`,如下所示:
```shell
curl http://127.0.0.1:9080/apisix/admin/routes/23 -H 'X-API-KEY: edd1c9f034335f136f87ad84b625c8f1' -X PUT -d '
@@ -221,12 +228,13 @@ curl http://127.0.0.1:9080/apisix/admin/routes/23 -H 'X-API-KEY: edd1c9f034335f1
}'
```
-### 测试 pb_option 参数
-
-访问上面配置的 route:
+可以通过如下命令检查刚刚配置的路由:
```shell
-$ curl -i "http://127.0.0.1:9080/zeebe/WorkflowInstanceCreate?bpmnProcessId=order-process&version=1&variables=\{\"orderId\":\"7\",\"ordervalue\":99\}"
+curl -i "http://127.0.0.1:9080/zeebe/WorkflowInstanceCreate?bpmnProcessId=order-process&version=1&variables=\{\"orderId\":\"7\",\"ordervalue\":99\}"
+```
+
+```Shell
HTTP/1.1 200 OK
Date: Wed, 13 Nov 2019 03:38:27 GMT
Content-Type: application/json
@@ -241,11 +249,9 @@ Trailer: grpc-message
{"workflowKey":"#2251799813685260","workflowInstanceKey":"#2251799813688013","bpmnProcessId":"order-process","version":1}
```
-`"workflowKey":"#2251799813685260"` 表示已成功。
-
## 禁用插件
-在插件设置页面中删除相应的 json 配置即可禁用 `grpc-transcode` 插件。APISIX 的插件是热加载的,因此无需重启 APISIX 服务。
+当你需要禁用 `grpc-transcode` 插件时,可以通过以下命令删除相应的 JSON 配置,APISIX 将会自动重新加载相关配置,无需重启服务:
```shell
curl http://127.0.0.1:9080/apisix/admin/routes/111 -H 'X-API-KEY: edd1c9f034335f136f87ad84b625c8f1' -X PUT -d '
diff --git a/docs/zh/latest/plugins/grpc-web.md b/docs/zh/latest/plugins/grpc-web.md
index 291dab7e1..4b84e9d62 100644
--- a/docs/zh/latest/plugins/grpc-web.md
+++ b/docs/zh/latest/plugins/grpc-web.md
@@ -1,5 +1,11 @@
---
title: grpc-web
+keywords:
+ - APISIX
+ - Plugin
+ - gRPC Web
+ - grpc-web
+description: 本文介绍了关于 Apache APISIX `grpc-web` 插件的基本信息及使用方法。
---
<!--
@@ -23,18 +29,15 @@ title: grpc-web
## 描述
-`grpc-web` 插件是一个代理插件,用于转换 [gRPC Web](https://github.com/grpc/grpc-web) 客户端到 `gRPC Server` 的请求。
+`grpc-web` 插件是一个代理插件,可以处理从 JavaScript 客户端到 gRPC Service 的 [gRPC Web](https://github.com/grpc/grpc-web) 请求。
-gRPC Web Client -> APISIX -> gRPC server
+## 启用插件
-## 如何开启
+你可以通过如下命令在指定路由上启用 `gRPC-web` 插件:
-启用 `gRPC Web` 代理插件,路由必须使用 `前缀匹配` 模式(例如:`/*` 或 `/grpc/example/*`),
-因为 `gRPC Web` 客户端会在 URI 中传递 `proto` 中声明的`包名称`、`服务接口名称`、`方法名称`等信息(例如:`/path/a6.RouteService/Insert`),
-使用 `绝对匹配` 时将无法命中插件和提取 `proto` 信息。
-
-```bash
-curl http://127.0.0.1:9080/apisix/admin/routes/1 -H 'X-API-KEY: edd1c9f034335f136f87ad84b625c8f1' -X PUT -d '
+```shell
+curl http://127.0.0.1:9080/apisix/admin/routes/1 \
+-H 'X-API-KEY: edd1c9f034335f136f87ad84b625c8f1' -X PUT -d '
{
"uri":"/grpc/web/*",
"plugins":{
@@ -50,19 +53,35 @@ curl http://127.0.0.1:9080/apisix/admin/routes/1 -H 'X-API-KEY: edd1c9f034335f13
}'
```
+:::info IMPORTANT
+
+在使用 `gRPC Web` 代理插件时,路由必须使用**前缀匹配**模式(例如:`/*` 或 `/grpc/example/*`),因为 `gRPC Web` 客户端会在 URI 中传递 `proto` 中声明的**包名称**、**服务接口名称**、**方法名称**等信息(例如:`/path/a6.RouteService/Insert`)。
+
+因此,在使用**绝对匹配**时将无法命中插件和提取 `proto` 信息。
+
+:::
+
## 测试插件
-- 请求方式仅支持 `POST` 和 `OPTIONS`,参考:[CORS support](https://github.com/grpc/grpc-web/blob/master/doc/browser-features.md#cors-support) 。
-- 内容类型支持 `application/grpc-web`、`application/grpc-web-text`、`application/grpc-web+proto`、`application/grpc-web-text+proto`,参考:[Protocol differences vs gRPC over HTTP2](https://github.com/grpc/grpc/blob/master/doc/PROTOCOL-WEB.md#protocol-differences-vs-grpc-over-http2) 。
-- 客户端部署,参考:[gRPC-Web Client Runtime Library](https://www.npmjs.com/package/grpc-web) 或 [Apache APISIX gRPC Web 测试框架](https://github.com/apache/apisix/tree/master/t/plugin/grpc-web) 。
-- 完成 `gRPC Web` 客户端部署后,即可通过 `浏览器` 或 `node` 向 `APISIX` 发起 `gRPC Web` 代理请求。
+请参考 [gRPC-Web Client Runtime Library](https://www.npmjs.com/package/grpc-web) 或 [Apache APISIX gRPC Web Test Framework](https://github.com/apache/apisix/tree/master/t/plugin/grpc-web) 了解如何配置你的 Web 客户端。
+
+运行 gRPC Web 客户端后,你可以从浏览器或通过 Node.js 向 APISIX 发出请求。
+
+:::note
+
+请求方式仅支持 `POST` 和 `OPTIONS`,详细信息请参考:[CORS support](https://github.com/grpc/grpc-web/blob/master/doc/browser-features.md#cors-support) 。
+
+内容类型支持 `application/grpc-web`、`application/grpc-web-text`、`application/grpc-web+proto`、`application/grpc-web-text+proto`,详细信息请参考:[Protocol differences vs gRPC over HTTP2](https://github.com/grpc/grpc/blob/master/doc/PROTOCOL-WEB.md#protocol-differences-vs-grpc-over-http2) 。
+
+:::
## 禁用插件
-只需删除插件配置中 `grpc-web` 的 JSON 配置即可。 APISIX 插件是热加载的,所以不需要重启 APISIX。
+当你需要禁用 `grpc-web` 插件时,可以通过如下命令删除相应的 `JSON` 配置,APISIX 将会自动重新加载相关配置,无需重启服务:
-```bash
-curl http://127.0.0.1:9080/apisix/admin/routes/1 -H 'X-API-KEY: edd1c9f034335f136f87ad84b625c8f1' -X PUT -d '
+```shell
+curl http://127.0.0.1:9080/apisix/admin/routes/1 \
+-H 'X-API-KEY: edd1c9f034335f136f87ad84b625c8f1' -X PUT -d '
{
"uri":"/grpc/web/*",
"plugins":{},
diff --git a/docs/zh/latest/plugins/mocking.md b/docs/zh/latest/plugins/mocking.md
index 7e0cadf5a..6c6cf39d8 100644
--- a/docs/zh/latest/plugins/mocking.md
+++ b/docs/zh/latest/plugins/mocking.md
@@ -1,5 +1,11 @@
---
title: mocking
+keywords:
+ - APISIX
+ - Plugin
+ - Mocking
+ - mocking
+ description: 本文介绍了关于 Apache APISIX `mocking` 插件的基本信息及使用方法。
---
<!--
@@ -23,22 +29,29 @@ title: mocking
## 描述
-Mock API 插件,绑定该插件后将随机返回指定格式的`mock`数据,不再转发到后端。
+`mocking` 插件用于模拟 API。当执行该插件时,它将随机返回指定格式的模拟数据,并且请求不会转发到上游。
## 属性
-| 名称 | 类型 | 必选项 | 默认值 | 有效值 | 描述 |
-| ------------- | -------| ----- | ----- | -------------------------------------------------------------- | ------------------------------------------------------------------------------------------------------------------------------------------------- |
-| delay | integer | 可选 | | | 延时返回的时间,单位为秒 |
-| response_status | integer| 可选 | 200 | | 返回的响应 http status code |
-| content_type | string | 可选 | application/json | | 返回的响应头的 Content-Type。 |
-| response_example| string | 可选 | | | 返回的响应体,与`response_schema`字段二选一 |
-| response_schema | object | 可选 | | | 指定响应的`jsonschema`对象,未指定`response_example`字段时生效,具体结构看后文说明 |
-| with_mock_header | boolean | 可选 | true | | 是否返回响应头:"x-mock-by: APISIX/{version}",默认返回,指定为 false 则不返回 |
+| 名称 | 类型 | 必选项 | 默认值 | 描述 |
+| ------------- | -------| ----- | ---------------- | --------------------------------------------------------------------------- |
+| delay | integer| 否 | | 延时返回的时间,单位为秒。 |
+| response_status | integer| 否 | 200 | 返回响应的 HTTP 状态码。 |
+| content_type | string | 否 | application/json | 返回响应的 Header `Content-Type`。 |
+| response_example| string | 否 | | 返回响应的 Body,与 `response_schema` 字段二选一。 |
+| response_schema | object | 否 | | 指定响应的 `jsonschema` 对象,未指定 `response_example` 字段时生效。 |
+| with_mock_header| boolean| 否 | true | 当设置为 `true` 时,将添加响应头 `x-mock-by: APISIX/{version}`。设置为 `false` 时则不添加该响应头。 |
-支持的字段类型:`string`, `number`, `integer`, `boolean`, `object`, `array`
-基础数据类型(`string`,`number`,`integer`,`boolean`)可通过配置`example`属性指定生成的响应值,未配置时随机返回。
-以下是一个`jsonschema`实例:
+JSON Schema 在其字段中支持以下类型:
+
+- `string`
+- `number`
+- `integer`
+- `boolean`
+- `object`
+- `array`
+
+以下是一个 JSON Schema 示例:
```json
{
@@ -86,7 +99,7 @@ Mock API 插件,绑定该插件后将随机返回指定格式的`mock`数据
}
```
-以下为该`jsonschema`可能生成的返回对象:
+以下为上述 JSON Schema 可能生成的返回对象:
```json
{
@@ -108,12 +121,13 @@ Mock API 插件,绑定该插件后将随机返回指定格式的`mock`数据
}
```
-## 如何启用
+## 启用插件
-这里以`route`为例 (`service`的使用是同样的方法),在指定的 `route` 上启用 `mocking` 插件。
+你可以通过如下命令在指定路由上启用 `mocking` 插件:
```shell
-curl http://127.0.0.1:9080/apisix/admin/routes/1 -H 'X-API-KEY: edd1c9f034335f136f87ad84b625c8f1' -X PUT -d '
+curl http://127.0.0.1:9080/apisix/admin/routes/1 \
+-H 'X-API-KEY: edd1c9f034335f136f87ad84b625c8f1' -X PUT -d '
{
"methods": ["GET"],
"uri": "/index.html",
@@ -178,9 +192,11 @@ curl http://127.0.0.1:9080/apisix/admin/routes/1 -H 'X-API-KEY: edd1c9f034335f13
## 测试插件
-当`mocking`插件配置如下时:
+通过上述命令启用插件后,可以使用如下方式测试插件是否启用成功:
-```json
+当 `mocking` 插件配置如下:
+
+```JSON
{
"delay":0,
"content_type":"",
@@ -190,10 +206,13 @@ curl http://127.0.0.1:9080/apisix/admin/routes/1 -H 'X-API-KEY: edd1c9f034335f13
}
```
-curl 访问将返回如下结果:
+通过如下命令进行测试:
```shell
-$ curl http://127.0.0.1:9080/test-mock -i
+curl http://127.0.0.1:9080/test-mock -i
+```
+
+```Shell
HTTP/1.1 201 Created
Date: Fri, 14 Jan 2022 11:49:34 GMT
Content-Type: application/json;charset=utf8
@@ -205,12 +224,13 @@ Server: APISIX/2.10.0
{"a":1,"b":2}
```
-## 移除插件
+## 禁用插件
-当你想去掉`mocking`插件的时候,很简单,在插件的配置中把对应的 json 配置删除即可,无须重启服务,即刻生效:
+当你需要禁用 `mocking` 插件时,可以通过以下命令删除相应的 JSON 配置,APISIX 将会自动重新加载相关配置,无需重启服务:
```shell
-curl http://127.0.0.1:9080/apisix/admin/routes/1 -H 'X-API-KEY: edd1c9f034335f136f87ad84b625c8f1' -X PUT -d '
+curl http://127.0.0.1:9080/apisix/admin/routes/1 \
+-H 'X-API-KEY: edd1c9f034335f136f87ad84b625c8f1' -X PUT -d '
{
"methods": ["GET"],
"uri": "/index.html",
@@ -222,5 +242,3 @@ curl http://127.0.0.1:9080/apisix/admin/routes/1 -H 'X-API-KEY: edd1c9f034335f13
}
}'
```
-
-现在就已经移除了`mocking`插件了。其他插件的开启和移除也是同样的方法。
diff --git a/docs/zh/latest/plugins/proxy-rewrite.md b/docs/zh/latest/plugins/proxy-rewrite.md
index 70007f974..52c5e07cc 100644
--- a/docs/zh/latest/plugins/proxy-rewrite.md
+++ b/docs/zh/latest/plugins/proxy-rewrite.md
@@ -1,5 +1,11 @@
---
title: proxy-rewrite
+keywords:
+ - APISIX
+ - Plugin
+ - Proxy Rewrite
+ - proxy-rewrite
+description: 本文介绍了关于 Apache APISIX `proxy-rewrite` 插件的基本信息及使用方法。
---
<!--
@@ -23,25 +29,26 @@ title: proxy-rewrite
## 描述
-proxy-rewrite 是上游代理信息重写插件,支持对 `scheme`、`uri`、`host` 等信息的重写。
+`proxy-rewrite` 是处理上游代理信息重写的插件,支持对 `scheme`、`uri`、`host` 等信息进行重写。
## 属性
-| Name | Type | Requirement | Default | Valid | Description |
-| --------- | ------------- | ----------- | ------- | ----------------- | ---------------------------------------------------------------------------------------------------------------------------------------------------------------------------------------------------------------------------------------------------------------------------------------------------|
-| scheme | string | 可选 | "http" | ["http", "https"] | 不推荐使用。应该在 Upstream 的 scheme 字段设置上游的 scheme。
-| uri | string | 可选 | | | 转发到上游的新 `uri` 地址。 |
-| method | string | 可选 | | ["GET", "POST", "PUT", "HEAD", "DELETE", "OPTIONS","MKCOL", "COPY", "MOVE", "PROPFIND", "PROPFIND","LOCK", "UNLOCK", "PATCH", "TRACE"] | 将 route 的请求方法代理为该请求方法。 |
-| regex_uri | array[string] | 可选 | | | 转发到上游的新 `uri` 地址,使用正则表达式匹配来自客户端的 uri,当匹配成功后使用模板替换转发到上游的 uri,未匹配成功时将客户端请求的 uri 转发至上游。当 `uri` 和 `regex_uri` 同时存在时,`uri` 优先被使用。例如:["^/iresty/(.*)/(.*)/(.*)","/$1-$2-$3"] 第一个元素代表匹配来自客户端请求的 uri 正则表达式,第二个元素代表匹配成功后转发到上游的 uri 模板。 |
-| host | string | 可选 | | | 转发到上游的新 `host` 地址,例如:`iresty.com` 。 |
-| headers | object | 可选 | | | 转发到上游的新 `headers`,可以设置多个。头信息如果存在将重写,不存在则添加。想要删除某个 header 的话,把对应的值设置为空字符串即可。支持使用 Nginx 的变量,需要以 `$` 开头,如 `client_addr: $remote_addr` :表示请求头 `client_addr` 为客户端 IP。 |
+| 名称 | 类型 | 必选项 | 默认值 | 有效值 | 描述 |
+| --------- | ------------- | ----- | ------- | ---------------------------------------------------------------------------------------------------------------------------------------|------------------------------------------ ------------------------------------------------------------------------------------------------------------------------------------------------------------|
+| scheme | string | 否 | "http" | ["http", "https"] | 不推荐使用。应该在 Upstream 的 `scheme` 字段设置上游的 `scheme`。|
+| uri | string | 否 | | | 转发到上游的新 `uri` 地址。支持 [NGINX variables](https://nginx.org/en/docs/http/ngx_http_core_module.html) 变量,例如:`$arg_name`。 |
+| method | string | 否 | | ["GET", "POST", "PUT", "HEAD", "DELETE", "OPTIONS","MKCOL", "COPY", "MOVE", "PROPFIND", "PROPFIND","LOCK", "UNLOCK", "PATCH", "TRACE"] | 将路由的请求方法代理为该请求方法。 |
+| regex_uri | array[string] | 否 | | | 转发到上游的新 `uri` 地址。使用正则表达式匹配来自客户端的 `uri`,如果匹配成功,则使用模板替换转发到上游的 `uri`,如果没有匹配成功,则将客户端请求的 `uri` 转发至上游。当同时配置 `uri` 和 `regex_uri` 属性时,优先使用 `uri`。例如:["^/iresty/(.*)/(.*)/(.*)","/$1-$2-$3"] 第一个元素代表匹配来自客户端请求的 `uri` 正则表达式,第二个元素代表匹配成功后转发到上游的 `uri` 模板。 |
+| host | string | 否 | | | 转发到上游的新 `host` 地址,例如:`iresty.com`。|
+| headers | object | 否 | | | 转发到上游的新 `headers`,可以设置多个。如果 header 存在将进行重写,如果不存在则会添加到 header 中。如果你想要删除某个 header,请把对应的值设置为空字符串即可。支持使用 NGINX 的变量,例如 `client_addr` 和`$remote_addr`。|
-## 如何启用
+## 启用插件
-下面是一个示例,在指定的 route 上开启了 `proxy-rewrite` 插件:
+你可以通过如下命令在指定路由上启用 `proxy-rewrite` 插件:
```shell
-curl http://127.0.0.1:9080/apisix/admin/routes/1 -H 'X-API-KEY: edd1c9f034335f136f87ad84b625c8f1' -X PUT -d '
+curl http://127.0.0.1:9080/apisix/admin/routes/1 \
+-H 'X-API-KEY: edd1c9f034335f136f87ad84b625c8f1' -X PUT -d '
{
"methods": ["GET"],
"uri": "/test/index.html",
@@ -68,23 +75,21 @@ curl http://127.0.0.1:9080/apisix/admin/routes/1 -H 'X-API-KEY: edd1c9f034335f1
## 测试插件
-基于上述配置进行测试:
+通过上述命令启用插件后,可以使用如下命令测试插件是否启用成功:
```shell
curl -X GET http://127.0.0.1:9080/test/index.html
```
-发送请求,查看上游服务 `access.log`,如果输出信息与配置一致:
+发送请求,查看上游服务的 `access.log`,如果输出信息与配置一致则表示 `proxy-rewrite` 插件已经生效。示例如下:
```
127.0.0.1 - [26/Sep/2019:10:52:20 +0800] iresty.com GET /test/home.html HTTP/1.1 200 38 - curl/7.29.0 - 0.000 199 107
```
-即表示 `proxy-rewrite` 插件生效了。
-
## 禁用插件
-当你想去掉 `proxy-rewrite` 插件的时候,很简单,在插件的配置中把对应的 json 配置删除即可,无须重启服务,即刻生效:
+当你需要禁用 `proxy-rewrite` 插件时,可以通过以下命令删除相应的 JSON 配置,APISIX 将会自动重新加载相关配置,无需重启服务:
```shell
curl http://127.0.0.1:9080/apisix/admin/routes/1 -H 'X-API-KEY: edd1c9f034335f136f87ad84b625c8f1' -X PUT -d '
@@ -100,5 +105,3 @@ curl http://127.0.0.1:9080/apisix/admin/routes/1 -H 'X-API-KEY: edd1c9f034335f1
}
}'
```
-
-现在就已经移除了 `proxy-rewrite` 插件了。其他插件的开启和移除也是同样的方法。
diff --git a/docs/zh/latest/plugins/response-rewrite.md b/docs/zh/latest/plugins/response-rewrite.md
index 15e77c9fa..a3701c8af 100644
--- a/docs/zh/latest/plugins/response-rewrite.md
+++ b/docs/zh/latest/plugins/response-rewrite.md
@@ -1,5 +1,11 @@
---
title: response-rewrite
+keywords:
+ - APISIX
+ - Plugin
+ - Response Rewrite
+ - response-rewrite
+description: 本文介绍了关于 Apache APISIX `response-rewrite` 插件的基本信息及使用方法。
---
<!--
@@ -23,39 +29,47 @@ title: response-rewrite
## 描述
-该插件支持修改上游服务或网关本身返回的 body 和 header 信息。
+`response-rewrite` 插件支持修改上游服务或 APISIX 返回的 Body 和 Header 信息。
-使用场景:
+该插件可以应用在以下场景中:
-1. 可以设置 `Access-Control-Allow-*` 等 header 信息,来实现 CORS(跨域资源共享)的功能。
+- 通过设置 `Access-Control-Allow-*` 字段实现 CORS(跨域资源共享)的功能。
+- 通过设置标头中的 `status_code` 和 `Location` 字段实现重定向。
-2. 另外也可以通过配置 status_code 和 header 里面的 Location 来实现重定向,当然如果只是需要重定向功能,最好使用 [redirect](redirect.md) 插件。
+:::tip
+
+如果你仅需要重定向功能,建议使用 [redirect](redirect.md) 插件。
+
+:::
## 属性
| 名称 | 类型 | 必选项 | 默认值 | 有效值 | 描述 |
|-----------------|---------|-----|--------|-----------------|----------------------------------------------------------------------------------------------------------------------------------------------------------------|
-| status_code | integer | 可选 | | [200, 598] | 修改上游返回状态码,默认保留原始响应代码。 |
-| body | string | 可选 | | | 修改上游返回的 `body` 内容,如果设置了新内容,header 里面的 content-length 字段也会被去掉。 |
-| body_base64 | boolean | 可选 | false | | 描述 `body` 字段是否需要 base64 解码之后再返回给客户端,用在某些图片和 Protobuffer 场景。 |
-| headers | object | 可选 | | | 返回给客户端的 `headers`,这里可以设置多个。头信息如果存在将重写,不存在则添加。想要删除某个 header 的话,把对应的值设置为空字符串即可。这个值能够以 `$var` 的格式包含 Nginx 变量,比如 `$remote_addr $balancer_ip`。 |
-| vars | array[] | 可选 | | | `vars` 是一个表达式列表,只有满足条件的请求和响应才会修改 body 和 header 信息,来自 [lua-resty-expr](https://github.com/api7/lua-resty-expr#operator-list)。如果 `vars` 字段为空,那么所有的重写动作都会被无条件的执行。 |
-| filters | array[] | 可选 | | | 一组过滤器,采用指定字符串表达式修改响应体。 |
-| filters.regex | string | 必选 | | | 用于匹配响应体正则表达式。 |
-| filters.scope | string | 可选 | "once" | "once","global" | 替换范围,"once" 表达式 `filters.regex` 仅替换首次匹配上响应体的内容,"global" 则进行全局替换。 |
-| filters.replace | string | 必选 | | | 替换后的内容。 |
-| filters.options | string | 可选 | "jo" | | 正则匹配有效参数,可选项见 [ngx.re.match](https://github.com/openresty/lua-nginx-module#ngxrematch)。 |
+| status_code | integer | 否 | | [200, 598] | 修改上游返回状态码,默认保留原始响应代码。 |
+| body | string | 否 | | | 修改上游返回的 `body` 内容,如果设置了新内容,header 里面的 content-length 字段也会被去掉。 |
+| body_base64 | boolean | 否 | false | | 描述 `body` 字段是否需要 base64 解码之后再返回给客户端,用在某些图片和 Protobuffer 场景。 |
+| headers | object | 否 | | | 返回给客户端的 `headers`,这里可以设置多个。头信息如果存在将重写,不存在则添加。想要删除某个 header 的话,把对应的值设置为空字符串即可。这个值能够以 `$var` 的格式包含 NGINX 变量,比如 `$remote_addr $balancer_ip`。 |
+| vars | array[] | 否 | | | `vars` 是一个表达式列表,只有满足条件的请求和响应才会修改 body 和 header 信息,来自 [lua-resty-expr](https://github.com/api7/lua-resty-expr#operator-list)。如果 `vars` 字段为空,那么所有的重写动作都会被无条件的执行。 |
+| filters | array[] | 否 | | | 一组过滤器,采用指定字符串表达式修改响应体。 |
+| filters.regex | string | 是 | | | 用于匹配响应体正则表达式。 |
+| filters.scope | string | 否 | "once" | "once","global" | 替换范围,"once" 表达式 `filters.regex` 仅替换首次匹配上响应体的内容,"global" 则进行全局替换。 |
+| filters.replace | string | 是 | | | 替换后的内容。 |
+| filters.options | string | 否 | "jo" | | 正则匹配有效参数,可选项见 [ngx.re.match](https://github.com/openresty/lua-nginx-module#ngxrematch)。 |
-`body` 和 `filters`,两个只能配置其中一个。
+:::note
-## 示例
+`body` 和 `filters` 属性只能配置其中一个。
-### 开启插件
+:::
-下面是一个示例,在指定的 route 上开启了 `response-rewrite` 插件:
+## 启用插件
+
+你可以通过如下命令在指定路由上启用 `response-rewrite` 插件:
```shell
-curl http://127.0.0.1:9080/apisix/admin/routes/1 -H 'X-API-KEY: edd1c9f034335f136f87ad84b625c8f1' -X PUT -d '
+curl http://127.0.0.1:9080/apisix/admin/routes/1 \
+-H 'X-API-KEY: edd1c9f034335f136f87ad84b625c8f1' -X PUT -d '
{
"methods": ["GET"],
"uri": "/test/index.html",
@@ -81,15 +95,17 @@ curl http://127.0.0.1:9080/apisix/admin/routes/1 -H 'X-API-KEY: edd1c9f034335f1
}'
```
-### 测试插件
+在上述命令中,通过配置 `vars` 参数可以让该插件仅在具有 200 状态码的响应上运行插件。
+
+## 测试插件
-基于上述配置进行测试:
+通过上述命令启用插件后,可以使用如下命令测试插件是否启用成功:
```shell
-curl -X GET -i http://127.0.0.1:9080/test/index.html
+curl -X GET -i http://127.0.0.1:9080/test/index.html
```
-如果看到返回的头部信息和内容都被修改了,即表示 `response-rewrite` 插件生效了,`vars` 将确保仅覆盖状态为 200 的响应。
+无论来自上游的响应是什么,返回结果都是相同的:
```shell
HTTP/1.1 200 OK
@@ -103,12 +119,23 @@ X-Server-balancer_addr: 127.0.0.1:80
{"code":"ok","message":"new json body"}
```
-### 禁用插件
+:::info IMPORTANT
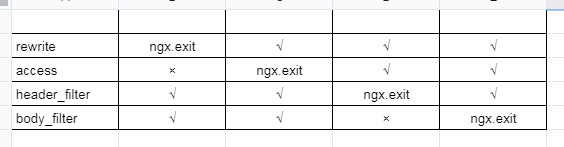
+
+[ngx.exit](https://openresty-reference.readthedocs.io/en/latest/Lua_Nginx_API/#ngxexit) 将会中断当前请求的执行并将其状态码返回给 NGINX。
+
+如果你在 `access` 阶段执行了 `ngx.exit`,该操作只是中断了请求处理阶段,响应阶段仍然会处理。如果你配置了 `response-rewrite` 插件,它会强制覆盖你的响应信息(如响应代码)。
+
+
-禁用 `response-rewrite` 插件很简单。你不需要重新启动服务,只需要在插件配置中删除相应的 json 配置,它将立即生效。
+:::
+
+## 禁用插件
+
+当你需要禁用 `response-rewrite` 插件时,可以通过以下命令删除相应的 JSON 配置,APISIX 将会自动重新加载相关配置,无需重启服务:
```shell
-curl http://127.0.0.1:9080/apisix/admin/routes/1 -H 'X-API-KEY: edd1c9f034335f136f87ad84b625c8f1' -X PUT -d '
+curl http://127.0.0.1:9080/apisix/admin/routes/1 \
+-H 'X-API-KEY: edd1c9f034335f136f87ad84b625c8f1' -X PUT -d '
{
"methods": ["GET"],
"uri": "/test/index.html",
@@ -120,11 +147,3 @@ curl http://127.0.0.1:9080/apisix/admin/routes/1 -H 'X-API-KEY: edd1c9f034335f1
}
}'
```
-
-## 注意事项
-
-`ngx.exit` 将中断当前请求的执行,并返回状态码给 Nginx。
-
-
-
-但是很多人可能会对 `ngx.exit` 理解出现偏差,即如果你在 `access` 阶段执行 `ngx.exit`,只是中断了请求处理阶段,响应阶段仍然会处理。比如,如果你配置了 `response-rewrite` 插件,它会强制覆盖你的响应信息(如响应代码)。