You are viewing a plain text version of this content. The canonical link for it is here.
Posted to notifications@apisix.apache.org by sy...@apache.org on 2022/12/07 07:03:53 UTC
[apisix-website] branch master updated: docs:add a translation blog (#1429)
This is an automated email from the ASF dual-hosted git repository.
sylviasu pushed a commit to branch master
in repository https://gitbox.apache.org/repos/asf/apisix-website.git
The following commit(s) were added to refs/heads/master by this push:
new 6a81543823d docs:add a translation blog (#1429)
6a81543823d is described below
commit 6a81543823d5b8e147dd4391693b7397ad484fc7
Author: 长龙 <36...@qq.com>
AuthorDate: Wed Dec 7 15:03:48 2022 +0800
docs:add a translation blog (#1429)
* docs:add a translation blog
---
.../blog/2022/12/a-poor-man\342\200\230s-api.md" | 318 +++++++++++++++++++++
1 file changed, 318 insertions(+)
diff --git "a/blog/zh/blog/2022/12/a-poor-man\342\200\230s-api.md" "b/blog/zh/blog/2022/12/a-poor-man\342\200\230s-api.md"
new file mode 100644
index 00000000000..961a8adb7fb
--- /dev/null
+++ "b/blog/zh/blog/2022/12/a-poor-man\342\200\230s-api.md"
@@ -0,0 +1,318 @@
+---
+title: "译文 | A poor man's API"
+authors:
+ - name: "Nicolas Fränkel"
+ title: "Author"
+ url: "https://github.com/nfrankel"
+ image_url: "https://github.com/nfrankel.png"
+ - name: "苏钰"
+ title: "Technical Writer"
+ url: "https://github.com/SylviaBABY"
+ image_url: "https://avatars.githubusercontent.com/u/39793568?v=4"
+keywords:
+- APISIX
+- API
+- REST API
+- 开源
+- PostgREST
+description: 本文将展示如何在不编写任何代码的情况下,简单实现一个 API 实践。
+tags: [Ecosystem]
+image: https://static.apiseven.com/2022/11/28/63841cb4ad10a.png
+---
+
+> 在 API 日渐流行的年代,越来越多的非技术人员也希望能从 API 的使用中获利,而创建一套成熟的 API 方案需要时间成本和金钱两方面的资源加持。在这个过程中,你需要考虑模型、设计、REST 原则等,而不仅仅是编写一行代码。如何打造一个具有高性价比且能持续迭代的产品,成为越来越多技术团队的目标。
+
+<!--truncate-->
+
+## 方案初试
+
+该解决方案主要使用的是 PostgreSQL 数据库,PostgreSQL 是一个开源 SQL 数据库。同时我们没有编写 REST API,而是使用了 PostgREST 组件。
+
+[PostgREST](https://postgrest.org/) 是一个独立的 Web 服务器,它可以将 PostgreSQL 数据库直接转换为 RESTful API。如果你想了解 PostgREST 的使用方法,可以参考[入门指南](https://postgrest.org/en/stable/tutorials/tut0.html)文档,内容非常全面且开箱即用。
+
+接下来,我们将它应用到一个简单的示例中。
+
+### 具体步骤
+
+> 以下过程你可以在 [GitHub](https://github.com/ajavageek/poor-man-api) 上找到完整源代码。
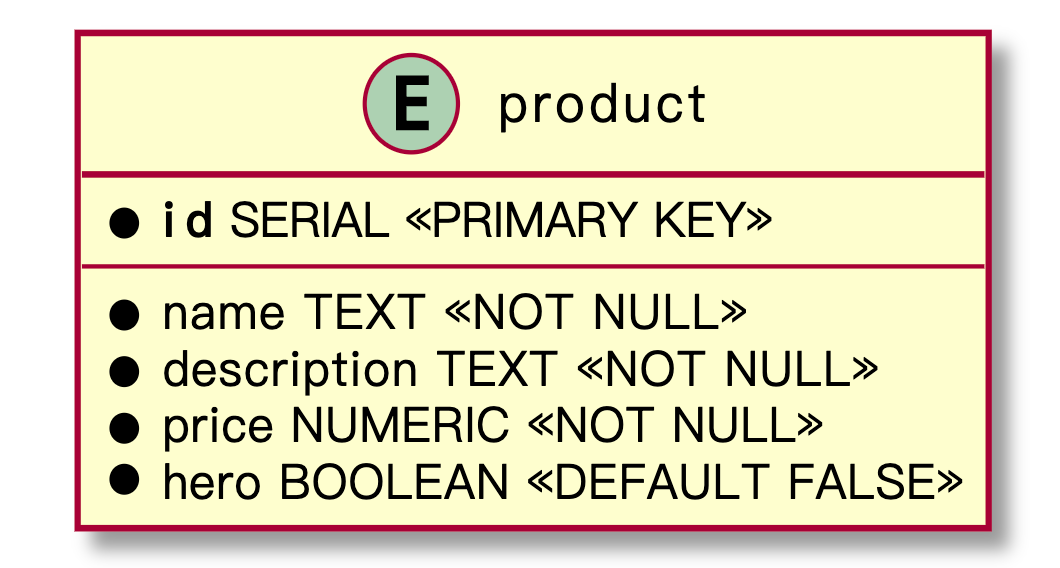
+下方展示了一个通过 CRUD API 公开的 product 表。
+
+
+
+由于我没有找到任何现成的 Docker 镜像,所以我单独创建了一份新的 Dockerfile。其中主要涉及依赖项的安装和参数化数据生成。
+
+***Dockerfile***
+
+```dockerfile
+FROM debian:bookworm-slim
+ARG POSTGREST_VERSION=v10.1.1
+ARG POSTGREST_FILE=postgrest-$POSTGREST_VERSION-linux-static-x64.tar.xz
+RUN mkdir postgrest
+WORKDIR postgrest
+ADD https://github.com/PostgREST/postgrest/releases/download/$POSTGREST_VERSION/$POSTGREST_FILE \
+ .
+RUN apt-get update && \
+ apt-get install -y libpq-dev xz-utils && \
+ tar xvf $POSTGREST_FILE && \
+ rm $POSTGREST_FILE
+```
+
+之后,Docker 镜像在 `/postgrest` 文件夹中会包含一个名为 `postgrest` 的可执行文件。这里可以通过 Docker Compose 来部署:
+
+***docker-compose.yml***
+
+```yaml
+version: "3"
+services:
+ postgrest:
+ build: ./postgrest
+ volumes:
+ - ./postgrest/product.conf:/etc/product.conf:ro
+ ports:
+ - "3000:3000"
+ entrypoint: ["/postgrest/postgrest"]
+ command: ["/etc/product.conf"]
+ depends_on:
+ - postgres
+ postgres:
+ image: postgres:15-alpine
+ environment:
+ POSTGRES_PASSWORD: "root"
+ volumes:
+ - ./postgres:/docker-entrypoint-initdb.d:ro
+```
+
+接下来可以执行以下命令,查询前文提到的 `product` 表:
+
+```shell
+curl localhost:3000/product
+```
+
+得到如下结果反馈:
+
+```json
+[{"id":1,"name":"Stickers pack","description":"A pack of rad stickers to display on your laptop or wherever you feel like. Show your love for Apache APISIX","price":0.49,"hero":false},
+ {"id":2,"name":"Lapel pin","description":"With this \"Powered by Apache APISIX\" lapel pin, support your favorite API Gateway and let everybody know about it.","price":1.49,"hero":false},
+ {"id":3,"name":"Tee-Shirt","description":"The classic geek product! At a conference, at home, at work, this tee-shirt will be your best friend.","price":9.99,"hero":true}]
+```
+
+## 方案优化
+
+尽管上文提到的这套解决方案有效,但仍存在很大的改进空间。比如数据库用户不能更改数据、实际操作中每个人都可以访问相关数据等。这对于与产品相关的数据来说,可能不是一个大问题,但如果是医疗数据呢?
+
+PostgREST 的官网[使用文档](https://postgrest.org/en/stable/admin.html)中提到了这一点,并明确提出:建议用户使用反向代理。
+
+提到反向代理,就不得不将目光转向到 API 网关行列。与 NGINX 不同,这里我选取了**开源领域非常活跃的 API 网关产品 — Apache APISIX**。APISIX 是一个动态、实时、高性能的 API 网关,提供了负载均衡、动态上游、灰度发布、精细化路由、限流限速、服务降级、服务熔断、身份认证、可观测性等数百项功能。
+
+首先,我们可以在 Docker Compose 文件中补充 APISIX 相关信息,包括 APISIX 及其依赖的存储 etcd,而 etcd 主要用于存储 APISIX 的路由、插件等配置信息。
+
+***docker-compose.yml***
+
+```yaml
+version: "3"
+services:
+ apisix:
+ image: apache/apisix:2.15.0-alpine
+ volumes:
+ - ./apisix/config.yml:/usr/local/apisix/conf/config.yaml:ro
+ ports:
+ - "9080:9080"
+ restart: always
+ depends_on:
+ - etcd
+ - postgrest
+ etcd:
+ image: bitnami/etcd:3.5.2
+ environment:
+ ETCD_ENABLE_V2: "true"
+ ALLOW_NONE_AUTHENTICATION: "yes"
+ ETCD_ADVERTISE_CLIENT_URLS: "http://0.0.0.0:2397"
+ ETCD_LISTEN_CLIENT_URLS: "http://0.0.0.0:2397"
+```
+
+然后将 APISIX 配置为 `postgrest` 的代理进行调用。
+
+```shell
+curl http://apisix:9080/apisix/admin/upstreams/1 -H 'X-API-KEY: 123xyz' -X PUT -d '
+{
+ "type": "roundrobin",
+ "nodes": {
+ "postgrest:3000": 1
+ }
+}'
+curl http://apisix:9080/apisix/admin/routes/1 -H 'X-API-KEY: 123xyz' -X PUT -d '
+{
+ "uri": "/*",
+ "upstream_id": 1
+}
+```
+
+现在再来查询端点,会得到与上文一致的返回结果。
+
+```shell
+curl localhost:9080/product
+```
+
+## 添砖加瓦
+
+虽然到目前为止,我们还没有添加任何实际项目,但准备工作已经全部就绪了。接下来就让我们为这个 API 添加一些其他功能,让其更安全有效,易于追踪。
+
+### DDoS 保护
+
+API 作为一个连接属性的组件,必然要保证其过程中的传输安全。因此,在这里我们对 API 增加一些防护,让其免受 DDoS 攻击。APISIX 提供了非常多的官方插件,涉及鉴权、流量处理、监控等等。为了防止 DDoS,我们可以使用 APISIX 的 `limit-count` 插件。
+
+在 APISIX 中使用插件时,你可以在创建特定路由时在每个路由上设置某个插件。如果你想让某个插件在每个路由上都生效,则可以使用全局规则。如下方所示,我们希望在默认情况下可以保护每个路由,所以使用全局规则设定 `limit-count` 插件。
+
+```shell
+curl http://apisix:9080/apisix/admin/global_rules/1 -H 'X-API-KEY: 123xyz' -X PUT -d '
+{
+ "plugins": {
+ "limit-count": {
+ "count": 1,
+ "time_window": 5,
+ "rejected_code": 429
+ }
+ }
+}'
+```
+
+现在,如果我们执行太多的请求,APISIX 将会保护上游。
+
+```shell
+curl localhost:9080/product
+```
+
+```xml
+<html>
+<head><title>429 Too Many Requests</title></head>
+<body>
+<center><h1>429 Too Many Requests</h1></center>
+<hr><center>openresty</center>
+</body>
+</html>
+```
+
+### 增加鉴权
+
+PostgREST 还在根端提供了一个 OpenAPI endpoint。因此,我们现在有两条路由: `/` (控制 Open API 规范)和 `/product` (控制产品)。
+
+假设我们现在需要制定一套限制访问的操作,即不允许未经授权的人访问数据。普通用户可以访问产品端信息,而管理员用户可以访问 Open API 规范和产品端信息。
+
+APISIX 提供了几种[身份验证方法](https://apisix.apache.org/plugins/#authentication),这些身份认证方式都可以通过插件进行实现。这里我们选取 APISIX 中最常用也是最简单的认证插件 [key-auth](https://apisix.apache.org/docs/apisix/plugins/key-auth/),它依赖于 [Consumer](https://apisix.apache.org/docs/apisix/terminology/consumer/)(消费者)抽象。 `key-auth` 插件的使用中需要一个特定的 header,这样插件就可以根据值数据进行反向查找,并找到其对应的 Consumer。
+
+以下代码展示了如何新建一个 Consumer:
+
+```shell
+curl http://apisix:9080/apisix/admin/consumers -H 'X-API-KEY: 123xyz' -X PUT -d '
+{
+ "username": "admin",
+ "plugins": {
+ "key-auth": {
+ "key": "admin"
+ }
+ }
+}'
+```
+
+同样的,我们需要对 Consumer `user` 和 Key `user` 进行相关操作。现在可以创建一个专用路由来配置它们,以便只有来自 `admin` 的请求才能通过:
+
+```shell
+curl http://apisix:9080/apisix/admin/routes -H 'X-API-KEY: 123xyz' -X POST -d '
+{
+ "uri": "/",
+ "upstream_id": 1,
+ "plugins": {
+ "key-auth": {},
+ "consumer-restriction": {
+ "whitelist": [ "admin" ]
+ }
+ }
+}'
+```
+
+然后使用以下命令测试一下:
+
+```shell
+curl localhost:9080
+```
+
+发现并没有起作用。这是因为我们没有通过 API 密钥的 header 进行身份验证。
+
+```shell
+{"message":"Missing API key found in request"}
+```
+
+添加 header 后再次进行测试:
+
+```shell
+curl -H "apikey: user" localhost:9080
+
+{"message":"The consumer_name is forbidden."}
+```
+
+发现仍然没有效果。这是因为这里 API key 为 `user` ,我们前边仅为 `admin` 也就是管理员设置了相关权限。所以如果更换为 `admin` ,就会如期返回 Open API 规范的相关信息。
+
+### 配置监控
+
+在软件系统中,总有一个被人们低估重要性的功能 —— **可观测性**。在生产环境中部署了任何组件,都需要监控其运行状况。
+
+如今,很多服务都提供了可观测性的功能,比如 [Prometheus](https://prometheus.io/)。得益于 Prometheus 的开源属性,它被广泛应用于实践中。因此,这里我们也选用 Prometheus 进行相关数据的监控。
+
+为了通过图表等形式显示数据,我们也同时需要依赖于 [Grafana](https://grafana.com/)。接下来,将这些组件添加到 Docker Compose 文件中。
+
+***docker-compose.yml***
+
+```yaml
+version: "3"
+services:
+ prometheus:
+ image: prom/prometheus:v2.40.1
+ - ./prometheus/prometheus.yml:/etc/prometheus/prometheus.yml
+ depends_on:
+ - apisix
+ grafana:
+ image: grafana/grafana:8.5.15
+ volumes:
+ - ./grafana/provisioning:/etc/grafana/provisioning
+ - ./grafana/dashboards:/var/lib/grafana/dashboards
+ - ./grafana/config/grafana.ini:/etc/grafana/grafana.ini
+ ports:
+ - "3001:3000"
+ depends_on:
+ - prometheus
+```
+
+以上操作需注意:APISIX 的默认监控方案中自带 Grafana,因此只需从 APISIX 中获取[相关配置](https://github.com/apache/apisix/blob/master/docs/assets/other/json/apisix-grafana-dashboard.json) 即可。同时将默认端口从 3000 更改为 3001 是为了避免与 PostgREST 服务发生冲突。
+
+一旦监控基础设施到位,我们只需要指示 APISIX 以 Prometheus 期望的格式提供数据即可。可以通过配置插件和新的全局规则来实现这一目标:
+
+config.yaml
+
+```yaml
+plugin_attr:
+ prometheus:
+ export_addr:
+ ip: "0.0.0.0"
+ port: 9091
+```
+
+```bash
+curl http://apisix:9080/apisix/admin/global_rules/2 -H 'X-API-KEY: 123xyz' -X PUT -d '
+{
+ "plugins": {
+ "prometheus": {}
+ }
+}'
+```
+
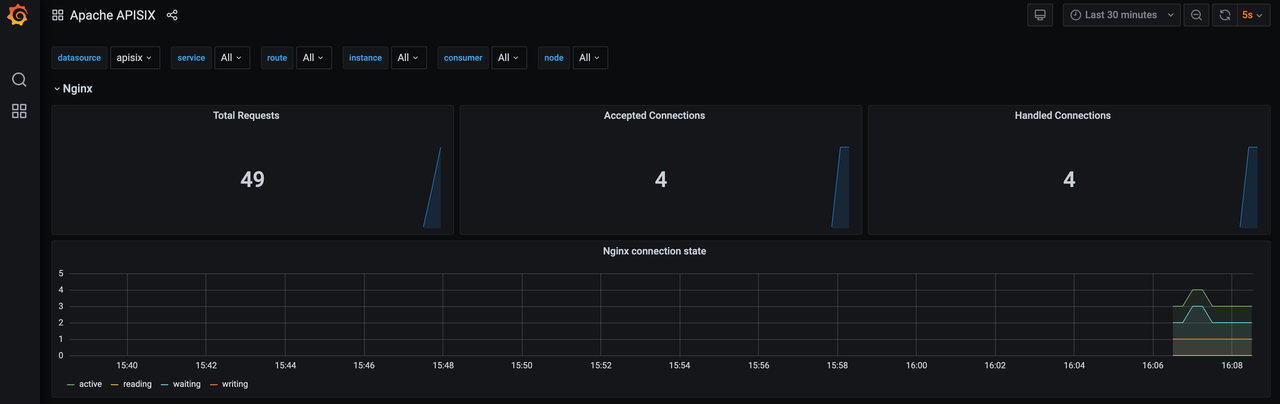
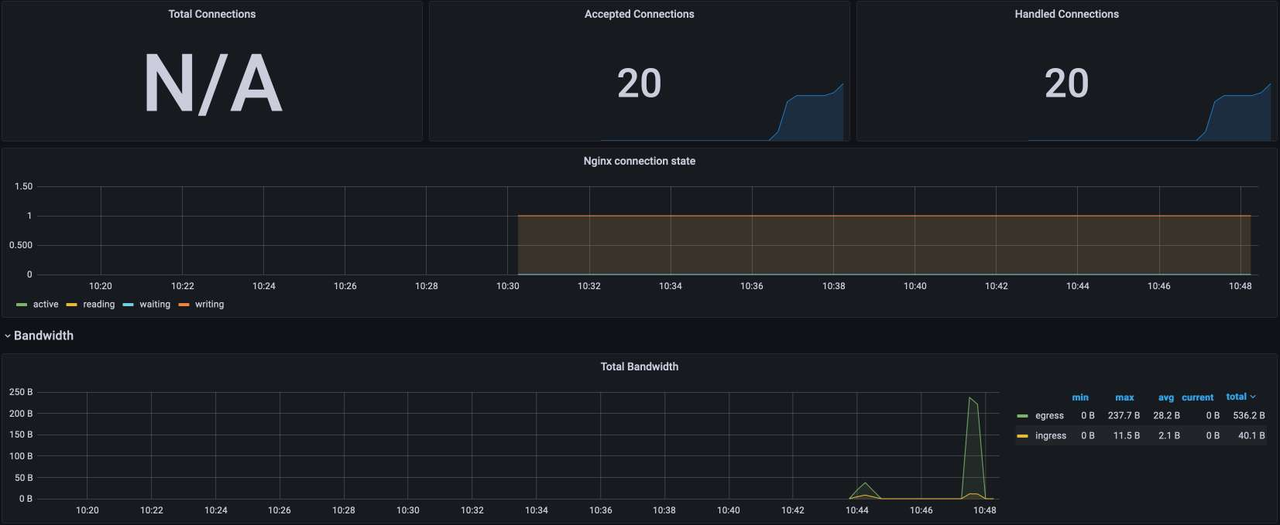
+此时发送几个查询请求,并打开 Grafana 仪表板,可看到类似数据。如果运行较多请求,则会出现更丰富的数据仪表。
+
+
+
+
+
+## 总结
+
+创建一个成熟的 RESTful API 是一项巨大的投资。你可以通过 PostgREST 将数据库暴露在 CRUD API 中来快速测试一个简单的 API。但是,这样的体系结构不适用于实际生产。要想使其更具实践性,就需要在 PostgREST 前设置一个 facade、一个反向代理,或者更好的 API 网关。
+
+Apache APISIX 作为云原生 API 网关,提供了广泛的特性,从流量处理到认证授权和可观测性等。有了 APISIX,你就可以用较低的成本快速验证你的 API 需求。锦上添花的是,当你验证需求完成之后,还可以保留现有的 facade,并用自定义开发的 API 来替换 PostgREST。