You are viewing a plain text version of this content. The canonical link for it is here.
Posted to notifications@apisix.apache.org by ju...@apache.org on 2021/11/13 02:55:26 UTC
[apisix-website] branch master updated: docs: add APISIX-Datadog plugin doc (#715)
This is an automated email from the ASF dual-hosted git repository.
juzhiyuan pushed a commit to branch master
in repository https://gitbox.apache.org/repos/asf/apisix-website.git
The following commit(s) were added to refs/heads/master by this push:
new 5529335 docs: add APISIX-Datadog plugin doc (#715)
5529335 is described below
commit 55293354b55ffd7401ac6d8369cb802cbc539023
Author: yilinzeng <36...@users.noreply.github.com>
AuthorDate: Sat Nov 13 10:55:22 2021 +0800
docs: add APISIX-Datadog plugin doc (#715)
---
website/blog/2021/11/12/apisix-datadog.md | 177 +++++++++++++++++++++
.../2021/11/12/apisix-datadog.md | 177 +++++++++++++++++++++
2 files changed, 354 insertions(+)
diff --git a/website/blog/2021/11/12/apisix-datadog.md b/website/blog/2021/11/12/apisix-datadog.md
new file mode 100644
index 0000000..1dcbaf9
--- /dev/null
+++ b/website/blog/2021/11/12/apisix-datadog.md
@@ -0,0 +1,177 @@
+---
+title: "Cloud Monitoring with Datadog in Apache APISIX"
+author: "Bisakh Mondal"
+authorURL: "https://github.com/bisakhmondal"
+authorImageURL: "https://avatars.githubusercontent.com/u/41498427?v=4"
+keywords:
+- Apache APISIX
+- Datadog
+- Observability
+- Cloud Monitoring
+description: Apache APISIX recently released a new plugin APISIX-Datadog, to provide a deeper integration with Datadog. This article introduces the APISIX-Datadog Plugin and its capabilities.
+tags: [Technology]
+---
+
+> Apache APISIX recently released a new plugin: [APISIX-Datadog](http://apisix.apache.org/docs/apisix/next/plugins/datadog), to provide a deeper integration with Datadog. This article introduces the APISIX-Datadog Plugin and its capabilities.
+
+<!--truncate-->
+
+
+
+As the complexity of IT products and consumer-facing application development increases, monitoring becomes an integral part of any application delivery. Additionally, to meet the endless demand of rapid upgrade cycles while ensuring stability, streamlined performance and keeping a perfect balance between service level indicators (SLI) with Service-level objectives (SLO) and Service-level agreement (SLA) - effective monitoring is immensely important.
+
+As a Cloud API Management Product, [Apache APISIX](http://apisix.apache.org/) decouples observability concerns from the application, which gives the developers an advantage of building applications focusing just on the business logic while Apache APISIX will take care of observability for the platform of their choice.
+
+Apache APISIX recently released a new plugin: [APISIX-Datadog](http://apisix.apache.org/docs/apisix/next/plugins/datadog), to provide a deeper integration with Datadog. This article introduces the APISIX-Datadog Plugin and its capabilities.
+
+## How APISIX-Datadog plugin works
+
+
+
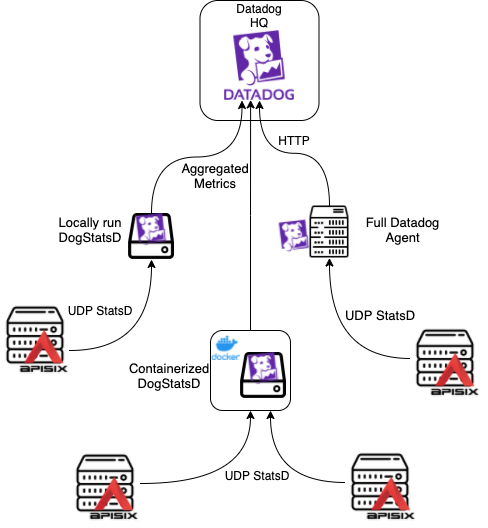
+The APISIX-Datadog plugin pushes its custom metrics to the DogStatsD server, comes bundled with Datadog agent over the UDP connection. DogStatsD basically is an implementation of StatsD protocol. It collects the custom metrics for Apache APISIX agent, aggregates it into a single data point and sends it to the configured Datadog server. To learn more about DogStatsD, please visit [DogStatsD documentation](https://docs.datadoghq.com/developers/dogstatsd/?tab=hostagent).
+
+When APISIX-Datadog is activated, Apache APISIX agent exports the following metrics to DogStatsD server for every request response cycle:
+
+|Metric Name|StatsD Type|Description|
+|-----------|-----------|-----------|
+|Request Counter|Counter|Number of requests received.|
+|Request Latency|Histogram|Time taken to process the request (in milliseconds).|
+|Upstream latency|Histogram|Time taken since proxying the request to the upstream server till a response is received (in milliseconds).|
+|APISIX Latency|Histogram|Time taken by APISIX agent to process the request (in milliseconds).|
+|Ingress Size|Timer|Request body size in bytes.|
+|Egress Size|Timer|Response body size in bytes.|
+
+The metrics will be sent to the DogStatsD agent with the following tags. If there is no suitable value for any particular tag, the tag will simply be omitted.
+
+|Metric Name|Description|
+|-----------|-----------|
+|route_name|Name specified in the route schema definition. If not present, it will fall back to the route id value.|
+|service_id|If a route has been created with the abstraction of service, the particular service id will be used.|
+|consumer|If the route has a linked consumer, the consumer Username will be added as a tag.|
+|balancer_ip|IP of the Upstream balancer that has processed the current request.|
+|response_status|HTTP response status code.|
+|scheme|Scheme that has been used to make requests, such as HTTP, gRPC, gRPCs etc.|
+
+The plugin maintains a buffer with a timer. When the timer expires, APISIX-Datadog plugin flashes the buffered metrics as a batch to the locally run dogstatsd server. This approach is less resource-hungry (though it might be insignificant as UDP sockets are very lightweight) by reusing the same UDP socket and doesn't overload the network all the time as the timer can be configured.
+
+## Steps to Run Datadog Agent
+
+1. If you are already using Datadog inside your infrastructure, you must have a datadog agent installed in your systems. It may either be a docker container, pod or binary for a respective package manager. In this case, you are good to go. Just make sure port 8125/udp is allowed through the firewall (if any) i.e more specifically, the Apache APISIX agent can reach port 8125 of the datadog agent. You may skip this subsection.
+
+> To learn more about how to install a full-fledged datadog agent, visit [here](https://docs.datadoghq.com/agent/).
+
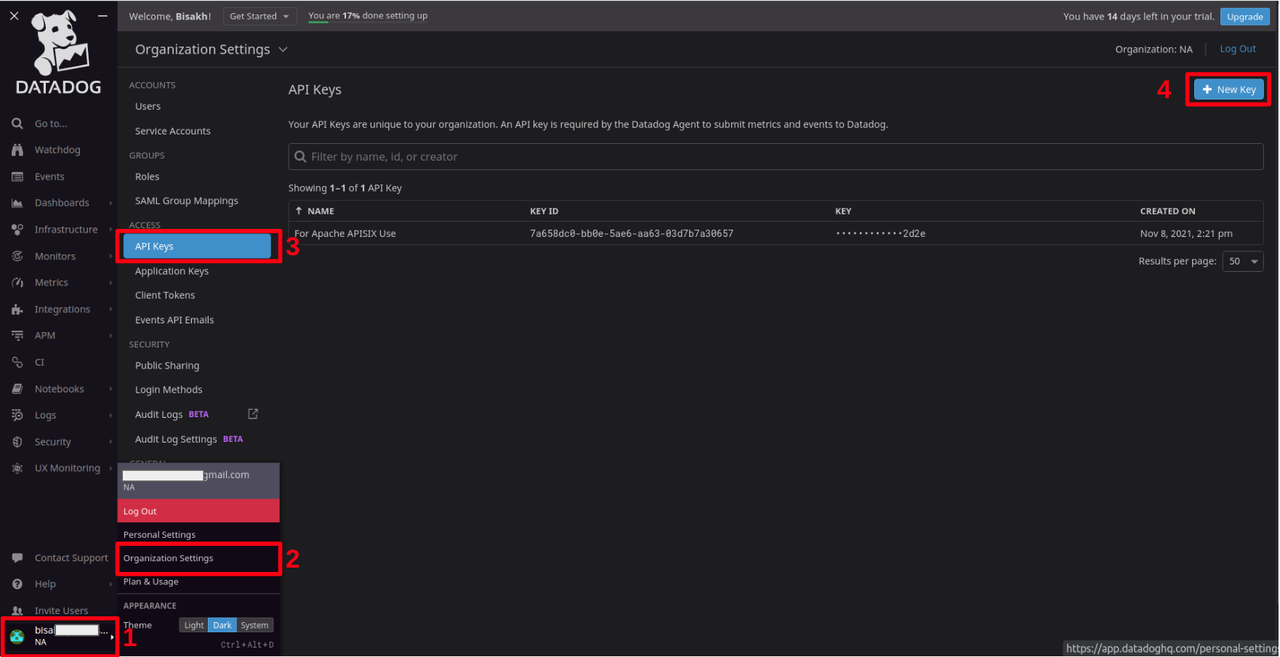
+2. If you are new to Datadog
+ 1. First create an account by visiting www.datadoghq.com.
+ 2. Generate an API Key.
+ 
+
+3. APISIX-Datadog plugin requires only the dogstatsd component of `datadog/agent` as the plugin asynchronously send metrics to the dogstatsd server following the statsd protocol over standard UDP socket. That's why APISIX recommends using the standalone `datadog/dogstatsd` image instead of using the full agent. It's extremely lightweight (only ~11 MB in size) compared to ~2.8GB of `datadog/agent` image.
+
+To run it as a container:
+
+```shell
+# pull the latest image
+docker pull datadog/dogstatsd:latest
+# run a detached container
+docker run -d --name dogstatsd-agent -e DD_API_KEY=<Your API Key from step 2> -p 8125:8125/udp datadog/dogstatsd
+```
+
+If you are using Kubernetes in your production environment, you can deploy `dogstatsd` as a `Daemonset` or as a `Multi-Container Pod` alongside Apache APISIX agent.
+
+## How to Use Datadog with Apache APISIX
+
+### Activate the APISIX-Datadog plugin
+
+The following is an example on how to activate the datadog plugin for a specific route. We are assumming your `dogstatsd` agent is already up an running.
+
+```shell
+# enable plugin for a specific route
+curl http://127.0.0.1:9080/apisix/admin/routes/1 -H 'X-API-KEY: edd1c9f034335f136f87ad84b625c8f1' -X PUT -d '
+{
+ "plugins": {
+ "datadog": {}
+ },
+ "upstream": {
+ "type": "roundrobin",
+ "nodes": {
+ "127.0.0.1:1980": 1
+ }
+ },
+ "uri": "/hello"
+}'
+```
+
+Now any requests to endpoint uri `/hello` will generate the above metrics and push it to local DogStatsD server of the datadog agent.
+
+### Custom Configuration
+
+In default configuration, the plugin expects the dogstatsd service to be available at `127.0.0.1:8125`. If you wish to update the config, please update the plugin metadata:
+
+#### Metadata Schema
+
+|Name|Type|Required|Default|Description|
+|----|----|--------|-------|-----------|
+|hosts|string|optional|"127.0.0.1"|The DogStatsD server host address|
+|port|integer|optional|8125|The DogStatsD server host port|
+|namespace|string|optional|"apisix"|Prefix for all the custom metrics sent by APISIX agent. Useful for finding entities for metric graph. e.g. (apisix.request.counter)|
+|constant_tags|array|optional|["source:apisix"]|Static tags embedded into generated metrics. Useful for grouping metric over certain signals.|
+
+To know more about how to effectively write tags, please visit [here](https://docs.datadoghq.com/getting_started/tagging/#defining-tags)
+
+Make a request to /apisix/admin/plugin_metadata endpoint with the updated metadata as following:
+
+```shell
+curl http://127.0.0.1:9080/apisix/admin/plugin_metadata/datadog -H 'X-API-KEY: edd1c9f034335f136f87ad84b625c8f1' -X PUT -d '
+{
+ "host": "127.0.0.1",
+ "port": 8125,
+ "constant_tags": [
+ "source:apisix",
+ "service:custom"
+ ],
+ "namespace": "apisix"
+}'
+```
+
+#### Plugin Schema
+
+Similarly, there are few attributes that can be tweaked while enabling the plugin.
+
+|Name|Type|Required|Default|Valid|Description|
+|----|----|--------|-------|-----|-----------|
+|batch_max_size|integer|optional|5000|[1,...]|Max buffer size of each batch|
+|inactive_timeout|integer|optional|5|[1,...]|Maximum age in seconds when the buffer will be flushed if inactive|
+|buffer_duration|integer|optional|60|[1,...]|Maximum age in seconds of the oldest entry in a batch before the batch must be processed|
+|max_retry_count|integer|optional|1|[1,...]|Maximum number of retries if one entry fails to reach dogstatsd server|
+
+As all the fields are optional and if no attributes are set, the datadog plugin gets instantiated with the default values. To update any attribute, just update the required route, service or consumer with the updated attribute value. For example, the code below modifies the maximum buffer size of each batch:
+
+```shell
+'{
+...
+"plugins": {
+ "datadog": {
+ "batch_max_size": 10
+ }
+}
+... }'
+```
+
+### Deactivate the APISIX-Datadog plugin
+
+Now, to deactivate the plugin, simply remove the corresponding json configuration in the plugin configuration to disable the `datadog`. APISIX plugins are hot-reloaded, therefore no need to restart APISIX.
+
+```shell
+# disable plugin for a route
+curl http://127.0.0.1:9080/apisix/admin/routes/1 -H 'X-API-KEY: edd1c9f034335f136f87ad84b625c8f1' -X PUT -d '
+{
+ "uri": "/hello",
+ "plugins": {},
+ "upstream": {
+ "type": "roundrobin",
+ "nodes": {
+ "127.0.0.1:1980": 1
+ }
+ }
+}'
+```
diff --git a/website/i18n/zh/docusaurus-plugin-content-blog/2021/11/12/apisix-datadog.md b/website/i18n/zh/docusaurus-plugin-content-blog/2021/11/12/apisix-datadog.md
new file mode 100644
index 0000000..4296e33
--- /dev/null
+++ b/website/i18n/zh/docusaurus-plugin-content-blog/2021/11/12/apisix-datadog.md
@@ -0,0 +1,177 @@
+---
+title: "APISIX-Datadog 插件发布,助力用户提高系统的可观测性"
+author: "Bisakh Mondal"
+authorURL: "https://github.com/bisakhmondal"
+authorImageURL: "https://avatars.githubusercontent.com/u/41498427?v=4"
+keywords:
+- Apache APISIX
+- Datadog
+- 可观测性
+- Cloud Monitoring
+description: Apache APISIX 最近发布了一个新的插件:APISIX-Datadog,以提供与 Datadog 监控平台的集成。这篇文章介绍了 APISIX-Datadog 插件的实现原理及功能。
+tags: [Technology]
+---
+
+> Apache APISIX 最近发布了一个新的插件:[APISIX-Datadog](http://apisix.apache.org/docs/apisix/next/plugins/datadog),以提供与 Datadog 监控平台的集成。这篇文章介绍了 APISIX-Datadog 插件的实现原理及功能。
+
+<!--truncate-->
+
+
+
+随着应用开发的复杂度增加,监控成为了应用的一个重要组成部分。及时、准确的监控既能满足快速迭代的周期性需求,又能够确保应用的稳定性和流畅性。如何选择一个适合的监控,以提升应用的可观测性,成为了每个开发者都必须面临的一道难题。
+
+[Apache APISIX](http://apisix.apache.org/) 将监控和可观测性从应用中解耦了出来,给开发人员带来了一个优势:在构建应用的时候,只需要关注业务逻辑,而 Apache APISIX 可以和开发人员选定的监控平台对接,处理可观测性的问题。
+
+Apache APISIX 最近发布了一个新的插件:APISIX-Datadog,以提供与 Datadog 监控平台的集成。这篇文章介绍了 APISIX-Datadog 插件的实现原理及功能。
+
+## APISIX-Datadog plugin 工作原理
+
+
+
+APISIX-Datadog 插件将其自定义指标推送到 DogStatsD server。而 DogStatsD server 通过 UDP 连接与 Datadog agent 捆绑在一起。DogStatsD 是 StatsD 协议的一个实现。它为 Apache APISIX agent 收集自定义指标,将其聚合成一个数据点,并将其发送到配置的 Datadog server。要了解更多关于 DogStatsD 的信息,请访问 DogStatsD 文档。
+
+当你启用 APISIX-Datadog 插件时,Apache APISIX agent 会在每个请求响应周期向 DogStatsD server 输出以下指标:
+
+|参数名称|StatsD 类型|描述|
+|-----------|-----------|-----------|
+|Request Counter|Counter|收到的请求数量。|
+|Request Latency|Histogram|处理该请求所需的时间,以毫秒为单位。|
+|Upstream latency|Histogram|上游 server agent 请求到收到响应所需的时间,以毫秒为单位。|
+|APISIX Latency|Histogram|APISIX agent 处理该请求的时间,以毫秒为单位。|
+|Ingress Size|Timer|请求体大小,以字节为单位。|
+|Egress Size|Timer|响应体大小,以字节为单位。|
+
+这些指标将被发送到 DogStatsD agent,并带有以下标签。如果任何特定的标签没有合适的值,该标签将被直接省略。
+
+|参数名称|描述|
+|-----------|-----------|
+|route_name|路由的名称,如果不存在,将显示路由 ID。|
+|service_id|如果一个路由是用服务的抽象概念创建的,那么特定的服务 ID 将被使用。|
+|consumer|如果路由有一个链接的消费者,消费者的用户名将被添加为一个标签。|
+|balancer_ip|处理了当前请求的上游复制均衡器的的 IP。|
+|response_status|HTTP 响应状态代码。|
+|scheme|已用于提出请求的协议,如 HTTP、gRPC、gRPCs 等。|
+
+APISIX-Datadog 插件维护了一个带有 timer 的 buffer。当 timer 失效时,APISIX-Datadog 插件会将 buffer 的指标作为一个批量处理程序传送给本地运行的 DogStatsD server。这种方法通过重复使用相同的 UDP 套接字,对资源的占用较少,而且由于可以配置 timer,所以不会一直让网络过载。
+
+## 启动 Datadog Agent
+
+1. 如果你已经在使用 Datadog,你必须在系统中安装一个 Datadog agent。它可以是一个 docker 容器,一个 pod 或二进制的包管理器。你只需要确保Apache APISIX agent 可以到达 Datadog agent 的 8125 端口。
+
+> 如果需要了解更多关于如何安装一个完整的 Datadog agent,请访问[这里](https://docs.datadoghq.com/agent/)。
+
+2. 如果你从没使用过 Datadog
+ 1. 首先访问 www.datadoghq.com ,创建一个账户。
+ 2. 然后按照下图标注的步骤生成 API 密钥。
+ 
+
+3. APISIX-Datadog 插件只需要依赖 `datadog/agent` 的 dogstatsd 组件即可实现,因为该插件按照 statsd 协议通过标准的 UDP 套接字向 DogStatsD server 异步发送参数。我们推荐使用独立的 `datadog/dogstatsd` 镜像,而不是使用完整的`datadog/agent` ,因为 `datadog/dogstatsd` 的组件大小只有大约 11 MB,更加轻量化。而完整的 `datadog/agent` 镜像的大小为 2.8 GB。
+
+运行以下命令,将它作为一个容器来运行:
+
+```shell
+# pull the latest image
+docker pull datadog/dogstatsd:latest
+# run a detached container
+docker run -d --name dogstatsd-agent -e DD_API_KEY=<Your API Key from step 2> -p 8125:8125/udp datadog/dogstatsd
+```
+
+如果你在生产环境中使用 Kubernetes,你可以将 `dogstatsd` 作为一个 `Daemonset` 或 `Multi-Container Pod` 与 Apache APISIX agent 一起部署。
+
+## 如何在 Apache APISIX 中使用 Datadog
+
+### 启用 APISIX-Datadog 插件
+
+如果你已经启动了 `dogstatsd` agent,只需执行一条命令,就可以为指定路由启用 APISIX-Datadog 插件。
+
+```shell
+# enable plugin for a specific route
+curl http://127.0.0.1:9080/apisix/admin/routes/1 -H 'X-API-KEY: edd1c9f034335f136f87ad84b625c8f1' -X PUT -d '
+{
+ "plugins": {
+ "datadog": {}
+ },
+ "upstream": {
+ "type": "roundrobin",
+ "nodes": {
+ "127.0.0.1:1980": 1
+ }
+ },
+ "uri": "/hello"
+}'
+```
+
+启用 APISIX-Datadog 插件后,任何对端点 URI `/hello` 的请求都会产生上述指标,并推送到 Datadog agent的本地 DogStatsD server。
+
+### 自定义配置
+
+如果启用 APISIX-Datadog 插件时,使用的是默认配置,dogstatsd 服务在 `127.0.0.1:8125` 可用。如果你想更新配置,请更新插件的元数据。
+
+#### 元数据参数解释
+
+|参数名称|类型|是否必须修改|默认值|描述|
+|----|----|---------------|-------|-----------|
+|hosts|string|否|"127.0.0.1"|DogStatsD server 的主机地址|
+|port|integer|否|8125|DogStatsD server的主机端口|
+|namespace|string|否|"apisix"|由 APISIX agent发送的所有自定义参数的前缀。对寻找指标图的实体很有帮助,例如:(apisix.request.counter)。|
+|constant_tags|array|否|["source:apisix"]|静态标签嵌入到生成的指标中。对某些信号的 metrics 进行分组很有用。|
+
+要了解更多关于如何有效地编写标签,请访问[这里](https://docs.datadoghq.com/getting_started/tagging/#defining-tags)。
+
+向 /apisix/admin/plugin_metadata 端点发出请求,更新元数据,如下所示。
+
+```shell
+curl http://127.0.0.1:9080/apisix/admin/plugin_metadata/datadog -H 'X-API-KEY: edd1c9f034335f136f87ad84b625c8f1' -X PUT -d '
+{
+ "host": "127.0.0.1",
+ "port": 8125,
+ "constant_tags": [
+ "source:apisix",
+ "service:custom"
+ ],
+ "namespace": "apisix"
+}'
+```
+
+#### 插件参数解释
+
+与元数据类似,在启用 APISIX-Datadog 插件时,你也可以调整其他参数。
+
+|参数名称|类型|是否必须修改|默认值|取值范围||描述|
+|----|----|--------|-------|-----|-----------|
+|batch_max_size|integer|否|5000|[1,...]|每个批次的 buffer 最大值|
+|inactive_timeout|integer|否|5|[1,...]|如果不活跃,buffer 将被刷新的最长时间(秒)。|
+|buffer_duration|integer|否|60|[1,...]|在必须处理一个批次之前,该批次中最老的条目的最长存活时间(秒)。|
+|max_retry_count|integer|否|1|[1,...]|如果一个条目未能到达 dogstatsd server,重试的次数。|
+
+由于所有的字段都是可选的,如果你没有手动设置任何参数,APISIX-Datadog 插件将使用默认值设置这些参数。如果你需要更新任何参数,只需用更新的参数值更新所需的路由、服务或消费者。例如,下面的代码将 `batch_max_size` 修改为 10。
+
+```shell
+'{
+...
+"plugins": {
+ "datadog": {
+ "batch_max_size": 10
+ }
+}
+... }'
+```
+
+### 停用 APISIX-Datadog 插件
+
+你只需在插件配置中删除相应的 json 配置即可停用 APISIX-Datadog 插件。得益于 Apache APISIX 插件的热加载机制,删除 json 配置后,会立即停用APISIX-Datadog 插件,不需要重新加载。
+
+```shell
+# disable plugin for a route
+curl http://127.0.0.1:9080/apisix/admin/routes/1 -H 'X-API-KEY: edd1c9f034335f136f87ad84b625c8f1' -X PUT -d '
+{
+ "uri": "/hello",
+ "plugins": {},
+ "upstream": {
+ "type": "roundrobin",
+ "nodes": {
+ "127.0.0.1:1980": 1
+ }
+ }
+}'
+```