You are viewing a plain text version of this content. The canonical link for it is here.
Posted to notifications@skywalking.apache.org by ha...@apache.org on 2022/04/19 12:50:43 UTC
[skywalking-website] branch master updated: Add java agent injector blog (#437)
This is an automated email from the ASF dual-hosted git repository.
hanahmily pushed a commit to branch master
in repository https://gitbox.apache.org/repos/asf/skywalking-website.git
The following commit(s) were added to refs/heads/master by this push:
new 60a5ca10ea Add java agent injector blog (#437)
60a5ca10ea is described below
commit 60a5ca10ea5867fee174f451ed77be08a93f0de4
Author: dashanji <da...@gmail.com>
AuthorDate: Tue Apr 19 20:50:37 2022 +0800
Add java agent injector blog (#437)
* add blog about java agent injector
Signed-off-by: dashanji <da...@gmail.com>
---
.../backend.png | Bin 0 -> 446791 bytes
.../dashboard.png | Bin 0 -> 380852 bytes
.../gateway.png | Bin 0 -> 502336 bytes
.../index.md | 503 +++++++++++++++++++++
.../topology.png | Bin 0 -> 230781 bytes
.../backend.png | Bin 0 -> 446791 bytes
.../dashboard.png | Bin 0 -> 380852 bytes
.../gateway.png | Bin 0 -> 502336 bytes
.../index.md | 500 ++++++++++++++++++++
.../topology.png | Bin 0 -> 230781 bytes
10 files changed, 1003 insertions(+)
diff --git a/content/blog/2022-04-19-How-to-use-the-java-agent-injector?/backend.png b/content/blog/2022-04-19-How-to-use-the-java-agent-injector?/backend.png
new file mode 100644
index 0000000000..f8788d97eb
Binary files /dev/null and b/content/blog/2022-04-19-How-to-use-the-java-agent-injector?/backend.png differ
diff --git a/content/blog/2022-04-19-How-to-use-the-java-agent-injector?/dashboard.png b/content/blog/2022-04-19-How-to-use-the-java-agent-injector?/dashboard.png
new file mode 100644
index 0000000000..83addaabf9
Binary files /dev/null and b/content/blog/2022-04-19-How-to-use-the-java-agent-injector?/dashboard.png differ
diff --git a/content/blog/2022-04-19-How-to-use-the-java-agent-injector?/gateway.png b/content/blog/2022-04-19-How-to-use-the-java-agent-injector?/gateway.png
new file mode 100644
index 0000000000..90717aef84
Binary files /dev/null and b/content/blog/2022-04-19-How-to-use-the-java-agent-injector?/gateway.png differ
diff --git a/content/blog/2022-04-19-How-to-use-the-java-agent-injector?/index.md b/content/blog/2022-04-19-How-to-use-the-java-agent-injector?/index.md
new file mode 100644
index 0000000000..504737906e
--- /dev/null
+++ b/content/blog/2022-04-19-How-to-use-the-java-agent-injector?/index.md
@@ -0,0 +1,503 @@
+---
+title: "How to use the java agent injector?"
+date: 2022-04-19
+author: "[Ye Cao](https://github.com/dashanji), Apache SkyWalking Committer; [Hongtao Gao](https://github.com/hanahmily), Apache SkyWalking PMC member, Tetrate.io."
+description: "Introduce how to quickly get started the java agent injector based on SWCK"
+
+tags:
+- User Manual
+---
+
+### content:
+
+1. [Introduction](#1.-Introduction)
+2. [Features](#2.-Features)
+3. [Install SWCK](#3.-Install-SWCK)
+4. [Deploy a demo application](#4.-Deploy-a-demo-application)
+5. [Verify the injector](#5.-Verify-the-injector)
+6. [Concluding remarks](#6.-Concluding-remarks)
+
+
+
+## 1. Introduction
+
+
+
+### 1.1 What's SWCK?
+
+[SWCK](https://github.com/apache/skywalking-swck) is a platform for the SkyWalking user, provisions, upgrades, maintains SkyWalking relevant components, and makes them work natively on Kubernetes.
+
+In fact, SWCK is an operator developed based on [kubebuilder](https://book.kubebuilder.io/introduction.html), providing users with Custom Resources ( CR ) and controllers for managing resources ( Controller ), all CustomResourceDefinitions(CRDs)are as follows:
+
+- [JavaAgent](https://github.com/apache/skywalking-swck/blob/master/docs/operator.md#javaagent)
+- [OAP](https://github.com/apache/skywalking-swck/blob/master/docs/operator.md#oap)
+- [UI](https://github.com/apache/skywalking-swck/blob/master/docs/operator.md#ui)
+- [Storage](https://github.com/apache/skywalking-swck/blob/master/docs/operator.md#storage)
+- [Satellite](https://github.com/apache/skywalking-swck/blob/master/docs/operator.md#satellite)
+- [Fetcher](https://github.com/apache/skywalking-swck/blob/master/docs/operator.md#fetcher)
+
+
+
+### 1.2 What's the java agent injector?
+
+For a java application, users need to inject the java agent into the application to get metadata and send it to the SkyWalking backend. To make users use the java agent more natively, we propose the java agent injector to inject the java agent sidecar into a pod. The java agent injector is actually a [Kubernetes Mutation Webhook Controller](https://kubernetes.io/docs/reference/access-authn-authz/admission-controllers/). The controller intercepts pod events and applies mutations to the po [...]
+
+
+
+## 2. Features
+
+- **Transparent**. User’s applications generally run in normal containers while the java agent runs in the init container, and both belong to the same pod. Each container in the pod mounts a shared memory volume that provides a storage path for the java agent. When the pod starts, the java agent in the init container will run before the application container, and the injector will store the java agent file in the shared memory volume. When the application container starts, the injector i [...]
+
+- **Configurability.** The injector provides two ways to configure the java agent: global configuration and custom configuration. The default global configuration is stored in the [configmap](https://kubernetes.io/docs/concepts/configuration/configmap/), you can update it as your own global configuration, such as `backend_service`. In addition, you can also set custom configuration for some applications via [annotation](https://kubernetes.io/zh/docs/concepts/overview/working-with-objects [...]
+
+- **Observability.** For each injected java agent, we provide [CustomDefinitionResources](https://kubernetes.io/docs/tasks/extend-kubernetes/custom-resources/custom-resource-definitions/) called `JavaAgent` to observe the final agent configuration. Please refer to [javaagent](https://github.com/apache/skywalking-swck/blob/master/docs/javaagent.md) to get more details.
+
+
+
+## 3. Install SWCK
+
+In the next steps, we will show how to build a stand-alone Kubernetes cluster and deploy the 0.6.1 version of SWCK on the platform.
+
+
+
+### 3.1 Tool Preparation
+
+Firstly, you need to install some tools as follows:
+
+1. [kind](http://kind.sigs.k8s.io), which is used to create a stand-alone Kubernetes cluster.
+2. [kubectl](https://kubernetes.io/docs/tasks/tools/), which is used to communicate with the Kubernetes cluster.
+
+
+
+### 3.2 Install stand-alone Kubernetes cluster
+
+After installing `kind` , you could use the following command to create a stand-alone Kubernetes cluster.
+
+> Notice! If your terminal is configured with a proxy, you need to close it before the cluster is created to avoid some errors.
+
+```sh
+$ kind create cluster --image=kindest/node:v1.19.1
+```
+
+After creating a cluster, you can get the pods as below.
+
+```sh
+$ kubectl get pod -A
+NAMESPACE NAME READY STATUS RESTARTS AGE
+kube-system coredns-f9fd979d6-57xpc 1/1 Running 0 7m16s
+kube-system coredns-f9fd979d6-8zj8h 1/1 Running 0 7m16s
+kube-system etcd-kind-control-plane 1/1 Running 0 7m23s
+kube-system kindnet-gc9gt 1/1 Running 0 7m16s
+kube-system kube-apiserver-kind-control-plane 1/1 Running 0 7m23s
+kube-system kube-controller-manager-kind-control-plane 1/1 Running 0 7m23s
+kube-system kube-proxy-6zbtb 1/1 Running 0 7m16s
+kube-system kube-scheduler-kind-control-plane 1/1 Running 0 7m23s
+local-path-storage local-path-provisioner-78776bfc44-jwwcs 1/1 Running 0 7m16s
+```
+
+
+
+### 3.3 Install certificates manger(cert-manger)
+
+The certificates of SWCK are distributed and verified by the certificate manager. You need to install the [cert-manager](https://cert-manager.io/docs/) through the following command.
+
+```sh
+$ kubectl apply -f https://github.com/jetstack/cert-manager/releases/download/v1.3.1/cert-manager.yaml
+```
+
+Verify whether cert-manager is installed successfully.
+
+```sh
+$ kubectl get pod -n cert-manager
+NAME READY STATUS RESTARTS AGE
+cert-manager-7dd5854bb4-slcmd 1/1 Running 0 73s
+cert-manager-cainjector-64c949654c-tfmt2 1/1 Running 0 73s
+cert-manager-webhook-6bdffc7c9d-h8cfv 1/1 Running 0 73s
+```
+
+
+
+### 3.4 Install SWCK
+
+The java agent injector is a component of the operator, so please follow the next steps to install the operator first.
+
+1. Get the deployment yaml file of SWCK and deploy it.
+
+```sh
+$ curl -Ls https://archive.apache.org/dist/skywalking/swck/0.6.1/skywalking-swck-0.6.1-bin.tgz | tar -zxf - -O ./config/operator-bundle.yaml | kubectl apply -f -
+```
+
+2. Check SWCK as below.
+
+```sh
+$ kubectl get pod -n skywalking-swck-system
+NAME READY STATUS RESTARTS AGE
+skywalking-swck-controller-manager-7f64f996fc-qh8s9 2/2 Running 0 94s
+```
+
+
+
+### 3.5 Install Skywalking components — OAPServer and UI
+
+1. Deploy the OAPServer and UI in the `default` namespace.
+
+```sh
+$ kubectl apply -f https://raw.githubusercontent.com/apache/skywalking-swck/master/operator/config/samples/default.yaml
+```
+
+2. Check the OAPServer.
+
+```sh
+$ kubectl get oapserver
+NAME INSTANCES RUNNING ADDRESS
+default 1 1 default-oap.default
+```
+
+3. Check the UI.
+
+```sh
+$ kubectl get ui
+NAME INSTANCES RUNNING INTERNALADDRESS EXTERNALIPS PORTS
+default 1 1 default-ui.default [80]
+```
+
+
+
+## 4. Deploy a demo application
+
+In the third step, we have installed SWCK and related Skywalking components. Next, we will show how to use the java agent injector in SWCK through two java application examples in two ways: global configuration and custom configuration.
+
+
+
+### 4.1 Set the global configuration
+
+When we have installed SWCK, the default configuration is the configmap in the system namespace, we can get it as follows.
+
+```sh
+$ kubectl get configmap skywalking-swck-java-agent-configmap -n skywalking-swck-system -oyaml
+apiVersion: v1
+data:
+ agent.config: |-
+ # The service name in UI
+ agent.service_name=${SW_AGENT_NAME:Your_ApplicationName}
+
+ # Backend service addresses.
+ collector.backend_service=${SW_AGENT_COLLECTOR_BACKEND_SERVICES:127.0.0.1:11800}
+
+ # Please refer to https://skywalking.apache.org/docs/skywalking-java/latest/en/setup/service-agent/java-agent/configurations/#table-of-agent-configuration-properties to get more details.
+```
+
+In the cluster created by `kind`, the `backend_service` may not be correct, we need to use the real OAPServer's address `default-oap.default` to replace the default `127.0.0.1`, so we can edit the configmap as follow.
+
+```sh
+$ kubectl edit configmap skywalking-swck-java-agent-configmap -n skywalking-swck-system
+configmap/skywalking-swck-java-agent-configmap edited
+
+$ kubectl get configmap skywalking-swck-java-agent-configmap -n skywalking-swck-system -oyaml
+apiVersion: v1
+data:
+ agent.config: |-
+ # The service name in UI
+ agent.service_name=${SW_AGENT_NAME:Your_ApplicationName}
+
+ # Backend service addresses.
+ collector.backend_service=${SW_AGENT_COLLECTOR_BACKEND_SERVICES:default-oap.default:11800}
+
+ # Please refer to https://skywalking.apache.org/docs/skywalking-java/latest/en/setup/service-agent/java-agent/configurations/#table-of-agent-configuration-properties to get more details.
+```
+
+
+
+### 4.2 Set the custom configuration
+
+In some cases, we need to use the Skywalking component to monitor different java applications, so the agent configuration of different applications may be different, such as the name of the application, and the plugins that the application needs to use, etc. Next, we will take two simple java applications developed based on `spring boot` and `spring cloud gateway` as examples for a detailed description. You can use the [source code](https://github.com/dashanji/swck-spring-cloud-k8s-demo) [...]
+
+```sh
+# build the springboot and springcloudgateway image
+$ git clone https://github.com/dashanji/swck-spring-cloud-k8s-demo
+$ cd swck-spring-cloud-k8s-demo && make
+
+# check the image
+$ docker images
+REPOSITORY TAG IMAGE ID CREATED SIZE
+gateway v0.0.1 51d16251c1d5 48 minutes ago 723MB
+app v0.0.1 62f4dbcde2ed 48 minutes ago 561MB
+
+# load the image into the cluster
+$ kind load docker-image app:v0.0.1 && kind load docker-image gateway:v0.0.1
+```
+
+
+
+### 4.3 deploy spring boot application
+
+1. Create the `springboot-system` namespace.
+
+```sh
+$ kubectl create namespace springboot-system
+```
+
+2. Label the `springboot-system`namespace to enable the java agent injector.
+
+```sh
+$ kubectl label namespace springboot-system swck-injection=enabled
+```
+
+3. Deploy the corresponding deployment file `springboot.yaml` for the spring boot application, which uses annotation to override the default agent configuration, such as `service_name`.
+
+> Notice! Before using the annotation to override the agent configuration, you need to add `strategy.skywalking.apache.org/agent.Overlay: "true"` to make the override take effect.
+
+```yaml
+apiVersion: apps/v1
+kind: Deployment
+metadata:
+ name: demo-springboot
+ namespace: springboot-system
+spec:
+ selector:
+ matchLabels:
+ app: demo-springboot
+ template:
+ metadata:
+ labels:
+ swck-java-agent-injected: "true" # enable the java agent injector
+ app: demo-springboot
+ annotations:
+ strategy.skywalking.apache.org/agent.Overlay: "true" # enable the agent overlay
+ agent.skywalking.apache.org/agent.service_name: "backend-service"
+ spec:
+ containers:
+ - name: springboot
+ imagePullPolicy: IfNotPresent
+ image: app:v0.0.1
+ command: ["java"]
+ args: ["-jar","/app.jar"]
+---
+apiVersion: v1
+kind: Service
+metadata:
+ name: demo
+ namespace: springboot-system
+spec:
+ type: ClusterIP
+ ports:
+ - name: 8085-tcp
+ port: 8085
+ protocol: TCP
+ targetPort: 8085
+ selector:
+ app: demo-springboot
+```
+
+4. Deploy a `spring boot` application in the `springboot-system` namespace.
+
+```sh
+$ kubectl apply -f springboot.yaml
+```
+
+5. Check for deployment.
+
+```sh
+$ kubectl get pod -n springboot-system
+NAME READY STATUS RESTARTS AGE
+demo-springboot-7c89f79885-dvk8m 1/1 Running 0 11s
+```
+
+6. Get the finnal injected java agent configuration through `JavaAgent`.
+
+```sh
+$ kubectl get javaagent -n springboot-system
+NAME PODSELECTOR SERVICENAME BACKENDSERVICE
+app-demo-springboot-javaagent app=demo-springboot backend-service default-oap.default:11800
+```
+
+
+
+### 4.4 deploy spring cloud gateway application
+
+1. Create the `gateway-system` namespace.
+
+```sh
+$ kubectl create namespace gateway-system
+```
+
+2. Label the `gateway-system`namespace to enable the java agent injector.
+
+```sh
+$ kubectl label namespace gateway-system swck-injection=enabled
+```
+
+3. Deploy the corresponding deployment file `springgateway.yaml` for the spring cloud gateway application, which uses annotation to override the default agent configuration, such as `service_name`. In addition, when using `spring cloud gateway`, we need to add the `spring cloud gateway` plugin to the agent configuration.
+
+> Notice! Before using the annotation to override the agent configuration, you need to add `strategy.skywalking.apache.org/agent.Overlay: "true"` to make the override take effect.
+
+```yaml
+apiVersion: apps/v1
+kind: Deployment
+metadata:
+ labels:
+ app: demo-gateway
+ name: demo-gateway
+ namespace: gateway-system
+spec:
+ selector:
+ matchLabels:
+ app: demo-gateway
+ template:
+ metadata:
+ labels:
+ swck-java-agent-injected: "true"
+ app: demo-gateway
+ annotations:
+ strategy.skywalking.apache.org/agent.Overlay: "true"
+ agent.skywalking.apache.org/agent.service_name: "gateway-service"
+ optional.skywalking.apache.org: "cloud-gateway-3.x" # add spring cloud gateway plugin
+ spec:
+ containers:
+ - image: gateway:v0.0.1
+ name: gateway
+ command: ["java"]
+ args: ["-jar","/gateway.jar"]
+---
+apiVersion: v1
+kind: Service
+metadata:
+ name: service-gateway
+ namespace: gateway-system
+spec:
+ type: ClusterIP
+ ports:
+ - name: 9999-tcp
+ port: 9999
+ protocol: TCP
+ targetPort: 9999
+ selector:
+ app: demo-gateway
+```
+
+4. Deploy a `spring cloud gateway` application in the `gateway-system` namespace.
+
+```sh
+$ kubectl apply -f springgateway.yaml
+```
+
+5. Check for deployment.
+
+```sh
+$ kubectl get pod -n gateway-system
+NAME READY STATUS RESTARTS AGE
+demo-gateway-5bb77f6d85-9j7c6 1/1 Running 0 15s
+```
+
+6. Get the finnal injected java agent configuration through `JavaAgent`.
+
+```sh
+$ kubectl get javaagent -n gateway-system
+NAME PODSELECTOR SERVICENAME BACKENDSERVICE
+app-demo-gateway-javaagent app=demo-gateway gateway-service default-oap.default:11800
+```
+
+
+
+## 5. Verify the injector
+
+1. After completing the above steps, we can view detailed state of the injected pod, like the injected `agent` container.
+
+```sh
+# get all injected pod
+$ kubectl get pod -A -lswck-java-agent-injected=true
+NAMESPACE NAME READY STATUS RESTARTS AGE
+gateway-system demo-gateway-5bb77f6d85-lt4z7 1/1 Running 0 69s
+springboot-system demo-springboot-7c89f79885-lkb5j 1/1 Running 0 75s
+
+# view detailed state of the injected pod [demo-springboot]
+$ kubectl describe pod -l app=demo-springboot -n springboot-system
+...
+Events:
+ Type Reason Age From Message
+ ---- ------ ---- ---- -------
+ ...
+ Normal Created 91s kubelet,kind-control-plane Created container inject-skywalking-agent
+ Normal Started 91s kubelet,kind-control-plane Started container inject-skywalking-agent
+ ...
+ Normal Created 90s kubelet,kind-control-plane Created container springboot
+ Normal Started 90s kubelet,kind-control-plane Started container springboot
+
+# view detailed state of the injected pod [demo-gateway]
+$ kubectl describe pod -l app=demo-gateway -n gateway-system
+...
+Events:
+ Type Reason Age From Message
+ ---- ------ ---- ---- -------
+ ...
+ Normal Created 2m20s kubelet,kind-control-plane Created container inject-skywalking-agent
+ Normal Started 2m20s kubelet,kind-control-plane Started container inject-skywalking-agent
+ ...
+ Normal Created 2m20s kubelet,kind-control-plane Created container gateway
+ Normal Started 2m20s kubelet,kind-control-plane Started container gateway
+```
+
+2. Now we can expose the service and watch the data displayed on the web. First of all, we need to get the `gateway` service and the `ui` service as follows.
+
+```sh
+$ kubectl get service service-gateway -n gateway-system
+NAME TYPE CLUSTER-IP EXTERNAL-IP PORT(S) AGE
+service-gateway ClusterIP 10.99.181.145 <none> 9999/TCP 9m19s
+
+$ kubectl get service default-ui
+NAME TYPE CLUSTER-IP EXTERNAL-IP PORT(S) AGE
+default-ui ClusterIP 10.111.39.250 <none> 80/TCP 82m
+```
+
+3. Then open two terminals to expose the service: `service-gateway`、`default-ui`.
+
+```sh
+$ kubectl port-forward service/service-gateway -n gateway-system 9999:9999
+Forwarding from 127.0.0.1:9999 -> 9999
+Forwarding from [::1]:9999 -> 9999
+```
+
+```sh
+$ kubectl port-forward service/default-ui 8090:80
+Forwarding from 127.0.0.1:8090 -> 8080
+Forwarding from [::1]:8090 -> 8080
+```
+
+4. Use the following commands to access the `spring boot` demo 10 times through the `spring cloud gateway` service.
+
+```sh
+$ for i in {1..10}; do curl http://127.0.0.1:9999/gateway/hello && echo ""; done
+Hello World!
+Hello World!
+Hello World!
+Hello World!
+Hello World!
+Hello World!
+Hello World!
+Hello World!
+Hello World!
+Hello World!
+```
+
+5. We can see the Dashboard by accessing `http://127.0.0.1:8090`.
+
+
+
+6. All services' topology is shown below.
+
+
+
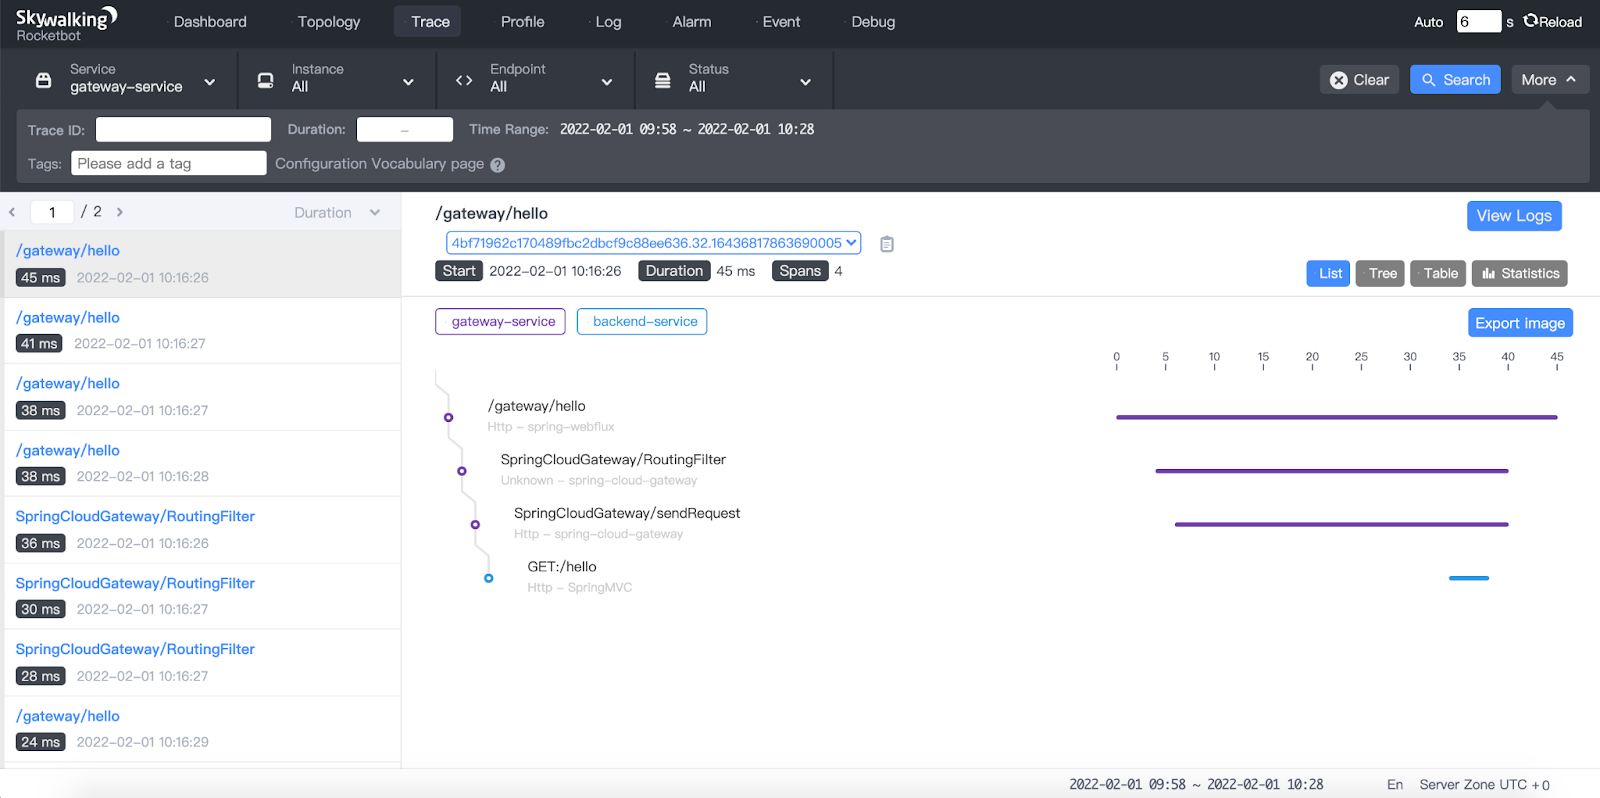
+7. We can see the trace information of `gateway-service`.
+
+
+
+8. We can see the trace information of `backend-service`.
+
+
+
+
+
+## 6. Concluding remarks
+
+If your application is deployed in the Kubernetes platform and requires Skywalking to provide monitoring services, SWCK can help you deploy, upgrade and maintain the Skywalking components in the Kubernetes cluster. In addition to this blog, you can also view [swck document](https://github.com/apache/skywalking-swck/blob/master/docs/operator.md#operator-Usage-Guide) and [Java agent injector documentation](https://github.com/apache/skywalking-swck/blob/master/docs/java-agent-injector.md) f [...]
+
diff --git a/content/blog/2022-04-19-How-to-use-the-java-agent-injector?/topology.png b/content/blog/2022-04-19-How-to-use-the-java-agent-injector?/topology.png
new file mode 100644
index 0000000000..d4a4cabb9f
Binary files /dev/null and b/content/blog/2022-04-19-How-to-use-the-java-agent-injector?/topology.png differ
diff --git a/content/zh/2022-04-19-How-to-use-the-java-agent-injector?/backend.png b/content/zh/2022-04-19-How-to-use-the-java-agent-injector?/backend.png
new file mode 100644
index 0000000000..f8788d97eb
Binary files /dev/null and b/content/zh/2022-04-19-How-to-use-the-java-agent-injector?/backend.png differ
diff --git a/content/zh/2022-04-19-How-to-use-the-java-agent-injector?/dashboard.png b/content/zh/2022-04-19-How-to-use-the-java-agent-injector?/dashboard.png
new file mode 100644
index 0000000000..83addaabf9
Binary files /dev/null and b/content/zh/2022-04-19-How-to-use-the-java-agent-injector?/dashboard.png differ
diff --git a/content/zh/2022-04-19-How-to-use-the-java-agent-injector?/gateway.png b/content/zh/2022-04-19-How-to-use-the-java-agent-injector?/gateway.png
new file mode 100644
index 0000000000..90717aef84
Binary files /dev/null and b/content/zh/2022-04-19-How-to-use-the-java-agent-injector?/gateway.png differ
diff --git a/content/zh/2022-04-19-How-to-use-the-java-agent-injector?/index.md b/content/zh/2022-04-19-How-to-use-the-java-agent-injector?/index.md
new file mode 100644
index 0000000000..cf7722e0f6
--- /dev/null
+++ b/content/zh/2022-04-19-How-to-use-the-java-agent-injector?/index.md
@@ -0,0 +1,500 @@
+---
+title: "如何使用java探针注入器?"
+date: 2022-04-19
+author: 曹野,高洪涛
+description: 本文介绍如何快速入手基于SWCK的java探针注入器。
+zh_tags:
+- User Manual
+---
+
+### 目录
+
+1. [介绍](#1.-介绍)
+2. [主要特点](#2.-主要特点)
+3. [安装SWCK](#3.-安装SWCK)
+4. [部署demo应用](#4.-部署demo应用)
+5. [验证注入器](#5.-验证注入器)
+6. [结束语](#6.-结束语)
+
+
+
+## 1. 介绍
+
+
+
+### 1.1 SWCK 是什么?
+
+[SWCK](https://github.com/apache/skywalking-swck)是部署在 Kubernetes 环境中,为 Skywalking 用户提供服务的平台,用户可以基于该平台使用、升级和维护 SkyWalking 相关组件。
+
+实际上,SWCK 是基于 [kubebuilder](https://book.kubebuilder.io/) 开发的Operator,为用户提供自定义资源( CR )以及管理资源的控制器( Controller ),所有的自定义资源定义(CRD)如下所示:
+
+- [JavaAgent](https://github.com/apache/skywalking-swck/blob/master/docs/operator.md#javaagent)
+- [OAP](https://github.com/apache/skywalking-swck/blob/master/docs/operator.md#oap)
+- [UI](https://github.com/apache/skywalking-swck/blob/master/docs/operator.md#ui)
+- [Storage](https://github.com/apache/skywalking-swck/blob/master/docs/operator.md#storage)
+- [Satellite](https://github.com/apache/skywalking-swck/blob/master/docs/operator.md#satellite)
+- [Fetcher](https://github.com/apache/skywalking-swck/blob/master/docs/operator.md#fetcher)
+
+
+
+### 1.2 java 探针注入器是什么?
+
+对于 java 应用来说,用户需要将 java 探针注入到应用程序中获取元数据并发送到 Skywalking 后端。为了让用户在 Kubernetes 平台上更原生地使用 java 探针,我们提供了 java 探针注入器,该注入器能够将 java 探针通过 sidecar 方式注入到应用程序所在的 pod 中。 java 探针注入器实际上是一个[Kubernetes Mutation Webhook控制器](https://kubernetes.io/docs/reference/access-authn-authz/admission-controllers/),如果请求中存在 [annotations](https://kubernetes.io/docs/concepts/overview/working-with-objects/annotations/) ,控制器会拦截 pod 事件并将其应用于 pod 上。
+
+
+
+## 2. 主要特点
+
+- **透明性**。用户应用一般运行在普通容器中而 java 探针则运行在初始化容器中,且两者都属于同一个 pod 。该 pod 中的每个容器都会挂载一个共享内存卷,为 java 探针提供存储路径。在 pod 启动时,初始化容器中的 java 探针会先于应用容器运行,由注入器将其中的探针文件存放在共享内存卷中。在应用容器启动时,注入器通过设置 JVM 参数将探针文件注入到应用程序中。用户可以通过这种方式实现 java 探针的注入,而无需重新构建包含 java 探针的容器镜像。
+- **可配置性**。注入器提供两种方式配置 java 探针:全局配置和自定义配置。默认的全局配置存放在 [configmap](https://kubernetes.io/docs/concepts/configuration/configmap/) 中,用户可以根据需求修改全局配置,比如修改 `backend_service` 的地址。此外,用户也能通过 annotation 为特定应用设置自定义的一些配置,比如不同服务的 `service_name` 名称。详情可见 [java探针说明书](https://github.com/apache/skywalking-swck/blob/master/docs/java-agent-injector.md)。
+- **可观察性**。每个 java 探针在被注入时,用户可以查看名为 `JavaAgent` 的 CRD 资源,用于观测注入后的 java 探针配置。详情可见 [JavaAgent说明](https://github.com/apache/skywalking-swck/blob/master/docs/javaagent.md)。
+
+
+
+## 3. 安装SWCK
+
+在接下来的几个步骤中,我们将演示如何从0开始搭建单机版的 Kubernetes 集群,并在该平台部署0.6.1版本的 SWCK。
+
+
+
+### 3.1 工具准备
+
+首先,你需要安装一些必要的工具,如下所示:
+
+1. [kind](http://kind.sigs.k8s.io),用于创建单机版 Kubernetes集群。
+2. [kubectl](https://kubernetes.io/docs/tasks/tools/),用于和Kubernetes 集群交互。
+
+
+
+### 3.2 搭建单机版 Kubernetes集群
+
+在安装完 [kind](http://kind.sigs.k8s.io) 工具后,可通过如下命令创建一个单机集群。
+
+> 注意!如果你的终端配置了代理,在运行以下命令之前最好先关闭代理,防止一些意外错误的发生。
+
+```sh
+$ kind create cluster --image=kindest/node:v1.19.1
+```
+
+在集群创建完毕后,可获得如下的pod信息。
+
+```sh
+$ kubectl get pod -A
+NAMESPACE NAME READY STATUS RESTARTS AGE
+kube-system coredns-f9fd979d6-57xpc 1/1 Running 0 7m16s
+kube-system coredns-f9fd979d6-8zj8h 1/1 Running 0 7m16s
+kube-system etcd-kind-control-plane 1/1 Running 0 7m23s
+kube-system kindnet-gc9gt 1/1 Running 0 7m16s
+kube-system kube-apiserver-kind-control-plane 1/1 Running 0 7m23s
+kube-system kube-controller-manager-kind-control-plane 1/1 Running 0 7m23s
+kube-system kube-proxy-6zbtb 1/1 Running 0 7m16s
+kube-system kube-scheduler-kind-control-plane 1/1 Running 0 7m23s
+local-path-storage local-path-provisioner-78776bfc44-jwwcs 1/1 Running 0 7m16s
+```
+
+
+
+### 3.3 安装证书管理器(cert-manger)
+
+ SWCK 的证书都是由证书管理器分发和验证,需要先通过如下命令安装[证书管理器cert-manger](https://cert-manager.io/docs/)。
+
+```sh
+$ kubectl apply -f https://github.com/jetstack/cert-manager/releases/download/v1.3.1/cert-manager.yaml
+```
+
+验证 cert-manger 是否安装成功。
+
+```sh
+$ kubectl get pod -n cert-manager
+NAME READY STATUS RESTARTS AGE
+cert-manager-7dd5854bb4-slcmd 1/1 Running 0 73s
+cert-manager-cainjector-64c949654c-tfmt2 1/1 Running 0 73s
+cert-manager-webhook-6bdffc7c9d-h8cfv 1/1 Running 0 73s
+```
+
+
+
+### 3.4 安装SWCK
+
+ java 探针注入器是 SWCK 中的一个组件,首先需要按照如下步骤安装 SWCK:
+
+1. 输入如下命令获取 SWCK 的 yaml 文件并部署在 Kubernetes 集群中。
+
+```sh
+$ curl -Ls https://archive.apache.org/dist/skywalking/swck/0.6.1/skywalking-swck-0.6.1-bin.tgz | tar -zxf - -O ./config/operator-bundle.yaml | kubectl apply -f -
+```
+
+2. 检查 SWCK 是否正常运行。
+
+```sh
+$ kubectl get pod -n skywalking-swck-system
+NAME READY STATUS RESTARTS AGE
+skywalking-swck-controller-manager-7f64f996fc-qh8s9 2/2 Running 0 94s
+```
+
+
+
+### 3.5 安装 Skywalking 组件 — OAPServer 和 UI
+
+1. 在 `default` 命名空间中部署 OAPServer 组件和 UI 组件。
+
+```sh
+$ kubectl apply -f https://raw.githubusercontent.com/apache/skywalking-swck/master/operator/config/samples/default.yaml
+```
+
+2. 查看 OAPServer 组件部署情况。
+
+```sh
+$ kubectl get oapserver
+NAME INSTANCES RUNNING ADDRESS
+default 1 1 default-oap.default
+```
+
+3. 查看 UI 组件部署情况。
+
+```sh
+$ kubectl get ui
+NAME INSTANCES RUNNING INTERNALADDRESS EXTERNALIPS PORTS
+default 1 1 default-ui.default [80]
+```
+
+
+
+## 4. 部署demo应用
+
+在第3个步骤中,我们已经安装好 SWCK 以及相关的 Skywalking 组件,接下来按照全局配置以及自定义配置两种方式,通过两个 java 应用实例,分别演示如何使用 SWCK 中的 java 探针注入器。
+
+
+
+### 4.1 设置全局配置
+
+当 SWCK 安装完成后,默认的全局配置就会以 configmap 的形式存储在系统命令空间中,可通过如下命令查看。
+
+```sh
+$ kubectl get configmap skywalking-swck-java-agent-configmap -n skywalking-swck-system -oyaml
+apiVersion: v1
+data:
+ agent.config: |-
+ # The service name in UI
+ agent.service_name=${SW_AGENT_NAME:Your_ApplicationName}
+
+ # Backend service addresses.
+ collector.backend_service=${SW_AGENT_COLLECTOR_BACKEND_SERVICES:127.0.0.1:11800}
+
+ # Please refer to https://skywalking.apache.org/docs/skywalking-java/latest/en/setup/service-agent/java-agent/configurations/#table-of-agent-configuration-properties to get more details.
+```
+
+在 `kind` 创建的 Kubernetes 集群中, SkyWalking 后端地址和 configmap 中指定的地址可能不同,我们需要使用真正的 OAPServer 组件的地址 `default-oap.default` 来代替默认的 `127.0.0.1` ,可通过修改 configmap 实现。
+
+```sh
+$ kubectl edit configmap skywalking-swck-java-agent-configmap -n skywalking-swck-system
+configmap/skywalking-swck-java-agent-configmap edited
+
+$ kubectl get configmap skywalking-swck-java-agent-configmap -n skywalking-swck-system -oyaml
+apiVersion: v1
+data:
+ agent.config: |-
+ # The service name in UI
+ agent.service_name=${SW_AGENT_NAME:Your_ApplicationName}
+
+ # Backend service addresses.
+ collector.backend_service=${SW_AGENT_COLLECTOR_BACKEND_SERVICES:default-oap.default:11800}
+
+ # Please refer to https://skywalking.apache.org/docs/skywalking-java/latest/en/setup/service-agent/java-agent/configurations/#table-of-agent-configuration-properties to get more details.
+```
+
+
+
+### 4.2 设置自定义配置
+
+在实际使用场景中,我们需要使用 Skywalking 组件监控不同的 java 应用,因此不同应用的探针配置可能有所不同,比如应用的名称、应用需要使用的插件等。为了支持自定义配置,注入器提供 annotation 来覆盖默认的全局配置。接下来我们将分别以基于 `spring boot` 以及 `spring cloud gateway` 开发的两个简单java应用为例进行详细说明,你可以使用这两个应用的[源代码](https://github.com/dashanji/swck-spring-cloud-k8s-demo)构建镜像。
+
+```sh
+# build the springboot and springcloudgateway image
+$ git clone https://github.com/dashanji/swck-spring-cloud-k8s-demo
+$ cd swck-spring-cloud-k8s-demo && make
+
+# check the image
+$ docker images
+REPOSITORY TAG IMAGE ID CREATED SIZE
+gateway v0.0.1 51d16251c1d5 48 minutes ago 723MB
+app v0.0.1 62f4dbcde2ed 48 minutes ago 561MB
+
+# load the image into the cluster
+$ kind load docker-image app:v0.0.1 && kind load docker-image gateway:v0.0.1
+```
+
+
+
+### 4.3 部署 spring boot 应用
+
+1. 创建 `springboot-system` 命名空间。
+
+```sh
+$ kubectl create namespace springboot-system
+```
+
+2. 给 `springboot-system` 命名空间打上标签使能 java 探针注入器。
+
+```sh
+$ kubectl label namespace springboot-system swck-injection=enabled
+```
+
+3. 接下来为 spring boot 应用对应的部署文件 `springboot.yaml` ,其中使用了 annotation 覆盖默认的探针配置,比如 `service_name` ,将其覆盖为 `backend-service` 。
+
+> 需要注意的是,在使用 annotation 覆盖探针配置之前,需要增加 `strategy.skywalking.apache.org/agent.Overlay: "true"` 来使覆盖生效。
+
+```yaml
+apiVersion: apps/v1
+kind: Deployment
+metadata:
+ name: demo-springboot
+ namespace: springboot-system
+spec:
+ selector:
+ matchLabels:
+ app: demo-springboot
+ template:
+ metadata:
+ labels:
+ swck-java-agent-injected: "true" # enable the java agent injector
+ app: demo-springboot
+ annotations:
+ strategy.skywalking.apache.org/agent.Overlay: "true" # enable the agent overlay
+ agent.skywalking.apache.org/agent.service_name: "backend-service"
+ spec:
+ containers:
+ - name: springboot
+ imagePullPolicy: IfNotPresent
+ image: app:v0.0.1
+ command: ["java"]
+ args: ["-jar","/app.jar"]
+---
+apiVersion: v1
+kind: Service
+metadata:
+ name: demo
+ namespace: springboot-system
+spec:
+ type: ClusterIP
+ ports:
+ - name: 8085-tcp
+ port: 8085
+ protocol: TCP
+ targetPort: 8085
+ selector:
+ app: demo-springboot
+```
+
+4. 在 `springboot-system` 命名空间中部署 `spring boot` 应用。
+
+```sh
+$ kubectl apply -f springboot.yaml
+```
+
+5. 查看部署情况。
+
+```sh
+$ kubectl get pod -n springboot-system
+NAME READY STATUS RESTARTS AGE
+demo-springboot-7c89f79885-dvk8m 1/1 Running 0 11s
+```
+
+6. 通过 `JavaAgent` 查看最终注入的 java 探针配置。
+
+```sh
+$ kubectl get javaagent -n springboot-system
+NAME PODSELECTOR SERVICENAME BACKENDSERVICE
+app-demo-springboot-javaagent app=demo-springboot backend-service default-oap.default:11800
+```
+
+
+
+### 4.4 部署 spring cloud gateway 应用
+
+1. 创建 `gateway-system` 命名空间。
+
+```sh
+$ kubectl create namespace gateway-system
+```
+
+2. 给 `gateway-system` 命名空间打上标签使能 java 探针注入器。
+
+```sh
+$ kubectl label namespace gateway-system swck-injection=enabled
+```
+
+3. 接下来为 spring cloud gateway 应用对应的部署文件 `springgateway.yaml` ,其中使用了 annotation 覆盖默认的探针配置,比如 `service_name` ,将其覆盖为 `gateway-service` 。此外,在使用 `spring cloud gateway` 时,我们需要在探针配置中添加 `spring cloud gateway` 插件。
+
+> 需要注意的是,在使用 annotation 覆盖探针配置之前,需要增加 `strategy.skywalking.apache.org/agent.Overlay: "true"` 来使覆盖生效。
+
+```yaml
+apiVersion: apps/v1
+kind: Deployment
+metadata:
+ labels:
+ app: demo-gateway
+ name: demo-gateway
+ namespace: gateway-system
+spec:
+ selector:
+ matchLabels:
+ app: demo-gateway
+ template:
+ metadata:
+ labels:
+ swck-java-agent-injected: "true"
+ app: demo-gateway
+ annotations:
+ strategy.skywalking.apache.org/agent.Overlay: "true"
+ agent.skywalking.apache.org/agent.service_name: "gateway-service"
+ optional.skywalking.apache.org: "cloud-gateway-3.x" # add spring cloud gateway plugin
+ spec:
+ containers:
+ - image: gateway:v0.0.1
+ name: gateway
+ command: ["java"]
+ args: ["-jar","/gateway.jar"]
+---
+apiVersion: v1
+kind: Service
+metadata:
+ name: service-gateway
+ namespace: gateway-system
+spec:
+ type: ClusterIP
+ ports:
+ - name: 9999-tcp
+ port: 9999
+ protocol: TCP
+ targetPort: 9999
+ selector:
+ app: demo-gateway
+```
+
+4. 在 `gateway-system` 命名空间中部署 `spring cloud gateway` 应用。
+
+```sh
+$ kubectl apply -f springgateway.yaml
+```
+
+5. 查看部署情况。
+
+```sh
+$ kubectl get pod -n gateway-system
+NAME READY STATUS RESTARTS AGE
+demo-gateway-758899c99-6872s 1/1 Running 0 15s
+```
+
+6. 通过 `JavaAgent` 获取最终注入的java探针配置。
+
+```sh
+$ kubectl get javaagent -n gateway-system
+NAME PODSELECTOR SERVICENAME BACKENDSERVICE
+app-demo-gateway-javaagent app=demo-gateway gateway-service default-oap.default:11800
+```
+
+
+
+## 5. 验证注入器
+
+1. 当完成上述步骤后,我们可以查看被注入pod的详细状态,比如被注入的`agent`容器。
+
+```sh
+# get all injected pod
+$ kubectl get pod -A -lswck-java-agent-injected=true
+NAMESPACE NAME READY STATUS RESTARTS AGE
+gateway-system demo-gateway-5bb77f6d85-lt4z7 1/1 Running 0 69s
+springboot-system demo-springboot-7c89f79885-lkb5j 1/1 Running 0 75s
+
+# view detailed state of the injected pod [demo-springboot]
+$ kubectl describe pod -l app=demo-springboot -n springboot-system
+...
+Events:
+ Type Reason Age From Message
+ ---- ------ ---- ---- -------
+ ...
+ Normal Created 91s kubelet,kind-control-plane Created container inject-skywalking-agent
+ Normal Started 91s kubelet,kind-control-plane Started container inject-skywalking-agent
+ ...
+ Normal Created 90s kubelet,kind-control-plane Created container springboot
+ Normal Started 90s kubelet,kind-control-plane Started container springboot
+
+# view detailed state of the injected pod [demo-gateway]
+$ kubectl describe pod -l app=demo-gateway -n gateway-system
+...
+Events:
+ Type Reason Age From Message
+ ---- ------ ---- ---- -------
+ ...
+ Normal Created 2m20s kubelet,kind-control-plane Created container inject-skywalking-agent
+ Normal Started 2m20s kubelet,kind-control-plane Started container inject-skywalking-agent
+ ...
+ Normal Created 2m20s kubelet,kind-control-plane Created container gateway
+ Normal Started 2m20s kubelet,kind-control-plane Started container gateway
+```
+
+2. 现在我们可以将服务绑定在某个端口上并通过 web 浏览器查看采样数据。首先,我们需要通过以下命令获取`gateway`服务和`ui`服务的信息。
+
+```sh
+$ kubectl get service service-gateway -n gateway-system
+NAME TYPE CLUSTER-IP EXTERNAL-IP PORT(S) AGE
+service-gateway ClusterIP 10.99.181.145 <none> 9999/TCP 9m19s
+
+$ kubectl get service default-ui
+NAME TYPE CLUSTER-IP EXTERNAL-IP PORT(S) AGE
+default-ui ClusterIP 10.111.39.250 <none> 80/TCP 82m
+```
+
+3. 接下来分别启动2个终端将`service-gateway` 以及 `default-ui` 绑定到本地端口上,如下所示:
+
+```sh
+$ kubectl port-forward service/service-gateway -n gateway-system 9999:9999
+Forwarding from 127.0.0.1:9999 -> 9999
+Forwarding from [::1]:9999 -> 9999
+```
+
+```sh
+$ kubectl port-forward service/default-ui 8090:80
+Forwarding from 127.0.0.1:8090 -> 8080
+Forwarding from [::1]:8090 -> 8080
+```
+
+4. 使用以下命令通过`spring cloud gateway` 网关服务暴露的端口来访问 `spring boot` 应用服务。
+
+```sh
+$ for i in {1..10}; do curl http://127.0.0.1:9999/gateway/hello && echo ""; done
+Hello World!
+Hello World!
+Hello World!
+Hello World!
+Hello World!
+Hello World!
+Hello World!
+Hello World!
+Hello World!
+Hello World!
+```
+
+5. 我们可以在 web 浏览器中输入 `http://127.0.0.1:8090` 来访问探针采集到的数据。
+
+
+
+6. 所有服务的拓扑图如下所示。
+
+
+
+7. 查看 `gateway-service` 网关服务的 trace 信息。
+
+
+
+8. 查看 `backend-service` 应用服务的 trace 信息。
+
+
+
+
+
+## 6. 结束语
+
+如果你的应用部署在 Kubernetes 平台中,且需要 Skywalking 提供监控服务, SWCK 能够帮助你部署、升级和维护 Kubernetes 集群中的 Skywalking 组件。除了本篇博客外,你还可以查看 [SWCK文档](https://github.com/apache/skywalking-swck/blob/master/docs/operator.md#operator-usage-guide) 以及 [java探针注入器文档](https://github.com/apache/skywalking-swck/blob/master/docs/java-agent-injector.md) 获取更多的信息。如果你觉得这个项目好用,请给 [SWCK](https://github.com/apache/skywalking-swck) 一个star! 如果你有任何疑问,欢迎在[Issues](https://github.com/apache/skywalking/issues)或者[Discussions](https://github.c [...]
+
diff --git a/content/zh/2022-04-19-How-to-use-the-java-agent-injector?/topology.png b/content/zh/2022-04-19-How-to-use-the-java-agent-injector?/topology.png
new file mode 100644
index 0000000000..d4a4cabb9f
Binary files /dev/null and b/content/zh/2022-04-19-How-to-use-the-java-agent-injector?/topology.png differ