You are viewing a plain text version of this content. The canonical link for it is here.
Posted to commits@iotdb.apache.org by ca...@apache.org on 2024/08/15 06:42:04 UTC
(iotdb-docs) branch main updated: Modify document content sequence number
This is an automated email from the ASF dual-hosted git repository.
caogaofei pushed a commit to branch main
in repository https://gitbox.apache.org/repos/asf/iotdb-docs.git
The following commit(s) were added to refs/heads/main by this push:
new 1aa2051 Modify document content sequence number
1aa2051 is described below
commit 1aa205154598c1dac5b9cf3ea81ba47470f725c9
Author: majialin <10...@users.noreply.github.com>
AuthorDate: Thu Aug 15 14:41:58 2024 +0800
Modify document content sequence number
---
.../Master/API/Programming-CSharp-Native-API.md | 112 ++++++++++-----------
.../Master/API/Programming-Cpp-Native-API.md | 38 +++----
src/UserGuide/Master/API/Programming-MQTT.md | 68 ++++++-------
src/UserGuide/Master/API/RestServiceV1.md | 84 +++++++---------
src/UserGuide/Master/API/RestServiceV2.md | 10 +-
.../Basic-Concept/Encoding-and-Compression.md | 47 +++++----
.../AINode_Deployment_timecho.md | 38 +++----
.../Cluster-Deployment.md | 10 +-
.../Cluster-Deployment_timecho.md | 12 +--
.../Docker-Deployment.md | 30 +++---
.../Docker-Deployment_timecho.md | 42 ++++----
.../Monitoring-panel-deployment.md | 60 +++++------
.../Ignition-IoTDB-plugin_timecho.md | 20 ++--
.../Master/FAQ/Frequently-asked-questions.md | 48 ++++-----
.../Master/QuickStart/ClusterQuickStart.md | 30 +++---
src/UserGuide/Master/User-Manual/AINode_timecho.md | 42 ++++----
.../Master/User-Manual/IoTDB-View_timecho.md | 58 +++++------
src/UserGuide/Master/User-Manual/Trigger.md | 10 +-
.../latest/API/Programming-CSharp-Native-API.md | 16 +--
.../latest/API/Programming-Cpp-Native-API.md | 38 +++----
src/UserGuide/latest/API/Programming-MQTT.md | 18 ++--
src/UserGuide/latest/API/RestServiceV1.md | 66 ++++++------
src/UserGuide/latest/API/RestServiceV2.md | 10 +-
.../Basic-Concept/Encoding-and-Compression.md | 47 +++++----
.../AINode_Deployment_timecho.md | 38 +++----
.../Cluster-Deployment.md | 12 +--
.../Cluster-Deployment_timecho.md | 14 +--
.../Docker-Deployment.md | 30 +++---
.../Docker-Deployment_timecho.md | 40 ++++----
.../Monitoring-panel-deployment.md | 60 +++++------
.../Stand-Alone-Deployment.md | 10 +-
.../Stand-Alone-Deployment_timecho.md | 12 +--
.../Ignition-IoTDB-plugin_timecho.md | 20 ++--
.../latest/FAQ/Frequently-asked-questions.md | 48 ++++-----
.../latest/QuickStart/ClusterQuickStart.md | 30 +++---
src/UserGuide/latest/User-Manual/AINode_timecho.md | 42 ++++----
.../latest/User-Manual/IoTDB-View_timecho.md | 58 +++++------
src/UserGuide/latest/User-Manual/Trigger.md | 10 +-
.../Master/API/Programming-CSharp-Native-API.md | 16 +--
.../Master/API/Programming-Cpp-Native-API.md | 27 +++--
src/zh/UserGuide/Master/API/Programming-MQTT.md | 18 ++--
src/zh/UserGuide/Master/API/RestServiceV1.md | 110 +++++++++-----------
src/zh/UserGuide/Master/API/RestServiceV2.md | 88 ++++++++--------
.../Basic-Concept/Encoding-and-Compression.md | 49 +++++----
.../AINode_Deployment_timecho.md | 38 +++----
.../Cluster-Deployment.md | 10 +-
.../Cluster-Deployment_timecho.md | 12 +--
.../Docker-Deployment.md | 30 +++---
.../Docker-Deployment_timecho.md | 40 ++++----
.../Monitoring-panel-deployment.md | 60 +++++------
.../Stand-Alone-Deployment.md | 10 +-
.../Stand-Alone-Deployment_timecho.md | 12 +--
.../Ignition-IoTDB-plugin_timecho.md | 20 ++--
.../Master/FAQ/Frequently-asked-questions.md | 48 ++++-----
.../Master/QuickStart/ClusterQuickStart.md | 30 +++---
.../UserGuide/Master/User-Manual/AINode_timecho.md | 43 ++++----
.../Master/User-Manual/IoTDB-View_timecho.md | 58 +++++------
.../latest/API/Programming-CSharp-Native-API.md | 16 +--
.../latest/API/Programming-Cpp-Native-API.md | 25 +++--
src/zh/UserGuide/latest/API/Programming-MQTT.md | 18 ++--
src/zh/UserGuide/latest/API/RestServiceV1.md | 94 ++++++++---------
src/zh/UserGuide/latest/API/RestServiceV2.md | 88 ++++++++--------
.../Basic-Concept/Encoding-and-Compression.md | 49 +++++----
.../AINode_Deployment_timecho.md | 38 +++----
.../Cluster-Deployment.md | 10 +-
.../Cluster-Deployment_timecho.md | 12 +--
.../Docker-Deployment.md | 30 +++---
.../Docker-Deployment_timecho.md | 40 ++++----
.../Monitoring-panel-deployment.md | 60 +++++------
.../Stand-Alone-Deployment.md | 10 +-
.../Stand-Alone-Deployment_timecho.md | 12 +--
.../Ignition-IoTDB-plugin_timecho.md | 20 ++--
.../latest/FAQ/Frequently-asked-questions.md | 48 ++++-----
.../latest/QuickStart/ClusterQuickStart.md | 30 +++---
.../UserGuide/latest/User-Manual/AINode_timecho.md | 42 ++++----
.../latest/User-Manual/IoTDB-View_timecho.md | 58 +++++------
76 files changed, 1380 insertions(+), 1417 deletions(-)
diff --git a/src/UserGuide/Master/API/Programming-CSharp-Native-API.md b/src/UserGuide/Master/API/Programming-CSharp-Native-API.md
index c6ad62c..12d431a 100644
--- a/src/UserGuide/Master/API/Programming-CSharp-Native-API.md
+++ b/src/UserGuide/Master/API/Programming-CSharp-Native-API.md
@@ -21,8 +21,6 @@
# C# Native API
-The Git repository for the C# Native API client is located [here](https://github.com/apache/iotdb-client-csharp/)
-
## Installation
### Install from NuGet Package
@@ -33,7 +31,7 @@ We have prepared Nuget Package for C# users. Users can directly install the clie
dotnet add package Apache.IoTDB
```
-Note that the `Apache.IoTDB` package only supports versions of the `.net framework 4.6.1` greater than `4.6.1`.
+Note that the `Apache.IoTDB` package only supports versions greater than `.net framework 4.6.1`.
## Prerequisites
@@ -42,9 +40,9 @@ Note that the `Apache.IoTDB` package only supports versions of the `.net framewo
## How to Use the Client (Quick Start)
-Users can quickly get started by referring to the use cases under the [Apache-IoTDB-Client-CSharp-UserCase](https://github.com/apache/iotdb-client-csharp/tree/main/Apache-IoTDB-Client-CSharp-UserCase) directory in the [iotdb-client-csharp Git repository](https://github.com/apache/iotdb-client-csharp). These use cases serve as a useful resource for getting familiar with the client's functionality and capabilities.
+Users can quickly get started by referring to the use cases under the Apache-IoTDB-Client-CSharp-UserCase directory. These use cases serve as a useful resource for getting familiar with the client's functionality and capabilities.
-For those who wish to delve deeper into the client's usage and explore more advanced features, the [samples](https://github.com/apache/iotdb-client-csharp/tree/main/samples/Apache.IoTDB.Samples) directory in the same repository contains additional code samples.
+For those who wish to delve deeper into the client's usage and explore more advanced features, the samples directory contains additional code samples.
## Developer environment requirements for iotdb-client-csharp
@@ -103,32 +101,32 @@ await session_pool.InsertTabletAsync(tablet);
await session_pool.Close();
```
-### **Row Record**
+## **Row Record**
- Encapsulate and abstract the `record` data in **IoTDB**
- e.g.
-| timestamp | status | temperature |
-| --------- | ------ | ----------- |
-| 1 | 0 | 20 |
+ | timestamp | status | temperature |
+ | --------- | ------ | ----------- |
+ | 1 | 0 | 20 |
- Construction:
```csharp
var rowRecord =
- new RowRecord(long timestamp, List<object> values, List<string> measurements);
+ new RowRecord(long timestamps, List<object> values, List<string> measurements);
```
### **Tablet**
-- A data structure similar to a table, containing several non-empty data blocks of a device's rows。
+- A data structure similar to a table, containing several non empty data blocks of a device's rows。
- e.g.
-| time | status | temperature |
-| ---- | ------ | ----------- |
-| 1 | 0 | 20 |
-| 2 | 0 | 20 |
-| 3 | 3 | 21 |
+ | time | status | temperature |
+ | ---- | ------ | ----------- |
+ | 1 | 0 | 20 |
+ | 2 | 0 | 20 |
+ | 3 | 3 | 21 |
- Construction:
@@ -137,59 +135,61 @@ var tablet =
Tablet(string deviceId, List<string> measurements, List<List<object>> values, List<long> timestamps);
```
+
+
## **API**
### **Basic API**
-| api name | parameters | notes | use example |
-| -------------- | ------------------------- | ------------------------ |------------------------------------|
-| Open | bool | open session | session_pool.Open(false) |
-| Close | null | close session | session_pool.Close() |
-| IsOpen | null | check if session is open | session_pool.IsOpen() |
-| OpenDebugMode | LoggingConfiguration=null | open debug mode | session_pool.OpenDebugMode() |
-| CloseDebugMode | null | close debug mode | session_pool.CloseDebugMode() |
-| SetTimeZone | string | set time zone | session_pool.SetTimeZone("+08:00") |
-| GetTimeZone | null | get time zone | session_pool.GetTimeZone() |
+| api name | parameters | notes | use example |
+| -------------- | ------------------------- | ------------------------ | ----------------------------- |
+| Open | bool | open session | session_pool.Open(false) |
+| Close | null | close session | session_pool.Close() |
+| IsOpen | null | check if session is open | session_pool.IsOpen() |
+| OpenDebugMode | LoggingConfiguration=null | open debug mode | session_pool.OpenDebugMode() |
+| CloseDebugMode | null | close debug mode | session_pool.CloseDebugMode() |
+| SetTimeZone | string | set time zone | session_pool.GetTimeZone() |
+| GetTimeZone | null | get time zone | session_pool.GetTimeZone() |
### **Record API**
-| api name | parameters | notes | use example |
-|-------------------------------------|-----------------------------------|-------------------------------------|--------------------------------------------------------------------------------------------------------------------------------------|
-| InsertRecordAsync | string, RowRecord | insert single record | session_pool.InsertRecordAsync("root.97209_TEST_CSHARP_CLIENT_GROUP.TEST_CSHARP_CLIENT_DEVICE", new RowRecord(1, values, measures)); |
-| InsertRecordsAsync | List\<string\>, List\<RowRecord\> | insert records | session_pool.InsertRecordsAsync(device_ids, rowRecords) |
-| InsertRecordsOfOneDeviceAsync | string, List\<RowRecord\> | insert records of one device | session_pool.InsertRecordsOfOneDeviceAsync(device_id, rowRecords) |
-| InsertRecordsOfOneDeviceSortedAsync | string, List\<RowRecord\> | insert sorted records of one device | InsertRecordsOfOneDeviceSortedAsync(deviceId, sortedRowRecords); |
-| TestInsertRecordAsync | string, RowRecord | test insert record | session_pool.TestInsertRecordAsync("root.97209_TEST_CSHARP_CLIENT_GROUP.TEST_CSHARP_CLIENT_DEVICE", rowRecord) |
-| TestInsertRecordsAsync | List\<string\>, List\<RowRecord\> | test insert record | session_pool.TestInsertRecordsAsync(device_ids, rowRecords) |
+| api name | parameters | notes | use example |
+| ----------------------------------- | ----------------------------- | ----------------------------------- | ------------------------------------------------------------ |
+| InsertRecordAsync | string, RowRecord | insert single record | session_pool.InsertRecordAsync("root.97209_TEST_CSHARP_CLIENT_GROUP.TEST_CSHARP_CLIENT_DEVICE", new RowRecord(1, values, measures)); |
+| InsertRecordsAsync | List\<string\>, List\<RowRecord\> | insert records | session_pool.InsertRecordsAsync(device_id, rowRecords) |
+| InsertRecordsOfOneDeviceAsync | string, List\<RowRecord\> | insert records of one device | session_pool.InsertRecordsOfOneDeviceAsync(device_id, rowRecords) |
+| InsertRecordsOfOneDeviceSortedAsync | string, List\<RowRecord\> | insert sorted records of one device | InsertRecordsOfOneDeviceSortedAsync(deviceId, sortedRowRecords); |
+| TestInsertRecordAsync | string, RowRecord | test insert record | session_pool.TestInsertRecordAsync("root.97209_TEST_CSHARP_CLIENT_GROUP.TEST_CSHARP_CLIENT_DEVICE", rowRecord) |
+| TestInsertRecordsAsync | List\<string\>, List\<RowRecord\> | test insert record | session_pool.TestInsertRecordsAsync(device_id, rowRecords) |
### **Tablet API**
-| api name | parameters | notes | use example |
-| ---------------------- |----------------| -------------------- |----------------------------------------------|
-| InsertTabletAsync | Tablet | insert single tablet | session_pool.InsertTabletAsync(tablet) |
+| api name | parameters | notes | use example |
+| ---------------------- | ------------ | -------------------- | -------------------------------------------- |
+| InsertTabletAsync | Tablet | insert single tablet | session_pool.InsertTabletAsync(tablet) |
| InsertTabletsAsync | List\<Tablet\> | insert tablets | session_pool.InsertTabletsAsync(tablets) |
-| TestInsertTabletAsync | Tablet | test insert tablet | session_pool.TestInsertTabletAsync(tablet) |
+| TestInsertTabletAsync | Tablet | test insert tablet | session_pool.TestInsertTabletAsync(tablet) |
| TestInsertTabletsAsync | List\<Tablet\> | test insert tablets | session_pool.TestInsertTabletsAsync(tablets) |
### **SQL API**
-| api name | parameters | notes | use example |
-| ----------------------------- | ---------- | ------------------------------ |----------------------------------------------------------------------------------------------------------------------------------------------------------------------------|
-| ExecuteQueryStatementAsync | string | execute sql query statement | session_pool.ExecuteQueryStatementAsync("select * from root.97209_TEST_CSHARP_CLIENT_GROUP.TEST_CSHARP_CLIENT_DEVICE where time<15"); |
+| api name | parameters | notes | use example |
+| ----------------------------- | ---------- | ------------------------------ | ------------------------------------------------------------ |
+| ExecuteQueryStatementAsync | string | execute sql query statement | session_pool.ExecuteQueryStatementAsync("select * from root.97209_TEST_CSHARP_CLIENT_GROUP.TEST_CSHARP_CLIENT_DEVICE where time<15"); |
| ExecuteNonQueryStatementAsync | string | execute sql nonquery statement | session_pool.ExecuteNonQueryStatementAsync( "create timeseries root.97209_TEST_CSHARP_CLIENT_GROUP.TEST_CSHARP_CLIENT_DEVICE.status with datatype=BOOLEAN,encoding=PLAIN") |
### **Scheam API**
-| api name | parameters | notes | use example |
-| -------------------------- |------------------------------------------------------------------------------| --------------------------- |------------------------------------------------------------------------------------------------------------------|
-| SetStorageGroup | string | set storage group | session_pool.SetStorageGroup("root.97209_TEST_CSHARP_CLIENT_GROUP_01") |
-| CreateTimeSeries | string, TSDataType, TSEncoding, Compressor | create time series | session_pool.CreateTimeSeries("root.97209_TEST_CSHARP_CLIENT_GROUP_01", data_type, encoding, compressor) |
-| DeleteStorageGroupAsync | string | delete single storage group | session_pool.DeleteStorageGroupAsync("root.97209_TEST_CSHARP_CLIENT_GROUP_01") |
-| DeleteStorageGroupsAsync | List\<string\> | delete storage group | session_pool.DeleteStorageGroupAsync("root.97209_TEST_CSHARP_CLIENT_GROUP") |
-| CreateMultiTimeSeriesAsync | List\<string\>, List\<TSDataType\> , List\<TSEncoding\> , List\<Compressor\> | create multi time series | session_pool.CreateMultiTimeSeriesAsync(ts_path_lst, data_type_lst, encoding_lst, compressor_lst); |
-| DeleteTimeSeriesAsync | List\<string\> | delete time series | session_pool.DeleteTimeSeriesAsync(ts_path_lst) |
-| DeleteTimeSeriesAsync | string | delete time series | session_pool.DeleteTimeSeriesAsync("root.97209_TEST_CSHARP_CLIENT_GROUP_01") |
-| DeleteDataAsync | List\<string\>, long, long | delete data | session_pool.DeleteDataAsync(ts_path_lst, 2, 3) |
+| api name | parameters | notes | use example |
+| -------------------------- | ------------------------------------------------------------ | --------------------------- | ------------------------------------------------------------ |
+| SetStorageGroup | string | set storage group | session_pool.SetStorageGroup("root.97209_TEST_CSHARP_CLIENT_GROUP_01") |
+| CreateTimeSeries | string, TSDataType, TSEncoding, Compressor | create time series | session_pool.InsertTabletsAsync(tablets) |
+| DeleteStorageGroupAsync | string | delete single storage group | session_pool.DeleteStorageGroupAsync("root.97209_TEST_CSHARP_CLIENT_GROUP_01") |
+| DeleteStorageGroupsAsync | List\<string\> | delete storage group | session_pool.DeleteStorageGroupAsync("root.97209_TEST_CSHARP_CLIENT_GROUP") |
+| CreateMultiTimeSeriesAsync | List\<string\>, List\<TSDataType\> , List\<TSEncoding\> , List\<Compressor\> | create multi time series | session_pool.CreateMultiTimeSeriesAsync(ts_path_lst, data_type_lst, encoding_lst, compressor_lst); |
+| DeleteTimeSeriesAsync | List\<string\> | delete time series | |
+| DeleteTimeSeriesAsync | string | delete time series | |
+| DeleteDataAsync | List\<string\>, long, long | delete data | session_pool.DeleteDataAsync(ts_path_lst, 2, 3) |
### **Other API**
@@ -203,15 +203,11 @@ var tablet =
## SessionPool
-In order to execute concurrent client requests, we provide a `SessionPool` for the native interface.
-Since `SessionPool` itself is a superset of `Session`, as soon as `SessionPool` is instantiated with a `pool_size` parameter set to 1, it reverts to the original `Session`.
+To implement concurrent client requests, we provide a `SessionPool` for the native interface. Since `SessionPool` itself is a superset of `Session`, when `SessionPool` is a When the `pool_size` parameter is set to 1, it reverts to the original `Session`
-We use the `ConcurrentQueue` data structure to encapsulate a client queue to maintain multiple connections with the server.
-When the `Open()` interface is called, a specified number of clients are created and stored in the queue.
-Synchronous access to the queue is achieved through the `System.Threading.Monitor` class.
+We use the `ConcurrentQueue` data structure to encapsulate a client queue to maintain multiple connections with the server. When the `Open()` interface is called, a specified number of clients are created in the queue, and synchronous access to the queue is achieved through the `System.Threading.Monitor` class.
-When a request is executed, it will try to find an idle client connection from the Connection pool.
-If there is no idle connection, the program will wait until there is an idle connection available and use that.
+When a request occurs, it will try to find an idle client connection from the Connection pool. If there is no idle connection, the program will need to wait until there is an idle connection
-When a connection is finished executing a request, it will automatically be returned to the pool and be available for processing other requests.
+When a connection is used up, it will automatically return to the pool and wait for the next time it is used up
diff --git a/src/UserGuide/Master/API/Programming-Cpp-Native-API.md b/src/UserGuide/Master/API/Programming-Cpp-Native-API.md
index 637d6a4..1350918 100644
--- a/src/UserGuide/Master/API/Programming-Cpp-Native-API.md
+++ b/src/UserGuide/Master/API/Programming-Cpp-Native-API.md
@@ -37,7 +37,7 @@
- **MAC**
- 1. Install Bison :Bison 2.3 is preinstalled on OSX, but this version is too low.
+1. Install Bison :Bison 2.3 is preinstalled on OSX, but this version is too low.
When building Thrift with Bison 2.3, the following error would pop out:
```invalid directive: '%code'```
@@ -60,14 +60,14 @@
echo 'export PATH="/usr/local/opt/bison/bin:$PATH"' >> ~/.zshrc
```
- 2. Install Boost :Please make sure a relative new version of Boost is ready on your machine.
- If no Boost available, install the latest version of Boost:
- ```shell
- brew install boost
- brew link boost
- ```
+2. Install Boost :Please make sure a relative new version of Boost is ready on your machine.
+ If no Boost available, install the latest version of Boost:
+ ```shell
+ brew install boost
+ brew link boost
+ ```
- 3. OpenSSL :Make sure the Openssl libraries has been install on your Mac. The default Openssl include file search path is "/usr/local/opt/openssl/include".
+3. OpenSSL :Make sure the Openssl libraries has been install on your Mac. The default Openssl include file search path is "/usr/local/opt/openssl/include".
If Openssl header files can not be found when building Thrift, please add option`-Dopenssl.include.dir=""`.
@@ -94,20 +94,20 @@
- **Windows**
- 1. Building environment
- * Install `MS Visual Studio`(recommend 2019 version): remember to install Visual Studio C/C++ IDE and compiler(supporting CMake, Clang, MinGW).
- * Download and install [CMake](https://cmake.org/download/) .
+1. Building environment
+ - Install `MS Visual Studio`(recommend 2019 version): remember to install Visual Studio C/C++ IDE and compiler(supporting CMake, Clang, MinGW).
+ - Download and install [CMake](https://cmake.org/download/) .
- 2. Download and install `Flex` & `Bison`
- * Download [Win_Flex_Bison](https://sourceforge.net/projects/winflexbison/) .
- * After downloaded, please rename the executables to `flex.exe` and `bison.exe` and add them to "PATH" environment variables.
+2. Download and install `Flex` & `Bison`
+ - Download [Win_Flex_Bison](https://sourceforge.net/projects/winflexbison/) .
+ - After downloaded, please rename the executables to `flex.exe` and `bison.exe` and add them to "PATH" environment variables.
- 3. Install `Boost`
- * Download [Boost](https://www.boost.org/users/download/) .
- * Then build `Boost` by executing bootstrap.bat and b2.exe.
+3. Install `Boost`
+ - Download [Boost](https://www.boost.org/users/download/) .
+ - Then build `Boost` by executing bootstrap.bat and b2.exe.
- 4. Install `OpenSSL`
- * Download and install [OpenSSL](http://slproweb.com/products/Win32OpenSSL.html) .
+4. Install `OpenSSL`
+ - Download and install [OpenSSL](http://slproweb.com/products/Win32OpenSSL.html) .
### Compile
diff --git a/src/UserGuide/Master/API/Programming-MQTT.md b/src/UserGuide/Master/API/Programming-MQTT.md
index 1b7f44f..5bbb610 100644
--- a/src/UserGuide/Master/API/Programming-MQTT.md
+++ b/src/UserGuide/Master/API/Programming-MQTT.md
@@ -18,7 +18,6 @@
under the License.
-->
-
# MQTT Protocol
[MQTT](http://mqtt.org/) is a machine-to-machine (M2M)/"Internet of Things" connectivity protocol.
@@ -26,19 +25,17 @@ It was designed as an extremely lightweight publish/subscribe messaging transpor
It is useful for connections with remote locations where a small code footprint is required and/or network bandwidth is at a premium.
IoTDB supports the MQTT v3.1(an OASIS Standard) protocol.
-IoTDB server includes a built-in MQTT service that allows remote devices to send messages to an IoTDB server directly.
+IoTDB server includes a built-in MQTT service that allows remote devices send messages into IoTDB server directly.
<img style="width:100%; max-width:800px; max-height:600px; margin-left:auto; margin-right:auto; display:block;" src="https://alioss.timecho.com/docs/img/github/78357432-0c71cf80-75e4-11ea-98aa-c43a54d469ce.png">
-## Built-in MQTT Service
-The built-in MQTT Service provides the ability of a direct connection to IoTDB using MQTT.
-It listens for publish messages from MQTT clients and then writes the data into storage immediately.
-The MQTT topic is directly mapped to the IoTDB timeseries used for persisting the data.
-The messages payload can be formatted to events by using the `PayloadFormatter` which loaded by Java SPI.
-The default implementation is `JSONPayloadFormatter`.
-The default `json` formatter supports both accepting single json objects as well as arrays of json objects.
-The following are two examples of valid MQTT message payloads:
+## Built-in MQTT Service
+The Built-in MQTT Service provide the ability of direct connection to IoTDB through MQTT. It listen the publish messages from MQTT clients
+ and then write the data into storage immediately.
+The MQTT topic corresponds to IoTDB timeseries.
+The messages payload can be format to events by `PayloadFormatter` which loaded by java SPI, and the default implementation is `JSONPayloadFormatter`.
+The default `json` formatter support two json format and its json array. The following is an MQTT message payload example:
```json
{
@@ -62,21 +59,19 @@ or json array of the above two.
<img style="width:100%; max-width:800px; max-height:600px; margin-left:auto; margin-right:auto; display:block;" src="https://alioss.timecho.com/docs/img/github/78357469-1bf11880-75e4-11ea-978f-a53996667a0d.png">
## MQTT Configurations
-
The IoTDB MQTT service load configurations from `${IOTDB_HOME}/${IOTDB_CONF}/iotdb-system.properties` by default.
-The `IoTDB MQTT service` loads it's configuration from `${IOTDB_HOME}/${IOTDB_CONF}/iotdb-system.properties` per default.
+Configurations are as follows:
-The configuration options of this file are as follows:
+| NAME | DESCRIPTION | DEFAULT |
+| ------------- |:-------------:|:------:|
+| enable_mqtt_service | whether to enable the mqtt service | false |
+| mqtt_host | the mqtt service binding host | 127.0.0.1 |
+| mqtt_port | the mqtt service binding port | 1883 |
+| mqtt_handler_pool_size | the handler pool size for handing the mqtt messages | 1 |
+| mqtt_payload_formatter | the mqtt message payload formatter | json |
+| mqtt_max_message_size | the max mqtt message size in byte| 1048576 |
-| NAME | DESCRIPTION | DEFAULT |
-|------------------------|:--------------------------------------------------:|:---------:|
-| enable_mqtt_service | whether to enable the mqtt service | false |
-| mqtt_host | the mqtt service binding host | 127.0.0.1 |
-| mqtt_port | the mqtt service binding port | 1883 |
-| mqtt_handler_pool_size |the handler pool size for handing the mqtt messages | 1 |
-| mqtt_payload_formatter | the mqtt message payload formatter | json |
-| mqtt_max_message_size | the max mqtt message size in byte | 1048576 |
## Coding Examples
The following is an example which a mqtt client send messages to IoTDB server.
@@ -108,12 +103,11 @@ connection.disconnect();
## Customize your MQTT Message Format
-If you need a special format, you can customize your MQTT Message format by writing a few lines of codes.
-
-An example can be found in [example/mqtt-customize](https://github.com/apache/iotdb/tree/master/example/mqtt-customize) module.
+If you do not like the above Json format, you can customize your MQTT Message format by just writing several lines
+of codes. An example can be found in `example/mqtt-customize` project.
Steps:
-* Create a java project, and add dependency:
+1. Create a java project, and add dependency:
```xml
<dependency>
<groupId>org.apache.iotdb</groupId>
@@ -121,7 +115,9 @@ Steps:
<version>1.1.0-SNAPSHOT</version>
</dependency>
```
-* Create your implementation class which implements the `org.apache.iotdb.db.protocol.mqtt.PayloadFormatter` interface:
+2. Define your implementation which implements `org.apache.iotdb.db.protocol.mqtt.PayloadFormatter`
+e.g.,
+
```java
package org.apache.iotdb.mqtt.server;
@@ -166,17 +162,19 @@ public class CustomizedJsonPayloadFormatter implements PayloadFormatter {
}
}
```
-* Update or create a file: `src/main/resources/META-INF/services/org.apache.iotdb.db.protocol.mqtt.PayloadFormatter` containing the fully qualified class name of your formatter.
- (In the previous example, this would be adding a single line with this content: `org.apache.iotdb.mqtt.server.CustomizedJsonPayloadFormatter`)
-* compile your implementation into a jar file: `mvn package -DskipTests`
+3. modify the file in `src/main/resources/META-INF/services/org.apache.iotdb.db.protocol.mqtt.PayloadFormatter`:
+ clean the file and put your implementation class name into the file.
+ In this example, the content is: `org.apache.iotdb.mqtt.server.CustomizedJsonPayloadFormatter`
+4. compile your implementation as a jar file: `mvn package -DskipTests`
+
Then, in your server:
-* Create an `${IOTDB_HOME}/ext/mqtt/` folder, and put the jar into this directory.
-* Update configuration to enable MQTT service in `conf/iotdb-system.properties` by setting `enable_mqtt_service=true`.
-* Set the value of `mqtt_payload_formatter` in `conf/iotdb-system.properties` to the value you are returning in your implementation of getName().
- (In this example, the value would be: `CustomizedJson`)
-* Launch the IoTDB server.
-* Now IoTDB will use your implementation to parse the MQTT message.
+1. Create ${IOTDB_HOME}/ext/mqtt/ folder, and put the jar into this folder.
+2. Update configuration to enable MQTT service. (`enable_mqtt_service=true` in `conf/iotdb-system.properties`)
+3. Set the value of `mqtt_payload_formatter` in `conf/iotdb-system.properties` as the value of getName() in your implementation
+ , in this example, the value is `CustomizedJson`
+4. Launch the IoTDB server.
+5. Now IoTDB will use your implementation to parse the MQTT message.
More: the message format can be anything you want. For example, if it is a binary format,
just use `payload.forEachByte()` or `payload.array` to get bytes content.
diff --git a/src/UserGuide/Master/API/RestServiceV1.md b/src/UserGuide/Master/API/RestServiceV1.md
index d88a9e9..81c3c6e 100644
--- a/src/UserGuide/Master/API/RestServiceV1.md
+++ b/src/UserGuide/Master/API/RestServiceV1.md
@@ -19,7 +19,7 @@
-->
-# RESTful Services (Not Recommend)
+# RESTful Services (Not Recommend)
IoTDB's RESTful services can be used for query, write, and management operations, using the OpenAPI standard to define interfaces and generate frameworks.
## Enable RESTful Services
@@ -32,7 +32,7 @@ RESTful services are disabled by default.
* User
- Find the `conf/iotdb-system.properties` file under the IoTDB installation directory and set `enable_rest_service` to `true` to enable the module.
+ Find the `conf/conf/iotdb-system.properties` file under the IoTDB installation directory and set `enable_rest_service` to `true` to enable the module.
```properties
enable_rest_service=true
@@ -81,7 +81,7 @@ The `/ping` API can be used for service liveness probing.
Request method: `GET`
-Request path: http://ip:port/ping
+Request path: `http://ip:port/ping`
The user name used in the example is: root, password: root
@@ -133,7 +133,7 @@ Request method: `POST`
Request header: `application/json`
-Request path: http://ip:port/rest/v1/query
+Request path: `http://ip:port/rest/v1/query`
Parameter Description:
@@ -157,38 +157,38 @@ Tip: Statements like `select * from root.xx.**` are not recommended because thos
**Expression query**
-```shell
-curl -H "Content-Type:application/json" -H "Authorization:Basic cm9vdDpyb290" -X POST --data '{"sql":"select s3, s4, s3 + 1 from root.sg27 limit 2"}' http://127.0.0.1:18080/rest/v1/query
-````
-
-```json
-{
- "expressions": [
- "root.sg27.s3",
- "root.sg27.s4",
- "root.sg27.s3 + 1"
- ],
- "columnNames": null,
- "timestamps": [
- 1635232143960,
- 1635232153960
- ],
- "values": [
- [
- 11,
- null
+ ```shell
+ curl -H "Content-Type:application/json" -H "Authorization:Basic cm9vdDpyb290" -X POST --data '{"sql":"select s3, s4, s3 + 1 from root.sg27 limit 2"}' http://127.0.0.1:18080/rest/v1/query
+ ````
+Response instance
+ ```json
+ {
+ "expressions": [
+ "root.sg27.s3",
+ "root.sg27.s4",
+ "root.sg27.s3 + 1"
],
- [
- false,
- true
+ "columnNames": null,
+ "timestamps": [
+ 1635232143960,
+ 1635232153960
],
- [
- 12.0,
- null
+ "values": [
+ [
+ 11,
+ null
+ ],
+ [
+ false,
+ true
+ ],
+ [
+ 12.0,
+ null
+ ]
]
- ]
-}
-```
+ }
+ ```
**Show child paths**
@@ -523,8 +523,7 @@ curl -H "Content-Type:application/json" -H "Authorization:Basic cm9vdDpyb290" -X
"expressions": null,
"columnNames": [
"devices",
- "isAligned",
- "Template"
+ "isAligned"
],
"timestamps": null,
"values": [
@@ -535,10 +534,6 @@ curl -H "Content-Type:application/json" -H "Authorization:Basic cm9vdDpyb290" -X
[
"false",
"false"
- ],
- [
- "t1",
- null
]
]
}
@@ -556,8 +551,7 @@ curl -H "Content-Type:application/json" -H "Authorization:Basic cm9vdDpyb290" -X
"columnNames": [
"devices",
"database",
- "isAligned",
- "Template"
+ "isAligned"
],
"timestamps": null,
"values": [
@@ -572,10 +566,6 @@ curl -H "Content-Type:application/json" -H "Authorization:Basic cm9vdDpyb290" -X
[
"false",
"false"
- ],
- [
- "t1",
- null
]
]
}
@@ -784,7 +774,7 @@ Request method: `POST`
Request header: `application/json`
-Request path: http://ip:port/rest/v1/nonQuery
+Request path: `http://ip:port/rest/v1/nonQuery`
Parameter Description:
@@ -820,7 +810,7 @@ Request method: `POST`
Request header: `application/json`
-Request path: http://ip:port/rest/v1/insertTablet
+Request path: `http://ip:port/rest/v1/insertTablet`
Parameter Description:
diff --git a/src/UserGuide/Master/API/RestServiceV2.md b/src/UserGuide/Master/API/RestServiceV2.md
index d3f5954..5255a86 100644
--- a/src/UserGuide/Master/API/RestServiceV2.md
+++ b/src/UserGuide/Master/API/RestServiceV2.md
@@ -81,7 +81,7 @@ The `/ping` API can be used for service liveness probing.
Request method: `GET`
-Request path: http://ip:port/ping
+Request path: `http://ip:port/ping`
The user name used in the example is: root, password: root
@@ -133,7 +133,7 @@ Request method: `POST`
Request header: `application/json`
-Request path: http://ip:port/rest/v2/query
+Request path: `http://ip:port/rest/v2/query`
Parameter Description:
@@ -774,7 +774,7 @@ Request method: `POST`
Request header: `application/json`
-Request path: http://ip:port/rest/v2/nonQuery
+Request path: `http://ip:port/rest/v2/nonQuery`
Parameter Description:
@@ -810,7 +810,7 @@ Request method: `POST`
Request header: `application/json`
-Request path: http://ip:port/rest/v2/insertTablet
+Request path: `http://ip:port/rest/v2/insertTablet`
Parameter Description:
@@ -849,7 +849,7 @@ Request method: `POST`
Request header: `application/json`
-Request path: http://ip:port/rest/v2/insertRecords
+Request path: `http://ip:port/rest/v2/insertRecords`
Parameter Description:
diff --git a/src/UserGuide/Master/Basic-Concept/Encoding-and-Compression.md b/src/UserGuide/Master/Basic-Concept/Encoding-and-Compression.md
index dcb6c68..76de626 100644
--- a/src/UserGuide/Master/Basic-Concept/Encoding-and-Compression.md
+++ b/src/UserGuide/Master/Basic-Concept/Encoding-and-Compression.md
@@ -26,51 +26,50 @@
To improve the efficiency of data storage, it is necessary to encode data during data writing, thereby reducing the amount of disk space used. In the process of writing and reading data, the amount of data involved in the I/O operations can be reduced to improve performance. IoTDB supports the following encoding methods for different data types:
-* PLAIN
+1. PLAIN
-PLAIN encoding, the default encoding mode, i.e, no encoding, supports multiple data types. It has high compression and decompression efficiency while suffering from low space storage efficiency.
+ PLAIN encoding, the default encoding mode, i.e, no encoding, supports multiple data types. It has high compression and decompression efficiency while suffering from low space storage efficiency.
-* TS_2DIFF
+2. TS_2DIFF
-Second-order differential encoding is more suitable for encoding monotonically increasing or decreasing sequence data, and is not recommended for sequence data with large fluctuations.
+ Second-order differential encoding is more suitable for encoding monotonically increasing or decreasing sequence data, and is not recommended for sequence data with large fluctuations.
-* RLE
+3. RLE
-Run-length encoding is suitable for storing sequence with continuous values, and is not recommended for sequence data with most of the time different values.
+ Run-length encoding is suitable for storing sequence with continuous values, and is not recommended for sequence data with most of the time different values.
-Run-length encoding can also be used to encode floating-point numbers, while it is necessary to specify reserved decimal digits (MAX\_POINT\_NUMBER) when creating time series. It is more suitable to store sequence data where floating-point values appear continuously, monotonously increasing or decreasing, and it is not suitable for storing sequence data with high precision requirements after the decimal point or with large fluctuations.
+ Run-length encoding can also be used to encode floating-point numbers, while it is necessary to specify reserved decimal digits (MAX\_POINT\_NUMBER) when creating time series. It is more suitable to store sequence data where floating-point values appear continuously, monotonously increasing or decreasing, and it is not suitable for storing sequence data with high precision requirements after the decimal point or with large fluctuations.
-> TS_2DIFF and RLE have precision limit for data type of float and double. By default, two decimal places are reserved. GORILLA is recommended.
+ > TS_2DIFF and RLE have precision limit for data type of float and double. By default, two decimal places are reserved. GORILLA is recommended.
-* GORILLA
+4. GORILLA
-GORILLA encoding is lossless. It is more suitable for numerical sequence with similar values and is not recommended for sequence data with large fluctuations.
+ GORILLA encoding is lossless. It is more suitable for numerical sequence with similar values and is not recommended for sequence data with large fluctuations.
-Currently, there are two versions of GORILLA encoding implementation, it is recommended to use `GORILLA` instead of `GORILLA_V1` (deprecated).
+ Currently, there are two versions of GORILLA encoding implementation, it is recommended to use `GORILLA` instead of `GORILLA_V1` (deprecated).
-Usage restrictions: When using GORILLA to encode INT32 data, you need to ensure that there is no data point with the value `Integer.MIN_VALUE` in the sequence. When using GORILLA to encode INT64 data, you need to ensure that there is no data point with the value `Long.MIN_VALUE` in the sequence.
+ Usage restrictions: When using GORILLA to encode INT32 data, you need to ensure that there is no data point with the value `Integer.MIN_VALUE` in the sequence. When using GORILLA to encode INT64 data, you need to ensure that there is no data point with the value `Long.MIN_VALUE` in the sequence.
-* DICTIONARY
+5. DICTIONARY
-DICTIONARY encoding is lossless. It is suitable for TEXT data with low cardinality (i.e. low number of distinct values). It is not recommended to use it for high-cardinality data.
+ DICTIONARY encoding is lossless. It is suitable for TEXT data with low cardinality (i.e. low number of distinct values). It is not recommended to use it for high-cardinality data.
-* ZIGZAG
-
+6. ZIGZAG
-ZIGZAG encoding maps signed integers to unsigned integers so that numbers with a small absolute value (for instance, -1) have a small variant encoded value too. It does this in a way that "zig-zags" back and forth through the positive and negative integers.
+ ZIGZAG encoding maps signed integers to unsigned integers so that numbers with a small absolute value (for instance, -1) have a small variant encoded value too. It does this in a way that "zig-zags" back and forth through the positive and negative integers.
-* CHIMP
+7. CHIMP
-CHIMP encoding is lossless. It is the state-of-the-art compression algorithm for streaming floating point data, providing impressive savings compared to earlier approaches. It is suitable for any numerical sequence with similar values and works best for sequence data without large fluctuations and/or random noise.
+ CHIMP encoding is lossless. It is the state-of-the-art compression algorithm for streaming floating point data, providing impressive savings compared to earlier approaches. It is suitable for any numerical sequence with similar values and works best for sequence data without large fluctuations and/or random noise.
-Usage restrictions: When using CHIMP to encode INT32 data, you need to ensure that there is no data point with the value `Integer.MIN_VALUE` in the sequence. When using CHIMP to encode INT64 data, you need to ensure that there is no data point with the value `Long.MIN_VALUE` in the sequence.
+ Usage restrictions: When using CHIMP to encode INT32 data, you need to ensure that there is no data point with the value `Integer.MIN_VALUE` in the sequence. When using CHIMP to encode INT64 data, you need to ensure that there is no data point with the value `Long.MIN_VALUE` in the sequence.
-* SPRINTZ
+8. SPRINTZ
-SPRINTZ coding is a type of lossless data compression technique that involves predicting the original time series data, applying Zigzag encoding, bit-packing encoding, and run-length encoding. SPRINTZ encoding is effective for time series data with small absolute differences between values. However, it may not be as effective for time series data with large differences between values, indicating large fluctuation.
-* RLBE
+ SPRINTZ coding is a type of lossless data compression technique that involves predicting the original time series data, applying Zigzag encoding, bit-packing encoding, and run-length encoding. SPRINTZ encoding is effective for time series data with small absolute differences between values. However, it may not be as effective for time series data with large differences between values, indicating large fluctuation.
+9. RLBE
-RLBE is a lossless encoding that combines the ideas of differential encoding, bit-packing encoding, run-length encoding, Fibonacci encoding and concatenation. RLBE encoding is suitable for time series data with increasing and small increment value, and is not suitable for time series data with large fluctuation.
+ RLBE is a lossless encoding that combines the ideas of differential encoding, bit-packing encoding, run-length encoding, Fibonacci encoding and concatenation. RLBE encoding is suitable for time series data with increasing and small increment value, and is not suitable for time series data with large fluctuation.
### Correspondence between data type and encoding
diff --git a/src/UserGuide/Master/Deployment-and-Maintenance/AINode_Deployment_timecho.md b/src/UserGuide/Master/Deployment-and-Maintenance/AINode_Deployment_timecho.md
index 36e2093..483919d 100644
--- a/src/UserGuide/Master/Deployment-and-Maintenance/AINode_Deployment_timecho.md
+++ b/src/UserGuide/Master/Deployment-and-Maintenance/AINode_Deployment_timecho.md
@@ -20,24 +20,24 @@
-->
# AINode Deployment
-## 1 AINode Introduction
+## AINode Introduction
-### 1.1 Capability Introduction
+### Capability Introduction
AINode is the third type of endogenous node provided by IoTDB after the Configurable Node and DataNode. This node extends its ability to perform machine learning analysis on time series by interacting with the DataNode and Configurable Node of the IoTDB cluster. It supports the introduction of existing machine learning models from external sources for registration and the use of registered models to complete time series analysis tasks on specified time series data through simple SQL sta [...]
-### 1.2 Delivery Method
+### Delivery Method
It is an additional package outside the IoTDB cluster, with independent installation and activation (if you need to try or use it, please contact Tianmu Technology Business or Technical Support).
-### 1.3 Deployment mode
+### Deployment mode
<div >
<img src="https://alioss.timecho.com/docs/img/AINode%20Deployment%201.png" alt="" style="width: 45%;"/>
<img src="https://alioss.timecho.com/docs/img/AINode%20Deployment%202.png" alt="" style="width: 45%;"/>
</div>
-## 2 Installation preparation
+## Installation preparation
-### 2.1 Get installation package
+### Get installation package
Users can download the software installation package for AINode, download and unzip it to complete the installation of AINode.
@@ -53,7 +53,7 @@
| README_ZH.md | file | Explanation of the Chinese version of the markdown format |
| `README.md` | file | Instructions |
-### 2.2 Environmental preparation
+### Environmental preparation
- Suggested operating environment:Ubuntu, CentOS, MacOS
- Runtime Environment
@@ -68,9 +68,9 @@
../Python-3.8.0/python -m venv venv(Folder Name)
```
-## 3 Installation steps
+## Installation steps
-### 3.1 AINode activation
+### AINode activation
Require IoTDB to be in normal operation and have AINode module authorization in the license (usually not in the license, please contact Tianmou Business or technical support personnel to obtain AINode module authorization).
@@ -105,7 +105,7 @@ Require IoTDB to be in normal operation and have AINode module authorization in
./start-datanode.sh -d #The parameter'd 'will be started in the background
```
- ### 3.2 Configuration item modification
+ ### Configuration item modification
AINode supports modifying some necessary parameters. You can find the following parameters in the `conf/iotdb-ainode.properties` file and make persistent modifications to them:
:
@@ -121,7 +121,7 @@ AINode supports modifying some necessary parameters. You can find the following
| ain_logs_dir | The path where AINode stores logs, the starting directory of the relative path is related to the operating system, and it is recommended to use an absolute path | String | logs/AINode | Effective after restart |
| ain_thrift_compression_enabled | Does AINode enable Thrift's compression mechanism , 0-Do not start, 1-Start | Boolean | 0 | Effective after restart |
-### 3.3 Start AINode
+### Start AINode
After completing the deployment of Seed Config Node, the registration and inference functions of the model can be supported by adding AINode nodes. After specifying the information of the IoTDB cluster in the configuration item, the corresponding instruction can be executed to start AINode and join the IoTDB cluster。
@@ -234,7 +234,7 @@ If the version of AINode has been updated (such as updating the `lib` folder), t
nohup bash sbin/start-ainode.bat > myout.file 2>& 1 &
```
-### 3.4 Detecting the status of AINode nodes
+### Detecting the status of AINode nodes
During the startup process of AINode, the new AINode will be automatically added to the IoTDB cluster. After starting AINode, you can enter SQL in the command line to query. If you see an AINode node in the cluster and its running status is Running (as shown below), it indicates successful joining.
@@ -250,7 +250,7 @@ IoTDB> show cluster
+------+----------+-------+---------------+------------+-------+-----------+
```
-### 3.5 Stop AINode
+### Stop AINode
If you need to stop a running AINode node, execute the corresponding shutdown script.
@@ -293,7 +293,7 @@ IoTDB> show cluster
```
If you need to restart the node, you need to execute the startup script again.
-### 3.6 Remove AINode
+### Remove AINode
When it is necessary to remove an AINode node from the cluster, a removal script can be executed. The difference between removing and stopping scripts is that stopping retains the AINode node in the cluster but stops the AINode service, while removing removes the AINode node from the cluster.
@@ -364,9 +364,9 @@ If the user loses files in the data folder, AINode may not be able to actively r
sbin\remove-ainode.bat -t <AINode-id>/<ip>:<rpc-port>
```
-## 4 common problem
+## common problem
-### 4.1 An error occurs when starting AINode stating that the venv module cannot be found
+### An error occurs when starting AINode stating that the venv module cannot be found
When starting AINode using the default method, a Python virtual environment will be created in the installation package directory and dependencies will be installed, so it is required to install the venv module. Generally speaking, Python 3.8 and above versions come with built-in VenV, but for some systems with built-in Python environments, this requirement may not be met. There are two solutions when this error occurs (choose one or the other):
@@ -382,7 +382,7 @@ Install version 3.8.0 of venv into AINode in the AINode path.
```
When running the startup script, use ` -i ` to specify an existing Python interpreter path as the running environment for AINode, eliminating the need to create a new virtual environment.
- ### 4.2 The SSL module in Python is not properly installed and configured to handle HTTPS resources
+ ### The SSL module in Python is not properly installed and configured to handle HTTPS resources
WARNING: pip is configured with locations that require TLS/SSL, however the ssl module in Python is not available.
You can install OpenSSLS and then rebuild Python to solve this problem
> Currently Python versions 3.6 to 3.9 are compatible with OpenSSL 1.0.2, 1.1.0, and 1.1.1.
@@ -396,7 +396,7 @@ make
sudo make install
```
- ### 4.3 Pip version is lower
+ ### Pip version is lower
A compilation issue similar to "error: Microsoft Visual C++14.0 or greater is required..." appears on Windows
@@ -408,7 +408,7 @@ The corresponding error occurs during installation and compilation, usually due
```
- ### 4.4 Install and compile Python
+ ### Install and compile Python
Use the following instructions to download the installation package from the official website and extract it:
```shell
diff --git a/src/UserGuide/Master/Deployment-and-Maintenance/Cluster-Deployment.md b/src/UserGuide/Master/Deployment-and-Maintenance/Cluster-Deployment.md
index 46a84ec..6415285 100644
--- a/src/UserGuide/Master/Deployment-and-Maintenance/Cluster-Deployment.md
+++ b/src/UserGuide/Master/Deployment-and-Maintenance/Cluster-Deployment.md
@@ -52,7 +52,7 @@ Assuming there are three Linux servers now, the IP addresses and service roles a
| 192.168.1.4 | iotdb-2 | ConfigNode、DataNode |
| 192.168.1.5 | iotdb-3 | ConfigNode、DataNode |
-### 1. Set Host Name
+### Set Host Name
On three machines, configure the host names separately. To set the host names, configure `/etc/hosts` on the target server. Use the following command:
@@ -62,7 +62,7 @@ echo "192.168.1.4 iotdb-2" >> /etc/hosts
echo "192.168.1.5 iotdb-3" >> /etc/hosts
```
-### 2. Configuration
+### Configuration
Unzip the installation package and enter the installation directory
@@ -121,7 +121,7 @@ Open DataNode Configuration File `./conf/iotdb-system.properties`,Set the follow
| dn_schema_region_consensus_port | The port used by DataNode for metadata replica consensus protocol communication | 10760 | 10760 | 10760 | 10760 | 10760 | Cannot be modified after initial startup |
| dn_seed_config_node | The ConfigNode address that the node connects to when registering to join the cluster, i.e. `cn_internal-address: cn_internal_port` | 127.0.0.1:10710 | The first CongfigNode's cn_internal-address: cn_internal_port | iotdb-1:10710 | iotdb-1:10710 | iotdb-1:10710 | Cannot be modified after initial startup |
-### 3. Start ConfigNode
+### Start ConfigNode
Start the first confignode of IoTDB-1 first, ensuring that the seed confignode node starts first, and then start the second and third confignode nodes in sequence
@@ -130,7 +130,7 @@ cd sbin
./start-confignode.sh -d #"- d" parameter will start in the background
```
-### 4. Start DataNode
+### Start DataNode
Enter the `sbin` directory of iotdb and start three datanode nodes in sequence:
@@ -139,7 +139,7 @@ cd sbin
./start-datanode.sh -d #"- d" parameter will start in the background
```
-### 5. Verify Deployment
+### Verify Deployment
Can be executed directly Cli startup script in `./sbin` directory:
diff --git a/src/UserGuide/Master/Deployment-and-Maintenance/Cluster-Deployment_timecho.md b/src/UserGuide/Master/Deployment-and-Maintenance/Cluster-Deployment_timecho.md
index 328270a..a16183b 100644
--- a/src/UserGuide/Master/Deployment-and-Maintenance/Cluster-Deployment_timecho.md
+++ b/src/UserGuide/Master/Deployment-and-Maintenance/Cluster-Deployment_timecho.md
@@ -52,7 +52,7 @@ Assuming there are three Linux servers now, the IP addresses and service roles a
| 192.168.1.4 | iotdb-2 | ConfigNode、DataNode |
| 192.168.1.5 | iotdb-3 | ConfigNode、DataNode |
-### 1. Set Host Name
+### Set Host Name
On three machines, configure the host names separately. To set the host names, configure `/etc/hosts` on the target server. Use the following command:
@@ -62,7 +62,7 @@ echo "192.168.1.4 iotdb-2" >> /etc/hosts
echo "192.168.1.5 iotdb-3" >> /etc/hosts
```
-### 2. Configuration
+### Configuration
Unzip the installation package and enter the installation directory
@@ -121,7 +121,7 @@ Open DataNode Configuration File `./conf/iotdb-system.properties`,Set the follow
| dn_schema_region_consensus_port | The port used by DataNode for metadata replica consensus protocol communication | 10760 | 10760 | 10760 | 10760 | 10760 | Cannot be modified after initial startup |
| dn_seed_config_node | The ConfigNode address that the node connects to when registering to join the cluster, i.e. `cn_internal-address: cn_internal_port` | 127.0.0.1:10710 | The first CongfigNode's cn_internal-address: cn_internal_port | iotdb-1:10710 | iotdb-1:10710 | iotdb-1:10710 | Cannot be modified after initial startup |
-### 3. Start ConfigNode
+### Start ConfigNode
Start the first confignode of IoTDB-1 first, ensuring that the seed confignode node starts first, and then start the second and third confignode nodes in sequence
@@ -130,7 +130,7 @@ cd sbin
./start-confignode.sh -d #"- d" parameter will start in the background
```
-### 4. Activate Database
+### Activate Database
#### Method 1: Activate file copy activation
@@ -165,7 +165,7 @@ cd sbin
Import completed. Please start cluster and excute 'show cluster' to verify activation status
```
-### 5. Start DataNode
+### Start DataNode
Enter the `sbin` directory of iotdb and start three datanode nodes in sequence:
@@ -174,7 +174,7 @@ cd sbin
./start-datanode.sh -d #"- d" parameter will start in the background
```
-### 6. Verify Deployment
+### Verify Deployment
Can be executed directly Cli startup script in `./sbin` directory:
diff --git a/src/UserGuide/Master/Deployment-and-Maintenance/Docker-Deployment.md b/src/UserGuide/Master/Deployment-and-Maintenance/Docker-Deployment.md
index 1cf94b2..813bcfb 100644
--- a/src/UserGuide/Master/Deployment-and-Maintenance/Docker-Deployment.md
+++ b/src/UserGuide/Master/Deployment-and-Maintenance/Docker-Deployment.md
@@ -22,7 +22,7 @@
## Environmental Preparation
-### 1.Docker Installation
+### Docker Installation
```SQL
#Taking Ubuntu as an example, other operating systems can search for installation methods themselves
@@ -42,7 +42,7 @@ sudo systemctl enable docker
docker --version #Display version information, indicating successful installation
```
-### 2. Docker-compose Installation
+### Docker-compose Installation
```SQL
#Installation command
@@ -57,7 +57,7 @@ docker-compose --version #Displaying version information indicates successful i
This section demonstrates how to deploy a standalone Docker version of 1C1D.
-### 1. Pull Image File
+### Pull Image File
The Docker image of Apache IoTDB has been uploaded tohttps://hub.docker.com/r/apache/iotdb。
@@ -75,13 +75,13 @@ docker images

-### 2. Create Docker Bridge Network
+### Create Docker Bridge Network
```Bash
docker network create --driver=bridge --subnet=172.18.0.0/16 --gateway=172.18.0.1 iotdb
```
-### 3. Write The Yml File For Docker-Compose
+### Write The Yml File For Docker-Compose
Here we take the example of consolidating the IoTDB installation directory and yml files in the/docker iotdb folder:
@@ -131,7 +131,7 @@ networks:
external: true
```
-### 4. Start IoTDB
+### Start IoTDB
Use the following command to start:
@@ -140,7 +140,7 @@ cd /docker-iotdb
docker-compose -f docker-compose-standalone.yml up -d #Background startup
```
-### 5. Validate Deployment
+### Validate Deployment
- Viewing the log, the following words indicate successful startup
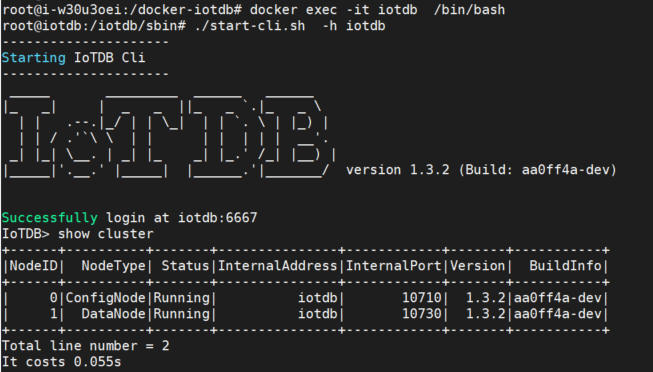
@@ -173,7 +173,7 @@ You can see that all services are running and the activation status shows as act
-### 6. Map/conf Directory (optional)
+### Map/conf Directory (optional)
If you want to directly modify the configuration file in the physical machine in the future, you can map the/conf folder in the container in three steps:
@@ -211,7 +211,7 @@ This section describes how to manually deploy an instance that includes 3 Config
Taking the host network as an example, we will demonstrate how to deploy a 3C3D cluster.
-### 1.Set Host Name
+### Set Host Name
Assuming there are currently three Linux servers, the IP addresses and service role assignments are as follows:
@@ -229,7 +229,7 @@ echo "192.168.1.4 iotdb-2" >> /etc/hosts
echo "192.168.1.5 iotdb-3" >> /etc/hosts
```
-### 2. Pull Image File
+### Pull Image File
The Docker image of Apache IoTDB has been uploaded tohttps://hub.docker.com/r/apache/iotdb。
@@ -247,7 +247,7 @@ docker images

-### 3.Write The Yml File For Docker Compose
+### Write The Yml File For Docker Compose
Here we take the example of consolidating the IoTDB installation directory and yml files in the `/docker-iotdb` folder:
@@ -326,7 +326,7 @@ services:
network_mode: "host" #Using the host network
```
-### 4. Starting Confignode For The First Time
+### Starting Confignode For The First Time
First, start configNodes on each of the three servers to obtain the machine code. Pay attention to the startup order, start the first iotdb-1 first, then start iotdb-2 and iotdb-3.
@@ -335,7 +335,7 @@ cd /docker-iotdb
docker-compose -f confignode.yml up -d #Background startup
```
-### 5. Start Datanode
+### Start Datanode
Start datanodes on 3 servers separately
@@ -346,7 +346,7 @@ docker-compose -f datanode.yml up -d #Background startup

-### 6. Validate Deployment
+### Validate Deployment
- Viewing the logs, the following words indicate that the datanode has successfully started
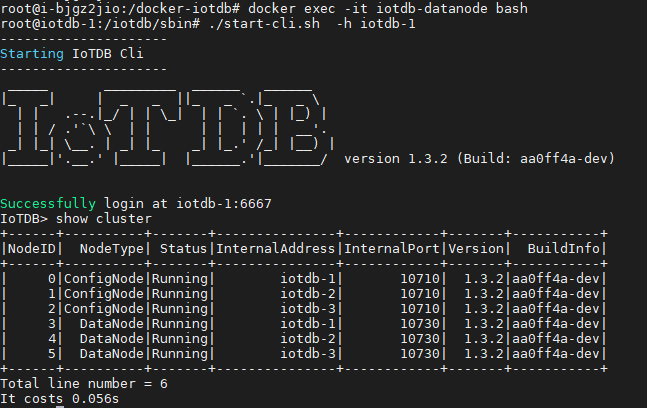
@@ -379,7 +379,7 @@ docker-compose -f datanode.yml up -d #Background startup
-### 7. Map/conf Directory (optional)
+### Map/conf Directory (optional)
If you want to directly modify the configuration file in the physical machine in the future, you can map the/conf folder in the container in three steps:
diff --git a/src/UserGuide/Master/Deployment-and-Maintenance/Docker-Deployment_timecho.md b/src/UserGuide/Master/Deployment-and-Maintenance/Docker-Deployment_timecho.md
index 4b43d61..a9c8daa 100644
--- a/src/UserGuide/Master/Deployment-and-Maintenance/Docker-Deployment_timecho.md
+++ b/src/UserGuide/Master/Deployment-and-Maintenance/Docker-Deployment_timecho.md
@@ -22,7 +22,7 @@
## Environmental Preparation
-### 1.Docker Installation
+### Docker Installation
```Bash
#Taking Ubuntu as an example, other operating systems can search for installation methods themselves
@@ -42,7 +42,7 @@ sudo systemctl enable docker
docker --version #Display version information, indicating successful installation
```
-### 2. Docker-compose Installation
+### Docker-compose Installation
```Bash
#Installation command
@@ -53,7 +53,7 @@ ln -s /usr/local/bin/docker-compose /usr/bin/docker-compose
docker-compose --version #Displaying version information indicates successful installation
```
-### 3. Install The Dmidecode Plugin
+### Install The Dmidecode Plugin
By default, Linux servers should already be installed. If not, you can use the following command to install them.
@@ -63,7 +63,7 @@ sudo apt-get install dmidecode
After installing dmidecode, search for the installation path: `wherever dmidecode`. Assuming the result is `/usr/sbin/dmidecode`, remember this path as it will be used in the later docker compose yml file.
-### 4. Get Container Image Of IoTDB
+### Get Container Image Of IoTDB
You can contact business or technical support to obtain container images for IoTDB Enterprise Edition.
@@ -71,7 +71,7 @@ You can contact business or technical support to obtain container images for IoT
This section demonstrates how to deploy a standalone Docker version of 1C1D.
-### 1. Load Image File
+### Load Image File
For example, the container image file name of IoTDB obtained here is: `iotdb-enterprise-1.3.2-3-standalone-docker.tar.gz`
@@ -89,13 +89,13 @@ docker images

-### 2. Create Docker Bridge Network
+### Create Docker Bridge Network
```Bash
docker network create --driver=bridge --subnet=172.18.0.0/16 --gateway=172.18.0.1 iotdb
```
-### 3. Write The Yml File For docker-compose
+### Write The Yml File For docker-compose
Here we take the example of consolidating the IoTDB installation directory and yml files in the/docker iotdb folder:
@@ -147,7 +147,7 @@ networks:
external: true
```
-### 4. First Launch
+### First Launch
Use the following command to start:
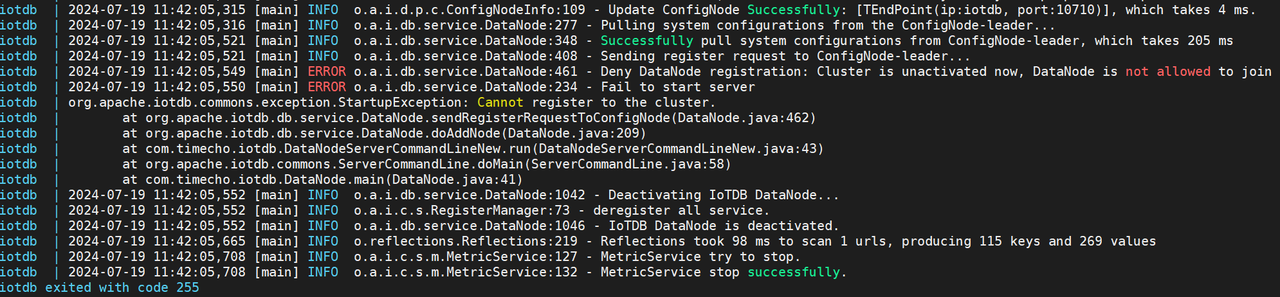
@@ -160,7 +160,7 @@ Due to lack of activation, it is normal to exit directly upon initial startup. T
-### 5. Apply For Activation
+### Apply For Activation
- After the first startup, a system_info file will be generated in the physical machine directory `/docker-iotdb/iotdb/activation`, and this file will be copied to the Timecho staff.
@@ -170,7 +170,7 @@ Due to lack of activation, it is normal to exit directly upon initial startup. T

-### 6. Restart IoTDB
+### Restart IoTDB
```Bash
docker-compose -f docker-compose-standalone.yml up -d
@@ -178,7 +178,7 @@ docker-compose -f docker-compose-standalone.yml up -d

-### 7. Validate Deployment
+### Validate Deployment
- Viewing the log, the following words indicate successful startup
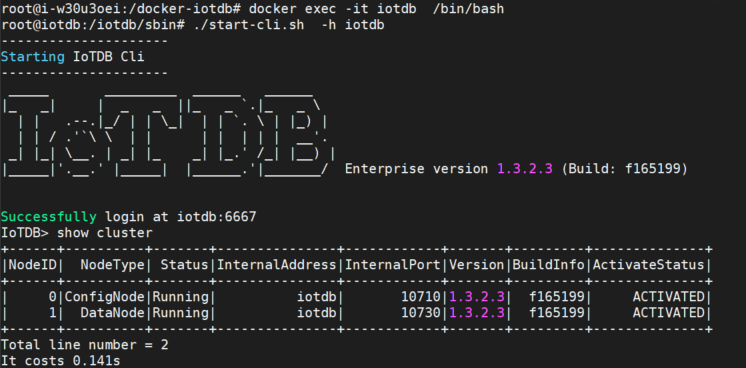
@@ -211,7 +211,7 @@ docker-compose -f docker-compose-standalone.yml up -d
-### 8. Map/conf Directory (optional)
+### Map/conf Directory (optional)
If you want to directly modify the configuration file in the physical machine in the future, you can map the/conf folder in the container in three steps:
@@ -251,7 +251,7 @@ This section describes how to manually deploy an instance that includes 3 Config
Taking the host network as an example, we will demonstrate how to deploy a 3C3D cluster.
-### 1.Set Host Name
+### Set Host Name
Assuming there are currently three Linux servers, the IP addresses and service role assignments are as follows:
@@ -269,7 +269,7 @@ echo "192.168.1.4 iotdb-2" >> /etc/hosts
echo "192.168.1.5 iotdb-3" >> /etc/hosts
```
-### 2. Load Image File
+### Load Image File
For example, the container image file name obtained for IoTDB is: `iotdb-enterprise-1.3.23-standalone-docker.tar.gz`
@@ -287,7 +287,7 @@ docker images

-### 3. Write The Yml File For Docker Compose
+### Write The Yml File For Docker Compose
Here we take the example of consolidating the IoTDB installation directory and yml files in the /docker-iotdb folder:
@@ -366,7 +366,7 @@ services:
network_mode: "host" #Using the host network
```
-### 4. Starting Confignode For The First Time
+### Starting Confignode For The First Time
First, start configNodes on each of the three servers to obtain the machine code. Pay attention to the startup order, start the first iotdb-1 first, then start iotdb-2 and iotdb-3.
@@ -375,7 +375,7 @@ cd /docker-iotdb
docker-compose -f confignode.yml up -d #Background startup
```
-### 5. Apply For Activation
+### Apply For Activation
- After starting three confignodes for the first time, a system_info file will be generated in each physical machine directory `/docker-iotdb/iotdb/activation`, and the system_info files of the three servers will be copied to the Timecho staff;
@@ -386,8 +386,8 @@ docker-compose -f confignode.yml up -d #Background startup

- After the license is placed in the corresponding activation folder, confignode will be automatically activated without restarting confignode
-
-### 6. Start Datanode
+
+### Start Datanode
Start datanodes on 3 servers separately
@@ -398,7 +398,7 @@ docker-compose -f datanode.yml up -d #Background startup

-### 7. Validate Deployment
+### Validate Deployment
- Viewing the logs, the following words indicate that the datanode has successfully started
@@ -431,7 +431,7 @@ docker-compose -f datanode.yml up -d #Background startup
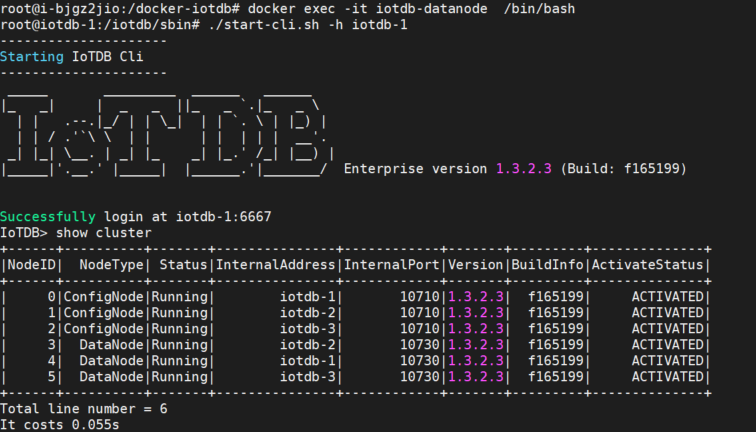
-### 8. Map/conf Directory (optional)
+### Map/conf Directory (optional)
If you want to directly modify the configuration file in the physical machine in the future, you can map the/conf folder in the container in three steps:
diff --git a/src/UserGuide/Master/Deployment-and-Maintenance/Monitoring-panel-deployment.md b/src/UserGuide/Master/Deployment-and-Maintenance/Monitoring-panel-deployment.md
index d9a418f..df4fbc2 100644
--- a/src/UserGuide/Master/Deployment-and-Maintenance/Monitoring-panel-deployment.md
+++ b/src/UserGuide/Master/Deployment-and-Maintenance/Monitoring-panel-deployment.md
@@ -185,11 +185,11 @@ When configuring the Data Source, pay attention to the URL where Prometheus is l
## Appendix, Detailed Explanation of Monitoring Indicators
-### 1. System Dashboard
+### System Dashboard
This panel displays the current usage of system CPU, memory, disk, and network resources, as well as partial status of the JVM.
-#### 1.1 CPU
+#### CPU
- CPU Core:CPU cores
- CPU Load:
@@ -197,7 +197,7 @@ This panel displays the current usage of system CPU, memory, disk, and network r
- Process CPU Load:The proportion of CPU occupied by the IoTDB process during sampling time
- CPU Time Per Minute:The total CPU time of all processes in the system per minute
-#### 1.2 Memory
+#### Memory
- System Memory:The current usage of system memory.
- Commited vm size: The size of virtual memory allocated by the operating system to running processes.
@@ -209,7 +209,7 @@ This panel displays the current usage of system CPU, memory, disk, and network r
- Total Memory:The total amount of memory that the IoTDB process has currently requested from the operating system.
- Used Memory:The total amount of memory currently used by the IoTDB process.
-#### 1.3 Disk
+#### Disk
- Disk Space:
- Total disk space:The maximum disk space that IoTDB can use.
@@ -236,7 +236,7 @@ This panel displays the current usage of system CPU, memory, disk, and network r
- I/O System Call Rate:The frequency of process calls to read and write system calls, similar to IOPS.
- I/O Throughput:The throughput of process I/O can be divided into two categories: actual-read/write and attemppt-read/write. Actual read and actual write refer to the number of bytes that a process actually causes block devices to perform I/O, excluding the parts processed by Page Cache.
-#### 1.4 JVM
+#### JVM
- GC Time Percentage:The proportion of GC time spent by the node JVM in the past minute's time window
- GC Allocated/Promoted Size Detail: The average size of objects promoted to the old era per minute by the node JVM, as well as the size of objects newly applied for by the new generation/old era and non generational new applications
@@ -262,7 +262,7 @@ This panel displays the current usage of system CPU, memory, disk, and network r
- unloaded:The number of classes uninstalled by the JVM since system startup
- The Number of Java Thread:The current number of surviving threads in IoTDB. Each sub item represents the number of threads in each state.
-#### 1.5 Network
+#### Network
Eno refers to the network card connected to the public network, while lo refers to the virtual network card.
@@ -271,9 +271,9 @@ Eno refers to the network card connected to the public network, while lo refers
- Packet Speed:The speed at which the network card sends and receives packets, and one RPC request can correspond to one or more packets
- Connection Num:The current number of socket connections for the selected process (IoTDB only has TCP)
-### 2.Performance Overview Dashboard
+### Performance Overview Dashboard
-#### 2.1 Cluster Overview
+#### Cluster Overview
- Total CPU Core:Total CPU cores of cluster machines
- DataNode CPU Load:CPU usage of each DataNode node in the cluster
@@ -294,7 +294,7 @@ Eno refers to the network card connected to the public network, while lo refers
- Total DataRegion: The total number of DataRegions managed by the cluster
- Total SchemaRegion: The total number of SchemeRegions managed by the cluster
-#### 2.2 Node Overview
+#### Node Overview
- CPU Core: The number of CPU cores in the machine where the node is located
- Disk Space: The disk size of the machine where the node is located
@@ -305,7 +305,7 @@ Eno refers to the network card connected to the public network, while lo refers
- Swap Memory:The swap memory size of the machine where the node is located
- File Number: Number of files managed by nodes
-#### 2.3 Performance
+#### Performance
- Session Idle Time:The total idle time and total busy time of the session connection of the node
- Client Connection: The client connection status of the node, including the total number of connections and the number of active connections
@@ -337,7 +337,7 @@ Eno refers to the network card connected to the public network, while lo refers
- Average Time Consumed Of Engine Stage: The average time consumption of each sub stage in the engine stage of a node
- P99 Time Consumed Of Engine Stage: P99 time consumption of each sub stage in the node engine stage
-#### 2.4 System
+#### System
- CPU Load: CPU load of nodes
- CPU Time Per Minute: The CPU time per minute of a node, with the maximum value related to the number of CPU cores
@@ -349,11 +349,11 @@ Eno refers to the network card connected to the public network, while lo refers
- File Size: Node management file size situation
- Log Number Per Minute: Different types of logs per minute for nodes
-### 3. ConfigNode Dashboard
+### ConfigNode Dashboard
This panel displays the performance of all management nodes in the cluster, including partitioning, node information, and client connection statistics.
-#### 3.1 Node Overview
+#### Node Overview
- Database Count: Number of databases for nodes
- Region
@@ -367,7 +367,7 @@ This panel displays the performance of all management nodes in the cluster, incl
- DataNodes:The DataNode situation of the cluster where the node is located
- System Overview: System overview of nodes, including system memory, disk usage, process memory, and CPU load
-#### 3.2 NodeInfo
+#### NodeInfo
- Node Count: The number of nodes in the cluster where the node is located, including ConfigNode and DataNode
- ConfigNode Status: The status of the ConfigNode node in the cluster where the node is located
@@ -377,7 +377,7 @@ This panel displays the performance of all management nodes in the cluster, incl
- DataRegion Distribution: The distribution of DataRegions in the cluster where the node is located
- DataRegionGroup Leader Distribution:The distribution of leaders in the DataRegionGroup of the cluster where the node is located
-#### 3.3 Protocol
+#### Protocol
- Client Count
- Active Client Num: The number of active clients in each thread pool of a node
@@ -390,7 +390,7 @@ This panel displays the performance of all management nodes in the cluster, incl
- Client Mean Borrow Wait Time: The average borrowing waiting time of clients in each thread pool of a node
- Client Mean Idle Time: The average idle time of clients in each thread pool of a node
-#### 3.4 Partition Table
+#### Partition Table
- SchemaRegionGroup Count: The number of SchemaRegionGroups in the Database of the cluster where the node is located
- DataRegionGroup Count: The number of DataRegionGroups in the Database of the cluster where the node is located
@@ -399,7 +399,7 @@ This panel displays the performance of all management nodes in the cluster, incl
- DataRegion Status: The DataRegion status of the cluster where the node is located
- SchemaRegion Status: The status of the SchemeRegion of the cluster where the node is located
-#### 3.5 Consensus
+#### Consensus
- Ratis Stage Time: The time consumption of each stage of the node's Ratis
- Write Log Entry: The time required to write a log for the Ratis of a node
@@ -407,17 +407,17 @@ This panel displays the performance of all management nodes in the cluster, incl
- Remote / Local Write QPS: Remote and local QPS written to node Ratis
- RatisConsensus Memory: Memory usage of Node Ratis consensus protocol
-### 4.DataNode Dashboard
+### DataNode Dashboard
This panel displays the monitoring status of all data nodes in the cluster, including write time, query time, number of stored files, etc.
-#### 4.1 Node Overview
+#### Node Overview
- The Number Of Entity: Entity situation of node management
- Write Point Per Second: The write speed per second of the node
- Memory Usage: The memory usage of the node, including the memory usage of various parts of IoT Consensus, the total memory usage of SchemaRegion, and the memory usage of various databases.
-#### 4.2 Protocol
+#### Protocol
- Node Operation Time Consumption
- The Time Consumed Of Operation (avg): The average time spent on various operations of a node
@@ -438,7 +438,7 @@ This panel displays the monitoring status of all data nodes in the cluster, incl
- Client Mean Borrow Wait Time: The average borrowing waiting time of clients in each thread pool of a node
- Client Mean Idle Time: The average idle time of clients in each thread pool of a node
-#### 4.3 Storage Engine
+#### Storage Engine
- File Count: Number of files of various types managed by nodes
- File Size: Node management of various types of file sizes
@@ -454,7 +454,7 @@ This panel displays the monitoring status of all data nodes in the cluster, incl
- Compaction Process Chunk Status: The number of Chunks in different states merged by nodes
- Compacted Point Num Per Minute: The number of merged nodes per minute
-#### 4.4 Write Performance
+#### Write Performance
- Write Cost(avg): Average node write time, including writing wal and memtable
- Write Cost(50%): Median node write time, including writing wal and memtable
@@ -490,7 +490,7 @@ This panel displays the monitoring status of all data nodes in the cluster, incl
- Series Num Of Flushing MemTable: The number of time series when flashing Memtables in different DataRegions of a node
- Average Point Num Of Flushing MemChunk: The average number of disk flushing points for node MemChunk
-#### 4.5 Schema Engine
+#### Schema Engine
- Schema Engine Mode: The metadata engine pattern of nodes
- Schema Consensus Protocol: Node metadata consensus protocol
@@ -519,7 +519,7 @@ This panel displays the monitoring status of all data nodes in the cluster, incl
- Time Consumed of Relead and Flush (avg): The average time taken for node triggered cache release and buffer flushing
- Time Consumed of Relead and Flush (99%): P99 time consumption for node triggered cache release and buffer flushing
-#### 4.6 Query Engine
+#### Query Engine
- Time Consumption In Each Stage
- The time consumed of query plan stages(avg): The average time spent on node queries at each stage
@@ -562,7 +562,7 @@ This panel displays the monitoring status of all data nodes in the cluster, incl
- The time consumed of query schedule time(50%): Median time spent on node query task scheduling
- The time consumed of query schedule time(99%): P99 of node query task scheduling time
-#### 4.7 Query Interface
+#### Query Interface
- Load Time Series Metadata
- The time consumed of load timeseries metadata(avg): The average time taken for node queries to load time series metadata
@@ -609,7 +609,7 @@ This panel displays the monitoring status of all data nodes in the cluster, incl
- The time consumed of build tsblock from merge reader(50%): The median time spent on constructing TsBlock through Merge Reader for node queries
- The time consumed of build tsblock from merge reader(99%): Node query using Merge Reader to construct TsBlock time-consuming P99
-#### 4.8 Query Data Exchange
+#### Query Data Exchange
The data exchange for the query is time-consuming.
@@ -634,7 +634,7 @@ The data exchange for the query is time-consuming.
- The time consumed of get data block task(50%): The median time taken for node queries to obtain data block tasks
- The time consumed of get data block task(99%): P99 time consumption for node query to obtain data block task
-#### 4.9 Query Related Resource
+#### Query Related Resource
- MppDataExchangeManager:The number of shuffle sink handles and source handles during node queries
- LocalExecutionPlanner: The remaining memory that nodes can allocate to query shards
@@ -644,7 +644,7 @@ The data exchange for the query is time-consuming.
- MemoryPool Capacity: The size of memory pools related to node queries, including maximum and remaining available values
- DriverScheduler: Number of queue tasks related to node queries
-#### 4.10 Consensus - IoT Consensus
+#### Consensus - IoT Consensus
- Memory Usage
- IoTConsensus Used Memory: The memory usage of IoT Consumes for nodes, including total memory usage, queue usage, and synchronization usage
@@ -664,7 +664,7 @@ The data exchange for the query is time-consuming.
- The Time Consumed Of Different Stages (50%): The median time spent on different execution stages of node IoT Consusus
- The Time Consumed Of Different Stages (99%):P99 of the time consumption for different execution stages of node IoT Consusus
-#### 4.11 Consensus - DataRegion Ratis Consensus
+#### Consensus - DataRegion Ratis Consensus
- Ratis Stage Time: The time consumption of different stages of node Ratis
- Write Log Entry: The time consumption of writing logs at different stages of node Ratis
@@ -672,7 +672,7 @@ The data exchange for the query is time-consuming.
- Remote / Local Write QPS: QPS written by node Ratis locally or remotely
- RatisConsensus Memory:Memory usage of node Ratis
-#### 4.12 Consensus - SchemaRegion Ratis Consensus
+#### Consensus - SchemaRegion Ratis Consensus
- Ratis Stage Time: The time consumption of different stages of node Ratis
- Write Log Entry: The time consumption for writing logs at each stage of node Ratis
diff --git a/src/UserGuide/Master/Ecosystem-Integration/Ignition-IoTDB-plugin_timecho.md b/src/UserGuide/Master/Ecosystem-Integration/Ignition-IoTDB-plugin_timecho.md
index 81b915e..a0db185 100644
--- a/src/UserGuide/Master/Ecosystem-Integration/Ignition-IoTDB-plugin_timecho.md
+++ b/src/UserGuide/Master/Ecosystem-Integration/Ignition-IoTDB-plugin_timecho.md
@@ -21,7 +21,7 @@
# Ignition
-## 1、Product Overview
+## Product Overview
1. Introduction to Ignition
@@ -38,7 +38,7 @@
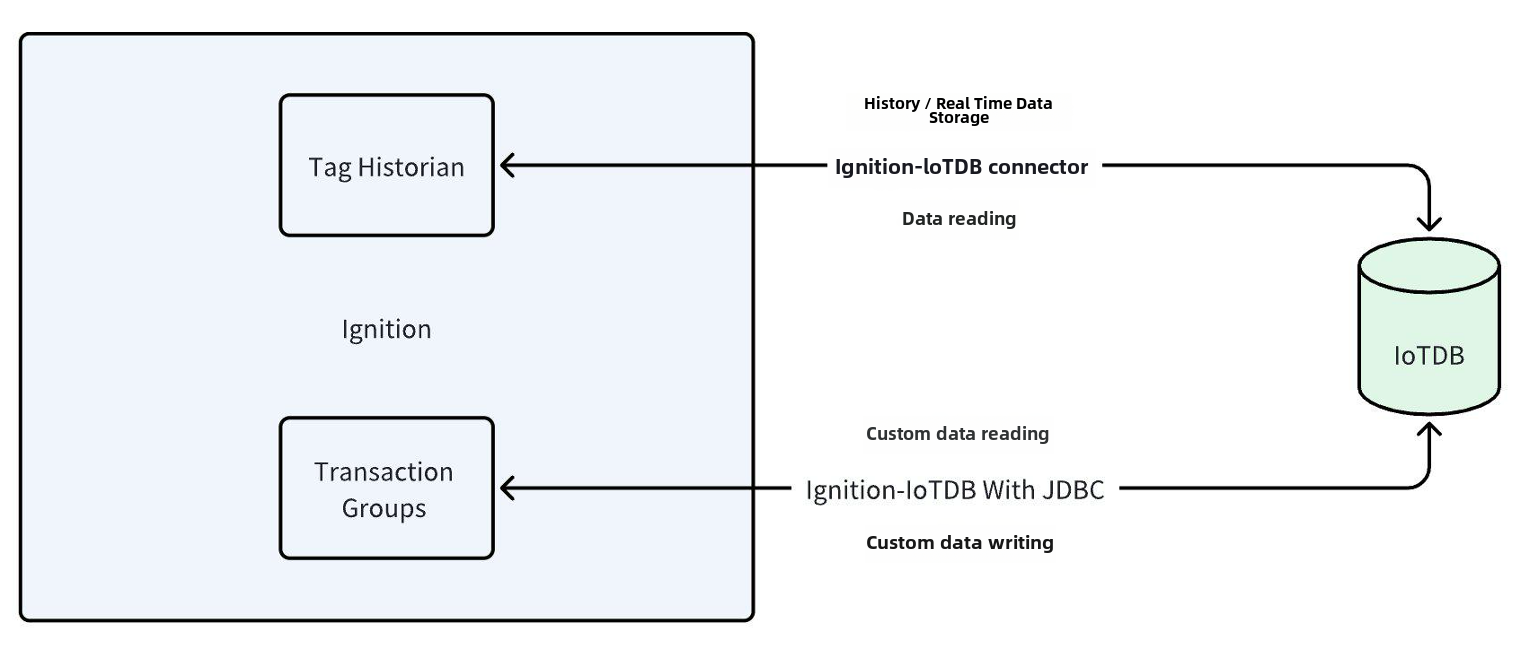
-## 2、Installation Requirements
+## Installation Requirements
| **Preparation Content** | Version Requirements |
| ------------------------------- | ------------------------------------------------------------ |
@@ -47,15 +47,15 @@
| Ignition-IoTDB Connector module | Please contact Business to obtain |
| Ignition-IoTDB With JDBC module | Download address:https://repo1.maven.org/maven2/org/apache/iotdb/iotdb-jdbc/ |
-## 3、Instruction Manual For Ignition-IoTDB Connector
+## Instruction Manual For Ignition-IoTDB Connector
-### 1、Introduce
+### Introduce
The Ignition-IoTDB Connector module can store data in a database connection associated with the historical database provider. The data is directly stored in a table in the SQL database based on its data type, as well as a millisecond timestamp. Store data only when making changes based on the value pattern and dead zone settings on each label, thus avoiding duplicate and unnecessary data storage.
The Ignition-IoTDB Connector provides the ability to store the data collected by Ignition into IoTDB.
-### 2、Installation Steps
+### Installation Steps
Step 1: Enter the `Configuration` - `System` - `Modules` module and click on the `Install or Upgrade a Module` button at the bottom
@@ -155,7 +155,7 @@ The configuration content is as follows:
-### 3、Instructions
+### Instructions
#### Configure Historical Data Storage
@@ -231,13 +231,13 @@ The configuration content is as follows:
system.iotdb.query("IoTDB", "select * from root.db.Sine where time > 1709563427247")
```
-## 4、Ignition-IoTDB With JDBC
+## Ignition-IoTDB With JDBC
-### 1、Introduce
+### Introduce
Ignition-IoTDB With JDBC provides a JDBC driver that allows users to connect and query the Ignition IoTDB database using standard JDBC APIs
-### 2、Installation Steps
+### Installation Steps
Step 1: Enter the `Configuration` - `Databases` -`Drivers` module and create the `Translator`
@@ -251,7 +251,7 @@ Step 3: Enter the `Configuration` - `Databases` - `Connections` module, create a

-### 3、Instructions
+### Instructions
#### Data Writing
diff --git a/src/UserGuide/Master/FAQ/Frequently-asked-questions.md b/src/UserGuide/Master/FAQ/Frequently-asked-questions.md
index 7352976..de789a0 100644
--- a/src/UserGuide/Master/FAQ/Frequently-asked-questions.md
+++ b/src/UserGuide/Master/FAQ/Frequently-asked-questions.md
@@ -23,7 +23,7 @@
## General FAQ
-### 1. How can I identify my version of IoTDB?
+### How can I identify my version of IoTDB?
There are several ways to identify the version of IoTDB that you are using:
@@ -65,7 +65,7 @@ Total line number = 1
It costs 0.241s
```
-### 2. Where can I find IoTDB logs?
+### Where can I find IoTDB logs?
Suppose your root directory is:
@@ -87,11 +87,11 @@ Let `$IOTDB_CLI_HOME = /workspace/iotdb/cli/target/iotdb-cli-{project.version}`
By default settings, the logs are stored under ```IOTDB_HOME/logs```. You can change log level and storage path by configuring ```logback.xml``` under ```IOTDB_HOME/conf```.
-### 3. Where can I find IoTDB data files?
+### Where can I find IoTDB data files?
By default settings, the data files (including tsfile, metadata, and WAL files) are stored under ```IOTDB_HOME/data/datanode```.
-### 4. How do I know how many time series are stored in IoTDB?
+### How do I know how many time series are stored in IoTDB?
Use IoTDB's Command Line Interface:
@@ -114,15 +114,15 @@ If you are using Linux, you can use the following shell command:
> 6
```
-### 5. Can I use Hadoop and Spark to read TsFile in IoTDB?
+### Can I use Hadoop and Spark to read TsFile in IoTDB?
Yes. IoTDB has intense integration with Open Source Ecosystem. IoTDB supports [Hadoop](https://github.com/apache/iotdb-extras/tree/master/connectors/hadoop), [Spark](https://github.com/apache/iotdb-extras/tree/master/connectors/spark-iotdb-connector) and [Grafana](https://github.com/apache/iotdb-extras/tree/master/connectors/grafana-connector) visualization tool.
-### 6. How does IoTDB handle duplicate points?
+### How does IoTDB handle duplicate points?
A data point is uniquely identified by a full time series path (e.g. ```root.vehicle.d0.s0```) and timestamp. If you submit a new point with the same path and timestamp as an existing point, IoTDB updates the value of this point instead of inserting a new point.
-### 7. How can I tell what type of the specific timeseries?
+### How can I tell what type of the specific timeseries?
Use ```SHOW TIMESERIES <timeseries path>``` SQL in IoTDB's Command Line Interface:
@@ -144,7 +144,7 @@ Otherwise, you can also use wildcard in timeseries path:
IoTDB> show timeseries root.fit.d1.*
```
-### 8. How can I change IoTDB's Cli time display format?
+### How can I change IoTDB's Cli time display format?
The default IoTDB's Cli time display format is readable (e.g. ```1970-01-01T08:00:00.001```), if you want to display time in timestamp type or other readable format, add parameter ```-disableISO8601``` in start command:
@@ -152,12 +152,12 @@ The default IoTDB's Cli time display format is readable (e.g. ```1970-01-01T08:0
> $IOTDB_CLI_HOME/sbin/start-cli.sh -h 127.0.0.1 -p 6667 -u root -pw root -disableISO8601
```
-### 9. How to handle error `IndexOutOfBoundsException` from `org.apache.ratis.grpc.server.GrpcLogAppender`?
+### How to handle error `IndexOutOfBoundsException` from `org.apache.ratis.grpc.server.GrpcLogAppender`?
This is an internal error log from Ratis 2.4.1, our dependency, and no impact on data writes or reads is expected.
It has been reported to the Ratis community and will be fixed in the future releases.
-### 10. How to deal with estimated out of memory errors?
+### How to deal with estimated out of memory errors?
Report an error message:
```
@@ -183,24 +183,24 @@ not affect normal operations. We will fix this message in the incoming releases.
### Cluster StartUp and Stop
-#### 1. Failed to start ConfigNode for the first time, how to find the reason?
+#### Failed to start ConfigNode for the first time, how to find the reason?
- Make sure that the data/confignode directory is cleared when start ConfigNode for the first time.
- Make sure that the <IP+Port> used by ConfigNode is not occupied, and the <IP+Port> is also not conflicted with other ConfigNodes.
- Make sure that the `cn_seed_config_node` is configured correctly, which points to the alive ConfigNode. And if the ConfigNode is started for the first time, make sure that `cn_seed_config_node` points to itself.
- Make sure that the configuration(consensus protocol and replica number) of the started ConfigNode is accord with the `cn_seed_config_node` ConfigNode.
-#### 2. ConfigNode is started successfully, but why the node doesn't appear in the results of `show cluster`?
+#### ConfigNode is started successfully, but why the node doesn't appear in the results of `show cluster`?
- Examine whether the `cn_seed_config_node` points to the correct address. If `cn_seed_config_node` points to itself, a new ConfigNode cluster is started.
-#### 3. Failed to start DataNode for the first time, how to find the reason?
+#### Failed to start DataNode for the first time, how to find the reason?
- Make sure that the data/datanode directory is cleared when start DataNode for the first time. If the start result is “Reject DataNode restart.”, maybe the data/datanode directory is not cleared.
- Make sure that the <IP+Port> used by DataNode is not occupied, and the <IP+Port> is also not conflicted with other DataNodes.
- Make sure that the `dn_seed_config_node` points to the alive ConfigNode.
-#### 4. Failed to remove DataNode, how to find the reason?
+#### Failed to remove DataNode, how to find the reason?
- Examine whether the parameter of `remove-datanode.sh` is correct, only rpcIp:rpcPort and dataNodeId are correct parameter.
- Only when the number of available DataNodes in the cluster is greater than max(schema_replication_factor, data_replication_factor), removing operation can be executed.
@@ -210,12 +210,12 @@ not affect normal operations. We will fix this message in the incoming releases.
If users want to make the Regions from Removing to available status, command `migrate region from datanodeId1 to datanodeId2` can take effect, this command can migrate the regions to other alive DataNodes.
Besides, IoTDB will publish `remove-datanode.sh -f` command in the next version, which can remove DataNodes forced (The failed migrated regions will be discarded).
-#### 5. Whether the down DataNode can be removed?
+#### Whether the down DataNode can be removed?
- The down DataNode can be removed only when the replica factor of schema and data is greater than 1.
Besides, IoTDB will publish `remove-datanode.sh -f` function in the next version.
-#### 6. What should be paid attention to when upgrading from 0.13 to 1.0?
+#### What should be paid attention to when upgrading from 0.13 to 1.0?
- The file structure between 0.13 and 1.0 is different, we can't copy the data directory from 0.13 to 1.0 to use directly.
If you want to load the data from 0.13 to 1.0, you can use the LOAD function.
@@ -224,40 +224,40 @@ not affect normal operations. We will fix this message in the incoming releases.
### Cluster Restart
-#### 1. How to restart any ConfigNode in the cluster?
+#### How to restart any ConfigNode in the cluster?
- First step: stop the process by `stop-confignode.sh` or kill PID of ConfigNode.
- Second step: execute `start-confignode.sh` to restart ConfigNode.
-#### 2. How to restart any DataNode in the cluster?
+#### How to restart any DataNode in the cluster?
- First step: stop the process by `stop-datanode.sh` or kill PID of DataNode.
- Second step: execute `start-datanode.sh` to restart DataNode.
-#### 3. If it's possible to restart ConfigNode using the old data directory when it's removed?
+#### If it's possible to restart ConfigNode using the old data directory when it's removed?
- Can't. The running result will be "Reject ConfigNode restart. Because there are no corresponding ConfigNode(whose nodeId=xx) in the cluster".
-#### 4. If it's possible to restart DataNode using the old data directory when it's removed?
+#### If it's possible to restart DataNode using the old data directory when it's removed?
- Can't. The running result will be "Reject DataNode restart. Because there are no corresponding DataNode(whose nodeId=xx) in the cluster. Possible solutions are as follows:...".
-#### 5. Can we execute `start-confignode.sh`/`start-datanode.sh` successfully when delete the data directory of given ConfigNode/DataNode without killing the PID?
+#### Can we execute `start-confignode.sh`/`start-datanode.sh` successfully when delete the data directory of given ConfigNode/DataNode without killing the PID?
- Can't. The running result will be "The port is already occupied".
### Cluster Maintenance
-#### 1. How to find the reason when Show cluster failed, and error logs like "please check server status" are shown?
+#### How to find the reason when Show cluster failed, and error logs like "please check server status" are shown?
- Make sure that more than one half ConfigNodes are alive.
- Make sure that the DataNode connected by the client is alive.
-#### 2. How to fix one DataNode when the disk file is broken?
+#### How to fix one DataNode when the disk file is broken?
- We can use `remove-datanode.sh` to fix it. Remove-datanode will migrate the data in the removing DataNode to other alive DataNodes.
- IoTDB will publish Node-Fix tools in the next version.
-#### 3. How to decrease the memory usage of ConfigNode/DataNode?
+#### How to decrease the memory usage of ConfigNode/DataNode?
- Adjust the ON_HEAP_MEMORY、OFF_HEAP_MEMORY options in conf/confignode-env.sh and conf/datanode-env.sh.
diff --git a/src/UserGuide/Master/QuickStart/ClusterQuickStart.md b/src/UserGuide/Master/QuickStart/ClusterQuickStart.md
index 79b3c11..f12792a 100644
--- a/src/UserGuide/Master/QuickStart/ClusterQuickStart.md
+++ b/src/UserGuide/Master/QuickStart/ClusterQuickStart.md
@@ -27,7 +27,7 @@ See also:
[FAQ](../FAQ/Frequently-asked-questions.md)
-## 1. Installation and deployment
+## Installation and deployment
As an example, we'd like to start an IoTDB cluster with 3 ConfigNodes and 3 DataNodes(3C3D) with minimum modifications. Thus,
- the cluster name is defaultCluster
@@ -53,7 +53,7 @@ Port:
- We could use IP address or hostname/domain to set up an IoTDB cluster, then we would take IP address. If using hostname/domain, `/etc/hosts` must be set well.
- JVM memory configuration: `ON_HEAP_MEMORY` in `confignode-env.sh` and `datanode-env.sh`, equal to or greater than 1G is recommended. It's enough for ConfigNode taking 1~2G. The memory taking of DataNode is decided by the inputing and querying data.
-### 1.1 download
+### download
In every computer, [Download](https://iotdb.apache.org/Download/) the IoTDB install package and extract it to working directory of `/data/iotdb`.
Then get the directory tree:
```shell
@@ -64,7 +64,7 @@ Then get the directory tree:
└── tools # other tools
```
-### 1.2. configuration
+### configuration
Configuration files are in `/data/iotdb/conf`.
Modify the specified configuration file according to the table below:
@@ -80,10 +80,10 @@ Modify the specified configuration file according to the table below:
**Notice:**
It's recommended that the configurations of iotdb-system.properties and the heap size of JVM in all nodes are the same.
-### 1.3. start IoTDB cluster
+### start IoTDB cluster
Before starting the IoTDB cluster, make sure the configurations are correct and there is no any data in the working directory.
-#### 1.3.1. start the first node
+#### start the first node
That is `cn_seed_config_node` in above configuration table.
Execute these commands below in node of `192.168.132.10`.
```shell
@@ -109,7 +109,7 @@ sbin/start-confignode.sh -d
sbin/start-datanode.sh -d
```
-#### 1.3.2. start service ConfigNode and DataNode in other nodes
+#### start service ConfigNode and DataNode in other nodes
Execute commands below in both 192.168.132.11 and 192.168.132.12:
```shell
cd /data/iotdb
@@ -118,7 +118,7 @@ sbin/start-standalone.sh
```
If starting failed, it's necessary to do [cleanup](#【reference】cleanup) in all nodes, and then doging all again from starting the first node.
-#### 1.3.3. check the cluster status
+#### check the cluster status
If everything goes well, the cluster will start successfully. Then, we can start the Cli for verification.
```shell
/data/iotdb/sbin/start-cli.sh -h 192.168.132.10
@@ -166,7 +166,7 @@ rm -rf data logs
It's necessary to remove directory of `data` but it's not necessary to remove directory of `logs`, only for convenience.
-## 2. Expand
+## Expand
`Expand` means add services of ConfigNode or DataNode into an existing IoTDB cluster.
It's the same as starting the other nodes mentioned above. That is downloading IoTDB install package, extracting, configurating and then starting. The new node here is `192.168.132.13`.
@@ -176,7 +176,7 @@ It's the same as starting the other nodes mentioned above. That is downloading I
- `cn_seed_config_node` and `dn_seed_config_node` must be the same to the cluster.
- The old data wouldn't be moved to the new node but the new data would be.
-### 2.1. configuration
+### configuration
Modify the specified configuration file according to the table below:
| Configuration | Configuration Option| IP:192.168.132.13 |
@@ -187,7 +187,7 @@ Modify the specified configuration file according to the table below:
| iotdb-system.properties | dn\_internal\_address | 192.168.132.13 |
| iotdb-system.properties | dn\_target\_config\_node\_list | 192.168.132.10:10710 |
-### 2.2. expand
+### expand
Execute commands below in new node of `192.168.132.13`:
```shell
cd /data/iotdb
@@ -195,7 +195,7 @@ cd /data/iotdb
sbin/start-standalone.sh
```
-### 2.3. check the result
+### check the result
Execute `show cluster` through Cli and the result like below:
```shell
/data/iotdb/sbin/start-cli.sh -h 192.168.132.10
@@ -216,14 +216,14 @@ IoTDB>show cluster;
```
-## 3. Remove service
+## Remove service
`Shrink` means removing a service from the IoTDB cluster.
**Notice:**
- `Shrink` could be done in any node within the cluster
- Any service could be shrinked within cluster. But the DataNode service of the cluster must greater than the data replica of iotdb-system.properties.
- Be patient to wait for the end of shrinking, and then read the guide in logs carefully.
-### 3.1 shrink service ConfigNode
+### shrink service ConfigNode
```shell
cd /data/iotdb
# way 1: shrink with ip:port
@@ -233,7 +233,7 @@ sbin/remove-confignode.sh 192.168.132.13:10710
sbin/remove-confignode.sh 6
```
-### 3.2 shrink service DataNode
+### shrink service DataNode
```shell
cd /data/iotdb
# way 1: shrink with ip:port
@@ -243,7 +243,7 @@ sbin/remove-datanode.sh 192.168.132.13:6667
sbin/remove-datanode.sh 7
```
-### 3.3 check the result
+### check the result
Execute `show cluster` through Cli, the result is like below:
```shell
diff --git a/src/UserGuide/Master/User-Manual/AINode_timecho.md b/src/UserGuide/Master/User-Manual/AINode_timecho.md
index 3fcd92e..8d1999de 100644
--- a/src/UserGuide/Master/User-Manual/AINode_timecho.md
+++ b/src/UserGuide/Master/User-Manual/AINode_timecho.md
@@ -33,7 +33,7 @@ The responsibilities of the three nodes are as follows:
- **DataNode**: responsible for receiving and parsing SQL requests from users; responsible for storing time-series data; responsible for preprocessing computation of data.
- **AINode**: responsible for model file import creation and model inference.
-## 1. Advantageous features
+## Advantageous features
Compared with building a machine learning service alone, it has the following advantages:
@@ -50,7 +50,7 @@ Compared with building a machine learning service alone, it has the following ad
-## 2. Basic Concepts
+## Basic Concepts
- **Model**: a machine learning model that takes time-series data as input and outputs the results or decisions of an analysis task. Model is the basic management unit of AINode, which supports adding (registration), deleting, checking, and using (inference) of models.
- **Create**: Load externally designed or trained model files or algorithms into MLNode for unified management and use by IoTDB.
@@ -61,16 +61,16 @@ Compared with building a machine learning service alone, it has the following ad
<img src="https://alioss.timecho.com/upload/AInode2.png" style="zoom:50%" />
::::
-## 3. Installation and Deployment
+## Installation and Deployment
The deployment of AINode can be found in the document [Deployment Guidelines](../Deployment-and-Maintenance/AINode_Deployment_timecho.md#AINode-部署) .
-## 4. Usage Guidelines
+## Usage Guidelines
AINode provides model creation and deletion process for deep learning models related to timing data. Built-in models do not need to be created and deleted, they can be used directly, and the built-in model instances created after inference is completed will be destroyed automatically.
-### 4.1 Registering Models
+### Registering Models
A trained deep learning model can be registered by specifying the vector dimensions of the model's inputs and outputs, which can be used for model inference. The following is the SQL syntax definition for model registration.
@@ -113,7 +113,7 @@ The specific meanings of the parameters in the SQL are as follows:
In addition to registration of local model files, registration can also be done by specifying remote resource paths via URIs, using open source model repositories (e.g. HuggingFace).
-#### 4.1.1 Example
+#### Example
In the current example folder, it contains model.pt and config.yaml files, model.pt is the training get, and the content of config.yaml is as follows:
@@ -148,7 +148,7 @@ After the SQL is executed, the registration process will be carried out asynchro
Once the model registration is complete, you can call specific functions and perform model inference by using normal queries.
-### 4.2 Viewing Models
+### Viewing Models
Successfully registered models can be queried for model-specific information through the show models command. The SQL definition is as follows:
@@ -171,7 +171,7 @@ State is used to show the current state of model registration, which consists of
- **DROPPING**: Model deletion is in progress, model related information is being deleted from configNode and AINode.
- **UNAVAILABLE**: Model creation failed, you can delete the failed model_name by drop model.
-#### 4.2.1 Example
+#### Example
```SQL
IoTDB> show models
@@ -196,7 +196,7 @@ IoTDB> show models
We have registered the corresponding model earlier, you can view the model status through the corresponding designation, active indicates that the model is successfully registered and can be used for inference.
-### 4.3 Delete Model
+### Delete Model
For a successfully registered model, the user can delete it via SQL. In addition to deleting the meta information on the configNode, this operation also deletes all the related model files under the AINode. The SQL is as follows:
@@ -206,7 +206,7 @@ drop model <model_name>
You need to specify the model model_name that has been successfully registered to delete the corresponding model. Since model deletion involves the deletion of data on multiple nodes, the operation will not be completed immediately, and the state of the model at this time is DROPPING, and the model in this state cannot be used for model inference.
-### 4.4 Using Built-in Model Reasoning
+### Using Built-in Model Reasoning
The SQL syntax is as follows:
@@ -221,7 +221,7 @@ Built-in model inference does not require a registration process, the inference
- **parameterName**: parameter name
- **parameterValue**: parameter value
-#### 4.4.1 Built-in Models and Parameter Descriptions
+#### Built-in Models and Parameter Descriptions
The following machine learning models are currently built-in, please refer to the following links for detailed parameter descriptions.
@@ -236,7 +236,7 @@ The following machine learning models are currently built-in, please refer to th
| Stray | _Stray | Anomaly detection | [Stray Parameter description](https://www.sktime.net/en/latest/api_reference/auto_generated/sktime.annotation.stray.STRAY.html) |
-#### 4.4.2 Example
+#### Example
The following is an example of an operation using built-in model inference. The built-in Stray model is used for anomaly detection algorithm. The input is `[144,1]` and the output is `[144,1]`. We use it for reasoning through SQL.
@@ -276,7 +276,7 @@ IoTDB> call inference(_Stray, "select s0 from root.eg.airline", k=2)
Total line number = 144
```
-### 4.5 Reasoning with Deep Learning Models
+### Reasoning with Deep Learning Models
The SQL syntax is as follows:
@@ -309,7 +309,7 @@ After completing the registration of the model, the inference function can be us
**Explanation 2**: In deep learning applications, timestamp-derived features (time columns in the data) are often used as covariates in generative tasks, and are input into the model together to enhance the model, but the time columns are generally not included in the model's output. In order to ensure the generality of the implementation, the model inference results only correspond to the real output of the model, if the model does not output the time column, it will not be included in [...]
-#### 4.5.1 Example
+#### Example
The following is an example of inference in action using a deep learning model, for the `dlinear` prediction model with input `[96,2]` and output `[48,2]` mentioned above, which we use via SQL.
@@ -351,7 +351,7 @@ IoTDB> call inference(dlinear_example,"select s0,s1 from root.**")
Total line number = 48
```
-#### 4.5.2 Example of using the tail/head window function
+#### Example of using the tail/head window function
When the amount of data is variable and you want to take the latest 96 rows of data for inference, you can use the corresponding window function tail. head function is used in a similar way, except that it takes the earliest 96 points.
@@ -395,7 +395,7 @@ IoTDB> call inference(dlinear_example,"select s0,s1 from root.**",window=tail(96
Total line number = 48
```
-#### 4.5.3 Example of using the count window function
+#### Example of using the count window function
This window is mainly used for computational tasks, when the model corresponding to the task can only process a fixed row of data at a time and what is ultimately desired is indeed multiple sets of predictions, using this window function allows for sequential inference using a sliding window of points. Suppose we now have an anomaly detection model anomaly_example(input: [24,2], output[1,1]) that generates a 0/1 label for each row of data, an example of its use is shown below:
```Shell
@@ -435,7 +435,7 @@ Total line number = 4
where the labels of each row in the result set correspond to the model output corresponding to the 16 rows of input.
-## 5. Privilege Management
+## Privilege Management
When using AINode related functions, the authentication of IoTDB itself can be used to do a permission management, users can only use the model management related functions when they have the USE_MODEL permission. When using the inference function, the user needs to have the permission to access the source sequence corresponding to the SQL of the input model.
@@ -444,9 +444,9 @@ When using AINode related functions, the authentication of IoTDB itself can be u
| USE_MODEL | create model/show models/drop model | √ | √ | x |
| READ_DATA| call inference | √ | √|√ |
-## 6. Practical Examples
+## Practical Examples
-### 6.1 Power Load Prediction
+### Power Load Prediction
In some industrial scenarios, there is a need to predict power loads, which can be used to optimise power supply, conserve energy and resources, support planning and expansion, and enhance power system reliability.
@@ -517,7 +517,7 @@ The data before 10/24 00:00 in the image is the past data input into the model,
As can be seen, we have used the relationship between the six load information and the corresponding time oil temperatures for the past 96 hours (4 days) to model the possible changes in this data for the oil temperature for the next 48 hours (2 days) based on the inter-relationships between the sequences learned previously, and it can be seen that the predicted curves maintain a high degree of consistency in trend with the actual results after visualisation.
-### 6.2 Power Prediction
+### Power Prediction
Power monitoring of current, voltage and power data is required in substations for detecting potential grid problems, identifying faults in the power system, effectively managing grid loads and analysing power system performance and trends.
@@ -586,7 +586,7 @@ The data before 01/25 14:33 is the past data input to the model, the yellow line
It can be seen that we have used the data of the last 8 minutes of voltage to model the possible changes in the A-phase voltage for the next 4 minutes based on the inter-relationships between the sequences learned earlier, and it can be seen that the predicted curves and the actual results maintain a high degree of synchronicity in terms of trends after visualisation.
-### 6.3 Anomaly Detection
+### Anomaly Detection
In the civil aviation and transport industry, there exists a need for anomaly detection of the number of passengers travelling on an aircraft. The results of anomaly detection can be used to guide the adjustment of flight scheduling to make the organisation more efficient.
diff --git a/src/UserGuide/Master/User-Manual/IoTDB-View_timecho.md b/src/UserGuide/Master/User-Manual/IoTDB-View_timecho.md
index a4d0aaa..cceada4 100644
--- a/src/UserGuide/Master/User-Manual/IoTDB-View_timecho.md
+++ b/src/UserGuide/Master/User-Manual/IoTDB-View_timecho.md
@@ -21,9 +21,9 @@
# View
-## I. Sequence View Application Background
+## Sequence View Application Background
-## 1.1 Application Scenario 1 Time Series Renaming (PI Asset Management)
+## Application Scenario 1 Time Series Renaming (PI Asset Management)
In practice, the equipment collecting data may be named with identification numbers that are difficult to be understood by human beings, which brings difficulties in querying to the business layer.
@@ -33,19 +33,19 @@ The Sequence View, on the other hand, is able to re-organise the management of t
It is difficult for the user to understand. However, at this point, the user is able to rename it using the sequence view feature, map it to a sequence view, and use `root.view.device001.temperature` to access the captured data.
-### 1.2 Application Scenario 2 Simplifying business layer query logic
+### Application Scenario 2 Simplifying business layer query logic
Sometimes users have a large number of devices that manage a large number of time series. When conducting a certain business, the user wants to deal with only some of these sequences. At this time, the focus of attention can be picked out by the sequence view function, which is convenient for repeated querying and writing.
**For example**: Users manage a product assembly line with a large number of time series for each segment of the equipment. The temperature inspector only needs to focus on the temperature of the equipment, so he can extract the temperature-related sequences and compose the sequence view.
-### 1.3 Application Scenario 3 Auxiliary Rights Management
+### Application Scenario 3 Auxiliary Rights Management
In the production process, different operations are generally responsible for different scopes. For security reasons, it is often necessary to restrict the access scope of the operations staff through permission management.
**For example**: The safety management department now only needs to monitor the temperature of each device in a production line, but these data are stored in the same database with other confidential data. At this point, it is possible to create a number of new views that contain only temperature-related time series on the production line, and then to give the security officer access to only these sequence views, thus achieving the purpose of permission restriction.
-### 1.4 Motivation for designing sequence view functionality
+### Motivation for designing sequence view functionality
Combining the above two types of usage scenarios, the motivations for designing sequence view functionality, are:
@@ -53,13 +53,13 @@ Combining the above two types of usage scenarios, the motivations for designing
2. to simplify the query logic at the business level.
3. Auxiliary rights management, open data to specific users through the view.
-## 2. Sequence View Concepts
+## Sequence View Concepts
-### 2.1 Terminology Concepts
+### Terminology Concepts
Concept: If not specified, the views specified in this document are **Sequence Views**, and new features such as device views may be introduced in the future.
-### 2.2 Sequence view
+### Sequence view
A sequence view is a way of organising the management of time series.
@@ -69,7 +69,7 @@ A sequence view is a virtual time series, and each virtual time series is like a
Users can create views using complex SQL queries, where the sequence view acts as a stored query statement, and when data is read from the view, the stored query statement is used as the source of the data in the FROM clause.
-### 2.3 Alias Sequences
+### Alias Sequences
There is a special class of beings in a sequence view that satisfy all of the following conditions:
@@ -81,13 +81,13 @@ Such a sequence view is called an **alias sequence**, or alias sequence view. A
** All sequence views, including aliased sequences, do not currently support Trigger functionality. **
-### 2.4 Nested Views
+### Nested Views
A user may want to select a number of sequences from an existing sequence view to form a new sequence view, called a nested view.
**The current version does not support the nested view feature**.
-### 2.5 Some constraints on sequence views in IoTDB
+### Some constraints on sequence views in IoTDB
#### Constraint 1 A sequence view must depend on one or several time series
@@ -130,13 +130,13 @@ However, their metadata such as tags and attributes are not shared.
This is because the business query, view-oriented users are concerned about the structure of the current view, and if you use group by tag and other ways to do the query, obviously want to get the view contains the corresponding tag grouping effect, rather than the time series of the tag grouping effect (the user is not even aware of those time series).
-## 3. Sequence view functionality
+## Sequence view functionality
-### 3.1 Creating a view
+### Creating a view
Creating a sequence view is similar to creating a time series, the difference is that you need to specify the data source, i.e., the original sequence, through the AS keyword.
-#### 3.1.1. SQL for creating a view
+#### SQL for creating a view
User can select some sequences to create a view:
@@ -168,7 +168,7 @@ AS
root.db.device.s01
```
-#### 3.1.2 Creating views with computational logic
+#### Creating views with computational logic
Following the example in section 2.2 Limitations 1:
@@ -198,7 +198,7 @@ The user can then query it like this:
SELECT avg_temperature FROM root.db.d01
```
-#### 3.1.3 Nested sequence views not supported
+#### Nested sequence views not supported
Continuing with the example from 3.1.2, the user now wants to create a new view using the sequence view `root.db.d01.avg_temperature`, which is not allowed. We currently do not support nested views, whether it is an aliased sequence or not.
@@ -210,7 +210,7 @@ AS
root.db.d01.avg_temperature -- Not supported. Nested views are not allowed
```
-#### 3.1.4 Creating multiple sequence views at once
+#### Creating multiple sequence views at once
If only one sequence view can be specified at a time which is not convenient for the user to use, then multiple sequences can be specified at a time, for example:
@@ -292,7 +292,7 @@ After that, if the user adds the sequence `root.db.d01.s02`, it does not corresp
Please always note that inter-sequence mapping relationships are stored statically and solidly.
-#### 3.1.5 Batch Creation of Sequence Views
+#### Batch Creation of Sequence Views
There are several existing devices, each with a temperature value, for example:
@@ -330,7 +330,7 @@ The final view contains these sequences:
Created using wildcards, only static mapping relationships at the moment of creation will be stored.
-#### 3.1.6 SELECT clauses are somewhat limited when creating views
+#### SELECT clauses are somewhat limited when creating views
The SELECT clause used when creating a serial view is subject to certain restrictions. The main restrictions are as follows:
@@ -340,7 +340,7 @@ The SELECT clause used when creating a serial view is subject to certain restric
Simply put, after `AS` you can only use `SELECT ... FROM ... ` and the results of this query must form a time series.
-### 3.2 View Data Queries
+### View Data Queries
For the data query functions that can be supported, the sequence view and time series can be used indiscriminately with identical behaviour when performing time series data queries.
@@ -361,11 +361,11 @@ However, if the user wants to query the metadata of the sequence, such as tag, a
In addition, for aliased sequences, if the user wants to get information about the time series such as tags, attributes, etc., the user needs to query the mapping of the view columns to find the corresponding time series, and then query the time series for the tags, attributes, etc. The method of querying the mapping of the view columns will be explained in section 3.5.
-### 3.3 Modify Views
+### Modify Views
Modifying a view, such as changing its name, modifying its calculation logic, deleting it, etc., is similar to creating a new view, in that you need to re-specify all the column descriptions for the entire view.
-#### 3.3.1 Modify view data source
+#### Modify view data source
```SQL
ALTER VIEW root.view.device.status
@@ -374,7 +374,7 @@ AS
FROM root.ln.wf.d01
```
-#### 3.3.2 Modify the view's calculation logic
+#### Modify the view's calculation logic
```SQL
ALTER VIEW root.db.d01.avg_temperature
@@ -383,7 +383,7 @@ AS
FROM root.db.d01
```
-#### 3.3.3 Tag point management
+#### Tag point management
- Add a new
tag
@@ -423,7 +423,7 @@ ALTER view root.turbine.d1.s1 DROP tag1, tag2
ALTER view root.turbine.d1.s1 UPSERT TAGS(tag2=newV2, tag3=v3) ATTRIBUTES(attr3=v3, attr4=v4)
```
-#### 3.3.4 Deleting Views
+#### Deleting Views
Since a view is a sequence, a view can be deleted as if it were a time series.
@@ -432,7 +432,7 @@ Since a view is a sequence, a view can be deleted as if it were a time series.
DELETE VIEW root.view.device.avg_temperatue
```
-### 3.4 View Synchronisation
+### View Synchronisation
Sequence view data is always obtained via real-time queries, so data synchronisation is naturally supported.
@@ -454,11 +454,11 @@ Please refer to the previous section 2.1.6 Restrictions2 for more details.
Please refer to the previous section 2.1.6 Restriction 5 for details.
-### 3.5 View Metadata Queries
+### View Metadata Queries
View metadata query specifically refers to querying the metadata of the view itself (e.g., how many columns the view has), as well as information about the views in the database (e.g., what views are available).
-#### 3.5.1 Viewing Current View Columns
+#### Viewing Current View Columns
The user has two ways of querying:
@@ -520,7 +520,7 @@ The last column, `SOURCE`, shows the data source for the sequence view, listing
Both of the above queries involve the data type of the view. The data type of a view is inferred from the original time series type of the query statement or alias sequence that defines the view. This data type is computed in real time based on the current state of the system, so the data type queried at different moments may be changing.
-## IV. FAQ
+## FAQ
#### Q1: I want the view to implement the function of type conversion. For example, a time series of type int32 was originally placed in the same view as other series of type int64. I now want all the data queried through the view to be automatically converted to int64 type.
diff --git a/src/UserGuide/Master/User-Manual/Trigger.md b/src/UserGuide/Master/User-Manual/Trigger.md
index 97ade9b..7c4e163 100644
--- a/src/UserGuide/Master/User-Manual/Trigger.md
+++ b/src/UserGuide/Master/User-Manual/Trigger.md
@@ -21,7 +21,7 @@
# TRIGGER
-## 1. Instructions
+## Instructions
The trigger provides a mechanism for listening to changes in time series data. With user-defined logic, tasks such as alerting and data forwarding can be conducted.
@@ -47,7 +47,7 @@ There are currently two trigger events for the trigger, and other trigger events
- BEFORE INSERT: Fires before the data is persisted. **Please note that currently the trigger does not support data cleaning and will not change the data to be persisted itself.**
- AFTER INSERT: Fires after the data is persisted.
-## 2. How to Implement a Trigger
+## How to Implement a Trigger
You need to implement the trigger by writing a Java class, where the dependency shown below is required. If you use [Maven](http://search.maven.org/), you can search for them directly from the [Maven repository](http://search.maven.org/).
@@ -318,7 +318,7 @@ public class ClusterAlertingExample implements Trigger {
}
```
-## 3. Trigger Management
+## Trigger Management
You can create and drop a trigger through an SQL statement, and you can also query all registered triggers through an SQL statement.
@@ -448,7 +448,7 @@ During the process of creating and dropping triggers in the cluster, we maintain
| DROPPING | Intermediate state of executing `DROP TRIGGER`, the cluster is in the process of dropping the trigger. | NO |
| TRANSFERRING | The cluster is migrating the location of this trigger instance. | NO |
-## 4. Notes
+## Notes
- The trigger takes effect from the time of registration, and does not process the existing historical data. **That is, only insertion requests that occur after the trigger is successfully registered will be listened to by the trigger. **
- The fire process of trigger is synchronous currently, so you need to ensure the efficiency of the trigger, otherwise the writing performance may be greatly affected. **You need to guarantee concurrency safety of triggers yourself**.
@@ -458,7 +458,7 @@ During the process of creating and dropping triggers in the cluster, we maintain
- The trigger JAR package has a size limit, which must be less than min(`config_node_ratis_log_appender_buffer_size_max`, 2G), where `config_node_ratis_log_appender_buffer_size_max` is a configuration item. For the specific meaning, please refer to the IOTDB configuration item description.
- **It is better not to have classes with the same full class name but different function implementations in different JAR packages.** For example, trigger1 and trigger2 correspond to resources trigger1.jar and trigger2.jar respectively. If two JAR packages contain a `org.apache.iotdb.trigger.example.AlertListener` class, when `CREATE TRIGGER` uses this class, the system will randomly load the class in one of the JAR packages, which will eventually leads the inconsistent behavior of trig [...]
-## 5. Configuration Parameters
+## Configuration Parameters
| Parameter | Meaning |
| ------------------------------------------------- | ------------------------------------------------------------ |
diff --git a/src/UserGuide/latest/API/Programming-CSharp-Native-API.md b/src/UserGuide/latest/API/Programming-CSharp-Native-API.md
index 9c7463a..12d431a 100644
--- a/src/UserGuide/latest/API/Programming-CSharp-Native-API.md
+++ b/src/UserGuide/latest/API/Programming-CSharp-Native-API.md
@@ -106,9 +106,9 @@ await session_pool.Close();
- Encapsulate and abstract the `record` data in **IoTDB**
- e.g.
-| timestamp | status | temperature |
-| --------- | ------ | ----------- |
-| 1 | 0 | 20 |
+ | timestamp | status | temperature |
+ | --------- | ------ | ----------- |
+ | 1 | 0 | 20 |
- Construction:
@@ -122,11 +122,11 @@ var rowRecord =
- A data structure similar to a table, containing several non empty data blocks of a device's rows。
- e.g.
-| time | status | temperature |
-| ---- | ------ | ----------- |
-| 1 | 0 | 20 |
-| 2 | 0 | 20 |
-| 3 | 3 | 21 |
+ | time | status | temperature |
+ | ---- | ------ | ----------- |
+ | 1 | 0 | 20 |
+ | 2 | 0 | 20 |
+ | 3 | 3 | 21 |
- Construction:
diff --git a/src/UserGuide/latest/API/Programming-Cpp-Native-API.md b/src/UserGuide/latest/API/Programming-Cpp-Native-API.md
index 637d6a4..1350918 100644
--- a/src/UserGuide/latest/API/Programming-Cpp-Native-API.md
+++ b/src/UserGuide/latest/API/Programming-Cpp-Native-API.md
@@ -37,7 +37,7 @@
- **MAC**
- 1. Install Bison :Bison 2.3 is preinstalled on OSX, but this version is too low.
+1. Install Bison :Bison 2.3 is preinstalled on OSX, but this version is too low.
When building Thrift with Bison 2.3, the following error would pop out:
```invalid directive: '%code'```
@@ -60,14 +60,14 @@
echo 'export PATH="/usr/local/opt/bison/bin:$PATH"' >> ~/.zshrc
```
- 2. Install Boost :Please make sure a relative new version of Boost is ready on your machine.
- If no Boost available, install the latest version of Boost:
- ```shell
- brew install boost
- brew link boost
- ```
+2. Install Boost :Please make sure a relative new version of Boost is ready on your machine.
+ If no Boost available, install the latest version of Boost:
+ ```shell
+ brew install boost
+ brew link boost
+ ```
- 3. OpenSSL :Make sure the Openssl libraries has been install on your Mac. The default Openssl include file search path is "/usr/local/opt/openssl/include".
+3. OpenSSL :Make sure the Openssl libraries has been install on your Mac. The default Openssl include file search path is "/usr/local/opt/openssl/include".
If Openssl header files can not be found when building Thrift, please add option`-Dopenssl.include.dir=""`.
@@ -94,20 +94,20 @@
- **Windows**
- 1. Building environment
- * Install `MS Visual Studio`(recommend 2019 version): remember to install Visual Studio C/C++ IDE and compiler(supporting CMake, Clang, MinGW).
- * Download and install [CMake](https://cmake.org/download/) .
+1. Building environment
+ - Install `MS Visual Studio`(recommend 2019 version): remember to install Visual Studio C/C++ IDE and compiler(supporting CMake, Clang, MinGW).
+ - Download and install [CMake](https://cmake.org/download/) .
- 2. Download and install `Flex` & `Bison`
- * Download [Win_Flex_Bison](https://sourceforge.net/projects/winflexbison/) .
- * After downloaded, please rename the executables to `flex.exe` and `bison.exe` and add them to "PATH" environment variables.
+2. Download and install `Flex` & `Bison`
+ - Download [Win_Flex_Bison](https://sourceforge.net/projects/winflexbison/) .
+ - After downloaded, please rename the executables to `flex.exe` and `bison.exe` and add them to "PATH" environment variables.
- 3. Install `Boost`
- * Download [Boost](https://www.boost.org/users/download/) .
- * Then build `Boost` by executing bootstrap.bat and b2.exe.
+3. Install `Boost`
+ - Download [Boost](https://www.boost.org/users/download/) .
+ - Then build `Boost` by executing bootstrap.bat and b2.exe.
- 4. Install `OpenSSL`
- * Download and install [OpenSSL](http://slproweb.com/products/Win32OpenSSL.html) .
+4. Install `OpenSSL`
+ - Download and install [OpenSSL](http://slproweb.com/products/Win32OpenSSL.html) .
### Compile
diff --git a/src/UserGuide/latest/API/Programming-MQTT.md b/src/UserGuide/latest/API/Programming-MQTT.md
index 3b45d98..5bbb610 100644
--- a/src/UserGuide/latest/API/Programming-MQTT.md
+++ b/src/UserGuide/latest/API/Programming-MQTT.md
@@ -107,7 +107,7 @@ If you do not like the above Json format, you can customize your MQTT Message fo
of codes. An example can be found in `example/mqtt-customize` project.
Steps:
-* Create a java project, and add dependency:
+1. Create a java project, and add dependency:
```xml
<dependency>
<groupId>org.apache.iotdb</groupId>
@@ -115,7 +115,7 @@ Steps:
<version>1.1.0-SNAPSHOT</version>
</dependency>
```
-* Define your implementation which implements `org.apache.iotdb.db.protocol.mqtt.PayloadFormatter`
+2. Define your implementation which implements `org.apache.iotdb.db.protocol.mqtt.PayloadFormatter`
e.g.,
```java
@@ -162,19 +162,19 @@ public class CustomizedJsonPayloadFormatter implements PayloadFormatter {
}
}
```
-* modify the file in `src/main/resources/META-INF/services/org.apache.iotdb.db.protocol.mqtt.PayloadFormatter`:
+3. modify the file in `src/main/resources/META-INF/services/org.apache.iotdb.db.protocol.mqtt.PayloadFormatter`:
clean the file and put your implementation class name into the file.
In this example, the content is: `org.apache.iotdb.mqtt.server.CustomizedJsonPayloadFormatter`
-* compile your implementation as a jar file: `mvn package -DskipTests`
+4. compile your implementation as a jar file: `mvn package -DskipTests`
Then, in your server:
-* Create ${IOTDB_HOME}/ext/mqtt/ folder, and put the jar into this folder.
-* Update configuration to enable MQTT service. (`enable_mqtt_service=true` in `conf/iotdb-system.properties`)
-* Set the value of `mqtt_payload_formatter` in `conf/iotdb-system.properties` as the value of getName() in your implementation
+1. Create ${IOTDB_HOME}/ext/mqtt/ folder, and put the jar into this folder.
+2. Update configuration to enable MQTT service. (`enable_mqtt_service=true` in `conf/iotdb-system.properties`)
+3. Set the value of `mqtt_payload_formatter` in `conf/iotdb-system.properties` as the value of getName() in your implementation
, in this example, the value is `CustomizedJson`
-* Launch the IoTDB server.
-* Now IoTDB will use your implementation to parse the MQTT message.
+4. Launch the IoTDB server.
+5. Now IoTDB will use your implementation to parse the MQTT message.
More: the message format can be anything you want. For example, if it is a binary format,
just use `payload.forEachByte()` or `payload.array` to get bytes content.
diff --git a/src/UserGuide/latest/API/RestServiceV1.md b/src/UserGuide/latest/API/RestServiceV1.md
index d04addb..81c3c6e 100644
--- a/src/UserGuide/latest/API/RestServiceV1.md
+++ b/src/UserGuide/latest/API/RestServiceV1.md
@@ -81,7 +81,7 @@ The `/ping` API can be used for service liveness probing.
Request method: `GET`
-Request path: http://ip:port/ping
+Request path: `http://ip:port/ping`
The user name used in the example is: root, password: root
@@ -133,7 +133,7 @@ Request method: `POST`
Request header: `application/json`
-Request path: http://ip:port/rest/v1/query
+Request path: `http://ip:port/rest/v1/query`
Parameter Description:
@@ -157,38 +157,38 @@ Tip: Statements like `select * from root.xx.**` are not recommended because thos
**Expression query**
-```shell
-curl -H "Content-Type:application/json" -H "Authorization:Basic cm9vdDpyb290" -X POST --data '{"sql":"select s3, s4, s3 + 1 from root.sg27 limit 2"}' http://127.0.0.1:18080/rest/v1/query
-````
-
-```json
-{
- "expressions": [
- "root.sg27.s3",
- "root.sg27.s4",
- "root.sg27.s3 + 1"
- ],
- "columnNames": null,
- "timestamps": [
- 1635232143960,
- 1635232153960
- ],
- "values": [
- [
- 11,
- null
+ ```shell
+ curl -H "Content-Type:application/json" -H "Authorization:Basic cm9vdDpyb290" -X POST --data '{"sql":"select s3, s4, s3 + 1 from root.sg27 limit 2"}' http://127.0.0.1:18080/rest/v1/query
+ ````
+Response instance
+ ```json
+ {
+ "expressions": [
+ "root.sg27.s3",
+ "root.sg27.s4",
+ "root.sg27.s3 + 1"
],
- [
- false,
- true
+ "columnNames": null,
+ "timestamps": [
+ 1635232143960,
+ 1635232153960
],
- [
- 12.0,
- null
+ "values": [
+ [
+ 11,
+ null
+ ],
+ [
+ false,
+ true
+ ],
+ [
+ 12.0,
+ null
+ ]
]
- ]
-}
-```
+ }
+ ```
**Show child paths**
@@ -774,7 +774,7 @@ Request method: `POST`
Request header: `application/json`
-Request path: http://ip:port/rest/v1/nonQuery
+Request path: `http://ip:port/rest/v1/nonQuery`
Parameter Description:
@@ -810,7 +810,7 @@ Request method: `POST`
Request header: `application/json`
-Request path: http://ip:port/rest/v1/insertTablet
+Request path: `http://ip:port/rest/v1/insertTablet`
Parameter Description:
diff --git a/src/UserGuide/latest/API/RestServiceV2.md b/src/UserGuide/latest/API/RestServiceV2.md
index d3f5954..5255a86 100644
--- a/src/UserGuide/latest/API/RestServiceV2.md
+++ b/src/UserGuide/latest/API/RestServiceV2.md
@@ -81,7 +81,7 @@ The `/ping` API can be used for service liveness probing.
Request method: `GET`
-Request path: http://ip:port/ping
+Request path: `http://ip:port/ping`
The user name used in the example is: root, password: root
@@ -133,7 +133,7 @@ Request method: `POST`
Request header: `application/json`
-Request path: http://ip:port/rest/v2/query
+Request path: `http://ip:port/rest/v2/query`
Parameter Description:
@@ -774,7 +774,7 @@ Request method: `POST`
Request header: `application/json`
-Request path: http://ip:port/rest/v2/nonQuery
+Request path: `http://ip:port/rest/v2/nonQuery`
Parameter Description:
@@ -810,7 +810,7 @@ Request method: `POST`
Request header: `application/json`
-Request path: http://ip:port/rest/v2/insertTablet
+Request path: `http://ip:port/rest/v2/insertTablet`
Parameter Description:
@@ -849,7 +849,7 @@ Request method: `POST`
Request header: `application/json`
-Request path: http://ip:port/rest/v2/insertRecords
+Request path: `http://ip:port/rest/v2/insertRecords`
Parameter Description:
diff --git a/src/UserGuide/latest/Basic-Concept/Encoding-and-Compression.md b/src/UserGuide/latest/Basic-Concept/Encoding-and-Compression.md
index 57d55a8..d73c4fb 100644
--- a/src/UserGuide/latest/Basic-Concept/Encoding-and-Compression.md
+++ b/src/UserGuide/latest/Basic-Concept/Encoding-and-Compression.md
@@ -26,51 +26,50 @@
To improve the efficiency of data storage, it is necessary to encode data during data writing, thereby reducing the amount of disk space used. In the process of writing and reading data, the amount of data involved in the I/O operations can be reduced to improve performance. IoTDB supports the following encoding methods for different data types:
-* PLAIN
+1. PLAIN
-PLAIN encoding, the default encoding mode, i.e, no encoding, supports multiple data types. It has high compression and decompression efficiency while suffering from low space storage efficiency.
+ PLAIN encoding, the default encoding mode, i.e, no encoding, supports multiple data types. It has high compression and decompression efficiency while suffering from low space storage efficiency.
-* TS_2DIFF
+2. TS_2DIFF
-Second-order differential encoding is more suitable for encoding monotonically increasing or decreasing sequence data, and is not recommended for sequence data with large fluctuations.
+ Second-order differential encoding is more suitable for encoding monotonically increasing or decreasing sequence data, and is not recommended for sequence data with large fluctuations.
-* RLE
+3. RLE
-Run-length encoding is suitable for storing sequence with continuous values, and is not recommended for sequence data with most of the time different values.
+ Run-length encoding is suitable for storing sequence with continuous values, and is not recommended for sequence data with most of the time different values.
-Run-length encoding can also be used to encode floating-point numbers, while it is necessary to specify reserved decimal digits (MAX\_POINT\_NUMBER) when creating time series. It is more suitable to store sequence data where floating-point values appear continuously, monotonously increasing or decreasing, and it is not suitable for storing sequence data with high precision requirements after the decimal point or with large fluctuations.
+ Run-length encoding can also be used to encode floating-point numbers, while it is necessary to specify reserved decimal digits (MAX\_POINT\_NUMBER) when creating time series. It is more suitable to store sequence data where floating-point values appear continuously, monotonously increasing or decreasing, and it is not suitable for storing sequence data with high precision requirements after the decimal point or with large fluctuations.
-> TS_2DIFF and RLE have precision limit for data type of float and double. By default, two decimal places are reserved. GORILLA is recommended.
+ > TS_2DIFF and RLE have precision limit for data type of float and double. By default, two decimal places are reserved. GORILLA is recommended.
-* GORILLA
+4. GORILLA
-GORILLA encoding is lossless. It is more suitable for numerical sequence with similar values and is not recommended for sequence data with large fluctuations.
+ GORILLA encoding is lossless. It is more suitable for numerical sequence with similar values and is not recommended for sequence data with large fluctuations.
-Currently, there are two versions of GORILLA encoding implementation, it is recommended to use `GORILLA` instead of `GORILLA_V1` (deprecated).
+ Currently, there are two versions of GORILLA encoding implementation, it is recommended to use `GORILLA` instead of `GORILLA_V1` (deprecated).
-Usage restrictions: When using GORILLA to encode INT32 data, you need to ensure that there is no data point with the value `Integer.MIN_VALUE` in the sequence. When using GORILLA to encode INT64 data, you need to ensure that there is no data point with the value `Long.MIN_VALUE` in the sequence.
+ Usage restrictions: When using GORILLA to encode INT32 data, you need to ensure that there is no data point with the value `Integer.MIN_VALUE` in the sequence. When using GORILLA to encode INT64 data, you need to ensure that there is no data point with the value `Long.MIN_VALUE` in the sequence.
-* DICTIONARY
+5. DICTIONARY
-DICTIONARY encoding is lossless. It is suitable for TEXT data with low cardinality (i.e. low number of distinct values). It is not recommended to use it for high-cardinality data.
+ DICTIONARY encoding is lossless. It is suitable for TEXT data with low cardinality (i.e. low number of distinct values). It is not recommended to use it for high-cardinality data.
-* ZIGZAG
-
+6. ZIGZAG
-ZIGZAG encoding maps signed integers to unsigned integers so that numbers with a small absolute value (for instance, -1) have a small variant encoded value too. It does this in a way that "zig-zags" back and forth through the positive and negative integers.
+ ZIGZAG encoding maps signed integers to unsigned integers so that numbers with a small absolute value (for instance, -1) have a small variant encoded value too. It does this in a way that "zig-zags" back and forth through the positive and negative integers.
-* CHIMP
+7. CHIMP
-CHIMP encoding is lossless. It is the state-of-the-art compression algorithm for streaming floating point data, providing impressive savings compared to earlier approaches. It is suitable for any numerical sequence with similar values and works best for sequence data without large fluctuations and/or random noise.
+ CHIMP encoding is lossless. It is the state-of-the-art compression algorithm for streaming floating point data, providing impressive savings compared to earlier approaches. It is suitable for any numerical sequence with similar values and works best for sequence data without large fluctuations and/or random noise.
-Usage restrictions: When using CHIMP to encode INT32 data, you need to ensure that there is no data point with the value `Integer.MIN_VALUE` in the sequence. When using CHIMP to encode INT64 data, you need to ensure that there is no data point with the value `Long.MIN_VALUE` in the sequence.
+ Usage restrictions: When using CHIMP to encode INT32 data, you need to ensure that there is no data point with the value `Integer.MIN_VALUE` in the sequence. When using CHIMP to encode INT64 data, you need to ensure that there is no data point with the value `Long.MIN_VALUE` in the sequence.
-* SPRINTZ
+8. SPRINTZ
-SPRINTZ coding is a type of lossless data compression technique that involves predicting the original time series data, applying Zigzag encoding, bit-packing encoding, and run-length encoding. SPRINTZ encoding is effective for time series data with small absolute differences between values. However, it may not be as effective for time series data with large differences between values, indicating large fluctuation.
-* RLBE
+ SPRINTZ coding is a type of lossless data compression technique that involves predicting the original time series data, applying Zigzag encoding, bit-packing encoding, and run-length encoding. SPRINTZ encoding is effective for time series data with small absolute differences between values. However, it may not be as effective for time series data with large differences between values, indicating large fluctuation.
+9. RLBE
-RLBE is a lossless encoding that combines the ideas of differential encoding, bit-packing encoding, run-length encoding, Fibonacci encoding and concatenation. RLBE encoding is suitable for time series data with increasing and small increment value, and is not suitable for time series data with large fluctuation.
+ RLBE is a lossless encoding that combines the ideas of differential encoding, bit-packing encoding, run-length encoding, Fibonacci encoding and concatenation. RLBE encoding is suitable for time series data with increasing and small increment value, and is not suitable for time series data with large fluctuation.
### Correspondence between data type and encoding
diff --git a/src/UserGuide/latest/Deployment-and-Maintenance/AINode_Deployment_timecho.md b/src/UserGuide/latest/Deployment-and-Maintenance/AINode_Deployment_timecho.md
index 36e2093..562537e 100644
--- a/src/UserGuide/latest/Deployment-and-Maintenance/AINode_Deployment_timecho.md
+++ b/src/UserGuide/latest/Deployment-and-Maintenance/AINode_Deployment_timecho.md
@@ -20,24 +20,24 @@
-->
# AINode Deployment
-## 1 AINode Introduction
+## AINode Introduction
-### 1.1 Capability Introduction
+### Capability Introduction
AINode is the third type of endogenous node provided by IoTDB after the Configurable Node and DataNode. This node extends its ability to perform machine learning analysis on time series by interacting with the DataNode and Configurable Node of the IoTDB cluster. It supports the introduction of existing machine learning models from external sources for registration and the use of registered models to complete time series analysis tasks on specified time series data through simple SQL sta [...]
-### 1.2 Delivery Method
+### Delivery Method
It is an additional package outside the IoTDB cluster, with independent installation and activation (if you need to try or use it, please contact Tianmu Technology Business or Technical Support).
-### 1.3 Deployment mode
+### Deployment mode
<div >
<img src="https://alioss.timecho.com/docs/img/AINode%20Deployment%201.png" alt="" style="width: 45%;"/>
<img src="https://alioss.timecho.com/docs/img/AINode%20Deployment%202.png" alt="" style="width: 45%;"/>
</div>
-## 2 Installation preparation
+## Installation preparation
-### 2.1 Get installation package
+### Get installation package
Users can download the software installation package for AINode, download and unzip it to complete the installation of AINode.
@@ -53,7 +53,7 @@
| README_ZH.md | file | Explanation of the Chinese version of the markdown format |
| `README.md` | file | Instructions |
-### 2.2 Environmental preparation
+### Environmental preparation
- Suggested operating environment:Ubuntu, CentOS, MacOS
- Runtime Environment
@@ -68,9 +68,9 @@
../Python-3.8.0/python -m venv venv(Folder Name)
```
-## 3 Installation steps
+## Installation steps
-### 3.1 AINode activation
+### AINode activation
Require IoTDB to be in normal operation and have AINode module authorization in the license (usually not in the license, please contact Tianmou Business or technical support personnel to obtain AINode module authorization).
@@ -105,7 +105,7 @@ Require IoTDB to be in normal operation and have AINode module authorization in
./start-datanode.sh -d #The parameter'd 'will be started in the background
```
- ### 3.2 Configuration item modification
+ ### Configuration item modification
AINode supports modifying some necessary parameters. You can find the following parameters in the `conf/iotdb-ainode.properties` file and make persistent modifications to them:
:
@@ -121,7 +121,7 @@ AINode supports modifying some necessary parameters. You can find the following
| ain_logs_dir | The path where AINode stores logs, the starting directory of the relative path is related to the operating system, and it is recommended to use an absolute path | String | logs/AINode | Effective after restart |
| ain_thrift_compression_enabled | Does AINode enable Thrift's compression mechanism , 0-Do not start, 1-Start | Boolean | 0 | Effective after restart |
-### 3.3 Start AINode
+### Start AINode
After completing the deployment of Seed Config Node, the registration and inference functions of the model can be supported by adding AINode nodes. After specifying the information of the IoTDB cluster in the configuration item, the corresponding instruction can be executed to start AINode and join the IoTDB cluster。
@@ -234,7 +234,7 @@ If the version of AINode has been updated (such as updating the `lib` folder), t
nohup bash sbin/start-ainode.bat > myout.file 2>& 1 &
```
-### 3.4 Detecting the status of AINode nodes
+### Detecting the status of AINode nodes
During the startup process of AINode, the new AINode will be automatically added to the IoTDB cluster. After starting AINode, you can enter SQL in the command line to query. If you see an AINode node in the cluster and its running status is Running (as shown below), it indicates successful joining.
@@ -250,7 +250,7 @@ IoTDB> show cluster
+------+----------+-------+---------------+------------+-------+-----------+
```
-### 3.5 Stop AINode
+### Stop AINode
If you need to stop a running AINode node, execute the corresponding shutdown script.
@@ -293,7 +293,7 @@ IoTDB> show cluster
```
If you need to restart the node, you need to execute the startup script again.
-### 3.6 Remove AINode
+### Remove AINode
When it is necessary to remove an AINode node from the cluster, a removal script can be executed. The difference between removing and stopping scripts is that stopping retains the AINode node in the cluster but stops the AINode service, while removing removes the AINode node from the cluster.
@@ -364,9 +364,9 @@ If the user loses files in the data folder, AINode may not be able to actively r
sbin\remove-ainode.bat -t <AINode-id>/<ip>:<rpc-port>
```
-## 4 common problem
+## common problem
-### 4.1 An error occurs when starting AINode stating that the venv module cannot be found
+### An error occurs when starting AINode stating that the venv module cannot be found
When starting AINode using the default method, a Python virtual environment will be created in the installation package directory and dependencies will be installed, so it is required to install the venv module. Generally speaking, Python 3.8 and above versions come with built-in VenV, but for some systems with built-in Python environments, this requirement may not be met. There are two solutions when this error occurs (choose one or the other):
@@ -382,7 +382,7 @@ Install version 3.8.0 of venv into AINode in the AINode path.
```
When running the startup script, use ` -i ` to specify an existing Python interpreter path as the running environment for AINode, eliminating the need to create a new virtual environment.
- ### 4.2 The SSL module in Python is not properly installed and configured to handle HTTPS resources
+ ### The SSL module in Python is not properly installed and configured to handle HTTPS resources
WARNING: pip is configured with locations that require TLS/SSL, however the ssl module in Python is not available.
You can install OpenSSLS and then rebuild Python to solve this problem
> Currently Python versions 3.6 to 3.9 are compatible with OpenSSL 1.0.2, 1.1.0, and 1.1.1.
@@ -396,7 +396,7 @@ make
sudo make install
```
- ### 4.3 Pip version is lower
+ ### Pip version is lower
A compilation issue similar to "error: Microsoft Visual C++14.0 or greater is required..." appears on Windows
@@ -408,7 +408,7 @@ The corresponding error occurs during installation and compilation, usually due
```
- ### 4.4 Install and compile Python
+ ### Install and compile Python
Use the following instructions to download the installation package from the official website and extract it:
```shell
diff --git a/src/UserGuide/latest/Deployment-and-Maintenance/Cluster-Deployment.md b/src/UserGuide/latest/Deployment-and-Maintenance/Cluster-Deployment.md
index adf3f1f..9dbf935 100644
--- a/src/UserGuide/latest/Deployment-and-Maintenance/Cluster-Deployment.md
+++ b/src/UserGuide/latest/Deployment-and-Maintenance/Cluster-Deployment.md
@@ -52,7 +52,7 @@ Assuming there are three Linux servers now, the IP addresses and service roles a
| 192.168.1.4 | iotdb-2 | ConfigNode、DataNode |
| 192.168.1.5 | iotdb-3 | ConfigNode、DataNode |
-### 1. Set Host Name
+### Set Host Name
On three machines, configure the host names separately. To set the host names, configure `/etc/hosts` on the target server. Use the following command:
@@ -62,7 +62,7 @@ echo "192.168.1.4 iotdb-2" >> /etc/hosts
echo "192.168.1.5 iotdb-3" >> /etc/hosts
```
-### 2. Configuration
+### Configuration
Unzip the installation package and enter the installation directory
@@ -75,7 +75,7 @@ cd apache-iotdb-{version}-all-bin
- `./conf/confignode-env.sh` configuration
-| **配置项** | **Description** | **Default** | **Recommended value** | **Note** |
+| **Configuration** | **Description** | **Default** | **Recommended value** | **Note** |
| :---------- | :----------------------------------------------------------- | :---------- | :----------------------------------------------------------- | :---------------------------------- |
| MEMORY_SIZE | The total amount of memory that IoTDB ConfigNode nodes can use | - | Can be filled in as needed, and the system will allocate memory based on the filled in values | Restarting the service takes effect |
@@ -121,7 +121,7 @@ Open DataNode Configuration File `./conf/iotdb-system.properties`,Set the follow
| dn_schema_region_consensus_port | The port used by DataNode for metadata replica consensus protocol communication | 10760 | 10760 | 10760 | 10760 | 10760 | Cannot be modified after initial startup |
| dn_seed_config_node | The ConfigNode address that the node connects to when registering to join the cluster, i.e. `cn_internal-address: cn_internal_port` | 127.0.0.1:10710 | The first CongfigNode's cn_internal-address: cn_internal_port | iotdb-1:10710 | iotdb-1:10710 | iotdb-1:10710 | Cannot be modified after initial startup |
-### 3. Start ConfigNode
+### Start ConfigNode
Start the first confignode of IoTDB-1 first, ensuring that the seed confignode node starts first, and then start the second and third confignode nodes in sequence
@@ -130,7 +130,7 @@ cd sbin
./start-confignode.sh -d #"- d" parameter will start in the background
```
-### 4. Start DataNode
+### Start DataNode
Enter the `sbin` directory of iotdb and start three datanode nodes in sequence:
@@ -139,7 +139,7 @@ cd sbin
./start-datanode.sh -d #"- d" parameter will start in the background
```
-### 5. Verify Deployment
+### Verify Deployment
Can be executed directly Cli startup script in `./sbin` directory:
diff --git a/src/UserGuide/latest/Deployment-and-Maintenance/Cluster-Deployment_timecho.md b/src/UserGuide/latest/Deployment-and-Maintenance/Cluster-Deployment_timecho.md
index c20aebd..35f87c5 100644
--- a/src/UserGuide/latest/Deployment-and-Maintenance/Cluster-Deployment_timecho.md
+++ b/src/UserGuide/latest/Deployment-and-Maintenance/Cluster-Deployment_timecho.md
@@ -52,7 +52,7 @@ Assuming there are three Linux servers now, the IP addresses and service roles a
| 192.168.1.4 | iotdb-2 | ConfigNode、DataNode |
| 192.168.1.5 | iotdb-3 | ConfigNode、DataNode |
-### 1. Set Host Name
+### Set Host Name
On three machines, configure the host names separately. To set the host names, configure `/etc/hosts` on the target server. Use the following command:
@@ -62,7 +62,7 @@ echo "192.168.1.4 iotdb-2" >> /etc/hosts
echo "192.168.1.5 iotdb-3" >> /etc/hosts
```
-### 2. Configuration
+### Configuration
Unzip the installation package and enter the installation directory
@@ -121,7 +121,7 @@ Open DataNode Configuration File `./conf/iotdb-system.properties`,Set the follow
| dn_schema_region_consensus_port | The port used by DataNode for metadata replica consensus protocol communication | 10760 | 10760 | 10760 | 10760 | 10760 | Cannot be modified after initial startup |
| dn_seed_config_node | The ConfigNode address that the node connects to when registering to join the cluster, i.e. `cn_internal-address: cn_internal_port` | 127.0.0.1:10710 | The first CongfigNode's cn_internal-address: cn_internal_port | iotdb-1:10710 | iotdb-1:10710 | iotdb-1:10710 | Cannot be modified after initial startup |
-### 3. Start ConfigNode
+### Start ConfigNode
Start the first confignode of IoTDB-1 first, ensuring that the seed confignode node starts first, and then start the second and third confignode nodes in sequence
@@ -130,9 +130,9 @@ cd sbin
./start-confignode.sh -d #"- d" parameter will start in the background
```
-### 4. Activate Database
+### Activate Database
-#### **Method 1: Activate file copy activation**
+#### Method 1: Activate file copy activation
- After starting three confignode nodes in sequence, copy the `activation` folder of each machine and the `system_info` file of each machine to the Timecho staff;
- The staff will return the license files for each ConfigNode node, where 3 license files will be returned;
@@ -165,7 +165,7 @@ cd sbin
Import completed. Please start cluster and excute 'show cluster' to verify activation status
```
-### 5. Start DataNode
+### Start DataNode
Enter the `sbin` directory of iotdb and start three datanode nodes in sequence:
@@ -174,7 +174,7 @@ cd sbin
./start-datanode.sh -d #"- d" parameter will start in the background
```
-### 6. Verify Deployment
+### Verify Deployment
Can be executed directly Cli startup script in `./sbin` directory:
diff --git a/src/UserGuide/latest/Deployment-and-Maintenance/Docker-Deployment.md b/src/UserGuide/latest/Deployment-and-Maintenance/Docker-Deployment.md
index 1cf94b2..813bcfb 100644
--- a/src/UserGuide/latest/Deployment-and-Maintenance/Docker-Deployment.md
+++ b/src/UserGuide/latest/Deployment-and-Maintenance/Docker-Deployment.md
@@ -22,7 +22,7 @@
## Environmental Preparation
-### 1.Docker Installation
+### Docker Installation
```SQL
#Taking Ubuntu as an example, other operating systems can search for installation methods themselves
@@ -42,7 +42,7 @@ sudo systemctl enable docker
docker --version #Display version information, indicating successful installation
```
-### 2. Docker-compose Installation
+### Docker-compose Installation
```SQL
#Installation command
@@ -57,7 +57,7 @@ docker-compose --version #Displaying version information indicates successful i
This section demonstrates how to deploy a standalone Docker version of 1C1D.
-### 1. Pull Image File
+### Pull Image File
The Docker image of Apache IoTDB has been uploaded tohttps://hub.docker.com/r/apache/iotdb。
@@ -75,13 +75,13 @@ docker images

-### 2. Create Docker Bridge Network
+### Create Docker Bridge Network
```Bash
docker network create --driver=bridge --subnet=172.18.0.0/16 --gateway=172.18.0.1 iotdb
```
-### 3. Write The Yml File For Docker-Compose
+### Write The Yml File For Docker-Compose
Here we take the example of consolidating the IoTDB installation directory and yml files in the/docker iotdb folder:
@@ -131,7 +131,7 @@ networks:
external: true
```
-### 4. Start IoTDB
+### Start IoTDB
Use the following command to start:
@@ -140,7 +140,7 @@ cd /docker-iotdb
docker-compose -f docker-compose-standalone.yml up -d #Background startup
```
-### 5. Validate Deployment
+### Validate Deployment
- Viewing the log, the following words indicate successful startup
@@ -173,7 +173,7 @@ You can see that all services are running and the activation status shows as act

-### 6. Map/conf Directory (optional)
+### Map/conf Directory (optional)
If you want to directly modify the configuration file in the physical machine in the future, you can map the/conf folder in the container in three steps:
@@ -211,7 +211,7 @@ This section describes how to manually deploy an instance that includes 3 Config
Taking the host network as an example, we will demonstrate how to deploy a 3C3D cluster.
-### 1.Set Host Name
+### Set Host Name
Assuming there are currently three Linux servers, the IP addresses and service role assignments are as follows:
@@ -229,7 +229,7 @@ echo "192.168.1.4 iotdb-2" >> /etc/hosts
echo "192.168.1.5 iotdb-3" >> /etc/hosts
```
-### 2. Pull Image File
+### Pull Image File
The Docker image of Apache IoTDB has been uploaded tohttps://hub.docker.com/r/apache/iotdb。
@@ -247,7 +247,7 @@ docker images

-### 3.Write The Yml File For Docker Compose
+### Write The Yml File For Docker Compose
Here we take the example of consolidating the IoTDB installation directory and yml files in the `/docker-iotdb` folder:
@@ -326,7 +326,7 @@ services:
network_mode: "host" #Using the host network
```
-### 4. Starting Confignode For The First Time
+### Starting Confignode For The First Time
First, start configNodes on each of the three servers to obtain the machine code. Pay attention to the startup order, start the first iotdb-1 first, then start iotdb-2 and iotdb-3.
@@ -335,7 +335,7 @@ cd /docker-iotdb
docker-compose -f confignode.yml up -d #Background startup
```
-### 5. Start Datanode
+### Start Datanode
Start datanodes on 3 servers separately
@@ -346,7 +346,7 @@ docker-compose -f datanode.yml up -d #Background startup

-### 6. Validate Deployment
+### Validate Deployment
- Viewing the logs, the following words indicate that the datanode has successfully started
@@ -379,7 +379,7 @@ docker-compose -f datanode.yml up -d #Background startup

-### 7. Map/conf Directory (optional)
+### Map/conf Directory (optional)
If you want to directly modify the configuration file in the physical machine in the future, you can map the/conf folder in the container in three steps:
diff --git a/src/UserGuide/latest/Deployment-and-Maintenance/Docker-Deployment_timecho.md b/src/UserGuide/latest/Deployment-and-Maintenance/Docker-Deployment_timecho.md
index 4b43d61..df2ec2d 100644
--- a/src/UserGuide/latest/Deployment-and-Maintenance/Docker-Deployment_timecho.md
+++ b/src/UserGuide/latest/Deployment-and-Maintenance/Docker-Deployment_timecho.md
@@ -22,7 +22,7 @@
## Environmental Preparation
-### 1.Docker Installation
+### Docker Installation
```Bash
#Taking Ubuntu as an example, other operating systems can search for installation methods themselves
@@ -42,7 +42,7 @@ sudo systemctl enable docker
docker --version #Display version information, indicating successful installation
```
-### 2. Docker-compose Installation
+### Docker-compose Installation
```Bash
#Installation command
@@ -53,7 +53,7 @@ ln -s /usr/local/bin/docker-compose /usr/bin/docker-compose
docker-compose --version #Displaying version information indicates successful installation
```
-### 3. Install The Dmidecode Plugin
+### Install The Dmidecode Plugin
By default, Linux servers should already be installed. If not, you can use the following command to install them.
@@ -63,7 +63,7 @@ sudo apt-get install dmidecode
After installing dmidecode, search for the installation path: `wherever dmidecode`. Assuming the result is `/usr/sbin/dmidecode`, remember this path as it will be used in the later docker compose yml file.
-### 4. Get Container Image Of IoTDB
+### Get Container Image Of IoTDB
You can contact business or technical support to obtain container images for IoTDB Enterprise Edition.
@@ -71,7 +71,7 @@ You can contact business or technical support to obtain container images for IoT
This section demonstrates how to deploy a standalone Docker version of 1C1D.
-### 1. Load Image File
+### Load Image File
For example, the container image file name of IoTDB obtained here is: `iotdb-enterprise-1.3.2-3-standalone-docker.tar.gz`
@@ -89,13 +89,13 @@ docker images

-### 2. Create Docker Bridge Network
+### Create Docker Bridge Network
```Bash
docker network create --driver=bridge --subnet=172.18.0.0/16 --gateway=172.18.0.1 iotdb
```
-### 3. Write The Yml File For docker-compose
+### Write The Yml File For docker-compose
Here we take the example of consolidating the IoTDB installation directory and yml files in the/docker iotdb folder:
@@ -147,7 +147,7 @@ networks:
external: true
```
-### 4. First Launch
+### First Launch
Use the following command to start:
@@ -160,7 +160,7 @@ Due to lack of activation, it is normal to exit directly upon initial startup. T

-### 5. Apply For Activation
+### Apply For Activation
- After the first startup, a system_info file will be generated in the physical machine directory `/docker-iotdb/iotdb/activation`, and this file will be copied to the Timecho staff.
@@ -170,7 +170,7 @@ Due to lack of activation, it is normal to exit directly upon initial startup. T

-### 6. Restart IoTDB
+### Restart IoTDB
```Bash
docker-compose -f docker-compose-standalone.yml up -d
@@ -178,7 +178,7 @@ docker-compose -f docker-compose-standalone.yml up -d

-### 7. Validate Deployment
+### Validate Deployment
- Viewing the log, the following words indicate successful startup
@@ -211,7 +211,7 @@ docker-compose -f docker-compose-standalone.yml up -d

-### 8. Map/conf Directory (optional)
+### Map/conf Directory (optional)
If you want to directly modify the configuration file in the physical machine in the future, you can map the/conf folder in the container in three steps:
@@ -251,7 +251,7 @@ This section describes how to manually deploy an instance that includes 3 Config
Taking the host network as an example, we will demonstrate how to deploy a 3C3D cluster.
-### 1.Set Host Name
+### Set Host Name
Assuming there are currently three Linux servers, the IP addresses and service role assignments are as follows:
@@ -269,7 +269,7 @@ echo "192.168.1.4 iotdb-2" >> /etc/hosts
echo "192.168.1.5 iotdb-3" >> /etc/hosts
```
-### 2. Load Image File
+### Load Image File
For example, the container image file name obtained for IoTDB is: `iotdb-enterprise-1.3.23-standalone-docker.tar.gz`
@@ -287,7 +287,7 @@ docker images

-### 3. Write The Yml File For Docker Compose
+### Write The Yml File For Docker Compose
Here we take the example of consolidating the IoTDB installation directory and yml files in the /docker-iotdb folder:
@@ -366,7 +366,7 @@ services:
network_mode: "host" #Using the host network
```
-### 4. Starting Confignode For The First Time
+### Starting Confignode For The First Time
First, start configNodes on each of the three servers to obtain the machine code. Pay attention to the startup order, start the first iotdb-1 first, then start iotdb-2 and iotdb-3.
@@ -375,7 +375,7 @@ cd /docker-iotdb
docker-compose -f confignode.yml up -d #Background startup
```
-### 5. Apply For Activation
+### Apply For Activation
- After starting three confignodes for the first time, a system_info file will be generated in each physical machine directory `/docker-iotdb/iotdb/activation`, and the system_info files of the three servers will be copied to the Timecho staff;
@@ -387,7 +387,7 @@ docker-compose -f confignode.yml up -d #Background startup
- After the license is placed in the corresponding activation folder, confignode will be automatically activated without restarting confignode
-### 6. Start Datanode
+### Start Datanode
Start datanodes on 3 servers separately
@@ -398,7 +398,7 @@ docker-compose -f datanode.yml up -d #Background startup

-### 7. Validate Deployment
+### Validate Deployment
- Viewing the logs, the following words indicate that the datanode has successfully started
@@ -431,7 +431,7 @@ docker-compose -f datanode.yml up -d #Background startup

-### 8. Map/conf Directory (optional)
+### Map/conf Directory (optional)
If you want to directly modify the configuration file in the physical machine in the future, you can map the/conf folder in the container in three steps:
diff --git a/src/UserGuide/latest/Deployment-and-Maintenance/Monitoring-panel-deployment.md b/src/UserGuide/latest/Deployment-and-Maintenance/Monitoring-panel-deployment.md
index ce62f7b..4a2d76f 100644
--- a/src/UserGuide/latest/Deployment-and-Maintenance/Monitoring-panel-deployment.md
+++ b/src/UserGuide/latest/Deployment-and-Maintenance/Monitoring-panel-deployment.md
@@ -185,11 +185,11 @@ When configuring the Data Source, pay attention to the URL where Prometheus is l
## Appendix, Detailed Explanation of Monitoring Indicators
-### 1. System Dashboard
+### System Dashboard
This panel displays the current usage of system CPU, memory, disk, and network resources, as well as partial status of the JVM.
-#### 1.1 CPU
+#### CPU
- CPU Core:CPU cores
- CPU Load:
@@ -197,7 +197,7 @@ This panel displays the current usage of system CPU, memory, disk, and network r
- Process CPU Load:The proportion of CPU occupied by the IoTDB process during sampling time
- CPU Time Per Minute:The total CPU time of all processes in the system per minute
-#### 1.2 Memory
+#### Memory
- System Memory:The current usage of system memory.
- Commited vm size: The size of virtual memory allocated by the operating system to running processes.
@@ -209,7 +209,7 @@ This panel displays the current usage of system CPU, memory, disk, and network r
- Total Memory:The total amount of memory that the IoTDB process has currently requested from the operating system.
- Used Memory:The total amount of memory currently used by the IoTDB process.
-#### 1.3 Disk
+#### Disk
- Disk Space:
- Total disk space:The maximum disk space that IoTDB can use.
@@ -236,7 +236,7 @@ This panel displays the current usage of system CPU, memory, disk, and network r
- I/O System Call Rate:The frequency of process calls to read and write system calls, similar to IOPS.
- I/O Throughput:The throughput of process I/O can be divided into two categories: actual-read/write and attemppt-read/write. Actual read and actual write refer to the number of bytes that a process actually causes block devices to perform I/O, excluding the parts processed by Page Cache.
-#### 1.4 JVM
+#### JVM
- GC Time Percentage:The proportion of GC time spent by the node JVM in the past minute's time window
- GC Allocated/Promoted Size Detail: The average size of objects promoted to the old era per minute by the node JVM, as well as the size of objects newly applied for by the new generation/old era and non generational new applications
@@ -262,7 +262,7 @@ This panel displays the current usage of system CPU, memory, disk, and network r
- unloaded:The number of classes uninstalled by the JVM since system startup
- The Number of Java Thread:The current number of surviving threads in IoTDB. Each sub item represents the number of threads in each state.
-#### 1.5 Network
+#### Network
Eno refers to the network card connected to the public network, while lo refers to the virtual network card.
@@ -271,9 +271,9 @@ Eno refers to the network card connected to the public network, while lo refers
- Packet Speed:The speed at which the network card sends and receives packets, and one RPC request can correspond to one or more packets
- Connection Num:The current number of socket connections for the selected process (IoTDB only has TCP)
-### 2.Performance Overview Dashboard
+### Performance Overview Dashboard
-#### 2.1 Cluster Overview
+#### Cluster Overview
- Total CPU Core:Total CPU cores of cluster machines
- DataNode CPU Load:CPU usage of each DataNode node in the cluster
@@ -294,7 +294,7 @@ Eno refers to the network card connected to the public network, while lo refers
- Total DataRegion: The total number of DataRegions managed by the cluster
- Total SchemaRegion: The total number of SchemeRegions managed by the cluster
-#### 2.2 Node Overview
+#### Node Overview
- CPU Core: The number of CPU cores in the machine where the node is located
- Disk Space: The disk size of the machine where the node is located
@@ -305,7 +305,7 @@ Eno refers to the network card connected to the public network, while lo refers
- Swap Memory:The swap memory size of the machine where the node is located
- File Number: Number of files managed by nodes
-#### 2.3 Performance
+#### Performance
- Session Idle Time:The total idle time and total busy time of the session connection of the node
- Client Connection: The client connection status of the node, including the total number of connections and the number of active connections
@@ -337,7 +337,7 @@ Eno refers to the network card connected to the public network, while lo refers
- Average Time Consumed Of Engine Stage: The average time consumption of each sub stage in the engine stage of a node
- P99 Time Consumed Of Engine Stage: P99 time consumption of each sub stage in the node engine stage
-#### 2.4 System
+#### System
- CPU Load: CPU load of nodes
- CPU Time Per Minute: The CPU time per minute of a node, with the maximum value related to the number of CPU cores
@@ -349,11 +349,11 @@ Eno refers to the network card connected to the public network, while lo refers
- File Size: Node management file size situation
- Log Number Per Minute: Different types of logs per minute for nodes
-### 3. ConfigNode Dashboard
+### ConfigNode Dashboard
This panel displays the performance of all management nodes in the cluster, including partitioning, node information, and client connection statistics.
-#### 3.1 Node Overview
+#### Node Overview
- Database Count: Number of databases for nodes
- Region
@@ -367,7 +367,7 @@ This panel displays the performance of all management nodes in the cluster, incl
- DataNodes:The DataNode situation of the cluster where the node is located
- System Overview: System overview of nodes, including system memory, disk usage, process memory, and CPU load
-#### 3.2 NodeInfo
+#### NodeInfo
- Node Count: The number of nodes in the cluster where the node is located, including ConfigNode and DataNode
- ConfigNode Status: The status of the ConfigNode node in the cluster where the node is located
@@ -377,7 +377,7 @@ This panel displays the performance of all management nodes in the cluster, incl
- DataRegion Distribution: The distribution of DataRegions in the cluster where the node is located
- DataRegionGroup Leader Distribution:The distribution of leaders in the DataRegionGroup of the cluster where the node is located
-#### 3.3 Protocol
+#### Protocol
- Client Count
- Active Client Num: The number of active clients in each thread pool of a node
@@ -390,7 +390,7 @@ This panel displays the performance of all management nodes in the cluster, incl
- Client Mean Borrow Wait Time: The average borrowing waiting time of clients in each thread pool of a node
- Client Mean Idle Time: The average idle time of clients in each thread pool of a node
-#### 3.4 Partition Table
+#### Partition Table
- SchemaRegionGroup Count: The number of SchemaRegionGroups in the Database of the cluster where the node is located
- DataRegionGroup Count: The number of DataRegionGroups in the Database of the cluster where the node is located
@@ -399,7 +399,7 @@ This panel displays the performance of all management nodes in the cluster, incl
- DataRegion Status: The DataRegion status of the cluster where the node is located
- SchemaRegion Status: The status of the SchemeRegion of the cluster where the node is located
-#### 3.5 Consensus
+#### Consensus
- Ratis Stage Time: The time consumption of each stage of the node's Ratis
- Write Log Entry: The time required to write a log for the Ratis of a node
@@ -407,17 +407,17 @@ This panel displays the performance of all management nodes in the cluster, incl
- Remote / Local Write QPS: Remote and local QPS written to node Ratis
- RatisConsensus Memory: Memory usage of Node Ratis consensus protocol
-### 4.DataNode Dashboard
+### DataNode Dashboard
This panel displays the monitoring status of all data nodes in the cluster, including write time, query time, number of stored files, etc.
-#### 4.1 Node Overview
+#### Node Overview
- The Number Of Entity: Entity situation of node management
- Write Point Per Second: The write speed per second of the node
- Memory Usage: The memory usage of the node, including the memory usage of various parts of IoT Consensus, the total memory usage of SchemaRegion, and the memory usage of various databases.
-#### 4.2 Protocol
+#### Protocol
- Node Operation Time Consumption
- The Time Consumed Of Operation (avg): The average time spent on various operations of a node
@@ -438,7 +438,7 @@ This panel displays the monitoring status of all data nodes in the cluster, incl
- Client Mean Borrow Wait Time: The average borrowing waiting time of clients in each thread pool of a node
- Client Mean Idle Time: The average idle time of clients in each thread pool of a node
-#### 4.3 Storage Engine
+#### Storage Engine
- File Count: Number of files of various types managed by nodes
- File Size: Node management of various types of file sizes
@@ -454,7 +454,7 @@ This panel displays the monitoring status of all data nodes in the cluster, incl
- Compaction Process Chunk Status: The number of Chunks in different states merged by nodes
- Compacted Point Num Per Minute: The number of merged nodes per minute
-#### 4.4 Write Performance
+#### Write Performance
- Write Cost(avg): Average node write time, including writing wal and memtable
- Write Cost(50%): Median node write time, including writing wal and memtable
@@ -490,7 +490,7 @@ This panel displays the monitoring status of all data nodes in the cluster, incl
- Series Num Of Flushing MemTable: The number of time series when flashing Memtables in different DataRegions of a node
- Average Point Num Of Flushing MemChunk: The average number of disk flushing points for node MemChunk
-#### 4.5 Schema Engine
+#### Schema Engine
- Schema Engine Mode: The metadata engine pattern of nodes
- Schema Consensus Protocol: Node metadata consensus protocol
@@ -519,7 +519,7 @@ This panel displays the monitoring status of all data nodes in the cluster, incl
- Time Consumed of Relead and Flush (avg): The average time taken for node triggered cache release and buffer flushing
- Time Consumed of Relead and Flush (99%): P99 time consumption for node triggered cache release and buffer flushing
-#### 4.6 Query Engine
+#### Query Engine
- Time Consumption In Each Stage
- The time consumed of query plan stages(avg): The average time spent on node queries at each stage
@@ -562,7 +562,7 @@ This panel displays the monitoring status of all data nodes in the cluster, incl
- The time consumed of query schedule time(50%): Median time spent on node query task scheduling
- The time consumed of query schedule time(99%): P99 of node query task scheduling time
-#### 4.7 Query Interface
+#### Query Interface
- Load Time Series Metadata
- The time consumed of load timeseries metadata(avg): The average time taken for node queries to load time series metadata
@@ -609,7 +609,7 @@ This panel displays the monitoring status of all data nodes in the cluster, incl
- The time consumed of build tsblock from merge reader(50%): The median time spent on constructing TsBlock through Merge Reader for node queries
- The time consumed of build tsblock from merge reader(99%): Node query using Merge Reader to construct TsBlock time-consuming P99
-#### 4.8 Query Data Exchange
+#### Query Data Exchange
The data exchange for the query is time-consuming.
@@ -634,7 +634,7 @@ The data exchange for the query is time-consuming.
- The time consumed of get data block task(50%): The median time taken for node queries to obtain data block tasks
- The time consumed of get data block task(99%): P99 time consumption for node query to obtain data block task
-#### 4.9 Query Related Resource
+#### Query Related Resource
- MppDataExchangeManager:The number of shuffle sink handles and source handles during node queries
- LocalExecutionPlanner: The remaining memory that nodes can allocate to query shards
@@ -644,7 +644,7 @@ The data exchange for the query is time-consuming.
- MemoryPool Capacity: The size of memory pools related to node queries, including maximum and remaining available values
- DriverScheduler: Number of queue tasks related to node queries
-#### 4.10 Consensus - IoT Consensus
+#### Consensus - IoT Consensus
- Memory Usage
- IoTConsensus Used Memory: The memory usage of IoT Consumes for nodes, including total memory usage, queue usage, and synchronization usage
@@ -664,7 +664,7 @@ The data exchange for the query is time-consuming.
- The Time Consumed Of Different Stages (50%): The median time spent on different execution stages of node IoT Consusus
- The Time Consumed Of Different Stages (99%):P99 of the time consumption for different execution stages of node IoT Consusus
-#### 4.11 Consensus - DataRegion Ratis Consensus
+#### Consensus - DataRegion Ratis Consensus
- Ratis Stage Time: The time consumption of different stages of node Ratis
- Write Log Entry: The time consumption of writing logs at different stages of node Ratis
@@ -672,7 +672,7 @@ The data exchange for the query is time-consuming.
- Remote / Local Write QPS: QPS written by node Ratis locally or remotely
- RatisConsensus Memory:Memory usage of node Ratis
-#### 4.12 Consensus - SchemaRegion Ratis Consensus
+#### Consensus - SchemaRegion Ratis Consensus
- Ratis Stage Time: The time consumption of different stages of node Ratis
- Write Log Entry: The time consumption for writing logs at each stage of node Ratis
diff --git a/src/UserGuide/latest/Deployment-and-Maintenance/Stand-Alone-Deployment.md b/src/UserGuide/latest/Deployment-and-Maintenance/Stand-Alone-Deployment.md
index 2d2395a..ba7fd0a 100644
--- a/src/UserGuide/latest/Deployment-and-Maintenance/Stand-Alone-Deployment.md
+++ b/src/UserGuide/latest/Deployment-and-Maintenance/Stand-Alone-Deployment.md
@@ -32,14 +32,14 @@
## Installation Steps
-### 1、Unzip the installation package and enter the installation directory
+### Unzip the installation package and enter the installation directory
```Shell
unzip apache-iotdb-{version}-all-bin.zip
cd apache-iotdb-{version}-all-bin
```
-### 2、Parameter Configuration
+### Parameter Configuration
#### Environment Script Configuration
@@ -91,7 +91,7 @@ Open the DataNode configuration file/ conf/iotdb-system.properties,Set the follo
| dn_schema_region_consensus_port | The port used by DataNode for metadata replica consensus protocol communication | 10760 | 10760 | Cannot be modified after initial startup |
| dn_seed_config_node | The ConfigNode address that the node connects to when registering to join the cluster, i.e. cn_internal-address: cn_internal_port | 127.0.0.1:10710 | cn_internal_address:cn_internal_port | Cannot be modified after initial startup |
-### 3、Start ConfigNode
+### Start ConfigNode
Enter the sbin directory of iotdb and start confignode
@@ -99,7 +99,7 @@ Enter the sbin directory of iotdb and start confignode
./start-confignode.sh -d #The "- d" parameter will start in the background
```
-### 4、Start DataNode
+### Start DataNode
Enter the sbin directory of iotdb and start datanode:
@@ -108,7 +108,7 @@ cd sbin
./start-datanode.sh -d #The "- d" parameter will start in the background
```
-### 5、Verify Deployment
+### Verify Deployment
Can be executed directly/ Cli startup script in sbin directory:
diff --git a/src/UserGuide/latest/Deployment-and-Maintenance/Stand-Alone-Deployment_timecho.md b/src/UserGuide/latest/Deployment-and-Maintenance/Stand-Alone-Deployment_timecho.md
index 7fea70f..fe26055 100644
--- a/src/UserGuide/latest/Deployment-and-Maintenance/Stand-Alone-Deployment_timecho.md
+++ b/src/UserGuide/latest/Deployment-and-Maintenance/Stand-Alone-Deployment_timecho.md
@@ -36,14 +36,14 @@ This chapter will introduce how to start an IoTDB standalone instance, which inc
## Installation Steps
-### 1、Unzip the installation package and enter the installation directory
+### Unzip the installation package and enter the installation directory
```shell
unzip iotdb-enterprise-{version}-bin.zip
cd iotdb-enterprise-{version}-bin
```
-### 2、Parameter Configuration
+### Parameter Configuration
#### Environment Script Configuration
@@ -95,7 +95,7 @@ Open the DataNode configuration file/ conf/iotdb-system.properties, Set the fo
| dn_schema_region_consensus_port | The port used by DataNode for metadata replica consensus protocol communication | 10760 | 10760 | Cannot be modified after initial startup |
| dn_seed_config_node | The ConfigNode address that the node connects to when registering to join the cluster, i.e. cn_internal-address: cn_internal_port | 127.0.0.1:10710 | cn_internal_address:cn_internal_port | Cannot be modified after initial startup |
-### 3、Start ConfigNode
+### Start ConfigNode
Enter the sbin directory of iotdb and start confignode
@@ -103,7 +103,7 @@ Enter the sbin directory of iotdb and start confignode
./start-confignode.sh -d #The "- d" parameter will start in the background
```
-### 4、Activate Database
+### Activate Database
#### Method 1: Activate file copy activation
@@ -137,7 +137,7 @@ License has been stored to sbin/../activation/license
Import completed. Please start cluster and excute 'show cluster' to verify activation status
```
-### 5、Start DataNode
+### Start DataNode
Enter the sbin directory of iotdb and start datanode:
@@ -146,7 +146,7 @@ cd sbin
./start-datanode.sh -d # The "- d" parameter will start in the background
```
-### 6、Verify Deployment
+### Verify Deployment
Can be executed directly/ Cli startup script in sbin directory:
diff --git a/src/UserGuide/latest/Ecosystem-Integration/Ignition-IoTDB-plugin_timecho.md b/src/UserGuide/latest/Ecosystem-Integration/Ignition-IoTDB-plugin_timecho.md
index 81b915e..a0db185 100644
--- a/src/UserGuide/latest/Ecosystem-Integration/Ignition-IoTDB-plugin_timecho.md
+++ b/src/UserGuide/latest/Ecosystem-Integration/Ignition-IoTDB-plugin_timecho.md
@@ -21,7 +21,7 @@
# Ignition
-## 1、Product Overview
+## Product Overview
1. Introduction to Ignition
@@ -38,7 +38,7 @@

-## 2、Installation Requirements
+## Installation Requirements
| **Preparation Content** | Version Requirements |
| ------------------------------- | ------------------------------------------------------------ |
@@ -47,15 +47,15 @@
| Ignition-IoTDB Connector module | Please contact Business to obtain |
| Ignition-IoTDB With JDBC module | Download address:https://repo1.maven.org/maven2/org/apache/iotdb/iotdb-jdbc/ |
-## 3、Instruction Manual For Ignition-IoTDB Connector
+## Instruction Manual For Ignition-IoTDB Connector
-### 1、Introduce
+### Introduce
The Ignition-IoTDB Connector module can store data in a database connection associated with the historical database provider. The data is directly stored in a table in the SQL database based on its data type, as well as a millisecond timestamp. Store data only when making changes based on the value pattern and dead zone settings on each label, thus avoiding duplicate and unnecessary data storage.
The Ignition-IoTDB Connector provides the ability to store the data collected by Ignition into IoTDB.
-### 2、Installation Steps
+### Installation Steps
Step 1: Enter the `Configuration` - `System` - `Modules` module and click on the `Install or Upgrade a Module` button at the bottom
@@ -155,7 +155,7 @@ The configuration content is as follows:
-### 3、Instructions
+### Instructions
#### Configure Historical Data Storage
@@ -231,13 +231,13 @@ The configuration content is as follows:
system.iotdb.query("IoTDB", "select * from root.db.Sine where time > 1709563427247")
```
-## 4、Ignition-IoTDB With JDBC
+## Ignition-IoTDB With JDBC
-### 1、Introduce
+### Introduce
Ignition-IoTDB With JDBC provides a JDBC driver that allows users to connect and query the Ignition IoTDB database using standard JDBC APIs
-### 2、Installation Steps
+### Installation Steps
Step 1: Enter the `Configuration` - `Databases` -`Drivers` module and create the `Translator`
@@ -251,7 +251,7 @@ Step 3: Enter the `Configuration` - `Databases` - `Connections` module, create a

-### 3、Instructions
+### Instructions
#### Data Writing
diff --git a/src/UserGuide/latest/FAQ/Frequently-asked-questions.md b/src/UserGuide/latest/FAQ/Frequently-asked-questions.md
index 1a431b9..4355ef7 100644
--- a/src/UserGuide/latest/FAQ/Frequently-asked-questions.md
+++ b/src/UserGuide/latest/FAQ/Frequently-asked-questions.md
@@ -23,7 +23,7 @@
## General FAQ
-### 1. How can I identify my version of IoTDB?
+### How can I identify my version of IoTDB?
There are several ways to identify the version of IoTDB that you are using:
@@ -65,7 +65,7 @@ Total line number = 1
It costs 0.241s
```
-### 2. Where can I find IoTDB logs?
+### Where can I find IoTDB logs?
Suppose your root directory is:
@@ -87,11 +87,11 @@ Let `$IOTDB_CLI_HOME = /workspace/iotdb/cli/target/iotdb-cli-{project.version}`
By default settings, the logs are stored under ```IOTDB_HOME/logs```. You can change log level and storage path by configuring ```logback.xml``` under ```IOTDB_HOME/conf```.
-### 3. Where can I find IoTDB data files?
+### Where can I find IoTDB data files?
By default settings, the data files (including tsfile, metadata, and WAL files) are stored under ```IOTDB_HOME/data/datanode```.
-### 4. How do I know how many time series are stored in IoTDB?
+### How do I know how many time series are stored in IoTDB?
Use IoTDB's Command Line Interface:
@@ -114,15 +114,15 @@ If you are using Linux, you can use the following shell command:
> 6
```
-### 5. Can I use Hadoop and Spark to read TsFile in IoTDB?
+### Can I use Hadoop and Spark to read TsFile in IoTDB?
Yes. IoTDB has intense integration with Open Source Ecosystem. IoTDB supports [Hadoop](https://github.com/apache/iotdb-extras/tree/master/connectors/hadoop), [Spark](https://github.com/apache/iotdb-extras/tree/master/connectors/spark-iotdb-connector) and [Grafana](https://github.com/apache/iotdb-extras/tree/master/connectors/grafana-connector) visualization tool.
-### 6. How does IoTDB handle duplicate points?
+### How does IoTDB handle duplicate points?
A data point is uniquely identified by a full time series path (e.g. ```root.vehicle.d0.s0```) and timestamp. If you submit a new point with the same path and timestamp as an existing point, IoTDB updates the value of this point instead of inserting a new point.
-### 7. How can I tell what type of the specific timeseries?
+### How can I tell what type of the specific timeseries?
Use ```SHOW TIMESERIES <timeseries path>``` SQL in IoTDB's Command Line Interface:
@@ -144,7 +144,7 @@ Otherwise, you can also use wildcard in timeseries path:
IoTDB> show timeseries root.fit.d1.*
```
-### 8. How can I change IoTDB's Cli time display format?
+### How can I change IoTDB's Cli time display format?
The default IoTDB's Cli time display format is readable (e.g. ```1970-01-01T08:00:00.001```), if you want to display time in timestamp type or other readable format, add parameter ```-disableISO8601``` in start command:
@@ -152,12 +152,12 @@ The default IoTDB's Cli time display format is readable (e.g. ```1970-01-01T08:0
> $IOTDB_CLI_HOME/sbin/start-cli.sh -h 127.0.0.1 -p 6667 -u root -pw root -disableISO8601
```
-### 9. How to handle error `IndexOutOfBoundsException` from `org.apache.ratis.grpc.server.GrpcLogAppender`?
+### How to handle error `IndexOutOfBoundsException` from `org.apache.ratis.grpc.server.GrpcLogAppender`?
This is an internal error log from Ratis 2.4.1, our dependency, and no impact on data writes or reads is expected.
It has been reported to the Ratis community and will be fixed in the future releases.
-### 10. How to deal with estimated out of memory errors?
+### How to deal with estimated out of memory errors?
Report an error message:
```
@@ -183,24 +183,24 @@ not affect normal operations. We will fix this message in the incoming releases.
### Cluster StartUp and Stop
-#### 1. Failed to start ConfigNode for the first time, how to find the reason?
+#### Failed to start ConfigNode for the first time, how to find the reason?
- Make sure that the data/confignode directory is cleared when start ConfigNode for the first time.
- Make sure that the <IP+Port> used by ConfigNode is not occupied, and the <IP+Port> is also not conflicted with other ConfigNodes.
- Make sure that the `cn_seed_config_node` is configured correctly, which points to the alive ConfigNode. And if the ConfigNode is started for the first time, make sure that `cn_seed_config_node` points to itself.
- Make sure that the configuration(consensus protocol and replica number) of the started ConfigNode is accord with the `cn_seed_config_node` ConfigNode.
-#### 2. ConfigNode is started successfully, but why the node doesn't appear in the results of `show cluster`?
+#### ConfigNode is started successfully, but why the node doesn't appear in the results of `show cluster`?
- Examine whether the `cn_seed_config_node` points to the correct address. If `cn_seed_config_node` points to itself, a new ConfigNode cluster is started.
-#### 3. Failed to start DataNode for the first time, how to find the reason?
+#### Failed to start DataNode for the first time, how to find the reason?
- Make sure that the data/datanode directory is cleared when start DataNode for the first time. If the start result is “Reject DataNode restart.”, maybe the data/datanode directory is not cleared.
- Make sure that the <IP+Port> used by DataNode is not occupied, and the <IP+Port> is also not conflicted with other DataNodes.
- Make sure that the `dn_seed_config_node` points to the alive ConfigNode.
-#### 4. Failed to remove DataNode, how to find the reason?
+#### Failed to remove DataNode, how to find the reason?
- Examine whether the parameter of `remove-datanode.sh` is correct, only rpcIp:rpcPort and dataNodeId are correct parameter.
- Only when the number of available DataNodes in the cluster is greater than max(schema_replication_factor, data_replication_factor), removing operation can be executed.
@@ -210,12 +210,12 @@ not affect normal operations. We will fix this message in the incoming releases.
If users want to make the Regions from Removing to available status, command `migrate region from datanodeId1 to datanodeId2` can take effect, this command can migrate the regions to other alive DataNodes.
Besides, IoTDB will publish `remove-datanode.sh -f` command in the next version, which can remove DataNodes forced (The failed migrated regions will be discarded).
-#### 5. Whether the down DataNode can be removed?
+#### Whether the down DataNode can be removed?
- The down DataNode can be removed only when the replica factor of schema and data is greater than 1.
Besides, IoTDB will publish `remove-datanode.sh -f` function in the next version.
-#### 6. What should be paid attention to when upgrading from 0.13 to 1.0?
+#### What should be paid attention to when upgrading from 0.13 to 1.0?
- The file structure between 0.13 and 1.0 is different, we can't copy the data directory from 0.13 to 1.0 to use directly.
If you want to load the data from 0.13 to 1.0, you can use the LOAD function.
@@ -224,40 +224,40 @@ not affect normal operations. We will fix this message in the incoming releases.
### Cluster Restart
-#### 1. How to restart any ConfigNode in the cluster?
+#### How to restart any ConfigNode in the cluster?
- First step: stop the process by `stop-confignode.sh` or kill PID of ConfigNode.
- Second step: execute `start-confignode.sh` to restart ConfigNode.
-#### 2. How to restart any DataNode in the cluster?
+#### How to restart any DataNode in the cluster?
- First step: stop the process by `stop-datanode.sh` or kill PID of DataNode.
- Second step: execute `s`tart-datanode.sh` to restart DataNode.
-#### 3. If it's possible to restart ConfigNode using the old data directory when it's removed?
+#### If it's possible to restart ConfigNode using the old data directory when it's removed?
- Can't. The running result will be "Reject ConfigNode restart. Because there are no corresponding ConfigNode(whose nodeId=xx) in the cluster".
-#### 4. If it's possible to restart DataNode using the old data directory when it's removed?
+#### If it's possible to restart DataNode using the old data directory when it's removed?
- Can't. The running result will be "Reject DataNode restart. Because there are no corresponding DataNode(whose nodeId=xx) in the cluster. Possible solutions are as follows:...".
-#### 5. Can we execute `start-confignode.sh`/`start-datanode.sh` successfully when delete the data directory of given ConfigNode/DataNode without killing the PID?
+#### Can we execute `start-confignode.sh`/`start-datanode.sh` successfully when delete the data directory of given ConfigNode/DataNode without killing the PID?
- Can't. The running result will be "The port is already occupied".
### Cluster Maintenance
-#### 1. How to find the reason when Show cluster failed, and error logs like "please check server status" are shown?
+#### How to find the reason when Show cluster failed, and error logs like "please check server status" are shown?
- Make sure that more than one half ConfigNodes are alive.
- Make sure that the DataNode connected by the client is alive.
-#### 2. How to fix one DataNode when the disk file is broken?
+#### How to fix one DataNode when the disk file is broken?
- We can use `remove-datanode.sh` to fix it. Remove-datanode will migrate the data in the removing DataNode to other alive DataNodes.
- IoTDB will publish Node-Fix tools in the next version.
-#### 3. How to decrease the memory usage of ConfigNode/DataNode?
+#### How to decrease the memory usage of ConfigNode/DataNode?
- Adjust the ON_HEAP_MEMORY、OFF_HEAP_MEMORY options in conf/confignode-env.sh and conf/datanode-env.sh.
diff --git a/src/UserGuide/latest/QuickStart/ClusterQuickStart.md b/src/UserGuide/latest/QuickStart/ClusterQuickStart.md
index 838ab31..9e49805 100644
--- a/src/UserGuide/latest/QuickStart/ClusterQuickStart.md
+++ b/src/UserGuide/latest/QuickStart/ClusterQuickStart.md
@@ -27,7 +27,7 @@ See also:
[FAQ](../FAQ/Frequently-asked-questions.md)
-## 1. Installation and deployment
+## Installation and deployment
As an example, we'd like to start an IoTDB cluster with 3 ConfigNodes and 3 DataNodes(3C3D) with minimum modifications. Thus,
- the cluster name is defaultCluster
@@ -53,7 +53,7 @@ Port:
- We could use IP address or hostname/domain to set up an IoTDB cluster, then we would take IP address. If using hostname/domain, `/etc/hosts` must be set well.
- JVM memory configuration: `ON_HEAP_MEMORY` in `confignode-env.sh` and `datanode-env.sh`, equal to or greater than 1G is recommended. It's enough for ConfigNode taking 1~2G. The memory taking of DataNode is decided by the inputing and querying data.
-### 1.1 download
+### download
In every computer, [Download](https://iotdb.apache.org/Download/) the IoTDB install package and extract it to working directory of `/data/iotdb`.
Then get the directory tree:
```shell
@@ -64,7 +64,7 @@ Then get the directory tree:
└── tools # other tools
```
-### 1.2. configuration
+### configuration
Configuration files are in `/data/iotdb/conf`.
Modify the specified configuration file according to the table below:
@@ -80,10 +80,10 @@ Modify the specified configuration file according to the table below:
**Notice:**
It's recommended that the configurations of iotdb-system.properties and the heap size of JVM in all nodes are the same.
-### 1.3. start IoTDB cluster
+### start IoTDB cluster
Before starting the IoTDB cluster, make sure the configurations are correct and there is no any data in the working directory.
-#### 1.3.1. start the first node
+#### start the first node
That is `cn_seed_config_node` in above configuration table.
Execute these commands below in node of `192.168.132.10`.
```shell
@@ -109,7 +109,7 @@ sbin/start-confignode.sh -d
sbin/start-datanode.sh -d
```
-#### 1.3.2. start service ConfigNode and DataNode in other nodes
+#### start service ConfigNode and DataNode in other nodes
Execute commands below in both 192.168.132.11 and 192.168.132.12:
```shell
cd /data/iotdb
@@ -118,7 +118,7 @@ sbin/start-standalone.sh
```
If starting failed, it's necessary to do [cleanup](#【reference】cleanup) in all nodes, and then doging all again from starting the first node.
-#### 1.3.3. check the cluster status
+#### check the cluster status
If everything goes well, the cluster will start successfully. Then, we can start the Cli for verification.
```shell
/data/iotdb/sbin/start-cli.sh -h 192.168.132.10
@@ -166,7 +166,7 @@ rm -rf data logs
It's necessary to remove directory of `data` but it's not necessary to remove directory of `logs`, only for convenience.
-## 2. Expand
+## Expand
`Expand` means add services of ConfigNode or DataNode into an existing IoTDB cluster.
It's the same as starting the other nodes mentioned above. That is downloading IoTDB install package, extracting, configurating and then starting. The new node here is `192.168.132.13`.
@@ -176,7 +176,7 @@ It's the same as starting the other nodes mentioned above. That is downloading I
- `cn_seed_config_node` and `dn_seed_config_node` must be the same to the cluster.
- The old data wouldn't be moved to the new node but the new data would be.
-### 2.1. configuration
+###confi guration
Modify the specified configuration file according to the table below:
| Configuration | Configuration Option| IP:192.168.132.13 |
@@ -187,7 +187,7 @@ Modify the specified configuration file according to the table below:
| iotdb-system.properties | dn\_internal\_address | 192.168.132.13 |
| iotdb-system.properties | dn\_target\_config\_node\_list | 192.168.132.10:10710 |
-### 2.2. expand
+### expand
Execute commands below in new node of `192.168.132.13`:
```shell
cd /data/iotdb
@@ -195,7 +195,7 @@ cd /data/iotdb
sbin/start-standalone.sh
```
-### 2.3. check the result
+### check the result
Execute `show cluster` through Cli and the result like below:
```shell
/data/iotdb/sbin/start-cli.sh -h 192.168.132.10
@@ -216,14 +216,14 @@ IoTDB>show cluster;
```
-## 3. Remove service
+## Remove service
`Shrink` means removing a service from the IoTDB cluster.
**Notice:**
- `Shrink` could be done in any node within the cluster
- Any service could be shrinked within cluster. But the DataNode service of the cluster must greater than the data replica of iotdb-system.properties.
- Be patient to wait for the end of shrinking, and then read the guide in logs carefully.
-### 3.1 shrink service ConfigNode
+### shrink service ConfigNode
```shell
cd /data/iotdb
# way 1: shrink with ip:port
@@ -233,7 +233,7 @@ sbin/remove-confignode.sh 192.168.132.13:10710
sbin/remove-confignode.sh 6
```
-### 3.2 shrink service DataNode
+### shrink service DataNode
```shell
cd /data/iotdb
# way 1: shrink with ip:port
@@ -243,7 +243,7 @@ sbin/remove-datanode.sh 192.168.132.13:6667
sbin/remove-datanode.sh 7
```
-### 3.3 check the result
+### check the result
Execute `show cluster` through Cli, the result is like below:
```shell
diff --git a/src/UserGuide/latest/User-Manual/AINode_timecho.md b/src/UserGuide/latest/User-Manual/AINode_timecho.md
index 3fcd92e..8d1999de 100644
--- a/src/UserGuide/latest/User-Manual/AINode_timecho.md
+++ b/src/UserGuide/latest/User-Manual/AINode_timecho.md
@@ -33,7 +33,7 @@ The responsibilities of the three nodes are as follows:
- **DataNode**: responsible for receiving and parsing SQL requests from users; responsible for storing time-series data; responsible for preprocessing computation of data.
- **AINode**: responsible for model file import creation and model inference.
-## 1. Advantageous features
+## Advantageous features
Compared with building a machine learning service alone, it has the following advantages:
@@ -50,7 +50,7 @@ Compared with building a machine learning service alone, it has the following ad
-## 2. Basic Concepts
+## Basic Concepts
- **Model**: a machine learning model that takes time-series data as input and outputs the results or decisions of an analysis task. Model is the basic management unit of AINode, which supports adding (registration), deleting, checking, and using (inference) of models.
- **Create**: Load externally designed or trained model files or algorithms into MLNode for unified management and use by IoTDB.
@@ -61,16 +61,16 @@ Compared with building a machine learning service alone, it has the following ad
<img src="https://alioss.timecho.com/upload/AInode2.png" style="zoom:50%" />
::::
-## 3. Installation and Deployment
+## Installation and Deployment
The deployment of AINode can be found in the document [Deployment Guidelines](../Deployment-and-Maintenance/AINode_Deployment_timecho.md#AINode-部署) .
-## 4. Usage Guidelines
+## Usage Guidelines
AINode provides model creation and deletion process for deep learning models related to timing data. Built-in models do not need to be created and deleted, they can be used directly, and the built-in model instances created after inference is completed will be destroyed automatically.
-### 4.1 Registering Models
+### Registering Models
A trained deep learning model can be registered by specifying the vector dimensions of the model's inputs and outputs, which can be used for model inference. The following is the SQL syntax definition for model registration.
@@ -113,7 +113,7 @@ The specific meanings of the parameters in the SQL are as follows:
In addition to registration of local model files, registration can also be done by specifying remote resource paths via URIs, using open source model repositories (e.g. HuggingFace).
-#### 4.1.1 Example
+#### Example
In the current example folder, it contains model.pt and config.yaml files, model.pt is the training get, and the content of config.yaml is as follows:
@@ -148,7 +148,7 @@ After the SQL is executed, the registration process will be carried out asynchro
Once the model registration is complete, you can call specific functions and perform model inference by using normal queries.
-### 4.2 Viewing Models
+### Viewing Models
Successfully registered models can be queried for model-specific information through the show models command. The SQL definition is as follows:
@@ -171,7 +171,7 @@ State is used to show the current state of model registration, which consists of
- **DROPPING**: Model deletion is in progress, model related information is being deleted from configNode and AINode.
- **UNAVAILABLE**: Model creation failed, you can delete the failed model_name by drop model.
-#### 4.2.1 Example
+#### Example
```SQL
IoTDB> show models
@@ -196,7 +196,7 @@ IoTDB> show models
We have registered the corresponding model earlier, you can view the model status through the corresponding designation, active indicates that the model is successfully registered and can be used for inference.
-### 4.3 Delete Model
+### Delete Model
For a successfully registered model, the user can delete it via SQL. In addition to deleting the meta information on the configNode, this operation also deletes all the related model files under the AINode. The SQL is as follows:
@@ -206,7 +206,7 @@ drop model <model_name>
You need to specify the model model_name that has been successfully registered to delete the corresponding model. Since model deletion involves the deletion of data on multiple nodes, the operation will not be completed immediately, and the state of the model at this time is DROPPING, and the model in this state cannot be used for model inference.
-### 4.4 Using Built-in Model Reasoning
+### Using Built-in Model Reasoning
The SQL syntax is as follows:
@@ -221,7 +221,7 @@ Built-in model inference does not require a registration process, the inference
- **parameterName**: parameter name
- **parameterValue**: parameter value
-#### 4.4.1 Built-in Models and Parameter Descriptions
+#### Built-in Models and Parameter Descriptions
The following machine learning models are currently built-in, please refer to the following links for detailed parameter descriptions.
@@ -236,7 +236,7 @@ The following machine learning models are currently built-in, please refer to th
| Stray | _Stray | Anomaly detection | [Stray Parameter description](https://www.sktime.net/en/latest/api_reference/auto_generated/sktime.annotation.stray.STRAY.html) |
-#### 4.4.2 Example
+#### Example
The following is an example of an operation using built-in model inference. The built-in Stray model is used for anomaly detection algorithm. The input is `[144,1]` and the output is `[144,1]`. We use it for reasoning through SQL.
@@ -276,7 +276,7 @@ IoTDB> call inference(_Stray, "select s0 from root.eg.airline", k=2)
Total line number = 144
```
-### 4.5 Reasoning with Deep Learning Models
+### Reasoning with Deep Learning Models
The SQL syntax is as follows:
@@ -309,7 +309,7 @@ After completing the registration of the model, the inference function can be us
**Explanation 2**: In deep learning applications, timestamp-derived features (time columns in the data) are often used as covariates in generative tasks, and are input into the model together to enhance the model, but the time columns are generally not included in the model's output. In order to ensure the generality of the implementation, the model inference results only correspond to the real output of the model, if the model does not output the time column, it will not be included in [...]
-#### 4.5.1 Example
+#### Example
The following is an example of inference in action using a deep learning model, for the `dlinear` prediction model with input `[96,2]` and output `[48,2]` mentioned above, which we use via SQL.
@@ -351,7 +351,7 @@ IoTDB> call inference(dlinear_example,"select s0,s1 from root.**")
Total line number = 48
```
-#### 4.5.2 Example of using the tail/head window function
+#### Example of using the tail/head window function
When the amount of data is variable and you want to take the latest 96 rows of data for inference, you can use the corresponding window function tail. head function is used in a similar way, except that it takes the earliest 96 points.
@@ -395,7 +395,7 @@ IoTDB> call inference(dlinear_example,"select s0,s1 from root.**",window=tail(96
Total line number = 48
```
-#### 4.5.3 Example of using the count window function
+#### Example of using the count window function
This window is mainly used for computational tasks, when the model corresponding to the task can only process a fixed row of data at a time and what is ultimately desired is indeed multiple sets of predictions, using this window function allows for sequential inference using a sliding window of points. Suppose we now have an anomaly detection model anomaly_example(input: [24,2], output[1,1]) that generates a 0/1 label for each row of data, an example of its use is shown below:
```Shell
@@ -435,7 +435,7 @@ Total line number = 4
where the labels of each row in the result set correspond to the model output corresponding to the 16 rows of input.
-## 5. Privilege Management
+## Privilege Management
When using AINode related functions, the authentication of IoTDB itself can be used to do a permission management, users can only use the model management related functions when they have the USE_MODEL permission. When using the inference function, the user needs to have the permission to access the source sequence corresponding to the SQL of the input model.
@@ -444,9 +444,9 @@ When using AINode related functions, the authentication of IoTDB itself can be u
| USE_MODEL | create model/show models/drop model | √ | √ | x |
| READ_DATA| call inference | √ | √|√ |
-## 6. Practical Examples
+## Practical Examples
-### 6.1 Power Load Prediction
+### Power Load Prediction
In some industrial scenarios, there is a need to predict power loads, which can be used to optimise power supply, conserve energy and resources, support planning and expansion, and enhance power system reliability.
@@ -517,7 +517,7 @@ The data before 10/24 00:00 in the image is the past data input into the model,
As can be seen, we have used the relationship between the six load information and the corresponding time oil temperatures for the past 96 hours (4 days) to model the possible changes in this data for the oil temperature for the next 48 hours (2 days) based on the inter-relationships between the sequences learned previously, and it can be seen that the predicted curves maintain a high degree of consistency in trend with the actual results after visualisation.
-### 6.2 Power Prediction
+### Power Prediction
Power monitoring of current, voltage and power data is required in substations for detecting potential grid problems, identifying faults in the power system, effectively managing grid loads and analysing power system performance and trends.
@@ -586,7 +586,7 @@ The data before 01/25 14:33 is the past data input to the model, the yellow line
It can be seen that we have used the data of the last 8 minutes of voltage to model the possible changes in the A-phase voltage for the next 4 minutes based on the inter-relationships between the sequences learned earlier, and it can be seen that the predicted curves and the actual results maintain a high degree of synchronicity in terms of trends after visualisation.
-### 6.3 Anomaly Detection
+### Anomaly Detection
In the civil aviation and transport industry, there exists a need for anomaly detection of the number of passengers travelling on an aircraft. The results of anomaly detection can be used to guide the adjustment of flight scheduling to make the organisation more efficient.
diff --git a/src/UserGuide/latest/User-Manual/IoTDB-View_timecho.md b/src/UserGuide/latest/User-Manual/IoTDB-View_timecho.md
index a4d0aaa..cceada4 100644
--- a/src/UserGuide/latest/User-Manual/IoTDB-View_timecho.md
+++ b/src/UserGuide/latest/User-Manual/IoTDB-View_timecho.md
@@ -21,9 +21,9 @@
# View
-## I. Sequence View Application Background
+## Sequence View Application Background
-## 1.1 Application Scenario 1 Time Series Renaming (PI Asset Management)
+## Application Scenario 1 Time Series Renaming (PI Asset Management)
In practice, the equipment collecting data may be named with identification numbers that are difficult to be understood by human beings, which brings difficulties in querying to the business layer.
@@ -33,19 +33,19 @@ The Sequence View, on the other hand, is able to re-organise the management of t
It is difficult for the user to understand. However, at this point, the user is able to rename it using the sequence view feature, map it to a sequence view, and use `root.view.device001.temperature` to access the captured data.
-### 1.2 Application Scenario 2 Simplifying business layer query logic
+### Application Scenario 2 Simplifying business layer query logic
Sometimes users have a large number of devices that manage a large number of time series. When conducting a certain business, the user wants to deal with only some of these sequences. At this time, the focus of attention can be picked out by the sequence view function, which is convenient for repeated querying and writing.
**For example**: Users manage a product assembly line with a large number of time series for each segment of the equipment. The temperature inspector only needs to focus on the temperature of the equipment, so he can extract the temperature-related sequences and compose the sequence view.
-### 1.3 Application Scenario 3 Auxiliary Rights Management
+### Application Scenario 3 Auxiliary Rights Management
In the production process, different operations are generally responsible for different scopes. For security reasons, it is often necessary to restrict the access scope of the operations staff through permission management.
**For example**: The safety management department now only needs to monitor the temperature of each device in a production line, but these data are stored in the same database with other confidential data. At this point, it is possible to create a number of new views that contain only temperature-related time series on the production line, and then to give the security officer access to only these sequence views, thus achieving the purpose of permission restriction.
-### 1.4 Motivation for designing sequence view functionality
+### Motivation for designing sequence view functionality
Combining the above two types of usage scenarios, the motivations for designing sequence view functionality, are:
@@ -53,13 +53,13 @@ Combining the above two types of usage scenarios, the motivations for designing
2. to simplify the query logic at the business level.
3. Auxiliary rights management, open data to specific users through the view.
-## 2. Sequence View Concepts
+## Sequence View Concepts
-### 2.1 Terminology Concepts
+### Terminology Concepts
Concept: If not specified, the views specified in this document are **Sequence Views**, and new features such as device views may be introduced in the future.
-### 2.2 Sequence view
+### Sequence view
A sequence view is a way of organising the management of time series.
@@ -69,7 +69,7 @@ A sequence view is a virtual time series, and each virtual time series is like a
Users can create views using complex SQL queries, where the sequence view acts as a stored query statement, and when data is read from the view, the stored query statement is used as the source of the data in the FROM clause.
-### 2.3 Alias Sequences
+### Alias Sequences
There is a special class of beings in a sequence view that satisfy all of the following conditions:
@@ -81,13 +81,13 @@ Such a sequence view is called an **alias sequence**, or alias sequence view. A
** All sequence views, including aliased sequences, do not currently support Trigger functionality. **
-### 2.4 Nested Views
+### Nested Views
A user may want to select a number of sequences from an existing sequence view to form a new sequence view, called a nested view.
**The current version does not support the nested view feature**.
-### 2.5 Some constraints on sequence views in IoTDB
+### Some constraints on sequence views in IoTDB
#### Constraint 1 A sequence view must depend on one or several time series
@@ -130,13 +130,13 @@ However, their metadata such as tags and attributes are not shared.
This is because the business query, view-oriented users are concerned about the structure of the current view, and if you use group by tag and other ways to do the query, obviously want to get the view contains the corresponding tag grouping effect, rather than the time series of the tag grouping effect (the user is not even aware of those time series).
-## 3. Sequence view functionality
+## Sequence view functionality
-### 3.1 Creating a view
+### Creating a view
Creating a sequence view is similar to creating a time series, the difference is that you need to specify the data source, i.e., the original sequence, through the AS keyword.
-#### 3.1.1. SQL for creating a view
+#### SQL for creating a view
User can select some sequences to create a view:
@@ -168,7 +168,7 @@ AS
root.db.device.s01
```
-#### 3.1.2 Creating views with computational logic
+#### Creating views with computational logic
Following the example in section 2.2 Limitations 1:
@@ -198,7 +198,7 @@ The user can then query it like this:
SELECT avg_temperature FROM root.db.d01
```
-#### 3.1.3 Nested sequence views not supported
+#### Nested sequence views not supported
Continuing with the example from 3.1.2, the user now wants to create a new view using the sequence view `root.db.d01.avg_temperature`, which is not allowed. We currently do not support nested views, whether it is an aliased sequence or not.
@@ -210,7 +210,7 @@ AS
root.db.d01.avg_temperature -- Not supported. Nested views are not allowed
```
-#### 3.1.4 Creating multiple sequence views at once
+#### Creating multiple sequence views at once
If only one sequence view can be specified at a time which is not convenient for the user to use, then multiple sequences can be specified at a time, for example:
@@ -292,7 +292,7 @@ After that, if the user adds the sequence `root.db.d01.s02`, it does not corresp
Please always note that inter-sequence mapping relationships are stored statically and solidly.
-#### 3.1.5 Batch Creation of Sequence Views
+#### Batch Creation of Sequence Views
There are several existing devices, each with a temperature value, for example:
@@ -330,7 +330,7 @@ The final view contains these sequences:
Created using wildcards, only static mapping relationships at the moment of creation will be stored.
-#### 3.1.6 SELECT clauses are somewhat limited when creating views
+#### SELECT clauses are somewhat limited when creating views
The SELECT clause used when creating a serial view is subject to certain restrictions. The main restrictions are as follows:
@@ -340,7 +340,7 @@ The SELECT clause used when creating a serial view is subject to certain restric
Simply put, after `AS` you can only use `SELECT ... FROM ... ` and the results of this query must form a time series.
-### 3.2 View Data Queries
+### View Data Queries
For the data query functions that can be supported, the sequence view and time series can be used indiscriminately with identical behaviour when performing time series data queries.
@@ -361,11 +361,11 @@ However, if the user wants to query the metadata of the sequence, such as tag, a
In addition, for aliased sequences, if the user wants to get information about the time series such as tags, attributes, etc., the user needs to query the mapping of the view columns to find the corresponding time series, and then query the time series for the tags, attributes, etc. The method of querying the mapping of the view columns will be explained in section 3.5.
-### 3.3 Modify Views
+### Modify Views
Modifying a view, such as changing its name, modifying its calculation logic, deleting it, etc., is similar to creating a new view, in that you need to re-specify all the column descriptions for the entire view.
-#### 3.3.1 Modify view data source
+#### Modify view data source
```SQL
ALTER VIEW root.view.device.status
@@ -374,7 +374,7 @@ AS
FROM root.ln.wf.d01
```
-#### 3.3.2 Modify the view's calculation logic
+#### Modify the view's calculation logic
```SQL
ALTER VIEW root.db.d01.avg_temperature
@@ -383,7 +383,7 @@ AS
FROM root.db.d01
```
-#### 3.3.3 Tag point management
+#### Tag point management
- Add a new
tag
@@ -423,7 +423,7 @@ ALTER view root.turbine.d1.s1 DROP tag1, tag2
ALTER view root.turbine.d1.s1 UPSERT TAGS(tag2=newV2, tag3=v3) ATTRIBUTES(attr3=v3, attr4=v4)
```
-#### 3.3.4 Deleting Views
+#### Deleting Views
Since a view is a sequence, a view can be deleted as if it were a time series.
@@ -432,7 +432,7 @@ Since a view is a sequence, a view can be deleted as if it were a time series.
DELETE VIEW root.view.device.avg_temperatue
```
-### 3.4 View Synchronisation
+### View Synchronisation
Sequence view data is always obtained via real-time queries, so data synchronisation is naturally supported.
@@ -454,11 +454,11 @@ Please refer to the previous section 2.1.6 Restrictions2 for more details.
Please refer to the previous section 2.1.6 Restriction 5 for details.
-### 3.5 View Metadata Queries
+### View Metadata Queries
View metadata query specifically refers to querying the metadata of the view itself (e.g., how many columns the view has), as well as information about the views in the database (e.g., what views are available).
-#### 3.5.1 Viewing Current View Columns
+#### Viewing Current View Columns
The user has two ways of querying:
@@ -520,7 +520,7 @@ The last column, `SOURCE`, shows the data source for the sequence view, listing
Both of the above queries involve the data type of the view. The data type of a view is inferred from the original time series type of the query statement or alias sequence that defines the view. This data type is computed in real time based on the current state of the system, so the data type queried at different moments may be changing.
-## IV. FAQ
+## FAQ
#### Q1: I want the view to implement the function of type conversion. For example, a time series of type int32 was originally placed in the same view as other series of type int64. I now want all the data queried through the view to be automatically converted to int64 type.
diff --git a/src/UserGuide/latest/User-Manual/Trigger.md b/src/UserGuide/latest/User-Manual/Trigger.md
index 97ade9b..7c4e163 100644
--- a/src/UserGuide/latest/User-Manual/Trigger.md
+++ b/src/UserGuide/latest/User-Manual/Trigger.md
@@ -21,7 +21,7 @@
# TRIGGER
-## 1. Instructions
+## Instructions
The trigger provides a mechanism for listening to changes in time series data. With user-defined logic, tasks such as alerting and data forwarding can be conducted.
@@ -47,7 +47,7 @@ There are currently two trigger events for the trigger, and other trigger events
- BEFORE INSERT: Fires before the data is persisted. **Please note that currently the trigger does not support data cleaning and will not change the data to be persisted itself.**
- AFTER INSERT: Fires after the data is persisted.
-## 2. How to Implement a Trigger
+## How to Implement a Trigger
You need to implement the trigger by writing a Java class, where the dependency shown below is required. If you use [Maven](http://search.maven.org/), you can search for them directly from the [Maven repository](http://search.maven.org/).
@@ -318,7 +318,7 @@ public class ClusterAlertingExample implements Trigger {
}
```
-## 3. Trigger Management
+## Trigger Management
You can create and drop a trigger through an SQL statement, and you can also query all registered triggers through an SQL statement.
@@ -448,7 +448,7 @@ During the process of creating and dropping triggers in the cluster, we maintain
| DROPPING | Intermediate state of executing `DROP TRIGGER`, the cluster is in the process of dropping the trigger. | NO |
| TRANSFERRING | The cluster is migrating the location of this trigger instance. | NO |
-## 4. Notes
+## Notes
- The trigger takes effect from the time of registration, and does not process the existing historical data. **That is, only insertion requests that occur after the trigger is successfully registered will be listened to by the trigger. **
- The fire process of trigger is synchronous currently, so you need to ensure the efficiency of the trigger, otherwise the writing performance may be greatly affected. **You need to guarantee concurrency safety of triggers yourself**.
@@ -458,7 +458,7 @@ During the process of creating and dropping triggers in the cluster, we maintain
- The trigger JAR package has a size limit, which must be less than min(`config_node_ratis_log_appender_buffer_size_max`, 2G), where `config_node_ratis_log_appender_buffer_size_max` is a configuration item. For the specific meaning, please refer to the IOTDB configuration item description.
- **It is better not to have classes with the same full class name but different function implementations in different JAR packages.** For example, trigger1 and trigger2 correspond to resources trigger1.jar and trigger2.jar respectively. If two JAR packages contain a `org.apache.iotdb.trigger.example.AlertListener` class, when `CREATE TRIGGER` uses this class, the system will randomly load the class in one of the JAR packages, which will eventually leads the inconsistent behavior of trig [...]
-## 5. Configuration Parameters
+## Configuration Parameters
| Parameter | Meaning |
| ------------------------------------------------- | ------------------------------------------------------------ |
diff --git a/src/zh/UserGuide/Master/API/Programming-CSharp-Native-API.md b/src/zh/UserGuide/Master/API/Programming-CSharp-Native-API.md
index 2a4a4dd..addbce6 100644
--- a/src/zh/UserGuide/Master/API/Programming-CSharp-Native-API.md
+++ b/src/zh/UserGuide/Master/API/Programming-CSharp-Native-API.md
@@ -93,9 +93,9 @@ await session_pool.Close();
- 对**IoTDB**中的`record`数据进行封装和抽象。
- 示例:
-| timestamp | status | temperature |
-| --------- | ------ | ----------- |
-| 1 | 0 | 20 |
+ | timestamp | status | temperature |
+ | --------- | ------ | ----------- |
+ | 1 | 0 | 20 |
- 构造方法:
@@ -109,11 +109,11 @@ var rowRecord =
- 一种类似于表格的数据结构,包含一个设备的若干行非空数据块。
- 示例:
-| time | status | temperature |
-| ---- | ------ | ----------- |
-| 1 | 0 | 20 |
-| 2 | 0 | 20 |
-| 3 | 3 | 21 |
+ | time | status | temperature |
+ | ---- | ------ | ----------- |
+ | 1 | 0 | 20 |
+ | 2 | 0 | 20 |
+ | 3 | 3 | 21 |
- 构造方法:
diff --git a/src/zh/UserGuide/Master/API/Programming-Cpp-Native-API.md b/src/zh/UserGuide/Master/API/Programming-Cpp-Native-API.md
index e189726..49a7c4f 100644
--- a/src/zh/UserGuide/Master/API/Programming-Cpp-Native-API.md
+++ b/src/zh/UserGuide/Master/API/Programming-Cpp-Native-API.md
@@ -37,8 +37,7 @@
### 安装相关依赖
- **MAC**
-
- 1. 安装 Bison :Mac 环境下预安装了 Bison 2.3 版本,但该版本过低不能够用来编译 Thrift。
+ 1. 安装 Bison :Mac 环境下预安装了 Bison 2.3 版本,但该版本过低不能够用来编译 Thrift。
使用 Bison 2.3 版本会报以下错误:
```invalid directive: '%code'```
@@ -88,20 +87,20 @@
- **Windows**
- 1. 构建编译环境
- * 安装 MS Visual Studio(推荐安装 2019 版本):安装时需要勾选 Visual Studio C/C++ IDE and compiler(supporting CMake, Clang, MinGW)。
- * 下载安装 [CMake](https://cmake.org/download/) 。
+1. 构建编译环境
+ - 安装 MS Visual Studio(推荐安装 2019 版本):安装时需要勾选 Visual Studio C/C++ IDE and compiler(supporting CMake, Clang, MinGW)。
+ - 下载安装 [CMake](https://cmake.org/download/) 。
- 2. 下载安装 Flex、Bison
- * 下载 [Win_Flex_Bison](https://sourceforge.net/projects/winflexbison/) 。
- * 下载后需要将可执行文件重命名为 flex.exe 和 bison.exe 以保证编译时能够被找到,添加可执行文件的目录到 PATH 环境变量中。
+2. 下载安装 Flex、Bison
+ - 下载 [Win_Flex_Bison](https://sourceforge.net/projects/winflexbison/) 。
+ - 下载后需要将可执行文件重命名为 flex.exe 和 bison.exe 以保证编译时能够被找到,添加可执行文件的目录到 PATH 环境变量中。
- 3. 安装 Boost
- * 下载 [Boost](https://www.boost.org/users/download/) 。
- * 本地编译 Boost :依次执行 bootstrap.bat 和 b2.exe 。
+3. 安装 Boost
+ - 下载 [Boost](https://www.boost.org/users/download/) 。
+ - 本地编译 Boost :依次执行 bootstrap.bat 和 b2.exe 。
- 4. 安装 OpenSSL
- * 下载安装 [OpenSSL](http://slproweb.com/products/Win32OpenSSL.html) 。
+4. 安装 OpenSSL
+ - 下载安装 [OpenSSL](http://slproweb.com/products/Win32OpenSSL.html) 。
### 执行编译
@@ -447,7 +446,7 @@ A:
</profiles>
</project>
```
-- 再次执行 mvn clean package -P with-cpp -pl iotdb-client/client-cpp -am -DskipTests,成功build
+- 再次执行 `mvn clean package -P with-cpp -pl iotdb-client/client-cpp -am -DskipTests`,成功build
## 基本接口说明
diff --git a/src/zh/UserGuide/Master/API/Programming-MQTT.md b/src/zh/UserGuide/Master/API/Programming-MQTT.md
index 11700b2..bb8dd1a 100644
--- a/src/zh/UserGuide/Master/API/Programming-MQTT.md
+++ b/src/zh/UserGuide/Master/API/Programming-MQTT.md
@@ -107,7 +107,7 @@ connection.disconnect();
可以在源码的 `example/mqtt-customize` 项目中找到一个简单示例。
步骤:
-* 创建一个 Java 项目,增加如下依赖
+1. 创建一个 Java 项目,增加如下依赖
```xml
<dependency>
<groupId>org.apache.iotdb</groupId>
@@ -115,7 +115,7 @@ connection.disconnect();
<version>1.3.0-SNAPSHOT</version>
</dependency>
```
-* 创建一个实现类,实现接口 `org.apache.iotdb.db.mqtt.protocol.PayloadFormatter`
+2. 创建一个实现类,实现接口 `org.apache.iotdb.db.mqtt.protocol.PayloadFormatter`
```java
package org.apache.iotdb.mqtt.server;
@@ -161,19 +161,19 @@ public class CustomizedJsonPayloadFormatter implements PayloadFormatter {
}
}
```
-* 修改项目中的 `src/main/resources/META-INF/services/org.apache.iotdb.db.protocol.mqtt.PayloadFormatter` 文件:
+3. 修改项目中的 `src/main/resources/META-INF/services/org.apache.iotdb.db.protocol.mqtt.PayloadFormatter` 文件:
将示例中的文件内容清除,并将刚才的实现类的全名(包名.类名)写入文件中。注意,这个文件中只有一行。
在本例中,文件内容为: `org.apache.iotdb.mqtt.server.CustomizedJsonPayloadFormatter`
-* 编译项目生成一个 jar 包: `mvn package -DskipTests`
+4. 编译项目生成一个 jar 包: `mvn package -DskipTests`
在 IoTDB 服务端:
-* 创建 ${IOTDB_HOME}/ext/mqtt/ 文件夹, 将刚才的 jar 包放入此文件夹。
-* 打开 MQTT 服务参数. (`enable_mqtt_service=true` in `conf/iotdb-system.properties`)
-* 用刚才的实现类中的 getName() 方法的返回值 设置为 `conf/iotdb-system.properties` 中 `mqtt_payload_formatter` 的值,
+1. 创建 ${IOTDB_HOME}/ext/mqtt/ 文件夹, 将刚才的 jar 包放入此文件夹。
+2. 打开 MQTT 服务参数. (`enable_mqtt_service=true` in `conf/iotdb-system.properties`)
+3. 用刚才的实现类中的 getName() 方法的返回值 设置为 `conf/iotdb-system.properties` 中 `mqtt_payload_formatter` 的值,
, 在本例中,为 `CustomizedJson`
-* 启动 IoTDB
-* 搞定.
+4. 启动 IoTDB
+5. 搞定
More: MQTT 协议的消息不限于 json,你还可以用任意二进制。通过如下函数获得:
`payload.forEachByte()` or `payload.array`。
diff --git a/src/zh/UserGuide/Master/API/RestServiceV1.md b/src/zh/UserGuide/Master/API/RestServiceV1.md
index 2ef4e65..a52d526 100644
--- a/src/zh/UserGuide/Master/API/RestServiceV1.md
+++ b/src/zh/UserGuide/Master/API/RestServiceV1.md
@@ -19,7 +19,7 @@
-->
-# RESTful 服务(不推荐)
+# RESTful 服务 (不推荐)
IoTDB 的 RESTful 服务可用于查询、写入和管理操作,它使用 OpenAPI 标准来定义接口并生成框架。
## 开启RESTful 服务
@@ -77,8 +77,8 @@ ping 接口可以用于线上服务检活。
请求方式:`GET`
-请求路径:http://ip:port/ping
-
+请求路径:`http://ip:port/ping
+`
请求示例:
```shell
@@ -127,7 +127,7 @@ query 接口可以用于处理数据查询和元数据查询。
请求头:`application/json`
-请求路径:http://ip:port/rest/v1/query
+请求路径:`http://ip:port/rest/v1/query`
参数说明:
@@ -149,12 +149,12 @@ query 接口可以用于处理数据查询和元数据查询。
提示:为了避免OOM问题,不推荐使用select * from root.xx.** 这种查找方式。
-请求示例 表达式查询:
-```shell
-curl -H "Content-Type:application/json" -H "Authorization:Basic cm9vdDpyb290" -X POST --data '{"sql":"select s3, s4, s3 + 1 from root.sg27 limit 2"}' http://127.0.0.1:18080/rest/v1/query
+1. 请求示例 表达式查询:
+ ```shell
+ curl -H "Content-Type:application/json" -H "Authorization:Basic cm9vdDpyb290" -X POST --data '{"sql":"select s3, s4, s3 + 1 from root.sg27 limit 2"}' http://127.0.0.1:18080/rest/v1/query
```
-响应示例:
+ - 响应示例:
```json
{
@@ -185,12 +185,12 @@ curl -H "Content-Type:application/json" -H "Authorization:Basic cm9vdDpyb290" -X
}
```
-请求示例 show child paths:
+2. 请求示例 show child paths:
```shell
curl -H "Content-Type:application/json" -H "Authorization:Basic cm9vdDpyb290" -X POST --data '{"sql":"show child paths root"}' http://127.0.0.1:18080/rest/v1/query
```
-响应示例:
+- 响应示例:
```json
{
@@ -208,12 +208,12 @@ curl -H "Content-Type:application/json" -H "Authorization:Basic cm9vdDpyb290" -X
}
```
-请求示例 show child nodes:
+3. 请求示例 show child nodes:
```shell
curl -H "Content-Type:application/json" -H "Authorization:Basic cm9vdDpyb290" -X POST --data '{"sql":"show child nodes root"}' http://127.0.0.1:18080/rest/v1/query
```
-响应示例:
+- 响应示例:
```json
{
@@ -231,12 +231,12 @@ curl -H "Content-Type:application/json" -H "Authorization:Basic cm9vdDpyb290" -X
}
```
-请求示例 show all ttl:
+4. 请求示例 show all ttl:
```shell
curl -H "Content-Type:application/json" -H "Authorization:Basic cm9vdDpyb290" -X POST --data '{"sql":"show all ttl"}' http://127.0.0.1:18080/rest/v1/query
```
-响应示例:
+- 响应示例:
```json
{
@@ -259,12 +259,12 @@ curl -H "Content-Type:application/json" -H "Authorization:Basic cm9vdDpyb290" -X
}
```
-请求示例 show ttl:
+5. 请求示例 show ttl:
```shell
curl -H "Content-Type:application/json" -H "Authorization:Basic cm9vdDpyb290" -X POST --data '{"sql":"show ttl on root.sg27"}' http://127.0.0.1:18080/rest/v1/query
```
-响应示例:
+- 响应示例:
```json
{
@@ -285,12 +285,12 @@ curl -H "Content-Type:application/json" -H "Authorization:Basic cm9vdDpyb290" -X
}
```
-请求示例 show functions:
+6. 请求示例 show functions:
```shell
curl -H "Content-Type:application/json" -H "Authorization:Basic cm9vdDpyb290" -X POST --data '{"sql":"show functions"}' http://127.0.0.1:18080/rest/v1/query
```
-响应示例:
+- 响应示例:
```json
{
@@ -324,12 +324,12 @@ curl -H "Content-Type:application/json" -H "Authorization:Basic cm9vdDpyb290" -X
}
```
-请求示例 show timeseries:
+7. 请求示例 show timeseries:
```shell
curl -H "Content-Type:application/json" -H "Authorization:Basic cm9vdDpyb290" -X POST --data '{"sql":"show timeseries"}' http://127.0.0.1:18080/rest/v1/query
```
-响应示例:
+- 响应示例:
```json
{
@@ -398,12 +398,12 @@ curl -H "Content-Type:application/json" -H "Authorization:Basic cm9vdDpyb290" -X
}
```
-请求示例 show latest timeseries:
+8. 请求示例 show latest timeseries:
```shell
curl -H "Content-Type:application/json" -H "Authorization:Basic cm9vdDpyb290" -X POST --data '{"sql":"show latest timeseries"}' http://127.0.0.1:18080/rest/v1/query
```
-响应示例:
+- 响应示例:
```json
{
@@ -472,12 +472,12 @@ curl -H "Content-Type:application/json" -H "Authorization:Basic cm9vdDpyb290" -X
}
```
-请求示例 count timeseries:
+9. 请求示例 count timeseries:
```shell
curl -H "Content-Type:application/json" -H "Authorization:Basic cm9vdDpyb290" -X POST --data '{"sql":"count timeseries root.**"}' http://127.0.0.1:18080/rest/v1/query
```
-响应示例:
+- 响应示例:
```json
{
@@ -494,12 +494,12 @@ curl -H "Content-Type:application/json" -H "Authorization:Basic cm9vdDpyb290" -X
}
```
-请求示例 count nodes:
+10. 请求示例 count nodes:
```shell
curl -H "Content-Type:application/json" -H "Authorization:Basic cm9vdDpyb290" -X POST --data '{"sql":"count nodes root.** level=2"}' http://127.0.0.1:18080/rest/v1/query
```
-响应示例:
+- 响应示例:
```json
{
@@ -516,20 +516,19 @@ curl -H "Content-Type:application/json" -H "Authorization:Basic cm9vdDpyb290" -X
}
```
-请求示例 show devices:
+11. 请求示例 show devices:
```shell
curl -H "Content-Type:application/json" -H "Authorization:Basic cm9vdDpyb290" -X POST --data '{"sql":"show devices"}' http://127.0.0.1:18080/rest/v1/query
```
-响应示例:
+- 响应示例:
```json
{
"expressions": null,
"columnNames": [
"devices",
- "isAligned",
- "Template"
+ "isAligned"
],
"timestamps": null,
"values": [
@@ -540,21 +539,17 @@ curl -H "Content-Type:application/json" -H "Authorization:Basic cm9vdDpyb290" -X
[
"false",
"false"
- ],
- [
- "t1",
- null
]
]
}
```
-请求示例 show devices with database:
+12. 请求示例 show devices with database:
```shell
curl -H "Content-Type:application/json" -H "Authorization:Basic cm9vdDpyb290" -X POST --data '{"sql":"show devices with database"}' http://127.0.0.1:18080/rest/v1/query
```
-响应示例:
+- 响应示例:
```json
{
@@ -562,8 +557,7 @@ curl -H "Content-Type:application/json" -H "Authorization:Basic cm9vdDpyb290" -X
"columnNames": [
"devices",
"database",
- "isAligned",
- "Template"
+ "isAligned"
],
"timestamps": null,
"values": [
@@ -578,21 +572,17 @@ curl -H "Content-Type:application/json" -H "Authorization:Basic cm9vdDpyb290" -X
[
"false",
"false"
- ],
- [
- "t1",
- null
]
]
}
```
-请求示例 list user:
+13. 请求示例 list user:
```shell
curl -H "Content-Type:application/json" -H "Authorization:Basic cm9vdDpyb290" -X POST --data '{"sql":"list user"}' http://127.0.0.1:18080/rest/v1/query
```
-响应示例:
+- 响应示例:
```json
{
@@ -609,12 +599,12 @@ curl -H "Content-Type:application/json" -H "Authorization:Basic cm9vdDpyb290" -X
}
```
-请求示例 原始聚合查询:
+14. 请求示例 原始聚合查询:
```shell
curl -H "Content-Type:application/json" -H "Authorization:Basic cm9vdDpyb290" -X POST --data '{"sql":"select count(*) from root.sg27"}' http://127.0.0.1:18080/rest/v1/query
```
-响应示例:
+- 响应示例:
```json
{
@@ -637,12 +627,12 @@ curl -H "Content-Type:application/json" -H "Authorization:Basic cm9vdDpyb290" -X
}
```
-请求示例 group by level:
+15. 请求示例 group by level:
```shell
curl -H "Content-Type:application/json" -H "Authorization:Basic cm9vdDpyb290" -X POST --data '{"sql":"select count(*) from root.** group by level = 1"}' http://127.0.0.1:18080/rest/v1/query
```
-响应示例:
+- 响应示例:
```json
{
@@ -663,12 +653,12 @@ curl -H "Content-Type:application/json" -H "Authorization:Basic cm9vdDpyb290" -X
}
```
-请求示例 group by:
+16. 请求示例 group by:
```shell
curl -H "Content-Type:application/json" -H "Authorization:Basic cm9vdDpyb290" -X POST --data '{"sql":"select count(*) from root.sg27 group by([1635232143960,1635232153960),1s)"}' http://127.0.0.1:18080/rest/v1/query
```
-响应示例:
+- 响应示例:
```json
{
@@ -718,12 +708,12 @@ curl -H "Content-Type:application/json" -H "Authorization:Basic cm9vdDpyb290" -X
}
```
-请求示例 last:
+17. 请求示例 last:
```shell
curl -H "Content-Type:application/json" -H "Authorization:Basic cm9vdDpyb290" -X POST --data '{"sql":"select last s3 from root.sg27"}' http://127.0.0.1:18080/rest/v1/query
```
-响应示例:
+- 响应示例:
```json
{
@@ -750,12 +740,12 @@ curl -H "Content-Type:application/json" -H "Authorization:Basic cm9vdDpyb290" -
}
```
-请求示例 disable align:
+18. 请求示例 disable align:
```shell
curl -H "Content-Type:application/json" -H "Authorization:Basic cm9vdDpyb290" -X POST --data '{"sql":"select * from root.sg27 disable align"}' http://127.0.0.1:18080/rest/v1/query
```
-响应示例:
+- 响应示例:
```json
{
@@ -764,12 +754,12 @@ curl -H "Content-Type:application/json" -H "Authorization:Basic cm9vdDpyb290" -X
}
```
-请求示例 align by device:
+19. 请求示例 align by device:
```shell
curl -H "Content-Type:application/json" -H "Authorization:Basic cm9vdDpyb290" -X POST --data '{"sql":"select count(s3) from root.sg27 align by device"}' http://127.0.0.1:18080/rest/v1/query
```
-响应示例:
+- 响应示例:
```json
{
@@ -778,12 +768,12 @@ curl -H "Content-Type:application/json" -H "Authorization:Basic cm9vdDpyb290" -X
}
```
-请求示例 select into:
+20. 请求示例 select into:
```shell
curl -H "Content-Type:application/json" -H "Authorization:Basic cm9vdDpyb290" -X POST --data '{"sql":"select s3, s4 into root.sg29.s1, root.sg29.s2 from root.sg27"}' http://127.0.0.1:18080/rest/v1/query
```
-响应示例:
+- 响应示例:
```json
{
@@ -798,7 +788,7 @@ curl -H "Content-Type:application/json" -H "Authorization:Basic cm9vdDpyb290" -X
请求头:`application/json`
-请求路径:http://ip:port/rest/v1/nonQuery
+请求路径:`http://ip:port/rest/v1/nonQuery`
参数说明:
@@ -834,7 +824,7 @@ curl -H "Content-Type:application/json" -H "Authorization:Basic cm9vdDpyb290" -X
请求头:`application/json`
-请求路径:http://ip:port/rest/v1/insertTablet
+请求路径:`http://ip:port/rest/v1/insertTablet`
参数说明:
diff --git a/src/zh/UserGuide/Master/API/RestServiceV2.md b/src/zh/UserGuide/Master/API/RestServiceV2.md
index ca15253..b9b315a 100644
--- a/src/zh/UserGuide/Master/API/RestServiceV2.md
+++ b/src/zh/UserGuide/Master/API/RestServiceV2.md
@@ -127,7 +127,7 @@ query 接口可以用于处理数据查询和元数据查询。
请求头:`application/json`
-请求路径:http://ip:port/rest/v2/query
+请求路径: `http://ip:port/rest/v2/query`
参数说明:
@@ -149,12 +149,12 @@ query 接口可以用于处理数据查询和元数据查询。
提示:为了避免OOM问题,不推荐使用select * from root.xx.** 这种查找方式。
-请求示例 表达式查询:
+1. 请求示例 表达式查询:
```shell
curl -H "Content-Type:application/json" -H "Authorization:Basic cm9vdDpyb290" -X POST --data '{"sql":"select s3, s4, s3 + 1 from root.sg27 limit 2"}' http://127.0.0.1:18080/rest/v2/query
```
-响应示例:
+- 响应示例:
```json
{
@@ -185,12 +185,12 @@ curl -H "Content-Type:application/json" -H "Authorization:Basic cm9vdDpyb290" -X
}
```
-请求示例 show child paths:
+2.请求示例 show child paths:
```shell
curl -H "Content-Type:application/json" -H "Authorization:Basic cm9vdDpyb290" -X POST --data '{"sql":"show child paths root"}' http://127.0.0.1:18080/rest/v2/query
```
-响应示例:
+- 响应示例:
```json
{
@@ -208,12 +208,12 @@ curl -H "Content-Type:application/json" -H "Authorization:Basic cm9vdDpyb290" -X
}
```
-请求示例 show child nodes:
+3. 请求示例 show child nodes:
```shell
curl -H "Content-Type:application/json" -H "Authorization:Basic cm9vdDpyb290" -X POST --data '{"sql":"show child nodes root"}' http://127.0.0.1:18080/rest/v2/query
```
-响应示例:
+- 响应示例:
```json
{
@@ -231,12 +231,12 @@ curl -H "Content-Type:application/json" -H "Authorization:Basic cm9vdDpyb290" -X
}
```
-请求示例 show all ttl:
+4. 请求示例 show all ttl:
```shell
curl -H "Content-Type:application/json" -H "Authorization:Basic cm9vdDpyb290" -X POST --data '{"sql":"show all ttl"}' http://127.0.0.1:18080/rest/v2/query
```
-响应示例:
+- 响应示例:
```json
{
@@ -259,12 +259,12 @@ curl -H "Content-Type:application/json" -H "Authorization:Basic cm9vdDpyb290" -X
}
```
-请求示例 show ttl:
+5. 请求示例 show ttl:
```shell
curl -H "Content-Type:application/json" -H "Authorization:Basic cm9vdDpyb290" -X POST --data '{"sql":"show ttl on root.sg27"}' http://127.0.0.1:18080/rest/v2/query
```
-响应示例:
+- 响应示例:
```json
{
@@ -285,12 +285,12 @@ curl -H "Content-Type:application/json" -H "Authorization:Basic cm9vdDpyb290" -X
}
```
-请求示例 show functions:
+6. 请求示例 show functions:
```shell
curl -H "Content-Type:application/json" -H "Authorization:Basic cm9vdDpyb290" -X POST --data '{"sql":"show functions"}' http://127.0.0.1:18080/rest/v2/query
```
-响应示例:
+- 响应示例:
```json
{
@@ -324,12 +324,12 @@ curl -H "Content-Type:application/json" -H "Authorization:Basic cm9vdDpyb290" -X
}
```
-请求示例 show timeseries:
+7. 请求示例 show timeseries:
```shell
curl -H "Content-Type:application/json" -H "Authorization:Basic cm9vdDpyb290" -X POST --data '{"sql":"show timeseries"}' http://127.0.0.1:18080/rest/v2/query
```
-响应示例:
+- 响应示例:
```json
{
@@ -398,12 +398,12 @@ curl -H "Content-Type:application/json" -H "Authorization:Basic cm9vdDpyb290" -X
}
```
-请求示例 show latest timeseries:
+8. 请求示例 show latest timeseries:
```shell
curl -H "Content-Type:application/json" -H "Authorization:Basic cm9vdDpyb290" -X POST --data '{"sql":"show latest timeseries"}' http://127.0.0.1:18080/rest/v2/query
```
-响应示例:
+- 响应示例:
```json
{
@@ -472,12 +472,12 @@ curl -H "Content-Type:application/json" -H "Authorization:Basic cm9vdDpyb290" -X
}
```
-请求示例 count timeseries:
+9. 请求示例 count timeseries:
```shell
curl -H "Content-Type:application/json" -H "Authorization:Basic cm9vdDpyb290" -X POST --data '{"sql":"count timeseries root.**"}' http://127.0.0.1:18080/rest/v2/query
```
-响应示例:
+- 响应示例:
```json
{
@@ -494,12 +494,12 @@ curl -H "Content-Type:application/json" -H "Authorization:Basic cm9vdDpyb290" -X
}
```
-请求示例 count nodes:
+10. 请求示例 count nodes:
```shell
curl -H "Content-Type:application/json" -H "Authorization:Basic cm9vdDpyb290" -X POST --data '{"sql":"count nodes root.** level=2"}' http://127.0.0.1:18080/rest/v2/query
```
-响应示例:
+- 响应示例:
```json
{
@@ -516,12 +516,12 @@ curl -H "Content-Type:application/json" -H "Authorization:Basic cm9vdDpyb290" -X
}
```
-请求示例 show devices:
+11. 请求示例 show devices:
```shell
curl -H "Content-Type:application/json" -H "Authorization:Basic cm9vdDpyb290" -X POST --data '{"sql":"show devices"}' http://127.0.0.1:18080/rest/v2/query
```
-响应示例:
+- 响应示例:
```json
{
@@ -544,12 +544,12 @@ curl -H "Content-Type:application/json" -H "Authorization:Basic cm9vdDpyb290" -X
}
```
-请求示例 show devices with database:
+12. 请求示例 show devices with database:
```shell
curl -H "Content-Type:application/json" -H "Authorization:Basic cm9vdDpyb290" -X POST --data '{"sql":"show devices with database"}' http://127.0.0.1:18080/rest/v2/query
```
-响应示例:
+- 响应示例:
```json
{
@@ -577,12 +577,12 @@ curl -H "Content-Type:application/json" -H "Authorization:Basic cm9vdDpyb290" -X
}
```
-请求示例 list user:
+13. 请求示例 list user:
```shell
curl -H "Content-Type:application/json" -H "Authorization:Basic cm9vdDpyb290" -X POST --data '{"sql":"list user"}' http://127.0.0.1:18080/rest/v2/query
```
-响应示例:
+- 响应示例:
```json
{
@@ -599,12 +599,12 @@ curl -H "Content-Type:application/json" -H "Authorization:Basic cm9vdDpyb290" -X
}
```
-请求示例 原始聚合查询:
+14. 请求示例 原始聚合查询:
```shell
curl -H "Content-Type:application/json" -H "Authorization:Basic cm9vdDpyb290" -X POST --data '{"sql":"select count(*) from root.sg27"}' http://127.0.0.1:18080/rest/v2/query
```
-响应示例:
+- 响应示例:
```json
{
@@ -627,12 +627,12 @@ curl -H "Content-Type:application/json" -H "Authorization:Basic cm9vdDpyb290" -X
}
```
-请求示例 group by level:
+15. 请求示例 group by level:
```shell
curl -H "Content-Type:application/json" -H "Authorization:Basic cm9vdDpyb290" -X POST --data '{"sql":"select count(*) from root.** group by level = 1"}' http://127.0.0.1:18080/rest/v2/query
```
-响应示例:
+- 响应示例:
```json
{
@@ -653,12 +653,12 @@ curl -H "Content-Type:application/json" -H "Authorization:Basic cm9vdDpyb290" -X
}
```
-请求示例 group by:
+16. 请求示例 group by:
```shell
curl -H "Content-Type:application/json" -H "Authorization:Basic cm9vdDpyb290" -X POST --data '{"sql":"select count(*) from root.sg27 group by([1635232143960,1635232153960),1s)"}' http://127.0.0.1:18080/rest/v2/query
```
-响应示例:
+- 响应示例:
```json
{
@@ -708,12 +708,12 @@ curl -H "Content-Type:application/json" -H "Authorization:Basic cm9vdDpyb290" -X
}
```
-请求示例 last:
+17. 请求示例 last:
```shell
curl -H "Content-Type:application/json" -H "Authorization:Basic cm9vdDpyb290" -X POST --data '{"sql":"select last s3 from root.sg27"}' http://127.0.0.1:18080/rest/v2/query
```
-响应示例:
+- 响应示例:
```json
{
@@ -740,12 +740,12 @@ curl -H "Content-Type:application/json" -H "Authorization:Basic cm9vdDpyb290" -
}
```
-请求示例 disable align:
+18. 请求示例 disable align:
```shell
curl -H "Content-Type:application/json" -H "Authorization:Basic cm9vdDpyb290" -X POST --data '{"sql":"select * from root.sg27 disable align"}' http://127.0.0.1:18080/rest/v2/query
```
-响应示例:
+- 响应示例:
```json
{
@@ -754,12 +754,12 @@ curl -H "Content-Type:application/json" -H "Authorization:Basic cm9vdDpyb290" -X
}
```
-请求示例 align by device:
+19. 请求示例 align by device:
```shell
curl -H "Content-Type:application/json" -H "Authorization:Basic cm9vdDpyb290" -X POST --data '{"sql":"select count(s3) from root.sg27 align by device"}' http://127.0.0.1:18080/rest/v2/query
```
-响应示例:
+- 响应示例:
```json
{
@@ -768,12 +768,12 @@ curl -H "Content-Type:application/json" -H "Authorization:Basic cm9vdDpyb290" -X
}
```
-请求示例 select into:
+20. 请求示例 select into:
```shell
curl -H "Content-Type:application/json" -H "Authorization:Basic cm9vdDpyb290" -X POST --data '{"sql":"select s3, s4 into root.sg29.s1, root.sg29.s2 from root.sg27"}' http://127.0.0.1:18080/rest/v2/query
```
-响应示例:
+- 响应示例:
```json
{
@@ -788,7 +788,7 @@ curl -H "Content-Type:application/json" -H "Authorization:Basic cm9vdDpyb290" -X
请求头:`application/json`
-请求路径:http://ip:port/rest/v2/nonQuery
+请求路径:`http://ip:port/rest/v2/nonQuery`
参数说明:
@@ -824,7 +824,7 @@ curl -H "Content-Type:application/json" -H "Authorization:Basic cm9vdDpyb290" -X
请求头:`application/json`
-请求路径:http://ip:port/rest/v2/insertTablet
+请求路径:`http://ip:port/rest/v2/insertTablet`
参数说明:
@@ -863,7 +863,7 @@ curl -H "Content-Type:application/json" -H "Authorization:Basic cm9vdDpyb290" -X
请求头:`application/json`
-请求路径:http://ip:port/rest/v2/insertRecords
+请求路径:`http://ip:port/rest/v2/insertRecords`
参数说明:
diff --git a/src/zh/UserGuide/Master/Basic-Concept/Encoding-and-Compression.md b/src/zh/UserGuide/Master/Basic-Concept/Encoding-and-Compression.md
index 39d0829..99402de 100644
--- a/src/zh/UserGuide/Master/Basic-Concept/Encoding-and-Compression.md
+++ b/src/zh/UserGuide/Master/Basic-Concept/Encoding-and-Compression.md
@@ -27,54 +27,51 @@
为了提高数据的存储效率,需要在数据写入的过程中对数据进行编码,从而减少磁盘空间的使用量。在写数据以及读数据的过程中都能够减少 I/O 操作的数据量从而提高性能。IoTDB 支持多种针对不同类型的数据的编码方法:
-* PLAIN 编码(PLAIN)
+1. PLAIN 编码(PLAIN)
-PLAIN 编码,默认的编码方式,即不编码,支持多种数据类型,压缩和解压缩的时间效率较高,但空间存储效率较低。
+ PLAIN 编码,默认的编码方式,即不编码,支持多种数据类型,压缩和解压缩的时间效率较高,但空间存储效率较低。
-* 二阶差分编码(TS_2DIFF)
+2. 二阶差分编码(TS_2DIFF)
-二阶差分编码,比较适合编码单调递增或者递减的序列数据,不适合编码波动较大的数据。
+ 二阶差分编码,比较适合编码单调递增或者递减的序列数据,不适合编码波动较大的数据。
-* 游程编码(RLE)
+3. 游程编码(RLE)
-游程编码,比较适合存储某些数值连续出现的序列,不适合编码大部分情况下前后值不一样的序列数据。
+ 游程编码,比较适合存储某些数值连续出现的序列,不适合编码大部分情况下前后值不一样的序列数据。
-游程编码也可用于对浮点数进行编码,但在创建时间序列的时候需指定保留小数位数(MAX_POINT_NUMBER,具体指定方式参见本文 [SQL 参考文档](../SQL-Manual/SQL-Manual.md))。比较适合存储某些浮点数值连续出现的序列数据,不适合存储对小数点后精度要求较高以及前后波动较大的序列数据。
+ 游程编码也可用于对浮点数进行编码,但在创建时间序列的时候需指定保留小数位数(MAX_POINT_NUMBER,具体指定方式参见本文 [SQL 参考文档](../SQL-Manual/SQL-Manual.md))。比较适合存储某些浮点数值连续出现的序列数据,不适合存储对小数点后精度要求较高以及前后波动较大的序列数据。
-> 游程编码(RLE)和二阶差分编码(TS_2DIFF)对 float 和 double 的编码是有精度限制的,默认保留 2 位小数。推荐使用 GORILLA。
+ > 游程编码(RLE)和二阶差分编码(TS_2DIFF)对 float 和 double 的编码是有精度限制的,默认保留 2 位小数。推荐使用 GORILLA。
-* GORILLA 编码(GORILLA)
+4. GORILLA 编码(GORILLA)
-GORILLA 编码是一种无损编码,它比较适合编码前后值比较接近的数值序列,不适合编码前后波动较大的数据。
+ GORILLA 编码是一种无损编码,它比较适合编码前后值比较接近的数值序列,不适合编码前后波动较大的数据。
-当前系统中存在两个版本的 GORILLA 编码实现,推荐使用`GORILLA`,不推荐使用`GORILLA_V1`(已过时)。
+ 当前系统中存在两个版本的 GORILLA 编码实现,推荐使用`GORILLA`,不推荐使用`GORILLA_V1`(已过时)。
-使用限制:使用 Gorilla 编码 INT32 数据时,需要保证序列中不存在值为`Integer.MIN_VALUE`的数据点;使用 Gorilla 编码 INT64 数据时,需要保证序列中不存在值为`Long.MIN_VALUE`的数据点。
+ 使用限制:使用 Gorilla 编码 INT32 数据时,需要保证序列中不存在值为`Integer.MIN_VALUE`的数据点;使用 Gorilla 编码 INT64 数据时,需要保证序列中不存在值为`Long.MIN_VALUE`的数据点。
-* 字典编码 (DICTIONARY)
+5. 字典编码 (DICTIONARY)
-字典编码是一种无损编码。它适合编码基数小的数据(即数据去重后唯一值数量小)。不推荐用于基数大的数据。
+ 字典编码是一种无损编码。它适合编码基数小的数据(即数据去重后唯一值数量小)。不推荐用于基数大的数据。
-* ZIGZAG 编码
+6. ZIGZAG 编码
-ZigZag编码将有符号整型映射到无符号整型,适合比较小的整数。
+ ZigZag编码将有符号整型映射到无符号整型,适合比较小的整数。
-* CHIMP 编码
+7. CHIMP 编码
-CHIMP 是一种无损编码。它是一种新的流式浮点数据压缩算法,可以节省存储空间。这个编码适用于前后值比较接近的数值序列,对波动小和随机噪声少的序列数据更加友好。
+ CHIMP 是一种无损编码。它是一种新的流式浮点数据压缩算法,可以节省存储空间。这个编码适用于前后值比较接近的数值序列,对波动小和随机噪声少的序列数据更加友好。
-使用限制:如果对 INT32 类型数据使用 CHIMP 编码,需要确保数据点中没有 `Integer.MIN_VALUE`。 如果对 INT64 类型数据使用 CHIMP 编码,需要确保数据点中没有 `Long.MIN_VALUE`。
+ 使用限制:如果对 INT32 类型数据使用 CHIMP 编码,需要确保数据点中没有 `Integer.MIN_VALUE`。 如果对 INT64 类型数据使用 CHIMP 编码,需要确保数据点中没有 `Long.MIN_VALUE`。
-* SPRINTZ 编码
-
-SPRINTZ编码是一种无损编码,将原始时序数据分别进行预测、Zigzag编码、位填充和游程编码。SPRINTZ编码适合差分值的绝对值较小(即波动较小)的时序数据,不适合差分值较大(即波动较大)的时序数据。
-
-* RLBE 编码
-
-RLBE编码是一种无损编码,将差分编码,位填充编码,游程长度,斐波那契编码和拼接等编码思想结合到一起。RLBE编码适合递增且递增值较小的时序数据,不适合波动较大的时序数据。
+8. SPRINTZ 编码
+ SPRINTZ编码是一种无损编码,将原始时序数据分别进行预测、Zigzag编码、位填充和游程编码。SPRINTZ编码适合差分值的绝对值较小(即波动较小)的时序数据,不适合差分值较大(即波动较大)的时序数据。
+9. RLBE 编码
+ RLBE编码是一种无损编码,将差分编码,位填充编码,游程长度,斐波那契编码和拼接等编码思想结合到一起。RLBE编码适合递增且递增值较小的时序数据,不适合波动较大的时序数据。
### 数据类型与编码的对应关系
diff --git a/src/zh/UserGuide/Master/Deployment-and-Maintenance/AINode_Deployment_timecho.md b/src/zh/UserGuide/Master/Deployment-and-Maintenance/AINode_Deployment_timecho.md
index 0c0e1ec..7843f07 100644
--- a/src/zh/UserGuide/Master/Deployment-and-Maintenance/AINode_Deployment_timecho.md
+++ b/src/zh/UserGuide/Master/Deployment-and-Maintenance/AINode_Deployment_timecho.md
@@ -20,24 +20,24 @@
-->
# AINode 部署
-## 1 AINode介绍
+## AINode介绍
-### 1.1 能力介绍
+### 能力介绍
AINode 是 IoTDB 在 ConfigNode、DataNode 后提供的第三种内生节点,该节点通过与 IoTDB 集群的 DataNode、ConfigNode 的交互,扩展了对时间序列进行机器学习分析的能力,支持从外部引入已有机器学习模型进行注册,并使用注册的模型在指定时序数据上通过简单 SQL 语句完成时序分析任务的过程,将模型的创建、管理及推理融合在数据库引擎中。目前已提供常见时序分析场景(例如预测与异常检测)的机器学习算法或自研模型。
-### 1.2 交付方式
+### 交付方式
是 IoTDB 集群外的额外套件,独立安装包,独立激活(如需试用或使用,请联系天谋科技商务或技术支持)。
-### 1.3 部署模式
+### 部署模式
<div >
<img src="https://alioss.timecho.com/docs/img/AINode%E9%83%A8%E7%BD%B21.png" alt="" style="width: 45%;"/>
<img src="https://alioss.timecho.com/docs/img/AINode%E9%83%A8%E7%BD%B22.png" alt="" style="width: 45%;"/>
</div>
-## 2 安装准备
+## 安装准备
-### 2.1 安装包获取
+### 安装包获取
用户可以下载AINode的软件安装包,下载并解压后即完成AINode的安装。
@@ -52,7 +52,7 @@ AINode 是 IoTDB 在 ConfigNode、DataNode 后提供的第三种内生节点,
| README_ZH.md | 文件 | markdown格式的中文版说明 |
| `README.md` | 文件 | 使用说明 |
-### 2.2 环境准备
+### 环境准备
- 建议操作环境: Ubuntu, CentOS, MacOS
- 运行环境
@@ -67,9 +67,9 @@ AINode 是 IoTDB 在 ConfigNode、DataNode 后提供的第三种内生节点,
# 安装3.8.0版本的venv
../Python-3.8.0/python -m venv venv(文件夹名)
```
-## 3 安装步骤
+## 安装步骤
-### 3.1 AINode 激活
+### AINode 激活
要求 IoTDB 处于正常运行状态,且 license 中有 AINode 模块授权(通常 license 中不具有 AINode 授权,可联系天谋商务或技术支持人员获取 AINode 模块授权)。
@@ -102,7 +102,7 @@ AINode 是 IoTDB 在 ConfigNode、DataNode 后提供的第三种内生节点,
cd sbin
./start-datanode.sh -d #-d参数将在后台进行启动
```
-### 3.2 配置项修改
+### 配置项修改
AINode 支持修改一些必要的参数。可以在 `conf/iotdb-ainode.properties` 文件中找到下列参数并进行持久化的修改:
| **名称** | **描述** | **类型** | **默认值** | **改后生效方式** |
@@ -115,7 +115,7 @@ AINode 支持修改一些必要的参数。可以在 `conf/iotdb-ainode.properti
| ain_models_dir | AINode 存储模型文件的路径,相对路径的起始目录与操作系统相关,建议使用绝对路径 | String | data/AINode/models | 重启后生效 |
| ain_logs_dir | AINode 存储日志的路径,相对路径的起始目录与操作系统相关,建议使用绝对路径 | String | logs/AINode | 重启后生效 |
| ain_thrift_compression_enabled | AINode 是否启用 thrift 的压缩机制,0-不启动、1-启动 | Boolean | 0 | 重启后生效 |
-### 3.3 启动 AINode
+### 启动 AINode
在完成 Seed-ConfigNode 的部署后,可以通过添加 AINode 节点来支持模型的注册和推理功能。在配置项中指定 IoTDB 集群的信息后,可以执行相应的指令来启动 AINode,加入 IoTDB 集群。
@@ -227,7 +227,7 @@ AINode 支持修改一些必要的参数。可以在 `conf/iotdb-ainode.properti
nohup bash sbin/start-ainode.bat > myout.file 2>& 1 &
```
-### 3.4 检测 AINode 节点状态
+### 检测 AINode 节点状态
AINode 启动过程中会自动将新的 AINode 加入 IoTDB 集群。启动 AINode 后可以在 命令行中输入 SQL 来查询,集群中看到 AINode 节点,其运行状态为 Running(如下展示)表示加入成功。
@@ -242,7 +242,7 @@ IoTDB> show cluster
+------+----------+-------+---------------+------------+-------+-----------+
```
-### 3.5 停止 AINode
+### 停止 AINode
如果需要停止正在运行的 AINode 节点,则执行相应的关闭脚本。
@@ -284,7 +284,7 @@ IoTDB> show cluster
```
如果需要重新启动该节点,需重新执行启动脚本。
-### 3.6 移除 AINode
+### 移除 AINode
当需要把一个 AINode 节点移出集群时,可以执行移除脚本。移除和停止脚本的差别是:停止是在集群中保留 AINode 节点但停止 AINode 服务,移除则是把 AINode 节点从集群中移除出去。
@@ -355,9 +355,9 @@ IoTDB> show cluster
sbin\remove-ainode.bat -t <AINode-id>/<ip>:<rpc-port>
```
-## 4 常见问题
+## 常见问题
-### 4.1 启动AINode时出现找不到venv模块的报错
+### 启动AINode时出现找不到venv模块的报错
当使用默认方式启动 AINode 时,会在安装包目录下创建一个 python 虚拟环境并安装依赖,因此要求安装 venv 模块。通常来说 python3.8 及以上的版本会自带 venv,但对于一些系统自带的 python 环境可能并不满足这一要求。出现该报错时有两种解决方案(二选一):
@@ -373,7 +373,7 @@ apt-get install python3.8-venv
```
在运行启动脚本时通过 `-i` 指定已有的 python 解释器路径作为 AINode 的运行环境,这样就不再需要创建一个新的虚拟环境。
- ### 4.2 python中的SSL模块没有被正确安装和配置,无法处理HTTPS资源
+ ### python中的SSL模块没有被正确安装和配置,无法处理HTTPS资源
WARNING: pip is configured with locations that require TLS/SSL, however the ssl module in Python is not available.
可以安装 OpenSSLS 后,再重新构建 python 来解决这个问题
> Currently Python versions 3.6 to 3.9 are compatible with OpenSSL 1.0.2, 1.1.0, and 1.1.1.
@@ -387,7 +387,7 @@ make
sudo make install
```
- ### 4.3 pip版本较低
+ ### pip版本较低
windows下出现类似“error:Microsoft Visual C++ 14.0 or greater is required...”的编译问题
@@ -399,7 +399,7 @@ sudo make install
```
- ### 4.4 安装编译python
+ ### 安装编译python
使用以下指定从官网下载安装包并解压:
```shell
diff --git a/src/zh/UserGuide/Master/Deployment-and-Maintenance/Cluster-Deployment.md b/src/zh/UserGuide/Master/Deployment-and-Maintenance/Cluster-Deployment.md
index 6441ddc..831fe22 100644
--- a/src/zh/UserGuide/Master/Deployment-and-Maintenance/Cluster-Deployment.md
+++ b/src/zh/UserGuide/Master/Deployment-and-Maintenance/Cluster-Deployment.md
@@ -52,7 +52,7 @@
| 192.168.1.4 | iotdb-2 | ConfigNode、DataNode |
| 192.168.1.5 | iotdb-3 | ConfigNode、DataNode |
-### 1. 设置主机名
+### 设置主机名
在3台机器上分别配置主机名,设置主机名需要在目标服务器上配置`/etc/hosts`,使用如下命令:
@@ -62,7 +62,7 @@ echo "192.168.1.4 iotdb-2" >> /etc/hosts
echo "192.168.1.5 iotdb-3" >> /etc/hosts
```
-### 2. 参数配置
+### 参数配置
解压安装包并进入安装目录
@@ -121,7 +121,7 @@ cd apache-iotdb-{version}-all-bin
| dn_schema_region_consensus_port | DataNode用于元数据副本共识协议通信使用的端口 | 10760 | 10760 | 10760 | 10760 | 10760 | 首次启动后不能修改 |
| dn_seed_config_node | 节点注册加入集群时连接的ConfigNode地址,即cn_internal_address:cn_internal_port | 127.0.0.1:10710 | 第一个CongfigNode的cn_internal_address:cn_internal_port | iotdb-1:10710 | iotdb-1:10710 | iotdb-1:10710 | 首次启动后不能修改 |
-### 3. 启动ConfigNode节点
+### 启动ConfigNode节点
先启动第一个iotdb-1的confignode, 保证种子confignode节点先启动,然后依次启动第2和第3个confignode节点
@@ -130,7 +130,7 @@ cd sbin
./start-confignode.sh -d #“-d”参数将在后台进行启动
```
-### 4. 启动DataNode 节点
+### 启动DataNode 节点
分别进入iotdb的`sbin`目录下,依次启动3个datanode节点:
@@ -139,7 +139,7 @@ cd sbin
./start-datanode.sh -d #“-d”参数将在后台进行启动
```
-### 5. 验证部署
+### 验证部署
可直接执行`./sbin`目录下的Cli启动脚本:
diff --git a/src/zh/UserGuide/Master/Deployment-and-Maintenance/Cluster-Deployment_timecho.md b/src/zh/UserGuide/Master/Deployment-and-Maintenance/Cluster-Deployment_timecho.md
index 433673c..eea8207 100644
--- a/src/zh/UserGuide/Master/Deployment-and-Maintenance/Cluster-Deployment_timecho.md
+++ b/src/zh/UserGuide/Master/Deployment-and-Maintenance/Cluster-Deployment_timecho.md
@@ -52,7 +52,7 @@
| 192.168.1.4 | iotdb-2 | ConfigNode、DataNode |
| 192.168.1.5 | iotdb-3 | ConfigNode、DataNode |
-### 1. 设置主机名
+### 设置主机名
在3台机器上分别配置主机名,设置主机名需要在目标服务器上配置`/etc/hosts`,使用如下命令:
@@ -62,7 +62,7 @@ echo "192.168.1.4 iotdb-2" >> /etc/hosts
echo "192.168.1.5 iotdb-3" >> /etc/hosts
```
-### 2. 参数配置
+### 参数配置
解压安装包并进入安装目录
@@ -121,7 +121,7 @@ cd iotdb-enterprise-{version}-bin
| dn_schema_region_consensus_port | DataNode用于元数据副本共识协议通信使用的端口 | 10760 | 10760 | 10760 | 10760 | 10760 | 首次启动后不能修改 |
| dn_seed_config_node | 节点注册加入集群时连接的ConfigNode地址,即cn_internal_address:cn_internal_port | 127.0.0.1:10710 | 第一个CongfigNode的cn_internal_address:cn_internal_port | iotdb-1:10710 | iotdb-1:10710 | iotdb-1:10710 | 首次启动后不能修改 |
-### 3. 启动ConfigNode节点
+### 启动ConfigNode节点
先启动第一个iotdb-1的confignode, 保证种子confignode节点先启动,然后依次启动第2和第3个confignode节点
@@ -130,7 +130,7 @@ cd sbin
./start-confignode.sh -d #“-d”参数将在后台进行启动
```
-### 4. 激活数据库
+### 激活数据库
#### **方式一:激活文件拷贝激活**
@@ -165,7 +165,7 @@ cd sbin
Import completed. Please start cluster and excute 'show cluster' to verify activation status
```
-### 5. 启动DataNode 节点
+### 启动DataNode 节点
分别进入iotdb的`sbin`目录下,依次启动3个datanode节点:
@@ -174,7 +174,7 @@ cd sbin
./start-datanode.sh -d #-d参数将在后台进行启动
```
-### 6. 验证部署
+### 验证部署
可直接执行`./sbin`目录下的Cli启动脚本:
diff --git a/src/zh/UserGuide/Master/Deployment-and-Maintenance/Docker-Deployment.md b/src/zh/UserGuide/Master/Deployment-and-Maintenance/Docker-Deployment.md
index 74d2941..92d4a6c 100644
--- a/src/zh/UserGuide/Master/Deployment-and-Maintenance/Docker-Deployment.md
+++ b/src/zh/UserGuide/Master/Deployment-and-Maintenance/Docker-Deployment.md
@@ -22,7 +22,7 @@
## 环境准备
-### 1. Docker安装
+### Docker安装
```SQL
#以ubuntu为例,其他操作系统可以自行搜索安装方法
@@ -42,7 +42,7 @@ sudo systemctl enable docker
docker --version #显示版本信息,即安装成功
```
-### 2. docker-compose安装
+### docker-compose安装
```SQL
#安装命令
@@ -57,7 +57,7 @@ docker-compose --version #显示版本信息即安装成功
本节演示如何部署1C1D的docker单机版。
-### 1. 拉取镜像文件
+### 拉取镜像文件
Apache IoTDB的Docker镜像已经上传至https://hub.docker.com/r/apache/iotdb。
@@ -75,13 +75,13 @@ docker images

-### 2. 创建docker bridge网络
+### 创建docker bridge网络
```Bash
docker network create --driver=bridge --subnet=172.18.0.0/16 --gateway=172.18.0.1 iotdb
```
-### 3.编写docker-compose的yml文件
+### 编写docker-compose的yml文件
这里我们以把IoTDB安装目录和yml文件统一放在`/docker-iotdb`文件夹下为例:
@@ -131,7 +131,7 @@ networks:
external: true
```
-### 4. 启动IoTDB
+### 启动IoTDB
使用下面的命令启动:
@@ -140,7 +140,7 @@ cd /docker-iotdb
docker-compose -f docker-compose-standalone.yml up -d #后台启动
```
-### 5. 验证部署
+### 验证部署
- 查看日志,有如下字样,表示启动成功
@@ -173,7 +173,7 @@ docker-compose -f docker-compose-standalone.yml up -d #后台启动

-### 6. 映射/conf目录(可选)
+### 映射/conf目录(可选)
后续如果想在物理机中直接修改配置文件,可以把容器中的/conf文件夹映射出来,分三步:
@@ -211,7 +211,7 @@ docker-compose -f docker-compose-standalone.yml up -d
下面以host网络为例演示如何部署3C3D集群。
-### 1.设置主机名
+### 设置主机名
假设现在有3台linux服务器,IP地址和服务角色分配如下:
@@ -229,7 +229,7 @@ echo "192.168.1.4 iotdb-2" >> /etc/hosts
echo "192.168.1.5 iotdb-3" >> /etc/hosts
```
-### 2. 拉取镜像文件
+### 拉取镜像文件
Apache IoTDB的Docker镜像已经上传至https://hub.docker.com/r/apache/iotdb。
@@ -247,7 +247,7 @@ docker images

-### 3.编写docker-compose的yml文件
+### 编写docker-compose的yml文件
这里我们以把IoTDB安装目录和yml文件统一放在`/docker-iotdb`文件夹下为例:
@@ -322,7 +322,7 @@ services:
network_mode: "host" #使用host网络
```
-### 4. 首次启动confignode
+### 首次启动confignode
先在3台服务器上分别启动confignode, 注意启动顺序,先启动第1台iotdb-1,再启动iotdb-2和iotdb-3。
@@ -331,7 +331,7 @@ cd /docker-iotdb
docker-compose -f confignode.yml up -d #后台启动
```
-### 5. 启动datanode
+### 启动datanode
在3台服务器上分别启动datanode
@@ -342,7 +342,7 @@ docker-compose -f datanode.yml up -d #后台启动

-### 6. 验证部署
+### 验证部署
- 查看日志,有如下字样,表示datanode启动成功
@@ -375,7 +375,7 @@ docker-compose -f datanode.yml up -d #后台启动

-### 7. 映射/conf目录(可选)
+### 映射/conf目录(可选)
后续如果想在物理机中直接修改配置文件,可以把容器中的/conf文件夹映射出来,分三步:
diff --git a/src/zh/UserGuide/Master/Deployment-and-Maintenance/Docker-Deployment_timecho.md b/src/zh/UserGuide/Master/Deployment-and-Maintenance/Docker-Deployment_timecho.md
index 9dab598..26555d1 100644
--- a/src/zh/UserGuide/Master/Deployment-and-Maintenance/Docker-Deployment_timecho.md
+++ b/src/zh/UserGuide/Master/Deployment-and-Maintenance/Docker-Deployment_timecho.md
@@ -22,7 +22,7 @@
## 环境准备
-### 1. Docker安装
+### Docker安装
```Bash
#以ubuntu为例,其他操作系统可以自行搜索安装方法
@@ -42,7 +42,7 @@ sudo systemctl enable docker
docker --version #显示版本信息,即安装成功
```
-### 2. docker-compose安装
+### docker-compose安装
```Bash
#安装命令
@@ -53,7 +53,7 @@ ln -s /usr/local/bin/docker-compose /usr/bin/docker-compose
docker-compose --version #显示版本信息即安装成功
```
-### 3. 安装dmidecode插件
+### 安装dmidecode插件
默认情况下,linux服务器应该都已安装,如果没有安装的话,可以使用下面的命令安装。
@@ -63,7 +63,7 @@ sudo apt-get install dmidecode
dmidecode 安装后,查找安装路径:`whereis dmidecode`,这里假设结果为`/usr/sbin/dmidecode`,记住该路径,后面的docker-compose的yml文件会用到。
-### 4. 获取IoTDB的容器镜像
+### 获取IoTDB的容器镜像
关于IoTDB企业版的容器镜像您可联系商务或技术支持获取。
@@ -71,7 +71,7 @@ dmidecode 安装后,查找安装路径:`whereis dmidecode`,这里假设结
本节演示如何部署1C1D的docker单机版。
-### 1. load 镜像文件
+### load 镜像文件
比如这里获取的IoTDB的容器镜像文件名是:`iotdb-enterprise-1.3.2.3-standalone-docker.tar.gz`
@@ -89,13 +89,13 @@ docker images

-### 2. 创建docker bridge网络
+### 创建docker bridge网络
```Bash
docker network create --driver=bridge --subnet=172.18.0.0/16 --gateway=172.18.0.1 iotdb
```
-### 3. 编写docker-compose的yml文件
+### 编写docker-compose的yml文件
这里我们以把IoTDB安装目录和yml文件统一放在`/docker-iotdb` 文件夹下为例:
@@ -147,7 +147,7 @@ networks:
external: true
```
-### 4. 首次启动
+### 首次启动
使用下面的命令启动:
@@ -160,7 +160,7 @@ docker-compose -f docker-compose-standalone.yml up

-### 5. 申请激活
+### 申请激活
- 首次启动后,在物理机目录`/docker-iotdb/iotdb/activation`下会生成一个 `system_info`文件,将这个文件拷贝给天谋工作人员。
@@ -170,7 +170,7 @@ docker-compose -f docker-compose-standalone.yml up

-### 6. 再次启动IoTDB
+### 再次启动IoTDB
```Bash
docker-compose -f docker-compose-standalone.yml up -d
@@ -178,7 +178,7 @@ docker-compose -f docker-compose-standalone.yml up -d

-### 7. 验证部署
+### 验证部署
- 查看日志,有如下字样,表示启动成功
@@ -211,7 +211,7 @@ docker logs -f iotdb-datanode #查看日志命令

-### 8. 映射/conf目录(可选)
+### 映射/conf目录(可选)
后续如果想在物理机中直接修改配置文件,可以把容器中的/conf文件夹映射出来,分三步:
@@ -251,7 +251,7 @@ docker-compose -f docker-compose-standalone.yml up -d
下面以host网络为例演示如何部署3C3D集群。
-### 1. 设置主机名
+### 设置主机名
假设现在有3台linux服务器,IP地址和服务角色分配如下:
@@ -269,7 +269,7 @@ echo "192.168.1.4 iotdb-2" >> /etc/hosts
echo "192.168.1.5 iotdb-3" >> /etc/hosts
```
-### 2. load镜像文件
+### load镜像文件
比如获取的IoTDB的容器镜像文件名是:`iotdb-enterprise-1.3.2.3-standalone-docker.tar.gz`
@@ -287,7 +287,7 @@ docker images

-### 3. 编写docker-compose的yml文件
+### 编写docker-compose的yml文件
这里我们以把IoTDB安装目录和yml文件统一放在/docker-iotdb文件夹下为例:
@@ -366,7 +366,7 @@ services:
network_mode: "host" #使用host网络
```
-### 4. 首次启动confignode
+### 首次启动confignode
先在3台服务器上分别启动confignode, 用来获取机器码,注意启动顺序,先启动第1台iotdb-1,再启动iotdb-2和iotdb-3。
@@ -375,7 +375,7 @@ cd /docker-iotdb
docker-compose -f confignode.yml up -d #后台启动
```
-### 5. 申请激活
+### 申请激活
- 首次启动3个confignode后,在每个物理机目录`/docker-iotdb/iotdb/activation`下都会生成一个`system_info`文件,将3个服务器的`system_info`文件拷贝给天谋工作人员;
@@ -387,7 +387,7 @@ docker-compose -f confignode.yml up -d #后台启动
- license放入对应的activation文件夹后,confignode会自动激活,不用重启confignode
-### 6. 启动datanode
+### 启动datanode
在3台服务器上分别启动datanode
@@ -398,7 +398,7 @@ docker-compose -f datanode.yml up -d #后台启动

-### 7. 验证部署
+### 验证部署
- 查看日志,有如下字样,表示datanode启动成功
@@ -431,7 +431,7 @@ docker-compose -f datanode.yml up -d #后台启动

-### 8. 映射/conf目录(可选)
+### 映射/conf目录(可选)
后续如果想在物理机中直接修改配置文件,可以把容器中的/conf文件夹映射出来,分三步:
diff --git a/src/zh/UserGuide/Master/Deployment-and-Maintenance/Monitoring-panel-deployment.md b/src/zh/UserGuide/Master/Deployment-and-Maintenance/Monitoring-panel-deployment.md
index aa2b554..8ee7139 100644
--- a/src/zh/UserGuide/Master/Deployment-and-Maintenance/Monitoring-panel-deployment.md
+++ b/src/zh/UserGuide/Master/Deployment-and-Maintenance/Monitoring-panel-deployment.md
@@ -187,11 +187,11 @@ cd grafana-*
## 附录、监控指标详解
-### 1. 系统面板(System Dashboard)
+### 系统面板(System Dashboard)
该面板展示了当前系统CPU、内存、磁盘、网络资源的使用情况已经JVM的部分状况。
-#### 1.1 CPU
+#### CPU
- CPU Core:CPU 核数
- CPU Load:
@@ -199,7 +199,7 @@ cd grafana-*
- Process CPU Load:IoTDB 进程在采样时间内占用的 CPU 比例
- CPU Time Per Minute:系统每分钟内所有进程的 CPU 时间总和
-#### 1.2 Memory
+#### Memory
- System Memory:当前系统内存的使用情况。
- Commited vm size: 操作系统分配给正在运行的进程使用的虚拟内存的大小。
@@ -211,7 +211,7 @@ cd grafana-*
- Total Memory:IoTDB 进程当前已经从操作系统中请求到的内存总量。
- Used Memory:IoTDB 进程当前已经使用的内存总量。
-#### 1.3 Disk
+#### Disk
- Disk Space:
- Total disk space:IoTDB 可使用的最大磁盘空间。
@@ -238,7 +238,7 @@ cd grafana-*
- I/O System Call Rate:进程调用读写系统调用的频率,类似于 IOPS。
- I/O Throughput:进程进行 I/O 的吞吐量,分为 actual_read/write 和 attempt_read/write 两类。actual read 和 actual write 指的是进程实际导致块设备进行 I/O 的字节数,不包含被 Page Cache 处理的部分。
-#### 1.4 JVM
+#### JVM
- GC Time Percentage:节点 JVM 在过去一分钟的时间窗口内,GC 耗时所占的比例
- GC Allocated/Promoted Size Detail: 节点 JVM 平均每分钟晋升到老年代的对象大小,新生代/老年代和非分代新申请的对象大小
@@ -264,7 +264,7 @@ cd grafana-*
- unloaded:系统启动至今 JVM 卸载的类的数量
- The Number of Java Thread:IoTDB 目前存活的线程数。各子项分别为各状态的线程数。
-#### 1.5 Network
+#### Network
eno 指的是到公网的网卡,lo 是虚拟网卡。
@@ -273,9 +273,9 @@ eno 指的是到公网的网卡,lo 是虚拟网卡。
- Packet Speed:网卡发送和接收数据包的速度,一次 RPC 请求可以对应一个或者多个数据包
- Connection Num:当前选定进程的 socket 连接数(IoTDB只有 TCP)
-### 2. 整体性能面板(Performance Overview Dashboard)
+### 整体性能面板(Performance Overview Dashboard)
-#### 2.1 Cluster Overview
+#### Cluster Overview
- Total CPU Core: 集群机器 CPU 总核数
- DataNode CPU Load: 集群各DataNode 节点的 CPU 使用率
@@ -296,7 +296,7 @@ eno 指的是到公网的网卡,lo 是虚拟网卡。
- Total DataRegion: 集群管理的 DataRegion 总数
- Total SchemaRegion: 集群管理的 SchemaRegion 总数
-#### 2.2 Node Overview
+#### Node Overview
- CPU Core: 节点所在机器的 CPU 核数
- Disk Space: 节点所在机器的磁盘大小
@@ -307,7 +307,7 @@ eno 指的是到公网的网卡,lo 是虚拟网卡。
- Swap Memory: 节点所在机器的交换内存大小
- File Number: 节点管理的文件数
-#### 2.3 Performance
+#### Performance
- Session Idle Time: 节点的 session 连接的总空闲时间和总忙碌时间
- Client Connection: 节点的客户端连接情况,包括总连接数和活跃连接数
@@ -339,7 +339,7 @@ eno 指的是到公网的网卡,lo 是虚拟网卡。
- Average Time Consumed Of Engine Stage: 节点的 engine 阶段各子阶段平均耗时
- P99 Time Consumed Of Engine Stage: 节点 engine 阶段各子阶段的 P99 耗时
-#### 2.4 System
+#### System
- CPU Load: 节点的 CPU 负载
- CPU Time Per Minute: 节点的每分钟 CPU 时间,最大值和 CPU 核数相关
@@ -351,11 +351,11 @@ eno 指的是到公网的网卡,lo 是虚拟网卡。
- File Size: 节点管理文件大小情况
- Log Number Per Minute: 节点的每分钟不同类型日志情况
-### 3. ConfigNode 面板(ConfigNode Dashboard)
+### ConfigNode 面板(ConfigNode Dashboard)
该面板展示了集群中所有管理节点的表现情况,包括分区、节点信息、客户端连接情况统计等。
-#### 3.1 Node Overview
+#### Node Overview
- Database Count: 节点的数据库数量
- Region
@@ -369,7 +369,7 @@ eno 指的是到公网的网卡,lo 是虚拟网卡。
- DataNodes: 节点所在集群的 DataNode 情况
- System Overview: 节点的系统概述,包括系统内存、磁盘使用、进程内存以及CPU负载
-#### 3.2 NodeInfo
+#### NodeInfo
- Node Count: 节点所在集群的节点数量,包括 ConfigNode 和 DataNode
- ConfigNode Status: 节点所在集群的 ConfigNode 节点的状态
@@ -379,7 +379,7 @@ eno 指的是到公网的网卡,lo 是虚拟网卡。
- DataRegion Distribution: 节点所在集群的 DataRegion 的分布情况
- DataRegionGroup Leader Distribution: 节点所在集群的 DataRegionGroup 的 Leader 分布情况
-#### 3.3 Protocol
+#### Protocol
- 客户端数量统计
- Active Client Num: 节点各线程池的活跃客户端数量
@@ -392,7 +392,7 @@ eno 指的是到公网的网卡,lo 是虚拟网卡。
- Client Mean Borrow Wait Time: 节点各线程池的客户端平均借用等待时间
- Client Mean Idle Time: 节点各线程池的客户端平均空闲时间
-#### 3.4 Partition Table
+#### Partition Table
- SchemaRegionGroup Count: 节点所在集群的 Database 的 SchemaRegionGroup 的数量
- DataRegionGroup Count: 节点所在集群的 Database 的 DataRegionGroup 的数量
@@ -401,7 +401,7 @@ eno 指的是到公网的网卡,lo 是虚拟网卡。
- DataRegion Status: 节点所在集群的 DataRegion 状态
- SchemaRegion Status: 节点所在集群的 SchemaRegion 的状态
-#### 3.5 Consensus
+#### Consensus
- Ratis Stage Time: 节点的 Ratis 各阶段耗时
- Write Log Entry: 节点的 Ratis 写 Log 的耗时
@@ -409,17 +409,17 @@ eno 指的是到公网的网卡,lo 是虚拟网卡。
- Remote / Local Write QPS: 节点 Ratis 的远程和本地写入的 QPS
- RatisConsensus Memory: 节点 Ratis 共识协议的内存使用
-### 4. DataNode 面板(DataNode Dashboard)
+### DataNode 面板(DataNode Dashboard)
该面板展示了集群中所有数据节点的监控情况,包含写入耗时、查询耗时、存储文件数等。
-#### 4.1 Node Overview
+#### Node Overview
- The Number Of Entity: 节点管理的实体情况
- Write Point Per Second: 节点的每秒写入速度
- Memory Usage: 节点的内存使用情况,包括 IoT Consensus 各部分内存占用、SchemaRegion内存总占用和各个数据库的内存占用。
-#### 4.2 Protocol
+#### Protocol
- 节点操作耗时
- The Time Consumed Of Operation (avg): 节点的各项操作的平均耗时
@@ -440,7 +440,7 @@ eno 指的是到公网的网卡,lo 是虚拟网卡。
- Client Mean Borrow Wait Time: 节点各线程池的客户端平均借用等待时间
- Client Mean Idle Time: 节点各线程池的客户端平均空闲时间
-#### 4.3 Storage Engine
+#### Storage Engine
- File Count: 节点管理的各类型文件数量
- File Size: 节点管理的各类型文件大小
@@ -456,7 +456,7 @@ eno 指的是到公网的网卡,lo 是虚拟网卡。
- Compaction Process Chunk Status: 节点合并不同状态的 Chunk 的数量
- Compacted Point Num Per Minute: 节点每分钟合并的点数
-#### 4.4 Write Performance
+#### Write Performance
- Write Cost(avg): 节点写入耗时平均值,包括写入 wal 和 memtable
- Write Cost(50%): 节点写入耗时中位数,包括写入 wal 和 memtable
@@ -492,7 +492,7 @@ eno 指的是到公网的网卡,lo 是虚拟网卡。
- Series Num Of Flushing MemTable: 节点的不同 DataRegion 的 Memtable 刷盘时的时间序列数
- Average Point Num Of Flushing MemChunk: 节点 MemChunk 刷盘的平均点数
-#### 4.5 Schema Engine
+#### Schema Engine
- Schema Engine Mode: 节点的元数据引擎模式
- Schema Consensus Protocol: 节点的元数据共识协议
@@ -521,7 +521,7 @@ eno 指的是到公网的网卡,lo 是虚拟网卡。
- Time Consumed of Relead and Flush (avg): 节点触发 cache 释放和 buffer 刷盘耗时的平均值
- Time Consumed of Relead and Flush (99%): 节点触发 cache 释放和 buffer 刷盘的耗时的 P99
-#### 4.6 Query Engine
+#### Query Engine
- 各阶段耗时
- The time consumed of query plan stages(avg): 节点查询各阶段耗时的平均值
@@ -564,7 +564,7 @@ eno 指的是到公网的网卡,lo 是虚拟网卡。
- The time consumed of query schedule time(50%): 节点查询任务调度耗时的中位数
- The time consumed of query schedule time(99%): 节点查询任务调度耗时的P99
-#### 4.7 Query Interface
+#### Query Interface
- 加载时间序列元数据
- The time consumed of load timeseries metadata(avg): 节点查询加载时间序列元数据耗时的平均值
@@ -611,7 +611,7 @@ eno 指的是到公网的网卡,lo 是虚拟网卡。
- The time consumed of build tsblock from merge reader(50%): 节点查询通过 Merge Reader 构造 TsBlock 耗时的中位数
- The time consumed of build tsblock from merge reader(99%): 节点查询通过 Merge Reader 构造 TsBlock 耗时的P99
-#### 4.8 Query Data Exchange
+#### Query Data Exchange
查询的数据交换耗时。
@@ -636,7 +636,7 @@ eno 指的是到公网的网卡,lo 是虚拟网卡。
- The time consumed of get data block task(50%): 节点查询获取 data block task 耗时的中位数
- The time consumed of get data block task(99%): 节点查询获取 data block task 耗时的 P99
-#### 4.9 Query Related Resource
+#### Query Related Resource
- MppDataExchangeManager: 节点查询时 shuffle sink handle 和 source handle 的数量
- LocalExecutionPlanner: 节点可分配给查询分片的剩余内存
@@ -646,7 +646,7 @@ eno 指的是到公网的网卡,lo 是虚拟网卡。
- MemoryPool Capacity: 节点查询相关的内存池的大小情况,包括最大值和剩余可用值
- DriverScheduler: 节点查询相关的队列任务数量
-#### 4.10 Consensus - IoT Consensus
+#### Consensus - IoT Consensus
- 内存使用
- IoTConsensus Used Memory: 节点的 IoT Consensus 的内存使用情况,包括总使用内存大小、队列使用内存大小、同步使用内存大小
@@ -666,7 +666,7 @@ eno 指的是到公网的网卡,lo 是虚拟网卡。
- The Time Consumed Of Different Stages (50%): 节点 IoT Consensus 不同执行阶段的耗时的中位数
- The Time Consumed Of Different Stages (99%): 节点 IoT Consensus 不同执行阶段的耗时的P99
-#### 4.11 Consensus - DataRegion Ratis Consensus
+#### Consensus - DataRegion Ratis Consensus
- Ratis Stage Time: 节点 Ratis 不同阶段的耗时
- Write Log Entry: 节点 Ratis 写 Log 不同阶段的耗时
@@ -674,7 +674,7 @@ eno 指的是到公网的网卡,lo 是虚拟网卡。
- Remote / Local Write QPS: 节点 Ratis 在本地或者远端写入的 QPS
- RatisConsensus Memory: 节点 Ratis 的内存使用情况
-#### 4.12 Consensus - SchemaRegion Ratis Consensus
+#### Consensus - SchemaRegion Ratis Consensus
- Ratis Stage Time: 节点 Ratis 不同阶段的耗时
- Write Log Entry: 节点 Ratis 写 Log 各阶段的耗时
diff --git a/src/zh/UserGuide/Master/Deployment-and-Maintenance/Stand-Alone-Deployment.md b/src/zh/UserGuide/Master/Deployment-and-Maintenance/Stand-Alone-Deployment.md
index 1099efc..404be1d 100644
--- a/src/zh/UserGuide/Master/Deployment-and-Maintenance/Stand-Alone-Deployment.md
+++ b/src/zh/UserGuide/Master/Deployment-and-Maintenance/Stand-Alone-Deployment.md
@@ -32,14 +32,14 @@
## 安装步骤
-### 1、解压安装包并进入安装目录
+### 解压安装包并进入安装目录
```shell
unzip apache-iotdb-{version}-all-bin.zip
cd apache-iotdb-{version}-all-bin
```
-### 2、参数配置
+### 参数配置
#### 环境脚本配置
@@ -91,7 +91,7 @@ cd apache-iotdb-{version}-all-bin
| dn_schema_region_consensus_port | DataNode用于元数据副本共识协议通信使用的端口 | 10760 | 10760 | 首次启动后不能修改 |
| dn_seed_config_node | 节点注册加入集群时连接的ConfigNode地址,即cn_internal_address:cn_internal_port | 127.0.0.1:10710 | cn_internal_address:cn_internal_port | 首次启动后不能修改 |
-### 3、启动ConfigNode 节点
+### 启动ConfigNode 节点
进入iotdb的sbin目录下,启动confignode
@@ -99,7 +99,7 @@ cd apache-iotdb-{version}-all-bin
./start-confignode.sh -d #“-d”参数将在后台进行启动
```
-### 4、启动DataNode 节点
+### 启动DataNode 节点
进入iotdb的sbin目录下,启动datanode:
@@ -108,7 +108,7 @@ cd sbin
./start-datanode.sh -d #-d参数将在后台进行启动
```
-### 5、验证部署
+### 验证部署
可直接执行 ./sbin 目录下的 Cli 启动脚本:
diff --git a/src/zh/UserGuide/Master/Deployment-and-Maintenance/Stand-Alone-Deployment_timecho.md b/src/zh/UserGuide/Master/Deployment-and-Maintenance/Stand-Alone-Deployment_timecho.md
index fb06cbf..6f91552 100644
--- a/src/zh/UserGuide/Master/Deployment-and-Maintenance/Stand-Alone-Deployment_timecho.md
+++ b/src/zh/UserGuide/Master/Deployment-and-Maintenance/Stand-Alone-Deployment_timecho.md
@@ -36,14 +36,14 @@
## 安装步骤
-### 1、解压安装包并进入安装目录
+### 解压安装包并进入安装目录
```shell
unzip iotdb-enterprise-{version}-bin.zip
cd iotdb-enterprise-{version}-bin
```
-### 2、参数配置
+### 参数配置
#### 环境脚本配置
@@ -95,7 +95,7 @@ cd iotdb-enterprise-{version}-bin
| dn_schema_region_consensus_port | DataNode用于元数据副本共识协议通信使用的端口 | 10760 | 10760 | 首次启动后不能修改 |
| dn_seed_config_node | 节点注册加入集群时连接的ConfigNode地址,即cn_internal_address:cn_internal_port | 127.0.0.1:10710 | cn_internal_address:cn_internal_port | 首次启动后不能修改 |
-### 3、启动 ConfigNode 节点
+### 启动 ConfigNode 节点
进入iotdb的sbin目录下,启动confignode
@@ -103,7 +103,7 @@ cd iotdb-enterprise-{version}-bin
./start-confignode.sh -d #“-d”参数将在后台进行启动
```
-### 4、激活数据库
+### 激活数据库
#### 方式一:激活文件拷贝激活
@@ -137,7 +137,7 @@ License has been stored to sbin/../activation/license
Import completed. Please start cluster and excute 'show cluster' to verify activation status
```
-### 5、启动DataNode 节点
+### 启动DataNode 节点
进入iotdb的sbin目录下,启动datanode:
@@ -146,7 +146,7 @@ cd sbin
./start-datanode.sh -d #-d参数将在后台进行启动
```
-### 6、验证部署
+### 验证部署
可直接执行 ./sbin 目录下的 Cli 启动脚本:
diff --git a/src/zh/UserGuide/Master/Ecosystem-Integration/Ignition-IoTDB-plugin_timecho.md b/src/zh/UserGuide/Master/Ecosystem-Integration/Ignition-IoTDB-plugin_timecho.md
index 10d212f..8e49093 100644
--- a/src/zh/UserGuide/Master/Ecosystem-Integration/Ignition-IoTDB-plugin_timecho.md
+++ b/src/zh/UserGuide/Master/Ecosystem-Integration/Ignition-IoTDB-plugin_timecho.md
@@ -20,7 +20,7 @@
-->
# Ignition
-## 一、产品概述
+## 产品概述
1. Ignition简介
@@ -37,7 +37,7 @@ Ignition 是一个基于WEB的监控和数据采集工具(SCADA)- 一个开
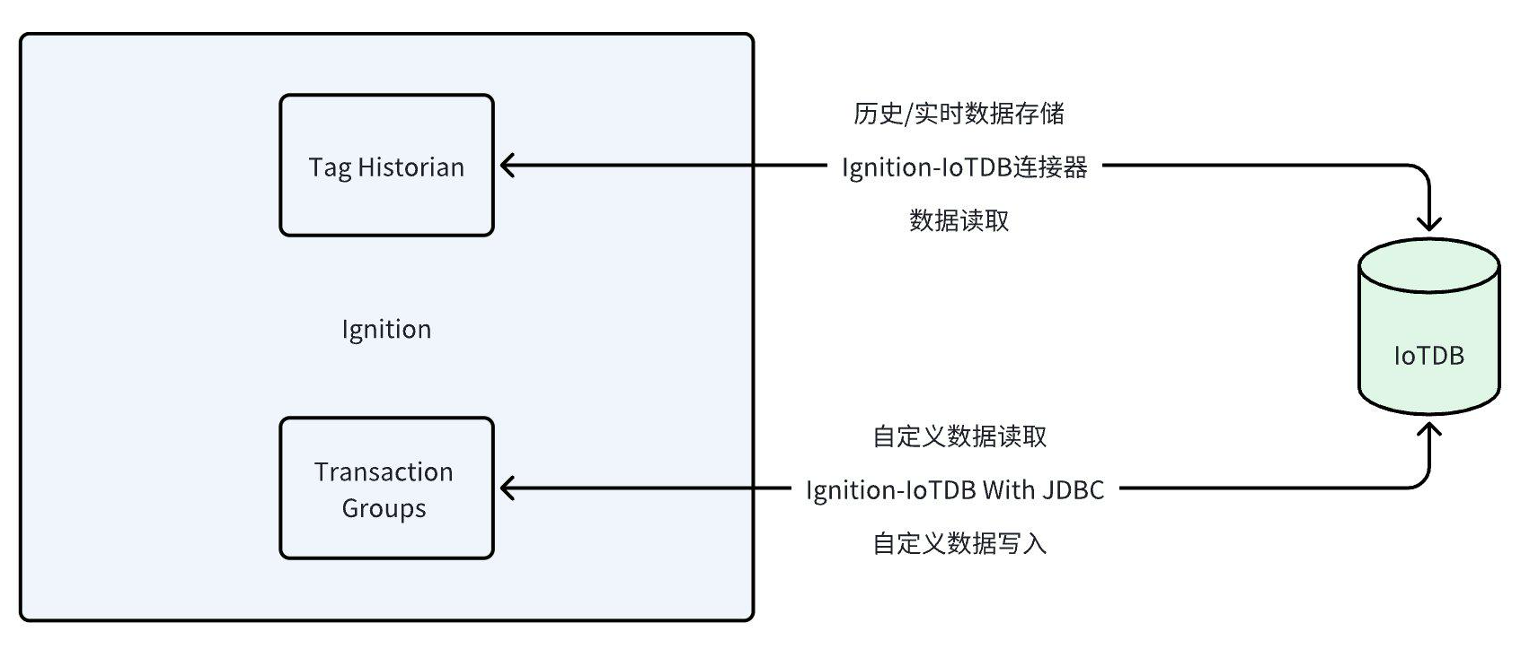
-## 二、安装要求
+## 安装要求
| **准备内容** | **版本要求** |
| :------------------------: | :------------------------------------------------------------: |
@@ -46,15 +46,15 @@ Ignition 是一个基于WEB的监控和数据采集工具(SCADA)- 一个开
| Ignition-IoTDB连接器模块 | 请联系商务获取 |
| Ignition-IoTDB With JDBC模块 | 下载地址:https://repo1.maven.org/maven2/org/apache/iotdb/iotdb-jdbc/ |
-## 三、Ignition-IoTDB连接器使用说明
+## Ignition-IoTDB连接器使用说明
-### 1、简介
+### 简介
Ignition-IoTDB连接器模块可以将数据存入与历史数据库提供程序关联的数据库连接中。数据根据其数据类型直接存储到 SQL 数据库中的表中,以及毫秒时间戳。根据每个标签上的值模式和死区设置,仅在更改时存储数据,从而避免重复和不必要的数据存储。
Ignition-IoTDB连接器提供了将 Ignition 采集到的数据存入 IoTDB 的能力。
-### 2、安装步骤
+### 安装步骤
步骤一:进入 `Config` - `System`- `Modules` 模块,点击最下方的`Install or Upgrade a Module...`
@@ -153,7 +153,7 @@ Ignition-IoTDB连接器提供了将 Ignition 采集到的数据存入 IoTDB 的
</table>
-### 3、使用说明
+### 使用说明
#### 配置历史数据存储
@@ -230,13 +230,13 @@ Ignition-IoTDB连接器提供了将 Ignition 采集到的数据存入 IoTDB 的
system.iotdb.query("IoTDB", "select * from root.db.Sine where time > 1709563427247")
```
-## 四、Ignition-IoTDB With JDBC
+## Ignition-IoTDB With JDBC
-### 1、简介
+### 简介
Ignition-IoTDB With JDBC提供了一个 JDBC 驱动,允许用户使用标准的JDBC API 连接和查询 lgnition-loTDB 数据库
-### 2、安装步骤
+### 安装步骤
步骤一:进入 `Config` - `Databases` -`Drivers` 模块,创建 `Translator`
@@ -250,7 +250,7 @@ system.iotdb.query("IoTDB", "select * from root.db.Sine where time > 17095634272

-### 3、使用说明
+### 使用说明
#### 数据写入
diff --git a/src/zh/UserGuide/Master/FAQ/Frequently-asked-questions.md b/src/zh/UserGuide/Master/FAQ/Frequently-asked-questions.md
index aae25f4..4d859ab 100644
--- a/src/zh/UserGuide/Master/FAQ/Frequently-asked-questions.md
+++ b/src/zh/UserGuide/Master/FAQ/Frequently-asked-questions.md
@@ -25,7 +25,7 @@
## 一般问题
-### 1. 如何查询我的IoTDB版本?
+### 如何查询我的IoTDB版本?
有几种方法可以识别您使用的 IoTDB 版本:
@@ -67,7 +67,7 @@ Total line number = 1
It costs 0.241s
```
-### 2. 在哪里可以找到IoTDB的日志?
+### 在哪里可以找到IoTDB的日志?
假设您的根目录是:
@@ -89,11 +89,11 @@ Readme.md
在默认的设置里,logs 文件夹会被存储在```IOTDB_HOME/logs```。您可以在```IOTDB_HOME/conf```目录下的```logback.xml```文件中修改日志的级别和日志的存储路径。
-### 3. 在哪里可以找到IoTDB的数据文件?
+### 在哪里可以找到IoTDB的数据文件?
在默认的设置里,数据文件(包含 TsFile,metadata,WAL)被存储在```IOTDB_HOME/data/datanode```文件夹。
-### 4. 如何知道IoTDB中存储了多少时间序列?
+### 如何知道IoTDB中存储了多少时间序列?
使用 IoTDB 的命令行接口:
@@ -116,15 +116,15 @@ IoTDB> count timeseries
> 6
```
-### 5. 可以使用Hadoop和Spark读取IoTDB中的TsFile吗?
+### 可以使用Hadoop和Spark读取IoTDB中的TsFile吗?
是的。IoTDB 与开源生态紧密结合。IoTDB 支持 [Hadoop](https://github.com/apache/iotdb-extras/tree/master/connectors/iotdb-connector/hadoop), [Spark](https://github.com/apache/iotdb-extras/tree/master/connectors/spark-iotdb-connector) 和 [Grafana](https://github.com/apache/iotdb-extras/tree/master/connectors/grafana-connector) 可视化工具。
-### 6. IoTDB如何处理重复的数据点?
+### IoTDB如何处理重复的数据点?
一个数据点是由一个完整的时间序列路径(例如:```root.vehicle.d0.s0```) 和时间戳唯一标识的。如果您使用与现有点相同的路径和时间戳提交一个新点,那么 IoTDB 将更新这个点的值,而不是插入一个新点。
-### 7. 我如何知道具体的timeseries的类型?
+### 我如何知道具体的timeseries的类型?
在 IoTDB 的命令行接口中使用 SQL ```SHOW TIMESERIES <timeseries path>```:
@@ -146,7 +146,7 @@ IoTDB> show timeseries root.fit.d1.s1
IoTDB> show timeseries root.fit.d1.*
```
-### 8. 如何更改IoTDB的客户端时间显示格式?
+### 如何更改IoTDB的客户端时间显示格式?
IoTDB 客户端默认显示的时间是人类可读的(比如:```1970-01-01T08:00:00.001```),如果您想显示是时间戳或者其他可读格式,请在启动命令上添加参数```-disableISO8601```:
@@ -154,12 +154,12 @@ IoTDB 客户端默认显示的时间是人类可读的(比如:```1970-01-01T
> $IOTDB_CLI_HOME/sbin/start-cli.sh -h 127.0.0.1 -p 6667 -u root -pw root -disableISO8601
```
-### 9. 怎么处理来自`org.apache.ratis.grpc.server.GrpcLogAppender`的`IndexOutOfBoundsException`?
+### 怎么处理来自`org.apache.ratis.grpc.server.GrpcLogAppender`的`IndexOutOfBoundsException`?
这是我们的依赖Ratis 2.4.1的一个内部错误日志,不会对数据写入和读取造成任何影响。
已经报告给Ratis社区,并会在未来的版本中修复。
-### 10. 预估内存不足报错如何处理?
+### 预估内存不足报错如何处理?
报错信息:
```
@@ -183,35 +183,35 @@ datanode_memory_proportion参数控制分给查询的内存,chunk_timeseriesme
### 集群启停
-#### 1. ConfigNode初次启动失败,如何排查原因?
+#### ConfigNode初次启动失败,如何排查原因?
- ConfigNode初次启动时确保已清空data/confignode目录
- 确保该ConfigNode使用到的<IP+端口>没有被占用,没有与已启动的ConfigNode使用到的<IP+端口>冲突
- 确保该ConfigNode的cn_seed_config_node(指向存活的ConfigNode;如果该ConfigNode是启动的第一个ConfigNode,该值指向自身)配置正确
- 确保该ConfigNode的配置项(共识协议、副本数等)等与cn_seed_config_node对应的ConfigNode集群一致
-#### 2. ConfigNode初次启动成功,show cluster的结果里为何没有该节点?
+#### ConfigNode初次启动成功,show cluster的结果里为何没有该节点?
- 检查cn_seed_config_node是否正确指向了正确的地址; 如果cn_seed_config_node指向了自身,则会启动一个新的ConfigNode集群
-#### 3. DataNode初次启动失败,如何排查原因?
+#### DataNode初次启动失败,如何排查原因?
- DataNode初次启动时确保已清空data/datanode目录。 如果启动结果为“Reject DataNode restart.”则表示启动时可能没有清空data/datanode目录
- 确保该DataNode使用到的<IP+端口>没有被占用,没有与已启动的DataNode使用到的<IP+端口>冲突
- 确保该DataNode的dn_seed_config_node指向存活的ConfigNode
-#### 4. 移除DataNode执行失败,如何排查?
+#### 移除DataNode执行失败,如何排查?
- 检查remove-datanode脚本的参数是否正确,是否传入了正确的ip:port或正确的dataNodeId
- 只有集群可用节点数量 > max(元数据副本数量, 数据副本数量)时,移除操作才允许被执行
- 执行移除DataNode的过程会将该DataNode上的数据迁移到其他存活的DataNode,数据迁移以Region为粒度,如果某个Region迁移失败,则被移除的DataNode会一直处于Removing状态
- 补充:处于Removing状态的节点,其节点上的Region也是Removing或Unknown状态,即不可用状态。 该Remvoing状态的节点也不会接受客户端的请求。如果要使Removing状态的节点变为可用,用户可以使用set system status to running 命令将该节点设置为Running状态;如果要使迁移失败的Region处于可用状态,可以使用migrate region from datanodeId1 to datanodeId2 命令将该不可用的Region迁移到其他存活的节点。另外IoTDB后续也会提供 `remove-datanode.sh -f` 命令,来强制移除节点(迁移失败的Region会直接丢弃)
-#### 5. 挂掉的DataNode是否支持移除?
+#### 挂掉的DataNode是否支持移除?
- 当前集群副本数量大于1时可以移除。 如果集群副本数量等于1,则不支持移除。 在下个版本会推出强制移除的命令
-#### 6. 从0.13升级到1.0需要注意什么?
+#### 从0.13升级到1.0需要注意什么?
- 0.13版本与1.0版本的文件目录结构是不同的,不能将0.13的data目录直接拷贝到1.0集群使用。如果需要将0.13的数据导入至1.0,可以使用LOAD功能
- 0.13版本的默认RPC地址是0.0.0.0,1.0版本的默认RPC地址是127.0.0.1
@@ -219,43 +219,43 @@ datanode_memory_proportion参数控制分给查询的内存,chunk_timeseriesme
### 集群重启
-#### 1. 如何重启集群中的某个ConfigNode?
+#### 如何重启集群中的某个ConfigNode?
- 第一步:通过`stop-confignode.sh`或kill进程方式关闭ConfigNode进程
- 第二步:通过执行`start-confignode.sh`启动ConfigNode进程实现重启
- 下个版本IoTDB会提供一键重启的操作
-#### 2. 如何重启集群中的某个DataNode?
+#### 如何重启集群中的某个DataNode?
- 第一步:通过`stop-datanode.sh`或kill进程方式关闭DataNode进程
- 第二步:通过执行`start-datanode.sh`启动DataNode进程实现重启
- 下个版本IoTDB会提供一键重启的操作
-#### 3. 将某个ConfigNode移除后(remove-confignode),能否再利用该ConfigNode的data目录重启?
+#### 将某个ConfigNode移除后(remove-confignode),能否再利用该ConfigNode的data目录重启?
- 不能。会报错:Reject ConfigNode restart. Because there are no corresponding ConfigNode(whose nodeId=xx) in the cluster.
-#### 4. 将某个DataNode移除后(remove-datanode),能否再利用该DataNode的data目录重启?
+#### 将某个DataNode移除后(remove-datanode),能否再利用该DataNode的data目录重启?
- 不能正常重启,启动结果为“Reject DataNode restart. Because there are no corresponding DataNode(whose nodeId=xx) in the cluster. Possible solutions are as follows:...”
-#### 5. 用户看到某个ConfigNode/DataNode变成了Unknown状态,在没有kill对应进程的情况下,直接删除掉ConfigNode/DataNode对应的data目录,然后执行`start-confignode.sh`/`start-datanode.sh`,这种情况下能成功吗?
+#### 用户看到某个ConfigNode/DataNode变成了Unknown状态,在没有kill对应进程的情况下,直接删除掉ConfigNode/DataNode对应的data目录,然后执行`start-confignode.sh`/`start-datanode.sh`,这种情况下能成功吗?
- 无法启动成功,会报错端口已被占用
### 集群运维
-#### 1. Show cluster执行失败,显示“please check server status”,如何排查?
+#### Show cluster执行失败,显示“please check server status”,如何排查?
- 确保ConfigNode集群一半以上的节点处于存活状态
- 确保客户端连接的DataNode处于存活状态
-#### 2. 某一DataNode节点的磁盘文件损坏,如何修复这个节点?
+#### 某一DataNode节点的磁盘文件损坏,如何修复这个节点?
- 当前只能通过remove-datanode的方式进行实现。remove-datanode执行的过程中会将该DataNode上的数据迁移至其他存活的DataNode节点(前提是集群设置的副本数大于1)
- 下个版本IoTDB会提供一键修复节点的功能
-#### 3. 如何降低ConfigNode、DataNode使用的内存?
+#### 如何降低ConfigNode、DataNode使用的内存?
- 在conf/confignode-env.sh、conf/datanode-env.sh文件可通过调整ON_HEAP_MEMORY、OFF_HEAP_MEMORY等选项可以调整ConfigNode、DataNode使用的最大堆内、堆外内存
diff --git a/src/zh/UserGuide/Master/QuickStart/ClusterQuickStart.md b/src/zh/UserGuide/Master/QuickStart/ClusterQuickStart.md
index bbb4932..6b53475 100644
--- a/src/zh/UserGuide/Master/QuickStart/ClusterQuickStart.md
+++ b/src/zh/UserGuide/Master/QuickStart/ClusterQuickStart.md
@@ -24,7 +24,7 @@
遇到问题可以看:
[FAQ](../FAQ/Frequently-asked-questions.md)
-## 1. 安装部署
+## 安装部署
部署集群时我们推荐优先使用`hostname`来配置集群,这样可以避免一些网络问题。需要在每个节点上分别配置`/etc/hosts` ,windows 上为`C:\Windows\System32\drivers\etc\hosts`。
@@ -54,7 +54,7 @@ IP地址和服务角色分配如下:
- 优先推荐使用 `hostname(机器名/域名)` 进行配置,这样可以避免一些网络问题,也更方便迁移集群。
- JVM堆内存配置: `confignode-env.sh` 和 `datanode-env.sh` 内配置`ON_HEAP_MEMORY`, 建议设置值大于等于1G。ConfigNode 1~2G就足够了,DataNode的内存配置则要取决于数据接入的数据量和查询数据量。
-### 1.1 下载安装包
+### 下载安装包
在每个节点,将安装包[下载](https://iotdb.apache.org/Download/)后,解压到安装目录,这里为`/data/iotdb`。
目录结构:
```shell
@@ -65,7 +65,7 @@ IP地址和服务角色分配如下:
└── tools # 其他工具
```
-### 1.2. 修改节点配置文件
+### 修改节点配置文件
在每个节点均配置 hosts
```shell
@@ -88,9 +88,9 @@ echo "192.168.132.12 iotdb-3" >> /etc/hosts
**注意:**
我们推荐所有节点的 iotdb-system.properties 和 JVM 的内存配置是一致的。
-### 1.3. 启动集群
+### 启动集群
启动集群前,需保证配置正确,保证 IoTDB 安装目录下没有数据(`data`目录)。
-#### 1.3.1. 启动第一个节点
+#### 启动第一个节点
即上面表格中`cn_seed_config_node`配置的节点。
登录该节点 `iotdb-1(192.168.132.10)`,执行下面命令:
```shell
@@ -117,7 +117,7 @@ sbin/start-confignode.sh -d
sbin/start-datanode.sh -d
```
-#### 1.3.2. 启动其他两个节点的 ConfigNode 和 DataNode
+#### 启动其他两个节点的 ConfigNode 和 DataNode
在节点 `iotdb-2(192.168.132.11)` 和 `iotdb-3(192.168.132.12)` 两个节点上分别执行:
```shell
cd /data/iotdb
@@ -126,7 +126,7 @@ sbin/start-standalone.sh
```
如果启动失败,需要在所有节点执行[清理环境](#【附录】清理环境)后,然后从启动第一个节点开始,再重新执行一次。
-#### 1.3.3. 检验集群状态
+#### 检验集群状态
在任意节点上,在 Cli 执行 `show cluster`:
```shell
/data/iotdb/sbin/start-cli.sh -h iotdb-1
@@ -174,7 +174,7 @@ rm -rf data logs
说明:删除 data 目录是必要的,删除 logs 目录是为了纯净日志,非必需。
-## 2. 集群扩容
+## 集群扩容
扩容方式与上方启动其他节点相同。也就是,在要添加的节点上,下载IoTDB的安装包,解压,修改配置,然后启动。这里要添加节点的IP为 `192.168.132.13`
**注意:**
- 扩容的节点必须是干净的节点,不能有数据(也就是`data`目录)
@@ -182,7 +182,7 @@ rm -rf data logs
- `cn_seed_config_node` 和 `dn_seed_config_node`的配置必须和已有集群一致。
- 原有数据不会移动到新节点,新创建的元数据分区和数据分区很可能在新的节点。
-### 2.1. 修改配置
+### 修改配置
在原节点上新增一行 hosts
```shell
echo "192.168.132.13 iotdb-4" >> /etc/hosts
@@ -205,7 +205,7 @@ echo "192.168.132.13 iotdb-4" >> /etc/hosts
| iotdb-system.properties | dn_internal_address | iotdb-4 |
| iotdb-system.properties | dn_seed_config_node | iotdb-1:10710 |
-### 2.2. 扩容
+### 扩容
在新增节点`iotdb-4(192.168.132.13)`上,执行:
```shell
cd /data/iotdb
@@ -213,7 +213,7 @@ cd /data/iotdb
sbin/start-standalone.sh
```
-### 2.3. 验证扩容结果
+### 验证扩容结果
在 Cli 执行 `show cluster`,结果如下:
```shell
/data/iotdb/sbin/start-cli.sh -h iotdb-1
@@ -233,13 +233,13 @@ IoTDB>show cluster;
+------+----------+-------+---------------+------------+-------+---------+
```
-## 3. 集群缩容
+## 集群缩容
**注意:**
- 可以在任何一个集群内的节点上,执行缩容操作。
- 集群内的任意节点都可以被缩容。但是存留的 DataNode 服务不能小于副本数设置。
- 请耐心等待缩容脚本执行结束,并仔细阅读日志说明,尤其是结束前的指南说明。
-### 3.1 缩容一个 ConfigNode
+### 缩容一个 ConfigNode
```shell
cd /data/iotdb
# 方式一:使用 ip:port 移除
@@ -249,7 +249,7 @@ sbin/remove-confignode.sh iotdb-4:10710
sbin/remove-confignode.sh 6
```
-### 3.2 缩容一个 DataNode
+### 缩容一个 DataNode
```shell
cd /data/iotdb
# 方式一:使用 ip:port 移除
@@ -259,7 +259,7 @@ sbin/remove-datanode.sh iotdb-4:6667
sbin/remove-datanode.sh 7
```
-### 3.3 验证缩容结果
+### 验证缩容结果
在 Cli 执行 `show cluster`,结果如下:
```shell
diff --git a/src/zh/UserGuide/Master/User-Manual/AINode_timecho.md b/src/zh/UserGuide/Master/User-Manual/AINode_timecho.md
index 90bc114..8a0b5db 100644
--- a/src/zh/UserGuide/Master/User-Manual/AINode_timecho.md
+++ b/src/zh/UserGuide/Master/User-Manual/AINode_timecho.md
@@ -33,7 +33,7 @@ AINode 是 IoTDB 在ConfigNode、DataNode后提供的第三种内生节点,该
- **DataNode**:负责接收并解析用户的 SQL请求;负责存储时间序列数据;负责数据的预处理计算。
- **AINode**:负责模型文件的导入创建以及模型推理。
-## 1. 优势特点
+## 优势特点
与单独构建机器学习服务相比,具有以下优势:
@@ -49,7 +49,7 @@ AINode 是 IoTDB 在ConfigNode、DataNode后提供的第三种内生节点,该
- **时间序列标注(Time Series Annotation)**:为每个数据点或特定时间段添加额外的信息或标记,例如事件发生、异常点、趋势变化等,以便更好地理解和分析数据。
-## 2. 基本概念
+## 基本概念
- **模型(Model)**:机器学习模型,以时序数据作为输入,输出分析任务的结果或决策。模型是AINode 的基本管理单元,支持模型的增(注册)、删、查、用(推理)。
- **创建(Create)**: 将外部设计或训练好的模型文件或算法加载到MLNode中,由IoTDB统一管理与使用。
@@ -60,16 +60,15 @@ AINode 是 IoTDB 在ConfigNode、DataNode后提供的第三种内生节点,该
<img src="https://alioss.timecho.com/docs/img/h3.PNG" style="zoom:50%" />
:::
-## 3. 安装部署
+## 安装部署
AINode 的部署可参考文档 [部署指导](../Deployment-and-Maintenance/AINode_Deployment_timecho.md#AINode-部署) 章节。
-
-## 4. 使用指导
+## 使用指导
AINode 对时序数据相关的深度学习模型提供了模型创建及删除的流程,内置模型无需创建及删除,可直接使用,并且在完成推理后创建的内置模型实例将自动销毁。
-### 4.1 注册模型
+### 注册模型
通过指定模型输入输出的向量维度,可以注册训练好的深度学习模型,从而用于模型推理。下方为模型注册的SQL语法定义。
@@ -112,7 +111,7 @@ SQL中参数的具体含义如下:
除了本地模型文件的注册,还可以通过URI来指定远程资源路径来进行注册,使用开源的模型仓库(例如HuggingFace)。
-#### 4.1.1 示例
+#### 示例
在当前的example文件夹下,包含model.pt和config.yaml文件,model.pt为训练得到,config.yaml的内容如下:
@@ -147,7 +146,7 @@ SQL执行后会异步进行注册的流程,可以通过模型展示查看模
模型注册完成后,就可以通过使用正常查询的方式调用具体函数,进行模型推理。
-### 4.2 查看模型
+### 查看模型
注册成功的模型可以通过show models指令查询模型的具体信息。其SQL定义如下:
@@ -170,7 +169,7 @@ show models <model_name>
- **DROPPING**:模型删除中,正在从configNode以及AINode处删除模型相关信息
- **UNAVAILABLE**: 模型创建失败,可以通过drop model删除创建失败的model_name。
-#### 4.2.1 示例
+#### 示例
```SQL
IoTDB> show models
@@ -195,7 +194,7 @@ IoTDB> show models
我们前面已经注册了对应的模型,可以通过对应的指定查看模型状态,active表明模型注册成功,可用于推理。
-### 4.3 删除模型
+### 删除模型
对于注册成功的模型,用户可以通过SQL进行删除。该操作除了删除configNode上的元信息外,还会删除所有AINode下的相关模型文件。其SQL如下:
@@ -205,7 +204,7 @@ drop model <model_name>
需要指定已经成功注册的模型model_name来删除对应的模型。由于模型删除涉及多个节点上的数据删除,操作不会立即完成,此时模型的状态为DROPPING,该状态的模型不能用于模型推理。
-### 4.4 使用内置模型推理
+### 使用内置模型推理
SQL语法如下:
@@ -220,7 +219,7 @@ call inference(<built_in_model_name>,sql[,<parameterName>=<parameterValue>])
- **parameterName**:参数名
- **parameterValue**:参数值
-#### 4.4.1 内置模型及参数说明
+#### 内置模型及参数说明
目前已内置如下机器学习模型,具体参数说明请参考以下链接。
@@ -234,7 +233,7 @@ call inference(<built_in_model_name>,sql[,<parameterName>=<parameterValue>])
| GMMHMM | _GMMHMM | 标注 | [GMMHMM参数说明](https://www.sktime.net/en/latest/api_reference/auto_generated/sktime.annotation.hmm_learn.gmm.GMMHMM.html) |
| Stray | _Stray | 异常检测 | [Stray参数说明](https://www.sktime.net/en/latest/api_reference/auto_generated/sktime.annotation.stray.STRAY.html) |
-#### 4.4.2 示例
+#### 示例
下面是使用内置模型推理的一个操作示例,使用内置的Stray模型进行异常检测算法,输入为`[144,1]`,输出为`[144,1]`,我们通过SQL使用其进行推理。
@@ -274,7 +273,7 @@ IoTDB> call inference(_Stray, "select s0 from root.eg.airline", k=2)
Total line number = 144
```
-### 4.5 使用深度学习模型推理
+### 使用深度学习模型推理
SQL语法如下:
@@ -307,7 +306,7 @@ window_function:
**说明2: 在深度学习应用中,经常将时间戳衍生特征(数据中的时间列)作为生成式任务的协变量,一同输入到模型中以提升模型的效果,但是在模型的输出结果中一般不包含时间列。为了保证实现的通用性,模型推理结果只对应模型的真实输出,如果模型不输出时间列,则结果中不会包含。**
-#### 4.5.1 示例
+#### 示例
下面是使用深度学习模型推理的一个操作示例,针对上面提到的输入为`[96,2]`,输出为`[48,2]`的`dlinear`预测模型,我们通过SQL使用其进行推理。
@@ -349,7 +348,7 @@ IoTDB> call inference(dlinear_example,"select s0,s1 from root.**")
Total line number = 48
```
-#### 4.5.2 使用tail/head窗口函数的示例
+#### 使用tail/head窗口函数的示例
当数据量不定且想要取96行最新数据用于推理时,可以使用对应的窗口函数tail。head函数的用法与其类似,不同点在于其取的是最早的96个点。
@@ -393,7 +392,7 @@ IoTDB> call inference(dlinear_example,"select s0,s1 from root.**",window=tail(96
Total line number = 48
```
-#### 4.5.3 使用count窗口函数的示例
+#### 使用count窗口函数的示例
该窗口主要用于计算式任务,当任务对应的模型一次只能处理固定行数据而最终想要的确实多组预测结果时,使用该窗口函数可以使用点数滑动窗口进行连续推理。假设我们现在有一个异常检测模型anomaly_example(input: [24,2], output[1,1]),对每行数据会生成一个0/1的标签,其使用示例如下:
@@ -434,7 +433,7 @@ Total line number = 4
其中结果集中的每行的标签对应16行输入对应的模型输出。
-## 5. 权限管理
+## 权限管理
使用AINode相关的功能时,可以使用IoTDB本身的鉴权去做一个权限管理,用户只有在具备 USE_MODEL 权限时,才可以使用模型管理的相关功能。当使用推理功能时,用户需要有访问输入模型的SQL对应的源序列的权限。
@@ -443,9 +442,9 @@ Total line number = 4
| USE_MODEL | create model / show models / drop model | √ | √ | x |
| READ_DATA | call inference | √ | √ | √ |
-## 6. 实际案例
+## 实际案例
-### 6.1 电力负载预测
+### 电力负载预测
在部分工业场景下,会存在预测电力负载的需求,预测结果可用于优化电力供应、节约能源和资源、支持规划和扩展以及增强电力系统的可靠性。
@@ -516,7 +515,7 @@ Total line number = 48
可以看到,我们使用了过去96个小时(4天)的六个负载信息和对应时间油温的关系,基于之前学习到的序列间相互关系对未来48个小时(2天)的油温这一数据的可能变化进行了建模,可以看到可视化后预测曲线与实际结果在趋势上保持了较高程度的一致性。
-### 6.2 功率预测
+### 功率预测
变电站需要对电流、电压、功率等数据进行电力监控,用于检测潜在的电网问题、识别电力系统中的故障、有效管理电网负载以及分析电力系统的性能和趋势等。
@@ -585,7 +584,7 @@ Total line number = 48
可以看到,我们使用了过去8分钟的电压的数据,基于之前学习到的序列间相互关系对未来4分钟的A相电压这一数据的可能变化进行了建模,可以看到可视化后预测曲线与实际结果在趋势上保持了较高程度的同步性。
-### 6.3 异常检测
+### 异常检测
在民航交通运输业,存在着对乘机旅客数量进行异常检测的需求。异常检测的结果可用于指导调整航班的调度,以使得企业获得更大效益。
diff --git a/src/zh/UserGuide/Master/User-Manual/IoTDB-View_timecho.md b/src/zh/UserGuide/Master/User-Manual/IoTDB-View_timecho.md
index e68fe0d..b7b7761 100644
--- a/src/zh/UserGuide/Master/User-Manual/IoTDB-View_timecho.md
+++ b/src/zh/UserGuide/Master/User-Manual/IoTDB-View_timecho.md
@@ -21,9 +21,9 @@
# 视图
-## 一、 序列视图应用背景
+## 序列视图应用背景
-### 1.1 应用场景1 时间序列重命名(PI资产管理)
+### 应用场景1 时间序列重命名(PI资产管理)
实际应用中,采集数据的设备可能使用人类难以理解的标识号来命名,这给业务层带来了查询上的困难。
@@ -33,19 +33,19 @@
对于用户来说,它是难以理解的。但此时,用户能够使用序列视图功能对它重命名,将它映射到一个序列视图中去,使用`root.view.device001.temperature`来访问采集到的数据。
-### 1.2 应用场景2 简化业务层查询逻辑
+### 应用场景2 简化业务层查询逻辑
有时用户有大量设备,管理着大量时间序列。在进行某项业务时,用户希望仅处理其中的部分序列,此时就可以通过序列视图功能挑选出关注重点,方便反复查询、写入。
**例如**:用户管理一条产品流水线,各环节的设备有大量时间序列。温度检测员仅需要关注设备温度,就可以抽取温度相关的序列,组成序列视图。
-### 1.3 应用场景3 辅助权限管理
+### 应用场景3 辅助权限管理
生产过程中,不同业务负责的范围一般不同,出于安全考虑往往需要通过权限管理来限制业务员的访问范围。
**例如**:安全管理部门现在仅需要监控某生产线上各设备的温度,但这些数据与其他机密数据存放在同一数据库。此时,就可以创建若干新的视图,视图中仅含有生产线上与温度有关的时间序列,接着,向安全员只赋予这些序列视图的权限,从而达到权限限制的目的。
-### 1.4 设计序列视图功能的动机
+### 设计序列视图功能的动机
结合上述两类使用场景,设计序列视图功能的动机,主要有:
@@ -53,13 +53,13 @@
2. 简化业务层查询逻辑。
3. 辅助权限管理,通过视图向特定用户开放数据。
-## 二、序列视图概念
+## 序列视图概念
-### 2.1 术语概念
+### 术语概念
约定:若无特殊说明,本文档所指定的视图均是**序列视图**,未来可能引入设备视图等新功能。
-### 2.2 序列视图
+### 序列视图
序列视图是一种组织管理时间序列的方式。
@@ -69,7 +69,7 @@
用户可以使用复杂的SQL查询创建视图,此时序列视图就像一条被存储的查询语句,当从视图中读取数据时,就把被存储的查询语句作为数据来源,放在FROM子句中。
-### 2.3 别名序列
+### 别名序列
在序列视图中,有一类特殊的存在,他们满足如下所有条件:
@@ -81,13 +81,13 @@
**所有序列视图包括别名序列目前均不支持触发器功能(Trigger)。**
-### 2.4 嵌套视图
+### 嵌套视图
用户可能想从一个现有的序列视图中选出若干序列,组成一个新的序列视图,就称之为嵌套视图。
**当前版本不支持嵌套视图功能**。
-### 2.5 IoTDB中对序列视图的一些约束
+### IoTDB中对序列视图的一些约束
#### 限制1 序列视图必须依赖于一个或者若干个时间序列
@@ -130,13 +130,13 @@
这是因为进行业务查询时,面向视图的用户关心的是当前视图的结构,而如果使用group by tag等方式做查询,显然希望是得到视图下含有对应tag的分组效果,而非时间序列的tag的分组效果(用户甚至对那些时间序列毫无感知)。
-## 三、序列视图功能介绍
+## 序列视图功能介绍
-### 3.1 创建视图
+### 创建视图
创建一个序列视图与创建一条时间序列类似,区别在于需要通过AS关键字指定数据来源,即原始序列。
-#### 3.1.1. 创建视图的SQL
+#### 创建视图的SQL
用户可以选取一些序列创建一个视图:
@@ -168,7 +168,7 @@ AS
root.db.device.s01
```
-#### 3.1.2 创建含有计算逻辑的视图
+#### 创建含有计算逻辑的视图
沿用2.2章节限制1中的例子:
@@ -198,7 +198,7 @@ AS
SELECT avg_temperature FROM root.db.d01
```
-#### 3.1.3 不支持嵌套序列视图
+#### 不支持嵌套序列视图
继续沿用3.1.2中的例子,现在用户想使用序列视图`root.db.d01.avg_temperature`创建一个新的视图,这是不允许的。我们目前不支持嵌套视图,无论它是否是别名序列,都不支持。
@@ -210,7 +210,7 @@ AS
root.db.d01.avg_temperature -- 不支持。不允许嵌套视图
```
-#### 3.1.4 一次创建多条序列视图
+#### 一次创建多条序列视图
一次只能指定一个序列视图对用户来说使用不方便,则可以一次指定多条序列,比如:
@@ -292,7 +292,7 @@ AS
请时刻注意,序列间映射关系是静态地、固化地存储的。
-#### 3.1.5 批量创建序列视图
+#### 批量创建序列视图
现有若干个设备,每个设备都有一个温度数值,例如:
@@ -330,7 +330,7 @@ AS
使用通配符创建,只会存储创建时刻的静态映射关系。
-#### 3.1.6 创建视图时SELECT子句受到一定限制
+#### 创建视图时SELECT子句受到一定限制
创建序列视图时,使用的SELECT子句受到一定限制。主要限制如下:
@@ -340,7 +340,7 @@ AS
简单来说,`AS`后只能使用`SELECT ... FROM ... `的结构,且该查询语句的结果必须能构成一条时间序列。
-### 3.2 视图数据查询
+### 视图数据查询
对于可以支持的数据查询功能,在执行时序数据查询时,序列视图与时间序列可以无差别使用,行为完全一致。
@@ -361,11 +361,11 @@ WHERE temperature01 < temperature02
此外,对于别名序列,如果用户想要得到时间序列的tag、attributes等信息,则需要先查询视图列的映射,找到对应的时间序列,再向时间序列查询tag、attributes等信息。查询视图列的映射的方法将会在3.5部分说明。
-### 3.3 视图修改
+### 视图修改
对视图的修改,例如改名、修改计算逻辑、删除等操作,都和创建新的视图类似,需要重新指定整个视图的全部列相关的描述。
-#### 3.3.1 修改视图数据来源
+#### 修改视图数据来源
```SQL
ALTER VIEW root.view.device.status
@@ -374,7 +374,7 @@ AS
FROM root.ln.wf.d01
```
-#### 3.3.2 修改视图的计算逻辑
+#### 修改视图的计算逻辑
```SQL
ALTER VIEW root.db.d01.avg_temperature
@@ -383,7 +383,7 @@ AS
FROM root.db.d01
```
-#### 3.3.3 标签点管理
+#### 标签点管理
- 添加新的标签
@@ -423,7 +423,7 @@ ALTER view root.turbine.d1.s1 DROP tag1, tag2
ALTER view root.turbine.d1.s1 UPSERT TAGS(tag2=newV2, tag3=v3) ATTRIBUTES(attr3=v3, attr4=v4)
```
-#### 3.3.4 删除视图
+#### 删除视图
因为一个视图就是一条序列,因此可以像删除时间序列一样删除一个视图。
@@ -431,7 +431,7 @@ ALTER view root.turbine.d1.s1 UPSERT TAGS(tag2=newV2, tag3=v3) ATTRIBUTES(attr3=
DELETE VIEW root.view.device.avg_temperatue
```
-### 3.4 视图同步
+### 视图同步
序列视图的数据总是经由实时的查询获得,因此天然支持数据同步。
@@ -453,11 +453,11 @@ DELETE VIEW root.view.device.avg_temperatue
详情请参考前文2.1.6 限制5
-### 3.5 视图元数据查询
+### 视图元数据查询
视图元数据查询,特指查询视图本身的元数据(例如视图有多少列),以及数据库内视图的信息(例如有哪些视图)。
-#### 3.5.1 查看当前的视图列
+#### 查看当前的视图列
用户有两种查询方式:
@@ -519,7 +519,7 @@ IoTDB>
上述两种查询都涉及视图的数据类型。视图的数据类型是根据定义视图的查询语句或别名序列的原始时间序列类型推断出来的。这个数据类型是根据当前系统的状态实时计算出来的,因此在不同时刻查询到的数据类型可能是改变的。
-## 四、FAQ
+## FAQ
#### Q1:我想让视图实现类型转换的功能。例如,原有一个int32类型的时间序列,和其他int64类型的序列被放在了同一个视图中。我现在希望通过视图查询到的数据,都能自动转换为int64类型。
diff --git a/src/zh/UserGuide/latest/API/Programming-CSharp-Native-API.md b/src/zh/UserGuide/latest/API/Programming-CSharp-Native-API.md
index 2a4a4dd..addbce6 100644
--- a/src/zh/UserGuide/latest/API/Programming-CSharp-Native-API.md
+++ b/src/zh/UserGuide/latest/API/Programming-CSharp-Native-API.md
@@ -93,9 +93,9 @@ await session_pool.Close();
- 对**IoTDB**中的`record`数据进行封装和抽象。
- 示例:
-| timestamp | status | temperature |
-| --------- | ------ | ----------- |
-| 1 | 0 | 20 |
+ | timestamp | status | temperature |
+ | --------- | ------ | ----------- |
+ | 1 | 0 | 20 |
- 构造方法:
@@ -109,11 +109,11 @@ var rowRecord =
- 一种类似于表格的数据结构,包含一个设备的若干行非空数据块。
- 示例:
-| time | status | temperature |
-| ---- | ------ | ----------- |
-| 1 | 0 | 20 |
-| 2 | 0 | 20 |
-| 3 | 3 | 21 |
+ | time | status | temperature |
+ | ---- | ------ | ----------- |
+ | 1 | 0 | 20 |
+ | 2 | 0 | 20 |
+ | 3 | 3 | 21 |
- 构造方法:
diff --git a/src/zh/UserGuide/latest/API/Programming-Cpp-Native-API.md b/src/zh/UserGuide/latest/API/Programming-Cpp-Native-API.md
index 8afc8c3..49a7c4f 100644
--- a/src/zh/UserGuide/latest/API/Programming-Cpp-Native-API.md
+++ b/src/zh/UserGuide/latest/API/Programming-Cpp-Native-API.md
@@ -37,8 +37,7 @@
### 安装相关依赖
- **MAC**
-
- 1. 安装 Bison :Mac 环境下预安装了 Bison 2.3 版本,但该版本过低不能够用来编译 Thrift。
+ 1. 安装 Bison :Mac 环境下预安装了 Bison 2.3 版本,但该版本过低不能够用来编译 Thrift。
使用 Bison 2.3 版本会报以下错误:
```invalid directive: '%code'```
@@ -88,20 +87,20 @@
- **Windows**
- 1. 构建编译环境
- * 安装 MS Visual Studio(推荐安装 2019 版本):安装时需要勾选 Visual Studio C/C++ IDE and compiler(supporting CMake, Clang, MinGW)。
- * 下载安装 [CMake](https://cmake.org/download/) 。
+1. 构建编译环境
+ - 安装 MS Visual Studio(推荐安装 2019 版本):安装时需要勾选 Visual Studio C/C++ IDE and compiler(supporting CMake, Clang, MinGW)。
+ - 下载安装 [CMake](https://cmake.org/download/) 。
- 2. 下载安装 Flex、Bison
- * 下载 [Win_Flex_Bison](https://sourceforge.net/projects/winflexbison/) 。
- * 下载后需要将可执行文件重命名为 flex.exe 和 bison.exe 以保证编译时能够被找到,添加可执行文件的目录到 PATH 环境变量中。
+2. 下载安装 Flex、Bison
+ - 下载 [Win_Flex_Bison](https://sourceforge.net/projects/winflexbison/) 。
+ - 下载后需要将可执行文件重命名为 flex.exe 和 bison.exe 以保证编译时能够被找到,添加可执行文件的目录到 PATH 环境变量中。
- 3. 安装 Boost
- * 下载 [Boost](https://www.boost.org/users/download/) 。
- * 本地编译 Boost :依次执行 bootstrap.bat 和 b2.exe 。
+3. 安装 Boost
+ - 下载 [Boost](https://www.boost.org/users/download/) 。
+ - 本地编译 Boost :依次执行 bootstrap.bat 和 b2.exe 。
- 4. 安装 OpenSSL
- * 下载安装 [OpenSSL](http://slproweb.com/products/Win32OpenSSL.html) 。
+4. 安装 OpenSSL
+ - 下载安装 [OpenSSL](http://slproweb.com/products/Win32OpenSSL.html) 。
### 执行编译
diff --git a/src/zh/UserGuide/latest/API/Programming-MQTT.md b/src/zh/UserGuide/latest/API/Programming-MQTT.md
index 11700b2..bb8dd1a 100644
--- a/src/zh/UserGuide/latest/API/Programming-MQTT.md
+++ b/src/zh/UserGuide/latest/API/Programming-MQTT.md
@@ -107,7 +107,7 @@ connection.disconnect();
可以在源码的 `example/mqtt-customize` 项目中找到一个简单示例。
步骤:
-* 创建一个 Java 项目,增加如下依赖
+1. 创建一个 Java 项目,增加如下依赖
```xml
<dependency>
<groupId>org.apache.iotdb</groupId>
@@ -115,7 +115,7 @@ connection.disconnect();
<version>1.3.0-SNAPSHOT</version>
</dependency>
```
-* 创建一个实现类,实现接口 `org.apache.iotdb.db.mqtt.protocol.PayloadFormatter`
+2. 创建一个实现类,实现接口 `org.apache.iotdb.db.mqtt.protocol.PayloadFormatter`
```java
package org.apache.iotdb.mqtt.server;
@@ -161,19 +161,19 @@ public class CustomizedJsonPayloadFormatter implements PayloadFormatter {
}
}
```
-* 修改项目中的 `src/main/resources/META-INF/services/org.apache.iotdb.db.protocol.mqtt.PayloadFormatter` 文件:
+3. 修改项目中的 `src/main/resources/META-INF/services/org.apache.iotdb.db.protocol.mqtt.PayloadFormatter` 文件:
将示例中的文件内容清除,并将刚才的实现类的全名(包名.类名)写入文件中。注意,这个文件中只有一行。
在本例中,文件内容为: `org.apache.iotdb.mqtt.server.CustomizedJsonPayloadFormatter`
-* 编译项目生成一个 jar 包: `mvn package -DskipTests`
+4. 编译项目生成一个 jar 包: `mvn package -DskipTests`
在 IoTDB 服务端:
-* 创建 ${IOTDB_HOME}/ext/mqtt/ 文件夹, 将刚才的 jar 包放入此文件夹。
-* 打开 MQTT 服务参数. (`enable_mqtt_service=true` in `conf/iotdb-system.properties`)
-* 用刚才的实现类中的 getName() 方法的返回值 设置为 `conf/iotdb-system.properties` 中 `mqtt_payload_formatter` 的值,
+1. 创建 ${IOTDB_HOME}/ext/mqtt/ 文件夹, 将刚才的 jar 包放入此文件夹。
+2. 打开 MQTT 服务参数. (`enable_mqtt_service=true` in `conf/iotdb-system.properties`)
+3. 用刚才的实现类中的 getName() 方法的返回值 设置为 `conf/iotdb-system.properties` 中 `mqtt_payload_formatter` 的值,
, 在本例中,为 `CustomizedJson`
-* 启动 IoTDB
-* 搞定.
+4. 启动 IoTDB
+5. 搞定
More: MQTT 协议的消息不限于 json,你还可以用任意二进制。通过如下函数获得:
`payload.forEachByte()` or `payload.array`。
diff --git a/src/zh/UserGuide/latest/API/RestServiceV1.md b/src/zh/UserGuide/latest/API/RestServiceV1.md
index 5b3fc6c..a52d526 100644
--- a/src/zh/UserGuide/latest/API/RestServiceV1.md
+++ b/src/zh/UserGuide/latest/API/RestServiceV1.md
@@ -77,8 +77,8 @@ ping 接口可以用于线上服务检活。
请求方式:`GET`
-请求路径:http://ip:port/ping
-
+请求路径:`http://ip:port/ping
+`
请求示例:
```shell
@@ -127,7 +127,7 @@ query 接口可以用于处理数据查询和元数据查询。
请求头:`application/json`
-请求路径:http://ip:port/rest/v1/query
+请求路径:`http://ip:port/rest/v1/query`
参数说明:
@@ -149,12 +149,12 @@ query 接口可以用于处理数据查询和元数据查询。
提示:为了避免OOM问题,不推荐使用select * from root.xx.** 这种查找方式。
-请求示例 表达式查询:
-```shell
-curl -H "Content-Type:application/json" -H "Authorization:Basic cm9vdDpyb290" -X POST --data '{"sql":"select s3, s4, s3 + 1 from root.sg27 limit 2"}' http://127.0.0.1:18080/rest/v1/query
+1. 请求示例 表达式查询:
+ ```shell
+ curl -H "Content-Type:application/json" -H "Authorization:Basic cm9vdDpyb290" -X POST --data '{"sql":"select s3, s4, s3 + 1 from root.sg27 limit 2"}' http://127.0.0.1:18080/rest/v1/query
```
-响应示例:
+ - 响应示例:
```json
{
@@ -185,12 +185,12 @@ curl -H "Content-Type:application/json" -H "Authorization:Basic cm9vdDpyb290" -X
}
```
-请求示例 show child paths:
+2. 请求示例 show child paths:
```shell
curl -H "Content-Type:application/json" -H "Authorization:Basic cm9vdDpyb290" -X POST --data '{"sql":"show child paths root"}' http://127.0.0.1:18080/rest/v1/query
```
-响应示例:
+- 响应示例:
```json
{
@@ -208,12 +208,12 @@ curl -H "Content-Type:application/json" -H "Authorization:Basic cm9vdDpyb290" -X
}
```
-请求示例 show child nodes:
+3. 请求示例 show child nodes:
```shell
curl -H "Content-Type:application/json" -H "Authorization:Basic cm9vdDpyb290" -X POST --data '{"sql":"show child nodes root"}' http://127.0.0.1:18080/rest/v1/query
```
-响应示例:
+- 响应示例:
```json
{
@@ -231,12 +231,12 @@ curl -H "Content-Type:application/json" -H "Authorization:Basic cm9vdDpyb290" -X
}
```
-请求示例 show all ttl:
+4. 请求示例 show all ttl:
```shell
curl -H "Content-Type:application/json" -H "Authorization:Basic cm9vdDpyb290" -X POST --data '{"sql":"show all ttl"}' http://127.0.0.1:18080/rest/v1/query
```
-响应示例:
+- 响应示例:
```json
{
@@ -259,12 +259,12 @@ curl -H "Content-Type:application/json" -H "Authorization:Basic cm9vdDpyb290" -X
}
```
-请求示例 show ttl:
+5. 请求示例 show ttl:
```shell
curl -H "Content-Type:application/json" -H "Authorization:Basic cm9vdDpyb290" -X POST --data '{"sql":"show ttl on root.sg27"}' http://127.0.0.1:18080/rest/v1/query
```
-响应示例:
+- 响应示例:
```json
{
@@ -285,12 +285,12 @@ curl -H "Content-Type:application/json" -H "Authorization:Basic cm9vdDpyb290" -X
}
```
-请求示例 show functions:
+6. 请求示例 show functions:
```shell
curl -H "Content-Type:application/json" -H "Authorization:Basic cm9vdDpyb290" -X POST --data '{"sql":"show functions"}' http://127.0.0.1:18080/rest/v1/query
```
-响应示例:
+- 响应示例:
```json
{
@@ -324,12 +324,12 @@ curl -H "Content-Type:application/json" -H "Authorization:Basic cm9vdDpyb290" -X
}
```
-请求示例 show timeseries:
+7. 请求示例 show timeseries:
```shell
curl -H "Content-Type:application/json" -H "Authorization:Basic cm9vdDpyb290" -X POST --data '{"sql":"show timeseries"}' http://127.0.0.1:18080/rest/v1/query
```
-响应示例:
+- 响应示例:
```json
{
@@ -398,12 +398,12 @@ curl -H "Content-Type:application/json" -H "Authorization:Basic cm9vdDpyb290" -X
}
```
-请求示例 show latest timeseries:
+8. 请求示例 show latest timeseries:
```shell
curl -H "Content-Type:application/json" -H "Authorization:Basic cm9vdDpyb290" -X POST --data '{"sql":"show latest timeseries"}' http://127.0.0.1:18080/rest/v1/query
```
-响应示例:
+- 响应示例:
```json
{
@@ -472,12 +472,12 @@ curl -H "Content-Type:application/json" -H "Authorization:Basic cm9vdDpyb290" -X
}
```
-请求示例 count timeseries:
+9. 请求示例 count timeseries:
```shell
curl -H "Content-Type:application/json" -H "Authorization:Basic cm9vdDpyb290" -X POST --data '{"sql":"count timeseries root.**"}' http://127.0.0.1:18080/rest/v1/query
```
-响应示例:
+- 响应示例:
```json
{
@@ -494,12 +494,12 @@ curl -H "Content-Type:application/json" -H "Authorization:Basic cm9vdDpyb290" -X
}
```
-请求示例 count nodes:
+10. 请求示例 count nodes:
```shell
curl -H "Content-Type:application/json" -H "Authorization:Basic cm9vdDpyb290" -X POST --data '{"sql":"count nodes root.** level=2"}' http://127.0.0.1:18080/rest/v1/query
```
-响应示例:
+- 响应示例:
```json
{
@@ -516,12 +516,12 @@ curl -H "Content-Type:application/json" -H "Authorization:Basic cm9vdDpyb290" -X
}
```
-请求示例 show devices:
+11. 请求示例 show devices:
```shell
curl -H "Content-Type:application/json" -H "Authorization:Basic cm9vdDpyb290" -X POST --data '{"sql":"show devices"}' http://127.0.0.1:18080/rest/v1/query
```
-响应示例:
+- 响应示例:
```json
{
@@ -544,12 +544,12 @@ curl -H "Content-Type:application/json" -H "Authorization:Basic cm9vdDpyb290" -X
}
```
-请求示例 show devices with database:
+12. 请求示例 show devices with database:
```shell
curl -H "Content-Type:application/json" -H "Authorization:Basic cm9vdDpyb290" -X POST --data '{"sql":"show devices with database"}' http://127.0.0.1:18080/rest/v1/query
```
-响应示例:
+- 响应示例:
```json
{
@@ -577,12 +577,12 @@ curl -H "Content-Type:application/json" -H "Authorization:Basic cm9vdDpyb290" -X
}
```
-请求示例 list user:
+13. 请求示例 list user:
```shell
curl -H "Content-Type:application/json" -H "Authorization:Basic cm9vdDpyb290" -X POST --data '{"sql":"list user"}' http://127.0.0.1:18080/rest/v1/query
```
-响应示例:
+- 响应示例:
```json
{
@@ -599,12 +599,12 @@ curl -H "Content-Type:application/json" -H "Authorization:Basic cm9vdDpyb290" -X
}
```
-请求示例 原始聚合查询:
+14. 请求示例 原始聚合查询:
```shell
curl -H "Content-Type:application/json" -H "Authorization:Basic cm9vdDpyb290" -X POST --data '{"sql":"select count(*) from root.sg27"}' http://127.0.0.1:18080/rest/v1/query
```
-响应示例:
+- 响应示例:
```json
{
@@ -627,12 +627,12 @@ curl -H "Content-Type:application/json" -H "Authorization:Basic cm9vdDpyb290" -X
}
```
-请求示例 group by level:
+15. 请求示例 group by level:
```shell
curl -H "Content-Type:application/json" -H "Authorization:Basic cm9vdDpyb290" -X POST --data '{"sql":"select count(*) from root.** group by level = 1"}' http://127.0.0.1:18080/rest/v1/query
```
-响应示例:
+- 响应示例:
```json
{
@@ -653,12 +653,12 @@ curl -H "Content-Type:application/json" -H "Authorization:Basic cm9vdDpyb290" -X
}
```
-请求示例 group by:
+16. 请求示例 group by:
```shell
curl -H "Content-Type:application/json" -H "Authorization:Basic cm9vdDpyb290" -X POST --data '{"sql":"select count(*) from root.sg27 group by([1635232143960,1635232153960),1s)"}' http://127.0.0.1:18080/rest/v1/query
```
-响应示例:
+- 响应示例:
```json
{
@@ -708,12 +708,12 @@ curl -H "Content-Type:application/json" -H "Authorization:Basic cm9vdDpyb290" -X
}
```
-请求示例 last:
+17. 请求示例 last:
```shell
curl -H "Content-Type:application/json" -H "Authorization:Basic cm9vdDpyb290" -X POST --data '{"sql":"select last s3 from root.sg27"}' http://127.0.0.1:18080/rest/v1/query
```
-响应示例:
+- 响应示例:
```json
{
@@ -740,12 +740,12 @@ curl -H "Content-Type:application/json" -H "Authorization:Basic cm9vdDpyb290" -
}
```
-请求示例 disable align:
+18. 请求示例 disable align:
```shell
curl -H "Content-Type:application/json" -H "Authorization:Basic cm9vdDpyb290" -X POST --data '{"sql":"select * from root.sg27 disable align"}' http://127.0.0.1:18080/rest/v1/query
```
-响应示例:
+- 响应示例:
```json
{
@@ -754,12 +754,12 @@ curl -H "Content-Type:application/json" -H "Authorization:Basic cm9vdDpyb290" -X
}
```
-请求示例 align by device:
+19. 请求示例 align by device:
```shell
curl -H "Content-Type:application/json" -H "Authorization:Basic cm9vdDpyb290" -X POST --data '{"sql":"select count(s3) from root.sg27 align by device"}' http://127.0.0.1:18080/rest/v1/query
```
-响应示例:
+- 响应示例:
```json
{
@@ -768,12 +768,12 @@ curl -H "Content-Type:application/json" -H "Authorization:Basic cm9vdDpyb290" -X
}
```
-请求示例 select into:
+20. 请求示例 select into:
```shell
curl -H "Content-Type:application/json" -H "Authorization:Basic cm9vdDpyb290" -X POST --data '{"sql":"select s3, s4 into root.sg29.s1, root.sg29.s2 from root.sg27"}' http://127.0.0.1:18080/rest/v1/query
```
-响应示例:
+- 响应示例:
```json
{
@@ -788,7 +788,7 @@ curl -H "Content-Type:application/json" -H "Authorization:Basic cm9vdDpyb290" -X
请求头:`application/json`
-请求路径:http://ip:port/rest/v1/nonQuery
+请求路径:`http://ip:port/rest/v1/nonQuery`
参数说明:
@@ -824,7 +824,7 @@ curl -H "Content-Type:application/json" -H "Authorization:Basic cm9vdDpyb290" -X
请求头:`application/json`
-请求路径:http://ip:port/rest/v1/insertTablet
+请求路径:`http://ip:port/rest/v1/insertTablet`
参数说明:
diff --git a/src/zh/UserGuide/latest/API/RestServiceV2.md b/src/zh/UserGuide/latest/API/RestServiceV2.md
index ca15253..b9b315a 100644
--- a/src/zh/UserGuide/latest/API/RestServiceV2.md
+++ b/src/zh/UserGuide/latest/API/RestServiceV2.md
@@ -127,7 +127,7 @@ query 接口可以用于处理数据查询和元数据查询。
请求头:`application/json`
-请求路径:http://ip:port/rest/v2/query
+请求路径: `http://ip:port/rest/v2/query`
参数说明:
@@ -149,12 +149,12 @@ query 接口可以用于处理数据查询和元数据查询。
提示:为了避免OOM问题,不推荐使用select * from root.xx.** 这种查找方式。
-请求示例 表达式查询:
+1. 请求示例 表达式查询:
```shell
curl -H "Content-Type:application/json" -H "Authorization:Basic cm9vdDpyb290" -X POST --data '{"sql":"select s3, s4, s3 + 1 from root.sg27 limit 2"}' http://127.0.0.1:18080/rest/v2/query
```
-响应示例:
+- 响应示例:
```json
{
@@ -185,12 +185,12 @@ curl -H "Content-Type:application/json" -H "Authorization:Basic cm9vdDpyb290" -X
}
```
-请求示例 show child paths:
+2.请求示例 show child paths:
```shell
curl -H "Content-Type:application/json" -H "Authorization:Basic cm9vdDpyb290" -X POST --data '{"sql":"show child paths root"}' http://127.0.0.1:18080/rest/v2/query
```
-响应示例:
+- 响应示例:
```json
{
@@ -208,12 +208,12 @@ curl -H "Content-Type:application/json" -H "Authorization:Basic cm9vdDpyb290" -X
}
```
-请求示例 show child nodes:
+3. 请求示例 show child nodes:
```shell
curl -H "Content-Type:application/json" -H "Authorization:Basic cm9vdDpyb290" -X POST --data '{"sql":"show child nodes root"}' http://127.0.0.1:18080/rest/v2/query
```
-响应示例:
+- 响应示例:
```json
{
@@ -231,12 +231,12 @@ curl -H "Content-Type:application/json" -H "Authorization:Basic cm9vdDpyb290" -X
}
```
-请求示例 show all ttl:
+4. 请求示例 show all ttl:
```shell
curl -H "Content-Type:application/json" -H "Authorization:Basic cm9vdDpyb290" -X POST --data '{"sql":"show all ttl"}' http://127.0.0.1:18080/rest/v2/query
```
-响应示例:
+- 响应示例:
```json
{
@@ -259,12 +259,12 @@ curl -H "Content-Type:application/json" -H "Authorization:Basic cm9vdDpyb290" -X
}
```
-请求示例 show ttl:
+5. 请求示例 show ttl:
```shell
curl -H "Content-Type:application/json" -H "Authorization:Basic cm9vdDpyb290" -X POST --data '{"sql":"show ttl on root.sg27"}' http://127.0.0.1:18080/rest/v2/query
```
-响应示例:
+- 响应示例:
```json
{
@@ -285,12 +285,12 @@ curl -H "Content-Type:application/json" -H "Authorization:Basic cm9vdDpyb290" -X
}
```
-请求示例 show functions:
+6. 请求示例 show functions:
```shell
curl -H "Content-Type:application/json" -H "Authorization:Basic cm9vdDpyb290" -X POST --data '{"sql":"show functions"}' http://127.0.0.1:18080/rest/v2/query
```
-响应示例:
+- 响应示例:
```json
{
@@ -324,12 +324,12 @@ curl -H "Content-Type:application/json" -H "Authorization:Basic cm9vdDpyb290" -X
}
```
-请求示例 show timeseries:
+7. 请求示例 show timeseries:
```shell
curl -H "Content-Type:application/json" -H "Authorization:Basic cm9vdDpyb290" -X POST --data '{"sql":"show timeseries"}' http://127.0.0.1:18080/rest/v2/query
```
-响应示例:
+- 响应示例:
```json
{
@@ -398,12 +398,12 @@ curl -H "Content-Type:application/json" -H "Authorization:Basic cm9vdDpyb290" -X
}
```
-请求示例 show latest timeseries:
+8. 请求示例 show latest timeseries:
```shell
curl -H "Content-Type:application/json" -H "Authorization:Basic cm9vdDpyb290" -X POST --data '{"sql":"show latest timeseries"}' http://127.0.0.1:18080/rest/v2/query
```
-响应示例:
+- 响应示例:
```json
{
@@ -472,12 +472,12 @@ curl -H "Content-Type:application/json" -H "Authorization:Basic cm9vdDpyb290" -X
}
```
-请求示例 count timeseries:
+9. 请求示例 count timeseries:
```shell
curl -H "Content-Type:application/json" -H "Authorization:Basic cm9vdDpyb290" -X POST --data '{"sql":"count timeseries root.**"}' http://127.0.0.1:18080/rest/v2/query
```
-响应示例:
+- 响应示例:
```json
{
@@ -494,12 +494,12 @@ curl -H "Content-Type:application/json" -H "Authorization:Basic cm9vdDpyb290" -X
}
```
-请求示例 count nodes:
+10. 请求示例 count nodes:
```shell
curl -H "Content-Type:application/json" -H "Authorization:Basic cm9vdDpyb290" -X POST --data '{"sql":"count nodes root.** level=2"}' http://127.0.0.1:18080/rest/v2/query
```
-响应示例:
+- 响应示例:
```json
{
@@ -516,12 +516,12 @@ curl -H "Content-Type:application/json" -H "Authorization:Basic cm9vdDpyb290" -X
}
```
-请求示例 show devices:
+11. 请求示例 show devices:
```shell
curl -H "Content-Type:application/json" -H "Authorization:Basic cm9vdDpyb290" -X POST --data '{"sql":"show devices"}' http://127.0.0.1:18080/rest/v2/query
```
-响应示例:
+- 响应示例:
```json
{
@@ -544,12 +544,12 @@ curl -H "Content-Type:application/json" -H "Authorization:Basic cm9vdDpyb290" -X
}
```
-请求示例 show devices with database:
+12. 请求示例 show devices with database:
```shell
curl -H "Content-Type:application/json" -H "Authorization:Basic cm9vdDpyb290" -X POST --data '{"sql":"show devices with database"}' http://127.0.0.1:18080/rest/v2/query
```
-响应示例:
+- 响应示例:
```json
{
@@ -577,12 +577,12 @@ curl -H "Content-Type:application/json" -H "Authorization:Basic cm9vdDpyb290" -X
}
```
-请求示例 list user:
+13. 请求示例 list user:
```shell
curl -H "Content-Type:application/json" -H "Authorization:Basic cm9vdDpyb290" -X POST --data '{"sql":"list user"}' http://127.0.0.1:18080/rest/v2/query
```
-响应示例:
+- 响应示例:
```json
{
@@ -599,12 +599,12 @@ curl -H "Content-Type:application/json" -H "Authorization:Basic cm9vdDpyb290" -X
}
```
-请求示例 原始聚合查询:
+14. 请求示例 原始聚合查询:
```shell
curl -H "Content-Type:application/json" -H "Authorization:Basic cm9vdDpyb290" -X POST --data '{"sql":"select count(*) from root.sg27"}' http://127.0.0.1:18080/rest/v2/query
```
-响应示例:
+- 响应示例:
```json
{
@@ -627,12 +627,12 @@ curl -H "Content-Type:application/json" -H "Authorization:Basic cm9vdDpyb290" -X
}
```
-请求示例 group by level:
+15. 请求示例 group by level:
```shell
curl -H "Content-Type:application/json" -H "Authorization:Basic cm9vdDpyb290" -X POST --data '{"sql":"select count(*) from root.** group by level = 1"}' http://127.0.0.1:18080/rest/v2/query
```
-响应示例:
+- 响应示例:
```json
{
@@ -653,12 +653,12 @@ curl -H "Content-Type:application/json" -H "Authorization:Basic cm9vdDpyb290" -X
}
```
-请求示例 group by:
+16. 请求示例 group by:
```shell
curl -H "Content-Type:application/json" -H "Authorization:Basic cm9vdDpyb290" -X POST --data '{"sql":"select count(*) from root.sg27 group by([1635232143960,1635232153960),1s)"}' http://127.0.0.1:18080/rest/v2/query
```
-响应示例:
+- 响应示例:
```json
{
@@ -708,12 +708,12 @@ curl -H "Content-Type:application/json" -H "Authorization:Basic cm9vdDpyb290" -X
}
```
-请求示例 last:
+17. 请求示例 last:
```shell
curl -H "Content-Type:application/json" -H "Authorization:Basic cm9vdDpyb290" -X POST --data '{"sql":"select last s3 from root.sg27"}' http://127.0.0.1:18080/rest/v2/query
```
-响应示例:
+- 响应示例:
```json
{
@@ -740,12 +740,12 @@ curl -H "Content-Type:application/json" -H "Authorization:Basic cm9vdDpyb290" -
}
```
-请求示例 disable align:
+18. 请求示例 disable align:
```shell
curl -H "Content-Type:application/json" -H "Authorization:Basic cm9vdDpyb290" -X POST --data '{"sql":"select * from root.sg27 disable align"}' http://127.0.0.1:18080/rest/v2/query
```
-响应示例:
+- 响应示例:
```json
{
@@ -754,12 +754,12 @@ curl -H "Content-Type:application/json" -H "Authorization:Basic cm9vdDpyb290" -X
}
```
-请求示例 align by device:
+19. 请求示例 align by device:
```shell
curl -H "Content-Type:application/json" -H "Authorization:Basic cm9vdDpyb290" -X POST --data '{"sql":"select count(s3) from root.sg27 align by device"}' http://127.0.0.1:18080/rest/v2/query
```
-响应示例:
+- 响应示例:
```json
{
@@ -768,12 +768,12 @@ curl -H "Content-Type:application/json" -H "Authorization:Basic cm9vdDpyb290" -X
}
```
-请求示例 select into:
+20. 请求示例 select into:
```shell
curl -H "Content-Type:application/json" -H "Authorization:Basic cm9vdDpyb290" -X POST --data '{"sql":"select s3, s4 into root.sg29.s1, root.sg29.s2 from root.sg27"}' http://127.0.0.1:18080/rest/v2/query
```
-响应示例:
+- 响应示例:
```json
{
@@ -788,7 +788,7 @@ curl -H "Content-Type:application/json" -H "Authorization:Basic cm9vdDpyb290" -X
请求头:`application/json`
-请求路径:http://ip:port/rest/v2/nonQuery
+请求路径:`http://ip:port/rest/v2/nonQuery`
参数说明:
@@ -824,7 +824,7 @@ curl -H "Content-Type:application/json" -H "Authorization:Basic cm9vdDpyb290" -X
请求头:`application/json`
-请求路径:http://ip:port/rest/v2/insertTablet
+请求路径:`http://ip:port/rest/v2/insertTablet`
参数说明:
@@ -863,7 +863,7 @@ curl -H "Content-Type:application/json" -H "Authorization:Basic cm9vdDpyb290" -X
请求头:`application/json`
-请求路径:http://ip:port/rest/v2/insertRecords
+请求路径:`http://ip:port/rest/v2/insertRecords`
参数说明:
diff --git a/src/zh/UserGuide/latest/Basic-Concept/Encoding-and-Compression.md b/src/zh/UserGuide/latest/Basic-Concept/Encoding-and-Compression.md
index 71dba0f..3a0a214 100644
--- a/src/zh/UserGuide/latest/Basic-Concept/Encoding-and-Compression.md
+++ b/src/zh/UserGuide/latest/Basic-Concept/Encoding-and-Compression.md
@@ -27,54 +27,51 @@
为了提高数据的存储效率,需要在数据写入的过程中对数据进行编码,从而减少磁盘空间的使用量。在写数据以及读数据的过程中都能够减少 I/O 操作的数据量从而提高性能。IoTDB 支持多种针对不同类型的数据的编码方法:
-* PLAIN 编码(PLAIN)
+1. PLAIN 编码(PLAIN)
-PLAIN 编码,默认的编码方式,即不编码,支持多种数据类型,压缩和解压缩的时间效率较高,但空间存储效率较低。
+ PLAIN 编码,默认的编码方式,即不编码,支持多种数据类型,压缩和解压缩的时间效率较高,但空间存储效率较低。
-* 二阶差分编码(TS_2DIFF)
+2. 二阶差分编码(TS_2DIFF)
-二阶差分编码,比较适合编码单调递增或者递减的序列数据,不适合编码波动较大的数据。
+ 二阶差分编码,比较适合编码单调递增或者递减的序列数据,不适合编码波动较大的数据。
-* 游程编码(RLE)
+3. 游程编码(RLE)
-游程编码,比较适合存储某些数值连续出现的序列,不适合编码大部分情况下前后值不一样的序列数据。
+ 游程编码,比较适合存储某些数值连续出现的序列,不适合编码大部分情况下前后值不一样的序列数据。
-游程编码也可用于对浮点数进行编码,但在创建时间序列的时候需指定保留小数位数(MAX_POINT_NUMBER,具体指定方式参见本文 [SQL 参考文档](../SQL-Manual/SQL-Manual.md))。比较适合存储某些浮点数值连续出现的序列数据,不适合存储对小数点后精度要求较高以及前后波动较大的序列数据。
+ 游程编码也可用于对浮点数进行编码,但在创建时间序列的时候需指定保留小数位数(MAX_POINT_NUMBER,具体指定方式参见本文 [SQL 参考文档](../SQL-Manual/SQL-Manual.md))。比较适合存储某些浮点数值连续出现的序列数据,不适合存储对小数点后精度要求较高以及前后波动较大的序列数据。
-> 游程编码(RLE)和二阶差分编码(TS_2DIFF)对 float 和 double 的编码是有精度限制的,默认保留 2 位小数。推荐使用 GORILLA。
+ > 游程编码(RLE)和二阶差分编码(TS_2DIFF)对 float 和 double 的编码是有精度限制的,默认保留 2 位小数。推荐使用 GORILLA。
-* GORILLA 编码(GORILLA)
+4. GORILLA 编码(GORILLA)
-GORILLA 编码是一种无损编码,它比较适合编码前后值比较接近的数值序列,不适合编码前后波动较大的数据。
+ GORILLA 编码是一种无损编码,它比较适合编码前后值比较接近的数值序列,不适合编码前后波动较大的数据。
-当前系统中存在两个版本的 GORILLA 编码实现,推荐使用`GORILLA`,不推荐使用`GORILLA_V1`(已过时)。
+ 当前系统中存在两个版本的 GORILLA 编码实现,推荐使用`GORILLA`,不推荐使用`GORILLA_V1`(已过时)。
-使用限制:使用 Gorilla 编码 INT32 数据时,需要保证序列中不存在值为`Integer.MIN_VALUE`的数据点;使用 Gorilla 编码 INT64 数据时,需要保证序列中不存在值为`Long.MIN_VALUE`的数据点。
+ 使用限制:使用 Gorilla 编码 INT32 数据时,需要保证序列中不存在值为`Integer.MIN_VALUE`的数据点;使用 Gorilla 编码 INT64 数据时,需要保证序列中不存在值为`Long.MIN_VALUE`的数据点。
-* 字典编码 (DICTIONARY)
+5. 字典编码 (DICTIONARY)
-字典编码是一种无损编码。它适合编码基数小的数据(即数据去重后唯一值数量小)。不推荐用于基数大的数据。
+ 字典编码是一种无损编码。它适合编码基数小的数据(即数据去重后唯一值数量小)。不推荐用于基数大的数据。
-* ZIGZAG 编码
+6. ZIGZAG 编码
-ZigZag编码将有符号整型映射到无符号整型,适合比较小的整数。
+ ZigZag编码将有符号整型映射到无符号整型,适合比较小的整数。
-* CHIMP 编码
+7. CHIMP 编码
-CHIMP 是一种无损编码。它是一种新的流式浮点数据压缩算法,可以节省存储空间。这个编码适用于前后值比较接近的数值序列,对波动小和随机噪声少的序列数据更加友好。
+ CHIMP 是一种无损编码。它是一种新的流式浮点数据压缩算法,可以节省存储空间。这个编码适用于前后值比较接近的数值序列,对波动小和随机噪声少的序列数据更加友好。
-使用限制:如果对 INT32 类型数据使用 CHIMP 编码,需要确保数据点中没有 `Integer.MIN_VALUE`。 如果对 INT64 类型数据使用 CHIMP 编码,需要确保数据点中没有 `Long.MIN_VALUE`。
+ 使用限制:如果对 INT32 类型数据使用 CHIMP 编码,需要确保数据点中没有 `Integer.MIN_VALUE`。 如果对 INT64 类型数据使用 CHIMP 编码,需要确保数据点中没有 `Long.MIN_VALUE`。
-* SPRINTZ 编码
-
-SPRINTZ编码是一种无损编码,将原始时序数据分别进行预测、Zigzag编码、位填充和游程编码。SPRINTZ编码适合差分值的绝对值较小(即波动较小)的时序数据,不适合差分值较大(即波动较大)的时序数据。
-
-* RLBE 编码
-
-RLBE编码是一种无损编码,将差分编码,位填充编码,游程长度,斐波那契编码和拼接等编码思想结合到一起。RLBE编码适合递增且递增值较小的时序数据,不适合波动较大的时序数据。
+8. SPRINTZ 编码
+ SPRINTZ编码是一种无损编码,将原始时序数据分别进行预测、Zigzag编码、位填充和游程编码。SPRINTZ编码适合差分值的绝对值较小(即波动较小)的时序数据,不适合差分值较大(即波动较大)的时序数据。
+9. RLBE 编码
+ RLBE编码是一种无损编码,将差分编码,位填充编码,游程长度,斐波那契编码和拼接等编码思想结合到一起。RLBE编码适合递增且递增值较小的时序数据,不适合波动较大的时序数据。
### 数据类型与编码的对应关系
diff --git a/src/zh/UserGuide/latest/Deployment-and-Maintenance/AINode_Deployment_timecho.md b/src/zh/UserGuide/latest/Deployment-and-Maintenance/AINode_Deployment_timecho.md
index 0c0e1ec..8b91d33 100644
--- a/src/zh/UserGuide/latest/Deployment-and-Maintenance/AINode_Deployment_timecho.md
+++ b/src/zh/UserGuide/latest/Deployment-and-Maintenance/AINode_Deployment_timecho.md
@@ -20,24 +20,24 @@
-->
# AINode 部署
-## 1 AINode介绍
+## AINode介绍
-### 1.1 能力介绍
+### 能力介绍
AINode 是 IoTDB 在 ConfigNode、DataNode 后提供的第三种内生节点,该节点通过与 IoTDB 集群的 DataNode、ConfigNode 的交互,扩展了对时间序列进行机器学习分析的能力,支持从外部引入已有机器学习模型进行注册,并使用注册的模型在指定时序数据上通过简单 SQL 语句完成时序分析任务的过程,将模型的创建、管理及推理融合在数据库引擎中。目前已提供常见时序分析场景(例如预测与异常检测)的机器学习算法或自研模型。
-### 1.2 交付方式
+### 交付方式
是 IoTDB 集群外的额外套件,独立安装包,独立激活(如需试用或使用,请联系天谋科技商务或技术支持)。
-### 1.3 部署模式
+### 部署模式
<div >
<img src="https://alioss.timecho.com/docs/img/AINode%E9%83%A8%E7%BD%B21.png" alt="" style="width: 45%;"/>
<img src="https://alioss.timecho.com/docs/img/AINode%E9%83%A8%E7%BD%B22.png" alt="" style="width: 45%;"/>
</div>
-## 2 安装准备
+## 安装准备
-### 2.1 安装包获取
+### 安装包获取
用户可以下载AINode的软件安装包,下载并解压后即完成AINode的安装。
@@ -52,7 +52,7 @@ AINode 是 IoTDB 在 ConfigNode、DataNode 后提供的第三种内生节点,
| README_ZH.md | 文件 | markdown格式的中文版说明 |
| `README.md` | 文件 | 使用说明 |
-### 2.2 环境准备
+### 环境准备
- 建议操作环境: Ubuntu, CentOS, MacOS
- 运行环境
@@ -67,9 +67,9 @@ AINode 是 IoTDB 在 ConfigNode、DataNode 后提供的第三种内生节点,
# 安装3.8.0版本的venv
../Python-3.8.0/python -m venv venv(文件夹名)
```
-## 3 安装步骤
+## 安装步骤
-### 3.1 AINode 激活
+### AINode 激活
要求 IoTDB 处于正常运行状态,且 license 中有 AINode 模块授权(通常 license 中不具有 AINode 授权,可联系天谋商务或技术支持人员获取 AINode 模块授权)。
@@ -102,7 +102,7 @@ AINode 是 IoTDB 在 ConfigNode、DataNode 后提供的第三种内生节点,
cd sbin
./start-datanode.sh -d #-d参数将在后台进行启动
```
-### 3.2 配置项修改
+### 配置项修改
AINode 支持修改一些必要的参数。可以在 `conf/iotdb-ainode.properties` 文件中找到下列参数并进行持久化的修改:
| **名称** | **描述** | **类型** | **默认值** | **改后生效方式** |
@@ -115,7 +115,7 @@ AINode 支持修改一些必要的参数。可以在 `conf/iotdb-ainode.properti
| ain_models_dir | AINode 存储模型文件的路径,相对路径的起始目录与操作系统相关,建议使用绝对路径 | String | data/AINode/models | 重启后生效 |
| ain_logs_dir | AINode 存储日志的路径,相对路径的起始目录与操作系统相关,建议使用绝对路径 | String | logs/AINode | 重启后生效 |
| ain_thrift_compression_enabled | AINode 是否启用 thrift 的压缩机制,0-不启动、1-启动 | Boolean | 0 | 重启后生效 |
-### 3.3 启动 AINode
+### 启动 AINode
在完成 Seed-ConfigNode 的部署后,可以通过添加 AINode 节点来支持模型的注册和推理功能。在配置项中指定 IoTDB 集群的信息后,可以执行相应的指令来启动 AINode,加入 IoTDB 集群。
@@ -227,7 +227,7 @@ AINode 支持修改一些必要的参数。可以在 `conf/iotdb-ainode.properti
nohup bash sbin/start-ainode.bat > myout.file 2>& 1 &
```
-### 3.4 检测 AINode 节点状态
+### 检测 AINode 节点状态
AINode 启动过程中会自动将新的 AINode 加入 IoTDB 集群。启动 AINode 后可以在 命令行中输入 SQL 来查询,集群中看到 AINode 节点,其运行状态为 Running(如下展示)表示加入成功。
@@ -242,7 +242,7 @@ IoTDB> show cluster
+------+----------+-------+---------------+------------+-------+-----------+
```
-### 3.5 停止 AINode
+### 停止 AINode
如果需要停止正在运行的 AINode 节点,则执行相应的关闭脚本。
@@ -284,7 +284,7 @@ IoTDB> show cluster
```
如果需要重新启动该节点,需重新执行启动脚本。
-### 3.6 移除 AINode
+### 移除 AINode
当需要把一个 AINode 节点移出集群时,可以执行移除脚本。移除和停止脚本的差别是:停止是在集群中保留 AINode 节点但停止 AINode 服务,移除则是把 AINode 节点从集群中移除出去。
@@ -355,9 +355,9 @@ IoTDB> show cluster
sbin\remove-ainode.bat -t <AINode-id>/<ip>:<rpc-port>
```
-## 4 常见问题
+## 常见问题
-### 4.1 启动AINode时出现找不到venv模块的报错
+### 启动AINode时出现找不到venv模块的报错
当使用默认方式启动 AINode 时,会在安装包目录下创建一个 python 虚拟环境并安装依赖,因此要求安装 venv 模块。通常来说 python3.8 及以上的版本会自带 venv,但对于一些系统自带的 python 环境可能并不满足这一要求。出现该报错时有两种解决方案(二选一):
@@ -373,7 +373,7 @@ apt-get install python3.8-venv
```
在运行启动脚本时通过 `-i` 指定已有的 python 解释器路径作为 AINode 的运行环境,这样就不再需要创建一个新的虚拟环境。
- ### 4.2 python中的SSL模块没有被正确安装和配置,无法处理HTTPS资源
+ ### python中的SSL模块没有被正确安装和配置,无法处理HTTPS资源
WARNING: pip is configured with locations that require TLS/SSL, however the ssl module in Python is not available.
可以安装 OpenSSLS 后,再重新构建 python 来解决这个问题
> Currently Python versions 3.6 to 3.9 are compatible with OpenSSL 1.0.2, 1.1.0, and 1.1.1.
@@ -387,7 +387,7 @@ make
sudo make install
```
- ### 4.3 pip版本较低
+ ### pip版本较低
windows下出现类似“error:Microsoft Visual C++ 14.0 or greater is required...”的编译问题
@@ -399,7 +399,7 @@ sudo make install
```
- ### 4.4 安装编译python
+ ### 安装编译python
使用以下指定从官网下载安装包并解压:
```shell
diff --git a/src/zh/UserGuide/latest/Deployment-and-Maintenance/Cluster-Deployment.md b/src/zh/UserGuide/latest/Deployment-and-Maintenance/Cluster-Deployment.md
index e0b487d..878241e 100644
--- a/src/zh/UserGuide/latest/Deployment-and-Maintenance/Cluster-Deployment.md
+++ b/src/zh/UserGuide/latest/Deployment-and-Maintenance/Cluster-Deployment.md
@@ -52,7 +52,7 @@
| 192.168.1.4 | iotdb-2 | ConfigNode、DataNode |
| 192.168.1.5 | iotdb-3 | ConfigNode、DataNode |
-### 1. 设置主机名
+### 设置主机名
在3台机器上分别配置主机名,设置主机名需要在目标服务器上配置`/etc/hosts`,使用如下命令:
@@ -62,7 +62,7 @@ echo "192.168.1.4 iotdb-2" >> /etc/hosts
echo "192.168.1.5 iotdb-3" >> /etc/hosts
```
-### 2. 参数配置
+### 参数配置
解压安装包并进入安装目录
@@ -121,7 +121,7 @@ cd apache-iotdb-{version}-all-bin
| dn_schema_region_consensus_port | DataNode用于元数据副本共识协议通信使用的端口 | 10760 | 10760 | 10760 | 10760 | 10760 | 首次启动后不能修改 |
| dn_seed_config_node | 节点注册加入集群时连接的ConfigNode地址,即cn_internal_address:cn_internal_port | 127.0.0.1:10710 | 第一个CongfigNode的cn_internal_address:cn_internal_port | iotdb-1:10710 | iotdb-1:10710 | iotdb-1:10710 | 首次启动后不能修改 |
-### 3. 启动ConfigNode节点
+### 启动ConfigNode节点
先启动第一个iotdb-1的confignode, 保证种子confignode节点先启动,然后依次启动第2和第3个confignode节点
@@ -130,7 +130,7 @@ cd sbin
./start-confignode.sh -d #“-d”参数将在后台进行启动
```
-### 4. 启动DataNode 节点
+### 启动DataNode 节点
分别进入iotdb的`sbin`目录下,依次启动3个datanode节点:
@@ -139,7 +139,7 @@ cd sbin
./start-datanode.sh -d # “-d”参数将在后台进行启动
```
-### 5. 验证部署
+### 验证部署
可直接执行`./sbin`目录下的Cli启动脚本:
diff --git a/src/zh/UserGuide/latest/Deployment-and-Maintenance/Cluster-Deployment_timecho.md b/src/zh/UserGuide/latest/Deployment-and-Maintenance/Cluster-Deployment_timecho.md
index 9023335..8da436a 100644
--- a/src/zh/UserGuide/latest/Deployment-and-Maintenance/Cluster-Deployment_timecho.md
+++ b/src/zh/UserGuide/latest/Deployment-and-Maintenance/Cluster-Deployment_timecho.md
@@ -51,7 +51,7 @@
| 192.168.1.4 | iotdb-2 | ConfigNode、DataNode |
| 192.168.1.5 | iotdb-3 | ConfigNode、DataNode |
-### 1. 设置主机名
+### 设置主机名
在3台机器上分别配置主机名,设置主机名需要在目标服务器上配置`/etc/hosts`,使用如下命令:
@@ -61,7 +61,7 @@ echo "192.168.1.4 iotdb-2" >> /etc/hosts
echo "192.168.1.5 iotdb-3" >> /etc/hosts
```
-### 2. 参数配置
+### 参数配置
解压安装包并进入安装目录
@@ -120,7 +120,7 @@ cd iotdb-enterprise-{version}-bin
| dn_schema_region_consensus_port | DataNode用于元数据副本共识协议通信使用的端口 | 10760 | 10760 | 10760 | 10760 | 10760 | 首次启动后不能修改 |
| dn_seed_config_node | 节点注册加入集群时连接的ConfigNode地址,即cn_internal_address:cn_internal_port | 127.0.0.1:10710 | 第一个CongfigNode的cn_internal_address:cn_internal_port | iotdb-1:10710 | iotdb-1:10710 | iotdb-1:10710 | 首次启动后不能修改 |
-### 3. 启动ConfigNode节点
+### 启动ConfigNode节点
先启动第一个iotdb-1的confignode, 保证种子confignode节点先启动,然后依次启动第2和第3个confignode节点
@@ -129,7 +129,7 @@ cd sbin
./start-confignode.sh -d #“-d”参数将在后台进行启动
```
-### 4. 激活数据库
+### 激活数据库
#### 方式一:激活文件拷贝激活
@@ -164,7 +164,7 @@ cd sbin
Import completed. Please start cluster and excute 'show cluster' to verify activation status
```
-### 5. 启动DataNode 节点
+### 启动DataNode 节点
分别进入iotdb的`sbin`目录下,依次启动3个datanode节点:
@@ -173,7 +173,7 @@ cd sbin
./start-datanode.sh -d #-d参数将在后台进行启动
```
-### 6. 验证部署
+### 验证部署
可直接执行`./sbin`目录下的Cli启动脚本:
diff --git a/src/zh/UserGuide/latest/Deployment-and-Maintenance/Docker-Deployment.md b/src/zh/UserGuide/latest/Deployment-and-Maintenance/Docker-Deployment.md
index 74d2941..92d4a6c 100644
--- a/src/zh/UserGuide/latest/Deployment-and-Maintenance/Docker-Deployment.md
+++ b/src/zh/UserGuide/latest/Deployment-and-Maintenance/Docker-Deployment.md
@@ -22,7 +22,7 @@
## 环境准备
-### 1. Docker安装
+### Docker安装
```SQL
#以ubuntu为例,其他操作系统可以自行搜索安装方法
@@ -42,7 +42,7 @@ sudo systemctl enable docker
docker --version #显示版本信息,即安装成功
```
-### 2. docker-compose安装
+### docker-compose安装
```SQL
#安装命令
@@ -57,7 +57,7 @@ docker-compose --version #显示版本信息即安装成功
本节演示如何部署1C1D的docker单机版。
-### 1. 拉取镜像文件
+### 拉取镜像文件
Apache IoTDB的Docker镜像已经上传至https://hub.docker.com/r/apache/iotdb。
@@ -75,13 +75,13 @@ docker images

-### 2. 创建docker bridge网络
+### 创建docker bridge网络
```Bash
docker network create --driver=bridge --subnet=172.18.0.0/16 --gateway=172.18.0.1 iotdb
```
-### 3.编写docker-compose的yml文件
+### 编写docker-compose的yml文件
这里我们以把IoTDB安装目录和yml文件统一放在`/docker-iotdb`文件夹下为例:
@@ -131,7 +131,7 @@ networks:
external: true
```
-### 4. 启动IoTDB
+### 启动IoTDB
使用下面的命令启动:
@@ -140,7 +140,7 @@ cd /docker-iotdb
docker-compose -f docker-compose-standalone.yml up -d #后台启动
```
-### 5. 验证部署
+### 验证部署
- 查看日志,有如下字样,表示启动成功
@@ -173,7 +173,7 @@ docker-compose -f docker-compose-standalone.yml up -d #后台启动

-### 6. 映射/conf目录(可选)
+### 映射/conf目录(可选)
后续如果想在物理机中直接修改配置文件,可以把容器中的/conf文件夹映射出来,分三步:
@@ -211,7 +211,7 @@ docker-compose -f docker-compose-standalone.yml up -d
下面以host网络为例演示如何部署3C3D集群。
-### 1.设置主机名
+### 设置主机名
假设现在有3台linux服务器,IP地址和服务角色分配如下:
@@ -229,7 +229,7 @@ echo "192.168.1.4 iotdb-2" >> /etc/hosts
echo "192.168.1.5 iotdb-3" >> /etc/hosts
```
-### 2. 拉取镜像文件
+### 拉取镜像文件
Apache IoTDB的Docker镜像已经上传至https://hub.docker.com/r/apache/iotdb。
@@ -247,7 +247,7 @@ docker images

-### 3.编写docker-compose的yml文件
+### 编写docker-compose的yml文件
这里我们以把IoTDB安装目录和yml文件统一放在`/docker-iotdb`文件夹下为例:
@@ -322,7 +322,7 @@ services:
network_mode: "host" #使用host网络
```
-### 4. 首次启动confignode
+### 首次启动confignode
先在3台服务器上分别启动confignode, 注意启动顺序,先启动第1台iotdb-1,再启动iotdb-2和iotdb-3。
@@ -331,7 +331,7 @@ cd /docker-iotdb
docker-compose -f confignode.yml up -d #后台启动
```
-### 5. 启动datanode
+### 启动datanode
在3台服务器上分别启动datanode
@@ -342,7 +342,7 @@ docker-compose -f datanode.yml up -d #后台启动

-### 6. 验证部署
+### 验证部署
- 查看日志,有如下字样,表示datanode启动成功
@@ -375,7 +375,7 @@ docker-compose -f datanode.yml up -d #后台启动

-### 7. 映射/conf目录(可选)
+### 映射/conf目录(可选)
后续如果想在物理机中直接修改配置文件,可以把容器中的/conf文件夹映射出来,分三步:
diff --git a/src/zh/UserGuide/latest/Deployment-and-Maintenance/Docker-Deployment_timecho.md b/src/zh/UserGuide/latest/Deployment-and-Maintenance/Docker-Deployment_timecho.md
index 9dab598..26555d1 100644
--- a/src/zh/UserGuide/latest/Deployment-and-Maintenance/Docker-Deployment_timecho.md
+++ b/src/zh/UserGuide/latest/Deployment-and-Maintenance/Docker-Deployment_timecho.md
@@ -22,7 +22,7 @@
## 环境准备
-### 1. Docker安装
+### Docker安装
```Bash
#以ubuntu为例,其他操作系统可以自行搜索安装方法
@@ -42,7 +42,7 @@ sudo systemctl enable docker
docker --version #显示版本信息,即安装成功
```
-### 2. docker-compose安装
+### docker-compose安装
```Bash
#安装命令
@@ -53,7 +53,7 @@ ln -s /usr/local/bin/docker-compose /usr/bin/docker-compose
docker-compose --version #显示版本信息即安装成功
```
-### 3. 安装dmidecode插件
+### 安装dmidecode插件
默认情况下,linux服务器应该都已安装,如果没有安装的话,可以使用下面的命令安装。
@@ -63,7 +63,7 @@ sudo apt-get install dmidecode
dmidecode 安装后,查找安装路径:`whereis dmidecode`,这里假设结果为`/usr/sbin/dmidecode`,记住该路径,后面的docker-compose的yml文件会用到。
-### 4. 获取IoTDB的容器镜像
+### 获取IoTDB的容器镜像
关于IoTDB企业版的容器镜像您可联系商务或技术支持获取。
@@ -71,7 +71,7 @@ dmidecode 安装后,查找安装路径:`whereis dmidecode`,这里假设结
本节演示如何部署1C1D的docker单机版。
-### 1. load 镜像文件
+### load 镜像文件
比如这里获取的IoTDB的容器镜像文件名是:`iotdb-enterprise-1.3.2.3-standalone-docker.tar.gz`
@@ -89,13 +89,13 @@ docker images

-### 2. 创建docker bridge网络
+### 创建docker bridge网络
```Bash
docker network create --driver=bridge --subnet=172.18.0.0/16 --gateway=172.18.0.1 iotdb
```
-### 3. 编写docker-compose的yml文件
+### 编写docker-compose的yml文件
这里我们以把IoTDB安装目录和yml文件统一放在`/docker-iotdb` 文件夹下为例:
@@ -147,7 +147,7 @@ networks:
external: true
```
-### 4. 首次启动
+### 首次启动
使用下面的命令启动:
@@ -160,7 +160,7 @@ docker-compose -f docker-compose-standalone.yml up

-### 5. 申请激活
+### 申请激活
- 首次启动后,在物理机目录`/docker-iotdb/iotdb/activation`下会生成一个 `system_info`文件,将这个文件拷贝给天谋工作人员。
@@ -170,7 +170,7 @@ docker-compose -f docker-compose-standalone.yml up

-### 6. 再次启动IoTDB
+### 再次启动IoTDB
```Bash
docker-compose -f docker-compose-standalone.yml up -d
@@ -178,7 +178,7 @@ docker-compose -f docker-compose-standalone.yml up -d

-### 7. 验证部署
+### 验证部署
- 查看日志,有如下字样,表示启动成功
@@ -211,7 +211,7 @@ docker logs -f iotdb-datanode #查看日志命令

-### 8. 映射/conf目录(可选)
+### 映射/conf目录(可选)
后续如果想在物理机中直接修改配置文件,可以把容器中的/conf文件夹映射出来,分三步:
@@ -251,7 +251,7 @@ docker-compose -f docker-compose-standalone.yml up -d
下面以host网络为例演示如何部署3C3D集群。
-### 1. 设置主机名
+### 设置主机名
假设现在有3台linux服务器,IP地址和服务角色分配如下:
@@ -269,7 +269,7 @@ echo "192.168.1.4 iotdb-2" >> /etc/hosts
echo "192.168.1.5 iotdb-3" >> /etc/hosts
```
-### 2. load镜像文件
+### load镜像文件
比如获取的IoTDB的容器镜像文件名是:`iotdb-enterprise-1.3.2.3-standalone-docker.tar.gz`
@@ -287,7 +287,7 @@ docker images

-### 3. 编写docker-compose的yml文件
+### 编写docker-compose的yml文件
这里我们以把IoTDB安装目录和yml文件统一放在/docker-iotdb文件夹下为例:
@@ -366,7 +366,7 @@ services:
network_mode: "host" #使用host网络
```
-### 4. 首次启动confignode
+### 首次启动confignode
先在3台服务器上分别启动confignode, 用来获取机器码,注意启动顺序,先启动第1台iotdb-1,再启动iotdb-2和iotdb-3。
@@ -375,7 +375,7 @@ cd /docker-iotdb
docker-compose -f confignode.yml up -d #后台启动
```
-### 5. 申请激活
+### 申请激活
- 首次启动3个confignode后,在每个物理机目录`/docker-iotdb/iotdb/activation`下都会生成一个`system_info`文件,将3个服务器的`system_info`文件拷贝给天谋工作人员;
@@ -387,7 +387,7 @@ docker-compose -f confignode.yml up -d #后台启动
- license放入对应的activation文件夹后,confignode会自动激活,不用重启confignode
-### 6. 启动datanode
+### 启动datanode
在3台服务器上分别启动datanode
@@ -398,7 +398,7 @@ docker-compose -f datanode.yml up -d #后台启动

-### 7. 验证部署
+### 验证部署
- 查看日志,有如下字样,表示datanode启动成功
@@ -431,7 +431,7 @@ docker-compose -f datanode.yml up -d #后台启动

-### 8. 映射/conf目录(可选)
+### 映射/conf目录(可选)
后续如果想在物理机中直接修改配置文件,可以把容器中的/conf文件夹映射出来,分三步:
diff --git a/src/zh/UserGuide/latest/Deployment-and-Maintenance/Monitoring-panel-deployment.md b/src/zh/UserGuide/latest/Deployment-and-Maintenance/Monitoring-panel-deployment.md
index a35267b..5e17793 100644
--- a/src/zh/UserGuide/latest/Deployment-and-Maintenance/Monitoring-panel-deployment.md
+++ b/src/zh/UserGuide/latest/Deployment-and-Maintenance/Monitoring-panel-deployment.md
@@ -187,11 +187,11 @@ cd grafana-*
## 附录、监控指标详解
-### 1. 系统面板(System Dashboard)
+### 系统面板(System Dashboard)
该面板展示了当前系统CPU、内存、磁盘、网络资源的使用情况已经JVM的部分状况。
-#### 1.1 CPU
+#### CPU
- CPU Core:CPU 核数
- CPU Load:
@@ -199,7 +199,7 @@ cd grafana-*
- Process CPU Load:IoTDB 进程在采样时间内占用的 CPU 比例
- CPU Time Per Minute:系统每分钟内所有进程的 CPU 时间总和
-#### 1.2 Memory
+#### Memory
- System Memory:当前系统内存的使用情况。
- Commited vm size: 操作系统分配给正在运行的进程使用的虚拟内存的大小。
@@ -211,7 +211,7 @@ cd grafana-*
- Total Memory:IoTDB 进程当前已经从操作系统中请求到的内存总量。
- Used Memory:IoTDB 进程当前已经使用的内存总量。
-#### 1.3 Disk
+#### Disk
- Disk Space:
- Total disk space:IoTDB 可使用的最大磁盘空间。
@@ -238,7 +238,7 @@ cd grafana-*
- I/O System Call Rate:进程调用读写系统调用的频率,类似于 IOPS。
- I/O Throughput:进程进行 I/O 的吞吐量,分为 actual_read/write 和 attempt_read/write 两类。actual read 和 actual write 指的是进程实际导致块设备进行 I/O 的字节数,不包含被 Page Cache 处理的部分。
-#### 1.4 JVM
+#### JVM
- GC Time Percentage:节点 JVM 在过去一分钟的时间窗口内,GC 耗时所占的比例
- GC Allocated/Promoted Size Detail: 节点 JVM 平均每分钟晋升到老年代的对象大小,新生代/老年代和非分代新申请的对象大小
@@ -264,7 +264,7 @@ cd grafana-*
- unloaded:系统启动至今 JVM 卸载的类的数量
- The Number of Java Thread:IoTDB 目前存活的线程数。各子项分别为各状态的线程数。
-#### 1.5 Network
+#### Network
eno 指的是到公网的网卡,lo 是虚拟网卡。
@@ -273,9 +273,9 @@ eno 指的是到公网的网卡,lo 是虚拟网卡。
- Packet Speed:网卡发送和接收数据包的速度,一次 RPC 请求可以对应一个或者多个数据包
- Connection Num:当前选定进程的 socket 连接数(IoTDB只有 TCP)
-### 2. 整体性能面板(Performance Overview Dashboard)
+### 整体性能面板(Performance Overview Dashboard)
-#### 2.1 Cluster Overview
+#### Cluster Overview
- Total CPU Core: 集群机器 CPU 总核数
- DataNode CPU Load: 集群各DataNode 节点的 CPU 使用率
@@ -296,7 +296,7 @@ eno 指的是到公网的网卡,lo 是虚拟网卡。
- Total DataRegion: 集群管理的 DataRegion 总数
- Total SchemaRegion: 集群管理的 SchemaRegion 总数
-#### 2.2 Node Overview
+#### Node Overview
- CPU Core: 节点所在机器的 CPU 核数
- Disk Space: 节点所在机器的磁盘大小
@@ -307,7 +307,7 @@ eno 指的是到公网的网卡,lo 是虚拟网卡。
- Swap Memory: 节点所在机器的交换内存大小
- File Number: 节点管理的文件数
-#### 2.3 Performance
+#### Performance
- Session Idle Time: 节点的 session 连接的总空闲时间和总忙碌时间
- Client Connection: 节点的客户端连接情况,包括总连接数和活跃连接数
@@ -339,7 +339,7 @@ eno 指的是到公网的网卡,lo 是虚拟网卡。
- Average Time Consumed Of Engine Stage: 节点的 engine 阶段各子阶段平均耗时
- P99 Time Consumed Of Engine Stage: 节点 engine 阶段各子阶段的 P99 耗时
-#### 2.4 System
+#### System
- CPU Load: 节点的 CPU 负载
- CPU Time Per Minute: 节点的每分钟 CPU 时间,最大值和 CPU 核数相关
@@ -351,11 +351,11 @@ eno 指的是到公网的网卡,lo 是虚拟网卡。
- File Size: 节点管理文件大小情况
- Log Number Per Minute: 节点的每分钟不同类型日志情况
-### 3. ConfigNode 面板(ConfigNode Dashboard)
+### ConfigNode 面板(ConfigNode Dashboard)
该面板展示了集群中所有管理节点的表现情况,包括分区、节点信息、客户端连接情况统计等。
-#### 3.1 Node Overview
+#### Node Overview
- Database Count: 节点的数据库数量
- Region
@@ -369,7 +369,7 @@ eno 指的是到公网的网卡,lo 是虚拟网卡。
- DataNodes: 节点所在集群的 DataNode 情况
- System Overview: 节点的系统概述,包括系统内存、磁盘使用、进程内存以及CPU负载
-#### 3.2 NodeInfo
+#### NodeInfo
- Node Count: 节点所在集群的节点数量,包括 ConfigNode 和 DataNode
- ConfigNode Status: 节点所在集群的 ConfigNode 节点的状态
@@ -379,7 +379,7 @@ eno 指的是到公网的网卡,lo 是虚拟网卡。
- DataRegion Distribution: 节点所在集群的 DataRegion 的分布情况
- DataRegionGroup Leader Distribution: 节点所在集群的 DataRegionGroup 的 Leader 分布情况
-#### 3.3 Protocol
+#### Protocol
- 客户端数量统计
- Active Client Num: 节点各线程池的活跃客户端数量
@@ -392,7 +392,7 @@ eno 指的是到公网的网卡,lo 是虚拟网卡。
- Client Mean Borrow Wait Time: 节点各线程池的客户端平均借用等待时间
- Client Mean Idle Time: 节点各线程池的客户端平均空闲时间
-#### 3.4 Partition Table
+#### Partition Table
- SchemaRegionGroup Count: 节点所在集群的 Database 的 SchemaRegionGroup 的数量
- DataRegionGroup Count: 节点所在集群的 Database 的 DataRegionGroup 的数量
@@ -401,7 +401,7 @@ eno 指的是到公网的网卡,lo 是虚拟网卡。
- DataRegion Status: 节点所在集群的 DataRegion 状态
- SchemaRegion Status: 节点所在集群的 SchemaRegion 的状态
-#### 3.5 Consensus
+#### Consensus
- Ratis Stage Time: 节点的 Ratis 各阶段耗时
- Write Log Entry: 节点的 Ratis 写 Log 的耗时
@@ -409,17 +409,17 @@ eno 指的是到公网的网卡,lo 是虚拟网卡。
- Remote / Local Write QPS: 节点 Ratis 的远程和本地写入的 QPS
- RatisConsensus Memory: 节点 Ratis 共识协议的内存使用
-### 4. DataNode 面板(DataNode Dashboard)
+### DataNode 面板(DataNode Dashboard)
该面板展示了集群中所有数据节点的监控情况,包含写入耗时、查询耗时、存储文件数等。
-#### 4.1 Node Overview
+#### Node Overview
- The Number Of Entity: 节点管理的实体情况
- Write Point Per Second: 节点的每秒写入速度
- Memory Usage: 节点的内存使用情况,包括 IoT Consensus 各部分内存占用、SchemaRegion内存总占用和各个数据库的内存占用。
-#### 4.2 Protocol
+#### Protocol
- 节点操作耗时
- The Time Consumed Of Operation (avg): 节点的各项操作的平均耗时
@@ -440,7 +440,7 @@ eno 指的是到公网的网卡,lo 是虚拟网卡。
- Client Mean Borrow Wait Time: 节点各线程池的客户端平均借用等待时间
- Client Mean Idle Time: 节点各线程池的客户端平均空闲时间
-#### 4.3 Storage Engine
+#### Storage Engine
- File Count: 节点管理的各类型文件数量
- File Size: 节点管理的各类型文件大小
@@ -456,7 +456,7 @@ eno 指的是到公网的网卡,lo 是虚拟网卡。
- Compaction Process Chunk Status: 节点合并不同状态的 Chunk 的数量
- Compacted Point Num Per Minute: 节点每分钟合并的点数
-#### 4.4 Write Performance
+#### Write Performance
- Write Cost(avg): 节点写入耗时平均值,包括写入 wal 和 memtable
- Write Cost(50%): 节点写入耗时中位数,包括写入 wal 和 memtable
@@ -492,7 +492,7 @@ eno 指的是到公网的网卡,lo 是虚拟网卡。
- Series Num Of Flushing MemTable: 节点的不同 DataRegion 的 Memtable 刷盘时的时间序列数
- Average Point Num Of Flushing MemChunk: 节点 MemChunk 刷盘的平均点数
-#### 4.5 Schema Engine
+#### Schema Engine
- Schema Engine Mode: 节点的元数据引擎模式
- Schema Consensus Protocol: 节点的元数据共识协议
@@ -521,7 +521,7 @@ eno 指的是到公网的网卡,lo 是虚拟网卡。
- Time Consumed of Relead and Flush (avg): 节点触发 cache 释放和 buffer 刷盘耗时的平均值
- Time Consumed of Relead and Flush (99%): 节点触发 cache 释放和 buffer 刷盘的耗时的 P99
-#### 4.6 Query Engine
+#### Query Engine
- 各阶段耗时
- The time consumed of query plan stages(avg): 节点查询各阶段耗时的平均值
@@ -564,7 +564,7 @@ eno 指的是到公网的网卡,lo 是虚拟网卡。
- The time consumed of query schedule time(50%): 节点查询任务调度耗时的中位数
- The time consumed of query schedule time(99%): 节点查询任务调度耗时的P99
-#### 4.7 Query Interface
+#### Query Interface
- 加载时间序列元数据
- The time consumed of load timeseries metadata(avg): 节点查询加载时间序列元数据耗时的平均值
@@ -611,7 +611,7 @@ eno 指的是到公网的网卡,lo 是虚拟网卡。
- The time consumed of build tsblock from merge reader(50%): 节点查询通过 Merge Reader 构造 TsBlock 耗时的中位数
- The time consumed of build tsblock from merge reader(99%): 节点查询通过 Merge Reader 构造 TsBlock 耗时的P99
-#### 4.8 Query Data Exchange
+#### Query Data Exchange
查询的数据交换耗时。
@@ -636,7 +636,7 @@ eno 指的是到公网的网卡,lo 是虚拟网卡。
- The time consumed of get data block task(50%): 节点查询获取 data block task 耗时的中位数
- The time consumed of get data block task(99%): 节点查询获取 data block task 耗时的 P99
-#### 4.9 Query Related Resource
+#### Query Related Resource
- MppDataExchangeManager: 节点查询时 shuffle sink handle 和 source handle 的数量
- LocalExecutionPlanner: 节点可分配给查询分片的剩余内存
@@ -646,7 +646,7 @@ eno 指的是到公网的网卡,lo 是虚拟网卡。
- MemoryPool Capacity: 节点查询相关的内存池的大小情况,包括最大值和剩余可用值
- DriverScheduler: 节点查询相关的队列任务数量
-#### 4.10 Consensus - IoT Consensus
+#### Consensus - IoT Consensus
- 内存使用
- IoTConsensus Used Memory: 节点的 IoT Consensus 的内存使用情况,包括总使用内存大小、队列使用内存大小、同步使用内存大小
@@ -666,7 +666,7 @@ eno 指的是到公网的网卡,lo 是虚拟网卡。
- The Time Consumed Of Different Stages (50%): 节点 IoT Consensus 不同执行阶段的耗时的中位数
- The Time Consumed Of Different Stages (99%): 节点 IoT Consensus 不同执行阶段的耗时的P99
-#### 4.11 Consensus - DataRegion Ratis Consensus
+#### Consensus - DataRegion Ratis Consensus
- Ratis Stage Time: 节点 Ratis 不同阶段的耗时
- Write Log Entry: 节点 Ratis 写 Log 不同阶段的耗时
@@ -674,7 +674,7 @@ eno 指的是到公网的网卡,lo 是虚拟网卡。
- Remote / Local Write QPS: 节点 Ratis 在本地或者远端写入的 QPS
- RatisConsensus Memory: 节点 Ratis 的内存使用情况
-#### 4.12 Consensus - SchemaRegion Ratis Consensus
+#### Consensus - SchemaRegion Ratis Consensus
- Ratis Stage Time: 节点 Ratis 不同阶段的耗时
- Write Log Entry: 节点 Ratis 写 Log 各阶段的耗时
diff --git a/src/zh/UserGuide/latest/Deployment-and-Maintenance/Stand-Alone-Deployment.md b/src/zh/UserGuide/latest/Deployment-and-Maintenance/Stand-Alone-Deployment.md
index 24222e8..cc4c477 100644
--- a/src/zh/UserGuide/latest/Deployment-and-Maintenance/Stand-Alone-Deployment.md
+++ b/src/zh/UserGuide/latest/Deployment-and-Maintenance/Stand-Alone-Deployment.md
@@ -32,14 +32,14 @@
## 安装步骤
-### 1、解压安装包并进入安装目录
+### 解压安装包并进入安装目录
```shell
unzip apache-iotdb-{version}-all-bin.zip
cd apache-iotdb-{version}-all-bin
```
-### 2、参数配置
+### 参数配置
#### 环境脚本配置
@@ -91,7 +91,7 @@ cd apache-iotdb-{version}-all-bin
| dn_schema_region_consensus_port | DataNode用于元数据副本共识协议通信使用的端口 | 10760 | 10760 | 首次启动后不能修改 |
| dn_seed_config_node | 节点注册加入集群时连接的ConfigNode地址,即cn_internal_address:cn_internal_port | 127.0.0.1:10710 | cn_internal_address:cn_internal_port | 首次启动后不能修改 |
-### 3、启动ConfigNode 节点
+### 启动ConfigNode 节点
进入iotdb的sbin目录下,启动confignode
@@ -99,7 +99,7 @@ cd apache-iotdb-{version}-all-bin
./start-confignode.sh -d #“-d”参数将在后台进行启动
```
-### 4、启动DataNode 节点
+### 启动DataNode 节点
进入iotdb的sbin目录下,启动datanode:
@@ -108,7 +108,7 @@ cd sbin
./start-datanode.sh -d #-d参数将在后台进行启动
```
-### 5、验证部署
+### 验证部署
可直接执行 ./sbin 目录下的 Cli 启动脚本:
diff --git a/src/zh/UserGuide/latest/Deployment-and-Maintenance/Stand-Alone-Deployment_timecho.md b/src/zh/UserGuide/latest/Deployment-and-Maintenance/Stand-Alone-Deployment_timecho.md
index fb06cbf..6f91552 100644
--- a/src/zh/UserGuide/latest/Deployment-and-Maintenance/Stand-Alone-Deployment_timecho.md
+++ b/src/zh/UserGuide/latest/Deployment-and-Maintenance/Stand-Alone-Deployment_timecho.md
@@ -36,14 +36,14 @@
## 安装步骤
-### 1、解压安装包并进入安装目录
+### 解压安装包并进入安装目录
```shell
unzip iotdb-enterprise-{version}-bin.zip
cd iotdb-enterprise-{version}-bin
```
-### 2、参数配置
+### 参数配置
#### 环境脚本配置
@@ -95,7 +95,7 @@ cd iotdb-enterprise-{version}-bin
| dn_schema_region_consensus_port | DataNode用于元数据副本共识协议通信使用的端口 | 10760 | 10760 | 首次启动后不能修改 |
| dn_seed_config_node | 节点注册加入集群时连接的ConfigNode地址,即cn_internal_address:cn_internal_port | 127.0.0.1:10710 | cn_internal_address:cn_internal_port | 首次启动后不能修改 |
-### 3、启动 ConfigNode 节点
+### 启动 ConfigNode 节点
进入iotdb的sbin目录下,启动confignode
@@ -103,7 +103,7 @@ cd iotdb-enterprise-{version}-bin
./start-confignode.sh -d #“-d”参数将在后台进行启动
```
-### 4、激活数据库
+### 激活数据库
#### 方式一:激活文件拷贝激活
@@ -137,7 +137,7 @@ License has been stored to sbin/../activation/license
Import completed. Please start cluster and excute 'show cluster' to verify activation status
```
-### 5、启动DataNode 节点
+### 启动DataNode 节点
进入iotdb的sbin目录下,启动datanode:
@@ -146,7 +146,7 @@ cd sbin
./start-datanode.sh -d #-d参数将在后台进行启动
```
-### 6、验证部署
+### 验证部署
可直接执行 ./sbin 目录下的 Cli 启动脚本:
diff --git a/src/zh/UserGuide/latest/Ecosystem-Integration/Ignition-IoTDB-plugin_timecho.md b/src/zh/UserGuide/latest/Ecosystem-Integration/Ignition-IoTDB-plugin_timecho.md
index 3070e24..ca26c33 100644
--- a/src/zh/UserGuide/latest/Ecosystem-Integration/Ignition-IoTDB-plugin_timecho.md
+++ b/src/zh/UserGuide/latest/Ecosystem-Integration/Ignition-IoTDB-plugin_timecho.md
@@ -20,7 +20,7 @@
-->
# Ignition
-## 一、产品概述
+## 产品概述
1. Ignition简介
@@ -37,7 +37,7 @@

-## 二、安装要求
+## 安装要求
| **准备内容** | **版本要求** |
| :------------------------: | :------------------------------------------------------------: |
@@ -46,15 +46,15 @@
| Ignition-IoTDB连接器模块 | 请联系商务获取 |
| Ignition-IoTDB With JDBC模块 | 下载地址:https://repo1.maven.org/maven2/org/apache/iotdb/iotdb-jdbc/ |
-## 三、Ignition-IoTDB连接器使用说明
+## Ignition-IoTDB连接器使用说明
-### 1、简介
+### 简介
Ignition-IoTDB连接器模块可以将数据存入与历史数据库提供程序关联的数据库连接中。数据根据其数据类型直接存储到 SQL 数据库中的表中,以及毫秒时间戳。根据每个标签上的值模式和死区设置,仅在更改时存储数据,从而避免重复和不必要的数据存储。
Ignition-IoTDB连接器提供了将 Ignition 采集到的数据存入 IoTDB 的能力。
-### 2、安装步骤
+### 安装步骤
步骤一:进入 `Config` - `System`- `Modules` 模块,点击最下方的`Install or Upgrade a Module...`
@@ -153,7 +153,7 @@ Ignition-IoTDB连接器提供了将 Ignition 采集到的数据存入 IoTDB 的
</table>
-### 3、使用说明
+### 使用说明
#### 配置历史数据存储
@@ -230,13 +230,13 @@ Ignition-IoTDB连接器提供了将 Ignition 采集到的数据存入 IoTDB 的
system.iotdb.query("IoTDB", "select * from root.db.Sine where time > 1709563427247")
```
-## 四、Ignition-IoTDB With JDBC
+## Ignition-IoTDB With JDBC
-### 1、简介
+### 简介
Ignition-IoTDB With JDBC提供了一个 JDBC 驱动,允许用户使用标准的JDBC API 连接和查询 lgnition-loTDB 数据库
-### 2、安装步骤
+### 安装步骤
步骤一:进入 `Config` - `Databases` -`Drivers` 模块,创建 `Translator`
@@ -250,7 +250,7 @@ system.iotdb.query("IoTDB", "select * from root.db.Sine where time > 17095634272

-### 3、使用说明
+### 使用说明
#### 数据写入
diff --git a/src/zh/UserGuide/latest/FAQ/Frequently-asked-questions.md b/src/zh/UserGuide/latest/FAQ/Frequently-asked-questions.md
index f70ee95..df33555 100644
--- a/src/zh/UserGuide/latest/FAQ/Frequently-asked-questions.md
+++ b/src/zh/UserGuide/latest/FAQ/Frequently-asked-questions.md
@@ -25,7 +25,7 @@
## 一般问题
-### 1. 如何查询我的IoTDB版本?
+### 如何查询我的IoTDB版本?
有几种方法可以识别您使用的 IoTDB 版本:
@@ -67,7 +67,7 @@ Total line number = 1
It costs 0.241s
```
-### 2. 在哪里可以找到IoTDB的日志?
+### 在哪里可以找到IoTDB的日志?
假设您的根目录是:
@@ -89,11 +89,11 @@ Readme.md
在默认的设置里,logs 文件夹会被存储在```IOTDB_HOME/logs```。您可以在```IOTDB_HOME/conf```目录下的```logback.xml```文件中修改日志的级别和日志的存储路径。
-### 3. 在哪里可以找到IoTDB的数据文件?
+### 在哪里可以找到IoTDB的数据文件?
在默认的设置里,数据文件(包含 TsFile,metadata,WAL)被存储在```IOTDB_HOME/data/dtanode```文件夹。
-### 4. 如何知道IoTDB中存储了多少时间序列?
+### 如何知道IoTDB中存储了多少时间序列?
使用 IoTDB 的命令行接口:
@@ -116,15 +116,15 @@ IoTDB> count timeseries
> 6
```
-### 5. 可以使用Hadoop和Spark读取IoTDB中的TsFile吗?
+### 可以使用Hadoop和Spark读取IoTDB中的TsFile吗?
是的。IoTDB 与开源生态紧密结合。IoTDB 支持 [Hadoop](https://github.com/apache/iotdb-extras/tree/master/connectors/hadoop), [Spark](https://github.com/apache/iotdb-extras/tree/master/connectors/spark-iotdb-connector) 和 [Grafana](https://github.com/apache/iotdb-extras/tree/master/connectors/grafana-connector) 可视化工具。
-### 6. IoTDB如何处理重复的数据点?
+### IoTDB如何处理重复的数据点?
一个数据点是由一个完整的时间序列路径(例如:```root.vehicle.d0.s0```) 和时间戳唯一标识的。如果您使用与现有点相同的路径和时间戳提交一个新点,那么 IoTDB 将更新这个点的值,而不是插入一个新点。
-### 7. 我如何知道具体的timeseries的类型?
+### 我如何知道具体的timeseries的类型?
在 IoTDB 的命令行接口中使用 SQL ```SHOW TIMESERIES <timeseries path>```:
@@ -146,7 +146,7 @@ IoTDB> show timeseries root.fit.d1.s1
IoTDB> show timeseries root.fit.d1.*
```
-### 8. 如何更改IoTDB的客户端时间显示格式?
+### 如何更改IoTDB的客户端时间显示格式?
IoTDB 客户端默认显示的时间是人类可读的(比如:```1970-01-01T08:00:00.001```),如果您想显示是时间戳或者其他可读格式,请在启动命令上添加参数```-disableISO8601```:
@@ -154,12 +154,12 @@ IoTDB 客户端默认显示的时间是人类可读的(比如:```1970-01-01T
> $IOTDB_CLI_HOME/sbin/start-cli.sh -h 127.0.0.1 -p 6667 -u root -pw root -disableISO8601
```
-### 9. 怎么处理来自`org.apache.ratis.grpc.server.GrpcLogAppender`的`IndexOutOfBoundsException`?
+### 怎么处理来自`org.apache.ratis.grpc.server.GrpcLogAppender`的`IndexOutOfBoundsException`?
这是我们的依赖Ratis 2.4.1的一个内部错误日志,不会对数据写入和读取造成任何影响。
已经报告给Ratis社区,并会在未来的版本中修复。
-### 10. 预估内存不足报错如何处理?
+### 预估内存不足报错如何处理?
报错信息:
```
@@ -183,35 +183,35 @@ datanode_memory_proportion参数控制分给查询的内存,chunk_timeseriesme
### 集群启停
-#### 1. ConfigNode初次启动失败,如何排查原因?
+#### ConfigNode初次启动失败,如何排查原因?
- ConfigNode初次启动时确保已清空data/confignode目录
- 确保该ConfigNode使用到的<IP+端口>没有被占用,没有与已启动的ConfigNode使用到的<IP+端口>冲突
- 确保该ConfigNode的cn_seed_config_node(指向存活的ConfigNode;如果该ConfigNode是启动的第一个ConfigNode,该值指向自身)配置正确
- 确保该ConfigNode的配置项(共识协议、副本数等)等与cn_seed_config_node对应的ConfigNode集群一致
-#### 2. ConfigNode初次启动成功,show cluster的结果里为何没有该节点?
+#### ConfigNode初次启动成功,show cluster的结果里为何没有该节点?
- 检查cn_seed_config_node是否正确指向了正确的地址; 如果cn_seed_config_node指向了自身,则会启动一个新的ConfigNode集群
-#### 3. DataNode初次启动失败,如何排查原因?
+#### DataNode初次启动失败,如何排查原因?
- DataNode初次启动时确保已清空data/datanode目录。 如果启动结果为“Reject DataNode restart.”则表示启动时可能没有清空data/datanode目录
- 确保该DataNode使用到的<IP+端口>没有被占用,没有与已启动的DataNode使用到的<IP+端口>冲突
- 确保该DataNode的dn_seed_config_node指向存活的ConfigNode
-#### 4. 移除DataNode执行失败,如何排查?
+#### 移除DataNode执行失败,如何排查?
- 检查`remove-datanode`脚本的参数是否正确,是否传入了正确的ip:port或正确的dataNodeId
- 只有集群可用节点数量 > max(元数据副本数量, 数据副本数量)时,移除操作才允许被执行
- 执行移除DataNode的过程会将该DataNode上的数据迁移到其他存活的DataNode,数据迁移以Region为粒度,如果某个Region迁移失败,则被移除的DataNode会一直处于Removing状态
- 补充:处于Removing状态的节点,其节点上的Region也是Removing或Unknown状态,即不可用状态。 该Remvoing状态的节点也不会接受客户端的请求。如果要使Removing状态的节点变为可用,用户可以使用set system status to running 命令将该节点设置为Running状态;如果要使迁移失败的Region处于可用状态,可以使用migrate region from datanodeId1 to datanodeId2 命令将该不可用的Region迁移到其他存活的节点。另外IoTDB后续也会提供`remove-datanode.sh -f`命令,来强制移除节点(迁移失败的Region会直接丢弃)
-#### 5. 挂掉的DataNode是否支持移除?
+#### 挂掉的DataNode是否支持移除?
- 当前集群副本数量大于1时可以移除。 如果集群副本数量等于1,则不支持移除。 在下个版本会推出强制移除的命令
-#### 6. 从0.13升级到1.0需要注意什么?
+#### 从0.13升级到1.0需要注意什么?
- 0.13版本与1.0版本的文件目录结构是不同的,不能将0.13的data目录直接拷贝到1.0集群使用。如果需要将0.13的数据导入至1.0,可以使用LOAD功能
- 0.13版本的默认RPC地址是0.0.0.0,1.0版本的默认RPC地址是127.0.0.1
@@ -219,43 +219,43 @@ datanode_memory_proportion参数控制分给查询的内存,chunk_timeseriesme
### 集群重启
-#### 1. 如何重启集群中的某个ConfigNode?
+#### 如何重启集群中的某个ConfigNode?
- 第一步:通过`stop-confignode.sh`或kill进程方式关闭ConfigNode进程
- 第二步:通过执行`start-confignode.sh`启动ConfigNode进程实现重启
- 下个版本IoTDB会提供一键重启的操作
-#### 2. 如何重启集群中的某个DataNode?
+#### 如何重启集群中的某个DataNode?
- 第一步:通过`stop-datanode.sh`或kill进程方式关闭DataNode进程
- 第二步:通过执行`start-datanode.sh`启动DataNode进程实现重启
- 下个版本IoTDB会提供一键重启的操作
-#### 3. 将某个ConfigNode移除后(remove-confignode),能否再利用该ConfigNode的data目录重启?
+#### 将某个ConfigNode移除后(remove-confignode),能否再利用该ConfigNode的data目录重启?
- 不能。会报错:Reject ConfigNode restart. Because there are no corresponding ConfigNode(whose nodeId=xx) in the cluster.
-#### 4. 将某个DataNode移除后(remove-datanode),能否再利用该DataNode的data目录重启?
+#### 将某个DataNode移除后(remove-datanode),能否再利用该DataNode的data目录重启?
- 不能正常重启,启动结果为“Reject DataNode restart. Because there are no corresponding DataNode(whose nodeId=xx) in the cluster. Possible solutions are as follows:...”
-#### 5. 用户看到某个ConfigNode/DataNode变成了Unknown状态,在没有kill对应进程的情况下,直接删除掉ConfigNode/DataNode对应的data目录,然后执行`start-confignode.sh`/`start-datanode.sh`,这种情况下能成功吗?
+#### 用户看到某个ConfigNode/DataNode变成了Unknown状态,在没有kill对应进程的情况下,直接删除掉ConfigNode/DataNode对应的data目录,然后执行`start-confignode.sh`/`start-datanode.sh`,这种情况下能成功吗?
- 无法启动成功,会报错端口已被占用
### 集群运维
-#### 1. Show cluster执行失败,显示“please check server status”,如何排查?
+#### Show cluster执行失败,显示“please check server status”,如何排查?
- 确保ConfigNode集群一半以上的节点处于存活状态
- 确保客户端连接的DataNode处于存活状态
-#### 2. 某一DataNode节点的磁盘文件损坏,如何修复这个节点?
+#### 某一DataNode节点的磁盘文件损坏,如何修复这个节点?
- 当前只能通过remove-datanode的方式进行实现。remove-datanode执行的过程中会将该DataNode上的数据迁移至其他存活的DataNode节点(前提是集群设置的副本数大于1)
- 下个版本IoTDB会提供一键修复节点的功能
-#### 3. 如何降低ConfigNode、DataNode使用的内存?
+#### 如何降低ConfigNode、DataNode使用的内存?
- 在`conf/confignode-env.sh`、`conf/datanode-env.sh`文件可通过调整ON_HEAP_MEMORY、OFF_HEAP_MEMORY等选项可以调整ConfigNode、DataNode使用的最大堆内、堆外内存
diff --git a/src/zh/UserGuide/latest/QuickStart/ClusterQuickStart.md b/src/zh/UserGuide/latest/QuickStart/ClusterQuickStart.md
index bbb4932..6b53475 100644
--- a/src/zh/UserGuide/latest/QuickStart/ClusterQuickStart.md
+++ b/src/zh/UserGuide/latest/QuickStart/ClusterQuickStart.md
@@ -24,7 +24,7 @@
遇到问题可以看:
[FAQ](../FAQ/Frequently-asked-questions.md)
-## 1. 安装部署
+## 安装部署
部署集群时我们推荐优先使用`hostname`来配置集群,这样可以避免一些网络问题。需要在每个节点上分别配置`/etc/hosts` ,windows 上为`C:\Windows\System32\drivers\etc\hosts`。
@@ -54,7 +54,7 @@ IP地址和服务角色分配如下:
- 优先推荐使用 `hostname(机器名/域名)` 进行配置,这样可以避免一些网络问题,也更方便迁移集群。
- JVM堆内存配置: `confignode-env.sh` 和 `datanode-env.sh` 内配置`ON_HEAP_MEMORY`, 建议设置值大于等于1G。ConfigNode 1~2G就足够了,DataNode的内存配置则要取决于数据接入的数据量和查询数据量。
-### 1.1 下载安装包
+### 下载安装包
在每个节点,将安装包[下载](https://iotdb.apache.org/Download/)后,解压到安装目录,这里为`/data/iotdb`。
目录结构:
```shell
@@ -65,7 +65,7 @@ IP地址和服务角色分配如下:
└── tools # 其他工具
```
-### 1.2. 修改节点配置文件
+### 修改节点配置文件
在每个节点均配置 hosts
```shell
@@ -88,9 +88,9 @@ echo "192.168.132.12 iotdb-3" >> /etc/hosts
**注意:**
我们推荐所有节点的 iotdb-system.properties 和 JVM 的内存配置是一致的。
-### 1.3. 启动集群
+### 启动集群
启动集群前,需保证配置正确,保证 IoTDB 安装目录下没有数据(`data`目录)。
-#### 1.3.1. 启动第一个节点
+#### 启动第一个节点
即上面表格中`cn_seed_config_node`配置的节点。
登录该节点 `iotdb-1(192.168.132.10)`,执行下面命令:
```shell
@@ -117,7 +117,7 @@ sbin/start-confignode.sh -d
sbin/start-datanode.sh -d
```
-#### 1.3.2. 启动其他两个节点的 ConfigNode 和 DataNode
+#### 启动其他两个节点的 ConfigNode 和 DataNode
在节点 `iotdb-2(192.168.132.11)` 和 `iotdb-3(192.168.132.12)` 两个节点上分别执行:
```shell
cd /data/iotdb
@@ -126,7 +126,7 @@ sbin/start-standalone.sh
```
如果启动失败,需要在所有节点执行[清理环境](#【附录】清理环境)后,然后从启动第一个节点开始,再重新执行一次。
-#### 1.3.3. 检验集群状态
+#### 检验集群状态
在任意节点上,在 Cli 执行 `show cluster`:
```shell
/data/iotdb/sbin/start-cli.sh -h iotdb-1
@@ -174,7 +174,7 @@ rm -rf data logs
说明:删除 data 目录是必要的,删除 logs 目录是为了纯净日志,非必需。
-## 2. 集群扩容
+## 集群扩容
扩容方式与上方启动其他节点相同。也就是,在要添加的节点上,下载IoTDB的安装包,解压,修改配置,然后启动。这里要添加节点的IP为 `192.168.132.13`
**注意:**
- 扩容的节点必须是干净的节点,不能有数据(也就是`data`目录)
@@ -182,7 +182,7 @@ rm -rf data logs
- `cn_seed_config_node` 和 `dn_seed_config_node`的配置必须和已有集群一致。
- 原有数据不会移动到新节点,新创建的元数据分区和数据分区很可能在新的节点。
-### 2.1. 修改配置
+### 修改配置
在原节点上新增一行 hosts
```shell
echo "192.168.132.13 iotdb-4" >> /etc/hosts
@@ -205,7 +205,7 @@ echo "192.168.132.13 iotdb-4" >> /etc/hosts
| iotdb-system.properties | dn_internal_address | iotdb-4 |
| iotdb-system.properties | dn_seed_config_node | iotdb-1:10710 |
-### 2.2. 扩容
+### 扩容
在新增节点`iotdb-4(192.168.132.13)`上,执行:
```shell
cd /data/iotdb
@@ -213,7 +213,7 @@ cd /data/iotdb
sbin/start-standalone.sh
```
-### 2.3. 验证扩容结果
+### 验证扩容结果
在 Cli 执行 `show cluster`,结果如下:
```shell
/data/iotdb/sbin/start-cli.sh -h iotdb-1
@@ -233,13 +233,13 @@ IoTDB>show cluster;
+------+----------+-------+---------------+------------+-------+---------+
```
-## 3. 集群缩容
+## 集群缩容
**注意:**
- 可以在任何一个集群内的节点上,执行缩容操作。
- 集群内的任意节点都可以被缩容。但是存留的 DataNode 服务不能小于副本数设置。
- 请耐心等待缩容脚本执行结束,并仔细阅读日志说明,尤其是结束前的指南说明。
-### 3.1 缩容一个 ConfigNode
+### 缩容一个 ConfigNode
```shell
cd /data/iotdb
# 方式一:使用 ip:port 移除
@@ -249,7 +249,7 @@ sbin/remove-confignode.sh iotdb-4:10710
sbin/remove-confignode.sh 6
```
-### 3.2 缩容一个 DataNode
+### 缩容一个 DataNode
```shell
cd /data/iotdb
# 方式一:使用 ip:port 移除
@@ -259,7 +259,7 @@ sbin/remove-datanode.sh iotdb-4:6667
sbin/remove-datanode.sh 7
```
-### 3.3 验证缩容结果
+### 验证缩容结果
在 Cli 执行 `show cluster`,结果如下:
```shell
diff --git a/src/zh/UserGuide/latest/User-Manual/AINode_timecho.md b/src/zh/UserGuide/latest/User-Manual/AINode_timecho.md
index 1d7e514..8a0b5db 100644
--- a/src/zh/UserGuide/latest/User-Manual/AINode_timecho.md
+++ b/src/zh/UserGuide/latest/User-Manual/AINode_timecho.md
@@ -33,7 +33,7 @@ AINode 是 IoTDB 在ConfigNode、DataNode后提供的第三种内生节点,该
- **DataNode**:负责接收并解析用户的 SQL请求;负责存储时间序列数据;负责数据的预处理计算。
- **AINode**:负责模型文件的导入创建以及模型推理。
-## 1. 优势特点
+## 优势特点
与单独构建机器学习服务相比,具有以下优势:
@@ -49,7 +49,7 @@ AINode 是 IoTDB 在ConfigNode、DataNode后提供的第三种内生节点,该
- **时间序列标注(Time Series Annotation)**:为每个数据点或特定时间段添加额外的信息或标记,例如事件发生、异常点、趋势变化等,以便更好地理解和分析数据。
-## 2. 基本概念
+## 基本概念
- **模型(Model)**:机器学习模型,以时序数据作为输入,输出分析任务的结果或决策。模型是AINode 的基本管理单元,支持模型的增(注册)、删、查、用(推理)。
- **创建(Create)**: 将外部设计或训练好的模型文件或算法加载到MLNode中,由IoTDB统一管理与使用。
@@ -60,15 +60,15 @@ AINode 是 IoTDB 在ConfigNode、DataNode后提供的第三种内生节点,该
<img src="https://alioss.timecho.com/docs/img/h3.PNG" style="zoom:50%" />
:::
-## 3. 安装部署
+## 安装部署
AINode 的部署可参考文档 [部署指导](../Deployment-and-Maintenance/AINode_Deployment_timecho.md#AINode-部署) 章节。
-## 4. 使用指导
+## 使用指导
AINode 对时序数据相关的深度学习模型提供了模型创建及删除的流程,内置模型无需创建及删除,可直接使用,并且在完成推理后创建的内置模型实例将自动销毁。
-### 4.1 注册模型
+### 注册模型
通过指定模型输入输出的向量维度,可以注册训练好的深度学习模型,从而用于模型推理。下方为模型注册的SQL语法定义。
@@ -111,7 +111,7 @@ SQL中参数的具体含义如下:
除了本地模型文件的注册,还可以通过URI来指定远程资源路径来进行注册,使用开源的模型仓库(例如HuggingFace)。
-#### 4.1.1 示例
+#### 示例
在当前的example文件夹下,包含model.pt和config.yaml文件,model.pt为训练得到,config.yaml的内容如下:
@@ -146,7 +146,7 @@ SQL执行后会异步进行注册的流程,可以通过模型展示查看模
模型注册完成后,就可以通过使用正常查询的方式调用具体函数,进行模型推理。
-### 4.2 查看模型
+### 查看模型
注册成功的模型可以通过show models指令查询模型的具体信息。其SQL定义如下:
@@ -169,7 +169,7 @@ show models <model_name>
- **DROPPING**:模型删除中,正在从configNode以及AINode处删除模型相关信息
- **UNAVAILABLE**: 模型创建失败,可以通过drop model删除创建失败的model_name。
-#### 4.2.1 示例
+#### 示例
```SQL
IoTDB> show models
@@ -194,7 +194,7 @@ IoTDB> show models
我们前面已经注册了对应的模型,可以通过对应的指定查看模型状态,active表明模型注册成功,可用于推理。
-### 4.3 删除模型
+### 删除模型
对于注册成功的模型,用户可以通过SQL进行删除。该操作除了删除configNode上的元信息外,还会删除所有AINode下的相关模型文件。其SQL如下:
@@ -204,7 +204,7 @@ drop model <model_name>
需要指定已经成功注册的模型model_name来删除对应的模型。由于模型删除涉及多个节点上的数据删除,操作不会立即完成,此时模型的状态为DROPPING,该状态的模型不能用于模型推理。
-### 4.4 使用内置模型推理
+### 使用内置模型推理
SQL语法如下:
@@ -219,7 +219,7 @@ call inference(<built_in_model_name>,sql[,<parameterName>=<parameterValue>])
- **parameterName**:参数名
- **parameterValue**:参数值
-#### 4.4.1 内置模型及参数说明
+#### 内置模型及参数说明
目前已内置如下机器学习模型,具体参数说明请参考以下链接。
@@ -233,7 +233,7 @@ call inference(<built_in_model_name>,sql[,<parameterName>=<parameterValue>])
| GMMHMM | _GMMHMM | 标注 | [GMMHMM参数说明](https://www.sktime.net/en/latest/api_reference/auto_generated/sktime.annotation.hmm_learn.gmm.GMMHMM.html) |
| Stray | _Stray | 异常检测 | [Stray参数说明](https://www.sktime.net/en/latest/api_reference/auto_generated/sktime.annotation.stray.STRAY.html) |
-#### 4.4.2 示例
+#### 示例
下面是使用内置模型推理的一个操作示例,使用内置的Stray模型进行异常检测算法,输入为`[144,1]`,输出为`[144,1]`,我们通过SQL使用其进行推理。
@@ -273,7 +273,7 @@ IoTDB> call inference(_Stray, "select s0 from root.eg.airline", k=2)
Total line number = 144
```
-### 4.5 使用深度学习模型推理
+### 使用深度学习模型推理
SQL语法如下:
@@ -306,7 +306,7 @@ window_function:
**说明2: 在深度学习应用中,经常将时间戳衍生特征(数据中的时间列)作为生成式任务的协变量,一同输入到模型中以提升模型的效果,但是在模型的输出结果中一般不包含时间列。为了保证实现的通用性,模型推理结果只对应模型的真实输出,如果模型不输出时间列,则结果中不会包含。**
-#### 4.5.1 示例
+#### 示例
下面是使用深度学习模型推理的一个操作示例,针对上面提到的输入为`[96,2]`,输出为`[48,2]`的`dlinear`预测模型,我们通过SQL使用其进行推理。
@@ -348,7 +348,7 @@ IoTDB> call inference(dlinear_example,"select s0,s1 from root.**")
Total line number = 48
```
-#### 4.5.2 使用tail/head窗口函数的示例
+#### 使用tail/head窗口函数的示例
当数据量不定且想要取96行最新数据用于推理时,可以使用对应的窗口函数tail。head函数的用法与其类似,不同点在于其取的是最早的96个点。
@@ -392,7 +392,7 @@ IoTDB> call inference(dlinear_example,"select s0,s1 from root.**",window=tail(96
Total line number = 48
```
-#### 4.5.3 使用count窗口函数的示例
+#### 使用count窗口函数的示例
该窗口主要用于计算式任务,当任务对应的模型一次只能处理固定行数据而最终想要的确实多组预测结果时,使用该窗口函数可以使用点数滑动窗口进行连续推理。假设我们现在有一个异常检测模型anomaly_example(input: [24,2], output[1,1]),对每行数据会生成一个0/1的标签,其使用示例如下:
@@ -433,7 +433,7 @@ Total line number = 4
其中结果集中的每行的标签对应16行输入对应的模型输出。
-## 5. 权限管理
+## 权限管理
使用AINode相关的功能时,可以使用IoTDB本身的鉴权去做一个权限管理,用户只有在具备 USE_MODEL 权限时,才可以使用模型管理的相关功能。当使用推理功能时,用户需要有访问输入模型的SQL对应的源序列的权限。
@@ -442,9 +442,9 @@ Total line number = 4
| USE_MODEL | create model / show models / drop model | √ | √ | x |
| READ_DATA | call inference | √ | √ | √ |
-## 6. 实际案例
+## 实际案例
-### 6.1 电力负载预测
+### 电力负载预测
在部分工业场景下,会存在预测电力负载的需求,预测结果可用于优化电力供应、节约能源和资源、支持规划和扩展以及增强电力系统的可靠性。
@@ -515,7 +515,7 @@ Total line number = 48
可以看到,我们使用了过去96个小时(4天)的六个负载信息和对应时间油温的关系,基于之前学习到的序列间相互关系对未来48个小时(2天)的油温这一数据的可能变化进行了建模,可以看到可视化后预测曲线与实际结果在趋势上保持了较高程度的一致性。
-### 6.2 功率预测
+### 功率预测
变电站需要对电流、电压、功率等数据进行电力监控,用于检测潜在的电网问题、识别电力系统中的故障、有效管理电网负载以及分析电力系统的性能和趋势等。
@@ -584,7 +584,7 @@ Total line number = 48
可以看到,我们使用了过去8分钟的电压的数据,基于之前学习到的序列间相互关系对未来4分钟的A相电压这一数据的可能变化进行了建模,可以看到可视化后预测曲线与实际结果在趋势上保持了较高程度的同步性。
-### 6.3 异常检测
+### 异常检测
在民航交通运输业,存在着对乘机旅客数量进行异常检测的需求。异常检测的结果可用于指导调整航班的调度,以使得企业获得更大效益。
diff --git a/src/zh/UserGuide/latest/User-Manual/IoTDB-View_timecho.md b/src/zh/UserGuide/latest/User-Manual/IoTDB-View_timecho.md
index e68fe0d..b7b7761 100644
--- a/src/zh/UserGuide/latest/User-Manual/IoTDB-View_timecho.md
+++ b/src/zh/UserGuide/latest/User-Manual/IoTDB-View_timecho.md
@@ -21,9 +21,9 @@
# 视图
-## 一、 序列视图应用背景
+## 序列视图应用背景
-### 1.1 应用场景1 时间序列重命名(PI资产管理)
+### 应用场景1 时间序列重命名(PI资产管理)
实际应用中,采集数据的设备可能使用人类难以理解的标识号来命名,这给业务层带来了查询上的困难。
@@ -33,19 +33,19 @@
对于用户来说,它是难以理解的。但此时,用户能够使用序列视图功能对它重命名,将它映射到一个序列视图中去,使用`root.view.device001.temperature`来访问采集到的数据。
-### 1.2 应用场景2 简化业务层查询逻辑
+### 应用场景2 简化业务层查询逻辑
有时用户有大量设备,管理着大量时间序列。在进行某项业务时,用户希望仅处理其中的部分序列,此时就可以通过序列视图功能挑选出关注重点,方便反复查询、写入。
**例如**:用户管理一条产品流水线,各环节的设备有大量时间序列。温度检测员仅需要关注设备温度,就可以抽取温度相关的序列,组成序列视图。
-### 1.3 应用场景3 辅助权限管理
+### 应用场景3 辅助权限管理
生产过程中,不同业务负责的范围一般不同,出于安全考虑往往需要通过权限管理来限制业务员的访问范围。
**例如**:安全管理部门现在仅需要监控某生产线上各设备的温度,但这些数据与其他机密数据存放在同一数据库。此时,就可以创建若干新的视图,视图中仅含有生产线上与温度有关的时间序列,接着,向安全员只赋予这些序列视图的权限,从而达到权限限制的目的。
-### 1.4 设计序列视图功能的动机
+### 设计序列视图功能的动机
结合上述两类使用场景,设计序列视图功能的动机,主要有:
@@ -53,13 +53,13 @@
2. 简化业务层查询逻辑。
3. 辅助权限管理,通过视图向特定用户开放数据。
-## 二、序列视图概念
+## 序列视图概念
-### 2.1 术语概念
+### 术语概念
约定:若无特殊说明,本文档所指定的视图均是**序列视图**,未来可能引入设备视图等新功能。
-### 2.2 序列视图
+### 序列视图
序列视图是一种组织管理时间序列的方式。
@@ -69,7 +69,7 @@
用户可以使用复杂的SQL查询创建视图,此时序列视图就像一条被存储的查询语句,当从视图中读取数据时,就把被存储的查询语句作为数据来源,放在FROM子句中。
-### 2.3 别名序列
+### 别名序列
在序列视图中,有一类特殊的存在,他们满足如下所有条件:
@@ -81,13 +81,13 @@
**所有序列视图包括别名序列目前均不支持触发器功能(Trigger)。**
-### 2.4 嵌套视图
+### 嵌套视图
用户可能想从一个现有的序列视图中选出若干序列,组成一个新的序列视图,就称之为嵌套视图。
**当前版本不支持嵌套视图功能**。
-### 2.5 IoTDB中对序列视图的一些约束
+### IoTDB中对序列视图的一些约束
#### 限制1 序列视图必须依赖于一个或者若干个时间序列
@@ -130,13 +130,13 @@
这是因为进行业务查询时,面向视图的用户关心的是当前视图的结构,而如果使用group by tag等方式做查询,显然希望是得到视图下含有对应tag的分组效果,而非时间序列的tag的分组效果(用户甚至对那些时间序列毫无感知)。
-## 三、序列视图功能介绍
+## 序列视图功能介绍
-### 3.1 创建视图
+### 创建视图
创建一个序列视图与创建一条时间序列类似,区别在于需要通过AS关键字指定数据来源,即原始序列。
-#### 3.1.1. 创建视图的SQL
+#### 创建视图的SQL
用户可以选取一些序列创建一个视图:
@@ -168,7 +168,7 @@ AS
root.db.device.s01
```
-#### 3.1.2 创建含有计算逻辑的视图
+#### 创建含有计算逻辑的视图
沿用2.2章节限制1中的例子:
@@ -198,7 +198,7 @@ AS
SELECT avg_temperature FROM root.db.d01
```
-#### 3.1.3 不支持嵌套序列视图
+#### 不支持嵌套序列视图
继续沿用3.1.2中的例子,现在用户想使用序列视图`root.db.d01.avg_temperature`创建一个新的视图,这是不允许的。我们目前不支持嵌套视图,无论它是否是别名序列,都不支持。
@@ -210,7 +210,7 @@ AS
root.db.d01.avg_temperature -- 不支持。不允许嵌套视图
```
-#### 3.1.4 一次创建多条序列视图
+#### 一次创建多条序列视图
一次只能指定一个序列视图对用户来说使用不方便,则可以一次指定多条序列,比如:
@@ -292,7 +292,7 @@ AS
请时刻注意,序列间映射关系是静态地、固化地存储的。
-#### 3.1.5 批量创建序列视图
+#### 批量创建序列视图
现有若干个设备,每个设备都有一个温度数值,例如:
@@ -330,7 +330,7 @@ AS
使用通配符创建,只会存储创建时刻的静态映射关系。
-#### 3.1.6 创建视图时SELECT子句受到一定限制
+#### 创建视图时SELECT子句受到一定限制
创建序列视图时,使用的SELECT子句受到一定限制。主要限制如下:
@@ -340,7 +340,7 @@ AS
简单来说,`AS`后只能使用`SELECT ... FROM ... `的结构,且该查询语句的结果必须能构成一条时间序列。
-### 3.2 视图数据查询
+### 视图数据查询
对于可以支持的数据查询功能,在执行时序数据查询时,序列视图与时间序列可以无差别使用,行为完全一致。
@@ -361,11 +361,11 @@ WHERE temperature01 < temperature02
此外,对于别名序列,如果用户想要得到时间序列的tag、attributes等信息,则需要先查询视图列的映射,找到对应的时间序列,再向时间序列查询tag、attributes等信息。查询视图列的映射的方法将会在3.5部分说明。
-### 3.3 视图修改
+### 视图修改
对视图的修改,例如改名、修改计算逻辑、删除等操作,都和创建新的视图类似,需要重新指定整个视图的全部列相关的描述。
-#### 3.3.1 修改视图数据来源
+#### 修改视图数据来源
```SQL
ALTER VIEW root.view.device.status
@@ -374,7 +374,7 @@ AS
FROM root.ln.wf.d01
```
-#### 3.3.2 修改视图的计算逻辑
+#### 修改视图的计算逻辑
```SQL
ALTER VIEW root.db.d01.avg_temperature
@@ -383,7 +383,7 @@ AS
FROM root.db.d01
```
-#### 3.3.3 标签点管理
+#### 标签点管理
- 添加新的标签
@@ -423,7 +423,7 @@ ALTER view root.turbine.d1.s1 DROP tag1, tag2
ALTER view root.turbine.d1.s1 UPSERT TAGS(tag2=newV2, tag3=v3) ATTRIBUTES(attr3=v3, attr4=v4)
```
-#### 3.3.4 删除视图
+#### 删除视图
因为一个视图就是一条序列,因此可以像删除时间序列一样删除一个视图。
@@ -431,7 +431,7 @@ ALTER view root.turbine.d1.s1 UPSERT TAGS(tag2=newV2, tag3=v3) ATTRIBUTES(attr3=
DELETE VIEW root.view.device.avg_temperatue
```
-### 3.4 视图同步
+### 视图同步
序列视图的数据总是经由实时的查询获得,因此天然支持数据同步。
@@ -453,11 +453,11 @@ DELETE VIEW root.view.device.avg_temperatue
详情请参考前文2.1.6 限制5
-### 3.5 视图元数据查询
+### 视图元数据查询
视图元数据查询,特指查询视图本身的元数据(例如视图有多少列),以及数据库内视图的信息(例如有哪些视图)。
-#### 3.5.1 查看当前的视图列
+#### 查看当前的视图列
用户有两种查询方式:
@@ -519,7 +519,7 @@ IoTDB>
上述两种查询都涉及视图的数据类型。视图的数据类型是根据定义视图的查询语句或别名序列的原始时间序列类型推断出来的。这个数据类型是根据当前系统的状态实时计算出来的,因此在不同时刻查询到的数据类型可能是改变的。
-## 四、FAQ
+## FAQ
#### Q1:我想让视图实现类型转换的功能。例如,原有一个int32类型的时间序列,和其他int64类型的序列被放在了同一个视图中。我现在希望通过视图查询到的数据,都能自动转换为int64类型。