You are viewing a plain text version of this content. The canonical link for it is here.
Posted to commits@weex.apache.org by ha...@apache.org on 2017/10/13 13:04:04 UTC
[09/51] [abbrv] incubator-weex-site git commit: rearrangement the
structure of the document
http://git-wip-us.apache.org/repos/asf/incubator-weex-site/blob/32a097bf/source/cn/wiki/common-styles.md
----------------------------------------------------------------------
diff --git a/source/cn/wiki/common-styles.md b/source/cn/wiki/common-styles.md
new file mode 100644
index 0000000..002a20c
--- /dev/null
+++ b/source/cn/wiki/common-styles.md
@@ -0,0 +1,628 @@
+---
+title: 通用样式
+type: wiki
+group: 样式
+order: 3.1
+version: 2.1
+---
+
+# 通用样式
+
+所有 Weex 组件都支持以下通用样式规则。
+
+## 盒模型
+
+
+
+Weex 盒模型基于 [CSS 盒模型](https://www.w3.org/TR/css3-box/),每个 Weex 元素都可视作一个盒子。我们一般在讨论设计或布局时,会提到「盒模型」这个概念。
+
+盒模型描述了一个元素所占用的空间。每一个盒子有四条边界:外边距边界 margin edge, 边框边界 border edge, 内边距边界 padding edge 与内容边界 content edge。这四层边界,形成一层层的盒子包裹起来,这就是盒模型大体上的含义。
+
+**注意:**
+Weex 对于长度值目前只支持*像素*值,不支持相对单位(`em`、`rem`)。
+
+- `width {length}`:,默认值 0
+- `height {length}`:,默认值 0
+- `padding {length}`:内边距,内容和边框之间的距离。默认值 0
+
+ 可有如下写法:
+
+ - `padding-left {length}`:,默认值 0
+ - `padding-right {length}`:,默认值 0
+ - `padding-top {length}`:,默认值 0
+ - `padding-bottom {length}`:,默认值 0
+- `margin`:
+
+ 外边距,元素和元素之间的空白距离。值类型为 length,默认值 0
+
+ 可有如下写法:
+
+ - `margin-left {length}`:,默认值 0
+ - `margin-right {length}`:,默认值 0
+ - `margin-top {length}`:,默认值 0
+ - `margin-bottom {length}`:,默认值 0
+- border:
+
+ 设定边框,`border` 目前不支持类似这样 `border: 1 solid #ff0000;` 的组合写法。
+
+ 可有如下写法:
+
+ - `border-style`:
+
+ 设定边框样式,值类型为 string,可选值为 `solid` | `dashed` | `dotted`,默认值 `solid`
+
+ 可有如下写法:
+
+ - `border-left-style {string}`:可选值为 `solid` | `dashed` | `dotted`,默认值 `solid`
+ - `border-top-style {string}`:可选值为 `solid` | `dashed` | `dotted`,默认值 `solid`
+ - `border-right-style {string}`:可选值为 `solid` | `dashed` | `dotted`,默认值 `solid`
+ - `border-bottom-style {string}`:可选值为 `solid` | `dashed` | `dotted`,默认值 `solid`
+
+ - `border-width {length}`:
+
+ 设定边框宽度,非负值, 默认值 0
+
+ 可有如下写法:
+
+ - `border-left-width {length}`:,非负值, 默认值 0
+ - `border-top-width {length}`:,非负值, 默认值 0
+ - `border-right-width {length}`:,非负值, 默认值 0
+ - `border-bottom-width {length}`:,非负值, 默认值 0
+
+ - `border-color {color}`:
+
+ 设定边框颜色,默认值 `#000000`
+
+ 可有如下写法:
+
+ - `border-left-color {color}`:,默认值 `#000000`
+ - `border-top-color {color}`:,默认值 `#000000`
+ - `border-right-color {color}`:,默认值 `#000000`
+ - `border-bottom-color {color}`:,默认值 `#000000`
+ - `border-radius {length}`:
+
+ 设定圆角,默认值 0
+
+ 可有如下写法:
+
+ - `border-bottom-left-radius {length}`:,非负值, 默认值 0
+ - `border-bottom-right-radius {length}`:,非负值, 默认值 0
+ - `border-top-left-radius {length}`:,非负值, 默认值 0
+ - `border-top-right-radius {length}`:,非负值, 默认值 0
+
+
+### 注意:
+
+Weex 盒模型的 `box-sizing` 默认为 `border-box`,即盒子的宽高包含内容、内边距和边框的宽度,不包含外边距的宽度。
+
+目前在 `<image>` 组件上尚无法只定义一个或几个角的 `border-radius`。比如你无法在这两个组件上使用 `border-top-left-radius`。该约束只对 iOS 生效,Android 并不受此限制。
+
+尽管 `overflow:hidden` 在 Android 上是默认行为,但只有下列条件都满足时,一个父 view 才会去 clip 它的子 view。这个限制只对 Android 生效,iOS 不受影响。
+* 父view是`div`, `a`, `cell`, `refresh` 或 `loading`。
+* 系统版本是 Android 4.3 或更高。
+* 系统版本不是 Andorid 7.0。
+* 父 view 没有 `background-image` 属性或系统版本是 Android 5.0 或更高。
+
+### 示例:
+
+```html
+<template>
+ <div>
+ <image style="width: 400px; height: 200px; margin-left: 20px;" src="https://g.alicdn.com/mtb/lab-zikuan/0.0.18/weex/weex_logo_blue@3x.png"></image>
+ </div>
+</template>
+```
+
+## Flexbox
+
+Weex 布局模型基于 CSS [`Flexbox`](http://www.w3.org/TR/css3-flexbox/),以便所有页面元素的排版能够一致可预测,同时页面布局能适应各种设备或者屏幕尺寸。
+
+Flexbox 包含 flex 容器和 flex 成员项。如果一个 Weex 元素可以容纳其他元素,那么它就成为 flex 容器。需要注意的是,flexbox 的老版规范相较新版有些出入,比如是否能支持 wrapping。这些都描述在 W3C 的工作草案中了,你需要注意下新老版本之间的不同。另外,老版本只在安卓 4.4 版以下得到支持。
+
+### Flex 容器
+
+在 Weex 中,Flexbox 是默认且唯一的布局模型,所以你不需要手动为元素添加 `display: flex;` 属性。
+
+- `flex-direction`:
+
+ 定义了 flex 容器中 flex 成员项的排列方向。可选值为 `row` | `column`,默认值为 `column`
+
+ - `column`:从上到下排列。
+ - `row`:从左到右排列。
+
+- `justify-content`:
+
+ 定义了 flex 容器中 flex 成员项在主轴方向上如何排列以处理空白部分。可选值为 `flex-start` | `flex-end` | `center` | `space-between`,默认值为 `flex-start`。
+
+ - `flex-start`:是默认值,所有的 flex 成员项都排列在容器的前部;
+ - `flex-end`:则意味着成员项排列在容器的后部;
+ - `center`:即中间对齐,成员项排列在容器中间、两边留白;
+ - `space-between`:表示两端对齐,空白均匀地填充到 flex 成员项之间。
+
+ 
+
+- `align-items`:
+
+ 定义了 flex 容器中 flex 成员项在纵轴方向上如何排列以处理空白部分。可选值为 `stretch` | `flex-start` | `center` | `flex-end`,默认值为 `stretch`。
+
+ - `stretch` 是默认值,即拉伸高度至 flex 容器的大小;
+ - `flex-start` 则是上对齐,所有的成员项排列在容器顶部;
+ - `flex-end` 是下对齐,所有的成员项排列在容器底部;
+ - `center` 是中间对齐,所有成员项都垂直地居中显示。
+
+ 
+
+### Flex 成员项
+
+flex 属性定义了 flex 成员项可以占用容器中剩余空间的大小。如果所有的成员项设置相同的值 `flex: 1`,它们将平均分配剩余空间. 如果一个成员项设置的值为 `flex: 2`,其它的成员项设置的值为 `flex: 1`,那么这个成员项所占用的剩余空间是其它成员项的2倍。
+
+- `flex {number}`:值为 number 类型。
+
+### 示例
+
+一个简单的网格布局。
+
+
+
+```html
+<template>
+ <div>
+ <div v-for="(v, i) in list" class="row">
+ <div v-for="(text, k) in v" class="item">
+ <div>
+ <text>{{text}}</text>
+ </div>
+ </div>
+ </div>
+ </div>
+</template>
+<style scoped>
+ .item{
+ flex:1;
+ justify-content: center;
+ align-items:center;
+ border-width:1;
+ }
+ .row{
+ flex-direction: row;
+ height:80px;
+ }
+</style>
+<script>
+ module.exports = {
+ data: function () {
+ return {
+ list:[
+ ['A', 'B', 'C'],
+ ['D', 'E', 'F'],
+ ['G', 'H', 'I']
+ ]
+ }
+ }
+ }
+</script>
+```
+
+一个在相对于屏幕水平居中,全屏居中的 `<div>`。
+
+```html
+<template>
+ <div class="wrapper">
+ <div class="box">
+ </div>
+ </div>
+</template>
+
+<style scoped>
+ .wrapper {
+ position: absolute;
+ top: 0;
+ right: 0;
+ bottom: 0;
+ left: 0;
+ background-color: #cccccc;
+ justify-content: center;
+ align-items: center;
+ }
+ .box {
+ width: 200px;
+ height: 200px;
+ background-color: #fc0000;
+ }
+</style>
+```
+
+## 定位
+
+Weex 支持 `position` 定位,用法与 CSS position 类似。为元素设置 `position` 后,可通过 `top`、`right`、`bottom`、`left` 四个属性设置元素坐标。
+
+- `position {string}`:
+
+ 设置定位类型。可选值为 `relative` | `absolute` | `fixed` | `sticky`,默认值为 `relative`。
+
+ - `relative` 是默认值,指的是相对定位;
+ - `absolute` 是绝对定位,以元素的容器作为参考系;
+ - `fixed` 保证元素在页面窗口中的对应位置显示;
+ - `sticky` 指的是仅当元素滚动到页面之外时,元素会固定在页面窗口的顶部。
+- `top {number}`:距离上方的偏移量,默认为 0。
+- `bottom {number}`:距离下方的偏移量,默认为 0。
+- `left {number}`:距离左方的偏移量,默认为 0。
+- `right {number}`:距离右方的偏移量,默认为 0。
+
+**注意:**
+
+1. Weex 目前不支持 `z-index` 设置元素层级关系,但靠后的元素层级更高,因此,对于层级高的元素,可将其排列在后面。
+2. 如果定位元素超过容器边界,在 Android 下,超出部分将**不可见**,原因在于 Android 端元素 `overflow` 默认值为 `hidden`,但目前 Android 暂不支持设置 `overflow: visible`。
+
+### 示例
+
+
+
+```html
+<template scoped>
+ <div class="wrapper">
+ <div class="box box1">
+ </div>
+ <div class="box box2">
+ </div>
+ <div class="box box3">
+ </div>
+ </div>
+</template>
+
+<style>
+ .wrapper {
+ position: absolute;
+ top: 0;
+ right: 0;
+ bottom: 0;
+ left: 0;
+ background-color: #cccccc;
+ }
+ .box {
+ width: 400px;
+ height: 400px;
+ position: absolute;
+ }
+ .box1 {
+ top: 0;
+ left: 0;
+ background-color: #ff0000;
+ }
+ .box2 {
+ top: 150px;
+ left: 150px;
+ background-color: #0055dd;
+ }
+ .box3 {
+ top: 300px;
+ left: 300px;
+ background-color: #00ff49;
+ }
+</style>
+```
+
+## transform
+
+transform 属性向元素应用 2D 转换。该属性允许我们对元素进行旋转、缩放、移动或倾斜。
+
+目前支持的 transform 声明格式:
+
+- translate( <number/percentage> [, <number/percentage>]?)
+- translateX( <number/percentage> )
+- translateY( <number/percentage> )
+- scale( <number>)
+- scaleX( <number> )
+- scaleY( <number> )
+- rotate( <angle/degree> )
+- rotateX( <angle/degree> ) <span class="api-version">v0.14+</span>
+- rotateY( <angle/degree> ) <span class="api-version">v0.14+</span>
+- perspective( <number> ) Android 4.1及以上版本支持 <span class="api-version">v0.16+</span>
+- transform-origin: number/percentage/keyword(top/left/right/bottom)
+
+### 示例
+
+```HTML
+<template>
+ <div class="wrapper">
+ <div class="transform">
+ <text class="title">Transformed element</text>
+ </div>
+ </div>
+</template>
+
+<style>
+ .transform {
+ align-items: center;
+ transform: translate(150px,200px) rotate(20deg);
+ transform-origin: 0 -250px;
+ border-color:red;
+ border-width:2px;
+ }
+ .title {font-size: 48px;}
+</style>
+```
+
+
+
+## transition <span class="api-version">v0.16.0+</span>
+
+现在您可以在CSS中使用transition属性来提升您应用的交互性与视觉感受,transition中包括布局动画,即LayoutAnimation,现在布局产生变化的同时也能使用transition带来的流畅动画。transition允许CSS的属性值在一定的时间区间内平滑地过渡。
+
+### 参数
+
+- ``transition-property``:允许过渡动画的属性名,设置不同样式transition效果的键值对,默认值为空,表示不执行任何transition,下表列出了所有合法的参数属性:
+
+| 参数名 | 描述 |
+| --------------- | ------------------------------ |
+| width | transition过渡执行的时候是否组件的宽度参与动画 |
+| height | transition过渡执行的时候是否组件的高度参与动画 |
+| top | transition过渡执行的时候是否组件的顶部距离参与动画 |
+| bottom | transition过渡执行的时候是否组件的底部距离参与动画 |
+| left | transition过渡执行的时候是否组件的左侧距离参与动画 |
+| right | transition过渡执行的时候是否组件的右侧距离参与动画 |
+| backgroundColor | transition过渡执行的时候是否组件的背景颜色参与动画 |
+| opacity | transition过渡执行的时候是否组件的不透明度参与动画 |
+| transform | transition过渡执行的时候是否组件的变换类型参与动画 |
+
+- ``transition-duration``:指定transition过渡的持续时间 (单位是毫秒),默认值是 `0`,表示没有动画效果。
+
+- ``transition-delay``:指定请求transition过渡操作到执行transition过渡之间的时间间隔 (单位是毫秒或者秒),默认值是 `0`,表示没有延迟,在请求后立即执行transition过渡。
+
+- ``transition-timing-function``:描述transition过渡执行的速度曲线,用于使transition过渡更为平滑。默认值是 `ease`。下表列出了所有合法的属性:
+
+| 属性名 | 描述 |
+| ------------------------------ | ---------------------------------------- |
+| ease | transition过渡逐渐变慢的过渡效果 |
+| ease-in | transition过渡慢速开始,然后变快的过渡效果 |
+| ease-out | transition过渡快速开始,然后变慢的过渡效果 |
+| ease-in-out | transition过渡慢速开始,然后变快,然后慢速结束的过渡效果 |
+| linear | transition过渡以匀速变化 |
+| cubic-bezier(x1, y1, x2, y2) | 使用三阶贝塞尔函数中自定义transition变化过程,函数的参数值必须处于 0 到 1 之间。更多关于三次贝塞尔的信息请参阅 [cubic-bezier](http://cubic-bezier.com/) 和 [Bézier curve](https://en.wikipedia.org/wiki/B%C3%A9zier_curve). |
+
+### 示例
+
+```html
+<style scoped>
+ .panel {
+ margin: 10px;
+ top:10px;
+ align-items: center;
+ justify-content: center;
+ border: solid;
+ border-radius: 10px;
+
+ transition-property: width,height,backgroundColor;
+ transition-duration: 0.3s;
+ transition-delay: 0s;
+ transition-timing-function: cubic-bezier(0.25, 0.1, 0.25, 1.0);
+ }
+</style>
+```
+
+## 伪类 <span class="api-version">v0.9.5+</span>
+
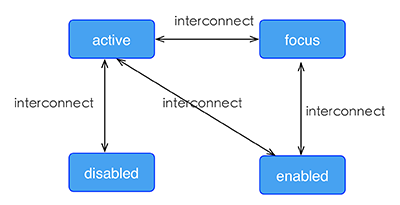
+Weex 支持四种伪类:`active`, `focus`, `disabled`, `enabled`
+
+所有组件都支持 `active`, 但只有 `input` 组件和 `textarea` 组件支持 `focus`, `enabled`, `disabled`。
+
+### 规则
+
+- 同时生效的时候,优先级高覆盖优先级低
+
+ - 例如:`input:active:enabled` 和 `input:active` 同时生效,前者覆盖后者
+
+- 互联规则如下所示
+
+ 
+
+### 示例
+
+```html
+<template>
+ <div class="wrapper">
+ <image :src="logoUrl" class="logo"></image>
+ </div>
+</template>
+
+<style scoped>
+ .wrapper {
+ align-items: center;
+ margin-top: 120px;
+ }
+ .title {
+ font-size: 48px;
+ }
+ .logo {
+ width: 360px;
+ height: 82px;
+ background-color: red;
+ }
+ .logo:active {
+ width: 180px;
+ height: 82px;
+ background-color: green;
+ }
+</style>
+
+<script>
+ export default {
+ props: {
+ logoUrl: {
+ default: 'https://alibaba.github.io/weex/img/weex_logo_blue@3x.png'
+ },
+ target: {
+ default: 'World'
+ }
+ },
+ methods: {
+ update (e) {
+ this.target = 'Weex';
+ }
+ }
+ };
+</script>
+```
+
+[试一下](http://dotwe.org/vue/df2c8f254620d6d30d0906ee75fe5b99)
+
+## 线性渐变 <span class="api-version">v0.10+</span>
+
+Weex 支持线性渐变背景,具体介绍可参考 [W3C description of the gradient](https://developer.mozilla.org/en-US/docs/Web/CSS/CSS_Images/Using_CSS_gradients)。
+
+所有组件均支持线性渐变。
+
+### 使用
+
+ 你可以通过 `background-image` 属性创建线性渐变。
+
+```css
+background-image: linear-gradient(to top,#a80077,#66ff00);
+```
+
+目前暂不支持 `radial-gradient`(径向渐变)。
+
+Weex 目前只支持两种颜色的渐变,渐变方向如下:
+
+* to right
+ 从左向右渐变
+* to left
+ 从右向左渐变
+* to bottom
+ 从上到下渐变
+* to top
+ 从下到上渐变
+* to bottom right
+ 从左上角到右下角
+* to top left
+ 从右下角到左上角
+
+### Note
+
+- `background-image` 优先级高于 `background-color`,这意味着同时设置 `background-image` 和 `background-color`,`background-color` 被覆盖。
+- 不要使用 `background` 简写.
+
+### 示例
+
+```html
+<template>
+ <scroller style="background-color: #3a3a3a">
+ <div class="container1" style="background-image:linear-gradient(to right,#a80077,#66ff00);">
+ <text class="direction">to right</text>
+ </div>
+ <div class="container1" style="background-image:linear-gradient(to left,#a80077,#66ff00);">
+ <text class="direction">to left</text>
+ </div>
+ <div class="container1" style="background-image:linear-gradient(to bottom,#a80077,#66ff00);">
+ <text class="direction">to bottom</text>
+ </div>
+ <div class="container1" style="background-image:linear-gradient(to top,#a80077,#66ff00);">
+ <text class="direction">to top</text>
+ </div>
+ <div style="flex-direction: row;align-items: center;justify-content: center">
+ <div class="container2" style="background-image:linear-gradient(to bottom right,#a80077,#66ff00);">
+ <text class="direction">to bottom right</text>
+ </div>
+ <div class="container2" style="background-image:linear-gradient(to top left,#a80077,#66ff00);">
+ <text class="direction">to top left</text>
+ </div>
+ </div>
+ </scroller>
+</template>
+<style>
+ .container1 {
+ margin: 10px;
+ width: 730px;
+ height: 200px;
+ align-items: center;
+ justify-content: center;
+ border: solid;
+ border-radius: 10px;
+ }
+
+ .container2 {
+ margin: 10px;
+ width: 300px;
+ height: 300px;
+ align-items: center;
+ justify-content: center;
+ border: solid;
+ border-radius: 10px;
+ }
+
+ .direction {
+ font-size: 40px;
+ color: white;
+ }
+</style>
+```
+
+## 阴影(box-shadow) <span class="api-version">v0.11+</span>
+
+Weex 支持阴影属性:`active`, `focus`, `disabled`, `enabled` `inset(可选)`,`offset-x`,`offset-y`, `blur-radius`,`color`
+
+
+### 注意
+
+- box-shadow仅仅支持iOS
+
+### 示例
+
+```html
+<template>
+ <div class="wrapper">
+ <div style="width:400px; height:60px;background-color: #FFE4C4; box-shadow:20px 10px rgb(255, 69, 0);">
+ <text class="title" style="text-align: center">Hello {{target}}</text>
+ </div>
+ <div style="margin-top: 80px;width:400px; height:60px;background-color: #FFE4C4; box-shadow: 20px 10px 5px rgba(255, 69, 0, 0.8);">
+ <text class="title" style="text-align: center">Hello {{target}}</text>
+ </div>
+ <div style="margin-top: 80px;width:400px; height:60px;background-color: #FFE4C4; box-shadow:inset 20px 10px 5px rgba(255, 69, 0, 0.8);">
+ <text class="title" style="text-align: center">Hello {{target}}</text>
+ </div>
+ <div style="margin-top: 80px;width:400px; height:60px;background-color: #FFE4C4; box-shadow:inset 20px 10px 5px rgb(255, 69, 0);">
+ <text class="title" style="text-align: center">Hello {{target}}</text>
+ </div>
+ <div style="margin-top: 80px;width:400px; height:60px;background-color: #FFE4C4; box-shadow:20px 10px 5px black;">
+ <text class="title" style="text-align: center">Hello {{target}}</text>
+ </div>
+ <div style="margin-top: 80px;width:400px; height:60px;background-color: #FFE4C4; box-shadow:20px 10px 5px #008B00;">
+ <text class="title" style="text-align: center">Hello {{target}}</text>
+ </div>
+ </div>
+</template>
+
+<style scoped>
+ .wrapper {align-items: center; margin-top: 120px;}
+ .title {font-size: 48px;}
+</style>
+
+<script>
+ module.exports = {
+ data: function () {
+ return {
+ logoUrl: 'https://alibaba.github.io/weex/img/weex_logo_blue@3x.png',
+ target: 'World'
+ };
+ }
+ };
+</script>
+```
+
+## 其他基本样式
+
+- `opacity {number}`:取值范围为 [0, 1] 区间。默认值是 1,即完全不透明;0 是完全透明;0.5 是 50% 的透明度。
+- `background-color {color}`:设定元素的背景色,可选值为色值,支持RGB( `rgb(255, 0, 0)` );RGBA( `rgba(255, 0, 0, 0.5)` );十六进制( `#ff0000` );精简写法的十六进制( `#f00` );色值关键字(`red`),默认值是 `transparent` 。
+
+**注意:** [色值的关键字列表](./color-names.html)。
+
+## 上手样式
+
+如果对于样式写法需要更多上手参考,可参考每个组件的文档中,都有常见的例子可供参考。
+
+你可以按照以下步骤来规划 Weex 页面的样式。
+
+1. 全局样式规划:将整个页面分割成合适的模块。
+2. flex 布局:排列和对齐页面模块。
+3. 定位盒子:定位并设置偏移量。
+4. 细节样式处理:增加特定的具体样式。
http://git-wip-us.apache.org/repos/asf/incubator-weex-site/blob/32a097bf/source/cn/wiki/css-units.md
----------------------------------------------------------------------
diff --git a/source/cn/wiki/css-units.md b/source/cn/wiki/css-units.md
new file mode 100644
index 0000000..c76aa8b
--- /dev/null
+++ b/source/cn/wiki/css-units.md
@@ -0,0 +1,65 @@
+---
+title: CSS 单位
+type: wiki
+group: 样式
+order: 3.3
+version: 2.1
+has_chapter_content: true
+---
+
+# CSS 单位
+
+## CSS `color` 单位
+
+支持以下写法:
+
+```css
+.classA {
+ /* 3-chars hex */
+ color: #0f0;
+ /* 6-chars hex */
+ color: #00ff00;
+ /* rgba */
+ color: rgb(255, 0, 0);
+ /* rgba */
+ color: rgba(255, 0, 0, 0.5);
+ /* transparent */
+ color: transparent;
+ /* Basic color keywords */
+ color: orange;
+ /* Extended color keywords */
+ color: darkgray;
+}
+```
+
+### 注意
+
+* 不支持 `hsl()`, `hsla()`, `currentColor`, 8个字符的十六进制颜色。
+
+* `rgb(a,b,c)` 或 `rgba(a,b,c,d)` 的性能比其他颜色格式差很多,请选择合适的颜色格式。
+
+颜色名称可查看 [颜色名称列表](./color-names.html).
+
+## CSS `length` 单位
+
+在 Weex 中,我们只支持 `px` 长度单位。并且它将在 JavaScript 运行时和本机渲染器中解析为数字类型。
+
+下面这些不同的写法,解析的结果完全相同。
+
+```css
+.classA { font-size: 48px; line-height: 64px; }
+```
+
+不支持类似 `em`,`rem`,`pt` 这样的 CSS 标准中的其他长度单位。
+
+## CSS `number` 单位
+
+仅仅一个数字。用于 [`opacity`](./common-style.html),[`lines`](./text-style.html)等。
+
+有时值必须是整数,例如:`lines`。
+
+## CSS `percentage` 单位 (暂不支持)
+
+表示百分比值,如“50%”,“66.7%”等。
+
+它是 CSS 标准的一部分,但 Weex 暂不支持。
http://git-wip-us.apache.org/repos/asf/incubator-weex-site/blob/32a097bf/source/cn/wiki/design-principle.md
----------------------------------------------------------------------
diff --git a/source/cn/wiki/design-principle.md b/source/cn/wiki/design-principle.md
new file mode 100644
index 0000000..c72ba3a
--- /dev/null
+++ b/source/cn/wiki/design-principle.md
@@ -0,0 +1,8 @@
+---
+title: 设计理念
+type: wiki
+group: Design
+order: 1.4
+has_chapter_content: false
+version: 2.1
+---
http://git-wip-us.apache.org/repos/asf/incubator-weex-site/blob/32a097bf/source/cn/wiki/event-bubble.md
----------------------------------------------------------------------
diff --git a/source/cn/wiki/event-bubble.md b/source/cn/wiki/event-bubble.md
new file mode 100644
index 0000000..b6bd083
--- /dev/null
+++ b/source/cn/wiki/event-bubble.md
@@ -0,0 +1,147 @@
+---
+title: 事件冒泡
+type: wiki
+group: 事件
+order: 4.2
+version: 2.1
+---
+
+# 事件冒泡 <span class="api-version">v0.13+</span>
+
+Weex 2.0 实现了 W3C 标准的事件冒泡机制。
+
+### 使用
+
+```html
+<template>
+ <div class="root" @click="rootClick" bubble="true">
+ <text style="font-size: 40px;">{{rootText}}</text>
+ <div class="outer" @click="parentClick">
+ <div>
+ <text style="font-size: 40px;">{{parentText}}</text>
+ </div>
+ <text class="inner" @click="click">{{innerText}}</text>
+ </div>
+ </div>
+</template>
+
+<script>
+ module.exports = {
+ data: {
+ innerText: 'click me',
+ parentText: '',
+ rootText: ''
+ },
+ methods: {
+ click: function(e) {
+ this.innerText = 'inner bubble'
+ },
+ parentClick: function(e) {
+ this.parentText = 'parent bubble'
+ },
+ rootClick: function(e) {
+ this.rootText = 'root bubble'
+ }
+ }
+ }
+</script>
+
+<style scoped>
+ .inner {
+ font-size: 40px;
+ text-align: center;
+ background-color: #7a9b1b;
+ padding: 40px;
+ }
+
+ .outer {
+ font-size: 40px;
+ text-align: center;
+ background-color: #9b7a1b;
+ padding: 120px;
+ }
+
+ .root {
+ font-size: 40px;
+ text-align: center;
+ background-color: #7a1b9b;
+ padding: 80px;
+ }
+</style>
+```
+
+[try it](http://dotwe.org/vue/fa2957ce3e9eb47ad9ae1da22d845e95)
+
+运行以上代码,用客户端打开,点击中间的元素,可以看到事件向上传播,依次触发。
+
+### 注意
+
+需要注意的是: ** 为了兼容之前的版本,Weex 默认不会开启事件冒泡机制。需要在根元素的属性上,添加 `bubble="true"` 来开启冒泡机制。否则,将不会向上传播事件,保持与之前版本的效果相同。 **
+
+### stopPropagation
+
+在事件处理函数中,可以使用 `e.stopPropagation()` 方法,来阻止本次事件向上的传递过程。注意,`e.stopPropagation()` 与 `bubble="true"` 不同,前者只会影响当前元素以及父元素的传播,不会影响子元素的传播;后者是为了版本兼容而增加的开关机制,会全局关闭或者开启冒泡机制,两者可以共同存在使用,如下:
+
+```html
+<template>
+ <div class="root" @click="rootClick" bubble="true">
+ <text style="font-size: 40px;">{{rootText}}</text>
+ <div class="outer" @click="parentClick">
+ <div>
+ <text style="font-size: 40px;">{{parentText}}</text>
+ </div>
+ <text class="inner" @click="click">{{innerText}}</text>
+ </div>
+ </div>
+</template>
+
+<script>
+ module.exports = {
+ data: {
+ innerText: 'click me',
+ parentText: '',
+ rootText: ''
+ },
+ methods: {
+ click: function(e) {
+ this.innerText = 'inner bubble'
+ },
+ parentClick: function(e) {
+ this.parentText = 'parent bubble'
+ e.stopPropagation()
+ },
+ rootClick: function(e) {
+ this.rootText = 'root bubble'
+ // e.stopPropagation()
+ }
+ }
+ }
+</script>
+
+<style scoped>
+ .inner {
+ font-size: 40px;
+ text-align: center;
+ background-color: #7a9b1b;
+ padding: 40px;
+ }
+
+ .outer {
+ font-size: 40px;
+ text-align: center;
+ background-color: #9b7a1b;
+ padding: 120px;
+ }
+
+ .root {
+ font-size: 40px;
+ text-align: center;
+ background-color: #7a1b9b;
+ padding: 80px;
+ }
+</style>
+```
+
+[try it](http://dotwe.org/vue/2cc80e19c9b2430fb780234628065a69)
+
+运行以上代码,用客户端打开,点击中间的元素,可以看到事件向上传播到父元素被终止,不再继续往根元素传播。
http://git-wip-us.apache.org/repos/asf/incubator-weex-site/blob/32a097bf/source/cn/wiki/faq.md
----------------------------------------------------------------------
diff --git a/source/cn/wiki/faq.md b/source/cn/wiki/faq.md
new file mode 100644
index 0000000..12c64d4
--- /dev/null
+++ b/source/cn/wiki/faq.md
@@ -0,0 +1,226 @@
+---
+title: 常见问题
+type: wiki
+group: FAQ
+order: 8
+version: 2.1
+layout: post
+---
+
+# 常见问题解答
+
+## 如何查阅旧文档?
+
+你可以通过文档左侧目录最后一项 “旧文档” 进入对于的历史文档页面。也可以直接访问以下链接访问:
+
+- [Guide](./v-0.10/guide/index.html)
+- [手册](./v-0.10/references/index.html)
+- [高阶知识](./v-0.10/advanced/index.html)
+- [工具](./v-0.10/tools/index.html)
+
+## Windows 指令错误
+
+请先安装 [Git for Windows](https://git-scm.com/download/win),在 [For Windows](https://github.com/apache/incubator-weex/tree/dev#for-windows) 中查看更多信息。
+
+
+## Android Studio 中 Gradle 错误
+
+下载 `license-gradle-plugin.jar` 可能引发一些错误,比如 `链接被重置(Connection reset)` 和 `证书无效(peer not authenticated)` 。这可能是由于网络问题导致的,请尝试使用代理或VPN。
+
+## 使用本地图片
+
+Weex 的原生运行机制支持从设备中加载图片,你只需要设置文件 url,例如 `file:///sdcard/image_new0.png` 这样的格式。但是 Weex 暂时还不支持加载你工程中的图片文件。
+
+## Windows 错误 `The header content contains invalid characters ` (头中包含非法字符)
+
+这是由于 weex-toolkit 的依赖 http-server 导致的,http-server 的老版本在中文 windows 中的支持不是很好。我们已经修复了这个问题,请在使用前升级 weex-toolkit 版本。
+
+## Playground 应用在扫面后什么都没有显示(白屏)
+
+最好的方法是查看 debug 日志来查找原因,你可以按照 [这篇文档](./guide/how-to/debug-with-devtools.html) 中的说明来查明导致这一问题的原因。
+
+## 关于 ECMAScript 版本问题
+
+Weex 在 iOS 中使用 JSCore ,在 Android 中使用 v8,因此他们都支持 ECMAScript 5。另外,我们还在原生环境中加了一些 polyfills:
+
+- `Promise` in iOS/Android
+- `Timer APIs` (setTimeout/clearTimeout/setInterval/clearInterval`) in iOS/Android
+- `console` in iOS/Android
+
+在浏览器中我们暂时是包含了一个 `Promise` 的 polyfill。
+
+在未来,开发者可以选择是否通过 configurations 来导入一个 polyfill。
+
+你也可以通过带有 `webpack` 的 `babel` 来写 ES6,这个加载器能够自动将 ES6 转换为 ES5。
+
+如果你还想要更多的 ES6 polyfills,你可以把他们引入到 JS Bundle 中。
+
+## 前端依赖
+
+在 Weex 中你有很多方法来 import/require 一个组件或者一个 JS 模块。以 ES5 为例:
+
+- `require('xxx.js')` : 依赖一个 JS 文件
+- `require('npm-module-name')` : 依赖一个 NPM 模块
+- `require('xxx.we')` : 包含一个 `.we` 文件来注册一个 Weex 自定义组件
+- `require('@weex-module/xxx')` : 依赖一个 Weex 原生模块。注意这只支持 `*.we` 文件而不支持 `*.js` 文件。如果你想要在一个 `*.js` 文件中使用 Weex 原生模块,暂时你可以这样写:
+
+```js
+// use this piece of code below to get Weex native module "modal"
+var modal
+__weex_define__('@weex-temp/x', function (__weex_require__) {
+ modal = __weex_require__('@weex-module/modal')
+})
+
+// use APIs in "modal" module
+modal.toast({message: 'hello'})
+```
+
+以后我们会给大家带来一个更好的设计。
+
+## iOS 文本 `line-height` 样式不正常
+
+`line-height` 样式在 `<text>` 组件中的表现与 H5 和 Android 不同,文本不会在行内居中,而是贴近行底部,因为这里使用的 iOS 原生 API。我们正在努力优化,与其他两端保持一致。
+
+## Android 只支持 `overflow:hidden`
+
+`overflow` 样式在 Android 默认为 `hidden` 并且无法修改,原因是 Android View framework 限制。这个问题只出现在 Android 端,iOS 端和 H5 正常。
+
+## 如何取消 750 像素自适应并以宽高比计算真实像素?
+
+`this.$getConfig()` 方法会返回一个对象,这个对象的 `deviceHeight` 和 `deviceWidth` 属性即实际设备宽度/高度(以像素为单位),而不是以 750 适配的。
+
+因此,您可以使用它们来计算实际像素的宽度/高度。
+
+假设您需要显示固定为 88 px 的导航栏,该导航栏的高度将是:
+
+``` javascript
+var height = 88 * 750 / env.deviceWidth
+```
+
+## 如何在 JavaScript 中检测是否支持某个原生的 module/component
+
+### 检测原生 module
+
+```javascript
+var xxx = require('@weex-module/xxx')
+if (xxx) {
+ // todo: use this module
+}
+else {
+ // todo: handle the exception
+}
+```
+
+### 检测原生 component
+
+```html
+<template>
+ <component is="{{type}}"></component>
+</template>
+
+<script>
+ var type = 'xxx'
+ var xxx = require('@weex-component/xxx')
+ if (!xxx) {
+ type = 'div' // downgrade to <div>
+ }
+ module.exports = {
+ data: function () {
+ return {
+ type: type
+ }
+ }
+ }
+</script>
+```
+
+## 如何在 pages 之间传递数据
+
+如果你有两个页面,A 页面和 B 页面
+
+1. A -> B,使用 [getConfig api](/references/api.md#getconfig) or [storage module](/modules/storage.md) 传递数据;
+2. B -> A,使用 [storage module](/modules/storage.md) 传递数据。
+
+
+## 父子组件之间进行 repeat 操作
+
+如果你有需求,在父子组件之间进行 repeat 操作,需要注意,必须严格按照官网文档的语法来书写代码。如果缺少子组件定义 data 数据,或者是没有指定需要向下传递的 props,都会导致页面不正常渲染。
+
+错误示例:
+
+```html
+<element name="child">
+ <template>
+ <div>
+ <text style="font-size:100">{{title}}</text>
+ </div>
+ </template>
+</element>
+
+<template>
+ <div>
+ <child repeat="item in lists"></child>
+ </div>
+</template>
+<script>
+ module.exports = {
+ data: {
+ lists: [
+ { title: 'A' },
+ { title: 'B' },
+ { title: 'C' }
+ ]
+ },
+ ready: function () {
+ this.lists.splice(0, 1)
+ }
+ }
+</script>
+```
+
+以上示例的理想执行情况,应该是页面上第一个元素 A 被删除,剩下 B、C 两个元素。
+但是,由于错误的写法,导致列表执行 splice 操作之后,出现错误的更新情况:页面最后一个元素 C 被删除。
+
+正确的写法如下:
+
+```html
+<element name="child">
+ <template>
+ <div>
+ <text style="font-size:100">{{title}}</text>
+ </div>
+ </template>
+
+ <script>
+ module.exports = {
+ data: {
+ title: null
+ }
+ }
+ </script>
+</element>
+
+<template>
+ <div>
+ <child repeat="item in lists" title="{{ item.title }}"></child>
+ </div>
+</template>
+<script>
+ module.exports = {
+ data: {
+ lists: [
+ { title: 'A' },
+ { title: 'B' },
+ { title: 'C' }
+ ]
+ },
+ ready: function () {
+ this.lists.splice(0, 1)
+ }
+ }
+</script>
+```
+
+在线示例请见:
+
+* [错误示例](http://dotwe.org/de97cf2c1b7ec09a53728edc9c27ad2a)
http://git-wip-us.apache.org/repos/asf/incubator-weex-site/blob/32a097bf/source/cn/wiki/gestures.md
----------------------------------------------------------------------
diff --git a/source/cn/wiki/gestures.md b/source/cn/wiki/gestures.md
new file mode 100644
index 0000000..dd75b31
--- /dev/null
+++ b/source/cn/wiki/gestures.md
@@ -0,0 +1,61 @@
+---
+title: 手势
+type: wiki
+group: 事件
+order: 4.3
+version: 2.1
+---
+
+# 手势
+
+*注:该功能属于实验性功能*
+
+Weex 封装了原生的触摸事件以提供手势系统。使用手势类似于在 Weex 中使用事件,只需在节点上设置 `on` 特性来监听手势即可。
+
+## 手势类型
+
+目前,仅支持以下四种手势类型:
+
+- **Touch**:当触摸到一个点,移动或从触摸面移开时触发 `touch` 手势。触摸手势很精准,它会返回所有详细的事件信息。所以,监听 `touch` 手势可能很慢,即使只移动一丁点也需要处理大量事件。有三种类型的 `touch` 手势:
+
+ - `touchstart` 将在触摸到触摸面上时触发。
+ - `touchmove` 将在触摸点在触摸面移动时被触发。
+ - `touchend` 将在从触摸面离开时被触发。
+
+- **Pan**:`pan` 手势也会返回触摸点在触摸面的移动信息,有点类似于 `touch` 手势。但是 `pan` 手势只会采样收集部分事件信息因此比 `touch` 事件要快得多,当然精准性差于 `touch`。`pan` 也有三中类型的手势,这些手势的意义与 `touch` 完全一样:
+
+ - `panstart`
+ - `panmove`
+ - `panend`
+ - `horizontalpan` <span class="api-version">v0.10+</span>:手势的 `start/move/end` 状态保存在 `state` 特性中。目前该手势在 Android 下会与 click 事件冲突。
+ - `verticalpan` <span class="api-version">v0.10+</span>:势的 `start/move/end` 状态保存在 `state` 特性中。目前该手势在 Android 下会与 click 事件冲突。
+- **Swipe**:`swipe` 将会在用户在屏幕上滑动时触发,一次连续的滑动只会触发一次 `swiper` 手势。
+- **LongPress**:`LongPress` 将会在触摸点连续保持 500 ms以上时触发。
+
+`touch` 和 `pan` 非常接近,它们的特点可以总结成这样:
+
+- **Touch**:完整信息,精准、很慢
+- **Pan**:抽样信息,很快,不够精准
+
+开发者可以根据自己的情况选择合适的手势。
+
+## 属性
+
+以下属性可以在手势的回调中使用:
+
+- `direction`:仅在 `swipe` 手势中存在,返回滑动方向,返回值可能为 `up`, `left`, `bottom`, `right`。
+- `changedTouches`:一个数组,包含了当前手势的触摸点的运动轨迹
+
+### changedTouches
+
+`changedTouches` 是一个数组,其子元素中包含以下属性:
+
+- `identifier`:触摸点的唯一标识符。
+- `pageX`:触摸点相对于文档左侧边缘的 X 轴坐标。
+- `pageY`:触摸点相对于文档顶部边缘的 Y 轴坐标。
+- `screenX`:触摸点相对于屏幕左侧边缘的 X 轴坐标。
+- `screenY`:触摸点相对于屏幕顶部边缘的 Y 轴坐标。
+
+## 约束
+
+目前,由于会触发大量事件冲突,Weex Android 还不支持在滚动类型的元素上监听手势,例如 `scroller`, `list` 和 `webview` 这三个组件。
http://git-wip-us.apache.org/repos/asf/incubator-weex-site/blob/32a097bf/source/cn/wiki/how-it-works.md
----------------------------------------------------------------------
diff --git a/source/cn/wiki/how-it-works.md b/source/cn/wiki/how-it-works.md
new file mode 100644
index 0000000..e21fa47
--- /dev/null
+++ b/source/cn/wiki/how-it-works.md
@@ -0,0 +1,63 @@
+---
+title: 工作原理
+type: wiki
+group: Design
+order: 1.1
+has_chapter_content: false
+chapter_title: 优势介绍
+version: 2.1
+---
+
+# 工作原理
+
+## 整体架构
+
+Weex 表面上是一个客户端技术,但实际上它串联起了从本地开发环境到云端部署和分发的整个链路。开发者首先可以在本地像撰写 web 页面一样撰写一个 app 的页面,然后编译成一段 JavaScript 代码,形成 Weex 的一个 JS bundle;在云端,开发者可以把生成的 JS bundle 部署上去,然后通过网络请求或预下发的方式传递到用户的移动应用客户端;在移动应用客户端里,WeexSDK 会准备好一个 JavaScript 引擎,并且在用户打开一个 Weex 页面时执行相应的 JS bundle,并在执行过程中产生各种命令发送到 native 端进行的界面渲染或数据存储、网络通信、调用设备功能、用户交互响应等移动应用的场景实践;同时,如果用户没有安装移动应用,他仍然可以在浏览器里打开一个相同的 web 页面,这个页面是使用相同的页面源代码,通过浏览器里的 JavaScript 引擎运行起来的。
+
+
+
+## 本地开发环境
+
+Weex 的本地开发环境基于 web 开发体验而设计,web 开发者可以通过自己熟悉的 HTML/CSS/JavaScript 技术和语法实现移动应用的界面。同时 Weex 也对 [Vue.js](https://vuejs.org/) 这一非常优秀的前端框架做了官方的支持。
+
+除此之外,Weex 的工程设计也是 web 开发者非常熟悉的,首先 web 开发者可以使用自己熟悉的 npm 进行依赖管理;其次 web 开发者在通过项目脚手架初始化工程、开发、调试、质量控制等各个环节,都可以参考 web 开发已有的最佳实践。
+
+和如今 web 开发的最佳实践一样,Weex 会把一个页面的源代码全部编译打包成一个 JS bundle,在浏览器中,我们需要把这个 JS bundle 作为一段 `<script>` 载入网页,在客户端里,我们把这段 JS bundle 载入本地,并通过 WeexSDK 直接执行。
+
+**相关阅读**
+
+* [Weex 和 web 平台的差异](../../references/platform-difference.html)
+* [Vue 2.x 在 Weex 和 web 中的差异](../../references/vue/difference-with-web.html)
+* [快速上手](../index.html)
+* [使用 Devtools](./devtools.html)
+
+## 云端部署和分发
+
+Weex 的 JS bundle 可以作为 web 开发中的一段静态资源进行部署和下发。几乎可以复用 HTML5 所有的工程体系和最佳实践。比如在本地开发环境通过部署工具将 JS bundle 部署到 CDN、通过 CMS 或搭建平台把业务数据和模块化的前端组件自动化拼接生成 JS bundle、通过服务端 JS bundle 的流量和日志统计页面的访问情况、通过 AppCache 或类似的方式对 JS bundle 在客户端进行缓存或预加载以降低网络通信的成本等。
+
+## 客户端 JavaScript 引擎
+
+Weex 的 iOS 和 Android 客户端中都会运行一个 JavaScript 引擎,来执行 JS bundle,同时向各端的渲染层发送规范化的指令,调度客户端的渲染和其它各种能力。我们在 iOS 下选择了 JavaScriptCore 内核,而在 Android 下选择了 UC 提供的 v8 内核。无论是从性能还是稳定性方面都提供了强有力的保障。
+
+为了让整个移动应用的资源利用得更好,我们在客户端提供的 JavaScript 引擎是单例的,即所有 JS bundle 公用一个 JavaScript 内核实例,同时对每个 JS bundle 在运行时进行了上下文的隔离,使得每个 JS bundle 都能够高效安全的工作。我们还把 Vue 2.0 这样的 JS Framework 做了预置,开发者不必把 JS Framework 打包在每个 JS bundle 里,从而大大减少了 JS bundle 的体积,也就进一步保障了页面打开的速度。
+
+## 客户端渲染层
+
+Weex 目前提供了 iOS 和 Android 两个客户端的 native 渲染层。每个端都基于 DOM 模型设计并实现了标准的界面渲染接口供 JavaScript 引擎调用。并且结合 web 标准和 native 的特点和优势实现了一套统一的组件和模块。Weex 在性能方面的表现也是非常优异的,尤其是界面首屏加载时间、native 下长列表的资源开销和复用情况、CPU、内存、帧率 等关键指标。当然,尽管 Weex 官方已经提供了一组开发者最常用的组件和模块,但面对丰富多样的移动应用研发需求,团队也难免会力不从心,为此我们提供了灵活自由的横向扩展能力,开发者可以根据自身的情况定制属于自己的客户端组件和模块,进一步丰富 Weex 在客户端上的能力。
+
+**相关链接**
+
+* [Weex 的组件和模块跟 web 标准的区别](../../references/web-standards.html)
+* [如何使用 iOS](../../references/ios-apis.html)
+* [如何使用 Android](../../references/android-apis.html)
+* [如何扩展 iOS](../../references/advanced/extend-to-ios.html)
+* [如何扩展 Android](../../references/advanced/extend-to-android.html)
+
+## 浏览器渲染
+
+Weex 除了提供 iOS 和 Android 的客户端渲染层之外,还基于 Vue 2.0 对官方的所有组件和模块进行了封装,开发者可以基于 Vue 2.0 用同一套源代码构建出在浏览器中相同效果的页面。并且同样可以横向扩展。
+
+**相关链接**
+
+* [如何使用 HTML5](../../references/html5-apis.html)
+* [如何扩展 HTML5](../../references/advanced/extend-to-html5.html)
http://git-wip-us.apache.org/repos/asf/incubator-weex-site/blob/32a097bf/source/cn/wiki/index.md
----------------------------------------------------------------------
diff --git a/source/cn/wiki/index.md b/source/cn/wiki/index.md
new file mode 100644
index 0000000..8a36f64
--- /dev/null
+++ b/source/cn/wiki/index.md
@@ -0,0 +1,6 @@
+---
+title: WiKi
+type: wiki
+order: 0
+version: 2.1
+---
http://git-wip-us.apache.org/repos/asf/incubator-weex-site/blob/32a097bf/source/cn/wiki/platform-difference.md
----------------------------------------------------------------------
diff --git a/source/cn/wiki/platform-difference.md b/source/cn/wiki/platform-difference.md
new file mode 100644
index 0000000..7c8fad4
--- /dev/null
+++ b/source/cn/wiki/platform-difference.md
@@ -0,0 +1,71 @@
+---
+title: 与 Web 平台的差异
+type: wiki
+group: Design
+order: 1.5
+version: 2.1
+has_chapter_content: true
+---
+
+# Weex 和 Web 平台的差异
+
+Weex 是一个跨平台解决方案,Web 平台只是其一种运行环境,除此之外还可以在 Android 和 iOS 客户端中运行。原生开发平台和 Web 平台之间的差异,在功能和开发体验上都有一些差异。
+
+## Weex 环境中没有 DOM
+
+DOM(Document Object Model),即文档对象模型,是 HTML 和 XML 文档的编程接口,是 Web 中的概念。Weex 的运行环境以原生应用为主,在 Android 和 iOS 环境中渲染出来的是原生的组件,不是 DOM Element。
+
+### 不支持 DOM 操作
+
+既然原生环境中不支持 Web API,没有 `Element` 、`Event` 、`File` 等对象,详细列表可以参考 [Web APIs on MDN](https://developer.mozilla.org/en-US/docs/Web/API)。不支持选中元素,如 `document.getElementById` 、 `document.querySelector` 等;当然也不支持基于 DOM API 的程序库(如 jQuery)。
+
+### 有限的事件类型
+
+Weex 支持在标签上绑定事件,和在浏览器中的写法一样,但是 Weex 中的事件是由原生组件捕获并触发的,行为和浏览器中有所不同,事件中的属性也和 Web 中有差异。
+
++ 并不支持 Web 中所有的事件类型,详情请参考[《通用事件》](./common-event.html)。
++ 不区分事件的捕获阶段和冒泡阶段,相当于 DOM 0 级事件。
+
+## Weex 环境中没有 BOM
+
+BOM(Browser Object Model),即浏览器对象模型,是浏览器环境为 javascript 提供的接口。Weex 在原生端没有并不基于浏览器运行,不支持浏览器提供的 BOM 接口。
+
+### 没有 `window` 、`screen` 对象
+
+Weex 中并未提供浏览器中的 `window` 和 `screen` 对象,不支持使用全局变量。如果是想要获取设备的屏幕或环境信息,可以使用 `WXEnvironment` 变量。
+
++ `WXEnvironment`
+ + `weexVersion`: WeexSDK 的版本。
+ + `appName`: 应用的名称。
+ + `appVersion`: 应用的版本。
+ + `platform`: 运行平台,可能的值是 `Web` 、`Android` 、`iOS` 之一。
+ + `osName`: 系统的名称。
+ + `osVersion`: 系统版本。
+ + `deviceWidth`: 设备宽度。
+ + `deviceHeight`: 设备高度。
+
+### 没有 `document` 对象
+
+在浏览器中 `document` 表示了当前活动的文档模型,在 Android 和 iOS 环境中并没有这个对象,也不支持与其相关的 DOM 操作。
+
+### 没有 `history` 、`location` 、`navigator` 对象
+
++ `history` 保存了当前页面的历史记录,并且提供了前进后退操作。
++ `location` 记录了当前页面 URL 相关的信息。
++ `navigator` 记录了当前浏览器中的信息。
+
+这些接口与浏览器自身的实现有关,可以控制页面的前进后退并且获取状态信息。虽然在 Android 和 iOS 中也有“历史”和“导航”的概念,但是它是用于多个管理视图之间的跳转的。换句话说,在浏览器中执行“前进”、“后退”仍然会处于同一个页签中,在原生应用中“前进”、“后退”则会真实的跳转到其他页面。
+
+此外 Weex 也提供了 `navigator` 模块来操作页面的跳转,使用方法参考[《navigator 导航控制》](./modules/navigator.html)。
+
+## 能够调用移动设备原生 API
+
+在 Weex 中能够调用移动设备原生 API,使用方法是通过注册、调用模块来实现。其中有一些模块是 Weex 内置的,如 clipboard 、 navigator 、storage 等。
+
++ [《clipboard 剪切板》](./modules/clipboard.html)
++ [《navigator 导航控制》](./modules/navigator.html)
++ [《storage 本地存储 》](./modules/storage.html)
+
+为了保持框架的通用性,Weex 内置的原生模块有限,不过 Weex 提供了横向扩展的能力,可以扩展原生模块,具体的扩展方法请参考[《iOS 扩展》](./advanced/index.html) 和[《Android 扩展》](./advanced/extend-to-android.html)。
+
+> 有些接口在浏览器环境中也存在,不过在使用时应该注意浏览器的兼容性;如剪贴板功能,出于安全性考虑,绝大多数浏览器都限制其使用。
http://git-wip-us.apache.org/repos/asf/incubator-weex-site/blob/32a097bf/source/cn/wiki/text-styles.md
----------------------------------------------------------------------
diff --git a/source/cn/wiki/text-styles.md b/source/cn/wiki/text-styles.md
new file mode 100644
index 0000000..b2c6865
--- /dev/null
+++ b/source/cn/wiki/text-styles.md
@@ -0,0 +1,47 @@
+---
+title: 文本样式
+type: wiki
+group: 样式
+order: 3.2
+version: 2.1
+---
+
+# 文本样式
+
+<span class="weex-version">v0.5+</span>
+
+文本类组件共享一些通用样式, 这类组件目前包括 [`<text>`](./components/text.html) 和 [`<input>`](./components/input.html)。
+
+## 属性
+
+- `color {color}`:文字颜色。
+
+ 可选值为色值,支持 RGB( `rgb(255, 0, 0)` );RGBA( `rgba(255, 0, 0, 0.5)` );十六进制( `#ff0000` );精简写法的十六进制( `#f00` );色值关键字(`red`)。
+
+- `lines {number}`: 指定文本行数。仅在 `<text>` 组件中支持。默认值是 `0` 代表不限制行数。
+
+- `font-size {number}`:文字大小。
+
+- `font-style {string}`:字体类别。可选值 `normal` | `italic`,默认为 `normal`。
+
+- `font-weight {string}`<span class="api-version">v0.9+</span>:字体粗细程度
+
+ * 可选值: `normal`, `bold`, `100`, `200`, `300`, `400`, `500`, `600`, `700`, `800`, `900`
+ * normal 等同于 400, bold 等同于 700;
+ * 默认值: `normal`;
+ * iOS 支持 9 种 font-weight值;Android 仅支持 400 和 700, 其他值会设为 400 或 700
+ * 类似 `lighter`, `bolder` 这样的值暂时不支持
+
+- `text-decoration {string}`:字体装饰,可选值 `none` | `underline` | `line-through`,默认值为 `none`。
+
+- `text-align {string}`:对齐方式。可选值 `left` | `center` | `right`,默认值为 `left`。目前暂不支持 `justify`, `justify-all`。
+
+- `font-family {string}`:设置字体。
+
+ 这个设置 **不保证** 在不同平台,设备间的一致性。如所选设置在平台上不可用,将会降级到平台默认字体。
+
+- `text-overflow {string}`:设置内容超长时的省略样式。可选值 `clip` | `ellipsis`
+
+## 其它参考
+
+- [颜色关键字列表](./color-names.html)。
http://git-wip-us.apache.org/repos/asf/incubator-weex-site/blob/32a097bf/source/contributing.md
----------------------------------------------------------------------
diff --git a/source/contributing.md b/source/contributing.md
new file mode 100644
index 0000000..e231c11
--- /dev/null
+++ b/source/contributing.md
@@ -0,0 +1,105 @@
+---
+title: How to Contribute
+type: community
+has_chapter_content: false
+version: 2.1
+---
+
+# How to Contribute
+
+Welcome to create [pull requests](https://github.com/apache/incubator-weex/compare) or join in our [mailing list](http://mail-archives.apache.org/mod_mbox/incubator-weex-dev/) for bugfix, doc, example, suggestion and anything.
+
+## Join in Weex Mailing List
+
+In Weex community all discussion will happen on mailing list.
+
+Just send an email to `dev-subscribe@weex.incubator.apache.org` and follow the instructions to subscribe Weex dev mailing list. And then you will receive all discussions and community messages by your personal email. In the same time you can freely send your own emails to join in us.
+
+At the same time you can see the archives of all the mails through the web: [http://mail-archives.apache.org/mod_mbox/incubator-weex-dev/](http://mail-archives.apache.org/mod_mbox/incubator-weex-dev/)
+
+*If you won't follow the mailing list any more. There is another way to unsubscribe it: send an email to `dev-unsubscribe@weex.incubator.apache.org` and follow the instructions.*
+
+Besides Weex dev mailing list, we also have some other mailing lists for you. You can check them out here: http://mail-archives.apache.org/mod_mbox/#weex.incubator
+
+## Branch Management
+
+```
+release
+ ↑
+release-{version}
+ ↑
+master <--- PR(feature/hotfix/typo)
+```
+
+0. `master` branch
+ 0. `master` is the stable developing branch.
+ 0. ***It's RECOMMENDED to commit hotfix (like typo) or feature PR to `master `***.
+0. `release-{version}` branch
+ 0. `release-{version}` is used for every version which we consider for stable publish.
+ 0. e.g. `release-0.16`
+0. `release` branch
+ 0. `release` is the latest release branch,we will make tag and publish version on this branch.
+
+### Branch Name For PR
+
+```
+{module}-{action}-{shortName}
+```
+
+* `{module}`, see [commit log module](#commit-log)
+* `{action}`
+ * `feature`: checkout from `{module}` and merge to `{module}` later. If `{module}` not exists, merge to `dev`
+ * `bugfix`: like `feature`, for bugfix only
+ * `hotfix`: checkout from `master` or release `tag`, merge to `master` and `{module}` later. If `{module}` not exists, merge to `dev`
+
+for example:
+
+* `android-bugfix-memory`
+* `jsfm-feature-communication`
+* `android-hotfix-compute-layout`
+
+## Commit Log
+
+```
+{action} [{module}] {description}
+```
+
+* `{action}`
+ * `+` add
+ * `*` update or bugfix
+ * `-` remove
+* `{module}`
+ * Including: android, ios, jsfm, html5, component, doc, website, example, test, all
+* `{description}`
+ * Just make it as clear and simple as possible.
+
+for example:
+
+* `+ [android] close #123, add refreshing for WebView`
+* `* [doc] fix #123, update video auto-play property`
+* `- [example] remove abc`
+
+## Pull Request
+
+You can [create pull requests](https://github.com/apache/incubator-weex/compare) in GitHub.
+
+1. First we suggest you have some discussion with the community (commonly in our mailing list) before you code.
+2. Fork repo from [https://github.com/apache/incubator-weex/](https://github.com/apache/incubator-weex/)
+3. Finish the job you want to do.
+4. Create a pull request.
+
+## Code Style Guide
+
+### Objective-C
+
+* Tabs for indentation(not spaces)
+* `*` operator goes with the variable name (e.g. Type *variable;)
+* Function definitions: place each brace on its own line.
+* Other braces: place the open brace on the line preceding the code block; place the close brace on its own line.
+* Use `#pragma marks` to categorize methods into functional groupings and protocol implementations
+* Follow other guidelines on [GitHub Objective-C Style Guide](https://github.com/github/objective-c-style-guide)
+
+### Java & Android
+
+* Use [Google Java Style](https://google.github.io/styleguide/javaguide.html) as basic guidelines of java code.
+* Follow [AOSP Code Style](https://source.android.com/source/code-style.html) for rest of android related code style.
http://git-wip-us.apache.org/repos/asf/incubator-weex-site/blob/32a097bf/source/faq.md
----------------------------------------------------------------------
diff --git a/source/faq.md b/source/faq.md
deleted file mode 100644
index afff270..0000000
--- a/source/faq.md
+++ /dev/null
@@ -1,207 +0,0 @@
----
-title: FAQ
-type: faq
-layout: post
----
-
-# FAQ
-
-## Where are legacy docs?
-
-- [Guide](./v-0.10/guide/index.html)
-- [References](./v-0.10/references/index.html)
-- [Advanced](./v-0.10/advanced/index.html)
-- [Tools](./v-0.10/tools/index.html)
-
-## Command errors in MS Windows
-
-Please install [Git for Windows](https://git-scm.com/download/win) first, see [For Windows](https://github.com/apache/incubator-weex/tree/dev#for-windows) for more information.
-
-
-## Gradle errors in Android Studio
-
-Downloading `license-gradle-plugin.jar` may trigger errors, like `Connection reset` or `peer not authenticated`.
-Maybe a network problem, try a proxy or VPN.
-
-## Use local image
-Weex's native runtime support load image file from device's disk, all you have to do set the file url like `file:///sdcard/image_new0.png`. As to load image file in your project, Weex is not support yet.
-
-## Error(`The header content contains invalid characters`) in windows
-This's is caused by weex-toolkit's dependency 'http-server', whose old version is not working well in chinese windows environment. We have fixed that, you should upgrade weex-toolkit before use that.
-
-## Playground app display nothing (white screen) after scan
-Best way to find out what's happening is read debug log, you can follow [this document](./guide/index.html) to firgure out how to do that.
-
-## About ECMAScript Version
-
-Weex uses JSCore in iOS and uses v8 in Android. So they both support ECMAScript 5 spec. Additionally, we do some polyfills in native environment:
-
-* `Promise` in iOS/Android
-* Timer APIs (`setTimeout` / `clearTimeout` / `setInterval` / `clearInterval`) in iOS/Android
-* `console` in iOS/Android
-
-In Browser we contains a polyfill of `Promise` temporarily. In the future developers can choose whether to import a polyfill by configurations.
-
-You can also write ES6 syntax by `babel` with `webpack`. The loader will convert ES6 syntax into ES5 automatically.
-
-If you want more ES6 polyfills you can import them into the JS Bundle as you like.
-
-## Dependencies in frontend
-
-In Weex you may have some ways to import/require a component or a JS module. Take ES5 syntax for example:
-
-* `require('xxx.js')`: depends on a JS file
-* `require('npm-module-name')`: depends on a NPM module
-* `require('xxx.we')`: include a `we` file to register a Weex custom component
-* `require('@weex-module/xxx')`: depends on a Weex native module. Notice that it is supported only in `*.we` file not `*.js` file. If you want to use Weex native module in a `*.js` file, temporarily you may write like this:
-
-```javascript
-// use this piece of code below to get Weex native module "modal"
-var modal
-__weex_define__('@weex-temp/x', function (__weex_require__) {
- modal = __weex_require__('@weex-module/modal')
-})
-
-// use APIs in "modal" module
-modal.toast({message: 'hello'})
-```
-
-We will bring a better syntax design in the future.
-
-## iOS text line-height style is abnormal
-
-`line-height` style in text component is different from h5 and Android, text value will be placed at bottom of line box because of iOS native api. We are trying to optimize it.
-
-## Android only support `overflow:hidden`
-The `overflow` style in android is `hidden` and cannot be changed. This is the result of Android View framework. This only happens on Android, iOS will work as expected.
-
-## How to get rid of 750 adaption and calculate width/height in real pixels?
-
-The deviceHeight and deviceWidth got in `this.$getConfig()` is the real device width/height in pixels, not the ones with 750-adapted.
-
-So you can use them to calculate width/height in real pixels.
-
-Suppose you need to display a navigation bar of fixed 88 pixels, the bar's height will be:
-
-```
-var height = 88 * 750 / env.deviceWidth
-```
-
-
-## How to detect an native module/component supported in JavaScript?
-
-### Detect native module
-
-```javascript
-var xxx = require('@weex-module/xxx')
-if (xxx) {
- // todo: use this module
-}
-else {
- // todo: handle the exception
-}
-```
-
-### Detect native component
-
-```html
-<template>
- <component is="{{type}}"></component>
-</template>
-
-<script>
- var type = 'xxx'
- var xxx = require('@weex-component/xxx')
- if (!xxx) {
- type = 'div' // downgrade to <div>
- }
- module.exports = {
- data: function () {
- return {
- type: type
- }
- }
- }
-</script>
-```
-
-## How to transfer data between pages
-
-If you have 2 pages, A and B.
-
-0. A -> B, use [storage module](./references/modules/storage.html) to transfer data
-0. B -> A, use [storage module](./references/modules/storage.html) to transfer data
-
-## How to use `repeat` in Parent-Child components
-
-If you want, You can make a `repeat` operation between Parent-Child components. But you must be strictly in accordance with the document syntax to write code. If there is no child component defined data, or there is no specify `props` that need to be passed down. It will lead to the page does not render properly.
-
-A correct example:
-
-```html
-<element name="child">
- <template>
- <div>
- <text style="font-size:100">{{title}}</text>
- </div>
- </template>
-
- <script>
- module.exports = {
- data: {
- title: null
- }
- }
- </script>
-</element>
-<template>
- <div>
- <child repeat="item in lists" title="{{ item.title }}"></child>
- </div>
-</template>
-<script>
- module.exports = {
- data: {
- lists: [
- { title: 'A' },
- { title: 'B' },
- { title: 'C' }
- ]
- },
- ready: function () {
- this.lists.splice(0, 1)
- }
- }
-</script>
-```
-
-A wrong example:
-
-```html
-<element name="child">
- <template>
- <div>
- <text style="font-size:100">{{title}}</text>
- </div>
- </template>
-</element>
-<template>
- <div>
- <child repeat="item in lists"></child>
- </div>
-</template>
-<script>
- module.exports = {
- data: {
- lists: [
- { title: 'A' },
- { title: 'B' },
- { title: 'C' }
- ]
- },
- ready: function () {
- this.lists.splice(0, 1)
- }
- }
-</script>
-```
http://git-wip-us.apache.org/repos/asf/incubator-weex-site/blob/32a097bf/source/guide/advanced/app-architecture.md
----------------------------------------------------------------------
diff --git a/source/guide/advanced/app-architecture.md b/source/guide/advanced/app-architecture.md
new file mode 100644
index 0000000..dc0f80f
--- /dev/null
+++ b/source/guide/advanced/app-architecture.md
@@ -0,0 +1,62 @@
+---
+title: Mobile App Architecture
+type: guide
+group: Advanced Guide
+order: 8.5
+version: 2.1
+---
+
+# Mobile App Architecture
+
+## Today's Mobile App
+
+Let's talk about what we think a mobile app should be.
+
+### Mobile App Needs Parallel Development
+
+Nowadays, all mobile app teams requires the ability to develop in parallel. When a mobile app keeps growing, supporting large-scale parallel development must become a very important key thing. Otherwise it's really easy to become a bottleneck.
+
+### Mobile App Needs to be Dynamic
+
+Today the development of mobile apps is very heavy. And it's really slow in iteration, release, distribution and online bugfix. The size of the package of an app is growing fast too. All of this is not suitable for this mobile internet age. Mobile app needs to be dynaimic which is out of the cumbersome process of version deployment and distribution.
+
+### Mobile App Needs Open Interconnection
+
+Today in your phone, things are hard to connect and share between different apps. They needs some container with common standard and specs to be shared with each other.
+
+## Our Thinking of Mobile App
+
+We think a dynamic, parallel development supported, standardized mobile app should be like this:
+
+```
+|------|------|------|------| |-----|
+| page | page | page | page | | api |
+|------|------|------|------| | api |
+| page | page | page | page | | api |
+|------|------|------|------| | api |
+| page | page | page | page | | api |
+|---------------------------| | api |
+| router | | api |
+|---------------------------| |-----|
+```
+
+* Pages: A whole mobile app should be divided into several mobile pages. Each mobile page has its own "URL".
+* Router: All the mobile pages above will be connected with router. And navigators or tab bars are just doing this job.
+* Features: All kinds of APIs or services provided from the device. Every mobile page could use these features as they like.
+
+So before you build your mobile app, make sure how many mobile pages your mobile app has and what are they. How do they connect each other. Give each mobile page a URL. And sort out all the APIs and services your mobile app needs.
+
+Then create the pages and develop, debug and deploy them using Weex.
+
+**Links**
+
+* [Mobile page architecture](./page-architecture.html)
+
+If you have built a complete mobile app already and just want to using Weex to rebuild part of these pages, that's absolutely no problem. Because Weex is just a SDK to build mobile pages which can coexist very well with other native views or hybrid pages.
+
+If the feature of WeexSDK is limited to your mobile app. You can extend your own components and modules. It requires some native development knowledge. But with our efforts on delivering more and more features, we believe this part of job will be getting smaller and smaller.
+
+**Links**
+
+* [Extend to iOS](../../references/advanced/extend-to-ios.html)
+* [Extend to Android](../../references/advanced/extend-to-android.html)
http://git-wip-us.apache.org/repos/asf/incubator-weex-site/blob/32a097bf/source/guide/advanced/downgrade.md
----------------------------------------------------------------------
diff --git a/source/guide/advanced/downgrade.md b/source/guide/advanced/downgrade.md
new file mode 100644
index 0000000..753fcff
--- /dev/null
+++ b/source/guide/advanced/downgrade.md
@@ -0,0 +1,12 @@
+---
+title: Downgrade
+type: guide
+group: Advanced Guide
+order: 8.2
+version: 2.1
+---
+
+# downgrade
+
+Weex 2.0 downgrade change to module,please refer to [downgrade](https://www.npmjs.com/package/@weex-project/downgrade)
+
http://git-wip-us.apache.org/repos/asf/incubator-weex-site/blob/32a097bf/source/guide/advanced/page-architecture.md
----------------------------------------------------------------------
diff --git a/source/guide/advanced/page-architecture.md b/source/guide/advanced/page-architecture.md
new file mode 100644
index 0000000..8117536
--- /dev/null
+++ b/source/guide/advanced/page-architecture.md
@@ -0,0 +1,49 @@
+---
+title: Weex Page Architecture
+type: guide
+group: Advanced Guide
+order: 8.6
+version: 2.1
+---
+
+# Weex Page Architecture
+
+A Weex page is a independent mobile page which includes UI, interaction logic, device power, lifecycle management etc.
+
+## UI
+
+### Native DOM Model
+
+Weex page has its HTML-like DOM model to manage UI. It will be decomposed into a DOM tree which consists of some DOM nodes.
+
+**Links**
+
+* [Weex Native DOM APIs](../../references/native-dom-api.html)
+
+### Components
+
+Weex supports many kinds of components. Some of them are content components such as text, image and videos. Some of them are container components such as div, list, scroller. Also there are some special components like slider, input, textarea, and switch.
+
+**Links**
+
+* [All components Weex supports](../../references/components/index.html)
+
+### Layout System
+
+Weex use some CSS properties to layout every nodes in the DOM tree together. It includes:
+
+* Box model: Describe the `width`, `height`, `padding`, `margin` and `border` of a component node.
+* Flexbox: Describe the relations between different nodes with CSS Flexbox Spec.
+* Supportting `absolute`, `relative`, `fixed` and `sticky` value of CSS `position` property.
+
+### Features
+
+Weex supports lots of device features through modules such as storage, navigation, modals etc. Each of them exposes some JS APIs.
+
+**Links**
+
+* [All modules Weex supports](../../references/modules/index.html)
+
+### Lifecycle
+
+Every Weex page has its lifecycle which is defined and implemented in WeexSDK. All Weex pages will go through the whole process, from being created and last to being destroyed.
http://git-wip-us.apache.org/repos/asf/incubator-weex-site/blob/32a097bf/source/guide/advanced/path.md
----------------------------------------------------------------------
diff --git a/source/guide/advanced/path.md b/source/guide/advanced/path.md
new file mode 100644
index 0000000..898881f
--- /dev/null
+++ b/source/guide/advanced/path.md
@@ -0,0 +1,38 @@
+---
+title: Asset Path
+type: guide
+group: Advanced Guide
+order: 8.1
+version: 2.1
+has_chapter_content: true
+---
+
+# Path
+
+<span class="weex-version">0.9</span>
+
+This article will cover uri (url) usage in Weex. Including using image/typeface resources, deal with relative uri and how to access local and packaged asset files.
+
+## Schemes
+
+* Local
+Weex SDK provide `local` scheme to access resources packaged with application, and of cource, it's not working in the HTML5 runtime.
+Currently, developers can use this scheme with `image` and text's font file location.
+ * In iOS, it's always locate file in 'bundle resources'. For example, a `image` component with `local:///app_icon` will load image file named 'app_icon' in bundle resouce, and font file work in the same way.
+ * In Android, image component will load from 'drawable' resource folder like 'res/drawable-xxx'. But load font file is different, android framework can not load font file from 'res', so SDK will load it from `asserts` folder.
+
+* HTTP/HTTPS
+It's working in the same way as in web, Weex support these at very beginning.
+
+* File
+Use `file` scheme to access local disk file. This scheme has its limitations: You would not hard coded a file url in source page. Because not matter it's running in different platform(iOS, Android) or not, the content will be totally different in another device, which is depend to the specific device.
+So one possible case is getting the file url in runtime dynamically, which you can use it to diaplay a local disk image, or maybe upload it later.
+
+## Relative URI
+
+[Like we do in HTML](https://www.w3.org/TR/html4/types.html#type-uri), weex process 'relative URI' in the same way. The relative URI, which start with `/`,`.`,`..`,`//`, will resolve by the bunle url.
+Means URL start with `/` will resolve to the root folder as bundle js file, `.` and `..` will resolve to current and parent folder, and `//` will resolve to same scheme bundle js have.
+
+## URI Adapter
+
+All the above is the default implementation, developers can extend or override these their own by providing a 'URI Adapter'. Same as the other adapters, Custom adapter should be set before Weex SDK is initializing.
http://git-wip-us.apache.org/repos/asf/incubator-weex-site/blob/32a097bf/source/guide/advanced/use-vuex-and-vue-router.md
----------------------------------------------------------------------
diff --git a/source/guide/advanced/use-vuex-and-vue-router.md b/source/guide/advanced/use-vuex-and-vue-router.md
new file mode 100644
index 0000000..037f1bb
--- /dev/null
+++ b/source/guide/advanced/use-vuex-and-vue-router.md
@@ -0,0 +1,90 @@
+---
+title: Use Vuex and vue-router
+type: guide
+group: Advanced Guide
+order: 8.4
+version: 2.1
+---
+
+# Using Vuex and vue-router
+
+Vue.js also has many peripheral technology products such as [Vuex](https://github.com/vuejs/vuex) and [vue-router](https://github.com/vuejs/vue-router), etc. Those libraries can also works well in Weex.
+
+> We developed a complete project based on Weex and Vue.js which named [weex-hackernews](https://github.com/weepteam/web-ehackernews). We used Vuex and vue-loader in it, and it works well on both iOS, Android and web.
+
+## Using Vuex
+
+> [Official Vuex documents](https://vuex.vuejs.org/en/)
+
+
+
+Vuex is a state management pattern + library for Vue.js applications. it's also a library implementation tailored specifically for Vue.js to take advantage of its granular reactivity system for efficient updates. It serves as a centralized store for all the components in an application, with rules ensuring that the state can only be mutated in a predictable fashion.
+
+As a kind of state management library, Vuex is platform-independent, It also can be used in Weex. Read its [official documents](https://vuex.vuejs.org/en/) for more details.
+
+It also integrates with Vue's official [devtools extension](https://github.com/vuejs/vue-devtools) to provide advanced features on web platform, such as zero-config time-travel debugging and state snapshot export / import. (web platform only)
+
+## Using vue-router
+
+> [Official vue-router documents](https://router.vuejs.org/en/)
+
+Creating a Single-page Application with Vue.js + vue-router is dead simple. With Vue.js, you are already composing our application with components. When adding vue-router to the mix, all you need to do is map your components to the routes and let vue-router know where to render them.
+
+However, there are many difference between web and Android or iOS, some features of vue-router are limited in Weex.
+
+### Router mode
+
+vue-router provides three routing modes:
+
++ `hash`: uses the URL hash for routing. Works in all Vue-supported browsers, including those that do not support HTML5 History API. (**default**)
++ `history`: requires HTML5 History API and server config. See [HTML5 History Mode](https://router.vuejs.org/en/essentials/history-mode.html).
++ `abstract`: works in all JavaScript environments, e.g. server-side with Node.js.
+
+You can pass the `mode` parameter when creating a router:
+
+```js
+new Router({
+ mode: 'abstract',
+ // ...
+})
+```
+
+Obviously "hash" mode and "history" mode are only available on the web, and have no effect in Weex. That is, you have to use "abstract" mode in Android and iOS. However, **vue-router will automatically be forced into "abstract" mode if no browser API is present.** so, just don't set the `mode` option, or set it to "abstract".
+
+### Programmatic navigation
+
+vue-router use `<router-link>` to create a navigation link, but in which some of the features based on the DOM events, it doesn't work well in the native environment. In Weex, you must use the [Programmatic Navigation](https://router.vuejs.org/en/essentials/navigation.html) to manage the router.
+
+Here is an basic example using `<router-link>`:
+
+```html
+<!-- Can only be used on the web, it takes no effects on Android or iOS! -->
+<template>
+ <div>
+ <router-link to="profile">
+ <text>Profile</text>
+ </router-link>
+ </div>
+</template>
+```
+
+For native platforms, you have to use the `router.push`:
+
+```html
+<template>
+ <div>
+ <text @click="jump">Profile</text>
+ </div>
+</template>
+
+<script>
+ import router from './path/to/router'
+ export default {
+ methods: {
+ jump () {
+ router.push('profile')
+ }
+ }
+ }
+</script>
+```
http://git-wip-us.apache.org/repos/asf/incubator-weex-site/blob/32a097bf/source/guide/contributing.md
----------------------------------------------------------------------
diff --git a/source/guide/contributing.md b/source/guide/contributing.md
deleted file mode 100644
index 0d4ba82..0000000
--- a/source/guide/contributing.md
+++ /dev/null
@@ -1,106 +0,0 @@
----
-title: How to Contribute
-type: guide
-order: 6
-has_chapter_content: true
-version: 2.1
----
-
-# How to Contribute
-
-Welcome to create [pull requests](https://github.com/apache/incubator-weex/compare) or join in our [mailing list](http://mail-archives.apache.org/mod_mbox/incubator-weex-dev/) for bugfix, doc, example, suggestion and anything.
-
-## Join in Weex Mailing List
-
-In Weex community all discussion will happen on mailing list.
-
-Just send an email to `dev-subscribe@weex.incubator.apache.org` and follow the instructions to subscribe Weex dev mailing list. And then you will receive all discussions and community messages by your personal email. In the same time you can freely send your own emails to join in us.
-
-At the same time you can see the archives of all the mails through the web: [http://mail-archives.apache.org/mod_mbox/incubator-weex-dev/](http://mail-archives.apache.org/mod_mbox/incubator-weex-dev/)
-
-*If you won't follow the mailing list any more. There is another way to unsubscribe it: send an email to `dev-unsubscribe@weex.incubator.apache.org` and follow the instructions.*
-
-Besides Weex dev mailing list, we also have some other mailing lists for you. You can check them out here: http://mail-archives.apache.org/mod_mbox/#weex.incubator
-
-## Branch Management
-
-```
-release
- ↑
-release-{version}
- ↑
-master <--- PR(feature/hotfix/typo)
-```
-
-0. `master` branch
- 0. `master` is the stable developing branch.
- 0. ***It's RECOMMENDED to commit hotfix (like typo) or feature PR to `master `***.
-0. `release-{version}` branch
- 0. `release-{version}` is used for every version which we consider for stable publish.
- 0. e.g. `release-0.16`
-0. `release` branch
- 0. `release` is the latest release branch,we will make tag and publish version on this branch.
-
-### Branch Name For PR
-
-```
-{module}-{action}-{shortName}
-```
-
-* `{module}`, see [commit log module](#commit-log)
-* `{action}`
- * `feature`: checkout from `{module}` and merge to `{module}` later. If `{module}` not exists, merge to `dev`
- * `bugfix`: like `feature`, for bugfix only
- * `hotfix`: checkout from `master` or release `tag`, merge to `master` and `{module}` later. If `{module}` not exists, merge to `dev`
-
-for example:
-
-* `android-bugfix-memory`
-* `jsfm-feature-communication`
-* `android-hotfix-compute-layout`
-
-## Commit Log
-
-```
-{action} [{module}] {description}
-```
-
-* `{action}`
- * `+` add
- * `*` update or bugfix
- * `-` remove
-* `{module}`
- * Including: android, ios, jsfm, html5, component, doc, website, example, test, all
-* `{description}`
- * Just make it as clear and simple as possible.
-
-for example:
-
-* `+ [android] close #123, add refreshing for WebView`
-* `* [doc] fix #123, update video auto-play property`
-* `- [example] remove abc`
-
-## Pull Request
-
-You can [create pull requests](https://github.com/apache/incubator-weex/compare) in GitHub.
-
-1. First we suggest you have some discussion with the community (commonly in our mailing list) before you code.
-2. Fork repo from [https://github.com/apache/incubator-weex/](https://github.com/apache/incubator-weex/)
-3. Finish the job you want to do.
-4. Create a pull request.
-
-## Code Style Guide
-
-### Objective-C
-
-* Tabs for indentation(not spaces)
-* `*` operator goes with the variable name (e.g. Type *variable;)
-* Function definitions: place each brace on its own line.
-* Other braces: place the open brace on the line preceding the code block; place the close brace on its own line.
-* Use `#pragma marks` to categorize methods into functional groupings and protocol implementations
-* Follow other guidelines on [GitHub Objective-C Style Guide](https://github.com/github/objective-c-style-guide)
-
-### Java & Android
-
-* Use [Google Java Style](https://google.github.io/styleguide/javaguide.html) as basic guidelines of java code.
-* Follow [AOSP Code Style](https://source.android.com/source/code-style.html) for rest of android related code style.
http://git-wip-us.apache.org/repos/asf/incubator-weex-site/blob/32a097bf/source/guide/extend-android.md
----------------------------------------------------------------------
diff --git a/source/guide/extend-android.md b/source/guide/extend-android.md
new file mode 100644
index 0000000..52c8849
--- /dev/null
+++ b/source/guide/extend-android.md
@@ -0,0 +1,218 @@
+---
+title: Extend Android
+type: guide
+group: Extend
+order: 6.2
+version: 2.1
+---
+
+## Module extend
+
+weex sdk support Module extend, Weex SDK provides only rendering capabilities, rather than have other capabilities, such as network, picture, and URL redirection. If you want the these features, you need to implement it.
+
+For example: If you want to implement an address jumping function, you can achieve a Module Follow the steps below.
+
+### Step to customize a module
+
+- Customize module must extend WXModule
+- @WXModuleAnno annotation must be added, as it is the only the way to recognized by Weex
+- The access levels of mehtod must be **public**
+- The module class also can not be an inner class
+- Customize can not be obfuscated by tools like ProGuard
+- Module methods will be invoked in UI thread, do not put time consuming operation there
+- Weex params can be int, double, float, String, Map, List
+
+Refer to the following example:
+
+```java
+public class WXEventModule extends WXModule{
+
+ private static final String WEEX_CATEGORY="com.taobao.android.intent.category.WEEX";
+
+ @WXModuleAnno
+ public void openURL(String url){
+ //implement your module logic here
+ }
+}
+```
+
+#### Support synchronous/asynchronous callback
+
+You can add `@JSMethod (uiThread = false or true)` annotation to choose the callback mode of moudle. See the follow example.
+
+```java
+ // as sync-callback mode
+@JSMethod (uiThread = false)
+public void testSyncCall(){
+ WXLogUtils.d("WXComponentSyncTest : Thread.currentThread().getName());
+}
+
+// as async-callback mode
+@JSMethod (uiThread = true)
+public void testAsyncCall(){
+ WXLogUtils.e("WXComponentASynTest : Thread.currentThread().getName() );
+}
+```
+
+### Register the moulde
+
+```java
+WXSDKEngine.registerModule("event", WXEventModule.class);
+```
+
+### Use this module in weex DSL
+Now `event` moudle is avaiable in weex, use the module like this:
+
+```javascript
+var event = weex.requireModule('event');
+event.openURL("http://www.github.com");
+```
+
+### Javascript callback
+
+If the module need implement a callback to javascript, you just add `JSCallback` argument to the method you want expose to javascript:
+
+```java
+@WXModuleAnno
+public void openURL(String url,JSCallback callback){
+ //implement your module logic here
+ Map<String,Object> resp = new HashMap();
+ resp.put("result","ok");
+ callback.invoke(resp);
+}
+```
+
+At the javascript side, call the module with javascript function to receive callback data:
+
+```javascript
+event.openURL("http://www.github.com",function(resp){ console.log(resp.result); });
+```
+
+### Component extend
+
+There are label, image, div, scroll, ect. components in weex, you can also customize your own components.
+
+#### Step to customize a component
+
+1. Customize components must extend WXComponent or WXContainer
+2. @WXComponentProp(name=value(value is attr or style of dsl)) for it be recognized by weex SDK.
+3. The access levels of mehtod must be **public**
+4. The component class can not be an inner class
+5. Customize can not be obfuscated by tools like ProGuard
+6. Component methods will be invoked in UI thread, do not put time consuming operation there.
+7. Weex params can be int, double, float, String, Map, List, Array
+
+
+Refer to the following example
+
+```java
+public class MyViewComponent extends WXComponent{
+ public MyViewComponent(WXSDKInstance instance, WXDomObject dom,
+ WXVContainer parent, String instanceId, boolean isLazy)
+ {
+ public MyViewComponent(WXSDKInstance instance, WXDomObject dom,
+ WXVContainer parent, String instanceId, boolean isLazy) {
+ super(instance, dom, parent, instanceId, isLazy);
+ }
+
+ @Override
+ protected void initView() {
+ mHost = new TextView(mContext);
+ }
+ @WXComponentProp(name=WXDomPropConstant.WX_ATTR_VALUE)
+ public void setMyViewValue(String value) {
+ ((TextView)mHost).setText(value);
+ }
+}
+```
+
+#### Register the Component
+
+
+```java
+WXSDKEngine.registerComponent("MyView", MyViewComponent.class);
+```
+
+### Adapter extend
+
+#### ImagedownloadAdapter
+
+Weex SDK has no image download capability, you need to implement `IWXImgLoaderAdapter`. Refer to the following examples.
+
+```java
+public class ImageAdapter implements IWXImgLoaderAdapter {
+
+ private Activity mContext;
+
+ public ImageAdapter(Activity activity) {
+ mContext = activity;
+ }
+
+ @Override
+ public void setImage(final String url, final ImageView view,
+ WXImageQuality quality, WXImageStrategy strategy) {
+ mContext.runOnUiThread(new Runnable() {
+
+ @Override
+ public void run() {
+ if (TextUtils.isEmpty(url)) {
+ view.setImageBitmap(null);
+ return;
+ }
+ String temp = url;
+ if (url.startsWith("//")){
+ temp = "http:" + url;
+ }
+ if (view.getLayoutParams().width<=0 || view.getLayoutParams().height<=0) {
+ return;
+ }
+ Picasso.with(WXEnvironment.getApplication())
+ .load(temp)
+ .resize(view.getLayoutParams().width,
+ view.getLayoutParams().height).into(view);
+ }
+ });
+ }
+}
+```
+
+#### Component Method
+ from WeexSDK `0.9.5`, you can define your component method
+
+ for example, define a method in component:
+
+ ```java
+ @JSMethod
+ public void focus(){
+ //method implementation
+ }
+ ```
+
+ after your registration for your own custom component, now you can call it in your js file.
+
+ ```html
+<template>
+ <mycomponent id='mycomponent'></mycomponent>
+</template>
+<script>
+ module.exports = {
+ created: function() {
+ this.$el('mycomponent').focus();
+ }
+ }
+</script>
+```
+
+#### Proguard Rules
+
+If you want to using proguard to protect your source code, please add the following rules to your profile:
+
+```java
+-keep class com.taobao.weex.WXDebugTool{*;}
+-keep class com.taobao.weex.devtools.common.LogUtil{*;}
+-keep public class * extends com.taobao.weex.ui.component.WXComponent{*;}
+-keep public class * extends com.taobao.weex.common.WXModule{*;}
+-keepclassmembers class ** {
+ @com.taobao.weex.ui.component.WXComponentProp public *;
+}
+```