You are viewing a plain text version of this content. The canonical link for it is here.
Posted to notifications@apisix.apache.org by ju...@apache.org on 2022/02/25 13:01:00 UTC
[apisix-website] branch master updated: docs: add consul blog (#905)
This is an automated email from the ASF dual-hosted git repository.
juzhiyuan pushed a commit to branch master
in repository https://gitbox.apache.org/repos/asf/apisix-website.git
The following commit(s) were added to refs/heads/master by this push:
new 5be3739 docs: add consul blog (#905)
5be3739 is described below
commit 5be37392cdb3dc9087751db6c2bd65cdc46f3967
Author: yilinzeng <36...@users.noreply.github.com>
AuthorDate: Fri Feb 25 21:00:53 2022 +0800
docs: add consul blog (#905)
---
website/blog/2022/02/25/consul.md | 251 +++++++++++++++++++++
.../2022/02/25/consul.md | 246 ++++++++++++++++++++
2 files changed, 497 insertions(+)
diff --git a/website/blog/2022/02/25/consul.md b/website/blog/2022/02/25/consul.md
new file mode 100644
index 0000000..1a22416
--- /dev/null
+++ b/website/blog/2022/02/25/consul.md
@@ -0,0 +1,251 @@
+---
+title: "Apache APISIX Integrates with Consul KV to Expand Its Capabilities in Service Discovery"
+authors:
+ - name: "Tao Yang"
+ title: "Author"
+ url: "https://github.com/SkyeYoung"
+ image_url: "https://github.com/SkyeYoung.png"
+ - name: "Yilin Zeng"
+ title: "Technical Writer"
+ url: "https://github.com/yzeng25"
+ image_url: "https://github.com/yzeng25.png"
+keywords:
+- Apache APISIX
+- Consul KV
+- Service Discovery
+- Servici Register
+description: Apache APISIX supports the Consul KV-based service discovery registry. This article will walk you through the process of implementing service discovery and service registry in Apache APISIX.
+tags: [Technology,Ecosystem,Service Discovery]
+---
+
+> Apache APISIX supports the Consul KV-based service discovery registry. This article will walk you through the process of implementing service discovery and service registry in Apache APISIX.
+
+<!--truncate-->
+
+## Background Information
+
+Consul is a service mesh solution. One of its cores, Consul KV, is a distributed key-value database whose primary purpose is to store configuration parameters and metadata, while also allowing users to store indexed objects.
+
+In the microservice architecture model, when the upstream services change due to capacity expansion, hardware failure, etc., the way to maintain the upstream service information by manually writing the configuration can lead to a steep increase in maintenance cost. In response, Apache APISIX provides a service discovery registry to dynamically obtain the latest service instance information to reduce the maintenance cost for users.
+
+Currently, Apache APISIX supports the Consul KV-based service discovery registry with the `consul_kv` module contributed by the community.
+
+## How It Works
+
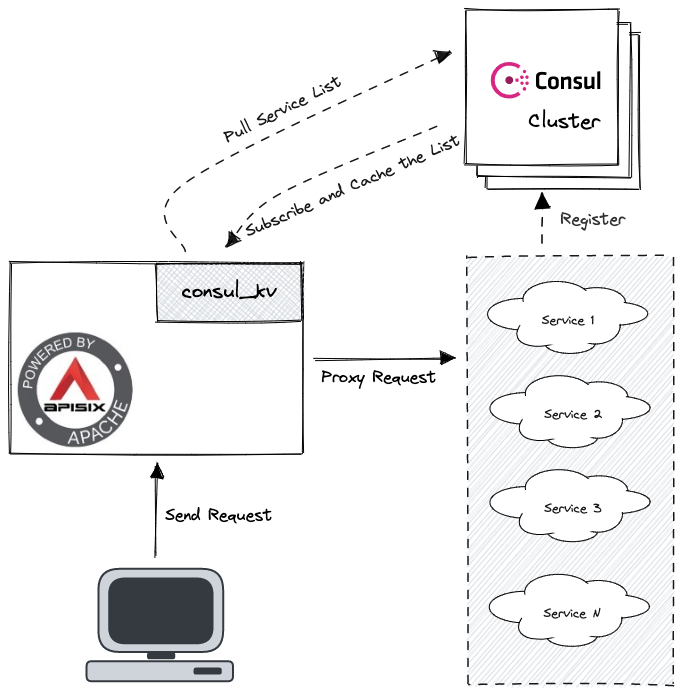
+Apache APISIX leverages the `consul_kv` module of the Consul KV distributed key-value storage capability to decouple the provider and consumer of a service and implement the two core functions of a service discovery registry.
+
+1. Service registration: Service providers register their services with the registry.
+2. Service Discovery: Service consumers find the routing information of service providers through the registry.
+
+Built on this foundation, Apache APISIX will be more flexible and adaptable to existing microservice architectures to better meet user needs.
+
+
+
+## How to Enable Consul in Apache APISIX
+
+The test environments in this article are built in Docker using docker-compose.
+
+1. Download Apache APISIX.
+
+ ```shell
+ # Pull the Git repository of apisix-docker
+ git clone https://github.com/apache/apisix-docker.git
+ ```
+
+2. Create Consul folder and configuration files.
+
+ ```shell
+ # Create Consul folder
+ mkdir -p ~/docker-things/consul/ && cd "$_"
+ # Create configuration files
+ touch docker-compose.yml server1.json
+ ```
+
+3. Edit the `docker-compose.yml` file.
+
+ ```yaml
+ version: '3.8'
+
+ services:
+ consul-server1:
+ image: consul:1.9.3
+ container_name: consul-server1
+ restart: always
+ volumes:
+ - ./server1.json:/consul/config/server1.json:ro
+ networks:
+ - apisix
+ ports:
+ - '8500:8500'
+ command: 'agent -bootstrap-expect=1'
+
+ networks:
+ apisix:
+ external: true
+ name: example_apisix
+ ```
+
+4. Edit the `server1.json` file.
+
+ ```json
+ {
+ "node_name": "consul-server1",
+ "server": true,
+ "addresses": {
+ "http": "0.0.0.0"
+ }
+ }
+ ```
+
+5. Add Consul-related configuration information to the Apache APISIX configuration file `apisix_conf/config.yaml`.
+
+ ```yaml
+ # config.yml
+ # ...other config
+ discovery:
+ consul_kv:
+ servers:
+ - "http://consul-server1:8500"
+ prefix: "upstreams"
+ ```
+
+6. Start Apache APISIX and Consul.
+
+ ```shell
+ # Go to the example, consul folder, start APISIX and Consul
+ docker-compose up -d
+ ```
+
+7. Register the test service to Consul. example contains two web services that you can use directly to test.
+
+ ```shell
+ # Check the docker-compose.yml of the example
+ # You can see two Web services
+ $ cat docker-compose.yml | grep web
+ # Outputs
+ web1:
+ - ./upstream/web1.conf:/etc/nginx/nginx.conf
+ web2:
+ - ./upstream/web2.conf:/etc/nginx/nginx.conf
+ ```
+
+8. Confirm the IP addresses of these Web services.
+
+ ```shell
+ $ sudo docker inspect -f='{{.Name}} - {{range .NetworkSettings.Networks}}{{.IPAddress}}{{end}}' $(sudo docker ps -aq) | grep web
+ # Outputs
+ /example-web1-1 - 172.26.0.7
+ /example-web2-1 - 172.26.0.2
+ ```
+
+9. Make a request to Consul's HTTP API in the terminal to register the test service.
+
+ ```shell
+ # Register with the corresponding IP
+ curl \
+ -X PUT \
+ -d ' {"weight": 1, "max_fails": 2, "fail_timeout": 1}' \
+ http://127.0.0.1:8500/v1/kv/upstreams/webpages/172.26.0.7:80
+
+ curl \
+ -X PUT \
+ -d ' {"weight": 1, "max_fails": 2, "fail_timeout": 1}' \
+ http://127.0.0.1:8500/v1/kv/upstreams/webpages/172.26.0.2:80
+ ```
+
+ The path after `/v1/kv/` follows the format `{Prefix}/{Service Name}/{IP}:{Port}`.
+
+ `{Prefix}` is the prefix written when configuring Consul in APISIX, while `{Service Name}` and `{IP}:{Port}` need to be determined by the user according to the upstream service.
+
+ The format of the data is `{"weight": <Num>, "max_fails": <Num>, "fail_timeout": <Num>}`.
+
+10. Check whether the test service is registered successfully.
+
+ ```shell
+ $ curl "http://127.0.0.1:8500/v1/kv/upstreams/webpages?keys"
+ ```
+
+ The following return message indicates successful registration.
+
+ ```shell
+ ["upstreams/webpages/172.26.0.2:80","upstreams/webpages/172.26.0.7:80"]%
+ ```
+
+### Create a Route and Enable Consul
+
+Add Consul to the route using the Admin API provided by Apache APISIX.
+
+The `X-API-KEY` and `upstream.service_name` need to be determined before adding them.
+
+- `X-API-KEY`: For the Admin API access token, in this example, we use the default `edd1c9f034335f136f87ad84b625c8f1`.
+- `upstream.service_name`: The name of the upstream service, which specifies the service in a registry that will be bound to a route, should be set to the URL used to register the test service when using Consul, and the `{IP}:{Port}` part should be removed at the end. We can also use the Memory Dump API provided by Apache APISIX to get the URL of the service and confirm whether the upstream service is discovered properly.
+
+```shell
+$ curl http://127.0.0.1:9092/v1/discovery/consul_kv/dump | jq
+# Output
+{
+ "services": {
+ # This key is the required URL
+ "http://consul-server1:8500/v1/kv/upstreams/webpages/": [
+ {
+ "port": 80,
+ "host": "172.26.0.7",
+ "weight": 1
+ },
+ {
+ "port": 80,
+ "host": "172.26.0.2",
+ "weight": 1
+ }
+ ]
+ },
+ "config": {
+ # ...configs
+ }
+}
+```
+
+### Add a Route
+
+Here the request with URL `/consul/*` is routed to `http://consul-server1:8500/v1/kv/upstreams/webpages/`. Also, the `discovery_type` must be set to `consul_kv` to start the corresponding module.
+
+```shell
+curl http://127.0.0.1:9080/apisix/admin/routes -H 'X-API-KEY: edd1c9f034335f136f87ad84b625c8f1' -X POST -d '
+{
+ "uri": "/consul/*",
+ "upstream": {
+ "service_name": "http://consul-server1:8500/v1/kv/upstreams/webpages/",
+ "type": "roundrobin",
+ "discovery_type": "consul_kv"
+ }
+}'
+```
+
+### Test and Verify the Result
+
+The request results show that the new route in Apache APISIX has been able to find the correct service address through Consul and request it to both nodes based on the load balancing policy.
+
+```shell
+# the first request
+curl -s http://127.0.0.1:9080/consul/
+# Output
+hello web1%
+
+# the second request
+curl -s http://127.0.0.1:9080/consul/
+# Output
+hello web2%
+
+# Note: It is also possible that both requests will return
+# the same result as web1 or web2.
+# This is caused by the nature of load balancing and
+# you can try to make more requests.
+```
+
+## Summary
+
+The first half of this article describes how Apache APISIX works with Consul to implement the Consul KV-based service discovery registry to solve the problem of service information management and maintenance. The second half of this article focuses on how to use Apache APISIX in Docker with Consul. Of course, the application in the actual scenario needs to be analyzed according to the business scenario and the existing system architecture.
+
+More instructions on using the Consul registry in Apache APISIX can be found in the [official documentation](https://apisix.apache.org/docs/apisix/discovery/consul_kv/).
+
+Apache APISIX is also currently working on additional plugins to support the integration of additional services, so if you are interested, feel free to start a discussion in [GitHub Discussion](https://github.com/apache/apisix/discussions), or via the [mailing list](https://apisix.apache.org/docs/general/subscribe-guide) to communicate.
diff --git a/website/i18n/zh/docusaurus-plugin-content-blog/2022/02/25/consul.md b/website/i18n/zh/docusaurus-plugin-content-blog/2022/02/25/consul.md
new file mode 100644
index 0000000..4177a22
--- /dev/null
+++ b/website/i18n/zh/docusaurus-plugin-content-blog/2022/02/25/consul.md
@@ -0,0 +1,246 @@
+---
+title: "Apache APISIX 集成 Consul KV,服务发现能力再升级"
+authors:
+ - name: "杨陶"
+ title: "Author"
+ url: "https://github.com/SkyeYoung"
+ image_url: "https://github.com/SkyeYoung.png"
+ - name: "曾奕霖"
+ title: "Technical Writer"
+ url: "https://github.com/yzeng25"
+ image_url: "https://github.com/yzeng25.png"
+keywords:
+- Apache APISIX
+- Consul KV
+- 服务发现
+- 服务注册
+description: Apache APISIX 支持基于 Consul KV 的服务发现注册表。这篇文章讲述了在 Apache APISIX 中实现服务发现和服务注册的全过程。
+tags: [Technology,Ecosystem,Service Discovery]
+---
+
+> Apache APISIX 支持基于 Consul KV 的服务发现注册表。这篇文章讲述了在 Apache APISIX 中实现服务发现和服务注册的全过程。
+
+<!--truncate-->
+
+## 背景信息
+
+Consul 是一个服务网格解决方案,其核心之一的 Consul KV 是一个分布式键值数据库,主要用途是存储配置参数和元数据,同时也允许用户存储索引对象。
+
+在微服务架构模式下,当扩容、硬件故障等导致上游服务发生变动的情况出现时,通过手动撰写配置,维护上游服务信息的方式,会导致维护成本陡增。对此,Apache APISIX 提供了服务发现注册中心的功能,实现动态获取最新的服务实例信息,以降低用户的维护成本。
+
+目前,Apache APISIX 借由社区贡献的 `consul_kv` 模块,支持了基于 Consul KV 的服务发现注册中心。
+
+## 插件工作原理
+
+Apache APISIX 利用 Consul KV 分布式键值存储能力的 `consul_kv` 模块,解耦了服务的提供者和消费者,实现了服务发现注册中心的两大核心功能。
+
+1. 服务注册:服务提供者向注册中心注册服务。
+2. 服务发现:服务消费者通过注册中心查找服务提供者的路由信息。
+
+在此基础上构建的 Apache APISIX 将更灵活地适应现有的微服务架构,更好地满足用户需求。
+
+
+
+## 如何使用
+
+本文中的测试环境均使用 docker-compose 在 Docker 中搭建。
+
+1. 下载 Apache APISIX。
+
+ ```shell
+ # 拉取 apisix-docker 的 Git 仓库
+ git clone https://github.com/apache/apisix-docker.git
+ ```
+
+2. 创建 Consul 文件夹和配置文件。
+
+ ```shell
+ # 创建 consul 文件夹
+ mkdir -p ~/docker-things/consul/ && cd "$_"
+ # 创建配置文件
+ touch docker-compose.yml server1.json
+ ```
+
+3. 修改 `docker-compose.yml` 文件。
+
+ ```yaml
+ version: '3.8'
+
+ services:
+ consul-server1:
+ image: consul:1.9.3
+ container_name: consul-server1
+ restart: always
+ volumes:
+ - ./server1.json:/consul/config/server1.json:ro
+ networks:
+ - apisix
+ ports:
+ - '8500:8500'
+ command: 'agent -bootstrap-expect=1'
+
+ networks:
+ apisix:
+ external: true
+ name: example_apisix
+ ```
+
+4. 修改 `server1.json` 文件。
+
+ ```json
+ {
+ "node_name": "consul-server1",
+ "server": true,
+ "addresses": {
+ "http": "0.0.0.0"
+ }
+ }
+ ```
+
+5. 在 Apache APISIX 中的配置文件 `apisix_conf/config.yaml` 添加 Consul 的相关配置信息。
+
+ ```yaml
+ # config.yml
+ # ...other config
+ discovery:
+ consul_kv:
+ servers:
+ - "http://consul-server1:8500"
+ prefix: "upstreams"
+ ```
+
+6. 启动 Apache APISIX 和 Consul。
+
+ ```shell
+ # 进入 example 和 consul 文件夹,依次启动 APISIX 和 Consul
+ docker-compose up -d
+ ```
+
+7. 将测试服务注册到 Consul。`example` 包含了两个 Web 服务,你可以直接使用这两个服务进行测试。
+
+ ```shell
+ # 检查 example 的 docker-compose.yml 就可以看到两个 Web 服务
+ $ cat docker-compose.yml | grep web
+ # 输出
+ web1:
+ - ./upstream/web1.conf:/etc/nginx/nginx.conf
+ web2:
+ - ./upstream/web2.conf:/etc/nginx/nginx.conf
+ ```
+
+8. 确认 Web 服务的 IP 地址。
+
+ ```shell
+ $ sudo docker inspect -f='{{.Name}} - {{range .NetworkSettings.Networks}}{{.IPAddress}}{{end}}' $(sudo docker ps -aq) | grep web
+ # 输出
+ /example-web1-1 - 172.26.0.7
+ /example-web2-1 - 172.26.0.2
+ ```
+
+9. 在终端中对 Consul 的 HTTP API 进行请求以注册测试服务。
+
+ ```shell
+ # 使用对应的 IP 进行注册
+ curl \
+ -X PUT \
+ -d ' {"weight": 1, "max_fails": 2, "fail_timeout": 1}' \
+ http://127.0.0.1:8500/v1/kv/upstreams/webpages/172.26.0.7:80
+
+ curl \
+ -X PUT \
+ -d ' {"weight": 1, "max_fails": 2, "fail_timeout": 1}' \
+ http://127.0.0.1:8500/v1/kv/upstreams/webpages/172.26.0.2:80
+ ```
+
+ 其中,`/v1/kv/` 后的路径按照 `{Prefix}/{Service Name}/{IP}:{Port}` 的格式构成。
+
+ `{Prefix}` 是在 APISIX 中配置 Consul 时写入的 prefix,`{Service Name}` 和 `{IP}:{Port}` 则需要根据上游服务,由用户自行确定。
+
+ 而数据的格式则为 `{"weight": <Num>, "max_fails": <Num>, "fail_timeout": <Num>}`。
+
+10. 查看测试服务是否注册成功。
+
+ ```shell
+ $ curl "http://127.0.0.1:8500/v1/kv/upstreams/webpages?keys"
+ ```
+
+ 返回消息如下则表示注册成功。
+
+ ```shell
+ ["upstreams/webpages/172.26.0.2:80","upstreams/webpages/172.26.0.7:80"]%
+ ```
+
+### 创建路由并为其启用 Consul
+
+使用 Apache APISIX 提供的 Admin API 将 Consul 添加到路由中。
+
+在添加之前需要先确定 `X-API-KEY` 和 `upstream.service_name` 两个数据。
+
+- `X-API-KEY`:Admin API 的访问 Token,在此示例中,我们使用默认的 `edd1c9f034335f136f87ad84b625c8f1` 即可。
+- `upstream.service_name`:上游服务的名称,它指定了将与某个路由绑定的某个注册中心中的服务(Service),使用 Consul 时需要设置为注册测试服务时的 URL,并去掉最后的 `{IP}:{Port}` 部分。我们也可以通过 Apache APISIX 提供的 Memory Dump API 获取服务的 URL,同时确认是否能正常发现上游服务。
+
+```shell
+$ curl http://127.0.0.1:9092/v1/discovery/consul_kv/dump | jq
+# 输出
+{
+ "services": {
+ # 这个 key 就是需要的 URL
+ "http://consul-server1:8500/v1/kv/upstreams/webpages/": [
+ {
+ "port": 80,
+ "host": "172.26.0.7",
+ "weight": 1
+ },
+ {
+ "port": 80,
+ "host": "172.26.0.2",
+ "weight": 1
+ }
+ ]
+ },
+ "config": {
+ # ...configs
+ }
+}
+```
+
+### 添加路由
+
+这里将 URL 为 `/consul/*` 的请求路由分配到 `http://consul-server1:8500/v1/kv/upstreams/webpages/`。同时, `discovery_type` 必须设置为 `consul_kv` 以启动对应模块。
+
+```shell
+curl http://127.0.0.1:9080/apisix/admin/routes -H 'X-API-KEY: edd1c9f034335f136f87ad84b625c8f1' -X POST -d '
+{
+ "uri": "/consul/*",
+ "upstream": {
+ "service_name": "http://consul-server1:8500/v1/kv/upstreams/webpages/",
+ "type": "roundrobin",
+ "discovery_type": "consul_kv"
+ }
+}'
+```
+
+### 测试配置结果
+
+通过请求结果可以看到, Apache APISIX 中新增的路由已经可以通过 Consul 找到正确的服务地址,并根据负载均衡策略请求到两个节点上。
+
+```shell
+# 第一次请求
+curl -s http://127.0.0.1:9080/consul/
+# 输出
+hello web1%
+
+# 第二次请求
+curl -s http://127.0.0.1:9080/consul/
+# 输出
+hello web2%
+
+# 注意:也有可能两次请求获取的都是 web1 或者 web2。
+# 这是由负载均衡的特性造成的,您可以尝试进行更多次请求。
+```
+
+## 总结
+
+本文的前半部分介绍了 Apache APISIX 如何配合 Consul 实现基于 Consul KV 的服务发现注册中心,解决服务信息管理维护的问题。而在后半部分则着重介绍了如何在 Docker 中搭配 Consul 使用 Apache APISIX 的操作流程。当然,在实际场景中的应用,还需要各位读者根据业务使用场景和已有的系统架构具体分析。关于在 Apache APISIX 中使用 Consul 注册中心的更多说明,可以在[官方文档](https://apisix.apache.org/zh/docs/apisix/discovery/consul_kv/)中找到。
+
+Apache APISIX 项目目前正在开发其他插件以支持集成更多服务,如果您对此有兴趣,您可以通过 [GitHub Discussions](https://github.com/apache/apisix/discussions) 发起讨论,或通过[邮件列表](https://apisix.apache.org/docs/general/subscribe-guide)进行交流.