You are viewing a plain text version of this content. The canonical link for it is here.
Posted to notifications@shenyu.apache.org by mi...@apache.org on 2023/02/04 12:08:26 UTC
[shenyu-website] 02/02: [type:publish] archive 2.5.0
This is an automated email from the ASF dual-hosted git repository.
midnight2104 pushed a commit to branch archive
in repository https://gitbox.apache.org/repos/asf/shenyu-website.git
commit cbbabc4b036b8154292b52f17e35ddd772e42970
Author: LL2104 <ll...@163.com>
AuthorDate: Sat Feb 4 20:07:59 2023 +0800
[type:publish] archive 2.5.0
---
NOTICE | 2 +-
.../version-2.5.1.json | 66 ++
.../version-2.5.1/deployment/_category_.json | 4 +
.../version-2.5.1/deployment/deployment-before.md | 46 ++
.../version-2.5.1/deployment/deployment-cluster.md | 230 ++++++
.../version-2.5.1/deployment/deployment-custom.md | 74 ++
.../deployment/deployment-docker-compose.md | 38 +
.../version-2.5.1/deployment/deployment-docker.md | 101 +++
.../version-2.5.1/deployment/deployment-helm.md | 10 +
.../version-2.5.1/deployment/deployment-k8s.md | 879 +++++++++++++++++++++
.../version-2.5.1/deployment/deployment-local.md | 50 ++
.../version-2.5.1/deployment/deployment-package.md | 71 ++
.../version-2.5.1/deployment/deployment-quick.md | 109 +++
.../version-2.5.1/design/_category_.json | 4 +
.../version-2.5.1/design/data-sync.md | 110 +++
.../version-2.5.1/design/database-design.md | 95 +++
.../version-2.5.1/design/flow-control.md | 36 +
.../version-2.5.1/design/register-center-design.md | 153 ++++
.../version-2.5.1/design/spi-design.md | 42 +
.../version-2.5.1/developer/_category_.json | 4 +
.../version-2.5.1/developer/custom-filter.md | 113 +++
.../developer/custom-jwt-covert-algorithm.md | 93 +++
.../developer/custom-parsing-ip-and-host.md | 50 ++
.../version-2.5.1/developer/custom-plugin.md | 309 ++++++++
.../version-2.5.1/developer/custom-result.md | 116 +++
.../developer/custom-sign-algorithm.md | 57 ++
.../developer/developer-shenyu-client.md | 184 +++++
.../version-2.5.1/developer/file-and-image.md | 18 +
.../version-2.5.1/developer/integration-test.md | 38 +
.../version-2.5.1/developer/local-model.md | 544 +++++++++++++
.../version-2.5.1/developer/shenyu-optimize.md | 55 ++
.../version-2.5.1/developer/spi/_category_.json | 4 +
.../developer/spi/custom-load-balance.md | 64 ++
.../developer/spi/custom-match-mode.md | 71 ++
.../developer/spi/custom-metrics-monitor.md | 60 ++
.../developer/spi/custom-mock-generator.md | 75 ++
.../developer/spi/custom-parameter-data.md | 71 ++
.../developer/spi/custom-predicate-judge.md | 120 +++
.../developer/spi/custom-rate-limiter.md | 103 +++
.../version-2.5.1/developer/thread-model.md | 29 +
.../version-2.5.1/index.md | 174 ++++
.../version-2.5.1/plugin-center/_category_.json | 4 +
.../plugin-center/cache/_category_.json | 4 +
.../plugin-center/cache/cache-plugin.md | 149 ++++
.../plugin-center/common/_category_.json | 4 +
.../plugin-center/common/general-context-plugin.md | 40 +
.../plugin-center/fault-tolerance/_category_.json | 4 +
.../fault-tolerance/hystrix-plugin.md | 143 ++++
.../fault-tolerance/rate-limiter-plugin.md | 195 +++++
.../fault-tolerance/resilience4j-plugin.md | 79 ++
.../fault-tolerance/sentinel-plugin.md | 216 +++++
.../plugin-center/http-process/_category_.json | 4 +
.../http-process/contextpath-plugin.md | 124 +++
.../http-process/modifyresponse-plugin.md | 166 ++++
.../http-process/parammapping-plugin.md | 109 +++
.../plugin-center/http-process/redirect-plugin.md | 53 ++
.../plugin-center/http-process/request-plugin.md | 37 +
.../plugin-center/http-process/rewrite-plugin.md | 103 +++
.../plugin-center/mock/_category_.json | 4 +
.../plugin-center/mock/mock-plugin.md | 194 +++++
.../plugin-center/observability/_category_.json | 4 +
.../observability/logging-aliyun-sls.md | 140 ++++
.../observability/logging-elasticsearch.md | 184 +++++
.../plugin-center/observability/logging-kafka.md | 156 ++++
.../plugin-center/observability/logging-plugin.md | 117 +++
.../plugin-center/observability/logging-pulsar.md | 156 ++++
.../observability/logging-rocketmq.md | 167 ++++
.../observability/logging-tencent-cls.md | 144 ++++
.../plugin-center/observability/metrics-plugin.md | 245 ++++++
.../plugin-center/proxy/_category_.json | 4 +
.../plugin-center/proxy/brpc-plugin.md | 75 ++
.../plugin-center/proxy/divide-plugin.md | 145 ++++
.../plugin-center/proxy/dubbo-plugin.md | 129 +++
.../plugin-center/proxy/grpc-plugin.md | 81 ++
.../plugin-center/proxy/motan-plugin.md | 59 ++
.../plugin-center/proxy/mqtt-plugin.md | 50 ++
.../plugin-center/proxy/sofa-plugin.md | 206 +++++
.../plugin-center/proxy/spring-cloud-plugin.md | 305 +++++++
.../plugin-center/proxy/tars-plugin.md | 169 ++++
.../plugin-center/proxy/websocket-plugin.md | 277 +++++++
.../plugin-center/security/_category_.json | 4 +
.../plugin-center/security/casdoor.md | 72 ++
.../security/cryptor-request-plugin.md | 64 ++
.../security/cryptor-response-plugin.md | 64 ++
.../plugin-center/security/jwt-plugin.md | 157 ++++
.../plugin-center/security/oauth2-plugin.md | 57 ++
.../plugin-center/security/sign-plugin.md | 525 ++++++++++++
.../plugin-center/security/waf-plugin.md | 75 ++
.../version-2.5.1/quick-start/_category_.json | 4 +
.../version-2.5.1/quick-start/quick-start-brpc.md | 65 ++
.../version-2.5.1/quick-start/quick-start-dubbo.md | 180 +++++
.../version-2.5.1/quick-start/quick-start-grpc.md | 175 ++++
.../version-2.5.1/quick-start/quick-start-http.md | 81 ++
.../version-2.5.1/quick-start/quick-start-motan.md | 95 +++
.../version-2.5.1/quick-start/quick-start-sofa.md | 136 ++++
.../quick-start/quick-start-springcloud.md | 164 ++++
.../version-2.5.1/quick-start/quick-start-tars.md | 116 +++
.../quick-start/quick-start-websocket.md | 147 ++++
.../version-2.5.1/user-guide/_category_.json | 4 +
.../user-guide/admin-usage/_category_.json | 4 +
.../user-guide/admin-usage/data-permission.md | 54 ++
.../admin-usage/dictionary-management.md | 30 +
.../admin-usage/plugin-handle-explanation.md | 51 ++
.../user-guide/admin-usage/role-management.md | 47 ++
.../user-guide/admin-usage/selector-and-rule.md | 322 ++++++++
.../version-2.5.1/user-guide/brpc-proxy.md | 100 +++
.../version-2.5.1/user-guide/dubbo-proxy.md | 439 ++++++++++
.../version-2.5.1/user-guide/grpc-proxy.md | 194 +++++
.../version-2.5.1/user-guide/http-proxy.md | 260 ++++++
.../version-2.5.1/user-guide/motan-proxy.md | 108 +++
.../user-guide/property-config/_category_.json | 4 +
.../property-config/admin-property-config.md | 260 ++++++
.../property-config/client-property-config.md | 90 +++
.../property-config/gateway-property-config.md | 578 ++++++++++++++
.../property-config/register-center-access.md | 438 ++++++++++
.../property-config/register-center-instance.md | 66 ++
.../user-guide/property-config/use-data-sync.md | 331 ++++++++
.../user-guide/sdk-usage/_category_.json | 4 +
.../user-guide/sdk-usage/shenyu-sdk-consul.md | 197 +++++
.../user-guide/sdk-usage/shenyu-sdk-etcd.md | 183 +++++
.../user-guide/sdk-usage/shenyu-sdk-eureka.md | 180 +++++
.../user-guide/sdk-usage/shenyu-sdk-nacos.md | 181 +++++
.../user-guide/sdk-usage/shenyu-sdk-zookeeper.md | 180 +++++
.../version-2.5.1/user-guide/sofa-rpc-proxy.md | 194 +++++
.../version-2.5.1/user-guide/spring-cloud-proxy.md | 305 +++++++
.../version-2.5.1/user-guide/tars-proxy.md | 96 +++
.../version-2.5.1/user-guide/websocket-proxy.md | 87 ++
src/pages/versions.tsx | 2 +-
versioned_sidebars/version-2.5.1-sidebars.json | 8 +
versions.json | 1 +
130 files changed, 16094 insertions(+), 2 deletions(-)
diff --git a/NOTICE b/NOTICE
index 0fce02777a0..d82353b67a4 100644
--- a/NOTICE
+++ b/NOTICE
@@ -1,5 +1,5 @@
Apache ShenYu
-Copyright 2021-2022 The Apache Software Foundation
+Copyright 2021-2023 The Apache Software Foundation
This product includes software developed at
The Apache Software Foundation (http://www.apache.org/).
diff --git a/i18n/zh/docusaurus-plugin-content-docs/version-2.5.1.json b/i18n/zh/docusaurus-plugin-content-docs/version-2.5.1.json
new file mode 100644
index 00000000000..22e05ae0d87
--- /dev/null
+++ b/i18n/zh/docusaurus-plugin-content-docs/version-2.5.1.json
@@ -0,0 +1,66 @@
+{
+ "version.label": {
+ "message": "2.5.1",
+ "description": "The label for version 2.5.1"
+ },
+ "sidebar.tutorialSidebar.category.Design": {
+ "message": "设计文档",
+ "description": "The label for category Design in sidebar tutorialSidebar"
+ },
+ "sidebar.tutorialSidebar.category.Deployment": {
+ "message": "运维部署",
+ "description": "The label for category Deployment in sidebar tutorialSidebar"
+ },
+ "sidebar.tutorialSidebar.category.Quick Start": {
+ "message": "快速开始",
+ "description": "The label for category Quick-Start in sidebar tutorialSidebar"
+ },
+ "sidebar.tutorialSidebar.category.User Guide": {
+ "message": "用户指南",
+ "description": "The label for category User-Guide in sidebar tutorialSidebar"
+ },
+ "sidebar.tutorialSidebar.category.Admin Usage": {
+ "message": "Admin使用",
+ "description": "The label for category Admin-Usage in sidebar tutorialSidebar"
+ },
+ "sidebar.tutorialSidebar.category.Property Config": {
+ "message": "属性配置",
+ "description": "The label for category Property-Config in sidebar tutorialSidebar"
+ },
+ "sidebar.tutorialSidebar.category.Plugin Center": {
+ "message": "插件集合",
+ "description": "The label for category Plugin-Center in sidebar tutorialSidebar"
+ },
+ "sidebar.tutorialSidebar.category.Http Handle": {
+ "message": "Http处理",
+ "description": "The label for category Http-Handle in sidebar tutorialSidebar"
+ },
+ "sidebar.tutorialSidebar.category.RPC Proxy": {
+ "message": "RPC代理",
+ "description": "The label for category RPC-Proxy in sidebar tutorialSidebar"
+ },
+ "sidebar.tutorialSidebar.category.Fault Tolerance": {
+ "message": "熔断限流",
+ "description": "The label for category Fault-Tolerance in sidebar tutorialSidebar"
+ },
+ "sidebar.tutorialSidebar.category.Authority And Certification": {
+ "message": "权限认证",
+ "description": "The label for category Authority-And-Certification in sidebar tutorialSidebar"
+ },
+ "sidebar.tutorialSidebar.category.Observability": {
+ "message": "可观测性",
+ "description": "The label for category Observability in sidebar tutorialSidebar"
+ },
+ "sidebar.tutorialSidebar.category.Common": {
+ "message": "通用组件",
+ "description": "The label for category Common"
+ },
+ "sidebar.tutorialSidebar.category.Developer Documentation": {
+ "message": "开发者文档",
+ "description": "The label for category Developer-Documentation in sidebar tutorialSidebar"
+ },
+ "sidebar.tutorialSidebar.category.SPI": {
+ "message": "SPI",
+ "description": "The label for category SPI in sidebar tutorialSidebar"
+ }
+}
diff --git a/i18n/zh/docusaurus-plugin-content-docs/version-2.5.1/deployment/_category_.json b/i18n/zh/docusaurus-plugin-content-docs/version-2.5.1/deployment/_category_.json
new file mode 100644
index 00000000000..d5c06da5450
--- /dev/null
+++ b/i18n/zh/docusaurus-plugin-content-docs/version-2.5.1/deployment/_category_.json
@@ -0,0 +1,4 @@
+{
+ "label": "运维部署",
+ "position": 3
+}
diff --git a/i18n/zh/docusaurus-plugin-content-docs/version-2.5.1/deployment/deployment-before.md b/i18n/zh/docusaurus-plugin-content-docs/version-2.5.1/deployment/deployment-before.md
new file mode 100644
index 00000000000..1a12f986b5b
--- /dev/null
+++ b/i18n/zh/docusaurus-plugin-content-docs/version-2.5.1/deployment/deployment-before.md
@@ -0,0 +1,46 @@
+---
+sidebar_position: 0
+title: 部署先决条件
+keywords: ["Prerequisites"]
+description: 部署先决条件
+---
+
+本文介绍在部署 `Apache ShenYu` 网关前, 所需要准备的一些先决条件。
+
+## 数据库环境准备
+
+在部署`shenyu-admin`项目前, 需初始化其所使用的数据库(数据库目前支持: Mysql、PostgreSql、Oracle), 其中所用到的脚本文件都存放在 [项目根目录下的db目录](https://github.com/apache/incubator-shenyu/tree/master/db) 中, 以下介绍了各数据库的初始步骤.
+
+### Mysql
+
+在[项目mysql初始化脚本目录](https://github.com/apache/incubator-shenyu/tree/master/db/init/mysql) 中找到初始化脚本`schema.sql`, 使用客户端连接工具连接您的Mysql服务并执行, 由此您会得到一个名为`shenyu`的数据库, 它之后可作为`shenyu-admin`项目的数据库使用.
+
+* sql脚本: https://github.com/apache/shenyu/tree/master/db/init/mysql
+
+* 驱动:
+
+ * maven repository: https://repo1.maven.org/maven2/mysql/mysql-connector-java/8.0.30/
+ * homepage: https://www.mysql.com/products/connector/
+
+### PostgreSql
+
+在[项目pg初始化脚本目录](https://github.com/apache/incubator-shenyu/tree/master/db/init/pg) 中找到初始化脚本`create-database.sql`、`create-table.sql`, 并使用客户端连接工具连接您的PostgreSql服务依次执行,由此您会得到一个名为shenyu的数据库, 它之后可作为`shenyu-admin`项目的数据库使用.
+
+* sql脚本: https://github.com/apache/shenyu/tree/master/db/init/pg
+
+* 驱动:
+
+ * maven repository: https://mvnrepository.com/artifact/org.postgresql/postgresql/42.5.0
+ * homepage: https://jdbc.postgresql.org/download/
+
+### Oracle
+
+在[项目oracle初始化脚本目录](https://github.com/apache/incubator-shenyu/blob/master/db/init/oracle) 中找到初始化脚本`schema.sql`, 使用客户端连接工具连接您的Oracle服务创建一个数据库, 在此数据库上执行`schema.sql`脚本, 由此您便初始化了`shenyu-admin`的数据库, 之后可在[项目配置文件](https://github.com/apache/incubator-shenyu/blob/master/shenyu-admin/src/main/resources/application-oracle.yml) 中调整您的oracle环境配置.
+
+* sql脚本: https://github.com/apache/shenyu/blob/master/db/init/oracle
+
+* 驱动:
+
+ * maven repository: https://mvnrepository.com/artifact/com.oracle.database.jdbc/ojdbc8/19.3.0.0
+ * homepage: https://www.oracle.com/database/technologies/appdev/jdbc-downloads.html
+
diff --git a/i18n/zh/docusaurus-plugin-content-docs/version-2.5.1/deployment/deployment-cluster.md b/i18n/zh/docusaurus-plugin-content-docs/version-2.5.1/deployment/deployment-cluster.md
new file mode 100644
index 00000000000..a16c563bcbf
--- /dev/null
+++ b/i18n/zh/docusaurus-plugin-content-docs/version-2.5.1/deployment/deployment-cluster.md
@@ -0,0 +1,230 @@
+---
+sidebar_position: 7
+title: 集群部署
+keywords: ["网关集群", "集群部署"]
+description: 集群部署
+---
+
+> 在阅读本文档前,你需要先阅读[部署先决条件](./deployment-before.md)文档来完成部署 `shenyu` 前的环境准备工作。
+
+本文是介绍在集群环境中快速部署`ShenYu`网关。
+
+> 在阅读本文档时,你可以先阅读[二进制包部署](./deployment-package.md)。
+
+### 环境准备
+
+* 至少准备两台已经安装了JDK1.8+的服务器用于部署网关启动器。
+* 准备一台已经安装了mysql、pgsql、h2和JDK1.8+的服务器用于部署网关管理端。
+* 准备一台服务器用于部署Nginx。
+
+### 启动 Apache ShenYu Admin
+
+* 在你的网关管理端服务器下载并解压[apache-shenyu-${current.version}-admin-bin.tar.gz](https://archive.apache.org/dist/shenyu/2.5.0/apache-shenyu-incubating-2.5.0-admin-bin.tar.gz) 。
+
+* 配置你的数据库,进入`/conf`目录,在`application.yaml`文件中修改`spring.profiles.active`节点为`mysql`, `pg` or `h2`。
+
+* 配置你的数据同步方式,进入`/conf`目录,在`application.yaml`文件中修改`shenyu.sync`节点为`websocket`, `http`, `zookeeper`, `etcd`, `consul` 或者 `nacos`。
+
+* 进入`bin`目录,启动ShenYu Bootstrap。
+
+```
+> windows: start.bat
+
+> linux: ./start.sh
+```
+
+### 启动 Apache ShenYu Boostrap
+
+* 在你的网关启动器服务器下载并解压[apache-shenyu-${current.version}-bootstrap-bin.tar.gz](https://archive.apache.org/dist/shenyu/2.5.0/apache-shenyu-incubating-2.5.0-bootstrap-bin.tar.gz) 。
+
+* 配置你的数据同步方式,进入`/conf`目录,在`application.yaml`文件中修改`shenyu.sync`节点为`websocket`, `http`, `zookeeper`, `etcd`, `consul` 或者 `nacos`,这个配置必须与`ShenyYu Admin`的配置保持相同。
+
+* 进入`bin`目录,启动ShenYu Admin。
+
+```
+> windwos : start.bat
+
+> linux : ./start.sh
+```
+
+> 在完成这些操作后,你将成功部署`ShenYu Boostrap`集群。
+>
+> 假如你`10.1.1.1`和`10.1.1.2`两台服务器在将部署`ShenYu Bootstrap`,并且在`10.1.1.3`部署nginx。
+
+### 启动 Nginx
+
+* 下载并安装nginx。
+
+* 在`nginx.conf`文件中修改`upstream`和`server`节点的配置。
+
+```nginx
+upstream shenyu_gateway_cluster {
+ ip_hash;
+ server 10.1.1.1:9195 max_fails=3 fail_timeout=10s weight=50;
+ server 10.1.1.2:9195 max_fails=3 fail_timeout=10s weight=50;
+}
+
+server {
+ listen 9195;
+ location / {
+ proxy_pass http://shenyu_gateway_cluster;
+ proxy_set_header HOST $host;
+ proxy_read_timeout 10s;
+ proxy_connect_timeout 10s;
+ }
+}
+```
+
+* 启动 nginx.
+
+```
+> windows: ./nginx.exe
+
+> linux: /usr/local/nginx/sbin/nginx
+```
+
+* 验证nginx配置是否生效,在`ShenYu Bootstrap`或者`Nginx`的日志文件中查看请求被分发到那台服务器上。
+
+
+### Apache Shenyu-nginx模块实现集群
+
+> 该模块提供SDK,用于通过注册中心为OpenResty自动监听Apache Shenyu可用的实例节点。
+>在集群模式下,Apache Shenyu支持部署多个Shenyu实例,随时可能有新的实例上线或下线。因此,Apache Shenyu引入了服务发现
+> OpenResty 模块来帮助客户端检测可用Shenyu实例。目前Apache Shenyu已经支持Zookeeper、Nacos、Etcd和Consul。Client或LoadBalancer
+> 可以通过这些Service注册中心获取可用的Shenyu实例。
+1. [Etcd](./deployment-cluster.md#Etcd开始)(支持)
+2. [Nacos](./deployment-cluster.md#Nacos开始)(支持)
+3. [Zookeeper](./deployment-cluster.md#Zookeeper开始)(支持)
+4. Consul(进行中)
+
+#### 入门
+
+* 先决条件
+1. Luarocks
+2. OpenResty
+
+#### 从源码构建
+
+首先,从GitHub clone源码。
+
+```
+git clone https://github.com/apache/shenyu-nginx
+```
+
+然后,从源代码构建并安装。
+
+```
+cd shenyu-nginx
+luarocks make rockspec/shenyu-nginx-main-0.rockspec
+```
+
+#### Etcd开始
+
+修改Nginx配置,创建并初始化Shenyu register模块,连接至目标注册中心。该模块将获取在同一个集群中注册到Etcd的
+所有Shenyu实例。它与Etcd客户端一样监视(基于长轮询)Shenyu实例列表。
+*Etcd示例:*
+
+```
+init_worker_by_lua_block {
+ local register = require("shenyu.register.etcd")
+ register.init({
+ balancer_type = "chash",
+ etcd_base_url = "http://127.0.0.1:2379",
+ })
+}
+```
+
+1. `balancer_type`指定负载均衡模式。它支持`chash`和`round` `robin`。
+2. `etcd_base_url`指定 `Etcd` 服务器。(目前不支持身份验证)。
+
+最后,重启OpenResty。
+
+```
+openresty -s reload
+```
+
+这就是一个完整的Etcd的使用[示例](https://github.com/apache/shenyu-nginx/blob/main/example/etcd/nginx.conf) 。
+
+#### Nacos开始
+
+修改Nginx配置,创建并初始化Shenyu register模块,连接至目标注册中心。以下是Nacos的示例:
+
+**Nacos示例:**
+
+```
+init_worker_by_lua_block {
+ local register = require("shenyu.register.nacos")
+ register.init({
+ shenyu_storage = ngx.shared.shenyu_storage,
+ balancer_type = "chash",
+ nacos_base_url = "http://127.0.0.1:8848",
+ username = "nacos",
+ password = "naocs",
+ })
+}
+```
+
+1. `balancer_type`指定负载均衡模式。它支持`chash`和`round` `robin`。
+2. `nacos_base_url`指定 `Nacos` 服务器地址。
+3. `username`指定登录 `Nacos` 的用户名。(仅在启用 Nacos auth 时才需要)
+4. `password`指定登录 `Nacos` 的密码。
+
+修改`upstream`启用动态更新shenyu实例列表。本案例将Shenyu实例列表与注册中心同步。
+
+```
+upstream shenyu {
+ server 0.0.0.1; -- bad
+
+ balancer_by_lua_block {
+ require("shenyu.register.nacos").pick_and_set_peer()
+ }
+}
+```
+
+最后,重启OpenResty。
+
+```
+openresty -s reload
+```
+
+这就是一个完整的Nacos的使用[example](https://github.com/apache/shenyu-nginx/blob/main/example/nacos/nginx.conf) 。
+
+#### Zookeeper开始
+
+修改Nginx配置,创建并初始化Shenyu register模块,连接目标注册中心。
+通过 zookeeper watch 事件监听Shenyu实例列表的变化。下面是 zookeeper 配置的示例。
+
+**Zookeeper示例:**
+
+```
+init_worker_by_lua_block {
+ local register = require("shenyu.register.zookeeper")
+ register.init({
+ servers = {"127.0.0.1:2181","127.0.0.1:2182"},
+ shenyu_storage = ngx.shared.shenyu_storage,
+ balancer_type = "roundrobin"
+ });
+ }
+```
+
+1. `servers` zookeeper 集群地址。
+2. `balancer_type`指定负载均衡模式。它支持chash和round robin。
+
+修改`upstream`启用动态更新Shenyu实例列表。本案例将Shenyu实例列表与注册中心同步。
+
+```
+upstream shenyu {
+ server 0.0.0.1;
+ balancer_by_lua_block {
+ require("shenyu.register.zookeeper").pick_and_set_peer()
+ }
+ }
+```
+
+最后,重启 OpenResty。
+
+```
+openresty -s reload
+```
+
+这是一个使用 Zookeeper的完整[示例](https://github.com/apache/incubator-shenyu-nginx/blob/main/example/zookeeper/nginx.conf) 。
diff --git a/i18n/zh/docusaurus-plugin-content-docs/version-2.5.1/deployment/deployment-custom.md b/i18n/zh/docusaurus-plugin-content-docs/version-2.5.1/deployment/deployment-custom.md
new file mode 100644
index 00000000000..ccaee450b0d
--- /dev/null
+++ b/i18n/zh/docusaurus-plugin-content-docs/version-2.5.1/deployment/deployment-custom.md
@@ -0,0 +1,74 @@
+---
+sidebar_position: 6
+title: 自定义部署
+description: 自定义部署
+---
+
+本文介绍如何基于 `Apache ShenYu` 搭建属于你自己的网关。
+
+> 在阅读本文档前,你需要先阅读[部署先决条件](./deployment-before.md)文档来完成部署 `shenyu` 前的环境准备工作。
+
+### 启动Apache ShenYu Admin
+
+* docker 用户参考 docker部署 Apache ShenYu Admin
+
+* liunx/windows 用户参考二进制包部署 Apache ShenYu Admin
+
+### 搭建自己的网关(推荐)
+
+* 首先新建一个空的 `springboot` 项目,可以参考 `shenyu-bootstrap`, 也可以在 [spring 官网](https://spring.io/quickstart) 创建。
+
+* 引入如下`jar`包:
+
+```xml
+<dependencies>
+ <dependency>
+ <groupId>org.springframework.boot</groupId>
+ <artifactId>spring-boot-starter-webflux</artifactId>
+ <version>2.2.2.RELEASE</version>
+ </dependency>
+ <dependency>
+ <groupId>org.springframework.boot</groupId>
+ <artifactId>spring-boot-starter-actuator</artifactId>
+ <version>2.2.2.RELEASE</version>
+ </dependency>
+ <dependency>
+ <groupId>org.apache.shenyu</groupId>
+ <artifactId>shenyu-spring-boot-starter-gateway</artifactId>
+ <version>${current.version}</version>
+ </dependency>
+ <dependency>
+ <groupId>org.apache.shenyu</groupId>
+ <artifactId>shenyu-spring-boot-starter-sync-data-websocket</artifactId>
+ <version>${current.version}</version>
+ </dependency>
+</dependencies>
+```
+
+其中, `${project.version}` 请使用当前最新版本。
+
+* 在你的 `application.yaml` 文件中加上如下配置:
+
+```yaml
+spring:
+ main:
+ allow-bean-definition-overriding: true
+management:
+ health:
+ defaults:
+ enabled: false
+shenyu:
+ sync:
+ websocket:
+ urls: ws://localhost:9095/websocket //设置成你的 shenyu-admin 地址
+```
+
+
+
+
+
+
+
+
+
+
diff --git a/i18n/zh/docusaurus-plugin-content-docs/version-2.5.1/deployment/deployment-docker-compose.md b/i18n/zh/docusaurus-plugin-content-docs/version-2.5.1/deployment/deployment-docker-compose.md
new file mode 100644
index 00000000000..c42a71faade
--- /dev/null
+++ b/i18n/zh/docusaurus-plugin-content-docs/version-2.5.1/deployment/deployment-docker-compose.md
@@ -0,0 +1,38 @@
+---
+sidebar_position: 3
+title: Docker-compose 部署
+keywords: ["docker-compose", "Deployment"]
+description: Docker-compose Deployment
+---
+
+本文介绍使用 `docker-compose` 来部署 `Apache ShenYu` 网关。
+
+> 在阅读本文档前,你需要先阅读[部署先决条件](./deployment-before.md)文档来完成部署 `shenyu` 前的环境准备工作。
+
+### 下载 shell 脚本
+
+```shell
+curl -O https://raw.githubusercontent.com/apache/shenyu/master/shenyu-dist/shenyu-docker-compose-dist/src/main/resources/install.sh
+```
+
+### 执行脚本
+
+这个脚本会下载需要的配置文件、mysql-connector,如果发现下载失败可以重复执行。
+
+```shell
+sh ./install.sh #默认拉取最新配置,如果需要部署已发布版本,可增加一个参数表示版本号,比如:v2.4.2 或 latest
+```
+
+### 初始化`shenyu-admin`存储数据源
+
+参考[数据库初始文档](./deployment-before.md#数据库环境准备) 初始化数据库环境 。
+
+### 修改配置文件
+
+修改脚本下载的配置文件来设置`JDBC`等配置。
+
+### 执行 docker-compose
+
+```shell
+docker-compose -f ./shenyu-${VERSION}/docker-compose.yaml up -d
+```
diff --git a/i18n/zh/docusaurus-plugin-content-docs/version-2.5.1/deployment/deployment-docker.md b/i18n/zh/docusaurus-plugin-content-docs/version-2.5.1/deployment/deployment-docker.md
new file mode 100644
index 00000000000..b57d3462514
--- /dev/null
+++ b/i18n/zh/docusaurus-plugin-content-docs/version-2.5.1/deployment/deployment-docker.md
@@ -0,0 +1,101 @@
+---
+sidebar_position: 3
+title: Docker部署
+keywords: ["Docker", "部署"]
+description: docker部署
+---
+
+本文介绍使用 `docker` 来部署 `Apache ShenYu` 网关。
+
+> 在阅读本文档前,你需要先阅读[部署先决条件](./deployment-before.md)文档来完成部署 `shenyu` 前的环境准备工作。
+
+### 创建 Docker Network
+
+```
+docker network create shenyu
+```
+
+### 启动 Apache ShenYu Admin
+
+```
+docker pull apache/shenyu-admin:${current.version}
+```
+
+> 在 2.5.1 版本之后,在 `docker run` 时,可以通过添加 `-e ADMIN_JVM="xxxx"` 来自定义 JVM 启动参数
+
+* 使用 `h2` 来存储后台数据:
+
+```
+docker run -d -p 9095:9095 --name shenyu-admin --net shenyu apache/shenyu-admin:${current.version}
+```
+
+* 使用 `MySQL` 来存储后台数据, 按照 [指引文档](./deployment-before.md#mysql) 初始化数据库, 将 [mysql-connector.jar](https://repo1.maven.org/maven2/mysql/mysql-connector-java/8.0.29/mysql-connector-java-8.0.29.jar) 拷贝到 `/${your_work_dir}/ext-lib`:
+
+```
+docker run --name shenyu-admin -v /${your_work_dir}/ext-lib:/opt/shenyu-admin/ext-lib -e "SPRING_PROFILES_ACTIVE=mysql" -e "spring.datasource.url=jdbc:mysql://${your_ip_port}/shenyu?useUnicode=true&characterEncoding=utf-8&useSSL=false&serverTimezone=Asia/Shanghai&zeroDateTimeBehavior=convertToNull" -e "spring.datasource.username=${your_username}" -e "spring.datasource.password=${your_password}" -d -p 9095:9095 --net shenyu apache/shenyu-admin:${current.version}
+```
+
+另外一种方式, 从 [配置文件地址](https://github.com/apache/shenyu/blob/master/shenyu-admin/src/main/resources/) 中把 `application.yml`、`application-mysql.yml`配置放到`${your_work_dir}/conf` , 调整`application.yml`中的配置`spring.profiles.active = mysql`,然后执行以下语句:
+
+```
+docker run --name shenyu-admin -v ${your_work_dir}/conf:/opt/shenyu-admin/conf -v /${your_work_dir}/ext-lib:/opt/shenyu-admin/ext-lib -d -p 9095:9095 --net shenyu apache/shenyu-admin:${current.version}
+```
+
+* 使用 `PostgreSql` 来存储后台数据, 按照 [指引文档](./deployment-before.md#postgresql) 初始化数据库, 执行以下语句:
+
+```
+docker run --name shenyu-admin -e "SPRING_PROFILES_ACTIVE=pg" -e "spring.datasource.url=jdbc:postgresql://${your_ip_port}/shenyu?useUnicode=true&characterEncoding=utf-8&useSSL=false" -e "spring.datasource.username=${your_username}" -e "spring.datasource.password=${your_password}" -d -p 9095:9095 --net shenyu apache/shenyu-admin:${current.version}
+```
+
+另外一种方式, 从 [配置文件地址](https://github.com/apache/shenyu/blob/master/shenyu-admin/src/main/resources/) 中把 `application.yml`、`application-pg.yml`配置放到`${your_work_dir}/conf`, 调整`application.yml`中的配置`spring.profiles.active = pg`,然后执行以下语句:
+
+```
+docker run --name shenyu-admin -v ${your_work_dir}/conf:/opt/shenyu-admin/conf -d -p 9095:9095 --net shenyu apache/shenyu-admin:${current.version}
+```
+
+* 使用 `Oracle` 来存储后台数据, 按照 [指引文档](./deployment-before.md#oracle) 初始化数据库, 执行以下语句:
+
+```
+docker run --name shenyu-admin -e "SPRING_PROFILES_ACTIVE=oracle" -e "spring.datasource.url=jdbc:oracle:thin:@localhost:1521/shenyu" -e "spring.datasource.username=${your_username}" -e "spring.datasource.password=${your_password}" -d -p 9095:9095 --net shenyu apache/shenyu-admin:${current.version}
+```
+
+另外一种方式, 从 [配置文件地址](https://github.com/apache/shenyu/blob/master/shenyu-admin/src/main/resources/) 中把 `application.yml`、`application-oracle.yml` 配置放到`${your_work_dir}/conf`, 调整`application.yml`中的配置`spring.profiles.active = oracle`,然后执行以下语句:
+
+```
+docker run --name shenyu-admin -v ${your_work_dir}/conf:/opt/shenyu-admin/conf -d -p 9095:9095 --net shenyu apache/shenyu-admin:${current.version}
+```
+
+### 启动Apache ShenYu Bootstrap
+
+> 在 2.5.1 版本之后,在 `docker run` 时,可以通过添加 `-e BOOT_JVM="xxxx"` 来自定义 JVM 启动参数
+
+首先拉取 Docker 镜像
+
+```shell
+docker pull apache/shenyu-bootstrap:${current.version}
+```
+
+如果不需要修改配置,可以直接使用以下命令启动
+
+```shell
+docker run -d \
+ -p 9195:9195 \
+ --name shenyu-bootstrap \
+ --net shenyu \
+ --env SHENYU_SYNC_WEBSOCKET_URLS=ws://shenyu-admin:9095/websocket \
+ apache/shenyu-bootstrap:${current.version}
+```
+
+> 使用 SHENYU_SYNC_WEBSOCKET_URLS 环境变量可以为 bootstrap 指定与 admin 通信的 Websocket 地址
+
+如果需要修改配置,可以从 Github 中拉取 bootstrap 的[配置文件](https://github.com/apache/shenyu/tree/master/shenyu-bootstrap/src/main/resources),将其所在目录记为 `$BOOTSTRAP_CONF`,并进行配置修改。修改完毕后,使用以下命令启动
+
+```shell
+docker run -d \
+ -p 9195:9195 \
+ -v $BOOTSTRAP_CONF:/opt/shenyu-bootstrap/conf \
+ --name shenyu-bootstrap \
+ --net shenyu \
+ --env SHENYU_SYNC_WEBSOCKET_URLS=ws://shenyu-admin:9095/websocket \
+ apache/shenyu-bootstrap:${current.version}
+```
diff --git a/i18n/zh/docusaurus-plugin-content-docs/version-2.5.1/deployment/deployment-helm.md b/i18n/zh/docusaurus-plugin-content-docs/version-2.5.1/deployment/deployment-helm.md
new file mode 100644
index 00000000000..233e74c81e6
--- /dev/null
+++ b/i18n/zh/docusaurus-plugin-content-docs/version-2.5.1/deployment/deployment-helm.md
@@ -0,0 +1,10 @@
+---
+sidebar_position: 5
+title: Helm部署
+keywords: ["Helm"]
+description: Helm部署
+---
+
+本文介绍使用 `helm` 来部署 `Apache ShenYu` 网关。
+
+详见 [Helm 部署](https://shenyu.apache.org/zh/helm/index/)
diff --git a/i18n/zh/docusaurus-plugin-content-docs/version-2.5.1/deployment/deployment-k8s.md b/i18n/zh/docusaurus-plugin-content-docs/version-2.5.1/deployment/deployment-k8s.md
new file mode 100644
index 00000000000..5d035da88ab
--- /dev/null
+++ b/i18n/zh/docusaurus-plugin-content-docs/version-2.5.1/deployment/deployment-k8s.md
@@ -0,0 +1,879 @@
+---
+sidebar_position: 4
+title: K8s部署
+keywords: ["k8s"]
+description: K8s部署
+---
+
+本文介绍使用 `K8s` 来部署 `Apache ShenYu` 网关。
+
+
+> 目录
+>
+> 示例一. 使用 h2 作为数据库
+>
+> 1. 创建 Namespace 和 ConfigMap
+> 2. 部署 shenyu-admin
+> 3. 部署 shenyu-bootstrap
+> 示例二. 使用 MySQL 作为数据库
+>
+> 和 h2 过程类似,需要额外注意的两个地方:
+>
+> 1. 需要下载 mysql-connector.jar,容器启动时会执行下载命令
+> 2. 需要指定外部 MySQL 数据库配置,通过 Endpoints 来代理外部 MySQL 数据库
+>
+> 具体流程如下:
+>
+> 1. 创建 Namespace和 ConfigMap
+> 2. 创建 Endpoints 代理外部 MySQL
+> 3. 部署 shenyu-admin
+> 4. 部署 shenyu-bootstrap
+
+## 示例一:使用 h2 作为数据库
+
+### 1. 创建 Namespace 和 ConfigMap
+
+> 创建 Namespace 和网关用到的配置文件
+
+- 创建文件 shenyu-ns.yaml
+
+```yaml
+apiVersion: v1
+kind: Namespace
+metadata:
+ name: shenyu
+ labels:
+ name: shenyu
+---
+apiVersion: v1
+kind: ConfigMap
+metadata:
+ name: shenyu-cm
+ namespace: shenyu
+data:
+ shenyu-admin-application.yml: |
+ server:
+ port: 9095
+ address: 0.0.0.0
+ spring:
+ profiles:
+ active: h2
+ thymeleaf:
+ cache: true
+ encoding: utf-8
+ enabled: true
+ prefix: classpath:/static/
+ suffix: .html
+ mvc:
+ pathmatch:
+ matching-strategy: ant_path_matcher
+ mybatis:
+ config-location: classpath:/mybatis/mybatis-config.xml
+ mapper-locations: classpath:/mappers/*.xml
+ shenyu:
+ register:
+ registerType: http #http #zookeeper #etcd #nacos #consul
+ serverLists: #localhost:2181 #http://localhost:2379 #localhost:8848
+ props:
+ sessionTimeout: 5000
+ connectionTimeout: 2000
+ checked: true
+ zombieCheckTimes: 5
+ scheduledTime: 10
+ nacosNameSpace: ShenyuRegisterCenter
+ sync:
+ websocket:
+ enabled: true
+ messageMaxSize: 10240
+ allowOrigins: ws://shenyu-admin-svc.shenyu.svc.cluster.local:9095;ws://shenyu-bootstrap-svc.shenyu.svc.cluster.local:9195;
+ ldap:
+ enabled: false
+ url: ldap://xxxx:xxx
+ bind-dn: cn=xxx,dc=xxx,dc=xxx
+ password: xxxx
+ base-dn: ou=xxx,dc=xxx,dc=xxx
+ object-class: person
+ login-field: cn
+ jwt:
+ expired-seconds: 86400000
+ shiro:
+ white-list:
+ - /
+ - /favicon.*
+ - /static/**
+ - /index**
+ - /platform/login
+ - /websocket
+ - /error
+ - /actuator/health
+ - /swagger-ui.html
+ - /webjars/**
+ - /swagger-resources/**
+ - /v2/api-docs
+ - /csrf
+ swagger:
+ enable: true
+ apidoc:
+ gatewayUrl: http://127.0.0.1:9195
+ envProps:
+ - envLabel: Test environment
+ addressLabel: Request Address
+ addressUrl: http://127.0.0.1:9195
+ - envLabel: Prod environment
+ addressLabel: Request Address
+ addressUrl: http://127.0.0.1:9195
+ logging:
+ level:
+ root: info
+ org.springframework.boot: info
+ org.apache.ibatis: info
+ org.apache.shenyu.bonuspoint: info
+ org.apache.shenyu.lottery: info
+ org.apache.shenyu: info
+ shenyu-admin-application-h2.yml: |
+ shenyu:
+ database:
+ dialect: h2
+ init_script: "sql-script/h2/schema.sql"
+ init_enable: true
+ spring:
+ datasource:
+ url: jdbc:h2:mem:~/shenyu;DB_CLOSE_DELAY=-1;MODE=MySQL;
+ username: sa
+ password: sa
+ driver-class-name: org.h2.Driver
+ shenyu-bootstrap-application.yml: |
+ server:
+ port: 9195
+ address: 0.0.0.0
+ spring:
+ main:
+ allow-bean-definition-overriding: true
+ allow-circular-references: true
+ application:
+ name: shenyu-bootstrap
+ codec:
+ max-in-memory-size: 2MB
+ cloud:
+ discovery:
+ enabled: false
+ nacos:
+ discovery:
+ server-addr: 127.0.0.1:8848 # Spring Cloud Alibaba Dubbo use this.
+ enabled: false
+ namespace: ShenyuRegisterCenter
+ eureka:
+ client:
+ enabled: false
+ serviceUrl:
+ defaultZone: http://localhost:8761/eureka/
+ instance:
+ prefer-ip-address: true
+ management:
+ health:
+ defaults:
+ enabled: false
+ shenyu:
+ matchCache:
+ enabled: false
+ maxFreeMemory: 256 # 256MB
+ netty:
+ http:
+ # set to false, user can custom the netty tcp server config.
+ webServerFactoryEnabled: true
+ selectCount: 1
+ workerCount: 4
+ accessLog: false
+ serverSocketChannel:
+ soRcvBuf: 87380
+ soBackLog: 128
+ soReuseAddr: false
+ connectTimeoutMillis: 10000
+ writeBufferHighWaterMark: 65536
+ writeBufferLowWaterMark: 32768
+ writeSpinCount: 16
+ autoRead: false
+ allocType: "pooled"
+ messageSizeEstimator: 8
+ singleEventExecutorPerGroup: true
+ socketChannel:
+ soKeepAlive: false
+ soReuseAddr: false
+ soLinger: -1
+ tcpNoDelay: true
+ soRcvBuf: 87380
+ soSndBuf: 16384
+ ipTos: 0
+ allowHalfClosure: false
+ connectTimeoutMillis: 10000
+ writeBufferHighWaterMark: 65536
+ writeBufferLowWaterMark: 32768
+ writeSpinCount: 16
+ autoRead: false
+ allocType: "pooled"
+ messageSizeEstimator: 8
+ singleEventExecutorPerGroup: true
+ instance:
+ enabled: false
+ registerType: zookeeper #etcd #consul
+ serverLists: localhost:2181 #http://localhost:2379 #localhost:8848
+ props:
+ cross:
+ enabled: true
+ allowedHeaders:
+ allowedMethods: "*"
+ allowedAnyOrigin: true # the same of Access-Control-Allow-Origin: "*"
+ allowedExpose: ""
+ maxAge: "18000"
+ allowCredentials: true
+ switchConfig:
+ local: true
+ file:
+ enabled: true
+ maxSize : 10
+ sync:
+ websocket:
+ urls: ws://shenyu-admin-svc.shenyu.svc.cluster.local:9095/websocket
+ allowOrigin: ws://shenyu-bootstrap-svc.shenyu.svc.cluster.local:9195
+ exclude:
+ enabled: false
+ paths:
+ - /favicon.ico
+ fallback:
+ enabled: false
+ paths:
+ - /fallback/hystrix
+ - /fallback/resilience4j
+ health:
+ enabled: false
+ paths:
+ - /actuator/health
+ - /health_check
+ extPlugin:
+ path:
+ enabled: true
+ threads: 1
+ scheduleTime: 300
+ scheduleDelay: 30
+ scheduler:
+ enabled: false
+ type: fixed
+ threads: 16
+ upstreamCheck:
+ enabled: false
+ timeout: 3000
+ healthyThreshold: 1
+ unhealthyThreshold: 1
+ interval: 5000
+ printEnabled: true
+ printInterval: 60000
+ ribbon:
+ serverListRefreshInterval: 10000
+ metrics:
+ enabled: false
+ name : prometheus
+ host: 127.0.0.1
+ port: 8090
+ jmxConfig:
+ props:
+ jvm_enabled: true
+ local:
+ enabled: false
+ sha512Key: "BA3253876AED6BC22D4A6FF53D8406C6AD864195ED144AB5C87621B6C233B548BAEAE6956DF346EC8C17F5EA10F35EE3CBC514797ED7DDD3145464E2A0BAB413"
+ logging:
+ level:
+ root: info
+ org.springframework.boot: info
+ org.apache.ibatis: info
+ org.apache.shenyu.bonuspoint: info
+ org.apache.shenyu.lottery: info
+ org.apache.shenyu: info
+
+```
+
+- 执行 `kubectl apply -f shenyu-ns.yaml`
+
+### 2. 部署 shenyu-admin
+
+> 创建网关管理服务
+
+- 创建文件 shenyu-admin.yaml
+
+```yaml
+# 示例使用 nodeport 方式暴露端口
+apiVersion: v1
+kind: Service
+metadata:
+ namespace: shenyu
+ name: shenyu-admin-svc
+spec:
+ selector:
+ app: shenyu-admin
+ type: NodePort
+ ports:
+ - protocol: TCP
+ port: 9095
+ targetPort: 9095
+ nodePort: 31095
+---
+# shenyu-admin
+apiVersion: apps/v1
+kind: Deployment
+metadata:
+ namespace: shenyu
+ name: shenyu-admin
+spec:
+ selector:
+ matchLabels:
+ app: shenyu-admin
+ replicas: 1
+ template:
+ metadata:
+ labels:
+ app: shenyu-admin
+ spec:
+ volumes:
+ - name: shenyu-admin-application
+ configMap:
+ name: shenyu-cm
+ items:
+ - key: shenyu-admin-application.yml
+ path: shenyu-admin-application.yml
+ - name: shenyu-admin-application-h2
+ configMap:
+ name: shenyu-cm
+ items:
+ - key: shenyu-admin-application-h2.yml
+ path: shenyu-admin-application-h2.yml
+ containers:
+ - name: shenyu-admin
+ image: apache/shenyu-admin:latest
+ imagePullPolicy: Always
+ ports:
+ - containerPort: 9095
+ env:
+ - name: 'TZ'
+ value: 'Asia/Beijing'
+ volumeMounts:
+ - name: shenyu-admin-application
+ mountPath: /opt/shenyu-admin/conf/application.yml
+ subPath: shenyu-admin-application.yml
+ - name: shenyu-admin-application-h2
+ mountPath: /opt/shenyu-admin/conf/application-h2.yml
+ subPath: shenyu-admin-application-h2.yml
+```
+
+- 执行`kubectl apply -f shenyu-admin.yaml`
+
+### 3. 部署 shenyu-bootstrap
+
+> 创建网关服务
+
+- 创建文件 shenyu-bootstrap.yaml
+
+```yaml
+# 示例使用 nodeport 方式暴露端口
+apiVersion: v1
+kind: Service
+metadata:
+ namespace: shenyu
+ name: shenyu-bootstrap-svc
+spec:
+ selector:
+ app: shenyu-bootstrap
+ type: NodePort
+ ports:
+ - protocol: TCP
+ port: 9195
+ targetPort: 9195
+ nodePort: 31195
+---
+# shenyu-bootstrap
+apiVersion: apps/v1
+kind: Deployment
+metadata:
+ namespace: shenyu
+ name: shenyu-bootstrap
+spec:
+ selector:
+ matchLabels:
+ app: shenyu-bootstrap
+ replicas: 1
+ template:
+ metadata:
+ labels:
+ app: shenyu-bootstrap
+ spec:
+ volumes:
+ - name: shenyu-bootstrap-application
+ configMap:
+ name: shenyu-cm
+ items:
+ - key: shenyu-bootstrap-application.yml
+ path: shenyu-bootstrap-application.yml
+ containers:
+ - name: shenyu-bootstrap
+ image: apache/shenyu-bootstrap:latest
+ ports:
+ - containerPort: 9195
+ env:
+ - name: TZ
+ value: Asia/Beijing
+ volumeMounts:
+ - name: shenyu-bootstrap-application
+ mountPath: /opt/shenyu-bootstrap/conf/application.yml
+ subPath: shenyu-bootstrap-application.yml
+```
+
+- 执行 `kubectl apply -f shenyu-bootstrap.yaml`
+
+## 示例二:使用 MySQL 作为数据库
+
+### 1. 创建 Namespace和 ConfigMap
+
+- 创建文件 shenyu-ns.yaml
+
+```yaml
+apiVersion: v1
+kind: Namespace
+metadata:
+ name: shenyu
+ labels:
+ name: shenyu
+---
+apiVersion: v1
+kind: ConfigMap
+metadata:
+ name: shenyu-cm
+ namespace: shenyu
+data:
+ shenyu-admin-application.yml: |
+ server:
+ port: 9095
+ address: 0.0.0.0
+ spring:
+ profiles:
+ active: mysql
+ thymeleaf:
+ cache: true
+ encoding: utf-8
+ enabled: true
+ prefix: classpath:/static/
+ suffix: .html
+ mvc:
+ pathmatch:
+ matching-strategy: ant_path_matcher
+ mybatis:
+ config-location: classpath:/mybatis/mybatis-config.xml
+ mapper-locations: classpath:/mappers/*.xml
+ shenyu:
+ register:
+ registerType: http #http #zookeeper #etcd #nacos #consul
+ serverLists: #localhost:2181 #http://localhost:2379 #localhost:8848
+ props:
+ sessionTimeout: 5000
+ connectionTimeout: 2000
+ checked: true
+ zombieCheckTimes: 5
+ scheduledTime: 10
+ nacosNameSpace: ShenyuRegisterCenter
+ sync:
+ websocket:
+ enabled: true
+ messageMaxSize: 10240
+ allowOrigins: ws://shenyu-admin-svc.shenyu.svc.cluster.local:9095;ws://shenyu-bootstrap-svc.shenyu.svc.cluster.local:9195;
+ ldap:
+ enabled: false
+ url: ldap://xxxx:xxx
+ bind-dn: cn=xxx,dc=xxx,dc=xxx
+ password: xxxx
+ base-dn: ou=xxx,dc=xxx,dc=xxx
+ object-class: person
+ login-field: cn
+ jwt:
+ expired-seconds: 86400000
+ shiro:
+ white-list:
+ - /
+ - /favicon.*
+ - /static/**
+ - /index**
+ - /platform/login
+ - /websocket
+ - /error
+ - /actuator/health
+ - /swagger-ui.html
+ - /webjars/**
+ - /swagger-resources/**
+ - /v2/api-docs
+ - /csrf
+ swagger:
+ enable: true
+ apidoc:
+ gatewayUrl: http://127.0.0.1:9195
+ envProps:
+ - envLabel: Test environment
+ addressLabel: Request Address
+ addressUrl: http://127.0.0.1:9195
+ - envLabel: Prod environment
+ addressLabel: Request Address
+ addressUrl: http://127.0.0.1:9195
+ logging:
+ level:
+ root: info
+ org.springframework.boot: info
+ org.apache.ibatis: info
+ org.apache.shenyu.bonuspoint: info
+ org.apache.shenyu.lottery: info
+ org.apache.shenyu: info
+ shenyu-admin-application-mysql.yml: |
+ shenyu:
+ database:
+ dialect: mysql
+ init_script: "sql-script/mysql/schema.sql"
+ init_enable: true
+ spring:
+ datasource:
+ url: jdbc:mysql://mysql.shenyu.svc.cluster.local:3306/shenyu?useUnicode=true&characterEncoding=utf-8&useSSL=false
+ username: {your_mysql_user}
+ password: {your_mysql_password}
+ driver-class-name: com.mysql.jdbc.Driver
+ shenyu-bootstrap-application.yml: |
+ server:
+ port: 9195
+ address: 0.0.0.0
+ spring:
+ main:
+ allow-bean-definition-overriding: true
+ allow-circular-references: true
+ application:
+ name: shenyu-bootstrap
+ codec:
+ max-in-memory-size: 2MB
+ cloud:
+ discovery:
+ enabled: false
+ nacos:
+ discovery:
+ server-addr: 127.0.0.1:8848 # Spring Cloud Alibaba Dubbo use this.
+ enabled: false
+ namespace: ShenyuRegisterCenter
+ eureka:
+ client:
+ enabled: false
+ serviceUrl:
+ defaultZone: http://localhost:8761/eureka/
+ instance:
+ prefer-ip-address: true
+ management:
+ health:
+ defaults:
+ enabled: false
+ shenyu:
+ matchCache:
+ enabled: false
+ maxFreeMemory: 256 # 256MB
+ netty:
+ http:
+ # set to false, user can custom the netty tcp server config.
+ webServerFactoryEnabled: true
+ selectCount: 1
+ workerCount: 4
+ accessLog: false
+ serverSocketChannel:
+ soRcvBuf: 87380
+ soBackLog: 128
+ soReuseAddr: false
+ connectTimeoutMillis: 10000
+ writeBufferHighWaterMark: 65536
+ writeBufferLowWaterMark: 32768
+ writeSpinCount: 16
+ autoRead: false
+ allocType: "pooled"
+ messageSizeEstimator: 8
+ singleEventExecutorPerGroup: true
+ socketChannel:
+ soKeepAlive: false
+ soReuseAddr: false
+ soLinger: -1
+ tcpNoDelay: true
+ soRcvBuf: 87380
+ soSndBuf: 16384
+ ipTos: 0
+ allowHalfClosure: false
+ connectTimeoutMillis: 10000
+ writeBufferHighWaterMark: 65536
+ writeBufferLowWaterMark: 32768
+ writeSpinCount: 16
+ autoRead: false
+ allocType: "pooled"
+ messageSizeEstimator: 8
+ singleEventExecutorPerGroup: true
+ instance:
+ enabled: false
+ registerType: zookeeper #etcd #consul
+ serverLists: localhost:2181 #http://localhost:2379 #localhost:8848
+ props:
+ cross:
+ enabled: true
+ allowedHeaders:
+ allowedMethods: "*"
+ allowedAnyOrigin: true # the same of Access-Control-Allow-Origin: "*"
+ allowedExpose: ""
+ maxAge: "18000"
+ allowCredentials: true
+ switchConfig:
+ local: true
+ file:
+ enabled: true
+ maxSize : 10
+ sync:
+ websocket:
+ urls: ws://shenyu-admin-svc.shenyu.svc.cluster.local:9095/websocket
+ allowOrigin: ws://shenyu-bootstrap-svc.shenyu.svc.cluster.local:9195
+ exclude:
+ enabled: false
+ paths:
+ - /favicon.ico
+ fallback:
+ enabled: false
+ paths:
+ - /fallback/hystrix
+ - /fallback/resilience4j
+ health:
+ enabled: false
+ paths:
+ - /actuator/health
+ - /health_check
+ extPlugin:
+ path:
+ enabled: true
+ threads: 1
+ scheduleTime: 300
+ scheduleDelay: 30
+ scheduler:
+ enabled: false
+ type: fixed
+ threads: 16
+ upstreamCheck:
+ enabled: false
+ timeout: 3000
+ healthyThreshold: 1
+ unhealthyThreshold: 1
+ interval: 5000
+ printEnabled: true
+ printInterval: 60000
+ ribbon:
+ serverListRefreshInterval: 10000
+ metrics:
+ enabled: false
+ name : prometheus
+ host: 127.0.0.1
+ port: 8090
+ jmxConfig:
+ props:
+ jvm_enabled: true
+ local:
+ enabled: false
+ sha512Key: "BA3253876AED6BC22D4A6FF53D8406C6AD864195ED144AB5C87621B6C233B548BAEAE6956DF346EC8C17F5EA10F35EE3CBC514797ED7DDD3145464E2A0BAB413"
+ logging:
+ level:
+ root: info
+ org.springframework.boot: info
+ org.apache.ibatis: info
+ org.apache.shenyu.bonuspoint: info
+ org.apache.shenyu.lottery: info
+ org.apache.shenyu: info
+```
+
+- 执行 `kubectl apply -f shenyu-ns.yaml`
+
+### 2. 创建 Endpoints 代理外部 MySQL
+
+- 初始化数据库[部署先决条件](./deployment-before.md)
+
+- 创建文件 shenyu-ep.yaml
+
+```yaml
+kind: Service
+apiVersion: v1
+metadata:
+ name: mysql
+ namespace: shenyu
+spec:
+ ports:
+ - port: 3306
+ name: mysql
+ targetPort: {your_mysql_port}
+---
+kind: Endpoints
+apiVersion: v1
+metadata:
+ name: mysql
+ namespace: shenyu
+subsets:
+- addresses:
+ - ip: {your_mysql_ip}
+ ports:
+ - port: {your_mysql_port}
+ name: mysql
+```
+
+- 执行 `kubectl apply -f shenyu-ep.yaml`
+
+### 3. 部署 shenyu-admin
+
+- 创建文件 shenyu-admin.yaml
+
+```yaml
+# 示例使用 nodeport 方式暴露端口
+apiVersion: v1
+kind: Service
+metadata:
+ namespace: shenyu
+ name: shenyu-admin-svc
+spec:
+ selector:
+ app: shenyu-admin
+ type: NodePort
+ ports:
+ - protocol: TCP
+ port: 9095
+ targetPort: 9095
+ nodePort: 31095
+---
+# shenyu-admin
+apiVersion: apps/v1
+kind: Deployment
+metadata:
+ namespace: shenyu
+ name: shenyu-admin
+spec:
+ selector:
+ matchLabels:
+ app: shenyu-admin
+ replicas: 1
+ template:
+ metadata:
+ labels:
+ app: shenyu-admin
+ spec:
+ volumes:
+ - name: shenyu-admin-application
+ configMap:
+ name: shenyu-cm
+ items:
+ - key: shenyu-admin-application.yml
+ path: shenyu-admin-application.yml
+ - name: shenyu-admin-application-mysql
+ configMap:
+ name: shenyu-cm
+ items:
+ - key: shenyu-admin-application-mysql.yml
+ path: shenyu-admin-application-mysql.yml
+ - name: mysql-connector-volume
+ emptyDir: {}
+ initContainers:
+ - name: download-mysql-jar
+ image: busybox:1.35.0
+ command: [ "sh","-c"]
+ args: ["wget https://repo1.maven.org/maven2/mysql/mysql-connector-java/8.0.23/mysql-connector-java-8.0.23.jar;
+ wget https://repo1.maven.org/maven2/mysql/mysql-connector-java/8.0.23/mysql-connector-java-8.0.23.jar.md5;
+ if [ $(md5sum mysql-connector-java-8.0.23.jar | cut -d ' ' -f1) = $(cat mysql-connector-java-8.0.23.jar.md5) ];
+ then echo success;
+ else echo failed;
+ exit 1;
+ fi;
+ mv /mysql-connector-java-8.0.23.jar /opt/shenyu-admin/ext-lib/mysql-connector-java.jar" ]
+ volumeMounts:
+ - name: mysql-connector-volume
+ mountPath: /opt/shenyu-admin/ext-lib
+ containers:
+ - name: shenyu-admin
+ image: apache/shenyu-admin:latest
+ imagePullPolicy: Always
+ ports:
+ - containerPort: 9095
+ env:
+ - name: 'TZ'
+ value: 'Asia/Beijing'
+ - name: SPRING_PROFILES_ACTIVE
+ value: mysql
+ volumeMounts:
+ - name: shenyu-admin-application
+ mountPath: /opt/shenyu-admin/conf/application.yml
+ subPath: shenyu-admin-application.yml
+ - name: shenyu-admin-application-mysql
+ mountPath: /opt/shenyu-admin/conf/application-mysql.yml
+ subPath: shenyu-admin-application-mysql.yml
+ - name: mysql-connector-volume
+ mountPath: /opt/shenyu-admin/ext-lib
+```
+
+- 执行`kubectl apply -f shenyu-admin.yaml`
+
+### 4. 部署 shenyu-bootstrap
+
+- 创建文件 shenyu-bootstrap.yaml
+
+```yaml
+# 示例使用 nodeport 方式暴露端口
+apiVersion: v1
+kind: Service
+metadata:
+ namespace: shenyu
+ name: shenyu-bootstrap-svc
+spec:
+ selector:
+ app: shenyu-bootstrap
+ type: NodePort
+ ports:
+ - protocol: TCP
+ port: 9195
+ targetPort: 9195
+ nodePort: 31195
+---
+# shenyu-bootstrap
+apiVersion: apps/v1
+kind: Deployment
+metadata:
+ namespace: shenyu
+ name: shenyu-bootstrap
+spec:
+ selector:
+ matchLabels:
+ app: shenyu-bootstrap
+ replicas: 1
+ template:
+ metadata:
+ labels:
+ app: shenyu-bootstrap
+ spec:
+ volumes:
+ - name: shenyu-bootstrap-application
+ configMap:
+ name: shenyu-cm
+ items:
+ - key: shenyu-bootstrap-application.yml
+ path: shenyu-bootstrap-application.yml
+ containers:
+ - name: shenyu-bootstrap
+ image: apache/shenyu-bootstrap:latest
+ ports:
+ - containerPort: 9195
+ env:
+ - name: TZ
+ value: Asia/Beijing
+ volumeMounts:
+ - name: shenyu-bootstrap-application
+ mountPath: /opt/shenyu-bootstrap/conf/application.yml
+ subPath: shenyu-bootstrap-application.yml
+```
+
+- 执行 `kubectl apply -f shenyu-bootstrap.yaml`
+
+## 测试访问
+
+**访问地址**:http://{K8S_CLUSTER_IP}:31095/
+
+**账号密码**:admin/123456
diff --git a/i18n/zh/docusaurus-plugin-content-docs/version-2.5.1/deployment/deployment-local.md b/i18n/zh/docusaurus-plugin-content-docs/version-2.5.1/deployment/deployment-local.md
new file mode 100644
index 00000000000..1ec4c66252d
--- /dev/null
+++ b/i18n/zh/docusaurus-plugin-content-docs/version-2.5.1/deployment/deployment-local.md
@@ -0,0 +1,50 @@
+---
+sidebar_position: 1
+title: 本地部署
+keywords: ["Deployment"]
+description: 本地部署
+---
+
+本文介绍本地环境启动 `Apache ShenYu` 网关。
+
+> 在阅读本文档前,你需要先阅读[部署先决条件](./deployment-before.md)文档来完成部署 `shenyu` 前的环境准备工作。
+
+### 环境准备
+
+* 本地正确安装JDK1.8+
+* 本地正确安装Git
+* 本地正确安装Maven
+* 选择一款开发工具,比如IDEA
+
+### 下载编译代码
+
+* 下载代码
+
+```
+git clone https://github.com/apache/shenyu.git
+cd incubator-shenyu
+mvn clean install -Dmaven.javadoc.skip=true -B -Drat.skip=true -Djacoco.skip=true -DskipITs -DskipTests
+```
+
+* 使用开发工具启动 `org.apache.shenyu.admin.ShenyuAdminBootstrap`,访问 http://localhost:9095 , 默认用户名和密码分别为: `admin` 和 `123456`。
+
+ * 如果使用`h2`来存储,设置变量 `--spring.profiles.active = h2` 启动服务。
+
+ * 如果使用`MySQL`来存储,需按照 [指引文档](./deployment-before.md#mysql) 初始化数据库和修改 `application-mysql.yml` 中的 `jdbc` 相关配置,再设置变量 `--spring.profiles.active = mysql` 启动服务。
+
+ * 如果使用`PostgreSql`来存储,需按照 [指引文档](./deployment-before.md#postgresql) 初始化数据库和修改 `application-pg.yml` 中的 `jdbc` 相关配置,再设置变量 `--spring.profiles.active = pg` 启动服务。
+
+ * 如果使用`Oracle`来存储,需按照 [指引文档](./deployment-before.md#oracle) 初始化数据库和修改 `application-oracle.yml` 中的 `jdbc` 相关配置,再设置变量 `--spring.profiles.active = oracle` 启动服务。
+
+* 使用开发工具启动 `org.apache.shenyu.bootstrap.ShenyuBootstrapApplication`。
+
+
+
+
+
+
+
+
+
+
+
diff --git a/i18n/zh/docusaurus-plugin-content-docs/version-2.5.1/deployment/deployment-package.md b/i18n/zh/docusaurus-plugin-content-docs/version-2.5.1/deployment/deployment-package.md
new file mode 100644
index 00000000000..22953f815a3
--- /dev/null
+++ b/i18n/zh/docusaurus-plugin-content-docs/version-2.5.1/deployment/deployment-package.md
@@ -0,0 +1,71 @@
+---
+sidebar_position: 2
+title: 二进制包部署
+keywords: ["二进制", "部署"]
+description: 二进制包部署
+---
+
+本文介绍使用二进制包部署 `Apache ShenYu` 网关。
+
+> 在阅读本文档前,你需要先阅读[部署先决条件](./deployment-before.md)文档来完成部署 `shenyu` 前的环境准备工作。
+
+
+### 启动 Apache ShenYu Admin
+
+* 下载 [apache-shenyu-${current.version}-admin-bin.tar.gz](https://archive.apache.org/dist/shenyu/2.5.0/apache-shenyu-2.5.0-admin-bin.tar.gz)
+
+* 解压缩 `apache-shenyu-${current.version}-admin-bin.tar.gz`。 进入 `bin` 目录。
+
+> 2.5.1版本后,`start.sh` 开始支持通过环境变量 `ADMIN_JVM` 自定义 JVM 启动参数。
+
+* 使用 `h2` 来存储后台数据:
+
+```
+> windows: start.bat
+
+> linux: ./start.sh
+```
+
+* 使用 `MySQL` 来存储后台数据,需按照 [指引文档](./deployment-before.md#mysql) 初始化数据库,将 [mysql-connector.jar](https://repo1.maven.org/maven2/mysql/mysql-connector-java/8.0.18/mysql-connector-java-8.0.18.jar) 拷贝到 `/${your_work_dir}/ext-lib`, 进入 `/conf` 目录修改 `application-mysql.yaml` 中 `jdbc` 的配置。
+
+* 将 `conf/application.yml` 中的 `spring.profiles.active` 修改成 `mysql`
+
+```
+> windows: start.bat
+
+> linux: ./start.sh
+```
+
+* 使用 `PostgreSql` 来存储后台数据,需按照 [指引文档](./deployment-before.md#postgresql) 初始化数据库, 进入 `/conf` 目录修改 `application-pg.yaml` 中 `jdbc` 的配置。
+
+* 将 `conf/application.yml` 中的 `spring.profiles.active` 修改成 `pg`
+
+```
+> windows: start.bat
+
+> linux: ./start.sh
+```
+
+* 使用 `Oracle` 来存储后台数据,需按照 [指引文档](./deployment-before.md#oracle) 初始化数据库, 进入 `/conf` 目录修改 `application-oracle.yaml` 中 `jdbc` 的配置。
+
+* 将 `conf/application.yml` 中的 `spring.profiles.active` 修改成 `oracle`
+
+```
+> windows: start.bat
+
+> linux: ./start.sh
+```
+
+### 启动 Apache ShenYu Bootstrap
+
+* 下载 [`apache-shenyu-${current.version}-bootstrap-bin.tar.gz`](https://archive.apache.org/dist/shenyu/2.5.0/apache-shenyu-2.5.0-bootstrap-bin.tar.gz)
+
+* 解压缩 `apache-shenyu-${current.version}-bootstrap-bin.tar.gz`。 进入 bin 目录。
+
+> 2.5.1版本后,`start.sh` 开始支持通过环境变量 `BOOT_JVM` 自定义 JVM 启动参数。
+
+```
+> windwos : start.bat
+
+> linux : ./start.sh
+```
diff --git a/i18n/zh/docusaurus-plugin-content-docs/version-2.5.1/deployment/deployment-quick.md b/i18n/zh/docusaurus-plugin-content-docs/version-2.5.1/deployment/deployment-quick.md
new file mode 100644
index 00000000000..61edeb2bf6b
--- /dev/null
+++ b/i18n/zh/docusaurus-plugin-content-docs/version-2.5.1/deployment/deployment-quick.md
@@ -0,0 +1,109 @@
+---
+sidebar_position: 1
+title: 单机快速部署
+keywords: ["Deployment"]
+description: 单机快速部署
+---
+
+本文介绍单机环境快速启动 `Apache ShenYu` 网关。
+
+> 在阅读本文档前,你需要先阅读[部署先决条件](./deployment-before.md)文档来完成部署 `shenyu` 前的环境准备工作。
+
+### 环境准备
+
+* 本地正确安装JDK1.8+
+
+### 启动 Apache ShenYu Bootstrap
+
+* 下载 [apache-shenyu-${current.version}-bootstrap-bin.tar.gz](https://archive.apache.org/dist/shenyu/2.5.0/apache-shenyu-2.5.0-bootstrap-bin.tar.gz)
+
+* 解压缩 `apache-shenyu-${current.version}-bootstrap-bin.tar.gz`。 进入 bin 目录。
+
+```
+> windwos : start.bat
+
+> linux : ./start.sh
+```
+
+### 选择器及规则配置
+
+参考[本地模式](../developer/local-model#新增选择器与规则)进行选择器及规则的配置。
+
+示例:
+
+* 如服务地址是`http://127.0.0.1:8080/helloworld`,直接访问将返回如下
+
+```json
+{
+ "name" : "Shenyu",
+ "data" : "hello world"
+}
+```
+
+* 按照如下进行选择器和规则配置
+
+### 使用postman
+
+> Headers 中添加 `localKey: 123456`。如果需要自定义 localKey,可以使用 sha512 工具根据明文生成 key,并更新 `shenyu.local.sha512Key` 属性。
+>
+> 请求方式POST,地址`http://localhost:9195/shenyu/plugin/selectorAndRules`,body 选择raw json,内容如下:
+
+```
+Headers
+
+localKey: 123456
+```
+
+```json
+{
+ "pluginName": "divide",
+ "selectorHandler": "[{\"upstreamUrl\":\"127.0.0.1:8080\"}]",
+ "conditionDataList": [{
+ "paramType": "uri",
+ "operator": "match",
+ "paramValue": "/**"
+ }],
+ "ruleDataList": [{
+ "ruleHandler": "{\"loadBalance\":\"random\"}",
+ "conditionDataList": [{
+ "paramType": "uri",
+ "operator": "match",
+ "paramValue": "/**"
+ }]
+ }]
+}
+```
+
+### 使用curl
+
+```bash
+curl --location --request POST 'http://localhost:9195/shenyu/plugin/selectorAndRules' \
+--header 'Content-Type: application/json' \
+--header 'localKey: 123456' \
+--data-raw '{
+ "pluginName": "divide",
+ "selectorHandler": "[{\"upstreamUrl\":\"127.0.0.1:8080\"}]",
+ "conditionDataList": [{
+ "paramType": "uri",
+ "operator": "match",
+ "paramValue": "/**"
+ }],
+ "ruleDataList": [{
+ "ruleHandler": "{\"loadBalance\":\"random\"}",
+ "conditionDataList": [{
+ "paramType": "uri",
+ "operator": "match",
+ "paramValue": "/**"
+ }]
+ }]
+}'
+```
+
+* 通过`http://localhost:9195/helloworld`请求服务,返回如下:
+
+```json
+{
+ "name" : "Shenyu",
+ "data" : "hello world"
+}
+```
diff --git a/i18n/zh/docusaurus-plugin-content-docs/version-2.5.1/design/_category_.json b/i18n/zh/docusaurus-plugin-content-docs/version-2.5.1/design/_category_.json
new file mode 100644
index 00000000000..681e473796f
--- /dev/null
+++ b/i18n/zh/docusaurus-plugin-content-docs/version-2.5.1/design/_category_.json
@@ -0,0 +1,4 @@
+{
+ "label": "设计文档",
+ "position": 2
+}
diff --git a/i18n/zh/docusaurus-plugin-content-docs/version-2.5.1/design/data-sync.md b/i18n/zh/docusaurus-plugin-content-docs/version-2.5.1/design/data-sync.md
new file mode 100644
index 00000000000..816e3c21296
--- /dev/null
+++ b/i18n/zh/docusaurus-plugin-content-docs/version-2.5.1/design/data-sync.md
@@ -0,0 +1,110 @@
+---
+sidebar_position: 2
+title: 数据同步设计
+keywords: ["Apache ShenYu"]
+description: 数据同步
+---
+
+本篇主要讲解数据同步原理,数据同步是指在 `shenyu-admin` 后台操作数据以后,使用何种策略将数据同步到 `Apache ShenYu` 网关。`Apache ShenYu` 网关当前支持`ZooKeeper`、`WebSocket`、`Http长轮询`、`Nacos` 、`Etcd` 和 `Consul` 进行数据同步。
+
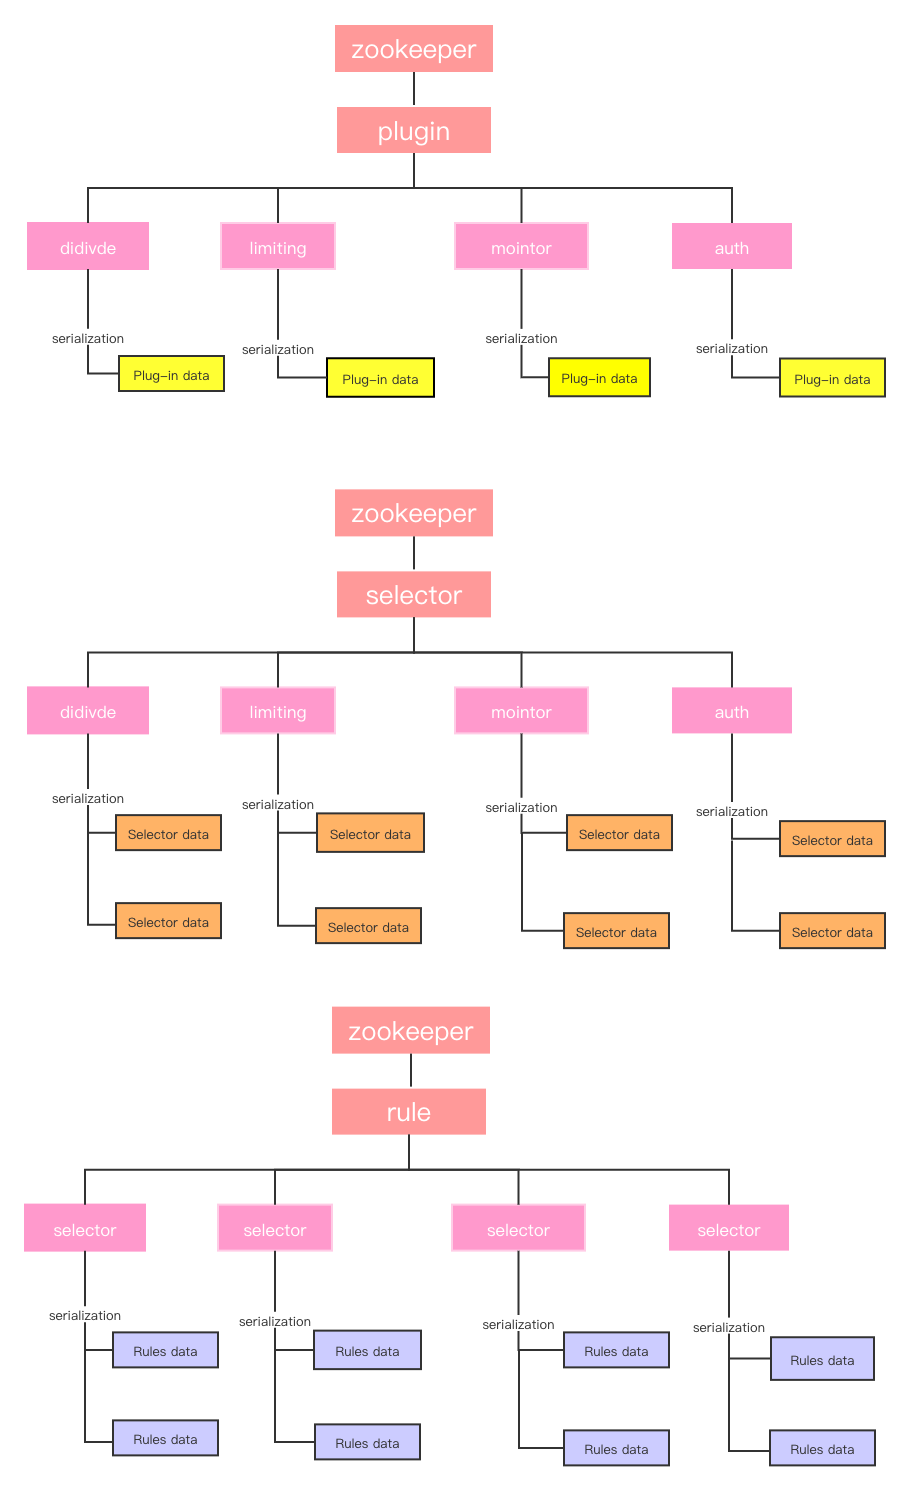
+<img src="/img/shenyu/dataSync/data-sync-dir-zh.png" width="60%" height="50%" />
+
+数据同步的相关配置请参考用户文档中的 [数据同步配置](../user-guide/property-config/use-data-sync.md) 。
+
+### 背景
+
+网关是流量请求的入口,在微服务架构中承担了非常重要的角色,网关高可用的重要性不言而喻。在使用网关的过程中,为了满足业务诉求,经常需要变更配置,比如流控规则、路由规则等等。因此,网关动态配置是保障网关高可用的重要因素。
+
+
+在实际使用 `Apache ShenYu` 网关过程中,用户也反馈了一些问题:
+
+* 依赖 `Zookeeper`,怎么使用 `Etcd`、`Consul`、`Nacos`等其他注册中心?
+* 依赖 `Redis`、`influxdb`,没有使用限流插件、监控插件,为什么需要这些?
+* 配置同步为什么不使用配置中心?
+* 为什么不能动态配置更新?
+* 每次都要查询数据库,使用`Redis`不就行了吗?
+
+根据用户的反馈信息,我们对 `Apache ShenYu` 也进行了部分的重构,当前数据同步特性如下:
+
+- 所有的配置都缓存在 `Apache ShenYu` 网关内存中,每次请求都使用本地缓存,速度非常快。
+- 用户可以在 `shenyu-admin` 后台任意修改数据,并马上同步到网关内存。
+- 支持 `Apache ShenYu` 的插件、选择器、规则数据、元数据、签名数据等数据同步。
+- 所有插件的选择器,规则都是动态配置,立即生效,不需要重启服务。
+- 数据同步方式支持 `Zookeeper`、`Http 长轮询`、`Websocket`、`Nacos`、`Etcd` 和 `Consul`。
+
+### 原理分析
+
+下图展示了 `Apache ShenYu` 数据同步的流程,`Apache ShenYu` 网关在启动时,会从配置服务同步配置数据,并且支持推拉模式获取配置变更信息,然后更新本地缓存。管理员可以在管理后台(`shenyu-admin`),变更用户权限、规则、插件、流量配置,通过推拉模式将变更信息同步给 `Apache ShenYu` 网关,具体是 `push` 模式,还是 `pull` 模式取决于使用哪种同步方式。
+
+ 
+
+在最初的版本中,配置服务依赖 `Zookeeper` 实现,管理后台将变更信息 `push` 给网关。而现在可以支持 `WebSocket`、`Http长轮询`、`Zookeeper`、`Nacos`、`Etcd` 和 `Consul`,通过在配置文件中设置 `shenyu.sync.${strategy}` 指定对应的同步策略,默认使用 `WebSocket` 同步策略,可以做到秒级数据同步。但是,有一点需要注意的是,`Apache ShenYu`网关 和 `shenyu-admin` 必须使用相同的同步策略。
+
+如下图所示,`shenyu-admin` 在用户发生配置变更之后,会通过 `EventPublisher` 发出配置变更通知,由 `EventDispatcher` 处理该变更通知,然后根据配置的同步策略(`Http、WebSocket、Zookeeper、Nacos、Etcd、Consul`),将配置发送给对应的事件处理器。
+
+- 如果是 `WebSocket` 同步策略,则将变更后的数据主动推送给 `shenyu-web`,并且在网关层,会有对应的 `WebsocketDataHandler` 处理器来处理 `shenyu-admin` 的数据推送。
+- 如果是 `Zookeeper` 同步策略,将变更数据更新到 `Zookeeper`,而 `ZookeeperSyncCache` 会监听到 `Zookeeper` 的数据变更,并予以处理。
+- 如果是 `Http` 同步策略,由网关主动发起长轮询请求,默认有 `90s` 超时时间,如果 `shenyu-admin` 没有数据变更,则会阻塞 `Http` 请求,如果有数据发生变更则响应变更的数据信息,如果超过 `60s` 仍然没有数据变更则响应空数据,网关层接到响应后,继续发起 `Http` 请求,反复同样的请求。
+
+<img src="/img/shenyu/dataSync/config-strategy-processor-zh.png" width="90%" height="80%" />
+
+### Zookeeper同步原理
+
+基于 `Zookeeper` 的同步原理很简单,主要是依赖 `Zookeeper` 的 `watch` 机制。`Apache ShenYu`网关会监听配置的节点,`shenyu-admin` 在启动的时候,会将数据全量写入 `Zookeeper`,后续数据发生变更时,会增量更新 `Zookeeper` 的节点,与此同时,`Apache ShenYu`网关会监听配置信息的节点,一旦有信息变更时,会更新本地缓存。
+
+
+
+`Apache ShenYu` 将配置信息写到`zookeeper`节点,是通过精心设计的,如果您想深入了解代码实现,请参考源码 `ZookeeperSyncDataService`。
+
+### WebSocket同步原理
+
+`WebSocket` 和 `Zookeeper` 机制有点类似,将网关与 `shenyu-admin` 建立好 `WebSocket` 连接时,`shenyu-admin` 会推送一次全量数据,后续如果配置数据发生变更,则以增量形式将变更数据通过 `WebSocket` 主动推送给 `Apache ShenYu`网关。
+
+使用 `WebSocket` 同步的时候,特别要注意断线重连,也就是要保持心跳。`Apache ShenYu`使用`java-websocket` 这个第三方库来进行`websocket`连接。
+如果您想深入了解代码实现,请参考源码 `WebsocketSyncDataService`。
+
+
+### Http长轮询同步原理
+
+`Zookeeper`和`WebSocket` 数据同步的机制比较简单,而 `Http长轮询`则比较复杂。 `Apache ShenYu` 借鉴了 `Apollo`、`Nacos` 的设计思想,取其精华,自己实现了 `Http长轮询`数据同步功能。注意,这里并非传统的 `ajax` 长轮询!
+
+<img src="/img/shenyu/dataSync/http-long-polling-zh.png" width="90%" height="80%" />
+
+`Http长轮询` 机制如上所示,`Apache ShenYu`网关主动请求 `shenyu-admin` 的配置服务,读取超时时间为 `90s`,意味着网关层请求配置服务最多会等待 `90s`,这样便于 `shenyu-admin` 配置服务及时响应变更数据,从而实现准实时推送。
+
+`http` 请求到达 `shenyu-admin` 之后,并非立马响应数据,而是利用 `Servlet3.0` 的异步机制,异步响应数据。首先,将长轮询请求任务 `LongPollingClient` 扔到 `BlockingQueue` 中,并且开启调度任务,`60s` 后执行,这样做的目的是 `60s` 后将该长轮询请求移除队列。因为即便是没有配置变更,也需要让网关知道,不能一直等待。而且网关请求配置服务时,也有 `90s` 的超时时间。
+
+
+如果这段时间内,管理员在 `shenyu-admin` 变更了配置数据,此时,会挨个移除队列中的长轮询请求,并响应数据,告知是哪个 `Group` 的数据发生了变更(我们将插件、规则、流量配置、用户配置数据分成不同的组)。网关收到响应信息之后,只知道是哪个 `Group` 发生了配置变更,还需要再次请求该 `Group` 的配置数据。这里可能会存在一个疑问:为什么不是直接将变更的数据写出?我们在开发的时候,也深入讨论过该问题,因为 `http 长轮询` 机制只能保证准实时,如果在网关层处理不及时,或者管理员频繁更新配置,很有可能便错过了某个配置变更的推送,安全起见,我们只告知某个 `Group` 信息发生了变更。
+
+当 `shenyu-web` 网关层接收到 `http` 响应信息之后,拉取变更信息(如果有变更的话),然后再次请求 `shenyu-admin` 的配置服务,如此反复循环。
+如果您想深入了解代码实现,请参考源码 `HttpSyncDataService`。
+
+
+### Nacos同步原理
+
+`Nacos`的同步原理与Zookeeper基本类似,主要依赖于`Nacos`的`配置管理`,各个配置节点的路径与Zookeeper类似。
+
+`Apache ShenYu`网关会监听配置的节点,启动时,如果`Nacos`中不存在配置节点,将同步全量的数据写入`Nacos`中,后续数据发生变更时,全量更新`Nacos`中的配置节点,与此同时,`Apache ShenYu`网关会监听配置信息的节点,一旦有信息变更时,会更新本地缓存。
+
+如果您想深入了解代码实现,请参考源码 `NacosSyncDataService`和`Nacos`的[官方文档](https://nacos.io/zh-cn/docs/sdk.html)。
+
+
+### Etcd同步原理
+
+`Etcd` 数据同步原理与Zookeeper类似,主要依赖于`Etcd`的`watch`机制,各个配置节点路径与`Zookeeper`相同。
+
+`Etcd`的原生API使用稍有点复杂,所有对其进行了一定的封装。
+
+`Apache ShenYu`网关会监听配置的节点,启动时,如果`Etcd`中不存在配置节点,将同步全量的数据写入`Etcd`中,后续数据发生变更时,增量更新`Etcd`中的配置节点,与此同时,`Apache ShenYu`网关会监听配置信息的节点,一旦有信息变更时,会更新本地缓存。
+
+如果您想深入了解代码实现,请参考源码 `EtcdSyncDataService`。
+
+### Consul同步原理
+
+`Consul` 数据同步原理是网关定时轮询 `Consul` 的配置中心,获取配置版本号与本地进行比对。
+
+`Apache ShenYu`网关会定时轮询配置的节点,默认间隔时间为1s。启动时,如果 `Consul` 中不存在配置节点,将同步全量的数据写入`Consul`中,后续数据发生变更时,增量更新 `Consul` 中的配置节点,与此同时,`Apache ShenYu`网关会定时轮询配置信息的节点,拉取配置版本号与本地进行比对,若发现版本号变更时,会更新本地缓存。
+
+如果您想深入了解代码实现,请参考源码 `ConsulSyncDataService`。
+
diff --git a/i18n/zh/docusaurus-plugin-content-docs/version-2.5.1/design/database-design.md b/i18n/zh/docusaurus-plugin-content-docs/version-2.5.1/design/database-design.md
new file mode 100644
index 00000000000..ec6ee2ac241
--- /dev/null
+++ b/i18n/zh/docusaurus-plugin-content-docs/version-2.5.1/design/database-design.md
@@ -0,0 +1,95 @@
+---
+sidebar_position: 1
+title: 管理后台数据结构设计
+keywords: ["db"]
+description: ShenYu Admin数据结构
+---
+
+`Apache ShenYu Admin` 是网关的后台管理系统,能够可视化管理所有插件、选择器和规则,设置用户、角色,控制资源。
+
+## 插件、选择器和规则
+
+* 插件:`Apache ShenYu` 使用插件化设计思想,实现插件的热插拔,极易扩展。内置丰富的插件,包括 `RPC` 代理、熔断和限流、权限认证、监控等等。
+* 选择器:每个插件可设置多个选择器,对流量进行初步筛选。
+* 规则:每个选择器可设置多个规则,对流量进行更细粒度的控制。
+* 数据库 `UML` 类图:
+
+<img src="/img/shenyu/db/shenyu-plugin-table.png" width="80%" height="60%" />
+
+* 设计详解:
+
+ * 一个插件对应多个选择器,一个选择器对应多个规则。
+
+ * 一个选择器对应多个匹配条件,一个规则对应多个匹配条件。
+
+ * 每个规则在对应插件下,有不同的处理能力。
+
+## 资源权限
+
+* 资源代表的是 `shenyu-admin` 用户后台中的菜单或者按钮。
+
+* 资源权限数据表用来存储用户名称、角色、资源数据以及对应关系。
+
+* 数据库 `UML` 类图:
+
+<img src="/img/shenyu/db/shenyu-permission-table.png" width="80%" height="60%" />
+
+* 设计详解:
+ * 一个用户对应多个角色,一个角色对应多个资源。
+
+
+## 数据权限
+
+* 数据权限表用来存储用户,选择器、规则对应关系。
+* 数据库 `UML` 类图:
+
+<img src="/img/shenyu/db/shenyu-data_permission-table.png" width="80%" height="60%" />
+
+* 设计详解:
+ * 数据权限的表为: `data_permission`,一个用户对应多条数据权限。
+ * 数据权限表中字段 `data_type` 区分不同的类型数据, 具体对应关系如下:`0 -> 选择器, 1 -> 规则`。
+ * 数据权限表中字段 `data_id` 存放相应类型的主键`id`。
+
+## 元数据
+
+* 元数据主要是用于网关的泛化调用。
+* 每个接口方法,对应一条元数据。
+* 数据库 `UML` 类图:
+
+<img src="/img/shenyu/db/mata_data_table.png" width="30%" height="30%" />
+
+
+* 设计详解:
+ * `path`:在请求网关的时候,会根据 `path` 来匹配到一条数据,然后进行后续的流程。
+
+ * `rpc_ext`:用于保存`RPC`代理中的扩展信息。
+
+## 字典管理
+
+* 字典管理主要用来维护和管理公用数据字典。
+* 数据库 `UML` 类图:
+
+<img src="/img/shenyu/db/shenyu_dict.png" width="30%" height="30%" />
+
+## API文档
+
+* API文档表用来维护和管理API文档。
+* 常见规范(如OpenApi3.0规范、yapi规范)的api doc(如json、md、html等)可以导入`shenyu-admin`,并最终存储到API文档表。
+* 通过API文档表可以生成其他常见规范的api doc。
+* 数据库 `UML` 类图:
+
+<img src="/img/shenyu/db/shenyu-api-doc-table.png" width="105%" height="105%" />
+
+* 设计详解:
+ * 一个tag可以有多个子tag,tag的层级无限,最下面的叶子节点是API。
+ * 相同path、支持多种http_method的接口,算多个API。
+ * 一个API有多个请求参数、多个响应字段。
+ * 一个参数/字段有它自己的类型(也就是model),每个类型由多个字段构成。
+ * 一个字段有它自己的类型,对应多个值。
+ * 一个值既可以作为请求示例值,也可以描述响应示例值(比如200表示OK、400表示非法参数)。
+ * `mock_request_record`表的`query`、`header`、`body`都存储json,但是`body`不支持存储特殊类型(比如文件)。
+ * `tag`表的`ext`存储它父tag(包括父tag的父tag,以此类推)的全量json数据。
+ * `api`表的`ext`可能存储ip列表、SpringCloud的service name。
+ * `parameter`表的`type`主要包括`requestUrlParam`、`requestHeader`、`requestBody`、`requestPathVariable`、`responseHeader`和`responseBody`;如果返回的类型是特殊类型(如文件),则不用关联`model_id`。
+ * `field`表的`ext`以json格式(方便后续扩展)存储泛型,如`{"genericTypes":[model_id1,model_id2]}`;`model_id`表示该字段属于哪个类型,`self_model_id`表示该字段自身是什么类型。
+ * `detail`表的`is_example`表示一个值是否是请求示例值,true是请求示例值,false是响应值。
diff --git a/i18n/zh/docusaurus-plugin-content-docs/version-2.5.1/design/flow-control.md b/i18n/zh/docusaurus-plugin-content-docs/version-2.5.1/design/flow-control.md
new file mode 100644
index 00000000000..26ecab9df6a
--- /dev/null
+++ b/i18n/zh/docusaurus-plugin-content-docs/version-2.5.1/design/flow-control.md
@@ -0,0 +1,36 @@
+---
+title: 流量控制设计
+keywords: ["flow-control"]
+description: Apache ShenYu 流量控制设计
+---
+
+`Apache ShenYu`网关通过插件、选择器和规则完成流量控制。相关数据结构可以参考之前的 [ShenYu Admin数据结构](./database-design) 。
+
+## 插件
+
+* 在`shenyu-admin`后台,每个插件都用`handle`(`json`格式)字段来表示不同的处理,而插件处理就是用来管理编辑`json`里面的自定义处理字段。
+* 该功能主要是用来支持插件处理模板化配置的。
+
+
+## 选择器和规则
+
+选择器和规则是 `Apache ShenYu` 网关中最灵魂的设计。掌握好它,你可以对任何流量进行管理。
+
+ 一个插件有多个选择器,一个选择器对应多种规则。选择器相当于是对流量的一级筛选,规则就是最终的筛选。
+对一个插件而言,我们希望根据我们的配置,达到满足条件的流量,插件才会被执行。
+ 选择器和规则就是为了让流量在满足特定的条件下,才去执行我们想要的,这种规则首先要明白。
+
+插件、选择器和规则执行逻辑如下,当流量进入到`Apache ShenYu`网关之后,会先判断是否有对应的插件,该插件是否开启;然后判断流量是否匹配该插件的选择器;然后再判断流量是否匹配该选择器的规则。如果请求流量能满足匹配条件才会执行该插件,否则插件不会被执行,处理下一个。`Apache ShenYu`网关就是这样通过层层筛选完成流量控制。
+
+<img src="/img/shenyu/plugin/plugin-chain-execute.png" width="40%" height="30%" />
+
+## 流量筛选
+
+<img src="/img/shenyu/design/flow-condition.png" width="30%" height="30%" />
+
+流量筛选,是选择器和规则的灵魂,对应为选择器与规则里面的匹配条件(conditions),根据不同的流量筛选规则,我们可以处理各种复杂的场景。流量筛选可以从`Header`, `URI`, `Query`, `Cookie` 等等Http请求获取数据,
+
+然后可以采用 `Match`,`=`,`SpEL`,`Regex`,`Groovy`,`Exclude`等匹配方式,匹配出你所预想的数据。多组匹配添加可以使用And/Or的匹配策略。
+
+
+具体的介绍与使用请看: [选择器与规则管理](../user-guide/admin-usage/selector-and-rule) 。
diff --git a/i18n/zh/docusaurus-plugin-content-docs/version-2.5.1/design/register-center-design.md b/i18n/zh/docusaurus-plugin-content-docs/version-2.5.1/design/register-center-design.md
new file mode 100644
index 00000000000..fc1cedcfdbb
--- /dev/null
+++ b/i18n/zh/docusaurus-plugin-content-docs/version-2.5.1/design/register-center-design.md
@@ -0,0 +1,153 @@
+---
+title: 客户端注册设计
+keywords: ["客户端接入"]
+description: 客户端接入原理
+---
+
+应用客户端接入是指将你的微服务接入到`Apache ShenYu`网关,当前支持`Http`、 `Dubbo`、 `Spring Cloud`、 `gRPC`、 `Motan`、 `Sofa`、 `Tars`等协议的接入。
+
+
+将应用客户端接入到`Apache ShenYu`网关是通过注册中心来实现的,涉及到客户端注册和服务端同步数据。注册中心支持`Http`、`Zookeeper`、`Etcd`、`Consul`和`Nacos`。
+
+
+<img src="/img/shenyu/register/register-center-dir-zh.png" width="70%" height="60%" />
+
+客户端接入的相关配置请参考用户文档中的 [客户端接入配置](../user-guide/property-config/register-center-access.md) 。
+
+
+## 设计原理
+
+### 注册中心客户端
+
+
+
+在你的微服务配置中声明注册中心客户端类型,如`Http`或`Zookeeper`。
+应用程序启动时使用`SPI`方式加载并初始化对应注册中心客户端,通过实现`Spring Bean`相关的后置处理器接口,在其中获取需要进行注册的服务接口信息,将获取的信息放入`Disruptor`中。
+
+注册中心客户端从`Disruptor`中读取数据,并将接口信息注册到`shenyu-admin`,`Disruptor`在其中起数据与操作解耦的作用,利于扩展。
+
+### 注册中心服务端
+
+
+
+在`shenyu-admin`配置中声明注册中心服务端类型,如`Http`或`Zookeeper`。当`shenyu-admin`启动时,读取配置类型,加载并初始化对应的注册中心服务端,注册中心服务端收到`shenyu-client`注册的接口信息后,将其放入`Disruptor`中,然后会触发注册处理逻辑,将服务接口信息更新并发布同步事件。
+
+`Disruptor`在其中起到数据与操作解耦,利于扩展。如果注册请求过多,导致注册异常,也有数据缓冲作用。
+
+### Http注册原理
+
+`Http`服务注册原理较为简单,在`shenyu-client`启动后,会调用`shenyu-admin`的相关服务注册接口,上传数据进行注册。
+
+`shenyu-admin` 收到请求后进行数据更新和数据同步事件发布,将接口信息同步到`Apache ShenYu`网关。
+
+### Zookeeper注册原理
+
+`Zookeeper`存储结构如下:
+
+```
+shenyu
+ ├──regsiter
+ ├ ├──metadata
+ ├ ├ ├──${rpcType}
+ ├ ├ ├ ├────${contextPath}
+ ├ ├ ├ ├──${ruleName} : save metadata data of MetaDataRegisterDTO
+ ├ ├──uri
+ ├ ├ ├──${rpcType}
+ ├ ├ ├ ├────${contextPath}
+ ├ ├ ├ ├──${ip:prot} : save uri data of URIRegisterDTO
+ ├ ├ ├ ├──${ip:prot}
+```
+
+`shenyu-client`启动时,将服务接口信息(`MetaDataRegisterDTO/URIRegisterDTO`)写到如上的`zookeeper`节点中。
+
+`shenyu-admin`使用`Zookeeper`的`Watch`机制,对数据的更新和删除等事件进行监听,数据变更后触发对应的注册处理逻辑。在收到`MetaDataRegisterDTO`节点变更后,触发`selector`和`rule`的数据变更和数据同步事件发布。收到`URIRegisterDTO`节点变更后,触发`selector`的`upstream`的更新和数据同步事件发布。
+
+## Etcd注册原理
+
+`Etcd`的键值存储结构如下:
+
+```
+shenyu
+ ├──regsiter
+ ├ ├──metadata
+ ├ ├ ├──${rpcType}
+ ├ ├ ├ ├────${contextPath}
+ ├ ├ ├ ├──${ruleName} : save metadata data of MetaDataRegisterDTO
+ ├ ├──uri
+ ├ ├ ├──${rpcType}
+ ├ ├ ├ ├────${contextPath}
+ ├ ├ ├ ├──${ip:prot} : save uri data of URIRegisterDTO
+ ├ ├ ├ ├──${ip:prot}
+```
+
+`shenyu-client`启动时,将服务接口信息(`MetaDataRegisterDTO/URIRegisterDTO`)以`Ephemeral`方式写到如上的`Etcd`节点中。
+
+`shenyu-admin`使用`Etcd`的`Watch`机制,对数据的更新和删除等事件进行监听,数据变更后触发对应的注册处理逻辑。在收到`MetaDataRegisterDTO`节点变更后,触发`selector`和`rule`的数据变更和数据同步事件发布。收到`URIRegisterDTO`节点变更后,触发`selector`的`upstream`的更新和数据同步事件发布。
+
+## Consul注册原理
+
+`Consul`的`Metadata`和`URI`分两部分存储,`URIRegisterDTO`随着服务注册记录在服务的`metadata`里,服务下线时随着服务节点一起消失。
+
+`Consul`的`MetaDataRegisterDTO`存在`Key/Value`里,键值存储结构如下:
+
+```
+shenyu
+ ├──regsiter
+ ├ ├──metadata
+ ├ ├ ├──${rpcType}
+ ├ ├ ├ ├────${contextPath}
+ ├ ├ ├ ├──${ruleName} : save metadata data of MetaDataRegisterDTO
+
+```
+
+`shenyu-client`启动时,将服务接口信息(`MetaDataRegisterDTO/URIRegisterDTO`)分别放在`ServiceInstance`的`Metadata`(`URIRegisterDTO`)和`KeyValue`(`MetaDataRegisterDTO`),按照上述方式进行存储。
+
+`shenyu-admin`通过监听`Catalog`和`KeyValue`的`index`的变化,来感知数据的更新和删除,数据变更后触发对应的注册处理逻辑。在收到`MetaDataRegisterDTO`节点变更后,触发`selector`和`rule`的数据变更和数据同步事件发布。收到`URIRegisterDTO`节点变更后,触发`selector`的`upstream`的更新和数据同步事件发布。
+
+## Nacos注册原理
+
+`Nacos`注册分为两部分:`URI` 和 `Metadata`。`URI` 使用实例注册方式,在服务异常的情况下,相关`URI`数据节点会自动进行删除,并发送事件到订阅端,订阅端进行相关的下线处理。`Metadata` 使用配置注册方式,没有相关上下线操作,当有`URI`实例注册时,会相应的发布`Metadata`配置,订阅端监听数据变化,进行更新处理。
+
+`URI`实例注册命令规则如下:
+
+```
+shenyu.register.service.${rpcType}
+```
+
+初始监听所有的`RpcType`节点,其下的`${contextPath}`实例会对应注册到其下,根据`IP`和`Port`进行区分,并携带其对应的`contextPath`信息。`URI` 实例上下线之后,触发`selector`的`upstream`的更新和数据同步事件发布。
+
+`URI` 实例上线时,会发布对应的 `Metadata` 数据,其节点名称命令规则如下:
+
+```
+shenyu.register.service.${rpcType}.${contextPath}
+```
+
+订阅端会对所有的`Metadata`配置继续监听,当初次订阅和配置更新后,触发`selector`和`rule`的数据变更和数据同步事件发布。
+
+### SPI扩展
+
+| *SPI 名称* | *详细说明* |
+| -------------------------------- | --------------------------- |
+| ShenyuClientRegisterRepository | ShenYu网关客户端接入注册服务资源 |
+
+| *已知实现类* | *详细说明* |
+| -------------------------------- | --------------------------- |
+| HttpClientRegisterRepository | 基于Http请求的实现 |
+| ZookeeperClientRegisterRepository| 基于Zookeeper注册的实现 |
+| EtcdClientRegisterRepository | 基于Etcd注册的实现 |
+| ConsulClientRegisterRepository | 基于Consul注册的实现 |
+| NacosClientRegisterRepository | 基于Nacos注册的实现 |
+
+
+| *SPI 名称* | *详细说明* |
+| -------------------------------- | ----------------------------- |
+| ShenyuServerRegisterRepository | ShenYu网关客户端注册的后台服务资源 |
+
+| *已知实现类* | *详细说明* |
+| -------------------------------- | ----------------------------- |
+| ShenyuHttpRegistryController | 使用Http服务接口来处理客户端注册请求 |
+| ZookeeperServerRegisterRepository| 使用Zookeeper来处理客户端注册节点 |
+| EtcdServerRegisterRepository | 使用Etcd来处理客户端注册节点 |
+| ConsulServerRegisterRepository | 使用Consul来处理客户端注册节点 |
+| NacosServerRegisterRepository | 使用Nacos来处理客户端注册节点 |
+
diff --git a/i18n/zh/docusaurus-plugin-content-docs/version-2.5.1/design/spi-design.md b/i18n/zh/docusaurus-plugin-content-docs/version-2.5.1/design/spi-design.md
new file mode 100644
index 00000000000..203ef3e43f3
--- /dev/null
+++ b/i18n/zh/docusaurus-plugin-content-docs/version-2.5.1/design/spi-design.md
@@ -0,0 +1,42 @@
+---
+title: SPI扩展设计
+keywords: ["spi design"]
+description: 对ShenYu网关中SPI的使用进行介绍
+---
+
+`SPI` 全称为 `Service Provider Interface`, 是 `JDK` 内置的一种服务提供发现功能, 一种动态替换发现的机制。
+
+[shenyu-spi](https://github.com/apache/incubator-shenyu/tree/master/shenyu-spi) 是`Apache ShenYu`网关自定义的`SPI`扩展实现,设计和实现原理参考了`Dubbo`的 [SPI扩展实现](https://dubbo.apache.org/zh/docs/v2.7/dev/impls/) 。
+
+
+### 注册中心扩展
+
+通过哪种方式实现服务的注册,当前支持`Consul`、`Etcd`、`Http`、`Nacos`和`Zookeeper`。注册中心的扩展包括客户端和服务端,接口分别为 `ShenyuServerRegisterRepository` 和 `ShenyuClientRegisterRepository` 。
+
+### 监控中心扩展
+
+负责服务的监控,通过`SPI`加载具体实现,当前支持`Prometheus` ,服务接口是 `MetricsService` 。
+
+### 负载均衡扩展
+
+从多个服务提供方中选择一个进行调用,当前支持的算法有`Hash`、`Random` 和 `RoundRobin`,扩展接口是 `LoadBalance` 。
+
+
+### RateLimiter扩展
+
+在`RateLimiter`插件中,使用何种限流算法,当前支持`Concurrent`、`LeakyBucket`、`SlidingWindow` 和 `TokenBucket`,扩展接口是 `RateLimiterAlgorithm` 。
+
+
+### 匹配方式扩展
+
+在添加选择器和规则时,使用哪种匹配方式,当前支持`And`、`Or`,扩展接口是 `MatchStrategy` 。
+
+
+### 条件参数扩展
+
+在添加选择器和规则时,使用哪种条件参数,当前支持`URI`、`RequestMethod`、`Query`、`Post`、`IP`、`Host`、`Cookie` 和 `Header`,扩展接口是 `ParameterData` 。
+
+
+### 条件策略扩展
+
+在添加选择器和规则时,使用哪种条件策略,当前支持`Match`、`Contains`、`Equals`、`Regex`、`TimerAfter`、`TimerBefore`和`Exclude`,扩展接口是 `PredicateJudge` 。
diff --git a/i18n/zh/docusaurus-plugin-content-docs/version-2.5.1/developer/_category_.json b/i18n/zh/docusaurus-plugin-content-docs/version-2.5.1/developer/_category_.json
new file mode 100644
index 00000000000..35803c66300
--- /dev/null
+++ b/i18n/zh/docusaurus-plugin-content-docs/version-2.5.1/developer/_category_.json
@@ -0,0 +1,4 @@
+{
+ "label": "开发者文档",
+ "position": 7
+}
diff --git a/i18n/zh/docusaurus-plugin-content-docs/version-2.5.1/developer/custom-filter.md b/i18n/zh/docusaurus-plugin-content-docs/version-2.5.1/developer/custom-filter.md
new file mode 100644
index 00000000000..8bb85010302
--- /dev/null
+++ b/i18n/zh/docusaurus-plugin-content-docs/version-2.5.1/developer/custom-filter.md
@@ -0,0 +1,113 @@
+---
+title: 自定义Filter
+description: filter扩展
+---
+
+
+## 说明
+
+* 本文介绍如何对 `org.springframework.web.server.WebFliter` 进行扩展。
+
+## 跨域支持
+
+* 新增 `org.apache.shenyu.web.filter.CrossFilter` 实现 `WebFilter`。
+
+```java
+ public class CrossFilter implements WebFilter {
+
+ private static final String ALLOWED_HEADERS = "x-requested-with, authorization, Content-Type, Authorization, credential, X-XSRF-TOKEN,token,username,client";
+
+ private static final String ALLOWED_METHODS = "*";
+
+ private static final String ALLOWED_ORIGIN = "*";
+
+ private static final String ALLOWED_EXPOSE = "*";
+
+ private static final String MAX_AGE = "18000";
+
+ @Override
+ @SuppressWarnings("all")
+ public Mono<Void> filter(final ServerWebExchange exchange, final WebFilterChain chain) {
+ ServerHttpRequest request = exchange.getRequest();
+ if (CorsUtils.isCorsRequest(request)) {
+ ServerHttpResponse response = exchange.getResponse();
+ HttpHeaders headers = response.getHeaders();
+ headers.add("Access-Control-Allow-Origin", ALLOWED_ORIGIN);
+ headers.add("Access-Control-Allow-Methods", ALLOWED_METHODS);
+ headers.add("Access-Control-Max-Age", MAX_AGE);
+ headers.add("Access-Control-Allow-Headers", ALLOWED_HEADERS);
+ headers.add("Access-Control-Expose-Headers", ALLOWED_EXPOSE);
+ headers.add("Access-Control-Allow-Credentials", "true");
+ if (request.getMethod() == HttpMethod.OPTIONS) {
+ response.setStatusCode(HttpStatus.OK);
+ return Mono.empty();
+ }
+ }
+ return chain.filter(exchange);
+ }
+ }
+```
+
+
+
+
+- 将 `CrossFilter` 注册成为 `Spring`的`bean`。
+
+
+## 网关过滤 springboot健康检查
+
+* 注意顺序,使用 `@Order` 注解
+
+```java
+@Component
+@Order(-99)
+public final class HealthFilter implements WebFilter {
+
+ private static final String[] FILTER_TAG = {"/actuator/health", "/health_check"};
+
+ @Override
+ public Mono<Void> filter(@Nullable final ServerWebExchange exchange, @Nullable final WebFilterChain chain) {
+ ServerHttpRequest request = Objects.requireNonNull(exchange).getRequest();
+ String urlPath = request.getURI().getPath();
+ for (String check : FILTER_TAG) {
+ if (check.equals(urlPath)) {
+ String result = JsonUtils.toJson(new Health.Builder().up().build());
+ DataBuffer dataBuffer = exchange.getResponse().bufferFactory().wrap(result.getBytes());
+ return exchange.getResponse().writeWith(Mono.just(dataBuffer));
+ }
+ }
+ return Objects.requireNonNull(chain).filter(exchange);
+ }
+}
+```
+
+
+
+## 继承 `org.apache.shenyu.web.filter.AbstractWebFilter`
+
+* 新增一个类继承`AbstractWebFilter`,并实现它的两个方法。
+
+```java
+ /**
+ * this is Template Method ,children Implement your own filtering logic.
+ *
+ * @param exchange the current server exchange
+ * @param chain provides a way to delegate to the next filter
+ * @return {@code Mono<Boolean>} result:TRUE (is pass),and flow next filter;FALSE (is not pass) execute doDenyResponse(ServerWebExchange exchange)
+ */
+ protected abstract Mono<Boolean> doFilter(ServerWebExchange exchange, WebFilterChain chain);
+
+ /**
+ * this is Template Method ,children Implement your own And response client.
+ *
+ * @param exchange the current server exchange.
+ * @return {@code Mono<Void>} response msg.
+ */
+ protected abstract Mono<Void> doDenyResponse(ServerWebExchange exchange);
+```
+
+* `doFilter` 方法返回 `Mono<true>` 表示通过,反之则不通过,不通过的时候,会调用 `doDenyResponse`输出相关信息到前端。
+
+
+
+
diff --git a/i18n/zh/docusaurus-plugin-content-docs/version-2.5.1/developer/custom-jwt-covert-algorithm.md b/i18n/zh/docusaurus-plugin-content-docs/version-2.5.1/developer/custom-jwt-covert-algorithm.md
new file mode 100644
index 00000000000..b4a7cdfd73a
--- /dev/null
+++ b/i18n/zh/docusaurus-plugin-content-docs/version-2.5.1/developer/custom-jwt-covert-algorithm.md
@@ -0,0 +1,93 @@
+---
+title: 自定义JWT插件转化算法
+description: 自定义JWT插件转化算法
+---
+
+
+
+## 说明
+
++ 用户可以自定义JWT插件中转化算法
+
+
+
+## 扩展
+
+ 转化算法的默认实现为 `org.apache.shenyu.plugin.jwt.strategy.DefaultJwtConvertStrategy`,采用的是SPI机制进行扩展,步骤如下:
+
+1. 实现接口`org.apache.shenyu.plugin.jwt.strategy.JwtConvertStrategy`
+
+ ```java
+ /**
+ * Represents a conversion strategy that convert jwt to some attributes of
+ * serverWebExchange, especially attributes of the request header.
+ */
+ @SPI
+ public interface JwtConvertStrategy {
+
+ /**
+ * HandleJson needs to be parsed into jwtRuleHandle in order to
+ * specify how to convert jwt.
+ *
+ * @param handleJson handleJson from rule
+ * @return jwtRuleHandle
+ */
+ JwtRuleHandle parseHandleJson(String handleJson);
+
+ /**
+ * Converts jwt to some attributes of serverWebExchange based on jwtRuleHandle.
+ *
+ * @param jwtRuleHandle jwtRuleHandle
+ * @param exchange exchange
+ * @param jwtBody jwtBody
+ * @return serverWebExchange
+ */
+ ServerWebExchange convert(JwtRuleHandle jwtRuleHandle, ServerWebExchange exchange, Map<String, Object> jwtBody);
+
+ }
+ ```
+
+ ```java
+ @Join
+ public class CustomJwtConvertStrategy implements JwtConvertStrategy {
+
+ @Override
+ public CustomJwtRuleHandle parseHandleJson(final String handleJson) {
+
+ return GsonUtils.getInstance().fromJson(handleJson, CustomJwtRuleHandle.class);
+ }
+
+ @Override
+ public ServerWebExchange convert(final JwtRuleHandle jwtRuleHandle, final ServerWebExchange exchange, final Map<String, Object> jwtBody) {
+ final CustomJwtRuleHandle customJwtRuleHandle = (CustomJwtRuleHandle) jwtRuleHandle;
+ String customConvert = customJwtRuleHandle.getCustomConvert();
+ ServerHttpRequest modifiedRequest =
+ exchange.getRequest().mutate().header("custom", customConvert).build();
+
+ return exchange.mutate().request(modifiedRequest).build();
+ }
+ }
+
+ ```
+
+
+
+2. 配置SPI
+
+ ```tex
+ custom=org.apache.shenyu.plugin.jwt.strategy.CustomJwtConvertStrategy
+ ```
+
+
+
+说明:系统会根据`JwtRuleHandle`的`handleType`参数来使用不同转化策略,比如下面的`JwtRuleHandle`系统会使用我们上面自定义的`CustomJwtConvertStrategy`。(注意:`handleType`为`default`或者不存在`handleType`属性,系统默认使用`DefaultJwtConvertStrategy`)
+
+```json
+{
+ "handleType":"custom",
+ "customConvert":"customConvert"
+}
+```
+
+案例代码可查看`org.apache.shenyu.plugin.jwt.strategy.CustomJwtConvertStrategy`
+
diff --git a/i18n/zh/docusaurus-plugin-content-docs/version-2.5.1/developer/custom-parsing-ip-and-host.md b/i18n/zh/docusaurus-plugin-content-docs/version-2.5.1/developer/custom-parsing-ip-and-host.md
new file mode 100644
index 00000000000..4a900190b2e
--- /dev/null
+++ b/i18n/zh/docusaurus-plugin-content-docs/version-2.5.1/developer/custom-parsing-ip-and-host.md
@@ -0,0 +1,50 @@
+---
+title: 正确获取IP与Host
+description: 正确获取Ip与host
+---
+
+## 说明
+
+* 本文是说明,如果网关前面有一层`nginx` 的时候,如何获取正确的`ip`与端口。
+* 获取正确的之后,在插件以及选择器中,可以根据 `ip`,与`host`来进行匹配。
+
+## 默认实现
+
+* 在 `Apache ShenYu` 网关自带实现为:`org.apache.shenyu.web.forward.ForwardedRemoteAddressResolver`。
+
+* 它需要你在 `nginx` 设置 `X-Forwarded-For`,以便来获取正确的 `ip` 与 `host`。
+
+
+## 扩展实现
+
+* 新增一个类 `CustomRemoteAddressResolver`,实现`org.apache.shenyu.plugin.api.RemoteAddressResolver`
+
+```java
+public interface RemoteAddressResolver {
+
+ /**
+ * Resolve inet socket address.
+ *
+ * @param exchange the exchange
+ * @return the inet socket address
+ */
+ default InetSocketAddress resolve(ServerWebExchange exchange) {
+ return exchange.getRequest().getRemoteAddress();
+ }
+
+}
+```
+
+* 把你新增的实现类注册成为spring的bean,如下
+
+```java
+ @Bean
+public RemoteAddressResolver customRemoteAddressResolver() {
+ return new CustomRemoteAddressResolver();
+ }
+```
+
+
+
+
+
diff --git a/i18n/zh/docusaurus-plugin-content-docs/version-2.5.1/developer/custom-plugin.md b/i18n/zh/docusaurus-plugin-content-docs/version-2.5.1/developer/custom-plugin.md
new file mode 100644
index 00000000000..7cfc7464f12
--- /dev/null
+++ b/i18n/zh/docusaurus-plugin-content-docs/version-2.5.1/developer/custom-plugin.md
@@ -0,0 +1,309 @@
+---
+title: 插件扩展
+keywords: ["扩展"]
+description: 插件扩展
+---
+
+## 说明
+
+* 插件是 `Apache ShenYu` 网关的核心执行者,每个插件在开启的情况下,都会对匹配的流量,进行自己的处理。
+* 在 `Apache ShenYu` 网关里面,插件分为两类。
+ * 一类是单一职责的调用链,不能对流量进行自定义的筛选。
+ * 一类是能对匹配的流量,执行自己的职责调用链。
+* 用户可以参考 [shenyu-plugin](https://github.com/apache/shenyu/tree/master/shenyu-plugin) 模块,新增自己的插件处理,如果有好的公用插件,可以向官网提交`pr`。
+
+## 单一职责插件
+
+* 引入如下依赖:
+
+```xml
+<dependency>
+ <groupId>org.apache.shenyu</groupId>
+ <artifactId>shenyu-plugin-api</artifactId>
+ <version>${project.version}</version>
+</dependency>
+```
+
+* 用户新增一个类 `MyShenyuPlugin`,直接实现 `org.apache.shenyu.plugin.api.ShenyuPlugin`
+
+```java
+public interface ShenyuPlugin {
+
+ /**
+ * Process the Web request and (optionally) delegate to the next
+ * {@code WebFilter} through the given {@link ShenyuPluginChain}.
+ *
+ * @param exchange the current server exchange
+ * @param chain provides a way to delegate to the next filter
+ * @return {@code Mono<Void>} to indicate when request processing is complete
+ */
+ Mono<Void> execute(ServerWebExchange exchange, ShenyuPluginChain chain);
+
+ /**
+ * return plugin order .
+ * This attribute To determine the plugin execution order in the same type plugin.
+ *
+ * @return int order
+ */
+ int getOrder();
+
+ /**
+ * acquire plugin name.
+ * this is plugin name define you must Provide the right name.
+ * if you impl AbstractShenyuPlugin this attribute not use.
+ *
+ * @return plugin name.
+ */
+ default String named() {
+ return "";
+ }
+
+ /**
+ * plugin is execute.
+ * if return true this plugin can not execute.
+ *
+ * @param exchange the current server exchange
+ * @return default false.
+ */
+ default Boolean skip(ServerWebExchange exchange) {
+ return false;
+ }
+}
+
+```
+
+* 接口方法详细说明
+
+ * `execute()` 方法为核心的执行方法,用户可以在里面自由的实现自己想要的功能。
+
+ * `getOrder()` 指定插件的排序。
+
+ * `named()` 指定插件的名称,命名采用`Camel Case`,如:`dubbo`、`springCloud`。
+
+ * `skip()` 在特定的条件下,该插件是否被跳过。
+
+
+* 注册成`Spring`的`bean`,参考如下,或者直接在实现类上加 `@Component` 注解。
+
+```java
+ @Bean
+ public ShenyuPlugin myShenyuPlugin() {
+ return new MyShenyuPlugin();
+ }
+```
+
+
+## 匹配流量处理插件
+
+* 引入如下依赖:
+
+```xml
+ <dependency>
+ <groupId>org.apache.shenyu</groupId>
+ <artifactId>shenyu-plugin-base</artifactId>
+ <version>${project.version}</version>
+ </dependency>
+```
+
+* 新增一个类 `CustomPlugin`,继承 `org.apache.shenyu.plugin.base.AbstractShenyuPlugin`
+
+* 以下是参考:
+
+```java
+/**
+ * This is your custom plugin.
+ * He is running in after before plugin, implement your own functionality.
+ * extends AbstractShenyuPlugin so you must user shenyu-admin And add related plug-in development.
+ *
+ * @author xiaoyu(Myth)
+ */
+public class CustomPlugin extends AbstractShenyuPlugin {
+
+ /**
+ * return plugin order .
+ * The same plugin he executes in the same order.
+ *
+ * @return int
+ */
+ @Override
+ public int getOrder() {
+ return 0;
+ }
+
+ /**
+ * acquire plugin name.
+ * return you custom plugin name.
+ * It must be the same name as the plug-in you added in the admin background.
+ *
+ * @return plugin name.
+ */
+ @Override
+ public String named() {
+ return "shenYu";
+ }
+
+ /**
+ * plugin is execute.
+ * Do I need to skip.
+ * if you need skip return true.
+ *
+ * @param exchange the current server exchange
+ * @return default false.
+ */
+ @Override
+ public Boolean skip(final ServerWebExchange exchange) {
+ return false;
+ }
+
+ /**
+ * this is Template Method child has Implement your own logic.
+ *
+ * @param exchange exchange the current server exchange
+ * @param chain chain the current chain
+ * @param selector selector
+ * @param rule rule
+ * @return {@code Mono<Void>} to indicate when request handling is complete
+ */
+ @Override
+ protected abstract Mono<Void> doExecute(ServerWebExchange exchange, ShenyuPluginChain chain, SelectorData selector, RuleData rule) {
+ LOGGER.debug(".......... function plugin start..............");
+ /*
+ * Processing after your selector matches the rule.
+ * rule.getHandle() is you Customize the json string to be processed.
+ * for this example.
+ * Convert your custom json string pass to an entity class.
+ */
+ final String ruleHandle = rule.getHandle();
+
+ final Test test = GsonUtils.getInstance().fromJson(ruleHandle, Test.class);
+
+ /*
+ * Then do your own business processing.
+ * The last execution chain.execute(exchange).
+ * Let it continue on the chain until the end.
+ */
+ System.out.println(test.toString());
+ return chain.execute(exchange);
+ }
+}
+
+```
+
+* 详细讲解:
+
+ * 继承该类的插件,插件会进行选择器规则匹配。
+
+ * 首先在 `shenyu-admin` 后台管理系统 --> 基础配置 --> 插件管理 中,新增一个插件,注意 名称与 你自定义插件的 `named()` 方法要一致。
+
+ * 重新登陆 `shenyu-admin` 后台,可以看见刚新增的插件,然后就可以进行选择器规则匹配。
+
+ * 在规则中,有个 `handler` 字段,是自定义处理数据,在 `doExecute()` 方法中,通过 `final String ruleHandle = rule.getHandle();` 获取,然后进行你的操作。
+
+* 注册成`Spring`的`bean`,参考如下或者直接在实现类上加 `@Component` 注解。
+
+```java
+ @Bean
+ public ShenyuPlugin customPlugin() {
+ return new CustomPlugin();
+ }
+```
+
+## 订阅你的插件数据,进行自定义的处理
+
+* 新增一个类 `PluginDataHandler`,实现 `org.apache.shenyu.plugin.base.handler.PluginDataHandler`
+
+```java
+public interface PluginDataHandler {
+
+ /**
+ * Handler plugin.
+ *
+ * @param pluginData the plugin data
+ */
+ default void handlerPlugin(PluginData pluginData) {
+ }
+
+ /**
+ * Remove plugin.
+ *
+ * @param pluginData the plugin data
+ */
+ default void removePlugin(PluginData pluginData) {
+ }
+
+ /**
+ * Handler selector.
+ *
+ * @param selectorData the selector data
+ */
+ default void handlerSelector(SelectorData selectorData) {
+ }
+
+ /**
+ * Remove selector.
+ *
+ * @param selectorData the selector data
+ */
+ default void removeSelector(SelectorData selectorData) {
+ }
+
+ /**
+ * Handler rule.
+ *
+ * @param ruleData the rule data
+ */
+ default void handlerRule(RuleData ruleData) {
+ }
+
+ /**
+ * Remove rule.
+ *
+ * @param ruleData the rule data
+ */
+ default void removeRule(RuleData ruleData) {
+ }
+
+ /**
+ * Plugin named string.
+ *
+ * @return the string
+ */
+ String pluginNamed();
+
+}
+```
+
+* 注意 `pluginNamed()` 要和你自定义的插件名称相同。
+
+* 注册成`Spring`的`bean`,参考如下或者直接在实现类上加 `@Component` 注解。
+
+```java
+@Bean
+public PluginDataHandler pluginDataHandler() {
+ return new PluginDataHandler();
+}
+```
+
+## 动态加载自定义插件
+
+* 当使用此功能时候,上述扩展 `ShenyuPlugin`, `PluginDataHandler`, 不用成为 `spring bean`。只需要构建出扩展项目的jar包即可。
+
+* 使用以下配置:
+
+```yaml
+shenyu:
+ extPlugin:
+ path: //加载扩展插件jar包路径
+ enabled: true //是否开启
+ threads: 1 //加载插件线程数量
+ scheduleTime: 300 //间隔时间(单位:秒)
+ scheduleDelay: 30 //网关启动后延迟多久加载(单位:秒)
+```
+
+#### 插件加载路径详解
+
+* 此路径是为存放扩展插件jar包的目录。
+
+* 可以使用 `-Dplugin-ext=xxxx` 指定,也可以使用 `shenyu.extPlugin.path`配置文件指定,如果都没配置,默认会加载网关启动路径下的 `ext-lib`目录。
+
+* 优先级 :`-Dplugin-ext=xxxx` > `shenyu.extPlugin.path` > `ext-lib(default)`
diff --git a/i18n/zh/docusaurus-plugin-content-docs/version-2.5.1/developer/custom-result.md b/i18n/zh/docusaurus-plugin-content-docs/version-2.5.1/developer/custom-result.md
new file mode 100644
index 00000000000..8b43611425d
--- /dev/null
+++ b/i18n/zh/docusaurus-plugin-content-docs/version-2.5.1/developer/custom-result.md
@@ -0,0 +1,116 @@
+---
+title: 自定义返回结果
+description: 自定义网关返回数据格式
+---
+
+## 说明
+
+* 本文介绍基于 `Apache ShenYu` 网关返回自定义的数据格式。
+* 网关需要统一的返回格式,如果需要自己定义格式,可以进行扩展。
+
+
+## 默认实现
+
+* 默认的实现为 `org.apache.shenyu.plugin.api.result.DefaultShenyuResult`
+
+* 返回的数据格式如下:
+
+```java
+public class DefaultShenyuEntity implements Serializable {
+
+ private static final long serialVersionUID = -2792556188993845048L;
+
+ private Integer code;
+
+ private String message;
+
+ private Object data;
+
+}
+```
+
+* 返回的 `json` 格式如下:
+
+```json
+{
+ "code": -100, //返回码,
+ "message": "您的参数错误,请检查相关文档!", //提示字段
+ "data": null // 具体的数据
+}
+```
+
+## 扩展
+
+* 新增一个类 `CustomShenyuResult` 实现 `org.apache.shenyu.plugin.api.result.ShenyuResult`
+
+```java
+/**
+ * The interface shenyu result.
+ */
+public interface ShenyuResult<T> {
+
+ /**
+ * The response result.
+ *
+ * @param exchange the exchange
+ * @param formatted the formatted object
+ * @return the result object
+ */
+ default Object result(ServerWebExchange exchange, Object formatted) {
+ return formatted;
+ }
+
+ /**
+ * format the origin, default is json format.
+ *
+ * @param exchange the exchange
+ * @param origin the origin
+ * @return format origin
+ */
+ default Object format(ServerWebExchange exchange, Object origin) {
+ // basic data
+ if (ObjectTypeUtils.isBasicType(origin)) {
+ return origin;
+ }
+ // error result or rpc origin result.
+ return JsonUtils.toJson(origin);
+ }
+
+ /**
+ * the response context type, default is application/json.
+ *
+ * @param exchange the exchange
+ * @param formatted the formatted data that is origin data or byte[] convert string
+ * @return the context type
+ */
+ default MediaType contentType(ServerWebExchange exchange, Object formatted) {
+ return MediaType.APPLICATION_JSON;
+ }
+
+ /**
+ * Error t.
+ *
+ * @param code the code
+ * @param message the message
+ * @param object the object
+ * @return the t
+ */
+ T error(int code, String message, Object object);
+}
+```
+
+> 处理顺序:`format`->`contextType`->`result`。`format`方法进行数据的格式化,若数据为基本类型返回自身,其他类型转换为`JSON`,参数`origin`为原始数据,可根据情况执行格式化处理。`contextType`,若是基本类型,使用`text/plain`,默认为`application/json`,参数`formatted`为`format`方法处理之后的数据,可结合`format`的返回结果进行数据类型的自定义处理。`result`的参数`formatted`为`format`方法处理之后的数据,默认返回自身,可结合`format`的返回结果进行数据类型的自定义处理。
+
+* 其中泛型 `T` 为自定义的数据格式,返回它就好。
+
+* 把你新增的实现类注册成为`Spring`的`bean`,如下:
+
+```java
+@Bean
+public ShenyuResult<?> customShenyuResult() {
+ return new CustomShenyuResult();
+}
+```
+
+
+
diff --git a/i18n/zh/docusaurus-plugin-content-docs/version-2.5.1/developer/custom-sign-algorithm.md b/i18n/zh/docusaurus-plugin-content-docs/version-2.5.1/developer/custom-sign-algorithm.md
new file mode 100644
index 00000000000..6ca0966a633
--- /dev/null
+++ b/i18n/zh/docusaurus-plugin-content-docs/version-2.5.1/developer/custom-sign-algorithm.md
@@ -0,0 +1,57 @@
+---
+title: 自定义sign插件检验算法
+description: 自定义sign插件检验
+---
+
+
+## 说明
+
+* 用户可以自定义签名认证算法来实现验证。
+
+## 扩展
+
+* 默认的实现为 `org.apache.shenyu.plugin.sign.service.ComposableSignService`。
+
+ ```java
+ @Bean
+ @ConditionalOnMissingBean(value = SignService.class, search = SearchStrategy.ALL)
+ public SignService signService() {
+ return new ComposableSignService(new DefaultExtractor(), new DefaultSignProvider());
+ }
+ ```
+
+
+
+* 新增一个类 `CustomSignService` 实现 `org.apache.shenyu.plugin.sign.api.SignService`。
+
+```java
+public interface SignService {
+
+ /**
+ * Gets verifyResult.
+ * @param exchange exchange
+ * @param requestBody requestBody
+ * @return result
+ */
+ VerifyResult signatureVerify(ServerWebExchange exchange, String requestBody);
+
+ /**
+ * Gets verifyResult.
+ * @param exchange exchange
+ * @return result
+ */
+ VerifyResult signatureVerify(ServerWebExchange exchange);
+}
+
+```
+
+* `VerifyResult`中`isSuccess()`返回`true`,表示验证通过,为`false`的时候,会把`getReason()`中的信息输出到前端。
+
+* 把新增的实现类注册成为`Spring`的`bean`,如下
+
+```java
+@Bean
+public SignService customSignService() {
+ return new CustomSignService();
+}
+```
diff --git a/i18n/zh/docusaurus-plugin-content-docs/version-2.5.1/developer/developer-shenyu-client.md b/i18n/zh/docusaurus-plugin-content-docs/version-2.5.1/developer/developer-shenyu-client.md
new file mode 100644
index 00000000000..4da3bce1d1f
--- /dev/null
+++ b/i18n/zh/docusaurus-plugin-content-docs/version-2.5.1/developer/developer-shenyu-client.md
@@ -0,0 +1,184 @@
+---
+title: 多语言Http客户端
+keywords: ["客户端"]
+description: 多语言http客户端
+---
+
+## 说明
+
+* 本文主要讲解其他语言的`http`服务如何接入网关。
+* 接入网关需要先获取 token, 然后可以根据需求调用注册服务或元数据接口
+
+
+
+## 获取 token
+
+- **请求方式**
+
+ `GET`
+
+- **请求路径**
+ - `http://{shenyu-admin}/platform/login`
+ - 其中 `shenyu-admin` 表示为 `admin` 后台管理系统的 `ip + port`
+
+
+- **请求参数**
+
+ - `query`参数,账号密码为 admin 服务的用户名和密码
+
+ | 字段 | 类型 | 是否必填 | 描述 |
+ | -------- | ------ | -------- | ------ |
+ | userName | String | 是 | 用户名 |
+ | password | String | 是 | 密码 |
+
+- **返回数据**
+
+ | 字段 | | 类型 | 描述 |
+ | ------- | ----------- | ------- | -------------------- |
+ | code | | Integer | 返回码 |
+ | message | | String | 返回信息 |
+ | data | | Object | 返回对象 |
+ | | id | Integer | 用户id |
+ | | userName | String | 账号 |
+ | | role | Integer | 角色 |
+ | | enabled | Boolean | 是否启用 |
+ | | dateCreated | String | 创建时间 |
+ | | dateUpdated | String | 更新时间 |
+ | | token | String | token |
+ | | expiredTime | Long | 超时时间,单位:毫秒 |
+
+ **示例**
+
+ ```json
+ {
+ "code": 200,
+ "message": "login dashboard user success",
+ "data": {
+ "id": "1",
+ "userName": "admin",
+ "role": 1,
+ "enabled": true,
+ "dateCreated": "2022-09-07 22:08:23",
+ "dateUpdated": "2022-09-07 22:08:23",
+ "token": "eyJ0eXAiOiJKV1QiLCJhbGciOiJIUzI1NiJ9.eyJ1c2VyTmFtZSI6ImFkbWluIiwiZXhwIjoxNjYyNjQ2MzU5fQ.WBXBgCcGsnnC00pRbDOtqCVoAaZr8MKH6WE6kY-NGaI",
+ "expiredTime": 86400000
+ }
+ }
+ ```
+
+## 注册服务
+
+- **请求方式**
+
+ `POST`
+
+- **请求路径**
+ - `http://{shenyu-admin}/shenyu-client/register-uri`
+ - 其中 `shenyu-admin` 表示为 `admin` 后台管理系统的 `ip + port`
+
+
+- **请求参数**
+
+ - `Header`参数
+
+ - `contentType: application/json`
+
+ - `X-Access-Token: {token}`,token 为调用登陆接口获取的 token
+
+ - `Body`参数,`json`类型
+
+ | 字段 | 类型 | 是否必填 | 描述 |
+ | ----------- | ------- | -------- | ------------------------------------------------------------ |
+ | protocol | String | 是 | 协议类型 |
+ | appName | String | 是 | 应用名称 |
+ | contextPath | String | 是 | 项目路径 |
+ | rpcType | String | 是 | rpc类型,支持的类型参考 [RpcTypeEnum](https://github.com/apache/shenyu/blob/master/shenyu-common/src/main/java/org/apache/shenyu/common/enums/RpcTypeEnum.java) |
+ | host | String | 是 | 客户端IP |
+ | port | Integer | 是 | 客户端端口 |
+ | eventType | String | 是 | 事件类型,支持的类型参考 [EventType](https://github.com/apache/shenyu/blob/master/shenyu-register-center/shenyu-register-common/src/main/java/org/apache/shenyu/register/common/enums/EventType.java) |
+
+ **示例**
+
+ ```json
+ {
+ "protocol": "http",
+ "appName": "app",
+ "contextPath": "/test",
+ "rpcType": "http",
+ "host": "127.0.0.1",
+ "port": "8080",
+ "eventType": "REGISTER"
+ }
+ ```
+
+- **返回数据**
+
+ 注册成功会返回 `success`
+
+
+
+
+## 注册元数据
+
+- **请求方式**
+
+ `POST`
+
+- **请求路径**
+ - `http://{shenyu-admin}/shenyu-client/register-metadata`
+ - 其中 `shenyu-admin` 表示为 `admin` 后台管理系统的 `ip + port`
+
+- **请求参数**
+ - `Header`参数
+
+ - `contentType: application/json`
+
+ - `X-Access-Token: {token}`,token 为调用登陆接口获取的 token
+
+ - `Body`参数,`json`类型
+
+ | 字段 | 类型 | 是否必填 | 描述 |
+ | ---------------- | ------------ | -------- | ------------------------------------------------------------ |
+ | appName | String | 是 | 应用名称 |
+ | contextPath | String | 是 | 项目路径 |
+ | path | String | 是 | 路径 |
+ | pathDesc | String | 是 | 路径描述 |
+ | rpcType | String | 是 | rpc类型,支持的类型参考 [RpcTypeEnum](https://github.com/apache/shenyu/blob/master/shenyu-common/src/main/java/org/apache/shenyu/common/enums/RpcTypeEnum.java) |
+ | serviceName | String | 是 | 服务名称 |
+ | methodName | String | 是 | 方法名称 |
+ | ruleName | String | 是 | 规则名称 |
+ | parameterTypes | String | 是 | 参数类型 |
+ | rpcExt | String | 是 | Rpc拓展参数 |
+ | enabled | Boolean | 否 | 状态 |
+ | host | String | 是 | 服务 IP |
+ | port | Integer | 是 | 服务端口 |
+ | pluginNames | List | 是 | 插件名称列表 |
+ | registerMetaData | Boolean | 否 | 是否注册元数据 |
+
+ **示例**
+
+ ```json
+ {
+ "appName": "app",
+ "contextPath": "/",
+ "path": "/test",
+ "rpcType": "http",
+ "serviceName": "测试服务",
+ "parameterTypes": "java.lang.String",
+ "pathDesc": "测试路径",
+ "methodName": "测试方法",
+ "ruleName": "测试规则",
+ "rpcExt": "{\"loadbalance\":\"hash\",\"retries\":3,\"timeout\":-1}",
+ "enabled": true,
+ "host": "127.0.0.1",
+ "port": 8080,
+ "pluginNames": [],
+ "registerMetaData": true
+ }
+ ```
+
+- **返回数据**
+
+ 注册成功会返回 `success`
+
+
diff --git a/i18n/zh/docusaurus-plugin-content-docs/version-2.5.1/developer/file-and-image.md b/i18n/zh/docusaurus-plugin-content-docs/version-2.5.1/developer/file-and-image.md
new file mode 100644
index 00000000000..fe412e9d3d8
--- /dev/null
+++ b/i18n/zh/docusaurus-plugin-content-docs/version-2.5.1/developer/file-and-image.md
@@ -0,0 +1,18 @@
+---
+title: 文件上传下载
+description: 文件上传下载
+---
+
+## 说明
+
+* 本文主要介绍 `Apache ShenYu` 的文件上传下载的支持。
+
+## 文件上传
+
+* 默认限制文件大小为`10M`。
+* 如果想修改,在启动服务的时候,使用`--file.size = 30`,为`int`类型。
+* 你之前怎么上传文件,还是怎么上传。
+
+## 文件下载
+
+* `Apache ShenYu` 支持流的方式进行下载,之前的接口怎么写的,现在还是怎么写,根本不需要变。
diff --git a/i18n/zh/docusaurus-plugin-content-docs/version-2.5.1/developer/integration-test.md b/i18n/zh/docusaurus-plugin-content-docs/version-2.5.1/developer/integration-test.md
new file mode 100644
index 00000000000..347710c22c1
--- /dev/null
+++ b/i18n/zh/docusaurus-plugin-content-docs/version-2.5.1/developer/integration-test.md
@@ -0,0 +1,38 @@
+---
+title: 本地运行集成测试
+description: Run Integration Test Locally
+tags: ["integration test"]
+---
+
+### 准备
+
+1. 克隆 [Apache ShenYu](https://github.com/apache/incubator-shenyu) 的代码.
+2. 安装并启动 `docker` .
+
+### 在本地开启集成测试
+
+1. 用 Maven 构建
+
+```shell
+./mvnw -B clean install -Prelease,docker -Dmaven.javadoc.skip=true -Dmaven.test.skip=true
+```
+
+2. 构建 `shenyu-integrated-test`
+
+```shell
+./mvnw -B clean install -Pit -DskipTests -f ./shenyu-integrated-test/pom.xml
+```
+
+3. docker-compose 运行
+
+```shell
+docker-compose -f ./shenyu-integrated-test/${{ matrix.case }}/docker-compose.yml up -d
+```
+
+> 你需要把 `${{ matrix.case }}` 替换成具体的目录, 比如 `shenyu-integrated-test-http`.
+
+4. 运行测试
+
+```shell
+./mvnw test -Pit -f ./shenyu-integrated-test/${{ matrix.case }}/pom.xml
+```
diff --git a/i18n/zh/docusaurus-plugin-content-docs/version-2.5.1/developer/local-model.md b/i18n/zh/docusaurus-plugin-content-docs/version-2.5.1/developer/local-model.md
new file mode 100644
index 00000000000..832a664c171
--- /dev/null
+++ b/i18n/zh/docusaurus-plugin-content-docs/version-2.5.1/developer/local-model.md
@@ -0,0 +1,544 @@
+---
+title: 本地模式
+keywords: ["本地模式"]
+description: 本地模式
+---
+
+## 说明
+
+* 主要介绍在单机环境下,然后使用本地 `API` 更新网关数据。
+
+* 统一返回结果:
+
+```
+success
+```
+
+* 统一请求前缀:`localhost:9095/shenyu`
+
+* 统一请求头:`localKey: 123456`
+
+## 插件数据
+
+### 新增或者更新插件
+
+新增或者更新插件
+
+##### 请求方式
+
+POST
+
+##### 请求路径
+
+/plugin/saveOrUpdate
+
+##### 请求参数
+
+|名称|类型|是否必需|默认值|描述|
+|---|---|---|---|---|
+|**PluginData**|[PluginData](#PluginData)|True| |插件对象(Body里面传Json对象)|
+
+##### <div id="PluginData">PluginData</div>
+
+|名称|类型|是否必需|默认值|描述|
+|---|---|---|---|---|
+|**id**|String|False| |插件ID|
+|**name**|String|True| |插件名称|
+|**config**|String|False| |插件配置(Json格式)|
+|**role**|String|False| |插件角色|
+|**enabled**|Boolean|False| |是否开启|
+
+##### 请求示例
+
+POST body
+
+```
+{"id":3,"name":"divide","enabled":"true"}
+
+```
+
+### 清空所有数据
+
+清空所有插件,选择器,规则数据
+
+##### 请求方式
+
+GET
+
+##### 请求路径
+
+/cleanAll
+
+### 清空插件数据
+
+清空单个插件,选择器,规则数据
+
+##### 请求方式
+
+GET
+
+##### 请求路径
+
+/cleanPlugin?name = xxxx
+
+##### Request参数
+
+|名称|类型|是否必需|默认值|描述|
+|---|---|---|---|---|
+|**name**|String|true| |插件名称 |
+
+### 删除插件
+
+删除单个插件(不包含,插件里面的选择器与规则)
+
+##### 请求方式
+
+GET
+
+##### 请求路径
+
+/plugin/delete?name = xxxx
+
+##### Request参数
+
+|名称|类型|是否必需|默认值|描述|
+|---|---|---|---|---|
+|**name**|String|true| |插件名称 |
+
+### 删除所有插件
+
+删除所有插件(不包含,插件里面的选择器与规则)
+
+##### 请求方式
+
+GET
+
+##### 请求路径
+
+/plugin/deleteAll
+
+### 获取插件
+
+根据名称获取插件数据
+
+##### 请求方式
+
+GET
+
+##### 请求路径
+
+/plugin/findByName?name=xxxx
+
+##### Request参数
+
+|名称|类型|是否必需|默认值|描述|
+|---|---|---|---|---|
+|**name**|String|true| |插件名称 |
+
+### 新增或更新选择器
+
+新增或者更新插件
+
+##### 请求方式
+
+POST
+
+##### 请求路径
+
+/plugin/selector/saveOrUpdate
+
+##### 请求参数
+
+|名称|类型|是否必需|默认值|描述|
+|---|---|---|---|---|
+|**SelectorData**|[SelectorData](#SelectorData)|True| |选择器对象(Body里面传Json对象)|
+
+##### <div id="SelectorData">SelectorData</div>
+
+|名称|类型|是否必需|默认值|描述|
+|---|---|---|---|---|
+|**id**|String|False| |选择器ID|
+|**pluginName**|String|True| |插件名称|
+|**name**|String|False| |选择器名称(不填则默认生成 plugin:selector+随机数字)|
+|**matchMode**|Integer|False| |匹配模式(0:and;1:or),不填默认生成 And模式|
+|**type**|Integer|False| |流量类型0:全流量;1:自定义流量)不填默认生成全流量|
+|**sort**|Integer|False| |排序 ,不填默认生成 10|
+|**enabled**|Boolean|False| |是否开启,不填默认生成 true|
+|**logged**|Boolean|False| |是否打印日志,不填默认生成为false|
+|**handle**|String|False| |选择器处理(Json对象,根据每个插件不同,传的对象不同)|
+|**conditionList**|[Condition](#Condition)|False| |条件集合,自定义流量需要传,全流量不用传(Json List对象)|
+
+##### <div id="Condition">Condition</div>
+
+|名称|类型|是否必需|默认值|描述|
+|---|---|---|---|---|
+|**paramType**|String|True| |参数类型(post,uri,query,host,header,cookie,req_method,domain)|
+|**operator**|String|True| |匹配方式(match,=,regex,>,<,contains,SpEL,Groovy,TimeBefore,TimeAfter)|
+|**paramName**|String|False| |参数名称(uri 参数类型时候,可以不传)|
+|**paramValue**|Integer|False| |匹配值|
+
+##### 请求示例
+
+POST body
+
+```
+{
+ "pluginName": "divide",
+ "type": 1,
+ "handle": "[{\"upstreamUrl\":\"127.0.0.1:8089\"}]",
+ "conditionDataList": [{
+ "paramType": "uri",
+ "operator": "match",
+ "paramName": null,
+ "paramValue": "/**"
+ }]
+}
+
+```
+
+##### 返回数据
+
+选择器ID
+
+```
+xxxxx
+```
+
+### 新增选择器与规则
+
+新增一条选择器与多条规则
+
+##### 请求方式
+
+POST
+
+##### 请求路径
+
+/plugin/selectorAndRules
+
+##### 请求参数
+
+|名称|类型|是否必需|默认值|描述|
+|---|---|---|---|---|
+|**SelectorRulesData**|[SelectorRulesData](#SelectorRulesData)|True| |选择器规则对象(Body里面传Json对象)|
+
+##### <div id="SelectorRulesData">SelectorRulesData</div>
+
+|名称|类型|是否必需|默认值|描述|
+|---|---|---|---|---|
+|**pluginName**|String|True| |插件名称|
+|**selectorName**|String|False| |选择器名称(不填则默认生成 plugin:selector+随机数字)|
+|**matchMode**|Integer|False| |匹配模式(0:and;1:or),不填默认生成 And模式|
+|**selectorHandler**|String|False| |选择器处理(Json对象,根据每个插件不同,传的对象不同)|
+|**conditionList**|[ConditionData](#ConditionData)|True| |选择器条件集合(Json List对象)|
+|**ruleDataList**|[RuleLocalData](#RuleLocalData)|True| |规则对象集合(Json List对象)|
+
+##### <div id="RuleLocalData">RuleLocalData</div>
+
+|名称|类型|是否必需|默认值|描述|
+|---|---|---|---|---|
+|**ruleName**|String|False| |规则名称|
+|**ruleHandler**|String|True| |规则处理(不同的插件传不同的值)|
+|**matchMode**|Integer|False| |匹配模式(0:and;1:or)|
+|**conditionList**|[ConditionData](#ConditionData)|True| |规则条件集合(Json List对象)|
+
+##### <div id="ConditionData">ConditionData</div>
+
+|名称|类型|是否必需|默认值|描述|
+|---|---|---|---|---|
+|**paramType**|String|True| |参数类型(post,uri,query,host,header,cookie,req_method,domain)|
+|**operator**|String|True| |匹配方式(match,=,regex,>,<,contains,SpEL,Groovy,TimeBefore,TimeAfter)|
+|**paramName**|String|False| |参数名称(uri 参数类型时候,可以不传)|
+|**paramValue**|Integer|False| |匹配值|
+
+##### 请求示例
+
+POST body
+
+```
+{
+ "pluginName": "divide",
+ "selectorHandler": "[{\"upstreamUrl\":\"127.0.0.1:8089\"}]",
+ "conditionDataList": [{
+ "paramType": "uri",
+ "operator": "match",
+ "paramValue": "/http/**"
+ }],
+ "ruleDataList": [{
+ "ruleHandler": "{\"loadBalance\":\"random\"}",
+ "conditionDataList": [{
+ "paramType": "uri",
+ "operator": "=",
+ "paramValue": "/http/test/payment"
+ }]
+ }, {
+ "ruleHandler": "{\"loadBalance\":\"random\"}",
+ "conditionDataList": [{
+ "paramType": "uri",
+ "operator": "=",
+ "paramValue": "/http/order/save"
+ }]
+ }]
+}
+
+```
+
+### 删除选择器
+
+根据选择器id与插件名称删除选择器
+
+##### 请求方式
+
+GET
+
+##### 请求路径
+
+/plugin/selector/delete?pluginName=xxxx&&id=xxxx
+
+##### Request参数
+
+|名称|类型|是否必需|默认值|描述|
+|---|---|---|---|---|
+|**pluginName**|String|true| |插件名称 |
+|**id**|String|true| |选择器id |
+
+### 获取插件下的所有选择器
+
+根据插件名称获取所有选择器
+
+##### 请求方式
+
+GET
+
+##### 请求路径
+
+/plugin/selector/findList?pluginName=xxxx
+
+##### Request参数
+
+|名称|类型|是否必需|默认值|描述|
+|---|---|---|---|---|
+|**pluginName**|String|true| |插件名称 |
+
+### 新增或更新规则
+
+新增或者更新规则数据
+
+##### 请求方式
+
+POST
+
+##### 请求路径
+
+/plugin/rule/saveOrUpdate
+
+##### 请求参数
+
+|名称|类型|是否必需|默认值|描述|
+|---|---|---|---|---|
+|**RuleData**|[RuleData](#RuleData)|True| |规则对象(Body里面传Json对象)|
+
+##### <div id="RuleData">RuleData</div>
+
+|名称|类型|是否必需|默认值|描述|
+|---|---|---|---|---|
+|**id**|String|False| |规则ID|
+|**pluginName**|String|True| |插件名称|
+|**name**|String|False| |规则名称(不填则默认生成 plugin:rule+随机数字)|
+|**selectorId**|String|True| |选择器ID(不填则默认生成 plugin:rule+随机数字)|
+|**matchMode**|Integer|False| |匹配模式(0:and;1:or),不填默认生成 And模式|
+|**sort**|Integer|False| |排序 ,不填默认生成 10|
+|**enabled**|Boolean|False| |是否开启,不填默认生成 true|
+|**logged**|Boolean|False| |是否打印日志,不填默认生成为false|
+|**handle**|String|False| |规则处理(Json对象,根据每个插件不同,传的对象不同)|
+|**conditionList**|[ConditionData](#ConditionData)|False| |条件集合(Json List对象)|
+
+##### <div id="conditionList">conditionList</div>
+
+|名称|类型|是否必需|默认值|描述|
+|---|---|---|---|---|
+|**paramType**|String|True| |参数类型(post,uri,query,host,header,cookie,req_method,domain)|
+|**operator**|String|True| |匹配方式(match,=,regex,>,<,contains,SpEL,Groovy,TimeBefore,TimeAfter)|
+|**paramName**|String|False| |参数名称(uri 参数类型时候,可以不传)|
+|**paramValue**|Integer|False| |匹配值|
+
+##### 请求示例
+
+POST body
+
+```
+{
+ "pluginName": "divide",
+ "selectorId": 123456,
+ "handle": "{\"loadBalance\":\"random\"}",
+ "conditionDataList": [{
+ "paramType": "uri",
+ "operator": "=",
+ "paramValue": "/test"
+ }]
+}
+
+```
+
+##### 返回数据
+
+规则ID
+
+```
+xxxxx
+```
+
+### 删除规则
+
+根据选择器id与规则id删除规则
+
+##### 请求方式
+
+GET
+
+##### 请求路径
+
+/plugin/rule/delete?selectorId=xxxx&&id=xxxx
+
+##### Request参数
+
+|名称|类型|是否必需|默认值|描述|
+|---|---|---|---|---|
+|**selectorId**|String|true| |选择器ID |
+|**id**|String|true| |规则ID |
+
+### 获取规则集合
+
+根据选择器ID获取所有规则
+
+##### 请求方式
+
+GET
+
+##### 请求路径
+
+/plugin/rule/findList?selectorId=xxxx
+
+##### Request参数
+
+|名称|类型|是否必需|默认值|描述|
+|---|---|---|---|---|
+|**selectorId**|String|true| |选择器ID |
+
+## 元数据
+
+### 新增或者更新元数据
+
+新增或者更新元数据
+
+##### 请求方式
+
+POST
+
+##### 请求路径
+
+/meta/saveOrUpdate
+
+##### 请求参数
+
+|名称|类型|是否必需|默认值|描述|
+|---|---|---|---|---|
+|**MetaData**|[MetaData](#MetaData)|True| |元数据对象(Body里面传Json对象)|
+
+##### <div id="MetaData">MetaData</div>
+
+|名称|类型|是否必需|默认值|描述|
+|---|---|---|---|---|
+|**id**|String|False| |元数据ID|
+|**appName**|String|True| |应用名称|
+|**contextPath**|String|True| |contextPath|
+|**path**|String|True| |请求路径|
+|**rpcType**|String|True| |rpc类型(dubbo,sofa,tars,springCloud,motan,grpc)|
+|**serviceName**|String|True| |接口名称|
+|**methodName**|String|True| |方法名称|
+|**parameterTypes**|String|True| |参数类型|
+|**rpcExt**|String|False| |rpc扩展参数(json对象)|
+|**enabled**|Boolean|False| |是否开启|
+
+### 删除元数据
+
+删除元数据
+
+##### 请求方式
+
+GET
+
+##### 请求路径
+
+/meta/delete?rpcType=xxxx&&path=xxx
+
+##### Request参数
+
+|名称|类型|是否必需|默认值|描述|
+|---|---|---|---|---|
+|**rpcType**|String|true| |rpc类型(dubbo,sofa,tars,springCloud,motan,grpc) |
+|**path**|String|true| |路径 |
+
+## 签名数据
+
+### 新增或者更新
+
+新增或者更新签名数据
+
+##### 请求方式
+
+POST
+
+##### 请求路径
+
+/auth/saveOrUpdate
+
+##### 请求参数
+
+|名称|类型|是否必需|默认值|描述|
+|---|---|---|---|---|
+|**AppAuthData**|[AppAuthData](#AppAuthData)|True| |签名对象(Body里面传Json对象)|
+
+##### <div id="AppAuthData">AppAuthData</div>
+
+|名称|类型|是否必需|默认值|描述|
+|---|---|---|---|---|
+|**appKey**|String|True| |app key|
+|**appSecret**|String|True| |app secret|
+|**enabled**|Boolean|False| |是否开启|
+|**open**|Boolean|False| |是否是开放平台|
+|**paramDataList**|[AuthParamData](#AuthParamData)|false| |参数集合,open为true时候需要传(Json list对象)|
+|**AuthPathData**|[AuthPathData](#AuthPathData)|false| |路径集合,open为true时候需要传(Json list对象)|
+
+##### <div id="AuthParamData">AuthParamData</div>
+
+|名称|类型|是否必需|默认值|描述|
+|---|---|---|---|---|
+|**appName**|String|True| |应用名称|
+|**appParam**|String|True| |应用参数|
+
+##### <div id="AuthPathData">AuthPathData</div>
+
+|名称|类型|是否必需|默认值|描述|
+|---|---|---|---|---|
+|**appName**|String|True| |应用名称|
+|**path**|String|True| |路径|
+|**enabled**|Boolean|False| |是否开启|
+
+### 删除
+
+删除签名数据
+
+##### 请求方式
+
+GET
+
+##### 请求路径
+
+/auth/delete?appKey=xxxx
+
+##### Request参数
+
+|名称|类型|是否必需|默认值|描述|
+|---|---|---|---|---|
+|**appKey**|String|true| |app key |
diff --git a/i18n/zh/docusaurus-plugin-content-docs/version-2.5.1/developer/shenyu-optimize.md b/i18n/zh/docusaurus-plugin-content-docs/version-2.5.1/developer/shenyu-optimize.md
new file mode 100644
index 00000000000..24af347f1f2
--- /dev/null
+++ b/i18n/zh/docusaurus-plugin-content-docs/version-2.5.1/developer/shenyu-optimize.md
@@ -0,0 +1,55 @@
+---
+title: ShenYu 性能优化
+keywords: ["优化"]
+description: ShenYu 性能优化
+---
+
+## 说明
+
+* 本文主要介绍如何对 `Apache ShenYu` 进行优化。
+
+
+## 本身消耗
+
+* `Apache ShenYu`本身所有的操作,都是基于 `JVM` 内存来匹配,本身消耗时间大概在 `1-3ms` 左右。
+
+## 底层Netty调优
+
+* `Apache ShenYu`内置依赖 `spring-webflux` 而其底层是使用的 `netty` 。
+
+* 我们可以自定义 `netty` 的相关参数来对 `Apache ShenYu` 进行优化,以下是示例:
+
+```java
+ @Bean
+ public NettyReactiveWebServerFactory nettyReactiveWebServerFactory() {
+ NettyReactiveWebServerFactory webServerFactory = new NettyReactiveWebServerFactory();
+ webServerFactory.addServerCustomizers(new EventLoopNettyCustomizer());
+ return webServerFactory;
+ }
+
+ private static class EventLoopNettyCustomizer implements NettyServerCustomizer {
+
+ @Override
+ public HttpServer apply(final HttpServer httpServer) {
+ return httpServer
+ .tcpConfiguration(tcpServer -> tcpServer
+ .runOn(LoopResources.create("shenyu-netty", 1, DEFAULT_IO_WORKER_COUNT, true), false)
+ .selectorOption(ChannelOption.SO_REUSEADDR, true)
+ .selectorOption(ChannelOption.ALLOCATOR, PooledByteBufAllocator.DEFAULT)
+ .option(ChannelOption.TCP_NODELAY, true)
+ .option(ChannelOption.ALLOCATOR, PooledByteBufAllocator.DEFAULT));
+ }
+ }
+```
+
+* 这个类在 `shenyu-bootstrap` 中已经内置,在压测的时候,可以根据自己的需求来进行优化设置。
+
+* 业务线程模型,请参考:[线程模型](./thread-model) 。
+
+
+
+
+
+
+
+
diff --git a/i18n/zh/docusaurus-plugin-content-docs/version-2.5.1/developer/spi/_category_.json b/i18n/zh/docusaurus-plugin-content-docs/version-2.5.1/developer/spi/_category_.json
new file mode 100644
index 00000000000..9976e06d561
--- /dev/null
+++ b/i18n/zh/docusaurus-plugin-content-docs/version-2.5.1/developer/spi/_category_.json
@@ -0,0 +1,4 @@
+{
+ "label": "自定义SPI",
+ "position": 1
+}
diff --git a/i18n/zh/docusaurus-plugin-content-docs/version-2.5.1/developer/spi/custom-load-balance.md b/i18n/zh/docusaurus-plugin-content-docs/version-2.5.1/developer/spi/custom-load-balance.md
new file mode 100644
index 00000000000..1cd1c9376a3
--- /dev/null
+++ b/i18n/zh/docusaurus-plugin-content-docs/version-2.5.1/developer/spi/custom-load-balance.md
@@ -0,0 +1,64 @@
+---
+title: 自定义负载均衡策略
+description: 自定义负载均衡策略
+---
+
+本文介绍如何对 `org.apache.shenyu.loadbalancer.spi.LoadBalancer` 进行自定义扩展。
+
+* 新建一个工程,引入如下依赖:
+
+```xml
+<dependencies>
+ <dependency>
+ <groupId>org.apache.shenyu</groupId>
+ <artifactId>shenyu-plugin-base</artifactId>
+ <version>${project.version}</version>
+ </dependency>
+</dependencies>
+```
+
+* 新增一个类 `CustomLoadBalancer`,继承`org.apache.shenyu.loadbalancer.spi.AbstractLoadBalancer`。
+
+```java
+public class CustomLoadBalancer extends AbstractLoadBalancer {
+
+ @Override
+ public Upstream doSelect(final List<Upstream> upstreamList, final String ip) {
+ // 自定义负载均衡实现逻辑
+ }
+}
+```
+
+* 在工程的META-INF/services目录创建 `org.apache.shenyu.loadbalancer.spi.LoadBalancer`文件中添加如下内容:
+
+```shell title="script"
+${spi name}=${custom class path}
+```
+
+`${spi name}`表示`spi`的名称,`${custom class path}`表示该类的全限定名。比如:
+
+```shell title="script"
+custom=xxx.xxx.xxx.CustomLoadBalancer
+```
+
+* 将工程打包,拷贝到网关 (bootstrap-bin) 的 `lib` 或 `ext-lib` 目录。
+
+* 在`Apache ShenYu`网关管理系统 --> 基础配置 --> 字典管理, 找到字典编码为 `LOAD_BALANCE`,新增一条数据,注意字典名称要为: `${spi name}`,图中的示例是`custom`。
+
+<img src="/img/shenyu/custom/custom_load_balancer_zh.png" width="80%" height="70%" />
+
+> 字典类型:`loadBalance`;
+>
+> 字典编码:`LOAD_BALANCE`;
+>
+> 字典名称:`${spi name}`,填写自定义`spi`的名称;
+>
+> 字典值:使用时,下拉框的值,不要和现有的重复;
+>
+> 字典描述或备注信息:描述信息;
+>
+> 排序: 排序;
+
+* 在添加选择器或规则时,就可以使用自定义的匹配方式:
+
+<img src="/img/shenyu/custom/use_custom_load_balancer_zh.png" width="90%" height="80%" />
diff --git a/i18n/zh/docusaurus-plugin-content-docs/version-2.5.1/developer/spi/custom-match-mode.md b/i18n/zh/docusaurus-plugin-content-docs/version-2.5.1/developer/spi/custom-match-mode.md
new file mode 100644
index 00000000000..a024d89162f
--- /dev/null
+++ b/i18n/zh/docusaurus-plugin-content-docs/version-2.5.1/developer/spi/custom-match-mode.md
@@ -0,0 +1,71 @@
+---
+title: 自定义匹配方式
+keywords: ["MatchStrategy"]
+description: 自定义匹配方式
+---
+
+本文介绍如何对 `org.apache.shenyu.plugin.base.condition.strategy.MatchStrategy` 进行自定义扩展。
+
+* 新建一个工程,引入如下依赖:
+
+```xml
+<dependencies>
+ <dependency>
+ <groupId>org.apache.shenyu</groupId>
+ <artifactId>shenyu-plugin-base</artifactId>
+ <version>${project.version}</version>
+ </dependency>
+</dependencies>
+```
+
+* 新增一个类 `CustomMatchStrategy`,继承`org.apache.shenyu.plugin.base.condition.strategy.AbstractMatchStrategy`,实现 `org.apache.shenyu.plugin.base.condition.strategy.MatchStrategy` ,添加注解`org.apache.shenyu.spi.Join`。
+
+```java
+/**
+ * This is custom match strategy.
+ */
+@Join
+public class CustomMatchStrategy extends AbstractMatchStrategy implements MatchStrategy {
+
+ @Override
+ public Boolean match(final List<ConditionData> conditionDataList, final ServerWebExchange exchange) {
+ // 匹配逻辑实现
+ }
+}
+```
+
+* 在工程的META-INF/services目录创建 `org.apache.shenyu.plugin.base.condition.strategy.MatchStrategy`文件中添加如下内容:
+
+```shell title="script"
+${spi name}=${custom class path}
+```
+
+`${spi name}`表示`spi`的名称,`${custom class path}`表示该类的全限定名。比如:
+
+```shell title="script"
+custom=xxx.xxx.xxx.CustomMatchStrategy
+```
+
+* 将工程打包,拷贝到网关 (bootstrap-bin) 的 `lib` 或 `ext-lib` 目录。
+
+* 在`Apache ShenYu`网关管理系统 --> 基础配置 --> 字典管理, 找到字典编码为 `MATCH_MODE`,新增一条数据,注意字典名称要为: `${spi name}`,图中的示例是`custom`。
+
+<img src="/img/shenyu/custom/custom_match_strategy_zh.png" width="70%" height="60%" />
+
+> 字典类型:`matchMode`;
+>
+> 字典编码:`MATCH_MODE`;
+>
+> 字典名称:`${spi name}`,填写自定义`spi`的名称;
+>
+> 字典值:使用时,下拉框的值,不要和现有的重复;
+>
+> 字典描述或备注信息:描述信息;
+>
+> 排序: 排序;
+>
+> 状态:打开或关闭。
+
+* 在添加选择器或规则时,就可以使用自定义的匹配方式:
+
+<img src="/img/shenyu/custom/use_custom_match_strategy_zh.png" width="80%" height="70%" />
diff --git a/i18n/zh/docusaurus-plugin-content-docs/version-2.5.1/developer/spi/custom-metrics-monitor.md b/i18n/zh/docusaurus-plugin-content-docs/version-2.5.1/developer/spi/custom-metrics-monitor.md
new file mode 100644
index 00000000000..ef573e8258f
--- /dev/null
+++ b/i18n/zh/docusaurus-plugin-content-docs/version-2.5.1/developer/spi/custom-metrics-monitor.md
@@ -0,0 +1,60 @@
+---
+title: 自定义指标监控
+description: 自定义指标监控
+---
+
+## 说明
+
+* 在自定义开发前,请先自定义搭建好网关环境,请参考: [自定义部署](../../deployment/deployment-custom)
+
+* 本文介绍如何对 `org.apache.shenyu.plugin.metrics.spi.MetricsService` 进行自定义扩展。
+
+## 扩展实现
+
+* 新建一个工程,引入如下依赖:
+
+```xml
+<dependencies>
+ <dependency>
+ <groupId>org.apache.shenyu</groupId>
+ <artifactId>shenyu-plugin-base</artifactId>
+ <version>${project.version}</version>
+ </dependency>
+</dependencies>
+```
+
+* 新增一个类 `${you class}`,实现 `org.apache.shenyu.plugin.metrics.spi.MetricsService`
+
+```java
+public class ${you class} implements MetricsService {
+
+ /**
+ * Start metrics tracker.
+ *
+ * @param metricsConfig metrics config
+ * @param metricsRegister the metrics register
+ */
+ public void start(MetricsConfig metricsConfig, MetricsRegister metricsRegister){
+ //自定义监控逻辑
+ }
+
+ /**
+ * Stop metrics tracker.
+ */
+ public void stop() {
+ //自定义关闭逻辑
+ }
+}
+```
+
+* 在项目 `resources` 目录下,新建 `META-INF/shenyu` 目录, 并且新增文件名为 : `org.apache.shenyu.plugin.metrics.spi.MetricsService`.
+内容新增 `${you spi name}` = `${you class path}`:
+
+```
+${you spi name} = ${you class path}
+```
+
+* 将工程打包,拷贝到网关 (bootstrap-bin) 的 `lib` 或 `ext-lib` 目录。
+
+* 在 `Admin` 后台 ---> 基础管理 ---> 插件管理 , 找到 `Monitor` 插件,编辑插件信息,注意``metricsName要为: `${you spi name}`。
+<img src="/img/shenyu/custom/custom-metrics-monitor-zh.jpg" width="40%" height="30%" />
diff --git a/i18n/zh/docusaurus-plugin-content-docs/version-2.5.1/developer/spi/custom-mock-generator.md b/i18n/zh/docusaurus-plugin-content-docs/version-2.5.1/developer/spi/custom-mock-generator.md
new file mode 100644
index 00000000000..6335433f2f1
--- /dev/null
+++ b/i18n/zh/docusaurus-plugin-content-docs/version-2.5.1/developer/spi/custom-mock-generator.md
@@ -0,0 +1,75 @@
+---
+title: 自定义mock数据生成器
+description: 自定义mock数据生成器
+---
+## 说明
+
+1. 本文介绍如何对 `org.apache.shenyu.plugin.mock.generator.Generator` 进行自定义扩展。
+2. mock 数据生成表达式需要满足 `${name|param1|param2|...}` 的格式。
+
+## 扩展实现
+
+* 新建一个工程,引入如下依赖:
+
+```xml
+<dependencies>
+ <dependency>
+ <groupId>org.apache.shenyu</groupId>
+ <artifactId>shenyu-plugin-mock</artifactId>
+ <version>${project.version}</version>
+ </dependency>
+</dependencies>
+```
+
+* 新增一个类 `CustomerGenerator`,实现 `org.apache.shenyu.plugin.mock.generator.Generator`。
+
+```java
+@Join
+public class CustomGenerator implements Generator<String> {
+ @Override
+ public String getName() {
+ // 生成器的名称,即 表达式第一个 | 之前的内容
+ }
+
+ @Override
+ public String generate() {
+ // 实现数据生成的逻辑
+ }
+
+ @Override
+ public int getParamSize() {
+ // 表达式必填参数的个数
+ }
+
+ @Override
+ public void initParam(List params, String rule) {
+ // params 会返回 表达式按照 | 切分后,除名称之外的内容
+ // rule 原表达式的内容,如果有自定的参数处理逻辑 可以使用这个参数
+ }
+
+ @Override
+ public boolean match(String rule) {
+ // 校验当前表达式是否可以合法
+ }
+
+ @Override
+ public String[] getPrefixAndSuffix() {
+ // 返回 生成内容之后添加的前缀和后缀 ,请返回 包含两个元素的字符串数组
+ // 第 0 个元素是前缀,第 1 个元素是后缀
+ }
+}
+```
+
+* 在工程的 META-INF/shenyu 目录创建 `org.apache.shenyu.plugin.mock.generator.Generator`文件中添加如下内容:
+
+```shell title="script"
+${spi name}=${custom class path}
+```
+
+`${spi name}`表示`spi`的名称,`${spi name }` 需要与 Generator 实现类中 getName() 方法定义的一致 `${custom class path}`表示该类的全限定名。比如:
+
+```shell title="script"
+custom=xxx.xxx.xxx.CustomGenerator
+```
+
+* 将工程打包,拷贝到网关 (bootstrap-bin) 的 `lib` 或 `ext-lib` 目录。
diff --git a/i18n/zh/docusaurus-plugin-content-docs/version-2.5.1/developer/spi/custom-parameter-data.md b/i18n/zh/docusaurus-plugin-content-docs/version-2.5.1/developer/spi/custom-parameter-data.md
new file mode 100644
index 00000000000..fe44fa372ad
--- /dev/null
+++ b/i18n/zh/docusaurus-plugin-content-docs/version-2.5.1/developer/spi/custom-parameter-data.md
@@ -0,0 +1,71 @@
+---
+title: 自定义条件参数
+keywords: ["ParameterData"]
+description: 自定义条件参数
+---
+
+本文介绍如何对 `org.apache.shenyu.plugin.base.condition.data.ParameterData` 进行自定义扩展。
+
+* 新建一个工程,引入如下依赖:
+
+```xml
+<dependencies>
+ <dependency>
+ <groupId>org.apache.shenyu</groupId>
+ <artifactId>shenyu-plugin-base</artifactId>
+ <version>${project.version}</version>
+ </dependency>
+</dependencies>
+```
+
+* 新增一个类 `CustomParameterData`,实现 `org.apache.shenyu.plugin.base.condition.data.ParameterData` 接口 ,添加注解`org.apache.shenyu.spi.Join`。
+
+```java
+/**
+ * This is custom parameter data.
+ */
+@Join
+public class CustomParameterData implements ParameterData {
+
+ @Override
+ public String builder(final String paramName, final ServerWebExchange exchange) {
+ // 自定义条件参数
+ }
+}
+```
+
+* 在工程的META-INF/services目录创建 `org.apache.shenyu.plugin.base.condition.data.ParameterData` 文件中添加如下内容:
+
+```shell title="script"
+${spi name}=${custom class path}
+```
+
+`${spi name}`表示`spi`的名称,`${custom class path}`表示该类的全限定名。比如:
+
+```shell title="script"
+custom=xxx.xxx.xxx.CustomParameterData
+```
+
+* 将工程打包,拷贝到网关 (bootstrap-bin) 的 `lib` 或 `ext-lib` 目录。
+
+* 在`Apache ShenYu`网关管理系统 --> 基础配置 --> 字典管理, 找到字典编码为 `PARAM_TYPE`,新增一条数据,注意字典名称要为: `${spi name}`,图中的示例是`custom`。
+
+<img src="/img/shenyu/custom/custom_parameter_data_zh.png" width="70%" height="60%" />
+
+> 字典类型:`paramType`;
+>
+> 字典编码:`PARAM_TYPE`;
+>
+> 字典名称:`${spi name}`,填写自定义`spi`的名称;
+>
+> 字典值:使用时,下拉框的值,不要和现有的重复;
+>
+> 字典描述或备注信息:描述信息;
+>
+> 排序: 排序;
+>
+> 状态:打开或关闭。
+
+* 在添加选择器或规则时,就可以使用自定义的条件参数:
+
+<img src="/img/shenyu/custom/use_custom_parameter_data_zh.png" width="80%" height="70%" />
diff --git a/i18n/zh/docusaurus-plugin-content-docs/version-2.5.1/developer/spi/custom-predicate-judge.md b/i18n/zh/docusaurus-plugin-content-docs/version-2.5.1/developer/spi/custom-predicate-judge.md
new file mode 100644
index 00000000000..9415fd95ef9
--- /dev/null
+++ b/i18n/zh/docusaurus-plugin-content-docs/version-2.5.1/developer/spi/custom-predicate-judge.md
@@ -0,0 +1,120 @@
+---
+title: 自定义条件策略
+keywords: ["PredicateJudge"]
+description: 自定义条件策略
+---
+
+## 说明
+
+* 本文介绍如何对 `org.apache.shenyu.plugin.base.condition.judge.PredicateJudge` 进行自定义扩展。
+* 条件谓语是选择器中连接数据和规则的桥梁,作用是筛选出符合条件的请求。
+* 目前已经存在包括 match, =, regex, contains, TimeBefore, TimeAfter, exclude 共七个条件谓语。
+* 用户可以参考 [judge](https://github.com/apache/shenyu/tree/master/shenyu-plugin/shenyu-plugin-base/src/main/java/org/apache/shenyu/plugin/base/condition/judge) 模块,新增自己的条件谓语,如果有好的公用插件,可以向官网提交 `pr`。
+
+## 扩展
+
+* 新建一个工程,引入如下依赖:
+
+```xml
+<dependencies>
+ <dependency>
+ <groupId>org.apache.shenyu</groupId>
+ <artifactId>shenyu-plugin-base</artifactId>
+ <version>${project.version}</version>
+ </dependency>
+</dependencies>
+```
+
+* 新增类 `CustomPredicateJudge`,实现 `org.apache.shenyu.plugin.base.condition.judge.PredicateJudge` 接口,添加注解 `org.apache.shenyu.spi.Join`。
+
+```java
+/**
+ * custom predicate judge.
+ */
+@Join
+public class CustomPredicateJudge implements PredicateJudge {
+
+ @Override
+ public Boolean judge(final ConditionData conditionData, final String realData) {
+ // 自定义条件策略
+ }
+}
+```
+
+* 在工程的META-INF/services目录创建 `org.apache.shenyu.plugin.base.condition.judge.PredicateJudge` 文件,并添加如下内容:
+
+```shell title="script"
+${spi name}=${custom class path}
+```
+
+`${spi name}` 表示 `spi` 的名称, `${custom class path}` 表示该类的全限定名。比如:
+
+```shell title="script"
+custom=xxx.xxx.xxx.CustomPredicateJudge
+```
+
+* 将工程打包,拷贝到网关 (bootstrap-bin) 的 `lib` 或 `ext-lib` 目录。
+
+* 在 `Apache ShenYu` 网关管理系统 --> 基础配置 --> 字典管理, 找到字典编码为 `OPERATOR`,新增一条数据,注意字典名称要为: `${spi name}`,图中的示例是 `custom`。
+
+<img src="/img/shenyu/custom/custom_predicate_judge_zh.png" width="70%" height="60%" />
+
+> 字典类型:`operator`;
+>
+> 字典编码:`OPERATOR`;
+>
+> 字典名称:`${spi name}`,填写自定义`spi`的名称;
+>
+> 字典值:使用时,下拉框的值,不要和现有的重复;
+>
+> 字典描述或备注信息:描述信息;
+>
+> 排序: 排序;
+>
+> 状态:打开或关闭。
+
+* 在添加选择器或规则时,就可以使用自定义的条件策略:
+
+<img src="/img/shenyu/custom/use_custom_predicate_judge_zh.png" width="80%" height="70%" />
+
+## 示例
+
+* 添加 `GroovyPredicateJudge` 和 `SpELPredicateJudge` 扩展。
+
+```java
+/**
+ * Groovy predicate judge.
+ */
+@Join
+public class GroovyPredicateJudge implements PredicateJudge {
+
+ @Override
+ public Boolean judge(final ConditionData conditionData, final String realData) {
+ return (Boolean) Eval.me(conditionData.getParamName(), realData, conditionData.getParamValue());
+ }
+}
+```
+
+```java
+/**
+ * SpEL predicate judge.
+ */
+@Join
+public class SpELPredicateJudge implements PredicateJudge {
+
+ private static final ExpressionParser EXPRESSION_PARSER = new SpelExpressionParser();
+
+ @Override
+ public Boolean judge(final ConditionData conditionData, final String realData) {
+ Expression expression = EXPRESSION_PARSER.parseExpression(conditionData.getParamValue().replace('#' + conditionData.getParamName(), realData));
+ return expression.getValue(Boolean.class);
+ }
+}
+```
+
+* 更新 `org.apache.shenyu.plugin.base.condition.judge.PredicateJudge`, 添加:
+
+```shell title="script"
+Groovy=xxx.xxx.xxx.GroovyPredicateJudge
+SpEL=xxx.xxx.xxx.SpELPredicateJudge
+```
diff --git a/i18n/zh/docusaurus-plugin-content-docs/version-2.5.1/developer/spi/custom-rate-limiter.md b/i18n/zh/docusaurus-plugin-content-docs/version-2.5.1/developer/spi/custom-rate-limiter.md
new file mode 100644
index 00000000000..b3573d15fba
--- /dev/null
+++ b/i18n/zh/docusaurus-plugin-content-docs/version-2.5.1/developer/spi/custom-rate-limiter.md
@@ -0,0 +1,103 @@
+---
+title: 自定义限流策略
+description: 自定义限流策略
+---
+
+
+## 说明
+
+* 在自定义开发前,请先自定义搭建好网关环境,请参考: [自定义部署](../../deployment/deployment-custom)
+
+* 本文介绍如何对 `org.apache.shenyu.plugin.ratelimiter.algorithm.RateLimiterAlgorithm` 进行自定义扩展。
+
+## 扩展实现
+
+* 新建一个工程,引入如下依赖:
+
+```xml
+<dependencies>
+ <dependency>
+ <groupId>org.apache.shenyu</groupId>
+ <artifactId>shenyu-plugin-base</artifactId>
+ <version>${project.version}</version>
+ </dependency>
+</dependencies>
+```
+
+* 新增一个类 `${you class}`,实现 `org.apache.shenyu.plugin.ratelimiter.algorithm.RateLimiterAlgorithm`
+
+```java
+public class ${you class} implements RateLimiterAlgorithm<T> {
+
+ /**
+ * Gets script.
+ *
+ * @return the script
+ */
+ public RedisScript<T> getScript() {
+ //你的开发逻辑
+ }
+
+ /**
+ * Gets keys.
+ *
+ * @param id the id
+ * @return the keys
+ */
+ public List<String> getKeys(String id) {
+ //你的开发逻辑
+ }
+ /**
+ * Callback string.
+ *
+ * @param script the script
+ * @param keys the keys
+ * @param scriptArgs the script args
+ */
+ default void callback(final RedisScript<?> script, final List<String> keys, final List<String> scriptArgs) {
+ //你的开发逻辑
+ }
+}
+```
+
+* 在项目 `resources` 目录下,新建 `META-INF/shenyu` 目录, 并且新增文件名为 : `org.apache.shenyu.plugin.ratelimiter.algorithm.RateLimiterAlgorithm`.
+内容新增 `${you spi name}` = `${you class path}`:
+
+```
+${you spi name} = ${you class path}
+```
+
+* 将工程打包,拷贝到网关 (bootstrap-bin) 的 `lib` 或 `ext-lib` 目录。
+
+* 在 `Admin` 后台 ---> 基础管理 ---> 字典管理 , 找到字典编码为 `ALGORITHM_*`,新增一条数据,注意字典名称要为: `${you spi name}`。
+
+<img src="/img/shenyu/custom/custom-rate-limiter-zh.jpg" width="40%" height="30%" />
+
+* 或者执行以下自定义`SQL`语句:
+
+```sql
+INSERT IGNORE INTO `shenyu_dict` (
+ `id`,
+ `type`,
+ `dict_code`,
+ `dict_name`,
+ `dict_value`,
+ `desc`,
+ `sort`,
+ `enabled`,
+ `date_created`,
+ `date_updated`
+ )
+VALUES (
+ 'you id',
+ 'matchMode',
+ 'MATCH_MODE',
+ 'you spi name',
+ 'you value',
+ 'you spi name',
+ 0,
+ 1,
+ '2021-08-30 19:29:10',
+ '2021-08-30 20:15:23'
+ );
+```
diff --git a/i18n/zh/docusaurus-plugin-content-docs/version-2.5.1/developer/thread-model.md b/i18n/zh/docusaurus-plugin-content-docs/version-2.5.1/developer/thread-model.md
new file mode 100644
index 00000000000..f284df3406f
--- /dev/null
+++ b/i18n/zh/docusaurus-plugin-content-docs/version-2.5.1/developer/thread-model.md
@@ -0,0 +1,29 @@
+---
+title: 线程模型
+keywords: ["线程模型"]
+description: 线程模型
+---
+
+## 说明
+
+* 本文主要介绍 `Apache ShenYu` 的线程模型,以及各种场景的使用。
+
+## IO与Work线程
+
+* `Apache ShenYu` 内置依赖 `spring-webflux`, 而其底层是使用的是 `netty`,这一块主要是使用的 `netty` 线程模型。
+
+## 业务线程
+
+* 默认使用调度线程来执行。
+* 默认使用固定的线程池来执行,其线程数为 `cpu * 2 + 1`。
+
+## 切换类型
+
+* `reactor.core.scheduler.Schedulers`。
+* 可以使用 `-Dshenyu.scheduler.type=fixed` 这个是默认。 设置其他的值 就会使用弹性线程池来执行`Schedulers.elastic()`。
+* 可以使用 `-Dshenyu.work.threads = xx` 来指定线程数量,默认为 `cpu * 2 + 1`,最小为`16`个线程。
+
+
+
+
+
diff --git a/i18n/zh/docusaurus-plugin-content-docs/version-2.5.1/index.md b/i18n/zh/docusaurus-plugin-content-docs/version-2.5.1/index.md
new file mode 100644
index 00000000000..747a554bb21
--- /dev/null
+++ b/i18n/zh/docusaurus-plugin-content-docs/version-2.5.1/index.md
@@ -0,0 +1,174 @@
+---
+sidebar_position: 1
+title: Apache ShenYu 介绍
+keywords: ["Apache shenyu"]
+description: Apache ShenYu 是一个异步的,高性能的,跨语言的,响应式的`API`网关。
+---
+
+# 架构图
+
+ 
+
+# 什么是 Apache ShenYu
+
+这是一个异步的,高性能的,跨语言的,响应式的 `API` 网关。
+
+# 为什么叫ShenYu
+
+ ShenYu(神禹)是中国古代君主夏禹(后世亦称大禹)的尊称,他留下了三渡黄河造福人民并成功治理黄河洪水的感人故事。他和尧、舜一起被认为是中国古代三大帝王之一。
+
+* 首先,ShenYu这个名字是为了弘扬我们中华文明的传统美德。
+* 其次,对于网关来说最重要的是流量管理。
+* 最后,社区将以公平、公正、公开、择优的方式做事,在向神禹致敬的同时,也符合 Apache Way。
+
+# 特点
+
+* 代理:支持Apache Dubbo,Spring Cloud,gRPC,Motan,SOFA,TARS,WebSocket,MQTT
+* 安全性:签名,OAuth 2.0,JSON Web令牌,WAF插件
+* API治理:请求、响应、参数映射、Hystrix、RateLimiter插件
+* 可观测性:跟踪、指标、日志记录插件
+* 仪表板:动态流量控制,用户菜单权限的可视化后端
+* 扩展:插件热插拔,动态加载
+* 集群:NGINX、Docker、Kubernetes
+* 语言:提供.NET,Python,Go,Java客户端用于API注册
+
+---
+
+# 脑图
+
+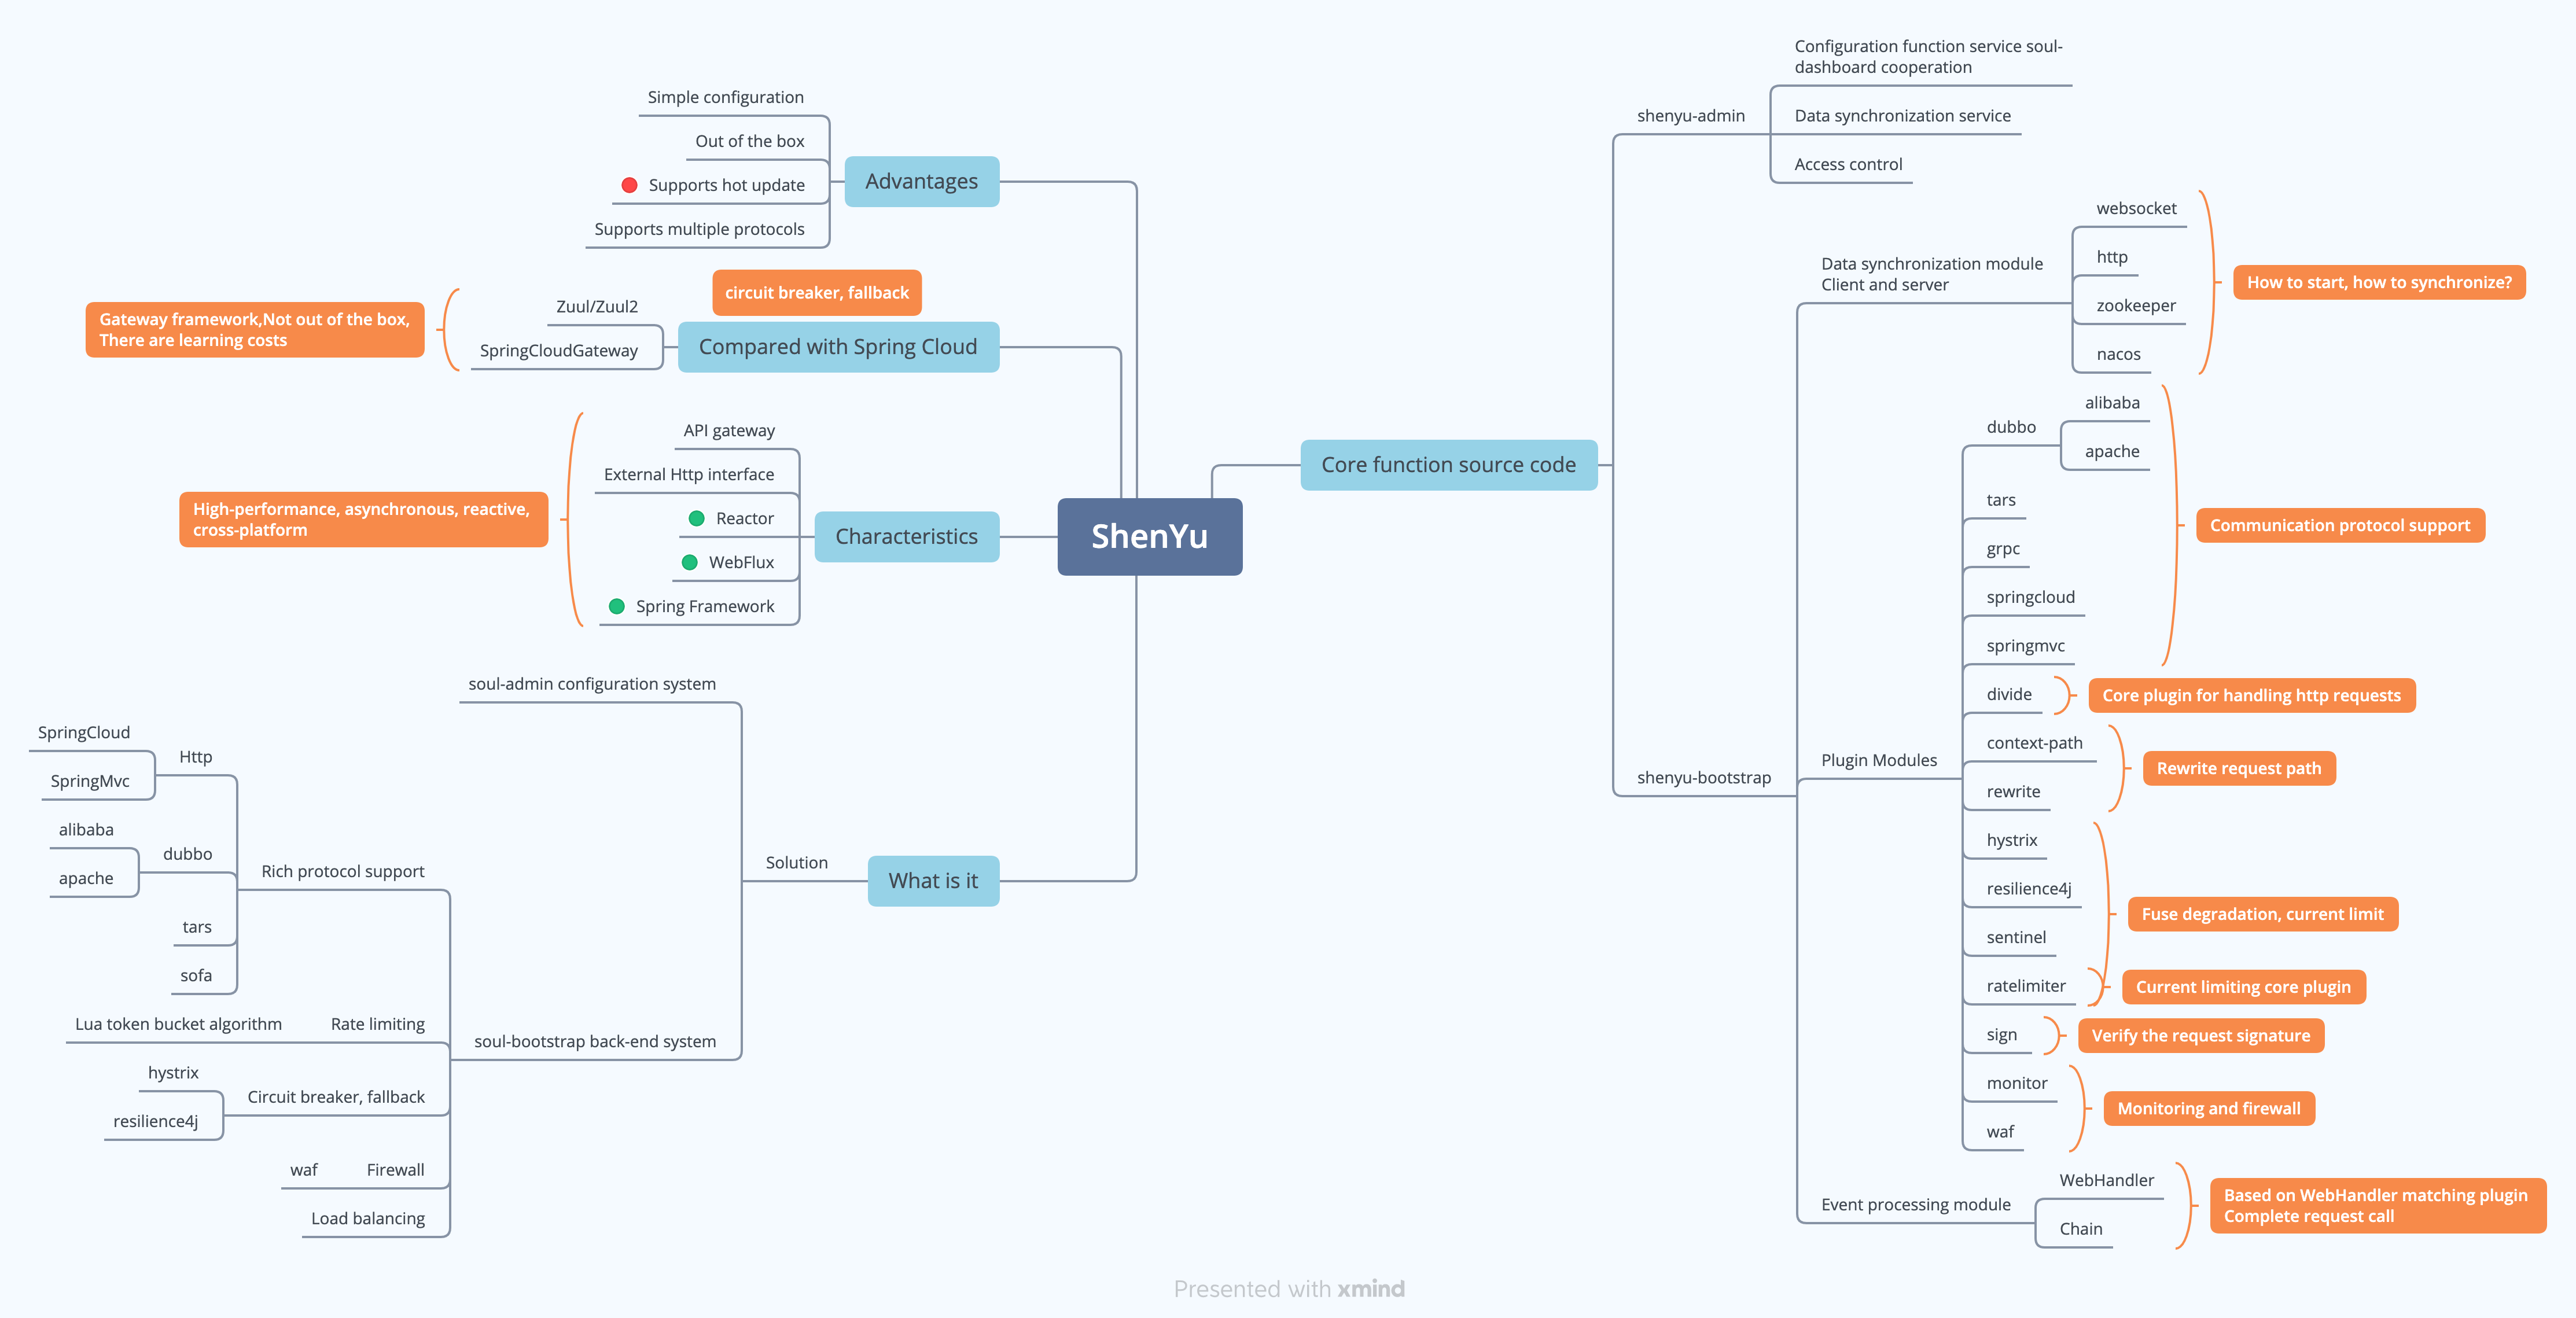
+
+# 快速开始 (docker)
+
+### 运行 Apache ShenYu Admin
+
+```
+docker pull apache/shenyu-admin
+docker network create shenyu
+docker run -d -p 9095:9095 --net shenyu apache/shenyu-admin
+```
+
+默认账号: **admin**
+
+默认密码: **123456**
+
+### 运行 Apache ShenYu Bootstrap
+
+```
+docker pull apache/shenyu-bootstrap
+docker run -d -p 9195:9195 --net shenyu apache/shenyu-bootstrap
+```
+
+### 路由设置
+
+* Real requests :<http://127.0.0.1:8080/helloworld>,
+
+```json
+{
+ "name" : "Shenyu",
+ "data" : "hello world"
+}
+```
+
+* 设置路由规则 (Standalone)
+
+将`localKey: 123456`添加到Headers中。如果需要自定义localKey,可以使用sha512工具基于明文生成密钥,并更新`shenyu.local.sha512Key`属性。
+
+```
+curl --location --request POST 'http://localhost:9195/shenyu/plugin/selectorAndRules' \
+--header 'Content-Type: application/json' \
+--header 'localKey: 123456' \
+--data-raw '{
+ "pluginName": "divide",
+ "selectorHandler": "[{\"upstreamUrl\":\"127.0.0.1:8080\"}]",
+ "conditionDataList": [{
+ "paramType": "uri",
+ "operator": "match",
+ "paramValue": "/**"
+ }],
+ "ruleDataList": [{
+ "ruleHandler": "{\"loadBalance\":\"random\"}",
+ "conditionDataList": [{
+ "paramType": "uri",
+ "operator": "match",
+ "paramValue": "/**"
+ }]
+ }]
+}'
+```
+
+* 代理请求 :<http://localhost:9195/helloworld>
+
+```json
+{
+ "name" : "Shenyu",
+ "data" : "hello world"
+}
+```
+
+---
+
+# 插件
+
+ 每当有请求进来,Apache ShenYu将基于责任链模式由所有启用的插件来执行它。
+
+ 作为Apache ShenYu的核心,插件是可扩展和可热插拔的。
+
+ 不同的插件做不同的事情。
+
+ 当然,用户也可以自定义插件来满足自己的需求。
+
+ 如果要自定义,见[自定义插件](https://shenyu.apache.org/docs/developer/custom-plugin/)
+
+---
+
+# Selector & Rule
+
+ 根据您的HTTP请求头,Selector和Rule将用于路由您的请求。
+
+ Selector是您的第一层路由,它是粗粒度的,例如模块级。
+
+ Rule是你的第二层路由,你认为你的请求应该做什么。例如模块中的方法级别。
+
+ Selector和Rule只匹配一次,然后返回匹配结果。因此最粗的粒度应该最后排序。
+
+---
+
+# Data Caching & Data Sync
+
+ 因为所有数据都是使用JVM中的ConcurrentHashMap缓存的,所以速度非常快。
+
+ Apache ShenYu通过监听ZooKeeper节点(或WebSocket push,HTTP long polling),在后台管理中用户更改配置信息时动态更新缓存。
+
+ 
+
+ 
+
+---
+
+# Prerequisite
+
+* JDK 1.8+
+
+---
+
+# Stargazers over time
+
+<a href="https://starchart.cc/apache/incubator-shenyu.svg"><img src="https://starchart.cc/apache/incubator-shenyu.svg"/></a>
+
+---
+
+# 贡献与支持
+
+* [贡献方式](https://shenyu.apache.org/community/contributor-guide)
+* [邮件我们](mailto:dev@shenyu.apache.org)
+
+---
+
+# 已知用户
+
+按注册顺序,欢迎更多接入公司在 https://github.com/apache/shenyu/issues/68 注册(仅限开源用户)。
+
+用户 : [已知用户](https://shenyu.apache.org/community/user-registration)
+
+---
diff --git a/i18n/zh/docusaurus-plugin-content-docs/version-2.5.1/plugin-center/_category_.json b/i18n/zh/docusaurus-plugin-content-docs/version-2.5.1/plugin-center/_category_.json
new file mode 100644
index 00000000000..4b82d108723
--- /dev/null
+++ b/i18n/zh/docusaurus-plugin-content-docs/version-2.5.1/plugin-center/_category_.json
@@ -0,0 +1,4 @@
+{
+ "label": "插件集合",
+ "position": 6
+}
diff --git a/i18n/zh/docusaurus-plugin-content-docs/version-2.5.1/plugin-center/cache/_category_.json b/i18n/zh/docusaurus-plugin-content-docs/version-2.5.1/plugin-center/cache/_category_.json
new file mode 100644
index 00000000000..1452462222c
--- /dev/null
+++ b/i18n/zh/docusaurus-plugin-content-docs/version-2.5.1/plugin-center/cache/_category_.json
@@ -0,0 +1,4 @@
+{
+ "label": "缓存123",
+ "position": 7
+}
diff --git a/i18n/zh/docusaurus-plugin-content-docs/version-2.5.1/plugin-center/cache/cache-plugin.md b/i18n/zh/docusaurus-plugin-content-docs/version-2.5.1/plugin-center/cache/cache-plugin.md
new file mode 100644
index 00000000000..8c7d33419aa
--- /dev/null
+++ b/i18n/zh/docusaurus-plugin-content-docs/version-2.5.1/plugin-center/cache/cache-plugin.md
@@ -0,0 +1,149 @@
+---
+title: 缓存插件
+keywords: ["缓存"]
+description: 缓存插件
+---
+
+
+# 1. 概述
+
+## 1.1 插件名称
+
+* 缓存插件
+
+## 1.2 适用场景
+
+* 数据不会频繁更新,而且需要大量调用的场景。
+
+* 对于数据一致性要求不高的场景。
+
+## 1.3 插件功能
+
+* `Cache`插件能够缓存目标服务的结果,允许用户配置缓存结果的失效时间。
+
+## 1.4 插件代码
+
+* 核心模块 `shenyu-plugin-cache-handler`.
+* 核心模块 `shenyu-plugin-cache-redis`.
+* 核心模块 `shenyu-plugin-cache-memory`.
+
+* 核心类 `org.apache.shenyu.plugin.cache.CachePlugin`
+* 核心类 `org.apache.shenyu.plugin.cache.redis.RedisCache`
+* 核心类 `org.apache.shenyu.plugin.cache.memory.MemoryCache`
+
+## 1.5 添加自哪个shenyu版本
+
+* 2.4.3
+
+# 2. 如何使用插件
+
+## 2.1 插件使用流程图
+
+
+
+## 2.2 导入pom
+
+* 在`ShenYu Bootstrap`导入cache插件的依赖。
+
+```xml
+<!--shenyu cache plugin start-->
+<dependency>
+ <groupId>org.apache.shenyu</groupId>
+ <artifactId>shenyu-spring-boot-starter-plugin-cache</artifactId>
+ <version>${project.version}</version>
+</dependency>
+<!--shenyu cache plugin end-->
+```
+
+## 2.3 启用插件
+
+在 `shenyu-admin` --> 基础配置 --> 插件管理 --> `Cache` 设置为开启。
+
+## 2.4 配置插件
+
+### 2.4.1 插件配置
+
+
+
+* `cacheType`: Cache目前支持两种模式缓存数据
+
+* memory:本地内存模式
+
+* redis:redis模式
+
+目前默认的是`本地内存模式`,目标服务的结果都存储在本地内存中,如果网关是通过集群的方式部署的,不建议使用`本地内存模式`,推荐使用`redis模式`,目标服务的数据都缓存到redis中。
+
+如果使用的是`本地内存模式`,只需要在cacheType中选择memory即可,其他配置都不需要配置。
+
+如果使用的是`redis模式`,在cacheType中选择redis,参数介绍:
+
+* `database`:缓存结果存储到哪个数据库中,默认是索引库0。
+
+* `master`:默认为master。
+
+* `mode`:redis的工作模式,默认为单点模式:`standalone`,此外还有集群模式:`cluster`,哨兵模式:`sentinel`。
+
+* `url` :配置 redis 数据库的IP和端口,通过冒号连接配置,示例:`192.168.1.1:6379`。
+
+* `password`: redis 数据库的密码,如果没有的话,可以不配置。
+
+* `maxldle`:连接池中最大空闲连接
+
+* `minldle`:连接池中最小空闲连接
+
+* `maxActive`:连接池最大连接数
+
+* `maxWait`:连接池最大阻塞等待时间(使用负值表示没有限制)默认 -1
+
+### 2.4.2 选择器配置
+
+* 选择器和规则设置,请参考:[选择器和规则管理](../../user-guide/admin-usage/selector-and-rule)
+
+### 2.4.3 规则配置
+
+
+
+* 只有匹配的请求,`Cache`插件才会对目标服务的结果进行缓存。
+
+`timeoutSecods`,该值为目标服务结果数据缓存时间,默认是60,单位`秒`。
+
+注意:当前版本的Cache插件是把url作为唯一key,标识同一个请求的。
+
+## 2.5 示例
+
+### 2.5.1 使用redis缓存请求结果
+
+#### 2.5.1.1 插件配置
+
+
+
+选择redis缓存模式,并且配置redis的数据库,url,模式和密码。
+
+#### 2.5.1.2 选择器配置
+
+
+
+#### 2.5.1.3 规则配置
+
+
+
+#### 2.5.1.4 发送请求
+
+* 发送请求并且缓存结果
+
+```http title="request"
+### shengyu getway proxy orderSave
+GET http://localhost:9195/http/order/findById?id=123
+Accept: application/json
+Content-Type: application/json
+```
+
+#### 2.5.1.5 核验缓存结果
+
+
+
+
+
+# 3. 如何禁用插件
+
+在 `shenyu-admin` --> 基础配置 --> 插件管理 --> `Cache` 设置为关闭。
diff --git a/i18n/zh/docusaurus-plugin-content-docs/version-2.5.1/plugin-center/common/_category_.json b/i18n/zh/docusaurus-plugin-content-docs/version-2.5.1/plugin-center/common/_category_.json
new file mode 100644
index 00000000000..55d9bb979c2
--- /dev/null
+++ b/i18n/zh/docusaurus-plugin-content-docs/version-2.5.1/plugin-center/common/_category_.json
@@ -0,0 +1,4 @@
+{
+ "label": "通用组件",
+ "position": 6
+}
diff --git a/i18n/zh/docusaurus-plugin-content-docs/version-2.5.1/plugin-center/common/general-context-plugin.md b/i18n/zh/docusaurus-plugin-content-docs/version-2.5.1/plugin-center/common/general-context-plugin.md
new file mode 100644
index 00000000000..b18bc4f0180
--- /dev/null
+++ b/i18n/zh/docusaurus-plugin-content-docs/version-2.5.1/plugin-center/common/general-context-plugin.md
@@ -0,0 +1,40 @@
+---
+title: GeneralContext插件
+keywords: ["generalContext"]
+description: generalContext插件
+---
+
+## 说明
+
+* `Apache ShenYu` 网关在对目标服务调用的时候,还容许用户使用 `generalContext` 插件在本次请求中通过读取header,进行服务上下文参数传递。
+
+## 插件设置
+
+* 在 `shenyu-admin`--> 基础配置 --> 插件管理-> `generalContext` ,设置为开启。
+
+* 如果用户不需要,可以把插件禁用。
+
+
+<img src="/img/shenyu/plugin/general-context/general-context-open-zh.png" width="70%" height="60%" />
+
+
+* 在网关的 `pom.xml` 文件中添加 `generalContext` 的支持。
+
+
+```xml
+ <!-- apache shenyu general context plugin start-->
+ <dependency>
+ <groupId>org.apache.shenyu</groupId>
+ <artifactId>shenyu-spring-boot-starter-plugin-general-context</artifactId>
+ <version>${project.version}</version>
+ </dependency>
+ <!-- apache shenyu general context plugin end-->
+```
+
+* 选择器和规则配置,请参考: [选择器和规则管理](../../user-guide/admin-usage/selector-and-rule)。
+* 只有匹配的请求,并且配置规则才会传递上下文信息。
+
+## 场景
+
+* 需要对请求header中的参数传递至代理服务端。
+* 需要对请求header中的某个key进行替换后传递至代理服务端。
diff --git a/i18n/zh/docusaurus-plugin-content-docs/version-2.5.1/plugin-center/fault-tolerance/_category_.json b/i18n/zh/docusaurus-plugin-content-docs/version-2.5.1/plugin-center/fault-tolerance/_category_.json
new file mode 100644
index 00000000000..cb67e969999
--- /dev/null
+++ b/i18n/zh/docusaurus-plugin-content-docs/version-2.5.1/plugin-center/fault-tolerance/_category_.json
@@ -0,0 +1,4 @@
+{
+ "label": "熔断限流",
+ "position": 3
+}
diff --git a/i18n/zh/docusaurus-plugin-content-docs/version-2.5.1/plugin-center/fault-tolerance/hystrix-plugin.md b/i18n/zh/docusaurus-plugin-content-docs/version-2.5.1/plugin-center/fault-tolerance/hystrix-plugin.md
new file mode 100644
index 00000000000..bb3b4057d24
--- /dev/null
+++ b/i18n/zh/docusaurus-plugin-content-docs/version-2.5.1/plugin-center/fault-tolerance/hystrix-plugin.md
@@ -0,0 +1,143 @@
+---
+title: Hystrix插件
+keywords: ["Hystrix"]
+description: hystrix插件
+---
+
+# 1. 概述
+
+## 1.1 插件名称
+
+* Hystrix插件
+
+## 1.2 适用场景
+
+* 服务不稳定,使用hystrix熔断保护服务
+
+## 1.3 插件功能
+
+* 熔断流量
+* 保护网关代理的服务
+* 隔离模式支持 `thread` 和 `semaphore`
+
+## 1.4 插件代码
+
+* 核心模块: `shenyu-plugin-hystrix`
+
+* 核心类: `org.apache.shenyu.plugin.hystrix.HystrixPlugin`
+
+## 1.5 添加自哪个shenyu版本
+
+ShenYu 2.4.0
+
+# 2. 如何使用插件
+
+## 2.1 插件使用流程图
+
+
+
+## 2.2 导入pom
+
+* 在网关的 `pom.xml` 文件中添加 `hystrix`的依赖。
+
+```xml
+<!-- apache shenyu hystrix plugin start-->
+<dependency>
+ <groupId>org.apache.shenyu</groupId>
+ <artifactId>shenyu-spring-boot-starter-plugin-hystrix</artifactId>
+ <version>${project.version}</version>
+</dependency>
+<!-- apache shenyu hystrix plugin end-->
+```
+
+## 2.3 启用插件
+
+在 `shenyu-admin` --> 基础配置 --> 插件管理 --> `hystrix` 设置为开启。
+
+## 2.4 配置插件
+
+### 2.4.1 插件配置
+
+* 无配置,但你应该打开hystrix插件。
+
+### 2.4.2 选择器配置
+
+用于对流量第一次筛选,不需要特殊处理字段。
+
+关于选择器和规则配置的更多说明,请参考:[选择器和规则管理](../../user-guide/admin-usage/selector-and-rule), 这里只对部分字段进行了介绍。
+
+
+
+### 2.4.3 规则配置
+
+用于对流量最终筛选,有规则处理逻辑,隔离模式支持 `thread` 和 `semaphore` 。
+
+
+
+* `hystrix`处理详解:
+
+ * 跳闸最小请求数量:最小的请求量,至少要达到这个量才会触发熔断。
+
+ * 错误百分比阀值: 这段时间内,发生异常的百分比。
+
+ * 最大并发量: 最大的并发量。
+
+ * 跳闸休眠时间`(ms)`:熔断以后恢复的时间。
+
+ * 分组`Key`: 一般设置为:`contextPath` 。
+
+ * 失败降级`URL`: 默认为 `/fallback/hystrix`。
+
+ * 命令`Key`: 一般设置为具体的路径接口。
+
+
+## 2.5 示例
+
+### 2.5.1 使用hystrix熔断保护服务
+
+#### 2.5.1.1 准备工作
+
+- 启动 ShenYu Admin
+- 启动 ShenYu Bootstrap
+- 启动一个后端服务
+
+#### 2.5.1.2 选择器配置
+
+
+
+#### 2.5.1.3 规则配置
+
+* 以下图片的规则仅为测试使用,实际情况取决于特定的场景而定。
+
+
+
+* 测试案例
+
+```java
+@RestController
+@RequestMapping("/test")
+@ShenyuSpringMvcClient("/test/**")
+public class HttpTestController {
+ @PostMapping("/testHystrix")
+ public ResultBean ok() {
+ Random random = new Random();
+ int num = random.nextInt(100);
+ if (num > 20) {
+ throw new RuntimeException();
+ }
+ return new ResultBean(200, "ok", null);
+ }
+}
+```
+
+#### 2.5.1.4 使用`Apache Jmeter`发送请求
+
+
+
+#### 2.5.1.5 验证结果
+
+
+
+# 3. 如何禁用插件
+
+在 `shenyu-admin` --> 基础配置 --> 插件管理 --> `hystrix` 设置为关闭。
diff --git a/i18n/zh/docusaurus-plugin-content-docs/version-2.5.1/plugin-center/fault-tolerance/rate-limiter-plugin.md b/i18n/zh/docusaurus-plugin-content-docs/version-2.5.1/plugin-center/fault-tolerance/rate-limiter-plugin.md
new file mode 100644
index 00000000000..dd8c7e3ceda
--- /dev/null
+++ b/i18n/zh/docusaurus-plugin-content-docs/version-2.5.1/plugin-center/fault-tolerance/rate-limiter-plugin.md
@@ -0,0 +1,195 @@
+---
+title: RateLimiter插件
+keywords: ["rateLimiter"]
+description: rateLimiter插件
+---
+
+# 1. 概述
+
+## 1.1 插件名称
+
+* RateLimiter 插件
+
+## 1.2 适用场景
+
+* 在网关集群环境下进行流量控制
+* 根据特定规则进行流量控制
+* 可以到接口级别,也可以到参数级别。
+
+## 1.3 插件功能
+
+* 基于redis进行流量控制
+
+## 1.4 插件代码
+
+* 核心模块 `shenyu-plugin-ratelimiter`.
+
+* 核心类 `org.apache.shenyu.plugin.ratelimiter.RateLimiterPlugin`
+* 核心类 `org.apache.shenyu.plugin.ratelimiter.executor.RedisRateLimiter`
+
+## 1.5 添加自哪个shenyu版本
+
+* ShenYu 2.4.0
+
+## 1.6 技术方案
+
+### 1.6.1 采用redis令牌桶算法进行限流
+
+- 系统以恒定的速率产⽣令牌,然后将令牌放⼊令牌桶中。
+- 令牌桶有⼀个容量,当令牌桶满了的时候,再向其中放⼊的令牌就会被丢弃。
+- 每次⼀个请求过来,需要从令牌桶中获取⼀个令牌,如果有令牌,则提供服务;如果没有令牌,则拒绝服务。
+
+* 流程图:
+ 
+
+### 1.6.2 采用redis漏桶算法进行限流。
+
+- ⽔(请求)先进⼊到漏桶⾥,漏桶以⼀定的速度出⽔,当⽔流⼊速度过⼤会直接溢出(拒绝服务)
+
+* 流程图:
+ 
+
+
+### 1.6.3 基于redis实现的滑动窗口算法
+
+- 滑动时间窗口通过维护⼀个单位时间内的计数值,每当⼀个请求通过时,就将计数值加1,当计数值超过预先设定的阈值时,就拒绝单位时间内的其他请求。如果单位时间已经结束,则将计数器清零,开启下⼀轮的计数。
+
+* 算法图:
+ 
+
+* 流程图:
+ 
+
+# 2. 如何使用插件
+
+## 2.1 插件使用流程图
+
+
+
+## 2.2 导入pom
+
+* 在网关的 `pom.xml` 文件中添加 `rateLimiter` 的依赖。
+
+```xml
+<!-- apache shenyu ratelimiter plugin start-->
+<dependency>
+ <groupId>org.apache.shenyu</groupId>
+ <artifactId>shenyu-spring-boot-starter-plugin-ratelimiter</artifactId>
+ <version>${project.version}</version>
+</dependency>
+<!-- apache shenyu ratelimiter plugin end-->
+```
+
+## 2.3 启用插件
+
+在 `shenyu-admin` --> 基础配置 --> 插件管理 --> `Cache` 设置为开启。
+
+## 2.4 配置插件
+
+### 2.4.1 插件配置
+
+
+
+* `mode`:redis的工作模式,默认为单点模式:`standalone`,此外还有集群模式:`cluster`,哨兵模式:`sentinel`。
+
+* `master`:默认为master。
+
+* `url` :配置 redis 数据库的IP和端口,通过冒号连接配置,示例:`192.168.1.1:6379`。
+
+* `password`: redis 数据库的密码,如果没有的话,可以不配置。
+
+### 2.4.2 选择器配置
+
+* 选择器和规则设置,请参考:[选择器和规则管理](../../user-guide/admin-usage/selector-and-rule)。
+
+### 2.4.3 规则配置
+
+
+
+* 令牌桶算法/并发令牌桶算法
+
+ * `algorithmName`(算法名):`tokenBucket/concurrent`。
+
+ * `replenishRate`(速率):允许用户每秒执行多少请求,而丢弃任何请求。这是令牌桶的填充速率。
+
+ * `burstCapacity`(容量):允许用户在一秒钟内执行的最大请求数。这是令牌桶可以保存的令牌数。
+
+ * `keyResolverName`(限流依据):`whole`表示按网关每秒限流,`remoteAddress`表示按IP每秒限流。
+
+* 漏桶算法
+
+ * `algorithmName`(算法名):`leakyBucket`。
+
+ * `replenishRate`(速率):单位时间内执行请求的速率,漏桶中水滴漏出的速率。
+
+ * `burstCapacity`(容量):允许用户在一秒钟内执行的最大请求数。这是桶中的水量。
+
+ * `keyResolverName`(限流依据):`whole`表示按网关每秒限流,`remoteAddress`表示按IP每秒限流。
+
+* 滑动窗口算法
+
+ * `algorithmName`(算法名):`slidingWindow`。
+
+ * `replenishRate`(速率):单位时间内执行请求的速率,用于计算时间窗口大小。
+
+ * `burstCapacity`(容量):时间窗口内(单位时间内)最大的请求数量。
+
+ * `keyResolverName`(限流依据):`whole`表示按网关每秒限流,`remoteAddress`表示按IP每秒限流。
+
+
+## 2.5 示例
+
+### 2.5.1 使用`RateLimiter`插件在网关集群环境中进行流量控制
+
+#### 2.5.1.1 准备工作
+
+- 在`10.10.10.10:9095`启动`ShenYu Admin`
+- 在`10.10.10.20:9195`和`10.10.10.30:9195`启动`ShenYu Bootstrap`, 配置`ShenYu Bootstrap`配置同步`10.10.10.10:9095`
+- 配置nginx,例如:
+
+```nginx
+upstream shenyu_gateway_cluster {
+ ip_hash;
+ server 10.1.1.1:9195 max_fails=3 fail_timeout=10s weight=50;
+ server 10.1.1.2:9195 max_fails=3 fail_timeout=10s weight=50;
+}
+
+server {
+ location / {
+ proxy_pass http://shenyu_gateway_cluster;
+ proxy_set_header HOST $host;
+ proxy_read_timeout 10s;
+ proxy_connect_timeout 10s;
+ }
+}
+```
+
+#### 2.5.1.2 插件、选择器、规则配置
+
+- 配置ratelimiter插件的redis的配置
+
+- 配置插件的选择器
+
+- 配置规则
+
+
+
+replenishRate为3, burstCapacity为10
+
+#### 2.5.1.3 使用`Apache Jmeter`发送请求到Nginx
+
+* jmeter线程组配置
+
+
+
+* jmeter http request配置
+
+
+
+#### 2.5.1.4 验证结果
+
+
+
+# 3. 如何禁用插件
+
+在 `shenyu-admin` --> 基础配置 --> 插件管理 --> `Cache` 设置为关闭。
diff --git a/i18n/zh/docusaurus-plugin-content-docs/version-2.5.1/plugin-center/fault-tolerance/resilience4j-plugin.md b/i18n/zh/docusaurus-plugin-content-docs/version-2.5.1/plugin-center/fault-tolerance/resilience4j-plugin.md
new file mode 100644
index 00000000000..083d327b380
--- /dev/null
+++ b/i18n/zh/docusaurus-plugin-content-docs/version-2.5.1/plugin-center/fault-tolerance/resilience4j-plugin.md
@@ -0,0 +1,79 @@
+---
+title: Resilience4j插件
+keywords: ["Resilience4j"]
+description: resilience4j插件
+---
+
+## 说明
+
+* `resilience4j`插件是网关用来对流量进行限流与熔断的可选选择之一。
+* `resilience4j`为网关熔断限流提供能力。
+
+
+## 插件设置
+
+请参考运维部署的内容,选择一种方式启动`shenyu-admin`。比如,通过 [本地部署](../../deployment/deployment-local) 启动`Apache ShenYu`后台管理系统。
+
+* 在 基础配置 `-->` 插件管理 `-->` `resilience4j`,设置为开启。 如果用户不使用,可以将其关闭。
+
+<img src="/img/shenyu/plugin/resilience4j/resilience4j-1.png" width="80%" height="80%" />
+
+
+## 在网关中引入 resilience4j 插件
+
+* 在网关的 `pom.xml` 文件中添加 `resilience4j`的依赖。
+
+```xml
+ <!-- apache shenyu resilience4j plugin start-->
+ <dependency>
+ <groupId>org.apache.shenyu</groupId>
+ <artifactId>shenyu-spring-boot-starter-plugin-resilience4j</artifactId>
+ <version>${project.version}</version>
+ </dependency>
+ <!-- apache shenyu resilience4j plugin end-->
+```
+
+## Resilience4j 插件配置
+
+关于选择器和规则配置的更多说明,请参考:[选择器和规则管理](../../user-guide/admin-usage/selector-and-rule), 这里只对部分字段进行了介绍。
+
+#### 选择器配置
+
+用于对流量第一次筛选,不需要特殊处理字段。
+
+<img src="/img/shenyu/plugin/resilience4j/resilience4j-2.png" width="80%" height="80%" />
+
+#### 规则配置
+
+用于对流量最终筛选,有规则处理逻辑。
+
+<img src="/img/shenyu/plugin/resilience4j/resilience4j-3.png" width="80%" height="80%" />
+
+
+* `resilience4j`处理详解:
+
+ * `limitForPeriod`:每次刷新令牌的数量,默认值:`50`。
+
+ * `limitRefreshPeriod`:刷新令牌的时间间隔,单位`ms`,默认值:`500`。
+
+ * `timeoutDurationRate`:等待获取令牌的超时时间,单位`ms`,默认值:`5000`。
+
+ * `circuitEnable`:是否开启熔断,`0`:关闭,`1`:开启,默认值:`0`。
+
+ * `failureRateThreshold`:错误率百分比,达到这个阈值,熔断器才会开启,默认值:`50`。
+
+ * `fallbackUri`:降级处理的`uri`。
+
+ * `minimumNumberOfCalls`:开启熔断的最小请求数,超过这个请求数才开启熔断统计,默认值:`100`。
+
+ * `bufferSizeInHalfOpen`:半开状态下的环形缓冲区大小,必须达到此数量才会计算失败率,默认值:`10`。
+
+ * `slidingWindowSize`:滑动窗口大小,默认值:`100`。
+
+ * `slidingWindowType`:滑动窗口类型,`0`:基于计数,`1`:基于时间,默认值:`0`。
+
+ * `timeoutDuration`:熔断超时时间,单位`ms`,默认值:`30000`。
+
+ * `waitIntervalInOpen`:熔断器开启持续时间,单位`ms`,默认值:`60000`。
+
+ * `automaticTransitionFromOpenToHalfOpenEnabled`:是否自动从`open`状态转换为`half-open`状态,`true`:是,`false`:否,默认值:`false`。
diff --git a/i18n/zh/docusaurus-plugin-content-docs/version-2.5.1/plugin-center/fault-tolerance/sentinel-plugin.md b/i18n/zh/docusaurus-plugin-content-docs/version-2.5.1/plugin-center/fault-tolerance/sentinel-plugin.md
new file mode 100644
index 00000000000..0c6d2f7072b
--- /dev/null
+++ b/i18n/zh/docusaurus-plugin-content-docs/version-2.5.1/plugin-center/fault-tolerance/sentinel-plugin.md
@@ -0,0 +1,216 @@
+---
+title: Sentinel插件
+keywords: ["Sentinel"]
+description: sentinel插件
+---
+
+# 1. 概述
+
+## 1.1 插件名称
+
+* Sentinel插件
+
+## 1.2 适用场景
+
+* `sentinel`插件是网关用来对流量进行限流与熔断的可选选择之一。
+* `sentinel`插件为网关熔断限流提供能力。
+
+## 1.3 插件功能
+
+* 流量控制
+* 请求熔断和服务降级
+
+## 1.4 插件代码
+
+* 核心包 `shenyu-plugin-sentinel`.
+
+* 核心类 `org.apache.shenyu.plugin.sentinel.SentinelPlugin`
+
+## 1.5 添加自哪个shenyu版本
+
+* 2.4.0
+
+# 2. 如何使用插件
+
+## 2.1 插件使用流程图
+
+
+
+## 2.2 导入pom
+
+* 在网关的 `pom.xml` 文件中添加 `sentinel` 依赖。
+
+```xml
+<!-- apache shenyu sentinel plugin start-->
+<dependency>
+ <groupId>org.apache.shenyu</groupId>
+ <artifactId>shenyu-spring-boot-starter-plugin-sentinel</artifactId>
+ <version>${project.version}</version>
+</dependency>
+<!-- apache shenyu sentinel plugin end-->
+```
+
+## 2.3 启用插件
+
+* 在 基础配置 `-->` 插件管理 `-->` `sentinel`,设置为开启。
+
+## 2.4 配置插件
+
+### 2.4.1 插件配置
+
+### 2.4.2 选择器配饰
+
+用于对流量第一次筛选,不需要特殊处理字段。
+
+<img src="/img/shenyu/plugin/sentinel/selector_zh.png" width="80%" height="80%" />
+
+### 2.4.3 规则配置
+
+用于对流量最终筛选,有规则处理逻辑。
+
+<img src="/img/shenyu/plugin/sentinel/rule_zh.png" width="80%" height="80%" />
+
+| field | default value | field type | desc |
+|-----------------------------------------------------|--------------------|------------|----------------------------------------------------------------------------------------------------------------------------|
+| degradeRuleCount | | Doule | 降级阈值 |
+| degradeRuleEnable | 1(enabled) | Integer | (是否开启流控 (1或0) ) :是否开启`sentinel`的流控。 |
+| degradeRuleGrade | 0(slow call ratio) | Integer | (断路器策略): 支持秒级RT/秒级Error Ratio/分钟级Error Count策略。 |
+| degradeRuleMinRequestAmount | 5 | Integer | 断路器最小请求量。 |
+| degradeRuleSlowRatioThreshold | 1.0d | Double | 退化的慢比率阈值。 |
+| degradeRuleStatIntervals | 1 | Integer | 降级的状态间隔。 |
+| degradeRuleTimeWindow | | Integer | 退化时间(单位:秒)。 |
+| flowRuleControlBehavior | 0(direact reject) | Integer | 效果(直接拒绝/排队/慢启动/冷启动+匀速器),不支持调用关系流控。 |
+| flowRuleControlBehavior-direct rejection by default | | | direct rejection by default (直接拒绝) |
+| flowRuleControlBehavior-warm up | | | warm up (冷启动) |
+| flowRuleControlBehavior-constant speed queuing | | | constant speed queuing (匀速排队,漏桶算法 ) |
+| flowRuleControlBehavior-preheating uniformly queued | | | 冷启动+匀速器,除了让流量缓慢增加,还还控制的了请求的间隔时间,让请求均匀速度通过。) |
+| flowRuleMaxQueueingTimeMs | 500ms | Integer | 最大排队等待时长(在 “preheating uniformly queued“, “constant speed queuing“ 模式生效)。 |
+| flowRuleWarmUpPeriodSec | 10 | Integer | 冷启动预热时长(秒) (在 “preheating uniformly queued” “warm up” 模式下生效) |
+| flowRuleCount | | Integer | 哨兵流控制计数。 |
+| flowRuleEnable | 1(enabled) | Integer | 是否开启哨兵流控功能。 |
+| flowRuleGrade | 1(QPS) | Integer | 限流阈值的类型(QPS 或 Thread Count)。 |
+| fallbackUri | | String | 断路后降级的uri。 |
+
+## 2.5 示例
+
+### 2.5.1 使用sentinel进行流量控制
+
+#### 2.5.1.1 插件配置
+
+* 在 基础配置 `-->` 插件管理 `-->` `sentinel`,设置为开启。
+
+#### 2.5.1.2 选择器配置
+
+
+
+#### 2.5.1.3 规则配置
+
+关于选择器和规则配置的更多说明,请参考:[选择器和规则管理](../../user-guide/admin-usage/selector-and-rule), 这里只对部分字段进行了介绍。
+
+
+
+使用qps限流策略,并且qps为10,拒绝策略为直接拒绝。
+
+代码如下:
+
+```java
+@RestController
+@RequestMapping("/order")
+@ShenyuSpringMvcClient("/order")
+public class OrderController {
+
+ /**
+ * Save order dto.
+ *
+ * @param orderDTO the order dto
+ * @return the order dto
+ */
+ @PostMapping("/save")
+ @ShenyuSpringMvcClient("/save")
+ public OrderDTO save(@RequestBody final OrderDTO orderDTO) {
+ orderDTO.setName("hello world save order");
+ return orderDTO;
+ }
+}
+```
+
+#### 2.5.1.4 通过`Apache Jmeter`请求网关
+
+* Jmeter线程组配置
+
+
+
+* Jmeter http请求配置
+
+
+
+#### 2.5.1.5 验证结果
+
+
+
+### 2.5.2 使用sentinel进行熔断降级控制
+
+#### 2.5.2.1 插件配置
+
+* 在 基础配置 `-->` 插件管理 `-->` `sentinel`,设置为开启。
+
+#### 2.5.2.2 选择器配置
+
+
+
+#### 2.5.2.3 规则配置
+
+
+
+当degrade strategy为`exception number`时,`degradeRuleSlowRatioThreshold`无效。 当单位时间内的最小请求数为 5,且请求发生的异常大于 3 时,将触发断路器。
+
+当degrade strategy为`slow call ratio`时,`degradeRuleSlowRatioThreshold`有效,`degradeRuleCount`表示RT(例如200)。
+
+
+代码如下:
+
+```java
+@RestController
+@RequestMapping("/order")
+@ShenyuSpringMvcClient("/order")
+public class OrderController {
+
+ /**
+ * Save order dto.
+ *
+ * @param orderDTO the order dto
+ * @return the order dto
+ */
+ @PostMapping("/save")
+ @ShenyuSpringMvcClient("/save")
+ public OrderDTO save(@RequestBody final OrderDTO orderDTO) {
+
+ Random random = new Random();
+ int num = random.nextInt(100);
+ if (num > 40) {
+ throw new RuntimeException("num great than 20");
+ }
+ orderDTO.setName("hello world save order");
+ return orderDTO;
+ }
+
+}
+```
+
+#### 2.5.2.4 通过`Apache Jmeter`请求网关
+
+* Jmeter线程组配置
+
+
+
+* Jmeter http请求配置
+
+
+
+#### 2.5.2.5 验证结果
+
+
+
+# 3. 如何禁用插件
+
+* 在 基础配置 `-->` 插件管理 `-->` `sentinel`,设置为关闭。
diff --git a/i18n/zh/docusaurus-plugin-content-docs/version-2.5.1/plugin-center/http-process/_category_.json b/i18n/zh/docusaurus-plugin-content-docs/version-2.5.1/plugin-center/http-process/_category_.json
new file mode 100644
index 00000000000..ce33bac3bfa
--- /dev/null
+++ b/i18n/zh/docusaurus-plugin-content-docs/version-2.5.1/plugin-center/http-process/_category_.json
@@ -0,0 +1,4 @@
+{
+ "label": "Http处理",
+ "position": 1
+}
diff --git a/i18n/zh/docusaurus-plugin-content-docs/version-2.5.1/plugin-center/http-process/contextpath-plugin.md b/i18n/zh/docusaurus-plugin-content-docs/version-2.5.1/plugin-center/http-process/contextpath-plugin.md
new file mode 100644
index 00000000000..6de28052300
--- /dev/null
+++ b/i18n/zh/docusaurus-plugin-content-docs/version-2.5.1/plugin-center/http-process/contextpath-plugin.md
@@ -0,0 +1,124 @@
+---
+title: Context Path插件
+keywords: ["contextPath"]
+description: contextPath插件
+---
+
+# 1. 概述
+
+## 1.1 插件名称
+
+* 上下文路径插件
+
+## 1.2 适用场景
+
+* 不同的服务可以通过设置不同的上下文路径来做服务的流量治理
+
+## 1.3 插件功能
+
+* 设置服务的上下文路径
+* 在接口调用的时候插件统一给服务的接口地址加上前缀
+
+## 1.4 插件代码
+
+* 核心模块 ```shenyu-plugin-context-path```
+* 核心类 ```org.apache.shenyu.plugin.context.path.ContextPathPlugin```
+
+## 1.5 添加自哪个 shenyu 版本
+
+* 2.3.0
+
+# 2. 如何使用插件
+
+## 2.1 插件使用流程图
+
+
+
+## 2.2 导入 pom
+
+- 在网关的 `pom.xml` 文件中添加插件 maven 配置。
+
+```xml
+ <dependency>
+ <groupId>org.apache.shenyu</groupId>
+ <artifactId>shenyu-spring-boot-starter-gateway</artifactId>
+ <version>${project.version}</version>
+ </dependency>
+```
+
+## 2.3 启用插件
+
+- 在 `shenyu-admin` --> 基础配置 --> 插件管理 --> `contextPath` 设置为开启。
+
+
+
+## 2.4 配置插件
+
+- 配置客户端项目的 contextPath
+
+
+
+- 选择器和规则设置,请参考:[选择器和规则管理](../../user-guide/admin-usage/selector-and-rule)。
+- shenyu-admin contextPath 插件配置,可以配置 contextPath 和 addPrefix:contextPath 定义了 contextPath 的值,addPrefix 定义了接口调用时需要自动增加的的前缀。
+
+
+
+## 2.5 示例
+
+### 2.5.1 示例 设置服务的上下文路径
+
+#### 2.5.1.1 参考[本地部署](https://shenyu.apache.org/zh/docs/deployment/deployment-local)启动 admin 和网关
+
+#### 2.5.1.2 参考 2.2 导入 pom 并重启网关
+
+#### 2.5.1.3 参考 2.3 启用插件
+
+#### 2.5.1.4 客户端项目配置 contextPath
+
+客户端项目可以直接使用 [shenyu-examples-http](https://github.com/apache/incubator-shenyu/tree/master/shenyu-examples/shenyu-examples-http),并在 application.yml 中配置 contextPath。
+
+
+
+配置完成后启动,可以看到 shenyu-admin 中多了一条 context 的 selector 和 rule 配置。
+
+
+
+#### 2.5.1.5 接口调用
+
+
+
+### 2.5.2 示例 增加前缀
+
+#### 2.5.2.1 参考[本地部署](https://shenyu.apache.org/zh/docs/deployment/deployment-local)启动 admin 和网关
+
+#### 2.5.2.2 参考 2.2 导入 pom 并重启网关
+
+#### 2.5.2.3 参考 2.3 启用插件
+
+#### 2.5.2.4 客户端项目配置 contextPath
+
+客户端项目可以直接使用 [shenyu-examples-http](https://github.com/apache/incubator-shenyu/tree/master/shenyu-examples/shenyu-examples-http),并在 application.yml 中配置 contextPath。
+
+
+
+配置完成后启动,可以看到 shenyu-admin 中多了一条 context 的 selector 和 rule 配置。
+
+
+
+#### 2.5.2.5 修改 addPrefix 的值
+
+
+
+#### 2.5.2.6 修改选择器和条件配置中 uri 的值,删除掉 addPrefix 部分,由于本例使用了 http 协议的服务,因此需要修改 divide 插件。
+
+
+
+#### 2.5.2.5 接口调用
+
+
+
+# 3. 如何禁用插件
+
+- 在 `shenyu-admin` --> 基础配置 --> 插件管理 --> `contextPath` 设置为禁用。
+
+
diff --git a/i18n/zh/docusaurus-plugin-content-docs/version-2.5.1/plugin-center/http-process/modifyresponse-plugin.md b/i18n/zh/docusaurus-plugin-content-docs/version-2.5.1/plugin-center/http-process/modifyresponse-plugin.md
new file mode 100644
index 00000000000..f0e71abce4e
--- /dev/null
+++ b/i18n/zh/docusaurus-plugin-content-docs/version-2.5.1/plugin-center/http-process/modifyresponse-plugin.md
@@ -0,0 +1,166 @@
+---
+title: ModifyResponse插件
+keywords: ["modifyResponse"]
+description: modifyResponse插件
+---
+
+# 1. 概述
+
+## 1.1 插件名称
+
+* 响应修改插件
+
+## 1.2 适用场景
+
+* 需要对接口的响应头部参数、响应HTTP状态码或响应体进行修改的场景
+
+## 1.3 插件功能
+
+* 修改HTTP响应状态码
+* 添加、设置、覆盖或者移除响应头部参数
+* 添加、覆盖或者移除响应体参数
+
+## 1.4 插件代码
+
+* 核心模块 ```shenyu-plugin-modify-response```
+* 核心类 ```org.apache.shenyu.plugin.modify.response.ModifyResponsePlugin```
+
+## 1.5 添加自哪个 shenyu 版本
+
+* 2.4.0
+
+# 2. 如何使用插件
+
+## 2.1 插件使用流程图
+
+
+
+## 2.2 导入 pom
+
+- 在网关的 `pom.xml` 文件中添加插件 maven 配置。
+
+```xml
+ <dependency>
+ <groupId>org.apache.shenyu</groupId>
+ <artifactId>shenyu-spring-boot-starter-gateway</artifactId>
+ <version>${project.version}</version>
+ </dependency>
+```
+
+## 2.3 启用插件
+
+- 在 `shenyu-admin` --> 基础配置 --> 插件管理 --> `modifyResponse` 设置为开启。
+
+
+
+## 2.4 配置插件
+
+* 选择器和规则设置,请参考:[选择器和规则管理](../../user-guide/admin-usage/selector-and-rule)。
+* `shenyu-admin`插件列表 --> `HttpProcess` --> `modifyResponse`,先添加选择器,然后添加规则:
+ * 添加选择器
+ 
+ * 添加规则
+ 
+
+## 2.5 示例
+
+客户端项目可以直接使用 [shenyu-examples-http](https://github.com/apache/shenyu/tree/master/shenyu-examples/shenyu-examples-http),注意该示例项目的`contextPath`为`/http`,需要在`shenyu-admin`和`shenyu-gateway`启动完成后启动。
+
+### 2.5.1 示例 设置HTTP响应状态码
+
+#### 2.5.1.1 参考[本地部署](https://shenyu.apache.org/zh/docs/deployment/deployment-local)启动 admin 和网关
+
+#### 2.5.1.2 参考 2.2 导入 pom 并重启网关
+
+#### 2.5.1.3 参考 2.3 启用插件
+
+#### 2.5.1.4 参考 2.4 配置插件规则
+
+配置插件规则:
+
+
+
+#### 2.5.1.5 接口调用
+
+
+
+### 2.5.2 示例 修改响应头部参数
+
+#### 2.5.2.1 参考[本地部署](https://shenyu.apache.org/zh/docs/deployment/deployment-local)启动 admin 和网关
+
+#### 2.5.2.2 参考 2.2 导入 pom 并重启网关
+
+#### 2.5.2.3 参考 2.3 启用插件
+
+#### 2.5.2.4 参考 2.4 配置插件规则
+
+
+
+#### 2.5.2.5 接口调用
+
+
+
+### 2.5.3 示例 修改响应体
+
+#### 2.5.3.1 参考[本地部署](https://shenyu.apache.org/zh/docs/deployment/deployment-local)启动 admin 和网关
+
+#### 2.5.3.2 参考 2.2 导入 pom 并重启网关
+
+#### 2.5.3.3 参考 2.3 启用插件
+
+#### 2.5.3.4 参考 2.4 配置插件规则
+
+配置插件规则:
+
+
+
+#### 2.5.3.5 接口调用
+
+
+
+## 3. 如何禁用插件
+
+- 在 `shenyu-admin` --> 基础配置 --> 插件管理 --> `modifyResponse` 设置为禁用。
+
+
+
+## 4. 插件规则参数列表
+
+对于HTTP响应状态码:
+
+* `statusCode`: 修改响应状态码
+
+对于HTTP响应头部参数:
+
+* `addHeaders`: 添加响应头部参数,键值对形式
+* `setHeaders`: 设置响应头部参数,键值对形式
+* `replaceHeaderKeys`: 替换响应头部参数,其中`key`参数为需要被替换的`key`,`value`参数为替换后的值
+* `removeHeaderKeys`: 移除响应头部参数,其中`key`参数为需要被移除的`key`
+
+对于HTTP响应体:
+
+* `addBodyKeys`: 添加响应内容
+* `replaceBodyKeys`: 替换响应内容,其中`key`参数为需要被替换的`key`,`value`参数为替换后的值
+* `removeBodyKeys`: 移除响应内容,其中`key`参数为需要被移除的`key`
+
+修改响应体是基于`JSONPath`实现的,`$.`代表根目录。对于下面的配置:
+
+
+
+插件开启前,响应内容为:
+
+```json
+{
+ "id": 3,
+ "name": "hello world findById"
+}
+```
+
+插件开启后,响应内容为:
+
+```json
+{
+ "id2": 3,
+ "add": "4"
+}
+```
diff --git a/i18n/zh/docusaurus-plugin-content-docs/version-2.5.1/plugin-center/http-process/parammapping-plugin.md b/i18n/zh/docusaurus-plugin-content-docs/version-2.5.1/plugin-center/http-process/parammapping-plugin.md
new file mode 100644
index 00000000000..446843f6c03
--- /dev/null
+++ b/i18n/zh/docusaurus-plugin-content-docs/version-2.5.1/plugin-center/http-process/parammapping-plugin.md
@@ -0,0 +1,109 @@
+---
+title: ParamMapping插件
+keywords: ["ParamMapping"]
+description: ParamMapping插件
+---
+
+# 1. 概述
+
+## 1.1 插件名称
+
+* paramMapping插件
+
+## 1.2 适用场景
+
+* 添加/删除/替换请求体中固定的参数
+
+## 1.3 插件功能
+
+* 用来对你的请求参数进行修改的插件。
+
+## 1.4 插件代码
+
+* 核心模块 `shenyu-plugin-param-mapping`
+
+* 核心类 `org.apache.shenyu.plugin.param.mapping.ParamMappingPlugin`
+
+## 1.5 添加自哪个shenyu版本
+
+* Since ShenYu 2.4.0
+
+# 2. 如何使用插件
+
+## 2.1 插件使用流程图
+
+
+
+## 2.2 导入pom
+
+* 在网关的 `pom.xml` 文件中添加 `paramMapping` 的支持。
+
+```xml
+<!-- apache shenyu param_mapping plugin start-->
+<dependency>
+ <groupId>org.apache.shenyu</groupId>
+ <artifactId>shenyu-spring-boot-starter-plugin-param-mapping</artifactId>
+ <version>${project.version}</version>
+</dependency>
+<!-- apache shenyu param_mapping plugin end-->
+```
+
+## 2.3 启用插件
+
+- 在 `shenyu-admin` --> 基础配置 --> 插件管理 --> `paramMapping` 设置为开启。
+
+## 2.4 配置插件
+
+### 2.4.1 插件配置
+
+* 再使用插件时应该开启插件!
+
+### 2.4.2 选择器配置
+
+* 选择器和规则设置,请参考:[选择器和规则管理](../../user-guide/admin-usage/selector-and-rule)。
+
+* 只有匹配的请求,才会修改请求体。
+
+### 2.4.3 规则配置
+
+
+* 参数解析:
+ * `addParameterKeys`: 在请求体中增加一个 `key-value`
+ * `replaceParameterKeys`: 替换请求体中的某一个 `key` ,`key` 是要被替换的值,`value` 是替换后的值
+ * `removeParameterKeys`: 移除请求体中的某一个 `key`
+
+* 修改请求体是通过 `JSONPath` 来实现的, `$.` 代表根目录
+
+## 2.5 示例
+
+### 2.5.1 在请求中添加参数
+
+#### 2.5.1.1 配置插件
+
+* 使用该插件时应先开启插件!
+
+#### 2.5.1.2 选择器配置
+
+#### 2.5.1.3 规则配置
+
+
+
+上面的配置,插件开启前,请求内容为
+
+```json
+{"id":3,"data":{"value":"18","age":"36"}}
+```
+
+#### 2.5.1.4 验证结果
+
+插件开启后,请求内容为
+
+```json
+{"name":"shenyu","userId":3,"data":{"age":"36"}}
+```
+
+上述操作,增加一个`name:shenyu`,把`id`替换为`userId`,移除`data`中的`value` 。
+
+# 3. 如何禁用插件
+
+- 在 `shenyu-admin` --> 基础配置 --> 插件管理 --> `paramMapping` 设置为关闭。
diff --git a/i18n/zh/docusaurus-plugin-content-docs/version-2.5.1/plugin-center/http-process/redirect-plugin.md b/i18n/zh/docusaurus-plugin-content-docs/version-2.5.1/plugin-center/http-process/redirect-plugin.md
new file mode 100644
index 00000000000..9a853563fa6
--- /dev/null
+++ b/i18n/zh/docusaurus-plugin-content-docs/version-2.5.1/plugin-center/http-process/redirect-plugin.md
@@ -0,0 +1,53 @@
+---
+title: Redirect插件
+keywords: ["redirect"]
+description: redirect插件
+---
+
+## 说明
+
+- Apache ShenYu 网关在对目标服务进行代理调用的时候,允许用户使用 `redirect` 插件来重定向请求。
+
+## 插件设置
+
+- 在 `shenyu-admin` --> 基础配置 --> 插件管理 --> `redirect`,设置为开启。
+- 如果用户不需要,可以把插件禁用。
+
+
+<img src="/img/shenyu/plugin/redirect/redirect-plugin-enable-zh.png" width="70%" height="60%" />
+
+
+## 插件使用
+
+- 在网关的 `pom.xml` 文件中添加 `redirect` 的支持。
+
+```xml
+ <!-- apache shenyu redirect plugin start-->
+ <dependency>
+ <groupId>org.apache.shenyu</groupId>
+ <artifactId>shenyu-spring-boot-starter-plugin-redirect</artifactId>
+ <version>${project.version}</version>
+ </dependency>
+ <!-- apache shenyu redirect plugin end-->
+```
+
+- 选择器和规则,只有匹配的请求,才会进行转发和重定向,请参考:[选择器规则管理](../../user-guide/admin-usage/selector-and-rule)。
+
+## 场景
+
+> 顾名思义,`redirect` 插件就是对 `uri` 的重新转发和重定向。
+
+#### 重定向
+
+* 我们在 `Rule` 配置自定义路径时,应该为一个可达的服务路径。
+* 当匹配到请求后,根据自定义的路径,`Apache ShenYu`网关会进行 `308` 服务跳转。
+
+<img src="/img/shenyu/plugin/redirect/redirect-plugin-rule-zh.png" width="70%" height="60%" />
+
+
+#### 网关自身接口转发
+
+* 当满足匹配规则时,服务内部会使用 `DispatcherHandler` 内部接口转发。
+* 要实现网关自身接口转发,我们需要在配置路径使用 `/` 作为前缀开始,具体配置如下图。
+
+<img src="/img/shenyu/plugin/redirect/redirect-plugin-forward-rule-zh.png" width="70%" height="60%" />
diff --git a/i18n/zh/docusaurus-plugin-content-docs/version-2.5.1/plugin-center/http-process/request-plugin.md b/i18n/zh/docusaurus-plugin-content-docs/version-2.5.1/plugin-center/http-process/request-plugin.md
new file mode 100644
index 00000000000..926643dafce
--- /dev/null
+++ b/i18n/zh/docusaurus-plugin-content-docs/version-2.5.1/plugin-center/http-process/request-plugin.md
@@ -0,0 +1,37 @@
+---
+title: Request插件
+keywords: ["RequestPlugin"]
+description: RequestPlugin
+---
+
+## 说明
+
+* `Apache ShenYu` 网关在对目标服务进行代理调用的时候,允许用户使用 `request` 插件对请求参数、请求头以及 `Cookie` 来添加、修改、移除请求头。
+
+## 插件设置
+
+* 在 `shenyu-admin` --> 基础配置 --> 插件管理 --> `request`,设置为开启。
+
+
+* 在网关的 `pom.xml` 文件中添加 `request` 的支持。
+
+* 如果用户不需要,可以把插件禁用。
+
+```xml
+ <!-- apache shenyu request plugin start-->
+<dependency>
+ <groupId>org.apache.shenyu</groupId>
+ <artifactId>shenyu-spring-boot-starter-plugin-request</artifactId>
+ <version>${project.version}</version>
+</dependency>
+ <!-- apache shenyu request plugin end-->
+```
+
+* 选择器和规则设置,请参考:[选择器和规则管理](../../user-guide/admin-usage/selector-and-rule)。
+
+* 只有匹配的请求,才会进行自定义请求参数修改功能。
+
+## 场景
+
+* 顾名思义,请求插件就是对 `uri` 请求参数进行自定义修改。
+* 当匹配到请求后,设置自定义修改规则,就会改变下游服务接受到的参数。
diff --git a/i18n/zh/docusaurus-plugin-content-docs/version-2.5.1/plugin-center/http-process/rewrite-plugin.md b/i18n/zh/docusaurus-plugin-content-docs/version-2.5.1/plugin-center/http-process/rewrite-plugin.md
new file mode 100644
index 00000000000..7e1ac62c340
--- /dev/null
+++ b/i18n/zh/docusaurus-plugin-content-docs/version-2.5.1/plugin-center/http-process/rewrite-plugin.md
@@ -0,0 +1,103 @@
+---
+title: Rewrite插件
+keywords: ["rewrite"]
+description: rewrite插件
+---
+
+# 1. 概述
+
+## 1.1 插件名称
+
+* Rewrite插件
+
+## 1.2 适用场景
+
+* 通过重写请求路径, 可以使用与目标服务不同的uri。
+
+## 1.3 插件功能
+
+* 该插件用于重写请求uri。
+
+## 1.4 插件代码
+
+* 核心模块 `shenyu-plugin-rewrite`
+
+* 核心类 `org.apache.shenyu.plugin.rewrite.RewritePlugin`
+
+## 1.5 添加自哪个Shenyu版本
+
+* 2.4.0
+
+# 2. 如何使用插件
+
+## 2.1 插件使用流程图
+
+
+
+## 2.2 导入pom
+
+- 在网关的 `pom.xml` 文件中添加插件 maven 配置。
+
+```xml
+ <dependency>
+ <groupId>org.apache.shenyu</groupId>
+ <artifactId>shenyu-spring-boot-starter-plugin-rewrite</artifactId>
+ <version>${project.version}</version>
+ </dependency>
+```
+
+## 2.3 启用插件
+
+- 在 `shenyu-admin` --> 基础配置 --> 插件管理 --> `rewrite` 设置为开启。
+
+
+## 2.4 配置插件
+
+### 2.4.1 插件配置
+
+* 在使用前要启用插件。
+* 如果不再使用插件需要禁用。
+
+### 2.4.2 选择器配置
+
+* 请参考: [选择器和规则管理](../../user-guide/admin-usage/selector-and-rule).
+
+### 2.4.3 规则配置
+
+
+
+* 参数解释:
+ * `regex` : 匹配uri中要重写部分的正则表达式。
+ * `replace` : 替换的内容
+
+## 2.5 示例
+
+### 2.5.1 重新uri示例
+
+#### 2.5.1.1 运行 `shenyu-examples-http` 项目
+
+* 使用[shenyu-examples-http](https://github.com/apache/incubator-shenyu/tree/master/shenyu-examples/shenyu-examples-http), 参考[](../../quick-start/quick-start-http#运行shenyu-examples-http项目)
+
+#### 2.5.1.1 插件配置
+
+* 参考[2.4.1](#241-插件配置)配置插件.
+
+#### 2.5.1.2 选择器配置
+
+* 参考[2.4.2](#242-选择器配置)配置选择器
+
+#### 2.5.1.3 规则配置
+
+
+
+请求 `/http/hello` 将被重写成`/hi`。
+
+#### 2.5.1.4 验证结果
+
+使用工具(如Postman)发起请求:
+
+
+
+# 3. 如何禁用插件
+
+- 在 `shenyu-admin` --> 基础配置 --> 插件管理 --> `rewrite` 设置为关闭。
diff --git a/i18n/zh/docusaurus-plugin-content-docs/version-2.5.1/plugin-center/mock/_category_.json b/i18n/zh/docusaurus-plugin-content-docs/version-2.5.1/plugin-center/mock/_category_.json
new file mode 100644
index 00000000000..e4f13a148a9
--- /dev/null
+++ b/i18n/zh/docusaurus-plugin-content-docs/version-2.5.1/plugin-center/mock/_category_.json
@@ -0,0 +1,4 @@
+{
+ "label": "Mock",
+ "position": 8
+}
diff --git a/i18n/zh/docusaurus-plugin-content-docs/version-2.5.1/plugin-center/mock/mock-plugin.md b/i18n/zh/docusaurus-plugin-content-docs/version-2.5.1/plugin-center/mock/mock-plugin.md
new file mode 100644
index 00000000000..aa44fbf3b60
--- /dev/null
+++ b/i18n/zh/docusaurus-plugin-content-docs/version-2.5.1/plugin-center/mock/mock-plugin.md
@@ -0,0 +1,194 @@
+---
+title: Mock 插件
+keywords: ["mock"]
+description: mock插件
+---
+
+# 1. 概述
+
+## 1.1 插件名称
+
+* Mock插件
+
+## 1.2 适用场景
+
+* 为请求指定响应状态码和响应体方便进行测试。
+
+## 1.3 插件功能
+
+* 设置请求的响应状态码和响应体。
+* 支持配置 `${}` 占位符自动生成数据。
+
+## 1.4 插件代码
+
+* 核心模块 ```shenyu-plugin-mock```
+* 核心类 ```org.apache.shenyu.plugin.mock.MockPlugin```
+
+## 1.5 添加自哪个 shenyu 版本
+
+* 2.5.0
+
+# 2. 如何使用插件
+
+## 2.1 导入 pom
+
+- 在网关的 `pom.xml` 文件中添加插件 maven 配置。
+
+```xml
+<dependency>
+ <groupId>org.apache.shenyu</groupId>
+ <artifactId>shenyu-spring-boot-starter-plugin-mock</artifactId>
+ <version>${project.version}</version>
+</dependency>
+```
+
+## 2.2 启用插件
+
+- 在 `shenyu-admin` --> 基础配置 --> 插件管理 --> `mock` 设置为开启。
+
+
+
+## 2.3 配置插件
+
+- 选择器和规则设置,请参考:[选择器和规则管理](../../user-guide/admin-usage/selector-and-rule)。
+- shenyu-admin mock 插件配置,支持配置 httpStatusCode 和 responseContent:
+ - httpStatusCode:配置请求的响应码。
+ - responseContent:配置响应体内容,支持配置 `${}` 占位符生成随机数据 。
+
+
+
+## 2.4 `${}` 支持的语法
+
+**~~`${int|min-max}`~~**
+
+ - **说明:** 生成 `min` 到 `max` 的随机整数,包含 `min` 和 `max` 。
+ - **示例:** `${int|10-20}`
+
+
+**~~`${double|min-max|format}`~~**
+
+- **说明:** 生成 `min` 到 `max` 的随机浮点数 ,包含 `min` 和 `max`,并按照 `format` 进行格式化。
+- **示例:** `${double|10-20}` , `${double|10-20.5|%.2f}`
+
+**~~`${email}`~~**
+
+- **说明:** 生成随机的邮箱地址。
+
+**~~`${phone}`~~**
+
+- **说明:** 生成随机的13位手机号码。
+
+**~~`${zh|min-max}`~~**
+
+- **说明:** 生成长度为 `min` 到 `max` (包含 `min` 和 `max`)的随机中文字符串。
+- **示例:** `${zh|10-20}`
+
+**~~`${en|min-max}`~~**
+
+- **说明:** 生成长度为 `min` 到 `max` (包含 `min` 和 `max`)的随机英文字符串。
+- **示例:** `${en|10-20}`
+
+**~~`${bool}`~~**
+
+- **说明:** 生成随机的`boolean` 类型的值 即 `true` 或 `false`。
+
+**~~`${list|[arg1,arg2...]}`~~**
+
+- **说明:** 随机返回列表中的任意一个值
+- **示例:** `${list|[gril,boy]}` 会返回 girl 或 boy 中任意一个。
+
+**~~`${current|format}`~~**
+
+- **说明:** 返回当前时间并使用 `format` 格式化,`format` 可缺省,默认是 `YYYY-MM-dd HH:mm:ss`。
+- **示例:** `${current}`,`${current|YYYY-MM-dd}`
+
+**~~`${array|item|length}`~~**
+
+- **说明:** 按照 `item` 格式定义生成长度为 `length` 的数组, `item` 中可以嵌套使用上述的所有数据生成规则,结果会自动添加`[]`。
+- **示例:** `${array|{"name":"test"}|3}` 会生成 `[{"name":"test"},{"name":"test"},{"name":"test"}]`,`${array|{"age":${int|18-65}}|3}`
+
+**${expression|expression}**
+
+目前支持spel表达式并内置了一些函数和参数,完全可替换旧的`${}`语法
+
++ **`${expression|#int(min,max)}`**
+
+ + **说明:** 生成 `min` 到 `max` 的随机整数,包含 `min` 和 `max` 。
+
+ - **示例:** `${expression|#int(1,2)}`
+
++ **`${expression|#double(min,max)}`**
+
+ + **说明:** 生成 `min` 到 `max` 的随机浮点数 ,包含 `min` 和 `max`,并按照 `format` 进行格式化。
+ + **示例:**`${expression|#double(10.5,12.0)}`,`${expression|#double(10.5,12.0,'¥%.2f')}`
+
++ **`${expression|#email()}`**
+
+ - **说明:** 生成随机的邮箱地址。
+
++ **`${expression|#phone()}`**
+
+ - **说明:** 生成随机的13位手机号码。
+
++ **`${expression|zh(min,max)}`**
+
+ - **说明:** 生成长度为 `min` 到 `max` (包含 `min` 和 `max`)的随机中文字符串。
+ - **示例:** `${expression|#zh(1,10)}`
+
++ **`${expression|en(min,max)}`**
+
+ - **说明:** 生成长度为 `min` 到 `max` (包含 `min` 和 `max`)的随机英文字符串。
+ - **示例:** `${expression|#en(1,10)}`
+
++ **`${expression|#bool()}`**
+
+ + **说明:** 生成随机的`boolean` 类型的值 即 `true` 或 `false`。
+
++ **`${expression|#oneOf(arg1,arg2...)}`**
+
+ + **说明:** 随机返回列表中的任意一个值,不限制类型
+ + **示例:** `${expression|#oneOf('shenyu','number',1)}` 会返回 'shneyu' 或 'number' 或者数值1。
+
++ **`${expression|current()}`**
+
+ - **说明:** 返回当前时间并使用 `format` 格式化,`format` 可缺省,默认是 `YYYY-MM-dd HH:mm:ss`。
+ - **示例:** `${expression|#current()}`,`${expression|#current('YYYY-MM-dd')}`
+
++ **`${expression|#array(item,length)}`**
+
+ - **说明:** 按照 `item` 格式定义生成长度为 `length` 的数组。
+
+ - **示例:** `expression|#array('shenyu',3)` 会生成 `["shenyu","shenyu","shenyu"]`.
+
+ 也可嵌套使用`${expression|#array(#bool(),2)}`或者`${expression|#array(#array('shenyu',2),2)}`
+
++ **`${expression|#req}`**
+
+ + 说明:内置请求参数,可根据请求内容生成响应数据
+ + 示例:`${expression|#req.method}`、`${expression|#req.queries['query_name']}`、`${req.queries.query_name}`、`${expression|#req.uri}`。当请求体为json时,可使用`jsonPath`,比如请求体为`{"name":"shenyu"}`,`${expression|#req.json.name}`将返回"shenyu"
+
++ **`${expression|spel}`**
+
+ + **说明**:直接使用Spel表达式生成数据
+ + **示例**:`${expression|T(java.time.LocalDate).now()}`、`${expression|1==1}`
+
+ 建议使用新的`${}`语法,旧的语法功能可能择期被移除。
+
+ 功能可替换查看表:
+
+ | old | new |
+ | -------------------------- | ----------------------------------- |
+ | ${int\|min-max} | ${expression\|#int(min,max)} |
+ | ${double\|min-max\|format} | ${expression\|#double(min,max)} |
+ | ${email} | ${expression\|#email()} |
+ | ${phone} | ${expression\|#phone()} |
+ | ${zh\|min-max} | ${expression\|#zh(min,max)} |
+ | ${en\|min-max} | ${expression\|#en(min,max)} |
+ | ${list\|[arg1,arg2...]} | ${expression\|#oneOf(arg1,agr2...)} |
+ | ${current\|format} | ${expression\|#current(format)} |
+ | ${bool} | ${expression\|#bool()} |
+ | ${array\|item\|length} | ${expression#array(item,length)} |
+
+
+**注意:不需要使用 `""` 包裹 `${}` ,mock插件会根据 `generator`的定义增加前缀和后缀。**
+
diff --git a/i18n/zh/docusaurus-plugin-content-docs/version-2.5.1/plugin-center/observability/_category_.json b/i18n/zh/docusaurus-plugin-content-docs/version-2.5.1/plugin-center/observability/_category_.json
new file mode 100644
index 00000000000..3019af60c74
--- /dev/null
+++ b/i18n/zh/docusaurus-plugin-content-docs/version-2.5.1/plugin-center/observability/_category_.json
@@ -0,0 +1,4 @@
+{
+ "label": "可观测性",
+ "position": 5
+}
diff --git a/i18n/zh/docusaurus-plugin-content-docs/version-2.5.1/plugin-center/observability/logging-aliyun-sls.md b/i18n/zh/docusaurus-plugin-content-docs/version-2.5.1/plugin-center/observability/logging-aliyun-sls.md
new file mode 100644
index 00000000000..7ab2c160387
--- /dev/null
+++ b/i18n/zh/docusaurus-plugin-content-docs/version-2.5.1/plugin-center/observability/logging-aliyun-sls.md
@@ -0,0 +1,140 @@
+---
+title: Aliyun Sls日志插件
+keywords: ["logging"]
+description: logging插件
+---
+
+# 1. 概述
+
+## 1.1 插件名称
+
+* Aliyun sls 日志插件
+
+## 1.2 适用场景
+
+* 收集日志到`aliyun sls`日志平台,并通过`aliyun sls`日志平台进行数据分析
+
+## 1.3 插件功能
+
+* 网关接收客户端请求,向服务端转发请求,并将服务端结果返回给客户端.网关可以记录下每次请求对应的详细信息。
+* 插件便是记录访问日志并将访问日志发送到Aliyun sls的插件.
+
+## 1.4 插件代码
+
+* 核心模块 `shenyu-plugin-logging-aliyun-sls`
+
+* 核心类 `org.apache.shenyu.plugin.aliyun.sls.LoggingAliYunSlsPlugin`
+* 核心类 `org.apache.shenyu.plugin.aliyun.sls.client.AliyunSlsLogCollectClient`
+
+## 1.5 添加自哪个shenyu版本
+
+ShenYu 2.5.0
+
+# 2. 如何使用插件
+
+## 2.1 插件使用流程图
+
+
+
+## 2.2 导入pom
+
+- 在ShenYu-Bootstrap导入对应的pom依赖。
+
+```xml
+<!-- shenyu logging-aliyunsls plugin start -->
+<dependency>
+ <groupId>org.apache.shenyu</groupId>
+ <artifactId>shenyu-spring-boot-starter-plugin-logging-aliyun-sls</artifactId>
+ <version>${project.version}</version>
+</dependency>
+<!-- shenyu logging-aliyunsls plugin end -->
+```
+
+## 2.3 启用插件
+
+- 在 `shenyu-admin` --> 基础配置 --> 插件管理-> `loggingAliyunSls` ,设置为开启。
+
+## 2.4 配置插件
+
+### 2.4.1 插件配置
+
+
+
+| 配置项 | 类型 | 描述 | 备注 |
+| :-------------- | :------ | :----------------------------------------------------------- | :----------------- |
+| accessId | String | accessId | 必填 |
+| accesskey | String | accesskey | 必填 |
+| host | String | 主机名,例如::cn-guangzhou.log.aliyuncs.com | 必填 |
+| projectName | String | 项目名 | 可选, 默认值:shenyu |
+| logStoreName | String | 存储store名称 | 可选, 默认值:shenyu-logstore |
+| topic | String | 日志存储topic | 可选, 默认值:shenyu-topic |
+| ttlInDay | Integer | 每天的ttl次数 | 可选, 默认值:3 |
+| shardCount | Integer | 阿里云日志的shard总数 | 可选, 默认值:10 |
+| sendThreadCount | Integer | 发送日志的线程数 | 可选, 默认值:1 |
+| ioThreadCount | Integer | io记录日志的线程数 | 可选, 默认值:1 |
+| sampleRate | String | 样本消费速率 | 可选, 默认值:1 |
+| maxRequestBody | Integer | 最大请求体 | 可选, 默认值:524288 |
+| maxResponseBody | Integer | 最大响应体 | 可选, 默认值:524288 |
+| bufferQueueSize | Integer | 消费队列大小 | 可选, 默认值:50000 |
+
+### 2.4.2 规则和选择器配置
+
+* 插件和选择器配置。请查看: [Selector and rule config](../../user-guide/admin-usage/selector-and-rule.md).
+
+
+## 2.5 Logging信息
+
+采集的access log的字段如下:
+
+| 字段名称 | 含义 | 说明 | 备注 |
+|:----------------------|:----------------------------------------------:|:------------------------------|:----|
+| clientIp | 客户端IP | | |
+| timeLocal | 请求时间字符串, 格式:yyyy-MM-dd HH:mm:ss.SSS | | |
+| method | 请求方法(不同rpc类型不一样,http类的为:get,post等待,rpc类的为接口名称) | | |
+| requestHeader | 请求头(json格式) | | |
+| responseHeader | 响应头(json格式) | | |
+| queryParams | 请求查询参数 | | |
+| requestBody | 请求Body(二进制类型的body不会采集) | | |
+| requestUri | 请求uri | | |
+| responseBody | 响应body | | |
+| responseContentLength | 响应body大小 | | |
+| rpcType | rpc类型 | | |
+| status | 响应码 | | |
+| upstreamIp | 上游(提供服务的程序)IP | | |
+| upstreamResponseTime | 上游(提供服务的程序)响应请求的耗时(毫秒ms) | | |
+| userAgent | 请求的用户代理 | | |
+| host | 请求的host | | |
+| module | 请求的模块 | | |
+| path | 请求的路径path | | |
+| traceId | 请求的链路追踪ID | 需要接入链路追踪插件,如skywalking,zipkin | |
+
+
+## 2.6 示例
+
+### 2.6.1 通过阿里云sls日志平台收集日志
+
+#### 2.6.1.1 插件配置
+
+* 开启插件,并配置aliyun sls插件,配置如下:
+
+
+
+#### 2.6.1.2 选择器配置
+
+
+
+#### 2.6.1.3 规则配置
+
+
+
+#### 2.6.1.4 发送请求
+
+
+
+#### 2.6.1.5 aliyun sls 日志平台展示
+
+
+
+# 3. 如何禁用插件
+
+- 在 `shenyu-admin` --> 基础配置 --> 插件管理-> `loggingAliyunSls` ,设置为关闭。
diff --git a/i18n/zh/docusaurus-plugin-content-docs/version-2.5.1/plugin-center/observability/logging-elasticsearch.md b/i18n/zh/docusaurus-plugin-content-docs/version-2.5.1/plugin-center/observability/logging-elasticsearch.md
new file mode 100644
index 00000000000..ee84de394d9
--- /dev/null
+++ b/i18n/zh/docusaurus-plugin-content-docs/version-2.5.1/plugin-center/observability/logging-elasticsearch.md
@@ -0,0 +1,184 @@
+---
+title: Logging-ElasticSearch插件
+keywords: ["Logging", "ElasticSearch"]
+description: Logging-ElasticSearch插件
+---
+
+# 1. 概述
+
+## 1.1 插件名称
+
+* Logging-ElasticSearch
+
+## 1.2 适用场景
+
+* 通过shenyu网关收集http请求日志,通过其他平台(Kibana)查询或者展示日志。
+
+## 1.3 插件功能
+
+>`Apache ShenYu` 网关接收客户端请求,向服务端转发请求,并将服务端结果返回给客户端。网关可以记录下每次请求对应的详细信息,
+> 列如: 请求时间、请求参数、请求路径、响应结果、响应状态码、耗时、上游IP、异常信息等待.
+> ShenYu网关可以通过Logging-ElasticSearch插件记录访问日志并将访问日志发送到ElasticSearch数据库。
+
+## 1.4 插件代码
+
+* 核心模块 `shenyu-plugin-logging-elasticsearch`
+
+* 核心类 `org.apache.shenyu.plugin.logging.elasticsearch.LoggingElasticSearchPlugin`
+* 核心类 `org.apache.shenyu.plugin.logging.elasticsearch.client.ElasticSearchLogCollectClient`
+
+## 1.5 添加自哪个shenyu版本
+
+* ShenYu 2.5.0
+
+## 1.6 技术方案
+
+* 架构图
+
+
+
+# 2. 如何使用插件
+
+## 2.1 插件使用流程图
+
+
+
+## 2.2 导入pom
+
+* 在shenyu-bootstrap模块的 `pom.xml` 文件中添加 `Logging-ElasticSearch`的依赖。
+
+```xml
+<!--shenyu logging-elasticsearch plugin start-->
+<dependency>
+ <groupId>org.apache.shenyu</groupId>
+ <artifactId>shenyu-spring-boot-starter-plugin-logging-elasticsearch</artifactId>
+ <version>${project.version}</version>
+</dependency>
+<!--shenyu logging-elasticsearch plugin end-->
+```
+
+## 2.3 启用插件
+
+* 在 `shenyu-admin`--> 基础配置 --> 插件管理-> `loggingElasticSearch` ,配置ElasticSearch参数,并设置为开启。
+
+## 2.4 配置插件
+
+### 2.4.1 开启插件,并配置elasticsearch,配置如下:
+
+
+
+* 各个配置项说明如下:
+
+| 配置项 | 类型 | 说明 | 备注 |
+| :-------------- | :------ | :------------------------------------------------- | :-------------------- |
+| config-item | type | description | remarks |
+| host | String | 主机名 | 必须 |
+| port | String | 端口号 | 必须 |
+| sampleRate | String | 采样率,范围0~1,0:关闭,0.01:采集1%,1:采集100% | 可选,默认1,全部采集 |
+| compressAlg | String | 压缩算法,默认不压缩,目前支持LZ4压缩 | 可选,默认不压缩 |
+| maxResponseBody | Ingeter | 最大响应体大小,超过阈值将不采集响应体 | 可选,默认512KB |
+| maxRequestBody | Ingeter | 最大请求体大小,超过阈值将不采集请求体 | 可选,默认512KB |
+*除了host、port其它都是可选*,大部分情况下只需要配置这2项就可以了。
+
+### 2.4.2 配置选择器和规则器
+
+选择器和规则详细配置,请参考: [选择器和规则管理](../../user-guide/admin-usage/selector-and-rule)。
+另外有时候一个大网关集群对应多个应用程序(业务),不同应用程序(业务)对应不同的主题,相关隔离,这时候可以按选择器配置不同的主题(可选)和采样率(可选),配置项的含义如上表所示。
+操作如下图:
+
+
+
+## 2.5 Logging信息
+
+采集的access log的字段如下:
+
+| 字段名称 | 含义 | 说明 | 备注 |
+| :-------------------- | :----------------------------------------------------------: | :---------------------------------------- | :--- |
+| clientIp | 客户端IP | | |
+| timeLocal | 请求时间字符串, 格式:yyyy-MM-dd HH:mm:ss.SSS | | |
+| method | 请求方法(不同rpc类型不一样,http类的为:get,post等待,rpc类的为接口名称) | | |
+| requestHeader | 请求头(json格式) | | |
+| responseHeader | 响应头(json格式) | | |
+| queryParams | 请求查询参数 | | |
+| requestBody | 请求Body(二进制类型的body不会采集) | | |
+| requestUri | 请求uri | | |
+| responseBody | 响应body | | |
+| responseContentLength | 响应body大小 | | |
+| rpcType | rpc类型 | | |
+| status | 响应码 | | |
+| upstreamIp | 上游(提供服务的程序)IP | | |
+| upstreamResponseTime | 上游(提供服务的程序)响应请求的耗时(毫秒ms) | | |
+| userAgent | 请求的用户代理 | | |
+| host | 请求的host | | |
+| module | 请求的模块 | | |
+| path | 请求的路径path | | |
+| traceId | 请求的链路追踪ID | 需要接入链路追踪插件,如skywalking,zipkin | |
+
+
+## 2.6 示例
+
+### 2.6.1 通过ElasticSearch收集http请求日志
+
+#### 2.6.1.1 安装ElasticSearch
+
+用户需要部署`ElasticSearch`服务来采集
+
+##### 2.6.1.1.1 windows 环境下安装ElasticSearch
+
+- 到[下载地址](https://www.elastic.co/downloads/elasticsearch)选择windows版本进行下载
+- 下载安装包后解压,进入`bin`目录下,双击执行`elasticsearch.bat`进行启动
+- 默认启动端口为 `9200`,访问 `http://localhost:9200`,验证是否成功
+
+
+
+##### 2.6.1.1.2 macos 环境下安装ElasticSearch
+
+- 到[下载地址](https://www.elastic.co/downloads/elasticsearch)选择macos版本进行下载
+- 下载安装包后解压,进入`bin`目录下,在终端执行启动命令: `./elasticsearch`
+- 默认启动端口为 `9200`,访问 `http://localhost:9200`,验证是否成功
+
+
+
+#### 2.6.1.2 安装Kibana
+
+##### 2.6.1.2.1 windows 环境下安装Kibana
+
+- 到[下载地址](https://www.elastic.co/cn/downloads/kibana)选择windows版本进行下载
+- 下载安装包后解压,进入`bin`目录下,双击执行`kibana.bat`进行启动
+- 默认启动端口为 `5601`,访问 `http://localhost:5601`,验证是否成功(前提是ElasticSearch已打开)
+
+
+
+##### 2.6.1.2.2 macos 环境下安装Kibana
+
+- 到[下载地址](https://www.elastic.co/cn/downloads/kibana)选择windows版本进行下载
+- 下载安装包后解压,进入`bin`目录下,在终端执行启动命令: `./kibana`
+- 默认启动端口为 `5601`,访问 `http://localhost:5601`,验证是否成功(前提是ElasticSearch已打开)
+
+
+
+#### 2.6.1.3 插件配置
+
+
+
+#### 2.6.1.4 选择器和规则的配置
+
+* 选择器和规则详细配置,请参考: [选择器和规则管理](../../user-guide/admin-usage/selector-and-rule)。
+
+#### 2.6.1.5 使用postman发起请求
+
+
+
+#### 2.6.1.6 使用Kibana查询数据
+
+
+
+- 第一次使用插件会自动创建`shenyu-access-logging`索引
+
+
+
+- 利用es查询语句可以查询到请求的日志信息
+
+# 3. 如何禁用插件
+
+- 在 `shenyu-admin` --> 基础配置 --> 插件管理-> `LoggingElasticSearch` ,设置为关闭。
diff --git a/i18n/zh/docusaurus-plugin-content-docs/version-2.5.1/plugin-center/observability/logging-kafka.md b/i18n/zh/docusaurus-plugin-content-docs/version-2.5.1/plugin-center/observability/logging-kafka.md
new file mode 100644
index 00000000000..2ca98cde3b3
--- /dev/null
+++ b/i18n/zh/docusaurus-plugin-content-docs/version-2.5.1/plugin-center/observability/logging-kafka.md
@@ -0,0 +1,156 @@
+---
+title: Logging-Kafka插件
+keywords: ["Logging", "Kafka"]
+description: Logging-kafka插件
+---
+
+# 1. 概述
+
+## 1.1 插件名称
+
+* Logging-Kafka Plugin
+
+## 1.2 适用场景
+
+* 通过Kafka收集网关http请求日志,通过其他应用消费Kafka消息,并且对日志进行分析。
+
+## 1.3 插件功能
+
+>`Apache ShenYu` 网关接收客户端请求,向服务端转发请求,并将服务端结果返回给客户端.网关可以记录下每次请求对应的详细信息,
+> 列如: 请求时间、请求参数、请求路径、响应结果、响应状态码、耗时、上游IP、异常信息等待.
+> Logging-Kafka插件便是记录访问日志并将访问日志发送到Kafka集群的插件.
+
+## 1.4 插件代码
+
+* 核心模块 `shenyu-plugin-logging-kafka`.
+
+* 核心类 `org.apache.shenyu.plugin.logging.kafka.LoggingKafkaPlugin`
+* 核心类 `org.apache.shenyu.plugin.logging.kafka.client.KafkaLogCollectClient`
+
+## 1.5 添加自哪个shenyu版本
+
+* ShenYu 2.5.0
+
+## 1.6 技术方案
+
+* 架构图
+ 
+
+* 在 `Apache ShenYu` 网关里面进行 `Logging` 全程异步采集、异步发送
+
+* 日志平台通过消费`Kafka`集群中的日志进行落库
+
+# 2. 如何使用插件
+
+## 2.1 插件使用流程图
+
+
+
+## 2.2 导入pom
+
+* 在网关的 `pom.xml` 文件中添加 `Logging-Kafka` 的依赖。
+
+```xml
+ <!--shenyu logging-kafka plugin start-->
+<dependency>
+ <groupId>org.apache.shenyu</groupId>
+ <artifactId>shenyu-spring-boot-starter-plugin-logging-kafka</artifactId>
+ <version>${project.version}</version>
+</dependency>
+<!--shenyu logging-kafka plugin end-->
+```
+
+## 2.3 启用插件
+
+* 在 `shenyu-admin`--> 基础配置 --> 插件管理-> `loggingKafka` ,配置kafka参数,并设置为开启。
+
+## 2.4 配置插件
+
+### 2.4.1 开启插件,并配置Kafka,配置如下
+
+
+
+* 各个配置项说明如下:
+
+| 配置项 | 类型 | 说明 | 备注 |
+|:-------------------------------------|:-----------------------|:----------------------------------|:-------------------------------------|
+| config-item | type | description | remarks |
+| topic | String | 消息队列主题 | 必须 |
+| namesrvAddr | String | 消息队列命名服务器地址 | 必须 |
+| sampleRate | String | 采样率,范围0~1,0:关闭,0.01:采集1%,1:采集100% | 可选,默认1,全部采集 |
+| compressAlg | String | 压缩算法,默认不压缩,目前支持LZ4压缩 | 可选,默认不压缩 |
+| maxResponseBody | Ingeter | 最大响应体大小,超过阈值将不采集响应体 | 可选,默认512KB |
+| maxRequestBody | Ingeter | 最大请求体大小,超过阈值将不采集请求体 | 可选,默认512KB |
+*除了topic、namesrvAddr其它都是可选*,大部分情况下只需要配置这2项就可以了。默认的Group-id是"shenyu-access-logging"。
+
+### 2.4.2 配置选择器和规则器
+
+* 选择器和规则详细配置,请参考: [选择器和规则管理](../../user-guide/admin-usage/selector-and-rule)。
+
+另外有时候一个大网关集群对应多个应用程序(业务),不同应用程序(业务)对应不同的主题,相关隔离,这时候可以按选择器配置不同的主题(可选)和采样率(可选),配置项的含义如上表所示。
+操作如下图:
+
+
+
+## 2.5 Logging信息
+
+采集的access log的字段如下:
+
+| 字段名称 | 含义 | 说明 | 备注 |
+|:----------------------|:----------------------------------------------:|:------------------------------|:----|
+| clientIp | 客户端IP | | |
+| timeLocal | 请求时间字符串, 格式:yyyy-MM-dd HH:mm:ss.SSS | | |
+| method | 请求方法(不同rpc类型不一样,http类的为:get,post等待,rpc类的为接口名称) | | |
+| requestHeader | 请求头(json格式) | | |
+| responseHeader | 响应头(json格式) | | |
+| queryParams | 请求查询参数 | | |
+| requestBody | 请求Body(二进制类型的body不会采集) | | |
+| requestUri | 请求uri | | |
+| responseBody | 响应body | | |
+| responseContentLength | 响应body大小 | | |
+| rpcType | rpc类型 | | |
+| status | 响应码 | | |
+| upstreamIp | 上游(提供服务的程序)IP | | |
+| upstreamResponseTime | 上游(提供服务的程序)响应请求的耗时(毫秒ms) | | |
+| userAgent | 请求的用户代理 | | |
+| host | 请求的host | | |
+| module | 请求的模块 | | |
+| path | 请求的路径path | | |
+| traceId | 请求的链路追踪ID | 需要接入链路追踪插件,如skywalking,zipkin | |
+
+## 2.6 示例
+
+### 2.6.1 通过Kafka收集请求日志
+
+#### 2.6.1.1 插件配置
+
+开启插件,并配置Kafka,配置如下:
+
+
+
+#### 2.6.1.2 选择器配置
+
+* 选择器和规则详细配置,请参考: [选择器和规则管理](../../user-guide/admin-usage/selector-and-rule)。
+
+另外有时候一个大网关集群对应多个应用程序(业务),不同应用程序(业务)对应不同的主题,相关隔离,这时候可以按选择器配置不同的主题(可选)和采样率(可选),配置项的含义如上表所示。
+操作如下图:
+
+
+#### 2.6.1.3 规则配置
+
+
+
+#### 2.6.1.4 请求服务
+
+
+
+#### 2.6.1.5 消费以及展示Logging
+
+由于各个日志平台有差异,如存储可用clickhouse,ElasticSearch等待,可视化有自研的或开源的Grafana、Kibana等。
+Logging-Kafka插件利用Kafka进行生产和消费解耦,同时以json格式输出日志,消费和可视化需要用户结合自身情况选择不同的技术栈来实现。
+
+# 3. 如何禁用插件
+
+- 在 `shenyu-admin` --> 基础配置 --> 插件管理-> loggingKafka ,设置为关闭。
+
+
diff --git a/i18n/zh/docusaurus-plugin-content-docs/version-2.5.1/plugin-center/observability/logging-plugin.md b/i18n/zh/docusaurus-plugin-content-docs/version-2.5.1/plugin-center/observability/logging-plugin.md
new file mode 100644
index 00000000000..c387bd8430d
--- /dev/null
+++ b/i18n/zh/docusaurus-plugin-content-docs/version-2.5.1/plugin-center/observability/logging-plugin.md
@@ -0,0 +1,117 @@
+---
+title: Logging插件
+keywords: ["logging"]
+description: logging插件
+---
+
+# 1. 概述
+
+## 1.1 插件名称
+
+* 请求日志记录插件
+
+## 1.2 适用场景
+
+* 开发时调试或者线上排查问题等情况下,需要在网关侧查看本次请求在转发过程中的相关信息,如请求头、请求参数或响应头、响应体等。
+
+## 1.3 插件功能
+
+* 通过logback或者log4j收集请求的url,请求头,请求体,响应信息和响应体,并将请求信息存储在本地。
+
+## 1.4 插件代码
+
+* 核心模块 `shenyu-pluign-logging-console`.
+
+* 核心类 `org.apache.shenyu.plugin.logging.console.LoggingConsolePlugin`
+
+## 1.5 添加自哪个shenyu版本
+
+* ShenYu 2.4.0
+
+# 2. 如何使用插件
+
+## 2.1 插件使用流程图
+
+
+
+## 2.2 导入pom
+
+- 在ShenYu-Bootstrap导入对应的pom依赖。
+
+```xml
+<dependency>
+ <groupId>org.apache.shenyu</groupId>
+ <artifactId>shenyu-spring-boot-starter-plugin-logging-console</artifactId>
+ <version>${project.version}</version>
+</dependency>
+```
+
+## 2.3 启用插件
+
+- 在 `shenyu-admin` --> 基础配置 --> 插件管理-> logging ,设置为开启。
+
+## 2.4 配置插件
+
+* 插件和选择器配置。请查看: [Selector and rule config](../../user-guide/admin-usage/selector-and-rule.md).
+
+## 2.5 示例
+
+## 2.5.1 收集http请求信息
+
+> 在你使用日志之前请在`ShenYuAdmin`开启日志插件.
+
+### 2.5.1.1 选择器配置
+
+
+
+### 2.5.1.2 规则配置
+
+
+
+### 2.5.1.3 调用服务
+
+
+
+### 2.5.1.4 验证结果
+
+如果请求成功,你将会在控制台看到如下信息。
+
+```
+Request Uri: http://localhost:9195/test/payment
+Request Method: POST
+
+[Request Headers Start]
+Content-Type: application/json
+Content-Length: 46
+Host: localhost:9195
+Connection: Keep-Alive
+User-Agent: Apache-HttpClient/4.5.13 (Java/11.0.11)
+Cookie: JSESSIONID=CD325CE813F61BB37783A1D0835959DD
+Accept-Encoding: gzip,deflate
+[Request Headers End]
+
+[Request Body Start]
+{
+ "userId": "11",
+ "userName": "xiaoming"
+}
+[Request Body End]
+
+Response Code: 200 OK
+
+[Response Headers Start]
+transfer-encoding: chunked
+Content-Length: 37
+Content-Type: application/json
+[Response Headers End]
+
+[Response Body Start]
+{"userId":"11","userName":"xiaoming"}
+[Response Body End]
+```
+
+# 3. 如何禁用插件
+
+- 在 `shenyu-admin` --> 基础配置 --> 插件管理-> logging ,设置为关闭。
+
+
diff --git a/i18n/zh/docusaurus-plugin-content-docs/version-2.5.1/plugin-center/observability/logging-pulsar.md b/i18n/zh/docusaurus-plugin-content-docs/version-2.5.1/plugin-center/observability/logging-pulsar.md
new file mode 100644
index 00000000000..8f713415613
--- /dev/null
+++ b/i18n/zh/docusaurus-plugin-content-docs/version-2.5.1/plugin-center/observability/logging-pulsar.md
@@ -0,0 +1,156 @@
+---
+title: Logging-Pulsar插件
+keywords: ["Logging", "Pulsar"]
+description: Logging-pulsar插件
+---
+
+# 1. 概述
+
+## 1.1 插件名称
+
+* Logging-Pulsar Plugin
+
+## 1.2 适用场景
+
+* 通过Pulsar收集网关http请求日志,通过其他应用消费Pulsar消息,并且对日志进行分析。
+
+## 1.3 插件功能
+
+>`Apache ShenYu` 网关接收客户端请求,向服务端转发请求,并将服务端结果返回给客户端.网关可以记录下每次请求对应的详细信息,
+> 列如: 请求时间、请求参数、请求路径、响应结果、响应状态码、耗时、上游IP、异常信息等待.
+> Logging-Pulsar插件便是记录访问日志并将访问日志发送到Pulsar集群的插件.
+
+## 1.4 插件代码
+
+* 核心模块 `shenyu-plugin-logging-pulsar`.
+
+* 核心类 `org.apache.shenyu.plugin.logging.pulsar.LoggingPulsarPlugin`
+* 核心类 `org.apache.shenyu.plugin.logging.pulsar.client.PulsarLogCollectClient`
+
+## 1.5 添加自哪个shenyu版本
+
+* ShenYu 2.5.1
+
+## 1.6 技术方案
+
+* 架构图
+ 
+
+* 在 `Apache ShenYu` 网关里面进行 `Logging` 全程异步采集、异步发送
+
+* 日志平台通过消费`Pulsar`集群中的日志进行落库
+
+# 2. 如何使用插件
+
+## 2.1 插件使用流程图
+
+
+
+## 2.2 导入pom
+
+* 在网关的 `pom.xml` 文件中添加 `Logging-Pulsar` 的依赖。
+
+```xml
+ <!--shenyu logging-pulsar plugin start-->
+<dependency>
+ <groupId>org.apache.shenyu</groupId>
+ <artifactId>shenyu-spring-boot-starter-plugin-logging-pulsar</artifactId>
+ <version>${project.version}</version>
+</dependency>
+<!--shenyu logging-pulsar plugin end-->
+```
+
+## 2.3 启用插件
+
+* 在 `shenyu-admin`--> 基础配置 --> 插件管理-> `loggingPulsar` ,配置pulsar参数,并设置为开启。
+
+## 2.4 配置插件
+
+### 2.4.1 开启插件,并配置Pulsar,配置如下
+
+
+
+* 各个配置项说明如下:
+
+| 配置项 | 类型 | 说明 | 备注 |
+|:-------------------------------------|:-----------------------|:----------------------------------|:-------------------------------------|
+| config-item | type | description | remarks |
+| topic | String | 消息队列主题 | 必须 |
+| serviceUrl | String | 消息队列服务器地址 | 必须 |
+| sampleRate | String | 采样率,范围0~1,0:关闭,0.01:采集1%,1:采集100% | 可选,默认1,全部采集 |
+| compressAlg | String | 压缩算法,默认不压缩,目前支持LZ4压缩 | 可选,默认不压缩 |
+| maxResponseBody | Ingeter | 最大响应体大小,超过阈值将不采集响应体 | 可选,默认512KB |
+| maxRequestBody | Ingeter | 最大请求体大小,超过阈值将不采集请求体 | 可选,默认512KB |
+*除了topic、namesrvAddr其它都是可选*,大部分情况下只需要配置这2项就可以了。默认的Group-id是"shenyu-access-logging"。
+
+### 2.4.2 配置选择器和规则器
+
+* 选择器和规则详细配置,请参考: [选择器和规则管理](../../user-guide/admin-usage/selector-and-rule)。
+
+另外有时候一个大网关集群对应多个应用程序(业务),不同应用程序(业务)对应不同的主题,相关隔离,这时候可以按选择器配置不同的主题(可选)和采样率(可选),配置项的含义如上表所示。
+操作如下图:
+
+
+
+## 2.5 Logging信息
+
+采集的access log的字段如下:
+
+| 字段名称 | 含义 | 说明 | 备注 |
+|:----------------------|:----------------------------------------------:|:------------------------------|:----|
+| clientIp | 客户端IP | | |
+| timeLocal | 请求时间字符串, 格式:yyyy-MM-dd HH:mm:ss.SSS | | |
+| method | 请求方法(不同rpc类型不一样,http类的为:get,post等待,rpc类的为接口名称) | | |
+| requestHeader | 请求头(json格式) | | |
+| responseHeader | 响应头(json格式) | | |
+| queryParams | 请求查询参数 | | |
+| requestBody | 请求Body(二进制类型的body不会采集) | | |
+| requestUri | 请求uri | | |
+| responseBody | 响应body | | |
+| responseContentLength | 响应body大小 | | |
+| rpcType | rpc类型 | | |
+| status | 响应码 | | |
+| upstreamIp | 上游(提供服务的程序)IP | | |
+| upstreamResponseTime | 上游(提供服务的程序)响应请求的耗时(毫秒ms) | | |
+| userAgent | 请求的用户代理 | | |
+| host | 请求的host | | |
+| module | 请求的模块 | | |
+| path | 请求的路径path | | |
+| traceId | 请求的链路追踪ID | 需要接入链路追踪插件,如skywalking,zipkin | |
+
+## 2.6 示例
+
+### 2.6.1 通过Pulsar收集请求日志
+
+#### 2.6.1.1 插件配置
+
+开启插件,并配置Pulsar,配置如下:
+
+
+
+#### 2.6.1.2 选择器配置
+
+* 选择器和规则详细配置,请参考: [选择器和规则管理](../../user-guide/admin-usage/selector-and-rule)。
+
+另外有时候一个大网关集群对应多个应用程序(业务),不同应用程序(业务)对应不同的主题,相关隔离,这时候可以按选择器配置不同的主题(可选)和采样率(可选),配置项的含义如上表所示。
+操作如下图:
+
+
+#### 2.6.1.3 规则配置
+
+
+
+#### 2.6.1.4 请求服务
+
+
+
+#### 2.6.1.5 消费以及展示Logging
+
+由于各个日志平台有差异,如存储可用clickhouse,ElasticSearch等待,可视化有自研的或开源的Grafana、Kibana等。
+Logging-Pulsar插件利用Pulsar进行生产和消费解耦,同时以json格式输出日志,消费和可视化需要用户结合自身情况选择不同的技术栈来实现。
+
+# 3. 如何禁用插件
+
+- 在 `shenyu-admin` --> 基础配置 --> 插件管理-> loggingPulsar ,设置为关闭。
+
+
diff --git a/i18n/zh/docusaurus-plugin-content-docs/version-2.5.1/plugin-center/observability/logging-rocketmq.md b/i18n/zh/docusaurus-plugin-content-docs/version-2.5.1/plugin-center/observability/logging-rocketmq.md
new file mode 100644
index 00000000000..56529cad1f7
--- /dev/null
+++ b/i18n/zh/docusaurus-plugin-content-docs/version-2.5.1/plugin-center/observability/logging-rocketmq.md
@@ -0,0 +1,167 @@
+---
+title: Logging-RocketMQ插件
+keywords: ["Logging", "RocketMQ"]
+description: Logging-RocketMQ插件
+---
+
+# 1. 概述
+
+## 1.1 插件名称
+
+* Logging-RocketMQ Plugin
+
+## 1.2 适用场景
+
+* 通过rocketmq收集网关http请求日志,通过其他应用消费rocketmq消息,并且对日志进行分析。
+
+## 1.3 插件功能
+
+>`Apache ShenYu` 网关接收客户端请求,向服务端转发请求,并将服务端结果返回给客户端.网关可以记录下每次请求对应的详细信息,
+> 列如: 请求时间、请求参数、请求路径、响应结果、响应状态码、耗时、上游IP、异常信息等待.
+> Logging-RocketMQ插件便是记录访问日志并将访问日志发送到RocketMQ集群的插件.
+
+## 1.4 插件代码
+
+* 核心模块 `shenyu-plugin-logging-rocketmq`.
+
+* 核心类 `org.apache.shenyu.plugin.logging.rocketmq.LoggingRocketMQPlugin`
+* 核心类 `org.apache.shenyu.plugin.logging.rocketmq.client.RocketMQLogCollectClient`
+
+## 1.5 添加自哪个shenyu版本
+
+* ShenYu 2.5.0
+
+## 1.6 技术方案
+
+* 架构图
+ 
+
+* 在 `Apache ShenYu` 网关里面进行 `Logging` 全程异步采集、异步发送
+
+* 日志平台通过消费`RocketMQ`集群中的日志进行落库,再使用`Grafana`、`Kibana`或者其它可视化平台展示
+
+# 2. 如何使用插件
+
+## 2.1 插件使用流程图
+
+
+
+## 2.2 导入pom
+
+* 在网关的 `pom.xml` 文件中添加 `Logging-RocketMQ` 的依赖。
+
+```xml
+ <!--shenyu logging-rocketmq plugin start-->
+<dependency>
+ <groupId>org.apache.shenyu</groupId>
+ <artifactId>shenyu-spring-boot-starter-plugin-logging-rocketmq</artifactId>
+ <version>${project.version}</version>
+</dependency>
+<!--shenyu logging-rocketmq plugin end-->
+```
+
+## 2.3 启用插件
+
+* 在 `shenyu-admin`--> 基础配置 --> 插件管理-> `loggingRocketMQ` ,配置rocketMQ参数,并设置为开启。
+
+## 2.4 配置插件
+
+### 2.4.1 开启插件,并配置rocketmq,配置如下
+
+
+
+* 各个配置项说明如下:
+
+| 配置项 | 类型 | 说明 | 备注 |
+|:-------------------------------------|:-----------------------|:----------------------------------|:-------------------------------------|
+| config-item | type | description | remarks |
+| topic | String | 消息队列主题 | 必须 |
+| namesrvAddr | String | 消息队列命名服务器地址 | 必须 |
+| producerGroup | String | 日志消息生产者组 | 必须 |
+| sampleRate | String | 采样率,范围0~1,0:关闭,0.01:采集1%,1:采集100% | 可选,默认1,全部采集 |
+| compressAlg | String | 压缩算法,默认不压缩,目前支持LZ4压缩 | 可选,默认不压缩 |
+| maxResponseBody | Ingeter | 最大响应体大小,超过阈值将不采集响应体 | 可选,默认512KB |
+| maxRequestBody | Ingeter | 最大请求体大小,超过阈值将不采集请求体 | 可选,默认512KB |
+*除了topic、namesrvAddr, producerGroup其它都是可选*,大部分情况下只需要配置这3项就可以了。
+
+### 2.4.2 配置选择器和规则器
+
+* 选择器和规则详细配置,请参考: [选择器和规则管理](../../user-guide/admin-usage/selector-and-rule)。
+
+另外有时候一个大网关集群对应多个应用程序(业务),不同应用程序(业务)对应不同的主题,相关隔离,这时候可以按选择器配置不同的主题(可选)和采样率(可选),配置项的含义如上表所示。
+操作如下图:
+
+
+
+## 2.5 Logging信息
+
+采集的access log的字段如下:
+
+| 字段名称 | 含义 | 说明 | 备注 |
+|:----------------------|:----------------------------------------------:|:------------------------------|:----|
+| clientIp | 客户端IP | | |
+| timeLocal | 请求时间字符串, 格式:yyyy-MM-dd HH:mm:ss.SSS | | |
+| method | 请求方法(不同rpc类型不一样,http类的为:get,post等待,rpc类的为接口名称) | | |
+| requestHeader | 请求头(json格式) | | |
+| responseHeader | 响应头(json格式) | | |
+| queryParams | 请求查询参数 | | |
+| requestBody | 请求Body(二进制类型的body不会采集) | | |
+| requestUri | 请求uri | | |
+| responseBody | 响应body | | |
+| responseContentLength | 响应body大小 | | |
+| rpcType | rpc类型 | | |
+| status | 响应码 | | |
+| upstreamIp | 上游(提供服务的程序)IP | | |
+| upstreamResponseTime | 上游(提供服务的程序)响应请求的耗时(毫秒ms) | | |
+| userAgent | 请求的用户代理 | | |
+| host | 请求的host | | |
+| module | 请求的模块 | | |
+| path | 请求的路径path | | |
+| traceId | 请求的链路追踪ID | 需要接入链路追踪插件,如skywalking,zipkin | |
+
+## 2.6 示例
+
+### 2.6.1 通过RocketMQ收集请求日志
+
+#### 2.6.1.1 插件配置
+
+开启插件,并配置rocketmq,配置如下:
+
+
+
+#### 2.6.1.2 选择器配置
+
+* 选择器和规则详细配置,请参考: [选择器和规则管理](../../user-guide/admin-usage/selector-and-rule)。
+
+另外有时候一个大网关集群对应多个应用程序(业务),不同应用程序(业务)对应不同的主题,相关隔离,这时候可以按选择器配置不同的主题(可选)和采样率(可选),配置项的含义如上表所示。
+操作如下图:
+
+
+#### 2.6.1.3 规则配置
+
+
+
+#### 2.6.1.4 请求服务
+
+
+
+#### 2.6.1.5 消费以及展示Logging
+
+由于各个日志平台有差异,如存储可用clickhouse,ElasticSearch等待,可视化有自研的或开源的Grafana、Kibana等。
+Logging-RocketMQ插件利用RocketMQ进行生产和消费解耦,同时以json格式输出日志,消费和可视化需要用户结合自身情况选择不同的技术栈来实现。
+
+#### 2.6.1.6 面板展示
+
+用户可根据自身情况选择可视化实现。
+下面展示下 `Grafana` 效果:
+[Grafana沙盒体验](https://play.grafana.org)
+
+
+
+# 3. 如何禁用插件
+
+- 在 `shenyu-admin` --> 基础配置 --> 插件管理-> loggingRocketMQ ,设置为关闭。
+
+
+
+
diff --git a/i18n/zh/docusaurus-plugin-content-docs/version-2.5.1/plugin-center/observability/logging-tencent-cls.md b/i18n/zh/docusaurus-plugin-content-docs/version-2.5.1/plugin-center/observability/logging-tencent-cls.md
new file mode 100644
index 00000000000..d3a81d13067
--- /dev/null
+++ b/i18n/zh/docusaurus-plugin-content-docs/version-2.5.1/plugin-center/observability/logging-tencent-cls.md
@@ -0,0 +1,144 @@
+---
+title: Logging-Tencent cls日志插件
+keywords: ["Logging"]
+description: logging插件
+---
+
+# 1. 概述
+
+## 1.1 插件名称
+
+* Tencent cls 日志插件
+
+## 1.2 适用场景
+
+* 收集日志到`Tencent cls`日志平台,并通过`Tencent cls`日志平台进行数据分析
+
+## 1.3 插件功能
+
+* 网关接收客户端请求,向服务端转发请求,并将服务端结果返回给客户端.网关可以记录下每次请求对应的详细信息。
+* 插件便是记录访问日志并将访问日志发送到Tencent cls的插件.
+
+## 1.4 插件代码
+
+* 核心模块 `shenyu-plugin-logging-tencent-cls`
+
+* 核心类 `org.apache.shenyu.plugin.tencent.cls.LoggingTencentClsPlugin`
+* 核心类 `org.apache.shenyu.plugin.tencent.cls.client.TencentClsLogCollectClient`
+
+## 1.5 添加自哪个shenyu版本
+
+ShenYu 2.5.1
+
+# 2. 如何使用插件
+
+## 2.1 插件使用流程图
+
+
+
+## 2.2 导入pom
+
+- 在ShenYu-Bootstrap导入对应的pom依赖。
+
+```xml
+<!-- shenyu logging-tencent-cls plugin start -->
+<dependency>
+ <groupId>org.apache.shenyu</groupId>
+ <artifactId>shenyu-spring-boot-starter-plugin-logging-tencent-cls</artifactId>
+ <version>${project.version}</version>
+</dependency>
+<!-- shenyu logging-tencent-cls plugin end -->
+```
+
+## 2.3 启用插件
+
+- 在 `shenyu-admin` --> 基础配置 --> 插件管理-> `loggingTencentCls` ,设置为开启。
+
+## 2.4 配置插件
+
+### 2.4.1 插件配置
+
+
+
+| 配置项 | 类型 | 备注 | 描述 |
+|:--------------------|:--------|:-----------------------|:--------------------------------------------------------------------------------------------------------------------------------|
+| secretId | String | 必填 | secretId |
+| secretKey | String | 必填 | secretKey |
+| endpoint | String | 必填 | 主机名,例如:ap-guangzhou.cls.tencentcs.com |
+| topic | String | 可选, 默认值:shenyu-topic | 日志存储topic |
+| sendThreadCount | String | 可选, 默认值:1 | 日志消费回调核心线程数 |
+| TotalSizeInBytes | Integer | 默认为 104857600 | 实例能缓存的日志大小上限, |
+| MaxSendThreadCount | Integer | 默认为 50 个 | client能并发的最多"goroutine"的数量, |
+| MaxBlockSec | Integer | 默认为 60000 毫秒 | 如果client可用空间不足,调用者在 send 方法上的最大阻塞时间。<br/> 如果超过这个时间后所需空间仍无法得到满足,send 方法会抛出TimeoutException。如果您希望 send 方法一直阻塞直到所需空间得到满足,可将该值设为负数。 |
+| MaxBatchSize | Integer | 默认为 512 * 1024 (512KB) | 当一个Batch中缓存的日志大小大于等于 batchSizeThresholdInBytes 时,该 batch 将被发送,最大可设置成 5MB |
+| MaxBatchCount | Integer | 默认为 4096 | 当一个Batch中缓存的日志条数大于等于 batchCountThreshold 时,该 batch 将被发送最大可设置成 40960 |
+| LingerMs | Integer | 默认为 2000 毫秒 | Batch从创建到可发送的逗留时间,最小可设置成 100 毫秒 |
+| Retries | Integer | 默认为 10 次 | 如果某个Batch首次发送失败,能够对其重试的次数,如果 retries 小于等于 0,该 ProducerBatch 首次发送失败后将直接进入失败队列 |
+| MaxReservedAttempts | Integer | 默认只保留最近的 11 次 | 每个Batch每次被尝试发送都对应着一个Attemp,此参数用来控制返回给用户的 attempt 个数,默认只保留最近的 11 次 attempt 信息。该参数越大能让您追溯更多的信息,但同时也会消耗更多的内存 |
+| BaseRetryBackoffMs | Integer | 默认为 100 毫秒 | 首次重试的退避时间 client采样指数退避算法,第 N 次重试的计划等待时间为 baseRetryBackoffMs * 2^(N-1 |
+| MaxRetryBackoffMs | Integer | 默认为 50 秒 | 重试的最大退避时间 |
+
+- 获取 `topic`
+
+
+
+### 2.4.2 规则和选择器配置
+
+* 插件和选择器配置。请查看: [Selector and rule config](../../user-guide/admin-usage/selector-and-rule.md).
+
+## 2.5 Logging信息
+
+采集的access log的字段如下:
+
+| 字段名称 | 含义 | 说明 | 备注 |
+|:----------------------|:----------------------------------------------:|:------------------------------|:----|
+| clientIp | 客户端IP | | |
+| timeLocal | 请求时间字符串, 格式:yyyy-MM-dd HH:mm:ss.SSS | | |
+| method | 请求方法(不同rpc类型不一样,http类的为:get,post等待,rpc类的为接口名称) | | |
+| requestHeader | 请求头(json格式) | | |
+| responseHeader | 响应头(json格式) | | |
+| queryParams | 请求查询参数 | | |
+| requestBody | 请求Body(二进制类型的body不会采集) | | |
+| requestUri | 请求uri | | |
+| responseBody | 响应body | | |
+| responseContentLength | 响应body大小 | | |
+| rpcType | rpc类型 | | |
+| status | 响应码 | | |
+| upstreamIp | 上游(提供服务的程序)IP | | |
+| upstreamResponseTime | 上游(提供服务的程序)响应请求的耗时(毫秒ms) | | |
+| userAgent | 请求的用户代理 | | |
+| host | 请求的host | | |
+| module | 请求的模块 | | |
+| path | 请求的路径path | | |
+| traceId | 请求的链路追踪ID | 需要接入链路追踪插件,如skywalking,zipkin | |
+
+
+## 2.6 示例
+
+### 2.6.1 通过腾讯云cls日志平台收集日志
+
+#### 2.6.1.1 插件配置
+
+* 开启插件,并配置 tencent cls插件,配置如下:
+
+
+
+#### 2.6.1.2 选择器配置
+
+
+
+#### 2.6.1.3 规则配置
+
+
+
+#### 2.6.1.4 发送请求
+
+
+
+#### 2.6.1.5 tencent sls 日志平台展示
+
+
+
+# 3. 如何禁用插件
+
+- 在 `shenyu-admin` --> 基础配置 --> 插件管理-> `loggingTencentCls` ,设置为关闭。
diff --git a/i18n/zh/docusaurus-plugin-content-docs/version-2.5.1/plugin-center/observability/metrics-plugin.md b/i18n/zh/docusaurus-plugin-content-docs/version-2.5.1/plugin-center/observability/metrics-plugin.md
new file mode 100644
index 00000000000..3e8241c63e8
--- /dev/null
+++ b/i18n/zh/docusaurus-plugin-content-docs/version-2.5.1/plugin-center/observability/metrics-plugin.md
@@ -0,0 +1,245 @@
+---
+title: Metrics插件
+keywords: ["Metrics"]
+description: Metrics插件
+---
+
+## 说明
+
+* `Metrics插件`插件是网关用来监控自身运行状态(`JVM`相关),请求的响应迟延,`QPS`、`TPS`等相关`metrics`。
+
+## 技术方案
+
+* 流程图
+ 
+
+* 异步或者同步的方式,在 `Apache ShenYu` 网关里面进行 `metrics` 埋点。
+
+* `prometheus` 服务端通过 `http` 请求来拉取 `metrics`,再使用 `Grafana` 展示。
+
+
+## 插件使用
+
+* 在网关的 `pom.xml` 文件中添加 `metrics` 的依赖。
+
+```xml
+ <!-- apache shenyu metrics plugin starter-->
+ <dependency>
+ <groupId>org.apache.shenyu</groupId>
+ <artifactId>shenyu-spring-boot-starter-plugin-metrics</artifactId>
+ <version>${project.version}</version>
+ </dependency>
+ <!-- apache shenyu metrics plugin end-->
+```
+
+* 在网关的配置yaml文件中编辑如下内容:
+
+```yml
+shenyu:
+ metrics:
+ enabled: false #设置为 true 表示开启
+ name : prometheus
+ host: 127.0.0.1 #暴露的ip
+ port: 8090 #暴露的端口
+ jmxConfig: #jmx配置
+ props:
+ jvm_enabled: true #开启jvm的监控指标
+```
+
+## metrics信息
+
+* 所有的`JVM`,线程,内存,等相关信息都会埋点,可以在 `Grafana` 面板中,新增一个 `JVM` 模块,则会完全展示 具体请看:https://github.com/prometheus/jmx_exporter
+
+* 另外还有如下自定义的 `metrics`
+
+| 名称 | 类型 |标签名称 | 说明 |
+|:------------------------ |:--------------------- |:-------------|:-------------------- |
+|shenyu_request_total |Counter | none | 收集ShenYu网关的所有请求 |
+|shenyu_request_throw_total |Counter | none | 收集ShenYu网关的所有异常请求 |
+|shenyu_request_type_total |Counter | path,type | 收集ShenYu网关监视器的所有匹配请求 |
+|shenyu_execute_latency_millis |histogram | none | 收集ShenYu网关执行时间间隔 |
+
+### jmx 指标
+
+| name | type | labals | help |
+|:-------------------------------:|:-------:|:------:|:--------------------------------------------------------------:|
+| jmx_config_reload_success_total | counter | | 成功重新加载配置的次数. |
+| jmx_config_reload_failure_total | counter | | 重新加载配置失败的次数. |
+| jmx_scrape_duration_seconds | gauge | | 此 JMX 抓取所用的秒数. |
+| jmx_scrape_error | gauge | | 如果此抓取失败,则非零. |
+| jmx_scrape_cached_beans | gauge | | 有缓存匹配规则的bean的数量 |
+| jmx_scrape_duration_seconds | gauge | | 此 JMX 抓取所花费的秒数. |
+
+### jvm 指标
+
+#### StandardExports
+
+| name | type | labels | help |
+|:-----------------------------:|:-------:|:------:|:------------------------------------------------------:|
+| process_cpu_seconds_total | counter | | 用户和系统CPU总计所用的秒数. |
+| process_start_time_seconds | gauge | | 自 unix 元年(1970-01-01)以来进程的开始时间. |
+| process_open_fds | gauge | | 打开的文件描述符的数量. |
+| process_max_fds | gauge | | 打开的文件描述符的最大数量. |
+| process_virtual_memory_bytes | gauge | | 虚拟内存的字节数. |
+| process_resident_memory_bytes | gauge | | 常驻内存的字节数. |
+
+#### MemoryPoolsExports
+
+| name | type | labels | help |
+|:------------------------------------------:|:-----:|:----------------------:|:-----------------------------------------------------------------:|
+| jvm_memory_objects_pending_finalization | gauge | {area="heap\|nonheap"} | 在终结器队列中等待的对象数. |
+| jvm_memory_bytes_used | gauge | {area="heap\|nonheap"} | 给定 JVM 内存区域的已用字节数. |
+| jvm_memory_bytes_committed | gauge | {area="heap\|nonheap"} | 给定 JVM 内存区域的已提交字节数. |
+| jvm_memory_bytes_max | gauge | {area="heap\|nonheap"} | 给定 JVM 内存区域的最大字节数. |
+| jvm_memory_bytes_init | gauge | {area="heap\|nonheap"} | 给定 JVM 内存区域的初始字节数. |
+| jvm_memory_pool_bytes_used | gauge | {pool} | 给定 JVM 内存池的已用字节数. |
+| jvm_memory_pool_bytes_committed | gauge | {pool} | 给定 JVM 内存池的已提交字节数. |
+| jvm_memory_pool_bytes_max | gauge | {pool} | 给定 JVM 内存池的最大字节数. |
+| jvm_memory_pool_bytes_init | gauge | {pool} | 给定 JVM 内存池的初始字节数. |
+| jvm_memory_pool_collection_used_bytes | gauge | {pool} | 给定 JVM 内存池最后一次 GC 后的已用字节数. |
+| jvm_memory_pool_collection_committed_bytes | gauge | {pool} | 给定 JVM 内存池的最后一次 GC 后的已提交字节数. |
+| jvm_memory_pool_collection_max_bytes | gauge | {pool} | 给定 JVM 内存池的最后一次 GC 后的最大字节数. |
+| jvm_memory_pool_collection_init_bytes | gauge | {pool} | 给定 JVM 内存池的最后一次 GC 后的初始字节数. |
+
+#### MemoryAllocationExports
+
+| name | type | labels | help |
+|:-------------------------------------:|:-------:|:------:|:------------------------------------------------------------------------------------------:|
+| jvm_memory_pool_allocated_bytes_total | counter | {pool} | 给定 JVM 内存池中分配的总字节数.(只有 GC 的时候才会更新) |
+| | | | |
+| | | | |
+
+#### BufferPoolsExports
+
+| name | type | labels | help |
+|:------------------------------:|:-----:|:------:|:------------------------------------------:|
+| jvm_buffer_pool_used_bytes | gauge | {pool} | 给定 JVM 缓冲池的已用字节数. |
+| jvm_buffer_pool_capacity_bytes | gauge | {pool} | 给定 JVM 缓冲池的字节容量. |
+| jvm_buffer_pool_used_buffers | gauge | {pool} | 给定 JVM 缓冲池的已用缓冲区. |
+
+#### GarbageCollectorExports
+
+| name | type | labels | help |
+|:-------------------------:|:-------:|:------:|:-------------------------------------------------------:|
+| jvm_gc_collection_seconds | summary | {gc} | 在给定的 JVM 垃圾收集器中花费的秒数. |
+
+#### ThreadExports
+
+| name | type | labels | help |
+|:------------------------------:|:-------:|:-------:|:------------------------------------------------------------------------------------------------------:|
+| jvm_threads_current | gauge | | JVM 的当前线程数 |
+| jvm_threads_daemon | gauge | | JVM 的守护进程线程数 |
+| jvm_threads_peak | gauge | | JVM 的峰值线程数 |
+| jvm_threads_started_total | counter | | JVM 的已启动的线程数 |
+| jvm_threads_deadlocked | gauge | | 处于死锁状态的 JVM 线程循环等待获取对象监视器或可拥有的同步器 |
+| jvm_threads_deadlocked_monitor | gauge | | 处于死锁等待获取对象监视器的 JVM 线程周期 |
+| jvm_threads_state | gauge | {state} | 状态为{state}的线程数 |
+
+#### ClassLoadingExports
+
+| name | type | labels | help |
+|:--------------------------:|:-------:|:------:|:---------------------------------------------------------------------------------------:|
+| jvm_classes_loaded | gauge | | 当前在 JVM 中加载的类的数量 |
+| jvm_classes_loaded_total | counter | | 自 JVM 开始执行以来已加载的类总数 |
+| jvm_classes_unloaded_total | counter | | 自 JVM 开始执行以来已卸载的类总数 |
+
+#### VersionInfoExports
+
+| name | type | labels | help |
+|:----:|:----:|:---------------------------------------------------------------------------------:|:---------------:|
+| jvm | info | {version(java.runtime.version),vendor(java.vm.vendor),runtime(java.runtime.name)} | JVM 版本信息 |
+
+
+## 收集 metrics
+
+用户需部署`Prometheus` 服务来采集
+
+### Windows 环境下安装Prometheus
+
+* 选择对应环境的 [下载地址](https://prometheus.io/download/) 安装
+* 修改配置文件:`prometheus.yml`
+
+ ```yaml
+ scrape_configs:
+ - job_name: 'Apache ShenYu'
+ # metrics_path defaults to '/metrics'
+ # scheme defaults to 'http'.
+ static_configs:
+ - targets: ['localhost:8090'] # metrics of apache shenyu are exposed on port 8090 by default
+ ```
+
+**注:** `job_name`跟`monitor`插件配置的`metricsName`相对应
+
+* 配置完成之后,在 `windows` 下可以直接双击 `prometheus.exe` 启动即可,默认启动端口为 `9090` ,访问 http://localhost:9090/ ,点击`status`->`Targets`,验证是否成功。
+
+
+
+### MacOS 环境下安装Prometheus
+
+* 使用brew 安装 prometheus,安装完成后`prometheus` 在`homebrew`下的 `Cellar` 文件夹中。
+
+```
+brew install prometheus
+```
+
+* 在prometheus.yml文件所在位置执行如下命令即可启动prometheus。
+
+```
+prometheus --config.file=prometheus.yml &
+```
+
+访问 `http://localhost:9090/` 验证是否正常启动。
+
+## 面板展示
+
+推荐使用 `Grafana`,用户可以自定义查询来个性化显示面板盘。
+
+下面介绍如何安装 `Grafana`
+
+### windows环境下安装Grafana
+
+
+* 安装 `Grafana`
+
+[下载地址](https://dl.grafana.com/oss/release/grafana-7.4.2.windows-amd64.zip) 解压进入 `bin` 目录然后双击 `grafana-server.exe` 运行 访问 `http://localhost:3000/?orgId=1` admin/admin 验证是否成功
+
+
+### macos环境下安装Grafana
+
+* 使用brew 安装 grafana 。
+
+```
+brew install grafana
+```
+
+* 以服务方式启动grafana
+
+```
+brew services start grafana
+```
+
+访问 `http://localhost:3000/` 验证是否正常启动。
+
+### 使用Grafana查看监控数据
+
+配置数据源,选择prometheus,注意数据源名字为prometheus。
+
+
+
+
+
+* 配置自定义metric面板`request_total`、`http_request_total`
+
+点击 `Create` - `Import` 输入`dashboards` 的 [面板json配置](https://shenyu.apache.org/img/shenyu/monitor/request_metric_dashboard.json)
+
+最终自定义 `Http` 请求监控面板效果如下:
+
+
+
+
+
+
+
+
+
+
diff --git a/i18n/zh/docusaurus-plugin-content-docs/version-2.5.1/plugin-center/proxy/_category_.json b/i18n/zh/docusaurus-plugin-content-docs/version-2.5.1/plugin-center/proxy/_category_.json
new file mode 100644
index 00000000000..00828e0e3d1
--- /dev/null
+++ b/i18n/zh/docusaurus-plugin-content-docs/version-2.5.1/plugin-center/proxy/_category_.json
@@ -0,0 +1,4 @@
+{
+ "label": "协议代理",
+ "position": 2
+}
diff --git a/i18n/zh/docusaurus-plugin-content-docs/version-2.5.1/plugin-center/proxy/brpc-plugin.md b/i18n/zh/docusaurus-plugin-content-docs/version-2.5.1/plugin-center/proxy/brpc-plugin.md
new file mode 100644
index 00000000000..45fcb6f7828
--- /dev/null
+++ b/i18n/zh/docusaurus-plugin-content-docs/version-2.5.1/plugin-center/proxy/brpc-plugin.md
@@ -0,0 +1,75 @@
+---
+title: Brpc插件
+keywords: ["Brpc"]
+description: Brpc插件
+---
+
+
+# 1. 概述
+
+## 1.1 插件名称
+
+* Brpc插件
+
+## 1.2 适用场景
+
+* 用来将`http协议` 转成 `Brpc协议`。
+
+## 1.3 插件代码
+
+* 核心模块 `shenyu-plugin-brpc`
+
+* 核心类 `org.apache.shenyu.plugin.brpc.BrpcPlugin`
+
+## 1.4 添加自哪个shenyu版本
+
+* Since ShenYu 2.5.1
+
+# 2. Brpc插件
+
+
+## 2.1 插件设置
+
+* 引入相关依赖,开启插件,请参考:[Brpc快速开始](../../quick-start/quick-start-brpc) 。
+
+* `Brpc`应用客户端接入,请参考:[Brpc服务接入](../../user-guide/brpc-proxy) 。
+
+
+## 2.2 元数据
+
+每一个`Brpc`接口方法,都会对应一条元数据,当`Brpc`应用客户端接入到`Apache ShenYu`网关时,会自动注册,可以在 `shenyu-admin`后台管理系统的基础配置 `-->` 元数据管理中查看。
+
+<img src="/img/shenyu/plugin/brpc/metadata.png" width="100%" height="100%" />
+
+* 应用名称:该条元数据所属的应用名称。
+
+* 方法名称:需要调用的方法名。
+
+* 路径:`Brpc`请求路径。
+
+* 路径描述:对该路径的说明,方便查看。
+
+* 参数类型:`Brpc`接口的参数类型列表,按照接口的参数类型顺序,通过半角逗号分隔。
+
+* Rpc扩展参数:描述了一个`Brpc`服务中每个接口信息。比如,下面是`Brpc`服务的接口信息:
+
+```json
+{
+ "methodInfo":[
+ {
+ "methodName":"getUser",
+ "paramTypes":[
+ {
+ "left":"java.lang.Long",
+ "right":"userId"
+ }
+ ]
+ }
+ ]
+}
+```
+
+
+* 服务接口:`Brpc`服务接口全限定名。
+
+* `Rpc`类型:下拉选择 `Brpc`。
diff --git a/i18n/zh/docusaurus-plugin-content-docs/version-2.5.1/plugin-center/proxy/divide-plugin.md b/i18n/zh/docusaurus-plugin-content-docs/version-2.5.1/plugin-center/proxy/divide-plugin.md
new file mode 100644
index 00000000000..97ae4c6d2a5
--- /dev/null
+++ b/i18n/zh/docusaurus-plugin-content-docs/version-2.5.1/plugin-center/proxy/divide-plugin.md
@@ -0,0 +1,145 @@
+---
+title: Divide插件
+keywords: ["divide"]
+description: divide插件
+---
+
+# 1. 概述
+
+## 1.1 插件名称
+
+* `divide`插件
+
+## 1.2 适用场景
+
+* 处理 `http协议` 请求
+* 支持流量治理,例如a/b 测试、灰度测试
+* 服务负载均衡
+* 设置接口的超时时间
+
+## 1.3 插件功能
+
+* 支持根据 uri、header、query 等请求信息做流量的治理
+* 支持设置请求的负载均衡策略,同时支持服务预热,目前支持三种策略:ip hash(带虚拟节点的一致性哈希)、round-robbin(加权轮询)、random(加权随机)
+* 支持设置接口级别请求头最大值、请求体最大值、请求超时时间
+* 支持设置超时重试策略和重试次数,目前重试策略支持:current(重试之前失败的服务器)和failover(重试其它服务器)
+
+## 1.4 插件代码
+
+* 核心模块 ```shenyu-plugin-divide```
+* 核心类 ```org.apache.shenyu.plugin.divide.DividePlugin```
+
+# 2. 如何使用插件
+
+## 2.1 插件使用流程图
+
+
+
+## 2.2 导入 pom
+
+- 在网关的 `pom.xml` 文件中添加插件 maven 配置。
+
+```xml
+ <dependency>
+ <groupId>org.apache.shenyu</groupId>
+ <artifactId>shenyu-spring-boot-starter-gateway</artifactId>
+ <version>${project.version}</version>
+ </dependency>
+```
+
+## 2.3 启用插件
+
+- 在 `shenyu-admin` --> 基础配置 --> 插件管理 --> `divide` 设置为开启。
+
+
+
+## 2.4 配置插件
+
+### 2.4.1 在客户端项目配置文件中配置接入参数
+
+ * 客户端接入方式和服务器地址,下面的示例使用了 http 接入方式,目前客户端支持的接入的方式有以下几种:http、zookeeper、etcd、nacos、consul,详细的接入配置参数请参考[客户端接入配置](../../user-guide/property-config/register-center-access.md)。
+ * 客户端配置,包含协议名称以及服务的路由地址,这里请使用 http 协议,并且必须配置 contextPath 的值作为每个服务的路由地址。
+
+```yaml
+ shenyu:
+ register:
+ registerType: http
+ serverLists: http://localhost:9095
+ props:
+ username: admin
+ password: 123456
+ client:
+ http: # http 协议
+ props:
+ contextPath: /http # 每个服务的路由地址
+```
+
+### 2.4.2 在 shenyu-admin 配置文件中配置 upstream 有效性的检测参数
+
+下面的示例使用了 http 接入方式,目前客户端支持的接入的方式有以下几种:http、zookeeper、etcd、nacos、consul,详细的接入配置参数请参考[客户端接入配置](../../user-guide/property-config/register-center-access.md)。
+
+> 只有 http 类型的注册中心才支持 upstream 检测
+
+```yaml
+ shenyu:
+ register:
+ registerType: http # 只有 http 类型的注册中心才支持检测 upstream
+ serverLists:
+ props:
+ checked: true # 默认为 ture,设置为 false,不检测
+ zombieCheckTimes: 5 # 僵尸 upstream 最大检测次数,超过 5 次不再检测其有效性,默认为 5
+ scheduledTime: 10 # 定时检测时间间隔,默认 10 秒
+ zombieRemovalTimes: 60 # upstream 多少秒不在线认定为僵尸 upstream,默认 60 秒
+```
+
+### 2.4.3 在 shenyu-admin 配置 divide 插件的选择器和规则信息
+
+客户端启动之后会在 shenyu-admin -> 插件列表 -> Proxy -> Divide 自动注册[选择器和规则](../../user-guide/admin-usage/selector-and-rule)信息。
+
+
+#### 2.4.3.1 选择器的配置
+
+divide 选择器示例,通用选择器配置请参考[选择器和规则](../../user-guide/admin-usage/selector-and-rule)。
+
+
+
+##### 2.4.3.1.1 选择器处理信息配置
+
+- `host`:填写 `localhost`,该字段暂时没使用。
+- `ip:port`:`ip` 与端口,这里填写你真实服务的 `ip` + 端口。
+- `protocol`::`http` 协议,填写 `http://` 或者 `https://`,不填写默认为:`http://`
+- `startupTime`: 启动时间,单位毫秒。
+- `weight`:负载均衡权重,服务启动自动注册的默认值为 50。
+- `warmupTime`:预热时间,单位毫秒,在预热中的服务器会计算瞬时权重,计算值会小于实际配置的权重,以保护刚启动的服务器,服务启动注册的默认值为 10。举个例子预热时间 100 毫秒,目前启动了 50 毫秒,配置的权重 50, 实际的权重是 25。
+- `status`:开启或关闭,开始状态此处理器才有效。
+
+#### 2.4.3.2 规则的处理信息配置
+
+divide 规则示例,通用规则配置请参考[选择器和规则](../../user-guide/admin-usage/selector-and-rule)。
+
+
+
+##### 2.4.3.2.1 规则处理信息配置
+
+- `loadStrategy`:如果`http`客户端是一个集群,`Apache ShenYu`网关调用时采取哪种负载均衡策略,当前支持 `roundRobin`、`random` 和 `hash`。
+- `timeout`:调用`http`客户端的超时时间。
+- `retryCount`:调用`http`客户端超时失败的重试次数。
+- `headerMaxSize`:请求`header`的最大值。
+- `requestMaxSize`:请求体的最大值。
+- `retryStrategy`:从`2.4.3版本`开始支持,失败后的重试策略,默认`current`以保持对低版本的兼容。 比如下游有3个服务`http://localhost:1111`、`http://localhost:1112`和`http://localhost:1113`,假设第一次负载均衡到`http://localhost:1111`并且`调用失败`。使用`current`策略会继续重试调用`http://localhost:1111`;使用`failover`策略会通过`负载均衡`重试调用到其他服务如`http://localhost:1112`,此时如果又失败了,则调用到`http://localhost:1113`,直到没有可用的服务为止。
+
+## 2.5 示例
+
+### 2.5.1 示例 A/B 测试
+
+待补充
+
+### 2.5.2 示例 灰度测试
+
+待补充
+
+# 3. 如何禁用插件
+
+- 在 `shenyu-admin` --> 基础配置 --> 插件管理 --> `divide` 设置为禁用。
+
+
diff --git a/i18n/zh/docusaurus-plugin-content-docs/version-2.5.1/plugin-center/proxy/dubbo-plugin.md b/i18n/zh/docusaurus-plugin-content-docs/version-2.5.1/plugin-center/proxy/dubbo-plugin.md
new file mode 100644
index 00000000000..8dfdae16170
--- /dev/null
+++ b/i18n/zh/docusaurus-plugin-content-docs/version-2.5.1/plugin-center/proxy/dubbo-plugin.md
@@ -0,0 +1,129 @@
+---
+title: Dubbo插件
+keywords: ["dubbo"]
+description: dubbo插件
+---
+
+## 说明
+
+* `dubbo`插件是将 `http协议` 转换成 `dubbo协议` 的插件,也是网关实现`dubbo`泛化调用的关键。
+* `dubbo`插件需要配合元数据才能实现`dubbo`的调用。
+* `apache dubbo` 和 `alibaba dubbo`,都是使用该一插件。
+
+## 插件设置
+
+* 引入相关依赖,开启插件,请参考:[Dubbo快速开始](../../quick-start/quick-start-dubbo) 。
+
+* `Dubbo`应用客户端接入,请参考:[Dubbo服务接入](../../user-guide/dubbo-proxy) 。
+
+* 选择器和规则配置,请参考:[选择器和规则管理](../../user-guide/admin-usage/selector-and-rule)。
+
+* 自`2.4.3版本`起dubbo插件新增字段及含义:
+
+<img src="/img/shenyu/plugin/dubbo/dubbo_plugin.png" width="80%" height="80%" />
+
+ * `corethreads`:业务线程池核心线程数。
+
+ * `queues`:业务线程池阻塞队列长度,0表示`无界阻塞队列`。
+
+ * `threadpool`:业务线程池类型,有`fixed`、`eager`、`cached`、`limited`和`shared`共5种类型,前面4种与dubbo官方提供的线程池一一对应,不多解释,这里单独说下`shared`,正如其名,`所有proxy插件`共用一个`shared`线程池,这样做的好处是能够减少线程池数量,进而降低内存、提高资源利用率。
+
+ * `threads`:业务线程池最大线程数。
+
+## 插件详解
+
+客户端接入`Apache ShenYu`网关后,会自动注册选择器和规则信息,关于选择器和规则配置,请参考:[选择器和规则管理](../../user-guide/admin-usage/selector-and-rule) 。
+
+#### 选择器处理
+
+<img src="/img/shenyu/plugin/dubbo/selector_zh_new.png" width="80%" height="80%" />
+
+选择器处理,即`handle`字段,是网关匹配到流量以后,可以进行处理的操作。更多信息请参考插件管理中的 [插件处理管理](../../user-guide/admin-usage/plugin-handle-explanation) 。
+
+* 处理配置详解:
+
+ * `host`:host地址。
+
+ * `ip:port`:ip+port地址。
+
+ * `protocol`:协议默认值为'http'。
+
+ * `group`:dubbo服务的组。
+
+ * `version`:dubbo服务版本号。
+
+ * `weight`:服务实例的权重。
+
+ * `warmupTime`:服务预热时间。
+
+ * `startupTime`:服务开启时间。
+
+ * `status`:true: 服务节点可用,false: 服务节点不可用.
+
+ * `gray`:灰度状态.
+
+灰度路由
+
+如果您想在dubbo插件中使用灰色路由,可以单击“灰色”按钮。
+
+* 灰度发布可以在发布新版本应用时,自定义控制新版本应用流量比重,渐进式完成新版本应用的全量上线,最大限度地控制新版本发布带来的业务风险,降低故障带来的影响面,同时支持快速回滚。
+
+当开启灰度是,网关的负载平衡算法将从当前节点列表中选择一个节点进行路由,并且您可以通过修改节点权重以更改负载平衡算法中节点的权重。
+
+需要注意的是,如果您的业务实例没有使用'shenyu-client-apache-dubbo'或者'shenyu-client-alibaba-dubbo'的客户端进行业务注册发现,您应该在当前选择器页面上手动添加节点信息进行灰度路由。
+
+#### 规则处理
+
+<img src="/img/shenyu/plugin/dubbo/rule_zh.png" width="80%" height="80%" />
+
+规则处理,即`handle`字段,是网关对流量完成最终匹配后,可以进行处理的操作。更多信息请参考插件管理中的 [插件处理管理](../../user-guide/admin-usage/plugin-handle-explanation) 。
+
+* 处理配置详解:
+
+ * `loadbalance`:负载均衡策略,如果选择灰度节点失败,将会使用默认的负载均衡方式。
+
+* Apache ShenYu将获得相应服务的真实IP,并从dubbo注册中心发起rpc代理调用。
+
+## 元数据
+
+每一个`dubbo`接口方法,都会对应一条元数据,当`dubbo`应用客户端接入到`Apache ShenYu`网关时,会自动注册,可以在 `shenyu-admin`后台管理系统的基础配置 `-->` 元数据管理中查看。
+
+<img src="/img/shenyu/plugin/dubbo/dubbo-metadata-zh.jpg" width="50%"/>
+
+* 应用名称:该条元数据所属的应用名称。
+
+* 方法名称:需要调用的方法名。
+
+* 路径:`http`请路径。
+
+* 路径描述:对该路径的说明,方便查看。
+
+* 参数类型:`dubbo`接口的参数类型列表,此处有两种声明方式。例如一个接口为 `update(Integer id, String name, Integer age)`
+
+ 方式一、类型列表
+
+ ```yaml
+ java.lang.Integer,java.lang.String,java.lang.Integer
+ ```
+
+ * 按照接口的参数类型顺序,通过半角逗号分隔。
+ * 请求传参时需**严格按照参数类型顺序传参**,没有值的用 `null`占位 。请求体示例:`{"id":1,"name": null,"age":18}`
+
+ 方式二、名称映射
+
+ ```yaml
+ {"id":"java.lang.Integer","name":"java.lang.String","age":"java.lang.Integer"}
+ ```
+
+ * 使用 `"参数名":"参数类型"`表示一个参数,按接口参数类型顺序设置,半角逗号分隔。
+ * 请求时无需关注顺序,也无需使用null占位。请求体示例: `{"name":"Mike","id":1}`
+
+* Rpc扩展参数:`dubbo`接口的其他配置,支持`json`格式,字段如下:
+
+```yaml
+{"timeout":10000,"group":"",version":"","loadbalance":"","retries":1}
+```
+
+* 服务接口:`dubbo`接口的全限定类名
+
+* `Rpc`类型:此处选择 `dubbo`。
diff --git a/i18n/zh/docusaurus-plugin-content-docs/version-2.5.1/plugin-center/proxy/grpc-plugin.md b/i18n/zh/docusaurus-plugin-content-docs/version-2.5.1/plugin-center/proxy/grpc-plugin.md
new file mode 100644
index 00000000000..5dd496ba2e8
--- /dev/null
+++ b/i18n/zh/docusaurus-plugin-content-docs/version-2.5.1/plugin-center/proxy/grpc-plugin.md
@@ -0,0 +1,81 @@
+---
+title: gRPC插件
+keywords: ["gRPC"]
+description: gRPC插件
+---
+
+
+## 说明
+
+`gRPC`插件是网关用于处理 `gRPC协议`请求的核心处理插件。
+
+## 插件设置
+
+* 引入相关依赖,开启插件,请参考:[gRPC快速开始](../../quick-start/quick-start-grpc) 。
+
+* `gRPC`应用客户端接入,请参考:[gRPC服务接入](../../user-guide/grpc-proxy) 。
+
+* 自`2.4.3版本`起grpc插件新增字段及含义:
+
+ * `threadpool`:业务线程池类型,有`cached`和`shared`共2种类型。
+
+ `cached`相当于grpc官方提供的默认线程池;
+
+ `shared`线程池,正如其名,`所有proxy插件`共用一个`shared`线程池,这样做的好处是能够减少线程池数量,进而降低内存、提高资源利用率。
+
+
+## 插件讲解
+
+
+客户端接入`Apache ShenYu`网关后,会自动注册选择器和规则信息,可以在插件列表 `->` rpc proxy `->` grpc 中查看。 关于选择器和规则配置,请参考:[选择器和规则管理](../../user-guide/admin-usage/selector-and-rule)。
+
+
+
+#### 选择器处理
+
+<img src="/img/shenyu/plugin/grpc/selector_handle.png" width="80%" height="80%" />
+
+
+选择器处理,即`handle`字段,是网关匹配到流量以后,可进行的处理操作。
+
+* 处理配置详解:
+
+
+ * `ip:port`:`ip` 与端口,这里填写你真实服务的 `ip` + 端口。
+
+ * `protocol`:`http` 协议,一般填写 `http://` 或者 `https://` ,不填写默认为:`http://`
+
+ * `weight`:服务权重。
+
+ * `status`:开启或关闭。
+
+
+## 元数据
+
+每一个`grpc`接口方法,都会对应一条元数据,当`gRPC`应用客户端接入到`Apache ShenYu`网关时,会自动注册,可以在 `shenyu-admin`后台管理系统的基础配置 `-->` 元数据管理中查看。
+
+<img src="/img/shenyu/plugin/grpc/metadata.png" width="80%" height="80%" />
+
+
+* 应用名称:该条元数据所属的应用名称。
+
+* 方法名称:需要调用的方法名。
+
+* 路径:`http`请路径。
+
+* 路径描述:对该路径的说明,方便查看。
+
+* 参数类型:`grpc`接口的参数类型列表,按照接口的参数类型顺序,通过半角逗号分隔。
+
+* Rpc扩展参数:`grpc`接口的其他配置,支持`json`格式,字段如下:
+
+```json
+{
+ "timeout": 5000,
+ "methodType": "BIDI_STREAMING"
+}
+```
+
+* 服务接口:`grpc`接口的全限定类名
+
+* `Rpc`类型:此处选择 `grpc`。
diff --git a/i18n/zh/docusaurus-plugin-content-docs/version-2.5.1/plugin-center/proxy/motan-plugin.md b/i18n/zh/docusaurus-plugin-content-docs/version-2.5.1/plugin-center/proxy/motan-plugin.md
new file mode 100644
index 00000000000..0543e32b21a
--- /dev/null
+++ b/i18n/zh/docusaurus-plugin-content-docs/version-2.5.1/plugin-center/proxy/motan-plugin.md
@@ -0,0 +1,59 @@
+---
+title: Motan插件
+keywords: ["Motan"]
+description: Motan插件
+---
+
+## 说明
+
+`Motan`插件是网关用于处理 `Motan协议`请求的核心处理插件。
+
+## 插件设置
+
+* 引入相关依赖,开启插件,请参考:[Motan快速开始](../../quick-start/quick-start-motan) 。
+
+* `Motan`应用客户端接入,请参考:[Motan服务接入](../../user-guide/motan-proxy) 。
+
+
+## 插件讲解
+
+客户端接入`Apache ShenYu`网关后,会自动注册选择器和规则信息,可以在插件列表 `->` rpc proxy `->` motan 中查看。 关于选择器和规则配置,请参考:[选择器和规则管理](../../user-guide/admin-usage/selector-and-rule)。
+
+#### 元数据
+
+每一个`motan`接口方法,都会对应一条元数据,当`motan`应用客户端接入到`Apache ShenYu`网关时,会自动注册,可以在 `shenyu-admin`后台管理系统的基础配置 `-->` 元数据管理中查看。
+
+<img src="/img/shenyu/plugin/motan/metadata.png" width="60%" height="50%" />
+
+* 应用名称:该条元数据所属的应用名称。
+
+* 方法名称:需要调用的方法名。
+
+* 路径:`motan`请求路径。
+
+* 路径描述:对该路径的说明,方便查看。
+
+* 参数类型:`motan`接口的参数类型列表,按照接口的参数类型顺序,通过半角逗号分隔。
+
+* Rpc扩展参数:描述了一个`motan`服务中每个接口信息。比如,下面是`motan`服务的接口信息:
+
+```json
+{
+ "methodInfo": [
+ {
+ "methodName": "hello",
+ "params": [
+ {
+ "left": "java.lang.String",
+ "right": "name"
+ }
+ ]
+ }
+ ],
+ "group": "motan-shenyu-rpc"
+}
+```
+
+* 服务接口:`motan`服务接口全限定名。
+
+* `Rpc`类型:下拉选择 `motan`。
diff --git a/i18n/zh/docusaurus-plugin-content-docs/version-2.5.1/plugin-center/proxy/mqtt-plugin.md b/i18n/zh/docusaurus-plugin-content-docs/version-2.5.1/plugin-center/proxy/mqtt-plugin.md
new file mode 100644
index 00000000000..777a67f957a
--- /dev/null
+++ b/i18n/zh/docusaurus-plugin-content-docs/version-2.5.1/plugin-center/proxy/mqtt-plugin.md
@@ -0,0 +1,50 @@
+---
+title: Mqtt 插件
+keywords: ["Mqtt"]
+description: Mqtt 插件
+---
+
+## 描述
+
+* 当前 MQTT 协议实现为 3.1 版本,实现的标识值为 `connect`、`publish`、`subscribe`、`unsubscribe`、`disconnect`、`PingReq`、`PingResp`,以及 QoS 0。
+
+* 缺少 retain、Qos(1,2) 实现,以及集群模式。
+
+* 具体请看 http://public.dhe.ibm.com/software/dw/webservices/ws-mqtt/mqtt-v3r1.html 内容
+
+## 引入 Mqtt 网关的插件支持
+
+* 在网关的 pom.xml 文件中引入这些依赖项。
+
+```xml
+<!-- apache shenyu mqtt plugin start-->
+<dependency>
+ <groupId>org.apache.shenyu</groupId>
+ <artifactId>shenyu-spring-boot-starter-plugin-mqtt</artifactId>
+ <version>${project.version}</version>
+</dependency>
+```
+
+## 插件配置
+
+* port:Mqtt监听端口。
+
+* bossGroupThreadCount:Netty主线程池大小,默认为1。
+
+* maxPayloadSize:最大有效载荷大小。
+
+* workerGroupThreadCount:Netty子线程池大小,默认为12。
+
+* username:用户名,默认为`shenyu`。
+
+* password:密码,默认为`shenyu`。
+
+* isEncryptPassword:是否加密密码,默认为 false 。
+
+* encryptMode:加密模式,目前仅支持MD5,其他加密方式可以自行实现,相关可以参考`org.apache.shenyu.protocol.mqtt.utils.EncryptUtil`这个加密工具类的实现。
+
+* leakDetectorLevel:资源泄露检测级别,默认DISABLED。
+
+## 注意
+
+* Mqtt插件没有选择器配置和规则配置。
diff --git a/i18n/zh/docusaurus-plugin-content-docs/version-2.5.1/plugin-center/proxy/sofa-plugin.md b/i18n/zh/docusaurus-plugin-content-docs/version-2.5.1/plugin-center/proxy/sofa-plugin.md
new file mode 100644
index 00000000000..81f1fadfd4b
--- /dev/null
+++ b/i18n/zh/docusaurus-plugin-content-docs/version-2.5.1/plugin-center/proxy/sofa-plugin.md
@@ -0,0 +1,206 @@
+---
+title: Sofa插件
+keywords: ["sofa"]
+description: sofa插件
+---
+
+# 1. 概述
+
+## 1.1 插件名称
+
+- sofa插件
+
+## 1.2 适用场景
+
+- 协议转换,将 http 协议的请求转换成 sofa 框架协议的服务处理的插件
+- 服务负载均衡
+
+## 1.3 插件功能
+
+- 将 http 协议的请求转换成 sofa 框架协议
+
+## 1.4 插件代码
+
+- 核心模块`shenyu-plugin-sofa`
+- 核心类`org.apache.shenyu.plugin.sofa.SofaPlugin`
+
+## 1.5 添加自哪个shenyu版本
+
+- 2.3.0
+
+# 2. 如何使用插件
+
+## 2.1 插件使用流程图
+
+
+
+## 2.2 导入pom
+
+```xml
+ <dependency>
+ <groupId>com.alipay.sofa</groupId>
+ <artifactId>rpc-sofa-boot-starter</artifactId>
+ <version>${rpc-sofa-boot-starter.version}</version>
+ </dependency>
+ <dependency>
+ <groupId>org.apache.shenyu</groupId>
+ <artifactId>shenyu-spring-boot-starter-client-sofa</artifactId>
+ <version>${project.version}</version>
+ <exclusions>
+ <exclusion>
+ <artifactId>guava</artifactId>
+ <groupId>com.google.guava</groupId>
+ </exclusion>
+ </exclusions>
+ </dependency>
+```
+
+## 2.3 在客户端项目中配置
+
+1. 在 application.yml 中配置 sofa 的配置
+
+```yaml
+com:
+ alipay:
+ sofa:
+ rpc:
+ registry-address: zookeeper://127.0.0.1:2181 # consul # nacos
+ bolt-port: 8888
+shenyu:
+ register:
+ registerType: http #zookeeper #etcd #nacos #consul
+ serverLists: http://localhost:9095 #localhost:2181 #http://localhost:2379 #localhost:8848
+ props:
+ username: admin
+ password: 123456
+ client:
+ sofa:
+ props:
+ contextPath: /sofa
+ ipAndPort: sofa
+ appName: sofa
+ port: 8888
+```
+
+2. 在 resources 目录下xml 文件中配置 sofa 服务暴露的服务接口
+
+```xml
+<beans xmlns="http://www.springframework.org/schema/beans"
+ xmlns:xsi="http://www.w3.org/2001/XMLSchema-instance"
+ xmlns:sofa="http://sofastack.io/schema/sofaboot"
+ xsi:schemaLocation="http://www.springframework.org/schema/beans http://www.springframework.org/schema/beans/spring-beans.xsd
+ http://sofastack.io/schema/sofaboot https://sofastack.io/schema/sofaboot.xsd"
+ default-autowire="byName">
+ <!-- 示例 sofa 接口 -->
+ <sofa:service ref="sofaSingleParamService" interface="org.apache.shenyu.examples.sofa.api.service.SofaSingleParamService">
+ <sofa:binding.bolt/>
+ </sofa:service>
+ <!-- 示例 sofa 接口 -->
+ <sofa:service ref="sofaMultiParamService" interface="org.apache.shenyu.examples.sofa.api.service.SofaMultiParamService">
+ <sofa:binding.bolt/>
+ </sofa:service>
+</beans>
+```
+
+3. 在接口上添加`@ShenyuSofaClient`注解
+
+```java
+@ShenyuSofaClient("/demo")
+@Service
+public class SofaClientMultiParamServiceImpl implements SofaClientMultiParamService {
+
+ @Override
+ @ShenyuSofaClient("/findByIdsAndName")
+ public SofaSimpleTypeBean findByIdsAndName(final List<Integer> ids, final String name) {
+ return new SofaSimpleTypeBean(ids.toString(), "hello world shenyu sofa param findByIdsAndName :" + name);
+ }
+}
+```
+
+## 2.4 启用插件
+
+- 在 `shenyu-admin` --> 基础配置 --> 插件管理-> `sofa` ,设置为开启。
+
+ 
+
+
+## 2.5 配置插件
+
+### 2.5.1 配置注册中心参数
+
+
+
+- `protocol`: 注册中心协议,目前支持 zookeeper、consul、nacos。
+- `register`: 注册中心的服务 IP 和 PORT。
+- `threadpool`:业务线程池类型,有`fixed`、`eager`、`cached`、`limited`和`shared`共5种类型,前面4种与dubbo官方提供的线程池一一对应,不多解释,这里单独说下`shared`,正如其名,`所有proxy插件`共用一个`shared`线程池,这样做的好处是能够减少线程池数量,进而降低内存、提高资源利用率。
+- `corethreads`:业务线程池核心线程数。
+- `threads`:业务线程池最大线程数。
+- `queues`:业务线程池阻塞队列长度,0表示`无界阻塞队列`。
+
+### 2.5.2 选择器配置
+
+> 流量需要经过选择器匹配。
+
+
+
+- 通过`@ShenyuSofaClient`注解自动配置选择器。
+
+### 2.5.3 规则配置
+
+> 流量经过选择器匹配成功之后,会进入规则来进行最终的流量匹配。
+
+
+
+- 通过`@ShenyuSofaClient`注解自动配置选择器。
+
+### 2.5.4 元数据配置
+
+> 当`sofa` 应用客户端接入到`Apache ShenYu`网关时,会自动注册,可以在 `shenyu-admin`后台管理系统的基础配置 `-->` 元数据管理中查看,每一个`sofa`接口方法,都会对应一条元数据。
+
+
+
+- 应用名称:该条元数据所属的应用名称。
+
+- 方法名称:需要调用的方法名。
+
+- 路径:`http`请路径。
+
+- 路径描述:对该路径的说明,方便查看。
+
+- 参数类型:按照接口的参数类型顺序。
+
+- Rpc扩展参数:接口的扩展参数配置,`json`格式。
+
+ 示例:`{"loadbalance":"hash","retries":3,"timeout":-1}`
+
+ - `loadbalance`:负载均衡策略,当前支持 roundRobin、random 和 hash。
+ - `retries`:调用客户端超时失败的重试次数。
+ - `timeout`:调用客户端的超时时间。
+
+- 服务接口:`sofa`接口的全限定类名。
+- `Rpc`类型:下拉选择 `sofa`。
+
+## 2.6 示例
+
+### 2.6.1 使用 ShenYu 访问 sofa 服务
+
+#### 2.6.1.1 准备工作
+
+- 启动 `Zookeeper` 服务注册发现中心
+- 启动 `ShenYu Admin`。
+- 启动 `Shenyu Bootstrap`。
+
+#### 2.6.1.2 插件配置
+
+- 打开插件,在 `shenyu-admin` --> 基础配置 --> 插件管理-> `sofa` ,设置为开启,并且根据需要调整注册中心配置。
+- 根据实际情况调整 [shenyu-examples-sofa](https://github.com/apache/shenyu/tree/master/shenyu-examples/shenyu-examples-sofa) 项目中 application.yml 配置并启动。
+
+#### 2.6.2.6 请求服务并且验证结果
+
+
+
+# 3. 如何禁用插件
+
+- 在 shenyu-admin --> 基础配置 --> 插件管理 --> 关闭 sofa 插件状态
+
+
diff --git a/i18n/zh/docusaurus-plugin-content-docs/version-2.5.1/plugin-center/proxy/spring-cloud-plugin.md b/i18n/zh/docusaurus-plugin-content-docs/version-2.5.1/plugin-center/proxy/spring-cloud-plugin.md
new file mode 100644
index 00000000000..a191153c255
--- /dev/null
+++ b/i18n/zh/docusaurus-plugin-content-docs/version-2.5.1/plugin-center/proxy/spring-cloud-plugin.md
@@ -0,0 +1,305 @@
+---
+title: Spring Cloud插件
+keywords: ["SpringCloud"]
+description: Spring Cloud插件
+---
+
+
+# 1. 概述
+
+## 1.1 插件名称
+
+* SpringCloud插件
+
+## 1.2 适用场景
+
+* 用来将`http协议` 转成 `Spring Cloud协议`。
+* 用于SpringCloud微服务灰度流量控制。
+
+## 1.3 插件功能
+
+* 将`http协议` 转成 `Spring Cloud协议`。
+
+## 1.4 插件代码
+
+* 核心模块 `shenyu-plugin-springcloud`
+
+* 核心类 `org.apache.shenyu.plugin.springcloud.SpringCloudPlugin`
+
+## 1.5 添加自哪个shenyu版本
+
+* 2.4.0
+
+# 2. 如何使用插件
+
+* 引入相关依赖,开启插件,请参考:[Spring Cloud快速开始](../../quick-start/quick-start-springcloud) 。
+
+* `Spring Cloud`应用客户端接入,请参考:[Spring Cloud服务接入](../../user-guide/spring-cloud-proxy) 。
+
+## 2.1 插件使用流程图
+
+
+
+## 2.2 导入pom
+
+* Eureka Registry
+
+```xml
+<dependency>
+ <groupId>org.apache.shenyu</groupId>
+ <artifactId>shenyu-spring-boot-starter-plugin-springcloud</artifactId>
+ <version>${project.version}</version>
+</dependency>
+
+<dependency>
+ <groupId>org.springframework.cloud</groupId>
+ <artifactId>spring-cloud-starter-netflix-eureka-client</artifactId>
+ <version>${eureka-client.version}</version>
+</dependency>
+
+<dependency>
+ <groupId>org.springframework.cloud</groupId>
+ <artifactId>spring-cloud-commons</artifactId>
+ <version>${spring-cloud-commons.version}</version>
+</dependency>
+
+<dependency>
+ <groupId>org.apache.shenyu</groupId>
+ <artifactId>shenyu-spring-boot-starter-plugin-httpclient</artifactId>
+ <version>${project.version}</version>
+</dependency>
+```
+
+* Nacos Registry
+
+```xml
+<dependency>
+ <groupId>org.apache.shenyu</groupId>
+ <artifactId>shenyu-spring-boot-starter-plugin-springcloud</artifactId>
+ <version>${project.version}</version>
+</dependency>
+
+<dependency>
+ <groupId>com.alibaba.cloud</groupId>
+ <artifactId>spring-cloud-starter-alibaba-nacos-discovery</artifactId>
+ <version>${nacos-discovery.version}</version>
+</dependency>
+
+<dependency>
+ <groupId>org.springframework.cloud</groupId>
+ <artifactId>spring-cloud-commons</artifactId>
+ <version>${spring-cloud-commons.version}</version>
+</dependency>
+
+<dependency>
+ <groupId>org.apache.shenyu</groupId>
+ <artifactId>shenyu-spring-boot-starter-plugin-httpclient</artifactId>
+ <version>${project.version}</version>
+</dependency>
+```
+
+## 2.3 在ShenYu Bootstrap配置SpringCloud
+
+### 2.3.1 配置SpringCloud的Eureka服务注册发现
+
+```yaml
+spring:
+ cloud:
+ discovery:
+ enabled: true
+
+eureka:
+ client:
+ enabled: true
+ serviceUrl:
+ defaultZone: http://localhost:8761/eureka/
+ instance:
+ prefer-ip-address: true
+```
+
+### 2.3.2 配置SpringCloud的Nacos服务注册发现
+
+```yaml
+spring:
+ cloud:
+ discovery:
+ enabled: true
+ nacos:
+ discovery:
+ server-addr: 127.0.0.1:8848 # Spring Cloud Alibaba Dubbo use this.
+ enabled: true
+ namespace: ShenyuRegisterCenter
+```
+
+### 2.3.3 配置SpringCloud插件负载均衡
+
+> *注意*
+>
+> 在ShenYu 2.5.0(包括)之后,ShenYu使用自有的`shenyu-loadbalancer`作为负载均衡客户端,你只需要在springcloud插件的规则配置中配置负载均衡。
+> 如果你没有配置负载均衡,将使用默认的`roundRobin`算法。
+>
+> 在ShenYu 2.4.3(包括)之前,ShenYu使用`Ribbon`作为负载均衡客户端,你必须如下配置负载均衡。
+
+```yaml
+spring:
+ cloud:
+ loadbalancer:
+ ribbon:
+ enabled: true
+```
+
+## 2.4 启用插件
+
+- 在 `shenyu-admin` --> 基础配置 --> 插件管理-> `springCloud` ,设置为开启。
+
+<img src="/img/shenyu/quick-start/springcloud/springcloud_open_en.png" width="60%" height="50%" />
+
+## 2.5 配置插件
+
+### 2.5.1 插件配置
+
+* 你必须配置你的服务注册发现中心并将插件打开。
+
+### 2.5.2 选择器和灰度流量配置
+
+
+
+* 灰度路由
+
+如果您想在springCloud插件中使用灰色路由,可以单击“灰色”按钮。
+
+
+
+* 灰度发布可以在发布新版本应用时,自定义控制新版本应用流量比重,渐进式完成新版本应用的全量上线,最大限度地控制新版本发布带来的业务风险,降低故障带来的影响面,同时支持快速回滚。
+
+当开启灰度是,网关的负载平衡算法将从当前节点列表中选择一个节点进行路由,并且您可以通过修改节点权重以更改负载平衡算法中节点的权重。
+
+<img src="/img/shenyu/plugin/springcloud/gray.png" width="80%" height="80%" />
+
+需要注意的是,如果您的业务实例没有使用`shenyu-client-springcloud`的客户端进行业务注册发现,您应该在当前选择器页面上手动添加节点信息进行灰度路由。
+
+* 处理配置详解:
+
+ * `serviceId`:serviceId。
+
+ * `gray`:启用灰度路由。
+
+ * `protocol`:协议默认值为'http://'。
+
+ * `upstreamUrl`: 服务器节点地址。
+
+ * `weight`: 服务器节点权重。
+
+ * `status`:true:服务器可用,false:服务器不可用。
+
+ * `timestamp`:节点的启动时间。
+
+ * `warmup`:节点的预热时间,参与负载均衡计算。
+
+
+### 2.5.3 规则配置
+
+规则处理,即`handle`字段,是网关对流量完成最终匹配后,可以进行处理的操作。更多信息请参考插件管理中的 [插件处理管理](../../user-guide/admin-usage/plugin-handle-explanation) 。
+
+* 使用 `shenyu-client-springcloud` 的规则配置
+
+
+
+* 规则配置详解:
+
+ * `timeout`:设置请求超时时间。
+ * `loadbalance`:负载均衡算法,有三个可选项:`roundRobin`,`random`,`hash`
+
+* 未使用 `shenyu-client-springcloud` 的规则配置
+
+
+
+* 规则配置详解:
+
+ * `path`:请求路径。
+ * `timeout`:设置请求超时时间。
+
+## 2.6 示例
+
+### 2.6.1 使用ShenYu访问SpringCloud服务
+
+#### 2.6.1.1 准备工作
+
+- 启动 `Eureka` 或 `Nacos` 服务注册发现中心, 如果你使用eureka, 启动 `shenyu-examples-eureka`即可
+- 启动 `ShenYu Admin`
+- 启动 `shenyu-examples-springcloud`
+
+#### 2.6.1.2 插件配置
+
+- 在 `shenyu-admin` --> 基础配置 --> 插件管理-> `springCloud` ,设置为开启。
+
+- 在`ShenYu Bootstrap`配置服务注册发现中心, 请查看 [2.3 在ShenYu Bootstrap配置SpringCloud](#2.3 在ShenYu Bootstrap配置SpringCloud)
+
+#### 2.6.1.3 选择器配置
+
+
+
+如果你想使用注册到ShenYu的灰度流量,你必须配置灰度路由。
+
+
+
+#### 2.6.1.4 规则配置
+
+如果你使用`shenyu-client-springcloud`注册服务到`ShenYu`,你可以不用配置规则,如果你想改变规则,请查看[2.5.3 规则配置](#2.5.3 规则配置)
+
+#### 2.6.1.5 请求服务并且验证结果
+
+
+
+### 2.6.2 使用ShenYu访问未注册到ShenYu的SpringCloud服务
+
+#### 2.6.2.1 准备工作
+
+- 启动 `Eureka` 或 `Nacos` 服务注册发现中心, 如果你使用eureka, 启动 `shenyu-examples-eureka`即可
+- 启动 `ShenYu Admin`
+- 启动 `shenyu-examples-springcloud`
+
+#### 2.6.2.2 插件配置
+
+- 在 `shenyu-admin` --> 基础配置 --> 插件管理-> `springCloud` ,设置为开启。
+
+- 在`ShenYu Bootstrap`配置服务注册发现中心, 请查看 [2.3 在ShenYu Bootstrap配置SpringCloud](#2.3 在ShenYu Bootstrap配置SpringCloud)
+
+#### 2.6.2.3 选择器配置
+
+
+
+如果你想使用未注册到ShenYu的灰度流量,你必须配置灰度流量相关的配置
+
+
+
+#### 2.6.2.4 规则配置
+
+
+
+你必须在规则配置中配置`path`字段,`path`字段为你的服务uri,例如:`/springcloud/new/feature/gateway/not`, `timeout`为你的服务允许的超时时间。
+
+#### 2.6.2.5 通过配置访问未注册的服务
+
+##### 2.6.2.5.1 在请求头使用 `rpc_type`字段进行访问
+
+```
+### shengyu getway proxy not support
+POST http://localhost:9195/springcloud/new/feature/gateway/not
+Accept: application/json
+Content-Type: application/json
+rpc_type: springCloud
+```
+
+##### 2.6.2.5.2 在ShenYuAdmin 添加元信息
+
+
+
+#### 2.6.2.6 请求服务并且验证结果
+
+
+
+
+# 3. 如何禁用插件
+
+- 在 `shenyu-admin` --> 基础配置 --> 插件管理-> `springCloud` ,设置为关闭。
diff --git a/i18n/zh/docusaurus-plugin-content-docs/version-2.5.1/plugin-center/proxy/tars-plugin.md b/i18n/zh/docusaurus-plugin-content-docs/version-2.5.1/plugin-center/proxy/tars-plugin.md
new file mode 100644
index 00000000000..c74621589ee
--- /dev/null
+++ b/i18n/zh/docusaurus-plugin-content-docs/version-2.5.1/plugin-center/proxy/tars-plugin.md
@@ -0,0 +1,169 @@
+---
+title: Tars插件
+keywords: ["Tars"]
+description: Tars插件
+---
+
+# 1. 概述
+
+## 1.1 插件名称
+
+- Tars插件
+
+## 1.2 适用场景
+
+- 协议转换,将 http 协议的请求转换成 Tars 框架协议的服务处理的插件
+- 服务负载均衡
+
+## 1.3 插件功能
+
+- 将 http 协议的请求转换成 Tars 框架协议
+
+## 1.4 插件代码
+
+- 核心模块`shenyu-plugin-tars`
+- 核心类`org.apache.shenyu.plugin.tars.TarsPlugin`
+
+## 1.5 添加自哪个shenyu版本
+
+- 2.3.0
+
+# 2. 如何使用插件
+
+## 2.1 插件使用流程图
+
+
+
+## 2.2 导入pom
+
+```xml
+ <dependency>
+ <groupId>org.apache.shenyu</groupId>
+ <artifactId>shenyu-spring-boot-starter-client-tars</artifactId>
+ <version>${shenyu.version}</version>
+ </dependency>
+```
+
+## 2.3 在客户端项目中配置
+
+1. 在 application.yml 中配置 Tars 的配置
+
+```yaml
+shenyu:
+ register:
+ registerType: http #zookeeper #etcd #nacos #consul
+ serverLists: http://localhost:9095 #localhost:2181 #http://localhost:2379 #localhost:8848
+ props:
+ username: admin
+ password: 123456
+ client:
+ tars:
+ props:
+ contextPath: /tars
+ appName: tars
+ port: 21715
+ host: 192.168.41.103 # client IP
+```
+
+2. 在接口上添加`@ShenyuTarsService`和`@ShenyuTarsClient`注解
+
+```java
+@TarsServant("HelloObj")
+@ShenyuTarsService(serviceName = "ShenyuExampleServer.ShenyuExampleApp.HelloObj")
+public class HelloServantImpl implements HelloServant {
+
+ @Override
+ @ShenyuTarsClient("/hello")
+ public String hello(final int no, final String name) {
+ return String.format("hello no=%s, name=%s, time=%s", no, name, System.currentTimeMillis());
+ }
+}
+```
+
+
+
+## 2.4 启用插件
+
+- 在 `shenyu-admin` --> 基础配置 --> 插件管理-> `tars` ,设置为开启。
+
+
+
+## 2.5 配置插件
+
+### 2.5.1 配置插件
+
+
+
+- `multiSelectorHandle`:设置为可以多个选择器处理,在选择器列表可配置多个选择器处理服务。
+- `multiRuleHandle`:设置为可以多个规则处理,在规则列表配置多个处理规则,建议配置为 single rule。
+- `threadpool`:业务线程池类型,有`fixed`、`eager`、`cached`、`limited`和`shared`共5种类型,前面4种与dubbo官方提供的线程池一一对应,不多解释,这里单独说下`shared`,正如其名,`所有proxy插件`共用一个`shared`线程池,这样做的好处是能够减少线程池数量,进而降低内存、提高资源利用率。
+- `corethreads`:业务线程池核心线程数。
+- `threads`:业务线程池最大线程数。
+- `queues`:业务线程池阻塞队列长度,0表示`无界阻塞队列`。
+
+### 2.5.2 选择器配置
+
+> 流量需要经过选择器匹配。
+
+
+
+- 通过`@ShenyuTarsClient`注解自动配置选择器。
+
+### 2.5.3 规则配置
+
+> 流量经过选择器匹配成功之后,会进入规则来进行最终的流量匹配。
+
+
+
+- 通过`@ShenyuTarsClient`注解自动配置规则。
+
+### 2.5.4 元数据配置
+
+> 当`Tars` 应用客户端接入到`Apache ShenYu`网关时,会自动注册,可以在 `shenyu-admin`后台管理系统的基础配置 `-->` 元数据管理中查看,每一个`Tars`接口方法,都会对应一条元数据。
+
+
+
+- 应用名称:该条元数据所属的应用名称。
+
+- 方法名称:需要调用的方法名。
+
+- 路径:`http`请路径。
+
+- 路径描述:对该路径的说明,方便查看。
+
+- 参数类型:按照接口的参数类型顺序。
+
+- Rpc扩展参数:接口的扩展参数配置,`json`格式。
+
+ 示例:`{"loadbalance":"hash","retries":3,"timeout":-1}`
+
+ - `loadbalance`:负载均衡策略,当前支持 roundRobin、random 和 hash。
+ - `retries`:调用客户端超时失败的重试次数。
+ - `timeout`:调用客户端的超时时间。
+
+- 服务接口:`Tars`接口的全限定类名。
+- `Rpc`类型:自动注册默认为 `tars`。
+
+## 2.6 示例
+
+### 2.6.1 使用 ShenYu 访问 Tars 服务
+
+#### 2.6.1.1 准备工作
+
+- 启动 `ShenYu Admin`。
+- 启动 `Shenyu Bootstrap`。
+
+#### 2.6.1.2 插件配置
+
+- 打开插件,在 `shenyu-admin` --> 基础配置 --> 插件管理-> `tars` ,设置为开启。
+- 根据实际情况调整 [shenyu-examples-tars](https://github.com/apache/shenyu/tree/master/shenyu-examples/shenyu-examples-tars) 项目中 application.yml 和 ShenyuExampleServer.ShenyuExampleApp.config.conf 文件并启动。
+
+#### 2.6.2.6 请求服务并且验证结果
+
+
+
+# 3. 如何禁用插件
+
+- 在 shenyu-admin --> 基础配置 --> 插件管理 --> 关闭 Tars 插件状态
+
+
diff --git a/i18n/zh/docusaurus-plugin-content-docs/version-2.5.1/plugin-center/proxy/websocket-plugin.md b/i18n/zh/docusaurus-plugin-content-docs/version-2.5.1/plugin-center/proxy/websocket-plugin.md
new file mode 100644
index 00000000000..edf99a40655
--- /dev/null
+++ b/i18n/zh/docusaurus-plugin-content-docs/version-2.5.1/plugin-center/proxy/websocket-plugin.md
@@ -0,0 +1,277 @@
+---
+title: Websocket插件
+keywords: ["Websocket"]
+description: Websocket插件
+---
+
+# 1. 概述
+
+## 1.1 插件名称
+
+* Websocket 插件
+
+## 1.2 适用场景
+
+* 转发场景,处理 websocket协议 请求,将其转发到后端其他 websocket 协议的服务
+* 服务负载均衡
+
+## 1.3 插件功能
+
+* 支持根据 host、uri、query 等请求信息做流量的治理
+* 支持设置请求的负载均衡策略,同时支持服务预热,目前支持三种策略:ip hash(带虚拟节点的一致性哈希)、round-robbin(加权轮询)、random(加权随机)
+* 支持设置接口级别请求超时时间
+* 支持设置超时重试次数
+
+## 1.4 插件代码
+
+* 核心模块 ```shenyu-plugin-websocket```
+* 核心类 ```org.apache.shenyu.plugin.websocket.WebSocketPlugin```
+
+## 1.5 添加自哪个shenyu版本
+
+- 2.4.3
+
+# 2. 如何使用插件
+
+## 2.1 插件使用流程图
+
+
+
+**名词解释**
+- shenyu 网关:包含 shenyu-admin 和 shenyu-bootstrap 服务。
+- 客户端项目:后端真实 websocket 服务
+
+**流程解释**
+1. 启动 shenyu 网关服务:参照运维部署,启动 shenyu-admin 和 shenyu-bootstrap,确保 shenyu 网关服务正常
+2. 在 shenyu-admin 中启用 websocket 插件:在 shenyu-admin 插件管理的页面中开启 websocket 插件
+3. 配置和启动客户端项目:启动客户端项目(后端真实 websocket 服务),并将服务信息配置到 shenyu 网关中,分为手动配置和自动配置两种方式
+4. 检查转发是否正常:检查转发能否成功
+
+## 2.2 启用插件
+
+- 在 shenyu-admin --> 基础配置 --> 插件管理 --> websocket 设置为开启。
+
+
+
+
+## 2.3 配置客户端服务
+
+### 2.3.1 手动配置
+
+> 在 shenyu-admin 页面上手动配置客户端服务,后端服务不需要任何改动,即可实现 websocket 协议转发
+
+1. Websocket 插件中添加选择器
+
+
+
+2. Websocket 插件中添加规则
+
+
+
+3. 启动客户端项目(后端 websocket 服务)
+
+4. 测试服务转发是否成功
+
+- 测试代码见附件5.1
+
+
+
+### 2.3.2 自动配置
+
+> 如果某些场景你需要通过自动配置来减少工作量,可以在后端服务中增加注解,实现自动配置服务到 shenyu 网关中
+
+1. 在后端服务项目中的 pom.xml 文件中添加插件 maven 配置。
+
+```xml
+ <dependency>
+ <groupId>org.apache.shenyu</groupId>
+ <artifactId>shenyu-spring-boot-starter-plugin-websocket</artifactId>
+ <version>${project.version}</version>
+ </dependency>
+```
+
+2. 使用`@ShenyuSpringWebSocketClient`注解,该注解会将 websocket 服务自动注册到 shenyu 网关
+3. 调整插件配置,配置参数详情见 2.4.1
+4. 启动客户端项目(后端 websocket 服务),示例代码见 2.5 示例
+5. 检查 shenyu-admin 页面中插件列表服务注册信息是否注册成功
+6. 测试服务转发是否成功
+
+- 测试代码见附件5.1
+
+
+
+## 2.4 配置插件
+
+### 2.4.1 在客户端项目中配置文件中配置接入参数
+
+* 客户端接入方式和服务器地址,参数为: `shenyu.register.*`,下面的示例使用了 http 接入方式,目前客户端支持的接入的方式有以下几种:http、zookeeper、etcd、nacos、consul,详细的接入配置参数请参考[客户端接入配置](../../user-guide/property-config/register-center-access.md)。
+* 客户端配置,参数为: `shenyu.client.websocket.*`,包含服务的名称、路由地址以及端口,必须配置 contextPath 的值作为每个服务的路由地址。
+
+```yaml
+shenyu:
+ register:
+ registerType: http
+ serverLists: http://localhost:9095
+ props:
+ username: admin
+ password: 123456
+ client:
+ websocket:
+ props:
+ contextPath: /ws-annotation
+ appName: ws-annotation
+ port: 8001 # 需要和服务端口保持一致
+```
+
+### 2.4.2 在 shenyu-admin 配置 websocket 插件的选择器和规则信息
+
+使用自动配置的方式,在客户端启动之后会在 shenyu-admin -> 插件列表 -> Proxy -> Websocket 自动注册[选择器和规则](../../user-guide/admin-usage/selector-and-rule.md)信息。
+
+
+#### 2.4.2.1 选择器的配置
+
+Websocket 选择器示例,通用选择器配置请参考[选择器和规则](../../user-guide/admin-usage/selector-and-rule.md)。
+
+
+
+##### 2.4.2.1.1 选择器处理信息配置
+
+- `host`:填写 `localhost`,该字段暂时没使用。
+- `ip:port`:`ip` 与端口,这里填写你真实服务的 `ip` + 端口。
+- `protocol`::`ws` 协议,不填写默认为:`ws://`
+- `startupTime`: 启动时间,单位毫秒。
+- `weight`:负载均衡权重,服务启动自动注册的默认值为 50。
+- `warmupTime`:预热时间,单位毫秒,在预热中的服务器会计算瞬时权重,计算值会小于实际配置的权重,以保护刚启动的服务器,服务启动注册的默认值为 10。举个例子预热时间 100 毫秒,目前启动了 50 毫秒,配置的权重 50, 实际的权重是 25。
+- `status`:开启或关闭,开始状态此处理器才有效。
+
+#### 2.4.2.2 规则的配置
+
+Websocket 规则示例,通用规则配置请参考[选择器和规则](../../user-guide/admin-usage/selector-and-rule.md)。
+
+
+
+##### 2.4.2.2.1 规则处理信息配置
+
+- `loadStrategy`:如果 websocket 客户端是一个集群,Apache ShenYu 网关调用时采取哪种负载均衡策略,当前支持 roundRobin、random 和 hash。
+- `timeout`:调用客户端的超时时间。
+- `retryCount`:调用客户端超时失败的重试次数。
+
+## 2.5 示例
+
+### 2.5.1 Spring Annotation Websocket使用示例
+
+[shenyu-example-spring-annotation-websocket](https://github.com/apache/shenyu/tree/master/shenyu-examples/shenyu-examples-websocket/shenyu-example-spring-annotation-websocket)
+
+### 2.5.2 Spring Native Websocket 使用示例
+
+[shenyu-example-spring-native-websocket](https://github.com/apache/shenyu/tree/master/shenyu-examples/shenyu-examples-websocket/shenyu-example-spring-native-websocket)
+
+### 2.5.3 Spring Reactive Websocket 使用示例
+
+[shenyu-example-spring-reactive-websocket](https://github.com/apache/shenyu/tree/master/shenyu-examples/shenyu-examples-websocket/shenyu-example-spring-reactive-websocket)
+
+# 3. 如何禁用插件
+
+- 在 shenyu-admin --> 基础配置 --> 插件管理 --> 关闭 websocket 插件状态
+
+
+
+# 4. 常见问题
+
+**4.1 websocket 建立连接出现 1002 错误**
+
+可能原因:客户端服务不正常,shenyu 网关和客户端项目不能建立正常连接,请检查网关到客户端的网络、客户端服务是否正常
+
+**4.2 多个客户端服务在 websocket 选择器中展示为空**
+
+可能原因:基础配置-> 插件管理 -> websocket -> multiSelectorHandle 选项选择 multiple handle
+
+
+
+# 5. 附件
+
+## 5.1 websocket调试代码
+
+- 创建一个名为 websocket.html 的文件,复制下面的代码到文件中
+- 使用谷歌浏览器打开 websocket.html
+
+```html
+<!DOCTYPE HTML>
+<html>
+<head>
+ <meta http-equiv="content-type" content="text/html" />
+ <title>Shenyu WebSocket Test</title>
+ <script>
+ var websocket;
+ function connect() {
+ try {
+ websocket = new WebSocket(document.getElementById("url").value);
+ websocket.onopen = onOpen;
+ websocket.onerror = onError;
+ websocket.onmessage = onReceive;
+ websocket.onclose = onClose;
+ } catch (e) {
+ alert('[websocket] establish connection error.');
+ }
+ }
+ function onOpen() {
+ alert('[websocket] connect success.');
+ }
+ function onError(e) {
+ alert("[websocket] connect error. code: " + e.code);
+ }
+ function onReceive(msg) {
+ var show = document.getElementById("show");
+ show.innerHTML += "[Server Response] => " + msg.data + "<br/>";
+ show.scrollTop = show.scrollHeight;
+ }
+ function onClose(e) {
+ console.log("[websocket] connect closed. code: " + e.code)
+ alert("[websocket] connect closed.");
+ document.getElementById("show").innerHTML = "";
+ document.getElementById("msg").value = "";
+ websocket = null;
+ }
+ function buttonClose() {
+ if (websocket == null) {
+ console.log("Please establish a connection first.")
+ } else {
+ websocket.close(1000);
+ document.getElementById("show").innerHTML = "";
+ document.getElementById("msg").value = "";
+ }
+ }
+ function send() {
+ if (websocket == null) {
+ alert("Please establish a connection first.")
+ } else {
+ var msg = document.getElementById("msg").value;
+ show.innerHTML += "[Client Request] => " + msg + "<br/>";
+ websocket.send(msg);
+ }
+ }
+ </script>
+</head>
+<body>
+ <input id="url" type="text" value="ws://localhost:9195/ws-annotation/myWs"><br />
+ <input id="msg" type="text"><br />
+ <button id="connect" onclick="connect();">Connect</button>
+ <button id="send" onclick="send();">Send</button>
+ <button id="close" onclick="buttonClose();">Close</button></br>
+ <div id="show" class="show"></div>
+</body>
+</html>
+<style>
+ input {
+ width: 400px;
+ margin-bottom: 10px;
+ }
+ .show {
+ width: 600px;
+ height: 400px;
+ overflow-y: auto;
+ border: 1px solid #333;
+ margin-top: 10px;
+ }
+</style>
+```
diff --git a/i18n/zh/docusaurus-plugin-content-docs/version-2.5.1/plugin-center/security/_category_.json b/i18n/zh/docusaurus-plugin-content-docs/version-2.5.1/plugin-center/security/_category_.json
new file mode 100644
index 00000000000..5ad8cb287a1
--- /dev/null
+++ b/i18n/zh/docusaurus-plugin-content-docs/version-2.5.1/plugin-center/security/_category_.json
@@ -0,0 +1,4 @@
+{
+ "label": "安全性",
+ "position": 4
+}
diff --git a/i18n/zh/docusaurus-plugin-content-docs/version-2.5.1/plugin-center/security/casdoor.md b/i18n/zh/docusaurus-plugin-content-docs/version-2.5.1/plugin-center/security/casdoor.md
new file mode 100644
index 00000000000..a3b09f5d30b
--- /dev/null
+++ b/i18n/zh/docusaurus-plugin-content-docs/version-2.5.1/plugin-center/security/casdoor.md
@@ -0,0 +1,72 @@
+---
+title: Casdoor插件
+keywords: ["Casdoor"]
+description: Casdoor插件
+---
+
+ShenYu 有Casdoor插件去使用Casdoor
+
+## 第一步.部署Casdoor
+
+首先,我们需要部署Casdoor.
+
+我们可以参考Casdoor官方文档去部署它.
+
+在成功部署之后,我们需要确保:
+
+* Casdoor服务成功在 **http://localhost:8000**上运行
+
+* 打开你喜爱的浏览器浏览 **http://localhost:7001**,你可以看到Casdoor的登陆页面
+
+* 输入`admin`和`123`去测试登录是否成功
+
+ 登陆成功之后,我们就可以使用casdoor.
+
+## 第二步.设置Casdoor应用
+
+### 1.创建或应用一个存在的组织
+
+### 2.添加我们的回调url
+
+ 
+
+### 3.在证书的编辑页面,我们能看到我们的`Certificate`
+
+ 
+
+## 第三步.运用Casdoor插件在Shenyu
+
+### 1.设置Casdoor插件在Shenyu
+
+ 
+
+注意:因为Shenyu只有单行输入框所以我们需要增加\n在每一行的证书.
+
+ 
+
+我们可以在复制他们并将它们粘贴到Shenyu的Casdoor配置中的certificate这一项中
+
+**我们不需要保存我们加\n的内容在Casdoor的证书设置处**,因为这只是为了复制方便.
+
+#### 2.设置Shenyu Casdoor的插件配置
+
+ 
+
+我们可以设置你所拥有的casdoor配置在Shenyu配置中
+
+### 3.得到服务和运用
+
+#### 3.1 直接访问页面
+
+ 
+
+#### 3.2 使用Casdoor登录
+
+ 
+ 
+
+#### 3.3携带token在Headers,你可以访问该页面
+
+ 
+
+#### 3.4 我们可以保存name,id和organization在Headers以至于你可以运用他们在下一次
diff --git a/i18n/zh/docusaurus-plugin-content-docs/version-2.5.1/plugin-center/security/cryptor-request-plugin.md b/i18n/zh/docusaurus-plugin-content-docs/version-2.5.1/plugin-center/security/cryptor-request-plugin.md
new file mode 100644
index 00000000000..dcbb1a55d8f
--- /dev/null
+++ b/i18n/zh/docusaurus-plugin-content-docs/version-2.5.1/plugin-center/security/cryptor-request-plugin.md
@@ -0,0 +1,64 @@
+---
+title: CryptorRequest 插件
+keywords: ["CryptorRequest"]
+description: CryptorRequest 插件
+---
+
+## 说明
+
+* `cryptorRequest` 插件是通过 `fieldNames` 去匹配 `requestBody` 里面的参数进行 `解密` 处理,替换当前 `requestBody` 内容。
+
+## 插件设置
+
+1. 在 `shenyu-admin` --> 基础配置 --> 插件管理 --> `cryptorRequest` 设置为开启。
+
+<img src="/img/shenyu/plugin/cryptor/enable-cryptor-request-plugin.png" width="80%" height="80%" />
+
+2. 打开 `selector` 配置需要匹配的流量。
+
+3. 打开 `selector` 对应的 `Rules` 配置。
+
+ <img src="/img/shenyu/plugin/cryptor/cryptor-request-rules-config.png" width="80%" height="80%" />
+
+* strategyName: 解密算法名称。当前基于 shenyu 的 SPI 机制,可自定义加解密算法,
+ 需要实现 `org.apache.shenyu.plugin.cryptor.strategy.CryptorStrategy` 接口。
+
+ 同时找到 `resources/META-INF/shenyu/` 底下的 `org.apache.shenyu.plugin.cryptor.strategy.CryptorStrategy` 文件,
+ 写上算法名称以及实现的 `CryptorStrategy` 接口的 class 的包名。
+
+* fieldNames: 匹配的参数名,支持解析多层次的 json 格式匹配,使用 `.` 分割,例如 data.id 。
+
+```json5
+ {
+ data: {
+ "id": ""
+ }
+ }
+```
+
+* decryptKey: 密钥,用于解密数据。
+
+* encryptKey: 密钥,用于加密数据。
+
+* way: 选择加密或解密。
+
+## 插件使用
+
+* 在网关的 `pom.xml` 文件中添加 `cryptorRequest` 的支持。
+
+```xml
+<!-- apache shenyu Cryptor Request plugin start-->
+<dependency>
+ <groupId>org.apache.shenyu</groupId>
+ <artifactId>shenyu-spring-boot-starter-plugin-cryptor</artifactId>
+ <version>${project.version}</version>
+</dependency>
+<!-- apache shenyu Cryptor Request plugin end-->
+```
+
+## 场景
+
+防互联网黑产,恶意获取数据。提高数据安全性。
+
+
+
diff --git a/i18n/zh/docusaurus-plugin-content-docs/version-2.5.1/plugin-center/security/cryptor-response-plugin.md b/i18n/zh/docusaurus-plugin-content-docs/version-2.5.1/plugin-center/security/cryptor-response-plugin.md
new file mode 100644
index 00000000000..1f530ae3ca9
--- /dev/null
+++ b/i18n/zh/docusaurus-plugin-content-docs/version-2.5.1/plugin-center/security/cryptor-response-plugin.md
@@ -0,0 +1,64 @@
+---
+title: CryptorResponse 插件
+keywords: ["CryptorResponse"]
+description: CryptorResponse 插件
+---
+
+## 说明
+
+* `CryptorResponse` 插件是通过 `fieldNames` 去匹配 `responseBody` 里面的参数进行 `加密` 处理,替换当前 `fieldNames` 对应内容。
+
+## 插件设置
+
+1. 在 `shenyu-admin` --> 基础配置 --> 插件管理 --> `cryptorResponse` 设置为开启。
+
+<img src="/img/shenyu/plugin/cryptor/enable-cryptor-response-plugin.png" width="80%" height="80%" />
+
+2. 打开 `selector` 配置需要匹配的流量。
+
+3. 打开 `selector` 对应的 `Rules` 配置。
+
+<img src="/img/shenyu/plugin/cryptor/cryptor-response-rules-config.png" width="80%" height="80%" />
+
+* strategyName: 解密算法名称。当前基于 shenyu 的 SPI 机制,可自定义加解密算法,
+ 需要实现 `org.apache.shenyu.plugin.cryptor.strategy.CryptorStrategy` 接口。
+
+ 同时找到 `resources/META-INF/shenyu/` 底下的 `org.apache.shenyu.plugin.cryptor.strategy.CryptorStrategy` 文件,
+ 写上算法名称以及实现的 `CryptorStrategy` 接口的 class 的包名。
+
+* fieldNames: 匹配的参数名,支持解析多层次的 json 格式匹配,使用 `.` 分割,例如 data.id 。
+
+```json5
+ {
+ data: {
+ "id": ""
+ }
+ }
+```
+
+* decryptKey: 密钥,用于解密数据。
+
+* encryptKey: 密钥,用于加密数据。
+
+* way: 选择加密或解密。
+
+## 插件使用
+
+* 在网关的 `pom.xml` 文件中添加 `cryptorResponse` 的支持。
+
+```xml
+<!-- apache shenyu Cryptor Response plugin start-->
+<dependency>
+ <groupId>org.apache.shenyu</groupId>
+ <artifactId>shenyu-spring-boot-starter-plugin-cryptor</artifactId>
+ <version>${project.version}</version>
+</dependency>
+<!-- apache shenyu Cryptor Response plugin end-->
+```
+
+## 场景
+
+防互联网黑产,恶意获取数据。提高数据安全性。
+
+
+
diff --git a/i18n/zh/docusaurus-plugin-content-docs/version-2.5.1/plugin-center/security/jwt-plugin.md b/i18n/zh/docusaurus-plugin-content-docs/version-2.5.1/plugin-center/security/jwt-plugin.md
new file mode 100644
index 00000000000..ce594023d9b
--- /dev/null
+++ b/i18n/zh/docusaurus-plugin-content-docs/version-2.5.1/plugin-center/security/jwt-plugin.md
@@ -0,0 +1,157 @@
+---
+
+title: JWT插件
+keywords: ["JWT"]
+description: JWT插件
+----------------
+
+# 1.概述
+
+## 1.1 插件名称
+
+* `jwt` 插件
+
+## 1.2 适用场景
+
+* 需要在网关统一鉴权。
+
+
+## 1.3 插件功能
+
+* `jwt` 插件,是针对 `http` 请求头的 `token`属性或者是 `authorization` 属性携带值进行鉴权判断,兼容 `OAuth2.0` 。
+
+## 1.4 插件代码
+
+* 核心模块为 `shenyu-plugin-jwt`.
+* 核心类为 `org.apache.shenyu.plugin.jwt.JwtPlugin`.
+
+## 1.5 添加自哪个ShenYu版本
+
+* 自从 ShenYu 2.4.0
+
+# 2.如何使用插件
+
+## 2.1 插件使用流程图
+
+
+
+## 2.2 导入pom
+
+```xml
+<dependency>
+ <groupId>org.apache.shenyu</groupId>
+ <artifactId>shenyu-spring-boot-starter-plugin-jwt</artifactId>
+ <version>${project.version}</version>
+</dependency>
+```
+
+## 2.3 启用插件
+
+- 在 `shenyu-admin` 基础配置 --> 插件管理 --> `jwt` ,设置为开启。
+
+## 2.4 配置插件
+
+### 2.4.1 Config plugin in ShenYu-Admin
+
+* 在ShenYu-Admin配置jwt插件的私钥,该私钥必须大于256位 。
+* `secretKey` : 该私钥为使用jwt时生成token,并且他是必须的。
+
+
+
+### 2.4.2 Selector config
+
+* 插件选择器和规则的配置请查看: [插件和规则配置](../../user-guide/admin-usage/selector-and-rule.md).
+
+### 2.4.3 Rule Config
+
+
+
+* convert是jwt的转化
+* jwtVal: jwt 请求体的名称
+* headerVal: jwt请求头的名称
+
+自定义转化算法请查看:[自定义JWT插件转化算法](../../developer/custom-jwt-covert-algorithm.md)
+
+## 2.5 示例
+
+### 2.5.1 使用jwt插件进行权限认证
+
+#### 2.5.1.1 配置jwt插件
+
+
+
+#### 2.5.1.2 配置选择器
+
+
+
+#### 2.5.1.3 配置规则
+
+
+
+#### 2.5.1.4 在网页中生成jwt token
+
+* 在你的浏览器中打开 `https://jwt.io/` , 并且填充对应的参数 。
+* 在 `https://jwt.io/` 的页面配置jwt请求头。
+* 在 `https://jwt.io/` 的页面配置jwt参数体。
+* 在 `https://jwt.io/` 的页面配置jwt签名参数。
+
+
+
+#### 2.5.1.5 使用Java代码生成jwt token
+
+```java
+public final class JwtPluginTest {
+
+ public void generateJwtCode() {
+ final String secreteKey = "shenyu-test-shenyu-test-shenyu-test";
+ Map<String, String> map = new HashMap<>();
+ map.put("id", "1");
+ map.put("name", "xiaoming");
+ Date date = new Date();
+ date.setTime(1655524800000L);
+ String token = Jwts.builder()
+ .setIssuedAt(date)
+ .setExpiration(new Date())
+ .setClaims(map)
+ .signWith(Keys.hmacShaKeyFor(secreteKey.getBytes(StandardCharsets.UTF_8)), SignatureAlgorithm.HS256)
+ .compact();
+ System.out.println(token);
+ }
+}
+```
+
+#### 2.5.1.6 请求服务
+
+##### 2.5.1.6.1 使用token方式请求服务
+
+* 在你的请求头中附带 `token: eyJhbGciOiJIUzI1NiJ9.eyJuYW1lIjoieGlhb21pbmciLCJpZCI6IjEifQ.LdRzGlB49alhq204chwF7pf3C0z8ZpuowPvoQdJmSRw` 字段并发起请求。
+
+##### 2.5.1.6.2 使用认证方式请求服务
+
+* 在你的请求头中附带 `Authorization: Bearer eyJhbGciOiJIUzI1NiJ9.eyJuYW1lIjoieGlhb21pbmciLCJpZCI6IjEifQ.LdRzGlB49alhq204chwF7pf3C0z8ZpuowPvoQdJmSRw` 并发起请求。
+
+#### 2.5.1.7 验证请求结果
+
+* 错误的签名
+
+```
+{
+ "code": 401,
+ "message": "Illegal authorization"
+}
+```
+
+* 正确的签名
+
+```
+{
+ "id": "123",
+ "name": "hello world save order"
+}
+```
+
+# 3.如何禁用插件
+
+* 在 `shenyu-admin` 基础配置 --> 插件管理 --> `jwt` ,设置为关闭。
+
+
diff --git a/i18n/zh/docusaurus-plugin-content-docs/version-2.5.1/plugin-center/security/oauth2-plugin.md b/i18n/zh/docusaurus-plugin-content-docs/version-2.5.1/plugin-center/security/oauth2-plugin.md
new file mode 100644
index 00000000000..9840f916ebe
--- /dev/null
+++ b/i18n/zh/docusaurus-plugin-content-docs/version-2.5.1/plugin-center/security/oauth2-plugin.md
@@ -0,0 +1,57 @@
+---
+title: OAuth2插件
+keywords: ["OAuth2"]
+description: OAuth 2插件
+---
+
+## 说明
+
+- `OAuth2` 插件使用 `Webflux OAuth2` 实现,用于支持 `OAuth` 协议。
+
+## 插件设置
+
+请参考运维部署的内容,选择一种方式启动`shenyu-admin`。比如,通过 [本地部署](../../deployment/deployment-local) 启动`Apache ShenYu`后台管理系统。
+
+* 在 `shenyu-admin` 基础配置 --> 插件管理 --> `oauth2` ,设置为开启。如果用户不想使用此功能,请在 `admin` 后台停用此插件。
+
+ <img src="/img/shenyu/plugin/oauth2/oauth2_open_zh.jpg" width="80%" height="80%" />
+
+## 插件使用
+
+- 在网关的pom文件中添加`oauth2`的支持
+
+```xml
+ <!-- apache shenyu oauth2 plugin start-->
+ <dependency>
+ <groupId>org.apache.shenyu</groupId>
+ <artifactId>shenyu-spring-boot-starter-plugin-oauth2</artifactId>
+ <version>${project.version}</version>
+ </dependency>
+ <!-- apache shenyu oauth2 plugin end-->
+
+```
+
+- 在`shenyu-bootstrap`模块配置`oauth2`
+
+```yml
+
+spring:
+ security:
+ oauth2:
+ client:
+ registration:
+ <这里填入你的 client-registration-id>:
+ client-id: <这里填入你的 client-id>
+ client-secret: <这里填入你的 client-secret>
+ # 下面这部分是授权服务器的配置
+ provider:
+ <这里填入你的 client-registration-id>:
+ authorization-uri: <这里填入你的 authorization-uri>
+ token-uri: <这里填入 access-token-uri>
+ user-info-uri: <这里填入 user-info-uri>
+ jwk-set-uri: <这里填入 jwk-set-uri>
+```
+
+- 在网关的配置文件中配置 `spring.security.oauth2` 的相关配置,详细配置说明可参考 [Spring Webflux OAuth2](https://docs.spring.io/spring-security/site/docs/current/reference/html5/#webflux-oauth2)
+- 配置选择器和规则作为您需要 `OAuth2` 授权的请求地址,默认放行所有请求。关于选择器和规则配置的更多说明,请参考:[选择器和规则管理](../../user-guide/admin-usage/selector-and-rule)
+
diff --git a/i18n/zh/docusaurus-plugin-content-docs/version-2.5.1/plugin-center/security/sign-plugin.md b/i18n/zh/docusaurus-plugin-content-docs/version-2.5.1/plugin-center/security/sign-plugin.md
new file mode 100644
index 00000000000..e915702a2b8
--- /dev/null
+++ b/i18n/zh/docusaurus-plugin-content-docs/version-2.5.1/plugin-center/security/sign-plugin.md
@@ -0,0 +1,525 @@
+---
+title: Sign插件
... 7025 lines suppressed ...