You are viewing a plain text version of this content. The canonical link for it is here.
Posted to notifications@apisix.apache.org by GitBox <gi...@apache.org> on 2021/11/22 08:19:42 UTC
[GitHub] [apisix-website] yzeng25 commented on a change in pull request #760: docs: add Tech blog 「Develop Ingress with Nocalhost」
yzeng25 commented on a change in pull request #760:
URL: https://github.com/apache/apisix-website/pull/760#discussion_r754032210
##########
File path: website/i18n/zh/docusaurus-plugin-content-blog/2021/11/22/develop-apisix-ingress-with-nocalhost-in-kubernetes.md
##########
@@ -0,0 +1,129 @@
+---
+title: "使用 Nocalhost 开发 Kubernetes 集群中 Apache APISIX Controller"
+author: "Garry Chen"
+authorURL: "https://github.com/neaped"
+authorImageURL: "https://avatars.githubusercontent.com/u/3713305?v=4"
+keywords:
+- Kubernetes
+- Apache APISIX Ingress
+- Nocalhost
+- Controller
+- 部署开发
+description: 本文将为您介绍如何使用 Nocalhost 将本地开发机无缝连接到一个远程 Kubernetes 集群,同时配合 IDE 来开发和调试 Apache APISIX Ingress Controller。利用现有技术栈更顺畅地开发和调试远程应用。
+tags: [Technology]
+---
+
+> 本文将为您介绍如何使用 Nocalhost 将本地开发机无缝连接到一个远程 Kubernetes 集群,同时配合 IDE 来开发和调试 Apache APISIX Ingress Controller。利用现有技术栈更顺畅地开发和调试远程应用。
+
+<!--truncate-->
+
+## 环境准备
+
+- 准备一个可用的 Kubernetes 集群。可使用任意拥有命名空间管理权限的 Kubernetes 集群
+- 本地已安装好 [Helm v3.0+](https://helm.sh)
+- 集群中已安装好 Apache APISIX
+- GoLand IDE 2020.03+ (本文应用的是 2021.2 版本)
+- 安装 [Nocalhost JetBrains plugin](https://nocalhost.dev/zh-CN/docs/installation#install-jetbrains-plugin) 插件
+- 安装 [Go 1.13](https://golang.org/dl/) 或更高版本
+
+## 部署 Apache APISIX Ingress Controller
+
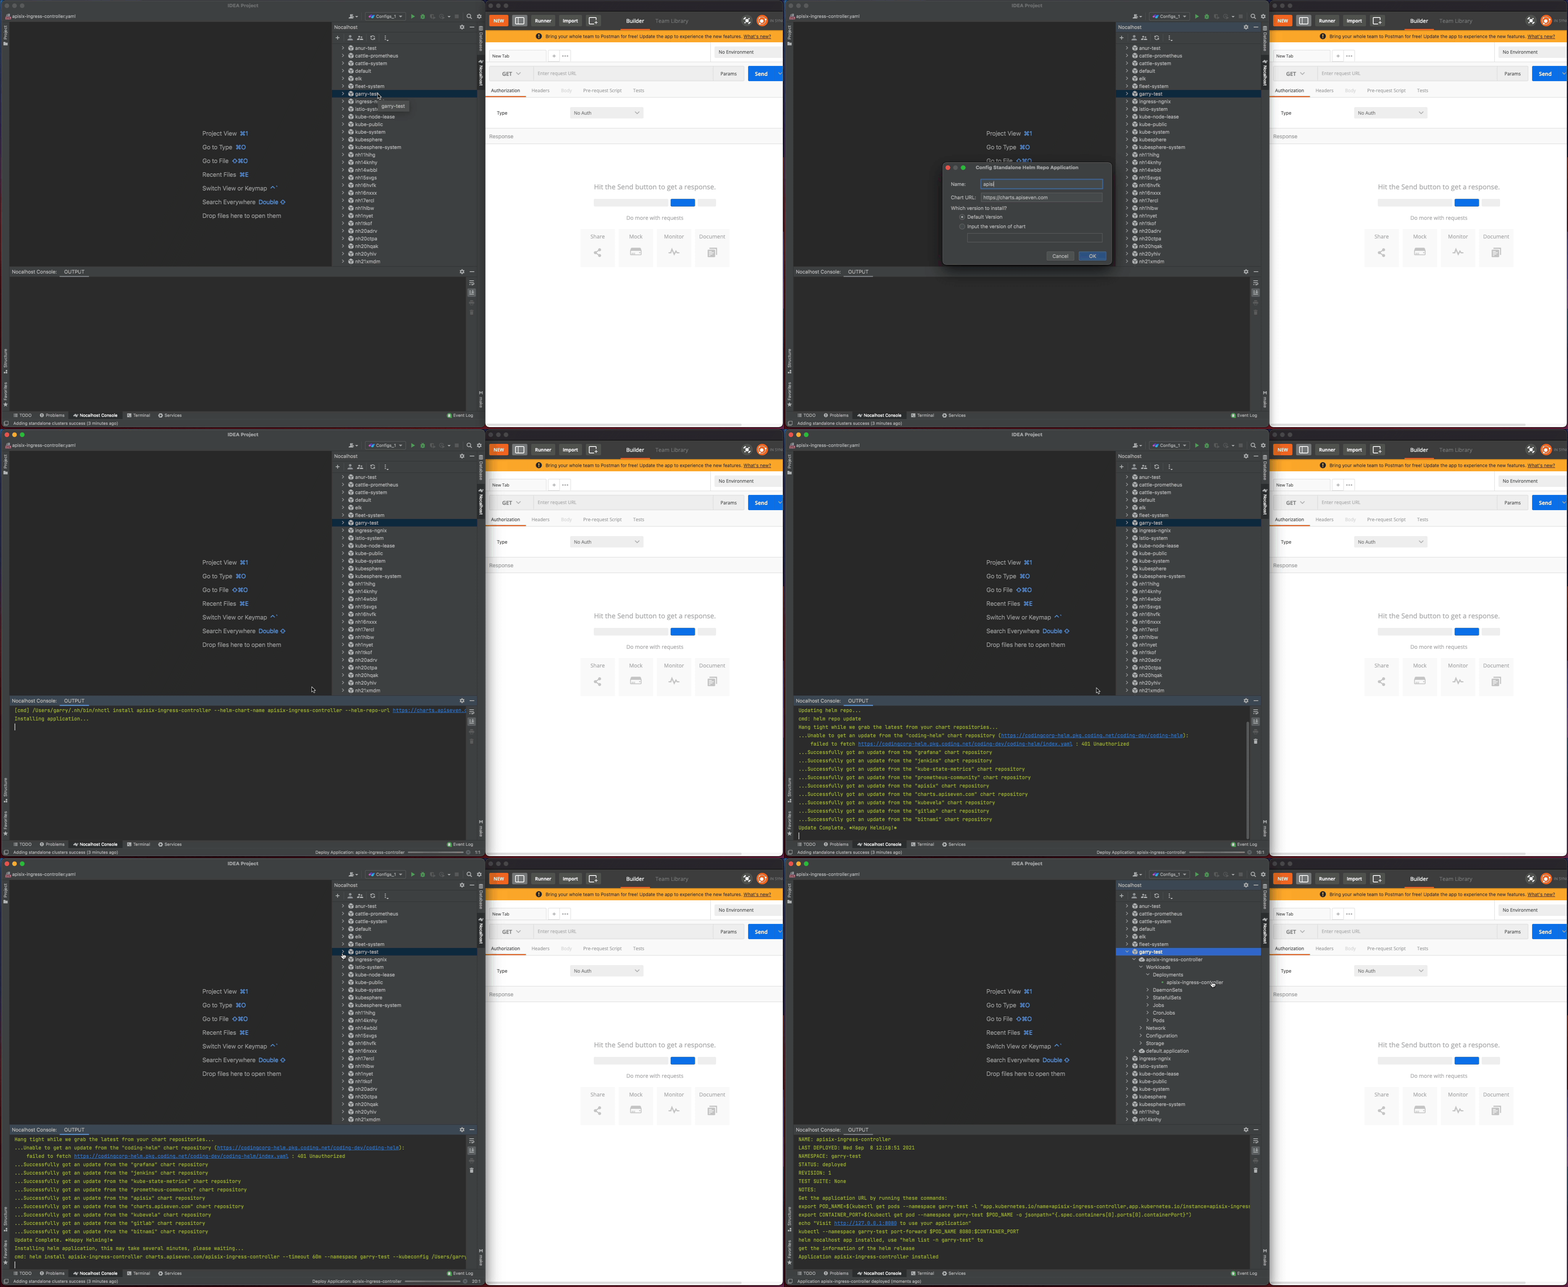
+在 GoLand 中通过 Nocalhost 部署 Apache APISIX Ingress Controller,操作如下:
+
+1. 在 GoLand 中打开 Nocalhost 插件
+2. 选择将要部署 APISIX Ingress Controller 的命名空间
+3. 右键点击选定的命名空间, 选择 **`Deploy Application`**, 然后选择 **`Helm Repo`** 作为安装方法
+4. 在下面的对话框中:
+ 1. 在 `Name` 中输入:`apisix-ingress-controller`
+ 2. 在 `Chart URL` 中输入:`https://charts.apiseven.com`
+
+
+
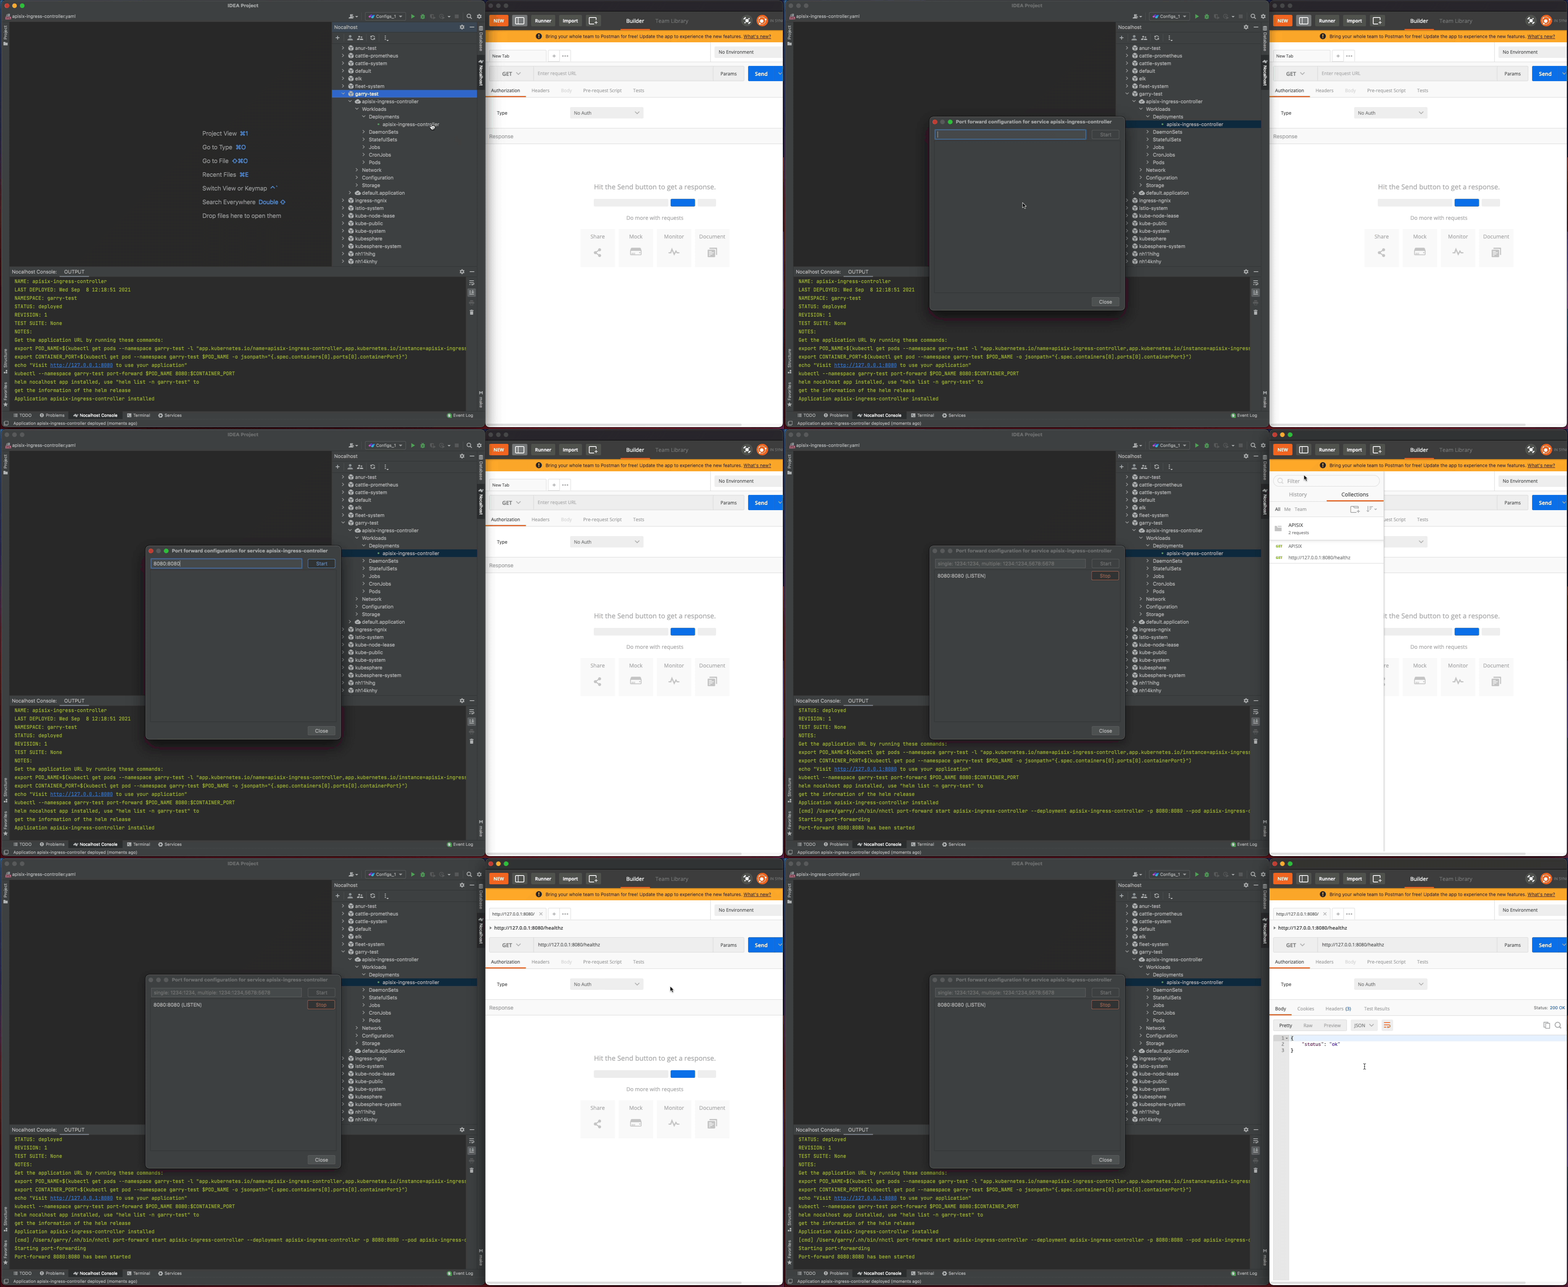
+部署完成后,我们通过在 IDE 内启用端口转发来测试 `apisix-ingress-controller`:
+
+1. 在 Nocalhost 插件的 Workloads 中找到 `apisix-ingress-controller`,右键点击并选择 **`Port Forward`**
+2. 添加端口转发 `8080:8080`
+3. 在本地访问 [`http://127.0.0.1:8080/healthz`](http://127.0.0.1:8080/healthz) 并检查结果
+
+
+
+## 开发
+
+### 步骤一:进入 DevMode
+
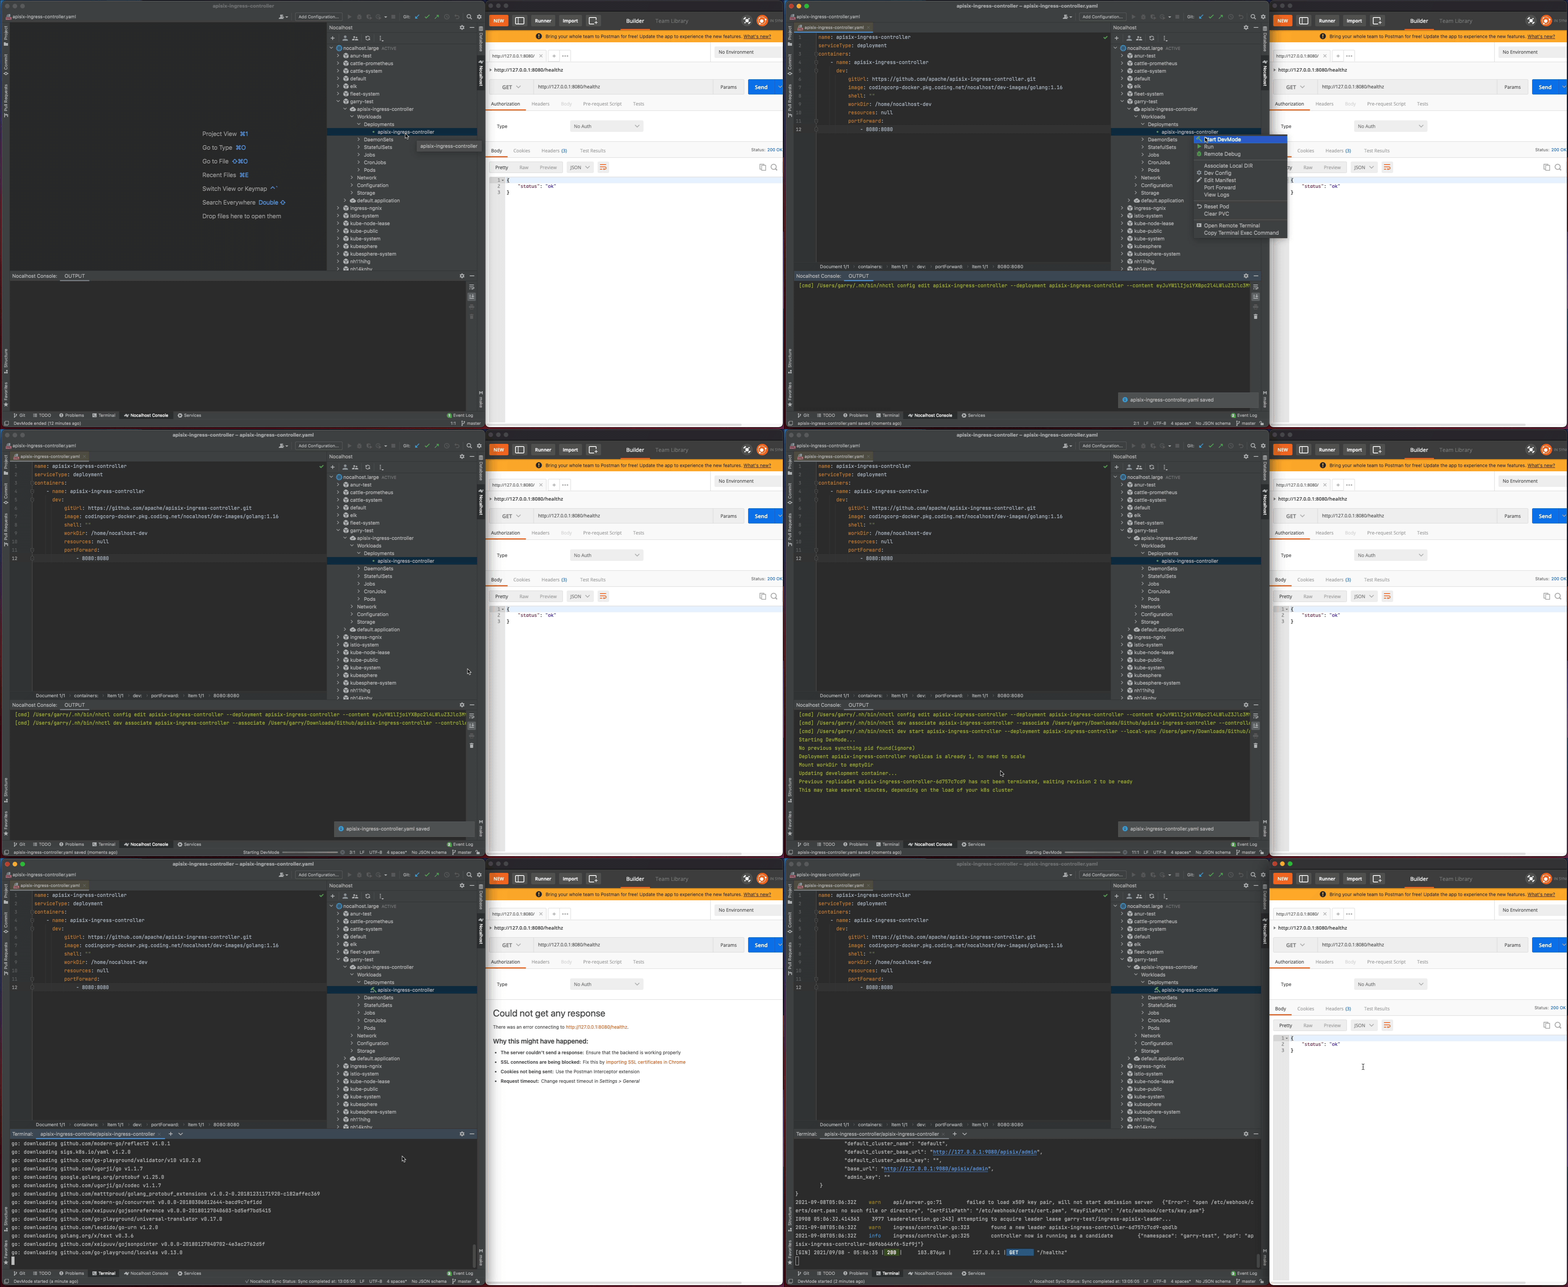
+1. 右键点击 `apisix-ingress-controller` 工作负载,选择 **`Start DevMode`**
+2. 如果您已经将源码克隆到本地,请选择您的源代码目录。否则通过输入仓库地址 https://github.com/apache/apisix-ingress-controller.git 来让 Nocalhost 克隆你的源代码到本地
+3. 等待操作完成,Nocalhost 将在进入 DevMode 后在 IDE 内打开远程终端
+
+现在通过在远程终端中输入以下命令来启动 `apisix-ingress-controller` 进程:
+
+```bash
+go run main.go ingress --config-path conf/config-default.yaml
+```
+
+`apisix-ingress-controller` 启动后,可通过 [`http://127.0.0.1:8080/healthz`](http://127.0.0.1:8080/healthz) 访问服务,并检查结果.
+
+
+
+### 步骤二:修改代码并检查结果
+
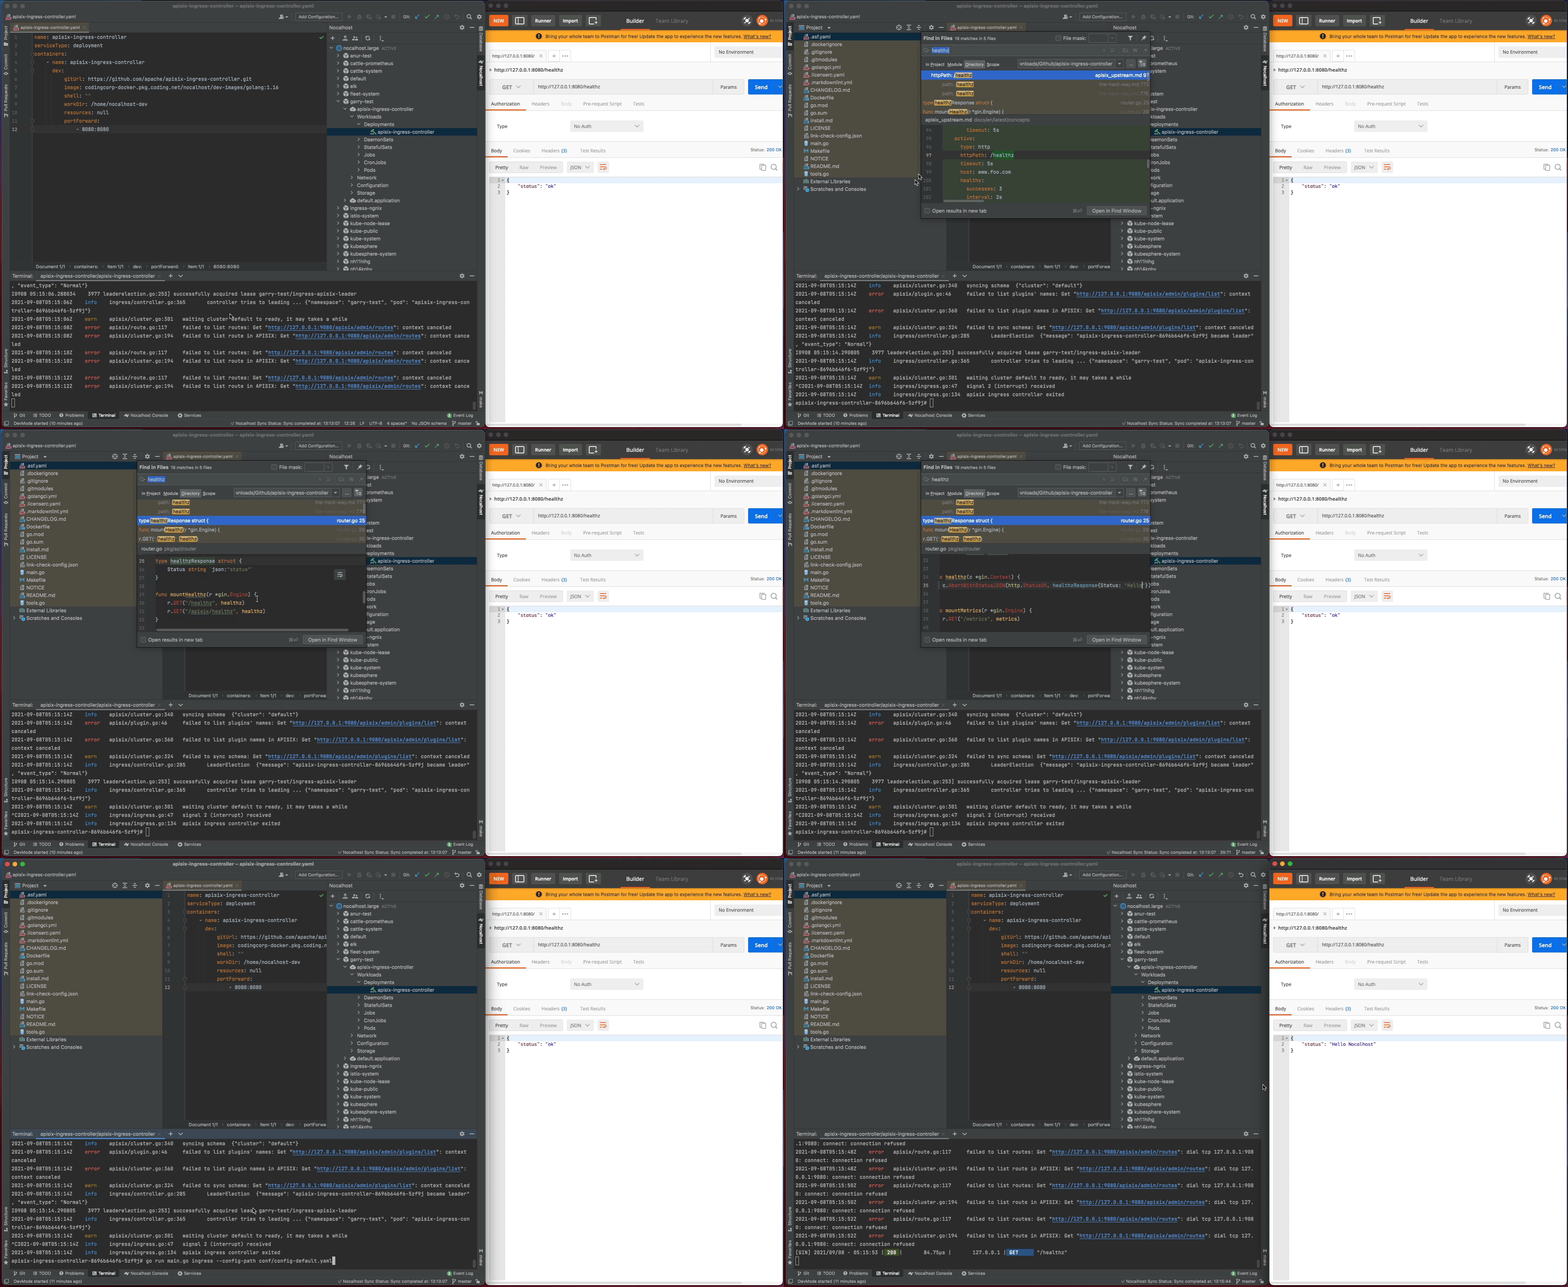
+现在我们来修改一下代码并看看效果:
+
+1. 停止 `apisix-ingress-controller` 进程
+2. 在 Goland 中搜索 `healthz` 并找到 `router.go` 文件。 将 `healthzResponse` 的状态代码从 `ok` 更改为 `Hello Nocalhost`
+3. 重新启动进程并在本地检查更改结果
+
+
+
+### 步骤三:结束开发模式
+
+现在关闭开发窗口并结束 DevMode:
Review comment:
```suggestion
现在关闭开发窗口并退出开发模式:
```
##########
File path: website/i18n/zh/docusaurus-plugin-content-blog/2021/11/22/develop-apisix-ingress-with-nocalhost-in-kubernetes.md
##########
@@ -0,0 +1,129 @@
+---
+title: "使用 Nocalhost 开发 Kubernetes 集群中 Apache APISIX Controller"
+author: "Garry Chen"
+authorURL: "https://github.com/neaped"
+authorImageURL: "https://avatars.githubusercontent.com/u/3713305?v=4"
+keywords:
+- Kubernetes
+- Apache APISIX Ingress
+- Nocalhost
+- Controller
+- 部署开发
+description: 本文将为您介绍如何使用 Nocalhost 将本地开发机无缝连接到一个远程 Kubernetes 集群,同时配合 IDE 来开发和调试 Apache APISIX Ingress Controller。利用现有技术栈更顺畅地开发和调试远程应用。
+tags: [Technology]
+---
+
+> 本文将为您介绍如何使用 Nocalhost 将本地开发机无缝连接到一个远程 Kubernetes 集群,同时配合 IDE 来开发和调试 Apache APISIX Ingress Controller。利用现有技术栈更顺畅地开发和调试远程应用。
+
+<!--truncate-->
+
+## 环境准备
+
+- 准备一个可用的 Kubernetes 集群。可使用任意拥有命名空间管理权限的 Kubernetes 集群
+- 本地已安装好 [Helm v3.0+](https://helm.sh)
+- 集群中已安装好 Apache APISIX
+- GoLand IDE 2020.03+ (本文应用的是 2021.2 版本)
+- 安装 [Nocalhost JetBrains plugin](https://nocalhost.dev/zh-CN/docs/installation#install-jetbrains-plugin) 插件
+- 安装 [Go 1.13](https://golang.org/dl/) 或更高版本
+
+## 部署 Apache APISIX Ingress Controller
+
+在 GoLand 中通过 Nocalhost 部署 Apache APISIX Ingress Controller,操作如下:
+
+1. 在 GoLand 中打开 Nocalhost 插件
+2. 选择将要部署 APISIX Ingress Controller 的命名空间
+3. 右键点击选定的命名空间, 选择 **`Deploy Application`**, 然后选择 **`Helm Repo`** 作为安装方法
+4. 在下面的对话框中:
+ 1. 在 `Name` 中输入:`apisix-ingress-controller`
+ 2. 在 `Chart URL` 中输入:`https://charts.apiseven.com`
+
+
+
+部署完成后,我们通过在 IDE 内启用端口转发来测试 `apisix-ingress-controller`:
+
+1. 在 Nocalhost 插件的 Workloads 中找到 `apisix-ingress-controller`,右键点击并选择 **`Port Forward`**
+2. 添加端口转发 `8080:8080`
+3. 在本地访问 [`http://127.0.0.1:8080/healthz`](http://127.0.0.1:8080/healthz) 并检查结果
+
+
+
+## 开发
+
+### 步骤一:进入 DevMode
+
+1. 右键点击 `apisix-ingress-controller` 工作负载,选择 **`Start DevMode`**
+2. 如果您已经将源码克隆到本地,请选择您的源代码目录。否则通过输入仓库地址 https://github.com/apache/apisix-ingress-controller.git 来让 Nocalhost 克隆你的源代码到本地
+3. 等待操作完成,Nocalhost 将在进入 DevMode 后在 IDE 内打开远程终端
+
+现在通过在远程终端中输入以下命令来启动 `apisix-ingress-controller` 进程:
+
+```bash
+go run main.go ingress --config-path conf/config-default.yaml
+```
+
+`apisix-ingress-controller` 启动后,可通过 [`http://127.0.0.1:8080/healthz`](http://127.0.0.1:8080/healthz) 访问服务,并检查结果.
+
+
+
+### 步骤二:修改代码并检查结果
+
+现在我们来修改一下代码并看看效果:
+
+1. 停止 `apisix-ingress-controller` 进程
+2. 在 Goland 中搜索 `healthz` 并找到 `router.go` 文件。 将 `healthzResponse` 的状态代码从 `ok` 更改为 `Hello Nocalhost`
+3. 重新启动进程并在本地检查更改结果
+
+
+
+### 步骤三:结束开发模式
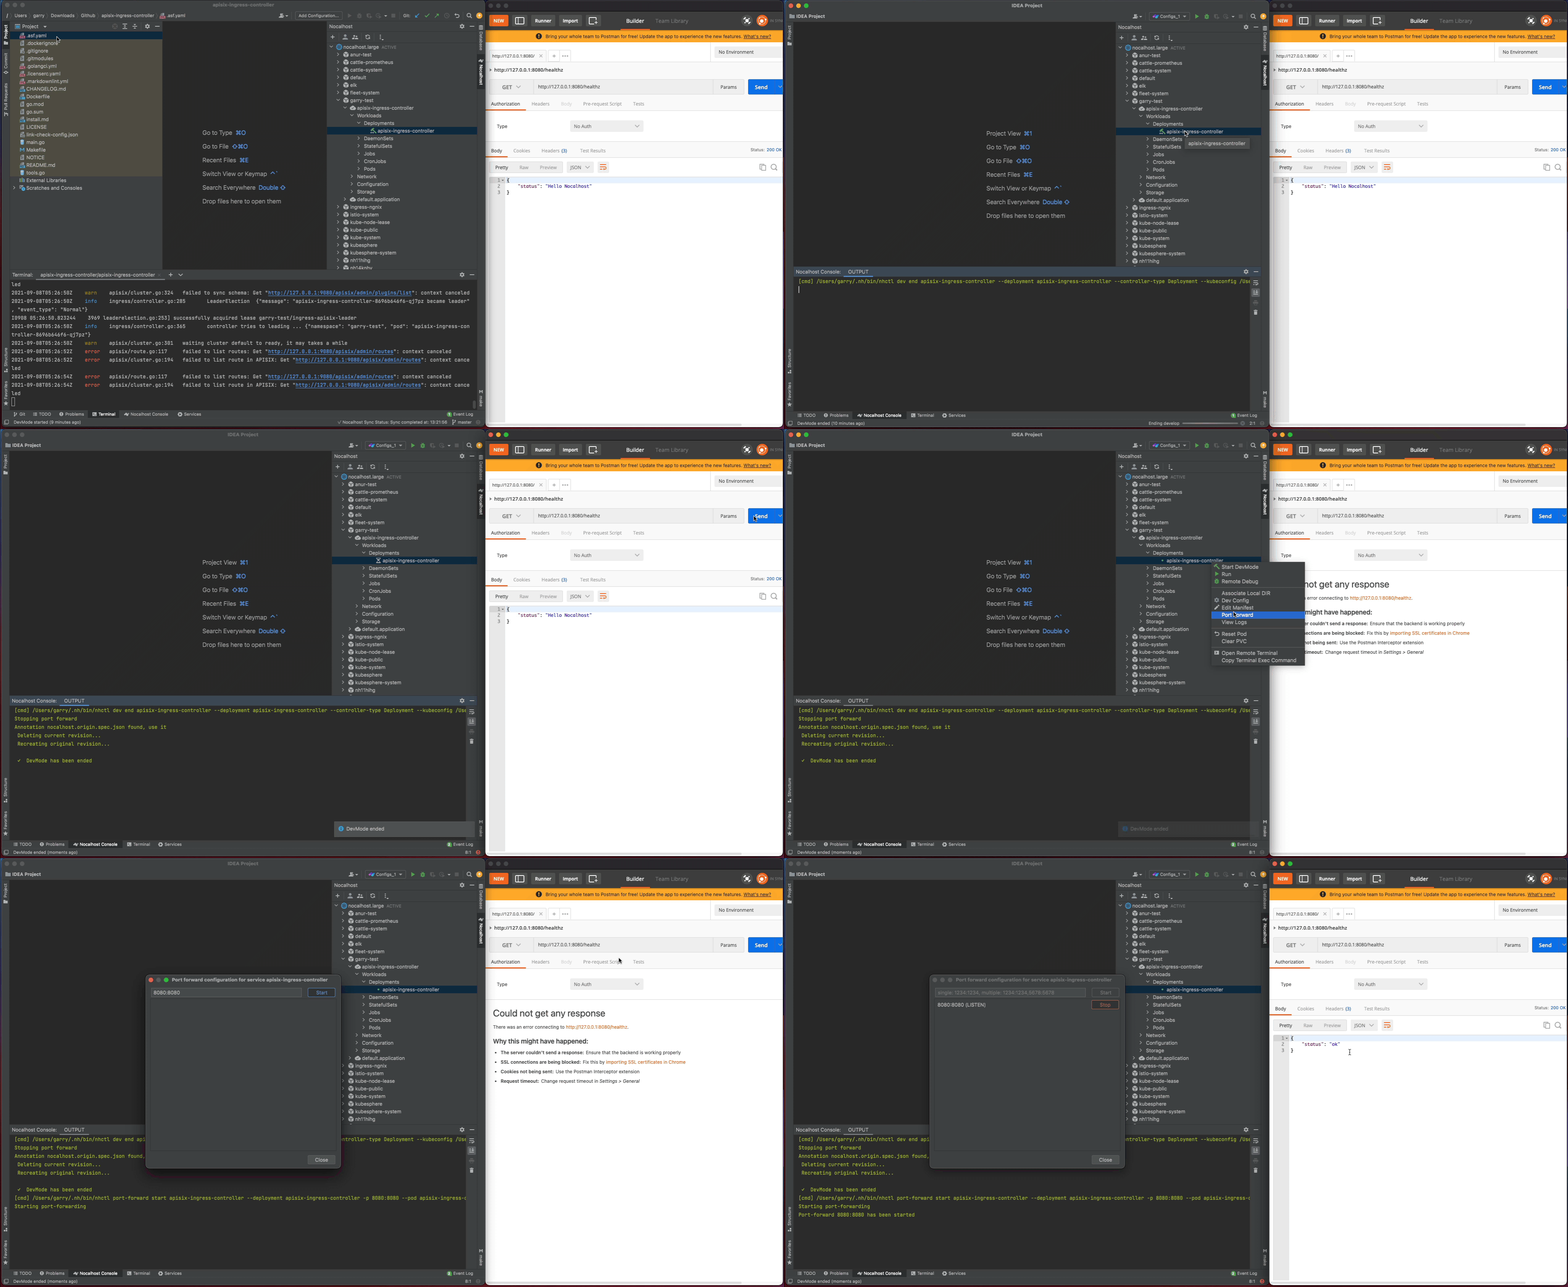
+
+现在关闭开发窗口并结束 DevMode:
+
+1. 右键点击 `apisix-ingress-controller`
+2. 选择 **`End DevMode`**
+
+Nocalhost 将使 `apisix-ingress-controller` 结束 DevMode, 并重置 `apisix-ingress-controller` 到其原始版本。启用端口转发来看看结束 DevMode 后的结果。
Review comment:
```suggestion
Nocalhost 将使 `apisix-ingress-controller`退出开发模式, 并重置 `apisix-ingress-controller` 到其原始版本。启用端口转发来看看退出开发模式后的结果。
```
##########
File path: website/blog/2021/11/22/develop-apisix-ingress-with-nocalhost-in-kubernetes.md
##########
@@ -0,0 +1,128 @@
+---
+title: "Developing APISIX Ingress Controller with Nocalhost in Kubernetes"
+author: "Garry Chen"
+authorURL: "https://github.com/neaped"
+authorImageURL: "https://avatars.githubusercontent.com/u/3713305?v=4"
+keywords:
+- Kubernetes
+- Apache APISIX Ingress
+- Nocalhost
+- Controller
+- Development
+description: This article walks you through using Nocalhost to seamlessly connect your local development machine to a remote Kubernetes cluster, allowing you to use IDE to develop and debug Apache APISIX Ingress Controller. Giving you the ability to comfortably develop and debug your remote apps with your existing skills.
+tags: [Technology]
+---
+
+> This article walks you through using Nocalhost to seamlessly connect your local development machine to a remote Kubernetes cluster, allowing you to use IDE to develop and debug Apache APISIX Ingress Controller. Giving you the ability to comfortably develop and debug your remote apps with your existing skills.
+
+<!--truncate-->
+
+## Prerequisites
+
+- Prepare an available Kubernetes cluster in your workstation. You can use any Kubernetes clusters that you have namespace admin privilege.
+- [Helm v3.0+](https://helm.sh) installed
+- GoLand IDE 2020.03+ (Use GoLand 2021.2 in this article)
+- [Install Nocalhost JetBrains plugin](https://nocalhost.dev/docs/installation#install-jetbrains-plugin)
+- Install [Go 1.13](https://golang.org/dl/) or later
+
+## Deploy Apache APISIX Ingress Controller
+
+I'm going to deploy Apache APISIX Ingress Controller by Nocalhost within GoLand:
+
+1. Open the Nocalhost plugin within GoLand
+2. Use the cluster inspector to select the namespace that you want to deploy.
+3. Right-click the selected namespace, choose **`Deploy Application`**, and select **`Helm Repo`** as installation method.
+4. In the following dialog box, input
+ 1.`apisix-ingress-controller` as `Name`
Review comment:
add a space
```
1. `apisix-ingress-controller` as `Name`
```
##########
File path: website/i18n/zh/docusaurus-plugin-content-blog/2021/11/22/develop-apisix-ingress-with-nocalhost-in-kubernetes.md
##########
@@ -0,0 +1,129 @@
+---
+title: "使用 Nocalhost 开发 Kubernetes 集群中 Apache APISIX Controller"
+author: "Garry Chen"
+authorURL: "https://github.com/neaped"
+authorImageURL: "https://avatars.githubusercontent.com/u/3713305?v=4"
+keywords:
+- Kubernetes
+- Apache APISIX Ingress
+- Nocalhost
+- Controller
+- 部署开发
+description: 本文将为您介绍如何使用 Nocalhost 将本地开发机无缝连接到一个远程 Kubernetes 集群,同时配合 IDE 来开发和调试 Apache APISIX Ingress Controller。利用现有技术栈更顺畅地开发和调试远程应用。
+tags: [Technology]
+---
+
+> 本文将为您介绍如何使用 Nocalhost 将本地开发机无缝连接到一个远程 Kubernetes 集群,同时配合 IDE 来开发和调试 Apache APISIX Ingress Controller。利用现有技术栈更顺畅地开发和调试远程应用。
+
+<!--truncate-->
+
+## 环境准备
+
+- 准备一个可用的 Kubernetes 集群。可使用任意拥有命名空间管理权限的 Kubernetes 集群
+- 本地已安装好 [Helm v3.0+](https://helm.sh)
+- 集群中已安装好 Apache APISIX
+- GoLand IDE 2020.03+ (本文应用的是 2021.2 版本)
+- 安装 [Nocalhost JetBrains plugin](https://nocalhost.dev/zh-CN/docs/installation#install-jetbrains-plugin) 插件
+- 安装 [Go 1.13](https://golang.org/dl/) 或更高版本
+
+## 部署 Apache APISIX Ingress Controller
+
+在 GoLand 中通过 Nocalhost 部署 Apache APISIX Ingress Controller,操作如下:
+
+1. 在 GoLand 中打开 Nocalhost 插件
+2. 选择将要部署 APISIX Ingress Controller 的命名空间
+3. 右键点击选定的命名空间, 选择 **`Deploy Application`**, 然后选择 **`Helm Repo`** 作为安装方法
+4. 在下面的对话框中:
+ 1. 在 `Name` 中输入:`apisix-ingress-controller`
+ 2. 在 `Chart URL` 中输入:`https://charts.apiseven.com`
+
+
+
+部署完成后,我们通过在 IDE 内启用端口转发来测试 `apisix-ingress-controller`:
+
+1. 在 Nocalhost 插件的 Workloads 中找到 `apisix-ingress-controller`,右键点击并选择 **`Port Forward`**
+2. 添加端口转发 `8080:8080`
+3. 在本地访问 [`http://127.0.0.1:8080/healthz`](http://127.0.0.1:8080/healthz) 并检查结果
+
+
+
+## 开发
+
+### 步骤一:进入 DevMode
Review comment:
Align with text and step 3
```suggestion
### 步骤一:进入开发模式
```
##########
File path: website/i18n/zh/docusaurus-plugin-content-blog/2021/11/22/develop-apisix-ingress-with-nocalhost-in-kubernetes.md
##########
@@ -0,0 +1,129 @@
+---
+title: "使用 Nocalhost 开发 Kubernetes 集群中 Apache APISIX Controller"
+author: "Garry Chen"
+authorURL: "https://github.com/neaped"
+authorImageURL: "https://avatars.githubusercontent.com/u/3713305?v=4"
+keywords:
+- Kubernetes
+- Apache APISIX Ingress
+- Nocalhost
+- Controller
+- 部署开发
+description: 本文将为您介绍如何使用 Nocalhost 将本地开发机无缝连接到一个远程 Kubernetes 集群,同时配合 IDE 来开发和调试 Apache APISIX Ingress Controller。利用现有技术栈更顺畅地开发和调试远程应用。
+tags: [Technology]
+---
+
+> 本文将为您介绍如何使用 Nocalhost 将本地开发机无缝连接到一个远程 Kubernetes 集群,同时配合 IDE 来开发和调试 Apache APISIX Ingress Controller。利用现有技术栈更顺畅地开发和调试远程应用。
+
+<!--truncate-->
+
+## 环境准备
+
+- 准备一个可用的 Kubernetes 集群。可使用任意拥有命名空间管理权限的 Kubernetes 集群
+- 本地已安装好 [Helm v3.0+](https://helm.sh)
+- 集群中已安装好 Apache APISIX
+- GoLand IDE 2020.03+ (本文应用的是 2021.2 版本)
+- 安装 [Nocalhost JetBrains plugin](https://nocalhost.dev/zh-CN/docs/installation#install-jetbrains-plugin) 插件
+- 安装 [Go 1.13](https://golang.org/dl/) 或更高版本
+
+## 部署 Apache APISIX Ingress Controller
+
+在 GoLand 中通过 Nocalhost 部署 Apache APISIX Ingress Controller,操作如下:
+
+1. 在 GoLand 中打开 Nocalhost 插件
+2. 选择将要部署 APISIX Ingress Controller 的命名空间
+3. 右键点击选定的命名空间, 选择 **`Deploy Application`**, 然后选择 **`Helm Repo`** 作为安装方法
+4. 在下面的对话框中:
+ 1. 在 `Name` 中输入:`apisix-ingress-controller`
+ 2. 在 `Chart URL` 中输入:`https://charts.apiseven.com`
+
+
+
+部署完成后,我们通过在 IDE 内启用端口转发来测试 `apisix-ingress-controller`:
+
+1. 在 Nocalhost 插件的 Workloads 中找到 `apisix-ingress-controller`,右键点击并选择 **`Port Forward`**
+2. 添加端口转发 `8080:8080`
+3. 在本地访问 [`http://127.0.0.1:8080/healthz`](http://127.0.0.1:8080/healthz) 并检查结果
+
+
+
+## 开发
+
+### 步骤一:进入 DevMode
+
+1. 右键点击 `apisix-ingress-controller` 工作负载,选择 **`Start DevMode`**
+2. 如果您已经将源码克隆到本地,请选择您的源代码目录。否则通过输入仓库地址 https://github.com/apache/apisix-ingress-controller.git 来让 Nocalhost 克隆你的源代码到本地
+3. 等待操作完成,Nocalhost 将在进入 DevMode 后在 IDE 内打开远程终端
+
+现在通过在远程终端中输入以下命令来启动 `apisix-ingress-controller` 进程:
+
+```bash
+go run main.go ingress --config-path conf/config-default.yaml
+```
+
+`apisix-ingress-controller` 启动后,可通过 [`http://127.0.0.1:8080/healthz`](http://127.0.0.1:8080/healthz) 访问服务,并检查结果.
+
+
+
+### 步骤二:修改代码并检查结果
+
+现在我们来修改一下代码并看看效果:
+
+1. 停止 `apisix-ingress-controller` 进程
+2. 在 Goland 中搜索 `healthz` 并找到 `router.go` 文件。 将 `healthzResponse` 的状态代码从 `ok` 更改为 `Hello Nocalhost`
+3. 重新启动进程并在本地检查更改结果
+
+
+
+### 步骤三:结束开发模式
+
+现在关闭开发窗口并结束 DevMode:
+
+1. 右键点击 `apisix-ingress-controller`
+2. 选择 **`End DevMode`**
+
+Nocalhost 将使 `apisix-ingress-controller` 结束 DevMode, 并重置 `apisix-ingress-controller` 到其原始版本。启用端口转发来看看结束 DevMode 后的结果。
+
+
+
+注意:在代码修改 DevMode 模式下,所有代码更改都只在**开发容器**中生效。
Review comment:
```suggestion
注意:在开发模式下修改代码,所有代码更改都只在**开发容器**中生效。
```
--
This is an automated message from the Apache Git Service.
To respond to the message, please log on to GitHub and use the
URL above to go to the specific comment.
To unsubscribe, e-mail: notifications-unsubscribe@apisix.apache.org
For queries about this service, please contact Infrastructure at:
users@infra.apache.org