You are viewing a plain text version of this content. The canonical link for it is here.
Posted to notifications@apisix.apache.org by bz...@apache.org on 2022/01/17 07:57:38 UTC
[apisix-website] branch master updated: docs: add blog for building APISIX in ubuntu for arm (#837)
This is an automated email from the ASF dual-hosted git repository.
bzp2010 pushed a commit to branch master
in repository https://gitbox.apache.org/repos/asf/apisix-website.git
The following commit(s) were added to refs/heads/master by this push:
new 8a7a54d docs: add blog for building APISIX in ubuntu for arm (#837)
8a7a54d is described below
commit 8a7a54da8b923d400a6e6cf2b217c28982acf0fa
Author: guoqqqi <72...@users.noreply.github.com>
AuthorDate: Mon Jan 17 15:57:34 2022 +0800
docs: add blog for building APISIX in ubuntu for arm (#837)
---
.../01/11/building-apisix-in-ubuntu-for-arm.md | 249 +++++++++++++++++++++
.../01/11/building-apisix-in-ubuntu-for-arm.md | 249 +++++++++++++++++++++
2 files changed, 498 insertions(+)
diff --git a/website/blog/2022/01/11/building-apisix-in-ubuntu-for-arm.md b/website/blog/2022/01/11/building-apisix-in-ubuntu-for-arm.md
new file mode 100644
index 0000000..70a85d2
--- /dev/null
+++ b/website/blog/2022/01/11/building-apisix-in-ubuntu-for-arm.md
@@ -0,0 +1,249 @@
+---
+title: "How to build Apache APISIX in ARM Ubuntu"
+authors:
+ - name: "Qi Guo"
+ title: "Author"
+ url: "https://github.com/guoqqqi"
+ image_url: "https://avatars.githubusercontent.com/u/72343596?v=4"
+keywords:
+- Apache APISIX
+- arm
+- ubuntu
+- Apple Macbook Pro M1
+description: By reading this article, you will learn how to build Apache APISIX (M1 chip environment) in ARM Ubuntu from source code.
+tags: [Technology]
+---
+
+> By reading this article you will learn how to build Apache APISIX (M1 chip environment) in ARM Ubuntu from source code. The ARM Ubuntu system is installed with the help of [https://multipass.run/](https://multipass.run/).
+
+<!--truncate-->
+
+## Clone source code
+
+First follow the [official documentation](https://apisix.apache.org/docs/apisix/how-to-build/). Clone the Apache APISIX source code repository and go to the project directory.
+
+```shell
+git clone https://github.com/apache/apisix.git
+cd apisix
+git checkout release/2.11
+```
+
+## Installing Dependencies
+
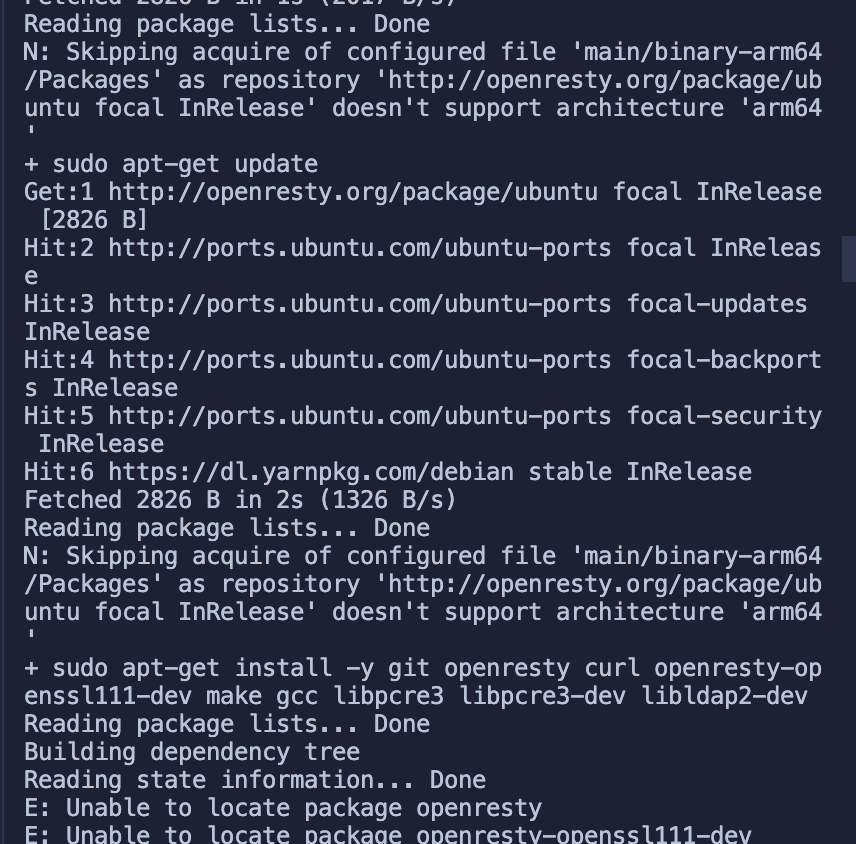
+1. Install the dependencies required for the project in one click via an automation script, running the following command in the **project root** directory.
+
+```shell
+bash utils/install-dependencies.sh
+```
+
+
+
+The error message indicates that this is due to a failure to successfully install `OpenResty`. The root cause is that there are no sources for the `ARM 64` platform by default.
+
+2. Here we install `OpenResty` manually, the installation steps can be found at [https://openresty.org/cn/linux-packages.html#ubuntu](https://openresty.org/cn/linux-packages.html#ubuntu).
+
+- Step 1: Install the several dependencies required to import the GPG public key (they can be removed at any time after the entire installation process is complete).
+
+```shell
+sudo apt-get -y install --no-install-recommends wget gnupg ca-certificates
+```
+
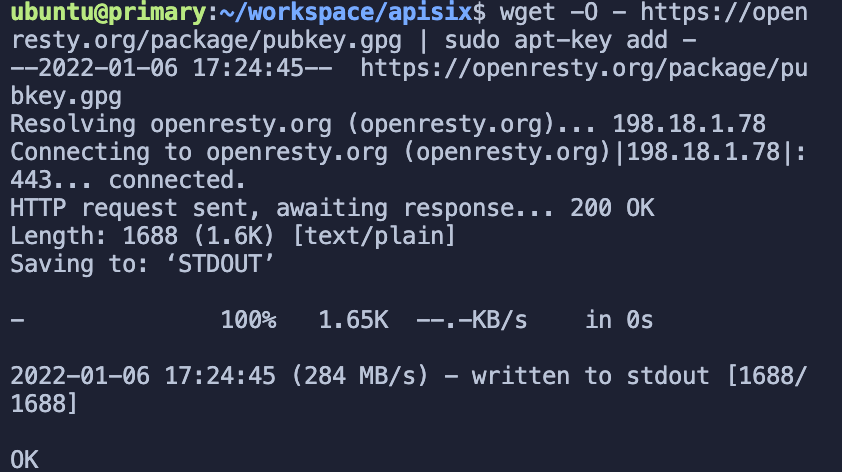
+- Step 2: Import our GPG key.
+
+```shell
+wget -O - https://openresty.org/package/pubkey.gpg | sudo apt-key add -
+```
+
+The import was successful as shown in the figure below.
+
+
+
+- Step 3: Add the official OpenResty APT repository. For x86_64 or amd64 systems, the following command can be used.
+
+```shell
+echo "deb http://openresty.org/package/ubuntu $(lsb_release -sc) main" \
+ | sudo tee /etc/apt/sources.list.d/openresty.list
+```
+
+- And for ARM64 or aarch64 systems, the following command can be used: (I am running this command on M1, the previous one reports an error)
+
+```shell
+echo "deb http://openresty.org/package/arm64/ubuntu $(lsb_release -sc) main" \
+ | sudo tee /etc/apt/sources.list.d/openresty.list
+```
+
+- Step 4: Update the APT Index.
+
+```shell
+sudo apt-get update
+```
+
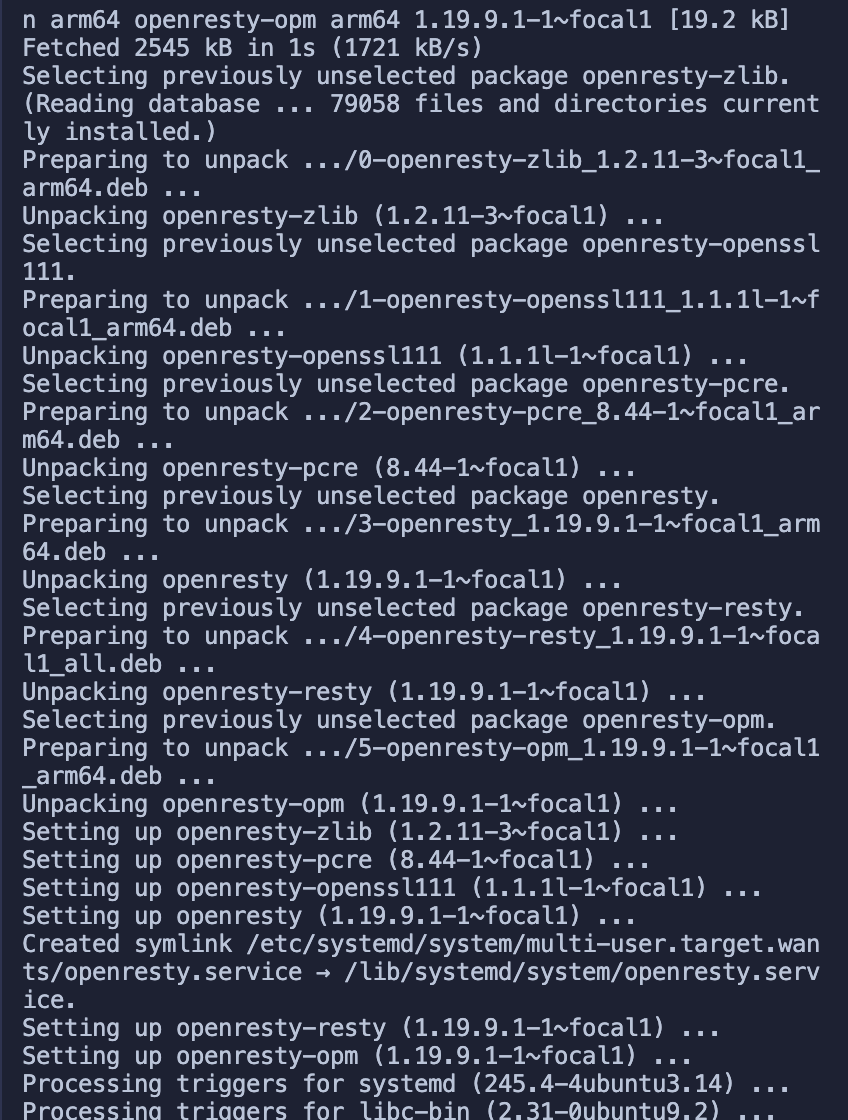
+The package can then be installed like this, e.g. `OpenResty`.
+
+```shell
+sudo apt-get -y install openresty
+```
+
+- Step 5: (Optional) The package and the corresponding associated package can be deleted by the following command.
+
+```shell
+sudo apt-get -y install --no-install-recommends software-properties-common
+```
+
+Successful installation of `OpenResty`.
+
+
+
+3. Rerun the installation dependency script (refer to step 1)
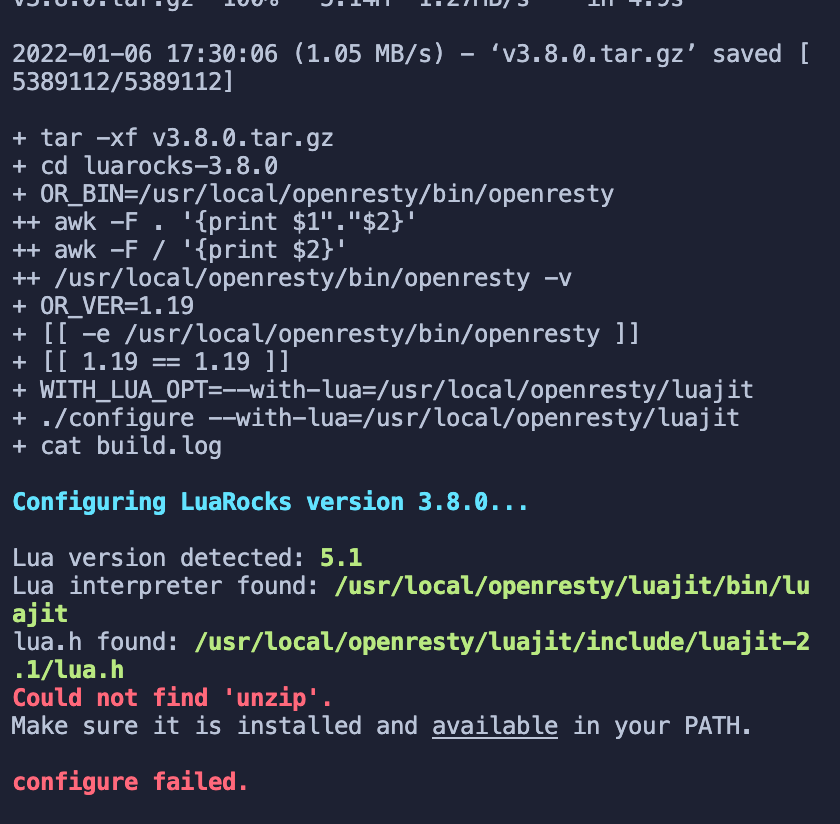
+4. Next, run the command `LUAROCKS_SERVER=https://luarocks.cn` to install the dependencies.
+
+
+
+Simply run the following command.
+
+```shell
+curl https://raw.githubusercontent.com/apache/apisix/master/utils/linux-install-luarocks.sh -sL | bash -
+```
+
+
+
+Another error message appears and we run the following command.
+
+```shell
+sudo apt install wget sudo unzip
+```
+
+We then re-run.
+
+```shell
+curl https://raw.githubusercontent.com/apache/apisix/master/utils/linux-install-luarocks.sh -sL | bash -
+```
+
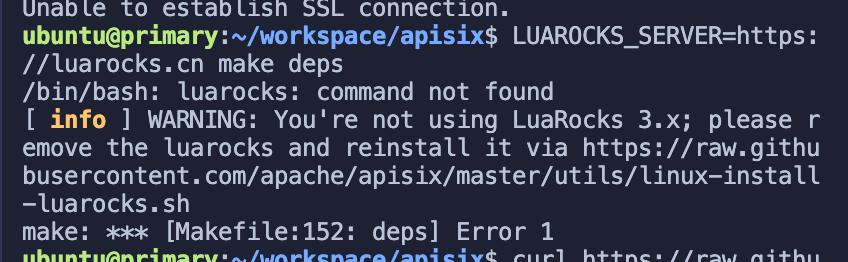
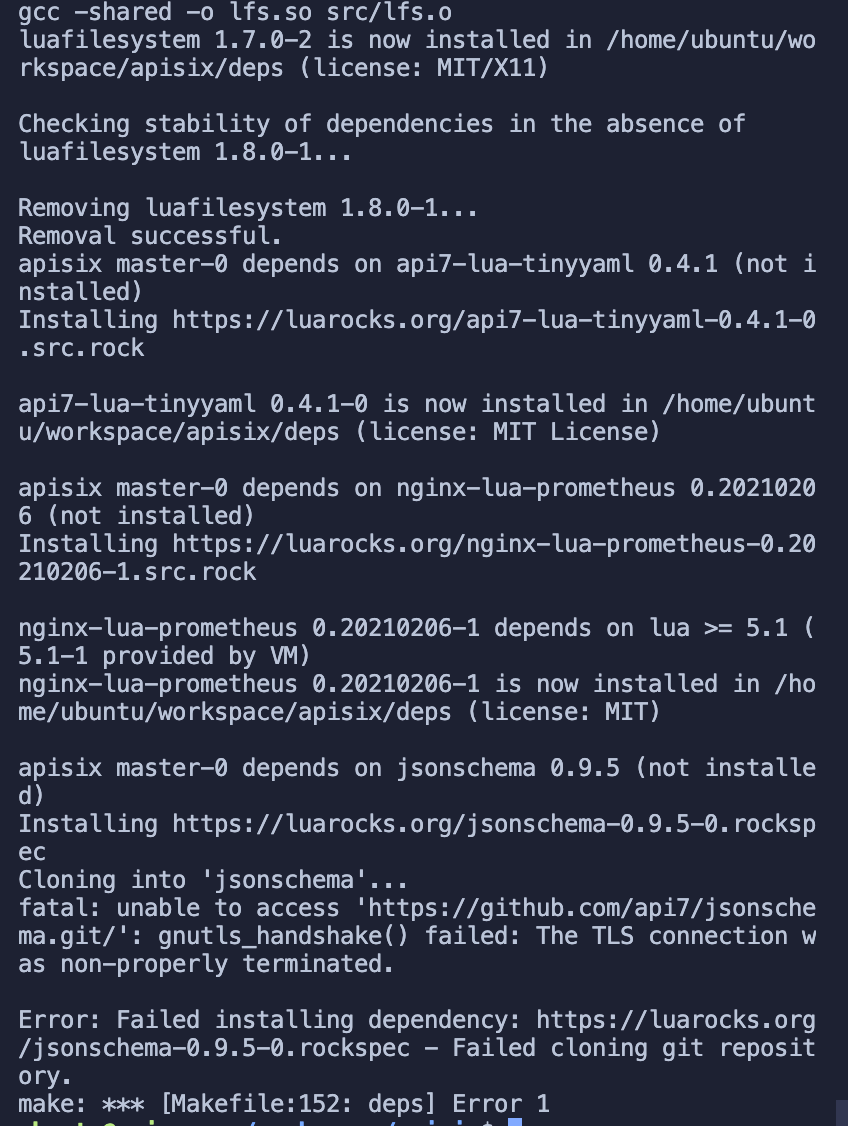
+We then proceeded to run the command to install the dependencies: `LUAROCKS_SERVER=https://luarocks.cn make deps`
+Finally it worked, there were indeed too many problems.
+
+
+
+Most of the dependencies have been successfully installed, but there is a new error message.
+Here it looks like the two repositories have not been successfully cloned, but that's fine, try running them backwards first.
+
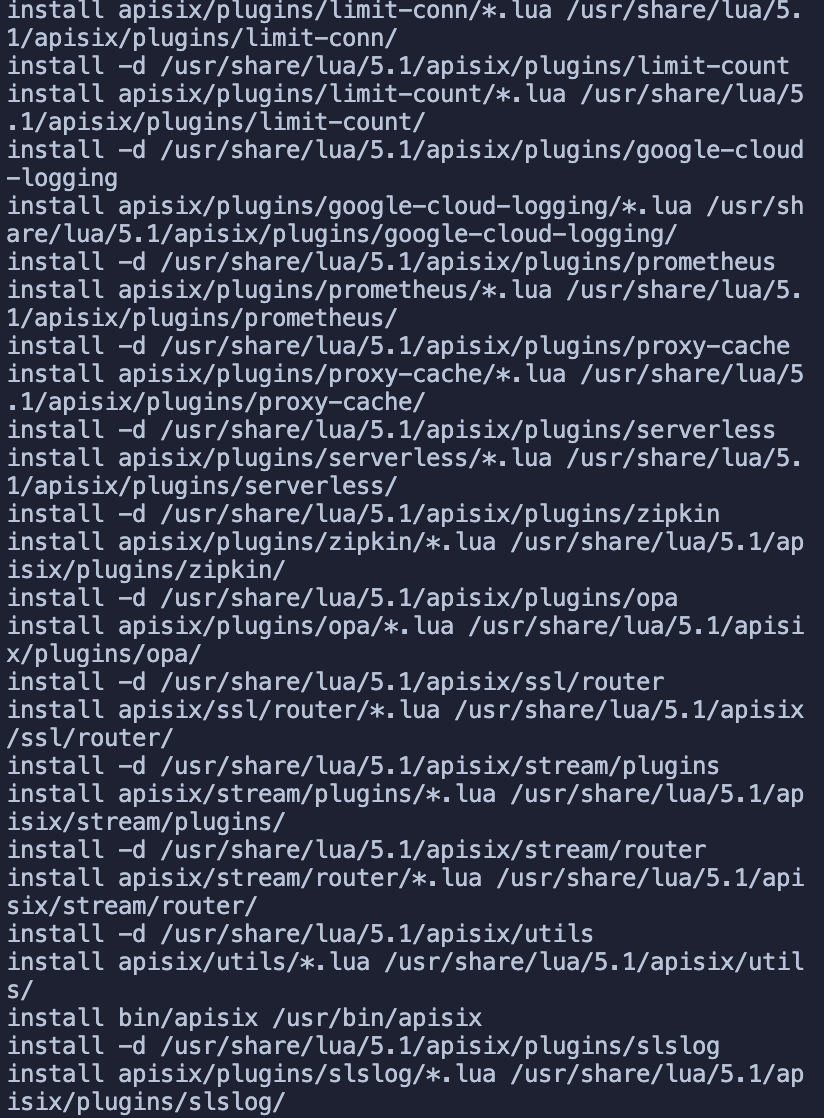
+5. Installing APISIX commands
+
+```shell
+make install
+# If you get an insufficient permissions message, use `sudo make install`
+```
+
+Success:
+
+
+
+## Install etcd
+
+### Installing etcd Error Guide
+
+Before starting APISIX you need to install etcd, refer to the [official documentation](https://apisix.apache.org/docs/apisix/2.10/install-dependencies/#ubuntu-1604--1804).
+
+> As the tutorial is not written for arm, etcd was installed successfully, but it did not run because the x86 binary was used to start it by default, so it did not run. (You can skip this section and go directly to the section on running the etcd service in Docker)
+
+- Download etcd.
+
+```shell
+wget https://github.com/etcd-io/etcd/releases/download/v3.4.13/etcd-v3.4.13-linux-amd64.tar.gz
+```
+
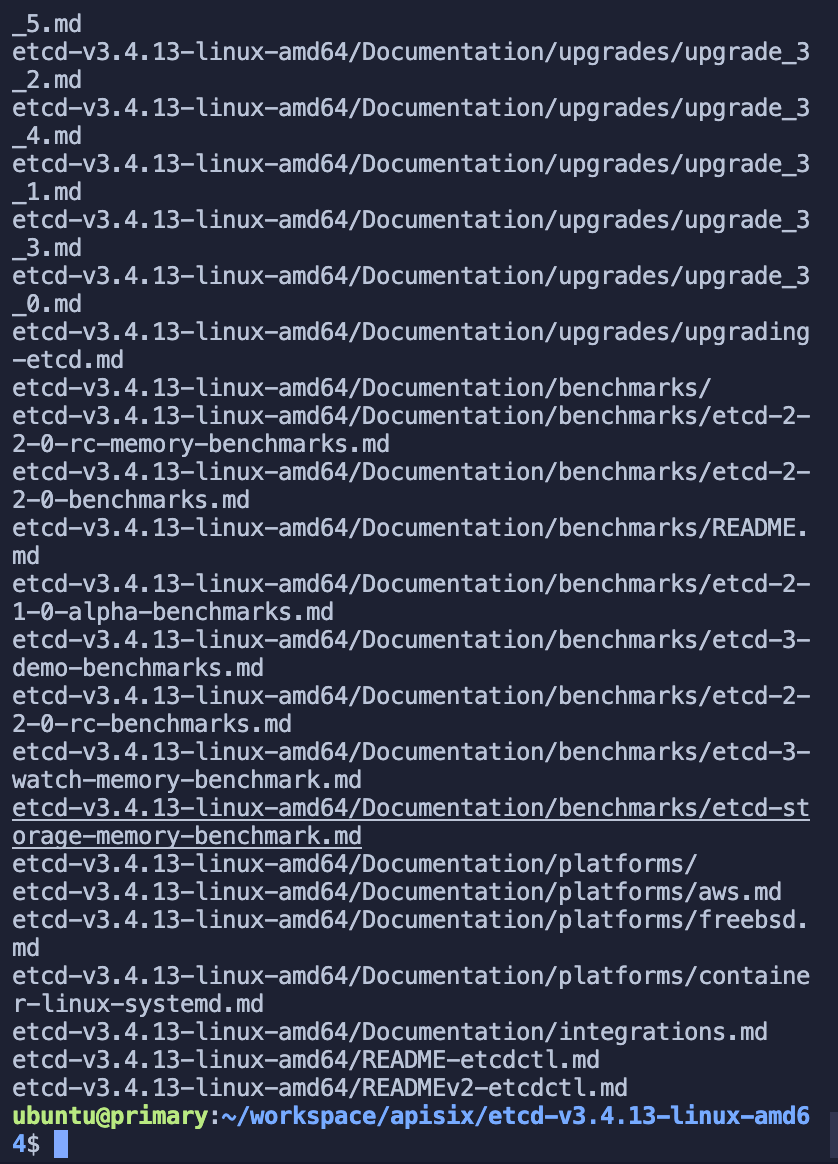
+- Decompress the etcd.
+
+```shell
+tar -xvf etcd-v3.4.13-linux-amd64.tar.gz && cd etcd-v3.4.13-linux-amd64 && sudo cp -a etcd etcdctl /usr/bin/
+```
+
+Success:
+
+
+
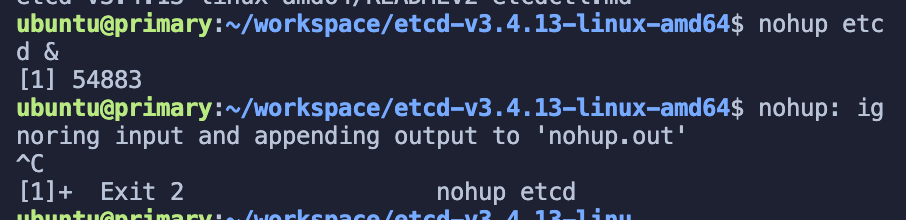
+- Start the etcd service
+
+```shell
+nohup etcd &
+```
+
+
+
+Then when I ran Apache APISIX later I found that etcd was reporting an error.
+
+
+
+In the end, I found that running etcd naked on ARM Ubuntu was too problematic, with all sorts of errors, so I decided to run docker instead~.
+
+### Running the etcd service in Docker
+
+1. Installing Docker
+
+```shell
+sudo apt install docker.io
+```
+
+Tip: Common docker commands: (add sudo before the command if you get no permission error)
+
+- View a list of all containers `docker ps -a`
+- View the list of running containers `docker ps`
+- View the list of images `docker image list`
+- Delete all containers `docker container prune`
+- Delete all images `docker image prune -f -a`
+
+More references: [Docker Getting Started Tutorial - Ruan Yifeng's Weblog](https://www.ruanyifeng.com/blog/2018/02/docker-tutorial.html).
+
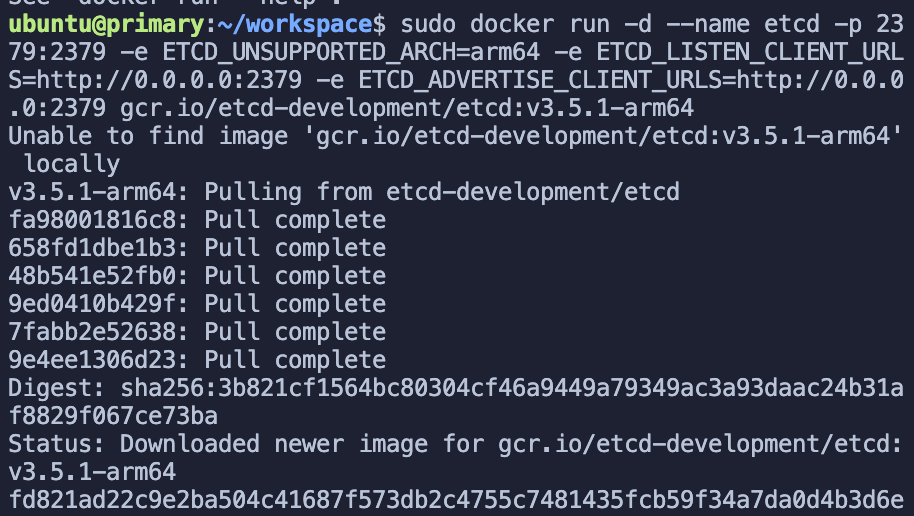
+2. Pull and run etcd
+
+```shell
+sudo docker run -d --name etcd -p 2379:2379 -e ETCD_UNSUPPORTED_ARCH=arm64 -e ETCD_LISTEN_CLIENT_URLS=http://0.0.0.0:2379 -e ETCD_ADVERTISE_CLIENT_URLS=http://0.0.0.0:2379 gcr.io/etcd-development/etcd:v3.5.1-arm64
+```
+
+Note: This image requires a proxy to be turned on.
+Success:
+
+
+
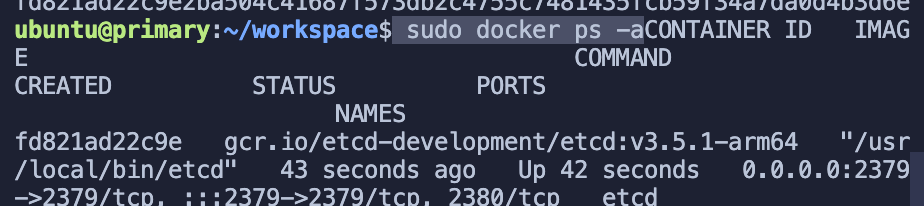
+Verify that etcd has started successfully.
+
+```shell
+sudo docker ps -a
+```
+
+
+
+As you can see, etcd has been successfully started.
+
+## Starting Apache APISIX
+
+All dependencies have been prepared and we can now start Apache APISIX ~ refer directly to How to build APISIX [official documentation](https://apisix.apache.org/docs/apisix/how-to-build).
+
+- Installing dependencies
+
+```shell
+make deps
+make install
+```
+
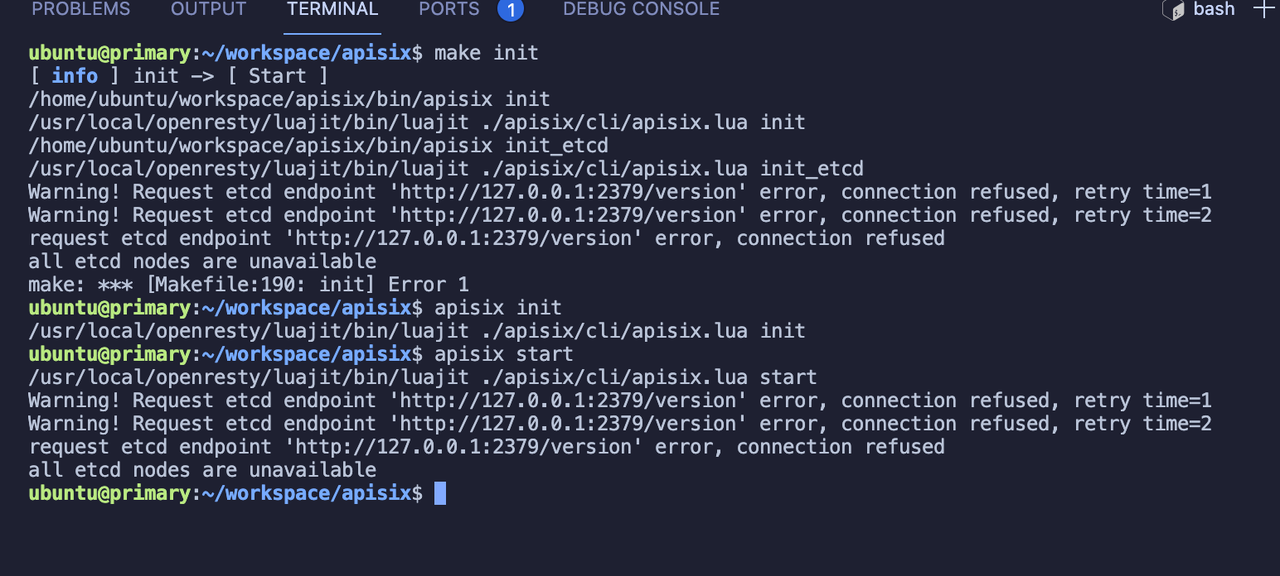
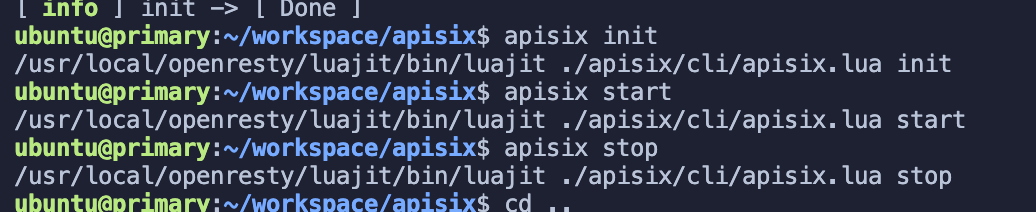
+- Initialise dependencies and start APISIX
+
+```shell
+apisix init
+
+# start APISIX
+apisix start
+
+# stop APISIX
+apisix stop
+```
+
+
+
+No more error messages, perfect finish!
+
+## Summary
+
+In general, there are two problems: the installation of APISIX dependencies and the etcd part of arm. The etcd part can be solved directly with docker, but there are also some pitfalls when pulling images, which I won't show here.
+
+If you have better suggestions, you are welcome to contribute to the Apache APISIX [build documentation](https://apisix.apache.org/docs/apisix/how-to-build/) and leave your suggestions to help more people.
diff --git a/website/i18n/zh/docusaurus-plugin-content-blog/2022/01/11/building-apisix-in-ubuntu-for-arm.md b/website/i18n/zh/docusaurus-plugin-content-blog/2022/01/11/building-apisix-in-ubuntu-for-arm.md
new file mode 100644
index 0000000..1805953
--- /dev/null
+++ b/website/i18n/zh/docusaurus-plugin-content-blog/2022/01/11/building-apisix-in-ubuntu-for-arm.md
@@ -0,0 +1,249 @@
+---
+title: "如何在 ARM Ubuntu 中构建 Apache APISIX"
+authors:
+ - name: "郭奇"
+ title: "Author"
+ url: "https://github.com/guoqqqi"
+ image_url: "https://avatars.githubusercontent.com/u/72343596?v=4"
+keywords:
+- Apache APISIX
+- arm
+- ubuntu
+- Apple Macbook Pro M1
+description: 通过阅读本文,您将了解如何在 ARM Ubuntu 中通过源码构建 Apache APISIX(M1 芯片环境)。
+tags: [Technology]
+---
+
+> 通过阅读本文,您将了解如何在 ARM Ubuntu 中通过源码构建 Apache APISIX(M1 芯片环境)。ARM Ubuntu 系统借助了 [https://multipass.run/](https://multipass.run/) 安装。
+
+<!--truncate-->
+
+## 克隆源码
+
+首先根据 [官方文档](https://apisix.apache.org/docs/apisix/how-to-build/) 克隆 Apache APISIX 源码仓库并进入项目目录。
+
+```shell
+git clone https://github.com/apache/apisix.git
+cd apisix
+git checkout release/2.11
+```
+
+## 安装项目依赖
+
+1. 通过脚本一键安装项目所需要的依赖,在**项目根目录**运行如下命令:
+
+```shell
+bash utils/install-dependencies.sh
+```
+
+
+
+通过错误提示可知,是由于未能成功安装 `OpenResty` 导致。根本原因是默认没有 `ARM 64` 平台的源。
+
+2. 下面我们手动安装下 `OpenResty`,具体安装步骤可参考 [https://openresty.org/cn/linux-packages.html#ubuntu](https://openresty.org/cn/linux-packages.html#ubuntu)。
+
+- 步骤一:安装导入 GPG 公钥时所需的几个依赖包(整个安装过程完成后可以随时删除它们):
+
+```shell
+sudo apt-get -y install --no-install-recommends wget gnupg ca-certificates
+```
+
+- 步骤二:导入我们的 GPG 密钥:
+
+```shell
+wget -O - https://openresty.org/package/pubkey.gpg | sudo apt-key add -
+```
+
+如下图所示,导入成功:
+
+
+
+- 步骤三:添加 OpenResty 官方 APT 仓库。对于 x86_64 或 amd64 系统,可以使用以下命令:
+
+```shell
+echo "deb http://openresty.org/package/ubuntu $(lsb_release -sc) main" \
+ | sudo tee /etc/apt/sources.list.d/openresty.list
+```
+
+- 而对于 ARM64 或 aarch64 系统,则可以使用下面的命令:(我在 M1 上运行的是该命令,上个命令会报错)
+
+```shell
+echo "deb http://openresty.org/package/arm64/ubuntu $(lsb_release -sc) main" \
+ | sudo tee /etc/apt/sources.list.d/openresty.list
+```
+
+- 步骤四:更新 APT 索引:
+
+```shell
+sudo apt-get update
+```
+
+然后就可以像下面这样安装软件包,比如 `OpenResty`:
+
+```shell
+sudo apt-get -y install openresty
+```
+
+- 步骤五:(可选)可以通过以下命令删除该包和对应的关联包:
+
+```shell
+sudo apt-get -y install --no-install-recommends software-properties-common
+```
+
+成功安装 `OpenResty`:
+
+
+
+3. 重新运行安装依赖脚本 (参考步骤一)
+4. 接着运行 `LUAROCKS_SERVER=https://luarocks.cn` 命令安装依赖:
+
+
+
+运行下面命令即可:
+
+```shell
+curl https://raw.githubusercontent.com/apache/apisix/master/utils/linux-install-luarocks.sh -sL | bash -
+```
+
+
+
+又出现了错误提示,我们运行以下命令:
+
+```shell
+sudo apt install wget sudo unzip
+```
+
+接着我们重新运行一次:
+
+```shell
+curl https://raw.githubusercontent.com/apache/apisix/master/utils/linux-install-luarocks.sh -sL | bash -
+```
+
+然后我们继续运行安装依赖的命令:`LUAROCKS_SERVER=https://luarocks.cn make deps`
+终于成功了,哭了,坑确实太多了。
+
+
+
+大部分依赖已经成功安装好,但是又有新的错误提示了。
+这里看起来是两个仓库未能成功克隆下来,没关系,先往后面运行试试:
+
+5. 安装 APISIX 命令
+
+```shell
+make install
+// 如果出现权限不足的提示,用 sudo make install
+```
+
+成功:
+
+
+
+## 安装 etcd
+
+### 踩坑 etcd
+
+启动 APISIX 之前需要安装下 etcd,参考 APISIX 提供的 [官方文档](https://apisix.apache.org/docs/apisix/2.10/install-dependencies/#ubuntu-1604--1804)
+
+>(由于该安装教程并不是针对 arm 写的,所以虽然成功安装了 etcd,但是未能成功将 etcd 运行起来,原因是因为默认使用的 x86 的二进制文件启动,所以无法运行。可以跳过该部分直接参考在 「Docker 中运行 etcd 服务」部分)
+
+- 下载 etcd:
+
+```shell
+wget https://github.com/etcd-io/etcd/releases/download/v3.4.13/etcd-v3.4.13-linux-amd64.tar.gz
+```
+
+- 解压 etcd:
+
+```shell
+tar -xvf etcd-v3.4.13-linux-amd64.tar.gz && cd etcd-v3.4.13-linux-amd64 && sudo cp -a etcd etcdctl /usr/bin/
+```
+
+成功:
+
+
+
+- 启动 etcd 服务
+
+```shell
+nohup etcd &
+```
+
+
+
+然后我在后面运行 Apache APISIX 时发现 etcd 报错了:
+
+
+
+发现在 ARM Ubuntu 裸跑 etcd 坑太多了,各种各样的错误,后来决定还是跑 docker 吧~
+
+### 在 Docker 中运行 etcd 服务
+
+1. 安装 Docker
+
+```shell
+sudo apt install docker.io
+```
+
+Tip: docker 常用的命令:(如果出现无权限错误,请在命令前添加 sudo)
+
+- 查看所有容器列表 docker ps -a
+- 查看正在运行的容器列表 docker ps
+- 查看镜像列表 docker image list
+- 删除所有容器 docker container prune
+- 删除所有镜像 docker image prune -f -a
+
+更多参考:[Docker 入门教程 - 阮一峰的网络日志](https://www.ruanyifeng.com/blog/2018/02/docker-tutorial.html)
+
+2. 拉取并运行 etcd
+
+```shell
+sudo docker run -d --name etcd -p 2379:2379 -e ETCD_UNSUPPORTED_ARCH=arm64 -e ETCD_LISTEN_CLIENT_URLS=http://0.0.0.0:2379 -e ETCD_ADVERTISE_CLIENT_URLS=http://0.0.0.0:2379 gcr.io/etcd-development/etcd:v3.5.1-arm64
+```
+
+注意:该镜像需要开代理。
+成功:
+
+
+
+验证 etcd 是否启动成功:
+
+```shell
+sudo docker ps -a
+```
+
+
+
+这样,etcd 已经成功启动了。
+
+## 启动 Apache APISIX
+
+所有的依赖项目已经准备完毕,现在我们可以启动 Apache APISIX 了~直接参考如何构建 APISIX [官方文档](https://apisix.apache.org/docs/apisix/how-to-build)。
+
+- 安装依赖
+
+```shell
+make deps
+make install
+```
+
+- 初始化依赖并启动 APISIX
+
+```shell
+apisix init
+
+# start APISIX
+apisix start
+
+# stop APISIX
+apisix stop
+```
+
+
+
+没有任何错误信息了,完美收工!
+
+## 总结:
+
+总体来说,有两个大坑是安装 APISIX 依赖部分和 arm 的 etcd 部分,etcd 部分可以直接用 docker 来解决,不过在拉取镜像的时候也会有一些坑,在此就不展示了,大多都是一些版本不匹配的错误,直接换别的镜像尝试就好。
+
+如果各位有更好的建议,欢迎大家为 Apache APISIX [构建文档](https://apisix.apache.org/docs/apisix/how-to-build/) 贡献,留下您的建议,来帮助更多的人。