You are viewing a plain text version of this content. The canonical link for it is here.
Posted to commits@iotdb.apache.org by ha...@apache.org on 2023/03/01 10:02:11 UTC
[iotdb] branch master updated: feat(site): image move to site (#9182)
This is an automated email from the ASF dual-hosted git repository.
haonan pushed a commit to branch master
in repository https://gitbox.apache.org/repos/asf/iotdb.git
The following commit(s) were added to refs/heads/master by this push:
new 8c65fbb343 feat(site): image move to site (#9182)
8c65fbb343 is described below
commit 8c65fbb343f8273cc56a5955eb6d156d2dfb168b
Author: CritasWang <cr...@outlook.com>
AuthorDate: Wed Mar 1 18:01:59 2023 +0800
feat(site): image move to site (#9182)
---
docs/UserGuide/API/InfluxDB-Protocol.md | 10 +-
docs/UserGuide/API/Programming-JDBC.md | 2 +-
docs/UserGuide/API/Programming-MQTT.md | 6 +-
.../UserGuide/API/Programming-Python-Native-API.md | 2 +-
docs/UserGuide/Cluster/Cluster-Concept.md | 4 +-
docs/UserGuide/Cluster/Cluster-Maintenance.md | 2 +-
.../Data-Concept/Data-Model-and-Terminology.md | 4 +-
docs/UserGuide/Data-Concept/Schema-Template.md | 6 +-
docs/UserGuide/Data-Concept/Time-Partition.md | 2 +-
docs/UserGuide/Ecosystem-Integration/DBeaver.md | 16 +-
.../Ecosystem-Integration/Grafana-Connector.md | 6 +-
.../Ecosystem-Integration/Grafana-Plugin.md | 58 +--
docs/UserGuide/Ecosystem-Integration/NiFi-IoTDB.md | 2 +-
.../UserGuide/Ecosystem-Integration/Spark-IoTDB.md | 2 +-
.../Ecosystem-Integration/Spark-TsFile.md | 4 +-
.../Ecosystem-Integration/Writing-Data-on-HDFS.md | 2 +-
.../Ecosystem-Integration/Zeppelin-IoTDB.md | 8 +-
.../Edge-Cloud-Collaboration/Sync-Tool.md | 4 +-
.../Integration-Test-refactoring-tutorial.md | 4 +-
docs/UserGuide/IoTDB-Introduction/Architecture.md | 2 +-
docs/UserGuide/IoTDB-Introduction/Scenario.md | 14 +-
docs/UserGuide/Maintenance-Tools/JMX-Tool.md | 4 +-
docs/UserGuide/Maintenance-Tools/Log-Tool.md | 6 +-
.../Maintenance-Tools/Maintenance-Command.md | 8 +-
docs/UserGuide/Monitor-Alert/Alerting.md | 2 +-
docs/UserGuide/Monitor-Alert/Metric-Tool.md | 10 +-
.../Operate-Metadata/Auto-Create-MetaData.md | 2 +-
docs/UserGuide/Operate-Metadata/Node.md | 2 +-
docs/UserGuide/Operate-Metadata/Timeseries.md | 2 +-
.../Operators-Functions/Continuous-Interval.md | 8 +-
docs/UserGuide/Operators-Functions/Sample.md | 10 +-
.../Operators-Functions/User-Defined-Function.md | 10 +-
docs/UserGuide/Query-Data/Continuous-Query.md | 8 +-
docs/UserGuide/Query-Data/Group-By.md | 6 +-
docs/UserGuide/Query-Data/Overview.md | 2 +-
.../UserGuide/QuickStart/Command-Line-Interface.md | 28 +-
docs/UserGuide/QuickStart/QuickStart.md | 2 +-
docs/UserGuide/Reference/Common-Config-Manual.md | 13 +-
docs/UserGuide/Reference/SQL-Reference.md | 4 +-
docs/UserGuide/Reference/TSDB-Comparison.md | 16 +-
docs/UserGuide/Syntax-Conventions/Identifier.md | 2 +-
docs/UserGuide/Syntax-Conventions/KeyValue-Pair.md | 4 +-
.../UserGuide/Syntax-Conventions/Literal-Values.md | 10 +-
.../Syntax-Conventions/NodeName-In-Path.md | 12 +-
.../Syntax-Conventions/Session-And-TsFile-API.md | 18 +-
docs/UserGuide/UserGuideReadme.md | 5 +-
docs/UserGuide/Write-Data/Batch-Load-Tool.md | 2 +-
docs/zh/UserGuide/API/InfluxDB-Protocol.md | 10 +-
docs/zh/UserGuide/API/Interface-Comparison.md | 2 +-
.../zh/UserGuide/API/Programming-Cpp-Native-API.md | 40 +-
docs/zh/UserGuide/API/Programming-JDBC.md | 2 +-
.../UserGuide/API/Programming-Java-Native-API.md | 48 +-
docs/zh/UserGuide/API/Programming-MQTT.md | 4 +-
.../UserGuide/API/Programming-Python-Native-API.md | 78 ++--
docs/zh/UserGuide/Cluster/Cluster-Concept.md | 6 +-
docs/zh/UserGuide/Cluster/Cluster-Maintenance.md | 30 +-
docs/zh/UserGuide/Cluster/Cluster-Setup.md | 58 +--
.../UserGuide/Cluster/Deployment-Recommendation.md | 26 +-
docs/zh/UserGuide/Data-Concept/Compression.md | 6 +-
.../Data-Concept/Data-Model-and-Terminology.md | 4 +-
docs/zh/UserGuide/Data-Concept/Data-Type.md | 14 +-
docs/zh/UserGuide/Data-Concept/Deadband-Process.md | 4 +-
docs/zh/UserGuide/Data-Concept/Encoding.md | 6 +-
docs/zh/UserGuide/Data-Concept/Schema-Template.md | 16 +-
docs/zh/UserGuide/Data-Concept/Time-Partition.md | 10 +-
docs/zh/UserGuide/Data-Concept/Time-zone.md | 4 +-
docs/zh/UserGuide/Data-Modeling/DataRegion.md | 8 +-
.../Data-Modeling/SchemaRegion-rocksdb.md | 8 +-
docs/zh/UserGuide/Delete-Data/TTL.md | 8 +-
docs/zh/UserGuide/Ecosystem-Integration/DBeaver.md | 16 +-
.../Ecosystem-Integration/Grafana-Connector.md | 6 +-
.../Ecosystem-Integration/Grafana-Plugin.md | 98 ++--
.../UserGuide/Ecosystem-Integration/NiFi-IoTDB.md | 22 +-
.../Ecosystem-Integration/Writing-Data-on-HDFS.md | 2 +-
.../Ecosystem-Integration/Zeppelin-IoTDB.md | 8 +-
.../Edge-Cloud-Collaboration/Sync-Tool.md | 2 +-
docs/zh/UserGuide/FAQ/FAQ-for-cluster-setup.md | 36 +-
.../Integration-Test-refactoring-tutorial.md | 4 +-
.../UserGuide/IoTDB-Introduction/Architecture.md | 2 +-
docs/zh/UserGuide/IoTDB-Introduction/Scenario.md | 14 +-
docs/zh/UserGuide/Maintenance-Tools/CSV-Tool.md | 24 +-
.../IoTDB-Data-Dir-Overview-Tool.md | 6 +-
docs/zh/UserGuide/Maintenance-Tools/JMX-Tool.md | 8 +-
docs/zh/UserGuide/Maintenance-Tools/Load-Tsfile.md | 14 +-
docs/zh/UserGuide/Maintenance-Tools/Log-Tool.md | 6 +-
.../Maintenance-Tools/TsFile-Load-Export-Tool.md | 24 +-
.../TsFile-Resource-Sketch-Tool.md | 6 +-
.../Maintenance-Tools/TsFile-Sketch-Tool.md | 6 +-
.../Maintenance-Tools/TsFile-Split-Tool.md | 2 +-
.../Maintenance-Tools/TsFileSelfCheck-Tool.md | 4 +-
docs/zh/UserGuide/Monitor-Alert/Alerting.md | 26 +-
docs/zh/UserGuide/Monitor-Alert/Metric-Tool.md | 9 +-
.../Operate-Metadata/Auto-Create-MetaData.md | 12 +-
docs/zh/UserGuide/Operate-Metadata/Database.md | 11 +-
docs/zh/UserGuide/Operate-Metadata/Node.md | 14 +-
docs/zh/UserGuide/Operate-Metadata/Template.md | 16 +-
docs/zh/UserGuide/Operate-Metadata/Timeseries.md | 16 +-
.../UserGuide/Operators-Functions/Aggregation.md | 14 +-
.../Operators-Functions/Anomaly-Detection.md | 56 +--
.../zh/UserGuide/Operators-Functions/Comparison.md | 18 +-
docs/zh/UserGuide/Operators-Functions/Constant.md | 2 +-
.../Operators-Functions/Continuous-Interval.md | 12 +-
.../zh/UserGuide/Operators-Functions/Conversion.md | 10 +-
.../UserGuide/Operators-Functions/Data-Matching.md | 32 +-
.../Operators-Functions/Data-Profiling.md | 170 +++----
.../UserGuide/Operators-Functions/Data-Quality.md | 48 +-
.../Operators-Functions/Data-Repairing.md | 48 +-
.../Operators-Functions/Frequency-Domain.md | 54 +--
docs/zh/UserGuide/Operators-Functions/Lambda.md | 8 +-
docs/zh/UserGuide/Operators-Functions/Logical.md | 6 +-
.../Operators-Functions/Machine-Learning.md | 10 +-
.../UserGuide/Operators-Functions/Mathematical.md | 12 +-
docs/zh/UserGuide/Operators-Functions/Overview.md | 12 +-
docs/zh/UserGuide/Operators-Functions/Sample.md | 50 +-
docs/zh/UserGuide/Operators-Functions/Selection.md | 2 +-
.../Operators-Functions/Series-Discovery.md | 18 +-
docs/zh/UserGuide/Operators-Functions/String.md | 98 ++--
.../UserGuide/Operators-Functions/Time-Series.md | 8 +-
.../Operators-Functions/User-Defined-Function.md | 62 +--
.../Operators-Functions/Variation-Trend.md | 10 +-
docs/zh/UserGuide/Query-Data/Align-By.md | 6 +-
docs/zh/UserGuide/Query-Data/Continuous-Query.md | 60 +--
docs/zh/UserGuide/Query-Data/Fill.md | 14 +-
docs/zh/UserGuide/Query-Data/Group-By.md | 48 +-
docs/zh/UserGuide/Query-Data/Having-Condition.md | 2 +-
docs/zh/UserGuide/Query-Data/Last-Query.md | 2 +-
docs/zh/UserGuide/Query-Data/Order-By.md | 6 +-
docs/zh/UserGuide/Query-Data/Overview.md | 47 +-
docs/zh/UserGuide/Query-Data/Pagination.md | 6 +-
docs/zh/UserGuide/Query-Data/Select-Expression.md | 22 +-
docs/zh/UserGuide/Query-Data/Select-Into.md | 44 +-
docs/zh/UserGuide/Query-Data/Where-Condition.md | 12 +-
docs/zh/UserGuide/QuickStart/ClusterQuickStart.md | 20 +-
.../UserGuide/QuickStart/Command-Line-Interface.md | 26 +-
docs/zh/UserGuide/QuickStart/Files.md | 32 +-
docs/zh/UserGuide/QuickStart/QuickStart.md | 2 +-
docs/zh/UserGuide/QuickStart/ServerFileList.md | 30 +-
.../zh/UserGuide/Reference/Common-Config-Manual.md | 52 ++-
.../Reference/ConfigNode-Config-Manual.md | 18 +-
.../UserGuide/Reference/DataNode-Config-Manual.md | 20 +-
docs/zh/UserGuide/Reference/Keywords.md | 2 +-
docs/zh/UserGuide/Reference/SQL-Reference.md | 26 +-
docs/zh/UserGuide/Reference/Status-Codes.md | 2 +-
docs/zh/UserGuide/Reference/TSDB-Comparison.md | 44 +-
.../Syntax-Conventions/Detailed-Grammar.md | 2 +-
docs/zh/UserGuide/Syntax-Conventions/Identifier.md | 10 +-
.../UserGuide/Syntax-Conventions/KeyValue-Pair.md | 2 +-
.../Keywords-And-Reserved-Words.md | 2 +-
.../UserGuide/Syntax-Conventions/Literal-Values.md | 17 +-
.../Syntax-Conventions/NodeName-In-Path.md | 6 +-
.../Syntax-Conventions/Session-And-TsFile-API.md | 2 +-
.../UserGuide/Trigger/Configuration-Parameters.md | 2 +-
docs/zh/UserGuide/Trigger/Implement-Trigger.md | 20 +-
docs/zh/UserGuide/Trigger/Instructions.md | 10 +-
docs/zh/UserGuide/Trigger/Notes.md | 2 +-
docs/zh/UserGuide/Trigger/Trigger-Management.md | 10 +-
docs/zh/UserGuide/UserGuideReadme.md | 7 +-
docs/zh/UserGuide/Write-Data/Batch-Load-Tool.md | 6 +-
docs/zh/UserGuide/Write-Data/MQTT.md | 2 +-
docs/zh/UserGuide/Write-Data/REST-API.md | 2 +-
docs/zh/UserGuide/Write-Data/Session.md | 4 +-
site/src/main/.vuepress/public/favicon.ico | Bin 0 -> 1595 bytes
site/src/main/.vuepress/public/img/IOTDB.png | Bin 0 -> 20818 bytes
.../TsFile/TsFile/tsFileVectorIndexCase5.png | Bin 0 -> 37197 bytes
.../TsFile/TsFile/tsFileVectorIndexCase6.png | Bin 0 -> 71207 bytes
.../TsFile/TsFile/tsFileVectorIndexCase7.png | Bin 0 -> 81847 bytes
.../API/IoTDB-InfluxDB/architecture-design.png | Bin 0 -> 145997 bytes
.../UserGuide/API/IoTDB-InfluxDB/class-diagram.png | Bin 0 -> 16881 bytes
.../UserGuide/API/IoTDB-InfluxDB/influxdb-data.png | Bin 0 -> 59411 bytes
.../API/IoTDB-InfluxDB/influxdb-vs-iotdb-data.png | Bin 0 -> 202016 bytes
.../UserGuide/API/IoTDB-InfluxDB/iotdb-data.png | Bin 0 -> 53434 bytes
.../API/IoTDB-SQLAlchemy/sqlalchemy-to-iotdb.png | Bin 0 -> 173461 bytes
.../AdministrationConsole.png | Bin 0 -> 197363 bytes
.../CLI/Command-Line-Interface/add_Realm_1.png | Bin 0 -> 212253 bytes
.../CLI/Command-Line-Interface/add_Realm_2.png | Bin 0 -> 49422 bytes
.../CLI/Command-Line-Interface/add_role1.png | Bin 0 -> 79274 bytes
.../CLI/Command-Line-Interface/add_role2.png | Bin 0 -> 55567 bytes
.../CLI/Command-Line-Interface/add_role3.png | Bin 0 -> 67423 bytes
.../CLI/Command-Line-Interface/add_role4.png | Bin 0 -> 73825 bytes
.../CLI/Command-Line-Interface/add_role5.png | Bin 0 -> 82391 bytes
.../CLI/Command-Line-Interface/client.png | Bin 0 -> 132520 bytes
.../CLI/Command-Line-Interface/login_keycloak.png | Bin 0 -> 219950 bytes
.../UserGuide/CLI/Command-Line-Interface/pwd.png | Bin 0 -> 235839 bytes
.../UserGuide/CLI/Command-Line-Interface/user.png | Bin 0 -> 167194 bytes
.../public/img/UserGuide/Cluster/Architecture.png | Bin 0 -> 55767 bytes
.../img/UserGuide/Cluster/Data-Partition.png | Bin 0 -> 106930 bytes
.../UserGuide/Cluster/DataNode-StateMachine-EN.jpg | Bin 0 -> 70582 bytes
.../UserGuide/Cluster/DataNode-StateMachine-ZH.jpg | Bin 0 -> 66988 bytes
.../img/UserGuide/Cluster/Preview1-Function.png | Bin 0 -> 256908 bytes
.../auto_create_sg_example.png | Bin 0 -> 81521 bytes
.../example_template_lifetime.png | Bin 0 -> 283522 bytes
.../example_template_lifetime_zh.png | Bin 0 -> 308440 bytes
.../Measurement-Template/example_with_template.png | Bin 0 -> 28982 bytes
.../example_without_template.png | Bin 0 -> 58632 bytes
.../Time-Partition/time_partition_example.png | Bin 0 -> 160113 bytes
.../UserGuide/Ecosystem-Integration/DBeaver/01.png | Bin 0 -> 163272 bytes
.../UserGuide/Ecosystem-Integration/DBeaver/02.png | Bin 0 -> 123947 bytes
.../UserGuide/Ecosystem-Integration/DBeaver/03.png | Bin 0 -> 144867 bytes
.../UserGuide/Ecosystem-Integration/DBeaver/04.png | Bin 0 -> 228587 bytes
.../UserGuide/Ecosystem-Integration/DBeaver/05.png | Bin 0 -> 198084 bytes
.../UserGuide/Ecosystem-Integration/DBeaver/06.png | Bin 0 -> 191463 bytes
.../UserGuide/Ecosystem-Integration/DBeaver/07.png | Bin 0 -> 222235 bytes
.../UserGuide/Ecosystem-Integration/DBeaver/08.png | Bin 0 -> 58150 bytes
.../UserGuide/Ecosystem-Integration/DBeaver/09.png | Bin 0 -> 350352 bytes
.../Grafana-plugin/add-empty-panel.png | Bin 0 -> 98208 bytes
.../Grafana-plugin/addvaribles.png | Bin 0 -> 196588 bytes
.../Grafana-plugin/alertPanel5.png | Bin 0 -> 42293 bytes
.../Grafana-plugin/alerting1.png | Bin 0 -> 103200 bytes
.../Grafana-plugin/alerting2.png | Bin 0 -> 44192 bytes
.../Grafana-plugin/alerting3.png | Bin 0 -> 119687 bytes
.../Grafana-plugin/alerting4.png | Bin 0 -> 130345 bytes
.../Grafana-plugin/alertpanel3.png | Bin 0 -> 250072 bytes
.../Grafana-plugin/alertpanel4.png | Bin 0 -> 85865 bytes
.../Grafana-plugin/alertpanel6.png | Bin 0 -> 164736 bytes
.../Grafana-plugin/alertpanle1.png | Bin 0 -> 333611 bytes
.../Grafana-plugin/alertpanle2.jpg | Bin 0 -> 137699 bytes
.../Grafana-plugin/applyvariables.png | Bin 0 -> 314991 bytes
.../Grafana-plugin/datasource_1.png | Bin 0 -> 275723 bytes
.../Grafana-plugin/datasource_2.png | Bin 0 -> 123473 bytes
.../Grafana-plugin/datasource_3.png | Bin 0 -> 167831 bytes
.../Grafana-plugin/distribution.png | Bin 0 -> 95592 bytes
.../Grafana-plugin/grafana-plugin-build.png | Bin 0 -> 48467 bytes
.../Grafana-plugin/grafana_input.png | Bin 0 -> 279162 bytes
.../Grafana-plugin/grafana_input2.png | Bin 0 -> 299017 bytes
.../Grafana-plugin/grafana_input_style.png | Bin 0 -> 268438 bytes
.../Grafana-plugin/manage.png | Bin 0 -> 224614 bytes
.../Grafana-plugin/setconf.png | Bin 0 -> 197642 bytes
.../Grafana-plugin/variablesinput3-1.png | Bin 0 -> 316272 bytes
.../Grafana-plugin/variablesinput3.png | Bin 0 -> 95470 bytes
.../Grafana-plugin/variblesinput.png | Bin 0 -> 92755 bytes
.../Grafana-plugin/variblesinput2-1.png | Bin 0 -> 94878 bytes
.../Grafana-plugin/variblesinput2-2.png | Bin 0 -> 326277 bytes
.../Grafana-plugin/variblesinput2.png | Bin 0 -> 92655 bytes
.../Architecture/Structure-of-Apache-IoTDB-cn.png | Bin 0 -> 126257 bytes
.../Architecture/Structure-of-Apache-IoTDB.png | Bin 0 -> 103140 bytes
.../public/img/UserGuide/OtherMaterial-Sample.Data | 516 +++++++++++++++++++++
.../Process-Data/Continuous-Query/pic1.png | Bin 0 -> 28418 bytes
.../Process-Data/Continuous-Query/pic2.png | Bin 0 -> 25023 bytes
.../Process-Data/Continuous-Query/pic3.png | Bin 0 -> 32982 bytes
.../Process-Data/Continuous-Query/pic4.png | Bin 0 -> 36135 bytes
.../Process-Data/GroupBy/groupBySession.jpeg | Bin 0 -> 45630 bytes
.../Process-Data/GroupBy/groupByVariation.jpeg | Bin 0 -> 59469 bytes
.../Process-Data/Triggers/ForwardQueueConsume.png | Bin 0 -> 190973 bytes
.../Process-Data/Triggers/Trigger_Process_Flow.jpg | Bin 0 -> 25591 bytes
.../Triggers/Trigger_Process_Strategy.jpg | Bin 0 -> 70240 bytes
.../UDF-User-Defined-Function/countWindow.png | Bin 0 -> 102766 bytes
.../UDF-User-Defined-Function/sessionWindow.png | Bin 0 -> 109806 bytes
.../UDF-User-Defined-Function/stateWindow.png | Bin 0 -> 94322 bytes
.../UDF-User-Defined-Function/timeWindow.png | Bin 0 -> 100258 bytes
.../UserGuide/System-Tools/Metrics/dashboard.png | Bin 0 -> 203647 bytes
.../Metrics/iotdb_prometheus_grafana.png | Bin 0 -> 304191 bytes
.../System-Tools/Metrics/metrics_demo_1.png | Bin 0 -> 262783 bytes
.../System-Tools/Metrics/metrics_demo_2.png | Bin 0 -> 191559 bytes
.../img/UserGuide/System-Tools/Sync-Tool/pipe2.png | Bin 0 -> 58248 bytes
...752940-50407b00-43a5-11eb-94fb-3e3be222183c.png | Bin 0 -> 169114 bytes
...752945-5171a800-43a5-11eb-8614-53b3276a3ce2.png | Bin 0 -> 87397 bytes
...752947-520a3e80-43a5-11eb-8fb1-8fac471c8c7e.png | Bin 0 -> 173739 bytes
...752948-52a2d500-43a5-11eb-9156-0c55667eb4cd.png | Bin 0 -> 125270 bytes
...251336-cf03c000-624f-11eb-8395-de5e349f47b5.png | Bin 0 -> 99963 bytes
...251353-d32fdd80-624f-11eb-80c1-fdb4197939fe.png | Bin 0 -> 112717 bytes
...251369-d7f49180-624f-11eb-9d19-fc7341582b90.png | Bin 0 -> 89864 bytes
...251377-daef8200-624f-11eb-9678-b1d5440be2de.png | Bin 0 -> 111910 bytes
...251391-df1b9f80-624f-11eb-9f1f-66823839acba.png | Bin 0 -> 94191 bytes
...251411-e5aa1700-624f-11eb-8ca8-00c0627b1e96.png | Bin 0 -> 98958 bytes
...254214-6cacbe80-6253-11eb-8532-d6a1829f8f66.png | Bin 0 -> 95325 bytes
...426760-73e3da80-8d73-11eb-9a8f-9232d1f2033b.png | Bin 0 -> 76603 bytes
...125919-f4850800-9929-11eb-8211-81d4c04af1ec.png | Bin 0 -> 142774 bytes
...957896-a9791080-a537-11eb-9962-541412bdcee6.png | Bin 0 -> 110029 bytes
...790229-23e34900-b8c8-11eb-87da-ac01dd117f28.png | Bin 0 -> 32058 bytes
...833923-182ffc00-bf32-11eb-8b3f-9f95d3729ad2.png | Bin 0 -> 324124 bytes
...668849-b1c69280-d1ec-11eb-83cb-3b73c40bdf72.png | Bin 0 -> 85937 bytes
...542457-5f511d00-d77c-11eb-8006-562d83069baa.png | Bin 0 -> 85488 bytes
...951720-707f1ee8-32ee-4fde-9252-048caebd232e.png | Bin 0 -> 293510 bytes
...178733-a0919d17-0663-4672-9c4f-1efad6f463c2.png | Bin 0 -> 101545 bytes
...181449-00d563c8-7bce-4ecd-a031-ec120ca42c3f.png | Bin 0 -> 66497 bytes
...183015-93b56644-3330-4acf-ae9e-d718a02b5f4c.png | Bin 0 -> 16451 bytes
...018765-6fda9391-ebcf-4c80-98c5-26f34bd74df0.png | Bin 0 -> 350636 bytes
...577195-f94d7500-1ef3-11e9-999a-b4f67055d80e.png | Bin 0 -> 41935 bytes
...577204-fe122900-1ef3-11e9-9e89-2eb1d46e24b8.png | Bin 0 -> 221206 bytes
...577216-09fdeb00-1ef4-11e9-9005-542ad7d9e9e0.png | Bin 0 -> 203454 bytes
...579014-695ef980-1efa-11e9-8cbc-e9e7ee4fa0d8.png | Bin 0 -> 861503 bytes
...579033-7ed42380-1efa-11e9-889f-fb4180291a9e.png | Bin 0 -> 386176 bytes
...579064-8f849980-1efa-11e9-8cd6-a7339cd0540f.jpg | Bin 0 -> 303859 bytes
...579080-96aba780-1efa-11e9-87ac-940c45b19dd7.jpg | Bin 0 -> 234375 bytes
...579095-a4f9c380-1efa-11e9-9f95-17165ec55568.jpg | Bin 0 -> 200091 bytes
...664777-2766ae00-1ff5-11e9-9d2f-7489f8ccbfc2.png | Bin 0 -> 277087 bytes
...664842-554bf280-1ff5-11e9-97d2-54eebe0b2ca1.png | Bin 0 -> 333531 bytes
...664878-6e54a380-1ff5-11e9-9718-4d0e24627fa8.png | Bin 0 -> 276994 bytes
...937461-14296f80-a303-11e9-9602-a7bed624bfb3.png | Bin 0 -> 238093 bytes
...922722-35180400-f05a-11e9-8ff0-7dd51716e4a8.png | Bin 0 -> 16824 bytes
...943956-39c1e800-fc16-11e9-8da2-a662f8246816.png | Bin 0 -> 213188 bytes
...109512-f808bc80-0ab2-11ea-9e4d-b2b2f58fb474.png | Bin 0 -> 16914 bytes
...792176-1718f400-1201-11ea-861a-1a83c07ca144.jpg | Bin 0 -> 14952 bytes
...357432-0c71cf80-75e4-11ea-98aa-c43a54d469ce.png | Bin 0 -> 38174 bytes
...357469-1bf11880-75e4-11ea-978f-a53996667a0d.png | Bin 0 -> 25267 bytes
...351839-bd288900-7f6b-11ea-8d12-feb18c35adad.png | Bin 0 -> 179218 bytes
...414865-5f815480-7fde-11ea-800c-47c7dbad7648.png | Bin 0 -> 101410 bytes
...462909-53a53e80-91e8-11ea-98df-0012380da0b2.png | Bin 0 -> 77209 bytes
...462914-5738c580-91e8-11ea-94d1-4ff6607e7e2c.png | Bin 0 -> 121334 bytes
...464569-725e0200-91f5-11ea-9ff9-49745f4c9ef2.png | Bin 0 -> 115173 bytes
...464639-ed271d00-91f5-11ea-91a0-b4fe9cb8204e.png | Bin 0 -> 160280 bytes
...768477-b874d780-950d-11ea-80ca-8807b9bd0970.png | Bin 0 -> 476193 bytes
...768490-bf034f00-950d-11ea-9b56-fef3edca0958.png | Bin 0 -> 332540 bytes
...197835-99a64980-1f62-11eb-84af-8301b8a6aad5.png | Bin 0 -> 71304 bytes
...197920-be9abc80-1f62-11eb-9efb-027f0590031c.png | Bin 0 -> 71488 bytes
...197948-cf4b3280-1f62-11eb-9c8c-c97d1adf032c.png | Bin 0 -> 116419 bytes
...633970-73671c00-235d-11eb-9913-f38e570fcfc8.png | Bin 0 -> 36452 bytes
...787878-47b51480-2b5b-11eb-8ed3-84088c5c30f7.png | Bin 0 -> 112663 bytes
.../img/zh/development/howtocontributecode/01.png | Bin 0 -> 89974 bytes
.../img/zh/development/howtocontributecode/02.png | Bin 0 -> 121641 bytes
.../img/zh/development/howtocontributecode/03.png | Bin 0 -> 214508 bytes
.../zh/development/howtocontributecode/issue.png | Bin 0 -> 108398 bytes
site/src/main/.vuepress/public/logo.png | Bin 0 -> 21687 bytes
313 files changed, 1810 insertions(+), 1277 deletions(-)
diff --git a/docs/UserGuide/API/InfluxDB-Protocol.md b/docs/UserGuide/API/InfluxDB-Protocol.md
index 9fcad8b2d5..2530c655e4 100644
--- a/docs/UserGuide/API/InfluxDB-Protocol.md
+++ b/docs/UserGuide/API/InfluxDB-Protocol.md
@@ -51,9 +51,9 @@ InfluxDB influxDB = IoTDBInfluxDBFactory.connect(openurl, username, password);
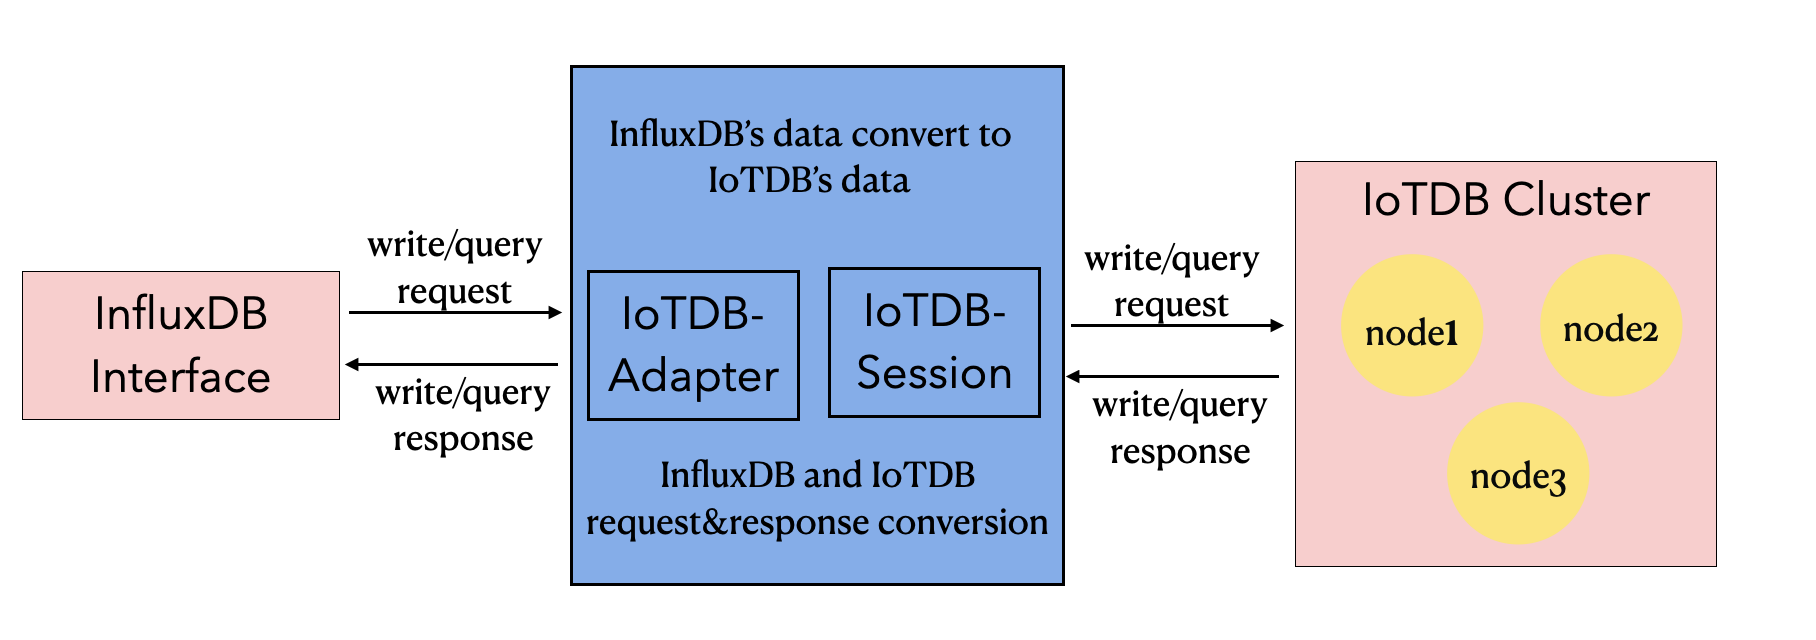
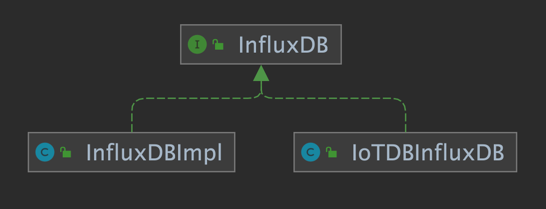
Based on the IoTDB Java ServiceProvider interface, the adapter implements the 'interface InfluxDB' of the java interface of InfluxDB, and provides users with all the interface methods of InfluxDB. End users can use the InfluxDB protocol to initiate write and read requests to IoTDB without perception.
-
+
-
+
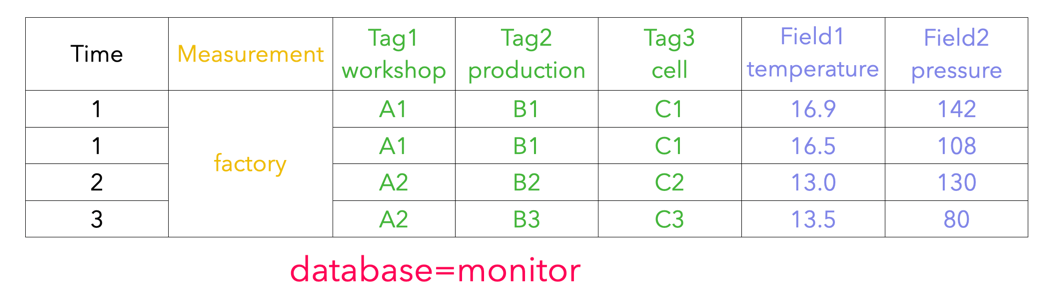
### 2.2 Metadata Format Conversion
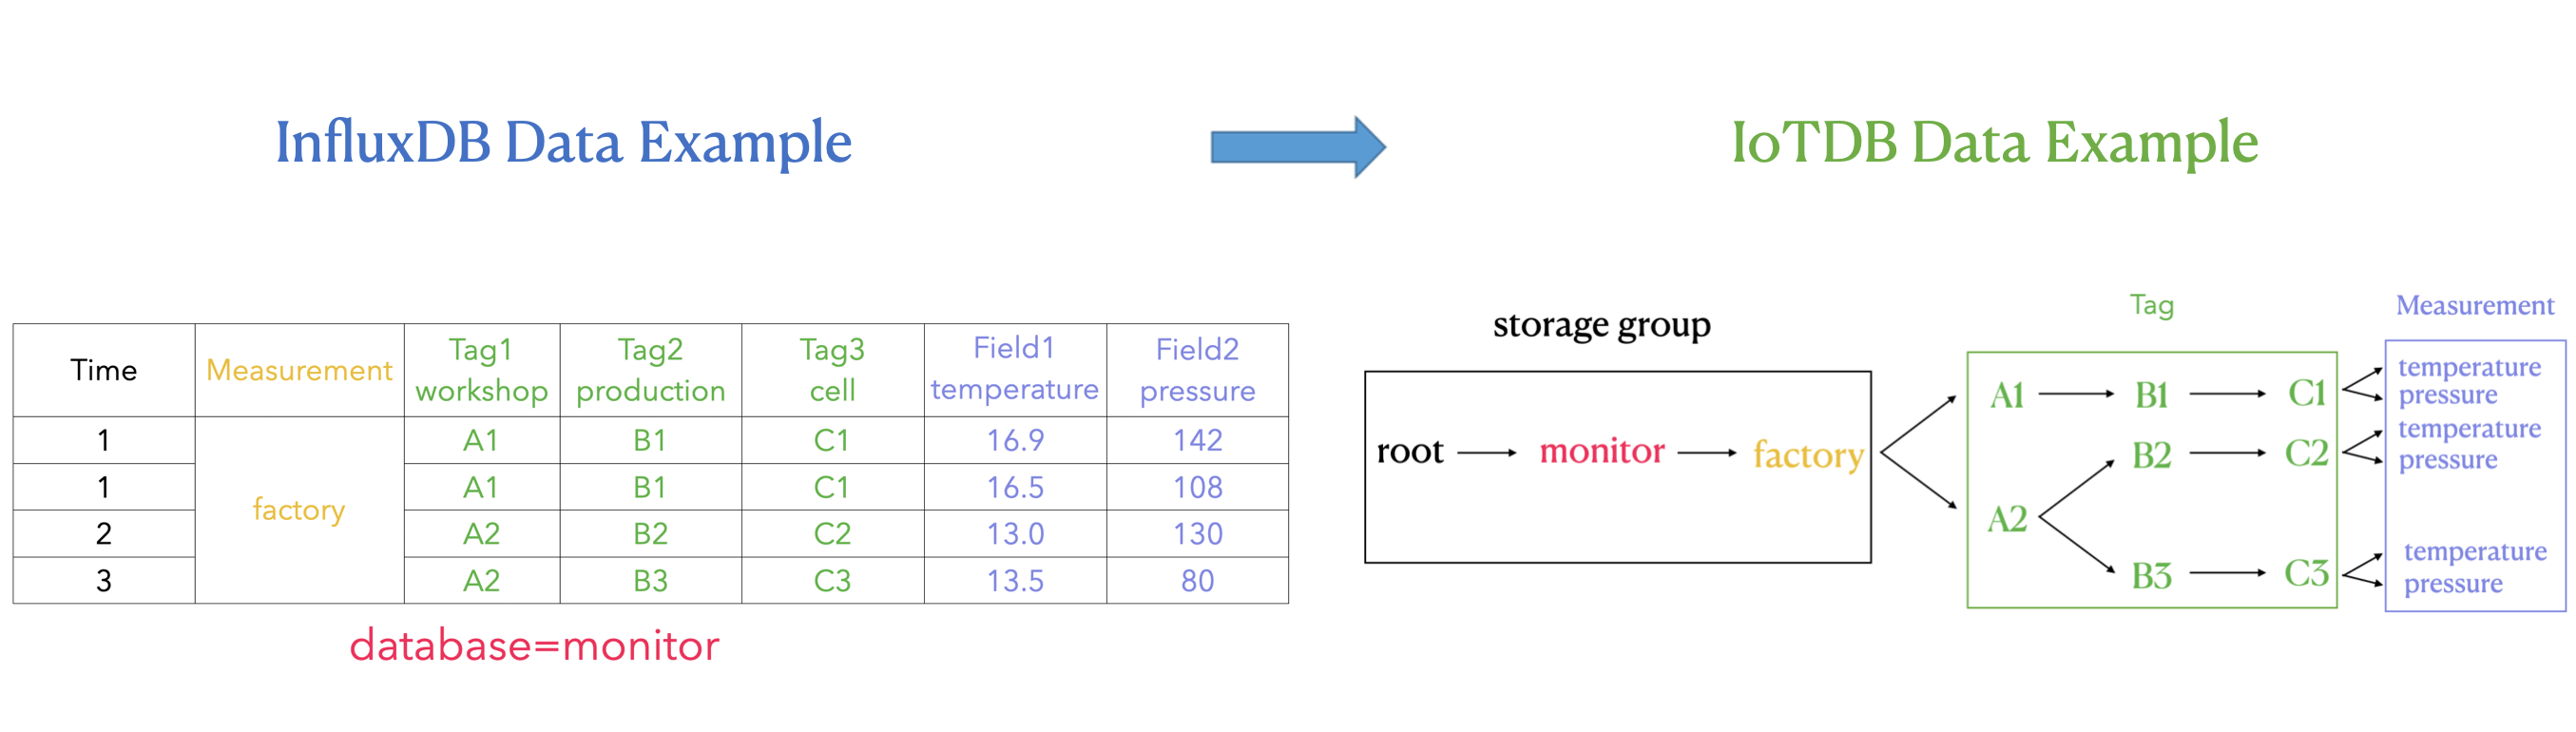
@@ -66,7 +66,7 @@ The metadata of InfluxDB is tag field model, and the metadata of IoTDB is tree m
3. tags: various indexed attributes.
4. fields: various record values(attributes without index).
-
+
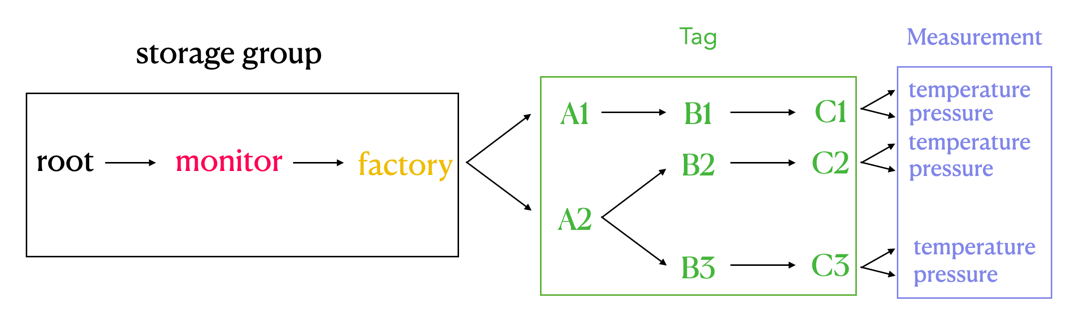
#### 2.2.2 IoTDB Metadata
@@ -74,7 +74,7 @@ The metadata of InfluxDB is tag field model, and the metadata of IoTDB is tree m
2. path(time series ID): storage path.
3. measurement: physical quantity.
-
+
#### 2.2.3 Mapping relationship between the two
@@ -87,7 +87,7 @@ The transformation relationship from InfluxDB metadata to IoTDB metadata can be
`root.{database}.{measurement}.{tag value 1}.{tag value 2}...{tag value N-1}.{tag value N}.{field key}`
-
+
As shown in the figure above, it can be seen that:
diff --git a/docs/UserGuide/API/Programming-JDBC.md b/docs/UserGuide/API/Programming-JDBC.md
index 3122634563..0329282ad1 100644
--- a/docs/UserGuide/API/Programming-JDBC.md
+++ b/docs/UserGuide/API/Programming-JDBC.md
@@ -64,7 +64,7 @@ It requires including the packages containing the JDBC classes needed for databa
**NOTE: For faster insertion, the insertTablet() in Session is recommended.**
-```Java
+```java
import java.sql.*;
import org.apache.iotdb.jdbc.IoTDBSQLException;
diff --git a/docs/UserGuide/API/Programming-MQTT.md b/docs/UserGuide/API/Programming-MQTT.md
index 4d3f6a9fc7..84838a5ec1 100644
--- a/docs/UserGuide/API/Programming-MQTT.md
+++ b/docs/UserGuide/API/Programming-MQTT.md
@@ -27,7 +27,7 @@ It is useful for connections with remote locations where a small code footprint
IoTDB supports the MQTT v3.1(an OASIS Standard) protocol.
IoTDB server includes a built-in MQTT service that allows remote devices send messages into IoTDB server directly.
-<img style="width:100%; max-width:800px; max-height:600px; margin-left:auto; margin-right:auto; display:block;" src="https://user-images.githubusercontent.com/6711230/78357432-0c71cf80-75e4-11ea-98aa-c43a54d469ce.png">
+<img style="width:100%; max-width:800px; max-height:600px; margin-left:auto; margin-right:auto; display:block;" src="/img/github/78357432-0c71cf80-75e4-11ea-98aa-c43a54d469ce.png">
### Built-in MQTT Service
@@ -56,7 +56,7 @@ or
```
or json array of the above two.
-<img style="width:100%; max-width:800px; max-height:600px; margin-left:auto; margin-right:auto; display:block;" src="https://user-images.githubusercontent.com/6711230/78357469-1bf11880-75e4-11ea-978f-a53996667a0d.png">
+<img style="width:100%; max-width:800px; max-height:600px; margin-left:auto; margin-right:auto; display:block;" src="/img/github/78357469-1bf11880-75e4-11ea-978f-a53996667a0d.png">
### MQTT Configurations
The IoTDB MQTT service load configurations from `${IOTDB_HOME}/${IOTDB_CONF}/iotdb-datanode.properties` by default.
@@ -112,7 +112,7 @@ Steps:
<dependency>
<groupId>org.apache.iotdb</groupId>
<artifactId>iotdb-server</artifactId>
- <version>${project.version}</version>
+ <version>1.1.0-SNAPSHOT</version>
</dependency>
```
* Define your implementation which implements `org.apache.iotdb.db.protocol.mqtt.PayloadFormatter`
diff --git a/docs/UserGuide/API/Programming-Python-Native-API.md b/docs/UserGuide/API/Programming-Python-Native-API.md
index c1cd8995ad..3539eef37c 100644
--- a/docs/UserGuide/API/Programming-Python-Native-API.md
+++ b/docs/UserGuide/API/Programming-Python-Native-API.md
@@ -513,7 +513,7 @@ The mapping relationship between them is:
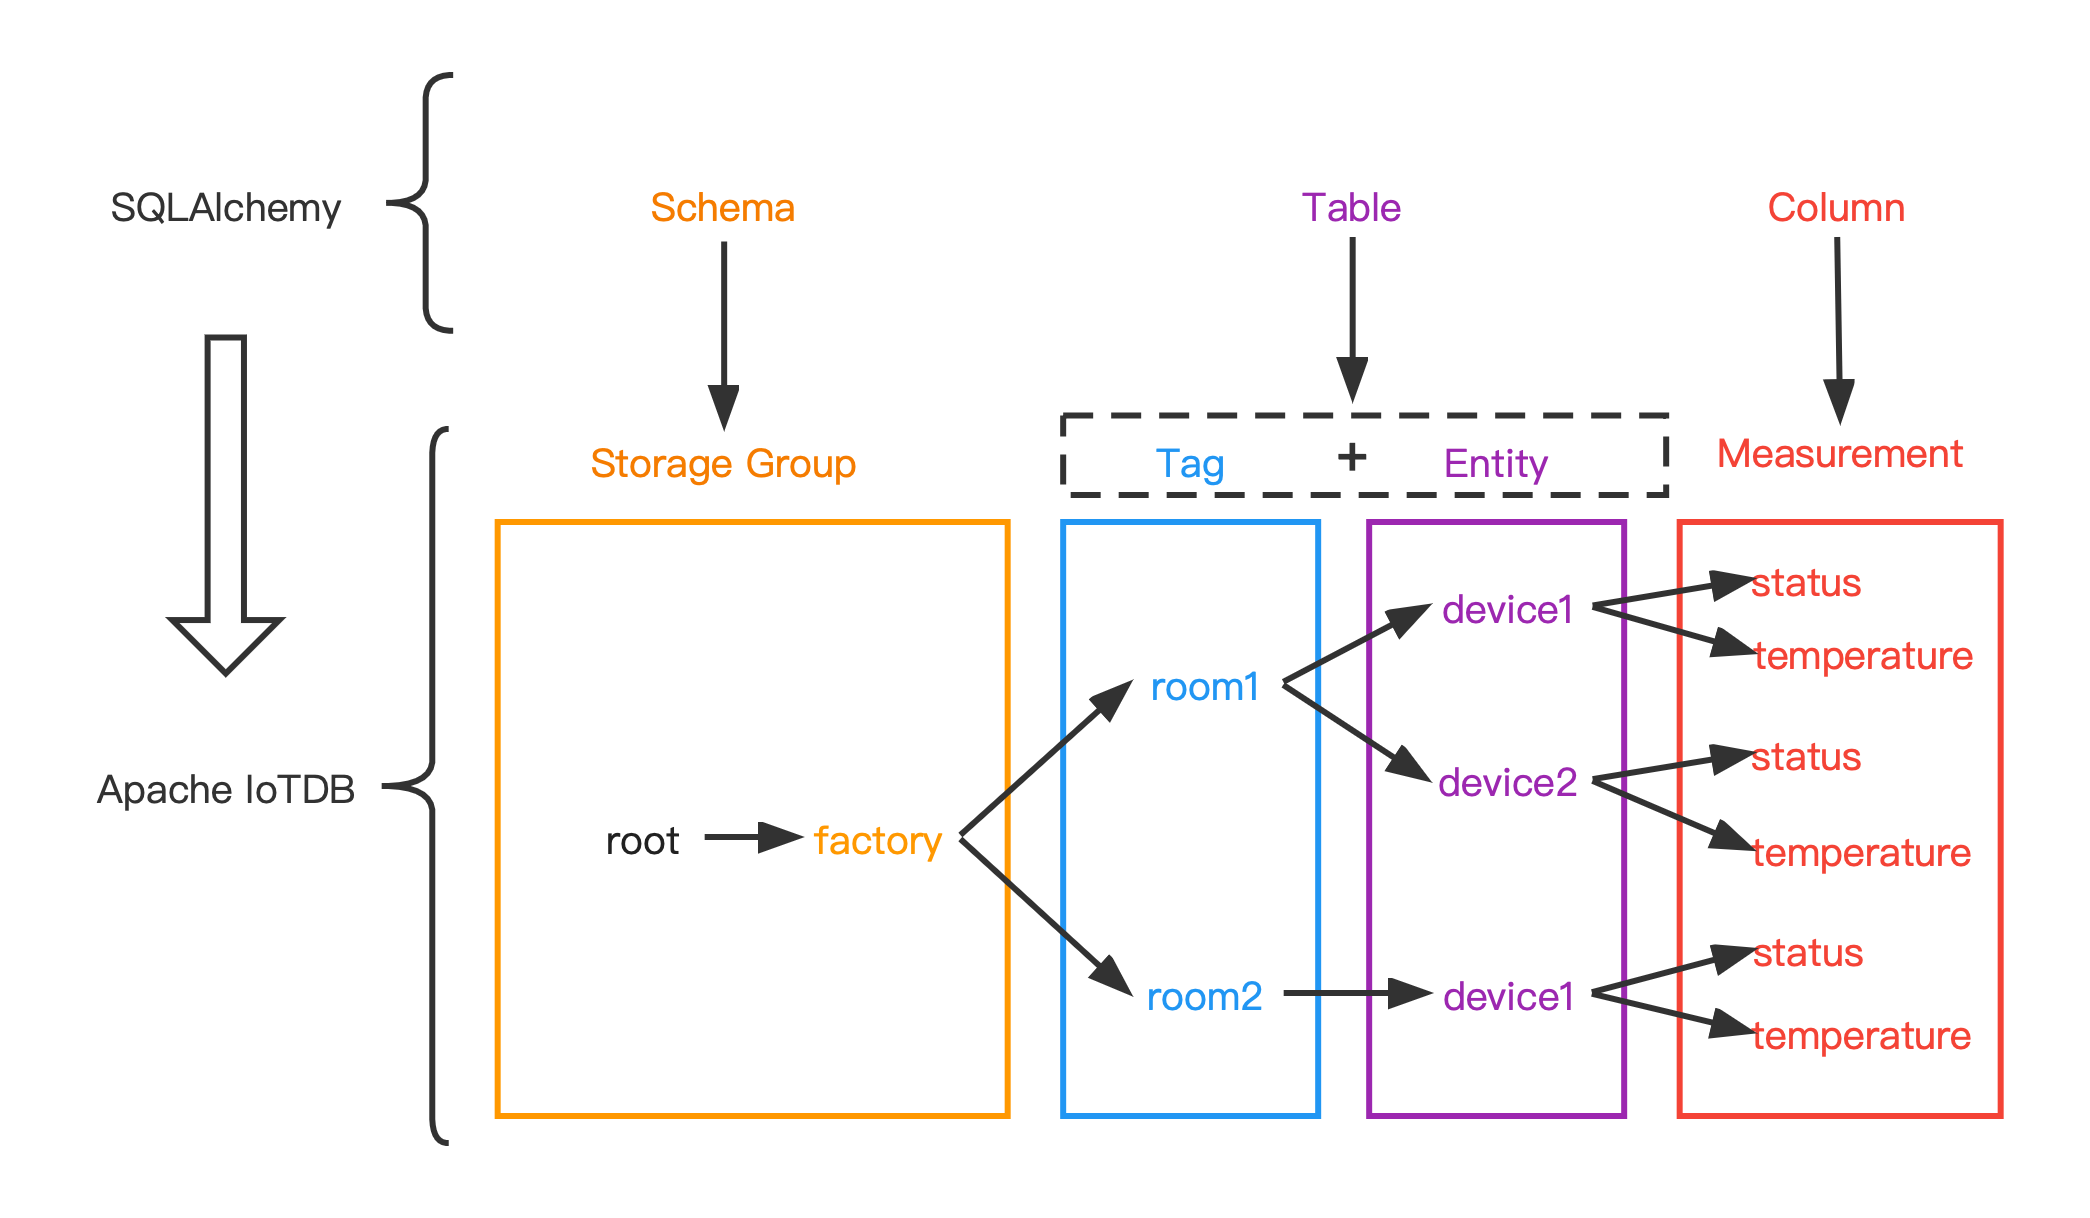
The following figure shows the relationship between the two more intuitively:
-
+
#### Data type mapping
| data type in IoTDB | data type in SQLAlchemy |
diff --git a/docs/UserGuide/Cluster/Cluster-Concept.md b/docs/UserGuide/Cluster/Cluster-Concept.md
index 25773dd10b..5131adc865 100644
--- a/docs/UserGuide/Cluster/Cluster-Concept.md
+++ b/docs/UserGuide/Cluster/Cluster-Concept.md
@@ -27,7 +27,7 @@ Apache IoTDB Cluster contains two types of nodes: ConfigNode and DataNode, each
An illustration of the cluster architecture:
-<img style="width:100%; max-width:500px; max-height:400px; margin-left:auto; margin-right:auto; display:block;" src="https://github.com/apache/iotdb-bin-resources/blob/main/docs/UserGuide/Cluster/Architecture.png?raw=true">
+<img style="width:100%; max-width:500px; max-height:400px; margin-left:auto; margin-right:auto; display:block;" src="/img/UserGuide/Cluster/Architecture.png?raw=true">
ConfigNode is the control node of the cluster, which manages the cluster's node status, partition information, etc. All ConfigNodes in the cluster form a highly available group, which is fully replicated.
@@ -98,7 +98,7 @@ A region is the basic unit of replication. Multiple replicas of a region constru
An illustration of the partition allocation in cluster:
-<img style="width:100%; max-width:500px; max-height:500px; margin-left:auto; margin-right:auto; display:block;" src="https://github.com/apache/iotdb-bin-resources/blob/main/docs/UserGuide/Cluster/Data-Partition.png?raw=true">
+<img style="width:100%; max-width:500px; max-height:500px; margin-left:auto; margin-right:auto; display:block;" src="/img/UserGuide/Cluster/Data-Partition.png?raw=true">
The figure contains 1 SchemaRegionGroup, and the schema_replication_factor is 3, so the 3 white SchemaRegion-0s form a replication group.
diff --git a/docs/UserGuide/Cluster/Cluster-Maintenance.md b/docs/UserGuide/Cluster/Cluster-Maintenance.md
index ab1c6ec4b1..0d61b46914 100644
--- a/docs/UserGuide/Cluster/Cluster-Maintenance.md
+++ b/docs/UserGuide/Cluster/Cluster-Maintenance.md
@@ -125,7 +125,7 @@ It costs 0.006s
### DataNode status definition
The state machine of DataNode is shown in the figure below:
-<img style="width:100%; max-width:500px; max-height:500px; margin-left:auto; margin-right:auto; display:block;" src="https://github.com/apache/iotdb-bin-resources/blob/main/docs/UserGuide/Cluster/DataNode-StateMachine-EN.jpg?raw=true">
+<img style="width:100%; max-width:500px; max-height:500px; margin-left:auto; margin-right:auto; display:block;" src="/img/UserGuide/Cluster/DataNode-StateMachine-EN.jpg?raw=true">
The DataNode statuses are defined as follows:
diff --git a/docs/UserGuide/Data-Concept/Data-Model-and-Terminology.md b/docs/UserGuide/Data-Concept/Data-Model-and-Terminology.md
index 5fc169cbda..482bfded97 100644
--- a/docs/UserGuide/Data-Concept/Data-Model-and-Terminology.md
+++ b/docs/UserGuide/Data-Concept/Data-Model-and-Terminology.md
@@ -25,7 +25,7 @@ A wind power IoT scenario is taken as an example to illustrate how to creat a co
According to the enterprise organization structure and equipment entity hierarchy, it is expressed as an attribute hierarchy structure, as shown below. The hierarchical from top to bottom is: power group layer - power plant layer - entity layer - measurement layer. ROOT is the root node, and each node of measurement layer is a leaf node. In the process of using IoTDB, the attributes on the path from ROOT node is directly connected to each leaf node with ".", thus forming the name of a ti [...]
-<center><img style="width:100%; max-width:800px; max-height:600px; margin-left:auto; margin-right:auto; display:block;" src="https://user-images.githubusercontent.com/19167280/122668849-b1c69280-d1ec-11eb-83cb-3b73c40bdf72.png"></center>
+<center><img style="width:100%; max-width:800px; max-height:600px; margin-left:auto; margin-right:auto; display:block;" src="/img/github/122668849-b1c69280-d1ec-11eb-83cb-3b73c40bdf72.png"></center>
Here are the basic concepts of the model involved in IoTDB.
@@ -132,7 +132,7 @@ When querying, you can query each timeseries separately.
When inserting data, it is allowed to insert null value in the aligned timeseries.
-<img style="width:100%; max-width:800px; max-height:600px; margin-left:auto; margin-right:auto; display:block;" src="https://user-images.githubusercontent.com/19167280/114125919-f4850800-9929-11eb-8211-81d4c04af1ec.png">
+<img style="width:100%; max-width:800px; max-height:600px; margin-left:auto; margin-right:auto; display:block;" src="/img/github/114125919-f4850800-9929-11eb-8211-81d4c04af1ec.png">
In the following chapters of data definition language, data operation language and Java Native Interface, various operations related to aligned timeseries will be introduced one by one.
diff --git a/docs/UserGuide/Data-Concept/Schema-Template.md b/docs/UserGuide/Data-Concept/Schema-Template.md
index a3d97622f1..2285ca330c 100644
--- a/docs/UserGuide/Data-Concept/Schema-Template.md
+++ b/docs/UserGuide/Data-Concept/Schema-Template.md
@@ -29,7 +29,7 @@ In order to enable different entities of the same type to share metadata, reduce
The following picture illustrates the data model of petrol vehicle scenario. The velocity, fuel amount, acceleration, and angular velocity of each petrol vehicle spread over cities will be collected. Obviously, the measurements of single petrol vehicle are the same as those of another.
-<img style="width:100%; max-width:800px; max-height:600px; margin-left:auto; margin-right:auto; display:block;" src="https://github.com/apache/iotdb-bin-resources/blob/main/docs/UserGuide/Data%20Concept/Measurement%20Template/example_without_template.png?raw=true" alt="example without template">
+<img style="width:100%; max-width:800px; max-height:600px; margin-left:auto; margin-right:auto; display:block;" src="/img/UserGuide/Data-Concept/Measurement-Template/example_without_template.png" alt="example without template">
## Concept
@@ -45,7 +45,7 @@ In the following chapters of data definition language, data operation language a
After applying schema template, the following picture illustrates the new data model of petrol vehicle scenario. All petrol vehicles share the schemas defined in template. There are no redundancy storage of measurement schemas.
-<img style="width:100%; max-width:800px; max-height:600px; margin-left:auto; margin-right:auto; display:block;" src="https://github.com/apache/iotdb-bin-resources/blob/main/docs/UserGuide/Data%20Concept/Measurement%20Template/example_with_template.png?raw=true" alt="example with template">
+<img style="width:100%; max-width:800px; max-height:600px; margin-left:auto; margin-right:auto; display:block;" src="/img/UserGuide/Data-Concept/Measurement-Template/example_with_template.png" alt="example with template">
### Lifetime of Schema Template
@@ -60,7 +60,7 @@ The term about lifetime of schema template may help you utilize it in a better w
It should be complemented that the distinction between SET and ACTIVATE is meant to serve an ubiquitous scenario where massive nodes with a common ancestor may need to apply the template. Under this circumstance, it is more feasible to SET the template on the common ancestor rather than all those descendant. For those who needs to apply the template, ACTIVATE is a more appropriate arrangement.
-<img style="width:100%; max-width:800px; margin-left:auto; margin-right:auto; display:block;" src="https://github.com/apache/iotdb-bin-resources/blob/main/docs/UserGuide/Data%20Concept/Measurement%20Template/example_template_lifetime.png?raw=true" alt="example with template">
+<img style="width:100%; max-width:800px; margin-left:auto; margin-right:auto; display:block;" src="/img/UserGuide/Data-Concept/Measurement-Template/example_template_lifetime.png" alt="example with template">
## Usage
diff --git a/docs/UserGuide/Data-Concept/Time-Partition.md b/docs/UserGuide/Data-Concept/Time-Partition.md
index ddd781d4b3..f67919e1e9 100644
--- a/docs/UserGuide/Data-Concept/Time-Partition.md
+++ b/docs/UserGuide/Data-Concept/Time-Partition.md
@@ -38,7 +38,7 @@ Time partition divides data according to time, and a time partition is used to s
Enable time partition and set partition_interval to 86400000 (one day), then the data distribution is shown as the following figure:
-<img style="width:100%; max-width:800px; max-height:600px; margin-left:auto; margin-right:auto; display:block;" src="https://github.com/apache/iotdb-bin-resources/blob/main/docs/UserGuide/Data%20Concept/Time-Partition/time_partition_example.png?raw=true" alt="time partition example">
+<img style="width:100%; max-width:800px; max-height:600px; margin-left:auto; margin-right:auto; display:block;" src="/img/UserGuide/Data-Concept/Time-Partition/time_partition_example.png?raw=true" alt="time partition example">
* Insert one datapoint with timestamp 0, calculate 0/86400000 = 0, then this datapoint will be stored in TsFile under folder 0
diff --git a/docs/UserGuide/Ecosystem-Integration/DBeaver.md b/docs/UserGuide/Ecosystem-Integration/DBeaver.md
index 25159978d5..5392b50c59 100644
--- a/docs/UserGuide/Ecosystem-Integration/DBeaver.md
+++ b/docs/UserGuide/Ecosystem-Integration/DBeaver.md
@@ -45,11 +45,11 @@ DBeaver is a SQL client software application and a database administration tool.
2. Start DBeaver
3. Open Driver Manager
- 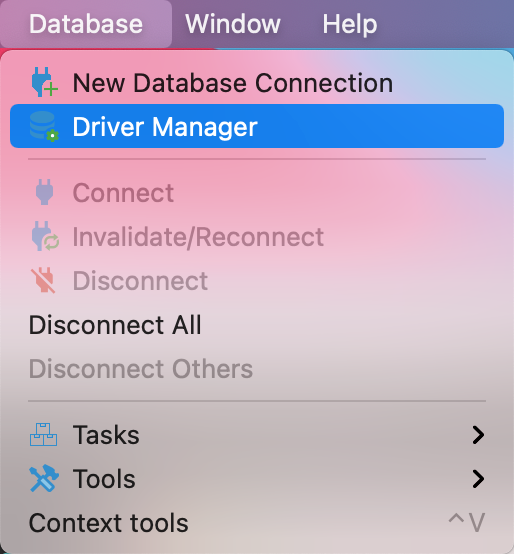
+ 
4. Create a new driver type for IoTDB
- 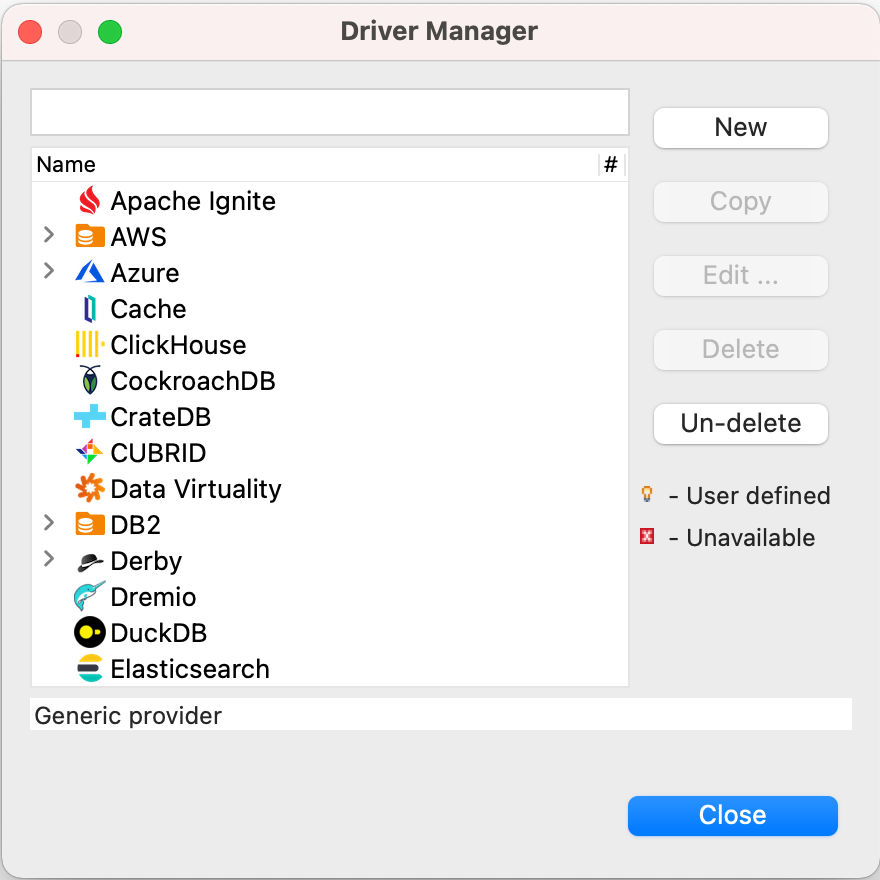
+ 
5. Download [Sources](https://iotdb.apache.org/Download/),unzip it and compile jdbc driver by the following command
@@ -58,15 +58,15 @@ DBeaver is a SQL client software application and a database administration tool.
```
6. Find and add a lib named `apache-iotdb-jdbc-{version}-jar-with-dependencies.jar`, which should be under `jdbc/target/`, then select `Find Class`.
- 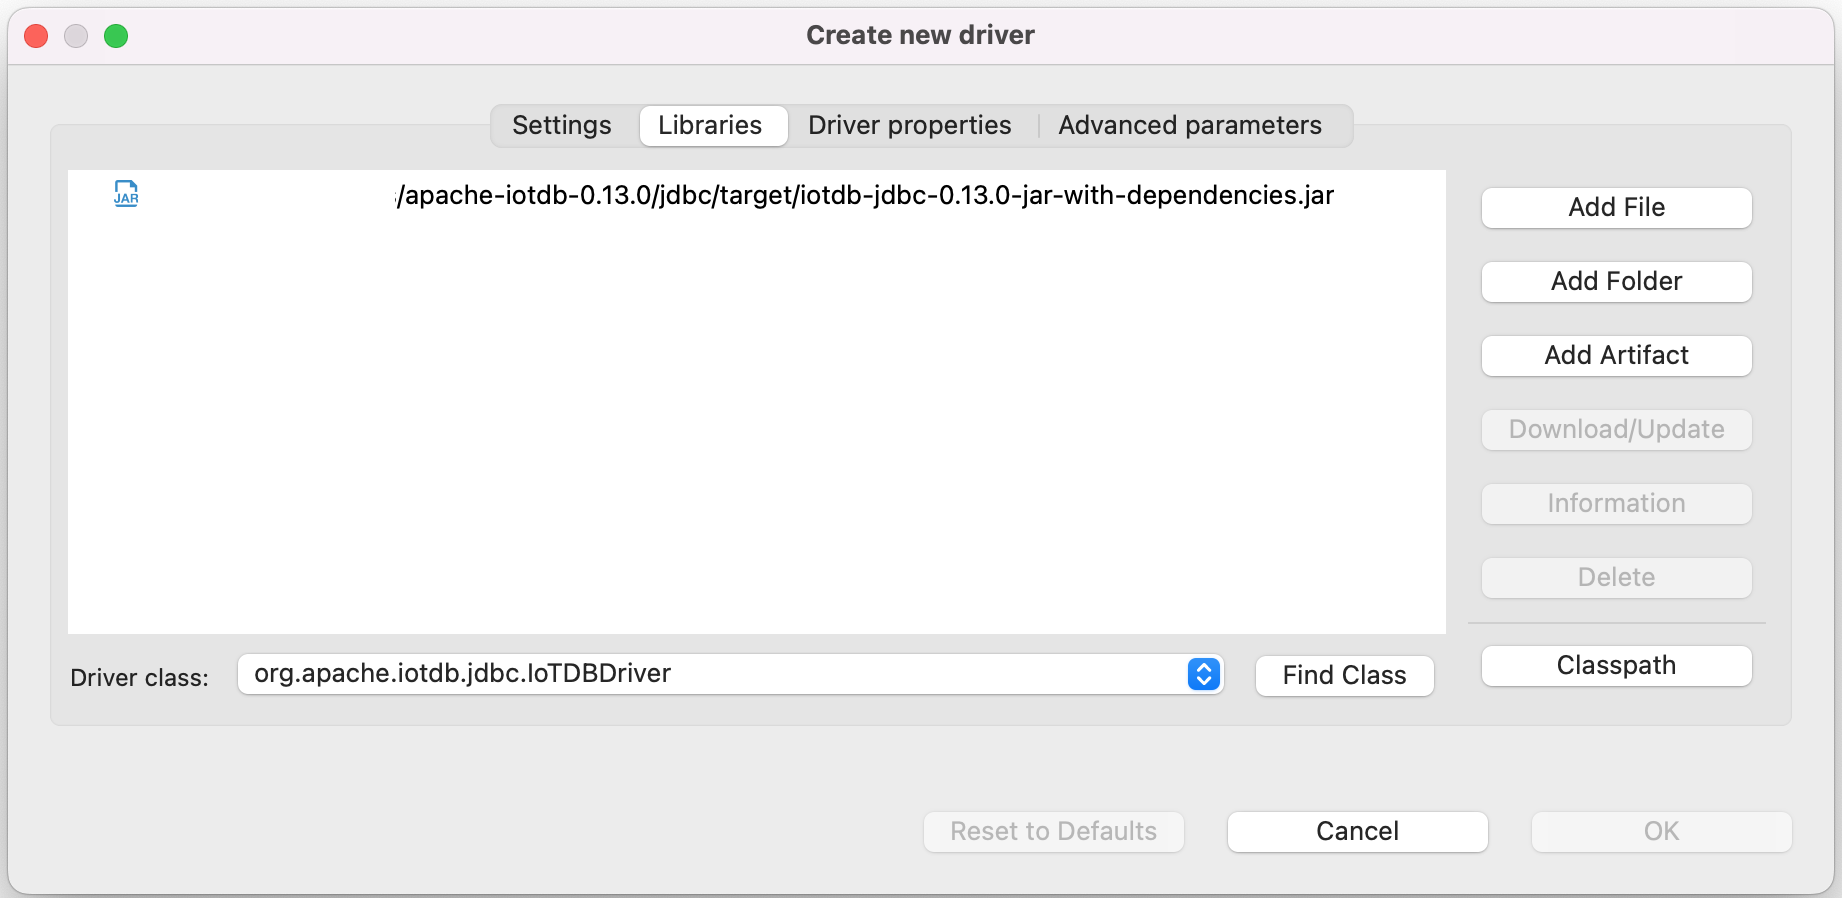
+ 
8. Edit the driver Settings
- 
+ 
9. Open New DataBase Connection and select iotdb
- 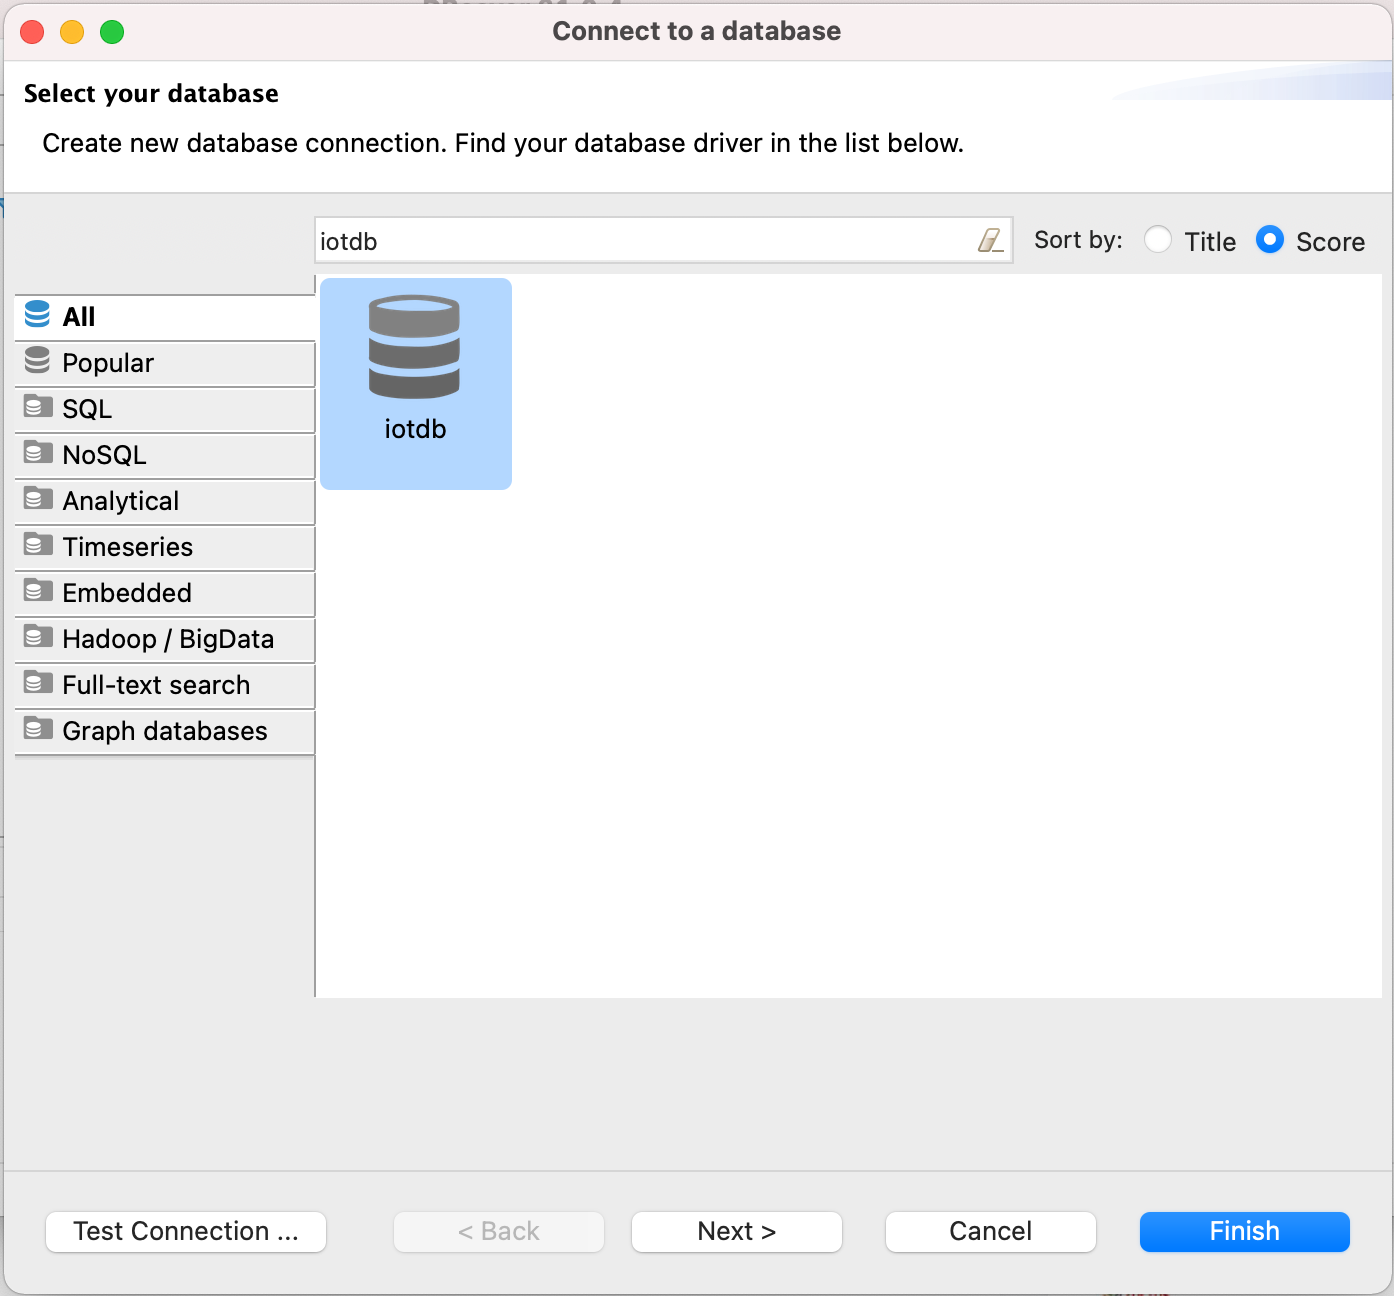
+ 
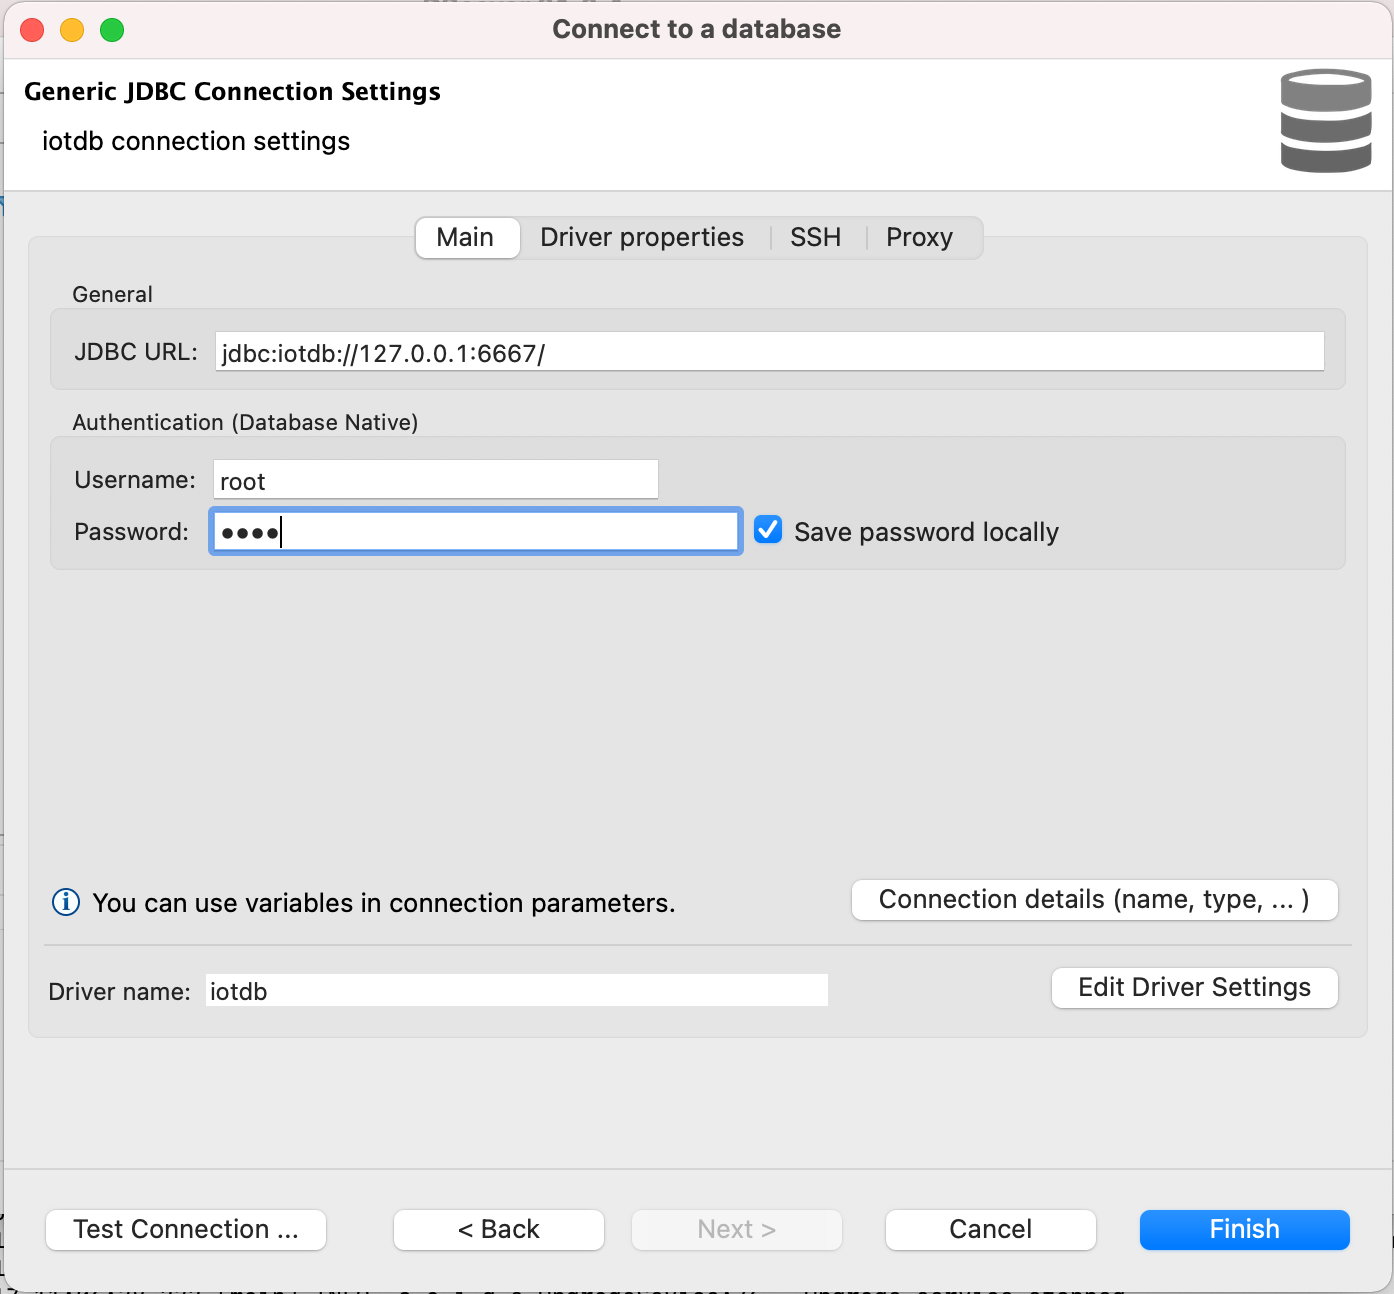
10. Edit JDBC Connection Settings
@@ -75,12 +75,12 @@ DBeaver is a SQL client software application and a database administration tool.
Username: root
Password: root
```
- 
+ 
11. Test Connection
- 
+ 
12. Enjoy IoTDB with DBeaver
- 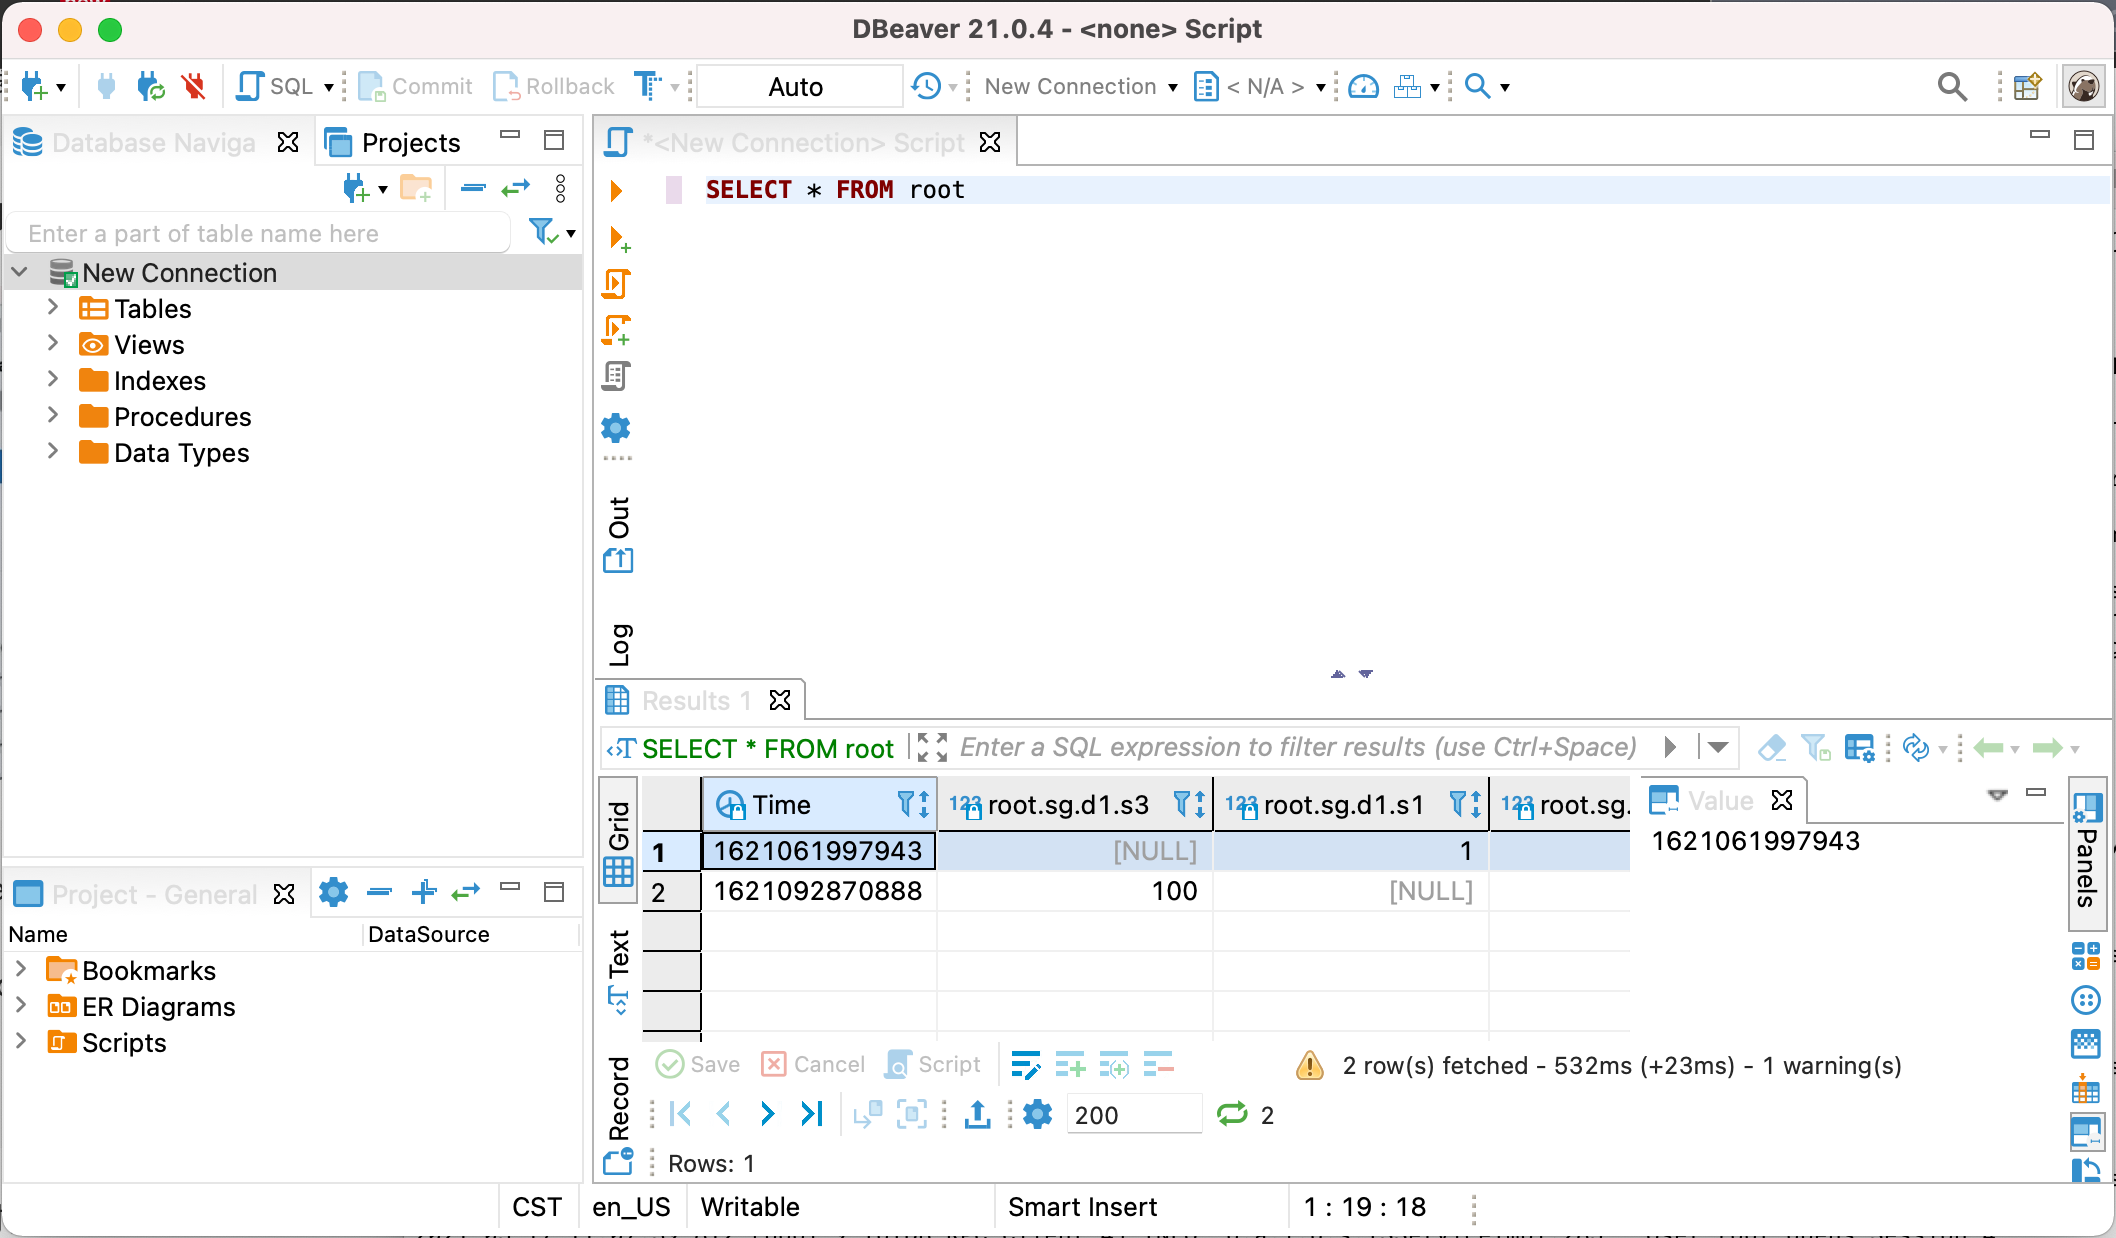
+ 
diff --git a/docs/UserGuide/Ecosystem-Integration/Grafana-Connector.md b/docs/UserGuide/Ecosystem-Integration/Grafana-Connector.md
index 1c9b12227b..72d26ca401 100644
--- a/docs/UserGuide/Ecosystem-Integration/Grafana-Connector.md
+++ b/docs/UserGuide/Ecosystem-Integration/Grafana-Connector.md
@@ -128,15 +128,15 @@ Username and password are both "admin" by default.
Select `Data Sources` and then `Add data source`, select `SimpleJson` in `Type` and `URL` is http://localhost:8888.
After that, make sure IoTDB has been started, click "Save & Test", and "Data Source is working" will be shown to indicate successful configuration.
-<img style="width:100%; max-width:800px; max-height:600px; margin-left:auto; margin-right:auto; display:block;" src="https://user-images.githubusercontent.com/13203019/51664777-2766ae00-1ff5-11e9-9d2f-7489f8ccbfc2.png">
+<img style="width:100%; max-width:800px; max-height:600px; margin-left:auto; margin-right:auto; display:block;" src="/img/github/51664777-2766ae00-1ff5-11e9-9d2f-7489f8ccbfc2.png">
-<img style="width:100%; max-width:800px; max-height:600px; margin-left:auto; margin-right:auto; display:block;" src="https://user-images.githubusercontent.com/13203019/51664842-554bf280-1ff5-11e9-97d2-54eebe0b2ca1.png">
+<img style="width:100%; max-width:800px; max-height:600px; margin-left:auto; margin-right:auto; display:block;" src="/img/github/51664842-554bf280-1ff5-11e9-97d2-54eebe0b2ca1.png">
#### Design in dashboard
Add diagrams in dashboard and customize your query. See http://docs.grafana.org/guides/getting_started/
-<img style="width:100%; max-width:800px; max-height:600px; margin-left:auto; margin-right:auto; display:block;" src="https://user-images.githubusercontent.com/13203019/51664878-6e54a380-1ff5-11e9-9718-4d0e24627fa8.png">
+<img style="width:100%; max-width:800px; max-height:600px; margin-left:auto; margin-right:auto; display:block;" src="/img/github/51664878-6e54a380-1ff5-11e9-9718-4d0e24627fa8.png">
### config grafana
diff --git a/docs/UserGuide/Ecosystem-Integration/Grafana-Plugin.md b/docs/UserGuide/Ecosystem-Integration/Grafana-Plugin.md
index abe2bf6537..1b63767f9e 100644
--- a/docs/UserGuide/Ecosystem-Integration/Grafana-Plugin.md
+++ b/docs/UserGuide/Ecosystem-Integration/Grafana-Plugin.md
@@ -80,7 +80,7 @@ go get: module github.com/grafana/grafana-plugin-sdk-go: Get "https://proxy.gola
If compiling successful, you can see the `dist` directory , which contains the compiled Grafana-Plugin:
-<img style="width:100%; max-width:333px; max-height:545px; margin-left:auto; margin-right:auto; display:block;" src="https://github.com/apache/iotdb-bin-resources/blob/main/docs/UserGuide/Ecosystem%20Integration/Grafana-plugin/grafana-plugin-build.png?raw=true">
+<img style="width:100%; max-width:333px; max-height:545px; margin-left:auto; margin-right:auto; display:block;" src="/img/UserGuide/Ecosystem-Integration/Grafana-plugin/grafana-plugin-build.png?raw=true">
##### Method 3: The distribution package of IoTDB is fully compiled
@@ -94,7 +94,7 @@ Execute following command in the IoTDB root directory:
If compiling successful, you can see that the `distribution/target` directory contains the compiled Grafana-Plugin:
-<img style="width:100%; max-width:333px; max-height:545px; margin-left:auto; margin-right:auto; display:block;" src="https://github.com/apache/iotdb-bin-resources/blob/main/docs/UserGuide/Ecosystem%20Integration/Grafana-plugin/distribution.png?raw=true">
+<img style="width:100%; max-width:333px; max-height:545px; margin-left:auto; margin-right:auto; display:block;" src="/img/UserGuide/Ecosystem-Integration/Grafana-plugin/distribution.png?raw=true">
#### Install Grafana-Plugin
@@ -171,9 +171,9 @@ Grafana displays data in a web page dashboard. Please open your browser and visi
Click the `Settings` icon on the left, select the `Data Source` option, and then click `Add data source`.
-<img style="width:100%; max-width:800px; max-height:600px; margin-left:auto; margin-right:auto; display:block;" src="https://github.com/apache/iotdb-bin-resources/blob/main/docs/UserGuide/Ecosystem%20Integration/Grafana-plugin/datasource_1.png?raw=true">
+<img style="width:100%; max-width:800px; max-height:600px; margin-left:auto; margin-right:auto; display:block;" src="/img/UserGuide/Ecosystem-Integration/Grafana-plugin/datasource_1.png?raw=true">
-<img style="width:100%; max-width:800px; max-height:600px; margin-left:auto; margin-right:auto; display:block;" src="https://github.com/apache/iotdb-bin-resources/blob/main/docs/UserGuide/Ecosystem%20Integration/Grafana-plugin/datasource_2.png?raw=true">
+<img style="width:100%; max-width:800px; max-height:600px; margin-left:auto; margin-right:auto; display:block;" src="/img/UserGuide/Ecosystem-Integration/Grafana-plugin/datasource_2.png?raw=true">
Select the `Apache IoTDB` data source.
@@ -184,22 +184,22 @@ Select the `Apache IoTDB` data source.
Click `Save & Test`, and `Success` will appear.
-<img style="width:100%; max-width:800px; max-height:600px; margin-left:auto; margin-right:auto; display:block;" src="https://github.com/apache/iotdb-bin-resources/blob/main/docs/UserGuide/Ecosystem%20Integration/Grafana-plugin/datasource_3.png?raw=true">
+<img style="width:100%; max-width:800px; max-height:600px; margin-left:auto; margin-right:auto; display:block;" src="/img/UserGuide/Ecosystem-Integration/Grafana-plugin/datasource_3.png?raw=true">
#### Create a new Panel
Click the `Dashboards` icon on the left, and select `Manage` option.
-<img style="width:100%; max-width:800px; max-height:600px; margin-left:auto; margin-right:auto; display:block;" src="https://github.com/apache/iotdb-bin-resources/blob/main/docs/UserGuide/Ecosystem%20Integration/Grafana-plugin/manage.png?raw=true">
+<img style="width:100%; max-width:800px; max-height:600px; margin-left:auto; margin-right:auto; display:block;" src="/img/UserGuide/Ecosystem-Integration/Grafana-plugin/manage.png?raw=true">
Click the `New Dashboard` icon on the top right, and select `Add an empty panel` option.
-<img style="width:100%; max-width:800px; max-height:600px; margin-left:auto; margin-right:auto; display:block;" src="https://github.com/apache/iotdb-bin-resources/blob/main/docs/UserGuide/Ecosystem%20Integration/Grafana-plugin/add%20empty%20panel.png?raw=true">
+<img style="width:100%; max-width:800px; max-height:600px; margin-left:auto; margin-right:auto; display:block;" src="/img/UserGuide/Ecosystem-Integration/Grafana-plugin/add-empty-panel.png?raw=true">
Grafana plugin supports SQL: Full Customized mode and SQL: Drop-down List mode, and the default mode is SQL: Full Customized mode.
-<img style="width:100%; max-width:800px; max-height:600px; margin-left:auto; margin-right:auto; display:block;" src="https://github.com/apache/iotdb-bin-resources/blob/main/docs/UserGuide/Ecosystem%20Integration/Grafana-plugin/grafana_input_style.png?raw=true">
+<img style="width:100%; max-width:800px; max-height:600px; margin-left:auto; margin-right:auto; display:block;" src="/img/UserGuide/Ecosystem-Integration/Grafana-plugin/grafana_input_style.png?raw=true">
##### SQL: Full Customized input method
@@ -207,7 +207,7 @@ Enter content in the SELECT, FROM , WHERE and CONTROL input box, where the WHERE
If a query involves multiple expressions, we can click `+` on the right side of the SELECT input box to add expressions in the SELECT clause, or click `+` on the right side of the FROM input box to add a path prefix:
-<img style="width:100%; max-width:800px; max-height:600px; margin-left:auto; margin-right:auto; display:block;" src="https://github.com/apache/iotdb-bin-resources/blob/main/docs/UserGuide/Ecosystem%20Integration/Grafana-plugin/grafana_input.png?raw=true">
+<img style="width:100%; max-width:800px; max-height:600px; margin-left:auto; margin-right:auto; display:block;" src="/img/UserGuide/Ecosystem-Integration/Grafana-plugin/grafana_input.png?raw=true">
SELECT input box: contents can be the time series suffix, function, udf, arithmetic expression, or nested expressions. You can also use the as clause to rename the result.
@@ -245,7 +245,7 @@ Tip: Statements like `select * from root.xx.**` are not recommended because thos
Select a time series in the TIME-SERIES selection box, select a function in the FUNCTION option, and enter the contents in the SAMPLING INTERVAL、SLIDING STEP、LEVEL、FILL input boxes, where TIME-SERIES is a required item and the rest are non required items.
-<img style="width:100%; max-width:800px; max-height:600px; margin-left:auto; margin-right:auto; display:block;" src="https://github.com/apache/iotdb-bin-resources/blob/main/docs/UserGuide/Ecosystem%20Integration/Grafana-plugin/grafana_input2.png?raw=true">
+<img style="width:100%; max-width:800px; max-height:600px; margin-left:auto; margin-right:auto; display:block;" src="/img/UserGuide/Ecosystem-Integration/Grafana-plugin/grafana_input2.png?raw=true">
#### Support for variables and template functions
@@ -253,34 +253,34 @@ Both SQL: Full Customized and SQL: Drop-down List input methods support the vari
After creating a new Panel, click the Settings button in the upper right corner:
-<img style="width:100%; max-width:800px; max-height:600px; margin-left:auto; margin-right:auto; display:block;" src="https://github.com/apache/iotdb-bin-resources/blob/main/docs/UserGuide/Ecosystem%20Integration/Grafana-plugin/setconf.png?raw=true">
+<img style="width:100%; max-width:800px; max-height:600px; margin-left:auto; margin-right:auto; display:block;" src="/img/UserGuide/Ecosystem-Integration/Grafana-plugin/setconf.png?raw=true">
Select `Variables`, click `Add variable`:
-<img style="width:100%; max-width:800px; max-height:600px; margin-left:auto; margin-right:auto; display:block;" src="https://github.com/apache/iotdb-bin-resources/blob/main/docs/UserGuide/Ecosystem%20Integration/Grafana-plugin/addvaribles.png?raw=true">
+<img style="width:100%; max-width:800px; max-height:600px; margin-left:auto; margin-right:auto; display:block;" src="/img/UserGuide/Ecosystem-Integration/Grafana-plugin/addvaribles.png?raw=true">
Example 1:Enter `Name`, `Label`, and `Query`, and then click the `Update` button:
-<img style="width:100%; max-width:800px; max-height:600px; margin-left:auto; margin-right:auto; display:block;" src="https://github.com/apache/iotdb-bin-resources/blob/main/docs/UserGuide/Ecosystem%20Integration/Grafana-plugin/variblesinput.png?raw=true">
+<img style="width:100%; max-width:800px; max-height:600px; margin-left:auto; margin-right:auto; display:block;" src="/img/UserGuide/Ecosystem-Integration/Grafana-plugin/variblesinput.png?raw=true">
Apply Variables, enter the variable in the `grafana panel` and click the `save` button:
-<img style="width:100%; max-width:800px; max-height:600px; margin-left:auto; margin-right:auto; display:block;" src="https://github.com/apache/iotdb-bin-resources/blob/main/docs/UserGuide/Ecosystem%20Integration/Grafana-plugin/applyvariables.png?raw=true">
+<img style="width:100%; max-width:800px; max-height:600px; margin-left:auto; margin-right:auto; display:block;" src="/img/UserGuide/Ecosystem-Integration/Grafana-plugin/applyvariables.png?raw=true">
Example 2: Nested use of variables:
-<img style="width:100%; max-width:800px; max-height:600px; margin-left:auto; margin-right:auto; display:block;" src="https://github.com/apache/iotdb-bin-resources/blob/main/docs/UserGuide/Ecosystem%20Integration/Grafana-plugin/variblesinput2.png?raw=true">
+<img style="width:100%; max-width:800px; max-height:600px; margin-left:auto; margin-right:auto; display:block;" src="/img/UserGuide/Ecosystem-Integration/Grafana-plugin/variblesinput2.png?raw=true">
-<img style="width:100%; max-width:800px; max-height:600px; margin-left:auto; margin-right:auto; display:block;" src="https://github.com/apache/iotdb-bin-resources/blob/main/docs/UserGuide/Ecosystem%20Integration/Grafana-plugin/variblesinput2-1.png?raw=true">
+<img style="width:100%; max-width:800px; max-height:600px; margin-left:auto; margin-right:auto; display:block;" src="/img/UserGuide/Ecosystem-Integration/Grafana-plugin/variblesinput2-1.png?raw=true">
-<img style="width:100%; max-width:800px; max-height:600px; margin-left:auto; margin-right:auto; display:block;" src="https://github.com/apache/iotdb-bin-resources/blob/main/docs/UserGuide/Ecosystem%20Integration/Grafana-plugin/variblesinput2-2.png?raw=true">
+<img style="width:100%; max-width:800px; max-height:600px; margin-left:auto; margin-right:auto; display:block;" src="/img/UserGuide/Ecosystem-Integration/Grafana-plugin/variblesinput2-2.png?raw=true">
Example 3: using function variables
-<img style="width:100%; max-width:800px; max-height:600px; margin-left:auto; margin-right:auto; display:block;" src="https://github.com/apache/iotdb-bin-resources/blob/main/docs/UserGuide/Ecosystem%20Integration/Grafana-plugin/variablesinput3.png?raw=true">
+<img style="width:100%; max-width:800px; max-height:600px; margin-left:auto; margin-right:auto; display:block;" src="/img/UserGuide/Ecosystem-Integration/Grafana-plugin/variablesinput3.png?raw=true">
-<img style="width:100%; max-width:800px; max-height:600px; margin-left:auto; margin-right:auto; display:block;" src="https://github.com/apache/iotdb-bin-resources/blob/main/docs/UserGuide/Ecosystem%20Integration/Grafana-plugin/variablesinput3-1.png?raw=true">
+<img style="width:100%; max-width:800px; max-height:600px; margin-left:auto; margin-right:auto; display:block;" src="/img/UserGuide/Ecosystem-Integration/Grafana-plugin/variablesinput3-1.png?raw=true">
The Name in the above figure is the variable name and the variable name we will use in the panel in the future. Label is the display name of the variable. If it is empty, the variable of Name will be displayed. Otherwise, the name of the Label will be displayed.
There are Query, Custom, Text box, Constant, DataSource, Interval, Ad hoc filters, etc. in the Type drop-down, all of which can be used in IoTDB's Grafana Plugin
@@ -304,30 +304,30 @@ This plugin supports Grafana alert function.
1. In the Grafana sidebar, hover over the `Alerting` icon and click `Notification channels`.
-<img style="width:100%; max-width:800px; max-height:600px; margin-left:auto; margin-right:auto; display:block;" src="https://github.com/apache/iotdb-bin-resources/blob/main/docs/UserGuide/Ecosystem%20Integration/Grafana-plugin/alerting1.png?raw=true">
+<img style="width:100%; max-width:800px; max-height:600px; margin-left:auto; margin-right:auto; display:block;" src="/img/UserGuide/Ecosystem-Integration/Grafana-plugin/alerting1.png?raw=true">
2. Click Add Channel.
-<img style="width:100%; max-width:800px; max-height:600px; margin-left:auto; margin-right:auto; display:block;" src="https://github.com/apache/iotdb-bin-resources/blob/main/docs/UserGuide/Ecosystem%20Integration/Grafana-plugin/alerting2.png?raw=true">
+<img style="width:100%; max-width:800px; max-height:600px; margin-left:auto; margin-right:auto; display:block;" src="/img/UserGuide/Ecosystem-Integration/Grafana-plugin/alerting2.png?raw=true">
3. Fill in the fields described below or select options. There are many types of Type, including DingDing, Email, Slack, WebHook, Prometheus Alertmanager, etc.
This sample Type uses `Prometheus Alertmanager`. Prometheus Alertmanager needs to be installed in advance. For more detailed configuration and parameter introduction, please refer to the official documentation: https://grafana.com/docs/grafana/v8.0/alerting/old- alerting/notifications/.
-<img style="width:100%; max-width:800px; max-height:600px; margin-left:auto; margin-right:auto; display:block;" src="https://github.com/apache/iotdb-bin-resources/blob/main/docs/UserGuide/Ecosystem%20Integration/Grafana-plugin/alerting3.png?raw=true">
+<img style="width:100%; max-width:800px; max-height:600px; margin-left:auto; margin-right:auto; display:block;" src="/img/UserGuide/Ecosystem-Integration/Grafana-plugin/alerting3.png?raw=true">
4. Click the `Test` button, the `Test notification sent` appears, click the `Save` button to save
-<img style="width:100%; max-width:800px; max-height:600px; margin-left:auto; margin-right:auto; display:block;" src="https://github.com/apache/iotdb-bin-resources/blob/main/docs/UserGuide/Ecosystem%20Integration/Grafana-plugin/alerting4.png?raw=true">
+<img style="width:100%; max-width:800px; max-height:600px; margin-left:auto; margin-right:auto; display:block;" src="/img/UserGuide/Ecosystem-Integration/Grafana-plugin/alerting4.png?raw=true">
5. After creating a new Panel, enter the query parameters and click Save, then select `Alert` and click `Create Alert`, as shown in the following figure:
-<img style="width:100%; max-width:800px; max-height:600px; margin-left:auto; margin-right:auto; display:block;" src="https://github.com/apache/iotdb-bin-resources/blob/main/docs/UserGuide/Ecosystem%20Integration/Grafana-plugin/alertpanle1.png?raw=true">
+<img style="width:100%; max-width:800px; max-height:600px; margin-left:auto; margin-right:auto; display:block;" src="/img/UserGuide/Ecosystem-Integration/Grafana-plugin/alertpanle1.png?raw=true">
6、Fill out the fields described below or select an option, `Name`- Enter a descriptive name. The name will be displayed in the Alert Rules list. This field supports templating.
`Evaluate every` - Specify how often the scheduler should evaluate the alert rule. This is referred to as the evaluation interval.
`For` - Specify how long the query needs to violate the configured thresholds before the alert notification triggers.。`Conditions`- Represents query criteria. Multiple combined query criteria can be configured.
-<img style="width:100%; max-width:800px; max-height:600px; margin-left:auto; margin-right:auto; display:block;" src="https://github.com/apache/iotdb-bin-resources/blob/main/docs/UserGuide/Ecosystem%20Integration/Grafana-plugin/alertpanle2.jpg?raw=true">
+<img style="width:100%; max-width:800px; max-height:600px; margin-left:auto; margin-right:auto; display:block;" src="/img/UserGuide/Ecosystem-Integration/Grafana-plugin/alertpanle2.jpg?raw=true">
Query conditions in the figure:avg() OF query(A,5m,now) IS ABOVE -1
@@ -344,19 +344,19 @@ More details can be found in the official documents:https://grafana.com/docs/gra
7、Click the `Test rule` button and the `firing: true` appears, the configuration is successful, click the `save` button
-<img style="width:100%; max-width:800px; max-height:600px; margin-left:auto; margin-right:auto; display:block;" src="https://github.com/apache/iotdb-bin-resources/blob/main/docs/UserGuide/Ecosystem%20Integration/Grafana-plugin/alertpanel3.png?raw=true">
+<img style="width:100%; max-width:800px; max-height:600px; margin-left:auto; margin-right:auto; display:block;" src="/img/UserGuide/Ecosystem-Integration/Grafana-plugin/alertpanel3.png?raw=true">
8、The following figure shows the alarm displayed in the grafana panel
-<img style="width:100%; max-width:800px; max-height:600px; margin-left:auto; margin-right:auto; display:block;" src="https://github.com/apache/iotdb-bin-resources/blob/main/docs/UserGuide/Ecosystem%20Integration/Grafana-plugin/alertpanel4.png?raw=true">
+<img style="width:100%; max-width:800px; max-height:600px; margin-left:auto; margin-right:auto; display:block;" src="/img/UserGuide/Ecosystem-Integration/Grafana-plugin/alertpanel4.png?raw=true">
9、View alert rules
-<img style="width:100%; max-width:800px; max-height:600px; margin-left:auto; margin-right:auto; display:block;" src="https://github.com/apache/iotdb-bin-resources/blob/main/docs/UserGuide/Ecosystem%20Integration/Grafana-plugin/alertPanel5.png?raw=true">
+<img style="width:100%; max-width:800px; max-height:600px; margin-left:auto; margin-right:auto; display:block;" src="/img/UserGuide/Ecosystem-Integration/Grafana-plugin/alertPanel5.png?raw=true">
10、View alert records in promehthus alertmanager
-<img style="width:100%; max-width:800px; max-height:600px; margin-left:auto; margin-right:auto; display:block;" src="https://github.com/apache/iotdb-bin-resources/blob/main/docs/UserGuide/Ecosystem%20Integration/Grafana-plugin/alertpanel6.png?raw=true">
+<img style="width:100%; max-width:800px; max-height:600px; margin-left:auto; margin-right:auto; display:block;" src="/img/UserGuide/Ecosystem-Integration/Grafana-plugin/alertpanel6.png?raw=true">
### More Details about Grafana
diff --git a/docs/UserGuide/Ecosystem-Integration/NiFi-IoTDB.md b/docs/UserGuide/Ecosystem-Integration/NiFi-IoTDB.md
index 6382bd647f..8852740795 100644
--- a/docs/UserGuide/Ecosystem-Integration/NiFi-IoTDB.md
+++ b/docs/UserGuide/Ecosystem-Integration/NiFi-IoTDB.md
@@ -129,7 +129,7 @@ This is a processor that reads the sql query from the incoming FlowFile and usin
| Username | Username to access the IoTDB. | null | true |
| Password | Password to access the IoTDB. | null | true |
| Record Writer | Specifies the Controller Service to use for writing results to a FlowFile. The Record Writer may use Inherit Schema to emulate the inferred schema behavior, i.e. An explicit schema need not be defined in the writer, and will be supplied by the same logic used to infer the schema from the column types. | null | true |
-| iotdb-query | The IoTDB query to execute. <bbr> Note: If there are incoming connections, then the query is created from incoming FlowFile's content otherwise"it is created from this property. | null | false |
+| iotdb-query | The IoTDB query to execute. <br> Note: If there are incoming connections, then the query is created from incoming FlowFile's content otherwise"it is created from this property. | null | false |
| iotdb-query-chunk-size | Chunking can be used to return results in a stream of smaller batches (each has a partial results up to a chunk size) rather than as a single response. Chunking queries can return an unlimited number of rows. Note: Chunking is enable when result chunk size is greater than 0 | 0 | false |
diff --git a/docs/UserGuide/Ecosystem-Integration/Spark-IoTDB.md b/docs/UserGuide/Ecosystem-Integration/Spark-IoTDB.md
index f53319b102..f7c987e178 100644
--- a/docs/UserGuide/Ecosystem-Integration/Spark-IoTDB.md
+++ b/docs/UserGuide/Ecosystem-Integration/Spark-IoTDB.md
@@ -93,7 +93,7 @@ Take the following TsFile structure as an example: There are three Measurements
The existing data in the TsFile is as follows:
-<img width="517" alt="SI " src="https://user-images.githubusercontent.com/69114052/98197835-99a64980-1f62-11eb-84af-8301b8a6aad5.png">
+<img width="517" alt="SI " src="/img/github/98197835-99a64980-1f62-11eb-84af-8301b8a6aad5.png">
The wide(default) table form is as follows:
diff --git a/docs/UserGuide/Ecosystem-Integration/Spark-TsFile.md b/docs/UserGuide/Ecosystem-Integration/Spark-TsFile.md
index 02fa7dea2c..2d0becf7f9 100644
--- a/docs/UserGuide/Ecosystem-Integration/Spark-TsFile.md
+++ b/docs/UserGuide/Ecosystem-Integration/Spark-TsFile.md
@@ -94,7 +94,7 @@ The way to display TsFile is dependent on the schema. Take the following TsFile
The existing data in the TsFile are:
-<img width="519" alt="ST 1" src="https://user-images.githubusercontent.com/69114052/98197920-be9abc80-1f62-11eb-9efb-027f0590031c.png">
+<img width="519" alt="ST 1" src="/img/github/98197920-be9abc80-1f62-11eb-9efb-027f0590031c.png">
The corresponding SparkSQL table is:
@@ -239,7 +239,7 @@ The way to display TsFile is related to TsFile Schema. Take the following TsFile
The existing data in the file are:
-<img width="817" alt="ST 2" src="https://user-images.githubusercontent.com/69114052/98197948-cf4b3280-1f62-11eb-9c8c-c97d1adf032c.png">
+<img width="817" alt="ST 2" src="/img/github/98197948-cf4b3280-1f62-11eb-9c8c-c97d1adf032c.png">
A set of time-series data
diff --git a/docs/UserGuide/Ecosystem-Integration/Writing-Data-on-HDFS.md b/docs/UserGuide/Ecosystem-Integration/Writing-Data-on-HDFS.md
index 9d0cffb1ca..646aae78f1 100644
--- a/docs/UserGuide/Ecosystem-Integration/Writing-Data-on-HDFS.md
+++ b/docs/UserGuide/Ecosystem-Integration/Writing-Data-on-HDFS.md
@@ -29,7 +29,7 @@ Currently, TsFiles(including both TsFile and related data files) are supported t
When you config to store TSFile on HDFS, your data files will be in distributed storage. The system architecture is as below:
-<img style="width:100%; max-width:700px; max-height:600px; margin-left:auto; margin-right:auto; display:block;" src="https://user-images.githubusercontent.com/19167280/66922722-35180400-f05a-11e9-8ff0-7dd51716e4a8.png">
+<img style="width:100%; max-width:700px; max-height:600px; margin-left:auto; margin-right:auto; display:block;" src="/img/github/66922722-35180400-f05a-11e9-8ff0-7dd51716e4a8.png">
#### Config and usage
diff --git a/docs/UserGuide/Ecosystem-Integration/Zeppelin-IoTDB.md b/docs/UserGuide/Ecosystem-Integration/Zeppelin-IoTDB.md
index b218b3ed2c..c5f509f3e7 100644
--- a/docs/UserGuide/Ecosystem-Integration/Zeppelin-IoTDB.md
+++ b/docs/UserGuide/Ecosystem-Integration/Zeppelin-IoTDB.md
@@ -25,7 +25,7 @@
Zeppelin is a web-based notebook that enables interactive data analytics. You can connect to data sources and perform interactive operations with SQL, Scala, etc. The operations can be saved as documents, just like Jupyter. Zeppelin has already supported many data sources, including Spark, ElasticSearch, Cassandra, and InfluxDB. Now, we have enabled Zeppelin to operate IoTDB via SQL.
-
+
@@ -113,7 +113,7 @@ In the interpreter page:
Now you are ready to use your interpreter.
-
+
We provide some simple SQL to show the use of Zeppelin-IoTDB interpreter:
@@ -147,7 +147,7 @@ We provide some simple SQL to show the use of Zeppelin-IoTDB interpreter:
The screenshot is as follows:
-
+
You can also design more fantasy documents referring to [[1]](https://zeppelin.apache.org/docs/0.9.0/usage/display_system/basic.html) and others.
@@ -159,7 +159,7 @@ The above demo notebook can be found at `$IoTDB_HOME/zeppelin-interpreter/Zeppe
You can configure the connection parameters in http://127.0.0.1:8080/#/interpreter :
-
+
The parameters you can configure are as follows:
diff --git a/docs/UserGuide/Edge-Cloud-Collaboration/Sync-Tool.md b/docs/UserGuide/Edge-Cloud-Collaboration/Sync-Tool.md
index 2214646b59..4aa356db73 100644
--- a/docs/UserGuide/Edge-Cloud-Collaboration/Sync-Tool.md
+++ b/docs/UserGuide/Edge-Cloud-Collaboration/Sync-Tool.md
@@ -31,7 +31,7 @@ You can use SQL commands to start or close a synchronization task at the sender,
## 2.Model definition
-
+
Two machines A and B, which are installed with iotdb, we want to continuously synchronize the data from A to B. To better describe this process, we introduce the following concepts.
@@ -131,7 +131,7 @@ All parameters are in `$IOTDB_ HOME$/conf/iotdb-common.properties`, after all mo
- Show all PipeSink types supported by IoTDB.
-```Plain%20Text
+```
IoTDB> SHOW PIPESINKTYPE
IoTDB>
+-----+
diff --git a/docs/UserGuide/Integration-Test/Integration-Test-refactoring-tutorial.md b/docs/UserGuide/Integration-Test/Integration-Test-refactoring-tutorial.md
index 136b06116d..3fc6c6749e 100644
--- a/docs/UserGuide/Integration-Test/Integration-Test-refactoring-tutorial.md
+++ b/docs/UserGuide/Integration-Test/Integration-Test-refactoring-tutorial.md
@@ -51,7 +51,7 @@ Generally, there are three steps to finish the integration test, (1) constructin
#### 1. Integration Test Class (IT Class) and Annotations
-When writing new IT classes, the developers are encouraged to create the new ones in the [integration-test](https://github.com/apache/iotdb/tree/master/integration-test) module. Except for the classes serving the other test cases, the classes containing integration tests to evaluate the functionality of IoTDB should be named "function"+"IT". For example, the test for auto-registration metadata in IoTDB is named “<font color=green>IoTDBAutoCreateSchema</font><font color=red>IT</font>”.
+When writing new IT classes, the developers are encouraged to create the new ones in the [integration-test](https://github.com/apache/iotdb/tree/master/integration-test) module. Except for the classes serving the other test cases, the classes containing integration tests to evaluate the functionality of IoTDB should be named "function"+"IT". For example, the test for auto-registration metadata in IoTDB is named “<span style="color:green">IoTDBAutoCreateSchema</span><span style="color:red [...]
- Category`` Annotation. **When creating new IT classes, the ```@Category``` should be introduced explicitly**, and the test environment should be specified by ```LocalStandaloneIT.class```, ```ClusterIT.class```, and ```RemoteIT.class```, which corresponds to the Local Standalone, Cluster and Remote environment respectively. **In general, ```LocalStandaloneIT.class``` and ```ClusterIT.class``` should both be included**. Only in the case when some functionalities are only supported in t [...]
- RunWith Annotation. The ```@RunWith(IoTDBTestRunner.class)``` annotation should be included in every IT class.
@@ -108,7 +108,7 @@ public static void tearDown() throws Exception {
#### 3. Implementing the logic of IT
-IT of Apache IoTDB should be implemented as black-box testing. Please name the method as "functionality"+"Test", e.g., "<font color=green>selectWithAlias</font><font color=red>Test</font>". The interaction should be implemented through JDBC or Session API.
+IT of Apache IoTDB should be implemented as black-box testing. Please name the method as "functionality"+"Test", e.g., "<span style="color:green">selectWithAlias</span><span style="color:red">Test</span>". The interaction should be implemented through JDBC or Session API.
1 With JDBC
diff --git a/docs/UserGuide/IoTDB-Introduction/Architecture.md b/docs/UserGuide/IoTDB-Introduction/Architecture.md
index b6b581cb4a..bff327c3b2 100644
--- a/docs/UserGuide/IoTDB-Introduction/Architecture.md
+++ b/docs/UserGuide/IoTDB-Introduction/Architecture.md
@@ -25,7 +25,7 @@ Besides IoTDB engine, we also developed several components to provide better IoT
IoTDB suite can provide a series of functions in the real situation such as data collection, data writing, data storage, data query, data visualization and data analysis. Figure 1.1 shows the overall application architecture brought by all the components of the IoTDB suite.
-<img style="width:100%; max-width:800px; max-height:600px; margin-left:auto; margin-right:auto; display:block;" src="https://github.com/apache/iotdb-bin-resources/blob/main/docs/UserGuide/IoTDB-Introduction/Architecture/Structure%20of%20Apache%20IoTDB.png?raw=true">
+<img style="width:100%; max-width:800px; max-height:600px; margin-left:auto; margin-right:auto; display:block;" src="/img/UserGuide/IoTDB-Introduction/Architecture/Structure-of-Apache-IoTDB.png?raw=true">
As shown in Figure 1.1, users can use JDBC to import timeseries data collected by sensor on the device to local/remote IoTDB. These timeseries data may be system state data (such as server load and CPU memory, etc.), message queue data, timeseries data from applications, or other timeseries data in the database. Users can also write the data directly to the TsFile (local or on HDFS).
diff --git a/docs/UserGuide/IoTDB-Introduction/Scenario.md b/docs/UserGuide/IoTDB-Introduction/Scenario.md
index 3709ba5b5a..c3e0e72ec0 100644
--- a/docs/UserGuide/IoTDB-Introduction/Scenario.md
+++ b/docs/UserGuide/IoTDB-Introduction/Scenario.md
@@ -31,11 +31,11 @@ In order to improve the quality of the printing, it is necessary for the company
At this point, the data can be stored using TsFile component, TsFileSync tool, and Hadoop/Spark integration component in the IoTDB suite.That is, each time a new chip is printed, a data is written on the SPI device using the SDK, which ultimately forms a TsFile. Through the TsFileSync tool, the generated TsFile will be synchronized to the data center according to certain rules (such as daily) and analyzed by data analysts tools.
-<img style="width:100%; max-width:800px; max-height:600px; margin-left:auto; margin-right:auto; display:block;" src="https://user-images.githubusercontent.com/13203019/51579014-695ef980-1efa-11e9-8cbc-e9e7ee4fa0d8.png">
+<img style="width:100%; max-width:800px; max-height:600px; margin-left:auto; margin-right:auto; display:block;" src="/img/github/51579014-695ef980-1efa-11e9-8cbc-e9e7ee4fa0d8.png">
In this scenario, only TsFile and TsFileSync are required to be deployed on a PC, and a Hadoop/Spark cluster is required. Figure below shows the architecture at this time.
-<img style="width:100%; max-width:800px; max-height:600px; margin-left:auto; margin-right:auto; display:block;" src="https://user-images.githubusercontent.com/25913899/81768490-bf034f00-950d-11ea-9b56-fef3edca0958.png">
+<img style="width:100%; max-width:800px; max-height:600px; margin-left:auto; margin-right:auto; display:block;" src="/img/github/81768490-bf034f00-950d-11ea-9b56-fef3edca0958.png">
* Scenario 2
@@ -43,11 +43,11 @@ A company has several wind turbines which are installed hundreds of sensors on e
In order to ensure the normal operation of the turbines and timely monitoring and analysis of the turbines, the company needs to collect these sensor data, perform partial calculation and analysis in the turbines working environment, and upload the original data collected to the data center.
-<img style="width:100%; max-width:800px; max-height:600px; margin-left:auto; margin-right:auto; display:block;" src="https://user-images.githubusercontent.com/13203019/51579033-7ed42380-1efa-11e9-889f-fb4180291a9e.png">
+<img style="width:100%; max-width:800px; max-height:600px; margin-left:auto; margin-right:auto; display:block;" src="/img/github/51579033-7ed42380-1efa-11e9-889f-fb4180291a9e.png">
In this situation, IoTDB, TsFileSync tools, and Hadoop/Spark integration components in the IoTDB suite can be used. A PC needs to be deployed with IoTDB and TsFileSync tools installed to support reading and writing data, local computing and analysis, and uploading data to the data center. In addition, Hadoop/Spark clusters need to be deployed for data storage and analysis on the data center side. Figure below shows the architecture at this time.
-<img style="width:100%; max-width:800px; max-height:600px; margin-left:auto; margin-right:auto; display:block;" src="https://user-images.githubusercontent.com/13203019/51579064-8f849980-1efa-11e9-8cd6-a7339cd0540f.jpg">
+<img style="width:100%; max-width:800px; max-height:600px; margin-left:auto; margin-right:auto; display:block;" src="/img/github/51579064-8f849980-1efa-11e9-8cd6-a7339cd0540f.jpg">
* Scenario 3
@@ -57,11 +57,11 @@ A variety of sensors are installed on each robotic device to monitor the robot's
In order to ensure that the data of the robot can be monitored and analyzed in time, the company needs to collect the information of these robot sensors, send them to the server that can connect to the external network, and then upload the original data information to the data center for complex calculation and analysis.
-<img style="width:100%; max-width:800px; max-height:600px; margin-left:auto; margin-right:auto; display:block;" src="https://user-images.githubusercontent.com/13203019/51579080-96aba780-1efa-11e9-87ac-940c45b19dd7.jpg">
+<img style="width:100%; max-width:800px; max-height:600px; margin-left:auto; margin-right:auto; display:block;" src="/img/github/51579080-96aba780-1efa-11e9-87ac-940c45b19dd7.jpg">
At this point, IoTDB, IoTDB-Client tools, TsFileSync tools, and Hadoop/Spark integration components in the IoTDB suite can be used. IoTDB-Client tool is installed on the robot and each of them is connected to the LAN of the factory. When sensors generate real-time data, the data will be uploaded to the server in the factory. The IoTDB server and TsFileSync is installed on the server connected to the external network. Once triggered, the data on the server will be upload to the data cente [...]
-<img style="width:100%; max-width:800px; max-height:600px; margin-left:auto; margin-right:auto; display:block;" src="https://user-images.githubusercontent.com/25913899/81768477-b874d780-950d-11ea-80ca-8807b9bd0970.png">
+<img style="width:100%; max-width:800px; max-height:600px; margin-left:auto; margin-right:auto; display:block;" src="/img/github/81768477-b874d780-950d-11ea-80ca-8807b9bd0970.png">
* Scenario 4
@@ -73,4 +73,4 @@ At this point, IoTDB, IoTDB-Client, and Hadoop/Spark integration components in t
In addition, Hadoop/Spark clusters need to be deployed for data storage and analysis on the data center side. As shown in Figure below.
-<img style="width:100%; max-width:800px; max-height:600px; margin-left:auto; margin-right:auto; display:block;" src="https://user-images.githubusercontent.com/13203019/51579095-a4f9c380-1efa-11e9-9f95-17165ec55568.jpg">
+<img style="width:100%; max-width:800px; max-height:600px; margin-left:auto; margin-right:auto; display:block;" src="/img/github/51579095-a4f9c380-1efa-11e9-9f95-17165ec55568.jpg">
diff --git a/docs/UserGuide/Maintenance-Tools/JMX-Tool.md b/docs/UserGuide/Maintenance-Tools/JMX-Tool.md
index 58f41b4489..3ac1eb645b 100644
--- a/docs/UserGuide/Maintenance-Tools/JMX-Tool.md
+++ b/docs/UserGuide/Maintenance-Tools/JMX-Tool.md
@@ -48,12 +48,12 @@ Step 4: Use jvisualvm
1. Make sure jdk 8 is installed. For versions later than jdk 8, you need to [download visualvm](https://visualvm.github.io/download.html)
2. Open jvisualvm
3. Right-click at the left navigation area -> Add JMX connection
-<img style="width:100%; max-width:300px; max-height:600px; margin-left:auto; margin-right:auto; display:block;" src="https://user-images.githubusercontent.com/19167280/81464569-725e0200-91f5-11ea-9ff9-49745f4c9ef2.png">
+<img style="width:100%; max-width:300px; max-height:600px; margin-left:auto; margin-right:auto; display:block;" src="/img/github/81464569-725e0200-91f5-11ea-9ff9-49745f4c9ef2.png">
4. Fill in information and log in as below. Remember to check "Do not require SSL connection".
An example is:
Connection:192.168.130.15:31999
Username:iotdb
Password:passw!d
-<img style="width:100%; max-width:300px; max-height:600px; margin-left:auto; margin-right:auto; display:block;" src="https://user-images.githubusercontent.com/19167280/81464639-ed271d00-91f5-11ea-91a0-b4fe9cb8204e.png">
+<img style="width:100%; max-width:300px; max-height:600px; margin-left:auto; margin-right:auto; display:block;" src="/img/github/81464639-ed271d00-91f5-11ea-91a0-b4fe9cb8204e.png">
diff --git a/docs/UserGuide/Maintenance-Tools/Log-Tool.md b/docs/UserGuide/Maintenance-Tools/Log-Tool.md
index 5395274642..0ce3c0512e 100644
--- a/docs/UserGuide/Maintenance-Tools/Log-Tool.md
+++ b/docs/UserGuide/Maintenance-Tools/Log-Tool.md
@@ -35,14 +35,14 @@ Here we use JConsole to connect with JMX.
Start the JConsole, establish a new JMX connection with the IoTDB Server (you can select the local process or input the IP and PORT for remote connection, the default operation port of the IoTDB JMX service is 31999). Fig 4.1 shows the connection GUI of JConsole.
-<img style="width:100%; max-width:800px; max-height:600px; margin-left:auto; margin-right:auto; display:block;" src="https://user-images.githubusercontent.com/13203019/51577195-f94d7500-1ef3-11e9-999a-b4f67055d80e.png">
+<img style="width:100%; max-width:800px; max-height:600px; margin-left:auto; margin-right:auto; display:block;" src="/img/github/51577195-f94d7500-1ef3-11e9-999a-b4f67055d80e.png">
After connected, click `MBean` and find `ch.qos.logback.classic.default.ch.qos.logback.classic.jmx.JMXConfigurator`(As shown in fig 4.2).
-<img style="width:100%; max-width:800px; max-height:600px; margin-left:auto; margin-right:auto; display:block;" src="https://user-images.githubusercontent.com/13203019/51577204-fe122900-1ef3-11e9-9e89-2eb1d46e24b8.png">
+<img style="width:100%; max-width:800px; max-height:600px; margin-left:auto; margin-right:auto; display:block;" src="/img/github/51577204-fe122900-1ef3-11e9-9e89-2eb1d46e24b8.png">
In the JMXConfigurator Window, there are 6 operations provided, as shown in fig 4.3. You can use these interfaces to perform operation.
-<img style="width:100%; max-width:800px; max-height:600px; margin-left:auto; margin-right:auto; display:block;" src="https://user-images.githubusercontent.com/13203019/51577216-09fdeb00-1ef4-11e9-9005-542ad7d9e9e0.png">
+<img style="width:100%; max-width:800px; max-height:600px; margin-left:auto; margin-right:auto; display:block;" src="/img/github/51577216-09fdeb00-1ef4-11e9-9005-542ad7d9e9e0.png">
#### Interface Instruction
diff --git a/docs/UserGuide/Maintenance-Tools/Maintenance-Command.md b/docs/UserGuide/Maintenance-Tools/Maintenance-Command.md
index eeb441de97..28e1051919 100644
--- a/docs/UserGuide/Maintenance-Tools/Maintenance-Command.md
+++ b/docs/UserGuide/Maintenance-Tools/Maintenance-Command.md
@@ -121,7 +121,7 @@ This command is used to display all ongoing queries, here are usage scenarios:
### Grammar
-```SQL
+```sql
SHOW QUERIES | (QUERY PROCESSLIST)
[WHERE whereCondition]
[ORDER BY sortKey {ASC | DESC}]
@@ -153,7 +153,7 @@ Note:
#### Example1:Obtain all current queries whose execution time is longer than 30 seconds
SQL string:
-```SQL
+```sql
SHOW QUERIES WHERE ElapsedTime > 30
```
@@ -173,12 +173,12 @@ SQL result:
#### Example2:Obtain the Top5 queries in the current execution time
SQL string:
-```SQL
+```sql
SHOW QUERIES limit 5
```
Equivalent to
-```SQL
+```sql
SHOW QUERIES ORDER BY ElapsedTime DESC limit 5
```
diff --git a/docs/UserGuide/Monitor-Alert/Alerting.md b/docs/UserGuide/Monitor-Alert/Alerting.md
index 1379825b93..6b3781d8f0 100644
--- a/docs/UserGuide/Monitor-Alert/Alerting.md
+++ b/docs/UserGuide/Monitor-Alert/Alerting.md
@@ -396,6 +396,6 @@ makes alerts of `critical` severity inhibit those of `warning` severity,
the alerting email we receive only contains the alert triggered
by the writing of `(5, 120)`.
-<img width="669" alt="alerting" src="https://user-images.githubusercontent.com/34649843/115957896-a9791080-a537-11eb-9962-541412bdcee6.png">
+<img width="669" alt="alerting" src="/img/github/115957896-a9791080-a537-11eb-9962-541412bdcee6.png">
diff --git a/docs/UserGuide/Monitor-Alert/Metric-Tool.md b/docs/UserGuide/Monitor-Alert/Metric-Tool.md
index fdc9f5a0a2..eb298ed263 100644
--- a/docs/UserGuide/Monitor-Alert/Metric-Tool.md
+++ b/docs/UserGuide/Monitor-Alert/Metric-Tool.md
@@ -457,19 +457,19 @@ thread information, class information, and the server's CPU usage.
After connecting to JMX, you can find the "MBean" named "org.apache.iotdb.metrics" through the "MBeans" tab, and you can
view the specific values of all monitoring metrics in the sidebar.
-<img style="width:100%; max-width:800px; max-height:600px; margin-left:auto; margin-right:auto; display:block;" alt="metric-jmx" src="https://user-images.githubusercontent.com/46039728/204018765-6fda9391-ebcf-4c80-98c5-26f34bd74df0.png">
+<img style="width:100%; max-width:800px; max-height:600px; margin-left:auto; margin-right:auto; display:block;" alt="metric-jmx" src="/img/github/204018765-6fda9391-ebcf-4c80-98c5-26f34bd74df0.png">
#### 5.1.2. Get other relevant data
After connecting to JMX, you can find the "MBean" named "org.apache.iotdb.service" through the "MBeans" tab, as shown in
the image below, to understand the basic status of the service
-<img style="width:100%; max-width:800px; max-height:600px; margin-left:auto; margin-right:auto; display:block;" src="https://user-images.githubusercontent.com/46039728/149951720-707f1ee8-32ee-4fde-9252-048caebd232e.png"> <br>
+<img style="width:100%; max-width:800px; max-height:600px; margin-left:auto; margin-right:auto; display:block;" src="/img/github/149951720-707f1ee8-32ee-4fde-9252-048caebd232e.png"> <br>
In order to improve query performance, IOTDB caches ChunkMetaData and TsFileMetaData. Users can use MXBean and expand
the sidebar `org.apache.iotdb.db.service` to view the cache hit ratio:
-<img style="width:100%; max-width:800px; max-height:600px; margin-left:auto; margin-right:auto; display:block;" src="https://user-images.githubusercontent.com/19167280/112426760-73e3da80-8d73-11eb-9a8f-9232d1f2033b.png">
+<img style="width:100%; max-width:800px; max-height:600px; margin-left:auto; margin-right:auto; display:block;" src="/img/github/112426760-73e3da80-8d73-11eb-9a8f-9232d1f2033b.png">
### 5.2. Prometheus
@@ -519,7 +519,7 @@ can be used to collect and store monitoring indicators, and Grafana can be used
The following picture describes the relationships among IoTDB, Prometheus and Grafana
-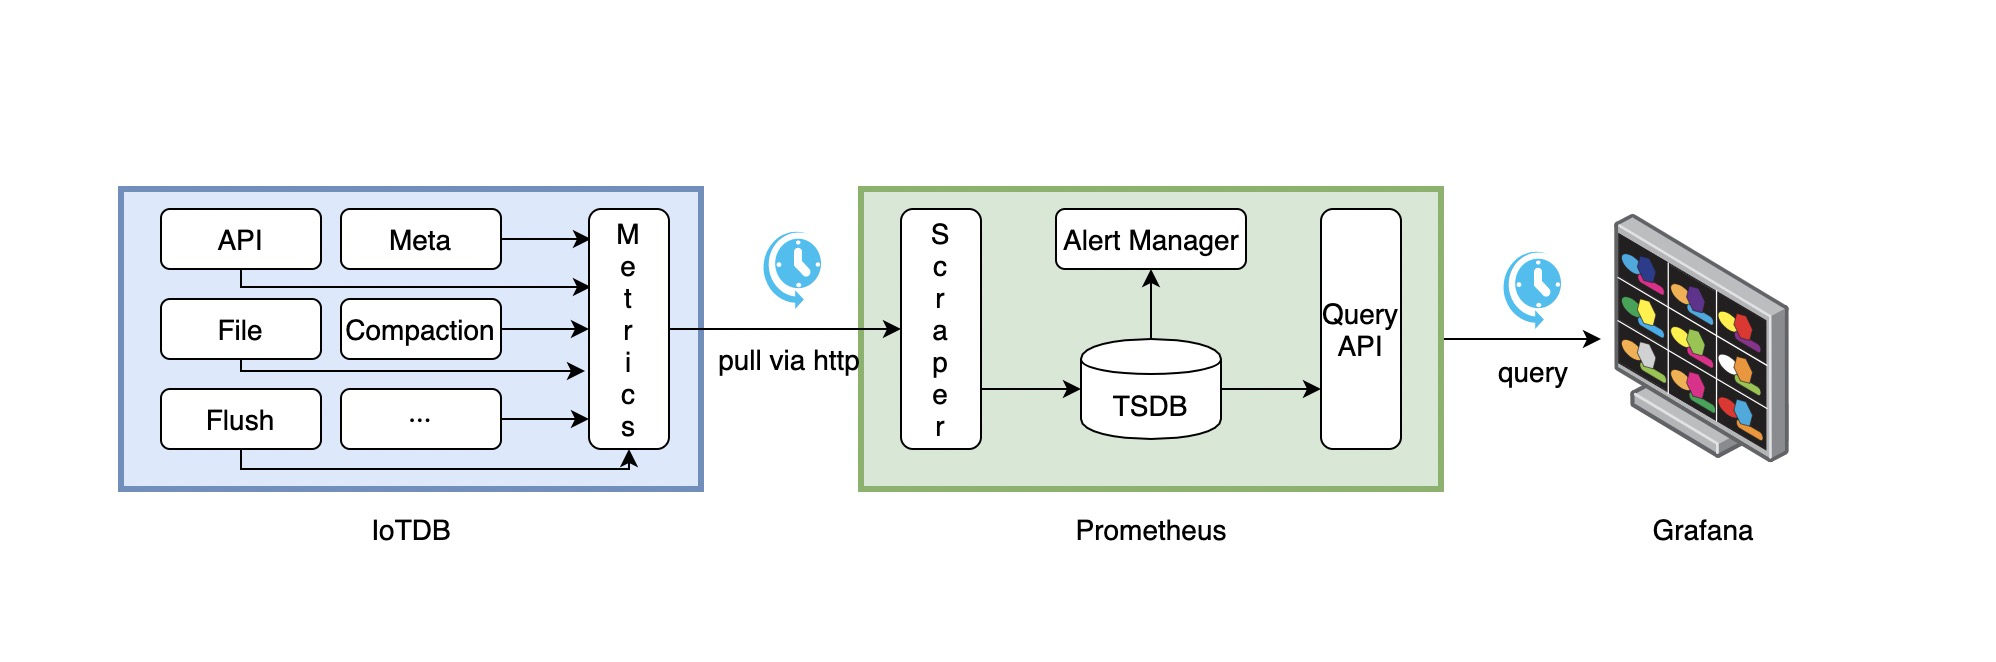
+
1. Along with running, IoTDB will collect its metrics continuously.
2. Prometheus scrapes metrics from IoTDB at a constant interval (can be configured).
@@ -559,7 +559,7 @@ The following documents may help you have a good journey with Prometheus and Gra
We provide the Apache IoTDB Dashboard, and the rendering shown in Grafana is as follows:
-
+
##### 5.2.4.1. How to get Apache IoTDB Dashboard
diff --git a/docs/UserGuide/Operate-Metadata/Auto-Create-MetaData.md b/docs/UserGuide/Operate-Metadata/Auto-Create-MetaData.md
index 131ce07248..f8a2439427 100644
--- a/docs/UserGuide/Operate-Metadata/Auto-Create-MetaData.md
+++ b/docs/UserGuide/Operate-Metadata/Auto-Create-MetaData.md
@@ -51,7 +51,7 @@ Illustrated as the following figure:
* When default_storage_group_level=2, root.turbine1.d1, root.turbine1.d2, root.turbine2.d1 and root.turbine2.d2 will be created as database.
-<img style="width:100%; max-width:800px; max-height:600px; margin-left:auto; margin-right:auto; display:block;" src="https://github.com/apache/iotdb-bin-resources/blob/main/docs/UserGuide/Data%20Concept/Auto-Create-MetaData/auto_create_sg_example.png?raw=true" alt="auto create database example">
+<img style="width:100%; max-width:800px; max-height:600px; margin-left:auto; margin-right:auto; display:block;" src="/img/UserGuide/Data-Concept/Auto-Create-MetaData/auto_create_sg_example.png?raw=true" alt="auto create database example">
## Auto create time series metadata(specify data type in the frontend)
diff --git a/docs/UserGuide/Operate-Metadata/Node.md b/docs/UserGuide/Operate-Metadata/Node.md
index 3fda6a31bb..b0bb49ade7 100644
--- a/docs/UserGuide/Operate-Metadata/Node.md
+++ b/docs/UserGuide/Operate-Metadata/Node.md
@@ -213,7 +213,7 @@ It costs 0.001s
## Count Devices
-* COUNT DEVICES <PathPattern>
+* COUNT DEVICES /<PathPattern/>
The above statement is used to count the number of devices. At the same time, it is allowed to specify `PathPattern` to count the number of devices matching the `PathPattern`.
diff --git a/docs/UserGuide/Operate-Metadata/Timeseries.md b/docs/UserGuide/Operate-Metadata/Timeseries.md
index 07ee8d6fb6..12c482e2ca 100644
--- a/docs/UserGuide/Operate-Metadata/Timeseries.md
+++ b/docs/UserGuide/Operate-Metadata/Timeseries.md
@@ -181,7 +181,7 @@ It costs 0.004s
Then the Metadata Tree will be as below:
-<center><img style="width:100%; max-width:600px; margin-left:auto; margin-right:auto; display:block;" src="https://user-images.githubusercontent.com/19167280/69792176-1718f400-1201-11ea-861a-1a83c07ca144.jpg"></center>
+<center><img style="width:100%; max-width:600px; margin-left:auto; margin-right:auto; display:block;" src="/img/github/69792176-1718f400-1201-11ea-861a-1a83c07ca144.jpg"></center>
As can be seen, `root` is considered as `LEVEL=0`. So when you enter statements such as:
```
diff --git a/docs/UserGuide/Operators-Functions/Continuous-Interval.md b/docs/UserGuide/Operators-Functions/Continuous-Interval.md
index b8d7d8ba5a..d1f6528650 100644
--- a/docs/UserGuide/Operators-Functions/Continuous-Interval.md
+++ b/docs/UserGuide/Operators-Functions/Continuous-Interval.md
@@ -28,10 +28,10 @@ They can be divided into two categories according to return value:
| Function Name | Input TSDatatype | Parameters | Output TSDatatype | Function Description |
|-------------------|--------------------------------------|-----------------------------------------------------------------------------------------------|-------------------|------------------------------------------------------------------------------------------------------------------------------------------------------------------------------|
-| ZERO_DURATION | INT32/ INT64/ FLOAT/ DOUBLE/ BOOLEAN | `min`:Optional with default value `0L`</br>`max`:Optional with default value `Long.MAX_VALUE` | Long | Return intervals' start times and duration times in which the value is always 0(false), and the duration time `t` satisfy `t >= min && t <= max`. The unit of `t` is ms |
-| NON_ZERO_DURATION | INT32/ INT64/ FLOAT/ DOUBLE/ BOOLEAN | `min`:Optional with default value `0L`</br>`max`:Optional with default value `Long.MAX_VALUE` | Long | Return intervals' start times and duration times in which the value is always not 0, and the duration time `t` satisfy `t >= min && t <= max`. The unit of `t` is ms |
-| ZERO_COUNT | INT32/ INT64/ FLOAT/ DOUBLE/ BOOLEAN | `min`:Optional with default value `1L`</br>`max`:Optional with default value `Long.MAX_VALUE` | Long | Return intervals' start times and the number of data points in the interval in which the value is always 0(false). Data points number `n` satisfy `n >= min && n <= max` |
-| NON_ZERO_COUNT | INT32/ INT64/ FLOAT/ DOUBLE/ BOOLEAN | `min`:Optional with default value `1L`</br>`max`:Optional with default value `Long.MAX_VALUE` | Long | Return intervals' start times and the number of data points in the interval in which the value is always not 0(false). Data points number `n` satisfy `n >= min && n <= max` |
+| ZERO_DURATION | INT32/ INT64/ FLOAT/ DOUBLE/ BOOLEAN | `min`:Optional with default value `0L`<br>`max`:Optional with default value `Long.MAX_VALUE` | Long | Return intervals' start times and duration times in which the value is always 0(false), and the duration time `t` satisfy `t >= min && t <= max`. The unit of `t` is ms |
+| NON_ZERO_DURATION | INT32/ INT64/ FLOAT/ DOUBLE/ BOOLEAN | `min`:Optional with default value `0L`<br>`max`:Optional with default value `Long.MAX_VALUE` | Long | Return intervals' start times and duration times in which the value is always not 0, and the duration time `t` satisfy `t >= min && t <= max`. The unit of `t` is ms |
+| ZERO_COUNT | INT32/ INT64/ FLOAT/ DOUBLE/ BOOLEAN | `min`:Optional with default value `1L`<br>`max`:Optional with default value `Long.MAX_VALUE` | Long | Return intervals' start times and the number of data points in the interval in which the value is always 0(false). Data points number `n` satisfy `n >= min && n <= max` |
+| NON_ZERO_COUNT | INT32/ INT64/ FLOAT/ DOUBLE/ BOOLEAN | `min`:Optional with default value `1L`<br>`max`:Optional with default value `Long.MAX_VALUE` | Long | Return intervals' start times and the number of data points in the interval in which the value is always not 0(false). Data points number `n` satisfy `n >= min && n <= max` |
##### Demonstrate
Example data:
diff --git a/docs/UserGuide/Operators-Functions/Sample.md b/docs/UserGuide/Operators-Functions/Sample.md
index c638fbf88d..95f8301f34 100644
--- a/docs/UserGuide/Operators-Functions/Sample.md
+++ b/docs/UserGuide/Operators-Functions/Sample.md
@@ -100,7 +100,7 @@ The timestamp of the sampling output of each bucket is the timestamp of the firs
| Function Name | Allowed Input Series Data Types | Required Attributes | Output Series Data Type | Series Data Type Description |
|----------|--------------------------------|---------------------------------------|------------|--------------------------------------------------|
-| EQUAL_SIZE_BUCKET_AGG_SAMPLE | INT32 / INT64 / FLOAT / DOUBLE | `proportion` The value range is `(0, 1]`, the default is `0.1`</br>`type`: The value types are `avg`, `max`, `min`, `sum`, `extreme`, `variance`, the default is `avg` | INT32 / INT64 / FLOAT / DOUBLE | Returns equal bucket aggregation samples that match the sampling ratio |
+| EQUAL_SIZE_BUCKET_AGG_SAMPLE | INT32 / INT64 / FLOAT / DOUBLE | `proportion` The value range is `(0, 1]`, the default is `0.1`<br>`type`: The value types are `avg`, `max`, `min`, `sum`, `extreme`, `variance`, the default is `avg` | INT32 / INT64 / FLOAT / DOUBLE | Returns equal bucket aggregation samples that match the sampling ratio |
Example data: `root.ln.wf01.wt01.temperature` has a total of `100` ordered data from `0.0-99.0`, and the test data is randomly sampled in equal buckets.
@@ -170,7 +170,7 @@ This function samples the input sequence with equal number of bucket outliers, t
| Function Name | Allowed Input Series Data Types | Required Attributes | Output Series Data Type | Series Data Type Description |
|----------|--------------------------------|---------------------------------------|------------|--------------------------------------------------|
-| EQUAL_SIZE_BUCKET_OUTLIER_SAMPLE | INT32 / INT64 / FLOAT / DOUBLE | The value range of `proportion` is `(0, 1]`, the default is `0.1`</br> The value of `type` is `avg` or `stendis` or `cos` or `prenextdis`, the default is `avg` </br>The value of `number` should be greater than 0, the default is `3`| INT32 / INT64 / FLOAT / DOUBLE | Returns outlier samples in equal buckets that match the sampling ratio and the number of samples in the bucket |
+| EQUAL_SIZE_BUCKET_OUTLIER_SAMPLE | INT32 / INT64 / FLOAT / DOUBLE | The value range of `proportion` is `(0, 1]`, the default is `0.1`<br> The value of `type` is `avg` or `stendis` or `cos` or `prenextdis`, the default is `avg` <br>The value of `number` should be greater than 0, the default is `3`| INT32 / INT64 / FLOAT / DOUBLE | Returns outlier samples in equal buckets that match the sampling ratio and the number of samples in the bucket |
Parameter Description
- `proportion`: sampling ratio
@@ -248,7 +248,7 @@ M4 is used to sample the `first, last, bottom, top` points for each sliding wind
- the bottom point is the point with the **m**inimal value (if there are multiple such points, M4 returns one of them);
- the top point is the point with the **m**aximal value (if there are multiple such points, M4 returns one of them).
-<img src="https://user-images.githubusercontent.com/33376433/198178733-a0919d17-0663-4672-9c4f-1efad6f463c2.png" alt="image" style="zoom:50%;" />
+<img src="/img/github/198178733-a0919d17-0663-4672-9c4f-1efad6f463c2.png" alt="image" style="zoom:50%;" />
| Function Name | Allowed Input Series Data Types | Attributes | Output Series Data Type | Series Data Type Description |
| ------------- | ------------------------------- | ------------------------------------------------------------ | ------------------------------ | ------------------------------------------------------------ |
@@ -261,7 +261,7 @@ M4 is used to sample the `first, last, bottom, top` points for each sliding wind
+ `windowSize`: The number of points in a window. Int data type. **Required**.
+ `slidingStep`: Slide a window by the number of points. Int data type. Optional. If not set, default to the same as `windowSize`.
-<img src="https://user-images.githubusercontent.com/33376433/198181449-00d563c8-7bce-4ecd-a031-ec120ca42c3f.png" alt="image" style="zoom: 50%;" />
+<img src="/img/github/198181449-00d563c8-7bce-4ecd-a031-ec120ca42c3f.png" alt="image" style="zoom: 50%;" />
*(image source: https://iotdb.apache.org/UserGuide/Master/Process-Data/UDF-User-Defined-Function.html#udtf-user-defined-timeseries-generating-function)*
@@ -272,7 +272,7 @@ M4 is used to sample the `first, last, bottom, top` points for each sliding wind
+ `displayWindowBegin`: The starting position of the window (included). Long data type. Optional. If not set, default to Long.MIN_VALUE, meaning using the time of the first data point of the input time series as the starting position of the window.
+ `displayWindowEnd`: End time limit (excluded, essentially playing the same role as `WHERE time < displayWindowEnd`). Long data type. Optional. If not set, default to Long.MAX_VALUE, meaning there is no additional end time limit other than the end of the input time series itself.
-<img src="https://user-images.githubusercontent.com/33376433/198183015-93b56644-3330-4acf-ae9e-d718a02b5f4c.png" alt="groupBy window" style="zoom: 67%;" />
+<img src="/img/github/198183015-93b56644-3330-4acf-ae9e-d718a02b5f4c.png" alt="groupBy window" style="zoom: 67%;" />
*(image source: https://iotdb.apache.org/UserGuide/Master/Query-Data/Aggregate-Query.html#downsampling-aggregate-query)*
diff --git a/docs/UserGuide/Operators-Functions/User-Defined-Function.md b/docs/UserGuide/Operators-Functions/User-Defined-Function.md
index a5c49cef34..bf933e81cd 100644
--- a/docs/UserGuide/Operators-Functions/User-Defined-Function.md
+++ b/docs/UserGuide/Operators-Functions/User-Defined-Function.md
@@ -171,7 +171,7 @@ The following are the strategies you can set:
`RowByRowAccessStrategy`: The construction of `RowByRowAccessStrategy` does not require any parameters.
The `SlidingTimeWindowAccessStrategy` is shown schematically below.
-<img style="width:100%; max-width:800px; max-height:600px; margin-left:auto; margin-right:auto; display:block;" src="https://raw.githubusercontent.com/apache/iotdb-bin-resources/main/docs/UserGuide/Process-Data/UDF-User-Defined-Function/timeWindow.png">
+<img style="width:100%; max-width:800px; max-height:600px; margin-left:auto; margin-right:auto; display:block;" src="/img/UserGuide/Process-Data/UDF-User-Defined-Function/timeWindow.png">
`SlidingTimeWindowAccessStrategy`: `SlidingTimeWindowAccessStrategy` has many constructors, you can pass 3 types of parameters to them:
@@ -185,12 +185,12 @@ The sliding step parameter is also optional. If the parameter is not provided, t
The relationship between the three types of parameters can be seen in the figure below. Please see the Javadoc for more details.
-<div style="text-align: center;"><img style="width:100%; max-width:800px; max-height:600px; margin-left:auto; margin-right:auto; display:block;" src="https://user-images.githubusercontent.com/30497621/99787878-47b51480-2b5b-11eb-8ed3-84088c5c30f7.png"></div>
+<div style="text-align: center;"><img style="width:100%; max-width:800px; max-height:600px; margin-left:auto; margin-right:auto; display:block;" src="/img/github/99787878-47b51480-2b5b-11eb-8ed3-84088c5c30f7.png"></div>
Note that the actual time interval of some of the last time windows may be less than the specified time interval parameter. In addition, there may be cases where the number of data rows in some time windows is 0. In these cases, the framework will also call the `transform` method for the empty windows.
The `SlidingSizeWindowAccessStrategy` is shown schematically below.
-<img style="width:100%; max-width:800px; max-height:600px; margin-left:auto; margin-right:auto; display:block;" src="https://raw.githubusercontent.com/apache/iotdb-bin-resources/main/docs/UserGuide/Process-Data/UDF-User-Defined-Function/countWindow.png">
+<img style="width:100%; max-width:800px; max-height:600px; margin-left:auto; margin-right:auto; display:block;" src="/img/UserGuide/Process-Data/UDF-User-Defined-Function/countWindow.png">
`SlidingSizeWindowAccessStrategy`: `SlidingSizeWindowAccessStrategy` has many constructors, you can pass 2 types of parameters to them:
@@ -200,7 +200,7 @@ The `SlidingSizeWindowAccessStrategy` is shown schematically below.
The sliding step parameter is optional. If the parameter is not provided, the sliding step will be set to the same as the window size.
The `SessionTimeWindowAccessStrategy` is shown schematically below. **Time intervals less than or equal to the given minimum time interval `sessionGap` are assigned in one group**
-<img style="width:100%; max-width:800px; max-height:600px; margin-left:auto; margin-right:auto; display:block;" src="https://raw.githubusercontent.com/apache/iotdb-bin-resources/main/docs/UserGuide/Process-Data/UDF-User-Defined-Function/sessionWindow.png">
+<img style="width:100%; max-width:800px; max-height:600px; margin-left:auto; margin-right:auto; display:block;" src="/img/UserGuide/Process-Data/UDF-User-Defined-Function/sessionWindow.png">
`SessionTimeWindowAccessStrategy`: `SessionTimeWindowAccessStrategy` has many constructors, you can pass 2 types of parameters to them:
- Parameter 1: The display window on the time axis.
@@ -208,7 +208,7 @@ The `SessionTimeWindowAccessStrategy` is shown schematically below. **Time inter
The `StateWindowAccessStrategy` is shown schematically below. **For numerical data, if the state difference is less than or equal to the given threshold `delta`, it will be assigned in one group. **
-<img style="width:100%; max-width:800px; max-height:600px; margin-left:auto; margin-right:auto; display:block;" src="https://raw.githubusercontent.com/apache/iotdb-bin-resources/main/docs/UserGuide/Process-Data/UDF-User-Defined-Function/stateWindow.png">
+<img style="width:100%; max-width:800px; max-height:600px; margin-left:auto; margin-right:auto; display:block;" src="/img/UserGuide/Process-Data/UDF-User-Defined-Function/stateWindow.png">
`StateWindowAccessStrategy` has four constructors.
- Constructor 1: For numerical data, there are 3 parameters: the time axis can display the start and end time of the time window and the threshold `delta` for the allowable change within a single window.
diff --git a/docs/UserGuide/Query-Data/Continuous-Query.md b/docs/UserGuide/Query-Data/Continuous-Query.md
index 4f744c7c8b..e536480d1b 100644
--- a/docs/UserGuide/Query-Data/Continuous-Query.md
+++ b/docs/UserGuide/Query-Data/Continuous-Query.md
@@ -75,19 +75,19 @@ END
#### `<start_time_offset>` == `<every_interval>`
-
+
#### `<start_time_offset>` > `<every_interval>`
-
+
#### `<start_time_offset>` < `<every_interval>`
-
+
#### `<every_interval>` is not zero
-
+
- `TIMEOUT POLICY` specify how we deal with the cq task whose previous time interval execution is not finished while the next execution time has reached. The default value is `BLOCKED`.
diff --git a/docs/UserGuide/Query-Data/Group-By.md b/docs/UserGuide/Query-Data/Group-By.md
index 4acc75b3ca..ecb07e65a6 100644
--- a/docs/UserGuide/Query-Data/Group-By.md
+++ b/docs/UserGuide/Query-Data/Group-By.md
@@ -135,7 +135,7 @@ The GROUP BY statement provides users with three types of specified parameters:
The actual meanings of the three types of parameters are shown in Figure below.
Among them, the parameter 3 is optional.
-<center><img style="width:100%; max-width:800px; max-height:600px; margin-left:auto; margin-right:auto; display:block;" src="https://user-images.githubusercontent.com/16079446/69109512-f808bc80-0ab2-11ea-9e4d-b2b2f58fb474.png">
+<center><img style="width:100%; max-width:800px; max-height:600px; margin-left:auto; margin-right:auto; display:block;" src="/img/github/69109512-f808bc80-0ab2-11ea-9e4d-b2b2f58fb474.png">
</center>
There are three typical examples of frequency reduction aggregation:
@@ -613,7 +613,7 @@ The supported return types of controlExpression and how to deal with null value
| delta!=0 | INT32、INT64、FLOAT、DOUBLE | If the processing group doesn't contains null, null value should be treated as infinity/infinitesimal and will end current group.<br/>Continuous null values are treated as stable values and assigned to the same group. |
| delta=0 | TEXT、BINARY、INT32、INT64、FLOAT、DOUBLE | Null is treated as a new value in a new group and continuous nulls belong to the same group. |
-<img style="width:100%; max-width:800px; max-height:600px; margin-left:auto; margin-right:auto; display:block;" src="https://raw.githubusercontent.com/apache/iotdb-bin-resources/main/docs/UserGuide/Process-Data/GroupBy/groupByVariation.jpeg" alt="groupByVariation">
+<img style="width:100%; max-width:800px; max-height:600px; margin-left:auto; margin-right:auto; display:block;" src="/img/UserGuide/Process-Data/GroupBy/groupByVariation.jpeg" alt="groupByVariation">
### Precautions for Use
1. The result of controlExpression should be a unique value. If multiple columns appear after using wildcard stitching, an error will be reported.
@@ -790,7 +790,7 @@ A given interval threshold to create a new group of data when the difference bet
The figure below is a grouping diagram under `GROUP BY SESSION`.
-<img style="width:100%; max-width:800px; max-height:600px; margin-left:auto; margin-right:auto; display:block;" src="https://raw.githubusercontent.com/apache/iotdb-bin-resources/main/docs/UserGuide/Process-Data/GroupBy/groupBySession.jpeg" alt="groupBySession">
+<img style="width:100%; max-width:800px; max-height:600px; margin-left:auto; margin-right:auto; display:block;" src="/img/UserGuide/Process-Data/GroupBy/groupBySession.jpeg" alt="groupBySession">
### Precautions for Use
1. For a group in resultSet, the time column output the start time of the group by default. __endTime can be used in select clause to output the endTime of groups in resultSet.
diff --git a/docs/UserGuide/Query-Data/Overview.md b/docs/UserGuide/Query-Data/Overview.md
index 4239baea47..ef8d57d84b 100644
--- a/docs/UserGuide/Query-Data/Overview.md
+++ b/docs/UserGuide/Query-Data/Overview.md
@@ -76,7 +76,7 @@ SELECT [LAST] selectExpr [, selectExpr] ...
### `GROUP BY` clause
- The `GROUP BY` clause specifies how the time series are aggregated by segment or group.
-- Segmented aggregation refers to segmenting data in the row direction according to the time dimension, aiming at the time relationship between different data points in the same time series, and obtaining an aggregated value for each segment. Currently only **segmentation by time interval**、**group by variation**、**group by condition** and **group by session** is supported, and more segmentation methods will be supported in the future.
+- Segmented aggregation refers to segmenting data in the row direction according to the time dimension, aiming at the time relationship between different data points in the same time series, and obtaining an aggregated value for each segment. Currently only **segmentation by time interval**、**group by variation**、**group by series** and **group by session** is supported, and more segmentation methods will be supported in the future.
- Group aggregation refers to grouping the potential business attributes of time series for different time series. Each group contains several time series, and each group gets an aggregated value. Support **group by path level** and **group by tag** two grouping methods.
- Segment aggregation and group aggregation can be mixed.
- For details and examples, see the document [Group By Aggregation](./Group-By.md).
diff --git a/docs/UserGuide/QuickStart/Command-Line-Interface.md b/docs/UserGuide/QuickStart/Command-Line-Interface.md
index e3a5bbbde4..ca755d83c2 100644
--- a/docs/UserGuide/QuickStart/Command-Line-Interface.md
+++ b/docs/UserGuide/QuickStart/Command-Line-Interface.md
@@ -46,9 +46,9 @@ After installation, there is a default user in IoTDB: `root`, and the
default password is `root`. Users can use this username to try IoTDB Cli/Shell tool. The cli startup script is the `start-cli` file under the \$IOTDB\_HOME/bin folder. When starting the script, you need to specify the IP and PORT. (Make sure the IoTDB cluster is running properly when you use Cli/Shell tool to connect to it.)
Here is an example where the cluster is started locally and the user has not changed the running port. The default rpc port is
-6667 </br>
+6667 <br>
If you need to connect to the remote DataNode or changes
-the rpc port number of the DataNode running, set the specific IP and RPC PORT at -h and -p.</br>
+the rpc port number of the DataNode running, set the specific IP and RPC PORT at -h and -p.<br>
You also can set your own environment variable at the front of the start script ("/sbin/start-cli.sh" for linux and "/sbin/start-cli.bat" for windows)
The Linux and MacOS system startup commands are as follows:
@@ -145,48 +145,48 @@ Shell >cd bin
Shell >bash ./standalone.sh
```
2、use url(https://ip:port/auth) login keycloack, the first login needs to create a user
-
+
3、Click administration console
-
+
4、In the master menu on the left, click Add realm and enter name to create a new realm
-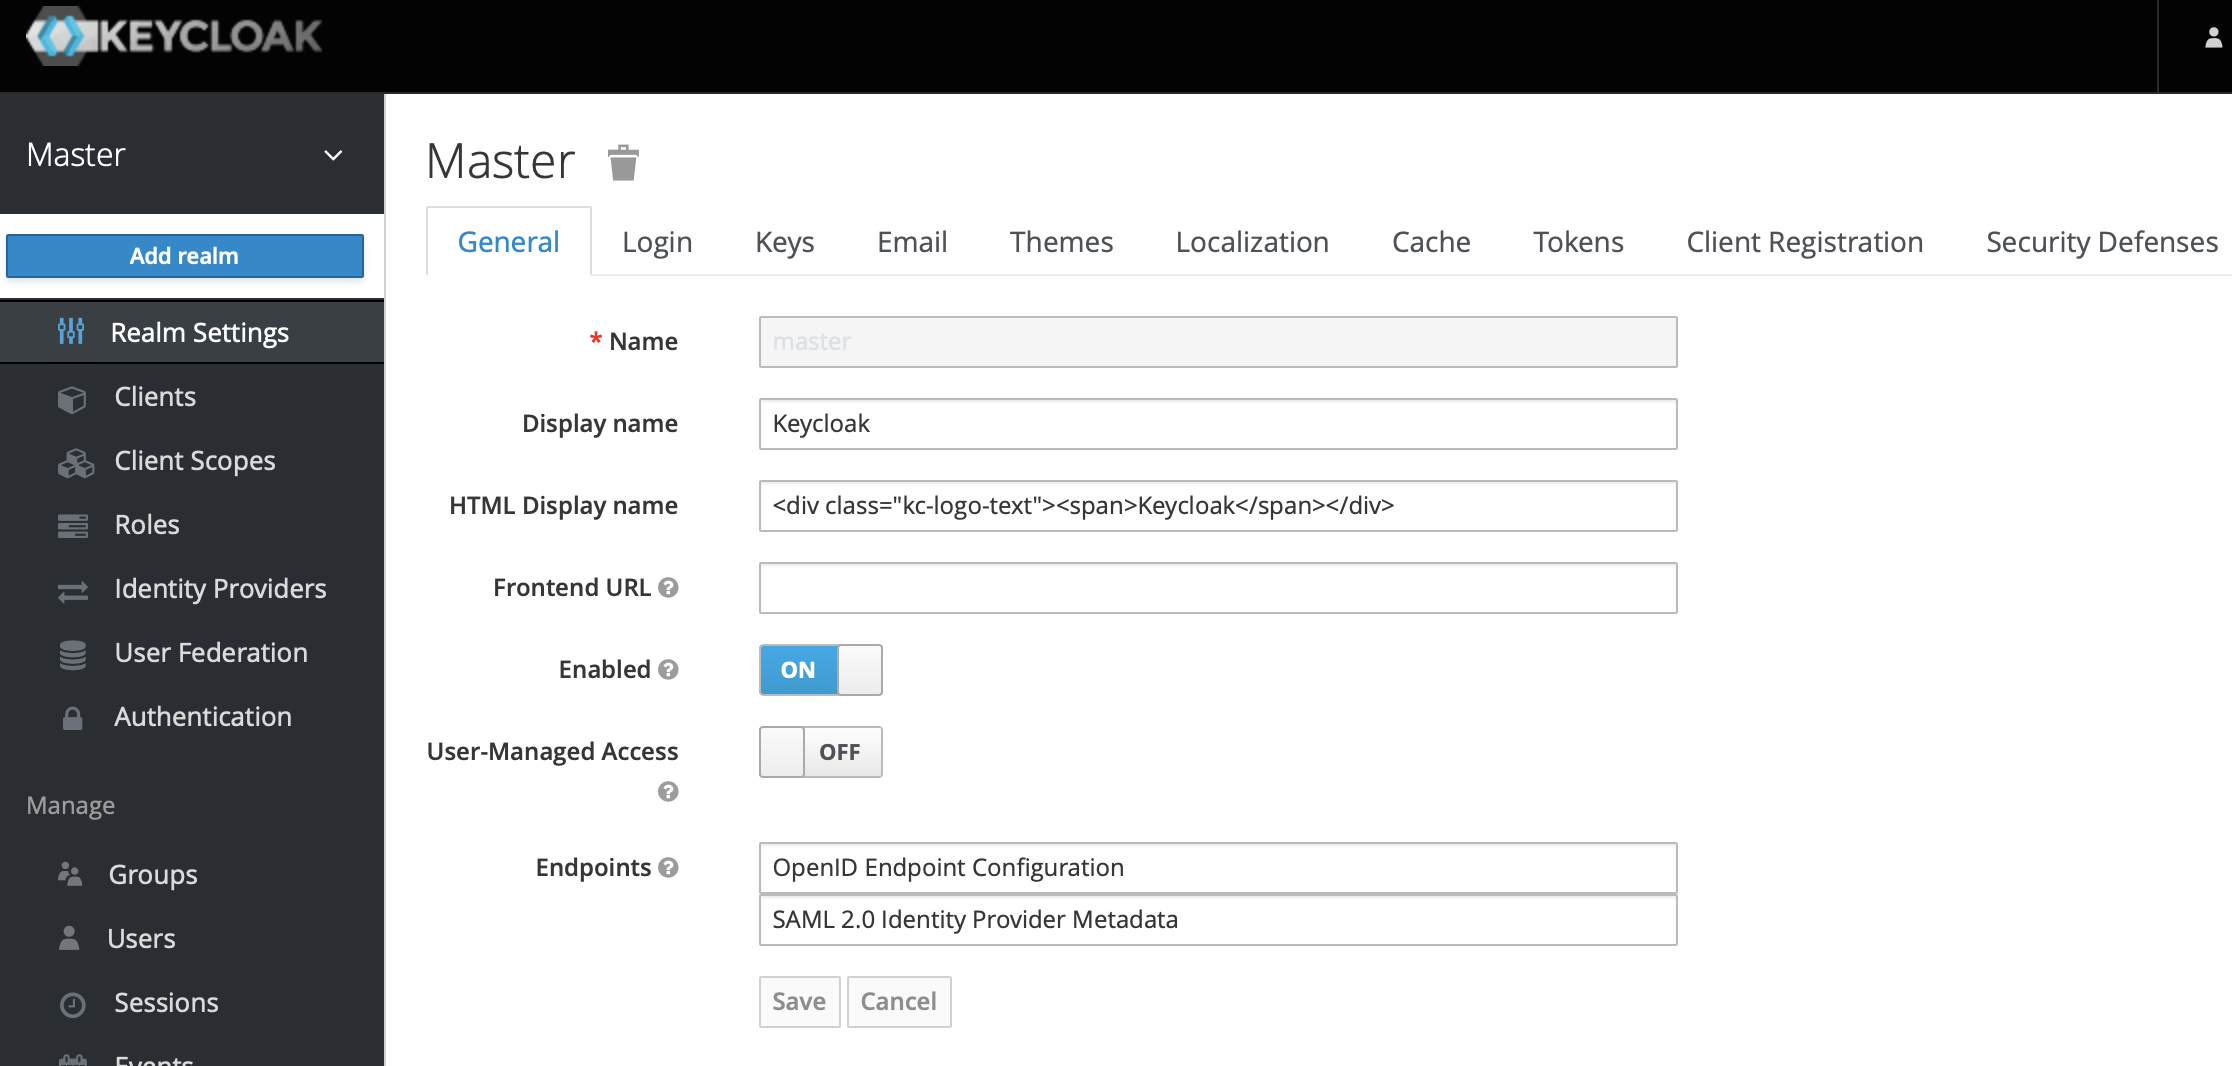
+
-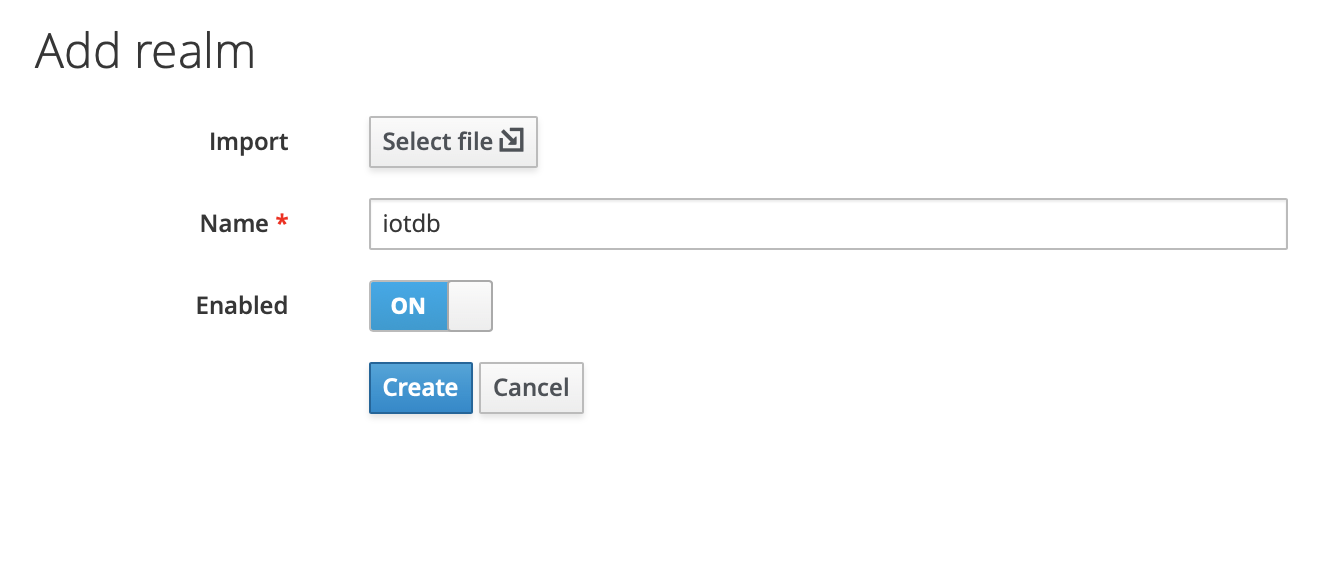
+
5、Click the menu clients on the left to create clients
-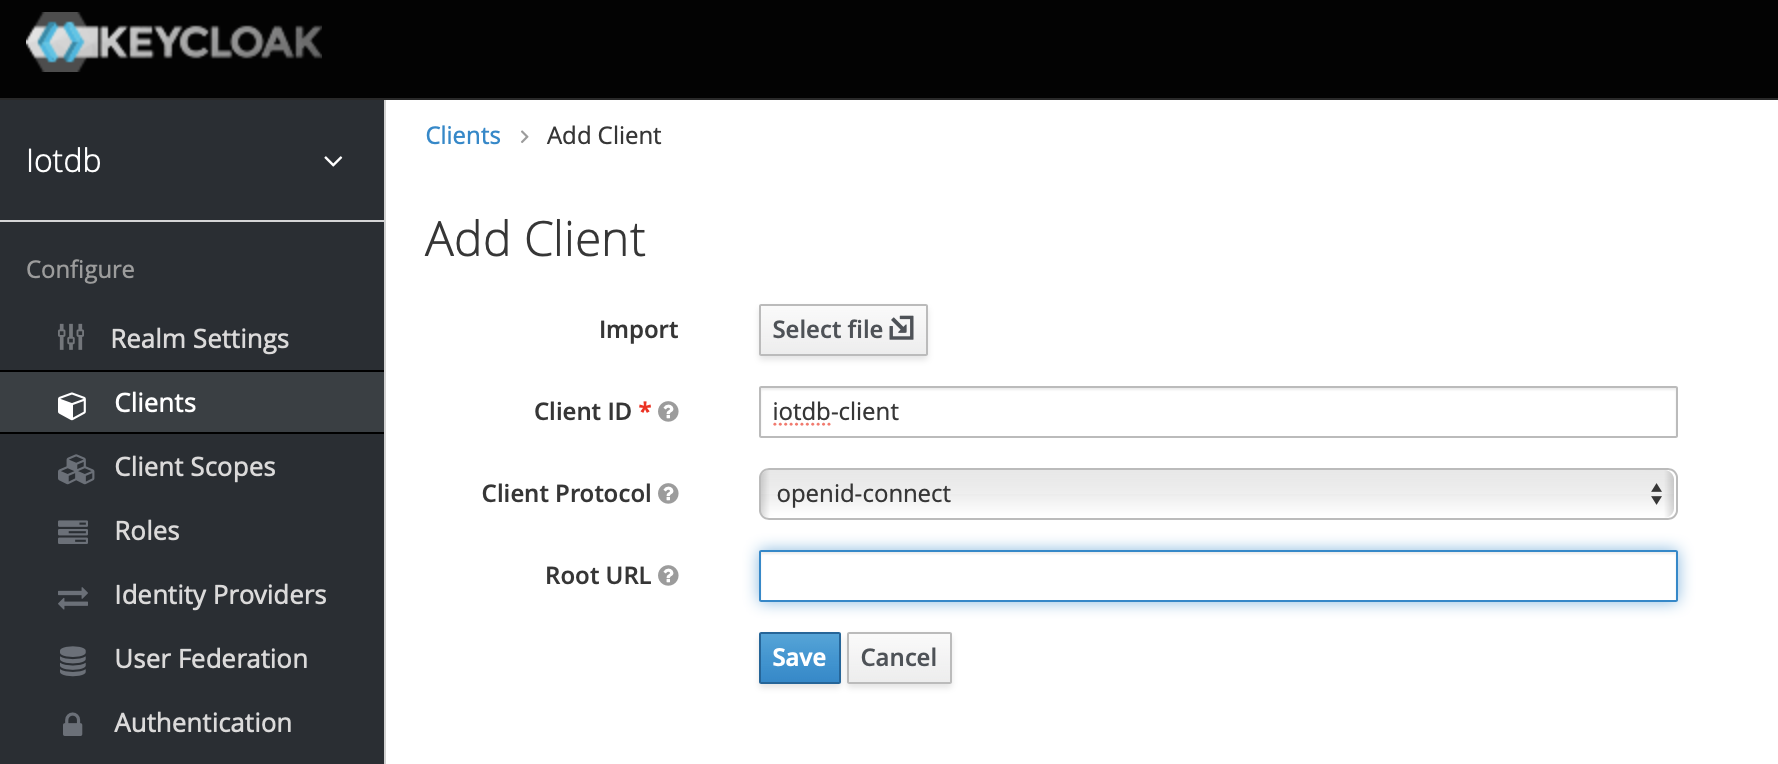
+
6、Click user on the left menu to create user
-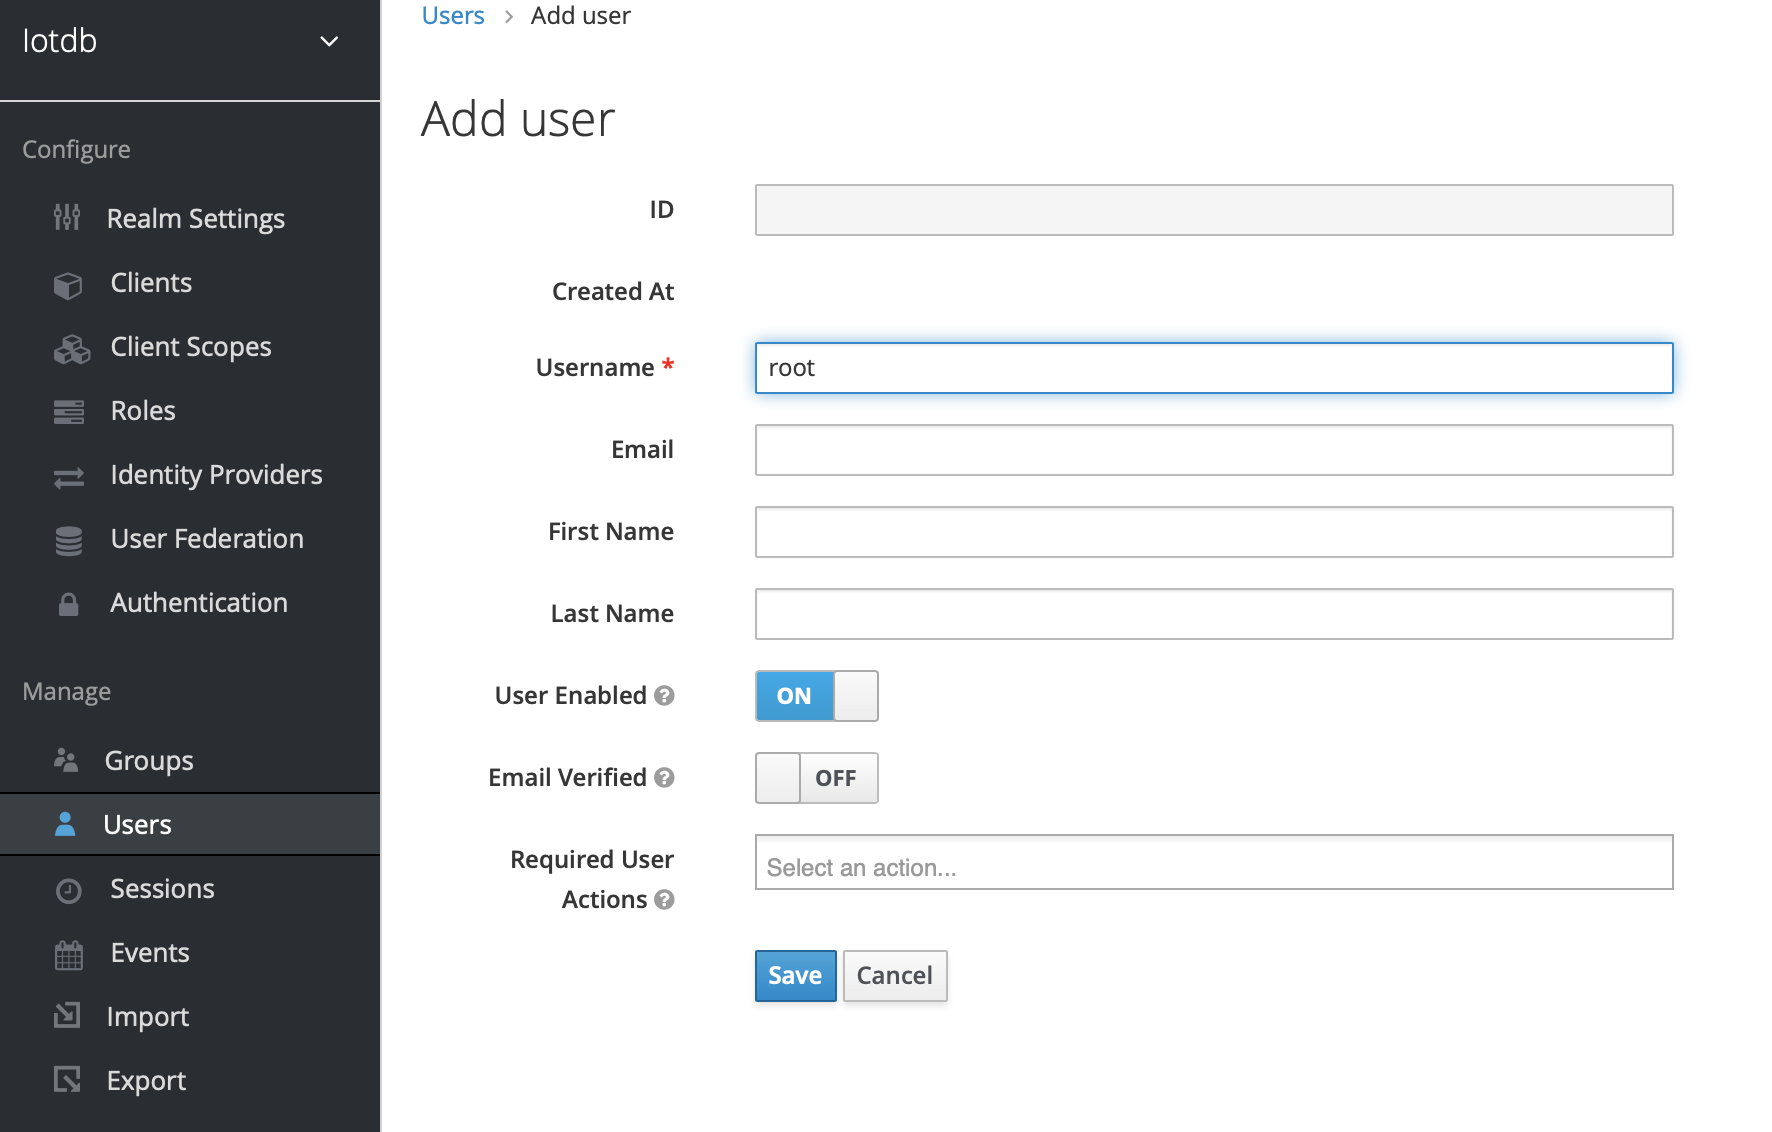
+
7、Click the newly created user ID, click the credentials navigation, enter the password and close the temporary option. The configuration of keycloud is completed
-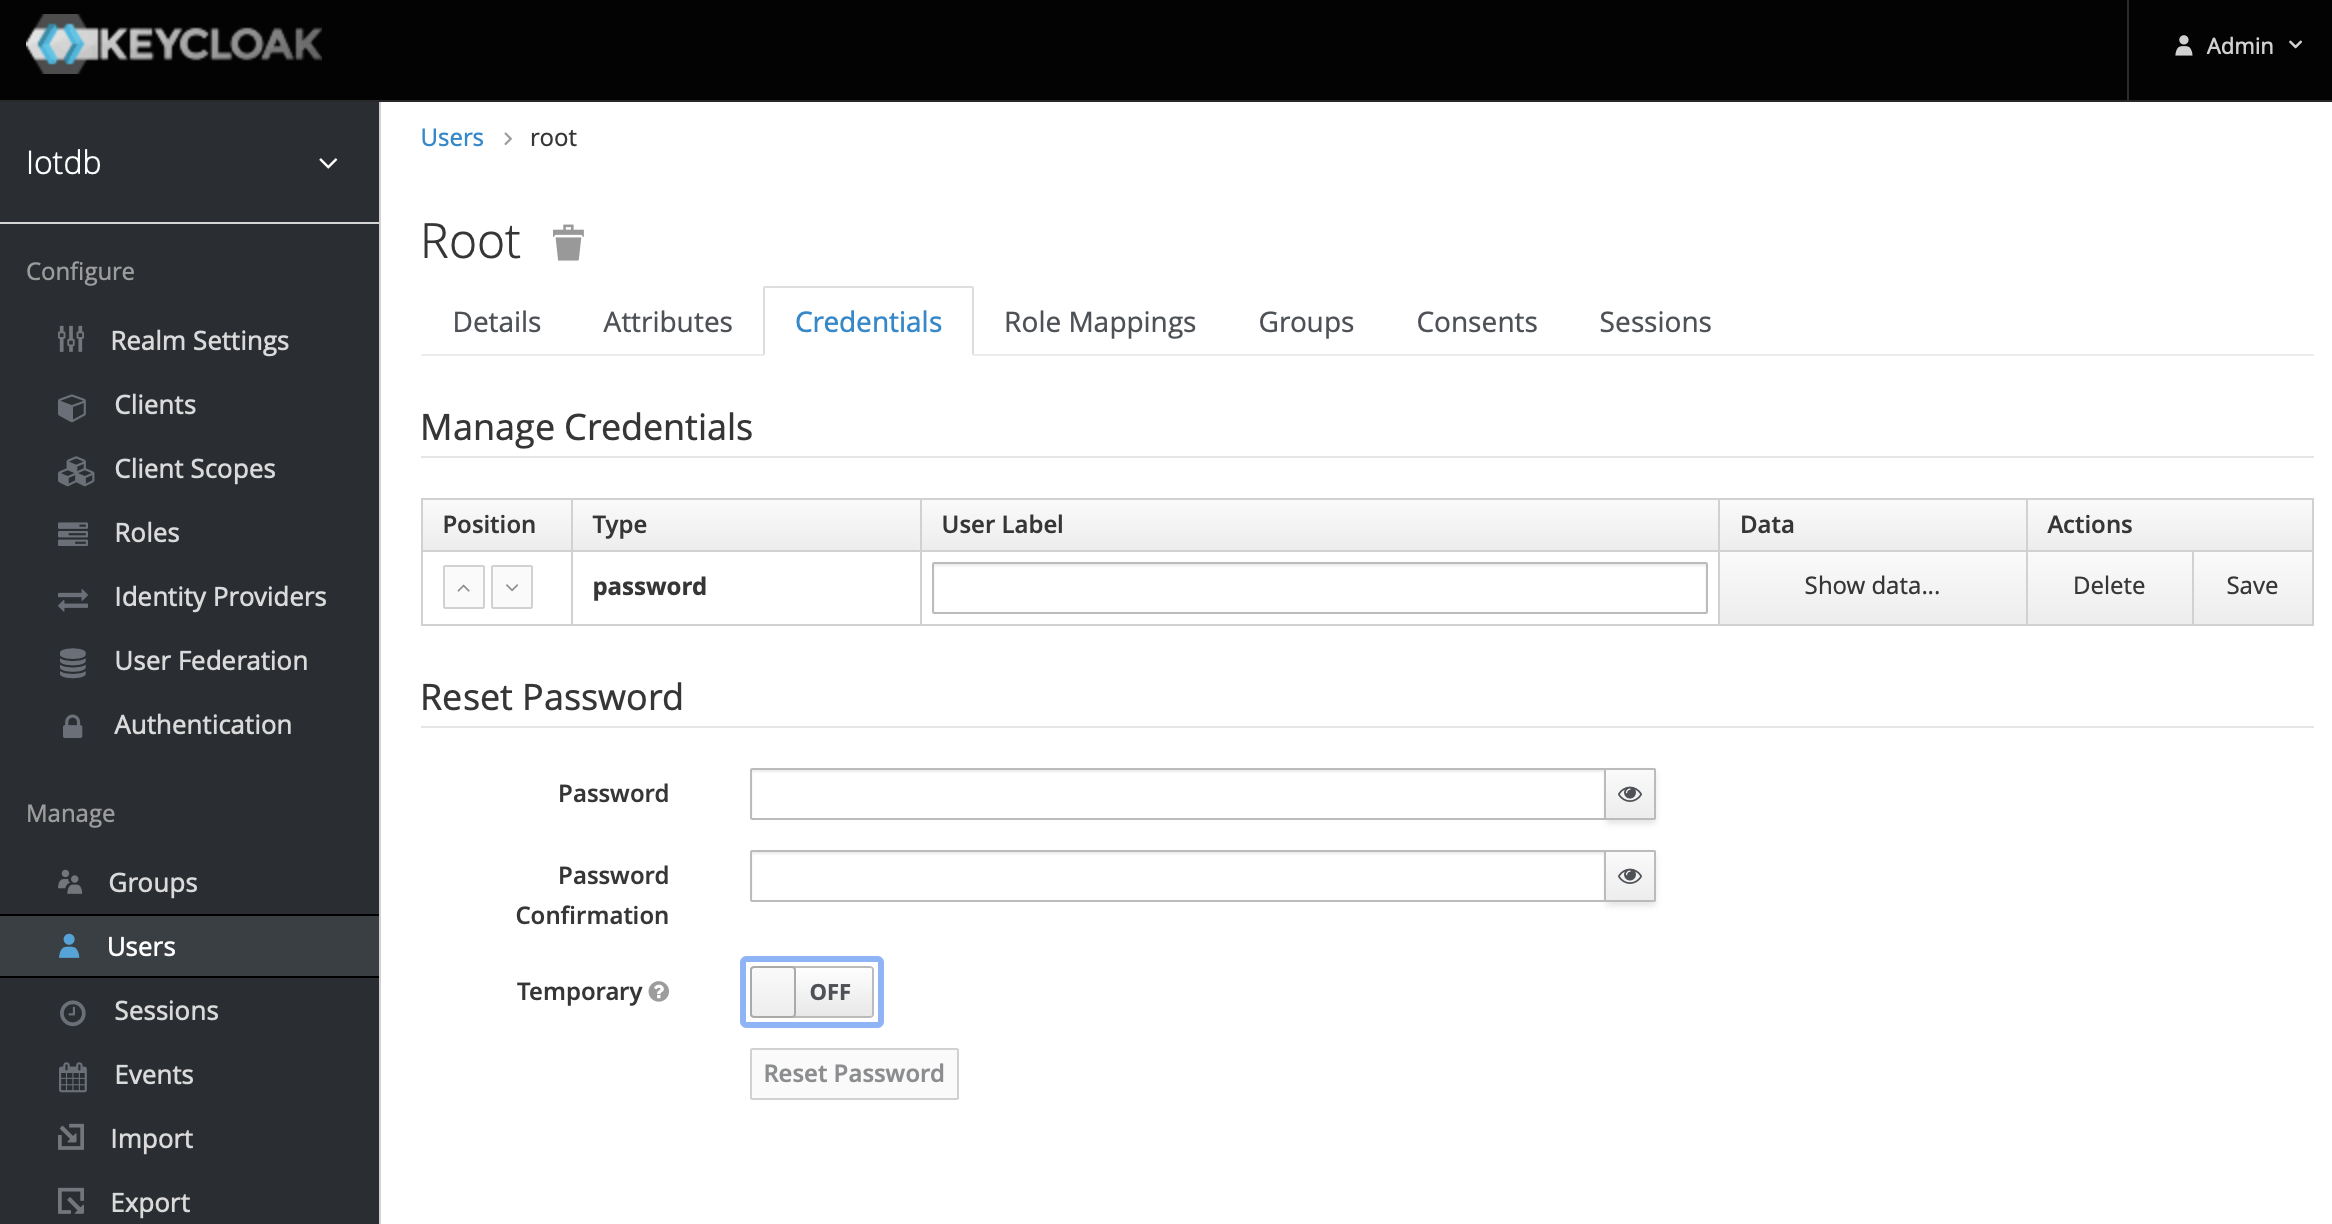
+
8、To create a role, click Roles on the left menu and then click the Add Role button to add a role
-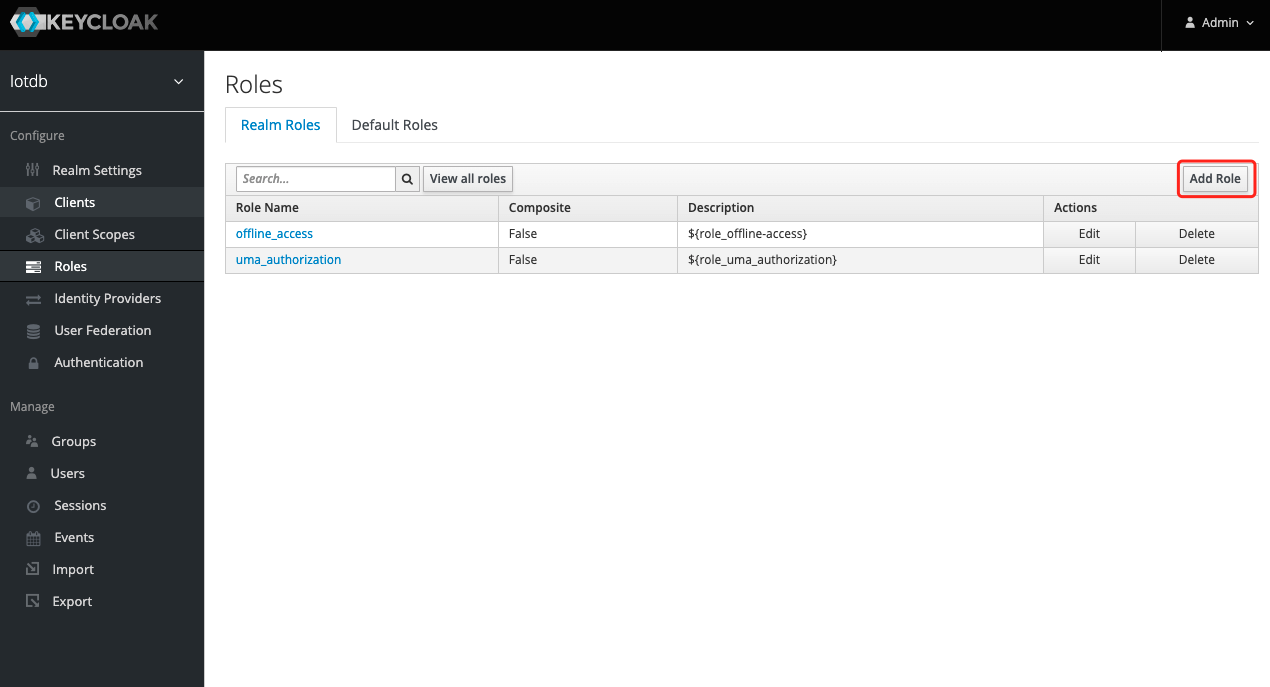
+
9、 Enter `iotdb_admin` in the Role Name and click the save button. Tip: `iotdb_admin` here cannot be any other name, otherwise even after successful login, you will not have permission to use iotdb's query, insert, create database, add users, roles and other functions
-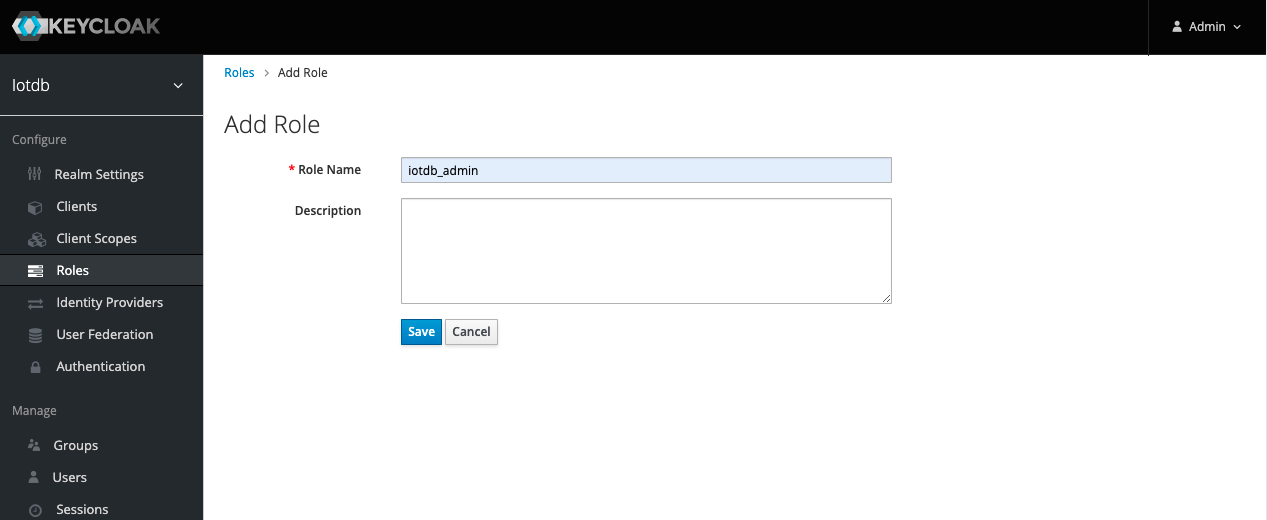
+
10、Click the User menu on the left and click the Edit button in the user list to add the `iotdb_admin` role we just created for this user
-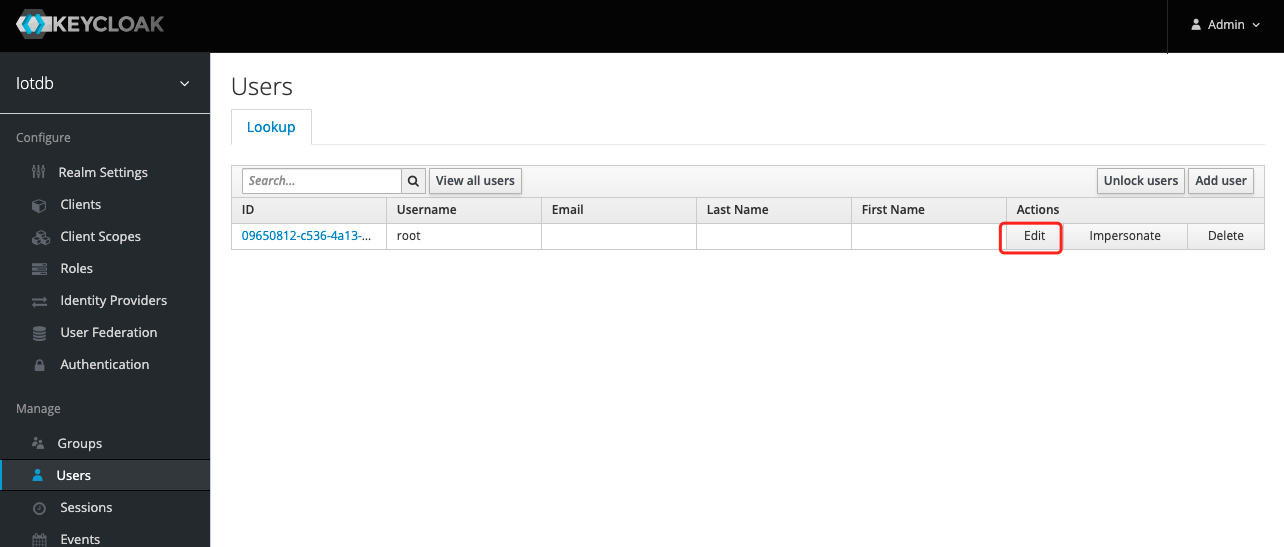
+
11、 Select Role Mappings, select the `iotdb_admin` role in Available Role and click the Add selected button to add the role
-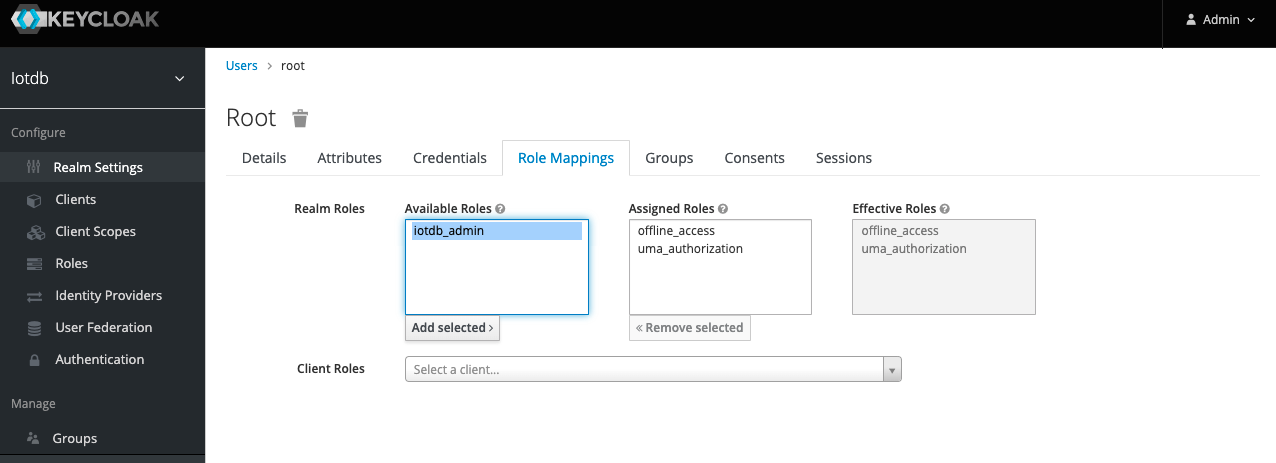
+
12. If the `iotdb_admin` role is in Assigned Roles and the `Success Role mappings updated` prompt appears, it proves that the role was added successfully
-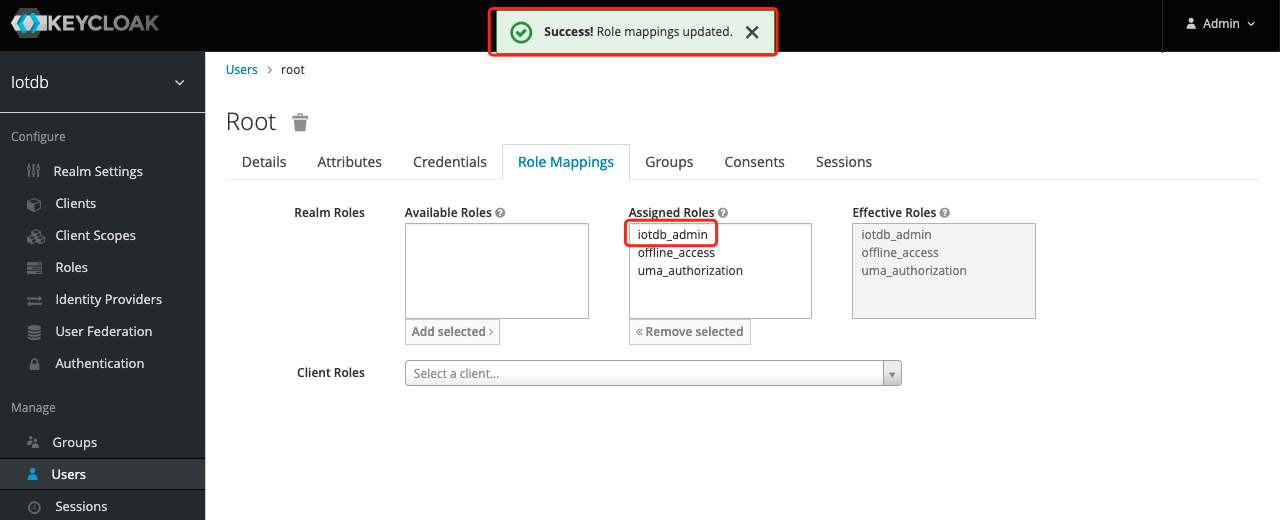
+
Tip: If the user role is adjusted, you need to regenerate the token and log in to iotdb again to take effect
diff --git a/docs/UserGuide/QuickStart/QuickStart.md b/docs/UserGuide/QuickStart/QuickStart.md
index 57844bfc87..5904f2926f 100644
--- a/docs/UserGuide/QuickStart/QuickStart.md
+++ b/docs/UserGuide/QuickStart/QuickStart.md
@@ -36,7 +36,7 @@ IoTDB provides you three installation methods, you can refer to the following su
* Installation from source code. If you need to modify the code yourself, you can use this method.
* Installation from binary files. Download the binary files from the official website. This is the recommended method, in which you will get a binary released package which is out-of-the-box.
-* Using Docker:The path to the dockerfile is https://github.com/apache/iotdb/blob/master/docker/src/main
+* Using Docker:The path to the dockerfile is [github](https://github.com/apache/iotdb/blob/master/docker/src/main)
## Download
diff --git a/docs/UserGuide/Reference/Common-Config-Manual.md b/docs/UserGuide/Reference/Common-Config-Manual.md
index 62757d8b86..5e6538fe9c 100644
--- a/docs/UserGuide/Reference/Common-Config-Manual.md
+++ b/docs/UserGuide/Reference/Common-Config-Manual.md
@@ -274,7 +274,7 @@ Different configuration parameters take effect in the following three ways:
|Name| concurrent\_writing\_time\_partition |
|:---:|:---|
-|Description| This config decides how many time partitions in a database can be inserted concurrently </br> For example, your partitionInterval is 86400 and you want to insert data in 5 different days, |
+|Description| This config decides how many time partitions in a database can be inserted concurrently <br> For example, your partitionInterval is 86400 and you want to insert data in 5 different days, |
|Type|int32|
|Default| 1 |
|Effective|After restarting system|
@@ -487,7 +487,7 @@ Different configuration parameters take effect in the following three ways:
| Name | mpp\_data\_exchange\_core\_pool\_size |
|:-----------:|:---------------------------------------------|
-| Description | The read consistency level, </br>1. strong(Default, read from the leader replica) </br>2. weak(Read from a random replica) |
+| Description | The read consistency level, <br>1. strong(Default, read from the leader replica) <br>2. weak(Read from a random replica) |
| Type | string |
| Default | strong |
| Effective | After restarting system |
@@ -518,6 +518,15 @@ Different configuration parameters take effect in the following three ways:
|Default| true |
|Effective|After restarting system|
+* max\_deduplicated\_path\_num
+
+|Name| max\_deduplicated\_path\_num |
+|:---:|:---|
+|Description| allowed max numbers of deduplicated path in one query. |
+|Type| Int32 |
+|Default| 1000 |
+|Effective|After restarting system|
+
* mpp\_data\_exchange\_core\_pool\_size
| Name | mpp\_data\_exchange\_core\_pool\_size |
diff --git a/docs/UserGuide/Reference/SQL-Reference.md b/docs/UserGuide/Reference/SQL-Reference.md
index 11276cb433..5bc5baaa32 100644
--- a/docs/UserGuide/Reference/SQL-Reference.md
+++ b/docs/UserGuide/Reference/SQL-Reference.md
@@ -1236,7 +1236,7 @@ Note: DateTime Type can support several types, see Chapter 3 Datetime section fo
PrecedenceEqualOperator : EQUAL | NOTEQUAL | LESSTHANOREQUALTO | LESSTHAN | GREATERTHANOREQUALTO | GREATERTHAN
```
```
-Timeseries : ROOT [DOT <LayerName>]* DOT <SensorName>
+Timeseries : ROOT [DOT \<LayerName\>]* DOT \<SensorName\>
LayerName : Identifier
SensorName : Identifier
eg. root.ln.wf01.wt01.status
@@ -1245,7 +1245,7 @@ Note: Timeseries must be start with `root`(case insensitive) and end with sensor
```
```
-PrefixPath : ROOT (DOT <LayerName>)*
+PrefixPath : ROOT (DOT \<LayerName\>)*
LayerName : Identifier | STAR
eg. root.sgcc
eg. root.*
diff --git a/docs/UserGuide/Reference/TSDB-Comparison.md b/docs/UserGuide/Reference/TSDB-Comparison.md
index 30d0ec449c..aaa0bf1789 100644
--- a/docs/UserGuide/Reference/TSDB-Comparison.md
+++ b/docs/UserGuide/Reference/TSDB-Comparison.md
@@ -23,7 +23,7 @@
## Overview
-
+
@@ -320,7 +320,7 @@ IoTDB uses batch insertion API and the batch size is distributed from 0 to 6000
The write throughput (points/second) is:
-
+
<span id = "exp1"> <center>Figure 1. Batch Size with Write throughput (points/second) IoTDB v0.11.1</center></span>
* client num:
@@ -330,24 +330,24 @@ IoTDB uses batch insertion API and the batch size is 100 (write 100 data points
The write throughput (points/second) is:
-
+
<center>Figure 3. Client Num with Write Throughput (points/second) IoTDB v0.11.1</center>
**Query performance**
-
+
<center>Figure 4. Raw data query 1 col time cost(ms) IoTDB v0.11.1</center>
-
+
<center>Figure 5. Aggregation query time cost(ms) IoTDB v0.11.1</center>
-
+
<center>Figure 6. Downsampling query time cost(ms) IoTDB v0.11.1</center>
-
+
<center>Figure 7. Latest query time cost(ms) IoTDB v0.11.1</center>
-
+
<center>Figure 8. Data compression IoTDB v0.11.1</center>
We can see that IoTDB outperforms others.
diff --git a/docs/UserGuide/Syntax-Conventions/Identifier.md b/docs/UserGuide/Syntax-Conventions/Identifier.md
index 9fee4778ef..659c513522 100644
--- a/docs/UserGuide/Syntax-Conventions/Identifier.md
+++ b/docs/UserGuide/Syntax-Conventions/Identifier.md
@@ -47,7 +47,7 @@ Below are basic constraints of identifiers, specific identifiers may have other
` may be written as `` in quoted identifiers. See the example below:
-```SQL
+```sql
# create template t1't"t
create schema template `t1't"t`
(temperature FLOAT encoding=RLE, status BOOLEAN encoding=PLAIN compression=SNAPPY)
diff --git a/docs/UserGuide/Syntax-Conventions/KeyValue-Pair.md b/docs/UserGuide/Syntax-Conventions/KeyValue-Pair.md
index c59efcbc3c..3041b1b81a 100644
--- a/docs/UserGuide/Syntax-Conventions/KeyValue-Pair.md
+++ b/docs/UserGuide/Syntax-Conventions/KeyValue-Pair.md
@@ -27,7 +27,7 @@ Below are usage scenarios of key-value pair:
- Attributes fields of trigger. See the attributes after `With` clause in the example below:
-```SQL
+```sql
# 以字符串形式表示键值对
CREATE TRIGGER `alert-listener-sg1d1s1`
AFTER INSERT
@@ -109,7 +109,7 @@ SHOW timeseries root.ln.** WHRER unit = c
- Attributes fields of Pipe and PipeSink.
-```SQL
+```sql
# PipeSink example
CREATE PIPESINK my_iotdb AS IoTDB ('ip' = '输入你的IP')
diff --git a/docs/UserGuide/Syntax-Conventions/Literal-Values.md b/docs/UserGuide/Syntax-Conventions/Literal-Values.md
index 52326d3bfa..48e608b279 100644
--- a/docs/UserGuide/Syntax-Conventions/Literal-Values.md
+++ b/docs/UserGuide/Syntax-Conventions/Literal-Values.md
@@ -38,7 +38,7 @@ Usages of string literals:
- Values of `TEXT` type data in `INSERT` or `SELECT` statements
- ```SQL
+ ```sql
# insert
insert into root.ln.wf02.wt02(timestamp,hardware) values(1, 'v1')
insert into root.ln.wf02.wt02(timestamp,hardware) values(2, '\\')
@@ -57,7 +57,7 @@ Usages of string literals:
- Used in`LOAD` / `REMOVE` / `SETTLE` instructions to represent file path.
- ```SQL
+ ```sql
# load
LOAD 'examplePath'
@@ -70,14 +70,14 @@ Usages of string literals:
- Password fields in user management statements
- ```SQL
+ ```sql
# write_pwd is the password
CREATE USER ln_write_user 'write_pwd'
```
- Full Java class names in UDF and trigger management statements
- ```SQL
+ ```sql
# Trigger example. Full java class names after 'AS' should be string literals.
CREATE TRIGGER `alert-listener-sg1d1s1`
AFTER INSERT
@@ -94,7 +94,7 @@ Usages of string literals:
- `AS` function provided by IoTDB can assign an alias to time series selected in query. Alias can be constant(including string) or identifier.
- ```SQL
+ ```sql
select s1 as 'temperature', s2 as 'speed' from root.ln.wf01.wt01;
# Header of dataset
diff --git a/docs/UserGuide/Syntax-Conventions/NodeName-In-Path.md b/docs/UserGuide/Syntax-Conventions/NodeName-In-Path.md
index ea1c55791e..19dc1b4331 100644
--- a/docs/UserGuide/Syntax-Conventions/NodeName-In-Path.md
+++ b/docs/UserGuide/Syntax-Conventions/NodeName-In-Path.md
@@ -31,7 +31,7 @@ Node name is a special identifier, it can also be wildcard `*` and `**`. When cr
As `*` can also be used in expressions of select clause to represent multiplication, below are examples to help you better understand the usage of `* `:
-```SQL
+```sql
# create timeseries root.sg.`a*b`
create timeseries root.sg.`a*b` with datatype=FLOAT,encoding=PLAIN;
@@ -61,7 +61,7 @@ When node name is not wildcard, it is a identifier, which means the constraints
- Create timeseries statement:
-```SQL
+```sql
# Node name contains special characters like ` and .,all nodes of this timeseries are: ["root","sg","www.`baidu.com"]
create timeseries root.sg.`www.``baidu.com`.a with datatype=FLOAT,encoding=PLAIN;
@@ -71,7 +71,7 @@ create timeseries root.sg.`111` with datatype=FLOAT,encoding=PLAIN;
After executing above statments, execute "show timeseries",below is the result:
-```SQL
+```sql
+---------------------------+-----+-------------+--------+--------+-----------+----+----------+
| timeseries|alias|database|dataType|encoding|compression|tags|attributes|
+---------------------------+-----+-------------+--------+--------+-----------+----+----------+
@@ -82,7 +82,7 @@ After executing above statments, execute "show timeseries",below is the result
- Insert statment:
-```SQL
+```sql
# Node name contains special characters like . and `
insert into root.sg.`www.``baidu.com`(timestamp, a) values(1, 2);
@@ -92,7 +92,7 @@ insert into root.sg(timestamp, `111`) values (1, 2);
- Query statement:
-```SQL
+```sql
# Node name contains special characters like . and `
select a from root.sg.`www.``baidu.com`;
@@ -102,7 +102,7 @@ select `111` from root.sg
Results:
-```SQL
+```sql
# select a from root.sg.`www.``baidu.com`
+-----------------------------+---------------------------+
| Time|root.sg.`www.``baidu.com`.a|
diff --git a/docs/UserGuide/Syntax-Conventions/Session-And-TsFile-API.md b/docs/UserGuide/Syntax-Conventions/Session-And-TsFile-API.md
index 7f085e4e80..6d0c171fac 100644
--- a/docs/UserGuide/Syntax-Conventions/Session-And-TsFile-API.md
+++ b/docs/UserGuide/Syntax-Conventions/Session-And-TsFile-API.md
@@ -25,7 +25,7 @@ When using the Session and TsFile APIs, if the method you call requires paramete
1. Take creating a time series createTimeseries as an example:
-```Java
+```java
public void createTimeseries(
String path,
TSDataType dataType,
@@ -36,7 +36,7 @@ public void createTimeseries(
If you wish to create the time series root.sg.a, root.sg.\`a.\`\`"b\`, root.sg.\`111\`, the SQL statement you use should look like this:
-```SQL
+```sql
create timeseries root.sg.a with datatype=FLOAT,encoding=PLAIN,compressor=SNAPPY;
# node names contain special characters, each node in the time series is ["root","sg","a.`\"b"]
@@ -48,7 +48,7 @@ create timeseries root.sg.`111` with datatype=FLOAT,encoding=PLAIN,compressor=SN
When you call the createTimeseries method, you should assign the path string as follows to ensure that the content of the path string is the same as when using SQL:
-```Java
+```java
// timeseries root.sg.a
String path = "root.sg.a";
@@ -61,7 +61,7 @@ String path = "root.sg.`111`";
2. Take inserting data insertRecord as an example:
-```Java
+```java
public void insertRecord(
String deviceId,
long time,
@@ -73,13 +73,13 @@ public void insertRecord(
If you want to insert data into the time series root.sg.a, root.sg.\`a.\`\`"b\`, root.sg.\`111\`, the SQL statement you use should be as follows:
-```SQL
+```sql
insert into root.sg(timestamp, a, `a.``"b`, `111`) values (1, 2, 2, 2);
```
When you call the insertRecord method, you should assign deviceId and measurements as follows:
-```Java
+```java
// deviceId is root.sg
String deviceId = "root.sg";
@@ -90,7 +90,7 @@ List<String> measurementList = Arrays.asList(measurements);
3. Take executeRawDataQuery as an example:
-```Java
+```java
public SessionDataSet executeRawDataQuery(
List<String> paths,
long startTime,
@@ -100,7 +100,7 @@ public SessionDataSet executeRawDataQuery(
If you wish to query the data of the time series root.sg.a, root.sg.\`a.\`\`"b\`, root.sg.\`111\`, the SQL statement you use should be as follows :
-```SQL
+```sql
select a from root.sg
# node name contains special characters
@@ -112,7 +112,7 @@ select `111` from root.sg
When you call the executeRawDataQuery method, you should assign paths as follows:
-```Java
+```java
// paths
String[] paths = new String[]{"root.sg.a", "root.sg.`a.``\"b`", "root.sg.`111`"};
List<String> pathList = Arrays.asList(paths);
diff --git a/docs/UserGuide/UserGuideReadme.md b/docs/UserGuide/UserGuideReadme.md
index 4c6c9d4cb7..e5201f0297 100644
--- a/docs/UserGuide/UserGuideReadme.md
+++ b/docs/UserGuide/UserGuideReadme.md
@@ -26,7 +26,6 @@ The "In Progress Version" is for matching the master branch of IOTDB's source co
Other documents are for IoTDB previous released versions.
- [In progress version](https://iotdb.apache.org/UserGuide/Master/QuickStart/QuickStart.html)
-- [Version 0.10.x](https://iotdb.apache.org/UserGuide/V0.10.x/Get%20Started/QuickStart.html)
-- [Version 0.9.x](https://iotdb.apache.org/UserGuide/V0.9.x/0-Get%20Started/1-QuickStart.html)
-- [Version 0.8.x](https://iotdb.apache.org/UserGuide/V0.8.x/0-Get%20Started/1-QuickStart.html)
+- [Version 1.0.x](https://iotdb.apache.org/UserGuide/V1.0.x/QuickStart/QuickStart.html)
+- [Version 0.13.x](https://iotdb.apache.org/UserGuide/V0.13.x/QuickStart/QuickStart.html)
diff --git a/docs/UserGuide/Write-Data/Batch-Load-Tool.md b/docs/UserGuide/Write-Data/Batch-Load-Tool.md
index d6aa73854f..912c2bb0cc 100644
--- a/docs/UserGuide/Write-Data/Batch-Load-Tool.md
+++ b/docs/UserGuide/Write-Data/Batch-Load-Tool.md
@@ -25,7 +25,7 @@ In different scenarios, the IoTDB provides a variety of methods for importing da
## TsFile Batch Load
-TsFile is the file format of time series used in IoTDB. You can directly import one or more TsFile files with time series into another running IoTDB instance through tools such as CLI. For details, see [TsFile Load Tool](../Maintenance-Tools/Load-TsFile.md) [TsFile Export Tools](../Maintenance-Tools/TsFile-Load-Export-Tool.md).
+TsFile is the file format of time series used in IoTDB. You can directly import one or more TsFile files with time series into another running IoTDB instance through tools such as CLI. For details, see [TsFile Load Tool](../Maintenance-Tools/Load-Tsfile.md) [TsFile Export Tools](../Maintenance-Tools/TsFile-Load-Export-Tool.md).
## CSV Batch Load
diff --git a/docs/zh/UserGuide/API/InfluxDB-Protocol.md b/docs/zh/UserGuide/API/InfluxDB-Protocol.md
index c281e2058a..d7725a9507 100644
--- a/docs/zh/UserGuide/API/InfluxDB-Protocol.md
+++ b/docs/zh/UserGuide/API/InfluxDB-Protocol.md
@@ -52,9 +52,9 @@ InfluxDB influxDB = IoTDBInfluxDBFactory.connect(openurl, username, password);
该适配器以 IoTDB Java ServiceProvider 接口为底层基础,实现了 InfluxDB 的 Java 接口 `interface InfluxDB`,对用户提供了所有 InfluxDB 的接口方法,最终用户可以无感知地使用 InfluxDB 协议向 IoTDB 发起写入和读取请求。
-
+
-
+
### 2.2 元数据格式转换
@@ -68,7 +68,7 @@ InfluxDB 的元数据是 tag-field 模型,IoTDB 的元数据是树形模型。
3. tags : 各种有索引的属性。
4. fields : 各种记录值(没有索引的属性)。
-
+
#### 2.2.2 IoTDB 元数据
@@ -76,7 +76,7 @@ InfluxDB 的元数据是 tag-field 模型,IoTDB 的元数据是树形模型。
2. path(time series ID):存储路径。
3. measurement: 物理量。
-
+
#### 2.2.3 两者映射关系
@@ -89,7 +89,7 @@ InfluxDB 元数据向 IoTDB 元数据的转换关系可以由下面的公示表
`root.{database}.{measurement}.{tag value 1}.{tag value 2}...{tag value N-1}.{tag value N}.{field key}`
-
+
如上图所示,可以看出:
diff --git a/docs/zh/UserGuide/API/Interface-Comparison.md b/docs/zh/UserGuide/API/Interface-Comparison.md
index de16a635a5..9b161e5375 100644
--- a/docs/zh/UserGuide/API/Interface-Comparison.md
+++ b/docs/zh/UserGuide/API/Interface-Comparison.md
@@ -19,7 +19,7 @@
-->
-# 原生接口对比
+## 原生接口对比
此章节主要为Java原生接口与Python原生接口的差异性对比,主要为方便区分Java原生接口与Python原生的不同之处。
diff --git a/docs/zh/UserGuide/API/Programming-Cpp-Native-API.md b/docs/zh/UserGuide/API/Programming-Cpp-Native-API.md
index 45617c0756..5eb4403d53 100644
--- a/docs/zh/UserGuide/API/Programming-Cpp-Native-API.md
+++ b/docs/zh/UserGuide/API/Programming-Cpp-Native-API.md
@@ -19,9 +19,9 @@
-->
-# C++ 原生接口
+## C++ 原生接口
-## 依赖
+### 依赖
- Java 8+
- Maven 3.5+
@@ -32,9 +32,9 @@
- GCC 5.5.0+
-## 安装
+### 安装
-### 安装相关依赖
+#### 安装相关依赖
- **MAC**
@@ -104,7 +104,7 @@
* 下载安装 [OpenSSL](http://slproweb.com/products/Win32OpenSSL.html) 。
-### 执行编译
+#### 执行编译
从 git 克隆源代码:
```shell
@@ -133,11 +133,11 @@ git checkout rel/0.13
编译成功后,打包好的 zip 文件位于 `client-cpp/target/client-cpp-${project.version}-cpp-${os}.zip`
-## 基本接口说明
+### 基本接口说明
下面将给出 Session 接口的简要介绍和原型定义:
-### 初始化
+#### 初始化
- 开启 Session
```cpp
@@ -155,9 +155,9 @@ void open(bool enableRPCCompression);
void close();
```
-### 数据定义接口(DDL)
+#### 数据定义接口(DDL)
-#### Database 管理
+##### Database 管理
- 设置 database
```cpp
@@ -170,7 +170,7 @@ void deleteStorageGroup(const std::string &storageGroup);
void deleteStorageGroups(const std::vector<std::string> &storageGroups);
```
-#### 时间序列管理
+##### 时间序列管理
- 创建单个或多个非对齐时间序列
```cpp
@@ -207,7 +207,7 @@ void deleteTimeseries(const std::vector<std::string> &paths);
bool checkTimeseriesExists(const std::string &path);
```
-#### 元数据模版
+##### 元数据模版
- 创建元数据模板
```cpp
@@ -279,9 +279,9 @@ std::vector<std::string> showMeasurementsInTemplate(const std::string &template_
```
-### 数据操作接口(DML)
+#### 数据操作接口(DML)
-#### 数据写入
+##### 数据写入
> 推荐使用 insertTablet 帮助提高写入效率。
@@ -321,7 +321,7 @@ void insertRecordsOfOneDevice(const std::string &deviceId,
std::vector<std::vector<char *>> &valuesList);
```
-#### 带有类型推断的写入
+##### 带有类型推断的写入
服务器需要做类型推断,可能会有额外耗时,速度较无需类型推断的写入慢。
@@ -342,7 +342,7 @@ void insertRecordsOfOneDevice(const std::string &deviceId,
const std::vector<std::vector<std::string>> &valuesList);
```
-#### 对齐时间序列写入
+##### 对齐时间序列写入
对齐时间序列的写入使用 insertAlignedXXX 接口,其余与上述接口类似:
@@ -352,7 +352,7 @@ void insertRecordsOfOneDevice(const std::string &deviceId,
- insertAlignedTablet
- insertAlignedTablets
-#### 数据删除
+##### 数据删除
- 删除一个或多个时间序列在某个时间点前或这个时间点的数据
```cpp
@@ -360,7 +360,7 @@ void deleteData(const std::string &path, int64_t time);
void deleteData(const std::vector<std::string> &deviceId, int64_t time);
```
-### IoTDB-SQL 接口
+#### IoTDB-SQL 接口
- 执行查询语句
```cpp
@@ -373,7 +373,7 @@ void executeNonQueryStatement(const std::string &sql);
```
-## 示例代码
+### 示例代码
示例工程源代码:
@@ -382,9 +382,9 @@ void executeNonQueryStatement(const std::string &sql);
编译成功后,示例代码工程位于 `example/client-cpp-example/target`
-## FAQ
+### FAQ
-### Thrift 编译相关问题
+#### Thrift 编译相关问题
1. MAC:本地 Maven 编译 Thrift 时如出现以下链接的问题,可以尝试将 xcode-commandline 版本从 12 降低到 11.5
https://stackoverflow.com/questions/63592445/ld-unsupported-tapi-file-type-tapi-tbd-in-yaml-file/65518087#65518087
diff --git a/docs/zh/UserGuide/API/Programming-JDBC.md b/docs/zh/UserGuide/API/Programming-JDBC.md
index f0c0b5de19..f335274f8d 100644
--- a/docs/zh/UserGuide/API/Programming-JDBC.md
+++ b/docs/zh/UserGuide/API/Programming-JDBC.md
@@ -56,7 +56,7 @@ mvn clean install -pl jdbc -am -Dmaven.test.skip=true
**注意:为了更快地插入,建议使用 executeBatch()**
-```Java
+```java
import java.sql.*;
import org.apache.iotdb.jdbc.IoTDBSQLException;
diff --git a/docs/zh/UserGuide/API/Programming-Java-Native-API.md b/docs/zh/UserGuide/API/Programming-Java-Native-API.md
index f6e8004562..6139fc0c71 100644
--- a/docs/zh/UserGuide/API/Programming-Java-Native-API.md
+++ b/docs/zh/UserGuide/API/Programming-Java-Native-API.md
@@ -19,16 +19,18 @@
-->
-# Java 原生接口
-## 安装
+# 应用编程接口
+## Java 原生接口
-### 依赖
+### 安装
+
+#### 依赖
* JDK >= 1.8
* Maven >= 3.6
-### 安装方法
+#### 安装方法
在根目录下运行:
@@ -36,7 +38,7 @@
mvn clean install -pl session -am -Dmaven.test.skip=true
```
-### 在 MAVEN 中使用原生接口
+#### 在 MAVEN 中使用原生接口
```xml
<dependencies>
@@ -48,7 +50,7 @@ mvn clean install -pl session -am -Dmaven.test.skip=true
</dependencies>
```
-## 语法说明
+### 语法说明
- 对于 IoTDB-SQL 接口:传入的 SQL 参数需要符合 [语法规范](../Syntax-Conventions/Literal-Values.md) ,并且针对 JAVA 字符串进行反转义,如双引号前需要加反斜杠。(即:经 JAVA 转义之后与命令行执行的 SQL 语句一致。)
- 对于其他接口:
@@ -56,11 +58,11 @@ mvn clean install -pl session -am -Dmaven.test.skip=true
- 经参数传入的标识符(如模板名):在 SQL 语句中需要使用反引号(`)进行转义的,均可以不用进行转义。
- 语法说明相关代码示例可以参考:`example/session/src/main/java/org/apache/iotdb/SyntaxConventionRelatedExample.java`
-## 基本接口说明
+### 基本接口说明
下面将给出 Session 对应的接口的简要介绍和对应参数:
-### 初始化
+#### 初始化
* 初始化 Session
@@ -116,9 +118,9 @@ void open(boolean enableRPCCompression)
void close()
```
-### 数据定义接口 DDL
+#### 数据定义接口 DDL
-#### Database 管理
+##### Database 管理
* 设置 database
@@ -132,7 +134,7 @@ void setStorageGroup(String storageGroupId)
void deleteStorageGroup(String storageGroup)
void deleteStorageGroups(List<String> storageGroups)
```
-#### 时间序列管理
+##### 时间序列管理
* 创建单个或多个时间序列
@@ -170,7 +172,7 @@ void deleteTimeseries(List<String> paths)
boolean checkTimeseriesExists(String path)
```
-#### 元数据模版
+##### 元数据模版
* 创建元数据模板,可以通过先后创建 Template、MeasurementNode 的对象,描述模板内物理量结构与类型、编码方式、压缩方式等信息,并通过以下接口创建模板
@@ -274,9 +276,9 @@ public void dropSchemaTemplate(String templateName);
注意:目前不支持从曾经在'prefixPath'路径及其后代节点使用模板插入数据后(即使数据已被删除)卸载模板。
-### 数据操作接口 DML
+#### 数据操作接口 DML
-#### 数据写入
+##### 数据写入
推荐使用 insertTablet 帮助提高写入效率
@@ -349,7 +351,7 @@ void insertRecordsOfOneDevice(String deviceId, List<Long> times,
List<List<Object>> valuesList)
```
-#### 带有类型推断的写入
+##### 带有类型推断的写入
当数据均是 String 类型时,我们可以使用如下接口,根据 value 的值进行类型推断。例如:value 为 "true" ,就可以自动推断为布尔类型。value 为 "3.2" ,就可以自动推断为数值类型。服务器需要做类型推断,可能会有额外耗时,速度较无需类型推断的写入慢
@@ -373,7 +375,7 @@ void insertStringRecordsOfOneDevice(String deviceId, List<Long> times,
List<List<String>> measurementsList, List<List<String>> valuesList)
```
-#### 对齐时间序列的写入
+##### 对齐时间序列的写入
对齐时间序列的写入使用 insertAlignedXXX 接口,其余与上述接口类似:
@@ -384,7 +386,7 @@ void insertStringRecordsOfOneDevice(String deviceId, List<Long> times,
* insertAlignedTablet
* insertAlignedTablets
-#### 数据删除
+##### 数据删除
* 删除一个或多个时间序列在某个时间点前或这个时间点的数据
@@ -393,7 +395,7 @@ void deleteData(String path, long endTime)
void deleteData(List<String> paths, long endTime)
```
-#### 数据查询
+##### 数据查询
* 时间序列原始数据范围查询:
- 指定的查询时间范围为左闭右开区间,包含开始时间但不包含结束时间。
@@ -435,7 +437,7 @@ SessionDataSet executeAggregationQuery(
long slidingStep);
```
-### IoTDB-SQL 接口
+#### IoTDB-SQL 接口
* 执行查询语句
@@ -449,7 +451,7 @@ SessionDataSet executeQueryStatement(String sql)
void executeNonQueryStatement(String sql)
```
-### 写入测试接口 (用于分析网络带宽)
+#### 写入测试接口 (用于分析网络带宽)
不实际写入数据,只将数据传输到 server 即返回
@@ -485,7 +487,7 @@ void testInsertTablet(Tablet tablet)
void testInsertTablets(Map<String, Tablet> tablets)
```
-### 示例代码
+#### 示例代码
浏览上述接口的详细信息,请参阅代码 ```session/src/main/java/org/apache/iotdb/session/Session.java```
@@ -493,7 +495,7 @@ void testInsertTablets(Map<String, Tablet> tablets)
使用对齐时间序列和元数据模板的示例可以参见 `example/session/src/main/java/org/apache/iotdb/AlignedTimeseriesSessionExample.java`
-## 针对原生接口的连接池
+### 针对原生接口的连接池
我们提供了一个针对原生接口的连接池 (`SessionPool`),使用该接口时,你只需要指定连接池的大小,就可以在使用时从池中获取连接。
如果超过 60s 都没得到一个连接的话,那么会打印一条警告日志,但是程序仍将继续等待。
@@ -513,7 +515,7 @@ void testInsertTablets(Map<String, Tablet> tablets)
或 `example/session/src/main/java/org/apache/iotdb/SessionPoolExample.java`
-## 集群信息相关的接口 (仅在集群模式下可用)
+### 集群信息相关的接口 (仅在集群模式下可用)
集群信息相关的接口允许用户获取如数据分区情况、节点是否当机等信息。
要使用该 API,需要增加依赖:
diff --git a/docs/zh/UserGuide/API/Programming-MQTT.md b/docs/zh/UserGuide/API/Programming-MQTT.md
index 4c65b14f62..816a46c211 100644
--- a/docs/zh/UserGuide/API/Programming-MQTT.md
+++ b/docs/zh/UserGuide/API/Programming-MQTT.md
@@ -30,7 +30,7 @@
IoTDB 支持 MQTT v3.1(OASIS 标准)协议。
IoTDB 服务器包括内置的 MQTT 服务,该服务允许远程设备将消息直接发送到 IoTDB 服务器。
-<img style="width:100%; max-width:800px; max-height:600px; margin-left:auto; margin-right:auto; display:block;" src="https://user-images.githubusercontent.com/6711230/78357432-0c71cf80-75e4-11ea-98aa-c43a54d469ce.png">
+<img style="width:100%; max-width:800px; max-height:600px; margin-left:auto; margin-right:auto; display:block;" src="/img/github/78357432-0c71cf80-75e4-11ea-98aa-c43a54d469ce.png">
### 内置 MQTT 服务
内置的 MQTT 服务提供了通过 MQTT 直接连接到 IoTDB 的能力。 它侦听来自 MQTT 客户端的发布消息,然后立即将数据写入存储。
@@ -57,7 +57,7 @@ MQTT 主题与 IoTDB 时间序列相对应。
```
或者以上两者的JSON数组形式。
-<img style="width:100%; max-width:800px; max-height:600px; margin-left:auto; margin-right:auto; display:block;" src="https://user-images.githubusercontent.com/6711230/78357469-1bf11880-75e4-11ea-978f-a53996667a0d.png">
+<img style="width:100%; max-width:800px; max-height:600px; margin-left:auto; margin-right:auto; display:block;" src="/img/github/78357469-1bf11880-75e4-11ea-978f-a53996667a0d.png">
### MQTT 配置
默认情况下,IoTDB MQTT 服务从`${IOTDB_HOME}/${IOTDB_CONF}/iotdb-datanode.properties`加载配置。
diff --git a/docs/zh/UserGuide/API/Programming-Python-Native-API.md b/docs/zh/UserGuide/API/Programming-Python-Native-API.md
index 3b213d8b79..9984eaf68a 100644
--- a/docs/zh/UserGuide/API/Programming-Python-Native-API.md
+++ b/docs/zh/UserGuide/API/Programming-Python-Native-API.md
@@ -19,13 +19,13 @@
-->
-# Python 原生接口
+## Python 原生接口
-## 依赖
+### 依赖
在使用 Python 原生接口包前,您需要安装 thrift (>=0.13) 依赖。
-## 如何使用 (示例)
+### 如何使用 (示例)
首先下载包:`pip3 install apache-iotdb`
@@ -49,11 +49,11 @@ session.open(False)
zone = session.get_time_zone()
session.close()
```
-## 基本接口说明
+### 基本接口说明
下面将给出 Session 对应的接口的简要介绍和对应参数:
-### 初始化
+#### 初始化
* 初始化 Session
@@ -75,9 +75,9 @@ session.open(enable_rpc_compression=False)
session.close()
```
-### 数据定义接口 DDL
+#### 数据定义接口 DDL
-#### Database 管理
+##### Database 管理
* 设置 database
@@ -91,7 +91,7 @@ session.set_storage_group(group_name)
session.delete_storage_group(group_name)
session.delete_storage_groups(group_name_lst)
```
-#### 时间序列管理
+##### 时间序列管理
* 创建单个或多个时间序列
@@ -127,9 +127,9 @@ session.delete_time_series(paths_list)
session.check_time_series_exists(path)
```
-### 数据操作接口 DML
+#### 数据操作接口 DML
-#### 数据写入
+##### 数据写入
推荐使用 insert_tablet 帮助提高写入效率
@@ -249,7 +249,7 @@ session.insert_records(
session.insert_records_of_one_device(device_id, time_list, measurements_list, data_types_list, values_list)
```
-#### 带有类型推断的写入
+##### 带有类型推断的写入
当数据均是 String 类型时,我们可以使用如下接口,根据 value 的值进行类型推断。例如:value 为 "true" ,就可以自动推断为布尔类型。value 为 "3.2" ,就可以自动推断为数值类型。服务器需要做类型推断,可能会有额外耗时,速度较无需类型推断的写入慢
@@ -257,7 +257,7 @@ session.insert_records_of_one_device(device_id, time_list, measurements_list, da
session.insert_str_record(device_id, timestamp, measurements, string_values)
```
-#### 对齐时间序列的写入
+##### 对齐时间序列的写入
对齐时间序列的写入使用 insert_aligned_xxx 接口,其余与上述接口类似:
@@ -268,7 +268,7 @@ session.insert_str_record(device_id, timestamp, measurements, string_values)
* insert_aligned_tablets
-### IoTDB-SQL 接口
+#### IoTDB-SQL 接口
* 执行查询语句
@@ -289,8 +289,8 @@ session.execute_statement(sql)
```
-### 元数据模版接口
-#### 构建元数据模版
+#### 元数据模版接口
+##### 构建元数据模版
1. 首先构建Template类
2. 添加子节点,可以选择InternalNode或MeasurementNode
3. 调用创建元数据模版接口
@@ -311,7 +311,7 @@ template.add_template(m_node_x)
session.create_schema_template(template)
```
-#### 修改模版节点信息
+##### 修改模版节点信息
修改模版节点,其中修改的模版必须已经被创建。以下函数能够在已经存在的模版中增加或者删除物理量
* 在模版中增加实体
```python
@@ -323,17 +323,17 @@ session.add_measurements_in_template(template_name, measurements_path, data_type
session.delete_node_in_template(template_name, path)
```
-#### 挂载元数据模板
+##### 挂载元数据模板
```python
session.set_schema_template(template_name, prefix_path)
```
-#### 卸载元数据模版
+##### 卸载元数据模版
```python
session.unset_schema_template(template_name, prefix_path)
```
-#### 查看元数据模版
+##### 查看元数据模版
* 查看所有的元数据模版
```python
session.show_all_templates()
@@ -368,14 +368,14 @@ session.show_paths_template_set_on(template_name)
session.show_paths_template_using_on(template_name)
```
-#### 删除元数据模版
+##### 删除元数据模版
删除已经存在的元数据模版,不支持删除已经挂载的模版
```python
session.drop_schema_template("template_python")
```
-### 对 Pandas 的支持
+#### 对 Pandas 的支持
我们支持将查询结果轻松地转换为 [Pandas Dataframe](https://pandas.pydata.org/pandas-docs/stable/reference/api/pandas.DataFrame.html)。
@@ -403,7 +403,7 @@ session.close()
df = ...
```
-### IoTDB Testcontainer
+#### IoTDB Testcontainer
Python 客户端对测试的支持是基于`testcontainers`库 (https://testcontainers-python.readthedocs.io/en/latest/index.html) 的,如果您想使用该特性,就需要将其安装到您的项目中。
@@ -423,11 +423,11 @@ class MyTestCase(unittest.TestCase):
默认情况下,它会拉取最新的 IoTDB 镜像 `apache/iotdb:latest`进行测试,如果您想指定待测 IoTDB 的版本,您只需要将版本信息像这样声明:`IoTDBContainer("apache/iotdb:0.12.0")`,此时,您就会得到一个`0.12.0`版本的 IoTDB 实例。
-### IoTDB DBAPI
+#### IoTDB DBAPI
IoTDB DBAPI 遵循 Python DB API 2.0 规范 (https://peps.python.org/pep-0249/),实现了通过Python语言访问数据库的通用接口。
-#### 例子
+##### 例子
+ 初始化
初始化的参数与Session部分保持一致(sqlalchemy_mode参数除外,该参数仅在SQLAlchemy方言中使用)
@@ -476,9 +476,9 @@ cursor.close()
conn.close()
```
-### IoTDB SQLAlchemy Dialect(实验性)
+#### IoTDB SQLAlchemy Dialect(实验性)
IoTDB的SQLAlchemy方言主要是为了适配Apache superset而编写的,该部分仍在完善中,请勿在生产环境中使用!
-#### 元数据模型映射
+##### 元数据模型映射
SQLAlchemy 所使用的数据模型为关系数据模型,这种数据模型通过表格来描述不同实体之间的关系。
而 IoTDB 的数据模型为层次数据模型,通过树状结构来对数据进行组织。
为了使 IoTDB 能够适配 SQLAlchemy 的方言,需要对 IoTDB 中原有的数据模型进行重新组织,
@@ -506,9 +506,9 @@ SQLAlchemy 中的元数据有:
下图更加清晰的展示了二者的映射关系:
-
+
-#### 数据类型映射
+##### 数据类型映射
| IoTDB 中的数据类型 | SQLAlchemy 中的数据类型 |
|--------------|-------------------|
| BOOLEAN | Boolean |
@@ -518,7 +518,7 @@ SQLAlchemy 中的元数据有:
| DOUBLE | Float |
| TEXT | Text |
| LONG | BigInteger |
-#### Example
+##### Example
+ 执行语句
@@ -563,13 +563,13 @@ for row in res:
print(row)
```
-## 给开发人员
+### 给开发人员
-### 介绍
+#### 介绍
这是一个使用 thrift rpc 接口连接到 IoTDB 的示例。在 Windows 和 Linux 上操作几乎是一样的,但要注意路径分隔符等不同之处。
-### 依赖
+#### 依赖
首选 Python3.7 或更高版本。
@@ -584,7 +584,7 @@ http://thrift.apache.org/docs/install/
pip install -r requirements_dev.txt
```
-### 编译 thrift 库并调试
+#### 编译 thrift 库并调试
在 IoTDB 源代码文件夹的根目录下,运行`mvn clean generate-sources -pl client-py -am`,
@@ -594,7 +594,7 @@ pip install -r requirements_dev.txt
**注意**不要将`iotdb/thrift`上传到 git 仓库中 !
-### Session 客户端 & 使用示例
+#### Session 客户端 & 使用示例
我们将 thrift 接口打包到`client-py/src/iotdb/session.py `中(与 Java 版本类似),还提供了一个示例文件`client-py/src/SessionExample.py`来说明如何使用 Session 模块。请仔细阅读。
@@ -613,7 +613,7 @@ zone = session.get_time_zone()
session.close()
```
-### 测试
+#### 测试
请在`tests`文件夹中添加自定义测试。
@@ -621,12 +621,12 @@ session.close()
**注意**一些测试需要在您的系统上使用 docker,因为测试的 IoTDB 实例是使用 [testcontainers](https://testcontainers-python.readthedocs.io/en/latest/index.html) 在 docker 容器中启动的。
-### 其他工具
+#### 其他工具
[black](https://pypi.org/project/black/) 和 [flake8](https://pypi.org/project/flake8/) 分别用于自动格式化和 linting。
它们可以通过 `black .` 或 `flake8 .` 分别运行。
-## 发版
+### 发版
要进行发版,
@@ -638,11 +638,11 @@ session.close()
最后,您就可以将包发布到 pypi 了。
-### 准备您的环境
+#### 准备您的环境
首先,通过`pip install -r requirements_dev.txt`安装所有必要的开发依赖。
-### 发版
+#### 发版
有一个脚本`release.sh`可以用来执行发版的所有步骤。
diff --git a/docs/zh/UserGuide/Cluster/Cluster-Concept.md b/docs/zh/UserGuide/Cluster/Cluster-Concept.md
index 5e16fc2ea6..340297d682 100644
--- a/docs/zh/UserGuide/Cluster/Cluster-Concept.md
+++ b/docs/zh/UserGuide/Cluster/Cluster-Concept.md
@@ -21,13 +21,15 @@ under the License.
-->
+# 分布式
## 集群基本概念
Apache IoTDB 集群版包含两种角色的节点,ConfigNode 和 DataNode,分别为不同的进程,可独立部署。
集群架构示例如下图:
-<img style="width:100%; max-width:500px; max-height:400px; margin-left:auto; margin-right:auto; display:block;" src="https://github.com/apache/iotdb-bin-resources/blob/main/docs/UserGuide/Cluster/Architecture.png?raw=true">
+<img style="width:100%; max-width:500px; max-height:400px; margin-left:auto; margin-right:auto; display:block;" src="/img/UserGuide/Cluster/Architecture.png?raw=true">
+
ConfigNode 是集群的控制节点,管理集群的节点状态、分区信息等,集群所有 ConfigNode 组成一个高可用组,数据全量备份。
@@ -100,7 +102,7 @@ Region 是数据复制的基本单位,一个 Region 的多个副本构成了
完整的集群分区复制的示意图如下:
-<img style="width:100%; max-width:500px; max-height:500px; margin-left:auto; margin-right:auto; display:block;" src="https://github.com/apache/iotdb-bin-resources/blob/main/docs/UserGuide/Cluster/Data-Partition.png?raw=true">
+<img style="width:100%; max-width:500px; max-height:500px; margin-left:auto; margin-right:auto; display:block;" src="/img/UserGuide/Cluster/Data-Partition.png?raw=true">
图中包含 1 个 SchemaRegionGroup,元数据采用 3 副本,因此 3 个白色的 SchemaRegion-0 组成了一个副本组。
diff --git a/docs/zh/UserGuide/Cluster/Cluster-Maintenance.md b/docs/zh/UserGuide/Cluster/Cluster-Maintenance.md
index eb7045b288..13d886631a 100644
--- a/docs/zh/UserGuide/Cluster/Cluster-Maintenance.md
+++ b/docs/zh/UserGuide/Cluster/Cluster-Maintenance.md
@@ -19,9 +19,9 @@
-->
-# 集群运维命令
+## 集群运维命令
-## 展示集群配置
+### 展示集群配置
当前 IoTDB 支持使用如下 SQL 展示集群的关键参数:
```
@@ -56,7 +56,7 @@ It costs 0.225s
**注意:** 必须保证该 SQL 展示的所有配置参数在同一集群各个节点完全一致
-## 展示 ConfigNode 信息
+### 展示 ConfigNode 信息
当前 IoTDB 支持使用如下 SQL 展示 ConfigNode 的信息:
```
@@ -77,7 +77,7 @@ Total line number = 3
It costs 0.030s
```
-### ConfigNode 状态定义
+#### ConfigNode 状态定义
对 ConfigNode 各状态定义如下:
- **Running**: ConfigNode 正常运行
@@ -85,7 +85,7 @@ It costs 0.030s
- 无法接收其它 ConfigNode 同步来的数据
- 不会被选为集群的 ConfigNode-leader
-## 展示 DataNode 信息
+### 展示 DataNode 信息
当前 IoTDB 支持使用如下 SQL 展示 DataNode 的信息:
```
@@ -124,7 +124,7 @@ Total line number = 2
It costs 0.006s
```
-### DataNode 状态定义
+#### DataNode 状态定义
DataNode 的状态机如下图所示:
<img style="width:100%; max-width:500px; max-height:500px; margin-left:auto; margin-right:auto; display:block;" src="https://github.com/apache/iotdb-bin-resources/blob/main/docs/UserGuide/Cluster/DataNode-StateMachine-ZH.jpg?raw=true">
@@ -149,7 +149,7 @@ DataNode 的状态机如下图所示:
| Removing | 否 | 否 | 否 |
| ReadOnly | 是 | 否 | 是 |
-## 展示全部节点信息
+### 展示全部节点信息
当前 IoTDB 支持使用如下 SQL 展示全部节点的信息:
```
@@ -212,7 +212,7 @@ Total line number = 6
It costs 0.340s
```
-## 展示 Region 信息
+### 展示 Region 信息
集群中以 SchemaRegion/DataRegion 作为元数据/数据的复制和管理单元,Region 的状态和分布对于系统运维和测试有很大帮助,如以下场景:
@@ -404,7 +404,7 @@ Total line number = 4
It costs 0.165s
```
-### Region 状态定义
+#### Region 状态定义
Region 继承所在 DataNode 的状态,对 Region 各状态定义如下:
- **Running**: Region 所在 DataNode 正常运行,Region 可读可写
@@ -420,7 +420,7 @@ Region 继承所在 DataNode 的状态,对 Region 各状态定义如下:
- 当且仅当严格多于一半的 Region 处于 Running 状态时, 该 RegionGroup 可进行数据的查询、写入和删除操作
- 如果处于 Running 状态的 Region 少于一半,该 RegionGroup 不可进行数据的数据的查询、写入和删除操作
-## 展示集群槽信息
+### 展示集群槽信息
集群使用分区来管理元数据和数据,分区定义如下:
@@ -429,7 +429,7 @@ Region 继承所在 DataNode 的状态,对 Region 各状态定义如下:
可以使用以下 SQL 来查询分区对应信息:
-### 展示数据分区所在的 DataRegion
+#### 展示数据分区所在的 DataRegion
展示一个数据分区(或一个序列槽下的所有数据分区)所在的 DataRegion:
- `SHOW DATA REGIONID OF root.sg WHERE SERIESSLOTID=s0 (AND TIMESLOTID=t0)`
@@ -461,7 +461,7 @@ Total line number = 2
It costs 0.006s
```
-### 展示元数据分区所在的 SchemaRegion
+#### 展示元数据分区所在的 SchemaRegion
展示一个元数据分区所在的 SchemaRegion:
- `SHOW SCHEMA REGIONID OF root.sg WHERE SERIESSLOTID=s0`
@@ -480,7 +480,7 @@ Total line number = 1
It costs 0.007s
```
-### 展示序列槽下的时间槽
+#### 展示序列槽下的时间槽
展示一个序列槽下的所有时间槽:
- `SHOW TIMESLOTID OF root.sg WHERE SERIESLOTID=s0 (AND STARTTIME=t1) (AND ENDTIME=t2)`
@@ -497,7 +497,7 @@ Total line number = 1
It costs 0.007s
```
-### 展示数据库的序列槽
+#### 展示数据库的序列槽
展示一个数据库内,数据,元数据或是所有的序列槽:
- `SHOW (DATA|SCHEMA)? SERIESSLOTID OF root.sg`
@@ -531,7 +531,7 @@ Total line number = 1
It costs 0.006s
```
-## 迁移 Region
+### 迁移 Region
以下 SQL 语句可以被用于手动迁移一个 region, 可用于负载均衡或其他目的。
```
MIGRATE REGION <Region-id> FROM <original-DataNodeId> TO <dest-DataNodeId>
diff --git a/docs/zh/UserGuide/Cluster/Cluster-Setup.md b/docs/zh/UserGuide/Cluster/Cluster-Setup.md
index 2637f80854..4eb795865c 100644
--- a/docs/zh/UserGuide/Cluster/Cluster-Setup.md
+++ b/docs/zh/UserGuide/Cluster/Cluster-Setup.md
@@ -19,11 +19,11 @@
-->
-# 1. 目标
+## 1. 目标
本文档为 IoTDB 集群版(1.0.0)的安装及启动教程。
-# 2. 前置检查
+## 2. 前置检查
1. JDK>=1.8 的运行环境,并配置好 JAVA_HOME 环境变量。
2. 设置最大文件打开数为 65535。
@@ -33,19 +33,19 @@
6. 在集群默认配置中,ConfigNode 会占用端口 10710 和 10720,DataNode 会占用端口 6667、10730、10740、10750 和 10760,
请确保这些端口未被占用,或者手动修改配置文件中的端口配置。
-# 3. 安装包获取
+## 3. 安装包获取
你可以选择下载二进制文件(见 3.1)或从源代码编译(见 3.2)。
-## 3.1 下载二进制文件
+### 3.1 下载二进制文件
1. 打开官网[Download Page](https://iotdb.apache.org/Download/)。
2. 下载 IoTDB 1.0.0 版本的二进制文件。
3. 解压得到 apache-iotdb-1.0.0-all-bin 目录。
-## 3.2 使用源码编译
+### 3.2 使用源码编译
-### 3.2.1 下载源码
+#### 3.2.1 下载源码
**Git**
```
@@ -58,7 +58,7 @@ git checkout v1.0.0
2. 下载 IoTDB 1.0.0 版本的源码。
3. 解压得到 apache-iotdb-1.0.0 目录。
-### 3.2.2 编译源码
+#### 3.2.2 编译源码
在 IoTDB 源码根目录下:
```
@@ -69,7 +69,7 @@ mvn clean package -pl distribution -am -DskipTests
**distribution/target/apache-iotdb-1.0.0-SNAPSHOT-all-bin/apache-iotdb-1.0.0-SNAPSHOT-all-bin**
找到集群版本的二进制文件。
-# 4. 安装包说明
+## 4. 安装包说明
打开 apache-iotdb-1.0.0-SNAPSHOT-all-bin,可见以下目录:
@@ -83,9 +83,9 @@ mvn clean package -pl distribution -am -DskipTests
| sbin | 脚本目录,包含 ConfigNode 和 DataNode 的启停移除脚本,以及 Cli 的启动脚本等 |
| tools | 系统工具目录 |
-# 5. 集群安装配置
+## 5. 集群安装配置
-## 5.1 集群安装
+### 5.1 集群安装
`apache-iotdb-1.0.0-SNAPSHOT-all-bin` 包含 ConfigNode 和 DataNode,
请将安装包部署于你目标集群的所有机器上,推荐将安装包部署于所有服务器的相同目录下。
@@ -93,7 +93,7 @@ mvn clean package -pl distribution -am -DskipTests
如果你希望先在一台服务器上尝试部署 IoTDB 集群,请参考
[Cluster Quick Start](https://iotdb.apache.org/zh/UserGuide/Master/QuickStart/ClusterQuickStart.html)。
-## 5.2 集群配置
+### 5.2 集群配置
接下来需要修改每个服务器上的配置文件,登录服务器,
并将工作路径切换至 `apache-iotdb-1.0.0-SNAPSHOT-all-bin`,
@@ -103,7 +103,7 @@ mvn clean package -pl distribution -am -DskipTests
对于所有部署 DataNode 的服务器,需要修改通用配置(见 5.2.1)和 DataNode 配置(见 5.2.3)。
-### 5.2.1 通用配置
+#### 5.2.1 通用配置
打开通用配置文件 ./conf/iotdb-common.properties,
可根据 [部署推荐](https://iotdb.apache.org/zh/UserGuide/Master/Cluster/Deployment-Recommendation.html)
@@ -120,7 +120,7 @@ mvn clean package -pl distribution -am -DskipTests
**注意:上述配置项在集群启动后即不可更改,且务必保证所有节点的通用配置完全一致,否则节点无法启动。**
-### 5.2.2 ConfigNode 配置
+#### 5.2.2 ConfigNode 配置
打开 ConfigNode 配置文件 ./conf/iotdb-confignode.properties,根据服务器/虚拟机的 IP 地址和可用端口,设置以下参数:
@@ -133,7 +133,7 @@ mvn clean package -pl distribution -am -DskipTests
**注意:上述配置项在节点启动后即不可更改,且务必保证所有端口均未被占用,否则节点无法启动。**
-### 5.2.3 DataNode 配置
+#### 5.2.3 DataNode 配置
打开 DataNode 配置文件 ./conf/iotdb-datanode.properties,根据服务器/虚拟机的 IP 地址和可用端口,设置以下参数:
@@ -150,9 +150,9 @@ mvn clean package -pl distribution -am -DskipTests
**注意:上述配置项在节点启动后即不可更改,且务必保证所有端口均未被占用,否则节点无法启动。**
-# 6. 集群操作
+## 6. 集群操作
-## 6.1 启动集群
+### 6.1 启动集群
本小节描述如何启动包括若干 ConfigNode 和 DataNode 的集群。
集群可以提供服务的标准是至少启动一个 ConfigNode 且启动 不小于(数据/元数据)副本个数 的 DataNode。
@@ -163,7 +163,7 @@ mvn clean package -pl distribution -am -DskipTests
2. 增加 ConfigNode(可选)
3. 增加 DataNode
-### 6.1.1 启动 Seed-ConfigNode
+#### 6.1.1 启动 Seed-ConfigNode
**集群第一个启动的节点必须是 ConfigNode,第一个启动的 ConfigNode 必须遵循本小节教程。**
@@ -206,7 +206,7 @@ nohup bash ./sbin/start-confignode.sh >/dev/null 2>&1 &
ConfigNode 的其它配置参数可参考
[ConfigNode 配置参数](https://iotdb.apache.org/zh/UserGuide/Master/Reference/ConfigNode-Config-Manual.html)。
-### 6.1.2 增加更多 ConfigNode(可选)
+#### 6.1.2 增加更多 ConfigNode(可选)
**只要不是第一个启动的 ConfigNode 就必须遵循本小节教程。**
@@ -249,7 +249,7 @@ nohup bash ./sbin/start-confignode.sh >/dev/null 2>&1 &
ConfigNode 的其它配置参数可参考
[ConfigNode配置参数](https://iotdb.apache.org/zh/UserGuide/Master/Reference/ConfigNode-Config-Manual.html)。
-### 6.1.3 增加 DataNode
+#### 6.1.3 增加 DataNode
**确保集群已有正在运行的 ConfigNode 后,才能开始增加 DataNode。**
@@ -291,7 +291,7 @@ DataNode 的其它配置参数可参考
**注意:当且仅当集群拥有不少于副本个数(max{schema\_replication\_factor, data\_replication\_factor})的 DataNode 后,集群才可以提供服务**
-## 6.2 启动 Cli
+### 6.2 启动 Cli
若搭建的集群仅用于本地调试,可直接执行 ./sbin 目录下的 Cli 启动脚本:
@@ -306,7 +306,7 @@ DataNode 的其它配置参数可参考
若希望通过 Cli 连接生产环境的集群,
请阅读 [Cli 使用手册](https://iotdb.apache.org/zh/UserGuide/Master/QuickStart/Command-Line-Interface.html)。
-## 6.3 验证集群
+### 6.3 验证集群
以在6台服务器上启动的3C3D(3个ConfigNode 和 3个DataNode)集群为例,
这里假设3个ConfigNode的IP地址依次为192.168.1.10、192.168.1.11、192.168.1.12,且3个ConfigNode启动时均使用了默认的端口10710与10720;
@@ -333,11 +333,11 @@ It costs 0.012s
若所有节点的状态均为 **Running**,则说明集群部署成功;
否则,请阅读启动失败节点的运行日志,并检查对应的配置参数。
-## 6.4 停止 IoTDB 进程
+### 6.4 停止 IoTDB 进程
本小节描述如何手动关闭 IoTDB 的 ConfigNode 或 DataNode 进程。
-### 6.4.1 使用脚本停止 ConfigNode
+#### 6.4.1 使用脚本停止 ConfigNode
执行停止 ConfigNode 脚本:
@@ -349,7 +349,7 @@ It costs 0.012s
.\sbin\stop-confignode.bat
```
-### 6.4.2 使用脚本停止 DataNode
+#### 6.4.2 使用脚本停止 DataNode
执行停止 DataNode 脚本:
@@ -361,7 +361,7 @@ It costs 0.012s
.\sbin\stop-datanode.bat
```
-### 6.4.3 停止节点进程
+#### 6.4.3 停止节点进程
首先获取节点的进程号:
@@ -381,11 +381,11 @@ kill -9 <pid>
**注意:有些端口的信息需要 root 权限才能获取,在此情况下请使用 sudo**
-## 6.5 集群缩容
+### 6.5 集群缩容
本小节描述如何将 ConfigNode 或 DataNode 移出集群。
-### 6.5.1 移除 ConfigNode
+#### 6.5.1 移除 ConfigNode
在移除 ConfigNode 前,请确保移除后集群至少还有一个活跃的 ConfigNode。
在活跃的 ConfigNode 上执行 remove-confignode 脚本:
@@ -407,7 +407,7 @@ kill -9 <pid>
.\sbin\remove-confignode.bat <cn_internal_address>:<cn_internal_port>
```
-### 6.5.2 移除 DataNode
+#### 6.5.2 移除 DataNode
在移除 DataNode 前,请确保移除后集群至少还有不少于(数据/元数据)副本个数的 DataNode。
在活跃的 DataNode 上执行 remove-datanode 脚本:
@@ -429,6 +429,6 @@ kill -9 <pid>
.\sbin\remove-datanode.bat <dn_rpc_address>:<dn_rpc_port>
```
-# 7. 常见问题
+## 7. 常见问题
请参考 [分布式部署FAQ](https://iotdb.apache.org/zh/UserGuide/Master/FAQ/FAQ-for-cluster-setup.html)
\ No newline at end of file
diff --git a/docs/zh/UserGuide/Cluster/Deployment-Recommendation.md b/docs/zh/UserGuide/Cluster/Deployment-Recommendation.md
index e2523e48f6..006e74a125 100644
--- a/docs/zh/UserGuide/Cluster/Deployment-Recommendation.md
+++ b/docs/zh/UserGuide/Cluster/Deployment-Recommendation.md
@@ -19,8 +19,8 @@
-->
-# IoTDB 部署推荐
-## 背景
+## IoTDB 部署推荐
+### 背景
系统能力
- 性能需求:系统读写速度,压缩比
@@ -33,7 +33,7 @@
- D:DataNode
- aCbD:a 个 ConfigNode 和 b 个 DataNode
-## 部署模式选型
+### 部署模式选型
| 模式 | 性能 | 扩展性 | 高可用 | 一致性 |
|:------------:|:----|:----|:----|:----|
@@ -54,9 +54,9 @@
| DataRegion 协议 data_region_consensus_protocol_class | Simple | IoT | IoT | Ratis |
-## 部署配置推荐
+### 部署配置推荐
-### 从 0.13 版本升级到 1.0
+#### 从 0.13 版本升级到 1.0
场景:
已在 0.13 版本存储了部分数据,希望迁移到 1.0 版本,并且与 0.13 表现保持一致。
@@ -76,12 +76,12 @@
数据迁移:
配置修改完成后,通过 load-tsfile 工具将 0.13 的 TsFile 都加载进 1.0 的 IoTDB 中,即可使用。
-### 直接使用 1.0
+#### 直接使用 1.0
**推荐用户仅设置 1 个 Database**
-#### 内存设置方法
-##### 根据活跃序列数估计内存
+##### 内存设置方法
+###### 根据活跃序列数估计内存
集群 DataNode 总堆内内存(GB) = 活跃序列数/100000 * 数据副本数
@@ -91,7 +91,7 @@
> - 集群 DataNode 总堆内内存(GB):1,000,000 / 100,000 * 3 = 30G
> - 每台 DataNode 的堆内内存配置为:30 / 3 = 10G
-##### 根据总序列数估计内存
+###### 根据总序列数估计内存
集群 DataNode 总堆内内存 (B) = 20 * (180 + 2 * 序列的全路径的平均字符数)* 序列总量 * 元数据副本数
@@ -101,11 +101,11 @@
> - 集群 DataNode 总堆内内存:20 * (180 + 2 * 20)* 1,000,000 * 3 = 13.2 GB
> - 每台 DataNode 的堆内内存配置为:13.2 GB / 3 = 4.4 GB
-#### 磁盘估计
+##### 磁盘估计
IoTDB 存储空间=数据存储空间 + 元数据存储空间 + 临时存储空间
-##### 数据磁盘空间
+###### 数据磁盘空间
序列数量 * 采样频率 * 每个数据点大小 * 存储时长 * 副本数 / 10 倍压缩比
@@ -121,12 +121,12 @@ IoTDB 存储空间=数据存储空间 + 元数据存储空间 + 临时存储空
> * 简版:1000 * 100 * 12 * 86400 * 365 * 3 / 10 = 11T
> * 完整版:1000设备 * 100测点 * 12字节每数据点 * 86400秒每天 * 365天每年 * 3副本 / 10压缩比 = 11T
-##### 元数据磁盘空间
+###### 元数据磁盘空间
每条序列在磁盘日志文件中大约占用 序列字符数 + 20 字节。
若序列有tag描述信息,则仍需加上约 tag 总字符数字节的空间。
-##### 临时磁盘空间
+###### 临时磁盘空间
临时磁盘空间 = 写前日志 + 共识协议 + 合并临时空间
diff --git a/docs/zh/UserGuide/Data-Concept/Compression.md b/docs/zh/UserGuide/Data-Concept/Compression.md
index 188025fb8b..cfd1251dbf 100644
--- a/docs/zh/UserGuide/Data-Concept/Compression.md
+++ b/docs/zh/UserGuide/Data-Concept/Compression.md
@@ -19,11 +19,11 @@
-->
-# 压缩方式
+## 压缩方式
当时间序列写入并按照指定的类型编码为二进制数据后,IoTDB 会使用压缩技术对该数据进行压缩,进一步提升空间存储效率。虽然编码和压缩都旨在提升存储效率,但编码技术通常只适合特定的数据类型(如二阶差分编码只适合与 INT32 或者 INT64 编码,存储浮点数需要先将他们乘以 10m 以转换为整数),然后将它们转换为二进制流。压缩方式(SNAPPY)针对二进制流进行压缩,因此压缩方式的使用不再受数据类型的限制。
-## 基本压缩方式
+### 基本压缩方式
IoTDB 允许在创建一个时间序列的时候指定该列的压缩方式。现阶段 IoTDB 支持以下几种压缩方式:
@@ -34,7 +34,7 @@ IoTDB 允许在创建一个时间序列的时候指定该列的压缩方式。
压缩方式的指定语法详见本文 [SQL 参考文档](../Reference/SQL-Reference.md)。
-## 压缩比统计信息
+### 压缩比统计信息
压缩比统计信息文件:data/system/compression_ratio/Ratio-{ratio_sum}-{memtable_flush_time}
diff --git a/docs/zh/UserGuide/Data-Concept/Data-Model-and-Terminology.md b/docs/zh/UserGuide/Data-Concept/Data-Model-and-Terminology.md
index 59f313ad1b..398918bc6b 100644
--- a/docs/zh/UserGuide/Data-Concept/Data-Model-and-Terminology.md
+++ b/docs/zh/UserGuide/Data-Concept/Data-Model-and-Terminology.md
@@ -25,7 +25,7 @@
根据企业组织结构和设备实体层次结构,我们将其物联网数据模型表示为如下图所示的属性层级组织结构,即电力集团层-风电场层-实体层-物理量层。其中 ROOT 为根节点,物理量层的每一个节点为叶子节点。IoTDB 采用树形结构定义数据模式,以从 ROOT 节点到叶子节点的路径来命名一个时间序列,层次间以“.”连接。例如,下图最左侧路径对应的时间序列名称为`ROOT.ln.wf01.wt01.status`。
-<img style="width:100%; max-width:800px; max-height:600px; margin-left:auto; margin-right:auto; display:block;" src="https://user-images.githubusercontent.com/19167280/123542457-5f511d00-d77c-11eb-8006-562d83069baa.png">
+<img style="width:100%; max-width:800px; max-height:600px; margin-left:auto; margin-right:auto; display:block;" src="/img/github/123542457-5f511d00-d77c-11eb-8006-562d83069baa.png">
在上图所描述的实际场景中,有许多实体所采集的物理量相同,即具有相同的工况名称和类型,因此,可以声明一个**元数据模板**来定义可采集的物理量集合。在实践中,元数据模板的使用可帮助减少元数据的资源占用,详细内容参见 [元数据模板文档](./Schema-Template.md)。
@@ -135,6 +135,6 @@ wildcard
插入数据时,对齐的时间序列中某列的某些行允许有空值。
-<img style="width:100%; max-width:800px; max-height:600px; margin-left:auto; margin-right:auto; display:block;" src="https://user-images.githubusercontent.com/19167280/114125919-f4850800-9929-11eb-8211-81d4c04af1ec.png">
+<img style="width:100%; max-width:800px; max-height:600px; margin-left:auto; margin-right:auto; display:block;" src="/img/github/114125919-f4850800-9929-11eb-8211-81d4c04af1ec.png">
在后续数据定义语言、数据操作语言和 Java 原生接口章节,将对涉及到对齐时间序列的各种操作进行逐一介绍。
diff --git a/docs/zh/UserGuide/Data-Concept/Data-Type.md b/docs/zh/UserGuide/Data-Concept/Data-Type.md
index e451bd094e..2606181b7b 100644
--- a/docs/zh/UserGuide/Data-Concept/Data-Type.md
+++ b/docs/zh/UserGuide/Data-Concept/Data-Type.md
@@ -19,9 +19,9 @@
-->
-# 数据类型
+## 数据类型
-## 基本数据类型
+### 基本数据类型
IoTDB 支持以下六种数据类型:
@@ -32,7 +32,7 @@ IoTDB 支持以下六种数据类型:
* DOUBLE(双精度浮点数)
* TEXT(字符串)
-### 浮点数精度配置
+#### 浮点数精度配置
对于 **FLOAT** 与 **DOUBLE** 类型的序列,如果编码方式采用 [RLE](Encoding.md) 或 [TS_2DIFF](Encoding.md) ,可以在创建序列时通过 `MAX_POINT_NUMBER` 属性指定浮点数的小数点后位数。
@@ -43,7 +43,7 @@ CREATE TIMESERIES root.vehicle.d0.s0 WITH DATATYPE=FLOAT, ENCODING=RLE, 'MAX_POI
若不指定,系统会按照配置文件 `iotdb-common.properties` 中的 [float_precision](../Reference/Common-Config-Manual.md) 项配置(默认为 2 位)。
-### 数据类型兼容性
+#### 数据类型兼容性
当写入数据的类型与序列注册的数据类型不一致时,
- 如果序列数据类型不兼容写入数据类型,系统会给出错误提示。
@@ -60,11 +60,11 @@ CREATE TIMESERIES root.vehicle.d0.s0 WITH DATATYPE=FLOAT, ENCODING=RLE, 'MAX_POI
| DOUBLE | INT32 INT64 FLOAT DOUBLE |
| TEXT | TEXT |
-## 时间戳类型
+### 时间戳类型
时间戳是一个数据到来的时间点,其中包括绝对时间戳和相对时间戳。
-### 绝对时间戳
+#### 绝对时间戳
IOTDB 中绝对时间戳分为二种,一种为 LONG 类型,一种为 DATETIME 类型(包含 DATETIME-INPUT, DATETIME-DISPLAY 两个小类)。
@@ -136,7 +136,7 @@ IoTDB 在显示时间戳时可以支持 LONG 类型以及 DATETIME-DISPLAY 类
</div>
-### 相对时间戳
+#### 相对时间戳
相对时间是指与服务器时间```now()```和```DATETIME```类型时间相差一定时间间隔的时间。
形式化定义为:
diff --git a/docs/zh/UserGuide/Data-Concept/Deadband-Process.md b/docs/zh/UserGuide/Data-Concept/Deadband-Process.md
index cac24d28a5..7339e13944 100644
--- a/docs/zh/UserGuide/Data-Concept/Deadband-Process.md
+++ b/docs/zh/UserGuide/Data-Concept/Deadband-Process.md
@@ -19,9 +19,9 @@
-->
-# 死区处理
+## 死区处理
-## 旋转门压缩
+### 旋转门压缩
旋转门压缩(SDT)算法是一种死区处理算法。SDT 的计算复杂度较低,并使用线性趋势来表示大量数据。
diff --git a/docs/zh/UserGuide/Data-Concept/Encoding.md b/docs/zh/UserGuide/Data-Concept/Encoding.md
index a6194a5bd2..471b6f41d0 100644
--- a/docs/zh/UserGuide/Data-Concept/Encoding.md
+++ b/docs/zh/UserGuide/Data-Concept/Encoding.md
@@ -19,9 +19,9 @@
-->
-# 编码方式
+## 编码方式
-## 基本编码方式
+### 基本编码方式
为了提高数据的存储效率,需要在数据写入的过程中对数据进行编码,从而减少磁盘空间的使用量。在写数据以及读数据的过程中都能够减少 I/O 操作的数据量从而提高性能。IoTDB 支持多种针对不同类型的数据的编码方法:
@@ -69,7 +69,7 @@ CHIMP 是一种无损编码。它是一种新的流式浮点数据压缩算法
使用限制:如果对 INT32 类型数据使用 CHIMP 编码,需要确保数据点中没有 `Integer.MIN_VALUE`。 如果对 INT64 类型数据使用 CHIMP 编码,需要确保数据点中没有 `Long.MIN_VALUE`。
-## 数据类型与编码的对应关系
+### 数据类型与编码的对应关系
前文介绍的五种编码适用于不同的数据类型,若对应关系错误,则无法正确创建时间序列。数据类型与支持其编码的编码方式对应关系总结如下表所示。
diff --git a/docs/zh/UserGuide/Data-Concept/Schema-Template.md b/docs/zh/UserGuide/Data-Concept/Schema-Template.md
index 34a7967e35..4a845b6895 100644
--- a/docs/zh/UserGuide/Data-Concept/Schema-Template.md
+++ b/docs/zh/UserGuide/Data-Concept/Schema-Template.md
@@ -19,9 +19,9 @@
-->
-# 元数据模板
+## 元数据模板
-## 问题背景
+### 问题背景
对于大量的同类型的实体,每一个实体下的物理量都相同,为每个序列注册时间序列一方面时间序列的元数据将占用较多的内存资源,另一方面,大量序列的维护工作也会十分复杂。
@@ -29,9 +29,9 @@
下图展示了一个燃油车场景的数据模型,各地区的多台燃油车的速度、油量、加速度、角速度四个物理量将会被采集,显然这些燃油车实体具备相同的物理量。
-<img style="width:100%; max-width:800px; max-height:600px; margin-left:auto; margin-right:auto; display:block;" src="https://github.com/apache/iotdb-bin-resources/blob/main/docs/UserGuide/Data%20Concept/Measurement%20Template/example_without_template.png?raw=true" alt="example without template">
+<img style="width:100%; max-width:800px; max-height:600px; margin-left:auto; margin-right:auto; display:block;" src="/img/UserGuide/Data-Concept/Measurement-Template/example_without_template.png?raw=true" alt="example without template">
-## 概念定义
+### 概念定义
元数据模板(Schema template)
@@ -45,9 +45,9 @@
使用元数据模板后,问题背景中示例的燃油车数据模型将会转变至下图所示的形式。所有的物理量元数据仅在模板中保存一份,所有的实体共享模板中的元数据。
-<img style="width:100%; max-width:800px; max-height:600px; margin-left:auto; margin-right:auto; display:block;" src="https://github.com/apache/iotdb-bin-resources/blob/main/docs/UserGuide/Data%20Concept/Measurement%20Template/example_with_template.png?raw=true" alt="example with template">
+<img style="width:100%; max-width:800px; max-height:600px; margin-left:auto; margin-right:auto; display:block;" src="/img/UserGuide/Data-Concept/Measurement-Template/example_with_template.png?raw=true" alt="example with template">
-### 生命周期
+#### 生命周期
了解元数据的生命周期及相关名词,有助于更顺畅地使用元数据模板。在描述这一概念时,有六个关键词分别指向特定的过程,分别是“创建”、“挂载”、“激活”、“解除”、“卸载”、和“删除”。下图展示了一个模板从创建、挂到删除的全部过程。当用户操作执行其中任一过程时,系统都会执行对应条件检查,如条件检查通过,则操作成功,否则,操作会被拒绝:
@@ -60,9 +60,9 @@
最后需要补充的是,**对挂载模板与激活模板进行区分,是为了服务一种常见的场景**:在 Apache IoTDB 元数据模型 MTree 中,经常需要在数量众多的节点上“应用”元数据模板,而这些节点一般拥有共同的祖先节点。因此,可以在其共同祖先节点**挂载**模板,而不必对其大量的孩子节点进行挂载操作。对于需要“应用”模板的节点,则应该使用**激活模板**的操作。
-<img style="width:100%; max-width:800px; margin-left:auto; margin-right:auto; display:block;" src="https://github.com/apache/iotdb-bin-resources/blob/main/docs/UserGuide/Data%20Concept/Measurement%20Template/example_template_lifetime_zh.png?raw=true" alt="example with template">
+<img style="width:100%; max-width:800px; margin-left:auto; margin-right:auto; display:block;" src="/img/UserGuide/Data-Concept/Measurement-Template/example_template_lifetime_zh.png?raw=true" alt="example with template">
-## 使用
+### 使用
目前,用户可以通过 Session 编程接口或 IoTDB-SQL 来使用元数据模板,包括模板的创建、修改、挂载与卸载等。Session 编程接口的详细文档可参见[此处](../API/Programming-Java-Native-API.md),IoTDB-SQL 的详细文档可参加[此处](../Operate-Metadata/Template.md)。下文将以 Session 中使用方法为例,进行简要介绍。
diff --git a/docs/zh/UserGuide/Data-Concept/Time-Partition.md b/docs/zh/UserGuide/Data-Concept/Time-Partition.md
index b2f65b06bf..cfa12cc8ee 100644
--- a/docs/zh/UserGuide/Data-Concept/Time-Partition.md
+++ b/docs/zh/UserGuide/Data-Concept/Time-Partition.md
@@ -19,9 +19,9 @@
-->
-# 时间分区
+## 时间分区
-## 主要功能
+### 主要功能
时间分区按照时间分割数据,一个时间分区用于保存某个时间范围内的所有数据。时间分区编号使用自然数表示,0 表示 1970 年 1 月 1 日,每隔 partition_interval 毫秒后加一。数据通过计算 timestamp / partition_interval 得到自己所在的时间分区编号,主要配置项如下所示:
@@ -34,17 +34,17 @@
|默认值| 604800000 |
|改后生效方式| 仅允许在第一次启动服务前修改 |
-## 配置示例
+### 配置示例
开启时间分区功能,并设置 partition_interval 为 86400000(一天),则数据的分布情况如下图所示:
-<img style="width:100%; max-width:800px; max-height:600px; margin-left:auto; margin-right:auto; display:block;" src="https://github.com/apache/iotdb-bin-resources/blob/main/docs/UserGuide/Data%20Concept/Time-Partition/time_partition_example.png?raw=true" alt="time partition example">
+<img style="width:100%; max-width:800px; max-height:600px; margin-left:auto; margin-right:auto; display:block;" src="/img/UserGuide/Data-Concept/Time-Partition/time_partition_example.png?raw=true" alt="time partition example">
* 插入一条时间戳为 0 的数据,计算 0 / 86400000 = 0,则该数据会被存储到 0 号文件夹下的TsFile中
* 插入一条时间戳为 1609459200010 的数据,计算 1609459200010 / 86400000 = 18628,则该数据会被存储到 18628 号文件夹下的TsFile中
-## 使用建议
+### 使用建议
使用时间分区功能时,建议同时打开 Memtable 的定时刷盘功能,共 6 个相关配置参数(详情见 [timed_flush配置项](../Reference/DataNode-Config-Manual.md))。
diff --git a/docs/zh/UserGuide/Data-Concept/Time-zone.md b/docs/zh/UserGuide/Data-Concept/Time-zone.md
index f6280a63d2..f6fb14a61b 100644
--- a/docs/zh/UserGuide/Data-Concept/Time-zone.md
+++ b/docs/zh/UserGuide/Data-Concept/Time-zone.md
@@ -19,7 +19,7 @@
-->
-# 时区
+## 时区
客户端连接 IoTDB 服务器时,可以指定该连接所要使用的时区。如果未指定,则**默认以客户端所在的时区作为连接的时区。**
@@ -51,7 +51,7 @@ CLI 中的方法为:
SHOW time_zone
```
-## 时区使用场景
+### 时区使用场景
IoTDB 服务器只针对时间戳进行存储和处理,时区只用来与客户端进行交互,具体场景如下:
diff --git a/docs/zh/UserGuide/Data-Modeling/DataRegion.md b/docs/zh/UserGuide/Data-Modeling/DataRegion.md
index 993c3a342b..db47f121fc 100644
--- a/docs/zh/UserGuide/Data-Modeling/DataRegion.md
+++ b/docs/zh/UserGuide/Data-Modeling/DataRegion.md
@@ -19,28 +19,28 @@
-->
-# 背景
+## 背景
Database 由用户显示指定,使用语句"CREATE DATABASE"来指定 database,每一个 database 有多个对应的 data region
为了确保最终一致性,每一个 data region 有一个数据插入锁(排它锁)来同步每一次插入操作。
所以服务端数据写入的并行度为 data region的数量。
-# 问题
+## 问题
从背景中可知,IoTDB数据写入的并行度为 max(客户端数量,服务端数据写入的并行度),也就是max(客户端数量,data region 数量)
在生产实践中,存储组的概念往往与特定真实世界实体相关(例如工厂,地点,国家等)。
因此存储组的数量可能会比较小,这会导致IoTDB写入并行度不足。即使我们开再多的客户端写入线程,也无法走出这种困境。
-# 解决方案
+## 解决方案
我们的方案是将一个存储组下的设备分为若干个设备组(称为 data region),将同步粒度从存储组级别改为 data region 粒度。
更具体的,我们使用哈希将设备分到不同的 data region 下,例如:
对于一个名为"root.sg.d"的设备(假设其存储组为"root.sg"),它属于的 data region 为"root.sg.[hash("root.sg.d") mod num_of_data_region]"
-# 使用方法
+## 使用方法
通过改变如下配置来设置每一个 database 下 data region 的数量:
diff --git a/docs/zh/UserGuide/Data-Modeling/SchemaRegion-rocksdb.md b/docs/zh/UserGuide/Data-Modeling/SchemaRegion-rocksdb.md
index 8a267f237c..046132c5a3 100644
--- a/docs/zh/UserGuide/Data-Modeling/SchemaRegion-rocksdb.md
+++ b/docs/zh/UserGuide/Data-Modeling/SchemaRegion-rocksdb.md
@@ -19,11 +19,11 @@
-->
-# 背景
+## 背景
在IoTDB服务启动时,通过加载日志文件`mlog.bin`组织元数据信息,并将结果长期持有在内存中;随着元数据的不断增长,内存会持续上涨;为支持海量元数据场景下,内存在可控范围内波动,我们提供了基于rocksDB的元数据存储方式。
-# 使用
+## 使用
首先使用下面的命令将 `schema-engine-rocksdb` 打包
@@ -47,7 +47,7 @@ schema_engine_mode=Rocksdb_based
当指定rocksdb作为元数据的存储方式时,我们开放了rocksdb相关的配置参数,您可以通过修改配置文件`schema-rocksdb.properties`,根据自己的需求,进行合理的参数调整,例如查询的缓存等。如没有特殊需求,使用默认值即可。
-# 功能支持说明
+## 功能支持说明
该模块仍在不断完善中,部分功能暂不支持,功能模块支持情况如下:
@@ -63,7 +63,7 @@ schema_engine_mode=Rocksdb_based
| continuous query | 不支持 |
-# 附: 所有接口支持情况
+## 附: 所有接口支持情况
外部接口,即客户端可以感知到,相关sql不支持;
diff --git a/docs/zh/UserGuide/Delete-Data/TTL.md b/docs/zh/UserGuide/Delete-Data/TTL.md
index 64da492e4f..06c20cf54d 100644
--- a/docs/zh/UserGuide/Delete-Data/TTL.md
+++ b/docs/zh/UserGuide/Delete-Data/TTL.md
@@ -19,7 +19,7 @@
-->
-# 数据存活时间(TTL)
+## 数据存活时间(TTL)
IoTDB 支持对 database 级别设置数据存活时间(TTL),这使得 IoTDB 可以定期、自动地删除一定时间之前的数据。合理使用 TTL
可以帮助您控制 IoTDB 占用的总磁盘空间以避免出现磁盘写满等异常。并且,随着文件数量的增多,查询性能往往随之下降,
@@ -27,7 +27,7 @@ IoTDB 支持对 database 级别设置数据存活时间(TTL),这使得 IoT
TTL的默认单位为毫秒,如果配置文件中的时间精度修改为其他单位,设置ttl时仍然使用毫秒单位。
-## 设置 TTL
+### 设置 TTL
设置 TTL 的 SQL 语句如下所示:
```
@@ -43,7 +43,7 @@ IoTDB> set ttl to root.** 3600000
```
表示给所有 database 设置TTL。
-## 取消 TTL
+### 取消 TTL
取消 TTL 的 SQL 语句如下所示:
@@ -63,7 +63,7 @@ IoTDB> unset ttl to root.**
取消设置所有 database 的 TTL 。
-## 显示 TTL
+### 显示 TTL
显示 TTL 的 SQL 语句如下所示:
diff --git a/docs/zh/UserGuide/Ecosystem-Integration/DBeaver.md b/docs/zh/UserGuide/Ecosystem-Integration/DBeaver.md
index 26b198dd47..65cd7799a9 100644
--- a/docs/zh/UserGuide/Ecosystem-Integration/DBeaver.md
+++ b/docs/zh/UserGuide/Ecosystem-Integration/DBeaver.md
@@ -46,10 +46,10 @@ DBeaver 是一个 SQL 客户端和数据库管理工具。DBeaver 可以使用 I
3. 打开 Driver Manager
- 
+ 
4. 为 IoTDB 新建一个驱动类型
- 
+ 
5. 下载[源代码](https://iotdb.apache.org/zh/Download/),解压并运行下面的命令编译 jdbc 驱动
@@ -58,15 +58,15 @@ DBeaver 是一个 SQL 客户端和数据库管理工具。DBeaver 可以使用 I
```
7. 在`jdbc/target/`下找到并添加名为`apache-iotdb-jdbc-{version}-jar-with-dependencies.jar`的库,点击 `Find Class`。
- 
+ 
8. 编辑驱动设置
- 
+ 
9. 新建 DataBase Connection, 选择 iotdb
- 
+ 
10. 编辑 JDBC 连接设置
@@ -75,12 +75,12 @@ DBeaver 是一个 SQL 客户端和数据库管理工具。DBeaver 可以使用 I
Username: root
Password: root
```
- 
+ 
11. 测试连接
- 
+ 
12. 可以开始通过 DBeaver 使用 IoTDB
- 
+ 
diff --git a/docs/zh/UserGuide/Ecosystem-Integration/Grafana-Connector.md b/docs/zh/UserGuide/Ecosystem-Integration/Grafana-Connector.md
index 3b60f231b2..c18f9d6d85 100644
--- a/docs/zh/UserGuide/Ecosystem-Integration/Grafana-Connector.md
+++ b/docs/zh/UserGuide/Ecosystem-Integration/Grafana-Connector.md
@@ -131,16 +131,16 @@ Grafana 以网页的 dashboard 形式为您展示数据,在使用时请您打
#### 添加 IoTDB 数据源
点击左上角的“Grafana”图标,选择`Data Source`选项,然后再点击`Add data source`。
-<img style="width:100%; max-width:800px; max-height:600px; margin-left:auto; margin-right:auto; display:block;" src="https://user-images.githubusercontent.com/13203019/51664777-2766ae00-1ff5-11e9-9d2f-7489f8ccbfc2.png">
+<img style="width:100%; max-width:800px; max-height:600px; margin-left:auto; margin-right:auto; display:block;" src="/img/github/51664777-2766ae00-1ff5-11e9-9d2f-7489f8ccbfc2.png">
在编辑数据源的时候,`Type`一栏选择`Simplejson`,`URL`一栏填写 http://\<ip\>:\<port\>,IP 为您的 IoTDB-Grafana-Connector 连接器所在的服务器 IP,Port 为运行端口(默认 8888)。之后确保 IoTDB 已经启动,点击“Save & Test”,出现“Data Source is working”提示表示配置成功。
-<img style="width:100%; max-width:800px; max-height:600px; margin-left:auto; margin-right:auto; display:block;" src="https://user-images.githubusercontent.com/13203019/51664842-554bf280-1ff5-11e9-97d2-54eebe0b2ca1.png">
+<img style="width:100%; max-width:800px; max-height:600px; margin-left:auto; margin-right:auto; display:block;" src="/img/github/51664842-554bf280-1ff5-11e9-97d2-54eebe0b2ca1.png">
#### 操作 Grafana
进入 Grafana 可视化页面后,可以选择添加时间序列,如下图。您也可以按照 Grafana 官方文档进行相应的操作,详情可参看 Grafana 官方文档:http://docs.grafana.org/guides/getting_started/。
-<img style="width:100%; max-width:800px; max-height:600px; margin-left:auto; margin-right:auto; display:block;" src="https://user-images.githubusercontent.com/13203019/51664878-6e54a380-1ff5-11e9-9718-4d0e24627fa8.png">
+<img style="width:100%; max-width:800px; max-height:600px; margin-left:auto; margin-right:auto; display:block;" src="/img/github/51664878-6e54a380-1ff5-11e9-9718-4d0e24627fa8.png">
### 配置 grafana
diff --git a/docs/zh/UserGuide/Ecosystem-Integration/Grafana-Plugin.md b/docs/zh/UserGuide/Ecosystem-Integration/Grafana-Plugin.md
index c816dc35f1..a9edfa7ede 100644
--- a/docs/zh/UserGuide/Ecosystem-Integration/Grafana-Plugin.md
+++ b/docs/zh/UserGuide/Ecosystem-Integration/Grafana-Plugin.md
@@ -19,11 +19,11 @@
-->
-# 系统集成
+## 系统集成
-## Grafana 插件
+### Grafana 插件
Grafana 是开源的指标量监测和可视化工具,可用于展示时序数据和应用程序运行分析。
@@ -31,20 +31,20 @@ Grafana 是开源的指标量监测和可视化工具,可用于展示时序数
-### 部署 Grafana 插件
+#### 部署 Grafana 插件
-#### 安装 Grafana
+##### 安装 Grafana
* Grafana 组件下载地址:https://grafana.com/grafana/download
* 版本 >= 7.0.0
-#### grafana-plugin 获取
+##### grafana-plugin 获取
-##### 方案一 grafana-plugin 下载
+###### 方案一 grafana-plugin 下载
二进制文件下载地址:https://iotdb.apache.org/zh/Download/
-##### 方案二 grafana-plugin 单独编译
+###### 方案二 grafana-plugin 单独编译
我们需要编译 IoTDB 仓库 `grafana-plugin` 目录下的前端工程并生成 `dist` 目标目录,具体执行流程如下。
@@ -83,9 +83,9 @@ go get: module github.com/grafana/grafana-plugin-sdk-go: Get "https://proxy.gola
如果编译成功,我们将看到生成的目标文件夹 `dist`,它包含了编译好的 Grafana 前端插件:
-<img style="width:100%; max-width:333px; max-height:545px; margin-left:auto; margin-right:auto; display:block;" src="https://github.com/apache/iotdb-bin-resources/blob/main/docs/UserGuide/Ecosystem%20Integration/Grafana-plugin/grafana-plugin-build.png?raw=true">
+<img style="width:100%; max-width:333px; max-height:545px; margin-left:auto; margin-right:auto; display:block;" src="/img/UserGuide/Ecosystem-Integration/Grafana-plugin/grafana-plugin-build.png?raw=true">
-##### 方案三 IoTDB 的分发包完整编译
+###### 方案三 IoTDB 的分发包完整编译
我们也可以通过执行 IoTDB 项目的**打包指令**获取 `grafana-plugin ` 的前端工程和其他配套的 IoTDB 可执行文件。
@@ -108,11 +108,11 @@ git clone https://github.com/apache/iotdb.git
如果编译成功,我们将看到 `distribution/target` 路径下包含了编译好的 Grafana 前端插件:
-<img style="width:100%; max-width:333px; max-height:545px; margin-left:auto; margin-right:auto; display:block;" src="https://github.com/apache/iotdb-bin-resources/blob/main/docs/UserGuide/Ecosystem%20Integration/Grafana-plugin/distribution.png?raw=true">
+<img style="width:100%; max-width:333px; max-height:545px; margin-left:auto; margin-right:auto; display:block;" src="/img/UserGuide/Ecosystem-Integration/Grafana-plugin/distribution.png?raw=true">
-#### grafana-plugin 插件安装
+##### grafana-plugin 插件安装
* 拷贝上述生成的前端工程目标文件夹到 Grafana 的插件目录中 `${Grafana文件目录}\data\plugins\`。如果没有此目录可以手动建或者启动grafana会自动建立,当然也可以修改plugins的位置,具体请查看下面的修改Grafana 的插件目录位置说明。
@@ -131,7 +131,7 @@ git clone https://github.com/apache/iotdb.git
更多详情,请点 [这里](https://grafana.com/docs/grafana/latest/plugins/installation/)
-#### 启动 Grafana
+##### 启动 Grafana
进入 Grafana 的安装目录,使用以下命令启动 Grafana:
* Windows 系统:
@@ -153,7 +153,7 @@ brew services start grafana
-#### 配置 IoTDB REST 服务
+##### 配置 IoTDB REST 服务
进入 `{iotdb 目录}/conf`,打开 `iotdb-common.properties` 文件,并作如下修改:
@@ -169,9 +169,9 @@ rest_service_port=18080
-### 使用 Grafana 插件
+#### 使用 Grafana 插件
-#### 访问 Grafana dashboard
+##### 访问 Grafana dashboard
Grafana 以网页的 dashboard 形式为您展示数据,在使用时请您打开浏览器,访问 `http://<ip>:<port>`。
@@ -183,13 +183,13 @@ Grafana 以网页的 dashboard 形式为您展示数据,在使用时请您打
-#### 添加 IoTDB 数据源
+##### 添加 IoTDB 数据源
点击左侧的 `设置` 图标,选择 `Data Source` 选项,然后再点击 `Add data source`。
-<img style="width:100%; max-width:800px; max-height:600px; margin-left:auto; margin-right:auto; display:block;" src="https://github.com/apache/iotdb-bin-resources/blob/main/docs/UserGuide/Ecosystem%20Integration/Grafana-plugin/datasource_1.png?raw=true">
+<img style="width:100%; max-width:800px; max-height:600px; margin-left:auto; margin-right:auto; display:block;" src="/img/UserGuide/Ecosystem-Integration/Grafana-plugin/datasource_1.png?raw=true">
-<img style="width:100%; max-width:800px; max-height:600px; margin-left:auto; margin-right:auto; display:block;" src="https://github.com/apache/iotdb-bin-resources/blob/main/docs/UserGuide/Ecosystem%20Integration/Grafana-plugin/datasource_2.png?raw=true">
+<img style="width:100%; max-width:800px; max-height:600px; margin-left:auto; margin-right:auto; display:block;" src="/img/UserGuide/Ecosystem-Integration/Grafana-plugin/datasource_2.png?raw=true">
选择 `Apache IoTDB` 数据源,`URL` 一栏填写 `http://<ip>:<port>`。
@@ -197,31 +197,31 @@ Ip 为您的 IoTDB 服务器所在的宿主机 IP,port 为 REST 服务的运
输入 IoTDB 服务器的 username 和 password,点击 `Save & Test`,出现 `Success` 则提示配置成功。
-<img style="width:100%; max-width:800px; max-height:600px; margin-left:auto; margin-right:auto; display:block;" src="https://github.com/apache/iotdb-bin-resources/blob/main/docs/UserGuide/Ecosystem%20Integration/Grafana-plugin/datasource_3.png?raw=true">
+<img style="width:100%; max-width:800px; max-height:600px; margin-left:auto; margin-right:auto; display:block;" src="/img/UserGuide/Ecosystem-Integration/Grafana-plugin/datasource_3.png?raw=true">
-#### 创建一个新的 Panel
+##### 创建一个新的 Panel
点击左侧的 `Dashboards` 图标,选择 `Manage`,如下图所示:
-<img style="width:100%; max-width:800px; max-height:600px; margin-left:auto; margin-right:auto; display:block;" src="https://github.com/apache/iotdb-bin-resources/blob/main/docs/UserGuide/Ecosystem%20Integration/Grafana-plugin/manage.png?raw=true">
+<img style="width:100%; max-width:800px; max-height:600px; margin-left:auto; margin-right:auto; display:block;" src="/img/UserGuide/Ecosystem-Integration/Grafana-plugin/manage.png?raw=true">
点击右上方的 `New Dashboard` 图标,选择 `Add an empty panel`,如下图所示:
-<img style="width:100%; max-width:800px; max-height:600px; margin-left:auto; margin-right:auto; display:block;" src="https://github.com/apache/iotdb-bin-resources/blob/main/docs/UserGuide/Ecosystem%20Integration/Grafana-plugin/add%20empty%20panel.png?raw=true">
+<img style="width:100%; max-width:800px; max-height:600px; margin-left:auto; margin-right:auto; display:block;" src="/img/UserGuide/Ecosystem-Integration/Grafana-plugin/add-empty-panel.png?raw=true">
Grafana Plugin 支持SQL: Full Customized和SQL: Drop-down List 两种方式,默认是SQL: Full Customized方式。
-<img style="width:100%; max-width:800px; max-height:600px; margin-left:auto; margin-right:auto; display:block;" src="https://github.com/apache/iotdb-bin-resources/blob/main/docs/UserGuide/Ecosystem%20Integration/Grafana-plugin/grafana_input_style.png?raw=true">
+<img style="width:100%; max-width:800px; max-height:600px; margin-left:auto; margin-right:auto; display:block;" src="/img/UserGuide/Ecosystem-Integration/Grafana-plugin/grafana_input_style.png?raw=true">
-##### SQL: Full Customized 输入方式
+###### SQL: Full Customized 输入方式
在 SELECT 输入框、FROM 输入框、WHERE输入框、CONTROL输入框中输入内容,其中 WHERE 和 CONTROL 输入框为非必填。
如果一个查询涉及多个表达式,我们可以点击 SELECT 输入框右侧的 `+` 来添加 SELECT 子句中的表达式,也可以点击 FROM 输入框右侧的 `+` 来添加路径前缀,如下图所示:
-<img style="width:100%; max-width:800px; max-height:600px; margin-left:auto; margin-right:auto; display:block;" src="https://github.com/apache/iotdb-bin-resources/blob/main/docs/UserGuide/Ecosystem%20Integration/Grafana-plugin/grafana_input.png?raw=true">
+<img style="width:100%; max-width:800px; max-height:600px; margin-left:auto; margin-right:auto; display:block;" src="/img/UserGuide/Ecosystem-Integration/Grafana-plugin/grafana_input.png?raw=true">
SELECT 输入框中的内容可以是时间序列的后缀,可以是函数或自定义函数,可以是算数表达式,也可以是它们的嵌套表达式。您还可以使用 as 子句来重命名需要显示的结果序列名字。
@@ -251,43 +251,43 @@ CONTROL 输入框为非必须填写项目,填写内容应当是控制查询类
提示:为了避免OOM问题,不推荐使用select * from root.xx.** 这种语句在Grafana plugin中使用。
-##### SQL: Drop-down List 输入方式
+###### SQL: Drop-down List 输入方式
在 TIME-SERIES 选择框中选择一条时间序列、FUNCTION 选择一个函数、SAMPLING INTERVAL、SLIDING STEP、LEVEL、FILL 输入框中输入内容,其中 TIME-SERIESL 为必填项其余为非必填项。
-<img style="width:100%; max-width:800px; max-height:600px; margin-left:auto; margin-right:auto; display:block;" src="https://github.com/apache/iotdb-bin-resources/blob/main/docs/UserGuide/Ecosystem%20Integration/Grafana-plugin/grafana_input2.png?raw=true">
+<img style="width:100%; max-width:800px; max-height:600px; margin-left:auto; margin-right:auto; display:block;" src="/img/UserGuide/Ecosystem-Integration/Grafana-plugin/grafana_input2.png?raw=true">
-#### 变量与模板功能的支持
+##### 变量与模板功能的支持
SQL: Full Customized和SQL: Drop-down List两种输入方式都支持 Grafana 的变量与模板功能,下面示例中使用SQL: Full Customized输入方式,SQL: Drop-down List与之类似。
创建一个新的 Panel 后,点击右上角的设置按钮,如下图所示:
-<img style="width:100%; max-width:800px; max-height:600px; margin-left:auto; margin-right:auto; display:block;" src="https://github.com/apache/iotdb-bin-resources/blob/main/docs/UserGuide/Ecosystem%20Integration/Grafana-plugin/setconf.png?raw=true">
+<img style="width:100%; max-width:800px; max-height:600px; margin-left:auto; margin-right:auto; display:block;" src="/img/UserGuide/Ecosystem-Integration/Grafana-plugin/setconf.png?raw=true">
选择 `Variables`,点击 `Add variable` ,如下图所示:
-<img style="width:100%; max-width:800px; max-height:600px; margin-left:auto; margin-right:auto; display:block;" src="https://github.com/apache/iotdb-bin-resources/blob/main/docs/UserGuide/Ecosystem%20Integration/Grafana-plugin/addvaribles.png?raw=true">
+<img style="width:100%; max-width:800px; max-height:600px; margin-left:auto; margin-right:auto; display:block;" src="/img/UserGuide/Ecosystem-Integration/Grafana-plugin/addvaribles.png?raw=true">
示例一:输入 `Name`,`Label`,选择Type的`Query`、在Query 中输入show child paths xx , 点击 `Update` 按钮,如下图所示:
-<img style="width:100%; max-width:800px; max-height:600px; margin-left:auto; margin-right:auto; display:block;" src="https://github.com/apache/iotdb-bin-resources/blob/main/docs/UserGuide/Ecosystem%20Integration/Grafana-plugin/variblesinput.png?raw=true">
+<img style="width:100%; max-width:800px; max-height:600px; margin-left:auto; margin-right:auto; display:block;" src="/img/UserGuide/Ecosystem-Integration/Grafana-plugin/variblesinput.png?raw=true">
应用 Variables,在 `grafana panel` 中输入变量点击 `save` 按钮,如下图所示
-<img style="width:100%; max-width:800px; max-height:600px; margin-left:auto; margin-right:auto; display:block;" src="https://github.com/apache/iotdb-bin-resources/blob/main/docs/UserGuide/Ecosystem%20Integration/Grafana-plugin/applyvariables.png?raw=true">
+<img style="width:100%; max-width:800px; max-height:600px; margin-left:auto; margin-right:auto; display:block;" src="/img/UserGuide/Ecosystem-Integration/Grafana-plugin/applyvariables.png?raw=true">
示例二:变量嵌套使用,如下图所示
-<img style="width:100%; max-width:800px; max-height:600px; margin-left:auto; margin-right:auto; display:block;" src="https://github.com/apache/iotdb-bin-resources/blob/main/docs/UserGuide/Ecosystem%20Integration/Grafana-plugin/variblesinput2.png?raw=true">
+<img style="width:100%; max-width:800px; max-height:600px; margin-left:auto; margin-right:auto; display:block;" src="/img/UserGuide/Ecosystem-Integration/Grafana-plugin/variblesinput2.png?raw=true">
-<img style="width:100%; max-width:800px; max-height:600px; margin-left:auto; margin-right:auto; display:block;" src="https://github.com/apache/iotdb-bin-resources/blob/main/docs/UserGuide/Ecosystem%20Integration/Grafana-plugin/variblesinput2-1.png?raw=true">
+<img style="width:100%; max-width:800px; max-height:600px; margin-left:auto; margin-right:auto; display:block;" src="/img/UserGuide/Ecosystem-Integration/Grafana-plugin/variblesinput2-1.png?raw=true">
-<img style="width:100%; max-width:800px; max-height:600px; margin-left:auto; margin-right:auto; display:block;" src="https://github.com/apache/iotdb-bin-resources/blob/main/docs/UserGuide/Ecosystem%20Integration/Grafana-plugin/variblesinput2-2.png?raw=true">
+<img style="width:100%; max-width:800px; max-height:600px; margin-left:auto; margin-right:auto; display:block;" src="/img/UserGuide/Ecosystem-Integration/Grafana-plugin/variblesinput2-2.png?raw=true">
示例三:函数变量使用,如下图所示
-<img style="width:100%; max-width:800px; max-height:600px; margin-left:auto; margin-right:auto; display:block;" src="https://github.com/apache/iotdb-bin-resources/blob/main/docs/UserGuide/Ecosystem%20Integration/Grafana-plugin/variablesinput3.png?raw=true">
+<img style="width:100%; max-width:800px; max-height:600px; margin-left:auto; margin-right:auto; display:block;" src="/img/UserGuide/Ecosystem-Integration/Grafana-plugin/variablesinput3.png?raw=true">
-<img style="width:100%; max-width:800px; max-height:600px; margin-left:auto; margin-right:auto; display:block;" src="https://github.com/apache/iotdb-bin-resources/blob/main/docs/UserGuide/Ecosystem%20Integration/Grafana-plugin/variablesinput3-1.png?raw=true">
+<img style="width:100%; max-width:800px; max-height:600px; margin-left:auto; margin-right:auto; display:block;" src="/img/UserGuide/Ecosystem-Integration/Grafana-plugin/variablesinput3-1.png?raw=true">
上图中Name 是变量名称也是将来我们在panel中使用的变量名称,Label是变量的展示名称如果为空就显示Name的变量反之则显示Label的名称,
Type下拉中有Query、Custom、Text box、Constant、DataSource、Interval、Ad hoc filters等这些都可以在IoTDB的Grafana Plugin 中使用
@@ -304,34 +304,34 @@ Type下拉中有Query、Custom、Text box、Constant、DataSource、Interval、A
* 提示:如果查询的字段中有布尔类型的数据,会将true转化成1,false转化成0结果值进行显示。
-#### 告警功能
+##### 告警功能
本插件支持 Grafana alert功能。
1、在 Grafana 侧栏中,将光标悬停在`Alerting`图标上,然后单击`Notification channels`。
-<img style="width:100%; max-width:800px; max-height:600px; margin-left:auto; margin-right:auto; display:block;" src="https://github.com/apache/iotdb-bin-resources/blob/main/docs/UserGuide/Ecosystem%20Integration/Grafana-plugin/alerting1.png?raw=true">
+<img style="width:100%; max-width:800px; max-height:600px; margin-left:auto; margin-right:auto; display:block;" src="/img/UserGuide/Ecosystem-Integration/Grafana-plugin/alerting1.png?raw=true">
2、单击添加频道。
-<img style="width:100%; max-width:800px; max-height:600px; margin-left:auto; margin-right:auto; display:block;" src="https://github.com/apache/iotdb-bin-resources/blob/main/docs/UserGuide/Ecosystem%20Integration/Grafana-plugin/alerting2.png?raw=true">
+<img style="width:100%; max-width:800px; max-height:600px; margin-left:auto; margin-right:auto; display:block;" src="/img/UserGuide/Ecosystem-Integration/Grafana-plugin/alerting2.png?raw=true">
3、填写下面描述的字段或选择选项,Type有好多种类型包括DingDing、Email、Slack、WebHook、Prometheus Alertmanager等。
本次示例Type使用`Prometheus Alertmanager`,需要提前安装好Prometheus Alertmanager,更多详细的配置及参数介绍请参考官方文档:https://grafana.com/docs/grafana/v8.0/alerting/old-alerting/notifications/。
-<img style="width:100%; max-width:800px; max-height:600px; margin-left:auto; margin-right:auto; display:block;" src="https://github.com/apache/iotdb-bin-resources/blob/main/docs/UserGuide/Ecosystem%20Integration/Grafana-plugin/alerting3.png?raw=true">
+<img style="width:100%; max-width:800px; max-height:600px; margin-left:auto; margin-right:auto; display:block;" src="/img/UserGuide/Ecosystem-Integration/Grafana-plugin/alerting3.png?raw=true">
4、点击`Test`按钮,出现`Test notification sent`点击`Save`按钮保存
-<img style="width:100%; max-width:800px; max-height:600px; margin-left:auto; margin-right:auto; display:block;" src="https://github.com/apache/iotdb-bin-resources/blob/main/docs/UserGuide/Ecosystem%20Integration/Grafana-plugin/alerting4.png?raw=true">
+<img style="width:100%; max-width:800px; max-height:600px; margin-left:auto; margin-right:auto; display:block;" src="/img/UserGuide/Ecosystem-Integration/Grafana-plugin/alerting4.png?raw=true">
5、创建一个新的 Panel 后,输入查询参数后点击保存然后选择`Alert`点击`Create Alert`,如下图所示:
-<img style="width:100%; max-width:800px; max-height:600px; margin-left:auto; margin-right:auto; display:block;" src="https://github.com/apache/iotdb-bin-resources/blob/main/docs/UserGuide/Ecosystem%20Integration/Grafana-plugin/alertpanle1.png?raw=true">
+<img style="width:100%; max-width:800px; max-height:600px; margin-left:auto; margin-right:auto; display:block;" src="/img/UserGuide/Ecosystem-Integration/Grafana-plugin/alertpanle1.png?raw=true">
6、填写下面描述的字段或选择选项, 其中`Name`是规则名称,`Evaluate every` 指定调度程序评估警报规则的频率,称为评估间隔,
`FOR` 指定在触发警报通知之前查询需要在多长时间内违反配置的阈值。`Conditions` 表示查询条件,可以配置多个组合查询条件。
-<img style="width:100%; max-width:800px; max-height:600px; margin-left:auto; margin-right:auto; display:block;" src="https://github.com/apache/iotdb-bin-resources/blob/main/docs/UserGuide/Ecosystem%20Integration/Grafana-plugin/alertpanle2.jpg?raw=true">
+<img style="width:100%; max-width:800px; max-height:600px; margin-left:auto; margin-right:auto; display:block;" src="/img/UserGuide/Ecosystem-Integration/Grafana-plugin/alertpanle2.jpg?raw=true">
图中的查询条件:avg() OF query(A,5m,now) IS ABOVE -1
@@ -346,21 +346,21 @@ IS ABOVE -1 定义阈值的类型和阈值。IS ABOVE表示在-1之上,可以
7、点击`Test rule` 按钮出现`firing: true`则配置成功,点击`save` 按钮
-<img style="width:100%; max-width:800px; max-height:600px; margin-left:auto; margin-right:auto; display:block;" src="https://github.com/apache/iotdb-bin-resources/blob/main/docs/UserGuide/Ecosystem%20Integration/Grafana-plugin/alertpanel3.png?raw=true">
+<img style="width:100%; max-width:800px; max-height:600px; margin-left:auto; margin-right:auto; display:block;" src="/img/UserGuide/Ecosystem-Integration/Grafana-plugin/alertpanel3.png?raw=true">
8、下图为grafana panel 中显示告警
-<img style="width:100%; max-width:800px; max-height:600px; margin-left:auto; margin-right:auto; display:block;" src="https://github.com/apache/iotdb-bin-resources/blob/main/docs/UserGuide/Ecosystem%20Integration/Grafana-plugin/alertpanel4.png?raw=true">
+<img style="width:100%; max-width:800px; max-height:600px; margin-left:auto; margin-right:auto; display:block;" src="/img/UserGuide/Ecosystem-Integration/Grafana-plugin/alertpanel4.png?raw=true">
9、查看告警规则
-<img style="width:100%; max-width:800px; max-height:600px; margin-left:auto; margin-right:auto; display:block;" src="https://github.com/apache/iotdb-bin-resources/blob/main/docs/UserGuide/Ecosystem%20Integration/Grafana-plugin/alertPanel5.png?raw=true">
+<img style="width:100%; max-width:800px; max-height:600px; margin-left:auto; margin-right:auto; display:block;" src="/img/UserGuide/Ecosystem-Integration/Grafana-plugin/alertPanel5.png?raw=true">
10、在promehthus alertmanager 中查看告警记录
-<img style="width:100%; max-width:800px; max-height:600px; margin-left:auto; margin-right:auto; display:block;" src="https://github.com/apache/iotdb-bin-resources/blob/main/docs/UserGuide/Ecosystem%20Integration/Grafana-plugin/alertpanel6.png?raw=true">
+<img style="width:100%; max-width:800px; max-height:600px; margin-left:auto; margin-right:auto; display:block;" src="/img/UserGuide/Ecosystem-Integration/Grafana-plugin/alertpanel6.png?raw=true">
-### 更多
+#### 更多
更多关于 Grafana 操作详情可参看 Grafana 官方文档:http://docs.grafana.org/guides/getting_started/。
diff --git a/docs/zh/UserGuide/Ecosystem-Integration/NiFi-IoTDB.md b/docs/zh/UserGuide/Ecosystem-Integration/NiFi-IoTDB.md
index 187a3ea034..f51d2aba94 100644
--- a/docs/zh/UserGuide/Ecosystem-Integration/NiFi-IoTDB.md
+++ b/docs/zh/UserGuide/Ecosystem-Integration/NiFi-IoTDB.md
@@ -18,9 +18,9 @@
under the License.
-->
-# nifi-iotdb-bundle
+## nifi-iotdb-bundle
-## Apache NiFi简介
+### Apache NiFi简介
Apache NiFi 是一个易用的、功能强大的、可靠的数据处理和分发系统。
@@ -46,11 +46,11 @@ Apache NiFi 包含以下功能:
* 多租户授权和策略管理
* 包括TLS和SSH的加密通信的标准协议
-## PutIoTDBRecord
+### PutIoTDBRecord
这是一个用于数据写入的处理器。它使用配置的 Record Reader 将传入 FlowFile 的内容读取为单独的记录,并使用本机接口将它们写入 Apache IoTDB。
-### PutIoTDBRecord的配置项
+#### PutIoTDBRecord的配置项
| 配置项 | 描述 | 默认值 | 是否必填 |
| ------------- |---------------------------------------------------------------------------------------------------------------------------------------------------------------| ------ | -------- |
@@ -65,7 +65,7 @@ Apache NiFi 包含以下功能:
| Aligned | 是否使用 aligned 接口?<br />这个配置可以通过 Attributes 的表达式来更新。 | false | false |
| MaxRowNumber | 指定 tablet 的最大行数。<br />这个配置可以通过 Attributes 的表达式来更新。 | 1024 | false |
-### Flowfile 的推断数据类型
+#### Flowfile 的推断数据类型
如果要使用推断类型,需要注意以下几点:
@@ -75,7 +75,7 @@ Apache NiFi 包含以下功能:
4. 除`Time` 以外的列必须以 `root.` 开头。
5. 支持的数据类型有: `INT`,`LONG`, `FLOAT`, `DOUBLE`, `BOOLEAN`, `TEXT`。
-### 通过配置项自定义 schema
+#### 通过配置项自定义 schema
如上所述,通过配置项来自定义 schema 比起推断的 schema来说,是一种更加灵活和强大的方式。
@@ -108,18 +108,18 @@ Apache NiFi 包含以下功能:
6. 支持的 `encoding` 有: `PLAIN`, `DICTIONARY`, `RLE`, `DIFF`, `TS_2DIFF`, `BITMAP`, `GORILLA_V1`, `REGULAR`, `GORILLA`。
7. 支持的 `compressionType` 有: `UNCOMPRESSED`, `SNAPPY`, `GZIP`, `LZO`, `SDT`, `PAA`, `PLA`, `LZ4`。
-## Relationships
+### Relationships
| relationship | 描述 |
| ------------ | ----------------------- |
| success | 数据能被正确的写入。 |
| failure | schema 或者数据有异常。 |
-## QueryIoTDBRecord
+### QueryIoTDBRecord
这是一个用于数据读取的处理器。它通过读取 FlowFile 的内容中的SQL 查询来对IoTDB的原生接口进行访问,并将查询结果用Record Writer写入 flowfile。
-### QueryIoTDBRecord的配置项
+#### QueryIoTDBRecord的配置项
| 配置项 | 描述 | 默认值 | 是否必填 |
| ------------- |--------------------------------------------------------------------------------| ------ | -------- |
@@ -128,11 +128,11 @@ Apache NiFi 包含以下功能:
| Username | IoTDB 的用户名 | null | true |
| Password | IoTDB 的密码 | null | true |
| Record Writer | 指定一个 Record Writer controller service 来写入数据。 | null | true |
-| iotdb-query | 需要执行的IoTDB query <bbr>。 Note: 如果有连入侧的连接那么查询会从FlowFile的内容中提取,否则使用当前配置的属性 | null | false |
+| iotdb-query | 需要执行的IoTDB query <br>。 Note: 如果有连入侧的连接那么查询会从FlowFile的内容中提取,否则使用当前配置的属性 | null | false |
| iotdb-query-chunk-size | 返回的结果可以进行分块,数据流中会返回一批按设置大小切分的数据,而不是一个单一的响应. 分块查询可以返回无限量的行。 注意: 数据分块只有在设置不为0时启用 | 0 | false |
-## Relationships
+### Relationships
| relationship | 描述 |
| ------------ | ----------------------- |
diff --git a/docs/zh/UserGuide/Ecosystem-Integration/Writing-Data-on-HDFS.md b/docs/zh/UserGuide/Ecosystem-Integration/Writing-Data-on-HDFS.md
index 44dc57341f..65a71e1331 100644
--- a/docs/zh/UserGuide/Ecosystem-Integration/Writing-Data-on-HDFS.md
+++ b/docs/zh/UserGuide/Ecosystem-Integration/Writing-Data-on-HDFS.md
@@ -29,7 +29,7 @@
当你配置使用 HDFS 存储 TSFile 之后,你的数据文件将会被分布式存储。系统架构如下:
-<img style="width:100%; max-width:700px; max-height:600px; margin-left:auto; margin-right:auto; display:block;" src="https://user-images.githubusercontent.com/19167280/66922722-35180400-f05a-11e9-8ff0-7dd51716e4a8.png">
+<img style="width:100%; max-width:700px; max-height:600px; margin-left:auto; margin-right:auto; display:block;" src="/img/github/66922722-35180400-f05a-11e9-8ff0-7dd51716e4a8.png">
#### Config and usage
diff --git a/docs/zh/UserGuide/Ecosystem-Integration/Zeppelin-IoTDB.md b/docs/zh/UserGuide/Ecosystem-Integration/Zeppelin-IoTDB.md
index b319cd2dd8..46a0fb015e 100644
--- a/docs/zh/UserGuide/Ecosystem-Integration/Zeppelin-IoTDB.md
+++ b/docs/zh/UserGuide/Ecosystem-Integration/Zeppelin-IoTDB.md
@@ -25,7 +25,7 @@
Apache Zeppelin 是一个基于网页的交互式数据分析系统。用户可以通过 Zeppelin 连接数据源并使用 SQL、Scala 等进行交互式操作。操作可以保存为文档(类似于 Jupyter)。Zeppelin 支持多种数据源,包括 Spark、ElasticSearch、Cassandra 和 InfluxDB 等等。现在,IoTDB 已经支持使用 Zeppelin 进行操作。样例如下:
-
+
### Zeppelin-IoTDB 解释器
@@ -105,7 +105,7 @@ or
现在可以开始使用 Zeppelin 操作 IoTDB 了。
-
+
我们提供了一些简单的 SQL 来展示 Zeppelin-IoTDB 解释器的使用:
@@ -138,7 +138,7 @@ WHERE time >= 1
样例如下:
-
+
用户也可以参考 [[1]](https://zeppelin.apache.org/docs/0.9.0/usage/display_system/basic.html) 编写更丰富多彩的文档。
@@ -148,7 +148,7 @@ WHERE time >= 1
进入页面 [http://127.0.0.1:8080/#/interpreter](http://127.0.0.1:8080/#/interpreter) 并配置 IoTDB 的连接参数:
-
+
可配置参数默认值和解释如下:
diff --git a/docs/zh/UserGuide/Edge-Cloud-Collaboration/Sync-Tool.md b/docs/zh/UserGuide/Edge-Cloud-Collaboration/Sync-Tool.md
index 38e3977c6d..100c65125f 100644
--- a/docs/zh/UserGuide/Edge-Cloud-Collaboration/Sync-Tool.md
+++ b/docs/zh/UserGuide/Edge-Cloud-Collaboration/Sync-Tool.md
@@ -31,7 +31,7 @@ IoTDB 同步工具内嵌于 IoTDB 引擎,与下游接收端相连,下游支
## 2.模型定义
-
+
TsFile 同步工具实现了数据从 "流入-> IoTDB ->流出" 的闭环。假设目前有两台机器A和B都安装了IoTDB,希望将 A 上的数据不断同步至 B 中。为了更好地描述这个过程,我们引入以下概念。
diff --git a/docs/zh/UserGuide/FAQ/FAQ-for-cluster-setup.md b/docs/zh/UserGuide/FAQ/FAQ-for-cluster-setup.md
index 066741a147..69e6df9d06 100644
--- a/docs/zh/UserGuide/FAQ/FAQ-for-cluster-setup.md
+++ b/docs/zh/UserGuide/FAQ/FAQ-for-cluster-setup.md
@@ -21,28 +21,28 @@
<!-- TOC -->
-# 分布式部署 FAQ
+## 分布式部署 FAQ
-## 一、集群启停
+### 一、集群启停
-### 1. ConfigNode初次启动失败,如何排查原因?
+#### 1. ConfigNode初次启动失败,如何排查原因?
- ConfigNode初次启动时确保已清空data/confignode目录
- 确保该ConfigNode使用到的<IP+端口>没有被占用,没有与已启动的ConfigNode使用到的<IP+端口>冲突
- 确保该ConfigNode的cn_target_confignode_list(指向存活的ConfigNode;如果该ConfigNode是启动的第一个ConfigNode,该值指向自身)配置正确
- 确保该ConfigNode的配置项(共识协议、副本数等)等与cn_target_confignode_list对应的ConfigNode集群一致
-### 2. ConfigNode初次启动成功,show cluster的结果里为何没有该节点?
+#### 2. ConfigNode初次启动成功,show cluster的结果里为何没有该节点?
- 检查cn_target_confignode_list是否正确指向了正确的地址; 如果cn_target_confignode_list指向了自身,则会启动一个新的ConfigNode集群
-### 3. DataNode初次启动失败,如何排查原因?
+#### 3. DataNode初次启动失败,如何排查原因?
- DataNode初次启动时确保已清空data/datanode目录。 如果启动结果为“Reject DataNode restart.”则表示启动时可能没有清空data/datanode目录
- 确保该DataNode使用到的<IP+端口>没有被占用,没有与已启动的DataNode使用到的<IP+端口>冲突
- 确保该DataNode的dn_target_confignode_list指向存活的ConfigNode
-### 4. 移除DataNode执行失败,如何排查?
+#### 4. 移除DataNode执行失败,如何排查?
- 检查remove-datanode脚本的参数是否正确,是否传入了正确的ip:port或正确的dataNodeId
- 只有集群可用节点数量 > max(元数据副本数量, 数据副本数量)时,移除操作才允许被执行
@@ -52,48 +52,48 @@
如果要使迁移失败的Region处于可用状态,可以使用migrate region from datanodeId1 to datanodeId2 命令将该不可用的Region迁移到其他存活的节点。
另外IoTDB后续也会提供remove-datanode.sh -f命令,来强制移除节点(迁移失败的Region会直接丢弃)
-### 5. 挂掉的DataNode是否支持移除?
+#### 5. 挂掉的DataNode是否支持移除?
- 当前集群副本数量大于1时可以移除。 如果集群副本数量等于1,则不支持移除。 在下个版本会推出强制移除的命令
-### 6. 从0.13升级到1.0需要注意什么?
+#### 6. 从0.13升级到1.0需要注意什么?
- 0.13版本与1.0版本的文件目录结构是不同的,不能将0.13的data目录直接拷贝到1.0集群使用。如果需要将0.13的数据导入至1.0,可以使用LOAD功能
- 0.13版本的默认RPC地址是0.0.0.0,1.0版本的默认RPC地址是127.0.0.1
-## 二、集群重启
+### 二、集群重启
-### 1. 如何重启集群中的某个ConfigNode?
+#### 1. 如何重启集群中的某个ConfigNode?
- 第一步:通过stop-confignode.sh或kill进程方式关闭ConfigNode进程
- 第二步:通过执行start-confignode.sh启动ConfigNode进程实现重启
- 下个版本IoTDB会提供一键重启的操作
-### 2. 如何重启集群中的某个DataNode?
+#### 2. 如何重启集群中的某个DataNode?
- 第一步:通过stop-datanode.sh或kill进程方式关闭DataNode进程
- 第二步:通过执行start-datanode.sh启动DataNode进程实现重启
- 下个版本IoTDB会提供一键重启的操作
-### 3. 将某个ConfigNode移除后(remove-confignode),能否再利用该ConfigNode的data目录重启?
+#### 3. 将某个ConfigNode移除后(remove-confignode),能否再利用该ConfigNode的data目录重启?
- 不能。会报错:Reject ConfigNode restart. Because there are no corresponding ConfigNode(whose nodeId=xx) in the cluster.
-### 4. 将某个DataNode移除后(remove-datanode),能否再利用该DataNode的data目录重启?
+#### 4. 将某个DataNode移除后(remove-datanode),能否再利用该DataNode的data目录重启?
- 不能正常重启,启动结果为“Reject DataNode restart. Because there are no corresponding DataNode(whose nodeId=xx) in the cluster. Possible solutions are as follows:...”
-### 5. 用户看到某个ConfigNode/DataNode变成了Unknown状态,在没有kill对应进程的情况下,直接删除掉ConfigNode/DataNode对应的data目录,然后执行start-confignode.sh/start-datanode.sh,这种情况下能成功吗?
+#### 5. 用户看到某个ConfigNode/DataNode变成了Unknown状态,在没有kill对应进程的情况下,直接删除掉ConfigNode/DataNode对应的data目录,然后执行start-confignode.sh/start-datanode.sh,这种情况下能成功吗?
- 无法启动成功,会报错端口已被占用
-## 三、集群运维
+### 三、集群运维
-### 1. Show cluster执行失败,显示“please check server status”,如何排查?
+#### 1. Show cluster执行失败,显示“please check server status”,如何排查?
- 确保ConfigNode集群一半以上的节点处于存活状态
- 确保客户端连接的DataNode处于存活状态
-### 2. 某一DataNode节点的磁盘文件损坏,如何修复这个节点?
+#### 2. 某一DataNode节点的磁盘文件损坏,如何修复这个节点?
- 当前只能通过remove-datanode的方式进行实现。remove-datanode执行的过程中会将该DataNode上的数据迁移至其他存活的DataNode节点(前提是集群设置的副本数大于1)
- 下个版本IoTDB会提供一键修复节点的功能
-### 3. 如何降低ConfigNode、DataNode使用的内存?
+#### 3. 如何降低ConfigNode、DataNode使用的内存?
- 在conf/confignode-env.sh、conf/datanode-env.sh文件可通过调整MAX_HEAP_SIZE、MAX_DIRECT_MEMORY_SIZE等选项可以调整ConfigNode、DataNode使用的最大堆内、堆外内存
diff --git a/docs/zh/UserGuide/Integration-Test/Integration-Test-refactoring-tutorial.md b/docs/zh/UserGuide/Integration-Test/Integration-Test-refactoring-tutorial.md
index 21e94d6eeb..88a34222f6 100644
--- a/docs/zh/UserGuide/Integration-Test/Integration-Test-refactoring-tutorial.md
+++ b/docs/zh/UserGuide/Integration-Test/Integration-Test-refactoring-tutorial.md
@@ -46,7 +46,7 @@ Apache IoTDB 集成测试的环境一共有3种,分别为**本地单机测试
#### 1. 集成测试类和注解
-构建的集成测试类时,开发者需要在 Apache IoTDB 的 [integration-test](https://github.com/apache/iotdb/tree/master/integration-test) 模块中创建测试类。类名应当能够精简准确地表述该集成测试的目的。除用于服务其他测试用例的类外,含集成测试用例用于测试 Apache IoTDB 功能的类,应当命名为“功能+IT”。例如,用于测试IoTDB自动注册元数据功能的集成测试命名为“<font color=green>IoTDBAutoCreateSchema</font><font color=red>IT</font>”。
+构建的集成测试类时,开发者需要在 Apache IoTDB 的 [integration-test](https://github.com/apache/iotdb/tree/master/integration-test) 模块中创建测试类。类名应当能够精简准确地表述该集成测试的目的。除用于服务其他测试用例的类外,含集成测试用例用于测试 Apache IoTDB 功能的类,应当命名为“功能+IT”。例如,用于测试IoTDB自动注册元数据功能的集成测试命名为“<span style="color:green">IoTDBAutoCreateSchema</span><span style="color:red">IT</span>”。
- Category 注解:**在构建集成测试类时,需要显式地通过引入```@Category```注明测试环境** ,测试环境用```LocalStandaloneIT.class```、```ClusterIT.class``` 和 ```RemoteIT.class```来表示,分别与“Apache IoTDB 集成测试的环境”中的本地单机测试环境、本地集群测试环境和远程测试环境对应。标签内是测试环境的集合,可以包含多个元素,表示在多种环境下分别测试。**一般情况下,标签```LocalStandaloneIT.class``` 和 ```ClusterIT.class``` 是必须添加的。** 当某些功能仅支持单机版 IoTDB 时可以只保留```LocalStandaloneIT.class```。
- RunWith 注解: 每一个集成测试类上都需要添加 ```@RunWith(IoTDBTestRunner.class)``` 标签。
@@ -99,7 +99,7 @@ public static void tearDown() throws Exception {
#### 3. 实现集成测试逻辑
-Apache IoTDB 的集成测试以黑盒测试的方式进行,测试方法的名称为“测试的功能点+Test”,例如“<font color=green>selectWithAlias</font><font color=red>Test</font>”。测试通过 JDBC 或 Session API 的接口来完成。
+Apache IoTDB 的集成测试以黑盒测试的方式进行,测试方法的名称为“测试的功能点+Test”,例如“<span style="color:green">selectWithAlias</span><span style="color:red">Test</span>”。测试通过 JDBC 或 Session API 的接口来完成。
1、使用JDBC接口
diff --git a/docs/zh/UserGuide/IoTDB-Introduction/Architecture.md b/docs/zh/UserGuide/IoTDB-Introduction/Architecture.md
index 3cca9ceb76..406908fc52 100644
--- a/docs/zh/UserGuide/IoTDB-Introduction/Architecture.md
+++ b/docs/zh/UserGuide/IoTDB-Introduction/Architecture.md
@@ -25,7 +25,7 @@ IoTDB 套件由若干个组件构成,共同形成“数据收集-数据写入-
如下图展示了使用 IoTDB 套件全部组件后形成的整体应用架构。下文称所有组件形成 IoTDB 套件,而 IoTDB 特指其中的时间序列数据库组件。
-<img style="width:100%; max-width:800px; max-height:600px; margin-left:auto; margin-right:auto; display:block;" src="https://github.com/apache/iotdb-bin-resources/blob/main/docs/UserGuide/IoTDB-Introduction/Architecture/Structure%20of%20Apache%20IoTDB%20cn.png?raw=true">
+<img style="width:100%; max-width:800px; max-height:600px; margin-left:auto; margin-right:auto; display:block;" src="/img/UserGuide/IoTDB-Introduction/Architecture/Structure-of-Apache-IoTDB-cn.png?raw=true">
在上图中,用户可以通过 JDBC 将来自设备上传感器采集的时序数据、服务器负载和 CPU 内存等系统状态数据、消息队列中的时序数据、应用程序的时序数据或者其他数据库中的时序数据导入到本地或者远程的 IoTDB 中。用户还可以将上述数据直接写成本地(或位于 HDFS 上)的 TsFile 文件。
diff --git a/docs/zh/UserGuide/IoTDB-Introduction/Scenario.md b/docs/zh/UserGuide/IoTDB-Introduction/Scenario.md
index f6d5c23a4c..2eda6e8990 100644
--- a/docs/zh/UserGuide/IoTDB-Introduction/Scenario.md
+++ b/docs/zh/UserGuide/IoTDB-Introduction/Scenario.md
@@ -29,11 +29,11 @@
此时可以采用 IoTDB 套件中的 TsFile 组件、TsFileSync 工具和 Hadoop/Spark 集成组件对数据进行存储:每新印刷一个芯片,就在 SPI 设备上使用 SDK 写一条数据,这些数据最终形成一个 TsFile 文件。通过 TsFileSync 工具,生成的 TsFile 文件将按一定规则(如每天)被同步到 Hadoop 数据中心,并由数据分析人员对其进行分析。
-<img style="width:100%; max-width:800px; max-height:600px; margin-left:auto; margin-right:auto; display:block;" src="https://user-images.githubusercontent.com/13203019/51579014-695ef980-1efa-11e9-8cbc-e9e7ee4fa0d8.png">
+<img style="width:100%; max-width:800px; max-height:600px; margin-left:auto; margin-right:auto; display:block;" src="/img/github/51579014-695ef980-1efa-11e9-8cbc-e9e7ee4fa0d8.png">
在场景 1 中,仅需要 TsFile、TsFileSync 部署在一台 PC 上,此外还需要部署 Hadoop/Spark 连接器用于数据中心端 Hadoop/Spark 集群的数据存储和分析。其示意图如上图所示。下图展示了此时的应用架构。
-<img style="width:100%; max-width:800px; max-height:600px; margin-left:auto; margin-right:auto; display:block;" src="https://user-images.githubusercontent.com/25913899/81768490-bf034f00-950d-11ea-9b56-fef3edca0958.png">
+<img style="width:100%; max-width:800px; max-height:600px; margin-left:auto; margin-right:auto; display:block;" src="/img/github/81768490-bf034f00-950d-11ea-9b56-fef3edca0958.png">
* 场景 2
@@ -43,11 +43,11 @@
此时可以采用 IoTDB 套件中的 IoTDB、TsFileSync 工具和 Hadoop/Spark 集成组件等。需要部署一个场控 PC 机,其上安装 IoTDB 和 TsFileSync 工具,用于支持读写数据、本地计算和分析以及上传数据到数据中心。此外还需要部署 Hadoop/Spark 连接器用于数据中心端 Hadoop/Spark 集群的数据存储和分析。如下图所示。
-<img style="width:100%; max-width:800px; max-height:600px; margin-left:auto; margin-right:auto; display:block;" src="https://user-images.githubusercontent.com/13203019/51579033-7ed42380-1efa-11e9-889f-fb4180291a9e.png">
+<img style="width:100%; max-width:800px; max-height:600px; margin-left:auto; margin-right:auto; display:block;" src="/img/github/51579033-7ed42380-1efa-11e9-889f-fb4180291a9e.png">
下图给出了此时的应用架构。
-<img style="width:100%; max-width:800px; max-height:600px; margin-left:auto; margin-right:auto; display:block;" src="https://user-images.githubusercontent.com/13203019/51579064-8f849980-1efa-11e9-8cd6-a7339cd0540f.jpg">
+<img style="width:100%; max-width:800px; max-height:600px; margin-left:auto; margin-right:auto; display:block;" src="/img/github/51579064-8f849980-1efa-11e9-8cd6-a7339cd0540f.jpg">
* 场景 3
@@ -57,11 +57,11 @@
此时,可以采用 IoTDB 套件中的 IoTDB、IoTDB-Client 工具、TsFileSync 工具和 Hadoop/Spark 集成组件等。将 IoTDB 服务器安装在工厂连接外网的服务器上,用户接收机械手传输的数据并将数据上传到数据中心。将 IoTDB-Client 工具安装在每一个连接工厂内网的机械手上,用于将传感器产生的实时数据上传到工厂内部服务器。再使用 TsFileSync 工具将原始数据上传到数据中心。此外还需要部署 Hadoop/Spark 连接器用于数据中心端 Hadoop/Spark 集群的数据存储和分析。如下图中间场景所示。
-<img style="width:100%; max-width:800px; max-height:600px; margin-left:auto; margin-right:auto; display:block;" src="https://user-images.githubusercontent.com/13203019/51579080-96aba780-1efa-11e9-87ac-940c45b19dd7.jpg">
+<img style="width:100%; max-width:800px; max-height:600px; margin-left:auto; margin-right:auto; display:block;" src="/img/github/51579080-96aba780-1efa-11e9-87ac-940c45b19dd7.jpg">
下图给出了此时的应用架构。
-<img style="width:100%; max-width:800px; max-height:600px; margin-left:auto; margin-right:auto; display:block;" src="https://user-images.githubusercontent.com/25913899/81768477-b874d780-950d-11ea-80ca-8807b9bd0970.png">
+<img style="width:100%; max-width:800px; max-height:600px; margin-left:auto; margin-right:auto; display:block;" src="/img/github/81768477-b874d780-950d-11ea-80ca-8807b9bd0970.png">
* 场景 4
@@ -73,4 +73,4 @@
此外还需要部署 Hadoop/Spark 集群用于数据中心端的数据存储和分析。如下图所示。
-<img style="width:100%; max-width:800px; max-height:600px; margin-left:auto; margin-right:auto; display:block;" src="https://user-images.githubusercontent.com/13203019/51579095-a4f9c380-1efa-11e9-9f95-17165ec55568.jpg">
+<img style="width:100%; max-width:800px; max-height:600px; margin-left:auto; margin-right:auto; display:block;" src="/img/github/51579095-a4f9c380-1efa-11e9-9f95-17165ec55568.jpg">
diff --git a/docs/zh/UserGuide/Maintenance-Tools/CSV-Tool.md b/docs/zh/UserGuide/Maintenance-Tools/CSV-Tool.md
index c8f32d3713..a08cd30362 100644
--- a/docs/zh/UserGuide/Maintenance-Tools/CSV-Tool.md
+++ b/docs/zh/UserGuide/Maintenance-Tools/CSV-Tool.md
@@ -19,13 +19,13 @@
-->
-# 导入导出 CSV
+## 导入导出 CSV
CSV 工具可帮您将 CSV 格式的数据导入到 IoTDB 或者将数据从 IoTDB 导出到 CSV 文件。
-## 使用 export-csv.sh
+### 使用 export-csv.sh
-### 运行方法
+#### 运行方法
```shell
# Unix/OS X
@@ -58,7 +58,7 @@ CSV 工具可帮您将 CSV 格式的数据导入到 IoTDB 或者将数据从 IoT
除此之外,如果你没有使用`-s`和`-q`参数,在导出脚本被启动之后你需要按照程序提示输入查询语句,不同的查询结果会被保存到不同的CSV文件中。
-### 运行示例
+#### 运行示例
```shell
# Unix/OS X
@@ -92,7 +92,7 @@ CSV 工具可帮您将 CSV 格式的数据导入到 IoTDB 或者将数据从 IoT
> tools/export-csv.sh -h 127.0.0.1 -p 6667 -u root -pw root -td ./ -tf yyyy-MM-dd\ HH:mm:ss -s sql.txt -linesPerFile 10 -t 10000
```
-### SQL 文件示例
+#### SQL 文件示例
```sql
select * from root.**;
@@ -122,15 +122,15 @@ Time,Device,hardware(TEXT),status(BOOLEAN)
布尔类型的数据用`true`或者`false`来表示,此处没有用双引号括起来。文本数据需要使用双引号括起来。
-### 注意
+#### 注意
注意,如果导出字段存在如下特殊字符:
1. `,`: 导出程序会在`,`字符前加`\`来进行转义。
-## 使用 import-csv.sh
+### 使用 import-csv.sh
-### 创建元数据 (可选)
+#### 创建元数据 (可选)
```sql
CREATE DATABASE root.fit.d1;
@@ -145,7 +145,7 @@ CREATE TIMESERIES root.fit.p.s1 WITH DATATYPE=INT32,ENCODING=RLE;
IoTDB 具有类型推断的能力,因此在数据导入前创建元数据不是必须的。但我们仍然推荐在使用 CSV 导入工具导入数据前创建元数据,因为这可以避免不必要的类型转换错误。
-### 待导入 CSV 文件示例
+#### 待导入 CSV 文件示例
通过时间对齐,并且header中不包含数据类型的数据。
@@ -184,7 +184,7 @@ Time,Device,str(TEXT),int(INT32)
1970-01-01T08:00:00.002+08:00,root.test.t1,hello world,123
```
-### 运行方法
+#### 运行方法
```shell
# Unix/OS X
@@ -227,7 +227,7 @@ Time,Device,str(TEXT),int(INT32)
- 用于指定每个导入失败文件写入数据的行数,默认值为10000。
- 例如:`-linesPerFailedFile 1`
-### 运行示例
+#### 运行示例
```sh
# Unix/OS X
@@ -252,7 +252,7 @@ Time,Device,str(TEXT),int(INT32)
> tools\import-csv.bat -h 127.0.0.1 -p 6667 -u root -pw root -f example-filename.csv -fd .\failed -tp ns -typeInfer boolean=text,float=double -linesPerFailedFile 10
```
-### 注意
+#### 注意
注意,在导入数据前,需要特殊处理下列的字符:
diff --git a/docs/zh/UserGuide/Maintenance-Tools/IoTDB-Data-Dir-Overview-Tool.md b/docs/zh/UserGuide/Maintenance-Tools/IoTDB-Data-Dir-Overview-Tool.md
index 6bb0e534e3..66bf5b8ed2 100644
--- a/docs/zh/UserGuide/Maintenance-Tools/IoTDB-Data-Dir-Overview-Tool.md
+++ b/docs/zh/UserGuide/Maintenance-Tools/IoTDB-Data-Dir-Overview-Tool.md
@@ -19,11 +19,11 @@
-->
-# IoTDB数据文件夹概览工具
+## IoTDB数据文件夹概览工具
IoTDB数据文件夹概览工具用于打印出数据文件夹的结构概览信息,工具位置为 tools/tsfile/print-iotdb-data-dir。
-## 用法
+### 用法
- Windows:
@@ -39,7 +39,7 @@ IoTDB数据文件夹概览工具用于打印出数据文件夹的结构概览信
注意:如果没有设置输出结果的存储路径, 将使用相对路径"IoTDB_data_dir_overview.txt"作为默认值。
-## 示例
+### 示例
以Windows系统为例:
diff --git a/docs/zh/UserGuide/Maintenance-Tools/JMX-Tool.md b/docs/zh/UserGuide/Maintenance-Tools/JMX-Tool.md
index b360f6e672..bc939582f4 100644
--- a/docs/zh/UserGuide/Maintenance-Tools/JMX-Tool.md
+++ b/docs/zh/UserGuide/Maintenance-Tools/JMX-Tool.md
@@ -19,11 +19,11 @@
-->
-# JMX 工具
+## JMX 工具
Java VisualVM 提供了一个可视化的界面,用于查看 Java 应用程序在 Java 虚拟机(JVM)上运行的详细信息,并对这些应用程序进行故障排除和分析。
-## 使用
+### 使用
第一步:获得 IoTDB-server。
@@ -49,11 +49,11 @@ JMX_IP="the_real_iotdb_server_ip" # 填写实际 IoTDB 的 IP 地址
1. 确保安装 jdk 8。jdk 8 以上需要 [下载 visualvm](https://visualvm.github.io/download.html)
2. 打开 jvisualvm
3. 在左侧导航栏空白处右键 -> 添加 JMX 连接
-<img style="width:100%; max-width:300px; max-height:600px; margin-left:auto; margin-right:auto; display:block;" src="https://user-images.githubusercontent.com/19167280/81462914-5738c580-91e8-11ea-94d1-4ff6607e7e2c.png">
+<img style="width:100%; max-width:300px; max-height:600px; margin-left:auto; margin-right:auto; display:block;" src="/img/github/81462914-5738c580-91e8-11ea-94d1-4ff6607e7e2c.png">
4. 填写信息进行登录,按下图分别填写,注意需要勾选”不要求 SSL 连接”。
例如:
连接:192.168.130.15:31999
用户名:iotdb
口令:passw!d
-<img style="width:100%; max-width:300px; max-height:600px; margin-left:auto; margin-right:auto; display:block;" src="https://user-images.githubusercontent.com/19167280/81462909-53a53e80-91e8-11ea-98df-0012380da0b2.png">
+<img style="width:100%; max-width:300px; max-height:600px; margin-left:auto; margin-right:auto; display:block;" src="/img/github/81462909-53a53e80-91e8-11ea-98df-0012380da0b2.png">
diff --git a/docs/zh/UserGuide/Maintenance-Tools/Load-Tsfile.md b/docs/zh/UserGuide/Maintenance-Tools/Load-Tsfile.md
index fba2063990..f10b9dc57a 100644
--- a/docs/zh/UserGuide/Maintenance-Tools/Load-Tsfile.md
+++ b/docs/zh/UserGuide/Maintenance-Tools/Load-Tsfile.md
@@ -19,15 +19,15 @@
-->
-# 加载 TsFile
+## 加载 TsFile
-## 介绍
+### 介绍
加载外部 tsfile 文件工具允许用户向正在运行中的 Apache IoTDB 中加载 tsfile 文件。或者您也可以使用脚本的方式将tsfile加载进IoTDB。
-## 使用SQL加载
+### 使用SQL加载
用户通过 Cli 工具或 JDBC 向 Apache IoTDB 系统发送指定命令实现文件加载的功能。
-### 加载 tsfile 文件
+#### 加载 tsfile 文件
加载 tsfile 文件的指令为:`load '<path/dir>' [sglevel=int][verify=true/false][onSuccess=delete/none]`
@@ -72,7 +72,7 @@ ONSUCCESS选项表示对于成功载入的tsfile的处置方式,默认为delet
**注意**,如果`$IOTDB_HOME$/conf/iotdb-datanode.properties`中`enable_auto_create_schema=true`时会在加载tsfile的时候自动创建tsfile中的元数据,否则不会自动创建。
-## 使用脚本加载
+### 使用脚本加载
若您在Windows环境中,请运行`$IOTDB_HOME/tools/load-tsfile.bat`,若为Linux或Unix,请运行`load-tsfile.sh`
@@ -88,7 +88,7 @@ ONSUCCESS选项表示对于成功载入的tsfile的处置方式,默认为delet
--onSuccess 对成功加载的TsFile的处理方法,可选,默认为delete,成功加载之后删除源TsFile,设为none时会 保留源TsFile
```
-### 使用范例
+#### 使用范例
假定服务器192.168.0.101:6667上运行一个IoTDB实例,想从将本地保存的TsFile备份文件夹D:\IoTDB\data中的所有的TsFile文件都加载进此IoTDB实例。
@@ -100,7 +100,7 @@ ONSUCCESS选项表示对于成功载入的tsfile的处置方式,默认为delet
等待脚本执行完成之后,可以检查IoTDB实例中数据已经被正确加载
-### 常见问题
+#### 常见问题
- 找不到或无法加载主类
- 可能是由于未设置环境变量$IOTDB_HOME,请设置环境变量之后重试
diff --git a/docs/zh/UserGuide/Maintenance-Tools/Log-Tool.md b/docs/zh/UserGuide/Maintenance-Tools/Log-Tool.md
index 6da846968e..ca905e4f11 100644
--- a/docs/zh/UserGuide/Maintenance-Tools/Log-Tool.md
+++ b/docs/zh/UserGuide/Maintenance-Tools/Log-Tool.md
@@ -33,15 +33,15 @@ IoTDB 支持用户通过修改日志配置文件的方式对 IoTDB 系统日志
本节以 Jconsole 为例介绍连接 JMX 并进入动态系统日志配置模块的方法。启动 Jconsole 控制页面,在新建连接处建立与 IoTDB Server 的 JMX 连接(可以选择本地进程或给定 IoTDB 的 IP 及 PORT 进行远程连接,IoTDB 的 JMX 服务默认运行端口为 31999),如下图使用远程进程连接 Localhost 下运行在 31999 端口的 IoTDB JMX 服务。
-<img style="width:100%; max-width:800px; max-height:600px; margin-left:auto; margin-right:auto; display:block;" src="https://user-images.githubusercontent.com/13203019/51577195-f94d7500-1ef3-11e9-999a-b4f67055d80e.png">
+<img style="width:100%; max-width:800px; max-height:600px; margin-left:auto; margin-right:auto; display:block;" src="/img/github/51577195-f94d7500-1ef3-11e9-999a-b4f67055d80e.png">
连接到 JMX 后,您可以通过 MBean 选项卡找到名为`ch.qos.logback.classic`的`MBean`,如下图所示。
-<img style="width:100%; max-width:800px; max-height:600px; margin-left:auto; margin-right:auto; display:block;" src="https://user-images.githubusercontent.com/13203019/51577204-fe122900-1ef3-11e9-9e89-2eb1d46e24b8.png">
+<img style="width:100%; max-width:800px; max-height:600px; margin-left:auto; margin-right:auto; display:block;" src="/img/github/51577204-fe122900-1ef3-11e9-9e89-2eb1d46e24b8.png">
在`ch.qos.logback.classic`的 MBean 操作(Operations)选项中,可以看到当前动态系统日志配置支持的 6 种接口,您可以通过使用相应的方法,来执行相应的操作,操作页面如图。
-<img style="width:100%; max-width:800px; max-height:600px; margin-left:auto; margin-right:auto; display:block;" src="https://user-images.githubusercontent.com/13203019/51577216-09fdeb00-1ef4-11e9-9005-542ad7d9e9e0.png">
+<img style="width:100%; max-width:800px; max-height:600px; margin-left:auto; margin-right:auto; display:block;" src="/img/github/51577216-09fdeb00-1ef4-11e9-9005-542ad7d9e9e0.png">
#### 动态系统日志接口说明
diff --git a/docs/zh/UserGuide/Maintenance-Tools/TsFile-Load-Export-Tool.md b/docs/zh/UserGuide/Maintenance-Tools/TsFile-Load-Export-Tool.md
index 74b4f2c028..80eb6b0477 100644
--- a/docs/zh/UserGuide/Maintenance-Tools/TsFile-Load-Export-Tool.md
+++ b/docs/zh/UserGuide/Maintenance-Tools/TsFile-Load-Export-Tool.md
@@ -19,15 +19,15 @@
-->
-# 导入 TsFile
+## 导入 TsFile
-## 介绍
+### 介绍
加载外部 tsfile 文件工具允许用户向正在运行中的 Apache IoTDB 中加载 tsfile 文件。或者您也可以使用脚本的方式将tsfile加载进IoTDB。
-## 使用SQL加载
+### 使用SQL加载
用户通过 Cli 工具或 JDBC 向 Apache IoTDB 系统发送指定命令实现文件加载的功能。
-### 加载 tsfile 文件
+#### 加载 tsfile 文件
加载 tsfile 文件的指令为:`load '<path/dir>' [sglevel=int][verify=true/false][onSuccess=delete/none]`
@@ -72,7 +72,7 @@ ONSUCCESS选项表示对于成功载入的tsfile的处置方式,默认为delet
**注意**,如果`$IOTDB_HOME$/conf/iotdb-datanode.properties`中`enable_auto_create_schema=true`时会在加载tsfile的时候自动创建tsfile中的元数据,否则不会自动创建。
-## 使用脚本加载
+### 使用脚本加载
若您在Windows环境中,请运行`$IOTDB_HOME/tools/load-tsfile.bat`,若为Linux或Unix,请运行`load-tsfile.sh`
@@ -88,7 +88,7 @@ ONSUCCESS选项表示对于成功载入的tsfile的处置方式,默认为delet
--onSuccess 对成功加载的TsFile的处理方法,可选,默认为delete,成功加载之后删除源TsFile,设为none时会 保留源TsFile
```
-### 使用范例
+#### 使用范例
假定服务器192.168.0.101:6667上运行一个IoTDB实例,想从将本地保存的TsFile备份文件夹D:\IoTDB\data中的所有的TsFile文件都加载进此IoTDB实例。
@@ -100,7 +100,7 @@ ONSUCCESS选项表示对于成功载入的tsfile的处置方式,默认为delet
等待脚本执行完成之后,可以检查IoTDB实例中数据已经被正确加载
-### 常见问题
+#### 常见问题
- 找不到或无法加载主类
- 可能是由于未设置环境变量$IOTDB_HOME,请设置环境变量之后重试
@@ -109,13 +109,13 @@ ONSUCCESS选项表示对于成功载入的tsfile的处置方式,默认为delet
- 执行到中途崩溃了想重新加载怎么办
- 重新执行刚才的命令,重新加载数据不会影响加载之后的正确性
-# 导出 TsFile
+## 导出 TsFile
TsFile 工具可帮您 通过执行指定sql、命令行sql、sql文件的方式将结果集以TsFile文件的格式导出至指定路径.
-## 使用 export-tsfile.sh
+### 使用 export-tsfile.sh
-### 运行方法
+#### 运行方法
```shell
# Unix/OS X
@@ -150,7 +150,7 @@ TsFile 工具可帮您 通过执行指定sql、命令行sql、sql文件的方式
除此之外,如果你没有使用`-s`和`-q`参数,在导出脚本被启动之后你需要按照程序提示输入查询语句,不同的查询结果会被保存到不同的TsFile文件中。
-### 运行示例
+#### 运行示例
```shell
# Unix/OS X
@@ -176,6 +176,6 @@ TsFile 工具可帮您 通过执行指定sql、命令行sql、sql文件的方式
> tools/export-tsfile.sh -h 127.0.0.1 -p 6667 -u root -pw root -td ./ -s ./sql.txt -f myTsFile -t 10000
```
-### Q&A
+#### Q&A
- 建议在导入数据时不要同时执行写入数据命令,这将有可能导致JVM内存不足的情况。
\ No newline at end of file
diff --git a/docs/zh/UserGuide/Maintenance-Tools/TsFile-Resource-Sketch-Tool.md b/docs/zh/UserGuide/Maintenance-Tools/TsFile-Resource-Sketch-Tool.md
index a38875245e..52893dbc81 100644
--- a/docs/zh/UserGuide/Maintenance-Tools/TsFile-Resource-Sketch-Tool.md
+++ b/docs/zh/UserGuide/Maintenance-Tools/TsFile-Resource-Sketch-Tool.md
@@ -19,11 +19,11 @@
-->
-# TsFile Resource概览工具
+## TsFile Resource概览工具
TsFile resource概览工具用于打印出TsFile resource文件的内容,工具位置为 tools/tsfile/print-tsfile-resource-files。
-## 用法
+### 用法
- Windows:
@@ -37,7 +37,7 @@ TsFile resource概览工具用于打印出TsFile resource文件的内容,工
./print-tsfile-resource-files.sh <TsFile resource文件所在的文件夹路径,或者单个TsFile resource文件路径>
```
-## 示例
+### 示例
以Windows系统为例:
diff --git a/docs/zh/UserGuide/Maintenance-Tools/TsFile-Sketch-Tool.md b/docs/zh/UserGuide/Maintenance-Tools/TsFile-Sketch-Tool.md
index 06cd39b8ad..f650a6e4be 100644
--- a/docs/zh/UserGuide/Maintenance-Tools/TsFile-Sketch-Tool.md
+++ b/docs/zh/UserGuide/Maintenance-Tools/TsFile-Sketch-Tool.md
@@ -19,11 +19,11 @@
-->
-# TsFile概览工具
+## TsFile概览工具
TsFile概览工具用于以概要模式打印出一个TsFile的内容,工具位置为 tools/tsfile/print-tsfile。
-## 用法
+### 用法
- Windows:
@@ -39,7 +39,7 @@ TsFile概览工具用于以概要模式打印出一个TsFile的内容,工具
注意:如果没有设置输出结果的存储路径, 将使用相对路径"TsFile_sketch_view.txt"作为默认值。
-## 示例
+### 示例
以Windows系统为例:
diff --git a/docs/zh/UserGuide/Maintenance-Tools/TsFile-Split-Tool.md b/docs/zh/UserGuide/Maintenance-Tools/TsFile-Split-Tool.md
index a091ee45a1..ef86d82f6e 100644
--- a/docs/zh/UserGuide/Maintenance-Tools/TsFile-Split-Tool.md
+++ b/docs/zh/UserGuide/Maintenance-Tools/TsFile-Split-Tool.md
@@ -19,7 +19,7 @@
-->
-# TsFile 拆分工具
+## TsFile 拆分工具
TsFile 拆分工具用来将一个 TsFile 拆分为多个 TsFile,工具位置为 tools/tsfile/split-tsfile-tool
diff --git a/docs/zh/UserGuide/Maintenance-Tools/TsFileSelfCheck-Tool.md b/docs/zh/UserGuide/Maintenance-Tools/TsFileSelfCheck-Tool.md
index 023006e433..98f0de158c 100644
--- a/docs/zh/UserGuide/Maintenance-Tools/TsFileSelfCheck-Tool.md
+++ b/docs/zh/UserGuide/Maintenance-Tools/TsFileSelfCheck-Tool.md
@@ -19,10 +19,10 @@
-->
-# TsFile 自检工具
+## TsFile 自检工具
IoTDB Server 提供了 TsFile 自检工具,目前该工具可以检查 TsFile 文件中的基本格式、TimeseriesMetadata 的正确性以及 TsFile 中各部分存储的 Statistics 的正确性和一致性。
-## 使用
+### 使用
第一步:创建一个 TsFileSelfCheckTool 类的对象。
``` java
diff --git a/docs/zh/UserGuide/Monitor-Alert/Alerting.md b/docs/zh/UserGuide/Monitor-Alert/Alerting.md
index f8f911d9c8..cfd5a5d62a 100644
--- a/docs/zh/UserGuide/Monitor-Alert/Alerting.md
+++ b/docs/zh/UserGuide/Monitor-Alert/Alerting.md
@@ -19,9 +19,9 @@
-->
-# 告警
+## 告警
-## 概览
+### 概览
IoTDB 告警功能预计支持两种模式:
* 写入触发:用户写入原始数据到原始时间序列,每插入一条数据都会触发 `Trigger` 的判断逻辑,
@@ -41,10 +41,10 @@ IoTDB 告警功能预计支持两种模式:
随着 [Trigger](../Trigger/Instructions.md) 模块的引入,可以实现写入触发模式的告警。
-## 部署 AlertManager
+### 部署 AlertManager
-### 安装与运行
-#### 二进制文件
+#### 安装与运行
+##### 二进制文件
预编译好的二进制文件可在 [这里](https://prometheus.io/download/) 下载。
运行方法:
@@ -52,7 +52,7 @@ IoTDB 告警功能预计支持两种模式:
./alertmanager --config.file=<your_file>
````
-#### Docker 镜像
+##### Docker 镜像
可在 [Quay.io](https://hub.docker.com/r/prom/alertmanager/)
或 [Docker Hub](https://quay.io/repository/prometheus/alertmanager) 获得。
@@ -61,7 +61,7 @@ IoTDB 告警功能预计支持两种模式:
docker run --name alertmanager -d -p 127.0.0.1:9093:9093 quay.io/prometheus/alertmanager
````
-### 配置
+#### 配置
如下是一个示例,可以覆盖到大部分配置规则,详细的配置规则参见
[这里](https://prometheus.io/docs/alerting/latest/configuration/)。
@@ -225,7 +225,7 @@ inhibit_rules:
equal: ['alertname']
````
-### API
+#### API
`AlertManager` API 分为 `v1` 和 `v2` 两个版本,当前 `AlertManager` API 版本为 `v2`
(配置参见
[api/v2/openapi.yaml](https://github.com/prometheus/alertmanager/blob/master/api/v2/openapi.yaml))。
@@ -238,9 +238,9 @@ inhibit_rules:
发送告警的 endpoint 变为 `/alertmanager/api/v1/alerts`
或 `/alertmanager/api/v2/alerts`。
-## 创建 trigger
+### 创建 trigger
-### 编写 trigger 类
+#### 编写 trigger 类
用户通过自行创建 Java 类、编写钩子中的逻辑来定义一个触发器。
具体配置流程参见 [Trigger](../Trigger/Implement-Trigger.md)。
@@ -335,7 +335,7 @@ public class ClusterAlertingExample implements Trigger {
}
```
-### 创建 trigger
+#### 创建 trigger
如下的 sql 语句在 `root.ln.wf01.wt01.temperature`
时间序列上注册了名为 `root-ln-wf01-wt01-alert`、
@@ -350,7 +350,7 @@ public class ClusterAlertingExample implements Trigger {
USING URI 'http://jar/ClusterAlertingExample.jar'
```
-## 写入数据
+### 写入数据
当我们完成 AlertManager 的部署和启动、Trigger 的创建,
可以通过向时间序列写入数据来测试告警功能。
@@ -367,4 +367,4 @@ INSERT INTO root.ln.wf01.wt01(timestamp, temperature) VALUES (5, 120);
会抑制 `severity` 为 `warning` 的告警,我们收到的告警邮件中只包含写入
`(5, 120)` 后触发的告警。
-<img alt="alerting" src="https://user-images.githubusercontent.com/34649843/115957896-a9791080-a537-11eb-9962-541412bdcee6.png">
+<img alt="alerting" src="/img/github/115957896-a9791080-a537-11eb-9962-541412bdcee6.png">
diff --git a/docs/zh/UserGuide/Monitor-Alert/Metric-Tool.md b/docs/zh/UserGuide/Monitor-Alert/Metric-Tool.md
index 38a0f480d5..9ea70137c2 100644
--- a/docs/zh/UserGuide/Monitor-Alert/Metric-Tool.md
+++ b/docs/zh/UserGuide/Monitor-Alert/Metric-Tool.md
@@ -19,6 +19,7 @@
-->
+# 监控告警
在 IoTDB 的运行过程中,我们希望对 IoTDB 的状态进行观测,以便于排查系统问题或者及时发现系统潜在的风险,能够**反映系统运行状态的一系列指标
**就是系统监控指标。
@@ -432,18 +433,18 @@ Core 级别的监控指标在系统运行中默认开启,每一个 Core 级别
连接到 JMX 后,您可以通过 "MBeans" 标签找到名为 "org.apache.iotdb.metrics" 的 "MBean",可以在侧边栏中查看所有监控指标的具体值。
-<img style="width:100%; max-width:800px; max-height:600px; margin-left:auto; margin-right:auto; display:block;" alt="metric-jmx" src="https://user-images.githubusercontent.com/46039728/204018765-6fda9391-ebcf-4c80-98c5-26f34bd74df0.png">
+<img style="width:100%; max-width:800px; max-height:600px; margin-left:auto; margin-right:auto; display:block;" alt="metric-jmx" src="/img/github/204018765-6fda9391-ebcf-4c80-98c5-26f34bd74df0.png">
#### 5.1.2. 获取其他相关数据
连接到 JMX 后,您可以通过 "MBeans" 标签找到名为 "org.apache.iotdb.service" 的 "MBean",如下图所示,了解服务的基本状态
-<img style="width:100%; max-width:800px; max-height:600px; margin-left:auto; margin-right:auto; display:block;" src="https://user-images.githubusercontent.com/46039728/149951720-707f1ee8-32ee-4fde-9252-048caebd232e.png"> <br>
+<img style="width:100%; max-width:800px; max-height:600px; margin-left:auto; margin-right:auto; display:block;" src="/img/github/149951720-707f1ee8-32ee-4fde-9252-048caebd232e.png"> <br>
为了提高查询性能,IOTDB 对 ChunkMetaData 和 TsFileMetaData 进行了缓存。用户可以使用 MXBean
,展开侧边栏`org.apache.iotdb.db.service`查看缓存命中率:
-<img style="width:100%; max-width:800px; max-height:600px; margin-left:auto; margin-right:auto; display:block;" src="https://user-images.githubusercontent.com/19167280/112426760-73e3da80-8d73-11eb-9a8f-9232d1f2033b.png">
+<img style="width:100%; max-width:800px; max-height:600px; margin-left:auto; margin-right:auto; display:block;" src="/img/github/112426760-73e3da80-8d73-11eb-9a8f-9232d1f2033b.png">
### 5.2. 使用 Prometheus 方式
@@ -718,4 +719,4 @@ static_configs:
#### 5.3.2. 获取监控指标
-根据如上的映射关系,可以构成相关的 IoTDB 查询语句获取监控指标
\ No newline at end of file
+根据如上的映射关系,可以构成相关的 IoTDB 查询语句获取监控指标
diff --git a/docs/zh/UserGuide/Operate-Metadata/Auto-Create-MetaData.md b/docs/zh/UserGuide/Operate-Metadata/Auto-Create-MetaData.md
index f83ba2b50c..6f3fbd0885 100644
--- a/docs/zh/UserGuide/Operate-Metadata/Auto-Create-MetaData.md
+++ b/docs/zh/UserGuide/Operate-Metadata/Auto-Create-MetaData.md
@@ -19,12 +19,12 @@
-->
-# 自动创建元数据
+## 自动创建元数据
自动创建元数据指的是根据写入数据的特征自动创建出用户未定义的时间序列,
这既能解决海量序列场景下设备及测点难以提前预测与建模的难题,又能为用户提供开箱即用的写入体验。
-## 自动创建 database
+### 自动创建 database
* enable\_auto\_create\_schema
@@ -52,7 +52,7 @@
<img style="width:100%; max-width:800px; max-height:600px; margin-left:auto; margin-right:auto; display:block;" src="https://github.com/apache/iotdb-bin-resources/blob/main/docs/UserGuide/Data%20Concept/Auto-Create-MetaData/auto_create_sg_example.png?raw=true" alt="auto create database example">
-## 自动创建序列的元数据(前端指定数据类型)
+### 自动创建序列的元数据(前端指定数据类型)
* 用户在写入时精确指定数据类型:
@@ -66,7 +66,7 @@
* 插入数据的同时自动创建序列,效率较高。
-## 自动创建序列的元数据(类型推断)
+### 自动创建序列的元数据(类型推断)
* 在写入时直接传入字符串,数据库推断数据类型:
@@ -80,7 +80,7 @@
* 由于类型推断会增加写入时间,所以通过类型推断自动创建序列元数据的效率要低于通过前端指定数据类型自动创建序列元数据,建议用户在可行时先选用前端指定数据类型的方式自动创建序列的元数据。
-### 类型推断
+#### 类型推断
| 数据(String) | 字符串格式 | iotdb-datanode.properties配置项 | 默认值 |
|:---:|:---|:------------------------------|:---|
@@ -95,7 +95,7 @@
* long_string_infer_type 配置项的目的是防止使用 FLOAT 推断 integer_string_infer_type 而造成精度缺失。
-### 编码方式
+#### 编码方式
| 数据类型 | iotdb-datanode.properties配置项 | 默认值 |
|:---|:-----------------------------|:---|
diff --git a/docs/zh/UserGuide/Operate-Metadata/Database.md b/docs/zh/UserGuide/Operate-Metadata/Database.md
index 439c27a36c..75ea79cf22 100644
--- a/docs/zh/UserGuide/Operate-Metadata/Database.md
+++ b/docs/zh/UserGuide/Operate-Metadata/Database.md
@@ -19,11 +19,12 @@
-->
-# 数据库管理
+# 元数据操作
+## 数据库管理
数据库(Database)可以被视为关系数据库中的Database。
-## 创建数据库
+### 创建数据库
我们可以根据存储模型建立相应的数据库。如下所示:
@@ -41,7 +42,7 @@ Database 节点名只支持中英文字符、数字、下划线的组合,如
还需注意,如果在 Windows 系统上部署,database 名是大小写不敏感的。例如同时创建`root.ln` 和 `root.LN` 是不被允许的。
-## 查看数据库
+### 查看数据库
在 database 创建后,我们可以使用 [SHOW DATABASES](../Reference/SQL-Reference.md) 语句和 [SHOW DATABASES \<PathPattern>](../Reference/SQL-Reference.md) 来查看 database,SQL 语句如下所示:
@@ -64,7 +65,7 @@ Total line number = 2
It costs 0.060s
```
-## 删除数据库
+### 删除数据库
用户可以使用`DELETE DATABASE <PathPattern>`语句删除该路径模式匹配的所有的数据库。在删除的过程中,需要注意的是数据库的数据也会被删除。
@@ -75,7 +76,7 @@ IoTDB > DELETE DATABASE root.sgcc
IoTDB > DELETE DATABASE root.**
```
-## 统计数据库数量
+### 统计数据库数量
用户可以使用`COUNT DATABASES <PathPattern>`语句统计数据库的数量,允许指定`PathPattern` 用来统计匹配该`PathPattern` 的数据库的数量
diff --git a/docs/zh/UserGuide/Operate-Metadata/Node.md b/docs/zh/UserGuide/Operate-Metadata/Node.md
index dfc7d4edb7..29475b4857 100644
--- a/docs/zh/UserGuide/Operate-Metadata/Node.md
+++ b/docs/zh/UserGuide/Operate-Metadata/Node.md
@@ -19,9 +19,9 @@
-->
-# 节点管理
+## 节点管理
-## 查看子路径
+### 查看子路径
```
SHOW CHILD PATHS pathPattern
@@ -57,7 +57,7 @@ It costs 0.002s
+---------------+
```
-## 查看子节点
+### 查看子节点
```
SHOW CHILD NODES pathPattern
@@ -88,7 +88,7 @@ SHOW CHILD NODES pathPattern
+------------+
```
-## 统计节点数
+### 统计节点数
IoTDB 支持使用`COUNT NODES <PathPattern> LEVEL=<INTEGER>`来统计当前 Metadata
树下满足某路径模式的路径中指定层级的节点个数。这条语句可以用来统计带有特定采样点的设备数。例如:
@@ -138,7 +138,7 @@ It costs 0.002s
> 注意:时间序列的路径只是过滤条件,与 level 的定义无关。
-## 查看设备
+### 查看设备
* SHOW DEVICES pathPattern? (WITH DATABASE)? limitClause? #showDevices
@@ -216,9 +216,9 @@ Total line number = 2
It costs 0.001s
```
-## 统计设备数量
+### 统计设备数量
-* COUNT DEVICES <PathPattern>
+* COUNT DEVICES \<PathPattern\>
上述语句用于统计设备的数量,同时允许指定`PathPattern` 用于统计匹配该`PathPattern` 的设备数量
diff --git a/docs/zh/UserGuide/Operate-Metadata/Template.md b/docs/zh/UserGuide/Operate-Metadata/Template.md
index 21b5781936..f01f470ee2 100644
--- a/docs/zh/UserGuide/Operate-Metadata/Template.md
+++ b/docs/zh/UserGuide/Operate-Metadata/Template.md
@@ -19,13 +19,13 @@
-->
-# 元数据模板
+## 元数据模板
IoTDB 支持元数据模板功能,实现同类型不同实体的物理量元数据共享,减少元数据内存占用,同时简化同类型实体的管理。
注:以下语句中的 `schema` 关键字可以省略。
-## 创建元数据模板
+### 创建元数据模板
创建元数据模板的 SQL 语法如下:
@@ -47,7 +47,7 @@ IoTDB> create schema template t2 aligned (lat FLOAT encoding=Gorilla, lon FLOAT
其中,物理量 `lat` 和 `lon` 是对齐的。
-## 挂载元数据模板
+### 挂载元数据模板
元数据模板在创建后,需执行挂载操作,方可用于相应路径下的序列创建与数据写入。
@@ -61,7 +61,7 @@ IoTDB> create schema template t2 aligned (lat FLOAT encoding=Gorilla, lon FLOAT
IoTDB> set schema template t1 to root.sg1.d1
```
-## 激活元数据模板
+### 激活元数据模板
挂载好元数据模板后,且系统开启自动注册序列功能的情况下,即可直接进行数据的写入。例如 database 为 root.sg1,模板 t1 被挂载到了节点 root.sg1.d1,那么可直接向时间序列(如 root.sg1.d1.temperature 和 root.sg1.d1.status)写入时间序列数据,该时间序列已可被当作正常创建的序列使用。
@@ -109,7 +109,7 @@ show devices root.sg1.**
+---------------+---------+
```
-## 查看元数据模板
+### 查看元数据模板
- 查看所有元数据模板
@@ -177,7 +177,7 @@ IoTDB> show paths using schema template t1
+-----------+
```
-## 解除元数据模板
+### 解除元数据模板
若需删除模板表示的某一组时间序列,可采用解除模板操作,SQL语句如下所示:
@@ -205,7 +205,7 @@ IoTDB> deactivate schema template t1 from root.sg1.*, root.sg2.*
若解除命令不指定模板名称,则会将给定路径涉及的所有模板使用情况均解除。
-## 卸载元数据模板
+### 卸载元数据模板
卸载元数据模板的 SQL 语句如下所示:
@@ -215,7 +215,7 @@ IoTDB> unset schema template t1 from root.sg1.d1
**注意**:不支持卸载仍处于激活状态的模板,需保证执行卸载操作前解除对该模板的所有使用,即删除所有该模板表示的序列。
-## 删除元数据模板
+### 删除元数据模板
删除元数据模板的 SQL 语句如下所示:
diff --git a/docs/zh/UserGuide/Operate-Metadata/Timeseries.md b/docs/zh/UserGuide/Operate-Metadata/Timeseries.md
index 6417c1f3d2..71f4f2a5df 100644
--- a/docs/zh/UserGuide/Operate-Metadata/Timeseries.md
+++ b/docs/zh/UserGuide/Operate-Metadata/Timeseries.md
@@ -19,9 +19,9 @@
-->
-# 时间序列管理
+## 时间序列管理
-## 创建时间序列
+### 创建时间序列
根据建立的数据模型,我们可以分别在两个存储组中创建相应的时间序列。创建时间序列的 SQL 语句如下所示:
@@ -53,7 +53,7 @@ error: encoding TS_2DIFF does not support BOOLEAN
详细的数据类型与编码方式的对应列表请参见 [编码方式](../Data-Concept/Encoding.md)。
-## 创建对齐时间序列
+### 创建对齐时间序列
创建一组对齐时间序列的SQL语句如下所示:
@@ -65,7 +65,7 @@ IoTDB> CREATE ALIGNED TIMESERIES root.ln.wf01.GPS(latitude FLOAT encoding=PLAIN
对齐的时间序列也支持设置别名、标签、属性。
-## 删除时间序列
+### 删除时间序列
我们可以使用`(DELETE | DROP) TimeSeries <PathPattern>`语句来删除我们之前创建的时间序列。SQL 语句如下所示:
@@ -76,7 +76,7 @@ IoTDB> delete timeseries root.ln.wf02.*
IoTDB> drop timeseries root.ln.wf02.*
```
-## 查看时间序列
+### 查看时间序列
* SHOW LATEST? TIMESERIES pathPattern? whereClause? limitClause?
@@ -143,7 +143,7 @@ show timeseries root.ln.** limit 10 offset 10
需要注意的是,当查询路径不存在时,系统会返回 0 条时间序列。
-## 统计时间序列总数
+### 统计时间序列总数
IoTDB 支持使用`COUNT TIMESERIES<Path>`来统计一条路径中的时间序列个数。SQL 语句如下所示:
```
@@ -175,7 +175,7 @@ It costs 0.004s
那么 Metadata Tree 如下所示:
-<img style="width:100%; max-width:600px; margin-left:auto; margin-right:auto; display:block;" src="https://user-images.githubusercontent.com/19167280/69792176-1718f400-1201-11ea-861a-1a83c07ca144.jpg">
+<img style="width:100%; max-width:600px; margin-left:auto; margin-right:auto; display:block;" src="/img/github/69792176-1718f400-1201-11ea-861a-1a83c07ca144.jpg">
可以看到,`root`被定义为`LEVEL=0`。那么当你输入如下语句时:
@@ -221,7 +221,7 @@ It costs 0.002s
> 注意:时间序列的路径只是过滤条件,与 level 的定义无关。
-## 标签点管理
+### 标签点管理
我们可以在创建时间序列的时候,为它添加别名和额外的标签和属性信息。
diff --git a/docs/zh/UserGuide/Operators-Functions/Aggregation.md b/docs/zh/UserGuide/Operators-Functions/Aggregation.md
index 89182a0012..0e63b6a0d8 100644
--- a/docs/zh/UserGuide/Operators-Functions/Aggregation.md
+++ b/docs/zh/UserGuide/Operators-Functions/Aggregation.md
@@ -19,7 +19,7 @@
-->
-# 聚合函数
+## 聚合函数
聚合函数是多对一函数。它们对一组值进行聚合计算,得到单个聚合结果。
@@ -41,9 +41,9 @@ IoTDB 支持的聚合函数如下:
| MIN_TIME | 求最小时间戳。 | 所有类型 | 无 | Timestamp |
| COUNT_IF | 求数据点连续满足某一给定条件,且满足条件的数据点个数(用keep表示)满足指定阈值的次数。 | BOOLEAN | `[keep >=/>/=/!=/</<=]threshold`:被指定的阈值或阈值条件,若只使用`threshold`则等价于`keep >= threshold`,`threshold`类型为`INT64`<br/> `ignoreNull`:可选,默认为`true`;为`true`表示忽略null值,即如果中间出现null值,直接忽略,不会打断连续性;为`false`表示不忽略null值,即如果中间出现null值,会打断连续性 | INT64 |
-## COUNT_IF
+### COUNT_IF
-### 语法
+#### 语法
```sql
count_if(predicate, [keep >=/>/=/!=/</<=]threshold[, 'ignoreNull'='true/false'])
```
@@ -53,9 +53,9 @@ threshold 及 ignoreNull 用法见上表
>注意: count_if 当前暂不支持与 group by time 的 SlidingWindow 一起使用
-### 使用示例
+#### 使用示例
-#### 原始数据
+##### 原始数据
```
+-----------------------------+-------------+-------------+
@@ -74,7 +74,7 @@ threshold 及 ignoreNull 用法见上表
+-----------------------------+-------------+-------------+
```
-#### 不使用ignoreNull参数(忽略null)
+##### 不使用ignoreNull参数(忽略null)
SQL:
```sql
@@ -90,7 +90,7 @@ select count_if(s1=0 & s2=0, 3), count_if(s1=1 & s2=0, 3) from root.db.d1
+--------------------------------------------------+--------------------------------------------------
```
-#### 使用ignoreNull参数
+##### 使用ignoreNull参数
SQL:
```sql
diff --git a/docs/zh/UserGuide/Operators-Functions/Anomaly-Detection.md b/docs/zh/UserGuide/Operators-Functions/Anomaly-Detection.md
index 0559e34a48..bccaf0c418 100644
--- a/docs/zh/UserGuide/Operators-Functions/Anomaly-Detection.md
+++ b/docs/zh/UserGuide/Operators-Functions/Anomaly-Detection.md
@@ -19,11 +19,11 @@
-->
-# 异常检测
+## 异常检测
-## IQR
+### IQR
-### 函数简介
+#### 函数简介
本函数用于检验超出上下四分位数1.5倍IQR的数据分布异常。
@@ -41,9 +41,9 @@
**说明**:$IQR=Q_3-Q_1$
-### 使用示例
+#### 使用示例
-#### 全数据计算
+##### 全数据计算
输入序列:
@@ -90,9 +90,9 @@ select iqr(s1) from root.test
+-----------------------------+-----------------+
```
-## KSigma
+### KSigma
-### 函数简介
+#### 函数简介
本函数利用动态 K-Sigma 算法进行异常检测。在一个窗口内,与平均值的差距超过k倍标准差的数据将被视作异常并输出。
@@ -110,9 +110,9 @@ select iqr(s1) from root.test
**提示:** k 应大于 0,否则将不做输出。
-### 使用示例
+#### 使用示例
-#### 指定k
+##### 指定k
输入序列:
@@ -157,9 +157,9 @@ select ksigma(s1,"k"="1.0") from root.test.d1 where time <= 2020-01-01 00:00:30
+-----------------------------+---------------------------------+
```
-## LOF
+### LOF
-### 函数简介
+#### 函数简介
本函数使用局部离群点检测方法用于查找序列的密度异常。将根据提供的第k距离数及局部离群点因子(lof)阈值,判断输入数据是否为离群点,即异常,并输出各点的 LOF 值。
@@ -179,9 +179,9 @@ select ksigma(s1,"k"="1.0") from root.test.d1 where time <= 2020-01-01 00:00:30
**提示:** 不完整的数据行会被忽略,不参与计算,也不标记为离群点。
-### 使用示例
+#### 使用示例
-#### 默认参数
+##### 默认参数
输入序列:
@@ -224,7 +224,7 @@ select lof(s1,s2) from root.test.d1 where time<1000
+-----------------------------+-------------------------------------+
```
-#### 诊断一维时间序列
+##### 诊断一维时间序列
输入序列:
@@ -286,9 +286,9 @@ select lof(s1, "method"="series") from root.test.d1 where time<1000
+-----------------------------+--------------------+
```
-## MissDetect
+### MissDetect
-### 函数简介
+#### 函数简介
本函数用于检测数据中的缺失异常。在一些数据中,缺失数据会被线性插值填补,在数据中出现完美的线性片段,且这些片段往往长度较大。本函数通过在数据中发现这些完美线性片段来检测缺失异常。
@@ -305,7 +305,7 @@ select lof(s1, "method"="series") from root.test.d1 where time<1000
**提示:** 数据中的`NaN`将会被忽略。
-### 使用示例
+#### 使用示例
输入序列:
@@ -373,9 +373,9 @@ select missdetect(s2,'minlen'='10') from root.test.d2
+-----------------------------+------------------------------------------+
```
-## Range
+### Range
-### 函数简介
+#### 函数简介
本函数用于查找时间序列的范围异常。将根据提供的上界与下界,判断输入数据是否越界,即异常,并输出所有异常点为新的时间序列。
@@ -393,9 +393,9 @@ select missdetect(s2,'minlen'='10') from root.test.d2
**提示:** 应满足`upper_bound`大于`lower_bound`,否则将不做输出。
-### 使用示例
+#### 使用示例
-#### 指定上界与下界
+##### 指定上界与下界
输入序列:
@@ -438,9 +438,9 @@ select range(s1,"lower_bound"="101.0","upper_bound"="125.0") from root.test.d1 w
+-----------------------------+------------------------------------------------------------------+
```
-## TwoSidedFilter
+### TwoSidedFilter
-### 函数简介
+#### 函数简介
本函数基于双边窗口检测法对输入序列中的异常点进行过滤。
@@ -455,7 +455,7 @@ select range(s1,"lower_bound"="101.0","upper_bound"="125.0") from root.test.d1 w
- `len`:双边窗口检测法中的窗口大小,取值范围为正整数,默认值为 5.如当`len`=3 时,算法向前、向后各取长度为3的窗口,在窗口中计算异常度。
- `threshold`:异常度的阈值,取值范围为(0,1),默认值为 0.3。阈值越高,函数对于异常度的判定标准越严格。
-### 使用示例
+#### 使用示例
输入序列:
@@ -530,9 +530,9 @@ select TwoSidedFilter(s0, 'len'='5', 'threshold'='0.3') from root.test
+-----------------------------+------------+
```
-## Outlier
+### Outlier
-### 函数简介
+#### 函数简介
本函数用于检测基于距离的异常点。在当前窗口中,如果一个点距离阈值范围内的邻居数量(包括它自己)少于密度阈值,则该点是异常点。
@@ -549,9 +549,9 @@ select TwoSidedFilter(s0, 'len'='5', 'threshold'='0.3') from root.test
**输出序列**:输出单个序列,类型与输入序列相同。
-### 使用示例
+#### 使用示例
-#### 指定查询参数
+##### 指定查询参数
输入序列:
diff --git a/docs/zh/UserGuide/Operators-Functions/Comparison.md b/docs/zh/UserGuide/Operators-Functions/Comparison.md
index 71ac9309f8..879a714858 100644
--- a/docs/zh/UserGuide/Operators-Functions/Comparison.md
+++ b/docs/zh/UserGuide/Operators-Functions/Comparison.md
@@ -19,9 +19,9 @@
-->
-# 比较运算符和函数
+## 比较运算符和函数
-## 基本比较运算符
+### 基本比较运算符
- 输入数据类型: `INT32`, `INT64`, `FLOAT`, `DOUBLE`。
- 注意:会将所有数据转换为`DOUBLE`类型后进行比较。`==`和`!=`可以直接比较两个`BOOLEAN`。
@@ -57,7 +57,7 @@ IoTDB> select a, b, a > 10, a <= b, !(a <= b), a > 10 && a > b from root.test;
+-----------------------------+-----------+-----------+----------------+--------------------------+---------------------------+------------------------------------------------+
```
-## `BETWEEN ... AND ...` 运算符
+### `BETWEEN ... AND ...` 运算符
|运算符 |含义|
|----------------------------|-----------|
@@ -74,7 +74,7 @@ select temperature from root.sg1.d1 where temperature between 36.5 and 40;
select temperature from root.sg1.d1 where temperature not between 36.5 and 40;
```
-## 模糊匹配运算符
+### 模糊匹配运算符
对于 TEXT 类型的数据,支持使用 `Like` 和 `Regexp` 运算符对数据进行模糊匹配
@@ -89,7 +89,7 @@ select temperature from root.sg1.d1 where temperature not between 36.5 and 40;
返回类型:`BOOLEAN`
-### 使用 `Like` 进行模糊匹配
+#### 使用 `Like` 进行模糊匹配
**匹配规则:**
@@ -123,7 +123,7 @@ Total line number = 1
It costs 0.002s
```
-### 使用 `Regexp` 进行模糊匹配
+#### 使用 `Regexp` 进行模糊匹配
需要传入的过滤条件为 **Java 标准库风格的正则表达式**。
@@ -180,7 +180,7 @@ select b, b like '1%', b regexp '[0-2]' from root.test;
+-----------------------------+-----------+-------------------------+--------------------------+
```
-## `IS NULL` 运算符
+### `IS NULL` 运算符
|运算符 |含义|
|----------------------------|-----------|
@@ -199,7 +199,7 @@ select code from root.sg1.d1 where temperature is null;
select code from root.sg1.d1 where temperature is not null;
```
-## `IN` 运算符
+### `IN` 运算符
|运算符 |含义|
|----------------------------|-----------|
@@ -245,7 +245,7 @@ select a, a in (1, 2) from root.test;
+-----------------------------+-----------+--------------------+
```
-## 条件函数
+### 条件函数
条件函数针对每个数据点进行条件判断,返回布尔值。
diff --git a/docs/zh/UserGuide/Operators-Functions/Constant.md b/docs/zh/UserGuide/Operators-Functions/Constant.md
index 6825bd32b2..41ad2bb24d 100644
--- a/docs/zh/UserGuide/Operators-Functions/Constant.md
+++ b/docs/zh/UserGuide/Operators-Functions/Constant.md
@@ -19,7 +19,7 @@
-->
-# 常序列生成函数
+## 常序列生成函数
常序列生成函数用于生成所有数据点的值都相同的时间序列。
diff --git a/docs/zh/UserGuide/Operators-Functions/Continuous-Interval.md b/docs/zh/UserGuide/Operators-Functions/Continuous-Interval.md
index 29cd01b8c5..627b2422f9 100644
--- a/docs/zh/UserGuide/Operators-Functions/Continuous-Interval.md
+++ b/docs/zh/UserGuide/Operators-Functions/Continuous-Interval.md
@@ -19,9 +19,9 @@
-->
-# 区间查询函数
+## 区间查询函数
-## 连续满足区间函数
+### 连续满足区间函数
连续满足条件区间函数用来查询所有满足指定条件的连续区间。
@@ -31,10 +31,10 @@
| 函数名 | 输入序列类型 | 属性参数 | 输出序列类型 | 功能描述 |
|-------------------|--------------------------------------|------------------------------------------------|-------|------------------------------------------------------------------|
-| ZERO_DURATION | INT32/ INT64/ FLOAT/ DOUBLE/ BOOLEAN | `min`:可选,默认值0</br>`max`:可选,默认值`Long.MAX_VALUE` | Long | 返回时间序列连续为0(false)的开始时间与持续时间,持续时间t(单位ms)满足`t >= min && t <= max` |
-| NON_ZERO_DURATION | INT32/ INT64/ FLOAT/ DOUBLE/ BOOLEAN | `min`:可选,默认值0</br>`max`:可选,默认值`Long.MAX_VALUE` | Long | 返回时间序列连续不为0(false)的开始时间与持续时间,持续时间t(单位ms)满足`t >= min && t <= max` | |
-| ZERO_COUNT | INT32/ INT64/ FLOAT/ DOUBLE/ BOOLEAN | `min`:可选,默认值1</br>`max`:可选,默认值`Long.MAX_VALUE` | Long | 返回时间序列连续为0(false)的开始时间与其后数据点的个数,数据点个数n满足`n >= min && n <= max` | |
-| NON_ZERO_COUNT | INT32/ INT64/ FLOAT/ DOUBLE/ BOOLEAN | `min`:可选,默认值1</br>`max`:可选,默认值`Long.MAX_VALUE` | Long | 返回时间序列连续不为0(false)的开始时间与其后数据点的个数,数据点个数n满足`n >= min && n <= max` | |
+| ZERO_DURATION | INT32/ INT64/ FLOAT/ DOUBLE/ BOOLEAN | `min`:可选,默认值0<br>`max`:可选,默认值`Long.MAX_VALUE` | Long | 返回时间序列连续为0(false)的开始时间与持续时间,持续时间t(单位ms)满足`t >= min && t <= max` |
+| NON_ZERO_DURATION | INT32/ INT64/ FLOAT/ DOUBLE/ BOOLEAN | `min`:可选,默认值0<br>`max`:可选,默认值`Long.MAX_VALUE` | Long | 返回时间序列连续不为0(false)的开始时间与持续时间,持续时间t(单位ms)满足`t >= min && t <= max` | |
+| ZERO_COUNT | INT32/ INT64/ FLOAT/ DOUBLE/ BOOLEAN | `min`:可选,默认值1<br>`max`:可选,默认值`Long.MAX_VALUE` | Long | 返回时间序列连续为0(false)的开始时间与其后数据点的个数,数据点个数n满足`n >= min && n <= max` | |
+| NON_ZERO_COUNT | INT32/ INT64/ FLOAT/ DOUBLE/ BOOLEAN | `min`:可选,默认值1<br>`max`:可选,默认值`Long.MAX_VALUE` | Long | 返回时间序列连续不为0(false)的开始时间与其后数据点的个数,数据点个数n满足`n >= min && n <= max` | |
测试数据:
```
diff --git a/docs/zh/UserGuide/Operators-Functions/Conversion.md b/docs/zh/UserGuide/Operators-Functions/Conversion.md
index 5efa14c0bd..02746ca336 100644
--- a/docs/zh/UserGuide/Operators-Functions/Conversion.md
+++ b/docs/zh/UserGuide/Operators-Functions/Conversion.md
@@ -19,11 +19,11 @@
-->
-# 数据类型转换
+## 数据类型转换
-## CAST
+### CAST
-### 函数简介
+#### 函数简介
当前IoTDB支持6种数据类型,其中包括INT32、INT64、FLOAT、DOUBLE、BOOLEAN以及TEXT。当我们对数据进行查询或者计算时可能需要进行数据类型的转换, 比如说将TEXT转换为INT32,或者提高数据精度,比如说将FLOAT转换为DOUBLE。所以,IoTDB支持使用cast函数对数据类型进行转换。
@@ -31,7 +31,7 @@
| ------ | ------------------------------------------------------------ | ------------------------ | ---------------------------------- |
| CAST | `type`:输出的数据点的类型,只能是 INT32 / INT64 / FLOAT / DOUBLE / BOOLEAN / TEXT | 由输入属性参数`type`决定 | 将数据转换为`type`参数指定的类型。 |
-### 类型转换说明
+#### 类型转换说明
1.当INT32、INT64类型的值不为0时,FLOAT与DOUBLE类型的值不为0.0时,TEXT类型不为空字符串或者"false"时,转换为BOOLEAN类型时值为true,否则为false。
@@ -98,7 +98,7 @@ Empty set.
It costs 0.009s
```
-### 使用示例
+#### 使用示例
测试数据:
```
diff --git a/docs/zh/UserGuide/Operators-Functions/Data-Matching.md b/docs/zh/UserGuide/Operators-Functions/Data-Matching.md
index 124f8ea3d1..99a8e196ce 100644
--- a/docs/zh/UserGuide/Operators-Functions/Data-Matching.md
+++ b/docs/zh/UserGuide/Operators-Functions/Data-Matching.md
@@ -19,11 +19,11 @@
-->
-# 数据匹配
+## 数据匹配
-## Cov
+### Cov
-### 函数简介
+#### 函数简介
本函数用于计算两列数值型数据的总体协方差。
@@ -39,7 +39,7 @@
+ 如果数据中所有的行都被忽略,函数将会输出`NaN`。
-### 使用示例
+#### 使用示例
输入序列:
@@ -82,9 +82,9 @@ select cov(s1,s2) from root.test.d2
+-----------------------------+-------------------------------------+
```
-## Dtw
+### Dtw
-### 函数简介
+#### 函数简介
本函数用于计算两列数值型数据的 DTW 距离。
@@ -100,7 +100,7 @@ select cov(s1,s2) from root.test.d2
+ 如果数据中所有的行都被忽略,函数将会输出 0。
-### 使用示例
+#### 使用示例
输入序列:
@@ -147,9 +147,9 @@ select dtw(s1,s2) from root.test.d2
+-----------------------------+-------------------------------------+
```
-## Pearson
+### Pearson
-### 函数简介
+#### 函数简介
本函数用于计算两列数值型数据的皮尔森相关系数。
@@ -164,7 +164,7 @@ select dtw(s1,s2) from root.test.d2
+ 如果某行数据中包含空值、缺失值或`NaN`,该行数据将会被忽略;
+ 如果数据中所有的行都被忽略,函数将会输出`NaN`。
-### 使用示例
+#### 使用示例
输入序列:
@@ -207,9 +207,9 @@ select pearson(s1,s2) from root.test.d2
+-----------------------------+-----------------------------------------+
```
-## PtnSym
+### PtnSym
-### 函数简介
+#### 函数简介
本函数用于寻找序列中所有对称度小于阈值的对称子序列。对称度通过 DTW 计算,值越小代表序列对称性越高。
@@ -225,7 +225,7 @@ select pearson(s1,s2) from root.test.d2
**输出序列:** 输出单个序列,类型为 DOUBLE。序列中的每一个数据点对应于一个对称子序列,时间戳为子序列的起始时刻,值为对称度。
-### 使用示例
+#### 使用示例
输入序列:
@@ -265,9 +265,9 @@ select ptnsym(s4, 'window'='5', 'threshold'='0') from root.test.d1
+-----------------------------+------------------------------------------------------+
```
-## XCorr
+### XCorr
-### 函数简介
+#### 函数简介
本函数用于计算两条时间序列的互相关函数值,
对离散序列而言,互相关函数可以表示为
@@ -291,7 +291,7 @@ $$OS[i] = CR(i-N) = \frac{1}{N} \sum_{m=1}^{2N-i} S_1[i-N+m]S_2[m],\ if\ i > N$$
+ 两条序列中的`null` 和`NaN` 值会被忽略,在计算中表现为 0。
-### 使用示例
+#### 使用示例
输入序列:
diff --git a/docs/zh/UserGuide/Operators-Functions/Data-Profiling.md b/docs/zh/UserGuide/Operators-Functions/Data-Profiling.md
index b496fc6b25..e92995743a 100644
--- a/docs/zh/UserGuide/Operators-Functions/Data-Profiling.md
+++ b/docs/zh/UserGuide/Operators-Functions/Data-Profiling.md
@@ -19,11 +19,11 @@
-->
-# 数据画像
+## 数据画像
-## ACF
+### ACF
-### 函数简介
+#### 函数简介
本函数用于计算时间序列的自相关函数值,即序列与自身之间的互相关函数,详情参见[XCorr](./Data-Matching.md#XCorr)函数文档。
@@ -37,7 +37,7 @@
+ 序列中的`NaN`值会被忽略,在计算中表现为0。
-### 使用示例
+#### 使用示例
输入序列:
@@ -78,9 +78,9 @@ select acf(s1) from root.test.d1 where time <= 2020-01-01 00:00:05
+-----------------------------+--------------------+
```
-## Distinct
+### Distinct
-### 函数简介
+#### 函数简介
本函数可以返回输入序列中出现的所有不同的元素。
@@ -97,7 +97,7 @@ select acf(s1) from root.test.d1 where time <= 2020-01-01 00:00:05
+ 字符串区分大小写
-### 使用示例
+#### 使用示例
输入序列:
@@ -131,9 +131,9 @@ select distinct(s2) from root.test.d2
+-----------------------------+-------------------------+
```
-## Histogram
+### Histogram
-### 函数简介
+#### 函数简介
本函数用于计算单列数值型数据的分布直方图。
@@ -155,7 +155,7 @@ select distinct(s2) from root.test.d2
+ 如果某个数据点的数值小于`min`,它会被放入第 1 个桶;如果某个数据点的数值大于`max`,它会被放入最后 1 个桶。
+ 数据中的空值、缺失值和`NaN`将会被忽略。
-### 使用示例
+#### 使用示例
输入序列:
@@ -211,9 +211,9 @@ select histogram(s1,"min"="1","max"="20","count"="10") from root.test.d1
+-----------------------------+---------------------------------------------------------------+
```
-## Integral
+### Integral
-### 函数简介
+#### 函数简介
本函数用于计算时间序列的数值积分,即以时间为横坐标、数值为纵坐标绘制的折线图中折线以下的面积。
@@ -234,9 +234,9 @@ select histogram(s1,"min"="1","max"="20","count"="10") from root.test.d1
+ 数据中`NaN`将会被忽略。折线将以临近两个有值数据点为准。
-### 使用示例
+#### 使用示例
-#### 参数缺省
+##### 参数缺省
缺省情况下积分以1s为时间单位。
@@ -278,7 +278,7 @@ select integral(s1) from root.test.d1 where time <= 2020-01-01 00:00:10
$$\frac{1}{2}[(1+2)\times 1 + (2+5) \times 1 + (5+6) \times 1 + (6+7) \times 1 + (7+8) \times 3 + (8+10) \times 2] = 57.5$$
-### 指定时间单位
+#### 指定时间单位
指定以分钟为时间单位。
@@ -302,9 +302,9 @@ select integral(s1, "unit"="1m") from root.test.d1 where time <= 2020-01-01 00:0
其计算公式为:
$$\frac{1}{2\times 60}[(1+2) \times 1 + (2+3) \times 1 + (5+6) \times 1 + (6+7) \times 1 + (7+8) \times 3 + (8+10) \times 2] = 0.958$$
-## IntegralAvg
+### IntegralAvg
-### 函数简介
+#### 函数简介
本函数用于计算时间序列的函数均值,即在相同时间单位下的数值积分除以序列总的时间跨度。更多关于数值积分计算的信息请参考`Integral`函数。
@@ -323,7 +323,7 @@ $$\frac{1}{2\times 60}[(1+2) \times 1 + (2+3) \times 1 + (5+6) \times 1 + (6+7)
+ 输入序列为空时,函数输出结果为 0;仅有一个数据点时,输出结果为该点数值。
-### 使用示例
+#### 使用示例
输入序列:
@@ -362,9 +362,9 @@ select integralavg(s1) from root.test.d1 where time <= 2020-01-01 00:00:10
其计算公式为:
$$\frac{1}{2}[(1+2)\times 1 + (2+5) \times 1 + (5+6) \times 1 + (6+7) \times 1 + (7+8) \times 3 + (8+10) \times 2] / 10 = 5.75$$
-## Mad
+### Mad
-### 函数简介
+#### 函数简介
本函数用于计算单列数值型数据的精确或近似绝对中位差,绝对中位差为所有数值与其中位数绝对偏移量的中位数。
@@ -383,9 +383,9 @@ $$\frac{1}{2}[(1+2)\times 1 + (2+5) \times 1 + (5+6) \times 1 + (6+7) \times 1 +
**提示:** 数据中的空值、缺失值和`NaN`将会被忽略。
-### 使用示例
+#### 使用示例
-#### 精确查询
+##### 精确查询
当`error`参数缺省或为0时,本函数计算精确绝对中位差。
@@ -441,7 +441,7 @@ select mad(s0) from root.test
+-----------------------------+------------------+
```
-#### 近似查询
+##### 近似查询
当`error`参数取值不为 0 时,本函数计算近似绝对中位差。
@@ -461,9 +461,9 @@ select mad(s0, "error"="0.01") from root.test
+-----------------------------+---------------------------------+
```
-## Median
+### Median
-### 函数简介
+#### 函数简介
本函数用于计算单列数值型数据的精确或近似中位数。中位数是顺序排列的一组数据中居于中间位置的数;当序列有偶数个时,中位数为中间二者的平均数。
@@ -477,7 +477,7 @@ select mad(s0, "error"="0.01") from root.test
**输出序列:** 输出单个序列,类型为 DOUBLE,序列仅包含一个时间戳为 0、值为中位数的数据点。
-### 使用示例
+#### 使用示例
输入序列:
@@ -531,9 +531,9 @@ select median(s0, "error"="0.01") from root.test
+-----------------------------+------------------------------------+
```
-## MinMax
+### MinMax
-### 函数简介
+#### 函数简介
本函数将输入序列使用 min-max 方法进行标准化。最小值归一至 0,最大值归一至 1.
@@ -549,9 +549,9 @@ select median(s0, "error"="0.01") from root.test
**输出序列**:输出单个序列,类型为 DOUBLE。
-### 使用示例
+#### 使用示例
-#### 全数据计算
+##### 全数据计算
输入序列:
@@ -617,9 +617,9 @@ select minmax(s1) from root.test
+-----------------------------+--------------------+
```
-## Mode
+### Mode
-### 函数简介
+#### 函数简介
本函数用于计算时间序列的众数,即出现次数最多的元素。
@@ -634,7 +634,7 @@ select minmax(s1) from root.test
+ 如果有多个出现次数最多的元素,将会输出任意一个。
+ 数据中的空值和缺失值将会被忽略,但`NaN`不会被忽略。
-### 使用示例
+#### 使用示例
输入序列:
@@ -672,9 +672,9 @@ select mode(s2) from root.test.d2
+-----------------------------+---------------------+
```
-## MvAvg
+### MvAvg
-### 函数简介
+#### 函数简介
本函数计算序列的移动平均。
@@ -688,9 +688,9 @@ select mode(s2) from root.test.d2
**输出序列**:输出单个序列,类型为 DOUBLE。
-### 使用示例
+#### 使用示例
-#### 指定窗口长度
+##### 指定窗口长度
输入序列:
@@ -754,9 +754,9 @@ select mvavg(s1, "window"="3") from root.test
+-----------------------------+---------------------------------+
```
-## PACF
+### PACF
-### 函数简介
+#### 函数简介
本函数通过求解 Yule-Walker 方程,计算序列的偏自相关系数。对于特殊的输入序列,方程可能没有解,此时输出`NaN`。
@@ -770,9 +770,9 @@ select mvavg(s1, "window"="3") from root.test
**输出序列**:输出单个序列,类型为 DOUBLE。
-### 使用示例
+#### 使用示例
-#### 指定滞后阶数
+##### 指定滞后阶数
输入序列:
@@ -825,9 +825,9 @@ select pacf(s1, "lag"="5") from root.test
+-----------------------------+-----------------------------+
```
-## Percentile
+### Percentile
-### 函数简介
+#### 函数简介
本函数用于计算单列数值型数据的精确或近似分位数。
@@ -844,7 +844,7 @@ select pacf(s1, "lag"="5") from root.test
**提示:** 数据中的空值、缺失值和`NaN`将会被忽略。
-### 使用示例
+#### 使用示例
输入序列:
@@ -899,9 +899,9 @@ select percentile(s0, "rank"="0.2", "error"="0.01") from root.test
+-----------------------------+------------------------------------------------------+
```
-## Quantile
+### Quantile
-### 函数简介
+#### 函数简介
本函数用于计算单列数值型数据的近似分位数。本函数基于KLL sketch算法实现。
@@ -918,7 +918,7 @@ select percentile(s0, "rank"="0.2", "error"="0.01") from root.test
**提示:** 数据中的空值、缺失值和`NaN`将会被忽略。
-### 使用示例
+#### 使用示例
输入序列:
@@ -973,9 +973,9 @@ select quantile(s0, "rank"="0.2", "K"="800") from root.test
+-----------------------------+------------------------------------------------------+
```
-## Period
+### Period
-### 函数简介
+#### 函数简介
本函数用于计算单列数值型数据的周期。
@@ -985,7 +985,7 @@ select quantile(s0, "rank"="0.2", "K"="800") from root.test
**输出序列:** 输出单个序列,类型为 INT32,序列仅包含一个时间戳为 0、值为周期的数据点。
-### 使用示例
+#### 使用示例
输入序列:
@@ -1021,9 +1021,9 @@ select period(s1) from root.test.d3
+-----------------------------+-----------------------+
```
-## QLB
+### QLB
-### 函数简介
+#### 函数简介
本函数对输入序列计算$Q_{LB} $统计量,并计算对应的p值。p值越小表明序列越有可能为非平稳序列。
@@ -1039,9 +1039,9 @@ select period(s1) from root.test.d3
**提示:** $Q_{LB} $统计量由自相关系数求得,如需得到统计量而非 p 值,可以使用 ACF 函数。
-### 使用示例
+#### 使用示例
-#### 使用默认参数
+##### 使用默认参数
输入序列:
@@ -1106,9 +1106,9 @@ select QLB(s1) from root.test.d1
+-----------------------------+--------------------+
```
-## Resample
+### Resample
-### 函数简介
+#### 函数简介
本函数对输入序列按照指定的频率进行重采样,包括上采样和下采样。目前,本函数支持的上采样方法包括`NaN`填充法 (NaN)、前值填充法 (FFill)、后值填充法 (BFill) 以及线性插值法 (Linear);本函数支持的下采样方法为分组聚合,聚合方法包括最大值 (Max)、最小值 (Min)、首值 (First)、末值 (Last)、平均值 (Mean)和中位数 (Median)。
@@ -1128,9 +1128,9 @@ select QLB(s1) from root.test.d1
**提示:** 数据中的`NaN`将会被忽略。
-### 使用示例
+#### 使用示例
-#### 上采样
+##### 上采样
当重采样频率高于数据原始频率时,将会进行上采样。
@@ -1177,7 +1177,7 @@ select resample(s1,'every'='5m','interp'='linear') from root.test.d1
+-----------------------------+----------------------------------------------------------+
```
-#### 下采样
+##### 下采样
当重采样频率低于数据原始频率时,将会进行下采样。
@@ -1200,7 +1200,7 @@ select resample(s1,'every'='30m','aggr'='first') from root.test.d1
```
-#### 指定重采样时间段
+##### 指定重采样时间段
可以使用`start`和`end`两个参数指定重采样的时间段,超出实际时间范围的部分会被插值填补。
@@ -1224,9 +1224,9 @@ select resample(s1,'every'='30m','start'='2021-03-06 15:00:00') from root.test.d
+-----------------------------+-----------------------------------------------------------------------+
```
-## Sample
+### Sample
-### 函数简介
+#### 函数简介
本函数对输入序列进行采样,即从输入序列中选取指定数量的数据点并输出。目前,本函数支持三种采样方法:**蓄水池采样法 (reservoir sampling)** 对数据进行随机采样,所有数据点被采样的概率相同;**等距采样法 (isometric sampling)** 按照相等的索引间隔对数据进行采样,**最大三角采样法 (triangle sampling)** 对所有数据会按采样率分桶,每个桶内会计算数据点间三角形面积,并保留面积最大的点,该算法通常用于数据的可视化展示中,采用过程可以保证一些关键的突变点在采用中得到保留,更多抽样算法细节可以阅读论文 [here](http://skemman.is/stream/get/1946/15343/37285/3/SS_MSthesis.pdf)。
@@ -1243,10 +1243,10 @@ select resample(s1,'every'='30m','start'='2021-03-06 15:00:00') from root.test.d
**提示:** 如果采样数大于序列长度,那么输入序列中所有的数据点都会被输出。
-### 使用示例
+#### 使用示例
-#### 蓄水池采样
+##### 蓄水池采样
当`method`参数为 'reservoir' 或缺省时,采用蓄水池采样法对输入序列进行采样。由于该采样方法具有随机性,下面展示的输出序列只是一种可能的结果。
@@ -1291,7 +1291,7 @@ select sample(s1,'method'='reservoir','k'='5') from root.test.d1
```
-#### 等距采样
+##### 等距采样
当`method`参数为 'isometric' 时,采用等距采样法对输入序列进行采样。
@@ -1315,9 +1315,9 @@ select sample(s1,'method'='isometric','k'='5') from root.test.d1
+-----------------------------+------------------------------------------------------+
```
-## Segment
+### Segment
-### 函数简介
+#### 函数简介
本函数按照数据的线性变化趋势将数据划分为多个子序列,返回分段直线拟合后的子序列首值或所有拟合值。
@@ -1335,7 +1335,7 @@ select sample(s1,'method'='isometric','k'='5') from root.test.d1
**提示:** 函数默认所有数据等时间间隔分布。函数读取所有数据,若原始数据过多,请先进行降采样处理。拟合采用自底向上方法,子序列的尾值可能会被认作子序列首值输出。
-### 使用示例
+#### 使用示例
输入序列:
@@ -1407,9 +1407,9 @@ select segment(s1,"error"="0.1") from root.test
+-----------------------------+------------------------------------+
```
-## Skew
+### Skew
-### 函数简介
+#### 函数简介
本函数用于计算单列数值型数据的总体偏度
@@ -1421,7 +1421,7 @@ select segment(s1,"error"="0.1") from root.test
**提示:** 数据中的空值、缺失值和`NaN`将会被忽略。
-### 使用示例
+#### 使用示例
输入序列:
@@ -1468,9 +1468,9 @@ select skew(s1) from root.test.d1
+-----------------------------+-----------------------+
```
-## Spline
+### Spline
-### 函数简介
+#### 函数简介
本函数提供对原始序列进行三次样条曲线拟合后的插值重采样。
@@ -1486,9 +1486,9 @@ select skew(s1) from root.test.d1
**提示**:输出序列保留输入序列的首尾值,等时间间隔采样。仅当输入点个数不少于 4 个时才计算插值。
-### 使用示例
+#### 使用示例
-#### 指定插值个数
+##### 指定插值个数
输入序列:
@@ -1675,9 +1675,9 @@ select spline(s1, "points"="151") from root.test
+-----------------------------+------------------------------------+
```
-## Spread
+### Spread
-### 函数简介
+#### 函数简介
本函数用于计算时间序列的极差,即最大值减去最小值的结果。
@@ -1689,7 +1689,7 @@ select spline(s1, "points"="151") from root.test
**提示:** 数据中的空值、缺失值和`NaN`将会被忽略。
-### 使用示例
+#### 使用示例
输入序列:
@@ -1731,9 +1731,9 @@ select spread(s1) from root.test.d1 where time <= 2020-01-01 00:00:30
+-----------------------------+-----------------------+
```
-## Stddev
+### Stddev
-### 函数简介
+#### 函数简介
本函数用于计算单列数值型数据的总体标准差。
@@ -1745,7 +1745,7 @@ select spread(s1) from root.test.d1 where time <= 2020-01-01 00:00:30
**提示:** 数据中的空值、缺失值和`NaN`将会被忽略。
-### 使用示例
+#### 使用示例
输入序列:
@@ -1792,9 +1792,9 @@ select stddev(s1) from root.test.d1
+-----------------------------+-----------------------+
```
-## ZScore
+### ZScore
-### 函数简介
+#### 函数简介
本函数将输入序列使用z-score方法进行归一化。
@@ -1810,9 +1810,9 @@ select stddev(s1) from root.test.d1
**输出序列**:输出单个序列,类型为 DOUBLE。
-### 使用示例
+#### 使用示例
-#### 全数据计算
+##### 全数据计算
输入序列:
diff --git a/docs/zh/UserGuide/Operators-Functions/Data-Quality.md b/docs/zh/UserGuide/Operators-Functions/Data-Quality.md
index 66c22108c7..4b18b0de74 100644
--- a/docs/zh/UserGuide/Operators-Functions/Data-Quality.md
+++ b/docs/zh/UserGuide/Operators-Functions/Data-Quality.md
@@ -19,11 +19,11 @@
-->
-# 数据质量
+## 数据质量
-## Completeness
+### Completeness
-### 函数简介
+#### 函数简介
本函数用于计算时间序列的完整性。将输入序列划分为若干个连续且不重叠的窗口,分别计算每一个窗口的完整性,并输出窗口第一个数据点的时间戳和窗口的完整性。
@@ -41,9 +41,9 @@
**提示:** 只有当窗口内的数据点数目超过10时,才会进行完整性计算。否则,该窗口将被忽略,不做任何输出。
-### 使用示例
+#### 使用示例
-#### 参数缺省
+###### 参数缺省
在参数缺省的情况下,本函数将会把全部输入数据都作为同一个窗口计算完整性。
@@ -87,7 +87,7 @@ select completeness(s1) from root.test.d1 where time <= 2020-01-01 00:00:30
+-----------------------------+-----------------------------+
```
-#### 指定窗口大小
+###### 指定窗口大小
在指定窗口大小的情况下,本函数会把输入数据划分为若干个窗口计算完整性。
@@ -147,9 +147,9 @@ select completeness(s1,"window"="15") from root.test.d1 where time <= 2020-01-01
+-----------------------------+--------------------------------------------+
```
-## Consistency
+### Consistency
-### 函数简介
+#### 函数简介
本函数用于计算时间序列的一致性。将输入序列划分为若干个连续且不重叠的窗口,分别计算每一个窗口的一致性,并输出窗口第一个数据点的时间戳和窗口的时效性。
@@ -166,9 +166,9 @@ select completeness(s1,"window"="15") from root.test.d1 where time <= 2020-01-01
**提示:** 只有当窗口内的数据点数目超过10时,才会进行一致性计算。否则,该窗口将被忽略,不做任何输出。
-### 使用示例
+#### 使用示例
-#### 参数缺省
+###### 参数缺省
在参数缺省的情况下,本函数将会把全部输入数据都作为同一个窗口计算一致性。
@@ -212,7 +212,7 @@ select consistency(s1) from root.test.d1 where time <= 2020-01-01 00:00:30
+-----------------------------+----------------------------+
```
-#### 指定窗口大小
+###### 指定窗口大小
在指定窗口大小的情况下,本函数会把输入数据划分为若干个窗口计算一致性。
@@ -272,9 +272,9 @@ select consistency(s1,"window"="15") from root.test.d1 where time <= 2020-01-01
+-----------------------------+-------------------------------------------+
```
-## Timeliness
+### Timeliness
-### 函数简介
+#### 函数简介
本函数用于计算时间序列的时效性。将输入序列划分为若干个连续且不重叠的窗口,分别计算每一个窗口的时效性,并输出窗口第一个数据点的时间戳和窗口的时效性。
@@ -291,9 +291,9 @@ select consistency(s1,"window"="15") from root.test.d1 where time <= 2020-01-01
**提示:** 只有当窗口内的数据点数目超过10时,才会进行时效性计算。否则,该窗口将被忽略,不做任何输出。
-### 使用示例
+#### 使用示例
-#### 参数缺省
+###### 参数缺省
在参数缺省的情况下,本函数将会把全部输入数据都作为同一个窗口计算时效性。
@@ -337,7 +337,7 @@ select timeliness(s1) from root.test.d1 where time <= 2020-01-01 00:00:30
+-----------------------------+---------------------------+
```
-#### 指定窗口大小
+###### 指定窗口大小
在指定窗口大小的情况下,本函数会把输入数据划分为若干个窗口计算时效性。
@@ -397,9 +397,9 @@ select timeliness(s1,"window"="15") from root.test.d1 where time <= 2020-01-01 0
+-----------------------------+------------------------------------------+
```
-## Validity
+### Validity
-### 函数简介
+#### 函数简介
本函数用于计算时间序列的有效性。将输入序列划分为若干个连续且不重叠的窗口,分别计算每一个窗口的有效性,并输出窗口第一个数据点的时间戳和窗口的有效性。
@@ -417,9 +417,9 @@ select timeliness(s1,"window"="15") from root.test.d1 where time <= 2020-01-01 0
**提示:** 只有当窗口内的数据点数目超过10时,才会进行有效性计算。否则,该窗口将被忽略,不做任何输出。
-### 使用示例
+#### 使用示例
-#### 参数缺省
+###### 参数缺省
在参数缺省的情况下,本函数将会把全部输入数据都作为同一个窗口计算有效性。
@@ -463,7 +463,7 @@ select validity(s1) from root.test.d1 where time <= 2020-01-01 00:00:30
+-----------------------------+-------------------------+
```
-#### 指定窗口大小
+###### 指定窗口大小
在指定窗口大小的情况下,本函数会把输入数据划分为若干个窗口计算有效性。
@@ -523,9 +523,9 @@ select validity(s1,"window"="15") from root.test.d1 where time <= 2020-01-01 00:
+-----------------------------+----------------------------------------+
```
-## Accuracy
+### Accuracy
-### 函数简介
+#### 函数简介
本函数基于主数据计算原始时间序列的准确性。
@@ -541,7 +541,7 @@ select validity(s1,"window"="15") from root.test.d1 where time <= 2020-01-01 00:
**输出序列**:输出单个值,类型为DOUBLE,值的范围为[0,1]。
-### 使用示例
+#### 使用示例
输入序列:
diff --git a/docs/zh/UserGuide/Operators-Functions/Data-Repairing.md b/docs/zh/UserGuide/Operators-Functions/Data-Repairing.md
index fe555d0c64..8318695d49 100644
--- a/docs/zh/UserGuide/Operators-Functions/Data-Repairing.md
+++ b/docs/zh/UserGuide/Operators-Functions/Data-Repairing.md
@@ -19,11 +19,11 @@
-->
-# 数据修复
+## 数据修复
-## TimestampRepair
+### TimestampRepair
-### 函数简介
+#### 函数简介
本函数用于时间戳修复。根据给定的标准时间间隔,采用最小化修复代价的方法,通过对数据时间戳的微调,将原本时间戳间隔不稳定的数据修复为严格等间隔的数据。在未给定标准时间间隔的情况下,本函数将使用时间间隔的中位数 (median)、众数 (mode) 或聚类中心 (cluster) 来推算标准时间间隔。
@@ -39,9 +39,9 @@
**输出序列:** 输出单个序列,类型与输入序列相同。该序列是修复后的输入序列。
-### 使用示例
+#### 使用示例
-#### 指定标准时间间隔
+##### 指定标准时间间隔
在给定`interval`参数的情况下,本函数将按照指定的标准时间间隔进行修复。
@@ -89,7 +89,7 @@ select timestamprepair(s1,'interval'='10000') from root.test.d2
+-----------------------------+----------------------------------------------------+
```
-#### 自动推算标准时间间隔
+##### 自动推算标准时间间隔
如果`interval`参数没有给定,本函数将按照推算的标准时间间隔进行修复。
@@ -118,9 +118,9 @@ select timestamprepair(s1) from root.test.d2
+-----------------------------+--------------------------------+
```
-## ValueFill
+### ValueFill
-### 函数简介
+#### 函数简介
**函数名:** ValueFill
@@ -134,8 +134,8 @@ select timestamprepair(s1) from root.test.d2
**备注:** AR 模型采用 AR(1),时序列需满足自相关条件,否则将输出单个数据点 (0, 0.0).
-### 使用示例
-#### 使用 linear 方法进行填补
+#### 使用示例
+##### 使用 linear 方法进行填补
当`method`缺省或取值为 'linear' 时,本函数将使用线性插值方法进行填补。
@@ -195,7 +195,7 @@ select valuefill(s1) from root.test.d2
+-----------------------------+-----------------------+
```
-#### 使用 previous 方法进行填补
+##### 使用 previous 方法进行填补
当`method`取值为 'previous' 时,本函数将使前值填补方法进行数值填补。
@@ -229,9 +229,9 @@ select valuefill(s1,"method"="previous") from root.test.d2
+-----------------------------+-------------------------------------------+
```
-## ValueRepair
+### ValueRepair
-### 函数简介
+#### 函数简介
本函数用于对时间序列的数值进行修复。目前,本函数支持两种修复方法:**Screen** 是一种基于速度阈值的方法,在最小改动的前提下使得所有的速度符合阈值要求;**LsGreedy** 是一种基于速度变化似然的方法,将速度变化建模为高斯分布,并采用贪心算法极大化似然函数。
@@ -251,9 +251,9 @@ select valuefill(s1,"method"="previous") from root.test.d2
**提示:** 输入序列中的`NaN`在修复之前会先进行线性插值填补。
-### 使用示例
+#### 使用示例
-#### 使用 Screen 方法进行修复
+##### 使用 Screen 方法进行修复
当`method`缺省或取值为 'Screen' 时,本函数将使用 Screen 方法进行数值修复。
@@ -311,7 +311,7 @@ select valuerepair(s1) from root.test.d2
+-----------------------------+----------------------------+
```
-#### 使用 LsGreedy 方法进行修复
+##### 使用 LsGreedy 方法进行修复
当`method`取值为 'LsGreedy' 时,本函数将使用 LsGreedy 方法进行数值修复。
@@ -345,9 +345,9 @@ select valuerepair(s1,'method'='LsGreedy') from root.test.d2
+-----------------------------+-------------------------------------------------+
```
-## MasterRepair
+### MasterRepair
-### 函数简介
+#### 函数简介
本函数实现基于主数据的时间序列数据修复。
@@ -364,7 +364,7 @@ select valuerepair(s1,'method'='LsGreedy') from root.test.d2
**输出序列:**输出单个序列,类型与输入数据中对应列的类型相同,序列为输入列修复后的结果。
-### 使用示例
+#### 使用示例
输入序列:
@@ -407,9 +407,9 @@ select MasterRepair(t1,t2,t3,m1,m2,m3) from root.test
+-----------------------------+-------------------------------------------------------------------------------------------+
```
-## SeasonalRepair
+### SeasonalRepair
-### 函数简介
+#### 函数简介
本函数用于对周期性时间序列的数值进行基于分解的修复。目前,本函数支持两种方法:**Classical**使用经典分解方法得到的残差项检测数值的异常波动,并使用滑动平均修复序列;**Improved**使用改进的分解方法得到的残差项检测数值的异常波动,并使用滑动中值修复序列。
**函数名:** SEASONALREPAIR
@@ -427,8 +427,8 @@ select MasterRepair(t1,t2,t3,m1,m2,m3) from root.test
**提示:** 输入序列中的`NaN`在修复之前会先进行线性插值填补。
-### 使用示例
-#### 使用经典分解方法进行修复
+#### 使用示例
+##### 使用经典分解方法进行修复
当`method`缺省或取值为'Classical'时,本函数将使用经典分解方法进行数值修复。
输入序列:
@@ -479,7 +479,7 @@ select seasonalrepair(s1,'period'=3,'k'=2) from root.test.d2
+-----------------------------+--------------------------------------------------+
```
-#### 使用改进的分解方法进行修复
+##### 使用改进的分解方法进行修复
当`method`取值为'Improved'时,本函数将使用改进的分解方法进行数值修复。
输入序列同上,用于查询的SQL语句如下:
diff --git a/docs/zh/UserGuide/Operators-Functions/Frequency-Domain.md b/docs/zh/UserGuide/Operators-Functions/Frequency-Domain.md
index 50091a0c70..9d10ed125a 100644
--- a/docs/zh/UserGuide/Operators-Functions/Frequency-Domain.md
+++ b/docs/zh/UserGuide/Operators-Functions/Frequency-Domain.md
@@ -19,11 +19,11 @@
-->
-# 频域分析
+## 频域分析
-## Conv
+### Conv
-### 函数简介
+#### 函数简介
本函数对两个输入序列进行卷积,即多项式乘法。
@@ -36,7 +36,7 @@
**提示:** 输入序列中的`NaN`将被忽略。
-### 使用示例
+#### 使用示例
输入序列:
@@ -69,9 +69,9 @@ select conv(s1,s2) from root.test.d2
+-----------------------------+--------------------------------------+
```
-## Deconv
+### Deconv
-### 函数简介
+#### 函数简介
本函数对两个输入序列进行去卷积,即多项式除法运算。
@@ -87,9 +87,9 @@ select conv(s1,s2) from root.test.d2
**提示:** 输入序列中的`NaN`将被忽略。
-### 使用示例
+#### 使用示例
-#### 计算去卷积的商
+##### 计算去卷积的商
当`result`参数缺省或为'quotient'时,本函数计算去卷积的商。
@@ -125,7 +125,7 @@ select deconv(s3,s2) from root.test.d2
+-----------------------------+----------------------------------------+
```
-#### 计算去卷积的余数
+##### 计算去卷积的余数
当`result`参数为'remainder'时,本函数计算去卷积的余数。输入序列同上,用于查询的SQL语句如下:
@@ -146,9 +146,9 @@ select deconv(s3,s2,'result'='remainder') from root.test.d2
+-----------------------------+--------------------------------------------------------------+
```
-## DWT
+### DWT
-### 函数简介
+#### 函数简介
本函数对输入序列进行一维离散小波变换。
@@ -166,9 +166,9 @@ select deconv(s3,s2,'result'='remainder') from root.test.d2
**提示:** 输入序列长度必须为2的整数次幂。
-### 使用示例
+#### 使用示例
-#### Haar变换
+##### Haar变换
输入序列:
@@ -227,9 +227,9 @@ select dwt(s1,"method"="haar") from root.test.d1
+-----------------------------+-------------------------------------+
```
-## FFT
+### FFT
-### 函数简介
+#### 函数简介
本函数对输入序列进行快速傅里叶变换。
@@ -247,9 +247,9 @@ select dwt(s1,"method"="haar") from root.test.d1
**提示:** 输入序列中的`NaN`将被忽略。
-### 使用示例
+#### 使用示例
-#### 等距傅里叶变换
+##### 等距傅里叶变换
当`type`参数缺省或为'uniform'时,本函数进行等距傅里叶变换。
@@ -319,7 +319,7 @@ select fft(s1) from root.test.d1
注:输入序列服从$y=sin(2\pi t/4)+2sin(2\pi t/5)$,长度为20,因此在输出序列中$k=4$和$k=5$处有尖峰。
-#### 等距傅里叶变换并压缩
+##### 等距傅里叶变换并压缩
输入序列同上,用于查询的SQL语句如下:
@@ -347,9 +347,9 @@ select fft(s1, 'result'='real', 'compress'='0.99'), fft(s1, 'result'='imag','com
注:基于傅里叶变换结果的共轭性质,压缩结果只保留前一半;根据给定的压缩参数,从低频到高频保留数据点,直到保留的能量比例超过该值;保留最后一个数据点以表示序列长度。
-## HighPass
+### HighPass
-### 函数简介
+#### 函数简介
本函数对输入序列进行高通滤波,提取高于截止频率的分量。输入序列的时间戳将被忽略,所有数据点都将被视作等距的。
@@ -365,7 +365,7 @@ select fft(s1, 'result'='real', 'compress'='0.99'), fft(s1, 'result'='imag','com
**提示:** 输入序列中的`NaN`将被忽略。
-### 使用示例
+#### 使用示例
输入序列:
@@ -435,9 +435,9 @@ select highpass(s1,'wpass'='0.45') from root.test.d1
注:输入序列服从$y=sin(2\pi t/4)+2sin(2\pi t/5)$,长度为20,因此高通滤波之后的输出序列服从$y=sin(2\pi t/4)$。
-## IFFT
+### IFFT
-### 函数简介
+#### 函数简介
本函数将输入的两个序列作为实部和虚部视作一个复数,进行逆快速傅里叶变换,并输出结果的实部。输入数据的格式参见`FFT`函数的输出,并支持以`FFT`函数压缩后的输出作为本函数的输入。
@@ -455,7 +455,7 @@ select highpass(s1,'wpass'='0.45') from root.test.d1
**提示:** 如果某行数据中包含空值或`NaN`,该行数据将会被忽略。
-### 使用示例
+#### 使用示例
输入序列:
@@ -510,9 +510,9 @@ select ifft(re, im, 'interval'='1m', 'start'='2021-01-01 00:00:00') from root.te
+-----------------------------+-------------------------------------------------------+
```
-## LowPass
+### LowPass
-### 函数简介
+#### 函数简介
本函数对输入序列进行低通滤波,提取低于截止频率的分量。输入序列的时间戳将被忽略,所有数据点都将被视作等距的。
@@ -528,7 +528,7 @@ select ifft(re, im, 'interval'='1m', 'start'='2021-01-01 00:00:00') from root.te
**提示:** 输入序列中的`NaN`将被忽略。
-### 使用示例
+#### 使用示例
输入序列:
diff --git a/docs/zh/UserGuide/Operators-Functions/Lambda.md b/docs/zh/UserGuide/Operators-Functions/Lambda.md
index af753b755d..466716b6db 100644
--- a/docs/zh/UserGuide/Operators-Functions/Lambda.md
+++ b/docs/zh/UserGuide/Operators-Functions/Lambda.md
@@ -19,11 +19,11 @@
-->
-# Lambda 表达式
+## Lambda 表达式
-## JEXL 自定义函数
+### JEXL 自定义函数
-### 函数简介
+#### 函数简介
Java Expression Language (JEXL) 是一个表达式语言引擎。我们使用 JEXL 来扩展 UDF,在命令行中,通过简易的 lambda 表达式来实现 UDF。
@@ -33,7 +33,7 @@ lambda 表达式中支持的运算符详见链接 [JEXL 中 lambda 表达式支
|----------|--------------------------------|---------------------------------------|------------|--------------------------------------------------|
| JEXL | INT32 / INT64 / FLOAT / DOUBLE / TEXT / BOOLEAN | `expr`是一个支持标准的一元或多元参数的lambda表达式,符合`x -> {...}`或`(x, y, z) -> {...}`的格式,例如`x -> {x * 2}`, `(x, y, z) -> {x + y * z}`| INT32 / INT64 / FLOAT / DOUBLE / TEXT / BOOLEAN | 返回将输入的时间序列通过lambda表达式变换的序列 |
-### 使用示例
+#### 使用示例
输入序列:
```
diff --git a/docs/zh/UserGuide/Operators-Functions/Logical.md b/docs/zh/UserGuide/Operators-Functions/Logical.md
index 42c6909b99..5d9cd83416 100644
--- a/docs/zh/UserGuide/Operators-Functions/Logical.md
+++ b/docs/zh/UserGuide/Operators-Functions/Logical.md
@@ -19,16 +19,16 @@
-->
-# 逻辑运算符
+## 逻辑运算符
-## 一元逻辑运算符
+### 一元逻辑运算符
- 支持运算符:`!`
- 输入数据类型:`BOOLEAN`。
- 输出数据类型:`BOOLEAN`。
- 注意:`!`的优先级很高,记得使用括号调整优先级。
-## 二元逻辑运算符
+### 二元逻辑运算符
- 支持运算符
- AND:`and`,`&`, `&&`
diff --git a/docs/zh/UserGuide/Operators-Functions/Machine-Learning.md b/docs/zh/UserGuide/Operators-Functions/Machine-Learning.md
index 784ae641cb..1593e09a99 100644
--- a/docs/zh/UserGuide/Operators-Functions/Machine-Learning.md
+++ b/docs/zh/UserGuide/Operators-Functions/Machine-Learning.md
@@ -19,11 +19,11 @@
-->
-# 机器学习
+## 机器学习
-## AR
+### AR
-### 函数简介
+#### 函数简介
本函数用于学习数据的自回归模型系数。
@@ -44,9 +44,9 @@
- 序列中的大部分点为等间隔采样点。
- 序列中的缺失点通过线性插值进行填补后用于学习过程。
-### 使用示例
+#### 使用示例
-#### 指定阶数
+##### 指定阶数
输入序列:
diff --git a/docs/zh/UserGuide/Operators-Functions/Mathematical.md b/docs/zh/UserGuide/Operators-Functions/Mathematical.md
index 263ab4354e..9d96c440e6 100644
--- a/docs/zh/UserGuide/Operators-Functions/Mathematical.md
+++ b/docs/zh/UserGuide/Operators-Functions/Mathematical.md
@@ -19,11 +19,11 @@
-->
-# 算数运算符和函数
+## 算数运算符和函数
-## 算数运算符
+### 算数运算符
-### 一元算数运算符
+#### 一元算数运算符
支持的运算符:`+`, `-`
@@ -31,7 +31,7 @@
输出数据类型:与输入数据类型一致
-### 二元算数运算符
+#### 二元算数运算符
支持的运算符:`+`, `-`, `*`, `/`, `%`
@@ -41,7 +41,7 @@
注意:当某个时间戳下左操作数和右操作数都不为空(`null`)时,二元运算操作才会有输出结果
-### 使用示例
+#### 使用示例
例如:
@@ -65,7 +65,7 @@ Total line number = 5
It costs 0.014s
```
-## 数学函数
+### 数学函数
目前 IoTDB 支持下列数学函数,这些数学函数的行为与这些函数在 Java Math 标准库中对应实现的行为一致。
diff --git a/docs/zh/UserGuide/Operators-Functions/Overview.md b/docs/zh/UserGuide/Operators-Functions/Overview.md
index b0a85dc90e..deb197edea 100644
--- a/docs/zh/UserGuide/Operators-Functions/Overview.md
+++ b/docs/zh/UserGuide/Operators-Functions/Overview.md
@@ -199,10 +199,10 @@ OR, |, ||
| 函数名 | 输入序列类型 | 属性参数 | 输出序列类型 | 功能描述 |
|-------------------|--------------------------------------|------------------------------------------------|-------|------------------------------------------------------------------|
-| ZERO_DURATION | INT32/ INT64/ FLOAT/ DOUBLE/ BOOLEAN | `min`:可选,默认值0</br>`max`:可选,默认值`Long.MAX_VALUE` | Long | 返回时间序列连续为0(false)的开始时间与持续时间,持续时间t(单位ms)满足`t >= min && t <= max` |
-| NON_ZERO_DURATION | INT32/ INT64/ FLOAT/ DOUBLE/ BOOLEAN | `min`:可选,默认值0</br>`max`:可选,默认值`Long.MAX_VALUE` | Long | 返回时间序列连续不为0(false)的开始时间与持续时间,持续时间t(单位ms)满足`t >= min && t <= max` | |
-| ZERO_COUNT | INT32/ INT64/ FLOAT/ DOUBLE/ BOOLEAN | `min`:可选,默认值1</br>`max`:可选,默认值`Long.MAX_VALUE` | Long | 返回时间序列连续为0(false)的开始时间与其后数据点的个数,数据点个数n满足`n >= min && n <= max` | |
-| NON_ZERO_COUNT | INT32/ INT64/ FLOAT/ DOUBLE/ BOOLEAN | `min`:可选,默认值1</br>`max`:可选,默认值`Long.MAX_VALUE` | Long | 返回时间序列连续不为0(false)的开始时间与其后数据点的个数,数据点个数n满足`n >= min && n <= max` | |
+| ZERO_DURATION | INT32/ INT64/ FLOAT/ DOUBLE/ BOOLEAN | `min`:可选,默认值0<br>`max`:可选,默认值`Long.MAX_VALUE` | Long | 返回时间序列连续为0(false)的开始时间与持续时间,持续时间t(单位ms)满足`t >= min && t <= max` |
+| NON_ZERO_DURATION | INT32/ INT64/ FLOAT/ DOUBLE/ BOOLEAN | `min`:可选,默认值0<br>`max`:可选,默认值`Long.MAX_VALUE` | Long | 返回时间序列连续不为0(false)的开始时间与持续时间,持续时间t(单位ms)满足`t >= min && t <= max` | |
+| ZERO_COUNT | INT32/ INT64/ FLOAT/ DOUBLE/ BOOLEAN | `min`:可选,默认值1<br>`max`:可选,默认值`Long.MAX_VALUE` | Long | 返回时间序列连续为0(false)的开始时间与其后数据点的个数,数据点个数n满足`n >= min && n <= max` | |
+| NON_ZERO_COUNT | INT32/ INT64/ FLOAT/ DOUBLE/ BOOLEAN | `min`:可选,默认值1<br>`max`:可选,默认值`Long.MAX_VALUE` | Long | 返回时间序列连续不为0(false)的开始时间与其后数据点的个数,数据点个数n满足`n >= min && n <= max` | |
详细说明及示例见文档 [区间查询函数](./Continuous-Interval.md)。
@@ -228,9 +228,9 @@ OR, |, ||
| 函数名 | 可接收的输入序列类型 | 必要的属性参数 | 输出序列类型 | 功能类型 |
|----------|--------------------------------|---------------------------------------|------------|--------------------------------------------------|
| EQUAL_SIZE_BUCKET_RANDOM_SAMPLE | INT32 / INT64 / FLOAT / DOUBLE | 降采样比例 `proportion`,取值范围为`(0, 1]`,默认为`0.1` | INT32 / INT64 / FLOAT / DOUBLE | 返回符合采样比例的等分桶随机采样 |
-| EQUAL_SIZE_BUCKET_AGG_SAMPLE | INT32 / INT64 / FLOAT / DOUBLE | `proportion`取值范围为`(0, 1]`,默认为`0.1`</br>`type`:取值类型有`avg`, `max`, `min`, `sum`, `extreme`, `variance`, 默认为`avg` | INT32 / INT64 / FLOAT / DOUBLE | 返回符合采样比例的等分桶聚合采样 |
+| EQUAL_SIZE_BUCKET_AGG_SAMPLE | INT32 / INT64 / FLOAT / DOUBLE | `proportion`取值范围为`(0, 1]`,默认为`0.1`<br>`type`:取值类型有`avg`, `max`, `min`, `sum`, `extreme`, `variance`, 默认为`avg` | INT32 / INT64 / FLOAT / DOUBLE | 返回符合采样比例的等分桶聚合采样 |
| EQUAL_SIZE_BUCKET_M4_SAMPLE | INT32 / INT64 / FLOAT / DOUBLE | `proportion`取值范围为`(0, 1]`,默认为`0.1`| INT32 / INT64 / FLOAT / DOUBLE | 返回符合采样比例的等分桶M4采样 |
-| EQUAL_SIZE_BUCKET_OUTLIER_SAMPLE | INT32 / INT64 / FLOAT / DOUBLE | `proportion`取值范围为`(0, 1]`,默认为`0.1`</br>`type`取值为`avg`或`stendis`或`cos`或`prenextdis`,默认为`avg`</br>`number`取值应大于0,默认`3`| INT32 / INT64 / FLOAT / DOUBLE | 返回符合采样比例和桶内采样个数的等分桶离群值采样 |
+| EQUAL_SIZE_BUCKET_OUTLIER_SAMPLE | INT32 / INT64 / FLOAT / DOUBLE | `proportion`取值范围为`(0, 1]`,默认为`0.1`<br>`type`取值为`avg`或`stendis`或`cos`或`prenextdis`,默认为`avg`<br>`number`取值应大于0,默认`3`| INT32 / INT64 / FLOAT / DOUBLE | 返回符合采样比例和桶内采样个数的等分桶离群值采样 |
| M4 | INT32 / INT64 / FLOAT / DOUBLE | 包含固定点数的窗口和滑动时间窗口使用不同的属性参数。包含固定点数的窗口使用属性`windowSize`和`slidingStep`。滑动时间窗口使用属性`timeInterval`、`slidingStep`、`displayWindowBegin`和`displayWindowEnd`。更多细节见下文。 | INT32 / INT64 / FLOAT / DOUBLE | 返回每个窗口内的第一个点(`first`)、最后一个点(`last`)、最小值点(`bottom`)、最大值点(`top`)。在一个窗口内的聚合点输出之前,M4会将它们按照时间戳递增排序并且去重。 |
## 数据质量函数库
diff --git a/docs/zh/UserGuide/Operators-Functions/Sample.md b/docs/zh/UserGuide/Operators-Functions/Sample.md
index 9c18f989f4..ef9f809794 100644
--- a/docs/zh/UserGuide/Operators-Functions/Sample.md
+++ b/docs/zh/UserGuide/Operators-Functions/Sample.md
@@ -19,15 +19,15 @@
-->
-# 采样函数
+## 采样函数
-## 等数量分桶降采样函数
+### 等数量分桶降采样函数
本函数对输入序列进行等数量分桶采样,即根据用户给定的降采样比例和降采样方法将输入序列按固定点数等分为若干桶。在每个桶内通过给定的采样方法进行采样。
-### 等数量分桶随机采样
+#### 等数量分桶随机采样
-#### 函数简介
+##### 函数简介
对等数量分桶后,桶内进行随机采样。
@@ -35,7 +35,7 @@
|----------|--------------------------------|---------------------------------------|------------|--------------------------------------------------|
| EQUAL_SIZE_BUCKET_RANDOM_SAMPLE | INT32 / INT64 / FLOAT / DOUBLE | 降采样比例 `proportion`,取值范围为`(0, 1]`,默认为`0.1` | INT32 / INT64 / FLOAT / DOUBLE | 返回符合采样比例的等分桶随机采样 |
-#### 使用示例
+##### 使用示例
输入序列:`root.ln.wf01.wt01.temperature`从`0.0-99.0`共`100`条数据。
@@ -95,9 +95,9 @@ Total line number = 10
It costs 0.024s
```
-### 等数量分桶聚合采样
+#### 等数量分桶聚合采样
-#### 函数简介
+##### 函数简介
采用聚合采样法对输入序列进行采样,用户需要另外提供一个聚合函数参数即
- `type`:聚合类型,取值为`avg`或`max`或`min`或`sum`或`extreme`或`variance`。在缺省情况下,采用`avg`。其中`extreme`表示等分桶中,绝对值最大的值。`variance`表示采样等分桶中的方差。
@@ -107,9 +107,9 @@ It costs 0.024s
| 函数名 | 可接收的输入序列类型 | 必要的属性参数 | 输出序列类型 | 功能类型 |
|----------|--------------------------------|---------------------------------------|------------|--------------------------------------------------|
-| EQUAL_SIZE_BUCKET_AGG_SAMPLE | INT32 / INT64 / FLOAT / DOUBLE | `proportion`取值范围为`(0, 1]`,默认为`0.1`</br>`type`:取值类型有`avg`, `max`, `min`, `sum`, `extreme`, `variance`, 默认为`avg` | INT32 / INT64 / FLOAT / DOUBLE | 返回符合采样比例的等分桶聚合采样 |
+| EQUAL_SIZE_BUCKET_AGG_SAMPLE | INT32 / INT64 / FLOAT / DOUBLE | `proportion`取值范围为`(0, 1]`,默认为`0.1`<br>`type`:取值类型有`avg`, `max`, `min`, `sum`, `extreme`, `variance`, 默认为`avg` | INT32 / INT64 / FLOAT / DOUBLE | 返回符合采样比例的等分桶聚合采样 |
-#### 使用示例
+##### 使用示例
输入序列:`root.ln.wf01.wt01.temperature`从`0.0-99.0`共`100`条有序数据,同等分桶随机采样的测试数据。
@@ -137,9 +137,9 @@ Total line number = 10
It costs 0.044s
```
-### 等数量分桶 M4 采样
+#### 等数量分桶 M4 采样
-#### 函数简介
+##### 函数简介
采用M4采样法对输入序列进行采样。即对于每个桶采样首、尾、最小和最大值。
@@ -147,7 +147,7 @@ It costs 0.044s
|----------|--------------------------------|---------------------------------------|------------|--------------------------------------------------|
| EQUAL_SIZE_BUCKET_M4_SAMPLE | INT32 / INT64 / FLOAT / DOUBLE | `proportion`取值范围为`(0, 1]`,默认为`0.1`| INT32 / INT64 / FLOAT / DOUBLE | 返回符合采样比例的等分桶M4采样 |
-#### 使用示例
+##### 使用示例
输入序列:`root.ln.wf01.wt01.temperature`从`0.0-99.0`共`100`条有序数据,同等分桶随机采样的测试数据。
@@ -177,15 +177,15 @@ Total line number = 12
It costs 0.065s
```
-### 等数量分桶离群值采样
+#### 等数量分桶离群值采样
-#### 函数简介
+##### 函数简介
本函数对输入序列进行等数量分桶离群值采样,即根据用户给定的降采样比例和桶内采样个数将输入序列按固定点数等分为若干桶,在每个桶内通过给定的离群值采样方法进行采样。
| 函数名 | 可接收的输入序列类型 | 必要的属性参数 | 输出序列类型 | 功能类型 |
|----------|--------------------------------|---------------------------------------|------------|--------------------------------------------------|
-| EQUAL_SIZE_BUCKET_OUTLIER_SAMPLE | INT32 / INT64 / FLOAT / DOUBLE | `proportion`取值范围为`(0, 1]`,默认为`0.1`</br>`type`取值为`avg`或`stendis`或`cos`或`prenextdis`,默认为`avg`</br>`number`取值应大于0,默认`3`| INT32 / INT64 / FLOAT / DOUBLE | 返回符合采样比例和桶内采样个数的等分桶离群值采样 |
+| EQUAL_SIZE_BUCKET_OUTLIER_SAMPLE | INT32 / INT64 / FLOAT / DOUBLE | `proportion`取值范围为`(0, 1]`,默认为`0.1`<br>`type`取值为`avg`或`stendis`或`cos`或`prenextdis`,默认为`avg`<br>`number`取值应大于0,默认`3`| INT32 / INT64 / FLOAT / DOUBLE | 返回符合采样比例和桶内采样个数的等分桶离群值采样 |
参数说明
- `proportion`: 采样比例
@@ -196,7 +196,7 @@ It costs 0.065s
- `cos`: 设桶内一个数据点为b,b左边的数据点为a,b右边的数据点为c,则取ab与bc向量的夹角的余弦值,值越小,说明形成的角度越大,越可能是异常值。找到cos值最小的`top number`个
- `prenextdis`: 设桶内一个数据点为b,b左边的数据点为a,b右边的数据点为c,则取ab与bc的长度之和作为衡量标准,和越大越可能是异常值,找到最大的`top number`个
-#### 使用示例
+##### 使用示例
测试数据:`root.ln.wf01.wt01.temperature`从`0.0-99.0`共`100`条数据,其中为了加入离群值,我们使得个位数为5的值自增100。
```
@@ -256,9 +256,9 @@ Total line number = 10
It costs 0.041s
```
-## M4函数
+### M4函数
-### 函数简介
+#### 函数简介
M4用于在窗口内采样第一个点(`first`)、最后一个点(`last`)、最小值点(`bottom`)、最大值点(`top`):
@@ -267,20 +267,20 @@ M4用于在窗口内采样第一个点(`first`)、最后一个点(`last`
- 最小值点是拥有这个窗口内最小值的点(如果有多个这样的点,M4只返回其中一个);
- 最大值点是拥有这个窗口内最大值的点(如果有多个这样的点,M4只返回其中一个)。
-<img src="https://user-images.githubusercontent.com/33376433/198178733-a0919d17-0663-4672-9c4f-1efad6f463c2.png" alt="image" style="zoom:50%;" />
+<img src="/img/github/198178733-a0919d17-0663-4672-9c4f-1efad6f463c2.png" alt="image" style="zoom:50%;" />
| 函数名 | 可接收的输入序列类型 | 属性参数 | 输出序列类型 | 功能类型 |
| ------ | ------------------------------ | ------------------------------------------------------------ | ------------------------------ | ------------------------------------------------------------ |
| M4 | INT32 / INT64 / FLOAT / DOUBLE | 包含固定点数的窗口和滑动时间窗口使用不同的属性参数。包含固定点数的窗口使用属性`windowSize`和`slidingStep`。滑动时间窗口使用属性`timeInterval`、`slidingStep`、`displayWindowBegin`和`displayWindowEnd`。更多细节见下文。 | INT32 / INT64 / FLOAT / DOUBLE | 返回每个窗口内的第一个点(`first`)、最后一个点(`last`)、最小值点(`bottom`)、最大值点(`top`)。在一个窗口内的聚合点输出之前,M4会将它们按照时间戳递增排序并且去重。 |
-### 属性参数
+#### 属性参数
**(1) 包含固定点数的窗口(SlidingSizeWindowAccessStrategy)使用的属性参数:**
+ `windowSize`: 一个窗口内的点数。Int数据类型。必需的属性参数。
+ `slidingStep`: 按照设定的点数来滑动窗口。Int数据类型。可选的属性参数;如果没有设置,默认取值和`windowSize`一样。
-<img src="https://user-images.githubusercontent.com/33376433/198181449-00d563c8-7bce-4ecd-a031-ec120ca42c3f.png" alt="image" style="zoom: 50%;" />
+<img src="/img/github/198181449-00d563c8-7bce-4ecd-a031-ec120ca42c3f.png" alt="image" style="zoom: 50%;" />
*(图片来源: https://iotdb.apache.org/UserGuide/Master/Process-Data/UDF-User-Defined-Function.html#udtf-user-defined-timeseries-generating-function)*
@@ -291,11 +291,11 @@ M4用于在窗口内采样第一个点(`first`)、最后一个点(`last`
+ `displayWindowBegin`: 窗口滑动的起始时间戳位置(包含在内)。Long数据类型。可选的属性参数;如果没有设置,默认取值为Long.MIN_VALUE,意为使用输入的时间序列的第一个点的时间戳作为窗口滑动的起始时间戳位置。
+ `displayWindowEnd`: 结束时间限制(不包含在内;本质上和`WHERE time < displayWindowEnd`起的效果是一样的)。Long数据类型。可选的属性参数;如果没有设置,默认取值为Long.MAX_VALUE,意为除了输入的时间序列自身数据读取完毕之外没有增加额外的结束时间过滤条件限制。
-<img src="https://user-images.githubusercontent.com/33376433/198183015-93b56644-3330-4acf-ae9e-d718a02b5f4c.png" alt="groupBy window" style="zoom: 67%;" />
+<img src="/img/github/198183015-93b56644-3330-4acf-ae9e-d718a02b5f4c.png" alt="groupBy window" style="zoom: 67%;" />
*(图片来源: https://iotdb.apache.org/UserGuide/Master/Query-Data/Aggregate-Query.html#downsampling-aggregate-query)*
-### 使用示例
+#### 使用示例
输入的时间序列:
@@ -368,7 +368,7 @@ select M4(s1,'windowSize'='10') from root.vehicle.d1
Total line number = 7
```
-### 推荐的使用场景
+#### 推荐的使用场景
**(1) 使用场景:保留极端点的降采样**
@@ -382,7 +382,7 @@ Total line number = 7
于是从可视化驱动的角度出发,使用查询语句:`"select M4(s1,'timeInterval'='(tqe-tqs)/w','displayWindowBegin'='tqs','displayWindowEnd'='tqe') from root.vehicle.d1"`,来采集每个时间跨度内的第一个点(`first`)、最后一个点(`last`)、最小值点(`bottom`)、最大值点(`top`)。最终结果点数不会超过`4*w`个,使用这些聚合点画出来的折线图与使用原始数据画出来的图在像素级别上是完全一致的。
-### 和其它SQL的功能比较
+#### 和其它SQL的功能比较
| SQL | 是否支持M4聚合 | 滑动窗口类型 | 示例 | 相关文档 |
| ------------------------------------------------- | ------------------------------------------------------------ | ------------------------------------------------- | ------------------------------------------------------------ | ------------------------------------------------------------ |
diff --git a/docs/zh/UserGuide/Operators-Functions/Selection.md b/docs/zh/UserGuide/Operators-Functions/Selection.md
index 314b81bc28..b6eb1ff051 100644
--- a/docs/zh/UserGuide/Operators-Functions/Selection.md
+++ b/docs/zh/UserGuide/Operators-Functions/Selection.md
@@ -19,7 +19,7 @@
-->
-## 选择函数
+### 选择函数
目前 IoTDB 支持如下选择函数:
diff --git a/docs/zh/UserGuide/Operators-Functions/Series-Discovery.md b/docs/zh/UserGuide/Operators-Functions/Series-Discovery.md
index 0a1d183992..919028ba98 100644
--- a/docs/zh/UserGuide/Operators-Functions/Series-Discovery.md
+++ b/docs/zh/UserGuide/Operators-Functions/Series-Discovery.md
@@ -19,11 +19,11 @@
-->
-# 序列发现
+## 序列发现
-## ConsecutiveSequences
+### ConsecutiveSequences
-### 函数简介
+#### 函数简介
本函数用于在多维严格等间隔数据中发现局部最长连续子序列。
@@ -44,9 +44,9 @@
**提示:** 对于不符合要求的输入,本函数不对输出做任何保证。
-### 使用示例
+#### 使用示例
-#### 手动指定标准时间间隔
+##### 手动指定标准时间间隔
本函数可以通过`gap`参数手动指定标准时间间隔。需要注意的是,错误的参数设置会导致输出产生严重错误。
@@ -87,7 +87,7 @@ select consecutivesequences(s1,s2,'gap'='5m') from root.test.d1
+-----------------------------+------------------------------------------------------------------+
```
-#### 自动估计标准时间间隔
+##### 自动估计标准时间间隔
当`gap`参数缺省时,本函数可以利用众数估计标准时间间隔,得到同样的结果。因此,这种用法更受推荐。
@@ -109,9 +109,9 @@ select consecutivesequences(s1,s2) from root.test.d1
+-----------------------------+------------------------------------------------------+
```
-## ConsecutiveWindows
+### ConsecutiveWindows
-### 函数简介
+#### 函数简介
本函数用于在多维严格等间隔数据中发现指定长度的连续窗口。
@@ -133,7 +133,7 @@ select consecutivesequences(s1,s2) from root.test.d1
**提示:** 对于不符合要求的输入,本函数不对输出做任何保证。
-### 使用示例
+#### 使用示例
输入序列:
diff --git a/docs/zh/UserGuide/Operators-Functions/String.md b/docs/zh/UserGuide/Operators-Functions/String.md
index 3f59900552..444d29846f 100644
--- a/docs/zh/UserGuide/Operators-Functions/String.md
+++ b/docs/zh/UserGuide/Operators-Functions/String.md
@@ -19,11 +19,11 @@
-->
-# 字符串处理
+## 字符串处理
-## STRING_CONTAINS
+### STRING_CONTAINS
-### 函数简介
+#### 函数简介
本函数判断字符串中是否存在子串 `s`
@@ -36,7 +36,7 @@
**输出序列:** 输出单个序列,类型为 BOOLEAN。
-### 使用示例
+#### 使用示例
``` sql
select s1, string_contains(s1, 's'='warn') from root.sg1.d4;
@@ -56,9 +56,9 @@ Total line number = 3
It costs 0.007s
```
-## STRING_MATCHES
+### STRING_MATCHES
-### 函数简介
+#### 函数简介
本函数判断字符串是否能够被正则表达式`regex`匹配。
@@ -71,7 +71,7 @@ It costs 0.007s
**输出序列:** 输出单个序列,类型为 BOOLEAN。
-### 使用示例
+#### 使用示例
``` sql
select s1, string_matches(s1, 'regex'='[^\\s]+37229') from root.sg1.d4;
@@ -91,9 +91,9 @@ Total line number = 3
It costs 0.007s
```
-## Length
+### Length
-### 函数简介
+#### 函数简介
本函数用于获取输入序列的长度。
@@ -105,7 +105,7 @@ It costs 0.007s
**提示:** 如果输入是NULL,返回NULL。
-### 使用示例
+#### 使用示例
输入序列:
@@ -135,9 +135,9 @@ select s1, length(s1) from root.sg1.d1
+-----------------------------+--------------+----------------------+
```
-## Locate
+### Locate
-### 函数简介
+#### 函数简介
本函数用于获取`target`子串第一次出现在输入序列的位置,如果输入序列中不包含`target`则返回 -1 。
@@ -154,7 +154,7 @@ select s1, length(s1) from root.sg1.d1
**提示:** 下标从 0 开始。
-### 使用示例
+#### 使用示例
输入序列:
@@ -201,9 +201,9 @@ select s1, locate(s1, "target"="1", "reverse"="true") from root.sg1.d1
+-----------------------------+--------------+------------------------------------------------------+
```
-## StartsWith
+### StartsWith
-### 函数简介
+#### 函数简介
本函数用于判断输入序列是否有指定前缀。
@@ -218,7 +218,7 @@ select s1, locate(s1, "target"="1", "reverse"="true") from root.sg1.d1
**提示:** 如果输入是NULL,返回NULL。
-### 使用示例
+#### 使用示例
输入序列:
@@ -248,9 +248,9 @@ select s1, startswith(s1, "target"="1") from root.sg1.d1
+-----------------------------+--------------+----------------------------------------+
```
-## EndsWith
+### EndsWith
-### 函数简介
+#### 函数简介
本函数用于判断输入序列是否有指定后缀。
@@ -265,7 +265,7 @@ select s1, startswith(s1, "target"="1") from root.sg1.d1
**提示:** 如果输入是NULL,返回NULL。
-### 使用示例
+#### 使用示例
输入序列:
@@ -295,9 +295,9 @@ select s1, endswith(s1, "target"="1") from root.sg1.d1
+-----------------------------+--------------+--------------------------------------+
```
-## Concat
+### Concat
-### 函数简介
+#### 函数简介
本函数用于拼接输入序列和`target`字串。
@@ -316,7 +316,7 @@ select s1, endswith(s1, "target"="1") from root.sg1.d1
+ 函数只能将输入序列和`targets`区分开各自拼接。`concat(s1, "target1"="IoT", s2, "target2"="DB")`和
`concat(s1, s2, "target1"="IoT", "target2"="DB")`得到的结果是一样的。
-### 使用示例
+#### 使用示例
输入序列:
@@ -363,9 +363,9 @@ select s1, s2, concat(s1, s2, "target1"="IoT", "target2"="DB", "series_behind"="
+-----------------------------+--------------+--------------+-----------------------------------------------------------------------------------------------+
```
-## Substr
+### Substr
-### 函数简介
+#### 函数简介
本函数用于获取下标从`start`到`end - 1`的子串
@@ -381,7 +381,7 @@ select s1, s2, concat(s1, s2, "target1"="IoT", "target2"="DB", "series_behind"="
**提示:** 如果输入是NULL,返回NULL。
-### 使用示例
+#### 使用示例
输入序列:
@@ -411,9 +411,9 @@ select s1, substr(s1, "start"="0", "end"="2") from root.sg1.d1
+-----------------------------+--------------+----------------------------------------------+
```
-## Upper
+### Upper
-### 函数简介
+#### 函数简介
本函数用于将输入序列转化为大写。
@@ -425,7 +425,7 @@ select s1, substr(s1, "start"="0", "end"="2") from root.sg1.d1
**提示:** 如果输入是NULL,返回NULL。
-### 使用示例
+#### 使用示例
输入序列:
@@ -455,9 +455,9 @@ select s1, upper(s1) from root.sg1.d1
+-----------------------------+--------------+---------------------+
```
-## Lower
+### Lower
-### 函数简介
+#### 函数简介
本函数用于将输入序列转换为小写。
@@ -469,7 +469,7 @@ select s1, upper(s1) from root.sg1.d1
**提示:** 如果输入是NULL,返回NULL。
-### 使用示例
+#### 使用示例
输入序列:
@@ -499,9 +499,9 @@ select s1, lower(s1) from root.sg1.d1
+-----------------------------+--------------+---------------------+
```
-## Trim
+### Trim
-### 函数简介
+#### 函数简介
本函数用于移除输入序列前后的空格。
@@ -513,7 +513,7 @@ select s1, lower(s1) from root.sg1.d1
**提示:** 如果输入是NULL,返回NULL。
-### 使用示例
+#### 使用示例
输入序列:
@@ -543,9 +543,9 @@ select s3, trim(s3) from root.sg1.d1
+-----------------------------+--------------+--------------------+
```
-## StrCmp
+### StrCmp
-### 函数简介
+#### 函数简介
本函数用于比较两个输入序列。 如果值相同返回 `0` , 序列1的值小于序列2的值返回一个`负数`,序列1的值大于序列2的值返回一个`正数`。
@@ -557,7 +557,7 @@ select s3, trim(s3) from root.sg1.d1
**提示:** 如果任何一个输入是NULL,返回NULL。
-### 使用示例
+#### 使用示例
输入序列:
@@ -587,9 +587,9 @@ select s1, s2, strcmp(s1, s2) from root.sg1.d1
+-----------------------------+--------------+--------------+--------------------------------------+
```
-## StrReplace
+### StrReplace
-### 函数简介
+#### 函数简介
本函数用于将文本中的子串替换为指定的字符串。
@@ -607,7 +607,7 @@ select s1, s2, strcmp(s1, s2) from root.sg1.d1
**输出序列:** 输出单个序列,类型为 TEXT。
-### 使用示例
+#### 使用示例
输入序列:
@@ -665,9 +665,9 @@ select strreplace(s1, "target"=",", "replace"="/", "limit"="1", "offset"="1", "r
+-----------------------------+-----------------------------------------------------+
```
-## RegexMatch
+### RegexMatch
-### 函数简介
+#### 函数简介
本函数用于正则表达式匹配文本中的具体内容并返回。
@@ -685,7 +685,7 @@ select strreplace(s1, "target"=",", "replace"="/", "limit"="1", "offset"="1", "r
**提示:** 空值或无法匹配给定的正则表达式的数据点没有输出结果。
-### 使用示例
+#### 使用示例
输入序列:
@@ -722,9 +722,9 @@ select regexmatch(s1, "regex"="\d+\.\d+\.\d+\.\d+", "group"="0") from root.test.
+-----------------------------+----------------------------------------------------------------------+
```
-## RegexReplace
+### RegexReplace
-### 函数简介
+#### 函数简介
本函数用于将文本中符合正则表达式的匹配结果替换为指定的字符串。
@@ -743,7 +743,7 @@ select regexmatch(s1, "regex"="\d+\.\d+\.\d+\.\d+", "group"="0") from root.test.
**输出序列:** 输出单个序列,类型为 TEXT。
-### 使用示例
+#### 使用示例
输入序列:
@@ -780,9 +780,9 @@ select regexreplace(s1, "regex"="192\.168\.0\.(\d+)", "replace"="cluster-$1", "l
+-----------------------------+-----------------------------------------------------------+
```
-## RegexSplit
+### RegexSplit
-### 函数简介
+#### 函数简介
本函数用于使用给定的正则表达式切分文本,并返回指定的项。
@@ -799,7 +799,7 @@ select regexreplace(s1, "regex"="192\.168\.0\.(\d+)", "replace"="cluster-$1", "l
**提示:** 如果`index`超出了切分后结果数组的秩范围,例如使用`,`切分`0,1,2`时输入`index`为 3,则该数据点没有输出结果。
-### 使用示例
+#### 使用示例
输入序列:
diff --git a/docs/zh/UserGuide/Operators-Functions/Time-Series.md b/docs/zh/UserGuide/Operators-Functions/Time-Series.md
index 777fe86122..9007c0d7f6 100644
--- a/docs/zh/UserGuide/Operators-Functions/Time-Series.md
+++ b/docs/zh/UserGuide/Operators-Functions/Time-Series.md
@@ -19,11 +19,11 @@
-->
-# 时间序列处理
+## 时间序列处理
-## CHANGE_POINTS
+### CHANGE_POINTS
-### 函数简介
+#### 函数简介
本函数用于去除输入序列中的连续相同值。如输入序列`1,1,2,2,3`输出序列为`1,2,3`。
@@ -33,7 +33,7 @@
**参数:** 无
-### 使用示例
+#### 使用示例
原始数据:
diff --git a/docs/zh/UserGuide/Operators-Functions/User-Defined-Function.md b/docs/zh/UserGuide/Operators-Functions/User-Defined-Function.md
index 1347874778..d237061d33 100644
--- a/docs/zh/UserGuide/Operators-Functions/User-Defined-Function.md
+++ b/docs/zh/UserGuide/Operators-Functions/User-Defined-Function.md
@@ -19,13 +19,13 @@
-->
-# 用户自定义函数
+## 用户自定义函数
UDF(User Defined Function)即用户自定义函数。IoTDB 提供多种内建函数来满足您的计算需求,同时您还可以通过创建自定义函数来满足更多的计算需求。
根据此文档,您将会很快学会 UDF 的编写、注册、使用等操作。
-## UDF 类型
+### UDF 类型
IoTDB 支持两种类型的 UDF 函数,如下表所示。
@@ -34,7 +34,7 @@ IoTDB 支持两种类型的 UDF 函数,如下表所示。
| UDTF(User Defined Timeseries Generating Function) | 自定义时间序列生成函数。该类函数允许接收多条时间序列,最终会输出一条时间序列,生成的时间序列可以有任意多数量的数据点。 |
| UDAF(User Defined Aggregation Function) | 正在开发,敬请期待。 |
-## UDF 依赖
+### UDF 依赖
如果您使用 [Maven](http://search.maven.org/) ,可以从 [Maven 库](http://search.maven.org/) 中搜索下面示例中的依赖。请注意选择和目标 IoTDB 服务器版本相同的依赖版本。
@@ -47,7 +47,7 @@ IoTDB 支持两种类型的 UDF 函数,如下表所示。
</dependency>
```
-## UDTF(User Defined Timeseries Generating Function)
+### UDTF(User Defined Timeseries Generating Function)
编写一个 UDTF 需要继承`org.apache.iotdb.udf.api.UDTF`类,并至少实现`beforeStart`方法和一种`transform`方法。
@@ -90,7 +90,7 @@ IoTDB 支持两种类型的 UDF 函数,如下表所示。
2. 配置 UDF 运行时必要的信息,即指定 UDF 访问原始数据时采取的策略和输出结果序列的类型
3. 创建资源,比如建立外部链接,打开文件等。
-#### UDFParameters
+##### UDFParameters
`UDFParameters`的作用是解析 SQL 语句中的 UDF 参数(SQL 中 UDF 函数名称后括号中的部分)。参数包括序列类型参数和字符串 key-value 对形式输入的属性参数。
@@ -115,7 +115,7 @@ void beforeStart(UDFParameters parameters, UDTFConfigurations configurations) th
}
```
-#### UDTFConfigurations
+##### UDTFConfigurations
您必须使用 `UDTFConfigurations` 指定 UDF 访问原始数据时采取的策略和输出结果序列的类型。
@@ -166,7 +166,7 @@ void beforeStart(UDFParameters parameters, UDTFConfigurations configurations) th
3 类参数的关系可见下图。策略的构造方法详见 Javadoc。
-<img style="width:100%; max-width:800px; max-height:600px; margin-left:auto; margin-right:auto; display:block;" src="https://user-images.githubusercontent.com/30497621/99787878-47b51480-2b5b-11eb-8ed3-84088c5c30f7.png">
+<img style="width:100%; max-width:800px; max-height:600px; margin-left:auto; margin-right:auto; display:block;" src="/img/github/99787878-47b51480-2b5b-11eb-8ed3-84088c5c30f7.png">
注意,最后的一些时间窗口的实际时间间隔可能小于规定的时间间隔参数。另外,可能存在某些时间窗口内数据行数量为 0 的情况,这种情况框架也会为该窗口调用一次`transform`方法。
@@ -362,11 +362,11 @@ UDTF 的结束方法,您可以在此方法中进行一些资源释放等的操
此方法由框架调用。对于一个 UDF 类实例而言,生命周期中会且只会被调用一次,即在处理完最后一条记录之后被调用。
-## 完整 Maven 项目示例
+### 完整 Maven 项目示例
如果您使用 [Maven](http://search.maven.org/),可以参考我们编写的示例项目**udf-example**。您可以在 [这里](https://github.com/apache/iotdb/tree/master/example/udf) 找到它。
-## UDF 注册
+### UDF 注册
注册一个 UDF 可以按如下流程进行:
@@ -378,9 +378,9 @@ UDTF 的结束方法,您可以在此方法中进行一些资源释放等的操
CREATE FUNCTION <UDF-NAME> AS <UDF-CLASS-FULL-PATHNAME> (USING URI URI-STRING)?
```
-### 示例:注册名为`example`的 UDF,以下两种注册方式任选其一即可
+#### 示例:注册名为`example`的 UDF,以下两种注册方式任选其一即可
-#### 不指定URI
+##### 不指定URI
准备工作:
使用该种方式注册时,您需要提前将 JAR 包放置到目录 `iotdb-server-1.0.0-all-bin/ext/udf`(该目录可配置) 下。
@@ -391,7 +391,7 @@ CREATE FUNCTION <UDF-NAME> AS <UDF-CLASS-FULL-PATHNAME> (USING URI URI-STRING)?
CREATE FUNCTION example AS 'org.apache.iotdb.udf.UDTFExample'
```
-#### 指定URI
+##### 指定URI
准备工作:
使用该种方式注册时,您需要提前将 JAR 包上传到 URI 服务器上并确保执行注册语句的 IoTDB 实例能够访问该 URI 服务器。
@@ -402,7 +402,7 @@ CREATE FUNCTION example AS 'org.apache.iotdb.udf.UDTFExample'
CREATE FUNCTION example AS 'org.apache.iotdb.udf.UDTFExample' USING URI 'http://jar/example.jar'
```
-### 注意
+#### 注意
由于 IoTDB 的 UDF 是通过反射技术动态装载的,因此您在装载过程中无需启停服务器。
UDF 函数名称是大小写不敏感的。
@@ -411,7 +411,7 @@ UDF 函数名称是大小写不敏感的。
不同的 JAR 包中最好不要有全类名相同但实现功能逻辑不一样的类。例如 UDF(UDAF/UDTF):`udf1`、`udf2`分别对应资源`udf1.jar`、`udf2.jar`。如果两个 JAR 包里都包含一个`org.apache.iotdb.udf.UDTFExample`类,当同一个 SQL 中同时使用到这两个 UDF 时,系统会随机加载其中一个类,导致 UDF 执行行为不一致。
-## UDF 卸载
+### UDF 卸载
卸载 UDF 的 SQL 语法如下:
@@ -425,11 +425,11 @@ DROP FUNCTION <UDF-NAME>
DROP FUNCTION example
```
-## UDF 查询
+### UDF 查询
UDF 的使用方法与普通内建函数的类似。
-### 支持的基础 SQL 语法
+#### 支持的基础 SQL 语法
* `SLIMIT` / `SOFFSET`
* `LIMIT` / `OFFSET`
@@ -437,7 +437,7 @@ UDF 的使用方法与普通内建函数的类似。
* 支持时间过滤
-### 带 * 查询
+#### 带 * 查询
假定现在有时间序列 `root.sg.d1.s1`和 `root.sg.d1.s2`。
@@ -453,7 +453,7 @@ UDF 的使用方法与普通内建函数的类似。
那么结果集中将包括`example(root.sg.d1.s1, root.sg.d1.s1)`,`example(root.sg.d1.s2, root.sg.d1.s1)`,`example(root.sg.d1.s1, root.sg.d1.s2)` 和 `example(root.sg.d1.s2, root.sg.d1.s2)`的结果。
-### 带自定义输入参数的查询
+#### 带自定义输入参数的查询
您可以在进行 UDF 查询的时候,向 UDF 传入任意数量的键值对参数。键值对中的键和值都需要被单引号或者双引号引起来。注意,键值对参数只能在所有时间序列后传入。下面是一组例子:
@@ -462,7 +462,7 @@ SELECT example(s1, 'key1'='value1', 'key2'='value2'), example(*, 'key3'='value3'
SELECT example(s1, s2, 'key1'='value1', 'key2'='value2') FROM root.sg.d1;
```
-### 与其他查询的嵌套查询
+#### 与其他查询的嵌套查询
``` sql
SELECT s1, s2, example(s1, s2) FROM root.sg.d1;
@@ -471,13 +471,13 @@ SELECT s1 * example(* / s1 + s2) FROM root.sg.d1;
SELECT s1, s2, s1 + example(s1, s2), s1 - example(s1 + example(s1, s2) / s2) FROM root.sg.d1;
```
-## 查看所有注册的 UDF
+### 查看所有注册的 UDF
``` sql
SHOW FUNCTIONS
```
-## 用户权限管理
+### 用户权限管理
用户在使用 UDF 时会涉及到 3 种权限:
@@ -487,18 +487,18 @@ SHOW FUNCTIONS
更多用户权限相关的内容,请参考 [权限管理语句](../Administration-Management/Administration.md)。
-## 配置项
+### 配置项
使用配置项 `udf_lib_dir` 来配置 udf 的存储目录.
在 SQL 语句中使用自定义函数时,可能提示内存不足。这种情况下,您可以通过更改配置文件`iotdb-datanode.properties`中的`udf_initial_byte_array_length_for_memory_control`,`udf_memory_budget_in_mb`和`udf_reader_transformer_collector_memory_proportion`并重启服务来解决此问题。
-## 贡献 UDF
+### 贡献 UDF
<!-- The template is copied and modified from the Apache Doris community-->
该部分主要讲述了外部用户如何将自己编写的 UDF 贡献给 IoTDB 社区。
-### 前提条件
+#### 前提条件
1. UDF 具有通用性。
@@ -508,40 +508,40 @@ SHOW FUNCTIONS
2. UDF 已经完成测试,且能够正常运行在用户的生产环境中。
-### 贡献清单
+#### 贡献清单
1. UDF 的源代码
2. UDF 的测试用例
3. UDF 的使用说明
-#### 源代码
+##### 源代码
1. 在`node-commons/src/main/java/org/apache/iotdb/commons/udf/builtin`中创建 UDF 主类和相关的辅助类。
2. 在`node-commons/src/main/java/org/apache/iotdb/commons/udf/builtin/BuiltinTimeSeriesGeneratingFunction.java`中注册您编写的 UDF。
-#### 测试用例
+##### 测试用例
您至少需要为您贡献的 UDF 编写集成测试。
您可以在`integration-test/src/test/java/org/apache/iotdb/db/it/udf`中为您贡献的 UDF 新增一个测试类进行测试。
-#### 使用说明
+##### 使用说明
使用说明需要包含:UDF 的名称、UDF 的作用、执行函数必须的属性参数、函数的适用的场景以及使用示例等。
使用说明需包含中英文两个版本。应分别在 `docs/zh/UserGuide/Operation Manual/DML Data Manipulation Language.md` 和 `docs/UserGuide/Operation Manual/DML Data Manipulation Language.md` 中新增使用说明。
-### 提交 PR
+#### 提交 PR
当您准备好源代码、测试用例和使用说明后,就可以将 UDF 贡献到 IoTDB 社区了。在 [Github](https://github.com/apache/iotdb) 上面提交 Pull Request (PR) 即可。具体提交方式见:[Pull Request Guide](https://iotdb.apache.org/Development/HowToCommit.html)。
当 PR 评审通过并被合并后,您的 UDF 就已经贡献给 IoTDB 社区了!
-## 已知的 UDF 库实现
+### 已知的 UDF 库实现
+ [IoTDB-Quality](./Data-Profiling.md),一个关于数据质量的 UDF 库实现,包括数据画像、数据质量评估与修复等一系列函数。
-## Q&A
+### Q&A
Q1: 如何修改已经注册的 UDF?
diff --git a/docs/zh/UserGuide/Operators-Functions/Variation-Trend.md b/docs/zh/UserGuide/Operators-Functions/Variation-Trend.md
index 32e59c5165..8b8d6326ce 100644
--- a/docs/zh/UserGuide/Operators-Functions/Variation-Trend.md
+++ b/docs/zh/UserGuide/Operators-Functions/Variation-Trend.md
@@ -19,7 +19,7 @@
-->
-# 趋势计算函数
+## 趋势计算函数
目前 IoTDB 支持如下趋势计算函数:
@@ -57,9 +57,9 @@ It costs 0.014s
|------|--------------------------------|------------------------------------------------------------------------------------------------------------------------|--------|------------------------------------------------|
| DIFF | INT32 / INT64 / FLOAT / DOUBLE | `ignoreNull`:可选,默认为true;为true时,前一个数据点值为null时,忽略该数据点继续向前找到第一个出现的不为null的值;为false时,如果前一个数据点为null,则不忽略,使用null进行相减,结果也为null | DOUBLE | 统计序列中某数据点的值与前一数据点的值的差。第一个数据点没有对应的结果输出,输出值为null |
-### 使用示例
+#### 使用示例
-#### 原始数据
+##### 原始数据
```
+-----------------------------+------------+------------+
@@ -74,7 +74,7 @@ It costs 0.014s
+-----------------------------+------------+------------+
```
-#### 不使用ignoreNull参数(忽略null)
+##### 不使用ignoreNull参数(忽略null)
SQL:
```sql
@@ -95,7 +95,7 @@ SELECT DIFF(s1), DIFF(s2) from root.test;
+-----------------------------+------------------+------------------+
```
-#### 使用ignoreNull参数
+##### 使用ignoreNull参数
SQL:
```sql
diff --git a/docs/zh/UserGuide/Query-Data/Align-By.md b/docs/zh/UserGuide/Query-Data/Align-By.md
index 77bc9fc3e0..84c92900e9 100644
--- a/docs/zh/UserGuide/Query-Data/Align-By.md
+++ b/docs/zh/UserGuide/Query-Data/Align-By.md
@@ -19,7 +19,7 @@
-->
-# 查询对齐模式
+## 查询对齐模式
在 IoTDB 中,查询结果集**默认按照时间对齐**,包含一列时间列和若干个值列,每一行数据各列的时间戳相同。
@@ -27,7 +27,7 @@
- 按设备对齐 `ALIGN BY DEVICE`
-## 按设备对齐
+### 按设备对齐
在按设备对齐模式下,设备名会单独作为一列出现,查询结果集包含一列时间列、一列设备列和若干个值列。如果 `SELECT` 子句中选择了 `N` 列,则结果集包含 `N + 2` 列(时间列和设备名字列)。
@@ -59,7 +59,7 @@ select * from root.ln.** where time <= 2017-11-01T00:01:00 align by device;
Total line number = 6
It costs 0.012s
```
-## 设备对齐模式下的排序
+### 设备对齐模式下的排序
在设备对齐模式下,默认按照设备名的字典序升序排列,每个设备内部按照时间戳大小升序排列,可以通过 `ORDER BY` 子句调整设备列和时间列的排序优先级。
详细说明及示例见文档 [结果集排序](./Order-By.md)。
\ No newline at end of file
diff --git a/docs/zh/UserGuide/Query-Data/Continuous-Query.md b/docs/zh/UserGuide/Query-Data/Continuous-Query.md
index a9101fde7d..679b2c1971 100644
--- a/docs/zh/UserGuide/Query-Data/Continuous-Query.md
+++ b/docs/zh/UserGuide/Query-Data/Continuous-Query.md
@@ -19,12 +19,12 @@
-->
-# 连续查询(Continuous Query, CQ)
+## 连续查询(Continuous Query, CQ)
-## 简介
+### 简介
连续查询(Continuous queries, aka CQ) 是对实时数据周期性地自动执行的查询,并将查询结果写入指定的时间序列中。
-## 语法
+### 语法
```sql
CREATE (CONTINUOUS QUERY | CQ) <cq_id>
@@ -52,7 +52,7 @@ END
> 2. GROUP BY TIME CLAUSE在连续查询中的语法稍有不同,它不能包含原来的第一个参数,即 [start_time, end_time),IoTDB会自动填充这个缺失的参数。如果指定,IoTDB将会抛出异常。
> 3. 如果连续查询中既没有GROUP BY TIME子句,也没有指定EVERY子句,IoTDB将会抛出异常。
-### 连续查询语法中参数含义的描述
+#### 连续查询语法中参数含义的描述
- `<cq_id>` 为连续查询指定一个全局唯一的标识。
- `<every_interval>` 指定了连续查询周期性执行的间隔。现在支持的时间单位有:ns, us, ms, s, m, h, d, w, 并且它的值不能小于用户在`iotdb-confignode.properties`配置文件中指定的`continuous_query_min_every_interval`。这是一个可选参数,默认等于group by子句中的`group_by_interval`。
@@ -74,28 +74,28 @@ END
> - 如果<start_time_offset>小于<every_interval>,在连续的两次查询执行的时间窗口中间将会有未覆盖的时间范围
> - start_time_offset 应该大于end_time_offset
-#### `<start_time_offset>`等于`<every_interval>`
+##### `<start_time_offset>`等于`<every_interval>`
-
+
-#### `<start_time_offset>`大于`<every_interval>`
+##### `<start_time_offset>`大于`<every_interval>`
-
+
-#### `<start_time_offset>`小于`<every_interval>`
+##### `<start_time_offset>`小于`<every_interval>`
-
+
-#### `<every_interval>`不为0
+##### `<every_interval>`不为0
-
+
- `TIMEOUT POLICY` 指定了我们如何处理“前一个时间窗口还未执行完时,下一个窗口的执行时间已经到达的场景,默认值是`BLOCKED`.
- `BLOCKED`意味着即使下一个窗口的执行时间已经到达,我们依旧需要阻塞等待前一个时间窗口的查询执行完再开始执行下一个窗口。如果使用`BLOCKED`策略,所有的时间窗口都将会被依此执行,但是如果遇到执行查询的时间长于周期性间隔时,连续查询的结果会迟于最新的时间窗口范围。
- `DISCARD`意味着如果前一个时间窗口还未执行完,我们会直接丢弃下一个窗口的执行时间。如果使用`DISCARD`策略,可能会有部分时间窗口得不到执行。但是一旦前一个查询执行完后,它将会使用最新的时间窗口,所以它的执行结果总能赶上最新的时间窗口范围,当然是以部分时间窗口得不到执行为代价。
-## 连续查询的用例
+### 连续查询的用例
下面是用例数据,这是一个实时的数据流,我们假设数据都按时到达。
@@ -115,7 +115,7 @@ END
+-----------------------------+-----------------------------+-----------------------------+-----------------------------+-----------------------------+
````
-### 配置连续查询执行的周期性间隔
+#### 配置连续查询执行的周期性间隔
在`RESAMPLE`子句中使用`EVERY`参数指定连续查询的执行间隔,如果没有指定,默认等于`group_by_interval`。
@@ -173,7 +173,7 @@ At **2021-05-11T22:19:00.000+08:00**, `cq1` executes a query within the time ran
+-----------------------------+---------------------------------+---------------------------------+---------------------------------+---------------------------------+
````
-### 配置连续查询的时间窗口大小
+#### 配置连续查询的时间窗口大小
使用`RANGE`子句中的`start_time_offset`参数指定连续查询每次执行的时间窗口的开始时间偏移,如果没有指定,默认值等于`EVERY`参数。
@@ -248,7 +248,7 @@ At **2021-05-11T22:19:00.000+08:00**, `cq2` executes a query within the time ran
+-----------------------------+---------------------------------+---------------------------------+---------------------------------+---------------------------------+
````
-### 同时配置连续查询执行的周期性间隔和时间窗口大小
+#### 同时配置连续查询执行的周期性间隔和时间窗口大小
使用`RESAMPLE`子句中的`EVERY`参数和`RANGE`参数分别指定连续查询的执行间隔和窗口大小。并且使用`fill()`来填充没有值的时间区间。
@@ -313,7 +313,7 @@ At **2021-05-11T22:19:00.000+08:00**, `cq3` executes a query within the time ran
+-----------------------------+---------------------------------+---------------------------------+---------------------------------+---------------------------------+
````
-### 配置连续查询每次查询执行时间窗口的结束时间
+#### 配置连续查询每次查询执行时间窗口的结束时间
使用`RESAMPLE`子句中的`EVERY`参数和`RANGE`参数分别指定连续查询的执行间隔和窗口大小。并且使用`fill()`来填充没有值的时间区间。
@@ -372,7 +372,7 @@ At **2021-05-11T22:19:00.000+08:00**, `cq4` executes a query within the time ran
+-----------------------------+---------------------------------+---------------------------------+---------------------------------+---------------------------------+
````
-### 没有GROUP BY TIME子句的连续查询
+#### 没有GROUP BY TIME子句的连续查询
不使用`GROUP BY TIME`子句,并在`RESAMPLE`子句中显式使用`EVERY`参数指定连续查询的执行间隔。
@@ -478,9 +478,9 @@ At **2021-05-11T22:19:00.000+08:00**, `cq5` executes a query within the time ran
+-----------------------------+-------------------------------+-----------+
````
-## 连续查询的管理
+### 连续查询的管理
-### 查询系统已有的连续查询
+#### 查询系统已有的连续查询
展示集群中所有的已注册的连续查询
@@ -490,7 +490,7 @@ SHOW (CONTINUOUS QUERIES | CQS)
`SHOW (CONTINUOUS QUERIES | CQS)`会将结果集按照`cq_id`排序。
-#### 例子
+##### 例子
```sql
SHOW CONTINUOUS QUERIES;
@@ -503,7 +503,7 @@ SHOW CONTINUOUS QUERIES;
| s1_count_cq | CREATE CQ s1_count_cq<br/>BEGIN<br/>SELECT count(s1)<br/>INTO root.sg_count.d.count_s1<br/>FROM root.sg.d<br/>GROUP BY(30m)<br/>END | active |
-### 删除已有的连续查询
+#### 删除已有的连续查询
删除指定的名为cq_id的连续查询:
@@ -513,7 +513,7 @@ DROP (CONTINUOUS QUERY | CQ) <cq_id>
DROP CQ并不会返回任何结果集。
-#### 例子
+##### 例子
删除名为s1_count_cq的连续查询:
@@ -521,28 +521,28 @@ DROP CQ并不会返回任何结果集。
DROP CONTINUOUS QUERY s1_count_cq;
```
-### 修改已有的连续查询
+#### 修改已有的连续查询
目前连续查询一旦被创建就不能再被修改。如果想要修改某个连续查询,只能先用`DROP`命令删除它,然后再用`CREATE`命令重新创建。
-## 连续查询的使用场景
+### 连续查询的使用场景
-### 对数据进行降采样并对降采样后的数据使用不同的保留策略
+#### 对数据进行降采样并对降采样后的数据使用不同的保留策略
可以使用连续查询,定期将高频率采样的原始数据(如每秒1000个点),降采样(如每秒仅保留一个点)后保存到另一个 database 的同名序列中。高精度的原始数据所在 database 的`TTL`可能设置的比较短,比如一天,而低精度的降采样后的数据所在的 database `TTL`可以设置的比较长,比如一个月,从而达到快速释放磁盘空间的目的。
-### 预计算代价昂贵的查询
+#### 预计算代价昂贵的查询
我们可以通过连续查询对一些重复的查询进行预计算,并将查询结果保存在某些目标序列中,这样真实查询并不需要真的再次去做计算,而是直接查询目标序列的结果,从而缩短了查询的时间。
> 预计算查询结果尤其对一些可视化工具渲染时序图和工作台时有很大的加速作用。
-### 作为子查询的替代品
+#### 作为子查询的替代品
IoTDB现在不支持子查询,但是我们可以通过创建连续查询得到相似的功能。我们可以将子查询注册为一个连续查询,并将子查询的结果物化到目标序列中,外层查询再直接查询哪个目标序列。
-#### 例子
+##### 例子
IoTDB并不会接收如下的嵌套子查询。这个查询会计算s1序列每隔30分钟的非空值数量的平均值:
@@ -577,7 +577,7 @@ SELECT avg(count_s1) from root.sg_count.d;
```
-## 连续查询相关的配置参数
+### 连续查询相关的配置参数
| 参数名 | 描述 | 类型 | 默认值 |
| :---------------------------------- |----------------------|----------|---------------|
| `continuous_query_submit_thread` | 用于周期性提交连续查询执行任务的线程数 | int32 | 2 |
diff --git a/docs/zh/UserGuide/Query-Data/Fill.md b/docs/zh/UserGuide/Query-Data/Fill.md
index d6b4d35a5e..a24f71ba70 100644
--- a/docs/zh/UserGuide/Query-Data/Fill.md
+++ b/docs/zh/UserGuide/Query-Data/Fill.md
@@ -19,15 +19,15 @@
-->
-# 结果集补空值
+## 结果集补空值
-## 功能介绍
+### 功能介绍
当执行一些数据查询时,结果集的某行某列可能没有数据,则此位置结果为空,但这种空值不利于进行数据可视化展示和分析,需要对空值进行填充。
在 IoTDB 中,用户可以使用 `FILL` 子句指定数据缺失情况下的填充模式,允许用户按照特定的方法对任何查询的结果集填充空值,如取前一个不为空的值、线性插值等。
-## 语法定义
+### 语法定义
**`FILL` 子句的语法定义如下:**
@@ -39,7 +39,7 @@ FILL '(' PREVIOUS | LINEAR | constant ')'
- 在 `Fill` 语句中只能指定一种填充方法,该方法作用于结果集的全部列。
- 空值填充不兼容 0.13 版本及以前的语法(即不支持 `FILL((<data_type>[<fill_method>(, <before_range>, <after_range>)?])+)`)
-## 填充方式
+### 填充方式
**IoTDB 目前支持以下三种空值填充方式:**
@@ -85,7 +85,7 @@ select temperature, status from root.sgcc.wf03.wt01 where time >= 2017-11-01T16:
Total line number = 4
```
-### `PREVIOUS` 填充
+#### `PREVIOUS` 填充
**对于查询结果集中的空值,使用该列前一个非空值进行填充。**
@@ -114,7 +114,7 @@ select temperature, status from root.sgcc.wf03.wt01 where time >= 2017-11-01T16:
Total line number = 4
```
-### `LINEAR` 填充
+#### `LINEAR` 填充
**对于查询结果集中的空值,使用该列前一个非空值和下一个非空值的线性插值进行填充。**
@@ -145,7 +145,7 @@ select temperature, status from root.sgcc.wf03.wt01 where time >= 2017-11-01T16:
Total line number = 4
```
-### 常量填充
+#### 常量填充
**对于查询结果集中的空值,使用指定常量填充。**
diff --git a/docs/zh/UserGuide/Query-Data/Group-By.md b/docs/zh/UserGuide/Query-Data/Group-By.md
index efd3c489ea..68cfb25e53 100644
--- a/docs/zh/UserGuide/Query-Data/Group-By.md
+++ b/docs/zh/UserGuide/Query-Data/Group-By.md
@@ -19,9 +19,9 @@
-->
-# 分段分组聚合
+## 分段分组聚合
-## 时间区间分段聚合
+### 时间区间分段聚合
分段聚合是一种时序数据典型的查询方式,数据以高频进行采集,需要按照一定的时间间隔进行聚合计算,如计算每天的平均气温,需要将气温的序列按天进行分段,然后计算平均值。
@@ -33,11 +33,11 @@
下图中指出了这三个参数的含义:
-<img style="width:100%; max-width:800px; max-height:600px; margin-left:auto; margin-right:auto; display:block;" src="https://user-images.githubusercontent.com/16079446/69109512-f808bc80-0ab2-11ea-9e4d-b2b2f58fb474.png">
+<img style="width:100%; max-width:800px; max-height:600px; margin-left:auto; margin-right:auto; display:block;" src="/img/github/69109512-f808bc80-0ab2-11ea-9e4d-b2b2f58fb474.png">
接下来,我们给出几个典型例子:
-### 未指定滑动步长的时间区间分组聚合查询
+#### 未指定滑动步长的时间区间分组聚合查询
对应的 SQL 语句是:
@@ -72,7 +72,7 @@ Total line number = 7
It costs 0.024s
```
-### 指定滑动步长的时间区间分组聚合查询
+#### 指定滑动步长的时间区间分组聚合查询
对应的 SQL 语句是:
@@ -135,7 +135,7 @@ Total line number = 5
It costs 0.006s
```
-### 按照自然月份的时间区间分组聚合查询
+#### 按照自然月份的时间区间分组聚合查询
对应的 SQL 语句是:
@@ -225,7 +225,7 @@ select count(status) from root.ln.wf01.wt01 group by([2017-10-31T00:00:00, 2019-
+-----------------------------+-------------------------------+
```
-### 左开右闭区间
+#### 左开右闭区间
每个区间的结果时间戳为区间右端点,对应的 SQL 语句是:
@@ -253,7 +253,7 @@ Total line number = 7
It costs 0.004s
```
-### 与分组聚合混合使用
+#### 与分组聚合混合使用
通过定义 LEVEL 来统计指定层级下的数据点个数。
@@ -305,7 +305,7 @@ Total line number = 7
It costs 0.004s
```
-## 路径层级分组聚合
+### 路径层级分组聚合
在时间序列层级结构中,分层聚合查询用于**对某一层级下同名的序列进行聚合查询**。
@@ -404,7 +404,7 @@ Total line number = 1
It costs 0.013s
```
-## 标签分组聚合
+### 标签分组聚合
IoTDB 支持通过 `GROUP BY TAGS` 语句根据时间序列中定义的标签的键值做聚合查询。
@@ -469,7 +469,7 @@ insert into root.factory1.d9(time, temperature) values(1000, 50.3);
insert into root.factory1.d9(time, temperature) values(3000, 52.1);
```
-### 单标签聚合查询
+#### 单标签聚合查询
用户想统计该工厂每个地区的设备的温度的平均值,可以使用如下查询语句
@@ -496,7 +496,7 @@ It costs 0.231s
2. 标签聚合查询除了输出聚合结果列,还会输出聚合标签的键值列。该列的列名为聚合指定的标签键,列的值则为所有查询的时间序列中出现的该标签的值。
如果某些时间序列未设置该标签,则在键值列中有一行单独的 `NULL` ,代表未设置标签的所有时间序列数据的聚合结果。
-### 多标签聚合查询
+#### 多标签聚合查询
除了基本的单标签聚合查询外,还可以按顺序指定多个标签进行聚合计算。
@@ -526,7 +526,7 @@ It costs 0.027s
从结果集中可以看到,和单标签聚合相比,多标签聚合的查询结果会根据指定的标签顺序,输出相应标签的键值列。
-### 基于时间区间的标签聚合查询
+#### 基于时间区间的标签聚合查询
按照时间区间聚合是时序数据库中最常用的查询需求之一。IoTDB 在基于时间区间的聚合基础上,支持进一步按照标签进行聚合查询。
@@ -559,7 +559,7 @@ SELECT AVG(temperature) FROM root.factory1.** GROUP BY ([1000, 10000), 5s), TAGS
和标签聚合相比,基于时间区间的标签聚合的查询会首先按照时间区间划定聚合范围,在时间区间内部再根据指定的标签顺序,进行相应数据的聚合计算。在输出的结果集中,会包含一列时间列,该时间列值的含义和时间区间聚合查询的相同。
-### 标签聚合查询的限制
+#### 标签聚合查询的限制
由于标签聚合功能仍然处于开发阶段,目前有如下未实现功能。
@@ -570,7 +570,7 @@ SELECT AVG(temperature) FROM root.factory1.** GROUP BY ([1000, 10000), 5s), TAGS
> 5. 暂不支持聚合函数内部包含表达式,例如 `count(s+1)`。
> 6. 不支持值过滤条件聚合,和分层聚合查询行为保持一致。
-## 差值分段聚合
+### 差值分段聚合
IoTDB支持通过`GROUP BY VARIATION`语句来根据差值进行分组。`GROUP BY VARIATION`会将第一个点作为一个组的**基准点**,每个新的数据在按照给定规则与基准点进行差值运算后,
如果差值小于给定的阈值则将该新点归于同一组,否则结束当前分组,以这个新的数据为新的基准点开启新的分组。
该分组方式不会重叠,且没有固定的开始结束时间。其子句语法如下:
@@ -599,9 +599,9 @@ group by variation(controlExpression[,delta][,ignoreNull=true/false])
下图为差值分段的一个分段方式示意图,与组中第一个数据的控制列值的差值在delta内的控制列对应的点属于相同的分组。
-<img style="width:100%; max-width:800px; max-height:600px; margin-left:auto; margin-right:auto; display:block;" src="https://raw.githubusercontent.com/apache/iotdb-bin-resources/main/docs/UserGuide/Process-Data/GroupBy/groupByVariation.jpeg" alt="groupByVariation">
+<img style="width:100%; max-width:800px; max-height:600px; margin-left:auto; margin-right:auto; display:block;" src="/img/UserGuide/Process-Data/GroupBy/groupByVariation.jpeg" alt="groupByVariation">
-### 使用注意事项
+#### 使用注意事项
1. `controlExpression`的结果应该为唯一值,如果使用通配符拼接后出现多列,则报错。
2. 对于一个分组,默认Time列输出分组的开始时间,查询时可以使用select `__endTime`的方式来使得结果输出分组的结束时间。
3. 与`ALIGN BY DEVICE`搭配使用时会对每个device进行单独的分组操作。
@@ -626,7 +626,7 @@ group by variation(controlExpression[,delta][,ignoreNull=true/false])
|1970-01-01T08:00:00.150+08:00| 66.5| 77.0| 90.0| 945.0| 99.0| 9.25|
+-----------------------------+-------+-------+-------+--------+-------+-------+
```
-### delta=0时的等值事件分段
+#### delta=0时的等值事件分段
使用如下sql语句
```sql
select __endTime, avg(s1), count(s2), sum(s3) from root.sg.d group by variation(s6)
@@ -660,7 +660,7 @@ select __endTime, avg(s1), count(s2), sum(s3) from root.sg.d group by variation(
|1970-01-01T08:00:00.150+08:00|1970-01-01T08:00:00.150+08:00| 66.5| 1| 90.0|
+-----------------------------+-----------------------------+-----------------+-------------------+-----------------+
```
-### delta!=0时的差值事件分段
+#### delta!=0时的差值事件分段
使用如下sql语句
```sql
select __endTime, avg(s1), count(s2), sum(s3) from root.sg.d group by variation(s6, 4)
@@ -691,7 +691,7 @@ select __endTime, avg(s1), count(s2), sum(s3) from root.sg.d group by variation(
|1970-01-01T08:00:00.090+08:00|1970-01-01T08:00:00.150+08:00| 80.5| 2| 180.0|
+-----------------------------+-----------------------------+-----------------+-------------------+-----------------+
```
-## 条件分段聚合
+### 条件分段聚合
当需要根据指定条件对数据进行筛选,并将连续的符合条件的行分为一组进行聚合运算时,可以使用`GROUP BY CONDITION`的分段方式;不满足给定条件的行因为不属于任何分组会被直接简单忽略。
其语法定义如下:
```sql
@@ -708,7 +708,7 @@ keep表达式用来指定形成分组所需要连续满足`predict`条件的数
用于指定遇到predict为null的数据行时的处理方式,为true则跳过该行,为false则结束当前分组。
-### 使用注意事项
+#### 使用注意事项
1. keep条件在查询中是必需的,但可以省略掉keep字符串给出一个`long`类型常数,默认为`keep=该long型常数`的等于条件。
2. `ignoreNull`默认为true。
3. 对于一个分组,默认Time列输出分组的开始时间,查询时可以使用select `__endTime`的方式来使得结果输出分组的结束时间。
@@ -760,7 +760,7 @@ select max_time(charging_status),count(vehicle_status),last_value(soc) from root
|1970-01-01T08:00:00.009+08:00| 10| 2| 60.0|
+-----------------------------+-----------------------------------------------+-------------------------------------------+-------------------------------------+
```
-## 会话分段聚合
+### 会话分段聚合
`GROUP BY SESSION`可以根据时间列的间隔进行分组,在结果集的时间列中,时间间隔小于等于设定阈值的数据会被分为一组。例如在工业场景中,设备并不总是连续运行,`GROUP BY SESSION`会将设备每次接入会话所产生的数据分为一组。
其语法定义如下:
```sql
@@ -772,9 +772,9 @@ group by session(timeInterval)
下图为`group by session`下的一个分组示意图
-<img style="width:100%; max-width:800px; max-height:600px; margin-left:auto; margin-right:auto; display:block;" src="https://raw.githubusercontent.com/apache/iotdb-bin-resources/main/docs/UserGuide/Process-Data/GroupBy/groupBySession.jpeg" alt="groupBySession">
+<img style="width:100%; max-width:800px; max-height:600px; margin-left:auto; margin-right:auto; display:block;" src="/img/UserGuide/Process-Data/GroupBy/groupBySession.jpeg">
-### 使用注意事项
+#### 使用注意事项
1. 对于一个分组,默认Time列输出分组的开始时间,查询时可以使用select `__endTime`的方式来使得结果输出分组的结束时间。
2. 与`ALIGN BY DEVICE`搭配使用时会对每个device进行单独的分组操作。
3. 当前暂不支持与`GROUP BY LEVEL`搭配使用。
diff --git a/docs/zh/UserGuide/Query-Data/Having-Condition.md b/docs/zh/UserGuide/Query-Data/Having-Condition.md
index 9669557969..421cf6d210 100644
--- a/docs/zh/UserGuide/Query-Data/Having-Condition.md
+++ b/docs/zh/UserGuide/Query-Data/Having-Condition.md
@@ -19,7 +19,7 @@
-->
-# 聚合结果过滤
+## 聚合结果过滤
如果想对聚合查询的结果进行过滤,可以在 `GROUP BY` 子句之后使用 `HAVING` 子句。
diff --git a/docs/zh/UserGuide/Query-Data/Last-Query.md b/docs/zh/UserGuide/Query-Data/Last-Query.md
index 1a39f6529d..86107e8214 100644
--- a/docs/zh/UserGuide/Query-Data/Last-Query.md
+++ b/docs/zh/UserGuide/Query-Data/Last-Query.md
@@ -19,7 +19,7 @@
-->
-# 最新点查询
+## 最新点查询
最新点查询是时序数据库 Apache IoTDB 中提供的一种特殊查询。它返回指定时间序列中时间戳最大的数据点,即一条序列的最新状态。
diff --git a/docs/zh/UserGuide/Query-Data/Order-By.md b/docs/zh/UserGuide/Query-Data/Order-By.md
index 051f837afc..7933072b95 100644
--- a/docs/zh/UserGuide/Query-Data/Order-By.md
+++ b/docs/zh/UserGuide/Query-Data/Order-By.md
@@ -19,9 +19,9 @@
-->
-# 结果集排序
+## 结果集排序
-## 时间对齐模式下的排序
+### 时间对齐模式下的排序
IoTDB的查询结果集默认按照时间对齐,可以使用`ORDER BY TIME`的子句指定时间戳的排列顺序。示例代码如下:
```sql
select * from root.ln.** where time <= 2017-11-01T00:01:00 order by time desc;
@@ -39,7 +39,7 @@ select * from root.ln.** where time <= 2017-11-01T00:01:00 order by time desc;
+-----------------------------+--------------------------+------------------------+-----------------------------+------------------------+
Total line number = 4
```
-## 设备对齐模式下的排序
+### 设备对齐模式下的排序
当使用`ALIGN BY DEVICE`查询对齐模式下的结果集时,可以使用`ORDER BY`子句对返回的结果集顺序进行规定。
在设备对齐模式下支持4种排序模式的子句,其中包括两种排序键,`DEVICE`和`TIME`,靠前的排序键为主排序键,每种排序键都支持`ASC`和`DESC`两种排列顺序。
diff --git a/docs/zh/UserGuide/Query-Data/Overview.md b/docs/zh/UserGuide/Query-Data/Overview.md
index c393831bbb..a4cdcfd690 100644
--- a/docs/zh/UserGuide/Query-Data/Overview.md
+++ b/docs/zh/UserGuide/Query-Data/Overview.md
@@ -19,11 +19,12 @@
-->
-# 概述
+# 数据查询
+## 概述
在 IoTDB 中,使用 `SELECT` 语句从一条或多条时间序列中查询数据。
-## 语法定义
+### 语法定义
```sql
SELECT [LAST] selectExpr [, selectExpr] ...
@@ -46,9 +47,9 @@ SELECT [LAST] selectExpr [, selectExpr] ...
[ALIGN BY {TIME | DEVICE}]
```
-## 语法说明
+### 语法说明
-### `SELECT` 子句
+#### `SELECT` 子句
- `SELECT` 子句指定查询的输出,由若干个 `selectExpr` 组成。
- 每个 `selectExpr` 定义查询结果中的一列或多列,它是一个由时间序列路径后缀、常量、函数和运算符组成的表达式。
@@ -56,24 +57,24 @@ SELECT [LAST] selectExpr [, selectExpr] ...
- 在 `SELECT` 子句中使用 `LAST` 关键词可以指定查询为最新点查询,详细说明及示例见文档 [最新点查询](./Last-Query.md) 。
- 详细说明及示例见文档 [选择表达式](./Select-Expression.md) 。
-### `INTO` 子句
+#### `INTO` 子句
- `SELECT INTO` 用于将查询结果写入一系列指定的时间序列中。`INTO` 子句指定了查询结果写入的目标时间序列。
- 详细说明及示例见文档 [SELECT INTO(查询写回)](Select-Into.md) 。
-### `FROM` 子句
+#### `FROM` 子句
- `FROM` 子句包含要查询的一个或多个时间序列的路径前缀,支持使用通配符。
- 在执行查询时,会将 `FROM` 子句中的路径前缀和 `SELECT` 子句中的后缀进行拼接得到完整的查询目标序列。
-### `WHERE` 子句
+#### `WHERE` 子句
- `WHERE` 子句指定了对数据行的筛选条件,由一个 `whereCondition` 组成。
- `whereCondition` 是一个逻辑表达式,对于要选择的每一行,其计算结果为真。如果没有 `WHERE` 子句,将选择所有行。
- 在 `whereCondition` 中,可以使用除聚合函数之外的任何 IOTDB 支持的函数和运算符。
- 详细说明及示例见文档 [查询过滤条件](./Where-Condition.md) 。
-### `GROUP BY` 子句
+#### `GROUP BY` 子句
- `GROUP BY` 子句指定对序列进行分段或分组聚合的方式。
- 分段聚合是指按照时间维度,针对同时间序列中不同数据点之间的时间关系,对数据在行的方向进行分段,每个段得到一个聚合值。目前支持**时间区间分段**、**差值分段**、**条件分段**和**会话分段**,未来将支持更多分段方式。
@@ -81,44 +82,44 @@ SELECT [LAST] selectExpr [, selectExpr] ...
- 分段聚合和分组聚合可以混合使用。
- 详细说明及示例见文档 [分段分组聚合](./Group-By.md) 。
-### `HAVING` 子句
+#### `HAVING` 子句
- `HAVING` 子句指定了对聚合结果的筛选条件,由一个 `havingCondition` 组成。
- `havingCondition` 是一个逻辑表达式,对于要选择的聚合结果,其计算结果为真。如果没有 `HAVING` 子句,将选择所有聚合结果。
- `HAVING` 要和聚合函数以及 `GROUP BY` 子句一起使用。
- 详细说明及示例见文档 [聚合结果过滤](./Having-Condition.md) 。
-### `ORDER BY` 子句
+#### `ORDER BY` 子句
- `ORDER BY` 子句用于指定结果集的排序方式。
- 按时间对齐模式下:默认按照时间戳大小升序排列,可以通过 `ORDER BY TIME DESC` 指定结果集按照时间戳大小降序排列。
- 按设备对齐模式下:默认按照设备名的字典序升序排列,每个设备内部按照时间戳大小升序排列,可以通过 `ORDER BY` 子句调整设备列和时间列的排序优先级。
- 详细说明及示例见文档 [结果集排序](./Order-By.md)。
-### `FILL` 子句
+#### `FILL` 子句
- `FILL` 子句用于指定数据缺失情况下的填充模式,允许用户按照特定的方法对任何查询的结果集填充空值。
- 详细说明及示例见文档 [结果集补空值](./Fill.md) 。
-### `SLIMIT` 和 `SOFFSET` 子句
+#### `SLIMIT` 和 `SOFFSET` 子句
- `SLIMIT` 指定查询结果的列数,`SOFFSET` 指定查询结果显示的起始列位置。`SLIMIT` 和 `SOFFSET` 仅用于控制值列,对时间列和设备列无效。
- 关于查询结果分页,详细说明及示例见文档 [结果集分页](./Pagination.md) 。
-### `LIMIT` 和 `OFFSET` 子句
+#### `LIMIT` 和 `OFFSET` 子句
- `LIMIT` 指定查询结果的行数,`OFFSET` 指定查询结果显示的起始行位置。
- 关于查询结果分页,详细说明及示例见文档 [结果集分页](./Pagination.md) 。
-### `ALIGN BY` 子句
+#### `ALIGN BY` 子句
- 查询结果集默认**按时间对齐**,包含一列时间列和若干个值列,每一行数据各列的时间戳相同。
- 除按时间对齐之外,还支持**按设备对齐**,查询结果集包含一列时间列、一列设备列和若干个值列。
- 详细说明及示例见文档 [查询对齐模式](./Align-By.md) 。
-## SQL 示例
+### SQL 示例
-### 示例1:根据一个时间区间选择一列数据
+#### 示例1:根据一个时间区间选择一列数据
SQL 语句为:
@@ -149,7 +150,7 @@ Total line number = 8
It costs 0.026s
```
-### 示例2:根据一个时间区间选择多列数据
+#### 示例2:根据一个时间区间选择多列数据
SQL 语句为:
@@ -178,7 +179,7 @@ Total line number = 6
It costs 0.018s
```
-### 示例3:按照多个时间区间选择同一设备的多列数据
+#### 示例3:按照多个时间区间选择同一设备的多列数据
IoTDB 支持在一次查询中指定多个时间区间条件,用户可以根据需求随意组合时间区间条件。例如,
@@ -212,7 +213,7 @@ Total line number = 9
It costs 0.018s
```
-### 示例4:按照多个时间区间选择不同设备的多列数据
+#### 示例4:按照多个时间区间选择不同设备的多列数据
该系统支持在一次查询中选择任意列的数据,也就是说,被选择的列可以来源于不同的设备。例如,SQL 语句为:
@@ -244,7 +245,7 @@ Total line number = 9
It costs 0.014s
```
-### 示例5:根据时间降序返回结果集
+#### 示例5:根据时间降序返回结果集
IoTDB 支持 `order by time` 语句,用于对结果按照时间进行降序展示。例如,SQL 语句为:
@@ -273,13 +274,13 @@ Total line number = 10
It costs 0.016s
```
-## 查询执行接口
+### 查询执行接口
在 IoTDB 中,提供两种方式执行数据查询操作:
- 使用 IoTDB-SQL 执行查询。
- 常用查询的高效执行接口,包括时间序列原始数据范围查询、最新点查询、简单聚合查询。
-### 使用 IoTDB-SQL 执行查询
+#### 使用 IoTDB-SQL 执行查询
数据查询语句支持在 SQL 命令行终端、JDBC、JAVA / C++ / Python / Go 等编程语言 API、RESTful API 中使用。
@@ -295,7 +296,7 @@ It costs 0.016s
- 在 RESTful API 中使用,详见 [HTTP API](../API/RestService.md) 。
-### 常用查询的高效执行接口
+#### 常用查询的高效执行接口
各编程语言的 API 为常用的查询提供了高效执行接口,可以省去 SQL 解析等操作的耗时。包括:
diff --git a/docs/zh/UserGuide/Query-Data/Pagination.md b/docs/zh/UserGuide/Query-Data/Pagination.md
index 03c65b4951..489b3fade3 100644
--- a/docs/zh/UserGuide/Query-Data/Pagination.md
+++ b/docs/zh/UserGuide/Query-Data/Pagination.md
@@ -19,14 +19,14 @@
-->
-# 查询结果分页
+## 查询结果分页
当查询结果集数据量很大,放在一个页面不利于显示,可以使用 `LIMIT/SLIMIT` 子句和 `OFFSET/SOFFSET `子句进行分页控制。
- `LIMIT` 和 `SLIMIT` 子句用于控制查询结果的行数和列数。
- `OFFSET` 和 `SOFFSET` 子句用于控制结果显示的起始位置。
-## 按行分页
+### 按行分页
用户可以通过 `LIMIT` 和 `OFFSET` 子句控制查询结果的行数,`LIMIT rowLimit` 指定查询结果的行数,`OFFSET rowOffset` 指定查询结果显示的起始行位置。
@@ -153,7 +153,7 @@ Total line number = 4
It costs 0.016s
```
-## 按列分页
+### 按列分页
用户可以通过 `SLIMIT` 和 `SOFFSET` 子句控制查询结果的列数,`SLIMIT seriesLimit` 指定查询结果的列数,`SOFFSET seriesOffset` 指定查询结果显示的起始列位置。
diff --git a/docs/zh/UserGuide/Query-Data/Select-Expression.md b/docs/zh/UserGuide/Query-Data/Select-Expression.md
index 59f92c70bf..e140be48d5 100644
--- a/docs/zh/UserGuide/Query-Data/Select-Expression.md
+++ b/docs/zh/UserGuide/Query-Data/Select-Expression.md
@@ -19,7 +19,7 @@
-->
-# 选择表达式
+## 选择表达式
`SELECT` 子句指定查询的输出,由若干个 `selectExpr` 组成。 每个 `selectExpr` 定义了查询结果中的一列或多列。
@@ -34,7 +34,7 @@
- 时间序列生成函数(包括内置函数和用户自定义函数)
- 常量
-## 使用别名
+### 使用别名
由于 IoTDB 独特的数据模型,在每个传感器前都附带有设备等诸多额外信息。有时,我们只针对某个具体设备查询,而这些前缀信息频繁显示造成了冗余,影响了结果集的显示与分析。
@@ -52,13 +52,13 @@ select s1 as temperature, s2 as speed from root.ln.wf01.wt01;
| ---- | ----------- | ----- |
| ... | ... | ... |
-## 运算符
+### 运算符
IoTDB 中支持的运算符列表见文档 [运算符和函数](../Operators-Functions/Overview.md)。
-## 函数
+### 函数
-### 聚合函数
+#### 聚合函数
聚合函数是多对一函数。它们对一组值进行聚合计算,得到单个聚合结果。
@@ -74,25 +74,25 @@ select s1, count(s1) from root.sg.d1 group by ([10,100),10ms);
IoTDB 支持的聚合函数见文档 [聚合函数](../Operators-Functions/Aggregation.md)。
-### 时间序列生成函数
+#### 时间序列生成函数
时间序列生成函数接受若干原始时间序列作为输入,产生一列时间序列输出。与聚合函数不同的是,时间序列生成函数的结果集带有时间戳列。
所有的时间序列生成函数都可以接受 * 作为输入,都可以与原始时间序列查询混合进行。
-#### 内置时间序列生成函数
+##### 内置时间序列生成函数
IoTDB 中支持的内置函数列表见文档 [运算符和函数](../Operators-Functions/Overview.md)。
-#### 自定义时间序列生成函数
+##### 自定义时间序列生成函数
IoTDB 支持通过用户自定义函数(点击查看: [用户自定义函数](../Operators-Functions/User-Defined-Function.md) )能力进行函数功能扩展。
-## 嵌套表达式举例
+### 嵌套表达式举例
IoTDB 支持嵌套表达式,由于聚合查询和时间序列查询不能在一条查询语句中同时出现,我们将支持的嵌套表达式分为时间序列查询嵌套表达式和聚合查询嵌套表达式两类。
-### 时间序列查询嵌套表达式
+#### 时间序列查询嵌套表达式
IoTDB 支持在 `SELECT` 子句中计算由**时间序列、常量、时间序列生成函数(包括用户自定义函数)和运算符**组成的任意嵌套表达式。
@@ -203,7 +203,7 @@ Total line number = 9
It costs 0.014s
```
-### 聚合查询嵌套表达式
+#### 聚合查询嵌套表达式
IoTDB 支持在 `SELECT` 子句中计算由**聚合函数、常量、时间序列生成函数和表达式**组成的任意嵌套表达式。
diff --git a/docs/zh/UserGuide/Query-Data/Select-Into.md b/docs/zh/UserGuide/Query-Data/Select-Into.md
index 5ed15b0d50..4a9a22a592 100644
--- a/docs/zh/UserGuide/Query-Data/Select-Into.md
+++ b/docs/zh/UserGuide/Query-Data/Select-Into.md
@@ -19,7 +19,7 @@
-->
-# 查询写回(SELECT INTO)
+## 查询写回(SELECT INTO)
`SELECT INTO` 语句用于将查询结果写入一系列指定的时间序列中。
@@ -28,9 +28,9 @@
- **查询结果存储**:将查询结果进行持久化存储,起到类似物化视图的作用。
- **非对齐序列转对齐序列**:对齐序列从0.13版本开始支持,可以通过该功能将非对齐序列的数据写入新的对齐序列中。
-## 语法定义
+### 语法定义
-### 整体描述
+#### 整体描述
```sql
selectIntoStatement
@@ -50,7 +50,7 @@ intoItem
;
```
-### `INTO` 子句
+#### `INTO` 子句
`INTO` 子句由若干个 `intoItem` 构成。
@@ -147,7 +147,7 @@ It costs 0.532s
该语句将表达式计算的结果存储到指定序列中。
-### 使用变量占位符
+#### 使用变量占位符
特别地,可以使用变量占位符描述目标序列与查询序列之间的对应规律,简化语句书写。目前支持以下两种变量占位符:
@@ -156,11 +156,11 @@ It costs 0.532s
在使用变量占位符时,`intoItem`与查询结果集列的对应关系不能存在歧义,具体情况分类讨论如下:
-#### 按时间对齐(默认)
+##### 按时间对齐(默认)
> 注:变量占位符**只能描述序列与序列之间的对应关系**,如果查询中包含聚合、表达式计算,此时查询结果中的列无法与某个序列对应,因此目标设备和目标物理量都不能使用变量占位符。
-##### (1)目标设备不使用变量占位符 & 目标物理量列表使用变量占位符
+###### (1)目标设备不使用变量占位符 & 目标物理量列表使用变量占位符
**限制:**
1. 每个 `intoItem` 中,物理量列表的长度必须为 1。<br>(如果长度可以大于1,例如 `root.sg1.d1(::, s1)`,无法确定具体哪些列与`::`匹配)
@@ -183,7 +183,7 @@ from root.sg.d1, root.sg.d2;
```
可以看到,在这种情况下,语句并不能得到很好地简化。
-##### (2)目标设备使用变量占位符 & 目标物理量列表不使用变量占位符
+###### (2)目标设备使用变量占位符 & 目标物理量列表不使用变量占位符
**限制:** 全部 `intoItem` 中目标物理量的数量与查询结果集列数一致。
@@ -196,7 +196,7 @@ into ::(s1_1, s2_2), root.sg.d2_2(s3_3), root.${2}_copy.::(s4)
from root.sg;
```
-##### (3)目标设备使用变量占位符 & 目标物理量列表使用变量占位符
+###### (3)目标设备使用变量占位符 & 目标物理量列表使用变量占位符
**限制:** `intoItem` 只有一个且物理量列表的长度为 1。
@@ -208,11 +208,11 @@ select * into root.sg_bk.::(::) from root.sg.**;
```
将 `root.sg` 下全部序列的查询结果写到 `root.sg_bk`,设备名后缀和物理量名保持不变。
-#### 按设备对齐(使用 `ALIGN BY DEVICE`)
+##### 按设备对齐(使用 `ALIGN BY DEVICE`)
> 注:变量占位符**只能描述序列与序列之间的对应关系**,如果查询中包含聚合、表达式计算,此时查询结果中的列无法与某个物理量对应,因此目标物理量不能使用变量占位符。
-##### (1)目标设备不使用变量占位符 & 目标物理量列表使用变量占位符
+###### (1)目标设备不使用变量占位符 & 目标物理量列表使用变量占位符
**限制:** 每个 `intoItem` 中,如果物理量列表使用了变量占位符,则列表的长度必须为 1。
@@ -226,7 +226,7 @@ from root.sg.d1, root.sg.d2, root.sg.d3
align by device;
```
-##### (2)目标设备使用变量占位符 & 目标物理量列表不使用变量占位符
+###### (2)目标设备使用变量占位符 & 目标物理量列表不使用变量占位符
**限制:** `intoItem` 只有一个。(如果出现多个带占位符的 `intoItem`,我们将无法得知每个 `intoItem` 需要匹配哪几个源设备)
@@ -240,7 +240,7 @@ from root.**
align by device;
```
-##### (3)目标设备使用变量占位符 & 目标物理量列表使用变量占位符
+###### (3)目标设备使用变量占位符 & 目标物理量列表使用变量占位符
**限制:** `intoItem` 只有一个且物理量列表的长度为 1。
@@ -252,7 +252,7 @@ select * into ::(backup_${4}) from root.sg.** align by device;
```
将 `root.sg` 下每条序列的查询结果写到相同设备下,物理量名前加`backup_`。
-### 指定目标序列为对齐序列
+#### 指定目标序列为对齐序列
通过 `ALIGNED` 关键词可以指定写入的目标设备为对齐写入,每个 `intoItem` 可以独立设置。
@@ -262,21 +262,21 @@ select s1, s2 into root.sg_copy.d1(t1, t2), aligned root.sg_copy.d2(t1, t2) from
```
该语句指定了 `root.sg_copy.d1` 是非对齐设备,`root.sg_copy.d2`是对齐设备。
-### 不支持使用的查询子句
+#### 不支持使用的查询子句
- `SLIMIT`、`SOFFSET`:查询出来的列不确定,功能不清晰,因此不支持。
- `LAST`查询、`GROUP BY TAGS`、`DISABLE ALIGN`:表结构和写入结构不一致,因此不支持。
-### 其他要注意的点
+#### 其他要注意的点
- 对于一般的聚合查询,时间戳是无意义的,约定使用 0 来存储。
- 当目标序列存在时,需要保证源序列和目标时间序列的数据类型兼容。关于数据类型的兼容性,查看文档 [数据类型](../Data-Concept/Data-Type.md#数据类型兼容性)。
- 当目标序列不存在时,系统将自动创建目标序列(包括 database)。
- 当查询的序列不存在或查询的序列不存在数据,则不会自动创建目标序列。
-## 应用举例
+### 应用举例
-### 实现 IoTDB 内部 ETL
+#### 实现 IoTDB 内部 ETL
对原始数据进行 ETL 处理后写入新序列。
```shell
IOTDB > SELECT preprocess_udf(*) INTO ::(preprocessed_${3}) FROM root.sg.*;
@@ -294,7 +294,7 @@ IOTDB > SELECT preprocess_udf(*) INTO ::(preprocessed_${3}) FROM root.sg.*;
```
以上语句使用自定义函数对数据进行预处理,将预处理后的结果持久化存储到新序列中。
-### 查询结果存储
+#### 查询结果存储
将查询结果进行持久化存储,起到类似物化视图的作用。
```shell
IOTDB > SELECT count(s1), last_value(s1) INTO root.sg.agg_${2}(count_s1, last_value_s1) FROM root.sg1.d1 GROUP BY ([0, 10000), 10ms);
@@ -310,7 +310,7 @@ It costs 0.115s
```
以上语句将降采样查询的结果持久化存储到新序列中。
-### 非对齐序列转对齐序列
+#### 非对齐序列转对齐序列
对齐序列从 0.13 版本开始支持,可以通过该功能将非对齐序列的数据写入新的对齐序列中。
**注意:** 建议配合使用 `LIMIT & OFFSET` 子句或 `WHERE` 子句(时间过滤条件)对数据进行分批,防止单次操作的数据量过大。
@@ -329,7 +329,7 @@ It costs 0.375s
```
以上语句将一组非对齐的序列的数据迁移到一组对齐序列。
-## 相关用户权限
+### 相关用户权限
用户必须有下列权限才能正常执行查询写回语句:
@@ -338,7 +338,7 @@ It costs 0.375s
更多用户权限相关的内容,请参考[权限管理语句](../Administration-Management/Administration.md)。
-## 相关配置参数
+### 相关配置参数
* `select_into_insert_tablet_plan_row_limit`
diff --git a/docs/zh/UserGuide/Query-Data/Where-Condition.md b/docs/zh/UserGuide/Query-Data/Where-Condition.md
index 82cc553fa0..0fc4bf1c31 100644
--- a/docs/zh/UserGuide/Query-Data/Where-Condition.md
+++ b/docs/zh/UserGuide/Query-Data/Where-Condition.md
@@ -19,7 +19,7 @@
-->
-# 查询过滤条件
+## 查询过滤条件
`WHERE` 子句指定了对数据行的筛选条件,由一个 `whereCondition` 组成。
@@ -28,7 +28,7 @@
根据过滤条件的不同,可以分为时间过滤条件和值过滤条件。时间过滤条件和值过滤条件可以混合使用。
-## 时间过滤条件
+### 时间过滤条件
使用时间过滤条件可以筛选特定时间范围的数据。对于时间戳支持的格式,请参考 [时间戳类型](../Data-Concept/Data-Type.md) 。
@@ -54,7 +54,7 @@
注:在上述示例中,`time` 也可写做 `timestamp`。
-## 值过滤条件
+### 值过滤条件
使用值过滤条件可以筛选数据值满足特定条件的数据。
**允许**使用 select 子句中未选择的时间序列作为值过滤条件。
@@ -105,11 +105,11 @@
select code from root.sg1.d1 where temperature is not null;
````
-## 模糊查询
+### 模糊查询
对于 TEXT 类型的数据,支持使用 `Like` 和 `Regexp` 运算符对数据进行模糊匹配
-### 使用 `Like` 进行模糊匹配
+#### 使用 `Like` 进行模糊匹配
**匹配规则:**
@@ -143,7 +143,7 @@ Total line number = 1
It costs 0.002s
```
-### 使用 `Regexp` 进行模糊匹配
+#### 使用 `Regexp` 进行模糊匹配
需要传入的过滤条件为 **Java 标准库风格的正则表达式**。
diff --git a/docs/zh/UserGuide/QuickStart/ClusterQuickStart.md b/docs/zh/UserGuide/QuickStart/ClusterQuickStart.md
index 35e543c52f..ab11f3a8fe 100644
--- a/docs/zh/UserGuide/QuickStart/ClusterQuickStart.md
+++ b/docs/zh/UserGuide/QuickStart/ClusterQuickStart.md
@@ -19,17 +19,17 @@
-->
-# 快速上手
+## 集群快速上手
以本地环境为例,演示 IoTDB 集群的启动、扩容与缩容。
**注意:本文档为使用本地不同端口,进行伪分布式环境部署的教程,仅用于练习。在真实环境部署时,一般不需要修改节点端口,仅需配置节点 IPV4 地址或域名即可。**
-## 1. 准备启动环境
+### 1. 准备启动环境
解压 apache-iotdb-1.0.0-all-bin.zip 至 cluster0 目录。
-## 2. 启动最小集群
+### 2. 启动最小集群
在 Linux 环境中,部署 1 个 ConfigNode 和 1 个 DataNode(1C1D)集群版,默认 1 副本:
```
@@ -37,7 +37,7 @@
./cluster0/sbin/start-datanode.sh
```
-## 3. 验证最小集群
+### 3. 验证最小集群
+ 最小集群启动成功,启动 Cli 进行验证:
```
@@ -58,11 +58,11 @@ Total line number = 2
It costs 0.242s
```
-## 4. 准备扩容环境
+### 4. 准备扩容环境
解压 apache-iotdb-1.0.0-all-bin.zip 至 cluster1 目录和 cluster2 目录
-## 5. 修改节点配置文件
+### 5. 修改节点配置文件
对于 cluster1 目录:
@@ -112,7 +112,7 @@ It costs 0.242s
| dn\_data\_region\_consensus\_port | 10762 |
| dn\_target\_config\_node\_list | 127.0.0.1:10710 |
-## 6. 集群扩容
+### 6. 集群扩容
将集群扩容至 3 个 ConfigNode 和 3 个 DataNode(3C3D)集群版,
指令执行顺序为先启动 ConfigNode,再启动 DataNode:
@@ -123,7 +123,7 @@ It costs 0.242s
./cluster2/sbin/start-datanode.sh
```
-## 7. 验证扩容结果
+### 7. 验证扩容结果
在 Cli 执行 `show cluster details`,结果如下:
```
@@ -142,7 +142,7 @@ Total line number = 6
It costs 0.012s
```
-## 8. 集群缩容
+### 8. 集群缩容
+ 缩容一个 ConfigNode:
```
@@ -162,7 +162,7 @@ It costs 0.012s
./cluster0/sbin/remove-confignode.sh 4
```
-## 9. 验证缩容结果
+### 9. 验证缩容结果
在 Cli 执行 `show cluster details`,结果如下:
```
diff --git a/docs/zh/UserGuide/QuickStart/Command-Line-Interface.md b/docs/zh/UserGuide/QuickStart/Command-Line-Interface.md
index 07c386ff15..d5c1dfb80a 100644
--- a/docs/zh/UserGuide/QuickStart/Command-Line-Interface.md
+++ b/docs/zh/UserGuide/QuickStart/Command-Line-Interface.md
@@ -38,7 +38,7 @@ IOTDB 为用户提供 cli/Shell 工具用于启动客户端和服务端程序。
## 运行
### Cli 运行方式
-安装后的 IoTDB 中有一个默认用户:`root`,默认密码为`root`。用户可以使用该用户尝试运行 IoTDB 客户端以测试服务器是否正常启动。客户端启动脚本为$IOTDB_HOME/sbin 文件夹下的`start-cli`脚本。启动脚本时需要指定运行 IP 和 RPC PORT。以下为服务器在本机启动,且用户未更改运行端口号的示例,默认端口为 6667。若用户尝试连接远程服务器或更改了服务器运行的端口号,请在-h 和-p 项处使用服务器的 IP 和 RPC PORT。</br>
+安装后的 IoTDB 中有一个默认用户:`root`,默认密码为`root`。用户可以使用该用户尝试运行 IoTDB 客户端以测试服务器是否正常启动。客户端启动脚本为$IOTDB_HOME/sbin 文件夹下的`start-cli`脚本。启动脚本时需要指定运行 IP 和 RPC PORT。以下为服务器在本机启动,且用户未更改运行端口号的示例,默认端口为 6667。若用户尝试连接远程服务器或更改了服务器运行的端口号,请在-h 和-p 项处使用服务器的 IP 和 RPC PORT。<br>
用户也可以在启动脚本的最前方设置自己的环境变量,如 JAVA_HOME 等 (对于 linux 用户,脚本路径为:"/sbin/start-cli.sh"; 对于 windows 用户,脚本路径为:"/sbin/start-cli.bat")
Linux 系统与 MacOS 系统启动命令如下:
@@ -132,49 +132,49 @@ Shell > bash ./standalone.sh
```
2、使用 https://ip:port/auth 登陆 keycloack, 首次登陆需要创建用户
-
+
3、点击 Administration Console 进入管理端
-
+
4、在左侧的 Master 菜单点击 add Realm, 输入 Name 创建一个新的 Realm
-
+
-
+
5、点击左侧菜单 Clients,创建 client
-
+
6、点击左侧菜单 User,创建 user
-
+
7、点击新创建的用户 id,点击 Credentials 导航输入密码和关闭 Temporary 选项,至此 keyclork 配置完成
-
+
8、创建角色,点击左侧菜单的 Roles然后点击Add Role 按钮添加角色
-
+
9、在Role Name 中输入`iotdb_admin`,点击save 按钮。提示:这里的`iotdb_admin`不能为其他名称否则即使登陆成功后也将无权限使用iotdb的查询、插入、创建 database、添加用户、角色等功能
-
+
10、点击左侧的User 菜单然后点击用户列表中的Edit的按钮为该用户添加我们刚创建的`iotdb_admin`角色
-
+
11、选择Role Mappings ,在Available Role选择`iotdb_admin`角色然后点Add selected 按钮添加角色
-
+
12、如果`iotdb_admin`角色在Assigned Roles中并且出现`Success Role mappings updated`提示,证明角色添加成功
-
+
提示:如果用户角色有调整需要重新生成token并且重新登陆iotdb才会生效
diff --git a/docs/zh/UserGuide/QuickStart/Files.md b/docs/zh/UserGuide/QuickStart/Files.md
index 119f35c7f6..ea26ca3841 100644
--- a/docs/zh/UserGuide/QuickStart/Files.md
+++ b/docs/zh/UserGuide/QuickStart/Files.md
@@ -19,31 +19,31 @@
-->
-# 数据文件存储
+## 数据文件存储
本节将介绍 IoTDB 的数据存储方式,便于您对 IoTDB 的数据管理有一个直观的了解。
IoTDB 需要存储的数据分为三类,分别为数据文件、系统文件以及写前日志文件。
-## 数据文件
+### 数据文件
> 在 basedir/data/目录下
数据文件存储了用户写入 IoTDB 系统的所有数据。包含 TsFile 文件和其他文件,可通过 [data_dirs 配置项](../Reference/DataNode-Config-Manual.md) 进行配置。
为了更好的支持用户对于磁盘空间扩展等存储需求,IoTDB 为 TsFile 的存储配置增加了多文件目录的存储方式,用户可自主配置多个存储路径作为数据的持久化位置(详情见 [data_dirs 配置项](../Reference/DataNode-Config-Manual.md)),并可以指定或自定义目录选择策略(详情见 [multi_dir_strategy 配置项](../Reference/DataNode-Config-Manual.md))。
-### TsFile
+#### TsFile
> 在 basedir/data/sequence or unsequence/{DatabaseName}/{DataRegionId}/{TimePartitionId}/目录下
1. {time}-{version}-{inner_compaction_count}-{cross_compaction_count}.tsfile
+ 数据文件
2. {TsFileName}.tsfile.mod
+ 更新文件,主要记录删除操作
-### TsFileResource
+#### TsFileResource
1. {TsFileName}.tsfile.resource
+ TsFile 的概要与索引文件
-### 与合并相关的数据文件
+#### 与合并相关的数据文件
> 在 basedir/data/sequence or unsequence/{DatabaseName}/目录下
1. 后缀为`.cross ` 或者 `.inner`
@@ -55,14 +55,14 @@ IoTDB 需要存储的数据分为三类,分别为数据文件、系统文件
4. 后缀为`.meta`的文件
+ 合并过程生成的元数据临时文件
-## 系统文件
+### 系统文件
系统 Schema 文件,存储了数据文件的元数据信息。可通过 system_dir 配置项进行配置(详情见 [system_dir 配置项](../Reference/DataNode-Config-Manual.md))。
-### 元数据相关文件
+#### 元数据相关文件
> 在 basedir/system/schema 目录下
-#### 元数据
+##### 元数据
1. mlog.bin
+ 记录的是元数据操作
2. mtree-1.snapshot
@@ -70,38 +70,38 @@ IoTDB 需要存储的数据分为三类,分别为数据文件、系统文件
3. mtree-1.snapshot.tmp
+ 临时文件,防止快照更新时,损坏旧快照文件
-#### 标签和属性
+##### 标签和属性
1. tlog.txt
+ 存储每个时序的标签和属性
+ 默认情况下每个时序 700 字节
-### 其他系统文件
-#### Version
+#### 其他系统文件
+##### Version
> 在 basedir/system/database/{DatabaseName}/{TimePartitionId} or upgrade 目录下
1. Version-{version}
+ 版本号文件,使用文件名来记录当前最大的版本号
-#### Upgrade
+##### Upgrade
> 在 basedir/system/upgrade 目录下
1. upgrade.txt
+ 记录升级进度
-#### Authority
+##### Authority
> 在 basedir/system/users/目录下是用户信息
> 在 basedir/system/roles/目录下是角色信息
-#### CompressRatio
+##### CompressRatio
> 在 basedir/system/compression_ration 目录下
1. Ration-{compressionRatioSum}-{calTimes}
+ 记录每个文件的压缩率
-## 写前日志文件
+### 写前日志文件
写前日志文件存储了系统的写前日志。可通过`wal_dir`配置项进行配置(详情见 [wal_dir 配置项](../Reference/DataNode-Config-Manual.md))。
> 在 basedir/wal 目录下
1. {DatabaseName}-{TsFileName}/wal1
+ 每个 memtable 会对应一个 wal 文件
-## 数据存储目录设置举例
+### 数据存储目录设置举例
接下来我们将举一个数据目录配置的例子,来具体说明如何配置数据的存储目录。
diff --git a/docs/zh/UserGuide/QuickStart/QuickStart.md b/docs/zh/UserGuide/QuickStart/QuickStart.md
index 3ecb2c2349..c0e9d79ae5 100644
--- a/docs/zh/UserGuide/QuickStart/QuickStart.md
+++ b/docs/zh/UserGuide/QuickStart/QuickStart.md
@@ -37,7 +37,7 @@ IoTDB 支持多种安装途径。用户可以使用三种方式对 IoTDB 进行
* 二进制可运行程序:请从 [下载](https://iotdb.apache.org/Download/) 页面下载最新的安装包,解压后即完成安装。
-* 使用 Docker 镜像:dockerfile 文件位于 https://github.com/apache/iotdb/blob/master/docker/src/main
+* 使用 Docker 镜像:dockerfile 文件位于[github](https://github.com/apache/iotdb/blob/master/docker/src/main)
## 软件目录结构
diff --git a/docs/zh/UserGuide/QuickStart/ServerFileList.md b/docs/zh/UserGuide/QuickStart/ServerFileList.md
index 1bf3f97e00..bb4e4fbd8b 100644
--- a/docs/zh/UserGuide/QuickStart/ServerFileList.md
+++ b/docs/zh/UserGuide/QuickStart/ServerFileList.md
@@ -23,9 +23,9 @@
>
> 持续更新中。..
-# 单机模式
+## 单机模式
-## 配置文件
+### 配置文件
> conf 目录下
1. iotdb-datanode.properties
2. logback.xml
@@ -39,12 +39,12 @@
1. system.properties
+ 记录的是所有不能变动的配置,启动时会检查,防止系统错误
-## 状态相关的文件
+### 状态相关的文件
-### 元数据相关文件
+#### 元数据相关文件
> 在 basedir/system/schema 目录下
-#### 元数据
+##### 元数据
1. mlog.bin
+ 记录的是元数据操作
2. mtree-1.snapshot
@@ -52,27 +52,27 @@
3. mtree-1.snapshot.tmp
+ 临时文件,防止快照更新时,损坏旧快照文件
-#### 标签和属性
+##### 标签和属性
1. tlog.txt
+ 存储每个时序的标签和属性
+ 默认情况下每个时序 700 字节
-### 数据相关文件
+#### 数据相关文件
> 在 basedir/data/目录下
-#### WAL
+##### WAL
> 在 basedir/wal 目录下
1. {StroageName}-{TsFileName}/wal1
+ 每个 memtable 会对应一个 wal 文件
-#### TsFile
+##### TsFile
> 在 basedir/data/sequence or unsequence/{DatabaseName}/{DataRegionId}/{TimePartitionId}/目录下
1. {time}-{version}-{mergeCnt}.tsfile
+ 数据文件
2. {TsFileName}.tsfile.mod
+ 更新文件,主要记录删除操作
-#### TsFileResource
+##### TsFileResource
1. {TsFileName}.tsfile.resource
+ TsFile 的概要与索引文件
2. {TsFileName}.tsfile.resource.temp
@@ -80,17 +80,17 @@
3. {TsFileName}.tsfile.resource.closing
+ 关闭标记文件,用于标记 TsFile 处于关闭状态,重启后可以据此选择是关闭或继续写入该文件
-#### Version
+##### Version
> 在 basedir/system/databases/{DatabaseName}/{DataRegionId}/{TimePartitionId} or upgrade 目录下
1. Version-{version}
+ 版本号文件,使用文件名来记录当前最大的版本号
-#### Upgrade
+##### Upgrade
> 在 basedir/system/upgrade 目录下
1. upgrade.txt
+ 记录升级进度
-#### Merge
+##### Merge
> 在 basedir/system/databases/{DatabaseName}/目录下
1. merge.mods
+ 记录合并过程中发生的删除等操作
@@ -99,11 +99,11 @@
3. tsfile.merge
+ 临时文件,每个顺序文件在合并时会产生一个对应的 merge 文件,用于存放临时数据
-#### Authority
+##### Authority
> 在 basedir/system/users/目录下是用户信息
> 在 basedir/system/roles/目录下是角色信息
-#### CompressRatio
+##### CompressRatio
> 在 basedir/system/compression_ration 目录下
1. Ration-{compressionRatioSum}-{calTimes}
+ 记录每个文件的压缩率
diff --git a/docs/zh/UserGuide/Reference/Common-Config-Manual.md b/docs/zh/UserGuide/Reference/Common-Config-Manual.md
index 51a148e851..78883d6711 100644
--- a/docs/zh/UserGuide/Reference/Common-Config-Manual.md
+++ b/docs/zh/UserGuide/Reference/Common-Config-Manual.md
@@ -19,22 +19,24 @@
-->
-# 公共配置参数
+# 参考
+
+## 公共配置参数
IoTDB ConfigNode 和 DataNode 的公共配置参数位于 `conf` 目录下。
* `iotdb-common.properties`:IoTDB 集群的公共配置。
-## 改后生效方式
+### 改后生效方式
不同的配置参数有不同的生效方式,分为以下三种:
+ **仅允许在第一次启动服务前修改:** 在第一次启动 ConfigNode/DataNode 后即禁止修改,修改会导致 ConfigNode/DataNode 无法启动。
+ **重启服务生效:** ConfigNode/DataNode 启动后仍可修改,但需要重启 ConfigNode/DataNode 后才生效。
+ **热加载:** 可在 ConfigNode/DataNode 运行时修改,修改后通过 Session 或 Cli 发送 ```load configuration``` 命令(SQL)至 IoTDB 使配置生效。
-## 系统配置项
+### 系统配置项
-### 副本配置
+#### 副本配置
* config\_node\_consensus\_protocol\_class
@@ -82,7 +84,7 @@ IoTDB ConfigNode 和 DataNode 的公共配置参数位于 `conf` 目录下。
| 默认值 | org.apache.iotdb.consensus.iot.IoTConsensus |
| 改后生效方式 | 仅允许在第一次启动服务前修改 |
-### 负载均衡配置
+#### 负载均衡配置
* series\_partition\_slot\_num
@@ -192,7 +194,7 @@ IoTDB ConfigNode 和 DataNode 的公共配置参数位于 `conf` 目录下。
| 默认值 | true |
| 改后生效方式 | 重启服务生效 |
-### 集群管理
+#### 集群管理
* time\_partition\_interval
@@ -223,7 +225,7 @@ IoTDB ConfigNode 和 DataNode 的公共配置参数位于 `conf` 目录下。
| 默认值 | 0.05 |
| 改后生效方式 | 重启服务生效 |
-### 内存控制配置
+#### 内存控制配置
* enable\_mem\_control
@@ -360,7 +362,7 @@ IoTDB ConfigNode 和 DataNode 的公共配置参数位于 `conf` 目录下。
|默认值| 1000 |
|改后生效方式|重启服务生效|
-### 元数据引擎配置
+#### 元数据引擎配置
* mlog\_buffer\_size
@@ -416,7 +418,7 @@ IoTDB ConfigNode 和 DataNode 的公共配置参数位于 `conf` 目录下。
|默认值| 10000 |
|改后生效方式| 重启服务生效 |
-### 数据类型自动推断
+#### 数据类型自动推断
* enable\_auto\_create\_schema
@@ -535,7 +537,7 @@ IoTDB ConfigNode 和 DataNode 的公共配置参数位于 `conf` 目录下。
| 默认值 | PLAIN |
| 改后生效方式 | 重启服务生效 |
-### 查询配置
+#### 查询配置
* read\_consistency\_level
@@ -672,7 +674,7 @@ IoTDB ConfigNode 和 DataNode 的公共配置参数位于 `conf` 目录下。
|默认值| 100000 |
|改后生效方式|重启服务生效|
-### 存储引擎配置
+#### 存储引擎配置
* timestamp\_precision
@@ -845,7 +847,7 @@ IoTDB ConfigNode 和 DataNode 的公共配置参数位于 `conf` 目录下。
| 默认值 | 10 |
| 改后生效方式 | 重启服务生效 |
-### 合并配置
+#### 合并配置
* enable\_seq\_space\_compaction
@@ -1081,7 +1083,7 @@ IoTDB ConfigNode 和 DataNode 的公共配置参数位于 `conf` 目录下。
|默认值| 50 |
|改后生效方式| 重启服务生效 |
-### 写前日志配置
+#### 写前日志配置
* wal\_mode
@@ -1173,7 +1175,7 @@ IoTDB ConfigNode 和 DataNode 的公共配置参数位于 `conf` 目录下。
| 默认值 | 20000 |
| 改后生效方式 | 热加载 |
-### TsFile 配置
+#### TsFile 配置
* group\_size\_in\_byte
@@ -1292,7 +1294,7 @@ IoTDB ConfigNode 和 DataNode 的公共配置参数位于 `conf` 目录下。
|默认值| 1024 |
|改后生效方式|热加载|
-### 授权配置
+#### 授权配置
* authorizer\_provider\_class
@@ -1367,7 +1369,7 @@ IoTDB ConfigNode 和 DataNode 的公共配置参数位于 `conf` 目录下。
| 默认值 | 30 |
| 改后生效方式 | 重启服务生效 |
-### UDF查询配置
+#### UDF查询配置
* udf\_initial\_byte\_array\_length\_for\_memory\_control
@@ -1405,7 +1407,7 @@ IoTDB ConfigNode 和 DataNode 的公共配置参数位于 `conf` 目录下。
| 默认值 | ext/udf(Windows:ext\\udf) |
| 改后生效方式 | 重启服务生效 |
-### 触发器配置
+#### 触发器配置
* trigger\_lib\_dir
@@ -1426,7 +1428,7 @@ IoTDB ConfigNode 和 DataNode 的公共配置参数位于 `conf` 目录下。
| 改后生效方式 | 重启服务生效 |
-### SELECT-INTO配置
+#### SELECT-INTO配置
* select\_into\_insert\_tablet\_plan\_row\_limit
@@ -1446,7 +1448,7 @@ IoTDB ConfigNode 和 DataNode 的公共配置参数位于 `conf` 目录下。
| 默认值 | 2 |
| 改后生效方式 | 重启服务生效 |
-### 连续查询配置
+#### 连续查询配置
* continuous\_query\_submit\_thread\_count
@@ -1466,7 +1468,7 @@ IoTDB ConfigNode 和 DataNode 的公共配置参数位于 `conf` 目录下。
| 默认值 | 1000 |
| 改后生效方式 | 重启服务生效 |
-### PIPE 配置
+#### PIPE 配置
* ip\_white\_list
@@ -1486,7 +1488,7 @@ IoTDB ConfigNode 和 DataNode 的公共配置参数位于 `conf` 目录下。
| 默认值 | 5 |
| 改后生效方式 | 热加载 |
-### Ratis 共识协议配置
+#### Ratis 共识协议配置
当Region配置了RatisConsensus共识协议之后,下述的配置项才会生效
* config\_node\_ratis\_log\_appender\_buffer\_size\_max
@@ -1814,7 +1816,7 @@ IoTDB ConfigNode 和 DataNode 的公共配置参数位于 `conf` 目录下。
| 默认值 | 1000 |
| 改后生效方式 | 重启生效 |
-### Procedure 配置
+#### Procedure 配置
* procedure\_core\_worker\_thread\_count
@@ -1843,7 +1845,7 @@ IoTDB ConfigNode 和 DataNode 的公共配置参数位于 `conf` 目录下。
| 默认值 | 800(s) |
| 改后生效方式 | 重启服务生效 |
-### MQTT代理配置
+#### MQTT代理配置
* enable\_mqtt\_service
@@ -1899,7 +1901,7 @@ IoTDB ConfigNode 和 DataNode 的公共配置参数位于 `conf` 目录下。
|默认值| 1048576 |
|改后生效方式|热加载|
-### REST 服务配置
+#### REST 服务配置
* enable\_rest\_service
@@ -2018,7 +2020,7 @@ IoTDB ConfigNode 和 DataNode 的公共配置参数位于 `conf` 目录下。
|默认值| 5000 |
|改后生效方式| 重启生效 |
-### InfluxDB 协议适配器配置
+#### InfluxDB 协议适配器配置
* enable\_influxdb\_rpc\_service
diff --git a/docs/zh/UserGuide/Reference/ConfigNode-Config-Manual.md b/docs/zh/UserGuide/Reference/ConfigNode-Config-Manual.md
index 98fcca5eea..307e745e52 100644
--- a/docs/zh/UserGuide/Reference/ConfigNode-Config-Manual.md
+++ b/docs/zh/UserGuide/Reference/ConfigNode-Config-Manual.md
@@ -19,7 +19,7 @@
-->
-# ConfigNode 配置参数
+## ConfigNode 配置参数
IoTDB ConfigNode 配置文件均位于 IoTDB 安装目录:`conf`文件夹下。
@@ -27,7 +27,7 @@ IoTDB ConfigNode 配置文件均位于 IoTDB 安装目录:`conf`文件夹下
* `iotdb-confignode.properties`:IoTDB ConfigNode 的配置文件。
-## 环境配置项(confignode-env.sh/bat)
+### 环境配置项(confignode-env.sh/bat)
环境配置项主要用于对 ConfigNode 运行的 Java 环境相关参数进行配置,如 JVM 相关配置。ConfigNode 启动时,此部分配置会被传给 JVM,详细配置项说明如下:
@@ -58,11 +58,11 @@ IoTDB ConfigNode 配置文件均位于 IoTDB 安装目录:`conf`文件夹下
|默认值|默认与最大堆内存相等|
|改后生效方式|重启服务生效|
-## 系统配置项(iotdb-confignode.properties)
+### 系统配置项(iotdb-confignode.properties)
IoTDB 集群的全局配置通过 ConfigNode 配置。
-### Config Node RPC 配置
+#### Config Node RPC 配置
* cn\_internal\_address
@@ -82,7 +82,7 @@ IoTDB 集群的全局配置通过 ConfigNode 配置。
| 默认值 | 10710 |
| 改后生效方式 | 重启服务生效 |
-### 共识协议
+#### 共识协议
* cn\_consensus\_port
@@ -93,7 +93,7 @@ IoTDB 集群的全局配置通过 ConfigNode 配置。
| 默认值 | 10720 |
| 改后生效方式 | 重启服务生效 |
-### 目标 Config Node 配置
+#### 目标 Config Node 配置
* cn\_target\_config\_node\_list
@@ -104,7 +104,7 @@ IoTDB 集群的全局配置通过 ConfigNode 配置。
| 默认值 | 127.0.0.1:10710 |
| 改后生效方式 | 重启服务生效 |
-### 数据目录
+#### 数据目录
* cn\_system\_dir
@@ -124,7 +124,7 @@ IoTDB 集群的全局配置通过 ConfigNode 配置。
|默认值| data/confignode/consensus(Windows:data\\configndoe\\consensus) |
|改后生效方式| 重启服务生效 |
-### Thrift RPC 配置
+#### Thrift RPC 配置
* cn\_rpc\_thrift\_compression\_enable
@@ -207,4 +207,4 @@ IoTDB 集群的全局配置通过 ConfigNode 配置。
| 默认值 | 300 |
| 改后生效方式 | 重启服务生效 |
-### Metric 监控配置
\ No newline at end of file
+#### Metric 监控配置
\ No newline at end of file
diff --git a/docs/zh/UserGuide/Reference/DataNode-Config-Manual.md b/docs/zh/UserGuide/Reference/DataNode-Config-Manual.md
index 9f15e54720..5ca0a4a1dc 100644
--- a/docs/zh/UserGuide/Reference/DataNode-Config-Manual.md
+++ b/docs/zh/UserGuide/Reference/DataNode-Config-Manual.md
@@ -19,7 +19,7 @@
-->
-# DataNode 配置参数
+## DataNode 配置参数
IoTDB DataNode 与 Standalone 模式共用一套配置文件,均位于 IoTDB 安装目录:`conf`文件夹下。
@@ -27,14 +27,14 @@ IoTDB DataNode 与 Standalone 模式共用一套配置文件,均位于 IoTDB
* `iotdb-datanode.properties`:IoTDB DataNode 和单机版的配置文件。
-## 热修改配置项
+### 热修改配置项
为方便用户使用,IoTDB 为用户提供了热修改功能,即在系统运行过程中修改 `iotdb-datanode.properties` 和 `iotdb-common.properties` 中部分配置参数并即时应用到系统中。下面介绍的参数中,改后 生效方式为`热加载`
的均为支持热修改的配置参数。
通过 Session 或 Cli 发送 ```load configuration``` 命令(SQL)至 IoTDB 可触发配置热加载。
-## 环境配置项(datanode-env.sh/bat)
+### 环境配置项(datanode-env.sh/bat)
环境配置项主要用于对 DataNode 运行的 Java 环境相关参数进行配置,如 JVM 相关配置。DataNode/Standalone 启动时,此部分配置会被传给 JVM,详细配置项说明如下:
@@ -83,11 +83,11 @@ IoTDB DataNode 与 Standalone 模式共用一套配置文件,均位于 IoTDB
|默认值|31999|
|改后生效方式|重启服务生效|
-## 系统配置项(iotdb-datanode.properties)
+### 系统配置项(iotdb-datanode.properties)
系统配置项是 IoTDB DataNode/Standalone 运行的核心配置,它主要用于设置 DataNode/Standalone 数据库引擎的参数。
-### Data Node RPC 服务配置
+#### Data Node RPC 服务配置
* dn\_rpc\_address
@@ -161,7 +161,7 @@ IoTDB DataNode 与 Standalone 模式共用一套配置文件,均位于 IoTDB
|默认值| 5000 |
|改后生效方式| 重启服务生效 |
-### 目标 Config Nodes 配置
+#### 目标 Config Nodes 配置
* dn\_target\_config\_node\_list
@@ -172,7 +172,7 @@ IoTDB DataNode 与 Standalone 模式共用一套配置文件,均位于 IoTDB
|默认值| 127.0.0.1:10710 |
|改后生效方式| 重启服务生效 |
-### 连接配置
+#### 连接配置
* dn\_session\_timeout\_threshold
@@ -265,7 +265,7 @@ IoTDB DataNode 与 Standalone 模式共用一套配置文件,均位于 IoTDB
| 默认值 | 300 |
| 改后生效方式 | 重启服务生效 |
-### 目录配置
+#### 目录配置
* dn\_system\_dir
@@ -321,9 +321,9 @@ IoTDB DataNode 与 Standalone 模式共用一套配置文件,均位于 IoTDB
| 默认值 | data/datanode/sync |
| 改后生效方式 | 热加载 |
-### Metric 配置
+#### Metric 配置
-## 开启 GC 日志
+### 开启 GC 日志
GC 日志默认是关闭的。为了性能调优,用户可能会需要收集 GC 信息。
若要打开 GC 日志,则需要在启动 IoTDB Server 的时候加上"printgc"参数:
diff --git a/docs/zh/UserGuide/Reference/Keywords.md b/docs/zh/UserGuide/Reference/Keywords.md
index 68f1be2bc8..fff9393965 100644
--- a/docs/zh/UserGuide/Reference/Keywords.md
+++ b/docs/zh/UserGuide/Reference/Keywords.md
@@ -19,7 +19,7 @@
-->
-# 关键字
+## 关键字
保留字(不能用于作为标识符):
diff --git a/docs/zh/UserGuide/Reference/SQL-Reference.md b/docs/zh/UserGuide/Reference/SQL-Reference.md
index aaff8ee919..32aa49fefe 100644
--- a/docs/zh/UserGuide/Reference/SQL-Reference.md
+++ b/docs/zh/UserGuide/Reference/SQL-Reference.md
@@ -19,9 +19,9 @@
-->
-# SQL 参考文档
+## SQL 参考文档
-## 显示版本号
+### 显示版本号
```sql
show version
@@ -37,7 +37,7 @@ Total line number = 1
It costs 0.417s
```
-## Schema 语句
+### Schema 语句
* 设置 database
@@ -355,7 +355,7 @@ Eg: IoTDB > SHOW CHILD PATHS root.ln.wf*
Note: This statement can be used in IoTDB Client and JDBC.
```
-## 数据管理语句
+### 数据管理语句
* 插入记录语句
@@ -791,7 +791,7 @@ Eg. select * from root.sg.d1 where s1 like 'abc\%'
| 200 | root.sg.d1.s1| abc% |
```
-## 数据库管理语句
+### 数据库管理语句
* 创建用户
@@ -957,7 +957,7 @@ password:=string
Eg: IoTDB > ALTER USER tempuser SET PASSWORD 'newpwd';
```
-## 功能
+### 功能
* COUNT
@@ -1051,7 +1051,7 @@ Eg. SELECT SUM(temperature) FROM root.ln.wf01.wt01 WHERE root.ln.wf01.wt01.tempe
Note: the statement needs to satisfy this constraint: <PrefixPath> + <Path> = <Timeseries>
```
-## TTL
+### TTL
IoTDB 支持对 database 级别设置数据存活时间(TTL),这使得 IoTDB 可以定期、自动地删除一定时间之前的数据。合理使用 TTL
可以帮助您控制 IoTDB 占用的总磁盘空间以避免出现磁盘写满等异常。并且,随着文件数量的增多,查询性能往往随之下降,
@@ -1101,7 +1101,7 @@ Eg DELETE PARTITION root.sg1 0,1,2
```
partitionId 可以通过查看数据文件夹获取,或者是计算 `timestamp / partitionInterval`得到。
-## 中止查询
+### 中止查询
- 显示正在执行的查询列表
@@ -1118,7 +1118,7 @@ E.g. KILL QUERY 2
```
-## 设置系统为只读/可写入模式
+### 设置系统为只读/可写入模式
```
@@ -1126,7 +1126,7 @@ IoTDB> SET SYSTEM TO READONLY
IoTDB> SET SYSTEM TO WRITABLE
```
-## 标识符列表
+### 标识符列表
```
QUOTE := '\'';
@@ -1180,7 +1180,7 @@ eg. _abc123
```
-## 常量列表
+### 常量列表
```
PointValue : Integer | Float | StringLiteral | Boolean
@@ -1197,7 +1197,7 @@ Note: DateTime Type can support several types, see Chapter 3 Datetime section fo
```
PrecedenceEqualOperator : EQUAL | NOTEQUAL | LESSTHANOREQUALTO | LESSTHAN | GREATERTHANOREQUALTO | GREATERTHAN
```
-Timeseries : ROOT [DOT <LayerName>]* DOT <SensorName>
+Timeseries : ROOT [DOT \<LayerName\>]* DOT \<SensorName\>
LayerName : Identifier
SensorName : Identifier
eg. root.ln.wf01.wt01.status
@@ -1206,7 +1206,7 @@ Note: Timeseries must be start with `root`(case insensitive) and end with sensor
```
```
-PrefixPath : ROOT (DOT <LayerName>)*
+PrefixPath : ROOT (DOT \<LayerName\>)*
LayerName : Identifier | STAR
eg. root.sgcc
eg. root.*
diff --git a/docs/zh/UserGuide/Reference/Status-Codes.md b/docs/zh/UserGuide/Reference/Status-Codes.md
index 5d93f11fca..fc28d4ed54 100644
--- a/docs/zh/UserGuide/Reference/Status-Codes.md
+++ b/docs/zh/UserGuide/Reference/Status-Codes.md
@@ -19,7 +19,7 @@
-->
-# 状态码
+## 状态码
IoTDB 引入了**状态码**这一概念。例如,因为 IoTDB 需要在写入数据之前首先注册时间序列,一种可能的解决方案是:
diff --git a/docs/zh/UserGuide/Reference/TSDB-Comparison.md b/docs/zh/UserGuide/Reference/TSDB-Comparison.md
index 6bee5662f4..3fc793eb8d 100644
--- a/docs/zh/UserGuide/Reference/TSDB-Comparison.md
+++ b/docs/zh/UserGuide/Reference/TSDB-Comparison.md
@@ -19,15 +19,15 @@
-->
-# 时间序列数据库比较
+## 时间序列数据库比较
-## Overview
+### Overview
-
+
**表格外观启发自 [Andriy Zabavskyy: How to Select Time Series DB](https://towardsdatascience.com/how-to-select-time-series-db-123b0eb4ab82)*
-## 1. 已知的时间序列数据库
+### 1. 已知的时间序列数据库
随着时间序列数据变得越来越重要,一些开源的时间序列数据库(Time Series Databases,or TSDB)诞生了。
@@ -55,11 +55,11 @@
Prometheus 和 Druid 也因为时间序列数据管理而闻名,但是 Prometheus 聚焦在数据采集、可视化和报警,Druid 聚焦在 OLAP 负载的数据分析,因此本文省略了 Prometheus 和 Druid。
-## 2. 比较
+### 2. 比较
本文将从以下两个角度比较时间序列数据库:功能比较、性能比较。
-### 2.1 功能比较
+#### 2.1 功能比较
以下两节分别是时间序列数据库的基础功能比较(2.1.1)和高级功能比较(2.1.2)。
@@ -71,7 +71,7 @@ Prometheus 和 Druid 也因为时间序列数据管理而闻名,但是 Prometh
- `-`:不支持
- `?`:未知
-#### 2.1.1 基础功能
+##### 2.1.1 基础功能
| TSDB | IoTDB | InfluxDB | OpenTSDB | KairosDB | TimescaleDB |
| ----------------------------- | :---------------------: | :--------: | :--------: | :--------: | :---------: |
@@ -183,7 +183,7 @@ Prometheus 和 Druid 也因为时间序列数据管理而闻名,但是 Prometh
- TimescaleDB 不能被企业免费使用。
- IoTDB 和 InfluxDB 可以满足时间序列数据管理的大部分需求,同时它俩之间有一些不同之处。
-#### 2.1.2 高级功能
+##### 2.1.2 高级功能
| TSDB | IoTDB | InfluxDB | OpenTSDB | KairosDB | TimescaleDB |
| ---------------------------- | :----: | :------: | :------: | :------: |:-----------:|
@@ -254,13 +254,13 @@ Prometheus 和 Druid 也因为时间序列数据管理而闻名,但是 Prometh
IoTDB 拥有许多其它时间序列数据库不支持的强大功能。
-### 2.2 性能比较
+#### 2.2 性能比较
如果你觉得:”如果我只需要基础功能的话,IoTDB 好像和其它的时间序列数据库没有什么不同。“
这好像是有道理的。但是如果考虑性能的话,你也许会改变你的想法。
-#### 2.2.1 快速浏览
+##### 2.2.1 快速浏览
| TSDB | IoTDB | InfluxDB | KairosDB | TimescaleDB |
| -------------------- | :---: | :------: | :------: | :---------: |
@@ -270,33 +270,33 @@ IoTDB 拥有许多其它时间序列数据库不支持的强大功能。
| *Downsampling Query* | ++ | + | +- | +- |
| *Latest Query* | ++ | + | +- | + |
-##### 写入性能
+###### 写入性能
我们从两个方面来测试写性能:batch size 和 client num。存储组的数量是 10。有 1000 个设备,每个设备有 100 个传感器,也就是说一共有 100K 条时间序列。
测试使用的 IoTDB 版本是`v0.11.1`。
-###### 改变 batch size
+* 改变 batch size
10 个客户端并发地写数据。IoTDB 使用 batch insertion API,batch size 从 1ms 到 1min 变化(每次调用 write API 写 N 个数据点)。
写入吞吐率(points/second)如下图所示:
-<img src="https://user-images.githubusercontent.com/24886743/106254214-6cacbe80-6253-11eb-8532-d6a1829f8f66.png" alt="Batch Size with Write Throughput (points/second)" />
+<img src="/img/github/106254214-6cacbe80-6253-11eb-8532-d6a1829f8f66.png" alt="Batch Size with Write Throughput (points/second)" />
<center>Figure 1. Batch Size with Write throughput (points/second) IoTDB v0.11.1</center>
-###### 改变 client num
+* 改变 client num
client num 从 1 到 50 变化。IoTDB 使用 batch insertion API,batch size 是 100(每次调用 write API 写 100 个数据点)。
写入吞吐率(points/second)如下图所示:
-
+
<center>Figure 3. Client Num with Write Throughput (points/second) IoTDB v0.11.1</center>
-##### 查询性能
+###### 查询性能
10 个客户端并发地读数据。存储组的数量是 10。有 10 个设备,每个设备有 10 个传感器,也就是说一共有 100 条时间序列。
@@ -306,25 +306,25 @@ client num 从 1 到 50 变化。IoTDB 使用 batch insertion API,batch size
测试结果如下图所示:
-
+
<center>Figure 4. Raw data query 1 col time cost(ms) IoTDB v0.11.1</center>
-
+
<center>Figure 5. Aggregation query time cost(ms) IoTDB v0.11.1</center>
-
+
<center>Figure 6. Downsampling query time cost(ms) IoTDB v0.11.1</center>
-
+
<center>Figure 7. Latest query time cost(ms) IoTDB v0.11.1</center>
可以看到,IoTDB 的 raw data query、aggregation query、downsampling query、latest query 查询性能表现都超越了其它数据库。
-#### 2.2.2 更多细节
+##### 2.2.2 更多细节
我们提供了一个 benchmark 工具,叫做 [IoTDB-benchamrk](https://github.com/thulab/iotdb-benchmark)(你可以用 dev branch 来编译它)。它支持 IoTDB, InfluxDB, KairosDB, TimescaleDB, OpenTSDB。
@@ -338,7 +338,7 @@ client num 从 1 到 50 变化。IoTDB 使用 batch insertion API,batch size
所有的客户端运行的机器配置是:Intel(R) Core(TM) i7-8700 CPU @ 3.20GHz,(6 cores 12 threads), 16GB memory, 256G SSD, OS: Ubuntu 16.04.7 LTS, 64bits.
-## 3. 结论
+### 3. 结论
从以上所有实验中,我们可以看到 IoTDB 的性能大大优于其他数据库。
diff --git a/docs/zh/UserGuide/Syntax-Conventions/Detailed-Grammar.md b/docs/zh/UserGuide/Syntax-Conventions/Detailed-Grammar.md
index 0d26359661..287b300079 100644
--- a/docs/zh/UserGuide/Syntax-Conventions/Detailed-Grammar.md
+++ b/docs/zh/UserGuide/Syntax-Conventions/Detailed-Grammar.md
@@ -19,7 +19,7 @@
-->
-# 词法与文法详细定义
+## 词法与文法详细定义
请阅读代码仓库中的词法和语法描述文件:
diff --git a/docs/zh/UserGuide/Syntax-Conventions/Identifier.md b/docs/zh/UserGuide/Syntax-Conventions/Identifier.md
index 59f036454b..a2e4d04bf7 100644
--- a/docs/zh/UserGuide/Syntax-Conventions/Identifier.md
+++ b/docs/zh/UserGuide/Syntax-Conventions/Identifier.md
@@ -19,13 +19,13 @@
-->
-# 标识符
+## 标识符
-## 使用场景
+### 使用场景
在 IoTDB 中,触发器名称、UDF函数名、元数据模板名称、用户与角色名、连续查询标识、Pipe、PipeSink、键值对中的键和值、别名等可以作为标识符。
-## 约束
+### 约束
请注意,此处约束是标识符的通用约束,具体标识符可能还附带其它约束条件,如用户名限制字符数大于等于4,更严格的约束请参考具体标识符相关的说明文档。
@@ -46,7 +46,7 @@
- 标识符包含不允许的特殊字符。
- 标识符为实数。
-## 如何在反引号引起的标识符中使用引号
+### 如何在反引号引起的标识符中使用引号
**在反引号引起的标识符中可以直接使用单引号和双引号。**
@@ -62,7 +62,7 @@ create schema template `t1't"t`
(temperature FLOAT encoding=RLE, status BOOLEAN encoding=PLAIN compression=SNAPPY)
```
-## 特殊情况示例
+### 特殊情况示例
需要使用反引号进行引用的部分情况示例:
diff --git a/docs/zh/UserGuide/Syntax-Conventions/KeyValue-Pair.md b/docs/zh/UserGuide/Syntax-Conventions/KeyValue-Pair.md
index 604bd76ed1..d7efc92b54 100644
--- a/docs/zh/UserGuide/Syntax-Conventions/KeyValue-Pair.md
+++ b/docs/zh/UserGuide/Syntax-Conventions/KeyValue-Pair.md
@@ -19,7 +19,7 @@
-->
-# 键值对
+## 键值对
**键值对的键和值可以被定义为标识符或者常量。**
diff --git a/docs/zh/UserGuide/Syntax-Conventions/Keywords-And-Reserved-Words.md b/docs/zh/UserGuide/Syntax-Conventions/Keywords-And-Reserved-Words.md
index 8e61315850..af3bef00c3 100644
--- a/docs/zh/UserGuide/Syntax-Conventions/Keywords-And-Reserved-Words.md
+++ b/docs/zh/UserGuide/Syntax-Conventions/Keywords-And-Reserved-Words.md
@@ -19,7 +19,7 @@
-->
-# 关键字
+## 关键字
关键字是在 SQL 具有特定含义的词,可以作为标识符。保留字是关键字的一个子集,保留字不能用于标识符。
diff --git a/docs/zh/UserGuide/Syntax-Conventions/Literal-Values.md b/docs/zh/UserGuide/Syntax-Conventions/Literal-Values.md
index f620f1788b..f2ad963bd0 100644
--- a/docs/zh/UserGuide/Syntax-Conventions/Literal-Values.md
+++ b/docs/zh/UserGuide/Syntax-Conventions/Literal-Values.md
@@ -19,11 +19,12 @@
-->
-# 字面值常量
+# 语法约定
+## 字面值常量
该部分对 IoTDB 中支持的字面值常量进行说明,包括字符串常量、数值型常量、时间戳常量、布尔型常量和空值。
-## 字符串常量
+### 字符串常量
在 IoTDB 中,字符串是由**单引号(`'`)或双引号(`"`)字符括起来的字符序列**。示例如下:
@@ -32,7 +33,7 @@
"another string"
```
-### 使用场景
+#### 使用场景
- `INSERT` 或者 `SELECT` 中用于表达 `TEXT` 类型数据的场景。
@@ -103,7 +104,7 @@
- 用于表示键值对,键值对的键和值可以被定义成常量(包括字符串)或者标识符,具体请参考键值对章节。
-### 如何在字符串内使用引号
+#### 如何在字符串内使用引号
- 在单引号引起的字符串内,双引号无需特殊处理。同理,在双引号引起的字符串内,单引号无需特殊处理。
- 在单引号引起的字符串里,可以通过双写单引号来表示一个单引号,即单引号 ' 可以表示为 ''。
@@ -123,7 +124,7 @@
"""string" // "string
```
-## 数值型常量
+### 数值型常量
数值型常量包括整型和浮点型。
@@ -135,16 +136,16 @@
在浮点上下文中可以使用整数,它会被解释为等效的浮点数。
-## 时间戳常量
+### 时间戳常量
时间戳是一个数据到来的时间点,在 IoTDB 中分为绝对时间戳和相对时间戳。详细信息可参考 [数据类型文档](https://iotdb.apache.org/zh/UserGuide/Master/Data-Concept/Data-Type.html)。
特别地,`NOW()`表示语句开始执行时的服务端系统时间戳。
-## 布尔型常量
+### 布尔型常量
布尔值常量 `TRUE` 和 `FALSE` 分别等价于 `1` 和 `0`,它们对大小写不敏感。
-## 空值
+### 空值
`NULL`值表示没有数据。`NULL`对大小写不敏感。
\ No newline at end of file
diff --git a/docs/zh/UserGuide/Syntax-Conventions/NodeName-In-Path.md b/docs/zh/UserGuide/Syntax-Conventions/NodeName-In-Path.md
index 2b03d056a4..f188c4a75d 100644
--- a/docs/zh/UserGuide/Syntax-Conventions/NodeName-In-Path.md
+++ b/docs/zh/UserGuide/Syntax-Conventions/NodeName-In-Path.md
@@ -19,11 +19,11 @@
-->
-# 路径结点名
+## 路径结点名
路径结点名是特殊的标识符,其还可以是通配符 \* 或 \*\*。在创建时间序列时,各层级的路径结点名不能为通配符 \* 或 \*\*。在查询语句中,可以用通配符 \* 或 \*\* 来表示路径结点名,以匹配一层或多层路径。
-## 通配符
+### 通配符
`*`在路径中表示一层。例如`root.vehicle.*.sensor1`代表的是以`root.vehicle`为前缀,以`sensor1`为后缀,层次等于 4 层的路径。
@@ -54,7 +54,7 @@ select a*b from root.sg
|Time|root.sg.a * root.sg.b|
```
-## 标识符
+### 标识符
路径结点名不为通配符时,使用方法和标识符一致。**在 SQL 中需要使用反引号引用的路径结点,在结果集中也会用反引号引起。**
diff --git a/docs/zh/UserGuide/Syntax-Conventions/Session-And-TsFile-API.md b/docs/zh/UserGuide/Syntax-Conventions/Session-And-TsFile-API.md
index cfecc02831..d8428dedf6 100644
--- a/docs/zh/UserGuide/Syntax-Conventions/Session-And-TsFile-API.md
+++ b/docs/zh/UserGuide/Syntax-Conventions/Session-And-TsFile-API.md
@@ -19,7 +19,7 @@
-->
-# Session And TsFile API
+## Session And TsFile API
在使用Session、TsFIle API时,如果您调用的方法需要以字符串形式传入物理量(measurement)、设备(device)、数据库(database)、路径(path)等参数,**请保证所传入字符串与使用 SQL 语句时的写法一致**,下面是一些帮助您理解的例子。具体代码示例可以参考:`example/session/src/main/java/org/apache/iotdb/SyntaxConventionRelatedExample.java`
diff --git a/docs/zh/UserGuide/Trigger/Configuration-Parameters.md b/docs/zh/UserGuide/Trigger/Configuration-Parameters.md
index 4e47a6a28e..61909b11df 100644
--- a/docs/zh/UserGuide/Trigger/Configuration-Parameters.md
+++ b/docs/zh/UserGuide/Trigger/Configuration-Parameters.md
@@ -21,7 +21,7 @@
-# 配置参数
+## 配置参数
| 配置项 | 含义 |
| ------------------------------------------------- | ---------------------------------------------- |
diff --git a/docs/zh/UserGuide/Trigger/Implement-Trigger.md b/docs/zh/UserGuide/Trigger/Implement-Trigger.md
index 4d1f6ab1f7..0979a644ce 100644
--- a/docs/zh/UserGuide/Trigger/Implement-Trigger.md
+++ b/docs/zh/UserGuide/Trigger/Implement-Trigger.md
@@ -21,9 +21,9 @@
-# 编写触发器
+## 编写触发器
-## 触发器依赖
+### 触发器依赖
触发器的逻辑需要您编写 Java 类进行实现。
在编写触发器逻辑时,需要使用到下面展示的依赖。如果您使用 [Maven](http://search.maven.org/),则可以直接从 [Maven 库](http://search.maven.org/)中搜索到它们。请注意选择和目标服务器版本相同的依赖版本。
@@ -37,7 +37,7 @@
</dependency>
```
-## 接口说明
+### 接口说明
编写一个触发器需要实现 `org.apache.iotdb.trigger.api.Trigger` 类。
@@ -106,7 +106,7 @@ public interface Trigger {
下面是所有可供用户进行实现的接口的说明。
-### 生命周期相关接口
+#### 生命周期相关接口
| 接口定义 | 描述 |
| ------------------------------------------------------------ | ------------------------------------------------------------ |
@@ -115,9 +115,9 @@ public interface Trigger {
| *default void onDrop() throws Exception {}* | 当您使用`DROP TRIGGER`语句删除触发器后,该接口会被调用。在每一个触发器实例的生命周期内,该接口会且仅会被调用一次。该接口主要有如下作用:可以进行资源释放的操作。可以用于持久化触发器计算的结果。 |
| *default void restore() throws Exception {}* | 当重启 DataNode 时,集群会恢复 DataNode 上已经注册的触发器实例,在此过程中会为该 DataNode 上的有状态触发器调用一次该接口。有状态触发器实例所在的 DataNode 宕机后,集群会在另一个可用 DataNode 上恢复该触发器的实例,在此过程中会调用一次该接口。该接口可以用于自定义恢复逻辑。 |
-### 数据变动侦听相关接口
+#### 数据变动侦听相关接口
-#### 侦听接口
+##### 侦听接口
```java
/**
@@ -162,7 +162,7 @@ insert into root.sg(time, a, b) values (1, 1, 1);
- root.sg.a 的数据会被组装成一个新的 tablet2,在相应的触发时机进行 Trigger2.fire(tablet2)
- root.sg.b 的数据会被组装成一个新的 tablet3,在相应的触发时机进行 Trigger3.fire(tablet3)
-#### 侦听策略接口
+##### 侦听策略接口
在触发器触发失败时,我们会根据侦听策略接口设置的策略进行相应的操作,您可以通过下述接口设置 `org.apache.iotdb.trigger.api.enums.FailureStrategy`,目前有乐观和悲观两种策略:
@@ -183,12 +183,12 @@ insert into root.sg(time, a, b) values (1, 1, 1);
您可以参考下图辅助理解,其中 Trigger1 配置采用乐观策略,Trigger2 配置采用悲观策略。Trigger1 和 Trigger2 的触发时机是 BEFORE INSERT,Trigger3 和 Trigger4 的触发时机是 AFTER INSERT。 正常执行流程如下:
-<img src="https://github.com/apache/iotdb-bin-resources/blob/main/docs/UserGuide/Process-Data/Triggers/Trigger_Process_Flow.jpg?raw=true">
+<img src="/img/UserGuide/Process-Data/Triggers/Trigger_Process_Flow.jpg?raw=true">
-<img src="https://github.com/apache/iotdb-bin-resources/blob/main/docs/UserGuide/Process-Data/Triggers/Trigger_Process_Strategy.jpg?raw=true">
+<img src="/img/UserGuide/Process-Data/Triggers/Trigger_Process_Strategy.jpg?raw=true">
-## 示例
+### 示例
如果您使用 [Maven](http://search.maven.org/),可以参考我们编写的示例项目 trigger-example。您可以在 [这里](https://github.com/apache/iotdb/tree/master/example/trigger) 找到它。后续我们会加入更多的示例项目供您参考。
diff --git a/docs/zh/UserGuide/Trigger/Instructions.md b/docs/zh/UserGuide/Trigger/Instructions.md
index d3fb7f88e9..93f126ccc9 100644
--- a/docs/zh/UserGuide/Trigger/Instructions.md
+++ b/docs/zh/UserGuide/Trigger/Instructions.md
@@ -19,26 +19,26 @@
-->
+# 触发器
-
-# 使用说明
+## 使用说明
触发器提供了一种侦听序列数据变动的机制。配合用户自定义逻辑,可完成告警、数据转发等功能。
触发器基于 Java 反射机制实现。用户通过简单实现 Java 接口,即可实现数据侦听。IoTDB 允许用户动态注册、卸载触发器,在注册、卸载期间,无需启停服务器。
-## 侦听模式
+### 侦听模式
IoTDB 的单个触发器可用于侦听符合特定模式的时间序列的数据变动,如时间序列 root.sg.a 上的数据变动,或者符合路径模式 root.**.a 的时间序列上的数据变动。您在注册触发器时可以通过 SQL 语句指定触发器侦听的路径模式。
-## 触发器类型
+### 触发器类型
目前触发器分为两类,您在注册触发器时可以通过 SQL 语句指定类型:
- 有状态的触发器。该类触发器的执行逻辑可能依赖前后的多条数据,框架会将不同节点写入的数据汇总到同一个触发器实例进行计算,来保留上下文信息,通常用于采样或者统计一段时间的数据聚合信息。集群中只有一个节点持有有状态触发器的实例。
- 无状态的触发器。触发器的执行逻辑只和当前输入的数据有关,框架无需将不同节点的数据汇总到同一个触发器实例中,通常用于单行数据的计算和异常检测等。集群中每个节点均持有无状态触发器的实例。
-## 触发时机
+### 触发时机
触发器的触发时机目前有两种,后续会拓展其它触发时机。您在注册触发器时可以通过 SQL 语句指定触发时机:
diff --git a/docs/zh/UserGuide/Trigger/Notes.md b/docs/zh/UserGuide/Trigger/Notes.md
index 153fb16e36..ce5ceaa44b 100644
--- a/docs/zh/UserGuide/Trigger/Notes.md
+++ b/docs/zh/UserGuide/Trigger/Notes.md
@@ -21,7 +21,7 @@
-# 重要注意事项
+## 重要注意事项
- 触发器从注册时开始生效,不对已有的历史数据进行处理。**即只有成功注册触发器之后发生的写入请求才会被触发器侦听到。**
- 触发器目前采用**同步触发**,所以编写时需要保证触发器效率,否则可能会大幅影响写入性能。**您需要自己保证触发器内部的并发安全性**。
diff --git a/docs/zh/UserGuide/Trigger/Trigger-Management.md b/docs/zh/UserGuide/Trigger/Trigger-Management.md
index d0faa3ed25..eddb1a60c4 100644
--- a/docs/zh/UserGuide/Trigger/Trigger-Management.md
+++ b/docs/zh/UserGuide/Trigger/Trigger-Management.md
@@ -21,13 +21,13 @@
-# 管理触发器
+## 管理触发器
您可以通过 SQL 语句注册和卸载一个触发器实例,您也可以通过 SQL 语句查询到所有已经注册的触发器。
**我们建议您在注册触发器时停止写入。**
-## 注册触发器
+### 注册触发器
触发器可以注册在任意路径模式上。被注册有触发器的序列将会被触发器侦听,当序列上有数据变动时,触发器中对应的触发方法将会被调用。
@@ -103,7 +103,7 @@ WITH (
- JAR 包的 URI 为 http://jar/ClusterAlertingExample.jar
- 创建该触发器实例时会传入 name 和 limit 两个参数。
-## 卸载触发器
+### 卸载触发器
可以通过指定触发器 ID 的方式卸载触发器,卸载触发器的过程中会且仅会调用一次触发器的 `onDrop` 接口。
@@ -124,7 +124,7 @@ DROP TRIGGER triggerTest1
上述语句将会卸载 ID 为 triggerTest1 的触发器。
-## 查询触发器
+### 查询触发器
可以通过 SQL 语句查询集群中存在的触发器的信息。SQL 语法如下:
@@ -139,7 +139,7 @@ SHOW TRIGGERS
| triggerTest1 | BEFORE_INSERT / AFTER_INSERT | STATELESS / STATEFUL | INACTIVE / ACTIVE / DROPPING / TRANSFFERING | root.** | org.apache.iotdb.trigger.TriggerExample | ALL(STATELESS) / DATA_NODE_ID(STATEFUL) |
-## 触发器状态说明
+### 触发器状态说明
在集群中注册以及卸载触发器的过程中,我们维护了触发器的状态,下面是对这些状态的说明:
... 1207 lines suppressed ...