You are viewing a plain text version of this content. The canonical link for it is here.
Posted to commits@weex.apache.org by ha...@apache.org on 2017/10/13 13:04:09 UTC
[14/51] [abbrv] incubator-weex-site git commit: rearrangement the
structure of the document
http://git-wip-us.apache.org/repos/asf/incubator-weex-site/blob/32a097bf/source/cn/v-0.10/advanced/extend-to-android.md
----------------------------------------------------------------------
diff --git a/source/cn/v-0.10/advanced/extend-to-android.md b/source/cn/v-0.10/advanced/extend-to-android.md
deleted file mode 100644
index f816ebd..0000000
--- a/source/cn/v-0.10/advanced/extend-to-android.md
+++ /dev/null
@@ -1,170 +0,0 @@
----
-title: Android 扩展
-type: advanced
-order: 9
-has_chapter_content: true
-version: 0.10
----
-
-# Android 扩展
-
-Weex 提供了扩展机制,可以根据自己的业务进行定制自己的功能。
-主要分为两类扩展:
-
-- Module 扩展 非 UI 的特定功能。例如 sendHttp、openURL 等。
-- Component 扩展 实现特别功能的 Native 控件。例如:RichTextview,RefreshListview 等。
-- Adapter 扩展 Weex 对一些基础功能实现了统一的接口,可实现这些接口来定制自己的业务。例如:图片下载等。
-
-## Module 扩展
-
-1. Module 扩展必须继承 WXModule 类。
-2. 扩展方法必须加上 @WXModuleAnno 注解。Weex 会根据注解来判断当前方法是否要运行在 UI 线程,和当前方法是否是扩展方法。
-3. Weex是根据反射来进行调用 Module 扩展方法,所以Module中的扩展方法必须是 public 类型。
-4. 同样因为是通过反射调用,Module 不能被混淆。请在混淆文件中添加代码:`-keep public class * extends com.taobao.weex.common.WXModule{*;}`
-5. Module 扩展的方法可以使用 int, double, float, String, Map, List 类型的参数
-6. 完成 Module 后一定要在初始化时注册 `WXSDKEngine.registerModule("myModule", MyModule.class);` 否则会报类似错误:`ReportException :undefined:9: TypeError: Object #<Object> has no method 'printLog'`
-
-示例如下:
-
-```java
-public class MyModule extends WXModule {
-
- @WXModuleAnno(runOnUIThread = true)
- public void printLog(String msg) {
- Toast.makeText(mWXSDKInstance.getContext(),msg,Toast.LENGTH_SHORT).show();
- }
-}
-```
-
-JS 调用如下:
-
-```html
-<template>
- <div>
- <text onclick="click">点击我测试</text>
- </div>
-</template>
-
-<script>
- module.exports = {
- methods: {
- click: function() {
- require('@weex-module/myModule').printLog("我是一个测试!");
- }
- }
- }
-</script>
-```
-
-## Component 扩展
-
-1. Component 扩展类必须集成 WXComponent.
-2. Component 对应的设置属性的方法必须添加注解 @WXComponentProp(name=value(value is attr or style of dsl))
-3. Weex sdk 通过反射调用对应的方法,所以 Component 对应的属性方法必须是 public,并且不能被混淆。请在混淆文件中添加代码 `-keep public class * extends com.taobao.weex.ui.component.WXComponent{*;}`
-4. Component 扩展的方法可以使用 int, double, float, String, Map, List 类型的参数
-5. 完成 Component 后一定要在初始化时注册 `WXSDKEngine.registerComponent("richtext",RichText.class);`
-
-示例如下:
-
-```java
-public class RichText extends WXComponent {
-
- public RichText(WXSDKInstance instance, WXDomObject dom, WXVContainer parent, boolean isLazy) {
- super(instance, dom, parent, isLazy);
- }
-
- @Override
- protected void initView() {
- mHost=new TextView(mContext);
- ((TextView)mHost).setMovementMethod(LinkMovementMethod.getInstance());
- }
-
- @WXComponentProp(name = "tel")
- public void setTelLink(String tel){
- SpannableString spannable=new SpannableString(tel);
- spannable.setSpan(new URLSpan("tel:"+tel),0,tel.length(), Spanned.SPAN_EXCLUSIVE_EXCLUSIVE);
- ((TextView)mHost).setText(spannable);
- }
-}
-```
-
-JS 调用如下:
-
-```html
-<template>
- <div>
- <richText tel="12305" style="width:200;height:100">12305</text>
- </div>
-</template>
-```
-## Adapter扩展
-
-图片下载:
-
-需要时集成接口 IWXImgLoaderAdapter,实现 setImage 方法。
-
-示例如下:
-
-```java
-public class ImageAdapter implements IWXImgLoaderAdapter {
-
- public ImageAdapter() {
- }
-
- @Override
- public void setImage(final String url, final ImageView view,
- WXImageQuality quality, WXImageStrategy strategy) {
-
- WXSDKManager.getInstance().postOnUiThread(new Runnable() {
-
- @Override
- public void run() {
- if(view==null||view.getLayoutParams()==null){
- return;
- }
- if (TextUtils.isEmpty(url)) {
- view.setImageBitmap(null);
- return;
- }
- String temp = url;
- if (url.startsWith("//")) {
- temp = "http:" + url;
- }
- if (view.getLayoutParams().width <= 0 || view.getLayoutParams().height <= 0) {
- return;
- }
- Picasso.with(WXEnvironment.getApplication())
- .load(temp)
- .into(view);
- }
- },0);
- }
-}
-```
-#### 组件方法支持
-从WeexSDK 0.9.5开始,你可以定义组件方法
-
-- 在组件中如下声明一个组件方法
-
- ```java
- @JSMethod
- public void focus(){
- //method implementation
- }
- ```
-- 注册组之后,你可以在weex 文件中调用
-
- ```html
- <template>
- <mycomponent id='mycomponent'></mycomponent>
- </template>
- <script>
- module.exports = {
- created: function() {
- this.$el('mycomponent').focus();
- }
- }
- </script>
- ```
-
-注:工程要添加依赖 `compile 'com.squareup.picasso:picasso:2.5.2'`
http://git-wip-us.apache.org/repos/asf/incubator-weex-site/blob/32a097bf/source/cn/v-0.10/advanced/extend-to-html5.md
----------------------------------------------------------------------
diff --git a/source/cn/v-0.10/advanced/extend-to-html5.md b/source/cn/v-0.10/advanced/extend-to-html5.md
deleted file mode 100644
index ff99629..0000000
--- a/source/cn/v-0.10/advanced/extend-to-html5.md
+++ /dev/null
@@ -1,253 +0,0 @@
----
-title: weex-html5 扩展
-type: advanced
-order: 11
-has_chapter_content: true
-version: 0.10
----
-
-# 扩展 weex-html5
-
-### 简介
-
-Weex 是一个高可扩展性的跨平台动态化开发方案,你可以在现有组件基础上定制自己需要的三端组件。你可以为 Weex API 模块添加新的方法,或者创建新的 API 模块和新的加载器。按照以下几个步骤扩展你的组件,API 或者加载器。
-
-首先要明确的是,组件和 API 模块是基于 Weex 的扩展,但是独立于 Weex,组件的定义本身是不需要依赖于 Weex 的,这样有助于组件的分散化管理,去除中心化依赖。
-
-其次,当你扩展一个组件,你需要同时扩展三端的组件(android, ios 和 web 端),毕竟 Weex 是一个重视三端一致体验的跨平台移动框架。你可以一个端一个端的扩展,也可以召唤其他端上的开发者来共同完成你在其他端上的组件(你总是可以在社区找到对某个功能有共同需求的开发者)。这里有一些在 [android 端](./extend-to-android.md)和 [ios 端](./extend-to-ios.md)做扩展的文档可以参考。
-
-你应该将你的扩展发布到 Weex 开发者可以方便找到和使用的渠道,比如 `npm`。我们推荐你将你开发的组件发布到 `npm` 供其他 Weex 开发者使用。
-
-最重要的是,你的组件的命名需要遵守 Weex 组件命名规范:以 `weex-` 开头作为组件的前缀,并且以 `-<platform>` 做为结尾后缀,除非你发布的包是三端的实现都包含在内的。这里有个 [`<weex-hello-web`>](https://github.com/MrRaindrop/weex-hello-web) 的例子作为参考,这里注册了一个简单的自定义的组件。
-
-### 创建新组件
-
-步骤:
-1. 在你的组件实现中必须继承 `Weex.Component` 这个类, 并选择性的重写其中的一些方法。
-2. 你的组件的 exports 需要暴露一个 `init` 方法,并在其中使用 `Weex.registerComponent` 注册你的组件。
-
-**这里用一个例子展示如何扩展一个新的组件**
-
-看这个组件扩展的代码( web 端上的组件):
-
-``` javascript
-const attr = {
- // ...
-}
-const style = {
- // ...
-}
-const event = {
- // ...
-}
-// 每个扩展组件都需要实现一个init方法,Weex会通过这方法进行安装和注册.
-function init (Weex) {
- const Component = Weex.Component
- const extend = Weex.utils.extend
-
- // 组件的构造函数
- function Hello (data) {
- Component.call(this, data)
- }
-
- // prototype继承
- Hello.prototype = Object.create(Component.prototype)
- extend(Hello.prototype, proto)
-
- // 配置属性、样式以及事件
- extend(Hello.prototype, { attr })
- extend(Hello.prototype, {
- style: extend(Object.create(Component.prototype.style), style)
- })
- extend(Hello.prototype, { event })
-
- Weex.registerComponent('weex-hello', Hello)
-}
-
-// 暴露init方法接口.
-export default { init }
-```
-
-上述代码摘引自 [weex-hello-web/src/index.js](https://github.com/MrRaindrop/weex-hello-web/blob/master/src/index.js#L46-L65)
-
-这个demo重写了基类 `Component`中的`create`方法。你也可以选择重写`Component`中的一些其他方法来定制组件的行为。典型的方法包括:
-- `create`: 创建组件的节点,在方法体中return这个节点.
-- `createChildren` 创建子节点.
-- `insertBefore` 在某个子节点之前插入一个新的子节点.
-- `appendChild` 在子节点列表的最后加上一个节点.
-- `removeChild` 移除一个子节点.
-
-**进阶**:更多关于组件定制和扩展的细节和代码展示,可以参考 [weex 主仓库的代码](https://github.com/apache/incubator-weex/tree/dev/html5),这里的组件基本上都是通过上述方式进行定义的。
-
-重要的一点,注册组件的关键方法是 `Weex.registerComponent`,如示例里的 `weex-hello` 组件的注册:
-
-``` javascript
-Weex.registerComponent('weex-hello', Hello)
-```
-
-上述代码引自 [weex-hello-web/src/index.js](https://github.com/MrRaindrop/weex-hello-web/blob/master/src/index.js#L62)
-
-在某个需要使用该组件的weex项目中使用 `Weex.install` 方法安装该组件:
-
-``` javascript
-// import the original weex-html5.
-import weex from 'weex-html5'
-import hello from 'weex-hello-web'
-// install the component.
-weex.install(hello)
-```
-
-上述代码引自 [weex_extend_demo/src/main.js](https://github.com/MrRaindrop/weex_extend_demo/blob/master/src/main.js#L1-L5)
-
-在你的 `.we` 文件中直接使用这个组件:
-
-``` html
-<template>
- <div>
- <weex-hello class="hello" style="txt-color:#fff;bg-color:green"
- value="WEEX" onclick="handleClick">
- </weex-hello>
- </div>
-</template>
-```
-
-上述代码引自[weex_extend_demo/demo/index.we](https://github.com/MrRaindrop/weex_extend_demo/blob/master/demo/index.we#L10-L15)
-### 扩展API
-
-你可以扩展新的 API 模块,或者为某个已有的模块添加新的 API. 比如,你可以添加一个 API 模块叫做 `user`,在里面添加一些用户登录登出处理的 API,比如 `login`, `logout` 等等。你可以通过 `require('@weex-module/moduleName)[methodName](arg1, arg2, ...)` ([Module APIs](../references/api.md)) 的方式调用你的 API.
-
-步骤:
-1. 实现你的 API module.
-2. 在你的 API 安装模块里暴露一个 `init` 方法,并在这个方法里面使用 `Weex.registerAPIModules` 注册你的 API module.
-
-**这里用一个例子展示如何扩展一个新的 API 模块**
-
-创建一个文件 `user.js`,在其中定义登录登出 `login/logout` 方法.
-
-``` javascript
-const user = {
- // 定义用户登录方法.
- login (callbackId) {
- login.then(res => {
- this.sender.performCallback(callbackId, res)
- }).catch(err => {
- this.sender.performCallback(callbackId, err)
- })
- },
-
- // 定义用户登出方法.
- logout (callbackId) {
- logout.then(res => {
- this.sender.performCallback(callbackId, res)
- }).catch(err => {
- this.sender.performCallback(callbackId, err)
- })
- }
-}
-
-// 定义user模块的元 (meta) 信息.
-const meta = {
- user: [{
- name: 'login',
- args: ['function']
- }, {
- name: 'logout',
- args: ['function']
- }]
-}
-
-export default {
- init (Weex) {
- // 注册这个模块,最后一个参数是模块的元信息.
- Weex.registerApiModule('user', user, meta)
- }
-}
-```
-
-这个简单的 user helper 模块就实现好了,可以发布到 npm 上,我们可以给这个模块取个名字,比如说 `weex-user-helper`。
-
-在你的新的 Weex 项目里安装这个模块:
-
-``` javascript
-import Weex from 'weex-html5'
-import user from 'weex-user-helper'
-
-Weex.install(user)
-```
-
-安装了这个模块,你就可以在 DSL 代码里引用这个模块干点事情了:
-
-``` html
-<template>
- <div>
- <div class="btn" onclick="handleClick">
- <text>LOGIN</text>
- </div>
- </div>
-</template>
-
-<script>
- var userHelper = require('@weex-module/user')
- module.exports = {
- methods: {
- handleClick: function () {
- userHelper.login(function () {
- // ... do sth. in callback.
- })
- }
- }
- }
-</script>
-```
-
-### 定制加载器loader
-
-**Loader仅用于weex-html5 (web端)加载dsl打包出来的bundle代码,native平台有其他的加载机制**
-
-已有的加载器包括 `xhr`, `jsonp` 和 `source`. 你可以使用 `weex.registerLoader` 注册一个新的加载器。例如,你有一个获取 Weex bundle 的服务 `myServe.getWeexBundle` , 通过这个服务可以加载 weex bundle,为此你可以定义一个加载器:
-
-``` javascript
-function loadByMyServe(pageId, callback) {
- myServe.getWeexBundle(pageId).then(function (bundle) {
- callback(bundle)
- }).catch(function(err) {
- callback(err)
- })
-}
-
-// 暴露init方法用于Weex安装此加载器.
-export default {
- init (Weex) {
- Weex.registerLoader('myserve', loadByMyServe)
- }
-}
-```
-
-在你的 weex-html5 项目的启动文件里安装并使用这个加载器:
-
-``` javascript
-import Weex from 'weex-html5'
-
-// 或者import from './myserve.js',不管是import一个npm模块还是import一个文件.
-import loader from 'myLoader'
-
-Weex.install(loader)
-
-// 在init方法里使用这个加载器加载bundle文件.
-(function () {
- function getUrlParam (key) {
- const reg = new RegExp('[?|&]' + key + '=([^&]+)')
- const match = location.search.match(reg)
- return match && match[1]
- }
- const page = getUrlParam('page') || 'examples/build/index.js'
- Weex.init({
- appId: location.href,
- loader: 'myserve', // 使用刚才定义的loader类型
- source: page,
- rootId: 'weex'
- })
-})();
-```
-
-以上是 Weex 带来的扩展性里比较主要的一部分,更多实现细节可以在 [weex 项目代码库](https://github.com/alibaba/weex)以及 weex 的开源社区里找到。
http://git-wip-us.apache.org/repos/asf/incubator-weex-site/blob/32a097bf/source/cn/v-0.10/advanced/extend-to-ios.md
----------------------------------------------------------------------
diff --git a/source/cn/v-0.10/advanced/extend-to-ios.md b/source/cn/v-0.10/advanced/extend-to-ios.md
deleted file mode 100644
index b163d62..0000000
--- a/source/cn/v-0.10/advanced/extend-to-ios.md
+++ /dev/null
@@ -1,279 +0,0 @@
----
-title: iOS 扩展
-type: advanced
-order: 10
-has_chapter_content: true
-version: 0.10
----
-
-## iOS 扩展
-
-### Module 扩展
-
-[swift](https://github.com/weexteam/article/issues/55) 扩展 module
-
-Weex SDK 只提供渲染,而不是其他的能力,如果你需要 像网络,图片,URL跳转这些特性,需要自己动手实现他们
-例如,如果你想实现一个url地址跳转函数,你可以按照如下步骤实现一个 Module
-1. **自定义module的步骤**
- 1. 自定义的module类 必须实现 `WXModuleProtocol`
- 2. 必须添加宏`WX_EXPORT_METHOD`, 它可以被weex识别,它的参数是 JavaScript调用 module指定方法的参数
- 3. 添加`@synthesized weexInstance`,每个moudle对象被绑定到一个指定的实例上
- 4. Module 方法会在UI线程中被调用,所以不要做太多耗时的任务在这里,如果要在其他线程执行整个module 方法,需要实现`WXModuleProtocol`中`- (NSThread *)targetExecuteThread`的方法,这样,分发到这个module的任务会在指定的线程中运行
- 5. Weex 的参数可以是 String 或者Map
- 6. Module 支持返回值给 JavaScript中的回调,回调的类型是`WXModuleCallback`,回调的参数可以是String或者Map
-
- ```object-c
- @implementation WXEventModule
- @synthesize weexInstance;
- WX_EXPORT_METHOD(@selector(openURL:callback))
- - (void)openURL:(NSString *)url callback:(WXModuleCallback)callback
- {
- NSString *newURL = url;
- if ([url hasPrefix:@"//"]) {
- newURL = [NSString stringWithFormat:@"http:%@", url];
- } else if (![url hasPrefix:@"http"]) {
- newURL = [NSURL URLWithString:url relativeToURL:weexInstance.scriptURL].absoluteString;
- }
-
- UIViewController *controller = [[WXDemoViewController alloc] init];
- ((WXDemoViewController *)controller).url = [NSURL URLWithString:newURL];
-
- [[weexInstance.viewController navigationController] pushViewController:controller animated:YES];
- callback(@{@"result":@"success"});
- }
-
- @end
- ```
-2. **Register the module**
- 通过调用 WXSDKEngine 中的 `registerModule:withClass`方法来注册自己的module
-
- ```object-c
- WXSDKEngine.h
- /**
- * @abstract Registers a module for a given name
- * @param name The module name to register
- * @param clazz The module class to register
- **/
- + (void)registerModule:(NSString *)name withClass:(Class)clazz;
- [WXSDKEngine registerModule:@"event" withClass:[WXEventModule class]];
- ```
-3. **使用自己的module**
- 这里的 require 里面的event 就是在 上一步调用`registerModule:` 注册module 时候的name
-
- ```javascript
- var eventModule = require('@weex-module/event');
- eventModule.openURL('url',function(ret) {
- nativeLog(ret);
- });
- ```
-
- Weex SDK没有 图片下载,navigation 操作的能力,请大家自己实现这些 protocol
-
-### handler 扩展
- **WXImgLoaderProtocol**
-
- weexSDK 没有提供图片下载的能力,需要实现 WXImgLoaderProtocol,参考下面的例子
-
- ```object-c
- WXImageLoaderProtocol.h
- @protocol WXImgLoaderProtocol <WXModuleProtocol>
- /**
- * @abstract Creates a image download handler with a given URL
- * @param imageUrl The URL of the image to download
- * @param imageFrame The frame of the image you want to set
- * @param options : The options to be used for this download
- * @param completedBlock : A block called once the download is completed.
- image : the image which has been download to local.
- error : the error which has happened in download.
- finished : a Boolean value indicating whether download action has finished.
- */
- -(id<WXImageOperationProtocol>)downloadImageWithURL:(NSString *)url imageFrame:(CGRect)imageFrame userInfo:(NSDictionary *)options completed:(void(^)(UIImage *image, NSError *error, BOOL finished))completedBlock;
- @end
- ```
-
- 实现上述协议
-
- ```object-c
- @implementation WXImgLoaderDefaultImpl
- #pragma mark -
- #pragma mark WXImgLoaderProtocol
-
- - (id<WXImageOperationProtocol>)downloadImageWithURL:(NSString *)url imageFrame:(CGRect)imageFrame userInfo:(NSDictionary *)userInfo completed:(void(^)(UIImage *image, NSError *error, BOOL finished))completedBlock
- {
- if ([url hasPrefix:@"//"]) {
- url = [@"http:" stringByAppendingString:url];
- }
- return (id<WXImageOperationProtocol>)[[SDWebImageManager sharedManager] downloadImageWithURL:[NSURL URLWithString:url] options:0 progress:^(NSInteger receivedSize, NSInteger expectedSize) {
- } completed:^(UIImage *image, NSError *error, SDImageCacheType cacheType, BOOL finished, NSURL *imageURL) {
- if (completedBlock) {
- completedBlock(image, error, finished);
- }
- }];
- }
- @end
- ```
-
-5. **handler注册**
-
- 你可以通过WXSDKEngine 中的 `registerHandler:withProtocol`注册handler
-
- ```object-c
- WXSDKEngine.h
- /**
- * @abstract Registers a handler for a given handler instance and specific protocol
- * @param handler The handler instance to register
- * @param protocol The protocol to confirm
- */
- + (void)registerHandler:(id)handler withProtocol:(Protocol *)protocol;
-
- [WXSDKEngine registerHandler:[WXImgLoaderDefaultImpl new] withProtocol:@protocol(WXImgLoaderProtocol)]
- ```
-
-#### Component 扩展
- 虽然WeexSDK中有提供内置的一些Component,但这有可能并不能满足你的需求。在之前你可能已经写了一些很酷炫native的组件,想包装一下,导入到Weex中,因此我们提供了让开发者实现自己的native Component
- 下面将以WeexSDK 中已经存在的 Component:`image`为例子,介绍一下如何构建一个native Component.
- 假设你已经了解IOS开发
- 1. 注册 Component
- 注册一个component比较简单,调用 `WXSDKEngine` 中的 `registerComponent:withClass:`方法,传入组件的标签名称,还有对应的class
- 然后你可以创建一个 `WXImageComponent` 表示`image`组件的实现 在.we 文件中,只需要写
- <image></image>
- 2. 添加属性
- 现在我们要做一些让image component更加强大的事情。既然作为一个图片的component,那它应该要有源,给他加上一个 `src`的属性,同时给它加上一个`resize`的属性(可以配置的有`contain/cover/stretch`)
-
- ```
- @interface WXImageComponent ()
-
- @property (nonatomic, strong) NSString *imageSrc;
- @property (nonatomic, assign) UIViewContentMode resizeMode;
-
- @end
- ```
- component中所有的style,attribute,events都会被传递到 Component的初始化方法中,所以,你可以在初始化方法中存储你感兴趣的一些属性值
-
- ```
- @implementation WXImageComponent
-
- - (instancetype)initWithRef:(NSString *)ref type:(NSString *)type styles:(NSDictionary *)styles attributes:(NSDictionary *)attributes events:(NSArray *)events weexInstance:(WXSDKInstance *)weexInstance
- {
- if (self = [super initWithRef:ref type:type styles:styles attributes:attributes events:events weexInstance:weexInstance]) {
- _imageSrc = [WXConvert NSString:attributes[@"src"]];
- _resizeMode = [WXConvert UIViewContentMode:attributes[@"resize"]];
- }
-
- return self;
- }
-
- @end
- ```
-
- attribute中拿到的值的类型都是`id`,我们可以用转换方法把它转换到任何值。Weex SDK提供了一些基础的转换方法,可以参考 `WXConvert`类,或者你可以添加自己的转换函数
-
- 1. Hooking 渲染生命周期
- native 的component 是由Weex管理的,weex 创建,布局,渲染,销毁。weex的component生命周期都是可以hook的,你可以在这些生命周期中去做自己的事情
-
- | 方法 | 描述 |
- | :-: | --- |
- | initWithRef:type:... | 用给定的属性初始化一个component. |
- | layoutDidFinish | 在component完成布局时候会调用. |
- | loadView | 创建component管理的view. |
- | viewWillLoad | 在component的view加载之前会调用. |
- | viewDidLoad | 在component的view加载完之后调用. |
- | viewWillUnload | 在component的view被释放之前调用. |
- | viewDidUnload | 在component的view被释放之后调用. |
- | updateStyles: | 在component的style更新时候调用. |
- | updateAttributes: | 在component的attribute更新时候调用. |
- | addEvent: | 给component添加event的时候调用. |
- | removeEvent: | 在event移除的时候调用. |
-
- 在image component的例子里面,如果我们需要我们自己的image view 的话,可以复写 `loadView`这个方法.
-
- ```
- - (UIView *)loadView
- {
- return [[WXImageView alloc] init];
- }
- ```
-
- 现在我们使用 `WXImageView` 渲染 `image` component。
- 1. 作为一个image component,我们需要拿到服务器图片,而且把它设置进image view 里. 这个操作可以在 `viewDidLoad` 方法中做,这个方法是在view已经被创建而且加载了时候weex SDK会调用到,而且`viewDidLoad`这个方法是你做额外初始化工作比如改变content mode(也就是设置resize) 的最好时间.
-
- ```
- - (void)viewDidLoad
- {
- UIImageView *imageView = (UIImageView *)self.view;
- imageView.contentMode = _resizeMode;
- imageView.userInteractionEnabled = YES;
- imageView.clipsToBounds = YES;
- imageView.exclusiveTouch = YES;
-
- // Do your image fetching and updating logic
- }
- ```
-
- 1. 如果可以改变image的src,也可以hook `updateAttributes:`方法来做属性更新操作,当`updateAttributes:`或者 `updateStyles:`被调用的时候, component的view 已经加载完成
-
- ```
- - (void)updateAttributes:(NSDictionary *)attributes
- {
- if (attributes[@"src"]) {
- _imageSrc = [WXConvert NSString:attributes[@"src"]];
- // Do your image updating logic
- }
-
- if (attributes[@"resize"]) {
- _resizeMode = [WXConvert UIViewContentMode:attributes[@"resize"]];
- self.view.contentMode = _resizeMode;
- }
- }
- ```
-
- 或许你需要考虑更多的生命周期方法去Hook,当布局完成时候,像`layoutDidFinish`,如果你想了解更多,可以参考一下`WXComponent.h` 声明的方法
- 现在你可以用在任何 .we文件里面使用 `<image>`,而且可以加上 image的属性
-
- ```
- <image style="your-custom-style" src="image-remote-source" resize="contain/cover/stretch"></image>
- ```
-##### component 方法
-WeexSDK 0.9.5 之后支持了在js中直接调用component的方法,这里提供一个例子,
-
-- 自定义一个WXMyCompoenent 的组件
-
- ```
- @implementation WXMyComponent
- WX_EXPORT_METHOD(@selector(focus)) // 暴露该方法给js
- - (instancetype)initWithRef:(NSString *)ref type:(NSString *)type styles:(NSDictionary *)styles attributes:(NSDictionary *)attributes events:(NSArray *)events weexInstance:(WXSDKInstance *)weexInstance
- {
- if (self = [super initWithRef:ref type:type styles:styles attributes:attributes events:events weexInstance:weexInstance]) {
- // handle your attributes
- // handle your styles
- }
-
- return self;
- }
-
- - (void)focus
- {
- NSLog(@"you got it");
- }
- @end
- ```
-
-- 注册组件 `[WXSDKEngine registerComponent:@"mycomponent" withClass:[WXMyComponent class]] `
-- 在weex 文件中调用
-
- ```html
- <template>
- <mycomponent id='mycomponent'></mycomponent>
- </template>
- <script>
- module.exports = {
- created: function() {
- this.$el('mycomponent').focus();
- }
- }
- </script>
- ```
-
-
-
-
\ No newline at end of file
http://git-wip-us.apache.org/repos/asf/incubator-weex-site/blob/32a097bf/source/cn/v-0.10/advanced/how-data-binding-works.md
----------------------------------------------------------------------
diff --git a/source/cn/v-0.10/advanced/how-data-binding-works.md b/source/cn/v-0.10/advanced/how-data-binding-works.md
deleted file mode 100644
index a905422..0000000
--- a/source/cn/v-0.10/advanced/how-data-binding-works.md
+++ /dev/null
@@ -1,39 +0,0 @@
----
-title: 数据绑定原理
-type: advanced
-order: 2
-has_chapter_content: true
-version: 0.10
----
-
-# 数据绑定实现原理
-
-Weex 的 JS Framework 是一个 MVVM,即 Model-View-ViewModel 框架。他会自动监听数据的变化,并通过 `{% raw %}{{字段名}}{% endraw %}` 的语法把数据和视图中所展示的内容自动绑定起来。当数据被改写的时候,视图会自动根据数据的变化而发生相应的变化。
-
-比如下面这个例子,`<text>` 的内容被绑定在了 `notes` 数据字段上:
-
-```html
-<template>
- <div>
- <text>{{notes}}</text>
- </div>
-<template>
-
-<script>
- module.exports = {
- data: {
- notes: 'Hello'
- }
- }
-</script>
-```
-
-Weex 的 JS Framework 会首先对 `data` 里的数据进行监听,这样未来的数据变化都能够被监听到。然后我们会编译整个 `<template>` 标签里的内容。当我们找到 `<text>` 标签里的 `{% raw %}{{notes}}{% endraw %}` 时,JS Framework 会跟踪 `data.notes` 的变化并在其发生变化时触发一个句柄,将 `<text>` 的内容设置为 `data.notes` 最新的值。这样的话开发者就不必手动关心数据和视图之间的数据同步问题了。
-
-在这个基础上我们还设计了一些特殊的语法:
-
-- `<foo if="...">` 代表一个条件监听,当其值为 `true` 时,`<foo>` 元素将会被创建和载入,反之则不会被创建或被移除掉。
-- `<foo repeat="...">` 代表一个列表监听,第一次加载的时候 `<foo>` 元素会被按照数组里的数据逐条 clone 并赋值。而当有列表项增加、移动或移除时,视图层也会自动触发相应的改变,并且智能优化至最小变更策略
-- `<foo if="..." repeat="...">` 两个特殊语法共用时,将会优先展开 `repeat` 然后逐条判断 `if`。
-
-相比于一些 virtual-DOM 的 diff 计算机制,我们会直接对数据进行 diff,而且只会 diff 由于用户操作或数据操作发生改变的那部分数据和视图,这是一种更小范围的计算方式。尤其在追求轻量快速的移动端界面上,这种更新机制更加显得具有优势。
http://git-wip-us.apache.org/repos/asf/incubator-weex-site/blob/32a097bf/source/cn/v-0.10/advanced/images/how-arch.png
----------------------------------------------------------------------
diff --git a/source/cn/v-0.10/advanced/images/how-arch.png b/source/cn/v-0.10/advanced/images/how-arch.png
deleted file mode 100644
index a13df7a..0000000
Binary files a/source/cn/v-0.10/advanced/images/how-arch.png and /dev/null differ
http://git-wip-us.apache.org/repos/asf/incubator-weex-site/blob/32a097bf/source/cn/v-0.10/advanced/images/how-render.png
----------------------------------------------------------------------
diff --git a/source/cn/v-0.10/advanced/images/how-render.png b/source/cn/v-0.10/advanced/images/how-render.png
deleted file mode 100644
index db9b0f4..0000000
Binary files a/source/cn/v-0.10/advanced/images/how-render.png and /dev/null differ
http://git-wip-us.apache.org/repos/asf/incubator-weex-site/blob/32a097bf/source/cn/v-0.10/advanced/index.md
----------------------------------------------------------------------
diff --git a/source/cn/v-0.10/advanced/index.md b/source/cn/v-0.10/advanced/index.md
deleted file mode 100644
index 8fea01e..0000000
--- a/source/cn/v-0.10/advanced/index.md
+++ /dev/null
@@ -1,146 +0,0 @@
----
-title: Weex 工作原理
-type: advanced
-order: 1
-has_chapter_content: true
-version: 0.10
----
-
-# Weex 工作原理概述
-
-## 总览
-
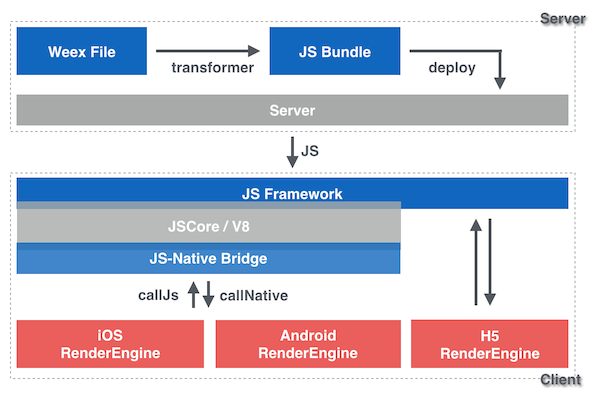
-Weex是跨平台,可扩展的动态化技术. 你能通过在Weex源码中写`<template>`, `<style>` 和 `<script>`标签,然后把这些标签转换为JS Bundle用于部署, 在服务端以这些JS Bundle响应请求. 当客户端接收到JS Bundle时,它能用被客户端中的JS引擎用于管理Native渲染;API调用和用户交互.
-
-### 工作流
-
-```
-Weex we 文件 --------------前端(we源码)
-↓ (转换) ------------------前端(构建过程)
-JS Bundle -----------------前端(JS Bundle代码)
-↓ (部署) ------------------服务器
-在服务器上的JS bundle ----服务器
-↓ (编译) ------------------ 客户端(JS引擎)
-虚拟 DOM 树 --------------- 客户端(Weex JS Framework)
-↓ (渲染) ------------------ 客户端(渲染引擎)
-Native视图 --------------- 客户端(渲染引擎)
-```
-
-在上面的工作流中,我们提到:
-
-- Transformer(转换器): 一个Node JS工具, 转换Weex源码为JS Bundle
-- Weex JS Framework(JS框架): 运行于客户端的的JS框架,管理着Weex实例的运行。Weex实例由JS Bundle创建并构建起虚拟DOM树. 另外,它发送/接受 Native 渲染层产生的系统调用,从而间接的响应用户交互。
-- Native引擎: 在不同的端上,有着不同的实现: iOS/Android/HTML5. 他们有着共同的组件设计, 模块API 和渲染效果. 所以他们能配合同样的 JS Framework 和 JS Bundle工作。
-
-## 转换器
-
-转换器转换Weex源码为JS Bundle. 整体工作可以分为三个部分:
-
-- 转换 `<template>` 为类JSON的树状数据结构, 转换数据绑定为返回数据的函数原型.例如. For example: `<foo a="{% raw %}{{x}}{% endraw %}" b="1" />` 将转换为 `{type: "foo", attr: {a: function () {return this.x}, b: 1}}`.
-- 转换 `<style>` 为类JSON的树状数据结构. 例如: `.classname {name: value;}` 将转换为 `{classname: {name: value}}`.
-- 把上面两部分的内容和 `<script>` 中的内容结合. 上面的三个部分将结合成一个JavaScript AMD 模块.
-
-一个完整的例子:
-
-```html
-<template>
- <foo a="{{x}}" b="1" class="bar"></foo>
-</template>
-<style>
- .bar {width: 200; height: 200}
-</style>
-<script>
- module.exports = {
- data: function () {
- return {x: 100}
- }
- }
-</script>
-```
-
-将转换为:
-
-```javascript
-define('@weex-component/main', function () {
- module.exports = {
- data: function () {
- return {x: 100}
- }
- }
- module.template = {
- type: "foo",
- attr: {
- a: function () {return this.x},
- b: 1,
- classname: ['bar']
- }
- }
- module.style = {
- bar: {width: 200, height: 200}
- }
-})
-bootstrap('@weex-component/main')
-```
-
-除此之外,转换器还会做一些额外的事情: 合并Bundle ,添加引导函数,配置外部数据等等,更详细的,请参阅[Synatax](../references/specs/js-bundle-format.html)章节.
-
-## 注意
-
-当前大部分Weex工具最终输出的JS Bundle格式都经过了[Webpack](https://webpack.github.io/)的二次处理,所以你实际使用工具输出的JS Bundle会和上面的有所区别.
-## JS Framework
-
-JS Framework 在初始化阶段被原生 JavaScript 引擎运行. 它提供被每个JS Bundle调用的 `define()` 和 `bootstrap()` 函数. 一旦JS Bundle从服务器下载后,这些函数就会执行. `define()` 函数以注册模块;`bootstrap()`会编译主要的模块为虚拟DOM,并发送渲染指令给Native .
-
-JS 和 Native 的沟通主要通过两个关键方法进行:
-
-- `callNative` 是一个由native代码实现的函数, 它被JS代码调用并向native发送指令,例如 `rendering`, `networking`, `authorizing`和其他客户端侧的 `toast` 等API.
-- `callJS` 是一个由JS实现的函数, 它用于Native向JS发送指令. 目前这些指令由用户交互和Native的回调函数组成.
-## Native 渲染引擎
-
-Native 渲染引擎提供客户端组件和模块.
-
-**Component(组件)** 在屏幕内可见,有特定行为. 能被配置不同的属性和样式,能响应用户交互. 常见的组件有: `<div>`, `<text>`, `<image>`.
-
-**Module(模块)** 是一组能被JS Framework调用的API. 其中的一些能以异步的方式调用JS Framework, 例如: 发送HTTP请求.
-
-在Weex实例运行期间,Native渲染引擎将接收各种各样不同模块的API调用。这些调用创建或更新组件外观,运行如`toast`的Native API.当用户交互或模块回调时,`callJS()`会由JS Framework调用. 这样的循环往复将从Weex实例初始化到销毁一直持续. 如下面的架构图所示, HTML5渲染引擎提供和Native渲染引擎几乎一致的功能。
-
-
-
-Weex架构图
-
-### 从Javascript中调用Native
-
-```
-[JS Framework]
-↓ callNative
-模块 APIs
- 渲染 -> 模块显示
- 其他功能
-[Native 渲染引擎]
-```
-### 从Native中调用Javascript
-
-```
-[Native 渲染引擎]
-模块 APIs 回调
-用户交互
-↓ callJS
-[JS Framework]
-```
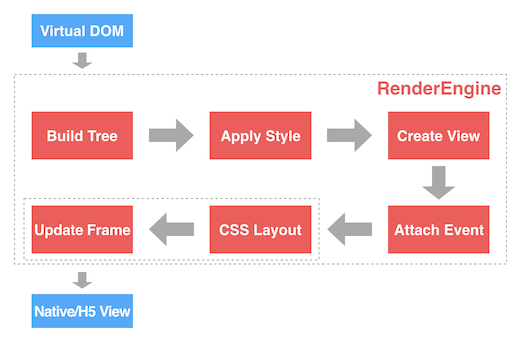
-### 渲染流程
-
-
-
-Weex 渲染流程
-
-1. 虚拟DOM.
-2. **构造树结构**. 分析虚拟DOM JSON数据以构造渲染树(RT).
-3. **添加样式**. 为渲染树的各个节点添加样式.
-4. **创建视图**. 为渲染树各个节点创建Native视图.
-5. **绑定事件**. 为Native视图绑定事件.
-6. **CSS布局**. 使用 [css-layout](https://github.com/facebook/css-layout) 来计算各个视图的布局.
-7. **更新视窗(Frame)**. 采用上一步的计算结果来更新视窗中各个视图的最终布局位置.
-8. 最终页面呈现.
-
-在Weex HTML5环境下 `CSS 布局` and `更新视窗` 由浏览器引擎(例如webkit)实现.
http://git-wip-us.apache.org/repos/asf/incubator-weex-site/blob/32a097bf/source/cn/v-0.10/advanced/integrate-devtools-to-android.md
----------------------------------------------------------------------
diff --git a/source/cn/v-0.10/advanced/integrate-devtools-to-android.md b/source/cn/v-0.10/advanced/integrate-devtools-to-android.md
deleted file mode 100644
index 5bffd05..0000000
--- a/source/cn/v-0.10/advanced/integrate-devtools-to-android.md
+++ /dev/null
@@ -1,272 +0,0 @@
----
-title: 集成 Devtools 到 Android
-type: advanced
-order: 12
-has_chapter_content: true
-version: 0.10
----
-
-# 集成 Devtools 到 Android
-
-Weex Devtools 能够方便调试 Weex 页面,但此功能离不开 Native 的支持。如何让你的 App 也集成 Devtools,在本章将会详细说明 Android 端如何接入 Weex Devtools。
-
-## Android 应用接入
-
-### 添加依赖
-
-可以通过 Gradle 或者 Maven 添加对 devtools aar 的依赖,也可以直接对源码依赖。强烈建议使用最新版本,因为 Weex SDK 和 devtools 都在快速的迭代开发中,新版本会有更多惊喜,同时也修复老版本中一些问题。最新的 release 版本可在[这里](https://github.com/weexteam/weex_devtools_android/releases)查看。所有的 release 版本都会发布到 [jcenter repo](https://bintray.com/alibabaweex/maven/weex_inspector)。
-
-- *Gradle 依赖*
-
- ```gradle
- dependencies {
- compile 'com.taobao.android:weex_inspector:0.8.0.0'
- }
- ```
-
-- *Maven依赖*
-
- ```xml
- <dependency>
- <groupId>com.taobao.android</groupId>
- <artifactId>weex_inspector</artifactId>
- <version>0.8.0.0</version>
- <type>pom</type>
- </dependency>
- ```
-
-- *源码依赖*
-
- 需要复制 [inspector](https://github.com/weexteam/weex_devtools_android/tree/master/inspector) 目录到你的 App 的同级目录,然后在工程的 `settings.gradle` 文件下添加 `include ":inspector"`,此过程可以参考 playground 源码的工程配置及其配置,然后在 App 的 `build.gralde` 中添加依赖。
-
- ```gradle
- dependencies {
- compile project(':inspector')
- }
- ```
-
- 另外 weex_inspector 中有一部分包是以 provided 的方式引入,接入方需要自行解决依赖和版本冲突。
-
- - **provided方式引用的包**
-
- ```gradle
- dependencies {
- provided 'com.google.code.findbugs:jsr305:2.0.1'
- provided 'com.android.support:appcompat-v7:23.1.1'
- provided 'com.taobao.android:weex_sdk:0.8.0'
- provided 'com.alibaba:fastjson:1.1.45+'
- ...
- }
- ```
-
- - **反射引用的包(0.8.0.0以上版本)**
-
- ```gradle
- dependencies {
- compile 'com.squareup.okhttp:okhttp:2.3.0'
- compile 'com.squareup.okhttp:okhttp-ws:2.3.0'
- ...
- }
- ```
-
- 或者
-
- ```gradle
- dependencies {
- compile 'com.squareup.okhttp:okhttp:3.4.1'
- compile 'com.squareup.okhttp:okhttp-ws:3.4.1'
- ...
- }
- ```
-
-#### 版本兼容
-
-| weex sdk | weex inspector | Debugger Server |
-|----------|----------------|-----------------|
-| 0.8.0.1+ | 0.0.8.1+ | 0.2.39+ |
-| 0.7.0+ | 0.0.7.13 | 0.2.38 |
-| 0.6.0+ | 0.0.2.2 | - |
-
-
-### 添加 Debug 模式开关
-
-控制调试模式的打开和关闭的关键点可以概括为三条规则。
-
-**规则一:通过 `sRemoteDebugMode` 和 `sRemoteDebugProxyUrl` 和来设置开关和 Debugger Server 地址。**
-
-Weex SDK 的 `WXEnvironment` 类里有一对静态变量标记了 Weex 当前的调试模式是否开启分别是:
-
-```java
-public static boolean sRemoteDebugMode; // 是否开启 debug 模式,默认关闭
-public static String sRemoteDebugProxyUrl; // DebugServer的websocket地址
-```
-
-无论在 App 中无论以何种方式设置 Debug 模式,都必须在恰当的时机调用类似如下的方法来设置 `WXEnvironment.sRemoteDebugMode` 和 `WXEnvironment.sRemoteDebugProxyUrl`。
-
-```java
-private void initDebugEnvironment(boolean enable, String host) {
- WXEnvironment.sRemoteDebugMode = enable;
- WXEnvironment.sRemoteDebugProxyUrl = "ws://" + host + ":8088/debugProxy/native";
-}
-```
-
-**规则二:修改 `sRemoteDebugMode` 后一定要调用``WXSDKEngine.reload()`。**
-
-一般來說,在修改了 `WXEnvironment.sRemoteDebugMode` 以后调用了 `WXSDKEngine.reload()` 方法才能够使 Debug模式生效。`WXSDKEngine.reload()` 用来重置 Weex 的运行环境上下文,在切换调试模式时需要调用此方法来创建新的 Weex 运行时和 DebugBridge 并将所有的 JS 调用桥接到调试服务器执行。在 reload 过程中会调用 launchInspector,这就是 SDK 控制 Debug 模式最核心一个方法,其传入参数即为 `sRemoteDebugMode`,若为 `true` 则该方法中尝试以反射的方式获取 DebugBridge 用来在远端执行 JS,否则在本地运行。
-
-```java
-private void launchInspector(boolean remoteDebug) {
- if (WXEnvironment.isApkDebugable()) {
- try {
- if (mWxDebugProxy != null) {
- mWxDebugProxy.stop();
- }
- HackedClass<Object> debugProxyClass = WXHack.into("com.taobao.weex.devtools.debug.DebugServerProxy");
- mWxDebugProxy = (IWXDebugProxy) debugProxyClass.constructor(Context.class, WXBridgeManager.class)
- .getInstance(WXEnvironment.getApplication(), WXBridgeManager.this);
- if (mWxDebugProxy != null) {
- mWxDebugProxy.start();
- if (remoteDebug) {
- mWXBridge = mWxDebugProxy.getWXBridge();
- } else {
- if (mWXBridge != null && !(mWXBridge instanceof WXBridge)) {
- mWXBridge = null;
- }
- }
- }
- } catch (HackAssertionException e) {
- WXLogUtils.e("launchInspector HackAssertionException ", e);
- }
- }
-}
-```
-
-只要遵循上面的原理,开启 Debug 模式的方式和时机可由接入方灵活实现。从 launchInspector 可以看到,SDK 对 devtools 的 aar 包并无强依赖,我们的 App 只需要在 Debug 包中打包该 aar 即可,这样多少可以缓解包大小问题和安全问题。
-
-**例外:** _若修改 `WXEnvironment.sRemoteDebugMode` 的时机在 `WXBridgeManager` 初始化和 restart 和之前则 `WXSDKEngine.reload()` 可忽略._
-
-**规则三:通过响应 `ACTION_DEBUG_INSTANCE_REFRESH` 广播及时刷新。**
-
-广播 `ACTION_DEBUG_INSTANCE_REFRESH` 在调试模式切换和 Chrome 调试页面刷新时发出,主要用来通知当前的 Weex容器以 Debug 模式重新加载当前页。在 playground 中的处理过程如下:
-
-```java
-public class RefreshBroadcastReceiver extends BroadcastReceiver {
- @Override
- public void onReceive(Context context, Intent intent) {
- if (IWXDebugProxy.ACTION_DEBUG_INSTANCE_REFRESH.equals(intent.getAction())) {
- if (mUri != null) {
- if (TextUtils.equals(mUri.getScheme(), "http") || TextUtils.equals(mUri.getScheme(), "https")) {
- loadWXfromService(mUri.toString());
- } else {
- loadWXfromLocal(true);
- }
- }
- }
- }
-}
-```
-
-如果接入方的容器未对该广播做处理,那么将不支持刷新和调试过程中编辑代码时的 watch 功能。
-
-## 接入示例
-
-最简单方式就是复用 Playground 的相关代码,比如扫码和刷新等模块,但是扫码不是必须的,它只是与 App 通信的一种形式,二维码里的包含DebugServer IP 及 bundle 地址等信息,用于建立 App 和 Debugger Server 之间的连接及动态加载 bundle。在 Playground 中给出了两种开启 debug 模式的范例。
-
-* 范例1:通过在 `XXXApplication` 中设置开关打开调试模式
-
-```java
-public class MyApplication extends Application {
- public void onCreate() {
- super.onCreate();
- initDebugEnvironment(true, "xxx.xxx.xxx.xxx"/*"DEBUG_SERVER_HOST"*/);
- }
-}
-```
-
-这种方式最直接,在代码中直接 hardcode 了开启调试模式,如果在 SDK 初始化之前调用甚至连 `WXSDKEngine.reload()` 都不需要调用,接入方如果需要更灵活的策略可以将 `initDebugEnvironment(boolean enable, String host)` 和 `WXSDKEngine.reload()` 组合在一起在合适的位置和时机调用即可。
-
-* 范例2:通过扫码打开调试模式
-
-Playground 中较多的使用扫码的方式传递信息,不仅用这种方式控制 Debug 模式的开关,而且还通过它来传入 bundle 的 url 直接调试。应当说在开发中这种方式是比较高效的,省去了修改 SDK 代码重复编译和安装 App 的麻烦,缺点就是调试工具这种方式接入需要 App 具有扫码和处理特定规则二维码的能力。除了 Playground 中的方式,接入方亦可根据业务场景对 Debugger 和接入方式进行二次开发。
-
-Playground 集成的具体代码可参考如下两个文件:
-
-* 开关控制,主要参考对二维码的处理部分,详见 [`WXApplication.java`](https://github.com/weexteam/weex_devtools_android/blob/master/playground/app/src/main/java/com/alibaba/weex/WXApplication.java)
-
-* 刷新控制 ,主要参考是对容器 `ACTION_DEBUG_INSTANCE_REFRESH`的处理,详见 [`WXPageActivity.java`](https://github.com/weexteam/weex_devtools_android/blob/master/playground/app/src/main/java/com/alibaba/weex/WXPageActivity.java)
-
-## 牛刀小试
-
-### 前置工作
-
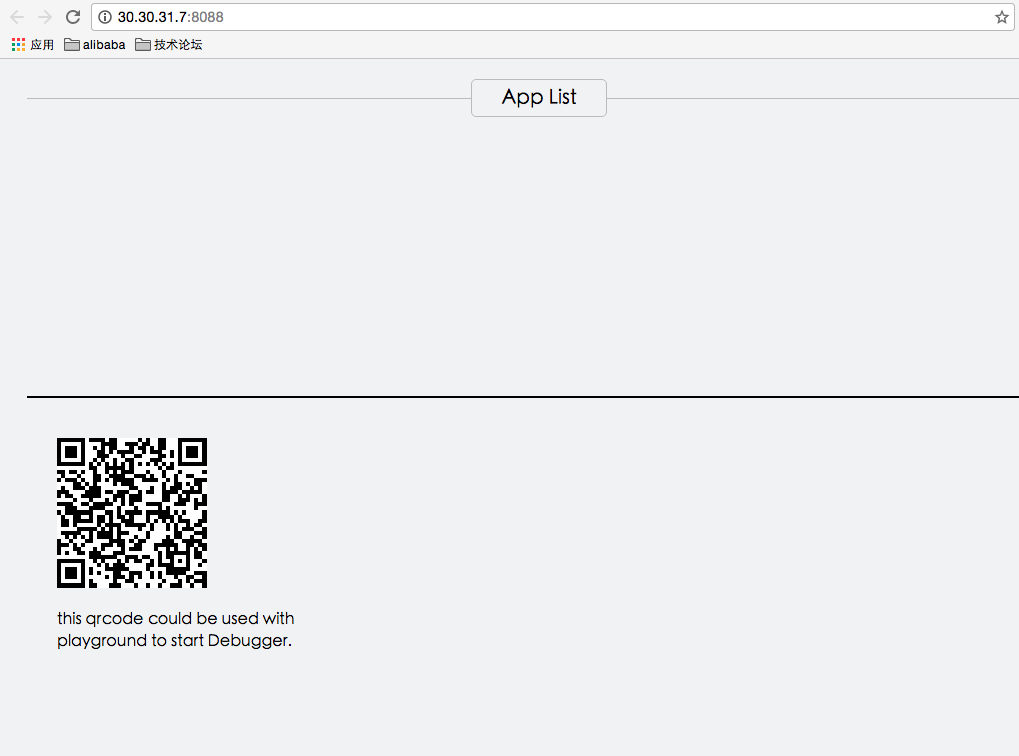
-如果未安装 Debugger Server,在命令行执行 `npm install -g weex-toolkit` 既可以安装调试服务器,运行命令 `weex debug` 就会启动 DebugServer 并打开一个调试页面(详情请查看 [本地开发](/develop-on-your-local-machine.md))。页面下方会展示一个二维码,这个二维码用于向 App 传递 Server 端的地址建立连接。
-
-
-
-### 开始调试
-
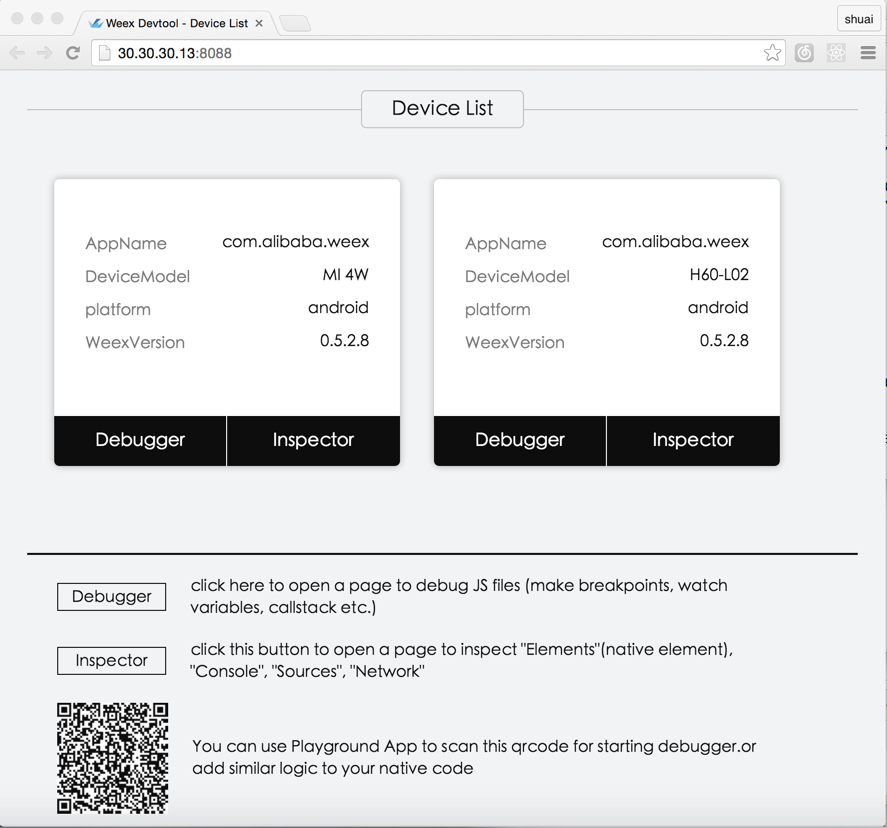
-如果你的 App 客户端完成了以上步骤那么恭喜你已经接入完毕,可以愉快的调试 Weex bundle 了,调试体验和网页调试一致!建议新手首先用官方的 Playground 体验一下调试流程。只需要启动 App 扫描 Chrome 调试页面下方的第一个二维码即可建立与 Debugger Server 的通信,Chorome 的调试页面将会列出连接成功的设备信息。
-
-
-
-#### 主要步骤如下
-
-1. 如果你要加载服务器上 bundle,第一步就是要让你的 bundle sever 跑起来. 在 Playground 中特别简单,只需要你到 Weex 源码目录下,运行 `./start` 即可。
-2. 命令行运行 `weex debug` 启动 Debugger Server,Chrome 将会打开一个网页,在网页下方有一个二维码和简单的介绍。
-3. 启动 App 并确认打开调试模式。你将在上一步中打开的网页中看到一个设备列表,每个设备项都有两个按钮,分别是 `Debugger` 和 `Inspector`。
-4. 点击 `Inspector` Chrome 将创建 Inspector 网页;点击 `Debugger` Chrome 将创建 Debugger 网页;二者是相互独立的功能,不相互依赖。
-
----
-
-## 背景知识
-
-### Devtools 组件介绍
-Devtools 扩展了 [Chrome Debugging Protocol](https://developer.chrome.com/devtools/docs/debugger-protocol),在客户端和调试服务器之间的采用 [JSON-RPC](https://en.wikipedia.org/wiki/JSON-RPC) 作为通信机制,本质上调试过程是两个进程间协同,相互交换控制权及运行结果的过程。更多细节还请阅读 [Weex Devtools Debugger 的技术选型实录](http://www.atatech.org/articles/59284)这篇文章。
-
-* **客户端**
-
- Devtools 客户端作为 aar 被集成 App 中,它通过 webscoket 连接到调试服务器,此处并未做安全检查。出于安全机制及包大小考虑,强烈建议接入方只在 debug 版本中打包此 aar。
-
-* **服务器**
-
- Devtools 服务器端是信息交换的中枢,既连接客户端,又连接 Chrome,大多数情况下扮演一个消息转发服务器和 Runtime Manager 的角色。
-
-* **Web端**
-
- Chrome 的 V8 引擎扮演着 Bundle javascript runtime 的角色。开启 debug 模式后,所有的 bundle js 代码都在该引擎上运行。另一方面我们也复用了 Chrome 前端的调试界面,例如设置断点,查看调用栈等,调试页关闭则 runtime 将会被清理。
-
-调试的大致过程请参考如下时序图。
-
-
-
-## FAQ
-
-在各业务接入过程中,陆续发现一些问题,对高频次的问题解答如下,开发中以 weex debug -V 的方式启动 Debugger Server 可以看到 server 端的 log 信息,对照上文中的时序图对于定位问题还是非常有帮助,建议调试中默认开启 server 端 log。
-
-1. **扫码 App 在 DebugServerProxy 中抛出 class not found**
-
- 已知的原因如下:
-
- * weex_inspector 以 provided 方式引用的包是否引入成功,如 fastjson 等。
- * weex_inspector 以 compile 方式引用的包是否引入成功,某些 app 重新引入 `com.squareup.okhttp:okhttp:2.3.0` 和 `com.squareup.okhttp:okhttp-ws:2.3.0` 则不再报错。
- * 混淆规则影响反射。
-
-2. **playground 扫码调试 crash**
-
- 已知的原因如下:
-
- * 系统为 android 6+,崩溃信息提示进程需要 `android.permission.READ_PHONE_STATE` 权限,代码中未做权限检查,在 0.0.2.7 版本以后已修复,不再需要此权限。
-
-3. **扫码后设备列表页并没有出现我的设备信息**
-
- 已知的原因如下:
-
- * Debugger Server 和手机在不同网段,被防火墙隔离。
- * 手机连接了 PC 端的代理,当前尚不支持。
- * 多进程连接服务器端的同一端口,比如在 Application 的 `onCreate` 中初始化 sdk,若多个进程连接服务器端的同一端口则报错,在 0.0.2.3 版本以后已支持多进程无此问题。
-
-4. **调试过程中频繁刷新连接失败,Server 端提示重新启动 App,非必现**
-
- 已知的原因如下:
-
- * 多线程操作网络连接引起,在频繁的即断即连时容易触发。在 0.0.7.1 版本已修复。
http://git-wip-us.apache.org/repos/asf/incubator-weex-site/blob/32a097bf/source/cn/v-0.10/advanced/integrate-devtools-to-ios.md
----------------------------------------------------------------------
diff --git a/source/cn/v-0.10/advanced/integrate-devtools-to-ios.md b/source/cn/v-0.10/advanced/integrate-devtools-to-ios.md
deleted file mode 100644
index 18e0050..0000000
--- a/source/cn/v-0.10/advanced/integrate-devtools-to-ios.md
+++ /dev/null
@@ -1,230 +0,0 @@
----
-title: 集成 Devtools 到 iOS
-type: advanced
-order: 13
-has_chapter_content: true
-version: 0.10
----
-
-# 集成 Devtools 到 iOS
-
-Weex Devtools 能够方便调试 Weex 页面,但此功能离不开 Native 的支持。如何让你的 App 也集成 Devtools,在本章将会详细说明 iOS 端如何接入 Weex Devtools。
-
-## iOS 应用接入
-
-### 添加依赖
-
-#### 方法一:cocoapods 依赖
-
-在工程目录的 podfile 添加如下代码
-
-```
-source https://github.com/CocoaPods/Specs.git,
-pod 'WXDevtool', '0.7.0', :configurations => ['Debug'],
-```
-
-目前有如下几个版本:
-
-0.7.0, 0.6.1, 0.1.1, 0.1.0 [master repo]
-
----
-
-可以通过更新本地 podspec repo,pod search 来查询最新版本,在 podfile 文件添加依赖。
-
-
-*** 推荐在DEBUG模式下依赖。 ***
-
-#### 方法二:github 源码依赖
-
-
-1. [拉取](https://github.com/weexteam/weex-devtool-iOS)最新的WXDevtool代码。
-
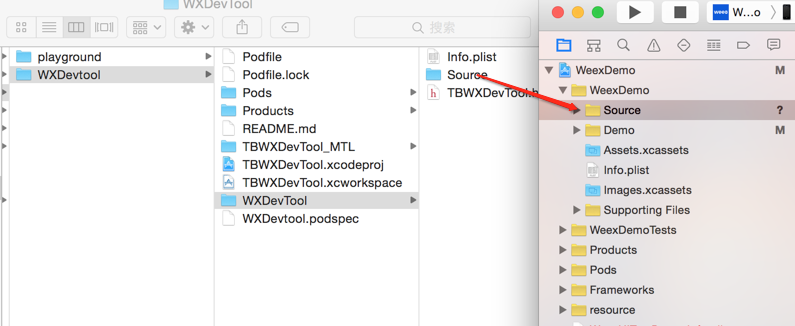
-2. 按照如下图示:直接拖动source目录源文件到目标工程中
-
- 
-
-3. 按照红框中配置勾选
-
- 
-
-
- 在相对较大的互联网App研发中, framework 静态库被广泛应用,所以推荐使用方法一接入。
-
-### 集成功能
-
-如果按照方法一接入:podfile 的方式,添加头文件包含:
-
-```
-#import <TBWXDevtool/WXDevtool.h>
-```
-
-如果按照方法二接入:源码依赖的方式,添加头文件包含:
-
-```
-#import "WXDevtool.h"
-```
-
-查看 WXDevtool 头文件如下:
-
-```object-c
-#import <Foundation/Foundation.h>
-
-@interface WXDevTool : NSObject
-/**
-* set debug status
-* @param isDebug : YES:open debug model and inspect model;
-* default is NO,if isDebug is NO, open inspect only;
-* */
-+ (void)setDebug:(BOOL)isDebug;
-
-
-/**
-* get debug status
-* */
-+ (BOOL)isDebug;
-
-
-/**
-* launch weex debug
-* @param url : ws://ip:port/debugProxy/native, ip and port is your devtool server address
-* eg:@"ws://30.30.29.242:8088/debugProxy/native"
-* */
-+ (void)launchDevToolDebugWithUrl:(NSString *)url;
-
-@end
-```
-
-`setDebug`:参数为 `YES` 时,直接开启 debug 模式,反之关闭,使用场景如下所述
-
-在你自己的程序中添加如下代码:
-
-```object-c
-[WXDevTool launchDevToolDebugWithUrl:@"ws://30.30.31.7:8088/debugProxy/native"];
-```
-
-其中的 ws 地址正是 Weex debug 控制台中出现的地址,直接 copy 到 `launchDevToolDebugWithUrl` 接口中。
-
-如果程序一启动就开启 Weex 调试,**需要在 WeexSDK 引擎初始化之前**添加代码:
-
-```object-c
-[WXDevTool setDebug:YES];
-[WXDevTool launchDevToolDebugWithUrl:@"ws://30.30.31.7:8088/debugProxy/native"];
-```
-
-#### 附加页面刷新功能
-
-- 为什么需要页面刷新功能?
-
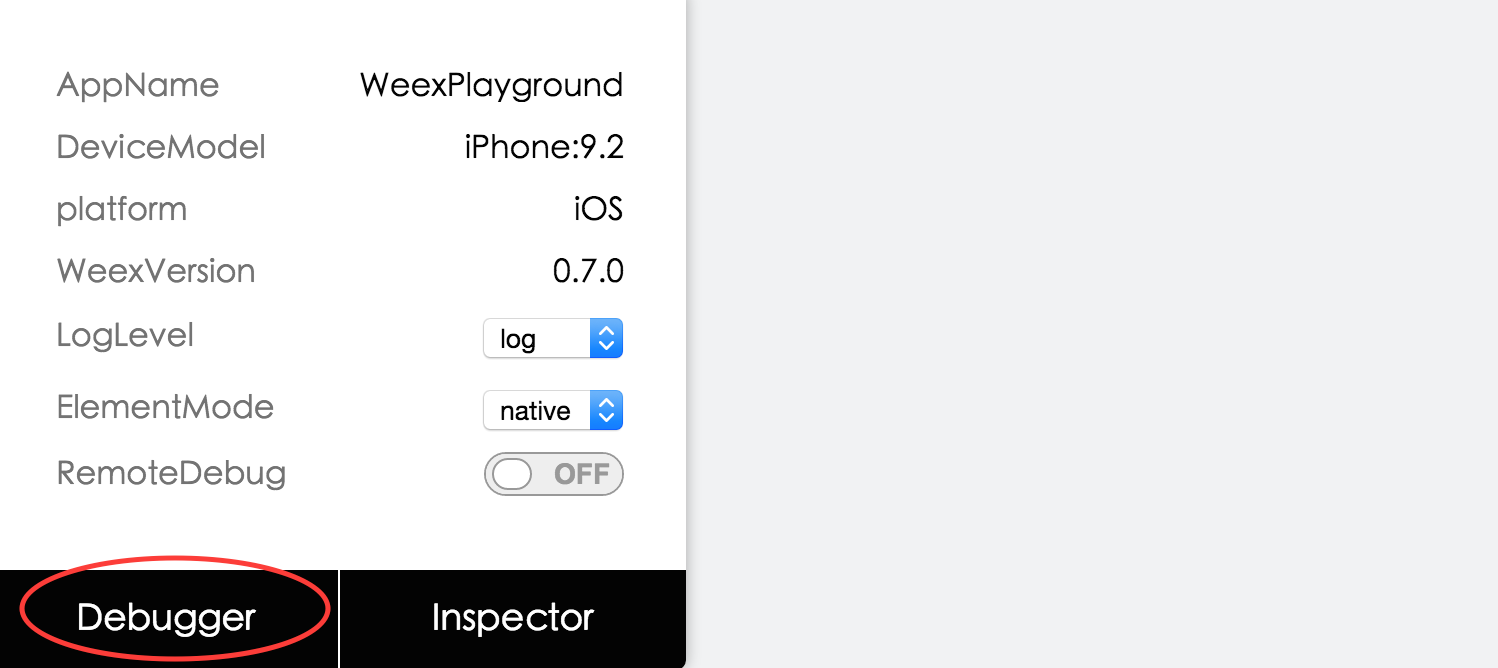
- 如下图所示,当点击 debug 按钮时,js 的运行环境会从手机端(JavaScriptCore)切换到 Chrome(V8),这时需要重新初始化 Weex 环境,重新渲染页面。页面渲染是需要接入方在自己的页面添加。
-
- 
-
-- 什么场景下需要添加页面刷新功能?
-
- - 点击 debug 按钮调试
- - 切换 RemoteDebug 开关
- - 刷新 Chrome 页面(command+R)
-
-- 如何添加刷新
-
- 在 Weex 页面初始化或 `viewDidLoad` 方法时添加注册通知,举例如下:
-
- ```object-c
- [[NSNotificationCenter defaultCenter] addObserver:self selector:notificationRefreshInstance: name:@"RefreshInstance" object:nil];
- ```
-
- 最后**千万记得**在 `dealloc` 方法中取消通知,如下所示
-
- ```
- - (void)dealloc
- {
- [[NSNotificationCenter defaultCenter] removeObserver:self];
- }
- ```
-
- 页面刷新实现,先销毁当前 instance,然后重新创建 instance,举例如下:
-
- ```
- - (void)render
- {
- CGFloat width = self.view.frame.size.width;
- [_instance destroyInstance];
- _instance = [[WXSDKInstance alloc] init];
- _instance.viewController = self;
- _instance.frame = CGRectMake(self.view.frame.size.width-width, 0, width, _weexHeight);
-
- __weak typeof(self) weakSelf = self;
- _instance.onCreate = ^(UIView *view) {
- [weakSelf.weexView removeFromSuperview];
- weakSelf.weexView = view;
- [weakSelf.view addSubview:weakSelf.weexView];
- UIAccessibilityPostNotification(UIAccessibilityScreenChangedNotification, weakSelf.weexView);
- };
- _instance.onFailed = ^(NSError *error) {
-
- };
-
- _instance.renderFinish = ^(UIView *view) {
- [weakSelf updateInstanceState:WeexInstanceAppear];
- };
-
- _instance.updateFinish = ^(UIView *view) {
- };
- if (!self.url) {
- return;
- }
- NSURL *URL = [self testURL: [self.url absoluteString]];
- NSString *randomURL = [NSString stringWithFormat:@"%@?random=%d",URL.absoluteString,arc4random()];
- [_instance renderWithURL:[NSURL URLWithString:randomURL] options:@{@"bundleUrl":URL.absoluteString} data:nil];
- }
- ```
-
-具体实现可参考 [playground](https://github.com/weexteam/weex-devtool-iOS/blob/master/Devtools/playground/WeexDemo/WXDemoViewController.m) `WXDemoViewController.m` 文件
-
-*说明:目前版本需要注册的通知名称为固定的 “RefreshInstance”,下个版本会添加用户自定义 name 。*
-
-## 使用
-
-如果未安装 Debugger Server,在命令行执行 `npm install -g weex-toolkit` 既可以安装调试服务器,运行命令 `weex debug` 就会启动 DebugServer 并打开一个调试页面(详情请查看 [本地开发](../guide/develop-on-your-local-machine.html))。页面下方会展示一个二维码,这个二维码用于向 App 传递 Server 端的地址建立连接。
-
-
-1. 日志级别控制
-
- 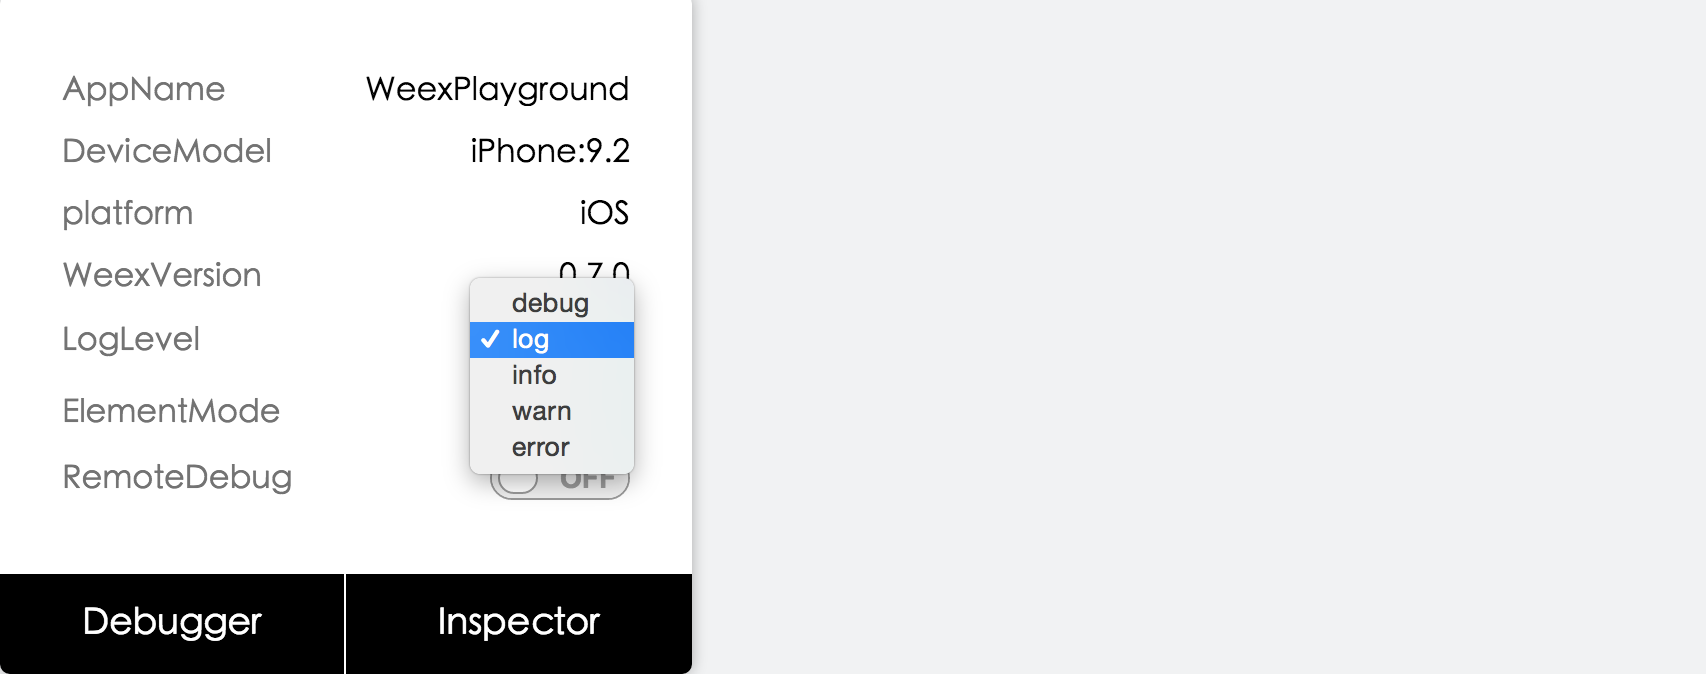
- 日志级别可以控制native端关于weex的日志。
-
- 日记级别描述如下:
-
- ```
- Off = 0,
- Error = Error
- Warning = Error | Warning,
- Info = Warning | Info,
- Log = Log | Info,
- Debug = Log | Debug,
- All = NSUIntegerMax
- ```
-
- 解释:off 关闭日志,Warning 包含 Error、Warning,Info 包含 Warning、Info,Log 包含 Info、Log,Debug 包含 Log、Debug,All 包含所有。
-
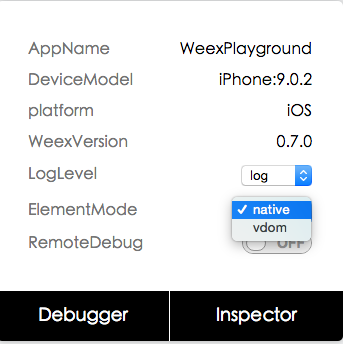
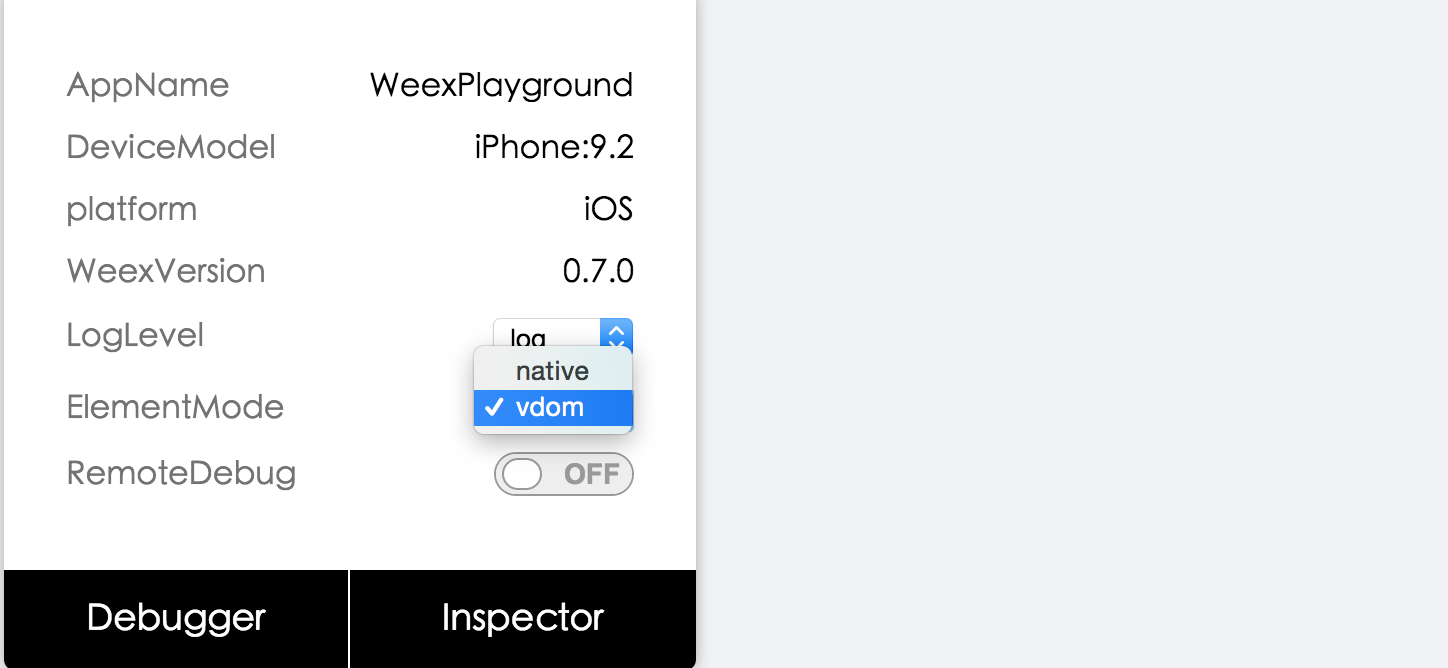
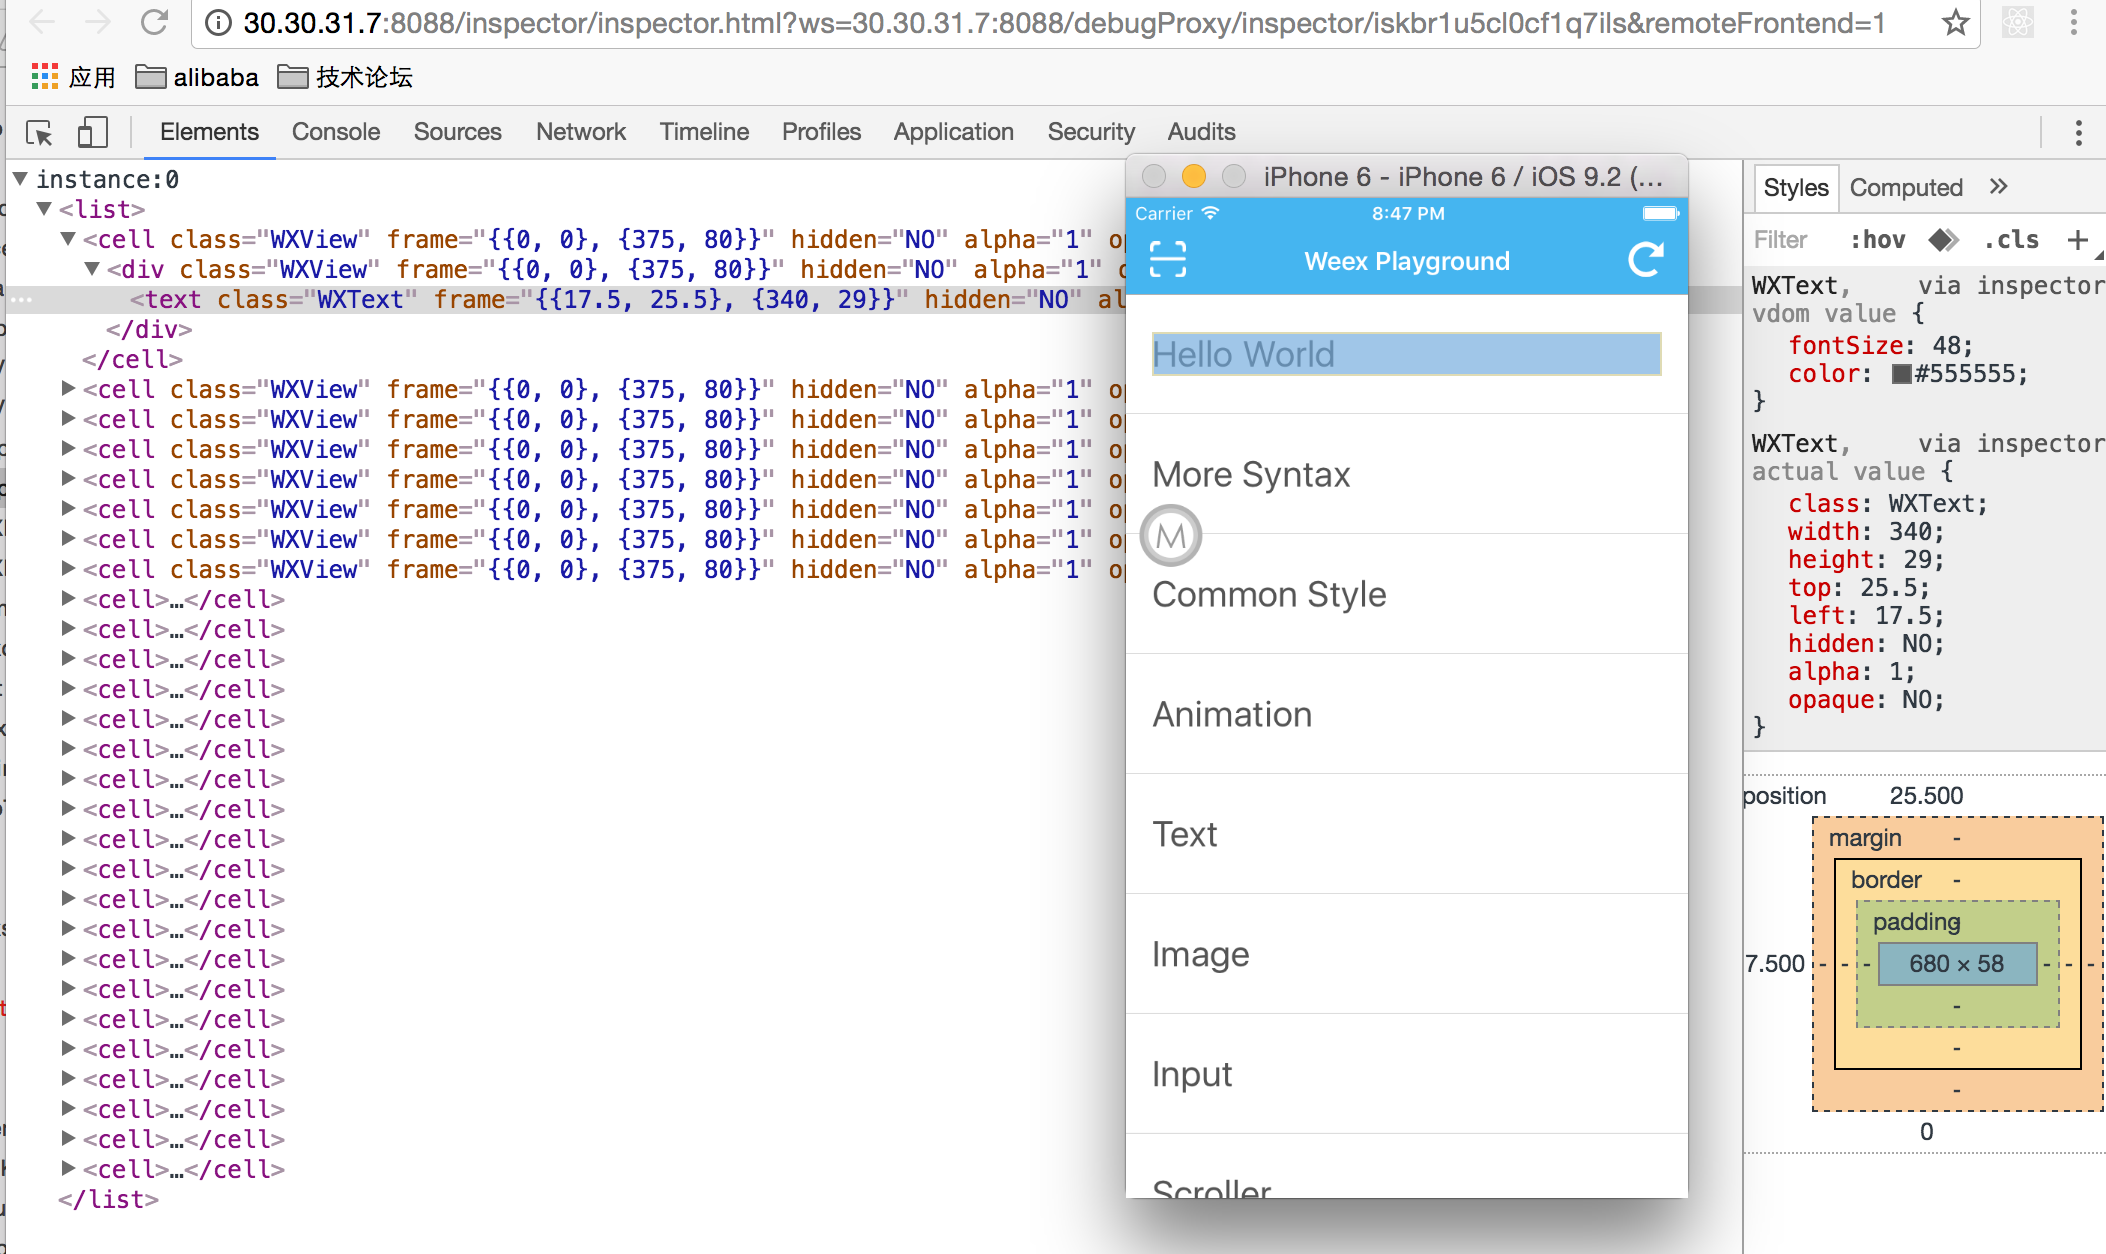
-2. Vdom/Native tree选择
-
- 
-
- *图一*
-
- 
-
- *图二*
-
- 点击图一所示native选项会打开图二,方便查看native tree以及view property
-
- 
-
- *图三*
-
- 
-
- *图四*
-
- 点击图三所示 vdom 选项会打开图四,方便查看 vdom tree 以及 component property。
http://git-wip-us.apache.org/repos/asf/incubator-weex-site/blob/32a097bf/source/cn/v-0.10/advanced/integrate-to-android.md
----------------------------------------------------------------------
diff --git a/source/cn/v-0.10/advanced/integrate-to-android.md b/source/cn/v-0.10/advanced/integrate-to-android.md
deleted file mode 100644
index b5bbf8c..0000000
--- a/source/cn/v-0.10/advanced/integrate-to-android.md
+++ /dev/null
@@ -1,201 +0,0 @@
----
-title: 集成到 Android
-type: advanced
-order: 4
-has_chapter_content: true
-version: 0.10
----
-
-# WEEX SDK 集成到 Android 工程
-
-注:以下文档都是假设您已经具备一定的Android开发经验。
-### Android 集成有两种方式
-
-1. 源码依赖:能够快速使用WEEX最新功能,可以根据自己项目的特性进行相关改进。
-2. SDK依赖:WEEX 会在jcenter 定期发布稳定版本。[jcenter](https://bintray.com/alibabaweex/maven/weex_sdk/view)
- 注:国内可能需要翻墙
-
-## 前期准备
-
-- 已经安装了[JDK](http://www.oracle.com/technetwork/java/javase/downloads/jdk8-downloads-2133151.html) version>=1.7 并配置了环境变量
-- 已经安装[Android SDK](https://developer.android.com/studio/index.html) 并配置环境变量。
-- Android SDK version 23 (compileSdkVersion in [`build.gradle`](https://github.com/apache/incubator-weex/blob/master/android/sdk/build.gradle))
-- SDK build tools version 23.0.1 (buildToolsVersion in [`build.gradle`](https://github.com/apache/incubator-weex/blob/master/android/sdk/build.gradle))
-- Android Support Repository >= 17 (for Android Support Library)
-
-## 快速接入
-
-如果你是尝鲜或者对稳定性要求比较高可以使用依赖SDK的方式。
-步骤如下:
-1. 创建Android工程,没有什么要特别说明的,按照你的习惯来。
-2. 修改build.gradle 加入如下基础依赖
-
- ```gradle
- compile 'com.android.support:recyclerview-v7:23.1.1'
- compile 'com.android.support:support-v4:23.1.1'
- compile 'com.android.support:appcompat-v7:23.1.1'
- compile 'com.alibaba:fastjson:1.1.46.android'
- compile 'com.taobao.android:weex_sdk:0.5.1@aar'
- ```
-
- 注:版本可以高不可以低。
-### 代码实现
-
-注:附录中有完整代码地址
-- 实现图片下载接口,初始化时设置。
-
-```java
-package com.weex.sample;
-
-import android.widget.ImageView;
-
-import com.taobao.weex.adapter.IWXImgLoaderAdapter;
-import com.taobao.weex.common.WXImageStrategy;
-import com.taobao.weex.dom.WXImageQuality;
-
-/**
- * Created by lixinke on 16/6/1.
- */
-public class ImageAdapter implements IWXImgLoaderAdapter {
-
-
- @Override
- public void setImage(String url, ImageView view, WXImageQuality quality, WXImageStrategy strategy) {
- //实现你自己的图片下载,否则图片无法显示。
- }
-}
-```
-- 初始化
-
-```java
-package com.weex.sample;
-
-import android.app.Application;
-
-import com.taobao.weex.InitConfig;
-import com.taobao.weex.WXSDKEngine;
-
-/**
- * 注意要在Manifest中设置android:name=".WXApplication"
- * 要实现ImageAdapter 否则图片不能下载
- * gradle 中一定要添加一些依赖,否则初始化会失败。
- * compile 'com.android.support:recyclerview-v7:23.1.1'
- * compile 'com.android.support:support-v4:23.1.1'
- * compile 'com.android.support:appcompat-v7:23.1.1'
- * compile 'com.alibaba:fastjson:1.1.45'
- */
-public class WXApplication extends Application {
-
- @Override
- public void onCreate() {
- super.onCreate();
- InitConfig config=new InitConfig.Builder().setImgAdapter(new ImageAdapter()).build();
- WXSDKEngine.initialize(this,config);
- }
-}
-
-```
-- 开始渲染
-
-```java
-package com.weex.sample;
-
-import android.os.Bundle;
-import android.support.v7.app.AppCompatActivity;
-import android.view.View;
-
-import com.taobao.weex.IWXRenderListener;
-import com.taobao.weex.WXSDKInstance;
-import com.taobao.weex.common.WXRenderStrategy;
-import com.taobao.weex.utils.WXFileUtils;
-
-public class MainActivity extends AppCompatActivity implements IWXRenderListener {
-
- WXSDKInstance mWXSDKInstance;
-
- @Override
- protected void onCreate(Bundle savedInstanceState) {
- super.onCreate(savedInstanceState);
- setContentView(R.layout.activity_main);
-
- mWXSDKInstance = new WXSDKInstance(this);
- mWXSDKInstance.registerRenderListener(this);
- /**
- * WXSample 可以替换成自定义的字符串,针对埋点有效。
- * template 是.we transform 后的 js文件。
- * option 可以为空,或者通过option传入 js需要的参数。例如bundle js的地址等。
- * jsonInitData 可以为空。
- * width 为-1 默认全屏,可以自己定制。
- * height =-1 默认全屏,可以自己定制。
- */
- mWXSDKInstance.render("WXSample", WXFileUtils.loadFileContent("hello.js", this), null, null, -1, -1, WXRenderStrategy.APPEND_ASYNC);
- }
-
- @Override
- public void onViewCreated(WXSDKInstance instance, View view) {
- setContentView(view);
- }
-
- @Override
- public void onRenderSuccess(WXSDKInstance instance, int width, int height) {
-
- }
-
- @Override
- public void onRefreshSuccess(WXSDKInstance instance, int width, int height) {
-
- }
-
- @Override
- public void onException(WXSDKInstance instance, String errCode, String msg) {
-
- }
-
-
- @Override
- protected void onResume() {
- super.onResume();
- if(mWXSDKInstance!=null){
- mWXSDKInstance.onActivityResume();
- }
- }
-
- @Override
- protected void onPause() {
- super.onPause();
- if(mWXSDKInstance!=null){
- mWXSDKInstance.onActivityPause();
- }
- }
-
- @Override
- protected void onStop() {
- super.onStop();
- if(mWXSDKInstance!=null){
- mWXSDKInstance.onActivityStop();
- }
- }
-
- @Override
- protected void onDestroy() {
- super.onDestroy();
- if(mWXSDKInstance!=null){
- mWXSDKInstance.onActivityDestroy();
- }
- }
-}
-```
-
-## 源码依赖(IDE Android Studio)
-
-1. 下载源码 `git clone https://github.com/alibaba/weex`
-2. 创建 Android 工程。
-3. 通过以下路径引入 SDK Module
- File->New-Import Module-> 选择 WEEX SDK Module(weex/android/sdk) -> Finish
-4. app 的 build.gradle 中添加如下依赖:`compile project(':weex_sdk')`
-5. 其他设置请参考上面快速接入
-
-### 附录
-
-WXSample地址
-`https://github.com/xkli/WXSample.git`
http://git-wip-us.apache.org/repos/asf/incubator-weex-site/blob/32a097bf/source/cn/v-0.10/advanced/integrate-to-html5.md
----------------------------------------------------------------------
diff --git a/source/cn/v-0.10/advanced/integrate-to-html5.md b/source/cn/v-0.10/advanced/integrate-to-html5.md
deleted file mode 100644
index 30ee3fd..0000000
--- a/source/cn/v-0.10/advanced/integrate-to-html5.md
+++ /dev/null
@@ -1,69 +0,0 @@
----
-title: 集成到 web
-type: advanced
-order: 6
-has_chapter_content: true
-version: 0.10
----
-
-## 项目中引入 html5 版 Weex
-
-### 简介
-
-Weex 是一个跨平台可扩展的动态化移动框架,能够真正帮助开发者实现'一次开发,到处运行'。由 Weex 提供的相关工具进行打包好的 bundle 文件可以运行在 android, ios 以及 web(这里我们也称之为html5)平台的渲染器上。Weex HTML5 是一个专用于在移动端 webview 以及各种现代浏览器上渲染 weex 文件的渲染器。
-### 获取 Weex HTML5
-
-使用 npm 安装最新版本的 Weex HTML5,并在你的项目中 require 进来。
-#### 从 npm 安装
-
-请确保通过 `npm install` 或者 `npm update` 获取 Weex HTML5 的最新版本 npm 包。更多关于 npm 的信息情查阅 [npm 官方网站](https://docs.npmjs.com/)。
-
-```bash
-npm install weex-html5
-```
-
-通过 require 引入 weex-html5:
-
-```bash
-var weex = require('weex-html5')
-```
-
-**注意:** 介于 Weex 目前仍处于开源内测阶段,还没有完全开放源代码,因此 `weex-jsframework` 可能还没有在 npm 上发布。当前版本的 `weex-html5` 包含了 `weex-jsframework`,你只需要 require `weex-html5` 即可暂时在 web 平台上运行 weex 代码。建议关注 Weex 的后续版本发布并做必要的引用方式调整。
-### 初始化 Weex
-
-你可以通过 Weex 暴露的 API `init` 来初始化一个 Weex 实例。这个方法需要传递一些配置信息已确定一些环境变量等信息,这些配置信息介绍如下:
-- `appId`: Weex 实例的 id,可以是任意字符串或者数字,并注意不要重复.
-- `source`: 请求的 Weex bundle 文件地址,或者 Weex bundle 文件代码本身,取决于下面的 loader 配置.
-- `loader`: 加载器类型,用于加载 weex bundle,值可以是 'xhr', 'jsonp' 或者 'source'.
- - `xhr`: 通过 XMLHttpRequest 加载 source(即 weex bundle 的 url 地址).
- - `jsonp`: 通过 JSONP 加载 weex bundle.
- - `source`: 直接接受 weex bundle 的代码作为参数.
-- `rootId`: root 容器的 id,默认容器 id 是 'weex'.
-
-以下是一个 Weex 初始化的示例:
-
-``` javascript
-function weexInit() {
- function getUrlParam (key) {
- var reg = new RegExp('[?|&]' + key + '=([^&]+)')
- var match = location.search.match(reg)
- return match && match[1]
- }
-
- var loader = getUrlParam('loader') || 'xhr'
- var page = getUrlParam('page')
-
- // 需要指定一个jsonp回调函数名称,如果没有则用默认值'weexJsonpCallback'
- var JSONP_CALLBACK_NAME = 'weexJsonpCallback'
-
- window.weex.init({
- jsonpCallback: JSONP_CALLBACK_NAME,
- appId: location.href,
- source: page,
- loader: loader,
- rootId: 'weex'
- })
-}
-
-weexInit()
-```
http://git-wip-us.apache.org/repos/asf/incubator-weex-site/blob/32a097bf/source/cn/v-0.10/advanced/integrate-to-ios.md
----------------------------------------------------------------------
diff --git a/source/cn/v-0.10/advanced/integrate-to-ios.md b/source/cn/v-0.10/advanced/integrate-to-ios.md
deleted file mode 100644
index 54a5ca7..0000000
--- a/source/cn/v-0.10/advanced/integrate-to-ios.md
+++ /dev/null
@@ -1,110 +0,0 @@
----
-title: 集成到 iOS
-type: advanced
-order: 5
-has_chapter_content: true
-version: 0.10
----
-
-# Weex SDK 集成到 iOS
-
-### cocoaPods 引入 Weex iOS SDK到工程
-
-可以通过源码编译出 Weex SDK,可以在新的 feature 或者 bugfix 分支,尝试最新的 feature
-#### cocoaPods集成
-
- 假设你已经完成了安装[iOS 开发环境](https://developer.apple.com/library/ios/documentation/IDEs/Conceptual/AppStoreDistributionTutorial/Setup/Setup.html) 和 [CocoaPods](https://guides.cocoapods.org/using/getting-started.html)
-
-1. 从 github 上 clone 一份代码
-
- ```
- git clone https://github.com/alibaba/weex.git
- ```
-
-2. 把 WeexSDK 导入到你已有的项目,如果没有,可以[参考](https://developer.apple.com/library/ios/documentation/IDEs/Conceptual/AppStoreDistributionTutorial/Setup/Setup.html)新建项目
- 拷贝 `ios/sdk` 下面目录到你的项目目录,在添加依赖之前,确保项目目录有 `Podfile`,如果没有,创建一个,用文本编辑器打开,添加如下依赖
-
- 如果使用正式版本如 0.6.1 的,就不需要做 拷贝 `ios/sdk` 这个操作,直接引用 cocoaPods 的 master repo 上就可以,这个需要在 Podfile 最前面添加
-
- ```
- source 'https://github.com/CocoaPods/Specs.git'
- ```
-
- ```object-c
- target 'YourTarget' do
- platform :ios, '7.0'
- pod 'WeexSDK', :path=>'./sdk/' # pod 'WeexSDK', '0.6.1'
- end
- ```
-
- 在命令行(terminal)中,切换到当前目录,运行 `pod install`, 过一会,项目的 .workspace 结尾的文件就被创建出来,到这步,依赖已经添加完了
-
-3. 初始化 Weex 环境
- 在 AppDelegate.m 文件中做初始化操作,一般会在 `didFinishLaunchingWithOptions` 方法中如下添加
-
- ```object-c
- //business configuration
- [WXAppConfiguration setAppGroup:@"AliApp"];
- [WXAppConfiguration setAppName:@"WeexDemo"];
- [WXAppConfiguration setAppVersion:@"1.0.0"];
-
- //init sdk enviroment
- [WXSDKEngine initSDKEnviroment];
-
- //register custom module and component,optional
- [WXSDKEngine registerComponent:@"MyView" withClass:[MyViewComponent class]];
- [WXSDKEngine registerModule:@"event" withClass:[WXEventModule class]];
-
- //register the implementation of protocol, optional
- [WXSDKEngine registerHandler:[WXNavigationDefaultImpl new] withProtocol:@protocol(WXNavigationProtocol)];
-
- //set the log level
- [WXLog setLogLevel: WXLogLevelAll];
- ```
-
-4. 渲染 weex Instance
- Weex 支持整体页面渲染和部分渲染两种模式,你需要做的事情是用指定的 URL 渲染 weex 的 view,然后添加到它的父容器上,父容器一般都是 viewController
-
- ```object-c
- #import <WeexSDK/WXSDKInstance.h>
- - (void)viewDidLoad
- {
- [super viewDidLoad];
-
- _instance = [[WXSDKInstance alloc] init];
- _instance.viewController = self;
- _instance.frame = self.view.frame;
-
- __weak typeof(self) weakSelf = self;
- _instance.onCreate = ^(UIView *view) {
- [weakSelf.weexView removeFromSuperview];
- [weakSelf.view addSubview:weakSelf.weexView];
- };
-
- _instance.onFailed = ^(NSError *error) {
- //process failure
- };
-
- _instance.renderFinish = ^ (UIView *view) {
- //process renderFinish
- };
- [_instance renderWithURL:self.url options:@{@"bundleUrl":[self.url absoluteString]} data:nil];
- }
- ```
-
- WXSDKInstance 是很重要的一个类,提供了基础的方法和一些回调,如`renderWithURL`,`onCreate`,`onFailed`等,可以参见 `WXSDKInstance.h`的 声明
-
-5. 销毁 Weex Instance
-
- 在 viewController 的 dealloc 阶段 销毁掉 weex instance, 释放内存,避免造成内存泄露
-
- ```object-c
- - (void)dealloc
- {
- [_instance destroyInstance];
- }
- ```
-
-### 导入 Weex SDK framework到工程
-
- 参考[此处](https://open.taobao.com/doc2/detail?spm=a219a.7629140.0.0.tFddsV&&docType=1&articleId=104829)直接导入weexSDK
http://git-wip-us.apache.org/repos/asf/incubator-weex-site/blob/32a097bf/source/cn/v-0.10/blog/index.md
----------------------------------------------------------------------
diff --git a/source/cn/v-0.10/blog/index.md b/source/cn/v-0.10/blog/index.md
deleted file mode 100644
index ef7b31d..0000000
--- a/source/cn/v-0.10/blog/index.md
+++ /dev/null
@@ -1,4 +0,0 @@
-type: blog
-index: true
-layout: blog
----
\ No newline at end of file
http://git-wip-us.apache.org/repos/asf/incubator-weex-site/blob/32a097bf/source/cn/v-0.10/guide/develop-on-your-local-machine.md
----------------------------------------------------------------------
diff --git a/source/cn/v-0.10/guide/develop-on-your-local-machine.md b/source/cn/v-0.10/guide/develop-on-your-local-machine.md
deleted file mode 100644
index 276a9f9..0000000
--- a/source/cn/v-0.10/guide/develop-on-your-local-machine.md
+++ /dev/null
@@ -1,175 +0,0 @@
----
-title: 如何在本地开发 Weex 页面
-type: guide
-order: 2
-has_chapter_content: true
-version: 0.10
----
-
-# 如何在本地开发 Weex 页面
-
-使用 [dotWe](http://dotwe.org) 对 Weex 尝鲜是一个不错的选择,但如果你想更专业的开发 Weex, [dotWe](http://dotwe.org) 就不怎么够用了。本章会教你如何搭建本地开发环境进行 Weex 开发。
-
-## 第一步:安装依赖
-
-首先,你需要 Node.js 和 weex-toolkit。
-
-安装 Node.js 方式多种多样,最简单的方式是在 [Node.js 官网](https://nodejs.org/en/) 下载可执行程序直接安装即可。
-
-对于 Mac,可以使用 [Homebrew](http://brew.sh/) 进行安装:
-
-```bash
-brew install node
-```
-
-> 更多安装方式可参考 [Node.js 官方信息](https://nodejs.org/en/download/)
-
-安装完成后,可以使用以下命令检测是否安装成功:
-
-```bash
-$ node -v
-v6.3.1
-$ npm -v
-3.10.3
-```
-
-通常,安装了 Node.js 环境,npm 包管理工具也随之安装了。因此,直接使用 npm 来安装 weex-toolkit。
-
-> npm 是一个 JavaScript 包管理工具,它可以让开发者轻松共享和重用代码。Weex 很多依赖来自社区,同样,Weex 也将很多工具发布到社区方便开发者使用。
-
-```bash
-$ npm install -g weex-toolkit
-```
-
-国内开发者可以考虑使用淘宝的 npm 镜像 —— [cnpm](https://npm.taobao.org/) 安装 weex-toolkit
-
-```bash
-$ npm install -g cnpm
-$ cnpm install -g weex-toolkit
-```
-
-*提示:*
-
-如果提示权限错误(*permission error*),使用 `sudo` 关键字进行安装
-
-```bash
-$ sudo cnpm install -g weex-toolkit
-```
-
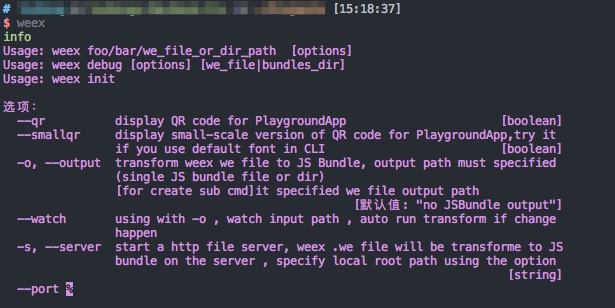
-安装结束后你可以直接使用 `weex` 命令验证是否安装成功,它会显示 `weex` 命令行工具各参数:
-
-
-
-## 第2步:创建文件
-
-现在可以开始编写代码了。首先,我们创建一个 `.we` 文件(Weex 程序的文件后缀(扩展名)是 `.we`)。
-
-打开空白的 `hello.we` 文件,输入三个标签,内容为:
-
-```html
-<template>
-</template>
-
-<style>
-</style>
-
-<script>
-</script>
-```
-
-我们在 [Get started](./index.md) 里已经介绍过 Weex 基本的代码结构:`<template>`、`<style>`、`<script>` 分别对应于 Web 中的 HTML,CSS(`<style>` 标签),JavaScript(`<script>` 标签)。
-
-其实,上面的代码就是最简单的 Weex 程序。但是 `.we` 文件是不能直接运行的,这时候需要使用刚才安装好的 weex-toolkit。weex-toolkit 会编译 `.we` 文件,并且创建静态服务器。
-
-这里,使用 `weex hello.we` 命令编译该程序。
-
-```bash
-$ weex hello.we
-```
-
-这时,命令行会做几件事:
-
-- 编译 `.we` 文件;
-- 启动热加载服务;
-- 启动静态服务器;
-- 拉起浏览器,访问 `http://127.0.0.1:8081/weex_tmp/h5_render/?hot-reload_controller&page=hello.js&loader=xhr`
-
-这时候,已经可以在浏览器预览 Weex 页面了。不过此时页面是空白的,因为 `.we` 文件中没有任何实质的内容。
-
-## 第3步:添加内容
-
-修改 `weex.we` 文件,向 `<template>` 标签中添加内容。具体代码如下:
-
-```html
-<template>
- <div>
- <text>Hello world</text>
- </div>
-</template>
-
-<style></style>
-
-<script></script>
-```
-
-保存代码后,浏览器会自动刷新页面,这时会看到浏览器显示了 “Hello world”。
-
-## 第4步:添加样式
-
-现在,对已有的文本内容进行样式修饰。这里将文本颜色设置为红色,字体大小为 50 像素。具体代码如下:
-
-```html
-<template>
- <div>
- <text class="text" style="color: #FF0000;">Hello world</text>
- </div>
-</template>
-
-<style>
- .text{
- font-size: 50;
- }
-</style>
-
-<script></script>
-```
-
-这时候,浏览器已经重新载入了页面。其实,是weex-toolkit开启了热加载。可以看到红色的 “Hello world”。
-
-**注意:**
-Weex 支持通过 `style` 标签来设定样式,也支持内联样式风格。 对于数值,无需添加任何单位(包括 px、em、rem 等),这是建议的写法。如需了解有哪些通用的样式,可以参考 [通用样式](../references/common-style.md)。
-
-## 第5步:预览
-
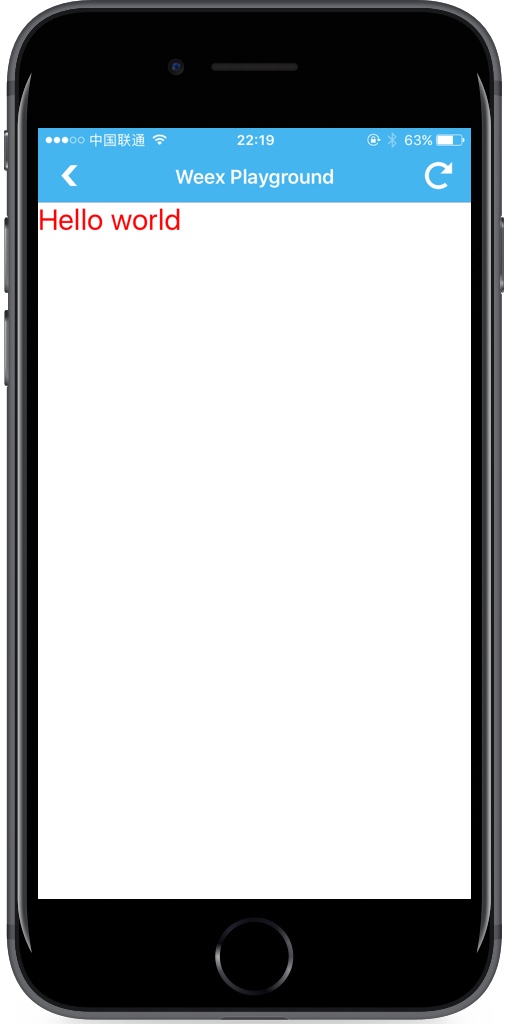
-已经在浏览器中看到了刚才的代码效果,为了验证三端是否一致,我们还需 [Playground App](https://alibaba.github.io/weex/download.html) 验证。
-
-这里,我们需要为 `weex hello.we` 增加 `--qr` 参数,表示生成二维码。
-
-```bash
-$ weex hello.we --qr
-```
-
-然后,使用 [Playground](https://alibaba.github.io/weex/download.html) 扫码即可。
-
-
-
-## 第6步:调试
-
-weex-toolkit 已经集成了 Debugger,只需要使用如下命令即可开启 Debugger 开关调试 `hello.we`:
-
-```bash
-$ weex debug hello.we
-```
-
-我们输入以上命令开启,会自动打开浏览器,页面上有两个二维码,第一个是 Debugger Server,第二个是 `.we` 文件的地址。我们在 Playground 中先扫第一个,此时浏览器会进入一个新的页面,请你选择你需要的调试模式:
-
-- Debugger:将会打开 js debugger 页面,您可以通过 debugger 页面调试 js(诸如打断点 查看js log 和查看调用堆栈等信息);
-- Inspector:将会打开 inspector 页面,您可以通过这个页面查看 Weex 页面的 element 属性结构,包含高亮元素,展示样式表,以及显示 native 的 log。同时可以打开一个远程的手机镜像,便于查看界面。另外调试方块中的 ElementMode 可以用来选择 element 树显示原始的 native 组件树还是显示面向前端同学的 DSL (HTML)组件树。
-
-选择一种模式后会新开窗口进入调试页面,这时我们再扫第二个二维码即可进入我们想要调试的页面进行调试了。
-
-## 接下来做什么?
-
-到目前为止,你已经可以在 [dotWe](http://dotwe.org) 或者本地开发 Weex 页面。接下来你可以去学习 Weex [语法](./syntax/main.md) 和 [开发手册](../references/main.md) 了解 Weex 更多特性。这些语法和特性,你完全可以用 [Playground](https://alibaba.github.io/weex/download.html) 运行起来。
-
-如果你已经熟悉 Weex 开发,你应该考虑如何让你的 App 也支持 Weex 页面,或者,怎样用 Weex 开发一个全新的 App 呢?带着这些问题,你可以阅读 [开发进阶](./how-to/main.md)。
http://git-wip-us.apache.org/repos/asf/incubator-weex-site/blob/32a097bf/source/cn/v-0.10/guide/how-to/debug-with-html5.md
----------------------------------------------------------------------
diff --git a/source/cn/v-0.10/guide/how-to/debug-with-html5.md b/source/cn/v-0.10/guide/how-to/debug-with-html5.md
deleted file mode 100644
index c4ba245..0000000
--- a/source/cn/v-0.10/guide/how-to/debug-with-html5.md
+++ /dev/null
@@ -1,47 +0,0 @@
----
-title: 在浏览器中调试
-type: guide
-order: 4.2
-version: 0.10
----
-
-# 如何在浏览器中调试?
-
-由于 weex-html5 可以在现代移动浏览器上运行,因此自然支持在浏览器的开发工具中调试 weex-html5 代码。下面将介绍如何使用浏览器的 devTools 调试和分析 weex-html5 程序。以chrome的调试工具为例:
-
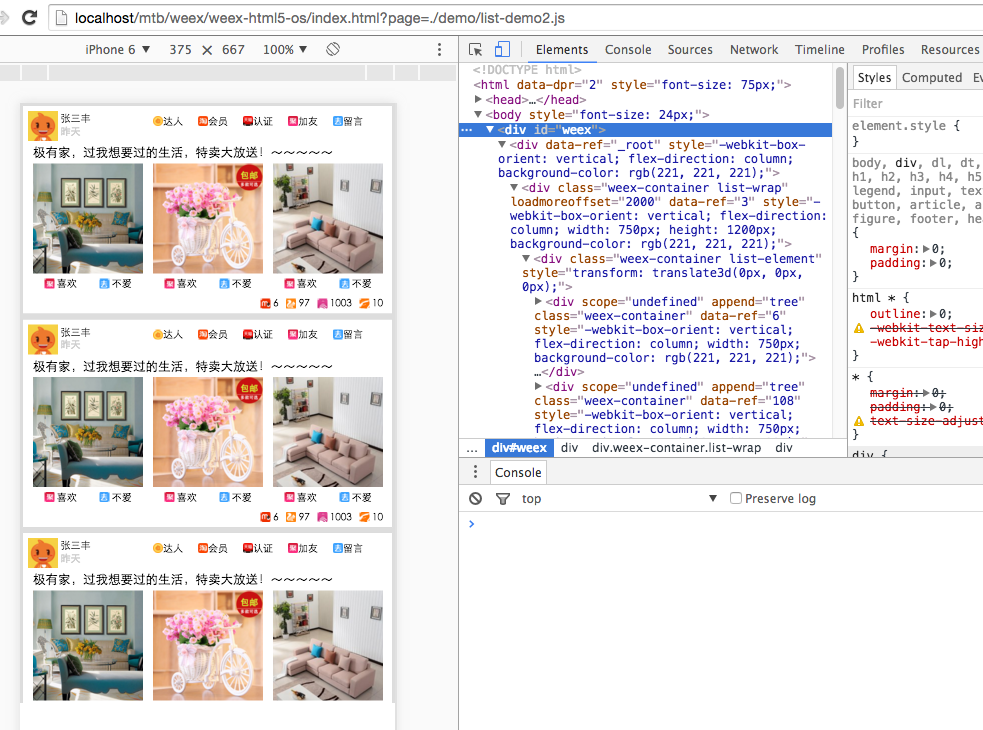
-
-
-## Elements
-
-使用 Elements 面板来检查 weex-html5 页面的布局和设计,并操纵 DOM 和 CSS 来自由地做一些开发实验。
-
-## Console
-
-您可以使用 `console.log` 在控制台上记录信息。
-
-## 断点
-
-您可以设置断点来调试代码,断点是调试代码的最有效的方法之一。断点使您能够暂停脚本执行,然后查看该时刻的调用堆栈变量值。
-
-手动断点是您在特定代码行上设置的各个断点。您可以通过 Chrome DevTools GUI 或在代码中插入 debugger 关键字来设置这些断点。
-
-## 找出 bug 的精确位置
-
-一般来说,有三个可能发生错误的地方:渲染器(weex-html5),js 框架(weex-js框架)和变压器(gulp-weex)。
-
-这里有一些方便以找出错误建议,以便你可以快速识别哪个是哪个地方的错误:
-
-* 请检查控制台是否有错误。在调试模式如果有一个错误出现,将会在 console 中打印有关于它的信息。
-* 在 bridge/receiver.js,查看是否调用了 `callNative` 函数。
-* 是否被认为是 API 的方法被执行。
-* 是否调用用于事件触发或执行回调的 `callJS` 方法。
-
-## 其他
-
-更多关于如何调试 H5 页面的信息请查看 [chrome's devTools docs](https://developers.google.com/web/tools/chrome-devtools/?hl=en)
-
-
-
-
-
-